Kaspersky Endpoint Security for Windows
628
1 Kaspersky Endpoint Security for Windows © 2022 AO Kaspersky Lab
-
Upload
khangminh22 -
Category
Documents
-
view
1 -
download
0
Transcript of Kaspersky Endpoint Security for Windows

1
Kaspersky Endpoint Security forWindows
© 2022 AO Kaspersky Lab

2
Contents
Frequently asked questions
What's new
Kaspersky Endpoint Security for Windows
Distribution kit
Hardware and software requirements
Comparison of available application features depending on the type of operating system
Comparison of application functions depending on the management tools
Compatibility with other applications
Installing and removing the application
Deployment through Kaspersky Security Center 12
Standard installation of the application
Creating an installation package
Updating databases in the installation package
Creating a remote installation task
Installing the application locally using the Wizard
Installing the application from the command line
Remotely installing the application using System Center Con�guration Manager
Description of setup.ini �le installation settings
Change application components
Upgrading from a previous version of the application
Remove the application
Uninstalling through Kaspersky Security Center
Uninstalling the application using the Wizard
Removing the application from the command line
Application licensing
About the End User License Agreement
About the license
About the license certi�cate
About subscription
About license key
About activation code
About the key �le
Activating the application
Activating the application through Kaspersky Security Center
Using the Activation Wizard to activate the application
Activating the application from the command line
Viewing license information
Purchasing a license
Renewing subscription
Data provision
Data provision under the End User License Agreement
Data provision when using Kaspersky Security Network
Compliance with European Union legislation (GDPR)
Getting started
About the Kaspersky Endpoint Security for Windows Management Plug-in
Special considerations when working with di�erent versions of management plug-ins

3
Special considerations when using encrypted protocols for interacting with external services
Application interface
Application icon in the taskbar noti�cation area
Simpli�ed application interface
Con�guring the display of the application interface
Getting started
Managing policies
Task management
Con�guring local application settings
Starting and stopping Kaspersky Endpoint Security
Pausing and resuming computer protection and control
Scanning the computer
Starting or stopping a scan task
Changing the security level
Changing the action to take on infected �les
Generating a list of objects to scan
Selecting the type of �les to scan
Optimizing �le scanning
Scanning compound �les
Using scan methods
Using scan technologies
Selecting the run mode for the scan task
Starting a scan task under the account of a di�erent user
Scanning removable drives when they are connected to the computer
Background scan
Checking the integrity of application
Updating databases and application software modules
Database and application module update scenarios
Updating from a server repository
Updating from a shared folder
Updating using Kaspersky Update Utility
Updating in mobile mode
Starting and stopping an update task
Starting an update task under the rights of a di�erent user account
Selecting the update task run mode
Adding an update source
Con�guring updates from a shared folder
Updating application modules
Using a proxy server for updates
Last update rollback
Working with active threats
Computer protection
File Threat Protection
Enabling and disabling File Threat Protection
Automatic pausing of File Threat Protection
Changing the action taken on infected �les by the File Threat Protection component
Forming the protection scope of the File Threat Protection component
Using scan methods

4
Using scan technologies in the operation of the File Threat Protection component
Optimizing �le scanning
Scanning compound �les
Changing the scan mode
Web Threat Protection
Enabling and disabling Web Threat Protection
Changing the action to take on malicious web tra�ic objects
Scanning URLs against databases of phishing and malicious web addresses
Using heuristic analysis in the operation of the Web Threat Protection component
Creating the list of trusted web addresses
Exporting and importing the list of trusted web addresses
Mail Threat Protection
Enabling and disabling Mail Threat Protection
Changing the action to take on infected email messages
Forming the protection scope of the Mail Threat Protection component
Scanning compound �les attached to email messages
Filtering email message attachments
Exporting and importing extensions for attachment �ltering
Scanning emails in Microsoft O�ice Outlook
Network Threat Protection
Enabling and disabling Network Threat Protection
Blocking an attacking computer
Con�guring addresses of exclusions from blocking
Exporting and importing the list of exclusions from blocking
Con�guring protection against network attacks by type
Firewall
Enabling or disabling Firewall
Changing the network connection status
Managing network packet rules
Creating a network packet rule
Enabling or disabling a network packet rule
Changing the Firewall action for a network packet rule
Changing the priority of a network packet rule
Exporting and importing network packet rules
Managing application network rules
Creating an application network rule
Enabling and disabling an application network rule
Changing the Firewall action for an application network rule
Changing the priority of an application network rule
Network Monitor
BadUSB Attack Prevention
Enabling and disabling BadUSB Attack Prevention
Using On-Screen Keyboard for authorization of USB devices
AMSI Protection
Enabling and disabling the AMSI Protection
Using AMSI Protection to scan compound �les
Exploit Prevention
Enabling and disabling Exploit Prevention

5
Selecting an action to take when an exploit is detected
System processes memory protection
Behavior Detection
Enabling and disabling Behavior Detection
Selecting the action to take on detecting malware activity
Protection of shared folders against external encryption
Enabling and disabling protection of shared folders against external encryption
Selecting the action to take on detection of external encryption of shared folders
Con�guring addresses of exclusions from protection of shared folders against external encryption
Exporting and importing a list of exclusions from protection of shared folders against external encryption
Host Intrusion Prevention
Enabling and disabling Host Intrusion Prevention
Managing application trust groups
Changing the trust group of an application
Con�guring trust group rights
Selecting a trust group for applications started before Kaspersky Endpoint Security
Selecting a trust group for unknown applications
Selecting a trust group for digitally signed applications
Managing application rights
Protecting operating system resources and personal data
Deleting information about unused applications
Monitoring Host Intrusion Prevention
Protecting access to audio and video
Remediation Engine
Kaspersky Security Network
Enabling and disabling the usage of Kaspersky Security Network
Limitations of Private KSN
Enabling and disabling cloud mode for protection components
Checking the connection to Kaspersky Security Network
Checking the reputation of a �le in Kaspersky Security Network
Encrypted connections scan
Con�guring the encrypted connections scan settings
Scanning encrypted connections in Firefox and Thunderbird
Excluding encrypted connections from scanning
Computer control
Web Control
Enabling and disabling Web Control
Actions with web resource access rules
Adding a web resource access rule
Assigning priorities to web resource access rules
Enabling and disabling a web resource access rule
Exporting and importing the list of trusted web addresses
Testing web resource access rules
Exporting and importing the list of web resource addresses
Monitoring user Internet activity
Editing templates of Web Control messages
Editing masks for web resource addresses
Migrating web resource access rules from previous versions of the application

6
Device Control
Enabling and disabling Device Control
About access rules
Editing a device access rule
Editing a connection bus access rule
Adding a Wi-Fi network to the trusted list
Monitoring usage of removable drives
Changing the caching duration
Actions with trusted devices
Adding a device to the Trusted list from the application interface
Adding a device to the Trusted list from Kaspersky Security Center
Exporting and importing the list of trusted devices
Obtaining access to a blocked device
Online mode for granting access
O�line mode for granting access
Editing templates of Device Control messages
Anti-Bridging
Enabling Anti-Bridging
Changing the status of a connection rule
Change the priority of a connection rule
Adaptive Anomaly Control
Enabling and disabling Adaptive Anomaly Control
Enabling and disabling an Adaptive Anomaly Control rule
Modifying the action taken when an Adaptive Anomaly Control rule is triggered
Creating an exclusion for an Adaptive Anomaly Control rule
Exporting and importing exclusions for Adaptive Anomaly Control rules
Applying updates for Adaptive Anomaly Control rules
Editing Adaptive Anomaly Control message templates
Viewing Adaptive Anomaly Control reports
Application Control
Application Control functionality limitations
Enabling and disabling Application Control
Selecting the Application Control mode
Working with Application Control rules in the application interface
Adding an Application Control rule
Adding a trigger condition for an Application Control rule
Changing the status of an Application Control rule
Managing Application Control rules in Kaspersky Security Center
Receiving information about the applications that are installed on users' computers
Creating application categories
Adding executable �les from the Executable �les folder to the application category
Adding event-related executable �les to the application category
Adding and modifying an Application Control rule using Kaspersky Security Center
Changing the status of an Application Control rule via Kaspersky Security Center
Exporting and importing Application Control rules
Testing Application Control rules using Kaspersky Security Center
Viewing events resulting from test operation of the Application Control component
Viewing a report on blocked applications in test mode

7
Viewing events resulting from operation of the Application Control component
Viewing a report on blocked applications
Testing Application Control rules
Application activity monitor
Rules for creating name masks for �les or folders
Editing Application Control message templates
Best practices for implementing a list of allowed applications
Con�guring allowlist mode for applications
Testing the allowlist mode
Support for allowlist mode
Network ports monitoring
Enabling monitoring of all network ports
Creating a list of monitored network ports
Creating a list of applications for which all network ports are monitored
Exporting and importing lists of monitored ports
Expanding Threat Protection
Managed Detection and Response
Kaspersky Endpoint Agent
Wipe Data
Password protection
Enabling Password protection
Granting permissions to individual users or groups
Using a temporary password to grant permissions
Special aspects of Password protection permissions
Trusted zone
Creating a scan exclusion
Enabling and disabling a scan exclusion
Editing the list of trusted applications
Enabling and disabling trusted zone rules for an application in the list of trusted applications
Using trusted system certi�cate storage
Managing Backup
Con�guring the maximum storage period for �les in Backup
Con�guring the maximum size of Backup
Restoring �les from Backup
Deleting backup copies of �les from Backup
Noti�cation service
Con�guring event log settings
Con�guring the display and delivery of noti�cations
Con�guring the display of warnings about the application status in the noti�cation area
Managing reports
View reports
Con�guring the maximum report storage term
Con�guring the maximum size of the report �le
Saving a report to �le
Clearing reports
Kaspersky Endpoint Security Self-Defense
Enabling and disabling Self-Defense
Enabling and disabling AM-PPL support

8
Enabling and disabling external management defense
Supporting remote administration applications
Kaspersky Endpoint Security performance and compatibility with other applications
Selecting types of detectable objects
Enabling or disabling Advanced Disinfection technology
Enabling or disabling energy-saving mode
Enabling or disabling conceding of resources to other applications
Creating and using a con�guration �le
Restoring the default application settings
Messaging between users and the administrator
Data Encryption
Encryption functionality limitations
Changing the length of the encryption key (AES56 / AES256)
Kaspersky Disk Encryption
Special features of SSD drive encryption
Full disk encryption using Kaspersky Disk Encryption technology
Creating a list of hard drives excluded from encryption
Exporting and importing a list of hard drives excluded from encryption
Enabling Single Sign-On (SSO) technology
Managing Authentication Agent accounts
Using a token and smart card with Authentication Agent
Hard drive decryption
Restoring access to a drive protected by Kaspersky Disk Encryption technology
Updating the operating system
Eliminating errors of encryption functionality update
Selecting the Authentication Agent tracing level
Editing Authentication Agent help texts
Removing leftover objects and data after testing the operation of Authentication Agent
BitLocker Management
Starting BitLocker Drive Encryption
Decrypting a hard drive protected by BitLocker
Restoring access to a drive protected by BitLocker
File Level Encryption on local computer drives
Encrypting �les on local computer drives
Forming encrypted �le access rules for applications
Encrypting �les that are created or modi�ed by speci�c applications
Generating a decryption rule
Decrypting �les on local computer drives
Creating encrypted packages
Restoring access to encrypted �les
Restoring access to encrypted data after operating system failure
Editing templates of encrypted �le access messages
Encryption of removable drives
Starting encryption of removable drives
Adding an encryption rule for removable drives
Exporting and importing a list of encryption rules for removable drives
Portable mode for accessing encrypted �les on removable drives
Decryption of removable drives

9
Viewing data encryption details
Viewing the encryption status
Viewing encryption statistics on Kaspersky Security Center dashboards
Viewing �le encryption errors on local computer drives
Viewing the data encryption report
Working with encrypted devices when there is no access to them
Recovering data by using the FDERT Restore Utility
Creating an operating system rescue disk
Managing the application from the command line
Commands
SCAN. Virus Scan
UPDATE. Updating databases and application software modules
ROLLBACK. Rolling back the last update
TRACES. Traces
START. Start the pro�le
STOP. Stopping a pro�le
STATUS. Pro�le status
STATISTICS. Pro�le operation statistics
RESTORE. Restoring �les
EXPORT. Exporting application settings
IMPORT. Importing application settings
ADDKEY. Applying a key �le
LICENSE. Licensing
RENEW. Purchasing a license
PBATESTRESET. Reset the disk check results before encrypting the disk
EXIT. Exit the application
EXITPOLICY. Disabling policy
STARTPOLICY. Enabling policy
DISABLE. Disabling protection
SPYWARE. Spyware detection
MDRLICENSE. MDR activation
KSN. Global/Private KSN transition
KESCLI commands
Scan. Virus Scan
GetScanState. Scan completion status
GetLastScanTime. Determining the scan completion time
GetThreats. Obtaining data on detected threats
UpdateDe�nitions. Updating databases and application software modules
GetDe�nitionState. Determining the update completion time
EnableRTP. Enabling protection
GetRealTimeProtectionState. File Threat Protection status
Version. Identifying the application version
Error codes
Appendix. Application pro�les
Managing the application through the REST API
Installing the application with the REST API
Working with the API
Sources of information about the application

10
Contacting Technical Support
Contents and storage of trace �les
Application traces
Application performance traces
Dump writing
Protecting dump �les and trace �les
Limitations and warnings
Glossary
Active key
Additional key
Administration group
Anti-virus databases
Archive
Authentication Agent
Certi�cate issuer
Database of malicious web addresses
Database of phishing web addresses
Disinfection
False alarm
Infectable �le
Infected �le
License certi�cate
Mask
Network Agent
Normalized form of the address of a web resource
OLE object
Portable File Manager
Protection scope
Scan scope
Task
Trusted Platform Module
Appendices
Appendix 1. Application settings
File Threat Protection
Web Threat Protection
Mail Threat Protection
Network Threat Protection
Firewall
BadUSB Attack Prevention
AMSI Protection
Exploit Prevention
Behavior Detection
Host Intrusion Prevention
Remediation Engine
Kaspersky Security Network
Web Control
Device Control
Application Control

11
Adaptive Anomaly Control
Endpoint Sensor
Full Disk Encryption
File Level Encryption
Encryption of removable drives
Templates (data encryption)
Exclusions
Application settings
Reports and storage
Network settings
Interface
Manage Settings
Task management
Scanning the computer
Background scan
Scan from context menu
Removable drives scan
Integrity check
Updating databases and application software modules
Appendix 2. Application trust groups
Appendix 3. File extensions for quick removable drives scan
Appendix 4. File Types for the Mail Threat Protection attachment �lter
Appendix 5. Network settings for interaction with external services
Appendix 6. Application events in the Windows Event Log
Information about third-party code
Trademark notices

12
GENERAL
On what computers can Kaspersky EndpointSecurity operate?
What has changed since the last version?
With which other Kaspersky applications canKaspersky Endpoint Security operate?
How can I conserve computer resources duringoperation of Kaspersky Endpoint Security?
DEPLOYMENT
How do I install Kaspersky Endpoint Security toall computers of an organization?
Which installation settings can be con�gured inthe command line?
How do I remotely uninstall Kaspersky EndpointSecurity?
UPDATE
What methods are available to update thedatabases?
What should I do if problems arise after anupdate?
How do I update databases outside of thecorporate network?
Is it possible to use a proxy server for updates?
SECURITY
How does Kaspersky Endpoint Security scanemail?
How do I exclude a trusted �le from scans?
How do I protect a computer against virusesfrom �ash drives?
How can I run a virus scan that is hidden from theuser?
How do I temporarily pause the protection ofKaspersky Endpoint Security?
How do I restore a �le that Kaspersky EndpointSecurity erroneously deleted?
How do I protect Kaspersky Endpoint Securityfrom being uninstalled by a user?
INTERNET
Does Kaspersky Endpoint Security scan encryptedconnections (HTTPS)?
How do I allow users to connect only to trusted Wi-Finetworks?
How do I block social networks?
APPLICATIONS
How do I �nd out which applications are installed on auser's computer (inventory)?
How do I prevent computer games from running?
How do I verify that Application Control has beencorrectly con�gured?
How do I add an application to the trusted list?
DEVICES
How do I block the use of �ash drives?
How do I add a device to the trusted list?
Is it possible to obtain access to a blocked device?
ENCRYPTION
Under which conditions is encryption impossible?
How do I use a password to restrict access to anarchive?
Is it possible to use smart cards and tokens withencryption?
Is it possible to gain access to encrypted data if there isno connection with Kaspersky Security Center?
What should I do if the computer operating system failsbut data remains encrypted?
SUPPORT
Where is the report �le stored?
How do I create a trace �le?
How do I enable dump writing?
Frequently asked questions
13
Update 11.6.0
1. Support for Windows 10 21H1. For details about support for the Microsoft Windows 10 operating system, pleaserefer to the Technical Support Knowledge Base .
2. The Managed Detection and Response component was added. This component facilitates interaction with thesolution known as Kaspersky Managed Detection and Response. Kaspersky Managed Detection and Response(MDR) provides round-the-clock protection from a growing number of threats capable of bypassing automatedprotection mechanisms for organizations that are having a di�icult time �nding highly quali�ed experts or whohave limited internal resources. For detailed information about how the solution works, please refer to theKaspersky Managed Detection and Response Help Guide .
3. Kaspersky Endpoint Agent, which is included in the distribution kit, has been updated to version 3.10. KasperskyEndpoint Agent 3.10 provides new features, resolves some previous issues, and has improved stability. For moredetails about the application, please refer to the documentation of Kaspersky solutions that support KasperskyEndpoint Agent.
4. It now provides the capability to manage protection against attacks such as Network Flooding and PortScanning in Network Threat Protection settings.
5. Added new method of creating network rules for Firewall. You can add packet rules and application rules forconnections that are displayed in the Network Monitor window. However, network rule connection settings willbe con�gured automatically.
6. Network Monitor interface is now improved. Added the information about network activity: process ID, thatinitiate network activity; network type (local network or the Internet); local ports. By default, the informationabout network type is hidden.
7. There is now the capability to automatically create Authentication Agent accounts for new Windows users. TheAgent allows a user to complete authentication for access to drives that were encrypted using Kaspersky DiskEncryption technology, and to load the operating system. The application checks information about Windowsuser accounts on the computer. If Kaspersky Endpoint Security detects a Windows user account that has noAuthentication Agent account, the application will create a new account for accessing encrypted drives. Thismeans that you do not need to manually add Authentication Agent accounts for computers with alreadyencrypted drives.
8. There is now the capability to monitor the disk encryption process in the application interface on users'computers (Kaspersky Disk Encryption and BitLocker). You can run the Encryption Monitor tool from the mainapplication window.
Update 11.5.0
1. Support for Windows 10 20H2. For details about support for the Microsoft Windows 10 operating system,please refer to the Technical Support Knowledge Base .
2. Updated application interface. Also updated the application icon in the noti�cation area, applicationnoti�cations, and dialog boxes.
What's new
Kaspersky Endpoint Security 11.6.0 for Windows o�ers the following features and improvements:
Kaspersky Endpoint Security 11.6.0 for Windows o�ers the following features and improvements:

14
3. Improved interface of the Kaspersky Endpoint Security web plug-in for the Application Control, Device Control,and Adaptive Anomaly Control components.
4. Added functionality for importing and exporting lists of rules and exclusions in XML format. The XML formatallows you to edit lists after they are exported. You can manage lists only in the Kaspersky Security CenterConsole. The following lists are available for export/import:
5. Object MD5 information was added to the threat detection report. In previous versions of the application,Kaspersky Endpoint Security showed only the SHA256 of an object.
6. Added capability to assign the priority for device access rules in Device Control settings. Priority assignmentenables more �exible con�guration of user access to devices. If a user has been added to multiple groups,Kaspersky Endpoint Security regulates device access based on the rule with the highest priority. For example,you can grant read-only permissions to the Everyone group and grant read/write permissions to theadministrators group. To do so, assign a priority of 0 for the administrators group and assign a priority of 1 forthe Everyone group. You can con�gure the priority only for devices that have a �le system. This includes harddrives, removable drives, �oppy disks, CD/DVD drives, and portable devices (MTP).
7. Added new functionality:
8. Added capability to con�gure the secure tra�ic scan mode: always scan tra�ic even if protection componentsare disabled, or scan tra�ic when requested by protection components.
Behavior Detection (list of exclusions).
Web Threat Protection (list of trusted web addresses).
Mail Threat Protection (list of attachment �lter extensions).
Network Threat Protection (list of exclusions).
Firewall (list of network packet rules).
Application Control (list of rules).
Web Control (list of rules).
Network port monitoring (lists of ports and applications monitored by Kaspersky Endpoint Security).
Kaspersky Disk Encryption (list of exclusions).
Encryption of removable drives (list of rules).
Manage audio noti�cations.
Cost-Aware Networking Kaspersky Endpoint Security limits its own network tra�ic if the Internetconnection is limited (for example, through a mobile connection).
Manage Kaspersky Endpoint Security settings via trusted remote administration applications (such asTeamViewer, LogMeIn Pro and Remotely Anywhere). You can use remote administration applications to startKaspersky Endpoint Security and manage settings in the application interface.
Manage the settings for scanning secure tra�ic in Firefox and Thunderbird. You can select the certi�catestorage that will be used by Mozilla: the Windows certi�cate storage or the Mozilla certi�cate storage. Thisfunctionality is available only for computers that do not have an applied policy. If a policy is being applied to acomputer, Kaspersky Endpoint Security automatically enables use of the Windows certi�cate storage inFirefox and Thunderbird.

15
9. Revised procedure for deleting information from reports. A user can only delete all reports. In previous versionsof the application, a user could select speci�c application components whose information would be deletedfrom reports.
10. Revised procedure for importing a con�guration �le containing Kaspersky Endpoint Security settings, andrevised procedure for restoring application settings. Prior to importing or restoring, Kaspersky EndpointSecurity shows only a warning. In previous versions of the application, you could view the values of the newsettings before they were applied.
11. Simpli�ed procedure for restoring access to a drive that was encrypted by BitLocker. After completing theaccess recovery procedure, Kaspersky Endpoint Security prompts the user to set a new password or PIN code.After setting a new password, BitLocker will encrypt the drive. In the previous version of the application, theuser had to manually reset the password in the BitLocker settings.
12. Users now have the capability to create their own local trusted zone for a speci�c computer. This way, userscan create their own local lists of exclusions and trusted applications in addition to the general trusted zone in apolicy. An administrator can allow or block the use of local exclusions or local trusted applications. Anadministrator can use Kaspersky Security Center to view, add, edit, or delete list items in the computerproperties.
13. Added capability to enter comments in the properties of trusted applications. Comments help simplifysearches and sorting of trusted applications.
14. Managing the application through the REST API:
Update 11.4.0
1. New design of the application icon in the taskbar noti�cation area. The new is now displayed instead of theold icon. If the user is required to perform an action (for example, restart the computer after updating theapplication), the icon will change to . If the protection components of the application are disabled or havemalfunctioned, the icon will change to or . If you hover over the icon, Kaspersky Endpoint Security willdisplay a description of the problem in computer protection.
2. Kaspersky Endpoint Agent, which is included in the distribution kit, has been updated to version 3.9. KasperskyEndpoint Agent 3.9 supports integration with new Kaspersky solutions. For more details about the application,please refer to the documentation of Kaspersky solutions that support Kaspersky Endpoint Agent.
3. Added the Not supported by license status for Kaspersky Endpoint Security components. You can view thestatus of components by clicking the button in the main application window.
4. New events from Exploit Prevention have been added to reports.
5. Drivers for Kaspersky Disk Encryption technology are now automatically added to the Windows RecoveryEnvironment (WinRE) when drive encryption is started. The previous version of Kaspersky Endpoint Securityadded drivers when installing the application. Adding drivers to WinRE can improve the stability of theapplication when restoring the operating system on computers protected by Kaspersky Disk Encryptiontechnology.
There is now the capability to con�gure the settings of the Mail Threat Protection extension for Outlook.
It is prohibited to disable detection of viruses, worms, and Trojans.
Kaspersky Endpoint Security 11.4.0 for Windows o�ers the following features and improvements:
Protection components

16
The Endpoint Sensor component has been removed from Kaspersky Endpoint Security. You can still con�gureEndpoint Sensor settings in a policy provided that Kaspersky Endpoint Security version 11.0.0 to 11.3.0 isinstalled on the computer.

17
Kaspersky Endpoint Security for Windows
Kaspersky Endpoint Security for Windows (hereinafter also referred to as Kaspersky Endpoint Security) providescomprehensive computer protection against various types of threats, network and phishing attacks.
To protect your computer, Kaspersky Endpoint Security uses the following threat detection technologies:
. Kaspersky Endpoint Security uses a model based on machine learning. This model wasdeveloped by Kaspersky experts. Throughout its use, the model continually receives updated threat data fromKSN, thereby training the model.
. Kaspersky Endpoint Security receives threat data from Kaspersky Security Network. KasperskySecurity Network (KSN) is an infrastructure of cloud services providing access to the online KasperskyKnowledge Base that contains information about the reputation of �les, web resources, and software.
. Kaspersky Endpoint Security uses threat data added by Kaspersky virus analysts. Virusanalysts manually check objects if the reputation of an object cannot be determined automatically.
. Kaspersky Endpoint Security analyzes the activity of an object in real time.
. Kaspersky Endpoint Security receives data from an automatic object analysis system. Thesystem processes all objects received by Kaspersky, and then determines the reputation of objects and addsthe corresponding data to the anti-virus databases. If the system is unable to determine the reputation of anobject, it sends a request to Kaspersky virus analysts.
. Kaspersky Endpoint Security scans objects on a virtual machine. Kaspersky Sandboxanalyzes the behavior of an object and makes a decision on its reputation. This technology is available only ifyou are using Kaspersky Sandbox.
Machine learning
Cloud analysis
Expert analysis
Behavior analysis
Automatic analysis
Kaspersky Sandbox
Each type of threat is handled by a dedicated component. Components can be enabled or disabled independently,and their settings can be con�gured.
The following application components are control components:
. This component keeps track of user attempts to start applications and regulates thestartup of applications.
. This component lets you con�gure �exible access restrictions to data storage devices (suchas hard drives, removable drives, and CD/DVD disks), data transmission equipment (such as modems),equipment that converts information (such as printers), or interfaces for connecting devices to computers(such as USB, Bluetooth).
. This component lets you set �exible restrictions on access to web resources for di�erent usergroups.
. This component monitors and controls potentially harmful actions that are nottypical of the protected computer.
Application Control
Device Control
Web Control
Adaptive Anomaly Control
The following application components are protection components:
. This component receives information about the actions of applications on your computerand provides this information to other components for more e�ective protection.
. This component tracks executable �les that are run by vulnerable applications. When thereis an attempt to run an executable �le from a vulnerable application that was not initiated by the user,Kaspersky Endpoint Security blocks this �le from running.
Behavior Detection
Exploit Prevention

18
. This component registers the actions of applications in the operating system andregulates application activity depending on the trust group of a particular application. A set of rules is speci�edfor each group of applications. These rules regulate the access of applications to user data and to resources ofthe operating system. Such data includes user �les in Documents folder, cookies, user activity log �les and �les,folders, and registry keys that contain settings and important information for the most frequently usedapplications.
. This component lets Kaspersky Endpoint Security roll back actions that have beenperformed by malware in the operating system.
. This component protects the �le system of the computer from infection. Thecomponent starts immediately after Kaspersky Endpoint Security is launched; it continuously remains incomputer RAM, and scans all �les that are opened, saved, or started on the computer and on all connectedstorage devices. This component intercepts every attempt to access a �le and scans the �le for viruses andother threats.
. This component scans tra�ic that arrives to the user computer via the HTTP and FTPprotocols, and checks whether web addresses are malicious or phishing.
. This component scans incoming and outgoing email messages for viruses and otherthreats.
. This component inspects inbound network tra�ic for activity that is typical ofnetwork attacks. Upon detecting an attempted network attack that targets your computer, KasperskyEndpoint Security blocks network activity from the attacking computer.
. This component protects data that is stored on the computer and blocks most possible threats to theoperating system while the computer is connected to the Internet or to a local area network.
. This component prevents infected USB devices emulating a keyboard fromconnecting to the computer.
. This component scans objects based on a request from third-party applications and noti�esthe requesting application about the scan result.
Host Intrusion Prevention
Remediation Engine
File Threat Protection
Web Threat Protection
Mail Threat Protection
Network Threat Protection
Firewall
BadUSB Attack Prevention
AMSI Protection
In addition to the real-time protection that the application components provide, we recommend that you regularlyscan the computer for viruses and other threats. This helps to rule out the possibility of spreading malware thatwas not detected by protection components, for example, due to a low security level.
To keep computer protection up to date, you must update the databases and modules that the application uses.The application is updated automatically by default, but if necessary, you can update the databases andapplication modules manually.
The following tasks are provided in Kaspersky Endpoint Security:
. Kaspersky Endpoint Security checks the application modules in the application installationfolder for corruption or modi�cations. If an application module has an incorrect digital signature, the module isconsidered corrupt.
. Kaspersky Endpoint Security scans the operating system, including kernel memory, objects that areloaded at operation system startup, disk boot sectors, backup storage of the operating system, and all harddrives and removable drives.
. Kaspersky Endpoint Security scans the objects that are selected by the user.
. Kaspersky Endpoint Security scans the kernel memory, objects that are loaded atoperation system startup and disk boot sectors.
Integrity Check
Full Scan
Custom Scan
Critical Areas Scan

19
Service functions of the application
1. Disables control and protection functions (encryption functionality remains enabled).
2. Noti�es the user that the functions have been disabled.
3. Attempts to restore the application to a functional state after updating anti-virus databases or applyingapplication module updates.
. Kaspersky Endpoint Security downloads updated databases and application modules. Updating keepsthe computer protected against the latest viruses and other threats.
. Kaspersky Endpoint Security rolls back the last update of databases and modules. Thislets you roll back the databases and application modules to their previous versions when necessary, forexample, when the new database version contains an invalid signature that causes Kaspersky Endpoint Securityto block a safe application.
Update
Last update rollback
Kaspersky Endpoint Security includes a number of service functions. Service functions are provided for keepingthe application up to date, expand its functionality, and assist the user with operating the application.
. In the course of its operation, the application keeps a report on each application component. You canalso use reports to track the results of completed tasks. The reports contain lists of events that occurredduring Kaspersky Endpoint Security operation and all the operations that the application performs. In case ofan incident, you can send reports to Kaspersky, where Technical Support specialists can look into the issue inmore detail.
. If the application detects infected �les while scanning the computer for viruses and otherthreats, it blocks those �les. Kaspersky Endpoint Security stores copies of disinfected and deleted �les inBackup. Kaspersky Endpoint Security moves �les that are not processed for any reason to the list of activethreats. You can scan �les, restore �les to their original folders, and empty the data storage.
. The noti�cation service helps the user to track the events that in�uence the computerprotection status and Kaspersky Endpoint Security operation. Noti�cations can be displayed on the screen orsent by email.
. User participation in Kaspersky Security Network enhances e�iciency ofcomputer protection through real-time use of information on the reputation of �les, web resources, andsoftware received from users worldwide.
. Purchasing a license unlocks full application functionality, provides access to application database andmodule updates, and support by phone or via email on issues related to installation, con�guration, and use ofthe application.
. All registered users of Kaspersky Endpoint Security can contact Technical Support specialists forassistance. You can send a request to Kaspersky Technical Support through the Kaspersky CompanyAccountportal or call Technical Support by phone.
Reports
Data storage
Noti�cation service
Kaspersky Security Network
License
Support
If the application returns errors or hangs up during operation, it may be restarted automatically.
If the application encounters recurring errors that cause the application to crash, the application performs thefollowing operations:
Distribution kit

20
kes_win.msi Kaspersky Endpoint Security installation package.
setup_kes.exe Files that are required for installing the application using any of the availablemethods.
kes_win.kud File for creating installation packages for Kaspersky Endpoint Security.
klcfginst.msi Kaspersky Endpoint Security Management Plug-in installation package forKaspersky Security Center.
bases.cab Update package �les that are used during installation.
cleaner.cab Files for removing incompatible software.
incompatible.txt File that contains a list of incompatible software.
ksn_<language_ID>.txt File where you can read through the terms of participation inKaspersky Security Network.
license.txt File where you can read through the End User License Agreement and thePrivacy Policy.
installer.ini File that contains the internal settings of the distribution kit.
endpointagent.msi Installation package for Kaspersky Endpoint Agent version 3.10, which is theapplication required for integration with other Kaspersky solutions (forexample, Kaspersky Sandbox).
Microsoft .NET Framework installation package.
keswin_web_plugin.zip Archive containing the �les required for installing the Kaspersky EndpointSecurity web plug-in.
It is not recommended to change the values of these settings. If you want to change installation options, usethe setup.ini �le.
The distribution kit includes the following distribution packages:
This distribution package contains cryptographic tools that implement the AES(Advanced Encryption Standard) encryption algorithm with an e�ective key length of 256 bits.
This distribution package contains cryptographic tools that implement the AES encryption algorithm with ane�ective key length of 56 bits.
Strong encryption (AES256)
Lite encryption (AES56)
Each distribution package contains the following �les:
NDP<version>-<packageproperties>
Hardware and software requirements
To ensure proper operation of Kaspersky Endpoint Security, your computer must meet the following requirements:
Minimum general requirements:

21
The SHA-1 module signature algorithm is deprecated by Microsoft. Update KB4474419 is required forsuccessful installation of Kaspersky Endpoint Security on a computer running the Microsoft Windows 7operating system. For more details about this update, visit the Microsoft technical support website .
For details about support for the Microsoft Windows 10 operating system, please refer to the TechnicalSupport Knowledge Base .
2 GB of free disk space on the hard drive
CPU:
RAM:
Microsoft .NET Framework 4.0 or later
Workstation: 1 GHz
Server: 1.4 GHz
Support for the SSE2 instruction set
Workstation (x86): 1 GB
Workstation (x64): 2 GB
Server: 2 GB
Supported operating systems for workstations:
Windows 7 Home / Professional / Ultimate / Enterprise Service Pack 1 or later;
Windows 8 Professional / Enterprise;
Windows 8.1 Professional / Enterprise;
Windows 10 Home / Pro / Pro for Workstations / Education / Enterprise.
Supported operating systems for servers:
Windows Small Business Server 2011 Essentials / Standard (64-bit);
Microsoft Small Business Server 2011 Standard (64-bit) is supported only if Service Pack 1 for MicrosoftWindows Server 2008 R2 is installed.
Windows MultiPoint Server 2011 (64-bit);
Windows Server 2008 R2 Foundation / Standard / Enterprise / Datacenter Service Pack 1 or later;
Windows Server 2012 Foundation / Essentials / Standard / Datacenter;
Windows Server 2012 R2 Foundation / Essentials / Standard / Datacenter;

22
The SHA-1 module signature algorithm is deprecated by Microsoft. Update KB4474419 is required forsuccessful installation of Kaspersky Endpoint Security on a computer running the Microsoft Windows Server2008 R2 operating system. For more details about this update, visit the Microsoft technical support website .
For details about support for the Microsoft Windows Server 2016 and Microsoft Windows Server 2019operating systems, please refer to the Technical Support Knowledge Base .
Windows Server 2016 Essentials / Standard / Datacenter;
Windows Server 2019 Essentials / Standard / Datacenter.
Supported terminal server types:
Microsoft Remote Desktop Services based on Windows Server 2008 R2 SP1;
Microsoft Remote Desktop Services based on Windows Server 2012;
Microsoft Remote Desktop Services based on Windows Server 2012 R2;
Microsoft Remote Desktop Services based on Windows Server 2016;
Microsoft Remote Desktop Services based on Windows Server 2019.
Supported virtual platforms:
VMWare Workstation 16 Pro
VMware ESXi 7.0 Update 1а
Microsoft Hyper-V Server 2019
Citrix Virtual Apps and Desktops 7
Citrix Provisioning 2009
Citrix Hypervisor 8.2 LTSR
Kaspersky Endpoint Security supports operation with the following versions of Kaspersky Security Center:
Kaspersky Security Center 11
Kaspersky Security Center 12
Kaspersky Security Center 12 Patch A
Kaspersky Security Center 12 Patch B
Kaspersky Security Center 13
Kaspersky Security Center 13.1
Kaspersky Security Center 13.2

23
Comparison of Kaspersky Endpoint Security features
Feature Workstation Server
Kaspersky Security Network
Behavior Detection
Exploit Prevention
Host Intrusion Prevention –
Remediation Engine
File Threat Protection
Web Threat Protection –
Mail Threat Protection –
Firewall
Network Threat Protection
BadUSB Attack Prevention
AMSI Protection
Application Control
Device Control –
Web Control –
Adaptive Anomaly Control –
Kaspersky Disk Encryption –
BitLocker Drive Encryption
File Level Encryption –
Encryption of removable drives –
Comparison of available application features depending on the type ofoperating system
The set of available Kaspersky Endpoint Security features depends on the type of operating system: workstationor server (see the table below).
Advanced Threat Protection
Essential Threat Protection
Security Controls
Data Encryption
Endpoint Agent
Managed Detection and Response

24
Comparison of Kaspersky Endpoint Security features
Feature Kaspersky Security Center 12 Kaspersky SecurityCenter
AdministrationConsole
WebConsole
Cloud Console
Kaspersky Security Network
Kaspersky Private Security Network –
Behavior Detection
Exploit Prevention
Host Intrusion Prevention
Remediation Engine
File Threat Protection
Web Threat Protection
Mail Threat Protection
Firewall
Network Threat Protection
BadUSB Attack Prevention
Managed Detection and Response
AMSI Protection
Application Control
Comparison of application functions depending on the management tools
The set of functions available in Kaspersky Endpoint Security depends on the management tools (see the tablebelow).
You can manage the application by using the following consoles of Kaspersky Security Center 12:
Administration Console. Microsoft Management Console (MMC) snap-in installed on the administrator'sworkstation.
Web Console. Component of Kaspersky Security Center that is installed on the Administration Server. You canwork in the Web Console through a browser on any computer that has access to the Administration Server.
You can also manage the application by using the Kaspersky Security Center Cloud Console. The KasperskySecurity Center Cloud Console is the cloud version of Kaspersky Security Center. This means that theAdministration Server and other components of Kaspersky Security Center are installed in the cloud infrastructureof Kaspersky. For details on managing the application through the Kaspersky Security Center Cloud Console,please refer to the Kaspersky Security Center Cloud Console Help Guide .
Advanced Threat Protection
Essential Threat Protection
Security Controls

25
Device Control
Web Control
Adaptive Anomaly Control
Kaspersky Disk Encryption –
BitLocker Drive Encryption
File Level Encryption –
Encryption of removable drives –
Add key
Changing application components
Inventory
Update
Update rollback
Virus scan
Integrity check –
Wipe Data
Managing Authentication Agentaccounts
–
Data Encryption
Endpoint Agent
Tasks
Compatibility with other applications
Prior to the installation, Kaspersky Endpoint Security checks the computer for the presence of Kasperskyapplications. The application also checks the computer for incompatible software. The list of incompatiblesoftware is available in the incompatible.txt �le that is included in the distribution kit.
DOWNLOAD THE INCOMPATIBLE.TXT FILE
Kaspersky Endpoint Security is incompatible with the following Kaspersky applications:
Kaspersky Small O�ice Security.
Kaspersky Internet Security.
Kaspersky Anti-Virus.
Kaspersky Total Security.
Kaspersky Safe Kids.
Kaspersky Free.

26
Kaspersky Anti-Ransomware Tool.
Kaspersky Anti Targeted Attack Platform (including the Endpoint Sensor component).
Kaspersky Sandbox (including Kaspersky Endpoint Agent).
Kaspersky Endpoint Detection and Response (including the Endpoint Sensor component).
If the Endpoint Agent component was installed on a computer using the deployment tools of otherKaspersky applications, the component will be automatically removed during installation of KasperskyEndpoint Security. Kaspersky Endpoint Security may also include the Endpoint Sensor / KasperskyEndpoint Agent component if you selected Endpoint Agent in the list of application components.
Kaspersky Security for Virtualization Light Agent.
Kaspersky Fraud Prevention for Endpoint.
Kaspersky Security for Windows Server.
Kaspersky Embedded Systems Security.
If Kaspersky applications from this list are installed on the computer, Kaspersky Endpoint Security removes theseapplications. Please wait for this process to �nish before continuing installation of Kaspersky Endpoint Security.

27
1. Settings received from the setup.ini �le.
2. Settings received from the installer.ini �le.
3. Settings received from the command line.
We recommend closing all running applications before starting the installation of Kaspersky Endpoint Security(including remote installation).
Installing and removing the application
Kaspersky Endpoint Security can be installed on a computer in the following ways:
locally, by using the Setup Wizard.
locally from the command line.
remotely through Kaspersky Security Center 12.
remotely through the Microsoft Windows Group Policy Management Editor (for more details, see MicrosoftTechnical Support website ).
remotely, by using the System Center Con�guration Manager.
You can con�gure the application installation settings in several ways. If you simultaneously use multiple methodsfor con�guring the settings, Kaspersky Endpoint Security applies the settings with the highest priority. KasperskyEndpoint Security uses the following order of priorities:
Deployment through Kaspersky Security Center 12
Kaspersky Endpoint Security can be deployed on computers within a corporate network in several ways. You canchoose the most suitable deployment scenario for your organization or combine several deployment scenarios atthe same time. Kaspersky Security Center 12 supports the following main deployment methods:
Installing the application using the Protection Deployment Wizard.
Standard installation method is convenient if you are satis�ed with the default settings of Kaspersky EndpointSecurity and your organization has a simple infrastructure that does not require special con�gurations.
Installing the application using the remote installation task.
Universal installation method, which allows to con�gure Kaspersky Endpoint Security settings and �exiblymanage remote installation tasks. Installation of Kaspersky Endpoint Security consists of the following steps:
1. Creating an installation package.
2. Creating a remote installation task.
Kaspersky Security Center 12 also supports other methods of installing Kaspersky Endpoint Security, such asdeployment within an operating system image. For details about other deployment methods, refer to KasperskySecurity Center Help 12 .

28
1. Selecting a Kaspersky Endpoint Security installation package.
An installation package is a set of �les created for remote installation of a Kaspersky application via KasperskySecurity Center. The installation package contains a range of settings needed to install the application and getit running immediately after installation. The installation package is created using �les with the .kpd and .kudextensions included in the application distribution kit. Kaspersky Endpoint Security installation package iscommon for all supported Windows versions and processor architecture types.
2. Creating the Install application remotely task of the Kaspersky Security Center Administration Server.
Kaspersky Endpoint Security deployment
Standard installation of the application
Kaspersky Security Center provides a Protection Deployment Wizard for installing the application on corporatecomputers. The Protection Deployment Wizard includes the following main actions:
How to run the Protection Deployment Wizard in the Administration Console (MMC)

29
1. In the Administration Console, go to the folder → → .
2. Click the link.
TCP ports 139 and 445, and UDP ports 137 and 138 must be opened on a client computer.
Step 1. Selecting an installation package
Step 2. Selecting devices for installation
Step 3. De�ning remote installation task settings
Administration Server Additional Remoteinstallation
Deploy installation package on managed devices (workstations)
This will start the Security Deployment Wizard. Follow the instructions of the Wizard.
Select Kaspersky Endpoint Security installation package from the list. If the list does not contain theinstallation package for Kaspersky Endpoint Security, you can create the package in the Wizard.
You can con�gure the installation package settings in Kaspersky Security Center. For example, you can selectthe application components that will be installed to a computer.
Network Agent will also be installed together with Kaspersky Endpoint Security. Network Agent facilitatesinteraction between the Administration Server and a client computer. If Network Agent is already installed onthe computer, it is not installed again.
Select the computers for installing Kaspersky Endpoint Security. The following options are available:
Assign the task to an administration group. In this case, the task is assigned to computers included in apreviously created administration group.
Select computers detected by the Administration Server in the network: unassigned devices. NetworkAgent is not installed on unassigned devices. In this case, the task is assigned to speci�c devices. Thespeci�c devices can include devices in administration groups as well as unassigned devices.
Specify device addresses manually, or import addresses from a list. You can specify NetBIOS names, IPaddresses, and IP subnets of devices to which you want to assign the task.
Con�gure the following additional application settings:
. Select the method of application installation:Force download of the installation package
. If Network Agent has not been installed on the computer, �rst Network Agentwill be installed using the tools of the operating system. Then Kaspersky Endpoint Security is installedby the tools of Network Agent.
. The installation package is deliveredto client computers using operating system resources via distribution points. You can select this optionif there is at least one distribution point in the network. For more details about distribution points, referto Kaspersky Security Center Help .
Using Network Agent
Using operating system resources through distribution points

30
Step 4. Selecting a license key
Step 5. Selecting the operating system restart setting
Step 6. Removing incompatible applications before installing the application
Step 7. Selecting an account for accessing devices
Step 8. Starting the installation
. Select the Kaspersky Endpoint Security installationmethod. If the network has more than one Administration Server installed, these Administration Serversmay see the same client computers. This may cause, for example, an application to be installed remotely onthe same client computer several times through di�erent Administration Servers, or other con�icts.
. Clear this check box if you want to install an earlierversion of the application, for example.
. Manually installing NetworkAgent using Active Directory resources. To install Network Agent, the remote installation task must be runwith domain administrator privileges.
. Files will be delivered to clientcomputers by using operating system resources through the Administration Server. You can select thisoption if Network Agent is not installed on the client computer, but the client computer is in the samenetwork as the Administration Server.
Using operating system resources through Administration Server
Behavior of devices managed by other Servers
Do not install application if it is already installed
Assign Network Agent installation in the Active Directory group policies
Add a key to the installation package for activating the application. This step is optional. If the AdministrationServer contains a license key with automatic distribution functionality, the key will be automatically addedlater. You can also activate the application later by using the Add key task.
Select the action to be performed if a computer restart is required. Restart is not required when installingKaspersky Endpoint Security. Restart is required only if you have to remove incompatible applications prior toinstallation. Restart may also be required when updating the application version.
Carefully read the list of incompatible applications and allow removal of these applications. If incompatibleapplications are installed on the computer, installation of Kaspersky Endpoint Security ends with an error.
Select the account for installing Network Agent using the tools of the operating system. In this case,administrator rights are required for computer access. You can add multiple accounts. If an account does nothave su�icient rights, the Installation Wizard uses the next account. If you install Kaspersky Endpoint Securityusing Network Agent tools, you do not have to select an account.
Exit the Wizard. If required, select the check box. You can monitor the progress of the task in the task properties.
Do not run the task after the Remote Installation Wizard completes
How to start the Protection Deployment Wizard in the Web Console and Cloud Console

31
TCP ports 139 and 445, and UDP ports 137 and 138 must be opened on a client computer.
Step 1. Selecting an installation package
Step 2. Selecting a license key
Step 3. Selecting a Network Agent
Step 4. Selecting devices for installation
Step 5. Con�guring advanced settings
In Web Console main window, select → →.
Device discovery and deployment Deployment and assignmentSecurity Deployment Wizard
This will start the Security Deployment Wizard. Follow the instructions of the Wizard.
Select Kaspersky Endpoint Security installation package from the list. If the list does not contain theinstallation package for Kaspersky Endpoint Security, you can create the package in the Wizard. To create theinstallation package, you do not need to search for the distribution package and save it to computer memory.In Kaspersky Security Center, you can view the list of distribution packages residing on Kaspersky servers, andthe installation package is created automatically. Kaspersky updates the list after the release of new versionsof applications.
You can con�gure the installation package settings in Kaspersky Security Center. For example, you can selectthe application components that will be installed to a computer.
Add a key to the installation package for activating the application. This step is optional. If the AdministrationServer contains a license key with automatic distribution functionality, the key will be automatically addedlater. You can also activate the application later by using the Add key task.
Select the version of Network Agent that will be installed together with Kaspersky Endpoint Security. NetworkAgent facilitates interaction between the Administration Server and a client computer. If Network Agent isalready installed on the computer, it is not installed again.
Select the computers for installing Kaspersky Endpoint Security. The following options are available:
Assign the task to an administration group. In this case, the task is assigned to computers included in apreviously created administration group.
Select computers detected by the Administration Server in the network: unassigned devices. NetworkAgent is not installed on unassigned devices. In this case, the task is assigned to speci�c devices. Thespeci�c devices can include devices in administration groups as well as unassigned devices.
Specify device addresses manually, or import addresses from a list. You can specify NetBIOS names, IPaddresses, and IP subnets of devices to which you want to assign the task.
Con�gure the following additional application settings:

32
Step 6. Selecting the operating system restart setting
Step 7. Removing incompatible applications before installing the application
Step 8. Assigning to an administration group
Step 9. Selecting an account for accessing devices
Step 10. Starting installation
. Selecting the method of application installation:
. Clear this check box if you want to install an earlierversion of the application, for example.
. Kaspersky Endpoint Security is installedby means of Network Agent or manually by means of Active Directory. To install Network Agent, the remoteinstallation task must be run with domain administrator privileges.
Force download of the installation package
. If Network Agent has not been installed on the computer, �rst Network Agentwill be installed using the tools of the operating system. Then Kaspersky Endpoint Security is installedby the tools of Network Agent.
. The installation package is deliveredto client computers using operating system resources via distribution points. You can select this optionif there is at least one distribution point in the network. For more details about distribution points, referto Kaspersky Security Center Help .
. Files will be delivered to clientcomputers by using operating system resources through the Administration Server. You can select thisoption if Network Agent is not installed on the client computer, but the client computer is in the samenetwork as the Administration Server.
Using Network Agent
Using operating system resources through distribution points
Using operating system resources through Administration Server
Do not install application if it is already installed
Assign package installation in Active Directory group policies
Select the action to be performed if a computer restart is required. Restart is not required when installingKaspersky Endpoint Security. Restart is required only if you have to remove incompatible applications prior toinstallation. Restart may also be required when updating the application version.
Carefully read the list of incompatible applications and allow removal of these applications. If incompatibleapplications are installed on the computer, installation of Kaspersky Endpoint Security ends with an error.
Select the administration group to which the computers will be moved after Network Agent is installed.Computers need to be moved to an administration group so that policies and group tasks can be applied. If acomputer is already in any administration group, the computer will not be moved. If you do not select anadministration group, computers will be added to the group.Unassigned devices
Select the account for installing Network Agent using the tools of the operating system. In this case,administrator rights are required for computer access. You can add multiple accounts. If an account does nothave su�icient rights, the Installation Wizard uses the next account. If you install Kaspersky Endpoint Securityusing Network Agent tools, you do not have to select an account.

33
Exit the Wizard. If necessary, select the check box. You can monitor theprogress of the task in the task properties.
Run task after Wizard �nishes
Creating an installation package
An installation package is a set of �les created for remote installation of a Kaspersky application via KasperskySecurity Center. The installation package contains a range of settings needed to install the application and get itrunning immediately after installation. The installation package is created using �les with the .kpd and .kudextensions included in the application distribution kit. Kaspersky Endpoint Security installation package is commonfor all supported Windows versions and processor architecture types.
How to create an installation package in the Administration Console (MMC)

34
1. In the Administration Console, go to the folder → → → .
This opens a list of installation packages that have been downloaded to Kaspersky Security Center.
2. Click the button.
Step 1. Selecting the installation package type
Step 2. De�ning the installation package name
Step 3. Selecting the distribution package for installation
Step 4. End User License Agreement and Privacy Policy
Administration Server Additional Remoteinstallation Installation packages
Create installation package
The New Package Wizard starts. Follow the instructions of the Wizard.
Select the option.Create installation package for Kaspersky application
Enter the name of the installation package, for example, Kaspersky Endpoint Security for Windows11.6.0 .
Click the button and select the kes_win.kud �le that is included in the distribution kit.Browse
If required, update the anti-virus databases in the installation package by using the check box.
Copy updates fromrepository to installation package
Read and accept the terms of the End User License Agreement and Privacy Policy.
The installation package will be created and added to Kaspersky Security Center. Using the installationpackage, you can install Kaspersky Endpoint Security on corporate network computers or update theapplication version. In the installation package settings, you can also select the application components andcon�gure the application installation settings (see the table below). The installation package contains anti-virus databases from the Administration Server repository. You can update the databases in the installationpackage to reduce tra�ic consumption when updating the databases after installing Kaspersky EndpointSecurity.
How to create an installation package in the Web Console and Cloud Console

35
1. In Web Console main window, select → → .
This opens a list of installation packages that have been downloaded to Kaspersky Security Center.
2. Click the button.
Step 1. Selecting the installation package type
Step 2. Installation packages
Installation package settings
Section Description
In this section, you can select the application components that will be available. You canchange the set of application components at a later time by using the Change applicationcomponents task. The BadUSB Attack Prevention component, Endpoint Agent component,and data encryption components are not installed by default. These components can beadded in the installation package settings.
. You can add the installationpath to the %PATH% variable for convenient use of the command line interface.
. Installation protection includes protection againstreplacement of the distribution package with malicious applications, blocking access to theinstallation folder of Kaspersky Endpoint Security, and blocking access to the systemregistry section containing application keys. However, if the application cannot be installed(for example, when performing remote installation with the help of Windows RemoteDesktop), you are advised to disable protection of the installation process.
. You can enable support of Citrix ProvisioningServices to install Kaspersky Endpoint Security to a virtual machine.
Device discovery and deployment Deployment and assignmentInstallation packages
Add
The New Package Wizard starts. Follow the instructions of the Wizard.
Select the option.Create installation package for Kaspersky application
The Wizard will create an installation package from the distribution package residing on Kaspersky servers. Thelist is updated automatically as new versions of applications are released. It is recommended to select thisoption for installation of Kaspersky Endpoint Security.
You can also create an installation package from a �le.
Select the Kaspersky Endpoint Security for Windows installation package. The installation package creationprocess starts. During creation of the installation package, you must accept the terms of the End UserLicense Agreement and Privacy Policy.
The installation package will be created and added to Kaspersky Security Center. Using the installationpackage, you can install Kaspersky Endpoint Security on corporate network computers or update theapplication version. In the installation package settings, you can also select the application components andcon�gure the application installation settings (see the table below). The installation package contains anti-virus databases from the Administration Server repository. You can update the databases in the installationpackage to reduce tra�ic consumption when updating the databases after installing Kaspersky EndpointSecurity.
Protectioncomponents
Installationsettings
Add application location to environment variable %PATH%
Do not protect the installation process
Ensure compatibility with Citrix PVS

36
. You can change the installation path of KasperskyEndpoint Security on a client computer. By default, the application is installed in the folder%ProgramFiles%\Kaspersky Lab\Kaspersky Endpoint Security for Windows .
. You can upload a �le that de�nes the settings of Kaspersky EndpointSecurity. You can create a con�guration �le in the local interface of the application.
You can update the databases in the installation package only in the Administration Console and KasperskySecurity Center 12 Web Console. It is not possible to update the databases in the installation package in theKaspersky Security Center Cloud Console.
1. In the Administration Console, go to the folder → → → .
This opens a list of installation packages that have been downloaded to Kaspersky Security Center.
2. Open the properties of the installation package.
3. In the section, click the button.
Path to application installation folder
Con�guration �le
Updating databases in the installation package
The installation package contains anti-virus databases from the Administration Server repository that are up todate when the installation package is created. After creating the installation package, you can update the anti-virus databases in the installation package. This lets you reduce tra�ic consumption when updating anti-virusdatabases after installing Kaspersky Endpoint Security.
To update the anti-virus databases in the Administration Server repository, use the Download updates to theAdministration Server repository task of the Administration Server. For more information about updating the anti-virus databases in the Administration Server repository, please refer to the Kaspersky Security Center HelpGuide .
How to update the anti-virus databases in the installation package through the Administration Console (MMC)
Administration Server Additional Remoteinstallation Installation packages
General Update databases
As a result, the anti-virus databases in the installation package will be updated from the AdministrationServer repository. The bases.cab �le that is included in the distribution kit will be replaced by the basesfolder. The update package �les will be inside the folder.
How to update anti-virus databases in an installation package through the Web Console

37
1. In Web Console main window, select → → .
This opens a list of installation packages downloaded to Web Console.
2. Click on the name of the Kaspersky Endpoint Security installation package in which you want to update theanti-virus databases.
The installation package properties window opens.
3. On the tab, click the link.
Device discovery and deployment Deployment and assignmentInstallation packages
General information Update databases
As a result, the anti-virus databases in the installation package will be updated from the AdministrationServer repository. The bases.cab �le that is included in the distribution kit will be replaced by the basesfolder. The update package �les will be inside the folder.
Creating a remote installation task
The Install application remotely task is designed for remote installation of Kaspersky Endpoint Security. The Installapplication remotely task allows you to deploy the installation package of the application to all computers in theorganization. Before deploying the installation package, you can update the anti-virus databases inside thepackage and select the available application components in the properties of the installation package.
How to create a remote installation task in the Administration Console (MMC)

38
1. In the Administration Console, go to the folder → .
The list of tasks opens.
2. Click the button.
Step 1. Selecting task type
Step 2. Selecting an installation package
Step 3. Additional
Step 4. Settings
Administration Server Tasks
New task
The Task Wizard starts. Follow the instructions of the Wizard.
Select → .Kaspersky Security Center Administration Server Install application remotely
Select Kaspersky Endpoint Security installation package from the list. If the list does not contain theinstallation package for Kaspersky Endpoint Security, you can create the package in the Wizard.
You can con�gure the installation package settings in Kaspersky Security Center. For example, you can selectthe application components that will be installed to a computer.
Network Agent will also be installed together with Kaspersky Endpoint Security. Network Agent facilitatesinteraction between the Administration Server and a client computer. If Network Agent is already installed onthe computer, it is not installed again.
Select the Network Agent installation package. The selected version of Network Agent will be installedtogether with Kaspersky Endpoint Security.
Con�gure the following additional application settings:
. Select the method of application installation:
. Select the Kaspersky Endpoint Security installationmethod. If the network has more than one Administration Server installed, these Administration Servers
Force download of the installation package
. If Network Agent has not been installed on the computer, �rst Network Agentwill be installed using the tools of the operating system. Then Kaspersky Endpoint Security is installedby the tools of Network Agent.
. The installation package is deliveredto client computers using operating system resources via distribution points. You can select this optionif there is at least one distribution point in the network. For more details about distribution points, referto Kaspersky Security Center Help .
. Files will be delivered to clientcomputers by using operating system resources through the Administration Server. You can select thisoption if Network Agent is not installed on the client computer, but the client computer is in the samenetwork as the Administration Server.
Using Network Agent
Using operating system resources through distribution points
Using operating system resources through Administration Server
Behavior of devices managed by other Servers

39
Step 5. Selecting the operating system restart setting
Step 6. Selecting the devices to which the task will be assigned
Step 7. Selecting the account to run the task
Step 8. Con�guring a task start schedule
Step 9. De�ning the task name
Step 10. Finishing task creation
may see the same client computers. This may cause, for example, an application to be installed remotely onthe same client computer several times through di�erent Administration Servers, or other con�icts.
. Clear this check box if you want to install an earlierversion of the application, for example.Do not install application if it is already installed
Select the action to be performed if a computer restart is required. Restart is not required when installingKaspersky Endpoint Security. Restart is required only if you have to remove incompatible applications prior toinstallation. Restart may also be required when updating the application version.
Select the computers for installing Kaspersky Endpoint Security. The following options are available:
Assign the task to an administration group. In this case, the task is assigned to computers included in apreviously created administration group.
Select computers detected by the Administration Server in the network: unassigned devices. NetworkAgent is not installed on unassigned devices. In this case, the task is assigned to speci�c devices. Thespeci�c devices can include devices in administration groups as well as unassigned devices.
Specify device addresses manually, or import addresses from a list. You can specify NetBIOS names, IPaddresses, and IP subnets of devices to which you want to assign the task.
Select the account for installing Network Agent using the tools of the operating system. In this case,administrator rights are required for computer access. You can add multiple accounts. If an account does nothave su�icient rights, the Installation Wizard uses the next account. If you install Kaspersky Endpoint Securityusing Network Agent tools, you do not have to select an account.
Con�gure a schedule for starting a task, for example, manually or when the computer is idle.
Enter a name for the task, for example, Install Kaspersky Endpoint Security for Windows 11.6.0 .
Exit the Wizard. If necessary, select the check box. You can monitor theprogress of the task in the task properties. The application will be installed in silent mode. After installation, the
icon will be added to the noti�cation area of the user's computer. If the icon looks like this , make sure thatyou activated the application.
Run task after Wizard �nishes
How to create a remote installation task in the Web Console and Cloud Console

40
1. In the main window of Web Console, select → .
The list of tasks opens.
2. Click the button.
Step 1. Con�guring general task settings
1. In the drop-down list, select .
2. In the drop-down list, select .
3. In the �eld, enter a brief description, such as Installation of Kaspersky EndpointSecurity for Managers .
4. In the section, select the task scope.
Step 2. Selecting computers for installation
Step 3. Con�guring an installation package
1. Select the Kaspersky Endpoint Security for Windows (11.6.0) installation package.
2. Select the Network Agent installation package.
The selected version of Network Agent will be installed together with Kaspersky Endpoint Security.Network Agent facilitates interaction between the Administration Server and a client computer. If NetworkAgent is already installed on the computer, it is not installed again.
3. In the section, select the application installation method:
Devices Tasks
Add
The Task Wizard starts. Follow the instructions of the Wizard.
Con�gure the general task settings:
Application Kaspersky Security Center
Task type Install application remotely
Task name
Devices to which the task will be assigned
At this step, select the computers on which Kaspersky Endpoint Security will be installed according to theselected task scope option.
At this step con�gure the settings of the installation package:
Force download of the installation package
. If Network Agent has not been installed on the computer, �rst Network Agentwill be installed using the tools of the operating system. Then Kaspersky Endpoint Security is installedby the tools of Network Agent.
. The installation package is deliveredto client computers using operating system resources via distribution points. You can select this optionif there is at least one distribution point in the network. For more details about distribution points, referto Kaspersky Security Center Help .
. Files will be delivered to clientcomputers by using operating system resources through the Administration Server. You can select this
Using Network Agent
Using operating system resources through distribution points
Using operating system resources through Administration Server

41
4. In the �eld, set a limit on the number of installationpackage download requests sent to the Administration Server. A limit on the number of requests will helpprevent the network from being overload.
5. In the �eld, set a limit on the number of attempts to install theapplication. If installation of Kaspersky Endpoint Security ends with an error, the task will automaticallystart the installation again.
6. If necessary, clear the check box. It allows, for example,to install one of the previous versions of the application.
7. If necessary, clear the check box. This lets youavoid downloading an application distribution package if the operating system of the computer does notmeet the software requirements. If you are sure that the operating system of the computer meets thesoftware requirements, you can skip this veri�cation.
8. If necessary, select the check box.Kaspersky Endpoint Security is installed by means of Network Agent or manually by means of ActiveDirectory. To install Network Agent, the remote installation task must be run with domain administratorprivileges.
9. If necessary, select the check box. Installation of KasperskyEndpoint Security takes up computer resources. For the convenience of the user, the ApplicationInstallation Wizard prompts you to close running applications before starting the installation. This helpsprevent disruptions in the operation of other applications and prevents possible malfunctions of thecomputer.
10. In the section, select the Kaspersky Endpoint Securityinstallation method. If the network has more than one Administration Server installed, these AdministrationServers may see the same client computers. This may cause, for example, an application to be installedremotely on the same client computer several times through di�erent Administration Servers, or othercon�icts.
Step 4. Selecting the account to run the task
Step 5. Completing task creation
option if Network Agent is not installed on the client computer, but the client computer is in the samenetwork as the Administration Server.
Maximum number of simultaneous downloads
Number of installation attempts
Do not install application if it is already installed
Check the operating system version before installation
Assign package installation in Active Directory group policies
O�er users to quit running applications
Behavior of devices managed by this Server
Select the account for installing Network Agent using the tools of the operating system. In this case,administrator rights are required for computer access. You can add multiple accounts. If an account does nothave su�icient rights, the Installation Wizard uses the next account. If you install Kaspersky Endpoint Securityusing Network Agent tools, you do not have to select an account.
Finish the wizard by clicking the button. A new task will be displayed in the list of tasks. To run a task,select the check box opposite the task and click the button. The application will be installed in silentmode. After installation, the icon will be added to the noti�cation area of the user's computer. If the iconlooks like this , make sure that you activated the application.
FinishStart
Installing the application locally using the Wizard

42
To install the application or upgrade the application from a previous version using the Setup Wizard:
1. Copy the distribution kit folder to the user's computer.
2. Run setup_kes.exe.
Preparing for installation
The interface of the application Setup Wizard consists of a sequence of windows corresponding to the applicationinstallation steps.
The Setup Wizard starts.
Before installing Kaspersky Endpoint Security on a computer or upgrading it from a previous version, the followingconditions are checked:
Presence of installed incompatible software (the list of incompatible software is available in the incompatible.txt�le that is included in the distribution kit).
Whether or not the hardware and software requirements are met.
Whether or not the user has the rights to install the software product.
If any one of the previous requirements is not met, a relevant noti�cation is displayed on the screen.
If the computer meets the listed requirements, the Setup Wizard searches for Kaspersky applications that couldlead to con�icts when running at the same time as the application being installed. If such applications are found,you are prompted to remove them manually.
If the detected applications include previous versions of Kaspersky Endpoint Security, all data that can bemigrated (such as activation data and application settings) is retained and used during installation of KasperskyEndpoint Security 11.6.0 for Windows, and the previous version of the application is automatically removed. Thisapplies to the following application versions:
Kaspersky Endpoint Security 10 Service Pack 1 Maintenance Release 4 for Windows (build 10.2.6.3733).
Kaspersky Endpoint Security 10 Service Pack 2 for Windows (build 10.3.0.6294).
Kaspersky Endpoint Security 10 Service Pack 2 Maintenance Release 1 for Windows (build 10.3.0.6294).
Kaspersky Endpoint Security 10 Service Pack 2 Maintenance Release 2 for Windows (build 10.3.0.6294).
Kaspersky Endpoint Security 10 Service Pack 2 Maintenance Release 3 for Windows (build 10.3.3.275).
Kaspersky Endpoint Security 10 Service Pack 2 Maintenance Release 4 for Windows (build 10.3.3.304).
Kaspersky Endpoint Security 11.0.0 for Windows (build 11.0.0.6499).
Kaspersky Endpoint Security 11.0.1 for Windows (build 11.0.1.90).
Kaspersky Endpoint Security 11.0.1 for Windows SF1 (build 11.0.1.90).
Kaspersky Endpoint Security 11.1.0 for Windows (build 11.1.0.15919).
Kaspersky Endpoint Security 11.1.1 for Windows (build 11.1.1.126).

43
Kaspersky Endpoint Security components
Advanced settings
Kaspersky Endpoint Security 11.2.0 for Windows (build 11.2.0.2254).
Kaspersky Endpoint Security 11.2.0 for Windows CF1 (build 11.2.0.2254).
Kaspersky Endpoint Security 11.3.0 for Windows (build 11.3.0.773).
Kaspersky Endpoint Security 11.4.0 for Windows (build 11.4.0.233).
Kaspersky Endpoint Security 11.5.0 for Windows (build 11.5.0.590).
During the installation process, you can select the components of Kaspersky Endpoint Security that you want toinstall. The File Threat Protection component is a mandatory component that must be installed. You cannot cancelits installation.
By default, all application components are selected for installation except the following components:
BadUSB Attack Prevention.
File Level Encryption.
Full Disk Encryption.
BitLocker Management.
Endpoint Agent. Endpoint Agent installs Kaspersky Endpoint Agent 3.10 for interaction between the applicationand Kaspersky solutions designed to detect advanced threats (for example, Kaspersky Sandbox).
You can change the available application components after the application is installed. To do so, you need to runthe Setup Wizard again and choose to change the available components.
. Installation protection includes protection against replacement ofthe distribution package with malicious applications, blocking access to the installation folder of KasperskyEndpoint Security, and blocking access to the system registry section containing application keys. However, if theapplication cannot be installed (for example, when performing remote installation with the help of Windows RemoteDesktop), you are advised to disable protection of the installation process.
Protect the application installation process
. You can enable support of Citrix Provisioning Services to install KasperskyEndpoint Security to a virtual machine.Ensure compatibility with Citrix PVS
. You can add the installation path to the %PATH%variable for convenient use of the command line interface.Add application location to environment variable %PATH%
Installing the application from the command line
Kaspersky Endpoint Security can be installed from the command line in one of the following modes:
In interactive mode by using the Application Setup Wizard.

44
To install the application or upgrade a previous version of the application:
1. Run the command line interpreter (cmd.exe) as an administrator.
2. Go to the folder where the Kaspersky Endpoint Security distribution package is located.
3. Run the following command:
setup_kes.exe /pEULA=1 /pPRIVACYPOLICY=1 [/pKSN=1|0] [/pALLOWREBOOT=1|0][/pSKIPPRODUCTCHECK=1|0] [/pSKIPPRODUCTUNINSTALL=1|0] [/pKLLOGIN=<user name>/pKLPASSWD=<password> /pKLPASSWDAREA=<password scope>] [/pENABLETRACES=1|0/pTRACESLEVEL=<tracing level>] [/s]
or
msiexec /i <distribution kit name> EULA=1 PRIVACYPOLICY=1 [KSN=1|0][ALLOWREBOOT=1|0] [SKIPPRODUCTCHECK=1|0] [SKIPPRODUCTUNINSTALL=1|0] [KLLOGIN=<username> KLPASSWD=<password> KLPASSWDAREA=<password scope>] [ENABLETRACES=1|0 TRACESLEVEL=<tracing level>] [/qn]
EULA=1
Accepting the terms of the End User License Agreement isnecessary for installing the application or upgrading the applicationversion.
PRIVACYPOLICY=1
To install the application or upgrade the application version, you mustaccept the Privacy Policy.
KSN Agreement or refusal to participate in Kaspersky Security Network (KSN).If no value is set for this parameter, Kaspersky Endpoint Security willprompt to con�rm your consent or refusal to participate in KSN whenKaspersky Endpoint Security is �rst started. Available values:
1 – agreement to participate in KSN.
0 – refusal to participate in KSN (default value).
In silent mode. After installation is started in silent mode, your involvement in the installation process is notrequired. To install the application in silent mode, use the /s and /qn keys.
Prior to installing the application in silent mode, please open and read the End User License Agreement andthe text of the Privacy Policy. The End User License Agreement and the text of the Privacy Policy areincluded in the Kaspersky Endpoint Security distribution kit. You may proceed to install the application onlyif you have fully read, understand, and accept the provisions and terms of the End User LicenseAgreement, you understand and agree that your data will be processed and transmitted (including to third-party countries) in accordance with the Privacy Policy, and you have fully read and understand the PrivacyPolicy. If you do not accept the provisions and terms of the End User License Agreement and the PrivacyPolicy, please do not install or use Kaspersky Endpoint Security.
Acceptance of the terms of the End User License Agreement. The textof the License Agreement is included in the distribution kit of KasperskyEndpoint Security.
Acceptance of the Privacy Policy. The text of the Privacy Policy isincluded in the Kaspersky Endpoint Security distribution kit.

45
The Kaspersky Endpoint Security distribution package is optimized foruse with Kaspersky Security Network. If you opted not to participatein Kaspersky Security Network, you should update Kaspersky EndpointSecurity immediately after the installation is complete.
ALLOWREBOOT=1
Restart is not required when installing Kaspersky Endpoint Security.Restart is required only if you have to remove incompatible applicationsprior to installation. Restart may also be required when updating theapplication version.
SKIPPRODUCTCHECK=1 Disabling checking for incompatible software. The list of incompatiblesoftware is available in the incompatible.txt �le that is included in thedistribution kit. If no value is set for this parameter and incompatiblesoftware is detected, the installation of Kaspersky Endpoint Security willbe terminated.
SKIPPRODUCTUNINSTALL=1 Disable automatic removal of detected incompatible software. If no valueis set for this parameter, Kaspersky Endpoint Security attempts toremove incompatible software.
KLLOGIN Set the user name for accessing the features and settings of KasperskyEndpoint Security (the Password protection component). The user nameis set together with the KLPASSWD and KLPASSWDAREA parameters. Theuser name KLAdmin is used by default.
KLPASSWD Specify a password for accessing Kaspersky Endpoint Security featuresand settings (the password is speci�ed together with the KLLOGIN andKLPASSWDAREA parameters).
If you speci�ed a password but did not specify a user name with theKLLOGIN parameter, the KLAdmin user name is used by default.
KLPASSWDAREA
SET – modifying application settings.
EXIT – exiting the application.
DISPROTECT – disabling protection components and stopping scantasks.
DISPOLICY – disabling the Kaspersky Security Center policy.
UNINST – removing the application from the computer.
DISCTRL – disabling control components.
REMOVELIC – removing the key.
REPORTS – viewing reports.
Automatic restart of the computer, if required after installation orupgrade of the application. If no value is set for this parameter, automaticcomputer restart is blocked.
Specify the scope of the password for accessing Kaspersky EndpointSecurity. When a user attempts to perform an action that is included inthis scope, Kaspersky Endpoint Security prompts for the user's accountcredentials (KLLOGIN and KLPASSWD parameters). Use the "; " characterto specify multiple values. Available values:

46
ENABLETRACES Enabling or disabling application traces. After Kaspersky EndpointSecurity starts, it saves trace �les in the folder%ProgramData%\Kaspersky Lab\KES\Traces. Available values:
1 – traces are enabled.
0 – traces are disabled (default value).
TRACESLEVEL Level of detail of traces. Available values:
100 (critical). Only messages about fatal errors.
200 (high). Messages about all errors, including fatal errors.
300 (diagnostic). Messages about all errors, as well as warnings.
400 (important). All error messages, warnings, and additionalinformation.
500 (normal). Messages about all errors and warnings, as well asdetailed information about the operation of the application in normalmode (default).
600 (low). All messages.
AMPPL Enables or disables protection of the Kaspersky Endpoint Securityprocesses using AM-PPL technology (Antimalware Protected ProcessLight). For more details about AM-PPL technology, please visit theMicrosoft website .
AM-PPL technology is available for Windows 10 version 1703 (RS2) orlater, and Windows Server 2019 operating systems.
Available values:
1 – protection of the Kaspersky Endpoint Security processes usingAM-PPL technology is enabled.
0 – protection of the Kaspersky Endpoint Security processes usingAM-PPL technology is disabled.
RESTAPI Managing the application through the REST API. To manage theapplication through the REST API, you must specify the user name(RESTAPI_User parameter).
Available values:
1 – management via REST API is allowed.
0 – management via REST API is blocked (default value).To manage the application through the REST API, management usingadministrative systems must be allowed. To do so, set theAdminKitConnector=1 parameter. If you manage the applicationthrough the REST API, it is impossible to manage the application usingthe administration systems of Kaspersky.
RESTAPI_User User name of the Windows domain account used for managing theapplication through the REST API. Management of the applicationthrough the REST API is available only to this user. Enter the user name in

47
the format <DOMAIN>\<UserName> (for example,RESTAPI_User=COMPANY\Administrator ). You can select only oneuser to work with the REST API.
Adding a user name is a prerequisite for managing the application throughthe REST API.
RESTAPI_Port Port used for managing the application through the REST API. Port 6782is used by default.
ADMINKITCONNECTOR Application management using administration systems. Administrationsystems include, for example, Kaspersky Security Center. In addition toKaspersky administration systems, you can use third-party solutions.Kaspersky Endpoint Security provides an API for this purpose.
Available values:
1 – application management with the help of administration systemsis allowed (default value).
0 – application management is allowed only through the localinterface.
Example:setup_kes.exe /pEULA=1 /pPRIVACYPOLICY=1 /pKSN=1/pALLOWREBOOT=1
msiexec /i kes_win.msi EULA=1 PRIVACYPOLICY=1KSN=1 KLLOGIN=Admin KLPASSWD=PasswordKLPASSWDAREA=EXIT;DISPOLICY;UNINST /qn
setup_kes.exe /pEULA=1 /pPRIVACYPOLICY=1 /pKSN=1/pENABLETRACES=1 /pTRACESLEVEL=600 /s
After Kaspersky Endpoint Security is installed, the trial license is activated unless you provided an activationcode in the setup.ini �le. A trial license usually has a short term. When the trial license expires, all KasperskyEndpoint Security features become disabled. To continue using the application, you need to activate theapplication with a commercial license by using the Application Activation Wizard or a special command.
To apply settings from the setup.ini, install.cfg, and setup.reg �les, place these �les into the folder containingthe Kaspersky Endpoint Security distribution package. You can also put the setup.reg �le in a di�erent folder.If you do so, you need to specify the path to the �le in the following application installation command:SETUPREG=<path to the setup.reg file> .
When installing the application or upgrading the application version in silent mode, use of the following �les issupported:
setup.ini – general settings for application installation
install.cfg – settings of Kaspersky Endpoint Security operation
setup.reg – registry keys
Registry keys from the setup.reg �le are written to the registry only if the setup.reg value is set for theSetupReg parameter in the setup.ini �le. The setup.reg �le is generated by Kaspersky experts. It is notrecommended to modify the contents of this �le.

48
These instructions apply to System Center Con�guration Manager 2012 R2.
To remotely install an application using System Center Con�guration Manager:
1. Open the Con�guration Manager console.
2. In the right part of the console, in the section, select .
3. In the upper part of the console in the control panel, click the button.
This starts the New Package and Application Wizard.
4. In the New Package and Application Wizard:
a. In the section:
b. In the section, select the option.
c. In the section:
d. In the section:
This step is optional.
Remotely installing the application using System Center Con�gurationManager
App management Packages
Create package
Package
In the �eld, enter the name of the installation package.
In the �eld, specify the path to the folder containing the distribution kit of KasperskyEndpoint Security.
Name
Source folder
Application type Standard application
Standard application
In the �eld, enter the unique name for the installation package (for example, the application nameincluding the version).
In the �eld, specify the Kaspersky Endpoint Security installation options from thecommand line.
Click the button to specify the path to the executable �le of the application.
Make sure that the list has the item selected.
Name
Command line
Browse
Execution mode Run with administrator rights
Requirements
Select the check box if you want a di�erent application to be startedbefore installing Kaspersky Endpoint Security.
Select the application from the drop-down list or specify the path to the executable �le ofthis application by clicking the button.
Select the option in the section if you want the application to be installed only in the speci�ed operating systems.
In the list below, select the check boxes opposite the operating systems in which Kaspersky EndpointSecurity will be installed.
Start another application �rst
ApplicationBrowse
This application can be started only on the speci�ed platforms Platformrequirements

49
e. In the section, check all entered values of the settings and click .
The created installation package will appear in the section in the list of available installation packages.
5. In the context menu of the installation package, select .
This starts the Deployment Wizard.
6. In the Deployment Wizard:
a. In the section:
b. In the section, add distribution points (for more detailed information, please refer to the helpdocumentation for System Center Con�guration Manager).
c. If required, specify the values of other settings in the Deployment Wizard. These settings are optional forremote installation of Kaspersky Endpoint Security.
d. In the section, check all entered values of the settings and click .
After the Deployment Wizard �nishes, a task will be created for remote installation of Kaspersky EndpointSecurity.
The alternatives to the value 1 are the values yes, on, enable, and enabled.
Summary Next
Packages
Deploy
General
In the �eld, enter the unique name of the installation package or select the installation packagefrom the list by clicking the button.
In the �eld, enter the name of the collection of computers on which the application will beinstalled, or select the collection by clicking the button.
SoftwareBrowse
CollectionBrowse
Contains
Summary Next
Description of setup.ini �le installation settings
The setup.ini �le is used when installing the application from the command line or when using the Group PolicyEditor of Microsoft Windows. To apply settings from the setup.ini �le, place this �le into the folder containing theKaspersky Endpoint Security distribution package.
DOWNLOAD THE SETUP.INI FILE
The setup.ini �le consists of the following sections:
[Setup] – general settings of application installation.
[Components] – selection of application components to be installed. If none of the components are speci�ed,all components that are available for the operating system are installed. File Threat Protection is a mandatorycomponent and is installed on the computer regardless of which settings are indicated in this section. TheManaged Detection and Response component is also absent from this section. To install this component, youmust activate Managed Detection and Response in the Kaspersky Security Center Console.
[Tasks] – selection of tasks to be included in the list of Kaspersky Endpoint Security tasks. If no task isspeci�ed, all tasks are included in the task list of Kaspersky Endpoint Security.

50
The alternatives to the value 0 are the values no, off, disable, and disabled.
Settings of the setup.ini �le
Section Parameter Description
[Setup] InstallDir Path to the application installation folder.
ActivationCode Kaspersky Endpoint Security activation code.
EULA=1
Accepting the terms of the End User LicenseAgreement is necessary for installing theapplication or upgrading the application version.
PrivacyPolicy=1
To install the application or upgrade the applicationversion, you must accept the Privacy Policy.
KSN Agreement or refusal to participate in KasperskySecurity Network (KSN). If no value is set for thisparameter, Kaspersky Endpoint Security will prompt tocon�rm your consent or refusal to participate in KSNwhen Kaspersky Endpoint Security is �rst started.Available values:
1 – agreement to participate in KSN.
0 – refusal to participate in KSN (default value).The Kaspersky Endpoint Security distributionpackage is optimized for use with KasperskySecurity Network. If you opted not to participate inKaspersky Security Network, you should updateKaspersky Endpoint Security immediately after theinstallation is complete.
Login Set the user name for accessing the features andsettings of Kaspersky Endpoint Security (the Passwordprotection component). The user name is set togetherwith the Password and PasswordArea parameters.The user name KLAdmin is used by default.
Password Specify a password for accessing Kaspersky EndpointSecurity features and settings (the password isspeci�ed together with the Login and PasswordAreaparameters).
Acceptance of the terms of the End User LicenseAgreement. The text of the License Agreement isincluded in the distribution kit of Kaspersky EndpointSecurity.
Acceptance of the Privacy Policy. The text of thePrivacy Policy is included in the Kaspersky EndpointSecurity distribution kit.

51
If you speci�ed a password but did not specify a username with the Login parameter, the KLAdmin username is used by default.
PasswordArea
SET – modifying application settings.
EXIT – exiting the application.
DISPROTECT – disabling protection componentsand stopping scan tasks.
DISPOLICY – disabling the Kaspersky SecurityCenter policy.
UNINST – removing the application from thecomputer.
DISCTRL – disabling control components.
REMOVELIC – removing the key.
REPORTS – viewing reports.
SelfProtection Enabling or disabling the application installationprotection mechanism. Available values:
1 – the application installation protectionmechanism is enabled (default value).
0 – the application installation protectionmechanism is disabled.Installation protection includes protection againstreplacement of the distribution package withmalicious applications, blocking access to theinstallation folder of Kaspersky Endpoint Security,and blocking access to the system registry sectioncontaining application keys. However, if theapplication cannot be installed (for example, whenperforming remote installation with the help ofWindows Remote Desktop), you are advised todisable protection of the installation process.
Reboot=1
Specify the scope of the password for accessingKaspersky Endpoint Security. When a user attempts toperform an action that is included in this scope,Kaspersky Endpoint Security prompts for the user'saccount credentials (Login and Passwordparameters). Use the "; " character to specify multiplevalues. Available values:
Automatic restart of the computer, if required afterinstallation or upgrade of the application. If no value isset for this parameter, automatic computer restart isblocked.

52
Restart is not required when installing KasperskyEndpoint Security. Restart is required only if you have toremove incompatible applications prior to installation.Restart may also be required when updating theapplication version.
AddEnvironment In the %PATH% system variable, add the path toexecutable �les located in the Kaspersky EndpointSecurity setup folder. Available values:
1 – the %PATH% system variable is supplementedwith the path to executable �les that are located inthe Kaspersky Endpoint Security setup folder.
0 – the %PATH% system variable is notsupplemented with the path to executable �les thatare located in the Kaspersky Endpoint Securitysetup folder.
AMPPL Enables or disables protection of the KasperskyEndpoint Security processes using AM-PPL technology(Antimalware Protected Process Light). For more detailsabout AM-PPL technology, please visit the Microsoftwebsite .
AM-PPL technology is available for Windows 10 version1703 (RS2) or later, and Windows Server 2019 operatingsystems.
Available values:
1 – protection of the Kaspersky Endpoint Securityprocesses using AM-PPL technology is enabled.
0 – protection of the Kaspersky Endpoint Securityprocesses using AM-PPL technology is disabled.
SetupReg Enable writing of registry keys from the setup.reg �le tothe registry. SetupReg: setup.reg parameter value.
EnableTraces Enabling or disabling application traces. After KasperskyEndpoint Security starts, it saves trace �les in the folder%ProgramData%\Kaspersky Lab\KES\Traces. Availablevalues:
1 – traces are enabled.
0 – traces are disabled (default value).
TracesLevel Level of detail of traces. Available values:
100 (critical). Only messages about fatal errors.
200 (high). Messages about all errors, including fatalerrors.
300 (diagnostic). Messages about all errors, as wellas warnings.

53
400 (important). All error messages, warnings, andadditional information.
500 (normal). Messages about all errors andwarnings, as well as detailed information about theoperation of the application in normal mode(default).
600 (low). All messages.
RESTAPI Managing the application through the REST API. Tomanage the application through the REST API, you mustspecify the user name (RESTAPI_User parameter).
Available values:
1 – management via REST API is allowed.
0 – management via REST API is blocked (defaultvalue).To manage the application through the REST API,management using administrative systems must beallowed. To do so, set the AdminKitConnector=1parameter. If you manage the application throughthe REST API, it is impossible to manage theapplication using the administration systems ofKaspersky.
RESTAPI_User User name of the Windows domain account used formanaging the application through the REST API.Management of the application through the REST API isavailable only to this user. Enter the user name in theformat <DOMAIN>\<UserName> (for example,RESTAPI_User=COMPANY\Administrator ). You canselect only one user to work with the REST API.
Adding a user name is a prerequisite for managing theapplication through the REST API.
RESTAPI_Port Port used for managing the application through theREST API. Port 6782 is used by default.
[Components] ALL Installation of all components. If the parameter value 1is speci�ed, all components will be installed regardlessof the installation settings of individual components.
MailThreatProtection Mail Threat Protection.
WebThreatProtection Web Threat Protection.
AMSI
HostIntrusionPrevention Host Intrusion Prevention.
BehaviorDetection Behavior Detection.
ExploitPrevention Exploit Prevention.
RemediationEngine Remediation Engine.
Firewall Firewall.
NetworkThreatProtection Network Threat Protection.
AMSI Protection.

54
WebControl Web Control.
DeviceControl Device Control.
ApplicationControl Application Control.
AdaptiveAnomaliesControl Adaptive Anomaly Control.
FileEncryption File Level Encryption libraries.
DiskEncryption Full Disk Encryption libraries.
BadUSBAttackPrevention BadUSB Attack Prevention.
AntiAPT Endpoint Agent. Endpoint Agent installs KasperskyEndpoint Agent 3.10 for interaction between theapplication and Kaspersky solutions designed to detectadvanced threats (for example, Kaspersky Sandbox).
AdminKitConnector Application management using administration systems.Administration systems include, for example, KasperskySecurity Center. In addition to Kaspersky administrationsystems, you can use third-party solutions. KasperskyEndpoint Security provides an API for this purpose.
Available values:
1 – application management with the help ofadministration systems is allowed (default value).
0 – application management is allowed only throughthe local interface.
[Tasks] ScanMyComputer Full Scan task. Available values:
1 – the task is included in the list of KasperskyEndpoint Security tasks.
0 – the task is not included in the list of KasperskyEndpoint Security tasks.
ScanCritical Critical Areas Scan task. Available values:
1 – the task is included in the list of KasperskyEndpoint Security tasks.
0 – the task is not included in the list of KasperskyEndpoint Security tasks.
Updater Update task. Available values:
1 – the task is included in the list of KasperskyEndpoint Security tasks.
0 – the task is not included in the list of KasperskyEndpoint Security tasks.
Change application components

55
During installation of the application, you can select the components that will be available. You can change theavailable application components in the following ways:
Locally, by using the Setup Wizard.
Application components are changed by using the normal method for a Windows operating system, which isthrough the Control Panel. Run the Application Setup Wizard and select the option to change the applicationcomponents that are available. Follow the instructions on the screen.
Remotely through Kaspersky Security Center.
The Change application components task allows you to change the components of Kaspersky EndpointSecurity after the application is installed.
Please take into account the following special considerations when changing the application components:
On computers running Windows Server, you cannot install all components of Kaspersky Endpoint Security (forexample, the Adaptive Anomaly Control component is not available).
If the hard drives on your computer are protected by Full Disk Encryption (FDE), you cannot remove the FullDisk Encryption component. To remove the Full Disk Encryption component, decrypt all the hard drives of thecomputer.
If the computer has encrypted �les (FLE) or the user uses encrypted removable drives (FDE or FLE), it will beimpossible to access the �les and removable drives after the Data Encryption components are removed. Youcan access the �les and removable drives by reinstalling the Data Encryption components.
How to add or remove application components in the Administration Console (MMC)

56
1. In the Administration Console, go to the folder → .
The list of tasks opens.
2. Click the button.
Step 1. Selecting task type
Step 2. Task settings for changing application components
1. Click the button.
2. Select the check box.
3. Enter the KLAdmin user account credentials.
Step 3. Selecting the devices to which the task will be assigned
Step 4. Con�guring a task start schedule
Step 5. De�ning the task name
Administration Server Tasks
New task
The Task Wizard starts. Follow the instructions of the Wizard.
Select → .Kaspersky Endpoint Security for Windows (11.6.0) Change application components
Select the application components that will be available on the user's computer.
Select the check box. The list of incompatible applicationscan be viewed in incompatible.txt , which is included in the distribution kit. If incompatible applications areinstalled on the computer, installation of Kaspersky Endpoint Security ends with an error.
Remove incompatible third-party applications
If necessary, enable password protection for task performance:
Additional
Use password for modifying the set of application components
Select the computers on which the task will be performed. The following options are available:
Assign the task to an administration group. In this case, the task is assigned to computers included in apreviously created administration group.
Select computers detected by the Administration Server in the network: unassigned devices. The speci�cdevices can include devices in administration groups as well as unassigned devices.
Specify device addresses manually, or import addresses from a list. You can specify NetBIOS names, IPaddresses, and IP subnets of devices to which you want to assign the task.
Con�gure a schedule for starting a task, for example, manually or when the computer is idle.
Enter a name for the task, for example, Add the Application Control component .

57
Step 6. Completing task creation
Exit the Wizard. If necessary, select the check box. You can monitor theprogress of the task in the task properties.
Run task after Wizard �nishes
As a result, the set of Kaspersky Endpoint Security components on users' computers will be changed in silentmode. The settings of available components will be displayed in the local interface of the application. Thecomponents that were not included in the application are disabled, and the settings of these components arenot available.
How to add or remove application components in the Web Console and Cloud Console

58
1. In the main window of Web Console, select → .
The list of tasks opens.
2. Click the button.
The Task Wizard starts. Follow the instructions of the Wizard.
Step 1. Con�guring general task settings
1. In the drop-down list, select .
2. In the drop-down list, select .
3. In the �eld, enter a brief description, for example, Add the Application Controlcomponent .
4. In the section, select the task scope.
Step 2. Selecting the devices to which the task will be assigned
Step 3. Completing task creation
1. In the section, select the check box.
2. Enter the KLAdmin user account credentials.
Devices Tasks
Add
Con�gure the general task settings:
Application Kaspersky Endpoint Security for Windows (11.6.0)
Task type Change application components
Task name
Select devices to which the task will be assigned
Select the computers on which the task will be performed. For example, select a separate administrationgroup or build a selection.
Select the check box and �nish the Wizard. In the taskproperties, select the tab and select the application components that will be available.
Open task properties window after task creationApplication Settings
If necessary, enable password protection for task performance:
Advanced Settings Use password for modifying the set of applicationcomponents
Save the changes and run the task.
As a result, the set of Kaspersky Endpoint Security components on users' computers will be changed in silentmode. The settings of available components will be displayed in the local interface of the application. Thecomponents that were not included in the application are disabled, and the settings of these components arenot available.
Upgrading from a previous version of the application
When you update a previous version of the application to a newer version, consider the following:

59
When upgrading Kaspersky Endpoint Security 10 Service Pack 2 for Windows to Kaspersky Endpoint Security11.6.0 for Windows, the �les that were placed in Backup or Quarantine in the previous version of the applicationwill be transferred to Backup in the new version of the application. For versions earlier than KasperskyEndpoint Security 10 Service Pack 2 for Windows, �les that were placed in Backup and Quarantine in aprevious version of the application are not migrated to the newer version.
Kaspersky Endpoint Security 11.6.0 is compatible with Kaspersky Security Center 12.
We recommend quitting all active applications before starting the update.
If the computer has hard drives that are encrypted using Full Disk Encryption (FDE), then you need to decryptall encrypted hard drives to upgrade Kaspersky Endpoint Security from version 10 to version 11.0.0 or later.
Before updating, Kaspersky Endpoint Security blocks the Full Disk Encryption functionality. If Full DiskEncryption could not be locked, the upgrade installation will not start. After updating the application, theFull Disk Encryption functionality will be restored.
Kaspersky Endpoint Security supports updates for the following versions of the application:
Kaspersky Endpoint Security 10 Service Pack 1 Maintenance Release 4 for Windows (build 10.2.6.3733).
Kaspersky Endpoint Security 10 Service Pack 2 for Windows (build 10.3.0.6294).
Kaspersky Endpoint Security 10 Service Pack 2 Maintenance Release 1 for Windows (build 10.3.0.6294).
Kaspersky Endpoint Security 10 Service Pack 2 Maintenance Release 2 for Windows (build 10.3.0.6294).
Kaspersky Endpoint Security 10 Service Pack 2 Maintenance Release 3 for Windows (build 10.3.3.275).
Kaspersky Endpoint Security 10 Service Pack 2 Maintenance Release 4 for Windows (build 10.3.3.304).
Kaspersky Endpoint Security 11.0.0 for Windows (build 11.0.0.6499).
Kaspersky Endpoint Security 11.0.1 for Windows (build 11.0.1.90).
Kaspersky Endpoint Security 11.0.1 for Windows SF1 (build 11.0.1.90).
Kaspersky Endpoint Security 11.1.0 for Windows (build 11.1.0.15919).
Kaspersky Endpoint Security 11.1.1 for Windows (build 11.1.1.126).
Kaspersky Endpoint Security 11.2.0 for Windows (build 11.2.0.2254).
Kaspersky Endpoint Security 11.2.0 for Windows CF1 (build 11.2.0.2254).
Kaspersky Endpoint Security 11.3.0 for Windows (build 11.3.0.773).
Kaspersky Endpoint Security 11.4.0 for Windows (build 11.4.0.233).
Kaspersky Endpoint Security 11.5.0 for Windows (build 11.5.0.590).
Kaspersky Endpoint Security can be updated on the computer in the following ways:

60
Removing Kaspersky Endpoint Security leaves the computer and user data unprotected against threats.
If you selected the Endpoint Agent component during installation of the application, the following twoapplications will be installed on the computer: Kaspersky Endpoint Security and Kaspersky Endpoint Agent.After uninstalling Kaspersky Endpoint Security, Kaspersky Endpoint Agent will also be uninstalledautomatically.
locally, by using the Setup Wizard.
locally from the command line.
remotely through Kaspersky Security Center 12.
remotely through the Microsoft Windows Group Policy Management Editor (for more details, see MicrosoftTechnical Support website ).
remotely, by using the System Center Con�guration Manager.
If the application that is deployed in the corporate network features a set of components other than the defaultset, updating the application through the Administration Console (MMC) is di�erent from updating the applicationthrough the Web Console and Cloud Console. When you update Kaspersky Endpoint Security, consider thefollowing:
Kaspersky Security Center Web Console or Kaspersky Security Center Cloud Console.
If you created an installation package for the new version of the application with the default set ofcomponents, then the set of components on a user's computer will not be changed. To use Kaspersky EndpointSecurity with the default set of components, you need to open the installation package properties, change theset of components, then revert to the original set of components and save the changes.
Kaspersky Security Center Administration Console.
The set of application components after the update will match the set of components in the installationpackage. That is, if the new version of the application has the default set of components, then, for example,BadUSB Attack Prevention will be removed from the computer, since this component is excluded from thedefault set. To continue using the application with the same set of components as before the update, selectthe required components in the installation package settings.
Remove the application
Kaspersky Endpoint Security can be uninstalled from the computer in the following ways:
locally, by using the Setup Wizard;
locally from the command line;
remotely, by using Kaspersky Security Center (refer to the Kaspersky Security Center Help for moreinformation);
remotely through the Microsoft Windows Group Policy Management Editor (for more details, see MicrosoftTechnical Support website ).

61
Uninstalling through Kaspersky Security Center
You can remotely uninstall the application by using the Uninstall application remotely task. When performing thetask, Kaspersky Endpoint Security downloads the application uninstall utility to the user's computer. Aftercompleting uninstallation of the application, the utility will be automatically removed.
How to remove the application through the Administration Console (MMC)

62
1. In the Administration Console, go to the folder → .
The list of tasks opens.
2. Click the button.
Step 1. Selecting task type
Step 2. Selecting the application to be removed
Step 3. Task settings for application uninstallation
Step 4. Uninstall utility settings
1. Select the check box.
2. Click the button.
Administration Server Tasks
New task
The Task Wizard starts. Follow the instructions of the Wizard.
Select → → .Kaspersky Security Center Administration Server Additional Uninstall application remotely
Select .Uninstall application supported by Kaspersky Security Center
Select .Kaspersky Endpoint Security for Windows (11.6.0)
Con�gure the following additional application settings:
. Select the utility delivery method:
. If necessary, clear this check box. This lets youavoid downloading the uninstall utility if the operating system of the computer does not meet the softwarerequirements. If you are sure that the operating system of the computer meets the software requirements,you can skip this veri�cation.
Force download of the uninstall utility
. If Network Agent has not been installed on the computer, �rst Network Agentwill be installed using the tools of the operating system. Kaspersky Endpoint Security is then uninstalledby the tools of Network Agent.
. The utility will be deliveredto client computers by using operating system resources through the Administration Server. You canselect this option if Network Agent is not installed on the client computer, but the client computer is inthe same network as the Administration Server.
. The utility is delivered to clientcomputers using operating system resources via distribution points. You can select this option if thereis at least one distribution point in the network. For more details about distribution points, refer toKaspersky Security Center Help .
Using Network Agent
Using Microsoft Windows resources by means of Administration Server
Using operating system resources through distribution points
Verify operating system version before downloading
If the application uninstallation operation is password protected, do the following:
Use uninstall password
Edit

63
3. Enter the KLAdmin account password.
Step 5. Selecting the operating system restart setting
Step 6. Selecting the devices to which the task will be assigned
Step 7. Selecting the account to run the task
Step 8. Con�guring a task start schedule
Step 9. De�ning the task name
Step 10. Finishing task creation
After uninstalling the application, a restart is required. Select the action that will be performed to restart thecomputer.
Select the computers on which the task will be performed. The following options are available:
Assign the task to an administration group. In this case, the task is assigned to computers included in apreviously created administration group.
Select computers detected by the Administration Server in the network: unassigned devices. The speci�cdevices can include devices in administration groups as well as unassigned devices.
Specify device addresses manually, or import addresses from a list. You can specify NetBIOS names, IPaddresses, and IP subnets of devices to which you want to assign the task.
Select the account for installing Network Agent using the tools of the operating system. In this case,administrator rights are required for computer access. You can add multiple accounts. If an account does nothave su�icient rights, the Installation Wizard uses the next account. If you uninstall Kaspersky EndpointSecurity using Network Agent tools, you do not have to select an account.
Con�gure a schedule for starting a task, for example, manually or when the computer is idle.
Enter a name for the task, such as Remove Kaspersky Endpoint Security 11.6.0 .
Exit the Wizard. If necessary, select the check box. You can monitor theprogress of the task in the task properties.
Run task after Wizard �nishes
The application will be uninstalled in silent mode.
How to remove the application through the Web Console and Cloud Console

64
1. In the main window of Web Console, select → .
The list of tasks opens.
2. Click the button.
Step 1. Con�guring general task settings
1. In the drop-down list, select .
2. In the drop-down list, select .
3. In the �eld, enter a brief description, for example, Uninstall Kaspersky EndpointSecurity from Technical Support computers .
4. In the section, select the task scope.
Step 2. Selecting the devices to which the task will be assigned
Step 3. Con�guring application uninstallation settings
1. Select .
2. Select .
3. . Select the utility delivery method:
4. In the �eld, set a limit on the number of requests sent tothe Administration Server to download the application uninstall utility. A limit on the number of requests will
Devices Tasks
Add
The Task Wizard starts. Follow the instructions of the Wizard.
Con�gure the general task settings:
Application Kaspersky Security Center
Task type Uninstall application remotely
Task name
Select devices to which the task will be assigned
Select the computers on which the task will be performed. For example, select a separate administrationgroup or build a selection.
At this step, con�gure the application uninstallation settings:
Remove managed application
Kaspersky Endpoint Security for Windows (11.6.0)
Force download of the uninstall utility
. If Network Agent has not been installed on the computer, �rst Network Agentwill be installed using the tools of the operating system. Kaspersky Endpoint Security is then uninstalledby the tools of Network Agent.
. The utility will be deliveredto client computers by using operating system resources through the Administration Server. You canselect this option if Network Agent is not installed on the client computer, but the client computer is inthe same network as the Administration Server.
. The utility is delivered to clientcomputers using operating system resources via distribution points. You can select this option if thereis at least one distribution point in the network. For more details about distribution points, refer toKaspersky Security Center Help .
Using Network Agent
Using Microsoft Windows resources by means of Administration Server
Using operating system resources through distribution points
Maximum number of simultaneous downloads

65
help prevent the network from being overload.
5. In the �eld, set a limit on the number of attempts to uninstall theapplication. If uninstallation of Kaspersky Endpoint Security ends with an error, the task will automaticallystart the uninstallation again.
6. If necessary, clear the check box. This lets youavoid downloading the uninstall utility if the operating system of the computer does not meet the softwarerequirements. If you are sure that the operating system of the computer meets the software requirements,you can skip this veri�cation.
Step 4. Selecting the account to run the task
Step 5. Completing task creation
If the application uninstallation operation is password protected, enter the KLAdmin account password inthe properties of the Uninstall application remotely task. Without the password, the task will not beperformed.
To use the KLAdmin account password in the Uninstall application remotely task:
1. In the main window of Web Console, select → .
The list of tasks opens.
2. Click the Kaspersky Security Center task .
The task properties window opens.
3. Select the tab.
4. Select the check box.
5. Enter the KLAdmin account password.
6. Click the button.
Number of uninstallation attempts
Check the operating system version before installation
Select the account for installing Network Agent using the tools of the operating system. In this case,administrator rights are required for computer access. You can add multiple accounts. If an account does nothave su�icient rights, the Installation Wizard uses the next account. If you uninstall Kaspersky EndpointSecurity using Network Agent tools, you do not have to select an account.
Finish the wizard by clicking the button. A new task will be displayed in the list of tasks.Finish
To run a task, select the check box opposite the task and click the button. The application will beuninstalled in silent mode. After uninstallation is complete, Kaspersky Endpoint Security shows a prompt torestart the computer.
Start
Devices Tasks
Uninstall application remotely
Application settings
Use uninstall password
Save
Uninstalling the application using the Wizard

66
To uninstall the application in silent mode:
1. Run the command line interpreter (cmd.exe) as an administrator.
2. Go to the folder where the Kaspersky Endpoint Security distribution package is located.
3. Run the following command:
Kaspersky Endpoint Security is removed using the normal method for a Windows operating system, which isthrough the Control Panel. The Setup Wizard starts. Follow the instructions on the screen.
You can specify which of the data that is used by the application you want to save for future use, during the nextinstallation of the application (such as when upgrading to a newer version of the application). If you do not specifyany data, the application will be completely removed.
You can save the following data:
, which lets you avoid having to activate the application again. Kaspersky Endpoint Securityautomatically adds a license key if the license term has not expired prior to installation.
– �les that are scanned by the application and placed in Backup.
Backup �les that are saved after removal of the application can be accessed only from the same versionof the application that was used to save those �les.
If you plan to use Backup objects after removal of the application, you must restore those objects beforeremoving the application. However, Kaspersky experts do not recommend restoring objects from Backupbecause this may harm the computer.
– values of application settings that are selected during applicationcon�guration.
– data that provides access to �les and drives that were encrypted beforeremoval of the application. To ensure access to encrypted �les and drives, make sure that you selected dataencryption functionality when reinstalling Kaspersky Endpoint Security. No further action is required for accessto previously encrypted �les and drives.
Activation data
Backup �les
Operational settings of the application
Local storage of encryption keys
Removing the application from the command line
Kaspersky Endpoint Security can be uninstalled from the command line in one of the following ways:
In interactive mode by using the Application Setup Wizard.
In silent mode. After uninstallation is started in silent mode, your involvement in the removal process is notrequired. To uninstall the application in silent mode, use the /s and /qn switches.
If the removal process is not password protected:
setup_kes.exe /s /x
or
msiexec.exe /x <GUID> /qn

67
Example:
<GUID> is the unique identi�er of the application. You can �nd out the GUID of the application by using thefollowing command:
wmic product where "Name like '%Kaspersky Endpoint Security%'" get Name,IdentifyingNumber.
If the removal process is password protected:
setup_kes.exe /pKLLOGIN=<user name> /pKLPASSWD=<password> /s /x
or
msiexec.exe /x <GUID> KLLOGIN=<user name> KLPASSWD=<password> /qn
msiexec.exe /x {9A017278-F7F4-4DF9-A482-0B97B70DD7ED} KLLOGIN=KLAdminKLPASSWD=!Password1 /qn

68
We recommend carefully reading the terms of the License Agreement before using the application.
Application licensing
This section provides information about general concepts related to application licensing.
About the End User License Agreement
The End User License Agreement is a binding agreement between you and AO Kaspersky Lab stipulating the termson which you may use the application.
You can view the terms of the License Agreement in the following ways:
When installing Kaspersky Endpoint Security in interactive mode.
By reading the license.txt �le. This document is included in the application distribution kit and is also located inthe application installation folder %ProgramFiles(x86)%\Kaspersky Lab\Kaspersky EndpointSecurity for Windows\Doc\<locale>\KES .
By con�rming that you agree with the End User License Agreement when installing the application, you signify youracceptance of the terms of the End User License Agreement. If you do not accept the terms of the End UserLicense Agreement, you must abort the installation.
About the license
A license is a time-limited right to use the application, granted under the End User License Agreement.
A valid license entitles you to the following kinds of services:
Use of the application in accordance with the terms of the End User License Agreement
Technical Support
The scope of services and application usage term depend on the type of license under which the application wasactivated.
The following license types are provided:
Trial – a free license intended for trying out the application.
A trial license usually has a short term. When the trial license expires, all Kaspersky Endpoint Security featuresbecome disabled. To continue using the application, you must purchase a commercial license.
You can activate the application under a trial license only once.
Commercial – a paid license that is provided when you purchase Kaspersky Endpoint Security.
Application functionality available under the commercial license depends on the choice of product. Theselected product is indicated in the License Certi�cate. Information on available products may be found at theKaspersky website .

69
When the commercial license expires, the application continues to work in limited functionality mode. You canuse protection and control components and run a scan using the application databases that were installedbefore the license expired. The application also continues to encrypt �les that had been modi�ed andencrypted before license expiration, but does not encrypt new �les. Use of Kaspersky Security Network is notavailable.
To continue using Kaspersky Endpoint Security in fully functional mode, you must renew your commerciallicense.
We recommend renewing the license before its expiration to ensure that your computer stays fully protectedagainst threats.
About the license certi�cate
A license certi�cate is a document transferred to the user together with a key �le or activation code.
The license certi�cate contains the following license information:
License key or order number.
Details of the user to whom the license is granted.
Details of the application that can be activated using the license.
Limitation on the number of licensed units (for example, the number of devices on which the application can beused under the license).
License term start date.
License expiration date or license term.
License type.
About subscription
A subscription for Kaspersky Endpoint Security is a purchase order for the application with speci�c parameters(such as the subscription expiry date and number of devices protected). You can order a subscription forKaspersky Endpoint Security from your service provider (such as your ISP). A subscription can be renewedmanually or automatically, or you may cancel your subscription. You can manage your subscription on the websiteof the service provider.
Subscription can be limited (for one year, for example) or unlimited (without an expiry date). To keep KasperskyEndpoint Security working after the limited subscription term expires, you need to renew your subscription.Unlimited subscription is renewed automatically if the vendor's services have been prepaid on time.
When a limited subscription expires, you may be provided a subscription renewal grace period during which theapplication continues to function. The availability and duration of such a grace period is decided by the serviceprovider.
To use Kaspersky Endpoint Security under a subscription, you need to apply the activation code received from theservice provider. After the activation code is applied, the active key is added. The active key determines the licensefor using the application under the subscription. It is not possible to add a reserve license key under a subscription.

70
Activation codes purchased under subscription may not be used to activate previous versions of KasperskyEndpoint Security.
A license certi�cate is not provided for a key that is added under a subscription.
A key for a trial license can be added only as an active key. It cannot be added as the reserve key. A trial licensekey cannot replace the active key to a commercial license.
About license key
A license key is a sequence of bits that you can use to activate and then use the application in accordance withthe terms of the End User License Agreement.
You can add a license key to the application by either applying a key �le or entering an activation code.
The key can be blocked by Kaspersky if the terms of the End User License Agreement are violated. If the key hasbeen blocked, you need to add a di�erent key to continue using the application.
There are two types of keys: active and reserve.
An active key is a key that is currently used by the application. A trial or commercial license key can be added asthe active key. The application cannot have more than one active key.
A reserve key is a key that entitles the user to use the application, but is not currently in use. At the expiry of theactive key, a reserve key automatically becomes active. A reserve key can be added only if the active key isavailable.
If a key is added to the list of prohibited keys, the application functionality de�ned by the license used to activatethe application remains available for eight days. The application noti�es the user that the key has been added tothe list of prohibited keys. After eight days, application functionality becomes limited to the functionality level thatis available after license expiry. You can use protection and control components and run a scan using theapplication databases that were installed before the license expired. The application also continues to encrypt �lesthat had been modi�ed and encrypted before license expiration, but does not encrypt new �les. Use of KasperskySecurity Network is not available.
About activation code
An activation code is a unique sequence of 20 alphanumeric characters. You enter an activation code to add alicense key that activates Kaspersky Endpoint Security. You receive an activation code at the email address youspeci�ed after purchasing Kaspersky Endpoint Security.
To activate the application with an activation code, Internet access is required to connect to Kaspersky activationservers.
When the application is activated using an activation code, the active key is added. A reserve license key can beadded only by using an activation code and cannot be added using a key �le.

71
It may take some time for the application to be activated with an activation code (during either remote ornon-interactive installation) due to load distribution across activation servers of Kaspersky. If you need toactivate the application right away, you may interrupt the ongoing activation process and start activationusing the Activation Wizard.
If an activation code is lost after activating the application, you can restore the activation code. You may need anactivation code, for example, to register a Kaspersky CompanyAccount . If the activation code was lost after theapplication activation, contact Kaspersky partner from whom you purchased the license.
About the key �le
A key �le is a �le with the .key extension that you receive from Kaspersky. The purpose of a key �le is to add alicense key that activates the application.
You receive a key �le at the email address that you provided when you purchased Kaspersky Endpoint Security orordered the trial version of Kaspersky Endpoint Security.
You do not need to connect to Kaspersky activation servers in order to activate the application with a key �le.
You can recover a key �le if it has been accidentally deleted. You may need a key �le to register a KasperskyCompanyAccount, for example.
To recover a key �le, do one of the following:
Contact the license seller.
Obtain a key �le on the Kaspersky website based on your existing activation code.
When the application is activated using a key �le, an active key is added. A reserve license key can be added onlyby using a key �le and cannot be added using an activation code.
Activating the application
Activation is the process of activating a license that allows you to use a fully functional version of the applicationuntil the license expires. The application activation involves adding a license key.
You can activate the application in one of the following ways:
Locally from the application interface, by using the Activation Wizard You can add both the active key and thereserve key in this way.
Remotely with the Kaspersky Security Center software suite by creating and then starting an add license keytask. You can add both the active key and the reserve key in this way.
Remotely by distributing key �les and activation codes stored in the Kaspersky Security Center AdministrationServer key storage to client computers. For more details on distributing keys, please refer to the KasperskySecurity Center Help Guide . You can add both the active key and the reserve key in this way.
The activation code purchased under subscription is distributed in the �rst place.
Using the command line.

72
The trial version of Kaspersky Security Center Cloud Console does not allow you to subsequently switch to acommercial version. Any trial workspace will be automatically deleted with all its contents after the 30-dayperiod expires.
Activating the application through Kaspersky Security Center
You can activate the application remotely through Kaspersky Security Center in the following ways:
Using the Add key task.
This method lets you add a key to a speci�c computer or to computers that are part of an administration group.
By distributing a key stored on the Kaspersky Security Center Administration Server to the computers.
This method lets you automatically add a key to computers that are already connected to Kaspersky SecurityCenter, and to new computers. To use this method, you need to �rst add the key to the Kaspersky SecurityCenter Administration Server. For more details about adding keys to the Kaspersky Security CenterAdministration Server, please refer to Kaspersky Security Center Help .
A trial version is provided for Kaspersky Security Center Cloud Console. The trial version is a special version ofKaspersky Security Center Cloud Console designed to familiarize a user with the features of the application. In thisversion, you can perform actions in a workspace for a period of 30 days. All managed applications are automaticallyrun under a trial license for Kaspersky Security Center Cloud Console, including Kaspersky Endpoint Security.However, you cannot activate Kaspersky Endpoint Security using its own trial license when the trial license forKaspersky Security Center Cloud Console expires. For detailed information about Kaspersky Security Centerlicensing, please refer to the Kaspersky Security Center Cloud Console Help .
You can monitor the use of licenses in the following ways:
View the Key usage report for the organization's infrastructure ( → ).
View the statuses of computers on the → tab. If the application is not activated,the computer will have the status and the status description.
View license information in the computer properties.
View the key properties ( → ).
Monitoring and reports Reports
Devices Managed devicesApplication is not activated
Operations Licensing
How to activate the application in the Administration Console (MMC)

73
1. In the Administration Console, go to the folder → .
The list of tasks opens.
2. Click the button.
Step 1. Selecting task type
Step 2. Adding a key
Step 3. Selecting the devices to which the task will be assigned
Step 4. Con�guring a task start schedule
Step 5. De�ning the task name
Step 6. Completing task creation
Administration Server Tasks
New task
The Task Wizard starts. Follow the instructions of the Wizard.
Select → .Kaspersky Endpoint Security for Windows (11.6.0) Add key
Enter an activation code or select a key �le.
For more details about adding keys to the Kaspersky Security Center repository, please refer to the KasperskySecurity Center Help Guide .
Select the computers on which the task will be performed. The following options are available:
Assign the task to an administration group. In this case, the task is assigned to computers included in apreviously created administration group.
Select computers detected by the Administration Server in the network: unassigned devices. The speci�cdevices can include devices in administration groups as well as unassigned devices.
Specify device addresses manually, or import addresses from a list. You can specify NetBIOS names, IPaddresses, and IP subnets of devices to which you want to assign the task.
Con�gure a schedule for starting a task, for example, manually or when the computer is idle.
Enter a name for the task, such as Activate Kaspersky Endpoint Security for Windows .
Exit the Wizard. If necessary, select the check box. You can monitor theprogress of the task in the task properties. As a result, Kaspersky Endpoint Security will be activated on users'computers in silent mode.
Run task after Wizard �nishes
How to activate the application in the Web Console and Cloud Console

74
1. In the main window of Web Console, select → .
The list of tasks opens.
2. Click the button.
Step 1. Con�guring general task settings
1. In the drop-down list, select .
2. In the drop-down list, select .
3. In the �eld, enter a brief description, such as Activation of Kaspersky EndpointSecurity for Windows .
4. In the section, select the task scope. Click the button.
Step 2. Selecting the devices to which the task will be assigned
Step 3. Selecting a license
Step 4. Completing task creation
Devices Tasks
Add
The Task Wizard starts. Follow the instructions of the Wizard.
Con�gure the general task settings:
Application Kaspersky Endpoint Security for Windows (11.6.0)
Task type Add key
Task name
Select devices to which the task will be assigned Next
Select the computers on which the task will be performed. The following options are available:
Assign the task to an administration group. In this case, the task is assigned to computers included in apreviously created administration group.
Select computers detected by the Administration Server in the network: unassigned devices. The speci�cdevices can include devices in administration groups as well as unassigned devices.
Specify device addresses manually, or import addresses from a list. You can specify NetBIOS names, IPaddresses, and IP subnets of devices to which you want to assign the task.
Select the license that you want to use to activate the application. Click the button.Next
You can add keys to the Web Console ( → ).Operations Licensing
Finish the wizard by clicking the button. A new task will be displayed in the list of tasks. To run a task,select the check box opposite the task and click the button. As a result, Kaspersky Endpoint Securitywill be activated on users' computers in silent mode.
FinishStart
In the properties of the Add key task, you can add a reserve key to the computer. A reserve key becomes activewhen the active key expires or is deleted. The availability of a reserve key lets you avoid application functionalitylimitations when a license expires.

75
1. In the Administration Console, go to the folder → .
A list of license keys opens.
2. Open the license key properties.
3. In the section, select the check box.
4. Save your changes.
1. In Web Console main window, select the → → .
A list of license keys opens.
2. Open the license key properties.
3. On the tab, switch on the toggle button.
4. Save your changes.
To activate Kaspersky Endpoint Security by using the Activation Wizard:
1. Click the button in the lower part of the main application window.
2. In the opened window, click the button.
To activate the application from the command line,
How to automatically add a license key to computers through the Administration Console (MMC)
Administration Server Kaspersky licenses
General Automatically distributed license key
As a result, the key will be automatically distributed to the appropriate computers. During automaticdistribution of a key as an active or a reserve key, the licensing limit on the number of computers (set in thekey properties) is taken into account. If the licensing limit is reached, distribution of this key to computersceases automatically. You can view the number of computers to which the key has been added and otherdata in the key properties in the section.Devices
How to automatically add a license key to computers through the Web Console and Cloud Console
Operations Licensing Kaspersky Licenses
General Deploy key automatically
As a result, the key will be automatically distributed to the appropriate computers. During automaticdistribution of a key as an active or a reserve key, the licensing limit on the number of computers (set in thekey properties) is taken into account. If the licensing limit is reached, distribution of this key to computersceases automatically. You can view the number of computers to which the key has been added and otherdata in the key properties on the tab.Devices
Using the Activation Wizard to activate the application
License
Activate the application using a new license
The Application Activation Wizard starts. Follow the instructions of the Activation Wizard.
Activating the application from the command line

76
To view information about a license:
Licensing window
type the following string in the command line:
avp.com license /add <activation code or key file> [/login=<user name> /password=<password>]
You need to enter the user account credentials (/login=<user name> /password=<password>) if PasswordProtection is enabled.
Viewing license information
Click the button at the bottom of the main application window.License
The window opens. This window displays information about the license (see �gure below).Licensing
The following information is provided in the window:Licensing
. Several keys can be stored on a computer. There are two types of keys: active and reserve. Theapplication cannot have more than one active key. A reserve key may become active only when the active keyexpires or after the key is deleted by using the button.
. A key is a unique alphanumeric sequence that is generated from an activation code or a key �le.
. The following types of licenses are available: trial and commercial.
. Full name of the purchased Kaspersky application.
Key status
Key
Licenses
Application name

77
To purchase a license:
1. In the main application window, click the button.
2. In the window, do one of the following:
A window will open with the website of the Kaspersky online store, where you can purchase a license.
. Application features that are available under your license. Features may include Protection,Security Controls, Data Encryption, and others. The list of available features is also provided in the LicenseCerti�cate.
. License type, number of computers that are covered by this license,license start date and expiration date and time (only for the active key).
License expiration time is displayed according to the time zone con�gured in the operating system.
Functionality
Additional information about the license
In the Licensing window, you can also do one of the following:
/ . Opens the Kaspersky online store website, where you can purchase orrenew a license. To do so, please enter your company information and pay for the order.
. Starts the Application Activation Wizard. In this Wizard you canadd a key using an activation code or a key �le. The Application Activation Wizard allows you to add an activekey and only one reserve key.
Purchase license Renew license
Activate the application under a new license
Purchasing a license
You may purchase a license after installing the application. On purchasing a license, you receive an activation codeor a key �le for activating the application.
License
Licensing
If no keys have been added or a key for trial license has been added, click the button.
If the key for a commercial license is added, click the button.
Purchase license
Renew license
Renewing subscription
When you use the application under subscription, Kaspersky Endpoint Security automatically contacts theactivation server at speci�c intervals until your subscription expires.
If you use the application under unlimited subscription, Kaspersky Endpoint Security automatically checks theactivation server for renewed keys in background mode. If a key is available on the activation server, the applicationadds it by replacing the previous key. In this way, unlimited subscription for Kaspersky Endpoint Security is renewedwithout user involvement.
If you are using the application under a limited subscription, on the expiration date of the subscription (or on theexpiration date of the subscription renewal grace period), Kaspersky Endpoint Security noti�es you about this andstops attempting to renew the subscription automatically. In this case, Kaspersky Endpoint Security behaves in thesame way as it does when a commercial license for the application expires: the application operates withoutupdates and the Kaspersky Security Network is unavailable.

78
To visit the website of the service provider from the application interface:
1. In the main application window, click the button.
2. In the window, click .
You can renew subscription on the website of the service provider.
You can update subscription status manually in the window. This may be required if the subscription hasbeen renewed after the grace period and the application has not updated the subscription status automatically.
Licensing
License
Licensing Contact your subscription provider

79
Data provision
Data provision under the End User License Agreement
If an activation code is applied to activate Kaspersky Endpoint Security, you agree to periodically send Kasperskythe following information automatically for the purposes of verifying correct use of the application:
type, version, and localization of Kaspersky Endpoint Security;
versions of installed updates for Kaspersky Endpoint Security;
ID of the computer and ID of the speci�c Kaspersky Endpoint Security installation on the computer;
serial number and active key identi�er;
type, version and bit rate of the operating system, and name of the virtual environment (if Kaspersky EndpointSecurity is installed in a virtual environment);
IDs of Kaspersky Endpoint Security components that are active when the information is transmitted.
Kaspersky may also use this information to generate statistics on the dissemination and use of Kasperskysoftware.
By using an activation code, you agree to automatically transmit the data listed above. If you do not agree totransmit this information to Kaspersky, you should use a key �le to activate Kaspersky Endpoint Security.
By accepting the terms of the End User License Agreement, you agree to automatically transmit the followinginformation:
When upgrading Kaspersky Endpoint Security:
When following links from the Kaspersky Endpoint Security interface:
version of Kaspersky Endpoint Security;
ID of Kaspersky Endpoint Security;
active key;
unique ID of the upgrade task start;
unique ID of the Kaspersky Endpoint Security installation.
version of Kaspersky Endpoint Security;
version of the operating system;
Kaspersky Endpoint Security activation date;
license expiration date;
key creation date;

80
Use of KSN under license on no more than 4 computers
Kaspersky Endpoint Security installation date;
ID of Kaspersky Endpoint Security;
ID of the detected vulnerability in the operating system;
ID of the last update installed for Kaspersky Endpoint Security;
hash of the detected �le with a threat, and the name of this threat according to the Kasperskyclassi�cation;
Kaspersky Endpoint Security activation error category;
Kaspersky Endpoint Security activation error code;
number of days until key expiration;
number of days that have elapsed since the key was added;
number of days that have elapsed since the license expired;
number of computers on which the active license is applied;
active key;
Kaspersky Endpoint Security license term;
current status of the license;
type of active license;
application type;
unique ID of the upgrade task start;
unique ID of the Kaspersky Endpoint Security installation on the computer;
Kaspersky Endpoint Security interface language.
Received information is protected by Kaspersky in accordance with the law and the requirements and applicableregulations of Kaspersky. Data is transmitted over encrypted communication channels.
Read the End User License Agreement and visit the Kaspersky website to learn more about how we receive,process, store, and destroy information about application usage after you accept the End User LicenseAgreement and consent to the Kaspersky Security Network Statement. The license.txt and ksn_<language ID>.txt�les contain the text of the End User License Agreement and Kaspersky Security Network Statement and areincluded in the application distribution kit.
Data provision when using Kaspersky Security Network
The set of data that Kaspersky Endpoint Security sends to Kaspersky depends on the type of license and theKaspersky Security Network usage settings.

81
Use of KSN under license on 5 or more computers
By accepting the Kaspersky Security Network Statement, you agree to automatically transmit the followinginformation:
information about KSN con�guration updates: identi�er of the active con�guration, identi�er of thecon�guration received, error code of the con�guration update;
information about �les and URL addresses to be scanned: checksums of the scanned �le (MD5, SHA2-256,SHA1) and �le patterns (MD5), the size of the pattern, type of the detected threat and its name according toRightholder's classi�cation, identi�er for the anti-virus databases, URL address for which the reputation isbeing requested, as well as the referrer URL address, the connection's protocol identi�er and the number of theport being used;
ID of the scan task that detected the threat;
information about digital certi�cates being used needed to verify their authenticity: the checksums (SHA256)of the certi�cate used to sign the scanned object and the certi�cate's public key;
identi�er of the Software component performing the scan;
IDs of the anti-virus databases and of the records in these anti-virus databases;
Information about activation of the Software on the Computer: signed header of the ticket from the activationservice (identi�er of the regional activation center, checksum of the activation code, checksum of the ticket,ticket creation date, unique identi�er of the ticket, ticket version, license status, start/end date and time ofticket validity, unique identi�er of the license, license version), identi�er of the certi�cate used to sign the ticketheader, checksum (MD5) of the key �le;
Information about the Rightholder's Software: full version, type, version of the protocol used to connect toKaspersky services.
By accepting the Kaspersky Security Network Statement, you agree to automatically transmit the followinginformation:
If the check box is selected and the check box is cleared, theapplication sends the following information:
Kaspersky Security Network Extended KSN mode
information about KSN con�guration updates: identi�er of the active con�guration, identi�er of thecon�guration received, error code of the con�guration update;
information about �les and URL addresses to be scanned: checksums of the scanned �le (MD5, SHA2-256,SHA1) and �le patterns (MD5), the size of the pattern, type of the detected threat and its name according toRightholder's classi�cation, identi�er for the anti-virus databases, URL address for which the reputation isbeing requested, as well as the referrer URL address, the connection's protocol identi�er and the number of theport being used;
ID of the scan task that detected the threat;
information about digital certi�cates being used needed to verify their authenticity: the checksums (SHA256)of the certi�cate used to sign the scanned object and the certi�cate's public key;
identi�er of the Software component performing the scan;
IDs of the anti-virus databases and of the records in these anti-virus databases;

82
Information about activation of the Software on the Computer: signed header of the ticket from the activationservice (identi�er of the regional activation center, checksum of the activation code, checksum of the ticket,ticket creation date, unique identi�er of the ticket, ticket version, license status, start/end date and time ofticket validity, unique identi�er of the license, license version), identi�er of the certi�cate used to sign the ticketheader, checksum (MD5) of the key �le;
Information about the Rightholder's Software: full version, type, version of the protocol used to connect toKaspersky services.
If the check box is selected in addition to the check box, theapplication sends the following information in addition to the information listed above:
Extended KSN mode Kaspersky Security Network
information about the results of categorization of the requested web-resources, which contains the processedURL and IP address of the host, the version of the Software's component that performed the categorization,the method of categorization and set of the categories de�ned for the web-resource;
information about the software installed on the Computer: names of the software applications and softwarevendors, registry keys and their values, information about �les of the installed software components(checksums (MD5, SHA2-256, SHA1), name, path to the �le on the Computer, size, version and the digitalsignature);
information about the state of anti-virus protection of the Computer: the versions and the release timestampsof the anti-virus databases being used, the ID of the task and the ID of Software that performs scanning;
information about �les being downloaded by the End User: the URL and IP addresses of the download and thedownload pages, download protocol identi�er and connection port number, the status of the URLs as maliciousor not, �le's attributes, size and checksums (MD5, SHA2-256, SHA1), information about the process thatdownloaded the �le (checksums (MD5, SHA2-256, SHA1), creation/build date and time, autoplay status,attributes, names of packers, information about signatures, executable �le �ag, format identi�er, and entropy),�le name and its path on the Computer, the �le's digital signature and timestamp of its generation, the URLaddress where detection occurred, the script's number on the page that appears to be suspicious or harmful,information about HTTP requests generated and the response to them;
information about the running applications and their modules: data about processes running on the system(process ID (PID), process name, information about the account the process was started from, the applicationand command that started the process, the sign of trusted program or process, the full path to the process's�les and their checksums (MD5, SHA2-256, SHA1), and the starting command line, level of the process'sintegrity, a description of the product that the process belongs to (the name of the product and informationabout the publisher), as well as digital certi�cates being used and information needed to verify theirauthenticity or information about the absence of a �le's digital signature), and information about the modulesloaded into the processes (their names, sizes, types, creation dates, attributes, checksums (MD5, SHA2-256,SHA1), the paths to them on the Computer), PE-�le header information, names of packers (if the �le waspacked);
information about all potentially malicious objects and activities: name of the detected object and full path tothe object on the computer, checksums of processed �les (MD5, SHA2-256, SHA1), detection date and time,names and sizes of infected �les and paths to them, path template code, executable �le �ag, indicator ofwhether the object is a container, names of the packer (if the �le was packed), �le type code, �le format ID, listof actions performed by malware and the decision made by the software and user in response to them, IDs ofthe anti-virus databases and of the records in these anti-virus databases that were used to make the decision,indicator of a potentially malicious object, the name of the detected threat according to the Rightholder'sclassi�cation, the level of danger, the detection status and detection method, reason for inclusion into theanalyzed context and sequence number of the �le in the context, checksums (MD5, SHA2-256, SHA1), the nameand attributes of the executable �le of the application through which the infected message or link wastransmitted, depersonalized IP addresses (IPv4 and IPv6) of the host of the blocked object, �le entropy, �leautorun indicator, time when the �le was �rst detected in the system, the number of times the �le has been runsince the last statistics were sent, information about the name, checksums (MD5, SHA256, SHA1) and size ofthe mail client through which the malicious object was received, ID of the software task that performed thescan, indicator of whether the �le reputation or signature was checked, �le processing result, checksum (MD5)

83
of the pattern collected for the object, the size of the pattern in bytes, and the technical speci�cations of theapplied detection technologies;
information about scanned objects: the assigned trust group to which and/or from which the �le has beenplaced, the reason the �le was placed in that category, category identi�er, information about the source of thecategories and the version of the category database, the �le's trusted certi�cate �ag, name of the �le's vendor,�le version, name and version of the software application which includes the �le;
information about vulnerabilities detected: the vulnerability ID in the database of vulnerabilities, the vulnerabilitydanger class;
information about emulation of the executable �le: �le size and its checksums (MD5, SHA2-256, SHA1), theversion of the emulation component, emulation depth, an array of properties of logical blocks and functionswithin logical blocks obtained during the emulation, data from the executable �le's PE headers;
the IP addresses of the attacking computer (IPv4 and IPv6), the number of the port on the Computer that thenetwork attack is directed at, identi�er of the protocol of the IP packet containing the attack, the attack'starget (organization name, website), �ag for the reaction to the attack, the attack's weight, trust level;
information about attacks associated with spoofed network resources, the DNS and IP addresses (IPv4 andIPv6) of visited websites;
DNS and IP addresses (IPv4 or IPv6) of the requested web resource, information about the �le and web clientaccessing the web resource, the name, size and checksums (MD5, SHA2-256, SHA1) of the �le, full path to the�le and path template code, the result of checking its digital signature, and its status in KSN;
information about rollback of malware actions: data on the �le whose activity was rolled back (name of the �le,full path to the �le, its size and checksums (MD5, SHA2-256, SHA1)), data on successful and unsuccessfulactions to delete, rename and copy �les and restore the values in the registry (names of registry keys and theirvalues), and information about system �les modi�ed by malware, before and after rollback;
Information about the exclusions set for the Adaptive Anomaly Control component: the ID and status of therule that was triggered, the action performed by the Software when the rule was triggered, the type of useraccount under which the process or the thread performs suspicious activity, information about the processthat performed or was subject to the suspicious activity (script ID or process �le name, full path to the process�le, path template code, checksums (MD5, SHA2-256, SHA1) of the process �le); information about the objectthat performed the suspicious actions and about the object that was subject to the suspicious actions(registry key name or �le name, full path to the �le, path template code, and checksums (MD5, SHA2-256, SHA1)of the �le).
information about loaded software modules: name, size and checksums (MD5, SHA2-256, SHA1) of the module�le, full path to it and the path template code, digital signature settings of the module �le, data and time ofsignature creation, name of the subject and organization that signed the module �le, ID of the process in whichthe module was loaded, name of the module supplier, and the sequence number of the module in the loadingqueue;
information about the quality of Software interaction with the KSN services: start and end date and time of theperiod when the statistics were generated, information about the quality of requests and connection to eachof the KSN services used (KSN service ID, number of successful requests, number of requests with responsesfrom cache, number of unsuccessful requests (network problems, KSN being disabled in the Software settings,incorrect routing), time spread of the successful requests, time spread of the cancelled requests, time spreadof the requests with exceeded time limit, number of connections to KSN taken from cache, number ofsuccessful connections to KSN, number of unsuccessful connections to KSN, number of successfultransactions, number of unsuccessful transactions, time spread of the successful connections to KSN, timespread of the unsuccessful connections to KSN, time spread of the successful transactions, time spread of theunsuccessful transactions);

84
if a potentially malicious object is detected, information is provided about data in the processes' memory:elements of the system object hierarchy (ObjectManager), data in UEFI BIOS memory, names of registry keysand their values;
information about events in the systems logs: the event's timestamp, the name of the log in which the eventwas found, type and category of the event, name of the event's source and the event's description;
information about network connections: version and checksums (MD5, SHA2-256, SHA1) of the �le from whichprocess was started that opened the port, the path to the process's �le and its digital signature, local andremote IP addresses, numbers of local and remote connection ports, connection state, timestamp of the port'sopening;
information about the date of Software installation and activation on the Computer: the ID of the partner thatsold the license, the serial number of the license, the signed header of the ticket from the activation service(the ID of a regional activation center, the checksum of the activation code, the checksum of the ticket, theticket creation date, the unique ID of the ticket, the ticket version, the license status, the ticket start/end dateand time, the unique ID of the license, the license version), the ID of the certi�cate used to sign the ticketheader, the checksum (MD5) of the key �le, the unique ID of Software installation on the Computer, the typeand ID of the application that gets updated, the ID of the update task;
information about the set of all installed updates, and the set of most recently installed/removed updates, thetype of event that caused the update information to be sent, duration since the installation of last update,information about any currently installed anti-virus databases;
information about software operation on the computer: data on CPU usage, data on memory usage (PrivateBytes, Non-Paged Pool, Paged Pool), number of active threads in the software process and pending threads,and the duration of software operation prior to the error;
number of software dumps and system dumps (BSOD) since the Software was installed and since the time ofthe last update, the identi�er and version of the Software module that crashed, the memory stack in theSoftware's process, and information about the anti-virus databases at the time of the crash;
data on the system dump (BSOD): a �ag indicating the occurrence of the BSOD on the Computer, the name ofthe driver that caused the BSOD, the address and memory stack in the driver, a �ag indicating the duration ofthe OS session before the BSOD occurred, memory stack of driver that crashed, type of stored memory dump,�ag for the OS session before BSOD lasted more than 10 minutes, unique identi�er of the dump, timestamp ofthe BSOD;
information about errors or performance problems that occurred during operation of the Softwarecomponents: the status ID of the Software, error type, code and cause as well of the time when the erroroccurred, the IDs of the component, module and process of the product in which the error occurred, the ID ofthe task or update category during which the error occurred, logs of drivers used by the Software (error code,module name, name of the source �le and the line where the error occurred);
information about updates of anti-virus databases and Software components: the name, date and time ofindex �les downloaded during the last update and being downloaded during the current update;
information about abnormal termination of the Software operation: the creation timestamp of the dump, itstype, the type of event that caused the abnormal termination of the Software operation (unexpected power-o�, third-party application crash), date and time of the unexpected power-o�;
information about the compatibility of Software drivers with hardware and Software: information about OSproperties that restrict the functionality of Software components (Secure Boot, KPTI, WHQL Enforce,BitLocker, Case Sensitivity), type of download Software installed (UEFI, BIOS), Trusted Platform Module (TPM)identi�er, TPM speci�cation version, information about the CPU installed on the Computer, operating modeand parameters of Code Integrity and Device Guard, operating mode of drivers and reason for use of thecurrent mode, version of Software drivers, software and hardware virtualization support status of theComputer;

85
information about third-party applications that caused the error: their name, version and localization, the errorcode and information about the error from the system log of applications, the address of the error and memorystack of the third-party application, a �ag indicating the occurrence of the error in the Software component,the length of time the third-party application was in operation before the error occurred, checksums (MD5,SHA2-256, SHA1) of the application process image, in which the error occurred, path to the application processimage and template code of the path, information from the system log with a description of the errorassociated with the application, information about the application module, in which an error occurred(exception identi�er, crash memory address as an o�set in the application module, name and version of themodule, identi�er of the application crash in the Rightholder's plug-in and memory stack of the crash, durationof the application session before crash);
version of the Software updater component, number of crashes of the updater component while runningupdate tasks over the lifetime of the component, ID of the update task type, number of failed attempts of theupdater component to complete update tasks;
information about the operation of the Software system monitoring components: full versions of thecomponents, date and time when the components were started, code of the event that over�owed the eventqueue and number of such events, the total number of queue over�ow events, information about the �le of theprocess of the initiator of the event (�le name and its path on the Computer, template code of the �le path,checksums (MD5, SHA2-256, SHA1) of the process associated with the �le, �le version), identi�er of the eventinterception that occurred, the full version of the interception �lter, identi�er of the type of the interceptedevent, size of the event queue and the number of events between the �rst event in the queue and the currentevent, number of overdue events in the queue, information about the �le of the process of the initiator of thecurrent event (�le name and its path on the Computer, template code of the �le path, checksums (MD5, SHA2-256, SHA1) of the process associated with the �le), duration of the event processing, maximum duration of theevent processing, probability of sending statistics, information about OS events for which the processing timelimit was exceeded (date and time of the event, number of repeated initializations of anti-virus databases, dateand time of the last repeated initialization of anti-virus databases after their update, event processing delaytime for each system monitoring component, number of queued events, number of processed events, numberof delayed events of the current type, total delay time for the events of the current type, total delay time for allevents);
information from the Windows event tracing tool (Event Tracing for Windows, ETW) in the event of Softwareperformance problems, suppliers of SysCon�g / SysCon�gEx / WinSATAssessment events from Microsoft:information about the Computer (model, manufacturer, form factor of the housing, version), information aboutWindows performance metrics (WinSAT assessments, Windows performance index), domain name, informationabout physical and logical processors (number of physical and logical processors, manufacturer, model,stepping level, number of cores, clock frequency, CPUID, cache characteristics, logic processor characteristics,indicators of supported modes and instructions), information about RAM modules (type, form factor,manufacturer, model, capacity, granularity of memory allocation), information about network interfaces (IP andMAC addresses, name, description, con�guration of network interfaces, breakdown of number and size ofnetwork packages by type, speed of network exchange, breakdown of number of network errors by type),con�guration of IDE controller, IP addresses of DNS servers, information about the video card (model,description, manufacturer, compatibility, video memory capacity, screen permission, number of bits per pixel,BIOS version), information about plug-and-play devices (name, description, device identi�er [PnP, ACPI],information about disks and storage devices (number of disks or �ash drives, manufacturer, model, diskcapacity, number of cylinders, number of tracks per cylinder, number of sectors per track, sector capacity,cache characteristics, sequential number, number of partitions, con�guration of SCSI controller), informationabout logical disks (sequential number, partition capacity, volume capacity, volume letter, partition type, �lesystem type, number of clusters, cluster size, number of sectors per cluster, number of empty and occupiedclusters, letter of bootable volume, o�set address of partition in relation to the start of the disk), informationabout BIOS motherboard (manufacturer, release date, version), information about motherboard (manufacturer,model, type), information about physical memory (shared and free capacity), information about operatingsystem services (name, description, status, tag, information about processes [name and PID]), energyconsumption parameters for the Computer, con�guration of interrupt controller, path to Windows systemfolders (Windows and System32), information about the OS (version, build, release date, name, type, installationdate), size of page �le, information about monitors (number, manufacturer, screen permission, resolutioncapacity, type), information about video card driver (manufacturer, release date, version);

86
information from ETW, suppliers of EventTrace / EventMetadata events from Microsoft: information on thesequence of system events (type, time, date, time zone), metadata about the �le with trace results (name,structure, trace parameters, breakdown of number of trace operations by type), information about the ОS(name, type, version, build, release date, start time);
information from ETW, suppliers of Process / Microsoft Windows Kernel Process / Microsoft Windows KernelProcessor Power events from Microsoft: information about started and completed processes (name, PID, startparameters, command line, return code, power management parameters, start and completion time, accesstoken type, SID, SessionID, number of descriptors installed), information about changes in thread priorities (TID,priority, time), information about disk operations of the process (type, time, capacity, number), history ofchanges to the structure and capacity of usable memory processes;
information from ETW, suppliers of StackWalk / Per�nfo events from Microsoft: information aboutperformance counters (performance of individual code sections, sequence of function calls, PID, TID, addressesand attributes of ISRs and DPCs);
information from ETW, supplier of KernelTraceControl-ImageID events from Microsoft: information onexecutable �les and dynamic libraries (name, image size, full path), information on PDB �les (name, identi�er),VERSIONINFO resource data for executable �les (name, description, creator, localization, application versionand identi�er, �le version and identi�er);
information from ETW, suppliers of FileIo / DiskIo / Image / Windows Kernel Disk events from Microsoft:information on �le and disk operations (type, capacity, start time, completion time, duration, completion status,PID, TID, driver function call addresses, I/O Request Packet (IRP), Windows �le object attributes), informationabout �les involved in �le and disk operations (name, version, size, full path, attributes, o�set, image checksum,open and access options);
information from ETW, supplier of PageFault events from Microsoft: information on memory page access errors(address, time, capacity, PID, TID, attributes of Windows �le object, memory allocation parameters);
information from ETW, supplier of Thread events from Microsoft: information on thread creation/completion,information on threads started (PID, TID, size of stack, priorities and allocation of CPU resources, I/O resources,memory pages between threads, stack address, address of init function, address of Thread Environment Block(TEB), Windows service tag);
information from ETW, supplier of Microsoft Windows Kernel Memory events from Microsoft: information aboutmemory management operations (completion status, time, quantity, PID), memory allocation structure (type,capacity, SessionID, PID);
information about Software operation in the event of performance problems: Software installation identi�er,type and value of drop in performance, information about the sequence of events within the Software (time,time zone, type, completion status, Software component identi�er, Software operating scenario identi�er, TID,PID, function call addresses), information about network connections to be checked (URL, direction of theconnection, size of network package), information about PDB �les (name, identi�er, image size of executable�le), information about �les to be checked (name, full path, checksum), Software performance monitoringparameters;
information about the last unsuccessful OS restart: the number of unsuccessful restarts since OS installation,data on the system dump (code and parameters of an error, name, version and checksum (CRC32) of themodule that caused an error in the OS operation, error address as an o�set in the module, checksums (MD5,SHA2-256, SHA1) of the system dump);
information to verify authenticity of digital certi�cates being used to sign �les: the certi�cate's �ngerprint, thechecksum algorithm, the certi�cate's public key and serial number, the name of the issuer of the certi�cate, theresult of certi�cate validation and the certi�cate's database identi�er;
information about the process executing the attack on the Software's self-defense: the name and size of theprocess �le, its checksums (MD5, SHA2-256, SHA1), the full path to the process �le and the template code of

87
the �le path, the creation/build timestamps, executable �le �ag, attributes of the process �le, informationabout the certi�cate used to sign the process �le, code of the account used to launch the process, ID ofoperations performed to access the process, type of resource with which the operation is performed (process,�le, registry object, FindWindow search function), name of resource with which the operation is performed, �agindicating success of the operation, the status of the �le of the process and its signature according to the KSN;
information about the Rightholder's Software: full version, type, localization and operation state of Softwareused, versions of the installed Software components and their operation state, information about the installedSoftware updates, the value of the TARGET �lter, the version of the protocol used to connect to theRightholder's services;
information about hardware installed on the Computer: type, name, model name, �rmware version, parametersof built-in and connected devices, the unique identi�er of the Computer with the installed Software;
information about the versions of the operating system and installed updates, the word size, edition andparameters of the OS run mode, version and checksums (MD5, SHA2-256, SHA1) of the OS kernel �le, and OSstartup date and time;
executable and non-executable �les, either entirely or partly;
portions of the Computer's RAM;
sectors involved in the process of booting the OS;
network tra�ic data packets;
web pages and emails containing suspicious and malicious objects;
description of the classes and instances of classes of the WMI repository;
application activity reports:
the name, size and version of the �le being sent, its description and checksums (MD5, SHA2-256, SHA1), �leformat identi�er, the name of the �le's vendor, the name of the product to which the �le belongs, full path tothe �le on the Computer, template code of the path, the creation and modi�cation timestamps of the �le;
start and end date/time of the validity period of the certi�cate (if the �le has a digital signature), the dateand the time of the signature, the name of the issuer of the certi�cate, information about the certi�cateholder, the �ngerprint, the certi�cate's public key and appropriate algorithms, and the certi�cate's serialnumber;
the name of the account from which the process is running;
checksums (MD5, SHA2-256, SHA1) of the name of the Computer on which the process is running;
titles of the process windows;
Identi�er for the anti-virus databases, name of the detected threat according to the Rightholder'sclassi�cation;
data about the installed license, its identi�er, type and expiration date;
local time of the Computer at the moment of the provision of information;
names and paths of the �les that were accessed by the process;
names of registry keys and their values that were accessed by the process;

88
Using Kaspersky Security Network
Activating the application with an activation code
Updating application modules and anti-virus databases
URL and IP addresses that were accessed by the process;
URL and IP addresses from which the running �le was downloaded.
Compliance with European Union legislation (GDPR)
Kaspersky Endpoint Security may transmit data to Kaspersky under the following scenarios:
Using Kaspersky Security Network
Activating the application with an activation code
Updating application modules and anti-virus databases
Following links in the application interface
Dump writing
Irrespective of the data classi�cation and territory from which the data is received, Kaspersky adheres to highstandards for data security and employs various legal, organizational and technical measures to protect the dataof users, to guarantee data security and con�dentiality, and also to ensure the ful�llment of users' rights asguaranteed by applicable legislation. The text of the Privacy Policy is included in the application distribution kit andis available on the Kaspersky website .
Prior to using Kaspersky Endpoint Security, please carefully read the description of transmitted data in the EndUser License Agreement and Kaspersky Security Network Statement. If speci�c data transmitted from KasperskyEndpoint Security under any of the described scenarios may be classi�ed as personal data according to your locallegislation or standard, you must ensure that such data is processed legally and obtain the consent of end usersfor the collection and transmission of such data.
Read the End User License Agreement and visit the Kaspersky website to learn more about how we receive,process, store, and destroy information about application usage after you accept the End User LicenseAgreement and consent to the Kaspersky Security Network Statement. The license.txt and ksn_<language ID>.txt�les contain the text of the End User License Agreement and Kaspersky Security Network Statement and areincluded in the application distribution kit.
If you do not want to transmit data to Kaspersky, you can disable data provision.
By using Kaspersky Security Network, you agree to automatically provide the data listed in the Kaspersky SecurityNetwork Statement. If you do not agree to provide this data to Kaspersky, use Private KSN or disable use of KSN.For more details about Private KSN, please refer to the documentation on Kaspersky Private Security Network.
By using an activation code, you agree to automatically provide the data listed in the End User License Agreement.If you do not agree to provide this data to Kaspersky, use a key �le to activate Kaspersky Endpoint Security .

89
Following links in the application interface
Dump writing
By using Kaspersky servers, you agree to automatically provide the data listed in the End User License Agreement.Kaspersky requires this information to verify that Kaspersky Endpoint Security is being legitimately used. If you donot agree to provide this information to Kaspersky, use Kaspersky Security Center for database updates orKaspersky Update Utility.
By using links in the application interface, you agree to automatically provide the data listed in the End UserLicense Agreement. The precise list of data transmitted in each speci�c link depends on where the link is located inthe application interface and which problem it aims to resolve. If you do not agree to provide this data toKaspersky, use the simpli�ed application interface or hide the application interface.
If you have enabled dump writing, Kaspersky Endpoint Security will create a dump �le that will contain all memorydata from application processes at the moment when this dump �le was created.

90
Kaspersky Security Center Administration Console
Kaspersky Security Center 12 Web Console and Kaspersky Security Center Cloud Console
Getting started
After installing Kaspersky Endpoint Security, you can manage the application using the following interfaces:
Local application interface.
Kaspersky Security Center Administration Console.
Kaspersky Security Center 12 Web Console.
Kaspersky Security Center Cloud Console.
Kaspersky Security Center lets you remotely install and uninstall, start and stop Kaspersky Endpoint Security,con�gure application settings, change the set of available application components, add keys, and start and stopupdate and scan tasks.
The application can be managed via Kaspersky Security Center using the Kaspersky Endpoint SecurityManagement Plug-in.
For more details on managing the application through Kaspersky Security Center, refer to the Kaspersky SecurityCenter Help .
Kaspersky Security Center 12 Web Console (hereinafter also referred to as Web Console) is a web applicationintended for centrally performing the main tasks to manage and maintain the security system of an organization'snetwork. Web Console is a Kaspersky Security Center component that provides a user interface. For detailedinformation about Kaspersky Security Center 12 Web Console, please refer to the Kaspersky Security CenterHelp .
Kaspersky Security Center Cloud Console (hereinafter also referred to as the "Cloud Console") is a cloud-basedsolution for protecting and managing an organization's network. For detailed information about Kaspersky SecurityCenter Cloud Console, please refer to the Kaspersky Security Center Cloud Console Help .
Web Console and Cloud Console let you do the following:
Monitor the status of your organization's security system.
Install Kaspersky applications on devices within your network.
Manage installed applications.
View reports on the security system status.
Management of Kaspersky Endpoint Security through the Web Console, Cloud Console, and Kaspersky SecurityCenter Administration Console all provide di�erent management capabilities. The available components and tasksalso vary for the di�erent Consoles.
About the Kaspersky Endpoint Security for Windows Management Plug-in

91
The version of the Management Plug-in may di�er from the version of Kaspersky Endpoint Securityapplication installed on the client computer. If the installed version of the Management Plug-in has lessfunctionality than the installed version of Kaspersky Endpoint Security, the settings of the missing functionsare not regulated by the Management Plug-in. These settings can be modi�ed by the user in the localinterface of Kaspersky Endpoint Security.
Installing the web plug-in
Updating the Management Plug-in
The Kaspersky Endpoint Security for Windows Management Plug-in enables interaction between KasperskyEndpoint Security and Kaspersky Security Center. The Management Plug-in lets you manage Kaspersky EndpointSecurity by using policies, tasks, and local application settings. Interaction with Kaspersky Security Center 12 WebConsole is provided by the web plug-in.
The web plug-in is not installed by default in Kaspersky Security Center 12 Web Console. In contrast to theManagement Plug-in for the Kaspersky Security Center Administration Console, which is installed on theadministrator workstation, the web plug-in must be installed on a computer that has Kaspersky Security Center 12Web Console installed. The functionality of the web plug-in is available to all administrators that have access toWeb Console in a browser. You can view the list of installed web plug-ins in Web Console interface:
→ . For more details about the compatibility of web plug-in versions and Web Console, refer toKaspersky Security Center Help .
Consolesettings Plug-ins
You can install the web plug-in as follows:
Install web plug-in using Initial Con�guration Wizard of Kaspersky Security Center 12 Web Console.
Web Console automatically prompts you to run the Initial Con�guration Wizard when connecting Web Consoleto the Administration Server for the �rst time. You can also run the Initial Con�guration Wizard in the WebConsole interface ( → →
). The Initial Con�guration Wizard can also check if the installed web plug-ins are up todate and download the necessary updates. For more details on the Initial Con�guration Wizard for KasperskySecurity Center 12 Web Console, please refer to the Kaspersky Security Center Help Guide .
Install web plug-in using from the list of available distribution packages in Web Console.
To install the web plug-in, select the distribution package of the Kaspersky Endpoint Security web plug-in in theWeb Console interface: → . The list of available distribution packages is updatedautomatically after new versions of Kaspersky applications are released.
Download the distribution package to the Web Console from an external source.
To install the web plug-in, add the ZIP-archive of the distribution package for the Kaspersky Endpoint Securityweb plug-in in the Web Console interface: → . The distribution package of the webplug-in can be downloaded on the Kaspersky website, for example.
Device discovery and deployment Deployment and assignment InitialCon�guration Wizard
Console settings Plug-ins
Console settings Plug-ins
To update the Kaspersky Endpoint Security for Windows Management Plug-in, download the latest version of theplug-in (included in distribution kit) and run the plug-in installation wizard.
If a new version of the web plug-in becomes available, Web Console will display the noti�cation Updates areavailable for utilized plug-ins. You can proceed to update the web plug-in version from this Web Consolenoti�cation. You can also manually check for new web plug-in updates in the Web Console interface (
→ ). The previous version of the web plug-in will be automatically removed during the update.Console
settings Plug-ins

92
When the web plug-in is updated, already existing items (for example, policies or tasks) are saved. The newsettings of items implementing new functions of Kaspersky Endpoint Security will appear in existing items andwill have the default values.
If any item is opened (such as a policy or task), the Management Plug-in checks its compatibility information. Ifthe version of the Management Plug-in is equal to or later than the version speci�ed in the compatibilityinformation, you can change the settings of this item. Otherwise, you cannot use the Management Plug-in tochange the settings of the selected item. It is recommended to upgrade the Management Plug-in.
Upgrading the Kaspersky Endpoint Security 10 for Windows Management Plug-in
You can update the web plug-in as follows:
Update the web plug-in in the list of web plug-ins in online mode.
To update the web plug-in, you must select the distribution package of the Kaspersky Endpoint Security webplug-in in the Web Console interface ( → ). Web Console checks for availableupdates on Kaspersky servers and downloads the relevant updates.
Update the web plug-in from a �le.
To update the web plug-in, you must select the ZIP-archive of the distribution package for the KasperskyEndpoint Security web plug-in in the Web Console interface: → . The distributionpackage of the web plug-in can be downloaded on the Kaspersky website, for example. You can update theKaspersky Endpoint Security web plug-in only to a more recent version. The web plug-in cannot be updated toan older version.
Console settings Plug-ins
Console settings Plug-ins
If any item is opened (such as a policy or task), the web plug-in checks its compatibility information. If the versionof the web plug-in is equal to or later than the version speci�ed in the compatibility information, you can changethe settings of this item. Otherwise, you cannot use the web plug-in to change the settings of the selected item. Itis recommended to update the web plug-in.
Special considerations when working with di�erent versions of managementplug-ins
You can manage Kaspersky Endpoint Security via Kaspersky Security Center only if you have a Management Plug-in whose version is equal to or later than the version speci�ed in the information regarding the compatibility ofKaspersky Endpoint Security with the Management Plug-in. You can view the minimum required version of theManagement Plug-in in the installer.ini �le included in the distribution kit.
If the Kaspersky Endpoint Security 10 for Windows Management Plug-in is installed in the Administration Console,please consider the following when installing the Kaspersky Endpoint Security 11 for Windows Management Plug-in:
The Kaspersky Endpoint Security 10 for Windows Management Plug-in will not be removed, and will remainavailable for operation. Therefore, you will have access to two Management Plug-ins for working withapplication versions 10 and 11.
The Kaspersky Endpoint Security 11 for Windows Management Plug-in does not support management ofKaspersky Endpoint Security 10 for Windows on users' computers.
The Kaspersky Endpoint Security 11 for Windows Management Plug-in does not support items (for example,policies or tasks) that were created using the Kaspersky Endpoint Security 10 for Windows Management Plug-

93
Upgrading the Kaspersky Endpoint Security 11 for Windows Management Plug-in
in.
You can use the Policies and Tasks Batch Conversion Wizard to convert policies and tasks from version 10to version 11. For more details about converting policies and tasks, please refer to the Kaspersky SecurityCenter Help Guide .
If the Kaspersky Endpoint Security 11 for Windows Management Plug-in is installed in the Administration Console,please consider the following when installing a new version of the Kaspersky Endpoint Security 11 for WindowsManagement Plug-in:
The previous version of the Kaspersky Endpoint Security 11 for Windows Management Plug-in will be removed.
The new version of the Kaspersky Endpoint Security 11 for Windows Management Plug-in supportsmanagement of the previous version of Kaspersky Endpoint Security 11 for Windows on users' computers.
You can use the new version of the Management Plug-in to change the settings in policies, tasks, and otheritems created by the previous version of the Management Plug-in.
For new settings, the new version of the Management Plug-in assigns the default values when a policy, policypro�le, or task are saved for the �rst time.
After the Management Plug-in is upgraded, it is recommended to check and save the values of the newsettings in policies and policy pro�les. If you do not do this, the new groups of Kaspersky Endpoint Securitysettings on the user's computer will take the default values and can be edited (the attribute). It isrecommended to check the settings starting with policies and policy pro�les at the top level of thehierarchy. It is also recommended to use the user account that has access rights to all functional areas ofKaspersky Security Center.
To learn about the new capabilities of the application, please refer to the Release Notes or the applicationhelp.
If a new parameter has been added to a group of settings in the new version of the Management Plug-in, thepreviously de�ned status of the / attribute for this group of settings is not changed.
When upgrading the Management Plug-in to version 11.2.0, you need to open a policy to automatically convert it.When doing so, Kaspersky Endpoint Security will prompt you for con�rmation to participate in KSN. If youalready upgraded the application to version 11.20 on the computers of your organization, participation in KSN willbe disabled until you accept the terms of participation in KSN.
Special considerations when using encrypted protocols for interacting withexternal services
Kaspersky Endpoint Security and Kaspersky Security Center uses an encrypted communication channel with TLS(Transport Layer Security) to work with external services of Kaspersky. Kaspersky Endpoint Security uses externalservices for the following functions:

94
Main application window
Operating status of installed components. You can also proceed to con�gure any of theinstalled components except for encryption components.
Manage Kaspersky Endpoint Security scan tasks. You can run a virus scan and application
Updating databases and application software modules;
Activating the application with an activation code (activation 2.0);
Using Kaspersky Security Network.
Use of TLS secures the application by providing the following features:
Encryption. The contents of messages are con�dential and are not disclosed to third-party users.
Integrity. The message recipient is certain that the message contents have not been modi�ed since themessage was forwarded by the sender.
Authentication. The recipient is certain that communication is established only with a trusted Kaspersky server.
Kaspersky Endpoint Security uses public key certi�cates for server authentication. A public key infrastructure (PKI)is required for working with certi�cates. A Certi�cate Authority is part of a PKI. Kaspersky uses its own Certi�cateAuthority because Kaspersky services are highly technical and not public. In this case, when root certi�cates ofThawte, VeriSign, GlobalTrust and others are revoked, the Kaspersky PKI remains operational without disruptions.
Environments that have MITM (software and hardware tools that support parsing of the HTTPS protocol) areconsidered to be unsafe by Kaspersky Endpoint Security. Errors may be encountered when working with Kasperskyservices. For example, there may be errors regarding the use of self-signed certi�cates. These errors may occurbecause an HTTPS Inspection tool from your environment does not recognize the Kaspersky PKI. To rectify theseproblems, you must con�gure exclusions for interacting with external services.
Application interface
Protectioncomponents
Tasks

95
integrity check. An administrator can hide tasks from a user or restrict management oftasks.
Manage Kaspersky Endpoint Security update tasks. You can update anti-virus databasesand application modules and roll back the last update. An administrator can hide tasks froma user or restrict management of tasks.
Proceed to other application features.
. View events that occurred during operation of the application, individualcomponents and tasks.
. View a list of saved copies of infected �les that the application has deleted.
. View information about threat detection technologiesand the number of threats detected by these technologies.
. Status of the connection between Kaspersky EndpointSecurity and Kaspersky Security Network, and global KSN statistics. Kaspersky SecurityNetwork (KSN) is an infrastructure of cloud services providing access to the onlineKaspersky Knowledge Base that contains information about the reputation of �les, webresources, and software. The use of data from Kaspersky Security Network ensuresfaster responses by Kaspersky Endpoint Security to new threats, improves theperformance of some protection components, and reduces the likelihood of falsepositives. If you are participating in Kaspersky Security Network, KSN services provideKaspersky Endpoint Security with information about the category and reputation ofscanned �les, as well as information about the reputation of scanned web addresses.
. View information about the operation of installed applications. SystemWatcher keeps track of the �le, registry, and operating system events associated with anapplication.
. View information about network activity of the computer in real time.
. Monitors the disk encryption or decryption process in real time.Encryption Monitor is available if the Kaspersky Disk Encryption component or BitLockerDrive Encryption component is installed.
Databaseupdate
More Tools
Reports
Backup
Threat detection technologies
Kaspersky Security Network
System Watcher
Network Monitor
Encryption Monitor
Con�gure application settings. An administrator can prohibit changes to settings inKaspersky Security Center.
Information about the application: current version of Kaspersky Endpoint Security, databaserelease date, key, and other information. You can also proceed to Kaspersky informationresources that provide useful information, recommendations, and answers to frequentlyasked questions on how to purchase, install, and use the application.
/ Messages containing information about available updates and requests for access toencrypted �les and devices.
License Application licensing. You can purchase a license, activate the application or renew asubscription. You can also view information about the current license.
Application icon in the taskbar noti�cation area
Immediately after installation of Kaspersky Endpoint Security, the application icon appears in the MicrosoftWindows taskbar noti�cation area.

96
The icon serves the following purposes:
It indicates application activity.
It acts as a shortcut to the context menu and main window of the application.
The following application icon statuses are provided for displaying application operating information:
The icon signi�es that critically important protection components of the application are enabled. KasperskyEndpoint Security will display a warning if the user is required to perform an action, for example, restart thecomputer after updating the application.
The icon signi�es that critically important protection components of the application are disabled or havemalfunctioned. Protection components may malfunction, for example, if the license has expired or as a result ofan application error. Kaspersky Endpoint Security will display a warning with a description of the problem incomputer protection.
The context menu of the application icon contains the following items:
. Opens the main application window. In this window, you can adjustthe operation of application components and tasks, and view the statistics of processed �les and detectedthreats.
. Pause the operation of all protection and control components thatare not marked by a lock ( ) in the policy. Prior to performing this operation, it is recommended to disable theKaspersky Security Center policy.
Prior to pausing the operation of protection and control components, the application requests the passwordfor accessing Kaspersky Endpoint Security (account password or temporary password). You can then selectthe pause period: for a speci�c amount of time, until a restart, or upon user request.
This context menu item is available if Password Protection is enabled. To resume the operation of protectionand control components, select in the context menu of the application.
Pausing the operation of protection and control components does not a�ect the performance of updateand scan tasks. The application also continues using Kaspersky Security Network.
/ . Disables a Kaspersky Security Center policy on the computer. All KasperskyEndpoint Security settings are available for con�guration, including settings that have a closed lock in the policy( ). If the policy is disabled, the application requests the password for accessing Kaspersky Endpoint Security(account password or temporary password). This context menu item is available if Password Protection isenabled. To enable the policy, select in the context menu of the application.
Settings. Opens the application settings window.
. This opens the window containing information necessary for contacting Kaspersky TechnicalSupport.
. This item opens an information window with application details.
. This item quits Kaspersky Endpoint Security. Clicking this context menu item causes the application to beunloaded from the computer RAM.
Kaspersky Endpoint Security for Windows
Pause protection / Resume protection
Resume protection
Disable policy Enable policy
Enable policy
Support Support
About
Exit

97
Application icon context menu
Simpli�ed application interface
If a Kaspersky Security Center policy con�gured to display the simpli�ed application interface is applied to a clientcomputer on which Kaspersky Endpoint Security is installed, the main application window is not available on thisclient computer. Right-click to open the context menu of the Kaspersky Endpoint Security icon (see the �gurebelow) containing the following items:
/ . Disables a Kaspersky Security Center policy on the computer. All KasperskyEndpoint Security settings are available for con�guration, including settings that have a closed lock in the policy( ). If the policy is disabled, the application requests the password for accessing Kaspersky Endpoint Security(account password or temporary password). This context menu item is available if Password Protection isenabled. To enable the policy, select in the context menu of the application.
. Drop-down list containing the following items:
. This opens the window containing information necessary for contacting Kaspersky TechnicalSupport.
. This item quits Kaspersky Endpoint Security. Clicking this context menu item causes the application to beunloaded from the computer RAM.
Context menu of the application icon when displaying the simpli�ed interface
Disable policy Enable policy
Enable policy
Tasks
.
.
.
.
.
.
Integrity Check
Last update rollback
Full Scan
Custom Scan
Critical Areas Scan
Update
Support Support
Exit
Con�guring the display of the application interface
You can con�gure the application interface display mode for a user. The user can interact with the application inthe following ways:

98
1. Open the Kaspersky Security Center Administration Console.
2. In the folder in the Administration Console tree, open the folder with the name of theadministration group to which the relevant client computers belong.
3. In the workspace, select the tab.
4. Select the necessary policy and double-click to open the policy properties.
5. In the policy window, select → .
6. In the section, do one of the following:
7. In the section, select the check box if you want thesimpli�ed application interface to be displayed on a client computer that has Kaspersky Endpoint Securityinstalled.
. On a client computer, the main application window is inaccessible, and only the iconin the Windows noti�cation area is available. In the context menu of the icon, the user can perform a limitednumber of operations with Kaspersky Endpoint Security. Kaspersky Endpoint Security also displaysnoti�cations above the application icon.
. On a client computer, the main window of Kaspersky Endpoint Security and the icon in theWindows noti�cation area are available. In the context menu of the icon, the user can perform operations withKaspersky Endpoint Security. Kaspersky Endpoint Security also displays noti�cations above the applicationicon.
. On a client computer, no signs of Kaspersky Endpoint Security operation are displayed. The iconin the Windows noti�cation area and noti�cations are not available.
With simpli�ed interface
With full interface
No interface
How to con�gure the application interface display mode in the Administration Console (MMC)
Managed devices
Policies
General settings Interface
Interaction with user
Select the check box if you want the following interface elements to bedisplayed on the client computer:
If this check box is selected, the user can view and, depending on the available rights, changeapplication settings from the application interface.
Clear the check box if you want to hide all signs of Kaspersky EndpointSecurity on the client computer.
Display application interface
Folder containing the application name in the menu
Kaspersky Endpoint Security icon in the Microsoft Windows taskbar noti�cation area
Pop-up noti�cations
Start
Display application interface
Interaction with user Simpli�ed application interface
How to con�gure the application interface display mode in the Web Console and Cloud Console

99
1. In the main window of Web Console, select → .
2. Click the name of the Kaspersky Endpoint Security policy for computers on which you want to enablesupport for portable mode.
The policy properties window opens.
3. Select the tab.
4. Select → .
5. In the section, con�gure how the application interface will be displayed:
6. Click .
Devices Policies and pro�les
Application settings
General settings Interface
Interaction with user
. On a client computer, the main application window is inaccessible, and onlythe icon in the Windows noti�cation area is available. In the context menu of the icon, the user canperform a limited number of operations with Kaspersky Endpoint Security. Kaspersky Endpoint Securityalso displays noti�cations above the application icon.
. On a client computer, the main window of Kaspersky Endpoint Security and the iconin the Windows noti�cation area are available. In the context menu of the icon, the user can performoperations with Kaspersky Endpoint Security. Kaspersky Endpoint Security also displays noti�cationsabove the application icon.
. On a client computer, no signs of Kaspersky Endpoint Security operation are displayed.The icon in the Windows noti�cation area and noti�cations are not available.
With simpli�ed interface
With full interface
No interface
OK
Getting started
After deploying the application on client computers, to work with Kaspersky Endpoint Security from KasperskySecurity Center Web Console you need to perform the following actions:
Create and con�gure a policy.
You can use policies to apply identical Kaspersky Endpoint Security settings to all client computers within anadministration group. The Initial Con�guration Wizard of Kaspersky Security Center automatically creates apolicy for Kaspersky Endpoint Security.
Create the Update and Virus Scan tasks.
The Update task is required for keeping computer security up to date. When the task is performed, KasperskyEndpoint Security updates the anti-virus databases and application modules. The Update task is createdautomatically by the Initial Con�guration Wizard of Kaspersky Security Center. To create the Update task,install the Kaspersky Endpoint Security for Windows web plug-in while running the Wizard.
The Virus Scan task is required for the timely detection of viruses and other malware. You need to manuallycreate the Virus Scan task.
How to create a Virus Scan task in the Administration Console (MMC)

100
1. In the Administration Console, go to the folder → .
The list of tasks opens.
2. Click the button.
Step 1. Selecting task type
Step 2. Scan scope
Step 3. Kaspersky Endpoint Security action
Step 4. Selecting the devices to which the task will be assigned
Administration Server Tasks
New task
The Task Wizard starts. Follow the instructions of the Wizard.
Select → .Kaspersky Endpoint Security for Windows (11.6.0) Virus Scan
Create the list of objects that Kaspersky Endpoint Security will scan while performing a scan task.
Choose the action on threat detection:
. If this option is selected, Kaspersky Endpoint Security automaticallyattempts to disinfect all infected �les that are detected. If disinfection fails, Kaspersky Endpoint Securitydeletes the �les.
. If this option is selected, Kaspersky Endpoint Security automaticallyattempts to disinfect all infected �les that are detected. If disinfection is not possible, Kaspersky EndpointSecurity adds the information about the infected �les that are detected to the list of active threats.
. If this option is selected, Kaspersky Endpoint Security adds the information about infected �les tothe list of active threats on detection of these �les.
. If the check box is selected, Kaspersky Endpoint Security usesthe Advanced Disinfection technology to treat active threats during the scan.
Advanced disinfection technology is aimed at purging the operating system of malicious applications thathave already started their processes in RAM and that prevent Kaspersky Endpoint Security from removingthem by using other methods. The threat is neutralized as a result. While Advanced Disinfection is inprogress, you are advised to refrain from starting new processes or editing the operating system registry.The advanced disinfection technology uses considerable operating system resources, which may slowdown other applications. After the advanced disinfection is complete, Kaspersky Endpoint Security willrestart the computer without asking the user for con�rmation.
Disinfect; delete if disinfection fails
Disinfect; inform if disinfection fails
Inform
Run Advanced Disinfection immediately
Con�gure the task run mode using the check box. This check boxenables / disables the function that suspends the Virus scan task when computer resources are limited.Kaspersky Endpoint Security pauses the Virus scan task if the screensaver is o� and the computer isunlocked.
Run only when the computer is idling
Select the computers on which the task will be performed. The following options are available:

101
Step 5. Selecting the account to run the task
Step 6. Con�guring a task start schedule
Step 7. De�ning the task name
Step 8. Completing task creation
Assign the task to an administration group. In this case, the task is assigned to computers included in apreviously created administration group.
Select computers detected by the Administration Server in the network: unassigned devices. The speci�cdevices can include devices in administration groups as well as unassigned devices.
Specify device addresses manually, or import addresses from a list. You can specify NetBIOS names, IPaddresses, and IP subnets of devices to which you want to assign the task.
Select an account to run the Virus Scan task. By default, Kaspersky Endpoint Security starts the task with therights of a local user account. If the scan scope includes network drives or other objects with restrictedaccess, select a user account with the su�icient access rights.
Con�gure a schedule for starting a task, for example, manually or after anti-virus databases are downloadedto the repository.
Enter a name for the task, for example, Daily full scan .
Exit the Wizard. If necessary, select the check box. You can monitor theprogress of the task in the task properties. As a result, the Virus Scan task will be executed on the usercomputers in accordance to the speci�ed schedule.
Run task after Wizard �nishes
How to create a Virus Scan task in the Web Console

102
1. In the main window of Web Console, select → .
The list of tasks opens.
2. Click the button.
The Task Wizard starts.
3. Con�gure the task settings:
a. In the drop-down list, select .
b. In the drop-down list, select .
c. In the �eld, enter a brief description, for example, Weekly scan .
d. In the section, select the task scope.
4. Select devices according to the selected task scope option. Click the button.
5. Finish the wizard by clicking the button.
A new task will be displayed in the list of tasks.
6. To con�gure the task schedule, go to the task properties.
It is recommended to con�gure a schedule that runs the task at least once per week.
7. Select the check box next to the task.
8. Click the button.
You can monitor the status of the task, and the number of devices on which the task was completedsuccessfully or completed with an error.
Active and inactive policy
Devices Tasks
Add
Application Kaspersky Endpoint Security for Windows (11.6.0)
Task type Virus Scan
Task name
Select devices to which the task will be assigned
Next
Finish
Run
As a result, the Virus Scan task will be executed on the user computers in accordance to the speci�edschedule.
Managing policies
A policy is a collection of application settings that are de�ned for an administration group. You can con�guremultiple policies with di�erent values for one application. An application can run under di�erent settings fordi�erent administration groups. Each administration group can have its own policy for an application.
Policy settings are sent to client computers by Network Agent during synchronization. By default, theAdministration Server performs synchronization immediately after policy settings are changed. UDP port 15000 onthe client computer is used for synchronization. The Administration Server performs synchronization every 15minutes by default. If synchronization fails after policy settings were changed, the next synchronization attemptwill be performed according to the con�gured schedule.

103
Out-of-o�ice policy
Settings inheritance
Settings inheritance
Creating a policy
A policy is intended for a group of managed computers and can be active or inactive. The settings of an activepolicy are saved on client computers during synchronization. You cannot simultaneously apply multiple policies toone computer, therefore only one policy may be active in each group.
You can create an unlimited number of inactive policies. An inactive policy does not a�ect application settings oncomputers in the network. Inactive policies are intended as preparations for emergency situations, such as a virusattack. If there is an attack via �ash drives, you can activate a policy that blocks access to �ash drives. In this case,the active policy automatically becomes inactive.
An out-of-o�ice policy is activated when a computer leaves the organization network perimeter.
Policies, like administration groups, are arranged in a hierarchy. By default, a child policy inherits settings from theparent policy. Child policy is a policy for nested hierarchy levels, that is a policy for nested administration groupsand secondary Administration Servers. You can disable the inheritance of settings from the parent policy.
Each policy setting has the attribute, which indicates if the settings can be modi�ed in the child policies or in thelocal application settings. The attribute is applicable only if inheritance of parent policy settings is enabled forthe child policy. Out-of-o�ice policies do not a�ect other policies through the hierarchy of administration groups.
The rights to access policy settings (read, write, execute) are speci�ed for each user who has access to theKaspersky Security Center Administration Server and separately for each functional scope of Kaspersky EndpointSecurity. To con�gure the rights to access policy settings, go to the section of the properties window ofthe Kaspersky Security Center Administration Server.
Security
How to create a policy in the Administration Console (MMC)

104
1. Open the Kaspersky Security Center Administration Console.
2. In the folder in the Administration Console tree, select the folder with the name of theadministration group to which the relevant client computers belong.
3. In the workspace, select the tab.
4. Click the button.
The Policy Wizard starts.
5. Follow the instructions of the Policy Wizard.
1. In the main window of Web Console, select → .
2. Click the button.
The Policy Wizard starts.
3. Select Kaspersky Endpoint Security and click .
4. Please read and accept the terms of the Kaspersky Security Network (KSN) Statement and click .
5. On the tab, you can perform the following actions:
6. On the tab, you can con�gure the Kaspersky Endpoint Security policy settings.
7. Click the button.
Managed devices
Policies
New policy
How to create a policy in the Web Console and Cloud Console
Devices Policies and pro�les
Add
Next
Next
General
Change the policy name.
Select the policy status:
Con�gure the inheritance of settings:
. After the next synchronization, the policy will be used as the active policy on the computer.
. Backup policy. If necessary, an inactive policy can be switched to active status.
. The policy is activated when a computer leaves the organization network perimeter.
Active
Inactive
Out-of-o�ice
. If this toggle button is switched on, the policy setting values areinherited from the top-level policy. Policy settings cannot be edited if is set for the parent policy.
. If the toggle button is on, the values of the policysettings are propagated to the child policies. In the properties of the child policy, the
toggle button will be automatically switched on and cannot be switched o�. Childpolicy settings are inherited from the parent policy, except for the settings marked with . Childpolicy settings cannot be edited if is set for the parent policy.
Inherit settings from parent policy
Force inheritance of settings for child policiesInherit parent
policy settings
Application settings
Save

105
Security level indicator
As a result, Kaspersky Endpoint Security settings will be con�gured on client computers during the nextsynchronization. You can view information about the policy that is being applied to the computer in the KasperskyEndpoint Security interface by clicking the button on the main screen (for example, the policy name). Todo so, in the settings of the Network Agent policy, you need to enable the receipt of extended policy data. Formore details about a Network Agent policy, please refer to the Kaspersky Security Center Help Guide .
Support
The security level indicator is displayed in the top part of the window. The indicator cantake one of the following values:
Properties: <Policy name>
. The indicator takes this value and turns green if all components from the followingcategories are enabled:
. The indicator takes this value and turns yellow if one of the important components isdisabled.
. The indicator takes this value and turns red in one of the following cases:
High protection level
. This category includes the following components:
. This category includes the following components:
Critical
File Threat Protection.
Behavior Detection.
Exploit Prevention.
Remediation Engine.
Important
Kaspersky Security Network.
Web Threat Protection.
Mail Threat Protection.
Host Intrusion Prevention.
Medium protection level
Low protection level
One or multiple critical components are disabled.
Two ore more important components are disabled.
If the indicator has the or value, a link that opens the window appears to the right of the indicator. In this window, you can
enable any of the recommended protection components.
Medium protection level Low protection levelRecommended protection components
Task management
You can create the following types of tasks to administer Kaspersky Endpoint Security through Kaspersky SecurityCenter:
Local tasks that are con�gured for an individual client computer.

106
Tasks are run on a computer only if Kaspersky Endpoint Security is running.
Add a new task
Group tasks that are con�gured for client computers within administration groups.
Tasks for a selection of computers.
You can create any number of group tasks, tasks for a selection of computers, or local tasks. For more detailsabout working with administration groups and selections of computers, please refer to Kaspersky Security CenterHelp .
Kaspersky Endpoint Security supports the following tasks:
. Kaspersky Endpoint Security scans the computer areas speci�ed in the task settings for virusesand other threats. The Virus Scan task is required for the operation of Kaspersky Endpoint Security and iscreated during the Initial Con�guration Wizard. It is recommended to con�gure a schedule that runs the task atleast once per week.
. Kaspersky Endpoint Security adds a key for activating applications, including an additional key. Beforerunning the task, make sure that the number of computers, on which the task is to be executed, does notexceed the number of computers allowed by the license.
. Kaspersky Endpoint Security installs or removes components on clientcomputers according to the list of components speci�ed in the task settings. The File Threat Protectioncomponent cannot be removed. The optimal set of Kaspersky Endpoint Security components helps toconserve computer resources.
. Kaspersky Endpoint Security receives information about all application executable �les that arestored on computers. The Inventory task is performed by the Application Control component. If theApplication Control component is not installed, the task will end with an error.
. Kaspersky Endpoint Security updates databases and application modules. The Update task is requiredfor the operation of Kaspersky Endpoint Security and is created during the Initial Con�guration Wizard. It isrecommended to con�gure a schedule that runs the task at least once per day.
. Kaspersky Endpoint Security deletes �les and folders from users' computers immediately or if thereis no connection with Kaspersky Security Center for a long time.
. Kaspersky Endpoint Security rolls back the last update of databases and application modules.This may be necessary if, for example, new databases contain incorrect data that could cause KasperskyEndpoint Security to block a safe application.
. Kaspersky Endpoint Security analyzes application �les, checks �les for corruption ormodi�cations, and veri�es the digital signatures of application �les.
. Kaspersky Endpoint Security con�gures the Authentication Agentaccount settings. An Authentication Agent is needed for working with encrypted drives. Before the operatingsystem is loaded, the user needs to complete authentication with the Agent.
Virus Scan
Add key
Change application components
Inventory
Update
Wipe data
Update rollback
Integrity check
Manage Authentication Agent accounts
How to create a task in the Administration Console (MMC)

107
1. Open the Kaspersky Security Center Administration Console.
2. Select the folder in the Administration Console tree.
3. Click the button.
The Task Wizard starts.
4. Follow the instructions of the Task Wizard.
1. In the main window of Web Console, select → .
The list of tasks opens.
2. Click the button.
The Task Wizard starts.
3. Con�gure the task settings:
a. In the drop-down list, select .
b. In the drop-down list, select the task that you want to run on user computers.
c. In the �eld, enter a brief description, for example, Update the application foraccounting .
d. In the section, select the task scope.
4. Select devices according to the selected task scope option. Click the button.
5. Finish the wizard by clicking the button.
Task access control
Tasks
New task
How to create a task in the Web Console and Cloud Console
Devices Tasks
Add
Application Kaspersky Endpoint Security for Windows (11.6.0)
Task type
Task name
Select devices to which the task will be assigned
Next
Finish
A new task will be displayed in the list of tasks. The task will have the default settings. To con�gure the tasksettings, you need to go to the task properties. To run a task, you need to select the check box opposite the taskand click the button. After the task has started, you can pause the task and resume it later.Start
In the list of tasks, you can monitor the task results, which include the task status and the statistics for taskperformance on computers. You can also create a selection of events to monitor the completion of tasks( → ). For more details on event selection, please refer to the KasperskySecurity Center Help Guide . Task execution results are also saved locally in Windows event log and in KasperskyEndpoint Security reports.
Monitoring and reports Event selections
The rights to access Kaspersky Endpoint Security tasks (read, write, execute) are de�ned for each user who hasaccess to Kaspersky Security Center Administration Server, through the settings of access to functional areas ofKaspersky Endpoint Security. To con�gure access to the functional areas of Kaspersky Endpoint Security, go tothe section of the properties window of Kaspersky Security Center Administration Server. For moredetails on task management through Kaspersky Security Center, please refer to the Kaspersky Security CenterHelp .
Security

108
1. Open the Kaspersky Security Center Administration Console.
2. In the folder in the Administration Console tree, open the folder with the name of theadministration group to which the relevant client computers belong.
3. In the workspace, select the tab.
4. Select the necessary policy and double-click to open the policy properties.
5. In the policy window, select → .
6. Con�gure the task management mode (see the table below).
7. Save your changes.
1. In the main window of Web Console, select the → tab.
2. Click the name of the Kaspersky Endpoint Security policy for computers on which you want to enablesupport for portable mode.
The policy properties window opens.
3. Select the tab.
4. Go to → .
5. Con�gure the task management mode (see the table below).
6. Click .
7. Con�rm your changes by clicking .
Task management settings
Parameter Description
If the check box is selected, local tasks are displayed in the Kaspersky Endpoint Securitylocal interface. When there are no additional policy restrictions, the user can con�gure andrun tasks. However, con�guring task run schedule remains unavailable for the user. The usercan run tasks only manually.
If the check box is cleared, use of local tasks is stopped. In this mode, local tasks do not runaccording to schedule. Tasks cannot be started or con�gured in the local interface ofKaspersky Endpoint Security, or when working with the command line.
You can con�gure users' rights to access tasks using a policy (task management mode). For example, you can hidegroup tasks in the Kaspersky Endpoint Security interface.
How to con�gure the task management mode in the Kaspersky Endpoint Security interface through theAdministration Console (MMC)
Managed devices
Policies
Local Tasks Task management
How to con�gure the task management mode in the Kaspersky Endpoint Security interface through the WebConsole
Devices Policies and pro�les
Application settings
Local tasks Task management
OK
Save
Allow use oflocal tasks
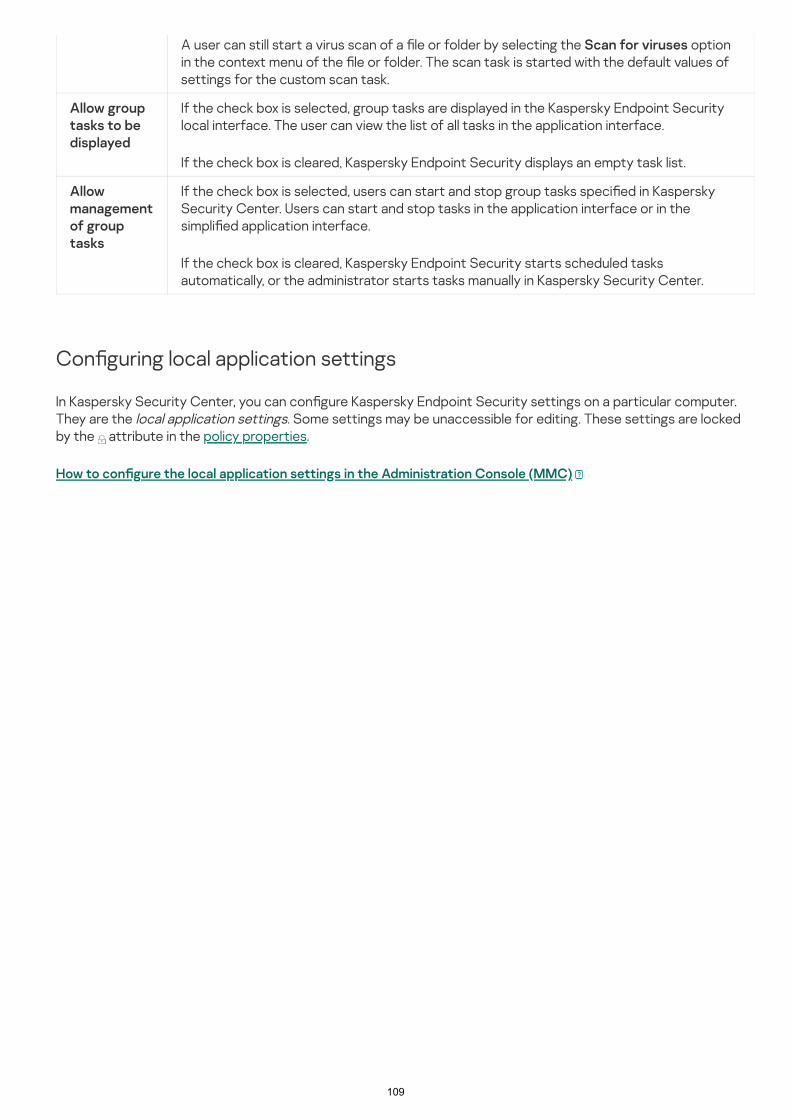
109
A user can still start a virus scan of a �le or folder by selecting the optionin the context menu of the �le or folder. The scan task is started with the default values ofsettings for the custom scan task.
Scan for viruses
Allow grouptasks to bedisplayed
If the check box is selected, group tasks are displayed in the Kaspersky Endpoint Securitylocal interface. The user can view the list of all tasks in the application interface.
If the check box is cleared, Kaspersky Endpoint Security displays an empty task list.
Allowmanagementof grouptasks
If the check box is selected, users can start and stop group tasks speci�ed in KasperskySecurity Center. Users can start and stop tasks in the application interface or in thesimpli�ed application interface.
If the check box is cleared, Kaspersky Endpoint Security starts scheduled tasksautomatically, or the administrator starts tasks manually in Kaspersky Security Center.
Con�guring local application settings
In Kaspersky Security Center, you can con�gure Kaspersky Endpoint Security settings on a particular computer.They are the local application settings. Some settings may be unaccessible for editing. These settings are lockedby the attribute in the policy properties.
How to con�gure the local application settings in the Administration Console (MMC)

110
1. Open the Kaspersky Security Center Administration Console.
2. In the folder of the Administration Console tree, open the folder with the name of theadministration group to which the relevant client computer belongs.
3. In the workspace, select the tab.
4. Select the computer for which you want to con�gure Kaspersky Endpoint Security settings.
5. In the context menu of the client computer, select .
A client computer properties window opens.
6. In the client computer properties window, select the section.
A list of Kaspersky applications that are installed on the client computer appears in the right part of theclient computer properties window.
7. Select Kaspersky Endpoint Security.
8. Click the button under the list of Kaspersky applications.
The window opens.
9. In the section, con�gure the settings for Kaspersky Endpoint Security as well as thereport and storage settings.
The other sections of the window arethe same as in the standard sections of Kaspersky Security Center. A description of these sections isprovided in the Kaspersky Security Center Help.
If an application is subject to a policy that prohibits changes to speci�c settings, you will not be able toedit them while con�guring application settings in the section.
10. To save your changes, in the window,click .
Managed devices
Devices
Properties
Applications
Properties
Kaspersky Endpoint Security for Windows application settings
General Settings
Kaspersky Endpoint Security for Windows application settings
General Settings
Kaspersky Endpoint Security for Windows application settingsOK
How to con�gure the local application settings in the Web Console and Cloud Console

111
1. In the main window of Web Console, select → .
2. Select the computer for which you want to con�gure local application settings.
This opens the computer properties.
3. Select the tab.
4. Click .
This opens the local application settings.
5. Select the tab.
6. Con�gure the local application settings.
7. Local application settings are the same as policy settings, except for encryption settings.
Downloading Kaspersky Endpoint Security anti-virus databases after the operating system starts can take upto two minutes depending on the capabilities of the computer. During this time, the level of computerprotection is reduced. The downloading of anti-virus databases when Kaspersky Endpoint Security is startedon an already started operating system does not cause a reduction in the level of computer protection.
1. Open the Kaspersky Security Center Administration Console.
2. In the folder in the Administration Console tree, open the folder with the name of theadministration group to which the relevant client computers belong.
3. In the workspace, select the tab.
4. Select the necessary policy and double-click to open the policy properties.
5. In the policy window, select → .
6. Use the check box to con�gurethe application startup.
7. Save your changes.
Devices Managed devices
Applications
Kaspersky Endpoint Security for Windows
Application settings
Starting and stopping Kaspersky Endpoint Security
After installing Kaspersky Endpoint Security to a user's computer, the application is started automatically. Bydefault, Kaspersky Endpoint Security is started after operating system startup. It is not possible to con�gureautomatic startup of the application in the operating system settings.
How to con�gure the startup of Kaspersky Endpoint Security in the Administration Console (MMC)
Managed devices
Policies
General settings Application settings
Start Kaspersky Endpoint Security for Windows on computer startup
How to con�gure the startup of Kaspersky Endpoint Security in the Web Console

112
1. In the main window of Web Console, select → .
2. Click the name of Kaspersky Endpoint Security policy for the computers for which you want to con�gurethe startup of the application.
The policy properties window opens.
3. Select the tab.
4. Select .
5. Click the link.
6. Use the check box to con�gurethe application startup.
7. Click .
8. Con�rm your changes by clicking .
1. In the lower part of the main application window, click the button.
2. In the application settings window, select the section.
3. Use the check box to con�gure how the application starts.
4. To save changes, click the button.
Kaspersky experts recommend against manually stopping Kaspersky Endpoint Security because doing soexposes the computer and your personal data to threats. If necessary, you can pause computer protection foras long as you need to, without stopping the application.
Devices Policies and pro�les
Application settings
General settings
Application settings
Start Kaspersky Endpoint Security for Windows on computer startup
OK
Save
How to con�gure the startup of Kaspersky Endpoint Security in the application interface
General
Launch at computer startup
Save
You can monitor the application status by using the widget.Protection Status
How to start or stop Kaspersky Endpoint Security in the Administration Console (MMC)

113
1. Open the Kaspersky Security Center Administration Console.
2. In the folder of the Administration Console tree, open the folder with the name of theadministration group to which the relevant client computer belongs.
3. In the workspace, select the tab.
4. Select the computer on which you want to start or stop the application.
5. Right-click to display the context menu of the client computer and select .
6. In the client computer properties window, select the section.
A list of Kaspersky applications that are installed on the client computer appears in the right part of theclient computer properties window.
7. Select Kaspersky Endpoint Security.
8. Do the following:
1. In the main window of Web Console, select → .
2. Click the name of the computer on which you want to start or stop Kaspersky Endpoint Security.
The computer properties window opens.
3. Select the tab.
4. Select the check box opposite .
5. Click the or button.
Managed devices
Devices
Properties
Applications
To start the application, click the button to the right of the list of Kaspersky applications.
To stop the application, click the button to the right of the list of Kaspersky applications.
How to start or stop Kaspersky Endpoint Security in the Web Console
Devices Managed devices
Applications
Kaspersky Endpoint Security for Windows
Start Stop
How to start or stop Kaspersky Endpoint Security from the command line

114
To stop the application from the command line, enable external management of system services.
1. Run the command line interpreter (cmd.exe) as an administrator.
2. Go to the folder where the Kaspersky Endpoint Security executable �le is located.
3. To start the application from the command line, enter klpsm.exe start_avp_service .
4. To stop the application from the command line, enter klpsm.exe stop_avp_service .
To pause computer protection and control:
1. Right-click to bring up the context menu of the application icon that is in the taskbar noti�cation area.
2. In the context menu, select (see the �gure below).
This context menu item is available if Password Protection is enabled.
3. Select one of the following options:
4. Click the button.
The �le klpsm.exe, which is included in the Kaspersky Endpoint Security distribution kit, is used to start or stopthe application from the command line.
Pausing and resuming computer protection and control
Pausing computer protection and control means disabling all protection and control components of KasperskyEndpoint Security for some time.
The application status is displayed using the application icon in the taskbar noti�cation area.
The icon signi�es that computer protection and control are paused.
The icon signi�es that computer protection and control are enabled.
Pausing or resuming computer protection and control does not a�ect scan or update tasks.
If any network connections are already established when you pause or resume computer protection and control, anoti�cation about the termination of these network connections is displayed.
Pause protection
– computer protection and control will resume after the amount of time that isspeci�ed in the drop-down list below.
– computer protection and control will resume after you restart theapplication or restart the operating system. Automatic startup of the application must be enabled to usethis option.
– computer protection and control will resume when you decide to re-enable them.
Pause for <time period>
Pause until application restart
Pause
Pause protection

115
Application icon context menu
To resume computer protection and control:
1. Right-click to bring up the context menu of the application icon that is in the taskbar noti�cation area.
2. In the context menu, select .
You can resume computer protection and control at any time, regardless of the computer protection andcontrol pause option that you selected previously.
Kaspersky Endpoint Security will pause the operation of all protection and control components that are notmarked by a lock ( ) in the policy. Prior to performing this operation, it is recommended to disable the KasperskySecurity Center policy.
Resume protection

116
Kaspersky Endpoint Security does not scan �les whose contents are located in OneDrive cloud storage, andcreates log entries stating that these �les have not been scanned.
Full Scan
Kaspersky experts recommend that you do not change the scan scope of the Full Scan task.
To conserve computer resources, it is recommended to run a background scan task instead of a full scan task.This will not a�ect the security level of the computer.
Critical Areas Scan
Kaspersky experts recommend that you do not change the scan scope of the Critical Areas Scan task.
Custom Scan
Scanning the computer
A virus scan is vital to computer security. Regularly run virus scans to rule out the possibility of spreading malwarethat is undetected by protection components due to a low security level setting or for other reasons.
A thorough scan of the entire computer. Kaspersky Endpoint Security scans the following objects:
Kernel memory
Objects that are loaded at startup of the operating system
Boot sectors
Operating system backup
All hard and removable drives
By default, Kaspersky Endpoint Security scans the kernel memory, running processes, and disk boot sectors.
Kaspersky Endpoint Security scans the objects that are selected by the user. You can scan any object from thefollowing list:
Kernel memory
Objects that are loaded at startup of the operating system
Operating system backup
Microsoft Outlook mailbox

117
Background scan
Integrity check
To start or stop a scan task:
1. In the main application window, click the button.
2. Click the button if you want to run the scan task.
To start or stop a scan task when the simpli�ed application interface is displayed:
1. Right-click to bring up the context menu of the application icon that is in the taskbar noti�cation area.
2. In the drop-down list in the context menu, do one of the following:
Hard, removable, and network drives
Any selected �le
Background scan is a scan mode of Kaspersky Endpoint Security that does not display noti�cations for the user.Background scan requires less computer resources than other types of scans (such as a full scan). In this mode,Kaspersky Endpoint Security scans startup objects, the boot sector, system memory, and the system partition.
Kaspersky Endpoint Security checks the application modules for corruption or modi�cations.
Starting or stopping a scan task
Regardless of the selected scan task run mode, you can start or stop a scan task at any time.
Tasks
Start scan
Kaspersky Endpoint Security will start scanning the computer. The application will show the scan progress, thenumber of scanned �les, and the scan time remaining. You can stop the task at any time by clicking the button.
Stop
Tasks
select a non-running scan task to start it
select a running scan task to stop it
select a paused scan task to resume or restart it
Changing the security level
Kaspersky Endpoint Security can use di�erent groups of settings for running a scan. These groups of settingssaved in the application are called security levels: , , . The security levelsettings are considered to be optimal. They are recommended by Kaspersky experts. You can select one of thepreset security levels or manually con�gure security level settings. If you change the security level settings, youcan always revert back to the recommended security level settings.
High Recommended Low Recommended

118
To change a security level:
1. In the main application window, click the button.
2. In the opened window, select the scan task and click the button.
3. In the section, do one of the following:
4. Save your changes.
To change the action to take on infected �les:
1. In the main application window, click the button.
2. In the opened window, select the scan task and click the button.
3. In the block, select one of the following options:
Tasks
Security level
If you want to apply one of the preset security levels, select it with the slider:
If you want to con�gure a custom security level, click the button and de�ne your owncomponent settings.
You can restore the values of preset security levels by clicking the button in the upper part of the window.
. Kaspersky Endpoint Security scans all types of �les. When scanning compound �les, KasperskyEndpoint Security also scans mail-format �les.
. Kaspersky Endpoint Security scans only the speci�ed �le formats on all hard drives,network drives, and removable storage media of the computer, and also embedded OLE objects.Kaspersky Endpoint Security does not scan archives or installation packages.
. Kaspersky Endpoint Security scans only new or modi�ed �les with the speci�ed extensions on allhard drives, removable drives, and network drives of the computer. Kaspersky Endpoint Security doesnot scan compound �les.
High
Recommended
Low
Advanced settings
Restore recommended security level
Changing the action to take on infected �les
By default, on detection of infected �les, Kaspersky Endpoint Security tries to disinfect them, or deletes them ifdisinfection is not possible.
Tasks
Action on threat detection
. If this option is selected, Kaspersky Endpoint Security automaticallyattempts to disinfect all infected �les that are detected. If disinfection fails, Kaspersky Endpoint Securitydeletes the �les.
. If this option is selected, Kaspersky Endpoint Security automaticallyattempts to disinfect all infected �les that are detected. If disinfection is not possible, Kaspersky EndpointSecurity adds the information about the infected �les that are detected to the list of active threats.
. If this option is selected, Kaspersky Endpoint Security adds the information about infected �les tothe list of active threats on detection of these �les.
Disinfect; delete if disinfection fails
Disinfect; block if disinfection fails
Inform

119
Before attempting to disinfect or delete an infected �le, Kaspersky Endpoint Security creates a backupcopy of the �le in case you need to restore the �le or if it can be disinfected in the future.
On detection of infected �les that are part of the Windows Store application, Kaspersky Endpoint Securityattempts to delete the �le.
4. Save your changes.
To generate a list of objects to scan:
1. In the main application window, click the button.
2. In the opened window, select the scan task and click the button.
3. Click the link.
4. In the opened window, select the objects that you want to add to the scan scope or exclude from it.
You cannot remove or edit objects that are included in the default scan scope.
5. If you want to add a new object to the scan scope:
a. Click the button.
The folder tree opens.
b. Select the object and click .
You can exclude an object from scans without deleting it from the list of objects in the scan scope. To do so,clear the check box next to the object.
6. Save your changes.
1. There is a low probability of introducing malicious code into �les of certain formats and its subsequentactivation (for example, TXT format). At the same time, there are �le formats that contain executable code(such as .exe, .dll). The executable code may also be contained in �les of formats that are not intended for thispurpose (for example, the DOC format). The risk of intrusion and activation of malicious code in such �les ishigh.
Generating a list of objects to scan
Tasks
Edit scan scope
Add
Select
Selecting the type of �les to scan
When selecting the type of �les to scan, consider the following:

120
2. An intruder may send a virus or another malicious application to your computer in an executable �le that hasbeen renamed with the .txt extension. If you select scanning of �les by extension, the application skips this �leduring scanning. If scanning of �les by format is selected, Kaspersky Endpoint Security analyzes the �le headerregardless of its extension. If this analysis reveals that the �le has the format of an executable �le (for example,EXE), the application scans it.
To select the type of �les to scan:
1. In the main application window, click the button.
2. In the opened window, select the scan task and click the button.
3. Click the button.
4. In the section, specify the type of �les that you want to scan when the selected scan task runs:
Kaspersky Endpoint Security considers �les without an extension as executable ones. Kaspersky EndpointSecurity always scans executable �les regardless of the �le types that you select for scanning.
5. Save your changes.
To optimize �le scanning:
1. In the main application window, click the button.
2. In the opened window, select the scan task and click the button.
3. Click the button.
4. In the block, con�gure the scan settings:
Tasks
Advanced settings
File types
. If this setting is enabled, Kaspersky Endpoint Security checks all �les without exception (all formatsand extensions).
. If this setting is enabled, Kaspersky Endpoint Security scans infectable �les only .Before scanning a �le for malicious code, the internal header of the �le is analyzed to determine the formatof the �le (for example, .txt, .doc, or .exe). The scan also looks for �les with particular �le extensions.
. If this setting is enabled, Kaspersky Endpoint Security scans infectable �lesonly . The �le format is then determined based on the �le's extension.
All �les
Files scanned by format
Files scanned by extension
Optimizing �le scanning
You can optimize �le scanning: reduce scan time and increase the operating speed of Kaspersky Endpoint Security.This can be achieved by scanning only new �les and those �les that have been modi�ed since the previous scan.This mode applies both to simple and to compound �les. You can also set a limit for scanning a single �le. When thespeci�ed time interval expires, Kaspersky Endpoint Security excludes the �le from the current scan (exceptarchives and objects that include several �les).
You can also enable use of the iChecker and iSwift technologies. The iChecker and iSwift technologies optimizethe speed of scanning �les, by excluding �les that have not been modi�ed since the most recent scan.
Tasks
Advanced settings
Scan optimization

121
5. Save your changes.
To con�gure scanning of compound �les:
1. In the main application window, click the button.
2. In the opened window, select the scan task and click the button.
3. Click the button.
4. In the section, specify which compound �les you want to scan: archives, installationpackages, �les in o�ice formats, �les in mail formats, and password-protected archives.
5. If scanning only new and modi�ed �les is disabled, con�gure the settings for scanning each type of compound�le: scan all �les of this type or only new �les.
If scanning only new and modi�ed �les is enabled, Kaspersky Endpoint Security scans only new and modi�ed�les of all types of compound �les.
6. In the block, do one of the following:
Kaspersky Endpoint Security scans large �les that are extracted from archives, regardless of whether the check box is selected.
7. Save your changes.
. Scans only new �les and those �les that have been modi�ed since thelast time they were scanned. This helps reduce the duration of a scan. This mode applies both to simple andto compound �les.
. Limits the duration for scanning a single object.After the speci�ed amount of time, Kaspersky Endpoint Security stops scanning a �le. This helps reduce theduration of a scan.
Scan only new and changed �les
Skip �les that are scanned for longer than N seconds
Scanning compound �les
A common technique of concealing viruses and other malware is to implant them in compound �les, such asarchives or databases. To detect viruses and other malware that are hidden in this way, the compound �le must beunpacked, which may slow down scanning. You can limit the types of compound �les to be scanned and therebyspeed up scanning.
Tasks
Advanced settings
Scan of compound �les
Size limit
If you do not want to unpack large compound �les, select the checkbox and specify the required value in the �eld.
If you want to unpack large compound �les regardless of their size, clear the check box.
Do not unpack large compound �lesMaximum �le size
Do not unpack largecompound �les
Do not unpack large compound �les
Using scan methods

122
To use scan methods:
1. In the main application window, click the button.
2. In the opened window, select the scan task and click the button.
3. Click the button.
4. If you want the application to use heuristic analysis when running the scan task, select the check box in the block. Then use the slider to set the heuristic analysis level: ,
, or .
5. Save your changes.
To use scan technologies:
1. In the main application window, click the button.
2. In the opened window, select the scan task and click the button.
3. Click the button.
4. In the block, select the check boxes next to the names of technologies that you want to useduring a scan:
5. Save your changes.
Kaspersky Endpoint Security uses a scanning technique called Machine learning and signature analysis. Duringsignature analysis, Kaspersky Endpoint Security matches the detected object with records in its database. Basedon the recommendations of Kaspersky experts, machine learning and signature analysis is always enabled.
To increase the e�ectiveness of protection, you can use heuristic analysis. When scanning �les for malicious code,the heuristic analyzer executes instructions in the executable �les. The number of instructions that are executedby the heuristic analyzer depends on the level that is speci�ed for the heuristic analyzer. The heuristic analysis levelensures a balance between the thoroughness of searching for new threats, the load on the resources of theoperating system, and the duration of heuristic analysis.
Tasks
Advanced settings
Heuristic analysisScan methods Light scan
Medium scan Deep scan
Using scan technologies
Tasks
Advanced settings
Scan technologies
. This technology allows increasing scan speed by excluding certain �les from scanning.Files are excluded from scanning by using a special algorithm that takes into account the release date ofKaspersky Endpoint Security databases, the date that the �le was last scanned on, and any modi�cations tothe scanning settings. The iSwift technology is an advancement of the iChecker technology for the NTFS�le system.
. This technology allows increasing scan speed by excluding certain �les from scanning.Files are excluded from scans by using a special algorithm that takes into account the release date ofKaspersky Endpoint Security databases, the date when the �le was last scanned, and any modi�cations tothe scan settings. There are limitations to iChecker Technology: it does not work with large �les and appliesonly to �les with a structure that the application recognizes (for example, EXE, DLL, LNK, TTF, INF, SYS,COM, CHM, ZIP, and RAR).
iSwift technology
iChecker technology

123
To select the scan task run mode:
1. In the main application window, click the button.
2. In the opened window, select the scan task and click the button.
3. Click the button.
4. In the opened window, con�gure the scan task run schedule.
5. Depending on the selected frequency, con�gure advanced settings that specify the task run schedule.
a. Select the if you want Kaspersky EndpointSecurity to run missed scan tasks at the �rst opportunity.
If , , or item is selected in the drop-down list, the check
box is unavailable.
b. If you want Kaspersky Endpoint Security to suspend a task when computer resources are limited, select the check box. Kaspersky Endpoint Security starts the scan task if the
computer is locked or if the screen saver is on.
This schedule option helps to conserve computer resources.
6. Save your changes.
To con�gure the start of a scan task under a di�erent user account:
1. In the main application window, click the button.
2. In the opened window, select the scan task and click the button.
3. Click → .
Selecting the run mode for the scan task
If it is impossible to run the scan task for any reason (for example, the computer is o� at that time), you cancon�gure the skipped task to be run automatically as soon as this becomes possible.
You can postpone the scan task start after application startup if the scan task start time matches the KasperskyEndpoint Security startup time. The scan task can only be run after the speci�ed time interval elapses after thestartup of Kaspersky Endpoint Security.
Tasks
Scan schedule
Run scheduled scan on the next day if computer is turned o�
Every minute Every hour After application startup After every updateRun scan Run scheduled scan on the next day if computer is turned o�
Run only when the computer is idle
Starting a scan task under the account of a di�erent user
By default, a scan task is run with the permissions of the account under which the user logged in to the operatingsystem. However, you may need to run a scan task under a di�erent user account. You can specify a user who hasthe appropriate rights in the settings of the scan task and run the scan task under this user's account.
Tasks
Advanced settings Run scan as

124
4. In the opened window, select the user who requires the rights to start the scan task.
5. Save your changes.
To con�gure scanning of removable drives when they are connected:
1. In the main application window, click the button.
2. In the opened window, select the removable drive scan task and click the button.
3. Use the toggle to enable or disable scans of removable drives upon connection to thecomputer.
4. Select the mode for scanning removable drives on connection:
5. If you want Kaspersky Endpoint Security to scan only those removable drives whose size does not exceed aspeci�ed value, select the check box and specify the value (in megabytes) inthe neighboring �eld.
6. Con�gure how the scan progress of a removable disk will be displayed. Do one of the following:
7. To save changes, click the button.
Scanning removable drives when they are connected to the computer
Kaspersky Endpoint Security scans all �les that you run or copy, even if the �le is located on a removable drive (FileThreat Protection component). To prevent the spread of viruses and other malware, you can con�gure automaticscans of removable drives when they are connected to the computer. Kaspersky Endpoint Security automaticallyattempts to disinfect all infected �les that are detected. If disinfection fails, Kaspersky Endpoint Security deletesthe �les. The component keeps a computer secure by running scans that implement machine learning, heuristicanalysis (high level) and signature analysis. Kaspersky Endpoint Security also uses iSwift and iChecker scanoptimization technologies. The technologies are always on and cannot be disabled.
Tasks
Removable drives scan
If this option is selected, when a removable drive is connected Kaspersky Endpoint Securityscans all �les located on the removable drive, including �les embedded within compound objects, archives,distribution packages, and �les in o�ice formats. Kaspersky Endpoint Security does not scan �les in mailformats or password-protected archives.
If this option is selected, after a removable drive is connected Kaspersky Endpoint Securityscans only �les of speci�c formats that are most vulnerable to infection, and does not unpack compoundobjects.
Detailed Scan
Quick Scan
Maximum removable drive size
If you want Kaspersky Endpoint Security to display the removable drive scan progress in a separate window,select the check box.
In the removable drive scan window, the user can stop the scan. To make removable drive scans mandatoryand prevent the user from stopping a scan, select the check box.
If you want Kaspersky Endpoint Security to run a removable drive scan in the background, clear the check box.
Show scan progress
Block the stopping of the scan task
Showscan progress
Save
Background scan

125
When performing a background scan, Kaspersky Endpoint Security does not scan �les whose contents arelocated in OneDrive cloud storage.
To enable background scans of the computer:
1. In the main application window, click the button.
2. In the opened window, select the scan task and click the button.
3. Use the toggle to enable or disable background scans.
4. Save your changes.
You can create the Integrity Check task both in the Kaspersky Security Center 12 Web Console and in theAdministration Console. It is not possible to create a task in the Kaspersky Security Center Cloud Console.
Background scan is a scan mode of Kaspersky Endpoint Security that does not display noti�cations for the user.Background scan requires less computer resources than other types of scans (such as a full scan). In this mode,Kaspersky Endpoint Security scans startup objects, the boot sector, system memory, and the system partition. Abackground scan is started in the following cases:
After an anti-virus database update.
30 minutes after Kaspersky Endpoint Security is started.
Every six hours.
When the computer is idling for �ve minutes or more (the computer is locked or the screensaver is on).
Background scan when the computer is idling is interrupted when any of the following conditions are true:
The computer went into active mode.
If the background scan has not been run for more than ten days, the scan is not interrupted.
The computer (laptop) has switched to battery mode.
Tasks
Background scan
Checking the integrity of application
Kaspersky Endpoint Security checks the application �les in the application installation folder for corruption ormodi�cations. For example, if an application library has an incorrect digital signature, the library is consideredcorrupt. The Integrity check task is intended for scanning application �les. Run the Integrity check task ifKaspersky Endpoint Security detected a malicious object but did not neutralize it.
How to run an application integrity check through the Administration Console (MMC)

126
1. In the Administration Console, go to the folder → .
The list of tasks opens.
2. Click the button.
Step 1. Selecting task type
Step 2. Selecting the devices to which the task will be assigned
Step 3. Con�guring a task start schedule
Step 4. De�ning the task name
Step 5. Completing task creation
Administration Server Tasks
New task
The Task Wizard starts. Follow the instructions of the Wizard.
Select → .Kaspersky Endpoint Security for Windows (11.6.0) Integrity check
Select the computers on which the task will be performed. The following options are available:
Assign the task to an administration group. In this case, the task is assigned to computers included in apreviously created administration group.
Select computers detected by the Administration Server in the network: unassigned devices. The speci�cdevices can include devices in administration groups as well as unassigned devices.
Specify device addresses manually, or import addresses from a list. You can specify NetBIOS names, IPaddresses, and IP subnets of devices to which you want to assign the task.
Con�gure a schedule for starting a task, for example, manually or when a virus outbreak is detected.
Enter a name for the task, for example, Integrity check after the computer was infected .
Exit the Wizard. If necessary, select the check box. You can monitor theprogress of the task in the task properties. As a result, Kaspersky Endpoint Security will check the integrity ofthe application. You can also con�gure an application integrity check schedule in the task properties.
Run task after Wizard �nishes
How to run an application integrity check through the Web Console

127
1. In the main window of Web Console, select → .
The list of tasks opens.
2. Click the button.
The Task Wizard starts.
3. Con�gure the task settings:
a. In the drop-down list, select .
b. In the drop-down list, select .
c. In the �eld, enter a brief description, for example, Check the integrity of theapplication after a computer infection .
d. In the section, select the task scope.
4. Select devices according to the selected task scope option. Click the button.
5. Finish the wizard by clicking the button.
A new task will be displayed in the list of tasks.
6. Select the check box next to the task.
Devices Tasks
Add
Application Kaspersky Endpoint Security for Windows (11.6.0)
Task type Integrity check
Task name
Select devices to which the task will be assigned
Next
Finish
As a result, Kaspersky Endpoint Security will check the integrity of the application. You can also con�gure anapplication integrity check schedule in the task properties.
Application integrity breaches may occur in the following cases:
A malicious object modi�ed �les of Kaspersky Endpoint Security. In this case, perform the procedure forrestoring Kaspersky Endpoint Security using the tools of the operating system. After restoration, run a full scanof the computer and repeat the integrity check.
The digital signature expired. In this case, update Kaspersky Endpoint Security.

128
Regular updates require a license in e�ect. If there is no current license, you will be able to perform an updateonly once.
Updates are downloaded over the HTTPS protocol. They may also be downloaded over the HTTP protocolwhen it is impossible to download updates over the HTTPS protocol.
If the databases are obsolete, the update package may be large, which may cause additional Internet tra�ic(up to several dozen MB).
Updating databases and application software modules
Updating the databases and application modules of Kaspersky Endpoint Security ensures up-to-date protectionon your computer. New viruses and other types of malware appear worldwide on a daily basis. Kaspersky EndpointSecurity databases contain information about threats and ways of neutralizing them. To detect threats quickly, youare urged to regularly update the databases and application modules.
The main update source for Kaspersky Endpoint Security is Kaspersky update servers.
Your computer must be connected to the Internet to successfully download the update package from Kasperskyupdate servers. By default, the Internet connection settings are determined automatically. If you are using a proxyserver, you need to con�gure the proxy server settings.
While performing an update, the following objects are downloaded and installed on your computer:
Kaspersky Endpoint Security databases. Computer protection is provided using databases that containsignatures of viruses and other threats and information on ways to neutralize them. Protection componentsuse this information when searching for and neutralizing infected �les on your computer. The databases areconstantly updated with records of new threats and methods for counteracting them. Therefore, werecommend that you update the databases regularly.
In addition to the Kaspersky Endpoint Security databases, the network drivers that enable the application'scomponents to intercept network tra�ic are updated.
Application modules. In addition to the databases of Kaspersky Endpoint Security, you can also update theapplication modules. Updating the application modules �xes vulnerabilities in Kaspersky Endpoint Security, addsnew functions, or enhances existing functions.
While updating, the application modules and databases on your computer are compared against the up-to-dateversion at the update source. If your current databases and application modules di�er from their respective up-to-date versions, the missing portion of the updates is installed on your computer.
Context help �les can be updated together with application module updates.
Information about the current status of Kaspersky Endpoint Security databases is displayed in the sectionin the window.
UpdateTasks
Information on update results and on all events that occur during the performance of the update task is logged inthe Kaspersky Endpoint Security report.
Database and application module update scenarios

129
Updating the databases and application modules of Kaspersky Endpoint Security ensures up-to-date protectionon your computer. New viruses and other types of malware appear worldwide on a daily basis. Kaspersky EndpointSecurity databases contain information about threats and ways of neutralizing them. To detect threats quickly, youare urged to regularly update the databases and application modules.
The following objects are updated on users' computers:
Anti-virus databases. Anti-virus databases include databases of malware signatures, description of networkattacks, databases of malicious and phishing web addresses, databases of banners, spam databases, and otherdata.
Application modules. Module updates are intended for eliminating vulnerabilities in the application and toimprove computer protection methods. Module updates may change the behavior of application componentsand add new capabilities.
Kaspersky Endpoint Security supports the following scenarios for updating databases and application modules:
Update from Kaspersky servers.
Kaspersky update servers are located in various countries throughout the world. This ensures high reliability ofupdates. If an update cannot be performed from one server, Kaspersky Endpoint Security switches over to thenext server.
Update from Kaspersky servers.
Centralized update.
Centralized update reduces external Internet tra�ic, and provides for convenient monitoring of the update.
Centralized update consists of the following steps:
1. Download the update package to a repository within the organization's network.
The update package is downloaded to the repository by the Administration Server task named Downloadupdates to Administration Server repository.
2. Download the update package to a shared folder (optional).
You can download the update package to a shared folder by using the following methods:
3. Distribute the update package to client computers.
The update package is distributed to client computers by the Kaspersky Endpoint Security Update task. Youcan create an unlimited number of update tasks for each administration group.
Using Kaspersky Endpoint Security Update task. The task is intended for one of the computers in thelocal company network.
Using the Kaspersky Update Utility. For detailed information about using Kaspersky Update Utility, refer toKaspersky Knowledge Base .

130
Updating from a server repository
Updating from a shared folder
Updating using Kaspersky Update Utility
For the Web Console, the default list of update sources contains the Kaspersky Security Center AdministrationServer and Kaspersky update servers. For the Kaspersky Security Center Cloud Console, the default list of updatesources contains distribution points and Kaspersky update servers. For more details about distribution points,refer to Kaspersky Security Center Cloud Console Help. You can add other update sources to the list. You canspecify HTTP/FTP servers and shared folders as update sources. If an update cannot be performed from anupdate source, Kaspersky Endpoint Security switches over to the next one.
Updates are downloaded from Kaspersky update servers or from other FTP- or HTTP servers over standardnetwork protocols. If connection to a proxy server is required for accessing the update source, specify the proxyserver settings in Kaspersky Endpoint Security policy settings.
Updating from a server repository
To conserve Internet tra�ic, you can con�gure updates of databases and application modules on computers ofthe organization's LAN from a server repository. For this purpose, Kaspersky Security Center must download anupdate package to the repository (FTP- or HTTP server, network or local folder) from Kaspersky update servers.Other computers on the organization's LAN will be able to receive the update package from the server repository.

131
1. Con�gure download of an update package to the Administration Server repository (Download updates toAdministration Server repository task).
2. Con�gure database and application module updates from the speci�ed server repository to the remainingcomputers on the organization's LAN (Update task).
Updating from a server repository
To con�gure download of an update package to the server repository:
1. In the main window of Web Console, select → .
The list of tasks opens.
2. Select the Administration Server task.
The task properties window opens.
The Download updates to the repository Administration Server task is created automatically by the InitialCon�guration Wizard of Kaspersky Security Center 12 Web Console, and this task may only have one singleinstance.
3. Select the tab.
4. In the section, click .
5. In the �eld, specify the address of FTP- or HTTP server, network folder or local folderwhere Kaspersky Security Center copies the update package received from Kaspersky update servers.
The following path format is used for update source:
6. Save your changes.
To con�gure Kaspersky Endpoint Security update from the speci�ed server storage:
1. In the main window of Web Console, select → .
The list of tasks opens.
Con�guring database and application module updates from a server repository consists of the following steps:
Devices Tasks
Download updates to the repository
Application settings
Other settings Con�gure
Update storage folder
For an FTP or HTTP server, enter its web address or IP address.
For example, http://dnl-01.geo.kaspersky.com/ or 93.191.13.103 .
For an FTP server, you can specify the authentication settings within the address in the following format:ftp://<user name>:<password>@<node>:<port> .
For a network folder, enter the UNC path.
For example, \\ Server\Share\Update distribution .
For a local folder, enter the full path to that folder.
For example, C:\Documents and Settings\All Users\Application Data\KasperskyLab\AVP11\Update distribution\ .
Devices Tasks

132
2. Click the task for Kaspersky Endpoint Security.
The task properties window opens.
The Update task is created automatically by the Initial Con�guration Wizard of Kaspersky Security Center. Tocreate the Update task, install the Kaspersky Endpoint Security for Windows web plug-in while running theWizard.
3. Select the tab → .
4. In the list of update sources, click the button.
5. In the �eld, specify the address of the FTP- or HTTP server, network folder or local folder whereKaspersky Security Center will copy the update package received from Kaspersky servers.
The address of the update source must match the address you speci�ed in the �eld when you con�gured download of updates to the server storage (see the instruction above).
6. In the section select .
7. Click .
8. Con�gure the priorities of update sources by using the and buttons.
9. Click the button.
1. Con�guring database and application module updates from a server repository.
2. Enable copying of an update package to a shared folder on one of the computers on the enterprise LAN (seethe instructions below).
3. Con�gure database and application module updates from the speci�ed shared folder to the remainingcomputers on the enterprise LAN (see the instructions below).
Update
Application settings Local mode
Add
Source
Folder for storingupdates
Status Enabled
OK
Up Down
Save
If an update cannot be performed from the �rst update source, Kaspersky Endpoint Security automaticallyswitches over to the next source.
Updating from a shared folder
To conserve Internet tra�ic, you can con�gure updates of databases and application modules on computers ofthe organization's LAN from a shared folder. For this purpose, one of the computers on the organization's LANmust receive update packages from the Kaspersky Security Center Administration Server or from Kasperskyupdate servers and then copy the received update package to the shared folder. Other computers on theorganization's LAN will be able to receive the update package from this shared folder.
Con�guring database and application module updates from a shared folder consists of the following steps:

133
Updating from a shared folder
To enable copying of the update package to the shared folder:
1. In the main window of Web Console, select → .
The list of tasks opens.
2. Click the task for Kaspersky Endpoint Security.
The task properties window opens.
The Update task is created automatically by the Initial Con�guration Wizard of Kaspersky Security Center. Tocreate the Update task, install the Kaspersky Endpoint Security for Windows web plug-in while running theWizard.
3. Select the tab → .
4. Con�gure the sources of updates.
The sources of updates can be Kaspersky update servers, Kaspersky Security Center Administration Server,other FTP- or HTTP servers, local folders, or network folders.
5. Select the check box.
6. In the �eld, enter the UNC path to the shared folder (for example, \\Server\Share\Updatedistribution ).
If the �eld is left blank, Kaspersky Endpoint Security will copy the update package to the folder C:\Documentsand Settings\All Users\Application Data\Kaspersky Lab\AVP11\Update distribution\ .
7. Click the button.
The Update task must be assigned for one computer that will serve as the source of updates.
To con�gure updates from a shared folder:
1. In the main window of Web Console, select → .
The list of tasks opens.
2. Click the button.
The Task Wizard starts.
3. Con�gure the task settings:
Devices Tasks
Update
Application settings Local mode
Copy updates to folder
Path
Save
Devices Tasks
Add

134
a. In the drop-down list, select .
b. In the drop-down list, select .
c. In the �eld, enter a brief description, for example, Update from shared folder .
d. In the section, select the task scope.
The Update task must be assigned to the computers of the organization's LAN, except the computerthat serves as the update source.
4. Select devices according to the selected task scope option and click .
5. Finish the wizard by clicking the button.
A new task will be displayed in the table of tasks.
6. Click the newly created Update. task.
The task properties window opens.
7. Go to the section.
8. Select the tab.
9. In the section, click the button.
10. In the �eld, enter the path to the shared folder.
The source address must match the address that you previously speci�ed in the �eld when youcon�gured copying of the update package to the shared folder (see the instructions above).
11. Click .
12. Con�gure the priorities of update sources by using the and buttons.
13. Click the button.
1. Con�guring database and application module updates from a server repository.
2. Install the Kaspersky Update Utility on one of the computers of the organization's LAN.
Application Kaspersky Endpoint Security for Windows (11.6.0)
Task type Update
Task name
Select devices to which the task will be assigned
Next
Create
Application settings
Local mode
Update source Add
Source
Path
OK
Up Down
Save
Updating using Kaspersky Update Utility
To conserve Internet tra�ic, you can con�gure updates of databases and application modules on computers ofthe organization's LAN from a shared folder using the Kaspersky Update Utility. For this purpose, one of thecomputers on the organization's LAN must receive update packages from the Kaspersky Security CenterAdministration Server or from Kaspersky update servers and then copy the received update packages to theshared folder using the utility. Other computers on the organization's LAN will be able to receive the updatepackage from this shared folder.
Con�guring database and application module updates from a shared folder consists of the following steps:

135
3. Con�gure copying of the update package to the shared folder in the Kaspersky Update Utility settings.
4. Con�gure database and application module updates from the speci�ed shared folder to the remainingcomputers on the organization's LAN.
Updating using Kaspersky Update Utility
To con�gure updates from a shared folder:
1. In the main window of Web Console, select → .
The list of tasks opens.
2. Click the task for Kaspersky Endpoint Security.
The task properties window opens.
The Update task is created automatically by the Initial Con�guration Wizard of Kaspersky Security Center. Tocreate the Update task, install the Kaspersky Endpoint Security for Windows web plug-in while running theWizard.
3. Select the tab → .
4. In the list of update sources, click the button.
5. In the �eld, enter the UNC path to the shared folder (for example, \\Server\Share\Updatedistribution ).
The source address must match the address indicated in the Kaspersky Update Utility settings.
6. Click .
7. Con�gure the priorities of update sources by using the and buttons.
8. Click the button.
You can download the Kaspersky Update Utility distribution package from the Kaspersky Technical Supportwebsite . After installing the utility, select the update source (for example, the Administration Server repository)and the shared folder to which the Kaspersky Update Utility will copy update packages. For detailed informationabout using Kaspersky Update Utility, refer to Kaspersky Knowledge Base .
Devices Tasks
Update
Application settings Local mode
Add
Source
OK
Up Down
Save
Updating in mobile mode

136
To con�gure the update settings for mobile mode:
1. In the main window of Web Console, select → .
The list of tasks opens.
2. Click the task for Kaspersky Endpoint Security.
The task properties window opens.
The Update task is created automatically by the Initial Con�guration Wizard of Kaspersky Security Center. Tocreate the Update task, install the Kaspersky Endpoint Security for Windows web plug-in while running theWizard.
Select the tab → .
3. Con�gure the sources of updates. The sources of updates can be Kaspersky update servers, other FTP- andHTTP servers, local folders, or network folders.
4. Click the button.
To start or stop an update task:
1. In the main application window, click the button.
2. In the block, click the button if you want to start theupdate task.
To start or stop the update task when the simpli�ed application interface is displayed:
1. Right-click to bring up the context menu of the application icon that is in the taskbar noti�cation area.
2. In the drop-down list in the context menu, do one of the following:
Mobile mode is the mode of Kaspersky Endpoint Security operation, when a computer leaves the organizationnetwork perimeter (o�line computer). For more details about working with o�line computers and out-of-o�iceusers, refer to Kaspersky Security Center Help .
An o�line computer outside of the organization's network cannot connect to the Administration Server to updatedatabases and application modules. By default, only Kaspersky update servers are used as update source forupdating databases and application modules in mobile mode. The use of a proxy server to connect to the Internetis determined by a special out-of-o�ice policy. The out-of-o�ice policy must be created separately. WhenKaspersky Endpoint Security is switched to mobile mode, the update task is started every two hours.
Devices Tasks
Update
Application settings Mobile mode
Save
As a result, the databases and application modules will be updated on user computers when they switch tomobile mode.
Starting and stopping an update task
Regardless of the selected update task run mode, you can start or stop a Kaspersky Endpoint Security updatetask at any time.
Database update
Update of databases and application modules Update
Kaspersky Endpoint Security will start updating the application modules and databases. The application will
display the task progress, the size of the downloaded �les, and the update source. You can click the buttonto stop this task at any time.
Tasks
select a non-running update task to start it

137
To start an update task under a di�erent user account:
1. In the main application window, click the button.
2. Select the Update task and click the link.
The Update task properties open.
3. Click the button.
4. In the opened window, select the option.
5. Enter the account credentials of a user with the necessary permissions to access the update source.
6. Save your changes.
To select the update task run mode:
1. In the main application window, click the button.
2. Select the Update task and click the link.
The Update task properties open.
3. Click the button.
4. In the opened window, select the update task run mode:
select a running update task to stop it
select a paused update task to resume or restart it
Starting an update task under the rights of a di�erent user account
By default, the Kaspersky Endpoint Security update task is started on behalf of the user whose account you haveused to log in to the operating system. However, Kaspersky Endpoint Security may be updated from an updatesource that the user cannot access due to a lack of required rights (for example, from a shared folder thatcontains an update package) or an update source for which proxy server authentication is not con�gured. In theKaspersky Endpoint Security settings, you can specify a user that has such rights and start the KasperskyEndpoint Security update task under that user account.
Database update
Run mode: <mode>
User Account Settings
Run database updates with user rights
Selecting the update task run mode
If it is not possible to run the update task for any reason (for example, the computer is not on at that time), you cancon�gure the skipped task to be start automatically as soon as this becomes possible.
You can postpone starting the update task after the application starts if you select the update taskrun mode, and if the start time of Kaspersky Endpoint Security matches the update task start schedule. Theupdate task can only be run after the speci�ed time interval elapses after the startup of Kaspersky EndpointSecurity.
By schedule
Database update
Run mode: <mode>
Set database update mode

138
5. Save your changes.
Kaspersky Endpoint Security does not support updates from HTTPS servers unless they are Kaspersky'supdate servers.
To add an update source:
1. In the main application window, click the button.
2. Select the Update task and click the link.
The Update task properties open.
3. Click the button.
4. In the window, click the button.
5. In the window that opens, specify the address of the FTP or HTTP server, network folder or local folder thatcontains the update package.
The following path format is used for update source:
If you want Kaspersky Endpoint Security to run the update task depending on whether or not an updatepackage is available from the update source, select . The frequency of checks by KasperskyEndpoint Security for update packages increases during virus outbreaks and is less at other times.
If you want to start an update task manually, select .
If you want to con�gure a startup schedule for the update task, select < >. Con�gure theadvanced settings for starting the update task:
Automatically
Manually
By schedule
In the �eld, specify the time interval by which the startof the update task is postponed after the startup of Kaspersky Endpoint Security.
If you want Kaspersky Endpoint Security to run skipped update tasks as soon as possible, select the check box.
Postpone running after application startup for
Runskipped tasks
Adding an update source
An update source is a resource that contains updates for databases and application modules of KasperskyEndpoint Security.
Update sources include the Kaspersky Security Center server, Kaspersky update servers, and network or localfolders.
The default list of update sources includes Kaspersky Security Center and Kaspersky update servers. You can addother update sources to the list. You can specify HTTP/FTP servers and shared folders as update sources.
If several resources are selected as update sources, Kaspersky Endpoint Security tries to connect to them oneafter another, starting from the top of the list, and performs the update task by retrieving the update packagefrom the �rst available source.
Database update
Run mode: <mode>
Select update sources
Add
For an FTP or HTTP server, enter its web address or IP address.

139
6. Click the button.
7. Con�gure the priorities of update sources by using the and buttons.
8. Save your changes.
1. Enabling the copying of an update package to a shared folder on one of the computers on the local areanetwork.
2. Con�gure database and application module updates from the speci�ed shared folder to the remainingcomputers on the organization's LAN.
To enable copying of the update package to the shared folder:
1. In the main application window, click the button.
2. Select the Update task and click the link.
The Update task properties open.
3. In the block, select the check box.
4. Enter the UNC path to the shared folder (for example, \\Server\Share\Update distribution ).
5. Save your changes.
To con�gure updates from a shared folder:
1. In the main application window, click the button.
2. Select the Update task and click the link.
For example, http://dnl-01.geo.kaspersky.com/ or 93.191.13.103 .
For an FTP server, you can specify the authentication settings within the address in the following format:ftp://<user name>:<password>@<node>:<port> .
For a network folder, enter the UNC path.
For example, \\ Server\Share\Update distribution .
For a local folder, enter the full path to that folder.
For example, C:\Documents and Settings\All Users\Application Data\KasperskyLab\AVP11\Update distribution\ .
Select
Up Down
Con�guring updates from a shared folder
To conserve Internet tra�ic, you can con�gure updates of databases and application modules on computers ofthe organization's LAN from a shared folder. For this purpose, one of the computers on the organization's LANmust receive update packages from the Kaspersky Security Center Administration Server or from Kasperskyupdate servers and then copy the received update package to the shared folder. Other computers on theorganization's LAN will be able to receive the update package from this shared folder.
Con�guring database and application module updates from a shared folder consists of the following steps:
Database update
Run mode: <mode>
Distributing updates Copy updates to folder
Database update
Run mode: <mode>

140
The Update task properties open.
3. Click the button.
4. In the window, click the button.
5. In the window that opens, enter the path to the shared folder.
The source address must match the address that you previously speci�ed when you con�gured copying ofthe update package to the shared folder (see the instructions above).
6. Click the button.
7. Con�gure the priorities of update sources by using the and buttons.
8. Save your changes.
After installing an application update, you may be required to restart your computer.
To con�gure application module updates:
1. In the main application window, click the button.
2. Select the Update task and click the link.
The Update task properties open.
3. In the block, select the check box.
4. Select the application module updates that you want to install.
Select update sources
Add
Select
Up Down
Updating application modules
Application module updates �x errors, improve performance, and add new features. When a new applicationmodule update becomes available, you need to con�rm installation of the update. You can con�rm installation of anapplication module update either in the application interface or in Kaspersky Security Center. When an updatebecomes available, the application will show one of the following noti�cations in the main window of KasperskyEndpoint Security: important update ( ), or critical update ( ). If application module updates require reviewing andaccepting the terms of the End User License Agreement, the application installs updates after the terms of theEnd User License Agreement have been accepted. For details about keeping track of application module updatesand con�rming an update in Kaspersky Security Center, please refer to the Kaspersky Security Center Help .
Database update
Run mode: <mode>
Downloading and installing updates of application modules Download updates ofapplication modules
. If this option is selected, when application module updates areavailable Kaspersky Endpoint Security installs critical updates automatically and all other application moduleupdates only after their installation is approved locally via the application interface or on the side ofKaspersky Security Center.
. If this option is selected, when application module updates are availableKaspersky Endpoint Security installs them only after their installation is approved locally via the applicationinterface or on the side of Kaspersky Security Center. This option is selected by default.
Install critical and approved updates
Install only approved updates

141
5. Save your changes.
To con�gure a connection to update sources through a proxy server:
1. In the main window of Web Console, click .
The Administration Server properties window opens.
2. Go to the section.
3. Select the check box.
4. Con�gure the proxy server connection settings: proxy server address, port, and authentication settings (username and password).
5. Click the button.
To disable use of a proxy server for a speci�c administration group:
1. In the main window of Web Console, select → .
2. Click the name of the Kaspersky Endpoint Security policy for computers on which you want to disable use of aproxy server.
The policy properties window opens.
3. Select the tab.
4. Go to the → section.
5. In the section, select .
6. Click .
7. Con�rm your changes by clicking .
To con�gure the proxy server settings in the application interface:
1. In the lower part of the main application window, click the button.
2. In the application settings window, select .
3. In the block, click the link.
4. In the opened window, select one of the following options for determining the proxy server address:
Using a proxy server for updates
You may be required to specify proxy server settings to download database and application module updates fromthe update source. If there are multiple update sources, proxy server settings are applied for all sources. If a proxyserver is not needed for some update sources, you can disable use of a proxy server in the policy properties.Kaspersky Endpoint Security will also use a proxy server to access Kaspersky Security Network and activationservers.
Internet access settings
Use proxy server
Save
Devices Policies and pro�les
Application settings
General settings Network settings
Proxy Server Settings Do not use proxy server
OK
Save
Network settings
Proxy server Proxy server settings
.Automatically detect proxy server settings

142
5. If you want to enable authentication on the proxy server, select the checkbox and provide your user account credentials.
6. If you want to disable proxy server use when updating databases and application modules from a shared folder,select the check box.
7. Save your changes.
To roll back the last update:
1. In the main application window, click the button.
2. In the block, click the button.
To start or stop a rollback task when the simpli�ed application interface is displayed:
1. Right-click to bring up the context menu of the application icon that is in the taskbar noti�cation area.
2. In the drop-down list in the context menu, do one of the following:
This option is selected by default. Kaspersky Endpoint Security uses the proxy server settings that arede�ned in the operating system settings.
.
If you selected this option, con�gure the settings for connecting to the proxy server: proxy server addressand port.
Use speci�ed proxy server settings
Use proxy server authentication
Bypass proxy server for local addresses
As a result, Kaspersky Endpoint Security will use the proxy server to download application module and databaseupdates. Kaspersky Endpoint Security will also use the proxy server to access KSN servers and Kasperskyactivation servers. If authentication is required on the proxy server but the user account credentials were notprovided or are incorrect, Kaspersky Endpoint Security will prompt you for the user name and password.
Last update rollback
After the databases and application modules are updated for the �rst time, the function of rolling back thedatabases and application modules to their previous versions becomes available.
Each time that a user starts the update process, Kaspersky Endpoint Security creates a backup copy of thecurrent databases and application modules. This lets you roll back the databases and application modules to theirprevious versions when necessary. Rolling back the last update is useful, for example, when the new databaseversion contains an invalid signature that causes Kaspersky Endpoint Security to block a safe application.
Database update
Rollback of databases to their previous version Roll back
Kaspersky Endpoint Security will start rolling back the last database update. The application will display the
rollback progress, the size of the downloaded �les, and the update source. You can click the button to stopthis task at any time.
Tasks
Select a non-running rollback task to start it.
Select a running rollback task to stop it.
Select a paused rollback task to resume or restart it.
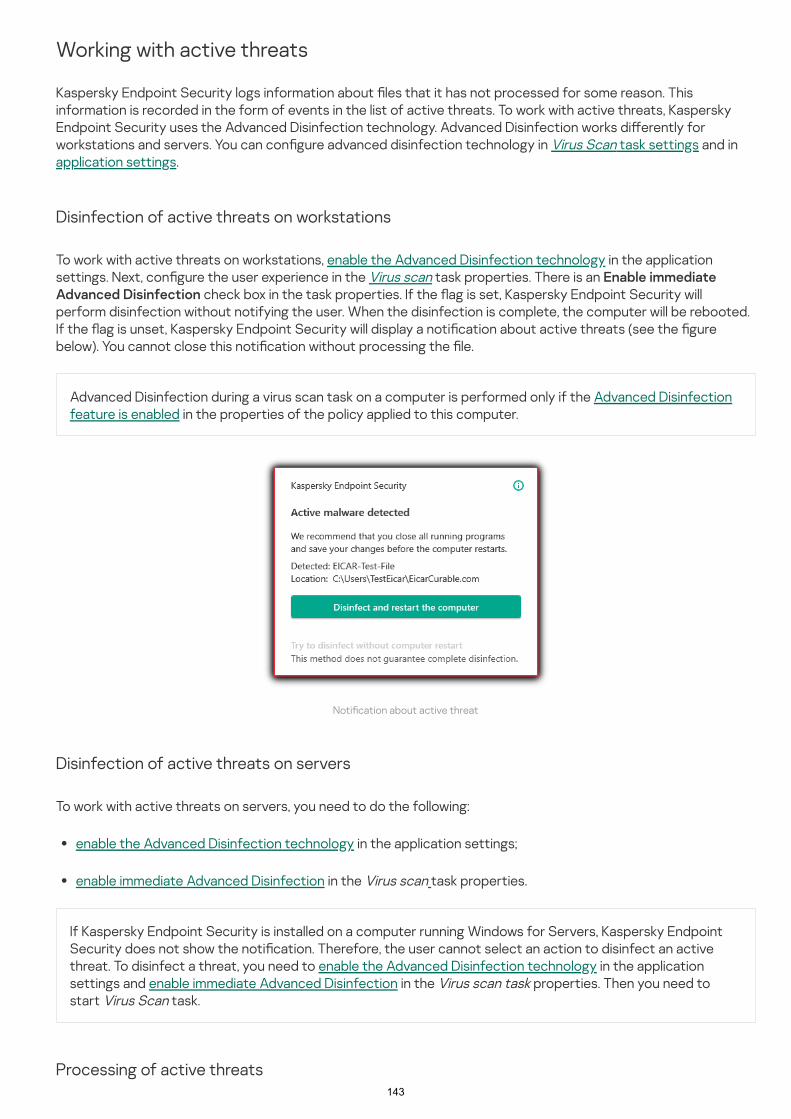
143
Disinfection of active threats on workstations
Advanced Disinfection during a virus scan task on a computer is performed only if the Advanced Disinfectionfeature is enabled in the properties of the policy applied to this computer.
Noti�cation about active threat
Disinfection of active threats on servers
If Kaspersky Endpoint Security is installed on a computer running Windows for Servers, Kaspersky EndpointSecurity does not show the noti�cation. Therefore, the user cannot select an action to disinfect an activethreat. To disinfect a threat, you need to enable the Advanced Disinfection technology in the applicationsettings and enable immediate Advanced Disinfection in the Virus scan task properties. Then you need tostart Virus Scan task.
Processing of active threats
Working with active threats
Kaspersky Endpoint Security logs information about �les that it has not processed for some reason. Thisinformation is recorded in the form of events in the list of active threats. To work with active threats, KasperskyEndpoint Security uses the Advanced Disinfection technology. Advanced Disinfection works di�erently forworkstations and servers. You can con�gure advanced disinfection technology in Virus Scan task settings and inapplication settings.
To work with active threats on workstations, enable the Advanced Disinfection technology in the applicationsettings. Next, con�gure the user experience in the Virus scan task properties. There is an
check box in the task properties. If the �ag is set, Kaspersky Endpoint Security willperform disinfection without notifying the user. When the disinfection is complete, the computer will be rebooted.If the �ag is unset, Kaspersky Endpoint Security will display a noti�cation about active threats (see the �gurebelow). You cannot close this noti�cation without processing the �le.
Enable immediateAdvanced Disinfection
To work with active threats on servers, you need to do the following:
enable the Advanced Disinfection technology in the application settings;
enable immediate Advanced Disinfection in the Virus scan task properties.

144
To process active threats:
1. In the main application window, click the button.
The list of active threats opens.
2. Select the object that you want to process.
3. Choose how you want to handle the threat:
An infected �le is considered processed if Kaspersky Endpoint Security performs one of the following actions onthis �le according to the speci�ed application settings while scanning the computer for viruses and other threats:
Disinfect.
Remove.
Delete if disinfection fails.
Kaspersky Endpoint Security moves the �le to the list of active threats if, for any reason, Kaspersky EndpointSecurity failed to perform an action on this �le according to the speci�ed application settings while scanning thecomputer for viruses and other threats.
This situation is possible in the following cases:
The scanned �le is unavailable (for example, it is located on a network drive or on a removable drive withoutwrite privileges).
The action that is selected in the section for scan tasks is , and the userselects the action when a noti�cation about the infected �le is displayed.
Main application window when a threat is detected
Action on threat detection InformSkip
Details
. If this option is selected, Kaspersky Endpoint Security automatically attempts to disinfect allinfected �les that are detected. If disinfection fails, Kaspersky Endpoint Security deletes the �les.Resolve

145
. If this option is selected, Kaspersky Endpoint Security deletes the entry from the list of activethreats. If there are no active threats remaining on the list, the computer status will be changed to OK. If theobject is detected again, Kaspersky Endpoint Security will add a new entry to the list of active threats.
. If this option is selected, Kaspersky Endpoint Security opens the folder containingthe object in the �le manager. You can then manually delete the object or move the object to a folder that isnot within the protection scope.
. If this option is selected, Kaspersky Endpoint Security opens the Kaspersky Virus Encyclopediawebsite .
Ignore
Open containing folder
Learn more

146
When attempting to access a �le whose contents are stored in the OneDrive cloud, Kaspersky EndpointSecurity downloads and scans the �le contents.
To enable or disable the File Threat Protection component:
1. In the lower part of the main application window, click the button.
2. In the application settings window, select → → .
3. Use the toggle to enable or disable the component.
4. If you enabled the component, do one of the following in the section:
Computer protection
File Threat Protection
The File Threat Protection component lets you prevent infection of the �le system of the computer. By default,the File Threat Protection component permanently resides in the computer's RAM. The component scans �les onall drives of the computer, as well as on connected drives. The component provides computer protection with thehelp of anti-virus databases, the Kaspersky Security Network cloud service, and heuristic analysis.
The component scans the �les accessed by the user or application. If a malicious �le is detected, KasperskyEndpoint Security blocks the �le operation. The application then disinfects or deletes the malicious �le, dependingon the settings of the File Threat Protection component.
Enabling and disabling File Threat Protection
By default, the File Threat Protection component is enabled and runs in the mode recommended by Kasperskyexperts. For File Threat Protection, Kaspersky Endpoint Security can apply di�erent groups of settings. Thesegroups of settings saved in the application are called security levels: , , . The
security level settings are considered to be the optimal settings recommended by Kasperskyexperts (see the table below). You can select one of the preset security levels or manually con�gure security levelsettings. If you change the security level settings, you can always revert back to the recommended security levelsettings.
High Recommended LowRecommended
Protection Essential Threat Protection File ThreatProtection
File Threat Protection
Security level
If you want to apply one of the preset security levels, select it with the slider:
. When this �le security level is selected, the File Threat Protection component takes the strictestcontrol of all �les that are opened, saved, and started. The File Threat Protection component scans all�le types on all hard drives, removable drives, and network drives of the computer. It also scans archives,installation packages, and embedded OLE objects.
. This �le security level is recommended by Kaspersky Lab experts. The File ThreatProtection component scans only the speci�ed �le formats on all hard drives, removable drives, andnetwork drives of the computer, and embedded OLE objects. The File Threat Protection componentdoes not scan archives or installation packages. The values of settings for the recommended securitylevel are provided in the table below.
High
Recommended

147
5. Save your changes.
File Threat Protection settings recommended by Kaspersky experts (recommended security level)
Parameter Value Description
If this setting is enabled, Kaspersky Endpoint Security scans infectable �lesonly . Before scanning a �le for malicious code, the internal header of the �leis analyzed to determine the format of the �le (for example, .txt, .doc, or .exe).The scan also looks for �les with particular �le extensions.
The technology was developed for detecting threats that cannot bedetected by using the current version of Kaspersky application databases. Itdetects �les that may be infected with an unknown virus or a new variety of aknown virus.
When scanning �les for malicious code, the heuristic analyzer executesinstructions in the executable �les. The number of instructions that areexecuted by the heuristic analyzer depends on the level that is speci�ed forthe heuristic analyzer. The heuristic analysis level ensures a balance betweenthe thoroughness of searching for new threats, the load on the resources ofthe operating system, and the duration of heuristic analysis.
Scans only new �les and those �les that have been modi�ed since the lasttime they were scanned. This helps reduce the duration of a scan. This modeapplies both to simple and to compound �les.
This technology allows increasing scan speed by excluding certain �les fromscanning. Files are excluded from scanning by using a special algorithm thattakes into account the release date of Kaspersky Endpoint Securitydatabases, the date that the �le was last scanned on, and any modi�cationsto the scanning settings. The iSwift technology is an advancement of theiChecker technology for the NTFS �le system.
This technology allows increasing scan speed by excluding certain �les fromscanning. Files are excluded from scans by using a special algorithm that takesinto account the release date of Kaspersky Endpoint Security databases, thedate when the �le was last scanned, and any modi�cations to the scansettings. There are limitations to iChecker Technology: it does not work withlarge �les and applies only to �les with a structure that the applicationrecognizes (for example, EXE, DLL, LNK, TTF, INF, SYS, COM, CHM, ZIP, andRAR).
Scans Microsoft O�ice �les (DOC, DOCX, XLS, PPT and other Microsoftextensions). O�ice format �les include OLE objects as well.
In this mode, File Threat Protection scans an object based on an analysis ofactions taken on the object. For example, when working with a MicrosoftO�ice document, Kaspersky Endpoint Security scans the �le when it is �rst
If you want to con�gure a custom security level, click the button and de�ne your owncomponent settings.
You can restore the values of preset security levels by clicking the button in the upper part of the window.
. The settings of this �le security level ensure maximum scanning speed. The File Threat Protectioncomponent scans only �les with speci�ed extensions on all hard drives, removable drives, and networkdrives of the computer. The File Threat Protection component does not scan compound �les.
Low
Advanced settings
Restore recommended security level
File types Filesscannedbyformat
HeuristicAnalysis
Lightscan
Scan onlynew andchanged�les
Enabled
iSwiftTechnology
Enabled
iCheckerTechnology
Enabled
Scan �lesinMicrosoftO�iceformats
Enabled
Scan mode Smartmode

148
opened and last closed. Intermediate operations that overwrite the �le do notcause it to be scanned.
If this option is selected, Kaspersky Endpoint Security automatically attemptsto disinfect all infected �les that are detected. If disinfection fails, KasperskyEndpoint Security deletes the �les.
File Threat Protection should be paused only as a last resort when it con�icts with some applications. If anycon�icts arise while a component is running, you are advised to contact Kaspersky Technical Support . Thesupport experts will help you set up the File Threat Protection component to run simultaneously with otherapplications on your computer.
To con�gure automatic pausing of File Threat Protection:
1. In the lower part of the main application window, click the button.
2. In the application settings window, select → → .
3. Click the button.
4. In the block, click the link.
5. In the opened window, con�gure the settings for pausing File Threat Protection:
a. Con�gure a schedule for automatically pausing File Threat Protection.
b. Create a list of applications whose operation should cause File Threat Protection to pause its activities.
6. Save your changes.
To change the action taken on infected �les by the File Threat Protection component:
1. In the lower part of the main application window, click the button.
Action onthreatdetection
Disinfect,if notpossible– delete
Automatic pausing of File Threat Protection
You can con�gure File Threat Protection to automatically pause at a speci�ed time or when working with speci�capplications.
Protection Essential Threat Protection File ThreatProtection
Advanced settings
Pause File Threat Protection Pause File Threat Protection
Changing the action taken on infected �les by the File Threat Protectioncomponent
By default, the File Threat Protection component automatically tries to disinfect all infected �les that aredetected. If disinfection fails, the File Threat Protection component deletes these �les.
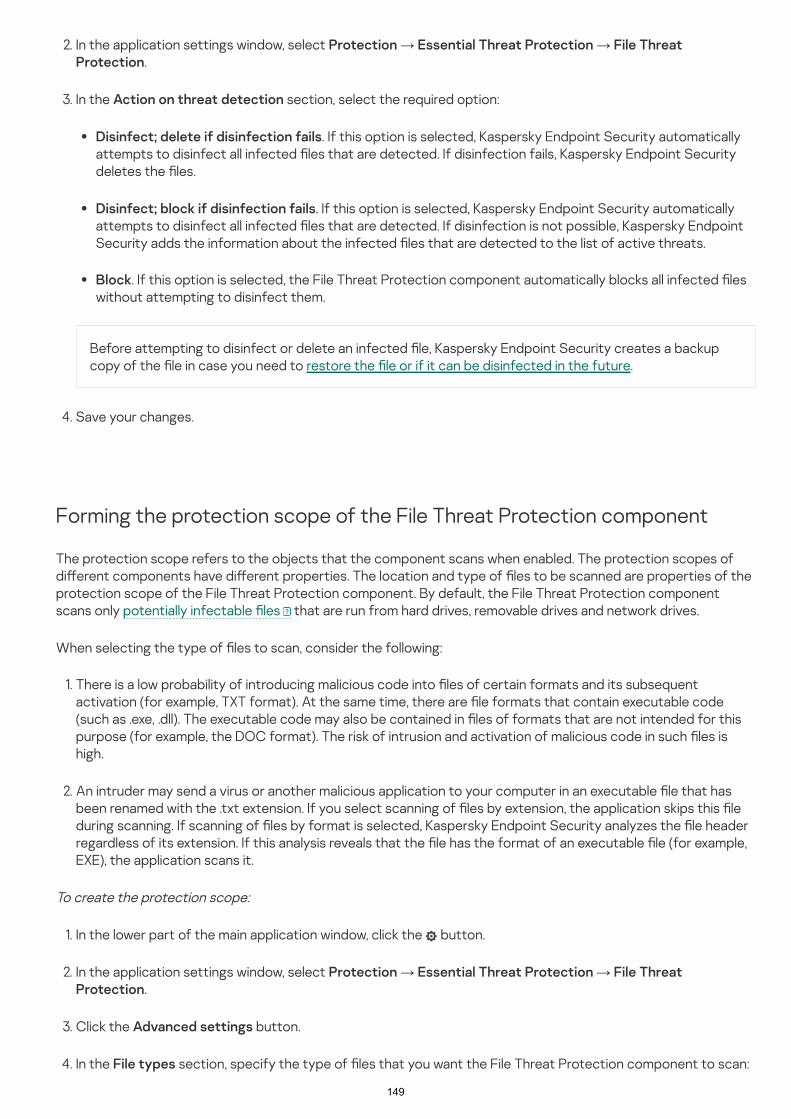
149
2. In the application settings window, select → → .
3. In the section, select the required option:
Before attempting to disinfect or delete an infected �le, Kaspersky Endpoint Security creates a backupcopy of the �le in case you need to restore the �le or if it can be disinfected in the future.
4. Save your changes.
1. There is a low probability of introducing malicious code into �les of certain formats and its subsequentactivation (for example, TXT format). At the same time, there are �le formats that contain executable code(such as .exe, .dll). The executable code may also be contained in �les of formats that are not intended for thispurpose (for example, the DOC format). The risk of intrusion and activation of malicious code in such �les ishigh.
2. An intruder may send a virus or another malicious application to your computer in an executable �le that hasbeen renamed with the .txt extension. If you select scanning of �les by extension, the application skips this �leduring scanning. If scanning of �les by format is selected, Kaspersky Endpoint Security analyzes the �le headerregardless of its extension. If this analysis reveals that the �le has the format of an executable �le (for example,EXE), the application scans it.
To create the protection scope:
1. In the lower part of the main application window, click the button.
2. In the application settings window, select → → .
3. Click the button.
4. In the section, specify the type of �les that you want the File Threat Protection component to scan:
Protection Essential Threat Protection File ThreatProtection
Action on threat detection
. If this option is selected, Kaspersky Endpoint Security automaticallyattempts to disinfect all infected �les that are detected. If disinfection fails, Kaspersky Endpoint Securitydeletes the �les.
. If this option is selected, Kaspersky Endpoint Security automaticallyattempts to disinfect all infected �les that are detected. If disinfection is not possible, Kaspersky EndpointSecurity adds the information about the infected �les that are detected to the list of active threats.
. If this option is selected, the File Threat Protection component automatically blocks all infected �leswithout attempting to disinfect them.
Disinfect; delete if disinfection fails
Disinfect; block if disinfection fails
Block
Forming the protection scope of the File Threat Protection component
The protection scope refers to the objects that the component scans when enabled. The protection scopes ofdi�erent components have di�erent properties. The location and type of �les to be scanned are properties of theprotection scope of the File Threat Protection component. By default, the File Threat Protection componentscans only potentially infectable �les that are run from hard drives, removable drives and network drives.
When selecting the type of �les to scan, consider the following:
Protection Essential Threat Protection File ThreatProtection
Advanced settings
File types

150
5. Click the link.
6. In the opened window, select the objects that you want to add to the protection scope or exclude from it.
You cannot remove or edit objects that are included in the default protection scope.
7. If you want to add a new object to the protection scope:
a. Click the button.
The folder tree opens.
b. Select the object and click .
You can exclude an object from scans without deleting it from the list of objects in the scan scope. To do so,clear the check box next to the object.
8. Save your changes.
To con�gure the use of heuristic analysis in the operation of the File Threat Protection component:
1. In the lower part of the main application window, click the button.
2. In the application settings window, select → → .
3. Click the button.
4. If you want the application to use heuristic analysis for protection against �le threats, select the check box in the block. Then use the slider to set the heuristic analysis level:
. If this setting is enabled, Kaspersky Endpoint Security checks all �les without exception (all formatsand extensions).
. If this setting is enabled, Kaspersky Endpoint Security scans infectable �les only .Before scanning a �le for malicious code, the internal header of the �le is analyzed to determine the formatof the �le (for example, .txt, .doc, or .exe). The scan also looks for �les with particular �le extensions.
. If this setting is enabled, Kaspersky Endpoint Security scans infectable �lesonly . The �le format is then determined based on the �le's extension.
All �les
Files scanned by format
Files scanned by extension
Edit protection scope
Add
Select
Using scan methods
Kaspersky Endpoint Security uses a scanning technique called Machine learning and signature analysis. Duringsignature analysis, Kaspersky Endpoint Security matches the detected object with records in its database. Basedon the recommendations of Kaspersky experts, machine learning and signature analysis is always enabled.
To increase the e�ectiveness of protection, you can use heuristic analysis. When scanning �les for malicious code,the heuristic analyzer executes instructions in the executable �les. The number of instructions that are executedby the heuristic analyzer depends on the level that is speci�ed for the heuristic analyzer. The heuristic analysis levelensures a balance between the thoroughness of searching for new threats, the load on the resources of theoperating system, and the duration of heuristic analysis.
Protection Essential Threat Protection File ThreatProtection
Advanced settings
Heuristicanalysis Scan methods Light

151
, , or .
5. Save your changes.
To con�gure the use of scan technologies in the operation of the File Threat Protection component:
1. In the lower part of the main application window, click the button.
2. In the application settings window, select → → .
3. Click the button.
4. In the block, select the check boxes next to the names of technologies that you want to usefor �le threat protection:
5. Save your changes.
To optimize �le scanning:
1. In the lower part of the main application window, click the button.
2. In the application settings window, select → → .
scan Medium scan Deep scan
Using scan technologies in the operation of the File Threat Protectioncomponent
Protection Essential Threat Protection File ThreatProtection
Advanced settings
Scan technologies
. This technology allows increasing scan speed by excluding certain �les from scanning.Files are excluded from scanning by using a special algorithm that takes into account the release date ofKaspersky Endpoint Security databases, the date that the �le was last scanned on, and any modi�cations tothe scanning settings. The iSwift technology is an advancement of the iChecker technology for the NTFS�le system.
. This technology allows increasing scan speed by excluding certain �les from scanning.Files are excluded from scans by using a special algorithm that takes into account the release date ofKaspersky Endpoint Security databases, the date when the �le was last scanned, and any modi�cations tothe scan settings. There are limitations to iChecker Technology: it does not work with large �les and appliesonly to �les with a structure that the application recognizes (for example, EXE, DLL, LNK, TTF, INF, SYS,COM, CHM, ZIP, and RAR).
iSwift technology
iChecker technology
Optimizing �le scanning
You can optimize the �le scanning that is performed by the File Threat Protection component by reducing the scantime and increasing the operating speed of Kaspersky Endpoint Security. This can be achieved by scanning onlynew �les and those �les that have been modi�ed since the previous scan. This mode applies both to simple and tocompound �les.
You can also enable the use of the iChecker and iSwift technologies that optimize the speed of �le scanning byexcluding �les that have not been modi�ed since the most recent scan.
Protection Essential Threat Protection File ThreatProtection

152
3. Click the button.
4. In the section, select the check box.
5. Save your changes.
The method used to process an infected compound �le (disinfection or deletion) depends on the type of �le.
The File Threat Protection component disinfects compound �les in the RAR, ARJ, ZIP, CAB, and LHA formatsand deletes �les in all other formats (except mail databases).
To con�gure scanning of compound �les:
1. In the lower part of the main application window, click the button.
2. In the application settings window, select → → .
3. Click the button.
4. In the section, specify the types of compound �les that you want to scan: archives,installation packages, or �les in o�ice formats.
5. If scanning only new and modi�ed �les is disabled, con�gure the settings for scanning each type of compound�le: scan all �les of this type or only new �les.
If scanning only new and modi�ed �les is enabled, Kaspersky Endpoint Security scans only new and modi�ed�les of all types of compound �les.
6. Con�gure the advanced settings for scanning compound �les.
Advanced settings
Scan optimization Scan only new and changed �les
Scanning compound �les
A common technique of concealing viruses and other malware is to implant them in compound �les, such asarchives or databases. To detect viruses and other malware that are hidden in this way, the compound �le must beunpacked, which may slow down scanning. You can limit the types of compound �les to be scanned and therebyspeed up scanning.
Protection Essential Threat Protection File ThreatProtection
Advanced settings
Scan of compound �les
.
If this check box is selected, Kaspersky Endpoint Security does not scan compound �les if their sizeexceeds the speci�ed value.
If this check box is cleared, Kaspersky Endpoint Security scans compound �les of all sizes.
Kaspersky Endpoint Security scans large �les that are extracted from archives, regardless of whetherthe check box is selected.
.
Do not unpack large compound �les
Do not unpack large compound �les
Unpack compound �les in the background

153
7. Save your changes.
To change the �le scan mode:
1. In the lower part of the main application window, click the button.
2. In the application settings window, select → → .
3. Click the button.
4. In the section, select the required mode:
5. Save your changes.
If the check box is selected, Kaspersky Endpoint Security provides access to compound �les that are largerthan the speci�ed value before these �les are scanned. In this case, Kaspersky Endpoint Security unpacksand scans compound �les in the background.
Kaspersky Endpoint Security provides access to compound �les that are smaller than this value only afterunpacking and scanning these �les.
If the check box is not selected, Kaspersky Endpoint Security provides access to compound �les only afterunpacking and scanning �les of any size.
Changing the scan mode
Scan mode refers to the condition that triggers �le scanning by the File Threat Protection component. By default,Kaspersky Endpoint Security scans �les in smart mode. In this �le scan mode, the File Threat Protectioncomponent decides whether or not to scan �les after analyzing operations that are performed with the �le by theuser, by an application on behalf of the user (under the account that was used to log in or a di�erent useraccount), or by the operating system. For example, when working with a Microsoft O�ice Word document,Kaspersky Endpoint Security scans the �le when it is �rst opened and last closed. Intermediate operations thatoverwrite the �le do not cause it to be scanned.
Protection Essential Threat Protection File ThreatProtection
Advanced settings
Scan mode
. In this mode, File Threat Protection scans an object based on an analysis of actions taken onthe object. For example, when working with a Microsoft O�ice document, Kaspersky Endpoint Securityscans the �le when it is �rst opened and last closed. Intermediate operations that overwrite the �le do notcause it to be scanned.
. In this mode, File Threat Protection scans objects whenever there is anattempt to open or modify them.
. In this mode, File Threat Protection scans objects only upon an attempt to open them.
. In this mode, File Threat Protection only scans objects upon an attempt to run them.
Smart mode
On access and modi�cation
On access
On execution
Web Threat Protection

154
This component is available if Kaspersky Endpoint Security is installed on a computer that runs on Windowsfor workstations. This component is unavailable if Kaspersky Endpoint Security is installed on a computer thatruns on Windows for servers.
For HTTPS tra�ic monitoring, you need to enable encrypted connections scan.
Website access denied message
The Web Threat Protection component prevents downloads of malicious �les from the Internet, and also blocksmalicious and phishing websites. The component provides computer protection with the help of anti-virusdatabases, the Kaspersky Security Network cloud service, and heuristic analysis.
Kaspersky Endpoint Security scans HTTP-, HTTPS- and FTP-tra�ic. Kaspersky Endpoint Security scans URLs andIP addresses. You can specify the ports that Kaspersky Endpoint Security will monitor, or select all ports.
When a user tries to open a malicious or phishing website, Kaspersky Endpoint Security will block access and showa warning (see the �gure below).
Enabling and disabling Web Threat Protection
By default, the Web Threat Protection component is enabled and runs in the mode recommended by Kasperskyexperts. For Web Threat Protection, Kaspersky Endpoint Security can apply di�erent groups of settings. Thesegroups of settings saved in the application are called security levels: , , . The
web tra�ic security level settings are considered to be the optimal settings recommended byKaspersky experts (see the table below). You can select one of the pre-installed security levels for web tra�ic thatis received or transmitted via the HTTP and FTP protocols, or con�gure a custom web tra�ic security level. If youchange the web tra�ic security level settings, you can always revert to the recommended web tra�ic security levelsettings.
High Recommended LowRecommended

155
To enable or disable the Web Threat Protection component:
1. In the lower part of the main application window, click the button.
2. In the application settings window, select → → .
3. Use the toggle to enable or disable the component.
4. If you enabled the component, do one of the following in the section:
5. Save your changes.
Web Threat Protection settings recommended by Kaspersky experts (recommended security level)
Parameter Value Description
Scanning the links to determine whether they are included in the database ofmalicious web addresses allows you to track websites that have been addedto denylist. The database of malicious web addresses is maintained byKaspersky, included in the application installation package, and updated duringKaspersky Endpoint Security database updates.
The database of phishing web addresses includes the web addresses ofcurrently known websites that are used to launch phishing attacks. Kasperskysupplements this database of phishing links with addresses obtained from theinternational organization known as the Anti-Phishing Working Group.The database of phishing addresses is included in the application installationpackage and supplemented with Kaspersky Endpoint Security databaseupdates.
(Web
The technology was developed for detecting threats that cannot be detectedby using the current version of Kaspersky application databases. It detects�les that may be infected with an unknown virus or a new variety of a knownvirus.
Protection Essential Threat Protection Web ThreatProtection
Web Threat Protection
Security level
If you want to apply one of the preset security levels, select it with the slider:
If you want to con�gure a custom security level, click the button and de�ne your owncomponent settings.
You can restore the values of preset security levels by clicking the button in the upper part of the window.
. The security level under which the Web Threat Protection component performs maximum scanningof web tra�ic that the computer receives over the HTTP and FTP protocols. Web Threat Protectionperforms detailed scanning of all web tra�ic objects by using the full set of application databases,and performs the deepest possible heuristic analysis .
. The security level that provides the optimal balance between the performance ofKaspersky Endpoint Security and the security of web tra�ic. The Web Threat Protectioncomponent performs heuristic analysis at the level. This web tra�ic security level isrecommended by Kaspersky specialists. The values of settings for the recommended security level areprovided in the table below.
. The settings of this web tra�ic security level ensure the maximum web tra�ic scanning speed. TheWeb Threat Protection component performs heuristic analysis at the level.
High
Recommended
medium scan
Lowlight scan
Advanced settings
Restore recommended security level
Check iflinks arelisted inthedatabaseofmaliciouslinks
Enabled
Check theURLagainstthedatabaseofphishingURLs
Enabled
Useheuristicanalysis
Mediumscan

156
ThreatProtection)
When web tra�ic is scanned for viruses and other applications that present athreat, the heuristic analyzer performs instructions in the executable �les. Thenumber of instructions that are executed by the heuristic analyzer depends onthe level that is speci�ed for the heuristic analyzer. The heuristic analysis levelensures a balance between the thoroughness of searching for new threats,the load on the resources of the operating system, and the duration ofheuristic analysis.
(Anti-Phishing)
The technology was developed for detecting threats that cannot be detectedby using the current version of Kaspersky application databases. It detects�les that may be infected with an unknown virus or a new variety of a knownvirus.
If this option is selected and an infected object is detected in web tra�ic, theWeb Threat Protection component blocks access to the object and displays amessage in the browser.
To change the action to take on malicious web tra�ic objects:
1. In the lower part of the main application window, click the button.
2. In the application settings window, select → → .
3. In the section, select the action that Kaspersky Endpoint Security performs onmalicious web tra�ic objects:
4. Save your changes.
Useheuristicanalysis
Enabled
Action onthreatdetection
Blockdownload
Changing the action to take on malicious web tra�ic objects
By default, on detection of an infected object in web tra�ic, the Web Threat Protection component blocks accessto the object and displays a noti�cation about the action.
Protection Essential Threat Protection Web ThreatProtection
Action on threat detection
. If this option is selected and an infected object is detected in web tra�ic, the Web ThreatProtection component blocks access to the object and displays a message in the browser.
. If this option is selected and an infected object is detected in web tra�ic, Kaspersky EndpointSecurity allows this object to be downloaded to the computer but adds information about the infectedobject to the list of active threats.
Block download
Inform
Scanning URLs against databases of phishing and malicious web addresses
Scanning links to see if they are included in the list of phishing web addresses allows avoiding phishing attacks. Aphishing attack can be disguised, for example, as an email message supposedly from your bank with a link to theo�icial website of the bank. By clicking the link, you go to an exact copy of the bank's website and can even see itsreal web address in the browser, even though you are on a counterfeit site. From this point forward, all of youractions on the site are tracked and can be used to steal your money.

157
To con�gure the Web Threat Protection component to check links against the databases of phishing and maliciousweb addresses:
1. In the lower part of the main application window, click the button.
2. In the application settings window, select → → .
3. Click the button.
4. Do the following:
5. Save your changes.
To con�gure the use of heuristic analysis:
Because links to phishing websites may be received not only in an email message but also from other sources suchas ICQ messages, the Web Threat Protection component monitors attempts to access a phishing website at theweb tra�ic scan level and blocks access to such websites. Lists of phishing URLs are included with the KasperskyEndpoint Security distribution kit.
Protection Essential Threat Protection Web ThreatProtection
Advanced settings
If you want the Web Threat Protection component to check links against the databases of malicious webaddresses, in the section, select the
check box. Scanning the links to determine whether they are included in the database of maliciousweb addresses allows you to track websites that have been added to denylist. The database of maliciousweb addresses is maintained by Kaspersky, included in the application installation package, and updatedduring Kaspersky Endpoint Security database updates.
Kaspersky Endpoint scans all links to determine if they are listed in databases of malicious webaddresses. The application's secure connection scan settings do not a�ect the link scanningfunctionality. In other words, if encrypted connection scans are disabled, Kaspersky Endpoint Securitychecks links against databases of malicious web addresses even if network tra�ic is transmitted overan encrypted connection.
If you want the Web Threat Protection component to check links against the databases of phishing webaddresses, select the check box in the
block. The database of phishing web addresses includes the web addresses of currently knownwebsites that are used to launch phishing attacks. Kaspersky supplements this database of phishing linkswith addresses obtained from the international organization known as the Anti-Phishing Working Group.The database of phishing addresses is included in the application installation package and supplementedwith Kaspersky Endpoint Security database updates.
You can also check links against the reputation databases of Kaspersky Security Network.
Scan methods Check the URL against the database of maliciousURLs
Check the URL against the database of phishing URLs Anti-Phishing
Using heuristic analysis in the operation of the Web Threat Protectioncomponent
To increase the e�ectiveness of protection, you can use heuristic analysis. During heuristic analysis, KasperskyEndpoint Security analyzes the activity of applications in the operating system. Heuristic analysis can detectthreats for which there are currently no records in the Kaspersky Endpoint Security databases.

158
1. In the lower part of the main application window, click the button.
2. In the application settings window, select → → .
3. Click the button.
4. In the block, select the check box if you want the application to useheuristic analysis when scanning web tra�ic for viruses and other malware. Then use the slider to set theheuristic analysis level: , , or .
5. In the block, select the check box if you want the application to useheuristic analysis when scanning web pages for phishing links.
6. Save your changes.
A URL may be the address of a speci�c web page or the address of a website.
To create a list of trusted web addresses:
1. In the lower part of the main application window, click the button.
2. In the application settings window, select → → .
3. Click the button.
4. Select the check box.
If the check box is selected, the Web Threat Protection component does not scan the content of web pages orwebsites whose addresses are included in the list of trusted web addresses. You can add both the speci�caddress and the address mask of a web page/website to the list of trusted web addresses.
5. Create a list of URLs / web pages whose content you trust.
6. Save your changes.
Protection Essential Threat Protection Web ThreatProtection
Advanced settings
Scan methods Use heuristic analysis
Light scan Medium scan Deep scan
Anti-Phishing Use heuristic analysis
Creating the list of trusted web addresses
You can create a list of URLs whose content you trust. The Web Threat Protection component does not analyzeinformation from trusted web addresses to check them for viruses or other threats. This option may be useful, forexample, if the Web Threat Protection component interferes with the downloading of a �le from a known website.
Protection Essential Threat Protection Web ThreatProtection
Advanced settings
Do not scan web tra�ic from trusted web addresses
Exporting and importing the list of trusted web addresses
You can export the list of trusted web addresses to an XML �le. Then you can modify the �le to, for example, add alarge number of web addresses of the same type. You can also use the export/import function to back up the listof trusted web addresses or to migrate the list to a di�erent server.

159
1. Open the Kaspersky Security Center Administration Console.
2. In the folder in the Administration Console tree, open the folder with the name of theadministration group to which the relevant client computers belong.
3. In the workspace, select the tab.
4. Select the necessary policy and double-click to open the policy properties.
5. In the policy window, select → .
6. Click the button.
7. In the opened window, select the tab.
8. To export the list of trusted web addresses:
a. Select the trusted web addresses that you want to export. To select multiple ports, use the or keys.
If you did not select any trusted web address, Kaspersky Endpoint Security will export all webaddresses.
b. Click the link.
c. In the window that opens, specify the name of the XML �le to which you want to export the list oftrusted web addresses, and select the folder in which you want to save this �le.
d. Click the button.
Kaspersky Endpoint Security exports the entire list of trusted web addresses to the XML �le.
9. To import the list of trusted addresses:
a. Click the link.
In the window that opens, select the XML �le from which you want to import the list of trustedaddresses.
b. Click the button.
If the computer already has a list of trusted addresses, Kaspersky Endpoint Security will prompt you todelete the existing list or add new entries to it from the XML �le.
10. Save your changes.
How to export and import a list of trusted web addresses in the Administration Console (MMC)
Managed devices
Policies
Essential Threat Protection Web Threat Protection
Settings
Trusted web addresses
CTRLSHIFT
Export
Save
Import
Open
How to export and import a list of trusted web addresses in the Web Console and Cloud Console

160
1. In the main window of Web Console, select → .
2. Click the name of the Kaspersky Endpoint Security policy for computers on which you want to export orimport a list of trusted web addresses.
The policy properties window opens.
3. Select the tab.
4. Select → .
5. To export the list of exclusions in the block:
a. Select the trusted web addresses that you want to export.
b. Click the link.
c. In the window that opens, specify the name of the XML �le to which you want to export the list oftrusted web addresses, and select the folder in which you want to save this �le.
d. Click the button.
Kaspersky Endpoint Security exports the entire list of trusted web addresses to the XML �le.
6. To import a list of exclusions in the block:
a. Click the link.
In the window that opens, select the XML �le from which you want to import the list of trustedaddresses.
b. Click the button.
If the computer already has a list of trusted addresses, Kaspersky Endpoint Security will prompt you todelete the existing list or add new entries to it from the XML �le.
7. Save your changes.
This component is available if Kaspersky Endpoint Security is installed on a computer that runs on Windowsfor workstations. This component is unavailable if Kaspersky Endpoint Security is installed on a computer thatruns on Windows for servers.
Devices Policies and pro�les
Application settings
Essential Threat Protection Web Threat Protection
Trusted web addresses
Export
Save
Trusted web addresses
Import
Open
Mail Threat Protection
The Mail Threat Protection component scans the attachments of incoming and outgoing email messages forviruses and other threats. The component also scans messages for malicious and phishing links. By default, the MailThreat Protection component permanently resides in the computer's RAM and scans all messages received orsent using the POP3, SMTP, IMAP, or NNTP protocols, or the Microsoft O�ice Outlook mail client (MAPI). Thecomponent provides computer protection with the help of anti-virus databases, the Kaspersky Security Networkcloud service, and heuristic analysis.

161
The Mail Threat Protection component does not scan messages if the mail client is open in a browser.
To enable or disable the Mail Threat Protection component:
1. In the lower part of the main application window, click the button.
2. In the application settings window, select → → .
3. Use the toggle to enable or disable the component.
4. If you enabled the component, do one of the following in the section:
When a malicious �le is detected in an attachment, Kaspersky Endpoint Security renames the message subject asfollows: [Message is infected] <message subject> or [Infected object deleted] <messagesubject> .
This component interacts with mail clients installed on the computer. For the Microsoft O�ice Outlook mail client,an extension with additional parameters is provided. The Mail Threat Protection extension is embedded in theMicrosoft O�ice Outlook mail client during installation of Kaspersky Endpoint Security.
Enabling and disabling Mail Threat Protection
By default, the Mail Threat Protection component is enabled and runs in the mode recommended by Kasperskyexperts. For Mail Threat Protection, Kaspersky Endpoint Security can apply di�erent groups of settings. Thesegroups of settings saved in the application are called security levels: , , . The
mail security level settings are considered to be the optimal settings recommended by Kasperskyexperts (see the table below). You can select one of the pre-installed email security levels or con�gure a customemail security level. If you have changed the email security level settings, you can always revert to therecommended email security level settings.
High Recommended LowRecommended
Protection Essential Threat Protection Mail ThreatProtection
Mail Threat Protection
Security level
If you want to apply one of the preset security levels, select it with the slider:
. When this email security level is selected, the Mail Threat Protection component scans emailmessages most thoroughly. The Mail Threat Protection component scans incoming and outgoing emailmessages, and performs deep heuristic analysis. The mail security level is recommended for high-risk environments. An example of such an environment is a connection to a free email service from ahome network that is not guarded by centralized email protection.
. The email security level that provides the optimal balance between the performance ofKaspersky Endpoint Security and email security. The Mail Threat Protection component scans incomingand outgoing email messages, and performs medium-level heuristic analysis. This mail tra�ic securitylevel is recommended by Kaspersky specialists. The values of settings for the recommended securitylevel are provided in the table below.
. When this email security level is selected, the Mail Threat Protection component only scansincoming email messages, performs light heuristic analysis, and does not scan archives that are attachedto email messages. At this mail security level, the Mail Threat Protection component scans emailmessages at maximum speed and uses a minimum of operating system resources. The mail securitylevel is recommended for use in a well-protected environment. An example of such an environment mightbe an enterprise LAN with centralized email security.
High
High
Recommended
Low
Low

162
5. Save your changes.
Mail Threat Protection settings recommended by Kaspersky experts (recommended security level)
Parameter Value Description
The Protection scope includes objects that the component checks whenit is run: or .
In order to protect your computers, you need only scan incomingmessages. You can turn on scanning for outgoing messages to preventinfected �les from being sent in archives. You can also turn on thescanning of outgoing messages if you want to prevent �les in particularformats from being sent, such as audio and video �les, for example.
If the check box is selected, scanning of email messages transmitted viathe POP3, SMTP, NNTP, IMAP protocols is enabled on the side of theextension integrated into Microsoft Outlook.
If mail is scanned using the extension for Microsoft Outlook, it isrecommended to use Cached Exchange Mode. For more detailedinformation about Cached Exchange Mode and recommendations on itsuse, refer to the Microsoft Knowledge Base.
Scans archives in the following formats: RAR, ARJ, ZIP, CAB, LHA, JAR, andICE.
Scans Microsoft O�ice �les (DOC, DOCX, XLS, PPT and other Microsoftextensions). O�ice format �les include OLE objects as well.
If this option is selected, the Mail Threat Protection component willreplace the last extension character found in the attached �les of thespeci�ed types with the underscore character (for example,attachment.doc_). Thus, in order to open the �le, the user must renamethe �le.
The technology was developed for detecting threats that cannot bedetected by using the current version of Kaspersky applicationdatabases. It detects �les that may be infected with an unknown virus ora new variety of a known virus.
When scanning �les for malicious code, the heuristic analyzer executesinstructions in the executable �les. The number of instructions that areexecuted by the heuristic analyzer depends on the level that is speci�edfor the heuristic analyzer. The heuristic analysis level ensures a balancebetween the thoroughness of searching for new threats, the load on theresources of the operating system, and the duration of heuristic analysis.
When an infected object is detected in an inbound or outbound message,Kaspersky Endpoint Security attempts to disinfect the detected object.The user will be able to access the message with a safe attachment. Ifthe object cannot be disinfected, Kaspersky Endpoint Security deletesthe infected object. Kaspersky Endpoint Security adds information aboutthe performed action to the message subject: [Infected object wasdeleted] <message subject> .
If you want to con�gure a custom security level, click the button and de�ne your owncomponent settings.
You can restore the values of preset security levels by clicking the button in the upper part of the window.
Advanced settings
Restore recommended security level
Protectionscope
Incomingandoutgoingmessages
Incoming and outgoing messages Incoming messages only
ConnectMicrosoftOutlookextension
Enabled
Scanattachedarchives
Enabled
ScanattachedO�iceformats
Enabled
Attachment�lter
Renameattachmentsof selectedtypes
HeuristicAnalysis
Mediumscan
Action onthreatdetection
Disinfect, ifnot possible– delete

163
To change the action to take on infected email messages:
1. In the lower part of the main application window, click the button.
2. In the application settings window, select → → .
3. In the section, select the action for Kaspersky Endpoint Security to perform whenan infected message is detected:
4. Save your changes.
To form the protection scope of the Mail Threat Protection component:
1. In the lower part of the main application window, click the button.
Changing the action to take on infected email messages
By default, the Mail Threat Protection component automatically attempts to disinfect all infected email messagesthat are detected. If disinfection fails, the Mail Threat Protection component deletes the infected email messages.
Protection Essential Threat Protection Mail ThreatProtection
Action on threat detection
. When an infected object is detected in an inbound or outboundmessage, Kaspersky Endpoint Security attempts to disinfect the detected object. The user will be able toaccess the message with a safe attachment. If the object cannot be disinfected, Kaspersky EndpointSecurity deletes the infected object. Kaspersky Endpoint Security adds information about the performedaction to the message subject: [Infected object was deleted] <message subject> .
. When an infected object is detected in an inbound message,Kaspersky Endpoint Security attempts to disinfect the detected object. The user will be able to access themessage with a safe attachment. If the object cannot be disinfected, Kaspersky Endpoint Security adds awarning to the message subject: [Message infected] <message subject> . The user will be able toaccess the message with the original attachment. When an infected object is detected in an outboundmessage, Kaspersky Endpoint Security attempts to disinfect the detected object. If the object cannot bedisinfected, Kaspersky Endpoint Security blocks transmission of the message, and the mail client shows anerror.
. If an infected object is detected in an inbound message, Kaspersky Endpoint Security adds a warningto the message subject: [Message infected] <message subject> . The user will be able to access themessage with the original attachment. If an infected object is detected in an outbound message, KasperskyEndpoint Security blocks transmission of the message, and the mail client shows an error.
Disinfect; delete if disinfection fails
Disinfect; block if disinfection fails
Block
Forming the protection scope of the Mail Threat Protection component
Protection scope refers to the objects that are scanned by the component when it is active. The protectionscopes of di�erent components have di�erent properties. The properties of the protection scope of the MailThreat Protection component include the settings for integrating the Mail Threat Protection component into mailclients, and the type of email messages and email protocols whose tra�ic is scanned by the Mail Threat Protectioncomponent. By default, Kaspersky Endpoint Security scans both incoming and outgoing email messages andtra�ic of the POP3, SMTP, NNTP, and IMAP protocols, and is integrated into the Microsoft O�ice Outlook mailclient.

164
2. In the application settings window, select → → .
3. Click the button.
4. In the block, select the messages to scan:
In order to protect your computers, you need only scan incoming messages. You can turn on scanning foroutgoing messages to prevent infected �les from being sent in archives. You can also turn on the scanning ofoutgoing messages if you want to prevent �les in particular formats from being sent, such as audio and video�les, for example.
If you choose to scan only incoming messages, it is recommended that you perform a one-time scan of alloutgoing messages because there is a chance that your computer has email worms that are being spreadover email. This helps to avoid problems resulting from unmonitored mass emailing of infected messagesfrom your computer.
5. In the section, do the following:
6. Save your changes.
Protection Essential Threat Protection Mail ThreatProtection
Advanced settings
Protection scope
.
.
Incoming and outgoing messages
Incoming messages only
Connectivity
If you want the Mail Threat Protection component to scan messages that are transmitted via the POP3,SMTP, NNTP and IMAP protocols before they arrive on the user's computer, select the
check box.
If you do not want the Mail Threat Protection component to scan messages that are transmitted via thePOP3, SMTP, NNTP and IMAP protocols before they arrive on the user's computer, clear the
check box. In this case, messages are scanned by the Mail ThreatProtection extension embedded in the Microsoft O�ice Outlook mail client after they are received on theuser computer if the check box is selected.
If you use a mail client other than Microsoft O�ice Outlook, messages that are transmitted via thePOP3, SMTP, NNTP and IMAP protocols are not scanned by the Mail Threat Protection component ifthe check box is cleared.
If you want to allow access to Mail Threat Protection component settings from Microsoft O�ice Outlookand enable scanning of messages that are transmitted via the POP3, SMTP, NNTP, IMAP, and MAPI protocolsafter they arrive on the computer using the extension that is embedded into Microsoft O�ice Outlook,select the check box.
If you want to block access to Mail Threat Protection component settings from Microsoft O�ice Outlookand disable scanning of messages that are transmitted via the POP3, SMTP, NNTP, IMAP, and MAPIprotocols after they arrive on the computer using the extension that is embedded into Microsoft O�iceOutlook, clear the check box.
The Mail Threat Protection extension is embedded in the Microsoft O�ice Outlook mail client duringinstallation of Kaspersky Endpoint Security.
ScanPOP3 / SMTP / NNTP / IMAP tra�ic
ScanPOP3 / SMTP / NNTP / IMAP tra�ic
Connect Microsoft Outlook extension
Scan POP3 / SMTP / NNTP / IMAP tra�ic
Connect Microsoft Outlook extension
Connect Microsoft Outlook extension

165
To con�gure scanning of compound �les attached to email messages:
1. In the lower part of the main application window, click the button.
2. In the application settings window, select → → .
3. Click the button.
4. In the section, con�gure the scan settings:
5. Save your changes.
The attachment �ltering functionality is not applied to outgoing email messages.
To con�gure �ltering of attachments:
1. In the lower part of the main application window, click the button.
2. In the application settings window, select → → .
3. Click the button.
4. In the section, do one of the following:
Scanning compound �les attached to email messages
You can enable or disable scanning of message attachments, limit the maximum size of message attachments tobe scanned, and limit the maximum message attachment scan duration.
Protection Essential Threat Protection Mail ThreatProtection
Advanced settings
Scan of compound �les
. Scans Microsoft O�ice �les (DOC, DOCX, XLS, PPT andother Microsoft extensions). O�ice format �les include OLE objects as well.
. Scans archives in the following formats: RAR, ARJ, ZIP, CAB, LHA, JAR, and ICE.
. If this check box is selected, the Mail Threat Protection componentexcludes archives attached to email messages from scanning if their size exceeds the speci�ed value. If thecheck box is cleared, the Mail Threat Protection component scans email attachment archives of any size.
. If the check box is selected, the time that is allocated for scanningarchives attached to email messages is limited to the speci�ed period.
Scan attached �les of Microsoft O�ice formats
Scan attached archives
Do not scan archives larger than N MB
Limit archive scan time to N seconds
Filtering email message attachments
Malicious applications can be distributed in the form of attachments in email messages. You can con�gure �lteringbased on the type of message attachments so that �les of the speci�ed types are automatically renamed ordeleted. By renaming an attachment of a certain type, Kaspersky Endpoint Security can protect your computeragainst automatic execution of a malicious application.
Protection Essential Threat Protection Mail ThreatProtection
Advanced settings
Attachment �lter

166
5. If you selected the option or the option during the previous step, select the check boxes opposite the relevant types of �les.
6. Save your changes.
If you do not want the Mail Threat Protection component to �lter message attachments, select the option.
If you want the Mail Threat Protection component to rename message attachments of the speci�ed types,select the option.
If you want the Mail Threat Protection component to delete message attachments of the speci�ed �letypes, select the option.
Disable�ltering
Rename attachments of selected types
Delete attachments of selected types
Rename attachments of selected types Delete attachments of selectedtypes
Exporting and importing extensions for attachment �ltering
You can export the list of attachment �lter extensions to an XML �le. You can use the export/import function toback up the list of extensions or to migrate the list to a di�erent server.
How to export and import a list of attachment �lter extensions in the Administration Console (MMC)

167
1. Open the Kaspersky Security Center Administration Console.
2. In the folder in the Administration Console tree, open the folder with the name of theadministration group to which the relevant client computers belong.
3. In the workspace, select the tab.
4. Select the necessary policy and double-click to open the policy properties.
5. In the policy window, select → .
6. In the section, click the button.
7. In the opened window, select the tab.
8. To export the list of extensions:
a. Select the extensions that you want to export. To select multiple ports, use the or keys.
b. Click the link.
c. In the window that opens, specify the name of the XML �le to which you want to export the list ofextensions, and select the folder in which you want to save this �le.
d. Click the button.
Kaspersky Endpoint Security exports the entire list of extensions to the XML �le.
9. To import the list of extensions:
a. Click the link.
b. In the window that opens, select the XML �le from which you want to import the list of extensions.
c. Click the button.
If the computer already has a list of extensions, Kaspersky Endpoint Security will prompt you to deletethe existing list or add new entries to it from the XML �le.
10. Save your changes.
Managed devices
Policies
Essential Threat Protection Mail Threat Protection
Security level Settings
Attachment �lter
CTRL SHIFT
Export
Save
Import
Open
How to export and import a list of attachment �lter extensions in the Web Console and Cloud Console

168
1. In the main window of Web Console, select → .
2. Click the name of the Kaspersky Endpoint Security policy for computers on which you want to export orimport a list of exclusions.
The policy properties window opens.
3. Select the tab.
4. Select → .
5. To export the list of extensions in the block:
a. Select the extensions that you want to export.
b. Click the link.
c. In the window that opens, specify the name of the XML �le to which you want to export the list ofextensions, and select the folder in which you want to save this �le.
d. Click the button.
Kaspersky Endpoint Security exports the entire list of extensions to the XML �le.
6. To import a list of extensions in the block:
a. Click the link.
b. In the window that opens, select the XML �le from which you want to import the list of extensions.
c. Click the button.
If the computer already has a list of extensions, Kaspersky Endpoint Security will prompt you to deletethe existing list or add new entries to it from the XML �le.
7. Save your changes.
The Mail Threat Protection extension supports operations with Outlook 2010, 2013, 2016, and 2019.
Devices Policies and pro�les
Application settings
Essential Threat Protection Mail Threat Protection
Attachment �lter
Export
Save
Attachment �lter
Import
Open
Scanning emails in Microsoft O�ice Outlook
During installation of Kaspersky Endpoint Security, the Mail Threat Protection extension is embedded intoMicrosoft O�ice Outlook (hereinafter also referred to as Outlook). It allows you to open the Mail Threat Protectioncomponent settings from within Outlook, and to specify when email messages are to be scanned for viruses andother threats. The Mail Threat Protection extension for Outlook can scan incoming and outgoing messages thatare transmitted via the POP3, SMTP, NNTP, IMAP, and MAPI protocols. Kaspersky Endpoint Security also supportsworking with other email clients (including Microsoft Outlook Express®, Windows Mail, and Mozilla™ Thunderbird™).

169
When working with the Mozilla Thunderbird mail client, the Mail Threat Protection component does not scanmessages that are transmitted via the IMAP protocol for viruses and other threats if �lters are used to movemessages from the folder.
If mail is scanned using the Mail Threat Protection extension for Outlook, it is recommended to use CachedExchange Mode. For more detailed information about Cached Exchange Mode and recommendations on itsuse, refer to the Microsoft Knowledge Base .
To con�gure the operating mode of the Mail Threat Protection extension for Outlook using Kaspersky SecurityCenter:
1. Open the Kaspersky Security Center Administration Console.
2. In the folder in the Administration Console tree, open the folder with the name of theadministration group to which the relevant client computers belong.
3. In the workspace, select the tab.
4. Select the necessary policy and double-click to open the policy properties.
5. In the policy window, select → .
6. In the section, click the button.
The window opens.
7. In the section, click the button.
8. In the window:
9. Save your changes.
Inbox
In Outlook, incoming messages are �rst scanned by the Mail Threat Protection component (if the Scan POP3,SMTP, NNTP, and IMAP tra�ic check box is selected in the interface of Kaspersky Endpoint Security) and then bythe Mail Threat Protection extension for Outlook. If the Mail Threat Protection component detects a maliciousobject in a message, it noti�es you about this event.
The Mail Threat Protection component settings can be con�gured directly in Outlook if the Microsoft Outlookextension is connected in the Kaspersky Endpoint Security interface.
Outgoing messages are �rst scanned by the Mail Threat Protection extension for Outlook, and are then scannedby the Mail Threat Protection component.
Managed devices
Policies
Essential Threat Protection Mail Threat Protection
Security level Settings
Mail Threat Protection
Connectivity Settings
Email protection
Select the check box if you want the Mail Threat Protection extension for Outlook toscan incoming messages as they arrive to the mailbox.
Select the check box if you want the Mail Threat Protection extension for Outlook toscan incoming messages when the user opens them.
Select the check box if you want the Mail Threat Protection extension for Outlook toscan outgoing messages as they are sent.
Scan when receiving
Scan when reading
Scan when sending

170
To enable or disable Network Threat Protection:
1. In the lower part of the main application window, click the button.
2. In the application settings window, select → .
3. Use the toggle to enable or disable the component.
4. Save your changes.
To block an attacking computer:
1. In the lower part of the main application window, click the button.
2. In the application settings window, select → .
3. Select the check box.
If the check box is selected, the Network Threat Protection component adds the attacking computer to theblocked list. This means that the Network Threat Protection component blocks the network connection withthe attacking computer after the �rst network attack attempt for the speci�ed amount of time. This blockautomatically protects the user's computer against possible future network attacks from the same address.
You can view the block list in the Network Monitor tool window.
Kaspersky Endpoint Security clears the block list when the application is restarted and when the NetworkThreat Protection settings are changed.
Network Threat Protection
The Network Threat Protection component scans inbound network tra�ic for activity that is typical of networkattacks. When Kaspersky Endpoint Security detects an attempted network attack on the user's computer, itblocks the network connection with the attacking computer.
Descriptions of currently known types of network attacks and ways to counteract them are provided in KasperskyEndpoint Security databases. The list of network attacks that the Network Threat Protection component detectsis updated during database and application module updates.
Enabling and disabling Network Threat Protection
By default, Network Threat Protection is enabled and running in the optimal mode. You can disable Network ThreatProtection if necessary.
Protection Network Threat Protection
Network Threat Protection
As a result, if Network Threat Protection is enabled, Kaspersky Endpoint Security scans inbound network tra�icfor activity that is typical of network attacks. When Kaspersky Endpoint Security detects an attempted networkattack on the user's computer, it blocks the network connection with the attacking computer.
Blocking an attacking computer
Protection Network Threat Protection
Add the attacking computer to the list of blocked computers for N minutes

171
4. Change the amount of time during which an attacking computer is blocked in the �eld next to the check box.
5. Save your changes.
To con�gure addresses of exclusions from blocking:
1. In the lower part of the main application window, click the button.
2. In the application settings window, select → .
3. Click the link.
4. In the window, click the button.
5. Enter the IP address of the computer from which network attacks must not be blocked.
6. Save your changes.
Add theattacking computer to the list of blocked computers for N minutes
As a result, when Kaspersky Endpoint Security detects an attempted network attack launched against the user'scomputer, it will block all connections with the attacking computer.
Con�guring addresses of exclusions from blocking
Kaspersky Endpoint Security can recognize a network attack and block an unsecured network connection that istransmitting a large number of packets (for example, from surveillance cameras). To work with trusted devices, youcan add the IP addresses of these devices to the list of exclusions.
Protection Network Threat Protection
Manage exclusions
Add
As a result, Kaspersky Endpoint Security does not track the activity from devices on the list of exclusions.
Exporting and importing the list of exclusions from blocking
You can export the list of exclusions to an XML �le. Then you can modify the �le to, for example, add a large numberof addresses of the same type. You can also use the export/import function to back up the list of exclusions or tomigrate the list to a di�erent server.
How to export and import a list of exclusions in the Administration Console (MMC)

172
1. Open the Kaspersky Security Center Administration Console.
2. In the folder in the Administration Console tree, open the folder with the name of theadministration group to which the relevant client computers belong.
3. In the workspace, select the tab.
4. Select the necessary policy and double-click to open the policy properties.
5. In the policy window, select → .
6. In the block, click the button.
7. To export the list of rules:
a. Select the exclusions that you want to export. To select multiple ports, use the or keys.
If you did not select any exclusion, Kaspersky Endpoint Security will export all exclusions.
b. Click the link.
c. In the window that opens, specify the name of the XML �le to which you want to export the list ofexclusions, and select the folder in which you want to save this �le.
d. Click the button.
Kaspersky Endpoint Security exports the entire list of exclusions to the XML �le.
8. To import the list of exclusions:
a. Click the button.
b. In the window that opens, select the XML �le from which you want to import the list of exclusions.
c. Click the button.
If the computer already has a list of exclusions, Kaspersky Endpoint Security will prompt you to deletethe existing list or add new entries to it from the XML �le.
9. Save your changes.
Managed devices
Policies
Essential Threat Protection Network Threat Protection
Network Threat Protection settings Exclusions
CTRL SHIFT
Export
Save
Import
Open
How to export and import a list of exclusions in the Web Console and Cloud Console

173
1. In the main window of Web Console, select → .
2. Click the name of the Kaspersky Endpoint Security policy for computers on which you want to export orimport a list of exclusions.
The policy properties window opens.
3. Select the tab.
4. Select → .
5. In the block, click the link.
The list of exclusions opens.
6. To export the list of rules:
a. Select the exclusions that you want to export.
b. Click the button.
c. Con�rm that you want to export only the selected exclusions, or export the entire list of exclusions.
d. In the window that opens, specify the name of the XML �le to which you want to export the list ofexclusions, and select the folder in which you want to save this �le.
e. Click the button.
Kaspersky Endpoint Security exports the entire list of exclusions to the XML �le.
7. To import the list of exclusions:
a. Click the button.
b. In the window that opens, select the XML �le from which you want to import the list of exclusions.
c. Click the button.
If the computer already has a list of exclusions, Kaspersky Endpoint Security will prompt you to deletethe existing list or add new entries to it from the XML �le.
8. Save your changes.
Devices Policies and pro�les
Application settings
Essential Threat Protection Network Threat Protection
Network Threat Protection settings Exclusions
Export
Save
Import
Open
Con�guring protection against network attacks by type
Kaspersky Endpoint Security lets you manage protection against the following types of network attacks:
Network Flooding is an attack on network resources of an organization (such as web servers). This attackconsists of sending a large number of requests to overload the bandwidth of network resources. When thishappens, users are unable to access the network resources of the organization.
A Port Scanning attack consists of scanning UDP ports, TCP ports, and network services on the computer. Thisattack allows the attacker to identify the degree of vulnerability of the computer before conducting more

174
To con�gure protection against network attacks by type:
1. In the lower part of the main application window, click the button.
2. In the application settings window, select → .
3. Use the toggle to enable or disable detection of theseattacks.
4. Use the toggle.
5. In the block, select one of the following options:
6. Save your changes.
Network Agent is used for interaction with Kaspersky Security Center. Firewall automatically creates networkrules required for the application and the Network Agent to work. As a result, the Firewall opens several portson the computer. Which ports are opened depends on computer's role (for example, distribution point). Tolearn more about the ports that will be opened on the computer, see Kaspersky Security Center Help .
Network rules
dangerous types of network attacks. Port Scanning also enables the attacker to identify the operating systemon the computer and select the appropriate network attacks for this operating system.
A MAC spoo�ng attack consists of changing the MAC address of a network device (network card). As a result,an attacker can redirect data sent to a device to another device and gain access to this data. KasperskyEndpoint Security lets you block MAC Spoo�ng attacks and receive noti�cations about the attacks.
You can disable detection of these types of attacks in case some of your allowed applications perform operationsthat are typical for these types of attacks. This will help avoid false alarms.
By default, Kaspersky Endpoint Security does not monitor Network Flooding, Port Scanning, and MAC spoo�ngattacks.
Protection Network Threat Protection
Treat port scanning and network �ooding as attacks
MAC Spoo�ng Protection
Upon detection of MAC spoo�ng attack
.
.
Notify only
Notify and block
Firewall
The Firewall blocks unauthorized connections to the computer while working on the Internet or local network. TheFirewall also controls the network activity of applications on the computer. This allows you to protect yourcorporate LAN from identity theft and other attacks. The component provides computer protection with the helpof anti-virus databases, the Kaspersky Security Network cloud service, and prede�ned network rules.
You can con�gure network rules at the following levels:
Network packet rules. Network packet rules impose restrictions on network packets, regardless of theapplication. Such rules restrict inbound and outbound network tra�ic through speci�c ports of the selected

175
Controlled access of applications to operating system resources, processes and personal data is provided bythe Host Intrusion Prevention component by using application rights.
1. Checks the security of the application using downloaded anti-virus databases.
2. Checks the security of the application in Kaspersky Security Network.
You are advised to participate in Kaspersky Security Network to help the Firewall work more e�ectively.
3. Puts the application in one of the trust groups: Trusted, Low Restricted, High Restricted, Untrusted.
A trust group de�nes the rights that Kaspersky Endpoint Security refers to when controlling applicationactivity. Kaspersky Endpoint Security places an application in a trust group depending on the level of dangerthat this application may pose to the computer.
Kaspersky Endpoint Security places an application in a trust group for the Firewall and Host IntrusionPrevention components. You cannot change the trust group only for the Firewall or Host IntrusionPrevention.
If you refused to participate in KSN or there is no network, Kaspersky Endpoint Security places theapplication in a trust group depending on the settings of the Host Intrusion Prevention component. Afterreceiving the reputation of the application from KSN, the trust group can be changed automatically.
4. It blocks network activity of the application depending on the trust group. For example, applications in the HighRestricted trust group are not allowed to use any network connections.
Network Rule Priorities
data protocol. Kaspersky Endpoint Security has prede�ned network packet rules with permissionsrecommended by Kaspersky experts.
Application network rules. Application network rules impose restrictions on the network activity of a speci�capplication. They factor in not only the characteristics of the network packet, but also the speci�c applicationto which this network packet is addressed or which issued this network packet.
During the �rst startup of the application, the Firewall performs the following actions:
The next time the application is started, Kaspersky Endpoint Security checks the integrity of the application. If theapplication is unchanged, the component uses the current network rules for it. If the application has beenmodi�ed, Kaspersky Endpoint Security analyzes the application as if it were being started for the �rst time.
Each rule has a priority. The higher a rule is on the list, the higher its priority. If network activity is added to severalrules, the Firewall regulates network activity according to the rule with the highest priority.
Network packet rules have a higher priority than network rules for applications. If both network packet rules andnetwork rules for applications are speci�ed for the same type of network activity, the network activity is handledaccording to the network packet rules.
176
Network connection statuses
To enable or disable Firewall:
1. In the lower part of the main application window, click the button.
2. In the application settings window, select → → .
3. Use the toggle to enable or disable the component.
4. Save your changes.
Network rules for applications work as follows: a network rule for applications includes access rules based on thenetwork status: public, local, or trusted. For example, applications in the High Restricted trust group are not allowedany network activity in networks of all statuses by default. If a network rule is speci�ed for an individual application(parent application), then the child processes of other applications will run according to the network rule of theparent application. If there is no network rule for the application, the child processes will run according to networkaccess rule of the application's trust group.
For example, you have prohibited any network activity in networks of all statuses for all applications, exceptbrowser X. If you start browser Y installation (child process) from browser X (parent application), then browser Yinstaller will access the network and download the necessary �les. After installation, browser Y will be denied anynetwork connections according to the Firewall settings. To prohibit network activity of browser Y installer as a childprocess, you must add a network rule for the installer of browser Y.
The Firewall allows you to control network activity depending on the status of the network connection. KasperskyEndpoint Security receives the network connection status from the computer's operating system. The status ofthe network connection in the operating system is set by the user when setting up the connection. You can changethe status of the network connection in the Kaspersky Endpoint Security settings. The Firewall will monitornetwork activity depending on the network status in the Kaspersky Endpoint Security settings, and not in theoperating system.
The network connection can have one of the following status types:
. The network is not protected by antivirus applications, �rewalls, or �lters (such as Wi-Fi in acafe). When the user operates a computer that is connected to such a network, Firewall blocks access to �lesand printers of this computer. External users are also unable to access data through shared folders and remoteaccess to the desktop of this computer. Firewall �lters the network activity of each application according tothe network rules that are set for it.
Firewall assigns Public network status to the Internet by default. You cannot change the status of the Internet.
. Network for users with restricted access to �les and printers on this computer (such as for acorporate LAN or home network).
. Safe network in which the computer is not exposed to attacks or unauthorized data accessattempts. Firewall permits any network activity within networks with this status.
Public network
Local network
Trusted network
Enabling or disabling Firewall
By default, Firewall is enabled and functions in the optimal mode.
Protection Essential Threat Protection Firewall
Firewall

177
To change the network connection status:
1. In the lower part of the main application window, click the button.
2. In the application settings window, select → → .
3. Click the button.
4. Select the network connection whose status you want to change.
5. In the column, select the status of the network connection:
6. Save your changes.
Changing the network connection status
Firewall assigns Public network status to the Internet by default. You cannot change the status of the Internet.
Protection Essential Threat Protection Firewall
Available networks
Network type
. The network is not protected by antivirus applications, �rewalls, or �lters (such as Wi-Fi in acafe). When the user operates a computer that is connected to such a network, Firewall blocks access to�les and printers of this computer. External users are also unable to access data through shared folders andremote access to the desktop of this computer. Firewall �lters the network activity of each applicationaccording to the network rules that are set for it.
. Network for users with restricted access to �les and printers on this computer (such as for acorporate LAN or home network).
. Safe network in which the computer is not exposed to attacks or unauthorized dataaccess attempts. Firewall permits any network activity within networks with this status.
Public network
Local network
Trusted network
Managing network packet rules
You can perform the following actions while managing network packet rules:
Create a new network packet rule.
You can create a new network packet rule by creating a set of conditions and actions that is applied to networkpackets and data streams.
Enable or disable a network packet rule.
All network packet rules that are created by Firewall by default have Enabled status. When a network packetrule is enabled, Firewall applies this rule.
You can disable any network packet rule that is selected in the list of network packet rules. When a networkpacket rule is disabled, Firewall temporarily does not apply this rule.
A new custom network packet rule is added to the list of network packet rules by default with Enabledstatus.
Edit the settings of an existing network packet rule.

178
When creating network packet rules, remember that they have priority over network rules for applications.
After you create a new network packet rule, you can always return to editing its settings and modify them asneeded.
Change the Firewall action for a network packet rule.
In the list of network packet rules, you can edit the action that is taken by Firewall on detecting network activitythat matches a speci�c network packet rule.
Change the priority of a network packet rule.
You can raise or lower the priority of a network packet rule that is selected in the list.
Remove a network packet rule.
You can remove a network packet rule to stop Firewall from applying this rule on detecting network activityand to stop this rule from showing in the list of network packet rules with Disabled status.
Creating a network packet rule
You can create a network packet rule in the following ways:
Use the Network Monitor tool.
Network Monitor is a tool designed for viewing information about the network activity of a user's computer inreal time. This is convenient because you do not need to con�gure all the rule settings. Some Firewall settingswill be inserted automatically from Network Monitor data. Network Monitor is available only in the applicationinterface.
Con�gure the Firewall settings.
This lets you �ne-tune the Firewall settings. You can create rules for any network activity, even if there is nonetwork activity at the current time.
How to use the Network Monitor tool to create a network packet rule in the application interface

179
1. In the main application window, click → .
2. Select the tab.
The tab shows all currently active network connections with the computer. Bothoutbound and inbound network connections are displayed.
3. In the context menu of a network connection, select .
This opens the network rule properties.
4. Set the status for the packet rule.
5. Manually enter the name of the network service in the �eld.
6. Con�gure the network rule settings (see the table below).
You can select a prede�ned rule template by clicking the link. Rule templatesdescribe the most frequently used network connections.
All network rule settings will be �lled in automatically.
7. If you want the actions of the network rule to be re�ected in the report, select the check box.
8. Click the button.
The new network rule will be added to the list.
9. Use the / buttons to set the priority of the network rule.
10. Save your changes.
More Tools Network Monitor
Network activity
Network activity
Create packet rule
Active
Name
Network rule template
Log events
Save
Up Down
How to use Firewall settings to create a network packet rule in the application interface

180
1. In the lower part of the main application window, click the button.
2. In the application settings window, select → → .
3. Click the button.
This opens the list of default network rules that are set by the Firewall.
4. Click the button.
This opens the network rule properties.
5. Set the status for the packet rule.
6. Manually enter the name of the network service in the �eld.
7. Con�gure the network rule settings (see the table below).
You can select a prede�ned rule template by clicking the link. Rule templatesdescribe the most frequently used network connections.
All network rule settings will be �lled in automatically.
8. If you want the actions of the network rule to be re�ected in the report, select the check box.
9. Click the button.
The new network rule will be added to the list.
10. Use the / buttons to set the priority of the network rule.
11. Save your changes.
Protection Essential Threat Protection Firewall
Packet rules
Add
Active
Name
Network rule template
Log events
Save
Up Down
How to create a network packet rule in the Administration Console (MMC)

181
1. Open the Kaspersky Security Center Administration Console.
2. In the folder in the Administration Console tree, open the folder with the name of theadministration group to which the relevant client computers belong.
3. In the workspace, select the tab.
4. Select the necessary policy and double-click to open the policy properties.
5. In the policy window, select → .
6. In the block, click the button.
This opens the list of network packet rules and the list of application network rules.
7. Select the tab.
This opens the list of default network rules that are set by the Firewall.
8. Click the button.
This opens the packet rule properties.
9. Manually enter the name of the network service in the �eld.
10. Con�gure the network rule settings (see the table below).
You can select a prede�ned rule template by clicking the button. Rule templates describe the mostfrequently used network connections.
All network rule settings will be �lled in automatically.
11. If you want the actions of the network rule to be re�ected in the report, select the check box.
12. Click the button.
The new network rule will be added to the list.
13. Use the / buttons to set the priority of the network rule.
14. Save your changes.
Managed devices
Policies
Essential Threat Protection Firewall
Firewall settings Settings
Network packet rules
Add
Name
Log events
Save
Up Down
The Firewall will control network packets according to the rule. You can disable a packet rule from Firewalloperation without deleting it from the list. To do so, clear the check box next to the object.
How to create a network packet rule in the Web Console and Cloud Console

182
1. In the main window of Web Console, select → .
2. Click the name of the Kaspersky Endpoint Security policy.
The policy properties window opens.
3. Select the tab.
4. Select → .
5. In the block, click the link.
This opens the list of default network rules that are set by the Firewall.
6. Click the button.
This opens the packet rule properties.
7. Manually enter the name of the network service in the �eld.
8. Con�gure the network rule settings (see the table below).
You can select a prede�ned rule template by clicking the link. Rule templates describe themost frequently used network connections.
All network rule settings will be �lled in automatically.
9. If you want the actions of the network rule to be re�ected in the report, select the check box.
10. Click the button.
The new network rule will be added to the list.
11. Use the / buttons to set the priority of the network rule.
12. Save your changes.
Network packet rule settings
Parameter Description
.
.
. If this option is selected, Firewall applies the application network rules tothe network connection.
Control network activity over the selected protocol: TCP, UDP, ICMP, ICMPv6, IGMP and GRE.
If ICMP or ICMPv6 is selected as the protocol, you can de�ne the ICMP packet type and code.
If TCP or UDP is selected as the protocol type, you can specify the comma-delimited portnumbers of the local and remote computers between which the connection is to be monitored.
. Firewall applies the network rule to all inbound network packets.
. Firewall applies the network rule to all network packets sent via a connection that wasinitiated by a remote computer.
Devices Policies and pro�les
Application settings
Essential Threat Protection Firewall
Firewall settings Network packet rules
Add
Name
Select template
Log events
Save
Up Down
The Firewall will control network packets according to the rule. You can disable a packet rule from Firewalloperation without deleting it from the list. Use the toggle in the column to enable or disable thepacket rule.
Status
Action Allow
Block
By application rules
Protocol
Direction Inbound (packet)
Inbound

183
. Firewall applies the network rule to both inbound and outbound networkpackets, regardless of whether the user's computer or a remote computer initiated thenetwork connection.
. Firewall applies the network rule to all outbound network packets.
. Firewall applies the network rule to all network packets sent via a connection thatwas initiated by the user's computer.
The TCP protocol establishes a connection. Use the , and directions for TCP. All other protocols do not establish connections,
but they send packets. For all other protocols, use the , or directions.
Network adapters that can send and/or receive network packets. Specifying the settings ofnetwork adapters makes it possible to di�erentiate between network packets sent or receivedby network adapters with identical IP addresses.
Restrict control of network packets based on their time to live (TTL).
Network addresses of remote computers that can send and receive network packets. Firewallapplies the network rule to the speci�ed range of remote network addresses. You can includeall IP addresses into a network rule, create a separate list of IP addresses, or select asubnetwork (Trusted networks, Local networks, Public networks).
Network addresses of computers that can send and receive network packets. Firewall appliesa network rule to the speci�ed range of local network addresses. You can include all IPaddresses in a network rule or create a separate list of IP addresses.
Sometimes the local address cannot be obtained for applications. If this is the case, thisparameter is ignored.
To enable or disable a network packet rule:
1. In the lower part of the main application window, click the button.
2. In the application settings window, select → → .
3. Click the button.
This opens a list of default network packet rules that are set by Firewall.
4. Select the necessary network packet rule in the list.
5. Use the toggle in the column to enable or disable the rule.
6. Save your changes.
Inbound / Outbound
Outbound (packet)
Outbound
Inbound OutboundInbound/Outbound
Inbound (packet) Outbound(packets) Inbound/Outbound
Networkadapters
Time tolive (TTL)
Remoteaddresses
Localaddresses
Enabling or disabling a network packet rule
Protection Essential Threat Protection Firewall
Packet rules
Status

184
To change the Firewall action that is applied to a network packet rule:
1. In the lower part of the main application window, click the button.
2. In the application settings window, select → → .
3. Click the button.
This opens a list of default network packet rules that are set by Firewall.
4. Select it in the list of network packet rules and click the button.
5. In the drop-down list, select the action to be performed by Firewall on detecting this kind of networkactivity:
6. Save your changes.
To change the network packet rule priority:
1. In the lower part of the main application window, click the button.
2. In the application settings window, select → → .
3. Click the button.
This opens a list of default network packet rules that are set by Firewall.
4. In the list, select the network packet rule whose priority you want to change.
5. Use the and buttons to move the network packet rule to the desired spot in the list of network packetrules.
Changing the Firewall action for a network packet rule
Protection Essential Threat Protection Firewall
Packet rules
Edit
Action
.
.
.
Allow
Block
By application rules
Changing the priority of a network packet rule
The priority of a network packet rule is determined by its position in the list of network packet rules. The topmostnetwork packet rule in the list of network packet rules has the highest priority.
Every manually created network packet rule is added to the end of the list of network packet rules and is of thelowest priority.
Firewall executes rules in the order in which they appear in the list of network packet rules, from top to bottom.According to each processed network packet rule that applies to a particular network connection, Firewall eitherallows or blocks network access to the address and port that are speci�ed in the settings of this networkconnection.
Protection Essential Threat Protection Firewall
Packet rules
Up Down

185
6. Save your changes.
1. Open the Kaspersky Security Center Administration Console.
2. In the folder in the Administration Console tree, open the folder with the name of theadministration group to which the relevant client computers belong.
3. In the workspace, select the tab.
4. Select the necessary policy and double-click to open the policy properties.
5. In the policy window, select → .
6. To export the list of network packet rules:
a. Select the rules that you want to export. To select multiple ports, use the or keys.
If you did not select any rule, Kaspersky Endpoint Security will export all rules.
b. Click the link.
c. In the window that opens, specify the name of the XML �le to which you want to export the list of rules,and select the folder in which you want to save this �le.
d. Click the button.
Kaspersky Endpoint Security exports the list of rules to the XML �le.
7. To import a list of network packet rules:
a. Click the link.
In the window that opens, select the XML �le from which you want to import the list of rules.
b. Click the button.
If the computer already has a list of rules, Kaspersky Endpoint Security will prompt you to delete theexisting list or add new entries to it from the XML �le.
8. Save your changes.
Exporting and importing network packet rules
You can export the list of network packet rules to an XML �le. Then you can modify the �le to, for example, add alarge number of rules of the same type. You can use the export/import function to back up the list of networkpacket rules or to migrate the list to a di�erent server.
How to export and import a list of network packet rules in the Administration Console (MMC)
Managed devices
Policies
Essential Threat Protection Firewall
CTRL SHIFT
Export
Save
Import
Open
How to export and import a list of network packet rules in the Web Console and Cloud Console

186
1. In the main window of Web Console, select → .
2. Click the name of the Kaspersky Endpoint Security policy for computers on which you want to export orimport the list of rules.
The policy properties window opens.
3. Select the tab.
4. Select → .
5. Click the link.
6. To export the list of network packet rules:
a. Select the rules that you want to export.
b. Click the button.
c. Con�rm that you want to export only the selected rules, or export the entire list.
d. Click the button.
Kaspersky Endpoint Security exports the list of rules to an XML �le in the default downloads folder.
7. To import a list of network packet rules:
a. Click the link.
In the window that opens, select the XML �le from which you want to import the list of rules.
b. Click the button.
If the computer already has a list of rules, Kaspersky Endpoint Security will prompt you to delete theexisting list or add new entries to it from the XML �le.
8. Save your changes.
By default, Firewall creates a set of network rules for each application group that is detected by KasperskyEndpoint Security on the computer. You can change the Firewall action that is applied to the application groupnetwork rules that are created by default. You cannot edit, remove, disable, or change the priority ofapplication group network rules that are created by default.
Devices Policies and pro�les
Application settings
Essential Threat Protection Firewall
Network packet rules
Export
Export
Import
Open
Managing application network rules
By default, Kaspersky Endpoint Security groups all applications that are installed on the computer by the name ofthe vendor of the software whose �le or network activity it monitors. Application groups are in turn categorizedinto trust groups. All applications and application groups inherit properties from their parent group: applicationcontrol rules, application network rules, and their execution priority.
Like the Host Intrusion Prevention component, by default the Firewall component applies the network rules for anapplication group when �ltering the network activity of all applications within the group. The application groupnetwork rules de�ne the rights of applications within the group to access di�erent network connections.

187
When creating network rules for applications, remember that network packet rules have priority overapplication network rules.
You can also create a network rule for an individual application. Such a rule will have a higher priority than thenetwork rule of the group to which the application belongs.
Creating an application network rule
By default, application activity is controlled by network rules that are de�ned for the trust group to whichKaspersky Endpoint Security assigned the application when it started the �rst time. If necessary, you can createnetwork rules for an entire trust group, for an individual application, or for a group of applications that are within atrust group.
Manually de�ned network rules have a higher priority than network rules that were determined for a trust group. Inother words, if manually de�ned application rules di�er from the application rules determined for a trust group,Firewall controls application activity according to the manually de�ned rules for applications.
By default, Firewall creates the following network rules for each application:
Any network activity in Trusted networks.
Any network activity in Local networks.
Any network activity in Public networks.
Kaspersky Endpoint Security controls the network activity of applications according to prede�ned network rulesas follows:
Trusted and Low Restricted: all network activity is allowed.
High Restricted and Untrusted: all network activity is blocked.
Prede�ned application rules cannot be edited or deleted.
You can create an application network rule in the following ways:
Use the Network Monitor tool.
Network Monitor is a tool designed for viewing information about the network activity of a user's computer inreal time. This is convenient because you do not need to con�gure all the rule settings. Some Firewall settingswill be inserted automatically from Network Monitor data. Network Monitor is available only in the applicationinterface.
Con�gure the Firewall settings.
This lets you �ne-tune the Firewall settings. You can create rules for any network activity, even if there is nonetwork activity at the current time.
How to use the Network Monitor tool to create an application network rule in the application interface

188
1. In the main application window, click → .
2. Select the or tab.
The tab shows all currently active network connections with the computer. Bothoutbound and inbound network connections are displayed.
The tab lists all open network ports of the computer.
3. In the context menu of a network connection, select .
The application rules and properties window opens.
4. Select the tab.
This opens the list of default network rules that are set by the Firewall.
5. Click the button.
This opens the network rule properties.
6. Manually enter the name of the network service in the �eld.
7. Con�gure the network rule settings (see the table below).
You can select a prede�ned rule template by clicking the link. Rule templatesdescribe the most frequently used network connections.
All network rule settings will be �lled in automatically.
8. If you want the actions of the network rule to be re�ected in the report, select the check box.
9. Click the button.
The new network rule will be added to the list.
10. Use the / buttons to set the priority of the network rule.
11. Save your changes.
More Tools Network Monitor
Network activity Open ports
Network activity
Open ports
Create application rule
Network rules
Add
Name
Network rule template
Log events
Save
Up Down
How to use Firewall settings to create an application network rule in the application interface

189
1. In the lower part of the main application window, click the button.
2. In the application settings window, select → → .
3. Click the button.
This opens the list of default network rules that are set by the Firewall.
4. In the list of applications, select the application or application group for which you want to create anetwork rule.
5. Right-click to open the context menu and select .
The application rules and properties window opens.
6. Select the tab.
7. Click the button.
This opens the network rule properties.
8. Manually enter the name of the network service in the �eld.
9. Con�gure the network rule settings (see the table below).
You can select a prede�ned rule template by clicking the link. Rule templatesdescribe the most frequently used network connections.
All network rule settings will be �lled in automatically.
10. If you want the actions of the network rule to be re�ected in the report, select the check box.
11. Click the button.
The new network rule will be added to the list.
12. Use the / buttons to set the priority of the network rule.
13. Save your changes.
Protection Essential Threat Protection Firewall
Application rules
Details and rules
Network rules
Add
Name
Network rule template
Log events
Save
Up Down
How to create an application network rule in the Administration Console (MMC)

190
1. Open the Kaspersky Security Center Administration Console.
2. In the folder in the Administration Console tree, open the folder with the name of theadministration group to which the relevant client computers belong.
3. In the workspace, select the tab.
4. Select the necessary policy and double-click to open the policy properties.
5. In the policy window, select → .
6. In the block, click the button.
This opens the list of network packet rules and the list of application network rules.
7. Select the tab.
8. Click the button.
9. In the opened window, enter criteria to search for the application for which you want to create a networkrule.
You can enter the name of the application or the name of the vendor. Kaspersky Endpoint Securitysupports environment variables and the * and ? characters when entering a mask.
10. Click the button.
Kaspersky Endpoint Security will search for the application in the consolidated list of applications installedon managed computers. Kaspersky Endpoint Security will show a list of applications that satisfy yoursearch criteria.
11. Select the necessary application.
12. In the drop-down list, select and click.
The application will be added to the default group.
13. Select the relevant application and then select from the context menu of theapplication.
The application rules and properties window opens.
14. Select the tab.
This opens the list of default network rules that are set by the Firewall.
15. Click the button.
This opens the network rule properties.
16. Manually enter the name of the network service in the �eld.
17. Con�gure the network rule settings (see the table below).
You can select a prede�ned rule template by clicking the button. Rule templates describe the mostfrequently used network connections.
All network rule settings will be �lled in automatically.
18. If you want the actions of the network rule to be re�ected in the report, select the check box.
Managed devices
Policies
Essential Threat Protection Firewall
Firewall settings Settings
Application network rules
Add
Refresh
Add selected applications to <trust group> group Default groupsOK
Application rights
Network rules
Add
Name
Log events

191
19. Click the button.
The new network rule will be added to the list.
20. Use the / buttons to set the priority of the network rule.
21. Save your changes.
Save
Up Down
How to create an application network rule in the Web Console and Cloud Console

192
1. In the main window of Web Console, select → .
2. Click the name of the Kaspersky Endpoint Security policy.
The policy properties window opens.
3. Select the tab.
4. Select → .
5. In the block, click the link.
This opens the application rights con�guration window and the list of protected resources.
6. Select the tab.
You will see a list of trust groups on the left side of the window and their properties on the right side.
7. Click the button.
This starts the Wizard for adding an application to a trust group.
8. Click the link to select the relevant trust group for the application.
9. Select the type. Click the button.
If you want to create a network rule for multiple applications, select the type and de�ne a name forthe application group.
10. In the opened list of applications, select the applications for which you want to create a network rule.
Use a �lter. You can enter the name of the application or the name of the vendor. Kaspersky EndpointSecurity supports environment variables and the * and ? characters when entering a mask.
11. Finish the Wizard by clicking .
The application will be added to the trust group.
12. In the left part of the window, select the relevant application.
13. In the right part of the window, select from the drop-down list.
This opens the list of default network rules that are set by the Firewall.
14. Click the button.
This opens the application rule properties.
15. Manually enter the name of the network service in the �eld.
16. Con�gure the network rule settings (see the table below).
You can select a prede�ned rule template by clicking the link. Rule templates describe themost frequently used network connections.
All network rule settings will be �lled in automatically.
17. If you want the actions of the network rule to be re�ected in the report, select the check box.
18. Click the button.
The new network rule will be added to the list.
Devices Policies and pro�les
Application settings
Essential Threat Protection Firewall
Firewall settings Application network rules
Application rights
Add
Selected target group
Application Next
Group
OK
Network rules
Add
Name
Select template
Log events
Save
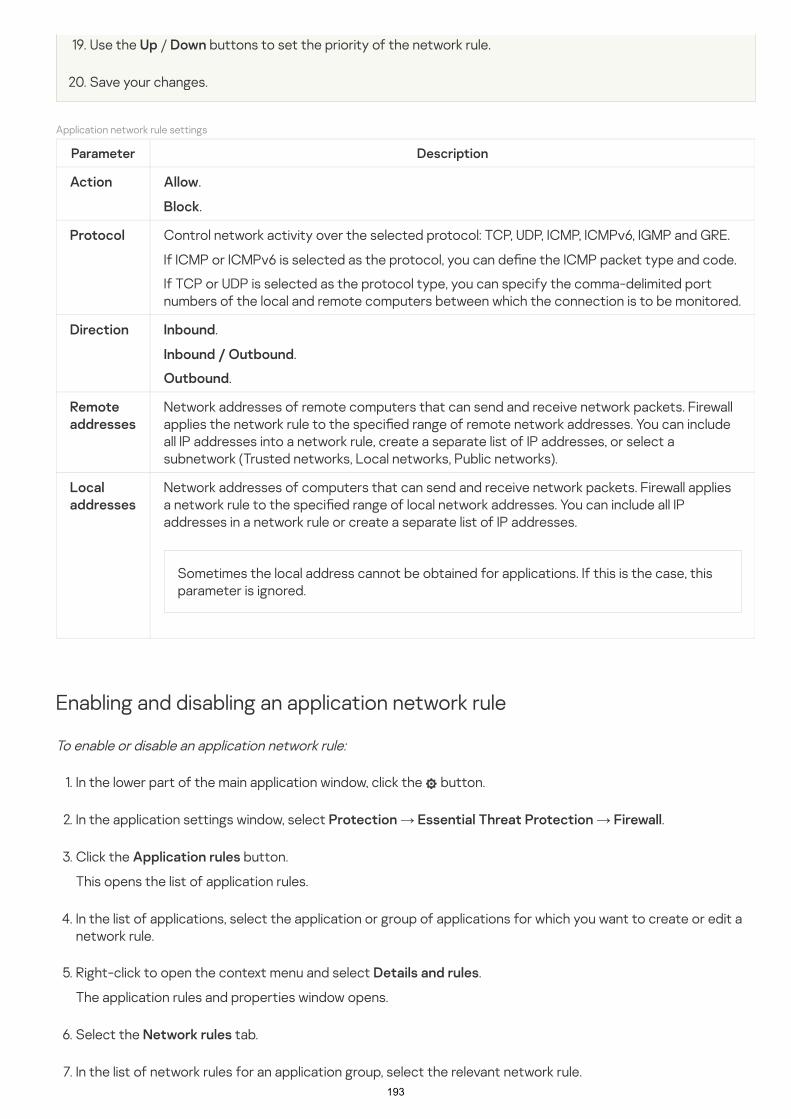
193
19. Use the / buttons to set the priority of the network rule.
20. Save your changes.
Application network rule settings
Parameter Description
.
.
Control network activity over the selected protocol: TCP, UDP, ICMP, ICMPv6, IGMP and GRE.
If ICMP or ICMPv6 is selected as the protocol, you can de�ne the ICMP packet type and code.
If TCP or UDP is selected as the protocol type, you can specify the comma-delimited portnumbers of the local and remote computers between which the connection is to be monitored.
.
.
.
Network addresses of remote computers that can send and receive network packets. Firewallapplies the network rule to the speci�ed range of remote network addresses. You can includeall IP addresses into a network rule, create a separate list of IP addresses, or select asubnetwork (Trusted networks, Local networks, Public networks).
Network addresses of computers that can send and receive network packets. Firewall appliesa network rule to the speci�ed range of local network addresses. You can include all IPaddresses in a network rule or create a separate list of IP addresses.
Sometimes the local address cannot be obtained for applications. If this is the case, thisparameter is ignored.
To enable or disable an application network rule:
1. In the lower part of the main application window, click the button.
2. In the application settings window, select → → .
3. Click the button.
This opens the list of application rules.
4. In the list of applications, select the application or group of applications for which you want to create or edit anetwork rule.
5. Right-click to open the context menu and select .
The application rules and properties window opens.
6. Select the tab.
7. In the list of network rules for an application group, select the relevant network rule.
Up Down
Action Allow
Block
Protocol
Direction Inbound
Inbound / Outbound
Outbound
Remoteaddresses
Localaddresses
Enabling and disabling an application network rule
Protection Essential Threat Protection Firewall
Application rules
Details and rules
Network rules

194
The network rule properties window opens.
8. Set the or status for the network rule.
You cannot disable an application group network rule that is created by Firewall by default.
9. Save your changes.
To change the Firewall action for all network rules for an application or group of applications:
1. In the lower part of the main application window, click the button.
2. In the application settings window, select → → .
3. Click the button.
This opens the list of application rules.
4. If you want to change the Firewall action that is applied to all network rules that are created by default, selectan application or group of applications in the list. Manually created network rules are left unchanged.
5. Right-click to open the context menu, select , then select the action that you want to assign:
6. Save your changes.
To change the Firewall response for one network rule for an application or application group:
1. In the lower part of the main application window, click the button.
2. In the application settings window, select → → .
3. Click the button.
This opens the list of application rules.
4. In the list, select the application or group of applications for which you want to change the action for onenetwork rule.
5. Right-click to open the context menu and select .
The application rules and properties window opens.
6. Select the tab.
Active Inactive
Changing the Firewall action for an application network rule
You can change the Firewall action that is applied to all network rules for an application or application group thatwere created by default, and change the Firewall action for a single custom network rule for an application orapplication group.
Protection Essential Threat Protection Firewall
Application rules
Network rules
.
.
.
Inherit
Allow
Block
Protection Essential Threat Protection Firewall
Application rules
Details and rules
Network rules
195
7. Select the network rule for which you want to change the Firewall action.
8. In the column, right-click to bring up the context menu and select the action that you want toassign:
9. Save your changes.
You cannot change the priority of application group network rules that are created by default.
To change the priority of a network rule:
1. In the lower part of the main application window, click the button.
2. In the application settings window, select → → .
3. Click the button.
This opens the list of application rules.
4. In the list of applications, select the application or group of applications for which you want to change thepriority of a network rule.
5. Right-click to open the context menu and select .
The application rules and properties window opens.
6. Select the tab.
7. Select the network rule whose priority you want to change.
8. Use the and buttons to move the network rule to the desired spot in the list of network rules.
9. Save your changes.
Permission
.
.
.
Inherit.
Allow
Block
Log events
Changing the priority of an application network rule
The priority of a network rule is determined by its position in the list of network rules. Firewall executes the rules inthe order in which they appear in the list of network rules, from top to bottom. According to each processednetwork rule that applies to a particular network connection, Firewall either allows or blocks network access to theaddress and port that are indicated in the settings of this network connection.
Manually created network rules have a higher priority than default network rules.
Protection Essential Threat Protection Firewall
Application rules
Details and rules
Network rules
Up Down

196
To start Network Monitor:
When the authorized keyboard is connected to a di�erent USB port of the computer, the application shows aprompt for authorization of this keyboard again.
Network Monitor
Network Monitor is a tool designed for viewing information about the network activity of a user's computer in realtime.
In the main application window, click → .More Tools Network Monitor
The window opens. In this window, information about the network activity of the computer isshown on four tabs:
Network Monitor
The tab shows all currently active network connections with the computer. Both outboundand inbound network connections are displayed. On this tab, you can also create network packet rules forFirewall operation.
The tab lists all open network ports of the computer. On this tab, you can also create networkpacket rules and application rules for Firewall operation.
The tab shows the volume of inbound and outbound network tra�ic between the user'scomputer and other computers in the network to which the user is currently connected.
The tab lists the IP addresses of remote computers whose network activity has beenblocked by the Network Threat Protection component after detecting network attack attempts from such IPaddresses.
Network activity
Open ports
Network tra�ic
Blocked computers
BadUSB Attack Prevention
Some viruses modify the �rmware of USB devices to trick the operating system into detecting the USB device as akeyboard. As a result, the virus may execute commands under your user account to download malware, forexample.
The BadUSB Attack Prevention component prevents infected USB devices emulating a keyboard from connectingto the computer.
When a USB device is connected to the computer and identi�ed as a keyboard by the operating system, theapplication prompts the user to enter a numerical code generated by the application from this keyboard or usingOn-Screen Keyboard if available (see the �gure below). This procedure is known as keyboard authorization.
If the code has been entered correctly, the application saves the identi�cation parameters – VID/PID of thekeyboard and the number of the port to which it has been connected – in the list of authorized keyboards.Authorization does not need to be repeated when the keyboard is reconnected or after the operating system isrestarted.

197
The BadUSB Attack Prevention component is not installed by default. If you need the BadUSB AttackPrevention component, you can add the component in the properties of the installation package beforeinstalling the application or change the available application components after installing the application.
Keyboard authorization
To enable or disable BadUSB Attack Prevention:
1. In the lower part of the main application window, click the button.
2. In the application settings window, select → → .
3. Use the toggle to enable or disable the component.
4. Save your changes.
If the numerical code has been entered incorrectly, the application generates a new code. Three attempts areavailable for entering the numerical code. If the numerical code is entered incorrectly three times in a row or the
window is closed, the application blocks input from this keyboard.When the keyboard is reconnected or the operating system is restarted, the application prompts the user toperform keyboard authorization again.
<Keyboard name> keyboard authorization
The application allows use of an authorized keyboard and blocks a keyboard that has not been authorized.
Enabling and disabling BadUSB Attack Prevention
USB devices identi�ed by the operating system as keyboards and connected to the computer before installationof the BadUSB Attack Prevention component are considered authorized after installation of the component.
Protection Essential Threat Protection BadUSB AttackPrevention
BadUSB Attack Prevention
As a result, if BadUSB Attack Prevention is enabled, Kaspersky Endpoint Security requires authorization of aconnected USB device identi�ed as a keyboard by the operating system. The user cannot use an unauthorizedkeyboard until it is authorized.
Using On-Screen Keyboard for authorization of USB devices

198
To allow or prohibit the use of On-Screen Keyboard for authorization:
1. In the lower part of the main application window, click the button.
2. In the application settings window, select → → .
3. Use the check box to block or allowuse of the On-Screen Keyboard for authorization.
4. Save your changes.
AMSI operation example
AMSI Protection component may decline a request from a third-party application, for example, if thisapplication exceeds maximum number of requests within a speci�ed interval. Kaspersky Endpoint Securitysends information about a rejected request from a third-party application to the Administration Server. AMSIProtection component does not reject requests from those third-party applications for which the
check box is selected
On-Screen Keyboard should be used only for authorization of USB devices that do not support the input ofrandom characters (e.g. bar code scanners). It is not recommended to use On-Screen Keyboard for authorizationof unknown USB devices.
Protection Essential Threat Protection BadUSB AttackPrevention
Prohibit use of On-Screen Keyboard for authorization of USB devices
AMSI Protection
AMSI Protection component is intended to support Antimalware Scan Interface from Microsoft. The AntimalwareScan Interface (AMSI) allows third-party applications with AMSI support to send objects (for example, PowerShellscripts) to Kaspersky Endpoint Security for an additional scan and then receive the results from scanning theseobjects. Third-party applications may include, for example, Microsoft O�ice applications (see the �gure below). Fordetails on AMSI refer to Microsoft documentation .
The AMSI Protection can only detect a threat and notify a third-party application about the detected threat.Third-party application after receiving a noti�cation of a threat does not allow to perform malicious actions (forexample, terminates).
Do notblock interaction with AMSI Protection Provider
AMSI Protection is available for the following operating systems for workstations and servers:
Windows 10 Home / Pro / Pro for Workstations / Education / Enterprise;
Windows Server 2016 Essentials / Standard / Datacenter;

199
To enable or disable the AMSI Protection:
1. In the lower part of the main application window, click the button.
2. In the application settings window, select → → .
3. Use the toggle to enable or disable the component.
4. Save your changes.
To con�gure AMSI Protection scans of compound �les:
1. In the lower part of the main application window, click the button.
2. In the application settings window, select → → .
3. In the section, specify the types of compound �les that you want to scan: archives,distribution package, or �les in o�ice formats.
4. In the section, do one of the following:
The AMSI Protection component scans large �les that are extracted from archives, regardless of whetherthe check box is selected.
5. Save your changes.
Windows Server 2019 Essentials / Standard / Datacenter.
Enabling and disabling the AMSI Protection
By default, the AMSI Protection is enabled.
Protection Essential Threat Protection AMSI Protection
AMSI Protection
Using AMSI Protection to scan compound �les
A common technique for concealing viruses and other malware is to embed them in compound �les such asarchives. To detect viruses and other malware that are hidden in this way, the compound �le must be unpacked,which may slow down scanning. You can limit the types of compound �les to be scanned, thus speeding upscanning.
Protection Essential Threat Protection AMSI Protection
Scan of compound �les
Size limit
To block the AMSI Protection component from unpacking large compound �les, select the check box and specify the required value in the �eld. The AMSI
Protection component will not unpack compound �les that are larger than the speci�ed size.
To allow the AMSI Protection component to unpack large compound �les, clear the check box.
Do not unpacklarge compound �les Maximum �le size
Do not unpack largecompound �les
Do not unpack large compound �les
Exploit Prevention

200
To enable or disable Exploit Prevention:
1. In the lower part of the main application window, click the button.
2. In the application settings window, select → → .
3. Use the toggle to enable or disable the component.
4. Save your changes.
To choose an action to be taken when an exploit is detected:
1. In the lower part of the main application window, click the button.
2. In the application settings window, select → → .
3. Select the relevant action in the block:
4. Save your changes.
The Exploit Prevention component detects program code that takes advantage of vulnerabilities on the computerto exploit administrator privileges or to perform malicious activities. For example, exploits can utilize a bu�erover�ow attack. To do so, the exploit sends a large amount of data to a vulnerable application. When processingthis data, the vulnerable application executes malicious code. As a result of this attack, the exploit can start anunauthorized installation of malware.
When there is an attempt to run an executable �le from a vulnerable application that was not performed by theuser, Kaspersky Endpoint Security blocks this �le from running or noti�es the user.
Enabling and disabling Exploit Prevention
By default, Exploit Prevention is enabled and runs in the mode recommended by Kaspersky experts. You candisable Exploit Prevention if necessary.
Protection Advanced Threat Protection Exploit Prevention
Exploit Prevention
As a result, if Exploit Prevention is enabled, Kaspersky Endpoint Security will monitor executable �les that are runby vulnerable applications. If Kaspersky Endpoint Security detects that an executable �le from a vulnerableapplication was run by something other than the user, Kaspersky Endpoint Security will perform the selectedaction (for example, will block the operation).
Selecting an action to take when an exploit is detected
By default, on detection of an exploit, Kaspersky Endpoint Security blocks operations attempted by the exploit.
Protection Advanced Threat Protection Exploit Prevention
On detecting exploit
. If this item is selected, on detecting an exploit, Kaspersky Endpoint Security blocks theoperations of this exploit and makes a log entry with information about this exploit.
. If this item is selected, when Kaspersky Endpoint Security detects an exploit it logs an entrycontaining information about the exploit and adds information about this exploit to the list of active threats.
Block operation
Inform
System processes memory protection

201
To enable or disable system process memory protection:
1. In the lower part of the main application window, click the button.
2. In the application settings window, select → → .
3. Use the toggle to enable or disable this feature.
4. Save your changes.
It is not recommended to disable Behavior Detection unless absolutely necessary because doing so wouldreduce the e�ectiveness of the protection components. The protection components may request datacollected by the Behavior Detection component to detect threats.
To enable or disable Behavior Detection:
1. In the lower part of the main application window, click the button.
2. In the application settings window, select → .
3. Use the toggle to enable or disable the component.
4. Save your changes.
In order to choose what to do if an application engages in malicious activity, perform the following steps:
By default, protection of system process memory is enabled.
Protection Advanced Threat Protection Exploit Prevention
Enable system process memory protection
As a result, Kaspersky Endpoint Security will block external processes that attempt to access system processes.
Behavior Detection
The Behavior Detection component receives data on the actions of applications on your computer and providesthis information to other protection components to improve their performance.
The Behavior Detection component utilizes Behavior Stream Signatures (BSS) for applications. If applicationactivity matches a behavior stream signature, Kaspersky Endpoint Security performs the selected responsiveaction. Kaspersky Endpoint Security functionality based on behavior stream signatures provides proactivedefense for the computer.
Enabling and disabling Behavior Detection
By default, Behavior Detection is enabled and runs in the mode recommended by Kaspersky experts. You candisable Behavior Detection if necessary.
Protection Advanced Threat Protection → Behavior Detection
Behavior Detection
As a result, if Behavior Detection is enabled, Kaspersky Endpoint Security will use behavior stream signatures toanalyze the activity of applications in the operating system.
Selecting the action to take on detecting malware activity

202
1. In the lower part of the main application window, click the button.
2. In the application settings window, select → .
3. Select the relevant action in the block:
4. Save your changes.
The component monitors operations performed only with those �les that are stored on mass storage deviceswith the NTFS �le system and that are not encrypted with EFS.
After Kaspersky Endpoint Security is installed, the protection of shared folders against external encryption willbe limited until the computer is restarted.
After Kaspersky Endpoint Security is installed, the protection of shared folders against external encryption willbe limited until the computer is restarted.
To enable or disable protection of shared folders against external encryption:
1. In the lower part of the main application window, click the button.
2. In the application settings window, select → .
3. Use the toggle to enable or disabledetection of activity that is typical of external encryption.
Protection Advanced Threat Protection → Behavior Detection
On detecting malware activity
. If this item is selected, on detecting malicious activity Kaspersky Endpoint Security deletes theexecutable �le of the malicious application and creates a backup copy of the �le in Backup.
. If this item is selected, on detecting malicious activity Kaspersky EndpointSecurity terminates this application.
. If this item is selected and malware activity of an application is detected, Kaspersky EndpointSecurity adds information about the malware activity of the application to the list of active threats.
Delete �le
Terminate the application
Inform
Protection of shared folders against external encryption
Protection of shared folders against external encryption provides for analysis of activity in shared folders. If thisactivity matches a behavior stream signature that is typical for external encryption, Kaspersky Endpoint Securityperforms the selected action.
By default, protection of shared folders against external encryption is disabled.
Enabling and disabling protection of shared folders against externalencryption
Protection Advanced Threat Protection → Behavior Detection
Enable protection of shared folders against external encryption

203
4. Save your changes.
To select the action to take on detection of external encryption of shared folders:
1. In the lower part of the main application window, click the button.
2. In the application settings window, select → → .
3. Select the relevant action in the block:
4. Save your changes.
The Audit Logon service must be enabled to enable exclusions of addresses from protection of shared foldersagainst external encryption. By default, the Audit Logon service is disabled (for detailed information aboutenabling the Audit Logon service, please visit the Microsoft website).
Selecting the action to take on detection of external encryption of sharedfolders
Protection Advanced Threat Protection Behavior Detection
Protection of shared folders against external encryption
. If this option is selected and Kaspersky Endpoint Security detects an attemptto modify �les in shared folders, it takes the following actions:
Also, if the Remediation Engine component is enabled, the modi�ed �les are restored from backup copies.
. If this option is selected and Kaspersky Endpoint Security detects an attempt to modify �les inshared folders, it takes the following actions:
Block connection for N min
Blocks network activity of the computer attempting the modi�cation.
Creates backup copies of �les that are being modi�ed.
Adds an entry to local application interface reports.
Sends information about the detected malicious activity to Kaspersky Security Center.
Inform
Adds an entry to local application interface reports.
Adds an entry to the list of active threats.
Sends information about the detected malicious activity to Kaspersky Security Center.
Con�guring addresses of exclusions from protection of shared foldersagainst external encryption

204
The functionality for excluding addresses from shared folder protection does not work on a remote computerif the remote computer was turned on before Kaspersky Endpoint Security was started. You can restart thisremote computer after Kaspersky Endpoint Security is started to ensure that the functionality for excludingaddresses from shared folder protection works on this remote computer.
To exclude remote computers that perform external encryption of shared folders:
1. In the lower part of the main application window, click the button.
2. In the application settings window, select → → .
3. In the block, click the link.
4. If you want to add an IP address or computer name to the list of exclusions, click the button.
5. Enter the IP address or name of the computer from which external encryption attempts must not be handled.
6. Save your changes.
Protection Advanced Threat Protection Behavior Detection
Exclusions Con�gure addresses of exclusions
Add
Exporting and importing a list of exclusions from protection of sharedfolders against external encryption
You can export the list of exclusions to an XML �le. Then you can modify the �le to, for example, add a large numberof addresses of the same type. You can also use the export/import function to back up the list of exclusions or tomigrate the list to a di�erent server.
How to export and import a list of exclusions in the Administration Console (MMC)

205
1. Open the Kaspersky Security Center Administration Console.
2. In the folder in the Administration Console tree, open the folder with the name of theadministration group to which the relevant client computers belong.
3. In the workspace, select the tab.
4. Select the necessary policy and double-click to open the policy properties.
5. In the policy window, select → .
6. In the section, click the button.
7. To export the list of rules:
a. Select the exclusions that you want to export. To select multiple ports, use the or keys.
If you did not select any exclusion, Kaspersky Endpoint Security will export all exclusions.
b. Click the link.
c. In the window that opens, specify the name of the XML �le to which you want to export the list ofexclusions, and select the folder in which you want to save this �le.
d. Click the button.
Kaspersky Endpoint Security exports the entire list of exclusions to the XML �le.
8. To import the list of exclusions:
a. Click the button.
b. In the window that opens, select the XML �le from which you want to import the list of exclusions.
c. Click the button.
If the computer already has a list of exclusions, Kaspersky Endpoint Security will prompt you to deletethe existing list or add new entries to it from the XML �le.
9. Save your changes.
Managed devices
Policies
Advanced Threat Protection Behavior Detection
Protection of shared folders against external encryption Exclusions
CTRL SHIFT
Export
Save
Import
Open
How to export and import a list of exclusions in the Web Console and Cloud Console

206
1. In the main window of Web Console, select → .
2. Click the name of the Kaspersky Endpoint Security policy for computers on which you want to export orimport a list of exclusions.
The policy properties window opens.
3. Select the tab.
4. Select → .
5. To export the list of exclusions in the block:
a. Select the exclusions that you want to export.
b. Click the button.
c. Con�rm that you want to export only the selected exclusions, or export the entire list of exclusions.
d. In the window that opens, specify the name of the XML �le to which you want to export the list ofexclusions, and select the folder in which you want to save this �le.
e. Click the button.
Kaspersky Endpoint Security exports the entire list of exclusions to the XML �le.
6. To import the list of exclusions in the block:
a. Click the button.
b. In the window that opens, select the XML �le from which you want to import the list of exclusions.
c. Click the button.
If the computer already has a list of exclusions, Kaspersky Endpoint Security will prompt you to deletethe existing list or add new entries to it from the XML �le.
7. Save your changes.
This component is available if Kaspersky Endpoint Security is installed on a computer that runs on Windowsfor workstations. This component is unavailable if Kaspersky Endpoint Security is installed on a computer thatruns on Windows for servers.
Devices Policies and pro�les
Application settings
Advanced Threat Protection Behavior Detection
Exclusions
Export
Save
Exclusions
Import
Open
Host Intrusion Prevention
The Host Intrusion Prevention component prevents applications from performing actions that may be dangerousfor the operating system, and ensures control over access to operating system resources and personal data. Thecomponent provides computer protection with the help of anti-virus databases and the Kaspersky SecurityNetwork cloud service.
The component controls the operation of applications by using application rights. Application rights include thefollowing access parameters:

207
Network activity of applications is controlled by the Firewall using network rules.
1. Checks the security of the application using downloaded anti-virus databases.
2. Checks the security of the application in Kaspersky Security Network.
You are advised to participate in Kaspersky Security Network to help the Host Intrusion Preventioncomponent work more e�ectively.
3. Puts the application in one of the trust groups: Trusted, Low Restricted, High Restricted, Untrusted.
A trust group de�nes the rights that Kaspersky Endpoint Security refers to when controlling applicationactivity. Kaspersky Endpoint Security places an application in a trust group depending on the level of dangerthat this application may pose to the computer.
Kaspersky Endpoint Security places an application in a trust group for the Firewall and Host IntrusionPrevention components. You cannot change the trust group only for the Firewall or Host IntrusionPrevention.
If you refused to participate in KSN or there is no network, Kaspersky Endpoint Security places theapplication in a trust group depending on the settings of the Host Intrusion Prevention component. Afterreceiving the reputation of the application from KSN, the trust group can be changed automatically.
4. Blocks application actions depending on the trust group. For example, applications from the High Restrictedtrust group are denied access to the operating system modules.
Access to operating system resources (for example, automatic startup options, registry keys)
Access to personal data (such as �les and applications)
During the �rst startup of the application, the Host Intrusion Prevention component performs the followingactions:
The next time the application is started, Kaspersky Endpoint Security checks the integrity of the application. If theapplication is unchanged, the component uses the current application rights for it. If the application has beenmodi�ed, Kaspersky Endpoint Security analyzes the application as if it were being started for the �rst time.
Enabling and disabling Host Intrusion Prevention
By default, the Host Intrusion Prevention component is enabled and runs in the mode recommended by Kasperskyexperts.
How to enable or disable the Host Intrusion Prevention component in the Administration Console (MMC)

208
1. Open the Kaspersky Security Center Administration Console.
2. In the folder in the Administration Console tree, open the folder with the name of theadministration group to which the relevant client computers belong.
3. In the workspace, select the tab.
4. Select the necessary policy and double-click to open the policy properties.
5. In the policy window, select → .
6. Use the check box to enable or disable the component.
7. Save your changes.
1. In the main window of Web Console, select → .
2. Click the name of the Kaspersky Endpoint Security policy.
The policy properties window opens.
3. Select the tab.
4. Select → .
5. Use the toggle to enable or disable the component.
6. Save your changes.
1. In the lower part of the main application window, click the button.
2. In the application settings window, select → → .
3. Use the toggle to enable or disable the component.
4. Save your changes.
Managed devices
Policies
Advanced Threat Protection Host Intrusion Prevention
Host Intrusion Prevention
How to enable or disable the Host Intrusion Prevention component in the Web Console and Cloud Console
Devices Policies and pro�les
Application settings
Advanced Threat Protection Host Intrusion Prevention
Host Intrusion Prevention
How to enable or disable the Host Intrusion Prevention component in the application interface
Protection Advanced Threat Protection Host IntrusionPrevention
Host Intrusion Prevention
If the Host Intrusion Prevention component is enabled, Kaspersky Endpoint Security will place an application in atrust group depending on the level of danger that this application may pose to the computer. Kaspersky EndpointSecurity will then block the actions of the application depending on the trust group.
Managing application trust groups

209
For applications that were started before Kaspersky Endpoint Security, only network activity is controlled.Control is performed according to the network rules de�ned in the Firewall settings.
Kaspersky specialists do not recommend moving applications from the automatically assigned trust group toa di�erent trust group. Instead, you can modify rights for an individual application if necessary.
When each application is started for the �rst time, the Host Intrusion Prevention component checks the securityof the application and places the application into one of the trust groups.
At the �rst stage of the application scan, Kaspersky Endpoint Security searches the internal database of knownapplications for a matching entry and at the same time sends a request to the Kaspersky Security Networkdatabase (if an Internet connection is available). Based on the results of the search in the internal database and theKaspersky Security Network database, the application is placed into a trust group. Each time the application issubsequently started, Kaspersky Endpoint Security sends a new query to the KSN database and places theapplication into a di�erent trust group if the reputation of the application in the KSN database has changed.
You can select a trust group to which Kaspersky Endpoint Security must automatically assign all unknownapplications. Applications that were started before Kaspersky Endpoint Security are automatically moved to thetrust group de�ned in the Host Intrusion Prevention component settings window.
Changing the trust group of an application
When each application is started for the �rst time, the Host Intrusion Prevention component checks the securityof the application and places the application into one of the trust groups.
How to change the trust group of an application in the Administration Console (MMC)

210
1. Open the Kaspersky Security Center Administration Console.
2. In the folder in the Administration Console tree, open the folder with the name of theadministration group to which the relevant client computers belong.
3. In the workspace, select the tab.
4. Select the necessary policy and double-click to open the policy properties.
5. In the policy window, select → .
6. In the block, click the button.
This opens the application rights con�guration window and the list of protected resources.
7. Select the tab.
8. Click the button.
9. In the opened window, enter criteria to search for the application whose trust group you want to change.
You can enter the name of the application or the name of the vendor. Kaspersky Endpoint Securitysupports environment variables and the * and ? characters when entering a mask.
10. Click the button.
Kaspersky Endpoint Security will search for the application in the consolidated list of applications installedon managed computers. Kaspersky Endpoint Security will show a list of applications that satisfy yoursearch criteria.
11. Select the necessary application.
12. In the drop-down list, select the necessary trust groupfor the application.
13. Save your changes.
Managed devices
Policies
Advanced Threat Protection Host Intrusion Prevention
Application rights Settings
Application rights
Add
Refresh
Add selected applications to <trust group> group
How to change the trust group of an application in the Web Console and Cloud Console

211
1. In the main window of Web Console, select → .
2. Click the name of the Kaspersky Endpoint Security policy.
The policy properties window opens.
3. Select the tab.
4. Select → .
5. In the block, click the link.
This opens the application rights con�guration window and the list of protected resources.
6. Select the tab.
You will see a list of trust groups on the left side of the window and their properties on the right side.
7. Click the button.
This starts the Wizard for adding an application to a trust group.
8. Click the link to select the relevant trust group for the application.
9. Select the type. Click the button.
If you want to change the trust group for multiple applications, select the type and de�ne a namefor the application group.
10. In the opened list of applications, select the applications whose trust group you want to change.
Use a �lter. You can enter the name of the application or the name of the vendor. Kaspersky EndpointSecurity supports environment variables and the * and ? characters when entering a mask.
11. Finish the Wizard by clicking .
The application will be added to the trust group.
12. Save your changes.
1. In the lower part of the main application window, click the button.
2. In the application settings window, select → → .
3. Click the button.
This opens the list of installed applications.
4. Select the necessary application.
5. In the context menu of the application, select <trust group>.
6. Save your changes.
Devices Policies and pro�les
Application settings
Advanced Threat Protection Host Intrusion Prevention
Application rights and protected resources Application rights and protectedresources
Application rights
Add
Selected target group
Application Next
Group
OK
How to change the trust group of an application in the application interface
Protection Advanced Threat Protection Host IntrusionPrevention
Manage applications
Restrictions→

212
As a result, the application will be put into the other trust group. Kaspersky Endpoint Security will then block theactions of the application depending on the trust group. The (user-de�ned) status will be assigned to theapplication. If the reputation of the application is changed in Kaspersky Security Network, the Host IntrusionPrevention component will leave this application's trust group unchanged.
Con�guring trust group rights
The optimal application rights are created for di�erent trust groups by default. The settings of rights forapplication groups that are in a trust group inherit values from the settings of the trust group rights.
How to change trust group rights in the Administration Console (MMC)

213
1. Open the Kaspersky Security Center Administration Console.
2. In the folder in the Administration Console tree, open the folder with the name of theadministration group to which the relevant client computers belong.
3. In the workspace, select the tab.
4. Select the necessary policy and double-click to open the policy properties.
5. In the policy window, select → .
6. In the block, click the button.
This opens the application rights con�guration window and the list of protected resources.
7. Select the tab.
8. Select the necessary trust group.
9. Select from the context menu of the trust group.
This opens the trust group properties.
10. Do one of the following:
Network activity of applications is controlled by the Firewall using network rules.
11. For the relevant resource, in the column of the corresponding action, right-click to open the context menuand select the necessary option: , ( ) or ( ).
12. If you want to monitor the use of computer resources, select ( / ).
Kaspersky Endpoint Security will record information about the operation of the Host Intrusion Preventioncomponent. Reports contain information about operations with computer resources performed by theapplication (allowed or forbidden). Reports also contain information about the applications that utilize eachresource.
13. Save your changes.
Managed devices
Policies
Advanced Threat Protection Host Intrusion Prevention
Application rights Settings
Application rights
Group rights
If you want to edit trust group rights that regulate operations with the operating system registry, user�les, and application settings, select the tab.
If you want to edit trust group rights that regulate access to operating system processes and objects,select the tab.
Files and system registry
Rights
Inherit Allow Forbid
Write to report
How to change trust group rights in the Web Console and Cloud Console

214
1. In the main window of Web Console, select → .
2. Click the name of the Kaspersky Endpoint Security policy.
The policy properties window opens.
3. Select the tab.
4. Select → .
5. In the block, click the link.
This opens the application rights con�guration window and the list of protected resources.
6. Select the tab.
You will see a list of trust groups on the left side of the window and their properties on the right side.
7. In the left part of the window, select the relevant trust group.
8. In the right part of the window, in the drop-down list, do one of the following:
Network activity of applications is controlled by the Firewall using network rules.
9. For the relevant resource, in the column of the corresponding action, select the necessary option: , ( ), or ( ).
10. If you want to monitor the use of computer resources, select ( / ).
Kaspersky Endpoint Security will record information about the operation of the Host Intrusion Preventioncomponent. Reports contain information about operations with computer resources performed by theapplication (allowed or forbidden). Reports also contain information about the applications that utilize eachresource.
11. Save your changes.
Devices Policies and pro�les
Application settings
Advanced Threat Protection Host Intrusion Prevention
Application rights and protected resources Application rights and protectedresources
Application rights
If you want to edit trust group rights that regulate operations with the operating system registry, user�les, and application settings, select .
If you want to edit trust group rights that regulate access to operating system processes and objects,select .
Files and system registry
Rights
InheritAllow Forbid
Write to report
How to change trust group rights in the application interface

215
1. In the lower part of the main application window, click the button.
2. In the application settings window, select → → .
3. Click the button.
This opens the list of installed applications.
4. Select the necessary trust group.
5. In the context menu of the trust group, select .
This opens the trust group properties.
6. Do one of the following:
Network activity of applications is controlled by the Firewall using network rules.
7. For the relevant resource, in the column of the corresponding action, right-click to open the context menuand select the necessary option: , ( ), or ( ).
8. If you want to monitor the use of computer resources, select ( ).
Kaspersky Endpoint Security will record information about the operation of the Host Intrusion Preventioncomponent. Reports contain information about operations with computer resources performed by theapplication (allowed or forbidden). Reports also contain information about the applications that utilize eachresource.
9. Save your changes.
For applications that were started before Kaspersky Endpoint Security, only network activity is controlled.Control is performed according to the network rules de�ned in the Firewall settings. To specify which networkrules must be applied to network activity monitoring for such applications, you must select a trust group.
Protection Advanced Threat Protection Host IntrusionPrevention
Manage applications
Details and rules
If you want to edit trust group rights that regulate operations with the operating system registry, user�les, and application settings, select the tab.
If you want to edit trust group rights that regulate access to operating system processes and objects,select the tab.
Files and system registry
Rights
Inherit Allow Forbid
Write to report
The trust group rights will be changed. Kaspersky Endpoint Security will then block the actions of the applicationdepending on the trust group. The status (User settings) will be assigned to the trust group.
Selecting a trust group for applications started before Kaspersky EndpointSecurity
How to select a trust group for applications started before Kaspersky Endpoint Security in the AdministrationConsole (MMC)

216
1. Open the Kaspersky Security Center Administration Console.
2. In the folder in the Administration Console tree, open the folder with the name of theadministration group to which the relevant client computers belong.
3. In the workspace, select the tab.
4. Select the necessary policy and double-click to open the policy properties.
5. In the policy window, select → .
6. In the block, click the button.
7. Select the necessary trust group for the setting.
8. Save your changes.
1. In the main window of Web Console, select → .
2. Click the name of the Kaspersky Endpoint Security policy.
The policy properties window opens.
3. Select the tab.
4. Select → .
5. Select the necessary trust group for the setting.
6. Save your changes.
1. In the lower part of the main application window, click the button.
2. In the application settings window, select → → .
3. Select the necessary trust group in the block.
4. Save your changes.
Managed devices
Policies
Advanced Threat Protection Host Intrusion Prevention
Application rights Edit
Applications launched before Kaspersky Endpoint Security forWindows are automatically moved to the <trust group> trust group
How to select a trust group for applications started before Kaspersky Endpoint Security in the Web Console andCloud Console
Devices Policies and pro�les
Application settings
Advanced Threat Protection Host Intrusion Prevention
Applications launched before Kaspersky Endpoint Security forWindows are automatically moved to the <trust group> trust group
How to select a trust group for applications started before Kaspersky Endpoint Security in the applicationinterface
Protection Advanced Threat Protection Host IntrusionPrevention
Applications launched before Kaspersky Endpoint Security forWindows are automatically moved to the <trust group> trust group

217
1. Open the Kaspersky Security Center Administration Console.
2. In the folder in the Administration Console tree, open the folder with the name of theadministration group to which the relevant client computers belong.
3. In the workspace, select the tab.
4. Select the necessary policy and double-click to open the policy properties.
5. In the policy window, select → .
6. In the block, use the drop-down list to select the necessary trust group.
If participation in Kaspersky Security Network is enabled, Kaspersky Endpoint Security sends KSN arequest for the reputation of an application each time the application is started. Based on the receivedresponse, the application may be moved to a trust group that is di�erent from the one speci�ed in theHost Intrusion Prevention component settings.
7. Use the check box to con�gureautomatic update of the rights of unknown applications.
8. Save your changes.
As a result, an application that is started before Kaspersky Endpoint Security will be put into the other trust group.Kaspersky Endpoint Security will then block the actions of the application depending on the trust group.
Selecting a trust group for unknown applications
During the �rst startup of an application, the Host Intrusion Prevention component determines the trust group forthe application. If you do not have Internet access or if Kaspersky Security Network has no information about thisapplication, Kaspersky Endpoint Security will place the application into the Low Restricted group by default. Wheninformation about a previously unknown application is detected in KSN, Kaspersky Endpoint Security will updatethe rights of this application. You can then manually edit the application rights.
How to select a trust group for unknown applications in the Administration Console (MMC)
Managed devices
Policies
Advanced Threat Protection Host Intrusion Prevention
Application processing rules Trust group for applications that could not beassigned to other groups
Update rights for previously unknown applications from KSN database
How to select a trust group for unknown applications in the Web Console and Cloud Console

218
1. In the main window of Web Console, select → .
2. Click the name of the Kaspersky Endpoint Security policy.
The policy properties window opens.
3. Select the tab.
4. Select → .
5. In the block, use the drop-down list to select the necessary trust group.
If participation in Kaspersky Security Network is enabled, Kaspersky Endpoint Security sends KSN arequest for the reputation of an application each time the application is started. Based on the receivedresponse, the application may be moved to a trust group that is di�erent from the one speci�ed in theHost Intrusion Prevention component settings.
6. Use the check box to con�gureautomatic update of the rights of unknown applications.
7. Save your changes.
1. In the lower part of the main application window, click the button.
2. In the application settings window, select → → .
3. In the block, select the relevant trust group.
If participation in Kaspersky Security Network is enabled, Kaspersky Endpoint Security sends KSN arequest for the reputation of an application each time the application is started. Based on the receivedresponse, the application may be moved to a trust group that is di�erent from the one speci�ed in theHost Intrusion Prevention component settings.
4. Use the check box to con�gureautomatic update of the rights of unknown applications.
5. Save your changes.
Devices Policies and pro�les
Application settings
Advanced Threat Protection Host Intrusion Prevention
Application processing rules Trust group for applications that could not beassigned to other groups
Update rights for previously unknown applications from KSN database
How to select a trust group for unknown applications in the application interface
Protection Advanced Threat Protection Host IntrusionPrevention
Trust group for unknown applications
Update rights for previously unknown applications from KSN database
Selecting a trust group for digitally signed applications
Kaspersky Endpoint Security always places applications signed by Microsoft certi�cates or Kaspersky certi�catesinto the Trusted group.
How to select a trust group for digitally signed applications in the Administration Console (MMC)

219
1. Open the Kaspersky Security Center Administration Console.
2. In the folder in the Administration Console tree, open the folder with the name of theadministration group to which the relevant client computers belong.
3. In the workspace, select the tab.
4. Select the necessary policy and double-click to open the policy properties.
5. In the policy window, select → .
6. In the block, use the checkbox to enable or disable automatic assignment to the Trusted group for applications containing the digitalsignature of trusted vendors.
Trusted vendors are those software vendors that are included in the trusted group by Kaspersky. You canalso add vendor certi�cate to the trusted system certi�cate store manually.
If this check box is cleared, the Host Intrusion Prevention component does not consider digitally signedapplications to be trusted, and uses other parameters to determine their trust group.
7. Save your changes.
1. In the main window of Web Console, select → .
2. Click the name of the Kaspersky Endpoint Security policy.
The policy properties window opens.
3. Select the tab.
4. Select → .
5. In the block, use the checkbox to enable or disable automatic assignment to the Trusted group for applications containing the digitalsignature of trusted vendors.
Trusted vendors are those software vendors that are included in the trusted group by Kaspersky. You canalso add vendor certi�cate to the trusted system certi�cate store manually.
If this check box is cleared, the Host Intrusion Prevention component does not consider digitally signedapplications to be trusted, and uses other parameters to determine their trust group.
6. Save your changes.
Managed devices
Policies
Advanced Threat Protection Host Intrusion Prevention
Application processing rules Trust applications that have a digital signature
How to select a trust group for digitally signed applications in the Web Console and Cloud Console
Devices Policies and pro�les
Application settings
Advanced Threat Protection Host Intrusion Prevention
Application processing rules Trust applications that have a digital signature
How to select a trust group for digitally signed applications in the application interface

220
1. In the lower part of the main application window, click the button.
2. In the application settings window, select → → .
3. In the block, use the checkbox to enable or disable automatic assignment to the Trusted group for applications containing the digitalsignature of trusted vendors.
Trusted vendors are those software vendors that are included in the trusted group by Kaspersky. You canalso add vendor certi�cate to the trusted system certi�cate store manually.
If this check box is cleared, the Host Intrusion Prevention component does not consider digitally signedapplications to be trusted, and uses other parameters to determine their trust group.
4. Save your changes.
Protection Advanced Threat Protection Host IntrusionPrevention
Application processing rules Trust applications that have a digital signature
Managing application rights
By default, application activity is controlled based on the application rights that are de�ned for the speci�c trustgroup that Kaspersky Endpoint Security assigned to the application when it started for the �rst time. If necessary,you can edit the application rights for an entire trust group, for an individual application, or for a group ofapplications within a trust group.
Manually de�ned application rights have a higher priority than application rights that were de�ned for a trust group.In other words, if manually de�ned application rights di�er from the application rights de�ned for a trust group, theHost Intrusion Prevention component controls application activity according to the manually de�ned applicationrights.
The rules that you create for applications are inherited by child applications. For example, if you deny all networkactivity for cmd.exe, all network activity will also be denied for notepad.exe if it is started using cmd.exe. If anapplication is started indirectly by another application but is not a child of the application it runs from, rules are notinherited.
How to change application rights in the Administration Console (MMC)

221
1. Open the Kaspersky Security Center Administration Console.
2. In the folder in the Administration Console tree, open the folder with the name of theadministration group to which the relevant client computers belong.
3. In the workspace, select the tab.
4. Select the necessary policy and double-click to open the policy properties.
5. In the policy window, select → .
6. In the block, click the button.
This opens the application rights con�guration window and the list of protected resources.
7. Select the tab.
8. Click the button.
9. In the opened window, enter criteria to search for the application whose application rights you want tochange.
You can enter the name of the application or the name of the vendor. Kaspersky Endpoint Securitysupports environment variables and the * and ? characters when entering a mask.
10. Click the button.
Kaspersky Endpoint Security will search for the application in the consolidated list of applications installedon managed computers. Kaspersky Endpoint Security will show a list of applications that satisfy yoursearch criteria.
11. Select the necessary application.
12. In the drop-down list, select and click.
The application will be added to the default group.
13. Select the relevant application and then select from the context menu of theapplication.
This opens the application properties.
14. Do one of the following:
Network activity of applications is controlled by the Firewall using network rules.
15. For the relevant resource, in the column of the corresponding action, right-click to open the context menuand select the necessary option: , ( ) or ( ).
16. If you want to monitor the use of computer resources, select ( / ).
Managed devices
Policies
Advanced Threat Protection Host Intrusion Prevention
Application rights Settings
Application rights
Add
Refresh
Add selected applications to <trust group> group Default groupsOK
Application rights
If you want to edit trust group rights that regulate operations with the operating system registry, user�les, and application settings, select the tab.
If you want to edit trust group rights that regulate access to operating system processes and objects,select the tab.
Files and system registry
Rights
Inherit Allow Forbid
Write to report

222
Kaspersky Endpoint Security will record information about the operation of the Host Intrusion Preventioncomponent. Reports contain information about operations with computer resources performed by theapplication (allowed or forbidden). Reports also contain information about the applications that utilize eachresource.
17. Save your changes.
How to change application rights in the Web Console and Cloud Console

223
1. In the main window of Web Console, select → .
2. Click the name of the Kaspersky Endpoint Security policy.
The policy properties window opens.
3. Select the tab.
4. Select → .
5. In the block, click the link.
This opens the application rights con�guration window and the list of protected resources.
6. Select the tab.
You will see a list of trust groups on the left side of the window and their properties on the right side.
7. Click the button.
This starts the Wizard for adding an application to a trust group.
8. Click the link to select the relevant trust group for the application.
9. Select the type. Click the button.
If you want to change the trust group for multiple applications, select the type and de�ne a namefor the application group.
10. In the opened list of applications, select the applications whose application rights you want to change.
Use a �lter. You can enter the name of the application or the name of the vendor. Kaspersky EndpointSecurity supports environment variables and the * and ? characters when entering a mask.
11. Finish the Wizard by clicking .
The application will be added to the trust group.
12. In the left part of the window, select the relevant application.
13. In the right part of the window, in the drop-down list, do one of the following:
Network activity of applications is controlled by the Firewall using network rules.
14. For the relevant resource, in the column of the corresponding action, select the necessary option: , ( ), or ( ).
15. If you want to monitor the use of computer resources, select ( / ).
Devices Policies and pro�les
Application settings
Advanced Threat Protection Host Intrusion Prevention
Application rights and protected resources Application rights and protectedresources
Application rights
Add
Selected target group
Application Next
Group
OK
If you want to edit trust group rights that regulate operations with the operating system registry, user�les, and application settings, select .
If you want to edit trust group rights that regulate access to operating system processes and objects,select .
Files and system registry
Rights
InheritAllow Forbid
Write to report

224
Kaspersky Endpoint Security will record information about the operation of the Host Intrusion Preventioncomponent. Reports contain information about operations with computer resources performed by theapplication (allowed or forbidden). Reports also contain information about the applications that utilize eachresource.
16. Save your changes.
How to change application rights in the application interface

225
1. In the lower part of the main application window, click the button.
2. In the application settings window, select → → .
3. Click the button.
This opens the list of installed applications.
4. Select the necessary application.
5. In the context menu of the application, select .
This opens the application properties.
6. Do one of the following:
7. For the relevant resource, in the column of the corresponding action, right-click to open the context menuand select the necessary option: , ( ), or ( ).
8. If you want to monitor the use of computer resources, select ( ).
Kaspersky Endpoint Security will record information about the operation of the Host Intrusion Preventioncomponent. Reports contain information about operations with computer resources performed by theapplication (allowed or forbidden). Reports also contain information about the applications that utilize eachresource.
9. Select the tab and con�gure the advanced settings of the application (see the table below).
10. Save your changes.
Advanced Settings of the application
Parameter Description
All �les that are opened by the application are excluded from scans by KasperskyEndpoint Security. For example, if you are using applications to back up �les, thisfeature helps reduce the consumption of resources by Kaspersky EndpointSecurity.
Kaspersky Endpoint Security will not monitor the application's �le- and networkactivity in the operating system. Application activity is monitored by the followingcomponents: Behavior Detection, Exploit Prevention, Host Intrusion Prevention,Remediation Engine and Firewall.
The restrictions con�gured for the parent process will not be applied byKaspersky Endpoint Security to a child process. The parent process is started byan application for which application rights (Host Intrusion Prevention) andapplication network rules (Firewall) are con�gured.
Protection Advanced Threat Protection Host IntrusionPrevention
Manage applications
Details and rules
If you want to edit trust group rights that regulate operations with the operating system registry, user�les, and application settings, select the tab.
If you want to edit trust group rights that regulate access to operating system processes and objects,select the tab.
Files and system registry
Rights
Inherit Allow Forbid
Write to report
Exclusions
Do not scanopened �les
Do notmonitorapplicationactivity
Do not inheritrestrictions ofthe parentprocess(application)
Do notmonitor theactivity of
Kaspersky Endpoint Security will not monitor the �le activity or network activityof applications that are started by this application.

226
Kaspersky Endpoint Security Self-Defense blocks all attempts to manageapplication services from a remote computer. If the check box is selected, theremote access application is allowed to manage Kaspersky Endpoint Securitysettings through the Kaspersky Endpoint Security interface.
/
childapplications
AllowinteractionwithKasperskyEndpointSecurityinterface
Do not scanencryptedtra�ic Donot scan alltra�ic
Network tra�ic initiated by the application will be excluded from scans byKaspersky Endpoint Security. You can exclude either all tra�ic or only encryptedtra�ic from scans. You can also exclude individual IP addresses and port numbersfrom scans.
Protecting operating system resources and personal data
The Host Intrusion Prevention component manages the rights of applications to take actions on various categoriesof operating system resources and personal data. Kaspersky specialists have established preset categories ofprotected resources. For example, the Operating system category has a Startup settings subcategory that lists allthe registry keys associated with autorun of applications. You cannot edit or delete the preset categories ofprotected resources or the protected resources that are within these categories.
How to add a protected resource in the Administration Console (MMC)

227
1. Open the Kaspersky Security Center Administration Console.
2. In the folder in the Administration Console tree, open the folder with the name of theadministration group to which the relevant client computers belong.
3. In the workspace, select the tab.
4. Select the necessary policy and double-click to open the policy properties.
5. In the policy window, select → .
6. In the block, click the button.
This opens the application rights con�guration window and the list of protected resources.
7. Select the tab.
You will see a list of protected resources in the left part of the window and the corresponding rights foraccessing those resources depending on the speci�c trust group.
8. Select the category of protected resources to which you want to add a new protected resource.
If you want to add a subcategory, click → .
9. Click the button. In the drop-down list, select the type of resource that you want to add: or .
10. In the opened window, select a �le, folder, or registry key.
You can view applications' rights to access the added resources. To do so, select an added resource in theleft part of the window and Kaspersky Endpoint Security will show the access rights for each trust group.You can also disable control of application activity with resources by using the check box next to a newresource.
11. Save your changes.
Managed devices
Policies
Advanced Threat Protection Host Intrusion Prevention
Application rights Settings
Protected resources
Add Category
Add File or folderRegistry key
How to add a protected resource in the Web Console and Cloud Console

228
1. In the main window of Web Console, select → .
2. Click the name of the Kaspersky Endpoint Security policy.
The policy properties window opens.
3. Select the tab.
4. Select → .
5. In the block, click the link.
This opens the application rights con�guration window and the list of protected resources.
6. Select the tab.
You will see a list of protected resources in the left part of the window and the corresponding rights foraccessing those resources depending on the speci�c trust group.
7. Click the button.
The New Resource Wizard starts.
8. Click the link to select the category of protected resources to which you want to add a newprotected resource.
If you want to add a subcategory, select the option.
9. Select the type of resource that you want to add: or .
10. Select a �le, folder, or registry key.
11. Finish the Wizard by clicking .
You can view applications' rights to access the added resources. To do so, select an added resource in theleft part of the window and Kaspersky Endpoint Security will show the access rights for each trust group.You can also use the check box in the column to disable control of application activity withresources.
12. Save your changes.
Devices Policies and pro�les
Application settings
Advanced Threat Protection Host Intrusion Prevention
Application rights and protected resources Application rights and protectedresources
Protected resources
Add
Group name
Category of protected resources
File or folder Registry key
OK
Status
How to add a protected resource in the application interface

229
1. In the lower part of the main application window, click the button.
2. In the application settings window, select → → .
3. Click the button.
The list of protected resources opens.
4. Select the category of protected resources to which you want to add a new protected resource.
If you want to add a subcategory, click → .
5. Click the button. In the drop-down list, select the type of resource that you want to add: or .
6. In the opened window, select a �le, folder, or registry key.
You can view applications' rights to access the added resources. To do so, select an added resource in theleft part of the window and Kaspersky Endpoint Security will show a list of applications and the accessrights for each application. You can also disable control of application activity with resources by using the
button in the column.
7. Save your changes.
Protection Advanced Threat Protection Host IntrusionPrevention
Manage resources
Add Category
Add File or folderRegistry key
Disable control Status
Kaspersky Endpoint Security will control access to the added operating system resources and to personal data.Kaspersky Endpoint Security controls an application's access to resources based on the trust group assigned tothe application. You can also change the trust group of an application.
Deleting information about unused applications
Kaspersky Endpoint Security uses application rights to control the activities of applications. Application rights aredetermined by their trust group. Kaspersky Endpoint Security puts an application into a trust group when theapplication is started for the �rst time. You can manually change the trust group of an application. You can alsomanually con�gure the rights of an individual application. Kaspersky Endpoint Security stores the followinginformation about an application: trust group of the application, and rights of the application.
Kaspersky Endpoint Security automatically deletes information about unused applications to save computerresources. Kaspersky Endpoint Security deletes application information according to the following rules:
If the trust group and rights of an application were determined automatically, Kaspersky Endpoint Securitydeletes information about this application after 30 days. It is not possible to change the storage term forapplication information or turn o� automatic deletion.
If you manually put an application into a trust group or con�gured its access rights, Kaspersky EndpointSecurity deletes information about this application after 60 days (default storage term). You can change thestorage term for application information, or turn o� automatic deletion (see the instructions below).
When you start an application whose information has been deleted, Kaspersky Endpoint Security analyzes theapplication as if it were starting for the �rst time.
How to con�gure automatic deletion of information about unused applications in the Administration Console(MMC)

230
1. Open the Kaspersky Security Center Administration Console.
2. In the folder in the Administration Console tree, open the folder with the name of theadministration group to which the relevant client computers belong.
3. In the workspace, select the tab.
4. Select the necessary policy and double-click to open the policy properties.
5. In the policy window, select → .
6. In the block, do one of the following:
7. Save your changes.
Managed devices
Policies
Advanced Threat Protection Host Intrusion Prevention
Application processing rules
If you want to con�gure automatic deletion, select the check box and specify the necessary number of days.
Information about the applications that you manually put into a trust group or whose access rights youmanually con�gured will be deleted by Kaspersky Endpoint Security after the de�ned number of days.Information about applications whose trust group and application rights were automatically determinedwill also be deleted by Kaspersky Endpoint Security after 30 days.
If you want to turn o� automatic deletion, clear the check box.
Information about the applications that you manually put into a trust group or whose access rights youmanually con�gured will be stored by Kaspersky Endpoint Security inde�nitely, without any storageterm limits. Kaspersky Endpoint Security will only delete information about applications whose trustgroup and application rights were automatically determined after 30 days.
Delete rights for applications that are notstarted for more than N days
Delete rights for applications that are not startedfor more than N days
How to con�gure automatic deletion of information about unused applications in the Web Console and CloudConsole

231
1. In the main window of Web Console, select → .
2. Click the name of the Kaspersky Endpoint Security policy.
The policy properties window opens.
3. Select the tab.
4. Select → .
5. In the block, do one of the following:
6. Save your changes.
1. In the lower part of the main application window, click the button.
2. In the application settings window, select → → .
3. In the block, do one of the following:
4. Save your changes.
Devices Policies and pro�les
Application settings
Advanced Threat Protection Host Intrusion Prevention
Application processing rules
If you want to con�gure automatic deletion, select the check box and specify the necessary number of days.
Information about the applications that you manually put into a trust group or whose access rights youmanually con�gured will be deleted by Kaspersky Endpoint Security after the de�ned number of days.Information about applications whose trust group and application rights were automatically determinedwill also be deleted by Kaspersky Endpoint Security after 30 days.
If you want to turn o� automatic deletion, clear the check box.
Information about the applications that you manually put into a trust group or whose access rights youmanually con�gured will be stored by Kaspersky Endpoint Security inde�nitely, without any storageterm limits. Kaspersky Endpoint Security will only delete information about applications whose trustgroup and application rights were automatically determined after 30 days.
Delete rights for applications that are notstarted for more than N days
Delete rights for applications that are not startedfor more than N days
How to con�gure automatic deletion of information about unused applications in the application interface
Protection Advanced Threat Protection Host IntrusionPrevention
Application processing rules
If you want to con�gure automatic deletion, select the check box and specify the necessary number of days.
Information about the applications that you manually put into a trust group or whose access rights youmanually con�gured will be deleted by Kaspersky Endpoint Security after the de�ned number of days.Information about applications whose trust group and application rights were automatically determinedwill also be deleted by Kaspersky Endpoint Security after 30 days.
If you want to turn o� automatic deletion, clear the check box.
Information about the applications that you manually put into a trust group or whose access rights youmanually con�gured will be stored by Kaspersky Endpoint Security inde�nitely, without any storageterm limits. Kaspersky Endpoint Security will only delete information about applications whose trustgroup and application rights were automatically determined after 30 days.
Delete rights for applications that are notstarted for more than N days
Delete rights for applications that are not startedfor more than N days

232
When con�guring Host Intrusion Prevention monitoring, take into account the potential network load whenforwarding events to Kaspersky Security Center. You can also enable saving of reports only in the local log ofKaspersky Endpoint Security.
Special features of audio stream protection
Monitoring Host Intrusion Prevention
You can receive reports on the operation of the Host Intrusion Prevention component. Reports containinformation about operations with computer resources performed by the application (allowed or forbidden).Reports also contain information about the applications that utilize each resource.
To monitor Host Intrusion Prevention operations, you need to enable report writing. For example, you can enableforwarding of reports for individual applications in the Host Intrusion Prevention component settings.
Protecting access to audio and video
Cybercriminals can use special programs to try to gain access to devices that record audio and video (such asmicrophones or webcams). Kaspersky Endpoint Security controls when applications receive an audio stream orvideo stream and protects data against unauthorized interception.
By default, Kaspersky Endpoint Security controls applications' access to the audio stream and video stream basedon the application's category:
Trusted and Low Restricted applications are allowed to receive the audio stream and video stream fromdevices by default.
High Restricted and Untrusted applications are not allowed to receive the audio stream and video stream fromdevices by default.
You can manually allow applications to receive the audio stream and video stream.
Audio stream protection has the following special characteristics:
The Host Intrusion Prevention component must be enabled for this functionality to work.
If the application started receiving the audio stream before the Host Intrusion Prevention component wasstarted, Kaspersky Endpoint Security allows the application to receive the audio stream and does not show anynoti�cations.
If you moved the application to the Untrusted group or High Restricted group after the application beganreceiving the audio stream, Kaspersky Endpoint Security allows the application to receive the audio stream anddoes not show any noti�cations.
After the settings for the application's access to sound recording devices have been changed (for example, ifthe application has been blocked from receiving the audio stream), this application must be restarted to stop itfrom receiving the audio stream.

233
Special features of application webcam access protection
Control of access to the audio stream from sound recording devices does not depend on an application'swebcam access settings.
Kaspersky Endpoint Security protects access to only built-in microphones and external microphones. Otheraudio streaming devices are not supported.
Kaspersky Endpoint Security cannot guarantee the protection of an audio stream from such devices as DSLRcameras, portable video cameras, and action cameras.
When you run audio and video recording or playback applications for the �rst time since installation ofKaspersky Endpoint Security, audio and video playback or recording may be interrupted. This is necessary inorder to enable the functionality that controls access to sound recording devices by applications. The systemservice that controls audio hardware will be restarted when Kaspersky Endpoint Security is run for the �rsttime.
Webcam access protection functionality has the following special considerations and limitations:
The application controls video and still images derived from the processing of webcam data.
The application controls the audio stream if it is part of the video stream received from the webcam.
The application controls only webcams connected via USB or IEEE1394 that are displayed as inthe Windows Device Manager.
Kaspersky Endpoint Security supports the following webcams:
Kaspersky cannot guarantee support for webcams that are not speci�ed in this list.
Imaging Devices
Logitech HD Webcam C270
Logitech HD Webcam C310
Logitech Webcam C210
Logitech Webcam Pro 9000
Logitech HD Webcam C525
Microsoft LifeCam VX-1000
Microsoft LifeCam VX-2000
Microsoft LifeCam VX-3000
Microsoft LifeCam VX-800
Microsoft LifeCam Cinema
Remediation Engine

234
The Remediation Engine lets Kaspersky Endpoint Security roll back actions that have been performed by malwarein the operating system.
When rolling back malware activity in the operating system, Kaspersky Endpoint Security handles the followingtypes of malware activity:
Kaspersky Endpoint Security performs the following actions:
The �le recovery feature has a number of limitations.
Kaspersky Endpoint Security performs the following actions:
Kaspersky Endpoint Security performs the following actions:
Kaspersky Endpoint Security performs the following actions:
File activity
Deletes executable �les that were created by malware (on all media except network drives).
Deletes executable �les that were created by programs that have been in�ltrated by malware.
Restores �les that have been modi�ed or deleted by malware.
Registry activity
Deletes registry keys that were created by malware.
Does not restore registry keys that have been modi�ed or deleted by malware.
System activity
Terminates processes that have been initiated by malware.
Terminates processes into which a malicious application has penetrated.
Does not resume processes that have been halted by malware.
Network activity
Blocks the network activity of malware.
Blocks the network activity of processes that have been in�ltrated by malware.
A rollback of malware actions can be started by the File Threat Protection or Behavior Detection component, orduring a virus scan.
Rolling back malware operations a�ects a strictly de�ned set of data. Rollback has no adverse e�ects on theoperating system or on the integrity of your computer data.
How to enable or disable the Remediation Engine component in the Administration Console (MMC)

235
1. Open the Kaspersky Security Center Administration Console.
2. In the folder in the Administration Console tree, open the folder with the name of theadministration group to which the relevant client computers belong.
3. In the workspace, select the tab.
4. Select the necessary policy and double-click to open the policy properties.
5. In the policy window, select → .
6. Use the check box to enable or disable the component.
7. Save your changes.
1. In the main window of Web Console, select → .
2. Click the name of the Kaspersky Endpoint Security policy.
The policy properties window opens.
3. Select the tab.
4. Select → .
5. Use the toggle to enable or disable the component.
6. Save your changes.
1. In the lower part of the main application window, click the button.
2. In the application settings window, select → → .
3. Use the toggle to enable or disable the component.
4. Save your changes.
Managed devices
Policies
Advanced Threat Protection Remediation Engine
Remediation Engine
How to enable or disable the Remediation Engine component in the Web Console and Cloud Console
Devices Policies and pro�les
Application settings
Advanced Threat Protection Remediation Engine
Remediation Engine
How to enable or disable the Remediation Engine component in the application interface
Protection Advanced Threat Protection RemediationEngine
Remediation Engine
As a result, if Remediation Engine is enabled, Kaspersky Endpoint Security will roll back the actions taken bymalicious applications in the operating system.
Kaspersky Security Network

236
Use of Kaspersky Security Network is voluntary. The application prompts you to use KSN during initialcon�guration of the application. Users can begin or discontinue participation in KSN at any time.
KSN Infrastructure
By default, Kaspersky Security Center uses Global KSN. You can con�gure the use of Private KSN in theAdministration Console (MMC), in the Kaspersky Security Center 12 Web Console, and in the command line. Itis not possible to con�gure the use of Private KSN in the Kaspersky Security Center Cloud Console.
KSN Proxy
To protect your computer more e�ectively, Kaspersky Endpoint Security uses data that is received from usersaround the globe. Kaspersky Security Network is designed for obtaining this data.
Kaspersky Security Network (KSN) is an infrastructure of cloud services providing access to the online KasperskyKnowledge Base that contains information about the reputation of �les, web resources, and software. The use ofdata from Kaspersky Security Network ensures faster responses by Kaspersky Endpoint Security to new threats,improves the performance of some protection components, and reduces the likelihood of false positives. If you areparticipating in Kaspersky Security Network, KSN services provide Kaspersky Endpoint Security with informationabout the category and reputation of scanned �les, as well as information about the reputation of scanned webaddresses.
For more detailed information about sending Kaspersky statistical information that is generated duringparticipation in KSN, and about the storage and destruction of such information, please refer to the KasperskySecurity Network Statement and the Kaspersky website . The ksn_<language ID>.txt �le with the text of theKaspersky Security Network Statement is included in the application distribution kit.
To reduce the load on KSN servers, Kaspersky experts may release application updates that temporarily disable orpartly restrict requests to Kaspersky Security Network. In this case, the status of the connection to KSN in thelocal interface of the application is Enabled with restrictions.
Kaspersky Endpoint Security supports the following KSN infrastructural solutions:
Global KSN is the solution that is used by most Kaspersky applications. KSN participants receive informationfrom Kaspersky Security Network and send Kaspersky information about objects detected on the user'scomputer to be analyzed additionally by Kaspersky analysts and to be included in the reputation and statisticaldatabases of Kaspersky Security Network.
Private KSN is a solution that enables users of computers hosting Kaspersky Endpoint Security or otherKaspersky applications to obtain access to reputation databases of Kaspersky Security Network, and to otherstatistical data without sending data to KSN from their own computers. Private KSN is designed for corporatecustomers who are unable to participate in Kaspersky Security Network for any of the following reasons:
Local workstations are not connected to the Internet.
Transmission of any data outside the country or outside the corporate LAN is prohibited by law or restrictedby corporate security policies.
For more details about Private KSN, please refer to the documentation on Kaspersky Private Security Network.
User computers managed by Kaspersky Security Center Administration Server can interact with KSN via the KSNProxy service.

237
To enable or disable the usage of Kaspersky Security Network:
1. In the lower part of the main application window, click the button.
2. In the application settings window, select → → .
3. Use the toggle to enable or disable the component.
If you enabled the use of KSN, Kaspersky Endpoint Security will display the Kaspersky Security NetworkStatement. Please read and accept the terms of the Kaspersky Security Network (KSN) Statement if you agreeto them.
By default, Kaspersky Endpoint Security uses the Extended KSN mode. Extended KSN mode is a mode in whichKaspersky Endpoint Security sends additional data to Kaspersky.
4. If required, �ip the toggle o�.
5. Save your changes.
The KSN Proxy service provides the following capabilities:
The user's computer can query KSN and submit information to KSN even without direct access to the Internet.
The KSN Proxy service caches processed data, thereby reducing the load on the external networkcommunication channel and speeding up receipt of the information that is requested by the user's computer.
For more details on the KSN Proxy service, please refer to the Kaspersky Security Center Help Guide .
Enabling and disabling the usage of Kaspersky Security Network
Protection Advanced Threat Protection Kaspersky SecurityNetwork
Kaspersky Security Network
Enable Extended KSN mode
As a result, if use of KSN is enabled, Kaspersky Endpoint Security uses information about the reputation of �les,web resources, and applications received from Kaspersky Security Network.
Limitations of Private KSN
Private KSN (hereinafter also referred to as KPSN) lets you use your own local reputation database to check thereputation of objects (�les or web addresses). The reputation of an object added to the local reputation databasehas a higher priority than one added to KSN/KPSN. For example, imagine that Kaspersky Endpoint Security isscanning a computer and requests the reputation of a �le in KSN/KPSN. If the �le has an "untrusted" reputation inthe local reputation database but has a "trusted" reputation in KSN/KPSN, Kaspersky Endpoint Security will detectthe �le as "untrusted" and will take the action de�ned for detected threats.
However, in some cases Kaspersky Endpoint Security might not request the reputation of an object in KSN/KPSN.If this is the case, Kaspersky Endpoint Security will not receive data from the local reputation database of KPSN.Kaspersky Endpoint Security might not request the reputation of an object in KSN/KPSN for the following reasons:
Kaspersky applications are using o�line reputation databases. O�line reputation databases are designed tooptimize resources during operation of Kaspersky applications and to protect critically important objects onthe computer. O�line reputation databases are created by Kaspersky experts based on data from KasperskySecurity Network. Kaspersky applications update o�line reputation databases with anti-virus databases of thespeci�c application. If o�line reputation databases contain information about an object being scanned, theapplication does not request the reputation of this object from KSN/KPSN.

238
When using Kaspersky Private Security Network, cloud mode functionality is available starting with KasperskyPrivate Security Network version 3.0.
To enable or disable cloud mode for protection components:
1. In the lower part of the main application window, click the button.
2. In the application settings window, select → .
3. Use the toggle to enable or disable the component.
4. Save your changes.
If the light version of anti-virus databases is not available for use, Kaspersky Endpoint Security automaticallyswitches to the premium version of anti-virus databases.
The application is using scan optimization technologies, such as iSwift or iChecker, or is caching reputationrequests in
Scan exclusions (trusted zone) are con�gured in the application settings. If this is the case, the application doesnot take into account the reputation of the object in the local reputation database.
KSN/KPSN. If this is the case, the application might not request the reputation of previously scanned objects.
To optimize its workload, the application scans �les of a certain format and size. The list of relevant formats andsize limits are determined by Kaspersky experts. This list is updated with the application's anti-virus databases.You can also con�gure scan optimization settings in the application interface, for example, for the File ThreatProtection component.
Enabling and disabling cloud mode for protection components
Cloud mode refers to the application operating mode in which Kaspersky Endpoint Security uses a light version ofanti-virus databases. Kaspersky Security Network supports the operation of the application when light anti-virusdatabases are being used. The light version of anti-virus databases lets you use approximately half of thecomputer RAM that would otherwise be used with the usual databases. If you do not participate in KasperskySecurity Network or if cloud mode is disabled, Kaspersky Endpoint Security downloads the full version of anti-virusdatabases from Kaspersky servers.
Protection Advanced Threat Protection → Kaspersky SecurityNetwork
Enable cloud mode
As a result, Kaspersky Endpoint Security downloads a light version or full version of anti-virus databases duringthe next update.
Checking the connection to Kaspersky Security Network
Your connection to Kaspersky Security Network may be lost for the following reasons:
You do not participate in Kaspersky Security Network.
Your computer is not connected to the Internet.

239
To check the connection to Kaspersky Security Network:
If the connection with Kaspersky Security Network servers cannot be restored, it is recommended to contactTechnical Support or your service provider.
Current key status does not allow connecting to Kaspersky Security Network. For example, a connection toKSN may be unavailable due to the following reasons:
Application is not activated.
License or subscription has expired.
License key issues have been identi�ed (for example, the key has been added to the list of prohibited keys).
In the main application window, click → .More Tools Kaspersky Security Network
This opens the window, which displays information about Kaspersky SecurityNetwork activity. The application receives KSN usage statistics when the windowis opened. The global statistics of the Kaspersky Security Network cloud service infrastructure and thesynchronization time are not refreshed in real time.
Kaspersky Security NetworkKaspersky Security Network
The left part of the window displays one of the following statuses for theconnection between the computer and Kaspersky Security Network:
Kaspersky Security Network
Enabled.
This status means that Kaspersky Security Network is being used in Kaspersky Endpoint Security operationsand KSN servers are available.
Enabled. Available with restrictions.
This status means that Kaspersky Security Network is being used in Kaspersky Endpoint Security operationsand KSN servers are unavailable.
KSN servers may be unavailable due to the following reasons:
If the time that has elapsed since the last synchronization with KSN servers exceeds 15 minutes or showsthe Unknown status, the status of the Kaspersky Endpoint Security connection to Kaspersky SecurityNetwork takes the Enabled value. Not available.
O�.
This status means that Kaspersky Security Network is not being used in Kaspersky Endpoint Securityoperations.
The KSN Proxy service (ksnproxy) is running on the computer.
Firewall blocks port 13111.
Checking the reputation of a �le in Kaspersky Security Network
If you are doubtful of the security of a �le, you can check its reputation in Kaspersky Security Network.

240
You can check the reputation of a �le if you have accepted the terms of the Kaspersky Security NetworkStatement.
To check the reputation of a �le in Kaspersky Security Network:
File context menu
Reputation of a �le in Kaspersky Security Network
Open the �le context menu and select the option (see the �gure below).Check reputation in KSN
Kaspersky Endpoint Security displays the �le reputation:
. Most users of Kaspersky Security Network have con�rmed that the �le is trusted.Trusted
. Although they donot have any malicious functions, such applications can be exploited by intruders. For details on legitimatesoftware that could be used by criminals to harm the computer or personal data of a user, please visit thewebsite of the Kaspersky IT Encyclopedia . You can add these applications to the trusted list.
Legitimate software that could be exploited to harm your computer or personal data
. A virus or other application that poses a threat.Untrusted
. Kaspersky Security Network does not have any information about the �le. You can scan a �le usinganti-virus databases (the option in the context menu).
UnknownScan for viruses
Kaspersky Endpoint Security displays the KSN solution that was used to determine the reputation of the �le:Global KSN or Private KSN.
Kaspersky Endpoint Security also displays additional information about the �le (see the �gure below).

241
This component is available if Kaspersky Endpoint Security is installed on a computer that runs on Windowsfor workstations. This component is unavailable if Kaspersky Endpoint Security is installed on a computer thatruns on Windows for servers.
To con�gure the encrypted connections scan settings:
1. In the lower part of the main application window, click the button.
2. In the application settings window, select .
3. In the Encrypted connections scan section, select the encrypted connection scanning mode:
Kaspersky Endpoint Security does not scan encrypted connections that were established by trustedapplications for which tra�ic scanning is disabled. Kaspersky Endpoint Security does not scan encryptedconnections from the prede�ned list of trusted websites. The prede�ned list of trusted websites iscreated by Kaspersky experts. This list is updated with the application's anti-virus databases. You can viewthe prede�ned list of trusted websites only in the Kaspersky Endpoint Security interface. You cannot viewthe list in the Kaspersky Security Center Console.
4. If necessary, add scan exclusions: trusted addresses and applications.
5. Click the button.
Encrypted connections scan
After installation, Kaspersky Endpoint Security adds a Kaspersky certi�cate to the system storage for trustedcerti�cates (Windows certi�cate store). Kaspersky Endpoint Security also includes the use of system storage oftrusted certi�cates in Firefox and Thunderbird to scan the tra�ic of these applications.
The Web Control, Mail Threat Protection, Web Threat Protection components can decrypt and scan networktra�ic transmitted over encrypted connections using the following protocols:
SSL 3.0.
TLS 1.0, TLS 1.1, TLS 1.2, TLS 1.3.
Con�guring the encrypted connections scan settings
Network settings
Kaspersky Endpoint Security will not have access to the contents ofwebsites whose addresses begin with https://.
. Kaspersky Endpoint Securitywill scan encrypted tra�ic only when requested by the File Threat Protection, Mail Threat Protection, andWeb Control components.
Kaspersky Endpoint Security will scan encrypted network tra�ic evenif protection components are disabled.
Do not scan encrypted connections
Scan encrypted connections upon request from protection components
Always scan encrypted connections
Advanced settings

242
6. Con�gure the settings for scanning encrypted connections (see the table below).
7. Save your changes.
Encrypted connections scan settings
Parameter Description
. If this option is selected, when visiting a domain with an untrusted certi�cate,Kaspersky Endpoint Security allows the network connection.
When opening a domain with an untrusted certi�cate in a browser, Kaspersky EndpointSecurity displays an HTML page showing a warning and the reason why visiting thatdomain is not recommended. A user can click the link from the HTML warning page toobtain access to the requested web resource. After following this link, during the nexthour Kaspersky Endpoint Security will not display warnings about an untrusted certi�catewhen visiting other resources on this same domain.
. If this option is selected, when visiting a domain with anuntrusted certi�cate, Kaspersky Endpoint Security blocks the network connection.
When opening a domain with an untrusted certi�cate in a browser, Kaspersky EndpointSecurity displays an HTML page showing the reason why that domain is blocked.
. If this item is selected, when an encrypted connection scanerror occurs, Kaspersky Endpoint Security blocks the network connection.
. If this item is selected, when an encrypted connectionscan error occurs, Kaspersky Endpoint Security adds the domain that resulted inthe error to the list of domains with scan errors and does not monitor encryptednetwork tra�ic when this domain is visited. You can view a list of domains withencrypted connections scan errors only in the local interface of the application. Toclear the list contents, you need to select .
If the check box is cleared, Kaspersky Endpoint Security does not block networkconnections established over the SSL 2.0 protocol and does not monitor network tra�ictransmitted over these connections.
If you are opening a website with an EV certi�cate for the �rst time, the encryptedconnection will be decrypted regardless of whether or not the check box is selected.
Whenvisiting adomain withanuntrustedcerti�cate
Allow
Block connection
Whenencryptedconnectionscan errorsoccur
Block connection
Add domain to exclusions
Block connection
Block SSL2.0connections
If the check box is selected, Kaspersky Endpoint Security blocks network connectionsestablished over the SSL 2.0 protocol.
Decryptencryptedconnectionswithwebsitesthat use EVcerti�cates
EV certi�cates (Extended Validation Certi�cates) con�rm the authenticity of websitesand enhance the security of the connection. Browsers use a lock icon in their address barto indicate that a website has an EV certi�cate. Browsers may also fully or partially colorthe address bar in green.
If the check box is selected, Kaspersky Endpoint Security decrypts and monitorsencrypted connections with websites that use an EV certi�cate.
If the check box is cleared, Kaspersky Endpoint Security does not have access to thecontents of HTTPS tra�ic. For this reason, the application monitors HTTPS tra�ic onlybased on the website address, for example, https://facebook.com .

243
To scan tra�ic in the Mozilla Firefox browser and the Thunderbird mail client, you must enable the EncryptedConnections Scan. If Encrypted Connections Scan is disabled, Kaspersky Endpoint Security does not scantra�ic in the Mozilla Firefox browser and Thunderbird mail client.
You can choose the certi�cate store only in the local interface of the application.
To choose a certi�cate store for scanning encrypted connections in Firefox and Thunderbird:
1. In the lower part of the main application window, click the button.
2. In the application settings window, select .
3. In the block, select the check box.
4. Select a certi�cate store:
5. Save your changes.
To exclude a web address from encrypted connection scans:
Scanning encrypted connections in Firefox and Thunderbird
After installation, Kaspersky Endpoint Security adds a Kaspersky certi�cate to the system storage for trustedcerti�cates (Windows certi�cate store). By default, Firefox and Thunderbird use their own proprietary Mozillacerti�cate store instead of the Windows certi�cate store. If Kaspersky Security Center is deployed in yourorganization and a policy is being applied to a computer, Kaspersky Endpoint Security automatically enables use ofthe Windows certi�cate store in Firefox and Thunderbird to scan the tra�ic of these applications. If a policy is notbeing applied to the computer, you can choose the certi�cate storage that will be used by Mozilla applications. Ifyou selected the Mozilla certi�cate store, manually add a Kaspersky certi�cate to it. This will help avoid errors whenworking with HTTPS tra�ic.
Prior to adding a certi�cate to the Mozilla store, export the Kaspersky certi�cate from the Windows Control Panel(browser properties). For details about exporting the Kaspersky certi�cate, please refer to the Technical SupportKnowledge Base . For details about adding a certi�cate to storage, visit the Mozilla technical support website .
Network settings
Mozilla Firefox and Thunderbird Scan secure tra�ic in Mozilla applications
. The Kaspersky root certi�cate is added to this store during installation ofKaspersky Endpoint Security.
. Mozilla Firefox and Thunderbird use their own certi�cate stores. If the Mozillacerti�cate store is selected, you need to manually add the Kaspersky root certi�cate to this store throughthe browser properties.
Use Windows certi�cate store
Use Mozilla certi�cate store
Excluding encrypted connections from scanning
Most web resources use encrypted connections. Kaspersky experts recommend that you enable Encryptedconnections scan. Is scanning encrypted connections interferes with work-related activity, you can add a websiteto exclusions referred to as trusted addresses. If a trusted application uses an encrypted connection, you candisable encrypted connections scan for this application. For example, you can disable encrypted connections scanfor cloud storage applications that use two-factor authentication with their own certi�cate.

244
1. In the lower part of the main application window, click the button.
2. In the application settings window, select .
3. In the section, click the button.
4. Click the button.
5. Enter a domain name or an IP address if you do not want Kaspersky Endpoint Security to scan encryptedconnections established when visiting that domain.
Kaspersky Endpoint Security supports the * character when entering a domain name mask.
Kaspersky Endpoint Security does not support masks for IP addresses.
Examples:
6. Save your changes.
Save your changes.
To view the list of domains with scan errors:
1. In the lower part of the main application window, click the button.
2. In the application settings window, select .
3. In the section, click the button.
Network settings
Encrypted connections scan Trusted addresses
Add
domain.com – this entry includes the following addresses: https://domain.com ,https://www.domain.com , https://domain.com/page123 . This entry excludes subdomains (forexample, subdomain.domain.com ).
subdomain.domain.com – this entry includes the following addresses:https://subdomain.domain.com , https://subdomain.domain.com/page123 . The entry excludes thedomain domain.com .
*.domain.com – this entry includes the following addresses: https://movies.domain.com ,https://images.domain.com/page123 . The entry excludes the domain domain.com .
By default, Kaspersky Endpoint Security does not scan encrypted connections when errors occur and adds thewebsite to a special list of Domains with scan errors. Kaspersky Endpoint Security compiles a separate list for eachuser and does not send data to Kaspersky Security Center. You can enable blocking the connection when a scanerror occurs. You can view a list of domains with encrypted connections scan errors only in the local interface ofthe application.
By default, Kaspersky Endpoint Security does not scan encrypted connections when errors occur and adds thewebsite to a special list of Domains with scan errors. Kaspersky Endpoint Security compiles a separate list for eachuser and does not send data to Kaspersky Security Center. You can enable blocking the connection when a scanerror occurs. You can view a list of domains with encrypted connections scan errors only in the local interface ofthe application.
Network settings
Encrypted connections scan Domains with scan errors
A list of domains with scan errors opens. To reset the list, enable blocking connection when scan errors occur inthe policy, apply the policy, then reset the parameter to its initial value and apply the policy again.

245
To view the global exclusions from encrypted tra�ic scans:
1. In the lower part of the main application window, click the button.
2. In the application settings window, select .
3. In the section, click the link.
Kaspersky specialists make a list of global exceptions — trusted websites that Kaspersky Endpoint Security doesnot check regardless of the application settings.
Network settings
Encrypted connections scan websites
This opens a list of websites compiled by Kaspersky experts. Kaspersky Endpoint Security does not scanprotected connections for websites on the list. The list may be updated when Kaspersky Endpoint Securitydatabases and modules are updated.

246
This component is available if Kaspersky Endpoint Security is installed on a computer that runs on Windowsfor workstations. This component is unavailable if Kaspersky Endpoint Security is installed on a computer thatruns on Windows for servers.
For HTTPS tra�ic monitoring, you need to enable encrypted connections scan.
Methods for managing access to websites
Website access rules
Computer control
Web Control
Web Control manages users' access to web resources. This helps reduce tra�ic and inappropriate use of worktime. When a user tries to open a website that is restricted by Web Control, Kaspersky Endpoint Security will blockaccess or show a warning (see the �gure below).
Kaspersky Endpoint Security monitors only HTTP- and HTTPS tra�ic.
Web Control lets you con�gure access to websites by using the following methods:
. Websites are categorized according to the Kaspersky Security Network cloud service,heuristic analysis, and the database of known websites (included in application databases). For example, youcan restrict user access to the "Social networks" category or to other categories .
. You can restrict users' access to data on a website, and hide graphic images, for example. KasperskyEndpoint Security determines the data type based on the �le format and not based on its extension.
Kaspersky Endpoint Security does not scan �les within archives. For example, if image �les were placed inan archive, Kaspersky Endpoint Security identi�es the "Archives" data type and not "Graphic �les".
. You can enter a web address or use masks.
Website category
Data type
Individual address
You can simultaneously use multiple methods for regulating access to websites. For example, you can restrictaccess to the "O�ice �les" data type just for the "Web-based mail" website category.
Web Control manages users' access to websites by using access rules. You can con�gure the following advancedsettings for a website access rule:
Users to which the rule applies.
For example, you can restrict Internet access through a browser for all users of the company except the ITdepartment.
Rule schedule.
For example, you can restrict Internet access through a browser during working hours only.

247
Access rule priorities
Web Control messages
To enable or disable Web Control:
1. In the lower part of the main application window, click the button.
Each rule has a priority. The higher a rule is on the list, the higher its priority. If a website has been added to multiplerules, Web Control regulates access to the website based on the rule with the highest priority. For example,Kaspersky Endpoint Security may identify a corporate portal as a social network. To restrict access to socialnetworks and provide access to the corporate web portal, create two rules: one block rule for the "Socialnetworks" website category and one allow rule for the corporate web portal. The access rule for the corporateweb portal must have a higher priority than the access rule for social networks.
Enabling and disabling Web Control
By default, Web Control is enabled.

248
2. In the application settings window, select → → .
3. Use the toggle to enable or disable the component.
4. Save your changes.
It is not recommended to create more than 1000 rules of access to web resources, as this can cause thesystem to become unstable.
To add or edit a web resource access rule:
Protection Security Controls Web Control
Web Control
Actions with web resource access rules
A web resource access rule is a set of �lters and actions that Kaspersky Endpoint Security performs when theuser visits web resources that are described in the rule during the time span that is indicated in the rule schedule.Filters allow you to precisely specify a pool of web resources to which access is controlled by the Web Controlcomponent.
The following �lters are available:
. Web Control categorizes web resources by content and data type. You can control useraccess to web resources with content and data falling into the types de�ned by these categories. When theusers visit web resources that belong to the selected content category and / or data type category, KasperskyEndpoint Security performs the action that is speci�ed in the rule.
. You can control user access to all web resource addresses or to individualweb resource addresses and / or groups of web resource addresses.
If �ltering by content and �ltering by web resource addresses are speci�ed, and the speci�ed web resourceaddresses and / or groups of web resource addresses belong to the selected content categories or data typecategories, Kaspersky Endpoint Security does not control access to all web resources in the selected contentcategories and / or data type categories. Instead, the application controls access only to the speci�ed webresource addresses and / or groups of web resource addresses.
. You can specify the names of users and / or groups of users forwhich access to web resources is controlled according to the rule.
. You can specify the rule schedule. The rule schedule determines the time span during whichKaspersky Endpoint Security monitors access to web resources covered by the rule.
Filter by content
Filter by web resource addresses
Filter by names of users and user groups
Rule schedule
After Kaspersky Endpoint Security is installed, the list of rules of the Web Control component is not blank. Tworules are preset:
Scripts and Stylesheets rule, which grants all users access at all times to web resources whose addressescontain the names of �les with the CSS, JS, or VBS extensions. For example: http://www.example.com/style.css,http://www.example.com/style.css?mode=normal.
Default rule. This rule is applied to any web resources that are not covered by other rules, and allows or blocksaccess to these web resources for all users.
Adding a web resource access rule

249
1. In the lower part of the main application window, click the button.
2. In the application settings window, select → → .
3. In the block, click the button.
4. In the window, click the button.
The window opens.
5. In the �eld, enter the name of the rule.
6. Select the status for the web resource access rule.
You can use the toggle to disable the web resource access rule at any time.
7. In the block, select the relevant option:
8. In the block, select the relevant content �lter:
To con�gure the content �lter:
a. Click the link.
b. Select the check boxes next to the names of the required categories of content and/or data types.
Selecting the check box next to the name of a content category and/or data type means that KasperskyEndpoint Security applies the rule to control access to web resources that belong to the selectedcategories of content and/or data types.
c. Return to the window for con�guring the web resource access rule.
9. In the block, select the relevant web resource address �lter:
Protection Security Controls Web Control
Settings Rules of access to web resources
Add
Rule of access to web resources
Rule name
Active
Action
. If this value is selected, Kaspersky Endpoint Security allows access to web resources that match theparameters of the rule.
. If this value is selected, Kaspersky Endpoint Security blocks access to web resources that match theparameters of the rule.
. If this value is selected, Kaspersky Endpoint Security displays a warning that a web resource isunwanted when the user attempts to access web resources that match the rule. By using links from thewarning message, the user can obtain access to the requested web resource.
Allow
Block
Warn
Filter type
. You can control user access to web resources by category (for example, theSocial networks category).
. You can control user access to web resources based on the speci�c data type of itspublished data (for example, Graphic images).
By content categories
By types of data
Con�gure
Addresses
. Web Control will not �lter web resources by address.
. Web Control will �lter only web resource addresses from the list. To create a list ofweb resource addresses:
a. Click the or button.
b. In the opened window, create a list of web resource addresses. You can enter a web address or usemasks. You can also export a list of web resource addresses from a TXT �le.
To all addresses
To individual addresses
Add address Add a group of addresses

250
10. In the block, select the relevant �lter for users:
11. In the drop-down list, select the name of the necessary schedule or generate a new schedulebased on the selected rule schedule. To do so:
a. Click the button.
b. In the window, click the button.
c. In the opened window, enter the rule schedule name.
d. Con�gure the web resource access schedule for users.
e. Return to the window for con�guring the web resource access rule.
12. Save your changes.
To assign a priority to a web resource access rule:
1. In the lower part of the main application window, click the button.
2. In the application settings window, select → → .
3. In the block, click the button.
4. In the opened window, select the rule whose priority you want to change.
5. Use the and buttons to move the rule to the relevant position in the list of web resource access rules.
6. Save your changes.
c. Return to the window for con�guring the web resource access rule.
If Encrypted Connections Scan is disabled, for the HTTPS protocol you can only �lter by the servername.
Users
. Web Control will not �lter web resources for speci�c users.
. Web Control will �lter web resources only for speci�c users. To create alist of users to whom you want to apply the rule:
a. Click the button.
b. In the opened window, select the users or group of users to whom you want to apply the web resourceaccess rule.
c. Return to the window for con�guring the web resource access rule.
To all users
To individual users and/or groups
Add
Rule schedule
Schedule management
Add
Assigning priorities to web resource access rules
You can assign priorities to each rule from the list of rules, by arranging the rules in a certain order.
Protection Security Controls Web Control
Settings Rules of access to web resources
Up Down

251
To enable or disable a web resource access rule:
1. In the lower part of the main application window, click the button.
2. In the application settings window, select → → .
3. In the block, click the button.
4. In opened window, select the rule that you want to enable or disable.
5. In the column, do the following:
6. Save your changes.
Enabling and disabling a web resource access rule
Protection Security Controls Web Control
Settings Rules of access to web resources
State
If you want to enable the use of the rule, select the value.
If you want to disable the use of the rule, select the value.
Active
Inactive
Exporting and importing the list of trusted web addresses
You can export the list of Web Policy Management rules to an XML �le. Then you can modify the �le to, forexample, add a large number of addresses of the same type. You can use the export/import function to back upthe list of Web Policy Management rules or to migrate the list to a di�erent server.
How to export and import a list of Web Policy Management rules in the Administration Console (MMC)

252
1. Open the Kaspersky Security Center Administration Console.
2. In the folder in the Administration Console tree, open the folder with the name of theadministration group to which the relevant client computers belong.
3. In the workspace, select the tab.
4. Select the necessary policy and double-click to open the policy properties.
5. In the policy window, select → .
6. To export the list of Web Policy Management rules:
a. Select the rules that you want to export. To select multiple ports, use the or keys.
If you did not select any rule, Kaspersky Endpoint Security will export all rules.
b. Click the link.
c. In the window that opens, specify the name of the XML �le to which you want to export the list of rules,and select the folder in which you want to save this �le.
d. Click the button.
Kaspersky Endpoint Security exports the list of rules to the XML �le.
7. To import the list of Web Policy Management rules:
a. Click the link.
In the window that opens, select the XML �le from which you want to import the list of rules.
b. Click the button.
If the computer already has a list of rules, Kaspersky Endpoint Security will prompt you to delete theexisting list or add new entries to it from the XML �le.
8. Save your changes.
Managed devices
Policies
Security Controls Web Policy Management
CTRL SHIFT
Export
Save
Import
Open
How to export and import a list of Web Policy Management rules in the Web Console and Cloud Console

253
1. In the main window of Web Console, select → .
2. Click the name of the Kaspersky Endpoint Security policy for computers on which you want to export orimport the list of rules.
The policy properties window opens.
3. Select the tab.
4. Go to → .
5. To export the list of rules, in the block:
a. Select the rules that you want to export.
b. Click the button.
c. Con�rm that you want to export only the selected rules, or export the entire list.
d. Click the button.
Kaspersky Endpoint Security exports the list of rules to an XML �le in the default downloads folder.
6. To import the list of rules, in the block:
a. Click the link.
In the window that opens, select the XML �le from which you want to import the list of rules.
b. Click the button.
If the computer already has a list of rules, Kaspersky Endpoint Security will prompt you to delete theexisting list or add new entries to it from the XML �le.
7. Save your changes.
To test the web resource access rules:
1. In the lower part of the main application window, click the button.
2. In the application settings window, select → → .
3. In the block, click the link.
The window opens.
4. If you want to test the rules that Kaspersky Endpoint Security uses to control access to a speci�c webresource, select the check box Enter the address of the web resource in the �eld below.
Devices Policies and pro�les
Application settings
Security Controls Web Policy Management
Rule List
Export
Export
Rule List
Import
Open
Testing web resource access rules
To check the consistency of Web Control rules, you can test them. For this purpose, the Web Control componentincludes a Rules Diagnostics function.
Protection Security Controls Web Control
Settings Rules diagnostics
Rules diagnostics
Specify address

254
5. If you want to test the rules that Kaspersky Endpoint Security uses to control access to web resources forspeci�ed users and / or groups of users, specify a list of users and / or groups of users.
6. If you want to test the rules that Kaspersky Endpoint Security uses to control access to web resources ofspeci�ed content categories and/or data type categories, select the check box and choose therelevant option from the drop-down list ( , , or
).
7. If you want to test the rules with account of the time and day of the week when an attempt is made to accessthe web resources that are speci�ed in the rule diagnostics conditions, select the
check box. Then specify the day of the week and the time.
8. Click the button.
To import or export a list of web resource addresses to a �le:
1. In the lower part of the main application window, click the button.
2. In the application settings window, select → → .
3. In the block, click the button.
4. Select the rule whose list of web resource addresses you want to export or import.
5. To export the list of trusted web addresses, do the following in the block:
a. Select the addresses that you want to export.
If you did not select any address, Kaspersky Endpoint Security will export all addresses.
b. Click the button.
c. In the opened window, enter the name of the TXT �le to which you want to export the list of web resourceaddresses, and select the folder in which you want to save this �le.
d. Click the button.
Kaspersky Endpoint Security exports the list of web resource addresses to a TXT �le.
6. To import the list of web resources, do the following in the block:
a. Click the button.
Filter contentBy content categories By types of data By content categories
and types of data
Include time of accessattempt
Test
Test completion is followed by a message with information about the action that is taken by Kaspersky EndpointSecurity, according to the �rst rule that is triggered on the attempt to access the speci�ed web resource (allow,block, or warn). The �rst rule to be triggered is the one with a rank on the list of Web Control rules which is higherthan that of other rules meeting the diagnostics conditions. The message is displayed on the right of the button. The following table lists the remaining triggered rules, specifying the action taken by Kaspersky EndpointSecurity. The rules are listed in the order of declining priority.
Test
Exporting and importing the list of web resource addresses
If you have created a list of web resource addresses in a web resource access rule, you can export it to a .txt �le.You can subsequently import the list from this �le to avoid creating a new list of web resource addresses manuallywhen con�guring an access rule. The option of exporting and importing the list of web resource addresses may beuseful if, for example, you create access rules with similar parameters.
Protection Security Controls Web Control
Settings Rules of access to web resources
Addresses
Export
Save
Addresses
Import

255
In the window that opens, select the TXT �le from which you want to import the list of web resources.
b. Click the button.
If the computer already has a list of addresses, Kaspersky Endpoint Security will prompt you to delete theexisting list or add new entries to it from the TXT �le.
7. Save your changes.
To inject a web page interaction script into web tra�ic:
1. In the lower part of the main application window, click the button.
2. In the application settings window, select .
3. In the block, select the check box.
4. Save your changes.
To con�gure logging of Web Control events on the user's computer:
1. In the lower part of the main application window, click the button.
2. In the application settings window, select the section.
3. In the block, click the button.
Open
Monitoring user Internet activity
Kaspersky Endpoint Security lets you log data on user visits to all websites, including allowed websites. Thisenables you to obtain the complete history of browser views. Kaspersky Endpoint Security sends user activityevents to Kaspersky Security Center, to the local log of Kaspersky Endpoint Security, and to the Windows Eventlog. To receive events in Kaspersky Security Center, you need to con�gure the settings of events in a policy in theAdministration Console or Web Console. You can also con�gure the transmission of Web Control events by emailand the display of on-screen noti�cations on the user's computer.
Kaspersky Endpoint Security creates the following user Internet activity events:
Block the website (Critical events status ).
Visit to a non-recommended website (Warnings status ).
Visit to an allowed website (Informational messages status ).
Prior to enabling user Internet activity monitoring, you must do the following:
Inject a web page interaction script into web tra�ic (see the instructions below). The script enables registrationof Web Control events.
For HTTPS tra�ic monitoring, you need to enable encrypted connections scan.
Network settings
Tra�ic processing Inject interaction script in tra�ic
As a result, Kaspersky Endpoint Security will inject a web page interaction script into web tra�ic. This scriptenables registration of Web Control events for the application event log, OS event log, and reports.
Interface
Noti�cations Noti�cation rules

256
4. In the opened window, select the section.
This opens the table of Web Control events and noti�cation methods.
5. Con�gure the noti�cation method for each event: or .
To log allowed website visit events, you need to also con�gure Web Control (see the instructions below).
In the events table, you can also enable an on-screen noti�cation and an email noti�cation. To sendnoti�cations by email, you need to con�gure the SMTP server settings. For more details about sendingnoti�cations by email, please refer to Kaspersky Security Center Help .
6. Save your changes.
To enable logging of events for visiting allowed websites:
1. In the lower part of the main application window, click the button.
2. In the application settings window, select → → .
3. In the block, click the button.
4. In the opened window, select the check box.
5. Save your changes.
Web Control
Save in local report Save in Windows Event Log
As a result, Kaspersky Endpoint Security begins logging user Internet activity events.
Web Control sends user activity events to Kaspersky Security Center as follows:
If you are using Kaspersky Security Center, Web Control sends events for all the objects that make up the webpage. For this reason, multiple events may be created when one web page is blocked. For example, whenblocking the web page http://www.example.com, Kaspersky Endpoint Security may relay events for thefollowing objects: http://www.example.com, http://www.example.com/icon.ico, http://www.example.com/�le.js,etc.
If you are using the Kaspersky Security Center Cloud Console, Web Control groups events and sends only theprotocol and domain of the website. For instance, if a user visits non-recommended web pageshttp://www.example.com/main, http://www.example.com/contact, and http://www.example.com/gallery,Kaspersky Endpoint Security will send only one event with the http://www.example.com object.
Protection Security Controls Web Control
Additional Advanced settings
Log the opening of allowed pages
As a result, you will be able to view the full browser history.
Editing templates of Web Control messages
Depending on the type of action that is speci�ed in the properties of Web Control rules, Kaspersky EndpointSecurity displays a message of one of the following types when users attempt to access Internet resources (theapplication substitutes an HTML page with a message for the HTTP server response):
Warning message. This message warns the user that visiting the web resource is not recommended and/orviolates the corporate security policy. Kaspersky Endpoint Security displays a warning message if the option is selected from the drop-down list in the settings of the rule that describes this web resource.
If the user believes that the warning is mistaken, the user may click the link from the warning to send a pre-generated message to the local corporate network administrator.
Message informing of blocking of a web resource. Kaspersky Endpoint Security displays a message informingthat a web resource is blocked if the option is selected from the drop-down list in the settings of
WarnAction
Block Action

257
To change the template for Web Control messages:
1. In the lower part of the main application window, click the button.
2. In the application settings window, select → → .
3. In the block, con�gure the templates for Web Control messages:
4. Save your changes.
1. The * character replaces any sequence that contains zero or more characters.
For example, if you enter the *abc* address mask, the access rule is applied to all web resources that containthe sequence abc . Example: http://www.example.com/page_0-9abcdef.html .
2. A sequence of *. characters (known as a domain mask) lets you select all domains of an address. The *.domain mask represents any domain name, subdomain name, or a blank line.
Example: the *.example.com mask represents the following addresses:
3. The www. character sequence at the start of the address mask is interpreted as a *. sequence.
Example: the address mask www.example.com is interpreted as *.example.com . This mask covers theaddresses www2.example.com and www.pictures.example.com .
the rule that describes this web resource.
If the user believes that the web resource is blocked by mistake, the user may click the link in the web resourceblock noti�cation message to send a pre-generated message to the local corporate network administrator.
Special templates are provided for the warning message, the message informing that a web resource is blocked,and the message sent to the LAN administrator. You can modify their content.
Protection Security Controls Web Control
Templates
. The entry �eld consists of a template of the message that is displayed if a rule for warning aboutattempts to access an unwanted web resource is triggered.
. The entry �eld contains the template of the message that appears if a rule which blocks accessto a web resource is triggered.
. The entry �eld contains the template of the message to be sent to the LANadministrator if the user considers the block to be a mistake.
Warnings
Blockage
Message to administrator
Editing masks for web resource addresses
Using a web resource address mask (also referred to as "address mask") may be useful if you need to enternumerous similar web resource addresses when creating a web resource access rule. If crafted well, one addressmask can replace a large number of web resource addresses.
When creating an address mask, follow these rules:
http://pictures.example.com . The domain mask *. represents pictures.
http://user.pictures.example.com . The domain mask *. represents pictures. and user.
http://example.com . The domain mask *. is interpreted as a blank line.

258
4. If an address mask does not start with the * character, the content of the address mask is equivalent to thesame content with the *. pre�x.
5. If an address mask ends with a character other than / or *, the content of the address mask is equivalent tothe same content with the /* post�x.
Example: the address mask http://www.example.com covers such addresses ashttp://www.example.com/abc , where a , b , and c are any characters.
6. If an address mask ends with the / character, the content of the address mask is equivalent to the samecontent with the /*. post�x.
7. The character sequence /* at the end of an address mask is interpreted as /* or an empty string.
8. Web resource addresses are veri�ed against an address mask, taking into account the protocol (http or https):
9. An address mask that is in double quotes is treated without considering any additional replacements, exceptthe * character if it has been initially included in the address mask. Rules 5 and 7 do not apply to address masksenclosed in double quotation marks (see examples 14 – 18 in the table below).
10. The user name and password, connection port, and character case are not taken into account duringcomparison with the address mask of a web resource.
Examples of how to use rules for creating address masks
No. Address mask Address of web resource toverify
Is theaddress
covered bythe
addressmask
Comment
1 *.example.com http://www.123example.com No See rule 1.
2 *.example.com http://www.123.example.com Yes See rule 2.
3 *example.com http://www.123example.com Yes See rule 1.
4 *example.com http://www.123.example.com Yes See rule 1.
5 http://www.*.example.com http://www.123example.com No See rule 1.
6 www.example.com http://www.example.com Yes See rules 3, 2, 1.
7 www.example.com https://www.example.com Yes See rules 3, 2, 1.
8 http://www.*.example.com http://123.example.com Yes See rules 3, 4, 1.
9 www.example.com http://www.example.com/abc Yes See rules 3, 5, 1.
If the address mask contains no network protocol, this address mask covers addresses with any networkprotocol.
Example: the address mask example.com covers the addresses http://example.com andhttps://example.com.
If the address mask contains a network protocol, this address mask only covers addresses with the samenetwork protocol as that of the address mask.
Example: the address mask http://*.example.com covers the address http://www.example.com butdoes not cover https://www.example.com .

259
10 example.com http://www.example.com Yes See rules 3, 1.
11 http://example.com/ http://example.com/abc Yes See rule 6.
12 http://example.com/* http://example.com Yes See rule 7.
13 http://example.com https://example.com No See rule 8.
14 "example.com" http://www.example.com No See rule 9.
15 "http://www.example.com" http://www.example.com/abc No See rule 9.
16 "*.example.com" http://www.example.com Yes See rules 1, 9.
17 "http://www.example.com/*" http://www.example.com/abc Yes See rules 1, 9.
18 "www.example.com" http://www.example.com;https://www.example.com
Yes See rules 9, 8.
19 www.example.com/abc/123 http://www.example.com/abc No An addressmask contains moreinformation than theaddress of a webresource.
Migrating web resource access rules from previous versions of theapplication
When Kaspersky Endpoint Security 10 Service Pack 2 for Windows or an earlier version of the application isupgraded to Kaspersky Endpoint Security for Windows 11.6.0, the web resource access rules based on webresource content categories are migrated as follows:
Rules of access to web resources that are based on one or several web resource content categories from the"Chats and forums", "Web-based mail", and "Social networks" lists migrate to the "Internet communication" webresource content category.
Rules of access to web resources based on one or several web resource content categories from the "E-stores" and "Payment systems" lists migrate to the "Online stores, banks, payment systems" web resourcecontent category.
Rules of access to web resources based on the "Gambling" web resource content category migrate to the"Gambling, lotteries, sweepstakes" content category.
Rules of access to web resources based on the "Browser games" web resource content category migrate tothe "Computer games" content category.
Rules of access to web resources based on web resource content categories that are not enumerated in thelist above are migrated without changes.
Device Control

260
This component is available if Kaspersky Endpoint Security is installed on a computer that runs on Windowsfor workstations. This component is unavailable if Kaspersky Endpoint Security is installed on a computer thatruns on Windows for servers.
Device access levels
Device Control manages user access to devices that are installed on or connected to the computer (for example,hard drives, cameras, or Wi-Fi modules). This lets you protect the computer from infection when such devices areconnected, and prevent loss or leaks of data.
Device Control controls access at the following levels:
. For example, printers, removable drives, and CD/DVD drives.
You can con�gure device access as follows:
. A connection bus is an interface used for connecting devices to the computer (for example,USB or FireWire). Therefore, you can restrict the connection of all devices, for example, over USB.
You can con�gure device access as follows:
. Trusted devices are devices to which users that are speci�ed in the trusted device settingshave full access at all times.
You can add trusted devices based on the following data:
Device type
Allow – .
Block – .
Depends on connection bus (except for Wi-Fi) – .
Block with exceptions (Wi-Fi only) – .
Connection bus
Allow – .
Block – .
Trusted devices
. Each device has a unique identi�er (Hardware ID, or HWID). You can view the ID in the deviceproperties by using operating system tools. Example device ID:SCSI\CDROM&VEN_NECVMWAR&PROD_VMWARE_SATA_CD00\5&354AE4D7&0&000000 . Adding devices by ID isconvenient if you want to add several speci�c devices.
. Each device has a vendor ID (VID) and a product ID (PID). You can view the IDs in thedevice properties by using operating system tools. Template for entering the VID and PID:VID_1234&PID_5678 . Adding devices by model is convenient if you use devices of a certain model in yourorganization. This way, you can add all devices of this model.
. If you are using multiple devices with similar IDs, you can add devices to the trusted listby using masks. The * character replaces any set of characters. Kaspersky Endpoint Security does notsupport the ? character when entering a mask. For example, WDC_C*.
. If you are using multiple devices with similar VIDs or PIDs (for example, devicesfrom the same manufacturer), you can add devices to the trusted list by using masks. The * characterreplaces any set of characters. Kaspersky Endpoint Security does not support the ? character whenentering a mask. For example, VID_05AC & PID_ *.
Devices by ID
Devices by model
Devices by ID mask
Devices by model mask
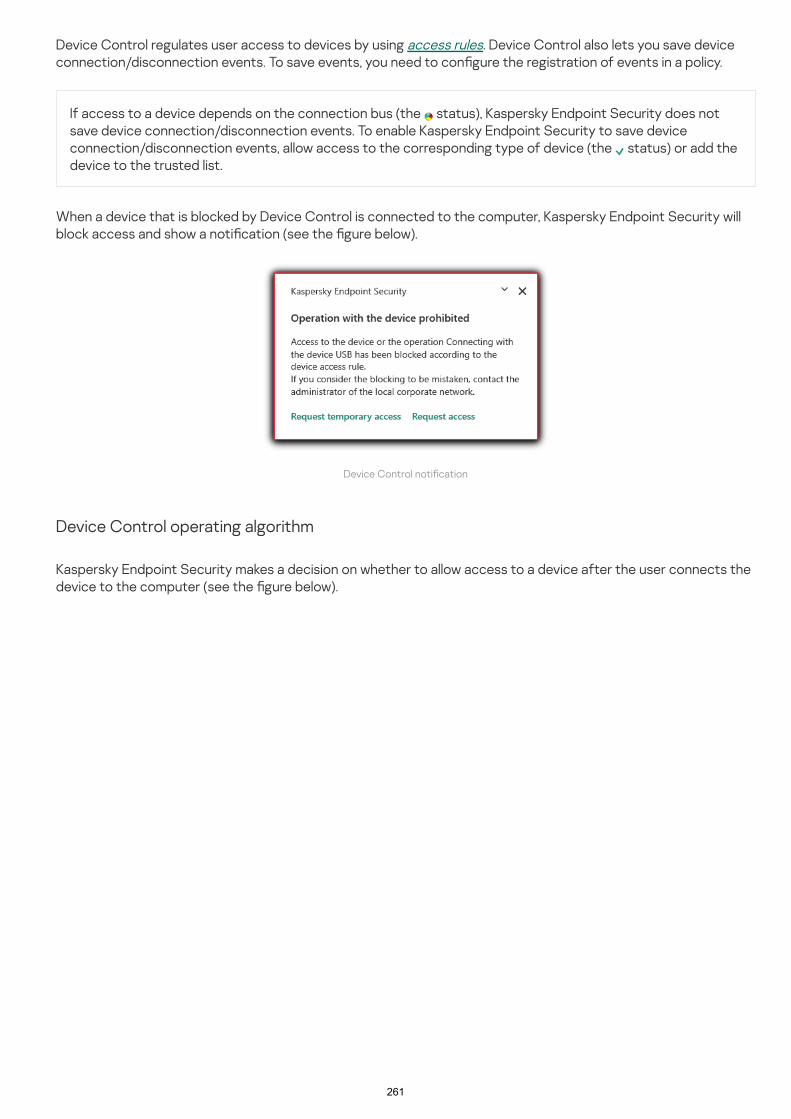
261
If access to a device depends on the connection bus (the status), Kaspersky Endpoint Security does notsave device connection/disconnection events. To enable Kaspersky Endpoint Security to save deviceconnection/disconnection events, allow access to the corresponding type of device (the status) or add thedevice to the trusted list.
Device Control noti�cation
Device Control operating algorithm
Device Control regulates user access to devices by using access rules. Device Control also lets you save deviceconnection/disconnection events. To save events, you need to con�gure the registration of events in a policy.
When a device that is blocked by Device Control is connected to the computer, Kaspersky Endpoint Security willblock access and show a noti�cation (see the �gure below).
Kaspersky Endpoint Security makes a decision on whether to allow access to a device after the user connects thedevice to the computer (see the �gure below).

262
Device Control operating algorithm
To enable or disable Device Control:
1. In the lower part of the main application window, click the button.
2. In the application settings window, select → → .
If a device is connected and access is allowed, you can edit the access rule and block access. In this case, the nexttime someone attempts to access the device (such as to view the folder tree, or perform read or writeoperations), Kaspersky Endpoint Security blocks access. A device without a �le system is blocked only the nexttime that the device is connected.
If a user of the computer with Kaspersky Endpoint Security installed must request access to a device that the userbelieves was blocked by mistake, send the user the request access instructions.
Enabling and disabling Device Control
By default, Device Control is enabled.
Protection Security Controls Device Control

263
3. Use the toggle to enable or disable the component.
4. Save your changes.
Device Access Rules
Access rule settings
Devices Accesscontrol
Schedule foraccess to a device
Assignment of usersand/or a group of users
Priority Read/writepermission
Hard drives
Removable drives
Printers – – – –
Floppy disks
CD/DVD drives
Modems – – – –
Tape devices – – – –
Multifunctionaldevices
– – – –
Smart card readers – – – –
– – – –
– – – –
– – – –
– – – –
Device Control
As a result, if Device Control is enabled, the application relays information about connected devices toKaspersky Security Center. You can view the list of connected devices in Kaspersky Security Center in the
folder.Hardware
About access rules
Access rules comprise a group of settings that determine which users can access devices that are installed orconnected to the computer. You cannot add a device that is outside of Device Control classi�cation. Access tosuch devices is allowed for all users.
The group of settings for an access rule di�ers depending on the type of device (see the table below).
Windows CE USBActiveSync devices
External networkadapters
Portable devices(MTP)
Bluetooth
Cameras andscanners
264
Mobile device access rules
Access rules for Wi-Fi networks
Connection bus access rules
To edit a device access rule:
1. In the lower part of the main application window, click the button.
2. In the application settings window, select → → .
Mobile devices running Android or iOS are categorized as portable devices (MTP). When a mobile device isconnected to the computer, the operating system determines the device type. If Android Debug Bridge (ADB),iTunes or their equivalent applications are installed on the computer, the operating system identi�es mobiledevices as ADB or iTunes devices. In all other cases, the operating system may identify the mobile device type as aportable device (MTP) for �le transfer, a PTP device (camera) for image transfer, or another device. The devicetype depends on the model of the mobile device.
Please note the following special considerations regarding access to ADB- or iTunes devices:
You cannot con�gure a device access schedule. If access to devices is restricted by rules (they have the status), ADB- and iTunes devices are always accessible.
You cannot con�gure device access for individual users, or con�gure access permissions (read/write). If accessto devices is restricted by rules (they have the status), ADB- and iTunes devices are accessible to all userswith all permissions.
You cannot con�gure access to trusted ADB- or iTunes devices for individual users. If the device is trusted,ADB- and iTunes devices are accessible to all users.
If you installed the ADB or iTunes applications after connecting a device to the computer, the unique ID of thedevice may be reset. This means that Kaspersky Endpoint Security will identify this device as a new device. If adevice is trusted, add the device to the trusted list again.
By default, access rules grant all users full access to the devices at all times, if access to the connection buses forthe corresponding types of devices is allowed (the status).
A Wi-Fi network access rule determines whether the use of Wi-Fi networks is allowed (the status) or forbidden(the status). You can add a trusted Wi-Fi network (the status) to a rule. Use of a trusted Wi-Fi network isallowed without limitations. By default, a Wi-Fi network access rule allows access to any Wi-Fi network.
Connection bus access rules determine whether the connection of devices is allowed (the status) or forbidden(the status). Rules that allow access to buses are created by default for all connection buses that are present inthe classi�cation of the Device Control component.
Editing a device access rule
A device access rule is a group of settings that determine how users can access devices that are installed orconnected to the computer. These settings include access to a speci�c device, an access schedule, and read orwrite permissions.
Protection Security Controls Device Control

265
3. In the block, click the button.
The opened window shows access rules for all devices that are included in the Device Control componentclassi�cation.
4. In the block, select the access rule that you want to edit. The block containsdevices that have a �le system for which you can con�gure additional access settings. By default, a deviceaccess rule grants all users full access to the speci�ed type of devices at any time.
a. In the block, select the appropriate device access option:
b. In the block, click the button.
This opens a window for adding a new device access rule.
c. Assign a priority to the rule. A rule includes the following attributes: user account, schedule, permissions(read/write), and priority.
A rule has a speci�c priority. If a user has been added to multiple groups, Kaspersky Endpoint Securityregulates device access based on the rule with the highest priority. Kaspersky Endpoint Security allows toassign priority from 0 to 10,000. The higher the value, the higher the priority. In other words, an entry with thevalue of 0 has the lowest priority.
For example, you can grant read-only permissions to the Everyone group and grant read/write permissionsto the administrators group. To do so, assign a priority of 1 for the administrators group and assign a priorityof 0 for the Everyone group.
The priority of a block rule is higher than the priority of an allow rule. In other words, if a user has been addedto multiple groups and the priority of all rules are the same, Kaspersky Endpoint Security regulates deviceaccess based on any existing block rule.
d. Set the status for the device access rule.
e. Con�gure users' device access permissions: read and/or write.
f. Select the users or group of users to whom you want to apply the device access rule.
g. Con�gure a device access schedule for users.
h. Click the button.
5. In the block, select the rule and con�gure access: , , or . If necessary, con�gure access to the connection bus.
6. In the block, click the link and con�gure access: , , or . If necessary, add Wi-Fi networks to the trusted list.
7. Save your changes.
Con�gure access Devices and Wi-Fi networks
Access to storage devices
Access
.
.
.
To block or allow access to a device, con�gure access to the connection bus.
.
This option lets you con�gure user rights, permissions, and a schedule for device access.
Allow
Block
Depends on connection bus
Restrict by rules
Users' rights Add
Enabled
Add
Access to external devices Allow Deny Depends onconnection bus
Access to Wi-Fi networks Wi-Fi Allow Block Block withexceptions

266
To edit a connection bus access rule:
1. In the lower part of the main application window, click the button.
2. In the application settings window, select → → .
3. In the block, click the button.
The opened window shows access rules for all connection buses that are included in the Device Controlcomponent classi�cation.
4. Select the access rule that you want to edit.
5. In the column, select whether or not to allow access to the connection bus: or .
6. Save your changes.
To add a Wi-Fi network to the trusted list:
1. In the lower part of the main application window, click the button.
2. In the application settings window, select → → .
3. In the block, click the button.
The opened window shows access rules for all devices that are included in the Device Control componentclassi�cation.
4. In the block, click the link.
The opened window shows the Wi-Fi network access rules.
5. In the column, select .
6. Click the button in the block.
7. In the opened window, do the following:
a. In the �eld, specify the name of the Wi-Fi network that you want to add to the trusted list.
b. In the drop-down list, select the type of authentication used when connecting to thetrusted Wi-Fi network.
c. In the drop-down list, select the type of encryption used for securing tra�ic of the trustedWi-Fi network.
Editing a connection bus access rule
Protection Security Controls Device Control
Settings Connection buses
Access Allow Deny
Adding a Wi-Fi network to the trusted list
You can allow users connect to Wi-Fi networks that you consider to be secure, such as a corporate Wi-Fi network.To do so, you must add the network to the list of trusted Wi-Fi networks. Device Control will block access to all Wi-Fi networks except those speci�ed in the trusted list.
Protection Security Controls Device Control
Settings Access rules for devices and Wi-Fi networks
Access to Wi-Fi networks Wi-Fi
Access Block with exceptions
Add Trusted Wi-Fi network
Network name
Authentication type
Encryption type

267
d. In the �eld, you can specify any information about the added Wi-Fi network.
A Wi-Fi network is considered trusted if its settings match all settings speci�ed in the rule.
8. Save your changes.
To enable monitoring of removable drive usage:
1. In the lower part of the main application window, click the button.
2. In the application settings window, select → → .
3. In the block, click the button.
The opened window shows access rules for all devices that are included in the Device Control componentclassi�cation.
4. In the block, select .
5. Click the link.
6. In the opened window, select the tab.
7. Turn on the toggle.
8. In the block, select the operations that you want to monitor: , .
9. In the block, select the formats of �les whose associated operations should be logged byDevice Control.
10. Select the users or group of users whose use of removable drives you want to monitor.
11. Save your changes.
Comment
Monitoring usage of removable drives
Protection Security Controls Device Control
Settings Access rules for devices and Wi-Fi networks
Access to storage devices Removable drives
Logging
Logging
Logging
File operations Write Delete
Filter by �le formats
As a result, when users write to �les located on removable drives or delete �les from removable drives,Kaspersky Endpoint Security will save information about such operations to the event log and send events toKaspersky Security Center. You can view events associated with �les on removable drives in the KasperskySecurity Center Administration Console in the workspace of the node on the tab.For events to be displayed in the local Kaspersky Endpoint Security event log, you must select the
check box in the noti�cation settings for the Device Control component.
Administration Server EventsFile
operation performed
Changing the caching duration
The Device Control component registers events related to monitored devices, such as connection anddisconnection of a device, reading a �le from a device, writing a �le to a device, and other events. Device Controlthen either allows or blocks the action according to the Kaspersky Endpoint Security settings.

268
Prior to changing the caching period, disable Kaspersky Endpoint Security Self-Defense. After changing thecaching period, enable Self-Defense.
To change the caching period:
1. Open the registry editor on the computer.
2. In the registry editor, go to the following section:
3. Open DeviceControlEventsCachePeriod for editing.
4. De�ne the number of minutes that Device Control must save information about an event before thisinformation is deleted.
Device Control saves information about events for a speci�c period of time called the caching period. Ifinformation about an event is cached and this event is repeated, there is no need to notify Kaspersky EndpointSecurity about it or to show another prompt for granting access to the corresponding action, such as connectinga device. This makes it more convenient to work with a device.
An event is considered a duplicate event if all of the following event settings match the record in the cache:
device ID
SID of the user account attempting access
Device category
Action taken with the device
Application permission verdict for this action: allowed or denied
Path to the process used to take the action
File that is being accessed
For 64-bit operating systems:[HKEY_LOCAL_MACHINE\SOFTWARE\WOW6432Node\KasperskyLab\protected\KES\environment]
For 32-bit operating systems:[HKEY_LOCAL_MACHINE\SOFTWARE\KasperskyLab\protected\KES\environment]
Actions with trusted devices
Trusted devices are devices to which users that are speci�ed in the trusted device settings have full access at alltimes.
To work with trusted devices, you can grant access to an individual user, to a group of users, or to all users of theorganization.
For example, if your organization does not allow the use of removable drives but administrators use removabledrives in their work, you can allow removable drives only for a group of administrators. To do so, add removabledrives to the trusted list and con�gure user access permissions.

269
To add a device to the Trusted list from the application interface:
1. In the lower part of the main application window, click the button.
2. In the application settings window, select → → .
3. In the block, click the button.
This opens the list of trusted devices.
4. Click the button.
This opens the list of connected devices. The list of devices depends on the value that is selected in the drop-down list.
5. In the list of devices, select the device that you want to add to the trusted list.
6. In the �eld, you can provide any relevant information about the trusted device.
7. Select the users or group of users for whom you want to allow access to trusted devices.
8. Save your changes.
Kaspersky Endpoint Security allows you to add a device to the trusted list in the following ways:
If Kaspersky Security Center is not deployed in your organization, you can connect the device to the computerand add it to the trusted list in the application settings. To distribute the list of trusted devices to all computersin your organization, you can enable merging the lists of trusted devices in a policy or use the export / importprocedure.
If Kaspersky Security Center is deployed in your organization, you can detect all connected devices remotelyand create a list of trusted devices in the policy. The list of trusted devices will be available on all computers towhich the policy is applied.
Kaspersky Endpoint Security has the following limitations when working with trusted devices:
Kaspersky Endpoint Security administration plug-in versions 11.0.0–11.2.0 cannot work with a list of trusteddevices that was created in Kaspersky Endpoint Security version 11.3.0 and 11.4.0. To work with a list of trusteddevices from these versions, the administration plug-in must be upgraded to version 11.3.0 and 11.4.0,respectively.
Kaspersky Endpoint Security administration plug-in version 11.3.0 and 11.4.0 cannot work with a list of trusteddevices that was created in Kaspersky Endpoint Security version 11.2.0 or earlier. For these versions to work witha list of trusted devices, the application must be upgraded to version 11.3.0 and 11.4.0, respectively. You can alsosend a request containing a description of your situation to Technical Support through KasperskyCompanyAccount .
To migrate a list of trusted devices from Kaspersky Endpoint Security version 11.2.0 to version 11.3.0, send arequest containing a description of your situation to Technical Support through Kaspersky CompanyAccount .
Adding a device to the Trusted list from the application interface
By default, when a device is added to the list of trusted devices, access to the device is granted to all users (theEveryone group of users).
Protection Security Controls Device Control
Settings Trusted devices
Select
Display connected devices
Comment

270
To add devices to the list of trusted devices:
1. Open the Kaspersky Security Center Administration Console.
2. In the folder in the Administration Console tree, open the folder with the name of theadministration group to which the relevant client computers belong.
3. In the workspace, select the tab.
4. Select the necessary policy and double-click to open the policy properties.
5. In the policy window, select → .
6. In the right part of the window, select the tab.
7. Select the check box if you want to create a consolidated list of trusted devicesfor all computers in the company.
The lists of trusted devices in the parent and child policies will be merged. The lists will be merged provided thatmerging values when inheriting is enabled. Trusted devices from the parent policy are displayed in child policiesin a read-only view. Changing or deleting trusted devices of the parent policy is not possible.
8. Click the button and select a method for adding a device to the trusted list.
9. To �lter devices, select a device type from the drop-down list (for example, ).
10. In the �eld, enter the device ID, model (VID and PID) or mask, depending on the selected additionmethod.
Adding a device to the Trusted list from Kaspersky Security Center
Kaspersky Security Center receives information about devices if Kaspersky Endpoint Security is installed on thecomputers and Device Control is enabled. It is not possible to add a device to the trusted list unless informationabout that device is available in Kaspersky Security Center.
You can add a device to the trusted list according to the following data:
. Each device has a unique identi�er (Hardware ID, or HWID). You can view the ID in the deviceproperties by using operating system tools. Example device ID:SCSI\CDROM&VEN_NECVMWAR&PROD_VMWARE_SATA_CD00\5&354AE4D7&0&000000 . Adding devices by ID isconvenient if you want to add several speci�c devices.
. Each device has a vendor ID (VID) and a product ID (PID). You can view the IDs in the deviceproperties by using operating system tools. Template for entering the VID and PID: VID_1234&PID_5678 .Adding devices by model is convenient if you use devices of a certain model in your organization. This way, youcan add all devices of this model.
. If you are using multiple devices with similar IDs, you can add devices to the trusted list byusing masks. The * character replaces any set of characters. Kaspersky Endpoint Security does not supportthe ? character when entering a mask. For example, WDC_C*.
. If you are using multiple devices with similar VIDs or PIDs (for example, devices fromthe same manufacturer), you can add devices to the trusted list by using masks. The * character replaces anyset of characters. Kaspersky Endpoint Security does not support the ? character when entering a mask. Forexample, VID_05AC & PID_ *.
Devices by ID
Devices by model
Devices by ID mask
Devices by model mask
Managed devices
Policies
Security Controls Device Control
Trusted devices
Merge values when inheriting
Add
Device type Removable Drives
Name / Model

271
Adding devices by model mask (VID and PID) works as follows: if you enter a model mask that does notmatch any model, Kaspersky Endpoint Security checks if the device ID (HWID) matches the mask.Kaspersky Endpoint Security checks only the part of the device ID that determines the manufacturer andthe type of the device(SCSI\CDROM&VEN_NECVMWAR&PROD_VMWARE_SATA_CD00\5&354AE4D7&0&000000). If the model maskmatches this part of the device ID, the devices that match the mask will be added to the list of trusteddevices on the computer. At the same time, the list of devices in Kaspersky Security Center remains emptywhen you click the button. To display the list of devices correctly, you can add devices by deviceID mask.
11. To �lter devices, in the �eld, enter the computer name or a mask for the name of the computer towhich the device is connected.
The * character replaces any set of characters. The ? character replaces any single character.
12. Click the button.
The table displays a list of devices that satisfy the de�ned �ltering criteria.
13. Select the check boxes next to the names of devices that you want to add to the trusted list.
14. In the �eld, enter a description of the reason for adding devices to the trusted list.
15. Click the button to the right of the �eld.
16. Select a user or a group in Active Directory and con�rm your selection.
By default, access to trusted devices is allowed for the Everyone group.
17. Save your changes.
1. Sequentially connect removable drives to your computer.
2. In the Kaspersky Endpoint Security settings, add the removable drives to the trusted list. If required, con�gureuser access permissions. For example, allow only administrators to access removable drives.
3. Export the list of trusted devices in the Kaspersky Endpoint Security settings (see the instructions below).
4. Distribute the trusted device list �le to other computers in your organization. For example, place the �le in ashared folder.
5. Import the list of trusted devices in the Kaspersky Endpoint Security settings on other computers in theorganization (see the instructions below).
Refresh
Computer
Refresh
Comment
Select Allow to users and / or groups of users
When a device is connected, Kaspersky Endpoint Security checks the list of trusted devices for an authorizeduser. If the device is trusted, Kaspersky Endpoint Security allows access to the device with all permissions, evenif access to the device type or connection bus is denied. If the device is untrusted and access is denied, you canrequest access to the locked device.
Exporting and importing the list of trusted devices
To distribute the list of trusted devices to all computers in your organization, you can use the export/importprocedure.
For example, if you need to distribute a list of trusted removable drives, you need to do the following:

272
To import or export the list of trusted devices:
1. In the lower part of the main application window, click the button.
2. In the application settings window, select → → .
3. In the block, click the button.
This opens the list of trusted devices.
4. To export the list of trusted devices:
a. Select the trusted devices that you want to export.
b. Click the button.
c. In the window that opens, specify the name of the XML �le to which you want to export the list of trusteddevices, and select the folder in which you want to save this �le.
d. Click the button.
Kaspersky Endpoint Security exports the entire list of trusted devices to the XML �le.
5. To import the list of trusted devices:
a. In the drop-down list, select the relevant action: or .
b. In the window that opens, select the XML �le from which you want to import the list of trusted devices.
c. Click the button.
If the computer already has a list of trusted devices, Kaspersky Endpoint Security will prompt you to deletethe existing list or add new entries to it from the XML �le.
6. Save your changes.
Online mode for granting access
Protection Security Controls Device Control
Settings Trusted devices
Export
Save
Import Import and add to existing Import and replaceexisting
Open
When a device is connected, Kaspersky Endpoint Security checks the list of trusted devices for an authorizeduser. If the device is trusted, Kaspersky Endpoint Security allows access to the device with all permissions, evenif access to the device type or connection bus is denied.
Obtaining access to a blocked device
When con�guring Device Control, you can accidentally block access to a device that is necessary for work.
If Kaspersky Security Center is not deployed in your organization, you can provide access to a device in thesettings of Kaspersky Endpoint Security. For example, you can add the device to the trusted list or temporarilydisable Device Control.
If Kaspersky Security Center is deployed in your organization and a policy has been applied to computers, you canprovide access to a device in the Administration Console.

273
You can grant access to a blocked device in online mode only if Kaspersky Security Center is deployed in theorganization and a policy has been applied to the computer. The computer must have the capability toestablish a connection with the Administration Server.
1. The user sends the administrator a message containing an access request.
2. The administrator adds the device to the trusted list.
You can add a trusted device in a policy for the administration group or in the local application settings for anindividual computer.
3. The administrator updates the settings of Kaspersky Endpoint Security on the user's computer.
Schematic for granting access to a device in online mode
O�line mode for granting access
You can grant access to a blocked device in o�line mode only if Kaspersky Security Center is deployed in theorganization and a policy has been applied to the computer. In the policy settings, in the section, the check box must be selected.
1. The user creates a request access �le and sends it to the administrator.
2. The administrator creates an access key from the request access �le and sends it to the user.
3. The user activates the access key.
Granting access in online mode consists of the following steps:
Device ControlAllow requests for temporary access
If you need to grant temporary access to a blocked device but you cannot add the device to the trusted list, youcan grant access to the device in o�line mode. This way, you can grant access to a blocked device even if thecomputer does not have network access or if the computer is outside of the corporate network.
Granting access in o�line mode consists of the following steps:

274
Schematic for granting access to a device in o�line mode
You can grant access to a blocked device in online mode only if Kaspersky Security Center is deployed in theorganization and a policy has been applied to the computer. The computer must have the capability toestablish a connection with the Administration Server.
A user requests access to a blocked device as follows:
1. Connect the device to the computer.
Kaspersky Endpoint Security will show a noti�cation stating that access to the device is blocked (see the �gurebelow).
2. Click the link.
The window opens. This message contains information about the blocked device.
3. Click the button.
Device Control noti�cation
Online mode for granting access
Request access
Administrator's message
Send
The administrator will receive a message containing a request to provide access, for example, by email. For moredetails about processing the requests of users, please refer to Kaspersky Security Center Help . After addingthe device to the trusted list and updating Kaspersky Endpoint Security settings on the computer, the user willreceive access to the device.
O�line mode for granting access

275
You can grant access to a blocked device in o�line mode only if Kaspersky Security Center is deployed in theorganization and a policy has been applied to the computer. In the policy settings, in the section, the check box must be selected.
A user requests access to a blocked device as follows:
1. Connect the device to the computer.
Kaspersky Endpoint Security will show a noti�cation stating that access to the device is blocked (see the �gurebelow).
2. Click the link.
The window opens with a list of connected devices.
3. In the list of connected devices, select the device to which you want to gain access.
4. Click the button.
5. In the �eld, specify the period of time for which you want to have access to the device.
6. Save the �le to computer memory.
Device Control noti�cation
The administrator creates an access key for a blocked device as follows:
1. Open the Kaspersky Security Center Administration Console.
2. In the folder of the Administration Console tree, open the folder with the name of theadministration group to which the relevant client computer belongs.
3. In the workspace, select the tab.
4. In the list of client computers, select the computer whose user needs to be granted temporary access to alocked device.
5. In the context menu of the computer, select .
6. In the opened window, select the tab.
7. Click the button and download the request access �le received from the user.
Device ControlAllow requests for temporary access
Request temporary access
Request access to device
Generate request access �le
Access duration
As a result, a request access �le with the *.akey extension will be downloaded to computer memory. Use anyavailable method to send the device request access �le to the corporate LAN administrator.
Managed devices
Devices
Grant access in o�line mode
Device Control
Browse

276
You will see information about the blocked device to which the user has requested access.
8. If necessary, change the value of the setting.
By default, the setting takes the value that was indicated by the user when creating theaccess request �le.
9. Specify the value of the setting.
This setting de�nes the time period during which the user can activate access to the blocked device by usingthe provided access key.
10. Save the access key �le to computer memory.
The user activates the access key as follows:
1. In the lower part of the main application window, click the button.
2. In the application settings window, select → → .
3. In the block, click the button.
4. In the opened window, click the button.
5. In the opened window, select the �le with the device access key received from the corporate LANadministrator. Click the button.
This opens a window containing information about access provision.
6. Click .
To edit the templates for Device Control messages:
1. In the lower part of the main application window, click the button.
2. In the application settings window, select → → .
3. In the block, con�gure the templates for Device Control messages:
Access duration
Access duration
Activate by
As a result, the blocked device access key will be downloaded to computer memory. An access key �le has the*.acode extension. Use any available method to send the blocked device access key to the user.
Protection Security Controls Device Control
Access request Request access to device
Activate access key
Open
OK
As a result, the user receives access to the device for the time period set by the administrator. The userreceives the full set of rights for accessing the device (read and write). When the key expires, access to thedevice will be blocked. If the user requires permanent access to the device, add the device to the trusted list.
Editing templates of Device Control messages
When the user attempts to access a blocked device, Kaspersky Endpoint Security displays a message stating thataccess to the device is blocked or that an operation with the device contents is forbidden. If the user believes thataccess to the device was mistakenly blocked or that an operation with device contents was forbidden by mistake,the user can send a message to the local corporate network administrator by clicking the link in the displayedmessage about the blocked action.
Templates are available for messages about blocked access to devices or forbidden operations with devicecontents, and for the message sent to the administrator. You can modify the message templates.
Protection Security Controls Device Control
Templates

277
4. Save your changes.
To enable Anti-Bridging:
1. In the lower part of the main application window, click the button.
2. In the application settings window, select → → .
3. In the block, click the button.
4. Use the toggle to enable or disable this feature.
5. Save your changes.
. Template of the message that appears when a user attempts to access a blockeddevice. This message also appears when a user attempts to perform an operation on the device contentsthat was blocked for this user.
. A template of the message that is sent to the LAN administrator when the userbelieves that access to the device is blocked or an operation with device content is forbidden by mistake.
Message about blocking
Message to administrator
Anti-Bridging
Anti-Bridging inhibits the creation of network bridges by preventing the simultaneous establishment of multiplenetwork connections for a computer. This lets you protect a corporate network from attacks over unprotected,unauthorized networks.
Anti-Bridging regulates the establishment of network connections by using connection rules.
Connection rules are created for the following prede�ned types of devices:
Network adapters
Wi-Fi adapters
Modems
If a connection rule is enabled, Kaspersky Endpoint Security:
Blocks the active connection when establishing a new connection, if the device type speci�ed in the rule isused for both connections.
Blocks connections that are established using the types of devices for which lower-priority rules are used.
Enabling Anti-Bridging
Anti-Bridging is disabled by default.
Protection Security Controls Device Control
Settings Anti-Bridging
Enable Anti-Bridging
After Anti-Bridging is enabled, Kaspersky Endpoint Security blocks already established connections accordingto the connection rules.

278
To change the status of a connection rule:
1. In the lower part of the main application window, click the button.
2. In the application settings window, select → → .
3. In the block, click the button.
4. In the block, select the rule whose status you want to change.
5. Use the toggles in the column to enable or disable the rule.
6. Save your changes.
To change the priority of a connection rule:
1. In the lower part of the main application window, click the button.
2. In the application settings window, select → → .
3. In the block, click the button.
4. In the block, select the rule whose priority you want to change.
5. Use the / buttons to set the priority of the connection rule.
The higher a rule is positioned in the table of rules, the higher its priority. Anti-Bridging blocks all connectionsexcept one connection established using the type of device for which the highest-priority rule is used.
6. Save your changes.
This component is available only for Kaspersky Endpoint Security for Business Advanced and Kaspersky TotalSecurity for Business. For more details about Kaspersky Endpoint Security for Business, please visit theKaspersky website .
This component is available if Kaspersky Endpoint Security is installed on a computer that runs on Windowsfor workstations. This component is unavailable if Kaspersky Endpoint Security is installed on a computer thatruns on Windows for servers.
Changing the status of a connection rule
Protection Security Controls Device Control
Settings Anti-Bridging
Rules for devices
Control
Change the priority of a connection rule
Protection Security Controls Device Control
Settings Anti-Bridging
Rules for devices
Up Down
Adaptive Anomaly Control

279
Adaptive Anomaly Control settings
1. Training Adaptive Anomaly Control.
After you enable Adaptive Anomaly Control, its rules work in training mode. During the training, AdaptiveAnomaly Control monitors rule triggering and sends triggering events to Kaspersky Security Center. Each rulehas its own duration of the training mode. The duration of the training mode is set by Kaspersky experts.Normally, the training mode is active for two weeks.
If a rule is not triggered at all during the training, Adaptive Anomaly Control will consider the actions associatedwith this rule as non-typical. Kaspersky Endpoint Security will block all actions associated with that rule.
If a rule was triggered during training, Kaspersky Endpoint Security logs events in the rule triggering report andthe repository.
2. Analyzing the rule triggering report.
The administrator analyzes the rule triggering report or the contents of the repository. Then the administrator can select the behavior of Adaptive Anomaly Control when
the rule is triggered: either block or allow. The administrator can also continue to monitor how the rule works andextend the duration of the training mode. If the administrator does not take any action, the application will alsocontinue to work in training mode. The training mode term is restarted.
Adaptive Anomaly Control noti�cation
The Adaptive Anomaly Control component monitors and blocks actions that are not typical of the computers in acompany's network. Adaptive Anomaly Control uses a set of rules to track uncharacteristic behavior (for example,the Start of Microsoft PowerShell from o�ice application rule). Rules are created by Kaspersky specialists basedon typical scenarios of malicious activity. You can con�gure how Adaptive Anomaly Control handles each rule and,for example, allow the execution of PowerShell scripts that automate certain work�ow tasks. Kaspersky EndpointSecurity updates the set of rules along with the application databases. Updates to the sets of rules must becon�rmed manually.
Con�guring Adaptive anomaly control consists of the following steps:
Triggering of rules in Smart Training mode
Triggering of rules in SmartTraining mode
Adaptive Anomaly Control is con�gured in real time. Adaptive Anomaly Control is con�gured via the followingchannels:
Adaptive Anomaly Control automatically starts to block the actions associated with the rules that were nevertriggered in training mode.
Kaspersky Endpoint Security adds new rules or removes obsolete ones.
The administrator con�gures the operation of the Adaptive Anomaly Control after reviewing the rule triggeringreport and the contents of the repository. It is recommended tocheck the rule triggering report and the contents of the
.
Triggering of rules in Smart Training modeTriggering of rules in Smart Training mode
repository
When a malicious application attempts to perform an action, Kaspersky Endpoint Security will block the action anddisplay a noti�cation (see �gure below).

280
Adaptive Anomaly Control operating algorithm
Adaptive Anomaly Control operating algorithm
To enable or disable Adaptive Anomaly Control:
1. In the lower part of the main application window, click the button.
2. In the application settings window, select → → .
3. Use the toggle to enable or disable the component.
4. Save your changes.
Kaspersky Endpoint Security decides whether to allow or block an action that is associated with a rule based onthe following algorithm (see the �gure below).
Enabling and disabling Adaptive Anomaly Control
Adaptive Anomaly Control is enabled by default.
Protection Security Controls Adaptive Anomaly Control
Adaptive Anomaly Control

281
To enable or disable an Adaptive Anomaly Control rule:
1. In the lower part of the main application window, click the button.
2. In the application settings window, select → → .
3. In the block, click the button.
The Adaptive Anomaly Control rule list opens.
4. In the table, select a set of rules (for example, Activity of o�ice applications) and expand the set.
5. Select a rule (for example, Start Windows PowerShell from o�ice applications).
6. Use the toggle in the column to enable or disable the Adaptive Anomaly Control rule.
7. Save your changes.
To edit the action that is taken when an Adaptive Anomaly Control rule is triggered:
1. In the lower part of the main application window, click the button.
2. In the application settings window, select → → .
3. In the block, click the button.
The Adaptive Anomaly Control rule list opens.
4. Select a rule in the table.
5. Click the button.
The Adaptive Anomaly Control rule properties window opens.
6. In the block, select one of the following options:
Enabling and disabling an Adaptive Anomaly Control rule
Protection Security Controls Adaptive Anomaly Control
Rules Edit rules
Status
Modifying the action taken when an Adaptive Anomaly Control rule istriggered
Protection Security Controls Adaptive Anomaly Control
Rules Edit rules
Edit
Action
. If this option is selected, the Adaptive Anomaly Control rule works in Smart training mode for aperiod of time de�ned by Kaspersky experts. In this mode, when an Adaptive Anomaly Control rule istriggered, Kaspersky Endpoint Security allows the activity covered by the rule and logs an entry in the
storage of the Kaspersky Security Center AdministrationServer. When the time period set for working in Smart Training mode ends, Kaspersky Endpoint Securityblocks the activity covered by an Adaptive Anomaly Control rule and logs an entry containing informationabout the activity.
. If this action is selected, when an Adaptive Anomaly Control rule is triggered Kaspersky EndpointSecurity blocks the activity covered by the rule and logs an entry containing information about the activity.
Smart
Triggering of rules in Smart Training mode
Block

282
7. Save your changes.
You cannot create more than 1,000 exclusions for Adaptive Anomaly Control rules. It is not recommended tocreate more than 200 exclusions. To reduce the number of exclusions used, it is recommended to use masks inthe settings of exclusions.
To create an exclusion for an Adaptive Anomaly Control rule:
1. In the lower part of the main application window, click the button.
2. In the application settings window, select → → .
3. In the block, click the button.
The Adaptive Anomaly Control rule list opens.
4. Select a rule in the table.
5. Click the button.
The Adaptive Anomaly Control rule properties window opens.
6. In the block, click the button.
The exclusion properties window opens.
7. Select the user for which you want to con�gure an exclusion.
Adaptive Anomaly Control does not support exclusions for user groups. If you select a user group,Kaspersky Endpoint Security does not apply the exclusion.
8. In the �eld, enter a description of the exclusion.
9. De�ne the settings of the source object or source process started by the object:
. If this action is selected, when an Adaptive Anomaly Control rule is triggered Kaspersky EndpointSecurity allows the activity covered by the rule and logs an entry containing information about the activity.Inform
Creating an exclusion for an Adaptive Anomaly Control rule
An exclusion for an Adaptive Anomaly Control rule includes a description of the source and target objects. Thesource object is the object performing the actions. The target object is the object on which the actions are beingperformed. For example, you have opened a �le named file.xlsx . As a result, a library �le with the DLL extensionis loaded into the computer memory. This library is used by a browser (executable �le named browser.exe ). In thisexample, file.xlsx is the source object, Excel is the source process, browser.exe is the target object, andBrowser is the target process.
Protection Security Controls Adaptive Anomaly Control
Rules Edit rules
Edit
Exclusions Add
Description
. Path or mask of the path to the �le or folder containing �les (for example,С:\Dir\File.exe or Dir\*.exe .
. File hash code.
Source process)
Source process hash

283
The Adaptive Anomaly Control rule is not applied to actions performed by the object, or to processes startedby the object.
10. Specify the settings of the target object or target processes started on the object.
The Adaptive Anomaly Control rule is not applied to actions taken on the object, or to processes started on theobject.
11. Save your changes.
To export or import the list of exclusions for selected rules:
1. In the lower part of the main application window, click the button.
2. In the application settings window, select → → .
3. In the block, click the button.
The Adaptive Anomaly Control rule list opens.
4. To export the list of rules:
a. Select the rules whose exceptions you want to export.
b. Click the button.
c. In the window that opens, specify the name of the XML �le to which you want to export the list ofexclusions, and select the folder in which you want to save this �le.
. Path or mask of the path to the �le or folder containing �les (for example,С:\Dir\File.exe or Dir\*.exe ). For example, �le path document.docm , which uses a script or macro tostart the target processes.
You can also specify other objects to exclude, such as a web address, macro, command in the command line,registry path, or others. Specify the object according to the following template: object://<object>,where <object> refers to the name of the object, for example, object://web.site.example.com ,object://VBA, object://ipconfig , object://HKEY_USERS . You can also use masks, for example,object://*C:\Windows\temp\* .
. File hash code.
Source object
Source object hash
. Path or mask of the path to the �le or folder containing �les (for example,С:\Dir\File.exe or Dir\*.exe .
. File hash code.
. The command to start the target process. Specify the command using the following patternobject://<command> , for example, object://cmdline:powershell -Command "$result ='C:\windows\temp\result_local_users_pwdage txt'" . You can also use masks, for example,object://*C:\windows\temp\* .
. File hash code.
Target process)
Target process hash
Target object
Target object hash
Exporting and importing exclusions for Adaptive Anomaly Control rules
Protection Security Controls Adaptive Anomaly Control
Rules Edit rules
Export

284
d. Con�rm that you want to export only the selected exclusions, or export the entire list of exclusions.
e. Click the button.
5. To import the list of rules:
a. Click the button.
b. In the window that opens, select the XML �le from which you want to import the list of exclusions.
c. Click the button.
If the computer already has a list of exclusions, Kaspersky Endpoint Security will prompt you to delete theexisting list or add new entries to it from the XML �le.
6. Save your changes.
Until the update is applied, Kaspersky Endpoint Security displays the Adaptive Anomaly Control rules set to bedeleted by the update in the table of rules and assigns the Disabled status to them. It is not possible tochange the settings of these rules.
To apply updates for Adaptive Anomaly Control rules:
1. In the lower part of the main application window, click the button.
2. In the application settings window, select → → .
3. In the block, click the button.
The Adaptive Anomaly Control rule list opens.
4. In the opened window, click the button.
The button is available if an update for Adaptive Anomaly Control rules is available.
5. Save your changes.
Save
Import
Open
Applying updates for Adaptive Anomaly Control rules
New Adaptive Anomaly Control rules may be added to the table of rules and existing Adaptive Anomaly Controlrules may be deleted from the table of rules when anti-virus databases are updated. Kaspersky Endpoint Securitydistinguishes Adaptive Anomaly Control rules that are to be deleted or added to the table, if an update for theserules has not been applied.
Protection Security Controls Adaptive Anomaly Control
Rules Edit rules
Approve updates
Approve updates
Editing Adaptive Anomaly Control message templates
When a user tries to do an action, blocked by Adaptive Anomaly Control rules, Kaspersky Endpoint Securitydisplays a message that potentially harmful actions are blocked. If the user believes that an action was mistakenlyblocked, the user can use the link in the message text to send a message to the local corporate networkadministrator.

285
To edit a message template:
1. In the lower part of the main application window, click the button.
2. In the application settings window, select → → .
3. In the block, con�gure the templates for Adaptive Anomaly Control messages:
4. Save your changes.
To view Adaptive Anomaly Control reports:
1. Open the Kaspersky Security Center Administration Console.
2. In the folder in the Administration Console tree, open the folder with the name of theadministration group to which the relevant client computers belong.
3. In the workspace, select the tab.
4. Select the necessary policy and double-click to open the policy properties.
5. In the section, select the subsection.
The settings of the Adaptive Anomaly Control component are displayed in the right part of the window.
6. Do one of the following:
7. The report generation process starts.
Special templates are available for the message about blocking potentially harmful actions and for the message tobe sent to the administrator. You can modify the message templates.
Protection Security Controls Adaptive Anomaly Control
Templates
. Template of the message that is displayed to a user when an Adaptive Anomaly Control rule thatblocks a non-typical action is triggered.
. Template of the message that a user can be sent to the local corporate networkadministrator if the user considers the blocking to be a mistake.
Blockage
Message to administrator
Viewing Adaptive Anomaly Control reports
Managed devices
Policies
Security Controls Adaptive Anomaly Control
If you want to view a report on the settings of Adaptive Anomaly Control rules, click the button.
If you want to view a report on the triggering of Adaptive Anomaly Control rules, click the button.
Rule status report
Rule triggeringreport
The report is displayed in a new window.
Application Control
Application Control manages the startup of applications on users' computers. This allows you to implement acorporate security policy when using applications. Application Control also reduces the risk of computer infectionby restricting access to applications.

286
1. Creating application categories.
The administrator creates categories of applications that the administrator wants to manage. Categories ofapplications are intended for all computers in the corporate network, regardless of administration groups. Tocreate a category, you can use the following criteria: KL category (for example, Browsers), �le hash, applicationvendor, and other criteria.
2. Creating Application Control rules.
The administrator creates Application Control rules in the policy for the administration group. The rule includesthe categories of applications and the startup status of applications from these categories: blocked or allowed.
3. Selecting the Application Control mode.
The administrator chooses the mode for working with applications that are not included in any of the rules(application denylist and allowlist).
Application Control operating modes
Con�guring Application Control consists of the following steps:
When a user attempts to start a prohibited application, Kaspersky Endpoint Security will block the application fromstarting and will display a noti�cation (see the �gure below).
A test mode is provided to check the con�guration of Application Control. In this mode, Kaspersky EndpointSecurity does the following:
Allows the startup of applications, including prohibited ones.
Shows a noti�cation about the startup of a prohibited application and adds information to the report on theuser's computer.
Sends data about the startup of prohibited applications to Kaspersky Security Center.
Application Control noti�cation
The Application Control component operates in two modes:
. In this mode, Application Control allows users to start all applications except for applications that areprohibited in Application Control rules.
This mode of Application Control is enabled by default.
. In this mode, Application Control blocks users from starting any applications except for applicationsthat are allowed and not prohibited in Application Control rules.
If the allow rules of Application Control are fully con�gured, the component blocks the startup of all newapplications that have not been veri�ed by the LAN administrator, while allowing the operation of the operatingsystem and of trusted applications that users rely on in their work.
You can read the recommendations on con�guring Application Control rules in allowlist mode.
Denylist
Allowlist

287
Application Control operating algorithm
Application Control operating algorithm
Application Control can be con�gured to operate in these modes both by using the Kaspersky Endpoint Securitylocal interface and by using Kaspersky Security Center.
However, Kaspersky Security Center o�ers tools that are not available in the Kaspersky Endpoint Security localinterface, such as the tools that are needed for the following tasks:
Creating application categories.
Application Control rules created in the Kaspersky Security Center Administration Console are based on yourcustom application categories and not on inclusion and exclusion conditions as is the case in the KasperskyEndpoint Security local interface.
Receiving information about applications that are installed on corporate LAN computers.
This is why it is recommended to use Kaspersky Security Center to con�gure the operation of the ApplicationControl component.
Kaspersky Endpoint Security uses an algorithm to make a decision about starting an application (see the �gurebelow).

288
Application Control functionality limitations
Operation of the Application Control component is limited in the following cases:
When the application version is upgraded, importing Application Control component settings is not supported.
When the application version is upgraded, importing Application Control settings is supported only if KasperskyEndpoint Security 10 Service Pack 2 for Windows or later is upgraded to Kaspersky Endpoint Security 11.6.0 forWindows.
When application versions other than Kaspersky Endpoint Security 10 Service Pack 2 for Windows areupgraded, the Application Control settings have to be con�gured anew in order to restore this componentto operational state.
If there is no connection with KSN servers, Kaspersky Endpoint Security receives information about thereputation of applications and their modules only from local databases.
The list of applications assigned by Kaspersky Endpoint Security to the KL category when a connection to KSN servers is available may di�er from the list of
applications assigned by Kaspersky Endpoint Security to the KL category when there is no connection to KSN.
At the Kaspersky Security Center database, information on 150,000 processed �les may be stored. Once thisnumber of records has been achieved, new �les will not be processed. To resume inventory operations, youmust delete the �les that were previously inventoried in the Kaspersky Security Center database from thecomputer on which Kaspersky Endpoint Security is installed.
The component does not control the startup of scripts unless the script is sent to the interpreter via thecommand line.
If the startup of an interpreter is allowed by Application Control rules, the component will not block a scriptstarted from this interpreter.
If at least one of the scripts speci�ed in the interpreter command line is blocked from start by Applicationcontrol rules, the component blocks all the scripts, speci�ed in the interpreter command line.
The component does not control the startup of scripts from interpreters that are not supported by KasperskyEndpoint Security.
Kaspersky Endpoint Security supports the following interpreters:
The following types of interpreters are supported:
Applications trustedaccording to reputation in KSN
Applications trusted accordingto reputation in KSN
Java
PowerShell
%ComSpec%;
289
To enable or disable Application Control:
1. In the lower part of the main application window, click the button.
2. In the application settings window, select → → .
3. Use the toggle to enable or disable the component.
4. Save your changes.
%SystemRoot%\\system32\\regedit.exe;
%SystemRoot%\\regedit.exe;
%SystemRoot%\\system32\\regedt32.exe;
%SystemRoot%\\system32\\cscript.exe;
%SystemRoot%\\system32\\wscript.exe;
%SystemRoot%\\system32\\msiexec.exe;
%SystemRoot%\\system32\\mshta.exe;
%SystemRoot%\\system32\\rundll32.exe;
%SystemRoot%\\system32\\wwahost.exe;
%SystemRoot%\\syswow64\\cmd.exe;
%SystemRoot%\\syswow64\\regedit.exe;
%SystemRoot%\\syswow64\\regedt32.exe;
%SystemRoot%\\syswow64\\cscript.exe;
%SystemRoot%\\syswow64\\wscript.exe;
%SystemRoot%\\syswow64\\msiexec.exe;
%SystemRoot%\\syswow64\\mshta.exe;
%SystemRoot%\\syswow64\\rundll32.exe;
%SystemRoot%\\syswow64\\wwahost.exe.
Enabling and disabling Application Control
By default, Application Control is disabled.
Protection Security Controls Application Control
Application Control

290
To select the Application Control mode:
1. In the lower part of the main application window, click the button.
2. In the application settings window, select → → .
3. In the block, select one of the following options:
All rules created during the selected mode are saved after the mode is changed so that the rules can be usedagain. To revert back to using these rules, all you have to do is select the necessary mode.
4. In the section, select the action to be performed by the componentwhen a user attempts to start an application that is blocked by Application Control rules.
5. Select the check box if you want Kaspersky Endpoint Security to monitor theloading of DLL modules when applications are started by users.
Information about the module and the application that loaded the module will be saved to a report.
Kaspersky Endpoint Security monitors only the DLL modules and drivers that have been loaded since the checkbox was selected. Restart the computer after selecting the check box if you want Kaspersky Endpoint Securityto monitor all DLL modules and drivers, including ones that are loaded before Kaspersky Endpoint Security isstarted.
When enabling control over the loading of DLL modules and drivers, make sure that one of the followingrules is enabled in the Application Control settings: the default rule or another rule thatcontains the "Trusted certi�cates" KL category and ensures that trusted DLL modules and drivers areloaded before Kaspersky Endpoint Security is started. Enabling control of the loading of DLL modules anddrivers when the rule is disabled may cause instability in the operating system.
As a result, if Application Control is enabled, the application forwards information about running executable �lesto Kaspersky Security Center. You can view the list of running executable �les in Kaspersky Security Center inthe folder. To receive information about all executable �les instead of only running executable�les, run the Inventory task.
Executable �les
Selecting the Application Control mode
Protection Security Controls Application Control
Application Startup Control mode
. If this option is selected, Application Control allows all users to start any applications, except incases that satisfy the conditions of Application Control block rules.
. If this option is selected, Application Control blocks all users from starting any applications, exceptin cases that satisfy the conditions of Application Control allow rules.
The rule and rule are initially de�ned for Allowlist mode. TheseApplication Control rules correspond to KL categories. The "Golden Image" KL category includesprograms that ensure normal operation of the operating system. The "Trusted Updaters" KL categoryincludes updaters for the most reputable software vendors. You cannot delete these rules. The settingsof these rules cannot be edited. By default, the rule is enabled and the
rule is disabled. All users are allowed to start applications that match the trigger conditions ofthese rules.
Denylist
Allowlist
Golden Image Trusted Updaters
Golden Image TrustedUpdaters
Action at startup of blocked applications
Control DLL modules load
Golden Image
Golden Image
291
We recommend turning on password protection for con�guring application settings, so that it is possibleto turn o� the rules blocking critical DLL modules and drivers form start, without modifying KasperskySecurity Center policy settings.
6. Save your changes.
Rule-triggering conditions
Decisions made by the Application Control component when a rule is triggered
Working with Application Control rules in the application interface
Kaspersky Endpoint Security controls the startup of applications by users by means of rules. An ApplicationControl rule speci�es the triggering conditions and actions performed by the Application Control componentwhen the rule is triggered (allowing or blocking application startup by users).
A rule-triggering condition has the following correlation: "condition type - condition criterion - condition value".Based on the rule-triggering conditions, Kaspersky Endpoint Security applies (or does not apply) a rule to anapplication.
The following types of conditions are used in rules:
Inclusion conditions. Kaspersky Endpoint Security applies the rule to the application if the application matchesat least one of the inclusion conditions.
Exclusion conditions. Kaspersky Endpoint Security does not apply the rule to the application if the applicationmatches at least one of the exclusion conditions and does not match any of the inclusion conditions.
Rule-triggering conditions are created using criteria. The following criteria are used to create rules in KasperskyEndpoint Security:
Path to the folder containing the executable �le of the application or path to the executable �le of theapplication.
Metadata: application executable �le name, application executable �le version, application name, applicationversion, application vendor.
Hash of the executable �le of the application.
Certi�cate: issuer, subject, thumbprint.
Inclusion of the application in a KL category.
Location of the application executable �le on a removable drive.
The criterion value must be speci�ed for each criterion used in the condition. If the parameters of the applicationbeing started match the values of criteria speci�ed in the inclusion condition, the rule is triggered. In this case,Application Control performs the action prescribed in the rule. If application parameters match the values ofcriteria speci�ed in the exclusion condition, Application Control does not control startup of the application.

292
Operating status of a rule
To add an Application Control rule:
1. In the lower part of the main application window, click the button.
2. In the application settings window, select → → .
3. Click the or button.
This opens the list of Application Control rules.
4. Click the button.
The window opens.
5. On the tab, de�ne the main settings of the rule:
a. In the �eld, enter the name of the rule.
b. In the �eld, enter a description of the rule.
c. Compile or edit a list of users and/or groups of users who are allowed or not allowed to start applicationsthat meet the rule trigger conditions. To do this, click the button in the table.
By default, the value is added to the list of users. The rule applies to all users.
If there is no user speci�ed in the table, the rule cannot be saved.
When a rule is triggered, Application Control allows users (or user groups) to start applications or blocks startupaccording to the rule. You can select individual users or groups of users that are allowed or not allowed to startapplications that trigger a rule.
If a rule does not specify those users allowed to start applications satisfying the rule, this rule is called a block rule.
If a rule that does not specify any users who are not allowed to start applications that match the rule, this rule iscalled an allow rule.
The priority of a block rule is higher than the priority of an allow rule. For example, if an Application Control allowrule has been assigned for a user group while an Application Control block rule has been assigned for one user inthis user group, this user will be blocked from starting the application.
Application Control rules can have one of the following operating statuses:
. This status means that the rule is used when Application Control is in operation.
. This status means that the rule is ignored when Application Control is in operation.
. This status signi�es that Kaspersky Endpoint Security allows the startup of applications to which the rulesapply but logs information about the startup of such applications in the report.
On
O�
Test
Adding an Application Control rule
Protection Security Controls Application Control
Blocked applications Allowed applications
Add
Application Control rule
General settings
Rule name
Description
Add Subjects and their rights
Everyone

293
d. In the table, use the toggle to de�ne the right of users to start applications.
e. Select the check box if you want all users that do not appear in the columnand that are not part of the group of users speci�ed in the column to be blocked from startingapplications that match the rule trigger conditions.
If the check box is cleared, Kaspersky Endpoint Security does not control thestartup of applications by users that are not speci�ed in the table and thatdo not belong to the groups of users speci�ed in the table.
f. If you want Kaspersky Endpoint Security to consider applications matching the rule trigger conditions astrusted updaters allowed to create other executable �les that will be allowed to run subsequently, select the
check box.
6. On the tab, create or edit the list of inclusion conditions for triggering the rule.
7. On the tab, create or edit the list of exclusion conditions for triggering the rule.
When Kaspersky Endpoint Security settings are migrated, the list of executable �les created by trustedupdaters is migrated as well.
8. Save your changes.
To add a new trigger condition for an Application Control rule:
1. In the lower part of the main application window, click the button.
2. In the application settings window, select → → .
3. Click the or button.
This opens the list of Application Control rules.
4. Select the rule for which you want to con�gure a trigger condition.
The Application Control rule properties open.
5. Select the tab or tab and click the button.
6. Select the trigger conditions for the Application Control rule:
Subjects and their rights
Deny for other users SubjectSubject
Deny for other usersSubjects and their rights
Subjects and their rights
Trusted Updaters
Conditions
Exclusions
Adding a trigger condition for an Application Control rule
Protection Security Controls Application Control
Blocked applications Allowed applications
Conditions Exclusions Add
. In the list of running applications, you can select theapplications to which the Application Control rule will be applied. Kaspersky Endpoint Security also listsapplications that were previously running on the computer. You need to select the criterion that you want touse to create one or multiple rule trigger conditions: , , , or
.
. A KL category is a list of applications that have shared theme attributes. The listis maintained by Kaspersky experts. For example, the KL category of "O�ice applications" includesapplications from the Microsoft O�ice suite, Adobe® Acrobat®, and others.
. You can select the application �le and select one of the rule trigger conditions: , , or .
Conditions from properties of started applications
File hash code Certi�cate KL category MetadataFolder path
Conditions "KL category"
Custom condition File hashcode Certi�cate Metadata Path to �le or folder

294
7. Save your changes.
To change the status of an Application Control rule:
1. In the lower part of the main application window, click the button.
2. In the application settings window, select → → .
3. Click the or button.
This opens the list of Application Control rules.
4. In the column, open the context menu and select one of the following:
5. Save your changes.
Rule-triggering conditions
. The Application Control rule is applied only to �les that are run ona removable drive.
. The Application Control rule is applied only to�les that reside within the speci�ed folder. You can also include or exclude �les from subfolders. You need toselect the criterion that you want to use to create one or multiple rule trigger conditions: ,
, , or .
Condition by �le drive (removable drive)
Conditions from properties of �les in the speci�ed folder
File hash codeCerti�cate KL category Metadata Folder path
When adding conditions, please take into account the following special considerations for Application Control:
Kaspersky Endpoint Security does not support an MD5 �le hash and does not control startup of applicationsbased on an MD5 hash. An SHA256 hash is used as a rule trigger condition.
It is not recommended to use only the and criteria as rule trigger conditions. Use of thesecriteria is unreliable.
If you are using a symbolic link in the �eld, you are advised to resolve the symbolic link forcorrect operation of the Application Control rule. To do so, click the button.
Issuer Subject
Path to �le or folderResolve symbolic link
Changing the status of an Application Control rule
Protection Security Controls Application Control
Blocked applications Allowed applications
Status
. This status means that the rule is used when the Application Control component is running.
. This status means that the rule is ignored when the Application Control component is running.
. This status means that Kaspersky Endpoint Security always allows the startup of applications towhich this rule applies but logs information about the startup of such applications in the report.
On
O�
Testing
Managing Application Control rules in Kaspersky Security Center
Kaspersky Endpoint Security controls the startup of applications by users by means of rules. An ApplicationControl rule speci�es the triggering conditions and actions performed by the Application Control componentwhen the rule is triggered (allowing or blocking application startup by users).

295
Decisions made by the Application Control component when a rule is triggered
Operating status of a rule
A rule-triggering condition has the following correlation: "condition type - condition criterion - condition value".Based on the rule-triggering conditions, Kaspersky Endpoint Security applies (or does not apply) a rule to anapplication.
The following types of conditions are used in rules:
Inclusion conditions. Kaspersky Endpoint Security applies the rule to the application if the application matchesat least one of the inclusion conditions.
Exclusion conditions. Kaspersky Endpoint Security does not apply the rule to the application if the applicationmatches at least one of the exclusion conditions and does not match any of the inclusion conditions.
Rule-triggering conditions are created using criteria. The following criteria are used to create rules in KasperskyEndpoint Security:
Path to the folder containing the executable �le of the application or path to the executable �le of theapplication.
Metadata: application executable �le name, application executable �le version, application name, applicationversion, application vendor.
Hash of the executable �le of the application.
Certi�cate: issuer, subject, thumbprint.
Inclusion of the application in a KL category.
Location of the application executable �le on a removable drive.
The criterion value must be speci�ed for each criterion used in the condition. If the parameters of the applicationbeing started match the values of criteria speci�ed in the inclusion condition, the rule is triggered. In this case,Application Control performs the action prescribed in the rule. If application parameters match the values ofcriteria speci�ed in the exclusion condition, Application Control does not control startup of the application.
When a rule is triggered, Application Control allows users (or user groups) to start applications or blocks startupaccording to the rule. You can select individual users or groups of users that are allowed or not allowed to startapplications that trigger a rule.
If a rule does not specify those users allowed to start applications satisfying the rule, this rule is called a block rule.
If a rule that does not specify any users who are not allowed to start applications that match the rule, this rule iscalled an allow rule.
The priority of a block rule is higher than the priority of an allow rule. For example, if an Application Control allowrule has been assigned for a user group while an Application Control block rule has been assigned for one user inthis user group, this user will be blocked from starting the application.
Application Control rules can have one of the following operating statuses:
. This status means that the rule is used when Application Control is in operation.On

296
To open the application properties window in the folder:
1. Open the Kaspersky Security Center Administration Console.
2. In the Administration Console tree, select → → .
3. Select an application.
4. In the context menu of the application, select .
To open the properties window for an executable �le in the folder:
1. Open the Kaspersky Security Center Administration Console.
2. In the Administration Console tree, select the → → folder.
3. Select an executable �le.
4. In the context menu of the executable �le, select .
. This status means that the rule is ignored when Application Control is in operation.O�
. This status signi�es that Kaspersky Endpoint Security allows the startup of applications to which the rulesapply but logs information about the startup of such applications in the report.Test
Receiving information about the applications that are installed on users'computers
To create optimal Application Control rules, it is recommended to �rst get a picture of the applications that areused on computers on the corporate LAN. To do this, you can obtain the following information:
Vendors, versions, and localizations of applications used on the corporate LAN.
Frequency of application updates.
Application usage policies adopted in the company (this may be security policies or administrative policies).
Storage location of application distribution packages.
Information about applications that are used on corporate LAN computers is available in the folder and in the folder. The folder and the folder arelocated in the folder in the Kaspersky Security Center Administration Console tree.
Applications registryExecutable �les Applications registry Executable �les
Application management
The folder contains the list of applications that were detected by Network Agent which isinstalled on the client computer.
Applications registry
The folder contains a list of all executable �les that have ever been started on client computers orthat were detected during the inventory task of Kaspersky Endpoint Security.
Executable �les
To view general information about the application and its executable �les, and the list of computers on which anapplication is installed, open the properties window of an application that is selected in the folder or in the folder.
Applications registryExecutable �les
Applications registry
Additional Application management Applications registry
Properties
Executable �les
Additional Application management Executable �les
Properties
297
To create an application category:
1. Open the Kaspersky Security Center Administration Console.
2. In the Administration Console tree, select the → → folder.
3. Click the button in the workspace.
The user category creation wizard starts.
4. Follow the instructions of the user category creation wizard.
Step 1. Selecting the category type
When creating a category with content added automatically, Kaspersky Security Center performs inventoryon �les with the following formats: EXE, COM, DLL, SYS, BAT, PS1, CMD, JS, VBS, REG, MSI, MSC, CPL, HTML,HTM, DRV, OCX, and SCR.
Step 2. Entering a user category name
Step 3. Con�guring the conditions for including applications in a category
Creating application categories
For more convenience when creating Application Control rules, you can create application categories.
It is recommended to create a "Work applications" category that covers the standard set of applications that areused at the company. If di�erent user groups use di�erent sets of applications in their work, a separate applicationcategory can be created for each user group.
Additional Application management Applicationcategories
Create a category
At this step, select one of the following types of application categories:
. If you selected this type of category, at the "Con�guring theconditions for including applications in a category" step and the "Con�guring the conditions for excludingapplications from a category" step, you will be able to de�ne the criteria whereby executable �les will beincluded into the category.
. If you selected this type of category, at the"Settings" step you will be able to specify a computer whose executable �les will be automatically included inthe category.
. If you selected this type of category, at the"Repository folder" step you will be able to specify a folder from which executable �les will be automaticallyincluded in the category.
Category with content added manually
Category which includes executable �les from selected devices
Category that includes executable �les from a speci�c folder
At this step, specify a name for the application category.

298
This step is available if you selected the category type.
Step 4. Con�guring the conditions for excluding applications from a category
Category with content added manually
At this step, in the drop-down list, select the conditions for including applications into the category:Add
. Add applications from the list of executable �les on the client device to thecustom category.
. Specify detailed data of executable �les as a condition for adding applications to thecustom category.
. Select a folder on the client device that contains executable �les. KasperskySecurity Center will indicate the metadata of these executable �les as a condition for adding applications tothe custom category.
. Select a folder on the client device that contains executable �les. KasperskySecurity Center will indicate the hashes of these executable �les as a condition for adding applications to thecustom category.
. Select a folder on the client device that contains executable �les signed withcerti�cates. Kaspersky Security Center will indicate the certi�cates of these executable �les as a condition foradding applications to the custom category.
It is not recommended to use conditions whose properties do not have the parameter speci�ed.
. Select the MSI package. Kaspersky Security Center will indicate the metadata ofexecutable �les packed in this MSI package as a condition for adding applications to the custom category.
. Select the MSI package. Kaspersky Security Centerwill indicate the hashes of executable �les packed in this MSI package as a condition for adding applications tothe custom category.
. Specify a KL category as a condition for adding applications to the custom category. A KLcategory is a list of applications that have shared theme attributes. The list is maintained by Kaspersky experts.For example, the KL category known as "O�ice applications" includes applications from the Microsoft O�icesuite, Adobe Acrobat, and others.
You can select all KL categories to generate an extended list of trusted applications.
. Select a folder on the client device. Kaspersky Security Center will add executable �lesfrom this folder to the custom category.
. Select certi�cates that were used to sign executable �les as acondition for adding applications to the custom category.
It is not recommended to use conditions whose properties do not have the parameter speci�ed.
. Specify the type of storage device (all hard drives and removable drives, or only removable drives)as a condition for adding applications to the custom category.
From the list of executable �les
From �le properties
Metadata from �les in folder
Checksums of �les in folder
Certi�cates for �les from folder
Certi�cate thumbprint
MSI installer �les metadata
Checksums of �les from MSI installer of the application
KL category
Path to application
Certi�cates from certi�cate repository
Certi�cate thumbprint
Drive type

299
This step is available if you selected the category type.
Applications speci�ed at this step are excluded from the category even if these applications were speci�ed atthe "Con�guring the conditions for including applications in a category" step.
Step 5. Settings
This step is available if you selected the category type.
Category with content added manually
At this step, in the drop-down list, select conditions for excluding applications from the category:Add
. Add applications from the list of executable �les on the client device to thecustom category.
. Specify detailed data of executable �les as a condition for adding applications to thecustom category.
. Select a folder on the client device that contains executable �les. KasperskySecurity Center will indicate the metadata of these executable �les as a condition for adding applications tothe custom category.
. Select a folder on the client device that contains executable �les. KasperskySecurity Center will indicate the hashes of these executable �les as a condition for adding applications to thecustom category.
. Select a folder on the client device that contains executable �les signed withcerti�cates. Kaspersky Security Center will indicate the certi�cates of these executable �les as a condition foradding applications to the custom category.
. Select the MSI package. Kaspersky Security Center will indicate the metadata ofexecutable �les packed in this MSI package as a condition for adding applications to the custom category.
. Select the MSI package. Kaspersky Security Centerwill indicate the hashes of executable �les packed in this MSI package as a condition for adding applications tothe custom category.
. Specify a KL category as a condition for adding applications to the custom category. A KLcategory is a list of applications that have shared theme attributes. The list is maintained by Kaspersky experts.For example, the KL category known as "O�ice applications" includes applications from the Microsoft O�icesuite, Adobe Acrobat, and others.
You can select all KL categories to generate an extended list of trusted applications.
. Select a folder on the client device. Kaspersky Security Center will add executable �lesfrom this folder to the custom category.
. Select certi�cates that were used to sign executable �les as acondition for adding applications to the custom category.
. Specify the type of storage device (all hard drives and removable drives, or only removable drives)as a condition for adding applications to the custom category.
From the list of executable �les
From �le properties
Metadata from �les in folder
Checksums of �les in folder
Certi�cates for �les from folder
MSI installer �les metadata
Checksums of �les from MSI installer of the application
KL category
Path to application
Certi�cates from certi�cate repository
Drive type
Category which includes executable �les from selected devices

300
Step 6. Repository folder
This step is available if you selected the category type.
At this step, click the button and specify the computers whose executable �les will be added to theapplication category by Kaspersky Security Center. All executable �les from the speci�ed computers presented inthe folder will be added to the application category by Kaspersky Security Center.
Add
Executable �les
At this step, you can also con�gure the following settings:
Algorithm for hash function calculation by Kaspersky Security Center. To select an algorithm, you must selectat least one of the following check boxes:
check box. Select this check box if you wantKaspersky Security Center to periodically clear the application category and add to it all executable �les fromthe speci�ed computers presented in the folder.
If the check box is cleared, Kaspersky SecurityCenter will not make any modi�cations to an application category after it is created.
�eld. In this �eld, you can specify the period of time (in hours) after which Kaspersky SecurityCenter clears the application category and adds to it all executable �les from the speci�ed computerspresented in the folder.
The �eld is available if the check box is selected.
.
.
Calculate SHA-256 for �les in this category (supported by Kaspersky Endpoint Security 10 ServicePack 2 for Windows and any later versions)
Calculate MD5 for �les in this category (supported by versions earlier than Kaspersky EndpointSecurity 10 Service Pack 2 for Windows)
Synchronize data with the Administration Server repository
Executable �les
Synchronize data with the Administration Server repository
Scan period (h)
Executable �les
Synchronize data with the Administration Server repository
Category that includes executable �les from a speci�c folder
At this step, click the button and specify the folder in which Kaspersky Security Center will search forexecutable �les to automatically add applications to the application category.
Browse
At this step, you can also con�gure the following settings:
check box. Select this check box if you want dynamic-linklibraries (DLL �les) to be included in the application category.
Including DLL �les in the application category may reduce the performance of Kaspersky Security Center.
check box. Select this check box if you want scripts to be included in theapplication category.
Including scripts in the application category may reduce the performance of Kaspersky Security Center.
Algorithm for hash function calculation by Kaspersky Security Center. To select an algorithm, you must selectat least one of the following check boxes:
Include dynamic-link libraries (DLL) in this category
Include script data in this category
.Calculate SHA-256 for �les in this category (supported by Kaspersky Endpoint Security 10 ServicePack 2 for Windows and any later versions)

301
Step 7. Creating a custom category
To add executable �les from the folder to the application category:
1. Open the Kaspersky Security Center Administration Console.
2. In the Administration Console tree, select → → folder.
3. In the workspace, select the executable �les that you want to add to the application category.
4. Right-click to open the context menu for the selected executable �les and select .
The window opens.
5. In the window:
check box. Select this check box if you want Kaspersky Security Center toperiodically search for executable �les in the folder used for automatically adding to the application category.
If the check box is cleared, Kaspersky Security Center searches for executable�les in the folder used for automatically adding to the application category only if changes have been made inthe folder, �les have been added to it or deleted from it.
�eld. In this �eld, you can specify the time interval (in hours) after which Kaspersky SecurityCenter will search for executable �les in the folder used for automatically adding to the application category.
This �eld is available if the check box is selected.
.Calculate MD5 for �les in this category (supported by versions earlier than Kaspersky EndpointSecurity 10 Service Pack 2 for Windows)
Force folder scan for changes
Force folder scan for changes
Scan period (h)
Force folder scan for changes
To exit the Application Setup Wizard, click the button.Finish
Adding executable �les from the Executable �les folder to the applicationcategory
In the folder the list of executable �les detected on computers is displayed. Kaspersky EndpointSecurity generates a list of executable �les after executing the Inventory task.
Executable �les
Executable �les
Additional Application management Executable �les
Add to category
Select application category
Select application category
In the upper part of the window, choose one of the following options:
In the section, choose one of the following options:
. Choose this option if you want to create a new application categoryand add executable �les to it.
. Choose this option if you want to select an existing applicationcategory and add executable �les to it.
Create category of applications
Add rules to speci�ed category
Rule type
. Select this option if you want to create a condition that adds executable �les tothe application category.
. Select this option if you want to create a condition that excludes executable �lesfrom the application category.
Add to inclusion rules
Add to exclusion rules

302
6. Click .
1. Open the Kaspersky Security Center Administration Console.
2. In the node of the Administration Console tree, select the tab.
3. Choose a selection of events related to operation of the Application Control component (Viewing eventsresulting from operation of the Application Control component, Viewing events resulting from test operationof the Application Control component) in the drop-down list.
4. Click the button.
5. Select the events whose associated executable �les you want to add to the application category.
6. Right-click to open the context menu for the selected events and select .
The window opens.
7. In the window:
In the section, choose one of the following options:File info type
.
.
.
.
Certi�cate data (or SHA-256 for �les without a certi�cate)
Certi�cate data (�les without a certi�cate will be skipped)
Only SHA-256 (�les without SHA-256 will be skipped)
MD5 (discontinued mode, only for Kaspersky Endpoint Security 10 Service Pack 1)
OK
Adding event-related executable �les to the application category
To add executable �les related to Application Control events to the application category:
Administration Server Events
Selection events
Run selection
Add to category
Select application category
Select application category
In the upper part of the window, choose one of the following options:
In the section, choose one of the following options:
In the section, choose one of the following options:
. Choose this option if you want to create a new application categoryand add executable �les to it.
. Choose this option if you want to select an existing applicationcategory and add executable �les to it.
Create category of applications
Add rules to speci�ed category
Rule type
. Select this option if you want to create a condition that adds executable �les tothe application category.
. Select this option if you want to create a condition that excludes executable �lesfrom the application category.
Add to inclusion rules
Add to exclusion rules
File info type
.Certi�cate data (or SHA-256 for �les without a certi�cate)

303
8. Click .
To add or modify an Application Control rule using Kaspersky Security Center:
1. Open the Kaspersky Security Center Administration Console.
2. In the folder in the Administration Console tree, open the folder with the name of theadministration group to which the relevant client computers belong.
3. In the workspace, select the tab.
4. Select the necessary policy and double-click to open the policy properties.
5. In the policy window, select → .
In the right part of the window, the settings of the Application Control component are displayed.
6. Do one of the following:
The window opens.
7. Do one of the following:
.
.
.
Certi�cate data (�les without a certi�cate will be skipped)
Only SHA-256 (�les without SHA-256 will be skipped)
MD5 (discontinued mode, only for Kaspersky Endpoint Security 10 Service Pack 1)
OK
Adding and modifying an Application Control rule using Kaspersky SecurityCenter
Managed devices
Policies
Security Controls Application Control
To add a rule, click the button.
If you want to edit an existing rule, select it in the list of rules and click the button.
Add
Edit
Application Control rule
If you want to create a new category:
a. Click the button.
The user category creation wizard starts.
b. Follow the instructions of the user category creation wizard.
c. In the drop-down list, select the created application category.
If you want to edit an existing category:
a. In the drop-down list, select the created application category that you want to edit.
b. Click the button.
The window opens.
c. Modify the settings of the selected application category.
Create a category
Category
Category
Properties
Properties: <Category name>

304
8. In the table, click the button.
The standard Microsoft Windows window opens.
9. In the window, specify the list of users and/or user groups for which you want tocon�gure permission to start applications from the selected category.
10. In the table:
11. Select the check box if you want all users that do not appear in the column andthat are not part of the group of users speci�ed in the column to be blocked from starting applicationsthat belong to the selected category.
12. If you want Kaspersky Endpoint Security to consider applications included in the selected application categoryas trusted updaters allowed to create other executable �les that will be subsequently allowed to run, select the
check box.
When Kaspersky Endpoint Security settings are migrated, the list of executable �les created by trustedupdaters is migrated as well.
13. Save your changes.
To change the status of an Application Control rule:
1. Open the Kaspersky Security Center Administration Console.
2. In the folder in the Administration Console tree, open the folder with the name of theadministration group to which the relevant client computers belong.
3. In the workspace, select the tab.
4. Select the necessary policy and double-click to open the policy properties.
5. In the policy window, select → .
In the right part of the window, the settings of the Application Control component are displayed.
6. In the column, left-click to display the context menu and select one of the following:
d. Click .
e. In the drop-down list, select the created application category based on which you want tocreate a rule.
OK
Category
Subjects and their rights Add
Select Users or Groups
Select Users or Groups
Subjects and their rights
If you want to allow users and/or groups of users to start applications that belong to the selected category,select the check box in the relevant rows.
If you want to block users and/or groups of users from starting applications that belong to the selectedcategory, select the check box in the relevant rows.
Allow
Deny
Deny for other users SubjectSubject
Trusted Updaters
Changing the status of an Application Control rule via Kaspersky SecurityCenter
Managed devices
Policies
Security Controls Application Control
Status

305
7. Save your changes.
. This status means that the rule is used when Application Control is in operation.
. This status means that the rule is ignored when Application Control is in operation.
. This status means that Kaspersky Endpoint Security always allows the startup of applications to whichthe rule applies but logs information about the startup of such applications in the report.
You can use the status to assign the action equivalent to the option for a portion ofrules when the option is selected in the drop-down list.
On
O�
Test
Test Test rulesApply rules Action
Exporting and importing Application Control rules
You can export the list of Application Control rules to an XML �le. You can use the export/import function to backup the list of Application Control rules or to migrate the list to a di�erent server.
When exporting and importing Application Control rules, please keep in mind the following special considerations:
Kaspersky Endpoint Security exports the list of rules only for the active Application Control mode. In otherwords, if Application Control is operating in denylist mode, Kaspersky Endpoint Security exports rules only forthis mode. To export the list of rules for allowlist mode, you need to switch the mode and run the exportoperation again.
Kaspersky Endpoint Security uses application categories for Application Control rules to work. When migratingthe list of Application Control rules to a di�erent server, you also need to migrate the list of applicationcategories. For more details on exporting or importing application categories, please refer to KasperskySecurity Center Help .
How to export and import a list of Application Control rules in the Administration Console (MMC)

306
1. Open the Kaspersky Security Center Administration Console.
2. In the folder in the Administration Console tree, open the folder with the name of theadministration group to which the relevant client computers belong.
3. In the workspace, select the tab.
4. Select the necessary policy and double-click to open the policy properties.
5. In the policy window, select → .
6. To export the list of Application Control rules:
a. Select the rules that you want to export. To select multiple ports, use the or keys.
If you did not select any rule, Kaspersky Endpoint Security will export all rules.
b. Click the link.
c. In the window that opens, specify the name of the XML �le to which you want to export the list of rules,and select the folder in which you want to save this �le.
d. Click the button.
Kaspersky Endpoint Security exports the list of rules to the XML �le.
7. To export a list of Application Control rules:
a. Click the link.
In the window that opens, select the XML �le from which you want to import the list of rules.
b. Click the button.
If the computer already has a list of rules, Kaspersky Endpoint Security will prompt you to delete theexisting list or add new entries to it from the XML �le.
8. Save your changes.
Managed devices
Policies
Security Controls Application Control
CTRL SHIFT
Export
Save
Import
Open
How to export and import a list of Application Control rules in the Web Console and Cloud Console

307
1. In the main window of Web Console, select → .
2. Click the name of the Kaspersky Endpoint Security policy for computers on which you want to export orimport the list of rules.
The policy properties window opens.
3. Select the tab.
4. Select → .
5. Click the link.
6. Select a list of rules: application denylist or allowlist.
7. To export the list of Application Control rules:
a. Select the rules that you want to export.
b. Click the button.
c. Con�rm that you want to export only the selected rules, or export the entire list.
d. Click the button.
Kaspersky Endpoint Security exports the list of rules to an XML �le in the default downloads folder.
8. To export a list of Application Control rules:
a. Click the link.
In the window that opens, select the XML �le from which you want to import the list of rules.
b. Click the button.
If the computer already has a list of rules, Kaspersky Endpoint Security will prompt you to delete theexisting list or add new entries to it from the XML �le.
9. Save your changes.
Devices Policies and pro�les
Application settings
Security Controls Application Control
Rules lists settings
Export
Export
Import
Open
Testing Application Control rules using Kaspersky Security Center
To ensure that Application Control rules do not block applications required for work, it is recommended to enabletesting of Application Control rules and analyze their operation after creating new rules. When testing ofApplication Control rules is enabled, Kaspersky Endpoint Security will not block applications whose startup isforbidden by Application Control, but will instead send noti�cations about their startup to the AdministrationServer.
An analysis of the operation of Application Control rules requires a review of the resultant Application Controlevents that are reported to Kaspersky Security Center. If test mode results in no blocked startup events for allapplications required for the work of the computer user, this means that the correct rules were created.Otherwise, you are advised to update the settings of the rules you have created, create additional rules, or deletethe existing rules.

308
To enable or disable testing of Application Control rules in Kaspersky Security Center:
1. Open the Kaspersky Security Center Administration Console.
2. In the folder in the Administration Console tree, open the folder with the name of theadministration group to which the relevant client computers belong.
3. In the workspace, select the tab.
4. Select the necessary policy and double-click to open the policy properties.
5. In the policy window, select → .
In the right part of the window, the settings of the Application Control component are displayed.
6. In the drop-down list, select one of the following items:
7. Do one of the following:
8. Save your changes.
To view Application Control testing events received by Kaspersky Security Center:
1. Open the Kaspersky Security Center Administration Console.
2. In the node of the Administration Console tree, select the tab.
3. Click the button.
The window opens.
4. Open the section.
5. Click the button.
6. In the table, select the and check boxes.
By default, Kaspersky Endpoint Security allows the startup of all applications except for applications prohibited bythe rules.
Managed devices
Policies
Security Controls Application Control
Control mode
. If this option is selected, Application Control allows all users to start any applications, except incases that satisfy the conditions of Application Control block rules.
. If this option is selected, Application Control blocks all users from starting any applications, exceptin cases that satisfy the conditions of Application Control allow rules.
Denylist
Allowlist
If you want to enable testing of Application Control rules, select the option in the drop-down list.
If you want to enable Application Control to manage the startup of applications on users' computers, selectthe option in the drop-down list.
Test rules Action
Apply rules Action
Viewing events resulting from test operation of the Application Controlcomponent
Administration Server Events
Create a selection
Properties: <Selection name>
Events
Clear all
Events Application startup prohibited in test mode Application startup allowedin test mode

309
7. Click .
8. In the drop-down list, select the created selection.
9. Click the button.
To view the report on blocked applications in test mode:
1. Open the Kaspersky Security Center Administration Console.
2. In the node of the Administration Console tree, select the tab.
3. Click the button.
The Report Template Wizard starts.
4. Follow the instructions of the Report Template Wizard. At the step, select → .
After you have �nished with the New Report Template Wizard, the new report template appears in the table onthe tab.
5. Open the report by double-clicking it.
To view events resulting from the operation of the Application Control component received by Kaspersky SecurityCenter:
1. Open the Kaspersky Security Center Administration Console.
2. In the node of the Administration Console tree, select the tab.
3. Click the button.
The window opens.
4. Open the section.
5. Click the button.
6. In the table, select the check box.
7. Click .
8. In the drop-down list, select the created selection.
9. Click the button.
OK
Selection events
Run selection
Viewing a report on blocked applications in test mode
Administration Server Reports
New report template
Selecting the report template typeOther Report on blocked applications in test mode
Reports
The report generation process starts. The report is displayed in a new window.
Viewing events resulting from operation of the Application Controlcomponent
Administration Server Events
Create a selection
Properties: <Selection name>
Events
Clear all
Events Application startup prohibited
OK
Selection events
Run selection

310
To view the report on blocked applications:
1. Open the Kaspersky Security Center Administration Console.
2. In the node of the Administration Console tree, select the tab.
3. Click the button.
The Report Template Wizard starts.
4. Follow the instructions of the Report Template Wizard. At the step, select → .
After you have �nished with the New Report Template Wizard, the new report template appears in the table onthe tab.
5. Open the report by double-clicking it.
To enable testing of Application Control rules or to select a blocking action for Application Control:
1. In the lower part of the main application window, click the button.
2. In the application settings window, select → → .
This opens the list of Application Control rules.
3. In the column, select .
This status means that Kaspersky Endpoint Security always allows the startup of applications to which this ruleapplies but logs information about the startup of such applications in the report.
4. Save your changes.
Viewing a report on blocked applications
Administration Server Reports
New report template
Selecting the report template typeOther Report on blocked applications
Reports
The report generation process starts. The report is displayed in a new window.
Testing Application Control rules
To ensure that Application Control rules do not block applications required for work, it is recommended to enabletesting of Application Control rules and analyze their operation after creating new rules.
An analysis of the operation of Application Control rules requires a review of the resultant Application Controlevents that are reported to Kaspersky Security Center. If test mode results in no blocked startup events for allapplications required for the work of the computer user, this means that the correct rules were created.Otherwise, you are advised to update the settings of the rules you have created, create additional rules, or deletethe existing rules.
Protection Security Controls Application Control
Status Testing
Kaspersky Endpoint Security will not block applications whose startup is forbidden by the Application Controlcomponent, but will send noti�cations about their startup to the Administration Server.
Application activity monitor

311
Using the Application Activity Monitor requires installing the Application Control and Host Intrusion Preventioncomponents. If these components are not installed, the Application Activity Monitor section in the mainapplication window is hidden.
To start Application Activity Monitor:
To edit a message template:
Application Activity Monitor is a tool designed for viewing information about the activity of applications on a user'scomputer in real time.
In the main application window, click → .More Tools Application Activity Monitor
The window opens. In this window, information about the activity of applications on theuser's computer is presented on three tabs:
Application Activity
The tab displays information about all applications installed on the computer.
The tab displays information about the computer resource consumption by each application in realtime. From this tab, you can also proceed to con�gure permissions for an individual application.
The tab displays the list of applications that are started when the operating system starts.
All applications
Running
Run at startup
Rules for creating name masks for �les or folders
A mask of a �le or folder name is a representation of the name of a folder or name and extension of a �le usingcommon characters.
You can use the following common characters to create a �le or folder name mask:
The * (asterisk) character, which takes the place of any set of characters (including an empty set). For example,the C:\*.txt mask will include all paths to �les with the txt extension located in folders and subfolders on the(C:) drive.
The ? (question mark) character, which takes the place of any single character, except the \ and / characters(delimiters of the names of �les and folders in paths to �les and folders). For example, the maskC:\Folder\???.txt will include paths to all �les residing in the folder named Folder that have the TXTextension and a name consisting of three characters.
Editing Application Control message templates
When a user attempts to start an application that is blocked by an Application Control rule, Kaspersky EndpointSecurity displays a message stating that the application is blocked from starting. If the user believes that anapplication was mistakenly blocked from starting, the user can use the link in the message text to send a messageto the local corporate network administrator.
Special templates are available for the message that is displayed when an application is blocked from starting andfor the message sent to the administrator. You can modify the message templates.

312
1. In the lower part of the main application window, click the button.
2. In the application settings window, select → → .
3. In the block, con�gure the templates for Application Control messages:
4. Save your changes.
1. Form the following types of groups:
2. Create a list of applications that must be allowed to start.
Prior to creating a list, you are advised to do the following:
a. Run the inventory task.
Information about the creation, recon�guration, and startup of an inventory task is available in the Taskmanagement section.
b. View the list of executable �les.
1. Create application categories containing the applications that must be allowed to start.
You can select one of the following methods for creating application categories:
Protection Security Controls Application Control
Templates
. Template of the message that is displayed when an Application Control rule that blocks anapplication from starting is triggered.
. Template of the message that a user can send to the corporate LANadministrator if the user believes that an application was blocked by mistake.
Blockage
Message to administrator
Best practices for implementing a list of allowed applications
When planning implementation of a list of allowed applications, it is recommended to perform the following actions:
User groups. Groups of users for whom you need to allow use of various sets of applications.
Administration groups. One or multiple groups of computers to which Kaspersky Security Center will applythe list of allowed applications. It is necessary to create multiple groups of computers if di�erent allowlistsettings are used for those groups.
Con�guring allowlist mode for applications
When con�guring the allowlist mode, it is recommended to perform the following actions:
. You can manually add to this category by using the followingconditions:Category with content added manually
File metadata. Kaspersky Security Center adds all executable �les accompanied by the speci�edmetadata to the application category.
File hash code. Kaspersky Security Center adds all executable �les with the speci�ed hash to theapplication category.

313
2. Select the allowlist mode for the Application Control component.
3. Create Application Control rules using the created application categories.
The rule and rule are initially de�ned for Allowlist mode. TheseApplication Control rules correspond to KL categories. The "Golden Image" KL category includes programsthat ensure normal operation of the operating system. The "Trusted Updaters" KL category includesupdaters for the most reputable software vendors. You cannot delete these rules. The settings of theserules cannot be edited. By default, the rule is enabled and the rule isdisabled. All users are allowed to start applications that match the trigger conditions of these rules.
4. Determine the applications for which automatic installation of updates must be allowed.
You can allow automatic installation of updates in one of the following ways:
. You can specify a folder from whichexecutable �les will be automatically assigned to the created application category.
. You can specify a computer for which allexecutable �les will be automatically assigned to the created application category.
When using this method of creating application categories, Kaspersky Security Center receivesinformation about applications on the computer from the folder.
Use of this condition excludes the capability to automatically install updates because di�erentversions of �les will have a di�erent hash.
File certi�cate. Kaspersky Security Center adds all executable �les signed with the speci�ed certi�cateto the application category.
KL category. Kaspersky Security Center adds all applications that are in the speci�ed KL category to theapplication category.
Path to application. Kaspersky Security Center adds all executable �les from this folder to theapplication category.
Use of the Application folder condition may be unsafe because any application from the speci�edfolder will be allowed to start. It is recommended to apply rules that use the application categorieswith the Application folder condition only to those users for whom the automatic installation ofupdates must be allowed.
Category that includes executable �les from a speci�c folder
Category which includes executable �les from selected devices
Executable �les
Golden Image Trusted Updaters
Golden Image Trusted Updaters
Golden Image
Specify an extended list of allowed applications by allowing the startup of all applications that belong to anyKL category.
Specify an extended list of allowed applications by allowing the startup of all applications that are signedwith certi�cates.
To allow the startup of all applications signed with certi�cates, you can create a category with a certi�cate-based condition that uses only the parameter with the value *.Subject

314
1. Determine the testing period (ranging from several days to two months).
2. Enable testing of Application Control rules.
3. Examine the events resulting from testing the operation of Application Control and reports on blockedapplications in test mode to analyze the testing results.
4. Based on the analysis results, make changes to the allowlist mode settings.
In particular, based on the test results, you can add executable �les related to events to an applicationcategory.
For the Application control rule, select the parameter. If this check box is selected,Kaspersky Endpoint Security considers the applications included in the rule as Trusted Updaters. KasperskyEndpoint Security allows the startup of applications that have been installed or updated by applicationsincluded in the rule, provided that no blocking rules are applied to those applications.
When Kaspersky Endpoint Security settings are migrated, the list of executable �les created by trustedupdaters is migrated as well.
Create a folder and place within it the executable �les of applications for which you want to allow automaticinstallation of updates. Then create an application category with the "Application folder" condition andspecify the path to that folder. Then create an allow rule and select this category.
Use of the Application folder condition may be unsafe because any application from the speci�edfolder will be allowed to start. It is recommended to apply rules that use the application categories withthe Application folder condition only to those users for whom the automatic installation of updatesmust be allowed.
Trusted Updaters
Testing the allowlist mode
To ensure that Application Control rules do not block applications required for work, it is recommended to enabletesting of Application Control rules and analyze their operation after creating new rules. When testing is enabled,Kaspersky Endpoint Security will not block applications whose startup is forbidden by Application Control rules,but will instead send noti�cations about their startup to the Administration Server.
When testing the allowlist mode, it is recommended to perform the following actions:
Support for allowlist mode
After selecting a blocking action for Application Control, it is recommended to continue supporting allowlist modeby performing the following actions:
Examine the events resulting from the operation of Application Control and reports on blocked runs to analyzethe e�ectiveness of Application Control.
Analyze users' requests to access applications.
Analyze unfamiliar executable �les by checking their reputation in Kaspersky Security Network.

315
To enable monitoring of all network ports:
1. In the lower part of the main application window, click the button.
2. In the application settings window, select .
3. In the section, select the option.
4. Save your changes.
To create a list of monitored network ports:
1. In the lower part of the main application window, click the button.
2. In the application settings window, select .
3. In the section, select .
4. Click the button.
This opens a list of network ports that are normally used for transmission of email and network tra�ic. This listof network ports is included in the Kaspersky Endpoint Security package.
Prior to installing updates for the operating system or for software, install those updates on a test group ofcomputers to check how they will be processed by Application Control rules.
Add the necessary applications to categories used in Application Control rules.
Network ports monitoring
During the operation of Kaspersky Endpoint Security, the Web Control, Mail Threat Protection and Web ThreatProtection components monitor data streams that are transmitted via speci�c protocols and that pass throughspeci�c open TCP and UDP ports on user computer. For example, the Mail Threat Protection component analyzesinformation transmitted via SMTP, while the Web Threat Protection component analyzes information transmittedvia HTTP and FTP.
Kaspersky Endpoint Security divides TCP and UDP ports of the user's computer into several groups, depending onthe likelihood of their being compromised. Some network ports are reserved for vulnerable services. You areadvised to monitor these ports more thoroughly because they have a greater likelihood of being targeted by anetwork attack. If you use non-standard services that rely on non-standard network ports, these network portsmay also be targeted by an attacking computer. You can specify a list of network ports and a list of applicationsthat request network access. These ports and applications then receive special attention from the Mail ThreatProtection and Web Threat Protection components during network tra�ic monitoring.
Enabling monitoring of all network ports
Network settings
Monitored ports Monitor all network ports
Creating a list of monitored network ports
Network settings
Monitored ports Monitor selected network ports only
Select

316
5. Use the toggle in the column to enable or disable network port monitoring.
6. If a network port is not shown in the list of network ports, add it by doing the following:
a. Click the button.
b. In the window that opens, enter the network port number and brief description.
c. Set the or status for network port monitoring.
7. Save your changes.
When the FTP protocol runs in passive mode, the connection can be established via a random network portthat is not added to the list of monitored network ports. To protect such connections, enable monitoring of allnetwork ports or con�gure control of network ports for applications that establish FTP connections.
We recommend including applications that receive or transmit data via the FTP protocol in the list ofapplications for which Kaspersky Endpoint Security monitors all network ports.
To create a list of applications for which all network ports are monitored:
1. In the lower part of the main application window, click the button.
2. In the application settings window, select .
3. In the section, select .
4. Select the check box.
If this check box is selected, Kaspersky Endpoint Security monitors all ports for the following applications:
Status
Add
Active Inactive
Creating a list of applications for which all network ports are monitored
You can create a list of applications for which Kaspersky Endpoint Security monitors all network ports.
Network settings
Monitored ports Monitor selected network ports only
Monitor all ports for the applications from the list recommended by Kaspersky
Adobe Reader.
Apple Application Support.
Google Chrome.
Microsoft Edge.
Mozilla Firefox.
Internet Explorer.
Java.
mIRC.

317
5. Select the check box.
6. Click the button.
This opens a list of applications for which Kaspersky Endpoint Security monitors network ports.
7. Use the toggle in the column to enable or disable network port monitoring.
8. If an application is not included in the list of applications, add it as follows:
a. Click the button.
b. In the window that opens, enter the path to the executable �le of the application and a brief description.
c. Set the or status for network port monitoring.
9. Save your changes.
Opera.
Pidgin.
Safari.
Mail.ru Agent.
Yandex Browser.
Monitor all ports for speci�ed applications
Select
Status
Add
Active Inactive
Exporting and importing lists of monitored ports
Kaspersky Endpoint Security uses the following lists to monitor network ports: list of network ports and list ofapplications whose ports are monitored by Kaspersky Endpoint Security. You can export lists of monitored portsto an XML �le. Then you can modify the �le to, for example, add a large number of ports with the same description.You can also use the export/import function to back up the lists of monitored ports or to migrate the lists to adi�erent server.
How to export and import lists of monitored ports in the Administration Console (MMC)

318
1. Open the Kaspersky Security Center Administration Console.
2. In the folder in the Administration Console tree, open the folder with the name of theadministration group to which the relevant client computers belong.
3. In the workspace, select the tab.
4. Select the necessary policy and double-click to open the policy properties.
5. In the policy window, select → .
6. In the section, select .
7. Click the button.
The window opens. The window displays a list of network ports that arenormally used for transmission of email and network tra�ic. This list of network ports is included in theKaspersky Endpoint Security package.
8. To export the list of network ports:
a. In the list of network ports, select the ports that you want to export. To select multiple ports, use the or keys.
If you did not select any port, Kaspersky Endpoint Security will export all ports.
b. Click the button.
c. In the opened window, enter the name of the XML �le to which you want to export the list of networkports, and select the folder in which you want to save this �le.
d. Click the button.
Kaspersky Endpoint Security exports the entire list of network ports to the XML �le.
9. To export the list of applications whose ports are monitored by Kaspersky Endpoint Security:
a. Select the check box.
b. In the list of applications, select the applications that you want to export. To select multiple ports, usethe or keys.
If you did not select any application, Kaspersky Endpoint Security will export all applications.
c. Click the button.
d. In the window that opens, specify the name of the XML �le to which you want to export the list ofapplications, and select the folder in which you want to save this �le.
e. Click the button.
Kaspersky Endpoint Security exports the entire list of applications to the XML �le.
10. To import the list of network ports:
a. In the list of network ports, click the button.
In the window that opens, select the XML �le from which you want to import the list of network ports.
Managed devices
Policies
General settings Network settings
Monitored ports Monitor selected network ports only
Settings
Network ports Network ports
CTRL SHIFT
Export
Save
Monitor all ports for speci�ed applications
CTRL SHIFT
Export
Save
Import

319
b. Click the button.
If the computer already has a list of network ports, Kaspersky Endpoint Security will prompt you todelete the existing list or add new entries to it from the XML �le.
11. To import a list of applications whose ports are monitored by Kaspersky Endpoint Security:
a. In the list of applications, click the button.
In the opened window, select the XML �le from which you want to import the list of applications.
b. Click the button.
If the computer already has a list of applications, Kaspersky Endpoint Security will prompt you to deletethe existing list or to add new entries to it from the XML �le.
12. Save your changes.
Open
Import
Open
How to export and import lists of monitored ports in the Web Console and Cloud Console

320
1. In the main window of Web Console, select → .
2. Click the name of the Kaspersky Endpoint Security policy for computers on which you want to export orimport lists of monitored ports.
The policy properties window opens.
3. Select the tab.
4. Go to the → section.
5. To export the list of network ports:
a. In the section, select .
b. Click the link.
The window opens. The window displays a list of network ports that arenormally used for transmission of email and network tra�ic. This list of network ports is included in theKaspersky Endpoint Security package.
c. In the list of network ports, select the ports that you want to export.
d. Click the button.
e. In the opened window, enter the name of the XML �le to which you want to export the list of networkports, and select the folder in which you want to save this �le.
f. Click the button.
Kaspersky Endpoint Security exports the entire list of network ports to the XML �le.
6. To export the list of applications whose ports are monitored by Kaspersky Endpoint Security:
a. In the block, select the check box.
b. Click the link.
c. In the list of applications, select the applications that you want to export.
d. Click the button.
e. In the window that opens, specify the name of the XML �le to which you want to export the list ofapplications, and select the folder in which you want to save this �le.
f. Click the button.
Kaspersky Endpoint Security exports the entire list of applications to the XML �le.
7. To import the list of network ports:
a. In the list of network ports, click the button.
In the window that opens, select the XML �le from which you want to import the list of network ports.
b. Click the button.
If the computer already has a list of network ports, Kaspersky Endpoint Security will prompt you todelete the existing list or add new entries to it from the XML �le.
Devices Policies and pro�les
Application settings
General settings Network settings
Monitored ports Monitor selected network ports only
N ports selected
Network ports Network ports
Export
Save
Monitored ports Monitor all ports for speci�ed applications
N applications selected
Export
Save
Import
Open

321
8. To import a list of applications whose ports are monitored by Kaspersky Endpoint Security:
a. In the list of applications, click the button.
In the opened window, select the XML �le from which you want to import the list of applications.
b. Click the button.
If the computer already has a list of applications, Kaspersky Endpoint Security will prompt you to deletethe existing list or to add new entries to it from the XML �le.
9. Save your changes.
Import
Open

322
Integration with Kaspersky Managed Detection and Response
1 Con�guring Private Kaspersky Security Network
Skip this step if you are using Kaspersky Security Center Cloud Console. Kaspersky Security Center CloudConsole automatically con�gures Local Kaspersky Security Network when installing the MDR plug-in.
Private KSN supports data exchange between computers and Kaspersky Security Network dedicated servers,but not Global KSN.
Upload the Kaspersky Security Network con�guration �le in the Administration Server properties. The KasperskySecurity Network con�guration �le is located within the ZIP archive of the MDR con�guration �le. You can obtainthe ZIP archive in the Kaspersky Managed Detection and Response Console. For details on con�guring PrivateKSN, please refer to the Kaspersky Security Center Help Guide . You can also upload a Kaspersky SecurityNetwork con�guration �le to the computer from the command line (see the instructions below).
Expanding Threat Protection
Managed Detection and Response
The Managed Detection and Response component was added to Kaspersky Endpoint Security version 11.6.0. Thiscomponent facilitates interaction with the solution known as Kaspersky Managed Detection and Response.Kaspersky Managed Detection and Response (MDR) continuously searches for, detects, and eliminates threatsaimed at your organization. For detailed information about how the solution works, please refer to the KasperskyManaged Detection and Response Help Guide .
When interacting with Kaspersky Managed Detection and Response, the application lets you perform the followingfunctions:
Activate Managed Detection and Response using a BLOB con�guration �le.
Execute commands from Kaspersky Managed Detection and Response.
Send telemetry data to Kaspersky Managed Detection and Response for threat detection.
Integration with Kaspersky Managed Detection and Response consists of the following steps:
How to con�gure Private KSN from the command line

323
1. Run the command line interpreter (cmd.exe) as an administrator.
2. Go to the folder where the Kaspersky Endpoint Security distribution package is located.
3. Run the following command:
avp.com KSN /private <file name>
<file name> is the name of the con�guration �le containing Private KSN settings (PKCS7 or PEM�le format).
Example:
As a result, Kaspersky Endpoint Security will use Private KSN to determine the reputation of �les, applications,and websites. The policy settings in the section will show the following operatingstatus: KSN network: Private KSN.
You must enable extended KSN mode for Managed Detection and Response to work.
2 Activate Managed Detection and Response.
Load the BLOB con�guration �le in the Kaspersky Endpoint Security policy (see the instructions below). TheBLOB �le contains the client ID and information about the license for Kaspersky Managed Detection andResponse. The BLOB �le is located inside the ZIP archive of the MDR con�guration �le. You can obtain the ZIParchive in the Kaspersky Managed Detection and Response Console. For detailed information about a BLOB �le,please refer to the Kaspersky Managed Detection and Response Help Guide .
1. Open the Kaspersky Security Center Administration Console.
2. In the folder in the Administration Console tree, open the folder with the name ofthe administration group to which the relevant client computers belong.
3. In the workspace, select the tab.
4. Select the necessary policy and double-click to open the policy properties.
5. In the policy window, select → .
6. Select the check box.
7. In the block, click and select the BLOB �le received in the Kaspersky ManagedDetection and Response Console. The �le has the P7 extension.
8. Save your changes.
avp.com KSN /private C:\kpsn_config.pkcs7
Kaspersky Security Network
How to activate Managed Detection and Response in the Administration Console (MMC)
Managed devices
Policies
Expanding Threat Protection Detection and Response
Managed Detection and Response
Settings Import
How to activate Managed Detection and Response in the Web Console and Cloud Console

324
1. In the main window of Web Console, select → .
2. Click the name of the Kaspersky Endpoint Security policy.
The policy properties window opens.
3. Select the tab.
4. Select → .
5. Turn on the toggle.
6. Click and select the BLOB �le that was obtained in the Kaspersky Managed Detection andResponse Console. The �le has the P7 extension.
7. Save your changes.
1. Run the command line interpreter (cmd.exe) as an administrator.
2. Go to the folder where the Kaspersky Endpoint Security distribution package is located.
3. Run the following command:
As a result, Kaspersky Endpoint Security will verify the BLOB �le. BLOB �le veri�cation includes checking thedigital signature and the license term. If the BLOB �le is successfully veri�ed, Kaspersky Endpoint Security willupload the �le and send the �le to the computer during the next synchronization with Kaspersky SecurityCenter. Check the operating status of the component by viewing the Application components status report.You can also view the operating status of a component in reports in the local interface of Kaspersky EndpointSecurity. The component will be added to the list of Kaspersky EndpointSecurity components.
You must enable the following components for Managed Detection and Response to work:
Kaspersky Security Network (extended mode).
Behavior Detection.
Enabling these components is non-optional. Otherwise Kaspersky Managed Detection and Response cannotfunction because it does not receive required telemetry data.
In addition, Kaspersky Managed Detection and Response uses data received from other applicationcomponents. Enabling those components is optional. Components that provide additional data include:
Devices Policies and pro�les
Application settings
Expanding Threat Protection Detection and Response
Managed Detection and Response
Import
How to activate Managed Detection and Response from the command line
If the application settings are not password protected:
avp.com MDRLICENSE /ADD <file name>
<file name> is the name of the BLOB con�guration �le for activating Managed Detection andResponse (P7 �le format).
If the application settings are password protected:
avp.com MDRLICENSE /ADD <file name> /login=<user name> /password=<password>
Managed Detection and Response

325
Web Threat Protection.
Mail Threat Protection.
Firewall.
Migration from Kaspersky Endpoint Agent to Kaspersky Endpoint Security for Windows
1. Con�gure integration with Kaspersky Managed Detection and Response in the Kaspersky Endpoint Securitypolicy.
2. Disable the Managed Detection and Response component in the Kaspersky Endpoint Agent policy.
If the Kaspersky Endpoint Security policy also applies to computers that do not have Kaspersky EndpointSecurity 11 – 11.5.0 installed, you must �rst create a separate Kaspersky Endpoint Agent policy for thosecomputers. In the new policy, con�gure integration with Kaspersky Managed Detection and Response.
Kaspersky Endpoint Security version 11 and later supports the MDR solution. Kaspersky Endpoint Security versions11 – 11.5.0 only sends telemetry data to Kaspersky Managed Detection and Response to enable threat detection.Kaspersky Endpoint Security version 11.6.0 has all the functionality of the built-in agent (Kaspersky EndpointAgent).
If you are using Kaspersky Endpoint Security 11 – 11.5.0, you must update databases to the latest version to workwith the MDR solution. You must also install Kaspersky Endpoint Agent.
If you are using Kaspersky Endpoint Security 11.6.0 or later, to work with the MDR solution, you must select theManaged Detection and Response component when installing the application. In this case, you do not need toinstall Kaspersky Endpoint Agent.
To migrate from Kaspersky Endpoint Agent to Kaspersky Endpoint Security for Windows:
Kaspersky Endpoint Agent
Kaspersky Endpoint Agent supports interaction between the application and other Kaspersky solutions fordetecting advanced threats (e.g. Kaspersky Sandbox). Kaspersky solutions are compatible with speci�c versions ofKaspersky Endpoint Agent.
For complete information about the Kaspersky Endpoint Agent for Windows included in the software solution youare using, and for complete information about the standalone solution, please refer to the Help Guide of therelevant product:
Kaspersky Anti Targeted Attack Platform Help Guide
Kaspersky Sandbox Help Guide
Kaspersky Endpoint Detection and Response Optimum Help Guide
Kaspersky Managed Detection and Response Help Guide

326
Kaspersky Endpoint Agent is included in the Kaspersky Endpoint Security distribution kit. You can install KasperskyEndpoint Agent during installation of Kaspersky Endpoint Security. To do so, you must select the Endpoint Agentcomponent during installation of the application (for example, in the installation package). After installing theapplication with Endpoint Agent, Kaspersky Endpoint Security and Kaspersky Endpoint Agent will be added to thelist of installed applications. After uninstalling Kaspersky Endpoint Security, Kaspersky Endpoint Agent will also beuninstalled automatically.

327
Kaspersky Endpoint Security performs the Wipe data task no matter which licensing type is being used, evenafter the license has expired.
Data Wipe modes
It is not possible to set a schedule for deleting data in task properties. You can only delete data immediatelyafter starting the task manually, or con�gure delayed data deletion if there is no connection with KasperskySecurity Center.
Limitations
Creating a Wipe data task
To delete data on users' computers:
Wipe Data
Kaspersky Endpoint Security lets you use a task to remotely delete data from users' computers.
Kaspersky Endpoint Security deletes data as follows:
In silent mode;
On hard drives and removable drives;
For all user accounts on the computer.
This task enables you to delete data in the following modes:
Immediate data deletion.
In this mode, you can, for example, delete outdated data to free up disk space.
Postponed data deletion.
This mode is intended, for example, to protect data on a laptop in case it is lost or stolen. You can con�gureautomatic data deletion if the laptop goes outside the boundaries of the corporate network and has not beensynchronized with Kaspersky Security Center in a long time.
Data Wipe has the following limitations:
Only a Kaspersky Security Center administrator can manage the Wipe data task. You cannot con�gure or starta task in the local interface of Kaspersky Endpoint Security.
For the NTFS �le system, Kaspersky Endpoint Security deletes only the names of the main data streams.Alternate data stream names cannot be deleted.
When you delete a symbolic link �le, Kaspersky Endpoint Security also deletes the �les whose paths arespeci�ed in the symbolic link.

328
1. In the main window of Web Console, select → .
The list of tasks opens.
2. Click the button.
The Task Wizard starts.
3. Con�gure the task settings:
a. In the drop-down list, select .
b. In the drop-down list, select .
c. In the �eld, enter a brief description, for example, Wipe data (Anti-Theft) .
d. In the section, select the task scope.
4. Select devices according to the selected task scope option. Click the button.
If new computers are added to an administration group within the task scope, the immediate data deletiontask is run on the new computers only if the task is completed within 5 minutes of the addition of the newcomputers.
5. Finish the wizard by clicking the button.
A new task will be displayed in the list of tasks.
6. Click the task of Kaspersky Endpoint Security.
The task properties window opens.
7. Select the tab.
8. Select the data deletion method:
9. If you want to postpone data deletion, select the check box. De�ne the number of days.
The postponed data deletion task will be performed each time that a connection with Kaspersky SecurityCenter is absent for the de�ned period of time.
When con�guring postponed data deletion, bear in mind that employees may turn o� their computer beforegoing on vacation. In this case, the absent connection term may be exceeded and data will be deleted. Alsoconsider the work schedule of o�line users. For more details about working with o�line computers and out-of-o�ice users, refer to Kaspersky Security Center Help .
If the check box is cleared, the task will be performed immediately after synchronization with KasperskySecurity Center.
10. Create a list of objects to delete:
Devices Tasks
Add
Application Kaspersky Endpoint Security for Windows (11.6.0)
Task type Wipe data
Task name
Select devices to which the task will be assigned
Next
Finish
Wipe data
Application settings
. Kaspersky Endpoint Security uses the operating systemresources to delete �les without sending them to the recycle bin.
. Kaspersky Endpoint Security overwrites �les with random data. Itis practically impossible to restore data after it is deleted.
Delete by means of the operating system
Delete completely, no recovery possible
Automatically delete data if there is no connection toKaspersky Security Center for more than N days

329
You can create a list of objects to delete on each tab. Kaspersky Endpoint Security will create a consolidatedlist and delete �les from this list when a task is complete.
You cannot delete �les that are required for operation of Kaspersky Endpoint Security.
11. Click the button.
12. Select the check box next to the task.
13. Click the button.
. Kaspersky Endpoint Security deletes all �les in the folder, and its subfolders. Kaspersky EndpointSecurity does not support masks and environment variables for entering a folder path.
. Kaspersky Endpoint Security searches for �les with the speci�ed extensions on allcomputer drives, including removable drives. Use the ";" or "," characters to specify multiple extensions.
. Kaspersky Endpoint Security will delete �les from the following areas:
Folders
Files by extension
Prede�ned folders
. Files in the standard Documents folder of the operating system, and its subfolders.
. Files in which the browser saves data from the websites visited by the user (such as userauthorization data).
. Files in the standard Desktop folder of the operating system, and its subfolders.
. Temporary �les related to the operation of Internet Explorer, such ascopies of web pages, images, and media �les.
. Temporary �les related to the operation of applications installed on the computer. Forexample, Microsoft O�ice applications create temporary �les containing backup copies of documents.
. Files related to the operation of the Outlook mail client: data �les (PST), o�line data �les(OST), o�line address book �les (OAB), and personal address book �les (PAB).
. Set of �les and folders that store operating system settings for the local user account.
Documents
Cookies
Desktop
Temporary Internet Explorer �les
Temporary �les
Outlook �les
User pro�le
Save
Run
As a result, data on users' computers will be deleted according to the selected mode: immediate or when aconnection is absent. If Kaspersky Endpoint Security cannot delete a �le, such as when a user is currently using a�le, the application does not attempt to delete it again. To complete data deletion, run the task again.

330
Kaspersky Endpoint Security access password prompt
User name and password
Password protection
Multiple users with di�erent levels of computer literacy can share a computer. If users have unrestricted access toKaspersky Endpoint Security and its settings, the overall level of computer protection may be reduced. Passwordprotection lets you restrict users' access to Kaspersky Endpoint Security according to the permissions granted tothem (for example, permission to exit the application).
If the user that started the Windows session (session user) has the permission to perform the action, KasperskyEndpoint Security does not request the user name and password or a temporary password. The user receivesaccess to Kaspersky Endpoint Security in accordance with the granted permissions.
If a session user does not have the permission to perform an action, the user can obtain access to the applicationin the following ways:
Enter a user name and password.
This method is suitable for day-to-day operations. To perform a password-protected action, you must enterthe domain account credentials of the user with the required permission. In this case, the computer must be inthat domain. If the computer is not in the domain, you can use the KLAdmin account.
Enter a temporary password.
This method is suitable for granting temporary permissions to perform blocked actions (for example, exiting theapplication) to users outside the corporate network. When a temporary password expires or a session ends,Kaspersky Endpoint Security reverts its settings to their previous state.
When a user attempts to perform a password-protected action, Kaspersky Endpoint Security prompts the userfor the user name and password or temporary password (see the �gure below).
To access Kaspersky Endpoint Security, you must enter your domain account credentials. Password protectionsupports the following accounts:
. An Administrator account with unrestricted access to Kaspersky Endpoint Security. The KLAdminaccount has the right to perform any action that is password-protected. The permissions for the KLAdminaccount cannot be revoked. When you enable password protection, Kaspersky Endpoint Security prompts youto set a password for the KLAdmin account.
KLAdmin

331
Temporary password
Password protection operating algorithm
Password protection operating algorithm
. A built-in Windows group that includes all users within the corporate network. Users inthe Everyone group can access the application according to the permissions that are granted to them.
. User accounts for which you can con�gure individual permissions. For example, if anaction is blocked for the Everyone group, you can allow this action for an individual user or a group.
. Account of the user who started the Windows session. You can switch to another session userwhen prompted for a password (the check box). In this case, KasperskyEndpoint Security regards the user whose account credentials were entered as the session user instead of theuser who started the Windows session.
The Everyone group
Individual users or groups
Session userSave password for current session
A temporary password can be used to grant temporary access to Kaspersky Endpoint Security for an individualcomputer outside of the corporate network. The Administrator generates a temporary password for an individualcomputer in the computer properties in Kaspersky Security Center. The Administrator selects the actions that willbe protected with the temporary password, and speci�es the temporary password's validity period.
Kaspersky Endpoint Security decides whether to allow or block a password-protected action based on thefollowing algorithm (see the �gure below).

332
To enable password protection:
1. In the lower part of the main application window, click the button.
In the application settings window, select the section.
2. Use the toggle to enable or disable the component.
3. Specify the password for the KLAdmin account and con�rm it.
The KLAdmin account has the right to perform any action that is password-protected.
If a computer is running under a policy, the Administrator can reset the password for the KLAdmin accountin the policy properties. If the computer is not connected to Kaspersky Security Center and you haveforgotten the password for the KLAdmin account, it is not possible to recover the password.
4. Set permissions for all users within the corporate network:
a. In the table, click the button to open the list of permissions for the Everyone group.
The Everyone group is a built-in Windows group that includes all users within the corporate network.
b. Select the check boxes next to the actions that users will be allowed to perform without entering thepassword.
If a check box is cleared, the users are blocked from performing the action. For example, if the check boxnext to the permission is cleared, you can exit the application only if you are logged in asKLAdmin, or as an individual user who has the required permission, or if you enter a temporary password.
Password protection permissions have some important aspects to consider. Make sure that allconditions for accessing Kaspersky Endpoint Security are ful�lled.
c. Click the button.
5. Save your changes.
You can disable Password protection only if you are logged in as KLAdmin. It is not possible to disablepassword protection if you are using any other user account or a temporary password.
Enabling Password protection
Password protection lets you restrict users' access to Kaspersky Endpoint Security according to the permissionsgranted to them (for example, permission to exit the application).
Interface
Password protection
Permissions Edit
Exit the application
OK
When password protection is enabled, the application will restrict users' access to Kaspersky Endpoint Securityaccording to the permissions granted to the Everyone group. You can perform the actions that are blocked forthe Everyone group only if you use the KLAdmin account, another account that is granted the requiredpermissions, or if you enter a temporary password.
During the password check, you can select the check box. In this case,Kaspersky Endpoint Security will not prompt for a password when a user attempts to perform another password-protected action for the duration of the session.
Save password for current session

333
You can use account credentials to access the application only if the computer is in the domain. If thecomputer is not in the domain, you can use the KLAdmin account or a temporary password.
To grant permissions to individual users or groups:
1. In the lower part of the main application window, click the button.
In the application settings window, select the section.
2. In the table, click the button.
3. In the opened window, click the button.
The standard Select Users or Groups dialog opens.
4. Select a user or a group in Active Directory and con�rm your selection.
5. In the list, select the check boxes next to the actions that the selected user or group will beallowed to perform without being prompted for a password.
If a check box is cleared, the users are blocked from performing the action. For example, if the check box nextto the permission is cleared, you can exit the application only if you are logged in asKLAdmin, or as an individual user who has the required permission, or if you enter a temporary password.
Password protection permissions have some important aspects to consider. Make sure that all conditionsfor accessing Kaspersky Endpoint Security are ful�lled.
6. Save your changes.
To allow a user to perform a blocked action using a temporary password:
1. Open the Kaspersky Security Center Administration Console.
2. In the folder in the Administration Console tree, open the folder with the name of theadministration group to which the relevant client computers belong.
Granting permissions to individual users or groups
You can grant access to Kaspersky Endpoint Security to individual users or groups. For example, if exiting theapplication is blocked for the Everyone group, you can grant the permission to an individualuser. As a result, you can exit the application only if you are logged in as that user or as KLAdmin.
Exit the application
Interface
Password protection Add
Select user
Permissions
Exit the application
As a result, if access to the application is restricted for the Everyone group, users will be granted permissions toaccess Kaspersky Endpoint Security according to the users' individual permissions.
Using a temporary password to grant permissions
A temporary password can be used to grant temporary access to Kaspersky Endpoint Security for an individualcomputer outside of the corporate network. This is necessary to allow the user to perform a blocked actionwithout obtaining the KLAdmin account credentials. To use a temporary password, the computer must be addedto Kaspersky Security Center.
Managed devices

334
3. In the workspace, select the tab.
4. Double-click to open the computer properties window.
5. In the computer properties window, select the section.
6. In the list of Kaspersky applications installed on the computer, select and double-click to open the application properties.
7. In the application settings window, select → .
8. In the section, click the button.
The window opens.
9. In the section, click the button.
The window opens.
10. In the �eld, specify the expiration date when the temporary password will expire.
11. In the table, select the check boxes next to the actions that will be available to theuser after entering the temporary password.
12. Click the button.
A window containing the temporary password opens (see the �gure below).
13. Copy the password and provide it to the user.
Temporary password
Con�gure application settings
Exit the application
Devices
Applications
Kaspersky Endpoint Security forWindows
General settings Interface
Password protection Settings
Password protection
Temporary password Settings
Create temporary password
Expiration date
Temporary password scope
Create
Special aspects of Password protection permissions
Password protection permissions have some important aspects and limitations to consider.
If a user's computer is running under a policy, make sure that all the required settings in the policy are available forediting (the attributes are open).
There are no special considerations or limitations.
335
Disable protection components
Disable control components
Disable Kaspersky Security Center policy
Remove key
Remove / modify / restore the application
Restore access to data on encrypted drives
It is not possible to grant the permission to disable protection components for the Everyone group. To allowusers other than KLAdmin to disable protection components, add a user or group that has the
permission in the Password Protection settings.
If a user's computer is running under a policy, make sure that all the required settings in the policy are availablefor editing (the attributes are open).
To disable protection components in the application settings, a user must have the permission.
To disable protection components from the context menu (by using the menu item), a usermust have the permission in addition to the permission.
Disableprotection components
Con�gure applicationsettings
Pause protectionDisable control components Disable protection components
It is not possible to grant the permission to disable control components for the Everyone group. To allow usersother than KLAdmin to disable control components, add a user or group that has the
permission in the Password Protection settings.
If a user's computer is running under a policy, make sure that all the required settings in the policy are availablefor editing (the attributes are open).
To disable control components in the application settings, a user must have the permission.
To disable control components from the context menu (by using the menu item), a user musthave the permission in addition to the permission.
Disable controlcomponents
Con�gure application settings
Pause protectionDisable protection components Disable control components
You cannot grant the "Everyone" group the permission to disable the Kaspersky Security Center policy. To allowusers other than KLAdmin to disable the policy, add a user or a group that has the
permission in the Password Protection settings.Disable Kaspersky Security
Center policy
There are no special considerations or limitations.
If you have allowed removing, modifying, and restoring the application for the "All" group, Kaspersky EndpointSecurity does not request a password when the user attempts to carry out these operations. Therefore, any userincluding users from outside the domain, can install, modify, or restore the application.

336
View reports
Restore from Backup
You can restore access to data on encrypted drives only if you are logged in as KLAdmin. Permission to performthis action cannot be granted to any other user.
There are no special considerations or limitations.
There are no special considerations or limitations.

337
Trusted zone
A trusted zone is a system administrator-con�gured list of objects and applications that Kaspersky EndpointSecurity does not monitor when active.
The administrator forms the trusted zone independently, taking into account the features of the objects that arehandled and the applications that are installed on the computer. It may be necessary to include objects andapplications in the trusted zone when Kaspersky Endpoint Security blocks access to a certain object orapplication, if you are sure that the object or application is harmless. An administrator can also allow a user tocreate their own local trusted zone for a speci�c computer. This way, users can create their own local lists ofexclusions and trusted applications in addition to the general trusted zone in a policy.
Creating a scan exclusion
A scan exclusion is a set of conditions that must be ful�lled so that Kaspersky Endpoint Security will not scan aparticular object for viruses and other threats.
Scan exclusions make it possible to safely use legitimate software that can be exploited by criminals to damage thecomputer or user data. Although they do not have any malicious functions, such applications can be exploited byintruders. For details on legitimate software that could be used by criminals to harm the computer or personal dataof a user, please visit the website of the Kaspersky IT Encyclopedia .
Such applications may be blocked by Kaspersky Endpoint Security. To prevent them from being blocked, you cancon�gure scan exclusions for the applications in use. To do so, add the name or name mask that is listed in theKaspersky IT Encyclopedia to the trusted zone. For example, you often use the Radmin application for remoteadministration of computers. Kaspersky Endpoint Security regards this activity as suspicious and may block it. Toprevent the application from being blocked, create a scan exclusion with the name or name mask that is listed inthe Kaspersky IT Encyclopedia.
If an application that collects information and sends it to be processed is installed on your computer, KasperskyEndpoint Security may classify this application as malware. To avoid this, you can exclude the application fromscanning by con�guring Kaspersky Endpoint Security as described in this document.
Scan exclusions can be used by the following application components and tasks that are con�gured by the systemadministrator:
Behavior Detection.
Exploit Prevention.
Host Intrusion Prevention.
File Threat Protection.
Web Threat Protection.
Mail Threat Protection.
Scan tasks.

338
Kaspersky Endpoint Security does not scan an object if the drive or folder containing this object is included inthe scan scope at the start of one of the scan tasks. However, the scan exclusion is not applied when acustom scan task is started for this particular object.
How to create a scan exclusion in the Administration Console (MMC)

339
1. Open the Kaspersky Security Center Administration Console.
2. In the folder in the Administration Console tree, open the folder with the name of theadministration group to which the relevant client computers belong.
3. In the workspace, select the tab.
4. Select the necessary policy and double-click to open the policy properties.
5. In the policy window, select → .
6. In the section, click the button.
7. In the window, select the tab.
This opens a window containing a list of exclusions.
8. Select the check box if you want to create a consolidated list of exclusionsfor all computers in the company. The lists of exclusions in the parent and child policies will be merged. Thelists will be merged provided that merging values when inheriting is enabled. Exclusions from the parentpolicy are displayed in child policies in a read-only view. Changing or deleting exclusions of the parent policyis not possible.
9. Select the check box if you want to enable the user to create a local list ofexclusions. This way, a user can create their own local list of exclusions in addition to the general list ofexclusions generated in the policy. An administrator can use Kaspersky Security Center to view, add, edit,or delete list items in the computer properties.
If the check box is cleared, the user can access only the general list of exclusions generated in the policy. Ifa local list was generated, after this functionality is disabled Kaspersky Endpoint Security continuesexcluding the listed �les from scans.
10. Click the button.
11. To exclude a �le or folder from scanning:
a. In the section, select the check box.
b. Click the link in the section to open the window.
c. Enter the �le or folder name or the mask of the �le or folder name, or select the �le or folder in thefolder tree by clicking .
Use masks:
Managed devices
Policies
General settings Exclusions
Scan exclusions and trusted applications Settings
Trusted zone Scan exclusions
Merge values when inheriting
Allow use of local exclusions
Add
Properties File or folder
select �le or folder Scan exclusion description Name of �le orfolder
Browse
The * (asterisk) character, which takes the place of any set of characters, except the \ and /characters (delimiters of the names of �les and folders in paths to �les and folders). For example,the mask C:\*\*.txt will include all paths to �les with the TXT extension located in folders on theC: drive, but not in subfolders.
Two consecutive * characters take the place of any set of characters (including an empty set) in the�le or folder name, including the \ and / characters (delimiters of the names of �les and folders inpaths to �les and folders). For example, the mask C:\Folder\**\*.txt will include all paths to �leswith the TXT extension located in the folder named Folder and its subfolders. The mask mustinclude at least one nesting level. The mask C:\**\*.txt is not a valid mask.

340
d. In the window, click .
A link to the added �le or folder appears in the section of the window.
12. To exclude objects with a speci�c name from scanning:
a. In the section, select the check box.
b. Click the link in the section to open the window.
c. Enter the name of the object type according to the classi�cation of the Kaspersky Encyclopedia (forexample, Email-Worm, Rootkit or RemoteAdmin).
You can use masks with the ? character (replaces any single character) and the * character (replacesany number of characters). For example, if the Client* mask is speci�ed, Kaspersky Endpoint Securityexcludes Client-IRC , Client-P2P and Client-SMTP objects from scans.
d. Click in the window.
A link to the added object name appears in the section of the window.
13. If you want to exclude an individual �le from scans:
a. In the section, select the check box.
b. Click the object hash entry link to open the window.
c. Enter the �le hash or select the �le by clicking the button.
If the �le is modi�ed, the �le hash will also be modi�ed. If this happens, the modi�ed �le will not beadded to exclusions.
d. Click in the window.
A link to the added object appears in the block of the window.
14. If necessary, in the �eld, enter a brief comment on the scan exclusion that you are creating.
15. Specify the Kaspersky Endpoint Security components that should use the scan exclusion:
a. Click the link in the section to activate the link.
b. Click the link to open the window.
c. Select the check boxes opposite the components to which the scan exclusion must be applied.
d. In the window, click .
If the components are speci�ed in the settings of the scan exclusion, this exclusion is applied only duringscanning by these components of Kaspersky Endpoint Security.
The ? (question mark) character, which takes the place of any single character, except the \ and /characters (delimiters of the names of �les and folders in paths to �les and folders). For example,the mask C:\Folder\???.txt will include paths to all �les residing in the folder named Folder thathave the TXT extension and a name consisting of three characters.
Name of �le or folder OK
Scan exclusion description Scanexclusion
Properties Object name
enter object name Scan exclusion description Object name
OK Object name
Scan exclusion description Scanexclusion
Properties Object hash
Object hash
Browse
OK Object hash
Scan exclusion description Scan exclusion
Comment
any Scan exclusion description select components
select components Protection components
Protection components OK

341
If the components are not speci�ed in the settings of the scan exclusion, this exclusion is applied duringscanning by all components of Kaspersky Endpoint Security.
16. You can use the check box to stop an exclusion at any time.
17. Save your changes.
How to create a scan exclusion in the Web Console and Cloud Console

342
1. In the main window of Web Console, select → .
2. Click the name of the Kaspersky Endpoint Security policy for the computers on which you want to add anexclusion.
The policy properties window opens.
3. Select the tab.
4. Select → .
5. In the block, click the link.
6. Select the check box if you want to create a consolidated list of exclusionsfor all computers in the company. The lists of exclusions in the parent and child policies will be merged. Thelists will be merged provided that merging values when inheriting is enabled. Exclusions from the parentpolicy are displayed in child policies in a read-only view. Changing or deleting exclusions of the parent policyis not possible.
7. Select the check box if you want to enable the user to create a local list ofexclusions. This way, a user can create their own local list of exclusions in addition to the general list ofexclusions generated in the policy. An administrator can use Kaspersky Security Center to view, add, edit,or delete list items in the computer properties.
If the check box is cleared, the user can access only the general list of exclusions generated in the policy. Ifa local list was generated, after this functionality is disabled Kaspersky Endpoint Security continuesexcluding the listed �les from scans.
8. Click the button.
9. Select how you want to add the exclusion: , or .
10. If you want to exclude a �le or folder from scans, select the �le or folder by clicking the button.
You can also manually enter the path. Kaspersky Endpoint Security supports the * and ? characters whenentering a mask:
11. If you want to exclude a speci�c type of object from scans, in the �eld enter the name of theobject type according to the classi�cation of the Kaspersky Encyclopedia (for example, Email-Worm,Rootkit or RemoteAdmin).
Devices Policies and pro�les
Application settings
General settings Exclusions
Scan exclusions and trusted applications Scan exclusions
Merge values when inheriting
Allow use of local exclusions
Add
File or folder Object name Object hash
Browse
The * (asterisk) character, which takes the place of any set of characters, except the \ and /characters (delimiters of the names of �les and folders in paths to �les and folders). For example, themask C:\*\*.txt will include all paths to �les with the TXT extension located in folders on the C: drive,but not in subfolders.
Two consecutive * characters take the place of any set of characters (including an empty set) in the�le or folder name, including the \ and / characters (delimiters of the names of �les and folders inpaths to �les and folders). For example, the mask C:\Folder\**\*.txt will include all paths to �leswith the TXT extension located in the folder named Folder and its subfolders. The mask must includeat least one nesting level. The mask C:\**\*.txt is not a valid mask.
The ? (question mark) character, which takes the place of any single character, except the \ and /characters (delimiters of the names of �les and folders in paths to �les and folders). For example, themask C:\Folder\???.txt will include paths to all �les residing in the folder named Folder that havethe TXT extension and a name consisting of three characters.
Object

343
You can use masks with the ? character (replaces any single character) and the * character (replaces anynumber of characters). For example, if the Client* mask is speci�ed, Kaspersky Endpoint Securityexcludes Client-IRC , Client-P2P and Client-SMTP objects from scans.
12. If you want to exclude an individual �le from scans, enter the �le hash in the �eld.
If the �le is modi�ed, the �le hash will also be modi�ed. If this happens, the modi�ed �le will not be added toexclusions.
13. In the block, select the components that you want the scan exclusion to apply to.
14. If necessary, in the �eld, enter a brief comment on the scan exclusion that you are creating.
15. You can use the toggle to stop an exclusion at any time.
16. Save your changes.
File hash
Protection components
Comment
How to create a scan exclusion in the application interface

344
1. In the lower part of the main application window, click the button.
2. In the application settings window, select .
3. In the block, click the link.
4. Click the button.
5. If you want to exclude a �le or folder from scans, select the �le or folder by clicking the button.
You can also manually enter the path. Kaspersky Endpoint Security supports the * and ? characters whenentering a mask:
6. If you want to exclude a speci�c type of object from scans, in the �eld enter the name of theobject type according to the classi�cation of the Kaspersky Encyclopedia (for example, Email-Worm,Rootkit or RemoteAdmin).
You can use masks with the ? character (replaces any single character) and the * character (replaces anynumber of characters). For example, if the Client* mask is speci�ed, Kaspersky Endpoint Securityexcludes Client-IRC , Client-P2P and Client-SMTP objects from scans.
7. If you want to exclude an individual �le from scans, enter the �le hash in the �eld.
If the �le is modi�ed, the �le hash will also be modi�ed. If this happens, the modi�ed �le will not be added toexclusions.
8. In the block, select the components that you want the scan exclusion to apply to.
9. If necessary, in the �eld, enter a brief comment on the scan exclusion that you are creating.
10. Select the status for the exclusion.
You can use the toggle to stop an exclusion at any time.
11. Save your changes.
Path mask examples:
Threats and exclusions
Exclusions Manage exclusions
Add
Browse
The * (asterisk) character, which takes the place of any set of characters, except the \ and /characters (delimiters of the names of �les and folders in paths to �les and folders). For example, themask C:\*\*.txt will include all paths to �les with the TXT extension located in folders on the C: drive,but not in subfolders.
Two consecutive * characters take the place of any set of characters (including an empty set) in the�le or folder name, including the \ and / characters (delimiters of the names of �les and folders inpaths to �les and folders). For example, the mask C:\Folder\**\*.txt will include all paths to �leswith the TXT extension located in the folder named Folder and its subfolders. The mask must includeat least one nesting level. The mask C:\**\*.txt is not a valid mask.
The ? (question mark) character, which takes the place of any single character, except the \ and /characters (delimiters of the names of �les and folders in paths to �les and folders). For example, themask C:\Folder\???.txt will include paths to all �les residing in the folder named Folder that havethe TXT extension and a name consisting of three characters.
Object
File hash
Protection components
Comment
Active
Paths to �les located in any folder:
The mask *.exe will include all paths to �les that have the exe extension.

345
To enable or disable a scan exclusion:
1. In the lower part of the main application window, click the button.
2. In the application settings window, select .
3. In the block, click the link.
4. Select the exclusion that you need in the list of scan exclusions.
5. Use the toggle next to an object to include this object in the scan scope or exclude it.
The mask example* will include all paths to �les named EXAMPLE.
Paths to �les located in a speci�ed folder:
The C:\dir\*.* mask will include all paths to �les located in the C:\dir\ folder, but not in the subfolders ofC:\dir\.
The mask C:\dir\* will include all paths to �les located in the C:\dir\ folder, but not in the subfolders ofC:\dir\.
The mask C:\dir\ will include all paths to �les located in the C:\dir\ folder, but not in the subfolders ofC:\dir\.
The mask C:\dir\*.exe will include all paths to �les with the EXE extension located in the C:\dir\ folder,but not in the subfolders of C:\dir\.
The mask C:\dir\test will include all paths to �les named "test" located in the C:\dir\ folder, but not inthe subfolders of C:\dir\.
The mask C:\dir\*\test will include all paths to �les named "test" located in the C:\dir\ folder and in thesubfolders of C:\dir\.
Paths to �les located in all folders with a speci�ed name:
The mask dir\*.* will include all paths to �les in folders named "dir", but not in the subfolders of thosefolders.
The mask dir\* will include all paths to �les in folders named "dir", but not in the subfolders of thosefolders.
The mask dir\ will include all paths to �les in folders named "dir", but not in the subfolders of those folders.
The mask dir\*.exe will include all paths to �les with the EXE extension in folders named "dir", but not inthe subfolders of those folders.
The mask dir\test will include all paths to �les named "test" in folders named "dir", but not in thesubfolders of those folders.
Enabling and disabling a scan exclusion
Threats and exclusions
Exclusions Manage exclusions

346
6. Save your changes.
Editing the list of trusted applications
The list of trusted applications is a list of applications whose �le and network activity (including malicious activity)and access to the system registry are not monitored by Kaspersky Endpoint Security. By default, KasperskyEndpoint Security scans objects that are opened, executed, or saved by any application process and controls theactivity of all applications and network tra�ic that is generated by them. However, an application that has beenadded to the list of trusted applications is excluded from scans by Kaspersky Endpoint Security.
For example, if you consider objects that are used by the standard Microsoft Windows Notepad application to besafe without scanning, meaning that you trust this application, you can add Microsoft Windows Notepad to the listof trusted applications. Scanning then skips objects that are used by this application.
In addition, certain actions that are classi�ed by Kaspersky Endpoint Security as suspicious may be safe within thecontext of the functionality of a number of applications. For example, the interception of text that is typed fromthe keyboard is a routine process for automatic keyboard layout switchers (such as Punto Switcher). To takeaccount of the speci�cs of such applications and exclude their activity from monitoring, we recommend that youadd such applications to the trusted applications list.
Excluding trusted applications from scanning allows avoiding compatibility con�icts between Kaspersky EndpointSecurity and other programs (for example, the problem of double-scanning of the network tra�ic of a third-partycomputer by Kaspersky Endpoint Security and by another anti-virus application), and also increases thecomputer's performance, which is critical when using server applications.
At the same time, the executable �le and process of the trusted application are still scanned for viruses and othermalware. An application can be fully excluded from Kaspersky Endpoint Security scanning by means of scanexclusions.
How to add an application to the trusted list in the Administration Console (MMC)

347
1. Open the Kaspersky Security Center Administration Console.
2. In the folder in the Administration Console tree, open the folder with the name of theadministration group to which the relevant client computers belong.
3. In the workspace, select the tab.
4. Select the necessary policy and double-click to open the policy properties.
5. In the policy window, select → .
6. In the section, click the button.
7. In the window, select the tab.
This opens a window containing a list of trusted applications.
8. Select the check box if you want to create a consolidated list of trustedapplications for all computers in the company. The lists of trusted applications in the parent and childpolicies will be merged. The lists will be merged provided that merging values when inheriting is enabled.Trusted applications from the parent policy are displayed in child policies in a read-only view. Changing ordeleting trusted applications of the parent policy is not possible.
9. Select the check box if you want to enable the user to create alocal list of trusted applications. This way, a user can create their own local list of trusted applications inaddition to the general list of trusted applications generated in the policy. An administrator can useKaspersky Security Center to view, add, edit, or delete list items in the computer properties.
If the check box is cleared, the user can access only the general list of trusted applications generated inthe policy. If a local list was generated, after this functionality is disabled Kaspersky Endpoint Securitycontinues excluding the listed trusted applications from scans.
10. Click the button.
11. In the opened window, enter the path to the executable �le of the trusted application.
Kaspersky Endpoint Security supports environment variables and the * and ? characters when entering amask.
Kaspersky Endpoint Security does not support the %userprofile% environment variable whengenerating a list of trusted applications on the Kaspersky Security Center console. To apply the entryto all user accounts, you can use the * character (for example, C:\Users\*\Documents\File.exe ).
Whenever you add a new environment variable, you need to restart the application.
12. Con�gure the advanced settings for the trusted application (see the table below).
13. You can use the check box to exclude an application from the trusted zone at any time.
14. Save your changes.
Managed devices
Policies
General settings Exclusions
Scan exclusions and trusted applications Settings
Trusted zone Trusted applications
Merge values when inheriting
Allow use of local trusted applications
Add
How to add an application to the trusted list in the Web Console and Cloud Console

348
1. In the main window of Web Console, select → .
2. Click the name of the Kaspersky Endpoint Security policy for computers on which you want to add theapplication to the trusted list.
The policy properties window opens.
3. Select the tab.
4. Select → .
5. In the block, click the link.
This opens a window containing a list of trusted applications.
6. Select the check box if you want to create a consolidated list of trustedapplications for all computers in the company. The lists of trusted applications in the parent and childpolicies will be merged. The lists will be merged provided that merging values when inheriting is enabled.Trusted applications from the parent policy are displayed in child policies in a read-only view. Changing ordeleting trusted applications of the parent policy is not possible.
7. Select the check box if you want to enable the user to create alocal list of trusted applications. This way, a user can create their own local list of trusted applications inaddition to the general list of trusted applications generated in the policy. An administrator can useKaspersky Security Center to view, add, edit, or delete list items in the computer properties.
If the check box is cleared, the user can access only the general list of trusted applications generated inthe policy. If a local list was generated, after this functionality is disabled Kaspersky Endpoint Securitycontinues excluding the listed trusted applications from scans.
8. Click the button.
9. In the opened window, enter the path to the executable �le of the trusted application.
Kaspersky Endpoint Security supports environment variables and the * and ? characters when entering amask.
Kaspersky Endpoint Security does not support the %userprofile% environment variable whengenerating a list of trusted applications on the Kaspersky Security Center console. To apply the entryto all user accounts, you can use the * character (for example, C:\Users\*\Documents\File.exe ).
Whenever you add a new environment variable, you need to restart the application.
10. Con�gure the advanced settings for the trusted application (see the table below).
11. You can use the check box to exclude an application from the trusted zone at any time.
12. Save your changes.
Devices Policies and pro�les
Application settings
General settings Exclusions
Scan exclusions and trusted applications Trusted applications
Merge values when inheriting
Allow use of local trusted applications
Add
How to add an application to the trusted list in the application interface

349
1. In the lower part of the main application window, click the button.
2. In the application settings window, select .
3. In the block, click the link.
4. In the window, click the button.
5. Select the executable �le of the trusted application.
You can also manually enter the path. Kaspersky Endpoint Security supports environment variables and the* and ? characters when entering a mask.
Kaspersky Endpoint Security supports environment variables and converts the path in the localinterface of the application. In other words, if you enter the �le path%userprofile%\Documents\File.exe , a C:\Users\Fred123\Documents\File.exe record isadded in local interface of the application for user Fred123. Accordingly, Kaspersky Endpoint Securityignores the File.exe trusted program for other users. To apply the entry to all user accounts, youcan use the * character (for example, C:\Users\*\Documents\File.exe ).
Whenever you add a new environment variable, you need to restart the application.
6. In the trusted application properties window, con�gure the advanced settings (see the table below).
7. You can use the toggle to exclude an application from the trusted zone at any time.
8. Save your changes.
Trusted application settings
Parameter Description
All �les that are opened by the application are excluded from scans by KasperskyEndpoint Security. For example, if you are using applications to back up �les, this featurehelps reduce the consumption of resources by Kaspersky Endpoint Security.
The restrictions con�gured for the parent process will not be applied by KasperskyEndpoint Security to a child process. The parent process is started by an application forwhich application rights (Host Intrusion Prevention) and application network rules(Firewall) are con�gured.
Threats and exclusions
Exclusions Specify trusted applications
Add
Do not scanopened �les
Do not monitorapplicationactivity
Kaspersky Endpoint Security will not monitor the application's �le- and network activityin the operating system. Application activity is monitored by the following components:Behavior Detection, Exploit Prevention, Host Intrusion Prevention, Remediation Engineand Firewall.
Do not inheritrestrictions ofthe parentprocess(application)
Do not monitorthe activity ofchildapplications
Kaspersky Endpoint Security will not monitor the �le activity or network activity ofapplications that are started by this application.
Allowinteraction withKasperskyEndpoint
Kaspersky Endpoint Security Self-Defense blocks all attempts to manage applicationservices from a remote computer. If the check box is selected, the remote accessapplication is allowed to manage Kaspersky Endpoint Security settings through theKaspersky Endpoint Security interface.

350
(available only inthe KasperskySecurity CenterConsole)
Kaspersky Endpoint Security will not monitor the trusted application's requests forobjects to be scanned by the AMSI Protection component.
Network tra�ic initiated by the application will be excluded from scans by KasperskyEndpoint Security. You can exclude either all tra�ic or only encrypted tra�ic from scans.You can also exclude individual IP addresses and port numbers from scans.
If necessary, you can provide a brief comment for the trusted application. Commentshelp simplify searches and sorting of trusted applications.
Status of the trusted application:
status means that the application is in the trusted zone.
status means that the application is excluded from the trusted zone.
To enable or disable the action of trusted zone rules applied to an application from the list of trusted applications:
1. In the lower part of the main application window, click the button.
2. In the application settings window, select .
3. In the block, click the link.
4. In the list of trusted applications, select the necessary trusted application.
5. Use the toggle in the column to include a trusted application in the scan scope or exclude it.
6. Save your changes.
To begin using trusted system certi�cate storage:
1. In the lower part of the main application window, click the button.
Securityinterface
Do not blockinteraction withAMSIProtectioncomponent
Do not scanencryptedtra�ic / Do notscan all tra�ic
Comment
Status
Active
Inactive
Enabling and disabling trusted zone rules for an application in the list oftrusted applications
Threats and exclusions
Exclusions Specify trusted applications
Status
Using trusted system certi�cate storage
Use of system certi�cate storage lets you exclude applications signed by a trusted digital signature from virusscans. Kaspersky Endpoint Security automatically assigns such applications to the Trusted group.

351
2. In the application settings window, select .
3. In the drop-down list, select which system store must be considered astrusted by Kaspersky Endpoint Security.
4. Save your changes.
Threats and exclusions
Trusted system certi�cate store

352
Kaspersky Endpoint Security does not provide the capability to con�gure user access permissions to backupcopies of �les.
To con�gure the maximum storage period for �les in Backup:
1. In the lower part of the main application window, click the button.
2. In the application settings window, select the section.
3. If you want to limit the storage period for copies of �les in Backup, select the check box in the block. In the �eld on the right of the check
box, specify the maximum storage period for copies of �les in Backup.
4. Save your changes.
To con�gure the maximum size of Backup:
1. In the lower part of the main application window, click the button.
Managing Backup
Backup stores backup copies of �les that were deleted or modi�ed during disinfection. A backup copy is a �lecopy created before the �le was disinfected or deleted. Backup copies of �les are stored in a special format anddo not pose a threat.
Backup copies of �les are stored in the folder C:\ProgramData\Kaspersky Lab\KES\QB .
Users in the Administrators group are granted full permission to access this folder. Limited access rights to thisfolder are granted to the user whose account was used to install Kaspersky Endpoint Security.
Sometimes it is not possible to maintain the integrity of �les during disinfection. If you partially or completely loseaccess to important information in a disinfected �le after disinfection, you can attempt to restore the �le from itsbackup copy to its original folder.
If Kaspersky Endpoint Security is running under the management of Kaspersky Security Center, backup copies of�les may be transmitted to the Kaspersky Security Center Administration Server. For more details about managingbackup copies of �les in Kaspersky Security Center, please refer to the Kaspersky Security Center Help system.
Con�guring the maximum storage period for �les in Backup
The default maximum storage period for copies of �les in Backup is 30 days. After expiration of the maximumstorage term, Kaspersky Endpoint Security deletes the oldest �les from Backup.
Reports and Storage
Store objects no longer than Ndays Backup Store objects no longer than N days
Con�guring the maximum size of Backup
You can specify the maximum size of Backup. The size of Backup is unlimited by default. After the maximum size isreached, Kaspersky Endpoint Security automatically deletes the oldest �les from Backup so that the maximum sizeis not exceeded.

353
2. In the application settings window, select the section.
3. If you want to limit the size of Backup, select the check box inthe block. Specify the maximum size of Backup.
4. Save your changes.
Upon detecting malicious code in a �le that is part of the Windows Store application, Kaspersky EndpointSecurity immediately deletes the �le without moving a copy of the �le to Backup. You can restore the integrityof the Windows Store application by using the appropriate tools of the Microsoft Windows 8 operatingsystem (see the Microsoft Windows 8 help �les for details on restoring a Windows Store application).
If several �les with identical names and di�erent content located in the same folder are moved to Backup, onlythe �le that was last placed in Backup can be restored.
To restore �les from Backup:
1. In the main application window, click → .
The window opens.
2. In the table in the window, select one or multiple Backup �les.
3. Click the button.
To delete backup copies of �les from Backup:
1. In the main application window, click → .
Reports and Storage
Limit the size of Backup to N MBBackup
Restoring �les from Backup
If malicious code is detected in a �le, Kaspersky Endpoint Security blocks the �le, assigns the Infected status to it,places a copy of it in Backup, and attempts to disinfect it. If �le disinfection succeeds, the status of the backupcopy of the �le changes to Disinfected. The �le becomes available in its original folder. If a �le cannot bedisinfected, Kaspersky Endpoint Security deletes it from its original folder. You can restore the �le from its backupcopy to its original folder.
Files with the Will be disinfected on computer restart status cannot be restored. Restart the computer, and the �lestatus will change to Disinfected or Deleted. You can also restore the �le from its backup copy to its original folder.
The set of backup copies of �les is presented as a table. For a backup copy of a �le, the path to the original folderof the �le is displayed. The path to the original folder of the �le may contain personal data.
More Tools Storage
Backup
Backup
Restore
Kaspersky Endpoint Security restores �les from the selected backup copies to their original folders.
Deleting backup copies of �les from Backup
Kaspersky Endpoint Security automatically deletes backup copies of �les with any status from Backup after thestorage term con�gured in application settings has elapsed. You can also manually delete any copy of a �le fromBackup.
More Tools Storage

354
The window opens.
2. Select the backup copies of �les that you want to delete from Backup and click the button. You canalso delete all �les from Backup by clicking the button.
Backup
DeleteDelete all
Kaspersky Endpoint Security deletes the selected backup copies of �les from Backup.

355
To con�gure event log settings:
1. In the lower part of the main application window, click the button.
2. In the application settings window, select the section.
3. In the section, click the button.
Kaspersky Endpoint Security components and tasks are shown in the left part of the window. The right part ofthe window lists the events generated for the selected component or task.
Events may contain the following user data:
4. In the left part of the window, select the component or task for which you want to con�gure the event logsettings.
Noti�cation service
All sorts of events occur during the operation of Kaspersky Endpoint Security. Noti�cations of these events canbe either be purely informational or contain critical information. For example, noti�cations may inform of asuccessful database and application modules update or log component errors that need remedying.
Kaspersky Endpoint Security supports the logging of information about events in the operation of the MicrosoftWindows application log and / or the Kaspersky Endpoint Security event log.
Kaspersky Endpoint Security delivers noti�cations in the following ways:
using pop-up noti�cations in the Microsoft Windows taskbar noti�cation area;
by email.
You can con�gure the delivery of event noti�cations. The method of noti�cation delivery is con�gured for eachtype of event.
When using the table of events to con�gure the noti�cation service, you can perform the following actions:
Filter noti�cation service events by column values or by custom �lter conditions.
Use the search function for noti�cation service events.
Sort noti�cation service events.
Change the order and set of columns that are displayed in the list of noti�cation service events.
Con�guring event log settings
Interface
Noti�cations Set up noti�cations
Paths to �les scanned by Kaspersky Endpoint Security.
Paths to registry keys modi�ed during the operation of Kaspersky Endpoint Security.
Microsoft Windows user name.
Addresses of web pages opened by the user.

356
5. Select check boxes opposite the relevant events in the and columns.
Events whose check boxes are selected in the column are displayed in in the section. Events whose check boxes are selected in the
column are displayed in in the section. To open the event logs,select → → → .
6. Save your changes.
To con�gure the display and delivery of noti�cations:
1. In the lower part of the main application window, click the button.
2. In the application settings window, select the section.
3. In the section, click the button.
Kaspersky Endpoint Security components and tasks are shown in the left part of the window. The right part ofthe window lists events generated for the selected component or the selected task.
Events may contain the following user data:
4. In the left part of the window, select the component or task for which you want to con�gure the delivery ofnoti�cations.
5. In the column, select the check boxes next to the required events.
Information about the selected events is displayed on the screen as pop-up messages in the MicrosoftWindows taskbar noti�cation area.
6. In the column, select the check boxes next to the required events.
Information about the selected events is delivered by email if the mail noti�cation delivery settings arecon�gured.
7. Click .
8. If you enabled email noti�cations, con�gure the settings for email delivery:
a. Click the button.
b. Select the check box to enable delivery of information about Kaspersky EndpointSecurity events selected in the column.
c. Specify the email noti�cation delivery settings.
Save in local report Save in Windows Event Log
Save in local report Applications andServices Logs Kaspersky Event Log Save inWindows Event Log Windows logs Application
Start Control Panel Administration Event Viewer
Con�guring the display and delivery of noti�cations
Interface
Noti�cations Set up noti�cations
Paths to �les scanned by Kaspersky Endpoint Security.
Paths to registry keys modi�ed during the operation of Kaspersky Endpoint Security.
Microsoft Windows user name.
Addresses of web pages opened by the user.
Notify on screen
Notify by email
OK
Email noti�cation settings
Notify about eventsNotify by email

357
d. Click .
9. Save your changes.
To con�gure the display of application status warnings in the noti�cation area:
1. In the lower part of the main application window, click the button.
2. In the application settings window, select the section.
3. In the section, select the check boxes opposite thosecategories of events about which you want to see noti�cations in the noti�cation area of Microsoft Windows.
4. Save your changes.
OK
Con�guring the display of warnings about the application status in thenoti�cation area
Interface
Show application's status in noti�cations area
When events associated with the selected categories occur, the application icon in the noti�cation area willchange to or depending on the severity of the warning.

358
Managing reports
Information about the operation of each Kaspersky Endpoint Security component, data encryption events, theperformance of each scan task, the update task and integrity check task, and the overall operation of theapplication is recorded in reports.
Reports are stored in the folder C:\ProgramData\Kaspersky Lab\KES\Report .
Reports may contain the following user data:
Paths to �les scanned by Kaspersky Endpoint Security.
Paths to registry keys modi�ed during the operation of Kaspersky Endpoint Security.
Microsoft Windows user name.
Addresses of web pages opened by the user.
The data in the report is presented in tabular form. Each table row contains information on a separate event. Eventattributes are located in the table columns. Certain columns are compound ones which contain nested columnswith additional attributes. To view additional attributes, click the button next to the name of the column. Eventsthat are logged during the operation of various components or during the performance of various tasks havedi�erent sets of attributes.
The following reports are available:
report. Contains information about events occurring during the interaction between the userand the application and in the course of application operation in general, which are unrelated to any particularKaspersky Endpoint Security components or tasks.
Reports on the operation of Kaspersky Endpoint Security components.
Kaspersky Endpoint Security task reports.
report. Contains information about events occurring during data encryption and decryption.
System Audit
Data encryption
Reports use the following event importance levels:
. Reference events that normally do not contain important information.Informational messages
. Events that need attention because they re�ect important situations in the operation of KasperskyEndpoint Security.
Warnings
. Events of critical importance that indicate problems in the operation of Kaspersky EndpointSecurity or vulnerabilities in the protection of the user's computer.
Critical events
For convenient processing of reports, you can modify the presentation of data on the screen in the following ways:
Filter the event list by various criteria.
Use the search function to �nd a speci�c event.
View the selected event in a separate section.

359
If a user can view reports, the user can also view all events re�ected in the reports.
To view reports:
1. In the main application window, click → .
2. In the left part of the window, in the list of components and tasks, select a component or task.
The right part of the window displays a report containing a list of events resulting from the operation of theselected component or selected task of Kaspersky Endpoint Security. You can sort events in the report basedon the values in cells of one of the columns. By default, report events are sorted in ascending order of thevalues in cells of the column.
3. To view detailed information about an event, select the event in the report.
A section with the event summary is displayed in the lower part of the window.
To modify the report maximum storage term:
1. In the lower part of the main application window, click the button.
2. In the application settings window, select the section.
3. If you want to limit the report storage term, select the check box in the block. De�ne the maximum report storage term.
4. Save your changes.
Sort the list of events by each report column.
Display and hide events grouped by the event �lter using the button.
Change the order and arrangement of columns that are shown in the report.
You can save a generated report to a text �le, if necessary. You can also delete report information on KasperskyEndpoint Security components and tasks that are combined into groups.
If Kaspersky Endpoint Security is running under the management of Kaspersky Security Center, information aboutevents may be relayed to the Kaspersky Security Center Administration Server (for more details, please refer tothe Kaspersky Security Center Help Guide ).
View reports
More Tools Reports
Reports
Event date
Con�guring the maximum report storage term
The default maximum storage term for reports on events that are logged by Kaspersky Endpoint Security is30 days. After that period of time, Kaspersky Endpoint Security automatically deletes the oldest entries from thereport �le.
Reports and Storage
Store reports no longer than N daysReports

360
To con�gure the maximum report �le size:
1. In the lower part of the main application window, click the button.
2. In the application settings window, select the section.
3. In the block, select the check box if you want to limit the size of areport �le. De�ne the maximum size of the report �le.
4. Save your changes.
The user is personally responsible for ensuring the security of information from a report saved to �le, andparticularly for controlling and restricting access to this information.
Kaspersky Endpoint Security logs events in the report in the same way as they are displayed on the screen: inother words, with the same set and sequence of event attributes.
To save a report to �le:
1. In the main application window, click → .
2. In the opened window, select the component or task.
A report is displayed in the right part of the window, which contains a list of events in the operation of theselected Kaspersky Endpoint Security component or task.
3. If necessary, you can modify data presentation in the report by:
4. Click the button in the upper right part of the window.
5. In the window that opens, specify the destination folder for the report �le.
Con�guring the maximum size of the report �le
You can specify the maximum size of the �le that contains the report. By default, the maximum report �le size is1024 MB. To avoid exceeding the maximum report �le size, Kaspersky Endpoint Security automatically deletes theoldest entries from the report �le when the maximum report �le size is reached.
Reports and Storage
Reports Limit the size of report �le to N MB
Saving a report to �le
You can save the report that you generate to a �le in text format (TXT) or a CSV �le.
More Tools Reports
Filtering events
Running an event search
Rearranging columns
Sorting events
Save report

361
6. In the �eld, type the report �le name.
7. In the �eld, select the necessary report �le format: TXT or CSV.
8. Save your changes.
To remove information from reports:
1. In the lower part of the main application window, click the button.
2. In the application settings window, select the section.
3. In the block, click the button.
4. If Password Protection is enabled, Kaspersky Endpoint Security may prompt you for user account credentials.The application prompts for account credentials if the user does not have the required permissions.
File name
File type
Clearing reports
Reports and Storage
Reports Clear
Kaspersky Endpoint Security will delete all reports for all application components and tasks.

362
Kaspersky Endpoint Security Self-Defense technologies
Technology Description х86computer
x64computer
The technology blocks access to the following applicationcomponents:
Files in the Kaspersky Endpoint Security installation folder
Registry keys with records belonging to the application
Processes that the application runs
The technology protects Kaspersky Endpoint Securityprocesses against malicious actions. For more details aboutAM-PPL technology, please visit the Microsoft website .
AM-PPL technology is available for Windows 10 version1703 (RS2) or later, and Windows Server 2019 operatingsystems.
–
The technology restricts the management of KasperskyEndpoint Security using special remote administrationapplications (such as TeamViewer or RemotelyAnywhere).
–(except
forWindows
7)
To enable or disable Self-Defense:
1. In the lower part of the main application window, click the button.
2. In the application settings window, select the section.
3. Use the check box to enable or disable the Self-Defense mechanism.
4. Save your changes.
Kaspersky Endpoint Security Self-Defense
Kaspersky Endpoint Security protects the computer from malicious applications, that attempt to block theoperation of Kaspersky Endpoint Security or even remove it from the computer. The set of available Self-Defensetechnologies for Kaspersky Endpoint Security depends on whether the operating system is 32-bit or 64-bit (referto the table below).
Self-Defensemechanism
AM-PPL(AntimalwareProtectedProcess Light)
Externalmanagementdefensemechanism
Enabling and disabling Self-Defense
The Self-Defense mechanism of Kaspersky Endpoint Security is enabled by default.
General
Enable Self-Defense
Enabling and disabling AM-PPL support

363
The AM-PPL service is available for Windows 10 version 1703 (RS2) or later, and Windows Server 2019operating systems.
To enable or disable AM-PPL technology:
1. Turn o� the application's Self-Defense mechanism.
The Self-Defense mechanism prevents modi�cation and deletion of application processes in the computermemory, including changing the AM-PPL status.
2. Run the command line interpreter (cmd.exe) as an administrator.
3. Go to the folder where the Kaspersky Endpoint Security executable �le is located.
4. Type the following in the command line:
5. Restart Kaspersky Endpoint Security.
6. Resume the application's Self-Defense mechanism.
Enabling support for AM-PPL technology
Kaspersky Endpoint Security supports Antimalware Protected Process Light technology (hereinafter referred toas "AM-PPL") from Microsoft. AM-PPL protects Kaspersky Endpoint Security processes against malicious actions(for example, terminating the application). AM-PPL allows only trusted processes to run. Kaspersky EndpointSecurity processes are signed in accordance with Windows security requirements, and therefore they are trusted.For more details about AM-PPL technology, please visit the Microsoft website . AM-PPL technology is enabledby default.
Kaspersky Endpoint Security also has built-in mechanisms for protecting application processes. AM-PPL supportlets you delegate process security functions to the operating system. You can thereby increase the speed of theapplication and reduce the consumption of computer resources.
klpsm.exe enable – enable support for AM-PPL technology (see the �gure below).
klpsm.exe disable – disable support for AM-PPL technology.
Enabling and disabling external management defense

364
Protection against external management is available only for computers running 32-bit operating systems.Technology is not available for computers running 64-bit operating systems.
To enable or disable protection against external management:
1. In the main application window, click the button .
2. In the application settings window, select → .
3. Use the check box toenable or disable protection against modi�cations of Kaspersky Endpoint Security settings. If you use remoteadministration applications, you should allow management of Kaspersky Endpoint Security settings and add theapplications to the trusted list. Untrusted remote administration applications are not allowed to modifyKaspersky Endpoint Security settings even when the
check box is selected. This check box is unavailable when the check box is selected.
4. Use the check box to enable or disable the protection of Kaspersky EndpointSecurity services against external management.
To quit the application from the command line, disable the protection of Kaspersky Endpoint Securityservices against external management.
5. Save your changes.
To enable the operation of remote administration applications:
1. In the lower part of the main application window, click the button.
2. In the application settings window, select .
3. In the block, click the link.
Protection against external management allows you to prohibit Kaspersky Endpoint Security managing usingremote administration applications (such as TeamViewer or RemotelyAnywhere). The technology serves thefollowing purposes:
Protection against modi�cation of Kaspersky Endpoint Security settings.
Protection against management of Kaspersky Endpoint Security services (such as the AVP service).
Protection against stopping application processes.
Advanced settings General
Allow managing Kaspersky Endpoint Security settings via remote control applications
Allow managing Kaspersky Endpoint Security settingsvia remote control applications Enable Self-Defense
Enable external service control
As a result, when external management defense mechanisms are enabled, Kaspersky Endpoint Security preventsthe mouse pointer from getting pointed at the application icon. When a remote user attempts to shut down anapplication service, a system window with an error message appears.
Supporting remote administration applications
You may occasionally need to use a remote administration application while external management defense isenabled.
Threats and exclusions
Exclusions Specify trusted applications

365
4. In the window, click the button.
5. Select the executable �le of the remote administration application.
You can also manually enter the path. Kaspersky Endpoint Security supports environment variables and the *and ? characters when entering a mask.
6. Select the check box.
7. Save your changes.
Add
Do not monitor application activity

366
Performance of Kaspersky Endpoint Security
Selecting types of detectable objects
Using energy-saving mode
Conceding computer resources to other applications
Kaspersky Endpoint Security performance and compatibility with otherapplications
The performance of Kaspersky Endpoint Security refers to the number of types of objects that can harm thecomputer that are detectable, as well as energy consumption and use of computer resources.
Kaspersky Endpoint Security lets you �ne-tune the protection of your computer and select the types ofobjects that the application detects during operation. Kaspersky Endpoint Security always scans the operatingsystem for viruses, worms, and Trojans. You cannot disable scanning of these types of objects. Such malware cancause signi�cant harm to the computer. For greater security on your computer, you can expand the range ofdetectable object types by enabling monitoring of legal software that can be used by criminals to damage yourcomputer or personal data.
Energy consumption by applications is a key consideration for portable computers. Kaspersky Endpoint Securityscheduled tasks usually use up considerable resources. When the computer is running on battery power, you canuse energy-saving mode to consume power more sparingly.
In energy-saving mode, the following scheduled tasks are postponed automatically:
Update task
Full Scan task
Critical Areas Scan task
Custom Scan task
Integrity Check task
Whether or not energy saving mode is enabled, Kaspersky Endpoint Security pauses encryption tasks when aportable computer switches to battery power. The application resumes encryption tasks when the portablecomputer switches from battery power to mains power.
Use of computer resources by Kaspersky Endpoint Security may impact the performance of other applications. Toresolve the problem of simultaneous operation during increased load on the CPU and hard drive subsystems,Kaspersky Endpoint Security can pause scheduled tasks and concede resources to other applications.
However, a number of applications start immediately when CPU resources become available, proceeding to work inbackground mode. To prevent scanning from depending on the performance of other applications, it is better tonot concede operating system resources to them.
You can start such tasks manually, if necessary.

367
Using advanced disinfection technology
To select types of detectable objects:
1. In the lower part of the main application window, click the button.
2. In the application settings window, select .
3. In the section, select check boxes opposite the types of objects that you wantKaspersky Endpoint Security to detect:
Today's malicious applications can penetrate the lowest levels of an operating system, which makes them virtuallyimpossible to eliminate. After detecting malicious activity in the operating system, Kaspersky Endpoint Securityperforms an extensive disinfection procedure that uses special advanced disinfection technology. Advanceddisinfection technology is aimed at purging the operating system of malicious applications that have alreadystarted their processes in RAM and that prevent Kaspersky Endpoint Security from removing them by using othermethods. The threat is neutralized as a result. While Advanced Disinfection is in progress, you are advised to refrainfrom starting new processes or editing the operating system registry. The advanced disinfection technology usesconsiderable operating system resources, which may slow down other applications.
After the Advanced Disinfection process has been completed on a computer running Microsoft Windows forworkstations, Kaspersky Endpoint Security requests the user's permission to reboot the computer. After systemreboot, Kaspersky Endpoint Security deletes malware �les and starts a "lite" full scan of the computer.
A reboot prompt is impossible on a computer running Microsoft Windows for servers due to the speci�cs ofKaspersky Endpoint Security. An unplanned reboot of a �le server can lead to problems involving temporaryunavailability of �le server data or loss of unsaved data. It is recommended to reboot a �le server strictly accordingto schedule. This is why Advanced Disinfection technology is disabled by default for �le servers.
If active infection is detected on a �le server, an event is relayed to Kaspersky Security Center with informationthat Active Disinfection is required. To disinfect an active infection of a server, enable Active Disinfectiontechnology for servers and start a Virus scan group task at a time convenient for server users.
Selecting types of detectable objects
Threats and exclusions
Types of detected objects
Viruses and worms

368
Ways in which worms spread
Type Name Description
Email-Worm
They spread via email.
An infected email message contains an attached �le with a copy of a worm,or a link to a �le that is uploaded to a website which may have been hacked orcreated exclusively for that purpose. When you open the attached �le, theworm is activated. When you click the link, download, and then open the �le,the worm also starts performing its malicious actions. After that, it goes onspreading copies of itself, searching for other email addresses and sendinginfected messages to them.
IMclients
They spread through IM clients.
Usually, such worms send messages that contain a link to a �le with a copy ofthe worm on a website, making use of the user's contact lists. When the userdownloads and opens the �le, the worm activates.
Internetchat
They spread via Internet Relay Chats, service systems which allowcommunicating with other people over the Internet in real time.
: viruses and worms (Viruses_and_Worms)Subcategory
: highThreat level
Classic viruses and worms perform actions that are not authorized by the user. They can create copiesof themselves which are able to self-replicate.
Classic virus
When a classic virus in�ltrates a computer, it infects a �le, activates, performs malicious actions, andadds copies of itself to other �les.
A classic virus multiplies only on local resources of the computer; it cannot penetrate other computerson its own. It can be passed to another computer only if it adds a copy of itself to a �le that is stored ina shared folder or on an inserted CD, or if the user forwards an email message with an attachedinfected �le.
Classic virus code can penetrate various areas of computers, operating systems, and applications.Depending on the environment, viruses are divided into �le viruses, boot viruses, script viruses, andmacro viruses.
Viruses can infect �les by using a variety of techniques. Overwriting viruses write their code over thecode of the �le that is infected, thus erasing the �le's content. The infected �le stops functioning andcannot be restored. Parasitic viruses modify �les, leaving them fully or partially functional. Companionviruses do not modify �les, but instead create duplicates. When an infected �le is opened, a duplicateof it (what is actually a virus) is started. The following types of viruses are also encountered: link viruses,OBJ viruses, LIB viruses, source code viruses, and many others.
Worm
As with a classic virus, the code of a worm is activated and performs malicious actions after it in�ltratesa computer. Worms are so named because of their ability to "crawl" from one computer to another andto spread copies via numerous data channels without the user's permission.
The main feature that allows di�erentiating between various types of worms is the way they spread.The following table provides an overview of various types of worms, which are classi�ed by the way inwhich they spread.
Email-Worm
IM-Worm
IRC-Worm

369
worms These worms publish a �le with a copy of themselves or a link to the �le in anInternet chat. When the user downloads and opens the �le, the wormactivates.
Networkworms
These worms spread over computer networks.
Unlike other types of worms, a typical network worm spreads without theuser's participation. It scans the local network for computers that containprograms with vulnerabilities. To do this, it sends a specially formed networkpacket (exploit) which contains the worm code or a part of it. If a "vulnerable"computer is on the network, it receives such a network packet. When theworm completely penetrates the computer, it activates.
Filesharingnetworkworms
They spread over peer-to-peer �le sharing networks.
To in�ltrate a P2P network, the worm copies itself into a �le sharing folderwhich is usually located on the user's computer. The P2P network displaysinformation about this �le so that the user may "�nd" the infected �le on thenetwork like any other �le, and then download and open it.
More sophisticated worms emulate the network protocol of a speci�c P2Pnetwork: they return positive responses to search queries and o�er copiesof themselves for download.
Othertypes ofworms
Other types of worms include:
Net-Worm
P2P-Worm
Worm
Worms that spread copies of themselves over network resources. Byusing the functions of the operating system, they scan available networkfolders, connect to computers on the Internet, and attempt to obtain fullaccess to their disk drives. Unlike the previously described types ofworms, other types of worms activate not on their own, but when theuser opens a �le that contains a copy of the worm.
Worms that do not use any of the methods described in the previoustable to spread (for example, those that spread over cell phones).
Trojans

370
Types of Trojan behavior on an infected computer
Type Name Description
Trojans –"archivebombs"
When unpacked, these archives grow in size to such an extentthat the computer's operation is impacted.
When the user attempts to unpack such an archive, thecomputer may slow down or freeze; the hard disk may become�lled with "empty" data. "Archive bombs" are especially dangerousto �le and mail servers. If the server uses an automatic system toprocess incoming information, an "archive bomb" may halt theserver.
Trojans forremoteadministration
They are considered the most dangerous type of Trojan. In theirfunctions, they are similar to remote administration applicationsthat are installed on computers.
These programs install themselves on the computer withoutbeing noticed by the user, allowing the intruder to manage thecomputer remotely.
Trojans They include the following malicious applications:
RansomTrojans
They take the user's information "hostage", modifying or blockingit, or impact the computer's operation so that the user loses theability to use information. The intruder demands a ransom fromthe user, promising to send an application to restore thecomputer's performance and the data that had been stored on it.
Trojan clickers They access web pages from the user's computer, either bysending commands to a browser on their own or by changing theweb addresses that are speci�ed in operating system �les.
: TrojansSubcategory
: highThreat level
Unlike worms and viruses, Trojans do not self-replicate. For example, they penetrate a computer viaemail or a browser when the user visits an infected web page. Trojans are started with the user'sparticipation. They begin performing their malicious actions right after they are started.
Di�erent Trojans behave di�erently on infected computers. The main functions of Trojans consist inblocking, modifying, or destroying information, and disabling computers or networks. Trojans can alsoreceive or send �les, run them, display messages on the screen, request web pages, download andinstall programs, and restart the computer.
Hackers often use "sets" of various Trojans.
Types of Trojan behavior are described in the following table.
Trojan-ArcBomb
Backdoor
Trojan
. These programs perform only the mainfunctions of Trojans: blocking, modifying or destroyinginformation, and disabling computers or networks. They donot have any advanced features, unlike the other types ofTrojans that are described in the table.
. These programs have advanced featurestypical of several types of Trojans.
Classic Trojans
Versatile Trojans
Trojan-Ransom
Trojan-Clicker

371
By using these programs, intruders perpetrate network attacksand increase website visits, increasing the number of displays ofbanner ads.
Trojandownloaders
They access the intruder's web page, download other maliciousapplications from it, and install them on the user's computer.They can contain the �le name of the malicious application todownload, or receive it from the web page that is accessed.
Trojandroppers
They contain other Trojans which they install on the hard driveand then install.
Intruders may use Trojan Dropper–type programs for thefollowing goals:
Trojannoti�ers
They inform an intruder that the infected computer is accessible,sending the intruder information about the computer: IP address,number of opened port, or email address. They connect with theintruder via email, FTP, accessing the intruder's web page, or inanother way.
Trojan Noti�er–type programs are often used in sets that aremade of several Trojans. They notify the intruder that otherTrojans have been successfully installed on the user's computer.
Trojan proxies They allow the intruder to anonymously access web pages byusing the user's computer; they are often used for sending spam.
Password-stealing-ware
Password-stealing-ware is a kind of Trojan that steals useraccounts, such as software registration data. These Trojans �ndcon�dential data in system �les and in the registry and send it tothe "master" by email, via FTP, by accessing the intruder's webpage, or in another way.
Some of these Trojans are categorized into separate types thatare described in this table. These are Trojans that steal bankaccounts (Trojan-Banker), steal data from users of IM clients(Trojan-IM), and steal information from users of online games(Trojan-GameThief).
Trojan spies They spy on the user, collecting information about the actionsthat the user makes while working at the computer. They mayintercept the data that the user enters at the keyboard, takescreenshots, or collect lists of active applications. After theyreceive the information, they transfer it to the intruder by email,via FTP, by accessing the intruder's web page, or in another way.
Trojannetworkattackers
They send numerous requests from the user's computer to aremote server. The server lacks resources to process allrequests, so it stops functioning (Denial of Service, or simplyDoS). Hackers often infect many computers with these programsso that they can use the computers to attack a single serversimultaneously.
Trojan-Downloader
Trojan-Dropper
Install a malicious application without being noticed by theuser: Trojan Dropper–type programs display no messages, ordisplay fake messages which inform, for example, of an error inan archive or an incompatible version of the operating system.
Protect another known malicious application from detection:not all anti-virus software can detect a malicious applicationwithin a Trojan Dropper–type application.
Trojan-Noti�er
Trojan-Proxy
Trojan-PSW
Trojan-Spy
Trojan-DDoS

372
DoS programs perpetrate an attack from a single computer withthe user's knowledge. DDoS (Distributed DoS) programsperpetrate distributed attacks from several computers withoutbeing noticed by the user of the infected computer.
Trojans thatstealinformationfrom users ofIM clients
They steal account numbers and passwords of IM client users.They transfer the data to the intruder by email, via FTP, byaccessing the intruder's web page, or in another way.
Rootkits They mask other malicious applications and their activity, thusprolonging the applications' persistence in the operating system.They can also conceal �les, processes in an infected computer'smemory, or registry keys which run malicious applications. Therootkits can mask data exchange between applications on theuser's computer and other computers on the network.
Trojans in theform of SMSmessages
They infect cell phones, sending SMS messages to premium-ratephone numbers.
Trojans thatstealinformationfrom users ofonline games
They steal account credentials from users of online games, afterwhich they send the data to the intruder by email, via FTP, byaccessing the intruder's web page, or in another way.
Trojans thatsteal bankaccounts
They steal bank account data or e-money system data; send thedata to the hacker by email, via FTP, by accessing the hacker'sweb page, or by using another method.
Trojans thatcollect emailaddresses
They collect email addresses that stored on a computer andsend them to the intruder by email, via FTP, by accessing theintruder's web page, or in another way. Intruders may send spamto the addresses they have collected.
Trojan-IM
Rootkit
Trojan-SMS
Trojan-GameThief
Trojan-Banker
Trojan-Mail�nder
Malicious tools

373
Features of malicious tools
Type Name Description
Constructors They allow creating new viruses, worms, and Trojans. Someconstructors boast a standard window-based interface inwhich the user can select the type of malicious application tocreate, the way of counteracting debuggers, and otherfeatures.
Networkattacks
They send numerous requests from the user's computer to aremote server. The server lacks resources to process allrequests, so it stops functioning (Denial of Service, or simplyDoS).
Exploits An exploit is a set of data or a program code that usesvulnerabilities of the application in which it is processed,performing a malicious action on a computer. For example, anexploit can write or read �les, or request "infected" web pages.
Di�erent exploits use vulnerabilities in di�erent applications ornetwork services. Disguised as a network packet, an exploit istransmitted over the network to numerous computers,searching for computers with vulnerable network services. Anexploit in a DOC �le uses the vulnerabilities of a text editor. Itmay start performing the actions that are preprogrammed bythe hacker when the user opens the infected �le. An exploitthat is embedded in an email message searches forvulnerabilities in any email client. It may start performing amalicious action as soon as the user opens the infectedmessage in this email client.
Net-Worms spread over networks by using exploits. Nukerexploits are network packets that disable computers.
Encryptors They encrypt other malicious applications to conceal themfrom the anti-virus application.
Programs for"contaminating"networks
They send numerous messages over network channels. Thistype of tools includes, for example, programs that contaminateInternet Relay Chats.
Flooder-type tools do not include programs that "contaminate"channels that are used by email, IM clients, and mobilecommunication systems. These programs are distinguished asseparate types that are described in the table (Email-Flooder,IM-Flooder, and SMS-Flooder).
Hacking tools They make it possible to hack the computer on which they areinstalled or attack another computer (for example, by addingnew system accounts without the user's permission or by
: Malicious toolsSubcategory
: mediumDanger level
Unlike other types of malware, malicious tools do not perform their actions right after they are started.They can be safely stored and started on the user's computer. Intruders often use the features ofthese programs to create viruses, worms, and Trojans, perpetrate network attacks on remote servers,hack computers, or perform other malicious actions.
Various features of malicious tools are grouped by the types that are described in the following table.
Constructor
Dos
Exploit
FileCryptor
Flooder
HackTool

374
erasing system logs to conceal traces of their presence in theoperating system). This type of tools includes some sni�erswhich feature malicious functions, such as passwordinterception. Sni�ers are programs that allow viewing networktra�ic.
Hoaxes They alarm the user with virus-like messages: they may "detecta virus" in an uninfected �le or notify the user that the disk hasbeen formatted, although this has not happened in reality.
Spoo�ng tools They send messages and network requests with a fake addressof the sender. Intruders use Spoofer-type tools to passthemselves o� as the true senders of messages, for example.
Tools thatmodifymaliciousapplications
They allow modifying other malware programs, concealing themfrom anti-virus applications.
Programs that"contaminate"emailaddresses
They send numerous messages to various email addresses,thus "contaminating" them. A large volume of incomingmessages prevents users from viewing useful messages in theirinboxes.
Programs that"contaminate"tra�ic of IMclients
They �ood users of IM clients with messages. A large volume ofmessages prevents users from viewing useful incomingmessages.
Programs that"contaminate"tra�ic withSMS messages
They send numerous SMS messages to cell phones.
Hoax
Spoofer
VirTool
Email-Flooder
IM-Flooder
SMS-Flooder
Adware
: advertising software (Adware);Subcategory
: mediumThreat level
Adware displays advertising information to the user. Adware programs display banner ads in theinterfaces of other programs and redirect search queries to advertising web pages. Some of themcollect marketing information about the user and send it to the developer: this information may includethe names of the websites that are visited by the user or the content of the user's search queries.Unlike Trojan-Spy–type programs, adware sends this information to the developer with the user'spermission.
Auto-dialers

375
Type Name Description
Internet chatclients
Users install these programs to talk to people in Internet RelayChats. Intruders use them to spread malware.
Auto-dialers They can establish phone connections over a modem in hiddenmode.
Programs fordownloading
They can download �les from web pages in hidden mode.
Programs formonitoring
They allow monitoring activity on the computer on which theyare installed (seeing which applications are active and how theyexchange data with applications that are installed on othercomputers).
Passwordrestorers
They allow viewing and restoring forgotten passwords.Intruders secretly implant them on users' computers with thesame purpose.
Remoteadministrationprograms
They are widely used by system administrators. Theseprograms allow obtaining access to the interface of a remotecomputer to monitor and manage it. Intruders secretly implantthem on users' computers with the same purpose: to monitorand manage remote computers.
Legal remote administration programs di�er from Backdoor-type Trojans for remote administration. Trojans have the abilityto penetrate the operating system independently and installthemselves; legal programs are unable to do so.
FTP servers They function as FTP servers. Intruders implant them on theuser's computer to open remote access to it via FTP.
Proxy servers They function as proxy servers. Intruders implant them on theuser's computer to send spam under the user's name.
Telnet servers They function as Telnet servers. Intruders implant them on theuser's computer to open remote access to it via Telnet.
Web servers They function as web servers. Intruders implant them on theuser's computer to open remote access to it via HTTP.
Tools forworking at alocalcomputer
They provide the user with additional options when working atthe user's own computer. The tools allow the user to hide �lesor windows of active applications and terminate activeprocesses.
Network tools They provide the user with additional options when working
: legal software that may be used by criminals to damage your computer or personal data.Subcategory
: mediumDanger level
Most of these applications are useful, so many users run them. These applications include IRC clients,auto-dialers, �le download programs, computer system activity monitors, password utilities, andInternet servers for FTP, HTTP, and Telnet.
However, if intruders gain access to these programs, or if they plant them on the user's computer, someof the application's features may be used to violate security.
These applications di�er by function; their types are described in the following table.
Client-IRC
Dialer
Downloader
Monitor
PSWTool
RemoteAdmin
Server-FTP
Server-Proxy
Server-Telnet
Server-Web
RiskTool
NetTool

376
with other computers on the network. These tools allowrestarting them, detecting open ports, and startingapplications that are installed on the computers.
P2P networkclients
They allow working on peer-to-peer networks. They can beused by intruders for spreading malware.
SMTP clients They send email messages without the user's knowledge.Intruders implant them on the user's computer to send spamunder the user's name.
Web toolbars They add toolbars to the interfaces of other applications touse search engines.
Pseudo-programs
They pass themselves o� as other programs. For example,there are pseudo-anti-virus programs which display messagesabout malware detection. However, in reality, they do not �ndor disinfect anything.
Client-P2P
Client-SMTP
WebToolbar
FraudTool
Other software that can be used by criminals to damage your computer or personal data

377
Type Name Description
Internet chatclients
Users install these programs to talk to people in Internet RelayChats. Intruders use them to spread malware.
Auto-dialers They can establish phone connections over a modem in hiddenmode.
Programs fordownloading
They can download �les from web pages in hidden mode.
Programs formonitoring
They allow monitoring activity on the computer on which theyare installed (seeing which applications are active and how theyexchange data with applications that are installed on othercomputers).
Passwordrestorers
They allow viewing and restoring forgotten passwords.Intruders secretly implant them on users' computers with thesame purpose.
Remoteadministrationprograms
They are widely used by system administrators. Theseprograms allow obtaining access to the interface of a remotecomputer to monitor and manage it. Intruders secretly implantthem on users' computers with the same purpose: to monitorand manage remote computers.
Legal remote administration programs di�er from Backdoor-type Trojans for remote administration. Trojans have the abilityto penetrate the operating system independently and installthemselves; legal programs are unable to do so.
FTP servers They function as FTP servers. Intruders implant them on theuser's computer to open remote access to it via FTP.
Proxy servers They function as proxy servers. Intruders implant them on theuser's computer to send spam under the user's name.
Telnet servers They function as Telnet servers. Intruders implant them on theuser's computer to open remote access to it via Telnet.
Web servers They function as web servers. Intruders implant them on theuser's computer to open remote access to it via HTTP.
Tools forworking at alocalcomputer
They provide the user with additional options when working atthe user's own computer. The tools allow the user to hide �lesor windows of active applications and terminate activeprocesses.
Network tools They provide the user with additional options when working
: legal software that may be used by criminals to damage your computer or personal data.Subcategory
: mediumDanger level
Most of these applications are useful, so many users run them. These applications include IRC clients,auto-dialers, �le download programs, computer system activity monitors, password utilities, andInternet servers for FTP, HTTP, and Telnet.
However, if intruders gain access to these programs, or if they plant them on the user's computer, someof the application's features may be used to violate security.
These applications di�er by function; their types are described in the following table.
Client-IRC
Dialer
Downloader
Monitor
PSWTool
RemoteAdmin
Server-FTP
Server-Proxy
Server-Telnet
Server-Web
RiskTool
NetTool

378
with other computers on the network. These tools allowrestarting them, detecting open ports, and startingapplications that are installed on the computers.
P2P networkclients
They allow working on peer-to-peer networks. They can beused by intruders for spreading malware.
SMTP clients They send email messages without the user's knowledge.Intruders implant them on the user's computer to send spamunder the user's name.
Web toolbars They add toolbars to the interfaces of other applications touse search engines.
Pseudo-programs
They pass themselves o� as other programs. For example,there are pseudo-anti-virus programs which display messagesabout malware detection. However, in reality, they do not �ndor disinfect anything.
Client-P2P
Client-SMTP
WebToolbar
FraudTool
Packed objects whose packing may be used to protect malicious code
Kaspersky Endpoint Security scans compressed objects and the unpacker module within SFX (self-extracting) archives.
To hide dangerous programs from anti-virus applications, intruders archive them by using specialpackers or create multi-packed �les.
Kaspersky virus analysts have identi�ed packers that are the most popular amongst hackers.
If Kaspersky Endpoint Security detects such a packer in a �le, the �le most likely contains a maliciousapplication or an application that can be used by criminals to cause harm to your computer or personaldata.
Kaspersky Endpoint Security singles out the following types of programs:
Packed �les that may cause harm – used for packing malware, such as viruses, worms, and Trojans.
Multi-packed �les (medium threat level) – the object has been packed three times by one or morepackers.
Multi-packed �les

379
4. Save your changes.
Advanced Disinfection works di�erently for workstations and servers. To use the technology on servers, youmust enable immediate advanced disinfection in the properties of the Anti-Virus Scan task. This prerequisiteis not necessary to use the technology on workstations.
To enable or disable the Advanced Disinfection technology:
1. In the lower part of the main application window, click the button.
2. In the application settings window, select the section.
3. In the section, select or clear the check box toenable or disable Advanced Disinfection technology.
4. Save your changes.
To enable or disable energy conservation mode:
Kaspersky Endpoint Security scans compressed objects and the unpacker module within SFX (self-extracting) archives.
To hide dangerous programs from anti-virus applications, intruders archive them by using specialpackers or create multi-packed �les.
Kaspersky virus analysts have identi�ed packers that are the most popular amongst hackers.
If Kaspersky Endpoint Security detects such a packer in a �le, the �le most likely contains a maliciousapplication or an application that can be used by criminals to cause harm to your computer or personaldata.
Kaspersky Endpoint Security singles out the following types of programs:
Packed �les that may cause harm – used for packing malware, such as viruses, worms, and Trojans.
Multi-packed �les (medium threat level) – the object has been packed three times by one or morepackers.
Enabling or disabling Advanced Disinfection technology
If Kaspersky Endpoint Security cannot halt the execution of a piece of malware, you can use the AdvancedDisinfection technology. By default, Advanced Disinfection is disabled because this technology uses a signi�cantamount of computing resources. Therefore, you can enable Advanced Disinfection only when working with activethreats.
General
Protection mode Enable Advanced Disinfection technology
As a result, the user cannot use most operating system features while Active Disinfection is in progress. Whenthe disinfection is complete, the computer is rebooted.
Enabling or disabling energy-saving mode

380
1. In the lower part of the main application window, click the button.
2. In the application settings window, select .
3. In the section, use the check box toenable or disable power saving mode.
When energy conservation mode is enabled and the computer is running on battery power, the following tasksare not run even if scheduled:
4. Save your changes.
To enable or disable conceding of resources to other applications:
1. In the lower part of the main application window, click the button.
2. In the application settings window, select the section.
3. In the section, use the check box to enable or disableconceding of resources to other applications.
When con�gured to concede resources to other applications, Kaspersky Endpoint Security postponesscheduled tasks that slow down other applications:
By default, the application is con�gured to concede resources to other applications.
4. Save your changes.
Threats and exclusions
Performance Postpone scheduled tasks while running on battery power
Update task
Full Scan task
Critical Areas Scan task
Custom Scan task
Integrity Check task
Enabling or disabling conceding of resources to other applications
General
Performance Concede resources to other applications
Update task
Full Scan task
Critical Areas Scan task
Custom Scan task
Integrity Check task

381
To create a con�guration �le:
1. In the lower part of the main application window, click the button.
2. In the application settings window, select .
3. Click the button.
4. In the window that opens, specify the path to where you want to save the con�guration �le, and enter its name.
To use the con�guration �le for local or remote installation of Kaspersky Endpoint Security, you must nameit install.cfg.
5. Click the button.
To import Kaspersky Endpoint Security settings from a con�guration �le:
1. In the lower part of the main application window, click the button.
2. In the application settings window, select .
3. Click the button.
4. In the window that opens, enter the path to the con�guration �le.
5. Click the button.
Creating and using a con�guration �le
A con�guration �le with Kaspersky Endpoint Security settings lets you accomplish the following tasks:
Perform local installation of Kaspersky Endpoint Security via the command line with prede�ned settings.
To do so, you must save the con�guration �le in the same folder where the distribution kit is located.
Perform remote installation of Kaspersky Endpoint Security via Kaspersky Security Center with prede�nedsettings.
Migrate Kaspersky Endpoint Security settings from one computer to another.
Manage settings
Export
Save
Manage settings
Import
Open
All values of Kaspersky Endpoint Security settings will be set according to the selected con�guration �le.

382
To restore the default application settings:
1. In the lower part of the main application window, click the button.
2. In the application settings window, select .
3. Click the button.
4. Click the button.
Restoring the default application settings
You can restore the settings recommended by Kaspersky for Endpoint Security at any time. When the settings arerestored, the security level is set for all protection components.Recommended
Manage settings
Restore
Save

383
To view a user message in the Kaspersky Security Center event storage:
1. Open the Kaspersky Security Center Administration Console.
2. In the node of the Administration Console tree, select the tab.
The Kaspersky Security Center workspace displays all events occurring during the operation of KasperskyEndpoint Security, including messages to the administrator that are received from LAN users.
Messaging between users and the administrator
The Application Control, Device Control, Web Control and Adaptive Anomaly Control components enable LANusers whose computers have Kaspersky Endpoint Security installed to send messages to the administrator.
A user may need to send a message to the local corporate network administrator in the following cases:
Device Control blocked access to the device.
The message template for a request to access a blocked device is available in the Kaspersky Endpoint Securityinterface in the Device Control section.
Application Control blocked the startup of an application.
The message template for a request to allow the startup of a blocked application is available in the KasperskyEndpoint Security interface in the Application Control section.
Web Control blocked access to a web resource.
The message template for a request to access a blocked web resource is available in the Kaspersky EndpointSecurity interface in the Web Control section.
The method used to send messages and the utilized template depends on whether or not there is an activeKaspersky Security Center policy running on the computer that has Kaspersky Endpoint Security installed, andwhether or not there is a connection with the Kaspersky Security Center Administration Server. The followingscenarios are possible:
If a Kaspersky Security Center policy is not running on the computer that has Kaspersky Endpoint Securityinstalled, a user's message is sent to the local area network administrator by email.
The message �elds are populated with the values of �elds from the template de�ned in the local interface ofKaspersky Endpoint Security.
If a Kaspersky Security Center policy is running on the computer that has Kaspersky Endpoint Securityinstalled, the standard message is sent to the Kaspersky Security Center Administration Server.
In this case, user messages are available for viewing in the Kaspersky Security Center event storage (seeinstruction below). The message �elds are populated with the values of �elds from the template de�ned in theKaspersky Security Center policy.
If a Kaspersky Security Center out-of-o�ice policy is running on the computer with Kaspersky EndpointSecurity installed, the method used to send messages depends on whether or not there is a connection withKaspersky Security Center.
In both cases, the message �elds are populated with the values of �elds from the template de�ned in theKaspersky Security Center policy.
If a connection with Kaspersky Security Center is established, Kaspersky Endpoint Security sends thestandard message to the Kaspersky Security Center Administration Server.
If a connection with Kaspersky Security Center is absent, a user's message is sent to the local area networkadministrator by email.
Administration Server Events

384
3. To con�gure the event �lter, in the drop-down list, select .
4. Select the message sent to the administrator.
5. Click the button in the right part of the Administration Console workspace.
Selection events User requests
Open event properties window

385
If your license has expired, or the End User License Agreement has been violated, the license key, KasperskyEndpoint Security, or encryption components has been removed, the encrypted status of previouslyencrypted �les is not guaranteed. This is because some applications, such as Microsoft O�ice Word, create atemporary copy of �les during editing. When the original �le is saved, the temporary copy replaces the original�le. As a result, on a computer that has no or inaccessible encryption functionality, the �le remainsunencrypted.
Data Encryption
Kaspersky Endpoint Security lets you encrypt �les and folders that are stored on local and removable drives, orentire removable drives and hard drives. Data encryption minimizes the risk of information leaks that may occurwhen a portable computer, removable drive or hard drive is lost or stolen, or when data is accessed byunauthorized users or applications. Kaspersky Endpoint Security uses the Advanced Encryption Standard (AES)encryption algorithm.
If the license has expired, the application does not encrypt new data, and old encrypted data remains encryptedand available for use. In this event, encrypting new data requires the application be activated with a new licensethat permits the use of encryption.
Kaspersky Endpoint Security o�ers the following aspects of data protection:
. You can compile lists of �les by extension or group ofextensions and lists of folders stored on local computer drives, and create rules for encrypting �les that arecreated by speci�c applications. After a policy is applied, Kaspersky Endpoint Security encrypts and decryptsthe following �les:
. You can specify a default encryption rule, according to which the applicationapplies the same action to all removable drives, or specify encryption rules for individual removable drives.
The default encryption rule has a lower priority than encryption rules created for individual removable drives.Encryption rules created for removable drives of the speci�ed device model have a lower priority thanencryption rules created for removable drives with the speci�ed device ID.
To select an encryption rule for �les on a removable drive, Kaspersky Endpoint Security checks whether or notthe device model and ID are known. The application then performs one of the following operations:
File Level Encryption on local computer drives
�les individually added to lists for encryption and decryption;
�les stored in folders added to lists for encryption and decryption;
�les created by separate applications.
Encryption of removable drives
If only the device model is known, the application uses the encryption rule (if any) created for removabledrives of the speci�c device model.
If only the device ID is known, the application uses the encryption rule (if any) created for removable driveswith the speci�c device ID.
If the device model and ID are known, the application applies the encryption rule (if any) created forremovable drives with the speci�c device ID. If no such rule exists, but there is an encryption rule created forremovable drives with the speci�c device model, the application applies this rule. If no encryption rule isspeci�ed for the speci�c device ID nor for the speci�c device model, the application applies the defaultencryption rule.
If neither the device model nor device ID is known, the application uses the default encryption rule.

386
The application lets you prepare a removable drive for using encrypted data stored on it in portable mode.After enabling portable mode, you can access encrypted �les on removable drives connected to a computerwithout encryption functionality.
. For any application, you can create an encrypted �leaccess rule that blocks access to encrypted �les or allows access to encrypted �les only as ciphertext, which isa sequence of characters obtained when encryption is applied.
. You can create encrypted archives and protect access to such archives with apassword. The contents of encrypted archives can be accessed only by entering the passwords with which youprotected access to those archives. Such archives can be securely transmitted over networks or on removabledrives.
. You can select an encryption technology: Kaspersky Disk Encryption or BitLocker DriveEncryption (hereinafter also referred to as simply "BitLocker").
BitLocker is a technology that is part of the Windows operating system. If a computer is equipped with aTrusted Platform Module (TPM), BitLocker uses it to store recovery keys that provide access to an encryptedhard drive. When the computer starts, BitLocker requests the hard drive recovery keys from the TrustedPlatform Module and unlocks the drive. You can con�gure the use of a password and/or PIN code for accessingrecovery keys.
You can specify the default full disk encryption rule and create a list of hard drives to be excluded fromencryption. Kaspersky Endpoint Security performs full disk encryption by sector after the Kaspersky SecurityCenter policy is applied. The application encrypts all logical partitions of hard drives simultaneously.
After the system hard drives have been encrypted, at the next computer startup the user must completeauthentication using the Authentication Agent before the hard drives can be accessed and the operatingsystem is loaded. This requires entering the password of the token or smart card connected to the computer,or the user name and password of the Authentication Agent account created by the local area networkadministrator using the Manage Authentication Agent accounts task. These accounts are based on MicrosoftWindows accounts under which users log into the operating system. You can also use Single Sign-On (SSO)technology, which lets you automatically log in to the operating system using the user name and password ofthe Authentication Agent account.
If you back up a computer and then encrypt the computer data, after which you restore the backup copyof the computer and encrypt the computer data again, Kaspersky Endpoint Security creates duplicates ofAuthentication Agent accounts. To remove the duplicate accounts, you must use the klmover utility withthe dupfix key. The klmover utility is included in the Kaspersky Security Center build. You can read moreabout its operation in the Kaspersky Security Center Help.
Access to encrypted hard drives is possible only from computers on which Kaspersky Endpoint Security withfull disk encryption functionality is installed. This precaution minimizes the risk of data leaks from an encryptedhard drive when an attempt to access it is made outside of the local area network of the company.
Managing rules of application access to encrypted �les
Creating encrypted packages
Full Disk Encryption
To encrypt hard drives and removable drives, you can use the function. It isrecommended you only use this function for new devices that have not been previously used. If you are applyingencryption to a device that is already in use, it is recommended you encrypt the entire device. This ensures that alldata is protected – even deleted data that might still contain retrievable information.
Encrypt used disk space only
Before beginning encryption, Kaspersky Endpoint Security obtains the map of �le system sectors. The �rst waveof encryption includes sectors that are occupied by �les at the moment when encryption is started. The secondwave of encryption includes sectors that were written to after encryption began. After encryption is complete, allsectors containing data are encrypted.
After encryption is complete and a user deletes a �le, the sectors that stored the deleted �le become available forstoring new information at the �le system level but remain encrypted. Thus, as �les are written to a new device andthe device is regularly encrypted with the function enabled, all sectors will beencrypted after some time.
Encrypt used disk space only

387
The data needed to decrypt �les is provided by the Kaspersky Security Center Administration Server thatcontrolled the computer at the time of encryption. If the computer with encrypted objects was managed by adi�erent Administration Server for some reason, you can obtain access to the encrypted data in one of thefollowing ways:
Administration Servers in the same hierarchy:
Separated Administration Servers:
You do not need to take any additional actions. The user will retain access to the encrypted objects.Encryption keys are distributed to all Administration Servers.
Request access to encrypted objects from the LAN administrator.
Restore data on encrypted devices using the Restore Utility.
Restore the con�guration of the Kaspersky Security Center Administration Server that controlled thecomputer at the time of encryption from a backup copy and use this con�guration on the AdministrationServer that now controls the computer with encrypted objects.
If there is no access to encrypted data, follow the special instructions for working with encrypted data (Restoringaccess to encrypted �les, Working with encrypted devices when there is no access to them).
Encryption functionality limitations
Data Encryption has the following limitations:
The application creates service �les during encryption. Around 0.5% of non-fragmented free space on the harddrive is required to store them. If there is not enough non-fragmented free space on the hard drive, encryptionwill not start until enough space is freed up.
You can manage all data encryption components in the Kaspersky Security Center Administration Console andin the Kaspersky Security Center 12 Web Console. In the Kaspersky Security Center Cloud Console, you canonly manage Bitlocker.
Data encryption is available only when using Kaspersky Endpoint Security with the Kaspersky Security Centeradministration system or the Kaspersky Security Center Cloud Console (BitLocker only). Data Encryption whenusing Kaspersky Endpoint Security in o�line mode is not possible because Kaspersky Endpoint Security storesencryption keys in Kaspersky Security Center.
If Kaspersky Endpoint Security is installed on a computer running Microsoft Windows for Servers, only full diskencryption using BitLocker Drive Encryption technology is available. If Kaspersky Endpoint Security is installedon a computer running Windows for Workstations, data encryption functionality is fully available.
Full disk encryption using Kaspersky Disk Encryption technology is unavailable for hard drives that do not meet thehardware and software requirements.
Compatibility between the full disk encryption functionality of Kaspersky Endpoint Security and Kaspersky Anti-Virus for UEFI is not supported. Kaspersky Anti-Virus for UEFI starts before the operating system loads. Whenusing full disk encryption, the application will detect the absence of an installed operating system on the computer.As a result, the operation of Kaspersky Anti-Virus for UEFI will end with an error. File Level Encryption (FLE) doesnot a�ect the operation of Kaspersky Anti-Virus for UEFI.
Kaspersky Endpoint Security supports the following con�gurations:

388
HDD, SSD, and USB drives.
Kaspersky Disk Encryption (FDE) technology supports working with SSD while preserving the performanceand service life of SSD drives.
Drives connected via bus: SCSI, ATA, IEEE1934, USB, RAID, SAS, SATA, NVME.
Non-removable drives connected via SD or MMC bus.
Drives with 512-byte sectors.
Drives with 4096-byte sectors that emulate 512 bytes.
Drives with the following type of partitions: GPT, MBR, and VBR (removable drives).
Embedded software of the UEFI 64 and Legacy BIOS standard.
Embedded software of the UEFI standard with Secure Boot support.
Secure Boot is a technology designed to verify digital signatures for UEFI loader applications and drivers.Secure Boot blocks the startup of UEFI applications and drivers that are unsigned or signed by unknownpublishers. Kaspersky Disk Encryption (FDE) fully supports Secure Boot. Authentication Agent is signed by aMicrosoft Windows UEFI Driver Publisher certi�cate.
On some devices (for example, Microsoft Surface Pro and Microsoft Surface Pro 2), an out-of-date list ofdigital signature veri�cation certi�cates may be installed by default. Prior to encrypting the drive, you need toupdate the list of certi�cates.
Embedded software of the UEFI standard with Fast Boot support.
Fast Boot is a technology that helps the computer start up faster. When Fast Boot technology is enabled,normally the computer loads only the minimum set of UEFI drivers required for starting the operating system.When Fast Boot technology is enabled, USB keyboards, mice, USB tokens, touchpads and touchscreens maynot work while Authentication Agent is running.
To use Kaspersky Disk Encryption (FDE), it is recommended to disable Fast Boot technology. You can usethe FDE Test Utility to test the operation of Kaspersky Disk Encryption (FDE).
Kaspersky Endpoint Security does not support the following con�gurations:
The boot loader is located on one drive while the operating system is on a di�erent drive.
The system contains embedded software of the UEFI 32 standard.
The system has Intel® Rapid Start Technology and drives that have a hibernation partition even when Intel®Rapid Start Technology is disabled.
Drives in MBR format with more than 10 extended partitions.
The system has a swap �le located on a non-system drive.
Multiboot system with multiple simultaneously installed operating systems.
Dynamic partitions (only primary partitions are supported).
Drives with less than 0.5% free unfragmented disk space.

389
Drives with a sector size di�erent from 512 bytes or 4096 bytes that emulate 512 bytes.
Hybrid drives.
The system has third-party loaders.
Drives with compressed NTFS directories.
Kaspersky Disk Encryption (FDE) technology is incompatible with other full disk encryption technologies (suchas BitLocker, McAfee Drive Encryption, and WinMagic SecureDoc).
Kaspersky Disk Encryption (FDE) technology is incompatible with Express Cache technology.
Creating, deleting, and modifying partitions on an encrypted drive is not supported. You could lose data.
File system formatting is not supported. You could lose data.
If you need to format a drive that was encrypted with Kaspersky Disk Encryption (FDE) technology, format thedrive on a computer that does not have Kaspersky Endpoint Security for Windows and use only full diskencryption.
An encrypted drive that is formatted with the quick format option may be mistakenly identi�ed as encryptedthe next time it is connected to a computer that has Kaspersky Endpoint Security for Windows installed. Userdata will be unavailable.
Authentication Agent supports no more than 100 accounts.
Single Sign-On technology is incompatible with other technologies of third-party developers.
Kaspersky Disk Encryption (FDE) technology is not supported on the following models of devices:
Authentication Agent does not support working with USB tokens when Legacy USB Support is enabled. Onlypassword-based authentication will be possible on the computer.
When encrypting a drive in Legacy BIOS mode, you are advised to enable Legacy USB Support on the followingmodels of devices:
Dell Latitude E6410 (UEFI mode)
HP Compaq nc8430 (Legacy BIOS mode)
Lenovo Think Center 8811 (Legacy BIOS mode)
Acer Aspire 5560G
Acer Aspire 6930
Acer TravelMate 8572T
Dell Inspiron 1420
Dell Inspiron 1545
Dell Inspiron 1750
Dell Inspiron N4110
Dell Latitude E4300

390
Changing the length of the encryption key is available only for Kaspersky Endpoint Security 11.2.0 or later.
Dell Studio 1537
Dell Studio 1569
Dell Vostro 1310
Dell Vostro 1320
Dell Vostro 1510
Dell Vostro 1720
Dell Vostro V13
Dell XPS L502x
Fujitsu Celsius W370
Fujitsu LifeBook A555
HP Compaq dx2450 Microtower PC
Lenovo G550
Lenovo ThinkPad L530
Lenovo ThinkPad T510
Lenovo ThinkPad W540
Lenovo ThinkPad X121e
Lenovo ThinkPad X200s (74665YG)
Samsung R530
Toshiba Satellite A350
Toshiba Satellite U400 10O
MSI 760GM-E51 (motherboard)
Changing the length of the encryption key (AES56 / AES256)
Kaspersky Endpoint Security uses the Advanced Encryption Standard (AES) encryption algorithm. KasperskyEndpoint Security supports the AES encryption algorithm with an e�ective key length of 256 or 56 bits. The dataencryption algorithm depends on the AES encryption library that is included in the distribution package: Strongencryption (AES256) or Lite encryption (AES56). The AES encryption library is installed together with theapplication.

391
1. Decrypt objects that Kaspersky Endpoint Security encrypted before you begin changing the encryption keylength:
a. Decrypt hard drives.
b. Decrypt �les on local drives.
c. Decrypt removable drives.
After the encryption key length is changed, objects that were previously encrypted become unavailable.
2. Remove Kaspersky Endpoint Security.
3. Install Kaspersky Endpoint Security from the Kaspersky Endpoint Security distribution package containing adi�erent encryption library.
It is impossible to change the length of the encryption key using the distribution package of the same versionof the application that is installed on your computer without �rst uninstalling the application.
Kaspersky Disk Encryption is available only for computers running a Windows operating system forworkstations. For computers running a Windows operating system for servers, use BitLocker Drive Encryptiontechnology.
Kaspersky Endpoint Security supports full disk encryption in FAT32, NTFS and exFat �le systems.
Changing the encryption key length consists of the following steps:
You can also change the encryption key length by upgrading the application. The key length can be changedthrough an application upgrade only if the following conditions are met:
Kaspersky Endpoint Security version 10 Service Pack 2 or later is installed on the computer.
Data encryption components (File Level Encryption, Full Disk Encryption) are not installed on the computer.
By default, data encryption components are not included in Kaspersky Endpoint Security. The BitLockerManagement component does not a�ect the change in the length of the encryption key.
To change the encryption key length, run the kes_win.msi or setup_kes.exe �le from the distribution packagecontaining the necessary encryption library. You can also remotely upgrade the application by using the installationpackage.
Kaspersky Disk Encryption

392
Before starting full disk encryption, the application runs a series of checks to determine if the device can beencrypted, which includes checking the system hard drive for compatibility with Authentication Agent or withBitLocker encryption components. To check for compatibility, the computer must be restarted. After thecomputer has been rebooted, the application performs all the necessary checks automatically. If the compatibilitycheck is successful, full disk encryption starts after the operating system has loaded and the application hasstarted. If the system hard drive is found to be incompatible with Authentication Agent or with BitLockerencryption components, the computer must be restarted by pressing the Reset hardware button. KasperskyEndpoint Security logs information about the incompatibility. Based on this information, the application does notstart full disk encryption at operating system startup. Information about this event is logged in Kaspersky SecurityCenter reports.
If the hardware con�guration of the computer has changed, the incompatibility information logged by theapplication during the previous check should be deleted in order to check the system hard drive for compatibilitywith Authentication Agent and BitLocker encryption components. To do so, prior to full disk encryption, typeavp pbatestreset in the command line. If the operating system fails to load after the system hard drive hasbeen checked for compatibility with Authentication Agent, you must remove the objects and data remaining aftertest operation of Authentication Agent by using the Restore Utility and then start Kaspersky Endpoint Securityand execute the avp pbatestreset command again.
After full disk encryption has started, Kaspersky Endpoint Security encrypts all data that is written to hard drives.
If the user shuts down or restarts the computer during full disk encryption, Authentication Agent is loaded beforethe next startup of the operating system. Kaspersky Endpoint Security resumes full disk encryption aftersuccessful authentication in Authentication Agent and operating system startup.
If the operating system switches to hibernation mode during full disk encryption, Authentication Agent is loadedwhen the operating system switches back from hibernation mode. Kaspersky Endpoint Security resumes full diskencryption after successful authentication in Authentication Agent and operating system startup.
If the operating system goes into sleep mode during full disk encryption, Kaspersky Endpoint Security resumes fulldisk encryption when the operating system comes out of sleep mode without loading Authentication Agent.
User authentication in the Authentication Agent can be performed in two ways:
Enter the name and password of the Authentication Agent account created by the LAN administrator usingKaspersky Security Center tools.
Enter the password of a token or smart card connected to the computer.
Use of a token or smart card is available only if the computer hard drives were encrypted using the AES256encryption algorithm. If the computer hard drives were encrypted using the AES56 encryption algorithm,addition of the electronic certi�cate �le to the command will be denied.
The authentication agent supports keyboard layouts for the following languages:
English (UK)
English (USA)
Arabic (Algeria, Morocco, Tunis; AZERTY layout)
Spanish (Latin America)
Italian
German (Germany and Austria)

393
A keyboard layout becomes available in the Authentication Agent if this layout has been added in the languageand regional standards settings of the operating system and has become available on the welcome screen ofMicrosoft Windows.
Free space requirements for storing encryption administration data
SSD drive size(GB)
Free space on primary partition of SSDdrive (MB)
Free space on secondary partition of SSDdrive (MB)
128 250 64
256 250 640
512 300 128
German (Switzerland)
Portuguese (Brazil, ABNT2 layout)
Russian (for 105-key IBM / Windows keyboards with the QWERTY layout)
Turkish (QWERTY layout)
French (France)
French (Switzerland)
French (Belgium, AZERTY layout)
Japanese (for 106-key keyboards with the QWERTY layout)
If the Authentication Agent account name contains symbols that cannot be entered using keyboard layoutsavailable in the Authentication Agent, encrypted hard drives can be accessed only after they are restored usingthe Restore Utility or after the Authentication Agent account name and password are restored.
Special features of SSD drive encryption
The application supports encryption of SSD drives, hybrid SSHD drives, and drives with the Intel Smart Responsefeature. The application does not support encryption of drives with the Intel Rapid Start feature. Disable the IntelRapid Start feature prior to encrypting such a drive.
Encryption of SSD drives has the following special features:
If an SSD drive is new and contains no con�dential data, enable encryption of only occupied space. This letsyou overwrite the relevant drive sectors.
If an SSD drive is in use and it has con�dential data, select one of the following options:
Fully wipe the SSD drive (Secure Erase), install the operating system and run encryption of the SSD drivewith the option to encrypt only occupied space enabled.
Run encryption of the SSD drive with the option to encrypt only occupied space disabled.
Encryption of an SSD drive requires 5-10 GB of free space. The free space requirements for storing encryptionadministration data are provided in the table below.

394
Prior to starting full disk encryption, you are advised to make sure that the computer is not infected. To do so,start the Full Scan or Critical Areas Scan task. Performing full disk encryption on a computer that is infectedby a rootkit may cause the computer to become inoperable.
To perform full disk encryption using Kaspersky Disk Encryption technology:
1. Open the Kaspersky Security Center Administration Console.
2. In the folder in the Administration Console tree, open the folder with the name of theadministration group to which the relevant client computers belong.
3. In the workspace, select the tab.
4. Select the necessary policy and double-click to open the policy properties.
5. In the policy window, select → .
6. In the drop-down list, select .
Kaspersky Disk Encryption technology cannot be used if the computer has hard drives that wereencrypted by BitLocker.
7. In the drop-down list, select .
If the computer has several operating systems installed, after encrypting all hard drives you will be able toload only the operating system that has the application installed.
If you need to exclude some of the hard drives from encryption, create a list of such hard drives.
8. Con�gure rules for adding Authentication Agent accounts during disk encryption. The Agent allows a user tocomplete authentication for access to encrypted drives and to load the operating system. To automatically addAuthentication Agent accounts, con�gure the following settings:
Full disk encryption using Kaspersky Disk Encryption technology
Managed devices
Policies
Data Encryption Full Disk Encryption
Encryption technology Kaspersky Disk Encryption
Encryption mode Encrypt all hard drives
. If this checkbox is selected, the application creates Authentication Agent accounts based on the list of Windows useraccounts on the computer. By default, Kaspersky Endpoint Security uses all local and domain accounts withwhich the user logged in to the operating system over the past 30 days.
. If thischeck box is selected, the application checks information about Windows user accounts on the computerbefore starting Authentication Agent. If Kaspersky Endpoint Security detects a Windows user account thathas no Authentication Agent account, the application will create a new account for accessing encrypteddrives. The new Authentication Agent account will have the following default settings: password-protectedsign-on only, and password change on �rst authentication. Therefore, you do not need to manually add
During encryption, automatically create Authentication Agent accounts for Windows users
Automatically create Authentication Agent accounts for all users of this computer upon sign-in

395
If you disabled automatic creation of Authentication Agent accounts, you can manually add AuthenticationAgent accounts by using the Manage accounts task. You can also use this task to change the settings ofAuthentication Agent accounts that were created automatically.
9. For user convenience, you can save the user name to Authentication Agent memory so that the user only hasto enter a password the next time they sign in to the system. To do so, select the
check box.
10. Select one of the following encryption methods:
11. If a hardware incompatibility problem occurs during computer encryption, you can select the check box.
Legacy USB Support a BIOS/UEFI function that allows you to use USB devices (such as a security token)during the computer's boot phase before starting the operating system (BIOS mode). Legacy USB Supportdoes not a�ect support for USB devices after the operating system is started.
When the Legacy USB Support function is enabled, the Authentication Agent in BIOS mode does notsupport working with tokens via USB. It is recommended to use this option only when there is a hardwarecompatibility issue and only for those computers on which the problem occurred.
12. Save your changes.
You can create a list of exclusions from encryption only for Kaspersky Disk Encryption technology.
To form a list of hard drives excluded from encryption:
Authentication Agent accounts using the Manage Authentication Agent accounts task for computers withalready encrypted drives.
Save user name entered inAuthentication Agent
If you want to apply encryption only to those hard drive sectors that are occupied by �les, select the check box.
If you are applying encryption on a drive that is already in use, it is recommended to encrypt the entire drive.This ensures that all data is protected – even deleted data that might still contain retrievable information.The function is recommended for new drives that have not been previouslyused.
If you want to apply encryption to the entire hard drive, clear the check box.
If a device was previously encrypted using the function, after applying apolicy in mode, sectors that are not occupied by �les will still not be encrypted.
Encrypt used disk space only
Encrypt used disk space only
Encrypt used disk space only
Encrypt used disk space onlyEncrypt all hard drives
Use Legacy USBSupport
is
You can use the Encryption Monitor tool to control the disk encryption or decryption process on a user'scomputer. You can run the Encryption Monitor tool from the main application window.
If system hard drives are encrypted, the Authentication Agent loads before startup of the operating system. Usethe Authentication Agent to complete authentication for obtaining access to encrypted system hard drives andload the operating system. After successful completion of the authentication procedure, the operating systemloads. The authentication process is repeated every time the operating system restarts.
Creating a list of hard drives excluded from encryption

396
1. Open the Kaspersky Security Center Administration Console.
2. In the folder in the Administration Console tree, open the folder with the name of theadministration group to which the relevant client computers belong.
3. In the workspace, select the tab.
4. Select the necessary policy and double-click to open the policy properties.
5. In the policy window, select → .
6. In the drop-down list, select the option.
Entries corresponding to hard drives excluded from encryption appear in the table. This table is empty if you have not previously formed a list of hard drives excluded from
encryption.
7. To add hard drives to the list of hard drives excluded from encryption:
a. Click the button.
The window opens.
b. In the window, specify the values of the followingparameters: , , , and .
c. Click the button.
d. In the column, select the check boxes in the table rows corresponding to those hard drives that youwant to add to the list of hard drives excluded from encryption.
e. Click .
The selected hard drives appear in the table.
8. If you want to remove hard drives from the table of exclusions, select one or several rows in the table and click the button.
To select multiple rows in the table, select them while holding down the key.
9. Save your changes.
Managed devices
Policies
Data Encryption Full Disk Encryption
Encryption technology Kaspersky Disk Encryption
Do not encrypt the followinghard drives
Add
Add devices from Kaspersky Security Center list
Add devices from Kaspersky Security Center listName Computer Disk type Kaspersky Disk Encryption
Refresh
Name
OK
Do not encrypt the following hard drives
Do not encryptthe following hard drives Delete
CTRL
Exporting and importing a list of hard drives excluded from encryption
You can export the list of hard drive encryption exclusions to an XML �le. Then you can modify the �le to, forexample, add a large number of exclusions of the same type. You can also use the export/import function to backup the list of exclusions or to migrate the exclusions to a di�erent server.
How to export and import a list of hard drive encryption exclusions in the Administration Console (MMC)

397
1. Open the Kaspersky Security Center Administration Console.
2. In the folder in the Administration Console tree, open the folder with the name of theadministration group to which the relevant client computers belong.
3. In the workspace, select the tab.
4. Select the necessary policy and double-click to open the policy properties.
5. In the policy window, select → .
6. In the drop-down list, select the option.
Entries corresponding to hard drives excluded from encryption appear in the table.
7. To export the list of exclusions:
a. Select the exclusions that you want to export. To select multiple ports, use the or keys.
If you did not select any exclusion, Kaspersky Endpoint Security will export all exclusions.
b. Click the link.
c. In the window that opens, specify the name of the XML �le to which you want to export the list ofexclusions, and select the folder in which you want to save this �le.
d. Click the button.
Kaspersky Endpoint Security exports the entire list of exclusions to the XML �le.
8. To import the list of rules:
a. Click the button.
b. In the window that opens, select the XML �le from which you want to import the list of exclusions.
c. Click the button.
If the computer already has a list of exclusions, Kaspersky Endpoint Security will prompt you to deletethe existing list or add new entries to it from the XML �le.
9. Save your changes.
Managed devices
Policies
Data Encryption Full Disk Encryption
Encryption technology Kaspersky Disk Encryption
Do not encrypt the followinghard drives
CTRL SHIFT
Export
Save
Import
Open
How to export and import a list of hard drive encryption exclusions in the Web Console

398
1. In the main window of Web Console, select → .
2. Click the name of the Kaspersky Endpoint Security policy for computers on which you want to export orimport a list of exclusions.
The policy properties window opens.
3. Select the tab.
4. Select → .
5. Select the technology and follow the link to con�gure the settings.
The encryption settings open.
6. Click the link.
7. To export the list of rules:
a. Select the exclusions that you want to export.
b. Click the button.
c. Con�rm that you want to export only the selected exclusions, or export the entire list of exclusions.
d. In the window that opens, specify the name of the XML �le to which you want to export the list ofexclusions, and select the folder in which you want to save this �le.
e. Click the button.
Kaspersky Endpoint Security exports the entire list of exclusions to the XML �le.
8. To import the list of rules:
a. Click the button.
b. In the window that opens, select the XML �le from which you want to import the list of exclusions.
c. Click the button.
If the computer already has a list of exclusions, Kaspersky Endpoint Security will prompt you to deletethe existing list or add new entries to it from the XML �le.
9. Save your changes.
Devices Policies and pro�les
Application settings
Data Encryption Full Disk Encryption
Kaspersky Disk Encryption
Exclusions
Export
Save
Import
Open
Enabling Single Sign-On (SSO) technology
Single Sign-On (SSO) technology allows you to automatically log into the operating system using the credentials ofthe Authentication Agent.
When using Single Sign-on technology, the Authentication Agent ignores the password strength requirementsspeci�ed in Kaspersky Security Center. You can set the password strength requirements in the operating systemsettings.

399
Single Sign-On technology is incompatible with third-party providers of account credentials.
1. Open the Kaspersky Security Center Administration Console.
2. In the folder in the Administration Console tree, open the folder with the name of theadministration group to which the relevant client computers belong.
3. In the workspace, select the tab.
4. Select the necessary policy and double-click to open the policy properties.
5. In the policy window, select → .
6. In the block, click the button.
7. In the window that opens, on the tab, select the check box.
8. Save your changes.
1. In the main window of Web Console, select → .
2. Click the name of the Kaspersky Endpoint Security policy for computers on which you want to enable useof Single Sign-On.
The policy properties window opens.
3. Select the tab.
4. Go to → .
5. Select the technology and follow the link to con�gure the settings.
The encryption settings open.
6. In the section, select the check box.
7. Click .
How to enable the use of Single Sign-On technology in the Administration Console (MMC)
Managed devices
Policies
Data Encryption Common Encryption Settings
Password settings Settings
Authentication Agent Use Single Sign-On (SSO)technology
As a result, the user needs to complete the authentication procedure only once with the Agent. Theauthentication procedure is not required for loading the operating system. The operating system loadsautomatically.
How to enable use of Single Sign-On in the Web Console
Devices Policies and pro�les
Application settings
Data Encryption Full Disk Encryption
Kaspersky Disk Encryption
Password settings Use Single Sign-On (SSO) technology
OK
As a result, the user needs to complete the authentication procedure only once with the Agent. Theauthentication procedure is not required for loading the operating system. The operating system loadsautomatically.

400
You cannot con�gure a schedule for starting the Manage Authentication Agent accounts task. It is alsoimpossible to forcibly stop a task.
For Single Sign-On to work, the Windows account password and the password for the Authentication Agentaccount must match. If the passwords do not match, the user needs to perform the authentication proceduretwice: in the interface of the Authentication Agent and before loading the operating system. After that, KasperskyEndpoint Security replaces the password of the Authentication Agent account with the password of the Windowsaccount.
Managing Authentication Agent accounts
Authentication Agent is needed for working with drives that are protected using Kaspersky Disk Encryption (FDE)technology. Before the operating system is loaded, the user needs to complete authentication with the Agent. TheManage Authentication Agent accounts task is designed for con�guring user authentication settings. You can uselocal tasks for individual computers as well as group tasks for computers from separate administration groups or aselection of computers.
How to create the Manage Authentication Agent accounts task in the Administration Console (MMC)

401
1. In the Administration Console, go to the folder → .
The list of tasks opens.
2. Click the button.
Step 1. Selecting task type
Step 2. Selecting an Authentication Agent account management command
Step 3. Selecting the devices to which the task will be assigned
Step 4. De�ning the task name
Step 5. Completing task creation
Administration Server Tasks
New task
The Task Wizard starts. Follow the instructions of the Wizard.
Select → .Kaspersky Endpoint Security for Windows (11.6.0) Manage Authentication Agent accounts
Generate a list of Authentication Agent account management commands. Management commands allow youto add, modify, and delete Authentication Agent accounts (see instructions below). Only users who have anAuthentication Agent account can complete the authentication procedure, load the operating system, andgain access to the encrypted drive.
Select the computers on which the task will be performed. The following options are available:
Assign the task to an administration group. In this case, the task is assigned to computers included in apreviously created administration group.
Select computers detected by the Administration Server in the network: unassigned devices. The speci�cdevices can include devices in administration groups as well as unassigned devices.
Specify device addresses manually, or import addresses from a list. You can specify NetBIOS names, IPaddresses, and IP subnets of devices to which you want to assign the task.
Enter a name for the task, for example, Administrator Accounts .
Exit the Wizard. If necessary, select the check box. You can monitor theprogress of the task in the task properties.
Run task after Wizard �nishes
As a result, after the task is completed at the next computer startup, the new user can complete theauthentication procedure, load the operating system, and gain access to the encrypted drive.
How to create the Manage Authentication Agent accounts task in the Web Console

402
1. In the main window of Web Console, select → .
The list of tasks opens.
2. Click the button.
Step 1. Con�guring general task settings
1. In the drop-down list, select .
2. In the drop-down list, select .
3. In the �eld, enter a brief description, such as Administrator accounts .
4. In the section, select the task scope.
Step 2. Managing Authentication Agent accounts
Step 3. Completing task creation
Devices Tasks
Add
The Task Wizard starts. Follow the instructions of the Wizard.
Con�gure the general task settings:
Application Kaspersky Endpoint Security for Windows (11.6.0)
Task type Manage Authentication Agent accounts
Task name
Select devices to which the task will be assigned
Generate a list of Authentication Agent account management commands. Management commands allow youto add, modify, and delete Authentication Agent accounts (see instructions below). Only users who have anAuthentication Agent account can complete the authentication procedure, load the operating system, andgain access to the encrypted drive.
Finish the wizard by clicking the button. A new task will be displayed in the list of tasks.Finish
To run a task, select the check box opposite the task and click the button.Start
As a result, after the task is completed at the next computer startup, the new user can complete theauthentication procedure, load the operating system, and gain access to the encrypted drive.
To add an Authentication Agent account, you need to add a special command to the Manage AuthenticationAgent accounts task. It is convenient to use a group task, for example, to add an administrator account to allcomputers.
Kaspersky Endpoint Security allows you to automatically create Authentication Agent accounts before encryptinga drive. You can enable automatic creation of Authentication Agent accounts in the Full Disk Encryption policysettings. You can also use Single Sign-On (SSO) technology.
How to add an Authentication Agent account through the Administration Console (MMC)

403
1. Open the properties of the Manage Authentication Agent accounts task.
2. In the task properties, select the section.
3. Click → .
4. In the window that opens, in the �eld, specify the name of the Microsoft Windowsaccount that will be used to create the Authentication Agent account.
5. If you manually entered the Windows account name, click the button to de�ne the account securityidenti�er (SID).
If you choose not to determine the security identi�er (SID) by clicking the button, it will bedetermined when the task is performed on the computer.
De�ning a Windows account security identi�er is necessary to verify that the Windows account namewas entered correctly. If the Windows account does not exist on the computer or in the trusteddomain, the Manage Authentication Agent accounts task will end with an error.
6. Select the check box if you want the existing account previously created for theAuthentication Agent to be replaced with the account being created.
This step is available when you are adding an Authentication Agent account creation command in theproperties of a group task for managing Authentication Agent accounts. This step is not available ifyou add a command for creating Authentication Agent account in the properties of the
local task.
7. In the �eld, type the name of the Authentication Agent account that must be entered duringauthentication for access to encrypted hard drives.
8. Select the check box if you want the application to prompt theuser to enter the Authentication Agent account password during authentication for accessing encryptedhard drives. Set a password for the Authentication Agent account. If necessary, you can request a newpassword from the user after the �rst authentication.
9. Select the check box if you want the application to prompt theuser to connect a token or smart card to the computer during authentication for accessing encryptedhard drives. Select a certi�cate �le for authentication with a smart card or token.
10. If required, in the �eld, enter the Authentication Agent account details that youneed for managing the command.
11. Do one of the following:
12. Save your changes.
Options
Add Account adding command
Windows account
Allow
Allow
Replace existing account
Full DiskEncryption, account management
User name
Allow password-based authentication
Allow certi�cate-based authentication
Command description
Select the option if you want the application to allow the user working under theaccount speci�ed in the command to access the authentication dialog in Authentication Agent.
Select the option if you want the application to block the user working under theaccount speci�ed in the command from accessing the authentication dialog in Authentication Agent.
Allow authentication
Block authentication

404
1. In the main window of Web Console, select → .
The list of tasks opens.
2. Click the task of Kaspersky Endpoint Security.
The task properties window opens.
3. Select the tab.
4. In the list of Authentication Agent accounts, click the button.
This starts the Authentication Agent Account Management Wizard.
5. Select the command type.
6. Select a user account. You can select an account from the list of domain accounts or manually enter theaccount name. Click the button.
Kaspersky Endpoint Security determines the account security identi�er (SID). This is necessary to verifythe account. If you entered the user name incorrectly, Kaspersky Endpoint Security will end the task withan error.
7. Con�gure the Authentication Agent account settings.
8. Save your changes.
9. Select the check box next to the task and click the button.
How to add an Authentication Agent account through the Web Console
Devices Tasks
Manage Authentication Agent accounts
Application settings
Add
Add account
Next
. Kaspersky EndpointSecurity scans existing accounts on the computer. If the user security ID on the computer and in thetask match, Kaspersky Endpoint Security will change the user account settings in accordance with thetask.
. The default user name of the Authentication Agent account corresponds to the domainname of the user.
. Set a password for the Authentication Agent account. Ifnecessary, you can request a new password from the user after the �rst authentication. This way, eachuser will have their own unique password. You can also set password strength requirements for theAuthentication Agent account in the policy.
. Select a certi�cate �le for authentication with a smart cardor token. This way, the user will need to enter the password for the smart card or token.
. Con�gure user access to the encrypted drive. You can, forexample, temporarily disable user authentication instead of deleting the Authentication Agent account.
. Enter an account description, if necessary.
Create a new Authentication Agent account to replace the existing account
User name
Allow password-based authentication
Allow certi�cate-based authentication
Account access to encrypted data
Comment
Start
As a result, after the task is completed at the next computer startup, the new user can complete theauthentication procedure, load the operating system, and gain access to the encrypted drive.

405
To change the password and other settings of the Authentication Agent account, you need to add a specialcommand to the Manage Authentication Agent accounts task. It is convenient to use a group task, for example, toreplace the administrator token certi�cate on all computers.
How to change the Authentication Agent account through the Administration Console (MMC)

406
1. Open the properties of the Manage Authentication Agent accounts task.
2. In the task properties, select the section.
3. Click → .
4. In the window that opens, in the �eld, specify the name of the Microsoft Windows useraccount that you want to change.
5. If you manually entered the Windows account name, click the button to de�ne the account securityidenti�er (SID).
If you choose not to determine the security identi�er (SID) by clicking the button, it will bedetermined when the task is performed on the computer.
De�ning a Windows account security identi�er is necessary to verify that the Windows account namewas entered correctly. If the Windows account does not exist on the computer or in the trusteddomain, the Manage Authentication Agent accounts task will end with an error.
6. Select the check box and enter a new name for the Authentication Agent account ifyou want Kaspersky Endpoint Security to change the user name for all Authentication Agent accountscreated using the Microsoft Windows account with the name indicated in the �eld tothe name typed in the �eld below.
7. Select the check box to make password-basedauthentication settings editable.
8. Select the check box if you want the application to prompt theuser to enter the Authentication Agent account password during authentication for accessing encryptedhard drives. Set a password for the Authentication Agent account.
9. Select the check box ifyou want Kaspersky Endpoint Security to change the value of the password change setting for allAuthentication Agent accounts created using the Microsoft Windows account with the name indicated inthe �eld to the setting value speci�ed below.
10. Specify the value of the password change setting upon authentication in Authentication Agent.
11. Select the check box to make settings ofauthentication based on the electronic certi�cate of a token or smart card editable.
12. Select the check box if you want the application to prompt theuser to enter the password to the token or smart card connected to the computer during theauthentication process in order to access encrypted hard drives. Select a certi�cate �le for authenticationwith a smart card or token.
13. Select the check box and edit the command description if you want KasperskyEndpoint Security to change the command description for all Authentication Agent accounts createdusing the Microsoft Windows account with the name indicated in the �eld.
14. Select the check box if you wantKaspersky Endpoint Security to change the rule for user access to the authentication dialog inAuthentication Agent to the value speci�ed below for all Authentication Agent accounts created using theMicrosoft Windows account with the name indicated in the �eld.
Options
Add Account editing command
Windows account
Allow
Allow
Change user name
Windows account
Modify password-based authentication settings
Allow password-based authentication
Edit the rule of password change upon authentication in Authentication Agent
Windows account
Modify certi�cate-based authentication settings
Allow certi�cate-based authentication
Edit command description
Windows account
Edit the rule of access to authentication in Authentication Agent
Windows account

407
15. Specify the rule for accessing the authentication dialog in Authentication Agent.
16. Save your changes.
How to change the Authentication Agent account through the Web Console

408
1. In the main window of Web Console, select → .
The list of tasks opens.
2. Click the task of Kaspersky Endpoint Security.
The task properties window opens.
3. Select the tab.
4. In the list of Authentication Agent accounts, click the button.
This starts the Authentication Agent Account Management Wizard.
5. Select the command type.
6. Select a user account. You can select an account from the list of domain accounts or manually enter theaccount name. Click the button.
Kaspersky Endpoint Security determines the account security identi�er (SID). This is necessary to verifythe account. If you entered the user name incorrectly, Kaspersky Endpoint Security will end the task withan error.
7. Select the check boxes next to the settings that you want to edit.
8. Con�gure the Authentication Agent account settings.
9. Save your changes.
10. Select the check box next to the task and click the button.
Devices Tasks
Manage Authentication Agent accounts
Application settings
Add
Edit account
Next
. Kaspersky EndpointSecurity scans existing accounts on the computer. If the user security ID on the computer and in thetask match, Kaspersky Endpoint Security will change the user account settings in accordance with thetask.
. The default user name of the Authentication Agent account corresponds to the domainname of the user.
. Set a password for the Authentication Agent account. Ifnecessary, you can request a new password from the user after the �rst authentication. This way, eachuser will have their own unique password. You can also set password strength requirements for theAuthentication Agent account in the policy.
. Select a certi�cate �le for authentication with a smart cardor token. This way, the user will need to enter the password for the smart card or token.
. Con�gure user access to the encrypted drive. You can, forexample, temporarily disable user authentication instead of deleting the Authentication Agent account.
. Enter an account description, if necessary.
Create a new Authentication Agent account to replace the existing account
User name
Allow password-based authentication
Allow certi�cate-based authentication
Account access to encrypted data
Comment
Start
To delete an Authentication Agent account, you need to add a special command to the Manage AuthenticationAgent accounts task. It is convenient to use a group task, for example, to delete the account of a dismissedemployee.
How to delete an Authentication Agent account through the Administration Console (MMC)

409
1. Open the properties of the Manage Authentication Agent accounts task.
2. In the task properties, select the section.
3. Click → .
4. In the window that opens, in the �eld, specify the name of the Windows user accountthat was used to create the Authentication Agent account that you want to delete.
5. If you manually entered the Windows account name, click the button to de�ne the account securityidenti�er (SID).
If you choose not to determine the security identi�er (SID) by clicking the button, it will bedetermined when the task is performed on the computer.
De�ning a Windows account security identi�er is necessary to verify that the Windows account namewas entered correctly. If the Windows account does not exist on the computer or in the trusteddomain, the Manage Authentication Agent accounts task will end with an error.
6. Save your changes.
1. In the main window of Web Console, select → .
The list of tasks opens.
2. Click the task of Kaspersky Endpoint Security.
The task properties window opens.
3. Select the tab.
4. In the list of Authentication Agent accounts, click the button.
This starts the Authentication Agent Account Management Wizard.
5. Select the command type.
6. Select a user account. You can select an account from the list of domain accounts or manually enter theaccount name.
7. Save your changes.
8. Select the check box next to the task and click the button.
Options
Add Account deletion command
Windows account
Allow
Allow
How to delete an Authentication Agent account through the Web Console
Devices Tasks
Manage Authentication Agent accounts
Application settings
Add
Remove account
Start
As a result, after the task is completed at the next computer startup, the user will not be able to completethe authentication procedure and load the operating system. Kaspersky Endpoint Security will deny accessto encrypted data.
To view the list of users who can complete authentication with the Agent and load the operating system, you needto go to the properties of the managed computer.

410
1. Open the Kaspersky Security Center Administration Console.
2. In the folder in the Administration Console tree, open the folder with the name of theadministration group to which the relevant client computers belong.
3. In the workspace, select the tab.
4. Double-click to open the computer properties window.
5. In the computer properties window, select the section.
The list of local tasks opens.
6. Select the task.
7. In the task properties, select the section.
1. In the main window of Web Console, select → .
2. Click the name of the computer on which you want to view the list of Authentication Agent accounts.
This opens the computer properties.
3. In the computer properties window, select the section.
The list of local tasks opens.
4. Select the task.
5. In the task properties, select the tab.
Use of a token or smart card is available only if the computer hard drives were encrypted using the AES256encryption algorithm. If the computer hard drives were encrypted using the AES56 encryption algorithm,addition of the electronic certi�cate �le to the command will be denied.
How to view the list of Authentication Agent accounts through the Administration Console (MMC)
Managed devices
Devices
Tasks
Manage Authentication Agent accounts
Options
As a result, you will be able to access a list of Authentication Agent accounts on this computer. Only usersfrom the list can complete authentication with the Agent and load the operating system.
How to view a list of Authentication Agent accounts through the Web Console
Devices Managed devices
Tasks
Manage Authentication Agent accounts
Application Settings
As a result, you will be able to access a list of Authentication Agent accounts on this computer. Only usersfrom the list can complete authentication with the Agent and load the operating system.
Using a token and smart card with Authentication Agent
A token or smart card can be used for authentication when accessing encrypted hard drives. To do so, you mustadd the electronic certi�cate �le of a token or smart card to the Manage Authentication Agent accounts task.

411
Kaspersky Endpoint Security supports the following tokens, smart card readers, and smart cards:
SafeNet eToken PRO 64K (4.2b)
SafeNet eToken PRO 72K Java
SafeNet eToken 4100-72K (Java)
SafeNet eToken 5100
SafeNet eToken 5105
SafeNet eToken 7300
EMC RSA SID 800
Gemalto IDPrime.NET 510
Gemalto IDPrime.NET 511
Rutoken ECP
Rutoken ECP Flash
Aladdin-RD JaCarta PKI
Athena IDProtect Laser
SafeNet eToken PRO 72K Java
Aladdin-RD JaCarta PKI
To add the �le of a token or smart card electronic certi�cate to the command for creating an AuthenticationAgent account, you must �rst save the �le using third-party software for managing certi�cates.
The token or smart-card certi�cate must have the following properties:
The certi�cate must be compliant with the X.509 standard, and the certi�cate �le must have DER encoding.
The certi�cate contains an RSA key with a length of at least 1024 bits.
If the electronic certi�cate of the token or smart card does not meet these requirements, you cannot load thecerti�cate �le into the command for creating an Authentication Agent account.
The KeyUsage parameter of the certi�cate must have the value keyEncipherment or dataEncipherment . TheKeyUsage parameter determines the purpose of the certi�cate. If the parameter has a di�erent value, KasperskySecurity Center will download the certi�cate �le but will display a warning.
If a user has lost a token or smart card, the administrator must add the �le of a token or smart card electroniccerti�cate to the command for creating an Authentication Agent account. Then the user must complete theprocedure for receiving access to encrypted devices or restoring data on encrypted devices.
Hard drive decryption
412
You can decrypt hard drives even if there is no active license permitting data encryption.
To decrypt hard drives:
1. Open the Kaspersky Security Center Administration Console.
2. In the folder in the Administration Console tree, open the folder with the name of theadministration group to which the relevant client computers belong.
3. In the workspace, select the tab.
4. Select the necessary policy and double-click to open the policy properties.
5. In the policy window, select → .
6. In the drop-down list, select the technology with which the hard drives were encrypted.
7. Do one of the following:
8. Save your changes.
Managed devices
Policies
Data Encryption Full Disk Encryption
Encryption technology
In the drop-down list, select the option if you want to decrypt allencrypted hard drives.
Add the encrypted hard drives that you want to decrypt to the table.
This option is available only for Kaspersky Disk Encryption technology.
Encryption mode Decrypt all hard drives
Do not encrypt the following hard drives
You can use the Encryption Monitor tool to control the disk encryption or decryption process on a user'scomputer. You can run the Encryption Monitor tool from the main application window.
If the user shuts down or restarts the computer during decryption of hard drives that were encrypted usingKaspersky Disk Encryption technology, the Authentication Agent loads before the next startup of the operatingsystem. Kaspersky Endpoint Security resumes hard drive decryption after successful authentication in theauthentication agent and operating system startup.
If the operating system switches to hibernation mode during decryption of hard drives that were encryptedusing Kaspersky Disk Encryption technology, Authentication Agent loads when the operating system comes outof hibernation mode. Kaspersky Endpoint Security resumes hard drive decryption after successfulauthentication in the authentication agent and operating system startup. After hard drive decryption,hibernation mode is unavailable until the �rst reboot of the operating system.
If the operating system goes into sleep mode during hard drive decryption, Kaspersky Endpoint Securityresumes hard drive decryption when the operating system comes out of sleep mode without loading theAuthentication Agent.
Restoring access to a drive protected by Kaspersky Disk Encryptiontechnology

413
Restoring access to the system hard drive
1. The user reports the request blocks to the administrator (see the �gure below).
2. The administrator enters the request blocks into Kaspersky Security Center, receives the response blocks andreports the response blocks to the user.
3. The user enters the response blocks in the Authentication Agent interface and obtains access to the harddrive.
Restoring access to a system hard drive protected by Kaspersky Disk Encryption technology
If a user has forgotten the password for accessing a hard drive protected by Kaspersky Disk Encryptiontechnology, you need to start the recovery procedure (Request-Response).
Restoring access to a system hard drive protected by Kaspersky Disk Encryption technology consists of thefollowing steps:
To start the recovery procedure, the user needs to click the button in the AuthenticationAgent interface.
Forgot your password
How to obtain response blocks for a system hard drive protected by Kaspersky Disk Encryption technology in theAdministration Console (MMC)

414
1. Open the Kaspersky Security Center Administration Console.
2. In the folder in the Administration Console tree, open the folder with the name of theadministration group to which the relevant client computers belong.
3. In the workspace, select the tab.
4. On the tab, select the computer of the user requesting access to encrypted data and right-clickto open the context menu.
5. In the context menu, select .
6. In the window that opens, select the tab.
7. In the section, select an encryption algorithm: or .
The data encryption algorithm depends on the AES encryption library that is included in the distributionpackage: Strong encryption (AES256) or Lite encryption (AES56). The AES encryption library is installedtogether with the application.
8. In the drop-down list, select the name of the Authentication Agent account of the user whorequested recovery of access to the drive.
9. In the drop-down list, select the encrypted hard drive for which you need to recover access.
10. In the section enter the blocks of request dictated by the user.
1. In the main window of Web Console, select → .
2. Select the check box next to the name of the computer whose drive you want to restore access to.
3. Click the button.
4. In the window that opens, select the section.
5. In the drop-down list, select the name of the Authentication Agent account created for the userwho is requesting recovery of the Authentication Agent account name and password.
6. Enter the request blocks conveyed by the user.
Managed devices
Devices
Devices
Grant access in o�line mode
Authentication Agent
Encryption algorithm in use AES56 AES256
Account
Hard drive
User request
As a result, the contents of the blocks of the response to the user's request for recovery of the user nameand password of an Authentication Agent account will be displayed in the �eld. Convey thecontents of the response blocks to the user.
Access key
How to obtain response blocks for a system hard drive protected by Kaspersky Disk Encryption technology in theWeb Console
Devices Managed devices
Share this device o�line
Authentication Agent
Account
The contents of the blocks of the response to the user's request for recovery of the user name andpassword of the Authentication Agent account will be displayed at the bottom of the window. Convey thecontents of the response blocks to the user.
After completing the recovery procedure, the Authentication Agent will prompt the user to change the password.

415
Restoring access to a non-system hard drive
1. The user sends a request access �le to the administrator.
2. The administrator adds the request access �le to Kaspersky Security Center, creates an access key �le andsends the �le to the user.
3. The user adds the access key �le to Kaspersky Endpoint Security and obtains access to the hard drive.
1. Open the Kaspersky Security Center Administration Console.
2. In the folder in the Administration Console tree, open the folder with the name of theadministration group to which the relevant client computers belong.
3. In the workspace, select the tab.
4. On the tab, select the computer of the user requesting access to encrypted data and right-clickto open the context menu.
5. In the context menu, select .
6. In the window that opens, select the tab.
7. On the tab, click the button.
8. In the window for selecting a request access �le, specify the path to the �le received from the user.
Restoring access to a non-system hard drive protected by Kaspersky Disk Encryption technology consists of thefollowing steps:
To start the recovery procedure, the user needs to attempt to access a hard drive. As a result, Kaspersky EndpointSecurity will create a request access �le (a �le with the KESDC extension), which the user needs to send to theadministrator, for example, by email.
How to obtain an access key �le for an encrypted non-system hard drive in the Administration Console (MMC)
Managed devices
Devices
Devices
Grant access in o�line mode
Data Encryption
Data Encryption Browse
You will see information about the user's request. Kaspersky Security Center generates a key �le. Email thegenerated encrypted data access key �le to the user. Or save the access �le and use any available methodto transfer the �le.
How to obtain an encrypted non-system hard drive access key �le in the Web Console

416
1. In the main window of Web Console, select → .
2. Select the check box next to the name of the computer whose data you want to restore access to.
3. Click the button.
4. Select the section.
5. Click the button and select the request access �le that you received from the user (a �le withthe KESDC extension).
The Web Console will display information about the request. This will include the name of the computer onwhich the user is requesting access to the �le.
6. Click the button and select a folder to save the encrypted data access key �le (a �le with theKESDR extension).
1. The operating system is updated through WSUS (Windows Server Update Services).
2. Windows 10 version 1607 (RS1) or later is installed on the computer.
3. Kaspersky Endpoint Security version 11.2.0 or later is installed on the computer.
Devices Managed devices
Share this device o�line
Data Encryption
Select �le
Save key
As a result, you will be able to obtain the encrypted data access key, which you will need to transfer to theuser.
Updating the operating system
There are a number of special considerations for updating the operating system of a computer that is protectedby Full Disk Encryption (FDE). Update the operating system as follows: �rst update the OS on one computer, thenupdate the OS on a small portion of the computers, then update the OS on all computers of the network.
If you are using Kaspersky Disk Encryption technology, Authentication Agent is loaded before the operatingsystem is started. Using Authentication Agent, the user can sign in to the system and receive access to encrypteddrives. Then the operating system begins loading.
If you start an update of the operating system on a computer that is protected using Kaspersky Disk Encryptiontechnology, the OS Update Wizard will remove Authentication Agent. As a result, the computer can be lockedbecause the OS loader will not be able to access the encrypted drive.
For details about safely updating the operating system, please refer to the Technical Support Knowledge Base .
Automatic updating of the operating system is available under the following conditions:
If all the conditions are met, you can update the operating system in the usual way.
If you are using Kaspersky Disk Encryption (FDE) technology and Kaspersky Endpoint Security for Windows version11.1.0 or 11.1.1 is installed on the computer, you do not need to decrypt the hard drives to update Windows 10.
To update the operating system, you need to do the following:

417
1. Prior to updating the system, copy the drivers named cm_km.inf, cm_km.sys, klfde.cat, klfde.inf, klfde.sys,klfdefsf.cat, klfdefsf.inf, and klfdefsf.sys to a local folder. For example, C:\fde_drivers.
2. Run the system update installation with the /ReflectDrivers switch and specify the folder containing thesaved drivers:
setup.exe /ReflectDrivers C:\fde_drivers
To eliminate errors that occurred when you start update process of the Full Disk Encryption functionality in thenew application version:
1. Decrypt hard drives.
2. Encrypt hard drives once again.
To eliminate errors that occurred during update process of the Full Disk Encryption functionality,
To select the Authentication Agent tracing level:
1. As soon as a computer with encrypted hard drives starts, press the button to call up a window forcon�guring Authentication Agent settings.
2. Select the tracing level in the Authentication Agent settings window:
If you are using BitLocker Drive Encryption technology, you do not need to decrypt the hard drives to updateWindows 10. For more details on BitLocker, please visit the Microsoft website .
Eliminating errors of encryption functionality update
Full Disk Encryption is updated when a previous version of the application is upgraded to Kaspersky EndpointSecurity for Windows 11.6.0.
When starting update of the Full Disk Encryption functionality the following errors may occur:
Unable to initialize update.
Device is incompatible with Authentication Agent.
During update of the Full Disk Encryption functionality the following errors may occur:
Unable to complete the update.
Full Disk Encryption upgrade rollback completed with an error.
restore access to encrypted devices using Restore Utility.
Selecting the Authentication Agent tracing level
The application logs service information about the operation of the Authentication Agent and information aboutthe user's operations with the Authentication Agent in the trace �le.
F3
. If this option is selected, the application does not log information aboutAuthentication Agent events in the trace �le.Disable debug logging (default)

418
Before editing help messages of the Authentication Agent, please review the list of supported characters in apreboot environment (see below).
To edit Authentication Agent help messages:
1. Open the Kaspersky Security Center Administration Console.
2. In the folder in the Administration Console tree, open the folder with the name of theadministration group to which the relevant client computers belong.
3. In the workspace, select the tab.
4. Select the necessary policy and double-click to open the policy properties.
5. In the policy window, select → .
6. In the section, click the button.
. If this option is selected, the application logs information about the operation of theAuthentication Agent and the user operations performed with the Authentication Agent in the trace �le.
. If this option is selected, the application logs detailed information about theoperation of the Authentication Agent and the user operations performed with the Authentication Agent inthe trace �le.
The level of detail of entries under this option is higher compared to the level of the option. A high level of detail of entries can slow down the startup of the Authentication Agent
and the operating system.
. If this option is selected, the application logs informationabout the operation of the Authentication Agent and the user operations performed with theAuthentication Agent in the trace �le, and relays it via the COM port.
If a computer with encrypted hard drives is connected to another computer via the COM port,Authentication Agent events can be examined from this other computer.
. If this option is selected, the application logs detailedinformation about the operation of the Authentication Agent and the user operations performed with theAuthentication Agent in the trace �le, and relays it via the COM port.
The level of detail of entries under this option is higher compared to the level of the option. A high level of detail of entries can slow down the startup of the
Authentication Agent and the operating system.
Enable debug logging
Enable verbose logging
Enable debuglogging
Enable debug logging and select serial port
Enable verbose debug logging and select serial port
Enable debuglogging and select serial port
Data is recorded in the Authentication Agent trace �le if there are encrypted hard drives on the computer orduring full disk encryption.
The Authentication Agent trace �le is not sent to Kaspersky, unlike other trace �les of the application. If necessary,you can manually send the Authentication Agent trace �le to Kaspersky for analysis.
Editing Authentication Agent help texts
Managed devices
Policies
Data Encryption Common Encryption Settings
Templates Help

419
This opens the window.
7. Do the following:
8. Edit help messages.
If you want to restore the original text, click the button.
You can enter help text containing 16 lines or less. The maximum length of a line is 64 characters.
9. Save your changes.
Limited support for characters in Authentication Agent help messages
Authentication Agent help messages
Select the tab to edit the help text shown in the Authentication Agent window whenaccount credentials are being entered.
Select the tab to edit the help text shown in the Authentication Agent window when thepassword for the Authentication Agent account is being changed.
Select the tab to edit the help text shown in the Authentication Agent window when thepassword for the Authentication Agent account is being recovered.
Authentication
Change password
Recover password
By default
In a preboot environment, the following Unicode characters are supported:
Basic Latin alphabet (0000 - 007F)
Additional Latin-1 characters (0080 - 00FF)
Extended Latin-A (0100 - 017F)
Extended Latin-B (0180 - 024F)
Uncombined extended ID characters (02B0 - 02FF)
Combined diacritical marks (0300 - 036F)
Greek and Coptic alphabets (0370 - 03FF)
Cyrillic (0400 - 04FF)
Hebrew (0590 - 05FF)
Arabic script (0600 - 06FF)
Additional extended Latin (1E00 - 1EFF)
Punctuation marks (2000 - 206F)
Currency symbols (20A0 - 20CF)
Letter-like symbols (2100 - 214F)
Geometric �gures (25A0 - 25FF)

420
To use a Kaspersky Security Center policy to remove objects and data that remained after test operation ofAuthentication Agent:
1. Apply to the computer a Kaspersky Security Center policy with settings con�gured to decrypt all computerhard drives.
2. Start Kaspersky Endpoint Security.
To remove information about application incompatibility with Authentication Agent,
Presentation forms of Arabic script-B (FE70 - FEFF)
Characters that are not speci�ed in this list are not supported in a preboot environment. It is not recommended touse such characters in Authentication Agent help messages.
Removing leftover objects and data after testing the operation ofAuthentication Agent
During application uninstallation, if Kaspersky Endpoint Security detects objects and data that remained on thesystem hard drive after test operation of Authentication Agent, application uninstallation is interrupted andbecomes impossible until such objects and data are removed.
Objects and data may remain on the system hard drive after test operation of Authentication Agent only inexceptional cases. For example, this can happen if the computer has not been restarted after a Kaspersky SecurityCenter policy with encryption settings was applied, or if the application fails to start after test operation ofAuthentication Agent.
You can remove objects and data that remained on the system hard drive after test operation of AuthenticationAgent in the following ways:
Using the Kaspersky Security Center policy.
using Restore Utility.
type the avp pbatestreset command in the command line.
BitLocker Management
BitLocker is an encryption technology built into Windows operating systems. Kaspersky Endpoint Security allowsyou to control and manage Bitlocker using Kaspersky Security Center. BitLocker encrypts logical volumes.BitLocker cannot be used for encryption of removable drives. For more details on BitLocker, refer to Microsoftdocumentation .
BitLocker provides secure storage of access keys using a trusted platform module. A Trusted Platform Module(TPM) is a microchip developed to provide basic functions related to security (for example, to store encryptionkeys). A Trusted Platform Module is usually installed on the computer motherboard and interacts with all othersystem components via the hardware bus. Using TPM is the safest way to store BitLocker access keys, since TPMprovides pre-startup system integrity veri�cation. You can still encrypt drives on a computer without a TPM. In thiscase, the access key will be encrypted with a password. BitLocker uses the following authentication methods:
TPM.

421
If you are using Windows group policies, turn o� BitLocker management in the policy settings. Windows policysettings may con�ict with Kaspersky Endpoint Security policy settings. When encrypting a drive, errors mayoccur.
Prior to starting full disk encryption, you are advised to make sure that the computer is not infected. To do so,start the Full Scan or Critical Areas Scan task. Performing full disk encryption on a computer that is infectedby a rootkit may cause the computer to become inoperable.
To use BitLocker Drive Encryption on computers running Windows operating systems for servers, installing theBitLocker Drive Encryption component may be required. Install the component using the operating systemtools (Add Roles and Components Wizard). For more information about installing BitLocker Drive Encryption,refer to the Microsoft documentation .
TPM and PIN.
Password.
After encrypting a drive, BitLocker creates a master key. Kaspersky Endpoint Security sends the master key toKaspersky Security Center so that you can restore access to the disk, for example, if a user has forgotten thepassword.
If a user encrypts a disk using BitLocker, Kaspersky Endpoint Security will send information about disk encryptionto Kaspersky Security Center. However, Kaspersky Endpoint Security will not send the master key to KasperskySecurity Center, so it will be impossible to restore access to the disk using Kaspersky Security Center. ForBitLocker to work correctly with Kaspersky Security Center, decrypt the drive and re-encrypt the drive using apolicy. You can decrypt a drive locally or using a policy.
After encrypting the system hard drive, the user needs to go through BitLocker authentication to boot theoperating system. After the authentication procedure, BitLocker will allow for users to log in. BitLocker does notsupport single sign-on technology (SSO).
Starting BitLocker Drive Encryption
How to run BitLocker Drive Encryption through the Administration Console (MMC)

422
1. Open the Kaspersky Security Center Administration Console.
2. In the folder in the Administration Console tree, open the folder with the name of theadministration group to which the relevant client computers belong.
3. In the workspace, select the tab.
4. Select the necessary policy and double-click to open the policy properties.
5. In the policy window, select → .
6. In the drop-down list, select .
7. In the drop-down list, select .
If the computer has several operating systems installed, after encryption you will be able to load onlythe operating system in which the encryption was performed.
8. Con�gure advanced BitLocker Drive Encryption options (see table below).
9. Save your changes.
1. In the main window of Web Console, select → .
2. Click the name of Kaspersky Endpoint Security policy for the computers for which you want to startBitLocker Drive Encryption.
The policy properties window opens.
3. Select the tab.
4. Go to → .
5. In the section, select .
6. Click the link.
This opens the Bitlocker Drive Encryption settings window.
7. In the drop-down list, select .
If the computer has several operating systems installed, after encryption you will be able to load onlythe operating system in which the encryption was performed.
8. Con�gure advanced BitLocker Drive Encryption options (see table below).
9. Click .
Managed devices
Policies
Data Encryption Full Disk Encryption
Encryption technology BitLocker Drive Encryption
Encryption mode Encrypt all hard drives
How to run BitLocker Drive Encryption through the Web Console and Cloud Console
Devices Policies and pro�les
Application settings
Data Encryption Full Disk Encryption
Manage encryption BitLocker Drive Encryption
BitLocker Drive Encryption
Encryption mode Encrypt all hard drives
OK

423
If the Federal Information Processing standard compatibility mode is enabled for computer operating system,then in Windows 8 and earlier versions of operating system, a request for connecting a storage device isdisplayed to save the recovery key �le. You can save multiple recovery key �les on a single storage device.
BitLocker Drive Encryption component settings
Parameter Description
This check box enables / disables the use of authentication requiring data input in apreboot environment, even if the platform does not have the capability for prebootinput (for example, with touchscreen keyboards on tablets).
The touchscreen of tablet computers is not available in the preboot environment.To complete BitLocker authentication on tablet computers, the user must connecta USB keyboard, for example.
If the check box is selected, use of authentication requiring preboot input is allowed. Itis recommended to use this setting only for devices that have alternative data inputtools in a preboot environment, such as a USB keyboard in addition to touchscreenkeyboards.
If the check box is cleared, BitLocker Drive Encryption is not possible on tablets.
If the check box is selected, the application applies hardware encryption. This lets youincrease the speed of encryption and use less computer resources.
This check box enables / disables the option that limits the encryption area to onlyoccupied hard drive sectors. This limit lets you reduce encryption time.
Enabling or disabling the feature after starting encryption does not modify this setting until the hard
drives are decrypted. You must select or clear the check box before startingencryption.
You can use the Encryption Monitor tool to control the disk encryption or decryption process on a user'scomputer. You can run the Encryption Monitor tool from the main application window.
After the policy is applied, the application will display the following queries, depending on the authenticationsettings:
TPM only. No user input required. The disk will be encrypted when the computer restarts.
TPM + PIN / Password. If a TPM module is available, a PIN code prompt window appears. If a TPM module is notavailable, you will see a password prompt window for preboot authentication.
Password only. You will see a password prompt window for preboot authentication.
After setting a password or a PIN, BitLocker will ask you to restart your computer to complete the encryption.Next, the user needs to go through the BitLocker authentication procedure. After the authentication procedure,the user must log on to the system. After the operating system has loaded, BitLocker will complete the encryption.
If there is no access to encryption keys, the user may request the local network administrator to provide arecovery key (if the recovery key was not saved earlier on the storage device or was lost).
Enable use ofBitLockerauthenticationrequiringprebootkeyboard inputon slates
Use hardwareencryption(Windows 8 andlater versions)
Encrypt useddisk space only(Windows 8 andlater versions)
Encrypt used disk space only (reduces encryptiontime)

424
If the check box is selected, only portions of the hard drive that are occupied by �lesare encrypted. Kaspersky Endpoint Security automatically encrypts new data as it isadded.
If the check box is cleared, the entire hard drive is encrypted, including residualfragments of previously deleted and modi�ed �les.
This option is recommended for new hard drives whose data has not beenmodi�ed or deleted. If you are applying encryption on a hard drive that is already inuse, it is recommended to encrypt the entire hard drive. This ensures protection ofall data, even deleted data that is potentially recoverable.
This check box is cleared by default.
If this option is selected, Kaspersky Endpoint Security prompts the user for a passwordwhen the user attempts to access an encrypted drive.
This option can be selected when a Trusted Platform Module (TPM) is not being used.
If this option is selected, BitLocker uses a Trusted Platform Module (TPM).
A Trusted Platform Module (TPM) is a microchip developed to provide basic functionsrelated to security (for example, to store encryption keys). A Trusted Platform Moduleis usually installed on the computer motherboard and interacts with all other systemcomponents via the hardware bus.
For computers running Windows 7 or Windows Server 2008 R2, only encryptionusing a TPM module is available. If a TPM module is not installed, BitLockerencryption is not possible. Use of a password on these computers is notsupported.
A device equipped with a Trusted Platform Module can create encryption keys that canbe decrypted only with the device. A Trusted Platform Module encrypts encryptionkeys with its own root storage key. The root storage key is stored within the TrustedPlatform Module. This provides an additional level of protection against attempts tohack encryption keys.
This action is selected by default.
You can set an additional layer of protection for access to the encryption key, andencrypt the key with a password or a PIN:
. If this check box is selected, a user can use of a PIN code toobtain access to an encryption key that is stored in a Trusted Platform Module(TPM).If this check box is cleared, users are prohibited from using PIN codes. To access theencryption key, a user must enter the password.You can allow the user to use enhanced PIN. Enhanced PIN allows using othercharacters in addition to numerical characters: uppercase and lowercase Latinletters, special characters, and spaces.
. If thecheck box is selected, the user can use a password to obtain access to encryptionkeys when a Trusted Platform Module (TPM) is not available.If the check box is cleared and the TPM is not available, full disk encryption will notstart.
Authenticationsettings
Use password (Windows 8 and later versions)
Use Trusted Platform Module (TPM)
Use PIN for TPM
Use Trusted Platform Module (TPM); if it is unavailable - use password

425
1. Open the Kaspersky Security Center Administration Console.
2. In the folder in the Administration Console tree, open the folder with the name of theadministration group to which the relevant client computers belong.
3. In the workspace, select the tab.
4. Select the necessary policy and double-click to open the policy properties.
5. In the policy window, select → .
6. In the drop-down list, select .
7. In the drop-down list, select .
8. Save your changes.
1. In the main window of Web Console, select the → tab.
2. Click the name of Kaspersky Endpoint Security policy for the computers for which you want to decrypthard drives.
The policy properties window opens.
3. Select the tab.
4. Go to → .
5. Select the technology and follow the link to con�gure the settings.
The encryption settings open.
6. In the drop-down list, select .
7. Click .
Decrypting a hard drive protected by BitLocker
Users can decrypt a disk using the operating system (the Turn O� BitLocker function). After that, KasperskyEndpoint Security will prompt the user to encrypt the disk again. Kaspersky Endpoint Security will be prompting toencrypt the disk unless you enable disk decryption in the policy.
How to decrypt a hard drive protected by BitLocker through the Administration Console (MMC)
Managed devices
Policies
Data Encryption Full Disk Encryption
Encryption technology BitLocker Drive Encryption
Encryption mode Decrypt all hard drives
How to decrypt a BitLocker-encrypted hard drive through the Web Console and Cloud Console
Devices Policies and pro�les
Application settings
Data Encryption Full Disk Encryption
BitLocker Drive Encryption
Encryption mode Decrypt all hard drives
OK
You can use the Encryption Monitor tool to control the disk encryption or decryption process on a user'scomputer. You can run the Encryption Monitor tool from the main application window.

426
If the computer's operating system has Federal Information Processing standard (FIPS) compatibility modeenabled, then in Windows 8 and older the recovery key �le is saved to the removable drive before encryption.To restore access to the drive, insert the removable drive and follow the on-screen instructions.
1. The user tells the administrator the recovery key ID (see the �gure below).
2. The administrator veri�es the ID of the recovery key in the computer properties in Kaspersky Security Center.The ID that the user provided must match the ID that is displayed in the computer properties.
3. If the recovery key IDs match, the administrator provides the user with the recovery key or sends a recovery key�le.
A recovery key �le is used for computers running the following operating systems:
For all other operating systems, a recovery key is used.
4. The user enters the recovery key and gains access to the hard drive.
Restoring access to a drive protected by BitLocker
If a user has forgotten the password for accessing a hard drive encrypted by BitLocker, you need to start therecovery procedure (Request-Response).
Restoring access to a hard drive encrypted by BitLocker consists of the following steps:
Windows 7
Windows 8
Windows Server 2008
Windows Server 2011
Windows Server 2012

427
Restoring access to a hard drive encrypted by BitLocker
Restoring access to a system drive
1. Open the Kaspersky Security Center Administration Console.
2. In the folder in the Administration Console tree, open the folder with the name of theadministration group to which the relevant client computers belong.
3. In the workspace, select the tab.
4. On the tab, select the computer of the user requesting access to encrypted data and right-clickto open the context menu.
5. In the context menu, select .
6. In the window that opens, select the tab.
7. Prompt the user for the recovery key ID indicated in the BitLocker password input window, and compare itwith the ID in the �eld.
If the IDs do not match, this key is not valid for restoring access to the speci�ed system drive. Makesure that the name of the selected computer matches the name of the user's computer.
To start the recovery procedure, the user needs to press the key at the pre-boot authentication stage.Esc
How to view the recovery key for a system drive encrypted by BitLocker in the Administration Console (MMC)
Managed devices
Devices
Devices
Grant access in o�line mode
Access to a BitLocker-protected system drive
Recovery key ID
As a result, you will have access to the recovery key or �le of the recovery key, which will need to betransferred to the user.
How to view the recovery key for a BitLocker-encrypted system drive in the Web Console and Cloud Console

428
1. In the main window of Web Console, select → .
2. Select the check box next to the name of the computer whose drive you want to restore access to.
3. Click the button.
4. In the window that opens, select the section.
5. Verify the recovery key ID. The ID provided by the user must match the ID that is displayed in the computersettings.
If the IDs do not match, this key is not valid for restoring access to the speci�ed system drive. Makesure that the name of the selected computer matches the name of the user's computer.
6. Click the button.
Windows 7 computers don't allow changing the password or PIN code. After the recovery key is entered andthe operating system is loaded, Kaspersky Endpoint Security won't prompt the user to change the passwordor PIN code. Thus, it is impossible to set a new password or a PIN code. This issue stems from the peculiaritiesof the operating system. To continue, you need to re-encrypt the hard drive.
Restoring access to a non-system drive
Devices Managed devices
Share this device o�line
BitLocker
Receive key
As a result, you will have access to the recovery key or �le of the recovery key, which will need to betransferred to the user.
After the operating system is loaded, Kaspersky Endpoint Security prompts the user to change the password orPIN code. After you set a new password or PIN code, BitLocker will create a new master key and send the key toKaspersky Security Center. As a result, the recovery key and recovery key �le will be updated. If the user has notchanged the password, you can use the old recovery key the next time the operating system loads.
To start the recovery procedure, the user needs to click the link in the window providingaccess to the drive. After gaining access to the encrypted drive, the user can enable automatic unlocking of thedrive during Windows authentication in the BitLocker settings.
Forgot your password
How to view the recovery key for a non-system drive encrypted by BitLocker in the Administration Console(MMC)

429
1. Open the Kaspersky Security Center Administration Console.
2. In the Administration Console tree, select the → → folder.
3. In the workspace, select the encrypted device for which you want to create an access key �le, and select in the device context
menu.
4. Prompt the user for the recovery key ID indicated in the BitLocker password input window, and compare itwith the ID in the �eld.
If the IDs do not match, this key is not valid for restoring access to the speci�ed drive. Make sure thatthe name of the selected computer matches the name of the user's computer.
5. Send the user the key that is indicated in the �eld.
1. In the main window of the Web Console, select → →.
2. Select the check box next to the name of the computer whose drive you want to restore access to.
3. Click the button.
This starts the Wizard for granting access to a device.
4. Follow the instructions of the Wizard for granting access to a device:
a. Select the plug-in.
b. Verify the recovery key ID. The ID provided by the user must match the ID that is displayed in thecomputer settings.
If the IDs do not match, this key is not valid for restoring access to the speci�ed system drive. Makesure that the name of the selected computer matches the name of the user's computer.
c. Click the button.
Additional Data encryption and protectionEncrypted devices
Get access to the device in Kaspersky Endpoint Security for Windows (11.6.0)
Recovery key ID
Recovery key
How to view the recovery key for a BitLocker-encrypted non-system drive in the Web Console and Cloud Console
Operations Data encryption and protectionEncrypted devices
Share this device o�line
Kaspersky Endpoint Security for Windows
Receive key
As a result, you will have access to the recovery key or �le of the recovery key, which will need to betransferred to the user.
File Level Encryption on local computer drives

430
This component is available if Kaspersky Endpoint Security is installed on a computer that runs on Windowsfor workstations. This component is unavailable if Kaspersky Endpoint Security is installed on a computer thatruns on Windows for servers.
Kaspersky Endpoint Security does not encrypt �les whose contents are located in OneDrive cloud storage,and blocks the encrypted �les from copying to OneDrive cloud storage, if these �les are not added todecryption rule.
To encrypt �les on local drives:
1. Open the Kaspersky Security Center Administration Console.
2. In the folder in the Administration Console tree, open the folder with the name of theadministration group to which the relevant client computers belong.
3. In the workspace, select the tab.
4. Select the necessary policy and double-click to open the policy properties.
5. In the policy window, select → .
6. In the right part of the window, select the tab.
7. In the drop-down list, select the item.
8. On the tab, click the button, and in the drop-down list select one of the following items:
a. Select the item to add �les from folders of local user pro�les suggested by Kasperskyexperts to an encryption rule.
File encryption has the following special features:
Kaspersky Endpoint Security encrypts / decrypts �les in prede�ned folders only for local user pro�les of theoperating system. Kaspersky Endpoint Security does not encrypt or decrypt �les in prede�ned folders ofroaming user pro�les, mandatory user pro�les, temporary user pro�les, or redirected folders.
Kaspersky Endpoint Security does not encrypt �les whose modi�cation could harm the operating system andinstalled applications. For example, the following �les and folders with all nested folders are on the list ofencryption exclusions:
The list of encryption exclusions cannot be viewed or edited. While �les and folders on the list of encryptionexclusions can be added to the encryption list, they will not be encrypted during �le encryption.
%WINDIR%;
%PROGRAMFILES% and %PROGRAMFILES(X86)%;
Windows registry �les.
Encrypting �les on local computer drives
Managed devices
Policies
Data Encryption File Level Encryption
Encryption
Encryption mode According to rules
Encryption Add
Prede�ned folders

431
b. Select the item to add a manually entered folder path to an encryption rule.
When adding a folder path, adhere to the following rules:
c. Select the item to add individual �le extensions to an encryption rule. Kaspersky EndpointSecurity encrypts �les with the speci�ed extensions on all local drives of the computer.
d. Select the item to add groups of �le extensions to an encryption rule (forexample, Microsoft O�ice Documents). Kaspersky Endpoint Security encrypts �les that have the extensionslisted in the groups of extensions on all local drives of the computer.
9. Save your changes.
. Files in the standard Documents folder of the operating system, and its subfolders.
. Files in the standard Favorites folder of the operating system, and its subfolders.
. Files in the standard Desktop folder of the operating system, and its subfolders.
. Temporary �les related to the operation of applications installed on the computer. Forexample, Microsoft O�ice applications create temporary �les containing backup copies of documents.
. Files related to the operation of the Outlook mail client: data �les (PST), o�line data �les(OST), o�line address book �les (OAB), and personal address book �les (PAB).
Documents
Favorites
Desktop
Temporary �les
Outlook �les
Custom folder
Use an environment variable (for example, %FOLDER%\UserFolder\ ). You can use an environmentvariable only once and only at the beginning of the path.
Do not use relative paths. You can use the set \..\ (e.g. C:\Users\..\UserFolder\ ). The set \..\denotes the transition to the parent folder.
Do not use the * and ? characters.
Do not use UNC paths.
Use ; or , as a separator character.
Files by extension
Files by groups of extensions
As soon as the policy is applied, Kaspersky Endpoint Security encrypts the �les that are included in theencryption rule and not included in the decryption rule.
File encryption has the following special features:
If the same �le is added to both an encryption rule and a decryption rule, then Kaspersky Endpoint Securityperforms the following actions:
Kaspersky Endpoint Security continues to encrypt new �les if these �les meet the criteria of the encryptionrule. For example, when you change the properties of an unencrypted �le (path or extension), the �le thenmeets the criteria of the encryption rule. Kaspersky Endpoint Security encrypts this �le.
When the user creates a new �le whose properties meet the encryption rule criteria, Kaspersky EndpointSecurity encrypts the �le as soon as it is opened.
Kaspersky Endpoint Security postpones the encryption of open �les until they are closed.
If the �le is not encrypted, Kaspersky Endpoint Security does not encrypt this �le.
If the �le is encrypted, Kaspersky Endpoint Security decrypts this �le.
432
To form encrypted �le access rules for applications:
1. Open the Kaspersky Security Center Administration Console.
2. In the folder in the Administration Console tree, open the folder with the name of theadministration group to which the relevant client computers belong.
3. In the workspace, select the tab.
4. Select the necessary policy and double-click to open the policy properties.
5. In the policy window, select → .
6. In the drop-down list, select the item.
Access rules are applied only when in the mode. After applying access rules in mode, if you switch to , mode, Kaspersky Endpoint Security will
ignore all access rules. All applications will have access to all encrypted �les.
7. In the right part of the window, select the tab.
8. If you want to select applications exclusively from the Kaspersky Security Center list, click the button andin the drop-down list select the item.
a. Specify the �lters to narrow down the list of applications in the table. To do so, specify the values of the, , and parameters, and all check boxes from the section.
b. Click the button.
c. The table lists applications that match the applied �lters.
d. In the column, select check boxes opposite the applications for which you want to formencrypted �le access rules.
e. In the drop-down list, select the rule that will determine the access of applications toencrypted �les.
f. In the drop-down list, select the action to be taken byKaspersky Endpoint Security on encrypted �le access rules that were previously formed for suchapplications.
g. Click .
If you move an encrypted �le to another folder on the local drive, the �le remains encrypted regardless ofwhether or not this folder is included in the encryption rule.
If you decrypt a �le and copy it to another local folder that is not included in the decryption rule, a copy of the�le may be encrypted. To prevent the copied �le from being encrypted, create a decryption rule for the targetfolder.
Forming encrypted �le access rules for applications
Managed devices
Policies
Data Encryption File Level Encryption
Encryption mode According to rules
According to rulesAccording to rules Leave unchanged
Rules for applications
AddApplications from Kaspersky Security Center list
Application Vendor Period added Group
Refresh
Applications
Rule for applications
Actions for applications that were selected earlier
OK

433
The details of an encrypted �le access rule for applications appear in the table on the tab.
9. If you want to manually select applications, click the button and in the drop-down list select the item.
a. In the entry �eld, type the name or list of names of executable application �les, including their extensions.
You can also add the names of executable �les of applications from the Kaspersky Security Center list byclicking the button.
b. If required, in the �eld, enter a description of the list of applications.
c. In the drop-down list, select the rule that will determine the access of applications toencrypted �les.
d. Click .
The details of an encrypted �le access rule for applications appear in the table on the tab.
10. Save your changes.
Files that were created or modi�ed by the speci�ed applications before the encryption rule was applied willnot be encrypted.
To con�gure encryption of �les that are created or modi�ed by speci�c applications:
1. Open the Kaspersky Security Center Administration Console.
2. In the folder in the Administration Console tree, open the folder with the name of theadministration group to which the relevant client computers belong.
3. In the workspace, select the tab.
4. Select the necessary policy and double-click to open the policy properties.
5. In the policy window, select → .
6. In the drop-down list, select the item.
Encryption rules are applied only in mode. After applying encryption rules in mode, if you switch to , mode, Kaspersky Endpoint Security will ignore all
encryption rules. Files that were previously encrypted will remain encrypted.
7. In the right part of the window, select the tab.
Rules for applications
Add Customapplications
Add from Kaspersky Security Center list
Description
Rule for applications
OK
Rules for applications
Encrypting �les that are created or modi�ed by speci�c applications
You can create a rule by which Kaspersky Endpoint Security will encrypt all �les created or modi�ed by theapplications speci�ed in the rule.
Managed devices
Policies
Data Encryption File Level Encryption
Encryption mode According to rules
According to rules Accordingto rules Leave unchanged
Rules for applications

434
8. If you want to select applications exclusively from the Kaspersky Security Center list, click the button andin the drop-down list select the item.
The window opens.
Do the following:
a. Specify the �lters to narrow down the list of applications in the table. To do so, specify the values of the, , and parameters, and all check boxes from the section.
b. Click the button.
The table lists applications that match the applied �lters.
c. In the column, select the check boxes next to the applications whose created �les you want toencrypt.
d. In the drop-down list, select .
e. In the drop-down list, select the action to be taken byKaspersky Endpoint Security on �le encryption rules that were previously formed for such applications.
f. Click .
Information about the encryption rule for �les created or modi�ed by the selected applications appears in thetable on the tab.
9. If you want to manually select applications, click the button and in the drop-down list select the item.
The window opens.
Do the following:
a. In the entry �eld, type the name or list of names of executable application �les, including their extensions.
You can also add the names of executable �les of applications from the Kaspersky Security Center list byclicking the button.
b. If required, in the �eld, enter a description of the list of applications.
c. In the drop-down list, select .
d. Click .
Information about the encryption rule for �les created or modi�ed by the selected applications appears in thetable on the tab.
10. Save your changes.
To generate a decryption rule:
1. Open the Kaspersky Security Center Administration Console.
2. In the folder in the Administration Console tree, open the folder with the name of theadministration group to which the relevant client computers belong.
AddApplications from Kaspersky Security Center list
Add applications from Kaspersky Security Center list
Application Vendor Period added Group
Refresh
Applications
Rule for applications Encrypt all created �les
Actions for applications that were selected earlier
OK
Rules for applications
Add Customapplications
Add / edit names of the executable �les of applications
Add from Kaspersky Security Center list
Description
Rule for applications Encrypt all created �les
OK
Rules for applications
Generating a decryption rule
Managed devices

435
3. In the workspace, select the tab.
4. Select the necessary policy and double-click to open the policy properties.
5. In the policy window, select → .
6. In the right part of the window, select the tab.
7. In the drop-down list, select the item.
8. On the tab, click the button, and in the drop-down list select one of the following items:
a. Select the item to add �les from folders of local user pro�les suggested by Kasperskyexperts to a decryption rule.
b. Select the item to add a manually entered folder path to a decryption rule.
c. Select the item to add individual �le extensions to a decryption rule. Kaspersky EndpointSecurity does not encrypt �les with the speci�ed extensions on all local drives of the computer.
d. Select the item to add groups of �le extensions to a decryption rule (forexample, Microsoft O�ice Documents). Kaspersky Endpoint Security does not encrypt �les that have theextensions listed in the groups of extensions on all local drives of the computer.
9. Save your changes.
If the same �le has been added to the encryption rule and the decryption rule, Kaspersky Endpoint Securitydoes not encrypt this �le if it is not encrypted, and decrypts the �le if it is encrypted.
To decrypt �les on local drives:
1. Open the Kaspersky Security Center Administration Console.
2. In the folder in the Administration Console tree, open the folder with the name of theadministration group to which the relevant client computers belong.
3. In the workspace, select the tab.
4. Select the necessary policy and double-click to open the policy properties.
5. In the policy window, select → .
6. In the right part of the window, select the tab.
7. Remove �les and folders that you want to decrypt from the encryption list. To do so, select �les and select the item in the context menu of the button.
You can delete several items from the encryption list at once. To do so, while holding down the key, selectthe �les you need by left-clicking them and select the item in the context menuof the button.
Files and folders removed from the encryption list are automatically added to the decryption list.
Policies
Data Encryption File Level Encryption
Decryption
Encryption mode According to rules
Decryption Add
Prede�ned folders
Custom folder
Files by extension
Files by groups of extensions
Decrypting �les on local computer drives
Managed devices
Policies
Data Encryption File Level Encryption
Encryption
Delete rule and decrypt �les Remove
CTRLDelete rule and decrypt �les
Remove

436
8. Form a �le decryption list.
9. Save your changes.
1. Open the Kaspersky Security Center Administration Console.
2. In the folder in the Administration Console tree, open the folder with the name of theadministration group to which the relevant client computers belong.
3. In the workspace, select the tab.
4. Select the necessary policy and double-click to open the policy properties.
5. In the policy window, select → .
6. In the block, click the button.
7. In the window that opens, select the tab.
8. Con�gure password complexity settings when creating encrypted packages.
As soon as the policy is applied, Kaspersky Endpoint Security decrypts encrypted �les that are added to thedecryption list.
Kaspersky Endpoint Security decrypts encrypted �les if their parameters (�le path / �le name / �le extension)change to match the parameters of objects added to the decryption list.
Kaspersky Endpoint Security postpones the decryption of open �les until they are closed.
Creating encrypted packages
To protect your data when sending �les to users outside the corporate network, you can use encrypted packages.Encrypted packages can be convenient for transferring large �les on removable drives, as email clients have �lesize restrictions.
Before creating encrypted packages, Kaspersky Endpoint Security will prompt the user for a password. To reliablyprotect the data, you can enable password strength check and specify password strength requirements. This willprevent users from using short and simple passwords, for example, 1234 .
How to enable password strength check when creating encrypted archives in the Administration Console (MMC)
Managed devices
Policies
Data Encryption Common Encryption Settings
Password settings Settings
Encrypted packages
How to enable password strength check when creating encrypted archives in the Web Console

437
1. In the main window of Web Console, select → .
2. Click the name of the Kaspersky Endpoint Security policy for the computers on which you want to enablepassword strength check.
The policy properties window opens.
3. Select the tab.
4. Go to → .
5. In the block, con�gure the password strength criteria requiredwhen creating encrypted packages.
When adding a �le to the encrypted package whose contents reside in OneDrive cloud storage, KasperskyEndpoint Security downloads the contents of the �le and performs encryption.
To create an encrypted package:
1. In any �le manager, select the �les or folders that you want to add to the encrypted package. Right-click toopen their context menu.
2. In the context menu, select (see �gure below).
3. In the window that opens, select a location on a removable drive to save the encrypted package → specify thepackage name and click the button.
4. In the window that opens, specify the password and con�rm it.
The password must meet the complexity criteria speci�ed in the policy.
5. Click the button.
Creating an encrypted package
Devices Policies and pro�les
Application settings
Data Encryption File Level Encryption
Encrypted package password settings
You can create encrypted packages on computers with Kaspersky Endpoint Security installed with File LevelEncryption available.
New encrypted package
Save
Create
The encrypted package creation process starts. Kaspersky Endpoint Security does not perform �lecompression when it creates an encrypted package. When the process �nishes, a self-extracting password-protected encrypted package (an executable �le with .exe extension – ) is created in the selected destinationfolder.

438
1. The user sends a request access �le to the administrator (see the �gure below).
2. The administrator adds the request access �le to Kaspersky Security Center, creates an access key �le andsends the �le to the user.
3. The user adds the access key �le to Kaspersky Endpoint Security and gains access to the �les.
To access �les in an encrypted package, double-click it to start the Unpacking Wizard, then enter the password. Ifyou forgot or lost your password, it is not possible to recover it and access the �les in the encrypted package. Youcan recreate the encrypted package.
Restoring access to encrypted �les
When �les are encrypted, Kaspersky Endpoint Security receives an encryption key required for directly accessingthe encrypted �les. Using this encryption key, a user working under any Windows user account that was activeduring �le encryption can directly access the encrypted �les. Users working under Windows accounts that wereinactive during �le encryption must connect to Kaspersky Security Center in order to access the encrypted �les.
Encrypted �les may be inaccessible under the following circumstances:
The user's computer stores encryption keys, but there is no connection with Kaspersky Security Center formanaging them. In this case, the user must request access to encrypted �les from the LAN administrator.
If access to Kaspersky Security Center does not exist, you must:
Encryption components are deleted from the user's computer. In this event, the user may open encrypted �leson local and removable disks but the contents of those �les will appear encrypted.
The user may work with encrypted �les under the following circumstances:
request an access key for access to encrypted �les on computer hard drives;
to access encrypted �les that are stored on removable drives, request separate access keys for encrypted�les on each removable drive.
Files are placed inside encrypted packages created on a computer with Kaspersky Endpoint Securityinstalled.
Files are stored on removable drives on which portable mode has been allowed.
To gain access to encrypted �les, the user needs to start the recovery procedure (Request-Response).
Recovering access to encrypted �les consists of the following steps:

439
Restoring access to encrypted �les
Kaspersky Endpoint Security generates a request access �le for access to all encrypted �les stored on thecomputer's drive (local drive or removable drive).
1. Open the Kaspersky Security Center Administration Console.
2. In the folder in the Administration Console tree, open the folder with the name of theadministration group to which the relevant client computers belong.
3. In the workspace, select the tab.
4. On the tab, select the computer of the user requesting access to encrypted data and right-clickto open the context menu.
5. In the context menu, select .
6. In the window that opens, select the tab.
7. On the tab, click the button.
8. In the window for selecting a request access �le, specify the path to the �le received from the user.
To start the recovery procedure, the user needs to attempt to access a �le. As a result, Kaspersky EndpointSecurity will create a request access �le (a �le with the KESDC extension), which the user needs to send to theadministrator, for example, by email.
How to obtain an encrypted data access key �le in the Administration Console (MMC)
Managed devices
Devices
Devices
Grant access in o�line mode
Data Encryption
Data Encryption Browse
You will see information about the user's request. Kaspersky Security Center generates a key �le. Email thegenerated encrypted data access key �le to the user. Or save the access �le and use any available methodto transfer the �le.
How to obtain an encrypted data access key �le in the Web Console

440
1. In the main window of Web Console, select → .
2. Select the check box next to the name of the computer whose data you want to restore access to.
3. Click the button.
4. Select the section.
5. Click the button and select the request access �le that you received from the user (a �le withthe KESDC extension).
The Web Console will display information about the request. This will include the name of the computer onwhich the user is requesting access to the �le.
6. Click the button and select a folder to save the encrypted data access key �le (a �le with theKESDR extension).
You can restore access to data after operating system failure only for �le level encryption (FLE). You cannotrestore access to data if full disk encryption (FDE) is used.
To restore access to encrypted data after operating system failure:
1. Reinstall the operating system without formatting the hard drive.
2. Install Kaspersky Endpoint Security.
3. Establish a connection between the computer and the Kaspersky Security Center Administration Server thatcontrolled the computer when the data was encrypted.
To edit templates of encrypted �le access messages:
1. Open the Kaspersky Security Center Administration Console.
2. In the folder in the Administration Console tree, open the folder with the name of theadministration group to which the relevant client computers belong.
Devices Managed devices
Share this device o�line
Data Encryption
Select �le
Save key
As a result, you will be able to obtain the encrypted data access key, which you will need to transfer to theuser.
After receiving the encrypted data access key �le, the user needs to run the �le by double-clicking it. As a result,Kaspersky Endpoint Security will grant access to all encrypted �les stored on the drive. To access encrypted �lesthat are stored on other drives, you must obtain a separate access key �le for each drive.
Restoring access to encrypted data after operating system failure
Access to encrypted data will be granted under the same conditions that applied before operating systemfailure.
Editing templates of encrypted �le access messages
Managed devices

441
3. In the workspace, select the tab.
4. Select the necessary policy and double-click to open the policy properties.
5. In the policy window, select → .
6. In the section, click the button.
The window opens.
7. Do the following:
8. Edit the message templates.
You can use the button and the drop-down list.
9. Save your changes.
This component is available if Kaspersky Endpoint Security is installed on a computer that runs on Windowsfor workstations. This component is unavailable if Kaspersky Endpoint Security is installed on a computer thatruns on Windows for servers.
Kaspersky Endpoint Security supports encryption of �les in FAT32 and NTFS �le systems. If a removable drivewith an unsupported �le system is connected to the computer, the encryption task for this removable driveends with an error and Kaspersky Endpoint Security assigns the read-only status to the removable drive.
Policies
Data Encryption Common Encryption Settings
Templates Templates
Templates
If you want to edit the user message template, select the tab. The window opens when the user attempts to access an encrypted �le while there is no key available on
the computer for access to encrypted �les. Clicking the button in the window automatically creates a user message. This message is sent to the corporate LAN
administrator along with the �le requesting access to encrypted �les.
If you want to edit the administrator message template, select the tab. Thismessage is created automatically when you click the button in the
window and is sent to the user after the user is granted access to encrypted �les.
User's message Access to data isblocked
Send by email Access to data isblocked
Administrator's messageSend by email Request access to
encrypted �les
By default Variable
Encryption of removable drives
To protect data on removable drives, you can use the following types of encryption:
Full Disk Encryption (FDE).
Encryption of the entire removable drive, including the �le system.
It is not possible to access encrypted data outside the corporate network. It is also impossible to accessencrypted data inside the corporate network if the computer is not connected to Kaspersky SecurityCenter (e.g. on a guest computer).
File Level Encryption (FLE).
Encryption of only �les on a removable drive. The �le system remains unchanged.

442
Accessing encrypted data
1. Checks for a master key in the local storage on the user's computer.
If the master key is found, the user gains access to the data on the removable drive.
If the master key is not found, Kaspersky Endpoint Security performs the following actions:
a. Sends a request to Kaspersky Security Center.
After receiving the request, Kaspersky Security Center sends a response that contains the master key.
b. Kaspersky Endpoint Security saves the master key in the local storage on the user's computer forsubsequent operations with the encrypted removable drive.
2. Decrypts the data.
Special features of removable drive encryption
Encryption of �les on removable drives provides the capability to access data outside the corporatenetwork using a special mode called portable mode.
During encryption, Kaspersky Endpoint Security creates a master key. Kaspersky Endpoint Security saves themaster key in the following repositories:
Kaspersky Security Center.
User's computer.
The master key is encrypted with the user's secret key.
Removable drive.
The master key is encrypted with the public key of Kaspersky Security Center.
After encryption is complete, the data on the removable drive can be accessed within the corporate network as ifwas on an ordinary unencrypted removable drive.
When a removable drive with encrypted data is connected, Kaspersky Endpoint Security performs the followingactions:
Encryption of removable drives has the following special features:
The policy with preset settings for removable drive encryption is formed for a speci�c group of managedcomputers. Therefore, the result of applying the Kaspersky Security Center policy con�gured forencryption / decryption of removable drives depends on the computer to which the removable drive isconnected.
Kaspersky Endpoint Security does not encrypt / decrypt read-only �les that are stored on removable drives.
The following device types are supported as removable drives:
Data media connected via the USB bus
hard drives connected via USB and FireWire buses

443
Kaspersky Endpoint Security supports encryption in FAT32 and NTFS �le systems. If a removable drive with anunsupported �le system is connected to the computer, removable drive encryption ends with an error andKaspersky Endpoint Security assigns read-only access for the removable drive.
To encrypt removable drives:
1. Open the Kaspersky Security Center Administration Console.
2. In the folder in the Administration Console tree, open the folder with the name of theadministration group to which the relevant client computers belong.
3. In the workspace, select the tab.
4. Select the necessary policy and double-click to open the policy properties.
5. In the policy window, select → .
6. In the drop-down list, select the default action that you want Kaspersky Endpoint Security toperform on removable drives:
Kaspersky Endpoint Security does not encrypt a removable drive that is already encrypted.
7. If you want to use portable mode for encryption of removable drives, select the check box.
Portable mode is a mode of �le encryption (FLE) on removable drives that provides the ability to access dataoutside of a corporate network. Portable mode also lets you work with encrypted data on computers that donot have Kaspersky Endpoint Security installed.
8. If you want to encrypt a new removable drive, it is recommended to select the check box. If the check box is cleared, Kaspersky Endpoint Security will encrypt all �les, including the residualfragments of deleted or modi�ed �les.
SSD drives connected via USB and FireWire buses
Starting encryption of removable drives
You can use a policy to decrypt a removable drive. A policy with de�ned settings for removable drive encryption isgenerated for a speci�c administration group. Therefore, the result of data decryption on removable drivesdepends on the computer to which the removable drive is connected.
Managed devices
Policies
Data Encryption Encryption of removable drives
Encryption mode
(FDE). Kaspersky Endpoint Security encrypts the contents of a removabledrive sector by sector. As a result, the application encrypts not only the �les stored on the removable drivebut also its �le systems, including the �le names and folder structures on the removable drive.
(FLE). Kaspersky Endpoint Security encrypts all �les that are stored on removable drives.The application does not encrypt the �le systems of removable drives, including the names of �les andfolder structures.
(FLE). Kaspersky Endpoint Security encrypts only those �les that have been addedto removable drives or that were stored on removable drives and have been modi�ed after the KasperskySecurity Center policy was last applied.
Encrypt entire removable drive
Encrypt all �les
Encrypt new �les only
Portable mode
Encrypt used disk space only

444
9. If you want to con�gure encryption for individual removable drives, de�ne encryption rules.
10. If you want to use full disk encryption of removable drives in o�line mode, select the check box.
O�line encryption mode refers to encryption of removable drives (FDE) when there is no connection toKaspersky Security Center. During encryption, Kaspersky Endpoint Security saves the master key only on theuser's computer. Kaspersky Endpoint Security will send the master key to Kaspersky Security Center during thenext synchronization.
If the computer on which the master key is saved is corrupted and data is not sent to Kaspersky SecurityCenter, it is not possible to obtain access to the removable drive.
If the check box is cleared and there is no connection toKaspersky Security Center, removable drive encryption is not possible.
11. Save your changes.
If encryption of a removable drive failed, view the report in the Kaspersky Endpoint Securityinterface. Access to �les may be blocked by another application. In this case, try unplugging the removabledrive from the computer and connecting it again.
Allow removable driveencryption in o�line mode
Allow removable drive encryption in o�line mode
After the policy is applied, when the user connects a removable drive or if a removable drive is alreadyconnected, Kaspersky Endpoint Security prompts the user for con�rmation to perform the encryptionoperation (see the �gure below).
The application lets you perform the following actions:
If the user con�rms the encryption request, Kaspersky Endpoint Security encrypts the data.
If the user declines the encryption request, Kaspersky Endpoint Security leaves the data unchanged andassigns read-only access for this removable drive.
If the user does not respond to the encryption request, Kaspersky Endpoint Security leaves the dataunchanged and assigns read-only access for this removable drive. The application prompts for con�rmationagain when subsequently applying a policy or the next time this removable drive is connected.
If the user initiates safe removal of a removable drive during data encryption, Kaspersky Endpoint Securityinterrupts the data encryption process and allows removal of the removable drive before the encryption processhas �nished. Data encryption will be continued the next time the removable drive is connected to this computer.
Data encryption

445
Removable drive encryption request
To add an encryption rule for removable drives:
1. Open the Kaspersky Security Center Administration Console.
2. In the folder in the Administration Console tree, open the folder with the name of theadministration group to which the relevant client computers belong.
3. In the workspace, select the tab.
4. Select the necessary policy and double-click to open the policy properties.
5. In the policy window, select → .
6. Click the button, and in the drop-down list select one of the following items:
7. In the drop-down list, select the action to be performed by KasperskyEndpoint Security on �les stored on the selected removable drives.
8. Select the check box if you want Kaspersky Endpoint Security to prepare removable drivesbefore encryption, making it possible to use encrypted �les stored on them in portable mode.
Portable mode lets you use encrypted �les stored on removable drives that are connected to computerswithout encryption functionality.
9. Select the check box if you want Kaspersky Endpoint Security to encrypt onlythose disk sectors that are occupied by �les.
Adding an encryption rule for removable drives
Managed devices
Policies
Data Encryption Encryption of removable drives
Add
If you want to add encryption rules for removable drives that are in the list of trusted devices of the DeviceControl component, select .
If you want to add encryption rules for removable drives that are in the Kaspersky Security Center list,select .
From list of trusted devices of this policy
From Kaspersky Security Center list of devices
Encryption mode for selected devices
Portable mode
Encrypt used disk space only
446
If you are applying encryption on a drive that is already in use, it is recommended to encrypt the entire drive.This ensures that all data is protected - even deleted data that might still contain retrievable information. The
function is recommended for new drives that have not been previously used.
If a device was previously encrypted using the function, after applying apolicy in mode, sectors that are not occupied by �les will still not beencrypted.
10. In the drop-down list, select the action to be performed byKaspersky Endpoint Security according to encryption rules that had been previously de�ned for removabledrives:
11. Save your changes.
Encrypt used disk space only
Encrypt used disk space onlyEncrypt entire removable drive
Actions for devices that were selected earlier
If you want the previously created encryption rule for the removable drive to remain unchanged, select .
If you want the previously created encryption rule for the removable drive to be replaced by the new rule,select .
Skip
Update
The added encryption rules for removable drives will be applied to removable drives connected to anycomputers in the organization.
Exporting and importing a list of encryption rules for removable drives
You can export the list of removable drive encryption rules to an XML �le. Then you can modify the �le to, forexample, add a large number of rules for the same type of removable drives. You can also use the export/importfunction to back up the list of rules or to migrate the rules to a di�erent server.
How to export and import a list of removable drive encryption rules in the Administration Console (MMC)

447
1. Open the Kaspersky Security Center Administration Console.
2. In the folder in the Administration Console tree, open the folder with the name of theadministration group to which the relevant client computers belong.
3. In the workspace, select the tab.
4. Select the necessary policy and double-click to open the policy properties.
5. In the policy window, select → .
6. To export the list of encryption rules for removable drives:
a. Select the rules that you want to export. To select multiple ports, use the or keys.
If you did not select any rule, Kaspersky Endpoint Security will export all rules.
b. Click the link.
c. In the window that opens, specify the name of the XML �le to which you want to export the list of rules,and select the folder in which you want to save this �le.
d. Click the button.
Kaspersky Endpoint Security exports the list of rules to the XML �le.
7. To import a list of encryption rules for removable drives:
a. Click the link.
In the window that opens, select the XML �le from which you want to import the list of rules.
b. Click the button.
If the computer already has a list of rules, Kaspersky Endpoint Security will prompt you to delete theexisting list or add new entries to it from the XML �le.
8. Save your changes.
Managed devices
Policies
Data Encryption Encryption of removable drives
CTRL SHIFT
Export
Save
Import
Open
How to export and import a list of removable drive encryption rules in the Web Console

448
1. In the main window of Web Console, select → .
2. Click the name of the Kaspersky Endpoint Security policy for computers on which you want to export orimport a list of removable drive encryption rules.
The policy properties window opens.
3. Select the tab.
4. Go to → .
5. In the block, click the link.
This opens a list of encryption rules for removable drives.
6. To export the list of encryption rules for removable drives:
a. Select the rules that you want to export.
b. Click the button.
c. Con�rm that you want to export only the selected rules, or export the entire list.
d. Click the button.
Kaspersky Endpoint Security exports the list of rules to an XML �le in the default downloads folder.
7. To import the list of rules:
a. Click the link.
In the window that opens, select the XML �le from which you want to import the list of rules.
b. Click the button.
If the computer already has a list of rules, Kaspersky Endpoint Security will prompt you to delete theexisting list or add new entries to it from the XML �le.
8. Save your changes.
Devices Policies and pro�les
Application settings
Data Encryption Encryption of Removable Drives
Encryption rules for selected devices Encryption rules
Export
Export
Import
Open
Portable mode for accessing encrypted �les on removable drives
Portable mode is a mode of �le encryption (FLE) on removable drives that provides the ability to access dataoutside of a corporate network. Portable mode also lets you work with encrypted data on computers that do nothave Kaspersky Endpoint Security installed.
Portable mode is convenient to use in the following cases:
There is no connection between the computer and the Kaspersky Security Center Administration Server.
The infrastructure has changed with the change of the Kaspersky Security Center Administration Server.
Kaspersky Endpoint Security is not installed on the computer.

449
Portable File Manager
The Portable File Manager starts automatically when a removable drive is connected to a computer on whichKaspersky Endpoint Security is not installed. If automatic startup of applications is disabled on the computer,manually start the Portable File Manager. To do so, run the �le named pmv.exe that is stored on the removabledrive.
Portable File Manager
Support for portable mode for working with encrypted �les
To work in portable mode, Kaspersky Endpoint Security installs a special encryption module named Portable FileManager on a removable drive. The Portable File Manager provides an interface for working with encrypted data ifKaspersky Endpoint Security is not installed on the computer (see the �gure below). If Kaspersky EndpointSecurity is installed on your computer, you can work with encrypted removable drives using your usual �le manager(for example, Explorer).
The Portable File Manager stores a key to encrypt �les on a removable drive. The key is encrypted with the userpassword. The user sets a password before encrypting �les on a removable drive.
How to enable portable mode support for working with encrypted �les on removable drives in the AdministrationConsole (MMC)

450
1. Open the Kaspersky Security Center Administration Console.
2. In the folder in the Administration Console tree, open the folder with the name of theadministration group to which the relevant client computers belong.
3. In the workspace, select the tab.
4. Select the necessary policy and double-click to open the policy properties.
5. In the policy window, select → .
6. In the drop-down list, select or .
Portable mode is available only with File Level Encryption (FLE). It is not possible to enable portablemode support for Full Disk Encryption (FDE).
7. Select the check box.
8. If necessary, add encryption rules for individual removable drives.
9. Save your changes.
10. After applying the policy, connect the removable drive to the computer.
11. Con�rm the removable drive encryption operation.
This opens a window in which you can create a password for Portable File Manager.
12. Specify a password that meets the strength requirements and con�rm it.
13. Click .
Managed devices
Policies
Data Encryption Encryption of removable drives
Encryption mode for selected devices Encrypt all �les Encrypt new �lesonly
Portable mode
OK
Kaspersky Endpoint Security will encrypt �les on the removable drive. The Portable File Manager used forworking with encrypted �les will also be added to the removable drive. If there are already encrypted �les onthe removable drive, Kaspersky Endpoint Security will encrypt them again using its own key. This allows theuser to access all �les on the removable drive in portable mode.
How to enable portable mode support for working with encrypted �les on removable drives in the Web Console

451
1. In the main window of Web Console, select → .
2. Click the name of the Kaspersky Endpoint Security policy for computers on which you want to enablesupport for portable mode.
The policy properties window opens.
3. Select the tab.
4. Go to → .
5. In the section, select or .
Portable mode is available only with File Level Encryption (FLE). It is not possible to enable portablemode support for Full Disk Encryption (FDE).
6. Select the check box.
7. If necessary, add encryption rules for individual removable drives.
8. Save your changes.
9. After applying the policy, connect the removable drive to the computer.
10. Con�rm the removable drive encryption operation.
This opens a window in which you can create a password for Portable File Manager.
11. Specify a password that meets the strength requirements and con�rm it.
12. Click .
Accessing encrypted �les on a removable drive
Devices Policies and pro�les
Application settings
Data Encryption Encryption of Removable Drives
Manage encryption Encrypt all �les Encrypt new �les only
Portable mode
OK
Kaspersky Endpoint Security will encrypt �les on the removable drive. The Portable File Manager used forworking with encrypted �les will also be added to the removable drive. If there are already encrypted �les onthe removable drive, Kaspersky Endpoint Security will encrypt them again using its own key. This allows theuser to access all �les on the removable drive in portable mode.
After encrypting �les on a removable drive with portable mode support, the following �le access methods areavailable:
If Kaspersky Endpoint Security is not installed on the computer, the Portable File Manager will prompt you toenter a password. You will need to enter the password each time you restart the computer or reconnect theremovable drive.
If the computer is located outside the corporate network and Kaspersky Endpoint Security is installed on thecomputer, the application will prompt you to enter the password or send the administrator a request to accessthe �les. After gaining access to �les on a removable drive, Kaspersky Endpoint Security will save the secret keyin the computer's key storage. This will allow access to �les in the future without entering a password or askingthe administrator.

452
Recovering the password for working in portable mode
Features of portable mode when connecting a removable drive to a computer from anothernetwork
If the computer is located inside the corporate network and Kaspersky Endpoint Security is installed on thecomputer, you will get access to the device without entering a password. Kaspersky Endpoint Security willreceive the secret key from the Kaspersky Security Center Administration Server to which the computer isconnected.
If you have forgotten the password for working in portable mode, you need to connect the removable drive to acomputer with Kaspersky Endpoint Security installed inside the corporate network. You will get access to the �lesbecause the secret key is stored in the computer's key storage or on the Administration Server. Decrypt and re-encrypt �les with a new password.
If the computer is located outside the corporate network and Kaspersky Endpoint Security is installed on thecomputer, you can access the �les in the following ways:
After entering the password, you will be able to view, modify, and save �les on the removable drive (transparentaccess). Kaspersky Endpoint Security can set a read-only access right for a removable drive if the followingparameters are con�gured in the policy settings for encryption of removable drives:
In all other cases, you will get full access to the removable drive (read/write permission). You will be able to addand delete �les.
You can change the removable drive access permissions even while the removable drive is connected to thecomputer. If the removable drive access permissions are changed, Kaspersky Endpoint Security will blockaccess to the �les and prompt you for the password again.
After entering the password, you cannot apply encryption policy settings for the removable drive. In this case, itis impossible to decrypt or re-encrypt �les on the removable drive.
If you have forgotten the password for working in portable mode, ask the administrator for access to �les. Toaccess the �les, the user needs to send the administrator a request access �le (a �le with the KESDCextension). The user can send the request access �le by email, for example. The administrator will send anencrypted data access �le (a �le with the KESDR extension).
After you complete the Request-Response password recovery procedure, you will receive transparent accessto �les on the removable drive, and full access to the removable drive (read/write permission).
You can apply a removable drive encryption policy, and decrypt �les, for example. After recovering the passwordor when the policy is updated, Kaspersky Endpoint Security will prompt you to con�rm the changes.
Password-based access
Portable mode support is disabled.
The or mode is selected.Encrypt all �les Encrypt new �les only
Ask the administrator for access to �les
How to obtain an encrypted data access �le in the Administration Console (MMC)

453
1. Open the Kaspersky Security Center Administration Console.
2. In the folder in the Administration Console tree, open the folder with the name of theadministration group to which the relevant client computers belong.
3. In the workspace, select the tab.
4. On the tab, select the computer of the user requesting access to encrypted data and right-click to open the context menu.
5. In the context menu, select .
6. In the window that opens, select the tab.
7. On the tab, click the button.
8. In the window for selecting a request access �le, specify the path to the �le received from the user.
1. In the main window of Web Console, select → .
2. Select the check box next to the name of the computer whose data you want to restore access to.
3. Click the button.
4. Select the section.
5. Click the button and select the request access �le that you received from the user (a �lewith the KESDC extension).
The Web Console will display information about the request. This will include the name of the computeron which the user is requesting access to the �le.
6. Click the button and select a folder to save the encrypted data access key �le (a �le with theKESDR extension).
Managed devices
Devices
Devices
Grant access in o�line mode
Data Encryption
Data Encryption Browse
You will see information about the user's request. Kaspersky Security Center generates a key �le. Emailthe generated encrypted data access key �le to the user. Or save the access �le and use any availablemethod to transfer the �le.
How to obtain an encrypted data access �le in the Web Console
Devices Managed devices
Share this device o�line
Data Encryption
Select �le
Save key
As a result, you will be able to obtain the encrypted data access key, which you will need to transfer tothe user.
Decryption of removable drives
You can use a policy to decrypt a removable drive. A policy with de�ned settings for removable drive encryption isgenerated for a speci�c administration group. Therefore, the result of data decryption on removable drivesdepends on the computer to which the removable drive is connected.

454
To decrypt removable drives:
1. Open the Kaspersky Security Center Administration Console.
2. In the folder in the Administration Console tree, open the folder with the name of theadministration group to which the relevant client computers belong.
3. In the workspace, select the tab.
4. Select the necessary policy and double-click to open the policy properties.
5. In the policy window, select → .
6. If you want to decrypt all encrypted �les that are stored on removable drives, in the drop-down list select .
7. To decrypt data that is stored on individual removable drives, edit the encryption rules for removable driveswhose data you want to decrypt. To do so:
a. In the list of removable drives for which encryption rules have been con�gured, select an entrycorresponding to the removable drive you need.
b. Click the button to edit the encryption rule for the selected removable drive.
The context menu of the button opens.
c. Select the item in the context menu of the button.
8. Save your changes.
If decryption of a removable drive failed, view the report in the Kaspersky Endpoint Securityinterface. Access to �les may be blocked by another application. In this case, try unplugging the removabledrive from the computer and connecting it again.
Managed devices
Policies
Data Encryption Encryption of removable drives
Encryption modeDecrypt entire removable drive
Set a rule
Set a rule
Decrypt all �les Set a rule
As a result, if a user connects a removable drive or if it is already connected, Kaspersky Endpoint Securitydecrypts the removable drive. The application warns the user that the decryption process may take some time.If the user initiates safe removal of a removable drive during data decryption, Kaspersky Endpoint Securityinterrupts the data decryption process and allows removal of the removable drive before the decryptionoperation has �nished. Data decryption will be continued the next time the removable drive is connected to thecomputer.
Data encryption
Viewing data encryption details
While encryption or decryption in progress, Kaspersky Endpoint Security relays information about the status ofencryption parameters applied to client computers to Kaspersky Security Center.
The following encryption status values are possible:
Encryption policy not de�ned. A Kaspersky Security Center encryption policy has not been de�ned for thecomputer.
Applying policy. Data encryption and / or decryption is in progress on the computer.

455
To view the encryption status of computer data:
1. Open the Kaspersky Security Center Administration Console.
2. In the folder in the Administration Console tree, open the folder with the name of theadministration group to which the relevant client computers belong.
3. In the workspace, select the tab.
The tab in the workspace shows the properties of computers in the selected administration group.
4. On the tab in the workspace, slide the scroll bar all the way to the right.
5. If the column is not displayed:
a. Right-click to open the context menu for the table header.
b. In the context menu, in the drop-down list, select .
The window opens.
c. In the window, select the check box.
d. Click .
To view the encryption status on Kaspersky Security Center dashboards:
1. Open the Kaspersky Security Center Administration Console.
2. In the console tree, select the node.
3. In the workspace to the right of the Administration Console tree, select the tab.
4. Create a new page with details panes containing data encryption statistics. To do so:
Error. An error occurred during data encryption and / or decryption on the computer.
Reboot required. The operating system has to be rebooted in order to start or �nish data encryption ordecryption on the computer.
Compliant with policy. Data encryption on the computer has been completed using the encryption settingsspeci�ed in the Kaspersky Security Center policy applied to the computer.
Cancelled by user. The user has declined to con�rm the �le encryption operation on the removable drive.
Viewing the encryption status
Managed devices
Devices
Devices
Devices
Encryption status
View Add/Remove columns
Add/Remove columns
Add/Remove columns Encryption status
OK
The column shows the encryption status of data on computers in the selected administrationgroup. This status is formed based on information about �le encryption on local drives of the computer, andabout full disk encryption.
Encryption status
Viewing encryption statistics on Kaspersky Security Center dashboards
Administration Server – <Computer name>
Statistics

456
a. On the tab, click the button.
The window opens.
b. In the window, click .
The window opens.
c. In the section of the window, type the page name.
d. In the section, click the button.
The window opens.
e. In the window in the group, select the item.
f. Click .
The window opens.
g. If necessary, edit the details pane settings. To do so, use the and sections of the window.
h. Click .
i. Repeat steps d – h of the instructions, selecting the item in the section of the window.
The details panes added appear in the list in the window.
j. In the window, click .
The name of the page with details panes created at the previous steps appears in the list of the window.
k. In the window, click .
5. On the tab, open the page that was created during the previous steps of the instructions.
To view the �le encryption errors on local computer drives:
1. Open the Kaspersky Security Center Administration Console.
2. In the folder of the Administration Console tree, open the folder with the name of theadministration group that includes the client computer whose list of �le encryption errors you want to view.
3. In the workspace, select the tab.
4. On the tab, select the name of the computer in the list and right-click it to open the context menu.
5. In the context menu of the computer, select the item. In the window,select the section.
6. In the section of the window, click the link to open the window.
Statistics Customize view
Properties: Statistics
Properties: Statistics Add
Properties: New page
General Properties: New page
Details panes Add
New details pane
New details panel Protection status Encryption of devices
OK
Properties: Encryption Control
View Devices Properties:Encryption of devices
OK
Encryption of removable drives Protectionstatus New details pane
Details panes Properties: New page
Properties: New page OK
PagesProperties: Statistics
Properties: Statistics Close
Statistics
The details panes appear, showing the encryption status of computers and removable drives.
Viewing �le encryption errors on local computer drives
Managed devices
Devices
Devices
Properties Properties: <computer name>Protection
Protection Properties: <computer name> View list of data encryptionerrors Data encryption errors

457
To view the data encryption report:
1. Open the Kaspersky Security Center Administration Console.
2. In the node of the Administration Console tree, select the tab.
3. Click the button.
The Report Template Wizard starts.
4. Follow the instructions of the Report Template Wizard. In the window in the section, select one of the following items:
After you have �nished with the New Report Template Wizard, the new report template appears in the table onthe tab.
5. Select the report template that was created at the previous steps of the instructions.
6. In the context menu of the template, select .
Obtaining access to encrypted devices
This window shows the details of �le encryption errors on local computer drives. When an error is corrected,Kaspersky Security Center removes the error details from the window.Data encryption errors
Viewing the data encryption report
Administration Server Reports
New report template
Select report template typeOther
.
.
.
.
Managed device encryption status report
Mass storage device encryption status report
File encryption errors report
Report on blocked access to encrypted �les
Reports
Show report
The report generation process starts. The report is displayed in a new window.
Working with encrypted devices when there is no access to them
A user may be required to request access to encrypted devices in the following cases:
The hard drive was encrypted on a di�erent computer.
The encryption key for a device is not on the computer (for example, upon the �rst attempt to access theencrypted removable drive on the computer), and the computer is not connected to Kaspersky SecurityCenter.
After the user has applied the access key to the encrypted device, Kaspersky Endpoint Security saves theencryption key on the user's computer and allows access to this device upon subsequent access attemptseven if there is no connection to Kaspersky Security Center.
Access to encrypted devices can be obtained as follows:

458
1. The user uses the Kaspersky Endpoint Security application interface to create a request access �le with thekesdc extension and sends it to the corporate LAN administrator.
2. The administrator uses the Kaspersky Security Center Administration Console to create an access key �le withthe kesdr extension and sends it to the user.
3. The user applies the access key.
Restoring data on encrypted devices
The data needed to restore access to encrypted devices using the Restore Utility resides in the memory ofthe user's computer in unencrypted form for some time. To reduce the risk of unauthorized access to suchdata, you are advised to restore access to encrypted devices on trusted computers.
1. The user uses the Restore Utility to create a request access �le with the fdertc extension and sends it to thecorporate LAN administrator.
2. The administrator uses the Kaspersky Security Center Administration Console to create an access key �le withthe fdertr extension and sends it to the user.
3. The user applies the access key.
To restore data on encrypted system hard drives, the user can also specify the Authentication Agent accountcredentials in the Restore Utility. If the metadata of the Authentication Agent account has been corrupted,the user must complete the restoration procedure using a request access �le.
1. Create a stand-alone Restore Utility (see the �gure below).
2. Connect a drive to a computer that does not have Kaspersky Endpoint Security encryption componentsinstalled.
A user can use the Encrypted Device Restore Utility (hereinafter referred to as the Restore Utility) to work withencrypted devices. This may be required in the following cases:
The procedure for using an access key to obtain access was unsuccessful.
Encryption components have not been installed on the computer with the encrypted device.
Data on encrypted devices can be restored as follows:
Before restoring data on encrypted devices, it is recommended to cancel the Kaspersky Security Center policy ordisable encryption in the Kaspersky Security Center policy settings on the computer where the procedure will beperformed. This prevents the device from being encrypted again.
Recovering data by using the FDERT Restore Utility
If the hard drive fails, the �le system may be corrupt. If this is the case, data protected by Kaspersky DiskEncryption technology will be unavailable. You can decrypt the data and copy the data to a new drive.
Data recovery on a drive protected by Kaspersky Disk Encryption technology consists of the following steps:

459
3. Run the Restore Utility and diagnose the hard drive.
4. Access data on the drive. To do so, enter the credentials of the Authentication Agent or start the recoveryprocedure (Request-Response).
FDERT Restore Utility
Creating a standalone restore utility
To create the executable �le of Restore Utility:
1. In the main application window, click the button.
2. In the window that opens, click the button.
Encrypted device Restore Utility starts.
3. Click the button in the window of Restore Utility.
4. Save the stand-alone Restore Utility to computer memory.
The data needed to restore access to encrypted devices using the Restore Utility resides in the memory ofthe user's computer in unencrypted form for some time. To reduce the risk of unauthorized access to suchdata, you are advised to restore access to encrypted devices on trusted computers.
Recovering data on a hard drive
To restore access to an encrypted device using the Restore Utility:
1. Run the �le named fdert.exe, which is the executable �le of the Restore Utility. This �le is created by KasperskyEndpoint Security.
Support
Restore encrypted device
Create Stand-alone Restore Utility
As a result, the executable �le of the Restore Utility (fdert.exe) will be saved in the speci�ed folder. Copy theRestore Utility to a computer that does not have Kaspersky Endpoint Security encryption components. Thisprevents the drive from being encrypted again.

460
2. In the Restore Utility window, from the drop-down list select an encrypted device to which youwant to restore access.
3. Click the button to allow the utility to de�ne which of the actions should be taken on the device: whetherit should be unlocked or decrypted.
If the computer has access to Kaspersky Endpoint Security encryption functionality, the Restore Utilityprompts you to unlock the device. While unlocking the device does not decrypt it, the device becomes directlyaccessible as a result of being unlocked. If the computer does not have access to Kaspersky Endpoint Securityencryption functionality, the Restore Utility prompts you to decrypt the device.
4. If you want to import diagnostic information, click the button.
The utility will save an archive with �les containing diagnostic information.
5. Click the button if diagnostics of the encrypted system hard drive has returned a message aboutproblems involving the master boot record (MBR) of the device.
Fixing the master boot record of the device can speed up the process of obtaining information that is neededfor unlocking or decrypting the device.
6. Click the or button depending on the results of diagnostics.
7. If you want to restore data using an Authentication Agent account, select the option and enter the credentials of the Authentication Agent.
This method is possible only when restoring data on a system hard drive. If the system hard drive was corruptedand Authentication Agent account data has been lost, you must obtain an access key from the corporate LANadministrator to restore data on an encrypted device.
8. If you want to start the recovery procedure, do the following:
a. Select the option.
b. Click the button and save the request access �le to computer memory (a �le with theFDERTC extension).
c. Send the request access �le to the corporate LAN administrator.
Do not close the window until you have received the access key. When thiswindow is opened again, you will not be able to apply the access key that was previously created by theadministrator.
d. Receive and save the access �le (a �le with the FDERTR extension) created and sent to you by thecorporate LAN administrator (see the instructions below).
e. Download the access �le in the window.
9. If you are decrypting a device, you must con�gure additional decryption settings:
Select device
Scan
Save diagnostics
Fix MBR
Unlock Decrypt
Use Authentication Agentaccount settings
Specify device access key manually
Receive access key
Receive device access key
Receive device access key
Specify area to decrypt:
Select the location for writing the decrypted data:
If you want to decrypt the entire device, select the option.
If you want to decrypt a portion of the data on a device, select the option and specify the decryption area boundaries.
Decrypt entire device
Decrypt individual device areas

461
10. Click .
1. Open the Kaspersky Security Center Administration Console.
2. In the Administration Console tree, select the → → folder.
3. In the workspace, select the encrypted device for which you want to create an access key �le, and select in the device context
menu.
If you are not sure for which computer the request access �le was generated, in the AdministrationConsole tree select the → folder and click the
link in the workspace.
4. In the window that opens, select the encryption algorithm to use: or .
The data encryption algorithm depends on the AES encryption library that is included in the distributionpackage: Strong encryption (AES256) or Lite encryption (AES56). The AES encryption library is installedtogether with the application.
5. Click the button. In the window that opens, specify the path to the request access �le (with theFDERTC extension) received from the user.
6. Click the button.
If you want the data on the original device to be rewritten with the decrypted data, clear the check box.
If you want to save decrypted data separately from the original encrypted data, select the check box and use the button to specify the path where to save the VHD �le.
Decrypt toa disk image �le
Decrypt to adisk image �le Browse
OK
The device unlocking / decryption process starts.
How to create an encrypted data access �le in the Administration Console (MMC)
Additional Data encryption and protectionEncrypted devices
Get access to the device in Kaspersky Endpoint Security for Windows (11.6.0)
Additional Data encryption and protection Getdevice encryption key in Kaspersky Endpoint Security for Windows (11.6.0)
AES256 AES56
Browse
Open
You will see information about the user's request. Kaspersky Security Center generates a key �le. Email thegenerated encrypted data access key �le to the user. Or save the access �le and use any available methodto transfer the �le.
How to create an encrypted data access �le in the Web Console

462
1. In the main window of the Web Console, select → .
2. Select the check box next to the name of the computer on which you want to recover data.
3. Click the button.
This starts the Wizard for granting access to a device.
4. Follow the instructions of the Wizard for granting access to a device:
a. Select the plug-in.
b. Select the encryption algorithm to use: or .
The data encryption algorithm depends on the AES encryption library that is included in the distributionpackage: Strong encryption (AES256) or Lite encryption (AES56). The AES encryption library is installedtogether with the application.
c. Click the button and select the request access �le received from the user (a �le with theFDERTC extension).
d. Click the button and select a folder to save the key �le for accessing encrypted data (a �lewith the FDERTR extension).
To create an operating system rescue disk:
1. Create an executable �le for the Encrypted Device Restore Utility.
2. Create a custom image of the Windows pre-boot environment. While creating the custom image of theWindows pre-boot environment, add the executable �le of Restore Utility to the image.
3. Save the custom image of the Windows pre-installation environment to bootable media such as a CD orremovable drive.
Refer to Microsoft help �les for instructions on creating a custom image of the Windows pre-boot environment(for example, in the Microsoft TechNet resource ).
Operations Data encryption and protection →Encrypted devices
Share this device o�line
Kaspersky Endpoint Security for Windows
AES256 AES56
Select �le
Save key
As a result, you will be able to obtain the encrypted data access key, which you will need to transfer to theuser.
Creating an operating system rescue disk
The operating system rescue disk can be useful when an encrypted hard drive cannot be accessed for somereason and the operating system cannot load.
You can load an image of the Windows operating system using the rescue disk and restore access to theencrypted hard drive using Restore Utility included in the operating system image.

463
Special characters in the command must be escaped. To escape &, |, (, ), <, >, ^, use the ^ character (forexample, to use the & character, enter ^&). To escape the % character, enter %%.
To manage Kaspersky Endpoint Security from the command line:
1. Run the command line interpreter (cmd.exe) as an administrator.
2. Go to the folder where the Kaspersky Endpoint Security executable �le is located.
3. To execute a command, enter:
avp.com <command> [options]
Managing the application from the command line
Command syntax
SCAN [<scan scope>] [<action on threat detection>] [<file types>] [<scan exclusions>] [/R[A]:<report file>] [<scan technologies>] [/C:<file with virus scan settings>]
<files toscan>
A space-separated list of �les and folders. Long paths must be enclosed in quotationmarks. Short paths (MS-DOS format) do not need to be enclosed in quotation marks. Forexample:
Managing the application from the command line
You can manage Kaspersky Endpoint Security from the command line. You can view the list of commands formanaging the application by executing the HELP command. To read about the syntax of a speci�c command, enterHELP <command>.
AVP commands
As a result, Kaspersky Endpoint Security will execute the command (see �gure below.)
SCAN. Virus Scan
Run the virus scan task.
Scan scope

464
"C:\Program Files (x86)\Example Folder" – long path.
C:\PROGRA~2\EXAMPL~1 – short path.
/ALL
/MEMORY Scan the Kernel memory
/STARTUP Scan the Objects that are loaded at startup of the operating system
/MAIL Scan Outlook mailbox
/REMDRIVES Scan removable drives.
/FIXDRIVES Scan hard drives.
/NETDRIVES Scan network drives.
/QUARANTINE Scan the �les in the Kaspersky Endpoint Security Backup.
/@:<filelist.lst>
Scan the �les and folders from a list. Each �le in the list must be on a new row. Long pathsmust be enclosed in quotation marks. Short paths (MS-DOS format) do not need to beenclosed in quotation marks. For example:
"C:\Program Files (x86)\Example Folder" – long path.
C:\PROGRA~2\EXAMPL~1 – short path.
/i0 Inform. If this option is selected, Kaspersky Endpoint Security adds the information aboutinfected �les to the list of active threats on detection of these �les.
/i1 Disinfect; block if disinfection fails. If this option is selected, Kaspersky Endpoint Securityautomatically attempts to disinfect all infected �les that are detected. If disinfection is notpossible, Kaspersky Endpoint Security adds the information about the infected �les that aredetected to the list of active threats.
/i2 Disinfect; delete if disinfection fails. If this option is selected, Kaspersky Endpoint Securityautomatically attempts to disinfect all infected �les that are detected. If disinfection fails,Kaspersky Endpoint Security deletes the �les.
This action is selected by default.
/i3 Disinfect the infected �les that are detected. If disinfection fails, delete the infected �les. Alsodelete compound �les (for example, archives) if the infected �le cannot be disinfected ordeleted.
Run the Full Scan task. Kaspersky Endpoint Security scans the following objects:
Kernel memory
Objects that are loaded at startup of the operating system
Boot sectors
Operating system backup
All hard and removable drives
Action onthreatdetection

465
/i4 Delete infected �les. Also delete compound �les (for example, archives) if the infected �lecannot be deleted.
/i8 Prompt the user for action as soon as a threat is detected.
/i9 Prompt the user for action after the scan is completed.
/fe Files scanned by extension. If this setting is enabled, Kaspersky Endpoint Security scans infectable�les only . The �le format is then determined based on the �le's extension.
/fi Files scanned by format. If this setting is enabled, Kaspersky Endpoint Security scans infectable�les only . Before scanning a �le for malicious code, the internal header of the �le is analyzed todetermine the format of the �le (for example, .txt, .doc, or .exe). The scan also looks for �les withparticular �le extensions.
/fa All �les. If this setting is enabled, Kaspersky Endpoint Security checks all �les without exception (allformats and extensions).
This is the default setting.
-e:a RAR, ARJ, ZIP, CAB, LHA, JAR, and ICE archives are excluded from the scan scope.
-e:b Mail databases, incoming and outgoing e-mails are excluded from the scan scope.
-E:<filemask>
Files that match the �le mask are excluded from the scan scope. For example:
The mask *.exe will include all paths to �les that have the exe extension.
The mask example* will include all paths to �les named EXAMPLE.
-e:<seconds> Files that take longer to scan than the speci�ed time limit (in seconds) are excluded fromthe scan scope.
-es:<megabytes>
Files that are larger than the speci�ed size limit (in megabytes) are excluded from thescan scope.
/R:<report file> Save only critical events to the report �le.
/RA:<report file> Save all events to a report �le.
/iChecker=on|off This technology allows increasing scan speed by excluding certain �les fromscanning. Files are excluded from scans by using a special algorithm that takes intoaccount the release date of Kaspersky Endpoint Security databases, the date whenthe �le was last scanned, and any modi�cations to the scan settings. There arelimitations to iChecker Technology: it does not work with large �les and applies onlyto �les with a structure that the application recognizes (for example, EXE, DLL, LNK,TTF, INF, SYS, COM, CHM, ZIP, and RAR).
/iSwift=on|off This technology allows increasing scan speed by excluding certain �les fromscanning. Files are excluded from scanning by using a special algorithm that takes
Filetypes
Scanexclusions
Saving events to a report �le mode
Scan technologies

466
into account the release date of Kaspersky Endpoint Security databases, the datethat the �le was last scanned on, and any modi�cations to the scanning settings.The iSwift technology is an advancement of the iChecker technology for the NTFS�le system.
Example:
Command syntax
UPDATE [local] ["<update source>"] [/R[A]:<report file>] [/C:<file with update settings >]
local Start of the Update task that was created automatically after the application was installed. Youcan change the settings of the Update task in the local application interface or in the console ofKaspersky Security Center. If this setting is not con�gured, Kaspersky Endpoint Security startsthe Update task with the default settings or with the settings speci�ed in the command. You cancon�gure Update task settings as follows:
UPDATE starts the Update task with the default settings: the update source is Kasperskyupdate servers, the account is System, and other default settings.
UPDATE local starts the Update task that was created automatically after installation(prede�ned task).
UPDATE <update settings> starts the Update task with manually de�ned settings (seebelow).
"<updatesource>"
Address of a HTTP or FTP server, or of a shared folder with the update package. You canspecify only one update source. If the update source is not speci�ed, Kaspersky EndpointSecurity uses the default source: Kaspersky update servers.
Advancedsettings
/C:<filewithvirusscansettings>
File with Virus scan task settings. The �le must be created manually and saved in TXT format.The �le can have the following contents: [<scan scope>] [<action on threatdetection>] [<file types>] [<scan exclusions>] [/R[A]:<report file>][<scan technologies>] .
avp.com SCAN /R:log.txt /MEMORY /STARTUP /MAIL "C:\Documents and Settings\AllUsers\My Documents" "C:\Program Files"
UPDATE. Updating databases and application software modules
Run the Update task.
Updatetasksettings
Updatesource

467
/R:<report file> Save only critical events to the report �le.
/RA:<report file> Save all events to a report �le.
/C:<filewith updatesettings>
File with the Update task settings. The �le must be created manually and saved in TXTformat. The �le can have the following contents: ["<update source>"] [/R[A]:<report file>] .
Example:
Command syntax
ROLLBACK [/R[A]:<report file>]
/R:<report file> Save only critical events to the report �le.
/RA:<report file> Save all events to a report �le.
Example:
Command syntax
TRACES on|off [<tracing level>] [<advanced settings>]
Saving events to a report �le mode
Advancedsettings
avp.com UPDATE local
avp.com UPDATE "ftp://my_server/kav updates" /RA:avbases_upd.txt
ROLLBACK. Rolling back the last update
Roll back the last anti-virus database update. This lets you roll back the databases and application modules to theirprevious version when necessary, for example, when the new database version contains an invalid signature thatcauses Kaspersky Endpoint Security to block a safe application.
Saving events to a report �le mode
avp.com ROLLBACK /RA:rollback.txt
TRACES. Traces
Enable / disable tracing. Trace �les are stored on the computer as long as the application is in use, and are deletedpermanently when the application is removed. Trace �les, except trace �les of Authentication Agent, are stored inthe folder %ProgramData%\Kaspersky Lab\KES\Traces. By default, tracing is disabled.
Tracing

468
<tracinglevel>
Level of detail of traces. Available values:
100 (critical). Only messages about fatal errors.
200 (high). Messages about all errors, including fatal errors.
300 (diagnostic). Messages about all errors, as well as warnings.
400 (important). All error messages, warnings, and additional information.
500 (normal). Messages about all errors and warnings, as well as detailed information aboutthe operation of the application in normal mode (default).
600 (low). All messages.
all Run a command with the dbg, file and mem parameters.
dbg Use the OutputDebugString function and save the trace �le. The OutputDebugString functionsends a character string to the application debugger to display on screen. For details, visit theMSDN website .
file Save one trace �le (no size limit).
rot Save traces to a limited number of �les of limited size and overwrite the older �les when themaximum size is reached.
mem Save traces to dump �les.
Examples:
avp.com TRACES on 500
avp.com TRACES on 500 dbg
avp.com TRACES off
avp.com TRACES on 500 dbg mem
avp.com TRACES off file
Command syntax
START <profile> [/R[A]:<report file>]
level
Advancedsettings
START. Start the pro�le
Start the pro�le (for example, to update databases or to enable a protection component).

469
<profile>
/R:<report file> Save only critical events to the report �le.
/RA:<report file> Save all events to a report �le.
Example:avp.com START Scan_Objects
To execute this command, Password protection must be enabled. The user must have the and permissions.
Command syntax
STOP <profile> /login=<user name> /password=<password>
<profile>
/login=<user name> /password=<password>
Kaspersky Endpoint Security also displays information about the status of service pro�les. Information aboutthe status of service pro�les may be required when you are contacting Kaspersky Technical Support.
Command syntax
STATUS [<profile>]
Pro�le
Pro�le name. A Pro�le is a Kaspersky Endpoint Security component, task or feature. You canview the list of available pro�les by executing the HELP START command.
Saving events to a report �le mode
STOP. Stopping a pro�le
Stop the running pro�le (for example, stop scanning, stop removable drives scan, or disable a protectioncomponent).
Disable protectioncomponents Disable control components
Pro�le
Pro�le name. A Pro�le is a Kaspersky Endpoint Security component, task or feature. You canview the list of available pro�les by executing the HELP STOP command.
Authentication
User account credentials with the required Password protectionpermissions.
STATUS. Pro�le status
Show status information for application pro�les (for example, running or completed). You can view the list ofavailable pro�les by executing the HELP STATUS command.

470
Command syntax
STATISTICS <profile>
To execute this command, Password protection must be enabled. The user must have the permission.
Kaspersky Endpoint Security does not provide the capability to con�gure user access permissions to backupcopies of �les.
Command syntax
RESTORE [/REPLACE] <file name> /login=<user name> /password=<password>
/REPLACE Overwrite an existing �le.
<file name> The name of the �le to be restored.
/login=<user name> /password=<password>
STATISTICS. Pro�le operation statistics
View statistical information about an application pro�le (for example, scan duration or the number of threatsdetected.) You can view the list of available pro�les by running the HELP STATISTICS command.
RESTORE. Restoring �les
You can restore a �le from Backup to its original folder. If a �le with the same name already exists at the speci�edpath, the su�ix "-copy"is appended to the �le name. The �le that is being restored is copied keeping its originalname.
Restore fromBackup
Backup stores backup copies of �les that were deleted or modi�ed during disinfection. A backup copy is a �lecopy created before the �le was disinfected or deleted. Backup copies of �les are stored in a special format anddo not pose a threat.
Backup copies of �les are stored in the folder C:\ProgramData\Kaspersky Lab\KES\QB .
Users in the Administrators group are granted full permission to access this folder. Limited access rights to thisfolder are granted to the user whose account was used to install Kaspersky Endpoint Security.
Advanced settings
Authentication
User account credentials with the required Password protectionpermissions.

471
Example:
Command syntax
EXPORT <profile> <file name>
<profile>
<filename>
The name of the �le to which the application settings will be exported. You can export KasperskyEndpoint Security settings to a DAT or CFG con�guration �le, to a TXT text �le, or to an XMLdocument.
Examples:
avp.com EXPORT ids ids_config.dat
avp.com EXPORT fm fm_config.txt
To execute this command, Password protection must be enabled. The user must have the permission.
Command syntax
IMPORT <file name> /login=<username> /password=<password>
<filename>
The name of the �le from which the application settings will be imported. You can importKaspersky Endpoint Security settings from a DAT or CFG con�guration �le, a TXT text �le, or anXML document.
avp.com RESTORE /REPLACE true_file.txt /login=KLAdmin /password=!Password1
EXPORT. Exporting application settings
Export Kaspersky Endpoint Security settings to a �le. The �le will be located in the C:\Windows\SysWOW64 folder.
Pro�le
Pro�le name. A Pro�le is a Kaspersky Endpoint Security component, task or feature. You canview the list of available pro�les by executing the HELP EXPORT command.
File toexport
IMPORT. Importing application settings
Imports settings for Kaspersky Endpoint Security from a �le that was created with the EXPORT command.
Con�gureapplication settings
File toimport

472
/login=<user name> /password=<password>
Example:
Command syntax
ADDKEY <file name> /login=<user name> /password=<password>
<file name> Key �le name.
Example:
To execute this command and remove a license key, Password protection must be enabled. The user must havethe permission.
Command syntax
LICENSE <operation> [/login=<user name> /password=<password>]
/ADD <file name> Apply the key �le to activate Kaspersky Endpoint Security. If the application isalready activated, the key will be added as a reserve one.
/ADD <activation Activate Kaspersky Endpoint Security using an activation code. If the application
Authentication
User account credentials with the required Password protectionpermissions.
avp.com IMPORT config.dat /login=KLAdmin /password=!Password1
ADDKEY. Applying a key �le
Apply the key �le to activate Kaspersky Endpoint Security. If the application is already activated, the key will beadded as a reserve one.
Key �le
Authentication
/login=<user name>/password=<password>
User account credentials. These credentials need to be entered only ifPassword protection is enabled.
avp.com ADDKEY file.key
LICENSE. Licensing
Perform actions with Kaspersky Endpoint Security license keys.
Remove key
Operation

473
code> is already activated, the key will be added as a reserve one.
/REFRESH <filename>
Renew your license with a key �le. A reserve key is added as a result. It becomesactive upon license expiration. It is not possible to add an active key by executingthis command.
/REFRESH<activation code>
Renew your license with an activation code. A reserve key is added as a result. Itbecomes active upon license expiration. It is not possible to add an active key byexecuting this command.
/DEL /login=<username> /password=<password>
Remove a license key. Reserve key will also be removed.
/login=<user name> /password=<password>
Example:
avp.com LICENSE /ADD file.key
avp.com LICENSE /ADD AAAAA-BBBBB-CCCCC-DDDDD
avp.com LICENSE /DEL /login=KLAdmin /password=!Password1
Authentication
User account credentials with the required Password protectionpermissions.
RENEW. Purchasing a license
Open the Kaspersky website to purchase or renew your license.
PBATESTRESET. Reset the disk check results before encrypting the disk
Reset the compatibility check results for Full Disk Encryption(FDE), including both the Kaspersky Disk Encryptionand BitLocker Drive Encryption technologies.
Before running Full Disk Encryption, the application performs a number of checks to verify that the computer canbe encrypted. If the computer does not support Full Disk Encryption, Kaspersky Endpoint Security logsinformation about the incompatibility. The next time you try to encrypt, the application does not perform thischeck and warns you that encryption is not possible. If the hardware con�guration of the computer has changed,the compatibility check results previously logged by the application must be reset to re-check the system harddrive for compatibility with Kaspersky Disk Encryption or BitLocker drive encryption technologies.
EXIT. Exit the application
Exits Kaspersky Endpoint Security. The application will be unloaded from the computer's RAM.

474
To execute this command, Password protection must be enabled. The user must have the permission.
Command syntax
EXIT /login=<user name> /password=<password>
To execute this command, Password protection must be enabled. The user must have the permission.
Command syntax
EXITPOLICY /login=<user name> /password=<password>
Command syntax
SPYWARE on|off
Exit the application
EXITPOLICY. Disabling policy
Disables a Kaspersky Security Center policy on the computer. All Kaspersky Endpoint Security settings areavailable for con�guration, including settings that have a closed lock in the policy ( ).
Disable KasperskySecurity Center policy
STARTPOLICY. Enabling policy
Enables a Kaspersky Security Center policy on the computer. The application settings will be con�gured accordingto the policy.
DISABLE. Disabling protection
Disables File Threat Protection on a computer with an expired Kaspersky Endpoint Security license. It is notpossible to run this command on a computer that has the application that is not activated or has a valid license.
SPYWARE. Spyware detection
Enable / disable spyware detection. By default, spyware detection is enabled.
MDRLICENSE. MDR activation

475
Administrator privileges are required for performing operations with a BLOB �le. Managed Detection andResponse settings in the policy must also be available for editing ( ).
Command syntax
MDRLICENSE <operation> [/login=<user name> /password=<password>]
/ADD<filename>
Apply the BLOB con�guration �le for integration with Kaspersky Managed Detection andResponse (P7 �le format). You can apply only one BLOB �le. If a BLOB �le was already added tothe computer, the �le will be replaced.
/DEL Delete the BLOB con�guration �le.
/login=<user name> /password=<password>
Example:
avp.com MDRLICENSE /ADD file.key
avp.com MDRLICENSE /DEL /login=KLAdmin /password=!Password1
Perform operations with the BLOB con�guration �le to activate Managed Detection and Response. The BLOB �lecontains the client ID and information about the license for Kaspersky Managed Detection and Response. TheBLOB �le is located inside the ZIP archive of the MDR con�guration �le. You can obtain the ZIP archive in theKaspersky Managed Detection and Response Console. For detailed information about a BLOB �le, please refer tothe Kaspersky Managed Detection and Response Help Guide .
Operation
Authentication
User account credentials with the required Password protectionpermissions.
KSN. Global/Private KSN transition
Selecting a Kaspersky Security Network solution for determining the reputation of �les or websites. KasperskyEndpoint Security supports the following KSN infrastructural solutions:
Global KSN is the solution that is used by most Kaspersky applications. KSN participants receive informationfrom Kaspersky Security Network and send Kaspersky information about objects detected on the user'scomputer to be analyzed additionally by Kaspersky analysts and to be included in the reputation and statisticaldatabases of Kaspersky Security Network.
Private KSN is a solution that enables users of computers hosting Kaspersky Endpoint Security or otherKaspersky applications to obtain access to reputation databases of Kaspersky Security Network, and to otherstatistical data without sending data to KSN from their own computers. Private KSN is designed for corporatecustomers who are unable to participate in Kaspersky Security Network for any of the following reasons:
Local workstations are not connected to the Internet.
Transmission of any data outside the country or outside the corporate LAN is prohibited by law or restrictedby corporate security policies.

476
Command syntax
KSN /global | /private <file name>
<file name> Name of the con�guration �le containing the KSN proxy server settings This �le hasthe PKCS7 or PEM extension.
Example:
To manage Kaspersky Endpoint Security from the command line:
1. Run the command line interpreter (cmd.exe) as an administrator.
2. Go to the folder where the Kaspersky Endpoint Security executable �le is located.
3. To execute a command, enter:
kescli <command> [options]
Managing the application from the command line
Private KSNcon�guration �le
avp.com KSN /global
avp.com KSN /private C:\ksn_config.pkcs7
KESCLI commands
KESCLI commands let you receive information about the state of computer protection using the OPSWATcomponent, and let you perform standard tasks such as virus scans and database updates.
You can view the list of KESCLI commands by using the --help command or by using the abbreviated command -h.
As a result, Kaspersky Endpoint Security will execute the command (see �gure below.)
Scan. Virus Scan

477
Command syntax
--opswat Scan <scan scope> <action on threat detection>
<files toscan>
;-separated list of �les and folders. E.g.: C:\Program Files (x86)\ExampleFolder.
0 Inform. If this option is selected, Kaspersky Endpoint Security adds the information aboutinfected �les to the list of active threats on detection of these �les.
1 Disinfect; delete if disinfection fails. If this option is selected, Kaspersky Endpoint Securityautomatically attempts to disinfect all infected �les that are detected. If disinfection fails,Kaspersky Endpoint Security deletes the �les.
This action is selected by default.
Example:
Command syntax
--opswat GetScanState
Example:
Run the virus scan task.
You can check the status of Full Scan task completion by using the GetScanState command and view the dateand time when the scan was last completed by using the GetLastScanTime command.
Scan scope
Action onthreatdetection
kescli --opswat Scan C:\Documents and Settings\All Users\My Documents;C:\ProgramFiles 1
GetScanState. Scan completion status
Receive information about the status of Full Scan task completion:
1 – the scan is in progress.
0 – the scan is not running.
kescli --opswat GetScanState
GetLastScanTime. Determining the scan completion time
Receive information about the date and time of the last Full Scan task completion.

478
Command syntax
--opswat GetLastScanTime
Example:
Command syntax
--opswat GetThreats
Managing the application from the command line
0
Auto-dialer programs (Pornware ).
Applications that could be used by a cybercriminal to harm the user's computer or data(Riskware ).
Packed objects whose packing method may be used to protect malicious code (Packed ).
Unknown objects (Xfiles ).
Known applications (Software ).
Concealed �les (Hidden ).
Application requiring attention (Pupware ).
kescli --opswat GetLastScanTime
GetThreats. Obtaining data on detected threats
Receive a list of detected threats (Threats report). This report contains information about threats and virusactivity during the last 30 days prior to creating the report.
When this command is executed, Kaspersky Endpoint Security will send a response in the following format:
<name of detected object> <type of object> <detection date and time> <path to file> <actionon threat detection> <threat danger level>
Objecttype
Not known (Unknown ).
1 Viruses (Virware ).
2 Trojan programs (Trojware ).
3 Malicious programs (Malware ).
4 Advertisement programs (Adware ).
5
6
7
20
21
22
23

479
Anomalous behavior (Anomaly ).
Not determined (Undetect ).
Ad banners (Banner ).
Network attack (Attack ).
Registry access (Registry ).
Suspicious activity (Suspicion ).
Vulnerabilities (Vulnerability ).
Phishing .
Unwanted email attachment (Attachment ).
Malware detected by Kaspersky Security Network (Urgent ).
Unknown link (Suspic URL ).
Other malware (Behavioral ).
0
Object has not been disinfected (not disinfected ).
Object was deleted (deleted ).
A backup copy of the object was created (backupped ).
Object was moved to Backup (quarantined ).
Object was deleted on computer restart (delete on reboot ).
Object was disinfected on computer restart (disinfect on reboot ).
Object was moved to Backup by a user (added by user ).
Object was added to exclusions (added to exclude ).
Object was moved to Backup on computer restart (quarantine onreboot ).
False positive (false alarm ).
Object was not detected (not found ).
Cannot resolve the threat (untreatable ).
Object was restored (rolled back ).
Object was created as a result of threat activity (produced by threat ).
Object was restored on computer restart (roll back on reboot ).
24
30
40
50
51
52
60
70
80
90
100
110
Action on threatdetection
Not known (unknown ).
1 Threat was remediated (ok ).
2 Object was infected and has not been disinfected (infected ).
5 Object is in an archive and has not been disinfected (archive ).
9 Object has been disinfected (disinfected ).
10
11
13
15
23
25
29
30
31
36
38 Process was terminated (terminated ).
40
41
42
43
44
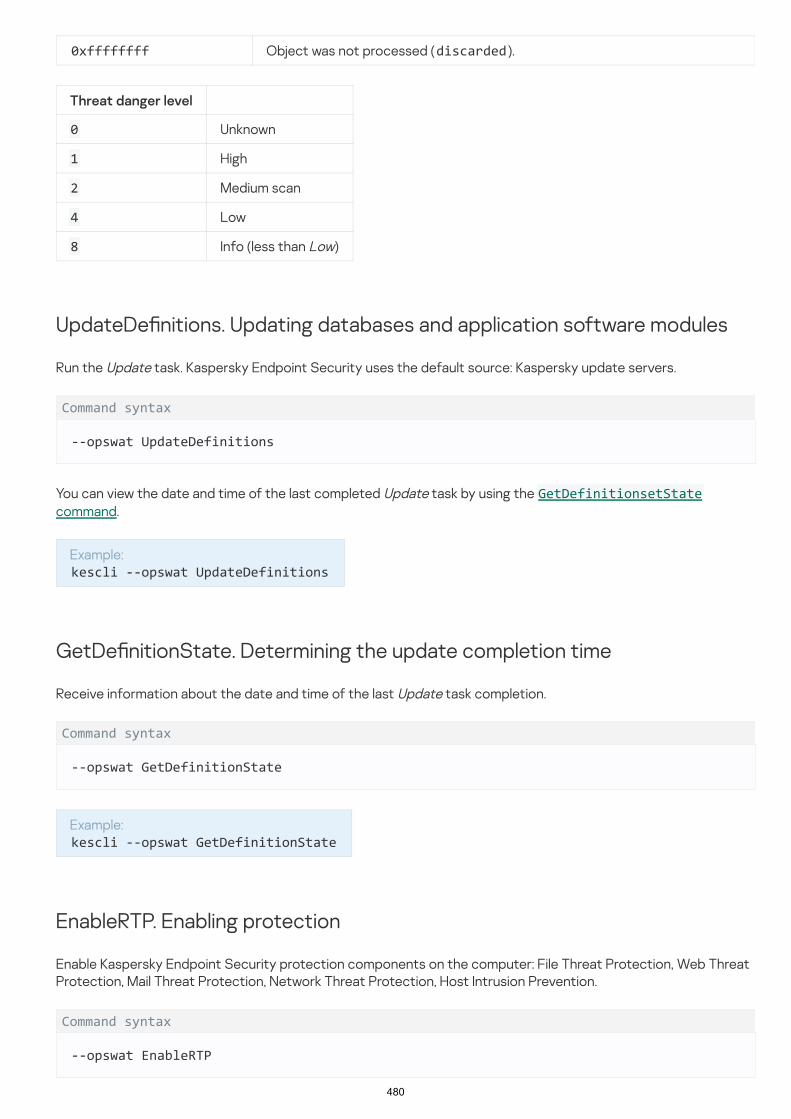
480
Object was not processed (discarded ).
0
Command syntax
--opswat UpdateDefinitions
Example:
Command syntax
--opswat GetDefinitionState
Example:
Command syntax
--opswat EnableRTP
0xffffffff
Threat danger level
Unknown
1 High
2 Medium scan
4 Low
8 Info (less than Low)
UpdateDe�nitions. Updating databases and application software modules
Run the Update task. Kaspersky Endpoint Security uses the default source: Kaspersky update servers.
You can view the date and time of the last completed Update task by using the GetDefinitionsetStatecommand.
kescli --opswat UpdateDefinitions
GetDe�nitionState. Determining the update completion time
Receive information about the date and time of the last Update task completion.
kescli --opswat GetDefinitionState
EnableRTP. Enabling protection
Enable Kaspersky Endpoint Security protection components on the computer: File Threat Protection, Web ThreatProtection, Mail Threat Protection, Network Threat Protection, Host Intrusion Prevention.

481
Example:
Command syntax
--opswat GetRealTimeProtectionState
Example:
Command syntax
--Version
Example:
Error codes
Error code Description
09479001 License key for Kaspersky Endpoint Security is already in use on this computer.
0947901D License expired. Database update is not available.
You can check the operating status of File Threat Protection by using the GetRealTimeProtectionStatecommand.
kescli --opswat EnableRTP
GetRealTimeProtectionState. File Threat Protection status
Receive information about the operating status of the File Threat Protection component:
1 – the component is enabled.
0 – the component is disabled.
kescli --opswat GetRealTimeProtectionState
Version. Identifying the application version
Identify the version of Kaspersky Endpoint Security for Windows.
You can also use the abbreviated command -v.
kescli -v
Error codes
Errors may occur when working with the application through the command line. When errors occur, KasperskyEndpoint Security shows an error message, for example, Error: Cannot start task 'EntAppControl'.Kaspersky Endpoint Security can also show additional information in the form of a code, for example,error=8947906D (see the table below).
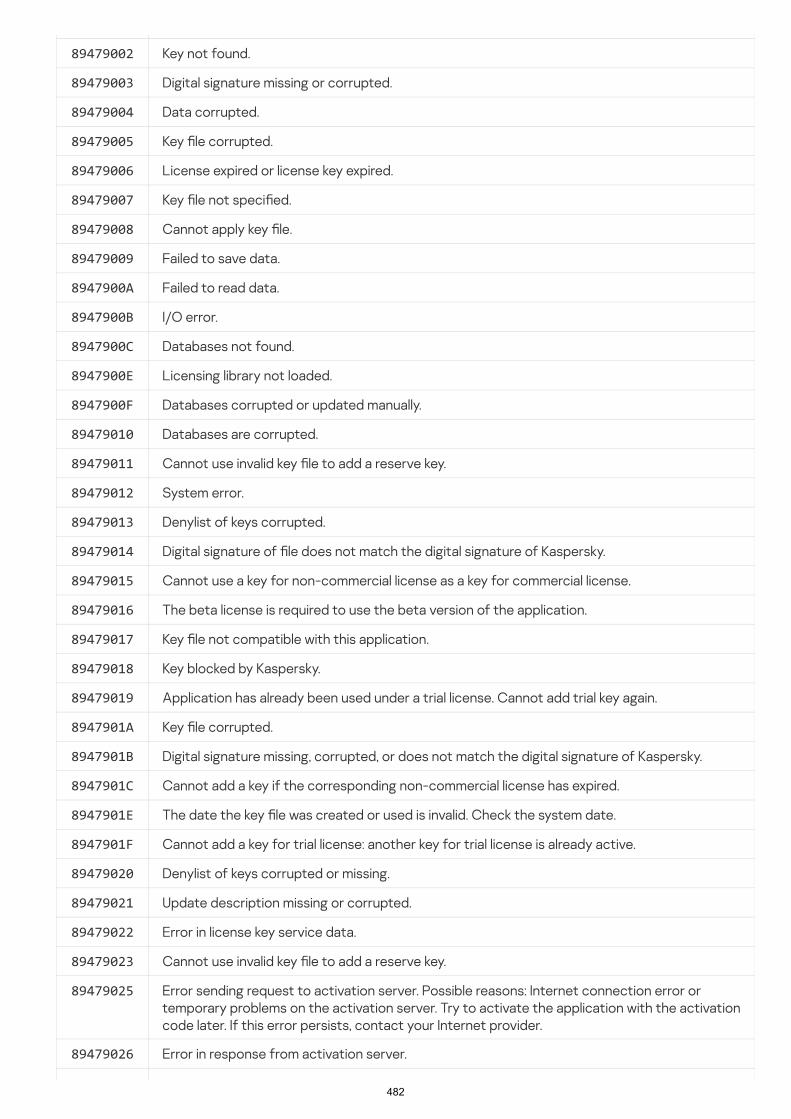
482
89479002 Key not found.
89479003 Digital signature missing or corrupted.
89479004 Data corrupted.
89479005 Key �le corrupted.
89479006 License expired or license key expired.
89479007 Key �le not speci�ed.
89479008 Cannot apply key �le.
89479009 Failed to save data.
8947900A Failed to read data.
8947900B I/O error.
8947900C Databases not found.
8947900E Licensing library not loaded.
8947900F Databases corrupted or updated manually.
89479010 Databases are corrupted.
89479011 Cannot use invalid key �le to add a reserve key.
89479012 System error.
89479013 Denylist of keys corrupted.
89479014 Digital signature of �le does not match the digital signature of Kaspersky.
89479015 Cannot use a key for non-commercial license as a key for commercial license.
89479016 The beta license is required to use the beta version of the application.
89479017 Key �le not compatible with this application.
89479018 Key blocked by Kaspersky.
89479019 Application has already been used under a trial license. Cannot add trial key again.
8947901A Key �le corrupted.
8947901B Digital signature missing, corrupted, or does not match the digital signature of Kaspersky.
8947901C Cannot add a key if the corresponding non-commercial license has expired.
8947901E The date the key �le was created or used is invalid. Check the system date.
8947901F Cannot add a key for trial license: another key for trial license is already active.
89479020
89479021 Update description missing or corrupted.
89479022 Error in license key service data.
89479023 Cannot use invalid key �le to add a reserve key.
89479025 Error sending request to activation server. Possible reasons: Internet connection error ortemporary problems on the activation server. Try to activate the application with the activationcode later. If this error persists, contact your Internet provider.
89479026 Error in response from activation server.
Denylist of keys corrupted or missing.

483
89479027 Cannot obtain response status.
89479028 Error occurred when saving temporary �le.
89479029 Activation code has been entered incorrectly or system date is incorrect. Check the systemdate on the computer.
8947902A Key �le not compatible with this application, or license expired. You cannot activate KasperskyEndpoint Security by using a key �le for a di�erent application.
8947902B Failed to receive key �le. Incorrect activation code was entered.
8947902C Activation server has returned error 400.
8947902D Activation server has returned error 401.
8947902E Activation server has returned error 403.
8947902F Activation server has returned error 404.
89479030 Activation server has returned error 405.
89479031 Activation server has returned error 406.
89479032 Authentication on proxy server required. Check the network settings.
89479033 Request timeout expired.
89479034 Activation server has returned error 409.
89479035 Activation server has returned error 410.
89479036 Activation server has returned error 411.
89479037 Activation server has returned error 412.
89479038 Activation server has returned error 413.
89479039 Activation server has returned error 414.
8947903A Activation server has returned error 415.
8947903C Internal server error.
8947903D Functionality not supported.
8947903E Invalid response from gateway. Check the network settings.
8947903F Service unavailable (HTTP Error 503).
89479040 Gateway response timeout has expired. Check the network settings.
89479041 The protocol is not supported by the server.
89479043 Unknown HTTP error.
89479044 Invalid resource ID.
89479046 Invalid URL.
89479047 Invalid destination folder.
89479048 Memory allocation error.
89479049 Error converting parameters to ANSI string (URL, folder, agent).
8947904A Error creating worker thread.
8947904B Worker thread already running.

484
8947904C Worker thread not running.
8947904D Key �le not found on activation server.
8947904E Key is blocked.
8947904F Internal error of activation server.
89479050 Not enough data in activation request.
89479053 License key expired.
89479054 Incorrect system date is set on the computer.
89479055 Trial license has expired.
89479056 License expired.
89479057 The limit of application activations has been exceeded for the speci�ed code.
89479058 Activation procedure ended with a system error.
89479059 Cannot use a key for non-commercial license as a key for commercial license.
8947905C Activation code is required.
89479062 Cannot connect to activation server.
89479064 Activation server is unavailable. Please check your Internet connection settings and retryactivation.
89479065 Application database release date exceeds the license expiration date.
89479066 Cannot replace the active key with an expired key.
89479067 Cannot add a reserve key if it expires before the current license.
89479068 Updated subscription key missing.
8947906A Incorrect activation code (checksum does not match).
8947906B Key already active.
8947906C License types that correspond to active and reserve keys do not match.
8947906D Component not supported by license.
8947906E Unable to add subscription key as a reserve key.
89479213 Transport layer general error.
89479214 Failed to connect to activation server.
89479215 Invalid URL format.
89479216 Failed to convert proxy server address.
89479217 Failed to convert server address. Check the Internet connection settings.
89479218 Failed to connect to activation server or proxy server.
89479219 Remote access denied.
8947921A Response timeout has expired.
8947921B Error sending HTTP request.
8947921C SSL connection error.
8947921D Operation interrupted by callback.

485
8947921E Too many forward attempts.
8947921F Recipient check failed.
89479220 Empty response from activation server.
89479221 Error sending data.
89479222 Error receiving data.
89479223 Local SSL certi�cate error.
89479224 SSL encryption error.
89479225 Server SSL certi�cate error.
89479226 Invalid contents of network packet.
89479227 User access denied.
89479228 Invalid SSL certi�cate �le.
89479229 Failed to establish SSL connection.
8947922A Failed to send or receive network packet. Please try again later.
8947922B Invalid �le with revoked certi�cates.
8947922C SSL certi�cate request error.
89479401 Unknown server error.
89479402 Internal server error.
89479403 No license key available for the activation code entered.
89479404 Active key blocked.
89479405 Required parameters of application activation request are missing.
89479406 Incorrect user name or password.
89479407 Incorrect activation code sent to server.
89479408 Activation code is invalid for Kaspersky Endpoint Security. You cannot activate KasperskyEndpoint Security by using a key �le for an unknown application.
89479409 Request is missing an activation code.
8947940B License expired (according to data from the activation server).
8947940C Number of activations with this code has been exceeded.
8947940D Invalid format of request ID.
8947940E Activation code is invalid for Kaspersky Endpoint Security. Activation code is intended for adi�erent Kaspersky application.
8947940F Cannot update license key.
89479410 Activation code is invalid for this region.
89479411 Activation code is invalid for the Kaspersky Endpoint Security language version.
89479412 Additional access to the activation server is required.
89479413 Activation server has returned error 643.
89479414 Activation server has returned error 644.

486
89479415 Activation server has returned error 645.
89479416 Activation server has returned error 646.
89479417 Activation code format not supported by activation server.
89479418 Invalid activation code format.
89479419 Incorrect system time is set on the computer.
8947941A Activation code is invalid for the Kaspersky Endpoint Security version.
8947941B Subscription expired.
8947941C Number of activations exceeded for this license key.
8947941D Invalid digital signature of license key.
8947941E Additional data is needed.
8947941F User data veri�cation failed.
89479420 Subscription inactive.
89479421 Activation server is under maintenance.
89479501 Unknown error of Kaspersky Endpoint Security.
89479502 Invalid parameter transferred (for example, an empty list of activation server addresses).
89479503 Incorrect activation code.
89479504 Invalid user name.
89479505 Invalid user password.
89479506 Invalid response from activation server.
89479507 Activation request interrupted.
89479509 Activation server returned an empty forwarding list.
Appendix. Application pro�les
A Pro�le is a Kaspersky Endpoint Security component, task or feature. Pro�les are used to manage the applicationfrom the command line. You can use pro�les to execute START, STOP, STATUS, STATISTICS, EXPORT, and IMPORTcommands. Using pro�les, you can con�gure application settings (for example, STOP DeviceControl) or run tasks(for example, START Scan_My_Computer).
The following pro�les are available:
AdaptiveAnomaliesControl – Adaptive Anomaly Control.
AMSI – AMSI Protection.
BehaviorDetection – Behavior Detection.
DeviceControl – Device control.
EntAppControl – Application Control.
File_Monitoring or FM – File Threat Protection.

487
Kaspersky Endpoint Security also supports service pro�les. Service pro�les may be required when you arecontacting Kaspersky Technical Support.
Firewall or FW – Firewall.
HIPS – Host Intrusion prevention.
IDS – Network Threat Protection.
IntegrityCheck – Integrity check.
Mail_Monitoring or EM – Mail Threat Protection.
Rollback – update rollback.
Scan_ContextScan – Scan from context menu.
Scan_IdleScan – Background scan.
Scan_Memory – Kernel memory scan.
Scan_My_Computer – Full scan.
Scan_Objects – Custom scan.
Scan_Qscan – Scan objects that are loaded at operation system startup.
Scan_Removable_Drive – Removable drives scan.
Scan_Startup or STARTUP – Critical Areas Scan.
Updater – Update.
Web_Monitoring or WM – Web Threat Protection.
WebControl – Web Control.

488
To install Kaspersky Endpoint Security with REST API support:
1. Run the command line interpreter (cmd.exe) as an administrator.
2. Go to the folder that contains the distribution package for Kaspersky Endpoint Security version 11.2.0 or later.
3. Install Kaspersky Endpoint Security with the following settings:
Managing the application through the REST API
Kaspersky Endpoint Security lets you con�gure application settings, run a scan, update the anti-virus databases,and perform other tasks using third-party solutions. Kaspersky Endpoint Security provides an API for this purpose.The Kaspersky Endpoint Security REST API operates over HTTP and consists of a set of request/responsemethods. In other words, you can manage Kaspersky Endpoint Security through a third-party solution, and not thelocal application interface or the Kaspersky Security Center Administration Console.
To start using REST API, you need to install Kaspersky Endpoint Security with support for the REST API. The RESTclient and Kaspersky Endpoint Security must be installed on the same computer.
To ensure safe interaction between Kaspersky Endpoint Security and the REST client:
Con�gure REST client's protection from unauthorized access according the recommendations of the RESTclient developer. Con�gure REST client folder protection from writing with the help of Discretionary AccessControl List – DACL.
To run REST client, use a separate account with administrator rights. Deny interactive sign-in into the systemfor this account.
The application is managed through the REST API at http://127.0.0.1 or http://localhost. It is not possible to remotelymanage Kaspersky Endpoint Security through the REST API.
OPEN THE REST API DOCUMENTATION
Installing the application with the REST API
To manage the application through the REST API, you need to install Kaspersky Endpoint Security with support forthe REST API. If you manage Kaspersky Endpoint Security through the REST API, you cannot manage theapplication using Kaspersky Security Center.
RESTAPI=1
RESTAPI_User=<User name>
User name for managing the application through the REST API. Enter the user name in the format<DOMAIN>\<UserName> (for example, RESTAPI_User=COMPANY\Administrator ). You can manage theapplication through the REST API only under this account. You can select only one user to work with theREST API.
RESTAPI_Port=<Port>
Port used for data exchange. Optional parameter. Port 6782 is selected by default.
AdminKitConnector=1
Application management using administration systems. Management is allowed by default.

489
You can also use the setup.ini �le to de�ne the settings for working with the REST API.
You can de�ne the settings for working with the RESТ API only during application installation. It is not possibleto change the settings after the application is installed. If you want to change the settings, uninstall KasperskyEndpoint Security and reinstall it with the new settings for working with the REST API.
Example:setup_kes.exe /pEULA=1 /pPRIVACYPOLICY=1 /pKSN=1 /pALLOWREBOOT=1/pAdminKitConnector=1 /pRESTAPI=1 /pRESTAPI_User=COMPANY\Administrator /s
Example:GET http://localhost:6782/kes/v1/api-docs
It is not possible to restrict access to the application through the REST API using Password Protection. Forexample, it is not possible to block a user from disabling protection through the REST API. You can con�gurePassword Protection through the REST API and restrict user access to the application through the localinterface.
1. Get the current values of the application settings. To do so, send a GET request.
Example:GET http://localhost:6782/kes/v1/settings/ExploitPrevention
2. The application will send a response with the structure and values of settings. Kaspersky Endpoint Securitysupports XML- and JSON formats.
Example:{
"action": 0,
"enableSystemProcessesMemoryProtection": true,
"enabled": true
}
3. Edit the application settings. To do so, send a POST request. Use the settings structure received in response tothe GET request.
Example:
As a result, you will be able to manage the application through the REST API. To verify its operation, open the RESTAPI documentation using a GET request.
Working with the API
To manage the application through the REST API, you need to run the REST client under the account that youspeci�ed when installing the application with REST API support. You can select only one user to work with theREST API.
OPEN THE REST API DOCUMENTATION
Managing the application through the REST API consists of the following steps:

490
POST http://localhost:6782/kes/v1/settings/ExploitPrevention
{
"action": 0,
"enableSystemProcessesMemoryProtection": false,
"enabled": true
}
4. The application will apply the changes in the settings and send a response containing the applicationcon�guration results.

491
Kaspersky Endpoint Security page on the Kaspersky website
Kaspersky Endpoint Security page in the Knowledge Base
Discussion of Kaspersky applications in user community
Sources of information about the application
On the Kaspersky Endpoint Security page , you can view general information about the application and itsfunctions and features.
The Kaspersky Endpoint Security page contains a link to the online store. There you can purchase or renew theapplication.
Knowledge Base is a section on the Technical Support website.
On the Kaspersky Endpoint Security page in the Knowledge Base , you can read articles that provide usefulinformation, recommendations, and answers to frequently asked questions on how to purchase, install, and use theapplication.
Knowledge Base articles can answer questions relating to not only Kaspersky Endpoint Security but also to otherKaspersky applications. Articles in the Knowledge Base may also contain news from Technical Support.
If your question does not require an urgent answer, you can discuss it with Kaspersky experts and other users inour Community .
In the Community, you can view existing topics, post your own comments, and create new discussion topics.

492
Kaspersky provides support for Kaspersky Endpoint Security during the application's life cycle (refer to theapplication life cycle page ). Before contacting Technical Support, please read the support rules .
The operations listed above should be performed only under the supervision of Technical Support specialistsby following their instructions. Unsupervised changes to application settings performed in ways other thanthose described in the Administrator's Guide or instructions of Technical Support specialists can slow down orcrash the operating system, a�ect computer security, or compromise the availability and integrity of databeing processed.
You are personally responsible for the security of the data that is stored on your computer, particularly formonitoring and restricting access to the data until it is submitted to Kaspersky.
Contacting Technical Support
If you cannot �nd a solution to your problem in the documentation or in other sources of information aboutKaspersky Endpoint Security, we recommend that you contact Technical Support. Technical Support will answeryour questions about installing and using Kaspersky Endpoint Security.
You can contact Technical Support in one of the following ways:
By visiting the Technical Support website
By sending a request to Kaspersky Technical Support through the Kaspersky CompanyAccount portal
After you inform Kaspersky Technical Support specialists about your issue, they may ask you to create a trace �le.The trace �le allows you to trace the process of performing application commands step by step and determine thestage of application operation at which an error occurs.
Technical Support specialists may also require additional information about the operating system, processes thatare running on the computer, detailed reports on the operation of application components.
While running diagnostics, Technical Support experts may ask you to change application settings by:
Activating the functionality for receiving extended diagnostic information.
Fine-tuning the settings of individual application components, which are not available via standard userinterface elements.
Changing the settings for storage of diagnostic information.
Con�guring the interception and logging of network tra�ic.
Technical Support experts will provide all the information needed to perform these operations (description of thesequence of steps, settings to be modi�ed, con�guration �les, scripts, additional command line functionality,debugging modules, special-purpose utilities, etc.) and inform you about the scope of data used for purposes ofdebugging. The extended diagnostic information is saved on the user's computer. The data is not automaticallytransmitted to Kaspersky.
Contents and storage of trace �les

493
Kaspersky Endpoint Security saves user passwords to a trace �le only in encrypted form.
Contents of SRV.log, GUI.log, and ALL.log trace �les
Trace �les are stored on the computer as long as the application is in use, and are deleted permanently when theapplication is removed.
Trace �les, except trace �les of Authentication Agent, are stored in the folder %ProgramData%\KasperskyLab\KES\Traces.
Trace �les are named as follows: KES<service version number_dateXX.XX_timeXX.XX_pidXXX.><tracefile type>.log .
You can view data saved in trace �les.
All trace �les contain the following common data:
Event time.
Number of the thread of execution.
The Authentication Agent trace �le does not contain this information.
Application component that caused the event.
Degree of event severity (informational event, warning, critical event, error).
A description of the event involving command execution by a component of the application and the result ofexecution of this command.
SRV.log , GUI.log, and ALL.log trace �les may store the following information in addition to general data:
Personal data, including the last name, �rst name, and middle name, if such data is included in the path to �leson the local computer.
Data on the hardware installed on the computer (such as BIOS/UEFI �rmware data). This data is written to trace�les when performing Kaspersky Disk Encryption.
The user name and password if they were transmitted openly. This data can be recorded in trace �les duringInternet tra�ic scanning.
The user name and password if they are contained in HTTP headers.
The name of the Microsoft Windows account if the account name is included in a �le name.
Your email address or a web address containing the name of your account and password if they are containedin the name of the object detected.
Websites that you visit and redirects from these websites. This data is written to trace �les when theapplication scans websites.

494
Contents of HST.log, BL.log, Dumpwriter.log, WD.log, AVPCon.dll.log trace �les
Contents of performance trace �les
Contents of the AMSI Protection component trace �le
Contents of trace �les of the Mail Threat Protection component
Proxy server address, computer name, port, IP address, and user name used to sign in to the proxy server. Thisdata is written to trace �les if the application uses a proxy server.
Remote IP addresses to which your computer established connections.
Message subject, ID, sender's name and address of the message sender's web page on a social network. Thisdata is written to trace �les if the Web Control component is enabled.
Network tra�ic data. This data is written to trace �les if tra�ic monitoring components are enabled (such asWeb Control).
Data received from Kaspersky servers (such as the version of anti-virus databases).
Statuses of Kaspersky Endpoint Security components and their operating data.
Data on user activity in the application.
Operating system events.
In addition to general data, the HST.log trace �le contains information about the execution of a database andapplication module update task.
In addition to general data, the BL.log trace �le contains information about events occurring during operation ofthe application, as well as data required to troubleshoot application errors. This �le is created if the application isstarted with the avp.exe –bl parameter.
In addition to general data, the Dumpwriter.log trace �le contains service information required fortroubleshooting errors that occur when the application dump �le is written.
In addition to general data, the WD.log trace �le contains information about events occurring during operation ofthe avpsus service, including application module update events.
In addition to general data, the AVPCon.dll.log trace �le contains information about events occurring during theoperation of the Kaspersky Security Center connectivity module.
Performance trace �les are named as follows: KES<versionnumber_dateXX.XX_timeXX.XX_pidXXX.>PERF.HAND.etl .
In addition to general data, performance trace �les contain information about the load on the processor,information about the loading time of the operating system and applications, and information about runningprocesses.
In addition to general data, the AMSI.log trace �le contains information about the results of scans performed onrequests from third-party applications.

495
Contents of trace �les of the Scan from Context Menu component
Contents of trace �les of the application web plug-in
Contents of the Authentication Agent trace �le
Application traces should be performed under the supervision of Kaspersky Technical Support.
To create an application trace �le:
1. In the main application window, click the button .
The trace �le mcou.OUTLOOK.EXE.log may contain parts of email messages, including email addresses, inaddition to general data.
The shellex.dll.log trace �le contains information about completion of the scan task and data required todebug the application, in addition to general information.
Trace �les of the application web plug-in are stored on the computer on which Kaspersky Security Center 12 WebConsole is deployed, in the folder Program Files\Kaspersky Lab\Kaspersky Security Center Web Console 12\logs.
Trace �les of the application web plug-in are named as follows: logs-kes_windows-<type of tracefile>.DESKTOP-<date of file update>.log . Web Console begins writing data after installation and deletesthe trace �les after Web Console is removed.
Trace �les of the application web plug-in contain the following information in addition to general data:
KLAdmin user password for unlocking the Kaspersky Endpoint Security interface (Password protection).
Temporary password for unlocking the Kaspersky Endpoint Security interface (Password protection).
User name and password for the SMTP mail server (Email noti�cations).
User name and password for the Internet proxy server (Proxy server).
User name and password for the Change application components task.
Account credentials and paths speci�ed in Kaspersky Endpoint Security tasks and policy properties.
The Authentication Agent trace �le is stored in the System Volume Information folder and is named as follows:KLFDE.{EB2A5993-DFC8-41a1-B050-F0824113A33A}.PBELOG.bin .
In addition to general data, the Authentication Agent trace �le contains information about the operation ofAuthentication Agent and the actions performed by the user with Authentication Agent.
Application traces
Application traces are detailed records of the actions performed by the application, and of messages aboutevents that occurred during operation of the application.

496
The window opens.
2. In the window, click the button.
3. Use the toggle to enable or disable tracing of application operation.
4. In the drop-down list, select an application tracing mode:
5. In the drop-down list, select the tracing level.
You are advised to clarify the required tracing level with a Technical Support specialist. In the absence ofguidance from Technical Support, set the tracing level to .
6. Restart Kaspersky Endpoint Security.
7. To stop the tracing process, return to the window and disable tracing.
You can also create trace �les when installing the application from the command line, including by using thesetup.ini �le.
Application traces should be performed under the supervision of Kaspersky Technical Support.
To create a performance trace �le:
1. In the main application window, click the button .
The window opens.
2. In the window, click the button.
3. Use the toggle to enable or disable tracing of application performance.
4. In the drop-down list, select an application tracing mode:
Support
Support Support Tools
Enable application traces
Traces
. Save traces to a limited number of �les of limited size and overwrite the older �les when themaximum size is reached. If this mode is selected, you can de�ne the maximum number of �les for rotationand the maximum size for each �le.
. Save one trace �le (no size limit).
with rotation
Write to a single �le
Level
Normal (500)
Support
Trace �les are stored on the computer as long as the application is in use, and are deleted permanently when theapplication is removed. Trace �les, except trace �les of Authentication Agent, are stored in the folder%ProgramData%\Kaspersky Lab\KES\Traces. By default, tracing is disabled.
Application performance traces
Kaspersky Endpoint Security lets you receive information about computer operating issues during use of theapplication. For example, you can receive information about delays in operating system loading after theapplication is installed. To do so, Kaspersky Endpoint Security creates performance trace �les. Performance tracesrefer to the logging of actions performed by the application for the purpose of diagnosing performance issues ofKaspersky Endpoint Security. To receive information, Kaspersky Endpoint Security uses the Event Tracing forWindows service (ETW). Kaspersky Technical Support is responsible for diagnosing issues of Kaspersky EndpointSecurity and establishing the reasons for those issues.
Support
Support Support Tools
Enable performance traces
Traces

497
5. In the drop-down list, select the tracing level:
6. In the drop-down list, select the tracing type:
7. Restart the computer and try to reproduce the problem.
8. To stop the tracing process, return to the window and disable tracing.
Saved dump �les may contain con�dential data. To control access to data, you must independently ensure thesecurity of dump �les.
To enable or disable dump writing:
1. In the lower part of the main application window, click the button.
2. In the application settings window, select the section.
3. In the block, use the check box to enable or disable application dumpwriting.
4. Save your changes.
. Save traces to a limited number of �les of limited size and overwrite the older �les when themaximum size is reached. If this mode is selected, you can de�ne the maximum size for each �le.
. Save one trace �le (no size limit).
with rotation
Write to a single �le
Level
. Kaspersky Endpoint Security analyzes the main operating system processes related to performance.
Kaspersky Endpoint Security analyzes all operating system processes related to performance.
Light
Detailed.
Tracing type
. Kaspersky Endpoint Security analyzes processes while the operating system is running.Use this tracing type if a problem persists after the operating system is loaded, such as a problem accessingthe Internet in the browser.
. Kaspersky Endpoint Security analyzes processes only while the operating system is loading.After the operating system is loaded, Kaspersky Endpoint Security stops tracing. Use this tracing type if theproblem is related to delayed loading of the operating system.
Basic information
On restart
Support
As a result, a performance trace �le will be created in the folder %ProgramData%\Kaspersky Lab\KES\Traces.After the trace �le is created, send the �le to Kaspersky Technical Support.
Dump writing
A dump �le contains all information about the working memory of Kaspersky Endpoint Security processes at themoment when the dump �le was created.
Dump �les are stored on the computer as long as the application is in use, and are deleted permanently when theapplication is removed. Dump �les are stored in the folder %ProgramData%\Kaspersky Lab\KES\Traces.
General
Debug information Enable dump writing
Protecting dump �les and trace �les

498
To enable or disable protection of dump �les and trace �les:
1. In the lower part of the main application window, click the button.
2. In the application settings window, select the section.
3. In the block, use the check box to enable ordisable �le protection.
4. Save your changes.
Dump �les and trace �les contain information about the operating system, and may also contain user data. Toprevent unauthorized access to such data, you can enable protection of dump �les and trace �les.
If protection of dump �les and trace �les is enabled, the �les can be accessed by the following users:
Dump �les can be accessed by the system administrator and local administrator, and by the user that enabledthe writing of dump �les and trace �les.
Trace �les can be accessed only by the system administrator and local administrator.
General
Debug information Enable dump and trace �les protection
Dump �les and trace �les that were written while protection was active remain protected even after thisfunction is disabled.

499
Limitations and warnings
Kaspersky Endpoint Security has a number of limitations that are not critical to operation of the application.
Installing the application

500
For details about support for the Microsoft Windows 10, Microsoft Windows Server 2016 and MicrosoftWindows Server 2019 operating systems, please refer to the Technical Support Knowledge Base .
After being installed to an infected computer, the application does not inform the user about the need torun a computer scan. You may experience problems activating the application. To resolve these problems,start a Critical Areas Scan.
If non-ASCII characters (for example, Russian letters) are used in the setup.ini and setup.reg �les, you areadvised to edit the �le using notepad.exe and to save the �le in UTF-16LE encoding. Other encodings arenot supported.
The application does not support the use of non-ASCII characters when specifying the applicationinstallation path in the installation package settings.
When application settings are imported from a CFG �le, the value of the setting that de�nes participationin Kaspersky Security Network is not applied. After importing the settings, please read the text of theKaspersky Security Network Statement and con�rm your consent to participate in Kaspersky SecurityNetwork. You can read the text of the Statement in the application interface or in the ksn_*.txt �le locatedin the folder containing the application distribution kit.
When upgrading from Kaspersky Endpoint Security 10 Service Pack 2 for Windows (build 10.3.0.6294), theHost Intrusion Prevention component is turned on.
When updating Kaspersky Endpoint Security 10 for Windows Service Pack 2 (build 10.3.0.6294), the �lesthat were placed in Backup or Quarantine in the previous version of the application will be transferred toBackup in the new version of the application. These �les are not transferred for versions earlier thanKaspersky Endpoint Security 10 for Windows Service Pack 2 (build 10.3.0.6294). To save them, you mustrestore the �les from Quarantine and Backup before upgrading the application. After the upgrade iscomplete, re-scan the restored �les.
If you want to remove and then re-install encryption (FLE or FDE) or the Device Control component, youmust restart the system before reinstallation.
When using the Microsoft Windows 10 operating system, you must restart the system after removing theFile Level Encryption (FLE) component.
When attempting to install any version of the AES Encryption Module on a computer that has KasperskyEndpoint Security for Windows 11.6.0 but no encryption components installed, installation of theEncryption Module will end with an error message stating that a newer version of the application isinstalled. Starting with Kaspersky Endpoint Security 10 for Windows Service Pack 2 (version 10.3.0.6294),there is no separate installation �le for the Encryption Module. Encryption libraries are included in theapplication distribution package. Kaspersky Endpoint Security 11.6.0 is incompatible with AES encryptionmodules. The libraries required for encryption are installed automatically when the Full Disk Encryption(FDE) or File Level Encryption (FLE) component is selected.
Installation of the application may end with an error stating An application whose name is missing orunreadable is installed on your computer. This means that incompatible applications or fragments of themremain on your computer. To remove artifacts of incompatible applications, send a request with a detaileddescription of the situation to Kaspersky Technical Support via Kaspersky CompanyAccount .
Starting from 11.0.0 application version, you can install Kaspersky Endpoint Security for Windows MMCplugin on top of the previous plugin version. To return to a previous plugin version, delete the current pluginand install a previous version of the plugin.
When upgrading Kaspersky Endpoint Security 11.0.0 or 11.0.1 for Windows, the local task schedule settingsfor the Update, Critical Areas Scan, Custom Scan, and Integrity Check tasks are not saved.

501
If you canceled removal of the application, start its recovery after the computer restarts.
On computers running Windows 10 version 1903 and 1909, upgrades from Kaspersky Endpoint Security 10for Windows Service Pack 2 Maintenance Release 3 (build 10.3.3.275), Service Pack 2 Maintenance Release4 (build 10.3.3.304), 11.0.0 and 11.0.1 with the File Level Encryption (FLE) component installed may end with anerror. This is because �le encryption is not supported for these versions of Kaspersky Endpoint Securityfor Windows in Windows 10 version 1903 and 1909. Prior to installing this upgrade, you are advised toremove the �le encryption component.
If you are upgrading a previous version of the application to version 11.6.0, to install Kaspersky EndpointAgent, restart the computer and sign in to the system using an account with local administrator rights.Otherwise, Kaspersky Endpoint Agent will not be installed during the upgrade procedure.
If the application is unsuccessfully installed with the Kaspersky Endpoint Agent component selected in aserver operating system and the Windows Installer Coordinator Error window appears, refer to theinstructions on the Microsoft support website.
If the application was installed locally in non-interactive mode, use the provided setup.ini �le to replace theinstalled components.
If you are upgrading Kaspersky Endpoint Security 10 for Windows Service Pack 2 Maintenance Release 4with the File Level Encryption (FLE) component installed on computers running Windows 10 version 1809,1903 and 1909, FDE drivers will not be installed to the WinRE image.
After Kaspersky Endpoint Security for Windows is installed in some con�gurations of Windows 7, WindowsDefender continues to operate. You are advised to manually disable Windows Defender to preventdegraded system performance.
After the application is upgraded from versions earlier than Kaspersky Endpoint Security 11 for Windows,the computer must be restarted.
Support for server platforms
The ReFS �le system is supported with limitations:
The Server Core and Cluster Mode con�gurations are not supported.
File Level Encryption (FLE) and Kaspersky Disk Encryption (FDE) technologies are not supported on serverplatforms.
Device Control is not supported on server platforms.
Microsoft Windows Server 2008 was excluded from support. - Installing the application on a computerrunning the Microsoft Windows Server 2008 operating system is not supported.
If you started several working sessions on the terminal server, Kaspersky Endpoint Security noti�cationsmay not work correctly. Example: user of session #1 runs a �le reputation check in KSN. Kaspersky EndpointSecurity will display a noti�cation with the check results to the user of session #2.
After server anti-virus check is started, scan exclusions added with iChecker are reset when the serveris rebooted.
Kaspersky Endpoint Security does not detect eicar.com and susp-eicar.com �les if meicar.exe �leexisted on the computer before Kaspersky Endpoint Security was installed.

502
Support for virtual platforms
Full disk encryption (FDE) on Hyper-V virtual machines is not supported.
Full disk encryption (FDE) on Citrix virtual platforms is not supported.
Windows 10 Enterprise multi-session is supported with limitations:
Installation and use of �le level encryption (FLE) on Citrix virtual platforms is not supported.
To support compatibility of Kaspersky Endpoint Security for Windows with Citrix PVS, perform installationwith the option enabled. This option can be enabled in the SetupWizard or by using the command line parameter /pCITRIXCOMPATIBILITY=1 . In case of remoteinstallation, the KUD �le must be edited by adding the following parameter to it:/pCITRIXCOMPATIBILITY=1 .
Citrix XenDesktop. Before starting cloning, you must disable Self-Defense to clone virtual machines thatuse vDisk.
When preparing a template machine for the Citrix XenDesktop master image with pre-installed KasperskyEndpoint Security for Windows and Kaspersky Security Center Network Agent, add the following types ofexclusions to the con�guration �le:
[Rule-Begin]
Type=File-Catalog-Construction
Action=Catalog-Location-Guest-Modifiable
name="%ALLUSERSPROFILE%\Kaspersky\**\*"
name="%ALLUSERSPROFILE%\KasperskyLab\**\*"
[Rule-End]
For details about Citrix XenDesktop, visit the Citrix Support website .
In some cases, an attempt to safely disconnect a removable drive may be unsuccessful on a virtualmachine that is deployed on a VMware ESXi hypervisor. Attempt to safely disconnect the device onceagain.
Kaspersky Endpoint Security considers Windows 10 Enterprise multi-session as a server operatingsystem. Therefore, Windows 10 Enterprise multi-session is supported with server platform-speci�climitations. For example, servers cannot use some Kaspersky Endpoint Security components. Theapplication also uses a server license key instead of a workstation license key.
Full disk encryption (FDE) is not supported.
Managing BitLocker is not supported.
Using Kaspersky Endpoint Security with removable drives is not supported. The Microsoft Azureinfrastructure de�nes removable drives as network drives.
Ensure compatibility with Citrix PVS
Compatibility with Kaspersky Security Center

503
You can manage the Adaptive Anomaly Control component only in Kaspersky Security Center version 11 orlater.
The Kaspersky Security Center 11 threat report might not display information about the action taken onthreats that were detected by the AMSI Protection.
The operating status of the AMSI Protection and Adaptive Anomaly Control components is available onlyin Kaspersky Security Center version 11 or later. You can view the operating status in the KasperskySecurity Center Console within the computer properties in the section. Reports for thesecomponents are also available only in Kaspersky Security Center version 11 or later.
Tasks
Licensing
If the Error receiving data system message is displayed, verify that the computer on which you areperforming activation has network access, or con�gure the activation settings via Kaspersky SecurityCenter Activation Proxy.
The application cannot be activated by subscription via the Kaspersky Security Center if the license hasexpired or if a trial license is active on the computer. To replace a trial license or a soon-to-be expiredlicense with a subscription license, use the license distribution task.
In the application interface, the license expiration date is displayed in the local time of the computer.
Installation of the application with an embedded key �le on a computer that has unstable Internet accessmay result in the temporary display of events stating that the application is not activated or that thelicense does not permit component operation. This is because the application �rst installs and attempts toactivate the embedded trial license, which requires Internet access for activation during the installationprocedure.
During the trial period, installation of any application upgrade or patch on a computer that has unstableInternet access may result in the temporary display of events stating that the application is not activated.This is because the application once again installs and attempts to activate the embedded trial license,which requires Internet access for activation when installing an upgrade.
If the trial license was automatically activated during application installation and then the application wasremoved without saving the license information, the application will not be automatically activated with thetrial license when re-installed. In this case, manually activate the application.
If you are using Kaspersky Security Center version 11 and Kaspersky Endpoint Security version 11.6.0,component performance reports may work incorrectly. If you installed Kaspersky Endpoint Securitycomponents that are not included in your license, Network Agent may send component status errors tothe Windows Event Log. To avoid errors, remove the components that are not included in your license.
Remediation Engine

504
The application restores �les only on devices that have the NTFS or FAT32 �le system.
The application can restore �les with the following extensions: odt, ods, odp, odm, odc, odb, doc, docx,docm, wps, xls, xlsx, xlsm, xlsb, xlk, ppt, pptx, pptm, mdb, accdb, pst, dwg, dxf, dxg, wpd, rtf, wb2, pdf, mdf,dbf, psd, pdd, eps, ai, indd, cdr, jpg, jpe, dng, 3fr, arw, srf, sr2, bay, crw, cr2, dcr, kdc, erf, mef, mrw, nef, nrw, orf,raf, raw, rwl, rw2, r3d, ptx, pef, srw, x3f, der, cer, crt, pem, pfx, p12, p7b, p7c, 1cd.
It is not possible to restore �les residing on network drives or on rewritable CD/DVD discs.
It is not possible to restore �les that were encrypted with the Encryption File System (EFS). For moredetails on EFS operation, please visit the Microsoft website .
The application does not monitor modi�cations to �les performed by processes at the level of theoperating system kernel.
The application does not monitor modi�cations made to �les over a network interface (for example, if a �leis stored in a shared folder and a process is started remotely from another computer).
Firewall

505
Filtration of packets or connections by local address, physical interface, and packet time to live (TTL) issupported in the following cases:
In application versions 11.0.0 and 11.0.1, de�ned MAC addresses are incorrectly applied. The MAC addresssettings for versions 11.0.0, 11.0.1 and 11.1.0 or later are not compatible. After upgrading the application orplug-in from these versions to version 11.1.0 or later, you must verify and recon�gure the de�ned MACaddresses in Firewall rules.
When upgrading the application from versions 11.1.1 and 11.2.0 to version 11.6.0, the statuses of permissionsfor the following Firewall rules are not migrated:
If you con�gured a network adapter or packet time to live (TTL) for an allowing packet rule, the priority ofthis rule is lower than a blocking application rule. In other words, if network activity is blocked for anapplication (for example, the application is in the High Restricted trust group), you cannot allow networkactivity of the application by using a packet rule with these settings. In all other cases, the priority of apacket rule is higher than an application network rule.
An error may occur in Kaspersky Endpoint Security for Windows 11.5.0–11.6.0 when importing a list ofFirewall packet rules. This may result in the deletion of user-de�ned local or remote addresses from a rule.To �x the error, please contact Technical Support. Technical Support will provide you with a patchedupdate for the plug-in. Or you can upgrade the application to the next version after its release.
When importing a list of Firewall packet rules, Kaspersky Endpoint Security may change the names of rules.The application identi�es rules that have the same set of main parameters, such as protocol, direction,remote and local ports, and packet time to live (TTL). If this set of main parameters is identical for multiplerules, the application assigns the same name to these rules or adds a parameter tag to the name. Thismeans that Kaspersky Endpoint Security imports all packet rules, but the name of rules that have identicalmain parameters may be changed.
When a network packet rule is triggered in Kaspersky Endpoint Security 11.6.0 or earlier, the column in the Firewall report will always display the Kaspersky Endpoint Security value. In addition,
the Firewall will block the connection at packet level for all applications. This behavior has been modi�ed forKaspersky Endpoint Security 11.7.0 or later. The column has been added to the Firewall report.When a network packet rule is triggered, the value in the column remains empty.
By local address for outbound packets or connections in application rules for TCP and UDP and packetrules.
By local address for inbound packets or connections (except UDP) in block application rules and packetrules.
By packet time to live (TTL) in block packet rules for inbound or outbound packets.
By network interface for inbound and outbound packets or connections in packet rules.
Requests to DNS server over TCP.
Requests to DNS server over UDP.
Any network activity.
ICMP Destination Unreachable incoming responses.
Incoming ICMP stream.
Applicationname
Rule typeApplication name

506
Application Control
When working in Microsoft Windows 10 in application denylist mode, block rules may be incorrectly applied,which could cause blocking of applications that are not speci�ed in rules.
When progressive web apps (PWA) are blocked by the Application Control component, appManifest.xml isindicated as the blocked app in the report.
Device Control
Access to Printer devices that were added to the trusted list is blocked by device and bus blocking rules.
For MTP devices, control of Read, Write, and Connect operations is supported if you are using the built-inMicrosoft drivers of the operating system. If a user installs a custom driver for working with a device (forexample, as part of iTunes or Android Debug Bridge), control of Read and Write operations may not work.
When working with MTP devices, access rules are changed after reconnecting the device.
If you are adding a device to the trusted list based on a model mask and use characters that are included inthe ID but not in the model name, these devices are not added. On a workstation, these devices will beadded to the trusted list based on an ID mask.
Web Control
The OGV and WEBM formats are not supported.
The RTMP protocol is not supported.
Adaptive Anomaly Control
It is recommended to create exclusions automatically based on the event. When manually adding anexclusion, add the * character to the beginning of the path when specifying the target object.
An Adaptive Anomaly Control Rules report cannot be generated if the sample includes even one eventwhose name contains more than 260 characters.
Adding exclusions from Adaptive Anomaly Control Triggering of Rules repository is not supported if theproperties of an object or a process have a value consisting of more than 256 characters (for example,path to target object). You can add an exclusion manually in the Policy settings. You can also add anexclusion in the Report on triggered Adaptive Anomaly Control rules.
Drive Encryption (FDE)

507
After installing the application, you must restart the operating system for hard drive encryption to workproperly.
The Authentication Agent does not support hieroglyphics or the special characters | and \.
For optimal computer performance after encryption, it is required that the processor supports AES-NIinstruction set (Intel Advanced Encryption Standard New Instructions). If the processor does not supportAES-NI, computer performance might decrease.
When there are processes that attempt to access encrypted devices before the application has grantedaccess to such devices, the application shows a warning stating that such processes must be terminated.If the processes cannot be terminated, re-connect the encrypted devices.
The unique IDs of hard drives are displayed in the device encryption statistics in inverted format.
It is not recommended to format devices while they are being encrypted.
When multiple removable drives are simultaneously connected to a computer, the encryption policy can beapplied to only one removable drive. When the removable devices are reconnected, the encryption policy isapplied correctly.
Encryption may fail to start on a heavily fragmented hard drive. Defragment the hard drive.
When hard drives are encrypted, hibernation is blocked from the time when the encryption task starts untilthe �rst restart of a computer running Microsoft Windows 7/8/8.1/10, and after installation of hard driveencryption until the �rst restart of Microsoft Windows 8/8.1/10 operating systems. When hard drives aredecrypted, hibernation is blocked from the time when the boot drive is fully decrypted until the �rst restartof the operating system. When the option is enabled in Microsoft Windows 8/8.1/10, blockingof hibernation prevents you from shutting down the operating system.
Windows 7 computers don't allow to change password during recovery when the disk is encrypted withBitLocker technology. After the recovery key is entered and the operating system is loaded, KasperskyEndpoint Security won't prompt the user to change the password or PIN code. Thus, it is impossible to seta new password or a PIN code. This issue stems from the peculiarities of the operating system. To continue,you need to re-encrypt the hard drive.
It is not recommended to use the xbootmgr.exe tool with additional providers enabled. For example,Dispatcher, Network, or Drivers.
Formatting an encrypted removable drive is not supported on a computer that has Kaspersky EndpointSecurity for Windows installed.
Formatting an encrypted removable drive with the FAT32 �le system is not supported (the drive isdisplayed as encrypted). To format a drive, reformat it to the NTFS �le system.
For details on restoring an operating system from a backup copy to an encrypted GPT device, visit theTechnical Support Knowledge Base .
Multiple download agents cannot co-exist on one encrypted computer.
It is impossible to access a removable drive that was previously encrypted on a di�erent computer when allof the following conditions are simultaneously met:
Quick Start
There is no connection to the Kaspersky Security Center server.
The user is attempting authorization with a new token or password.

508
If a similar situation occurs, restart the computer. After the computer has been restarted, access to theencrypted removable drive will be granted.
Discovery of USB devices by the Authentication Agent may not be supported when xHCI mode for USB isenabled in BIOS settings.
Kaspersky Disk Encryption (FDE) for the SSD part of a device that is used for caching the most frequentlyused data is not supported for SSHD devices.
Encryption of hard drives in 32-bit Microsoft Windows 8/8.1/10 operating systems running in UEFI mode isnot supported.
Restart the computer before encrypting a decrypted hard drive again.
Hard drive encryption is not compatible with Kaspersky Anti-Virus for UEFI. It is not recommended to usehard drive encryption on computers that have Kaspersky Anti-Virus for UEFI installed.
Creating Authentication Agent accounts based on Microsoft accounts is supported with the followinglimitations:
If the name of an Authentication Agent account has the format <domain>/<Windows account name> ,after changing the computer name you need to also change the names of accounts that were created forlocal users of this computer. For example, imagine that there is a local user Ivanov on the Ivanovcomputer, and an Authentication Agent account with the name Ivanov/Ivanov has been created for thisuser. If the computer name Ivanov has been changed to Ivanov-PC , you need to change the name of theAuthentication Agent account for the user Ivanov from Ivanov/Ivanov to Ivanov-PC/Ivanov . Youcan change the account name using the local account management task of the Authentication Agent.Before the name of the account has been changed, authentication in the preboot environment is possibleusing the old name (for example, Ivanov/Ivanov ).
If a user is allowed to access a computer that was encrypted using Kaspersky Disk Encryption technologyonly by using a token and this user needs to complete the access recovery procedure, make sure that thisuser is granted password-based access to this computer after access to the encrypted computer hasbeen restored. The password that the user set when restoring access might not be saved. In this case, theuser will have to complete the procedure for restoring access to the encrypted computer again the nexttime the computer is restarted.
When decrypting a hard drive using the FDE Recovery Tool, the decryption process may end with an errorif data on the source device is overwritten with the decrypted data. Part of the data on the hard drive willremain encrypted. It is recommended to choose the option to save decrypted data to a �le in the devicedecryption settings when using the FDE Recovery Tool.
If the Authentication Agent password has been changed, a message containing the text Your password hasbeen changed successfully. Click OK appears and the user restarts the computer, the new password is notsaved. The old password must be used for subsequent authentication in the preboot environment.
Disk encryption is incompatible with Intel Rapid Start technology.
Disk encryption is incompatible with ExpressCache technology.
In some cases, when attempting to decrypt an encrypted drive using the FDE Recovery Tool, the toolmistakenly detects the device status as "unencrypted" after the "Request-Response" procedure is
Single Sign-On technology is not supported.
Automatic creation of Authentication Agent accounts is not supported if the option to createaccounts for users who log in to the system in the last N days is selected.

509
completed. The tool's log shows an event stating that the device was successfully decrypted. In this case,you must restart the data recovery procedure to decrypt the device.
After the Kaspersky Endpoint Security for Windows plug-in is updated in the Web Console, the clientcomputer properties do not show the BitLocker recovery key until the Web Console service is restarted.
To see the other limitations of full disk encryption support and a list of devices for which encryption ofhard drives is supported with restrictions, please refer to the Technical Support Knowledge Base .
File Level Encryption (FLE)

510
File and folder encryption is not supported in operating systems of the Microsoft Windows Embeddedfamily.
Once you have installed the application, you must restart the operating system for �le and folderencryption to work properly.
If an encrypted �le is stored on a computer that has available encryption functionality and you access the�le from a computer where encryption is not available, direct access to this �le will be provided. Anencrypted �le that is stored in a network folder on a computer that has available encryption functionality iscopied in decrypted form to a computer that does not have available encryption functionality.
You are advised to decrypt �les that were encrypted with Encrypting File System before encrypting �leswith Kaspersky Endpoint Security for Windows.
After a �le is encrypted, its size increases by 4 kB.
After a �le is encrypted, the Archive attribute is set in the �le properties.
If an unpacked �le from an encrypted archive has the same name as an already existing �le on yourcomputer, the latter will be overwritten by the new �le that is unpacked from an encrypted archive. Theuser is not noti�ed about the overwrite operation.
The Portable File Manager interface does not display messages about errors that occur during itsoperation.
Kaspersky Endpoint Security for Windows does not start the Portable File Manager on a computer thathas the File Level Encryption component installed.
The Portable File Manager cannot be used to gain access to a removable drive if the following conditionsare simultaneously met:
In this case, access is not possible even if you know the password for the Portable File Manager.
When �le encryption is used, the application is incompatible with the Sylpheed mail client.
Kaspersky Endpoint Security for Windows does not support the rule of restriction of access to encrypted�les for some applications, if you have dragged an encrypted �le to the application. If you are adding anencrypted �le in another way, Kaspersky Endpoint Security will block application's access to the encrypted�le according to the rule (e.g., copy and paste via clipboard). The reason for this behavior is that the drag-and-drop operation is performed by the built-in �le manager, not by the application. E.g., for the Outlookclient with the enabled rule of restriction of access to encrypted �les, Kaspersky Endpoint Security willallows the mail client to access the encrypted �le, if a user has dragged the �le to an email message. If theuser has copied the �le to the clipboard and tried to paste it to an email message, Kaspersky EndpointSecurity will block access to the �le.
Changing the page �le settings is not supported. The operating system uses the default values instead ofthe speci�ed parameter values.
Use safe removal when working with encrypted removable drives. We cannot guarantee data integrity if theremovable drive is not safely removed.
There is no connection to Kaspersky Security Center;
Kaspersky Endpoint Security for Windows is installed on the computer;
Data encryption (FDE or FLE) was not performed on the computer.

511
After �les are encrypted, their non-encrypted originals are securely deleted.
Synchronization of o�line �les using Client-Side Caching (CSC) is not supported. It is recommended toprohibit o�line management of shared resources at the group policy level. Files that are in o�line mode canbe edited. After synchronization, changes made to an o�line �le may be lost. For details regarding supportfor Client-Side Caching (CSC) when using encryption, please refer to the Technical Support KnowledgeBase .
Creation of an encrypted archive in the root of the system hard drive is not supported.
You may experience problems when accessing encrypted �les over the network. You are advised to movethe �les to a di�erent source or make sure that the computer being used as a �le server is managed by thesame Kaspersky Security Center Administration Server.
Changing the keyboard layout may cause the password entry window for an encrypted self-extractingarchive to hang. To solve this problem, close the password entry window, switch the keyboard layout in youroperating system, and re-enter the password for the encrypted archive.
When �le encryption is used on systems that have multiple partitions on one disk, you are advised to usethe option that automatically determines the size of the page�le.sys �le. After the computer restarts, thepage�le.sys �le may move between disk partitions.
After applying �le encryption rules, including �les in the My Documents folder, make sure that users forwhom encryption has been applied can successfully access encrypted �les. To do so, have each user signin to the system when a connection to Kaspersky Security Center is available. If a user attempts to accessencrypted �les without a connection to Kaspersky Security Center, the system may hang.
If system �les are somehow included in the scope of �le level encryption, events regarding errors whenencrypting these �les may appear in reports. The �les speci�ed in these events are not actually encrypted.
Pico processes are not supported.
Case-sensitive paths are not supported. When encryption rules or decryption rules are applied, the pathsin product events are displayed in lowercase.
It is not recommended to encrypt �les that are used by the system on startup. If these �les are encrypted,an attempt to access encrypted �les without a connection to Kaspersky Security Center may cause thesystem to hang or result in prompts for access to unencrypted �les.
When removable drives are encrypted with portable mode support, password age control cannot bedisabled.
If users jointly work with a �le over the network under FLE rules via applications that use the �le-to-memory mapping method (such as WordPad or FAR) and applications designed for working with large �les(such as Notepad ++ ), the �le in unencrypted form may be blocked inde�nitely without the capability toaccess it from the computer on which it resides.
File encryption in OneDrive sync folders is not supported. Adding folders with already encrypted �les tothe OneDrive sync list may result in loss of data in the encrypted �les.
When the �le level encryption component is installed, management of users and groups does not work inWSL mode (Windows Subsystem for Linux).
When the �le level encryption component is installed, POSIX (Portable Operating System Interface) forrenaming and deleting �les is not supported.
Other limitations
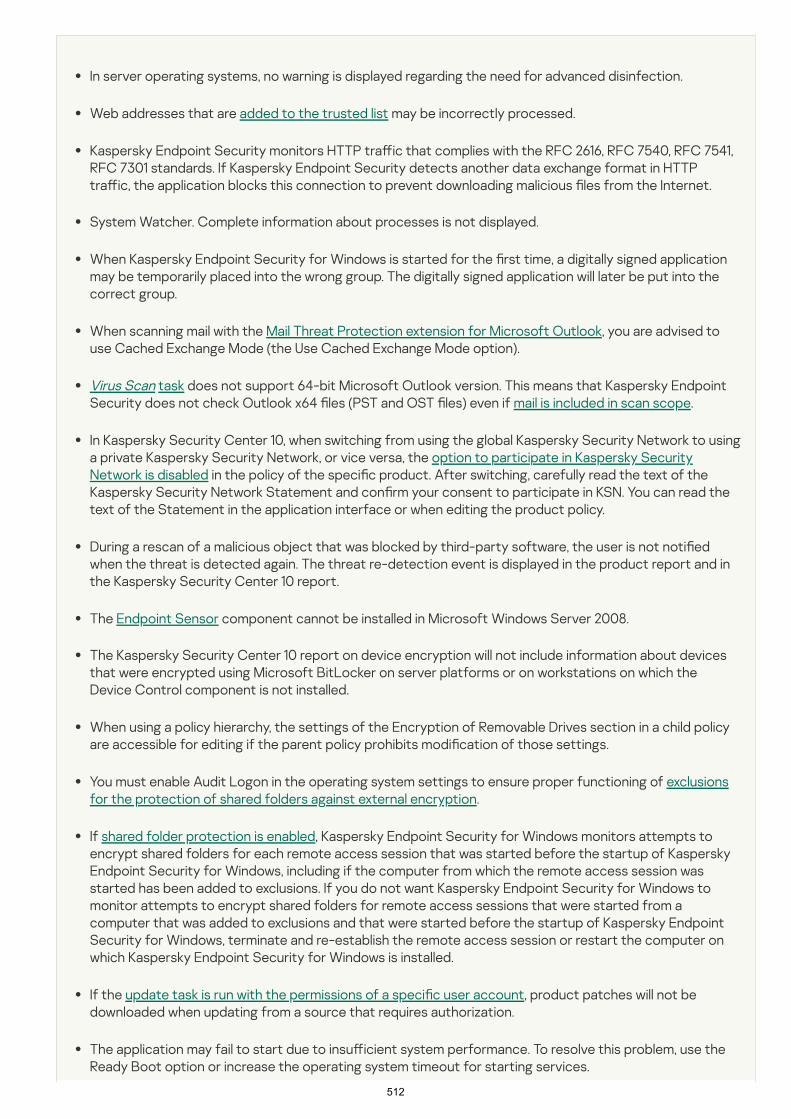
512
In server operating systems, no warning is displayed regarding the need for advanced disinfection.
Web addresses that are added to the trusted list may be incorrectly processed.
Kaspersky Endpoint Security monitors HTTP tra�ic that complies with the RFC 2616, RFC 7540, RFC 7541,RFC 7301 standards. If Kaspersky Endpoint Security detects another data exchange format in HTTPtra�ic, the application blocks this connection to prevent downloading malicious �les from the Internet.
System Watcher. Complete information about processes is not displayed.
When Kaspersky Endpoint Security for Windows is started for the �rst time, a digitally signed applicationmay be temporarily placed into the wrong group. The digitally signed application will later be put into thecorrect group.
When scanning mail with the Mail Threat Protection extension for Microsoft Outlook, you are advised touse Cached Exchange Mode (the Use Cached Exchange Mode option).
Virus Scan task does not support 64-bit Microsoft Outlook version. This means that Kaspersky EndpointSecurity does not check Outlook x64 �les (PST and OST �les) even if mail is included in scan scope.
In Kaspersky Security Center 10, when switching from using the global Kaspersky Security Network to usinga private Kaspersky Security Network, or vice versa, the option to participate in Kaspersky SecurityNetwork is disabled in the policy of the speci�c product. After switching, carefully read the text of theKaspersky Security Network Statement and con�rm your consent to participate in KSN. You can read thetext of the Statement in the application interface or when editing the product policy.
During a rescan of a malicious object that was blocked by third-party software, the user is not noti�edwhen the threat is detected again. The threat re-detection event is displayed in the product report and inthe Kaspersky Security Center 10 report.
The Endpoint Sensor component cannot be installed in Microsoft Windows Server 2008.
The Kaspersky Security Center 10 report on device encryption will not include information about devicesthat were encrypted using Microsoft BitLocker on server platforms or on workstations on which theDevice Control component is not installed.
When using a policy hierarchy, the settings of the Encryption of Removable Drives section in a child policyare accessible for editing if the parent policy prohibits modi�cation of those settings.
You must enable Audit Logon in the operating system settings to ensure proper functioning of exclusionsfor the protection of shared folders against external encryption.
If shared folder protection is enabled, Kaspersky Endpoint Security for Windows monitors attempts toencrypt shared folders for each remote access session that was started before the startup of KasperskyEndpoint Security for Windows, including if the computer from which the remote access session wasstarted has been added to exclusions. If you do not want Kaspersky Endpoint Security for Windows tomonitor attempts to encrypt shared folders for remote access sessions that were started from acomputer that was added to exclusions and that were started before the startup of Kaspersky EndpointSecurity for Windows, terminate and re-establish the remote access session or restart the computer onwhich Kaspersky Endpoint Security for Windows is installed.
If the update task is run with the permissions of a speci�c user account, product patches will not bedownloaded when updating from a source that requires authorization.
The application may fail to start due to insu�icient system performance. To resolve this problem, use theReady Boot option or increase the operating system timeout for starting services.

513
The application cannot work in Safe Mode.
To ensure that Kaspersky Endpoint Security for Windows versions 11.5.0 and 11.6.0 can work correctly withCisco AnyConnect software, you must install Compliance Module version 4.3.183.2048 or later. Learn moreabout compatibility with Cisco Identity Services Engine in Cisco documentation .
We cannot guarantee that Audio Control will work until after the �rst restart after installing the application.
When rotated trace �les are enabled, no traces are created for the AMSI component and the Outlookplug-in.
Performance traces cannot be manually collected in Windows Server 2008.
Performance traces for the "Restart" trace type are not supported.
The KSN availability check task is no longer supported.
Turning o� the "Disable external management of the system services" option will not allow you to stop theservice of the application that was installed with the AMPPL=1 parameter (by default, the parameter valueis set to 1 starting with the Windows 10RS2 operating system version). The AMPPL parameter with a valueof 1 enables the use of Protection Processes technology for the product service.
To run a custom scan of a folder, the user that starts the custom scan must have the permissions to readthe attributes of this folder. Otherwise the custom folder scan will be impossible and will end with an error.
When a scan rule de�ned in a policy includes a path without the \ character at the end, for example,С:\folder1\folder2 , the scan will be run for the path С:\folder1\.
When upgrading the application from version 11.1.0 to 11.6.0, the AMSI Protection settings will be reset totheir default values.
If you are using software restriction policies (SRP), the computer may fail to load (black screen). You areadvised to change the SRP settings as follows: set the value for the parameter, and add rules withthe security level for paths to �les of the application (C:\Program Files\CommonFiles\Kaspersky Lab and C:\Program Files\Kaspersky Lab). For details on using SRP, refer toMicrosoft documentation .
Management of Outlook plug-in settings via Rest API is not supported.
Task run settings for a speci�c user cannot be transferred between devices via a con�guration �le. Aftersettings are applied from a con�guration �le, manually specify the user name and password.
After installing an update, the integrity check task does not work until the system is restarted to apply theupdate.
When the rotated trace level is changed through the remote diagnostics utility, Kaspersky EndpointSecurity for Windows incorrectly displays a blank value for the trace level. However, trace �les are writtenaccording to the correct trace level. When the rotated trace level is changed through the local interface ofthe application, the trace level is correctly modi�ed but the remote diagnostics utility incorrectly displaysthe trace level that was last de�ned by the utility. This may cause the administrator to not have up-to-dateinformation about the current trace level, and relevant information may be absent from traces if a usermanually changes the trace level in the local interface of the application.
In the local interface, Password protection settings don't allow changing the name of the administratoraccount (KLAdmin by default). To change the name of the administrator account, you need to disable
All software �les except libraries (such as DLL)Apply software restriction policies to the following objects
Unrestricted

514
Password protection, then enable Password protection and specify a new name of the administratoraccount.
Kaspersky Endpoint Security monitors HTTP tra�ic that complies with the RFC 2616, RFC 7540, RFC 7541,RFC 7301 standards. If Kaspersky Endpoint Security detects another data exchange format in HTTPtra�ic, the application blocks this connection to prevent downloading malicious �les from the Internet.
When scanning an encrypted connection, Kaspersky Endpoint Security forces HTTP/1.
The Kaspersky Endpoint Security application when installed on a Windows Server 2019 server isincompatible with Docker. Deploying Docker containers on a computer with Kaspersky Endpoint Securitycauses a crash (BSOD).

515
Active key
Additional key
Administration group
Anti-virus databases
Archive
Authentication Agent
Certi�cate issuer
Database of malicious web addresses
Glossary
A key that is currently used by the application.
A key that certi�es the right to use the application but is not currently being used.
A set of devices that share common functions and a set of Kaspersky applications installed on them. Devices aregrouped so that they can be managed conveniently as a single unit. A group may include other groups. It is possibleto create group policies and group tasks for each installed application in the group.
Databases that contain information about computer security threats known to Kaspersky as of the anti-virusdatabase release date. Anti-virus database signatures help to detect malicious code in scanned objects. Anti-virusdatabases are created by Kaspersky specialists and updated hourly.
One or several �les packed into a single compressed �le. A specialized application called an archiver is required forpacking and unpacking data.
Interface that lets you complete authentication to access encrypted hard drives and load the operating systemafter the bootable hard drive has been encrypted.
Certi�cation center that issued the certi�cate.

516
Database of phishing web addresses
Disinfection
False alarm
Infectable �le
Infected �le
License certi�cate
Mask
A list of web addresses whose content may be considered to be dangerous. The list is created by Kasperskyspecialists. It is regularly updated and is included in the Kaspersky application distribution kit.
A list of web addresses which Kaspersky specialists have determined to be phishing-related. The database isregularly updated and is part of the Kaspersky application distribution kit.
A method of processing infected objects that results in complete or partial recovery of data. Not all infectedobjects can be disinfected.
A false alarm occurs when the Kaspersky application reports an uninfected �le as infected because the signatureof the �le is similar to that of a virus.
A �le which, due to its structure or format, can be used by intruders as a "container" to store and spread maliciouscode. As a rule, these are executable �les, with such �le extensions as .com, .exe, and .dll. There is a fairly high risk ofintrusion of malicious code in such �les.
A �le which contains malicious code (code of known malware has been detected when scanning the �le).Kaspersky does not recommend using such �les, because they may infect your computer.
A document that Kaspersky transfers to the user together with the key �le or activation code. It containsinformation about the license granted to the user.
Representation of a �le name and extension by using wildcards.
File masks can contain any characters that are allowed in �le names, including wildcards:
The * (asterisk) character, which takes the place of any set of characters, except the \ and / characters(delimiters of the names of �les and folders in paths to �les and folders). For example, the mask C:\*\*.txt

517
Network Agent
Normalized form of the address of a web resource
Example:
Non-normalized form of an address: www.Example.com\.
Normalized form of an address: www.example.com.
OLE object
Portable File Manager
will include all paths to �les with the TXT extension located in folders on the C: drive, but not in subfolders.
Two consecutive * characters take the place of any set of characters (including an empty set) in the �le orfolder name, including the \ and / characters (delimiters of the names of �les and folders in paths to �les andfolders). For example, the mask C:\Folder\**\*.txt will include all paths to �les with the TXT extensionlocated in the folder named Folder and its subfolders. The mask must include at least one nesting level. Themask C:\**\*.txt is not a valid mask. The ** mask is available only for creating scan exclusions.
The ? (question mark) character, which takes the place of any single character, except the \ and / characters(delimiters of the names of �les and folders in paths to �les and folders). For example, the maskC:\Folder\???.txt will include paths to all �les residing in the folder named Folder that have the TXTextension and a name consisting of three characters.
A Kaspersky Security Center component that enables interaction between the Administration Server andKaspersky applications that are installed on a speci�c network node (workstation or server). This component iscommon for all Kaspersky applications running under Windows. Dedicated versions of Network Agent are intendedfor applications running under other operating systems.
The normalized form of the address of a web resource is a textual representation of a web resource address that isobtained through normalization. Normalization is a process whereby the textual representation of a web resourceaddress changes according to speci�c rules (for example, exclusion of the user login, password, and connectionport from the text representation of the web resource address; additionally, the web resource address is changedfrom uppercase to lowercase characters).
Regarding the operation of protection components, the purpose of normalization of web resource addresses is toavoid scanning website addresses, which may di�er in syntax while being physically equivalent, more than once.
An attached �le or a �le that is embedded in another �le. Kaspersky applications allow scanning OLE objects forviruses. For example, if you insert a Microsoft O�ice Excel® table into a Microsoft O�ice Word document, thetable is scanned as an OLE object.
This is an application that provides an interface for working with encrypted �les on removable drives whenencryption functionality is not available on the computer.

518
Protection scope
Scan scope
Task
Trusted Platform Module
Objects that are constantly being scanned by the Essential Threat Protection component when it is running. Theprotection scopes of di�erent components have di�erent properties.
Objects that Kaspersky Endpoint Security scans while performing a scan task.
Functions performed by the Kaspersky application as tasks, for example: Real-time File Protection, Full DeviceScan, Database Update.
A microchip developed to provide basic functions related to security (for example, for storing encryption keys). ATrusted Platform Module is usually installed on the computer motherboard and interacts with all other systemcomponents via the hardware bus.

519
When attempting to access a �le whose contents are stored in the OneDrive cloud, Kaspersky EndpointSecurity downloads and scans the �le contents.
File Threat Protection component settings
Parameter Description
(available onlyin theAdministrationConsole(MMC) and inthe KasperskyEndpointSecurityinterface)
For File Threat Protection, Kaspersky Endpoint Security can apply di�erent groups ofsettings. These groups of settings that are stored in the application are called securitylevels:
. When this �le security level is selected, the File Threat Protection componenttakes the strictest control of all �les that are opened, saved, and started. The FileThreat Protection component scans all �le types on all hard drives, removable drives,and network drives of the computer. It also scans archives, installation packages, andembedded OLE objects.
. This �le security level is recommended by Kaspersky Lab experts. TheFile Threat Protection component scans only the speci�ed �le formats on all harddrives, removable drives, and network drives of the computer, and embedded OLEobjects. The File Threat Protection component does not scan archives or installationpackages.
. The settings of this �le security level ensure maximum scanning speed. The FileThreat Protection component scans only �les with speci�ed extensions on all harddrives, removable drives, and network drives of the computer. The File ThreatProtection component does not scan compound �les.
. If this setting is enabled, Kaspersky Endpoint Security checks all �les withoutexception (all formats and extensions).
Appendices
This section contains information that supplements the body of the document.
Appendix 1. Application settings
You can use a policy, tasks, or the application interface to con�gure Kaspersky Endpoint Security. Detailedinformation about application components is provided in the corresponding sections.
File Threat Protection
The File Threat Protection component lets you prevent infection of the �le system of the computer. By default,the File Threat Protection component permanently resides in the computer's RAM. The component scans �les onall drives of the computer, as well as on connected drives. The component provides computer protection with thehelp of anti-virus databases, the Kaspersky Security Network cloud service, and heuristic analysis.
The component scans the �les accessed by the user or application. If a malicious �le is detected, KasperskyEndpoint Security blocks the �le operation. The application then disinfects or deletes the malicious �le, dependingon the settings of the File Threat Protection component.
Security level
High
Recommended
Low
File types All �les

520
(available onlyin theAdministrationConsole(MMC) and inthe KasperskyEndpointSecurityinterface)
. If this setting is enabled, Kaspersky Endpoint Security scansinfectable �les only . Before scanning a �le for malicious code, the internal header of the�le is analyzed to determine the format of the �le (for example, .txt, .doc, or .exe). The scanalso looks for �les with particular �le extensions.
. If this setting is enabled, Kaspersky Endpoint Security scansinfectable �les only . The �le format is then determined based on the �le's extension.
Contains objects that are scanned by the File Threat Protection component. A scan objectmay be a hard drive, removable drive, network drive, folder, �le, or multiple �les de�ned by amask.
By default, the File Threat Protection component scans �les that are started on any harddrives, removable drives, or network drives. The protection scope for these objects cannotbe changed or deleted. You can also exclude an object (such as removable drives) fromscans.
(available onlyin theAdministrationConsole(MMC) and inthe KasperskyEndpointSecurityinterface)
The machine learning and signature analysis method uses the Kaspersky Endpoint Securitydatabases that contain descriptions of known threats and ways to neutralize them.Protection that uses this method provides the minimum acceptable security level.
Based on the recommendations of Kaspersky experts, machine learning and signatureanalysis is always enabled.
(available onlyin theAdministrationConsole(MMC) and inthe KasperskyEndpointSecurityinterface)
The technology was developed for detecting threats that cannot be detected by using thecurrent version of Kaspersky application databases. It detects �les that may be infectedwith an unknown virus or a new variety of a known virus.
When scanning �les for malicious code, the heuristic analyzer executes instructions in theexecutable �les. The number of instructions that are executed by the heuristic analyzerdepends on the level that is speci�ed for the heuristic analyzer. The heuristic analysis levelensures a balance between the thoroughness of searching for new threats, the load on theresources of the operating system, and the duration of heuristic analysis.
. If this option is selected, Kaspersky EndpointSecurity automatically attempts to disinfect all infected �les that are detected. Ifdisinfection fails, Kaspersky Endpoint Security deletes the �les.
. If this option is selected, Kaspersky Endpoint Securityautomatically attempts to disinfect all infected �les that are detected. If disinfection is notpossible, Kaspersky Endpoint Security adds the information about the infected �les thatare detected to the list of active threats.
. If this option is selected, the File Threat Protection component automatically blocksall infected �les without attempting to disinfect them.
Before attempting to disinfect or delete an infected �le, Kaspersky Endpoint Securitycreates a backup copy of the �le in case you need to restore the �le or if it can bedisinfected in the future.
Files scanned by format
Files scanned by extension
Protectionscope
Machinelearning andsignatureanalysis
HeuristicAnalysis
Action onthreatdetection
Disinfect; delete if disinfection fails
Disinfect; block if disinfection fails
Block

521
Scans only new �les and those �les that have been modi�ed since the last time they werescanned. This helps reduce the duration of a scan. This mode applies both to simple and tocompound �les.
Scans archives in the following formats: RAR, ARJ, ZIP, CAB, LHA, JAR, and ICE.
This check box enables/disables scanning of third-party distribution packages.
Scans Microsoft O�ice �les (DOC, DOCX, XLS, PPT and other Microsoft extensions).O�ice format �les include OLE objects as well.
If this check box is selected, Kaspersky Endpoint Security does not scan compound �les iftheir size exceeds the speci�ed value.
If this check box is cleared, Kaspersky Endpoint Security scans compound �les of all sizes.
Kaspersky Endpoint Security scans large �les that are extracted from archivesregardless of whether the check box is ticked or not.
If the check box is selected, Kaspersky Endpoint Security provides access to compound�les that are larger than the speci�ed value before these �les are scanned. In this case,Kaspersky Endpoint Security unpacks and scans compound �les in the background.
Kaspersky Endpoint Security provides access to compound �les that are smaller than thisvalue only after unpacking and scanning these �les.
If the check box is not selected, Kaspersky Endpoint Security provides access tocompound �les only after unpacking and scanning �les of any size.
(available onlyin theAdministrationConsole(MMC) and inthe KasperskyEndpointSecurityinterface)
Kaspersky Endpoint Security scans �les accessed by the user, operating system, or anapplication running under the user's account.
. In this mode, File Threat Protection scans an object based on an analysis ofactions taken on the object. For example, when working with a Microsoft O�ice document,Kaspersky Endpoint Security scans the �le when it is �rst opened and last closed.Intermediate operations that overwrite the �le do not cause it to be scanned.
. In this mode, File Threat Protection scans objects wheneverthere is an attempt to open or modify them.
. In this mode, File Threat Protection scans objects only upon an attempt toopen them.
. In this mode, File Threat Protection only scans objects upon an attempt torun them.
This technology allows increasing scan speed by excluding certain �les from scanning. Filesare excluded from scanning by using a special algorithm that takes into account the releasedate of Kaspersky Endpoint Security databases, the date that the �le was last scanned on,and any modi�cations to the scanning settings. The iSwift technology is an advancementof the iChecker technology for the NTFS �le system.
Scan onlynew andchanged �les
Scan archives
Scandistributionpackages
Scan �les inMicrosoftO�iceformats
Do notunpack largecompound�les
Unpackcompound�les in thebackground
Scan mode
Smart mode
On access and modi�cation
On access
On execution
iSwiftTechnology

522
(available onlyin theAdministrationConsole(MMC) and inthe KasperskyEndpointSecurityinterface)
(available onlyin theAdministrationConsole(MMC) and inthe KasperskyEndpointSecurityinterface)
This technology allows increasing scan speed by excluding certain �les from scanning. Filesare excluded from scans by using a special algorithm that takes into account the releasedate of Kaspersky Endpoint Security databases, the date when the �le was last scanned,and any modi�cations to the scan settings. There are limitations to iChecker Technology: itdoes not work with large �les and applies only to �les with a structure that the applicationrecognizes (for example, EXE, DLL, LNK, TTF, INF, SYS, COM, CHM, ZIP, and RAR).
(available onlyin theAdministrationConsole(MMC) and inthe KasperskyEndpointSecurityinterface)
This temporarily and automatically pauses operation of File Threat Protection at thespeci�ed time or when working with the speci�ed applications.
For HTTPS tra�ic monitoring, you need to enable encrypted connections scan.
iCheckerTechnology
Pause FileThreatProtection
Web Threat Protection
The Web Threat Protection component prevents downloads of malicious �les from the Internet, and also blocksmalicious and phishing websites. The component provides computer protection with the help of anti-virusdatabases, the Kaspersky Security Network cloud service, and heuristic analysis.
Kaspersky Endpoint Security scans HTTP-, HTTPS- and FTP-tra�ic. Kaspersky Endpoint Security scans URLs andIP addresses. You can specify the ports that Kaspersky Endpoint Security will monitor, or select all ports.
When a user tries to open a malicious or phishing website, Kaspersky Endpoint Security will block access and showa warning (see the �gure below).

523
Website access denied message
Web Threat Protection component settings
Parameter Description
(available only intheAdministrationConsole (MMC)and in theKasperskyEndpointSecurityinterface)
For Web Threat Protection, Kaspersky Endpoint Security can apply di�erent groups ofsettings. These groups of settings that are stored in the application are called securitylevels:
. The security level under which the Web Threat Protection component performsmaximum scanning of web tra�ic that the computer receives over the HTTP and FTPprotocols. Web Threat Protection performs detailed scanning of all web tra�icobjects by using the full set of application databases, and performs the deepestpossible heuristic analysis .
. The security level that provides the optimal balance between theperformance of Kaspersky Endpoint Security and the security of web tra�ic. TheWeb Threat Protection component performs heuristic analysis at the level. This web tra�ic security level is recommended by Kaspersky specialists.
. The settings of this web tra�ic security level ensure the maximum web tra�icscanning speed. The Web Threat Protection component performs heuristic analysis atthe level.
. If this option is selected and an infected object is detected in webtra�ic, the Web Threat Protection component blocks access to the object and displays amessage in the browser.
. If this option is selected and an infected object is detected in web tra�ic,Kaspersky Endpoint Security allows this object to be downloaded to the computer butadds information about the infected object to the list of active threats.
Scanning the links to determine whether they are included in the database of maliciousweb addresses allows you to track websites that have been added to denylist. Thedatabase of malicious web addresses is maintained by Kaspersky, included in the
Security level
High
Recommended
medium scan
Low
light scan
Action onthreatdetection
Block download
Inform
Check the URLagainst thedatabase ofmalicious URLs

524
(available only intheAdministrationConsole (MMC)and in theKasperskyEndpointSecurityinterface)
application installation package, and updated during Kaspersky Endpoint Securitydatabase updates.
(available only intheAdministrationConsole (MMC)and in theKasperskyEndpointSecurityinterface)
The technology was developed for detecting threats that cannot be detected by usingthe current version of Kaspersky application databases. It detects �les that may beinfected with an unknown virus or a new variety of a known virus.
When web tra�ic is scanned for viruses and other applications that present a threat, theheuristic analyzer performs instructions in the executable �les. The number ofinstructions that are executed by the heuristic analyzer depends on the level that isspeci�ed for the heuristic analyzer. The heuristic analysis level ensures a balance betweenthe thoroughness of searching for new threats, the load on the resources of theoperating system, and the duration of heuristic analysis.
(available only intheAdministrationConsole (MMC)and in theKasperskyEndpointSecurityinterface)
The database of phishing web addresses includes the web addresses of currently knownwebsites that are used to launch phishing attacks. Kaspersky supplements this databaseof phishing links with addresses obtained from the international organization known asthe Anti-Phishing Working Group. The database of phishing addresses is included in theapplication installation package and supplemented with Kaspersky Endpoint Securitydatabase updates.
If the check box is selected, the Web Threat Protection component does not scan thecontent of web pages or websites whose addresses are included in the list of trustedweb addresses. You can add both the speci�c address and the address mask of a webpage/website to the list of trusted web addresses.
The Mail Threat Protection component does not scan messages if the mail client is open in a browser.
Use HeuristicAnalysis
Check the URLagainst thedatabase ofphishing URLs
Do not scanweb tra�icfrom trustedweb addresses
Mail Threat Protection
The Mail Threat Protection component scans the attachments of incoming and outgoing email messages forviruses and other threats. The component also scans messages for malicious and phishing links. By default, the MailThreat Protection component permanently resides in the computer's RAM and scans all messages received orsent using the POP3, SMTP, IMAP, or NNTP protocols, or the Microsoft O�ice Outlook mail client (MAPI). Thecomponent provides computer protection with the help of anti-virus databases, the Kaspersky Security Networkcloud service, and heuristic analysis.
When a malicious �le is detected in an attachment, Kaspersky Endpoint Security renames the message subject asfollows: [Message is infected] <message subject> or [Infected object deleted] <messagesubject> .

525
Mail Threat Protection component settings
Parameter Description
(available onlyin theAdministrationConsole(MMC) and inthe KasperskyEndpointSecurityinterface)
For Mail Threat Protection, Kaspersky Endpoint Security can apply di�erent groups ofsettings. These groups of settings that are stored in the application are called securitylevels:
. When this email security level is selected, the Mail Threat Protection componentscans email messages most thoroughly. The Mail Threat Protection component scansincoming and outgoing email messages, and performs deep heuristic analysis. The mail security level is recommended for high-risk environments. An example of such anenvironment is a connection to a free email service from a home network that is notguarded by centralized email protection.
. The email security level that provides the optimal balance between theperformance of Kaspersky Endpoint Security and email security. The Mail ThreatProtection component scans incoming and outgoing email messages, and performsmedium-level heuristic analysis. This mail tra�ic security level is recommended byKaspersky specialists.
. When this email security level is selected, the Mail Threat Protection componentonly scans incoming email messages, performs light heuristic analysis, and does notscan archives that are attached to email messages. At this mail security level, the MailThreat Protection component scans email messages at maximum speed and uses aminimum of operating system resources. The mail security level is recommendedfor use in a well-protected environment. An example of such an environment might bean enterprise LAN with centralized email security.
The Protection scope includes objects that the component checks when it is run: or .
This component interacts with mail clients installed on the computer. For the Microsoft O�ice Outlook mail client,an extension with additional parameters is provided. The Mail Threat Protection extension is embedded in theMicrosoft O�ice Outlook mail client during installation of Kaspersky Endpoint Security.
Security level
High
High
Recommended
Low
Low
Action onthreatdetection
. When an infected object is detected in an inboundor outbound message, Kaspersky Endpoint Security attempts to disinfect the detectedobject. The user will be able to access the message with a safe attachment. If the objectcannot be disinfected, Kaspersky Endpoint Security deletes the infected object. KasperskyEndpoint Security adds information about the performed action to the message subject:[Infected object was deleted] <message subject> .
Disinfect; delete if disinfection fails
. When an infected object is detected in an inboundmessage, Kaspersky Endpoint Security attempts to disinfect the detected object. Theuser will be able to access the message with a safe attachment. If the object cannot bedisinfected, Kaspersky Endpoint Security adds a warning to the message subject:[Message infected] <message subject> . The user will be able to access themessage with the original attachment. When an infected object is detected in an outboundmessage, Kaspersky Endpoint Security attempts to disinfect the detected object. If theobject cannot be disinfected, Kaspersky Endpoint Security blocks transmission of themessage, and the mail client shows an error.
Disinfect; block if disinfection fails
. If an infected object is detected in an inbound message, Kaspersky EndpointSecurity adds a warning to the message subject: [Message infected] <messagesubject> . The user will be able to access the message with the original attachment. If aninfected object is detected in an outbound message, Kaspersky Endpoint Security blockstransmission of the message, and the mail client shows an error.
Block
Protectionscope Incoming and outgoing messages Incoming messages only
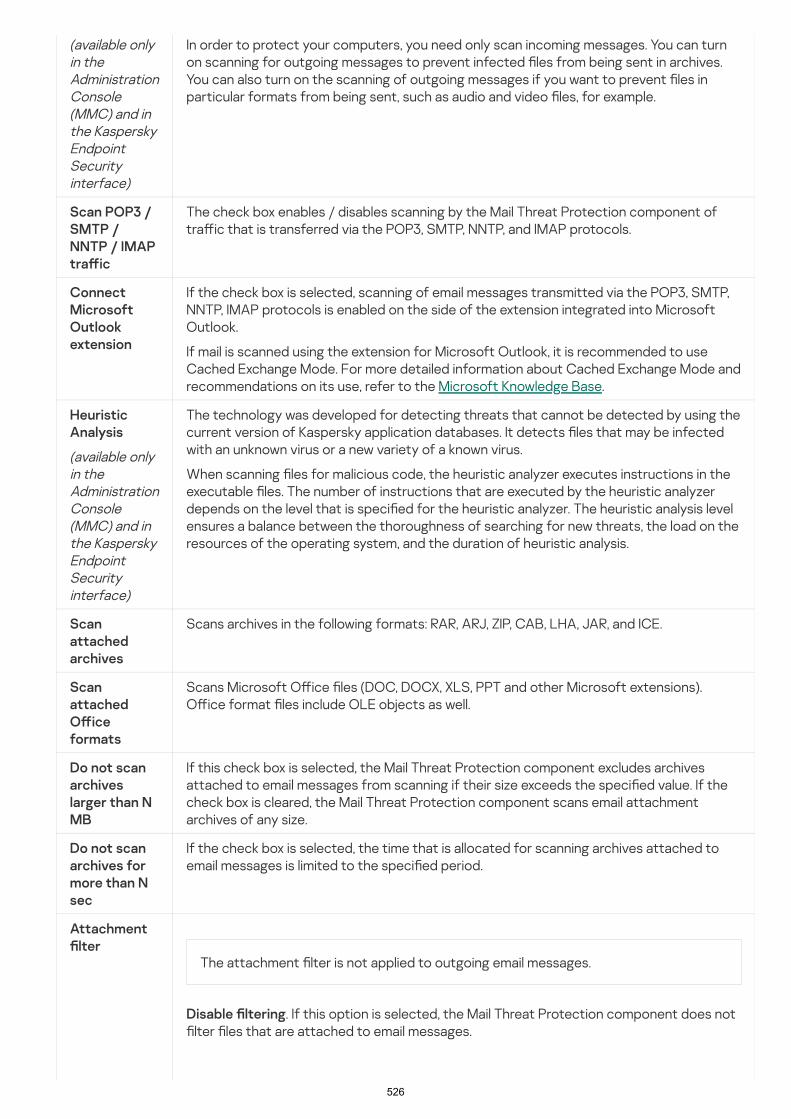
526
The check box enables / disables scanning by the Mail Threat Protection component oftra�ic that is transferred via the POP3, SMTP, NNTP, and IMAP protocols.
If the check box is selected, scanning of email messages transmitted via the POP3, SMTP,NNTP, IMAP protocols is enabled on the side of the extension integrated into MicrosoftOutlook.
If mail is scanned using the extension for Microsoft Outlook, it is recommended to useCached Exchange Mode. For more detailed information about Cached Exchange Mode andrecommendations on its use, refer to the Microsoft Knowledge Base.
(available onlyin theAdministrationConsole(MMC) and inthe KasperskyEndpointSecurityinterface)
The technology was developed for detecting threats that cannot be detected by using thecurrent version of Kaspersky application databases. It detects �les that may be infectedwith an unknown virus or a new variety of a known virus.
When scanning �les for malicious code, the heuristic analyzer executes instructions in theexecutable �les. The number of instructions that are executed by the heuristic analyzerdepends on the level that is speci�ed for the heuristic analyzer. The heuristic analysis levelensures a balance between the thoroughness of searching for new threats, the load on theresources of the operating system, and the duration of heuristic analysis.
Scans archives in the following formats: RAR, ARJ, ZIP, CAB, LHA, JAR, and ICE.
Scans Microsoft O�ice �les (DOC, DOCX, XLS, PPT and other Microsoft extensions).O�ice format �les include OLE objects as well.
If this check box is selected, the Mail Threat Protection component excludes archivesattached to email messages from scanning if their size exceeds the speci�ed value. If thecheck box is cleared, the Mail Threat Protection component scans email attachmentarchives of any size.
If the check box is selected, the time that is allocated for scanning archives attached toemail messages is limited to the speci�ed period.
The attachment �lter is not applied to outgoing email messages.
(available onlyin theAdministrationConsole(MMC) and inthe KasperskyEndpointSecurityinterface)
In order to protect your computers, you need only scan incoming messages. You can turnon scanning for outgoing messages to prevent infected �les from being sent in archives.You can also turn on the scanning of outgoing messages if you want to prevent �les inparticular formats from being sent, such as audio and video �les, for example.
Scan POP3 /SMTP /NNTP / IMAPtra�ic
ConnectMicrosoftOutlookextension
HeuristicAnalysis
Scanattachedarchives
ScanattachedO�iceformats
Do not scanarchiveslarger than NMB
Do not scanarchives formore than Nsec
Attachment�lter
. If this option is selected, the Mail Threat Protection component does not�lter �les that are attached to email messages.Disable �ltering

527
Network Threat Protection component settings
Parameter Description
Network Flooding is an attack on network resources of an organization (such as web servers).This attack consists of sending a large number of requests to overload the bandwidth ofnetwork resources. When this happens, users are unable to access the network resources ofthe organization.
A Port Scanning attack consists of scanning UDP ports, TCP ports, and network services onthe computer. This attack allows the attacker to identify the degree of vulnerability of thecomputer before conducting more dangerous types of network attacks. Port Scanning alsoenables the attacker to identify the operating system on the computer and select theappropriate network attacks for this operating system.
If this check box is selected, Kaspersky Endpoint Security monitors network tra�ic to detectthese attacks. When an attack is detected, the application �lters and blocks the tra�icassociated with the attack. This way, if a Network Flooding attack is launched against thecomputer, the application reduces the load on the resource being attacked. If a PortScanning attack is launched against the computer, Kaspersky Endpoint Security preventsdata leaks on the computer.
You can disable detection of these types of attacks in case some of your allowedapplications perform operations that are typical for these types of attacks. This will helpavoid false alarms.
If the check box is selected, the Network Threat Protection component adds the attackingcomputer to the blocked list. This means that the Network Threat Protection componentblocks the network connection with the attacking computer after the �rst network attackattempt for the speci�ed amount of time. This block automatically protects the user'scomputer against possible future network attacks from the same address.
You can view the block list in the Network Monitor tool window.
Kaspersky Endpoint Security clears the block list when the application is restarted andwhen the Network Threat Protection settings are changed.
. If this option is selected, the Mail ThreatProtection component will replace the last extension character found in the attached �lesof the speci�ed types with the underscore character (for example, attachment.doc_).Thus, in order to open the �le, the user must rename the �le.
Rename attachments of selected types
. If this option is selected, the Mail ThreatProtection component deletes attached �les of the speci�ed types from email messages.Delete attachments of selected types
In the list of �le masks, you can specify the types of attached �les to rename or deletefrom email messages.
Network Threat Protection
The Network Threat Protection component scans inbound network tra�ic for activity that is typical of networkattacks. When Kaspersky Endpoint Security detects an attempted network attack on the user's computer, itblocks the network connection with the attacking computer.
Descriptions of currently known types of network attacks and ways to counteract them are provided in KasperskyEndpoint Security databases. The list of network attacks that the Network Threat Protection component detectsis updated during database and application module updates.
DetectPortScanningandNetworkFloodingattacks
Add theattackingcomputerto the listof blockedcomputersfor Nminutes

528
The list contains IP addresses from which Network Threat Protection does not block networkattacks.
Kaspersky Endpoint Security does not log information on network attacks from the IPaddresses that are in the list of exclusions.
A MAC spoo�ng attack consists of changing the MAC address of a network device (networkcard). As a result, an attacker can redirect data sent to a device to another device and gainaccess to this data. Kaspersky Endpoint Security lets you block MAC Spoo�ng attacks andreceive noti�cations about the attacks.
Network Agent is used for interaction with Kaspersky Security Center. Firewall automatically creates networkrules required for the application and the Network Agent to work. As a result, the Firewall opens several portson the computer. Which ports are opened depends on computer's role (for example, distribution point). Tolearn more about the ports that will be opened on the computer, see Kaspersky Security Center Help .
Network rules
Controlled access of applications to operating system resources, processes and personal data is provided bythe Host Intrusion Prevention component by using application rights.
1. Checks the security of the application using downloaded anti-virus databases.
2. Checks the security of the application in Kaspersky Security Network.
You are advised to participate in Kaspersky Security Network to help the Firewall work more e�ectively.
3. Puts the application in one of the trust groups: Trusted, Low Restricted, High Restricted, Untrusted.
A trust group de�nes the rights that Kaspersky Endpoint Security refers to when controlling applicationactivity. Kaspersky Endpoint Security places an application in a trust group depending on the level of dangerthat this application may pose to the computer.
Exclusions
ProtectionagainstMACspoo�ng
Firewall
The Firewall blocks unauthorized connections to the computer while working on the Internet or local network. TheFirewall also controls the network activity of applications on the computer. This allows you to protect yourcorporate LAN from identity theft and other attacks. The component provides computer protection with the helpof anti-virus databases, the Kaspersky Security Network cloud service, and prede�ned network rules.
You can con�gure network rules at the following levels:
Network packet rules. Network packet rules impose restrictions on network packets, regardless of theapplication. Such rules restrict inbound and outbound network tra�ic through speci�c ports of the selecteddata protocol. Kaspersky Endpoint Security has prede�ned network packet rules with permissionsrecommended by Kaspersky experts.
Application network rules. Application network rules impose restrictions on the network activity of a speci�capplication. They factor in not only the characteristics of the network packet, but also the speci�c applicationto which this network packet is addressed or which issued this network packet.
During the �rst startup of the application, the Firewall performs the following actions:

529
Kaspersky Endpoint Security places an application in a trust group for the Firewall and Host IntrusionPrevention components. You cannot change the trust group only for the Firewall or Host IntrusionPrevention.
If you refused to participate in KSN or there is no network, Kaspersky Endpoint Security places theapplication in a trust group depending on the settings of the Host Intrusion Prevention component. Afterreceiving the reputation of the application from KSN, the trust group can be changed automatically.
4. It blocks network activity of the application depending on the trust group. For example, applications in the HighRestricted trust group are not allowed to use any network connections.
Network Rule Priorities
Network connection statuses
The next time the application is started, Kaspersky Endpoint Security checks the integrity of the application. If theapplication is unchanged, the component uses the current network rules for it. If the application has beenmodi�ed, Kaspersky Endpoint Security analyzes the application as if it were being started for the �rst time.
Each rule has a priority. The higher a rule is on the list, the higher its priority. If network activity is added to severalrules, the Firewall regulates network activity according to the rule with the highest priority.
Network packet rules have a higher priority than network rules for applications. If both network packet rules andnetwork rules for applications are speci�ed for the same type of network activity, the network activity is handledaccording to the network packet rules.
Network rules for applications work as follows: a network rule for applications includes access rules based on thenetwork status: public, local, or trusted. For example, applications in the High Restricted trust group are not allowedany network activity in networks of all statuses by default. If a network rule is speci�ed for an individual application(parent application), then the child processes of other applications will run according to the network rule of theparent application. If there is no network rule for the application, the child processes will run according to networkaccess rule of the application's trust group.
For example, you have prohibited any network activity in networks of all statuses for all applications, exceptbrowser X. If you start browser Y installation (child process) from browser X (parent application), then browser Yinstaller will access the network and download the necessary �les. After installation, browser Y will be denied anynetwork connections according to the Firewall settings. To prohibit network activity of browser Y installer as a childprocess, you must add a network rule for the installer of browser Y.
The Firewall allows you to control network activity depending on the status of the network connection. KasperskyEndpoint Security receives the network connection status from the computer's operating system. The status ofthe network connection in the operating system is set by the user when setting up the connection. You can changethe status of the network connection in the Kaspersky Endpoint Security settings. The Firewall will monitornetwork activity depending on the network status in the Kaspersky Endpoint Security settings, and not in theoperating system.
The network connection can have one of the following status types:
. The network is not protected by antivirus applications, �rewalls, or �lters (such as Wi-Fi in acafe). When the user operates a computer that is connected to such a network, Firewall blocks access to �lesand printers of this computer. External users are also unable to access data through shared folders and remote
Public network

530
access to the desktop of this computer. Firewall �lters the network activity of each application according tothe network rules that are set for it.
Firewall assigns Public network status to the Internet by default. You cannot change the status of the Internet.
. Network for users with restricted access to �les and printers on this computer (such as for acorporate LAN or home network).
. Safe network in which the computer is not exposed to attacks or unauthorized data accessattempts. Firewall permits any network activity within networks with this status.
Firewall component settings
Parameter Description
Table with a list of network packet rules. Network packet rules serve to imposerestrictions on network packets, regardless of the application. Such rules restrict inboundand outbound network tra�ic through speci�c ports of the selected data protocol.
The table lists pre-con�gured network packet rules that are recommended by Kasperskyfor optimum protection of the network tra�ic of computers that run on MicrosoftWindows operating systems.
Firewall sets the execution priority of each network packet rule. Firewall processesnetwork packet rules in the order in which they appear in the list of network packetrules, from top to bottom. Firewall locates the topmost network packet rule that issuitable for the network connection and applies it by either allowing or blocking networkactivity. Firewall then ignores all subsequent network packet rules for the speci�cnetwork connection.
Network packet rules have higher priority than network rules for applications.
This table contains information about network connections that Firewall detects on thecomputer.
The Public network status is assigned to the Internet by default. You cannot changethe status of the Internet.
Table of applications that are controlled by the Firewall component. Applications areassigned to trust groups. A trust group de�nes the rights used by Kaspersky EndpointSecurity when controlling network activity of applications.
You can select an application from a single list of all applications installed on computersunder the in�uence of a policy and add the application to a trust group.
Local network
Trusted network
Networkpacket rules
Networkconnections
Networkrules
Appendices
Network rules
Table of network rules for applications that are part of a trust group. In accordance withthese rules, Firewall regulates the network activity of an application.
The table displays the prede�ned network rules that are recommended by Kasperskyexperts. These network rules have been added to optimally protect the network tra�ic ofcomputers running Windows operating systems. It is not possible to delete theprede�ned network rules.
BadUSB Attack Prevention
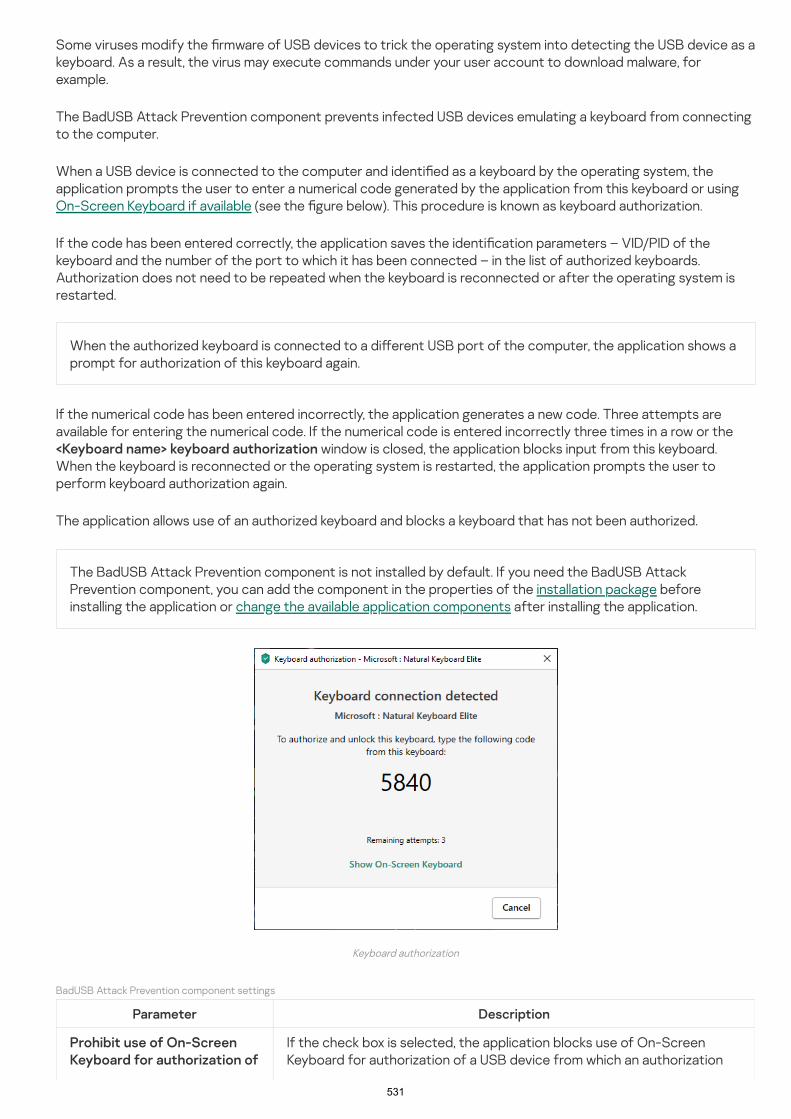
531
When the authorized keyboard is connected to a di�erent USB port of the computer, the application shows aprompt for authorization of this keyboard again.
The BadUSB Attack Prevention component is not installed by default. If you need the BadUSB AttackPrevention component, you can add the component in the properties of the installation package beforeinstalling the application or change the available application components after installing the application.
Keyboard authorization
BadUSB Attack Prevention component settings
Parameter Description
If the check box is selected, the application blocks use of On-ScreenKeyboard for authorization of a USB device from which an authorization
Some viruses modify the �rmware of USB devices to trick the operating system into detecting the USB device as akeyboard. As a result, the virus may execute commands under your user account to download malware, forexample.
The BadUSB Attack Prevention component prevents infected USB devices emulating a keyboard from connectingto the computer.
When a USB device is connected to the computer and identi�ed as a keyboard by the operating system, theapplication prompts the user to enter a numerical code generated by the application from this keyboard or usingOn-Screen Keyboard if available (see the �gure below). This procedure is known as keyboard authorization.
If the code has been entered correctly, the application saves the identi�cation parameters – VID/PID of thekeyboard and the number of the port to which it has been connected – in the list of authorized keyboards.Authorization does not need to be repeated when the keyboard is reconnected or after the operating system isrestarted.
If the numerical code has been entered incorrectly, the application generates a new code. Three attempts areavailable for entering the numerical code. If the numerical code is entered incorrectly three times in a row or the
window is closed, the application blocks input from this keyboard.When the keyboard is reconnected or the operating system is restarted, the application prompts the user toperform keyboard authorization again.
<Keyboard name> keyboard authorization
The application allows use of an authorized keyboard and blocks a keyboard that has not been authorized.
Prohibit use of On-ScreenKeyboard for authorization of

532
code cannot be entered.
AMSI operation example
AMSI Protection component may decline a request from a third-party application, for example, if thisapplication exceeds maximum number of requests within a speci�ed interval. Kaspersky Endpoint Securitysends information about a rejected request from a third-party application to the Administration Server. AMSIProtection component does not reject requests from those third-party applications for which the
check box is selected
USB devices
AMSI Protection
AMSI Protection component is intended to support Antimalware Scan Interface from Microsoft. The AntimalwareScan Interface (AMSI) allows third-party applications with AMSI support to send objects (for example, PowerShellscripts) to Kaspersky Endpoint Security for an additional scan and then receive the results from scanning theseobjects. Third-party applications may include, for example, Microsoft O�ice applications (see the �gure below). Fordetails on AMSI refer to Microsoft documentation .
The AMSI Protection can only detect a threat and notify a third-party application about the detected threat.Third-party application after receiving a noti�cation of a threat does not allow to perform malicious actions (forexample, terminates).
Do notblock interaction with AMSI Protection Provider
AMSI Protection is available for the following operating systems for workstations and servers:
Windows 10 Home / Pro / Pro for Workstations / Education / Enterprise;
Windows Server 2016 Essentials / Standard / Datacenter;
Windows Server 2019 Essentials / Standard / Datacenter.
AMSI Protection Provider component settings
Parameter Description
Scans archives in the following formats: RAR, ARJ, ZIP, CAB, LHA, JAR, and ICE.
This check box enables/disables scanning of third-party distribution packages.
Scans Microsoft O�ice �les (DOC, DOCX, XLS, PPT and other Microsoftextensions). O�ice format �les include OLE objects as well.
If this check box is selected, Kaspersky Endpoint Security does not scan
Scan archives
Scan distributionpackages
Scan �les inMicrosoft O�iceformats
Do not unpack large
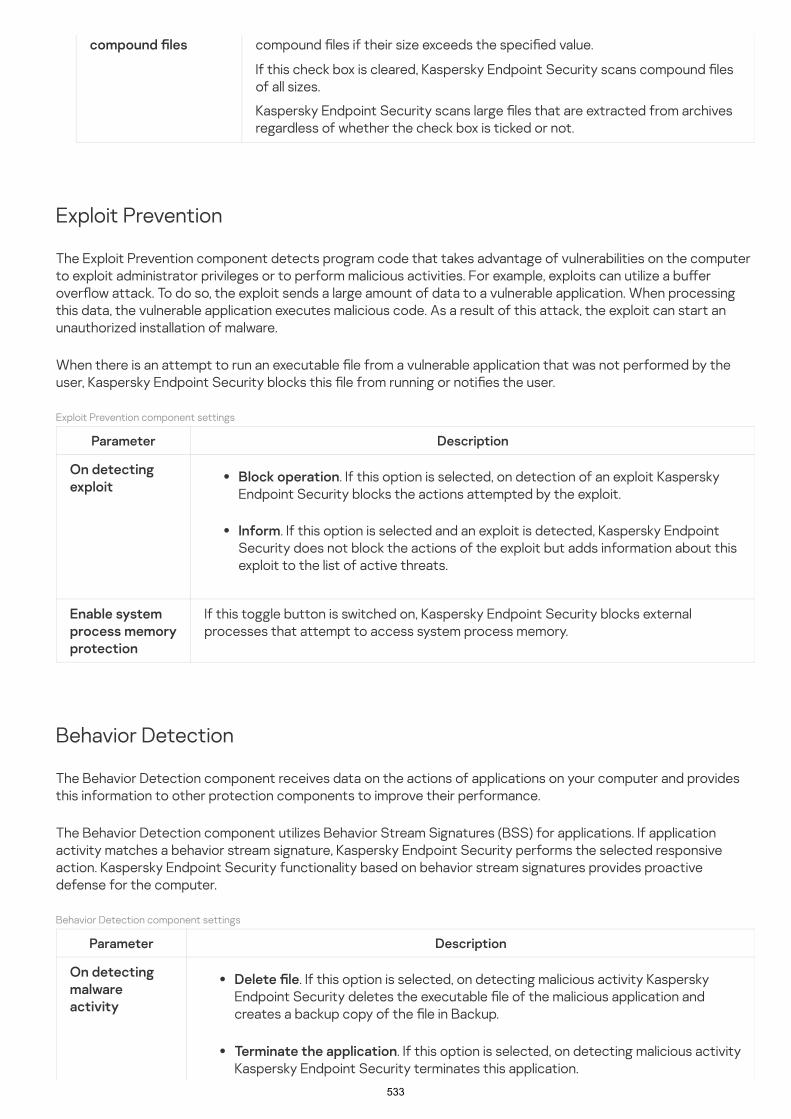
533
Exploit Prevention component settings
Parameter Description
. If this option is selected, on detection of an exploit KasperskyEndpoint Security blocks the actions attempted by the exploit.
. If this option is selected and an exploit is detected, Kaspersky EndpointSecurity does not block the actions of the exploit but adds information about thisexploit to the list of active threats.
If this toggle button is switched on, Kaspersky Endpoint Security blocks externalprocesses that attempt to access system process memory.
Behavior Detection component settings
Parameter Description
. If this option is selected, on detecting malicious activity KasperskyEndpoint Security deletes the executable �le of the malicious application andcreates a backup copy of the �le in Backup.
. If this option is selected, on detecting malicious activityKaspersky Endpoint Security terminates this application.
compound �les if their size exceeds the speci�ed value.
If this check box is cleared, Kaspersky Endpoint Security scans compound �lesof all sizes.
Kaspersky Endpoint Security scans large �les that are extracted from archivesregardless of whether the check box is ticked or not.
compound �les
Exploit Prevention
The Exploit Prevention component detects program code that takes advantage of vulnerabilities on the computerto exploit administrator privileges or to perform malicious activities. For example, exploits can utilize a bu�erover�ow attack. To do so, the exploit sends a large amount of data to a vulnerable application. When processingthis data, the vulnerable application executes malicious code. As a result of this attack, the exploit can start anunauthorized installation of malware.
When there is an attempt to run an executable �le from a vulnerable application that was not performed by theuser, Kaspersky Endpoint Security blocks this �le from running or noti�es the user.
On detectingexploit
Block operation
Inform
Enable systemprocess memoryprotection
Behavior Detection
The Behavior Detection component receives data on the actions of applications on your computer and providesthis information to other protection components to improve their performance.
The Behavior Detection component utilizes Behavior Stream Signatures (BSS) for applications. If applicationactivity matches a behavior stream signature, Kaspersky Endpoint Security performs the selected responsiveaction. Kaspersky Endpoint Security functionality based on behavior stream signatures provides proactivedefense for the computer.
On detectingmalwareactivity
Delete �le
Terminate the application

534
. If this option is selected and malicious activity of an application isdetected, Kaspersky Endpoint Security does not terminate this application butadds information about the malicious activity of this application to the list of activethreats.
If the toggle button is switched on, Kaspersky Endpoint Security analyzes activity inshared folders. If this activity matches a behavior stream signature that is typical forexternal encryption, Kaspersky Endpoint Security performs the selected action.
Kaspersky Endpoint Security prevents external encryption of only those �les thatare located on media that have the NTFS �le system and are not encrypted by theEFS system.
. If this option is selected, on detecting an attempt to modify �les in sharedfolders, Kaspersky Endpoint Security adds information about this attempt tomodify �les in shared folders to the list of active threats.
. If this option is selected, on detecting an attempt to modify�les in shared folders, Kaspersky Endpoint Security blocks network activityoriginating from the computer attempting to modify �les and creates backupcopies of modi�ed �les.
If the Remediation Engine component is enabled and the optionis selected, Kaspersky Endpoint Security restores modi�ed �les from backupcopies.
The time for which Kaspersky Endpoint Security blocks the network activity of theremote computer performing encryption of shared folders.
List of computers from which attempts to encrypt shared folders will not be monitored.
To apply the list of exclusions of computers from protection of shared foldersagainst external encryption, you must enable Audit Logon in the Windows securityaudit policy. Audit Logon is disabled by default. For more details about a Windowssecurity audit policy, please visit the Microsoft website .
Inform
Enableprotection ofshared foldersagainst externalencryption
Inform
Block connection
Block connection
Blockconnection forN minutes
Exclusions
Host Intrusion Prevention
The Host Intrusion Prevention component prevents applications from performing actions that may be dangerousfor the operating system, and ensures control over access to operating system resources and personal data. Thecomponent provides computer protection with the help of anti-virus databases and the Kaspersky SecurityNetwork cloud service.
The component controls the operation of applications by using application rights. Application rights include thefollowing access parameters:
Access to operating system resources (for example, automatic startup options, registry keys)

535
Network activity of applications is controlled by the Firewall using network rules.
1. Checks the security of the application using downloaded anti-virus databases.
2. Checks the security of the application in Kaspersky Security Network.
You are advised to participate in Kaspersky Security Network to help the Host Intrusion Preventioncomponent work more e�ectively.
3. Puts the application in one of the trust groups: Trusted, Low Restricted, High Restricted, Untrusted.
A trust group de�nes the rights that Kaspersky Endpoint Security refers to when controlling applicationactivity. Kaspersky Endpoint Security places an application in a trust group depending on the level of dangerthat this application may pose to the computer.
Kaspersky Endpoint Security places an application in a trust group for the Firewall and Host IntrusionPrevention components. You cannot change the trust group only for the Firewall or Host IntrusionPrevention.
If you refused to participate in KSN or there is no network, Kaspersky Endpoint Security places theapplication in a trust group depending on the settings of the Host Intrusion Prevention component. Afterreceiving the reputation of the application from KSN, the trust group can be changed automatically.
4. Blocks application actions depending on the trust group. For example, applications from the High Restrictedtrust group are denied access to the operating system modules.
Host Intrusion Prevention component settings
Parameter Description
Access to personal data (such as �les and applications)
During the �rst startup of the application, the Host Intrusion Prevention component performs the followingactions:
The next time the application is started, Kaspersky Endpoint Security checks the integrity of the application. If theapplication is unchanged, the component uses the current application rights for it. If the application has beenmodi�ed, Kaspersky Endpoint Security analyzes the application as if it were being started for the �rst time.
Applicationrights
Applications
Table of applications that are monitored by the Host Intrusion Prevention component.Applications are assigned to trust groups. A trust group de�nes the rights that KasperskyEndpoint Security refers to when controlling application activity.
You can select an application from a single list of all applications installed on computersunder the in�uence of a policy and add the application to a trust group.
Application access rights are presented in the following tables:
. This table contains the rights of applications within a trustgroup to access operating system resources and personal data.Files and system registry

536
The table contains categorized computer resources. The Host Intrusion Preventioncomponent monitors attempts by other applications to access resources in the table.
A resource can be a registry category, �le or folder, or registry key.
Table of applications monitored by the Host Intrusion Prevention component for theselected resource. Applications are assigned to trust groups. A trust group de�nes therights that Kaspersky Endpoint Security refers to when controlling application activity.
A trust group in which Kaspersky Endpoint Security will place applications that are startedbefore Kaspersky Endpoint Security.
If the check box is selected, the Host Intrusion Prevention component updates rights forpreviously unknown applications by using the Kaspersky Security Network database.
If this check box is selected, the Host Intrusion Prevention component places theapplications with the digital signature of trusted vendors in the Trusted group.
Trusted vendors are those software vendors that are trusted by Kaspersky. You can alsoadd vendor certi�cate to the trusted certi�cate store manually.
If this check box is cleared, the Host Intrusion Prevention component does not considersuch applications to be trusted, and uses other parameters to determine their trust group.
. This table contains the rights of applications in a trust group to accessprocesses and resources of the operating system.
. Table of network rules for applications that are part of a trust group. Inaccordance with these rules, Firewall regulates the network activity of applications. Thetable displays the prede�ned network rules that are recommended by Kasperskyexperts. These network rules have been added to optimally protect the network tra�icof computers running Windows operating systems. It is not possible to delete theprede�ned network rules.
Rights
Network rules
Protectedresources
Name
Applications
Trust groupforapplicationsstartedbeforestartup ofKasperskyEndpointSecurity
Update rightsfor previouslyunknownapplicationsfrom KSNdatabase
Trustapplicationsthat have adigitalsignature
Delete rightsforapplicationsthat are notstarted formore than Ndays
If the check box is selected, Kaspersky Endpoint Security automatically deletesinformation about the application (trust group and access rights) if the followingconditions are met:
You manually put the application into a trust group or con�gured its access rights.
The application has not started within the de�ned period of time.
If the trust group and rights of an application were determined automatically, KasperskyEndpoint Security deletes information about this application after 30 days. It is notpossible to change the storage term for application information or turn o� automaticdeletion.

537
Items in this drop-down list determine to which trust group Kaspersky Endpoint Securitywill assign an unknown application.
You can choose one of the following items:
.
.
.
The next time you start this application, Kaspersky Endpoint Security analyzes theapplication as if it were starting for the �rst time.
Trust groupforapplicationsthat couldnot beassigned toother groups
Low Restricted
High Restricted
Untrusted
Remediation Engine
The Remediation Engine lets Kaspersky Endpoint Security roll back actions that have been performed by malwarein the operating system.
When rolling back malware activity in the operating system, Kaspersky Endpoint Security handles the followingtypes of malware activity:
Kaspersky Endpoint Security performs the following actions:
The �le recovery feature has a number of limitations.
Kaspersky Endpoint Security performs the following actions:
Kaspersky Endpoint Security performs the following actions:
Kaspersky Endpoint Security performs the following actions:
File activity
Deletes executable �les that were created by malware (on all media except network drives).
Deletes executable �les that were created by programs that have been in�ltrated by malware.
Restores �les that have been modi�ed or deleted by malware.
Registry activity
Deletes registry keys that were created by malware.
Does not restore registry keys that have been modi�ed or deleted by malware.
System activity
Terminates processes that have been initiated by malware.
Terminates processes into which a malicious application has penetrated.
Does not resume processes that have been halted by malware.
Network activity

538
Use of Kaspersky Security Network is voluntary. The application prompts you to use KSN during initialcon�guration of the application. Users can begin or discontinue participation in KSN at any time.
KSN Infrastructure
Blocks the network activity of malware.
Blocks the network activity of processes that have been in�ltrated by malware.
A rollback of malware actions can be started by the File Threat Protection or Behavior Detection component, orduring a virus scan.
Rolling back malware operations a�ects a strictly de�ned set of data. Rollback has no adverse e�ects on theoperating system or on the integrity of your computer data.
Kaspersky Security Network
To protect your computer more e�ectively, Kaspersky Endpoint Security uses data that is received from usersaround the globe. Kaspersky Security Network is designed for obtaining this data.
Kaspersky Security Network (KSN) is an infrastructure of cloud services providing access to the online KasperskyKnowledge Base that contains information about the reputation of �les, web resources, and software. The use ofdata from Kaspersky Security Network ensures faster responses by Kaspersky Endpoint Security to new threats,improves the performance of some protection components, and reduces the likelihood of false positives. If you areparticipating in Kaspersky Security Network, KSN services provide Kaspersky Endpoint Security with informationabout the category and reputation of scanned �les, as well as information about the reputation of scanned webaddresses.
For more detailed information about sending Kaspersky statistical information that is generated duringparticipation in KSN, and about the storage and destruction of such information, please refer to the KasperskySecurity Network Statement and the Kaspersky website . The ksn_<language ID>.txt �le with the text of theKaspersky Security Network Statement is included in the application distribution kit.
To reduce the load on KSN servers, Kaspersky experts may release application updates that temporarily disable orpartly restrict requests to Kaspersky Security Network. In this case, the status of the connection to KSN in thelocal interface of the application is Enabled with restrictions.
Kaspersky Endpoint Security supports the following KSN infrastructural solutions:
Global KSN is the solution that is used by most Kaspersky applications. KSN participants receive informationfrom Kaspersky Security Network and send Kaspersky information about objects detected on the user'scomputer to be analyzed additionally by Kaspersky analysts and to be included in the reputation and statisticaldatabases of Kaspersky Security Network.
Private KSN is a solution that enables users of computers hosting Kaspersky Endpoint Security or otherKaspersky applications to obtain access to reputation databases of Kaspersky Security Network, and to otherstatistical data without sending data to KSN from their own computers. Private KSN is designed for corporatecustomers who are unable to participate in Kaspersky Security Network for any of the following reasons:
Local workstations are not connected to the Internet.
Transmission of any data outside the country or outside the corporate LAN is prohibited by law or restrictedby corporate security policies.

539
By default, Kaspersky Security Center uses Global KSN. You can con�gure the use of Private KSN in theAdministration Console (MMC), in the Kaspersky Security Center 12 Web Console, and in the command line. Itis not possible to con�gure the use of Private KSN in the Kaspersky Security Center Cloud Console.
KSN Proxy
Kaspersky Security Network settings
Parameter Description
Extended KSN mode is a mode in which Kaspersky Endpoint Security sends additional data toKaspersky. Kaspersky Endpoint Security uses KSN to detect threats regardless of the toggleposition.
Kaspersky Endpoint Security downloads the light version of anti-virus databases duringthe next update after the check box was selected.
If the toggle button is switched o�, Kaspersky Endpoint Security uses the full version of anti-virus databases.
Kaspersky Endpoint Security downloads the full version of anti-virus databases duringthe next update after the check box was cleared.
For more details about Private KSN, please refer to the documentation on Kaspersky Private Security Network.
User computers managed by Kaspersky Security Center Administration Server can interact with KSN via the KSNProxy service.
The KSN Proxy service provides the following capabilities:
The user's computer can query KSN and submit information to KSN even without direct access to the Internet.
The KSN Proxy service caches processed data, thereby reducing the load on the external networkcommunication channel and speeding up receipt of the information that is requested by the user's computer.
For more details on the KSN Proxy service, please refer to the Kaspersky Security Center Help Guide .
EnableextendedKSN mode
EnableCloudmode
Cloud mode refers to the application operating mode in which Kaspersky Endpoint Securityuses a light version of anti-virus databases. Kaspersky Security Network supports theoperation of the application when light anti-virus databases are being used. The light versionof anti-virus databases lets you use approximately half of the computer RAM that wouldotherwise be used with the usual databases. If you do not participate in Kaspersky SecurityNetwork or if cloud mode is disabled, Kaspersky Endpoint Security downloads the full versionof anti-virus databases from Kaspersky servers.
If the toggle button is switched on, Kaspersky Endpoint Security uses the light version of anti-virus databases, which reduces the load on operating system resources.
Computerstatuswhen KSNservers
The items in this drop-down list determine the status of a computer in Kaspersky SecurityCenter when KSN servers are unavailable.

540
(availableonly in theKasperskySecurityCenterConsole)
(availableonly in theKasperskySecurityCenterConsole)
(availableonly in theKasperskySecurityCenterConsole)
For HTTPS tra�ic monitoring, you need to enable encrypted connections scan.
Methods for managing access to websites
areunavailable
Use KSNProxy
If the check box is selected, Kaspersky Endpoint Security uses the KSN Proxy service. You cancon�gure the KSN Proxy service settings in the Administration Server properties.
Use KSNserverswhen KSNProxy isnotavailable
If the check box is selected, Kaspersky Endpoint Security uses KSN servers when the KSNProxy service is unavailable. KSN servers may be located both on the side of Kaspersky (whenGlobal KSN is used) and on the side of third parties (when Private KSN is used).
Web Control
Web Control manages users' access to web resources. This helps reduce tra�ic and inappropriate use of worktime. When a user tries to open a website that is restricted by Web Control, Kaspersky Endpoint Security will blockaccess or show a warning (see the �gure below).
Kaspersky Endpoint Security monitors only HTTP- and HTTPS tra�ic.
Web Control lets you con�gure access to websites by using the following methods:
. Websites are categorized according to the Kaspersky Security Network cloud service,heuristic analysis, and the database of known websites (included in application databases). For example, youcan restrict user access to the "Social networks" category or to other categories.
. You can restrict users' access to data on a website, and hide graphic images, for example. KasperskyEndpoint Security determines the data type based on the �le format and not based on its extension.
Website category
Data type

541
Website access rules
Access rule priorities
Kaspersky Endpoint Security does not scan �les within archives. For example, if image �les were placed inan archive, Kaspersky Endpoint Security identi�es the "Archives" data type and not "Graphic �les".
. You can enter a web address or use masks.Individual address
You can simultaneously use multiple methods for regulating access to websites. For example, you can restrictaccess to the "O�ice �les" data type just for the "Web-based mail" website category.
Web Control manages users' access to websites by using access rules. You can con�gure the following advancedsettings for a website access rule:
Users to which the rule applies.
For example, you can restrict Internet access through a browser for all users of the company except the ITdepartment.
Rule schedule.
For example, you can restrict Internet access through a browser during working hours only.
Each rule has a priority. The higher a rule is on the list, the higher its priority. If a website has been added to multiplerules, Web Control regulates access to the website based on the rule with the highest priority. For example,Kaspersky Endpoint Security may identify a corporate portal as a social network. To restrict access to socialnetworks and provide access to the corporate web portal, create two rules: one block rule for the "Socialnetworks" website category and one allow rule for the corporate web portal. The access rule for the corporateweb portal must have a higher priority than the access rule for social networks.

542
Web Control messages
Web Control component settings
Parameter Description
List containing web resource access rules. Each rule has a priority. The higher a rule is on thelist, the higher its priority. If a website has been added to multiple rules, Web Control regulatesaccess to the website based on the rule with the highest priority.
The Default rule is a rule for accessing web resources that are not covered by any other rule.The following options are available:
, also known as denylist mode for prohibited websites.
, also known as allowlist mode for allowed websites.
. The entry �eld consists of a template of the message that is displayed if a rulefor warning about attempts to access an unwanted web resource is triggered.
. The entry �eld contains the template of the message thatappears if a rule which blocks access to a web resource is triggered.
Rules ofaccess towebresources
Defaultrule
Allow all except the rules list
Deny everything except the rules list
Messagetemplates
Warning
Message about blocking

543
. The entry �eld contains the template of the message to besent to the LAN administrator if the user considers the block to be a mistake.
Monitoring user Internet activity may require more computer resources when decryptingHTTPS tra�ic.
This component is available if Kaspersky Endpoint Security is installed on a computer that runs on Windowsfor workstations. This component is unavailable if Kaspersky Endpoint Security is installed on a computer thatruns on Windows for servers.
Device access levels
Message to administrator
Log theopeningof allowedpages
Kaspersky Endpoint Security logs data on visits to all websites, including allowed websites.Kaspersky Endpoint Security sends events to Kaspersky Security Center, to the local log ofKaspersky Endpoint Security, and to the Windows Event log. To monitor user Internet activity,you need to con�gure the settings for saving events.
Device Control
Device Control manages user access to devices that are installed on or connected to the computer (for example,hard drives, cameras, or Wi-Fi modules). This lets you protect the computer from infection when such devices areconnected, and prevent loss or leaks of data.
Device Control controls access at the following levels:
. For example, printers, removable drives, and CD/DVD drives.
You can con�gure device access as follows:
. A connection bus is an interface used for connecting devices to the computer (for example,USB or FireWire). Therefore, you can restrict the connection of all devices, for example, over USB.
You can con�gure device access as follows:
. Trusted devices are devices to which users that are speci�ed in the trusted device settingshave full access at all times.
You can add trusted devices based on the following data:
Device type
Allow – .
Block – .
Depends on connection bus (except for Wi-Fi) – .
Block with exceptions (Wi-Fi only) – .
Connection bus
Allow – .
Block – .
Trusted devices

544
If access to a device depends on the connection bus (the status), Kaspersky Endpoint Security does notsave device connection/disconnection events. To enable Kaspersky Endpoint Security to save deviceconnection/disconnection events, allow access to the corresponding type of device (the status) or add thedevice to the trusted list.
Device Control noti�cation
Device Control operating algorithm
. Each device has a unique identi�er (Hardware ID, or HWID). You can view the ID in the deviceproperties by using operating system tools. Example device ID:SCSI\CDROM&VEN_NECVMWAR&PROD_VMWARE_SATA_CD00\5&354AE4D7&0&000000 . Adding devices by ID isconvenient if you want to add several speci�c devices.
. Each device has a vendor ID (VID) and a product ID (PID). You can view the IDs in thedevice properties by using operating system tools. Template for entering the VID and PID:VID_1234&PID_5678 . Adding devices by model is convenient if you use devices of a certain model in yourorganization. This way, you can add all devices of this model.
. If you are using multiple devices with similar IDs, you can add devices to the trusted listby using masks. The * character replaces any set of characters. Kaspersky Endpoint Security does notsupport the ? character when entering a mask. For example, WDC_C*.
. If you are using multiple devices with similar VIDs or PIDs (for example, devicesfrom the same manufacturer), you can add devices to the trusted list by using masks. The * characterreplaces any set of characters. Kaspersky Endpoint Security does not support the ? character whenentering a mask. For example, VID_05AC & PID_ *.
Devices by ID
Devices by model
Devices by ID mask
Devices by model mask
Device Control regulates user access to devices by using access rules. Device Control also lets you save deviceconnection/disconnection events. To save events, you need to con�gure the registration of events in a policy.
When a device that is blocked by Device Control is connected to the computer, Kaspersky Endpoint Security willblock access and show a noti�cation (see the �gure below).
Kaspersky Endpoint Security makes a decision on whether to allow access to a device after the user connects thedevice to the computer (see the �gure below).

545
Device Control operating algorithm
Device Control component settings
Parameter Description
(available only inthe KasperskySecurity CenterConsole)
This table contains all possible types of devices according to the classi�cation of theDevice Control component, including their respective access statuses.
If a device is connected and access is allowed, you can edit the access rule and block access. In this case, the nexttime someone attempts to access the device (such as to view the folder tree, or perform read or writeoperations), Kaspersky Endpoint Security blocks access. A device without a �le system is blocked only the nexttime that the device is connected.
If a user of the computer with Kaspersky Endpoint Security installed must request access to a device that the userbelieves was blocked by mistake, send the user the request access instructions.
Allow requestsfor temporaryaccess
If the check box is selected, the button is available through the localinterface of Kaspersky Endpoint Security. Clicking this button opens the
window. In this window, the user can request temporary access to ablocked device.
Request accessRequest
access to device
Devices andWi-Fi networks

546
List of trusted devices and users who are granted access to these devices.
. Template of the message that appears when a userattempts to access a blocked device. This message also appears when a userattempts to perform an operation on the device contents that was blocked for thisuser.
. A template of the message that is sent to the LANadministrator when the user believes that access to the device is blocked or anoperation with device content is forbidden by mistake.
1. Creating application categories.
The administrator creates categories of applications that the administrator wants to manage. Categories ofapplications are intended for all computers in the corporate network, regardless of administration groups. Tocreate a category, you can use the following criteria: KL category (for example, Browsers), �le hash, applicationvendor, and other criteria.
2. Creating Application Control rules.
The administrator creates Application Control rules in the policy for the administration group. The rule includesthe categories of applications and the startup status of applications from these categories: blocked or allowed.
3. Selecting the Application Control mode.
Connectionbuses
A list of all available connection buses according to the Device Control component'sclassi�cation, including their respective access statuses.
Trusteddevices
Anti-Bridging Anti-Bridging inhibits the creation of network bridges by preventing the simultaneousestablishment of multiple network connections for a computer. This lets you protect acorporate network from attacks over unprotected, unauthorized networks.
Anti-Bridging blocks the establishment of multiple connections according to thepriorities of devices. The higher a device is on the list, the higher its priority.
If an active connection and a new connection are both of the same type (for example,Wi-Fi), Kaspersky Endpoint Security blocks the active connection and allowsestablishment of the new connection.
If an active connection and a new connection are of di�erent types (for example, anetwork adapter and Wi-Fi), Kaspersky Endpoint Security blocks the connection with thelower priority and allows the connection with the higher priority.
Anti-Bridging supports operation with the following types of devices: network adapter,Wi-Fi, and modem.
Messagetemplates
Message about blocking
Message to administrator
Application Control
Application Control manages the startup of applications on users' computers. This allows you to implement acorporate security policy when using applications. Application Control also reduces the risk of computer infectionby restricting access to applications.
Con�guring Application Control consists of the following steps:

547
The administrator chooses the mode for working with applications that are not included in any of the rules(application denylist and allowlist).
Application Control operating modes
When a user attempts to start a prohibited application, Kaspersky Endpoint Security will block the application fromstarting and will display a noti�cation (see the �gure below).
A test mode is provided to check the con�guration of Application Control. In this mode, Kaspersky EndpointSecurity does the following:
Allows the startup of applications, including prohibited ones.
Shows a noti�cation about the startup of a prohibited application and adds information to the report on theuser's computer.
Sends data about the startup of prohibited applications to Kaspersky Security Center.
Application Control noti�cation
The Application Control component operates in two modes:
. In this mode, Application Control allows users to start all applications except for applications that areprohibited in Application Control rules.
This mode of Application Control is enabled by default.
. In this mode, Application Control blocks users from starting any applications except for applicationsthat are allowed and not prohibited in Application Control rules.
If the allow rules of Application Control are fully con�gured, the component blocks the startup of all newapplications that have not been veri�ed by the LAN administrator, while allowing the operation of the operatingsystem and of trusted applications that users rely on in their work.
You can read the recommendations on con�guring Application Control rules in allowlist mode.
Denylist
Allowlist
Application Control can be con�gured to operate in these modes both by using the Kaspersky Endpoint Securitylocal interface and by using Kaspersky Security Center.
However, Kaspersky Security Center o�ers tools that are not available in the Kaspersky Endpoint Security localinterface, such as the tools that are needed for the following tasks:
Creating application categories.
Application Control rules created in the Kaspersky Security Center Administration Console are based on yourcustom application categories and not on inclusion and exclusion conditions as is the case in the KasperskyEndpoint Security local interface.
Receiving information about applications that are installed on corporate LAN computers.

548
Application Control operating algorithm
Application Control operating algorithm
Application Control component settings
Parameter Description
If the toggle button is switched on, Kaspersky Endpoint Security allows the startup of anapplication that is blocked in the current Application Control mode, but logs informationabout its startup in the report.
You can choose one of the following options:
. If this option is selected, Application Control allows all users to start anyapplications, except in cases that satisfy the conditions of Application Control blockrules.
. If this option is selected, Application Control blocks all users from starting anyapplications, except in cases that satisfy the conditions of Application Control allowrules.
This is why it is recommended to use Kaspersky Security Center to con�gure the operation of the ApplicationControl component.
Kaspersky Endpoint Security uses an algorithm to make a decision about starting an application (see the �gurebelow).
Test mode
ApplicationControlmode Denylist
Allowlist

549
When mode is selected, two Application Control rules are automatically created:
.
.
You cannot edit the settings of or delete automatically created rules. You can enable ordisable these rules.
If the check box is selected, Kaspersky Endpoint Security controls the loading of DLLmodules when users attempt to start applications. Information about the DLL module andthe application that loaded this DLL module is logged in the report.
When enabling control over the loading of DLL modules and drivers, make sure that oneof the following rules is enabled in the Application Control settings: the default
rule or another rule that contains the "Trusted certi�cates" KL category andensures that trusted DLL modules and drivers are loaded before Kaspersky EndpointSecurity is started. Enabling control of the loading of DLL modules and drivers when the
rule is disabled may cause instability in the operating system.
Kaspersky Endpoint Security monitors only the DLL modules and drivers that have beenloaded since the check box was selected. After selecting the check box, it is recommendedto restart the computer to ensure that the application monitors all DLL modules and drivers,including those loaded before Kaspersky Endpoint Security starts.
This component is available only for Kaspersky Endpoint Security for Business Advanced and Kaspersky TotalSecurity for Business. For more details about Kaspersky Endpoint Security for Business, please visit theKaspersky website .
This component is available if Kaspersky Endpoint Security is installed on a computer that runs on Windowsfor workstations. This component is unavailable if Kaspersky Endpoint Security is installed on a computer thatruns on Windows for servers.
Allowlist
Golden Image
Trusted Updaters
ControlDLL
GoldenImage
Golden Image
Messagetemplates
. Template of the message that is displayed when an ApplicationControl rule that blocks an application from starting is triggered.Message about blocking
. Template of the message that a user can send to the corporateLAN administrator if the user believes that an application was blocked by mistake.Message to administrator
Adaptive Anomaly Control
The Adaptive Anomaly Control component monitors and blocks actions that are not typical of the computers in acompany's network. Adaptive Anomaly Control uses a set of rules to track uncharacteristic behavior (for example,the Start of Microsoft PowerShell from o�ice application rule). Rules are created by Kaspersky specialists basedon typical scenarios of malicious activity. You can con�gure how Adaptive Anomaly Control handles each rule and,for example, allow the execution of PowerShell scripts that automate certain work�ow tasks. Kaspersky EndpointSecurity updates the set of rules along with the application databases. Updates to the sets of rules must becon�rmed manually.

550
Adaptive Anomaly Control settings
1. Training Adaptive Anomaly Control.
After you enable Adaptive Anomaly Control, its rules work in training mode. During the training, AdaptiveAnomaly Control monitors rule triggering and sends triggering events to Kaspersky Security Center. Each rulehas its own duration of the training mode. The duration of the training mode is set by Kaspersky experts.Normally, the training mode is active for two weeks.
If a rule is not triggered at all during the training, Adaptive Anomaly Control will consider the actions associatedwith this rule as non-typical. Kaspersky Endpoint Security will block all actions associated with that rule.
If a rule was triggered during training, Kaspersky Endpoint Security logs events in the rule triggering report andthe repository.
2. Analyzing the rule triggering report.
The administrator analyzes the rule triggering report or the contents of the repository. Then the administrator can select the behavior of Adaptive Anomaly Control when
the rule is triggered: either block or allow. The administrator can also continue to monitor how the rule works andextend the duration of the training mode. If the administrator does not take any action, the application will alsocontinue to work in training mode. The training mode term is restarted.
Adaptive Anomaly Control noti�cation
Adaptive Anomaly Control operating algorithm
Con�guring Adaptive anomaly control consists of the following steps:
Triggering of rules in Smart Training mode
Triggering of rules in SmartTraining mode
Adaptive Anomaly Control is con�gured in real time. Adaptive Anomaly Control is con�gured via the followingchannels:
Adaptive Anomaly Control automatically starts to block the actions associated with the rules that were nevertriggered in training mode.
Kaspersky Endpoint Security adds new rules or removes obsolete ones.
The administrator con�gures the operation of the Adaptive Anomaly Control after reviewing the rule triggeringreport and the contents of the repository. It is recommended tocheck the rule triggering report and the contents of the
.
Triggering of rules in Smart Training modeTriggering of rules in Smart Training mode
repository
When a malicious application attempts to perform an action, Kaspersky Endpoint Security will block the action anddisplay a noti�cation (see �gure below).
Kaspersky Endpoint Security decides whether to allow or block an action that is associated with a rule based onthe following algorithm (see the �gure below).

551
Adaptive Anomaly Control operating algorithm
Adaptive Anomaly Control component settings
Parameter Description
(available only in theKaspersky SecurityCenter Console)
This report contains information about the status of Adaptive Anomaly Controldetection rules (for example, the O� or Block). The report is generated for alladministration groups.
(available only in theKaspersky SecurityCenter Console)
This report contains information about non-typical actions detected usingAdaptive Anomaly Control. The report is generated for all administration groups.
Adaptive Anomaly Control table of rules. Rules are created by Kasperskyspecialists based on typical scenarios of potentially malicious activity.
. Template of the message that is displayed to auser when an Adaptive Anomaly Control rule that blocks a non-typicalaction is triggered.
. Template of the message that a user can besent to the local corporate network administrator if the user considers theblocking to be a mistake.
Rule status report
Rule triggering report
Rules
Templates Message about blocking
Message to administrator

552
Endpoint Sensor is not included in Kaspersky Endpoint Security 11.4.0.
You can manage the Endpoint Sensor in the Kaspersky Security Center 12 Web Console and in the KasperskySecurity Center Administration Console. It is not possible to manage Endpoint Sensor in the KasperskySecurity Center Cloud Console.
Endpoint Sensor
Endpoint Sensor is designed to interact with Kaspersky Anti Targeted Attack Platform. Kaspersky Anti TargetedAttack Platform is a solution designed for timely detection of sophisticated threats such as targeted attacks,advanced persistent threats (APT), zero-day attacks, and others. Kaspersky Anti Targeted Attack Platformincludes two functional blocks: Kaspersky Anti Targeted Attack (hereinafter also referred to as "KATA") andKaspersky Endpoint Detection and Response (hereinafter also referred to as "KEDR"). You can purchase KEDRseparately. For detailed information on the solution. refer to the Kaspersky Anti Targeted Attack Platform Help .
Managing Endpoint Sensor has the following limitations:
You can con�gure Endpoint Sensor settings in a policy provided that Kaspersky Endpoint Security version 11.0.0to 11.3.0 is installed on the computer. For more information about con�guring Endpoint Sensor settings usingthe policy, refer to the help articles for the previous versions of Kaspersky Endpoint Security .
If Kaspersky Endpoint Security version 11.4.0 and later is installed on the computer, you cannot con�gureEndpoint Sensor settings in the policy.
Endpoint Sensor is installed on client computers. On these computers, the component constantly monitorsprocesses, active network connections, and �les that are modi�ed. Endpoint Sensor relays information to theKATA server.
The component functionality is available under the following operating systems:
Windows 7 Service Pack 1 Home / Professional / Enterprise;
Windows 8.1.1 Professional / Enterprise;
Windows 10 RS3 Home / Professional / Education / Enterprise;
Windows 10 RS4 Home / Professional / Education / Enterprise;
Windows 10 RS5 Home / Professional / Education / Enterprise;
Windows 10 RS6 Home / Professional / Education / Enterprise;
Windows Server 2008 R2 Foundation / Standard / Enterprise (64-bit);
Windows Server 2012 Foundation / Standard / Enterprise (64-bit);
Windows Server 2012 R2 Foundation / Standard / Enterprise (64-bit);
Windows Server 2016 Essentials / Standard (64-bit).

553
For detailed information on KATA operation, please refer to the Kaspersky Anti Targeted Attack Platform HelpGuide .
Kaspersky Disk Encryption
BitLocker Drive Encryption
Full Disk Encryption
You can select an encryption technology: Kaspersky Disk Encryption or BitLocker Drive Encryption (hereinafteralso referred to as simply "BitLocker").
After the system hard drives have been encrypted, at the next computer startup the user must completeauthentication using the Authentication Agent before the hard drives can be accessed and the operating systemis loaded. This requires entering the password of the token or smart card connected to the computer, or the username and password of the Authentication Agent account created by the local area network administrator usingthe Manage Authentication Agent accounts task. These accounts are based on Microsoft Windows accountsunder which users log into the operating system. You can also use Single Sign-On (SSO) technology, which lets youautomatically log in to the operating system using the user name and password of the Authentication Agentaccount.
User authentication in the Authentication Agent can be performed in two ways:
Enter the name and password of the Authentication Agent account created by the LAN administrator usingKaspersky Security Center tools.
Enter the password of a token or smart card connected to the computer.
Use of a token or smart card is available only if the computer hard drives were encrypted using the AES256encryption algorithm. If the computer hard drives were encrypted using the AES56 encryption algorithm,addition of the electronic certi�cate �le to the command will be denied.
BitLocker is an encryption technology built into Windows operating systems. Kaspersky Endpoint Security allowsyou to control and manage Bitlocker using Kaspersky Security Center. BitLocker encrypts logical volumes.BitLocker cannot be used for encryption of removable drives. For more details on BitLocker, refer to Microsoftdocumentation .
BitLocker provides secure storage of access keys using a trusted platform module. A Trusted Platform Module(TPM) is a microchip developed to provide basic functions related to security (for example, to store encryptionkeys). A Trusted Platform Module is usually installed on the computer motherboard and interacts with all othersystem components via the hardware bus. Using TPM is the safest way to store BitLocker access keys, since TPMprovides pre-startup system integrity veri�cation. You can still encrypt drives on a computer without a TPM. In thiscase, the access key will be encrypted with a password. BitLocker uses the following authentication methods:
TPM.
TPM and PIN.
Password.

554
If you are using Windows group policies, turn o� BitLocker management in the policy settings. Windows policysettings may con�ict with Kaspersky Endpoint Security policy settings. When encrypting a drive, errors mayoccur.
Kaspersky Disk Encryption component settings
Parameter Description
. If this item is selected, the application encrypts all hard driveswhen the policy is applied.
If the computer has several operating systems installed, after encryption you will beable to load only the operating system that has the application installed.
. If this item is selected, the application decrypts all previouslyencrypted hard drives when the policy is applied.
. If this item is selected, the application leaves drives in their previousstate when the policy is applied. If the drive was encrypted, it remains encrypted. If thedrive was decrypted, it remains decrypted. This item is selected by default.
If this check box is selected, the application creates Authentication Agent accountsbased on the list of Windows user accounts on the computer. By default, KasperskyEndpoint Security uses all local and domain accounts with which the user logged in to theoperating system over the past 30 days.
. If this check box is selected, when running the full diskencryption task Kaspersky Endpoint Security creates Authentication Agent accounts forall computer accounts that have ever been active.
. If this check box is selected, when running the fulldisk encryption task Kaspersky Endpoint Security creates Authentication Agentaccounts for all computer accounts belonging to a certain domain that have ever beenactive.
. If this check box is selected, when running the fulldisk encryption task Kaspersky Endpoint Security creates Authentication Agentaccounts for all local computer accounts that have ever been active.
. If this check box is selected, when running the full disk encryptiontask Kaspersky Endpoint Security creates a local administrator account.
After encrypting a drive, BitLocker creates a master key. Kaspersky Endpoint Security sends the master key toKaspersky Security Center so that you can restore access to the disk, for example, if a user has forgotten thepassword.
If a user encrypts a disk using BitLocker, Kaspersky Endpoint Security will send information about disk encryptionto Kaspersky Security Center. However, Kaspersky Endpoint Security will not send the master key to KasperskySecurity Center, so it will be impossible to restore access to the disk using Kaspersky Security Center. ForBitLocker to work correctly with Kaspersky Security Center, decrypt the drive and re-encrypt the drive using apolicy. You can decrypt a drive locally or using a policy.
After encrypting the system hard drive, the user needs to go through BitLocker authentication to boot theoperating system. After the authentication procedure, BitLocker will allow for users to log in. BitLocker does notsupport single sign-on technology (SSO).
Encryptionmode
Encrypt all hard drives
Decrypt all hard drives
Leave unchanged
Duringencryption,automaticallycreateAuthenticationAgentaccounts forWindows users
AuthenticationAgent accountcreationsettings
All accounts on the computer
All domain accounts on the computer
All local accounts on the computer
Local administrator
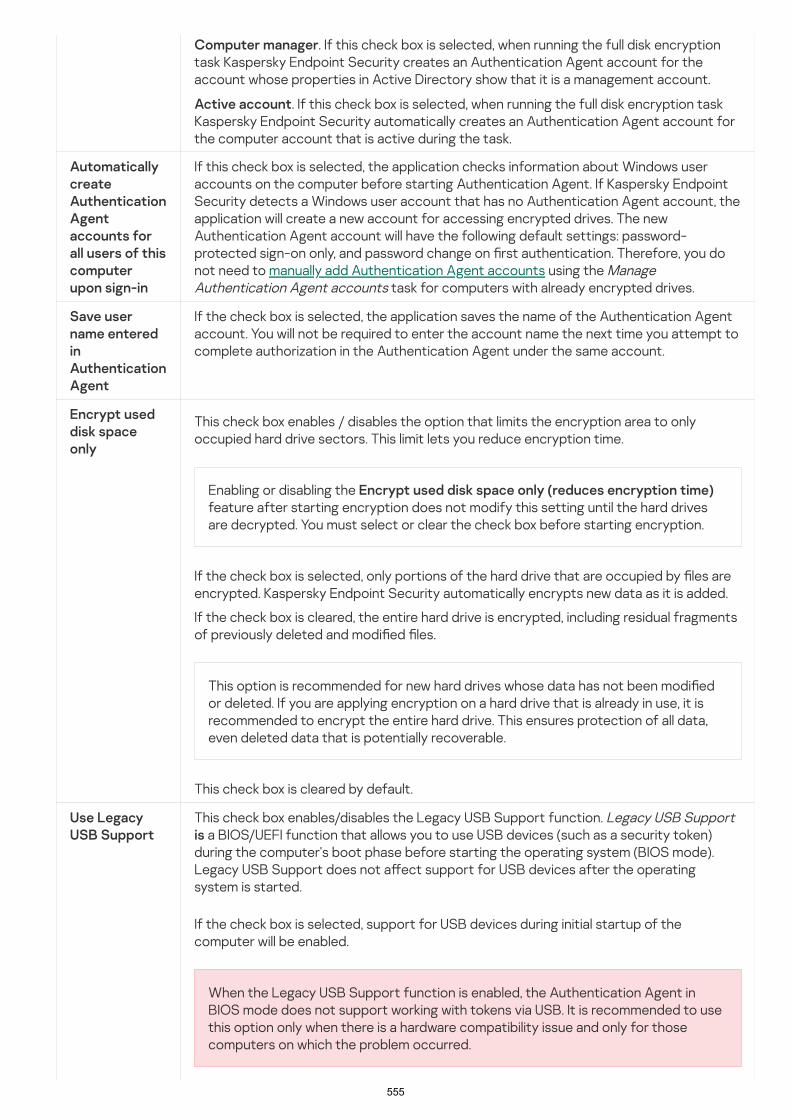
555
. If this check box is selected, when running the full disk encryptiontask Kaspersky Endpoint Security creates an Authentication Agent account for theaccount whose properties in Active Directory show that it is a management account.
. If this check box is selected, when running the full disk encryption taskKaspersky Endpoint Security automatically creates an Authentication Agent account forthe computer account that is active during the task.
If this check box is selected, the application checks information about Windows useraccounts on the computer before starting Authentication Agent. If Kaspersky EndpointSecurity detects a Windows user account that has no Authentication Agent account, theapplication will create a new account for accessing encrypted drives. The newAuthentication Agent account will have the following default settings: password-protected sign-on only, and password change on �rst authentication. Therefore, you donot need to manually add Authentication Agent accounts using the ManageAuthentication Agent accounts task for computers with already encrypted drives.
If the check box is selected, the application saves the name of the Authentication Agentaccount. You will not be required to enter the account name the next time you attempt tocomplete authorization in the Authentication Agent under the same account.
This check box enables / disables the option that limits the encryption area to onlyoccupied hard drive sectors. This limit lets you reduce encryption time.
Enabling or disabling the feature after starting encryption does not modify this setting until the hard drivesare decrypted. You must select or clear the check box before starting encryption.
If the check box is selected, only portions of the hard drive that are occupied by �les areencrypted. Kaspersky Endpoint Security automatically encrypts new data as it is added.
If the check box is cleared, the entire hard drive is encrypted, including residual fragmentsof previously deleted and modi�ed �les.
This option is recommended for new hard drives whose data has not been modi�edor deleted. If you are applying encryption on a hard drive that is already in use, it isrecommended to encrypt the entire hard drive. This ensures protection of all data,even deleted data that is potentially recoverable.
This check box is cleared by default.
When the Legacy USB Support function is enabled, the Authentication Agent inBIOS mode does not support working with tokens via USB. It is recommended to usethis option only when there is a hardware compatibility issue and only for thosecomputers on which the problem occurred.
Computer manager
Active account
AutomaticallycreateAuthenticationAgentaccounts forall users of thiscomputerupon sign-in
Save username enteredinAuthenticationAgent
Encrypt useddisk spaceonly
Encrypt used disk space only (reduces encryption time)
Use LegacyUSB Support
This check box enables/disables the Legacy USB Support function. Legacy USB Support a BIOS/UEFI function that allows you to use USB devices (such as a security token)
during the computer's boot phase before starting the operating system (BIOS mode).Legacy USB Support does not a�ect support for USB devices after the operatingsystem is started.
is
If the check box is selected, support for USB devices during initial startup of thecomputer will be enabled.

556
Authentication Agent account password strength settings. You can also enable the useof Single Sign-On (SSO) technology.
SSO technology makes it possible to use the same account credentials to accessencrypted hard drives and to sign in to the operating system.
If the check box is selected, you must enter the account credentials for accessingencrypted hard drives and then automatically logging in to the operating system.
If the check box is cleared, to access encrypted hard drives and subsequently log into theoperating system you must separately enter the credentials for accessing encrypted harddrives and the operating system user account credentials.
. Help text that appears in the Authentication Agent window whenentering account credentials.
. Help text that appears in the Authentication Agent window whenchanging the password for the Authentication Agent account.
. Help text that appears in the Authentication Agent window whenrecovering the password for the Authentication Agent account.
BitLocker Drive Encryption component settings
Parameter Description
. If this item is selected, the application encrypts all hard driveswhen the policy is applied.
If the computer has several operating systems installed, after encryption you willbe able to load only the operating system that has the application installed.
. If this item is selected, the application decrypts all previouslyencrypted hard drives when the policy is applied.
. If this item is selected, the application leaves drives in their previousstate when the policy is applied. If the drive was encrypted, it remains encrypted. If thedrive was decrypted, it remains decrypted. This item is selected by default.
This check box enables / disables the use of authentication requiring data input in apreboot environment, even if the platform does not have the capability for prebootinput (for example, with touchscreen keyboards on tablets).
The touchscreen of tablet computers is not available in the preboot environment.To complete BitLocker authentication on tablet computers, the user must connecta USB keyboard, for example.
If the check box is selected, use of authentication requiring preboot input is allowed. Itis recommended to use this setting only for devices that have alternative data inputtools in a preboot environment, such as a USB keyboard in addition to touchscreenkeyboards.
If the check box is cleared, BitLocker Drive Encryption is not possible on tablets.
If the check box is selected, the application applies hardware encryption. This lets youincrease the speed of encryption and use less computer resources.
This check box enables / disables the option that limits the encryption area to onlyoccupied hard drive sectors. This limit lets you reduce encryption time.
Passwordsettings
Help texts Authentication
Change password
Recover password
Encryption mode Encrypt all hard drives
Decrypt all hard drives
Leave unchanged
Enable use ofBitLockerauthenticationrequiringprebootkeyboard inputon slates
Use hardwareencryption
Encrypt useddisk space only(Windows 8 andlater versions)

557
Enabling or disabling the feature after starting encryption does not modify this setting until the hard
drives are decrypted. You must select or clear the check box before startingencryption.
If the check box is selected, only portions of the hard drive that are occupied by �lesare encrypted. Kaspersky Endpoint Security automatically encrypts new data as it isadded.
If the check box is cleared, the entire hard drive is encrypted, including residualfragments of previously deleted and modi�ed �les.
This option is recommended for new hard drives whose data has not beenmodi�ed or deleted. If you are applying encryption on a hard drive that is already inuse, it is recommended to encrypt the entire hard drive. This ensures protection ofall data, even deleted data that is potentially recoverable.
This check box is cleared by default.
If this option is selected, Kaspersky Endpoint Security prompts the user for a passwordwhen the user attempts to access an encrypted drive.
This option can be selected when a Trusted Platform Module (TPM) is not being used.
If this option is selected, BitLocker uses a Trusted Platform Module (TPM).
A Trusted Platform Module (TPM) is a microchip developed to provide basic functionsrelated to security (for example, to store encryption keys). A Trusted Platform Moduleis usually installed on the computer motherboard and interacts with all other systemcomponents via the hardware bus.
For computers running Windows 7 or Windows Server 2008 R2, only encryptionusing a TPM module is available. If a TPM module is not installed, BitLockerencryption is not possible. Use of a password on these computers is notsupported.
A device equipped with a Trusted Platform Module can create encryption keys that canbe decrypted only with the device. A Trusted Platform Module encrypts encryptionkeys with its own root storage key. The root storage key is stored within the TrustedPlatform Module. This provides an additional level of protection against attempts tohack encryption keys.
This action is selected by default.
You can set an additional layer of protection for access to the encryption key, andencrypt the key with a password or a PIN:
. If this check box is selected, a user can use of a PIN code toobtain access to an encryption key that is stored in a Trusted Platform Module(TPM).If this check box is cleared, users are prohibited from using PIN codes. To access theencryption key, a user must enter the password.You can allow the user to use enhanced PIN. Enhanced PIN allows using othercharacters in addition to numerical characters: uppercase and lowercase Latinletters, special characters, and spaces.
Encrypt used disk space only (reduces encryptiontime)
Authenticationsettings
Use password (Windows 8 and later versions)
Use Trusted Platform Module (TPM)
Use PIN for TPM

558
. If thecheck box is selected, the user can use a password to obtain access to encryptionkeys when a Trusted Platform Module (TPM) is not available.
If the check box is cleared and the TPM is not available, full disk encryption will notstart.
This component is available if Kaspersky Endpoint Security is installed on a computer that runs on Windowsfor workstations. This component is unavailable if Kaspersky Endpoint Security is installed on a computer thatruns on Windows for servers.
Use Trusted Platform Module (TPM); if it is unavailable - use password
File Level Encryption
You can compile lists of �les by extension or group of extensions and lists of folders stored on local computerdrives, and create rules for encrypting �les that are created by speci�c applications. After a policy is applied,Kaspersky Endpoint Security encrypts and decrypts the following �les:
�les individually added to lists for encryption and decryption;
�les stored in folders added to lists for encryption and decryption;
�les created by separate applications.
File encryption has the following special features:
Kaspersky Endpoint Security encrypts / decrypts �les in prede�ned folders only for local user pro�les of theoperating system. Kaspersky Endpoint Security does not encrypt or decrypt �les in prede�ned folders ofroaming user pro�les, mandatory user pro�les, temporary user pro�les, or redirected folders.
Kaspersky Endpoint Security does not encrypt �les whose modi�cation could harm the operating system andinstalled applications. For example, the following �les and folders with all nested folders are on the list ofencryption exclusions:
The list of encryption exclusions cannot be viewed or edited. While �les and folders on the list of encryptionexclusions can be added to the encryption list, they will not be encrypted during �le encryption.
File Level Encryption component settings
Parameter Description
. If this item is selected, Kaspersky Endpoint Security leaves the �lesand folders unchanged without encrypting or decrypting them.
. If this item is selected, Kaspersky Endpoint Securityencrypts the �les and folders according to encryption rules, decrypts the �les andfolders according to decryption rules, and regulates the access of applications toencrypted �les according to application rules.
%WINDIR%;
%PROGRAMFILES% and %PROGRAMFILES(X86)%;
Windows registry �les.
Manageencryption
Leave unchanged
Encrypt according to rules

559
This component is available if Kaspersky Endpoint Security is installed on a computer that runs on Windowsfor workstations. This component is unavailable if Kaspersky Endpoint Security is installed on a computer thatruns on Windows for servers.
. If this item is selected, Kaspersky Endpoint Security decrypts all encrypted�les and folders.
This tab shows encryption rules for �les stored on local drives. You can add �les asfollows:
. Kaspersky Endpoint Security allows you to add the followingareas:
. Files in the standard Documents folder of the operating system, and itssubfolders.
. Files in the standard Favorites folder of the operating system, and itssubfolders.
. Files in the standard Desktop folder of the operating system, and itssubfolders.
. Temporary �les related to the operation of applications installed onthe computer. For example, Microsoft O�ice applications create temporary �lescontaining backup copies of documents.
. Files related to the operation of the Outlook mail client: data �les (PST),o�line data �les (OST), o�line address book �les (OAB), and personal address book�les (PAB).
. You can type the path to the folder. When adding a folder path, adhere to thefollowing rules:Use an environment variable (for example, %FOLDER%\UserFolder\ ). You can use anenvironment variable only once and only at the beginning of the path.Do not use relative paths. You can use the set \..\ (e.g.C:\Users\..\UserFolder\ ). The set \..\ denotes the transition to the parentfolder.Do not use the * and ? characters.Do not use UNC paths.Use ; or , as a separator character.
. You can select extension groups from the list, such as theextension group Archives. You can also manually add the �le extension.
This tab shows decryption rules for �les stored on local drives.
The tab displays a table containing encrypted �le access rules for applications andencryption rules for �les that are created or modi�ed by individual applications.
Password strength requirements to meet when creating encrypted packages.
Decrypt all
Encryptionrules
Prede�ned folders
Documents
Favorites
Desktop
Temporary �les
Outlook �les
Folders
Files by extension
Decryptionrules
Rules forapplications
Encryptedpackagepasswordsettings
Encryption of removable drives

560
Kaspersky Endpoint Security supports encryption of �les in FAT32 and NTFS �le systems. If a removable drivewith an unsupported �le system is connected to the computer, the encryption task for this removable driveends with an error and Kaspersky Endpoint Security assigns the read-only status to the removable drive.
Accessing encrypted data
1. Checks for a master key in the local storage on the user's computer.
If the master key is found, the user gains access to the data on the removable drive.
If the master key is not found, Kaspersky Endpoint Security performs the following actions:
a. Sends a request to Kaspersky Security Center.
After receiving the request, Kaspersky Security Center sends a response that contains the master key.
b. Kaspersky Endpoint Security saves the master key in the local storage on the user's computer forsubsequent operations with the encrypted removable drive.
To protect data on removable drives, you can use the following types of encryption:
Full Disk Encryption (FDE).
Encryption of the entire removable drive, including the �le system.
It is not possible to access encrypted data outside the corporate network. It is also impossible to accessencrypted data inside the corporate network if the computer is not connected to Kaspersky SecurityCenter (e.g. on a guest computer).
File Level Encryption (FLE).
Encryption of only �les on a removable drive. The �le system remains unchanged.
Encryption of �les on removable drives provides the capability to access data outside the corporatenetwork using a special mode called portable mode.
During encryption, Kaspersky Endpoint Security creates a master key. Kaspersky Endpoint Security saves themaster key in the following repositories:
Kaspersky Security Center.
User's computer.
The master key is encrypted with the user's secret key.
Removable drive.
The master key is encrypted with the public key of Kaspersky Security Center.
After encryption is complete, the data on the removable drive can be accessed within the corporate network as ifwas on an ordinary unencrypted removable drive.
When a removable drive with encrypted data is connected, Kaspersky Endpoint Security performs the followingactions:

561
2. Decrypts the data.
Special features of removable drive encryption
Encryption of removable drives has the following special features:
The policy with preset settings for removable drive encryption is formed for a speci�c group of managedcomputers. Therefore, the result of applying the Kaspersky Security Center policy con�gured forencryption / decryption of removable drives depends on the computer to which the removable drive isconnected.
Kaspersky Endpoint Security does not encrypt / decrypt read-only �les that are stored on removable drives.
The following device types are supported as removable drives:
Encryption of removable drives component settings
Parameter Description
. If this item is selected, when applying the policy with thespeci�ed encryption settings for removable drives, Kaspersky Endpoint Security encryptsremovable drives sector by sector, including their �le systems.
. If this item is selected, when applying the policy with the speci�edencryption settings for removable drives, Kaspersky Endpoint Security encrypts all �lesthat are stored on removable drives. Kaspersky Endpoint Security does not re-encrypt�les that are already encrypted. The contents of the �le system of a removable drive,including the folder structure and names of encrypted �les, are not encrypted and remainaccessible.
. If this item is selected, when applying the policy with the speci�edencryption settings for removable drives, Kaspersky Endpoint Security encrypts onlythose �les that were added or modi�ed on removable drives after the Kaspersky SecurityCenter policy was last applied. This encryption mode is convenient when a removable driveis used for both personal and work purposes. This encryption mode lets you leave all old�les unchanged and encrypt only those �les that the user creates on a work computerthat has Kaspersky Endpoint Security installed and encryption functionality enabled. As aresult, access to personal �les is always available, regardless of whether or not KasperskyEndpoint Security is installed on the computer with encryption functionality enabled.
. If this item is selected, when applying the policy with thespeci�ed encryption settings for removable drives, Kaspersky Endpoint Security decryptsall encrypted �les stored on removable drives as well as the �le systems of the removabledrives if they were previously encrypted.
. If this item is selected, the application leaves drives in their previousstate when the policy is applied. If the drive was encrypted, it remains encrypted. If thedrive was decrypted, it remains decrypted. This item is selected by default.
This check box enables / disables the preparation of a removable drive that makes itpossible to access �les stored on this removable drive on computers outside of thecorporate network.
Data media connected via the USB bus
hard drives connected via USB and FireWire buses
SSD drives connected via USB and FireWire buses
Manageencryption
Encrypt entire removable drive
Encrypt all �les
Encrypt new �les only
Decrypt entire removable drive
Leave unchanged
Portablemode

562
If this check box is selected, Kaspersky Endpoint Security prompts the user to specify apassword before encrypting �les on a removable drive upon the application of the policy.The password is needed to access �les encrypted on a removable drive on computersoutside of the corporate network. You can con�gure the password strength.
Portable mode is available for the or modes.
If the check box is selected, only portions of the drive that are occupied by �les areencrypted. Kaspersky Endpoint Security automatically encrypts new data as it is added.
If the check box is cleared, the entire drive is encrypted, including residual fragments ofpreviously deleted and modi�ed �les.
The ability to encrypt only occupied space is available only for the mode.
After encryption started, enabling / disabling the function will not change this setting. You must select or clear the check box beforestarting encryption.
This table contains devices for which custom encryption rules are de�ned. You can createencryption rules for individual removable drives in the following ways:
If this check box is selected, Kaspersky Endpoint Security encrypts removable drives evenwhen there is no connection to Kaspersky Security Center. In this case, the data requiredfor decrypting removable drives is stored on the hard drive of the computer to which theremovable drive is connected, and is not transmitted to Kaspersky Security Center.
If the check box is cleared, Kaspersky Endpoint Security does not encrypt removabledrives without a connection to Kaspersky Security Center.
Password strength settings for the Portable File Manager.
Encrypt all �les Encrypt new �les only
Encryptused diskspace only
This check box enables / disables the encryption mode in which only occupied disk sectorsare encrypted. This mode is recommended for new drives whose data has not beenmodi�ed or deleted.
Encrypt entireremovable drive
Encrypt used disk space only
Encryptionrules forselecteddevices Add a removable drive from the list of trusted devices for Device Control.
Manually add a removable drive:
By device ID (Hardware ID, or HWID)
By device model: vendor ID (VID) and product ID (PID)
Allowremovabledriveencryptionin o�linemode
Portablemodepasswordsettings
Templates (data encryption)

563
Requesting access to encrypted data
Scan exclusions
After data encryption, Kaspersky Endpoint Security may restrict access to data, for example, due to a change inthe organization's infrastructure and a change in the Kaspersky Security Center Administration Server. If a userdoes not have access to encrypted data, the user can ask the administrator for access to the data. In other words,the user needs to send a request access �le to the administrator. The user then needs to upload the response �lereceived from the administrator to Kaspersky Endpoint Security. Kaspersky Endpoint Security allows you torequest access to data from the administrator via email (see the �gure below).
A template is provided for reporting a lack of access to encrypted data. For user convenience, you can �ll out thefollowing �elds:
. Enter the email address of the administrator group with rights to the data encryption features.
. Enter the subject of the email with your request for access to encrypted �les. You can, for example,add tags to �lter messages.
. If necessary, change the contents of the message. You can use variables to get the necessary data(for example, %USER_NAME% variable).
To
Subject
Message
Exclusions
A trusted zone is a system administrator-con�gured list of objects and applications that Kaspersky EndpointSecurity does not monitor when active.
The administrator forms the trusted zone independently, taking into account the features of the objects that arehandled and the applications that are installed on the computer. It may be necessary to include objects andapplications in the trusted zone when Kaspersky Endpoint Security blocks access to a certain object orapplication, if you are sure that the object or application is harmless. An administrator can also allow a user tocreate their own local trusted zone for a speci�c computer. This way, users can create their own local lists ofexclusions and trusted applications in addition to the general trusted zone in a policy.
A scan exclusion is a set of conditions that must be ful�lled so that Kaspersky Endpoint Security will not scan aparticular object for viruses and other threats.
564
List of trusted applications
Scan exclusions make it possible to safely use legitimate software that can be exploited by criminals to damage thecomputer or user data. Although they do not have any malicious functions, such applications can be exploited byintruders. For details on legitimate software that could be used by criminals to harm the computer or personal dataof a user, please visit the website of the Kaspersky IT Encyclopedia .
Such applications may be blocked by Kaspersky Endpoint Security. To prevent them from being blocked, you cancon�gure scan exclusions for the applications in use. To do so, add the name or name mask that is listed in theKaspersky IT Encyclopedia to the trusted zone. For example, you often use the Radmin application for remoteadministration of computers. Kaspersky Endpoint Security regards this activity as suspicious and may block it. Toprevent the application from being blocked, create a scan exclusion with the name or name mask that is listed inthe Kaspersky IT Encyclopedia.
If an application that collects information and sends it to be processed is installed on your computer, KasperskyEndpoint Security may classify this application as malware. To avoid this, you can exclude the application fromscanning by con�guring Kaspersky Endpoint Security as described in this document.
Scan exclusions can be used by the following application components and tasks that are con�gured by the systemadministrator:
Behavior Detection.
Exploit Prevention.
Host Intrusion Prevention.
File Threat Protection.
Web Threat Protection.
Mail Threat Protection.
Scan tasks.
The list of trusted applications is a list of applications whose �le and network activity (including malicious activity)and access to the system registry are not monitored by Kaspersky Endpoint Security. By default, KasperskyEndpoint Security scans objects that are opened, executed, or saved by any application process and controls theactivity of all applications and network tra�ic that is generated by them. However, an application that has beenadded to the list of trusted applications is excluded from scans by Kaspersky Endpoint Security.
For example, if you consider objects that are used by the standard Microsoft Windows Notepad application to besafe without scanning, meaning that you trust this application, you can add Microsoft Windows Notepad to the listof trusted applications. Scanning then skips objects that are used by this application.
In addition, certain actions that are classi�ed by Kaspersky Endpoint Security as suspicious may be safe within thecontext of the functionality of a number of applications. For example, the interception of text that is typed fromthe keyboard is a routine process for automatic keyboard layout switchers (such as Punto Switcher). To takeaccount of the speci�cs of such applications and exclude their activity from monitoring, we recommend that youadd such applications to the trusted applications list.
Excluding trusted applications from scanning allows avoiding compatibility con�icts between Kaspersky EndpointSecurity and other programs (for example, the problem of double-scanning of the network tra�ic of a third-partycomputer by Kaspersky Endpoint Security and by another anti-virus application), and also increases thecomputer's performance, which is critical when using server applications.

565
Settings of exclusions
Parameter Description
At the same time, the executable �le and process of the trusted application are still scanned for viruses and othermalware. An application can be fully excluded from Kaspersky Endpoint Security scanning by means of scanexclusions.
Types ofdetectedobjects
Regardless of the con�gured application settings, Kaspersky Endpoint Security alwaysdetects and blocks viruses, worms, and Trojans. They can cause signi�cant harm to thecomputer.
Viruses and worms

566
Ways in which worms spread
Type Name Description
Email-Worm
They spread via email.
An infected email message contains an attached �le witha copy of a worm, or a link to a �le that is uploaded to awebsite which may have been hacked or createdexclusively for that purpose. When you open the attached�le, the worm is activated. When you click the link,download, and then open the �le, the worm also startsperforming its malicious actions. After that, it goes onspreading copies of itself, searching for other emailaddresses and sending infected messages to them.
IMclients
They spread through IM clients.
: viruses and worms (Viruses_and_Worms)Subcategory
: highThreat level
Classic viruses and worms perform actions that are not authorized by the user. Theycan create copies of themselves which are able to self-replicate.
Classic virus
When a classic virus in�ltrates a computer, it infects a �le, activates, performsmalicious actions, and adds copies of itself to other �les.
A classic virus multiplies only on local resources of the computer; it cannot penetrateother computers on its own. It can be passed to another computer only if it adds acopy of itself to a �le that is stored in a shared folder or on an inserted CD, or if theuser forwards an email message with an attached infected �le.
Classic virus code can penetrate various areas of computers, operating systems, andapplications. Depending on the environment, viruses are divided into �le viruses, bootviruses, script viruses, and macro viruses.
Viruses can infect �les by using a variety of techniques. Overwriting viruses writetheir code over the code of the �le that is infected, thus erasing the �le's content.The infected �le stops functioning and cannot be restored. Parasitic viruses modify�les, leaving them fully or partially functional. Companion viruses do not modify �les,but instead create duplicates. When an infected �le is opened, a duplicate of it (whatis actually a virus) is started. The following types of viruses are also encountered: linkviruses, OBJ viruses, LIB viruses, source code viruses, and many others.
Worm
As with a classic virus, the code of a worm is activated and performs maliciousactions after it in�ltrates a computer. Worms are so named because of their abilityto "crawl" from one computer to another and to spread copies via numerous datachannels without the user's permission.
The main feature that allows di�erentiating between various types of worms is theway they spread. The following table provides an overview of various types of worms,which are classi�ed by the way in which they spread.
Email-Worm
IM-Worm

567
Usually, such worms send messages that contain a link to a�le with a copy of the worm on a website, making use ofthe user's contact lists. When the user downloads andopens the �le, the worm activates.
Internetchatworms
They spread via Internet Relay Chats, service systemswhich allow communicating with other people over theInternet in real time.
These worms publish a �le with a copy of themselves or alink to the �le in an Internet chat. When the userdownloads and opens the �le, the worm activates.
Networkworms
These worms spread over computer networks.
Unlike other types of worms, a typical network wormspreads without the user's participation. It scans the localnetwork for computers that contain programs withvulnerabilities. To do this, it sends a specially formednetwork packet (exploit) which contains the worm code ora part of it. If a "vulnerable" computer is on the network, itreceives such a network packet. When the wormcompletely penetrates the computer, it activates.
Filesharingnetworkworms
They spread over peer-to-peer �le sharing networks.
To in�ltrate a P2P network, the worm copies itself into a�le sharing folder which is usually located on the user'scomputer. The P2P network displays information aboutthis �le so that the user may "�nd" the infected �le on thenetwork like any other �le, and then download and open it.
More sophisticated worms emulate the network protocolof a speci�c P2P network: they return positive responsesto search queries and o�er copies of themselves fordownload.
Othertypes ofworms
Other types of worms include:
IRC-Worm
Net-Worm
P2P-Worm
Worm
Worms that spread copies of themselves over networkresources. By using the functions of the operatingsystem, they scan available network folders, connectto computers on the Internet, and attempt to obtainfull access to their disk drives. Unlike the previouslydescribed types of worms, other types of wormsactivate not on their own, but when the user opens a�le that contains a copy of the worm.
Worms that do not use any of the methods describedin the previous table to spread (for example, those thatspread over cell phones).
Trojans

568
Types of Trojan behavior on an infected computer
Type Name Description
Trojans –"archivebombs"
When unpacked, these archives grow in size tosuch an extent that the computer's operationis impacted.
When the user attempts to unpack such anarchive, the computer may slow down orfreeze; the hard disk may become �lled with"empty" data. "Archive bombs" are especiallydangerous to �le and mail servers. If the serveruses an automatic system to processincoming information, an "archive bomb" mayhalt the server.
Trojans forremoteadministration
They are considered the most dangerous typeof Trojan. In their functions, they are similar toremote administration applications that areinstalled on computers.
These programs install themselves on thecomputer without being noticed by the user,allowing the intruder to manage the computerremotely.
Trojans They include the following maliciousapplications:
: TrojansSubcategory
: highThreat level
Unlike worms and viruses, Trojans do not self-replicate. For example, they penetrate acomputer via email or a browser when the user visits an infected web page. Trojansare started with the user's participation. They begin performing their maliciousactions right after they are started.
Di�erent Trojans behave di�erently on infected computers. The main functions ofTrojans consist in blocking, modifying, or destroying information, and disablingcomputers or networks. Trojans can also receive or send �les, run them, displaymessages on the screen, request web pages, download and install programs, andrestart the computer.
Hackers often use "sets" of various Trojans.
Types of Trojan behavior are described in the following table.
Trojan-ArcBomb
Backdoor
Trojan
. These programs performonly the main functions of Trojans: blocking,modifying or destroying information, anddisabling computers or networks. They donot have any advanced features, unlike theother types of Trojans that are described inthe table.
. These programs haveadvanced features typical of several typesof Trojans.
Classic Trojans
Versatile Trojans

569
RansomTrojans
They take the user's information "hostage",modifying or blocking it, or impact thecomputer's operation so that the user losesthe ability to use information. The intruderdemands a ransom from the user, promising tosend an application to restore the computer'sperformance and the data that had beenstored on it.
Trojan clickers They access web pages from the user'scomputer, either by sending commands to abrowser on their own or by changing the webaddresses that are speci�ed in operatingsystem �les.
By using these programs, intruders perpetratenetwork attacks and increase website visits,increasing the number of displays of bannerads.
Trojandownloaders
They access the intruder's web page,download other malicious applications from it,and install them on the user's computer. Theycan contain the �le name of the maliciousapplication to download, or receive it from theweb page that is accessed.
Trojandroppers
They contain other Trojans which they installon the hard drive and then install.
Intruders may use Trojan Dropper–typeprograms for the following goals:
Trojannoti�ers
They inform an intruder that the infectedcomputer is accessible, sending the intruderinformation about the computer: IP address,number of opened port, or email address. Theyconnect with the intruder via email, FTP,accessing the intruder's web page, or inanother way.
Trojan Noti�er–type programs are often usedin sets that are made of several Trojans. Theynotify the intruder that other Trojans havebeen successfully installed on the user'scomputer.
Trojan proxies They allow the intruder to anonymouslyaccess web pages by using the user's
Trojan-Ransom
Trojan-Clicker
Trojan-Downloader
Trojan-Dropper
Install a malicious application without beingnoticed by the user: Trojan Dropper–typeprograms display no messages, or displayfake messages which inform, for example,of an error in an archive or an incompatibleversion of the operating system.
Protect another known maliciousapplication from detection: not all anti-virus software can detect a maliciousapplication within a Trojan Dropper–typeapplication.
Trojan-Noti�er
Trojan-Proxy

570
computer; they are often used for sendingspam.
Password-stealing-ware
Password-stealing-ware is a kind of Trojan thatsteals user accounts, such as softwareregistration data. These Trojans �ndcon�dential data in system �les and in theregistry and send it to the "master" by email,via FTP, by accessing the intruder's web page,or in another way.
Some of these Trojans are categorized intoseparate types that are described in this table.These are Trojans that steal bank accounts(Trojan-Banker), steal data from users of IMclients (Trojan-IM), and steal information fromusers of online games (Trojan-GameThief).
Trojan spies They spy on the user, collecting informationabout the actions that the user makes whileworking at the computer. They may interceptthe data that the user enters at the keyboard,take screenshots, or collect lists of activeapplications. After they receive theinformation, they transfer it to the intruder byemail, via FTP, by accessing the intruder's webpage, or in another way.
Trojannetworkattackers
They send numerous requests from the user'scomputer to a remote server. The server lacksresources to process all requests, so it stopsfunctioning (Denial of Service, or simply DoS).Hackers often infect many computers withthese programs so that they can use thecomputers to attack a single serversimultaneously.
DoS programs perpetrate an attack from asingle computer with the user's knowledge.DDoS (Distributed DoS) programs perpetratedistributed attacks from several computerswithout being noticed by the user of theinfected computer.
Trojans thatstealinformationfrom users ofIM clients
They steal account numbers and passwords ofIM client users. They transfer the data to theintruder by email, via FTP, by accessing theintruder's web page, or in another way.
Rootkits They mask other malicious applications andtheir activity, thus prolonging the applications'persistence in the operating system. They canalso conceal �les, processes in an infectedcomputer's memory, or registry keys which runmalicious applications. The rootkits can maskdata exchange between applications on theuser's computer and other computers on thenetwork.
Trojans in theform of SMSmessages
They infect cell phones, sending SMSmessages to premium-rate phone numbers.
Trojan-PSW
Trojan-Spy
Trojan-DDoS
Trojan-IM
Rootkit
Trojan-SMS

571
Trojans thatstealinformationfrom users ofonline games
They steal account credentials from users ofonline games, after which they send the datato the intruder by email, via FTP, by accessingthe intruder's web page, or in another way.
Trojans thatsteal bankaccounts
They steal bank account data or e-moneysystem data; send the data to the hacker byemail, via FTP, by accessing the hacker's webpage, or by using another method.
Trojans thatcollect emailaddresses
They collect email addresses that stored on acomputer and send them to the intruder byemail, via FTP, by accessing the intruder's webpage, or in another way. Intruders may sendspam to the addresses they have collected.
Trojan-GameThief
Trojan-Banker
Trojan-Mail�nder
Malicious tools

572
Features of malicious tools
Type Name Description
Constructors They allow creating new viruses, worms, andTrojans. Some constructors boast astandard window-based interface in whichthe user can select the type of maliciousapplication to create, the way ofcounteracting debuggers, and otherfeatures.
Networkattacks
They send numerous requests from theuser's computer to a remote server. Theserver lacks resources to process allrequests, so it stops functioning (Denial ofService, or simply DoS).
Exploits An exploit is a set of data or a program codethat uses vulnerabilities of the application inwhich it is processed, performing a maliciousaction on a computer. For example, anexploit can write or read �les, or request"infected" web pages.
Di�erent exploits use vulnerabilities indi�erent applications or network services.Disguised as a network packet, an exploit istransmitted over the network to numerouscomputers, searching for computers withvulnerable network services. An exploit in aDOC �le uses the vulnerabilities of a texteditor. It may start performing the actionsthat are preprogrammed by the hacker whenthe user opens the infected �le. An exploitthat is embedded in an email messagesearches for vulnerabilities in any emailclient. It may start performing a maliciousaction as soon as the user opens theinfected message in this email client.
Net-Worms spread over networks by usingexploits. Nuker exploits are network packetsthat disable computers.
Encryptors They encrypt other malicious applications toconceal them from the anti-virusapplication.
: Malicious toolsSubcategory
: mediumDanger level
Unlike other types of malware, malicious tools do not perform their actions right afterthey are started. They can be safely stored and started on the user's computer.Intruders often use the features of these programs to create viruses, worms, andTrojans, perpetrate network attacks on remote servers, hack computers, or performother malicious actions.
Various features of malicious tools are grouped by the types that are described inthe following table.
Constructor
Dos
Exploit
FileCryptor

573
Programs for"contaminating"networks
They send numerous messages overnetwork channels. This type of toolsincludes, for example, programs thatcontaminate Internet Relay Chats.
Flooder-type tools do not include programsthat "contaminate" channels that are used byemail, IM clients, and mobile communicationsystems. These programs are distinguishedas separate types that are described in thetable (Email-Flooder, IM-Flooder, and SMS-Flooder).
Hacking tools They make it possible to hack the computeron which they are installed or attack anothercomputer (for example, by adding newsystem accounts without the user'spermission or by erasing system logs toconceal traces of their presence in theoperating system). This type of toolsincludes some sni�ers which featuremalicious functions, such as passwordinterception. Sni�ers are programs thatallow viewing network tra�ic.
Hoaxes They alarm the user with virus-like messages:they may "detect a virus" in an uninfected �leor notify the user that the disk has beenformatted, although this has not happenedin reality.
Spoo�ng tools They send messages and network requestswith a fake address of the sender. Intrudersuse Spoofer-type tools to pass themselveso� as the true senders of messages, forexample.
Tools thatmodifymaliciousapplications
They allow modifying other malwareprograms, concealing them from anti-virusapplications.
Programs that"contaminate"emailaddresses
They send numerous messages to variousemail addresses, thus "contaminating" them.A large volume of incoming messagesprevents users from viewing usefulmessages in their inboxes.
Programs that"contaminate"tra�ic of IMclients
They �ood users of IM clients withmessages. A large volume of messagesprevents users from viewing useful incomingmessages.
Programs that"contaminate"tra�ic withSMS messages
They send numerous SMS messages to cellphones.
Flooder
HackTool
Hoax
Spoofer
VirTool
Email-Flooder
IM-Flooder
SMS-Flooder
Adware

574
: advertising software (Adware);Subcategory
: mediumThreat level
Adware displays advertising information to the user. Adware programs display bannerads in the interfaces of other programs and redirect search queries to advertisingweb pages. Some of them collect marketing information about the user and send itto the developer: this information may include the names of the websites that arevisited by the user or the content of the user's search queries. Unlike Trojan-Spy–type programs, adware sends this information to the developer with the user'spermission.
Auto-dialers

575
Type Name Description
Internet chatclients
Users install these programs to talk topeople in Internet Relay Chats. Intruders usethem to spread malware.
Auto-dialers They can establish phone connections overa modem in hidden mode.
Programs fordownloading
They can download �les from web pages inhidden mode.
Programs formonitoring
They allow monitoring activity on thecomputer on which they are installed (seeingwhich applications are active and how theyexchange data with applications that areinstalled on other computers).
Passwordrestorers
They allow viewing and restoring forgottenpasswords. Intruders secretly implant themon users' computers with the same purpose.
Remoteadministrationprograms
They are widely used by systemadministrators. These programs allowobtaining access to the interface of aremote computer to monitor and manage it.Intruders secretly implant them on users'computers with the same purpose: tomonitor and manage remote computers.
Legal remote administration programs di�erfrom Backdoor-type Trojans for remoteadministration. Trojans have the ability topenetrate the operating systemindependently and install themselves; legalprograms are unable to do so.
FTP servers They function as FTP servers. Intrudersimplant them on the user's computer toopen remote access to it via FTP.
Proxy servers They function as proxy servers. Intrudersimplant them on the user's computer tosend spam under the user's name.
Telnet servers They function as Telnet servers. Intrudersimplant them on the user's computer to
: legal software that may be used by criminals to damage yourcomputer or personal data.Subcategory
: mediumDanger level
Most of these applications are useful, so many users run them. These applicationsinclude IRC clients, auto-dialers, �le download programs, computer system activitymonitors, password utilities, and Internet servers for FTP, HTTP, and Telnet.
However, if intruders gain access to these programs, or if they plant them on theuser's computer, some of the application's features may be used to violate security.
These applications di�er by function; their types are described in the following table.
Client-IRC
Dialer
Downloader
Monitor
PSWTool
RemoteAdmin
Server-FTP
Server-Proxy
Server-Telnet

576
open remote access to it via Telnet.
Web servers They function as web servers. Intrudersimplant them on the user's computer toopen remote access to it via HTTP.
Tools forworking at alocalcomputer
They provide the user with additionaloptions when working at the user's owncomputer. The tools allow the user to hide�les or windows of active applications andterminate active processes.
Network tools They provide the user with additionaloptions when working with other computerson the network. These tools allow restartingthem, detecting open ports, and startingapplications that are installed on thecomputers.
P2P networkclients
They allow working on peer-to-peernetworks. They can be used by intruders forspreading malware.
SMTP clients They send email messages without theuser's knowledge. Intruders implant them onthe user's computer to send spam under theuser's name.
Web toolbars They add toolbars to the interfaces of otherapplications to use search engines.
Pseudo-programs
They pass themselves o� as otherprograms. For example, there are pseudo-anti-virus programs which display messagesabout malware detection. However, in reality,they do not �nd or disinfect anything.
Server-Web
RiskTool
NetTool
Client-P2P
Client-SMTP
WebToolbar
FraudTool
Detect other software that can be used by criminals to damage your computer orpersonal data

577
Type Name Description
Internet chatclients
Users install these programs to talk topeople in Internet Relay Chats. Intruders usethem to spread malware.
Auto-dialers They can establish phone connections overa modem in hidden mode.
Programs fordownloading
They can download �les from web pages inhidden mode.
Programs formonitoring
They allow monitoring activity on thecomputer on which they are installed (seeingwhich applications are active and how theyexchange data with applications that areinstalled on other computers).
Passwordrestorers
They allow viewing and restoring forgottenpasswords. Intruders secretly implant themon users' computers with the same purpose.
Remoteadministrationprograms
They are widely used by systemadministrators. These programs allowobtaining access to the interface of aremote computer to monitor and manage it.Intruders secretly implant them on users'computers with the same purpose: tomonitor and manage remote computers.
Legal remote administration programs di�erfrom Backdoor-type Trojans for remoteadministration. Trojans have the ability topenetrate the operating systemindependently and install themselves; legalprograms are unable to do so.
FTP servers They function as FTP servers. Intrudersimplant them on the user's computer toopen remote access to it via FTP.
Proxy servers They function as proxy servers. Intrudersimplant them on the user's computer tosend spam under the user's name.
Telnet servers They function as Telnet servers. Intrudersimplant them on the user's computer to
: legal software that may be used by criminals to damage yourcomputer or personal data.Subcategory
: mediumDanger level
Most of these applications are useful, so many users run them. These applicationsinclude IRC clients, auto-dialers, �le download programs, computer system activitymonitors, password utilities, and Internet servers for FTP, HTTP, and Telnet.
However, if intruders gain access to these programs, or if they plant them on theuser's computer, some of the application's features may be used to violate security.
These applications di�er by function; their types are described in the following table.
Client-IRC
Dialer
Downloader
Monitor
PSWTool
RemoteAdmin
Server-FTP
Server-Proxy
Server-Telnet

578
open remote access to it via Telnet.
Web servers They function as web servers. Intrudersimplant them on the user's computer toopen remote access to it via HTTP.
Tools forworking at alocalcomputer
They provide the user with additionaloptions when working at the user's owncomputer. The tools allow the user to hide�les or windows of active applications andterminate active processes.
Network tools They provide the user with additionaloptions when working with other computerson the network. These tools allow restartingthem, detecting open ports, and startingapplications that are installed on thecomputers.
P2P networkclients
They allow working on peer-to-peernetworks. They can be used by intruders forspreading malware.
SMTP clients They send email messages without theuser's knowledge. Intruders implant them onthe user's computer to send spam under theuser's name.
Web toolbars They add toolbars to the interfaces of otherapplications to use search engines.
Pseudo-programs
They pass themselves o� as otherprograms. For example, there are pseudo-anti-virus programs which display messagesabout malware detection. However, in reality,they do not �nd or disinfect anything.
Server-Web
RiskTool
NetTool
Client-P2P
Client-SMTP
WebToolbar
FraudTool
Packed objects whose packing may be used to protect malicious code

579
This table contains information about scan exclusions.
Kaspersky Endpoint Security scans compressed objects and the unpacker modulewithin SFX (self-extracting) archives.
To hide dangerous programs from anti-virus applications, intruders archive them byusing special packers or create multi-packed �les.
Kaspersky virus analysts have identi�ed packers that are the most popular amongsthackers.
If Kaspersky Endpoint Security detects such a packer in a �le, the �le most likelycontains a malicious application or an application that can be used by criminals tocause harm to your computer or personal data.
Kaspersky Endpoint Security singles out the following types of programs:
Packed �les that may cause harm – used for packing malware, such as viruses,worms, and Trojans.
Multi-packed �les (medium threat level) – the object has been packed three timesby one or more packers.
Multi-packed �les
Kaspersky Endpoint Security scans compressed objects and the unpacker modulewithin SFX (self-extracting) archives.
To hide dangerous programs from anti-virus applications, intruders archive them byusing special packers or create multi-packed �les.
Kaspersky virus analysts have identi�ed packers that are the most popular amongsthackers.
If Kaspersky Endpoint Security detects such a packer in a �le, the �le most likelycontains a malicious application or an application that can be used by criminals tocause harm to your computer or personal data.
Kaspersky Endpoint Security singles out the following types of programs:
Packed �les that may cause harm – used for packing malware, such as viruses,worms, and Trojans.
Multi-packed �les (medium threat level) – the object has been packed three timesby one or more packers.
Exclusions
You can exclude objects from scans by using the following methods:
Specify the path to the �le or folder.
Enter the object hash.
Use masks:

580
This table lists trusted applications whose activity is not monitored by Kaspersky EndpointSecurity during its operation.
The Application Control component regulates the startup of each of the applicationsregardless of whether or not the application is included in the table of trusted applications.
(availableonly in theKasperskySecurityCenterConsole)
This merges the list of scan exclusions and trusted applications in the parent and childpolicies of Kaspersky Security Center. To merge lists, the child policy must be con�gured toinherit the settings of the parent policy of Kaspersky Security Center.
If the check box is selected, list items from the Kaspersky Security Center parent policy aredisplayed in child policies. This way you can, for example, create a consolidated list of trustedapplications for the entire organization.
Inherited list items in a child policy cannot be deleted or edited. Items on the list of scanexclusions and the list of trusted applications that are merged during inheritance can bedeleted and edited only in the parent policy. You can add, edit or delete list items in lower-level policies.
If items on lists of the child and parent policy match, these items are displayed as the sameitem of the parent policy.
If the check box is not selected, list items are not merged when inheriting the settings ofKaspersky Security Center policies.
Enter the name of the object type according to the classi�cation of the KasperskyEncyclopedia (for example, Email-Worm, Rootkit or RemoteAdmin). You can usemasks with the ? character (replaces any single character) and the * character (replacesany number of characters). For example, if the Client* mask is speci�ed, KasperskyEndpoint Security excludes Client-IRC , Client-P2P and Client-SMTP objects fromscans.
The * (asterisk) character, which takes the place of any set of characters, except the\ and / characters (delimiters of the names of �les and folders in paths to �les andfolders). For example, the mask C:\*\*.txt will include all paths to �les with the TXTextension located in folders on the C: drive, but not in subfolders.
Two consecutive * characters take the place of any set of characters (including anempty set) in the �le or folder name, including the \ and / characters (delimiters ofthe names of �les and folders in paths to �les and folders). For example, the maskC:\Folder\**\*.txt will include all paths to �les with the TXT extension located inthe folder named Folder and its subfolders. The mask must include at least onenesting level. The mask C:\**\*.txt is not a valid mask.
The ? (question mark) character, which takes the place of any single character, exceptthe \ and / characters (delimiters of the names of �les and folders in paths to �lesand folders). For example, the mask C:\Folder\???.txt will include paths to all �lesresiding in the folder named Folder that have the TXT extension and a nameconsisting of three characters.
Trustedapplications
Mergevalues wheninheriting
Allow use oflocalexclusions /Allow use oflocaltrustedapplications
Local exclusions and local trusted applications (local trusted zone) – user-de�ned list ofobjects and applications in Kaspersky Endpoint Security for a speci�c computer. KasperskyEndpoint Security does not monitor objects and applications from the local trusted zone.This way, users can create their own local lists of exclusions and trusted applications inaddition to the general trusted zone in a policy.
If the check box is selected, a user can create a local list of scan exclusions and a local list oftrusted applications. An administrator can use Kaspersky Security Center to view, add, edit,or delete list items in the computer properties.

581
(availableonly in theKasperskySecurityCenterConsole)
If one of the trusted system certi�cate stores is selected, Kaspersky Endpoint Securityexcludes applications signed with a trusted digital signature from scans. Kaspersky EndpointSecurity automatically assigns such applications to the Trusted group.
If is selected, Kaspersky Endpoint Security scans applications regardless ofwhether or not they have a digital signature. Kaspersky Endpoint Security places anapplication in a trust group depending on the level of danger that this application may poseto the computer.
If the check box is cleared, a user can access only the general lists of scan exclusions andtrusted applications generated in the policy. If local lists were generated, after thisfunctionality is disabled Kaspersky Endpoint Security continues excluding the listed objectsfrom scans.
Trustedsystemcerti�catestore Do not use
Application settings
You can con�gure the following general settings of the application:
Operating mode
Self-Defense
Performance
Debug information
Computer status when settings are applied
Application settings
Parameter Description
When the check box is selected, Kaspersky Endpoint Security is started after theoperating system loads, protecting the computer during the entire session.
When the check box is cleared, Kaspersky Endpoint Security is not started after theoperating system loads, until the user starts it manually. Computer protection isdisabled and user data may be exposed to threats.
If the check box is selected, a pop-up noti�cation appears on the screen when maliciousactivity is detected in the operating system. In its noti�cation, Kaspersky EndpointSecurity o�ers the user to perform Advanced Disinfection of the computer. After theuser approves this procedure, Kaspersky Endpoint Security neutralizes the threat. Aftercompleting the advanced disinfection procedure, Kaspersky Endpoint Security restartsthe computer. The advanced disinfection technology uses considerable computingresources, which may slow down other applications.
If Kaspersky Endpoint Security is installed on a computer running Windows forServers, Kaspersky Endpoint Security does not show the noti�cation. Therefore, theuser cannot select an action to disinfect an active threat. To disinfect a threat, youneed to enable advanced disinfection technology in application settings and runadvanced disinfection immediately in Virus Scan task settings. Then you need tostart Virus Scan task.
StartKasperskyEndpointSecurity atcomputerstartup
EnableAdvancedDisinfectiontechnology

582
(availableonly in theKasperskySecurityCenterConsole)
When this check box is selected, Kaspersky Endpoint Security prevents alteration ordeletion of application �les on the hard drive, memory processes, and entries in thesystem registry.
If the check box is selected, trusted remote administration applications (such asTeamViewer, LogMeIn Pro, and Remotely Anywhere) can modify Kaspersky EndpointSecurity settings.
Untrusted remote administration applications are prohibited from modifying KasperskyEndpoint Security settings even when the check box is selected.
If the check box is selected, Kaspersky Endpoint Security allows management ofapplication services from a remote computer. When an attempt is made to manageapplication services remotely, a noti�cation is displayed in the Microsoft Windowstaskbar, above the application icon (unless the noti�cation service has been disabled bythe user).
If the check box is selected, energy conservation mode is enabled. Kaspersky EndpointSecurity postpones scheduled tasks. You can start scan and update tasks manually, ifnecessary.
When Kaspersky Endpoint Security runs scheduled tasks, this may result in increasedworkload on the CPU and disk subsystems, which slows down the performance of otherapplications.
When the check box is selected, Kaspersky Endpoint Security suspends scheduled taskswhen it detects an increased load and frees up operating system resources for userapplications.
If the check box is selected, Kaspersky Endpoint Security writes dumps when it crashes.
If the check box is cleared, Kaspersky Endpoint Security does not write dumps. Theapplication also deletes existing dump �les from the computer hard drive.
Settings for displaying the statuses of client computers with Kaspersky EndpointSecurity installed in the Web Console when errors occur while applying a policy or
UseKasperskySecurityCenter asproxyserver foractivation
If this check box is selected, the Kaspersky Security Center Administration Server is usedas a proxy server when activating the application.
EnableSelf-Defense
AllowmanagingKasperskyEndpointSecuritysettings viaremotecontrolapplications
Enableexternalservicecontrol
Postponescheduledtasks whilerunning onbatterypower
Concederesourcesto otherapplications
Enabledumpwriting
Enabledump andtrace �lesprotection
If the check box is selected, access to dump �les is granted to the system administratorand local administrator as well as to the user who enabled dump writing. Only system andlocal administrators can access trace �les.
If the check box is cleared, any user can access dump �les and trace �les.
Computerstatus

583
Reports
Backup
Kaspersky Endpoint Security does not provide the capability to con�gure user access permissions to backupcopies of �les.
Settings of reports and storage
Parameter Description
If the check box is selected, the maximum report storage term is limited to the de�nedtime interval. The default maximum storage term for reports is 30 days. After that periodof time, Kaspersky Endpoint Security automatically deletes the oldest entries from thereport �le.
If the check box is selected, the maximum report �le size is limited to the de�ned value. Bydefault, the maximum �le size is 1024 MB. To avoid exceeding the maximum report �le size,Kaspersky Endpoint Security automatically deletes the oldest entries from the report �lewhen the maximum report �le size is reached.
If the check box is selected, the maximum �le storage term is limited to the de�ned timeinterval. The default maximum storage term for �les is 30 days. After expiration of themaximum storage term, Kaspersky Endpoint Security deletes the oldest �les from Backup.
If the check box is selected, the maximum storage size is limited to the de�ned value. By
(availableonly in theKasperskySecurityCenterConsole)
executing a task. The OK, Warning, and Critical statuses are available.whensettings areapplied
Reports and storage
Information about the operation of each Kaspersky Endpoint Security component, data encryption events, theperformance of each scan task, the update task and integrity check task, and the overall operation of theapplication is recorded in reports.
Reports are stored in the folder C:\ProgramData\Kaspersky Lab\KES\Report .
Backup stores backup copies of �les that were deleted or modi�ed during disinfection. A backup copy is a �lecopy created before the �le was disinfected or deleted. Backup copies of �les are stored in a special format anddo not pose a threat.
Backup copies of �les are stored in the folder C:\ProgramData\Kaspersky Lab\KES\QB .
Users in the Administrators group are granted full permission to access this folder. Limited access rights to thisfolder are granted to the user whose account was used to install Kaspersky Endpoint Security.
Store reportsno longer thanN days
Limit the sizeof report �leto N MB
Store objectsno longer thanN days
Limit the size

584
default, the maximum size is 100 MB. To avoid exceeding the maximum storage size,Kaspersky Endpoint Security automatically deletes the oldest �les from storage when themaximum storage size is reached.
(available onlyin KasperskySecurityCenter)
Network options
Parameter Description
If this check box is selected, the application limits its own network tra�ic when the Internetconnection is limited. Kaspersky Endpoint Security identi�es a high-speed mobile Internetconnection as a limited connection and identi�es a Wi-Fi connection as an unlimitedconnection.
Kaspersky experts recommend injecting this web page interaction script into tra�ic toensure correct operation of Web Control.
Settings of the proxy server used for Internet access of users of client computers.Kaspersky Endpoint Security uses these settings for certain protection components,including for updating databases and application modules.
If the check box is selected, Kaspersky Endpoint Security does not use a proxy server whenperforming an update from a shared folder.
of Backup toN MB
Data transfertoAdministrationServer
Categories of events on client computers whose information must be relayed to theAdministration Server.
Network settings
You can con�gure the proxy server used for connecting to the Internet and updating anti-virus databases, selectthe network port monitoring mode, and con�gure encrypted connections scan.
Limit tra�icon meteredconnections
Cost-Aware Networking works on computers running Windows 8 or later.
Inject scriptinto webtra�ic tointeractwith webpages
If the check box is selected, Kaspersky Endpoint Security injects a web page interactionscript into web tra�ic. This script ensures that the Web Control component can workcorrectly. The script enables registration of Web Control events. Without this script, youcannot enable user Internet activity monitoring.
Proxyserver
For automatic con�guration of a proxy server, Kaspersky Endpoint Security uses the WPADprotocol (Web Proxy Auto-Discovery Protocol). If the IP address of the proxy server cannotbe determined by using this protocol, Kaspersky Endpoint Security uses the proxy serveraddress that is speci�ed in the Microsoft Internet Explorer browser settings.
Bypassproxyserver forlocaladdresses
Monitoredports
. In this network port monitoring mode, the protectioncomponents (File Threat Protection, Web Threat Protection, Mail Threat Protection) monitordata streams that are transmitted via any open network ports of the computer.
Monitor all network ports

585
SSL 3.0.
TLS 1.0, TLS 1.1, TLS 1.2, TLS 1.3.
Kaspersky Endpoint Security will not have accessto the contents of websites whose addresses begin with https://.
. KasperskyEndpoint Security will scan encrypted tra�ic only when requested by the File ThreatProtection, Mail Threat Protection, and Web Control components.
Kaspersky Endpoint Security will scan encryptednetwork tra�ic even if protection components are disabled.
Kaspersky Endpoint Security does not scan encrypted connections that wereestablished by trusted applications for which tra�ic scanning is disabled. KasperskyEndpoint Security does not scan encrypted connections from the prede�ned list oftrusted websites. The prede�ned list of trusted websites is created by Kasperskyexperts. This list is updated with the application's anti-virus databases. You can view theprede�ned list of trusted websites only in the Kaspersky Endpoint Security interface.You cannot view the list in the Kaspersky Security Center Console.
. If this option is selected, when visiting a domain with an untrusted certi�cate,Kaspersky Endpoint Security allows the network connection.
When opening a domain with an untrusted certi�cate in a browser, Kaspersky EndpointSecurity displays an HTML page showing a warning and the reason why visiting that domainis not recommended. A user can click the link from the HTML warning page to obtain accessto the requested web resource. After following this link, during the next hour KasperskyEndpoint Security will not display warnings about an untrusted certi�cate when visitingother resources on this same domain.
. If this option is selected, when visiting a domain with an untrustedcerti�cate, Kaspersky Endpoint Security blocks the network connection.
When opening a domain with an untrusted certi�cate in a browser, Kaspersky EndpointSecurity displays an HTML page showing the reason why that domain is blocked.
. In this network port monitoring mode, the protectioncomponents monitor the selected ports of the computer and the network activity of theselected applications. The list of network ports that are normally used for transmission ofemail and network tra�ic is con�gured according to the recommendations of Kasperskyexperts.
Monitor selected network ports only
. This usesa prede�ned list of applications whose network ports are monitored by Kaspersky EndpointSecurity. For example, this list includes Google Chrome, Adobe Reader, Java, and otherapplications.
Monitor all ports for the applications from the list recommended by Kaspersky
. This uses a list of applications whose networkports are monitored by Kaspersky Endpoint Security.Monitor all ports for speci�ed applications
Encryptedconnectionsscan
Kaspersky Endpoint Security scans encrypted network tra�ic transmitted over the followingprotocols:
Kaspersky Endpoint Security supports the following encrypted connection scanning modes:
Do not scan encrypted connections
Scan encrypted connections upon request from protection components
Always scan encrypted connections
Whenvisiting adomain withanuntrustedcerti�cate
Allow
Block connection

586
. If this item is selected, when an encrypted connection scan erroroccurs, Kaspersky Endpoint Security blocks the network connection.
. If this item is selected, when an encrypted connection scanerror occurs, Kaspersky Endpoint Security adds the domain that resulted in the errorto the list of domains with scan errors and does not monitor encrypted network tra�icwhen this domain is visited. You can view a list of domains with encrypted connectionsscan errors only in the local interface of the application. To clear the list contents, youneed to select .
If the check box is cleared, Kaspersky Endpoint Security does not block networkconnections established over the SSL 2.0 protocol and does not monitor network tra�ictransmitted over these connections.
If you are opening a website with an EV certi�cate for the �rst time, the encryptedconnection will be decrypted regardless of whether or not the check box is selected.
This uses a list of web addresses for which Kaspersky Endpoint Security does not scannetwork connections. You can enter a domain name or IP address. Kaspersky EndpointSecurity supports the * character when entering a domain name mask.
Kaspersky Endpoint Security does not support masks for IP addresses.
Examples:
domain.com – this entry includes the following addresses: https://domain.com ,https://www.domain.com , https://domain.com/page123 . This entry excludessubdomains (for example, subdomain.domain.com ).
subdomain.domain.com – this entry includes the following addresses:https://subdomain.domain.com , https://subdomain.domain.com/page123 . Theentry excludes the domain domain.com .
*.domain.com – this entry includes the following addresses:https://movies.domain.com , https://images.domain.com/page123 . The entryexcludes the domain domain.com .
Whenencryptedconnectionscan errorsoccur
Block connection
Add domain to exclusions
Block connection
Block SSL2.0connections
If the check box is selected, Kaspersky Endpoint Security blocks network connectionsestablished over the SSL 2.0 protocol.
Decryptencryptedconnectionswithwebsitesthat use EVcerti�cates
EV certi�cates (Extended Validation Certi�cates) con�rm the authenticity of websites andenhance the security of the connection. Browsers use a lock icon in their address bar toindicate that a website has an EV certi�cate. Browsers may also fully or partially color theaddress bar in green.
If the check box is selected, Kaspersky Endpoint Security decrypts and monitors encryptedconnections with websites that use an EV certi�cate.
If the check box is cleared, Kaspersky Endpoint Security does not have access to thecontents of HTTPS tra�ic. For this reason, the application monitors HTTPS tra�ic onlybased on the website address, for example, https://facebook.com .
Trustedaddresses
Trustedapplications
List of applications whose activity is not monitored by Kaspersky Endpoint Security duringits operation. You can select the types of application activity that Kaspersky Endpoint

587
(availableonly in theKasperskyEndpointSecurityinterface)
If this check box is selected, Kaspersky Endpoint Security scans encrypted tra�ic in theMozilla Firefox browser and Thunderbird mail client. Access to some websites via the HTTPSprotocol may be blocked.
To scan tra�ic in the Mozilla Firefox browser and the Thunderbird mail client, you mustenable the Encrypted Connections Scan. If Encrypted Connections Scan is disabled,Kaspersky Endpoint Security does not scan tra�ic in the Mozilla Firefox browser andThunderbird mail client.
Kaspersky Endpoint Security uses the Kaspersky root certi�cate to decrypt and analyzeencrypted tra�ic. You can select the certi�cate store that will contain the Kaspersky rootcerti�cate.
. The Kaspersky root certi�cate is added to this storeduring installation of Kaspersky Endpoint Security.
. Mozilla Firefox and Thunderbird use their own certi�catestores. If the Mozilla certi�cate store is selected, you need to manually add the Kasperskyroot certi�cate to this store through the browser properties.
Interface settings
Parameter Description
(availableonly in theKasperskySecurityCenterConsole)
. On a client computer, the main application window is inaccessible,and only the icon in the Windows noti�cation area is available. In the context menu of theicon, the user can perform a limited number of operations with Kaspersky Endpoint Security.Kaspersky Endpoint Security also displays noti�cations above the application icon.
. On a client computer, the main window of Kaspersky Endpoint Securityand the icon in the Windows noti�cation area are available. In the context menu of the icon,the user can perform operations with Kaspersky Endpoint Security. Kaspersky EndpointSecurity also displays noti�cations above the application icon.
. On a client computer, no signs of Kaspersky Endpoint Security operation aredisplayed. The icon in the Windows noti�cation area and noti�cations are not available.
A table with the settings of noti�cations about events of di�erent importance levels thatmay occur during the operation of a component, task, or the entire application. KasperskyEndpoint Security shows noti�cations about these events on the screen, sends them byemail, or logs them.
Security will not monitor (for example, do not scan network tra�ic). Kaspersky EndpointSecurity supports environment variables and the * and ? characters when entering a mask.
Scan securetra�ic inMozillaapplications
Use Windows certi�cate store
Use Mozilla certi�cate store
Interface
You can con�gure the settings of the application interface.
Interactionwith user
With simpli�ed interface
With full interface
No interface
Noti�cationsettings
Emailnoti�cationsettings
SMTP server settings for delivery of noti�cations about events registered during operationof the application.
Showapplication'sstatus in
Categories of application events that cause the Kaspersky Endpoint Security icon tochange in the Microsoft Windows taskbar noti�cation area ( or ) and result in a pop-upnoti�cation.

588
(availableonly in theKasperskySecurityCenterConsole)
Application con�guration management settings
Settings Description
noti�cationsarea
Local anti-virusdatabasestatusnoti�cations
Settings of noti�cations about outdated anti-virus databases used by the application.
Passwordprotection
If the toggle button is switched on, Kaspersky Endpoint Security prompts the user for apassword when the user attempts to perform an operation that is within the scope ofPassword Protection. The Password Protection scope includes forbidden operations (suchas disabling protection components) and the user accounts to which the PasswordProtection scope is applied.
After Password Protection is enabled, Kaspersky Endpoint Security prompts you to set apassword for performing operations.
TechnicalSupportwebresources
List of links to web resources containing information about technical support for KasperskyEndpoint Security. Added links are displayed in the window of the KasperskyEndpoint Security local interface instead of standard links.
Support
Message touser
(availableonly in theKasperskySecurityCenterConsole)
Message that is displayed in the window of the local interface of KasperskyEndpoint Security.
Support
Manage Settings
You can save the current Kaspersky Endpoint Security settings to a �le and use them to quickly con�gure theapplication on a di�erent computer. You can also use a con�guration �le when deploying the application throughKaspersky Security Center 12 with an installation package. You can restore the default settings at any time.
Application con�guration management settings are available only in the Kaspersky Endpoint Security interface.
Import Extract application settings from a �le in CFG format and apply them.
Export Save the current application settings to a �le in CFG format.
Restore You can restore the settings recommended by Kaspersky for Endpoint Security at any time.When the settings are restored, the security level is set for all protectioncomponents.
Recommended

589
Task management settings
Parameter Description
If the check box is selected, local tasks are displayed in the Kaspersky Endpoint Securitylocal interface. When there are no additional policy restrictions, the user can con�gure andrun tasks. However, con�guring task run schedule remains unavailable for the user. The usercan run tasks only manually.
If the check box is cleared, use of local tasks is stopped. In this mode, local tasks do not runaccording to schedule. Tasks cannot be started or con�gured in the local interface ofKaspersky Endpoint Security, or when working with the command line.
A user can still start a virus scan of a �le or folder by selecting the optionin the context menu of the �le or folder. The scan task is started with the default values ofsettings for the custom scan task.
Kaspersky Endpoint Security does not scan �les whose contents are located in OneDrive cloud storage, andcreates log entries stating that these �les have not been scanned.
Task management
You can create the following types of tasks to administer Kaspersky Endpoint Security through Kaspersky SecurityCenter:
Local tasks that are con�gured for an individual client computer.
Group tasks that are con�gured for client computers within administration groups.
Tasks for a selection of computers.
You can create any number of group tasks, tasks for a selection of computers, or local tasks. For more detailsabout working with administration groups and selections of computers, please refer to Kaspersky Security CenterHelp .
Allow use oflocal tasks
Scan for viruses
Allow grouptasks to bedisplayed
If the check box is selected, group tasks are displayed in the Kaspersky Endpoint Securitylocal interface. The user can view the list of all tasks in the application interface.
If the check box is cleared, Kaspersky Endpoint Security displays an empty task list.
Allowmanagementof grouptasks
If the check box is selected, users can start and stop group tasks speci�ed in KasperskySecurity Center. Users can start and stop tasks in the application interface or in thesimpli�ed application interface.
If the check box is cleared, Kaspersky Endpoint Security starts scheduled tasksautomatically, or the administrator starts tasks manually in Kaspersky Security Center.
Scanning the computer
A virus scan is vital to computer security. Regularly run virus scans to rule out the possibility of spreading malwarethat is undetected by protection components due to a low security level setting or for other reasons.

590
Full Scan
Kaspersky experts recommend that you do not change the scan scope of the Full Scan task.
To conserve computer resources, it is recommended to run a background scan task instead of a full scan task.This will not a�ect the security level of the computer.
Critical Areas Scan
Kaspersky experts recommend that you do not change the scan scope of the Critical Areas Scan task.
Custom Scan
Background scan
A thorough scan of the entire computer. Kaspersky Endpoint Security scans the following objects:
Kernel memory
Objects that are loaded at startup of the operating system
Boot sectors
Operating system backup
All hard and removable drives
By default, Kaspersky Endpoint Security scans the kernel memory, running processes, and disk boot sectors.
Kaspersky Endpoint Security scans the objects that are selected by the user. You can scan any object from thefollowing list:
Kernel memory
Objects that are loaded at startup of the operating system
Operating system backup
Microsoft Outlook mailbox
Hard, removable, and network drives
Any selected �le
Background scan is a scan mode of Kaspersky Endpoint Security that does not display noti�cations for the user.Background scan requires less computer resources than other types of scans (such as a full scan). In this mode,Kaspersky Endpoint Security scans startup objects, the boot sector, system memory, and the system partition.

591
Integrity check
Scan settings
Parameter Description
Kaspersky Endpoint Security can use di�erent groups of settings for running a scan. Thesegroups of settings that are stored in the application are called security levels:
. Kaspersky Endpoint Security scans all types of �les. When scanning compound �les,Kaspersky Endpoint Security also scans mail-format �les.
. Kaspersky Endpoint Security scans only the speci�ed �le formats on allhard drives, network drives, and removable storage media of the computer, and alsoembedded OLE objects. Kaspersky Endpoint Security does not scan archives orinstallation packages.
. Kaspersky Endpoint Security scans only new or modi�ed �les with the speci�edextensions on all hard drives, removable drives, and network drives of the computer.Kaspersky Endpoint Security does not scan compound �les.
. If this option is selected, Kaspersky Endpoint Securityautomatically attempts to disinfect all infected �les that are detected. If disinfection fails,Kaspersky Endpoint Security deletes the �les.
. If this option is selected, Kaspersky Endpoint Securityautomatically attempts to disinfect all infected �les that are detected. If disinfection is notpossible, Kaspersky Endpoint Security adds the information about the infected �les that aredetected to the list of active threats.
. If this option is selected, Kaspersky Endpoint Security adds the information aboutinfected �les to the list of active threats on detection of these �les.
Before attempting to disinfect or delete an infected �le, Kaspersky Endpoint Securitycreates a backup copy of the �le in case you need to restore the �le or if it can bedisinfected in the future.
. Run mode in which you can start scan manually at a time when it is convenient foryou.
. In this scan task run mode, Kaspersky Endpoint Security starts the scan task inaccordance with the schedule that you create. If this scan task run mode is selected, you canalso start the scan task manually.
If the check box is selected, Kaspersky Endpoint Security starts the skipped scan task assoon as it becomes possible. The scan task may be skipped, for example, if the computer waso� at the scheduled scan task start time.
If the check box is cleared, Kaspersky Endpoint Security does not run skipped scan tasks.Instead, it carries out the next scan task in accordance with the current schedule.
Kaspersky Endpoint Security checks the application modules for corruption or modi�cations.
Securitylevel
High
Recommended
Low
Action onthreatdetection
Disinfect; delete if disinfection fails
Disinfect; block if disinfection fails
Inform
Protectionscope
List of objects that Kaspersky Endpoint Security scans while performing a scan task. Objectswithin the scan scope can include the kernel memory, running processes, boot sectors,system backup storage, mail databases, hard drive, removable drive or network drive, folder or�le.
Scanschedule
Manually
Scheduled
Runskippedtasks

592
(availableonly in theKasperskySecurityCenterConsole)
Postponed start of the scan task when computer resources are busy. Kaspersky EndpointSecurity starts the scan task if the computer is locked or if the screen saver is on.
By default the scan task is run in the name of the user with whose rights you are registered inthe operating system. The protection scope may include network drives or other objects thatrequire special rights to access. You can specify a user that has the required rights in theKaspersky Endpoint Security settings and run the scan task under this user's account.
Kaspersky Endpoint Security considers �les without an extension as executable ones.Kaspersky Endpoint Security always scans executable �les regardless of the �le typesthat you select for scanning.
. If this setting is enabled, Kaspersky Endpoint Security checks all �les withoutexception (all formats and extensions).
. If this setting is enabled, Kaspersky Endpoint Security scansinfectable �les only . Before scanning a �le for malicious code, the internal header of the �leis analyzed to determine the format of the �le (for example, .txt, .doc, or .exe). The scan alsolooks for �les with particular �le extensions.
. If this setting is enabled, Kaspersky Endpoint Security scansinfectable �les only . The �le format is then determined based on the �le's extension.
Scans only new �les and those �les that have been modi�ed since the last time they werescanned. This helps reduce the duration of a scan. This mode applies both to simple and tocompound �les.
Limits the duration for scanning a single object. After the speci�ed amount of time,Kaspersky Endpoint Security stops scanning a �le. This helps reduce the duration of a scan.
Scans archives in the following formats: RAR, ARJ, ZIP, CAB, LHA, JAR, and ICE.
This check box enables/disables scanning of third-party distribution packages.
Scans Microsoft O�ice �les (DOC, DOCX, XLS, PPT and other Microsoft extensions). O�iceformat �les include OLE objects as well.
This check box enables / disables the option for Kaspersky Endpoint Security to scan �les inemail formats and mail databases.
Run onlywhen thecomputeris idling
Run scanas
File types
All �les
Files scanned by format
Files scanned by extension
Scan onlynew andchanged�les
Skip �lesthat arescannedfor longerthan Nseconds
Scanarchives
Scandistributionpackages
Scan �lesinMicrosoftO�iceformats
Scan emailformats

593
The application only fully scans MS Outlook, Windows Mail/Outlook Express and EML mail �leformats and only if the computer has the MS Outlook x86 mail client.
If the check box is selected, Kaspersky Endpoint Security splits the mail-format �le into itscomponents (header, body, attachments) and scans them for threats.
If the check box is cleared, Kaspersky Endpoint Security skips scanning of password-protected archives.
If this check box is selected, Kaspersky Endpoint Security does not scan compound �les iftheir size exceeds the speci�ed value.
If this check box is cleared, Kaspersky Endpoint Security scans compound �les of all sizes.
Kaspersky Endpoint Security scans large �les that are extracted from archives regardless ofwhether the check box is ticked or not.
The machine learning and signature analysis method uses the Kaspersky Endpoint Securitydatabases that contain descriptions of known threats and ways to neutralize them.Protection that uses this method provides the minimum acceptable security level.
Based on the recommendations of Kaspersky experts, machine learning and signatureanalysis is always enabled.
The technology was developed for detecting threats that cannot be detected by using thecurrent version of Kaspersky application databases. It detects �les that may be infected withan unknown virus or a new variety of a known virus.
This technology allows increasing scan speed by excluding certain �les from scanning. Filesare excluded from scanning by using a special algorithm that takes into account the releasedate of Kaspersky Endpoint Security databases, the date that the �le was last scanned on,and any modi�cations to the scanning settings. The iSwift technology is an advancement ofthe iChecker technology for the NTFS �le system.
This technology allows increasing scan speed by excluding certain �les from scanning. Filesare excluded from scans by using a special algorithm that takes into account the release dateof Kaspersky Endpoint Security databases, the date when the �le was last scanned, and anymodi�cations to the scan settings. There are limitations to iChecker Technology: it does notwork with large �les and applies only to �les with a structure that the application recognizes(for example, EXE, DLL, LNK, TTF, INF, SYS, COM, CHM, ZIP, and RAR).
If this check box is cleared, Kaspersky Endpoint Security scans the mail-format �le as a single�le.
Scanpassword-protectedarchives
If the check box is selected, Kaspersky Endpoint Security scans password-protectedarchives. Before �les in an archive can be scanned, you are prompted to enter the password.
Do notunpacklargecompound�les
Machinelearningandsignatureanalysis
HeuristicAnalysis
When scanning �les for malicious code, the heuristic analyzer executes instructions in theexecutable �les. The number of instructions that are executed by the heuristic analyzerdepends on the level that is speci�ed for the heuristic analyzer. The heuristic analysis levelensures a balance between the thoroughness of searching for new threats, the load on theresources of the operating system, and the duration of heuristic analysis.
iSwiftTechnology
iCheckerTechnology
Background scan
Background scan is a scan mode of Kaspersky Endpoint Security that does not display noti�cations for the user.Background scan requires less computer resources than other types of scans (such as a full scan). In this mode,Kaspersky Endpoint Security scans startup objects, the boot sector, system memory, and the system partition. Abackground scan is started in the following cases:
After an anti-virus database update.

594
When performing a background scan, Kaspersky Endpoint Security does not scan �les whose contents arelocated in OneDrive cloud storage.
When performing a scan from the context menu, Kaspersky Endpoint Security does not scan �les whosecontents are located in OneDrive cloud storage.
Scan from context menu
Scan from Context Menu task settings
Parameter Description
. If this option is selected, Kaspersky Endpoint Securityautomatically attempts to disinfect all infected �les that are detected. If disinfection fails,Kaspersky Endpoint Security deletes the �les.
. If this option is selected, Kaspersky Endpoint Securityautomatically attempts to disinfect all infected �les that are detected. If disinfection is notpossible, Kaspersky Endpoint Security adds the information about the infected �les that aredetected to the list of active threats.
. If this option is selected, Kaspersky Endpoint Security adds the information aboutinfected �les to the list of active threats on detection of these �les.
30 minutes after Kaspersky Endpoint Security is started.
Every six hours.
When the computer is idling for �ve minutes or more (the computer is locked or the screensaver is on).
Background scan when the computer is idling is interrupted when any of the following conditions are true:
The computer went into active mode.
If the background scan has not been run for more than ten days, the scan is not interrupted.
The computer (laptop) has switched to battery mode.
Scan from context menu
Kaspersky Endpoint Security lets you run a scan of individual �les for viruses and other malware from the contextmenu (see the �gure below).
Action onthreatdetection
Disinfect; delete if disinfection fails
Disinfect; block if disinfection fails
Inform

595
Scans only new �les and those �les that have been modi�ed since the last time they werescanned. This helps reduce the duration of a scan. This mode applies both to simple and tocompound �les.
Limits the duration for scanning a single object. After the speci�ed amount of time,Kaspersky Endpoint Security stops scanning a �le. This helps reduce the duration of a scan.
Scans archives in the following formats: RAR, ARJ, ZIP, CAB, LHA, JAR, and ICE.
The check box enables or disables scanning of distribution packages.
Scans Microsoft O�ice �les (DOC, DOCX, XLS, PPT and other Microsoft extensions). O�iceformat �les include OLE objects as well.
The machine learning and signature analysis method uses the Kaspersky Endpoint Securitydatabases that contain descriptions of known threats and ways to neutralize them.Protection that uses this method provides the minimum acceptable security level.
Scan onlynew andchanged�les
Skip �lesthat arescannedfor longerthan N sec
Scanarchives
Scandistributionpackages
Scan �lesinMicrosoftO�iceformats
Do notunpacklargecompound�les
If this check box is selected, Kaspersky Endpoint Security does not scan compound �les iftheir size exceeds the speci�ed value.
Machinelearningandsignatureanalysis Based on the recommendations of Kaspersky experts, machine learning and signature
analysis is always enabled.
HeuristicAnalysis
The technology was developed for detecting threats that cannot be detected by using thecurrent version of Kaspersky application databases. It detects �les that may be infected withan unknown virus or a new variety of a known virus.
When scanning �les for malicious code, the heuristic analyzer executes instructions in theexecutable �les. The number of instructions that are executed by the heuristic analyzerdepends on the level that is speci�ed for the heuristic analyzer. The heuristic analysis levelensures a balance between the thoroughness of searching for new threats, the load on theresources of the operating system, and the duration of heuristic analysis.
iSwiftTechnology
This technology allows increasing scan speed by excluding certain �les from scanning. Filesare excluded from scanning by using a special algorithm that takes into account the releasedate of Kaspersky Endpoint Security databases, the date that the �le was last scanned on,and any modi�cations to the scanning settings. The iSwift technology is an advancement ofthe iChecker technology for the NTFS �le system.
iCheckerTechnology
This technology allows increasing scan speed by excluding certain �les from scanning. Filesare excluded from scans by using a special algorithm that takes into account the release dateof Kaspersky Endpoint Security databases, the date when the �le was last scanned, and anymodi�cations to the scan settings. There are limitations to iChecker Technology: it does notwork with large �les and applies only to �les with a structure that the application recognizes(for example, EXE, DLL, LNK, TTF, INF, SYS, COM, CHM, ZIP, and RAR).

596
Removable drives scan task settings
Parameter Description
.
If this option is selected, after a removable drive is connectedKaspersky Endpoint Security scans all �les located on the removable drive, including�les within compound objects.
If this option is selected, after a removable drive is connected KasperskyEndpoint Security scans only �les of speci�c formats that are most vulnerable toinfection, and does not unpack compound objects.
If this check box is selected, Kaspersky Endpoint Security performs the action that isselected in the drop-down list on removabledrives with a size not more than the speci�ed maximum drive size.
If the check box is cleared, Kaspersky Endpoint Security performs the action that isselected in the drop-down list on removabledrives of any size.
If the check box is selected, Kaspersky Endpoint Security displays the progress ofremovable drives scan in a separate window and in the window.
If the check box is cleared, Kaspersky Endpoint Security performs removable drives scan inthe background.
If the check box is selected, the button in the window and the button inthe window are not available in the local interface of Kaspersky EndpointSecurity.
You can create the Integrity Check task both in the Kaspersky Security Center 12 Web Console and in theAdministration Console. It is not possible to create a task in the Kaspersky Security Center Cloud Console.
Removable drives scan
Kaspersky Endpoint Security allows you to scan removable drives that are connected to your computer for virusesand other malware.
Action onconnectionof aremovabledrive
Do not scan
Detailed Scan
Quick Scan
Maximumremovabledrive size
Action on connection of a removable drive
Action on connection of a removable drive
Show scanprogress Tasks
Block thestopping ofthe scan task
Stop Tasks StopVirus Scan
Integrity check
Kaspersky Endpoint Security checks the application �les in the application installation folder for corruption ormodi�cations. For example, if an application library has an incorrect digital signature, the library is consideredcorrupt. The Integrity check task is intended for scanning application �les. Run the Integrity check task ifKaspersky Endpoint Security detected a malicious object but did not neutralize it.
Application integrity breaches may occur in the following cases:
A malicious object modi�ed �les of Kaspersky Endpoint Security. In this case, perform the procedure forrestoring Kaspersky Endpoint Security using the tools of the operating system. After restoration, run a full scanof the computer and repeat the integrity check.

597
Regular updates require a license in e�ect. If there is no current license, you will be able to perform an updateonly once.
Updates are downloaded over the HTTPS protocol. They may also be downloaded over the HTTP protocolwhen it is impossible to download updates over the HTTPS protocol.
The digital signature expired. In this case, update Kaspersky Endpoint Security.
Integrity check task settings
Parameter Description
. Run mode in which you can start scan manually at a time when it is convenientfor you.
. In this scan task run mode, Kaspersky Endpoint Security starts the scan taskin accordance with the schedule that you create. If this scan task run mode is selected,you can also start the scan task manually.
If the check box is selected, Kaspersky Endpoint Security starts the skipped scan task assoon as it becomes possible. The scan task may be skipped, for example, if the computerwas o� at the scheduled scan task start time.
If the check box is cleared, Kaspersky Endpoint Security does not run skipped scan tasks.Instead, it carries out the next scan task in accordance with the current schedule.
Postponed start of the scan task when computer resources are busy. Kaspersky EndpointSecurity starts the scan task if the computer is locked or if the screen saver is on.
(availableonly in theKasperskySecurityCenterConsole)
By default the scan task is run in the name of the user with whose rights you areregistered in the operating system. Special permissions may be required for accessing theapplication installation folder. You can specify a user that has the required rights in theKaspersky Endpoint Security settings and run the scan task under this user's account.
Scanschedule
Manually
Scheduled
Runskippedtasks
Run onlywhen thecomputeris idling
Run as
Updating databases and application software modules
Updating the databases and application modules of Kaspersky Endpoint Security ensures up-to-date protectionon your computer. New viruses and other types of malware appear worldwide on a daily basis. Kaspersky EndpointSecurity databases contain information about threats and ways of neutralizing them. To detect threats quickly, youare urged to regularly update the databases and application modules.
The main update source for Kaspersky Endpoint Security is Kaspersky update servers.
Your computer must be connected to the Internet to successfully download the update package from Kasperskyupdate servers. By default, the Internet connection settings are determined automatically. If you are using a proxyserver, you need to con�gure the proxy server settings.
While performing an update, the following objects are downloaded and installed on your computer:

598
If the databases are obsolete, the update package may be large, which may cause additional Internet tra�ic(up to several dozen MB).
Application module and database update settings
Parameter Description
. In this mode, Kaspersky Endpoint Security checks the update source foravailability of new update packages with a certain frequency. The frequency of checking forthe update package increases during virus outbreaks and decreases when there are none.After detecting a fresh update package, Kaspersky Endpoint Security downloads it andinstalls updates on your computer.
. This update task run mode allows you to manually start the update task.
. In this update task run mode, Kaspersky Endpoint Security runs the update task inaccordance with the schedule that you have speci�ed. If this update task run mode isselected, you can also start the Kaspersky Endpoint Security update task manually.
If the check box is selected, Kaspersky Endpoint Security starts the skipped update task assoon as this becomes possible. The update task can be skipped, for example, if the computerwas turned o� at the update task start time.
If the check box is cleared, Kaspersky Endpoint Security does not start missed update tasks.Instead, it runs the next update task in accordance with the current schedule.
Kaspersky Endpoint Security databases. Computer protection is provided using databases that containsignatures of viruses and other threats and information on ways to neutralize them. Protection componentsuse this information when searching for and neutralizing infected �les on your computer. The databases areconstantly updated with records of new threats and methods for counteracting them. Therefore, werecommend that you update the databases regularly.
In addition to the Kaspersky Endpoint Security databases, the network drivers that enable the application'scomponents to intercept network tra�ic are updated.
Application modules. In addition to the databases of Kaspersky Endpoint Security, you can also update theapplication modules. Updating the application modules �xes vulnerabilities in Kaspersky Endpoint Security, addsnew functions, or enhances existing functions.
While updating, the application modules and databases on your computer are compared against the up-to-dateversion at the update source. If your current databases and application modules di�er from their respective up-to-date versions, the missing portion of the updates is installed on your computer.
Context help �les can be updated together with application module updates.
Information about the current status of Kaspersky Endpoint Security databases is displayed in the sectionin the window.
UpdateTasks
Information on update results and on all events that occur during the performance of the update task is logged inthe Kaspersky Endpoint Security report.
Run mode Automatically
Manually
Scheduled
Runskippedtasks
Updatesource
An update source is a resource that contains updates for databases and application modulesof Kaspersky Endpoint Security.
Update sources include the Kaspersky Security Center server, Kaspersky update servers, andnetwork or local folders.
The default list of update sources includes Kaspersky Security Center and Kaspersky updateservers. You can add other update sources to the list. You can specify HTTP/FTP servers andshared folders as update sources.

599
Kaspersky Endpoint Security does not support updates from HTTPS servers unless theyare Kaspersky's update servers.
If several resources are selected as update sources, Kaspersky Endpoint Security tries toconnect to them one after another, starting from the top of the list, and performs the updatetask by retrieving the update package from the �rst available source.
By default, the Kaspersky Endpoint Security update task is started on behalf of the userwhose account you have used to log in to the operating system. However, Kaspersky EndpointSecurity may be updated from an update source that the user cannot access due to a lack ofrequired rights (for example, from a shared folder that contains an update package) or anupdate source for which proxy server authentication is not con�gured. In the KasperskyEndpoint Security settings, you can specify a user that has such rights and start theKaspersky Endpoint Security update task under that user account.
This check box enables / disables downloads of application module updates along with anti-virus database updates.
If the check box is selected, Kaspersky Endpoint Security noti�es the user about availableapplication module updates and includes application module updates in the update packagewhile running the update task. The way application module updates are applied is determinedby the following settings:
. If this option is selected, when applicationmodule updates are available Kaspersky Endpoint Security installs critical updatesautomatically and all other application module updates only after their installation isapproved locally via the application interface or on the side of Kaspersky SecurityCenter.
. If this option is selected, when application moduleupdates are available Kaspersky Endpoint Security installs them only after theirinstallation is approved locally via the application interface or on the side of KasperskySecurity Center. This option is selected by default.
If the check box is cleared, Kaspersky Endpoint Security does not notify the user aboutavailable application module updates and does not include application module updates in theupdate package while running the update task.
If application module updates require reviewing and accepting the terms of the End UserLicense Agreement, the application installs updates after the terms of the End UserLicense Agreement have been accepted.
This check box is selected by default.
Run taskas
Downloadupdates ofapplicationmodules
Install critical and approved updates
Install only approved updates
Copyupdates tofolder
If this check box is selected, Kaspersky Endpoint Security copies the update package to theshared folder speci�ed under the check box. After that, other computers on your LAN areable to receive the update package from this shared folder. This reduces Internet tra�icbecause the update package is downloaded only once. The following folder is speci�ed bydefault: C:\ProgramData\Kaspersky Lab\KES\Update distribution\ .
Proxyserver forupdates
Proxy server settings for Internet access of users of client computers to update applicationmodules and databases.
For automatic con�guration of a proxy server, Kaspersky Endpoint Security uses the WPADprotocol (Web Proxy Auto-Discovery Protocol). If the IP address of the proxy server cannotbe determined by using this protocol, Kaspersky Endpoint Security uses the proxy serveraddress that is speci�ed in the Microsoft Internet Explorer browser settings.

600
(availableonly in theKasperskyEndpointSecurityinterface)
(availableonly in theKasperskyEndpointSecurityinterface)
Bypassproxyserver forlocaladdresses
If the check box is selected, Kaspersky Endpoint Security does not use a proxy server whenperforming an update from a shared folder.
Appendix 2. Application trust groups
Kaspersky Endpoint Security categorizes all applications that are started on the computer into trust groups.Applications are categorized into trust groups depending on the level of threat that the applications pose to theoperating system.
The trust groups are as follows:
. This group includes applications for which one or more of the following conditions are met:
No operations are prohibited for these applications.
. This group includes applications for which the following conditions are met:
Such applications are subject to minimal restrictions on access to operating system resources.
. This group includes applications for which the following conditions are met:
Trusted
Applications are digitally signed by trusted vendors.
Applications are recorded in the trusted applications database of Kaspersky Security Network.
The user has placed applications in the Trusted group.
Low Restricted
Applications are not digitally signed by trusted vendors.
Applications are not recorded in the trusted applications database of Kaspersky Security Network.
The user has placed applications in the "Low Restricted" group.
High Restricted
Applications are not digitally signed by trusted vendors.
Applications are not recorded in the trusted applications database of Kaspersky Security Network.
The user has placed applications in the High Restricted group.

601
com – executable �le of an application no larger than 64 KB
exe – executable �le or self-extracting archive
sys – Microsoft Windows system �le
prg – program text for dBase™, Clipper or Microsoft Visual FoxPro®, or a WAVmaker program
bin – binary �le
bat – batch �le
cmd – command �le for Microsoft Windows NT (similar to a bat �le for DOS), OS/2
dpl – compressed Borland Delphi library
dll – dynamic link library
scr – Microsoft Windows splash screen
cpl – Microsoft Windows control panel module
ocx – Microsoft OLE (Object Linking and Embedding) object
tsp – program running in split-time mode
drv – device driver
vxd – Microsoft Windows virtual device driver
pif – program information �le
lnk – Microsoft Windows link �le
reg – Microsoft Windows system registry key �le
Such applications are subject to high restrictions on access to operating system resources.
. This group includes applications for which the following conditions are met:
For these applications, all operations are blocked.
Untrusted
Applications are not digitally signed by trusted vendors.
Applications are not recorded in the trusted applications database of Kaspersky Security Network.
The user has placed applications in the Untrusted group.
Appendix 3. File extensions for quick removable drives scan

602
ini – con�guration �le which contains con�guration data for Microsoft Windows, Windows NT, and someapplications
cla – Java class
vbs – Visual Basic® script
vbe – BIOS video extension
js, jse – JavaScript source text
htm – hypertext document
htt – Microsoft Windows hypertext header
hta – hypertext program for Microsoft Internet Explorer®
asp – Active Server Pages script
chm – compiled HTML �le
pht – HTML �le with integrated PHP scripts
php – script that is integrated into HTML �les
wsh – Microsoft Windows Script Host �le
wsf – Microsoft Windows script
the – Microsoft Windows 95 desktop wallpaper �le
hlp – Win Help �le
eml – Microsoft Outlook Express email message
nws – new Microsoft Outlook Express email message
msg – Microsoft Mail email message
plg – email message
mbx – saved Microsoft O�ice Outlook email message
doc* – Microsoft O�ice Word documents, such as: doc for Microsoft O�ice Word documents, docx for MicrosoftO�ice Word 2007 documents with XML support, and docm for Microsoft O�ice Word 2007 documents withmacro support
dot* – Microsoft O�ice Word document templates, such as: dot for Microsoft O�ice Word document templates,dotx for Microsoft O�ice Word 2007 document templates, dotm for Microsoft O�ice Word 2007 documenttemplates with macro support
fpm – database program, Microsoft Visual FoxPro start �le
rtf – Rich Text Format document

603
shs – Windows Shell Scrap Object Handler fragment
dwg – AutoCAD® drawing database
msi – Microsoft Windows Installer package
otm – VBA project for Microsoft O�ice Outlook
pdf – Adobe Acrobat document
swf – Shockwave® Flash package object
jpg, jpeg – compressed image graphics format
emf – Enhanced Meta�le format �le;
ico – object icon �le
ov? – Microsoft O�ice Word executable �les
xl* – Microsoft O�ice Excel documents and �les, such as: xla, the extension for Microsoft O�ice Excel, xlc fordiagrams, xlt for document templates, xlsx for Microsoft O�ice Excel 2007 workbooks, xltm for Microsoft O�iceExcel 2007 workbooks with macro support, xlsb for Microsoft O�ice Excel 2007 workbooks in binary (non-XML)format, xltx for Microsoft O�ice Excel 2007 templates, xlsm for Microsoft O�ice Excel 2007 templates withmacro support, and xlam for Microsoft O�ice Excel 2007 plug-ins with macro support
pp* – Microsoft O�ice PowerPoint® documents and �les, such as: pps for Microsoft O�ice PowerPoint slides,ppt for presentations, pptx for Microsoft O�ice PowerPoint 2007 presentations, pptm for Microsoft O�icePowerPoint 2007 presentations with macros support, potx for Microsoft O�ice PowerPoint 2007 presentationtemplates, potm for Microsoft O�ice PowerPoint 2007 presentation templates with macro support, ppsx forMicrosoft O�ice PowerPoint 2007 slide shows, ppsm for Microsoft O�ice PowerPoint 2007 slide shows withmacro support, and ppam for Microsoft O�ice PowerPoint 2007 plug-ins with macro support
md* – Microsoft O�ice Access® documents and �les, such as: mda for Microsoft O�ice Access workgroups andmdb for databases
sldx – a Microsoft PowerPoint 2007 slide
sldm – a Microsoft PowerPoint 2007 slide with macro support
thmx – a Microsoft O�ice 2007 theme
Note that the actual format of a �le may not match its �le name extension.
com – executable �le of an application no larger than 64 KB
Appendix 4. File Types for the Mail Threat Protection attachment �lter
If you enabled �ltering of email attachments, the Mail Threat Protection component may rename or delete �leswith the following extensions:

604
exe – executable �le or self-extracting archive
sys – Microsoft Windows system �le
prg – program text for dBase™, Clipper or Microsoft Visual FoxPro®, or a WAVmaker program
bin – binary �le
bat – batch �le
cmd – command �le for Microsoft Windows NT (similar to a bat �le for DOS), OS/2
dpl – compressed Borland Delphi library
dll – dynamic link library
scr – Microsoft Windows splash screen
cpl – Microsoft Windows control panel module
ocx – Microsoft OLE (Object Linking and Embedding) object
tsp – program running in split-time mode
drv – device driver
vxd – Microsoft Windows virtual device driver
pif – program information �le
lnk – Microsoft Windows link �le
reg – Microsoft Windows system registry key �le
ini – con�guration �le which contains con�guration data for Microsoft Windows, Windows NT, and someapplications
cla – Java class
vbs – Visual Basic® script
vbe – BIOS video extension
js, jse – JavaScript source text
htm – hypertext document
htt – Microsoft Windows hypertext header
hta – hypertext program for Microsoft Internet Explorer®
asp – Active Server Pages script
chm – compiled HTML �le

605
pht – HTML �le with integrated PHP scripts
php – script that is integrated into HTML �les
wsh – Microsoft Windows Script Host �le
wsf – Microsoft Windows script
the – Microsoft Windows 95 desktop wallpaper �le
hlp – Win Help �le
eml – Microsoft Outlook Express email message
nws – new Microsoft Outlook Express email message
msg – Microsoft Mail email message
plg – email message
mbx – saved Microsoft O�ice Outlook email message
doc* – Microsoft O�ice Word documents, such as: doc for Microsoft O�ice Word documents, docx for MicrosoftO�ice Word 2007 documents with XML support, and docm for Microsoft O�ice Word 2007 documents withmacro support
dot* – Microsoft O�ice Word document templates, such as: dot for Microsoft O�ice Word document templates,dotx for Microsoft O�ice Word 2007 document templates, dotm for Microsoft O�ice Word 2007 documenttemplates with macro support
fpm – database program, Microsoft Visual FoxPro start �le
rtf – Rich Text Format document
shs – Windows Shell Scrap Object Handler fragment
dwg – AutoCAD® drawing database
msi – Microsoft Windows Installer package
otm – VBA project for Microsoft O�ice Outlook
pdf – Adobe Acrobat document
swf – Shockwave® Flash package object
jpg, jpeg – compressed image graphics format
emf – Enhanced Meta�le format �le;
ico – object icon �le
ov? – Microsoft O�ice Word executable �les

606
xl* – Microsoft O�ice Excel documents and �les, such as: xla, the extension for Microsoft O�ice Excel, xlc fordiagrams, xlt for document templates, xlsx for Microsoft O�ice Excel 2007 workbooks, xltm for Microsoft O�iceExcel 2007 workbooks with macro support, xlsb for Microsoft O�ice Excel 2007 workbooks in binary (non-XML)format, xltx for Microsoft O�ice Excel 2007 templates, xlsm for Microsoft O�ice Excel 2007 templates withmacro support, and xlam for Microsoft O�ice Excel 2007 plug-ins with macro support
pp* – Microsoft O�ice PowerPoint® documents and �les, such as: pps for Microsoft O�ice PowerPoint slides,ppt for presentations, pptx for Microsoft O�ice PowerPoint 2007 presentations, pptm for Microsoft O�icePowerPoint 2007 presentations with macros support, potx for Microsoft O�ice PowerPoint 2007 presentationtemplates, potm for Microsoft O�ice PowerPoint 2007 presentation templates with macro support, ppsx forMicrosoft O�ice PowerPoint 2007 slide shows, ppsm for Microsoft O�ice PowerPoint 2007 slide shows withmacro support, and ppam for Microsoft O�ice PowerPoint 2007 plug-ins with macro support
md* – Microsoft O�ice Access® documents and �les, such as: mda for Microsoft O�ice Access workgroups andmdb for databases
sldx – a Microsoft PowerPoint 2007 slide
sldm – a Microsoft PowerPoint 2007 slide with macro support
thmx – a Microsoft O�ice 2007 theme
Network settings
Address Description
activation-v2.kaspersky.com/activationservice/activationservice.svc
Protocol: HTTPS
Port: 443
Activating the application
s00.upd.kaspersky.com
s01.upd.kaspersky.com
s02.upd.kaspersky.com
s03.upd.kaspersky.com
s04.upd.kaspersky.com
s05.upd.kaspersky.com
s06.upd.kaspersky.com
s07.upd.kaspersky.com
s08.upd.kaspersky.com
s09.upd.kaspersky.com
s10.upd.kaspersky.com
s11.upd.kaspersky.com
s12.upd.kaspersky.com
s13.upd.kaspersky.com
Updating databases andapplication modules
Appendix 5. Network settings for interaction with external services
Kaspersky Endpoint Security uses the following network settings for interacting with external services.

607
s14.upd.kaspersky.com
s15.upd.kaspersky.com
s16.upd.kaspersky.com
s17.upd.kaspersky.com
s18.upd.kaspersky.com
s19.upd.kaspersky.com
cm.k.kaspersky-labs.com
Protocol: HTTPS
Port: 443
downloads.upd.kaspersky.com
Protocol: HTTPS
Port: 443
Updating databases andapplication modules
Checking if Kaspersky serversare accessible. If access tothe servers using system DNSis not possible, the applicationuses public DNS. This isnecessary to make sure anti-virus databases are updatedand the level of security ismaintained for the computer.Kaspersky Endpoint Securityuses the following list ofpublic DNS servers in thefollowing order:
1. Google Public DNS(8.8.8.8).
2. Cloud�are DNS (1.1.1.1).
3. Alibaba Cloud DNS(223.6.6.6).
4. Quad9 DNS (9.9.9.9).
5. CleanBrowsing(185.228.168.168).

608
Requests emitted by theapplication may containaddresses of domains andthe public IP address ofthe user because theapplication establishes aTCP/UDP connection withthe DNS server. Thisinformation is needed, forexample, to validate thecerti�cate of a webresource when usingHTTPS. If KasperskyEndpoint Security is usinga public DNS server, dataprocessing is governed bythe privacy policy of therelevant service. If youwant to prevent KasperskyEndpoint Security fromusing a public DNS server,contact Technical Supportfor a private patch.
touch.kaspersky.com
Protocol: HTTPReceiving the trusted time forchecking the validity period ofthe certi�cate (TLSconnection).
Warning about access denialto a web resource in thebrowser (Web ThreatProtection and Web Control)
p00.upd.kaspersky.com
p01.upd.kaspersky.com
p02.upd.kaspersky.com
p03.upd.kaspersky.com
p04.upd.kaspersky.com
p05.upd.kaspersky.com
p06.upd.kaspersky.com
p07.upd.kaspersky.com
p08.upd.kaspersky.com
p09.upd.kaspersky.com
p10.upd.kaspersky.com
p11.upd.kaspersky.com
p12.upd.kaspersky.com
p13.upd.kaspersky.com
p14.upd.kaspersky.com
Updating databases andapplication modules

609
p15.upd.kaspersky.com
p16.upd.kaspersky.com
p17.upd.kaspersky.com
p18.upd.kaspersky.com
p19.upd.kaspersky.com
downloads.kaspersky-labs.com
cm.k.kaspersky-labs.com
Protocol: HTTP
Port: 80
ds.kaspersky.com
Protocol: HTTPS
Port: 443
Using Kaspersky SecurityNetwork
ksn-a-stat-geo.kaspersky-labs.com
ksn-file-geo.kaspersky-labs.com
ksn-verdict-geo.kaspersky-labs.com
ksn-url-geo.kaspersky-labs.com
ksn-a-p2p-geo.kaspersky-labs.com
ksn-info-geo.kaspersky-labs.com
ksn-cinfo-geo.kaspersky-labs.com
Protocol: Any
Port: 443, 1443
Using Kaspersky SecurityNetwork
click.kaspersky.com
redirect.kaspersky.com
Protocol: HTTPS
Follow links from the interface
crl.kaspersky.com
ocsp.kaspersky.com
Protocol: HTTP
Port: 80
Public Key Infrastructure (PKI)
Appendix 6. Application events in the Windows Event Log
Information about the operation of each Kaspersky Endpoint Security component, data encryption events, theperformance of each scan task, the update task and integrity check task, and the overall operation of theapplication is recorded in the Windows Event Log.
System audit

610
Codes of events
EventID
Description Enabled bydefault
201 End User License Agreement violated
203 License has almost expired –
204 License expires soon –
206 Databases are missing or corrupted –
207 Databases are extremely out of date –
208 Databases are out of date –
209 Application autorun is disabled –
210 Automatic updates are disabled –
211 Self-Defense is disabled –
212 Task cannot run –
213 The operation with application resources is blocked by Self-Defense –
214 Protection components are disabled –
215 Computer is running in safe mode –
216 There are unprocessed �les –
217 Report cleared
218 Application settings changed
219 Group policy applied
220 Group policy disabled –
221 Task started –
222 Task stopped –
223 Task completed –
224 Restart the application to complete the update –
225 Computer restart required
226 The license allows the use of components that have not been installed –
227 –
229 Activation error
230 Incorrect reserve activation code –
231 Active threat detected Advanced Disinfection must be started –
232 Advanced Disinfection started –
233 Advanced Disinfection completed –
235 Application started
236 Application stopped
237 Application crashed during previous session
Installed components match the license

611
240 License expires soon
238 Subscription settings have changed
239 Subscription has been renewed
335 Object restored from Backup
336 Cannot restore object from Backup
245 Processing of some OS functions is disabled
250 Encrypted connection terminated
708 Task settings applied successfully –
335 Object restored from Backup
2000 Enter a user name and password –
2001 Suspicious network activity detected –
2020 Participation in KSN is enabled –
2021 Participation in KSN is disabled –
2022 KSN servers available –
2023 KSN servers unavailable –
2024 The application works and processes data under relevant laws and uses theappropriate infrastructure
227 All application components that are de�ned by the license have been installedand run in normal mode
–
Behavior Detection

612
Codes of events
EventID
Description Enabled bydefault
303 –
307 –
308 –
311 –
313 –
323 –
329 –
331 –
452 –
453 –
455 –
458 –
459 –
453 –
Codes of events
Event ID Description Enabled by default
302 Malicious object detected –
331 Blocked –
455 Rollback completed –
323 Object will be deleted on restart –
307 Object deleted –
329 Object renamed –
457 File restored –
458 Registry value restored –
459 Registry value deleted –
Detected legitimate software that can be used by intruders to damage yourcomputer or personal data
Object deleted
A backup copy of the object was created
Cannot create a backup copy
Cannot be deleted
Object will be deleted on restart
Object renamed
Blocked
Process terminated
Cannot terminate the process
Rollback completed
Registry value restored
Registry value deleted
File/code execution blocked
Exploit Prevention
Host Intrusion Prevention

613
Codes of events
EventID
Description Enabled bydefault
301 Object processed –
302 Malicious object detected –
303 Detected legitimate software that can be used by intruders to damage yourcomputer or personal data
–
306 Object disinfected –
307 Object deleted –
308 A backup copy of the object was created –
310 Cannot create a backup copy –
312 Disinfection not possible –
313 Cannot be deleted –
314 Object not processed –
315 Object skipped –
317 Processing error
318 Archive detected –
319 Packed object detected –
320 Object encrypted –
321 Object corrupted –
322 Password-protected archive detected –
323 Object will be deleted on restart –
324 Object will be disinfected on restart –
327 Overwritten by a copy that was disinfected earlier –
332 Information about detected object –
335 Object restored from Backup –
336 Cannot restore object from Backup
340 Object is on the Private KSN allowlist
401 Application placed in the trusted group –
402 Application placed in restricted group –
403 Host Intrusion Prevention was triggered –
452 Process terminated –
453 Cannot terminate the process –
File Threat Protection

614
Codes of events
EventID
Description Enabled bydefault
302 Malicious object detected
317 Processing error
336 Cannot restore object from Backup
340 Object is on the Private KSN allowlist
301 Object processed –
306 Object disinfected –
307 Object deleted –
308 A backup copy of the object was created –
310 Cannot create a backup copy –
312 Disinfection not possible –
313 Cannot be deleted –
314 Object not processed –
315 Object skipped –
318 Archive detected –
319 Packed object detected –
320 Object encrypted –
321 Object corrupted –
322 Password-protected archive detected –
323 Object will be deleted on restart –
324 Object will be disinfected on restart –
325 Overwritten by a copy that was disinfected earlier –
303 Detected legitimate software that can be used by intruders to damage yourcomputer or personal data
–
329 Object renamed –
335 Object restored from Backup –
452 Process terminated –
453 Cannot terminate the process –
332 Information about detected object –
Web Threat Protection

615
Codes of events
EventID
Description Enabled bydefault
301 –
302 Malicious object detected
303 Detected legitimate software that can be used by intruders to damage yourcomputer or personal data
–
317 Processing error
318 Archive detected –
319 Packed object detected –
321 Object corrupted –
322 Password-protected archive detected –
329 Object renamed –
362 Dangerous link blocked
1201 Previously opened dangerous link detected
1211 Previously opened malicious link detected
363 Dangerous link opened
341 Object download was blocked –
370 Link is on the Private KSN allowlist
370 Object is on the Private KSN allowlist
332 Information about detected object –
Object processed
Mail Threat Protection

616
Codes of events
EventID
Description Enabled bydefault
301 Object processed –
306 Object disinfected –
302 Malicious object detected
317 Processing error
340 Object is on the Private KSN allowlist
307 Object deleted –
308 A backup copy of the object was created –
312 Disinfection not possible –
314 Object not processed –
318 Archive detected –
319 Packed object detected –
321 Object corrupted –
322 Password-protected archive detected –
329 Object renamed –
303 Detected legitimate software that can be used by intruders to damageyour computer
–
332 Information about detected object –
Codes of events
Event ID Description Enabled by default
601 Network activity allowed –
602 –
Codes of events
Event ID Description Enabled by default
651 –
Firewall
Network activity blocked
Network Threat Protection
Network attack detected
BadUSB Attack Prevention

617
Codes of events
Event ID Description Enabled by default
2050 Keyboard authorized –
2051 Keyboard not authorized
2052 Keyboard authorization error
Codes of events
EventID
Description Enabled bydefault
301 Object processed –
302 Malicious object detected
303 –
314 –
315 Object skipped –
317 Processing error
318 Archive detected –
319 Packed object detected –
320 –
321 –
322 –
1512 –
329 –
332 –
340 Object is on the Private KSN allowlist
2200 AMSI request blocked
AMSI Protection
Detected legitimate software that can be used by intruders to damage yourcomputer or personal data
Object not processed
Object encrypted
Object corrupted
Password-protected archive detected
The object scan result has been sent to a third-party application
Object renamed
Information about detected object
Application Control
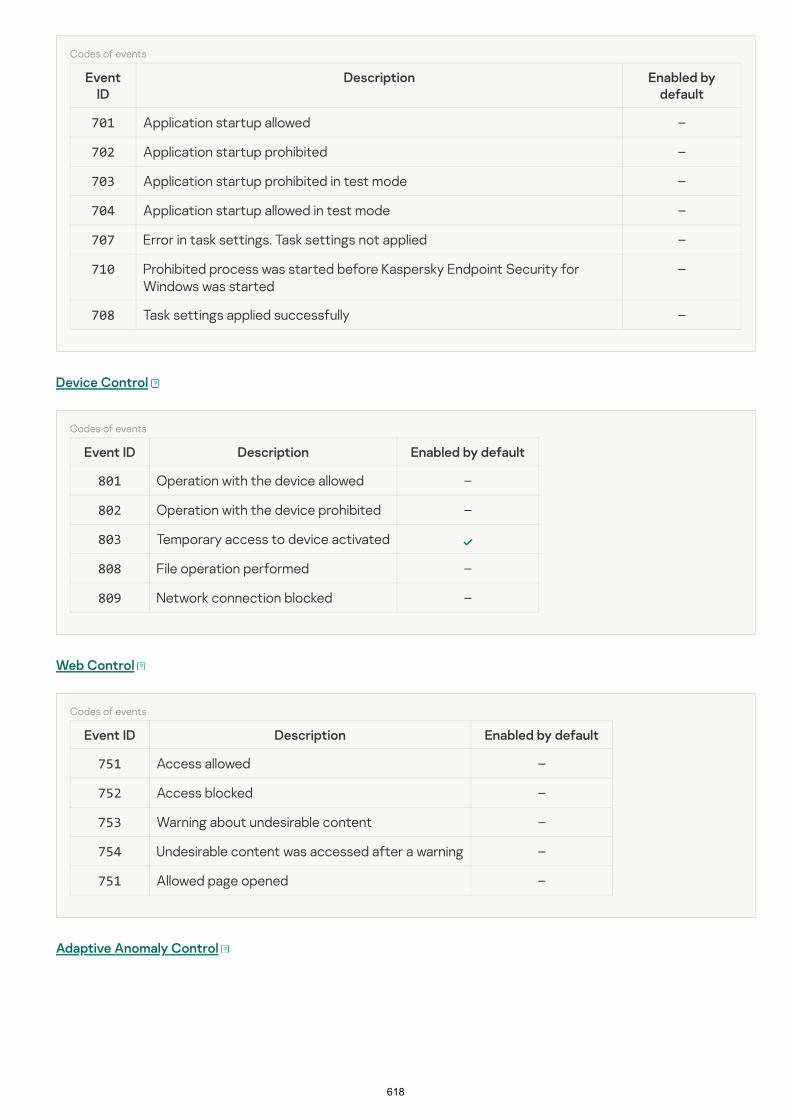
618
Codes of events
EventID
Description Enabled bydefault
701 –
702 –
703 –
704 –
707 Error in task settings. Task settings not applied –
710 Prohibited process was started before Kaspersky Endpoint Security forWindows was started
–
708 Task settings applied successfully –
Codes of events
Event ID Description Enabled by default
801 –
802 –
803 Temporary access to device activated
808 –
809 –
Codes of events
Event ID Description Enabled by default
751 –
752 –
753 –
754 –
751 –
Application startup allowed
Application startup prohibited
Application startup prohibited in test mode
Application startup allowed in test mode
Device Control
Operation with the device allowed
Operation with the device prohibited
File operation performed
Network connection blocked
Web Control
Access allowed
Access blocked
Warning about undesirable content
Undesirable content was accessed after a warning
Allowed page opened
Adaptive Anomaly Control

619
Codes of events
Event ID Description Enabled by default
501 Complaint of blocked application activity –
2201 Process action skipped –
2200 Process action blocked
Data Encryption

620
Codes of events
EventID
Description Enabled bydefault
904 Error applying �le encryption/decryption rules
912 File encryption/decryption error
1305 Error encrypting/decrypting device
931 Error creating encrypted package
951 Error enabling portable mode
953 Error disabling portable mode
1311 Failed to load encryption module
1340 The task for managing Authentication Agent accounts ended with an error
1312 Policy cannot be applied
1342 FDE upgrade failed
1343 FDE upgrade rollback successful
1345 Failed to install or upgrade Kaspersky Disk Encryption drivers in the WinREimage
1346 Failed to uninstall Kaspersky Disk Encryption drivers from the WinRE image
1370 BitLocker recovery key was changed
901 Started applying �le encryption/decryption rules –
902 Finished applying �le encryption/decryption rules –
903 Interrupted applying �le encryption/decryption rules –
905 Resumed applying �le encryption/decryption rules –
910 File encryption/decryption started –
911 File encryption/decryption completed –
913 File has not been encrypted because it is an exclusion –
914 File encryption/decryption interrupted –
1301 Device encryption/decryption started –
1302 Device encryption/decryption completed –
1307 Device is not encrypted –
1303 Device encryption/decryption interrupted –
1304 Device encryption/decryption resumed –
1309 Drive encryption/decryption process has been switched to passive mode –
1308 Device encryption/decryption process has been switched to active mode –
1306 User has opted out of the encryption policy –
940 File access blocked
950 Portable mode enabled –

621
952 –
1330 New Authentication Agent account created –
1337 Account not added. This account already exists –
1338 Account not modi�ed. This account does not exist –
1339 Account not deleted. This account does not exist –
1331 Authentication Agent account deleted –
1332 Authentication Agent account password changed –
1334 Failed Authentication Agent login attempt –
1333 Successful Authentication Agent login –
1335 Hard drive accessed using the procedure of requesting access to encrypteddevices
–
1336 Failed attempt to access the hard drive using the procedure of requestingaccess to encrypted devices
–
1310 Encryption module loaded –
1344 Full Disk Encryption upgrade rollback completed with an error
1341 FDE upgrade successful
1332 Authentication Agent account password changed –
Portable mode disabled
Endpoint Sensor

622
Codes of events
EventID
Description Enabled bydefault
2100 Kaspersky Anti Targeted Attack Platform server unavailable –
2105 Application startup was blocked
2106 Document opening was blocked
2104 –
2103 –
2101 –
2102 –
2112 All processes started from a �le image or stream were terminated
2113 Application started
2111 File or stream was deleted by the Kaspersky Anti Targeted Attack Platformserver administrator
2110 File was restored from quarantine on the Kaspersky Anti Targeted AttackPlatform server by the administrator
2109 File is quarantined on the Kaspersky Anti Targeted Attack Platform server byadministrator
2107 Network activity of all third-party applications is blocked
2108 Network activity of all third-party applications is unblocked
Tasks from the Kaspersky Anti Targeted Attack Platform server are beingprocessed
Processing of tasks from the Kaspersky Anti Targeted Attack Platform server isinactive
Endpoint Sensors connected to server
Connection to the Kaspersky Anti Targeted Attack Platform server restored
Scanning the computer

623
Codes of events
EventID
Description Enabled bydefault
302 Malicious object detected
335 Object restored from Backup
336 Cannot restore object from Backup
340 Object is on the Private KSN allowlist
301 Object processed –
329 Object renamed –
306 Object disinfected –
307 Object deleted –
308 A backup copy of the object was created –
310 Cannot create a backup copy –
312 Disinfection not possible –
313 Cannot be deleted –
314 Object not processed –
315 Object skipped –
317 Processing error –
318 Archive detected –
319 Packed object detected –
320 Object encrypted –
321 Object corrupted –
322 Password-protected archive detected –
323 Object will be deleted on restart –
324 Object will be disinfected on restart –
327 Overwritten by a copy that was disinfected earlier –
303 Detected legitimate software that can be used by intruders to damage yourcomputer or personal data
–
Codes of events
Event ID Description Enabled by default
2002 System module signature check failed –
Integrity check
Database update

624
Codes of events
Event ID Description Enabled by default
101 An internal error has occurred
1001 Update source selected –
1002 Proxy server selected –
1003 File download –
1004 File downloaded –
1005 File installed –
1006 File updated –
1007 File rolled back due to update error –
1008 Updating �les –
1009 Distributing updates –
1010 Rolling back �les –
1011 Error updating component –
1012 Error distributing component updates –
1013 Creating the list of �les to download –
1014 Local update error –
1016 Operation canceled by the user –
1017 Cannot start two tasks at the same time –
1018 Error verifying application databases and modules –
1019 Error in interaction with Kaspersky Security Center –
1020 No available updates –
1021 Not all components were updated –
1022 Update distribution completed successfully –
1023 Update completed successfully, update distribution failed –
2153 Patch installation failed –
2156 Patch rollback failed –
2150 Downloading patches –
2151 Installing patches –
2152 Patch installed –
2154 Rolling back patch –
2155 Patch rolled back –
Wipe Data

625
Codes of events
Event ID Description Enabled by default
223 Task completed –
221 Task started –
222 Task stopped –
2252 –
2253 –
2251 –
The object cannot be deleted
Wipe task statistics
Object deleted

626
Information about third-party code
Information about third-party code is contained in the �le legal_notices.txt, in the application installation folder.

627
Trademark notices
Registered trademarks and service marks are the property of their respective owners.
Adobe, Acrobat, Flash, Reader, and Shockwave are either registered trademarks or trademarks of Adobe SystemsIncorporated in the United States and/or other countries.
Apple, FireWire, iTunes and Safari are trademarks of Apple Inc., registered in the U.S. and other countries.
AutoCAD is a trademark or registered trademark of Autodesk, Inc., and/or its subsidiaries and/or a�iliates in theUSA and/or other countries.
The Bluetooth word, mark and logos are owned by Bluetooth SIG, Inc.
Borland is trademark or registered trademark of Borland Software Corporation.
Android and Google Chrome are trademarks of Google, Inc.
Citrix and Citrix Provisioning Services, and XenDesktop are trademarks of Citrix Systems, Inc. and/or one or moreof its subsidiaries, and may be registered in the United States Patent and Trademark O�ice and in other countries.
Dell is a trademark of Dell, Inc. or its subsidiaries.
dBase is a trademark of dataBased Intelligence, Inc.
EMC is a trademark or registered trademark of EMC Corporation in the United States and/or elsewhere.
Radmin is a registered trademark of Famatech.
IBM is a trademark of International Business Machines Corporation, registered in many jurisdictions worldwide.
ICQ is a trademark and/or service mark of ICQ LLC.
Intel is a trademark of Intel Corporation in the U.S. and/or other countries.
IOS is a registered trademark of Cisco Systems, Inc. and/or its a�iliates in the United States and other countries.
Lenovo and ThinkPad are trademarks of Lenovo in the United States and/or elsewhere.
Linux is the registered trademark of Linus Torvalds in the U.S. and other countries.
Logitech is either a registered trademark or trademark of Logitech in the United States and/or other countries.
LogMeIn Pro and Remotely Anywhere are trademarks of LogMeIn, Inc.
Mail.ru is a registered trademark of Mail.Ru, LLC.
McAfee is a trademark or registered trademark of McAfee, Inc. in the United States and other countries.
Microsoft, Access, Active Directory, ActiveSync, BitLocker, Excel, Internet Explorer, LifeCam Cinema, MSDN,MultiPoint, Outlook, PowerPoint, PowerShell, Visual Basic, Visual FoxPro, Windows, Windows PowerShell, WindowsServer, Windows Store, MS-DOS, Surface and Hyper-V are trademarks of Microsoft Corporation in the UnitedStates and other countries.
Mozilla, Firefox, and Thunderbird are the trademarks of the Mozilla Foundation.

628
Java and JavaScript are registered trademarks of Oracle and/or its a�iliates.
VERISIGN is a registered trademark in the United States and elsewhere or an unregistered trademark of VeriSign,Inc. and its subsidiaries.
VMware and VMware ESXi are registered trademarks or trademarks of VMware, Inc. in the United States and/orother jurisdictions.
Thawte is a trademark or registered trademark of Symantec Corporation or its a�iliates in the U.S. and othercountries.
SAMSUNG is a trademark of SAMSUNG in the United States and other countries.


![[GSW] Windows - Stata](https://static.fdokumen.com/doc/165x107/63274b65051fac18490e2cc7/gsw-windows-stata.jpg)