IPv4 Subnetting: - Network and Security Consultant
119
IPv4 Subnetting: An IP address consists of 32 bits of information. These bits are divided into four sections, referred to as octets or bytes, with each containing 1 byte (8 bits). You can depict an IP address using one of three methods: Dotted-decimal, as in 172.16.30.56 Binary, as in 10101100.00010000.00011110.00111000 Hexadecimal, as in AC.10.1E.38 The network address (which can also be called the network number) uniquely identifies each network. The node/host IP address is assigned to, and uniquely identifies, each machine on a network. Starting Octet shows which class the IP belongs to: Class A: 0 - 126 Loopbak: 127 Class B: 128 - 191 Class C: 192 - 223 Class D: 224 - 239 Class E: 240 – 255 Loopback (localhost) Used to test the IP stack on the local computer. Can be any address from 127.0.0.1 through 127.255.255.254. Broadcasts (layer 3) These are sent to all nodes on the network. Unicast This is an address for a single interface, and these are used to send packets to a single destination host. Multicast These are packets sent from a single source and transmitted to many devices on different networks. Referred to as “one-to-many.” Classless inter-domain routing (CIDR) is a set of Internet protocol (IP) standards that is used to create unique identifiers for networks and individual devices. The IP addresses allow particular information packets to be sent to specific computers. Classless interdomain routing (CIDR) helps reduce the size of routing tables by aggregating routes, and Network Address Translation (NAT), which reduces the number of required public IP addresses used by each organization or company. The primary goal of CIDR is to improve the scalability of Internet routers’ routing tables. Imagine the implications of an Internet router being burdened by carrying a route to every class A, B, and C network on the planet. CIDR uses both technical tools and administrative strategies to reduce the size of the Internet routing tables. Technically, CIDR uses route summarization, but with Internet scale in mind. For example, CIDR might be used to allow a large ISP to control a range of IP addresses from 198.0.0.0 to 198.255.255.255. ISPs 2, 3, and 4 need only one route (198.0.0.0/8) in their routing tables to be able to forward packets to all destinations that begin with 198. Note that this summary actually summarizes multiple class C networks—a typical feature of CIDR. ISP 1’s routers contain more detailed routing entries for addresses beginning with 198, based on where they allocate IP addresses for
-
Upload
khangminh22 -
Category
Documents
-
view
0 -
download
0
Transcript of IPv4 Subnetting: - Network and Security Consultant
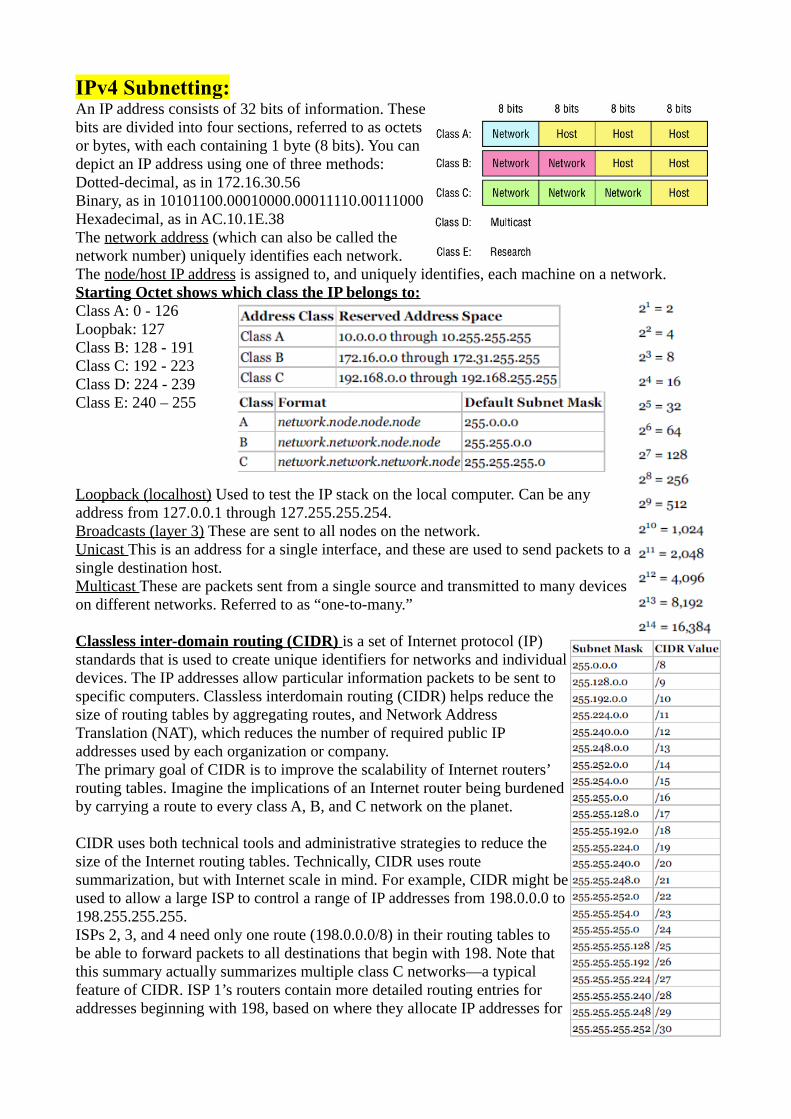
IPv4 Subnetting:An IP address consists of 32 bits of information. Thesebits are divided into four sections, referred to as octetsor bytes, with each containing 1 byte (8 bits). You candepict an IP address using one of three methods:Dotted-decimal, as in 172.16.30.56Binary, as in 10101100.00010000.00011110.00111000Hexadecimal, as in AC.10.1E.38The network address (which can also be called thenetwork number) uniquely identifies each network.The node/host IP address is assigned to, and uniquely identifies, each machine on a network.Starting Octet shows which class the IP belongs to:Class A: 0 - 126Loopbak: 127Class B: 128 - 191Class C: 192 - 223Class D: 224 - 239Class E: 240 – 255
Loopback (localhost) Used to test the IP stack on the local computer. Can be anyaddress from 127.0.0.1 through 127.255.255.254.Broadcasts (layer 3) These are sent to all nodes on the network.Unicast This is an address for a single interface, and these are used to send packets to asingle destination host.Multicast These are packets sent from a single source and transmitted to many deviceson different networks. Referred to as “one-to-many.”
Classless inter-domain routing (CIDR) is a set of Internet protocol (IP)standards that is used to create unique identifiers for networks and individualdevices. The IP addresses allow particular information packets to be sent tospecific computers. Classless interdomain routing (CIDR) helps reduce thesize of routing tables by aggregating routes, and Network AddressTranslation (NAT), which reduces the number of required public IPaddresses used by each organization or company. The primary goal of CIDR is to improve the scalability of Internet routers’routing tables. Imagine the implications of an Internet router being burdenedby carrying a route to every class A, B, and C network on the planet.
CIDR uses both technical tools and administrative strategies to reduce thesize of the Internet routing tables. Technically, CIDR uses routesummarization, but with Internet scale in mind. For example, CIDR might beused to allow a large ISP to control a range of IP addresses from 198.0.0.0 to198.255.255.255.ISPs 2, 3, and 4 need only one route (198.0.0.0/8) in their routing tables tobe able to forward packets to all destinations that begin with 198. Note thatthis summary actually summarizes multiple class C networks—a typicalfeature of CIDR. ISP 1’s routers contain more detailed routing entries foraddresses beginning with 198, based on where they allocate IP addresses for

their customers. ISP 1 would reduce its routing tables similarly with large ranges used by the other ISPs.CIDR attacks the problem of large routing tables through administrative means as well. As shown inFigure 4-5 , ISPs are assigned contiguous blocks of addresses to use when assigning addresses for their customers. Likewise, regional authorities are assigned large address blocks, so when individual companies ask for registered public IP addresses, they ask their regional registry to assign them an address block. As a result, addresses assigned by the regional agency will at least be aggregatable into one large geographic region ofthe world. CIDR refers to the administrative assignment of large address blocks, and the related summarized routes, for the purpose of reducing the size of the Internet routing tables.Note: Because CIDR defines how to combine routes for multiple classful networks into a single route, some people think of this process as being the opposite of subnetting. As a result, many people refer to CIDR’s summarization results as supernetting.
Private Addressing:One of the issues with Internetgrowth was the assignment ofall possible network numbers toa small number of companies ororganizations. Private IPaddressing helps to mitigate thisproblem by allowing computersthat will never be directly connected to the Internet to not use public, Internet-routable addresses. For IP hosts that will purposefully have no direct Internet connectivity, you can use several reservednetwork numbers. In other words, any organization can use these network numbers. However, no organization is allowed to advertise these networks using a routing protocol on the Internet. Furthermore, all Internet routers should be configured to reject these routes.
Class C Subnettng: Binary Decimal CIDR---------------------------------------------------------00000000 = 255.255.255.0 /2410000000 = 255.255.255.128 /2511000000 = 255.255.255.192 /2611100000 = 255.255.255.224 /2711110000 = 255.255.255.240 /2811111000 = 255.255.255.248 /2911111100 = 255.255.255.252 /30Subnetting Steps: 1. How many subnets 2^x?2. How many hosts per subnet 2^y - 2?3. What are the valid subnets (256 - subnet_mask = each subnet block size)?4. What is the broadcast address of each subnet?5. What are valid hosts?
Example1: 192.168.10.0 = Network address255.255.255.128 = Subnet mask /251. 2^1 = 2 subnets. 2. 2^7 - 2 = 126 hosts per subnet.3. 256 - 128 = 128 block size

192.168.10.0 and 192.168.10.128 are two subnets.4. 192.168.10.127 and 192.168.10.255 are broadcast addresses.5. 192.168.10.1-126 and 192.168.10.129-254 are valid hosts.
Example2:192.168.10.0 = Network address255.255.255.252 = Subnet mask /301. 2^6 = 64 subnets. 2. 2^2 - 2 = 2 hosts per subnet.3. 256 - 252 = 4 block size.
/30 is usually used by Point-to-point WAN links.
Class B Subnetting:255.255.0.0 (/16)255.255.128.0 (/17) 255.255.255.0 (/24)255.255.192.0 (/18) 255.255.255.128 (/25)255.255.224.0 (/19) 255.255.255.192 (/26)255.255.240.0 (/20) 255.255.255.224 (/27)255.255.248.0 (/21) 255.255.255.240 (/28)255.255.252.0 (/22) 255.255.255.248 (/29)255.255.254.0 (/23) 255.255.255.252 (/30)
Example1:172.16.0.0 = Network address255.255.254.0 = Subnet mask /23
1. 2^7 = 128 subnets. 2. 2^9 - 2 = 510 hosts per subnet. 3. 256 - 254 = 2 block size.valid subnets are 0, 2, 4, 6, 8, etc., up to 254.First five subnets:
Example2:172.16.0.0 = Network address255.255.255.0 = Subnet mask /24
1. 2^8 = 256 subnets.2. 2^8 - 2 = 256 hosts per subnet.3. 256 - 255 = 1 block size.Valid subnets are 0, 1, 2, 3, etc., all the way to 255.
Example3:172.16.0.0 = Network address255.255.255.224 = Subnet mask /271. 2^11 = 2048.2. 2^5 - 2 = 30 hosts per subnet.3. 256 - 224 = 32 block size.Valid subnets are 0, 32, 64, 96, 128,160, 192, 224.

Class A Subnetting: 255.0.0.0 (/8)255.128.0.0 (/9) 255.255.240.0 (/20)255.192.0.0 (/10) 255.255.248.0 (/21)255.224.0.0 (/11) 255.255.252.0 (/22)255.240.0.0 (/12) 255.255.254.0 (/23)255.248.0.0 (/13) 255.255.255.0 (/24)255.252.0.0 (/14) 255.255.255.128 (/25)255.254.0.0 (/15) 255.255.255.192 (/26)255.255.0.0 (/16) 255.255.255.224 (/27)255.255.128.0 (/17) 255.255.255.240 (/28)255.255.192.0 (/18) 255.255.255.248 (/29)255.255.224.0 (/19) 255.255.255.252 (/30)
Example1:10.0.0.0255.255.0.0 (/16)1. Subnets? 28 = 256.2. Hosts? 216 – 2 = 65,534.3. Valid subnets? What is the interesting octet? 256 – 255 = 1. 0, 1, 2, 3, etc. (all in the second octet). The subnets would be 10.0.0.0, 10.1.0.0, 10.2.0.0, 10.3.0.0, etc., up to 10.255.0.0.
Example2:10.0.0.0255.255.240.0 (/20)1. Subnets? 212 = 4096.2. Hosts? 212 – 2 = 4094.3. Valid subnets? What is your interesting octet? 256 – 240 = 16. The subnets in the second octet area block size of 1 and the subnets in the third octet are 0, 16, 32, etc.
Example3:10.0.0.0255.255.255.192 (/26)1. Subnets? 218 = 262,144.2. Hosts? 26 – 2 = 62.3. Valid subnets? In the second andthird octet, the block size is 1, andin the fourth octet, the block size is64.
VLSM:Create many networks from a large single network using subnet masks of different lengths in various kinds of network designs is called VLSM (Variable Length Subnet Mask) networking.
192.168.10.0 = Network255.255.255.240 (/28) = Mask

Example1:
Example2:
192.168.10.0/28 - B192.168.10.16/28 - C192.168.10.32/27 - A192.168.10.64/26 - H192.168.10.128/26 - J192.168.10.192/28 - I192.168.10.208/28 - G 192.168.10.224/28 - K192.168.10.244/30 - D192.168.10.248/30 - E192.168.10.252/30 - F

Route summarization (also called route aggregation or supernetting):Example1:Let’s say we want to create the most optimal summary for the following 4 networks:192.168.0.0 / 24 subnet mask 255.255.255.0192.168.1.0 / 24 subnet mask 255.255.255.0192.168.2.0 / 24 subnet mask 255.255.255.0192.168.3.0 / 24 subnet mask 255.255.255.0Let’s convert these network addresses to binary:192.168.0.0 11000000 10101000 00000000 00000000192.168.1.0 11000000 10101000 00000001 00000000192.168.2.0 11000000 10101000 00000010 00000000192.168.3.0 11000000 10101000 00000011 00000000
Now we have to look how many bits these network addresses have in common. The first and secondoctets are the same, so that’s 16 bits.Let’s zoom in on the third octet:00000000000000010000001000000011Our summary address will be 192.168.0.0 /22 (subnet mask 255.255.252.0).
Example2:Let’s look at another example. Let’s say we want to summarize the following networks:172.16.0.0 / 16 subnet mask 255.255.0.0172.17.0.0 / 16 subnet mask 255.255.0.0172.18.0.0 / 16 subnet mask 255.255.0.0172.19.0.0 / 16 subnet mask 255.255.0.0172.20.0.0 / 16 subnet mask 255.255.0.0172.21.0.0 / 16 subnet mask 255.255.0.0172.22.0.0 / 16 subnet mask 255.255.0.0172.23.0.0 / 16 subnet mask 255.255.0.0Let’s look at it in binary first. I’ll write down the second octet since the first one is the same for all network addresses:16 0001000017 0001000118 0001001019 0001001120 0001010021 0001010122 0001011023 00010111The first 5 bits for all these addresses are the same. The first octet had 8 similar bits so that’s 8 + 5 =13 bits.The summary address will be 172.16.0.0 /13 (subnet mask will be 255.248.0.0).
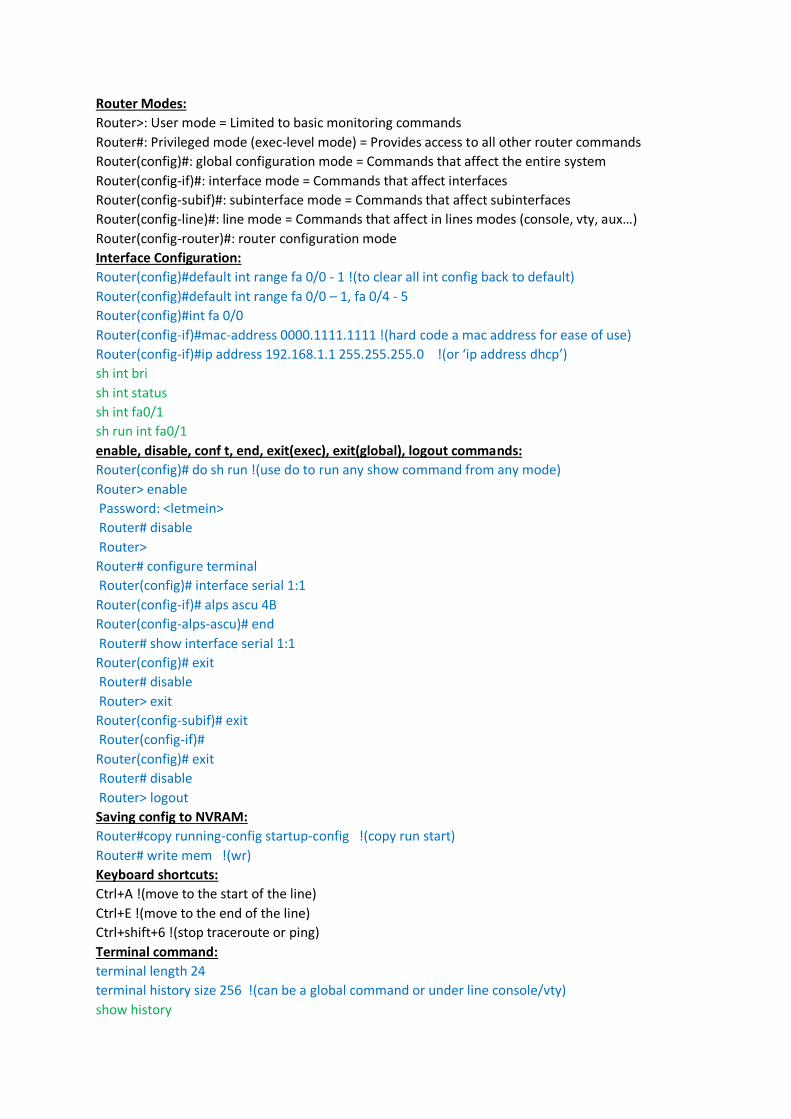
Router Modes:
Router>: User mode = Limited to basic monitoring commands
Router#: Privileged mode (exec-level mode) = Provides access to all other router commands
Router(config)#: global configuration mode = Commands that affect the entire system
Router(config-if)#: interface mode = Commands that affect interfaces
Router(config-subif)#: subinterface mode = Commands that affect subinterfaces
Router(config-line)#: line mode = Commands that affect in lines modes (console, vty, aux…)
Router(config-router)#: router configuration mode
Interface Configuration:
Router(config)#default int range fa 0/0 - 1 !(to clear all int config back to default)
Router(config)#default int range fa 0/0 – 1, fa 0/4 - 5
Router(config)#int fa 0/0
Router(config-if)#mac-address 0000.1111.1111 !(hard code a mac address for ease of use)
Router(config-if)#ip address 192.168.1.1 255.255.255.0 !(or ‘ip address dhcp’)
sh int bri
sh int status
sh int fa0/1
sh run int fa0/1
enable, disable, conf t, end, exit(exec), exit(global), logout commands:
Router(config)# do sh run !(use do to run any show command from any mode)
Router> enable
Password: <letmein>
Router# disable
Router>
Router# configure terminal
Router(config)# interface serial 1:1
Router(config-if)# alps ascu 4B
Router(config-alps-ascu)# end
Router# show interface serial 1:1
Router(config)# exit
Router# disable
Router> exit
Router(config-subif)# exit
Router(config-if)#
Router(config)# exit
Router# disable
Router> logout
Saving config to NVRAM:
Router#copy running-config startup-config !(copy run start)
Router# write mem !(wr)
Keyboard shortcuts:
Ctrl+A !(move to the start of the line)
Ctrl+E !(move to the end of the line)
Ctrl+shift+6 !(stop traceroute or ping)
Terminal command:
terminal length 24
terminal history size 256 !(can be a global command or under line console/vty)
show history

Verifying commands:
sh version
sh flash:
sh run !(default commands don't show in run)
sh start
sh post
sh arp
sh hosts
sh users !(to see the users who are loggedin to vty)
clear line vty 0 !(to clear the loggedin user on a specific line)
sh processes cpu
sh processes cpu sort !(more like top command in linux)
sh process cpu history !(utilization over time)
sh ip int bri
Pipe parameter:
sh run | include hostname
sh run | include revision| modified
sh run | section fa 0/1
sh run | begin line con 0
sh run | exclude interface
Resetting switch config:
delete flash:vlan.dat
erase start
reload !(‘reload in 5’ command will reload in 5 mins)
Configuring switch/router to use SSH:
SW1(config)#hostname SW1
SW1(config)# ip domain-name example.com !(encryption keys are associated to FQDN domain
names)
SW1(config)# username admin password cisco
SW1(config)# crypto key generate rsa
How many bits in the modulus [512]: 1024
SW1(config)# ip ssh version 2
SW1(config)# line vty 0 4
SW1(config-line)# login local !(ssh required username and password both. You must create local
username and password prior to setting this command)
SW1(config-line)# transport input telnet ssh
SW1# show crypto key mypubkey rsa
Aliases:
SW1(config)# alias exec c configure terminal
SW1(config)# alias exec s show ip interface brief
SW1(config)# alias exec sr show running-config
Capturing wireshark packets on a router and export to tftp as pcap:
R1#monitor capture 1 int fa0/0 both !(options: both | in | out)
R1#monitor capture 1 match any
R1#monitor capture 1 start
R1#monitor capture 1 export tftp://10.0.0.100/r1.marking.pcap
R1#no monitor capture 1
Test or verification by generating http traffic converting a router into a http server:

R1(config)#username ali password cisco
R1(config)#username privilege 15
R1(config)#ip http server
R1(config)#ip http authentication local
R1(config)#ip http path bootflash:
R2#copy http://ali:cisco@R1_IP/FILE_NAME null:
ping, traceroute, ssh and telnet:
R1(config)#ip telnet tos B8
R1#ping !(extended ping)
R1#ping 8.8.8.8 source fa0/0
R1#traceroute !(extended traceroute)
R1#traceroute 8.8.8.8
R1#telnet bing.com 80
R1#telnet 192.168.1.1 /source-interface loopback0
R1#ssh -l root 192.168.1.1
mac address table:
sh mac-address-table
sh mac-address-table | include 9fe7
sh mac-address-table interface fastEthernet 1/0/48
sh mac-address-table count
clear mac address-table dynamic
debug matm all !(to see everything mac address table management switch does)
ARP:
arp !('arp -a' for windows CLI)
clear ip arp
arp –a
using ACL with a debug command for tshoot:
R#access-list 1 permit host 10.0.0.2
R#debug ip packet 1 detail
Basic switch/router setup commands:
SW#setup
Switch(config)# hostname SW1
SW1(config)# enable secret cisco !(MD5 hash)
SW1(config)# enable password notcisco !(Clear text)
SW1(config)# line console 0
SW1(config-line)# password cisco
SW1(config-line)# login
SW1(config)# line vty 0 4
SW1(config-line)# password cisco
SW1(config-line)# login
SW1(config)# service password-encryption !(to encrypt all the passwords in the config, but is weak
type 7 encryption and can be cracked easily)
SW1(config)# banner motd $
-=-=-=-=-=-=-=-=-=-=-=-=-=-=-=-=-
UNAUTHORIZED ACCESS IS PROHIBITED
-=-=-=-=-=-=-=-=-=-=-=-=-=-=-=-=-
$
SW1(config)# interface vlan 1
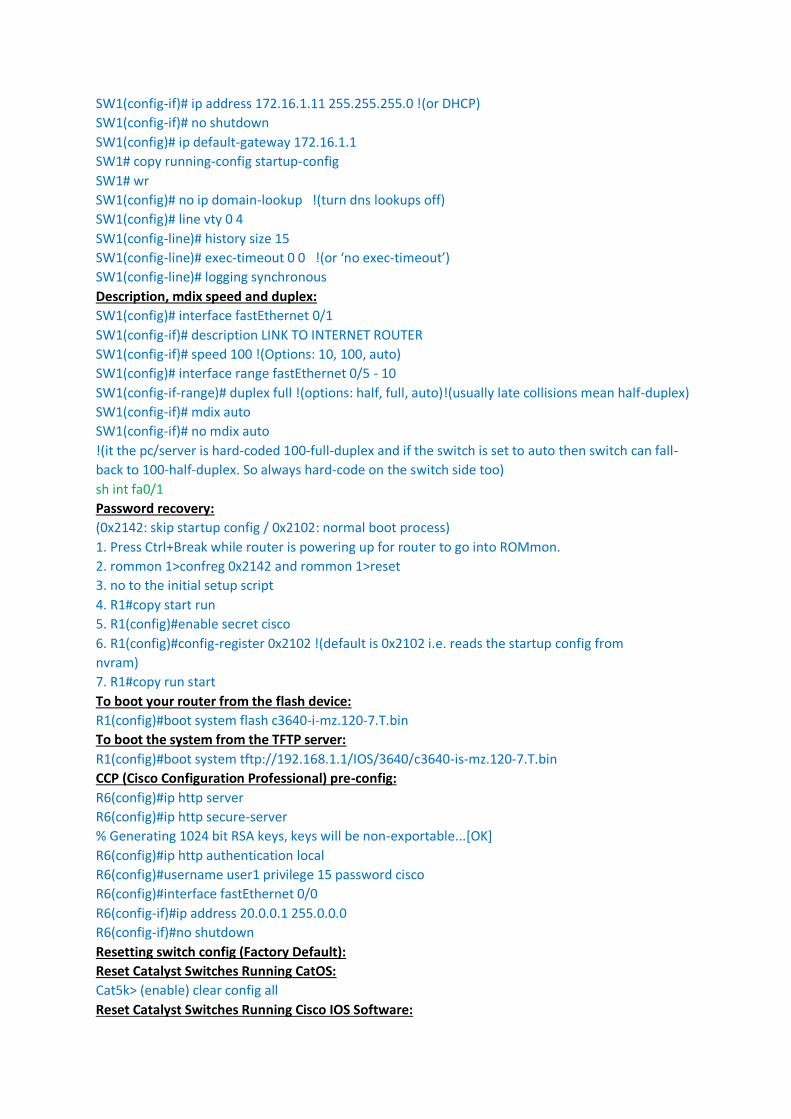
SW1(config-if)# ip address 172.16.1.11 255.255.255.0 !(or DHCP)
SW1(config-if)# no shutdown
SW1(config)# ip default-gateway 172.16.1.1
SW1# copy running-config startup-config
SW1# wr
SW1(config)# no ip domain-lookup !(turn dns lookups off)
SW1(config)# line vty 0 4
SW1(config-line)# history size 15
SW1(config-line)# exec-timeout 0 0 !(or ‘no exec-timeout’)
SW1(config-line)# logging synchronous
Description, mdix speed and duplex:
SW1(config)# interface fastEthernet 0/1
SW1(config-if)# description LINK TO INTERNET ROUTER
SW1(config-if)# speed 100 !(Options: 10, 100, auto)
SW1(config)# interface range fastEthernet 0/5 - 10
SW1(config-if-range)# duplex full !(options: half, full, auto)!(usually late collisions mean half-duplex)
SW1(config-if)# mdix auto
SW1(config-if)# no mdix auto
!(it the pc/server is hard-coded 100-full-duplex and if the switch is set to auto then switch can fall-
back to 100-half-duplex. So always hard-code on the switch side too)
sh int fa0/1
Password recovery:
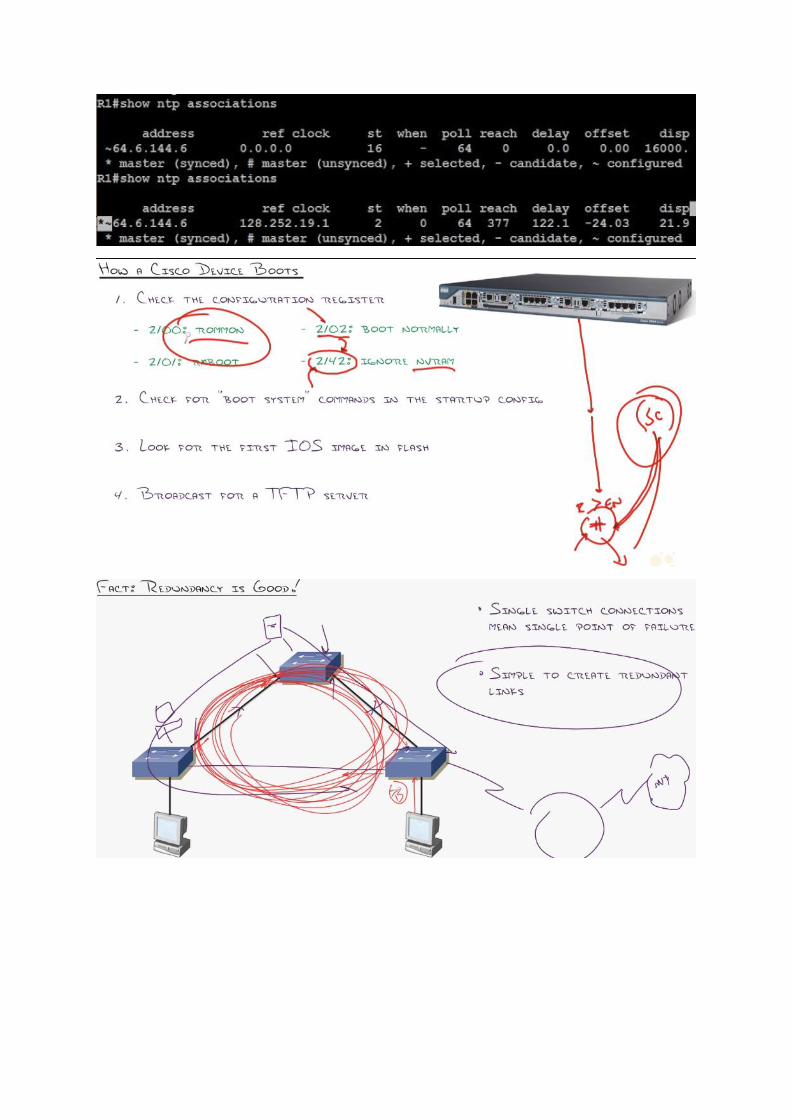
(0x2142: skip startup config / 0x2102: normal boot process)
1. Press Ctrl+Break while router is powering up for router to go into ROMmon.
2. rommon 1>confreg 0x2142 and rommon 1>reset
3. no to the initial setup script
4. R1#copy start run
5. R1(config)#enable secret cisco
6. R1(config)#config-register 0x2102 !(default is 0x2102 i.e. reads the startup config from
nvram)
7. R1#copy run start
To boot your router from the flash device:
R1(config)#boot system flash c3640-i-mz.120-7.T.bin
To boot the system from the TFTP server:
R1(config)#boot system tftp://192.168.1.1/IOS/3640/c3640-is-mz.120-7.T.bin
CCP (Cisco Configuration Professional) pre-config:
R6(config)#ip http server
R6(config)#ip http secure-server
% Generating 1024 bit RSA keys, keys will be non-exportable...[OK]
R6(config)#ip http authentication local
R6(config)#username user1 privilege 15 password cisco
R6(config)#interface fastEthernet 0/0
R6(config-if)#ip address 20.0.0.1 255.0.0.0
R6(config-if)#no shutdown
Resetting switch config (Factory Default):
Reset Catalyst Switches Running CatOS:
Cat5k> (enable) clear config all
Reset Catalyst Switches Running Cisco IOS Software:
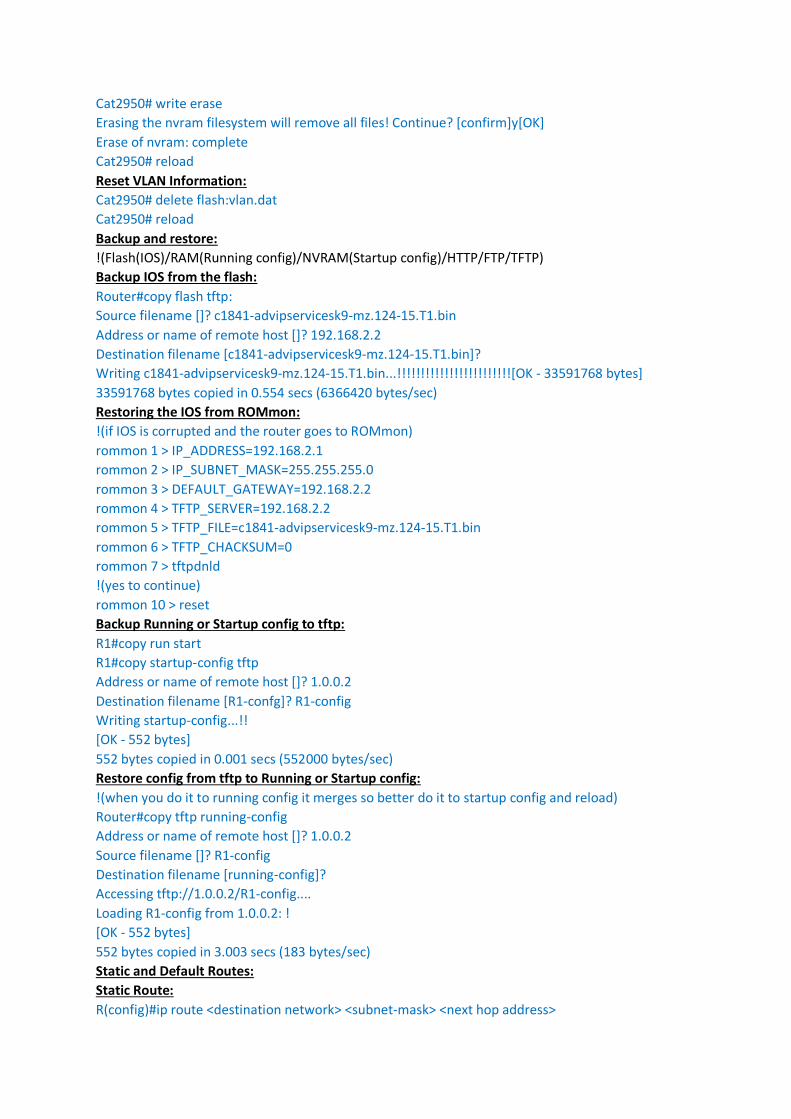
Cat2950# write erase
Erasing the nvram filesystem will remove all files! Continue? [confirm]y[OK]
Erase of nvram: complete
Cat2950# reload
Reset VLAN Information:
Cat2950# delete flash:vlan.dat
Cat2950# reload
Backup and restore:
!(Flash(IOS)/RAM(Running config)/NVRAM(Startup config)/HTTP/FTP/TFTP)
Backup IOS from the flash:
Router#copy flash tftp:
Source filename []? c1841-advipservicesk9-mz.124-15.T1.bin
Address or name of remote host []? 192.168.2.2
Destination filename [c1841-advipservicesk9-mz.124-15.T1.bin]?
Writing c1841-advipservicesk9-mz.124-15.T1.bin...!!!!!!!!!!!!!!!!!!!!!!!![OK - 33591768 bytes]
33591768 bytes copied in 0.554 secs (6366420 bytes/sec)
Restoring the IOS from ROMmon:
!(if IOS is corrupted and the router goes to ROMmon)
rommon 1 > IP_ADDRESS=192.168.2.1
rommon 2 > IP_SUBNET_MASK=255.255.255.0
rommon 3 > DEFAULT_GATEWAY=192.168.2.2
rommon 4 > TFTP_SERVER=192.168.2.2
rommon 5 > TFTP_FILE=c1841-advipservicesk9-mz.124-15.T1.bin
rommon 6 > TFTP_CHACKSUM=0
rommon 7 > tftpdnld
!(yes to continue)
rommon 10 > reset
Backup Running or Startup config to tftp:
R1#copy run start
R1#copy startup-config tftp
Address or name of remote host []? 1.0.0.2
Destination filename [R1-confg]? R1-config
Writing startup-config...!!
[OK - 552 bytes]
552 bytes copied in 0.001 secs (552000 bytes/sec)
Restore config from tftp to Running or Startup config:
!(when you do it to running config it merges so better do it to startup config and reload)
Router#copy tftp running-config
Address or name of remote host []? 1.0.0.2
Source filename []? R1-config
Destination filename [running-config]?
Accessing tftp://1.0.0.2/R1-config....
Loading R1-config from 1.0.0.2: !
[OK - 552 bytes]
552 bytes copied in 3.003 secs (183 bytes/sec)
Static and Default Routes:
Static Route:
R(config)#ip route <destination network> <subnet-mask> <next hop address>
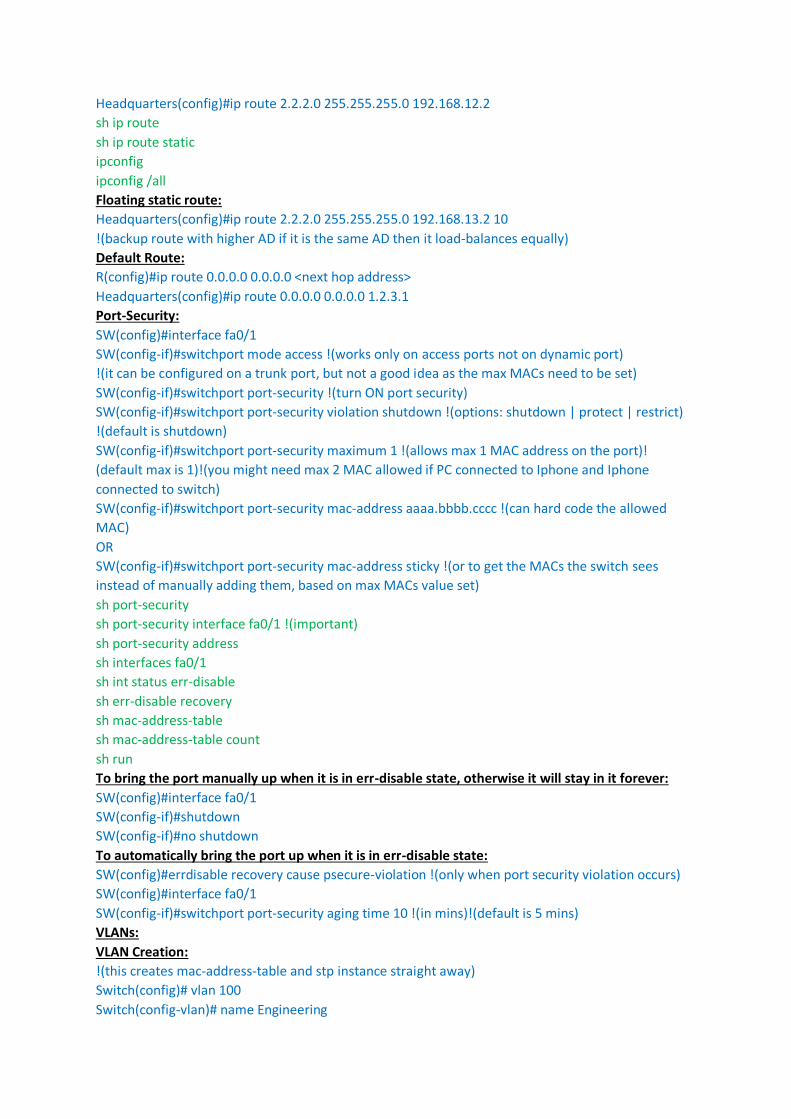
Headquarters(config)#ip route 2.2.2.0 255.255.255.0 192.168.12.2
sh ip route
sh ip route static
ipconfig
ipconfig /all
Floating static route:
Headquarters(config)#ip route 2.2.2.0 255.255.255.0 192.168.13.2 10
!(backup route with higher AD if it is the same AD then it load-balances equally)
Default Route:
R(config)#ip route 0.0.0.0 0.0.0.0 <next hop address>
Headquarters(config)#ip route 0.0.0.0 0.0.0.0 1.2.3.1
Port-Security:
SW(config)#interface fa0/1
SW(config-if)#switchport mode access !(works only on access ports not on dynamic port)
!(it can be configured on a trunk port, but not a good idea as the max MACs need to be set)
SW(config-if)#switchport port-security !(turn ON port security)
SW(config-if)#switchport port-security violation shutdown !(options: shutdown | protect | restrict)
!(default is shutdown)
SW(config-if)#switchport port-security maximum 1 !(allows max 1 MAC address on the port)!
(default max is 1)!(you might need max 2 MAC allowed if PC connected to Iphone and Iphone
connected to switch)
SW(config-if)#switchport port-security mac-address aaaa.bbbb.cccc !(can hard code the allowed
MAC)
OR
SW(config-if)#switchport port-security mac-address sticky !(or to get the MACs the switch sees
instead of manually adding them, based on max MACs value set)
sh port-security
sh port-security interface fa0/1 !(important)
sh port-security address
sh interfaces fa0/1
sh int status err-disable
sh err-disable recovery
sh mac-address-table
sh mac-address-table count
sh run
To bring the port manually up when it is in err-disable state, otherwise it will stay in it forever:
SW(config)#interface fa0/1
SW(config-if)#shutdown
SW(config-if)#no shutdown
To automatically bring the port up when it is in err-disable state:
SW(config)#errdisable recovery cause psecure-violation !(only when port security violation occurs)
SW(config)#interface fa0/1
SW(config-if)#switchport port-security aging time 10 !(in mins)!(default is 5 mins)
VLANs:
VLAN Creation:
!(this creates mac-address-table and stp instance straight away)
Switch(config)# vlan 100
Switch(config-vlan)# name Engineering

!(This method is the only way to configure extended range VLANs as opposed to database mode)
!(Normal VLAN 1-1005. Extended VLAN(1006-4094) transparent mode or V3.Internal 1002-1005)
sh vlan
VLAN database mode (is being deprecated):
Switch#vlan database
Switch(vlan)#vlan 4 name sales
Switch(vlan)#apply
Switch(vlan)#exit
Access Port Configuration (Assigning a port to an access VLAN):
Switch(config-if)# switchport mode access !(can belong only to one VLAN. Will not send DTP)
!(It is good security measure to disable DTP/trunk negotiation on unused ports)
Switch(config-if)# switchport access vlan 100
Switch(config-if)# switchport voice vlan 150 !(options: vlan-id | dot1p | untagged | none)
!(You can configure the switch port, which is connected to an IP Phone, to use one VLAN for voice
traffic and another VLAN for data traffic originating from a device that is connected to the access
port of the IP Phone)
Trunk (tagged) Port Configuration:
!(Trunk port can be connected to a server, switch or a router)
Switch(config-if)# switchport trunk encapsulation dot1q !(do this first before making it a trunk)
OR
Switch(config-if)# switchport trunk encapsulation isl !(not all switches support this anymore)
Switch(config-if)# switchport mode trunk !(transmits DTP messages as courtesy)
Switch(config-if)# switchport nonegotiate !(will not send DTP messages even it is a trunk port)
Switch(config-if)# switchport trunk native vlan 10
!(any traffic that is not a part of any vlan on a trunk is put under native vlan e.g. cdp traffic)
!(it is a good security measure to change the native vlan to something other than VLAN 1)
sh int fa0/1 switchport
Allowed VLANs on the trunk:
Switch(config-if)# switchport trunk allowed vlan 10,20-30 !(these are the only allowed. Careful!)
Switch(config-if)#switchport trunk allowed vlan remove 1- 4094
Switch(config-if)#switchport trunk allowed vlan add 1-50 !(adds to the previous ones)
Switch(config-if)#switchport trunk allowed vlan none
Switch(config-if)#switchport trunk allowed vlan all !(default so won't see in show run)
Trunk Negotiation (DTP Negotiation):
1. dynamic auto and dynamic desirable.
Switch(config-if)#switchport mode dynamic auto
OR
Switch(config-if)#switchport mode dynamic desirable
sh vlan !(only shows interfaces in access mode and no trunk interfaces)
sh vlan bri
sh ip int bri
sh vlan bri vlan 10
sh int trunk !(shows trunk interfaces in use and allowed vlans)
sh int fa0/14 trunk !(shows allowed vlans on a trunk. Also shows native vlan)
sh int fa0/1 switchport !(see the operational and admin modes of a port. Also trunk encapsulation)
sh vlan id 2
sh vlan name sales
sh int vlan 1
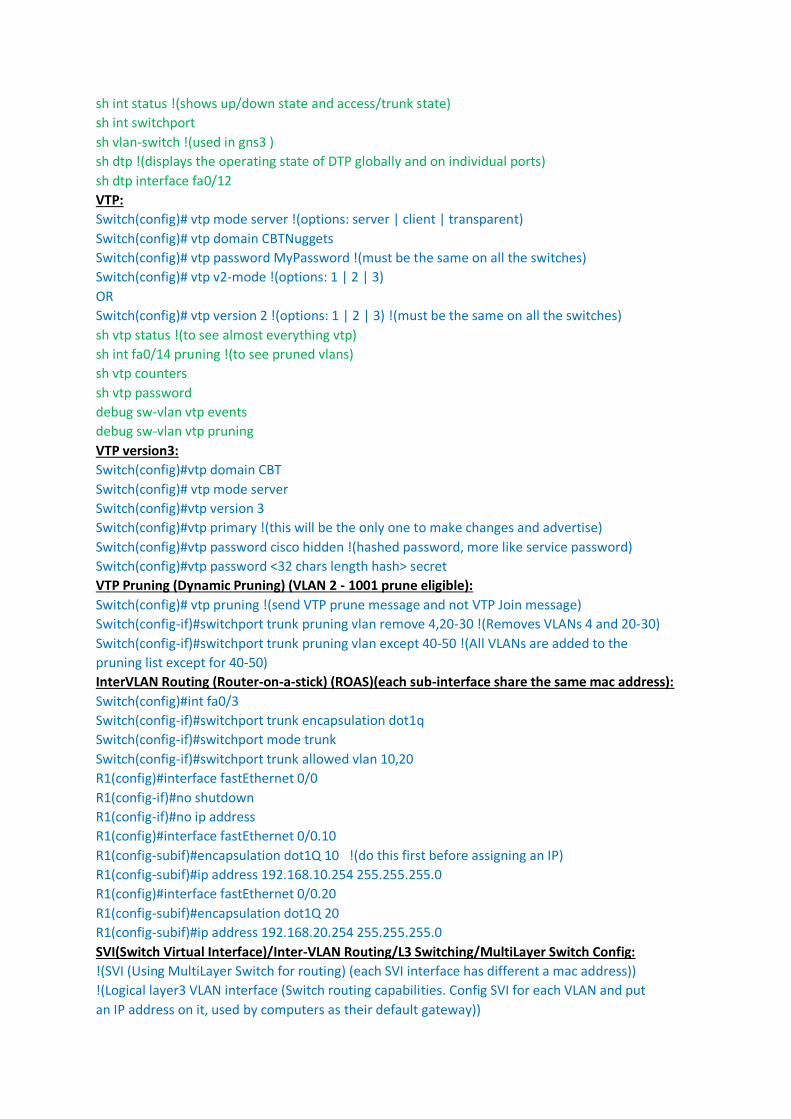
sh int status !(shows up/down state and access/trunk state)
sh int switchport
sh vlan-switch !(used in gns3 )
sh dtp !(displays the operating state of DTP globally and on individual ports)
sh dtp interface fa0/12
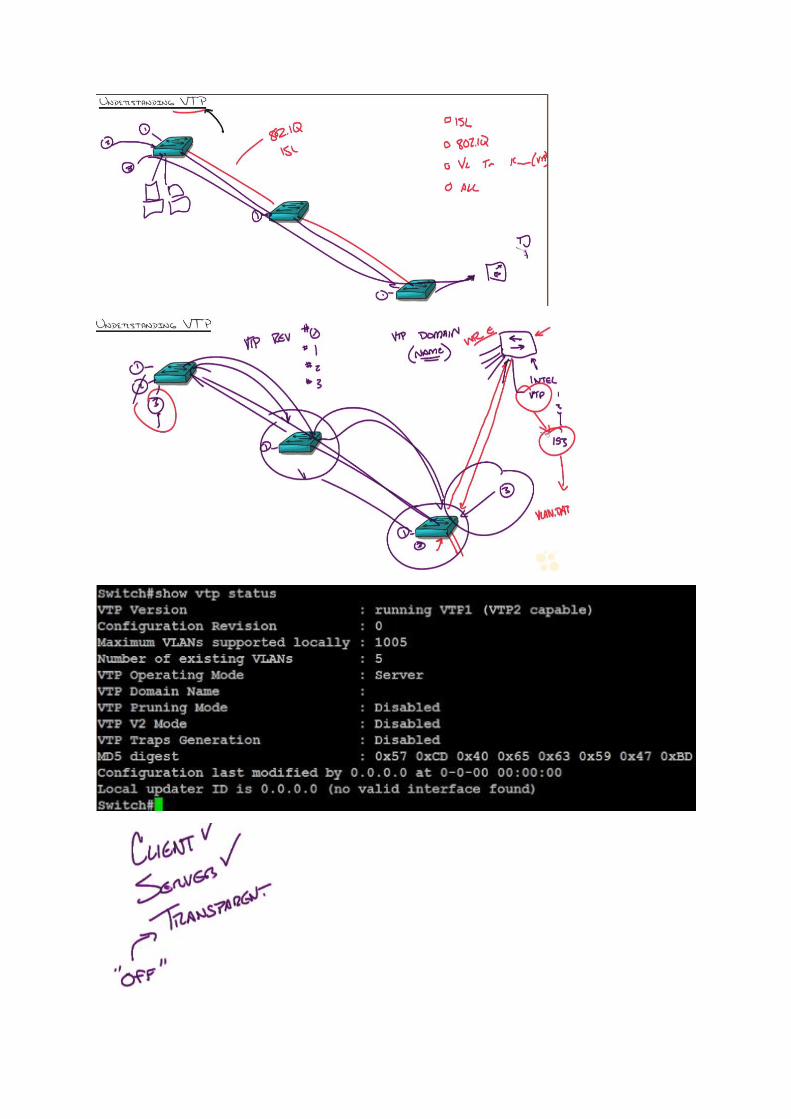
VTP:
Switch(config)# vtp mode server !(options: server | client | transparent)
Switch(config)# vtp domain CBTNuggets
Switch(config)# vtp password MyPassword !(must be the same on all the switches)
Switch(config)# vtp v2-mode !(options: 1 | 2 | 3)
OR
Switch(config)# vtp version 2 !(options: 1 | 2 | 3) !(must be the same on all the switches)
sh vtp status !(to see almost everything vtp)
sh int fa0/14 pruning !(to see pruned vlans)
sh vtp counters
sh vtp password
debug sw-vlan vtp events
debug sw-vlan vtp pruning
VTP version3:
Switch(config)#vtp domain CBT
Switch(config)# vtp mode server
Switch(config)#vtp version 3
Switch(config)#vtp primary !(this will be the only one to make changes and advertise)
Switch(config)#vtp password cisco hidden !(hashed password, more like service password)
Switch(config)#vtp password <32 chars length hash> secret
VTP Pruning (Dynamic Pruning) (VLAN 2 - 1001 prune eligible):
Switch(config)# vtp pruning !(send VTP prune message and not VTP Join message)
Switch(config-if)#switchport trunk pruning vlan remove 4,20-30 !(Removes VLANs 4 and 20-30)
Switch(config-if)#switchport trunk pruning vlan except 40-50 !(All VLANs are added to the
pruning list except for 40-50)
InterVLAN Routing (Router-on-a-stick) (ROAS)(each sub-interface share the same mac address):
Switch(config)#int fa0/3
Switch(config-if)#switchport trunk encapsulation dot1q
Switch(config-if)#switchport mode trunk
Switch(config-if)#switchport trunk allowed vlan 10,20
R1(config)#interface fastEthernet 0/0
R1(config-if)#no shutdown
R1(config-if)#no ip address
R1(config)#interface fastEthernet 0/0.10
R1(config-subif)#encapsulation dot1Q 10 !(do this first before assigning an IP)
R1(config-subif)#ip address 192.168.10.254 255.255.255.0
R1(config)#interface fastEthernet 0/0.20
R1(config-subif)#encapsulation dot1Q 20
R1(config-subif)#ip address 192.168.20.254 255.255.255.0
SVI(Switch Virtual Interface)/Inter-VLAN Routing/L3 Switching/MultiLayer Switch Config:
!(SVI (Using MultiLayer Switch for routing) (each SVI interface has different a mac address))
!(Logical layer3 VLAN interface (Switch routing capabilities. Config SVI for each VLAN and put
an IP address on it, used by computers as their default gateway))
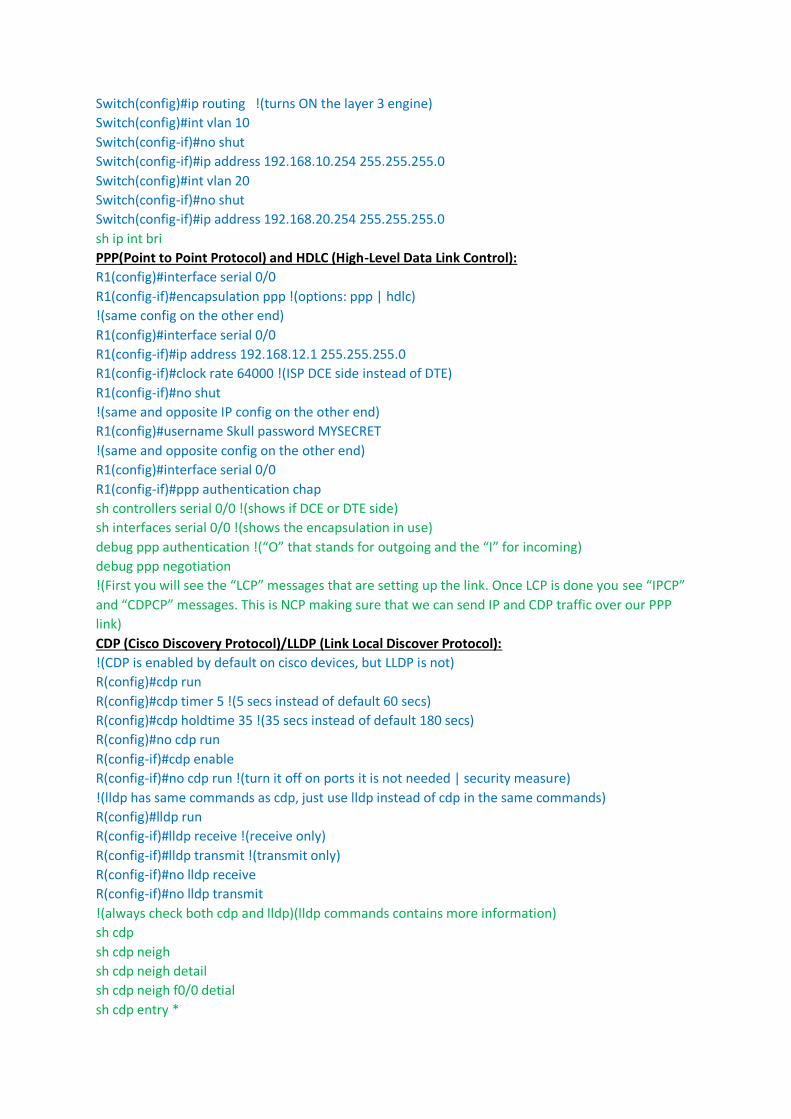
Switch(config)#ip routing !(turns ON the layer 3 engine)
Switch(config)#int vlan 10
Switch(config-if)#no shut
Switch(config-if)#ip address 192.168.10.254 255.255.255.0
Switch(config)#int vlan 20
Switch(config-if)#no shut
Switch(config-if)#ip address 192.168.20.254 255.255.255.0
sh ip int bri
PPP(Point to Point Protocol) and HDLC (High-Level Data Link Control):
R1(config)#interface serial 0/0
R1(config-if)#encapsulation ppp !(options: ppp | hdlc)
!(same config on the other end)
R1(config)#interface serial 0/0
R1(config-if)#ip address 192.168.12.1 255.255.255.0
R1(config-if)#clock rate 64000 !(ISP DCE side instead of DTE)
R1(config-if)#no shut
!(same and opposite IP config on the other end)
R1(config)#username Skull password MYSECRET
!(same and opposite config on the other end)
R1(config)#interface serial 0/0
R1(config-if)#ppp authentication chap
sh controllers serial 0/0 !(shows if DCE or DTE side)
sh interfaces serial 0/0 !(shows the encapsulation in use)
debug ppp authentication !(“O” that stands for outgoing and the “I” for incoming)
debug ppp negotiation
!(First you will see the “LCP” messages that are setting up the link. Once LCP is done you see “IPCP”
and “CDPCP” messages. This is NCP making sure that we can send IP and CDP traffic over our PPP
link)
CDP (Cisco Discovery Protocol)/LLDP (Link Local Discover Protocol):
!(CDP is enabled by default on cisco devices, but LLDP is not)
R(config)#cdp run
R(config)#cdp timer 5 !(5 secs instead of default 60 secs)
R(config)#cdp holdtime 35 !(35 secs instead of default 180 secs)
R(config)#no cdp run
R(config-if)#cdp enable
R(config-if)#no cdp run !(turn it off on ports it is not needed | security measure)
!(lldp has same commands as cdp, just use lldp instead of cdp in the same commands)
R(config)#lldp run
R(config-if)#lldp receive !(receive only)
R(config-if)#lldp transmit !(transmit only)
R(config-if)#no lldp receive
R(config-if)#no lldp transmit
!(always check both cdp and lldp)(lldp commands contains more information)
sh cdp
sh cdp neigh
sh cdp neigh detail
sh cdp neigh f0/0 detial
sh cdp entry *

sh cdp entry SW*
sh cdp int
sh cdp int fa0/0 !(shows set timers)
sh cdp traffic
STP:
!(STP(802.1d)/PVST+/RSTP(802.1w)/RPVST/MST)
!([BPDU:BridgePriority(32768)+MAC])
!(STP: RootPorts->DesignatedPorts->BlockingPorts)
!(All RootBridgePorts are DP and One DP per link)
!(ElectRoot->RootPorts(LowestCost/LowestBrdigeID/LowestPortNumber)->BlockTheRest)
!(Costs: 100Mbps=19/1Gbps=4/10Gbps=2)
!(STP Timers:Block20sec/Listen15sec/Learn15sec/Forward)
!(RSTP: RootPorts->DesignatedPorts->AlternatePorts)
Change BPDU default timers:
SwitchA(config)#spanning-tree vlan 10 hello-time 1 !(1sec/default 2sec)
SwitchB(config)#spanning-tree vlan 20 max-age 6 !(6sec/default 20sec)
SwitchC(config)#spanning-tree vlan 30 forward-time 4 !(4sec/default 15sec)
Change Root Bridge:
SwitchA(config)#spanning-tree vlan 1 root primary !(hard code a root bridge)
!(This is a macro that looks at the current priority of the root bridge and changes your running-config
to lower your own priority. Based on VLAN number)
OR
SwitchA(config)#spanning-tree vlan 1 priority 4096 !(hard code priority. multiple of 4096)
Change Root Port/Non-Designated Port:
SwitchB(config)#interface fa0/14
SwitchB(config-if)#spanning-tree cost 500
!(can be used to change the cost of root port to get a different root port chosen)
OR
SwitchA(config)#interface fa0/14
SwitchA(config-if)#spanning-tree port-priority 16
!(can be used to change the port priority to get a different root port chosen)
PortFast:
!(To avoid spanning tree calculations and disable STP for connections to PCs)
SwitchB(config)interface fa0/2
SwitchB(config-if)#spanning-tree portfast !(configured on access ports)
SwitchB(config)#spanning-tree portfast default !(can be enabled globally for all access mode ports)
Enable Rapid-PVST:
SwitchA(config)#spanning-tree mode rapid-pvst !(to enable rapid spanning-tree protocol)
sh spa !(important)
sh spa | begin int
sh spa summary !(stp mode, portfast, bpdu guard/filter, loopguard, uplink/backbone fast)
sh spa detail !(to see number of topology changes and the int it is happening on)
sh run | inc priority
sh spa vlan 10
sh mac address-table dynamic !(to verify traffic path. Port on which mac was learnt)
sh mac address-table aging-time
sh spa inconsistentports !(to see when root guard is working)
debug spa

debug spa events !(to see topology change notifications)
debug spa backbonefast detail
debug spa bpdu ACLs:
sh access-lists
sh ip access-lists
sh access-lists 1
sh ip access-lists 1
sh access-lists ACL_NAME1
sh ip access-lists ACL_NAME1
sh ip access-lists interface fa0/0
sh ip int fa0/0
sh time-range
sh time-range ACL_NAME1
sh run | inc access-list Standard Access List:
!(Standard Access List close to the destination are best)
R1(config)#access-list 1 permit 10.0.0.0 0.255.255.255
R1(config)#access-list 1 deny host 10.0.0.1 log
R1(config)#access-list 1 permit any any !(don't forget this as there is a default deny at the end)
Extended Access list:
!(Extended Access lists closer to the source are best)
R1(config)#access-list 101 permit tcp 10.0.0.0 0.255.255.255 187.100.1.6 0.0.0.0 eq 20
!(187.100.1.6 0.0.0.0 is the same as host 187.100.1.6)
R1(config)#access-list 101 deny tcp any eq 22 host 10.0.0.1 range 22 23
R1(config)#access-list 101 permit ip any any dscp cs2
Apply this ACL to an interface:
R1(config)#interface Fa0/1
R1(config-if)#ip access-group 1 out
OR
R1(config)#interface Fa0/0
R1(config-if)#ip access-group 1 in
Named ACLs:
R(config)#ip access-list extended MyACL
R(config-ext-nacl)#100 permit ip host 1.1.1.1 any
Edit and Insert Lines in ACLs:
R(config)#ip access-list extended MyACL
R(config-ext-nacl)#no 500
R(config-ext-nacl)#500 permit ip any host 5.5.5.5
R(config-ext-nacl)#510 permit ip any host 6.6.6.6
Time-based ACLs:
R(config)#time-range TR_WORKDAYS
R(config-time-range)#periodic weekdays 08:00 to 19:00
!(Don't configure NTP unless mentioned in the LAB)
R(config)#ip access-list extended 100
R(config-ext-nacl)#27 permit tcp any any eq www time-range TR_WORKDAYS
Block pings with acls:
access-list 100 deny icmp any any echo

access-list 100 deny icmp any any echo-reply
access-list 100 permit ip any any
OR
access-list 101 deny icmp host 192.168.1.51 host 192.168.1.34 echo
access-list 100 permit ip any any
ACL log keyword:
R1(config)# ip access-list extended Block_SSH
R1(config-ext-nacl)# no 10
R1(config-ext-nacl)# 10 deny tcp any any eq 22 log
Vty lines ACL (block/allow telnet/ssh):
R1(config)#ip access-list extended VTY_ACCESS
R1(config-ext-nacl)#20 permit tcp 10.1.1.0 0.0.0.255 any eq 22
R1(config-ext-nacl)#30 permit tcp 10.1.1.0 0.0.0.255 any eq 23
R1(config-ext-nacl)#500 deny ip any any log
R1(config-ext-nacl)#line vty 0 4
R1(config-line)#access-class VTY_ACCESS in
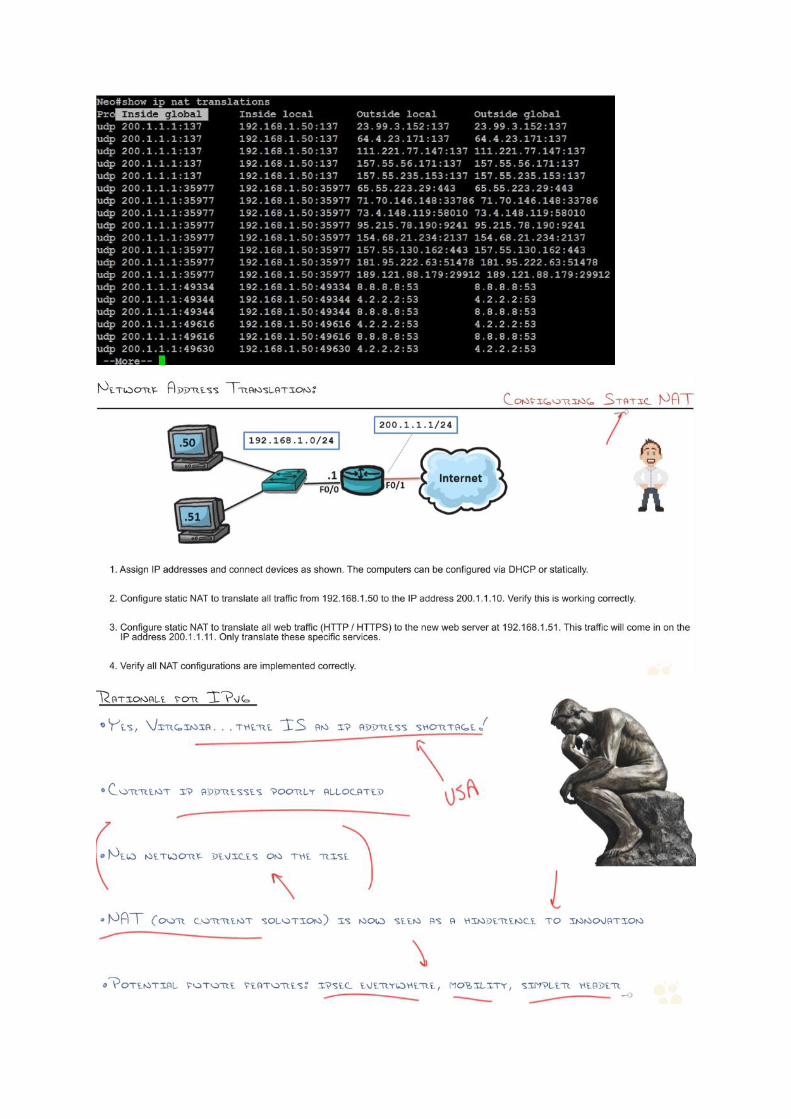
NAT:
1. ACL to identify the addresses to be translated
2. Set inside and outside interfaces
3. Define nat operations
sh nat translations
netstat
sh run | inc ip nat
sh ip nat trans verbose
sh ip nat stat
clear ip nat translation *
debug ip nat
Define the traffic to match:
R(config)#access-list 10 permit 10.0.0.0 0.0.255.255 !(ACL to match)
Static NAT: (Note: two way NAT. Just like a port-forward so be careful)
R(config)#ip nat inside source static 10.0.0.19 192.0.2.1
OR
R(config)#ip nat outside source static 192.0.2.1 10.0.0.19
R(config)#ip nat inside source static tcp 10.0.0.3 80 192.0.2.1 80
R(config)#ip nat inside source static tcp 10.0.0.3 443 192.0.2.1 443
Dynamic NAT:
R(config)#ip nat pool MyPool 192.0.2.1 192.0.2.254 prefix-length 24 !(Public IP pools)
R(config)#ip nat inside source list 10 pool MyPool !(actual NAT rule)
R(config)#ip nat inside source static 10.0.0.42 192.0.2.42 !(can be combined with static)
PAT:
R(config)#ip nat inside source static tcp 10.0.0.3 80 192.0.2.1 80
R(config)#ip nat inside source static tcp 10.0.0.3 443 192.0.2.1 443
R(config)#ip nat inside source static tcp 10.0.0.10 3389 192.0.2.1 3389
R(config)#ip nat inside source static tcp 10.0.0.11 3389 192.0.2.1 3390
R(config)#ip nat inside source list 10 pool MyPool overload
OR
R(config)#ip nat inside source list 10 interface FastEthernet 0/0 overload
Identify interfaces: (Note: should be the last step, especially in a production network)
R(config)#int fa0/0
R(config-if)#ip address dhcp !(ISP assigned IP for external interface)
R(config-if)#ip nat outside
R(config)#int fa0/1
R(config-if)#ip address 192.168.1.1
R(config-if)#ip nat nat inside
Syslog (splunk/kiwi)(port udp 514):
Router(config)#ntp server pool.ntp.org
Router(config)#no service timestamps !(you can disable timestamps and use sequence numbers)
Router(config)#service sequence-numbers
Router(config)#logging console errors !(severity level 3 and lower)
!(This logging information is saved in the RAM of your device. Once you reboot it you will lose this
logging history)
Router(config)#terminal monitor !(if you want to see syslog messages on vty sessiosn when your
on vty)
Router(config)#logging buffered 4096 !(buffer size in bytes)
Router(config)#logging 192.168.1.100 !(all logging sent to the syslog server except level 7)
Router(config)#logging trap 7 !(this will sent also the debug info to the syslog server)
R1(config)# logging host 192.168.1.25 !(sending it to a syslog server e.g. kiwi syslog server)
R1(config)# logging source-interface Loopback0
R1(config)# logging trap notifications
R1(config)# no logging console
sh logging !(to see logging information)
sh logging history !(to see the set severity level)
sh ntp status !(to see if clock is synchronized)
NTP:
Clock commands:
R1# clock set 14:12:00 10 feb 2005
R1(config)# clock timezone ARIZONA -7
sh clock
NTP config:
R1(config)# ntp server 1.gr.pool.ntp.org
sh ntp associations
Use the router as an NTP server:
R1(config)# ntp master
SNMP (Simple Network Management Protocol):
!(PRTG is well-known)
Router(config)#snmp-server community MY_STRING ro 10 !(options: ro | rw)
Router(config)#access-list 10 permit host 192.168.1.2
Router(config)#snmp-server location Amsterdam
Router(config)#snmp-server contact [email protected]
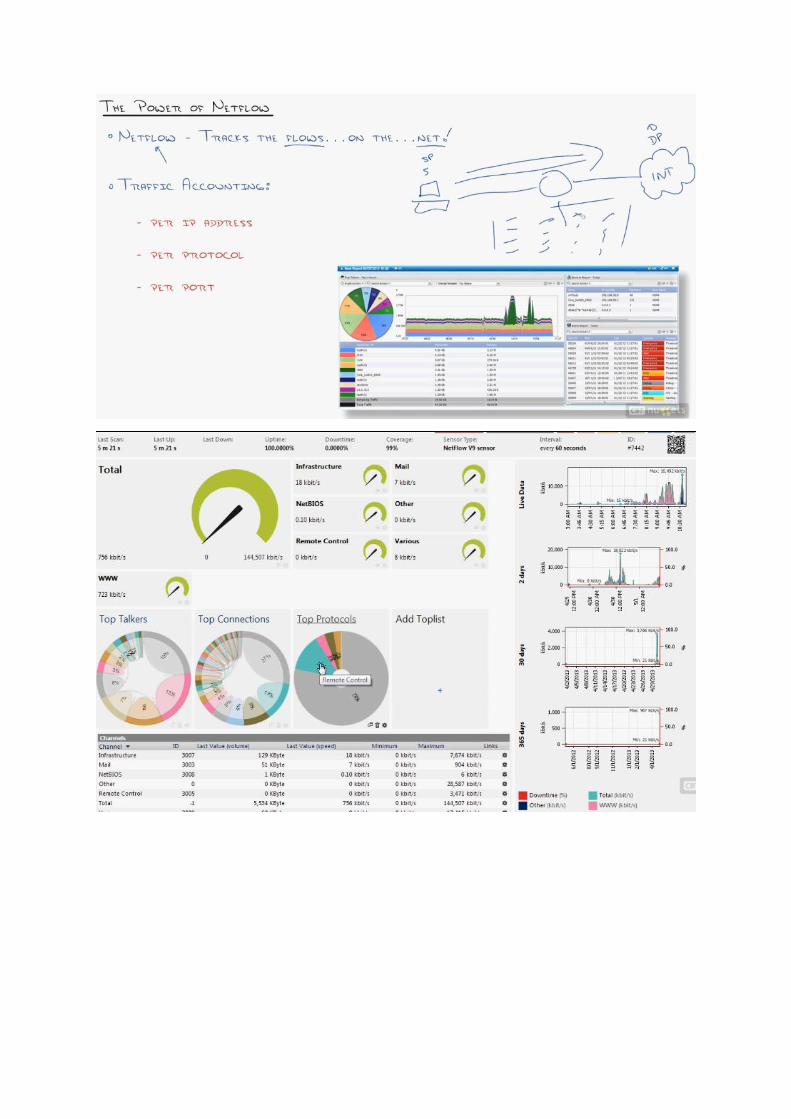
Netflow:
Router(config)#interface fastEthernet 0/0 !(the direction to monitor)
Router(config-if)#ip flow ingress
Router(config-if)#ip flow egress
Router(config)#ip flow-export version 9 !(netflow version)
Router(config)#ip flow-export destination 192.168.1.2 100 !(netflow collector)
sh ip cache flow !(shows you netflow is working) DHCP (Dynamic Host configuration protocol):
R1(config)# service dhcp
R1(config)# ip dhcp pool NET-POOL
R1(dhcp-config)# network 192.168.1.0 255.255.255.0 !(you can use prefix notation with it)
R1(dhcp-config)# default-router 192.168.1.1
R1(dhcp-config)# dns-server 8.8.8.8 8.8.4.4
R1(dhcp-config)# domain-name company1.com
R1(dhcp-config)# lease 9 !(9 days/default is 1 day)
OR
R1(dhcp-config)# lease 0 4 30 !(set the lease time for 4 hours and 30 minutes)
R1(config)# ip dhcp excluded-address 192.168.1.1 192.168.1.5
R1(config)# ip dhcp excluded-address 192.168.1.10
sh ip dhcp binding
ipconfig /release
ipconfig /renew
Cisco DHCP Option 150 Configuration:
R1(config)# ip dhcp pool NET-POOL
R1(dhcp-config)# option 150 ip 10.10.22.99 10.10.22.100 !(Configure 2 IPs)
DHCP Relay:
R1(config)#int fa0/0.52
R1(config-subif)#ip helper-address 10.1.51.200
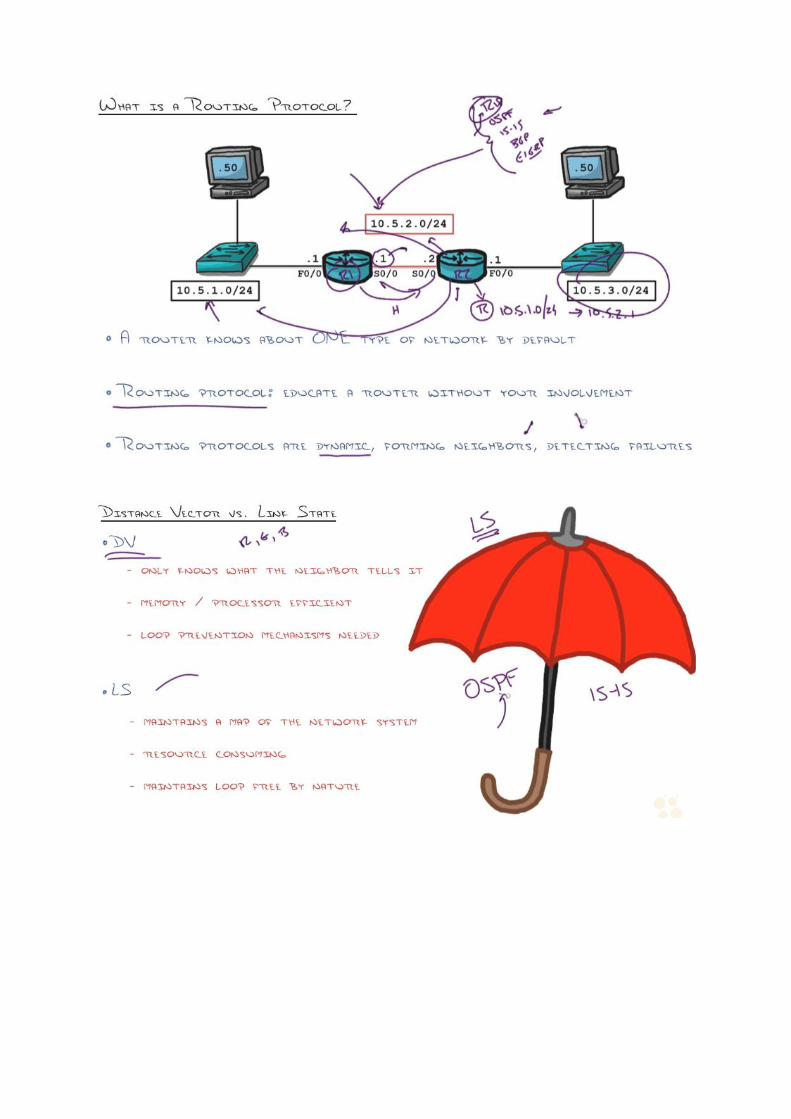
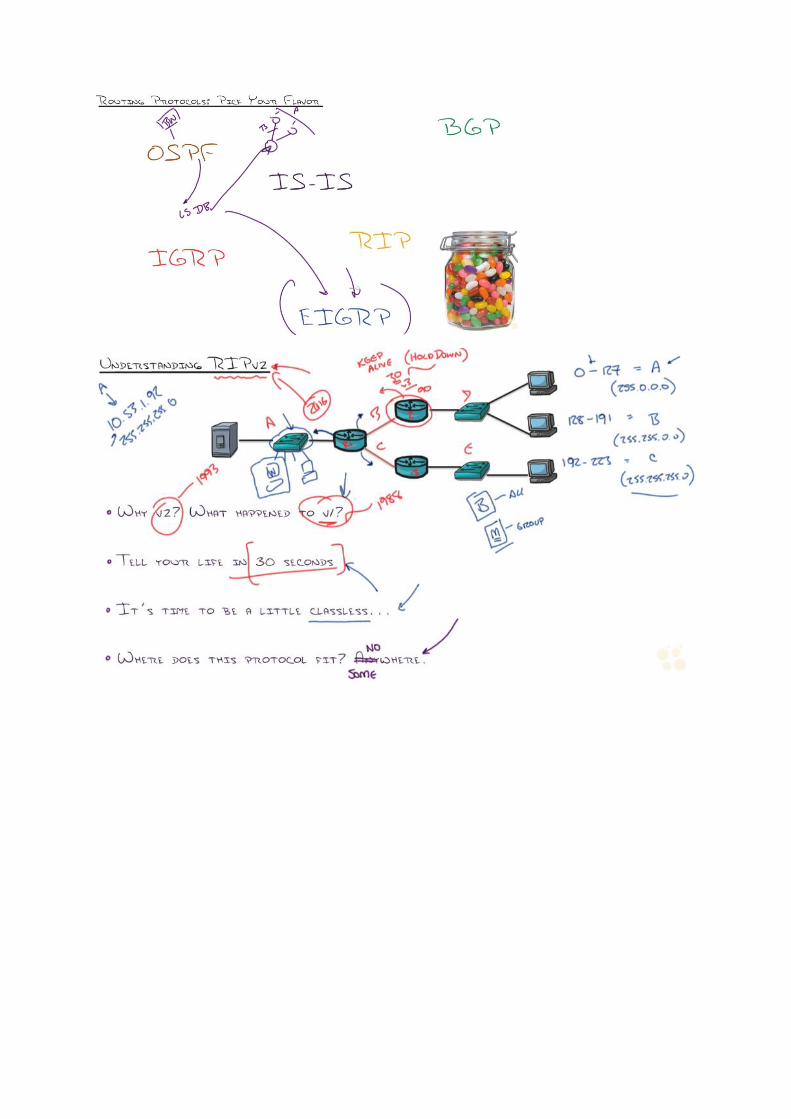
RIP (AD is 120 and metric is hop-count):
!(Distance Vector(DV): 1. Max Distance(16hops)/2.RoutePoison/3.TriggeredUpdates/
4.SplitHorizon/5.HoldDownTimers)
R1(config)#router rip
R1(config-router)#network 192.168.12.0 !(network command tells what network to advertise and
what interfaces to send advertisements out)
R1(config-router)#network 172.16.1.0
R1(config-router)#version 2
R1(config-router)#no auto-summary
R2(config)#router rip
R2(config-router)#network 192.168.12.0
R2(config-router)#network 192.168.23.0
R2(config-router)#version 2
R2(config-router)#no auto-summary
R3(config)#router rip
R3(config-router)#network 172.16.0.0
R3(config-router)#network 192.168.23.0
R3(config-router)#version 2
R3(config-router)#no auto-summary
sh ip route
sh ip route rip !(R NETWORK [AD/METRIC] via NEXT_HOP, TIME_LEARNT, EXIT_INTERFACE)
sh ip protocols
sh ip rip database
debug ip rip
sh ipv6 route
sh ipv6 route rip

sh ipv6 protocols
sh ipv6 rip database
debug ipv6 rip
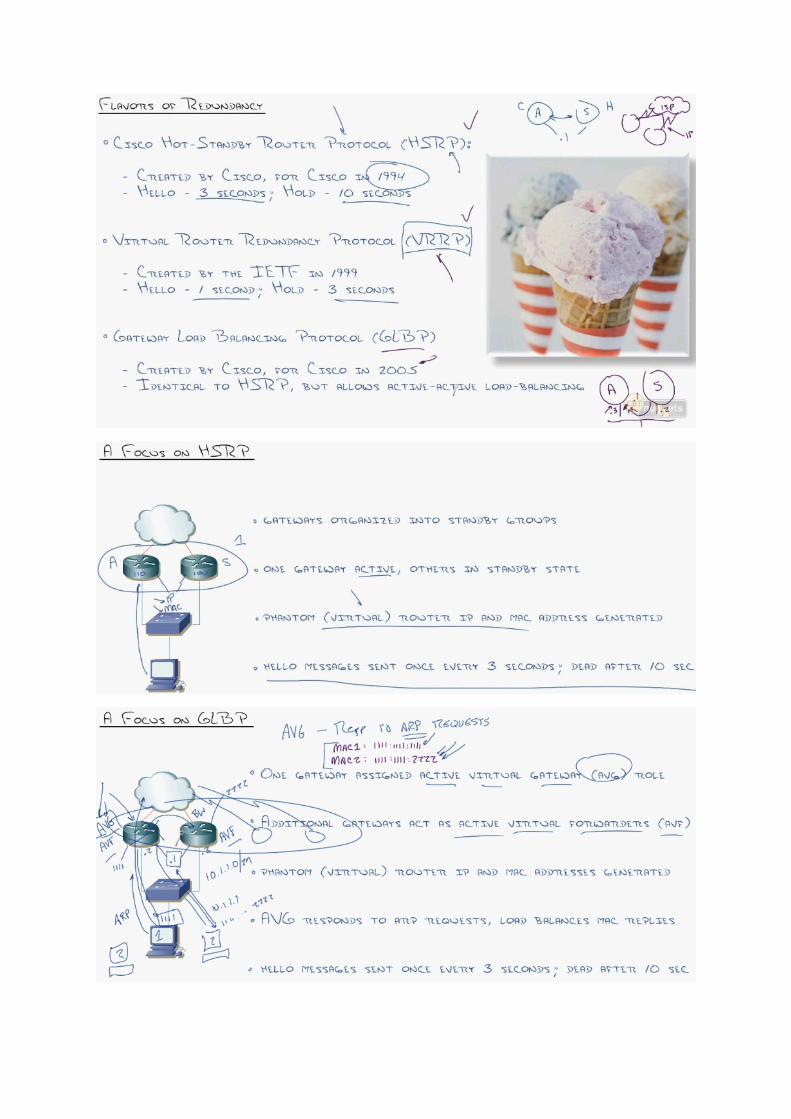
FHRP (First Hop Redundancy Protocols):
!(Virtual IP and Virtual MAC)
HSRP(Hot Standby Routing Protocol):
!(Hello 3sec/Hold 10sec)
!(Active-Standby)
SwitchA(config)#interface fa0/17 !(internal interface)
SwitchA(config-if)#no switchport
SwitchA(config-if)#ip address 192.168.1.1 255.255.255.0
SwitchA(config)#interface fa0/19 !(external interface)
SwitchA(config-if)#no switchport
SwitchA(config-if)#ip address 192.168.14.1 255.255.255.0
SwitchA(config)#ip routing
SwitchA(config)#ip route 0.0.0.0 0.0.0.0 192.168.14.4
SwitchA(config)#interface fa0/17
SwitchA(config-if)#standby 1 ip 192.168.1.3 !(create a standby group and assign an IP)
!(Same and opposite config on SwitchB)
!(PC is configured with a default gateway of 192.168.1.3 i.e. Virtual Gateway's IP)
!(HSRPv1 uses the 0000.0c07.acXX MAC address where XX is the HSRP group number e.g.
0000.0c07.ac01 for group 1)(HSRPv2 uses 0000.0C9F.FXXX MAC)
!(By default the switch with the highest priority will become the active HSRP device. If the priority
is the same then the highest IP address)
SwitchA(config)#interface fa0/17
SwitchA(config-if)#standby 1 priority 150 !(default priority is 100)
SwitchA(config-if)#standby 1 preempt !(could become active if router goes down & then up)
SwitchA(config-if)#standby 1 preempt delay minimum 60
OR
SwitchA(config-if)#standby 1 preempt delay reload 60 !(If a router reboots it might need some
time to “converge”)
SwitchA(config-if)#standby 1 mac-address 0000.1111.5555 !(instead of using default hsrp MAC)
SwitchA(config-if)#standby 1 version 2 !(version must be same on both devices)
SwitchA(config-if)#standby 1 name my-hsrp-name !(name of the group for ease)
SwitchA(config-if)#standby 1 authentication md5 key-string md5pass !(prevent rogue hsrp router)
!(can also use a key chain the same way you would use in eigrp or anywhere else)
SwitchA(config-if)#standby 1 timers msec 100 msec 300 !(default hello 3 secs & hold 10 secs)
Interface tracking (object tracking):
1. Select an interface to track and if it fails decrease the priority so that another device can become
the active router. Tracking checks the line protocol status, but can also be configured to check if the
route exists or with SLA probes.
SwitchA(config)#interface fa0/17 !(internal interface)
SwitchA(config-if)#standby 1 preempt !(preemption is imp otherwise tracking is useless)
SwitchB(config)#interface fa0/19 !(internal interface)
SwitchB(config-if)#standby 1 preempt !(preemption is imp otherwise tracking is useless)
SwitchA(config-if)#standby 1 track fastEthernet 0/19 !(external interface)
SwitchA(config)#interface fa0/19
SwitchA(config-if)#shutdown

!(Verify)
SwitchA#show standby | include Priority
Priority 140 (configured 150) !(by default decrements the priority by 10)
SwitchA(config)#interface fa0/17
SwitchA(config-if)#standby 1 track fastEthernet 0/19 60
OR
SwitchA(config-if)#standby 1 track 1 decrement 60
!(If the links goes down again the priority will become 90 reducing it by 60 so the other device with
default priority 100 will then become active)
!(Interface tracking will only check the state of any interface not if anything fails upstream)
IP SLA with object tracking:
!(IP SLA can be used for many things. One of them is to generate a ping to a destination every X
seconds and we can combine this with object tracking)
SwitchA(config)#interface fa0/17
SwitchA(config-if)#no standby 1 track fastEthernet 0/19 60
SwitchA(config)#ip sla 1
SwitchA(config-ip-sla)#icmp-echo 192.168.14.4
SwitchA(config)#ip sla schedule 1 start-time now life forever
SwitchA(config)#track 1 rtr 1 reachability
SwitchA(config)#interface fa0/19
SwitchA(config-if)#standby 1 track 1 decrement 60
!(Test)
RouterA(config)#interface fa0/13
RouterA(config-if)#shutdown
VRRP (Virtual Router Redundancy Protocol):
!(Hello 1sec/Hold 3sec)
!(Master-Backup)
1. Exactly same config as HSRP except we use vrrp instead of standby
2. VRRP uses the 0000.5e00.01XX MAC address where XX is the VRRP group number.
3. VRRP can have the same IP as that of the real interface as opposed to HSRP. The device that has
got the real IP as the virtual IP becomes the master, priority is not looked at then because the
priority of the master is set to the highest value of 255.
GLBP (Gateway Load Balancing Protocol):
!(Hello 3sec/Hold 10sec)
!(Active-Active Load Balancing)
!(AVG(Active Virtual Gateway)(Manager: Generates MACs for AVFs) and AVF(Active Virtual
Forwarder))
R1(config)#interface fa1/0
R1(config-if)#glbp 1 ip 192.168.1.3
R1(config-if)#glbp 1 preempt
R1(config-if)#glbp 1 authentication md5 key-string mypass
!(Same and opposite config on SwitchB)
R1(config-if)#glbp 1 priority 150
!(The virtual MAC address that GLBP uses is 0007.b400.XXYY (where X = GLBP group number
and Y = AVF number))
GLBP interface tracking:
!(Interface tracking works differently for GLBP compared to HSRP or VRRP. It has a weighting
mechanism whic is used to determine if a device can be AVF or not)

SwitchB#show glbp | include Weighting
Weighting 100 (default 100)
SwitchB(config)#track 16 interface fastEthernet 0/16 line-protocol
SwitchB(config)#track 17 interface fastEthernet 0/17 line-protocol
SwitchB(config)#interface fa0/19
SwitchB(config-if)#glbp 1 weighting track 16 decrement 20
SwitchB(config-if)#glbp 1 weighting track 17 decrement 20
SwitchB(config-if)#glbp 1 weighting 100 lower 70 upper 90
!(Verify)
SwitchB#show glbp | include Weighting
Weighting 100 (configured 100), thresholds: lower 70, upper 90
!(Test and verify)
!(Now shutdown int fa0/16)
!(Weighting 80 (configured 100), thresholds: lower 70, upper 90)
!(Now shutdown int fa0/17)
!(Weighting 60, low (configured 100), thresholds: lower 70, upper 90)
!(Now 'no shutdown' int fa0/16
!(Weighting 80, low (configured 100), thresholds: lower 70, upper 90)
!(Now 'no shutdown' int fa0/17)
!(Weighting 100, low (configured 100), thresholds: lower 70, upper 90)
GLBP weighted Load-Balancing:
!(default I round-robin. If you have a beefier router you can use weighted load-balancing)
!(configured on AVG)
SwitchB(config)#interface fa0/19
SwitchB(config-if)#glbp 1 load-balancing weighted
SwitchB(config-if)#glbp 1 weighting 200 !(this switch will have double the traffic going through)
sh standby
sh standby bri
sh standby fa0/17
sh standby | inc priority
sh standby | inc time
sh standby vlan 1
sh standby all
debug standby events
debug standby errors
debug standby packets
debug standby events track
!(Note: Exactly same commands for VRRP and GLBP, but use vrrp and glbp instead of stanby)
sh ip arp !(verification of mac on the switch)
c:\>ipconfig !(to verify the gateway configured on the PC)
c:\>arp -a !(to verify the mac learned on the PC)
c:\>tracert 8.8.8.8 !(Note: tracert shows the original active router IP instead of the VIP)
sh glbp bri !(To see the active AVG & AVF. Also to verify the mac addresses of the AVF i.e. which one
the PC if going through, as it will keep doing round-robin. Clear arp cache of the PC and verify again)
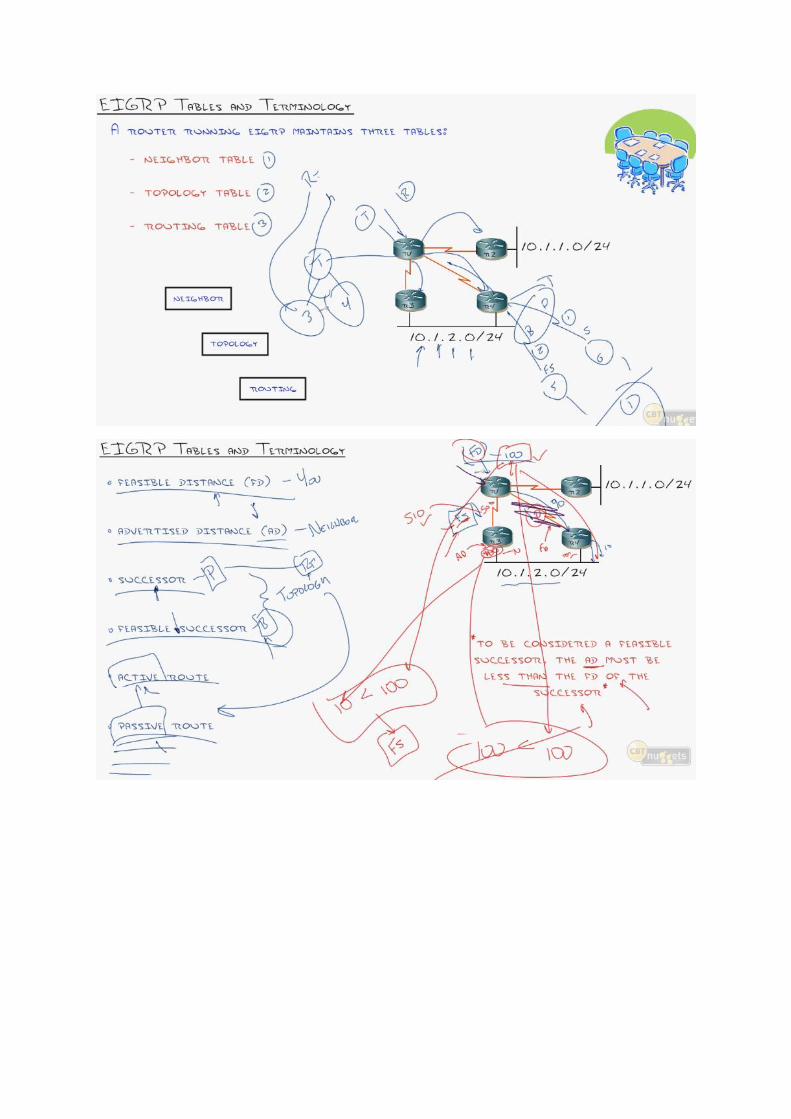
EIGRP:
!(BackupRoutes(FastConvergence/DUAL)/FelxibleSummrization/UnequalCostLB)
!(NeighbourTable(OnlyNeighbours)/TopologyTable(LearnedFromneighbours)/RoutingTable(Best))
(FeasibleDistance(HowFarFromYou)/AdvertisedDistance(HowFarFromNeighbour)/Successor(Rout

ingTable)/FeasibleSuccessor(TopologyTable)/ActiveRoute(ActivelySearching)/PassiveRoute)
!(To be a Feasible Successor, the AD must be less than the FD of the Successor)
!(Hello/Update/Query/Reply/Ack)
!(Bandwidth (k1) and Delay (k3) by default/MTU/Load/Reliability)
Metric = bandwidth (slowest link) + delay (sum of delays)
1. Bandwidth: [10^7 / minimum bandwidth in the path] * 256.
2. Delay: sums of delays in the path multiplied by 256 (in tens of microseconds).
So the formula looks like:
Metric = (10^7 / minimum bandwidth) * 256 + (sum of delays) * 256
EIGRP Config:
R1(config)#router eigrp 1 !(1 is AS number)
R1(config-router)#no auto-summary
R1(config-router)#network 1.1.1.0 0.0.0.255
R1(config-router)#network 192.168.12.0
R1(config-router)#exit
R2(config)#router eigrp 1
R2(config-router)#no auto-summary
R2(config-router)#network 2.2.2.0 0.0.0.255
R2(config-router)#network 192.168.12.0
Named EIGRP:
!(Since IOS 15, EIGRP has a new method of configuration called named EIGRP)
R1(config)#router eigrp MY_NAME
R1(config-router)#address-family ipv4 autonomous-system 12
R1(config-router-af)#network 192.168.12.0
R1(config-router-af)#af-interface FastEthernet 0/0
EIGRP Authentication:
R1(config)#key chain MYCHAIN
R1(config-keychain)#key 1
R1(config-keychain-key)#key-string BANANA
R1(config)#interface fastEthernet 0/0
R1(config-if)#ip authentication mode eigrp 1 md5
R1(config-if)#ip authentication key-chain eigrp 1 MYCHAIN
sh ip route !(to see the routing table)
sh ip router eigrp !(you will also see feasible successor if load balanced)
!(D NETWORK [AD/METRIC] via NEXT_HOP, TIME_LEARNT, EXIT_INTERFACE)
sh ip eigrp interfaces
sh ip eigrp neighbors
sh ip eigrp topology
!(P NETWORK, 1 successors, FD is 158720 via NEXT_HOP (FD/AD), EXIT_INTERFACE)
sh ip eigrp traffic
clear ip eigrp neighbor !(reset the EIGRP neighbor adjacency on a router)
debug ip eigrp packet
debug ip eigrp neighbors
debug eigrp packets hello
debug eigrp packets update
debug eigrp packets ack
debug eigrp packets query
debug eigrp packets
sh ip protocols !(It will show you for which networks you are routing, passive interfaces and the
administrative distance)!(Also shows K values)
EtherChannel:
!(PagP Modes: On/Desirable/Auto/Off)
!(LACP Modes: On/Active/Passive/Off)
EtherChannel L2 Configuration:
SwitchA(config)#default int range fa0/13 - 14
SwitchA(config)#int range fa0/13 – 14
SwitchA(config-if)#shut
SwitchA(config-if)#channel-group 1 mode desirable !(options(LACP/PAgp):
active/desirable,passive/auto, on)
SwitchA(config-if)#no shut
SwitchA(config)#interface port-channel 1
SwitchA(config-if)#switchport trunk encapsulation dot1q
SwitchA(config-if)#switchport mode trunk
!(same config when using LACP except for modes are different)
EtherChannel L3 Configuration:
SW1(config)# interface port-channel 1
SW1(config-if)# no switchport
SW1(config-if)# ip address 172.16.1.11 255.255.255.0
SW1(config)# deafult int range fastethernet0/1 - 2
SW1(config)# int range fastethernet0/1 – 2
SW1(config-if-range)# no switchport
SW1(config-if-range)# no ip address
SW1(config-if-range)# channel-group 1 mode desirable
!(same an opposite config on SW2)
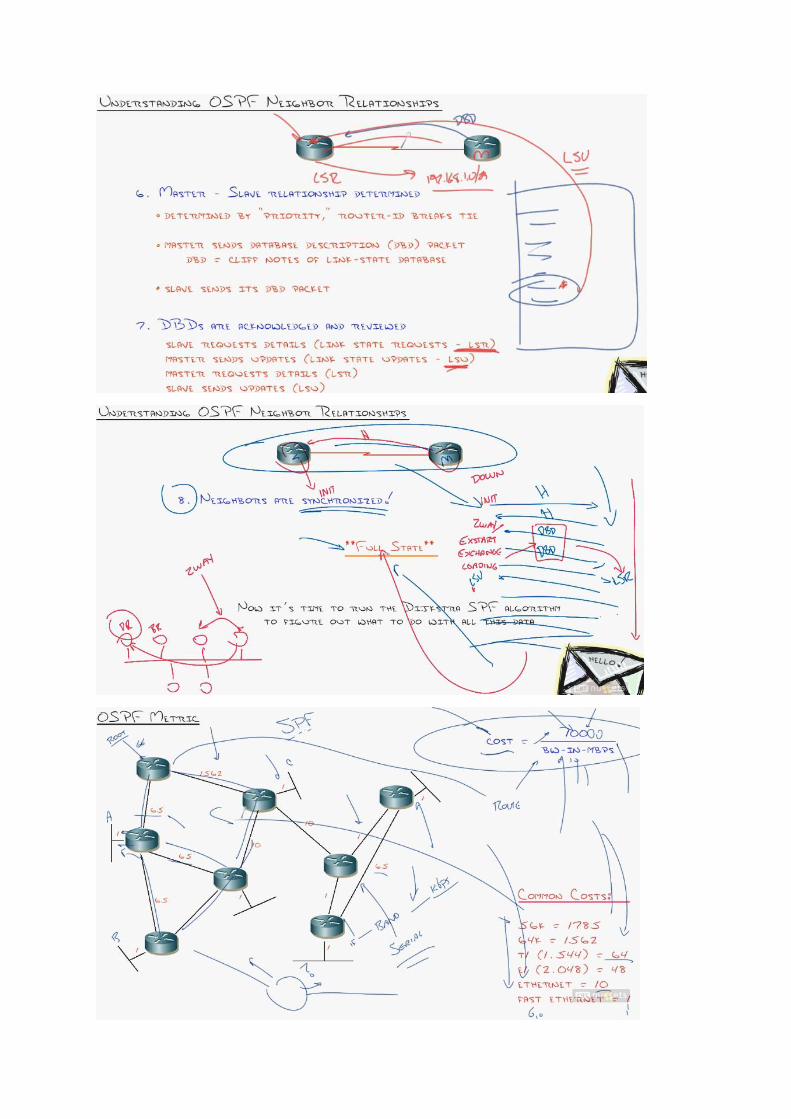
OSPF:
Configuration:
R1(config)#router ospf 1
R1(config-router)#network 192.168.23.0 0.0.0.255 area 0
Changing Router ID:
R1(config)#router ospf
R1(config-router)#router-id 3.3.3.3
R1#clear ip ospf process
Manually change the cost:
R1(config)#interface fastEthernet 1/0
R1(config-if)#ip ospf cost 50 !(manually changing cost)
Advertising Default Route:
R1(config)#router ospf 1
R1(config-router)#default-information originate always !(advertising default route)
Plain-text Authentication:
R1(config)#interface fastEthernet 1/0
R1(config-if)#ip ospf authentication
R1(config-if)#ip ospf authentication-key secret
MD5 authentication:
R1(config)#interface fastEthernet 1/0
R1(config-if)#ip ospf authentication message-digest
R1(config-if)#ip ospf message-digest-key 1 md5 mykey

Change the OSPF timers:
R1(config-if)#interface fastEthernet 1/0
R1(config-if)#ip ospf hello-interval 5
R1(config-if)#ip ospf dead-interval 15
Multi-area OSPF:
R1(config)#router ospf 1
R1(config-router)#network 1.1.1.0 0.0.0.255 area 0
R1(config-router)#network 192.168.12.0 0.0.0.255 area 0
R2(config)#router ospf 1
R2(config-router)#network 192.168.12.0 0.0.0.255 area 0
R2(config-router)#network 192.168.23.0 0.0.0.255 area 1
sh ip ospf neighbor !(to see the full state of neighbor and DR/BDR/DROTHER)
sh ip protocols !(to see the router id)
sh ip route ospf
!(O NETWORK_LEARNT [AD/METRIC] via NEXT_HOP, TIME, EXIT_INTERFACE)
sh ip ospf interface fa1/0 !(to check the cost of an interface and timers)
sh ip ospf database !(shows the LSDB/to see the LSAs)
debug ip ospf packet
debug ip ospf adj !(to see 7 states of adjacency)
clear ip ospf process !(to restart the ospf process)
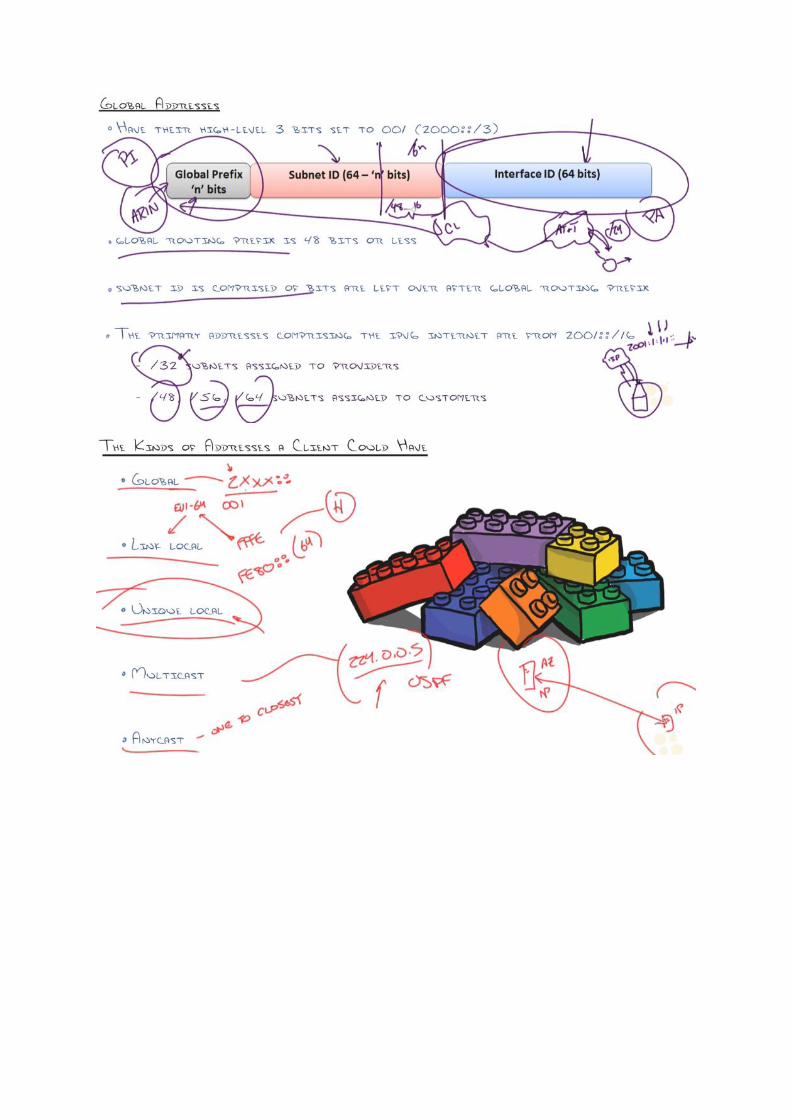
IPv6:
R1(config)#ip routing !(this is used for ipv4 which is ON by default)
R1(config)#ipv6 unicast-routing
R1(config)#int fa1/0
R1(config-if)#ipv6 address 2001:210:10:1::1/64
R1(config-if)#ipv6 address autoconfig !(allows PCs to auto generate IPv6 addresses)
R1(config-if)#no shut
R1(config)#ipv6 route 2001:56::0/64 2001:210:10:1::2
sh ipv6 int bri
sh ipv6 int
sh ipv6 route
sh ipv6 neighbors
R2#ping 2001:210:10:1::1
R2#ping ipv6 !(extended ipv6 ping)
IPv6 ACLs:
!(same concept as ipv4 ACL)
R1(config)#ipv6 access-list CBTACL
R1(config-ipv6-acl)#permit tcp any any eq 23
R1(config)#int fa0/0
R1(config-if)#ipv6 traffic-filter CBTACL in
sh ipv6 access-list
IPv6 EIGRP:
R1(config)#ipv6 unicast-routing
R1(config)#ipv6 router eigrp 100
R1(config-rtr)#no shut
R1(config)#int fa0/0
R1(config-if)#ipv6 eigrp 100
sh ipv6 protocols

sh ipv6 eigrp neighbors
IPv6 OSPF:
R1(config)#ipv6 unicast-routing
R1(config)#ipv6 router ospf 1
R1(config-rtr)#router-id 1.1.1.1
R1(config)#int fa0/0
R1(config-if)#ipv6 ospf 1 area 0
sh ipv6 ospf neighbors
sh ipv6 ospf int
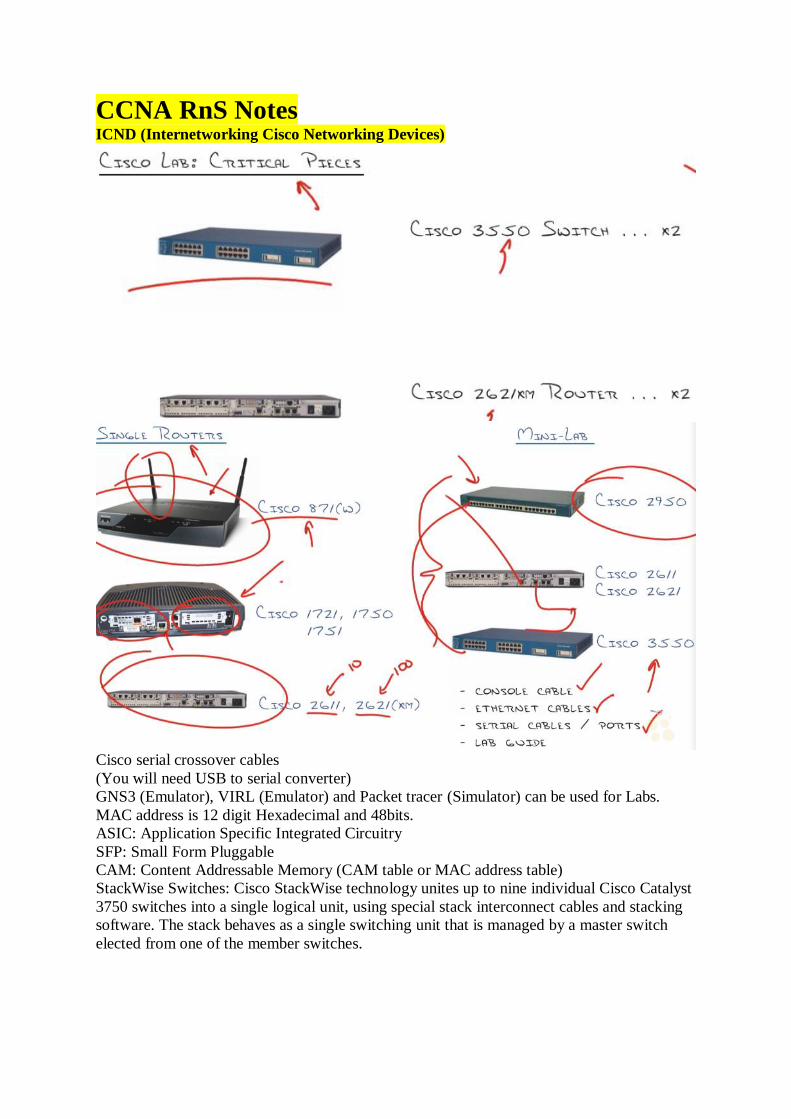
CCNA RnS Notes ICND (Internetworking Cisco Networking Devices)
Cisco serial crossover cables
(You will need USB to serial converter)
GNS3 (Emulator), VIRL (Emulator) and Packet tracer (Simulator) can be used for Labs.
MAC address is 12 digit Hexadecimal and 48bits.
ASIC: Application Specific Integrated Circuitry
SFP: Small Form Pluggable
CAM: Content Addressable Memory (CAM table or MAC address table)
StackWise Switches: Cisco StackWise technology unites up to nine individual Cisco Catalyst
3750 switches into a single logical unit, using special stack interconnect cables and stacking
software. The stack behaves as a single switching unit that is managed by a master switch
elected from one of the member switches.

Cisco StackWise technology unites up to nine individual Cisco Catalyst 3750switches into
a single logical unit, using special stack interconnect cables and stacking software. The
stack behaves as a single switching unit that is managed by a master switch elected from
one of the member switches.

ASICs belong to switches
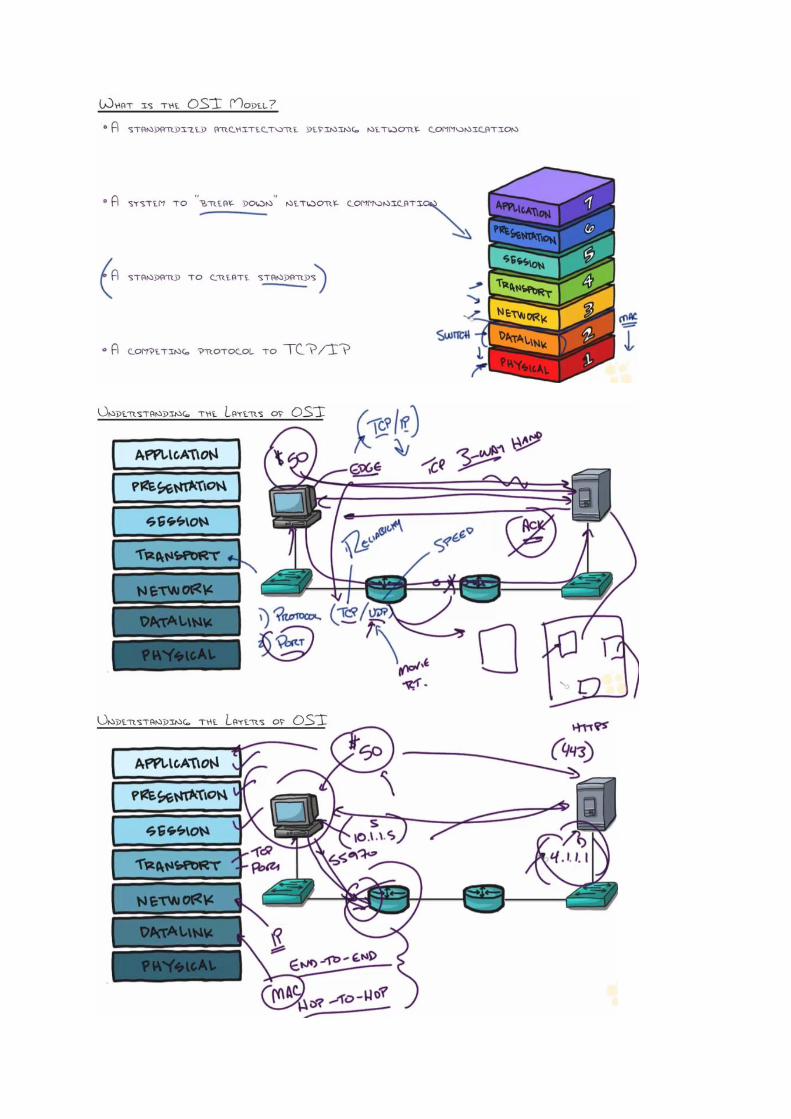
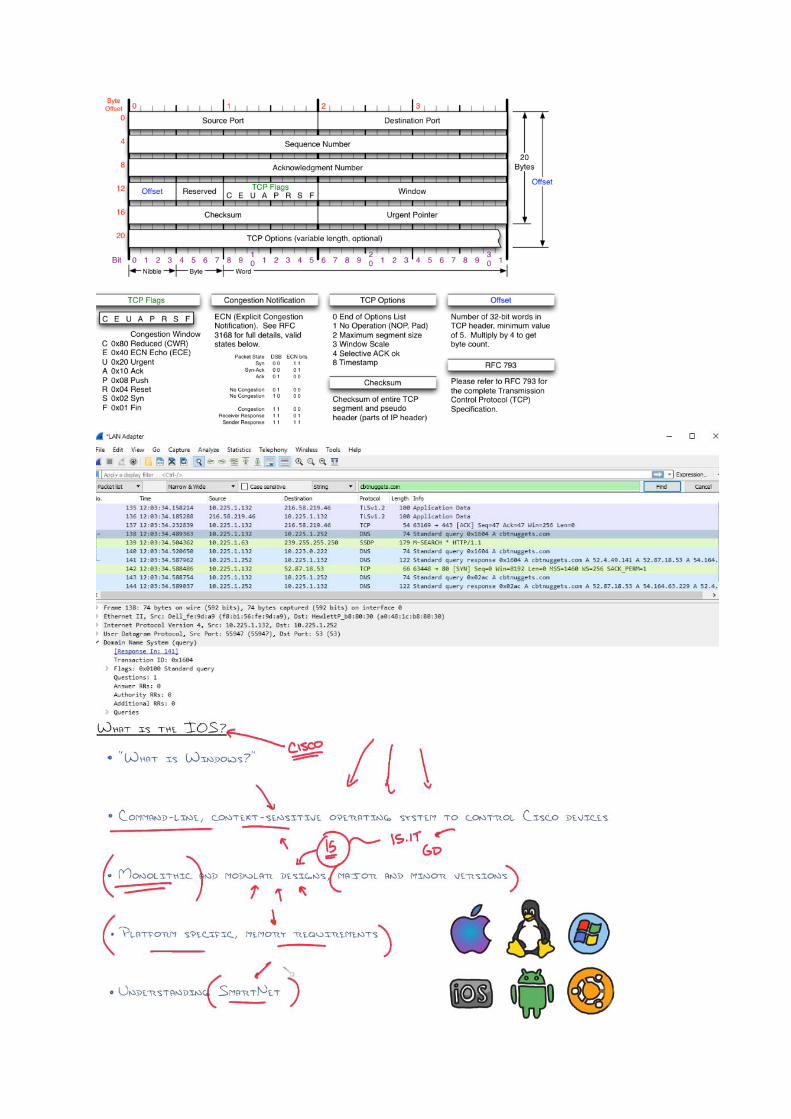
IOS: Internetwork Operating System (Cisco’s Operating System on Router and Switches)
STATELESS Firewall: Stateless firewalls watch network traffic, and restrict or block packets based
on source and destination addresses or other static values. They are not 'aware' of traffic patterns or
data flows. A stateless firewall uses simple rule-sets that do not account for the possibility that a
packet might be received by the firewall 'pretending' to be something you asked for.
STATEFUL Firewall: Stateful firewalls can watch traffic streams from end to end. It keeps track of
connections and allows only the return traffic. They are are aware of communication paths and can
implement various IP Security (IPsec) functions such as tunnels and encryption. In technical terms,
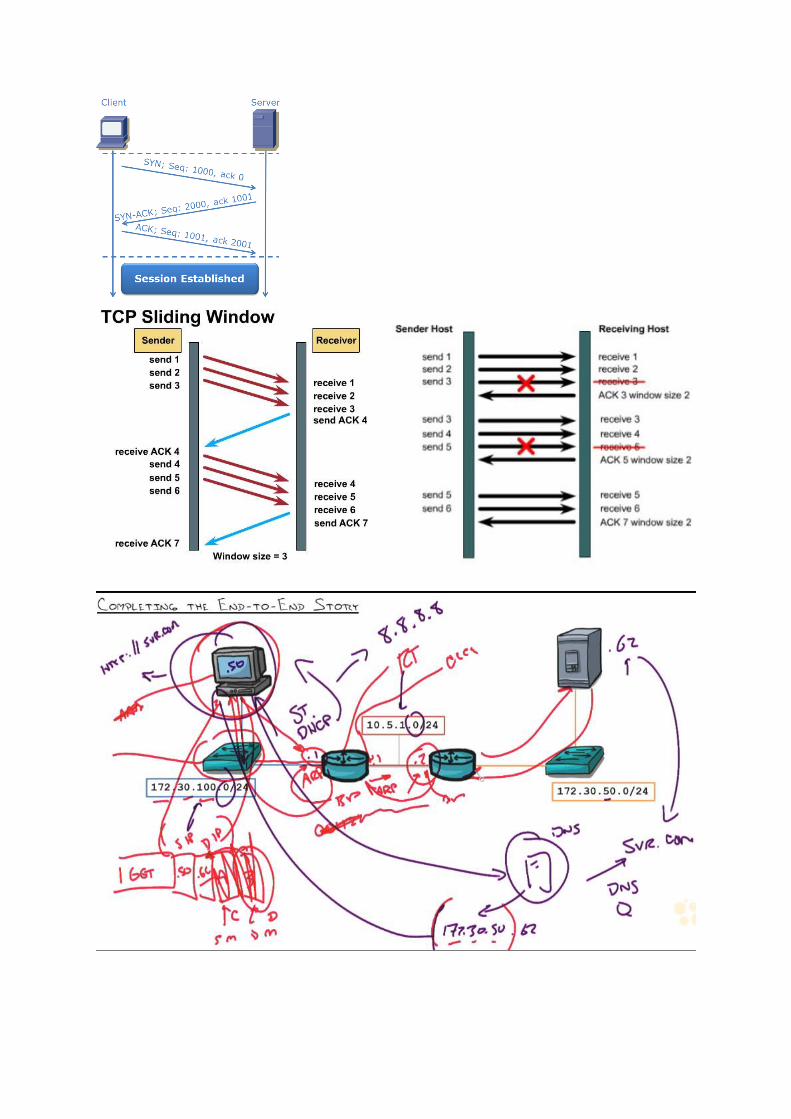
this means that stateful firewalls can tell what stage a TCP connection is in (open, open sent,
synchronized, synchronization acknowledge or established), it can tell if the MTU has changed,
whether packets have fragmented etc.
IPS: Intrusion prevention System (Signature based or Anomaly based)

Higher security zone (100) (inside) can reach lower security zone (0 or 50) (outside and DMZ) but not
the other way around.
EtherChannel: Bundle upto 8 links for combined bandwidth (i.e. LoadBalanced).
CSMA/CD: Carrier Sense Multiple Access/Collision Detection (used on hub wired network)
CSMA/CA: Carrier Sense Multiple Access/Collision Avoidance (used on wireless network)
MDF: Main Distribution Frame
IDF: Intermediate Distribution Frame
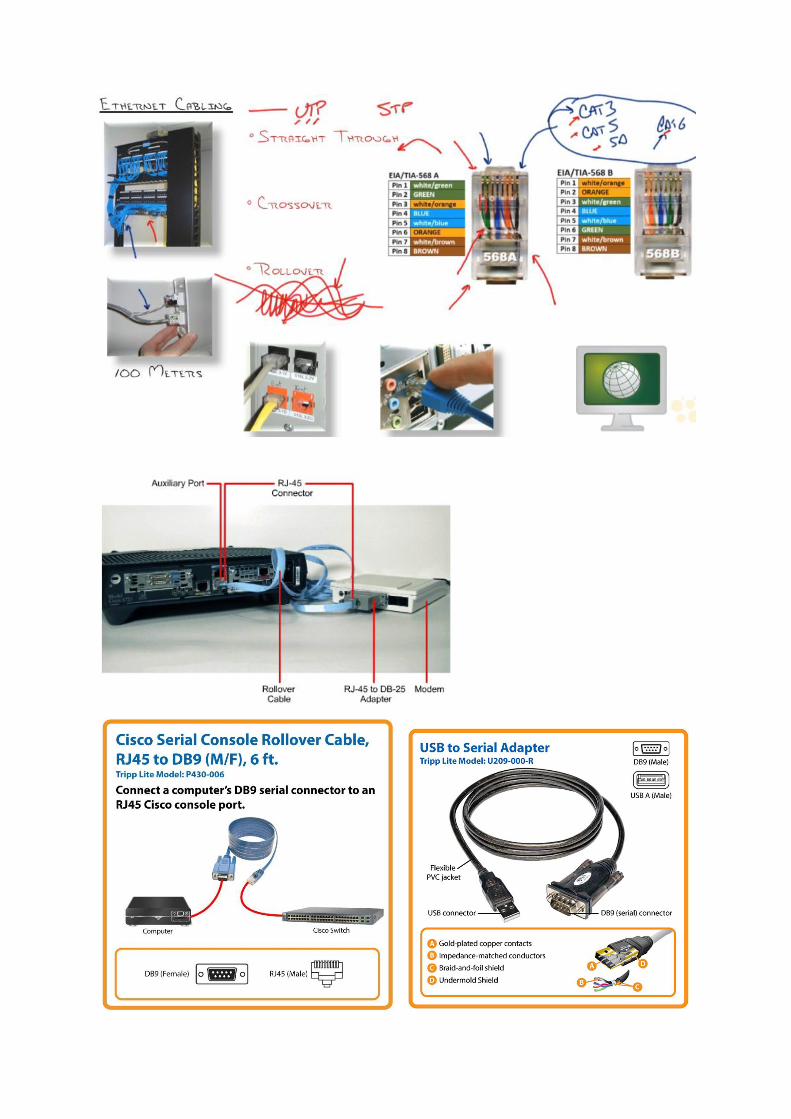
Ethernet: 100m
MultiMode (MM) Fibre: around 500m
SingleMode (SM) Fibre: more than 2Kms

UTP: Unshielded Twisted Pair cable
STP: Shielded twisted pair cable
Auto-MDIX: Media Dependent Interface Crossover

CUCM (Cisco Unified Communication Manager) is what makes the call between IP phones. The
brains of the voice network.
IP phones know how to communicate to the CUCM through dhcp option 66.
Cisco unity is the voice mail server where the CUCM send the voice mails to if ip phone hasn’t
accepted the call.

Anycast is used in IPv6 and can be used in IPv4 for DNS.

Private IP addresses are not routable on the internet because ISPs block them.

Arp cache is by default 5 mins.


Well-known port numbers: 0-1024
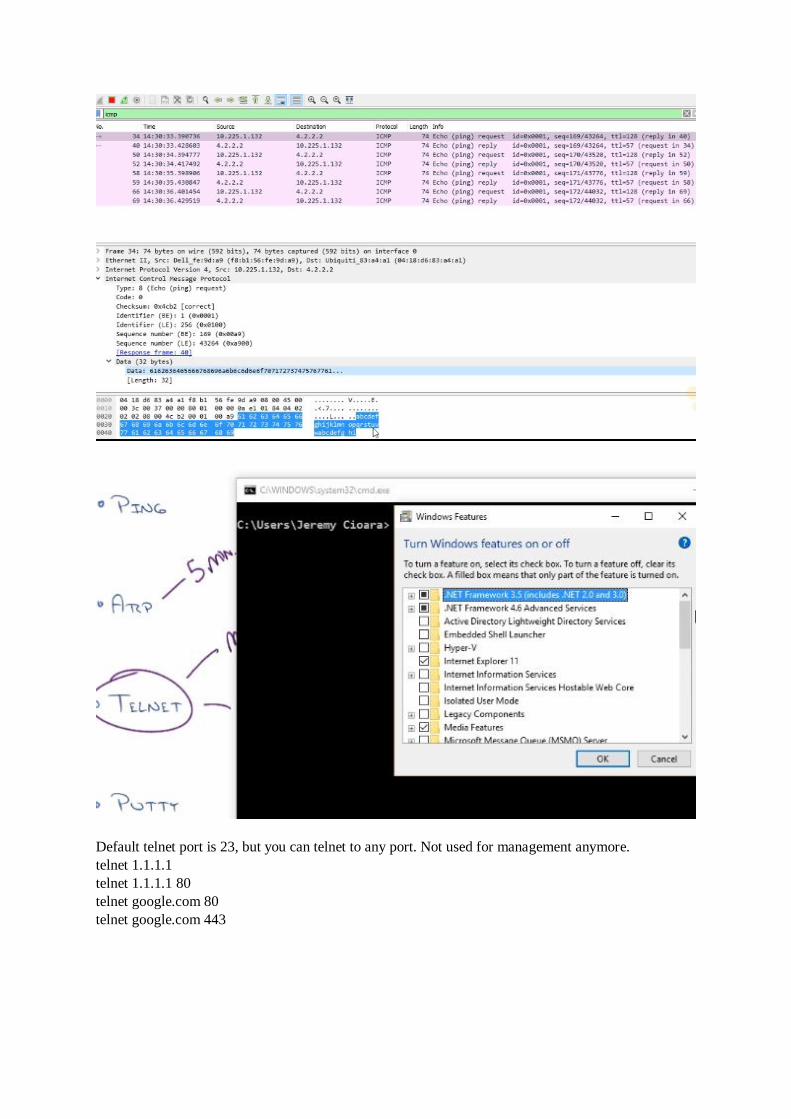
Default telnet port is 23, but you can telnet to any port. Not used for management anymore.
telnet 1.1.1.1
telnet 1.1.1.1 80
telnet google.com 80
telnet google.com 443

Youcan use securecrt instead of telnet. Putty is free.
ipconfig
ipconfig/all
ipconfig/release
ipconfig/renew
ipconfig/flushdns
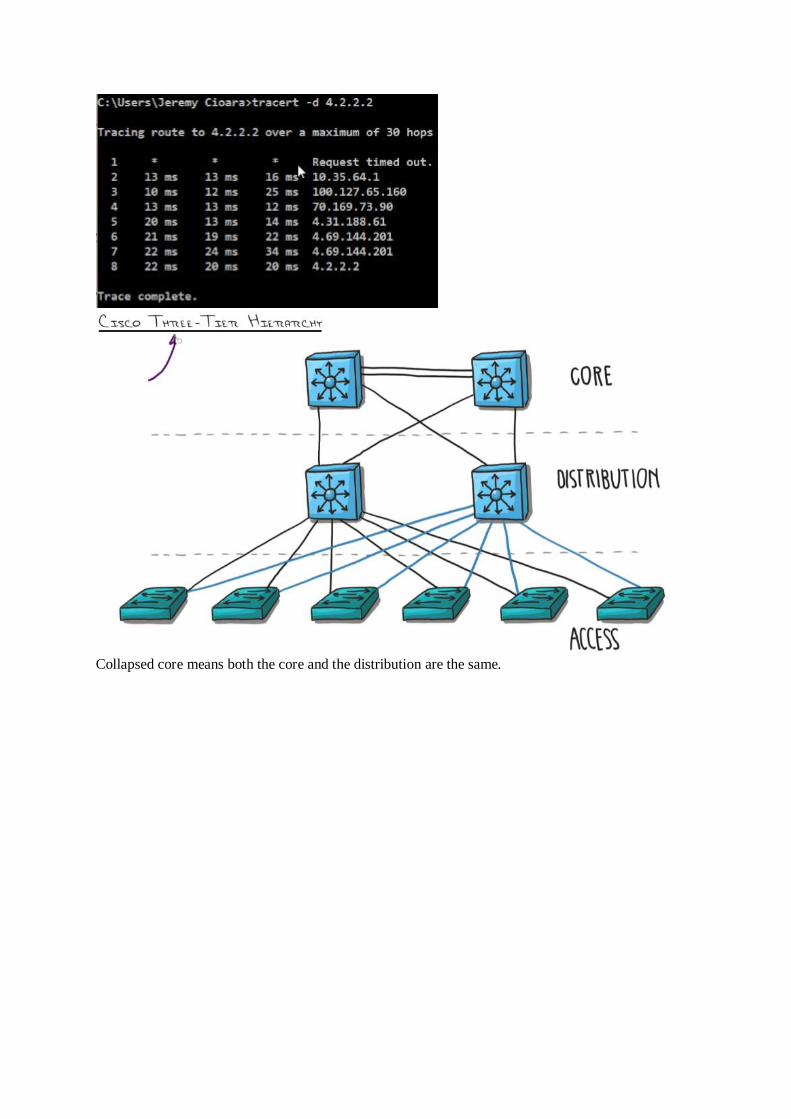
Collapsed core means both the core and the distribution are the same.


Putty and SecureCRT are usually used.

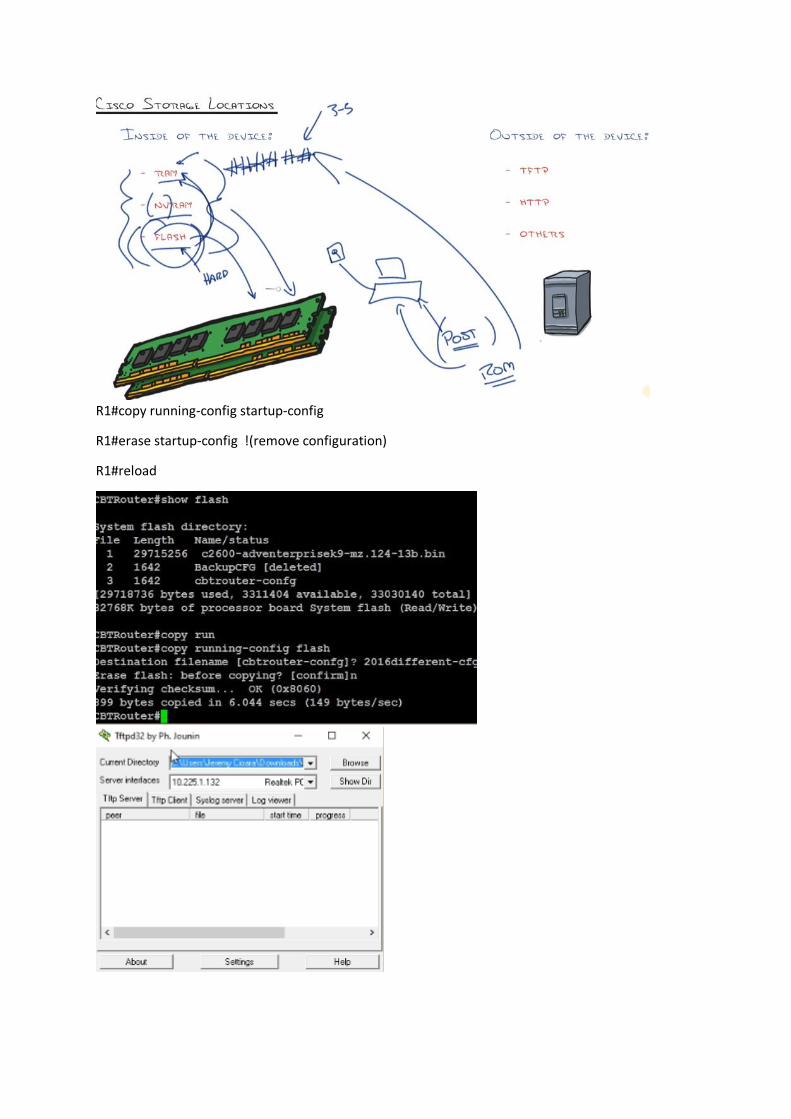
R1#copy running-config startup-config
R1#erase startup-config !(remove configuration)
R1#reload
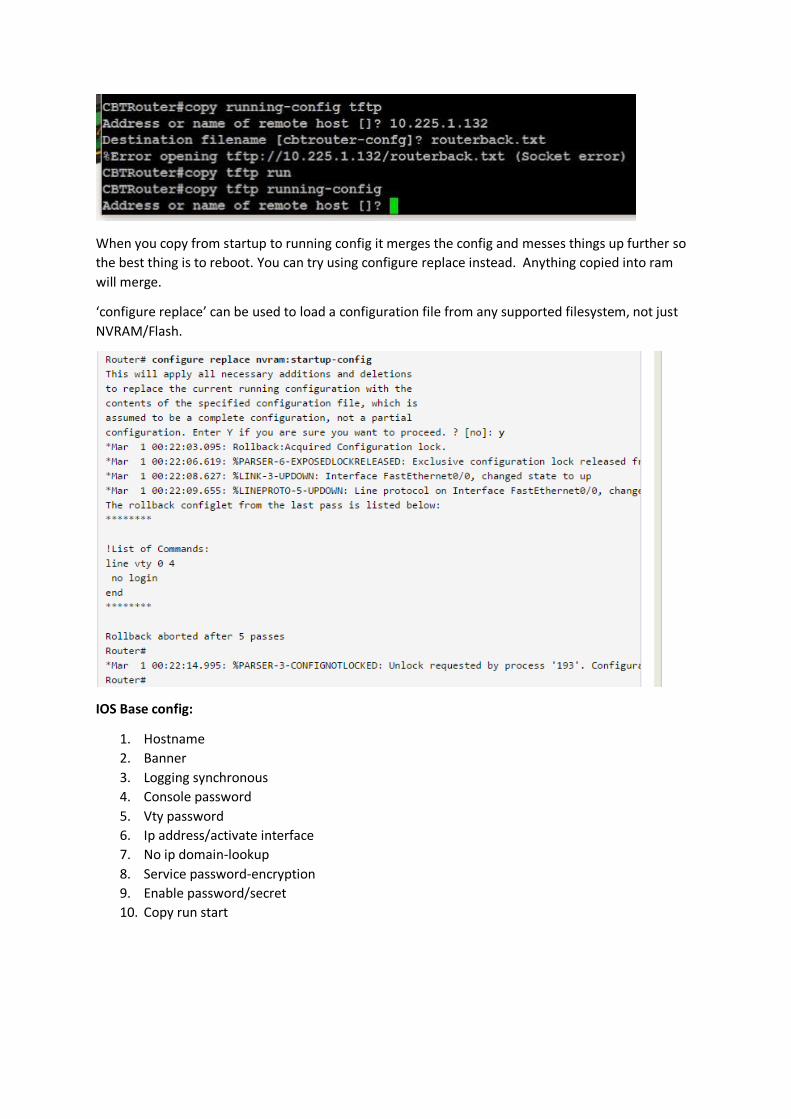
When you copy from startup to running config it merges the config and messes things up further so
the best thing is to reboot. You can try using configure replace instead. Anything copied into ram
will merge.
‘configure replace’ can be used to load a configuration file from any supported filesystem, not just
NVRAM/Flash.
IOS Base config:
1. Hostname
2. Banner
3. Logging synchronous
4. Console password
5. Vty password
6. Ip address/activate interface
7. No ip domain-lookup
8. Service password-encryption
9. Enable password/secret
10. Copy run start

telnet is
not secure for remote management and is not used anymore. It is a best practise to disable telnet
and use ssh

With 3750 stackwise switches you combine the management plane of the switches into one.

First six digits represent the vendor.
Use mac-address tables, cdp and cable maps to locate a device.

Rest is the same config for telnet/ssh
It is recommended to hard code the speed and duplex especially when you have 100Mbps devices
otherwise the standard says that if the other side doesn’t reply back then fall-back to half duplex.

Server actively running and listening on 5201 port. Good test to
check internal network speeds before even checking the external internet.


ASIC based devices are limited with features which is why the routers still exist.


Native vlan should be configured the same on both sides


Difference between Option 150 and Option 66:
•DHCP option 150 supports a list of TFTP servers (Multiple Server IPs)
•DHCP option 66 only supports the IP address or the hostname of a single TFTP server.
DHCP Option 150 is Cisco proprietary. Option 66 is an IEEE standard.
For Cisco phones IP addresses can be assigned manually or by using DHCP. Devices also require
access to a TFTP server that contains device configuration name files (.cnf file format), which enables
the device to communicate with Cisco Call Manager.
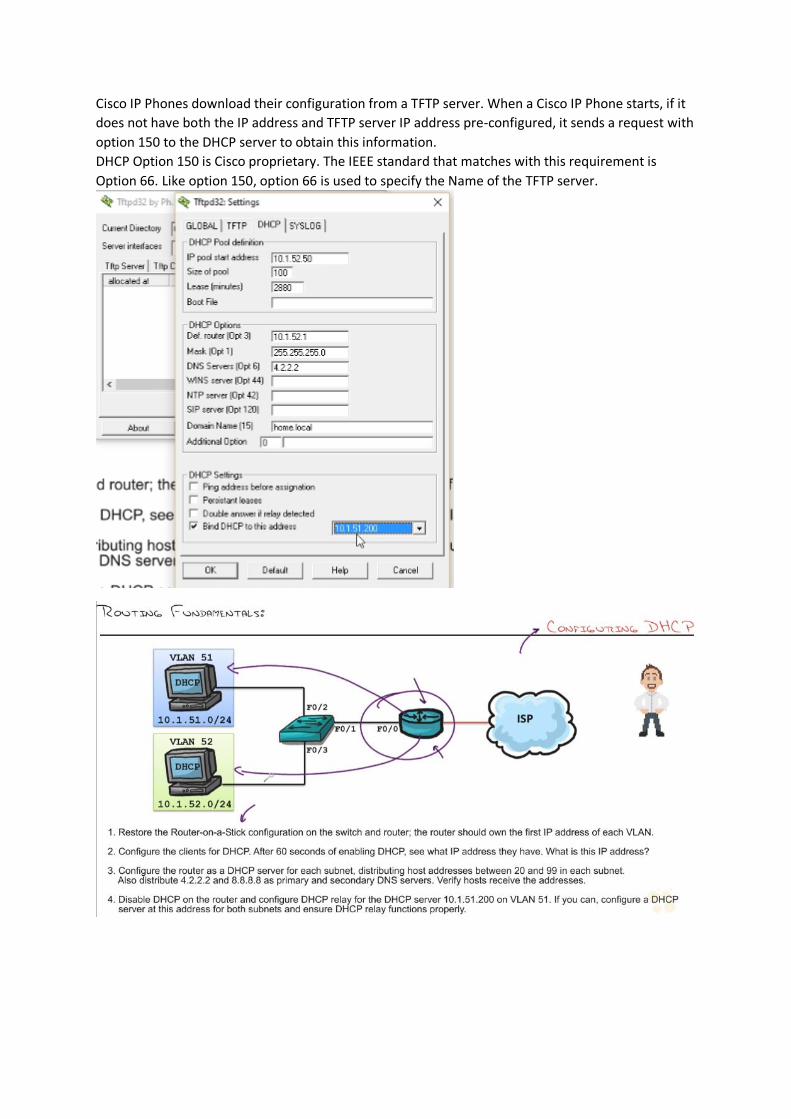
Cisco IP Phones download their configuration from a TFTP server. When a Cisco IP Phone starts, if it
does not have both the IP address and TFTP server IP address pre-configured, it sends a request with
option 150 to the DHCP server to obtain this information.
DHCP Option 150 is Cisco proprietary. The IEEE standard that matches with this requirement is
Option 66. Like option 150, option 66 is used to specify the Name of the TFTP server.


SYS: Facility
Severity: 5
CONFIG_I: Mnemonic
Message: