Introduction to Video Editing for Oral Historians
20
Introduction to Video Editing for Oral Historians BY JUAN J. GUTIÉRREZ AND MARÍA VALLADARES 1 California State University, Monterey Bay Abstract Oral history relies primarily in the elicitation and capturing of accounts of history passed down by work of moth from generation to generation. The methods, technology and tools utilized to capturing these accounts tend to transform rapidly, rendering books and articles obsolete soon. This essay looks for a balance between the basic lasting concepts of quality in recording accounts and providing readers with specific information on software and hardware available at the time of publication while addressing the most important issue of the archival of the accounts in digital formats that have the potential to last for generations to come. Introduction Oral History has been defined as “the recording of personal testimony delivered in oral form” (Yow 2005: 3). By definition, practitioners of Oral History have a duty to record information. Throughout history and in present times as well there are very many techniques and ways in which a testimony can be recorded. It can be recorded in the memory of others listening to the person giving the testimony in what we call oral tradition. In this case, the most complex of all techniques and tools are at play that is the amazing human memory and oral expression. With the invention of writing as a system to codify memories outside our minds, humankind discovered its ability to transform concepts and ideas into symbols and to keep them in the form of external and lasting representations. This in turn has enabled cultures and civilizations to endure. In our days, the emergence and popularization of digital technologies to record image and voice has opened up an extraordinary opportunity for oral historians to create well organized and crafted recordings of testimonies for future generations. These pages explore (a) the basic concepts that connect current methodologies utilized by oral historians in the production of small video clips of professional quality, (b) the basic process and tools to design, capture and edit short video clips for oral history and (c) new tools and techniques to deploy oral history video clips for presentations, and to face the challenges in the storage and maintenance of digital resources in archives. 1 Juan J. Gutierrez (PhD UC Santa Barbara 1997) is an Associate Professor of Anthropology at the California State University, Monterey Bay and member of the International Oral History Association. María Valladares is a free lance graphic designer and webmaster for the International Oral History Association. We both give many Thanks and kudos to Marshall Brain and Roxanne Reid from HowStuffWorks.com (How Video Editing Works?).
-
Upload
khangminh22 -
Category
Documents
-
view
5 -
download
0
Transcript of Introduction to Video Editing for Oral Historians

Introduction to Video Editing for Oral Historians BY JUAN J. GUTIÉRREZ AND MARÍA VALLADARES1
California State University, Monterey Bay
Abstract
Oral history relies primarily in the elicitation and capturing of accounts of history passed down by work of moth from generation to generation. The methods, technology and tools utilized to capturing these accounts tend to transform rapidly, rendering books and articles obsolete soon. This essay looks for a balance between the basic lasting concepts of quality in recording accounts and providing readers with specific information on software and hardware available at the time of publication while addressing the most important issue of the archival of the accounts in digital formats that have the potential to last for generations to come.
Introduction Oral History has been defined as “the recording of personal testimony delivered in oral form” (Yow 2005: 3). By definition, practitioners of Oral History have a duty to record information. Throughout history and in present times as well there are very many techniques and ways in which a testimony can be recorded. It can be recorded in the memory of others listening to the person giving the testimony in what we call oral tradition. In this case, the most complex of all techniques and tools are at play that is the amazing human memory and oral expression. With the invention of writing as a system to codify memories outside our minds, humankind discovered its ability to transform concepts and ideas into symbols and to keep them in the form of external and lasting representations. This in turn has enabled cultures and civilizations to endure. In our days, the emergence and popularization of digital technologies to record image and voice has opened up an extraordinary opportunity for oral historians to create well organized and crafted recordings of testimonies for future generations.
These pages explore (a) the basic concepts that connect current methodologies utilized by oral historians in the production of small video clips of professional quality, (b) the basic process and tools to design, capture and edit short video clips for oral history and (c) new tools and techniques to deploy oral history video clips for presentations, and to face the challenges in the storage and maintenance of digital resources in archives.
1 Juan J. Gutierrez (PhD UC Santa Barbara 1997) is an Associate Professor of Anthropology at the California State University, Monterey Bay and member of the International Oral History Association. María Valladares is a free lance graphic designer and webmaster for the International Oral History Association. We both give many Thanks and kudos to Marshall Brain and Roxanne Reid from HowStuffWorks.com (How Video Editing Works?).

Gutiérrez and Valladares Video Editing for Oral Historians
[2]
I. Basic concepts and process for the production of small video clips of professional quality for Oral History
1. Oral History Interviewing As a methodological strategy, Oral History is fundamentally technique for gathering evidence and it is spoken history, oral testimony, a first time recollection of unique memories and life experience. As a dynamic enterprise of touching and crafting, oral historians are now invested and interested in utilizing current technologies to capture and render the testimonies they work with (Benmayor 2008). Interviewing is by far the most important method and techniques utilized by oral historians. Together with carefully preparing and framing the interview the oral historian is confronted with the legalities and ethics of research, the creation and care of interpersonal relationships that emerge from the practice, and also and no less importantly, with the different varieties of oral history projects, from community studies, to biographies, to family research, and the specific technical aspects of each variety (Yow, 2005). Setting up the correct preconditions: ethics and trust Creating a high quality video clip is so much about building our technical know-how and sophistication as it is about understanding how to effectively engage our informants in an ethically sound relationship. Who owns the materials and copy rights of the materials produced? Creating a video clip then moves into the skill of the interviewer as an elicitor. Having a clear understanding and agreement on copyright issues and ownership of the materials prior to holding the interviews makes a difference and rests the interview in an environment of trust. The perfect conditions for a sound interview include creating an environment where the interviewee to feels safe, respected and appreciated.
Creating an effective and natural context Once we have achieved a clear understanding on the basis of our relationship to the interviewee prior to the event, we are now faced with the all too familiar awkward moment when we set up for the interview. How to enable the narrator into feeling comfortable and at ease with our crew, the camera and the microphones? How do we tease them into speaking without being all to directive or obtrusive. We all have seen clips or interviews where the interviewer seems to be demanding a certain answer by creating leading questions: Isn’t it true that you suffered a lot in hands of the dictator?, Isn’t it true that the company was exploiting you? Letting the informant speak is not always easy, and sometimes interviewers fall in the temptation of even contradicting the informant. “Actually, the distribution of the land was in 1935 not 1946.” Practical advice A typical interview in Oral History is held with one individual, although many researchers have done collective interviews. When you are ready to interview, think about where you will be sitting, and be culturally sensitive with regards to the use of space. Different cultures have a different sense of personal space. While in México sitting in the same bench to conduct the interview and closet o the informant might be acceptable, in other cultures the proximity can be a distraction or plain inappropriate. By the same token too much distance will render the interview technically difficult and will

Gutiérrez and Valladares Video Editing for Oral Historians
[3]
create a sense of disengagement that will effect the tone and quality of the responses and elaborations of the informant. By paying attention to these issues before hand, most researchers will know what is appropriate and inappropriate in the different cultural settings they work. As a rule of thumb it is best to keep a distance where you can have eye contact and where the voice can flow at a natural level.
Another important aspect to consider will be to look at the elements of context where the interview takes place. Sometimes the researcher will have to work in complicated context where a good understanding of what works and does not work in capturing good quality video and sound will come handy. A quick rearrangement of the same elements will have a tremendous impact on the quality of the final clip. For example placing the camera in a given angle may give intense back light rendering obscure the face and facial expression of the informant. It is very important to learn how to use the natural light to the advantage of the process. Sometimes placing the camera facing the opposite side from the most intense source (a door, a window, a lamp) will not only avoid highly contrasted images, but will place the face of the informant as the most interesting feature of the frame, and will likely result in an appropriate, naturalistic illumination. When recording outdoors a clear sense of the position of the son is just as important. When possible, artificial light is great as it allows for a richer frame and for effective capturing of facial expressions of emotions and internal state. Have your camera assistant bringing the face to a prominent area of the frame, but not so much that it dismisses the context. If you are recording on your own as we often do, make sure not to leave the camera on autofocus as that would likely result in out of focus segments as the interviewee moves or rocks back and forth, and in and out of your frame.
The environmental noise can have a very adverse effect in an otherwise excellent interview. Work with your informant to make sure that there are no noises that affect their voice: tapping the table, moving the microphone as they mimic to accompany their narrative, rustling papers. A quick rule of thumb is to use a high quality microphone place 5 to 6 inches to the source of the sound.
While there are many different styles to distend the atmosphere prior to the taping of the interview, some researchers find it useful to have the interviewees helping with the set up and testing of the sound. Test sound to ensure it is taping correctly.
Check list of basic aspects to consider when recording a video clip:
Pre Interview
Discuss with your interviewee and reach an agreement regarding the ownership of the materials being videotape.
Check equipment, batteries, peripherals. Carry spare batteries, test before taking to the field.
Pilot your outline with a third party to ensure questions are well framed and understandable

Gutiérrez and Valladares Video Editing for Oral Historians
[4]
During the interview
Involve when appropriate your informant in the setting up of the recording. Ask for his her opinion and make them feel as a collaborator as opposed to feeling as an object being scrutinized.
Check and take advantage of sources of light.
Briefly check video and sound.
If recording on your own disallow auto focus and define a clear focus during testing.
Consider the issue of space with respect to your interviewee.
2. Video Production: Making it Doable Creating a video today seems a menial task that most people can and usually do. There are thousands of examples of videos in the YouTube era. Almost anyone can actually setup a camera – mobile phones will do it today– and create a video clip. Anyone can sit down at a home computer and produce a studio-quality motion picture. All that is needed is a video camera, software and a desire to create something.
Some of the things that people can do with a hand-held camera and computer technology is a really nice rendition of your last holidays, far better than good old "home movies" or an outstanding video presentation for work, even a full documentary film or a blockbuster movie, just like short documentaries.
The truth is that it is not as easy as it looks. In every Oral History Conference we can see videos that are more engaging and impacting than others. What is it that a Video for Oral History needs to be effective? The task can be truly taxing when we start using some of the software packages that are widely available. For example, the first screen that you are welcomed with in Premiere2 is truly complicated. There seems that we need to know so much to know that we need to know. Lets now explore the basic principles of video editing and four basic elements:
One. What is possible
Two. What you really need -- in terms of equipment and software -- to make it happen
Three. The concepts you have to understand in order to use any of the popular editing packages
Four. What is specific of Oral History that must be kept in mind when creating a video clip.
What is possible? 2 You may download and set up a free demo version of Adobe Premiere so that you can try out all of these concepts once on your own. At the end of the process, you will be surprised to see just how much you can do with today's technology and how easy it is to get started. http://www.adobe.com/downloads/

Gutiérrez and Valladares Video Editing for Oral Historians
[5]
Take a look at two video clips from your local archive or from YouTube and select them, one for its low quality, and one for its high quality. More likely than not, the low quality short clip will look to you amateurish, disjointed or flat, it may be confusing, or will have low technical quality, with poor image and lousy sound. Regarding content, the clip may seem inconsequential, forced, artificially directed or disconnected from the main idea of the history. Whether you are an expert in video production, you will somehow know what is good and what is bad.
Our familiarity with high quality production makes us have high standards when we watch a video, even if we are not explicitly aware of just what these standards are. We know a bad clip when we see it. From the mere technical stand-point, and for an oral history project, there are a few basic features that we expect to watch on a high quality video clip:
• A title at the beginning • A set of "shots" cut together in a nice way to tell a story
o A shot is a specific subject filmed from a specific angle. • A fairly high number of shots
• High quality capture of video and sound In any television show clip every shot is short, often changing angles on the same individual or object. The transitions are interesting and varied. The soundtrack is always of high quality and often shots are further illuminated with fixed images. Lets for now hold on these basic features and the fact that we have the ability to know when a video is of good quality. We will first review what are the basic tools necessary to create a video clip to return then to how to use them to include these minimum elements in our work.
3. Video Capture: Basic Tools In addition to having a story to tell, the first think that you really need in order to produce a good video is a sense of the means at reach to create it. While making a good clip requires some planning and a lot of work, the reality is that today the technology and tools are more readily available both at the institutional environment where most oral historians work today around the world as well as for those whose professional practice is independent. All we need is:
• A digital camcorder that has a FireWire (IEEE 1394) connection
• A desktop or laptop computer, also equipped with a FireWire connection • A piece of video editing software
Digital Camcorders There are hundreds of digital video cameras, or camcorders, on the market today from manufacturers like Sony, Panasonic, JVC and Canon. Newer cameras now have a built-in hard-drive which means that you no longer need tapes to record the images and sound.

Gutiérrez and Valladares Video Editing for Oral Historians
[6]
The good news for the rest of us is that the MiniDV (miniature digital video) tapes and cameras are coming down in price.
Just about every camcorder based on the MiniDV tape format includes a FireWire (IEEE 1394) port on the camera so that you can load the video onto your computer quickly and easily. A fire wire is a wire that enables you to connect your computer to the camera. The fire comes from the fact that it not only transmits information, but it also powers the camera. It is a cable only that more complicated.
Typical digital camcorders on the market during the first decade of the 21st century are the Hi-8 camcorder, the MiniDV camcorder, and the CCD cameras. The Hi-8 camcorder soon became the least expensive of all digital camcorder. It uses Hi-8mm tapes instead of MiniDV tapes, but records on them digitally. A wise geek will tell you that “the difference between analog and digital technologies is that analog technologies record waveforms as they are, while digital technologies convert analog waveforms into sets of numbers, recording the numbers instead. When played back, the numbers are converted into a voltage stream that approximates the original analog wave” (wiseGEEK 2008). This kind of camera is very handy if you have a lot of analog 8mm or Hi-8 tapes that you want to load into your computer. The camera will convert an analog tape and run it out through the FireWire port on the camera, or record in digital format onto new tapes. The only problem with some of these cameras is a fairly low resolution. The MiniDV camcorders are the more popular today. It usually has a 1-megapixel CCD (charge-coupled device) that gives it great image quality. This means that it is an instrument that can capture images in great detail. The high end, these days are cameras with three or more CCDs. This is an entry-level professional camcorder with three CCDs, which means more detail and quality. These cameras can produce broadcast-quality images and has professional features normally utilized in professional studios. Whichever type of camera you pick, it needs to have a FireWire or a connection so you can hook it to your computer. Computer and software. You can use just about any desktop computer for video editing, as long as it has a FireWire port or a USB port to connect the camera to. If your computer does not have a FireWire port and your camera is not USB friendly, it is possible to add a card to almost any computer that will allow it to use the cable. Another important feature of any computer is to have enough CPU power, hard disk space and bus bandwidth to handle the data flowing in on the FireWire cable For example, the machine that I am using to type this paragraphs has the following specifications: It has an Intel Pentium 4. Which means it is not the newest model but is the average computer in a university in California by 2006. The CPU states 3.06 GigaHertz and 0.99 Gigabytes of RAM. RAM means Random Access Memory (RAM) it is the space your computer has in order to read and write data utilized by your CPU (central processing unit). If you use your office as a metaphore, the RAM is equivalent to how large is your desk top. The larger it is the more objects you can have in there without having to turn around and opening the drawers of the desk or your archive. The space available in your drawers is equivalent to how much hard disk space you have. If you have a tiny desktop then you need to spend a lot of time opening

Gutiérrez and Valladares Video Editing for Oral Historians
[7]
and closing those drawers. In our metaphor the CPU of Central Processing Unit is none other than yourself. The more desktop space the more productive you are! CPU power is measured in Mega Hertz and it tells how many million cycles (questions and answers) can it process in one second. It is a safe bet to say that a computer with a 3.0 Mhz will be much more capable of running your software and editing your movies than other with 1.0 Mhz. When purchasing or downloading your software, make sure to check for the “minimum system requirements” as that will tell you if your computer has what it takes to process images. Remember that processing video is one of the more demanding tasks your computer will ever handle.
Video processing in general uses lots of CPU power and moves tons of data on and off the hard disk. There are two different places where you will most feel the benefits of a fast machine and the sluggishness of a slow one. When you render a movie that you have created or write it out to hard disk, you will definitely feel the speed of the machine. On a fast machine, rendering and writing can take minutes. On a slow machine it can take hours.
A windows computer that will be able to process video at an acceptable pace today has the following specifications:
Pentium 3 or higher CPU – Fast operator.
512MB or higher RAM – Large work space 20 Gigabytes or more of Hard Drive – Lots of space where to store information
If your computer is an Apple, chances are you do not need to be concerned with any of this, because in all sincerity Apple computers are built with you in mind. They are easy to use and if they have the software installed (iMovie) then you are set.

Gutiérrez and Valladares Video Editing for Oral Historians
[8]
A more important issue comes when you are reading data from or writing data to the camera. When the video data stream is coming in from the camera through the FireWire cable, the computer and hard disk must be able to keep up with the camera or the computer will lose frames. When sending a completed movie back to the camera, the processor must be able to stream the data quickly enough or the camera will lose frames. A Pentium 3 machine running at 500 MHz, with 512 MB of RAM and a 20-GB hard drive is right on the edge of being able to handle the data stream from the FireWire connection. It can not handle it if any other applications (like an e-mail program) are running. A Pentium 4 machine or a late-model Mac with 512 MB or 1 GB of RAM and a big hard disk is a nice machine to have when you are rendering and writing files.
The Software There are many software packages available for editing video on your computer. Windows XP even ships with software that's built into the operating system. Machines from Sony and Apple have software that comes with the machines. Windows Movie Maker is an excellent example of pre-packaged software readily available. Although software and hardware are fast rendered obsolete by new versions and new options, I will discuss Adobe Premiere here to demonstrate the basic steps of video editing process that actually apply to all most different software packages in the market. For example, if you know how to use adobe Premiere it will be very easy to transfer the skill to use Microsoft Movie Maker, and even more so easy to use the Apple software iMovie. The advantage of using Premiere is that there is a free demo version available on the Web, and it will run on both PCs and Macs. Adobe Premiere is a full-featured and well respected video editing package that can do almost anything you would want to do for an academic project of high quality.
4. Video Editing: Basic Concepts There are several basic concepts that one must keep in mind to work with Premiere. Capture, which refers to the transferring of the raw footage from the camera to your computer; AVI and MOV files, which refers to the files that are placed onto your computer once the transfer is completed; Shots, which we will use to refer to the discrete scenes or moments of a given interview; and Timeline, which is a working space that you use to integrate the different components, video, sound, transitions, still shots, of your final edited clip. Capture. The first concept is called capture. You have to move all of the footage out of the camera and onto your computer's hard disk. There are three ways to do this:
a. You can capture all of the footage in a single file on your hard disk. A half hour of video footage might consume 10 gigabytes of space. (Note that some operating systems and video editing software packages limit file size to 2 gigabytes. Other packages put a 30-minute limit on file size.)
b. You could bring it in as five or 10 smaller files, which together will total 10 gigabytes but will be a little more manageable.
c. You can have a piece of software bring in the footage shot by shot. Adobe Premiere can do this manually, but a program like DVGate Motion (which comes standard on many Sony computers) can automatically scan the tape, find the beginning and end of

Gutiérrez and Valladares Video Editing for Oral Historians
[9]
every shot, and then bring them all in. Each shot will be in a different file when it's done. If you have access to a program like this, it makes your life very easy.
If you have just a few minutes of footage, technique (a) is the way to go. If you have an hour of footage, techniques (b) and (c) are useful.
AVI and MOV files The capture process will create AVI (on the PC) or MOV (on the Mac) files on your hard disk. These files contain your footage, frame by frame, in the maximum resolution that your camera can produce. So these files are huge. Typically, three minutes of footage will consume about 1 gigabyte of space. You can never have enough disk space when you do a lot of video editing.
Shots Once you have all of your footage into your machine, you need a way to select the parts that you are going to use. In most testimonies recorded for Oral History we tend to see a single angel with the person telling the story, but in other instances we have also seen two even three angles of the person leading the narrative. Filming with two or three angles will bring dynamism to a clip, and an environment that the viewers are accustomed to. You can do this by using more than one camera, or by moving the camera two or three times during the course of the interview. If you are using one single camera out of the big file of all the footage, you need a way to mark the beginning and end of these three little clips so that you can move them around as individual units and bond them together into the final scene. You do this by looking at the raw footage and marking an IN and OUT point for the little sections that you want to use. Then you drag these little clips onto the timeline. You can also merge different clips into one single timeline. Timeline Once you have your shots figured out, you need a place to arrange them in the proper order and hook them together. The place where you do that is called a timeline. You line the shots up in sequential order. Then you can play them as a sequence. With just three concepts -- capture, shots and timeline -- you can make a movie. It will not be fancy, but it will be 10 times better than watching raw footage. Let's run through these steps and create a movie with them.
5. Organizing your Production Once you have your raw footage in your computer it is a good moment to analyze and organize into different subsets that will allow you to tell a story. It is always a good idea to edit one full version of the interview, with a Title page and basic information related to the interviewee, the interviewer, date, place, and other relevant contextual information but you can also package the raw footage into discrete and / or combined segments that will allow you to tell a story. A first solid step is to identify or create different subsections for your raw footage. Sometimes the sections are determined simply by specific answers to specific questions or, if the interview was simply outlined based on open ended questions, by dividing the raw footage into the different themes addressed by the interviewee.

Gutiérrez and Valladares Video Editing for Oral Historians
[10]
Oftentimes the session will render critical moments of reflection and memory that encompass a critical aspect of the story, segments that are often central in the presentation of the story in a highly structure event (a speech, a panel presentation, or a class session). To identify and label these segments I recommend utilizing the following or a similar working table:
6. A Typical Software Package: Running Adobe Premiere3 The first thing that you see when you run Adobe Premiere is this imposing dialog:
3 You may download a trial copy from the following webpage:
http://www.adobe.com/downloads/

Gutiérrez and Valladares Video Editing for Oral Historians
[11]
You can simply click OK and move on to the next step, as the defaults have been determined to address the average needs of the user. If you are not interested in the technicalities you are welcome to skip the bullets and the box that ensure. If you'd like to understand what this dialog box is talking about, and have more control, here's a quick description:
• This dialog is a complex way of letting you tell Premiere how your camera records raw footage. There are two parts to the equation -- the video resolution and the audio sampling rate.
• If you have a camcorder that uses MiniDV or DV-CAM tapes, then your camera is taking images at 720 x 480 resolution.
• You would choose from one of the first two blocks (DV - NTSC or DV - PAL) depending on whether your camera is NTSC or PAL. The United States and Canada use NTSC, and Europe and Asia use PAL. An extraordinarily easy way to learn almost anything that seems complicated to handle is to write a question in a search engine. For example, what
• Then you have to pick whether you shot your raw footage using standard format or widescreen (16:9) format.
• Then you have to choose the audio sampling rate. The easiest thing to do is look in your camera's manual, but 48 KHz seems to be standard for most MiniDV camcorders.
• If you are using a MiniDV camera in the United States and you are shooting standard rather than widescreen, then the default that Premiere chooses is correct. Otherwise, choose an appropriate option for your situation.

Gutiérrez and Valladares Video Editing for Oral Historians
[12]
Project settings presets are groups of project settings. Adobe Premiere Pro comes with several categories of project settings presets installed: DV-24P, DV-NTSC (North American standard), DV-PAL (European standard), Panasonic P2 DVCPRO50, Panasonic P2 DVCPROHD, HDV, and Mobile & Devices. These contain the correct project settings for the most typical project types. The Panasonic P2 DVCPRO50 and Panasonic P2 DVCPROHD categories of project settings presets are for editing DVCPRO material recorded to MXF files using a Panasonic P2 video camera. For DV25 material recorded in Panasonic P2 format, use a preset for DV-NTSC or DV-PAL, depending on the television standard of the footage.
When creating a new project, you can either select from among the standard project settings presets or customize a group of project settings and save the customized group as a custom project settings preset. If you want full control over almost all the project’s parameters, you must start a new project and customize its project settings presets.
After you begin working in a project, you can review project settings, but you can change only a few of them. Choose Project > Project Settings to view the settings you can change.
Project settings are organized into the following categories: General Controls the fundamental characteristics of the project, including the file format Adobe
Premiere Pro uses for its preview files and playback (Editing Mode), count time (Display Format), and play back video (Timebase).
Capture. Controls how Adobe Premiere Pro transfers video and audio directly from a deck or camera. (None of the other project settings options affect capturing.) The contents of this panel depend on the editing mode. If you’re capturing DV footage, you don’t need to change capture settings. When DV/IEEE 1394 Capture is the selected capture format, no options are available because the options are automatically set to the IEEE 1394 standard. Additional capture formats and options may appear if you install other software, such as software included with a capture card certified to be compatible with Adobe Premiere Pro
Once you get past the Project Settings dialog, you come to the main working screen of Premiere, which looks something like this:
There are five different areas on the screen that are important, the project area, the monitor area, the timeline area, the transitions area, and the navigator area.
Gutiérrez and Valladares Video Editing for Oral Historians
[13]
The Project Area. The project area keeps track of all of the different AVI/MOV files containing the raw footage that you are using to create your movie.
The Monitor Area. The monitor area has two video windows. The left window, called the Source window, let's you look at different AVI files so that you can identify the IN and OUT points for the clips you want to use. The right window, called the Program window, lets you view your movie as it develops on the timeline. Both have standard controls to play, stop, repeat and so on. The Timeline Area. The timeline area is where you assemble audio and video clips into your final movie. This timeline initially has room for two video tracks and three audio tracks, but it can handle dozens if you like.
The Transitions Area. The transitions area lets you choose different transitions so you can drop them on the timeline.
The Navigator Area. The navigator area lets you see your whole project at a glance, no matter how big it gets. It also lets you set the zoom level in the timeline area.
6. Editing a video with Adobe Premiere. Editing a Video: Capture and Clips
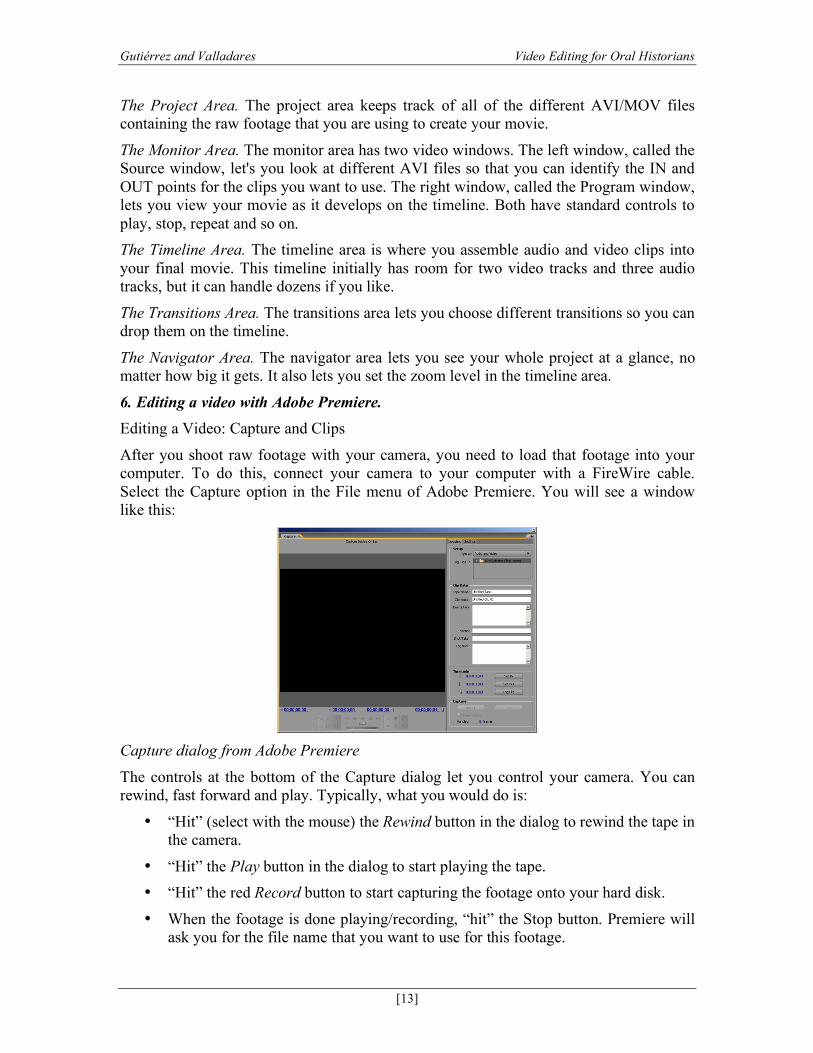
After you shoot raw footage with your camera, you need to load that footage into your computer. To do this, connect your camera to your computer with a FireWire cable. Select the Capture option in the File menu of Adobe Premiere. You will see a window like this:
Capture dialog from Adobe Premiere The controls at the bottom of the Capture dialog let you control your camera. You can rewind, fast forward and play. Typically, what you would do is:
• “Hit” (select with the mouse) the Rewind button in the dialog to rewind the tape in the camera.
• “Hit” the Play button in the dialog to start playing the tape. • “Hit” the red Record button to start capturing the footage onto your hard disk.
• When the footage is done playing/recording, “hit” the Stop button. Premiere will ask you for the file name that you want to use for this footage.

Gutiérrez and Valladares Video Editing for Oral Historians
[14]
You can either capture all of your footage in one big file, or your can capture it in a number of smaller files. (Note that some operating systems and video editing software packages limit file size to 2 gigabytes. Other packages limit file size to 30 minutes. You also need to make sure that you have enough free disk space to hold all the captured footage.) Premiere will create AVI (on the PC) or MOV (on the Mac) files on your hard disk at a rate of about 1 gigabyte per three minutes of raw footage.
Clipping To make a selection from the raw movie you have imported, take the following steps:
• You first need to "import" the file containing the raw footage into the current project so that Premiere can use it. If you captured the footage in Premiere, then it was imported automatically. If not, choose Import from the File menu and locate the AVI or MOV file you wish to add to the project. Adobe uses the concept of a "bin" to hold AVI and MOV files. A bin is like a folder -- it is just a collection of files. In complicated projects, you may have several bins that store different types of footage. Here's what you'll see after you import the footage:
• Drag the clip file from the Project window into the Source window.
• Play it in the Source window to see what you've got by pushing the Play button. • Mark the IN and OUT points for a clip you want to use in the Source window.
There are several ways to mark the IN and OUT points. As you are playing the video, probably the easiest way is to hit the I and O keys on the keyboard when you see the IN and OUT points. Once you rough them in, you can fine-tune them with the mouse by dragging them.
Marking IN and OUT points in the Source window: The little green bar above the time code shows you which part of the raw footage has been selected for the clip.
Now that you have selected a clip, you can add it to the timeline.
7. Editing a Video: Timeline and Transitions Once you have marked a clip by selecting the IN and OUT points in the Source window, you can add the clip to the timeline. Simply drag the image from the Source window down to the timeline. You will see something that looks like this:

Gutiérrez and Valladares Video Editing for Oral Historians
[15]
The timeline with a single clip in it (Note that your view of the timeline may look slightly different. Right-click on the timeline and change the preferences to select your view of the timeline).
What the timeline now shows is that your movie contains one clip, about five seconds long.
Now what you can do is repeat this process and drag several more clips onto the timeline. You will end up with something like this:

Gutiérrez and Valladares Video Editing for Oral Historians
[16]
This is the simplest possible movie -- a bunch of clips strung together on a timeline. But it is a movie nonetheless, and it is 10 times better than raw footage because you have chosen the best parts of the raw footage to assemble on the timeline.
To play your movie, you can click the play button on the program portion of the monitor area, or you can click in the time portion of the timeline area to move the pointer and then press the space bar to start playing from that point.
Let's say that you would like to change the length of a clip once you have it on the timeline. There are several ways to do this:
• You can drag either end of the clip on the timeline with the mouse.
• You can use the razor blade (upper left corner of the timeline window) and cut a clip, and then delete either end by clicking on the end and hitting the delete key. Then you can right-click on the gap that you created and choose Ripple Delete from the menu that pops up.
Transitions Sometimes simple cuts from one clip to the next work well, but other times you might want to use fancier transitions from scene to scene. For example, you might want to use a dissolve, or a wipe or a fade. Premiere has all sorts of transitions available. Simply choose one from the transitions area and drag it to a spot between two clips on the timeline:

Gutiérrez and Valladares Video Editing for Oral Historians
[17]
Once in place on the timeline, right-click on the transition to adjust it if you like. The transitions will look like this on the timeline:
When you play your movie, you will not be able to immediately see how the transition will actually look. That's because transitions take some extra processing to complete the effect. Premiere tells you that extra processing still needs to be done by putting a small red bar above the transition, as seen in the previous illustration. To activate the extra processing, you Render the timeline. From the Timeline menu, choose Render Work Area. When the processing is finished, you can play your movie to see the transition.
Background Music and Narration When you shoot your raw footage with your camcorder, it has a sound track. There are three reasons why you might want to supplement or replace the existing sound track:
1. Many of the TV shows and videos you see today, and almost all movies, have a musical background during all or part of the action. Music can lend atmosphere and create a certain feeling. Music can add a lot of professionalism to the finished work. 2. An additional sound track is frequently used to handle narration. Most documentary and nature films use this technique. 3. In many cases, the sound you record is unusable, or just not quite right, for the movie you are creating. For example, if a lion roars at the zoo and you capture the image, you may not be able to capture the sound because the lion is 50 feet away and you are using a zoom lens to film him. In that case, you'll want to substitute a better roar for the one you have.
To handle music, you have several options: • You can make up your own music and record it yourself. Obviously you can get a
lot more sophisticated than that, but it shows you how easy it is. • You can buy CDs full of royalty-free music loops and sound effects.
Gutiérrez and Valladares Video Editing for Oral Historians
[18]
You can import many different types of sound files (including WAV, AIF, etc.) into a Premiere project and then position it on the timeline in Audio Track #2. Now when you play your movie, Premiere will automatically mix the original sound track of your movie with the new audio track and play it.
To handle narration, probably the easiest thing to do is simply read your narration into the camera, and then capture the video as you normally would. You can separate the narration sound track from the video track and use the sound track. Simply drop the raw narration footage onto the timeline, right-click on it and select "Split Video and Audio." Click on the video portion and delete it. Now you have the narration sound track that you can lay on the timeline at the proper point. Particularly with narration, timing the video with the audio becomes important. Once you have the narration sound track on the timeline, you can slice it up with the razor blade tool to either add gaps or delete sections to help with timing.
In a big project, it is not unusual to be working with half a dozen sound tracks. Premiere can manage an unlimited number of audio (or video) tracks. To add a new sound track, all you need to do is right-click on the timeline and select the Track option. Select to add a new track.
If the visual part of a movie is perfect but the sound is not, then the movie looks amateurish. Fortunately, Premiere offers sophisticated tools for getting the sound right. We've already discussed how to add new sound tracks to the timeline. Now you need to understand how to adjust each sound track so that everything sounds perfect.
On every sound track, there is an arrow icon. Clicking it will expand the view and make an adjustment area for the sound track available, as you can see here:
In this adjustment area, you can add new control points simply by clicking anywhere along the red line. Then you move the control points by dragging them with the mouse. The control points control the level of the sound. For example, in the following illustration, the level of the sound in video track 1 has been taken to zero so that the sound on a split-edit is used instead:
What you will normally do is listen to the sound track and "even out" or "sweeten" the sound by adjusting things so that the sound is uniform throughout your entire piece. It is important to mention that having a good microphone can really help sound quality, especially when you are filming someone talking. A good lavaliere microphone (the kind that you clip onto the front of the speaker's shirt) can make a huge difference. Lavalieres come in both wired and wireless versions. You will especially notice the advantages of lavalieres when you are filming indoors -- a lavaliere will completely eliminate the echoes and "booming" sound that you will frequently get from recording someone indoors with the camcorder's built-in microphone. Check out Shure's Wireless Microphone Systems for details.
8. Reviewing what to bring and what to keep in mind when creating a video clip 1. Mini-DV Camcorders

Gutiérrez and Valladares Video Editing for Oral Historians
[19]
2. Camera Movement. Zoom. Pan. Dolly. Close-in. Interviewing in a natural setting makes a powerful sensory statement.
3. Manual Settings. Check your settings before shooting: Focus, White Balance, Shutter Speed, Exposure, Aperature. How they work. How they affect your picture.
4. Camera Menus Be familiar with the Camera Menus. 5. Check List
We'll go step by step through your "checklist" (20 items) of getting everything set up, and being ready to shoot. in a hurry!
6. Lighting Just the basics of lighting.
3. Opacity
Your clips can be made transparent, so we can "see through them" to other layers on the video tracks below.
4. Title Designer. You can make titles, graphics, rolling credits. This is a
sophisticated and elaborate tool in Premiere Pro that comes with a wide range of templates to help you create professional layouts and designs.
4. Sequences In earlier versions of Premiere, we were limited to one Timeline per project. Now we
can have multiple Timelines, or Sequences, in any project -- which makes it much easier to manage the long ones. Then bring them all together when you're ready to play the finished scene. 5. Add Tracks, Slow Motion, Markers
There's no shortage of video or audio tracks. Although you won't need more than five or ten in most cases, there are a hundred of them at your disposal. Also, we check out slow-motion capabilities, and Markers. 1. Export To Video
You'll want to play your finished scenes out to your camera, where you can store them on the Mini-DV tapes for "back-ups".
2. Export to Web & DVD You can also convert your scenes to web-based formats, and MPEG-2 for DVD's.
3. DVDiT. A quick look at a DVD authoring program. Premiere Pro 2. We'll start a project in "Pro 2", and see all the new formats (in response to the new DV Camcorders) that Premiere supports: HD, HDV, SD, DV-24 fps. Also, the windows can be "tied together" now. When you resize one, the window next to it moves, too. No wasted space.

Gutiérrez and Valladares Video Editing for Oral Historians
[20]
References Campbell, L. (2005, November). Say It Aloud You Can Become an Oral Historian. Writing, 28(3), 8-13. Retrieved September 18, 2008, from Humanities International Index database.
Benmayor, R. (2008, June). Digital Storytelling as a Signature Pedagogy for the New Humanities. Arts & Humanities in Higher Education, 7(2), 188-204. Retrieved September 18, 2008, from Humanities International Index database. Mutnick, D. (2007, June). Inscribing the World: An Oral History Project in Brooklyn. College Composition & Communication, 58(4), 626-647. Retrieved September 18, 2008, from Humanities International Index database.
Boyd, N. (2008). Who Is the Subject? Queer Theory Meets Oral History. . (pp. 177-189). . Retrieved September 18, 2008, from Humanities International Index database.
WiseGeek.com What is the Difference Between Analog and Digital?http://www.wisegeek.com/what-is-the-difference-between-analog-and-digital.htm