Jr. Historians Tackle Their Local History - CSUSB
44
1 Jr. Historians Tackle Their Local History: Step-By-Step Project- Based Activities That Serve as a Template for Any Community to Develop Their Own History Curriculum Table of Contents Acknowledgements 2 Overview: Jr. Historians Tackle Their Local History 3 Description of the Unit Historical and Social Science Analysis Skills Compelling Questions and Supporting Questions Common Core Standards Using an Inquiry Approach Preparations for Jr. Historians Tackle Their Local History Directions for Creating a Timeline of Our Community’s History Bio-Sketches for the History of Our Local Community The Living History Museum Lesson 1: Traditions, Migration, and Population 9 Lesson 2: Early Explorers, Settlers, and Founders 16 Lesson 3: Land Use 20 Lesson 4: Change Over Time - New Businesses and Services 29 Lesson 5: The Growth and Development Continues 34 Lesson 6: Timeline of Our Community’s History 39 Extended Activities 43
-
Upload
khangminh22 -
Category
Documents
-
view
0 -
download
0
Transcript of Jr. Historians Tackle Their Local History - CSUSB

1
Jr. Historians Tackle Their Local History: Step-By-Step Project-
Based Activities That Serve as a Template for Any Community to
Develop Their Own History Curriculum
Table of Contents
Acknowledgements 2
Overview: Jr. Historians Tackle Their Local History 3
Description of the Unit
Historical and Social Science Analysis Skills
Compelling Questions and Supporting Questions
Common Core Standards
Using an Inquiry Approach
Preparations for Jr. Historians Tackle Their Local History
Directions for Creating a Timeline of Our Community’s History
Bio-Sketches for the History of Our Local Community
The Living History Museum
Lesson 1: Traditions, Migration, and Population 9
Lesson 2: Early Explorers, Settlers, and Founders 16
Lesson 3: Land Use 20
Lesson 4: Change Over Time - New Businesses and Services 29
Lesson 5: The Growth and Development Continues 34
Lesson 6: Timeline of Our Community’s History 39
Extended Activities 43

2
Jr. Historians Tackle Their Local History: Step-By-Step Project-
Based Activities That Serve as a Template for Any Community to
Develop Their Own History Curriculum
Acknowledgements
Project Director and Author
Priscilla H. Porter, Ed.D.
Professor Emeritus of Education, California State University Dominguez Hills
Dr. Priscilla H. Porter is the Director of the Porter History-Social Science Resource Room at
the Palm Desert Campus of California State University San Bernardino. A former elementary
teacher, Dr. Porter is the author of numerous curriculum guides and is the senior author of
Reflections, a Kindergarten to Grade 6 social studies textbook series published by Harcourt
School Publishers.
Teacher Contributors to this curriculum guide include:
Amiya Sawyer Linton, Palm Springs Unified School District
Louisa Castrodale Higgins, Riverside County Office of Education
Rossie Becerra Davies, Montebello Unified School District
Cynthia Delameter, Los Angeles Unified School District
James Feffer, Palm Springs Unified School District
Blanca Luna, Palm Springs Unified School District
Lynda Lemon Rush, Charter Oak School District
Rebecca Valbuena, Glendora School District
Many thanks to Dr. Jud Grenier for his years of providing inspiration for the teaching of community history and to Janice Harbin for her editing expertise. Requesting Your Review – Reviews are very important to authors. If you’ve enjoyed this curriculum guide, please write a review of it on www.Amazon.com Copyright 2020 by Priscilla Porter Permission is hereby granted to reproduce and distribute this publication for educational and research purposes. Direct inquiries to: Dr. Priscilla H. Porter Palm Desert Campus, California State University San Bernardino 37-500 Cook Street Palm Desert, California 92211 [email protected] Cover photographs by Charles W. Porter

3
Overview: Jr. Historians Tackle Their Local History
Description of the Unit
This step-by-step guide is intended to serve as a template for developing the local history of
any community. Students draw from historical and community resources to organize the
sequence of events in local history and describe how each period of settlement left its mark
on the land.
“Local history” may be interpreted as a specific city or town or as broadly as the local region.
It is your choice to determine the geographic boundaries of your community.
Students discover the history of their community, including the explorers who visited there,
the newcomers who have settled there, and the people who continue to come to the area
today. Students trace their community’s development including how individuals and families
have contributed to its founding and economic growth, and how the community has changed
over time, drawing on maps, photographs, advertisements, and other primary sources. The
unit concludes with a Living History Museum where students portray local historical figures.
Historical and Social Science Analysis Skills
• Students place key events and people of the historical era they are studying in a chronological sequence and within a spatial context; they interpret timelines.
• Students differentiate between primary and secondary sources.
• Students pose relevant questions about events they encounter in census data, maps, historical documents, oral interviews, and photographs.
• Students explain how the present is connected to the past, identifying both similarities and differences between the two, and how some things change over time and some things stay the same.
• Students summarize the key events of the era they are studying and explain the historical contexts of those events.
• Students develop historical, geographic, economic, and cultural literacy while building basic study skills, critical thinking skills and participation skills.
The above analysis skills are developed through the following project-based activities.
Lesson 1: Students construct their own artifact box, family members are interviewed about
their migration to the local community, the Timeline of Our Community’s History is introduced,
and population growth is graphed.
Lesson 2: Bio-sketches of people important to local history are read, and students make
event cards.

4
Lesson 3: Students analyze old maps and early advertisements that promote the local
community, they become historians as they interview older residents, and they go on a
community scavenger hunt. A visit to a local history museum or historic site is recommended.
Lesson 4: “Then and Now” photographs are used to help show how the community has
developed over time. Bio-sketches are introduced to tell the story of the changing economy
and the community’s history during recent times.
Lesson 5: Students create a scrapbook page for a bio-sketch, a tourism brochure for their
community, and portray a significant person in the Living History Museum.
Lesson 6: Students participate in an imaginary tea party, and construct an individual or group
Timeline of Our Community’s History.
Compelling Questions
Why did people move to our community? How has our community changed over time?
Supporting Questions
Lesson 1 What are some of my family’s cultural and religious traditions? When and why
did my family come to the local community? What is the population of our
community and how has it changed over time?
Lesson 2 Who were the early explorers of the local community? Who were the settlers
who came here? Why was the community established? How did individuals or
families contribute to the founding and development of our community?
Lesson 3 How has the local community changed over time, drawing upon primary
sources such as maps, advertisements, and interviews?
Lesson 4 How has our community changed over time? Why do some things change, and
some things stay the same? What economies were established by the settlers
and what influences do these economies have on the present-day economy?
What key businesses and services exist in the local community and how have
these changed over time?
Lesson 5 What individuals have contributed to the recent growth and development of the
local community? What role has tourism played in the growth and development
of the community?
Lesson 6 What are the key events in the history of the local community?
5
Common Core Standards for English Language Arts* *RL= Reading Literature Standards; RI= Reading Informational Text; W-Writing; SL= Speaking and Listening
RL 3.3 Describe characters in a story (their traits, motivations, or feelings) and explain how
their actions contribute to the sequence of events.
RI 3.1 Ask and answer questions to demonstrate understanding of a text, referring explicitly
to the text as the basis for the answers.
RI 3.2 Determine the main idea of a text; recount the key details and explain how they
support the main idea.
RI 3.3 Describe the relationship between a series of historical events in a text, using
language that pertains to time, sequence, and cause/effect.
RI 3.4 Determine the meaning of general academic and domain specific words and phrases
in a text relevant to the subject area.
RI 3.7 Use information gained from illustrations (e.g., maps, photographs) and the words in a
text to demonstrate understanding of the text (e.g., where, when, why, how events occur).
RI 3.9 Compare and contrast the most important points and key details presented in two texts
on the same topic.
W 3.1 Write an opinion piece, supporting a point of view with reasons.
W 3.2 Write informative/explanatory texts to examine a topic and convey information clearly.
W 3.3 Write a narrative to develop imagined experiences using descriptive details.
SL 3.1 Engage effectively in a range of collaborative discussions.
SL 3.3 Ask and answer questions about information from a speaker.
SL 3.4 Report on a topic or text with appropriate facts and relevant, descriptive details,
speaking clearly at an understandable pace.
Common Core Standards for Mathematics
Represent and Interpret Data 3. Draw a scaled bar graph to represent a data set. Solve one
step and two step “how many more” and “how many less” problems using information
presented in scaled bar graphs.
Using an Inquiry Approach
Young children begin to see themselves as capable problem-solvers and active contributors
to their community and beyond when they engage in social studies inquiry. The goal is to
spark curiosity in the children about the history of their local community, develop robust
investigations into the compelling and supporting questions; consider possible solutions and
consequences of their research; help them separate evidence-based claims from opinions;
and finally have students communicate and act upon what they learned by participating in
The Living History Museum (see pages 8, 36-37).

6
Preparations for Jr. Historians Tackle Their Local History
This step-by-step guide is intended to serve as a template. You need to collect the
information pertinent to your community and research the available museum archives to
gather the recommended resources. Archival “foot-work” is needed since many local events
and people significant to the development of the local community may not be found on the
internet.
Begin by collecting the recommended research materials listed below. Divide your materials
into the categories listed in BOLD. Elicit the help of your local history museums. Make it a
project with a team of teachers and local history enthusiasts.
Recommended Local History Materials to Collect
• List of significant dates in the history of the community. Write 1-2 sentences
describing what happened. (See the sample timeline below.)
• List of significant people in the history (i.e. settlers), businesses, services, and
government of the community from its development to today. List these people on the
timeline. A brief one-page bio-sketch should be written in the first-person for each
significant person. Prepare enough bio-sketches so each child in your group will have
a different one. (See the sample bio-sketch on page 8.)
• Photos from long ago and today. Include historic locations, businesses, etc. Identify
the exact location of the photo, preferably the address. Go to the same location today
and take a photo of the same location from the same vantage point.
• Maps of the community from long ago and today.
• Population census figures for every ten years of the community.
• Advertisements that encouraged people to move to your community long ago and
ads that encourage them to move to the community today.
Directions for Creating a Timeline of Our Community’s History
In preparation for this unit, construct a timeline for the history of the local community. Enter
the dates onto a word document so it can be duplicated for the students. For example:
Spanish explorer, Juan Bautista de Anza, passed south of the Coachella
Valley in search of a land route from Sonora to Monterey.
Captain Jose Romero, a Spanish explorer, entered the Banning Pass to look
for a land route to Yuma. Not until his second attempt did Romero made it all
the way to Yuma.
The William Bradshaw Trail stage route started through the Banning Pass from
Los Angeles to the gold fields of Arizona.
The Southern Pacific Railroad’s first steam engine made the run between Los
Angeles and Indio on May 29th. The next year the line was completed from Indio
to Yuma.

7
Note: On the timeline, the names listed in BOLD are significant people in the local history.
Each significant person you have identified should be listed on your timeline.
Recommended: Draw the timeline on a large sheet of butcher paper (or shelf paper) that is
approximately 4 yards long. Make short vertical lines on the timeline about 6” apart. Label the
lines beginning with 1770, or the date of your choice. As an alternative to the butcher paper,
use 10 sheets of 12” by 18” construction paper, two for each century from the dates 1700 to
2100. Divide each century into decades.
Label each successive date in ten-year intervals (1770, 1780, 1790, 1800, 1810, 1820…)
ending with the year 2020, or later. Refer to the sample timeline shown below. Give the
timeline a title, such as Timeline of Our Community’s History.
Mount the timeline on the bulletin board or classroom wall.
At the top of the timeline, label each appropriate century.
17th century 18th century 19th century 20th century 21st century
Event Cards: As you study the history of the local community, have
one student at a time use a 2”X3” index card to make an “event
card” for the time line, one for each of the events and one for each of
the significant people. The “event card” should have the date, a brief
description of the event, and a small illustration. As completed,
post each Event Card on the Timeline. Encourage students to
make the event cards colorful to enhance the appeal of the timeline.
Throughout this unit, continue to add event cards to the timeline.
Bio-Sketches for the History of Our Community
Plan to write enough bio-sketches of “significant people” so each child will have one. This is
the most time-consuming part in the development of the local history project. Elicit a team to
of teachers or history enthusiasts help write the bio-sketches.
It is recommended each bio-sketch be written in the first person and includes a photograph of
the person, if available. Refer to the “sample” bio-sketch on the next page.

8
[Sample Bio-Sketch]
My name is Albert G. Tingman. I am known as the
“Father of Indio.” I came to the area in 1877 as a
railroad construction boss for the Southern Pacific
Railroad. By 1883, I became the railroad station
agent and a telegrapher.
Two years later, my wife and I homesteaded and
purchased 160 acres of Southern Pacific Railroad
property. I built Indio’s first store near the train depot.
I built a corral on the south side of the store for
travelers, local prospectors at the mines, and railroad
workers...
Limit each bio-sketch to one page, double-spaced. Assemble copies of all the bio-sketches
and the community timeline into a booklet. Provide a copy for each child.
The Living History Museum
For the Living History Museum, each student selects an historical figure from your local
community’s history to portray at The Living History Museum. Students “perform” their “living
history” for family members, friends and interested members of the community.
To prepare for The Living History Museum, each student writes a speech using the first
person “voice” of the historic person he/she selected from the bio-sketch booklet. The
speech should include the person’s name, important dates, contributions to the local
community’s history, and any other historic information about the person’s life. Students may
include additional information about their historical figure, if it is available.
On the day of The Living History Museum, each student should wear a simple costume that
represents what the historic person may have worn in
his or her work.
Students share artifacts or props associated with the
individual; for example, an early settler may have a
copy of a town map.
Students will be the “exhibits” in The Living History
Museum as they role play the historic person. Place
a “Press Here” button near each student. Museum
visitors “gently” push the button and the historic
person “comes to life” and shares his/her speech.
Refer to pages 36-37 for more information.
Albert G. Tingman

9
Lesson 1: Traditions, Migration, and Population
Supporting Questions
• What are some of my family’s cultural and religious traditions?
• When and why did my family come to the local community?
• What is the population of our community and how has it changed over time?
Activity # 1 Migrant Farm Workers
Materials needed: A copy of the book Amelia’s Road by Linda Jacobs Altman. If the book is
not available, move to Activity #2.
Step 1: Information for students In this unit, we will study about people who have come to
the local community and the reasons that have brought them here. In this first activity, we will
learn about migrant farm workers. The term “migrant” means to move from place to place.
Migrant farm workers move from harvest to harvest, staying in
temporary housing or labor camps for short periods of time.
Step 2: A Book to Read Show the cover of the book Amelia’s Road
by Linda Jacobs Altman. Point out that the cover picture shows
Amelia, the daughter of a farm worker. In the book, she describes
how she is tired of moving around so much and dreams of her own
home. The farm work and moving about makes it very difficult for
Amelia to know any one place very well or to make friends. In
Amelia’s story, she is looking for a place where she belongs and
can call home, a place she can come back home to (RL 3.3).
After reading the story, have students describe the characters in the story (e.g., their traits,
motivations, or feelings) and explain how their actions contribute to the sequence of events.
Have students talk with a partner as you ask the following questions:
• What is Amelia’s life like as the daughter of migrant farm workers?
• Why does Amelia’s family move from farm to farm?
• What do you think it would be like to move from place to place?
• What is meant in the book by the phrase, the accidental road? (a short cut Amelia found
by accident. It was narrow and rocky, more like a footpath.)
• At the end of the story, why does Amelia feel that now she has a place that belongs to her
and to which she belongs? How does she adjust to this new place? (RL 3.3)
Step 3: Writing and Drawing Share with the students a special place that you enjoy. Ask
students if they have a special favorite place. Optional: Have the students each draw a
picture of “some place that is really special,” and title it “My Special Place.” Either before
drawing or afterward, have students write what makes their place so special (W 3.2).
10
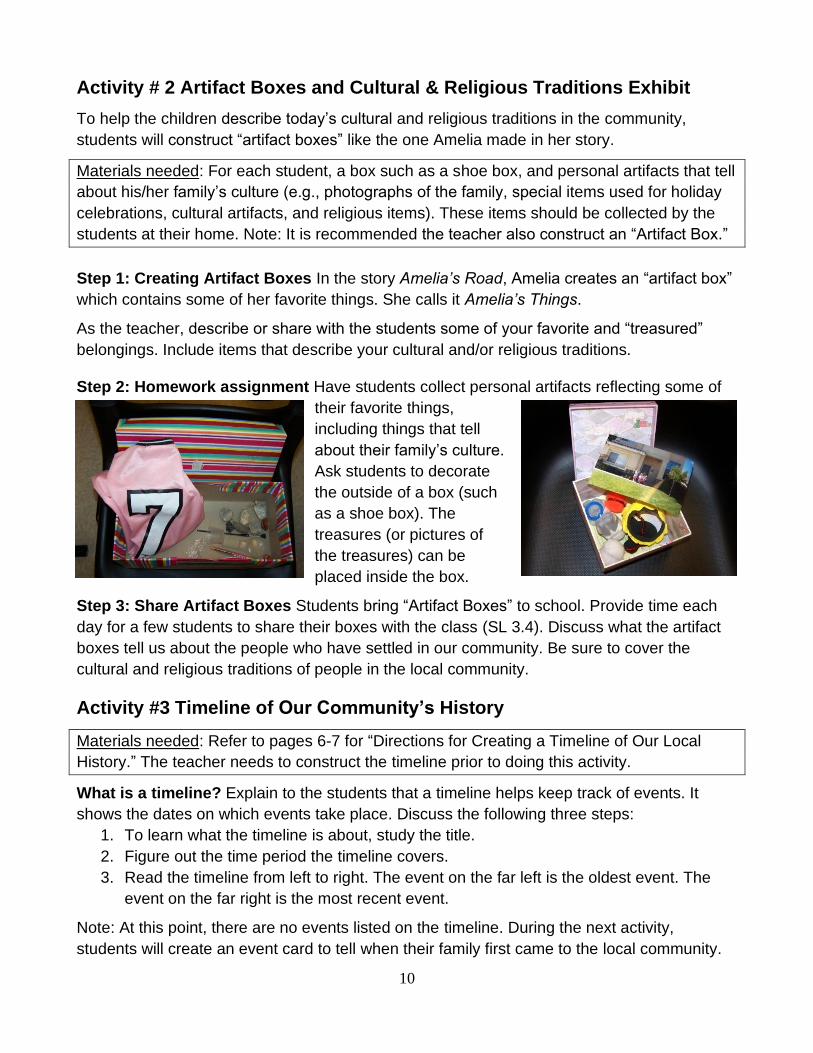
Activity # 2 Artifact Boxes and Cultural & Religious Traditions Exhibit
To help the children describe today’s cultural and religious traditions in the community,
students will construct “artifact boxes” like the one Amelia made in her story.
Materials needed: For each student, a box such as a shoe box, and personal artifacts that tell
about his/her family’s culture (e.g., photographs of the family, special items used for holiday
celebrations, cultural artifacts, and religious items). These items should be collected by the
students at their home. Note: It is recommended the teacher also construct an “Artifact Box.”
Step 1: Creating Artifact Boxes In the story Amelia’s Road, Amelia creates an “artifact box”
which contains some of her favorite things. She calls it Amelia’s Things.
As the teacher, describe or share with the students some of your favorite and “treasured”
belongings. Include items that describe your cultural and/or religious traditions.
Step 2: Homework assignment Have students collect personal artifacts reflecting some of
their favorite things,
including things that tell
about their family’s culture.
Ask students to decorate
the outside of a box (such
as a shoe box). The
treasures (or pictures of
the treasures) can be
placed inside the box.
Step 3: Share Artifact Boxes Students bring “Artifact Boxes” to school. Provide time each
day for a few students to share their boxes with the class (SL 3.4). Discuss what the artifact
boxes tell us about the people who have settled in our community. Be sure to cover the
cultural and religious traditions of people in the local community.
Activity #3 Timeline of Our Community’s History
Materials needed: Refer to pages 6-7 for “Directions for Creating a Timeline of Our Local
History.” The teacher needs to construct the timeline prior to doing this activity.
What is a timeline? Explain to the students that a timeline helps keep track of events. It
shows the dates on which events take place. Discuss the following three steps:
1. To learn what the timeline is about, study the title.
2. Figure out the time period the timeline covers.
3. Read the timeline from left to right. The event on the far left is the oldest event. The
event on the far right is the most recent event.
Note: At this point, there are no events listed on the timeline. During the next activity,
students will create an event card to tell when their family first came to the local community.
11
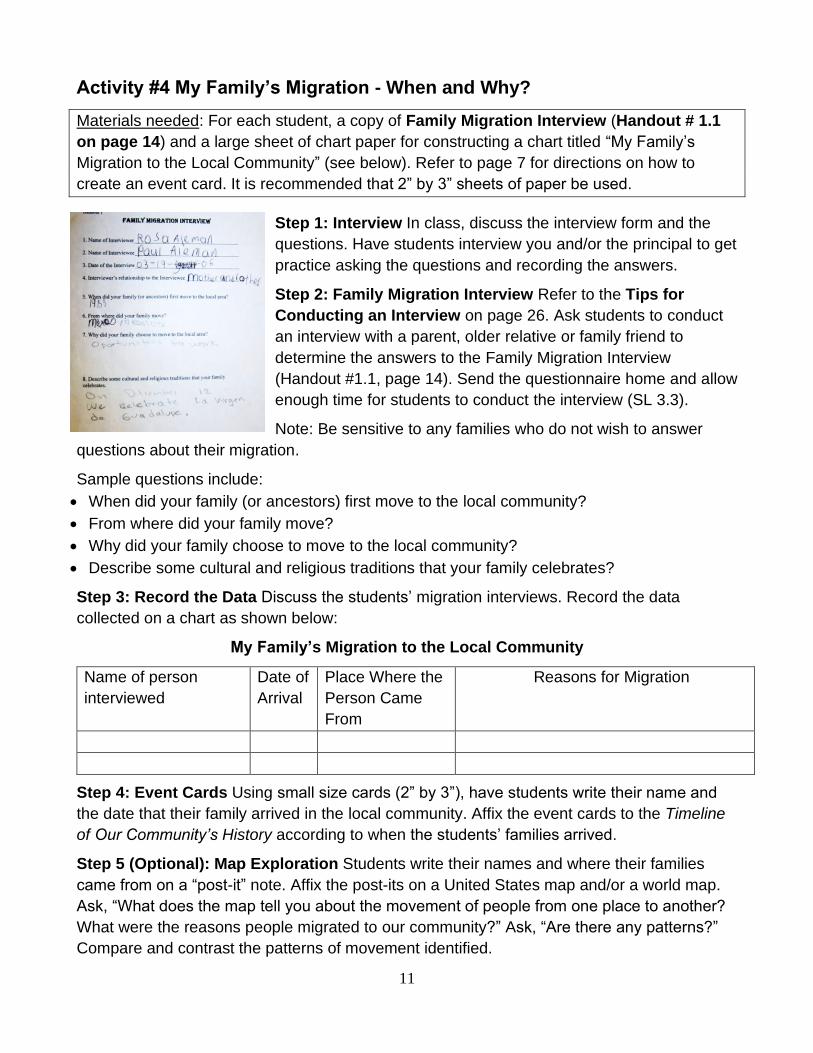
Activity #4 My Family’s Migration - When and Why?
Materials needed: For each student, a copy of Family Migration Interview (Handout # 1.1
on page 14) and a large sheet of chart paper for constructing a chart titled “My Family’s
Migration to the Local Community” (see below). Refer to page 7 for directions on how to
create an event card. It is recommended that 2” by 3” sheets of paper be used.
Step 1: Interview In class, discuss the interview form and the
questions. Have students interview you and/or the principal to get
practice asking the questions and recording the answers.
Step 2: Family Migration Interview Refer to the Tips for
Conducting an Interview on page 26. Ask students to conduct
an interview with a parent, older relative or family friend to
determine the answers to the Family Migration Interview
(Handout #1.1, page 14). Send the questionnaire home and allow
enough time for students to conduct the interview (SL 3.3).
Note: Be sensitive to any families who do not wish to answer
questions about their migration.
Sample questions include:
• When did your family (or ancestors) first move to the local community?
• From where did your family move?
• Why did your family choose to move to the local community?
• Describe some cultural and religious traditions that your family celebrates?
Step 3: Record the Data Discuss the students’ migration interviews. Record the data
collected on a chart as shown below:
My Family’s Migration to the Local Community
Name of person
interviewed
Date of
Arrival
Place Where the
Person Came
From
Reasons for Migration
Step 4: Event Cards Using small size cards (2” by 3”), have students write their name and
the date that their family arrived in the local community. Affix the event cards to the Timeline
of Our Community’s History according to when the students’ families arrived.
Step 5 (Optional): Map Exploration Students write their names and where their families
came from on a “post-it” note. Affix the post-its on a United States map and/or a world map.
Ask, “What does the map tell you about the movement of people from one place to another?
What were the reasons people migrated to our community?” Ask, “Are there any patterns?”
Compare and contrast the patterns of movement identified.

12
Activity # 5 A Population Bar Graph– Represent and Interpret Census Data
Materials needed: For each student, a copy of your community’s population since census
data was recorded and graph paper or the bar graph template Our Community’s
Population, (Handout #1.2, page 15). It is helpful to use a document camera, if available, to
display both handouts.
Step 1: What is a Primary Source? Primary sources are documents, images or artifacts
that provide firsthand testimony or direct evidence concerning an historical topic. A primary
source can be a diary, manuscript, autobiography, recording, or any other source that was
created at the time under study. Provide samples of primary sources, if available. Secondary
sources were created by someone who did not experience first-hand or participate in the
event. Some types of secondary source include textbooks and encyclopedias.
Step 2: Decennial Census Explain to students that a census is a primary source document.
The population of a city is determined by a national census taken every 10 years. This
Decennial Census (10-year survey) attempts to count all persons living in the United States
on April 1st in all years ending with a zero (1990, 2000, 2010, 2020, etc…). The census
includes categories such as men, women, children, age and ethnicity.
Step 3: Our Community’s Population Share the census figures for your community since it
was founded. If the population for your community is not available, you may use that of the
county where your community is located. Discuss the figures in the chart.
Pose the questions such as:
• How has the population of our community changed over time?
• Why does the population of a community change?
• Why do you think the community grew so much between the years ____ and ____?
• Why do people come to our community today?
Step 4: Construct a Scaled Bar Graph. Demonstrate how to
construct a bar graph. On the horizontal “x” axis, write the years
covered by your census in intervals of 10 years, such as 1900,
1910, etc. On the vertical “y” axis, begin with zero and place the
figures for your community’s population in intervals such as
100,000, 200,000 etc.. Shade in the Population Census for your
community on graph paper or use the bar graph template (Handout
#1.2, page 15) (Math - Represent Data 3).
Step 5: Interpret Data on a Scaled Bar Graph. Ask students
several “how many more” and “how many less” questions using
information presented in the scaled bar graph (Math - Interpret Data 3).
As students work with the Population Graph, select a few students to make event cards with
the population for each census year. Add the cards to the timeline.

13
Activity # 6 Growth in Our Community
Review the chart, “My Family’s Migration to Our Community” developed in Activity #4 and
the population graph of our community (Activity #5). Have students engage in a range of
collaborative discussions building on others’ ideas and expressing their own clearly as you
ask the following questions (SL 3.1):
• When did most of the families in our class come to our community?
• Why did they come?
• What are the reasons why people come to our community today?
• How much population is enough, and how much is too much?
• What “trade-offs” or individual economic choices do people make when they move to a
new place?
• What does someone “give up” when moving to a new place?
• What does one gain from a move to a new community?
• What are the “benefits” of moving? What are the “costs” (not only financial) of moving?
Assessment
The assessment of this lesson is integrated with the instruction and occurs throughout the
unit. The supporting question provides a framework for the evaluation of the lesson.
• Construct an artifact box that tells about your family’s cultural and religious traditions
and then orally summarize for the class what is included in the artifact box (Activity #2).
• Conduct a family migration interview (Activity #4).
• Create an Event Card for when your family arrived in the local community. Affix it to the
Timeline of Our Community’s History (Activity #4).
• Construct a bar graph of the population of your local community (Activity #5).
14
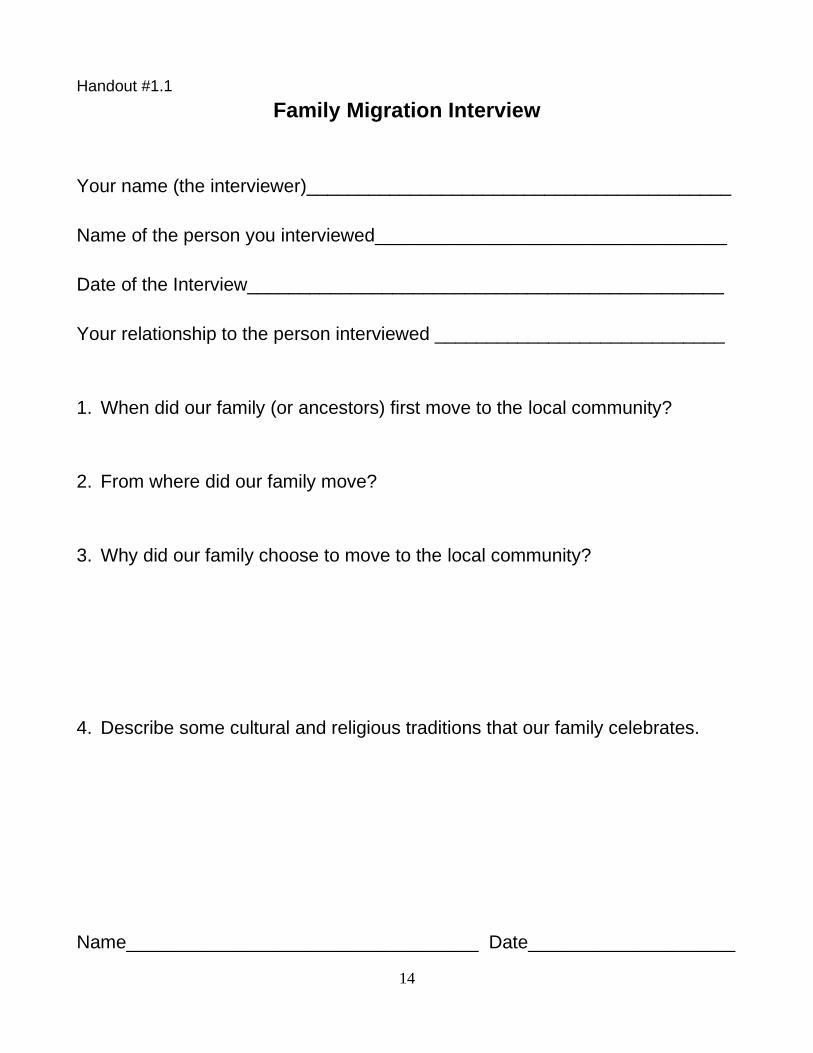
Handout #1.1
Family Migration Interview
Your name (the interviewer)_________________________________________
Name of the person you interviewed__________________________________
Date of the Interview______________________________________________
Your relationship to the person interviewed ____________________________
1. When did our family (or ancestors) first move to the local community?
2. From where did our family move?
3. Why did our family choose to move to the local community?
4. Describe some cultural and religious traditions that our family celebrates.
Name__________________________________ Date____________________

15
Handout #1.2 Our Community’s Population Using the Population Census Figures, shade each column to the appropriate level.
1910 1920 1930 1940 1950 1960 1970 1980 1990 1920 2010 2020
Name__________________________________ Date____________________

16
Lesson 2: Early Explorers, Settlers, and Founders
Supporting Questions
• Who were the early explorers of the local community?
• Who were the first settlers who settled here?
• Why was the community established?
• How did individuals or families contribute to the founding of our community?
Activity #1 Explorers to Our Community
Materials needed: Refer to the description of the bio-sketches on pages 7 and 8. It is
recommended that all bio-sketches and the Timeline of Our Community’s History be
duplicated and assembled into a reading packet for students to use throughout this unit.
Step 1: Frontload vocabulary To assist students with acquisition of general academic
vocabulary, discuss the following words (RI 3.4):
explore – to set out to
find a new place, verb.
explorer – a person who
goes to find out about a
place, noun.
Ask students why explorers might want to leave their homes for unknown lands.
Step 2: Reading a Bio-Sketch On the Timeline of Our Community’s History, read the entry
for the first person in your bio-sketch booklet. Discuss his/her accomplishments and the date.
Sample:
Spanish explorer, Juan Bautista de Anza, passed south of the Coachella
Valley in search of a land route from Sonora to Monterey.
Next, read the first bio-sketch. Help students determine the main idea of the text; recount the
key details; and, explain how the details support the main idea. Ask questions to help
students demonstrate their understanding of the text. Encourage them to refer explicitly to the
text as the basis for their answers (RI 3.2).
Note: Use guided reading of the text, including think aloud and/or text dependent questions
which direct students back into the text (RI 3.1). Use a discussion protocol and strategies
such as mumble reading, reciprocal reading and role playing.
Mumble Reading: To use “mumble reading,” the teacher reads the bio-sketch in a clearly
articulated voice, while simultaneously the students read in low, quiet voices.

17
Reciprocal Reading: In reciprocal teaching, students form pairs to reread the bio-sketch, one
paragraph at a time. After one student reads the first paragraph, his/her partner asks a
question that comes to mind about the reading. Students then switch roles and read the next
paragraph. Each set of partners always gets to ask questions as well as read a paragraph
and answer questions. For the first time, it is recommended the teacher have several pairs of
students model the process of reciprocal reading. Plan enough time to be sure the students
understand the process.
Partners continue reading each paragraph and asking questions. At the end of the bio-
sketch, have one or more of the students summarize the reading. This technique teaches
students to focus intently on what they are reading by designing and asking questions.
Role Play: Select a student to portray the part of your first bio-sketch. For example, Juan
Bautista de Anza. Have the student read and practice the bio-sketch to later play this part in
The Living History Museum (SL 3.4). Refer to page 8 for a description of The Living History
Museum. The museum is held at the end of Lesson 5.
Step 3: Bio-sketch Read the timeline entry for the next bio-sketch person and discuss
his/her accomplishments and the date.
Read the bio-sketch. Help students determine the main idea of the text; recount the key
details; and, explain how the details support the main idea. Ask questions to help students
demonstrate their understanding of the text. Encourage them to refer explicitly to the text as
the basis for their answers (RI 3.1, RI 3.2).
Role Play: Select a student to portray the part of the bio-sketch person. Using the bio-sketch,
have the student read and practice the bio-sketch for The Living History Museum (SL 3.4).
Activity #2 Timeline of Our Community’s History
Materials needed: 2” x 3” note card or a piece of construction paper for each student who will
portray your first two bio-sketches. Refer to the “Directions for Creating a Timeline of Our
Community’s History” described on pages 6 and 7.
Step 1: Event Cards Provide the students who read the first two bio-sketches in Activity #1
with a 2” x 3” note card or a piece of construction paper to make “event cards.” As described
on page 7, each event card includes the name of the event, the date, a brief description of
the event, and a small illustration. Encourage students to make the event card colorful. Place
the completed event cards on the Timeline of Our Community’s History.
Note: If desired, have all students make all the event cards as one student makes the Event
Card for the class timeline. Punch a hole in the upper left-hand corner of each card and use
an O-ring to keep the cards together. This is time-consuming, but students love having their
own copy of the timeline cards.
18
Step 2: Timeline Review the two events posted on the timeline. Have students describe the
relationship between the two historical events using language that pertains to time,
sequence, and cause/effect (RI 3.3).
Activity # 3 Bio-Sketch Chart
Materials needed: Use either a large piece of chart paper or butcher paper to construct a
large version of the Bio-Sketch Chart (shown below). Include the headings: Name of Bio-
Sketch; Important Dates; and, Description of the Bio-Sketches’ Contributions to our
Community’s History. Provide space for all the bio-sketches to be added throughout the unit.
To help students keep track of the bio-sketches read during this unit, begin a Bio-Sketch
Chart with the first two bio-sketches. As students read each new bio-sketch, keep the
organizer up-to-date and add new information throughout the unit.
Summarization skill: To develop the skill of summarizing, students can help identify the
information to include on the chart (RI 3.2).
Bio-Sketch Chart
Name of Bio-Sketch Important
Dates
Description of the Bio-Sketches’ Contributions
to our Community’s History
Teacher Option: To make the chart into a manipulative activity so students can practice
sorting and matching each item, create a separate card for the name of the bio-sketch, a card
for the important date, and a card for the description of the bio-sketches’ contribution.
Activity # 4 Settlers Travel to the Region
Materials needed: Bio-sketches of early settlers to the region; timeline of local history.
Step 1: Frontload vocabulary To assist students with acquisition of general academic
vocabulary, discuss the following words (RI 3.4):
settle – to live in a new
community, verb.
settler – a person who lives in
a new community, noun. A
settler is a person that starts a
new life in a place where there
are no other houses, streets or
towns.
settlement – a new
community, noun. When a
group of people settles an
area together, they create a
settlement.
settle + ment = settlement
Questions to ask:
1. Why might settlers want to leave their homes to live in a new land?
2. What reasons would cause people to settle in locations like our community?
3. What do you think life was like in the early settlements?

19
Background Information: Provide students with information about the early settlers of your
community. What businesses did the early settlers open? Did it become a thriving community
right away, or was its’ development slow? Were the settlers influenced by the availability of
railroads or rich land for farming? Was it a stopping off point midway between other
locations? Were the settlers attracted by certain geographic features or the climate?
Step 2: Reading assignment. Select the bio-sketches of the early settlers. Read the timeline
entry. Discuss his/her accomplishments and the date.
• Read the bio-sketch. Help students determine the main idea of the text; recount the
key details; and, explain how the details support the main idea. Ask questions to help
students demonstrate their understanding of the text (RI 3.1, 3.2).
• Role Play: Select a student to read the bio-sketch and to make an event card to add to
the Timeline of Our Community’s History.
• Summarization Skill: Have students summarize the information about the bio-sketch
and add this to the “Bio-Sketch” chart (RI 3.2).
Activity #5 Founding and Development of the Local Community
Materials needed: For each student, a copy of the bio-sketches for newcomers who came to
the community and helped lead its founding and development.
Step 1: Reading assignment Select the bio-sketches of residents who played a role in the
founding and development of the community.
• Read the timeline entry. Discuss his/her accomplishments and the date.
• Read the bio-sketch. Help students determine the main idea of the text; recount the
key details; and, explain how the details support the main idea. Ask questions to help
students demonstrate their understanding of the text. Encourage them to refer
explicitly to the text as the basis for their answers (RI 3.1, 3.2).
• Role Play: Select a student to read the bio-sketch and make an event card to add to
the Timeline of Our Community’s History (SL 3.4).
• Summarization Skill: Have students summarize the information about the bio-sketch
and add this to the “Bio-Sketch” chart (RI 3.2).
Step 2: Timeline Analysis Help students describe the relationship between the series of
historical events that have been added to the timeline. Use language that pertains to time,
sequence, and cause/effect (RI 3.3).
Assessment
The supporting questions provide a framework for the evaluation of the lesson.
• Determine the main idea of the bio-sketches; recount the key details; and, explain
how the details support the main idea.
• Selected students make an event card to add to the Local Community Timeline.
• Summarize the information about each bio-sketch for the “Bio-Sketch” chart.
20
Lesson 3: Land Use
Supporting Question
• How has our community changed over time, drawing upon primary source documents
such as maps, advertisements and interviews?
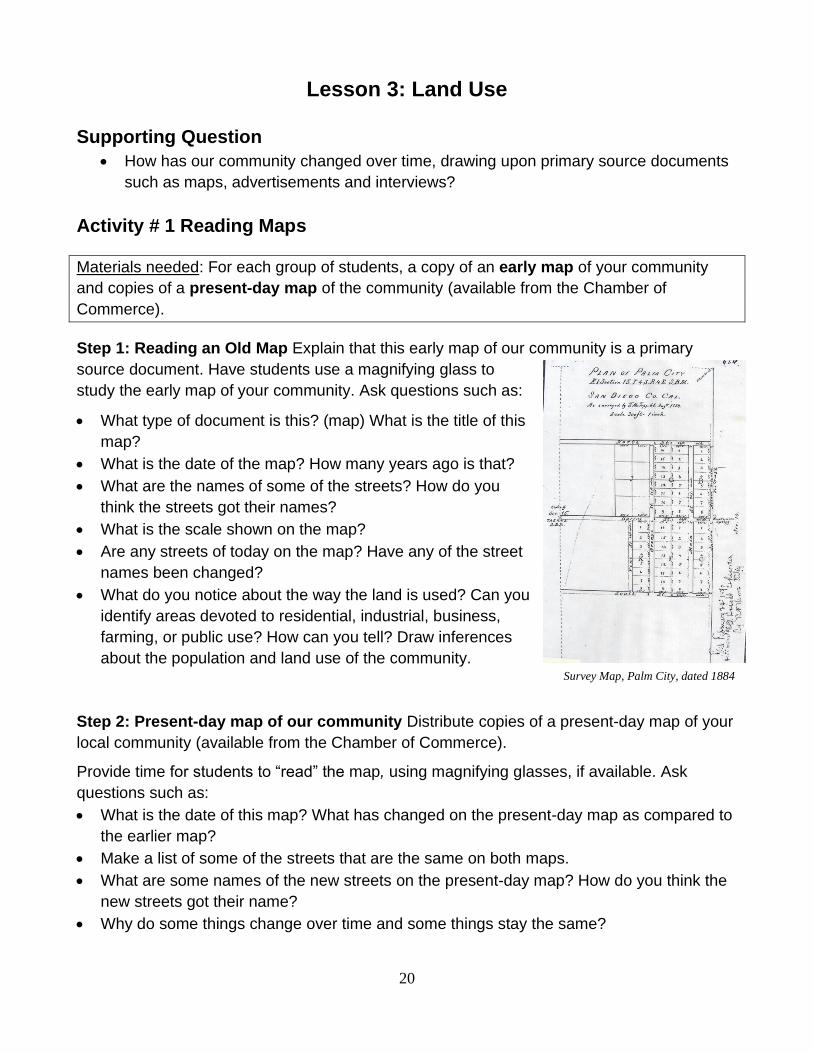
Activity # 1 Reading Maps
Materials needed: For each group of students, a copy of an early map of your community
and copies of a present-day map of the community (available from the Chamber of
Commerce).
Step 1: Reading an Old Map Explain that this early map of our community is a primary
source document. Have students use a magnifying glass to
study the early map of your community. Ask questions such as:
• What type of document is this? (map) What is the title of this
map?
• What is the date of the map? How many years ago is that?
• What are the names of some of the streets? How do you
think the streets got their names?
• What is the scale shown on the map?
• Are any streets of today on the map? Have any of the street
names been changed?
• What do you notice about the way the land is used? Can you
identify areas devoted to residential, industrial, business,
farming, or public use? How can you tell? Draw inferences
about the population and land use of the community.
Step 2: Present-day map of our community Distribute copies of a present-day map of your
local community (available from the Chamber of Commerce).
Provide time for students to “read” the map, using magnifying glasses, if available. Ask
questions such as:
• What is the date of this map? What has changed on the present-day map as compared to
the earlier map?
• Make a list of some of the streets that are the same on both maps.
• What are some names of the new streets on the present-day map? How do you think the
new streets got their name?
• Why do some things change over time and some things stay the same?
Survey Map, Palm City, dated 1884
21
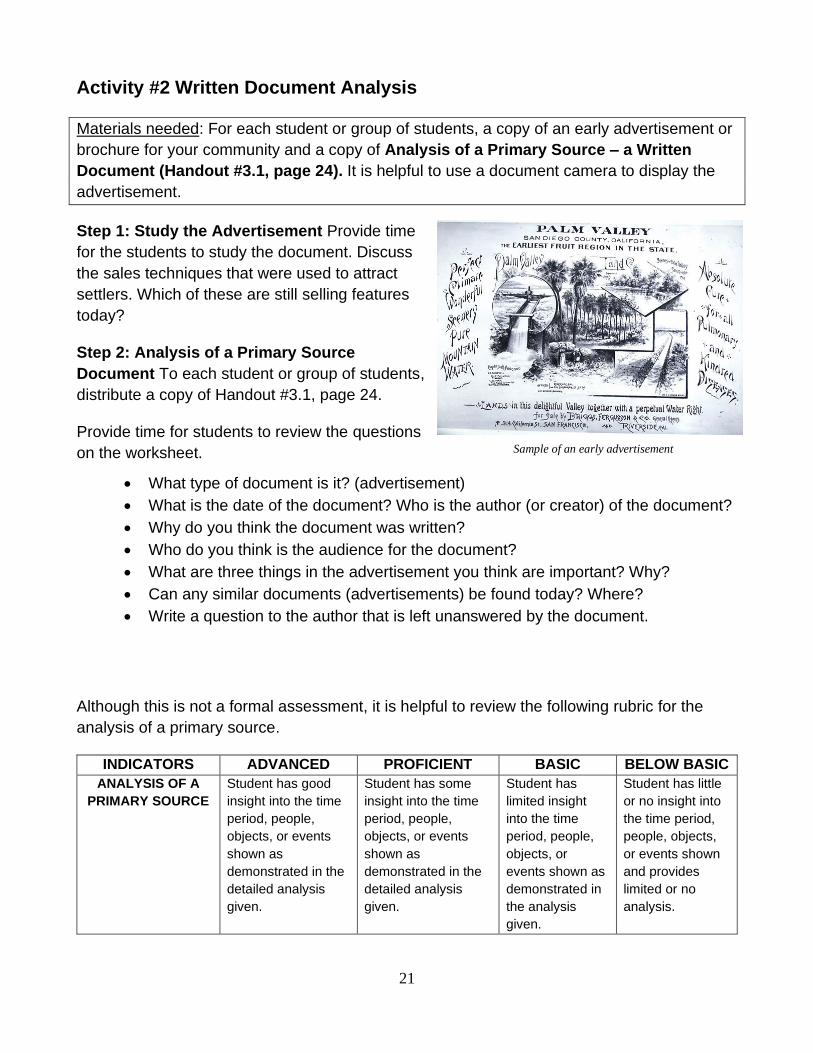
Activity #2 Written Document Analysis
Materials needed: For each student or group of students, a copy of an early advertisement or
brochure for your community and a copy of Analysis of a Primary Source – a Written
Document (Handout #3.1, page 24). It is helpful to use a document camera to display the
advertisement.
Step 1: Study the Advertisement Provide time
for the students to study the document. Discuss
the sales techniques that were used to attract
settlers. Which of these are still selling features
today?
Step 2: Analysis of a Primary Source
Document To each student or group of students,
distribute a copy of Handout #3.1, page 24.
Provide time for students to review the questions
on the worksheet.
• What type of document is it? (advertisement)
• What is the date of the document? Who is the author (or creator) of the document?
• Why do you think the document was written?
• Who do you think is the audience for the document?
• What are three things in the advertisement you think are important? Why?
• Can any similar documents (advertisements) be found today? Where?
• Write a question to the author that is left unanswered by the document.
Although this is not a formal assessment, it is helpful to review the following rubric for the
analysis of a primary source.
INDICATORS ADVANCED PROFICIENT BASIC BELOW BASIC
ANALYSIS OF A
PRIMARY SOURCE
Student has good
insight into the time
period, people,
objects, or events
shown as
demonstrated in the
detailed analysis
given.
Student has some
insight into the time
period, people,
objects, or events
shown as
demonstrated in the
detailed analysis
given.
Student has
limited insight
into the time
period, people,
objects, or
events shown as
demonstrated in
the analysis
given.
Student has little
or no insight into
the time period,
people, objects,
or events shown
and provides
limited or no
analysis.
Sample of an early advertisement

22
Activity # 3 Letter Writing – an Opinion Piece Supporting a Point of View
Assign students the following writing prompt. To write their letters, students should use key
details presented in the primary documents reviewed so far in this unit (W3.1).
You are an early settler living in our community. The year is ____. Write a letter to a friend to
encourage your friend to move to our community. Give at least three reasons why your friend
should move to our community. Use a personal letter format with date, salutation, body,
closing and signature. Use linking words, e.g., because, therefore, since, for example, to
connect the reasons.
Activity # 4 Interview a Long-Term Resident of Our Community
Materials needed: For each student, duplicate a copy of Interview a Long-Term Resident
(Handout #3.2, page 25) and Tips for Conducting an Interview (Handout #3.3, page 26).
Step 1: What is a Primary Source? Review with students that primary sources provide first-
hand information. Primary sources for studying our community can include maps,
photographs, advertisements, oral histories, newspapers and other sources. Primary sources
can be found at places such as the public library and at the local historical societies and
museums. In this lesson students have already investigated their local history by looking at
some primary sources, including maps and advertisements. In this activity, students will
speak with community members to find out more about the history of their community.
Interviewing a long-time resident to ask questions is a good way to learn details about the
history of a community. Before your students interview an
older resident, have them do a practice interview. Invite to
the classroom several older citizens who have lived in the
community for a long time (SL 3.3).
Using Handout #3.2, page 25, have students record the
visitor’s responses on the interview sheet as the teacher
records the responses on a copy of Handout #3.2 that is
displayed with a document camera, or on chart paper.
Refer to Tips for Conducting an Interview (Handout #3.3,
page 26) for additional directions for setting up an
interview, planning the interview, and actions to take
during the interview and after the interview. Provide
several days for students to conduct their interviews.
Have students share the responses on their
questionnaires as they are completed.

23
Activity # 5 Family Project: A Scavenger Hunt of Our Community
Materials needed: For each student, duplicate a copy of Family Project: A Scavenger Hunt
of Our Community (Handout #3.4, page 27).
To gain a better understanding about what makes up our community, it is important for
students to be aware of what is located in the community.
Provide parents with a copy of Family Project: A Scavenger Hunt of Our Community
(Handout #3.4, page 27). Parents are asked to take their child on a “car trip” or a “walking
trip” to visit at least five different locations within the community. Students complete the
handout by writing in the name of the location and its address. If possible, encourage
students to take a close-up photograph of each location he/she visits and bring it to share
with the class.
After the homework is returned, display photographs of the various places in the community
visited during the scavenger hunt. Read aloud the clues and have the students identify the
photograph that depicts the place (e.g. “Which photo shows a post office?”).
(Optional, but encouraged!) Visit Special Places - Encourage each student to choose a
place to visit in the community, such as a historical society or a museum. Students should
report back using A Place to Visit (Handout #3.5, page 28)
Teacher Note: This is a good time for a class field trip to a local museum or an historic site. If
this is not possible, you may view a video of the local area.
Assessment
The assessment of this lesson is integrated with the instruction and occurs throughout the
unit. The supporting question provides a framework for the evaluation of the lesson.
• “Read” maps, including an early map of the community and a present-day map of the
community (Activity #1).
• Analyze written documents, including an early advertisement or brochure for the local
community (Activity #2).
• Write an opinion piece (personal letter) from an early settler in the community to a
friend. In the letter, try to persuade the friend to move to the community, supporting your
point of view with reasons. (Activity #3).
• Conduct an interview of a long-term resident of our community. Pose questions to
that resident that will reveal information about life growing up in the area and the changes
that have taken place (Activity #4).
• Family Project: A Scavenger Hunt of Our Community (Activity #5).
• (Optional) Visit a museum or historical society (Activity #5).

24
Handout #3.1
Analysis of a Primary Source – A Written Document
Using the primary source document provided by your teacher, analyze it to
demonstrate your insight into the time period, the people and the event shown.
What type of a document is it?
What is the date of the document?
Who is the author (or creator) of the document?
Who do you think is the audience for the document?
Why do you think this document was written?
What are three things in the document you think are important? Why?
Can any similar documents be found today? Where?
Write a question to the author that is left unanswered by the document.
Name_____________________________________ Date________________________

25
Handout #3.2 Interview a Long-Term Resident of Our Community
Below is a suggested list of questions to help you learn about the past. Summarize the
answers in the space provided. Read your summary to the person interviewed to make sure it
is accurate.
Interviewer’s Name__________________________Date of the Interview________________
Name of the Person Interviewed________________________________________________
Interview Questions Record the Answers Here
When were you born?
Where were you born?
What was it like to live in
our community years
ago? What did people do
for fun?
What big events do you
remember? Were there
any festivals or parades?
What did your parents do
to earn a living?
Where did you go to
school? What was your
first job?
What businesses have
opened or closed since
you have lived here?
Thinking back to your
childhood, what do you
remember most?
In what ways has the
community changed?
How has it stayed the
same?

26
Handout #3.3 Tips for Conducting an Interview
Set up the interview.
• Write, call or email the person.
• Tell the person who you are and why you would like to conduct an interview.
• Ask the person to set a convenient time and place for you to meet.
Prepare for the interview
• Gather basic information: the person’s name, where or when he or she was
born; and how long he or she has lived in the community.
• Use the form, Interview a Long-Term Resident of Our Community (Handout
#3.2) or make your own list of questions. Try to think of questions that will
lead to interesting answers. Here are some extra ones to get you started.
➢ What was your neighborhood like?
➢ Do you remember any storms, earthquakes or fires? What was it like?
➢ What was your school like?
➢ How did you stay cool in the summer? Warm in the winter?
During the interview
• Listen carefully.
• Make eye contact.
• Look interested.
• Do not interrupt the person.
• Take notes as you talk with the person.
• If you want to use a tape recorder or video recorder, ask the person first.
• Read back or review with the person all the answers you have recorded. In
that way you make sure that your answers are accurate and acceptable to
your guest. It may lead to even more complete answers or new information.
• During the review of your notes, you may add extra questions.
• And, have fun.
After the Interview
• Before you leave, thank the person.
• Follow-up by writing a thank-you note or making a thank-you telephone call.

27
Handout #3.4 Family Project: A Scavenger Hunt of Our Community
To complete the Scavenger Hunt, please take your child on a “car trip” or a “walking trip” to at
least five of the places listed below, record the name and address, and, if possible, please
take a close-up photograph.
Find a fire station.
Which one did you choose? _______________________________________________
Where is it? (address) _______________________________________________
Find a park.
Which one did you choose? _______________________________________________
Where is it? (address) _______________________________________________
Find a library.
Which one did you choose? ______________________________________________
Where is it? (address) ______________________________________________
Find a grocery store.
Which one did you choose? ______________________________________________
Where is it? (address) ______________________________________________
Find City Hall.
Where is it? (address) ______________________________________________
Find a church, synagogue or mosque
Which one did you choose? ______________________________________________
Where is it? (address) ______________________________________________
Find a post office.
Which one did you choose? ______________________________________________
Where is it? (address) ______________________________________________
Find a location of your choice.
Which one did you choose? ______________________________________________
Where is it? (address) ______________________________________________
Name__________________________________ Date____________________

28
Handout #3.5 A Place to Visit
Choose a place to visit in the local community (e.g., a museum or a historical society).
Report back with the following information:
Name of place visited:________________________________________________________
Date and time of visit:________________________________________________________
What I saw on my visit:________________________________________________________
__________________________________________________________________________
__________________________________________________________________________
__________________________________________________________________________
__________________________________________________________________________
__________________________________________________________________________
__________________________________________________________________________
__________________________________________________________________________
Why I think others should visit this place:__________________________________________
__________________________________________________________________________
__________________________________________________________________________
__________________________________________________________________________
Other places I would like to visit someday (and why):________________________________
__________________________________________________________________________
Name:________________________________________Date:________________________
29
Lesson 4: Change Over Time - New Businesses
and Services
Supporting Questions:
• How has our community changed over time? Why do some things change and some
things stay the same?
• What economies were established by the settlers and what influence do these
economies have on the present-day economy?
• What key businesses and services exist in our community and how have these
changed over time?
To prepare for Activities #1 and #2, locate photographs of early street scenes and businesses
in the local community from long ago and take photographs of the exact same location today.
Have one photograph for each student or each pair of students. Mount each photograph on
colored construction paper, using the same color of paper for the same location both
“then” and “now” and a different color for each location. Write a caption identifying each
photograph and mount it on the back of the photo. Laminate the photographs, if possible.
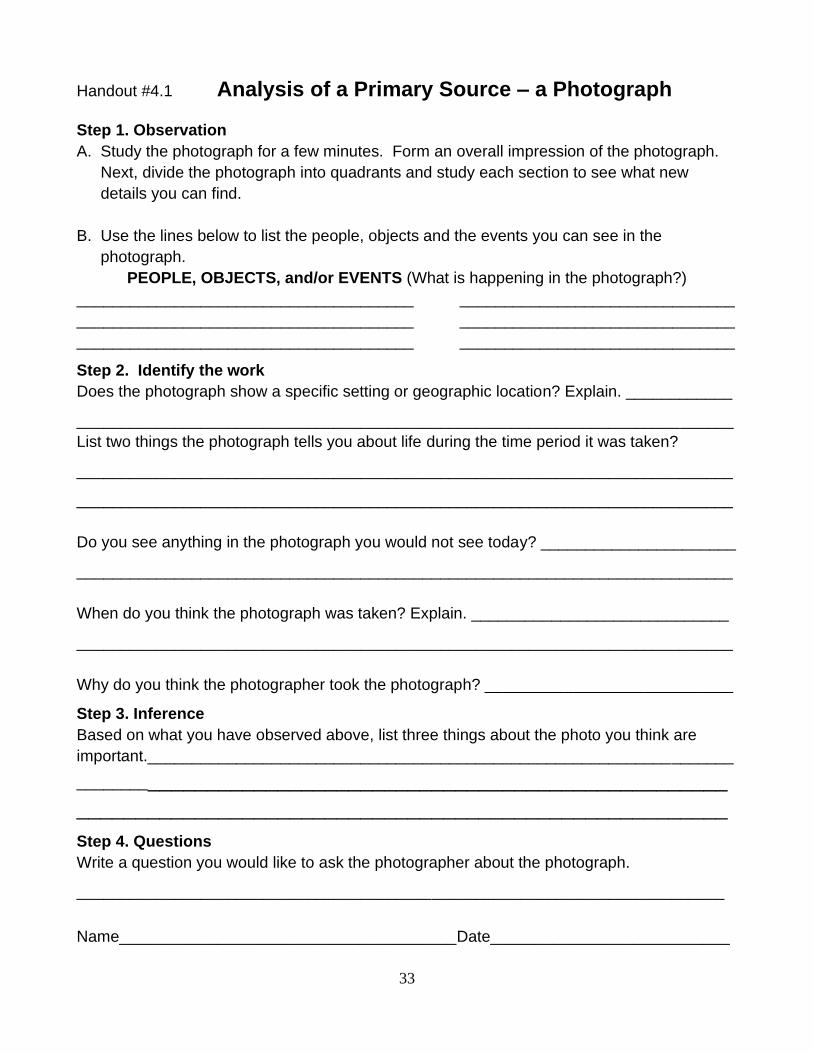
Activity #1 How to “Read” a Primary Source Document – a Photograph
Materials needed: Select a “Then” photograph, preferably a street scene. For each student, a
copy of the Analysis of a Primary Source – a Photograph (Handout #4.1, page 33); a
document camera or computer to display the photograph
Step 1:“Then” Photo Use a document camera to display one of the “Then” photographs.
As the students analyze the photograph, ask questions such as:
• What do you see in the photograph? (people; objects such as buildings, cars, words;
events; geographic features)
• What is the setting of the photograph? (What location is pictured?)
• Do you see anything in the photograph you would not see today? (RI 3.7)
Step 2: Analysis of a Photograph Model how to record information about the photograph
on a copy of the Analysis of a Primary Source – a Photograph (Handout #4.1, page 33).
Activity #2 Our Community “Then” and “Now” Photographs
Materials needed: Set of Then and Now photographs of the local community, as described
above. For each pair of students, duplicate a copy of Analysis of a Primary Source – a
Photograph (Handout #4.1, page 33).

30
Step 1: “Then” and “Now” Photographs Distribute a different “Then” or “Now” photograph
to each student or pair of students. Provide time for students to independently look at their
photograph. As the students analyze their photograph, encourage them to look for the
following:
• What do you see in the photograph? (people, objects, buildings, cars, words, geographic
features)
• What is the setting of the photograph? (What location is pictured?)
• Do you see anything in the photograph you would not see today? (RI 3.7)
Step 2: Analyze a Primary Source Photograph Distribute a copy of the Analysis of a
Primary Source – a Photograph (Handout #4.1, page 33) and have each student or pair of
students complete it using his/her photograph. Provide guidance as needed (RI 3.7).
Step 3: Line Up – “Then” or “Now” Ask students to line up on one side of the classroom if
they think their photograph was taken long ago [this side is called “Then”] or on the other side
of the classroom if they think their photograph was taken recently [this side is called “Now”].
Students hold their photograph so others in the class can see it. Have each student explain
why he or she chose to stand on the side of “Then” or “Now.”
Step 4: Find Your Partner Tell each student in the “Then” line that he or she has a partner in
the “Now” line. Look for the person who has a photograph mounted on the same color
construction paper. Once you have found that person, the two of you will become partners.
Choose a location in the classroom to sit together and analyze your two photographs.
Step 5: Some Things Change and Some Things Stay the Same After students have had
time to study their photographs, help them analyze how the present is connected to the past
and how some things change and some things stay the same.
• What are some things that are similar in your photographs? Look at the natural
landscape, the streets, and the buildings. What things have stayed the same?
• What are some things that are different in your photographs? Look at the natural
landscape, the streets, and the buildings. What things have changed?
• What do the photographs reveal about businesses in our community?
• What do the photographs reveal about transportation in our community?
• Why do you think the photograph was taken?
• Why do some things change over time and some things stay the same?
Step 6: Photo Analysis Distribute to each student a different “Then” or “Now” photograph
and a copy of the Analysis of a Primary Source – a Photograph (Handout #4.1, page 33).
Have students analyze their photograph and complete Handout #4.1. Refer to the rubric
listed on the next page (RI 3.7).

31
Analysis of a Primary Source – a Photograph
INDICATORS ADVANCED PROFICIENT BASIC BELOW BASIC
ANALYSIS OF A
PRIMARY SOURCE
Student has good
insight into the time
period, people,
objects, or events
shown as
demonstrated in the
detailed analysis
given.
Student has some
insight into the time
period, people,
objects, or events
shown as
demonstrated in the
detailed analysis
given.
Student has
limited insight into
the time period,
people, objects,
or events shown
as demonstrated
in the analysis
given.
Student has little
or no insight into
the time period,
people, objects,
or events shown
and provides
limited or no
analysis.
SUPPORTS THE
TOPIC WITH
ACCURATE
EXAMPLES
Student supports the
topic with insightful
historical and/or
geographic
examples.
Student supports
the topic with
several historical
and/or geographic
accurate examples.
Student supports
the topic with
limited historical
and/or geographic
examples.
Student has few
or no historical
and/or
geographic
examples.
Activity # 3 Businesses Change Over Time
Materials needed: For each student, a copy of the bio-sketches for local business leaders,
including commercial, manufacturing, agriculture, etc..
Step 1: Businesses in Our Community Explain that a community is made up of many kinds
of businesses. As a community grows, the businesses can change. When jobs are available
in a certain place, people tend to move there; when jobs are not available, people leave.
Sometimes the population of a community changes because of the availability of jobs.
• What types of businesses are located in our community?
• Can you name any new businesses in our community?
• In what ways do you think businesses have created changes in our community?
Step 2: Entrepreneur Introduce the vocabulary word entrepreneur as someone who starts
and runs a business (RI 3.4). Provide students with some background information about
some of the first businesses in the community.
Step 3: Reading Assignment Read the bio-sketches related to community business
leaders. Read the timeline entries. Discuss their accomplishments and the dates.
• Read the bio-sketches. Help students determine the main idea of the text; recount the
key details; and, explain how the details support the main idea. Ask questions to help
students demonstrate their understanding of the text (RI 3.1, RI 3.2).
• Role Play: Select a student to read each bio-sketch and to make an event card to add
to the Timeline of Our Community’s History (SL 3.4).
• Summarization Skill: Have students summarize the information about the bio-sketch
and add this to the “Bio-Sketch” chart (RI 3.2).

32
Activity # 4 More People Bring New Services, More Services Bring New
People
Materials needed: A copy for each student of the bio-sketches for people who established
new services for the community.
Step 1: New Services Discuss all the types of services that can be found in a community.
These may include the newspaper, schools, banks, medical services, hospitals, electrical
service, water service, hair salon, etc… When new people move to an area, new services
often follow them. Sometimes new services become available which encourages people to
move to the community.
Ask students why the availability of new services, such as having a doctor, a newspaper, a
bank and electrical service, might encourage people to move to a community.
Step 2: Reading Assignment Read the bio-sketches for residents who established services
for the community. Using guided reading, determine the main idea of the text; recount the key
details; and, explain how the details support the main idea (RI 3.1, RI 3.2). Select a student to
play the part of each bio-sketch and make an event card to add to the Timeline of Our
Community’s History (SL 3.4). Summarize the information for each bio-sketch and this to the
Bio-Sketch Chart (RI 3.2).
Activity # 5 New Cities Incorporate and Grow
Materials needed: A copy for each student of the bio-sketches for people who have played a
role in the government of the community, from incorporation to today.
Provide information about the incorporation of your community. Read the bio-sketches for
residents who worked to incorporate your community and persons who have played a key
role in governing the community (RI 3.1). Help students determine the main idea of the text
(RI 3.2). Select a student to play the part of each bio-sketch and make an event card to add
to the Timeline of Our Community’s History (SL 3.4). Summarize the information about each
bio-sketch and add this to the Bio-Sketch Chart (RI 3.2).
Assessment: The assessment of this lesson is integrated with the instruction and occurs
throughout the lesson. The supporting questions provide a framework for the evaluation of
the lesson.
• Using a “Then” or “Now” photograph of the local community, complete the
worksheet Analysis of a Primary Source – a Photograph (Activity #1 and #2).
• Read bio-sketches for significant people in local businesses, services, and
government; summarize the material on the Bio-Sketch Chart (Activity #3 - #5).
• Selected students read their character’s bio-sketch and make event cards for the
timeline (Activity #3 - #5).
33
Handout #4.1 Analysis of a Primary Source – a Photograph
Step 1. Observation
A. Study the photograph for a few minutes. Form an overall impression of the photograph.
Next, divide the photograph into quadrants and study each section to see what new
details you can find.
B. Use the lines below to list the people, objects and the events you can see in the
photograph.
PEOPLE, OBJECTS, and/or EVENTS (What is happening in the photograph?)
______________________________________ _______________________________
______________________________________ _______________________________
______________________________________ _______________________________
Step 2. Identify the work
Does the photograph show a specific setting or geographic location? Explain. ____________
__________________________________________________________________________
List two things the photograph tells you about life during the time period it was taken?
__________________________________________________________________________
__________________________________________________________________________
Do you see anything in the photograph you would not see today? ______________________
__________________________________________________________________________
When do you think the photograph was taken? Explain. _____________________________
__________________________________________________________________________
Why do you think the photographer took the photograph? ____________________________
Step 3. Inference
Based on what you have observed above, list three things about the photo you think are
important.__________________________________________________________________
_________________________________________________________
_______________________________________________________
Step 4. Questions
Write a question you would like to ask the photographer about the photograph.
_________________________________________________________________________
Name______________________________________Date___________________________

34
Lesson 5: The Growth and Development Continues
Supporting Questions
• What individuals have contributed to the recent growth and development of the local
community?
• What role has tourism played in the growth and development of the community?
Activity #1 Make a Scrapbook
Materials needed: For each group, a copy of a bio-sketch for an individual who has
contributed to the recent growth and development of the community; computer access for
further research and to locate photographs of the bio-sketch. For each student, a copy of
Make a Scrapbook – a Group Project (Handout #5.1, page 38) For the scrapbook,
construction paper, crayons, markers, glue and scissors.
Step 1: Growth and Development Divide the students into groups, one for each of the bio-
sketches who contributed to the recent growth and development of your community.
Distribute to each group a copy of their bio-sketch. Provide time for students to read their bio-
sketch together. Then, using print or digital sources, have students research their bio-sketch
and compare and contrast the most important points presented in at least two sources on the
same topic (RI 3.9). They should summarize the information, add it to the Bio-Sketch Chart,
and write an event card for the Timeline of Our Community’s History (RI 3.2).
Step 2: Introduce the scrapbook prompt Explain to students that they will work in their
group to read their bio-sketch. Then, using print and digital sources, they will research the
bio-sketch. Compare and contrast the most important points presented in at least two
sources about your bio-sketch as you determine what to include on your scrapbook page or
pages that he/her may have developed (RI 3.9). For each item in their scrapbook, use
descriptive details to write a brief narrative to explain the imagined experience (W.3.3).
Prompt: Working in a group, construct a page or pages of a scrapbook that could belong to
your bio-sketch. Include a photograph of the person and pictures or drawings of two or three
“artifacts” or primary sources that might be found in his/her scrap book. Use descriptive
details to write a brief narrative to explain the imagined experience. The scrapbook pages
should show why the person is significant to the growth and development of our community.
Step 3: Evaluate the Scrapbooks Have each group orally share their scrapbook page or
pages. Classmates should have a copy of the bio-sketch of the person featured in each
scrapbook page so they may ask questions following the presentation (RI 3.1).
Using the rubric included on Handout #5.1 (page 38), students help the teacher orally
evaluate each group’s scrapbook page according to whether the content is historically
accurate and is supported with accurate examples. Add other evaluation criteria as desired.

35
Activity #2 Tourism
Materials needed: Copies of various “rack cards” advertising attractions, special events and
shopping in the local community (found in the lobby of local hotels); copies of free
publications with advertisements for local attractions found at restaurants and hotels; copies
of a section of the newspaper that advertises special events, Chamber of Commerce
resources, etc.; a variety of art materials to create tourism brochures for the community.
Step 1: Tourism in Our Local Community As an area grows, each community develops its
own identity and offers its own tourist attractions. Share information about the tourism
industry in the local community and/or nearby communities.
Step 2: Rack Cards Share “rack cards” and advertising brochures. Develop a list of the
attractions, special events, and shopping available for visitors and local residents. Discuss
the characteristics of an effective advertising brochure. Have students compare and contrast
the layout and the variety of information contained within the brochures.
Step 3: Community Travel Brochure Students create a Community Travel Brochure to
inform tourists about the available attractions, special events and/or shopping opportunities.
This project may be done as an individual project, in pairs, or as a group project. Each
brochure should highlight a different attraction. Students may add photographs they have
taken or photos from “rack cards” and magazines.
On their travel brochure, students need to write brief informative/explanatory text to explain
the topic and convey information clearly (W 3.2).
As an option, have students develop a new tourist attraction, special event, or shopping
opportunity of the future that they would like to see in the local community and design a travel
brochure to attract tourists and local residents.
Activity #3 Changes in Our Community Using the information learned in Lessons 1
through 5, each student writes an informative/explanatory text with at least 5 sentences to
examine the topic, “Changes in Our Community.” Requirements include:
• introduce the topic and group related information together,
• convey the information clearly with facts, details and supportive historical evidence,
• use linking words and phrases (e.g., also, another, and, more, but) to connect ideas,
• provide a concluding statement (W 3.2).
Activity #4 The Living History Museum
The Living History Museum is the major culminating activity for this unit. Each student selects
an historical figure from your local community’s history to portray at The Living History
Museum. Students report on their topic and text with appropriate facts and relevant,
descriptive details and “perform” their “living history” for family members, friends and
interested members of the community (SL 3.4). Refer to page 8 and the next page for
directions and further information about The Living History Museum.

36
Student Preparation for The Living History Museum
1. Read the bio-sketch you have selected.
2. Make small note cards with a few words that you can refer to, if
necessary, as you speak.
3. Review your notes to be sure you have the information you need.
4. Speak in the “first person” as if you are the person.
5. Include visuals such as props, artifacts or maps.
6. Practice your presentation out loud and if possible, in front of
someone else.
7. Be sure to speak clearly and loudly.
8. Keep your listeners interested by using facial expressions and hand movements.
9. Do not put your hands in your pockets while speaking.
10. Look at your audience while you speak, even if you are holding a prop.
Prompt: Select an historical figure from the local community’s history to portray at the Living
History Museum. Read the bio-sketch and plan a simple oral presentation. The oral
presentation should include:
• the person’s name
• important dates in his/her life
• his/her contributions to the community’s history
• any other historic information about the person’s life.
Hint: Be sure to speak in the first person as if you are the person.
The Living History Museum
Report on a topic or text with appropriate facts and relevant, descriptive details (SL 3.4).
INDICATORS ADVANCED PROFICIENT BASIC BELOW
BASIC
SUPPORTS THE
TOPIC WITH
ACCURATE
EXAMPLES
Student
supports the
topic with
insightful
historical and/or
geographic
examples.
Student
supports the
topic with
several historical
and/or
geographic
accurate
examples.
Student
supports the
topic with
limited
historical
and/or
geographic
examples.
Student has
few or no
historical
and/or
geographic
examples.
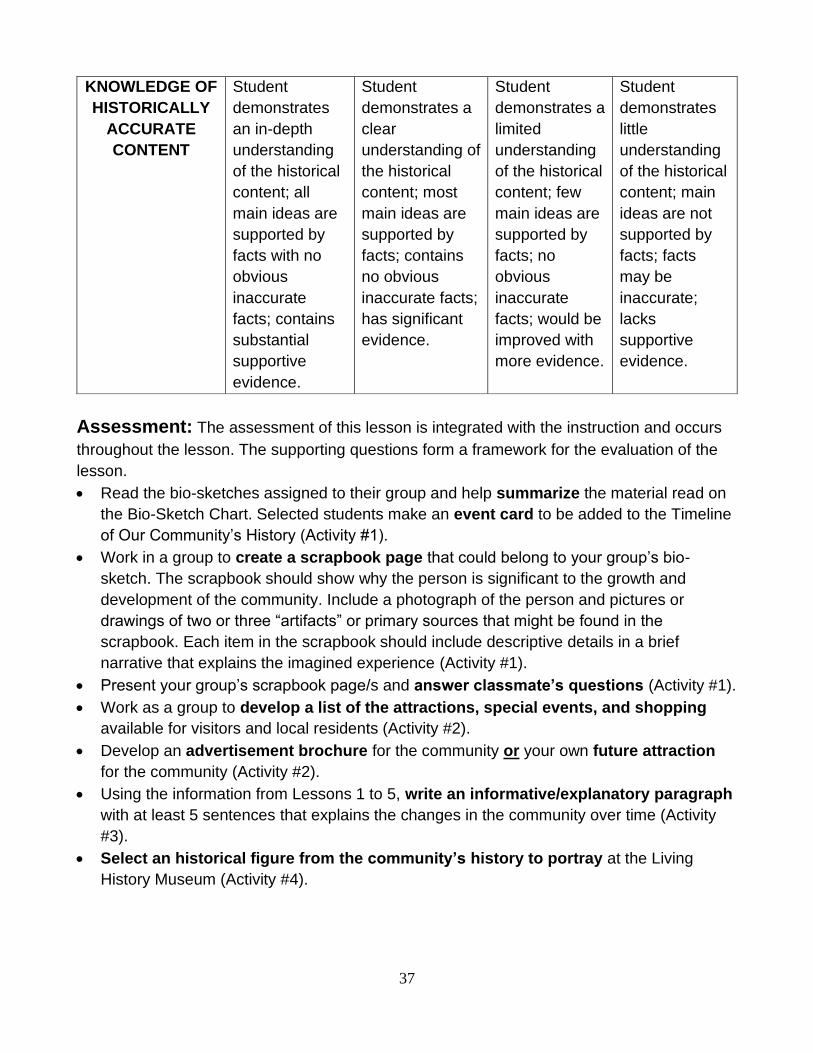
37
KNOWLEDGE OF
HISTORICALLY
ACCURATE
CONTENT
Student
demonstrates
an in-depth
understanding
of the historical
content; all
main ideas are
supported by
facts with no
obvious
inaccurate
facts; contains
substantial
supportive
evidence.
Student
demonstrates a
clear
understanding of
the historical
content; most
main ideas are
supported by
facts; contains
no obvious
inaccurate facts;
has significant
evidence.
Student
demonstrates a
limited
understanding
of the historical
content; few
main ideas are
supported by
facts; no
obvious
inaccurate
facts; would be
improved with
more evidence.
Student
demonstrates
little
understanding
of the historical
content; main
ideas are not
supported by
facts; facts
may be
inaccurate;
lacks
supportive
evidence.
Assessment: The assessment of this lesson is integrated with the instruction and occurs
throughout the lesson. The supporting questions form a framework for the evaluation of the
lesson.
• Read the bio-sketches assigned to their group and help summarize the material read on
the Bio-Sketch Chart. Selected students make an event card to be added to the Timeline
of Our Community’s History (Activity #1).
• Work in a group to create a scrapbook page that could belong to your group’s bio-
sketch. The scrapbook should show why the person is significant to the growth and
development of the community. Include a photograph of the person and pictures or
drawings of two or three “artifacts” or primary sources that might be found in the
scrapbook. Each item in the scrapbook should include descriptive details in a brief
narrative that explains the imagined experience (Activity #1).
• Present your group’s scrapbook page/s and answer classmate’s questions (Activity #1).
• Work as a group to develop a list of the attractions, special events, and shopping
available for visitors and local residents (Activity #2).
• Develop an advertisement brochure for the community or your own future attraction
for the community (Activity #2).
• Using the information from Lessons 1 to 5, write an informative/explanatory paragraph
with at least 5 sentences that explains the changes in the community over time (Activity
#3).
• Select an historical figure from the community’s history to portray at the Living
History Museum (Activity #4).

38
Handout # 5.1
Make a Scrapbook - a Group Project
In your group, read your bio-sketch together. Then, using print or digital sources, research
your bio-sketch. Compare and contrast the most important points presented in at least two
sources about your bio-sketch as you determine what to include on your scrapbook page or
pages.
Prompt: Working in a group, construct a page or pages of a scrapbook that could belong to
your bio-sketch. Include a photograph of the person and pictures or drawings of two or three
“artifacts” or primary sources that might be found in his/her scrapbook. Use descriptive details
to write a brief narrative to explain the imagined experience. The scrapbook pages should
show why the person is significant to the growth and development of our community.
INDICATORS ADVANCED PROFICIENT BASIC BELOW BASIC
KNOWLEDGE OF
HISTORICALLY
ACCURATE
CONTENT
Student
demonstrates
an in-depth
understanding
of the historical
content; all
main ideas are
supported by
facts with no
obvious
inaccurate
facts; contains
substantial
supportive
evidence.
Student
demonstrates a
clear
understanding
of the historical
content; most
main ideas are
supported by
facts; contains
no obvious
inaccurate facts;
has significant
evidence.
Student
demonstrates
a limited
understanding
of the
historical
content; few
main ideas are
supported by
facts; no
obvious
inaccurate
facts; would be
improved with
more
evidence.
Student
demonstrates
little
understanding
of the
historical
content; main
ideas are not
supported by
facts; facts
may be
inaccurate;
lacks
supportive
evidence.
SUPPORTS THE
TOPIC WITH
ACCURATE
EXAMPLES
Student supports
the topic with
insightful
historical and/or
geographic
examples.
Student supports
the topic with
several historical
and/or
geographic
accurate
examples.
Student
supports the
topic with
limited
historical and/or
geographic
examples.
Student has few
or no historical
and/or
geographic
examples.

39
Lesson 6: Timeline of Our Community’s History
Supporting Question
• What are the key events in the history of our community?
Activity # 1 An Imaginary Tea Party
Materials needed: Duplicate a copy of the
Timeline of Our Community’s History. Cut
the timeline into strips. Use only the strips that
include a date, name and event. Put all strips
into a container. Have a plastic teacup for each
student to hold during the imaginary tea party;
dress-up clothes such as hats for the girls and a
hat and tie for the boys, if available.
Step 1: Preparation for the Tea Party Ask students if they have ever been to a tea party.
Explain that at a tea party, each guest’s behavior is “ever so proper.” Guests move about the
room speaking with different guests. Conversations are brief as guests want to move about
and speak with as many of the other guests as possible. Frequently heard conversations
often begin with, “Daahling, did you know that….” Some guests are known to hold up their
right pinky finger as they sip their imaginary tea and move about the room! Consider having
students dress for the tea party by wearing special “dress-up” clothes and hats.
Step 2: Tea Party Each student chooses a “date/name/event” strip from the container.
Students carefully read their card and practice saying the information about themselves,
including their name, an appropriate date and an event in which he/she participated.
Begin the tea party. As the students move slowly about the room, each one stops to visit with
another guest. He/she shares his/her name and
an event and then moves on to another guest.
Students should act very “prim and proper” as
they share their event with “emotional
enthusiasm”.
The “tea party” strategy is a fun way for students
to share a large number of facts about significant
people in the history of the community. Students
are not expected to memorize all the events and
dates.
40
Activity # 2 Newspaper Headlines
Share some newspaper headlines with the students. Discuss their format. Working in pairs or
small groups, students write a catchy headline for events on the Timeline of Our
Community’s History.
Activity # 3 Writing News Stories
Divide the class into 8 to 10 groups. Assign each group one of the key events featured on the
Timeline of Our Community’s History. Groups, or individual students, may then develop a
series of news stories about ONE event using each of the formats listed below:
• a descriptive story about the event, including who, what, when, where and why (W 3.2)
• an “imaginary” interview of a person involved with the event (include imaginary
quotations) (W 3.3).
• an advice column suggesting a solution to a challenge related to the event (W 3.3).
• an editorial or a Letter to the Editor about the event (W 3.1).
Assemble the articles into a newspaper for each group. Let the group determine the name of
their newspaper, the date of the issue, and the design for the paper’s masthead.
Activity #4 A Timeline of Our Community’s History
Materials needed: copies of Timeline of Our Community’s History - Individual Project (Handout #5.1, page 41) or 3-D Chronological Timeline - Group Project (Handout #5.2,
pages 42).
Students work individually or in a group to create a timeline of the local community’s history
for the 19th, 20th or 21st century. Use at least 5 dates for the timeline. Write text to convey
information clearly about each event (W 3.2). Refer to the specific directions and the rubric on
pages 41 and 42.
Assessment: The assessment of this lesson is integrated with the instruction and occurs
throughout the lesson. The supporting questions form a framework for the evaluation of the
lesson.
• Select a person to portray at a Tea Party.
• Write a catchy headline for events on the Timeline of Our Community’s History.
• Work in a group to develop a series of news stories about ONE event on the
community timeline.
• Work individually or in a group to create a timeline of the local community’s history for
the 19th, 20th or 21st century using at least 5 dates for the timeline. Write text to
convey information clearly about each event

41
Handout # 5.1
Timeline of Our Community’s History - Individual Project
Prompt: Construct a timeline of our community’s history for the 19th, 20th or 21st century.
Divide the dates on the timeline into decades. On the timeline, accurately place in
chronological order at least five key events or people and write text to convey information
clearly about each event and why it is important to the community’s history.
INDICATORS ADVANCED PROFICIENT BASIC BELOW
BASIC
KNOWLEDGE OF
HISTORICALLY
ACCURATE
CONTENT
Student
demonstrates an in-
depth understanding
of the historical
content; all main
ideas are supported
by facts with no
obvious inaccurate
facts; contains
substantial
supportive evidence.
Student
demonstrates a
clear understanding
of the historical
content; all main
ideas are supported
by facts; contains
no obvious
inaccurate facts;
has significant
evidence.
Student
demonstrates a
limited
understanding of the
historical content;
most main ideas are
supported by facts,
no obvious
inaccurate facts;
would be improved
with more evidence.
Student
demonstrates
little
understanding
of the historical
content; facts
may be
inaccurate;
lacks
supportive
evidence.
KNOWLEDGE OF
CHRONOLOGICAL
THINKING
Student correctly
places key events
and/or people of the
historical era they
are studying into a
chronological
sequence and/or
interprets timelines.
Student correctly
places key events
and/or people of the
historical era they
are studying into a
chronological
sequence and/or
interprets timelines.
Student correctly
places a few key
events and/or
people of the
historical era they
are studying into a
chronological
sequence and/or
provides limited
interpretation of
timelines.
Student fails to
correctly place
key events
and/or people
of the historical
era they are
studying into a
chronological
sequence
and/or provides
no
interpretation of
timelines.
SUPPORTS THE
TOPIC WITH
ACCURATE
EXAMPLES
Student supports the
topic with insightful
historical and/or
geographic
examples.
Student supports
the topic with
several historical
and/or geographic
accurate examples.
Student supports
the topic with limited
historical and/or
geographic
examples.
Student has
few or no
historical
and/or
geographic
examples.
HISTORICAL
INTERPRETATION
AND ANALYSIS OF
SIGNIFICANCE
Student shows an in-
depth understanding
of the significance of
the topic in history;
has a clear
conclusion with
historical evidence;
links the topic to
today.
Student shows the
significance of the
topic in history;
concludes with
adequate historical
evidence; links the
topic to today.
Student shows the
significance of the
topic in history;
concludes with
some historical
evidence; attempts
to link the topic to
today.
Student makes
no statement or
suggestion that
the topic is
significant;
uses vague or
no evidence;
fails to link the
topic to today.
42
Handout #5.2
A 3-D Timeline of Our Community’s History - Group Project
Prompt: Working in a group of 5, construct a 3-D timeline for either the 19th, 20th or 21st
century of our community’s history. Divide the dates on the timeline into decades. As a group,
decide upon at least five events or people to show on your 3-D timeline. Use art materials
and realia to build three-dimensional models to illustrate the events. Write text to convey
information clearly about each event. As your group presents their timeline to the class,
explain why the events or people shown are significant to the history of our community.
TASK: Work in groups of five to construct a 3-D timeline of at least five historic events listed
on the Timeline of Our Community’s History. Use the rubric provided on page 41.
• Select a chairperson to keep track of the step-by-step progress of your group.
• Review the events recorded on the Timeline of Our Community’s History.
• Select five historic events for the timeline, i.e.,1909, 1938, 1952, 1960 and 1965.
• Create a title for your 3-D Timeline, i.e., Turning Points in Our Community’s History.
• Determine the time intervals for your timeline, i.e., decades from 1900 to 1990.
• On a large sheet of butcher paper, use a ruler to create a proportional timeline, i.e.,
_________________________________________________
1900 1910 1920 1930 1940 1950 1960 1970 1980 1990
• Construct a label (sign) for each event. On each label, include the name of the event
with its date and convey information clearly about each event.
• Determine where to place each label on the timeline.
• Research information about each event.
o Include 2 to 3 facts per event.
o Include the names of key people involved with each event.
o Write text to convey information clearly about each event. Use a separate
sheet of paper to be displayed with your 3-D models.
o For each event, explain what impact it has had on the history of our community.
• Use a variety of art materials (i.e., construction paper, paint, scissors and glue) to
construct a 3-dimensional model to illustrate each event. Be creative.
• Display your 3-D models on the timeline or on a table beneath the time line.
• As your group presents its timeline, be prepared to explain how the events depicted
had an impact on the history of our community.
43
Extended Activities for the Study of Our Community’s History
Develop a Welcome to Our Community kit that includes interesting facts and information
about people and events important to the development of the community. Describe local
historic sites and places of interest (W 3.2).
Construct a Map of the Community that includes a title, the cartographer’s name, a map
key, at least four major streets, a mode of transportation other than roads, four major
businesses, points of interest, and one educational institution.
Exhibit. Make a photographic and pictorial exhibit of the local community for display at your
school or for placement at city hall. Choose items that highlight historic homes, churches,
businesses, government buildings and general styles of architecture.
Research the Names of Streets in Our Community. Develop with students appropriate
categories that reflect street names, e.g., trees (Maple, Walnut); people’s names (Lincoln,
Martin Luther King, Jr.); foreign words (Verde, Amigo); numbers (32nd Street), etc... Once
categories are established, display these on a chart. Have students work in groups to study
local street maps to collect a minimum of 5 street names per category. Combine all the
students’ charts into a single class chart. Using the class chart, ask the following questions:
• How many of the streets honor important people in United States history?
• How many streets honor people in our local community?
• What do street names tell us about the beliefs of the people of our community?
• Have any of the street names been changed recently? Why? When?
Plan a Community Bus Trip - Using a local bus service schedule, have students plan a bus
trip in the community. After a route selection, have students trace their route on a local map
and describe the selected route using cardinal directions.
Locate pictures of different types of transportation from different time periods. Arrange
these into chronological order.
Using at least three sentences, write a “compare and contrast” paragraph that describes
how the community has changed over time (W 3.2).
Imaginative Narrative. Write an imaginative story that has its basis founded on an old
photograph of the community (W 3.3).
Research “Our Community 100 Years Ago.” Imagine what our community looked like 100
years ago. Illustrate or write about the old-time community. Use primary sources such as
newspaper articles and personal recollections.
Letter to the Past. Write an informative letter to a child that may have lived in the community
100 years ago. In the letter, explain what changes have taken place over the past 100 years.
Give specific examples. Illustrations may be included (W 3.2).

44
Create a “History Day” celebration. Have students present the projects that were
developed during this unit. Invitations may be extended to the community as well as to
students from other classrooms.
Community Birthday Celebration. Design a birthday celebration for the community. Use the
following questions for planning purposes:
• What form should the celebration take? Should there be speakers?
• Where should the celebration take place? Is there a limit to the number of attendees?
• When should it take place?
• What special materials are required?
Make a Community Quilt (allow 2 weeks). Each student selects or collects a 5”x 5” square
of fabric and, using permanent markers/felt tip pens, designs his/her square to illustrate
something about the community. Allow a week for students to sew the squares together
during class or request parent volunteers to complete the project.
Murals. Make a mural of Our Community Today and a mural of Our Community Long Ago.
Create a PowerPoint or video about the local community. Include interviews with
community leaders and interesting sites in the community. Identify subtopics. In small teams,
students write the dialogue for each identified subtopic. Include background music, such as
Copeland’s “Our Town.” Include photographs and student reenactments where appropriate.
Info-mercial. For homework, instruct students to watch an info-mercial. Have students form
small groups to write a script for an info-mercial about the benefits of working and living in the
community. Have student cameramen videotape the info-mercials.
Community Cookbook. Students bring to class a recipe contributed by a family member or
neighbor. Students classify the recipes into groups (e.g., main dish, salad, dessert, bread,
and vegetable). Students put recipes in a book format. Students and a family member may
prepare their recipe and share the final results at a “Community Food Fest.”
Historic Rubbings. Make a rubbing of a plaque on a building, a tombstone in a cemetery, or
a landmark that shows something about the community’s history. Write a description of the
rubbing. Explain what the rubbing tells about the community’s history (W 3.2).
Photo Analysis of Architectural Changes. Have students compare and contrast different
types of homes in the community from the past up to the present, i.e., adobe; ranch-style;
Spanish Colonial; Craftsman-Californian Bungalow; modernism buildings; and other styles
found in your community. Order the pictures and place them on a timeline according to the
decade they were built.
Future Architecture Trends. Students design a home of the future, incorporating features
that will accommodate futuristic styles and functions.