Working with Computer Forensics Data July 20, 2011 ... - CORE
Upload
independentCategory
view
2download
0
1
Irfan Shakeel

2
Table of Contents Table of Contents ................................................................................................................................. 2
Case Scenario ................................................................................................................................... 4 The Need for Forensics .................................................................................................................... 4 What is Computer Forensics? .......................................................................................................... 4 Computer Forensics Process ............................................................................................................ 5
Identification ................................................................................................................................ 5 Collection ..................................................................................................................................... 5 Examination ................................................................................................................................. 5 Analysis ........................................................................................................................................ 5 Reporting ...................................................................................................................................... 6
Computer Forensics Team ............................................................................................................... 6 First Responder ............................................................................................................................ 7
Rules of Computer Forensics ........................................................................................................... 7 3 A's of Computer Forensics ............................................................................................................ 8 Evidence & Its Types ....................................................................................................................... 9 Digital Evidence ............................................................................................................................... 9 Rules of Evidence .......................................................................................................................... 10
Chain of Custody ........................................................................................................................ 10 Chain of Custody Form ...................................................................................................................... 12
Sources of Evidence ................................................................................................................... 13 Gathering Digital Evidence – The Procedure ................................................................................ 14 Volatile Evidence ........................................................................................................................... 15
Why the Volatile Data/Evidence is so Important ....................................................................... 16 Volatile Data Collection Strategy .................................................................................................. 16
System Profiling ......................................................................................................................... 16 ........................................................................................................................................................ 17 ........................................................................................................................................................ 18 ........................................................................................................................................................ 20 Evidence Management ................................................................................................................... 27 Modes of Attack ............................................................................................................................. 27 Computer Forensics - Systematic Approach .................................................................................. 29
Module 2: Legal Aspects of Computer Forensics .............................................................................. 30 Legal Process: ............................................................................................................................ 30
U.S Statutory Law .......................................................................................................................... 32 Wiretap Act Electronic Communication Privacy Act ................................................................ 33 Pen/Trap & Trace Act 18 U.S.C. §§ 3121-27 ............................................................................ 33
Stored Wire and Electronic Communication Act - 18 U.S.C. §§ 2701-12 .................................... 33 Intellectual Property laws: ............................................................................................................. 34
Module 3: File System structure & Architecture ............................................................................... 36 Storage Media: ........................................................................................................................... 36 Hard Drive .................................................................................................................................. 36
File System & Structure ................................................................................................................. 41 Microsoft Windows File Systems .................................................................................................. 43 Windows Registry .......................................................................................................................... 47 Linux File Systems ......................................................................................................................... 49
Inodes ......................................................................................................................................... 49 Journaling File System ............................................................................................................... 50 Module4: Evidence Acquisition & Investigation ....................................................................... 54 Storage Media Image: ................................................................................................................ 54 Hashing to Verify the Integrity of the Image ............................................................................. 60 Image Acquisition on Linux ...................................................................................................... 62

3
Data Analysis ................................................................................................................................. 65 Disk Analysis on Linux – Autopsy ............................................................................................ 73
End Note: ....................................................................................................................................... 79

4
Module1: Foundation of Computer Forensics
Case Scenario Alex is the computer forensics investigator and has been hired to investigate data theft case in an organization. The general manager of the organization believes that some of their employees are involved in illegal activities including the network breach and the transfer of their confidential data, which is against the organizational policy. Alex has performed his investigation, collected the evidences and then he submitted his final report. According to the report, two employees were found responsible for the data theft. Based on this report, a case has been lodged against them. In the scenario mentioned above, the organization was the client, Alex was the service provider and the service that was being provided is called computer forensics & digital investigation services. The objective of this course is to discuss Alex’ work:
• Work process of computer forensics • The process of initiating and performing the investigation • Legal laws & boundaries • Techniques to gather evidence • The scope of the forensic work
The Need for Forensics The world has become a global village since the advent of computer, digital devices & the internet. Life seems impossible without these technologies, as they are necessary for our workplace, home, street, and everywhere. Information can be stored or transferred by desktop computers, laptop, routers, printers, CD/DVD, flash drive, or thumb drive. The variations and development of data storage and transfer capabilities have encouraged the development of forensic tools, techniques, procedures and investigators. In the last few years, we have witnessed the increase in crimes that involved computers. As a result, computer forensics and digital investigation have emerged as a proper channel to identify, collect, examine, analysis and report the computer crimes.
What is Computer Forensics? As a rule of thumb, “Forensic is the scientific tests or techniques used in connection with the detection of crime.” - Wikipedia. Furthermore, forensic is the process of using scientific techniques during the identification, collection, examination and reporting the evidence to the court. So what computer forensics is all about?
According to Dr. H.B.Wolfe computer forensics is, “A methodical series of techniques and procedures for gathering evidence, from computing equipment and various storage devices and digital media that can be presented in a court of law in a coherent and meaningful format.” If we further define computer forensics then, it is the procedure to collect, analyze and presentation of digital evidence to the court.
The scope of computer forensics is not limited to investigating a crime only. Apart from this,

5
computer forensics can be used for:
• Data recovery
• Log monitoring
• Data acquisition (from the retired or damaged devices)
• Fulfill the compliance needs
Computer Forensics Process Computer forensics work procedure or work process can be divided into 5 major parts:
Identification The first process of computer forensics is to identify the scenario or to understand the case. At this stage, the investigator has to identify the purpose of investigation, type of incident, parties that involved in the incidence, and the resources that are required to fulfill the needs of the case.
Collection The collection (chain of custody) is one of the important steps because your entire case is based on the evidence collected from the crime scene. Collection is the data acquisition process from the relevant data sources while maintaining the integrity of data. Timely execution of the collection process is crucial in order to maintain the confidentiality and integrity of the data. Important evidence may lost if not acted as required.
Examination The aim of third process is to examine the collected data by following standard procedures, techniques, tools and methodology to extract the meaningful information related to the case.
Analysis Since all five processes are linked together, the analysis is the procedure to analyze the data acquired after examination process. At this stage, the investigator search for the possible evidence

6
against the suspect, if any. Use the tools and techniques to analyze the data. Techniques and tools should be justified legally, because it helps you to create and present your report in front of the court.
Reporting This is the final, but the most important step. At this step, an investigator needs to document the process used to collect, examine and analyze the data. The investigation report also consists the documentation of how the tools and procedures were being selected. The objective of this step is to report and present the findings justified by evidences.
Every step mentioned above can be further divided into many parts and every part has its own standard operating procedures, we look into them in detail in the coming chapters.
Computer Forensics Team Law enforcement and security agencies are responsible for investigating a computer crime, however every organization should have the capability to solve their basic issues and investigation by themselves. Even an organization can hire experts from small or mid-size computer investigation firms. Also you can create your own firm that provides computer forensic services. To do so, you need a forensics lab, permission from the government to establish a forensics business, the right tools with the right people and rules/policies to run the business effectively and efficiently. As discussed, an organization should have enough capability to handle and solve the basic issues by their own people. Without this ability, it is very hard for an organization to determine the fraud, illegal activities, policy, or network breach or even they will find it hard to implement the cyber security rules in the organization. The need of such abilities may vary and it depends on the nature of business, security threats and the possible loss.
Here are the key people that a computer investigation firm should have:
• Investigators: This is a group of people (number depends on the size of the firm) who handle and solve the case. It is their job to use the forensic tools and techniques in order to find the evidence against the suspect. They may call the law enforcement agencies, if required. Investigators are supposed to act immediately after the occurrence of the event that is suspected of criminal activity.
• Photographer: To record the crime scene is as important as investigating it. The photographer’s job is to take photographs of the crime scene (IT devices and other equipment).
• Incident Handlers (first responder): Every organization, regardless of type, should have incident handlers in their IT department. The responsibility of these people is to monitor and act if any computer security incidence happen, such as breaching of network policy, code injection, server hijacking, RAT or any other malicious code installation. They generally use the variety of computer forensics tools to accomplish their job.
• IT Engineers & technicians (other support staff): This is the group of people who run the daily operation of the firm. They are IT engineers and technicians to maintain the forensics lab. This team should consist of network administrator, IT support, IT security engineers and desktop support. The key role of this team is to make sure the smooth organizational functions, monitoring, troubleshooting, data recovery and to maintain the required backup.
• Attorney: Since computer forensics directly deal with investigation and to submit the case in the court, so an attorney should be a part of this team.

7
First Responder The first responder and the function of the first responder is crucial for computer forensics and investigation. The first responder is the first person notified, and take action to the security incident. The first responder toolkit will be discussed in the upcoming chapters, but at this stage, I will discuss the roles and responsibilities of the first responder. The first responder is a role that could be assigned to anyone, including IT security engineers, network administrator and others. The person who is responsible to act as a first responder should have knowledge, skills and the toolkit of first responders. The first responder should be ready to handle any situation and his/her action should be planned and well documented. Some core responsibilities are as follows:
• Figure out or understand the situation, event and problem. • Gather and collect the information from the crime scene • Discuss the collected information with the other team members • Document each and everything
First responder or incident handlers should have first-hand experience of Information security, different operating systems and their architectures.
Rules of Computer Forensics There are certain rules and boundaries that should be keep in mind while conducting an investigation. Matthew Braid, in his AusCERT paper, ‘Collecting Electronic Evidence after a System Compromise’ has provided the rules of computer forensics:
1. Minimize or eliminate the chances to examining the original evidence: Make the accurate and exact copy of the collected information to minimize the option of examining the original. This is the first and the most important rule that should be considered before doing any investigation, create duplicates and investigate the duplicates. You should make the exact copy in order to maintain the integrity of the data.
2. Don't Proceed if it is beyond your knowledge If you see a roadblock while investigating, then stop at that moment and do not proceed if it is beyond your knowledge and skills, consult or ask an experienced to guide you in a particular matter. This is to secure the data, otherwise the data might be damaged which is unbearable. Do not take this situation as a challenge, go and get additional training because we are in the learning process and we love to learn.
3. Follow the rules of evidence You might be worried because we have not discussed any rule of evidence yet, but the next topic will be about evidence. The rule of evidence must be followed during the investigation process to make sure that the evidence will be accepted in court.

8
4. Create Document Document the behavior, if any changes occur in evidence. An investigator should document the reason, result and the nature of change occurred with the evidence. Let say, restarting a machine may change its temporary files, note it down.
5. Get the written permission and follow the local security policy Before starting an investigation process, you should make sure to have a written permission with instruction related to the scope of your investigation. It is very important because during the investigation you need to get access or need to make copies of the sensitive data, if the written permission is not with you then you may find yourself in trouble for breaching the IT security policy.
6. Be ready to testify Since you are collecting the evidence than you should make yourself ready to testify it in the court, otherwise the collected evidence may become inadmissible.
7. Your action should be repeatable Do not work on trial-and -error, else no one is going to believe you and your investigation. Make sure to document every step taken. You should be confident enough to perform the same action again to prove the authenticity of the evidence.
8. Work fast to reduce data loss Work fast to eliminate the chances of data loss, volatile data may lost if not collected in time. While automation can also be introduced to speed up the process, do not create a rush situation. Increase the human workforce where needed.
Always start collecting data from volatile evidence.
9. Don't shut down before collecting evidence This is a rule of thumb, since the collection of data or evidence itself is important for an investigation. You should make sure not to shut down the system before you collect all the evidence. If the system is shut down, then you will lose the volatile data. Shutdown and rebooting should be avoided at all cost.
10. Don't run any program on the affected system Collect all the evidence, copy them, create many duplicates and work on them. Do not run any program, otherwise you may trigger something that you don't want to trigger. Think of a Trojan horse.
3 A's of Computer Forensics Computer forensics methodology has been presented by Kruse & Heiser in their book titled “Computer Forensics: Incident Response Essentials”. They have provided the 3A's of computer forensics that are applicable for Windows and other OS as well.
1. Acquire the evidence without altering or damaging the original.
2. Authenticate that the recovered evidence is same as the original seized data. 3. Analyze data without any alterations

9
Evidence & Its Types Evidence is the key to prove the case in the court, evidence from a legal point of view can be divided into many types and each type do have its own characteristics in it. To keep the characteristics in mind during evidence collection helps an investigator to make the case stronger.
Admissible is the important characteristics of any evidence, it is generally the first rule of every evidence. Let's discuss the multiple types of evidence:
1. Real / tangible evidence: As the name suggests, real evidence is consists of a
tangible/physical material e.g hard-drive, flash drive, etc. Apart from the material, human can also be treated as real evidence e.g. an eye witness.
2. Original evidence: As law-pedia defines, “Evidence of a statement made by a person other than the testifying witness, which is offered to prove that the statement was actually made rather than to prove its truth.” This is generally an out of court statement.
3. Hearsay evidence: It is also referred as “out of court statement”, it is made in court, to prove the truth of the matter declared.
4. Testimony: When a witness takes oath in a court and give his/her statement in front of the court.
Evidence should be admissible, accurate and authentic; otherwise, it can be challenged while presenting the case in the court.
Digital Evidence Digital devices are not limited to computer, mobile phones and internet only; every electronic device having processing and storage capability can be used in crime. For example, mp3 player can be used to transfer the encoded message; electronic appliances might be used as storage to store the illegal documents. The duty of investigator or first responder is to identify and seize the digital device for further investigation. Digital information expressed or represent by the binary units of 1's (ones) and 0's (zeros). Digital information is stored in electronic devices by sending the instructions via software, program or code. The same way this information can be retrieved from the electronic device by using the program, here computer forensics software comes. So what is digital evidence and where are the key sources to get the evidence?
Digital evidence: According to Wikipedia, “Digital evidence or electronic evidence is any probative information stored or transmitted in digital form that a party to a court case may use at trial.” Digital evidence is any information that can be transmitted or stored by an electronic device.
Characteristics of Digital Evidence:
• Timing is one of the important characteristics of digital evidence, first responder has responded immediately; otherwise, the data may be lost. For example, devices run on batteries may shutdown and current network connection may be lost.

10
• Just like fingerprints or any other biometric evidence, digital evidence is also hidden or latent, which requires a process to unearth.
• Digital evidence might be destroyed or damaged. Quick response and chain of custody is the key in computer forensics, you need to act according to the situation otherwise the important data might be damaged (intentionally or unintentionally).
Rules of Evidence Matthew Braid, in his AusCERT paper, ‘Collecting Electronic Evidence after a System Com promise’ has defined the five rules of evidence:
1. Admissible The first and the most important rule is that your evidence should be able to use in court as an evidence.
2. Authentic Evidence should be authentic and it should be related and relevant to the case, you need to prove in front of the court that the collected evidence is authentic. Fail to do so, means the failure of the investigation.
3. Complete or Whole The court will not accept half evidence, you should be unbiased during your investigation and your evidence should not show the one prospective of the incident. As Matthew says, “it is vital to collect evidence that eliminates alternative suspects. For instance, if you can show the attacker was logged in at the time of the incident, you also need to show who else was logged in and demonstrate why you think they didn’t do it. This is called Exculpatory Evidence and is an important part of proving a case. ”
4. Reliable Reliability of the evidence is important, but the process is also important and it should not create any doubt on the evidence.
5. Believable or Acceptable The evidence presented in the court should be in layman’s language, clear and easy to understand. You should present a well-crafted version of the document with the reference to the technical document.
Chain of Custody This particular term is not only related to the computer forensics, any case or even any investigation has this important aspect. “Chain of Custody” is the process to acquire, secure, move and store the evidence until the time it is presented in court. While seizing the electronic device, you should tag it with the date/time of acquiring, case number and evidence numbers. This information is crucial while creating a case in the court. Evidence custodian is responsible to collect, transfer and store the evidence in the forensics lab. Anyone doing this job should understand its importance and he/she should not waste the valuable time. Chain (strong metal use to connect or link between stuff) of custody, as the name says, “chain of custody shows how the evidence is acquired, managed, transferred or transported during the investigation process. And who involve in the process, what their responsibilities are and for how

11
much time they store the evidence and how they transfer it to someone else.” This important process tells the story of the evidence, if not carefully done then the opposite attorney can challenge and even dismiss the presented evidence.
In order to justify the chain of custody, you need to provide the evidence. You must provide the evidence that you maintained, documenting the chain-of-custody during the investigation process and you or anyone has not damaged or altered the evidence whether intentionally or unintentionally. “Chain of custody form” is the tool used to keep record of every important aspect, here is the sample chain-of-custody form:

12
Chain of Custody Form
Case number: _________________________________ Case officer Name: _________________________________
Officer ID #: _________________________________ Date/time of seized: _________________________________
Location of seizure: _________________________________
Information of the Evidence
Item number Quantity Description (model number, vendor name, current condition)
Chain of Custody
Item # Date/Time Released by Received By Comments & remarks
Chain of
As you can see the aforementioned chain-of-custody form, this is the evidence that says about the parties who involved in maintaining the evidence. Court may call anyone to testify the process of how he/she delivered the evidence to the other party and how he/she stored the evidence in the lab.
As discussed in the previous topic that Authentication is the foremost rule of the evidence, you need to prove that the evidence is authentic and chain of custody plays a tremendous role along the way of authentication. It's not enough in order to just testify following the fact by what was compiled. Having a documented process in place that can track compiled information as well as ensure it is preserved but not manipulated with is also required.

13
Computer forensics expert organizations should have the guidelines and process that should support the admissibility of evidence into legal actions, including information on how the evidences have been acquired and handled, preserving the integrity of tools and equipment, maintaining the chain of custody, and storing evidence appropriately. The court might dismiss the case, if you fail to maintain the proper chain-of-custody, because the evidence can be challenged on the basis of every rule of evidence discussed earlier:
•Admissibility: How you will prove what you are presenting as evidence? There is no way; you need a document to support your argument.
•Authentic: If there is no chain-of-custody, then you will fail to prove that the presented evidence is authentic and gathered from the crime scene.
•Complete or whole: Again, you need a document to prove it.
•Reliable: Who is going to believe that you or anyone else have not altered or modified the evidence? You need to have a signed document and the people who can testify.
•Believable: The fifth rule is already void if fail to maintain the other four rules.
This is why the chain-of-custody is very important because the entire case is based on the evidence and the evidence is based on chain-of-custody process.
You should be ready to testify the steps taken while handling the evidence: who did what with the evidence and why?
You should bring the chain-of-custody of form in the court to justify your words. Technology has made our life very easy, we have cloud computing; you can store the evidence (soft-copy) in the cloud to reduce the transfer of the evidence. Now you will have a strong point to be presented in the court that the real evidence has been uploaded in the cloud in the very place to avoid the risk.
Sources of Evidence So what are the key sources of evidence or how computer forensics investigator gets the evidence? Since evidence could be anything and could be everywhere. In one case, you need to get evidence from mp3 player, and on some other case, evidence has to be retrieved from iPhone. The source is not limited and it depends on the nature of the case you are working on. Highly technical skills and expertise are required to examine and acquire the evidence from these sources. This is why this mini course has been designed. We look into the structure of many hardware devices as well as the file format of many operating systems. Apart from real evidence (tangible), sometimes you need to investigate for human testimony. So social engineering or the human skill set is also required to investigate the human and get the valuable information. While investigating or acquiring evidence, you need to maintain the integrity and confidentiality of the data. This is very important as you might damage or retire the evidence, which you should not do.
As a rule, an investigator look for evidence in every electronic devices directly or indirectly related to the crime scene.
These are a few sources from where the evidence might be collected:
1. Hard-drive
2. Firewall logs
3. System logs
4. Social networking websites

14
5. Website that was visited
6. Email
7. GPS devices
8. Security camera's
9. Networking equipment
10. PDA (personal digital assistant)
11. Chat room or chat server There are many sources, think about Internet of things.
Gathering Digital Evidence – The Procedure The process to gather the digital evidence is simple and it should be followed to avoid any damage. The successful outcome of the process means you have secured the evidence effectively and efficiently.
So let's discuss the general procedure:
So it the four step process.
• Identification There is a difference between data, information and an evidence, you should have a clear idea and you should distinguish between data and evidence. You need to extract evidence from the data, so identify the possible source from you can extract the evidence.
• Collection & Preservation Once identified, collect it. Make sure to preserve the evidence to as close as original state. Document any change, if made.
• Analysis Mark the qualified people to analyze the collected evidence to find the cause and effect relationship.
• Verification & Presentation Verify the steps taken and the tools that were used. Presentation is vital, craft the document to be
15
presented in front of non-technical personnel and linked every step with the technical document for reference purpose, the presentation is very important to share your work otherwise it has no value.
Volatile Evidence Under the heading of volatile evidence, we will discuss the process and methodology to collect the volatile evidence. First, we should look into the volatile data and what volatile data is. What are the characteristics of a volatile data?
Usually, computer forensics deals with the procedures and techniques to identify, collect, examine, analyze and report the data available in the storage of an electronic device. However, a smart investigator always tries to collect information about the current status of the device. The job of the first responder is crucial to do this. Usually they take the device in custody and shut it down to move it into the forensics lab. In the forensics lab, the persistence or the stored data, is collected from the suspicious storage device. However, rebooting or shutdown is the major cause of data loss, especially the volatile data. In order to collect the volatile data, the first responder needs a running system.
The first responder has to create their own toolkit to gather the volatile data. In the recent years, we have seen rapid development of the forensic tools. For example, we have EnCase, NTI's law enforcement suite, and FTK. However, almost all the tools focus on collecting the persistent data. There are many open source tools are available that can be the part of the first responder toolkit, and some of the open source tools are exclusively being created to gather the data, but most of them do not get the complete set of volatile data. It is highly recommended for a first responder to get their set of tools. They should also learn the commands to gather the volatile data manually. As you now understand the concept of volatile data, here are some definitions for reference:
What is Volatile Data?
Carnegie Mellon University defines it as follows: “Volatile data is any data stored in system memory that will be lost when the machine loses power or is shut down.”
Therefore, there are generally two sets of data:
• Persistent
• Volatile Persistent data:
Persistent data is stored in the nonvolatile storage devices, for example; hard-drive, USB, CD/DVD and other external storage device. This type of data usually not lost after rebooting or shutting down the machine. At the start of the investigation process, you need to differentiate between persistent and volatile data. You should make a policy to get the volatile data first; else, it may be lost.
Persistent data is usually collected in the forensics lab. Volatile Data:
Volatile data is stored in the system memory. This data will be lost if the system is rebooted or shut down. Matthew Braid, in his AusCERT paper, ‘Collecting Electronic Evidence after a System Compromise’ has created a list of evidence sources ordered by relative volatility. An example Order of Volatility would be:
• Registers and Cache
• Routing Tables

16
• Arp Cache
• Process Table
• Kernel Statistics and Modules
• Main Memory
• Temporary File Systems
• Secondary Memory
• Router Configuration
• Network Topology
Why the Volatile Data/Evidence is so Important Volatile data give an insight of the current state of the suspicious machine. It tells you about the logged-in users, processes that are running, and open ports with their remote connection. In the broader perspective, you can get the timeline of the suspicious machine, who, what and why they were using the machine when the incident happened. You can also get the date/time and the user who is likely responsible for the security incident. Volatile data gives an investigator a broader perspective, an idea about the whole scenario, and how to proceed with the case.
Volatile Data Collection Strategy Following are the key points that should be considered before starting the collection process:
1. Do not use the suspicious machine programs: create or establish your own command shell to gather the volatile information. The first responder toolkit should carry a command shell to use when required, and at this stage, you should use it.
2. Method to store the collected information: The process to transfer the collected evidence of the suspicious machine to the remote or collection system is very important and you should have a plan in mind to do so. Netcat is handy to establish connections so you may use it.
There are mainly two types of information that an investigator has to collect during the process: 1. Volatile system information: As the name suggests, collect the current running process,
and configuration of the system.
2. Volatile network information: Collect the information about the network, open ports and the connectivity of the suspicious machine.
System Profiling An investigator has to get the profile of the system. It is the job of the network administrator to maintain the profile of every system. However, the system profile can be created in the run time. Typically, the following information should collected to compile the system profile:
OS type and version
total amount of physical memory
system installation date
pagefile location

17
registered owner
installed physical hardware and configurations
system directory
installed software applications
Systeminfo.exe The aforementioned command is for Windows OS, and it allows you to collect some important information about the system.
The following information has been retrieved:
registered owner
BIOS version
system uptime
system directory
original install date
number of network cards installed
In case of a Linux machine, you can use the following commands:
cat /proc/meminfo cat /proc/cpuinfo

18
PSTools It comes with multiple command line tools and it was exclusively created for system administrators to perform their administrative operations. You need to get it from the official Microsoft website. Get the file and then extract all the utilities to acquire the volatile data from the suspicious machine. It is the combination of multiple tools and we will discuss them one-by-one (when needed). At this stage, let’s try PSInfo utility.
An investigator wants to get the information of the running software on the suspicious machine, so this command-line utility is very handy.

19
Uname – Linux If you are a Linux user then you might have heard about this command before. Uname is used to create system profile. If an investigator wants to know the machine name, OS and kernel version then use this command on the suspicious machine.
What activities have been performed after starting the suspicious computer? Yes, it is the most important question that an investigator has to think about, and they should have to find the history of executed commands along with the system date and time. Finding command history along with the date/time is very crucial because you need to make your evidence and the process admissible. It is not necessary that the current system, date/time is similar to the actual date/time. Find the current system date/time and then document it. Document the date/time after executing every forensic tool.

20
After executing the aforementioned command, an investigator can get lots of valuable information. For example, the incoming and outgoing connection. The important things are to find is whether the attacker has added any user accounts or not, and has the attacker(s) installed any software in the machine? And here on Windows:
Make sure to record every activity, documentation is the key, since you need to submit your report to court. Current System Uptime
You are acquiring volatile data, is it worthwhile? Check the system uptime to know the time when the suspicious machine was started. It also helps you to understand whether the incident occurred during the uptime period or someone else has rebooted after the incident. For Linux and Windows respectively:

21
Legitimate VS Illegitimate Processes
The first responder investigates the cyber-crime, and a cyber-criminal might inject the malicious software in the suspicious machine before the incident to get the remote access or after the incident to monitor the further activities. Anything is possible; so from the investigation point of view, you should check the current processes of the suspicious machine. The objective is to identify the malicious service, and software running on the machine.
The key to examine is to have a list of legitimate system and application processes and then compare it with the running processes (PID or process identifier).
Harlan Carvey in his paper “Windows Forensics and Incident Recovery” has suggested documenting the following information about running processes.
• the process’ executable image
• the command line used to initiate the process
• how long the process has been running
• the security context that it runs in
• modules or libraries (DLLs) it accesses
• memory that the process consumes

22
Let's try to find the running processes:
1. After executing the following command, several executable files have been identified. Let's take svchost.exe (PID=912) for further analysis:
2. How long has this service (912) been running? PsList has the answer:
3. And how much virtual memory is this process (912) consuming at the moment? Again Pslist
with a specific command.
4. Apart from the processes, what services are running? Use PsService command. Again, are you documenting everything? If not, then at the end of the investigation you will have nothing in hand. Make sure you are documenting because you are left with no other choice.
5. Use Pslist to find valuable information of the suspicious machine:
Pri: Priority WS: Working set Thd: Number of threads
WSPk: Working set peak Hnd: Number of handles Priv: Private memory
VM: Virtual memory NonP: Non-paged memory Mem: Memory usage

23
What about Linux? Let's look into the Forensic tools to be used for Linux machine: For Linux
“Top” is the command that needs to be executed in the terminal to find the running processes. It prints result after sorting, the most CPU-intensive tasks are at top. Here you can see the process ID, time and most importantly the executed command to run the process.
PS
Apart from top, we have another command that provides the information of the current running processes, ID, CPU usage, memory usage and other useful information.
$ ps ax $ ps -ef
To get the full list of running processes
$ ps –U user Find the other system users running processes $ ps –C program_name Find the histroy of a particular program $ ps -A View all the processes $ ps r View the running process only

24
Volatile evidence from Network: Fport:
We have another forensics tool to discuss; the objective is to find the open TCP/IP and UDP ports and what applications are listening on those ports. An investigator should map the ports to the running processes and you should document the process identification number and the path. You can download the fport from Mcafee website.
The key to this test is to find and examine associated (with suspicious machine) IP addresses with their open ports. By examining network information, the first responder may easily get an idea whether the incident happened remotely or locally. During the evidence gathering process, look for unfamiliar or abnormal open ports with the services running, you may get the trace of RAT (remote administrative tools) or any other type of backdoor. Apart from fport, you can also use the netstat -an command to get the communication history:

25
Netstat -anb is also a very useful command that displays the list of TCP/IP connection, protocol, local or MAC addresses and IP addresses.
In the following screen, you can see the local and remote IP, protocol, status and PID of a service.
Other native windows commands are also useful in getting volatile network evidences, NBTstat -s shows the connection of the local suspicious machine with the remote IP so that an investigator can map the shared resources on the network.
Net The Net command has various functions, user accounts policy, shared resources on the network, network statistics and many other information can be acquired. Let say net share to find the information of the share folder and other shared resources, for example a printer.
You don't need to get any forensics tool at the moment to investigate the suspicious Linux machine. Linux native commands are handy and they provide a great deal of information to the investigator.

26
On the above screen you can see the protocol, status of the process, the path of the program that is running and other useful information. Logged on Users
In this section, we will try to extract the information of the legitimate users on the suspicious machine. What is the total number of authorized users? Moreover, what are their names and profiles? Access time, remote access or local access? PSLoggedon: is the part of Pstools and it allows you to see the locally and remotely logged on users:
Net user: It is the native windows command to find the local and remote users of the suspicious machine.
On Linux machine, last is one of the important command. It allows an investigator to see history of logged on users local or remote.

27
Locate the, etc. directory on the terminal and then open the passwd file, this file contains user account information with the encrypted passwords.
Evidence Management In the previous topics, you have learned to find and gather the volatile data/evidence. Getting evidence is not enough; management of evidence is the art. Strict policies and procedures should be created to manage the evidence. Make sure to maintain the integrity of the data, chain of custody should not be broken. Evidence management guide should be created and your organizational policy should emphasize to implement it. Key points to ponder:
• Create a list of possible data that can be retrieved from the list of devices
• From where the electronic device retrieved
• What are the methodology to store the evidence? Make the place secure, limit the access rights
• Make sure that you can do all the process again and it will provide the same result
• Document everything, every tool that you are using, every process and everything You need to carefully manage the evidence and if you failed, then you will most likely to fail in the proceedings.
Modes of Attack Computer forensics and digital investigation depend on the nature of cyber-crime occurred. First, the identification of the crime informs the investigator to take the possible steps. What are the mode

28
of cyber-attack, and what is cyber-crime? What kind of crime should an investigator investigate?
In this section, the answers of the aforementioned questions will be addressed. We can generally divide the mode of attack into two types:
• Internal or insider attacks
• External or outsider attacks Some statistics:
• Survey results given on cybersenate.com shows the motivation of the attack is cyber-crime
• Result mentioned on hackmageddon.com shows that SQL-injection is the most common type of cyber-attack in 2014.
A few examples of cyber-crime:
• Financial frauds
• Laptop or other device theft

29
• Insider Internet abuse
• Data theft
• Unauthorized access whether locally or remotely
• Viruses, worms and backdoor
• Denial of service attack
• and many more...
Computer Forensics - Systematic Approach An investigator should have a standard guideline and steps to use during the investigation, which we call a systematic approach. Every step is based on specific reasons and they are linked together. Systematic approaches may differ, and it depends on the local laws and your own organization policy.
1. Initial assessment of the case: Before starting the actual investigation, you should look at the broader prospective of the case and the possible outcomes. Keep in mind that you have to be suspicious of everyone and everything. Do not try to imagine the result at first, because if you do so then you unintentionally work in that particular direction. Communicate with the relevant people about the incident; try to gather as much information as you can.
What is the nature of the case? What is the situation after the incident?
2. Create a design to approach the case: You should have everything, every possible step in your mind and you should write them down. Create the process to handle this particular case. How you are going to approach the authority, the victim and the suspect? How you are going to seize the machines? What legal documents you might need to do this and how you are going to get the legal documents?
3. Required resources: What resources this case might require? Human resources, technical, and the software that required. Do you have the necessary software or do you need to get it? If you need assistance from any other company or team, this also comes under the required resources, create the list and get them at first place.
4. Identify the risks: Risk assessment should be done to evaluate the possible risks that are involved in the particular case. Based on the experience, your organization should have the list of possible problems occurred during an investigation, even you can judge the risk based on your own experience. After identification, take the necessary steps to minimize or mitigate the risks.
5. Analyze the data: This is the time to collect/gather evidence from the captured devices, use the software and processes that you have defined earlier to extract the information.
6. Investigation: All right, you have collected the data. Now investigate the extracted evidence and point out the culprit.
7. Complete report: Creation a report is very important; write a complete report; mentions the taken steps, tools/processes and the outcomes.
8. Critique the case: Self-evaluation is the key, since you need to forward your report to court. After completing the report, you should thoroughly review the entire case. Find your weaknesses and improve them for future cases.

30
Module 2: Legal Aspects of Computer Forensics Anyone doing computer forensics must aware of the legal aspect and implication of the case. You can't simply investigate or seize any machine without following the proper laws and regulations. The legal aspects are important, since the case will go to the court and apart from the hearing, you need to follow laws while investigating otherwise you will find yourself in trouble.
Legal Process: The legal process depends on your local laws and rules. Somehow, we can make a standard process because every case should have the following in it:
• Complaint
• Investigation
• Prosecution
The aforementioned steps are actually the stages of a case. In the first stage, a complaint received, the investigator will investigate the complaint, and with the help of prosecutor, collect, analyze and report to build a case. You can't start a criminal investigation by yourself. A criminal investigation requires evidence of an illegal act. If evidence is not found, then the criminal investigation cannot be started. Someone should inform the local police about the crime that has been committed and based on receiving the complaint the further investigation would be started. At the very first step, the local police investigate the crime. They report the type of the case to the top management and then a specialist will be assigned to look after the case. Not every policeman is not a computer expert. Sometimes they only know the basics about digital devices. During the seizure process, they might damage the critical evidence. To avoid any mishaps, CTIN has defined levels of law enforcement expertise. Bill Nelson, Amelia & Christopher Steuart have also mentioned in their book:
1. The Police officer is responsible for acquiring and seizing the digital evidence on the crime scene.
2. Managing high-tech investigations, teaching investigators what to ask for, and understanding computer terminology and what can and can’t be retrieved from digital evidence. The assigned detectives usually handle the case.
3. Specialist training in retrieving digital evidence, normally conducted by a data recovery or computer forensics expert, network forensics expert, or Internet fraud investigator. This person might also be qualified to manage a case, depending on his or her background.
You, as an investigator should have knowledge and expertise of computer forensics, and how to handle cyber-crime cases. You have to judge the level of expertise of the other team members and assign their roles, responsibilities and the expected performance. Follow the systematic approach discussed in the previous chapter, look for the evidence and then create a strong case supported by the evidences.
Your job as a computer investigator is to investigate the digital devices, extract the evidence and create the report. From this point onward, the job of a prosecutor is started. As an investigator, you need to submit the final report with the evidences to the government attorney, the level of authority depends on the nature of the case, and your local laws.

31
Computer forensics is comparatively a new field of study to the court and many of the existing laws used to prosecute computer-related crimes, legal precedents, and practices related to computer forensics are in a state of flux. The United States Department of Justice’s Cyber-crime Web Site is the rich source to get the latest updates even case study of the cyber-crime cases. You can find the available guides on evidence management and other topics related to computer forensics. As it was discussed that you should collect evidence in a way that is legally admissible in a court. There are two core areas of law related to cyber-crime.
1. U.S. Constitution
• 4th Amendment “Protection against unreasonable search and seizure”
• 5th Amendment “Protection against self-incrimination”
2. U.S. Statutory Law
• 18 U.S.C. 2510-22 (The Wiretap Act )
• 18 U.S.C. 3121-27 (The Pen Registers and Trap and Trace Devices Statute)
• 18 U.S.C. 2701-12 (The Stored Wired and Electronic Communication Act) Although the amendments were written before there were problems occurred by misusing the electronic devices, the principles in them apply to how computer forensics is practiced.
U.S. Constitution: 4th Amendments:
“The right of the people to be secure in their persons, houses, papers, and effects, against unreasonable searches and seizures, shall not be violated, and no Warrants shall issue, but upon probable cause, supported by Oath or affirmation, and particularly describing the place to be searched, and the persons or things to be seized. ”
See the following excerpt from a U.S. Department of Justice Manual, you can see that the 4th amendments can be applied in computer cases:
“When confronted with this issue, courts have analogized electronic storage devices to closed containers, and have reasoned that accessing the information stored within an electronic storage device is akin to opening a closed container. Because individuals generally retain a reasonable expectation of privacy in the contents of closed containers, see United States v. Ross, 456 U.S. 798, 822-23 (1982), they also generally retain a reasonable expectation of privacy in data held within electronic storage devices. Accordingly, accessing information stored in a computer ordinarily will implicate the owner’s reasonable expectation of privacy in the information. See United States v. Barth, 26 F. Supp. 2D 929, 936- 37 (W.D. Tex. 1998) (finding reasonable expectation of privacy in files stored on hard drive of personal computer); United States v. Reyes, 922 F. Supp. 818, 832- 33 (S.D.N.Y. 1996) (finding reasonable expectation of privacy in data stored in a pager); United States v. Lynch, 908 F. Supp. 284, 287 (D.V.I. 1995) (same); United States v. Chan, 830 F. Supp. 531, 535 (N.D. Cal. 1993) (same); United States v. Blas, 1990 WL 265179, at *21 (E.D. Wis. Dec. 4, 1990) (“[A]n individual has the same expectation of privacy in a pager, computer, or other electronic data storage and retrieval device as in a closed container.”).

32
The 4th amendment gives power to the general public and protects them from unreasonable searches and seizures, In general, the principles set forth by the 4th amendment provide for individuals to enjoy a “reasonable expectation of privacy.” Network administrator and even investigator have to understand that the individual is allowed to enjoy the privacy. Some key points that you should understand are:
• The 4th amendment only restricts the right of Government agent, not the private individuals (you should consult with the legal adviser to find out whether your organization can be considered “Government” or not).
• The level of expected privacy is substantially less outside of the home, although not eliminated.
• In case, if the item protected by the 4th amendment lost; the privacy enjoyed from this amendment is also dissolved. If it finds that the process, methodology and tools have violated 4th amendment while recovering the evidence, then the information or evidence will become inadmissible by the courts.
5th Amendments:
You need to carefully understand the 5th amendment because it directly affects the cryptography, as stated that:
“No person shall be compelled in any criminal case to be a witness against himself.”
As mentioned in the paper “Center for Democracy and Technology. Impact of the McCain-Kerrey Bill on Constitutional Privacy Rights”:
Under the Fifth Amendment, an individual cannot be compelled to testify to his or her memorized key.
The word memorized is very important in this context; keep in mind that the key (passkey) is never written on anywhere. The 5th amendment protects an individual from being compelled to provide the incriminating testimony. Remember, it does not provide protection if the evidence is written somewhere.
U.S Statutory Law Anyone without the restriction of their profession, concerned with computer forensics must know the following statutory law:
• 18 U.S.C. 2510-22 (The Wiretap Act )
• 18 U.S.C. 3121-27 (The Pen Registers and Trap and Trace Devices Statute)
• 18 U.S.C. 2701-12 (The Stored Wired and Electronic Communication Act) These laws highly affects the work process and methodology of the first responder, computer administrator and anyone collecting computer records and working on digital investigation. The first two laws (18 U.S.C. 2510-22 & 18 U.S.C. 3121-27) are dealing with real time electronic communication, while the third law (18 U.S.C. 2701-12) deals with stored data of the electronic communication.
Let discuss the real-time electronic communication first. Before discussing the exceptions and prohibited acts, we should discuss the electronic communication based on OSI model.
The wiretap act and pen trap/trace act both deal with real time communication; however, they focus on different aspects of this communication. The real time communication can further be divided into two parts:
• Content

33
• Non-content In every communication, both the aforementioned information are there, so what data should be treated as non-content and what should be treated as the actual content? I will explain the both from the OSI point of view. OSI is a seven layer theoretical model that explain the flow of electronic communication; these two laws are act on the following layer of OSI model:
Pen trap/trace act • Data link layer (2) • Network layer (3) • Transport layer (4)
Non-content
Wiretap act • Session layer (5) • Presentation layer (6) • Application layer (7)
Content
Wiretap Act Electronic Communication Privacy Act The law prohibited:
“intentionally intercepts, endeavors to intercept, or procures any other person to intercept or endeavor to intercept, any wire, oral, or electronic communication. ”
Wiretap act prohibits the interception of real time electronic communication so you should think twice before using the sniffing tools like wireshark, ethereal, TCPdump, etc.1 There are some exceptions and you should find a way out through them.
Keep in mind that this law does not restrict to gather or intercept signaling information, however pen trap/trace act restrict the intercept of signaling information.
Pen/Trap & Trace Act 18 U.S.C. §§ 3121-27 This act prohibits from getting this signaling information for, example, routing info, dialing codes and other outgoing signaling information. The law says:
“no person may install or use a pen register or a trap and trace device without first obtaining a court order under section 3123 of this title or under the Foreign Intelligence Surveillance Act of 1978 (50 U.S.C. 1801 et seq.).”
So what does pen register, trap and trace means? Well, the legal document provides the admissible definition and they are: 18 U.S. Code § 3127(4):
the term “trap and trace device” means a device or process which captures the incoming electronic or other impulses which identify the originating number or other dialing, routing, addressing, and signaling information reasonably likely to identify the source of a wire or electronic communication, provided, however, that such information shall not include the contents of any communication; 2
Stored Wire and Electronic Communication Act - 18 U.S.C. §§ 2701-12 Unlike the two acts discussed in the previous topics, stored wire & electronic communication act deals with the stored information of any communication. Apart from this statute, there are HIPAA & FERPA too. They also deal with the level of protection, access & disclosure of stored 1 https://www.law.cornell.edu/uscode/text/18/2511 2 https://www.law.cornell.edu/uscode/text/18/part-II/chapter-206

34
communication. Some prohibitions are:
1. “a person or entity providing an electronic communication service to the public shall not knowingly divulge to any person or entity the contents of a communication while in electronic storage by that service;”
2. “a person or entity providing remote computing service to the public shall not knowingly divulge to any person or entity the contents of any communication which is carried or maintained on that service”
Intellectual Property laws: Intellectual properties are the rights own by individual or a group of people (organization) over their own creation, creation including the content, logo and other properties. Intellectual property laws can be further divided into copyright laws, trademark and trade secret laws, etc. 17 U.S. Code § 506 - Criminal offenses This particular law is about copyright and it address the following areas:
• Criminal Infringement (Any person who willfully infringes a copyright shall be punished)
• Forfeiture, Destruction, and Restitution • Fraudulent Copyright Notice • Fraudulent Removal of Copyright Notice • False Representation • Rights of Attribution and Integrity
“Any person who, with fraudulent intent, removes or alters any notice of copyright appearing on a copy of a copyrighted work shall be fined not more than $2,500” “Any person who knowingly makes a false representation of a material fact in the application for copyright registration provided shall be fined”
18 U.S. Code § 2320 - Trafficking in counterfeit goods or services (Trademark) Legal definition of the term traffic is:
“to transport, transfer, or otherwise dispose of, to another, for purposes of commercial advantage or private financial gain, or to make, import, export, obtain control of, or possess, with intent to so transport, transfer, or otherwise dispose of”
This particular law is related to the copyrighted content (document, text, video, audio) and the registered trademark. This law is aim to restrict the transfer of content by using any means (for example email, USB drive, CD/DVD and other media) and it restricts the usage of the stuff for any commercial or even a financial gain. According to 18 U.S. Code § 2320(b(a)) the penalty would be:
“...shall be fined not more than $2,000,000 or imprisoned not more than 10 years, or both...”
As a computer forensics investigator, you should always seek legal advice, because it is the part of your job. Follow the rules and regulations and create a strong case supported by evidence and by

35
following laws. This is the end of second module; we will discuss the file system from the next module.

36
Module 3: File System structure & Architecture It is crucial for a computer forensics investigator to understand the file system of multiple operating systems, how they create/modify files and how they interact with storage devices (hard-drive, USB, etc.). What kind of the storage devices do we have and what are their structures. This module discusses the technicalities of modern computer devices with the aim to provide the inside and understanding of storage medium and architecture of the current famous operating systems.
Storage Media: Generally, there are two types of disk drives or storage media for that matter:
• Fixed storage
• External or removal storage As a computer user, you must have used both types of drives, and you must know the basic difference between both drives. This chapter does not aim to differentiate drive with another type of drive, but this chapter aims to discuss the structure of different drives. Yes, fixed storage are the built-in storage space available in any electronic device and the external or removal is the one that you can plug and play with. The rapid growth in computer industry has introduced many storage mediums, apart from the traditional media types, for example hard-drive and CD (compact disk), files can be stored in USB drive, mp3 player, mobile phones, digital camera, etc.
Hard Drive To understand the file, file system, how OS interact with storage media (hard-drive), how the flow of information works, etc., you need to understand the physical or hardware of hard-drive. It is also important to understand the place where data actually store, so that you will be able to retrieve it during your investigation. A hard drive is made up of one or more platters coated with magnetic material, data stored or recorded magnetically onto the disk. Following are the important components of the hard-drive:
• Platter
• Head
• Tracks
• Cylinder
• Sector
The platter is the place where data stored magnetically, so platter is one of the important component of the hard-drive. The hard-drive platter is made up of aluminum alloy, glass and ceramic is also used in the creation of platter. It is important to understand that the area where data stores composed of magnetic media coating done by iron oxide substance. Data is stored on the both front and back sides of the platter which is also known as side0 and side1. The data of each platter are physically stored into tracks and sectors.

37
Image source: https://media.licdn.com/mpr/mpr/shrinknp_800_800/p/8/005/0a2/349/2636bc8.jpg
• The head is the actual device that reads and writes data on platter, hard-drive consists of multiple platters with heads inserted between them, head can read both sides of the platter.
Image source: http://www.dtidatarecovery.com/resourcecenter/harddrive.jpg
• Tracks are the part of platter; a track is an individual concentric circle on the platter where data recorded. Every track has its own unique identification number for tracking, and the number starts from 0 at outer edge and moves an inner portion till the center of the circle reaching the value around 1023. Head access the track in one position at a time, and a single

38
hard-drive consists of more than a thousand of the tracks.
Image source: http://recover-tools.com/wp-content/uploads/2014/09/2.jpg
• Cylinder is a combination of tracks, or cylinder is a column of tracks and formed when tracks are lined up.
• Sector is the small storage section on the track which divides it. The size of a sector is 512 bytes.
The maximum storage of the hard-drive can determine by a mathematical formula that needs input information of the hardware of that drive: Bytes on a disk = Number of cylinders * Number of heads * Number of sectors (group of 512 or more bytes) Let say:
Cylinder = 1024 Heads = 32
Sectors = 63
Bytes on a disk = 1024*32*63 = 2064384 sectors where 1 sector is equals to 512 bytes, hence:
Bytes on a disk = 2064384*512 = 1056964608 or 1.056 GB

39
image source: https://i-technet.sec.s-msft.com/dynimg/IC306536.jpg In the above picture, you can see the important components of the hard-drive, there functions have already been discussed, so lets move on further.
Cluster:
Cluster is an important component that we should discuss, it is somehow linked to the sector discussed above or it may be referred as the group of sectors. The cluster is an allocation unit and a space allocated for files and directories to be stored. The minimum size can be one sector/cluster. If small files store on a file system with large cluster will waste the disk space, and this wasted space is called slack space. Cluster size or number of cluster is always calculated of an exponent of 2. 1 sector = 2^0
8 sectors = 2^3

40
How to determine the Cluster size:
Open the command prompt and type chkdsk to check the hard disk:
Here you can see “4096” bytes in each allocation, allocation unit is the cluster actually. Hence the size is 4096 bytes.
Slack Space:
Infosec Institute ehacking --------- -------- ----------- --------- --------- ------------ -------------
File Slack Space Refer to the concept created above, slack space is the free or unused space in a cluster, this space is available between the end of the actual file and the allocated data unit (end of cluster). Slack space and investigating slack space are way too important for forensics expert because this space can contain salient information about the suspect and evidence can be retrieved from this space. For example, if suspect deleted all of the files and directories that filled the entire cluster and then saved or created some new files that filled half of the cluster only to mislead the investigator, the other half of the cluster may have the information of the deleted file which can be retrieved and can be used as evidence against the suspect.
Cluster

41
File System & Structure A file or a data file is a collection of data and information grouped under one particular name called file name. The file can be made up of many data types for example, audio, video, text, etc. The file system is the workflow, process and method that defines how the data is stored and where they are placed on logical volumes. The logical volume is the result of the partition process, and it is a partition acting as a single entity that has been formatted with a file system. Understanding the file system is crucial for forensics investigator, as you must know the location and distribution of various types of files and how they structured on mapped in the memory.
Before the hard drive or any other storage media are used to store the file, the disk must be partitioned and formatted into multiple logical volumes. In the Microsoft Windows file system, the logical units are labeled as C, D, E, F and so on. Hidden partitions can also be created to hide the intended data; this space can created between the primary partition and the first logical partition. This unused space is referred as partition gap, hidden data can alter by using the disk editor utility. Different operating systems may have different file systems and structure. However, there are some common traits that you can find in every file system, for example, the concept of directories and files. Types of File System
File system can further divided into four types:
• Disk file system: Manage data or files in the storage devices
• Network file system (NFS): Run network services and structure
• Database file system: Instead of hierarchical structured management, files identified by their characteristics
• Special purpose file system List of file systems are available on many websites even on Wikipedia, here are most common types of file system: Disk file system
• ADFS – Acorn filing system, successor to DFS.
• BFS – the Be File System used on BeOS
• EFS – Encrypted file system, An extension of NTFS
• EFS (IRIX) – an older block filing system under IRIX.
• Ext – Extended file system, designed for Linux systems
• Ext2 – Extended file system 2, designed for Linux systems
• Ext3 – Extended file system 3, designed for Linux systems, (ext2+journalling)
• FAT – Used on DOS and Microsoft Windows, 12 and 16 bit table depths
• FAT32 – FAT with 32 bit table depth
• FFS (Amiga) – Fast File System, used on Amiga systems. Nice for floppies, but useless on hard drives.
• FFS – Fast File System, used on *BSD systems
• Files-11 – OpenVMS file system
• HFS – Hierarchical File System, used on older Mac OS systems

42
• FS – and PFS2, PFS3, etc. Technically interesting file system available for the Amiga, performs very well under a lot of circumstances. Very simple and elegant.
• ReiserFS – File system which uses journaling
• Reiser4 – File system which uses journaling, newest version of ReiserFS
• SFS – Smart File System, available for the Amiga.
• Sprite – The original log-structured file system.
• UDF – Packet based file system for WORM/RW media such as CD-
• RW and DVD.
• UFS – UNIX File system, used on older BSD systems
• UFS2 – UNIX File system, used on newer BSD systems
• UMSDOS – FAT file system extended to store permissions and metadata, used for Linux.
• VxFS – Veritas file system, first commercial journaling file system;
• HP-UX, Solaris, Linux, AIX
• XFS – Used on SGI IRIX and Linux systems
• ZFS – Used on Solaris 10 Network File system
• Andrew File System
• AppleShare
• BeeGFS
• DCE Distributed File System
• NFS
• Red Hat Storage Server
• Arla (file system)
• OpenAFS
• OpenSFS
• XtreemFS
• Server Message Block
Special purpose file system
• Tmpfs (temporary file storage facility on many UNIX-like operating systems)
• ftpfs (ftp access)
• kernfs (BSD)
• Procfs
• Encrypting File System

43
• Wii Backup File System
• WebDAV
Microsoft Windows File Systems Since Windows is the most common operating system, let's start discussing the file system of windows first. The primary file system in windows can be divided into two types:
• FAT
• NTFS FAT and NTFS both use different cluster size depending on the size of the volume, and each file system has a maximum number of clusters that it can support.
File Allocation Table (FAT): As Microsoft says:
“The first FAT file system was developed by Microsoft in 1976. That system was based on the BASIC programming language and allowed programs and data to be stored on a floppy disk. Since that time, the FAT file system has been improved upon multiple times to take advantage of advances in computer technology, and to further refine and enrich the FAT file system itself. Today, the FAT file system has become the ubiquitous format used for interchange of media between computers, and, since the advent of inexpensive, removable flash memory, also between digital devices. The FAT file system is now supported by a wide variety of OSs running on all sizes of computers, from servers to personal digital assistants. In addition, many digital devices such as still and video cameras, audio recorders, video game systems, scanners, and printers make use of FAT file system technology. ”
reference: http://www.dpreview.com/articles/8269265213/microsoftisfat
The FAT database contains file names, directory names, cluster number and attribute of a file; and it is typically written on the outermost track of the disk.
FAT versions:
• FAT12: The oldest file system and it created to use for floppy disks. It has a limited amount of storage, volume not more than 16 MB. It uses 12-bit file allocation table entry to address an entry into file system. It was designed for MS-DOS 1.0
• FAT16: It uses 16-bit file allocation table entry to address an entry into file system; this is why it is called FAT16. It was created for large disk and it can handle the storage capacity up to 2 GB, and for some newer OSs the capacity is up to 4GB.
• FAT32: It is the advance file system as compared to the FAT12 and FAT16. It uses 32-bit file allocation table where the top 4 bits are reserved. Cluster size used: 4096-32768 bytes. It can access up to 2 TB of disk storage.
New Technology File System(NTFS): NTFS has several improvements over the FAT, it is the primary file system used by Windows XP and later versions. NTFS supports large file names and it supports the large storage media. It is known as a recoverable file system; it can automatically recover or restore the consistency of the file system when an error occurs. It also supports encryption, compression and permission is being

44
defined for the user or group level.
List of NTFS Metafiles:
File name Description $MFTMirr Duplicate of the first vital entries of $MFT, usually 4 entries (4 Kilobytes). $LogFile Contains transaction log of file system metadata changes. $AttrDef A table of MFT attributes that associates numeric identifiers with names. $Bitmap An array of bit entries: each bit indicates whether its corresponding cluster is
used (allocated) or free (available for allocation). $UpCase A table of unicode uppercase characters for ensuring case-insensitivity in
Win32 and DOS namespaces. $Extend A file system directory containing various optional extensions, such as $Quota,
$ObjId, $Reparse or $UsnJrnl. $Extend\$Quota Holds disk quota information. Contains two index roots, named $O and $Q. $Extend\$ObjId Holds link tracking information. Contains an index root and allocation named
$O. $Extend\$Reparse Holds reparse point data (such as symbolic links). Contains an index root and
allocation named $R. . Root directory. Directory data is stored in $INDEX_ROOT and
$INDEX_ALLOCATION attributes both named $I30. $MFT Describes all files on the volume, including file names, timestamps, stream
names, and lists of cluster numbers where data streams reside, indexes, security identifiers, and file attributes like "read only", "compressed", "encrypted",, etc.
$Boot Volume boot record. This file is always located at the first clusters on the volume. It contains bootstrap code (see NTLDR/BOOTMGR) and a BIOS parameter block including a volume serial number and cluster numbers of $MFT and $MFTMirr.
$Volume Contains information about the volume, namely the volume object identifier, volume label, file system version, and volume flags (mounted, chkdsk requested, requested $LogFile resize, mounted on NT 4, volume serial number updating, structure upgrade request). This data is not stored in a data stream, but in special MFT attributes: If present, a volume object ID is stored in an $OBJECT_ID record; the volume label is stored in a $VOLUME_NAME record, and the remaining volume data is in a $VOLUME_INFORMATION record. Note: volume serial number is stored in file $Boot
Source: https://en.wikipedia.org/?title=NTFS#Metafiles NTFS vs. FAT
Criteria NTFS FAT32 FAT16 FAT12 OS Windows NT DOS v7 and higher DOS All versions DOS All versions

45
Windows 2000 Windows XP Windows 2003 Server Windows 2008Windows Vista Windows 7
Windows 98 Windows ME Windows 2000 Windows XP Windows 2003 Server Windows Vista Windows 7
of Microsoft Windows
of Microsoft Windows
Volume size 232 clusters minus 1 cluster
32GB for all OS. 2TB for some OS
2GB for all OS. 4GB for some OS
16MB
Files on volume 4,294,967,295 (232-1)
4194304 65536
Max file size 244 bytes (16 TeraBytes) minus 64KB
4GB minus 2 Bytes 2GB (Limit Only by Volume Size)
16MB (Limit Only by Volume Size)
Boot Sector Location
First and Last Sectors
First Sector and Copy in Sector #6
First Sector First Sector
File attributes Standard and Custom
Standard Set Standard Set Standard Set
Compression Yes No No No
Encryption Yes No No No
Permission Yes No No No
Disk quotas No No No No
Built-in security Yes No No No
Recoverability Yes No No No Performance Low on small
volumes High on Large
High on small volumes Low on large
Highest on small volumes Low on large
High
Fault Tolerance Max Minimal Average Average
Let's compare them on the basis of volumes and the cluster size.
Volume size FAT16 cluster size FAT32 cluster size NTFS cluster size 7MB – 16MB 2KB Not supported 512 bytes 17 MB–32 MB 512 bytes Not supported 512 bytes 33 MB–64 MB 1 KB 512 bytes 512 bytes 65 MB–128 MB 2 KB 1 KB 512 bytes 129 MB–256 MB 4 KB 2 KB 512 bytes 257 MB–512 MB 8 KB 4 KB 512 bytes 513 MB–1,024 MB 16 KB 4 KB 1 KB

46
1,025 MB–2 GB 32 KB 4 KB 2 KB 2 GB–4 GB 64 KB 4 KB 4 KB 4 GB–8 GB Not supported 4 KB 4 KB 8 GB–16 GB Not supported 8 KB 4 KB 16 GB–32 GB Not supported 16 KB 4 KB 32 GB–2 terabytes Not supported Not supported 4 KB
Apart from Windows, you should understand the file system of other operating system including Linux. Now we will use the hex workshop to analyze the partition physical level. You need to understand the hexadecimal codes to understand the file systems of various operating systems. Here is the list of the hexadecimal codes with the respectable file system.
Hexadecimal code File system 01 DOS 12-bit FAT 04 DOS 16-bit FAT for partitions smaller than 32 MB 05 Extended partition 06 DOS 16-bit FAT for partitions larger than 32 MB 07 NTFS 08 AIX bootable partition 09 AIX data partition 0B DOS 32-bit FAT 0C DOS 32-bit FAT for interrupt 13 support 17 Hidden NTFS partition (XP and earlier) 1B Hidden FAT32 partition 1E Hidden VFAT partition 3C Partition Magic recovery partition 66-69 Novell partitions 81 Linux 82 Linux swap partition (can also be associated with Solaris
partitions) 83 Linux native file systems (Ext2, Ext3, Reiser, Xiafs) 86 FAT16 volume/stripe set (Windows NT) 87 High Performance File System (HPFS) fault-tolerant mirrored
partition or NTFS volume/stripe set A5 FreeBSD and BSD/386 A6 OpenBSD A9 NetBSD C7 Typical of a corrupted NTFS volume/stripe set
Let's do it. Download Hex workshop (www.hexworkshop.com) and install it to analyze.

47
• After installation, click on the icon and open the program
• In Hex workshop, click on Disk → Open Drive and the see the list of logical drives. In the example below, I have clicked on my C: drive to analyze it.
Here “.R.NTFS” shows that the partition has been formatted as an NTFS drive. If you see MSD0S5.0 or MSWIN4.1 in the first logical sector, then it means that the drive formatted as FAT.
Windows Registry Windows registry is the hierarchical database; it contains the information of the users, applications, hardware, etc. Windows registry know everything about a program, where the program is stored, its version and every setting of that program. During execution of any task, windows continuously refer to the registry. Data in registry stores at Binary file.
Windows Registry Structure:
• The hives

48
• Handle key
• Key
• Sub-key
• Value
• The hives: It is the branches in HKEY_USER and HKEY_LOCAL_MACHINE.
• Hkey or handle key: They are the categories of hives
• Key: Every Hkey divides into different folders named key.
• Sub-key: Another key displayed under key is called sub-key
• Value: It is the content of a particular key “REGedit” run this command to open the registry editor.
Registry Hkey/hives & their functions:
Hkey Functions HKEY_CURRENT_USER This hive contains information of the current logged-in user.
Information including the configuration and preference settings.
HKEY_LOCAL_MACHINE The machine configuration, hardware and installed software information are available under this hive
HKEY_CLASSES_ROOT A symbolic link to HKEY_LOCAL_MACHINE\SOFTWARE\Classes; provides file type and file extension information, URL protocol prefixes, and so forth

49
HKEY_USERS It contains information of all the users ever logged-in on this machine
HKEY_DYN_DATA It contains information about hardware Plug and Play. The following table shows the registry and the supporting files:
Hive Supporting files HKEY_CURRENT_CONFIG System, System.alt, System.log, System.sav HKEY_CURRENT_USER Ntuser.dat, Ntuser.dat.log HKEY_LOCAL_MACHINE\SAM Sam, Sam.log, Sam.sav HKEY_LOCAL_MACHINE\Security Security, Security.log, Security.sav HKEY_LOCAL_MACHINE\Software Software, Software.log, Software.sav HKEY_LOCAL_MACHINE\System System, System.alt, System.log, System.sav HKEY_USERS\.DEFAULT Default, Default.log, Default.sav
Linux File Systems In the previous topics, we have discussed Windows OS file systems and now under the heading of Linux file system, we will discuss the file system and architecture of Linux OS. Linux or it is for UNIX supports multiple file systems and it is the open-source OS. Before discussing the file systems, we should discuss some basic concept related to file system in Linux. What is a File? In Linux, everything is file while the others are processes, file is connected with the storage media and whatever you store, it informs the file. The file is the collection of data; data may be your text, image, video, etc. To manage the files on Linux, ordered tree structure has been created where the root contains large branches, and the branches contain a regular file (leaves of a tree for that matter). What is Directory? Directory is a special file that contains other files and sub-directories. Directory can be further divided into two types:
• Root directory • Sub-directory
Since Linux is based on tree structure, hence we have root or root directory. You can't change the root directory, you can't rename it. It is denoted by a forward slash (/). Sub-directory is the branch of the tree, we have many sub-directories of a single root (single OS), it can be created/deleted and you can also rename them.
Inodes The inode is the basic concept in Linux file system, each file in Linux is represented by inodes which is the structure of the file system. Each inode contains the information of the file, timestamps, size, file type, owner of the file, permission, etc. It is also called Index number because

50
each inode is identified by a unique assigned number in the file system. If we summarize, then it is the database stores metadata about each file and directory. It is used to track the file on the hard-drive. The inode contains entries and each entry is 128 bytes in size. The inode contains the following attributes of the file:
• Inode number (identification number) • Access control list • Owner of the file • Group which file belongs to • Permission (read, write, executable, etc.) • Size of the file • Type of the file • File access, modification and deletion time
The inode has nothing to do with the content (data) and even name of the file, it only works to manage the file within the file system by assigning a unique number to every file. # ls -i filename # stat filename
In the above example, I have analyzed a mp3 file. The first output shows the identification number of this particular file, while the second output provides more details about the file.
Journaling File System Journaling file system introduced in Linux is the main reason that many corporations switched to Linux, however it is no longer a unique reason because there are other file systems available having capability. The file systems before Ext3 are based on static structure, they don't have journaling functionality. However, Ext3 and beyond file system has journaling capability. So what journaling file system is all about? According to Wikipedia: “A journaling file system is a file system that keeps track of changes not yet committed to the file system's main part by recording the intentions of such changes in a data structure known as a "journal", which is usually a circular log.” If a system is not properly shutdown (think of power failure), then journaling file system provides

51
the consistency of the data (whether you have saved the file or not). Journaling file system first write into another part of hard-drive called journal where it stores the logs of the file. So journaling file system is always consistent. File Systems in Linux As discussed, Linux supports many file systems, but EXT (Extended file system) is the most common and the most famous file system. EXT file has versions:
• ext2 • ext3 • ext4
Ext was designed in 1992 by the French developer Remy Card as a first file system created for Linux kernel. Partition size was limited to 64 MB and 14 bytes was the limit for file names. EXT2 Ext was immediately superseded by ext2. The second extended file system was created by Remy Card in 1993. Ext2 was the most famous and the default file system in Linux until the launch of ext3. However, USB and other removal storage media are still using ext2 as their first choice file system. Ext2 does not support journaling; this is the main reason why ext2 is recommended for USB drives because these drives does not need to do the journaling. It supports maximum file length of 255 bytes and the max file size is 2 TB. In ext2, the directories and files are not indexed, so searching a file within large amount of files may take time. Block Size Max file size Max file system size 1 KB 16 GB 4 TB 2 KB 256 GB 8 TB 4 KB 2 TB 16 TB 8 KB 2 TB 32 TB EXT3 The third extended file system was launched in 2001 and developed by Stephen Tweedie. It has journaling which is the main edge of it over ext2. Ext3 is more advanced than ext2, because it has the capability to index the directories and files by using an H-tree. Maximum individual file size is 2 TB, overall the file system can be up to 32 TB. The Ext2 file system can be switched to ext3 without taking backup. Block Size Max file size Max file system size 1 KB 16 GB 4 TB 2 KB 256 GB 8 TB

52
4 KB 2 TB 16 TB 8 KB 2 TB 32 TB EXT4 The fourth extended file system is the successor of ext3 with the aim to improve the performance and stability. It was released in Linux kernel version 2.6.28 in 2008. It uses 48 bit addressing system which allows the maximum file size of 16 TB and the maximum volume size of 1 EB. User has given the rights to turn on/off the journaling in ext4. Let's compare EXT with Windows file system on the basis on Journaling and size: File System Max File Size Partition Size Journaling FAT 16 2 GB 2 GB No
FAT32 4 GB 8 TB No NTFS 2 TB 256 TB Yes ext2 2 TB 32 TB No ext3 2 TB 32 TB Yes ext4 16 TB 1 EB Yes As discussed, the file system is the tree-based structure where we have root (/). Here you can see the content of the root location.
Where, usr/ Partition for user program home/ Where user stores its data (content) Var/ Stores temporary data Opt/ Stores third party software lost+found/ Files that were saved during failures are here. Lib/ Library file for the programs Boot/ The startup files and the kernel Dev/ It contains the information about the hardware Root/ Admin user home directory Mnt/ Mount point for external file systems (USB, CD, etc.) Sbin/ It has the programs run by the system

53
Determine the file system of a machine Use df -T command: df -T | awk '{print $1,$2,$NF}' | grep "^/dev"
In the following example, you can see the external drive along with the internal drives. Let's find their file system information.
/dev/sdb represents the external media (USB in my case), so here we go:
For the internal partition:
This is it. In this section we have discussed many important topics of Linux file system including the journaling concept and inodes, the information of the root, sub-directories discussed above are very important, and you should look inside them while investigating the case. In the next module, we will see the techniques to gather evidence and how to analyze them.

54
Module4: Evidence Acquisition & Investigation Many important topics have been discussed in the previous module and now the objective of this module is to introduce forensic software and to demonstrate their usage. In the first module, we have discussed the rules that you must follow during evidence acquisition process. There are many tools, both commercial and open-source are available, and somehow many of them are same as per their function; every investigator has its own toolkit and you should make your own. The selection of toolkit highly depends on your mindset, way of work and the expected cases. Anyhow, let's discuss some important concept first.
Storage Media Image: Creating storage media image is crucial for investigating a case and finding evidence out of it. Evidence acquisition & investigation process are:
• Creating image of storage media (suspect media)
• Verifying the integrity by hashing
• Analyze the storage media and its content Creating an image is nothing but making a copy of the suspect device and analyze the copied version of the storage media. Media image is a file that contains data (actual content) and the structure of the media, here media means any storage device; for example, hard-drive, USB, CD/DVD, etc. Note: Never investigate the original device, take the copy of the device and investigate it.
AccessData Corp. is a well-known company that provides computer forensics tools/software. In this guide, we will use their software and apart AccessData, we will use some open-source software too.
AccessData FTK Imager – Forensics Tool
FTK image is a wonderful software that can create an image of the storage media, it can also preview the content of the created image, and you can export the image for further investigation. Keep in mind that an image can be created locally or remotely. In this scenario, I am taking an image of a removal drive (USB) and the same image will be used throughout this guide.
• Download the FTK imager and install it.
• Click on the icon, open the software and here is the main window:

55
• Click on the File, here you can see multiple options to take images from. Information from memory can also be collected, and you can image the individual item too.

56
• Click on Create disk image option. Now select the device type. In our situation, logical drive.
• Select the drive and finish the procedure

57
• In the next window, select the destination drive or folder, where you want this image to be saved.
• You need to select the image type. Here E01 file format is for EnCase (famous digital forensics program). AFF stores all the data along with metadata in a single file, while SMART stores the metadata in separate file. We will select the RAW (DD) option, that is the RAW image file format and it can also be analyzed in Linux operating system. Select the type and click next.

58
• The next window is for administrating and managing purpose, you need to enter the
information relevant to the case.
• In the window, enter the destination path and the name of the Image. If you are analyzing large drive, then you can split the image into multiple parts, image fragmented size is the failed to provide this information.

59
• The process may take time, and it depends on the disk size.
• You need to verify the hash to make sure the integrity of the acquired data. The following window will appear after the creation of the image. Here you can see the information of MD5 and SHA1 hash and their results. Since the values are matched, hence it indicates that nobody has altered the disk and you got the exact copy of the suspect device.
• In order to view the summary of the overall process, create on image summary. This same information has also been printed in the text format (available at the same location).

60
This is it. This is how you create an exact copy of the suspect device for investigation purposes; make sure to keep the hash details with you to verify the integrity in the investigation process where you will be touching the data.
Hashing to Verify the Integrity of the Image Hashing process is to match the image with the source media or drive. Hashing is as if you are doing a biometric verification of a human. There are many algorithms created for hashing, and hashing can be used for many reasons, including encryption, but in our scenario we are discussing hashing from a forensics point of view. MD5, 128bit, 32 character algorithm is one of the famous amongst the list of algorithms. If you alter the data acquired from the suspect disk, it will change its hash value. It is crucial to maintain the integrity; otherwise, you can't verify in court that you did not change the evidence in any way. Following are the steps to verify the integrity of the data; Hex workshop is the software for this purpose:
• Open Hex workshop → File → Open
• Browse and select the image file created in the previous topic, you will witness the hexadecimal values like this:

61
• This hexadecimal values and the characters are the content of the storage media. If alter any of these values, the hash will also be changed. So conduct a fair investigation, never try to change the evidence else, you will make the legal process very difficult. Now click on Tools → generate checksum
• List of algorithms is there, select MD5 and SHA1 for verification and click on Generate

62
• Generating hash values may take little time and it depends on the file size. So here is the result, as you can see that the created image has not been changed yet because the hash values are similar:
• Changing the name or even extension for that matter, does not change the hash value. You can try this. However, if you change any value (data) then the hash will be changed respectively.
Image Acquisition on Linux In the previous topics, we have discussed software and processes to create an image of the suspect device on Windows OS. The same functions can be performed on Linux machine too, there are open-source tools are available that can make your job effective and efficient. DD is an UNIX command that is very important for forensic experts, this is the command-line utility means you don't have the graphical user interface to execute the functions. Creating image via DD is equivalent with the other software for example, FTK imager.
dcfldd is the command-line utility and it is the advanced version of DD. Many forensics tasks can be done by using this command:
• Image verification: dcfldd can verify the integrity of the data and provides a solution to check the target device, whether it is matched with the input file or not.
• Split out: If you are analyzing a large disk, then you can split the image on multiple files. It helps you to transfer the data.
• Multiple output: This utility has an ability to output multiple files and disks at a time.
• Log output: It creates txt file of the logs and the hashes. There is another utility named “dc3dd” that is also useful in forensic examination, however, it has some limitation as comparing to dcfldd. We will use dcfldd to acquire an image.

63
The objectives of this case are:
• Creating image of a disk in Linux
• Understand the procedure to mount a directory or even partition
• Where the disk image data is
• Verify the integrity by creating and comparing hashes Let's do it:
• Open Kali Linux terminal and type the command “fdisk -l ”. The output contains the list of partitions. Here you can see the partitions; SDA1, SDA2, SDA5 and SDB which is an external device (USB).
• Take SDB for further analysis. On the terminal type “parted -l” to see the space of each drive. Here you can see the type of the drive (SDB) which is FAT32 . In addition, the size is “4027MB”.

64
• It's time to mount the drive. We need to mount the drive first so that we will be able to make any changes to it. Mounting in Linux is like loading a drive or simply opening a drive. First, we need to create a location, you can do this by locating the file system in Linux too, but here I am performing all tasks from the terminal. Click on the file system → mnt, here you should create a folder.
On your terminal type sudo mkdir /mnt/locat
• Sudo, provides the administrative rights to perform the job
• mkdir a simple command to make a directory and the another directory

65
• After creating the location, mount the drive to the location. Use the command “sudo mount /dev/sdb /mnt/locat”
• Once mounted, create a new folder for incident. mkdir /mnt/locat/case
• Note everything, fdisk -l > /mnt/locat/case/fdisk.txt
• Create image of the disk by using: dcfldd if=/dev/sdb hash=md5,sha256 hashwindow=1G md5log=/root/md5.txt sha256log=/root/sha256.txt hashconv=after conv=noerror,sync of=/root/driveimage.dd
• Here, Hash=md5,sha256 represents the type of the algorithms to be used This is it, the process to create an image of a disk on a Linux machine. Now you have witnessed the procedure on both the Linux and Windows machine. In the next topic we will analyze the created images.
Data Analysis After the acquisition and verification of the storage media image, the next step is to analyze the content to find the possible evidences of the case. During the investigation process, you should consider that the suspect is smart and he/she might try to hide, delete and encrypt the important evidence. First, analyze the clearly visible files and folders and then look for the hidden and deleted items. Take a deep look into every file and directories.
In the previous step, we have successfully created the image and the image has also been verified to maintain the integrity of the data. Now let's move further. Prodiscover Basic is the forensics software that we are going to use to analyze the data. This particular software can be used to achieve both the purposes, creating image and analysis. Anyway, in this particular scenario, we will use prodiscover to analyze the file and then we will create the report.
• This is the first window, where it asks information related to the project that you are starting to work on.

66
• To add an image, click on Action → Add → Image Prodiscover has a wonderful feature to create an image. You can even create an image of the disk from this software. I am using the same image created in the previous topic.
• On the left navigation menu, click on Images → the name of the drive Here you can see

67
the content of the acquired (suspect) disk. Your job is now to analyze every file and folder and to look for the possible evidence. The biggest mistake that you should not make, is the damage to the data; otherwise the integrity of the data will be lost and you won't be able to prove anything in the court.
There is a way to copy the data and then view it in the user-friendly mode, but how? Follow the procedure below, by doing this you can maintain the integrity.
• The technique is very simple. Let say you want to analyze a single file, and then simply copy it and it on any other place, use Hex workshop to get the hash of that file and then do whatever you want to do. After completing the job, make sure to reanalyze the file again and compare it with the previously taken hash.

68
• Here you can see, I have pasted this file somewhere else and generating the MD5 hash via Hex workshop.
Get the hash information and store it. Open this file without any fear, acquire the evidence, close the file, reanalyze the hash and you are done.
Click on Save Project to save the project and use it whenever you want.
AccessData Forensics Toolkit (FTK) Accessdata FTK is a premium computer forensics and digital investigation software, it has:
• Court cited solution • Database driven for speed and resiliency • Easily expandable given unified database • An integrated feature set • Interoperability with AccessData solutions
If the suspect has tried or successfully removed or wiped out the evidence, then don't worry, FTK is the best solution to find and recover the deleted files and folder. It has a strong case management and administration database too.
• After installation, open the program. You will asked to create a case of you can work on any existing case. In our scenario, I am opening a case.

69
• Provide the detail of the case, as discussed; it has strong case management ability. Make sure to provide the right information that you use to maintain the database of the cases.
• It is recommended to leave the default case log options that provides approximately all the features of the software.

70
• Click on Next and in the following window; you need to provide the image of the drive. Here I am browsing the image created before.

71
• Select the time zone and provide the evidence number (identification).
• The process to load the evidence image take some time depending on the size of the image.

72
When it is done, you will see the following summarize window, here you can see that total file items are 233 and 39 are deleted files, which were being removed by someone before taking the image of the disk (hmmmm interesting). There are six documents in the image while 37 multimedia files and the other useful information mentioned in the screen.
• Let's explore the image, here the folder with a cross sign mean that they have been removed.
You can recover them to analyze.
• FTK has an ability to show the files in the user-friendly mode, here you can view the image, video file, text, unzip the folder and every other function. In the example below, I am reading a text file within FTK window.

73
Therefore, this is how you create an image of a storage media and how an investigator should investigate the drive while maintaining integrity of the data. Every steps are mentioned above needs practice, create your forensics lab and perform the tasks. In the next topic, we will analyze a drive in a Linux machine.
Disk Analysis on Linux – Autopsy Sleuth Kit is the open-source computer forensics investigation suite, Autopsy is the front-end or user interface of Sleuth Kit. You can run Autopsy on Linux, Windows and MAC OS. Autopsy is very useful while analyzing FAT,NTFS, Ext3 and other file systems. If you want to conduct an investigation on the command-line, then use Slueth Kit while the GUI is called Autopsy. It is available on the famous Linux distribution Kali Linux, so you need not to worry about the installation. You can open .dd extension of the disk image (we have created the file format while creating the image).
Important features are:
• Timeline Analysis: Displays system events in a graphical interface to help identify activity.
• Keyword Search: Text extraction and index-searched modules enable you to find files that mention specific terms and find regular expression patterns.
• Web Artifacts: Extracts web activity from common browsers to help identify user activity.
• Registry Analysis: Uses RegRipper to identify recently accessed documents and USB devices.
• LNK File Analysis: Identifies short cuts and accessed documents
• Email Analysis: Parses MBOX format messages, such as Thunderbird.
• EXIF: Extracts geo location and camera information from JPEG files.
• File Type Sorting: Group files by their type to find all images or documents.
• Media Playback: View videos and images in the application and not require an external viewer.

74
• Thumbnail viewer: Displays thumbnail of images to help quick view pictures.
Let’s do it:
• On the Kali Linux Applications → Kali Linux → Forensics → Digital Forensics →
Autopsy
• Copy the local host URL and open your favorite browser, paste it and then you will see the first window of Autopsy.

75
• Click on New Case, it will ask the details of the case. Put the relevant information because it is for administrative and management purpose (think if you are investigating so many cases at the same time). You need to create history of every case. Put the information and click on New case:
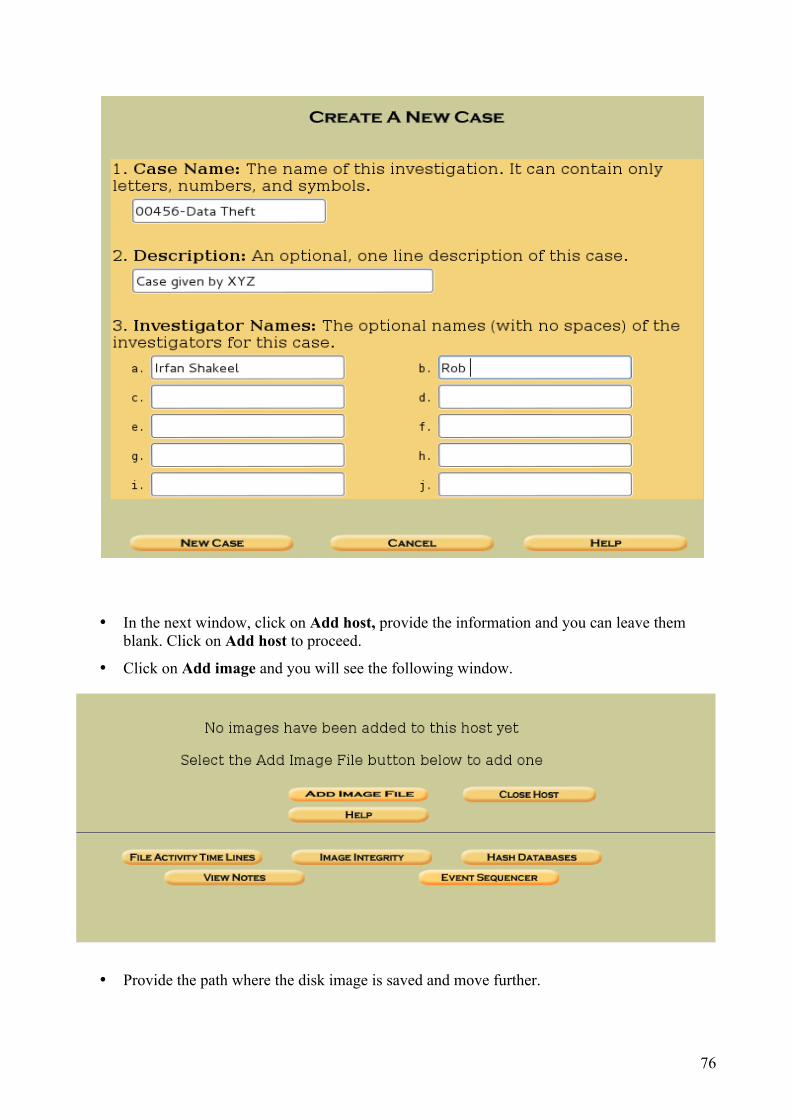
76
• In the next window, click on Add host, provide the information and you can leave them blank. Click on Add host to proceed.
• Click on Add image and you will see the following window.
• Provide the path where the disk image is saved and move further.

77
• Select the calculate option so that Autopsy calculate the hash, that you will match with the previously created hash to make sure that the image is not changed.
• Select the appropriate option from the tab to start your analysis, click on File Analysis

78
• You will see the content of the acquired image, now click on any file and take notes of the evidence.
• Analyze any file and then click on ASCII report to generate the basic report of the file.
• Here is the sample report:

79
We have discussed the process to create a disk image, and how to view the content without compromising the integrity of the data. You have also witnessed the usage of most common computer forensic tools; you should not stop here and keep practicing every feature of the tools mentioned in the topics discussed earlier.
End Note: This is the end of this mini course, but not certainly the end of knowledge and skills. It is highly recommended to create a forensics lab of your own to practice the skills acquired while reading this course material. Technology is changing every day, we have so many storage media and it is your job to understand the media so that you will be able to investigate whenever needed. Get the software discussed in this mini course and practice the evidence management of your own. Try your level best to maintain the integrity at every level, you might have noticed that, I have used this term so many times in the course. Yes, because it is crucial for your case.
Best of luck for your practice.
Copyright © 2022 FDOKUMEN