
intelligent Touch Manager - Tin Lavir
125
Commissioning Manual intelligent Touch Manager Model DCM601A51 MONITOR CPU ALIVE SLAVE MASTER BACKUP LAN SW SERVICE LAN FRONT BACK DⅢMASTER ON OFF RESET LAN LINK DⅢMONITOR
-
Upload
khangminh22 -
Category
Documents
-
view
5 -
download
0
Transcript of intelligent Touch Manager - Tin Lavir

Commissioning Manual
intelligent Touch Manager
ModelDCM601A51
MONITOR
CPU ALIVESLAVE
MASTER
BACKUP
LAN SW
SERVICE LAN
FRONT BACKDⅢ MASTER
ON
OFF RESET
LAN LINK DⅢ MONITOR
Commissioning Manual EM11A021DCM601A51 intelligent Touch Manager
1
Contents
System Overview ............................................................................4
1. About the iTM (intelligent Touch Manager) ......................................................4
1-1 System Configuration ......................................................................................................... 4
2. Engineering ........................................................................................................5
2-1 Engineering Workflow ......................................................................................................... 5
2-2 Logging into Service Mode ................................................................................................. 7
Names and Functions ....................................................................9
3. Detailed Screen Description .............................................................................9
3-1 Setup Screen Structure ...................................................................................................... 9
3-2 Service Settings Tab ......................................................................................................... 10
3-3 System Settings Tab ......................................................................................................... 12
Basic Functions ............................................................................13
4. Service Settings ...............................................................................................13
4-1 Mgmt. Point Data Regist ................................................................................................... 13
• Registering a management point with the iTM unit ....................................................... 14
• Detailed Mgmt. Point Attributes screen and button descriptions ................................... 21
• Registering management points using a CSV file ......................................................... 33
4-2 Other Setting..................................................................................................................... 38
4-3 DIII-NET Engineering ....................................................................................................... 39
4-4 Time Zone......................................................................................................................... 41
4-5 Changeover Option ........................................................................................................... 41
4-6 History Mgmt. (Delete) ...................................................................................................... 43
4-7 Pre-engineering ................................................................................................................ 44
• Displaying the main screen ........................................................................................... 46
• Scenario 1: Installation to new property ........................................................................ 48
• Scenario 2: Maintenance of existing property
(When carrying out pre-engineering using the current setting) .................. 52
• Scenario 3: Restore with existing property’s backup data ............................................. 54
• Scenario 4: Implementation of new functions due to existing property’s upgrade ........ 55
Contents

Commissioning Manual EM11A021DCM601A51 intelligent Touch Manager
2
4-8 Upgrade ............................................................................................................................ 55
4-9 Backup .............................................................................................................................. 56
4-10 Installation ...................................................................................................................... 58
4-11 Contact Info .................................................................................................................... 60
4-12 Setting outdoor unit ........................................................................................................ 62
• Precautions when using DIII-NET EXPANDER ADAPTER ........................................... 63
• Table of types ................................................................................................................ 63
4-13 Leakage Check .............................................................................................................. 69
• Preparations .................................................................................................................. 70
• Registering indoor units ................................................................................................ 70
• Running Leakage Check by Schedule Control ............................................................. 72
• Copying a schedule program ........................................................................................ 74
• Starting Leakage Check by manual operation .............................................................. 75
• Stopping Leakage Check by manual operation ............................................................ 76
• Outputting the Leakage Check results to a CSV file ..................................................... 77
• Conflict with other controls ............................................................................................ 79
• Failure mode ................................................................................................................. 81
Optional Functions .......................................................................84
5. Service Settings ...............................................................................................84
5-1 Activation .......................................................................................................................... 84
• Acquiring the Activation key .......................................................................................... 84
• Entering the Activation key ............................................................................................ 84
5-2 Dealer Option Setup ......................................................................................................... 86
Operating Optional Functions .....................................................87
6. System Settings ...............................................................................................87
6-1 Network ............................................................................................................................ 87
6-2 Web Remote Management ............................................................................................... 90
• Connecting the PC and iTM .......................................................................................... 91
• Checking the Web browser and Flash Player versions ................................................. 92
• Setting up the IP address (Windows XP Professional) ................................................. 93
• Setting up the IP address (Windows Vista Business) ................................................... 97
• Setting up the IP address (Windows 7 Professional) .................................................. 101
• Precautions when using Internet Explorer on Windows Vista and Windows 7............ 104
• Network Connection Check ........................................................................................ 105

Commissioning Manual EM11A021DCM601A51 intelligent Touch Manager
3
• Logging into Service Mode via Web Remote Management ........................................ 108
iTM integrator Explanation .......................................................109
7. iTM integrator .................................................................................................109
7-1 Basic Setup..................................................................................................................... 109
7-2 iTM integrator Service Settings ...................................................................................... 114
• Service Settings Tab (Menu List Screen) .................................................................... 115
• Controller Access Setup ............................................................................................. 116
Appendix .....................................................................................120
8. Useful Information .........................................................................................120
8-1 Troubleshooting .............................................................................................................. 120
9. Hardware Specifications ...............................................................................122
9-1 iTM Hardware Specification ............................................................................................ 122

Commissioning Manual EM11A021DCM601A51 intelligent Touch Manager
4
1. About the iTM (intelligent Touch Manager)
1-1 System Configuration
iTM
iTMplus adaptor
iTMplus adaptor
iTMplus adaptor
iTMplus adaptor
iTMplus adaptor
iTMplus adaptor
USB memoryDi/Pi port
RS485 (Expansion adapter port)
Di/Pi port
Up to 7
D3net port
Up to 64 groups
LAN port
USB port
D3net
ROUTER
Web Remote Management
Web Remote Management
Port 1~4:Port 1:Port 2~4:
HUB/SWITCH/ROUTER/....
Emergency Stop signal inputPower meter pulse inputInput signal (contact) such aspower outage signal
Emergency Stop signal inputPower meter pulse inputInput signal (contact) such as power outage signal
Intranet/Internet
Web Remote Management possible from network-connected PCSimultaneous login of max. 4 managers and 16 users supported.
System Overview

Commissioning Manual EM11A021DCM601A51 intelligent Touch Manager
5
2. Engineering
2-1 Engineering WorkflowVarious engineering works are necessary for using the iTM.
Engineering works can be roughly divided into those carried out at the office in advance and those
carried out on site after installation.
The following diagram shows the engineering workflow.
New installation (Without using the pre-engineering tool)
At the office See:
Prepare various information.Check the equipment to connect to DIII-NET.Allocate the Group Address.
Acquire the upgrade data. 4-8 Upgrade
Acquiring the Activation key* When necessary
5-1 Activation Acquiring the Activation key
At the site
Install the iTM. Installation Manual (EM11A016)
Install the upgrade data. 4-10 Installation
Make basic settings.(Boot sequence)
Installation Manual (EM11A016)
Set up “Main” and “Sub”. 4-3 DIII-NET Engineering
Activate optional maker functions.Enable dealer options.* When necessary
5-1 Activation Entering the Activation key5-2 Dealer Option Setup
Register management points and Layout View.(Load from CSV or register manually)
4-1 Mgmt. Point Data Regist

Commissioning Manual EM11A021DCM601A51 intelligent Touch Manager
6
New installation (By using the pre-engineering tool)
At the office See:
Prepare various information.Check the equipment to connect to DIII-NET.Allocate the Group Address.
Acquire the upgrade data. 4-8 Upgrade
Back up the iTM data.* In the case of maintenance (When pre-engineering by using the current settings)
4-9 Backup
Set up management points.(Pre-engineering tool, spreadsheet such as Microsoft Excel)
4-7 Pre-engineering
Create the Layout View.(Layout View creation tool)* When necessary
Commissioning Manual Supplementary VolumeLayout View Creation Tool (EM11A024)
Acquiring the Activation key* When necessary
5-1 Activation Acquiring the Activation key
At the site
Install the iTM. Installation Manual (EM11A016)
Install the upgrade data. 4-10 Installation
Make basic settings. (Boot sequence)
Installation Manual (EM11A016)
Set up “Main” and “Sub”. 4-3 DIII-NET Engineering
Install pre-engineering data and Layout View data. 4-10 Installation
Activate optional maker functions.Enable dealer options.* When necessary
5-1 Activation Entering the Activation key5-2 Dealer Option Setup

Commissioning Manual EM11A021DCM601A51 intelligent Touch Manager
7
2-2 Logging into Service ModeTo run engineering, you must log into the Service (SE) Mode from the Menu List screen.
In the SE Mode, the Service Settings tab, which is normally hidden, is displayed on the Menu List.
Also, special buttons available only in SE Mode are displayed on the tabs.
The following describes how to log into the SE Mode.
1. Display the Menu List screen.
(1)(3)
(2) (4)
2. Touch the four corners of the screen in the indicated order. The Password Input dialog appears.
3. Enter the service password (daikin) and touch the OK button to log into the SE Mode.

Commissioning Manual EM11A021DCM601A51 intelligent Touch Manager
8
Furthermore, if the screen is locked, entering the service password instead of the administrator
password after carrying out the special operation indicated below, allows you to unlock the
screen and log into the SE Mode.
(1)
(4)(2)
(3)

Commissioning Manual EM11A021DCM601A51 intelligent Touch Manager
9
3. Detailed Screen Description
3-1 Setup Screen Structure
Service Settings Tab
A/C Auto Regist
Mgmt. Point Data Regist
Other Setting
DIII-NET Engineering
Time Zone
Changeover Option
History Mgmt. (Delete)
Pre-engineering
Upgrade
Backup
Installation
Contact Info
Setting outdoor unit
Leakage Check
Activation
Dealer Option Setup
System Settings Tab
Network
Web Remote Management
Displays a list of functions configurable by service engineers
This function automatically registers air conditioners that are not yet registered as management points
This function allows you to manually register, edit, or delete management points
Allows you to configure the error detection level and enable or disable the Dry mode
Allows you to switch the master and slave settings and, when used in conjunction with an upper level central controller, configure the setpoint limitation function
Allows you to configure the time difference between the UTC (Universal Time Coordinated) and the local time
This function allows you to configure or cancel the cooling / heating selection right
This function allows you to delete the history data
This tool allows you to preconfigure necessary settings on the PC
Allows you to write a new system file for upgrade
This function allows you to read the current system file and configuration data
This function allows you to install the data for upgrade or restoration
Configure the contact information for inquires about system errors or other problems
Configure the model type of the outdoor unit
This function automatically detects refrigerant leak
This function allows you to enter the Activation key required to activate a manufacturer option
Allows you to enable or disable a dealer option
Displays a list of functions related with system settings
Allows you to configure the network IP address and other related settings
Allows you to configure the Web Remote Management user
(See page 10.)
(See page 10.)
(See page 13.)
(See page 38.)
(See page 39.)
(See page 41.)
(See page 41.)
(See page 43.)
(See page 44.)
(See page 55.)
(See page 56.)
(See page 58.)
(See page 60.)
(See page 62.)
(See page 69.)
(See page 84.)
(See page 86.)
(See page 12.)
(See page 87.)
(See page 90.)
Basic Functions
Names and Functions

Commissioning Manual EM11A021DCM601A51 intelligent Touch Manager
10
3-2 Service Settings Tab
(1) (2) (3) (4) (5) (6) (7)
(8) (9) (10) (11) (12) (13)
The button of an optional function is hidden unless the option is enabled.
NOTE
(1) A/C Auto Regist
Automatically registers as management points those air conditioners that are connected to the iTM
but not registered as management point. The air conditioner icons to be displayed on the Standard
View screen are also set up automatically.
Automatic registration is supported only for indoor units and Ventilator.
NOTE
(2) Mgmt. Point Data Regist
Registers, modifies, and deletes management points to be operated/controlled using the iTM. The
management point data can also be input from/output to a file in CSV format.
(3) Activation
Enables optional maker functions based on entered Activation keys.
Optional maker functions refer to the Power Proportional Distribution and Energy Navigator
functions.
NOTE

Commissioning Manual EM11A021DCM601A51 intelligent Touch Manager
11
(4) Dealer Option
Enables/Disables dealer options.
(5) Time Zone
Sets up the difference between the Universal Time Coordinated (UTC) and local time.
(6) History Mgmt. (Delete)
Deletes history records of a specified period from the history.
(7) Other Setting
Enables/Disables the “Detect Level” and “Dry Operation Mode”.
Detect Level: When enabled, indicates management point error alarms via icons and history.
Dry Operation Mode: When enabled, allows you to set Dry mode from the touch panel, the
Schedule or Interlocking function.
(8) DIII-NET Engineering
Sets up the iTM as Main or Sub. When an upper central controller is also installed, sets Setpoint
Restriction to “Enable” or “Auto”.
The “Auto” option automatically Enables/Disables Setpoint Restriction depending on whether
an upper central unit is installed or not.
NOTE
(9) Changeover Option
Enables/Disables the Changeover Option for an air conditioner.
(10) Layout Setup (Optional function)
Displayed only when Layout View data exists.
Allows you to Enter/Output Layout View data.
(11) Contact Info
Sets up contact information (three lines) for inquiries regarding errors in the system and the like.
(12) Outdoor Setup
Allows you to manually register the indoor units that belong to the refrigeration system of each
outdoor unit based on the indoor and outdoor unit’s installation information.
Also, allows you to automatically check leakage for each refrigeration system in a multi-refrigeration
system. You can also make it run at a set time by using the Schedule function.
(13) Energy Navigator (Optional function)
Sets up the reference room temperature, month to start collecting data, and energy conversion type
to be used by the Energy Navigator.

Commissioning Manual EM11A021DCM601A51 intelligent Touch Manager
12
3-3 System Settings Tab
(2)(1)
(3)
(1) Network
Sets up the network IP addresses as well as the Web Servers.
(2) Web Access Users
Sets up Web users for Web Remote Management.
(3) Backup
Allows you to export the system file and setup data.

Commissioning Manual EM11A021DCM601A51 intelligent Touch Manager
13
Basic Functions
4. Service Settings
4-1 Mgmt. Point Data RegistRegister, modify, and delete management points to be controlled using the iTM. Management points can be
registered in two ways: directly with the iTM unit, or by editing a CSV file on a PC and loading it to the iTM unit.
The figure below shows the flowchart of a management point registration.
Install iTM and equipmentin the site
Install iTM and equipment in the site
Install iTM and equipment in the site
Start up iTM and auto recognize A/C
Start up iTM and auto recognize A/C
Replace A/C and registermanagement points using auto recognition
Start up iTM and auto recognize A/C
Scope of this chapter
See 4-7 Pre-engineering
Preparation Operation (Control/Check) Operation (Update)
Wor
kflow
Whe
n cr
eatin
g m
anag
emen
t po
int d
ata
afte
r in
stal
ling
iTM
Whe
n in
stal
ling
iTM
afte
r cr
eatin
g m
anag
emen
t poi
nt d
ata
Whe
n cr
eatin
g m
anag
emen
t poi
nt d
ata
usin
g pr
e-en
gine
erin
g to
ol a
nd lo
adin
g th
e m
anag
emen
t po
int d
ata
to a
n in
stal
led
iTM
Output CSV file with management point data to register management points other than A/C
Edit the CSV file and create the manage-ment point data
Merge the created management point data in the CSV file with that on the site’s iTM
Control and monitor equipment based on the registered management point data
Replace or add A/C and/or equipment, and output CSV file, and register management point data
Start up the iTM to be installed in the site and output a CSV file without any registered management point
Edit the CSV file and create the management point data
Enter the created management point data in the CSV file to the iTM to be delivered to the site
Check that the management point data registered in advance has no errors
Create management point data using the pre-engineering tool
Load the management point data created using the pre-engineering tool to iTM

Commissioning Manual EM11A021DCM601A51 intelligent Touch Manager
14
The following describes the operating procedure.
Registering a management point with the iTM unit
1. Automatically recognizing air conditioners
Automatically recognize air conditioners. The iTM unit will search for any D3 units that can be
registered, but have not yet been registered with it.
Log into SE Mode from the Menu List screen and display the Service Settings tab (see page 7).
Touch the Mgmt. Pnt Data Regist button on the Service Settings tab to display the main Mgmt.
Point Data Register screen (see page 10).
(1)
(2)
(1) is the list of registered management points.
Touch the A/C Auto Register button (2) to display the Auto Search Result screen.
(3)
(4)
(3) is the search results list. The Detailed Type and Port/Address are displayed.

Commissioning Manual EM11A021DCM601A51 intelligent Touch Manager
15
For management points whose Detailed Type is unknown, you can select the management point
and display the Management Point Types screen by touching the Detailed Type button (4).
(5)
Using the radio buttons (5), select the management point type. Touch the OK button to save and
return to the Auto Search Result screen for air conditioners.
(7)(8)
(6)
Touching the Refresh button (6) updates the Search Result List (7) to its most recent status.
Selecting a management point to register and touching the Add button adds it to the Register
Candidate List (8). To register all management points listed in (7), touch the Add ALL button.
To delete a management point from the Register Candidate List (8), select it and touch the
Remove button. The management point moves to (7) and is deleted from the list of candidates
that can be registered. Touching the Rem. ALL button deletes all of the candidates that can be
registered.

Commissioning Manual EM11A021DCM601A51 intelligent Touch Manager
16
Touch the OK button to register the management point (8) and return to the main Mgmt. Point
Data Register screen.
The Add and Add ALL buttons are grayed out when the upper limit of registration has been
reached and thus no more management points can be registered.
NOTE
2. Manually registering management points
Register one by one the management points that are not registered by automatic recognition.
(9)
Touch the Add button (9) to display the Management Point Types screen.

Commissioning Manual EM11A021DCM601A51 intelligent Touch Manager
17
Select the management point type to register from Indoor, Outdoor, Ventilator, Di, and Pi.
To select another type, select the Others radio button and touch the Select button. The
Management Point Types screen for other types appears.
Select the management point type and touch the OK button to save and return to Management
Point Types screen.
Remark: External Ao or External Pi are not supported by this model.
When finished, touch the OK button to display the Mng. Point Attributes screen.
3. Setting up details for a management point
Set up details for a management point.
Tabs and items displayed on the Mng. Point Attributes screen vary depending on the selected
management point type. Set up by switching the displayed tabs as necessary.
For details of each tab, see page 21 onwards.

Commissioning Manual EM11A021DCM601A51 intelligent Touch Manager
18
When finished with all the tabs, touch the OK button to save the settings and return to the main
Mgmt. Point Data Register screen.
4. Deleting/Editing/Copying a management point
(13)
(10) (11) (12)
Touching the Delete button (10) deletes the management point selected in the list.
Touching the Edit button (11) displays the Mng. Point Attributes screen for editing the
management point selected in the list. (See procedures 1 to 3)
Touching the Copy button (12) makes a copy of the management point selected in the list.
Modify as necessary since the copy has exactly the same data. Registering as is will cause
duplicated address error and the like.
NOTE

Commissioning Manual EM11A021DCM601A51 intelligent Touch Manager
19
5. Checking the setting results
Touching the Check button (13) checks the content of the current settings data and displays the
check results on the Information check screen.
If an error is found, discards the edited content retained until then and restores the saved original data.
“No error” is displayed if no error is found. Touch the Close button to close the screen.
Check items listClassification Check item Message
Common
Duplicated management point
names
===== Mng. point name duplication [Management point name] ([Management point ID]) <-> [Management point name] ([Management point ID])
===== Mng. point name duplication Excess of total number of other management points
Mgmt. points exceeded (Other)
Excess of number of chiller management points
Chiller Mgmt. Pnt
Excess of number of outdoor management points
Outdoor Unit Mgmt. points exceeded
Excess of total number of Internal Pi
management points Internal Pi Mgmt. point exceeded
DIII Duplicated D3
addresses
===== D3 address duplication [Management point name] ([Management point ID]) <-> [Management point name] ([Management point ID])
===== D3 address duplication
Di, Pi Duplicated port
numbers
===== Di/Pi address duplication [Management point name] ([Management point ID]) <-> [Management point name] ([Management point ID])
===== Di/Pi address duplication
Internal Ai Ai reference
management point error
Ai:[Management point name]([Management point ID]): The reference Mng. point is inaccurate
Ai:[Management point name]([Management point ID]): Analog type error [Invalid]
Internal Pi Duplicated port
numbers
===== Internal Pi address duplication [Management point name] ([Management point ID]) <-> [Management point name] ([Management point ID])
===== Internal Pi address duplication
BACnet Duplicated object IDs===== Duplicate object IDs
[Management point name] ([Management point ID]) <-> [Management point name] ([Management point ID]) ===== Duplicate object IDs

Commissioning Manual EM11A021DCM601A51 intelligent Touch Manager
20
6. Restarting iTM
Restart iTM to reflect the settings.
(14)
When finished, touch the OK button (14). A settings data check is carried out and the
Information check screen displayed if errors are found. If no problems are found, the dialog
below appears.
Touching the Yes button after confirming restarts the iTM unit.

Commissioning Manual EM11A021DCM601A51 intelligent Touch Manager
21
Detailed Mgmt. Point Attributes screen and button descriptions
The following describes the Mng. Point Attributes screen in detail.
Tabs and items displayed on the Mng. Point Attributes screen vary depending on the selected
management point type. Set up by switching the displayed tabs as necessary.
• Common 1 Tab
Sets common items for a management point.
Displayed items vary depending on the management point type.
<Indoor, Ventilator, D3Chiller, D3Di, and D3Dio> <External Di>
<External Dio> <Di, Pi, External Ai>
<Outdoor> <Internal Ai>
(15) (15)
(16)(18)
(19)(20)
(17)
(15)
(16)(18)
(19)(20)
(17)
(15)(16)
(18)(19)
(20)
(17)(16)
(18)(19)
(20)
(17)
(16)(18)
(19)(20)
(17)
(15)
(16)(18)
(19)(20)
(17)

Commissioning Manual EM11A021DCM601A51 intelligent Touch Manager
22
<Internal Pi>
(15)
(16) (17)
(18)
(19)
(20)
(15) Port No. text field, Address combo box
Sets up the port number and address to which the management point belongs.
For the port number, touch the Modify button and enter it in the Numerical Input dialog that
appears.
For the address, select it using the combo box.
Duplicated addresses cannot be registered. All addresses must be different.

Commissioning Manual EM11A021DCM601A51 intelligent Touch Manager
23
The range of values you can enter/set is as indicated in the table below.
Detailed Type
Port number Address
ViewMinimum/Maximum value
(Default value)View Minimum/Maximum value
(Default value)Non-differentiated
Di/Pi 1 to 8 (1)* 1 to 4 (2)*
D3Di 1 to 8 (1) 1-00 to 4-15 (1-00)
D3Dio 1 to 8 (1) 1-00 to 4-15 (1-00)
Indoor unit 1 to 8 (1) 1-00 to 4-15 (1-00)
Ventilator 1 to 8 (1) 1-00 to 4-15 (1-00)
D3Chiller 1 to 8 (1) 1-00 to 4-15 (1-00)
Outdoor unit 1 to 8 (1) × -
Internal Ai × - × -
Internal Pi 1 to 8 (1) × -
* The combination: Port number 1 and Address 1 is assigned exclusively for the input of the iTM unit emergency stop signal and cannot be used.
(16) Detailed Type field
Displays the detailed management point type. However, you cannot modify it here.
(17) Mgmt. Pt. ID field
Displays the management point ID automatically allocated by the system. However, you cannot
modify it here.
(18) Name text field
Sets up the management point name.
Touch the Modify button and enter the name in the Name Input dialog that appears.
Specify a name for the management point using 1 to 12 characters, irrespective of single or
double byte.
(19) Detailed Info. text field
Set up information about the management point as necessary.
Touch the Modify button and enter the value in the Text Input dialog that appears.
The number of characters you can enter is 0 to 50, irrespective of single or double byte.
(20) Icon field
Sets up the icon for the management point.
Touch the Modify button and set the icon in the Icon Setup screen that appears.

Commissioning Manual EM11A021DCM601A51 intelligent Touch Manager
24
• Common 2 Tab
Sets up common items 2 for a management point.
Displayed items vary depending on the management point type.
<Outdoor><Indoor>
(22)(22)
(21)
<Internal Pi><D3Chiller, D3Dio, External Dio>
(22)
(21)
(21) Prohibit Manual Operation check box
Select the check box when prohibiting manual operation from the iTM.
(22) Address/ACNSS address text field
Sets up the ACNSS address.
Touch the Modify button and enter the value in the Numerical Input dialog that appears.
Addresses can be specified in steps of 1 and within the following ranges of values.
Indoor unit: 1 to 128, Outdoor unit: 1 to 127, Internal Pi: 1 to 127

Commissioning Manual EM11A021DCM601A51 intelligent Touch Manager
25
• Monitoring Tab
Sets up the monitoring item.
Select either of the communication error monitoring levels: Monitor or Monitor + History by using
the radio button.
• Ventilator Tab
Sets up the Ventilator.
(23)(24)
(25)
(23) Ventilation Mode check box
Select the check box when setting up Fresh Up and/or Auto Air Volume.
(24) Fresh Up check box
Select the check box to enable Fresh Up.
(25) Auto Air Volume check box
Select the check box to enable Auto Air Volume.

Commissioning Manual EM11A021DCM601A51 intelligent Touch Manager
26
• Dio Tab
Sets up the Dio.
Displayed items vary depending on the management point type.
<Di> <External Di>
<External Dio>
(26)
(27)
(26)
(28)
(29)
(30)
(26)
(31)
(32)
(28)
(29)
(30)
(33)
(34)
(26) Point Type radio button
Select the Di Point Type from A type and B type.
(27) Operation Mode radio button
Select the Di operation mode from Normal and Equipment error input.
(28) Error input masking time after start signal radio button
Select an Error Mask Time after operation input from 10 and 30 seconds.
Start up error occurs if the external Di or external Dio cannot start even after the time set up here
elapses from the moment the Start signal has been received.
(29) Monitor Input radio button
Select whether to carry out error detection when the external Di or external Dio is off from Enable
and Disable.
(30) Error input type radio button
Select the error input detection from A type and B type.

Commissioning Manual EM11A021DCM601A51 intelligent Touch Manager
27
(31) Post-Priority radio button
Select whether to allow Start/Stop from the equipment from Enable and Disable.
(32) Error output holding radio button
Select whether to block the control signal when an error is detected from Enable and Disable.
(33) Start-Stop Error radio button
Select whether to carry out start/stop error detection from Enable and Disable.
(34) Output Contact A/B radio button
Select the type of output contact from A type and B type.
• Pulse Tab
Sets up the pulse value.
Displayed items vary depending on the management point type.
<Pi>
(35)(36)(37)(38)
<Internal Pi>
(37)(38)(39)(40)
(35) Pulse Amount text field
Sets up the pulse value.
Touch the Modify button and enter the value in the Numerical Input dialog that appears.
You can enter a value in the –1 to 999999999 range, in increments of 1.
(36) Pulse Step text field
Sets up the pulse constant.
Touch the Modify button and enter the value in the Numerical Input dialog that appears.
You can enter a value in the 1 to 999999 range, in increments of 1.
(37) Unit Label text field
Sets up the unit.
Touch the Modify button and enter the value in the Text Input dialog that appears.
The number of characters you can enter is 0 to 8, irrespective of single or double byte.

Commissioning Manual EM11A021DCM601A51 intelligent Touch Manager
28
(38) Power Ratio text field
Sets up the power ratio.
Touch the Modify button and enter the value in the Numerical Input dialog that appears.
You can enter a value in the 0.01 to 99999.99 range, in increments of 0.01.
For the Internal Pi, the power ratio is fixed to 0.1.
(39) Coeff a text field
Sets up the coefficient a.
Touch the Modify button and enter the value in the Numerical Input dialog that appears. You can
enter a value in the 0.000 to 1000.000 range, in increments of 0.001.
(40) Coeff b text field
Sets up the coefficient b.
Touch the Modify button and enter the value in the Numerical Input dialog that appears. You can
enter a value in the −10.000 to 10.000 range, in increments of 0.001.

Commissioning Manual EM11A021DCM601A51 intelligent Touch Manager
29
• Analog Tab
Sets up the analog value.
Displayed items vary depending on the management point type.
<External Ai>
Analog 1 Analog 2
Analog 1 Analog 2
<External Ai>
<Internal Ai> <Internal Ai>
(41)
(42)
(43)
(44)
(47)
(45) (46)
(48)(41)
(42)
(43)
(44)
For the range of values that can be input for each type in the Numerical Input dialog see the table on page 31.
(41) Unit Label text field
Sets up the unit.
Touch the Modify button and enter the value in the Text Input dialog that appears.
The number of characters you can enter is 0 to 8, irrespective of single or double byte.
(42) Hysteresis text field
Sets up the hysteresis.
Touch the Modify button and enter the value in the Numerical Input dialog that appears.
(43) Lower Limit field
Sets up the lower limit and monitoring status for lower limit error monitoring.
For the lower limit, touch the Modify button and enter it in the Numerical Input dialog that
appears.
For the monitoring status, select from Disable, Monitoring, and Monitor + History from the combo box.

Commissioning Manual EM11A021DCM601A51 intelligent Touch Manager
30
(44) Upper Limit field
Sets up the upper limit and monitoring status for upper limit error monitoring.
For the upper limit, touch the Modify button and enter it in the Numerical Input dialog that
appears.
For the monitoring status, select from Disable, Monitoring, and Monitor + History from the combo
box.
(45) Analog Type radio button
Select the analog value type from Temperature and Other.
(46) Unit Type radio button
Select the unit type of External Ai either “Thermistor” or “Other”. The unit type cannot be
configured when Other is selected in Analog Type (45).
Selecting Thermistor sets the Minimum value and Maximum value text fields (47) to –512.0 and
512.0 (or –890 and 954 in Fahrenheit), respectively, which cannot be changed.
(47) Minimum Value / Maximum Value text field
Sets up the physical quantities corresponding to the minimum and maximum analog value input
signals.
Touch the Modify button and enter the value in the Numerical Input dialog that appears.
(48) Reference settings field
Sets up the Target Point and Target analog value for the Internal Ai.
Touch the Ref.. button and select the Target Point and Target analog value to set from the Analog
Point Selection screen that appears (see page 32).

Commissioning Manual EM11A021DCM601A51 intelligent Touch Manager
31
Acceptable range for each numeric value
Detailed Type
Classification Item
For Celsius For Fahrenheit For analog valueMinimum/
Maximum value (Default value)
IncrementMinimum/
Maximum value (Default value)
IncrementMinimum/
Maximum value (Default value)
Increment
External Ai BACnet Ai
Upper/Lower Limit
monitoring
Hysteresis0.0 to 512.0
(0.0)0.1
0 to 922 (0)
10.00 to 9999.99 (0.00)
0.01
Lower limit
−512.0 to 512.0 (0.0)
0.1−890 to 954
(32)1
−9999.99 to 9999.99 (0.00)
0.01
Upper limit
−512.0 to 512.0 (0.0)
0.1−890 to 954
(32)1
−9999.99 to 9999.99 (0.00)
0.01
Analog value
Minimum value
−512.0 to 512.0 (0.0/−512.0)*3 0.1
−890 to 954 (32/−890)*3 1
−9999.99 to 9999.99 (0.00)
0.01
Maximum value
−512.0 to 512.0 (100.0/512.0)*3 0.1
−890 to 954 (212/954)*3 1
−9999.99 to 9999.99 (100.00)
0.01
Internal Ai
Upper/Lower Limit
monitoring
Hysteresis0.0 to 512.0
(0.0)*2 0.10 to 922
(0)*2 1
Lower limit
−512.0 to 512.0 (0.0)*2 0.1
−890 to 954 (32)*2 1
Upper limit
−512.0 to 512.0 (0.0)*2 0.1
−890 to 954 (32)*2 1
BACnet AoAnalog value
Min. of op
−512.0 to 512.0 (0.0)
0.1−890 to 954
(32)1
−9999.99 to 9999.99 (0.00)*1
0.01*1
Max. of op
−512.0 to 512.0 (0.0)
0.1−890 to 954
(32)1
−9999.99 to 9999.99 (0.00)*1
0.01*1
Displayed accuracy
−1 (−1)
10
(0)1
−2 to 3 (−1)
1
*1 Min of op. and Max of op. can be set up with the accuracy specified in Displayed accuracy. If Displayed accuracy is modified when Min of op. and Max of op. are already set, their value are rounded to fit the
accuracy specified by the Displayed accuracy. (When loading a CSV file, an input data error will occur if it contains any value finer than the specified accuracy.)*2 The default values displayed on GUI will change depending on whether Celsius or Fahrenheit is selected in System
Settings.*3 The former or latter value will be used depending on whether Unit Type is Other or Thermistor, respectively. (When loading a CSV file with Thermistor selected, the default value will be used regardless of the input data.)

Commissioning Manual EM11A021DCM601A51 intelligent Touch Manager
32
• Analog Point Selection Screen
Sets up the reference for the Internal Ai. Touch the Ref.. button on the Analog2 tab to display the
Analog Point Selection screen.
(49) (50)
(49) is the list of management points with analog value.
(50) is the list of analog values that applicable to the Internal Ai of the selected management
point.

Commissioning Manual EM11A021DCM601A51 intelligent Touch Manager
33
Registering management points using a CSV file
1. Outputting a CSV file
The current settings data can be output to a CSV file for editing the management point data
using a computer software or the Pre-engineering tool. The CSV file can be edited using
“Microsoft Excel” and the like.
Log into SE Mode from the Menu List screen and display the Service Settings tab (see page 7).
Touch the Mgmt. Point Data Register button on the Service Settings tab to display the main
Mgmt. Point Data Register screen.
(51)
Connect a USB memory to the iTM unit and touch the Save button (51).
Touch the Yes button on the Confirm dialog that appears. Saving to the USB memory starts.
Saving is complete when a save completion dialog appears. Touch the Close button to return to
the main Mgmt. Point Data Register screen.
Commissioning Manual EM11A021DCM601A51 intelligent Touch Manager
34
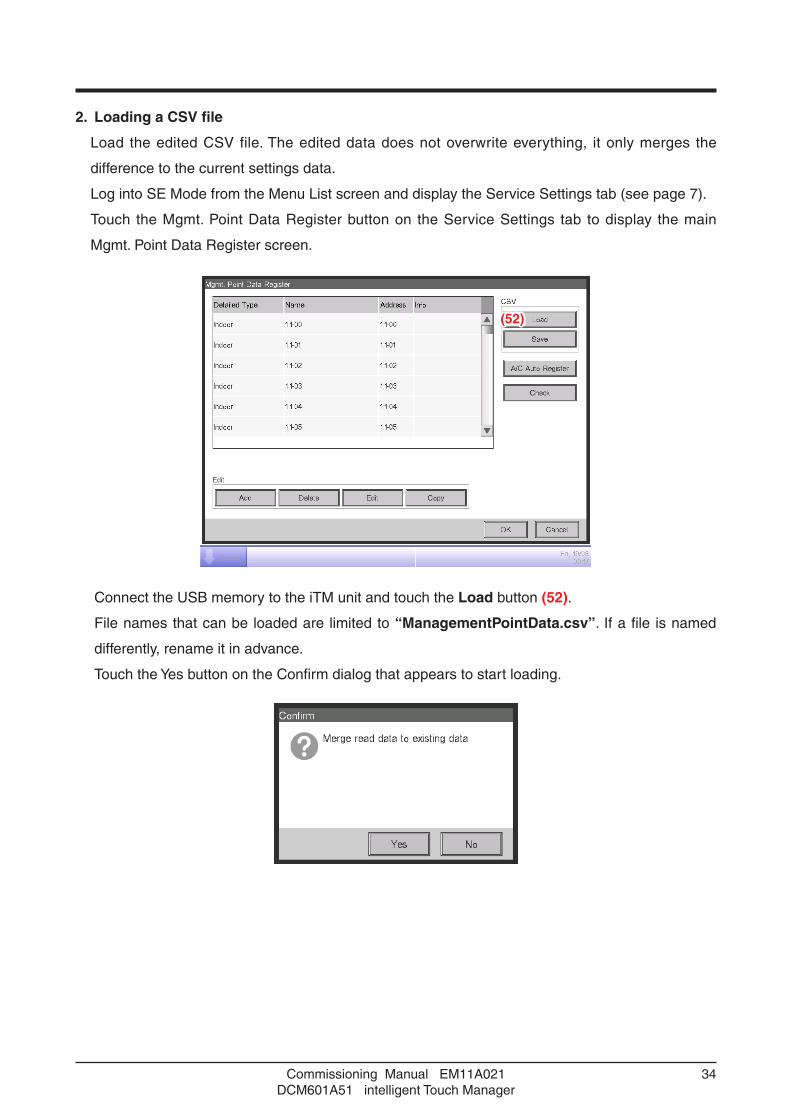
2. Loading a CSV file
Load the edited CSV file. The edited data does not overwrite everything, it only merges the
difference to the current settings data.
Log into SE Mode from the Menu List screen and display the Service Settings tab (see page 7).
Touch the Mgmt. Point Data Register button on the Service Settings tab to display the main
Mgmt. Point Data Register screen.
(52)
Connect the USB memory to the iTM unit and touch the Load button (52).
File names that can be loaded are limited to “ManagementPointData.csv”. If a file is named
differently, rename it in advance.
Touch the Yes button on the Confirm dialog that appears to start loading.

Commissioning Manual EM11A021DCM601A51 intelligent Touch Manager
35
If the setting data has been loaded without any problem, the merge results appear.
The Display Merge Results screen consists of the tabs: Add, Modify, Modification Failed, and No
change.
After checking the list on each tab, touch the Close button to return to the main Mgmt. Point
Data Register screen.

Commissioning Manual EM11A021DCM601A51 intelligent Touch Manager
36
3. CSV file format
The format of the CSV file output from the iTM is as shown below. A CSV file output when no
management point data is registered can be used as a template for new implementations since
only the area used by the system and the header portion are output.
The
follo
win
g ta
ble
show
s th
e C
SV
form
at fo
r m
anag
emen
t poi
nt d
ata
regi
stra
tion.
•N
umer
ic v
alue
s in
dica
ted
in e
ach
item
cor
resp
ond
to t
he c
olum
n nu
mbe
r in
the
CS
V fi
le (
the
first
col
umn
is fi
xed
and
used
for
dat
a ty
pe
iden
tifica
tion)
. Bla
nk it
ems
indi
cate
ther
e is
no
appl
icab
le d
ata.
Clas
sifica
tion
Key
wor
dD
escr
iptio
nV
alue
Man
agem
ent p
oint
type
Di
Pi
D3D
iD
3Dio
Indo
or
unit
Out
door
un
itIn
tern
al
Ai
Vent
ilato
r C
hille
rIn
tern
al
Pi
BAC
net
Di
BAC
net
Dio
BAC
net
Ai
BAC
net
Ao
Com
mon
—H
eade
r ty
pe
iden
tifica
tion
—D
I-HP
I-HD
3DI-H
D3
DIO
-H
IN-H
O
UT-
H
INTE
RN
AL
AI-H
H
RV-
H
CH
IL-H
INTE
RN
AL
PI-H
BA
CNET
DI
-HBA
CNET
DI
O-H
BACN
ET
AI-H
BACN
ET
AO-H
—D
ata
type
iden
tifica
tion
—D
I-DP
I-DD
3DI-D
D3
DIO
-D
IN-D
O
UT-
D
INTE
RN
AL
AI-D
H
RV-
D
CH
IL-D
INTE
RN
AL
PI-D
BA
CNET
DI
-DBA
CNET
DI
O-D
BACN
ET
AI-D
BACN
ET
AO-D
PO
INT
IDM
anag
emen
t poi
nt ID
101
to 1
0000
00
2
NA
ME
Nam
eSt
ring
(1 to
12
char
acte
rs re
gard
less
of s
ingl
e or
dou
ble
byte
)3
DE
TAIL
ED
INF
OD
etai
led
info
rmat
ion
Strin
g (0
to 5
0 ch
arac
ters
rega
rdle
ss o
f sin
gle
or d
oubl
e by
te)
4
PR
OH
IBIT
OP
Pro
hibi
t man
ual
oper
atio
n0:
Allo
wed
, 1: P
rohi
bite
d5
55
55
5
PO
RT
NO
Por
t num
ber
D3,
Inte
rnal
Pi,
Mai
n un
it: 1
to 8
E
xter
nal:
1 to
30
55
56
65
66
5
AD
DR
ES
S1
Upp
er le
vel a
ddre
ss
(gro
up)
D3:
1 to
4
Ext
erna
l: 1
to 1
20
Inte
rnal
Pi:
1 to
127
O
utdo
or u
nit:
1 to
127
M
ain
unit:
1 to
4 (
2 to
4 fo
r P
ort 1
)
66
67
76
77
6
AD
DR
ES
S2
Low
er le
vel a
ddre
ss
(uni
t)D
3Dio
, D3D
i, In
door
uni
t, V
entil
ator
, C
hille
r: 0
to 1
57
88
88
STA
RT
STO
PM
ON
ON
Sta
tus
Mon
itor
Ext
erna
l Di:
1 to
120
E
xter
nal D
io:
ON
Sta
tus
Mon
itor a
ddre
ss 1
to 1
20
Not
spe
cifie
d: 0
NO
RM
ALA
BN
OR
MA
LMO
NN
orm
al/A
bnor
mal
M
onito
rN
orm
al/A
bnor
mal
Mon
itor
Inpu
t add
ress
1 to
120
N
ot s
peci
fied:
0
STA
RT
STO
PO
N/O
FF
ope
ratio
n0:
Alw
ays
1: In
stan
t
STA
RT
STO
PAD
DR
1S
tart
/Sto
p ad
dres
s 1
Alw
ays:
1 to
120
In
stan
t: O
N a
ddre
ss 1
to 1
20
STA
RT
STO
PAD
DR
2S
tart
/Sto
p ad
dres
s 2
Alw
ays:
Han
dled
as
inva
lid
Inst
ant:
OF
F a
ddre
ss 1
to 1
20
SE
RV
ER
INS
TBA
Cnet
Ser
ver D
evice
Insta
nce
0 to
419
4302
56
56
STA
TOB
JTY
PE
Sta
tus
Obj
ect T
ype*
0 to
102
3, N
ot u
sed:
−1
67
6
STA
TOB
JIN
ST
Sta
tus
Obj
ect I
nsta
nce*
0 to
419
4302
, Not
use
d: −
17
87
OP
OB
JTY
PE
Ope
ratio
n O
bjec
t Typ
e*0
to 1
023,
Not
use
d: −
19
7
OP
OB
JIN
ST
Ope
ratio
n O
bjec
t In
stan
ce*
0 to
419
4302
, Not
use
d: −
110
8
ER
RO
BJT
YP
EE
rror
Obj
ect T
ype*
0 to
102
3, N
ot u
sed:
−1
811
ER
RO
BJI
NS
TE
rror
Obj
ect I
nsta
nce*
0 to
419
4302
, Not
use
d: −
19
12
ICO
NIc
on ID
100
to 9
997
78
99
75
99
710
138
9
AN
AD
DR
AC
NS
S A
ddre
ssIn
door
uni
t (2
to 1
28, 1
: Inv
alid
) 10
Mon
itorin
g C
OM
MO
NLV
Comm
unica
tion e
rror m
onito
ring l
evel
1: M
onito
ring,
2: M
onito
r +
His
tory
88
910
1110
1011
149
10
* S
et to
-1
whe
n no
t use
d.
T
he it
em is
reg
arde
d as
not
use
d if
eith
er th
e O
bjec
t Typ
e or
Obj
ect I
nsta
nce
valu
e is
set
to –
1.
F
or in
form
atio
n on
the
Obj
ect T
ype,
ref
er to
the
appl
icab
le g
uide
line
(IS
O16
484-
5).
Out
put o
nly
whe
n B
AC
net (
optio
nal)
is e
nabl
ed.
Output only when BACnet (optional) is enabled.

Commissioning Manual EM11A021DCM601A51 intelligent Touch Manager
37
Class
ificati
onK
eyw
ord
Des
crip
tion
Val
ue
Man
agem
ent p
oint
type
Di
Pi
D3D
iD
3Dio
Indo
or
unit
Out
door
un
itIn
tern
al
Ai
Ven
tilat
orC
hille
rIn
tern
al
Pi
BAC
net
Di
BAC
net
Dio
BAC
net
Ai
BAC
net
Ao
Di/D
io
DIM
OD
ED
i Ope
ratio
n m
ode
0: N
orm
al, 1
: Equ
ipm
ent e
rror
inpu
t 9
CP
TY
PE
P
oint
type
0:
B ty
pe, 1
: A ty
pe
10
LAT
ER
OP
EP
ost-
Prio
rity
0: D
isab
le, 1
: Ena
ble
AB
NO
RM
ALO
PE
rror
out
put h
oldi
ng0:
Dis
able
, 1: E
nabl
e
STA
RT
FAIL
Error
Mas
k Tim
e afte
r ope
ration
inpu
t0:
10
seco
nds,
1: 3
0 se
cond
s
MO
NIT
OR
INM
onito
r in
put
0: D
isab
le, 1
: Ena
ble
AB
NO
RM
AL
INP
UT
Err
or in
put d
etec
tion
0: B
type
, 1: A
type
STA
RT
STO
P F
AIL
UR
ES
tart
/Sto
p er
ror
0: D
isab
le, 1
: Ena
ble
OU
TP
UT
SP
EC
CO
NTA
CT
Out
put c
onta
ct0:
B ty
pe, 1
: A ty
pe
Pi
PV
AL
Pul
se v
alue
0 to
999
9999
99, −
1: O
ut o
f sco
pe o
f mer
ge9
PC
ON
ST
Pul
se c
onst
ant
1 to
999
999
10
PR
ATIO
Pow
er r
atio
0.01
to 9
9999
.99
11
UN
ITS
TR
Uni
t str
ing
Strin
g (0
to 8
cha
ract
ers
rega
rdle
ss o
f sin
gle
or d
oubl
e by
te)
128
CFA
Cor
rect
ion
coef
ficie
nt a
0.00
0 to
100
0.00
09
CF
BC
orre
ctio
n co
effic
ient
b−
10.0
00 to
10.
000
10
Ai/A
o
UN
ITS
TR
Uni
t str
ing
Strin
g (0
to 8
cha
ract
ers
rega
rdle
ss o
f sin
gle
or d
oubl
e by
te)
For I
nter
nal A
i: •S
et to
“°C”
or “
°F” d
epen
ding
on
the
Syst
em S
ettin
gs if
any
re
fere
nce
man
agem
ent p
oint
exis
ts.
•Set
to “-
--” if
no
refe
renc
e m
anag
emen
t poi
nt e
xists
.Fo
r oth
er m
anag
emen
t poi
nts:
Set t
o “°
C” o
r “°F
” dep
endi
ng o
n th
e Sy
stem
Set
tings
, exc
ept
when
the
Anal
og ty
pe is
Tem
pera
ture
.
610
11
TAR
GE
TID
Targ
et m
anag
emen
t poi
ntM
anag
emen
t poi
nt ID
(ind
oor u
nit,
chille
r), −
1: N
ot s
peci
fied
7
TAR
GE
TT
YP
EM
easu
red
anal
og v
alue
1: S
uctio
n te
mpe
ratu
re, 2
: Set
poin
t (In
door
uni
t)
1: W
ater
inle
t tem
pera
ture
, 2:
Wat
er o
utle
t tem
pera
ture
(C
hille
r)8
AN
ALO
GT
YP
EA
nalo
g ty
pe0:
Nor
mal
, 1: T
empe
ratu
re11
12
MA
RG
INH
yste
resi
sS
ee p
age
31.
912
UP
PE
RV
AL
Upp
er li
mit
See
pag
e 31
.10
13
LOW
ER
VA
LLo
wer
lim
itS
ee p
age
31.
1114
ULM
MO
NLV
Upp
er li
mit
mon
itorin
g le
vel
0: D
isab
le, 1
: Mon
itorin
g, 2
: Mon
itor
+ H
isto
ry12
15
LLM
MO
NLV
Low
er li
mit
mon
itorin
g le
vel
0: D
isab
le, 1
: Mon
itorin
g, 2
: Mon
itor
+ H
isto
ry13
16
MIN
VA
LM
inim
um v
alue
See
pag
e 31
.17
MA
XV
AL
Max
imum
val
ueS
ee p
age
31.
18
TE
RM
MIN
VA
LTe
rmin
al m
inim
um v
alue
See
pag
e 31
.
TE
RM
MA
XV
AL
Term
inal
max
imum
val
ueS
ee p
age
31.
OP
MIN
VA
LM
inim
um o
pera
tion
valu
eS
ee p
age
31.
13
OP
MA
XV
AL
Max
imum
ope
ratio
n va
lue
See
pag
e 31
.14
OP
UN
ITDis
playe
d acc
uracy
(exp
onen
t of 1
0)S
ee p
age
31.
15
Vent
ilato
rV
MO
DE
Ven
tilat
ion
mod
e0:
Dis
able
d, 1
: Ena
bled
11
FR
ES
HE
NU
PFr
esh
up0:
Dis
able
d, 1
: Ena
bled
12
AU
TOV
OL
Aut
omat
ic a
ir vo
lum
e0:
Dis
able
d, 1
: Ena
bled
13

Commissioning Manual EM11A021DCM601A51 intelligent Touch Manager
38
• Symbols (decimal point, digit group separator, etc) used in Windows may vary depending on
the locale. Be sure to check before editing a file.
• Pi pulse value at the time of saving the CSV file is output with an invalid, out of the merge
scope value (−1). To enable pulse value merge, rewrite it to a valid range value.
• Daikin recommends you to leave the management point ID in the CSV file in blank so that
they are automatically set up at loading.
NOTE
4-2 Other SettingSets up whether to recognize the “Warning” from a management point as an error and indicate it
via icon and history. Also Enables/Disables the Dry operation mode.
1. Log into SE Mode from the Menu List screen and display the Service Settings tab (see page 7).
Touch the Other Setting button on the Service Settings tab to display the Centralized Monitoring
Setup screen (see page 10).
(1)
(2)
2. Enable/Disable using the To regard Warning as Error level radio button (1). The following table
shows the displayed content for each error type depending on the setting.
Err TypeError detection level
[Legend]
: Error indication
×: No error indication
Not regard Warning as Error level Regard Warning as Error level
IconEquipment error
Warning ×
HistoryEquipment error
Warning ×

Commissioning Manual EM11A021DCM601A51 intelligent Touch Manager
39
3. Enable/Disable dry operation mode in Dry Operation Mode (2). When enabled, allows you to
set Dry mode from the touch panel, or the Schedule or Interlocking function. Touch the OK
button to commit and close the screen.
4-3 DIII-NET EngineeringSets up the iTM as “Main” or “Sub” when also installing an upper central controller. Sets Setpoint
Restriction to “Enable” or “Auto” when also installing an upper central controller (such as: Interface
for use in BACnet, Interface for use in LONWORKS).
1. Log into SE Mode from the Menu List screen and display the Service Settings tab (see page 7).
Touch the DIII-NET Engineering button on the Service Settings tab to display the DIII-NET
Engineering screen (see page 10).
(1) (2)
(3) (4)
(5)
2. Set “Main” or “Sub” using the Main/Sub controller Settings radio button (1). A restart is
necessary after switching the Main/Sub controller Settings.
When “Sub” is selected, Setpoint Range Limit if another controller exists (2) is greyed out
and cannot be selected. The setting is “always disabled”.
NOTE
3. If you have set “Main” in step 2, select “Enable” or “Auto” in Setpoint Range Limit if another
controller exists (2).
Enable: The Setpoint Restriction is enabled.
Auto: The Setpoint Restriction is disabled when an upper central unit is present. The Setpoint
Restriction is enabled when an upper central unit is not present.

Commissioning Manual EM11A021DCM601A51 intelligent Touch Manager
40
4. (3) is a list of Connector Plugs for each iTM port. (4) is a list of central units recognized on the
port selected in (3), where its name is displayed along with its Main/Sub setting. Central units
that can be installed together are as follows.
This iTM is not displayed in (4).
NOTE
Displayed information Applicable product
DDSInterface for use in BACnet
Interface for use in LONWORKS
Main CRC-1 Central Remote Controller iTM iTM plus adaptorSub CRC-1
Main On/Off-1ON/OFF Controller
Sub On/Off-1
Main On/Off-2ON/OFF Controller
Sub On/Off-2
Main On/Off-3ON/OFF Controller
Sub On/Off-3
Main On/Off-4ON/OFF Controller
Sub On/Off-4
(Hidden) Service checker, LC
Unknown Central units other than the above
5. Pressing the Refresh button (5) updates (3) and (4). Touching the OK button displays a
confirmation dialog. Touch the Yes button to commit. The screen closes and the system restarts.
If you install or uninstall another controller, please review the configuration of the Setpoint
Range Limit.
NOTE

Commissioning Manual EM11A021DCM601A51 intelligent Touch Manager
41
4-4 Time ZoneSets up the difference between the Universal Time Coordinated (UTC) and local time.
1. Log into SE Mode from the Menu List screen and display the Service Settings tab (see page 7).
Touch the Time Zone button on the Service Settings tab to display the Time Zone Setting screen
(see page 10).
(1)
2. Select the time zone in the Time Zone area (1). Touching the OK button displays a confirmation
dialog. Touch the Yes button to commit and close the screen.
4-5 Changeover OptionEnables/Disables the Changeover Option for an indoor unit.
1. Log into SE Mode from the Menu List screen and display the Service Settings tab (see page 7).
Touch the Changeover Option button on the Service Settings tab to display the Changeover
Option screen (see page 10).
(1)
(4) (3) (2)

Commissioning Manual EM11A021DCM601A51 intelligent Touch Manager
42
2. (1) is an air conditioner list displaying all Group Addresses. When no management points are
registered, columns other than Group Addr. are displayed blank.
The displayed contents are as indicated in the table below.
Column Displayed information Value rangeGroup Addr. Group address number 1:1-00 to 8:4-15
NameDisplays the name of the
connected unit.Characters permitted by Mgmt. Point Data
Register.
OD-Unit Addr.
Refrigeration system number of the connected unit.
“----” is displayed for units for which the refrigeration system number could not be acquired.
0 to 127/----
Changeover OptionWhether Changeover Option is
available or not for the connected unit.Able / N/A / Selectable / ---- *1
Err CodeError code detected in the connected unit. Blank when there are no errors.
Possible Error Code values
ConnectionUnit connection status Blank when normal.
Comm Err / N/A / Maintenance *2
TypeType of the connected unit.
Blank when type is not registered.
Indoor / Ventilator / Chiller / Dio
*1 See the table below for the correspondence between the content displayed in the Changeover Option column and its meaning.
*2 Comm Err : Group address of the connected unit with communication error.
N/A : A group address not registered as a management point.
Maintenance : A group address of a connected unit under maintenance.
Changeover Option
Meaning
Availability for selection
Release button
Setup button
Able Unit with Changeover Option. ×
N/A There is an indoor unit with Changeover Option within the same refrigeration system. × ×
Selectable There are no indoor units with Changeover Option within the same refrigeration system. ×
--- Connection is “N/A” or Type is other than “Indoor”. × ×
[Legend] : Not greyed out ×: Greyed out
3. Select the indoor unit for which you want to set the Changeover Option from (1) and touch the
Settings button (2). The Changeover Option becomes “Able”. At that moment, the Changeover
Option for the other indoor units in the same refrigeration system becomes “N/A”.
4. Select the indoor unit for which you want to release the Changeover Option from (1) and touch
the Release button (3). The Changeover Option becomes “Selectable”. At that moment, the
Changeover Option for the other indoor units in the same refrigeration system also becomes
“Selectable”. Touching the Refresh button (4) updates the contents displayed in (1). Close the
screen using the Close button.
Commissioning Manual EM11A021DCM601A51 intelligent Touch Manager
43
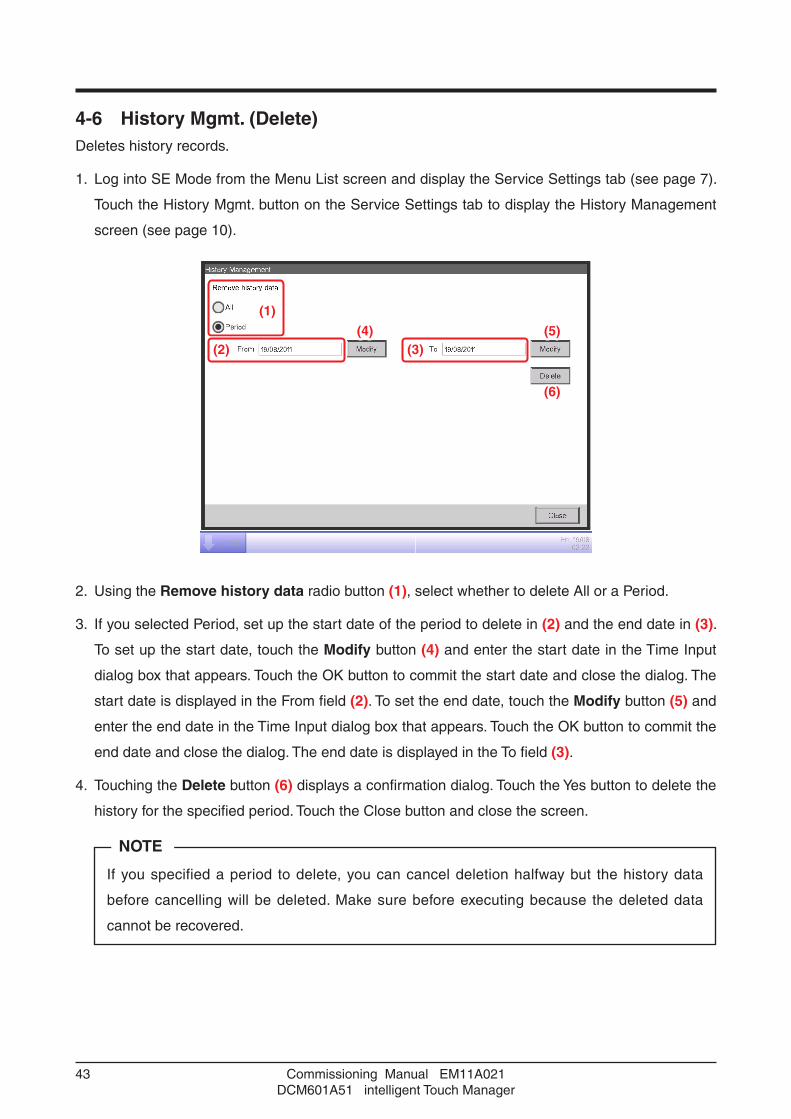
4-6 History Mgmt. (Delete)Deletes history records.
1. Log into SE Mode from the Menu List screen and display the Service Settings tab (see page 7).
Touch the History Mgmt. button on the Service Settings tab to display the History Management
screen (see page 10).
(1)
(2) (3)
(6)
(5)(4)
2. Using the Remove history data radio button (1), select whether to delete All or a Period.
3. If you selected Period, set up the start date of the period to delete in (2) and the end date in (3).
To set up the start date, touch the Modify button (4) and enter the start date in the Time Input
dialog box that appears. Touch the OK button to commit the start date and close the dialog. The
start date is displayed in the From field (2). To set the end date, touch the Modify button (5) and
enter the end date in the Time Input dialog box that appears. Touch the OK button to commit the
end date and close the dialog. The end date is displayed in the To field (3).
4. Touching the Delete button (6) displays a confirmation dialog. Touch the Yes button to delete the
history for the specified period. Touch the Close button and close the screen.
If you specified a period to delete, you can cancel deletion halfway but the history data
before cancelling will be deleted. Make sure before executing because the deleted data
cannot be recovered.
NOTE

Commissioning Manual EM11A021DCM601A51 intelligent Touch Manager
44
4-7 Pre-engineeringPre-engineering is carried out to lessen the work to be carried out on site, such as when installing
iTM in a large new property, modifying settings due to a large-scale equipment renovation, or
making extensive modifications to the settings due to the implementation of new functions, etc.
By using the Pre-engineering tool (demo version for PC) described here together with the CSV file
input/output function described in 4-1 and the backup function described in 4-9, you will be able to
set up most of the items at the office including detailed settings and automatic control settings for
the management points, as well as system settings.
Property data
*2 No restore if there is no file in USB memory
• Layout settings
(5)-1Restore/Upgrade
(5)-2Layout settings input
• iTM system• Settings• Auto accumulated data *2
(5) Data load to iTM
USB memory
(4)-2Layout settings output
(4)-1Restore data output
(4) Property data output
• Layout settings• HW specific info
• Installer program• iTM system• Settings• Auto accumulated data *1• HW specific info
(3)-2Layout View edit
(3) Property data edit
• Area settings• Management point information• Layout settings
Layout settings
(3)-1Data edit
• Data after settings modification
*1 Whether to write automatically accumulated data to USB memory is selectable.
Property dataNew or
• Data before settings modification
• Folder of a property
(2) Property data selection
New• Property folder group
USB memory
• iTM system• Settings• Auto accumulated data• HW specific info
• Area settings• Management point information• Layout settings• HW specific info
(1)-2 Layout settings output
(1) Data export from iTM
(1)-1 Backup
iTMiTM unit function
Pre-engineering tool
Pre-engineering Tool and iTM Unit Data Flow Diagram
iTM integrator uses the backup data for restoring because it is not compatible with the Pre-
engineering tool.
NOTE

Commissioning Manual EM11A021DCM601A51 intelligent Touch Manager
45
Relationship between the assumed scenario and functions Function
Scenario
Pre-engineering tool
(2) Property data selection
(3) Property data edit (4) Property data output
(3)-1 Data edit
(3)-2 Layout
View edit
Restore data output
Layout settings output
Scenario 1: Installation to new property
×
Scenario 2: Maintenance of existing property
Data edit ×
Layout View edit × ×
Scenario 3: Restore with existing property’s backup data
* Not applicable to iTM integrator
× × ×
Scenario 4: Implementation of new functions due to existing property’s upgrade
× ×
Function
Scenario
iTM unit(1) Export from iTM (5) Load to iTM
(1)-1 Backup
(1)-2 Layout settings output
(5)-1 Restore/ Upgrade
(5)-2 Layout settings input
Scenario 1: Installation to new property
× × ×
Scenario 2: Maintenance of existing property
Data edit × ×
Layout View edit × ×
Scenario 3: Restore with existing property’s backup data
× × ×
Scenario 4: Implementation of new functions due to existing property’s upgrade
× ×

Commissioning Manual EM11A021DCM601A51 intelligent Touch Manager
46
Download the pre-engineering tool from the Distributor’s Page.
To use the pre-engineering tool, a separate PC is necessary. The requirements for the PC are as
indicated in the table below.
PC requirement for running the pre-engineering tool
Function Requirement
PC to run the pre-engineering tool
OS: Windows XP Professional SP3 (32 bit) Windows VISTA Business SP2 (32 bit) Windows 7 Professional SP1 (32 bit, 64bit)
CPU: Equivalent to Intel Core 2 Duo 1.2 GHz or higher Memory: 2 GB or more Free HDD space: 10 GB or more Network: 100Base-TX or higher Display resolution: 1024 x 768 or higher
Network 100Base-TX Real transfer rate: 115 kbps or higher
Supported security software McAfee 2011 Norton 2011 Virus Buster 2011
Flash Player Version 11.1
Web browser Internet Explorer 8, 9 Firefox 10.0
Displaying the main screen
1. Start up the pre-engineering tool on the PC.

Commissioning Manual EM11A021DCM601A51 intelligent Touch Manager
47
(1)
2. On the login screen that appears, enter the password and click the Login button (1).
The iTM Pre-engineering tool main screen appears if the correct password has been provided.
Main screen

Commissioning Manual EM11A021DCM601A51 intelligent Touch Manager
48
Scenario 1: Installation to new property
Set up data for the new property in advance.
(2)
Main screen
1. Click the New button (2) to display the Create New Folder dialog.
(3)
(4) (5)
Create New Folder dialog
2. Select the location to create the new property’s folder in (3).
Clicking the Make New Folder button (4) creates a new folder directly under the folder selected
in (3).
Clicking the OK button (5) sets up the folder selected in (3) as new folder. A dialog confirming
whether to delete the data in the folder appears. Click the Yes button to commit and return to the
iTM Pre-engineering tool main screen.

Commissioning Manual EM11A021DCM601A51 intelligent Touch Manager
49
Clicking the OK button on the confirmation dialog box deletes all folders and files within the
folder.
NOTE
(6)
Main screen
3. Click the Edit Data button (6) to start up the iTM demo version for PC.
(7)Screen of demo version for PC
The demo version for PC allows you to make similar settings as with the iTM unit. Make settings
as required.
When finished, click the button (7) and return to the Pre-engineering tool main screen.

Commissioning Manual EM11A021DCM601A51 intelligent Touch Manager
50
Input of Activation key (optional functions enable) is not accepted.
NOTE
(8)
Main screen
4. Output the edited restore data in the property folder to a USB memory.
Click the Export to USB button (8). The Output to USB dialog appears.
(10)(9)
Select the drive in the Drive combo box (9).
Select the content to output using the Output Data radio button (10).
Click the OK button. A conformation dialog appears, indicating that you are about to delete the
data in the folder. If you click the Yes button to confirm the deletion, the output of data starts and
the screen closes.
Check that the USB memory is ready for writing data. The output will fail if it is damaged, has
insufficient storage capacity, or is write-protected.
NOTE

Commissioning Manual EM11A021DCM601A51 intelligent Touch Manager
51
5. The set up restore data is saved to the USB. Insert the USB memory to iTM to restore. (For
details, see 4-10 Installation)
“Layout Setup data only” is available when the Layout option is enabled and saves only the
Layout Setup data to the USB memory. For the method of entering the Layout Setup data to
the iTM unit, see the supplementary volume Layout View Creation Tool (EM11A024).
NOTE

Commissioning Manual EM11A021DCM601A51 intelligent Touch Manager
52
Scenario 2: Maintenance of existing property (When carrying out pre-engineering using the current setting)
When extensively modifying an existing property due to equipment renovation and the like, the
current settings for the existing property must be modified.
1. Back up the system file data as well as settings data, MAC addresses, etc. on the iTM unit to a
USB memory. (For details, see 4-9 Backup)
2. Copy data backed up in the USB memory (folder name: Backup_MAC address_year month day_
hour minute second) to a PC. Start up the Pre-engineering tool and display its main screen. (For
details, see page 46)
(12)
(11)
(13)
Main screen
3. Click the Open button (11) to display the Select Folder to Open dialog.
Select the folder of the property to edit and click the OK button.
If the property data is created using an older version, a dialog that prompts upgrade appears.
Click the OK button.
NOTE
The absolute path is displayed in (12) when a property data is selected.

Commissioning Manual EM11A021DCM601A51 intelligent Touch Manager
53
4. Click the Edit Data button (13) to start up the iTM demo version for PC.
The steps from editing using the demo version for PC to restore data output to USB and iTM
restore are the same as steps 3 to 5 of the procedure for Scenario 1: Installation to new property.
The Layout Setup data backup and restore procedures are the same as when modifying the
Layout View of an existing property. For the method of editing the Layout Setup data, see the
supplementary volume Layout View Creation Tool (optional).
NOTE

Commissioning Manual EM11A021DCM601A51 intelligent Touch Manager
54
Scenario 3: Restore with existing property’s backup data
When iTM in an existing property is replaced due to malfunction and the like, the system is
recovered by restoring the backup data (folder name: Backup_MAC address_year month day_hour
minute second) to the new iTM.
• iTM
(14)
Main screen
1. Click the Open button (14) to display the Select Folder to Open dialog. Select the folder of the
property for which you are creating the restore data and click the OK button to close the screen.
2. The restore data in the selected folder is output to a USB memory.
The steps up to the output to USB and iTM restore are the same as steps 4 and 5 of the
procedure for Scenario 1: Installation to new property.
• iTM integrator
1. Copy the data backed up with iTM integrator (folder name: iTM_integrator_Backup_MAC
address_year month day_hour minute second) to the USB memory connected to a PC.
2. Move all the data in the folder copied to the USB memory to directly below the USB memory.
3. Insert the USB memory prepared with PC to the iTM integrator to restore. (For details, see 4-10
Installation)

Commissioning Manual EM11A021DCM601A51 intelligent Touch Manager
55
Scenario 4: Implementation of new functions due to existing property’s upgrade
When implementing new functions to an existing property, the upgraded Pre-engineering tool is
used to create the functions’ settings data.
1. Back up the system file data as well as settings data, MAC addresses, etc. on the iTM unit to a
USB memory. (For details, see 4-9 Backup)
2. Copy data backed up in the USB memory (folder name: Backup_MAC address_year month day_
hour minute second) to a PC. Start up the newly acquired upgraded Pre-engineering tool and
display its main screen. (For details, see page 46)
3. Edit the settings data using the upgraded Pre-engineering tool.
The steps up to the output of the edited data to USB and iTM restore are the same as steps 4
and 5 of the procedure for Scenario 1: Installation to new property.
4-8 UpgradeUpgrade includes system file installation for a new property or new function implementation to an
existing property. (When using the Pre-engineering tool, see 4-7 Pre-engineering)
When installing a new iTM, be sure to install the updater program during the preparation.
NOTE
Download procedure
1. From your PC, access the Network Solution page of the Distributor’s Page. Then, download and
save the updater program onto the USB memory.
2. Insert the USB memory with the updater program into iTM and install. For the installation
procedure, see 4-10 Installation.
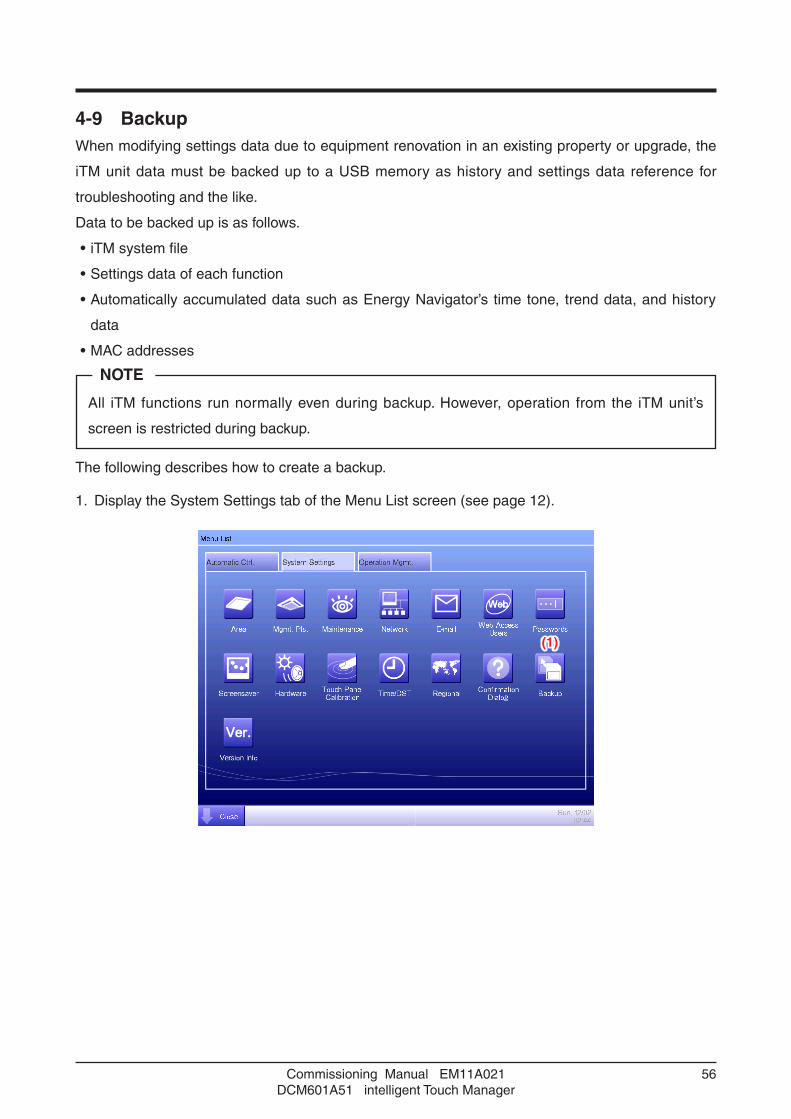
Commissioning Manual EM11A021DCM601A51 intelligent Touch Manager
56
4-9 BackupWhen modifying settings data due to equipment renovation in an existing property or upgrade, the
iTM unit data must be backed up to a USB memory as history and settings data reference for
troubleshooting and the like.
Data to be backed up is as follows.
• iTM system file
• Settings data of each function
• Automatically accumulated data such as Energy Navigator’s time tone, trend data, and history
data
• MAC addresses
All iTM functions run normally even during backup. However, operation from the iTM unit’s
screen is restricted during backup.
NOTE
The following describes how to create a backup.
1. Display the System Settings tab of the Menu List screen (see page 12).
(1)

Commissioning Manual EM11A021DCM601A51 intelligent Touch Manager
57
2. Insert a USB memory into iTM. Touching the Backup button (1) displays a backup start
confirmation dialog.
3. Touch the Yes button. A USB memory content deletion confirmation dialog appears.
4. Touching the Yes button displays a wait dialog and starts the backup. When backup is complete,
an information dialog appears. Touch the Close button to close the screen and remove the USB
memory.
• All the folders and files in the USB memory will be deleted when the backup begin.
• One folder with the following name will be created in the USB memory when the backup
complete.
“Backup_XXXXXXXXXXXX_YYYYMMDD_HHMMSS”
(XXXXXXXXXXXX: MAC address of the iTM, YYYYMMDD_HHMMSS: Year, Month, Day,
Hour, Minute and Second of the backup execution time)
• When backup fails because the USB memory is not inserted or due to an error, an error
dialog appears.
NOTE

Commissioning Manual EM11A021DCM601A51 intelligent Touch Manager
58
4-10 InstallationData installation to the iTM unit includes installation of upgrade data and pre-engineered data (See
4-7 Pre-engineering). The installation procedure is the same in all cases.
The following describes the operating procedure.
1. Insert the USB memory with the target data into the iTM unit and turn on, or restart, the iTM unit
while pressing the MONITOR button provided on it. Keep the MONITOR button depressed until
the following screen appears and then release it. To restart, press the RESET// switch on the
front panel. (See the intelligent Touch Manager Installation Manual).
2. The calibration screen appears. Correct the touch panel calibration. To calibrate more accurately,
use a touch pen.
(1)
3. A cross (1) will appear 5 times on the screen. Touch the centre of each cross in order. You can
start the calibration again by touching a point far from the cross. The calibration is complete
when you touched the cross 5 times.

Commissioning Manual EM11A021DCM601A51 intelligent Touch Manager
59
4. The installation tool screen appears once calibration is finished.
If an error is found in the installer program on the USB memory, an error confirmation dialog
appears. Be sure to prepare the correct installer program.
NOTE
(2)
(4)(5) (6)(7)(8) (9)
(10)(11)
(12)(13)
(14)
(3)
5. The version of the data and MAC addresses in the USB memory are compared with the version
and MAC addresses on the iTM.
The information displayed on the installation tool screen is as follows.
(2) Name
(3) Version of the installer
(4) Name of the current version
(5) Name of the current controller
(6) Current version
(7) Name of the installer
(8) Name of the installer controller
(9) Version of the installer
(10) Current hardware name
(11) Current MAC address
(12) Name of the installer hardware
(13) Installer’s MAC address
(14) Message displayed in accordance with the installation tool’s status.

Commissioning Manual EM11A021DCM601A51 intelligent Touch Manager
60
If there is no flaw in the information, touching the OK button on the installation tool screen starts
the installation. When installation is complete, an information dialog appears. Remove the USB
memory and touch the Close button to close the screen. The iTM automatically restarts and
checks the history and version information, and then installation will be completed.
If the data version on the installer side is earlier than that on iTM, the OK button on the
installation tool screen is greyed out and cannot be clicked.
NOTE
4-11 Contact InfoSets up contact information for inquiries regarding the system.
1. Log into SE Mode from the Menu List screen and display the Service Settings tab (see page 7).
Touch the Contact Info button on the Service Settings tab to display the Contact Information
Setup screen (see page 10).
(1)
2. You can set up to 3 lines of contact information: Lines 1 to 3 (1). Touch the Modify button to
display the Text Input dialog. Enter necessary information such as dealer’s name, telephone
number, e-mail address, etc. You can enter up to 50 characters in each line, regardless of single
or double byte.
When finished setting up the contact information, touch the OK button to close the screen.

Commissioning Manual EM11A021DCM601A51 intelligent Touch Manager
61
3. The registered contact information can be checked on the Contact tab of the Information screen
accessible from the Standard View screen. (See User’s Manual (EM11A015))

Commissioning Manual EM11A021DCM601A51 intelligent Touch Manager
62
4-12 Setting outdoor unitSet the type of the outdoor unit registered as a Mgmt. point.
1. Log into SE Mode from the Menu List screen and display the Service Settings tab (see page 7).
Touch the Outdoor Setup button on the Service Settings tab to display the Outdoor Setup screen
(see page 10).
(1)
2. Select the desired outdoor unit from the list and touch the (1) Type button.
When the input dialogue is displayed, input the type. The type depends on the model of the
outdoor unit. Check the type in the table on page 63 before setting.
If the specified type of outdoor unit is wrong, leakage check operation cannot be executed
correctly. Be careful when setting the type.
CAUTION
When you use the outdoor unit as Internal Pi, check that the pulse amount is correct in the
detailed information screen.
NOTE

Commissioning Manual EM11A021DCM601A51 intelligent Touch Manager
63
Precautions when using DIII-NET EXPANDER ADAPTER
In the application using the DIII-NET EXPANDER ADAPTER, if you monitor the outdoor units or
use Internal Pi or such other functions processed based on information from the outdoor units, you
need to cut the jumper pin of the DIII-NET EXPANDER ADAPTER.
Intended functions: Monitoring of outdoor units, Energy Navigator and leakage detection.
F1 F2
X1M
The jumper pin to be cut is J1 only.
There are two jumper pins to be cut, so be sure to cut both of
them.
The total number of outdoor units connected to the DIII-NET EXPANDER ADAPTER (whose J1
jumper pins were cut) and those directly connected to iTM should be 10 or less.
NOTE
Table of types
No. Model name Type
1 RXYQ5MY1B 1
2 RXYQ8MY1B 1
3 RXYQ10MY1B 1
4 RXYQ12MY1B 1
5 RXYQ14MY1B 1
6 RXYQ16MY1B 1
7 RXYQ18MY1B 1
8 RXYQ20MY1B 1
9 RXYQ22MY1B 1
10 RXYQ24MY1B 1
11 RXYQ26MY1B 1
12 RXYQ28MY1B 1
13 RXYQ30MY1B 1
14 RXYQ32MY1B 1
15 RXYQ34MY1B 1
16 RXYQ36MY1B 1
17 RXYQ38MY1B 1
18 RXYQ40MY1B 1
19 RXYQ42MY1B 1
20 RXYQ44MY1B 1
21 RXYQ46MY1B 1
22 RXYQ48MY1B 1
23 RXYQ5M7W1B 1
24 RXYQ8M7W1B 1
25 RXYQ10M7W1B 1
26 RXYQ12M7W1B 1
27 RXYQ14M7W1B 1
28 RXYQ16M7W1B 1
29 RXYQ18M7W1B 1
30 RXYQ20M7W1B 1
31 RXYQ22M7W1B 1
32 RXYQ24M7W1B 1
33 RXYQ26M7W1B 1
34 RXYQ28M7W1B 1
35 RXYQ30M7W1B 1
No. Model name Type
36 RXYQ32M7W1B 1
37 RXYQ34M7W1B 1
38 RXYQ36M7W1B 1
39 RXYQ38M7W1B 1
40 RXYQ40M7W1B 1
41 RXYQ42M7W1B 1
42 RXYQ44M7W1B 1
43 RXYQ46M7W1B 1
44 RXYQ48M7W1B 1
45 RX10MTL 1
46 RX10MTLE 1
47 RX10MY1 1
48 RX10MY1E 1
49 RX10MYL 1
50 RX10MYLE 1
51 RX12MTL 1
52 RX12MTLE 1
53 RX12MY1 1
54 RX12MY1E 1
55 RX12MYL 1
56 RX12MYLE 1
57 RX14MTL 1
58 RX14MTLE 1
59 RX14MY1 1
60 RX14MY1E 1
61 RX14MYL 1
62 RX14MYLE 1
63 RX16MTL 1
64 RX16MTLE 1
65 RX16MY1 1
66 RX16MY1E 1
67 RX16MYL 1
68 RX16MYLE 1
69 RX18MTL 1
70 RX18MTLE 1
No. Model name Type
71 RX18MY1 1
72 RX18MY1E 1
73 RX18MYL 1
74 RX18MYLE 1
75 RX20MTL 1
76 RX20MTLE 1
77 RX20MY1 1
78 RX20MY1E 1
79 RX20MYL 1
80 RX20MYLE 1
81 RX22MTL 1
82 RX22MTLE 1
83 RX22MY1 1
84 RX22MY1E 1
85 RX22MYL 1
86 RX22MYLE 1
87 RX24MTL 1
88 RX24MTLE 1
89 RX24MY1 1
90 RX24MY1E 1
91 RX24MYL 1
92 RX24MYLE 1
93 RX26MTL 1
94 RX26MTLE 1
95 RX26MY1 1
96 RX26MY1E 1
97 RX26MYL 1
98 RX26MYLE 1
99 RX28MTL 1
100 RX28MTLE 1
101 RX28MY1 1
102 RX28MY1E 1
103 RX28MYL 1
104 RX28MYLE 1
105 RX30MTL 1
No. Model name Type
106 RX30MTLE 1
107 RX30MY1 1
108 RX30MY1E 1
109 RX30MYL 1
110 RX30MYLE 1
111 RX32MTL 1
112 RX32MTLE 1
113 RX32MY1 1
114 RX32MY1E 1
115 RX32MYL 1
116 RX32MYLE 1
117 RX34MTL 1
118 RX34MTLE 1
119 RX34MY1 1
120 RX34MY1E 1
121 RX34MYL 1
122 RX34MYLE 1
123 RX36MTL 1
124 RX36MTLE 1
125 RX36MY1 1
126 RX36MY1E 1
127 RX36MYL 1
128 RX36MYLE 1
129 RX38MTL 1
130 RX38MTLE 1
131 RX38MY1 1
132 RX38MY1E 1
133 RX38MYL 1
134 RX38MYLE 1
135 RX40MTL 1
136 RX40MTLE 1
137 RX40MY1 1
138 RX40MY1E 1
139 RX40MYL 1
140 RX40MYLE 1

Commissioning Manual EM11A021DCM601A51 intelligent Touch Manager
64
No. Model name Type
141 RX42MTL 1
142 RX42MTLE 1
143 RX42MY1 1
144 RX42MY1E 1
145 RX42MYL 1
146 RX42MYLE 1
147 RX44MTL 1
148 RX44MTLE 1
149 RX44MY1 1
150 RX44MY1E 1
151 RX44MYL 1
152 RX44MYLE 1
153 RX46MTL 1
154 RX46MTLE 1
155 RX46MY1 1
156 RX46MY1E 1
157 RX46MYL 1
158 RX46MYLE 1
159 RX48MTL 1
160 RX48MTLE 1
161 RX48MY1 1
162 RX48MY1E 1
163 RX48MYL 1
164 RX48MYLE 1
165 RX5MTL 1
166 RX5MTLE 1
167 RX5MY1 1
168 RX5MY1E 1
169 RX5MYL 1
170 RX5MYLE 1
171 RX8MTL 1
172 RX8MTLE 1
173 RX8MY1 1
174 RX8MY1E 1
175 RX8MYL 1
176 RX8MYLE 1
177 RXY10MTL 1
178 RXY10MTLE 1
179 RXY10MY1 1
180 RXY10MY1E 1
181 RXY10MYL 1
182 RXY10MYLE 1
183 RXY12MTL 1
184 RXY12MTLE 1
185 RXY12MY1 1
186 RXY12MY1E 1
187 RXY12MYL 1
188 RXY12MYLE 1
189 RXY14MTL 1
190 RXY14MTLE 1
191 RXY14MY1 1
192 RXY14MY1E 1
193 RXY14MYL 1
194 RXY14MYLE 1
195 RXY16MTL 1
196 RXY16MTLE 1
197 RXY16MY1 1
198 RXY16MY1E 1
199 RXY16MYL 1
200 RXY16MYLE 1
201 RXY18MTL 1
202 RXY18MTLE 1
203 RXY18MY1 1
204 RXY18MY1E 1
205 RXY18MYL 1
206 RXY18MYLE 1
207 RXY20MTL 1
No. Model name Type
208 RXY20MTLE 1
209 RXY20MY1 1
210 RXY20MY1E 1
211 RXY20MYL 1
212 RXY20MYLE 1
213 RXY22MTL 1
214 RXY22MTLE 1
215 RXY22MY1 1
216 RXY22MY1E 1
217 RXY22MYL 1
218 RXY22MYLE 1
219 RXY24MTL 1
220 RXY24MTLE 1
221 RXY24MY1 1
222 RXY24MY1E 1
223 RXY24MYL 1
224 RXY24MYLE 1
225 RXY26MTL 1
226 RXY26MTLE 1
227 RXY26MY1 1
228 RXY26MY1E 1
229 RXY26MYL 1
230 RXY26MYLE 1
231 RXY28MTL 1
232 RXY28MTLE 1
233 RXY28MY1 1
234 RXY28MY1E 1
235 RXY28MYL 1
236 RXY28MYLE 1
237 RXY30MTL 1
238 RXY30MTLE 1
239 RXY30MY1 1
240 RXY30MY1E 1
241 RXY30MYL 1
242 RXY30MYLE 1
243 RXY32MTL 1
244 RXY32MTLE 1
245 RXY32MY1 1
246 RXY32MY1E 1
247 RXY32MYL 1
248 RXY32MYLE 1
249 RXY34MTL 1
250 RXY34MTLE 1
251 RXY34MY1 1
252 RXY34MY1E 1
253 RXY34MYL 1
254 RXY34MYLE 1
255 RXY36MTL 1
256 RXY36MTLE 1
257 RXY36MY1 1
258 RXY36MY1E 1
259 RXY36MYL 1
260 RXY36MYLE 1
261 RXY38MTL 1
262 RXY38MTLE 1
263 RXY38MY1 1
264 RXY38MY1E 1
265 RXY38MYL 1
266 RXY38MYLE 1
267 RXY40MTL 1
268 RXY40MTLE 1
269 RXY40MY1 1
270 RXY40MY1E 1
271 RXY40MYL 1
272 RXY40MYLE 1
273 RXY42MTL 1
274 RXY42MTLE 1
No. Model name Type
275 RXY42MY1 1
276 RXY42MY1E 1
277 RXY42MYL 1
278 RXY42MYLE 1
279 RXY44MTL 1
280 RXY44MTLE 1
281 RXY44MY1 1
282 RXY44MY1E 1
283 RXY44MYL 1
284 RXY44MYLE 1
285 RXY46MTL 1
286 RXY46MTLE 1
287 RXY46MY1 1
288 RXY46MY1E 1
289 RXY46MYL 1
290 RXY46MYLE 1
291 RXY48MTL 1
292 RXY48MTLE 1
293 RXY48MY1 1
294 RXY48MY1E 1
295 RXY48MYL 1
296 RXY48MYLE 1
297 RXY5MTL 1
298 RXY5MTLE 1
299 RXY5MY1 1
300 RXY5MY1E 1
301 RXY5MYL 1
302 RXY5MYLE 1
303 RXY8MTL 1
304 RXY8MTLE 1
305 RXY8MY1 1
306 RXY8MY1E 1
307 RXY8MYL 1
308 RXY8MYLE 1
309 REYQ8MY1B 1
310 REYQ10MY1B 1
311 REYQ12MY1B 1
312 REYQ14MY1B 1
313 REYQ16MY1B 1
314 REYQ18MY1B 1
315 REYQ20MY1B 1
316 REYQ22MY1B 1
317 REYQ24MY1B 1
318 REYQ26MY1B 1
319 REYQ28MY1B 1
320 REYQ30MY1B 1
321 REYQ32MY1B 1
322 REYQ34MY1B 1
323 REYQ36MY1B 1
324 REYQ38MY1B 1
325 REYQ40MY1B 1
326 REYQ42MY1B 1
327 REYQ44MY1B 1
328 REYQ46MY1B 1
329 REYQ48MY1B 1
330 RHXY8MY1 1
331 RHXY10MY1 1
332 RHXY12MY1 1
333 RHXY14MY1 1
334 RHXY16MY1 1
335 RHXY18MY1 1
336 RHXY20MY1 1
337 RHXY22MY1 1
338 RHXY24MY1 1
339 RHXY26MY1 1
340 RHXY28MY1 1
341 RHXY30MY1 1
No. Model name Type
342 RHXY32MY1 1
343 RHXY34MY1 1
344 RHXY36MY1 1
345 RHXY38MY1 1
346 RHXY40MY1 1
347 RHXY42MY1 1
348 RHXY44MY1 1
349 RHXY46MY1 1
350 RHXY48MY1 1
351 RXYMQ4MV4A 1
352 RXYMQ5MV4A 1
353 RXYMQ6MV4A 1
354 RXYMQ4M7V3B 1
355 RXYMQ5M7V3B 1
356 RXYMQ6M7V3B 1
357 RXYQ96MTJU 1
358 RHX8MAY1 1
359 RHX12MAY1 1
360 RHX18MAY1 1
361 REYQ96MTJU 1
362 RMX112CMV2C 1
363 RMX140CMV2C 1
364 RMX160CMV2C 1
365 RXM4MVM 1
366 RXM5MVM 1
367 RXM6MVM 1
368 RXYM4MVM 1
369 RXYM5MVM 1
370 RXYM6MVM 1
371 RXYM4MVMT 1
372 RXYM5MVMT 1
373 RXYM6MVMT 1
374 RXYSQ4M7V3B 1
375 RXYSQ5M7V3B 1
376 RXYSQ6M7V3B 1
377 RWEYQ10MY1 1
378 RWEYQ20MY1 1
379 RWEYQ30MY1 1
380 RXYQ5PY1 3
381 RXYQ8PY1 3
382 RXYQ10PY1 3
383 RXYQ12PY1 3
384 RXYQ14PY1 3
385 RXYQ16PY1 3
386 RXYQ18PY1 3
387 RXYQ20PY1 3
388 RXYQ22PY1 3
389 RXYQ24PY1 3
390 RXYQ26PY1 3
391 RXYQ28PY1 3
392 RXYQ30PY1 3
393 RXYQ32PY1 3
394 RXYQ34PY1 3
395 RXYQ36PY1 3
396 RXYQ38PY1 3
397 RXYQ40PY1 3
398 RXYQ42PY1 3
399 RXYQ44PY1 3
400 RXYQ46PY1 3
401 RXYQ48PY1 3
402 RXYQ50PY1 3
403 RXYQ52PY1 3
404 RXYQ54PY1 3
405 RXYQ8PY1C 3
406 RXYQ10PY1C 3
407 RXYQ12PY1C 3
408 RXYQ14PY1C 3

Commissioning Manual EM11A021DCM601A51 intelligent Touch Manager
65
No. Model name Type
409 RXYQ16PY1C 3
410 RXYQ18PY1C 3
411 RXYQ20PY1C 3
412 RXYQ22PY1C 3
413 RXYQ24PY1C 3
414 RXYQ26PY1C 3
415 RXYQ28PY1C 3
416 RXYQ30PY1C 3
417 RXYQ32PY1C 3
418 RXYQ34PY1C 3
419 RXYQ36PY1C 3
420 RXYQ38PY1C 3
421 RXYQ40PY1C 3
422 RXYQ42PY1C 3
423 RXYQ44PY1C 3
424 RXYQ46PY1C 3
425 RXYQ48PY1C 3
426 RXYQ50PY1C 3
427 RXYQ52PY1C 3
428 RXYQ54PY1C 3
429 RXYMQ4PVE 3
430 RXYMQ5PVE 3
431 RXYMQ6PVE 3
432 RMXS112DV2C 3
433 RMXS112DY1C 3
434 RMXS140DV2C 3
435 RMXS140DY1C 3
436 RMXS160DV2C 3
437 RMXS160DY1C 3
438 LMXS4DMV2C 3
439 LMXS5DMV2C 3
440 LMXS6DMV2C 3
441 REYQ10M7W1B 1
442 RXYSQ4M 1
443 RXYSQ5M 1
444 RXYSQ6M 1
445 RXYQ5MAY1 1
446 RXYQ8MAY1 1
447 RXYQ10MAY1 1
448 RXYQ12MAY1 1
449 RXYQ14MAY1 1
450 RXYQ16MAY1 1
451 RHXYQ8MAY1 1
452 RHXYQ10MAY1 1
453 RHXYQ12MAY1 1
454 RHXYQ14MAY1 1
455 RHXYQ16MAY1 1
456 RCXYQ8MAY1 1
457 RCXYQ10MAY1 1
458 RCXYQ12MAY1 1
459 RCXYQ14MAY1 1
460 RXYQ8M8W1B 1
461 RXYQ10M8W1B 1
462 RXYQ12M8W1B 1
463 RXYQ14M8W1B 1
464 RXYQ16M8W1B 1
465 RXYQ18M8W1B 1
466 RXYQ20M8W1B 1
467 RXYQ22M8W1B 1
468 RXYQ24M8W1B 1
469 RXYQ26M8W1B 1
470 RXYQ28M8W1B 1
471 RXYQ30M8W1B 1
472 RXYQ32M8W1B 1
473 RXYQ34M8W1B 1
474 RXYQ36M8W1B 1
475 RXYQ38M8W1B 1
No. Model name Type
476 RXYQ40M8W1B 1
477 RXYQ42M8W1B 1
478 RXYQ44M8W1B 1
479 RXYQ46M8W1B 1
480 RXYQ48M8W1B 1
481 REYQ8M7W1B 1
482 REYQ12M7W1B 1
483 REYQ14M7W1B 1
484 REYQ16M7W1B 1
485 REYQ18M7W1B 1
486 REYQ20M7W1B 1
487 REYQ22M7W1B 1
488 REYQ24M7W1B 1
489 REYQ26M7W1B 1
490 REYQ28M7W1B 1
491 REYQ30M7W1B 1
492 REYQ32M7W1B 1
493 REYQ34M7W1B 1
494 REYQ36M7W1B 1
495 REYQ38M7W1B 1
496 REYQ40M7W1B 1
497 REYQ42M7W1B 1
498 REYQ44M7W1B 1
499 REYQ46M7W1B 1
500 REYQ48M7W1B 1
501 RCXYQ16MAY1 1
502 RCXYQ18MAY1 1
503 RCXYQ20MAY1 1
504 RCXYQ22MAY1 1
505 RCXYQ24MAY1 1
506 RCXYQ26MAY1 1
507 RCXYQ28MAY1 1
508 RCXYQ30MAY1 1
509 RCXYQ32MAY1 1
510 RCXYQ34MAY1 1
511 RCXYQ36MAY1 1
512 RCXYQ38MAY1 1
513 RCXYQ40MAY1 1
514 RCXYQ42MAY1 1
515 RCXYQ44MAY1 1
516 RCXYQ46MAY1 1
517 RCXYQ48MAY1 1
518 RXQ8MAY19 1
519 RXQ8MAY15 1
520 RXQ10MAY19 1
521 RXQ10MAY15 1
522 RXQ12MAY19 1
523 RXQ12MAY15 1
524 RXQ14MAY19 1
525 RXQ14MAY15 1
526 RXQ16MAY19 1
527 RXQ16MAY15 1
528 RXQ18MAY19 1
529 RXQ18MAY15 1
530 RXYQ8MAY19 1
531 RXYQ10MAY19 1
532 RXYQ12MAY19 1
533 RXYQ14MAY19 1
534 RXYQ16MAY19 1
535 RXYQ5M9W1B 1
536 RXYQ8M9W1B 1
537 RXYQ10M9W1B 1
538 RXYQ12M9W1B 1
539 RXYQ14M9W1B 1
540 RXYQ16M9W1B 1
541 RXYQ18M9W1B 1
542 RXYQ20M9W1B 1
No. Model name Type
543 RXYQ22M9W1B 1
544 RXYQ24M9W1B 1
545 RXYQ26M9W1B 1
546 RXYQ28M9W1B 1
547 RXYQ30M9W1B 1
548 RXYQ32M9W1B 1
549 RXYQ34M9W1B 1
550 RXYQ36M9W1B 1
551 RXYQ38M9W1B 1
552 RXYQ40M9W1B 1
553 RXYQ42M9W1B 1
554 RXYQ44M9W1B 1
555 RXYQ46M9W1B 1
556 RXYQ48M9W1B 1
557 RXYQ5PY16 3
558 RXYQ8PY16 3
559 RXYQ10PY16 3
560 RXYQ12PY16 3
561 RXYQ14PY16 3
562 RXYQ16PY16 3
563 RXYQ18PY16 3
564 RXYQ20PY16 3
565 RXYQ22PY16 3
566 RXYQ24PY16 3
567 RXYQ26PY16 3
568 RXYQ28PY16 3
569 RXYQ30PY16 3
570 RXYQ32PY16 3
571 RXYQ34PY16 3
572 RXYQ36PY16 3
573 RXYQ38PY16 3
574 RXYQ40PY16 3
575 RXYQ42PY16 3
576 RXYQ44PY16 3
577 RXYQ46PY16 3
578 RXYQ48PY16 3
579 RXYQ50PY16 3
580 RXYQ52PY16 3
581 RXYQ54PY16 3
582 REMQ8PY1 3
583 REYQ8PY1B 3
584 REMQ10PY1 3
585 REYQ10PY1B 3
586 REMQ12PY1 3
587 REYQ12PY1B 3
588 REMQ14PY1 3
589 REYQ14PY1B 3
590 REMQ16PY1 3
591 REYQ16PY1B 3
592 RWEYQ8PY1 1
593 RWEYQ10PY1 1
594 RWEYQ16PY1 1
595 RWEYQ18PY1 1
596 RWEYQ20PY1 1
597 RWEYQ24PY1 1
598 RWEYQ26PY1 1
599 RWEYQ28PY1 1
600 RWEYQ30PY1 1
601 RXYN10AY1 3
602 RHXYQ8PY1 3
603 RHXYQ10PY1 3
604 RHXYQ12PY1 3
605 RHXYQ14PY1 3
606 RHXYQ16PY1 3
607 RHXYQ18MAY1 1
608 RHXYQ20MAY1 1
609 RHXYQ22MAY1 1
No. Model name Type
610 RHXYQ24MAY1 1
611 RHXYQ26MAY1 1
612 RHXYQ28MAY1 1
613 RHXYQ30MAY1 1
614 RHXYQ32MAY1 1
615 RHXYQ34MAY1 1
616 RHXYQ36MAY1 1
617 RHXYQ38MAY1 1
618 RHXYQ40MAY1 1
619 RHXYQ42MAY1 1
620 RHXYQ44MAY1 1
621 RHXYQ46MAY1 1
622 RHXYQ48MAY1 1
623 RXYQ10P7W1B 3
624 RXYQ12P7W1B 3
625 RXYQ14P7W1B 3
626 RXYQ16P7W1B 3
627 RXYQ18P7W1B 3
628 RXYQ20P7W1B 3
629 RXYQ22P7W1B 3
630 RXYQ24P7W1B 3
631 RXYQ26P7W1B 3
632 RXYQ28P7W1B 3
633 RXYQ30P7W1B 3
634 RXYQ32P7W1B 3
635 RXYQ34P7W1B 3
636 RXYQ36P7W1B 3
637 RXYQ38P7W1B 3
638 RXYQ40P7W1B 3
639 RXYQ42P7W1B 3
640 RXYQ44P7W1B 3
641 RXYQ46P7W1B 3
642 RXYQ48P7W1B 3
643 RXYQ50P7W1B 3
644 RXYQ52P7W1B 3
645 RXYQ54P7W1B 3
646 RXYQ5M8W1B 1
647 RXYQ5P7W1B 3
648 RXYQ8P7W1B 3
649 RXYSQ4P7V3B 3
650 RXYSQ5P7V3B 3
651 RXYSQ6P7V3B 3
652 REYQ8M8W1B 1
653 REYQ12M8W1B 1
654 REYQ14M8W1B 1
655 REYQ16M8W1B 1
656 REYQ18M8W1B 1
657 REYQ20M8W1B 1
658 REYQ22M8W1B 1
659 REYQ24M8W1B 1
660 REYQ26M8W1B 1
661 REYQ28M8W1B 1
662 REYQ30M8W1B 1
663 REYQ32M8W1B 1
664 REYQ34M8W1B 1
665 REYQ36M8W1B 1
666 REYQ38M8W1B 1
667 REYQ40M8W1B 1
668 REYQ42M8W1B 1
669 REYQ44M8W1B 1
670 REYQ46M8W1B 1
671 REYQ48M8W1B 1
672 RXYQ18MAY1 1
673 RXYQ20MAY1 1
674 RXYQ22MAY1 1
675 RXYQ24MAY1 1
676 RXYQ26MAY1 1

Commissioning Manual EM11A021DCM601A51 intelligent Touch Manager
66
No. Model name Type
677 RXYQ28MAY1 1
678 RXYQ30MAY1 1
679 RXYQ32MAY1 1
680 RXYQ34MAY1 1
681 RXYQ36MAY1 1
682 RXYQ38MAY1 1
683 RXYQ40MAY1 1
684 RXYQ42MAY1 1
685 RXYQ44MAY1 1
686 RXYQ46MAY1 1
687 RXYQ48MAY1 1
688 RXYQ8MY1K 1
689 RXYQ10MY1K 1
690 RXQ5MAY1 1
691 RXQ8MAY1 1
692 RXQ10MAY1 1
693 RXQ12MAY1 1
694 RXQ14MAY1 1
695 RXQ16MAY1 1
696 RXQ18MAY1 1
697 RXQ20MAY1 1
698 RXQ22MAY1 1
699 RXQ24MAY1 1
700 RXQ26MAY1 1
701 RXQ28MAY1 1
702 RXQ30MAY1 1
703 RXQ32MAY1 1
704 RXQ34MAY1 1
705 RXQ36MAY1 1
706 RXQ38MAY1 1
707 RXQ40MAY1 1
708 RXQ42MAY1 1
709 RXQ44MAY1 1
710 RXQ46MAY1 1
711 RXQ48MAY1 1
712 RHXYQ18PY1 3
713 RHXYQ20PY1 3
714 RHXYQ22PY1 3
715 RHXYQ24PY1 3
716 RHXYQ26PY1 3
717 RHXYQ28PY1 3
718 RHXYQ30PY1 3
719 RHXYQ32PY1 3
720 RHXYQ34PY1 3
721 RHXYQ36PY1 3
722 RHXYQ38PY1 3
723 RHXYQ40PY1 3
724 RHXYQ42PY1 3
725 RHXYQ44PY1 3
726 RHXYQ46PY1 3
727 RHXYQ48PY1 3
728 RHXYQ50PY1 3
729 RHXYQ52PY1 3
730 RHXYQ54PY1 3
731 RHXY20PY1 3
732 RHXY22PY1 3
733 RHXY24PY1 3
734 RHXY26PY1 3
735 RHXY28PY1 3
736 RHXY30PY1 3
737 RHXY32PY1 3
738 RHXY34PY1 3
739 RHXY36PY1 3
740 RHXY38PY1 3
741 RHXY40PY1 3
742 RHXY42PY1 3
743 RHXY44PY1 3
No. Model name Type
744 RHXY46PY1 3
745 RHXY48PY1 3
746 RHXY50PY1 3
747 RHXY52PY1 3
748 RHXY54PY1 3
749 RXQ5M7W1B 1
750 RXQ8M7W1B 1
751 RXQ10M7W1B 1
752 RXQ8M8W1B 1
753 RXQ10M8W1B 1
754 RXYQ72MTJU 1
755 RXYQ144MTJU 1
756 RXYQ168MTJU 1
757 RXYQ192MTJU 1
758 REYQ72MTJU 1
759 REYQ144MTJU 1
760 REYQ168MTJU 1
761 REYQ192MTJU 1
762 RXQ5M9W1B 1
763 RXQ8M9W1B 1
764 RXQ10M9W1B 1
765 RZP350MAY1 1
766 RXMQ4PVE 3
767 RXMQ5PVE 3
768 RXMQ6PVE 3
769 RXQ5PY1 3
770 RXQ8PY1 3
771 RXQ10PY1 3
772 RXQ12PY1 3
773 RXQ14PY1 3
774 RXQ16PY1 3
775 RXQ18PY1 3
776 RXQ20PY1 3
777 RXQ22PY1 3
778 RXQ24PY1 3
779 RXQ26PY1 3
780 RXQ28PY1 3
781 RXQ30PY1 3
782 RXQ32PY1 3
783 RXQ34PY1 3
784 RXQ36PY1 3
785 RXQ38PY1 3
786 RXQ40PY1 3
787 RXQ42PY1 3
788 RXQ44PY1 3
789 RXQ46PY1 3
790 RXQ48PY1 3
791 RXQ50PY1 3
792 RXQ52PY1 3
793 RXQ54PY1 3
794 RXQ8PY16 3
795 RXQ10PY16 3
796 RXQ12PY16 3
797 RXQ14PY16 3
798 RXQ16PY16 3
799 RXQ18PY16 3
800 RXQ20PY16 3
801 RXQ22PY16 3
802 RXQ24PY16 3
803 RXQ26PY16 3
804 RXQ28PY16 3
805 RXQ30PY16 3
806 RXQ32PY16 3
807 RXQ34PY16 3
808 RXQ36PY16 3
809 RXQ38PY16 3
810 RXQ40PY16 3
No. Model name Type
811 RXQ42PY16 3
812 RXQ44PY16 3
813 RXQ46PY16 3
814 RXQ48PY16 3
815 RXQ50PY16 3
816 RXQ52PY16 3
817 RXQ54PY16 3
818 RXQ5PAY1 3
819 RXQ8PAY1 3
820 RXQ10PAY1 3
821 RXQ12PAY1 3
822 RXQ14PAY1 3
823 RXQ16PAY1 3
824 RXQ18PAY1 3
825 RXQ20PAY1 3
826 RXQ22PAY1 3
827 RXQ24PAY1 3
828 RXQ26PAY1 3
829 RXQ28PAY1 3
830 RXQ30PAY1 3
831 RXQ32PAY1 3
832 RXQ34PAY1 3
833 RXQ36PAY1 3
834 RXQ38PAY1 3
835 RXQ40PAY1 3
836 RXQ42PAY1 3
837 RXQ44PAY1 3
838 RXQ46PAY1 3
839 RXQ48PAY1 3
840 RXQ50PAY1 3
841 RXQ52PAY1 3
842 RXQ54PAY1 3
843 RXYQ5PAY6 3
844 RXYQ8PAY6 3
845 RXYQ10PAY6 3
846 RXYQ12PAY6 3
847 RXYQ14PAY6 3
848 RXYQ16PAY6 3
849 RXYQ18PAY6 3
850 RXYQ20PAY6 3
851 RXYQ22PAY6 3
852 RXYQ24PAY6 3
853 RXYQ26PAY6 3
854 RXYQ28PAY6 3
855 RXYQ30PAY6 3
856 RXYQ32PAY6 3
857 RXYQ34PAY6 3
858 RXYQ36PAY6 3
859 RXYQ38PAY6 3
860 RXYQ40PAY6 3
861 RXYQ42PAY6 3
862 RXYQ44PAY6 3
863 RXYQ46PAY6 3
864 RXYQ48PAY6 3
865 RXYQ50PAY6 3
866 RXYQ52PAY6 3
867 RXYQ54PAY6 3
868 RXYQ5PAY19 3
869 RXYQ8PAY19 3
870 RXYQ10PAY19 3
871 RXYQ12PAY19 3
872 RXYQ14PAY19 3
873 RXYQ16PAY19 3
874 RXYQ18PAY19 3
875 RXYQ20PAY19 3
876 RXYQ22PAY19 3
877 RXYQ24PAY19 3
No. Model name Type
878 RXYQ26PAY19 3
879 RXYQ28PAY19 3
880 RXYQ30PAY19 3
881 RXYQ32PAY19 3
882 RXYQ34PAY19 3
883 RXYQ36PAY19 3
884 RXYQ38PAY19 3
885 RXYQ40PAY19 3
886 RXYQ42PAY19 3
887 RXYQ44PAY19 3
888 RXYQ46PAY19 3
889 RXYQ48PAY19 3
890 RXYQ50PAY19 3
891 RXYQ52PAY19 3
892 RXYQ54PAY19 3
893 RXYQ5PAYL 3
894 RXYQ8PAYL 3
895 RXYQ10PAYL 3
896 RXYQ12PAYL 3
897 RXYQ14PAYL 3
898 RXYQ16PAYL 3
899 RXYQ18PAYL 3
900 RXYQ20PAYL 3
901 RXYQ22PAYL 3
902 RXYQ24PAYL 3
903 RXYQ26PAYL 3
904 RXYQ28PAYL 3
905 RXYQ30PAYL 3
906 RXYQ32PAYL 3
907 RXYQ34PAYL 3
908 RXYQ36PAYL 3
909 RXYQ38PAYL 3
910 RXYQ40PAYL 3
911 RXYQ42PAYL 3
912 RXYQ44PAYL 3
913 RXYQ46PAYL 3
914 RXYQ48PAYL 3
915 RXYQ50PAYL 3
916 RXYQ52PAYL 3
917 RXYQ54PAYL 3
918 RXYQ5PRY6 3
919 RXYQ8PRY6 3
920 RXYQ10PRY6 3
921 RXYQ12PRY6 3
922 RXYQ14PRY6 3
923 RXYQ16PRY6 3
924 RXYQ18PRY6 3
925 RXYQ20PRY6 3
926 RXYQ22PRY6 3
927 RXYQ24PRY6 3
928 RXYQ26PRY6 3
929 RXYQ28PRY6 3
930 RXYQ30PRY6 3
931 RXYQ32PRY6 3
932 RXYQ34PRY6 3
933 RXYQ36PRY6 3
934 RXYQ38PRY6 3
935 RXYQ40PRY6 3
936 RXYQ42PRY6 3
937 RXYQ44PRY6 3
938 RXYQ46PRY6 3
939 RXYQ48PRY6 3
940 RXYQ50PRY6 3
941 RXYQ52PRY6 3
942 RXYQ54PRY6 3
943 RXYQ16PHY1 3
944 RXYQ18PHY1 3

Commissioning Manual EM11A021DCM601A51 intelligent Touch Manager
67
No. Model name Type
945 RXYQ24PHY1 3
946 RXYQ26PHY1 3
947 RXYQ28PHY1 3
948 RXYQ30PHY1 3
949 RXYQ32PHY1 3
950 RXYQ34PHY1 3
951 RXYQ36PHY1 3
952 RXYQ38PHY1 3
953 RXYQ40PHY1 3
954 RXYQ42PHY1 3
955 RXYQ44PHY1 3
956 RXYQ46PHY1 3
957 RXYQ48PHY1 3
958 RXYQ50PHY1 3
959 RXY24PHY1 3
960 RXY26PHY1 3
961 RXY28PHY1 3
962 RXY30PHY1 3
963 RXY32PHY1 3
964 RXY34PHY1 3
965 RXY36PHY1 3
966 RXY38PHY1 3
967 RXY40PHY1 3
968 RXY42PHY1 3
969 RXY44PHY1 3
970 RXY46PHY1 3
971 RXY48PHY1 3
972 RXY50PHY1 3
973 RXQ16PHY1 3
974 RXQ18PHY1 3
975 RXQ24PHY1 3
976 RXQ26PHY1 3
977 RXQ28PHY1 3
978 RXQ30PHY1 3
979 RXQ32PHY1 3
980 RXQ34PHY1 3
981 RXQ36PHY1 3
982 RXQ38PHY1 3
983 RXQ40PHY1 3
984 RXQ42PHY1 3
985 RXQ44PHY1 3
986 RXQ46PHY1 3
987 RXQ48PHY1 3
988 RXQ50PHY1 3
989 RXQ16PAHY1 3
990 RXQ18PAHY1 3
991 RXQ24PAHY1 3
992 RXQ26PAHY1 3
993 RXQ28PAHY1 3
994 RXQ30PAHY1 3
995 RXQ32PAHY1 3
996 RXQ34PAHY1 3
997 RXQ36PAHY1 3
998 RXQ38PAHY1 3
999 RXQ40PAHY1 3
1000 RXQ42PAHY1 3
1001 RXQ44PAHY1 3
1002 RXQ46PAHY1 3
1003 RXQ48PAHY1 3
1004 RXQ50PAHY1 3
1005 RHXYQ5PAY1 3
1006 RHXYQ8PAY1 3
1007 RHXYQ10PAY1 3
1008 RHXYQ12PAY1 3
1009 RHXYQ14PAY1 3
1010 RHXYQ16PAY1 3
1011 RHXYQ18PAY1 3
No. Model name Type
1012 RHXYQ20PAY1 3
1013 RHXYQ22PAY1 3
1014 RHXYQ24PAY1 3
1015 RHXYQ26PAY1 3
1016 RHXYQ28PAY1 3
1017 RHXYQ30PAY1 3
1018 RHXYQ32PAY1 3
1019 RHXYQ34PAY1 3
1020 RHXYQ36PAY1 3
1021 RHXYQ38PAY1 3
1022 RHXYQ40PAY1 3
1023 RHXYQ42PAY1 3
1024 RHXYQ44PAY1 3
1025 RHXYQ46PAY1 3
1026 RHXYQ48PAY1 3
1027 RHXYQ50PAY1 3
1028 RHXYQ52PAY1 3
1029 RHXYQ54PAY1 3
1030 RXYQ8P7Y1K 3
1031 RXYQ10P7Y1K 3
1032 RXYQ12P7Y1K 3
1033 RXYQ16P7Y1K 3
1034 RXYQ18P7Y1K 3
1035 RXYQ20P7Y1K 3
1036 RXYQ22P7Y1K 3
1037 RXYQ24P7Y1K 3
1038 RXYQ26P7Y1K 3
1039 RXYQ28P7Y1K 3
1040 RXYQ30P7Y1K 3
1041 RXYQ32P7Y1K 3
1042 RXYQ34P7Y1K 3
1043 RXYQ36P7Y1K 3
1044 RXYQ8P7YLK 3
1045 RXYQ10P7YLK 3
1046 RXYQ12P7YLK 3
1047 RXYQ16P7YLK 3
1048 RXYQ18P7YLK 3
1049 RXYQ20P7YLK 3
1050 RXYQ22P7YLK 3
1051 RXYQ24P7YLK 3
1052 RXYQ26P7YLK 3
1053 RXYQ28P7YLK 3
1054 RXYQ30P7YLK 3
1055 RXYQ32P7YLK 3
1056 RXYQ34P7YLK 3
1057 RXYQ36P7YLK 3
1058 RXYMQ36PVJU 3
1059 RXYMQ48PVJU 3
1060 RXYHQ12P8W1B 3
1061 RXYQ16P8W1B 3
1062 RXYHQ16P8W1B 3
1063 RXYHQ18P8W1B 3
1064 RXYHQ20P8W1B 3
1065 RXYHQ22P8W1B 3
1066 RXYHQ24P8W1B 3
1067 RXYHQ36P8W1B 3
1068 RXYHQ26P8W1B 3
1069 RXYHQ28P8W1B 3
1070 RXYHQ30P8W1B 3
1071 RXYHQ32P8W1B 3
1072 RXYHQ34P8W1B 3
1073 RXYHQ12P9W1B 3
1074 RXYHQ16P9W1B 3
1075 RXYHQ18P9W1B 3
1076 RXYHQ20P9W1B 3
1077 RXYHQ22P9W1B 3
1078 RXYHQ24P9W1B 3
No. Model name Type
1079 RXYHQ26P9W1B 3
1080 RXYHQ28P9W1B 3
1081 RXYHQ30P9W1B 3
1082 RXYHQ32P9W1B 3
1083 RXYHQ34P9W1B 3
1084 RXYHQ36P9W1B 3
1085 RXQ5P7W1B 3
1086 RXQ8P7W1B 3
1087 RXQ10P7W1B 3
1088 RXQ12P7W1B 3
1089 RXQ14P7W1B 3
1090 RXQ16P7W1B 3
1091 RXQ18P7W1B 3
1092 REYQ8PY1 3
1093 REYQ10PY1 3
1094 REYQ12PY1 3
1095 REYQ14PY1 3
1096 REYQ16PY1 3
1097 REYQ18PY1 3
1098 REYQ20PY1 3
1099 REYQ22PY1 3
1100 REYQ24PY1 3
1101 REYQ26PY1 3
1102 REYQ28PY1 3
1103 REYQ30PY1 3
1104 REYQ32PY1 3
1105 REYQ34PY1 3
1106 REYQ36PY1 3
1107 REYQ38PY1 3
1108 REYQ40PY1 3
1109 REYQ42PY1 3
1110 REYQ44PY1 3
1111 REYQ46PY1 3
1112 REYQ48PY1 3
1113 REYQ8P8Y1B 3
1114 REYQ10P8Y1B 3
1115 REYQ12P8Y1B 3
1116 REYQ14P8Y1B 3
1117 REYQ16P8Y1B 3
1118 REYQ18P8Y1B 3
1119 REYQ20P8Y1B 3
1120 REYQ22P8Y1B 3
1121 REYQ24P8Y1B 3
1122 REYQ26P8Y1B 3
1123 REYQ28P8Y1B 3
1124 REYQ30P8Y1B 3
1125 REYQ32P8Y1B 3
1126 REYQ34P8Y1B 3
1127 REYQ36P8Y1B 3
1128 REYQ38P8Y1B 3
1129 REYQ40P8Y1B 3
1130 REYQ42P8Y1B 3
1131 REYQ44P8Y1B 3
1132 REYQ46P8Y1B 3
1133 REYQ48P8Y1B 3
1134 REYHQ20P8W1B 3
1135 REYHQ22P8W1B 3
1136 REYHQ24P8W1B 3
1137 REYHQ16P9W1B 3
1138 REYHQ20P9W1B 3
1139 REYHQ22P9W1B 3
1140 REYHQ24P9W1B 3
1141 RXYQ72PTJU 3
1142 RXYQ72PYDN 3
1143 RXYQ96PTJU 3
1144 RXYQ96PYDN 3
1145 RXYQ120PTJU 3
No. Model name Type
1146 RXYQ120PYDN 3
1147 RXYQ72PATJ 3
1148 RXYQ96PATJ 3
1149 RXYQ108PATJ 3
1150 RXYQ72PAYD 3
1151 RXYQ96PAYD 3
1152 RXYQ108PAYD 3
1153 RXYQ120PTJUR 3
1154 RXYQ120PYDNR 3
1155 RXYQ144PTJU 3
1156 RXYQ168PTJU 3
1157 RXYQ192PTJU 3
1158 RXYQ216PTJU 3
1159 RXYQ240PTJU 3
1160 RXYQ144PYDN 3
1161 RXYQ168PYDN 3
1162 RXYQ192PYDN 3
1163 RXYQ216PYDN 3
1164 RXYQ240PYDN 3
1165 REYQ72PTJU 3
1166 REYQ96PTJU 3
1167 REYQ120PTJU 3
1168 REYQ144PTJU 3
1169 REYQ168PTJU 3
1170 REYQ192PTJU 3
1171 REYQ216PTJU 3
1172 REYQ240PTJU 3
1173 REYQ72PYDN 3
1174 REYQ96PYDN 3
1175 REYQ120PYDN 3
1176 REYQ144PYDN 3
1177 REYQ168PYDN 3
1178 REYQ192PYDN 3
1179 REYQ216PYDN 3
1180 REYQ240PYDN 3
1181 REYQ72PATJ 3
1182 REYQ96PATJ 3
1183 REYQ120PATJ 3
1184 REYQ144PATJ 3
1185 REYQ168PATJ 3
1186 REYQ192PATJ 3
1187 REYQ72PAYD 3
1188 REYQ96PAYD 3
1189 REYQ120PAYD 3
1190 REYQ144PAYD 3
1191 REYQ168PAYD 3
1192 REYQ192PAYD 3
1193 RXYQ144PAYD 3
1194 RXYQ144PATJ 3
1195 RXYQ168PATJ 3
1196 RXYQ216PTJUR 3
1197 RXYQ240PTJUR 3
1198 RXYQ168PAYD 3
1199 RXYQ192PAYD 3
1200 RXYQ216PYDNR 3
1201 RXYQ240PYDNR 3
1202 REYQ216PYDNR 3
1203 REYQ240PYDNR 3
1204 REYQ216PTJUR 3
1205 REYQ240PTJUR 3
1206 RXYQ192PATJ 3
1207 REYHQ16P8W1B 3
1208 CMSQ200A7W1B 3
1209 CMSQ250A7W1B 3
1210 RWEYQ60MTJU 1
1211 RWEYQ72MTJU 1
1212 RWEYQ84MTJU 1

Commissioning Manual EM11A021DCM601A51 intelligent Touch Manager
68
No. Model name Type
1213 RWEYQ144MTJU 1
1214 RWEYQ168MTJU 1
1215 RWEYQ216MTJU 1
1216 RWEYQ252MTJU 1
1217 RWEYQ84PTJU 1
1218 RWEYQ72PTJU 1
1219 RWEYQ168PTJU 1
1220 RWEYQ144PTJU 1
1221 RWEYQ252PTJU 1
1222 RWEYQ216PTJU 1
1223 RXYMQ36MVJU 1
No. Model name Type
1224 RXYMQ48MVJU 1
1225 RZQ18PVJU 3
1226 RZQ24PVJU 3
1227 RZQ30PVJU 3
1228 RQYQ140P 3
1229 RQYQ180P 3
1230 RQCYQ280P 3
1231 RQCYQ360P 3
1232 RQCYQ460P 3
1233 RQCYQ500P 3
1234 RQCYQ540P 3
No. Model name Type
1235 RQYQ8PY1 1
1236 RQYQ10PY1 1
1237 RQYQ12PY1 1
1238 RQYQ14PY1 1
1239 RQYQ16PY1 1
1240 RQYP615A 1
1241 RQYP680A 1
1242 RQYP730A 1
1243 RQYP785A 1
1244 RQYP850A 1
1245 RQCEQ280P 3
No. Model name Type
1246 RQCEQ360P 3
1247 RQCEQ460P 3
1248 RQCEQ500P 3
1249 RQCEQ540P 3
1250 RQCEQ636P 3
1251 RQCEQ712P 3
1252 RQCEQ744P 3
1253 RQCEQ816P 3
1254 RQCEQ848P 3

Commissioning Manual EM11A021DCM601A51 intelligent Touch Manager
69
4-13 Leakage CheckLeakage Check is a function available in VRV III or later outdoor units. It checks refrigeration
systems for leakage. Leakage Check can be carried our centrally for multiple refrigeration systems
installed in a property by sending instructions from the iTM to the outdoor units via DIII-NET. Using
the Schedule Control function, you can make the outdoor units run Leakage Check at a specified
date and time. You can also run Leakage Check manually on site. Furthermore, Leakage Check
can also be run from the Web Remote Management. (See page 90)
The Leakage Check takes approximately 180 minutes to complete.
Before starting leakage check, inform the user of NOTE described on page 80.
NOTE
The following shows the system configuration diagram.
System Configuration
Multi air conditioners for building
DIII-NET
iTM
DIII-NET
Multi air conditioners for building
D3Plus adapter for iTM
Refrigerant Charging Operation
• By schedule• Manually
Router
Web Remote Management
HUB
Web Remote Management
LAN port
Scope of this specification
Service person
Service personBy schedule Manually
internet
intranet

Commissioning Manual EM11A021DCM601A51 intelligent Touch Manager
70
Leakage Check functions
Category Function DescriptionUsage scene As
Web function
Reference pageSchedule Manual
Setup
Registration of Indoor Unit
Registers applicable indoor units to place them under maintenance when the outdoor unit in the same refrigeration system is subject to Leakage Check.
(Page 70)
Outdoor unit model type setting
Configures the model type of the outdoor unit.
(Page 62)
Operation
Schedule control
The instruction to run Leakage Check is sent to the target outdoor unit at the date and time set up using the Schedule Control function.
– (Page 72)
Manual operation
The instruction to run Leakage Check is sent to the target outdoor unit right after the command is input.
– (Page 75)
Monitoring
Leakage calculation
Calculates the leakage based on the data received from the outdoor units.
CSV file outputCSV file output enables monitoring of the outdoor unit’s Leakage Check results.
(Page 77)
History HistorySettings modifications, sent instructions, and errors are recorded as history.
Preparations
The following preparations are necessary for running Leakage Check.
• Refrigerant Charging Operation
Refrigerant Charging Operation must have been run during installation and trial of outdoor units.
Leakage Check is not possible if Refrigerant Charging Operation has not been run because
without it, the outdoor unit cannot recognize the “amount of automatically charged refrigerant”
(amount of refrigerant charged by the outdoor unit using Refrigerant Charging Operation).
• Outdoor unit’s address setting (See Installation Manual (EM11A016))
The outdoor unit’s address is necessary. Make sure addresses are set up in advance.
Registering indoor units
Manually register indoor units that belong to the refrigeration system of each outdoor unit based on
the installation information.
1. Log into SE Mode from the Menu List screen and display the Service Settings tab (see page 7).

Commissioning Manual EM11A021DCM601A51 intelligent Touch Manager
71
Touch the Outdoor Setup button on the Service Settings tab to display the Outdoor Setup screen
(see page 10).
(1)
(2)
2. (1) is a list of outdoor units registered in iTM. The Charge item displays the current Refrigerant
Charging Operation status for each outdoor unit.
Completed: Refrigerant Charging Operation is complete
Uncompleted: Refrigerant Charging Operation is incomplete
Unknown: Refrigerant Charging Operation status is unknown due to communication error
The other items display the address and name of the outdoor units, as well as the number of
indoor units registered with the selected outdoor unit, and registered schedules.
3. Selecting an outdoor unit and touching the Register button (2) displays the Registration of
Indoor Unit screen.
(4)(3)

Commissioning Manual EM11A021DCM601A51 intelligent Touch Manager
72
4. (3) is the Registered Indoor Unit list.
(4) is the Unregistered Indoor Unit list. Select the indoor unit you want to register and touch the
Add button to register. To unregister, select the indoor unit from (3) and touch the Remove button
to move it to (4). The indoor unit becomes unregistered.
Touch the OK button to commit the indoor unit registration and close the screen.
Running Leakage Check by Schedule Control
Set up a schedule program to run Leakage Check.
(5)
(6)
1. Select an outdoor unit from the Outdoor Unit list (5) and touch the Schedule button (6) to
display the Schedule Setup screen.
(7)
(8) (9) (10)

Commissioning Manual EM11A021DCM601A51 intelligent Touch Manager
73
2. The management point name of the target outdoor unit appears in the Name field (7).
You may set up to four schedule programs per outdoor unit.
Enable/disable the schedule program in (8).
Set up the Leakage Check start date in (9). Touch the Modify button and enter the time in the
Time Input dialog that appears. The range of values you can specify is January 1, 2010 to
December 31, 2036.
(10) displays the start time. Touch the Modify button and enter the time in the Time Input dialog
that appears. The range of values you can specify is “00:00 to 23:59 (AM12:00 to PM11:59 when
12-hour clock is used)”. Click the OK button to commit the program and close the screen.
• Date and time are displayed according to the locale settings.
• For duplicated execution times, the program with the smaller number has precedence.
• When the system time is adjusted for clock drift, the execution of a scheduled Leakage
Check changes as follows for an adjustment that stretches over the program execution
time, depending on the extent of the adjustment.
Condition Extent of adjustmentOperation when execution time falls within
the adjustment
When time is advanced
Fine adjustment (Up to +120 sec)
Executed immediately after the time is modified
Significant adjustment (+120 sec or more)
Not executed
When time is put back
Fine adjustment (Up to −120 sec)
Not executed
Significant adjustment (−120 sec or more)
Executed at the specified time (duplicated execution)
• On DST start date, a time gap results while on the end date, a duplicated period of time
results.
If a scheduled program’s execution time falls within these periods of time, it operates as
follows.
Set to the time gap on DST start date → Not executed (The specified time does not occur)
Set to the duplicated period of time on DST end date → Executed twice (The specified
time occurs twice)
NOTE

Commissioning Manual EM11A021DCM601A51 intelligent Touch Manager
74
Copying a schedule program
1. You may set the same program set up in the Schedule Setup screen to another outdoor unit.
(11)
Touch the Schedule Copy button (11) to display the Copy screen.
(12)
(13) (14)
2. The name of the outdoor unit source of copy appears in the Copy from field (12).
Display the name of the outdoor unit destination of copy in the Copy to list (13).
The Available list (14) is a list of outdoor units that can be registered as copy destination.
Selecting an outdoor unit and touching the Add button, registers it in the Copy to list (13)
To unregister as copy destination, select the indoor unit from (13) and touch the Remove button
to move it to (14). The indoor unit becomes unregistered.
Touch the OK button to overwrite the schedule program and close the dialog.
Example: The above screens shows the operation when the schedule program set up for an
outdoor unit named “od 1” is copied to an outdoor unit named “od 2”.

Commissioning Manual EM11A021DCM601A51 intelligent Touch Manager
75
Starting Leakage Check by manual operation
Start Leakage Check by manual operation.
(15)(16)
1. Select the target outdoor unit from the Outdoor Unit list (15) and touch the Check Start button
(16). A confirmation dialog appears. Touching the Yes button starts a check to determine whether
the statuses of the target outdoor unit and indoor units registered in the refrigeration system of
the outdoor unit are suitable for starting Leakage Check. If they are in normal status, the
Leakage Check starts.
2. Statuses unsuitable for starting Leakage Check are as follows.
• Target outdoor unit
Is under maintenance by System Settings.
Is undergoing Leakage Check.
Is experiencing communication error.
Refrigerant Charging Operation is incomplete.
• Indoor units registered in the same refrigeration system as the target outdoor unit
At least one is experiencing equipment error.
At least one is under maintenance.
At least one is in emergency stop.

Commissioning Manual EM11A021DCM601A51 intelligent Touch Manager
76
Executing a Leakage Check places the outdoor unit and indoor units registered in the same
refrigeration system under “Maintenance”. “Maintenance” is released upon Leakage Check
completion (If the iTM is stopped when the Leakage Check completes, “Maintenance” is
released at power recovery).
After staring Leakage Check, check that an appropriate indoor unit is “Under Maintenance”.
Also, upon completion of a Leakage Check run, check on the History screen if no
communication error has occurred with outdoor units and, if any error is found, run Leakage
Check again.
NOTE
Stopping Leakage Check by manual operation
Stop Leakage Check by manual operation.
(17)
(18)
1. Select the target outdoor unit from the Outdoor Unit list (17) and touch the Check Stop button
(18). A confirmation dialog appears. Touching the Yes button starts to check the target outdoor
unit and indoor units registered in the refrigeration system. If they are normal, the Leakage
Check for the outdoor unit is stopped. If a communication error occurs with the target outdoor
unit, the Leakage Check cannot be stopped.
When the Leakage Check stops, the “Maintenance” status placed on the outdoor unit and
indoor units registered in the same refrigeration system is released.
NOTE

Commissioning Manual EM11A021DCM601A51 intelligent Touch Manager
77
Outputting the Leakage Check results to a CSV file
Output the Leakage Check results to a CSV file.
(19)
(20)
1. Insert a USB memory into the iTM and touch the CSV Output button (20). A confirmation dialog
appears. Touching the Yes button outputs to the USB memory the Leakage Check results for all
outdoor units registered in the Outdoor Unit list (19) as a CSV file named LeakageCheck.csv. If
a file with the same name already exists, the Leakage Check results are saved by naming the
file LeakageCheck+sequential number (1 to 9). If there are no more sequential numbers that can
be used, an error dialog is displayed and the output to CSV file aborted.
When operation is via Web connection, the CSV is output to the HDD of the PC connected
to the Web.
NOTE
The CSV file format specification is as follows.
Controller name
Date, Time
Version number
Title
Check Date/Leakage Amount Leakage AmountCheck DateLeakage AmountCheck DateLeakage AmountCheck Date
b
zyx
.. ..
Outdoor 80Outdoor 2Outdoor 1
Up to 160 columns
intelligent Touch Manager
2010/11/17 PM 2:00
Ver 1.00.00
Leakage Check Result
. . .
. . .
. . .
. . .
. . .
. . .
. . .
2010/5/10AM1:00
2010/11/10AM2:00
a 2010/5/23AM2:30
2010/11/10AM2:00
2010/5/10AM1:00

Commissioning Manual EM11A021DCM601A51 intelligent Touch Manager
78
• The calculated leakage amount is only a guide.
• The check result may not be correct if the power is lost during leakage check.
NOTE
• Leakage check may fail depending on the room temperature.
Moderate the room temperature by conducting the cooling or heating operation before
starting leakage check.
* Recommended temperature
Room temperature: 22°C – 30°C
Outdoor temperature: 5°C – 35°C
• The indoor unit stops after a leakage check.
However, indoor units not connected to the remote control continue operating.
Furthermore, these indoor units may operate in a different mode from that before the leakage
check.
For this reason, set up a schedule to stop or start the indoor units in a specific operation
mode as required.
(Set up the schedule to stop/start the indoor units after 180 minutes from the start of the
leakage check since iTM leakage check ends after 180 minutes.)
Check with the building janitor for any inconvenience if indoor units are stopped after the
leakage check.
• Always check the following in the history before checking the leakage check results.
Leakage check fails if an equipment error occurs during leakage check. Run leakage check
again after clearing the cause of the error.
CAUTION
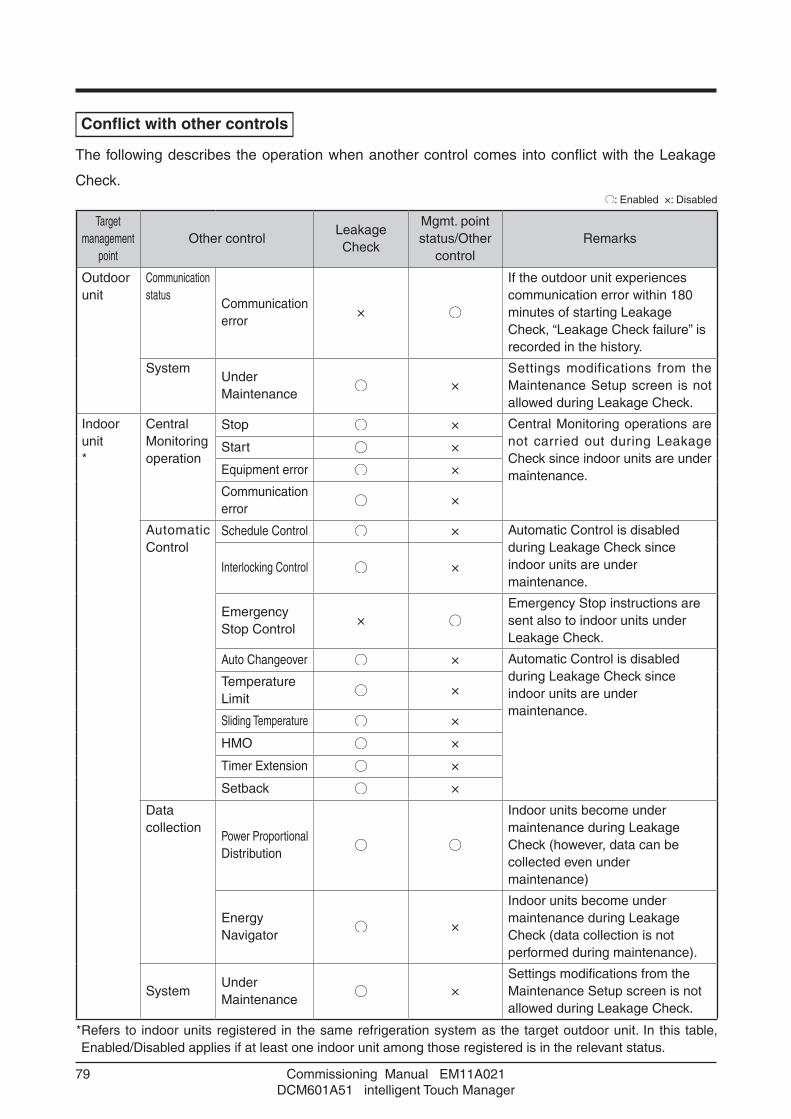
Commissioning Manual EM11A021DCM601A51 intelligent Touch Manager
79
Conflict with other controls
The following describes the operation when another control comes into conflict with the Leakage
Check.: Enabled ×: Disabled
Target management
pointOther control
Leakage Check
Mgmt. point status/Other
controlRemarks
Outdoor unit
Communication status
Communication error
×
If the outdoor unit experiences communication error within 180 minutes of starting Leakage Check, “Leakage Check failure” is recorded in the history.
SystemUnder Maintenance
×Settings modifications from the Maintenance Setup screen is not allowed during Leakage Check.
Indoor unit *
Central Monitoring operation
Stop × Central Monitoring operations are not carried out during Leakage Check since indoor units are under maintenance.
Start ×
Equipment error ×
Communication error
×
Automatic Control
Schedule Control × Automatic Control is disabled during Leakage Check since indoor units are under maintenance.
Interlocking Control ×
Emergency Stop Control
×Emergency Stop instructions are sent also to indoor units under Leakage Check.
Auto Changeover × Automatic Control is disabled during Leakage Check since indoor units are under maintenance.
Temperature Limit
×
Sliding Temperature ×
HMO ×
Timer Extension ×
Setback ×
Data collection
Power Proportional Distribution
Indoor units become under maintenance during Leakage Check (however, data can be collected even under maintenance)
Energy Navigator
×
Indoor units become under maintenance during Leakage Check (data collection is not performed during maintenance).
SystemUnder Maintenance
×Settings modifications from the Maintenance Setup screen is not allowed during Leakage Check.
* Refers to indoor units registered in the same refrigeration system as the target outdoor unit. In this table, Enabled/Disabled applies if at least one indoor unit among those registered is in the relevant status.

Commissioning Manual EM11A021DCM601A51 intelligent Touch Manager
80
• Inform the user that all units are forced to operate in the cooling mode during leakage check.
• Caution the user not to change the time setting of iTM during leakage check.
• Power consumed by the indoor unit during leakage check is also proportionally distributed.
• Leakage check and power limit control (*) cannot be conducted at the same time.
(i) If power limit control is set to [Demand 3(Forced thermo OFF)], it will be conducted before
leakage control.
(ii) If power limit control is set to [Demand 1,Demand 2], leakage check will be conducted first.
* In power limit control, a command is sent to the outdoor unit via the outdoor unit external
control adapter (DTA104A * * ).
• Leakage check and iTM energy saving control cannot be conducted at the same time.
Leakage check will be conducted before energy saving control.
NOTE

Commissioning Manual EM11A021DCM601A51 intelligent Touch Manager
81
Failure mode
The following describes the failure modes of the Leakage Check.
Scene Failure mode Impact to users Cause
Handling
Notification methodRecovery method
When How
Preparation Forget to run Refrigerant Charging Operation
Cannot run Leakage Check
Cannot recognize the amount of automatically charged refrigerant
When the [Check Start] button is touched
• An error message indicating No Auto Charge is displayed
• No Auto Charge is recorded in the history
Touch the [Check Start] button after running Refrigerant Charging Operation
At schedule trigger
• No Auto Charge is recorded in the history
Set up the schedule again after running Refrigerant Charging Operation
Forgot the outdoor unit address
Cannot conduct Leakage Check
A check command cannot be sent because the outdoor unit address of the command destination is unknown
When [Check Start] is pressed
• The message of communication error is displayed
• The history of communication errors is saved
Press [Check Start] again after setting the outdoor unit address
At schedule trigger
• The history of communication errors is saved
Set the schedule again after setting the outdoor unit address
Pre-engineering
Forget to register indoor units
• Possibility of malfunction since Automatic Control is not disabled
• Incorrect Leakage Check results
Indoor units in the refrigeration system are not placed under maintenance because refrigeration system information for the outdoor unit/indoor units is unknown
During Leakage Check
• Indoor unit management point’s icon (the target indoor unit’s icon do not go on)
* Make the operating procedure include a step that checks whether the target indoor unit’s icon go on after Leakage Check is started
Touch the [Check Stop] button and stop the Leakage Check. Register the indoor units and touch the [Check Start] button again, or set up the schedule again
Indoor unit registration is incorrect
• Possibility of malfunction since Automatic Control is not disabled
• Other than the target indoor units are placed under maintenance and Automatic Control on them, disabled
• Incorrect Leakage Check results
Since the refrigeration system information for the outdoor unit/indoor units is incorrect, the indoor units of the target refrigeration system are not placed under maintenance, or other than the target indoor units are placed under maintenance
During Leakage Check
• Indoor unit management points’ icon
* Make the operating procedure include a step that checks whether the target indoor unit’s icon go on after Leakage Check is started
Touch the [Check Stop] button and stop the Leakage Check. Modify the indoor unit registration and touch the [Check Start] button again, or set up the schedule again
Schedule setup
Set up an overlapping program
None — Only the program with the smallest number will be executed

Commissioning Manual EM11A021DCM601A51 intelligent Touch Manager
82
Scene Failure mode Impact to users Cause
Handling
Notification methodRecovery method
When How
Leakage Check
instruction
Manual Check Start failure
Leakage Check cannot be run
• Outdoor units are under maintenance
• Outdoor units are communication error
• Outdoor units are auto charge not completed
• Indoor units are equipment error
• Indoor units are under maintenance
• Indoor units are in emergency stop
When the [Check Start] button is touched
• Cause of failure is displayed as an error message
• Cause of failure is recorded in the history
Touch the [Check Start] button again after recovering the cause of failure
Schedu led Check Start failure
Leakage Check cannot be run
At schedule trigger
• Cause of failure is recorded in the history
Set up the schedule again after recovering the cause of failure
iTM judged that it successfully started Leakage Check, but outdoor unit has not started Leakage Check
• Output of incorrect check results
• Inability to cancel “Under Maintenance” status until 180 minutes have elapsed
The Check Start instruction was sent to an outdoor unit, but the sending attempt failed due to a communication error and then iTM was turned OFF before it judges that the sending attempt was failed
When an iTM start time of 180 minutes has elapsed since the start of Leakage Check
• Maintenance status is canceled and Leakage Check results are made viewable
Touch the Check Start button or set up the schedule again after recovery from the cause of failure
iTM judged that it failed to start Leakage Check, but outdoor unit has started Leakage Check
• Outdoor unit remains in a Leakage Check run, cooling indoor air unintendedly
• Ability to re-send Leakage Check instruction to outdoor units under maintenance
The Check Start instruction was sent to an outdoor unit to start a Leakage Check run, but communication with the outdoor unit was disconnected before iTM receives a response
• When the Check Start instruction was sent
• When a communication error occurred
• Leakage Check Start failure is recorded in the history
• Communication failure is recorded into the history
Solve the communication error and start a Leakage Check run again when an iTM start time of 180 minutes has elapsed
iTM judged that it completed Leakage Check, but outdoor unit has not stopped Leakage Check
• Outdoor unit remains in a Leakage Check run, cooling indoor air unintendedly
• Ability to re-send Leakage Check instruction to outdoor units under maintenance
Communication was disconnected when Leakage Check was stopped, but iTM has not yet judged that it is a communication error
• When the Check Stop instruction was sent
• When a communication error occurred
• Leakage Check Stop failure is recorded in the history
• Communication failure is recorded into the history
Solve the communication error and start a Leakage Check run again when an iTM start time of 180 minutes has elapsed

Commissioning Manual EM11A021DCM601A51 intelligent Touch Manager
83
Scene Failure mode Impact to users Cause
Handling
Notification methodRecovery method
When How
During Leakage Check
Emergency Stop signal has been received during Leakage Check
Emergency stop cannot stop indoor units
Indoor units are under maintenance
At emergency stop signal generation
• The emergency stop signal is sent and indoor units emergency stopped
Touch the [Check Start] button or set up the schedule again after the Emergency Stop is released
Time has been modified during Leakage Check
None — Judgment is possible because the results are viewable when an iTM start time of 180 minutes has elapsed since the start of Leakage Check even after a change in the scheduled time. However, modifying the time during Leakage Check should be avoided from the operation viewpoint
iTM stops during Leakage Check due to power outage
None — When iTM starts up after power recovery, it judges the end time from the Leakage Check start time and current time. If the Leakage Check has not been completed, it is continued and the results checked after completion
iTM and outdoor unit stopped simultaneously during Leakage Check due to power outage
Leakage Check is interrupted
The outdoor unit interrupts Leakage Check in case of power outage
Error in the communication between iTM and outdoor unit during Leakage Check
None — When a communication error occurred
• Leakage Check failure is recorded in the history
• Maintenance status is released
Touch the [Check Start] button again or set up the schedule again after recovering the cause of failure
Outdoor unit experiences power outage during Leakage Check
Leakage Check is interrupted
The outdoor unit interrupts Leakage Check in case of power outage
When an iTM start time of 180 minutes has elapsed since the start of Leakage Check
• Maintenance status is released and the Leakage Check results checked
Touch the [Check Start] button again or set up the schedule again after recovering the cause of failure
Attempt to release Maintenance status of the target management point from System Settings during Leakage Check
• The outdoor unit/indoor units malfunction because Automatic Control is not disabled
• Leakage Check instruction can be sent again
Automatic Control are not disabled Whether Leakage Check is been run or not cannot be checked
When releasing the Maintenance status
• Transition to the Maintenance screen is prevented during Leakage Check
—
Leakage Check results
acquisition
Outdoor unit experiences communication error after Leakage Check end
None — There is no problem since the Leakage Check results are already received
iTM stops after Leakage Check end due to power outage
None — There is no problem since the Leakage Check results are already received

Commissioning Manual EM11A021DCM601A51 intelligent Touch Manager
84
Optional Functions
5. Service Settings
5-1 ActivationIn addition to standard functions, iTM provides various optional functions suited to users’ needs.
There are two types of optional functions: optional maker functions sold by Daikin Industries, Ltd.
and dealer options sold by dealers.
This chapter describes the procedure to activate optional maker functions.
Acquiring the Activation key
To activate an optional maker function, you must acquire the Activation key before making settings
on site.
Since Activation keys are available at the Daikin Distributor’s Page, you need a PC connected to
the Internet.
To obtain the key, the MAC address indicated on the iTM main unit and the software ID shown in
the license form supplied with the main unit will be requested. Check them in advance. Be sure to
have them handy.
1. Access to Daikin Distributor’s Page using the Web browser on your PC.
http://global.daikin.com/distributor/index.html
Enter your user name and password to login and go to page that issues Activation keys.
2. Enter the MAC Address and Option Software ID. Make a note of the Activation key that is
displayed.
iTM does not require the entry of the basic software ID.
NOTE
Entering the Activation key
The following describes the procedure to enable the optional maker function on site based on the
Activation key acquired in advance.
1. Log into SE Mode from the Menu List screen and display the Service Settings tab (see page 7).
Touch the Activation button on the Service Settings tab to display the Activation Setup screen
(see page 10).

Commissioning Manual EM11A021DCM601A51 intelligent Touch Manager
85
(1)
(2)
(3)
2. The MAC address of the iTM unit appears in MAC Address (1).
(2) is a list of currently enabled optional maker functions.
3. To enable a new optional maker function, touch the Add button (3). Enter the Activation key for
the optional maker function using the text input keyboard that appears and touch the OK button.
If the key is correct, the function is added to the list (2).
4. Touch the OK button on the Activation Setup screen.
A confirmation dialog with the message “Settings have been changed. Reboot now to enable
new settings?” appears. Touch the Yes button and restart the iTM unit.

Commissioning Manual EM11A021DCM601A51 intelligent Touch Manager
86
5-2 Dealer Option SetupThe following describes the procedure to enable dealer options.
1. Log into SE Mode from the Menu List screen and display the Service Settings tab (see page 7).
Touch the Dealer Option Switch button on the Service Settings tab to display the Dealer Option
screen (see page 10).
(1) (2)
Enable (1) is a list of enabled dealer options.
Disable (2) is a list of disabled dealer options.
2. To enable a new optional function, select it from (2) and touch the Add button. It is added to (1)
and enabled.
To disable, select the optional function from (1) and touch the Remove button. Touch the Yes
button on the confirmation dialog that appears. It is moved to (2) and disabled.
3. When finished, touch the OK button. A confirmation dialog with the message “Settings have
been changed. Reboot now to enable new settings?” appears. Touch the OK button and restart
the iTM unit.

Commissioning Manual EM11A021DCM601A51 intelligent Touch Manager
87
Operating Optional Functions
6. System Settings
6-1 NetworkiTM allows you to operate it remotely via the Internet, or receive notification via E-mail in the case
of an error. To use these functions, you must set up the network on the iTM unit.
The following describes how to set this up.
1. Touch the Network button on the System Settings tab of the Menu List screen to display the
Network screen (see page 12).
(1)(2)(3)
(4)(5)(6)(7)
<Name Input dialog> <IP Address Input dialog>

Commissioning Manual EM11A021DCM601A51 intelligent Touch Manager
88
2. The current settings are displayed. Touch the Modify button to modify the settings in the Input
dialog that appears. For information necessary for the settings, consult your network
administrator.
(1) Controller name
(2) Host name
(3) IP address
(4) Subnet mask
(5) Default gateway address
(6) Preferred DNS address
(7) Alternate DNS address
3. Set up the Web server port number.
(8)
Touch the Web Server button (8) to display the Web Server screen and set up the port number.

Commissioning Manual EM11A021DCM601A51 intelligent Touch Manager
89
(9)(10)
Select (9) to use the default port 80.
Selecting (10) displays the port number 8080. Touching the Modify button allows you to modify
the settings in the Numerical Input dialog that appears.
Touch the OK button to save and close the screen.
4. When finished, touch the OK button. A confirmation dialog appears.
5. A restart confirmation message is displayed. Touch the Yes button to reflect the setting and
restart the iTM.

Commissioning Manual EM11A021DCM601A51 intelligent Touch Manager
90
6-2 Web Remote ManagementThe iTM can be remotely operated via the Internet or local network.
Ethernet (100Base-T or higher)
PC (Web browser)
PC (Web browser)
Internet
iTM
Firewall
For settings necessary on the iTM unit, see “6-1 Network”. This chapter describes the PC setup
procedure.
To use the Web Remote Management functions, you need to separately prepare a PC and software
such as a Web browser. The requirements for the PC are as indicated in the table below.
Function Requirement
PC for Web Remote Management OS: Windows XP Professional SP3 (32 bit) Windows VISTA Business SP2 (32 bit) Windows 7 Professional SP1 (32bit, 64bit)
CPU: Equivalent to Intel Core 2 Duo 1.2 GHz or higherMemory: 2 GB or moreFree HDD space: 10 GB or moreNetwork: 100Base-TX or higherDisplay resolution: 1024 x 768 or higher
Network 100Base-TXReal transfer rate: 115 kbps or higher
Supported security software McAfee 2011Norton 2011Virus Buster 2011
Flash Player Version 11.1
Web browser Internet Explorer 8, 9Firefox 10.0

Commissioning Manual EM11A021DCM601A51 intelligent Touch Manager
91
Connecting the PC and iTM
Connect the PC and iTM unit into a network using an Ethernet cable.
Ethernet cables use for connecting networks come in two types: straight and cross. Connect the PC
and iTM unit by referring to the connection diagrams below.
Straight cable connection diagram Cross cable connection diagram
When connecting the PC and iTM directly:
Use a 100Base-TX or higher Ethernet cross cable.
Ethernet (Cross cable)
iTMPC
ETHERNET100BASE-TX
When connecting the PC and iTM via a hub:
Use a 100Base-TX or higher Ethernet straight cable.
Ethernet (Straight cable)
iTMPC
Hub
ETHERNET100BASE-TX

Commissioning Manual EM11A021DCM601A51 intelligent Touch Manager
92
Checking the Web browser and Flash Player versions
1. Start up the Web browser (Internet Explorer) and select [About] from the [Help] menu.
In the case of Firefox, you can check by selecting [Help] → [About Mozilla Firefox].
NOTE
Check that the version is 8.0.xxxx.xxxxxxx or 9.0. xxxx.xxxxxxx. (The xxx portion may be any)
2. Enter the address of the site for checking the Flash Player version: http://www.adobe.com/
software/flash/about/

Commissioning Manual EM11A021DCM601A51 intelligent Touch Manager
93
Check that the version is 11.1.xxx.xx. (The xxx portion can be any)
Operation cannot be guaranteed if both the Web browser and Flash Player are not of the
specified version. Be sure to use the version described in the table.
Necessary software can be downloaded from Microsoft, Adobe, and other sites for free.
NOTE
Setting up the IP address (Windows XP Professional)
1. Select [Start] → [Control Panel].
2. Click [Network and Internet Connections].

Commissioning Manual EM11A021DCM601A51 intelligent Touch Manager
94
3. Click [Network Connections].
4. Double click [Local Area Connection].

Commissioning Manual EM11A021DCM601A51 intelligent Touch Manager
95
5. Select [Properties].
6. Select [Internet Protocol (TCP/IP)] and click [Properties].
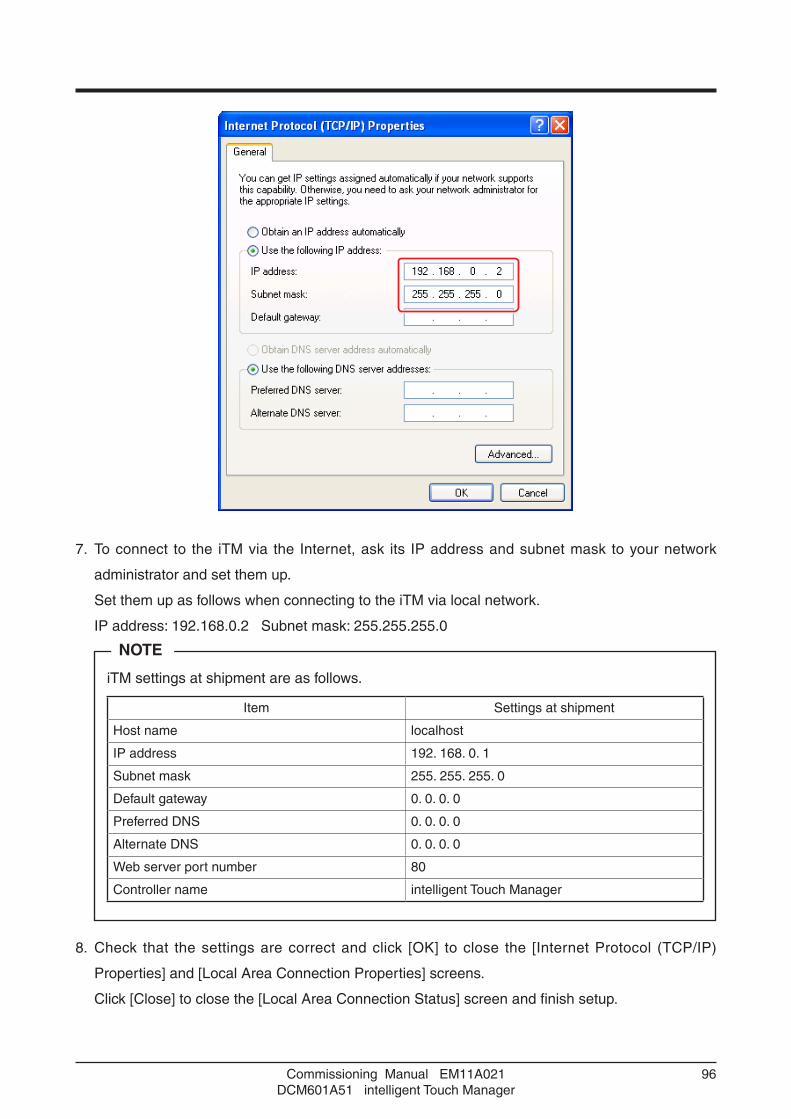
Commissioning Manual EM11A021DCM601A51 intelligent Touch Manager
96
7. To connect to the iTM via the Internet, ask its IP address and subnet mask to your network
administrator and set them up.
Set them up as follows when connecting to the iTM via local network.
IP address: 192.168.0.2 Subnet mask: 255.255.255.0
iTM settings at shipment are as follows.
Item Settings at shipment
Host name localhost
IP address 192. 168. 0. 1
Subnet mask 255. 255. 255. 0
Default gateway 0. 0. 0. 0
Preferred DNS 0. 0. 0. 0
Alternate DNS 0. 0. 0. 0
Web server port number 80
Controller name intelligent Touch Manager
NOTE
8. Check that the settings are correct and click [OK] to close the [Internet Protocol (TCP/IP)
Properties] and [Local Area Connection Properties] screens.
Click [Close] to close the [Local Area Connection Status] screen and finish setup.

Commissioning Manual EM11A021DCM601A51 intelligent Touch Manager
97
Setting up the IP address (Windows Vista Business)
1. Select [Start] → [Control Panel].
2. Click [Network and Internet].
3. Click [Network and Sharing Center].

Commissioning Manual EM11A021DCM601A51 intelligent Touch Manager
98
4. Click [Manage network connections].
5. Double click [Local Area Connection].

Commissioning Manual EM11A021DCM601A51 intelligent Touch Manager
99
6. Click [Properties].
7. Select [Internet Protocol Version 4 (TCP/IPv4)] and click [Properties].

Commissioning Manual EM11A021DCM601A51 intelligent Touch Manager
100
8. To connect to the iTM via the Internet, ask its IP address and subnet mask to your network
administrator and set them up.
Set them up as follows when connecting to the iTM via local network.
IP address: 192.168.0.2 Subnet mask: 255.255.255.0
For iTM settings at the time of shipment, see page 96.
NOTE
9. Check that the settings are correct and click [OK] to close the [Internet Protocol Version 4 (TCP/
IPv4) Properties] and [Local Area Connection Properties] screens.
Click [Close] to close the [Local Area Connection Status] screen and finish setup.

Commissioning Manual EM11A021DCM601A51 intelligent Touch Manager
101
Setting up the IP address (Windows 7 Professional)
1. Select [Start] → [Control Panel].
2. Click [Network and Internet].
3. Click [Network and Sharing Center].

Commissioning Manual EM11A021DCM601A51 intelligent Touch Manager
102
4. Double click [Local Area Connection].
5. Select [Properties].

Commissioning Manual EM11A021DCM601A51 intelligent Touch Manager
103
6. Select [Internet Protocol Version 4 (TCP/IPv4)] and click [Properties].
7. To connect to the iTM via the Internet, ask its IP address and subnet mask to your network
administrator and set them up.

Commissioning Manual EM11A021DCM601A51 intelligent Touch Manager
104
Set them up as follows when connecting to the iTM via local network.
IP address: 192.168.0.2 Subnet mask: 255.255.255.0
For iTM settings at the time of shipment, see page 96.
NOTE
8. Check that the settings are correct and click [OK] to close the [Internet Protocol Version 4 (TCP/
IPv4) Properties] and [Local Area Connection Properties] screens.
Click [Close] to close the [Local Area Connection Status] screen and finish setup.
Precautions when using Internet Explorer on Windows Vista and Windows 7
In Windows Vista and Windows 7, some operations are restricted by the User Account Control
(UAC) regardless of the user type (administrator/regular user). For that reason, to use Internet
Explorer on Windows Vista or Windows 7, you must “turn off” the “Protected Mode” of the Internet
Explorer.
To “turn off” the “Protected Mode” of your Internet Explorer, follow the steps below.
However, be warned that this method may expose the system to security vulnerabilities. Be
sure you have understood its risks before using.
NOTE
(1) Select the tool.
(2) Open Internet Options.
(3) Deselect [Turn on Protected Mode].
(4) Click the OK button on the [Internet Options] window.
(5) Click the OK button on the [Warning] window.

Commissioning Manual EM11A021DCM601A51 intelligent Touch Manager
105
(1)
(2)
(3)(4)
(5)
Network Connection Check
Check whether the Ethernet connection between a PC and iTM is normal.
Carry out the following procedure from the PC.
<Windows XP> <Windows VISTA, Windows 7>

Commissioning Manual EM11A021DCM601A51 intelligent Touch Manager
106
1. From the Start menu of the PC, select “All Programs” → “Accessories” → “Command Prompt”.
Alternatively, select “Run” from the Start menu of the PC, enter “cmd” in Open and click the OK
button. (Windows XP)

Commissioning Manual EM11A021DCM601A51 intelligent Touch Manager
107
2. The command prompt starts up. Type “ping” followed by one single byte space and then the iTM
IP address, and press the Enter key. (In this example, the IP address is 192.168.0.1)

Commissioning Manual EM11A021DCM601A51 intelligent Touch Manager
108
3. If Lost=0(0% loss) is displayed, the Ethernet connection between the PC and the iTM unit is
normal.
If Lost=4(100% loss) is displayed, then the PC could not recognize the iTM unit. Check the
settings.
When a port number is set up in the network settings of the iTM unit, enter “:” followed by the
port number after the IP address.
(Example: If port number is 8080, enter 192.168.0.1:8080)
NOTE
Logging into Service Mode via Web Remote Management
The Service Mode is also available when managing the iTM remotely using this function, in the
same way as from the unit, if you have accessed the Web Remote Management function as
manager.
The procedure to log into Service Mode is similar as that from the unit, by clicking the four corners
of the browser’s window and entering the password. For details, see “2-2 Logging into Service
Mode”.

Commissioning Manual EM11A021DCM601A51 intelligent Touch Manager
109
iTM integrator Explanation
7. iTM integrator
7-1 Basic SetupIf you are sure that all connections have been made, proceed to the basic setup of the iTM
integrator. Here, “basic setup” means setting up the iTM integrator in preparation for controlling the
operation of your air conditioning system.
Turning on the power of the iTM integrator starts a setup program that lets you complete the basic
setup procedure. You can complete the basic setup procedure by following the instructions
displayed on the monitor display in steps.
The setting assignment made through this procedure may be changed at a later time.
The following sections appear in the order of the setup steps.
1. From your PC, access the Network Solution page of the Distributor’s Page. Then, download and
save the basic software onto the USB memory.
2. Publish the activation key of the basic software.
In the same way as in step 1, access the Network Solution page and then go to the Activation
key issue page.

Commissioning Manual EM11A021DCM601A51 intelligent Touch Manager
110
Select Basic software and enter the MAC address, Software ID, and User information of the iTM
integrator you want to install.
Write down the activation key that appears on the screen.
3. Powering on data backup battery
To retain the settings even in the event of a power outage, the iTM integrator has a built-in
battery. Because this battery is disabled by default, the first thing you should do is to enable it.
Open the front slide cover and turn the screws to remove the
front slide cover. Set the BACKUP switch to “ON”. < BACKUP switch >
4. Install the software. For the procedure, see 4-10 Installation.

Commissioning Manual EM11A021DCM601A51 intelligent Touch Manager
111
5. Setting up display language
Set up the display language used throughout the iTM integrator setup screens.
<Language Settings screen>
1. Touch the desired language from those listed on the screen.
The radio button next to the language you touched is now selected.
2. Touch OK.
The Locale Settings screen appears.
If the message “Turn ON Battery Backup switch” appears instead of the Locale Settings
screen, it means that you did not turn on the data backup battery. If so, refer to the step 3 on
the previous page to turn on the data backup battery. When done, touch the OK button
shown with the message on the screen. Then, the Locale setup screen appears.
NOTE
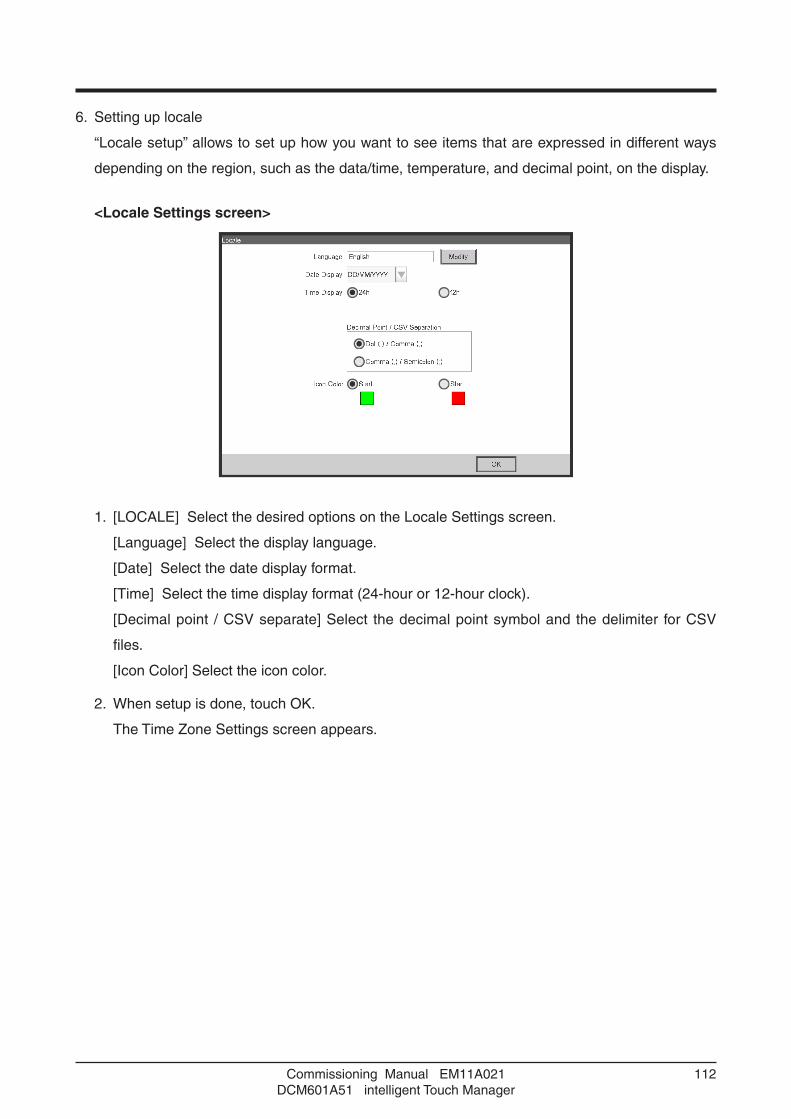
Commissioning Manual EM11A021DCM601A51 intelligent Touch Manager
112
6. Setting up locale
“Locale setup” allows to set up how you want to see items that are expressed in different ways
depending on the region, such as the data/time, temperature, and decimal point, on the display.
<Locale Settings screen>
1. [LOCALE] Select the desired options on the Locale Settings screen.
[Language] Select the display language.
[Date] Select the date display format.
[Time] Select the time display format (24-hour or 12-hour clock).
[Decimal point / CSV separate] Select the decimal point symbol and the delimiter for CSV
files.
[Icon Color] Select the icon color.
2. When setup is done, touch OK.
The Time Zone Settings screen appears.
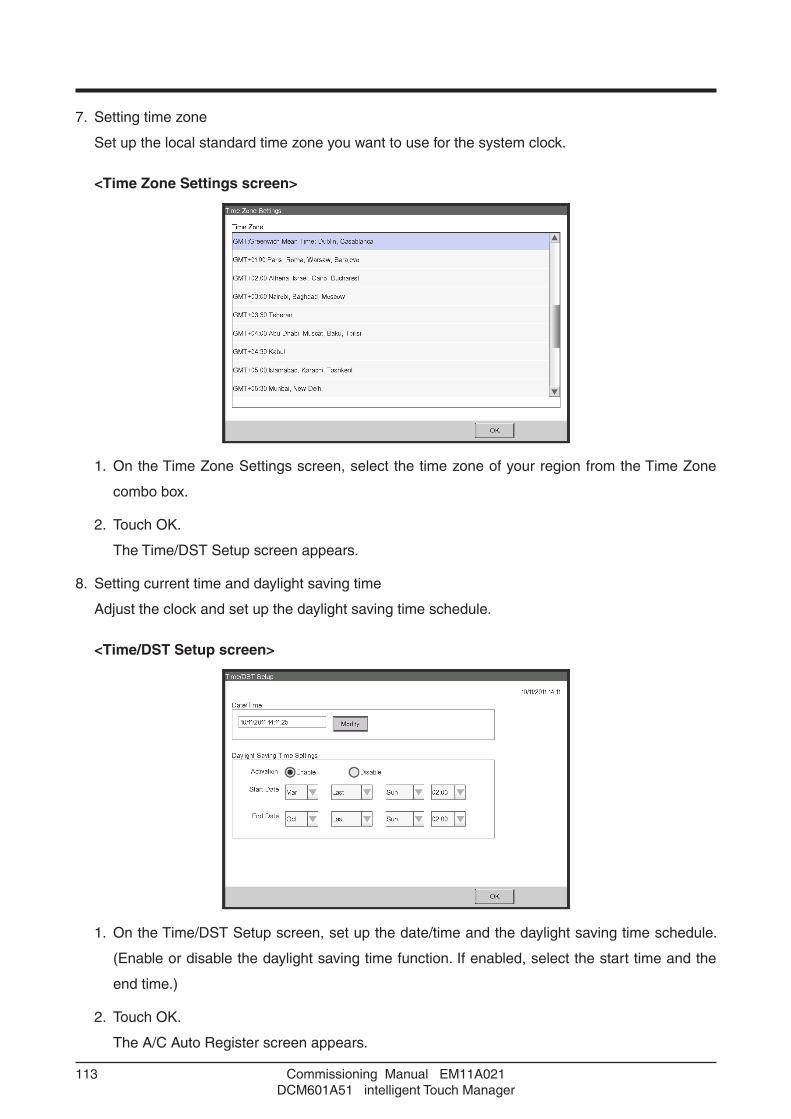
Commissioning Manual EM11A021DCM601A51 intelligent Touch Manager
113
7. Setting time zone
Set up the local standard time zone you want to use for the system clock.
<Time Zone Settings screen>
1. On the Time Zone Settings screen, select the time zone of your region from the Time Zone
combo box.
2. Touch OK.
The Time/DST Setup screen appears.
8. Setting current time and daylight saving time
Adjust the clock and set up the daylight saving time schedule.
<Time/DST Setup screen>
1. On the Time/DST Setup screen, set up the date/time and the daylight saving time schedule.
(Enable or disable the daylight saving time function. If enabled, select the start time and the
end time.)
2. Touch OK.
The A/C Auto Register screen appears.

Commissioning Manual EM11A021DCM601A51 intelligent Touch Manager
114
7-2 iTM integrator Service SettingsSet up the iTM integrator unit.
iTM integrator
USB port
USB memory
Power(100 240V)
LAN port
Web Remote Management
RouterWeb Remote Management
HUB
100Base-TX compliant
iTM iTM iTM iTM iTM
Individually working as iTM*
5 units connected
Internet
Internet
Service settings described in this chapter are for the iTM integrator unit. Settings for iTM units are
to be made in the respective iTM, or from the iTM integrator Standard View screen by accessing
the respective iTM.

Commissioning Manual EM11A021DCM601A51 intelligent Touch Manager
115
Service Settings Tab (Menu List Screen)
Displayed when you log into Service Mode from the iTM integrator Menu List screen.
The procedure to log into Service Mode is the same as that for the iTM. See “2-2 Logging into
Service Mode”.
(1) (2) (3) (4)
(1) Time Zone
Sets the difference between the Universal Time Coordinated (UTC) on the iTM integrator and the
local time.
The setup method is the same as that for the iTM. See “4-4 Time Zone”.
(2) History Mgmt. (Delete)
Deletes history records of a specified period from the iTM integrator’s history.
The setup method is the same as that for the iTM. See “4-6 History Mgmt. (Delete)”.
(3) Controller Access
Sets up the connection between the iTM integrator and iTM.
See the next page for a description of the setup method.
(4) Contact Info
Sets up contact information (three lines) for inquiries regarding errors in the iTM integrator system
and the like.
The setup method is the same as that for the iTM. See “4-11 Contact Info”.
All settings in this Service Settings tab are for the iTM integrator unit. Please note that they are
not for the iTM unit to be controlled using the iTM integrator.
NOTE

Commissioning Manual EM11A021DCM601A51 intelligent Touch Manager
116
Controller Access Setup
Set up the connection between the iTM to be controlled and the iTM integrator.
1. Display the Service Settings tab on the iTM integrator Menu List screen.
(1)
2. Touch the Controller Access button (1) to display the Controller Access Setting screen.

Commissioning Manual EM11A021DCM601A51 intelligent Touch Manager
117
(2)
3. Touch the Add button (2) to display the Controller screen.
(3)
(4)
4. Touch the Modify button (3) and enter the iTM IP address in the IP Address Input dialog that
appears.
Set up the iTM Web port number in (4). Select Default or User Setup using the radio button. If
you selected User Setup, then touch the Modify button to enter it in the Numerical Input dialog
that appears.
The possible value range, value at shipment, and initial value at new registration for the IP
address and Web server port number are as follows.

Commissioning Manual EM11A021DCM601A51 intelligent Touch Manager
118
Item Possible value rangeValue at shipment
Initial value at new registration
IP address set up in controller
“1 to 223(*)”.“0 to 255”.“0 to 255”.“0 to 255”* Addresses starting with “127” cannot be set up since they are for loopback.
— 192.168.0.1
Web server port number set up in controller
Default: 80User Setting: 1024 to 65535, in increments of 1
— Default: 80
5. When finished, touch the OK button to return to the Controller Access Setting screen.
(5)
(6)
(8)
(7)
The registered iTM’s IP address, Web server port number, connection status, and controller
name are listed in (5). You can register up to five iTM.
The Delete button (6) allows you to delete the iTM selected in the list.
The Order button (7) allows you to sort the list.
The Update button (8) allows you to acquire connection statuses and controller names and
refresh the list (5).
• You must enable the “Web Remote Management” option of each iTM you want to register.
See “5-2 Dealer Option Setup” in this manual.
• The controller name is the name set up in the network settings on the iTM unit. See “6-1
Network” in this manual.
• The controller name is automatically acquired if the communication between iTM
integrator and iTM is working normally.
NOTE

Commissioning Manual EM11A021DCM601A51 intelligent Touch Manager
119
6. When finished, touch the OK button to close the screen.
If there is an iTM whose connection status is “Disconnected”, the following Confirm dialog
appears.
To exit setup leaving the iTM disconnected, touch the Yes button. To return to the Controller screen,
touch the No button.
7. Open and close all the Layout Views of iTM.

Commissioning Manual EM11A021DCM601A51 intelligent Touch Manager
120
Appendix
8. Useful Information
8-1 TroubleshootingTroubleshooting table
Problem Checking method Cause Measure
Remote operation Cannot remotely operate iTM from the PC.
When iTM and PC are connected via hub, check whether they are correctly connected.
PC is not connected with iTM. Connect the iTM and PC via hub using LAN cables.
Cross cables are used as the LAN cable for connecting the iTM and PC via hub.
Use straight cables as LAN cable for connecting the iTM and PC via hub.
The hub is turned off. Turn on the hub.
Check that iTM is turned on. The iTM is turned off. Turn on the iTM.
Check whether the network settings on the PC are in conformity with the settings described in this manual.
The network settings on the PC are incorrect.
Modify the network settings on the PC so that they are in conformity with the settings described in this manual.
When iTM and PC are connected directly, check whether they are connected using the correct cable.
The LAN cable connecting the iTM and PC is a straight cable.
Connect the iTM and PC using a cross cable.
The procedure described in this manual has not been followed.
Install again by following the procedure in this manual.
DIII-NET All management points on the same DIII-NET are experiencing communication error.
Check whether the DIII-NET cable is correctly connected to the iTM DIII-NET port.
The DIII-NET cable is not correctly connected to the iTM DIII-NET port.
Connect the DIII-NET cable to the correct iTM DIII-NET port.
Check whether the DIII-NET cable between the iTM and outdoor unit is correctly connected.
The DIII-NET cable between the iTM and outdoor unit is not correctly connected.
Correctly connect the DIII-NET cable to the iTM and outdoor unit.
Some of the management points are experiencing communication error.
Check whether the group address is set up for the management points.
The group address is not set up for the management points.
Set up the correct group address for the management points.
Check whether the number of connected indoor units is exceeding the maximum number of indoor units that can be connected.
The total number of connected indoor units exceeds 64 groups, 128 units.
The total number of connected indoor units must not exceed 64 groups, 128 units.
Check whether the total wire length is exceeding the guidelines.
The total wire length exceeds 2000m. (For shielded cords, the total wire length exceeds 1500m)
The total wire length must not exceed 2000m (1500m for shielded cords).
Check the status of the management points against the wiring diagram.
Connection is done to the wrong DIII-NET port.
Connect to the correct DIII-NET port.
A management point experiences communication error intermittently.
Check the wire used. The wire used in DIII-NET has 3 or more cores.
Change to a wire with the designated specification.
Check the actual wire status against the wiring diagram.
The wiring on the DIII-NET is that of a branch wire after branching.
Connect DIII-NET again so that wiring does not become that of a branch wire after branching.
Check whether the number o f connected indoor units is exceeding the maximum number of indoor units that can be connected.
The total number of connected indoor units exceeds 64 groups, 128 units.
The total number of connected indoor units must not exceed 64 groups, 128 units.
Check whether the total wire length is exceeding the guidelines.
The total wire length exceeds 2000m. (For shielded cords, the total wire length exceeds 1500m)
The total wire length must not exceed 2000m (1500m for shielded cords).
Check the connection status of DIII-NET pin terminals.
DIII-NET pin terminals are not firmly connected.
Connect DIII-NET pin terminals firmly.
Check the status of the terminal board.
There are three or more wires connected to one terminal.
Limit the number of wires to connect to one terminal to two.
Check the installation status of other units.
There is a source of noise around the DIII-NET.
Separate DIII-NET from the source of noise.
A “Duplicated parent centralized control on DIII port” is output.
Check whether there is any other central unit set up as parent.
There are multiple central units set up as “parent”.
Disconnect all connectors for parent centralized control from central units other than the iTM. When an upper central unit is connected, disconnect the connector for parent centralized control from the iTM. (Change the DIII MASTER switch to SLAVE)
A “DIII port transmission buffer overflow” message is output.
Check the wire used. The wire used in DIII-NET has 3 or more cores.
Change to a wire with the designated specification.
Check the actual wire status against the wiring diagram.
The wiring on the DIII-NET is that of a branch.
Connect DIII-NET again so that wiring does not become that of a branch.
Check the connection status of DIII-NET pin terminals.
DIII-NET pin terminals are not firmly connected.
Connect DIII-NET pin terminals firmly.
Check the installation status of other units.
There is a source of noise around the DIII-NET.
Separate DIII-NET from the source of noise.

Commissioning Manual EM11A021DCM601A51 intelligent Touch Manager
121
Problem Checking method Cause Measure
Air conditioner control
Air conditioners continue to work in cool mode though the room temperature is lower than the lower limit set up by the Temperature Limit function.
Check whether the subject indoor units have Changeover Option.
The subject indoor units are controlled by an upper unit with Changeover Option.
Check the Temperature Limit settings.
Air conditioners continue to work in heat mode though the room temperature is higher than the upper limit set up by the Temperature Limit function.
Check whether the indoor units have Changeover Option.
The subject indoor units are controlled by an upper unit with Changeover Option.
Check the Temperature Limit settings.
Indoor units working in automatic mode switches to heat (cool) mode spontaneously.
Check in the history whether the Temperature Limit function is running.
The subject indoor units are controlled by the Temperature Limit function.
Check the Temperature Limit settings.
Check in the history whether the Auto Changeover function is running.
The subject indoor units are controlled by the Auto Changeover function.
Check the Auto Changeover settings.
Check i n t he h i s to r y whe the r switching between cool and heat modes is according to the Schedule function.
Switching between cool and heat modes is controlled by a schedule program.
Check the schedule program.
Check the history whether switching between cool and heat modes is according to the Interlocking Control function.
Switching between cool and heat modes is controlled by an interlocking program.
Check the interlocking program.
Check the history whether switching between cool and heat modes is carried out manually.
Switching between cool and heat modes is carried out manually.
PPD Cannot connect iTM to PPD engineering tool.
When iTM and PC are connected via hub, check whether they are correctly connected.
PC is not connected with iTM. Connect the iTM and PC via hub using LAN cables.
Cross cables are used as the LAN cables connecting the iTM and hub, and PC and hub.
Use straight cables as LAN cable for connecting the iTM and PC via hub.
The hub is turned off. Turn on the hub.
Check that iTM is turned on. The iTM is turned off. Turn on the iTM.
Check whether the network settings on the PC are in conformity with the settings described in this manual.
The network settings on the PC are incorrect.
Modify the network settings on the PC so that they are in conformity with the settings described in this manual.
When iTM and PC are connected directly, check whether they are connected using the correct cable.
The LAN cable connecting the iTM and PC is a straight cable.
Connect the iTM and PC using a cross cable.
A Firewall is installed on the PC. Disable or delete the Firewall on the PC. (Be warned that disabling or deleting the firewall may expose the system to security vulnerabilities)
The pulse port is not displayed on the PPD setup tool.
Check whether the Pi management point is registered in iTM.
Pi management point is not registered. Register the Pi management point.
When trying to run a trial for the set up model on the PPD engineering tool, some of the indoor units are not automatically recognized.
Check whether the management points registered in iTM are experiencing communication error.
Indoor units are experiencing communication error.
Find and solve the cause of the communication error in the indoor units.
Check whether the subject indoor units are included in the model database.
The subject indoor units are not included in the model database.
Check whether the engineering tool is the latest. Check with System Support if they are supported models. If they are supported models, ask their capacity and actual state. If they are models that must be set up manually, set them up manually.
The calculated power measurement at the iTM is 1/10 of the detected kWh.
Check whether the pulse rate is “10” for the management point.
1 kWh/pulse is set up for pulse rate for the management point instead of the intended 10 kWh/pulse.
Re-set the pulse rate to 10 kWh/pulse.
The calculated power measurement at the iTM is 10 times the detected kWh.
Check whether the pulse rate is “1” for the management point.
10 kWh/pulse is set up for pulse rate for the management point instead of the intended 1 kWh/pulse.
Re-set the pulse rate to 1 kWh/pulse.
The pulse value does not increase for the displayed management point.
Check the port number to which the pulse signal wire is connected.
The pulse signal wire is not connected to the correct Pi port.
Connect the pulse signal wire to the correct Pi port.
Check whether the detected kWh is increasing.
The detected kWh is not increasing. Check whether the kWh meter is correctly connected.
The total pulse value at the iTM does not match the detected PPD value.
Check the history whether a power failure signal has been input while iTM was being reset.
The pulse value has been partially lost while iTM was being reset.
Give explanation to users.
Check the PPD engineering tool settings.
PPD was set to not distribute the consumed power while the air conditioners are stopped.
Check the PPD specification. If there is any problem, after consulting with the users, modify settings to distribute the consumed power while the air conditions are stopped.
Consumed power has been distributed though operation time for the subject indoor unit is “0”.
Check the PPD engineering tool settings.
PPD was set to distribute the consumed power also while the air conditioners are stopped.
Check the PPD settings. If there is any problem, after consulting with the users, modify settings to not distribute the consumed power while the air conditions are stopped.
Consumed power is “0” though the subject indoor unit is operating.
Check the operation mode of the indoor unit.
The operation mode was fan mode. Check the PPD settings.
The thermostat was always OFF though the air conditioner was operating in cool or heat mode.
Check the PPD settings.
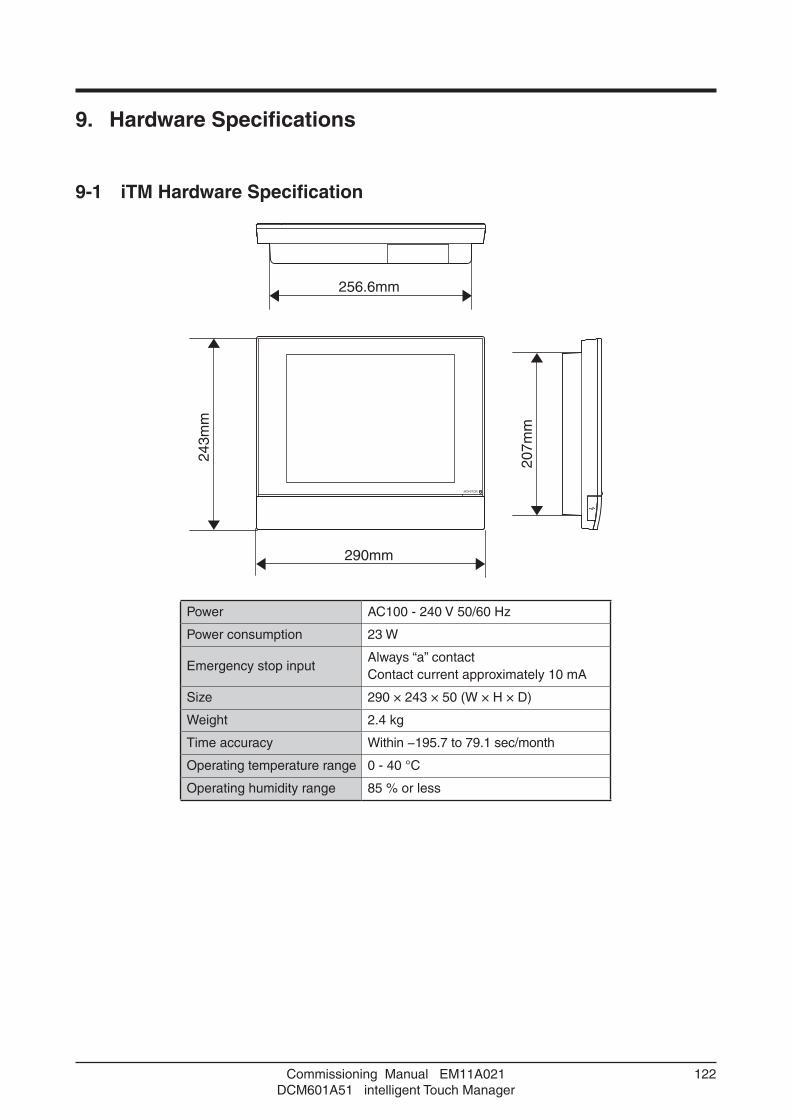
Commissioning Manual EM11A021DCM601A51 intelligent Touch Manager
122
9. Hardware Specifications
9-1 iTM Hardware Specification24
3mm
207m
m
290mm
256.6mm
Power AC100 - 240 V 50/60 Hz
Power consumption 23 W
Emergency stop inputAlways “a” contact Contact current approximately 10 mA
Size 290 × 243 × 50 (W × H × D)
Weight 2.4 kg
Time accuracy Within −195.7 to 79.1 sec/month
Operating temperature range 0 - 40 °C
Operating humidity range 85 % or less

Commissioning Manual EM11A021DCM601A51 intelligent Touch Manager
123
Peripheral Equipment Specification
Function Requirement
PC for Web Remote
Management
PC for pre-engineering tool
OS: Windows XP Professional SP3 (32 bit)
Windows Vista Business SP2 (32 bit)
Windows 7 Professional SP1 (32 bit, 64bit)
CPU: Equivalent to Intel Core 2 Duo 1.2 GHz or higher
Memory: 2 GB or more
Free HDD space: 10 GB or more
Network: 100Base-TX or higher
Display resolution: 1024 x 768 or higher
Network 100Base-TX
Real transfer rate: 115 kbps or higher
USB memory USB2.0
Memory capacity: 8 GB (Free space: 5 GB) or more, 32 GB or less
recommended.
==Recommended product (Operation confirmed)==
Kingston Data Traveler Generation 3 (G3) 32 GB
Supported security
software
McAfee 2011
Norton 2011
Virus Buster 2011
Flash Player Version 11.1
Web browser Internet Explorer 8, 9
Firefox 10.0

EM11A021 (1208) HT


![Mission Manager[1]](https://static.fdokumen.com/doc/165x107/6313fe215cba183dbf075a68/mission-manager1.jpg)