Integrate Microsoft Exchange with the IM and Presence ...
14
Integrate Microsoft Exchange with the IM and Presence Service over Exchange Web Services • Microsoft Exchange 2007 Configuration over Exchange Web Services, page 1 • Microsoft Exchange 2010 and 2013 Configuration over Exchange Web Services, page 7 • Enable Authentication on the Exchange Virtual Directories, page 12 Microsoft Exchange 2007 Configuration over Exchange Web Services Before You Begin Note that the steps required to configure Exchange Server 2007 differ depending on whether you use Windows Server 2003 or Windows Server 2008. You must complete the following tasks when configuring access to mailboxes on the Exchange Server 2007. For detailed instructions, see the Exchange Server 2007 documentation at the following URL:http:// technet.microsoft.com/en-us/library/bb124558(EXCHG.80).aspx. • Verifying Windows Security Settings • Grant Users Permission to Sign in to the Service Account Locally, on page 2 • Setting Impersonation Permissions at the Server Level , on page 4 • Granting Send As Permissions to the Service Account and User Mailboxes, on page 5 • Granting Impersonation Permissions to the Service Account and User Mailboxes, on page 6 • Verifying Permissions on the Microsoft Exchange 2007 Account, on page 7 The IM and Presence Service only requires impersonation permissions on the account to enable it to log in to that account when it connects to the Exchange Server. Note that this account does not typically receive mail so you do not need to be concerned about allocating space for it. Tip Microsoft Exchange for IM and Presence Service on Cisco Unified Communications Manager, Release 11.0(1) 1
-
Upload
khangminh22 -
Category
Documents
-
view
0 -
download
0
Transcript of Integrate Microsoft Exchange with the IM and Presence ...
Integrate Microsoft Exchange with the IM andPresence Service over Exchange Web Services
• Microsoft Exchange 2007 Configuration over Exchange Web Services, page 1
• Microsoft Exchange 2010 and 2013 Configuration over Exchange Web Services, page 7
• Enable Authentication on the Exchange Virtual Directories, page 12
Microsoft Exchange 2007 Configuration over Exchange WebServices
Before You Begin
Note that the steps required to configure Exchange Server 2007 differ depending on whether you useWindowsServer 2003 or Windows Server 2008.
You must complete the following tasks when configuring access to mailboxes on the Exchange Server 2007.For detailed instructions, see the Exchange Server 2007 documentation at the following URL:http://technet.microsoft.com/en-us/library/bb124558(EXCHG.80).aspx.
• Verifying Windows Security Settings
• Grant Users Permission to Sign in to the Service Account Locally, on page 2
• Setting Impersonation Permissions at the Server Level , on page 4
• Granting Send As Permissions to the Service Account and User Mailboxes, on page 5
• Granting Impersonation Permissions to the Service Account and User Mailboxes, on page 6
• Verifying Permissions on the Microsoft Exchange 2007 Account, on page 7
The IM and Presence Service only requires impersonation permissions on the account to enable it to login to that account when it connects to the Exchange Server. Note that this account does not typically receivemail so you do not need to be concerned about allocating space for it.
Tip
Microsoft Exchange for IM and Presence Service on Cisco Unified Communications Manager, Release 11.0(1)
1
Windows Security Policy SettingsIM and Presence Service integration with Microsoft Exchange supports various authentication methodsincluding Windows Integrated authentication (NTLM).
IM and Presence Service supports both NTLMv1 and NTLMv2 Windows Integrated authentication, withNTLMv2 used as the default.
Configuring theLanManager authentication level to SendNTLMv2 response only. Refuse LM&NTLMon the Windows domain controller enforces NTLMv2 authentication on the domain.
IM and Presence Service does not support NTLMv2 session security. Message confidentiality and integrityare provided by secure http (https).
Note
Verifying Windows Security Settings
Procedure
Step 1 On the Windows domain controller and server(s) running Exchange, choose Start > Administrative Tools> Local Security Policy.
Step 2 Navigate to Security Settings > Local Policies > Security Options.Step 3 Choose Network Security: Minimum session security for NTLM SSP based (including secure RPC)
servers.Step 4 Verify that the Require NTLMv2 session security check box is unchecked.Step 5 If the Require NTLMv2 session security check box is checked, complete the following steps:
a) Uncheck the check box Require NTLMv2 session security.b) Click OK.
Step 6 To apply the new security settings reboot the Windows domain controller and server(s) running Exchange.The reboot is only required for servers on which a security policy configuration change was performed.Note
Grant Users Permission to Sign in to the Service Account LocallyComplete one of the following procedures to configure users to log in to the service account locally.
Before you begin
• For Exchange impersonation to work, all Microsoft Exchange servers must be members of theWindowsAuthorization Access Group.
• The service account should not be a member of any of the Exchange Administrative Groups. Exchangeexplicitly denies Impersonation for all accounts in those groups.
Microsoft Exchange for IM and Presence Service on Cisco Unified Communications Manager, Release 11.0(1)2
Integrate Microsoft Exchange with the IM and Presence Service over Exchange Web ServicesWindows Security Policy Settings
Configuring Microsoft Exchange 2007 on Windows Server 2003
Procedure
Step 1 Log in to the Exchange Server 2007 user interface using a service account that has been delegated the ExchangeView Only Administrator role.
Step 2 In the left pane, under Security Settings, navigate to Local Policies > User Rights Assignments.Step 3 In the right pane of the console, double-click Allow Log On Locally.Step 4 Choose Add User or Group then navigate to the service account that you created and choose it.Step 5 Choose Check Names, and verify that the specified user is correct.Step 6 Click OK.
What to Do Next
Setting Impersonation Permissions at the Server Level , on page 4
Configuring Microsoft Exchange 2007 on Windows Server 2008
Procedure
Step 1 Log in to Exchange Server 2007 using a service account that has been delegated the Exchange View OnlyAdministrator role.
Step 2 Choose Start.Step 3 Type gpmc.msc.Step 4 Choose Enter.Step 5 Open the Domain Controller Security Settings window on the Exchange Server.Step 6 In the left pane, under Security Settings, navigate to Local Policies > User Rights Assignments.Step 7 In the right pane of the console, double-click Allow Log On Locally.Step 8 Ensure that the Define these policy settings check box is checked.Step 9 Choose Add User or Group and navigate to the service account that you previously created and choose it.
Then click OK.Step 10 Choose Check Names, and verify that the specified user is correct. Then click OK.Step 11 Click Apply then click OK in the Allow Log On Locally Properties dialog box.Step 12 Determine if your users SMTP address is alias@FQDN. If it is not, you must impersonate using the user
principal name (UPN). This is defined as alias@FQDN.
What to Do Next
Setting Impersonation Permissions at the Server Level , on page 4
Microsoft Exchange for IM and Presence Service on Cisco Unified Communications Manager, Release 11.0(1)
3
Integrate Microsoft Exchange with the IM and Presence Service over Exchange Web ServicesGrant Users Permission to Sign in to the Service Account Locally
Setting Impersonation Permissions at the Server LevelThe command in the following procedure allows you to grant impersonation permissions at the server level.You can also grant permissions at the database, user, and contact levels.
Before you begin
• If you wish to only grant the service account rights to access individual Microsoft Exchange servers,replace
Get-OrganizationConfig
with the string
Get-ExchangeServer -Identity ServerName
where ServerName is the name of the Exchange Server.
Example
Add-ADPermission -Identity (Get-ExchangeServer -Identity exchangeserver1).
DistinguishedName -User (Get-User -Identity user | select-object).identity
-ExtendedRights Send-As
• Verify that the SMTP address of your users is defined as alias@FQDN. If it is not, you must impersonatethe user account using the User Principal Name (UPN).
Procedure
Step 1 Open the Exchange Management Shell (EMS) for command line entry.Step 2 Run this Add-ADPermission command to add the impersonation permissions on the server.
Syntax
Add-ADPermission -Identity (Get-OrganizationConfig).DistinguishedName -User (Get-User
-Identity User | select-object).identity -AccessRights GenericAll -InheritanceType Descendents
Example
Add-ADPermission -Identity (Get-OrganizationConfig).DistinguishedName -User (Get-User
-Identity Ex2007 | select-object).identity -AccessRights GenericAll -InheritanceType
Descendents
What to Do Next
Setting Active Directory Service Extended Permissions for the Service Account, on page 4
Setting Active Directory Service Extended Permissions for the Service Account
Before You Begin
You must set these permissions on the Client Access Server (CAS) for the service account that performs theimpersonation.
Microsoft Exchange for IM and Presence Service on Cisco Unified Communications Manager, Release 11.0(1)4
Integrate Microsoft Exchange with the IM and Presence Service over Exchange Web ServicesSetting Impersonation Permissions at the Server Level
• If the CAS is located behind a load-balancer, grant thems-Exch-EPI-Impersonation rights to theMicrosoft Exchange 2007 account for all CASs behind the load-balancer.
• If your mailbox servers are located on a different machine to the CASs, grantms-Exch-EPI-Impersonation rights for the Exchange 2007 account for all mailbox servers.
• You can also set these permissions by usingActive Directory Sites and Services or theActive DirectoryUsers and Computers user interfaces.
Procedure
Step 1 Open the Exchange Management Shell (EMS).Step 2 Run this Add-ADPermission command in the EMS to add the impersonation permissions on the server for
the identified service account (for example, Exchange 2007).
Syntax
Add-ADPermission -Identity (Get-OrganizationConfig).DistinguishedName -User (Get-User
-Identity User | select-object).identity -ExtendedRight ms-Exch-EPI-Impersonation
Example
Add-ADPermission -Identity (Get-OrganizationConfig).DistinguishedName -User (Get-User
-Identity Ex2007 | select-object).identity -ExtendedRight ms-Exch-EPI-Impersonation
Step 3 Run this Add-ADPermission command in the EMS to add the impersonation permissions to the service accounton each mailbox that it impersonates:
Syntax
Add-ADPermission -Identity (Get-OrganizationConfig).DistinguishedName -User (Get-User
-Identity User | select-object).identity -ExtendedRight ms-Exch-EPI-May-Impersonate
Example
Add-ADPermission -Identity (Get-OrganizationConfig).DistinguishedName -User (Get-User
-Identity Ex2007 | select-object).identity -ExtendedRight ms-Exch-EPI-May-Impersonate
What to Do Next
Granting Send As Permissions to the Service Account and User Mailboxes, on page 5
Granting Send As Permissions to the Service Account and User MailboxesFollow this procedure to grant send as permissions to the service account and user mailboxes.
You cannot use the Microsoft Exchange Management Console (EMC) to complete this step.Note
Microsoft Exchange for IM and Presence Service on Cisco Unified Communications Manager, Release 11.0(1)
5
Integrate Microsoft Exchange with the IM and Presence Service over Exchange Web ServicesGranting Send As Permissions to the Service Account and User Mailboxes
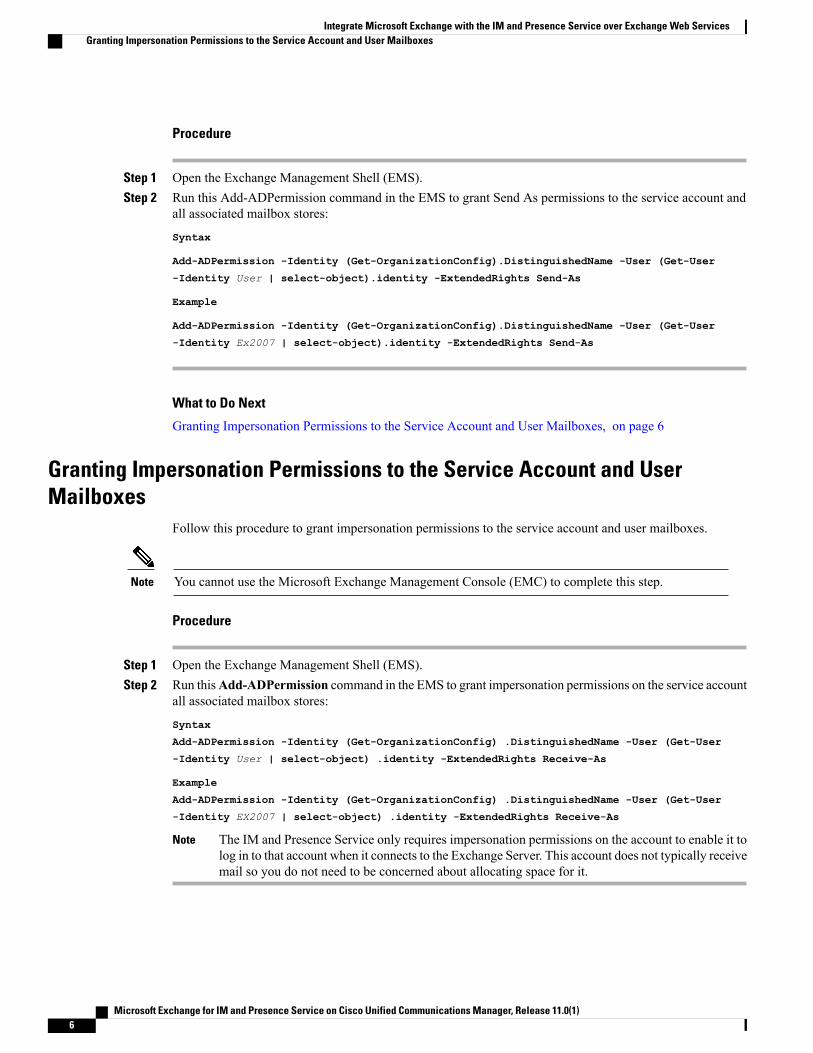
Procedure
Step 1 Open the Exchange Management Shell (EMS).Step 2 Run this Add-ADPermission command in the EMS to grant Send As permissions to the service account and
all associated mailbox stores:
Syntax
Add-ADPermission -Identity (Get-OrganizationConfig).DistinguishedName -User (Get-User
-Identity User | select-object).identity -ExtendedRights Send-As
Example
Add-ADPermission -Identity (Get-OrganizationConfig).DistinguishedName -User (Get-User
-Identity Ex2007 | select-object).identity -ExtendedRights Send-As
What to Do Next
Granting Impersonation Permissions to the Service Account and User Mailboxes, on page 6
Granting Impersonation Permissions to the Service Account and UserMailboxes
Follow this procedure to grant impersonation permissions to the service account and user mailboxes.
You cannot use the Microsoft Exchange Management Console (EMC) to complete this step.Note
Procedure
Step 1 Open the Exchange Management Shell (EMS).Step 2 Run thisAdd-ADPermission command in the EMS to grant impersonation permissions on the service account
all associated mailbox stores:
Syntax
Add-ADPermission -Identity (Get-OrganizationConfig) .DistinguishedName -User (Get-User
-Identity User | select-object) .identity -ExtendedRights Receive-As
Example
Add-ADPermission -Identity (Get-OrganizationConfig) .DistinguishedName -User (Get-User
-Identity EX2007 | select-object) .identity -ExtendedRights Receive-As
The IM and Presence Service only requires impersonation permissions on the account to enable it tolog in to that account when it connects to the Exchange Server. This account does not typically receivemail so you do not need to be concerned about allocating space for it.
Note
Microsoft Exchange for IM and Presence Service on Cisco Unified Communications Manager, Release 11.0(1)6
Integrate Microsoft Exchange with the IM and Presence Service over Exchange Web ServicesGranting Impersonation Permissions to the Service Account and User Mailboxes
What to Do Next
Verifying Permissions on the Microsoft Exchange 2007 Account, on page 7
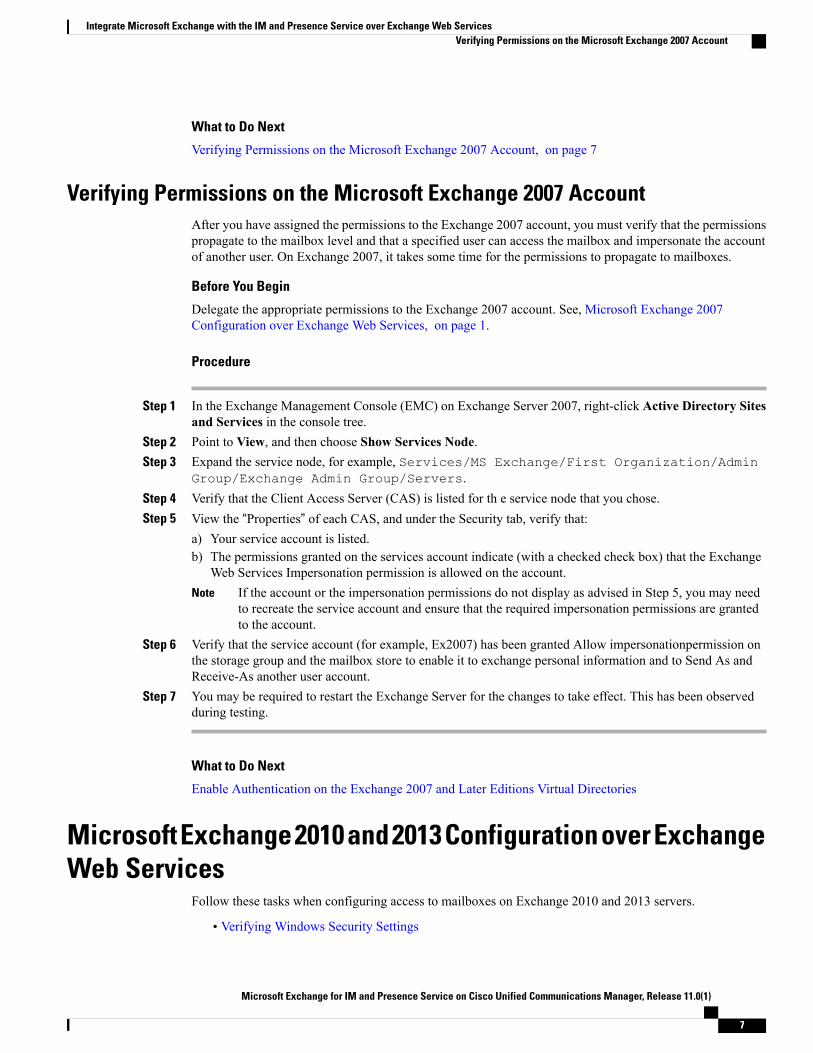
Verifying Permissions on the Microsoft Exchange 2007 AccountAfter you have assigned the permissions to the Exchange 2007 account, you must verify that the permissionspropagate to the mailbox level and that a specified user can access the mailbox and impersonate the accountof another user. On Exchange 2007, it takes some time for the permissions to propagate to mailboxes.
Before You Begin
Delegate the appropriate permissions to the Exchange 2007 account. See, Microsoft Exchange 2007Configuration over Exchange Web Services, on page 1.
Procedure
Step 1 In the Exchange Management Console (EMC) on Exchange Server 2007, right-click Active Directory Sitesand Services in the console tree.
Step 2 Point to View, and then choose Show Services Node.Step 3 Expand the service node, for example, Services/MS Exchange/First Organization/Admin
Group/Exchange Admin Group/Servers.Step 4 Verify that the Client Access Server (CAS) is listed for th e service node that you chose.Step 5 View the “Properties” of each CAS, and under the Security tab, verify that:
a) Your service account is listed.b) The permissions granted on the services account indicate (with a checked check box) that the Exchange
Web Services Impersonation permission is allowed on the account.If the account or the impersonation permissions do not display as advised in Step 5, you may needto recreate the service account and ensure that the required impersonation permissions are grantedto the account.
Note
Step 6 Verify that the service account (for example, Ex2007) has been granted Allow impersonationpermission onthe storage group and the mailbox store to enable it to exchange personal information and to Send As andReceive-As another user account.
Step 7 You may be required to restart the Exchange Server for the changes to take effect. This has been observedduring testing.
What to Do Next
Enable Authentication on the Exchange 2007 and Later Editions Virtual Directories
Microsoft Exchange 2010 and 2013 Configuration over ExchangeWeb Services
Follow these tasks when configuring access to mailboxes on Exchange 2010 and 2013 servers.
• Verifying Windows Security Settings
Microsoft Exchange for IM and Presence Service on Cisco Unified Communications Manager, Release 11.0(1)
7
Integrate Microsoft Exchange with the IM and Presence Service over Exchange Web ServicesVerifying Permissions on the Microsoft Exchange 2007 Account
• Setting Exchange Impersonation Permissions for Specific Users or Groups
• Verify Permissions on the Microsoft Exchange 2010 or 2013 Accounts, on page 11
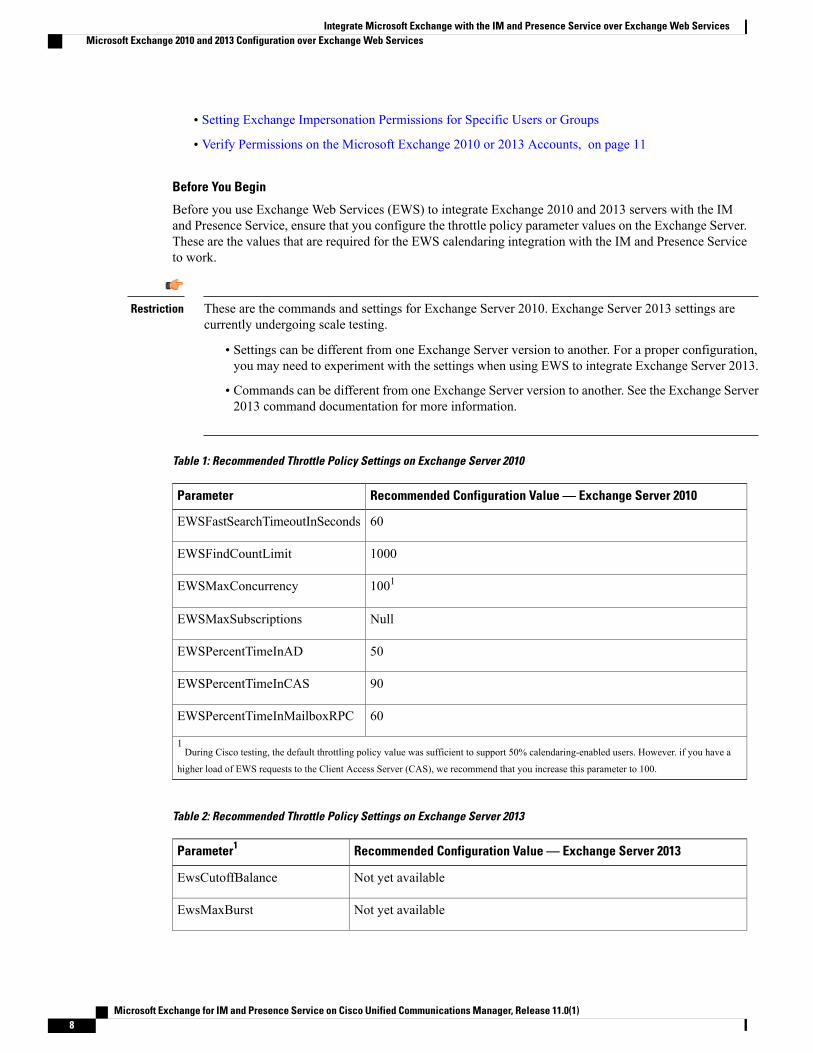
Before You Begin
Before you use Exchange Web Services (EWS) to integrate Exchange 2010 and 2013 servers with the IMand Presence Service, ensure that you configure the throttle policy parameter values on the Exchange Server.These are the values that are required for the EWS calendaring integration with the IM and Presence Serviceto work.
These are the commands and settings for Exchange Server 2010. Exchange Server 2013 settings arecurrently undergoing scale testing.
Restriction
• Settings can be different from one Exchange Server version to another. For a proper configuration,you may need to experiment with the settings when using EWS to integrate Exchange Server 2013.
• Commands can be different from one Exchange Server version to another. See the Exchange Server2013 command documentation for more information.
Table 1: Recommended Throttle Policy Settings on Exchange Server 2010
Recommended Configuration Value — Exchange Server 2010Parameter
60EWSFastSearchTimeoutInSeconds
1000EWSFindCountLimit
1001EWSMaxConcurrency
NullEWSMaxSubscriptions
50EWSPercentTimeInAD
90EWSPercentTimeInCAS
60EWSPercentTimeInMailboxRPC
1During Cisco testing, the default throttling policy value was sufficient to support 50% calendaring-enabled users. However. if you have a
higher load of EWS requests to the Client Access Server (CAS), we recommend that you increase this parameter to 100.
Table 2: Recommended Throttle Policy Settings on Exchange Server 2013
Recommended Configuration Value — Exchange Server 2013Parameter1
Not yet availableEwsCutoffBalance
Not yet availableEwsMaxBurst
Microsoft Exchange for IM and Presence Service on Cisco Unified Communications Manager, Release 11.0(1)8
Integrate Microsoft Exchange with the IM and Presence Service over Exchange Web ServicesMicrosoft Exchange 2010 and 2013 Configuration over Exchange Web Services
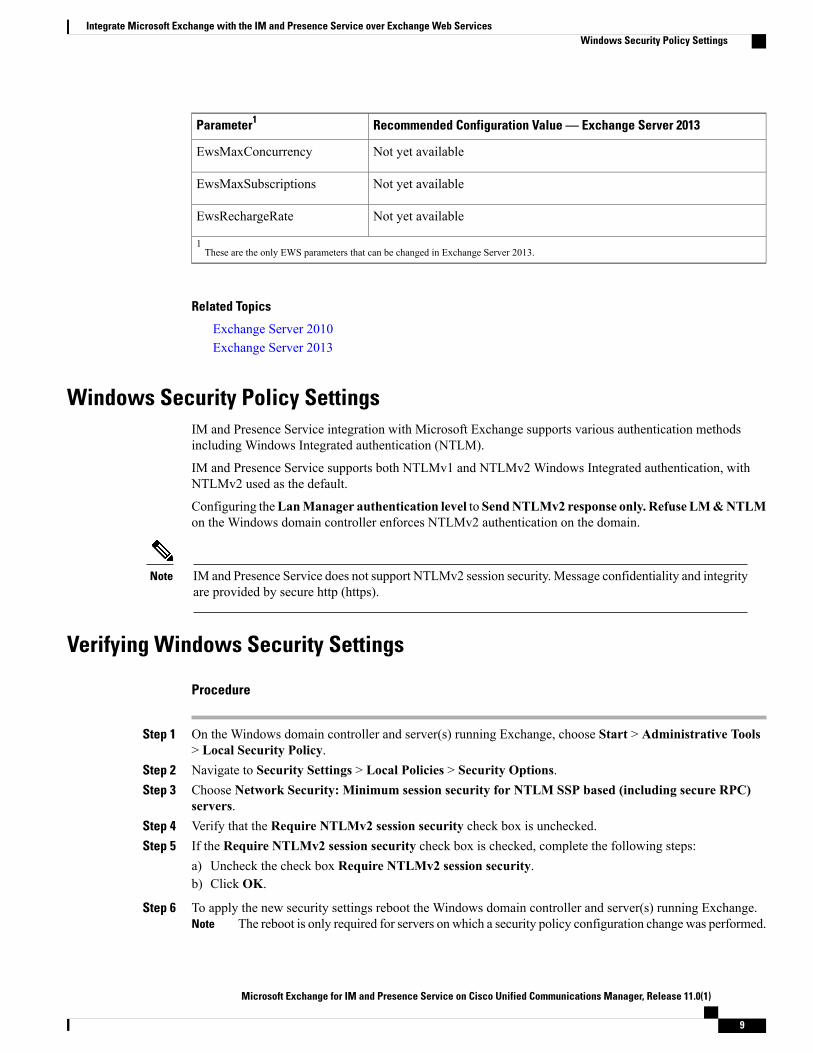
Recommended Configuration Value — Exchange Server 2013Parameter1
Not yet availableEwsMaxConcurrency
Not yet availableEwsMaxSubscriptions
Not yet availableEwsRechargeRate
1These are the only EWS parameters that can be changed in Exchange Server 2013.
Related Topics
Exchange Server 2010Exchange Server 2013
Windows Security Policy SettingsIM and Presence Service integration with Microsoft Exchange supports various authentication methodsincluding Windows Integrated authentication (NTLM).
IM and Presence Service supports both NTLMv1 and NTLMv2 Windows Integrated authentication, withNTLMv2 used as the default.
Configuring theLanManager authentication level to SendNTLMv2 response only. Refuse LM&NTLMon the Windows domain controller enforces NTLMv2 authentication on the domain.
IM and Presence Service does not support NTLMv2 session security. Message confidentiality and integrityare provided by secure http (https).
Note
Verifying Windows Security Settings
Procedure
Step 1 On the Windows domain controller and server(s) running Exchange, choose Start > Administrative Tools> Local Security Policy.
Step 2 Navigate to Security Settings > Local Policies > Security Options.Step 3 Choose Network Security: Minimum session security for NTLM SSP based (including secure RPC)
servers.Step 4 Verify that the Require NTLMv2 session security check box is unchecked.Step 5 If the Require NTLMv2 session security check box is checked, complete the following steps:
a) Uncheck the check box Require NTLMv2 session security.b) Click OK.
Step 6 To apply the new security settings reboot the Windows domain controller and server(s) running Exchange.The reboot is only required for servers on which a security policy configuration change was performed.Note
Microsoft Exchange for IM and Presence Service on Cisco Unified Communications Manager, Release 11.0(1)
9
Integrate Microsoft Exchange with the IM and Presence Service over Exchange Web ServicesWindows Security Policy Settings
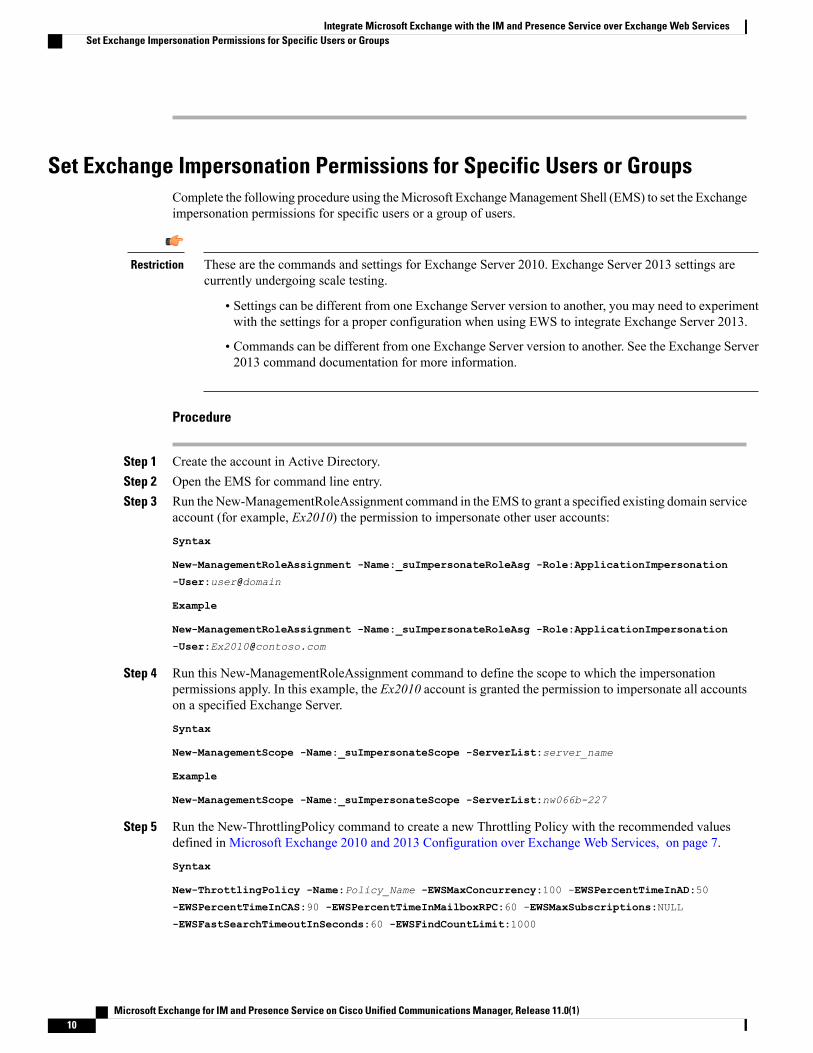
Set Exchange Impersonation Permissions for Specific Users or GroupsComplete the following procedure using theMicrosoft ExchangeManagement Shell (EMS) to set the Exchangeimpersonation permissions for specific users or a group of users.
These are the commands and settings for Exchange Server 2010. Exchange Server 2013 settings arecurrently undergoing scale testing.
Restriction
• Settings can be different from one Exchange Server version to another, you may need to experimentwith the settings for a proper configuration when using EWS to integrate Exchange Server 2013.
• Commands can be different from one Exchange Server version to another. See the Exchange Server2013 command documentation for more information.
Procedure
Step 1 Create the account in Active Directory.Step 2 Open the EMS for command line entry.Step 3 Run the New-ManagementRoleAssignment command in the EMS to grant a specified existing domain service
account (for example, Ex2010) the permission to impersonate other user accounts:
Syntax
New-ManagementRoleAssignment -Name:_suImpersonateRoleAsg -Role:ApplicationImpersonation
-User:user@domain
Example
New-ManagementRoleAssignment -Name:_suImpersonateRoleAsg -Role:ApplicationImpersonation
-User:[email protected]
Step 4 Run this New-ManagementRoleAssignment command to define the scope to which the impersonationpermissions apply. In this example, the Ex2010 account is granted the permission to impersonate all accountson a specified Exchange Server.
Syntax
New-ManagementScope -Name:_suImpersonateScope -ServerList:server_name
Example
New-ManagementScope -Name:_suImpersonateScope -ServerList:nw066b-227
Step 5 Run the New-ThrottlingPolicy command to create a new Throttling Policy with the recommended valuesdefined in Microsoft Exchange 2010 and 2013 Configuration over Exchange Web Services, on page 7.
Syntax
New-ThrottlingPolicy -Name:Policy_Name -EWSMaxConcurrency:100 -EWSPercentTimeInAD:50
-EWSPercentTimeInCAS:90 -EWSPercentTimeInMailboxRPC:60 -EWSMaxSubscriptions:NULL
-EWSFastSearchTimeoutInSeconds:60 -EWSFindCountLimit:1000
Microsoft Exchange for IM and Presence Service on Cisco Unified Communications Manager, Release 11.0(1)10
Integrate Microsoft Exchange with the IM and Presence Service over Exchange Web ServicesSet Exchange Impersonation Permissions for Specific Users or Groups
Example
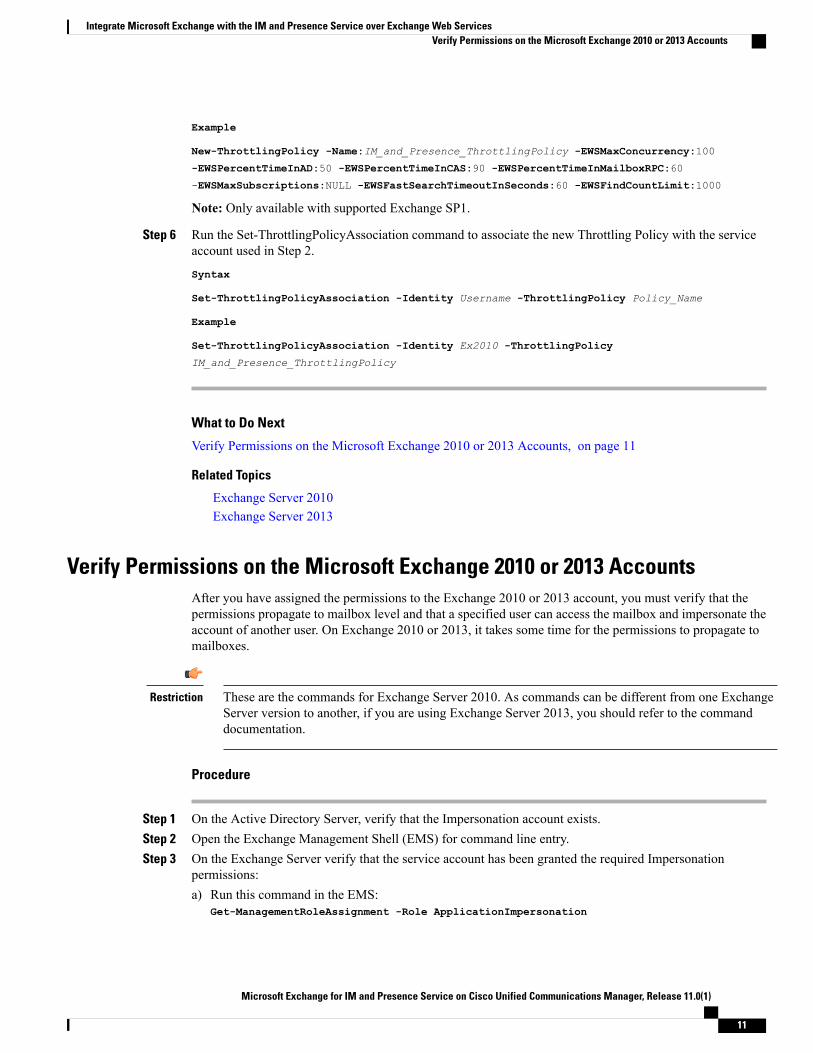
New-ThrottlingPolicy -Name:IM_and_Presence_ThrottlingPolicy -EWSMaxConcurrency:100
-EWSPercentTimeInAD:50 -EWSPercentTimeInCAS:90 -EWSPercentTimeInMailboxRPC:60
-EWSMaxSubscriptions:NULL -EWSFastSearchTimeoutInSeconds:60 -EWSFindCountLimit:1000
Note: Only available with supported Exchange SP1.
Step 6 Run the Set-ThrottlingPolicyAssociation command to associate the new Throttling Policy with the serviceaccount used in Step 2.
Syntax
Set-ThrottlingPolicyAssociation -Identity Username -ThrottlingPolicy Policy_Name
Example
Set-ThrottlingPolicyAssociation -Identity Ex2010 -ThrottlingPolicy
IM_and_Presence_ThrottlingPolicy
What to Do Next
Verify Permissions on the Microsoft Exchange 2010 or 2013 Accounts, on page 11
Related Topics
Exchange Server 2010Exchange Server 2013
Verify Permissions on the Microsoft Exchange 2010 or 2013 AccountsAfter you have assigned the permissions to the Exchange 2010 or 2013 account, you must verify that thepermissions propagate to mailbox level and that a specified user can access the mailbox and impersonate theaccount of another user. On Exchange 2010 or 2013, it takes some time for the permissions to propagate tomailboxes.
These are the commands for Exchange Server 2010. As commands can be different from one ExchangeServer version to another, if you are using Exchange Server 2013, you should refer to the commanddocumentation.
Restriction
Procedure
Step 1 On the Active Directory Server, verify that the Impersonation account exists.Step 2 Open the Exchange Management Shell (EMS) for command line entry.Step 3 On the Exchange Server verify that the service account has been granted the required Impersonation
permissions:a) Run this command in the EMS:
Get-ManagementRoleAssignment -Role ApplicationImpersonation
Microsoft Exchange for IM and Presence Service on Cisco Unified Communications Manager, Release 11.0(1)
11
Integrate Microsoft Exchange with the IM and Presence Service over Exchange Web ServicesVerify Permissions on the Microsoft Exchange 2010 or 2013 Accounts
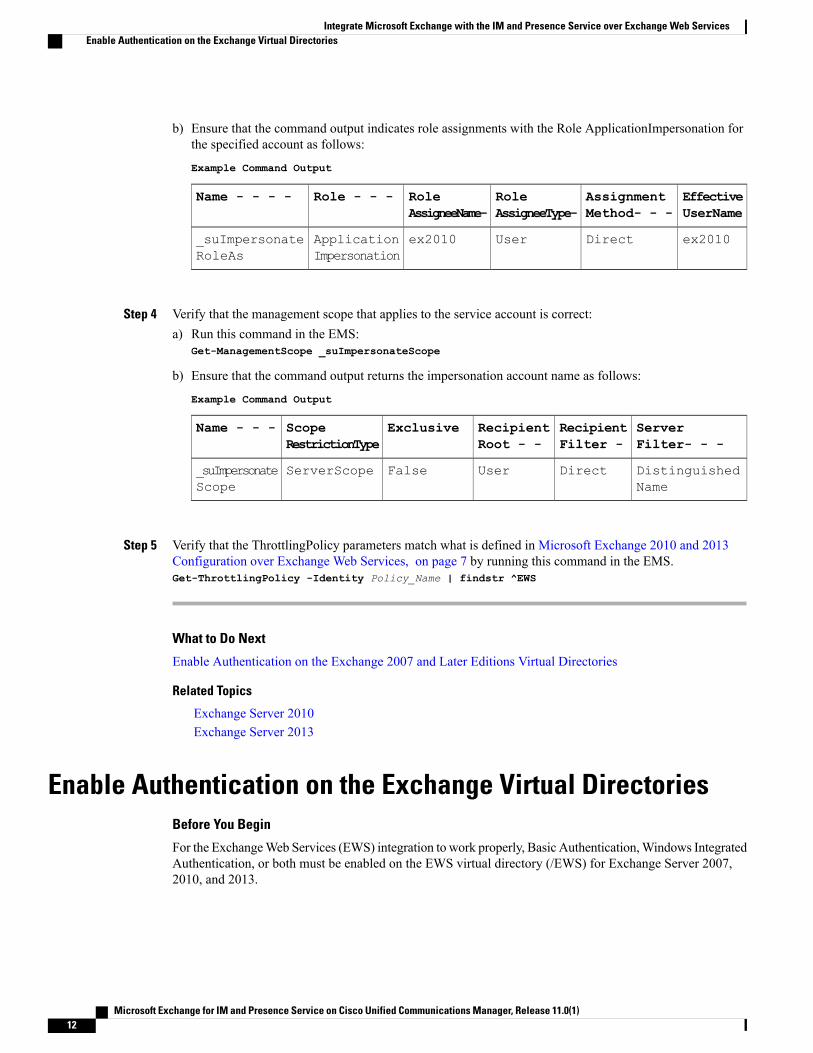
b) Ensure that the command output indicates role assignments with the Role ApplicationImpersonation forthe specified account as follows:
Example Command Output
EffectiveUserName
AssignmentMethod- - -
RoleAssigneeType-
RoleAssigneeName-
Role - - -Name - - - -
ex2010DirectUserex2010ApplicationImpersonation
_suImpersonateRoleAs
Step 4 Verify that the management scope that applies to the service account is correct:a) Run this command in the EMS:
Get-ManagementScope _suImpersonateScope
b) Ensure that the command output returns the impersonation account name as follows:
Example Command Output
ServerFilter- - -
RecipientFilter -
RecipientRoot - -
ExclusiveScopeRestrictionType
Name - - -
DistinguishedName
DirectUserFalseServerScope_suImpersonateScope
Step 5 Verify that the ThrottlingPolicy parameters match what is defined in Microsoft Exchange 2010 and 2013Configuration over Exchange Web Services, on page 7 by running this command in the EMS.Get-ThrottlingPolicy -Identity Policy_Name | findstr ^EWS
What to Do Next
Enable Authentication on the Exchange 2007 and Later Editions Virtual Directories
Related Topics
Exchange Server 2010Exchange Server 2013
Enable Authentication on the Exchange Virtual DirectoriesBefore You Begin
For the ExchangeWeb Services (EWS) integration to work properly, Basic Authentication,Windows IntegratedAuthentication, or both must be enabled on the EWS virtual directory (/EWS) for Exchange Server 2007,2010, and 2013.
Microsoft Exchange for IM and Presence Service on Cisco Unified Communications Manager, Release 11.0(1)12
Integrate Microsoft Exchange with the IM and Presence Service over Exchange Web ServicesEnable Authentication on the Exchange Virtual Directories
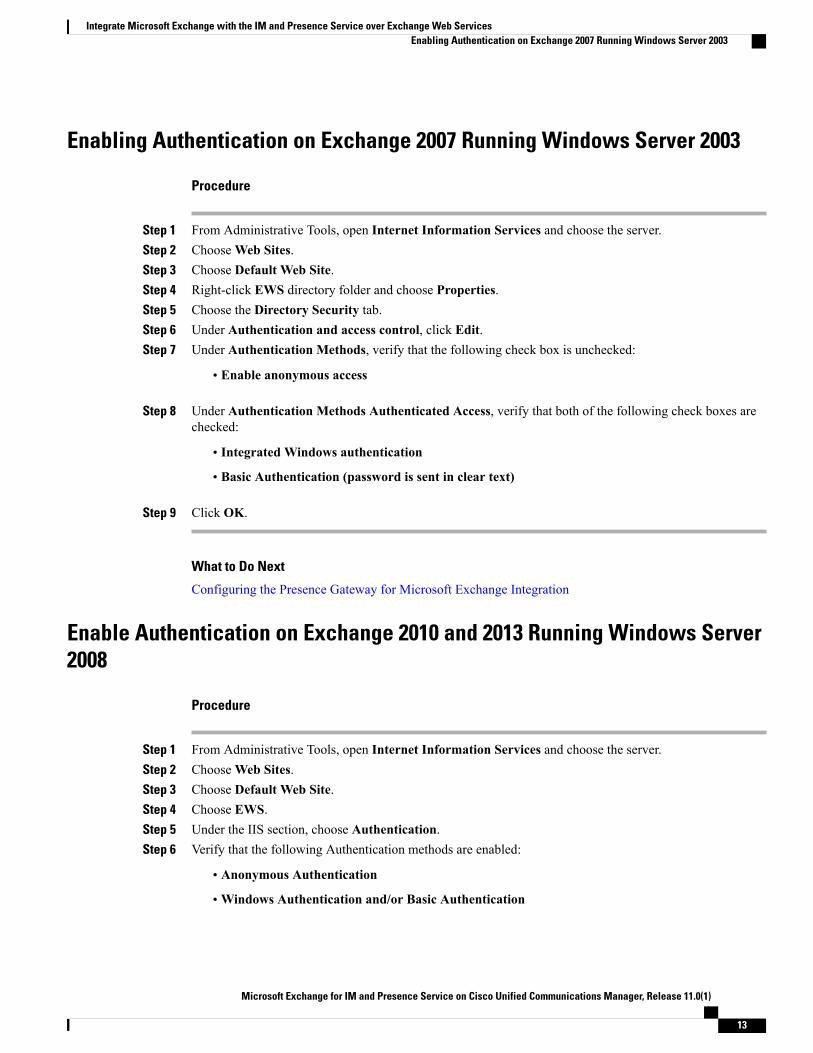
Enabling Authentication on Exchange 2007 Running Windows Server 2003
Procedure
Step 1 From Administrative Tools, open Internet Information Services and choose the server.Step 2 ChooseWeb Sites.Step 3 Choose Default Web Site.Step 4 Right-click EWS directory folder and choose Properties.Step 5 Choose the Directory Security tab.Step 6 Under Authentication and access control, click Edit.Step 7 Under Authentication Methods, verify that the following check box is unchecked:
• Enable anonymous access
Step 8 Under Authentication Methods Authenticated Access, verify that both of the following check boxes arechecked:
• Integrated Windows authentication
• Basic Authentication (password is sent in clear text)
Step 9 Click OK.
What to Do Next
Configuring the Presence Gateway for Microsoft Exchange Integration
Enable Authentication on Exchange 2010 and 2013 Running Windows Server2008
Procedure
Step 1 From Administrative Tools, open Internet Information Services and choose the server.Step 2 ChooseWeb Sites.Step 3 Choose Default Web Site.Step 4 Choose EWS.Step 5 Under the IIS section, choose Authentication.Step 6 Verify that the following Authentication methods are enabled:
• Anonymous Authentication
•Windows Authentication and/or Basic Authentication
Microsoft Exchange for IM and Presence Service on Cisco Unified Communications Manager, Release 11.0(1)
13
Integrate Microsoft Exchange with the IM and Presence Service over Exchange Web ServicesEnabling Authentication on Exchange 2007 Running Windows Server 2003

Step 7 Use the Enable/Disable link in the Actions column to configure appropriately.
What to Do Next
Configuring the Presence Gateway for Microsoft Exchange Integration
Related Topics
Managing Outlook Web App Virtual DirectoriesEnable or Disable SSL on Exchange Web Services Virtual Directories
Microsoft Exchange for IM and Presence Service on Cisco Unified Communications Manager, Release 11.0(1)14
Integrate Microsoft Exchange with the IM and Presence Service over Exchange Web ServicesEnable Authentication on Exchange 2010 and 2013 Running Windows Server 2008