Instruction manual for combination microwave - Caple
200
Instruction manual for combination microwave Model code: CM210SS Contact Caple on 0117 938 7420 or for spare parts www.caple.co.uk
-
Upload
khangminh22 -
Category
Documents
-
view
0 -
download
0
Transcript of Instruction manual for combination microwave - Caple
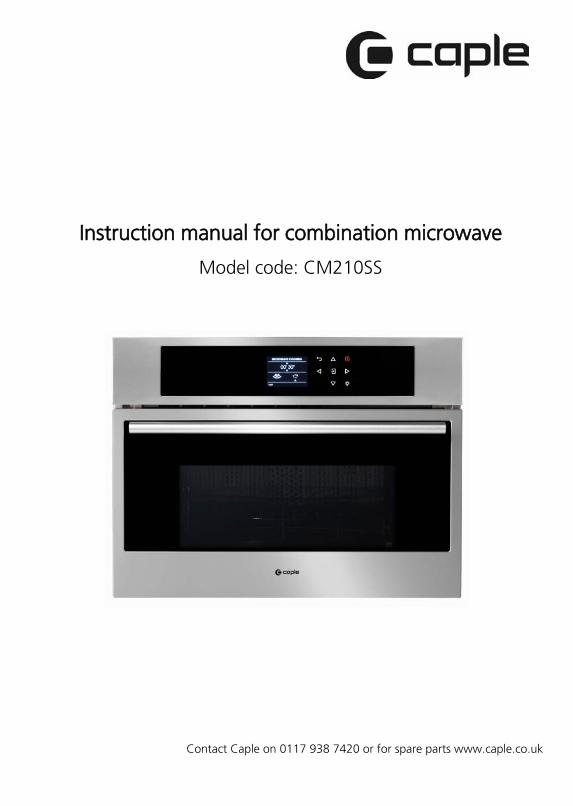
Instruction manual for combination microwave
Model code: CM210SS
Contact Caple on 0117 938 7420 or for spare parts www.caple.co.uk

EN
1
TABLE OF CONTENTS PAGE
1 - Warnings for Microwave Ovens 4Food preparation 4Pots and pans 4Microwave power and duration 4Packaging 4Beverages 4Foods for newborns 5Foods with skin or peel 5Drying foods 5Oil 6Causes of damage 6First use 8Assembling and disassembling the flat grill 8Respect for the environment 9
2 - The Control Panel 10Keypad 10
3 - General Oven Information 11Error codes 11Beeps 11Default Settings 11F Failure Number Codes 11Preheat 11Timer 11Preheating the Oven 12Operational Suggestions 12Operation with microwaves 12Oven Condensation and Temperature 12High Altitude Baking 12
4 - General Oven Tips 12
5 - Getting Started 13Instructions for initial switch-on 13
6 - User Settings 14Language 14Temperature & Weight 14Time 14Date 15Brightness 15Volume 15
TABLE OF CONTENTS PAGE
7 - System Setting 16Event Log 16Demo 16
8 - Starting Your Oven 17Switching the oven on and off 17Cooking Mode Tables 18
9 - Traditional Cooking 19Changing the cooking mode 19Changing temperature 19Pre-heating phase 19
10 - Time Oven Mode Operation 20Cook Time 20Stop Time 20
11 - Microwave Cooking 21 Defrost by time Function 21 Defrost by weight Function 21 Microwave Function 21 Microwave + Grill Function 22 Microwave + Fan heat Function 22Changing Watts Power 23Changing Time 23Changing Temperature 23Changing Weight 23
12 - Using Oven Lights 24
13 - Recipes 25
14 - For the Installer 27Electrical Hook-Up 28
15 - Solving Traditional Baking Problems 29
16 - Troubleshooting 30
17 - Assistance or Service 31Service Data Record 31
EN
2
Dear Customer,We would like to thank you and congratulate you on your choice.This new product has been carefully designed and built using top quality materials, and meticulously tested to ensure that it meets all your culinary requirements.Please read and observe these simple instructions, which will enable you to achieve excellent results from the very first time you use it. This state-of-the-art appliance comes to you with our very best wishes.
THIS PRODUCT IS DESIGNED FOR DOMESTIC USE. THE MANUFACTURER DECLINES ALL RESPONSIBILITY FOR PERSONAL INJURY OR PROPERTY DAMAGE DERIVING FROM INCORRECT INSTALLATION OR IMPROPER, ERRONEOUS OR UNSUITABLE USE.THE APPLIANCE MUST NOT BE USED BY PEOPLE (INCLUDING CHILDREN) WITH PHYSICAL, SENSORIAL OR MENTAL IMPAIRMENTS, OR BY PEOPLE WITHOUT THE NECESSARY EXPERIENCE OR KNOWLEDGE, UNLESS THEY ARE SUPERVISED OR INSTRUCTED IN THE USE OF THE APPLIANCE BY A PERSON RESPONSIBLE FOR THEIR SAFETY.CHILDREN MUST BE SUPERVISED TO ENSURE THAT THEY DO NOT PLAY WITH THE APPLIANCE. DO NOT PLACE ALUMINIUM FOIL, POTS OR SIMILAR OBJECTS IN CONTACT WITH THE BASE INSIDE THE OVEN FOR COOKING. THE HEATING ACTION OF THE LOWER HEATING ELEMENT CAUSES OVERHEATING OF THE LOWER PART OF THE OVEN CAUSING DAMAGE AND SERIOUS CONSEQUENCES (RISK OF FIRE) EVEN TO THE COUNTER UNDER THE OVEN.THE APPLIANCE GETS VERY HOT DURING USE.WARNING: DON’T TOUCH THE HEATING ELEMENTS INSIDE THE OVEN.
ATTENTION• If the door or the gasket seals of the door are damaged,
the oven may not be used until it is repaired by a qualifiedservice engineer.
• It is dangerous for anyone other than a qualified serviceengineer to perform any maintenance or repairs thatinvolve the removal of any cover that protects againstexposure to microwaves;
• Liquids or other foods must not be heated in air-tight containers because they could explode;
• Children may not use the oven without supervision until they have been adequately instructed in its safe use and understand the dangers of using it incorrectly;
• Only use untensils that are appropriate for microwave ovens;
• When heating food in plastic or paper containers, checkthe oven frequently because of the risks of fire;
ATTENTION• If you see smoke coming out, turn off the appliance or
remove its plug and keep the door closed to extinguishany flames;
• Heating beverages in the microwave oven can causea delayed boil-over, so be careful when handling thecontainer;
• The contents of baby bottles and baby food in jars must bemixed or shaken and their temperature must be checkedbefore feeding to avoid scalding;
• Eggs in the shell and whole hardboiled eggs must not beheated in microwave ovens because they could explodeeven after the end of heating in the microwave;
• A detailed explanation for cleaning the gasket seals of thedoors of the cavity and adjacent parts;
• The oven must be cleaned periodically and all foodresidues must be removed;
• Failure to keep the oven clean could cause deterioration ofthe surfaces that could reduce the life of the appliance andcause dangerous conditions;
• Do not use rough abrasives or sharp metal scrapers toclean the glass door of the oven because they couldscratch the surface and cause the glass to shatter.
• Do not use steam cleaners to clean the appliance.
IMPORTANT INSTRUCTIONSAND SAFETY WARNINGS
Read carefully and keep for future use
EN
3
1 - Warnings for Microwave Ovens
Food preparation
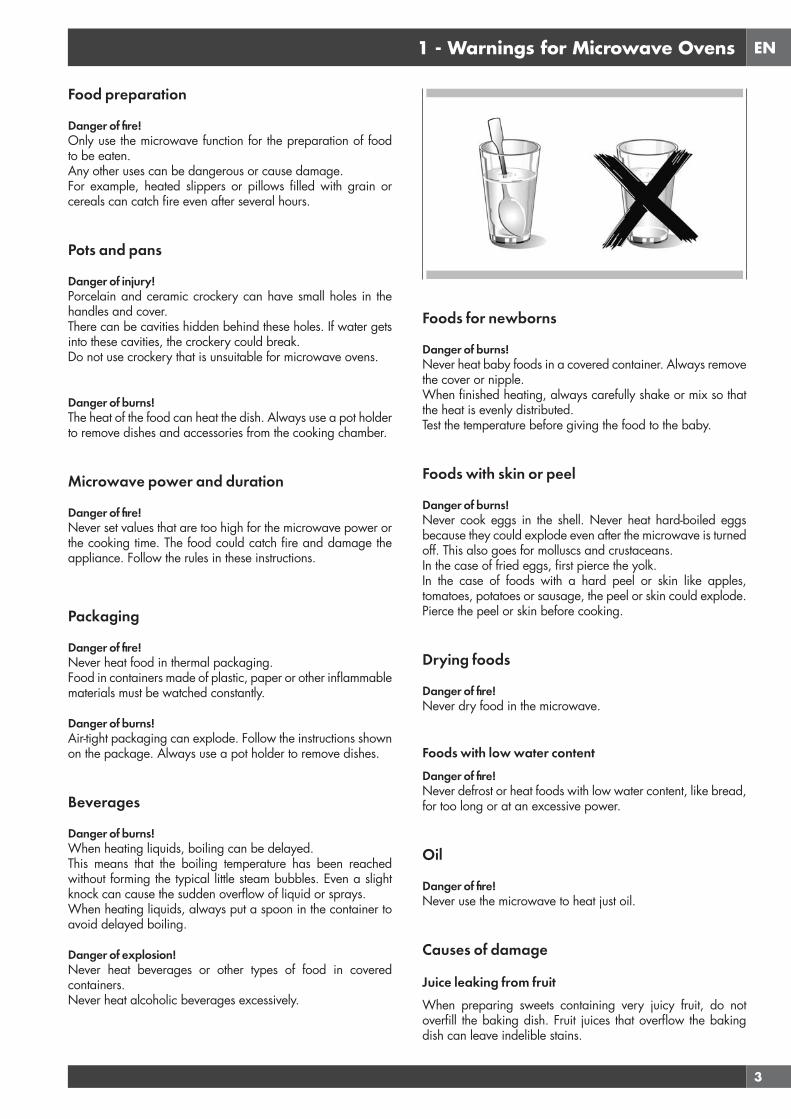
Danger of fire!Only use the microwave function for the preparation of food to be eaten.Any other uses can be dangerous or cause damage.For example, heated slippers or pillows filled with grain or cereals can catch fire even after several hours.
Pots and pans
Danger of injury!Porcelain and ceramic crockery can have small holes in the handles and cover.There can be cavities hidden behind these holes. If water gets into these cavities, the crockery could break.Do not use crockery that is unsuitable for microwave ovens.
Danger of burns!The heat of the food can heat the dish. Always use a pot holder to remove dishes and accessories from the cooking chamber.
Microwave power and duration
Danger of fire!Never set values that are too high for the microwave power or the cooking time. The food could catch fire and damage the appliance. Follow the rules in these instructions.
Packaging
Danger of fire!Never heat food in thermal packaging.Food in containers made of plastic, paper or other inflammable materials must be watched constantly.
Danger of burns!Air-tight packaging can explode. Follow the instructions shown on the package. Always use a pot holder to remove dishes.
Beverages
Danger of burns!When heating liquids, boiling can be delayed.This means that the boiling temperature has been reached without forming the typical little steam bubbles. Even a slight knock can cause the sudden overflow of liquid or sprays.When heating liquids, always put a spoon in the container to avoid delayed boiling.
Danger of explosion!Never heat beverages or other types of food in covered containers.Never heat alcoholic beverages excessively.
Foods for newborns
Danger of burns!Never heat baby foods in a covered container. Always remove the cover or nipple.When finished heating, always carefully shake or mix so that the heat is evenly distributed.Test the temperature before giving the food to the baby.
Foods with skin or peel
Danger of burns!Never cook eggs in the shell. Never heat hard-boiled eggs because they could explode even after the microwave is turned off. This also goes for molluscs and crustaceans.In the case of fried eggs, first pierce the yolk.In the case of foods with a hard peel or skin like apples, tomatoes, potatoes or sausage, the peel or skin could explode.Pierce the peel or skin before cooking.
Drying foods
Danger of fire!Never dry food in the microwave.
Foods with low water contentDanger of fire!Never defrost or heat foods with low water content, like bread, for too long or at an excessive power.
Oil
Danger of fire!Never use the microwave to heat just oil.
Causes of damage
Juice leaking from fruitWhen preparing sweets containing very juicy fruit, do not overfill the baking dish. Fruit juices that overflow the baking dish can leave indelible stains.
EN
4
Technical breakdownNever use enamelled baking dishes in the microwave because it could cause a technical breakdown.
Cooling with the door of the appliance openThe cooking chamber must only be cooled with the door closed. Check that nothing is stuck on the door of the appliance.Even if the door is only ajar, nearby cabinets can be damaged over time.
Very dirty gasket sealIf the gasket seal is very dirty, the door of the appliance does not close correctly during operation. The surfaces of nearby cabinets can be damaged.Always keep the gasket seal clean.
Using the door of the appliance as a support surfaceDo not rest or lean on the open door of the appliance and do not put dishware or accessories on it.
Using the microwave without food in the chamberOnly turn on the microwave after you have put the food in the cooking chamber. Without food inside, the appliance can become overloaded. The only exception allowed are brief tests of dishware (in this regard, see the warnings about pots and pans).
Moist foodsDo not leave moist foods in the cooking chamber for extended periods of time.
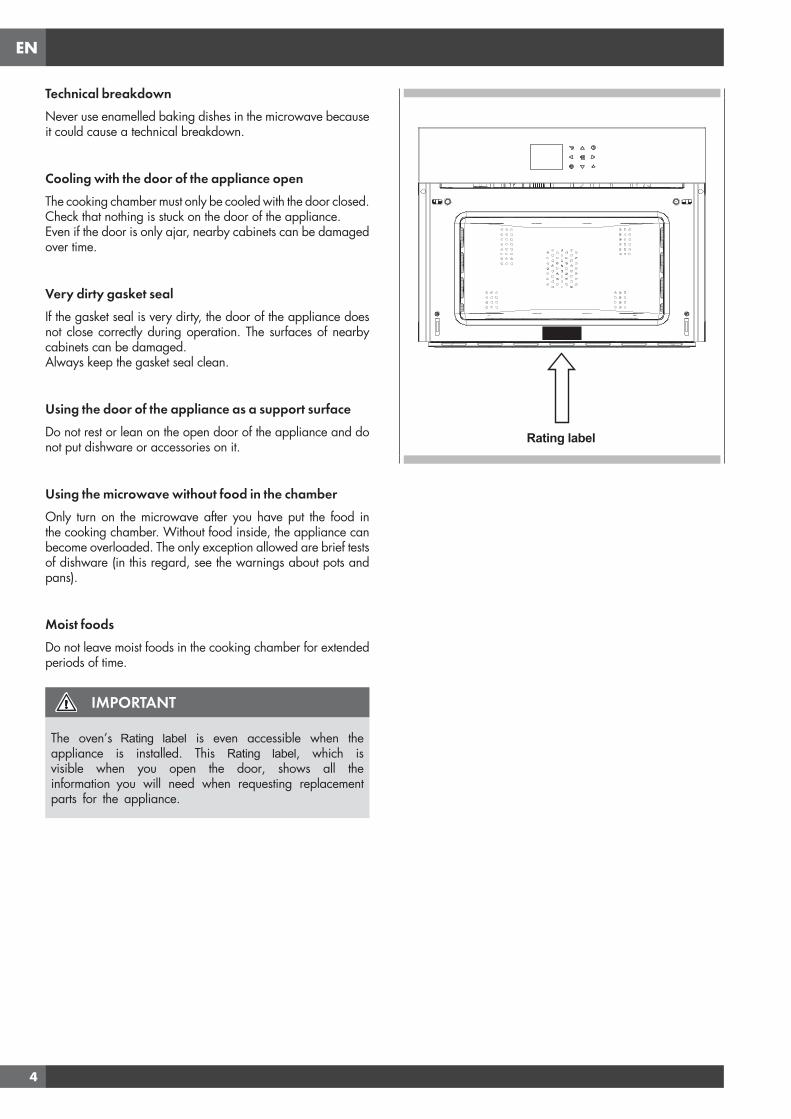
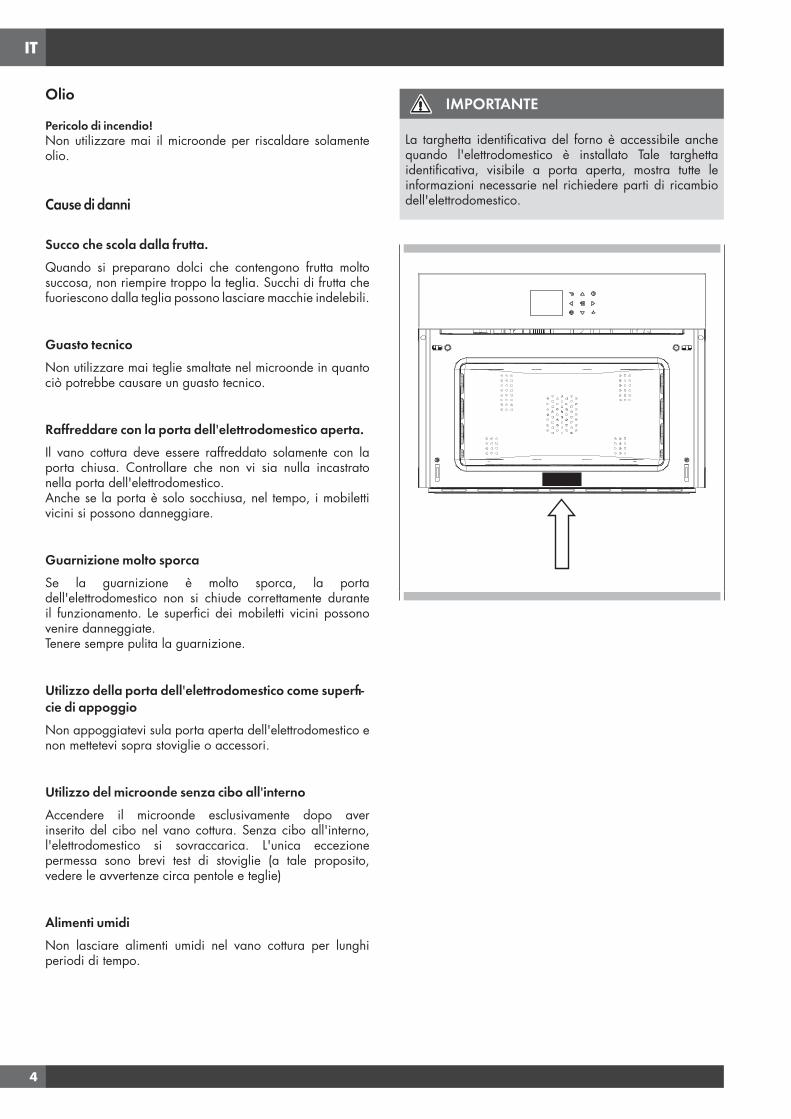
IMPORTANT
The oven’s Rating label is even accessible when the appliance is installed. This Rating label, which is visible when you open the door, shows all the information you will need when requesting replacement parts for the appliance.
Rating label

EN
5
IMPORTANT
As a safety precaution, before cleaning the oven, always disconnect the plug from the outlet or remove the appliance’s power cord. In addition, avoid using acid or alkaline substances such as lemon, vinegar, salt, tomatoes, etc. Avoid using products containing chlorine, acids or abrasives, especially for cleaning the painted walls.
First use
The oven should be thoroughly cleaned with soap and water and carefully rinsed.Heat the oven for about 30 minutes at the maximum temperature; this eliminates all the residual manufacturing oils that could cause unpleasant odours during cooking. Use the circular plus fan function without accessories in the oven. Before using the accessories for the first time, clean them carefully with a very hot alkaline washing solution and a soft cloth.
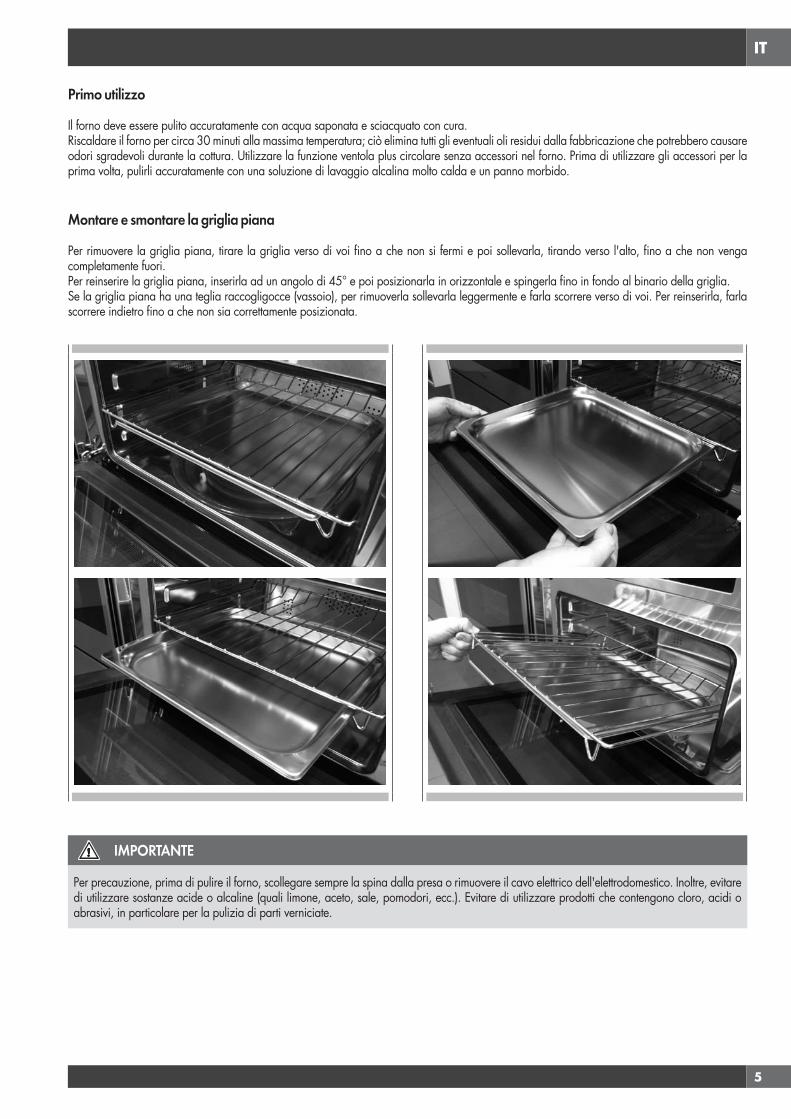
Assembling and disassembling the flat grill
To remove the flat grill, pull the grill towards you until it stops and then lift, by pulling upwards, until it comes completely out.To put the flat grill back in, insert it at a 45-degree angle and then position it horizontally and push it all the way in to the end of the grill track.If the flat grill has a drip-pan (tray), to remove it, lift slightly and slide it towards you. To reinsert it, slide it back until it is correctly seated.

EN
6
Respect for the environment
The documentation for this appliance is printed on paper bleached without chlorine or recycled paper to contribute to protecting the environment. The packaging was designed to prevent damage to the environment; they are ecological products that can be recovered or recycled.Recycling the packing saves raw materials and reduces the volume of industrial and domestic waste.
THE PACKING MATERIAL is 100% recyclable and marked with the recycling symbol. Dispose of in conformity with local law. The packing material (plastic bags, polystyrene parts, etc.) must be kept out of the reach of children because it is potentially dangerous.
THIS APPLIANCE is marked in conformity with European Directive 2002/96/EC, Waste Electrical and Electronic Equipment (WEEE). By making sure that this product is disposed of correctly, the user contributes to preventing potential negative consequences for the environment and health.
THE SYMBOL on the product or accompanying documentation indicates that this product must not be treatedas domestic waste but must be delivered to a suitable collection point for the recycling of electrical andelectronic equipment.
DISPOSAL MUST BE MADE in conformity with local laws on waste disposal.
FOR ADDITIONAL INFORMATION about the treatment, recovery and recycling of this product, contact the local office of competence, the domestic waste collection service or the store where the product was purchased.
BEFORE SCRAPPING, make it unusable by cutting the electrical cord.

EN
7
2 - The Control Panel
Keypad
To operate the key, press gently. The keypad will not work if more than one key is pressed at the same time.
Movement arrows
Return to previous display page. Keep pressed to return to Home page
Switches the oven on and off.
Confirms the settings and starts cooking operations. When pressed during a cooking operation, the function is placed in pause. Press again to restart.
To set the timer.Enter the functions menu during cooking.
Switches the inner oven light on and off.
Your appliance could vary slightly compared to the illustrations below.
A - Keypad
B - Display screen
PM
FRIDAY 11/20/2015
04:26
B A
EN
8
3 - General Oven Information
Error codes
This code appears in the event of the electronic control indicating a fault. When the error appears, the current function is blocked. If the type of error is related to a safety function, the oven becomes unusable and every time a start attempt is made, the same error appears (in which case call Caple service), while if the error relates to a minor fault, after being restarted the oven can be used for the functions that do not involve the faulty part (e.g. a heating element).
Beeps
Confirms that the command has been received after a key has been pressed.It also indicates that a time function has been completed (e.g. Timer or Timed Cooking). During the execution of a recipe, an acoustic signal warns the user that the oven is waiting for operation by the user (e.g. insert the dish or turn it over). Beeps also signal an oven fault.
Default Settings
The cooking modes automatically select a suitable temperature when the cooking mode is selected, these can be changed when a different one is needed.
F Failure Number Codes
These codes are displayed when the electronic control detects a problem in the oven or in the electronics.The error code is recorded in the Error Log in the Setup menu. This error can be communicated to the service technician so he/she can understand the possible cause of the problem in advance.
Preheat
Whenever a cooking mode is set and the oven is heating, the preheating starts, during this period, the instantaneous temperature is displayed together with the thermometer icon. As soon as the 100% is reached, the control sounds an “end of preheat” tone and the current temperature value disappears.
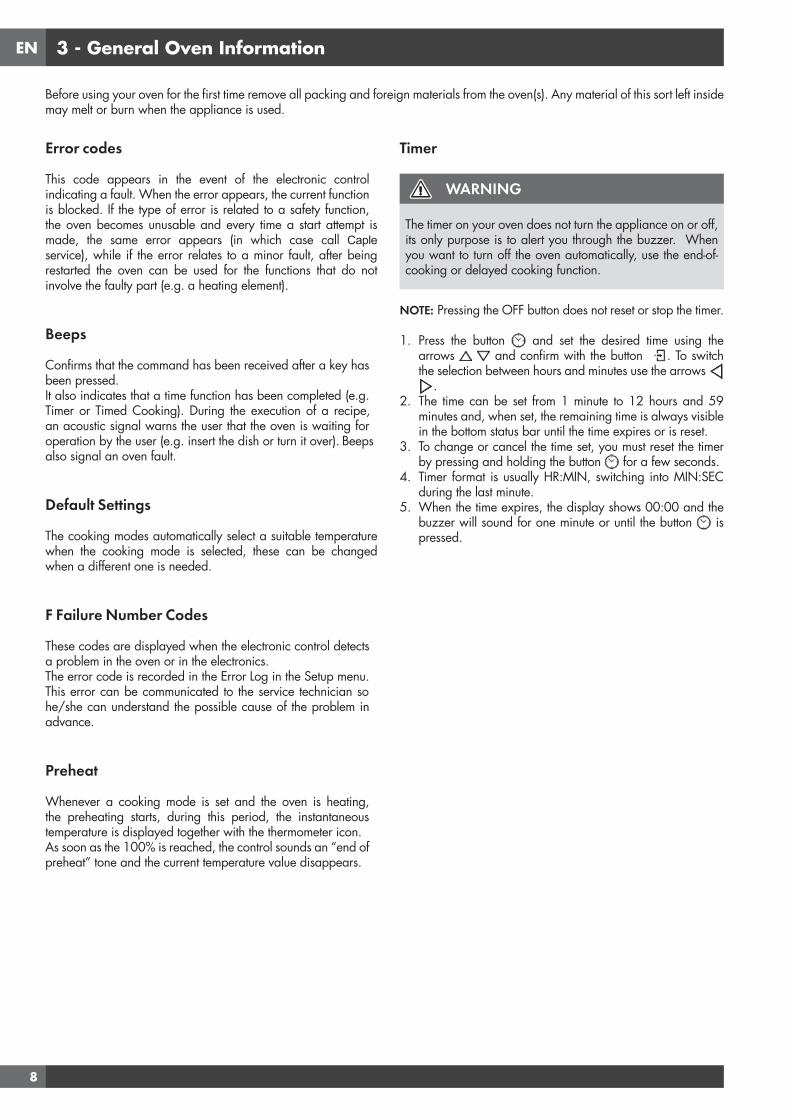
Timer
WARNING
The timer on your oven does not turn the appliance on or off, its only purpose is to alert you through the buzzer. When you want to turn off the oven automatically, use the end-of-cooking or delayed cooking function.
NOTE: Pressing the OFF button does not reset or stop the timer.
1. Press the button and set the desired time using the arrows and confirm with the button . To switch the selection between hours and minutes use the arrows
.2. The time can be set from 1 minute to 12 hours and 59
minutes and, when set, the remaining time is always visiblein the bottom status bar until the time expires or is reset.
3. To change or cancel the time set, you must reset the timerby pressing and holding the button for a few seconds.
4. Timer format is usually HR:MIN, switching into MIN:SECduring the last minute.
5. When the time expires, the display shows 00:00 and thebuzzer will sound for one minute or until the button ispressed.
Before using your oven for the first time remove all packing and foreign materials from the oven(s). Any material of this sort left inside may melt or burn when the appliance is used.
EN
9
4 - General Oven Tips
Preheating the Oven
• Selecting a higher temperature does not shorten the preheattime.
• Preheating is necessary for good results when baking cakes,cookies, pastry and breads.
• Preheating will help to sear roasts and seal in meat juices.• Place oven racks in their proper position before preheating.• During preheating, the selected cooking temperature is
always displayed.• A beep will confirm that the oven is preheated and the
“detected temperature” will turn off.
Operational Suggestions
• Do not set pans on the open oven door.• Use the interior oven lights to view the food through the oven
door window rather than opening the door frequently.
Operation with microwaves
The microwaves are transformed into heat inside foods. The microwave oven can be used by itself or in combinationwith other types of heating. This section contains information about the dishware and instructions for settingthe microwave oven.
WARNINGS FOR DISHWARE
Suitable dishwareYou can use heat-resistant dishware made of glass, glass ceramic, porcelain, ceramic or refractory plastics. These materials are permeable to microwaves.It is also possible to use normal plates. In this way, it won’t be necessary to transfer the food.Dishware with gold or silver decorations can only be used if the manufacture guarantees that they can be used in microwave ovens.Remember that, when using the oven in microwave mode, the dish must be placed on the rotating plate.When using the oven in combination mode, it is preferable to place the dish to be cooked on the low, round grill, supported so that it is centred on the rotating plate.
Unsuitable dishwareMetal dishware cannot be used.Metal is not permeable to microwaves. Food in metal containers will remain cold.Warning! Metal components, such as spoons in glasses, must stay at least 2 cm from the walls of the oven and the inside of the door. In fact, sparks could seriously damage the inside of the glass door.Warning! The flat grill must be removed when using the microwave and combined modes. Use it only with traditional oven functions.
Testing dishwareNever turn on the microwave oven before you have put in the food.The only exception allowed is testing dishware.If you are unsure if your dishware can be used in the microwave oven, we recommend performing the following test:place the empty pot in the appliance for ½ - 1 minute at the maximum power. Check the temperature. The pot must be cold or slightly warm. If it is hot or there are sparks, the pot is not suitable.
Oven Condensation and Temperature
• It is normal for a certain amount of moisture to evaporatefrom the food during any cooking process. The amountdepends on the moisture content of the food. The moisturemay condense on any surface cooler than the inside of theoven, such as the control panel.
• Your new oven has an electronic temperature sensor thatallows maintaining an accurate temperature.
High Altitude Baking
• When cooking at high altitude, recipes and cooking timewill vary from the standard.

EN
10
5 - Getting Started
Instructions for initial switch-on
Once the oven has been connected to the power supply for the first time, the control automatically prepares for setting a number of user settings, which remain stored in case of any subsequent switch-on.
NOTE: Both at the first and subsequent connections to the power supply, the door lock mechanism performs a calibration run – in this phase, always keep the door closed.
• Language• Temperature & Weight• Time• Date
Refer to the USER SETTING paragraph for setting instructions.
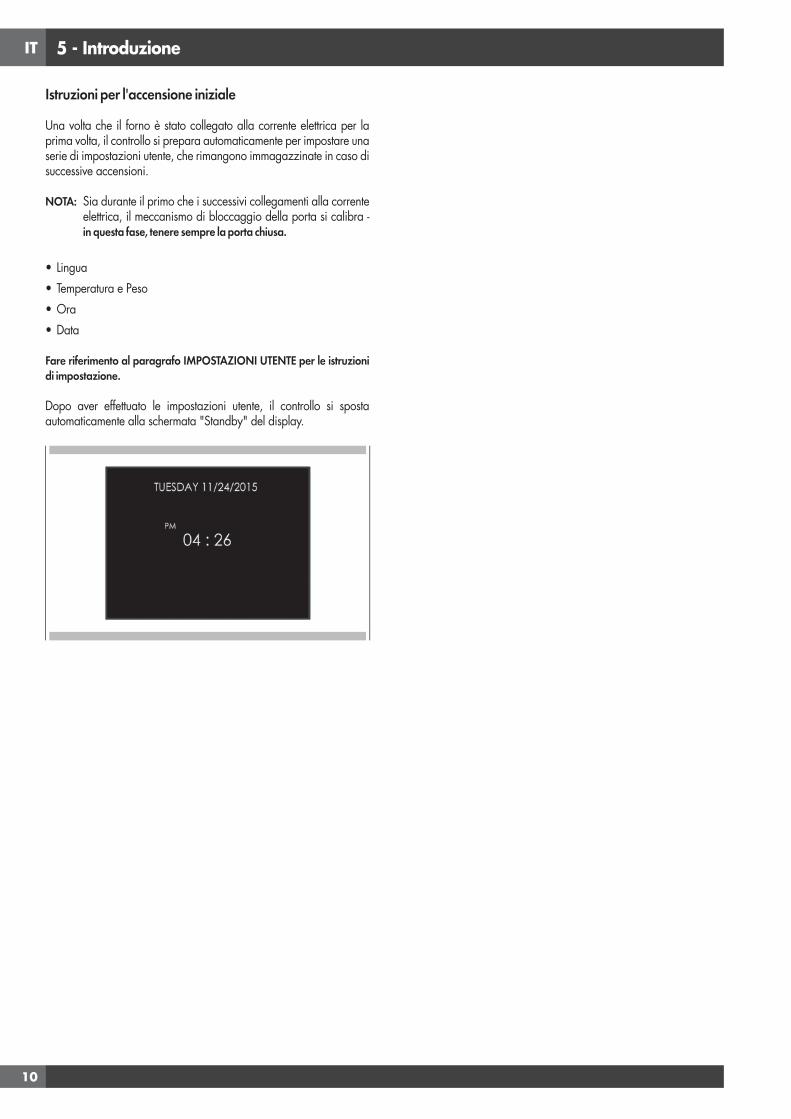
After making the user settings, the control moves automatically to the “Standby” display page.
EN
11
6 - User Settings
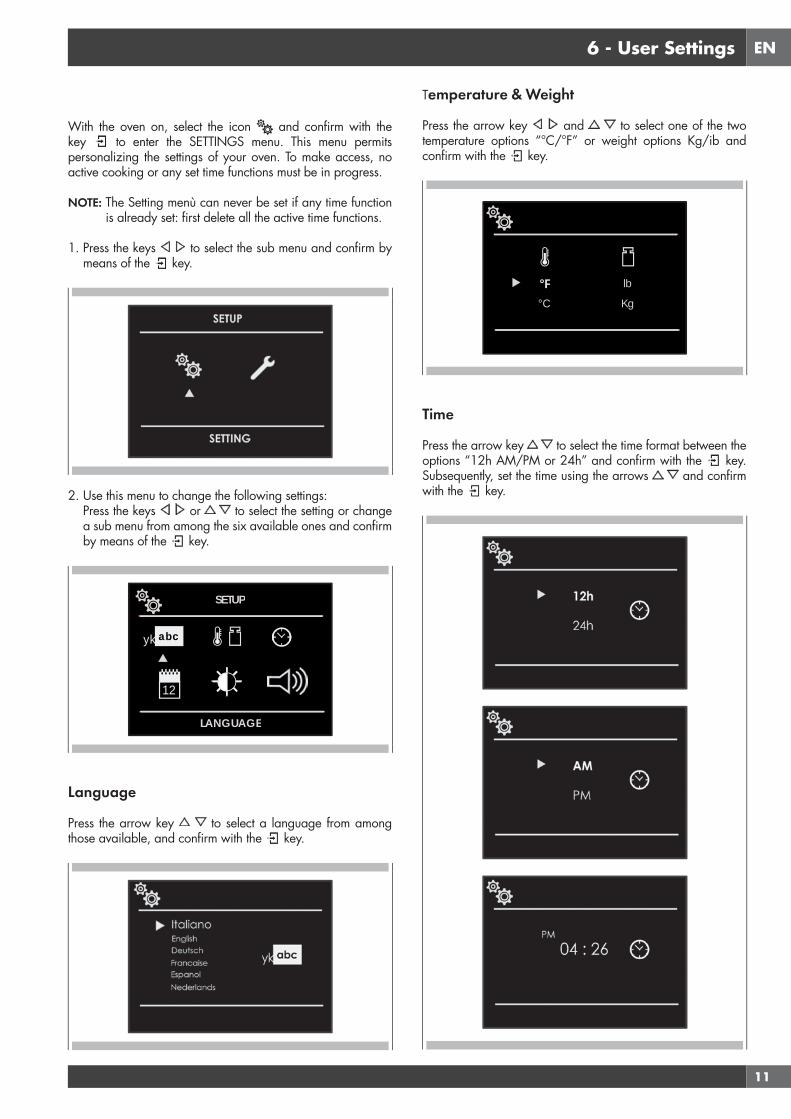
With the oven on, select the icon and confirm with the key to enter the SETTINGS menu. This menu permits personalizing the settings of your oven. To make access, no active cooking or any set time functions must be in progress.
NOTE: The Setting menù can never be set if any time function is already set: first delete all the active time functions.
1. Press the keys to select the sub menu and confirm by means of the key.
2. Use this menu to change the following settings:Press the keys or to select the setting or changea sub menu from among the six available ones and confirmby means of the key.
12
yk abc
SETUP
LANGUAGE
Language
Press the arrow key to select a language from among those available, and confirm with the key.
Temperature & Weight
Press the arrow key and to select one of the two temperature options “°C/°F” or weight options Kg/ib and confirm with the key.
°F°C
lb
Kg
Time
Press the arrow key to select the time format between the options “12h AM/PM or 24h” and confirm with the key. Subsequently, set the time using the arrows and confirm with the key.
EN
12
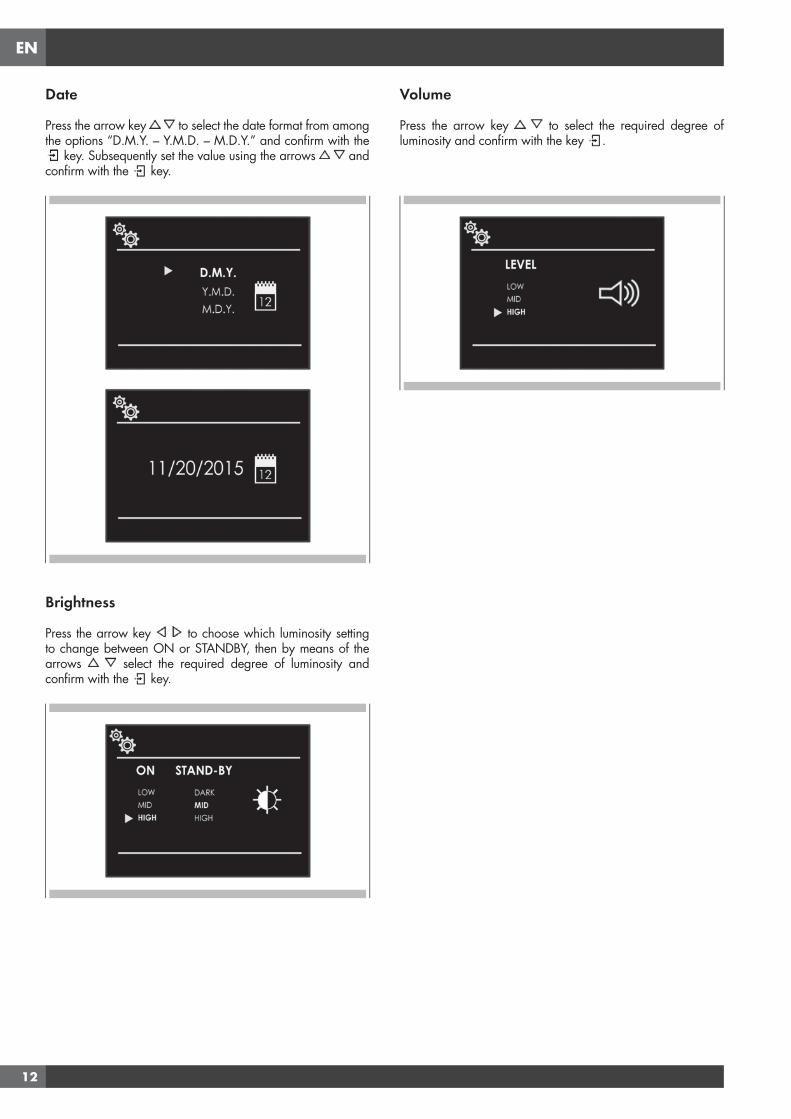
Date
Press the arrow key to select the date format from among the options “D.M.Y. – Y.M.D. – M.D.Y.” and confirm with the
key. Subsequently set the value using the arrows and confirm with the key.
Brightness
Press the arrow key to choose which luminosity setting to change between ON or STANDBY, then by means of the arrows select the required degree of luminosity and confirm with the key.
Volume
Press the arrow key to select the required degree of luminosity and confirm with the key .
EN
13
7 - System Setting
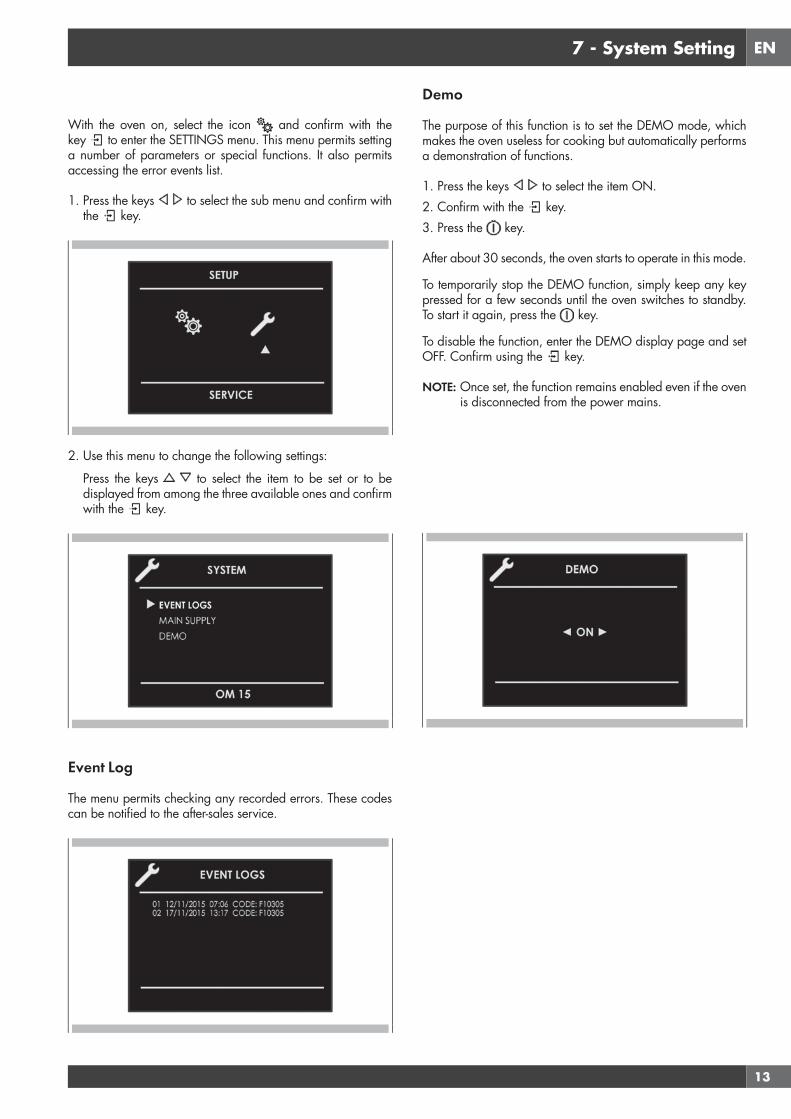
With the oven on, select the icon and confirm with the key to enter the SETTINGS menu. This menu permits setting a number of parameters or special functions. It also permits accessing the error events list.
1. Press the keys to select the sub menu and confirm with the key.
2. Use this menu to change the following settings:
Press the keys to select the item to be set or to bedisplayed from among the three available ones and confirmwith the key.
Event Log
The menu permits checking any recorded errors. These codes can be notified to the after-sales service.
Demo
The purpose of this function is to set the DEMO mode, which makes the oven useless for cooking but automatically performs a demonstration of functions.
1. Press the keys to select the item ON.2. Confirm with the key.3. Press the key.
After about 30 seconds, the oven starts to operate in this mode.
To temporarily stop the DEMO function, simply keep any key pressed for a few seconds until the oven switches to standby. To start it again, press the key.
To disable the function, enter the DEMO display page and set OFF. Confirm using the key.
NOTE: Once set, the function remains enabled even if the oven is disconnected from the power mains.

EN
14
8 - Starting Your Oven
Multifunction Oven
Traditional Cooking
FAN HEAT
FAN HEAT & GRILL
TURBO GRILL
GRILL
Microwave Cooking
DEFROST BY TIME
DEFROST BY WEIGHT
MICROWAVE COOKING
MICROWAVE AND GRILL
MICROWAVE AND FAN HEAT
1. Select the icon and press the key Select theappropriate cooking mode according to the food to becooked using the arrows and confirm with the key .
2. On this display page, it is still possible to change thecooking mode by using the keys.
3. If the proposed temperature is correct, confirm with thekey to start cooking, otherwise, if the key is not pressedwithin 10 seconds, the oven switches to automatic modeand the cooking mode icon becomes animated.
Switching the oven on and off
IMPORTANT
• The key does not stop the function.• After switching off the oven, the cooling fan could continue to operate until the inner parts of the oven have cooled down.
Press to switch the oven on and press again to switch it off. The oven returns to standby mode.

EN
15
Cooking Mode Tables
Traditional CookingCOOKING MODE ICON TEMPERATURE
Min. Preset Max.
FAN HEAT 50° C 165° C 230° C
FAN HEAT & GRILL 50° C 210° C 230° C
TURBO GRILL 50° C 165° C 230° C
GRILL 50° C 230° C 230° C
Microwave CookingCOOKING MODE ICON SET WEIGHT WATT TEMPERATURE
Min. Preset Max. Min. Preset Max. Min. Preset Max.
DEFROST BY TIME 150 W
DEFROST BY WEIGHT
Bread 100 g 500 g 600 g 150 W
Vegetable 100 g 500 g 1000 g 150 W
Meat 100 g 500 g 1500 g 150 W
Fish 100 g 500 g 800 g 150 W
MICROWAVE COOKING 150 W 900 W 900 W
MICROWAVE AND GRILL
150W 150 W 200° C
300W 300 W
450W 450 W
MICROWAVE AND FAN HEAT
150W 150 W 50° C 100° C 200° C
300W 300 W
450W 450 W
EN
16
9 - Traditional Cooking
Changing the cooking mode
1. During untimed cooking, a cooking pause can be set bypressing the key.All the settings of the suspended cooking operation remainstored and can be reactivated by pressing the same keyagain.
2. To change the cooking mode while the oven is working,press the key and then the To change the cooking mode while the oven is working,
, key.At this point, another cooking mode can be selected fromamong those available in the group by means of the arrows
.
Changing temperature
IMPORTANT
• At the end of a function, the display screen shows theresidual compartment heat temperature from the standbypage.
1. From the cooking mode preview display page, thetemperature can be changed by means of the arrowssubsequently confirming by means of the key.
2. Once cooking has started, the temperature can in any casebe changed, at any time, by means of the arrows .
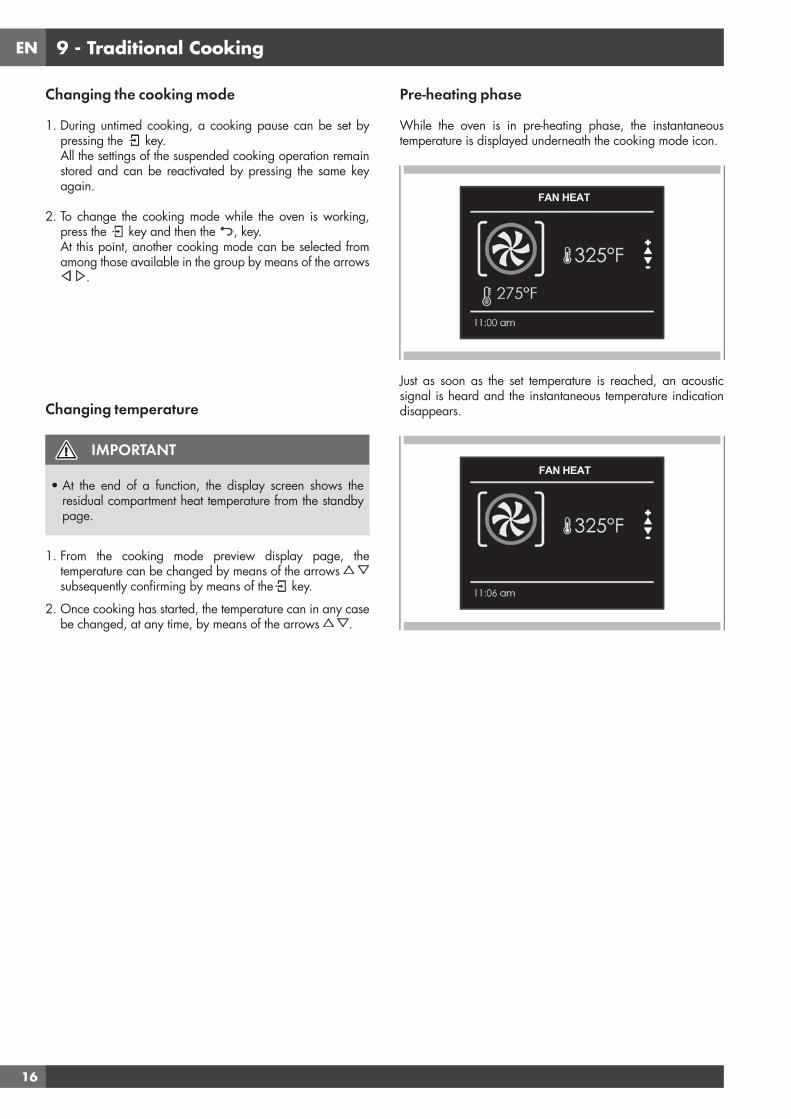
Pre-heating phase
While the oven is in pre-heating phase, the instantaneous temperature is displayed underneath the cooking mode icon.
Just as soon as the set temperature is reached, an acoustic signal is heard and the instantaneous temperature indication disappears.
FAN HEAT
FAN HEAT

EN
17
10 - Time Oven Mode Operation
Be sure that the time-of-day clock is displaying the correct time.The timed mode turns off the oven at the end of the cook time.
CAUTION
Never leave food in the oven for more than one hour before and after cooking. This could deteriorate the properties of the food itself.
NOTE: The maximum cooking time that can be set is 12 h.
Cook Time
Use the “Cook Time” function to operate the oven for a determinate period of time. The oven starts immediately and switches off automatically once the time has expired.
To Set a Timed Mode1. Select the cooking mode and temperature.2. There are two ways to set the function.a) Select to set the duration and press .b) Select to set the stop time and press .3. After selecting one of the two above options, set the time by
means of the arrows and confirm with the key.4. After pressing the key, cooking starts and the time
cooking information is shown on the display page.• Cooking mode• Temperature• Cooking time• End of cooking time
5 After cooking, the oven switches off and an acoustic signal warns that cooking has terminated.
To change the cooking time when the oven is already operating, simply press the e key and enter the new cooking time before pressing the key again.
Stop Time
Use the “Stop Time” function to delay the start of timed cooking. Enter the cooking stop time and the oven will automatically calculate the start time. The oven switches on and off automatically.
To Delay the Start of a Timed Mode1 First of all set the required timed cooking as indicated in the
“COOK TIME” paragraph.2 Select to set the stop time and press .3 Set the cooking stop time by means the arrows and
confirm by means of the key.4 After pressing the key, the function positions in standby
and the postponed cooking details are shown on the screen.• Cooking mode• Temperature• Cooking stop time• Cooking start time
After cooking, the oven switches off and an acoustic signal warns that cooking has terminated.
To change the cooking time and stop time when the oven is already operating, simply press the key and enter the new cooking time or cooking stop time and press the key again.
FAN HEATFAN HEAT
EN
18
11 - Microwave Cooking
NOTE: it is essential to carefully read the instructions and warnings to ensure correct use.
ATTENTION
Microwave functions will not start until the door has been closed. If the door is opened while the oven is on, the oven will go into pause mode and the message “DOOR OPEN” will appear on the display.To restart the function, the door needs to be closed.
The function can be paused at any time using the key, when it is pressed again the function restarts .
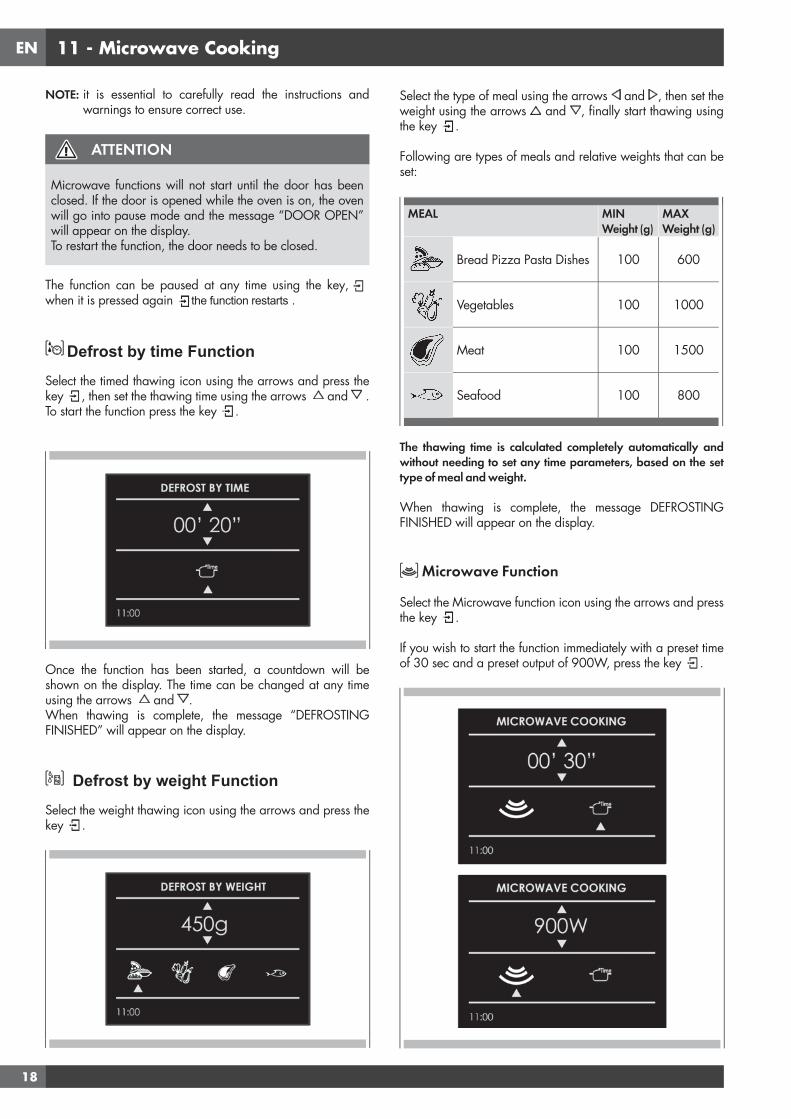
Defrost by time FunctionSelect the timed thawing icon using the arrows and press the key , then set the thawing time using the arrows and .To start the function press the key .
Once the function has been started, a countdown will be shown on the display. The time can be changed at any time using the arrows and . When thawing is complete, the message “DEFROSTING FINISHED” will appear on the display.
Defrost by weight FunctionSelect the weight thawing icon using the arrows and press the key .
Select the type of meal using the arrows and , then set the weight using the arrows and , finally start thawing using the key .
Following are types of meals and relative weights that can be set:
MEAL MIN Weight (g)
MAX Weight (g)
Bread Pizza Pasta Dishes 100 600
Vegetables 100 1000
Meat 100 1500
Seafood 100 800
The thawing time is calculated completely automatically and without needing to set any time parameters, based on the set type of meal and weight.
When thawing is complete, the message DEFROSTING FINISHED will appear on the display.
Microwave Function
Select the Microwave function icon using the arrows and press the key .
If you wish to start the function immediately with a preset time of 30 sec and a preset output of 900W, press the key .

EN
19
If you wish to personalise the time and output, open the sub-menu managed as follows:• TIME: Select the icon and use the keys and to
personalise the time.• MICROWAVE OUTPUT: Select the icon and use the keys
and to select the microwave output setting from the 6 possible levels, 150W - 300W - 450W - 600W - 750W - 900W.
Once the new parameters have been set, press the key to start cooking.
Once cooking has started, a countdown will be shown on the display. The time can be changed at any time using the arrows
and .
At the end of cooking, the message “END COOKING” will appear on the display.
Microwave + Grill Function
Select the Microwave+Grill function icon using the arrows and press the key , then set the thawing time using the arrows
and .
If you wish to start the function immediately with the preset time and a preset output of 300W, press the key .
If you wish to personalise the output, open the sub-menu managed as follows:• MICROWAVE OUTPUT: Select the icon and use the keys
and to select the microwave output setting from the 3 possible levels, 150W - 300W - 450W.
Once the new parameter has been set, press the key to start cooking.
Once cooking has started, a countdown will be shown on the display. The time can be changed at any time using the arrows
and .
At the end of cooking, the message “END COOKING” will appear on the display.
Microwave + Fan heat Function
Select the Microwave+Ring function icon using the arrows and press the key , then set the thawing time using the arrows
and .
If you wish to start the function immediately with the preset time and a preset temperature of 100°C, with a preset microwave output of 300W, press the key .
If you wish to personalise the temperature and output, open the sub-menu managed as follows:• TEMPERATURE: Select the icon and use the keys and
to personalise the temperature between 50°C and 200°C.• MICROWAVE OUTPUT: Select the icon and use the keys
and to select the microwave output setting from the 3 possible levels, 150W - 300W - 450W.
MICROWAVE AND FAN HEAT
MICROWAVE AND FAN HEAT
MICROWAVE AND FAN HEAT

EN
20
Once the new parameters have been set, press the key to start cooking.
Once cooking has started, a countdown will be shown on the display. The time can be changed at any time using the arrows
and .
At the end of cooking, the message “END COOKING” will appear on the display.
Changing Watts Power
Press the icon and press the key Select the time icon and change the time value by means the arrows and confirm with the key .
Changing Time
1. From the cooking mode preview display page, thetemperature can be changed by means of the arrowssubsequently confirming by means of the key.
2. Once cooking has started, the temperature can in any casebe changed, at any time, by means of the arrows .
Changing Temperature
(only available for microwave and ring)Press the icon and press the key (only available for microwave and ring)
Select the cooking mode icon and change the setting temperature by means the arrows and confirm with the key .
Changing Weight
(only available for defrost by weight)Press the icon and change the weight by means the arrows
and confirm with the key .
EN
21
12 - Using Oven Lights
A single light key activates the lights.Touch to turn lights on or off .Oven lights turn on automatically when the door is opened.When an oven is in use, oven lights turn on automatically when a mode is started.Oven lights will turn off automatically when the oven mode is cancelled.
NOTE: Once switched on, the lights go off automatically after 3 minutes. To switch them back on, press the key or open the door.
EN
22
13 - Recipes
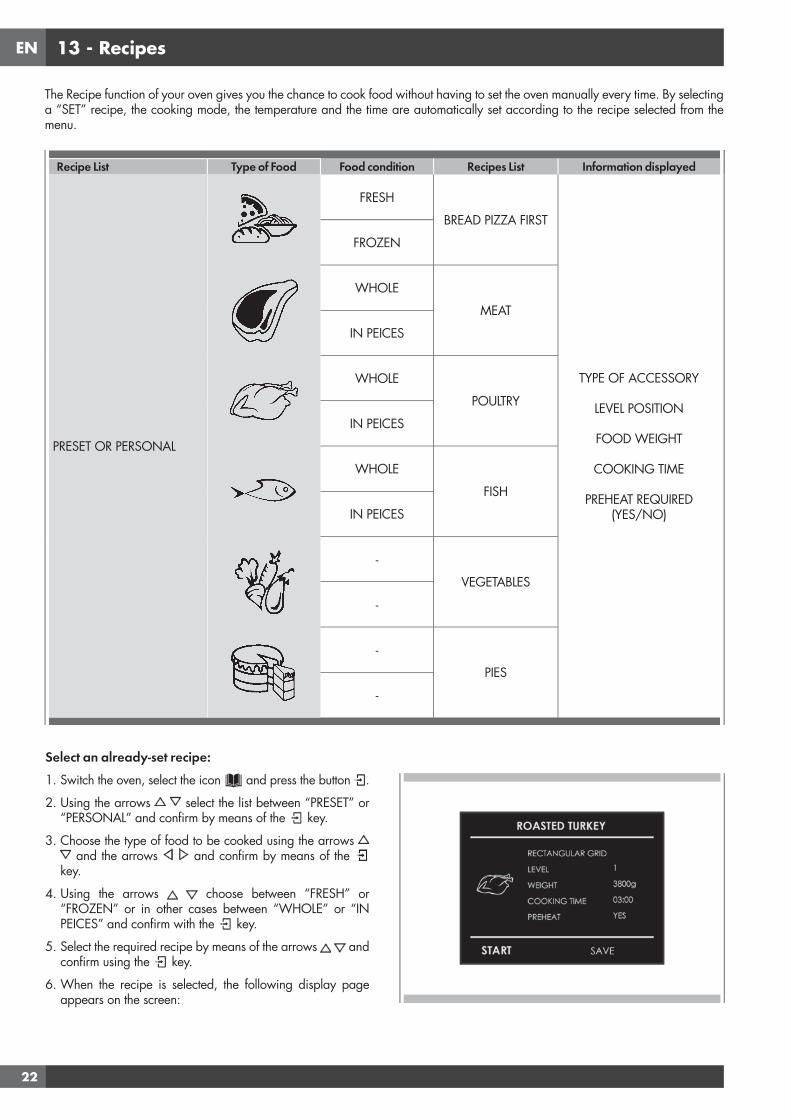
Select an already-set recipe:1. Switch the oven, select the icon and press the button .
2. Using the arrows select the list between “PRESET” or “PERSONAL” and confirm by means of the key.
3. Choose the type of food to be cooked using the arrowsand the arrows and confirm by means of the
key.
4. Using the arrows choose between “FRESH” or“FROZEN” or in other cases between “WHOLE” or “INPEICES” and confirm with the key.
5. Select the required recipe by means of the arrows and confirm using the key.
6. When the recipe is selected, the following display pageappears on the screen:
The Recipe function of your oven gives you the chance to cook food without having to set the oven manually every time. By selecting a “SET” recipe, the cooking mode, the temperature and the time are automatically set according to the recipe selected from the menu.
Recipe List Type of Food Food condition Recipes List Information displayed
PRESET OR PERSONAL
FRESH
BREAD PIZZA FIRST
TYPE OF ACCESSORY
LEVEL POSITION
FOOD WEIGHT
COOKING TIME
PREHEAT REQUIRED(YES/NO)
FROZEN
WHOLE
MEAT
IN PEICES
WHOLE
POULTRY
IN PEICES
WHOLE
FISH
IN PEICES
-
VEGETABLES
-
-
PIES
-

EN
23
7. To start the recipe, confirm with the key.During a recipe, a number of acoustic and visual messageswill ask you to perform the following operations. Simplyfollow the instructions on the screen.
8. Upon termination, the oven switches off and an acousticand visual signal warns that the recipe has terminated.
Saving a personalized recipe:Once a recipe has been selected, the “Time” and “Weight”
setting can be changed and the recipe can be saved among the “PERSONAL” ones.
1. Once a recipe has been selected, press the key andconfirm by means of the key.
2. To change the weight, enter the desired weight by means ofthe arrows and confirm by means of the key.
3. The oven switches automatically to the cooking time. Tochange this time, use the arrows and confirm againby means of the key.
4. At this point, the recipe can be saved in the list of“PERSONAL” recipes by selecting “SAVE” and confirmingby means of the key.
NOTE: If the time and weight values are changed and not saved straight away, at the end of the recipe, a message appears which asks whether you want to save it.
5. To start the recipe press the key.
Cancelling a Personalized recipe:1. To eliminate a recipe from the list of personalized recipes,
select the recipe.2. Press the key and select the choice and confirm with the
key.

EN
24
14 - For the Installer
Install the oven in the counterThe oven must be installed under a cook top, in a column, or combined with the relative warming drawer. The dimensions of the space must be those shown in figure.The cabinet material must be able to withstand the heat.The oven must be centred within the walls of the cabinet and fixed with the screws and bushings that are provided.
560
min 460
50510
560
50 510
595
52826
144140
596
554
545
560min 450
50510
533
455
594
540
432
min 458
min 3
560
min 3
533
455
594
540
432
EN
25
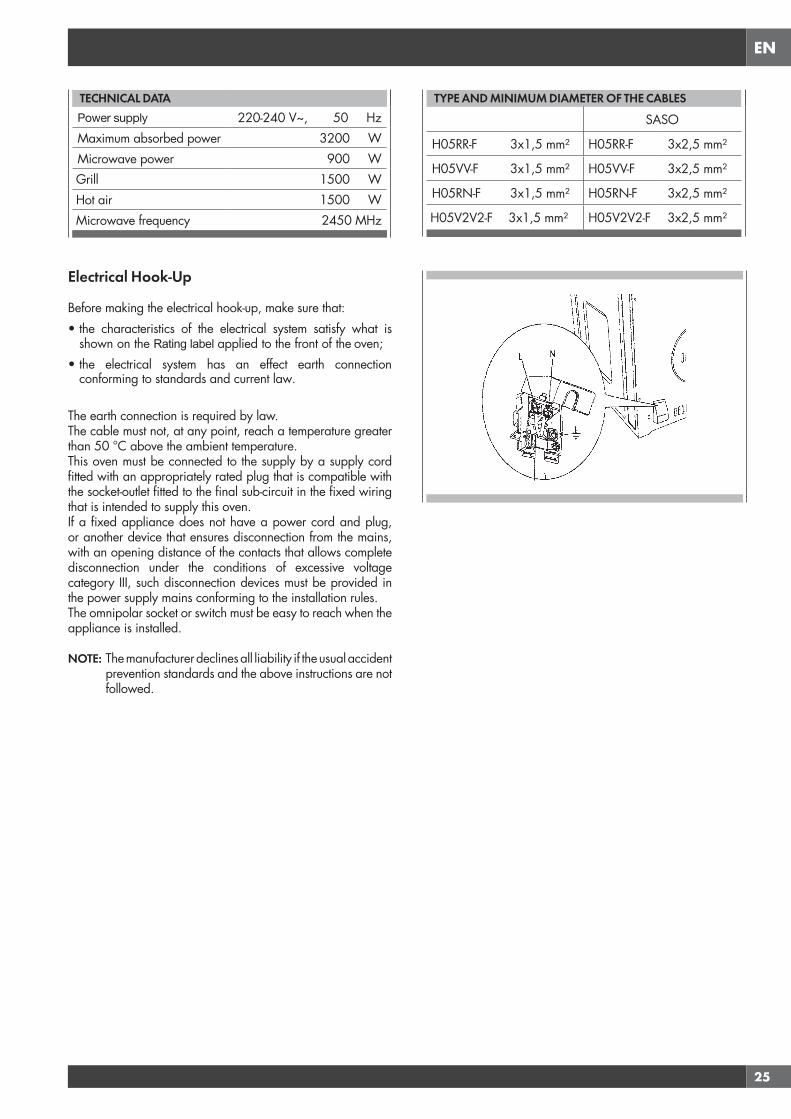
TECHNICAL DATAPower supply 220-240 V~, 50 HzMaximum absorbed power 3200 WMicrowave power 900 WGrill 1500 WHot air 1500 WMicrowave frequency 2450 MHz
Electrical Hook-Up
Before making the electrical hook-up, make sure that:• the characteristics of the electrical system satisfy what is
shown on the Rating label applied to the front of the oven;• the electrical system has an effect earth connection
conforming to standards and current law.
The earth connection is required by law.The cable must not, at any point, reach a temperature greater than 50 °C above the ambient temperature.This oven must be connected to the supply by a supply cord fitted with an appropriately rated plug that is compatible with the socket-outlet fitted to the final sub-circuit in the fixed wiring that is intended to supply this oven.If a fixed appliance does not have a power cord and plug, or another device that ensures disconnection from the mains, with an opening distance of the contacts that allows complete disconnection under the conditions of excessive voltage category III, such disconnection devices must be provided in the power supply mains conforming to the installation rules.The omnipolar socket or switch must be easy to reach when the appliance is installed.
NOTE: The manufacturer declines all liability if the usual accident prevention standards and the above instructions are not followed.
TYPE AND MINIMUM DIAMETER OF THE CABLES
SASO
H05RR-F 3x1,5 mm² H05RR-F 3x2,5 mm²
H05VV-F 3x1,5 mm² H05VV-F 3x2,5 mm²
H05RN-F 3x1,5 mm² H05RN-F 3x2,5 mm²
H05V2V2-F 3x1,5 mm² H05V2V2-F 3x2,5 mm²
EN
26
15 - Solving Traditional Baking Problems
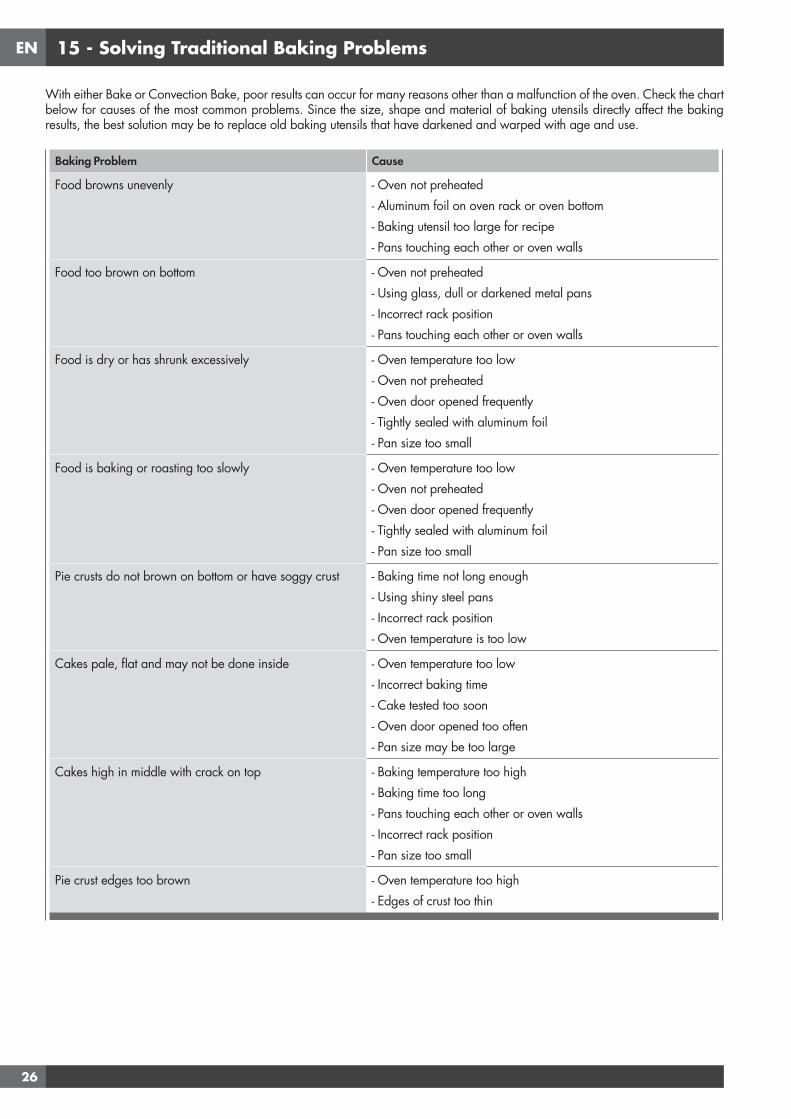
With either Bake or Convection Bake, poor results can occur for many reasons other than a malfunction of the oven. Check the chart below for causes of the most common problems. Since the size, shape and material of baking utensils directly affect the baking results, the best solution may be to replace old baking utensils that have darkened and warped with age and use.
Baking Problem Cause
Food browns unevenly - Oven not preheated- Aluminum foil on oven rack or oven bottom- Baking utensil too large for recipe- Pans touching each other or oven walls
Food too brown on bottom - Oven not preheated- Using glass, dull or darkened metal pans- Incorrect rack position- Pans touching each other or oven walls
Food is dry or has shrunk excessively - Oven temperature too low- Oven not preheated- Oven door opened frequently- Tightly sealed with aluminum foil- Pan size too small
Food is baking or roasting too slowly - Oven temperature too low- Oven not preheated- Oven door opened frequently- Tightly sealed with aluminum foil- Pan size too small
Pie crusts do not brown on bottom or have soggy crust - Baking time not long enough- Using shiny steel pans- Incorrect rack position- Oven temperature is too low
Cakes pale, flat and may not be done inside - Oven temperature too low- Incorrect baking time- Cake tested too soon- Oven door opened too often- Pan size may be too large
Cakes high in middle with crack on top - Baking temperature too high- Baking time too long- Pans touching each other or oven walls- Incorrect rack position- Pan size too small
Pie crust edges too brown - Oven temperature too high- Edges of crust too thin
EN
27
16 - Troubleshooting
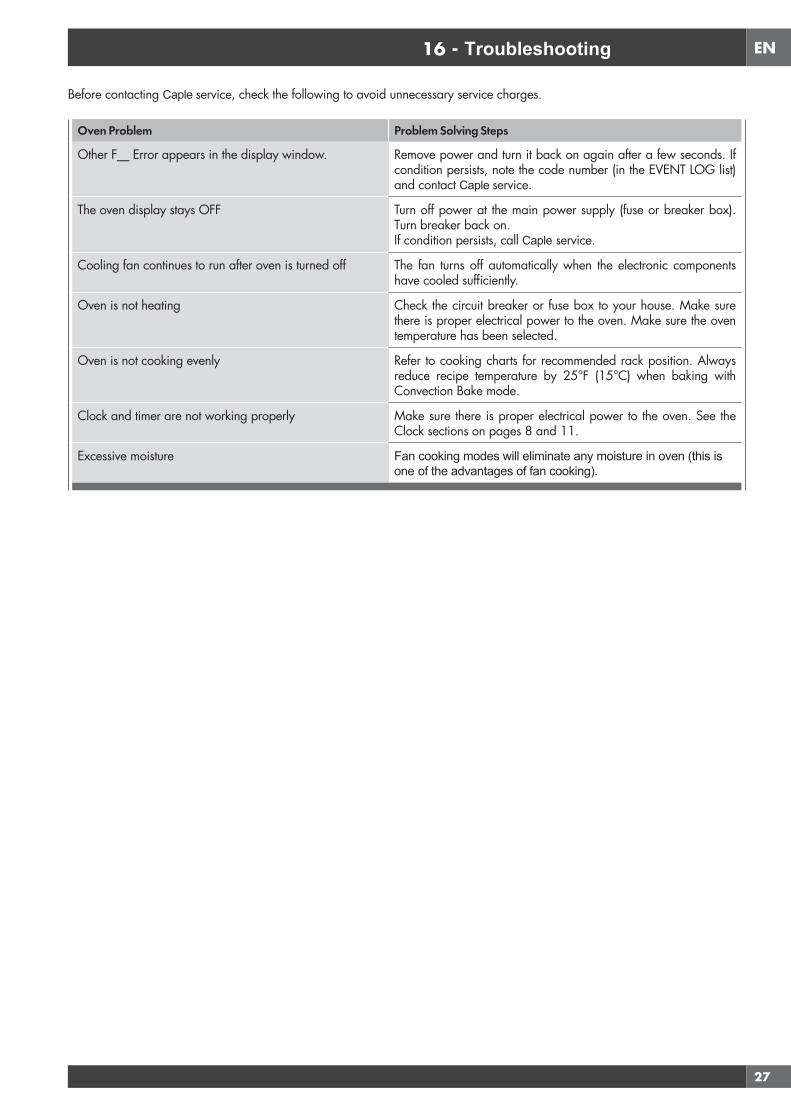
Before contacting Caple service, check the following to avoid unnecessary service charges.
Oven Problem Problem Solving Steps
Other F__ Error appears in the display window. Remove power and turn it back on again after a few seconds. If condition persists, note the code number (in the EVENT LOG list) and contact Caple service.
The oven display stays OFF Turn off power at the main power supply (fuse or breaker box). Turn breaker back on.If condition persists, call Caple service.
Cooling fan continues to run after oven is turned off The fan turns off automatically when the electronic components have cooled sufficiently.
Oven is not heating Check the circuit breaker or fuse box to your house. Make sure there is proper electrical power to the oven. Make sure the oven temperature has been selected.
Oven is not cooking evenly Refer to cooking charts for recommended rack position. Always reduce recipe temperature by 25°F (15°C) when baking with Convection Bake mode.
Clock and timer are not working properly Make sure there is proper electrical power to the oven. See the Clock sections on pages 8 and 11.
Excessive moisture Fan cooking modes will eliminate any moisture in oven (this is one of the advantages of fan cooking).
EN
28
17 - Assistance or Service
Before contacting Caple service, please check “Troubleshooting.” It may save you the cost of a service call.If you still need help, follow the instructions below. When calling, please know the purchase date and the complete model and serial number of your appliance. This information will help us to better respond to your request.
Service Data Record
For authorized service or parts information please contact our Caple service department:T - 0117 938 7420E - [email protected]
For serial tag location see Page 3. Now is a good time to write this information in the space provided below.Keep your invoice for warranty validation.
Service Data Record
Model Number _________________________________
Serial Number __________________________________
Date of Installation or Occupancy __________________
IT
1
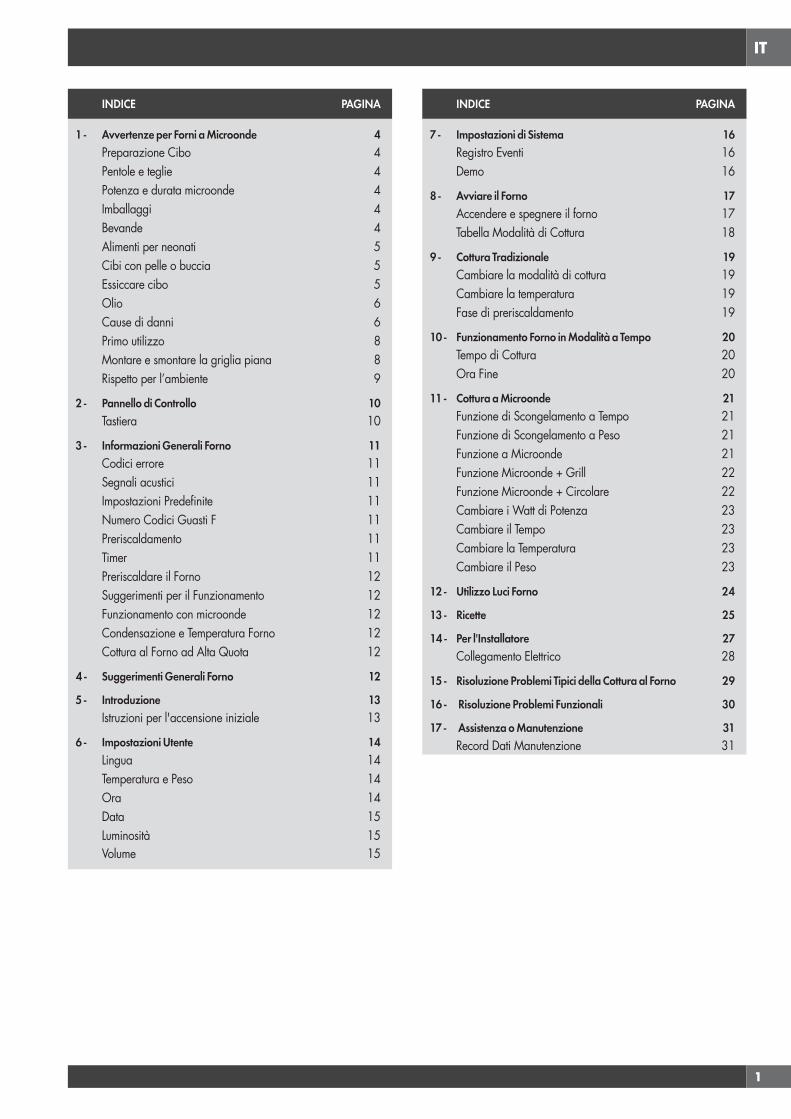
INDICE PAGINA
1 - Avvertenze per Forni a Microonde 4Preparazione Cibo 4Pentole e teglie 4Potenza e durata microonde 4Imballaggi 4Bevande 4Alimenti per neonati 5Cibi con pelle o buccia 5Essiccare cibo 5Olio 6Cause di danni 6Primo utilizzo 8Montare e smontare la griglia piana 8Rispetto per l’ambiente 9
2 - Pannello di Controllo 10Tastiera 10
3 - Informazioni Generali Forno 11Codici errore 11Segnali acustici 11Impostazioni Predefinite 11Numero Codici Guasti F 11Preriscaldamento 11Timer 11Preriscaldare il Forno 12Suggerimenti per il Funzionamento 12Funzionamento con microonde 12Condensazione e Temperatura Forno 12Cottura al Forno ad Alta Quota 12
4 - Suggerimenti Generali Forno 12
5 - Introduzione 13Istruzioni per l'accensione iniziale 13
6 - Impostazioni Utente 14Lingua 14Temperatura e Peso 14Ora 14Data 15Luminosità 15Volume 15
INDICE PAGINA
7 - Impostazioni di Sistema 16Registro Eventi 16Demo 16
8 - Avviare il Forno 17Accendere e spegnere il forno 17Tabella Modalità di Cottura 18
9 - Cottura Tradizionale 19Cambiare la modalità di cottura 19Cambiare la temperatura 19Fase di preriscaldamento 19
10 - Funzionamento Forno in Modalità a Tempo 20Tempo di Cottura 20Ora Fine 20
11 - Cottura a Microonde 21Funzione di Scongelamento a Tempo 21Funzione di Scongelamento a Peso 21Funzione a Microonde 21Funzione Microonde + Grill 22Funzione Microonde + Circolare 22Cambiare i Watt di Potenza 23Cambiare il Tempo 23Cambiare la Temperatura 23Cambiare il Peso 23
12 - Utilizzo Luci Forno 24
13 - Ricette 25
14 - Per l'Installatore 27Collegamento Elettrico 28
15 - Risoluzione Problemi Tipici della Cottura al Forno 29
16 - Risoluzione Problemi Funzionali 30
17 - Assistenza o Manutenzione 31Record Dati Manutenzione 31
IT
2
Gentile Cliente,La ringraziamo e ci congratuliamo per la Sua scelta.Questo nuovo prodotto è stato accuratamente progettato e costruito con materiali di primissima qualità e accuratamente collaudato per poter soddisfare tutte le Sue esigenze culinarie.La preghiamo pertanto di leggere e rispettare le facili istruzioni che Le permetteranno di raggiungere eccellenti risultati sin dal primo utilizzo. Insieme a questo innovativo elettrodomestico Le porgiamo i nostri migliori auguri.
QUESTO PRODOTTO È PROGETTATO ESCLUSIVAMENTE PER UTILIZZO DOMESTICO. IL COSTRUTTORE DECLINA OGNI RESPONSABILITÀ PER LESIONI A PERSONE O DANNI A COSE DERIVANTI DA INSTALLAZIONE NON CORRETTA O IMPORPRIA, UTILIZZO ERRATO O NON IDONEO.QUESTO APPARECCHIO NON È DESTINATO ALL'UTILIZZO DA PARTE DI PERSONE (INCLUSI BAMBINI) CON RIDOTTE CAPACITÀ FISICHE, SENSORIALI O FACOLTÀ MENTALI, O PERSONE CON MANCANZA DI ESPERIENZA O DIMESTICHEZZA, A MENO CHE SIANO SOTTOPOSTI A SUPERVISIONE O VENGANO DATE LORO ISTRUZIONI CONCERNENTI L'UTILIZZO DELL’APPARECCHIO DA PARTE DI UNA PERSONA RESPONSABILE DELLA LORO SICUREZZA.I BAMBINI DEVONO ESSERE SORVEGLIATI AL FINE DI EVITARE CHE GIOCHINO CON L'ELETTRODOMESTICO. NON POSIZIONARE FOGLI DI ALLUMINIO, PENTOLE O OGGETTI SIMILI A CONTATTO CON LA BASE INTERNA DEL FORNO PER LA COTTURA. L'AZIONE RISCALDANTE DELL'ELEMENTO RISCALDANTE INFERIORE CAUSA SURRISCALDAMENTO DELLA PARTE INFERIORE DEL FORNO PROVOCANDO DANNI E CONSEGUENZE GRAVI (RISCHIO DI INCENDIO) ANCHE ALL'INCASSO SOTTOSTANTE IL FORNO.L'ELETTRODOMESTICO RAGGIUNGE TEMPERATURE ELEVATE DURNATE L'UTILIZZO.ATTENZIONE: NON TOCCARE GLI ELEMENTI RISCALDANTI ALL'INTERNO DEL FORNO.
ATTENZIONE• Se la porta o la guarnizione della porta sono
danneggiati, il forno non può essere utilizzato fino ache non vengano riparate da un tecnico dell'assistenzaqualificato;
• È pericoloso per chiunque non sia un tecnicodell'assistenza effettuare qualunque attività dimanutenzione o riparazione che coinvolga la rimozionedi qualsivoglia copertura che protegga dall'esposizionealle microonde;
• Liquidi o altri alimenti non devono essere riscaldati incontenitori sotto vuoto in quanto potrebbero esplodere;
• I bambini non possono utilizzare il forno senzasupervisione fino a che non vengano adeguatamenteistruiti al suo utilizzo sicuro e capiscano i pericoli delsuo incorretto utilizzo;
ATTENZIONE• Utilizzare solamente utensili adatti a forni a microonde;• Quando si riscalda il cibo in contenitori di plastica o
carta, controllare spesso il forno a causa del rischio diincendio;
• Se vedete del fumo fuoriuscire, spegnerel'elettrodomestico o rimuovere la spina e tenere la portachiusa per far estinguere eventuali fiamme;
• Riscaldare bevande nel microonde spesso causaun'ebollizione ritardata; maneggiare dunque ilcontenitore con cautela;
• I contenuti di biberon o cibi per neonati in vasettidevono essere mescolati o agitati e la loro temperaturadeve essere controllata prima di somministrarli perevitare scottature;
• Uova con guscio e uova sode intere non devonoessere riscaldate nel microonde in quanto potrebberoesplodere anche dopo la fine del riscaldamento almicroonde;
• Una spiegazione dettagliata per la pulizia dellaguarnizione delle porte della cavità e delle partiadiacenti;
• Il forno deve essere pulito periodicamente e tutti i residuidi cibo devono essere rimossi;
• In caso contrario, le superfici del forno si deteriorerannoe ciò potrà ridurre la vita dell'elettrodomestico egenerare condizioni di pericolo;
• Non utilizzare pulitori abrasivi o raschietti metallicitaglienti per pulire il vetro della porta del forno inquanto potrebbero graffiare la superficie provocandola frantumazione del vetro.
• Non utilizzare pulitori a vapore per pulirel'elettrodomestico.
ISTRUZIONI IMPORTANTIE AVVERTENZE DI SICUREZZA
Leggere attentamente e conservare per futuro utilizzo
IT
3
1 - Avvertenze per Forni a Microonde
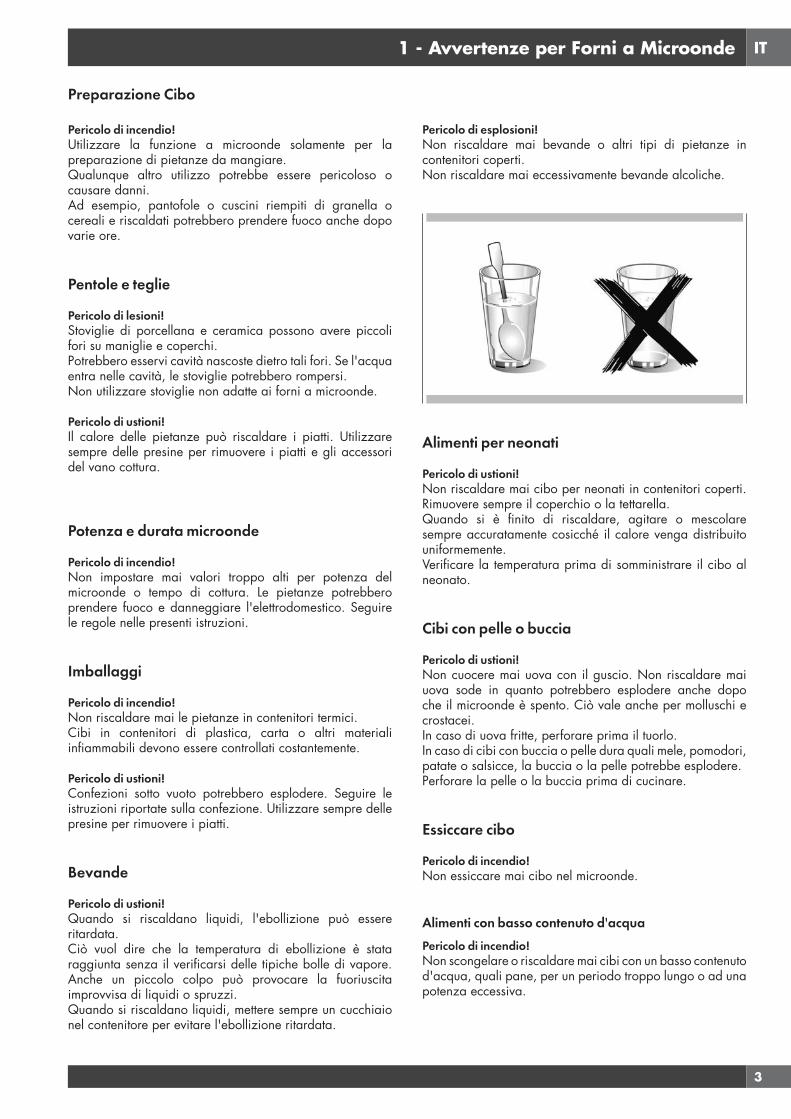
Preparazione Cibo
Pericolo di incendio!Utilizzare la funzione a microonde solamente per la preparazione di pietanze da mangiare.Qualunque altro utilizzo potrebbe essere pericoloso o causare danni.Ad esempio, pantofole o cuscini riempiti di granella o cereali e riscaldati potrebbero prendere fuoco anche dopo varie ore.
Pentole e teglie
Pericolo di lesioni!Stoviglie di porcellana e ceramica possono avere piccoli fori su maniglie e coperchi.Potrebbero esservi cavità nascoste dietro tali fori. Se l'acqua entra nelle cavità, le stoviglie potrebbero rompersi.Non utilizzare stoviglie non adatte ai forni a microonde.
Pericolo di ustioni!Il calore delle pietanze può riscaldare i piatti. Utilizzare sempre delle presine per rimuovere i piatti e gli accessori del vano cottura.
Potenza e durata microonde
Pericolo di incendio!Non impostare mai valori troppo alti per potenza del microonde o tempo di cottura. Le pietanze potrebbero prendere fuoco e danneggiare l'elettrodomestico. Seguire le regole nelle presenti istruzioni.
Imballaggi
Pericolo di incendio!Non riscaldare mai le pietanze in contenitori termici.Cibi in contenitori di plastica, carta o altri materiali infiammabili devono essere controllati costantemente.
Pericolo di ustioni!Confezioni sotto vuoto potrebbero esplodere. Seguire le istruzioni riportate sulla confezione. Utilizzare sempre delle presine per rimuovere i piatti.
Bevande
Pericolo di ustioni!Quando si riscaldano liquidi, l'ebollizione può essere ritardata.Ciò vuol dire che la temperatura di ebollizione è stata raggiunta senza il verificarsi delle tipiche bolle di vapore. Anche un piccolo colpo può provocare la fuoriuscita improvvisa di liquidi o spruzzi.Quando si riscaldano liquidi, mettere sempre un cucchiaio nel contenitore per evitare l'ebollizione ritardata.
Pericolo di esplosioni!Non riscaldare mai bevande o altri tipi di pietanze in contenitori coperti.Non riscaldare mai eccessivamente bevande alcoliche.
Alimenti per neonati
Pericolo di ustioni!Non riscaldare mai cibo per neonati in contenitori coperti. Rimuovere sempre il coperchio o la tettarella.Quando si è finito di riscaldare, agitare o mescolare sempre accuratamente cosicché il calore venga distribuito uniformemente.Verificare la temperatura prima di somministrare il cibo al neonato.
Cibi con pelle o buccia
Pericolo di ustioni!Non cuocere mai uova con il guscio. Non riscaldare mai uova sode in quanto potrebbero esplodere anche dopo che il microonde è spento. Ciò vale anche per molluschi e crostacei.In caso di uova fritte, perforare prima il tuorlo.In caso di cibi con buccia o pelle dura quali mele, pomodori, patate o salsicce, la buccia o la pelle potrebbe esplodere.Perforare la pelle o la buccia prima di cucinare.
Essiccare cibo
Pericolo di incendio!Non essiccare mai cibo nel microonde.
Alimenti con basso contenuto d'acquaPericolo di incendio!Non scongelare o riscaldare mai cibi con un basso contenuto d'acqua, quali pane, per un periodo troppo lungo o ad una potenza eccessiva.
IT
4
Olio
Pericolo di incendio!Non utilizzare mai il microonde per riscaldare solamente olio.
Cause di danni
Succo che scola dalla frutta.Quando si preparano dolci che contengono frutta molto succosa, non riempire troppo la teglia. Succhi di frutta che fuoriescono dalla teglia possono lasciare macchie indelebili.
Guasto tecnicoNon utilizzare mai teglie smaltate nel microonde in quanto ciò potrebbe causare un guasto tecnico.
Raffreddare con la porta dell'elettrodomestico aperta.Il vano cottura deve essere raffreddato solamente con la porta chiusa. Controllare che non vi sia nulla incastrato nella porta dell'elettrodomestico.Anche se la porta è solo socchiusa, nel tempo, i mobiletti vicini si possono danneggiare.
Guarnizione molto sporcaSe la guarnizione è molto sporca, la porta dell'elettrodomestico non si chiude correttamente durante il funzionamento. Le superfici dei mobiletti vicini possono venire danneggiate.Tenere sempre pulita la guarnizione.
Utilizzo della porta dell'elettrodomestico come superfi-cie di appoggioNon appoggiatevi sula porta aperta dell'elettrodomestico e non mettetevi sopra stoviglie o accessori.
Utilizzo del microonde senza cibo all'internoAccendere il microonde esclusivamente dopo aver inserito del cibo nel vano cottura. Senza cibo all'interno, l'elettrodomestico si sovraccarica. L'unica eccezione permessa sono brevi test di stoviglie (a tale proposito, vedere le avvertenze circa pentole e teglie)
Alimenti umidiNon lasciare alimenti umidi nel vano cottura per lunghi periodi di tempo.
IMPORTANTE
La targhetta identificativa del forno è accessibile anche quando l'elettrodomestico è installato Tale targhetta identificativa, visibile a porta aperta, mostra tutte le informazioni necessarie nel richiedere parti di ricambio dell'elettrodomestico.
IT
5
IMPORTANTE
Per precauzione, prima di pulire il forno, scollegare sempre la spina dalla presa o rimuovere il cavo elettrico dell'elettrodomestico. Inoltre, evitare di utilizzare sostanze acide o alcaline (quali limone, aceto, sale, pomodori, ecc.). Evitare di utilizzare prodotti che contengono cloro, acidi o abrasivi, in particolare per la pulizia di parti verniciate.
Primo utilizzo
Il forno deve essere pulito accuratamente con acqua saponata e sciacquato con cura.Riscaldare il forno per circa 30 minuti alla massima temperatura; ciò elimina tutti gli eventuali oli residui dalla fabbricazione che potrebbero causare odori sgradevoli durante la cottura. Utilizzare la funzione ventola plus circolare senza accessori nel forno. Prima di utilizzare gli accessori per la prima volta, pulirli accuratamente con una soluzione di lavaggio alcalina molto calda e un panno morbido.
Montare e smontare la griglia piana
Per rimuovere la griglia piana, tirare la griglia verso di voi fino a che non si fermi e poi sollevarla, tirando verso l'alto, fino a che non venga completamente fuori.Per reinserire la griglia piana, inserirla ad un angolo di 45° e poi posizionarla in orizzontale e spingerla fino in fondo al binario della griglia.Se la griglia piana ha una teglia raccogligocce (vassoio), per rimuoverla sollevarla leggermente e farla scorrere verso di voi. Per reinserirla, farla scorrere indietro fino a che non sia correttamente posizionata.

IT
6
Rispetto per l’ambiente
La documentazione del presente elettrodomestico utilizza carta sbiancata senza cloro oppure carta riciclata allo scopo di contribuire alla tutela dell’ambiente. Gli imballaggi sono concepiti per evitare di danneggiare l’ambiente; sono prodotti ecologici che possono essere recuperati o riciclati.Riciclando l’imballaggio, si contribuirà ad un risparmio di materie prime e ad una riduzione del volume degli scarti industriali e domestici.
IL MATERIALE DI IMBALLAGGIO è riciclabile al 100% ed è contrassegnato dal simbolo del riciclaggio. Per lo smaltimento seguire le normative locali. Il materiale di imballaggio (sacchetti di plastica, parti in polistirolo, ecc.) deve essere tenuto fuori dalla portata dei bambini in quanto potenzialmente pericoloso.
QUESTO ELETTRODOMESTICO è contrassegnato in conformità alla Direttiva Europea 2002/96/UE, Rifiuti di Apparecchiature Elettriche ed Elettroniche (RAEE). Assicurandosi che questo prodotto venga smaltito in modo corretto, l’utente contribuisce a prevenire potenziali conseguenze negative per l’ambiente e la salute.
IL SIMBOLO sul prodotto o insieme alla documentazione indica che questo prodotto potrebbe non dover essere trattatocome rifiuto domestico, ma deve essere condotto presso un punto di raccolta adeguato per il riciclo ci apparecchiaturaelettrica ed elettronica.
LO SMALTIMENTO DEVE AVVENIRE in conformità alle normative locali in materia di smaltimento dei rifiuti.
PER INFORMAZIONI AGGIUNTIVE sul trattamento, recupero e riciclo di questo prodotto, contattare l'ufficio locale di competenza, il servizio di raccolta di rifiuti domestici o il negozio in cui è stato acquistato il prodotto.
PRIMA DELLA ROTTAMAZIONE, renderlo inutilizzabile tagliando il cavo elettrico.

IT
7
2 - Pannello di Controllo
Tastiera
Per far funzionare i tasti, premere delicatamente. La tastiera non funziona se più tasti vengono premuti contemporaneamente.
Frecce di spostamento
Ritornare alla schermata del display precedente. Tenere premuto per tornare alla Schermata principale
Accendere e spegnere il forno.
Conferma le impostazioni ed avvia le operazioni di cottura. Quando premuto durante un'operazione di cottura, la funzione viene messa in pausa. Premere nuovamente per riavviare.
Per impostare il timer.Accedere al menù funzioni durante la cottura.
Accendere e spegnere la luce interna del forno.
Il vostro elettrodomestico potrebbe differire leggermente dalle illustrazioni sottostanti.
A - Tastiera
B - Schermo display
PM
FRIDAY 11/20/2015
04:26
B A
IT
8
3 - Informazioni Generali Forno
Codici errore
Questo codice appare in caso il controllo elettrico indichi un guasto. Quando appare l'errore, la funzione corrente viene bloccata. Se il tipo di errore è relativo ad una funzione di sicurezza, il forno diventa inutilizzabile e ogni qualvolta si tenti di avviarlo, appare lo stesso errore (nel cui caso chiamare l'assistenza post-vendita), mentre se l'errore riguarda un guasto minore, dopo averlo riavviato, il forno può essere utilizzato per le funzioni che non includono la parte danneggiata (ad es. un elemento riscaldante).
Segnali acustici
Conferma che il comando è stato ricevuto a seguito della pressione di un tasto.Indica inoltre che una funzione a tempo è stata completata (ad es. Timer o Cottura a Tempo). Durante l'esecuzione di una ricetta, un segnale acustico avverte l'utente che il forno è in attesa di istruzioni da parte dell'utente (ad es. inserire il piatto o rivoltarlo).I segnali acustici segnalano inoltre un guasto del forno.
Impostazioni Predefinite
Le modalità di cottura selezionano automaticamente una temperatura adatta; quando necessario, questa può essere cambiata.
Numero Codici Guasti F
Tali codici vengono mostrati quando il controllo elettronico rileva un problema nel forno o nell'elettronica.Il codice errore è registrato nel Registro Errori nel Menù impostazioni. Tale errore può essere comunicato al tecnico dell'assistenza cosicché lui/lei possa comprendere le possibili cause del problema in anticipo.
Preriscaldamento
Ogni qualvolta viene impostata una modalità di cottura e il forno riscalda, si avvia il preriscaldamento; durante tale periodo, viene mostrata la temperatura corrente insieme all'icona del termometro.Non appena raggiunge il 100%, il controllo emette un suono di "fine del preriscaldamento" e il valore della temperatura corrente scompare.
Timer
ATTENZIONE
Il timer nel vostro forno non accende o spegne l'elettrodomestico; il suo unico scopo è quello di allertarvi tramite il campanello. Quando volete spegnere il forno in modo automatico, utilizzare la funzione cottura-terminata o cottura ritardata.
NOTA: Premere il tasto OFF non reimposta né arresta il timer.
1. Premere il pulsante e impostare il tempo desiderato utilizzando le frecce e confermare con il pulsante . Per cambiare la selezione tra ore e minuti utilizzare le frecce .
2. Il tempo può essere impostato da 1 minuto a 12 ore e 59 minuti e, quando impostato, il tempo rimanente è sempre visibile nella barra di stato inferiore fino a che il tempo non finisca o venga reimpostato.
3. Per cambiare o cancellare il tempo impostato, dovete reimpostare il timer tenendo premuto il tasto per alcuni secondi.
4. Il formato del timer è solitamente HR MIN, passando a MIN SEC durante l'ultimo minuto.
5. Quando scade il tempo, il display mostra 00:00 e il campanello suona per un minuto o fino a che non venga premuto il pulsante
.
Prima di utilizzare il forno per la prima volta rimuovere tutto l'imballaggio e i corpi estranei dal forno(i). Qualunque materiale di questo tipo lasciato all'interno potrebbe fondersi o bruciare durante l'utilizzo dell'elettrodomestico.
IT
9
4 - Suggerimenti Generali Forno
Preriscaldare il Forno
• Selezionare una temperatura maggiore non accorcia il tempo di preriscaldamento.
• Il preriscaldamento è necessario per buoni risultati quando si cuciono al forno dolci, biscotti, pasticcini e pane.
• Preriscaldare aiuterà a rosolare arrosti e a non disperdere i succhi della carne.
• Mettere le griglie da forno in posizione prima di preriscaldare.• Durante il preriscaldamento, la temperatura di cottura selezionata
viene sempre mostrata.• Un segnale acustico confermerà che il forno è preriscaldato e la
"temperatura rilevata" si spegnerà.
Suggerimenti per il Funzionamento
• Non posizionare teglie sulla porta del forno aperta.• Utilizzare le luci interne del forno per vedere le pietanze attraverso il
vetro della porta del forno piuttosto che aprire frequentemente la porta.
Funzionamento con microonde
Le microonde vengono trasformate in calore all'interno degli alimenti. Le microonde possono essere utilizzate da sole o in combinazionecon altri tipi di riscaldamento. La presente sezione contiene informazioni circa le stoviglie e istruzioni per impostareil forno a microonde.
AVVERTENZE PER LE STOVIGLIE
Stoviglie adatteSi possono utilizzare stoviglie resistenti al calore fatte di vetro, vetroceramica, porcellana, ceramica o plastiche refrattarie. Tali materiali sono permeabili alle microonde.È inoltre possibile utilizzare piatti normali. In tal modo, non sarà necessario trasferire le pietanze.Stoviglie con decorazioni in oro o argento possono essere utilizzate solamente se il produttore assicura che possano essere usate in forni a microonde.Ricordare che, quando si utilizza il forno in modalità a microonde, il piatto deve essere posizionato sul piatto rotante.Quando si utilizza il forno in modalità combinata, è preferibile posizionare la pietanza da cucinare sulla griglia rotonda inferiore supportata in modo che sia centrata sul piatto rotante.
Stoviglie non adatteStoviglie di metallo non possono essere utilizzate.Il metallo non è permeabile alle microonde. Le pietanze in contenitori di metallo rimarranno fredde.Attenzione! Elementi di metallo, quali cucchiai nei bicchieri, devono stare per lo meno a 2 cm dalle pareti del forno e dall'interno della porta. Difatti, le scintille potrebbero gravemente danneggiare l'interno della porta di vetro.Attenzione! La griglia piana deve essere rimossa quando si utilizzano le modalità a microonde e combinata. Utilizzarla solamente con le funzioni forno tradizionale.
Testare le stoviglieNon accendere mai il microonde prima di aver inserito le pietanze.L'unica eccezione permessa è per provare le stoviglie.In caso non siate sicuri qualora le vostre stoviglie posano essere utilizzate nel forno a microonde, viraccomandiamo di effettuare il seguente test:posizionare una pentola vuota nell'elettrodomestico per ½ - 1 minuto alla massimapotenza. Controllare la temperatura. La pentola deve essere fredda o leggermente calda. Se èbollente o vi sono scintille, la pentola non è adatta.
Condensazione e Temperatura Forno
• È normale che una certa quantità di umidità evapori dalle pietanze durante qualunque processo di cottura. La quantità dipende dall'umidità contenuta nelle pietanze. L'umidità può condensarsi su qualunque superficie più fredda rispetto all'interno del forno quale, ad esempio, il pannello di controllo.
• Il vostro nuovo forno ha un sensore di temperatura elettronico che permette di mantenere una temperatura accurata.
Cottura al Forno ad Alta Quota
• Quando si cucina ad altitudini elevate, le ricette e i tempi di cottura variano.
IT
10
5 - Introduzione
Istruzioni per l'accensione iniziale
Una volta che il forno è stato collegato alla corrente elettrica per la prima volta, il controllo si prepara automaticamente per impostare una serie di impostazioni utente, che rimangono immagazzinate in caso di successive accensioni.
NOTA: Sia durante il primo che i successivi collegamenti alla corrente elettrica, il meccanismo di bloccaggio della porta si calibra - in questa fase, tenere sempre la porta chiusa.
• Lingua• Temperatura e Peso• Ora• Data
Fare riferimento al paragrafo IMPOSTAZIONI UTENTE per le istruzioni di impostazione.
Dopo aver effettuato le impostazioni utente, il controllo si sposta automaticamente alla schermata "Standby" del display.

IT
11
6 - Impostazioni Utente
Con il forno acceso, selezionare l'icona e confermare con il tasto per accedere al menù IMPOSTAZIONI. Tale menù permette di
personalizzare le impostazioni del vostro forno. Per accedervi, non devono essere in corso cotture né funzioni a tempo.
NOTA: Il Menù impostazioni non può mai essere impostato se una qualunque funzione a tempo è già impostata: cancellare prima qualunque funzione a tempo attiva.
1. Premere i tasti per selezionare il sottomenù e confermare con il tasto .
2. Utilizzare il presente menù per cambiare le seguenti impostazioni: Premere i tasti o per selezionare le impostazioni o
cambiare un sottomenù tra i sei disponibili e confermare per mezzo del tasto .
12
yk abc
SETUP
LANGUAGE
Lingua
Premere la freccia per selezionare la lingua tra quelle disponibili e confermare con il tasto .
Temperatura e Peso
Premere la freccia e per selezionare una delle due opzioni temperatura “°C/°F” o opzioni peso Kg/lb e confermare con il tasto
.
°F°C
lb
Kg
Ora
Premere la freccia per selezionare il formato ora tra le opzioni "12h AM/PM o 24h” e confermare con il tasto . Successivamente, impostare l'ora premendo le frecce e confermare con il tasto .
IT
12
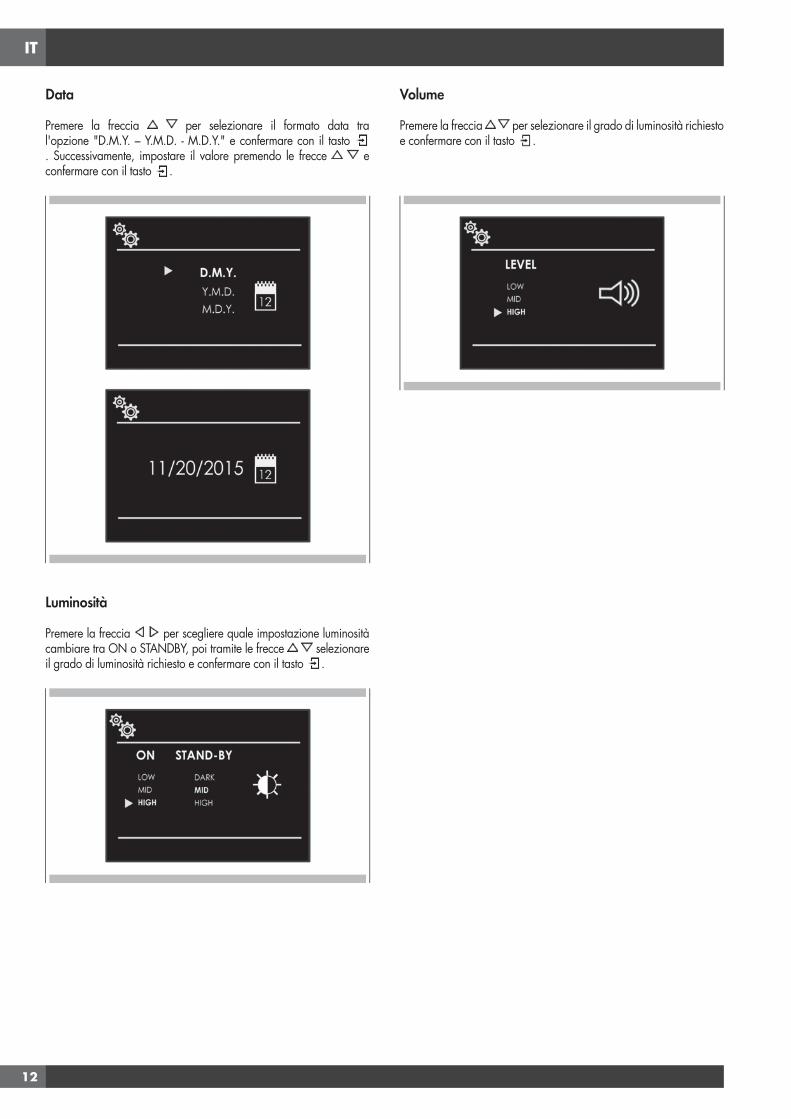
Data
Premere la freccia per selezionare il formato data tra l'opzione "D.M.Y. – Y.M.D. - M.D.Y." e confermare con il tasto . Successivamente, impostare il valore premendo le frecce e confermare con il tasto .
Luminosità
Premere la freccia per scegliere quale impostazione luminosità cambiare tra ON o STANDBY, poi tramite le frecce selezionare il grado di luminosità richiesto e confermare con il tasto .
Volume
Premere la freccia per selezionare il grado di luminosità richiesto e confermare con il tasto .

IT
13
7 - Impostazioni di Sistema
Con il forno acceso, selezionare l'icona e confermare con il tasto per accedere al menù IMPOSTAZIONI. Tale menù permette di
impostare una serie di parametri o funzioni speciali. Permette inoltre di accedere alla lista eventi errore.
1. Premere i tasti per selezionare il sottomenù e confermare con il tasto .
2. Utilizzare il presente menù per cambiare le seguenti impostazioni:
Premere i tasti per selezionare la voce da impostare o da mostrare sul display dai tre disponibili e confermare con il tasto .
Registro Eventi
Il menù permette di controllare qualunque errore registrato. Tali codici possono essere notificati al servizio di assistenza post-vendita.
Demo
Lo scopo di tale funzione è quello di impostare la modalità DEMO che rende il forno inutilizzabile per cucinare, ma esegue una dimostrazione delle funzioni in automatico.
1. Premere i tasti per selezionare la voce ON.2. Confermare con il tasto .3. Premere il tasto .
Dopo circa 30 secondi il forno inizia a funzionare in tale modalità.
Per arrestare momentaneamente la funzione DEMO, tenere semplicemente premuto qualunque tasto per pochi secondi fino a che il forno non vada in standby. Per riavviarla, premere il tasto .
Per disabilitare la funzione, accedere alla schermata DEMO e impostarla su OFF. Confermare con il tasto .
NOTA: Una volta impostata, la funzione rimane abilitata anche se il forno è disconnesso dall'alimentazione elettrica.

IT
14
8 - Avviare il Forno
Forno Multifunzione
Cottura Tradizionale
COTTURA CIRCOLARE VENTILATA
CIRCOLARE E GRILL
GRILL VENTILATO
GRILL
Cottura a Microonde
SCONGELAMENTO A TEMPO
SCONGELAMENTO A PESO
COTTURA A MICROONDE
MICROONDE E GRILL
MICROONDE E RING
Forno Termico
Cottura Tradizionale
GRILL
Cottura a Microonde
SCONGELAMENTO A TEMPO
SCONGELAMENTO A PESO
COTTURA A MICROONDE
MICROONDE E GRILL
1. Selezionare l'icona e premere il tasto Selezionare la modalità di cottura adeguata per le pietanze da cuocere utilizzando le frecce e confermare con il tasto .
2. Sul display è ancora possibile cambiare la modalità di cottura utilizzando i tasti .
3. Se la temperatura proposta è corretta, confermare con il tasto per avviare la cottura, altrimenti, se il tasto non viene premuto entro 10 secondi, il forno cambia in modalità automatica e l'icona della modalità di cottura diventa animata.
Accendere e spegnere il forno
IMPORTANTE
• Il tasto non arresta la funzione.• Dopo aver spento il forno, la ventola di raffreddamento continua a funzionare fino a che le parti interne del forno non si siano raffreddate.
Premere per accendere il forno e premere nuovamente per spegnerlo. Il forno torna in modalità standby.
IT
15
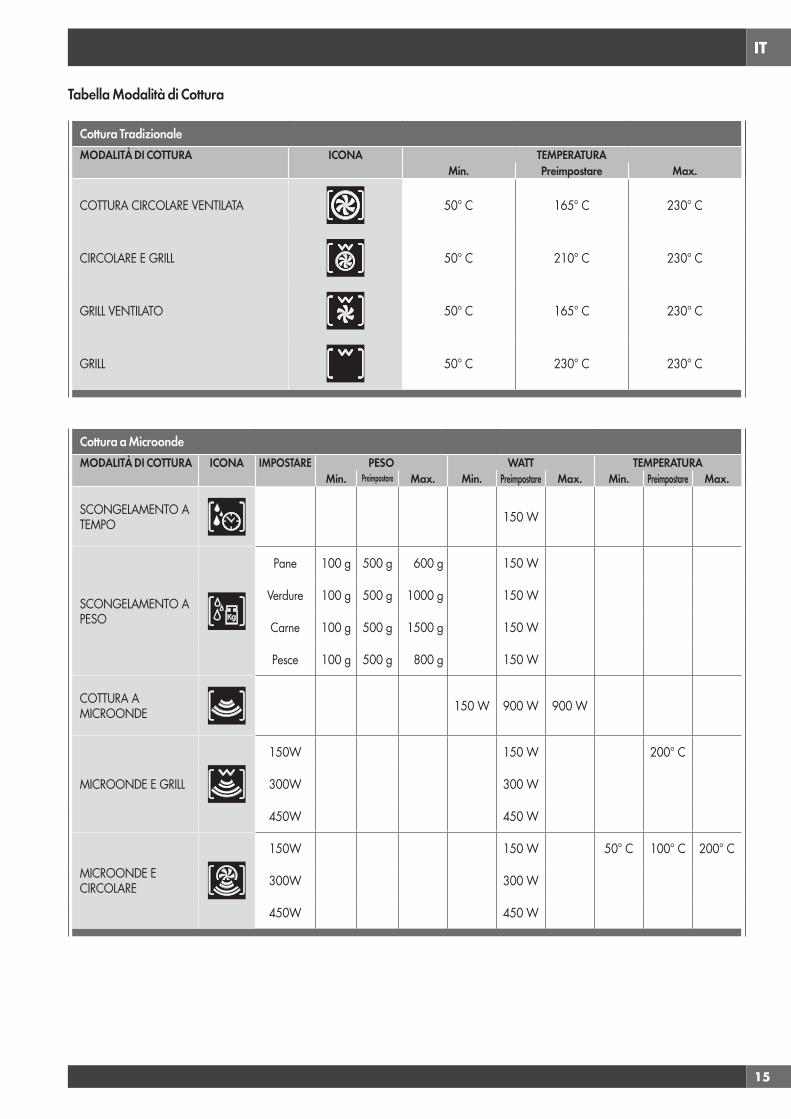
Tabella Modalità di Cottura
Cottura TradizionaleMODALITÀ DI COTTURA ICONA TEMPERATURA
Min. Preimpostare Max.
COTTURA CIRCOLARE VENTILATA 50° C 165° C 230° C
CIRCOLARE E GRILL 50° C 210° C 230° C
GRILL VENTILATO 50° C 165° C 230° C
GRILL 50° C 230° C 230° C
Cottura a MicroondeMODALITÀ DI COTTURA ICONA IMPOSTARE PESO WATT TEMPERATURA
Min. Preimpostare Max. Min. Preimpostare Max. Min. Preimpostare Max.
SCONGELAMENTO A TEMPO 150 W
SCONGELAMENTO A PESO
Pane 100 g 500 g 600 g 150 W
Verdure 100 g 500 g 1000 g 150 W
Carne 100 g 500 g 1500 g 150 W
Pesce 100 g 500 g 800 g 150 W
COTTURA A MICROONDE 150 W 900 W 900 W
MICROONDE E GRILL
150W 150 W 200° C
300W 300 W
450W 450 W
MICROONDE E CIRCOLARE
150W 150 W 50° C 100° C 200° C
300W 300 W
450W 450 W
IT
16
9 - Cottura Tradizionale
Cambiare la modalità di cottura
1. Durante la cottura non a tempo, si può impostare una pausa di cottura premendo il tasto .
Tutte le impostazioni della funzione di cottura impostata si conservano e possono essere riattivate premendo nuovamente lo stesso tasto.
2. Per cambiare la modalità di cottura mentre il forno è in funzione, premere il tasto e poi il tasto .
A questo punto, si può selezionare un'altra modalità di cottura tra quelle disponibili nella lista tramite le frecce .
Cambiare la temperatura
IMPORTANTE
• Alla fine di una funzione, lo schermo mostra la temperatura residua interna sulla schermata di standby.
1. Dalla schermata di anteprima della modalità di cottura, si può cambiare la temperatura tramite le frecce confermando successivamente con il tasto .
2. Una volta che la cottura è iniziata, la temperatura può comunque essere cambiata in qualsiasi momento, tramite le frecce .
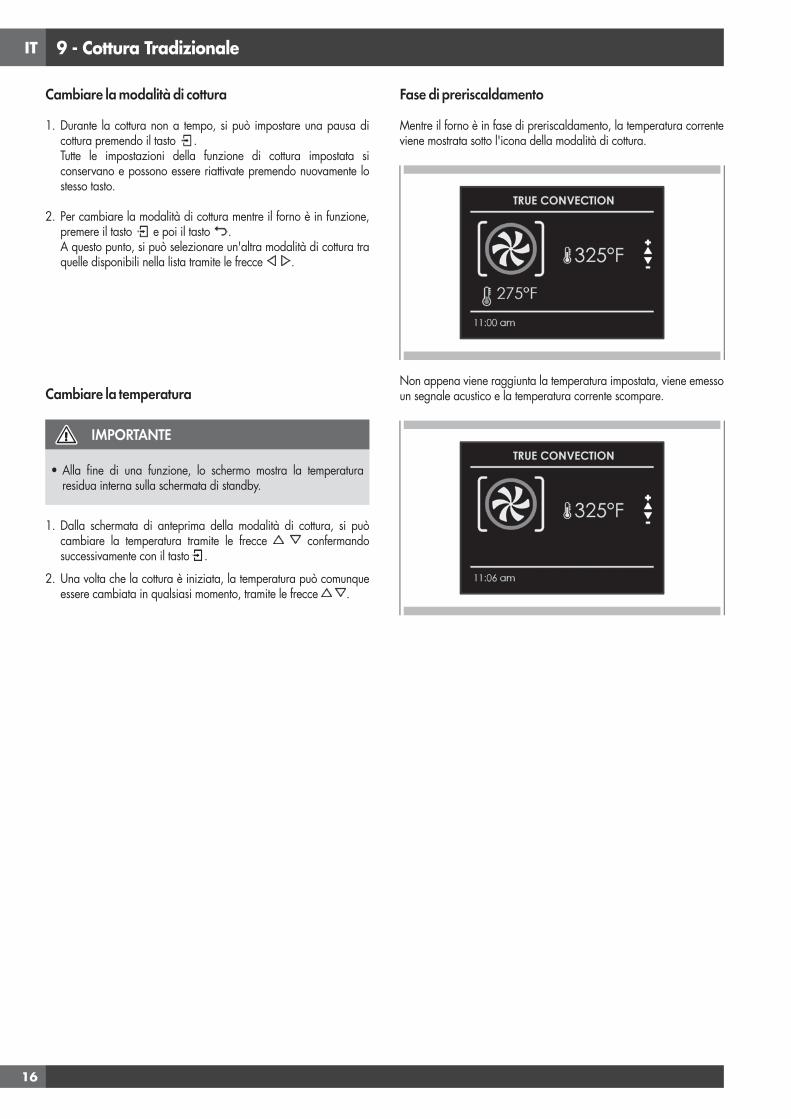
Fase di preriscaldamento
Mentre il forno è in fase di preriscaldamento, la temperatura corrente viene mostrata sotto l'icona della modalità di cottura.
Non appena viene raggiunta la temperatura impostata, viene emesso un segnale acustico e la temperatura corrente scompare.
IT
17
10 - Funzionamento Forno in Modalità a Tempo
Assicurarsi che data e ora siano impostate correttamente.La modalità a tempo spegne il forno alla fine del tempo di cottura.
ATTENZIONE
Non lasciare mai pietanze nel forno per più di un'ora prima e dopo la cottura. Ciò potrebbe causare il deterioramento delle pietanze stesse.
NOTA: Il tempo di cottura massimo che può essere impostato è 12 h.
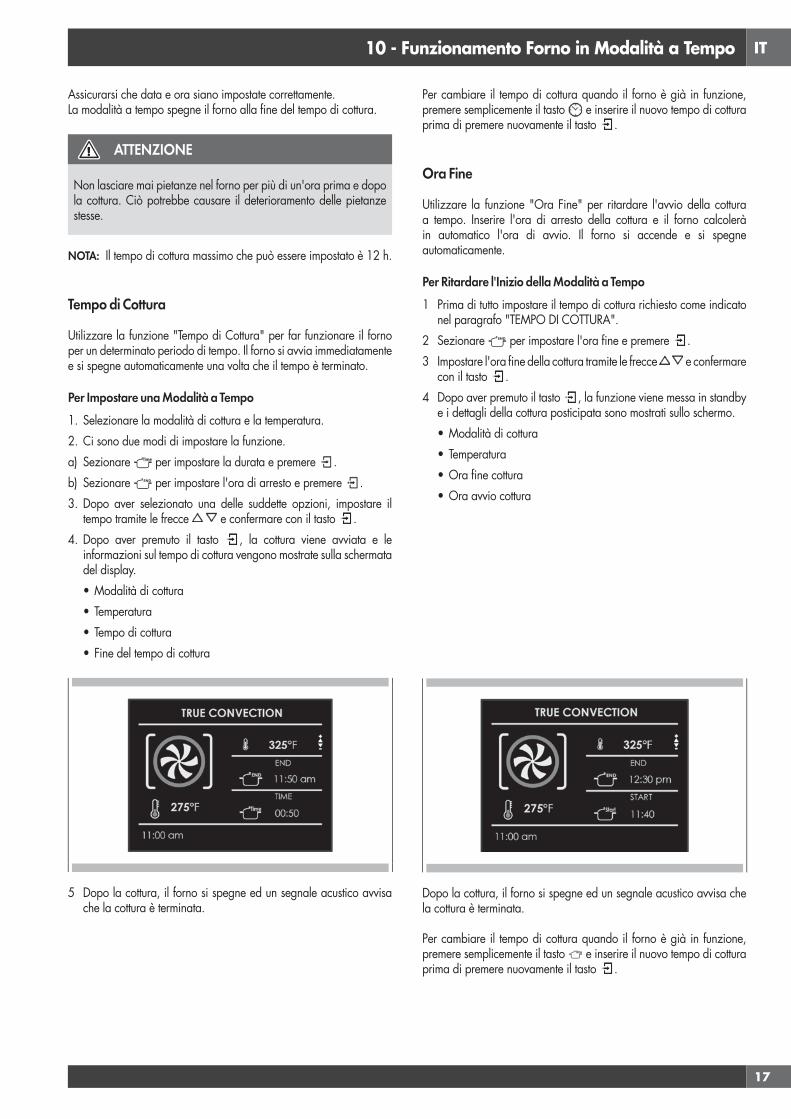
Tempo di Cottura
Utilizzare la funzione "Tempo di Cottura" per far funzionare il forno per un determinato periodo di tempo. Il forno si avvia immediatamente e si spegne automaticamente una volta che il tempo è terminato.
Per Impostare una Modalità a Tempo1. Selezionare la modalità di cottura e la temperatura.2. Ci sono due modi di impostare la funzione.a) Sezionare per impostare la durata e premere .b) Sezionare per impostare l'ora di arresto e premere .3. Dopo aver selezionato una delle suddette opzioni, impostare il
tempo tramite le frecce e confermare con il tasto .4. Dopo aver premuto il tasto , la cottura viene avviata e le
informazioni sul tempo di cottura vengono mostrate sulla schermata del display.• Modalità di cottura• Temperatura• Tempo di cottura• Fine del tempo di cottura
5 Dopo la cottura, il forno si spegne ed un segnale acustico avvisa che la cottura è terminata.
Per cambiare il tempo di cottura quando il forno è già in funzione, premere semplicemente il tasto e inserire il nuovo tempo di cottura prima di premere nuovamente il tasto .
Ora Fine
Utilizzare la funzione "Ora Fine" per ritardare l'avvio della cottura a tempo. Inserire l'ora di arresto della cottura e il forno calcolerà in automatico l'ora di avvio. Il forno si accende e si spegne automaticamente.
Per Ritardare l'Inizio della Modalità a Tempo1 Prima di tutto impostare il tempo di cottura richiesto come indicato
nel paragrafo "TEMPO DI COTTURA".2 Sezionare per impostare l'ora fine e premere .3 Impostare l'ora fine della cottura tramite le frecce e confermare
con il tasto .4 Dopo aver premuto il tasto , la funzione viene messa in standby
e i dettagli della cottura posticipata sono mostrati sullo schermo.• Modalità di cottura• Temperatura• Ora fine cottura• Ora avvio cottura
Dopo la cottura, il forno si spegne ed un segnale acustico avvisa che la cottura è terminata.
Per cambiare il tempo di cottura quando il forno è già in funzione, premere semplicemente il tasto e inserire il nuovo tempo di cottura prima di premere nuovamente il tasto .
IT
18
11 - Cottura a Microonde
NOTA: È fondamentale leggere attentamente le istruzioni e le avvertenze per un corretto utilizzo.
ATTENZIONE
Le funzioni a microonde non inizieranno finché la porta non sarà chiusa. Se la porta è aperta mentre il forno è acceso, il forno andrà in modalità pausa e sul display verrà mostrato il messaggio "PORTA APERTA".Per riavviare la funzione, la porta deve essere chiusa.
La funzione può essere messa in pausa in qualunque momento con il tasto , quando viene premuto nuovamente la funzione riparte.
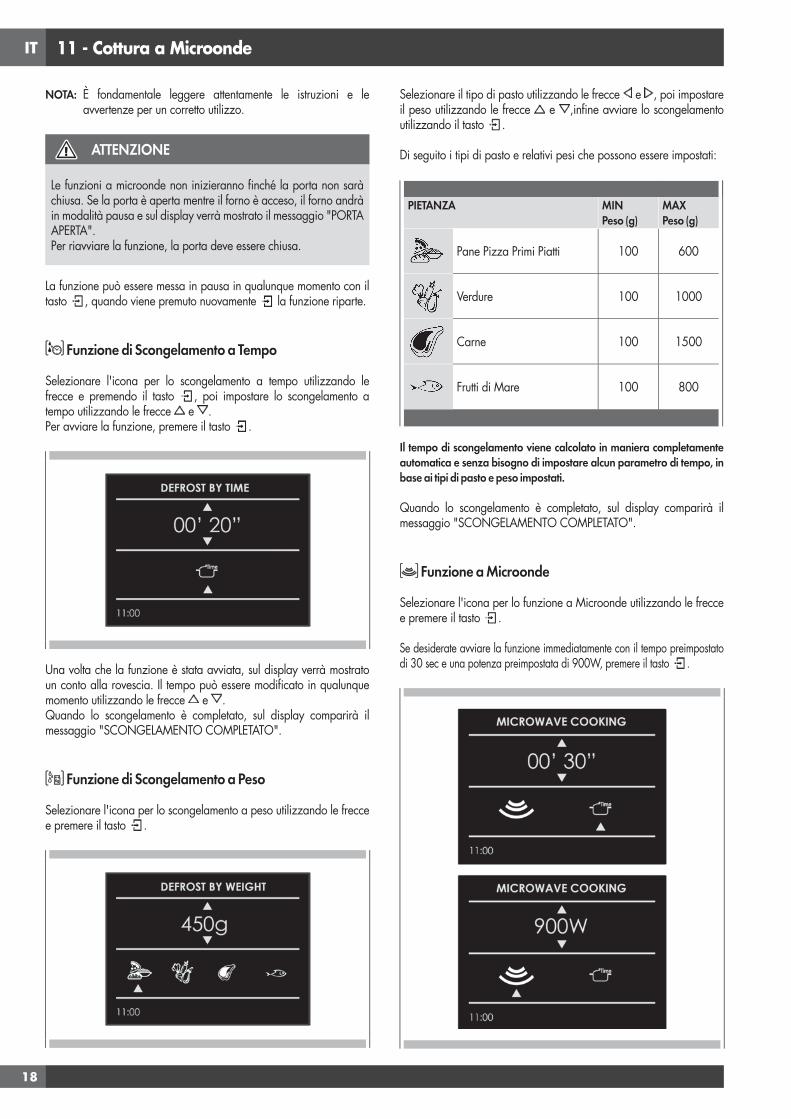
Funzione di Scongelamento a Tempo
Selezionare l'icona per lo scongelamento a tempo utilizzando le frecce e premendo il tasto , poi impostare lo scongelamento a tempo utilizzando le frecce e .Per avviare la funzione, premere il tasto .
Una volta che la funzione è stata avviata, sul display verrà mostrato un conto alla rovescia. Il tempo può essere modificato in qualunque momento utilizzando le frecce e . Quando lo scongelamento è completato, sul display comparirà il messaggio "SCONGELAMENTO COMPLETATO".
Funzione di Scongelamento a Peso
Selezionare l'icona per lo scongelamento a peso utilizzando le frecce e premere il tasto .
Selezionare il tipo di pasto utilizzando le frecce e , poi impostare il peso utilizzando le frecce e ,infine avviare lo scongelamento utilizzando il tasto .
Di seguito i tipi di pasto e relativi pesi che possono essere impostati:
PIETANZA MINPeso (g)
MAX Peso (g)
Pane Pizza Primi Piatti 100 600
Verdure 100 1000
Carne 100 1500
Frutti di Mare 100 800
Il tempo di scongelamento viene calcolato in maniera completamente automatica e senza bisogno di impostare alcun parametro di tempo, in base ai tipi di pasto e peso impostati.
Quando lo scongelamento è completato, sul display comparirà il messaggio "SCONGELAMENTO COMPLETATO".
Funzione a Microonde
Selezionare l'icona per lo funzione a Microonde utilizzando le frecce e premere il tasto .
Se desiderate avviare la funzione immediatamente con il tempo preimpostato di 30 sec e una potenza preimpostata di 900W, premere il tasto .

IT
19
Se volete personalizzare tempo e potenza, aprire il sottomenù organizzato come segue:• TEMPO: Selezionare l'icona e utilizzare i tasti e per
personalizzare il tempo.• POTENZA MICROONDE: Selezionare l'icona e utilizzare i tasti
e per selezionare la potenza del microonde dai 6 possibili livelli, 150W - 300W - 450W - 600W - 750W - 900W.
Una volta che il nuovo parametro è stato impostato, premere il tasto per avviare la cottura.
Una volta che la cottura è stata avviata, sul display verrà mostrato un conto alla rovescia. Il tempo può essere modificato in qualunque momento utilizzando le frecce e .
Quando la cottura è completata, sul display comparirà il messaggio "COTTURA TERMINATA".
Funzione Microonde + Grill
Selezionare l'icona per la funzione Microonde + Grill utilizzando le frecce e premendo il tasto , poi impostare lo scongelamento a tempo utilizzando le frecce e .
Se desiderate avviare la funzione immediatamente con il tempo preimpostato ed una potenza preimpostata di 300W, premere il tasto
.
Se volete personalizzare la potenza, aprire il sottomenù organizzato come segue:• POTENZA MICROONDE: Selezionare l'icona e utilizzare i tasti
e per selezionare la potenza del microonde dai 3 possibili livelli, 150W - 300W - 450W.
Una volta che il nuovo parametro è stato impostato, premere il tasto per avviare la cottura.
Una volta che la cottura è stata avviata, sul display verrà mostrato un conto alla rovescia. Il tempo può essere modificato in qualunque momento utilizzando le frecce e .
Quando la cottura è completata, sul display comparirà il messaggio "COTTURA TERMINATA".
Funzione Microonde + Circolare
Selezionare l'icona per la funzione Microonde + Circolare utilizzando le frecce e premendo il tasto , poi impostare il tempo di scongelamento utilizzando le frecce e .
Se desiderate avviare la funzione immediatamente con il tempo preimpostato ed una temperatura preimpostata di 100°C, con una potenza microonde preimpostata di 300W, premere il tasto .
Se volete personalizzare temperatura e potenza, aprire il sottomenù organizzato come segue:• TEMPERATURA: Selezionare l'icona e utilizzare i tasti e
per personalizzare la temperatura tra 50°C e 200°C.• POTENZA MICROONDE: Selezionare l'icona e utilizzare i tasti
e per selezionare la potenza del microonde dai 3 possibili livelli, 150W - 300W - 450W.
IT
20
Una volta che il nuovo parametro è stato impostato, premere il tasto per avviare la cottura.
Una volta che la cottura è stata avviata, sul display verrà mostrato un conto alla rovescia. Il tempo può essere modificato in qualunque momento utilizzando le frecce e .
Quando la cottura è completata, sul display comparirà il messaggio "COTTURA TERMINATA".
Cambiare i Watt di Potenza
Selezionare l'icona e premere il tasto Selezionare l'icona microonde e cambiare la potenza di wattaggio utilizzando le frecce
e confermare con il tasto .
Cambiare il Tempo
Premere l’icona e premere il tasto Selezionare l’icona tempo e cambiare il valore del tempo tramite le frecce e confermare con il tasto Selezionare l’icona tempo e cambiare il valore del tempo tramite le
.
Cambiare la Temperatura
(disponibile solamente per microonde e ring)Selezionare l'icona e premere il tasto Selezionare l'icona microonde e cambiare l'impostazione temperatura utilizzando le frecce e confermare con il tasto .
Cambiare il Peso
(disponibile solamente per scongelamento a peso)Premere l'icona e cambiare il peso tramite le frecce e confermare con il tasto .
IT
21
12 - Utilizzo Luci Forno
Un solo tasto luce attiva le luci.Premere per accendere o spegnere le luci.Le luci del forno si accendono automaticamente quando la porta è aperta.Quando un forno viene utilizzato, le luci si accendono automaticamente all'avvio di una modalità di cottura.Le luci del forno si spegneranno automaticamente quando una modalità di cottura viene cancellata.
NOTA: Una volta accese, le luci si spengono automaticamente dopo 3 minuti. Per riaccenderle premere il tasto o aprire la porta.
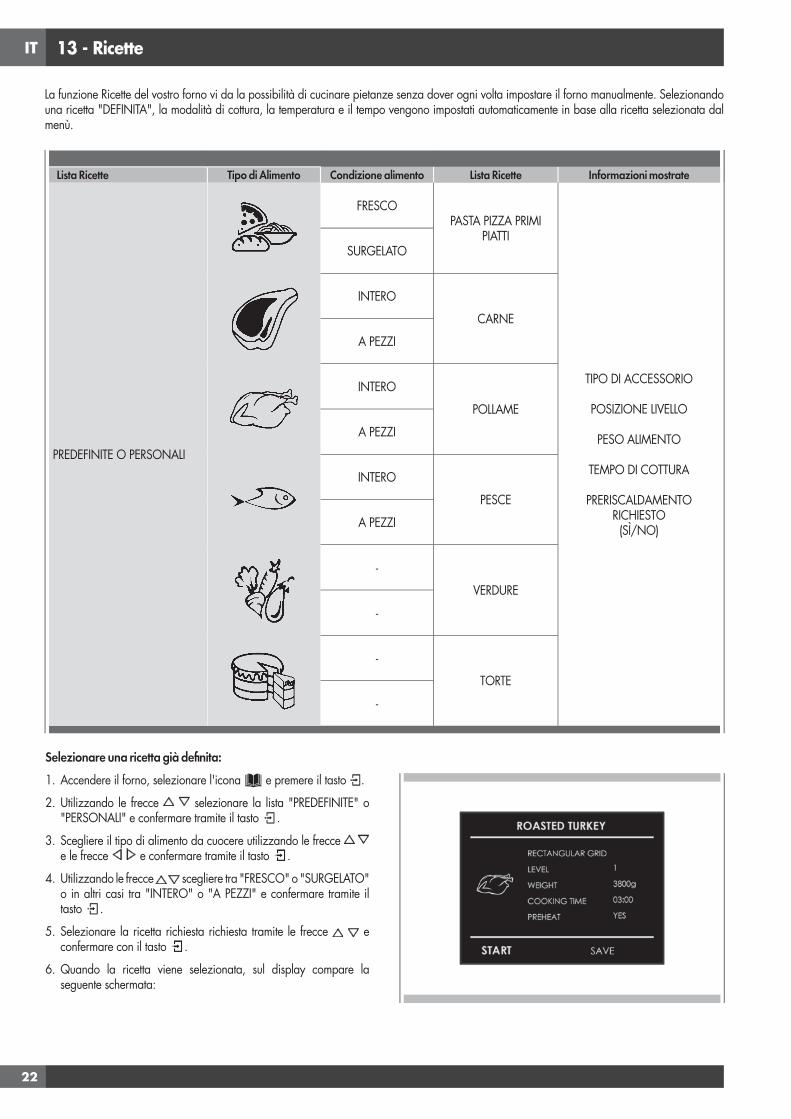
IT
22
13 - Ricette
Selezionare una ricetta già definita:1. Accendere il forno, selezionare l'icona e premere il tasto .
2. Utilizzando le frecce selezionare la lista "PREDEFINITE" o "PERSONALI" e confermare tramite il tasto .
3. Scegliere il tipo di alimento da cuocere utilizzando le frecce e le frecce e confermare tramite il tasto .
4. Utilizzando le frecce scegliere tra "FRESCO" o "SURGELATO" o in altri casi tra "INTERO" o "A PEZZI" e confermare tramite il tasto .
5. Selezionare la ricetta richiesta richiesta tramite le frecce e confermare con il tasto .
6. Quando la ricetta viene selezionata, sul display compare la seguente schermata:
La funzione Ricette del vostro forno vi da la possibilità di cucinare pietanze senza dover ogni volta impostare il forno manualmente. Selezionando una ricetta "DEFINITA", la modalità di cottura, la temperatura e il tempo vengono impostati automaticamente in base alla ricetta selezionata dal menù.
Lista Ricette Tipo di Alimento Condizione alimento Lista Ricette Informazioni mostrate
PREDEFINITE O PERSONALI
FRESCOPASTA PIZZA PRIMI
PIATTI
TIPO DI ACCESSORIO
POSIZIONE LIVELLO
PESO ALIMENTO
TEMPO DI COTTURA
PRERISCALDAMENTO RICHIESTO(SÌ/NO)
SURGELATO
INTERO
CARNE
A PEZZI
INTERO
POLLAME
A PEZZI
INTERO
PESCE
A PEZZI
-
VERDURE
-
-
TORTE
-
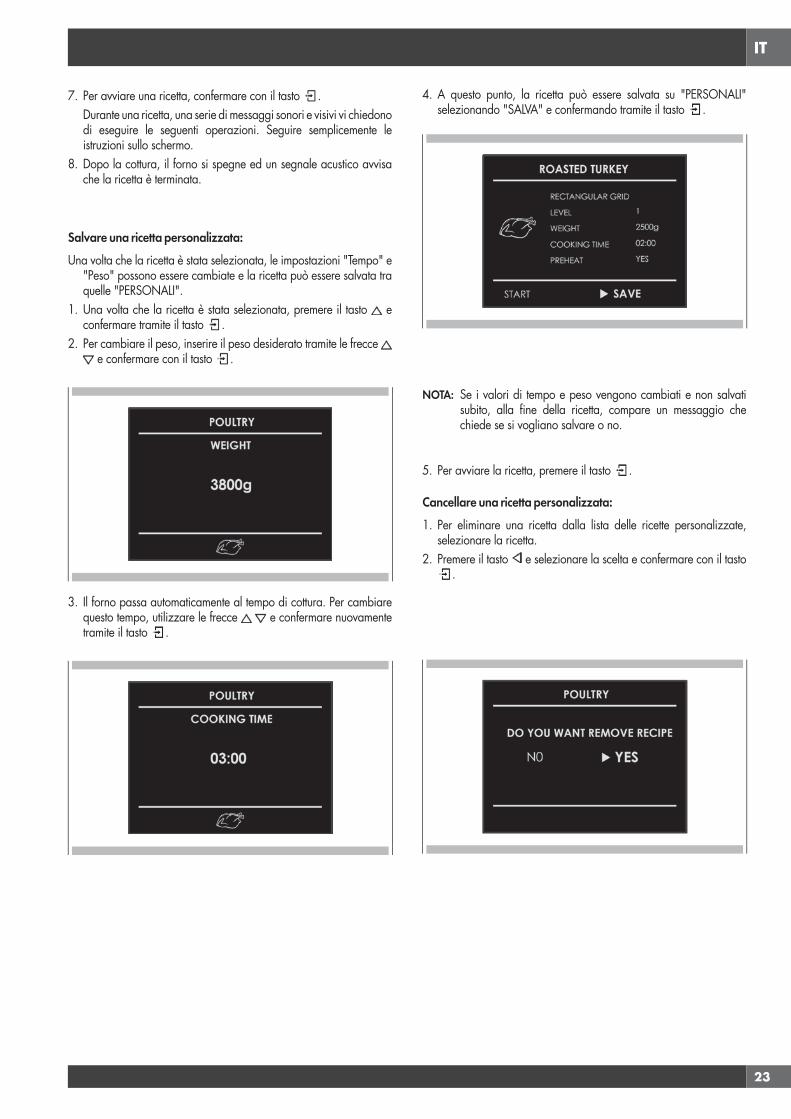
IT
23
7. Per avviare una ricetta, confermare con il tasto . Durante una ricetta, una serie di messaggi sonori e visivi vi chiedono
di eseguire le seguenti operazioni. Seguire semplicemente le istruzioni sullo schermo.
8. Dopo la cottura, il forno si spegne ed un segnale acustico avvisa che la ricetta è terminata.
Salvare una ricetta personalizzata:Una volta che la ricetta è stata selezionata, le impostazioni "Tempo" e
"Peso" possono essere cambiate e la ricetta può essere salvata tra quelle "PERSONALI".
1. Una volta che la ricetta è stata selezionata, premere il tasto e confermare tramite il tasto .
2. Per cambiare il peso, inserire il peso desiderato tramite le frecce e confermare con il tasto .
3. Il forno passa automaticamente al tempo di cottura. Per cambiare questo tempo, utilizzare le frecce e confermare nuovamente tramite il tasto .
4. A questo punto, la ricetta può essere salvata su "PERSONALI" selezionando "SALVA" e confermando tramite il tasto .
NOTA: Se i valori di tempo e peso vengono cambiati e non salvati subito, alla fine della ricetta, compare un messaggio che chiede se si vogliano salvare o no.
5. Per avviare la ricetta, premere il tasto .
Cancellare una ricetta personalizzata:1. Per eliminare una ricetta dalla lista delle ricette personalizzate,
selezionare la ricetta.2. Premere il tasto e selezionare la scelta e confermare con il tasto
.

IT
24
14 - Per l'Installatore
Installare il forno da incasso.Il forno deve essere installato sotto un piano cottura, in una colonna, o combinato con il relativo cassetto scaldavivande.Le dimensioni dello spazio devono essere quelle mostrate in figura.Il materiale del vano deve essere in grado di sopportare il calore.Il forno deve essere centrato all'interno delle pareti del vano e fissato con le viti e le boccole fornite.
560
min 460
50510
560
50 510
595
52826
144140
596
554
545
560min 450
50510
533
455
594
540
432
min 458
min 3
560
min 3
533
455
594
540
432
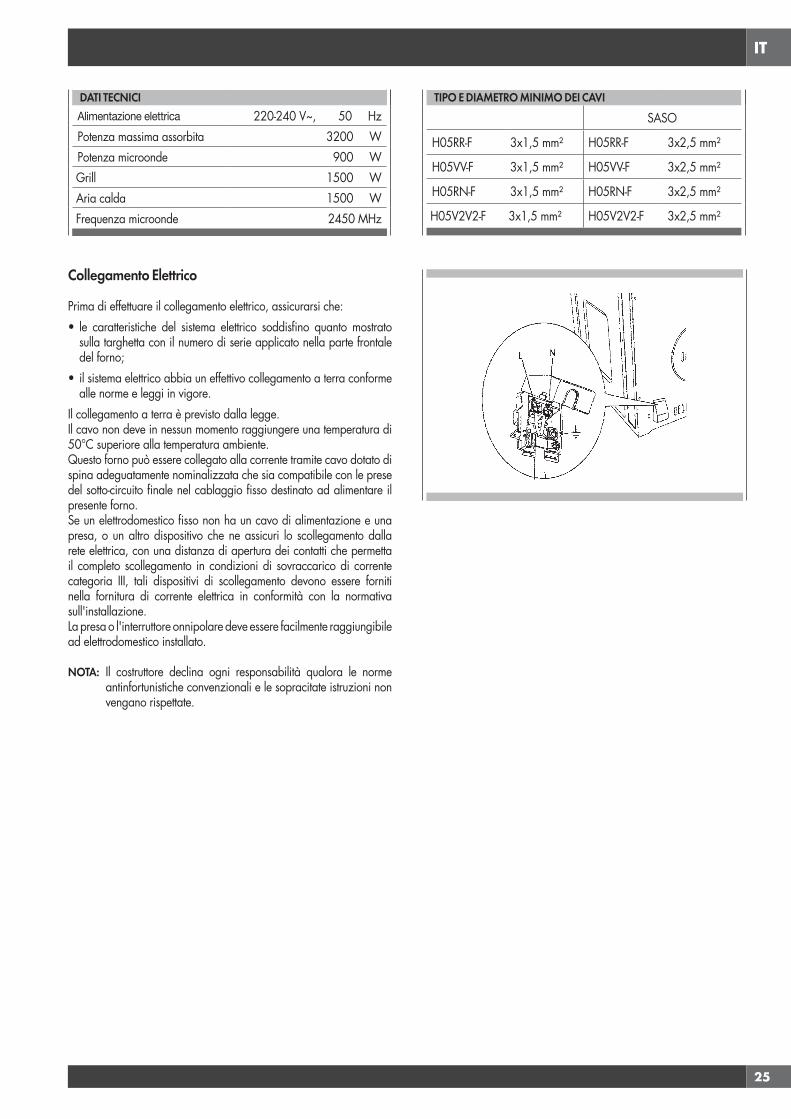
IT
25
DATI TECNICIAlimentazione elettrica 220-240 V~, 50 HzPotenza massima assorbita 3200 WPotenza microonde 900 WGrill 1500 WAria calda 1500 WFrequenza microonde 2450 MHz
Collegamento Elettrico
Prima di effettuare il collegamento elettrico, assicurarsi che:• le caratteristiche del sistema elettrico soddisfino quanto mostrato
sulla targhetta con il numero di serie applicato nella parte frontale del forno;
• il sistema elettrico abbia un effettivo collegamento a terra conforme alle norme e leggi in vigore.
Il collegamento a terra è previsto dalla legge.Il cavo non deve in nessun momento raggiungere una temperatura di 50°C superiore alla temperatura ambiente.Questo forno può essere collegato alla corrente tramite cavo dotato di spina adeguatamente nominalizzata che sia compatibile con le prese del sotto-circuito finale nel cablaggio fisso destinato ad alimentare il presente forno.Se un elettrodomestico fisso non ha un cavo di alimentazione e una presa, o un altro dispositivo che ne assicuri lo scollegamento dalla rete elettrica, con una distanza di apertura dei contatti che permetta il completo scollegamento in condizioni di sovraccarico di corrente categoria III, tali dispositivi di scollegamento devono essere forniti nella fornitura di corrente elettrica in conformità con la normativa sull'installazione.La presa o l'interruttore onnipolare deve essere facilmente raggiungibile ad elettrodomestico installato.
NOTA: Il costruttore declina ogni responsabilità qualora le norme antinfortunistiche convenzionali e le sopracitate istruzioni non vengano rispettate.
TIPO E DIAMETRO MINIMO DEI CAVISASO
H05RR-F 3x1,5 mm² H05RR-F 3x2,5 mm²
H05VV-F 3x1,5 mm² H05VV-F 3x2,5 mm²
H05RN-F 3x1,5 mm² H05RN-F 3x2,5 mm²
H05V2V2-F 3x1,5 mm² H05V2V2-F 3x2,5 mm²
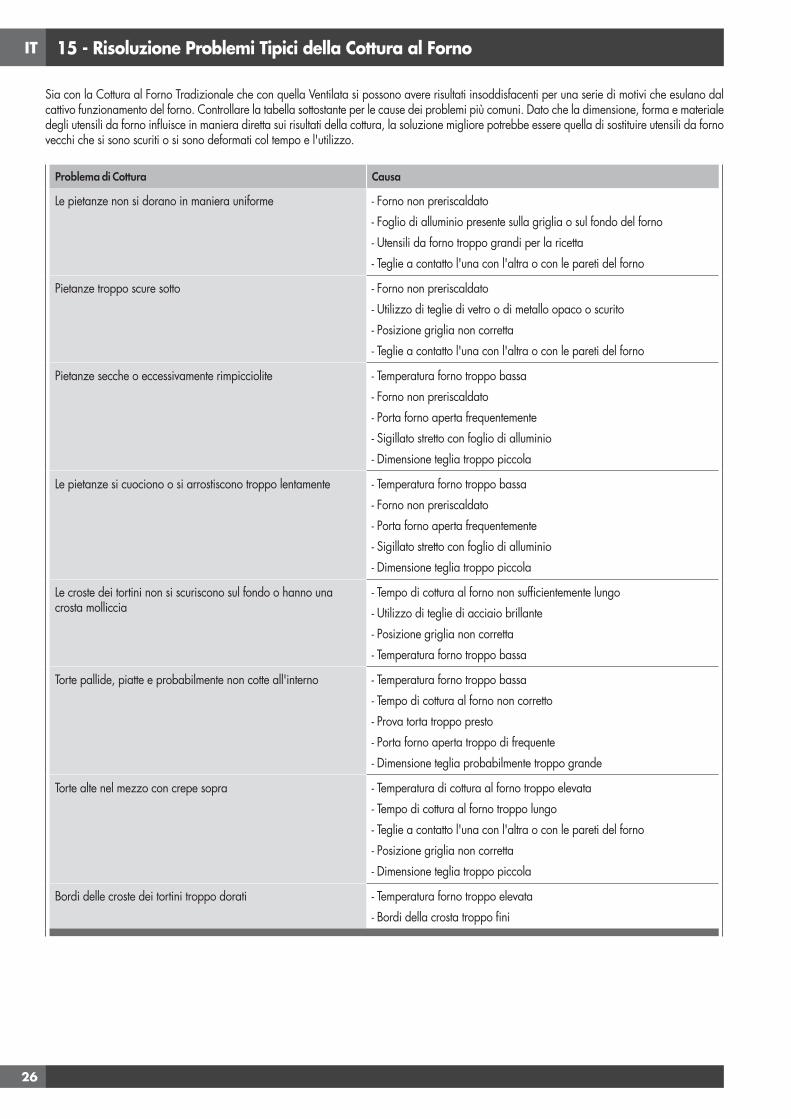
IT
26
15 - Risoluzione Problemi Tipici della Cottura al Forno
Sia con la Cottura al Forno Tradizionale che con quella Ventilata si possono avere risultati insoddisfacenti per una serie di motivi che esulano dal cattivo funzionamento del forno. Controllare la tabella sottostante per le cause dei problemi più comuni. Dato che la dimensione, forma e materiale degli utensili da forno influisce in maniera diretta sui risultati della cottura, la soluzione migliore potrebbe essere quella di sostituire utensili da forno vecchi che si sono scuriti o si sono deformati col tempo e l'utilizzo.
Problema di Cottura Causa
Le pietanze non si dorano in maniera uniforme - Forno non preriscaldato- Foglio di alluminio presente sulla griglia o sul fondo del forno- Utensili da forno troppo grandi per la ricetta- Teglie a contatto l'una con l'altra o con le pareti del forno
Pietanze troppo scure sotto - Forno non preriscaldato- Utilizzo di teglie di vetro o di metallo opaco o scurito- Posizione griglia non corretta- Teglie a contatto l'una con l'altra o con le pareti del forno
Pietanze secche o eccessivamente rimpicciolite - Temperatura forno troppo bassa- Forno non preriscaldato- Porta forno aperta frequentemente- Sigillato stretto con foglio di alluminio- Dimensione teglia troppo piccola
Le pietanze si cuociono o si arrostiscono troppo lentamente - Temperatura forno troppo bassa- Forno non preriscaldato- Porta forno aperta frequentemente- Sigillato stretto con foglio di alluminio- Dimensione teglia troppo piccola
Le croste dei tortini non si scuriscono sul fondo o hanno una crosta molliccia
- Tempo di cottura al forno non sufficientemente lungo- Utilizzo di teglie di acciaio brillante- Posizione griglia non corretta- Temperatura forno troppo bassa
Torte pallide, piatte e probabilmente non cotte all'interno - Temperatura forno troppo bassa- Tempo di cottura al forno non corretto- Prova torta troppo presto- Porta forno aperta troppo di frequente- Dimensione teglia probabilmente troppo grande
Torte alte nel mezzo con crepe sopra - Temperatura di cottura al forno troppo elevata- Tempo di cottura al forno troppo lungo- Teglie a contatto l'una con l'altra o con le pareti del forno- Posizione griglia non corretta- Dimensione teglia troppo piccola
Bordi delle croste dei tortini troppo dorati - Temperatura forno troppo elevata- Bordi della crosta troppo fini

IT
27
16 - Risoluzione Problemi Funzionali
Prima di contattare il centro assistenza, controllare quanto segue per evitare costi di assistenza inutili.
Problema forno Fasi Risoluzione Problema
Altri Errori __F compaiono sullo schermo del display. Rimuovere la corrente e riaccenderla dopo pochi secondi,. Se la condizione persiste, annotare il numero di codice (nella lista REGISTRO EVENTI) e contattare il centro assistenza.
Il display del forno rimane SPENTO. Togliere corrente dall’alimentazione principale (fusibile o quadro elettrico). Riaccendere il quadro elettrico.Se la condizione persiste, chiamare un centro assistenza autorizzato.
La ventola di raffreddamento continua a funzionare anche quando il forno è spento
La ventola si spegne automaticamente quando le componenti elettriche si sono raffreddate a sufficienza.
Il forno non si riscalda Controllare l'interruttore magnetotermico o la scatola portafusibili di casa vostra. Assicurarsi che il forno sia adeguatamente alimentato da corrente elettrica. Assicurarsi che la temperatura del forno sia stata selezionata.
Il forno non si riscalda in maniera uniforme Fare riferimento alle tabelle per il corretto posizionamento della griglia. Ridurre sempre la temperatura della ricetta di 25°F (15°C) quando si cuoce con la modalità Cottura Ventilata.
L'orologio e il timer non funzionano correttamente Assicurarsi che il forno sia adeguatamente alimentato da corrente elettrica. Vedere le sezioni Orologio a Pagina 8 e 11.
Eccessiva umidità Le modalità ventilate eliminano qualunque umidità nel forno (questo è uno dei vantaggi della ventilazione).
IT
28
17 - Assistenza o Manutenzione
Prima di contattare il centro assistenza, si prega di controllare "Risoluzione Problemi". Vi potrebbe far risparmiare il costo della chiamata per assistenza.Se avete ancora bisogno di aiuto, seguite le istruzioni sottostanti. Al momento della chiamata, si prega di sapere la data di acquisto, il modello completo e il numero di serie del vostro elettrodomestico. Queste informazioni ci aiuteranno a rispondere in maniera migliore alla vostra richiesta.
Record Dati Manutenzione
Per assistenza o parti autorizzate vedere il paragrafo "GARANZIA per Elettrodomestici".
Per la collocazione della targhetta seriale vedere Pagina 4. Ora è un buon momento per scrivere tali informazioni nello spazio apposito in basso.Conservare la fattura per la convalida della garanzia.
Record Dati Manutenzione
Modello Numero _________________________________
Numero di Serie __________________________________
Data di Installazione o di Presa di Possesso __________________

FR
1
TABLE DES MATIERES PAGE
1 Avertissements pour les fours à microondes 4Préparation des aliments 4Plats et récipients 4Emballage 4Boissons 4Aliments pour les nouveaux-nés 4Aliments avec peau 5Sécher des aliments 5Huile 5Causes de dommage 6Première utilisation 6Montage et démontage du grill plat 8Respect de l’environnement 8
2 Tableau de commande 9Clavier 10
3 Généralités concernant le four 10Codes d’erreur 11Bips sonores 11Réglages par défaut 11F Codes numériques d’erreur 11Préchauffage 11Minuterie 11Préchauffage du four 11Suggestions d’utilisation 12Fonctionnement des microondes 12Condensation du four et température 12Cuisson à haute altitude 12
4 Conseils Généraux Sur le Four 12
5 Démarrage 12Instructions à suivre lors du premier allumage 13
6 Réglages utilisateur 13Langue 14Température et poids 14Heure 14Date 14Luminosité 15Volume 15
TABLE DES MATIERES PAGE
7 Réglage du système 15Journal d’événements 16Démo 16
8 Mise en marche du four 16Allumage et arrêt du four 17Tableaux des modes de cuisson 17
9 Cuisson traditionnelle 18Modification du mode de cuisson 19Modification de la température 19Phase de préchauffage 19
10 Fonctionnement du mode temporisé 19Temps de cuisson 20Temps d’arrêt 20
11 Cuisson aux microondes 20 Fonction décongélation temporisée 21 Fonction décongélation poids 21 Fonction Micro-ondes 21 Fonction micro-ondes + grill 21 Fonction Microonde + Ring 22Modifier la puissance en Watts 22Changer l'heure 23Changer le poids 23
12 Utilisation des lumières du four 23
13 Recettes 23
14 Pour l'installateur 24BRANCHEMENT ELECTRIQUE 25
15 Résolutions des problèmes de cuisson 27
16 Résolution des Problèmes de Fonctionnement 28
17 Assistance ou Service Après-Vente 29Enregistrement des données d'entretien 30
FR
2
Cher Client,Vous venez d’acheter l’un de nos produits et nous vous en remercions vivement.Ce nouveau produit, minutieusement conçu et construit avec des matériaux de tout premier choix, a été soigneusement testé afin de satisfaire chacune de vos exigences en matière de cuisson.Nous vous prions de lire et de respecter ces instructions simples qui vous permettront d’obtenir d’excellents résultats dès la première utilisation. Nous vous souhaitons une bonne cuisine avec cet appareil moderne.
CE PRODUIT EST CONÇU POUR UN USAGE DOMESTIQUE. LE FABRICANT DECLINE TOUTE RESPONSABILITE EN CAS DE LESIONS CORPORELLES OU DE DOMMAGE AUX BIENS DE PROPRIETE DERIVANT D'UNE INSTALLATION INCORRECTE OU D'UNE UTILISATOIN INCORREXTE, ERRONEE OU INAPPROPRIEE.L'APPAREIL NE DOIT PAS ETRE UTILISE PAR DES PERSONNES (Y COMPRIS LES ENFANTS) AYANT DES HANDICAPS PHYSIQUES, SENSORIELS OU MENTAUX OU PAR DES PERSONNES NE POSSEDANT PAS L'EXPERIENCE OU LES CONNAISSANCES NECESSAIRES, SAUF SI CELLES-CI SONT SURVEILLEES OU FORMEES A L'UTILISATION DE L'APPAREIL PAR UNE PERSONNE RESPONSABLE DE LEUR SECURITE.LES ENFANTS DOIVENT ETRE SURVEILLLES POUR GARANTIR QU'ILS NE JOUENT PAS AVEC L'APPAREIL. NE PAS METTRE DE FEUILLES D'ALUMINIUM, DE PLATS OU OBJETS SIMILAIRES EN CONTACT AVEC LA BASE A L'INTERIEUR DU FOUR, POUR LA CUISSON. L'ACTION CHAUFFANTE DE LA RESISTANCE INFERIEURE ENTRAINE UNE SURCHAUFFE DE LA PARTIE INFERIEURE DU FOUR CE QUI PROVOQUE DES DOMMAGES ET A DE GRAVES CONSEQUENCES (RISQUE D'INCENDIE) Y COMPRIS AU PLAN DE TRAVAIL SITUE SOUS LE FOUR.L'APPAREIL DEVIENT TRES CHAUD PENDANT L'UTILISATION.AVERTISSEMENT : NE PAS TOUCHER LES RESISTANCES SE TROUVANT DANS LE FOUR.
AVERTISSEMENT• Si la porte ou les joints d'étanchéité de la porte sont
endommagés, le four ne doit pas être utilisé tant qu'il n'a pas été réparé par un technicien d'assistance qualifié.
• Il est dangereux pour toute autre personne que le technicien d'effectuer des interventions de maintenance ou des réparations qui impliquent de retirer tout carter de protection contre une exposition aux micro-ondes.
• Il est interdit de réchauffer des liquides et tout autre aliment dans des récipients hermétiques car ces derniers pourraient exploser.
• Les enfants ne doivent pas utiliser le four sans surveillance sauf s'ils ont reçu des instructions adéquates pour une utilisation en toute sécurité et qu'ils comprennent les dangers d'une utilisation incorrecte.
• Utiliser uniquement des ustensiles adaptés aux fours à microondes.
• Quand on réchauffe des aliments dans des récipients en plastique ou en papier, vérifier le four fréquemment en raison des risques de feu.
• Si on constate que de la fumée sort du four, l'éteindre immédiatement ou le débrancher de la prise électrique et laisser la porte fermée pour éteindre les flammes.
• Réchauffer des boissons dans le four à microondes peut entraîner un débordement par bouillonnement retardé ; il convient donc d'être particulièrement attentif quand on manipule le récipient.
• Le contenu des biberons et les aliments pour bébés en pots doivent être mélangés ou secoués et leur température doit être contrôlée avant de les donner à l'enfant afin d'éviter toute brûlure et tout échaudage.
• Les œufs à la coque et les œufs durs entiers ne doivent pas être chauffés au four à microondes car ils pourraient exploser même après la fin de la cuisson dans le four.
• Une explication détaillée pour le nettoyage des joints d'étanchéité des portes de la chambre de cuisson et des composants adjacents est fournie.
• Le four doit être nettoyé périodiquement et tous les résidus de nourriture doivent être éliminés.
• Ne pas maintenir la propreté du four pourrait causer une détérioration des surfaces ce qui pourrait réduire la durée de vie de l'appareil et causer des conditions dangereuses.
• Ne pas utiliser des brosses à récurer abrasives ou métalliques acérées pour nettoyer la vitre de la porte du four car elles rayeraient la vitre avec le risque de la briser.
• Ne pas utiliser des dispositifs à vapeur pour nettoyer l'appareil.
INSTRUCTIONS IMPORTANTESET CONSIGNES DE SECURITE
Lire attentivement et conserver pour un usage futur
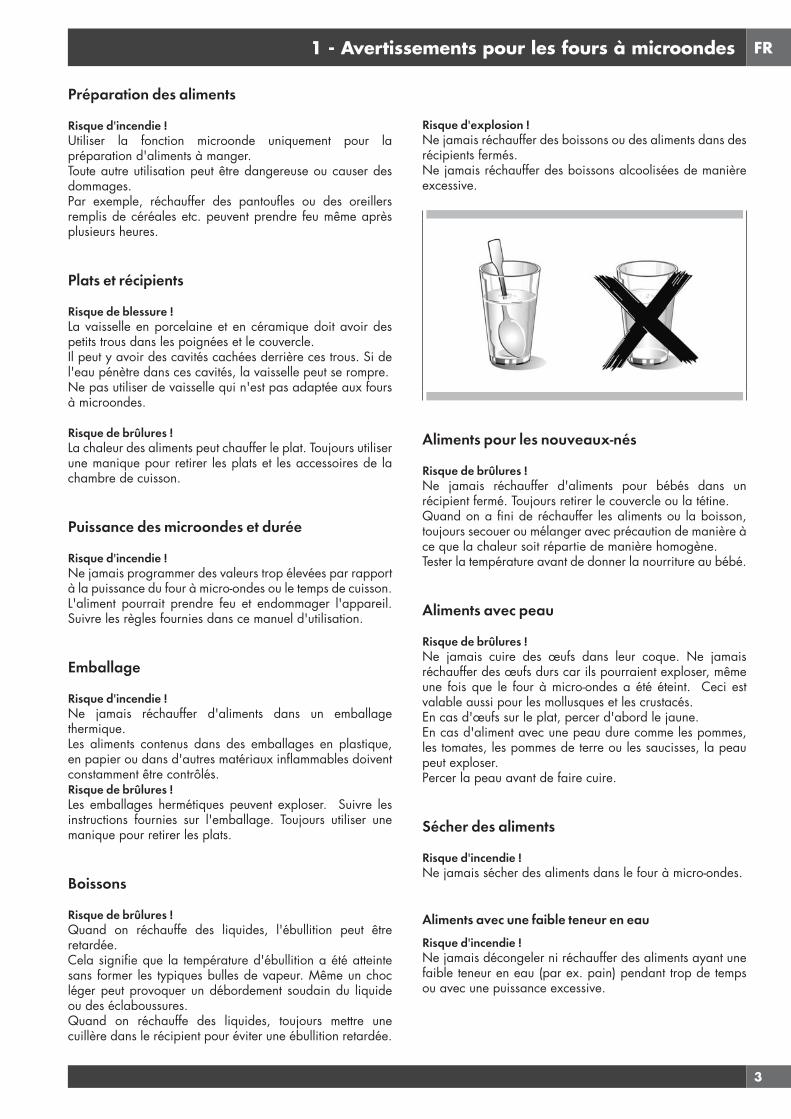
FR
3
1 - Avertissements pour les fours à microondes
Préparation des aliments
Risque d'incendie !Utiliser la fonction microonde uniquement pour la préparation d'aliments à manger.Toute autre utilisation peut être dangereuse ou causer des dommages. Par exemple, réchauffer des pantoufles ou des oreillers remplis de céréales etc. peuvent prendre feu même après plusieurs heures.
Plats et récipients
Risque de blessure !La vaisselle en porcelaine et en céramique doit avoir des petits trous dans les poignées et le couvercle. Il peut y avoir des cavités cachées derrière ces trous. Si de l'eau pénètre dans ces cavités, la vaisselle peut se rompre.Ne pas utiliser de vaisselle qui n'est pas adaptée aux fours à microondes.
Risque de brûlures !La chaleur des aliments peut chauffer le plat. Toujours utiliser une manique pour retirer les plats et les accessoires de la chambre de cuisson.
Puissance des microondes et durée
Risque d'incendie !Ne jamais programmer des valeurs trop élevées par rapport à la puissance du four à micro-ondes ou le temps de cuisson. L'aliment pourrait prendre feu et endommager l'appareil. Suivre les règles fournies dans ce manuel d'utilisation.
Emballage
Risque d'incendie !Ne jamais réchauffer d'aliments dans un emballage thermique.Les aliments contenus dans des emballages en plastique, en papier ou dans d'autres matériaux inflammables doivent constamment être contrôlés.Risque de brûlures !Les emballages hermétiques peuvent exploser. Suivre les instructions fournies sur l'emballage. Toujours utiliser une manique pour retirer les plats.
Boissons
Risque de brûlures !Quand on réchauffe des liquides, l'ébullition peut être retardée.Cela signifie que la température d'ébullition a été atteinte sans former les typiques bulles de vapeur. Même un choc léger peut provoquer un débordement soudain du liquide ou des éclaboussures.Quand on réchauffe des liquides, toujours mettre une cuillère dans le récipient pour éviter une ébullition retardée.
Risque d'explosion !Ne jamais réchauffer des boissons ou des aliments dans des récipients fermés.Ne jamais réchauffer des boissons alcoolisées de manière excessive.
Aliments pour les nouveaux-nés
Risque de brûlures !Ne jamais réchauffer d'aliments pour bébés dans un récipient fermé. Toujours retirer le couvercle ou la tétine.Quand on a fini de réchauffer les aliments ou la boisson, toujours secouer ou mélanger avec précaution de manière à ce que la chaleur soit répartie de manière homogène.Tester la température avant de donner la nourriture au bébé.
Aliments avec peau
Risque de brûlures !Ne jamais cuire des œufs dans leur coque. Ne jamais réchauffer des œufs durs car ils pourraient exploser, même une fois que le four à micro-ondes a été éteint. Ceci est valable aussi pour les mollusques et les crustacés.En cas d'œufs sur le plat, percer d'abord le jaune.En cas d'aliment avec une peau dure comme les pommes, les tomates, les pommes de terre ou les saucisses, la peau peut exploser. Percer la peau avant de faire cuire.
Sécher des aliments
Risque d'incendie !Ne jamais sécher des aliments dans le four à micro-ondes.
Aliments avec une faible teneur en eauRisque d'incendie !Ne jamais décongeler ni réchauffer des aliments ayant une faible teneur en eau (par ex. pain) pendant trop de temps ou avec une puissance excessive.
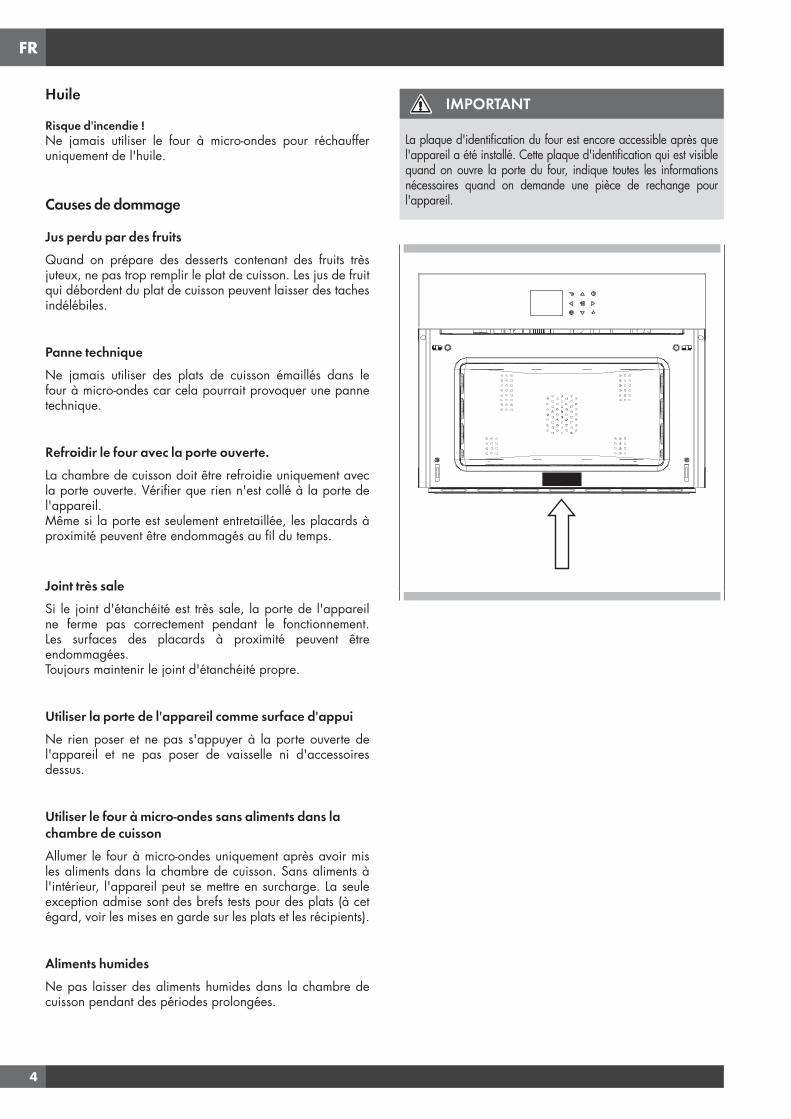
FR
4
Huile
Risque d'incendie !Ne jamais utiliser le four à micro-ondes pour réchauffer uniquement de l'huile.
Causes de dommage
Jus perdu par des fruitsQuand on prépare des desserts contenant des fruits très juteux, ne pas trop remplir le plat de cuisson. Les jus de fruit qui débordent du plat de cuisson peuvent laisser des taches indélébiles.
Panne techniqueNe jamais utiliser des plats de cuisson émaillés dans le four à micro-ondes car cela pourrait provoquer une panne technique.
Refroidir le four avec la porte ouverte.La chambre de cuisson doit être refroidie uniquement avec la porte ouverte. Vérifier que rien n'est collé à la porte de l'appareil.Même si la porte est seulement entretaillée, les placards à proximité peuvent être endommagés au fil du temps.
Joint très saleSi le joint d'étanchéité est très sale, la porte de l'appareil ne ferme pas correctement pendant le fonctionnement. Les surfaces des placards à proximité peuvent être endommagées.Toujours maintenir le joint d'étanchéité propre.
Utiliser la porte de l'appareil comme surface d'appuiNe rien poser et ne pas s'appuyer à la porte ouverte de l'appareil et ne pas poser de vaisselle ni d'accessoires dessus.
Utiliser le four à micro-ondes sans aliments dans la chambre de cuissonAllumer le four à micro-ondes uniquement après avoir mis les aliments dans la chambre de cuisson. Sans aliments à l'intérieur, l'appareil peut se mettre en surcharge. La seule exception admise sont des brefs tests pour des plats (à cet égard, voir les mises en garde sur les plats et les récipients).
Aliments humidesNe pas laisser des aliments humides dans la chambre de cuisson pendant des périodes prolongées.
IMPORTANT
La plaque d'identification du four est encore accessible après que l'appareil a été installé. Cette plaque d'identification qui est visible quand on ouvre la porte du four, indique toutes les informations nécessaires quand on demande une pièce de rechange pour l'appareil.
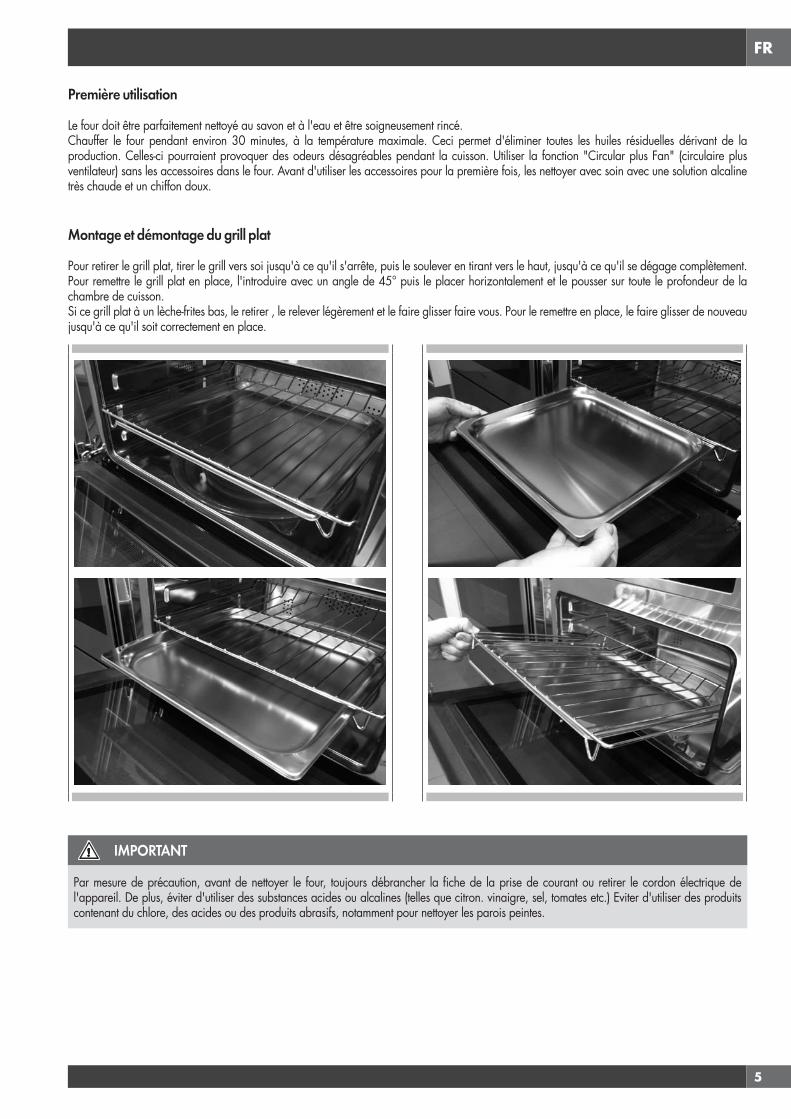
FR
5
IMPORTANT
Par mesure de précaution, avant de nettoyer le four, toujours débrancher la fiche de la prise de courant ou retirer le cordon électrique de l'appareil. De plus, éviter d'utiliser des substances acides ou alcalines (telles que citron. vinaigre, sel, tomates etc.) Eviter d'utiliser des produits contenant du chlore, des acides ou des produits abrasifs, notamment pour nettoyer les parois peintes.
Première utilisation
Le four doit être parfaitement nettoyé au savon et à l'eau et être soigneusement rincé. Chauffer le four pendant environ 30 minutes, à la température maximale. Ceci permet d'éliminer toutes les huiles résiduelles dérivant de la production. Celles-ci pourraient provoquer des odeurs désagréables pendant la cuisson. Utiliser la fonction "Circular plus Fan" (circulaire plus ventilateur) sans les accessoires dans le four. Avant d'utiliser les accessoires pour la première fois, les nettoyer avec soin avec une solution alcaline très chaude et un chiffon doux.
Montage et démontage du grill plat
Pour retirer le grill plat, tirer le grill vers soi jusqu'à ce qu'il s'arrête, puis le soulever en tirant vers le haut, jusqu'à ce qu'il se dégage complètement.Pour remettre le grill plat en place, l'introduire avec un angle de 45° puis le placer horizontalement et le pousser sur toute le profondeur de la chambre de cuisson.Si ce grill plat à un lèche-frites bas, le retirer , le relever légèrement et le faire glisser faire vous. Pour le remettre en place, le faire glisser de nouveau jusqu'à ce qu'il soit correctement en place.
FR
6
Respect de l’environnement
La documentation relative à cet appareil est réalisée avec du papier blanchi, sans chlore, ou du papier recyclé, dans le but de contribuer à la protection de l’environnement. Les emballages sont conçus de manière à ne pas polluer la nature ; il s’agit de produits écologiques qui peuvent être récupérés ou recyclés.En recyclant l’emballage, on contribue à économiser les matières premières et à réduire le volume des déchets industriels et ménagers.
LE MATERIEL D’EMBALLAGE est recyclable à 100% et est marqué par le symbole du recyclage. Pour l’élimination, suivre les règlementations locales. Le matériel d’emballage (sachets en plastique, parties en polystyrène, etc.) doit être tenu hors de la portée des enfants, car il représente une source potentielle de danger.
CET APPAREIL est marqué conformément à la Directive Européenne 2002/96/CE, Déchets d’équipements électriques et électroniques provenant des Equipements Electriques et Electroniques [Waste Electrical and Electronic Equipment] (WEEE). L’utilisateur doit s’assurer que ce produit est éliminé correctement, et contribue ainsi à éviter les conséquences négatives potentielles pour l’environnement et la santé.
LE SYMBOLE sur le produit ou sur la documentation d’accompagnement indique que ce produit ne doit pas traitécomme un déchet domestique, mais doit être remis auprès du centre de collecte approprié pour le recyclage des appareils électriques et électroniques.
LA MISE AU REBUT DOIT ETRE EFFECTUEE en conformité avec les lois locales sur l'élimination des déchets.
POUR PLUS D'INFORMATIONS sur le traitement, la récupération et le recyclage de ce produit, contacter l'organisme local compétent , le service de ramassage des déchets domestiques ou le magasin où le produit a été acheté.
AVANT LA MISE AU REBUT, rendre le produit inutilisable en coupant le cordon électrique.

FR
7
2 - Tableau de commande
Clavier
Pour utiliser les touches, appuyer dessus, légèrement. Le clavier ne fonctionnera pas si on enfonce pus d'une touche à la fois.
Flèches de déplacement
Retour à la page-écran précédente: la pression continue permet de retourner à la page d'accueil.
Allumage et arrêt du four
Confirme les paramètres et démarre les opérations de cuisson Quand la touche est enfoncée pendant une opération de cuisson, la fonction est mise en pause. Appuyer de nouveau pour faire remettre en marche.
Pour configurer la minuterie.Accéder au menu Fonctions pendant la cuisson.
Allumage et arrêt de la lumière du four.
Votre appareil peut présenter des petites différences par rapport à l'illustration ci-dessous.
A - Clavier
B - Ecran
PM
FRIDAY 11/20/2015
04:26
B A
FR
8
3 - Généralités concernant le four
Codes d’erreur
Ce code s'affiche quand la commande électrique indique une défaillance. Quand une erreur s'affiche, la fonction en cours est bloquée. Si le type d’erreur est lié à une fonction de sécurité, le four devient inutilisable et l’erreur se représente à chaque redémarrage (dans ce cas, appeler le service d’assistance); si, en revanche, l’erreur correspond à une défaillance d’importance secondaire, le four pourra encore être utilisé au redémarrage dans les fonctions n’impliquant pas la partie défaillante (par exemple un élément thermique).
Bips sonores
Valide la réception de la commande après la pression d’une touche.Il signale également qu’une fonction temporisée s’est achevée (ex. horloge ou cuisson temporisée). Pendant l’exécution d’une recette, le signal sonore prévient l’utilisateur que le four attend une opération de sa part (par ex. introduire le plat ou le retourner).Les bips sonores indiquent aussi une défaillance du four.
Réglages par défaut
Dès la sélection d’un mode de cuisson, celui-ci sélectionne automatiquement une température adaptée, qui peut cependant être modifiée au besoin.
F Codes numériques d’erreur
Ces codes s’affichent quand l’unité de commande électronique détecte un problème au niveau du four ou de l’électronique de contrôle.Le code d’erreur est enregistré dans le journal des erreurs du menu Setup. Cette erreur peut être communiquée au technicien du service d’assistance pour qu’il comprenne à l’avance la cause possible d’erreur.
Préchauffage
Lorsque vous sélectionnez un mode de cuisson, le préchauffage démarre ; pendant ce temps, la température instantanée s’affiche avec l’icône du thermomètre.Dès que la valeur 100% de la température est atteinte, un signal sonore indique la fin du préchauffage et la valeur de température actuelle disparaît
Minuterie
AVERTISSEMENT
La minuterie du four n'allume pas et n'éteint pas le four ; elle sert uniquement à vous avertir avec l'avertisseur sonore. Quand on souhaite éteindre le four automatiquement, il est nécessaire d'utiliser la fonction Fin de cuisson et la fonction de cuisson retardée.
REMARQUE : Enfoncer le bouton OFF ne réinitialise pas et n'arrête pas non plus la minuterie.
1. Enfoncer le bouton et régler le temps souhaité à l'aide des flèches puis confirmer avec le bouton . Pour faire basculer la sélection entre les heures et les minutes, utiliser les flèches .
2. Il est possible de paramétrer le temps de 1 minutes à 12 heures et 59 minutes et, quand celui-ci est paramétré, le temps restant est toujours visible dans la barre d'état du bas jusqu'à ce que ce temps se soit écoulé ou que la minuterie soit réinitialisée.
3. Pour modifier ou annuler le temps paramétré, il est nécessaire de remettre la minuterie à zéro et de maintenir le bouton enfoncé pendant quelques secondes.
4. Le format de la minuterie est généralement HR:MIN, puis il passe en MIN:SEC pendant la dernière minute.
5. Quand le temps est écoulé, l'écran affiche 00:00 et l'avertisseur sonore sonne pendant une minute ou jusqu'à ce que le bouton soit enfoncé.
Avant d’utiliser le four pour la première fois, retirez tous les matériaux d’emballage et autres. En effet, tous ces matériaux pourraient fondre ou brûler une fois l’appareil allumé.
FR
9
4 - Conseils Généraux Sur le Four
Préchauffage du four
• Sélectionnez une température plus élevée ne réduit pas le temps de préchauffage.
• Le préchauffage est nécessaire pour de bons résultats lorsque vous cuisinez des gâteaux, des biscuits, des pâtisseries et du pain.
• Le préchauffage aidera à saisir les rôtis et à garder la viande juteuse.• Places les grilles de four dans leur position appropriée avant le
préchauffage.• Pendant le préchauffage, la température de cuisson choisie est
toujours affichée.• Un signal va confirmer que le four est préchauffé et l’écriture
“température détectée” s’éteindra.
Suggestions d’utilisation
• Ne posez pas les plats sur la porte ouverte.• Utilisez la lumière intérieure du four pour voir la nourriture à travers la
fenêtre de la porte du four plutôt que d’ouvrir la porte fréquemment.
Fonctionnement des microondes
Les microondes sont transformées en chaleur dans les aliments. Le four a microondes peut être utilisé de manière autonome ou associéavec d'autres types de chauffage. Cette section contient des informations sur la vaisselle et des instructions sur la programmationdu four à microondes.
AVERTISSEMENT POUR LA VAISSELLE
Vaisselle adaptéeIl est possible d'utiliser de la vaisselle résistant à la chaleur, en verre, en vitrocéramique, en porcelaine, en céramique ou en plastiques réfractaires. Ces matériaux sont perméables aux micro-ondes.Il est aussi possible d'utiliser des assiettes ordinaires. De cette façon, il ne sera pas nécessaire de transférer la nourriture.Vaisselle avec des décorations en or ou en argent ne peut être utilisée que si le fabricant garantit qu'elle peut être utilisé dans les fours à micro-ondes. Il convient de se rappeler que, quand on utiliser le four en mode micro-ondes, le plat doit être placé sur le plateau rotatif. Quand on utiliser le four avec un mode combiné, il est préférable de placer le plat devant être cuit sur le grill rond, bas, supporté de manière à ce qu'il soit centrée sur le plateau rotatif.
Vaisselle incompatibleIl n'est pas possible d'utiliser la vaisselle métallique.Le métal n'est pas perméable aux micro-ondes. Les aliments dans des récipients métalliques resteront froids.Avertissement ! Les ustensiles métalliques tels que cuillères en verre, doivent rester à, au moins 2 cm, des parois du four et l'intérieur de la porte. En effet, les étincelles peuvent endommager gravement l'intérieur de la porte vitrée.Avertissement ! Le grill plat doit être retiré quand on utilise les modes micro-ondes et combinés. L'utiliser uniquement avec des fonctions four traditionnelles.
Tester la vaisselleNe jamais allumer le four à micro-ondes avant d'y avoir introduit les aliments.La seule exception autorisée est le fait de tester la vaisselle.Si vous n'êtes pas certain que votre vaisselle peut etre utilisée dans le four à micro-ondes, nousrecommandons d'effectuer le test suivant : mettre le récipient ou le plat vide dans l'appareil pendant 30 s - 1 min à la puissance maximale. Vérifier la température. Le récipient doit être froid ou légèrement tiède. Si il est chaud ou s'il y a des étincelles, le récipient ne convient pas.
Condensation du four et température
• Il est normal qu’une certaine quantité d’humidité s’évapore des aliments pendant la cuisson. La quantité dépend de l’humidité contenue dans la nourriture. L’humidité peut se condenser sur toute surface plus froide que l’intérieur du four, comme le tableau de commande.
• Votre nouveau four a un capteur électronique de température qui permet de maintenir soigneusement la température sélectionnée.
Cuisson à haute altitude
• Lorsque vous cuisinez à haute altitude, les recettes et les durées de cuisson varient de la norme.
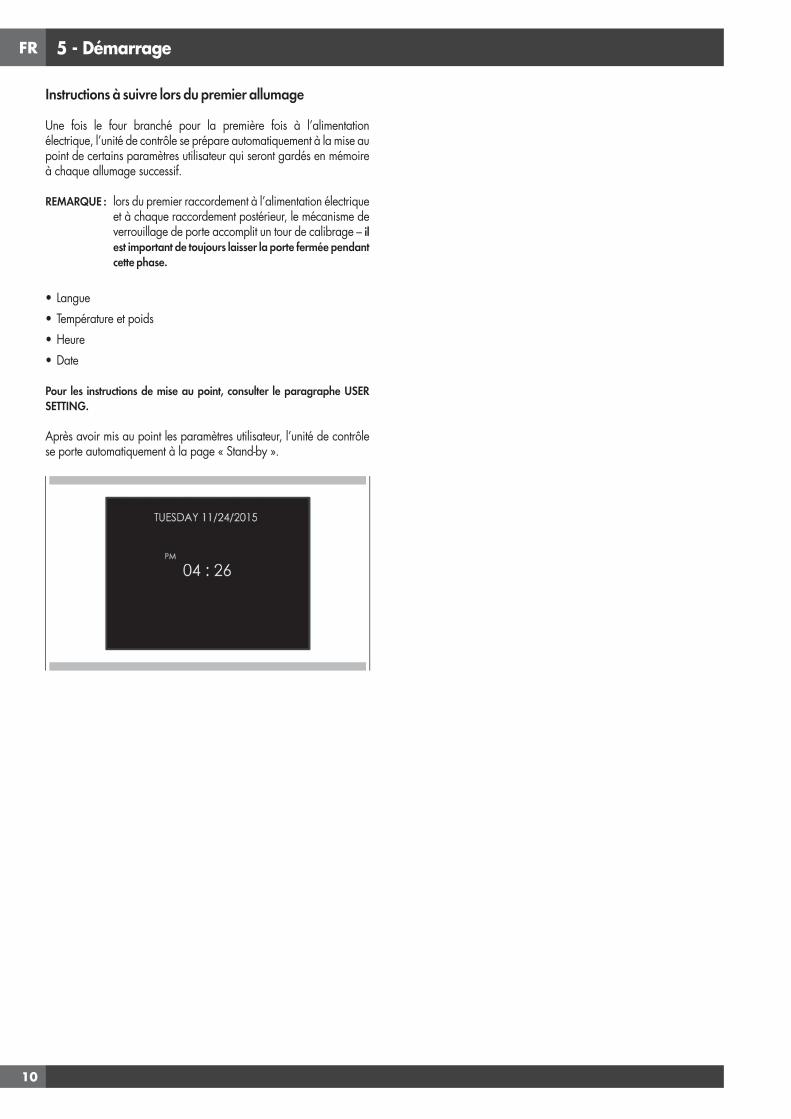
FR
10
5 - Démarrage
Instructions à suivre lors du premier allumage
Une fois le four branché pour la première fois à l’alimentation électrique, l’unité de contrôle se prépare automatiquement à la mise au point de certains paramètres utilisateur qui seront gardés en mémoire à chaque allumage successif.
REMARQUE : lors du premier raccordement à l’alimentation électrique et à chaque raccordement postérieur, le mécanisme de verrouillage de porte accomplit un tour de calibrage – il est important de toujours laisser la porte fermée pendant cette phase.
• Langue• Température et poids• Heure• Date
Pour les instructions de mise au point, consulter le paragraphe USER SETTING.
Après avoir mis au point les paramètres utilisateur, l’unité de contrôle se porte automatiquement à la page « Stand-by ».
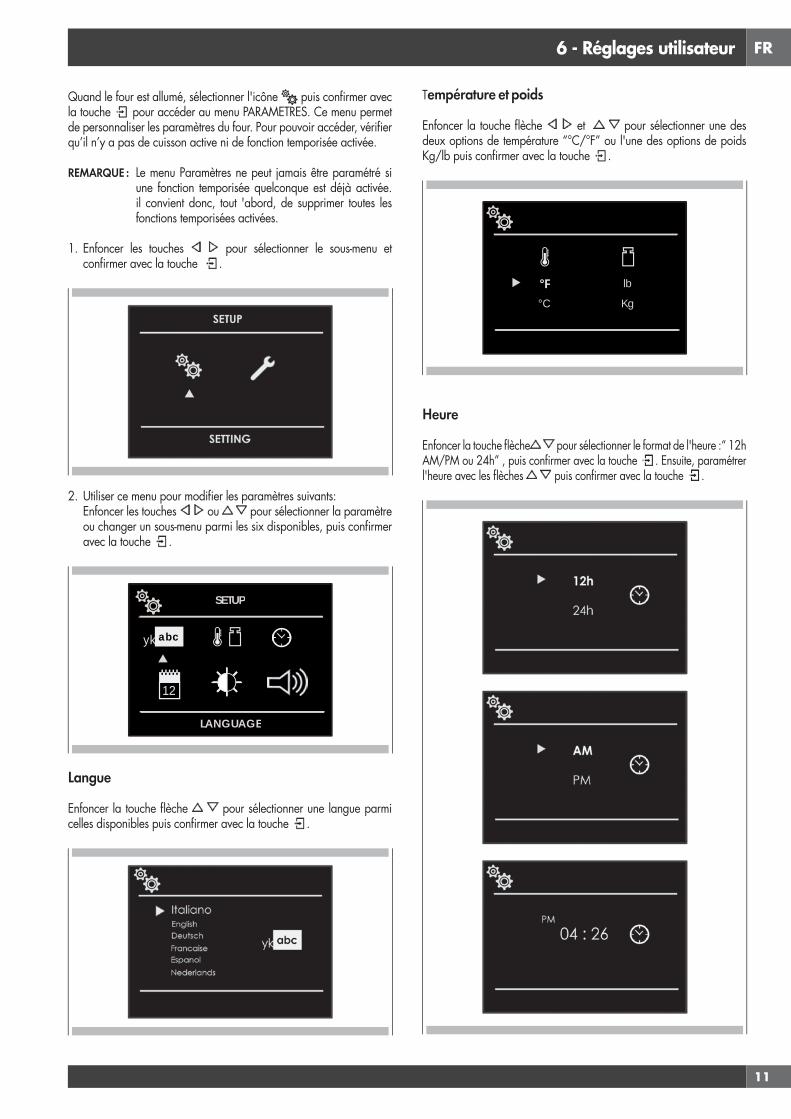
FR
11
6 - Réglages utilisateur
Quand le four est allumé, sélectionner l'icône puis confirmer avec la touche pour accéder au menu PARAMETRES. Ce menu permet de personnaliser les paramètres du four. Pour pouvoir accéder, vérifier qu’il n’y a pas de cuisson active ni de fonction temporisée activée.
REMARQUE : Le menu Paramètres ne peut jamais être paramétré si une fonction temporisée quelconque est déjà activée. il convient donc, tout 'abord, de supprimer toutes les fonctions temporisées activées.
1. Enfoncer les touches pour sélectionner le sous-menu et confirmer avec la touche .
2. Utiliser ce menu pour modifier les paramètres suivants: Enfoncer les touches ou pour sélectionner la paramètre
ou changer un sous-menu parmi les six disponibles, puis confirmer avec la touche .
12
yk abc
SETUP
LANGUAGE
Langue
Enfoncer la touche flèche pour sélectionner une langue parmi celles disponibles puis confirmer avec la touche .
Température et poids
Enfoncer la touche flèche et pour sélectionner une des deux options de température “°C/°F” ou l'une des options de poids Kg/lb puis confirmer avec la touche .
°F°C
lb
Kg
Heure
Enfoncer la touche flèche pour sélectionner le format de l'heure :“ 12h AM/PM ou 24h” , puis confirmer avec la touche . Ensuite, paramétrer l'heure avec les flèches puis confirmer avec la touche .

FR
12
Date
Enfoncer la touche flèche pour sélectionner le format de la date parmi les options disponibles : “J.M.A. – A.M.J. – M.J.A.”, puis confirmer avec la touche . Ensuite, paramétrer la valeur avec les flèches puis confirmer avec la touche .
Luminosité
Enfoncer la touche flèche pour choisir le paramétrage de luminosité à changer entre ON ou STANDBY puis, avec les touches flèches sélectionner le degré de luminosité souhaité et confirmer avec la touche .
Volume
Cliquer sur la touche flèche pour sélectionner le degré de luminosité souhaité, puis confirmer avec la touche .
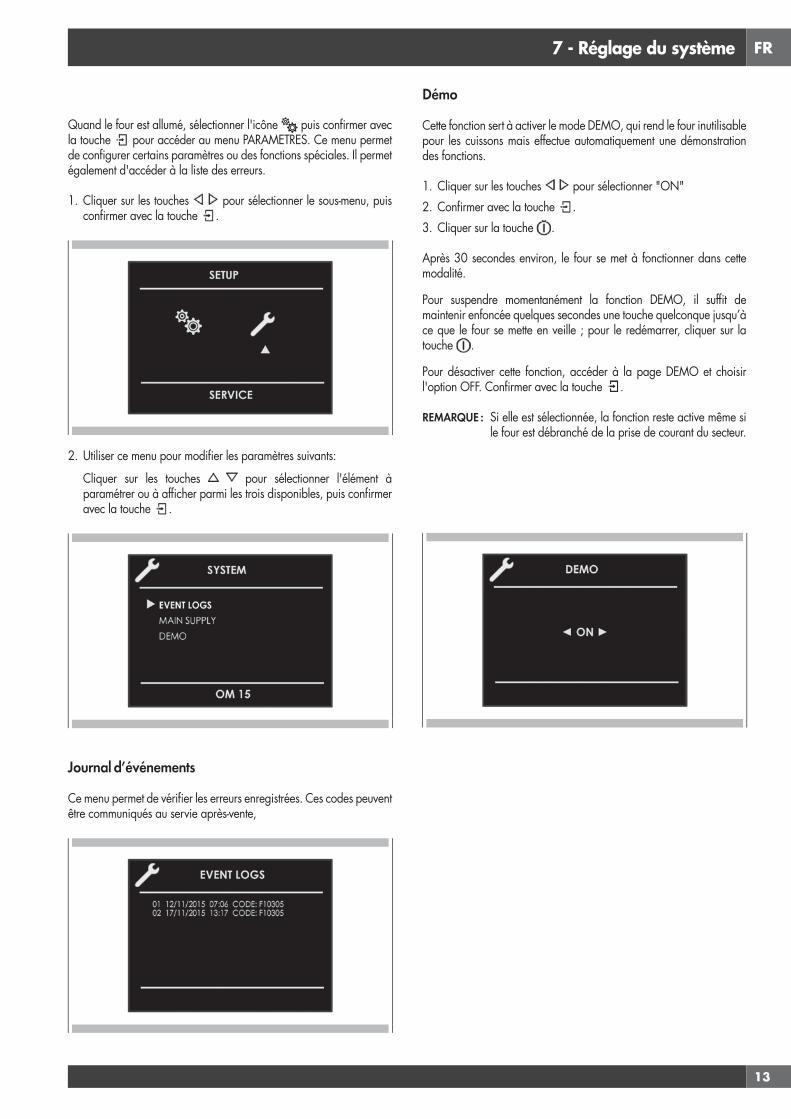
FR
13
7 - Réglage du système
Quand le four est allumé, sélectionner l'icône puis confirmer avec la touche pour accéder au menu PARAMETRES. Ce menu permet de configurer certains paramètres ou des fonctions spéciales. Il permet également d'accéder à la liste des erreurs.
1. Cliquer sur les touches pour sélectionner le sous-menu, puis confirmer avec la touche .
2. Utiliser ce menu pour modifier les paramètres suivants:
Cliquer sur les touches pour sélectionner l'élément à paramétrer ou à afficher parmi les trois disponibles, puis confirmer avec la touche .
Journal d’événements
Ce menu permet de vérifier les erreurs enregistrées. Ces codes peuvent être communiqués au servie après-vente,
Démo
Cette fonction sert à activer le mode DEMO, qui rend le four inutilisable pour les cuissons mais effectue automatiquement une démonstration des fonctions.
1. Cliquer sur les touches pour sélectionner "ON"2. Confirmer avec la touche .3. Cliquer sur la touche .
Après 30 secondes environ, le four se met à fonctionner dans cette modalité.
Pour suspendre momentanément la fonction DEMO, il suffit de maintenir enfoncée quelques secondes une touche quelconque jusqu’à ce que le four se mette en veille ; pour le redémarrer, cliquer sur la touche .
Pour désactiver cette fonction, accéder à la page DEMO et choisir l'option OFF. Confirmer avec la touche .
REMARQUE : Si elle est sélectionnée, la fonction reste active même si le four est débranché de la prise de courant du secteur.
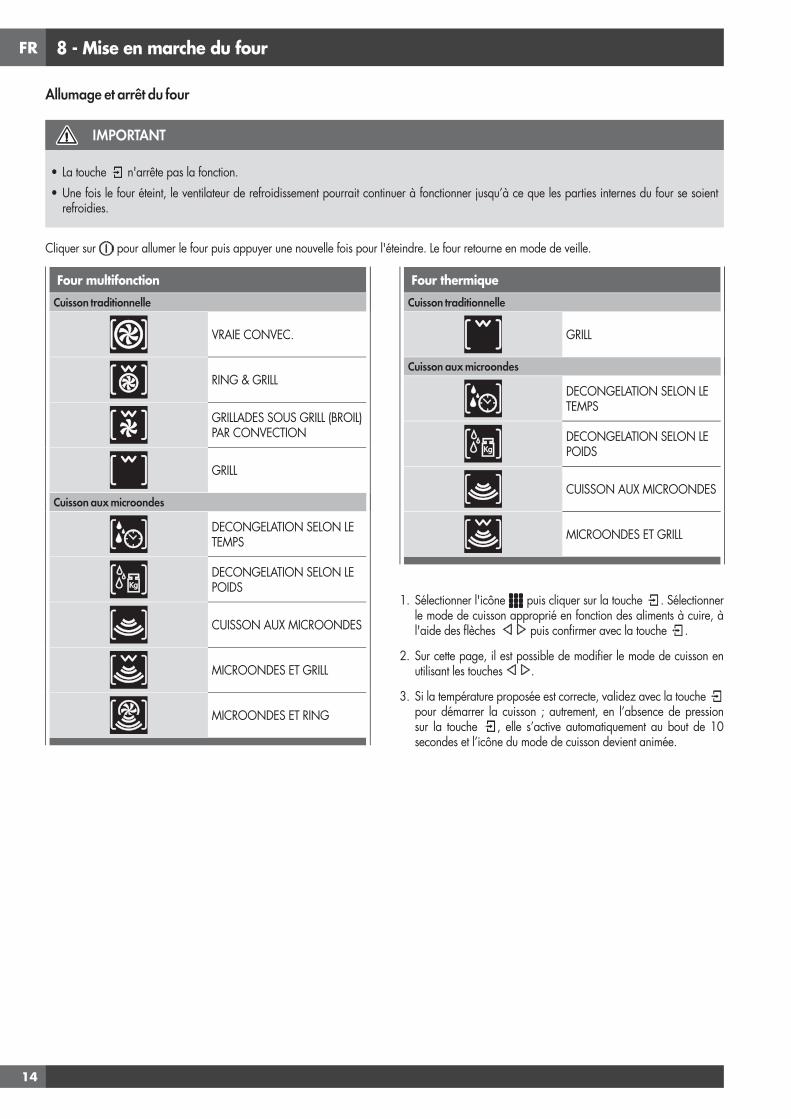
FR
14
8 - Mise en marche du four
Four multifonction
Cuisson traditionnelle
VRAIE CONVEC.
RING & GRILL
GRILLADES SOUS GRILL (BROIL) PAR CONVECTION
GRILL
Cuisson aux microondes
DECONGELATION SELON LE TEMPS
DECONGELATION SELON LE POIDS
CUISSON AUX MICROONDES
MICROONDES ET GRILL
MICROONDES ET RING
Four thermique
Cuisson traditionnelle
GRILL
Cuisson aux microondes
DECONGELATION SELON LE TEMPS
DECONGELATION SELON LE POIDS
CUISSON AUX MICROONDES
MICROONDES ET GRILL
1. Sélectionner l'icône puis cliquer sur la touche . Sélectionner le mode de cuisson approprié en fonction des aliments à cuire, à l'aide des flèches puis confirmer avec la touche .
2. Sur cette page, il est possible de modifier le mode de cuisson en utilisant les touches .
3. Si la température proposée est correcte, validez avec la touche pour démarrer la cuisson ; autrement, en l’absence de pression sur la touche , elle s’active automatiquement au bout de 10 secondes et l’icône du mode de cuisson devient animée.
Allumage et arrêt du four
IMPORTANT
• La touche n'arrête pas la fonction.• Une fois le four éteint, le ventilateur de refroidissement pourrait continuer à fonctionner jusqu’à ce que les parties internes du four se soient
refroidies.
Cliquer sur pour allumer le four puis appuyer une nouvelle fois pour l'éteindre. Le four retourne en mode de veille.
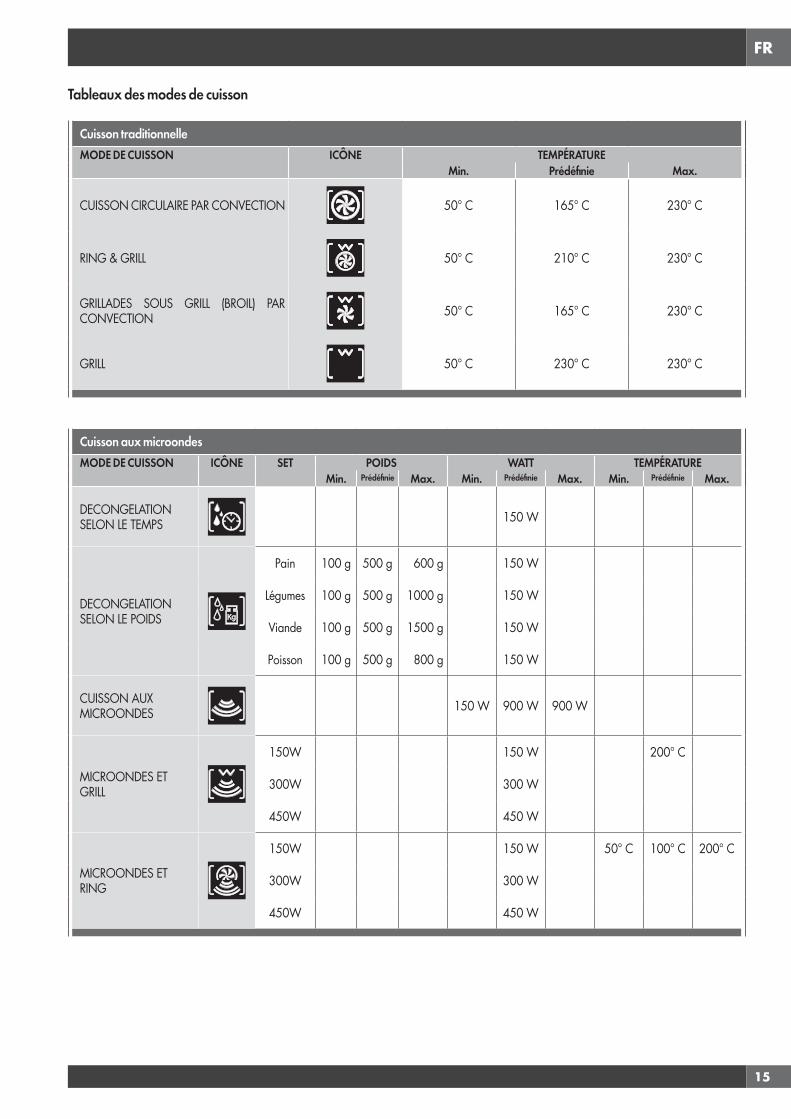
FR
15
Tableaux des modes de cuisson
Cuisson traditionnelleMODE DE CUISSON ICÔNE TEMPÉRATURE
Min. Prédéfinie Max.
CUISSON CIRCULAIRE PAR CONVECTION 50° C 165° C 230° C
RING & GRILL 50° C 210° C 230° C
GRILLADES SOUS GRILL (BROIL) PAR CONVECTION 50° C 165° C 230° C
GRILL 50° C 230° C 230° C
Cuisson aux microondesMODE DE CUISSON ICÔNE SET POIDS WATT TEMPÉRATURE
Min. Prédéfinie Max. Min. Prédéfinie Max. Min. Prédéfinie Max.
DECONGELATION SELON LE TEMPS 150 W
DECONGELATION SELON LE POIDS
Pain 100 g 500 g 600 g 150 W
Légumes 100 g 500 g 1000 g 150 W
Viande 100 g 500 g 1500 g 150 W
Poisson 100 g 500 g 800 g 150 W
CUISSON AUX MICROONDES 150 W 900 W 900 W
MICROONDES ET GRILL
150W 150 W 200° C
300W 300 W
450W 450 W
MICROONDES ET RING
150W 150 W 50° C 100° C 200° C
300W 300 W
450W 450 W

FR
16
9 - Cuisson traditionnelle
Modification du mode de cuisson
1. Pour mettre en pause la marche du four pendant une cuisson non temporisée, cliquer sur la touche .
Tous les paramètres de la cuisson interrompue restent mémorisés ; pour redémarrer, appuyez à nouveau sur cette touche.
2. Pour changer le mode de cuisson quand le four est en marche, cliquer sur la touche puis sur la touche Pour changer le mode de cuisson quand le four est en marche,
. Il est alors possible de choisir un autre mode de cuisson parmi ceux
disponibles dans le groupe, à l'aide des des flèches .
Modification de la température
IMPORTANT
• À la fin d’une fonction, l’afficheur montre, la température de chaleur résiduelle de la cavité à la page de stand-by
1. Il est possible de modifier la température à la page d’aperçu du mode de cuisson avec les flèches puis en confirmant avec la touche .
2. Une fois que la cuisson a démarré, il est possible de changer la température à n’importe quel moment, avec les flèches .
Phase de préchauffage
Pendant que le four est en préchauffage, la température instantanée s’affiche sous l’icône du mode du cuisson.
Dès que la température de consigne est atteinte, le four émet un signal sonore et l’indication de la température instantanée disparaît.
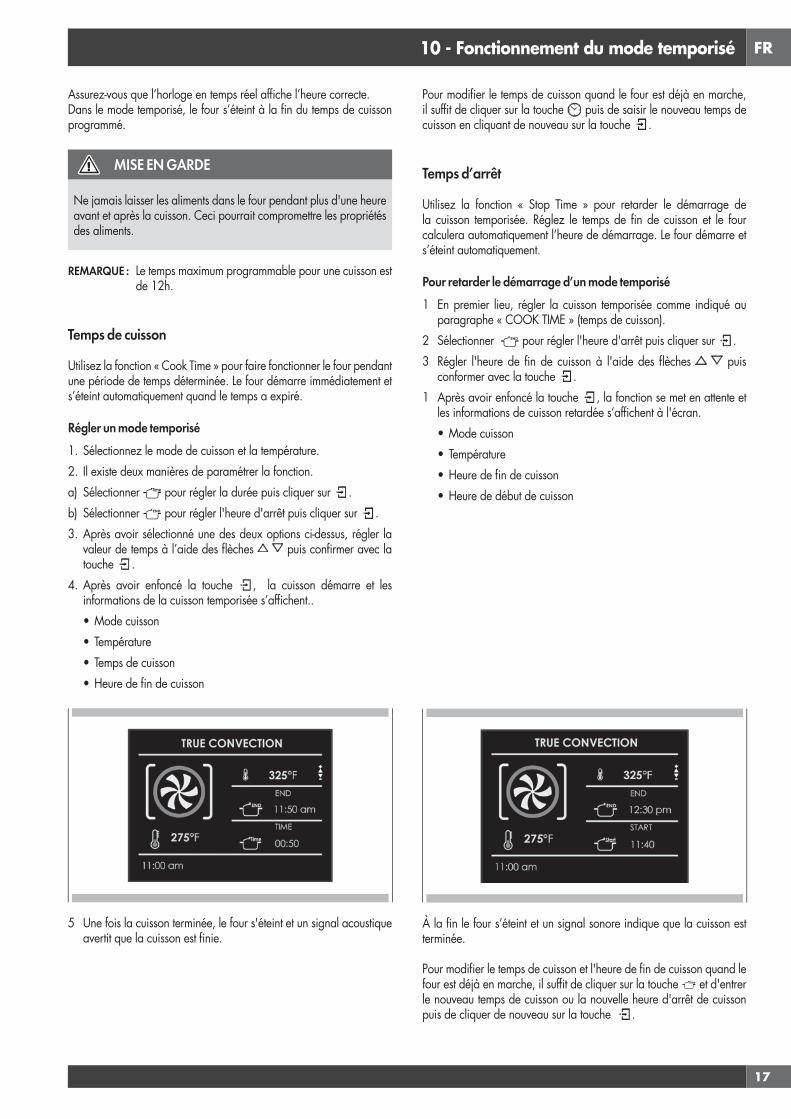
FR
17
10 - Fonctionnement du mode temporisé
Assurez-vous que l’horloge en temps réel affiche l’heure correcte.Dans le mode temporisé, le four s’éteint à la fin du temps de cuisson programmé.
MISE EN GARDE
Ne jamais laisser les aliments dans le four pendant plus d'une heure avant et après la cuisson. Ceci pourrait compromettre les propriétés des aliments.
REMARQUE : Le temps maximum programmable pour une cuisson est de 12h.
Temps de cuisson
Utilisez la fonction « Cook Time » pour faire fonctionner le four pendant une période de temps déterminée. Le four démarre immédiatement et s’éteint automatiquement quand le temps a expiré.
Régler un mode temporisé1. Sélectionnez le mode de cuisson et la température.2. Il existe deux manières de paramétrer la fonction.a) Sélectionner pour régler la durée puis cliquer sur .b) Sélectionner pour régler l'heure d'arrêt puis cliquer sur .3. Après avoir sélectionné une des deux options ci-dessus, régler la
valeur de temps à l’aide des flèches puis confirmer avec la touche .
4. Après avoir enfoncé la touche , la cuisson démarre et les informations de la cuisson temporisée s’affichent..• Mode cuisson• Température• Temps de cuisson• Heure de fin de cuisson
5 Une fois la cuisson terminée, le four s'éteint et un signal acoustique avertit que la cuisson est finie.
Pour modifier le temps de cuisson quand le four est déjà en marche, il suffit de cliquer sur la touche puis de saisir le nouveau temps de cuisson en cliquant de nouveau sur la touche .
Temps d’arrêt
Utilisez la fonction « Stop Time » pour retarder le démarrage de la cuisson temporisée. Réglez le temps de fin de cuisson et le four calculera automatiquement l’heure de démarrage. Le four démarre et s’éteint automatiquement.
Pour retarder le démarrage d’un mode temporisé1 En premier lieu, régler la cuisson temporisée comme indiqué au
paragraphe « COOK TIME » (temps de cuisson).2 Sélectionner pour régler l'heure d'arrêt puis cliquer sur .3 Régler l'heure de fin de cuisson à l'aide des flèches puis
conformer avec la touche .1 Après avoir enfoncé la touche , la fonction se met en attente et
les informations de cuisson retardée s’affichent à l'écran.• Mode cuisson• Température• Heure de fin de cuisson• Heure de début de cuisson
À la fin le four s’éteint et un signal sonore indique que la cuisson est terminée.
Pour modifier le temps de cuisson et l'heure de fin de cuisson quand le four est déjà en marche, il suffit de cliquer sur la touche et d'entrer le nouveau temps de cuisson ou la nouvelle heure d'arrêt de cuisson puis de cliquer de nouveau sur la touche .

FR
18
11 - Cuisson aux microondes
REMARQUE : il est essentiel de lire attentivement les instructions et les mies en garde afin de garantir une utilisation correcte.
ATTENTION
Les fonctions microondes démarreront uniquement une fois que la porte sera fermée. Si la porte est ouverte pendant que le four est en marche, le four se met sur pause et le message "PORTE OUVERTE" s'affiche à l'écran. Pour redémarrer la fonction, il est nécessaire de refermer la porte.
La fonction peut être mise sur pause à tout moment à l'aide de la touche ; il suffit de cliquer de nouveau sur pour redémarrer la fonction.
Fonction décongélation temporisée
Sélectionner l'icône de la fonction décongélation temporisée à l'aide des flèches puis cliquer sur la touche , ensuite, programmer le temps de décongélation à l'aide des flèches et .Pour faire partir la fonction, cliquer sur la touche .
Quand la cuisson a commencé, un compte à rebours s'affiche à l'écran. Il est possible de modifier le temps, à tout moment, avec les flèches et . Quand la décongélation est terminée, le message "DECONGELATION TERMINEE" s'affiche à l'écran.
Fonction décongélation poids
Sélectionner l'icône de la décongélation en fonction du poids, à l'aide des flèches puis cliquer sur la touche .
Sélectionner le type de repas à l'aide des flèches et , puis paramétrer le poids avec les flèches et enfin, démarrer la décongélation avec la touche .
Les types de repas et les poids correspondants pouvant être programmés sont indiqués ci-après :
REPAS Poids MIN (g)
Poids MAX (g)
Pain Pizza Plats de pâtes 100 600
Légumes 100 1000
Viande 100 1500
Fruits de mer 100 800
Le temps de décongélation est calculé entièrement en automatique et sans qu'il ne soit nécessaire de programmer des paramètres de temps, en fonction du type de repas et du poids paramétrés.
Quand la décongélation est terminée, le message "DECONGELATION TERMINEE" s'affiche à l'écran.
Fonction Micro-ondes
Sélectionner l'icône de la fonction Micro-ondes, à l'aide des flèches puis cliquer sur la touche .
Si on souhaite démarrer la fonction immédiatement avec un temps préétabli de 30 s. et une puissance prédéfinie de 900W, cliquer sur la touche .
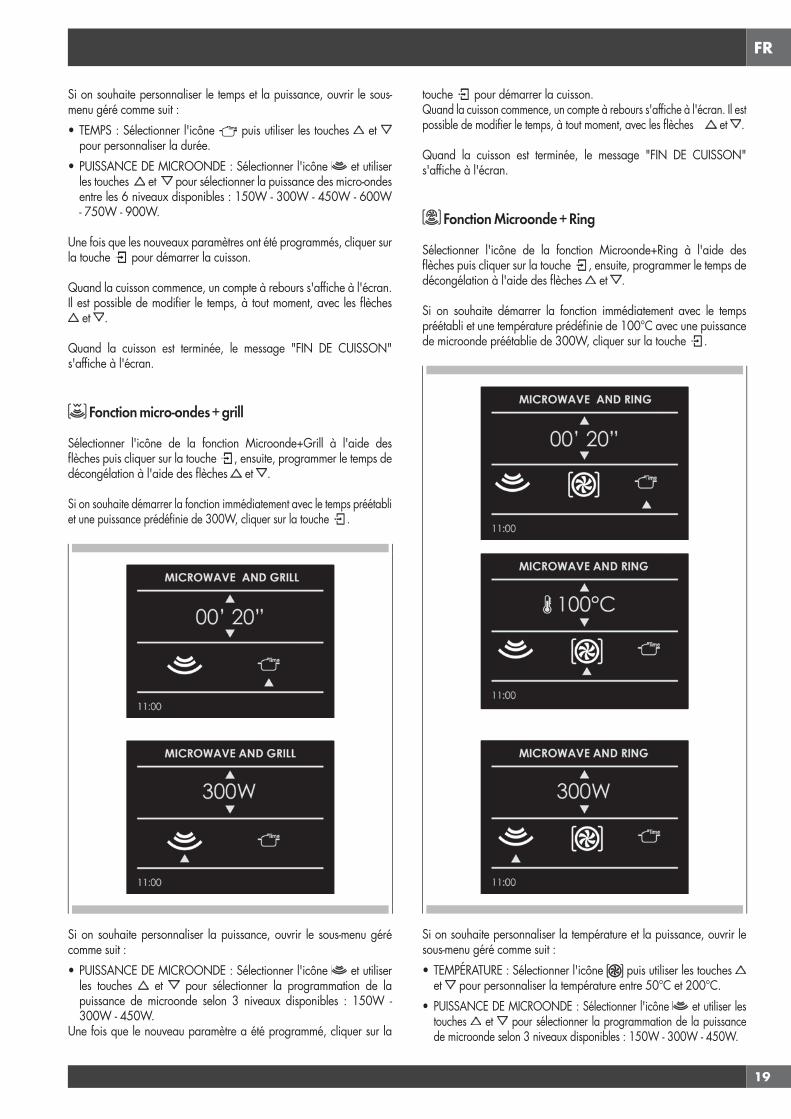
FR
19
Si on souhaite personnaliser le temps et la puissance, ouvrir le sous-menu géré comme suit :• TEMPS : Sélectionner l'icône puis utiliser les touches et
pour personnaliser la durée.• PUISSANCE DE MICROONDE : Sélectionner l'icône et utiliser
les touches et pour sélectionner la puissance des micro-ondes entre les 6 niveaux disponibles : 150W - 300W - 450W - 600W - 750W - 900W.
Une fois que les nouveaux paramètres ont été programmés, cliquer sur la touche pour démarrer la cuisson.
Quand la cuisson commence, un compte à rebours s'affiche à l'écran. Il est possible de modifier le temps, à tout moment, avec les flèches
et .
Quand la cuisson est terminée, le message "FIN DE CUISSON" s'affiche à l'écran.
Fonction micro-ondes + grill
Sélectionner l'icône de la fonction Microonde+Grill à l'aide des flèches puis cliquer sur la touche , ensuite, programmer le temps de décongélation à l'aide des flèches et .
Si on souhaite démarrer la fonction immédiatement avec le temps préétabli et une puissance prédéfinie de 300W, cliquer sur la touche .
Si on souhaite personnaliser la puissance, ouvrir le sous-menu géré comme suit :• PUISSANCE DE MICROONDE : Sélectionner l'icône et utiliser
les touches et pour sélectionner la programmation de la puissance de microonde selon 3 niveaux disponibles : 150W - 300W - 450W.
Une fois que le nouveau paramètre a été programmé, cliquer sur la
touche pour démarrer la cuisson.Quand la cuisson commence, un compte à rebours s'affiche à l'écran. Il est possible de modifier le temps, à tout moment, avec les flèches et .
Quand la cuisson est terminée, le message "FIN DE CUISSON" s'affiche à l'écran.
Fonction Microonde + Ring
Sélectionner l'icône de la fonction Microonde+Ring à l'aide des flèches puis cliquer sur la touche , ensuite, programmer le temps de décongélation à l'aide des flèches et .
Si on souhaite démarrer la fonction immédiatement avec le temps préétabli et une température prédéfinie de 100°C avec une puissance de microonde préétablie de 300W, cliquer sur la touche .
Si on souhaite personnaliser la température et la puissance, ouvrir le sous-menu géré comme suit : • TEMPÉRATURE : Sélectionner l'icône puis utiliser les touches
et pour personnaliser la température entre 50°C et 200°C.• PUISSANCE DE MICROONDE : Sélectionner l'icône et utiliser les
touches et pour sélectionner la programmation de la puissance de microonde selon 3 niveaux disponibles : 150W - 300W - 450W.

FR
20
Une fois que les nouveaux paramètres ont été programmés, cliquer sur la touche pour démarrer la cuisson.
Quand la cuisson commence, un compte à rebours s'affiche à l'écran. Il est possible de modifier le temps, à tout moment, avec les flèches
et .
Quand la cuisson est terminée, le message "FIN DE CUISSON" s'affiche à l'écran.
Modifier la puissance en Watts
Cliquer sur l'icône puis sur la touche . Sélectionner l'icône microonde et modifier la puissance avec les flèches et confirmer avec la touche .
Changer l'heure
Cliquer sur l’icône puis cliquer sur la touche . Sélectionner l’icône de temps et changer la valeur de temps à l’aide des flèches
et confirmer avec la touche .
Changer la température
(disponible uniquement pour microondes et Ring (résistance circulaire))Cliquer sur l'icône puis sur la touche (disponible uniquement pour microondes et Ring (résistance circulaire))
. Sélectionner l'icône du mode de cuisson et modifier la programmation de la température avec les flèches et confirmer avec la touche .
Changer le poids
(disponible uniquement pour la décongélation en fonction du poids)Cliquer sur l'icône et modifier le poids avec les flèches et confirmer avec la touche .
FR
21
12 - Utilisation des lumières du four
Un seul bouton lumineux active les lampes des fours.Toucher pour allumer ou éteindre les lumières.L’éclairage du four s’allume automatiquement à l’ouverture de la porte.Quand un four est en service, les lampes du four s’allument automatiquement lors de l’activation d’un mode de fonctionnement.Les lampes du four s’éteignent automatiquement à la désactivation du mode de fonctionnement.
REMARQUE : Une fois allumées, les lumières s'éteignent automatiquement après 3 minutes. Pour les rallumer, cliquer sur la touche ou ouvrir la porte.
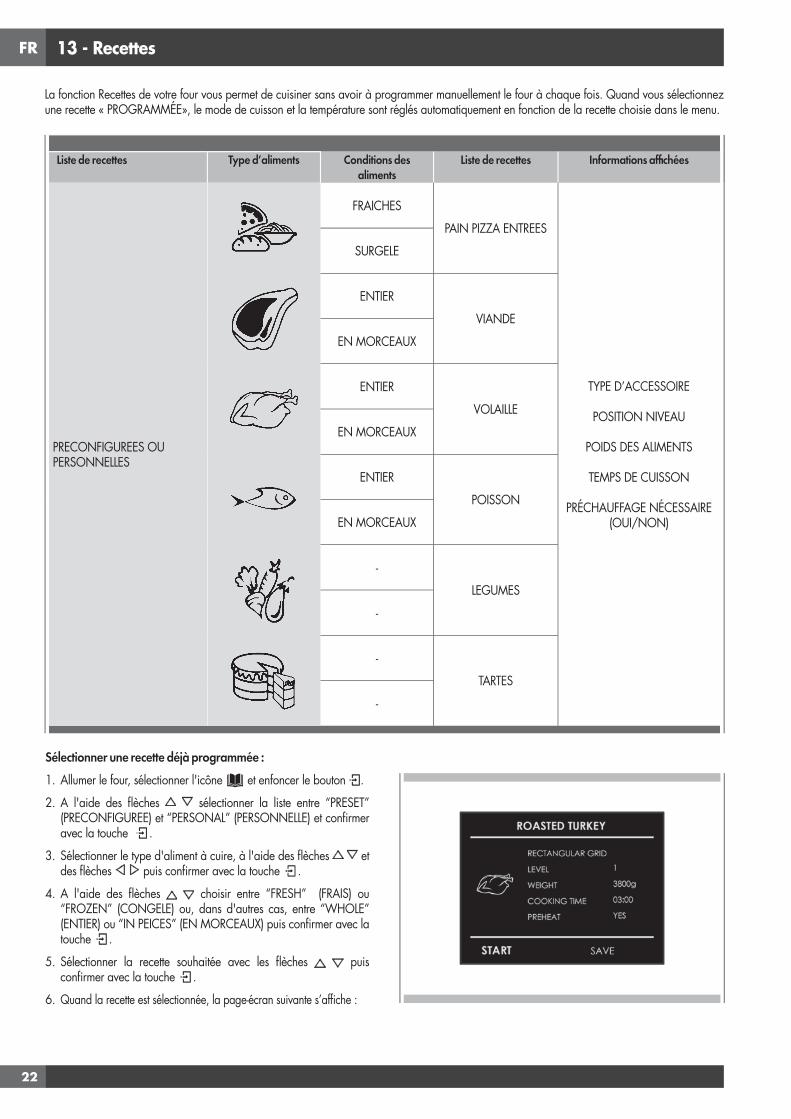
FR
22
13 - Recettes
Sélectionner une recette déjà programmée :1. Allumer le four, sélectionner l'icône et enfoncer le bouton .
2. A l'aide des flèches sélectionner la liste entre “PRESET” (PRECONFIGUREE) et “PERSONAL” (PERSONNELLE) et confirmer avec la touche .
3. Sélectionner le type d'aliment à cuire, à l'aide des flèches et des flèches puis confirmer avec la touche .
4. A l'aide des flèches choisir entre “FRESH” (FRAIS) ou “FROZEN” (CONGELE) ou, dans d'autres cas, entre “WHOLE” (ENTIER) ou “IN PEICES” (EN MORCEAUX) puis confirmer avec la touche .
5. Sélectionner la recette souhaitée avec les flèches puis confirmer avec la touche .
6. Quand la recette est sélectionnée, la page-écran suivante s’affiche :
La fonction Recettes de votre four vous permet de cuisiner sans avoir à programmer manuellement le four à chaque fois. Quand vous sélectionnez une recette « PROGRAMMÉE», le mode de cuisson et la température sont réglés automatiquement en fonction de la recette choisie dans le menu.
Liste de recettes Type d’aliments Conditions des aliments
Liste de recettes Informations affichées
PRECONFIGUREES OU PERSONNELLES
FRAICHES
PAIN PIZZA ENTREES
TYPE D’ACCESSOIRE
POSITION NIVEAU
POIDS DES ALIMENTS
TEMPS DE CUISSON
PRÉCHAUFFAGE NÉCESSAIRE(OUI/NON)
SURGELE
ENTIER
VIANDE
EN MORCEAUX
ENTIER
VOLAILLE
EN MORCEAUX
ENTIER
POISSON
EN MORCEAUX
-
LEGUMES
-
-
TARTES
-
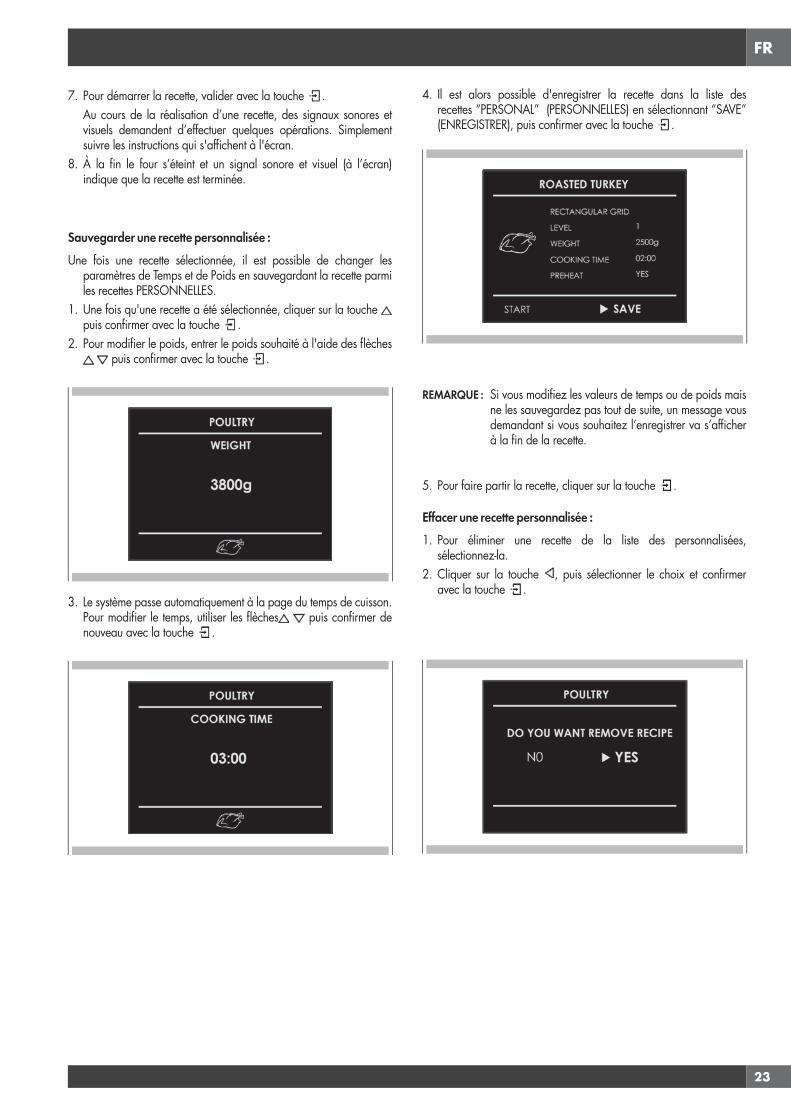
FR
23
7. Pour démarrer la recette, valider avec la touche . Au cours de la réalisation d’une recette, des signaux sonores et
visuels demandent d’effectuer quelques opérations. Simplement suivre les instructions qui s'affichent à l'écran.
8. À la fin le four s’éteint et un signal sonore et visuel (à l’écran) indique que la recette est terminée.
Sauvegarder une recette personnalisée :Une fois une recette sélectionnée, il est possible de changer les
paramètres de Temps et de Poids en sauvegardant la recette parmi les recettes PERSONNELLES.
1. Une fois qu'une recette a été sélectionnée, cliquer sur la touche puis confirmer avec la touche .
2. Pour modifier le poids, entrer le poids souhaité à l'aide des flèches puis confirmer avec la touche .
3. Le système passe automatiquement à la page du temps de cuisson. Pour modifier le temps, utiliser les flèches puis confirmer de nouveau avec la touche .
4. Il est alors possible d'enregistrer la recette dans la liste des recettes “PERSONAL” (PERSONNELLES) en sélectionnant “SAVE” (ENREGISTRER), puis confirmer avec la touche .
REMARQUE : Si vous modifiez les valeurs de temps ou de poids mais ne les sauvegardez pas tout de suite, un message vous demandant si vous souhaitez l’enregistrer va s’afficher à la fin de la recette.
5. Pour faire partir la recette, cliquer sur la touche .
Effacer une recette personnalisée :1. Pour éliminer une recette de la liste des personnalisées,
sélectionnez-la.2. Cliquer sur la touche , puis sélectionner le choix et confirmer
avec la touche .
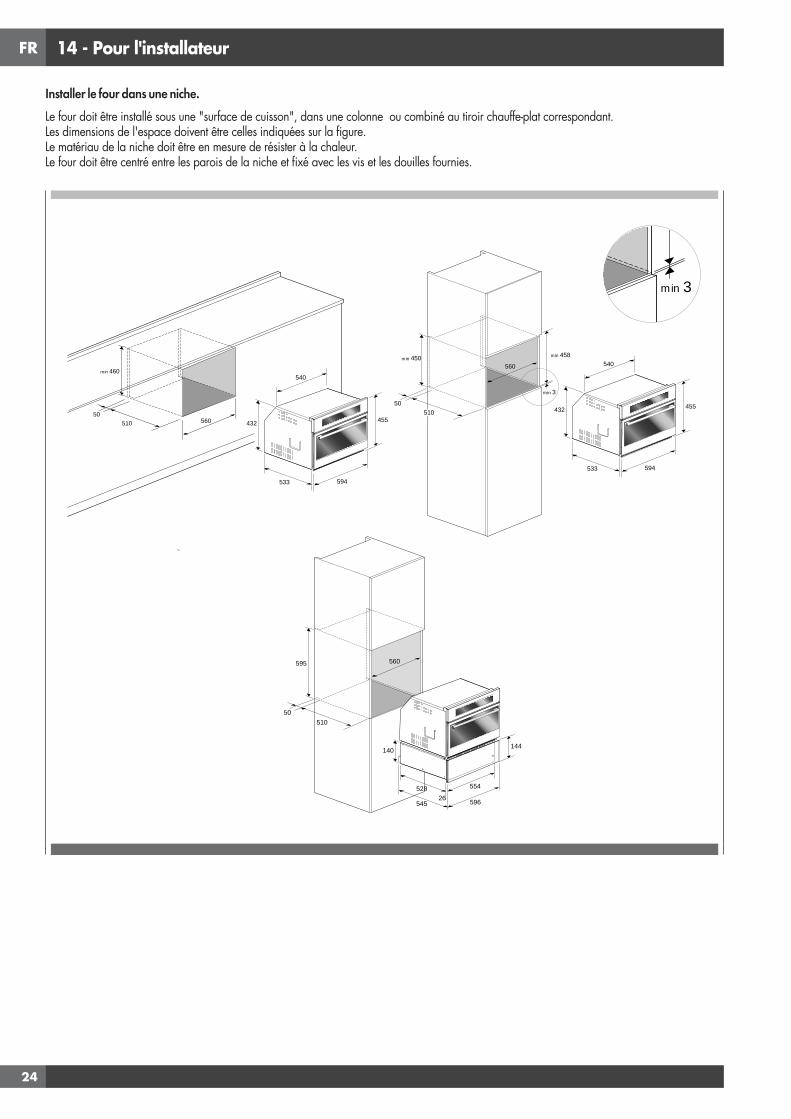
FR
24
14 - Pour l'installateur
Installer le four dans une niche.Le four doit être installé sous une "surface de cuisson", dans une colonne ou combiné au tiroir chauffe-plat correspondant. Les dimensions de l'espace doivent être celles indiquées sur la figure. Le matériau de la niche doit être en mesure de résister à la chaleur. Le four doit être centré entre les parois de la niche et fixé avec les vis et les douilles fournies.
560
min 460
50510
560
50 510
595
52826
144140
596
554
545
560min 450
50510
533
455
594
540
432
min 458
min 3
560
min 3
533
455
594
540
432
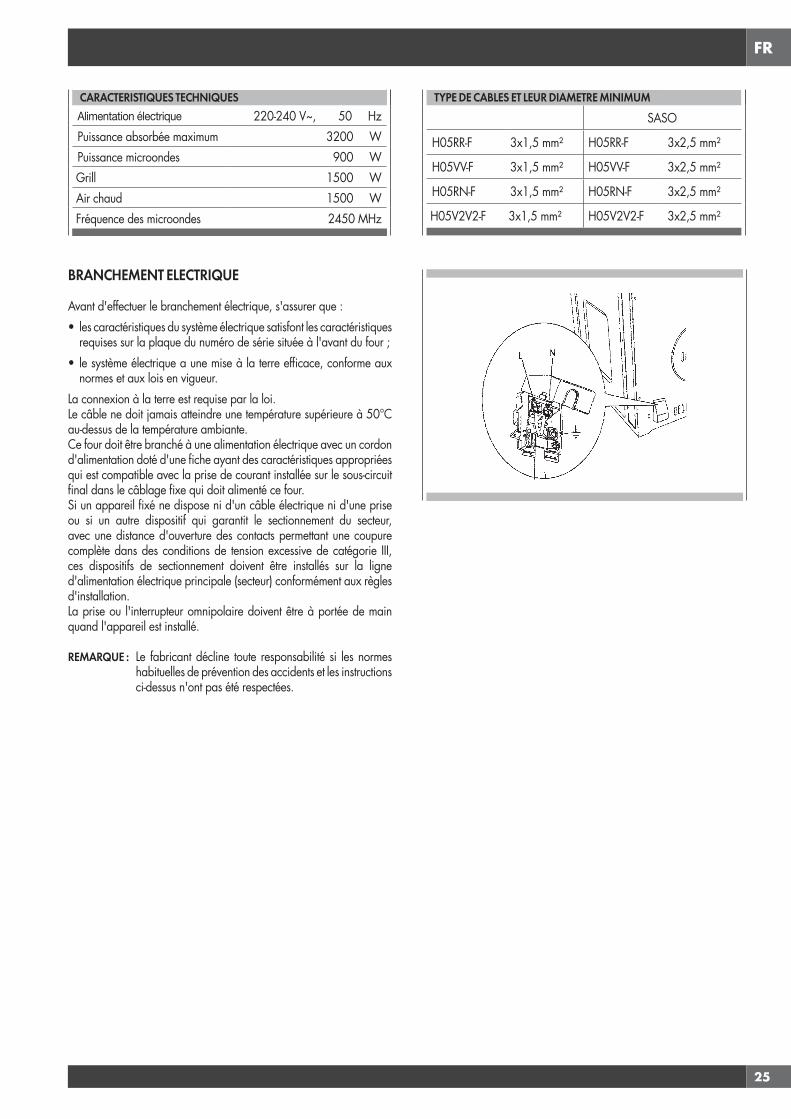
FR
25
CARACTERISTIQUES TECHNIQUESAlimentation électrique 220-240 V~, 50 HzPuissance absorbée maximum 3200 WPuissance microondes 900 WGrill 1500 WAir chaud 1500 WFréquence des microondes 2450 MHz
BRANCHEMENT ELECTRIQUE
Avant d'effectuer le branchement électrique, s'assurer que :• les caractéristiques du système électrique satisfont les caractéristiques
requises sur la plaque du numéro de série située à l'avant du four ;• le système électrique a une mise à la terre efficace, conforme aux
normes et aux lois en vigueur. La connexion à la terre est requise par la loi. Le câble ne doit jamais atteindre une température supérieure à 50°C au-dessus de la température ambiante. Ce four doit être branché à une alimentation électrique avec un cordon d'alimentation doté d'une fiche ayant des caractéristiques appropriées qui est compatible avec la prise de courant installée sur le sous-circuit final dans le câblage fixe qui doit alimenté ce four. Si un appareil fixé ne dispose ni d'un câble électrique ni d'une prise ou si un autre dispositif qui garantit le sectionnement du secteur, avec une distance d'ouverture des contacts permettant une coupure complète dans des conditions de tension excessive de catégorie III, ces dispositifs de sectionnement doivent être installés sur la ligne d'alimentation électrique principale (secteur) conformément aux règles d'installation. La prise ou l'interrupteur omnipolaire doivent être à portée de main quand l'appareil est installé.
REMARQUE : Le fabricant décline toute responsabilité si les normes habituelles de prévention des accidents et les instructions ci-dessus n'ont pas été respectées.
TYPE DE CABLES ET LEUR DIAMETRE MINIMUMSASO
H05RR-F 3x1,5 mm² H05RR-F 3x2,5 mm²
H05VV-F 3x1,5 mm² H05VV-F 3x2,5 mm²
H05RN-F 3x1,5 mm² H05RN-F 3x2,5 mm²
H05V2V2-F 3x1,5 mm² H05V2V2-F 3x2,5 mm²
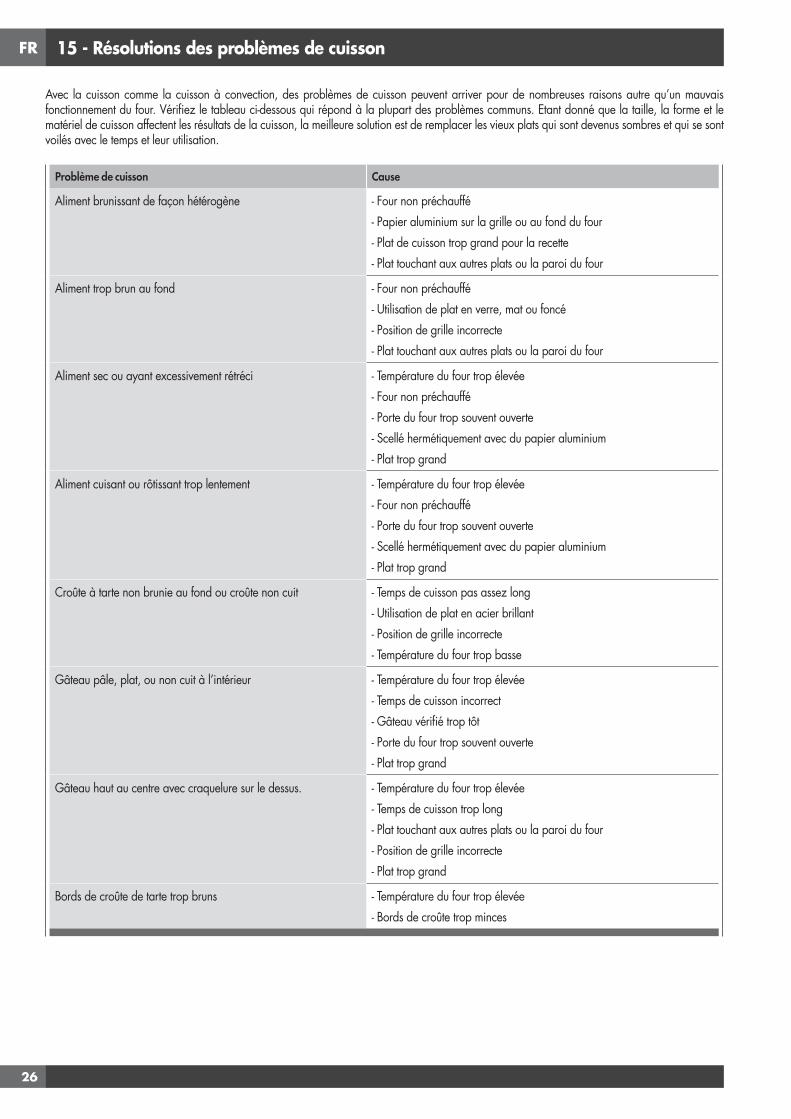
FR
26
15 - Résolutions des problèmes de cuisson
Avec la cuisson comme la cuisson à convection, des problèmes de cuisson peuvent arriver pour de nombreuses raisons autre qu’un mauvais fonctionnement du four. Vérifiez le tableau ci-dessous qui répond à la plupart des problèmes communs. Etant donné que la taille, la forme et le matériel de cuisson affectent les résultats de la cuisson, la meilleure solution est de remplacer les vieux plats qui sont devenus sombres et qui se sont voilés avec le temps et leur utilisation.
Problème de cuisson Cause
Aliment brunissant de façon hétérogène - Four non préchauffé- Papier aluminium sur la grille ou au fond du four- Plat de cuisson trop grand pour la recette- Plat touchant aux autres plats ou la paroi du four
Aliment trop brun au fond - Four non préchauffé- Utilisation de plat en verre, mat ou foncé- Position de grille incorrecte- Plat touchant aux autres plats ou la paroi du four
Aliment sec ou ayant excessivement rétréci - Température du four trop élevée- Four non préchauffé- Porte du four trop souvent ouverte- Scellé hermétiquement avec du papier aluminium- Plat trop grand
Aliment cuisant ou rôtissant trop lentement - Température du four trop élevée- Four non préchauffé- Porte du four trop souvent ouverte- Scellé hermétiquement avec du papier aluminium- Plat trop grand
Croûte à tarte non brunie au fond ou croûte non cuit - Temps de cuisson pas assez long- Utilisation de plat en acier brillant- Position de grille incorrecte- Température du four trop basse
Gâteau pâle, plat, ou non cuit à l’intérieur - Température du four trop élevée- Temps de cuisson incorrect- Gâteau vérifié trop tôt- Porte du four trop souvent ouverte- Plat trop grand
Gâteau haut au centre avec craquelure sur le dessus. - Température du four trop élevée- Temps de cuisson trop long- Plat touchant aux autres plats ou la paroi du four- Position de grille incorrecte- Plat trop grand
Bords de croûte de tarte trop bruns - Température du four trop élevée- Bords de croûte trop minces
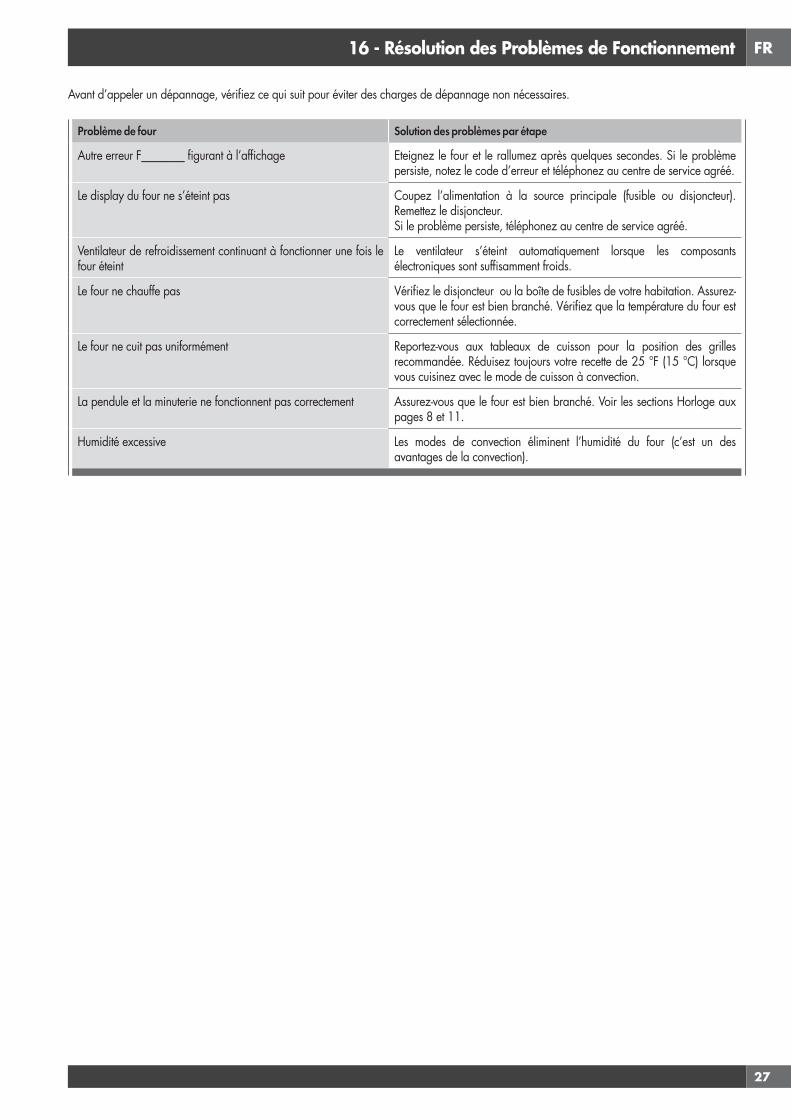
FR
27
16 - Résolution des Problèmes de Fonctionnement
Avant d’appeler un dépannage, vérifiez ce qui suit pour éviter des charges de dépannage non nécessaires.
Problème de four Solution des problèmes par étape
Autre erreur F________ figurant à l’affichage Eteignez le four et le rallumez après quelques secondes. Si le problème persiste, notez le code d’erreur et téléphonez au centre de service agréé.
Le display du four ne s’éteint pas Coupez l’alimentation à la source principale (fusible ou disjoncteur). Remettez le disjoncteur.Si le problème persiste, téléphonez au centre de service agréé.
Ventilateur de refroidissement continuant à fonctionner une fois le four éteint
Le ventilateur s’éteint automatiquement lorsque les composants électroniques sont suffisamment froids.
Le four ne chauffe pas Vérifiez le disjoncteur ou la boîte de fusibles de votre habitation. Assurez-vous que le four est bien branché. Vérifiez que la température du four est correctement sélectionnée.
Le four ne cuit pas uniformément Reportez-vous aux tableaux de cuisson pour la position des grilles recommandée. Réduisez toujours votre recette de 25 °F (15 °C) lorsque vous cuisinez avec le mode de cuisson à convection.
La pendule et la minuterie ne fonctionnent pas correctement Assurez-vous que le four est bien branché. Voir les sections Horloge aux pages 8 et 11.
Humidité excessive Les modes de convection éliminent l’humidité du four (c’est un des avantages de la convection).
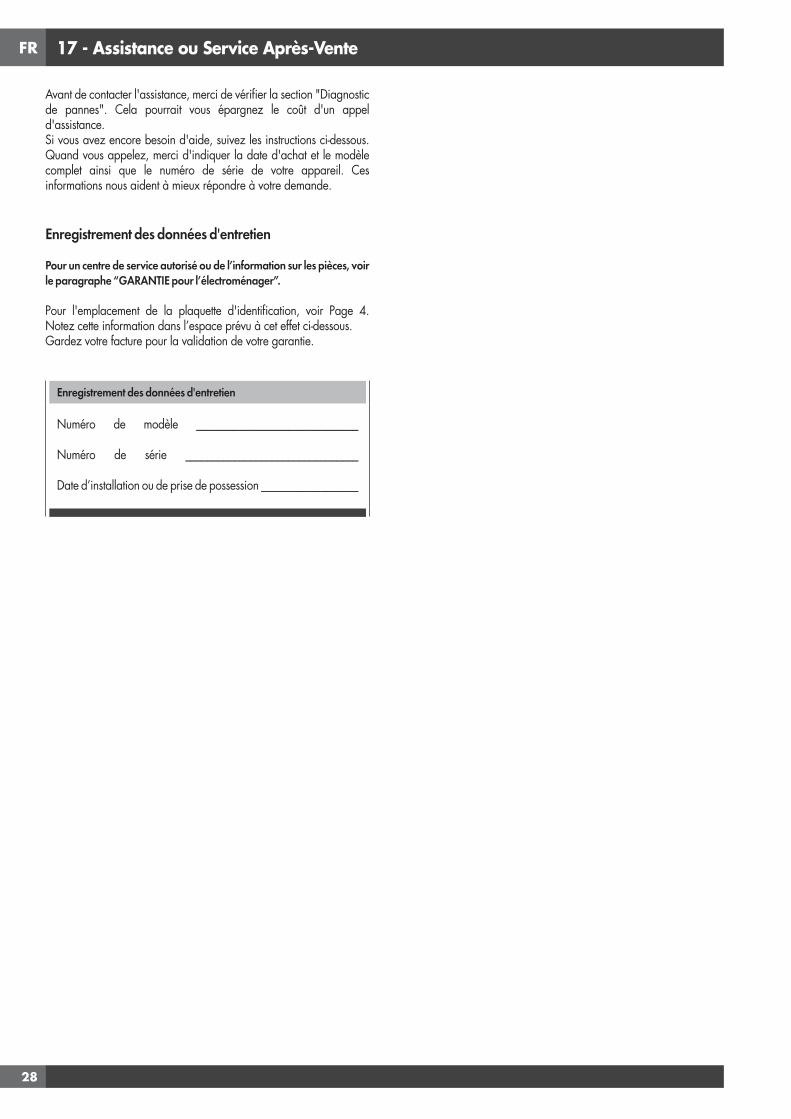
FR
28
17 - Assistance ou Service Après-Vente
Avant de contacter l'assistance, merci de vérifier la section "Diagnostic de pannes". Cela pourrait vous épargnez le coût d'un appel d'assistance.Si vous avez encore besoin d'aide, suivez les instructions ci-dessous. Quand vous appelez, merci d'indiquer la date d'achat et le modèle complet ainsi que le numéro de série de votre appareil. Ces informations nous aident à mieux répondre à votre demande.
Enregistrement des données d'entretien
Pour un centre de service autorisé ou de l’information sur les pièces, voir le paragraphe “GARANTIE pour l’électroménager”.
Pour l'emplacement de la plaquette d'identification, voir Page 4. Notez cette information dans l’espace prévu à cet effet ci-dessous.Gardez votre facture pour la validation de votre garantie.
Enregistrement des données d'entretien
Numéro de modèle ______________________________
Numéro de série ________________________________
Date d’installation ou de prise de possession __________________
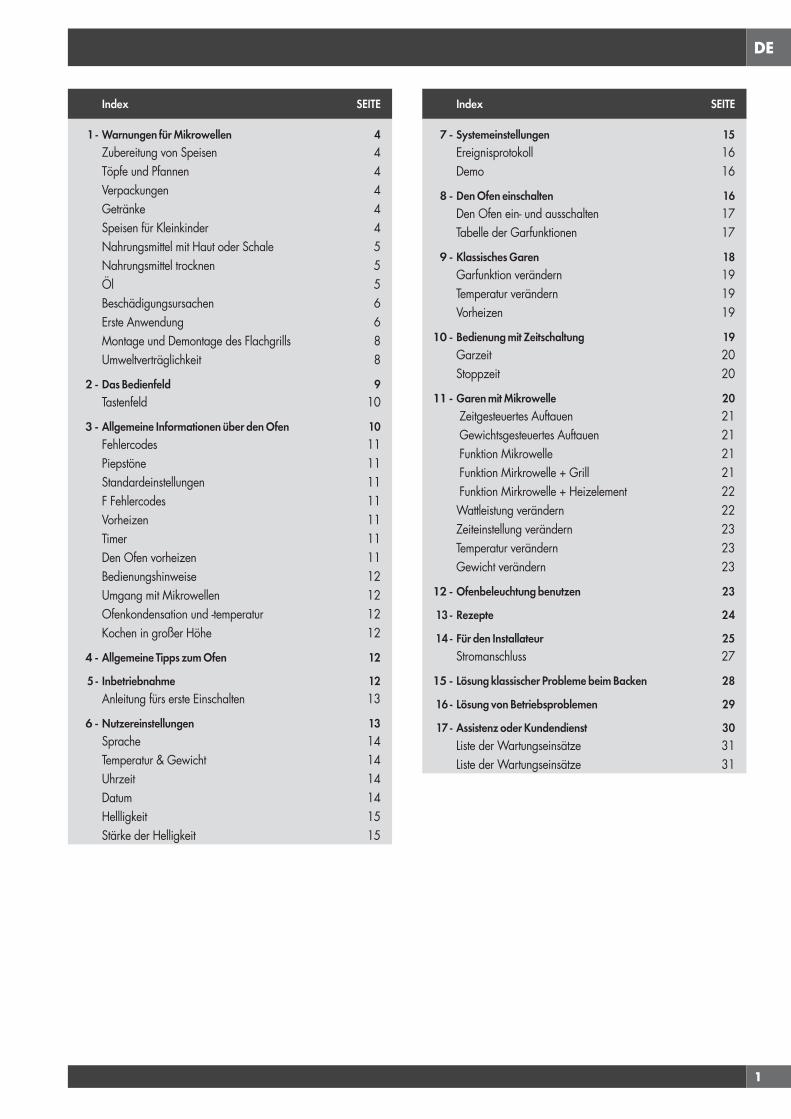
DE
1
Index SEITE
1 - Warnungen für Mikrowellen 4Zubereitung von Speisen 4Töpfe und Pfannen 4Verpackungen 4Getränke 4Speisen für Kleinkinder 4Nahrungsmittel mit Haut oder Schale 5Nahrungsmittel trocknen 5Öl 5Beschädigungsursachen 6Erste Anwendung 6Montage und Demontage des Flachgrills 8Umweltverträglichkeit 8
2 - Das Bedienfeld 9Tastenfeld 10
3 - Allgemeine Informationen über den Ofen 10Fehlercodes 11Piepstöne 11Standardeinstellungen 11F Fehlercodes 11Vorheizen 11Timer 11Den Ofen vorheizen 11Bedienungshinweise 12Umgang mit Mikrowellen 12Ofenkondensation und -temperatur 12Kochen in großer Höhe 12
4 - Allgemeine Tipps zum Ofen 12
5 - Inbetriebnahme 12Anleitung fürs erste Einschalten 13
6 - Nutzereinstellungen 13Sprache 14Temperatur & Gewicht 14Uhrzeit 14Datum 14Hellligkeit 15Stärke der Helligkeit 15
Index SEITE
7 - Systemeinstellungen 15Ereignisprotokoll 16Demo 16
8 - Den Ofen einschalten 16Den Ofen ein- und ausschalten 17Tabelle der Garfunktionen 17
9 - Klassisches Garen 18Garfunktion verändern 19Temperatur verändern 19Vorheizen 19
10 - Bedienung mit Zeitschaltung 19Garzeit 20Stoppzeit 20
11 - Garen mit Mikrowelle 20 Zeitgesteuertes Auftauen 21 Gewichtsgesteuertes Auftauen 21 Funktion Mikrowelle 21 Funktion Mirkrowelle + Grill 21 Funktion Mirkrowelle + Heizelement 22Wattleistung verändern 22Zeiteinstellung verändern 23Temperatur verändern 23Gewicht verändern 23
12 - Ofenbeleuchtung benutzen 23
13 - Rezepte 24
14 - Für den Installateur 25Stromanschluss 27
15 - Lösung klassischer Probleme beim Backen 28
16 - Lösung von Betriebsproblemen 29
17 - Assistenz oder Kundendienst 30Liste der Wartungseinsätze 31Liste der Wartungseinsätze 31
DE
2
Sehr verehrte Kundin, sehr verehrter Kunde,wir danken Ihnen und beglückwünschen Sie zu Ihrer Wahl. Dieses neue, sorgfältig konzipierte und aus erstklassigen Materialien hergestellte Produkt wurde akkurat kontrolliert, um allen Ihren Bedürfnissen für das perfekte Kochen zu entsprechen.Wir bitten Sie deshalb, diese einfachen Anleitungen zu lesen und einzuhalten, mit denen Sie schon ab dem ersten Gebrauch herausragende Ergebnisse erzielen werden. Mit diesem modernen Gerät möchten wir Ihnen unsere besten Glückwünsche aussprechen.
DIESES PRODUKT IST FÜR DEN HAUSGEBRAUCH BESTIMMT. DER HERSTELLER LEHNT JEGLICHE VERANTWORTUNG FÜR SCHÄDEN AN PERSONEN UND GEGENSTÄNDEN AB, DIE AUF EINE FALSCHE INSTALLATION ODER UNSACHGEMÄSSEN, FALSCHEN ODER UNGEGEIGNETEN GEBRAUCH ZURÜCKZUFÜHREN SIND. DIE VORRICHTUNG DARF NICHT VON PERSONEN (KINDER INBEGRIFFEN) BENUTZT WERDEN, DIE KÖRPERLICHE, SENSORIALE ODER GEISTIGE BEHINDERUNGEN HABEN ODER VON PERSONEN OHNE DIE NOTWENDIGE ERFAHRUNG ODER WISSEN, ES SEI DENN SIE WERDEN VON EINER PERSON, DIE FÜR DEREN SICHERHEIT VERANTWORTLICH IST, ÜBERWACHT UND ANGEWIESEN.KINDER MÜSSEN ÜBERWACHT WERDEN, DAMIT SIE MIT DEM APPARAT NICH SPIELEN. KEINE ALUMINIUMFOLIE, TÖPFE ODER ÄHNLICHE GEGENSTÄNDE, DIE DIE BASIS BERÜHREN, IN DEN OFEN ZUM GAREN STELLEN. DER HEIZVORGANG DES UNTEREN HEIZELELMENTS ERZEUGT EINE ÜBERHITZUNG DES UNTEREN OFENTEILS, WAS SCHWERWIEGENDE KONSEQUENZEN HABEN KANN (AUCH FEUER), AUCH DER ZÄHLER UNTER DEM OFEN KANN BESCHÄDIGT WERDEN.DER APPARAT WIRD WÄHREND DER BENUTZUNG SEHR HEISS.WARNUNG: DIE HEIZELEMENTE DES OFENS NICHT BERÜHREN
ACHTUNG
• Sind die Türdichtungen oder die Tür beschädigt, dann darf der Ofen erst nach der Reparatur durch einen Fachmann wieder benutzt werden.
• Es ist gefährlich Wartungen oder Reparaturen durchzuführen und dazu Abdeckungen, die vor Mikrowellen schützen, abzunehmen. Dies darf nur der Fachmann!
• Flüssigkeiten und andere Nahrungsmittel dürfen nicht in luftdicht verschlossenen Behältern erhitzt werden, da diese explodieren können;
ACHTUNG
• Kinder dürfen den Ofen nicht ohne Überwachung benutzen solange sie nicht entsprechend eingewiesen wurden und die Gefahren, die durch unsachgemäßen Gebrauch entstehen, verstanden haben.
• Nur Küchengeräte verwenden, die für die Mikrowelle geeignet sind.
• Werden Nahrungsmittel in Plastik oder Papierbehältern erhitzt, dann den Ofen regelmäßig überprüfen, da Brandgefahr besteht.
• Falls Rauch aus dem Ofen dringt, den Apparat ausschalten oder den Stecker ziehen und die Tür geschlossen halten, damit die Flammen ersticken.
• Beim Erhitzen von Getränken in der Mikrowelle kann es zu einem verspäteten Überkochen kommen, daher muss sehr sorgsam mit dem Behälter umgegangen werden.
• Der Inhalt von Babyfläschchen und Babynahrung muss umgerührt oder geschüttelt werden und deren Temperatur überprüft werden, bevor sie verfüttert werden, um Überhitzungen zu vermeiden.
• Eier in der Schale und hartgekochte Eier dürfen nicht in der Mikrowelle erhitzt werden, da diese sogar nach dem Erhitzen in der Mikrowelle explodieren könnten.
• Detaillierte Erläuterung der Reinigung der Türdichtungen und naheliegender Bauteile;
• Der Ofen muss regelmäßig gereinigt werden und Speisereste müssen entfernt werden;
• Wird der Ofen nicht gereinigt, dann können die Oberflächen beschädigt werden, die Lebensdauer verkürzt sich und es können gefährliche Bedingungen entstehen;
• Keine groben Scheuermittel oder scharfe Metallkratzer verwenden, um die Glastüren des Ofens zu reinigen, denn diese können die Oberfläche verkratzen und das Glas zerbrechen.
• Keine Dampfstrahler zur Reinigung des Apparats verwenden.
WICHTIGE BEDIENUNGS- UNDSICHERHEITSANLEITUNGEN
Vor Gebrauch sorgfältig durchlesen
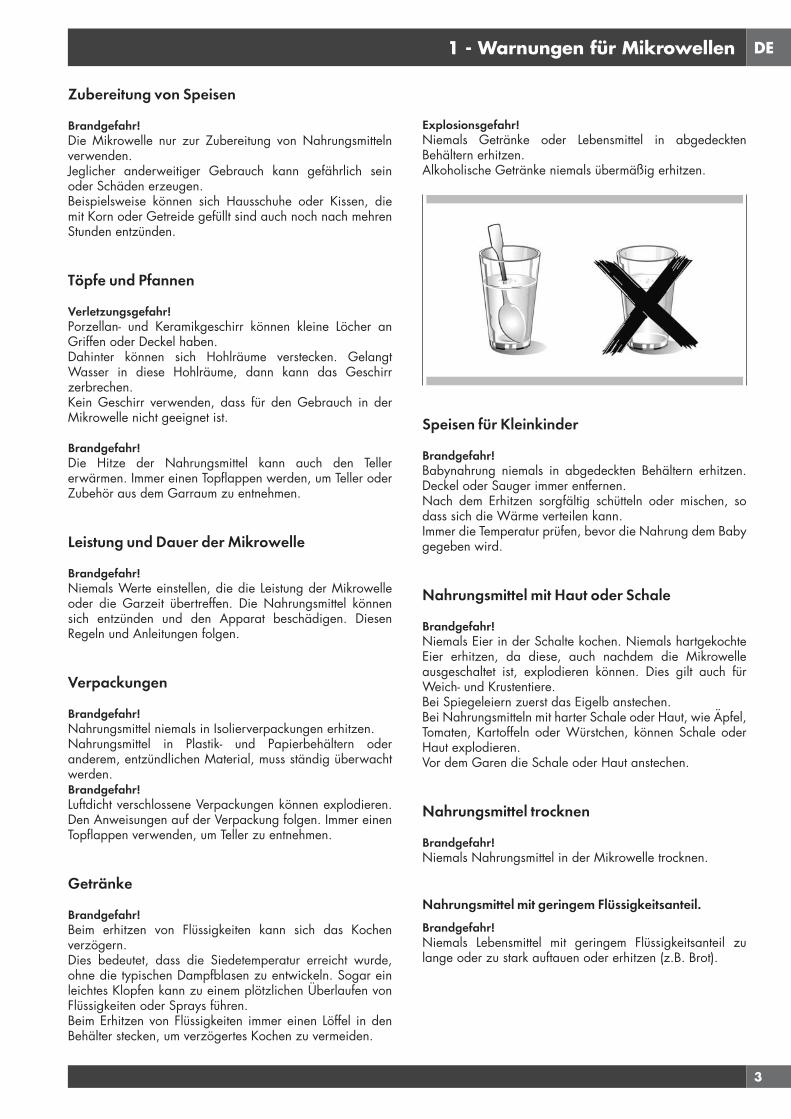
DE
3
1 - Warnungen für Mikrowellen
Zubereitung von Speisen
Brandgefahr!Die Mikrowelle nur zur Zubereitung von Nahrungsmitteln verwenden.Jeglicher anderweitiger Gebrauch kann gefährlich sein oder Schäden erzeugen.Beispielsweise können sich Hausschuhe oder Kissen, die mit Korn oder Getreide gefüllt sind auch noch nach mehren Stunden entzünden.
Töpfe und Pfannen
Verletzungsgefahr!Porzellan- und Keramikgeschirr können kleine Löcher an Griffen oder Deckel haben.Dahinter können sich Hohlräume verstecken. Gelangt Wasser in diese Hohlräume, dann kann das Geschirr zerbrechen.Kein Geschirr verwenden, dass für den Gebrauch in der Mikrowelle nicht geeignet ist.
Brandgefahr!Die Hitze der Nahrungsmittel kann auch den Teller erwärmen. Immer einen Topflappen werden, um Teller oder Zubehör aus dem Garraum zu entnehmen.
Leistung und Dauer der Mikrowelle
Brandgefahr!Niemals Werte einstellen, die die Leistung der Mikrowelle oder die Garzeit übertreffen. Die Nahrungsmittel können sich entzünden und den Apparat beschädigen. Diesen Regeln und Anleitungen folgen.
Verpackungen
Brandgefahr!Nahrungsmittel niemals in Isolierverpackungen erhitzen.Nahrungsmittel in Plastik- und Papierbehältern oder anderem, entzündlichen Material, muss ständig überwacht werden.Brandgefahr!Luftdicht verschlossene Verpackungen können explodieren. Den Anweisungen auf der Verpackung folgen. Immer einen Topflappen verwenden, um Teller zu entnehmen.
Getränke
Brandgefahr!Beim erhitzen von Flüssigkeiten kann sich das Kochen verzögern.Dies bedeutet, dass die Siedetemperatur erreicht wurde, ohne die typischen Dampfblasen zu entwickeln. Sogar ein leichtes Klopfen kann zu einem plötzlichen Überlaufen von Flüssigkeiten oder Sprays führen.Beim Erhitzen von Flüssigkeiten immer einen Löffel in den Behälter stecken, um verzögertes Kochen zu vermeiden.
Explosionsgefahr! Niemals Getränke oder Lebensmittel in abgedeckten Behältern erhitzen.Alkoholische Getränke niemals übermäßig erhitzen.
Speisen für Kleinkinder
Brandgefahr!Babynahrung niemals in abgedeckten Behältern erhitzen. Deckel oder Sauger immer entfernen.Nach dem Erhitzen sorgfältig schütteln oder mischen, so dass sich die Wärme verteilen kann.Immer die Temperatur prüfen, bevor die Nahrung dem Baby gegeben wird.
Nahrungsmittel mit Haut oder Schale
Brandgefahr!Niemals Eier in der Schalte kochen. Niemals hartgekochte Eier erhitzen, da diese, auch nachdem die Mikrowelle ausgeschaltet ist, explodieren können. Dies gilt auch für Weich- und Krustentiere.Bei Spiegeleiern zuerst das Eigelb anstechen.Bei Nahrungsmitteln mit harter Schale oder Haut, wie Äpfel, Tomaten, Kartoffeln oder Würstchen, können Schale oder Haut explodieren.Vor dem Garen die Schale oder Haut anstechen.
Nahrungsmittel trocknen
Brandgefahr!Niemals Nahrungsmittel in der Mikrowelle trocknen.
Nahrungsmittel mit geringem Flüssigkeitsanteil.Brandgefahr!Niemals Lebensmittel mit geringem Flüssigkeitsanteil zu lange oder zu stark auftauen oder erhitzen (z.B. Brot).
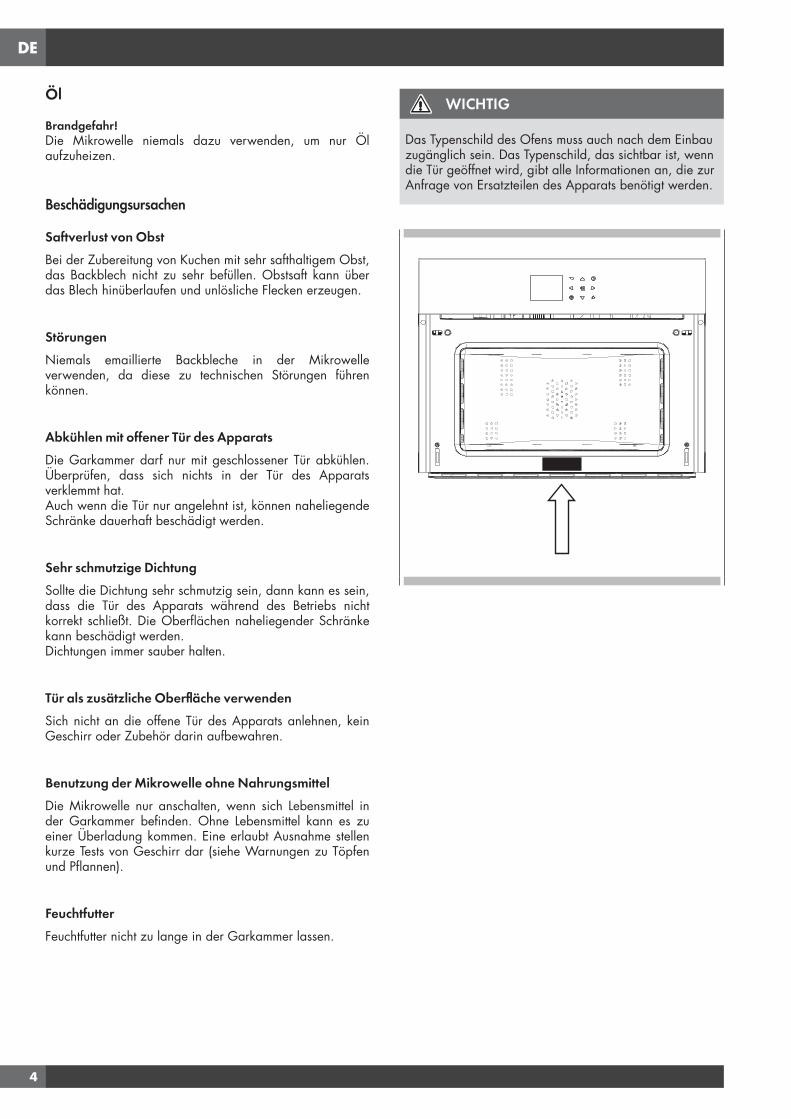
DE
4
Öl
Brandgefahr!Die Mikrowelle niemals dazu verwenden, um nur Öl aufzuheizen.
Beschädigungsursachen
Saftverlust von ObstBei der Zubereitung von Kuchen mit sehr safthaltigem Obst, das Backblech nicht zu sehr befüllen. Obstsaft kann über das Blech hinüberlaufen und unlösliche Flecken erzeugen.
StörungenNiemals emaillierte Backbleche in der Mikrowelle verwenden, da diese zu technischen Störungen führen können.
Abkühlen mit offener Tür des ApparatsDie Garkammer darf nur mit geschlossener Tür abkühlen. Überprüfen, dass sich nichts in der Tür des Apparats verklemmt hat.Auch wenn die Tür nur angelehnt ist, können naheliegende Schränke dauerhaft beschädigt werden.
Sehr schmutzige DichtungSollte die Dichtung sehr schmutzig sein, dann kann es sein, dass die Tür des Apparats während des Betriebs nicht korrekt schließt. Die Oberflächen naheliegender Schränke kann beschädigt werden.Dichtungen immer sauber halten.
Tür als zusätzliche Oberfläche verwendenSich nicht an die offene Tür des Apparats anlehnen, kein Geschirr oder Zubehör darin aufbewahren.
Benutzung der Mikrowelle ohne NahrungsmittelDie Mikrowelle nur anschalten, wenn sich Lebensmittel in der Garkammer befinden. Ohne Lebensmittel kann es zu einer Überladung kommen. Eine erlaubt Ausnahme stellen kurze Tests von Geschirr dar (siehe Warnungen zu Töpfen und Pflannen).
FeuchtfutterFeuchtfutter nicht zu lange in der Garkammer lassen.
WICHTIG
Das Typenschild des Ofens muss auch nach dem Einbau zugänglich sein. Das Typenschild, das sichtbar ist, wenn die Tür geöffnet wird, gibt alle Informationen an, die zur Anfrage von Ersatzteilen des Apparats benötigt werden.
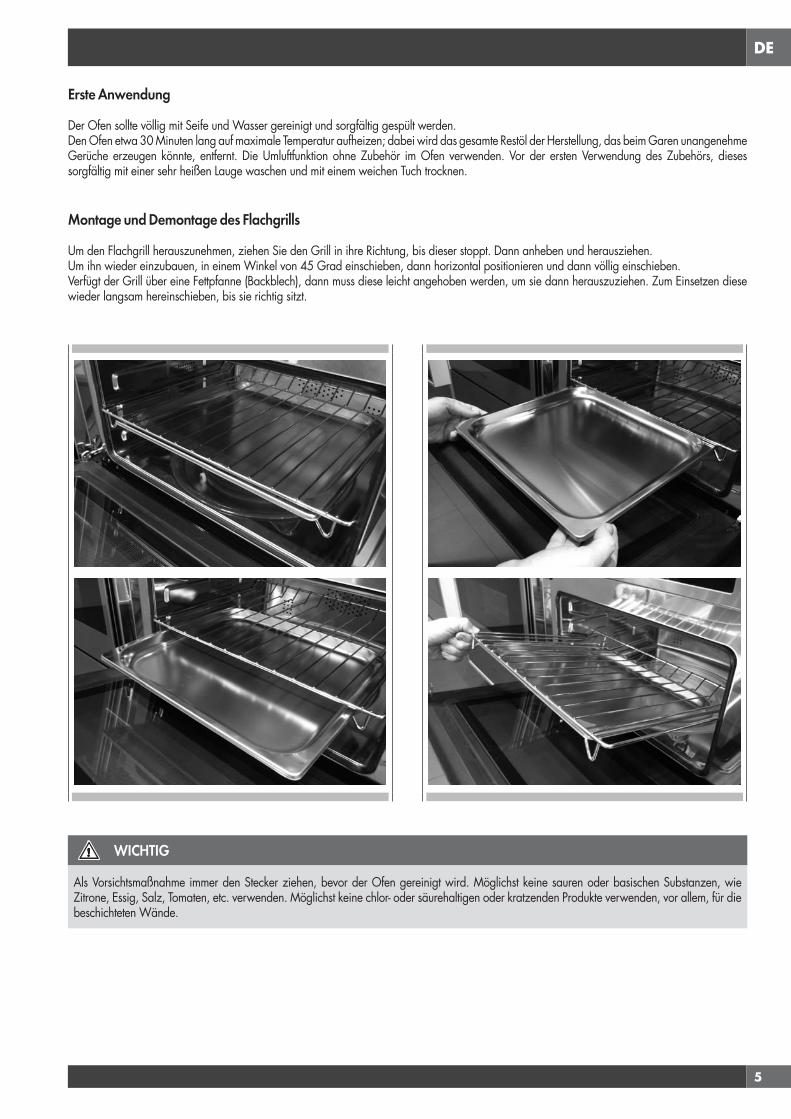
DE
5
WICHTIG
Als Vorsichtsmaßnahme immer den Stecker ziehen, bevor der Ofen gereinigt wird. Möglichst keine sauren oder basischen Substanzen, wie Zitrone, Essig, Salz, Tomaten, etc. verwenden. Möglichst keine chlor- oder säurehaltigen oder kratzenden Produkte verwenden, vor allem, für die beschichteten Wände.
Erste Anwendung
Der Ofen sollte völlig mit Seife und Wasser gereinigt und sorgfältig gespült werden.Den Ofen etwa 30 Minuten lang auf maximale Temperatur aufheizen; dabei wird das gesamte Restöl der Herstellung, das beim Garen unangenehme Gerüche erzeugen könnte, entfernt. Die Umluftfunktion ohne Zubehör im Ofen verwenden. Vor der ersten Verwendung des Zubehörs, dieses sorgfältig mit einer sehr heißen Lauge waschen und mit einem weichen Tuch trocknen.
Montage und Demontage des Flachgrills
Um den Flachgrill herauszunehmen, ziehen Sie den Grill in ihre Richtung, bis dieser stoppt. Dann anheben und herausziehen.Um ihn wieder einzubauen, in einem Winkel von 45 Grad einschieben, dann horizontal positionieren und dann völlig einschieben.Verfügt der Grill über eine Fettpfanne (Backblech), dann muss diese leicht angehoben werden, um sie dann herauszuziehen. Zum Einsetzen diese wieder langsam hereinschieben, bis sie richtig sitzt.
DE
6
Umweltverträglichkeit
Zum Schutz der Umwelt wurde für die Unterlagen zu diesem Geräts chlorfrei gebleichtes Papier oder Recyclingpapier verwendet. Die Verpackung wurde aus umweltfreundlichen Produkten hergestellt und kann daher wieder verwendet oder recycelt werden.Das Recyceln der Verpackung trägt zur Einsparung von Rohstoffen und zu einer Reduzierung der Industrie- und Haushaltsmüllmengen bei.
DAS VERPACKUNGSMATERIAL ist 100% recycelbar und mit dem Recyclingsymbol versehen. Für die Entsorgung die örtlichen Auflagen befolgen. Das Verpackungsmaterial (Plastiktüten, Polystyrolteile usw.) muss außerhalb der Reichweite von Kindern aufbewahrt werden, da es sich um potentielle Gefahrenquellen handelt.
DIESES GERÄT stimmt mit der EU-Richtlinie 2002/96/UE, Waste Electrical and Electronic Equipment (WEEE, über Elektro- und Elektronik-Altgeräte) überein und ist dementsprechend markiert. Wenn der Anwender sicherstellt, dass das Produkt sachgerecht entsorgt wird, trägt er dazu bei, den negativen Umwirkungen auf Umwelt und Gesundheit vorzubeugen.
DAS SYMBOL am Produkt oder in den beiliegenden Unterlagen zeigt an, dass dieses nichtals Haushaltsmüll entsorgt werden darf, sondern zu einer Recyclingsammelstelle für elektrische undelektronische Apparate gebracht werden muss.
DIE ENTSORGUNG MUSS in Übereinstimmung mit der örtlichen Gesetzgebung zur Müllentsorgung GESCHEHEN.
Für ZUSÄTZLICHE INFORMATIONEN über Entsorgung und Recycling dieses Produkts, setzten Sie sich bitte mit dem örtlich zuständigem Amt, der Müllentsorgungsstelle oder dem Geschäft, in dem Sie das Produkt gekauft haben, in Verbindung.
Machen Sie den Apparat vor dem ABWACKEN unverwendbar, in dem Sie das Stromkabel durchschneiden.

DE
7
2 - Das Bedienfeld
Tastenfeld
Die Tasten sanft drücken. Das Tastenfeld funktioniert nicht, wenn mehr als eine Taste gleichzeitig gedrückt wird.
Bewegungspfeile
Zurück zur vorherigen Seite. Gedrückt halten, um wieder auf die Homepage zu kommen
Schaltet den Ofen ein und aus.
Bestätigt die Einstellungen und startet den Garvorgang. Falls beim Garen gedrückt, dann wird die Funktion in Pause gesetzt. Zum erneuten Start nochmals drücken.
Zum Einstellen des Timers.Eingabe der Menüfunktionen beim Garen.
Schaltet die Ofenbeleuchtung ein und aus.
Ihr Apparat kann sich leicht von der unten aufgeführten Abbildung unterscheiden.
A - Tastenfeld
B - Bildschirm
PM
FRIDAY 11/20/2015
04:26
B A

DE
8
3 - Allgemeine Informationen über den Ofen
Fehlercodes
Dieser Code erscheint, falls die elektronische Steuerung einen Fehler feststellt. Erscheint der Fehler, dann wird die derzeitige Funktion blockiert. Bezieht sich die Fehlermeldung auf eine Sicherheitsfunktion, dann kann der Ofen nicht mehr benutzt werden und bei jedem Startversuch wird der gleiche Fehler angezeigt (Kundendienst anrufen). Bezieht sich der Fehler auf ein geringeres Problem, dann kann der Ofen bis auf die Funktion, bei der die Fehlermeldung erscheint (z.B. Heizlelement) weiterhin benutzt werden.
Piepstöne
Bestätigen, dass das Kommando nach dem Drücken der Taste, empfangen wurde.Sie zeigen auch an, dass eine Zeitfunktion beendet wurde (z.B. Timer oder zeitgesteuertes Garen). Beim Ausführen eines Rezepts, zeigt ein akustisches Signal an, dass der Ofen auf einen Eingriff durch den Bediener wartet (z.B. einen Teller hineinstellen oder etwas umdrehen).Piepstöne weisen auch auf einen Fehler des Ofens hin.
Standardeinstellungen
Die Garweise wählt automatisch eine geeignete Temperatur aus, wenn die Garweise gewählt wurde. Diese kann verändert werden, falls eine andere Art benötigt wird.
F Fehlercodes
Diese Codes werden angezeigt, wenn die elektronische Steuerung ein Problem am Ofen oder an der Elektronik findet.Der Fehlercode wird im Fehlerprotokoll im Setup-Menü aufgezeichnet. Dieser Fehler kann dem Techniker des Kundendienstes mitgeteilt werden, so dass er/sie die mögliche Ursache des Problems im voraus verstehen kann.
Vorheizen
Beim Einstellen einer Garfunktion und beim Heizen des Ofens startet das Vorheizen und die augenblickliche Temperatur wird gemeinsam mit der Temperaturikone angezeigt.Sobald 100% erreicht sind, erklingt ein Ton "Vorheizen zu Ende" und die Anzeige der derzeitigen Temperatur verschwindet.
Timer
WARNUNG
Der Timer an Ihrem Ofen schaltet den Apparat weder ein noch aus, sein einziger Zweck ist es, Sie durch den Summer auf etwas aufmerksam zu machen. Möchten Sie den Ofen automatisch abschalten, dann wählen Sie bitte die Funktion "Garen zu Ende" oder die verzögerte Garkfunktion.
HINWEIS: Wird die OFF-Taste gedrückt, dann wird der Timer aber nicht zurückgesetzt oder gestoppt.
1. Taste drücken und die gewünschte Uhrzeit mithilfe der Pfeile einstellen und mit der Taste bestätigen. Um zwischen
Stunden und Minuten zu wechseln, benutzen Sie die Pfeile .
2. Die Uhrzeit kann von 1 Minute bis 12 Stunden und 59 Minuten eingestellt werden und ist diese eingestellt, dann wird die verbleibende Zeit immer auf der unteren Statusleiste angezeigt, bis die Zeit abgelaufen ist oder zurückgesetzt wird.
3. Um die Zeiteinstellung zu verändern oder zu annullieren, muss die Taste einige Sekunden lang gedrückt gehalten werden.
4. Das Format des Timer ist normalerweise STD:MIN und geht in der letzten Minute auf MIN:SEK über.
5. Ist die Zeit abgelaufen, dann wird 00:00 angezeigt und der Summer wird eine Minute lang ertönen, bis die Taste gedrückt wird.
Vor der ersten Inbetriebnahme des Ofens, das gesamte Verpackungs- und Fremdmaterial vom Ofen/von den Öfen entfernen. Solches Material kann, falls es im Ofen verbleibt, schmelzen oder sich entzünden

DE
9
4 - Allgemeine Tipps zum Ofen
Den Ofen vorheizen
• Durch die Auswahl einer höheren Temperatur verkürzt sich die Vorheizzeit nicht.
• Vorheizen ist notwendig, um ein besseres Ergebnis beim Backen von Kuchen, Keksen, Gebäck und Brot zu erzielen.
• Vorheizen hilft beim Anbraten und Fleischsäfte zu versiegeln.• Vor dem Vorheizen die Gitterroste in die richtige Position bringen.• Beim Vorheizen wird die gewählte Gartemperatur immer angezeigt.• Ein Piepston bestätigt, dass der Ofen vorgeheizt ist und die
"festgestellte Temperatur" erlöscht.
Bedienungshinweise
• Keine Pfannen auf der offenen Ofentür abstellen.• Die Innenbeleuchtung des Ofens dazu verwenden, um Speisen
durch das Ofentürfenster zu betrachten anstatt die Tür öfters zu öffnen.
Umgang mit Mikrowellen
Mikrowellen werden in den Speisen in Wärme umgewandelt. Die Mikrowelle kann allein oder in Kombinationanderen Heiztypen verwendet werden. Dieser Abschnitt enthält Informationen über Geschirr und Anleitungen zu den Einstellungender Mikrowelle.
HINWEISE ZUM GESCHIRR
Geeignetes GeschirrSie können hitzebeständiges Geschirr aus Glas, Glaskeramik, Porzellan, Keramik oder feuerfestes Plastik verwenden. Diese Materialien sind für die Mikrowellen durchlässig. Es können auch normale Teller verwendet werden. Dadurch können die Speisen direkt auf dem Teller bleiben.Geschirr mit Gold- oder Silberverzierungen können nur verwendet werden, wenn der Hersteller garantiert, dass diese für Mikrowellenherde geeignet sind.Denken Sie daran, dass die Schale sich auf dem Drehteller befinden muss, wenn die Mikrowelle benutzt wird.Wird der Ofen in Kombiweise verwendet, dann ist es von Vorteil, die Schale auf dem niedrigen Rundgrill zu stellen, so dass diese auf dem Drehteller zentriert ist.
Ungeeignetes GeschirrMetallgeschirr darf nicht verwendet werden.Metall lässt keine Mikrowellen durch. Speisen in Metallbehälter bleiben kalt.Warnung! Metallteile, wie beispielsweise Löffel in Gläsern, müssen mindestens 2 cm von den Ofenwänden und der Innenseite der Tür entfernt sein. Funken können die Innenseite der Glastür schwer beschädigen.Warnung! Der Flachgrill muss bei der Nutzung der Mikrowelle und der Nutzung in Kombination herausgenommen werden. Benutzen Sie diesen nur mit klassischen Ofenfunktionen.
Geschirrtest Die Mikrowelle niemals ohne Speisen einschalten.Die einzige Ausnahme ist der Geschirrtest.Falls Sie nicht sicher sind, ob ihr Geschirr in der Mikrowelle benutzt werden kann, dannempfehlen wir, folgenden Test durchzuführen:Stellen Sie einen leeren Topf ½ - 1 Minute bei maximaler Leistung in den Apparat. Prüfen Sie die Temperatur. Der Topf muss kalt oder leicht warm sein. Ist erheiß oder entstehen Funken, dann ist er nicht geeignet.
Ofenkondensation und -temperatur
• Es ist normal, dass eine gewisse Feuchtigkeit aus den Speisen beim Garen austritt. Die Menge hängt von der in der Speise enthaltenen Feuchtigkeit ab. Die Feuchtigkeit kann auf jeder Oberfläche, die kühler als die Innenseite des Ofens ist, beispielsweise am Bedienfeld, kondensieren.
• Ihr neuer Ofen verfügt über einen elektronischen Temperatursensor, mit dem die genaue Temperatur eingehalten werden kann.
Kochen in großer Höhe
• Falls Sie in einer großen Höhenlage kochen, dann weichen Rezepte und Garzeiten vom Standard ab.
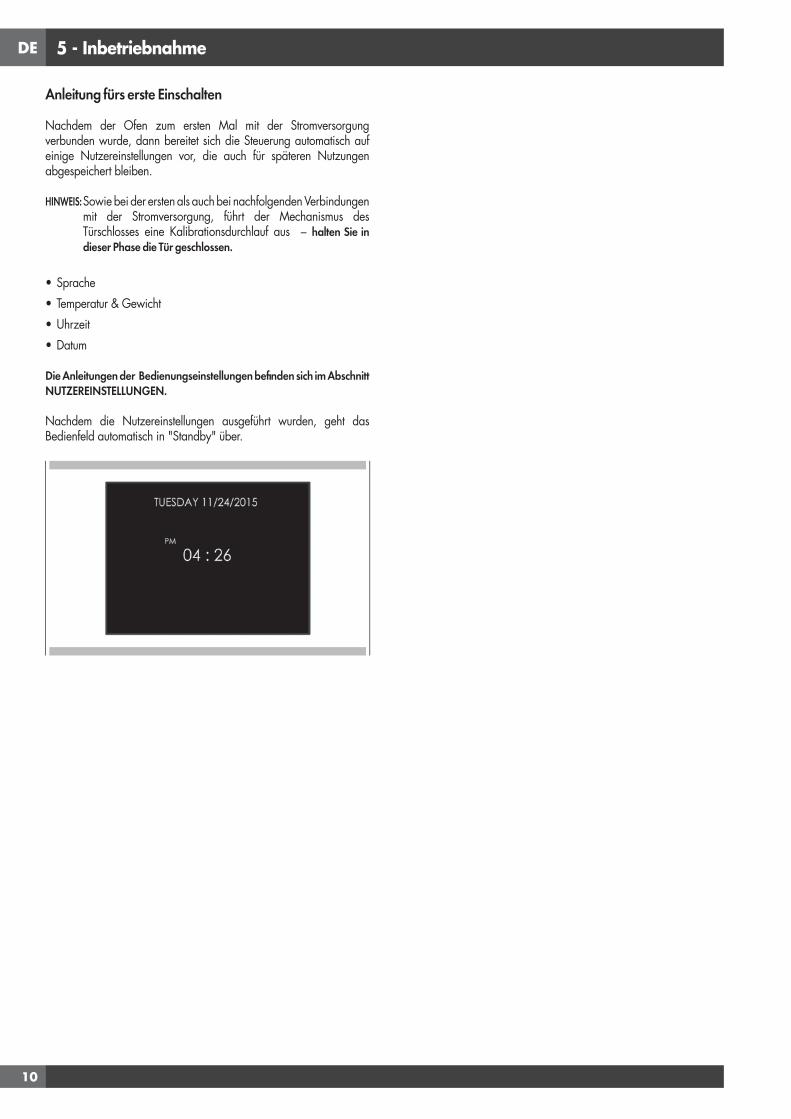
DE
10
5 - Inbetriebnahme
Anleitung fürs erste Einschalten
Nachdem der Ofen zum ersten Mal mit der Stromversorgung verbunden wurde, dann bereitet sich die Steuerung automatisch auf einige Nutzereinstellungen vor, die auch für späteren Nutzungen abgespeichert bleiben.
HINWEIS: Sowie bei der ersten als auch bei nachfolgenden Verbindungen mit der Stromversorgung, führt der Mechanismus des Türschlosses eine Kalibrationsdurchlauf aus – halten Sie in dieser Phase die Tür geschlossen.
• Sprache• Temperatur & Gewicht• Uhrzeit• Datum
Die Anleitungen der Bedienungseinstellungen befinden sich im Abschnitt NUTZEREINSTELLUNGEN.
Nachdem die Nutzereinstellungen ausgeführt wurden, geht das Bedienfeld automatisch in "Standby" über.
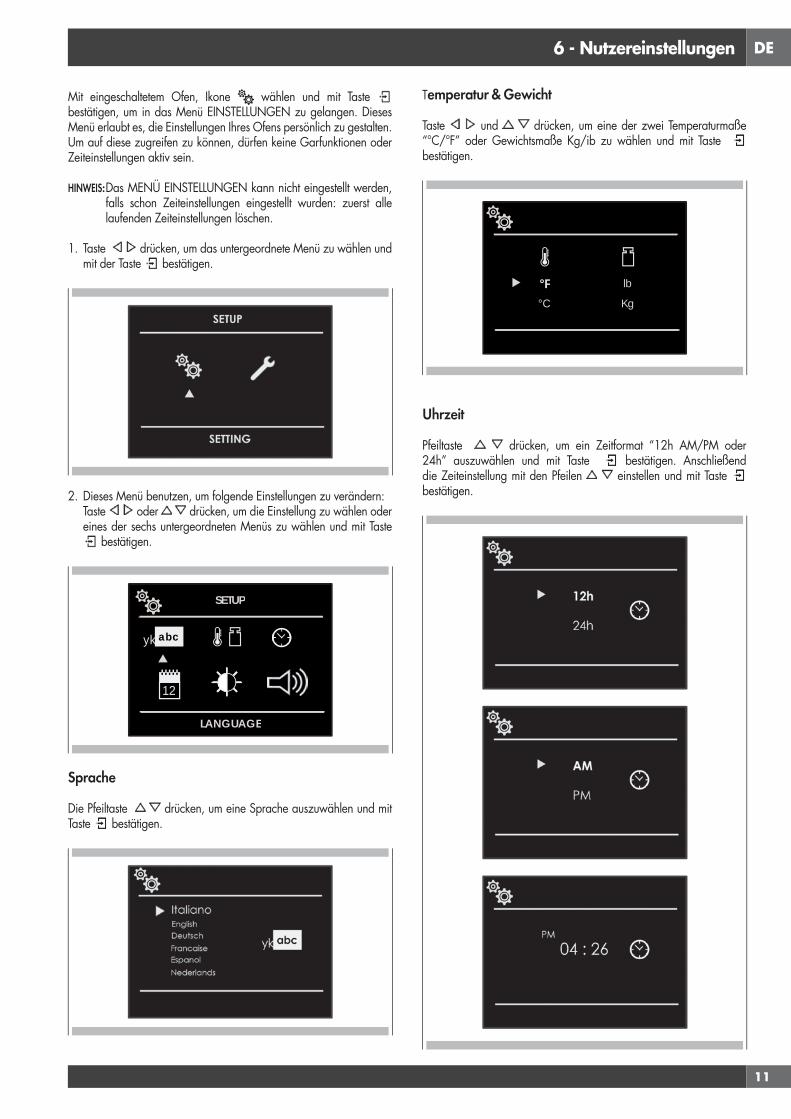
DE
11
6 - Nutzereinstellungen
Mit eingeschaltetem Ofen, Ikone wählen und mit Taste bestätigen, um in das Menü EINSTELLUNGEN zu gelangen. Dieses Menü erlaubt es, die Einstellungen Ihres Ofens persönlich zu gestalten. Um auf diese zugreifen zu können, dürfen keine Garfunktionen oder Zeiteinstellungen aktiv sein.
HINWEIS: Das MENÜ EINSTELLUNGEN kann nicht eingestellt werden, falls schon Zeiteinstellungen eingestellt wurden: zuerst alle laufenden Zeiteinstellungen löschen.
1. Taste drücken, um das untergeordnete Menü zu wählen und mit der Taste bestätigen.
2. Dieses Menü benutzen, um folgende Einstellungen zu verändern: Taste oder drücken, um die Einstellung zu wählen oder
eines der sechs untergeordneten Menüs zu wählen und mit Taste bestätigen.
12
yk abc
SETUP
LANGUAGE
Sprache
Die Pfeiltaste drücken, um eine Sprache auszuwählen und mit Taste bestätigen.
Temperatur & Gewicht
Taste und drücken, um eine der zwei Temperaturmaße “°C/°F” oder Gewichtsmaße Kg/ib zu wählen und mit Taste bestätigen.
°F°C
lb
Kg
Uhrzeit
Pfeiltaste drücken, um ein Zeitformat “12h AM/PM oder 24h” auszuwählen und mit Taste bestätigen. Anschließend die Zeiteinstellung mit den Pfeilen einstellen und mit Taste bestätigen.

DE
12
Datum
Pfeiltaste drücken, um das Datum unter den Formaten “T.M.J. – J.M.T. – M.T.J.” auszuwählen und mit der Taste bestätigen. Anschließend den Wert mit den Pfeilen einstellen und mit Taste
bestätigen.
Hellligkeit
Pfeiltaste drücken, um die Helligkeiteinstellung zwischen AN oder STANDBY auszuwählen, dann mit den Pfeilen den gewünschten Helligkeitsgrad auswählen und mit Taste bestätigen.
Stärke der Helligkeit
Pfeiltaste drücken, um die Stärke der Helligkeit auszuwählen und mit Taste bestätigen.
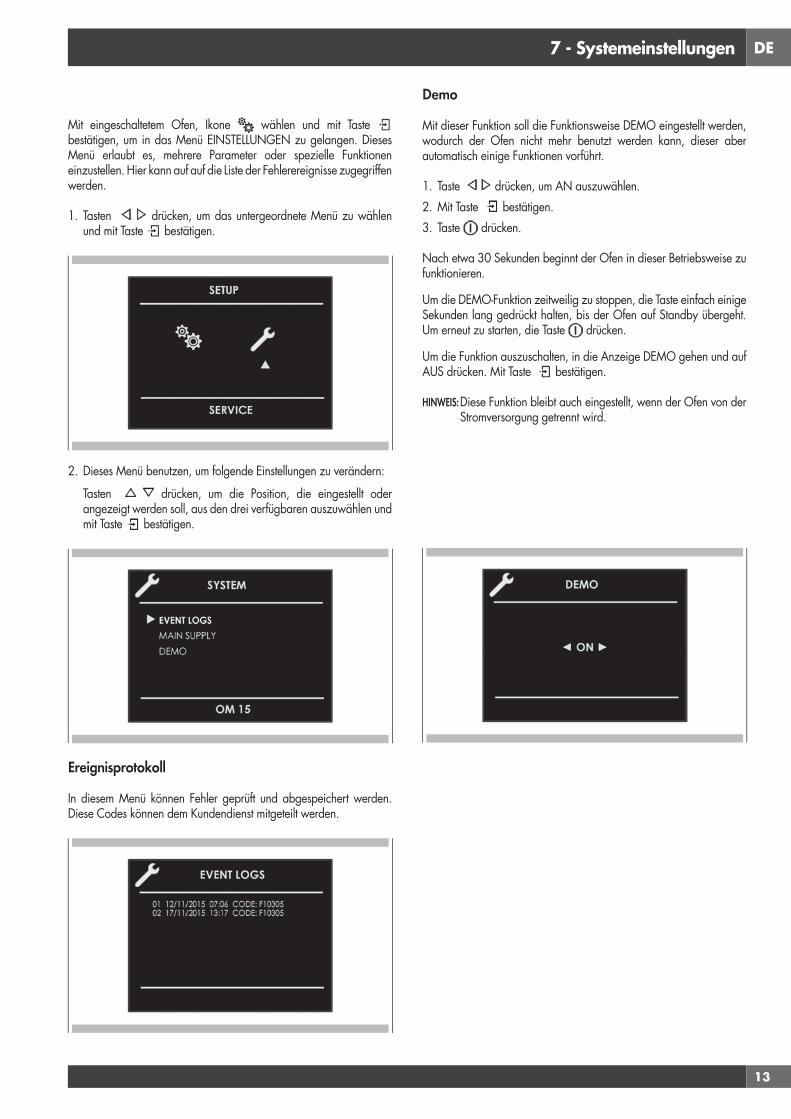
DE
13
7 - Systemeinstellungen
Mit eingeschaltetem Ofen, Ikone wählen und mit Taste bestätigen, um in das Menü EINSTELLUNGEN zu gelangen. Dieses Menü erlaubt es, mehrere Parameter oder spezielle Funktionen einzustellen. Hier kann auf auf die Liste der Fehlerereignisse zugegriffen werden.
1. Tasten drücken, um das untergeordnete Menü zu wählen und mit Taste bestätigen.
2. Dieses Menü benutzen, um folgende Einstellungen zu verändern:
Tasten drücken, um die Position, die eingestellt oder angezeigt werden soll, aus den drei verfügbaren auszuwählen und mit Taste bestätigen.
Ereignisprotokoll
In diesem Menü können Fehler geprüft und abgespeichert werden. Diese Codes können dem Kundendienst mitgeteilt werden.
Demo
Mit dieser Funktion soll die Funktionsweise DEMO eingestellt werden, wodurch der Ofen nicht mehr benutzt werden kann, dieser aber automatisch einige Funktionen vorführt.
1. Taste drücken, um AN auszuwählen. 2. Mit Taste bestätigen.3. Taste drücken.
Nach etwa 30 Sekunden beginnt der Ofen in dieser Betriebsweise zu funktionieren.
Um die DEMO-Funktion zeitweilig zu stoppen, die Taste einfach einige Sekunden lang gedrückt halten, bis der Ofen auf Standby übergeht. Um erneut zu starten, die Taste drücken.
Um die Funktion auszuschalten, in die Anzeige DEMO gehen und auf AUS drücken. Mit Taste bestätigen.
HINWEIS: Diese Funktion bleibt auch eingestellt, wenn der Ofen von der Stromversorgung getrennt wird.
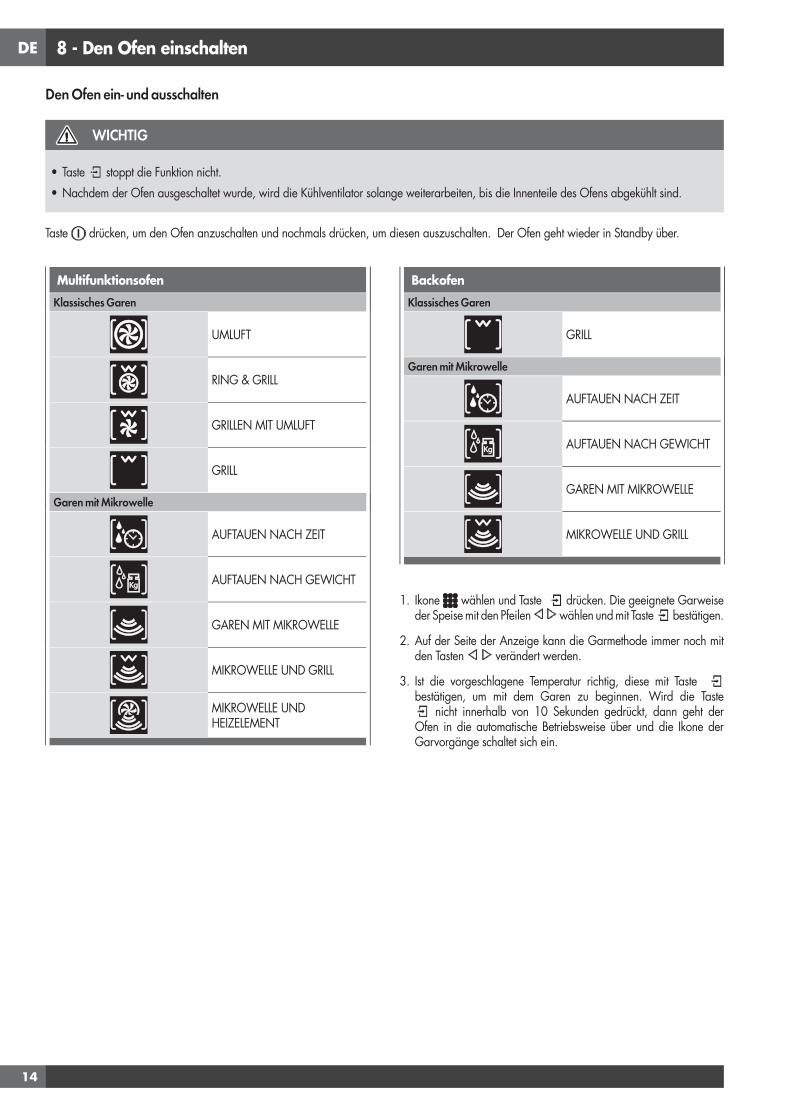
DE
14
8 - Den Ofen einschalten
Multifunktionsofen
Klassisches Garen
UMLUFT
RING & GRILL
GRILLEN MIT UMLUFT
GRILL
Garen mit Mikrowelle
AUFTAUEN NACH ZEIT
AUFTAUEN NACH GEWICHT
GAREN MIT MIKROWELLE
MIKROWELLE UND GRILL
MIKROWELLE UND HEIZELEMENT
Backofen
Klassisches Garen
GRILL
Garen mit Mikrowelle
AUFTAUEN NACH ZEIT
AUFTAUEN NACH GEWICHT
GAREN MIT MIKROWELLE
MIKROWELLE UND GRILL
1. Ikone wählen und Taste drücken. Die geeignete Garweise der Speise mit den Pfeilen wählen und mit Taste bestätigen.
2. Auf der Seite der Anzeige kann die Garmethode immer noch mit den Tasten verändert werden.
3. Ist die vorgeschlagene Temperatur richtig, diese mit Taste bestätigen, um mit dem Garen zu beginnen. Wird die Taste
nicht innerhalb von 10 Sekunden gedrückt, dann geht der Ofen in die automatische Betriebsweise über und die Ikone der Garvorgänge schaltet sich ein.
Den Ofen ein- und ausschalten
WICHTIG
• Taste stoppt die Funktion nicht.• Nachdem der Ofen ausgeschaltet wurde, wird die Kühlventilator solange weiterarbeiten, bis die Innenteile des Ofens abgekühlt sind.
Taste drücken, um den Ofen anzuschalten und nochmals drücken, um diesen auszuschalten. Der Ofen geht wieder in Standby über.
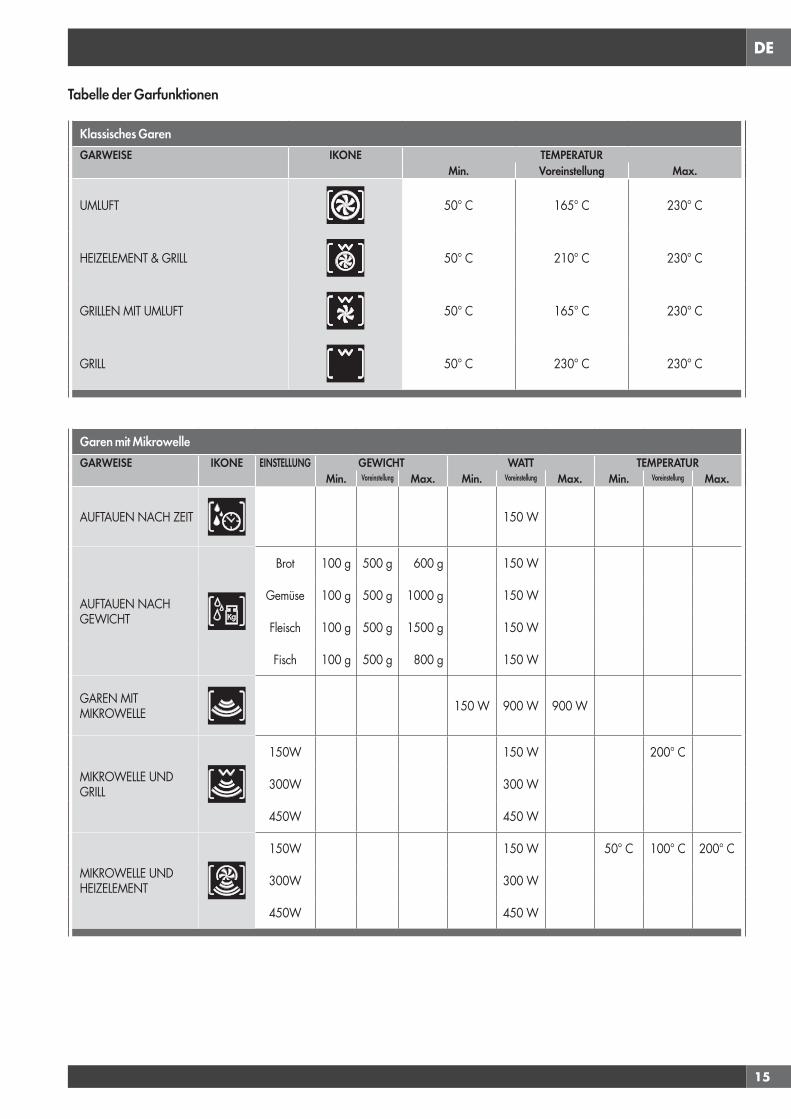
DE
15
Tabelle der Garfunktionen
Klassisches GarenGARWEISE IKONE TEMPERATUR
Min. Voreinstellung Max.
UMLUFT 50° C 165° C 230° C
HEIZELEMENT & GRILL 50° C 210° C 230° C
GRILLEN MIT UMLUFT 50° C 165° C 230° C
GRILL 50° C 230° C 230° C
Garen mit MikrowelleGARWEISE IKONE EINSTELLUNG GEWICHT WATT TEMPERATUR
Min. Voreinstellung Max. Min. Voreinstellung Max. Min. Voreinstellung Max.
AUFTAUEN NACH ZEIT 150 W
AUFTAUEN NACH GEWICHT
Brot 100 g 500 g 600 g 150 W
Gemüse 100 g 500 g 1000 g 150 W
Fleisch 100 g 500 g 1500 g 150 W
Fisch 100 g 500 g 800 g 150 W
GAREN MIT MIKROWELLE 150 W 900 W 900 W
MIKROWELLE UND GRILL
150W 150 W 200° C
300W 300 W
450W 450 W
MIKROWELLE UND HEIZELEMENT
150W 150 W 50° C 100° C 200° C
300W 300 W
450W 450 W

DE
16
9 - Klassisches Garen
Garfunktion verändern
1. Beim Garen ohne Zeiteinstellung kann eine Pause mit Taste vorgenommen werden.
Alle Einstellungen des unterbrochenen Garvorgangs bleiben abgespeichert und können wieder gestartet werden, in dem die Taste erneut gedrückt wird.
2. Soll die Garweise verändert werden während der Ofen läuft, Taste drücken und dann Taste .
Jetzt kann eine andere Garweise aus den verfügbaren Funktionen mithilfe der Pfeile ausgewählt werden.
Temperatur verändern
WICHTIG
• Nach einer Funktion wird am Bildschirm die Temperatur der restlichen Hitze des Innenraums auf der Standby-Seite angezeigt.
1. Auf der Anzeigeseite der Garmethoden kann die Temperatur mithilfe der Pfeile verändert und dann mit der Taste bestätigt werden.
2. Nachdem der Garvorgang begonnen hat, kann die Temperatur immer und zu welchem Zeitpunkt auch immer mithilfe der Pfeile
verändert werden.
Vorheizen
Befindet sich der Ofen in der Vorheizphase, dann wird die derzeitige Temperatur unter der Ikone der Garmethode angezeigt.
Sobald die Temperatur erreicht ist, erklingt ein akustisches Signal und die Temperaturanzeige verschwindet.
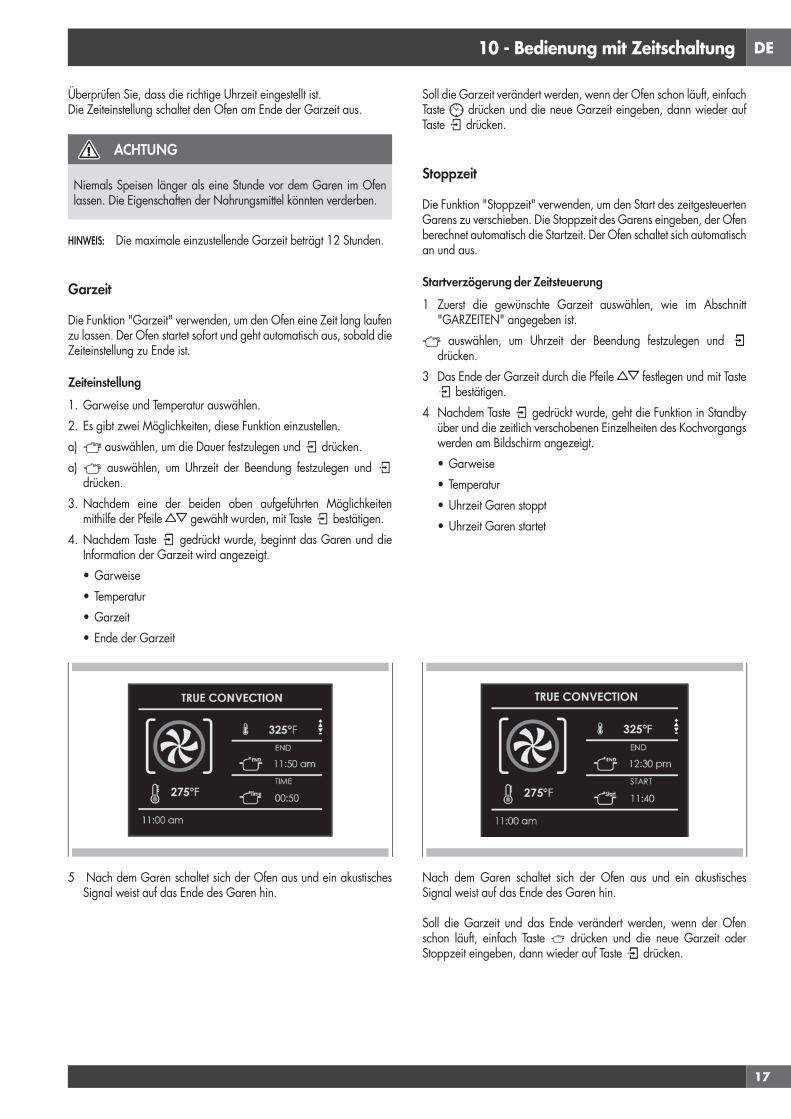
DE
17
10 - Bedienung mit Zeitschaltung
Überprüfen Sie, dass die richtige Uhrzeit eingestellt ist.Die Zeiteinstellung schaltet den Ofen am Ende der Garzeit aus.
ACHTUNG
Niemals Speisen länger als eine Stunde vor dem Garen im Ofen lassen. Die Eigenschaften der Nahrungsmittel könnten verderben.
HINWEIS: Die maximale einzustellende Garzeit beträgt 12 Stunden.
Garzeit
Die Funktion "Garzeit" verwenden, um den Ofen eine Zeit lang laufen zu lassen. Der Ofen startet sofort und geht automatisch aus, sobald die Zeiteinstellung zu Ende ist.
Zeiteinstellung1. Garweise und Temperatur auswählen.2. Es gibt zwei Möglichkeiten, diese Funktion einzustellen.a) auswählen, um die Dauer festzulegen und drücken.a) auswählen, um Uhrzeit der Beendung festzulegen und
drücken.3. Nachdem eine der beiden oben aufgeführten Möglichkeiten
mithilfe der Pfeile gewählt wurden, mit Taste bestätigen.4. Nachdem Taste gedrückt wurde, beginnt das Garen und die
Information der Garzeit wird angezeigt.• Garweise • Temperatur• Garzeit • Ende der Garzeit
5 Nach dem Garen schaltet sich der Ofen aus und ein akustisches Signal weist auf das Ende des Garen hin.
Soll die Garzeit verändert werden, wenn der Ofen schon läuft, einfach Taste drücken und die neue Garzeit eingeben, dann wieder auf Taste drücken.
Stoppzeit
Die Funktion "Stoppzeit" verwenden, um den Start des zeitgesteuerten Garens zu verschieben. Die Stoppzeit des Garens eingeben, der Ofen berechnet automatisch die Startzeit. Der Ofen schaltet sich automatisch an und aus.
Startverzögerung der Zeitsteuerung1 Zuerst die gewünschte Garzeit auswählen, wie im Abschnitt
"GARZEITEN" angegeben ist. auswählen, um Uhrzeit der Beendung festzulegen und drücken.
3 Das Ende der Garzeit durch die Pfeile festlegen und mit Taste bestätigen.
4 Nachdem Taste gedrückt wurde, geht die Funktion in Standby über und die zeitlich verschobenen Einzelheiten des Kochvorgangs werden am Bildschirm angezeigt.• Garweise• Temperatur• Uhrzeit Garen stoppt• Uhrzeit Garen startet
Nach dem Garen schaltet sich der Ofen aus und ein akustisches Signal weist auf das Ende des Garen hin.
Soll die Garzeit und das Ende verändert werden, wenn der Ofen schon läuft, einfach Taste drücken und die neue Garzeit oder Stoppzeit eingeben, dann wieder auf Taste drücken.
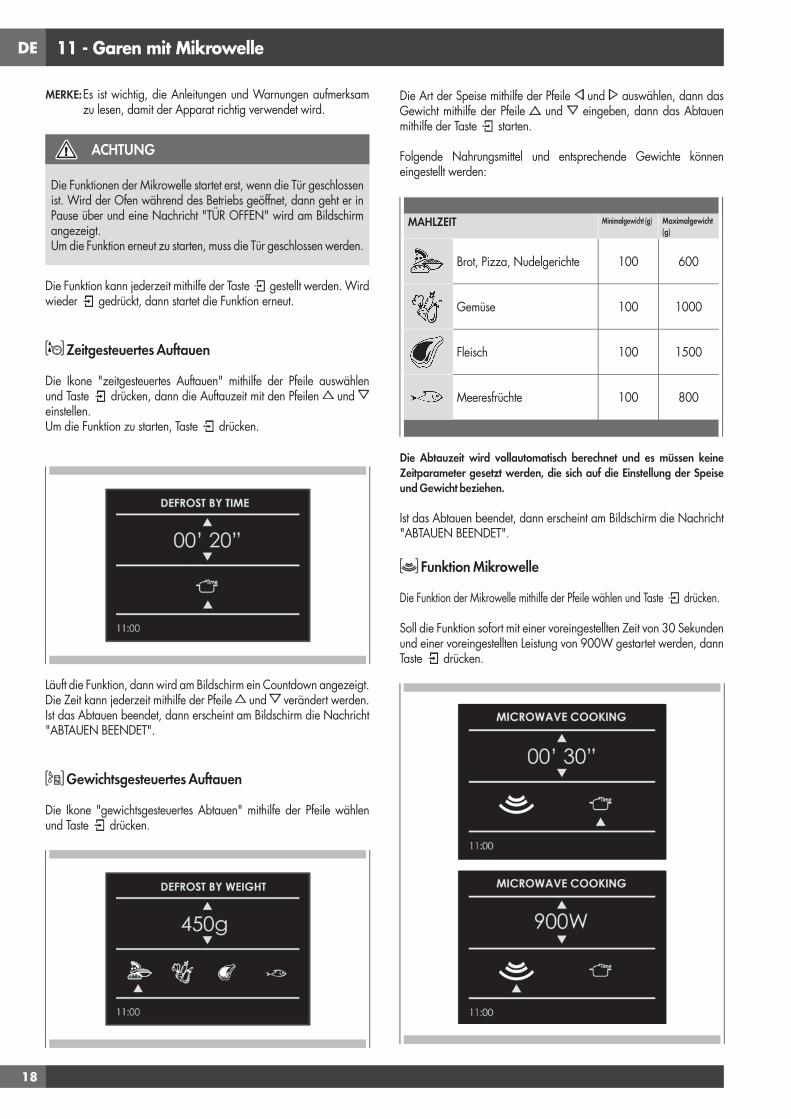
DE
18
11 - Garen mit Mikrowelle
MERKE: Es ist wichtig, die Anleitungen und Warnungen aufmerksam zu lesen, damit der Apparat richtig verwendet wird.
ACHTUNG
Die Funktionen der Mikrowelle startet erst, wenn die Tür geschlossen ist. Wird der Ofen während des Betriebs geöffnet, dann geht er in Pause über und eine Nachricht "TÜR OFFEN" wird am Bildschirm angezeigt.Um die Funktion erneut zu starten, muss die Tür geschlossen werden.
Die Funktion kann jederzeit mithilfe der Taste gestellt werden. Wird wieder gedrückt, dann startet die Funktion erneut.
Zeitgesteuertes Auftauen
Die Ikone "zeitgesteuertes Auftauen" mithilfe der Pfeile auswählen und Taste drücken, dann die Auftauzeit mit den Pfeilen und einstellen.Um die Funktion zu starten, Taste drücken.
Läuft die Funktion, dann wird am Bildschirm ein Countdown angezeigt. Die Zeit kann jederzeit mithilfe der Pfeile und verändert werden. Ist das Abtauen beendet, dann erscheint am Bildschirm die Nachricht "ABTAUEN BEENDET".
Gewichtsgesteuertes Auftauen
Die Ikone "gewichtsgesteuertes Abtauen" mithilfe der Pfeile wählen und Taste drücken.
Die Art der Speise mithilfe der Pfeile und auswählen, dann das Gewicht mithilfe der Pfeile und eingeben, dann das Abtauen mithilfe der Taste starten.
Folgende Nahrungsmittel und entsprechende Gewichte können eingestellt werden:
MAHLZEIT Minimalgewicht (g) Maximalgewicht (g)
Brot, Pizza, Nudelgerichte 100 600
Gemüse 100 1000
Fleisch 100 1500
Meeresfrüchte 100 800
Die Abtauzeit wird vollautomatisch berechnet und es müssen keine Zeitparameter gesetzt werden, die sich auf die Einstellung der Speise und Gewicht beziehen.
Ist das Abtauen beendet, dann erscheint am Bildschirm die Nachricht "ABTAUEN BEENDET".
Funktion Mikrowelle
Die Funktion der Mikrowelle mithilfe der Pfeile wählen und Taste drücken.
Soll die Funktion sofort mit einer voreingestellten Zeit von 30 Sekunden und einer voreingestellten Leistung von 900W gestartet werden, dann Taste drücken.
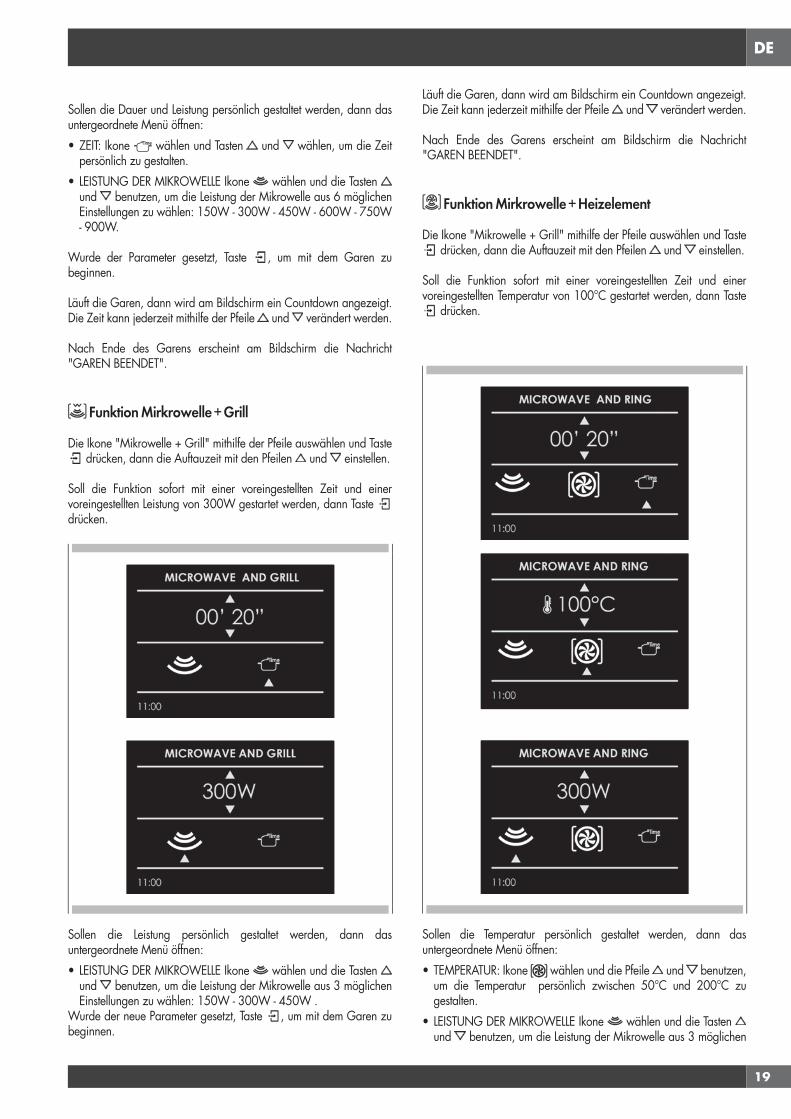
DE
19
Sollen die Dauer und Leistung persönlich gestaltet werden, dann das untergeordnete Menü öffnen:• ZEIT: Ikone wählen und Tasten und wählen, um die Zeit
persönlich zu gestalten.• LEISTUNG DER MIKROWELLE Ikone wählen und die Tasten
und benutzen, um die Leistung der Mikrowelle aus 6 möglichen Einstellungen zu wählen: 150W - 300W - 450W - 600W - 750W - 900W.
Wurde der Parameter gesetzt, Taste , um mit dem Garen zu beginnen.
Läuft die Garen, dann wird am Bildschirm ein Countdown angezeigt. Die Zeit kann jederzeit mithilfe der Pfeile und verändert werden.
Nach Ende des Garens erscheint am Bildschirm die Nachricht "GAREN BEENDET".
Funktion Mirkrowelle + Grill
Die Ikone "Mikrowelle + Grill" mithilfe der Pfeile auswählen und Taste drücken, dann die Auftauzeit mit den Pfeilen und einstellen.
Soll die Funktion sofort mit einer voreingestellten Zeit und einer voreingestellten Leistung von 300W gestartet werden, dann Taste drücken.
Sollen die Leistung persönlich gestaltet werden, dann das untergeordnete Menü öffnen:• LEISTUNG DER MIKROWELLE Ikone wählen und die Tasten
und benutzen, um die Leistung der Mikrowelle aus 3 möglichen Einstellungen zu wählen: 150W - 300W - 450W .
Wurde der neue Parameter gesetzt, Taste , um mit dem Garen zu beginnen.
Läuft die Garen, dann wird am Bildschirm ein Countdown angezeigt. Die Zeit kann jederzeit mithilfe der Pfeile und verändert werden.
Nach Ende des Garens erscheint am Bildschirm die Nachricht "GAREN BEENDET".
Funktion Mirkrowelle + Heizelement
Die Ikone "Mikrowelle + Grill" mithilfe der Pfeile auswählen und Taste drücken, dann die Auftauzeit mit den Pfeilen und einstellen.
Soll die Funktion sofort mit einer voreingestellten Zeit und einer voreingestellten Temperatur von 100°C gestartet werden, dann Taste
drücken.
Sollen die Temperatur persönlich gestaltet werden, dann das untergeordnete Menü öffnen:• TEMPERATUR: Ikone wählen und die Pfeile und benutzen,
um die Temperatur persönlich zwischen 50°C und 200°C zu gestalten.
• LEISTUNG DER MIKROWELLE Ikone wählen und die Tasten und benutzen, um die Leistung der Mikrowelle aus 3 möglichen
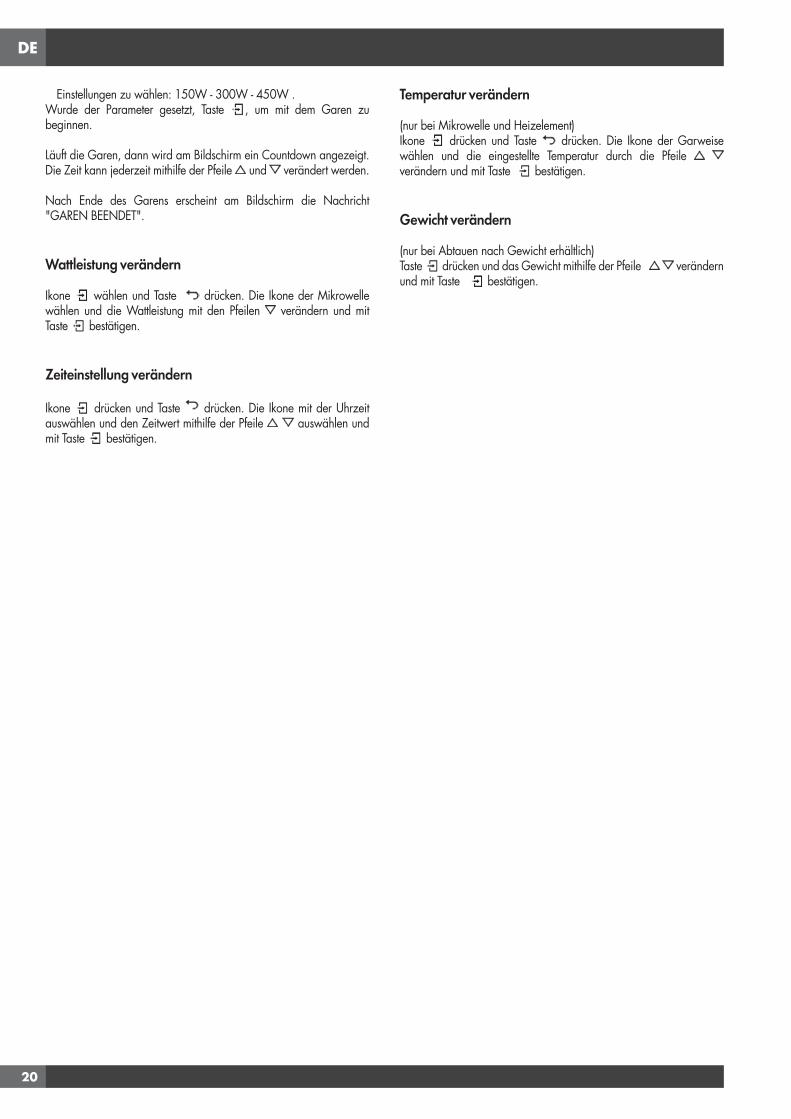
DE
20
Einstellungen zu wählen: 150W - 300W - 450W .Wurde der Parameter gesetzt, Taste , um mit dem Garen zu beginnen.
Läuft die Garen, dann wird am Bildschirm ein Countdown angezeigt. Die Zeit kann jederzeit mithilfe der Pfeile und verändert werden.
Nach Ende des Garens erscheint am Bildschirm die Nachricht "GAREN BEENDET".
Wattleistung verändern
Ikone wählen und Taste drücken. Die Ikone der Mikrowelle wählen und die Wattleistung mit den Pfeilen verändern und mit Taste bestätigen.
Zeiteinstellung verändern
Ikone drücken und Taste drücken. Die Ikone mit der Uhrzeit auswählen und den Zeitwert mithilfe der Pfeile auswählen und mit Taste bestätigen.
Temperatur verändern
(nur bei Mikrowelle und Heizelement)Ikone drücken und Taste (nur bei Mikrowelle und Heizelement)
drücken. Die Ikone der Garweise wählen und die eingestellte Temperatur durch die Pfeile verändern und mit Taste bestätigen.
Gewicht verändern
(nur bei Abtauen nach Gewicht erhältlich)Taste drücken und das Gewicht mithilfe der Pfeile verändern und mit Taste bestätigen.
DE
21
12 - Ofenbeleuchtung benutzen
Das Licht wird mit einer Lichttaste eingeschaltet. berühren, um das Licht ein- oder auszuschalten.
Das Ofenlicht geht automatisch an, wenn die Tür geöffnet wird.Läuft der Ofen, dann geht das Licht automatisch beim Start an.Das Ofenlicht schaltet automatisch aus, sobald der Ofenmodus gelöscht wird.
HINWEIS: Nach dem Einschalten schaltet das Licht automatisch nach 3 Minuten wieder aus. Um es erneut einzuschalten, die Taste drücken oder die Tür öffnen.
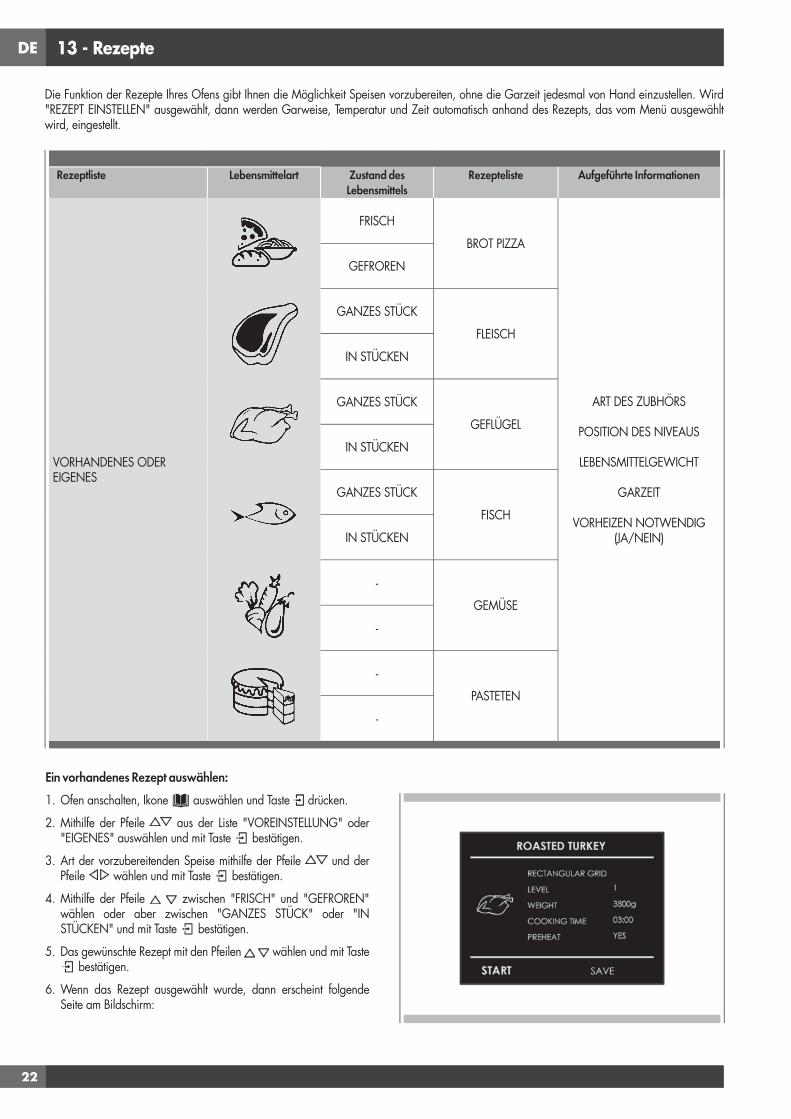
DE
22
13 - Rezepte
Ein vorhandenes Rezept auswählen:1. Ofen anschalten, Ikone auswählen und Taste drücken.
2. Mithilfe der Pfeile aus der Liste "VOREINSTELLUNG" oder "EIGENES" auswählen und mit Taste bestätigen.
3. Art der vorzubereitenden Speise mithilfe der Pfeile und der Pfeile wählen und mit Taste bestätigen.
4. Mithilfe der Pfeile zwischen "FRISCH" und "GEFROREN" wählen oder aber zwischen "GANZES STÜCK" oder "IN STÜCKEN" und mit Taste bestätigen.
5. Das gewünschte Rezept mit den Pfeilen wählen und mit Taste bestätigen.
6. Wenn das Rezept ausgewählt wurde, dann erscheint folgende Seite am Bildschirm:
Die Funktion der Rezepte Ihres Ofens gibt Ihnen die Möglichkeit Speisen vorzubereiten, ohne die Garzeit jedesmal von Hand einzustellen. Wird "REZEPT EINSTELLEN" ausgewählt, dann werden Garweise, Temperatur und Zeit automatisch anhand des Rezepts, das vom Menü ausgewählt wird, eingestellt.
Rezeptliste Lebensmittelart Zustand des Lebensmittels
Rezepteliste Aufgeführte Informationen
VORHANDENES ODER EIGENES
FRISCH
BROT PIZZA
ART DES ZUBHÖRS
POSITION DES NIVEAUS
LEBENSMITTELGEWICHT
GARZEIT
VORHEIZEN NOTWENDIG(JA/NEIN)
GEFROREN
GANZES STÜCK
FLEISCH
IN STÜCKEN
GANZES STÜCK
GEFLÜGEL
IN STÜCKEN
GANZES STÜCK
FISCH
IN STÜCKEN
-
GEMÜSE
-
-
PASTETEN
-
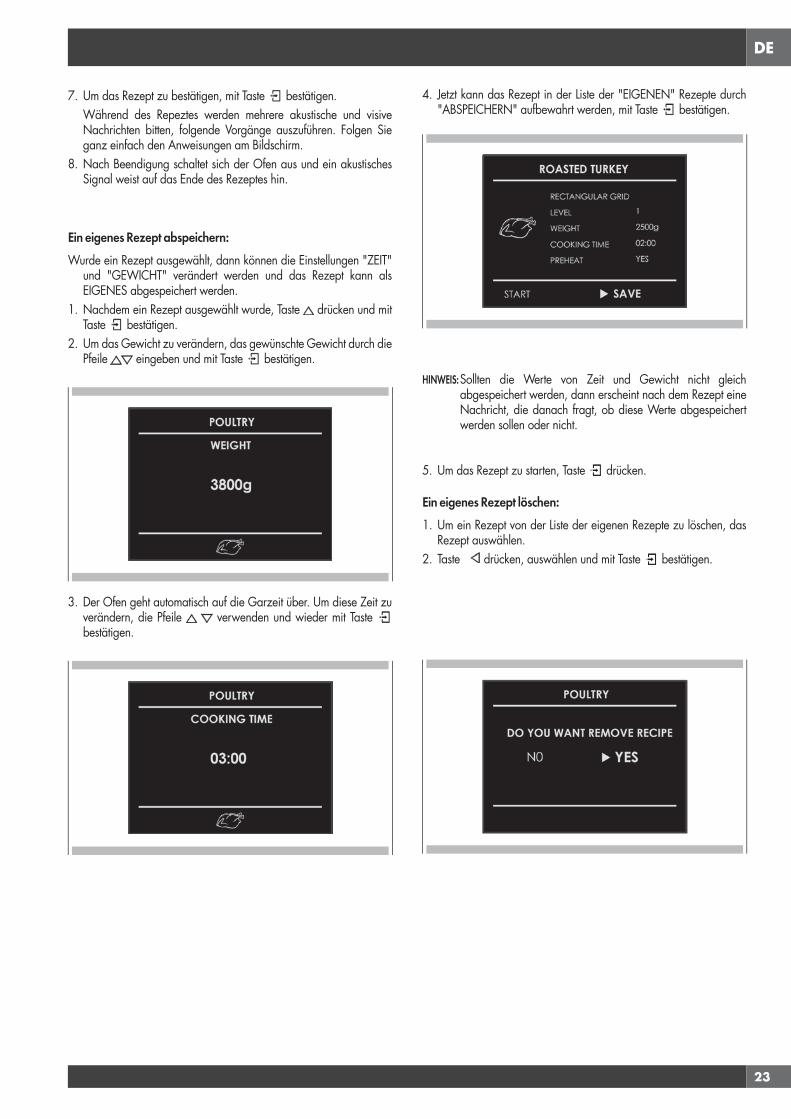
DE
23
7. Um das Rezept zu bestätigen, mit Taste bestätigen. Während des Repeztes werden mehrere akustische und visive
Nachrichten bitten, folgende Vorgänge auszuführen. Folgen Sie ganz einfach den Anweisungen am Bildschirm.
8. Nach Beendigung schaltet sich der Ofen aus und ein akustisches Signal weist auf das Ende des Rezeptes hin.
Ein eigenes Rezept abspeichern:Wurde ein Rezept ausgewählt, dann können die Einstellungen "ZEIT"
und "GEWICHT" verändert werden und das Rezept kann als EIGENES abgespeichert werden.
1. Nachdem ein Rezept ausgewählt wurde, Taste drücken und mit Taste bestätigen.
2. Um das Gewicht zu verändern, das gewünschte Gewicht durch die Pfeile eingeben und mit Taste bestätigen.
3. Der Ofen geht automatisch auf die Garzeit über. Um diese Zeit zu verändern, die Pfeile verwenden und wieder mit Taste bestätigen.
4. Jetzt kann das Rezept in der Liste der "EIGENEN" Rezepte durch "ABSPEICHERN" aufbewahrt werden, mit Taste bestätigen.
HINWEIS: Sollten die Werte von Zeit und Gewicht nicht gleich abgespeichert werden, dann erscheint nach dem Rezept eine Nachricht, die danach fragt, ob diese Werte abgespeichert werden sollen oder nicht.
5. Um das Rezept zu starten, Taste drücken.
Ein eigenes Rezept löschen:1. Um ein Rezept von der Liste der eigenen Rezepte zu löschen, das
Rezept auswählen.2. Taste drücken, auswählen und mit Taste bestätigen.

DE
24
14 - Für den Installateur
Den Ofen in der Theke installieren.Der Ofen muss unter einer Herdplatte, in einer Kolonne oder kombiniert mit der entsprechenden Wärmeschublade installiert werden.Der Raumbedarf entspricht den Angaben in der Abbildung.Das Material des Schranks muss hitzebeständig sein. Der Ofen muss zwischen den Schrankwänden zentriert werden und mit den mitgelieferten Schrauben und Buchsen befestigt werden.
560
min 460
50510
560
50 510
595
52826
144140
596
554
545
560min 450
50510
533
455
594
540
432
min 458
min 3
560
min 3
533
455
594
540
432
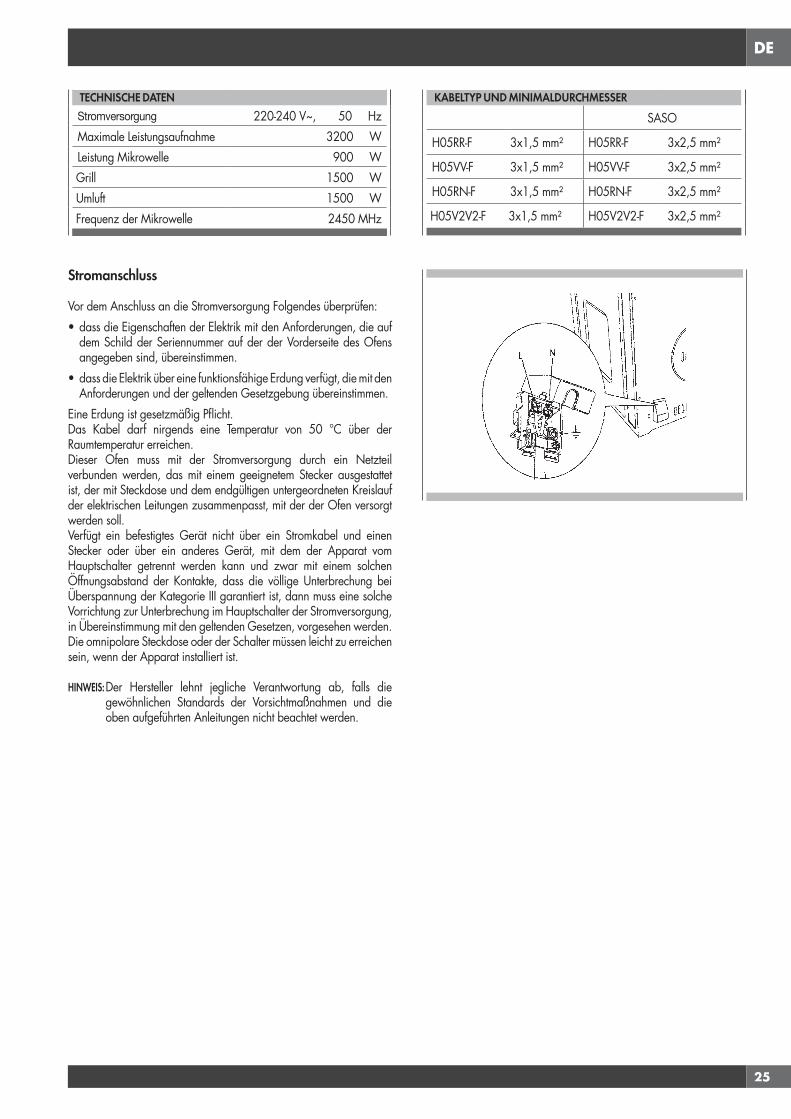
DE
25
TECHNISCHE DATENStromversorgung 220-240 V~, 50 HzMaximale Leistungsaufnahme 3200 WLeistung Mikrowelle 900 WGrill 1500 WUmluft 1500 WFrequenz der Mikrowelle 2450 MHz
Stromanschluss
Vor dem Anschluss an die Stromversorgung Folgendes überprüfen:• dass die Eigenschaften der Elektrik mit den Anforderungen, die auf
dem Schild der Seriennummer auf der der Vorderseite des Ofens angegeben sind, übereinstimmen.
• dass die Elektrik über eine funktionsfähige Erdung verfügt, die mit den Anforderungen und der geltenden Gesetzgebung übereinstimmen.
Eine Erdung ist gesetzmäßig Pflicht.Das Kabel darf nirgends eine Temperatur von 50 °C über der Raumtemperatur erreichen.Dieser Ofen muss mit der Stromversorgung durch ein Netzteil verbunden werden, das mit einem geeignetem Stecker ausgestattet ist, der mit Steckdose und dem endgültigen untergeordneten Kreislauf der elektrischen Leitungen zusammenpasst, mit der der Ofen versorgt werden soll. Verfügt ein befestigtes Gerät nicht über ein Stromkabel und einen Stecker oder über ein anderes Gerät, mit dem der Apparat vom Hauptschalter getrennt werden kann und zwar mit einem solchen Öffnungsabstand der Kontakte, dass die völlige Unterbrechung bei Überspannung der Kategorie III garantiert ist, dann muss eine solche Vorrichtung zur Unterbrechung im Hauptschalter der Stromversorgung, in Übereinstimmung mit den geltenden Gesetzen, vorgesehen werden.Die omnipolare Steckdose oder der Schalter müssen leicht zu erreichen sein, wenn der Apparat installiert ist.
HINWEIS: Der Hersteller lehnt jegliche Verantwortung ab, falls die gewöhnlichen Standards der Vorsichtmaßnahmen und die oben aufgeführten Anleitungen nicht beachtet werden.
KABELTYP UND MINIMALDURCHMESSERSASO
H05RR-F 3x1,5 mm² H05RR-F 3x2,5 mm²
H05VV-F 3x1,5 mm² H05VV-F 3x2,5 mm²
H05RN-F 3x1,5 mm² H05RN-F 3x2,5 mm²
H05V2V2-F 3x1,5 mm² H05V2V2-F 3x2,5 mm²
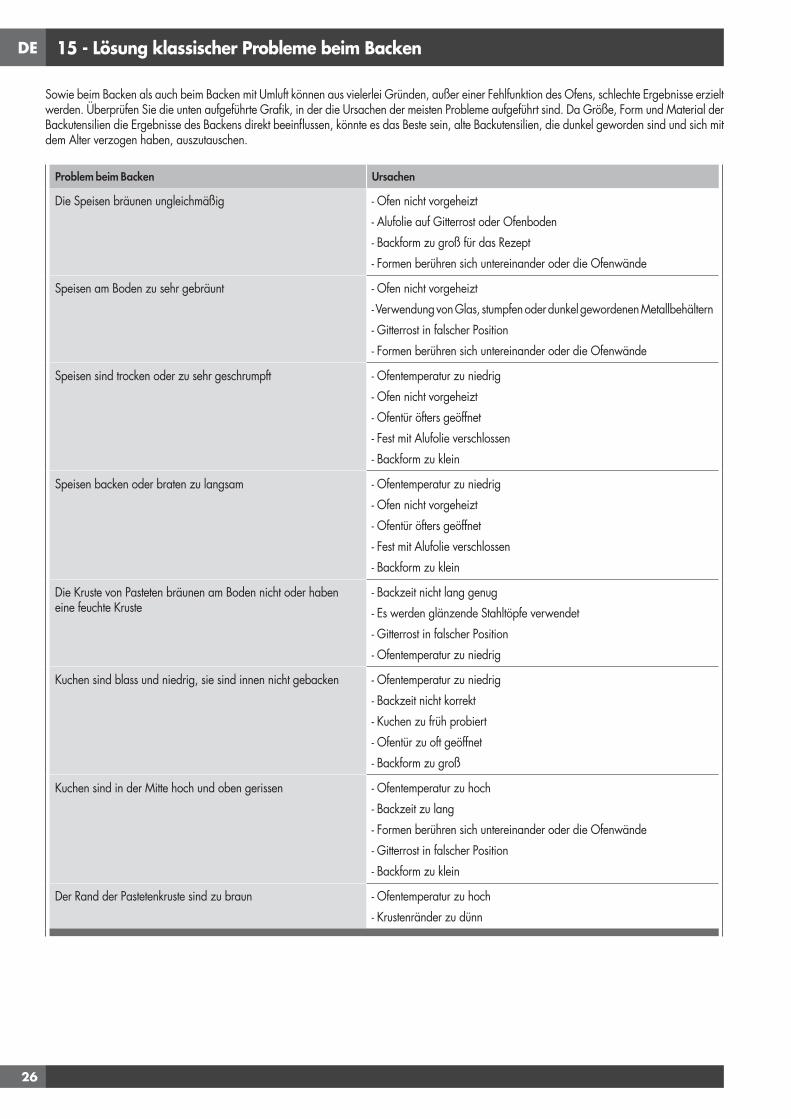
DE
26
15 - Lösung klassischer Probleme beim Backen
Sowie beim Backen als auch beim Backen mit Umluft können aus vielerlei Gründen, außer einer Fehlfunktion des Ofens, schlechte Ergebnisse erzielt werden. Überprüfen Sie die unten aufgeführte Grafik, in der die Ursachen der meisten Probleme aufgeführt sind. Da Größe, Form und Material der Backutensilien die Ergebnisse des Backens direkt beeinflussen, könnte es das Beste sein, alte Backutensilien, die dunkel geworden sind und sich mit dem Alter verzogen haben, auszutauschen.
Problem beim Backen Ursachen
Die Speisen bräunen ungleichmäßig - Ofen nicht vorgeheizt- Alufolie auf Gitterrost oder Ofenboden- Backform zu groß für das Rezept- Formen berühren sich untereinander oder die Ofenwände
Speisen am Boden zu sehr gebräunt - Ofen nicht vorgeheizt- Verwendung von Glas, stumpfen oder dunkel gewordenen Metallbehältern- Gitterrost in falscher Position- Formen berühren sich untereinander oder die Ofenwände
Speisen sind trocken oder zu sehr geschrumpft - Ofentemperatur zu niedrig- Ofen nicht vorgeheizt- Ofentür öfters geöffnet- Fest mit Alufolie verschlossen- Backform zu klein
Speisen backen oder braten zu langsam - Ofentemperatur zu niedrig- Ofen nicht vorgeheizt- Ofentür öfters geöffnet- Fest mit Alufolie verschlossen- Backform zu klein
Die Kruste von Pasteten bräunen am Boden nicht oder haben eine feuchte Kruste
- Backzeit nicht lang genug- Es werden glänzende Stahltöpfe verwendet- Gitterrost in falscher Position- Ofentemperatur zu niedrig
Kuchen sind blass und niedrig, sie sind innen nicht gebacken - Ofentemperatur zu niedrig- Backzeit nicht korrekt- Kuchen zu früh probiert- Ofentür zu oft geöffnet- Backform zu groß
Kuchen sind in der Mitte hoch und oben gerissen - Ofentemperatur zu hoch- Backzeit zu lang- Formen berühren sich untereinander oder die Ofenwände- Gitterrost in falscher Position- Backform zu klein
Der Rand der Pastetenkruste sind zu braun - Ofentemperatur zu hoch- Krustenränder zu dünn
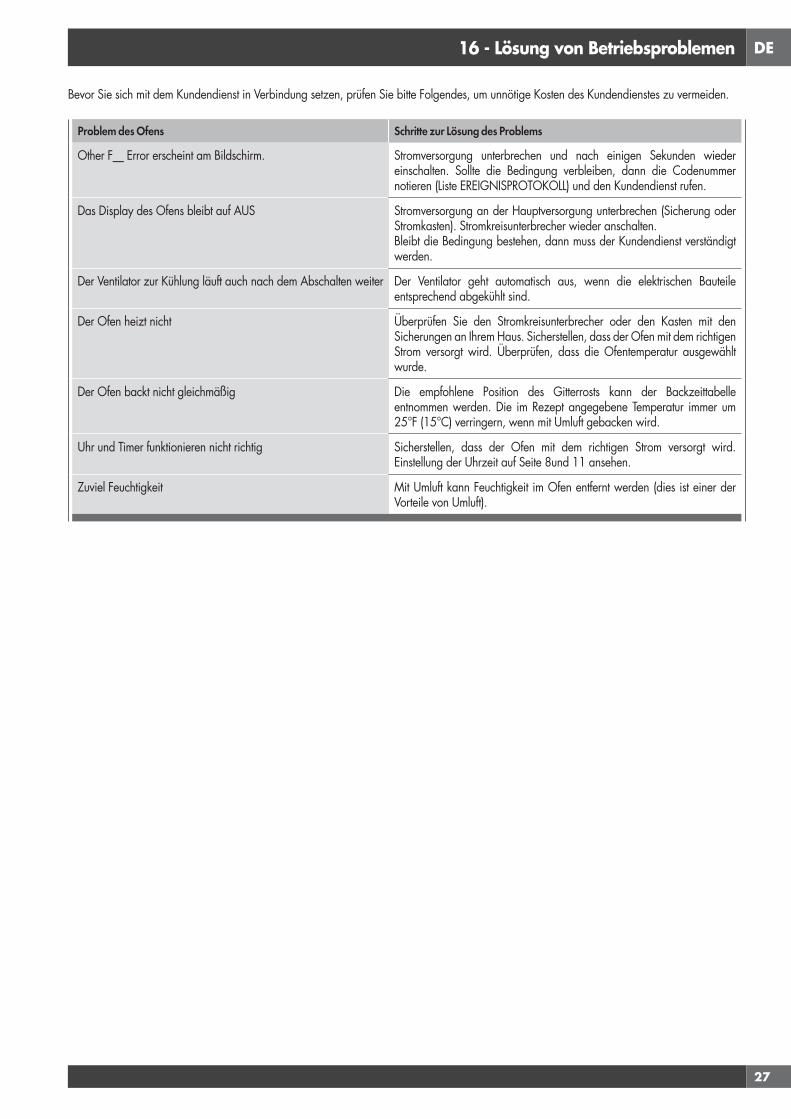
DE
27
16 - Lösung von Betriebsproblemen
Bevor Sie sich mit dem Kundendienst in Verbindung setzen, prüfen Sie bitte Folgendes, um unnötige Kosten des Kundendienstes zu vermeiden.
Problem des Ofens Schritte zur Lösung des Problems
Other F__ Error erscheint am Bildschirm. Stromversorgung unterbrechen und nach einigen Sekunden wieder einschalten. Sollte die Bedingung verbleiben, dann die Codenummer notieren (Liste EREIGNISPROTOKOLL) und den Kundendienst rufen.
Das Display des Ofens bleibt auf AUS Stromversorgung an der Hauptversorgung unterbrechen (Sicherung oder Stromkasten). Stromkreisunterbrecher wieder anschalten.Bleibt die Bedingung bestehen, dann muss der Kundendienst verständigt werden.
Der Ventilator zur Kühlung läuft auch nach dem Abschalten weiter Der Ventilator geht automatisch aus, wenn die elektrischen Bauteile entsprechend abgekühlt sind.
Der Ofen heizt nicht Überprüfen Sie den Stromkreisunterbrecher oder den Kasten mit den Sicherungen an Ihrem Haus. Sicherstellen, dass der Ofen mit dem richtigen Strom versorgt wird. Überprüfen, dass die Ofentemperatur ausgewählt wurde.
Der Ofen backt nicht gleichmäßig Die empfohlene Position des Gitterrosts kann der Backzeittabelle entnommen werden. Die im Rezept angegebene Temperatur immer um 25°F (15°C) verringern, wenn mit Umluft gebacken wird.
Uhr und Timer funktionieren nicht richtig Sicherstellen, dass der Ofen mit dem richtigen Strom versorgt wird. Einstellung der Uhrzeit auf Seite 8und 11 ansehen.
Zuviel Feuchtigkeit Mit Umluft kann Feuchtigkeit im Ofen entfernt werden (dies ist einer der Vorteile von Umluft).
DE
28
17 - Assistenz oder Kundendienst
Bevor Sie sich mit dem Kundendienst in Verbindung setzen, überprüfen sie bitte die Liste mit der Störungsbeseitigung. Dadurch können Sie eventuell die Kosten für den Kundendiensteinsatz sparen.Falls Sie noch immer Hilfe brauchen, dann befolgen Sie bitte die nachstehenden Anweisungen. Bitte teilen Sie uns beim Anruf das Kaufdatum und die komplette Nummer des Modells und der Serie ihres Apparats mit. Mithilfe dieser Informationen können wir Ihre Anfrage besser beantworten.
Liste der Wartungseinsätze
Informationen über den genehmigten Kundendienst und Ersatzteile, siehe Abschnitt "GARANTIE von Apparaten für den Hausgebrauch"
Plakette mit der Seriennummer, siehe Seite 4. Bitte füllen Sie jetzt folgende Informationen in den unten stehenden Kasten.Bitte heben Sie die Rechnung für die Garantie auf.
Liste der Wartungseinsätze
Modellnummer _________________________________
Seriennummer __________________________________
Datum der Installation oder Inbetriebnahme__________________
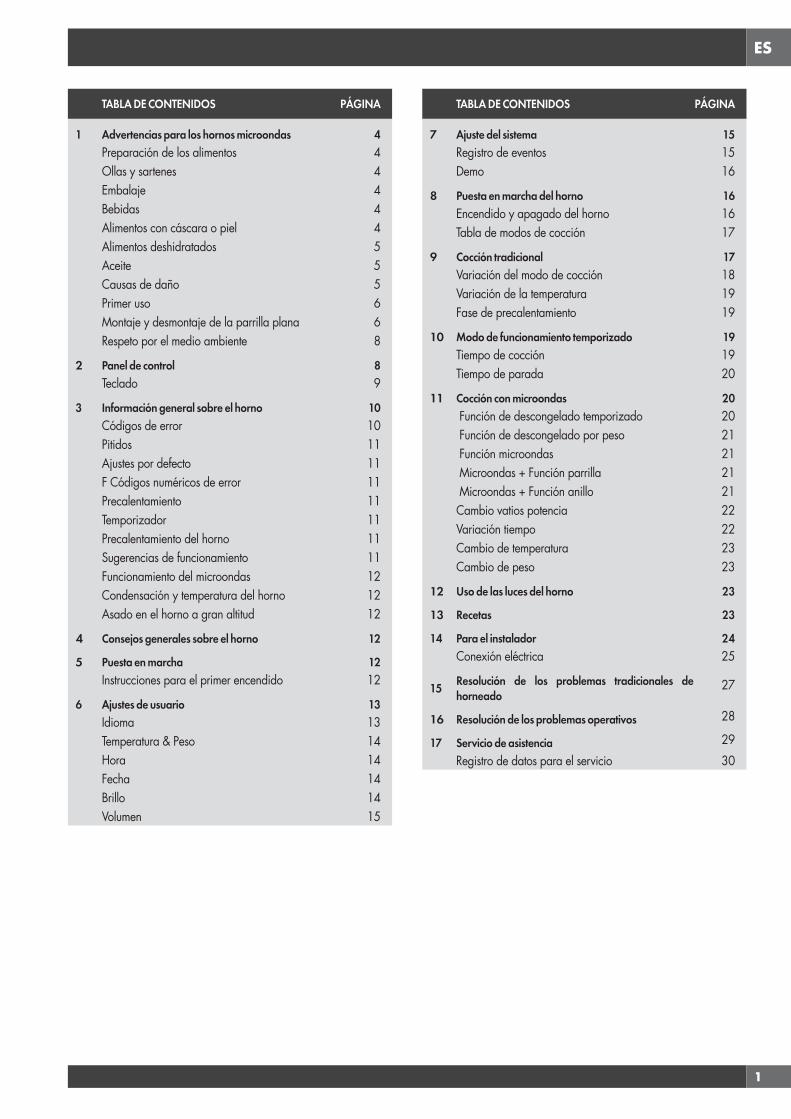
ES
1
TABLA DE CONTENIDOS PÁGINA
1 Advertencias para los hornos microondas 4Preparación de los alimentos 4Ollas y sartenes 4Embalaje 4Bebidas 4Alimentos con cáscara o piel 4Alimentos deshidratados 5Aceite 5Causas de daño 5Primer uso 6Montaje y desmontaje de la parrilla plana 6Respeto por el medio ambiente 8
2 Panel de control 8Teclado 9
3 Información general sobre el horno 10Códigos de error 10Pitidos 11Ajustes por defecto 11F Códigos numéricos de error 11Precalentamiento 11Temporizador 11Precalentamiento del horno 11Sugerencias de funcionamiento 11Funcionamiento del microondas 12Condensación y temperatura del horno 12Asado en el horno a gran altitud 12
4 Consejos generales sobre el horno 12
5 Puesta en marcha 12Instrucciones para el primer encendido 12
6 Ajustes de usuario 13Idioma 13Temperatura & Peso 14Hora 14Fecha 14Brillo 14Volumen 15
TABLA DE CONTENIDOS PÁGINA
7 Ajuste del sistema 15Registro de eventos 15Demo 16
8 Puesta en marcha del horno 16Encendido y apagado del horno 16Tabla de modos de cocción 17
9 Cocción tradicional 17Variación del modo de cocción 18Variación de la temperatura 19Fase de precalentamiento 19
10 Modo de funcionamiento temporizado 19Tiempo de cocción 19Tiempo de parada 20
11 Cocción con microondas 20 Función de descongelado temporizado 20 Función de descongelado por peso 21 Función microondas 21 Microondas + Función parrilla 21 Microondas + Función anillo 21Cambio vatios potencia 22Variación tiempo 22Cambio de temperatura 23Cambio de peso 23
12 Uso de las luces del horno 23
13 Recetas 23
14 Para el instalador 24Conexión eléctrica 25
15 Resolución de los problemas tradicionales de horneado
27
16 Resolución de los problemas operativos 28
17 Servicio de asistencia 29Registro de datos para el servicio 30
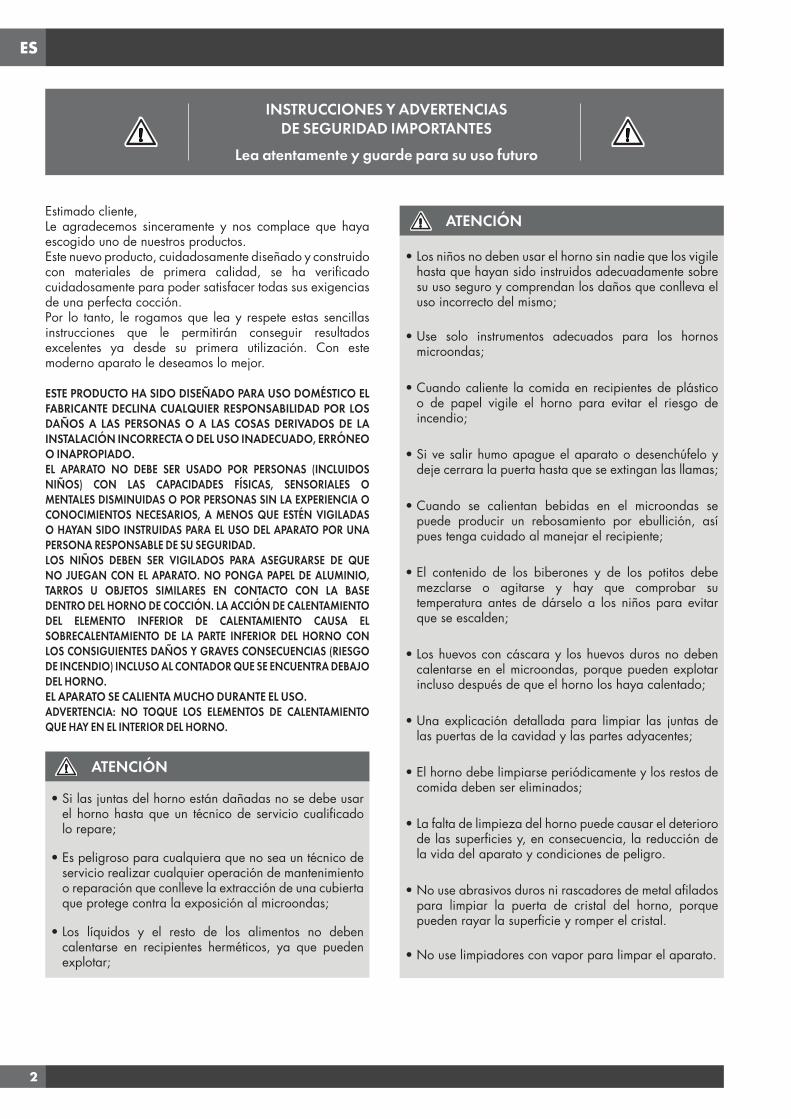
ES
2
Estimado cliente,Le agradecemos sinceramente y nos complace que haya escogido uno de nuestros productos.Este nuevo producto, cuidadosamente diseñado y construido con materiales de primera calidad, se ha verificado cuidadosamente para poder satisfacer todas sus exigencias de una perfecta cocción.Por lo tanto, le rogamos que lea y respete estas sencillas instrucciones que le permitirán conseguir resultados excelentes ya desde su primera utilización. Con este moderno aparato le deseamos lo mejor.
ESTE PRODUCTO HA SIDO DISEÑADO PARA USO DOMÉSTICO EL FABRICANTE DECLINA CUALQUIER RESPONSABILIDAD POR LOS DAÑOS A LAS PERSONAS O A LAS COSAS DERIVADOS DE LA INSTALACIÓN INCORRECTA O DEL USO INADECUADO, ERRÓNEO O INAPROPIADO.EL APARATO NO DEBE SER USADO POR PERSONAS (INCLUIDOS NIÑOS) CON LAS CAPACIDADES FÍSICAS, SENSORIALES O MENTALES DISMINUIDAS O POR PERSONAS SIN LA EXPERIENCIA O CONOCIMIENTOS NECESARIOS, A MENOS QUE ESTÉN VIGILADAS O HAYAN SIDO INSTRUIDAS PARA EL USO DEL APARATO POR UNA PERSONA RESPONSABLE DE SU SEGURIDAD.LOS NIÑOS DEBEN SER VIGILADOS PARA ASEGURARSE DE QUE NO JUEGAN CON EL APARATO. NO PONGA PAPEL DE ALUMINIO, TARROS U OBJETOS SIMILARES EN CONTACTO CON LA BASE DENTRO DEL HORNO DE COCCIÓN. LA ACCIÓN DE CALENTAMIENTO DEL ELEMENTO INFERIOR DE CALENTAMIENTO CAUSA EL SOBRECALENTAMIENTO DE LA PARTE INFERIOR DEL HORNO CON LOS CONSIGUIENTES DAÑOS Y GRAVES CONSECUENCIAS (RIESGO DE INCENDIO) INCLUSO AL CONTADOR QUE SE ENCUENTRA DEBAJO DEL HORNO. EL APARATO SE CALIENTA MUCHO DURANTE EL USO.ADVERTENCIA: NO TOQUE LOS ELEMENTOS DE CALENTAMIENTO QUE HAY EN EL INTERIOR DEL HORNO.
ATENCIÓN
• Si las juntas del horno están dañadas no se debe usar el horno hasta que un técnico de servicio cualificado lo repare;
• Es peligroso para cualquiera que no sea un técnico de servicio realizar cualquier operación de mantenimiento o reparación que conlleve la extracción de una cubierta que protege contra la exposición al microondas;
• Los líquidos y el resto de los alimentos no deben calentarse en recipientes herméticos, ya que pueden explotar;
ATENCIÓN
• Los niños no deben usar el horno sin nadie que los vigile hasta que hayan sido instruidos adecuadamente sobre su uso seguro y comprendan los daños que conlleva el uso incorrecto del mismo;
• Use solo instrumentos adecuados para los hornos microondas;
• Cuando caliente la comida en recipientes de plástico o de papel vigile el horno para evitar el riesgo de incendio;
• Si ve salir humo apague el aparato o desenchúfelo y deje cerrara la puerta hasta que se extingan las llamas;
• Cuando se calientan bebidas en el microondas se puede producir un rebosamiento por ebullición, así pues tenga cuidado al manejar el recipiente;
• El contenido de los biberones y de los potitos debe mezclarse o agitarse y hay que comprobar su temperatura antes de dárselo a los niños para evitar que se escalden;
• Los huevos con cáscara y los huevos duros no deben calentarse en el microondas, porque pueden explotar incluso después de que el horno los haya calentado;
• Una explicación detallada para limpiar las juntas de las puertas de la cavidad y las partes adyacentes;
• El horno debe limpiarse periódicamente y los restos de comida deben ser eliminados;
• La falta de limpieza del horno puede causar el deterioro de las superficies y, en consecuencia, la reducción de la vida del aparato y condiciones de peligro.
• No use abrasivos duros ni rascadores de metal afilados para limpiar la puerta de cristal del horno, porque pueden rayar la superficie y romper el cristal.
• No use limpiadores con vapor para limpar el aparato.
INSTRUCCIONES Y ADVERTENCIASDE SEGURIDAD IMPORTANTES
Lea atentamente y guarde para su uso futuro

ES
3
1 - Advertencias para los hornos microondas
Preparación de los alimentos
¡Peligro de incendio!Use solo la función microondas para preparar alimentos que van a comerse. Cualquier otro uso puede ser peligroso o causar daños. Por ejemplo, las zapatillas de ir por casa o las almohadas rellenas de cereales pueden prenderse incluso al cabo de varias horas.
Ollas y sartenes
¡Peligro de heridas!Las vajillas de porcelana o cerámica pueden tener pequeños agujeros en las asas y en las tapaderas. Detrás de dichos agujeros puede haber cavidades ocultas. Si entra agua en estas cavidades la vajilla se puede romper. No use vajillas no apropiadas para hornos microondas.
¡Peligro de quemaduras!El calor de los alimentos puede calentar el plato. Use siempre una manopla para sacar los platos y los accesorios de la cámara de cocción.
Potencia y duración del microondas
¡Peligro de incendio!No programe nunca valores demasiado elevados para la potencia del microondas o para el tiempo de cocción. Los alimentos pueden incendiarse y dañar el aparato. Siga las indicaciones que se dan en este manual de instrucciones.
Embalaje
¡Peligro de incendio!No caliente nunca alimentos en envases térmicos. Los recipientes para alimentos de plástico, papel u otros materiales inflamables deben ser constantemente vigilados.
¡Peligro de quemaduras!Los envases herméticos pueden explotar. Siga las instrucciones que figuran en el embalaje. Use siempre una manopla o agarradera para sacar los platos.
Bebidas
¡Peligro de quemaduras!Es posible retrasar la ebullición cuando se calientan líquidos. Esto significa que la temperatura de ebullición se alcanza sin que se formen las típicas burbujas de vapor. Hasta el golpe más ligero puede hacer que el liquido rebose o salpique. Para evitar que se retrase la ebullición al calentar líquidos meta siempre una cuchara en el recipiente.
¡Peligro de explosión!No caliente nunca bebidas ni alimentos en recipientes cerrados. No caliente nunca en exceso las bebidas alcohólicas.
Alimentos para recién nacidos¡Peligro de quemaduras!No caliente nunca alimentos infantiles en recipientes cerrados. Quite siempre la tapadera o boquilla. Una vez calentado agite o remueva con cuidado para que el calor se distribuya de manera uniforme. Verifique la temperatura antes de dar la comida a los niños.
Alimentos con cáscara o piel
¡Peligro de quemaduras!No caliente nunca huevos con cáscara. No caliente nunca huevos duros, porque pueden explotar antes de que se apague el microondas. Esta misma regla se aplica a los moluscos y crustáceos. En caso de huevos fritos pinche antes la yema. La piel dura de alimentos como las manzanas, los tomates, las patatas o las salchichas puede explotar. Pinche la piel antes de cocerlos.
Alimentos deshidratados¡Peligro de incendio!No seque nunca alimentos en el microondas.
Alimentos con bajo contenido de agua. ¡Peligro de incendio!No descongele ni caliente nunca alimentos con bajo contenido de agua, como el pan, durante mucho tiempo o a una potencia excesiva.
Aceite
¡Peligro de incendio!No use nunca el microondas para calentar el aceite.
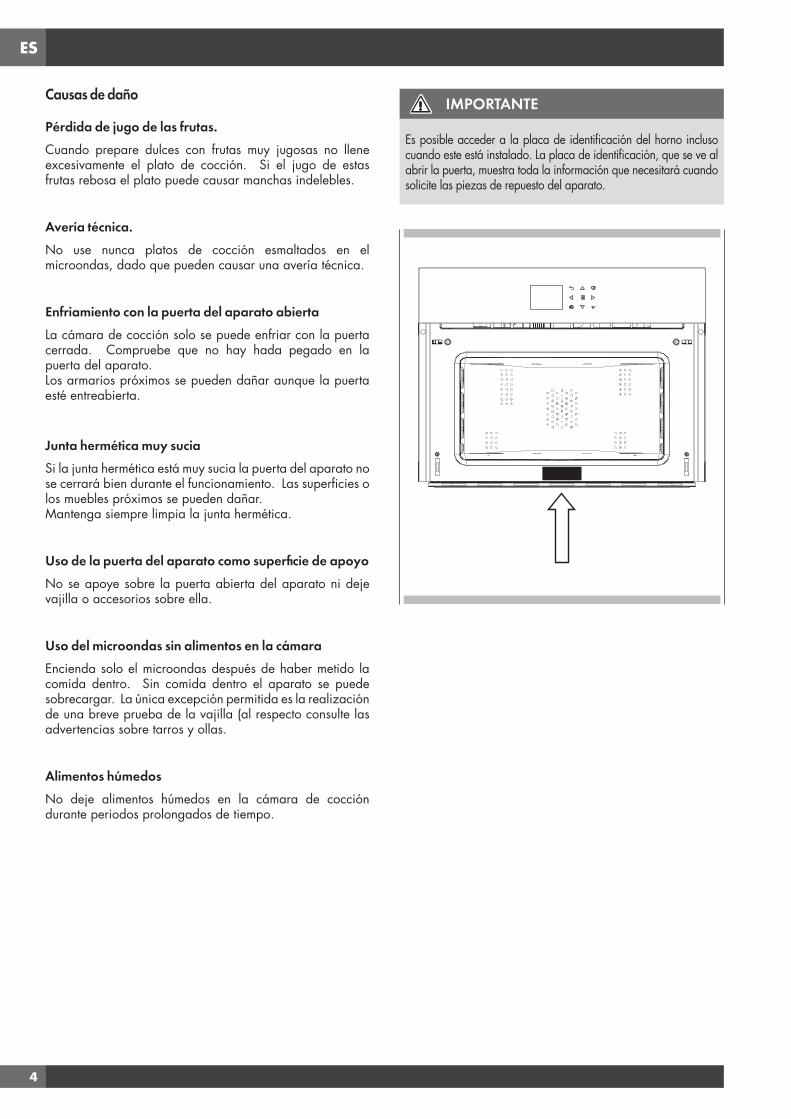
ES
4
Causas de daño
Pérdida de jugo de las frutas. Cuando prepare dulces con frutas muy jugosas no llene excesivamente el plato de cocción. Si el jugo de estas frutas rebosa el plato puede causar manchas indelebles.
Avería técnica. No use nunca platos de cocción esmaltados en el microondas, dado que pueden causar una avería técnica.
Enfriamiento con la puerta del aparato abiertaLa cámara de cocción solo se puede enfriar con la puerta cerrada. Compruebe que no hay hada pegado en la puerta del aparato. Los armarios próximos se pueden dañar aunque la puerta esté entreabierta.
Junta hermética muy suciaSi la junta hermética está muy sucia la puerta del aparato no se cerrará bien durante el funcionamiento. Las superficies o los muebles próximos se pueden dañar. Mantenga siempre limpia la junta hermética.
Uso de la puerta del aparato como superficie de apoyoNo se apoye sobre la puerta abierta del aparato ni deje vajilla o accesorios sobre ella.
Uso del microondas sin alimentos en la cámaraEncienda solo el microondas después de haber metido la comida dentro. Sin comida dentro el aparato se puede sobrecargar. La única excepción permitida es la realización de una breve prueba de la vajilla (al respecto consulte las advertencias sobre tarros y ollas.
Alimentos húmedosNo deje alimentos húmedos en la cámara de cocción durante periodos prolongados de tiempo.
IMPORTANTE
Es posible acceder a la placa de identificación del horno incluso cuando este está instalado. La placa de identificación, que se ve al abrir la puerta, muestra toda la información que necesitará cuando solicite las piezas de repuesto del aparato.

ES
5
IMPORTANTE
Como precaución de seguridad, antes de limpiar el horno desconecte siempre la clavija de la salida o quite el cable de alimentación del aparato. Además, evite usar sustancias ácidas o alcalinas (como limón, vinagre, sal, tomates, etc.). Evite usar productos que contengan cloro, ácidos o abrasivos, en especial para limpiar las partes pintadas.
Primer uso
El horno debe limpiarse meticulosamente con agua y jabón y enjuague con cuidado.Caliente el horno unos 30 minutos a temperatura máxima, esto elimina todos los aceites residuales que pueden causar mal olor durante la cocción. Use la función ventilador plus circular sin los accesorios del horno. Antes de usar los accesorios por primera vez límpielos cuidadosamente con una solución de lavado alcalina muy caliente y un trapo suave.
Montaje y desmontaje de la parrilla plana
Para sacar la parrilla plana tire de ella hacia usted hasta que se pare, a continuación súbala tirando hacia arriba hasta que salga por completo.Para volver a meter la parrilla plana introdúzcala formando un ángulo de 45º y a continuación´póngala horizongtal y empújela hasta el fondo de la guía. Si la parrilla plana tiene una bandeja de goteo, para sacarla súbala un poco y tire hacia usted. Para volver a introducirla deslícela hasta que quede completamente encajada.
ES
6
Respeto por el medio ambiente
La documentación del presente aparato utiliza papel blanqueado, sin cloro, o papel reciclado con la finalidad de contribuir en la protección del medio ambiente. Los embalajes se han concebido de forma que no perjudiquen el medio ambiente; se pueden recuperar o reciclar puesto que se trata de productos ecológicos.Reciclando el embalaje se contribuye a ahorrar materias primas y a reducir el volumen de los descartes industriales y domésticos.
LA CAJA DEL EMBALAJE es 100% reciclable, como lo atestigua el símbolo impreso. Elimínelo de acuerdo con la legislación local. Los materiales de embalaje (bolsas de plástico, partes de poliestireno, etc.) fuera del alcance de los niños porque son potencialmente peligrosos.
ESTE APARATO tiene la marca CE en conformidad con la Directiva europea 2002/96/CE sobre residuos de aparatos eléctricos y electrónicos (WEEE). Al asegurarse de que se desecha correctamente, contribuirá a evitar las posibles consecuencias negativas para el medio ambiente y la salud pública que podría conllevar una gestión inadecuada de los residuos.
EL SÍMBOLO que figura en el producto o en la documentación indica que este producto no debe tratarsecomo residuo doméstico sino que debe entregarse a un punto de recogida adecuado para el reciclaje de los equipos eléctricos y electrónicos.
LA ELIMINACIÓN DEBE REALIZARSE de acuerdo con las leyes locales sobre eliminación de residuos.
PARA MAYOR INFORMACIÓN sobre el tratamiento, la recuperación y el reciclaje de este producto póngase en contacto con la oficina local competente, el servicio de recogida de residuos domésticos o el comercio en que compró el producto.
ANTES DE DESECHARLO asegúrese de que no se puede utilizar cortando el cable eléctrico.
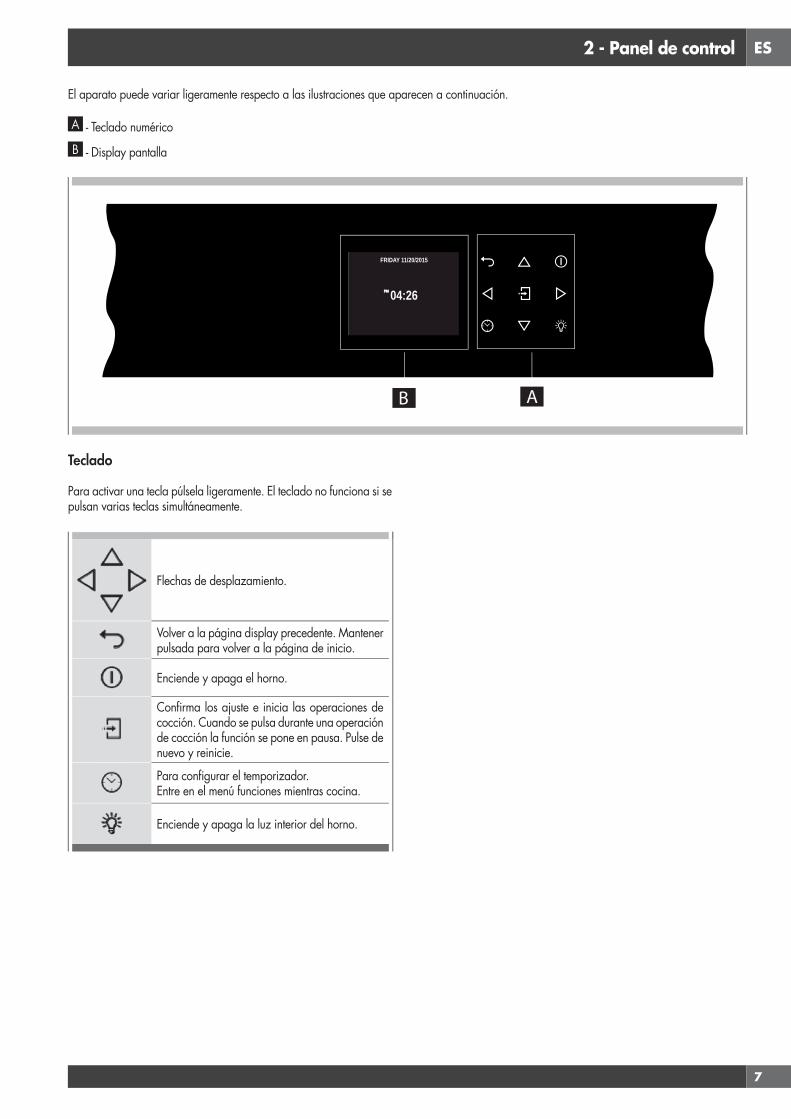
ES
7
2 - Panel de control
Teclado
Para activar una tecla púlsela ligeramente. El teclado no funciona si se pulsan varias teclas simultáneamente.
Flechas de desplazamiento.
Volver a la página display precedente. Mantener pulsada para volver a la página de inicio.
Enciende y apaga el horno.
Confirma los ajuste e inicia las operaciones de cocción. Cuando se pulsa durante una operación de cocción la función se pone en pausa. Pulse de nuevo y reinicie.
Para configurar el temporizador.Entre en el menú funciones mientras cocina.
Enciende y apaga la luz interior del horno.
El aparato puede variar ligeramente respecto a las ilustraciones que aparecen a continuación.
A - Teclado numérico
B - Display pantalla
PM
FRIDAY 11/20/2015
04:26
B A
ES
8
3 - Información general sobre el horno
Códigos de error
Este código aparece en caso de que el control electrónico indique un fallo. Cuando aparece el error se bloquea la función corriente. Si el tipo de error está ligado a una función de seguridad el horno no se puede utilizar y en cada nueva puesta en marcha aparece el mismo error (en este caso llamar al servicio de asistencia), mientras que si el error está ligado a una avería de importancia secundaria, después de encender de nuevo, el horno puede utilizarse en las funciones que no conciernen a la parte averiada (por ejemplo un elemento calentador).
Pitidos
Confirma la recepción de la orden tras haber pulsado una tecla.Además señala que una función a tiempo determinado ha acabado (ej. Temporizador o Cocción Temporizada) Durante la ejecución de una receta el sonido avisa al usuario que el horno espera una operación por parte del usuario mismo (ej. introducir los alimentos o dar la vuelta a los alimentos).Los pitidos indican también un fallo del horno.
Ajustes por defecto
Tan pronto como se selecciona un modo de cocción, este selecciona automáticamente uan temperatura adecuada que podrá, sin embargo, modificarse según las necesidades.
F Códigos numéricos de error
Estos códigos aparecen visualizados cuando la unidad electrónica de control detecta un problema a nivel del horno o de la electrónica de mando.El código de error queda registrado en el Log de los errores en el menú Setup. Este error puede comunicarse al técnico de servicio para que pueda conocer lo antes posible la causa del problema.
Precalentamiento
El precalentamiento se cuando se selecciona un modo de cocción ; durante este tiempo, la temperatura instantánea aparece visualizada junto con el icono del termómetro.Cuando la temperatura alcanza el 100% del valor previsto, una señal acústica indica el final del precalentamiento y desaparece el valor de temperatura actual.
Temporizador
ADVERTENCIA
El temporizador de su horno no enciende ni apaga el aparato, su único propósito es advertirle mediante el timbre. Si quiere apagar el horno de forma automática use la función final de cocción o cocción pospuesta.
NOTA: Pulsando el botón OFF no se reajusta ni se detiene el temporizador.
1 Pulse el botón y programe el tiempo deseado usando las flechas y confirme con el botón . Para cambiar la selección entre horas y minutos use las flechas .
2 El tiempo se puede programar de 1 minuto a 12 horas y 59 minutos y, una vez programado, el tiempo restante se puede visualizar en todo momento al fondo de la barra de estado hasta que expira el tiempo o se reajusta.
3 Para modificar o cancelar el tiempo programado debe reajustar el temporizador pulsando el botón varios segundos.
4 El formato del temporizador suele ser HR:MIN y cambia a MIN:SEG en el último minuto.
5 Cuando expira el tiempo el display muestra 00:00 y el timbre suena durante un minuto o hasta que se pulsa el botón.
Antes de utilizar el horno por primera vez, retire todos los materiales de embalaje y demás. Estos materiales podrían derretirse o quemarse al encender el aparato.
ES
9
4 - Consejos generales sobre el horno
Precalentamiento del horno
• Seleccionar una temperatura más alta no acorta el tiempo de precalentado.
• Se necesita precalentar para obtener buenos resultados al hornear pasteles, galletas, pastelelitos y panes.
• El precalentado ayudará a dorar los asados y a que la carne conserve sus jugos.
• Coloque las rejillas del horno en su posición correcta antes de precalentar.
• Durante el precalentado la pantalla muestra la temperatura de cocción seleccionada.
• Un pitido confirmará que el horno se ha precalentado y se desactivará la indicación “temperatura detectada”.
Sugerencias de funcionamiento
• No ponga recipientes sobre la puerta abierta del horno• Utilice la luz interna del horno para mirar los alimentos a través de
la ventana del horno en lugar de abrir la puerta frecuentemente.
Funcionamiento del microondas
Las microondas se transforman en calor en el interior de los alimentos. El horno microondas se puede utilizar solo o en combinación con otros tipos de calentamiento. Esta sección contiene información sobre la vajilla e instrucciones para la configuración del horno microondas.
ADVERTENCIAS SOBRE LA VAJILLA
Vajilla adecuadaPuede utilizar vajillas resistentes de cristal, vitrocerámica, porcelana, cerámica o plásticos refractarios. Estos materiales son permeables a las microondas. También es posible usar platos normales. De esta forma no será necesario sacar los alimentos. Las vajillas con decoraciones de oro o plata solo se pueden usar si el fabricante garantiza que es posible. Recuerde que al usar el horno en modo microondas el plato debe ponerse en la placa giratoria. Si usa el horno en modo combinado es preferible poner el plato a cocer en la parrilla redonda inferior, de forma que quede centrado en la placa giratoria.
Vajilla inadecuadaNo se pueden usar vajillas metálicas. El metal no es permeable a las microondas. Los alimentos en recipientes metálicos permanecerán fríos. ¡Advertencia! Los componentes metálicos, como cucharas en el interior de vasos, deben ponerse a, al menos, 2 cm de las paredes del horno y del interior de la puerta. De hecho, las salpicaduras pueden dañar gravemente el interior de la puerta de cristal. ¡Advertencia! La parrilla plana debe sacarse cuando se utilicen los modos microondas o combinado. Solo se usa en las funciones tradicionales del horno.
Test vajillaNo encienda nunca el horno microondas antes de haber metido los alimentos. La única excepción permitida es la prueba de la vajilla. Si no está seguro si puede usar o no una vajilla en el microondas le recomendamosque efectúe el siguiente test: deje la pieza de vajilla en el aparato durante ½ - 1 minuto a potencia máxima. Compruebe la temperatura. La vajilla debe estar fría o un poco tibia. Si estácaliente o hay salpicaduras la vajilla no es adecuada.
Condensación y temperatura del horno
• Es normal que una cierta cantidad de humedad se evapore de los alimentos durante el proceso de cocción. La cantidad depende del contenido de humedad que contienen los alimentos. La humedad se puede condensar sobre una superficie más fría o en el interior del horno, así como en el panel de control.
• Su nuevo horno lleva un sensor electrónico de temperatura que permite mantener la temperatura deseada con exactitud.
Asado en el horno a gran altitud
• Cuando se hornea a gran altitud, las recetas y el tiempo de cocción varían con respecto a los estándares.

ES
10
5 - Puesta en marcha
Instrucciones para el primer encendido
Una vez conectado el horno a la alimentación eléctrica por primera vez, el control de prepara automáticamente para setear algunas configuraciones del usuario, que se mantendrán en la memoria en caso de encendidos sucesivos.
NOTA: Tanto en la primera, como en las conexiones siguientes, a la alimentación eléctrica el mecanismo de bloqueo de la puerta realiza una vuelta de calibrado, en esta fase mantener siempre la puerta cerrada.
• Idioma• Temperatura y peso• Hora• Fecha
Consulte el apartado AJUSTES DE USUARIO para las instrucciones de configuración.
Después de haber ajustado las configuraciones del usuario el control de pone automáticamente en la pantalla “Stand-by”.
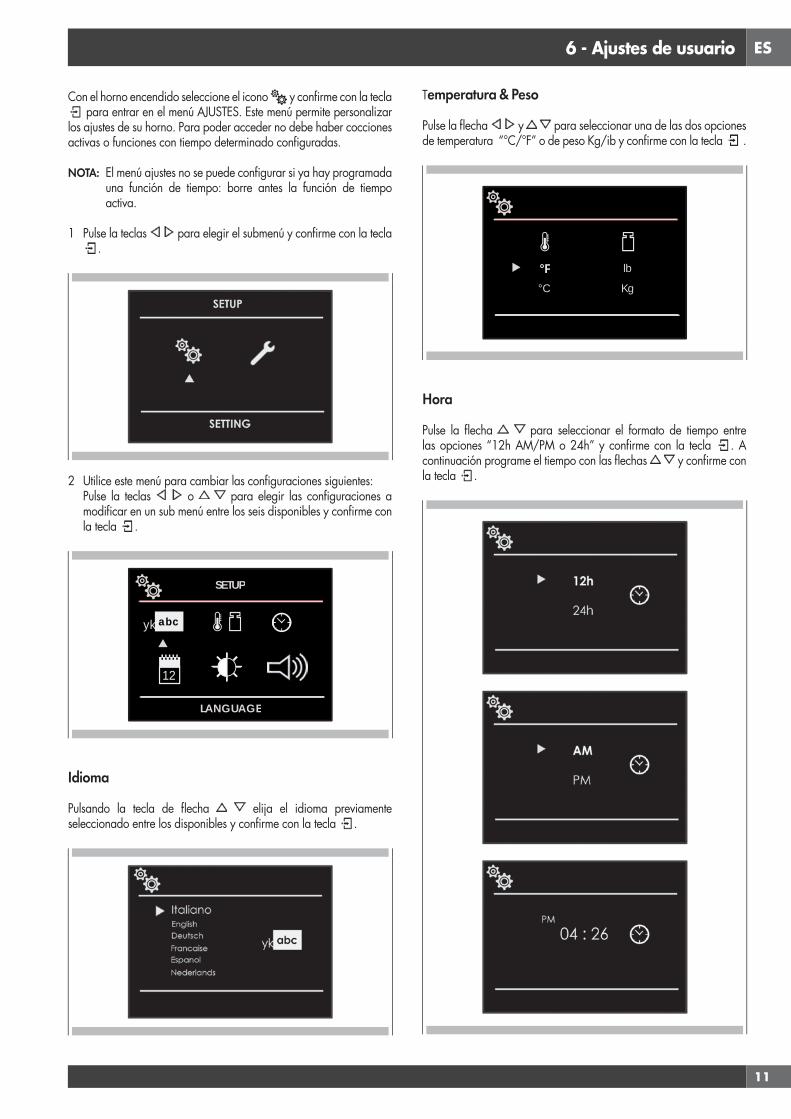
ES
11
6 - Ajustes de usuario
Con el horno encendido seleccione el icono y confirme con la tecla para entrar en el menú AJUSTES. Este menú permite personalizar
los ajustes de su horno. Para poder acceder no debe haber cocciones activas o funciones con tiempo determinado configuradas.
NOTA: El menú ajustes no se puede configurar si ya hay programada una función de tiempo: borre antes la función de tiempo activa.
1 Pulse la teclas para elegir el submenú y confirme con la tecla .
2 Utilice este menú para cambiar las configuraciones siguientes: Pulse la teclas o para elegir las configuraciones a
modificar en un sub menú entre los seis disponibles y confirme con la tecla .
12
yk abc
SETUP
LANGUAGE
Idioma
Pulsando la tecla de flecha elija el idioma previamente seleccionado entre los disponibles y confirme con la tecla .
Temperatura & Peso
Pulse la flecha y para seleccionar una de las dos opciones de temperatura “°C/°F” o de peso Kg/ib y confirme con la tecla .
°F°C
lb
Kg
Hora
Pulse la flecha para seleccionar el formato de tiempo entre las opciones “12h AM/PM o 24h” y confirme con la tecla . A continuación programe el tiempo con las flechas y confirme con la tecla .

ES
12
Fecha
Pulse la flecha para seleccionar el formato de fecha entre las opciones “D.M.A. – A.M.D. – M.D.A.” y confirme con la tecla . A continuación ajuste el valor con las flechas y confirme con la tecla .
Brillo
Pulsando la flecha elegir la configuración de luminosidad a modificar entre la condición de ON o STAND-BY, elegir después por medio de las flechas el grado de lunminosidad deseado y confirmar con la tecla .
Volumen
Pulse la flecha para seleccionar el grado necesario de luminosidad y confirme con la tecla .
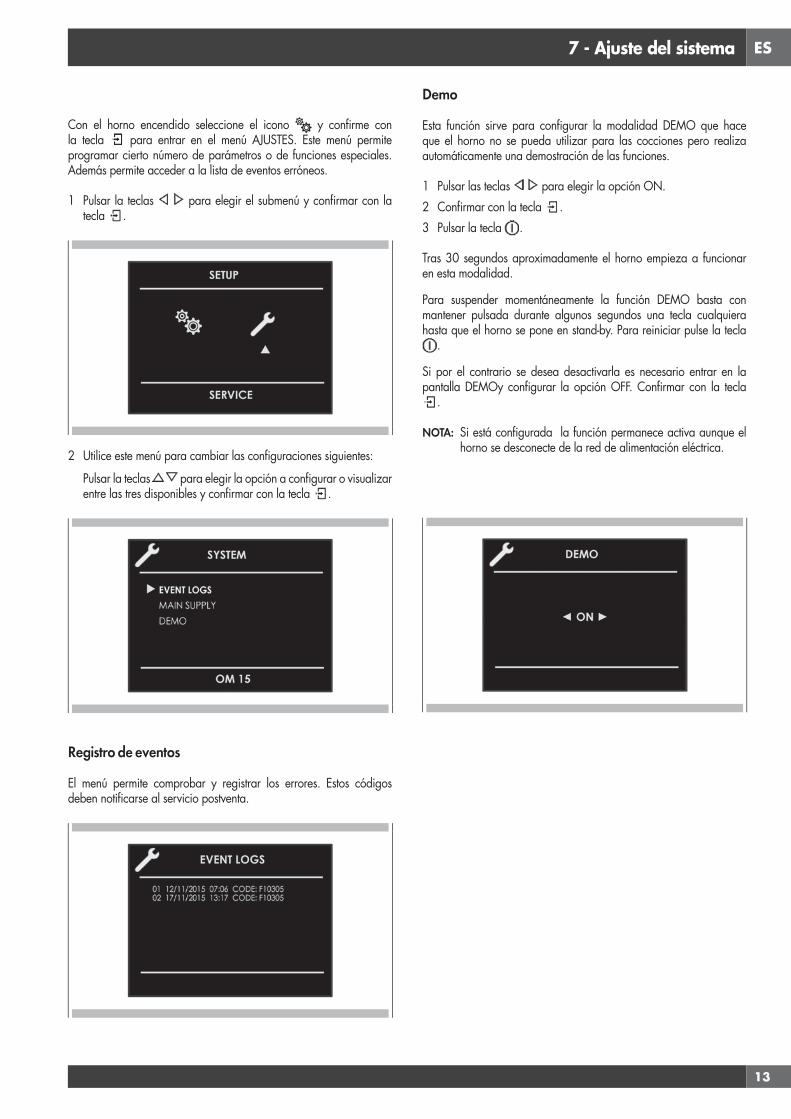
ES
13
7 - Ajuste del sistema
Con el horno encendido seleccione el icono y confirme con la tecla para entrar en el menú AJUSTES. Este menú permite programar cierto número de parámetros o de funciones especiales. Además permite acceder a la lista de eventos erróneos.
1 Pulsar la teclas para elegir el submenú y confirmar con la tecla .
2 Utilice este menú para cambiar las configuraciones siguientes:
Pulsar la teclas para elegir la opción a configurar o visualizar entre las tres disponibles y confirmar con la tecla .
Registro de eventos
El menú permite comprobar y registrar los errores. Estos códigos deben notificarse al servicio postventa.
Demo
Esta función sirve para configurar la modalidad DEMO que hace que el horno no se pueda utilizar para las cocciones pero realiza automáticamente una demostración de las funciones.
1 Pulsar las teclas para elegir la opción ON.2 Confirmar con la tecla .3 Pulsar la tecla .
Tras 30 segundos aproximadamente el horno empieza a funcionar en esta modalidad.
Para suspender momentáneamente la función DEMO basta con mantener pulsada durante algunos segundos una tecla cualquiera hasta que el horno se pone en stand-by. Para reiniciar pulse la tecla
.
Si por el contrario se desea desactivarla es necesario entrar en la pantalla DEMOy configurar la opción OFF. Confirmar con la tecla
.
NOTA: Si está configurada la función permanece activa aunque el horno se desconecte de la red de alimentación eléctrica.

ES
14
8 - Puesta en marcha del horno
Horno multifunciones
Cocción tradicional
CONVECCIÓN VERDADERA
ANILLO & PARRILLA
CONVECCIÓN BROIL
GRILL
Cocción con el microondas
DESCONGELACIÓN POR TIEMPO
DESCONGELACIÓN POR PESO
COCCIÓN EN EL MICROONDAS
MICROONDAS Y GRILL
MICROONDAS Y ANILLO
Horno térmico
Cocción tradicional
GRILL
Cocción con el microondas
DESCONGELACIÓN POR TIEMPO
DESCONGELACIÓN POR PESO
COCCIÓN EN EL MICROONDAS
MICROONDAS Y GRILL
1 Seleccione el icono y pulse la tecla Seleccione el modo apropiado de cocción en función de los alimentos que debe cocer usando las flechas y confirme con la tecla .
2 En esta página display se puede, todavía, cambiar el modo de cocción las teclas .
3 Si la temperatura propuesta es correcta confirmar con la tecla para poner en marcha la cocción, si no es así, si no se pulsa la tecla después de 10 segundos se pone en marcha de modo automático y el icono del modo de cocción se pone animado.
Encendido y apagado del horno
IMPORTANTE
• La tecla no detiene la función.• Después de haber apagado el horno, el ventilador de enfriamiento podría seguir funcionando hasta que las partes internas del horno no se
hayan enfriado.
Pulse para encender el horno y vuelva a pulsarla para apagarlo. El horno se vuelve a poner en modo standby.

ES
15
Tabla de modos de cocción
Cocción tradicionalMODO DE COCCIÓN ICONO TEMPERATURA
Mín. Predefinida Máx.
CONVECCIÓN VERDADERA 50° C 165° C 230° C
ANILLO & PARRILLA 50° C 210° C 230° C
CONVECCIÓN BROIL 50° C 165° C 230° C
GRILL 50° C 230° C 230° C
Cocción con el microondasMODO DE COCCIÓN ICONO SET PESO VATIOS TEMPERATURA
Mín. Predefinida Máx. Mín. Predefinida Máx. Mín. Predefinida Máx.
DESCONGELACIÓN POR TIEMPO 150 W
DESCONGELACIÓN POR PESO
Pan 100 g 500 g 600 g 150 W
Verduras 100 g 500 g 1000 g 150 W
Carne 100 g 500 g 1500 g 150 W
Pescado 100 g 500 g 800 g 150 W
COCCIÓN EN EL MICROONDAS 150 W 900 W 900 W
MICROONDAS Y GRILL
150W 150 W 200° C
300W 300 W
450W 450 W
MICROONDAS Y ANILLO
150W 150 W 50° C 100° C 200° C
300W 300 W
450W 450 W

ES
16
9 - Cocción tradicional
Variación del modo de cocción
1 Durante la cocción sin tiempo determinado se puede realizar una pausa pulsando la tecla .
Todos los ajustes de la operación suspensión de cocción se memorizan y se pueden reactivar volviendo a pulsar la tecla.
2 Para cambiar el modo de cocción mientras el horno está funcionando pulse la tecla y luego la tecla .
En este momento se puede seleccionar otro modo de cocción entre los disponibles en el grupo mediante las flechas .
Variación de la temperatura
IMPORTANTE
• Al final de una función el display de la página de stand-by visualiza la temperatura de calor residual de la cavidad.
1 Desde la página display vista previa modo cocción se puede variar la temperatura por medio de las flechas confirmando a continuación con la tecla .
2 Una vez puesta en marcha la cocción es posible de todas maneras variar la temperatura en cualquier momento por medio de las flechas .
Fase de precalentamiento
Mientras que el horno está en fase de precalentamiento la temperatura actual aparece visulaizada bajo el icono de modo de cocción.
En cuanto se alcanza la temperatura configurada se produce una señal acústica y desaparece la indicación de la temperatura actual.
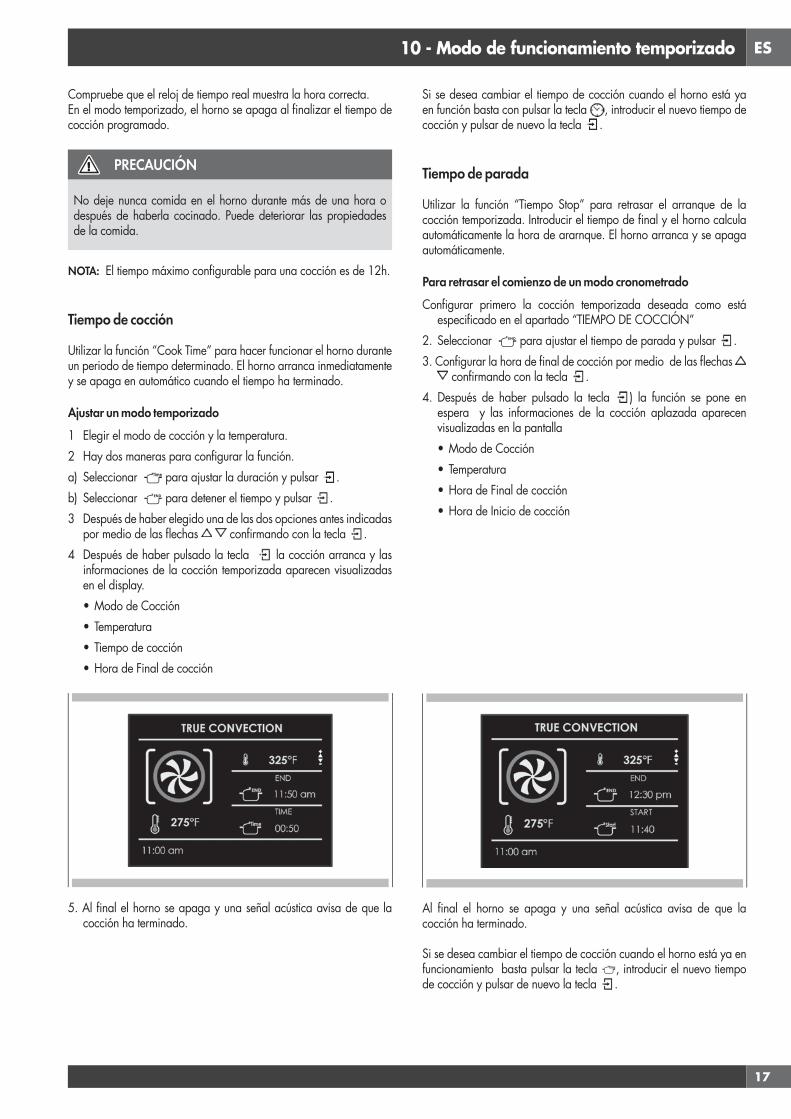
ES
17
10 - Modo de funcionamiento temporizado
Compruebe que el reloj de tiempo real muestra la hora correcta.En el modo temporizado, el horno se apaga al finalizar el tiempo de cocción programado.
PRECAUCIÓN
No deje nunca comida en el horno durante más de una hora o después de haberla cocinado. Puede deteriorar las propiedades de la comida.
NOTA: El tiempo máximo configurable para una cocción es de 12h.
Tiempo de cocción
Utilizar la función “Cook Time” para hacer funcionar el horno durante un periodo de tiempo determinado. El horno arranca inmediatamente y se apaga en automático cuando el tiempo ha terminado.
Ajustar un modo temporizado1 Elegir el modo de cocción y la temperatura.2 Hay dos maneras para configurar la función.a) Seleccionar para ajustar la duración y pulsar .b) Seleccionar para detener el tiempo y pulsar .3 Después de haber elegido una de las dos opciones antes indicadas
por medio de las flechas confirmando con la tecla .4 Después de haber pulsado la tecla la cocción arranca y las
informaciones de la cocción temporizada aparecen visualizadas en el display.• Modo de Cocción• Temperatura• Tiempo de cocción• Hora de Final de cocción
5. Al final el horno se apaga y una señal acústica avisa de que la cocción ha terminado.
Si se desea cambiar el tiempo de cocción cuando el horno está ya en función basta con pulsar la tecla , introducir el nuevo tiempo de cocción y pulsar de nuevo la tecla .
Tiempo de parada
Utilizar la función “Tiempo Stop” para retrasar el arranque de la cocción temporizada. Introducir el tiempo de final y el horno calcula automáticamente la hora de ararnque. El horno arranca y se apaga automáticamente.
Para retrasar el comienzo de un modo cronometradoConfigurar primero la cocción temporizada deseada como está
especificado en el apartado “TIEMPO DE COCCIÓN”2. Seleccionar para ajustar el tiempo de parada y pulsar .3. Configurar la hora de final de cocción por medio de las flechas
confirmando con la tecla .4. Después de haber pulsado la tecla ) la función se pone en
espera y las informaciones de la cocción aplazada aparecen visualizadas en la pantalla• Modo de Cocción• Temperatura• Hora de Final de cocción• Hora de Inicio de cocción
Al final el horno se apaga y una señal acústica avisa de que la cocción ha terminado.
Si se desea cambiar el tiempo de cocción cuando el horno está ya en funcionamiento basta pulsar la tecla , introducir el nuevo tiempo de cocción y pulsar de nuevo la tecla .

ES
18
11 - Cocción con microondas
NOTA: es esencial leer atentamente las instrucciones y advertencias para asegurar un uso correcto.
ATENCIÓN
Las funciones del microondas no iniciarán hasta que se cierre la puerta. Si se abre la puerta con el horno encendido este se pondrá en modo pausa y en el display aparecerá el mensaje "PUERTA ABIERTA". Para restablecer el funcionamiento es necesario cerrar la puerta.
La función se puede detener en cualquier momento usando la tecla , cuando se vuelve a pulsar la función se pone en marcha de nuevo.
Función de descongelado temporizado
Seleccione el icono descongelación temporizada con las flechas y pulse la tecla , a continuación programe el tiempo de descongelación con las flechas y .Para iniciar la función pulsar la tecla .
Al iniciar la función aparecerá una cuenta atrás en el display. El tiempo se puede variar en cualquier momento mediante las flechas
y . Una vez completada la descongelación el mensaje "FIN DESCONGELACIÓN" aparecerá en el display.
Función de descongelado por peso
Seleccione el icono descongelación por peso y pulse la tecla .
Seleccione el tipo de comida con las flechas y , y configure el peso mediante las flechas y , por último inicie la descongelación con la tecla .
A continuación se enumeran varios alimentos con el pero que es posible programar:
ALIMENTO Peso MÍN (g)
MÁX Peso (g)
Pan, pizza,. platos de pasta 100 600
Verduras 100 1000
Carne 100 1500
Marisco 100 800
El tiempo de descongelación se calcula de forma totalmente automática y sin necesidad de ajustar ningún parámetro en especial, en función del tipo de comida y peso programados.
Una vez completada la descongelación el mensaje "FIN DESCONGELACIÓN" aparecerá en el display.
Función microondas
Seleccione el icono función microondas con las flechas y pulse la tecla .
Si desea iniciar la función enseguida con un tiempo preconfigurado de 30 seg. y una potencia de 900W, pulse la tecla .
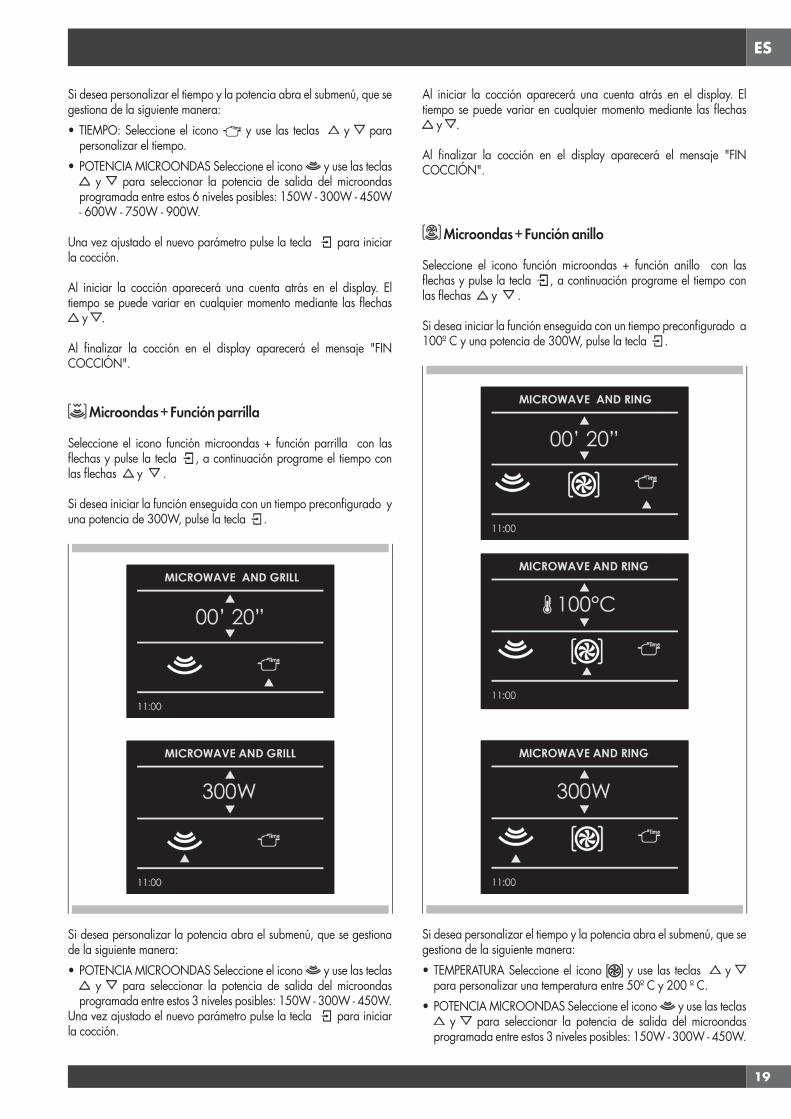
ES
19
Si desea personalizar el tiempo y la potencia abra el submenú, que se gestiona de la siguiente manera: • TIEMPO: Seleccione el icono y use las teclas y para
personalizar el tiempo.• POTENCIA MICROONDAS Seleccione el icono y use las teclas
y para seleccionar la potencia de salida del microondas programada entre estos 6 niveles posibles: 150W - 300W - 450W - 600W - 750W - 900W.
Una vez ajustado el nuevo parámetro pulse la tecla para iniciar la cocción.
Al iniciar la cocción aparecerá una cuenta atrás en el display. El tiempo se puede variar en cualquier momento mediante las flechas
y .
Al finalizar la cocción en el display aparecerá el mensaje "FIN COCCIÓN".
Microondas + Función parrilla
Seleccione el icono función microondas + función parrilla con las flechas y pulse la tecla , a continuación programe el tiempo con las flechas y .
Si desea iniciar la función enseguida con un tiempo preconfigurado y una potencia de 300W, pulse la tecla .
Si desea personalizar la potencia abra el submenú, que se gestiona de la siguiente manera:• POTENCIA MICROONDAS Seleccione el icono y use las teclas
y para seleccionar la potencia de salida del microondas programada entre estos 3 niveles posibles: 150W - 300W - 450W.
Una vez ajustado el nuevo parámetro pulse la tecla para iniciar la cocción.
Al iniciar la cocción aparecerá una cuenta atrás en el display. El tiempo se puede variar en cualquier momento mediante las flechas
y .
Al finalizar la cocción en el display aparecerá el mensaje "FIN COCCIÓN".
Microondas + Función anillo
Seleccione el icono función microondas + función anillo con las flechas y pulse la tecla , a continuación programe el tiempo con las flechas y .
Si desea iniciar la función enseguida con un tiempo preconfigurado a 100º C y una potencia de 300W, pulse la tecla .
Si desea personalizar el tiempo y la potencia abra el submenú, que se gestiona de la siguiente manera:• TEMPERATURA Seleccione el icono y use las teclas y
para personalizar una temperatura entre 50º C y 200 º C. • POTENCIA MICROONDAS Seleccione el icono y use las teclas
y para seleccionar la potencia de salida del microondas programada entre estos 3 niveles posibles: 150W - 300W - 450W.
ES
20
Una vez ajustado el nuevo parámetro pulse la tecla para iniciar la cocción.
Al iniciar la cocción aparecerá una cuenta atrás en el display. El tiempo se puede variar en cualquier momento mediante las flechas
y .
Al finalizar la cocción en el display aparecerá el mensaje "FIN COCCIÓN".
Cambio vatios potencia
Pulse el icono y pulse la tecla Seleccione el icono microondas, cambie los vatios de potencia mediante las flechas y confirme con la tecla .
Variación tiempo
Pulse el icono y la tecla Seleccione el icono tiempo, cambie el valor tiempo mediante las flechas y confirme con la tecla
Cambio de temperatura
(solo disponible para microondas y anillo). Seleccione el icono y pulse la tecla (solo disponible para microondas y anillo).
Seleccione el modo de cocción y cambie la programación de la temperatura mediante las flechas y confirme con la tecla .
Cambio de peso
(solo disponible en descongelación por peso)Pulse el icono , cambie el peso con las flechas y confirme con la tecla .

ES
21
12 - Uso de las luces del horno
Un botón luminoso activa las luces .Pulsar para encender o apagar las luces.Las luces internas del horno se encienden automáticamente cuando se abre la puerta..Cuando un horno está en servicio, las luces del horno se encienden automáticamente al activarse un modo de funcionamiento.Las luces del horno se apagan automáticamente cuando se desactiva el modo de funcionamiento.
NOTA: Una vez encendidas las luces se apagan automáticamente al cabo de 3 minutos. Para volver a encenderla pulse la tecla o abra la puerta.
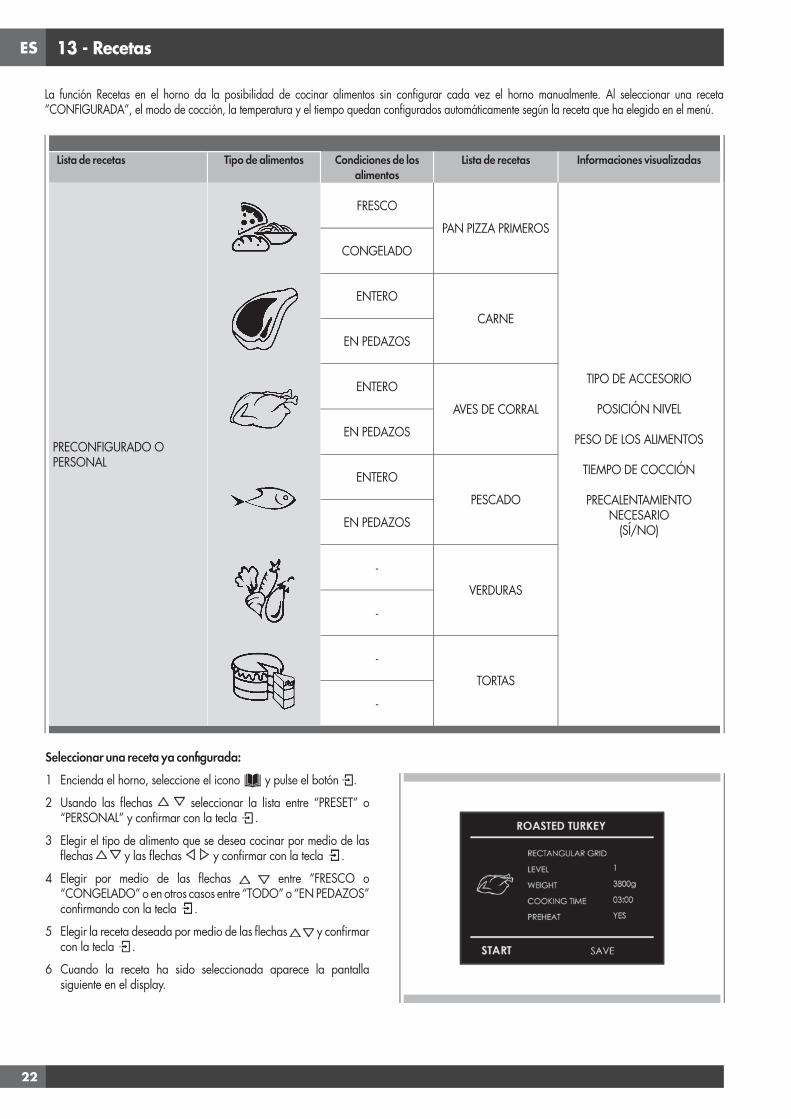
ES
22
13 - Recetas
Seleccionar una receta ya configurada:1 Encienda el horno, seleccione el icono y pulse el botón .
2 Usando las flechas seleccionar la lista entre “PRESET” o “PERSONAL” y confirmar con la tecla .
3 Elegir el tipo de alimento que se desea cocinar por medio de las flechas y las flechas y confirmar con la tecla .
4 Elegir por medio de las flechas entre “FRESCO o “CONGELADO” o en otros casos entre “TODO” o “EN PEDAZOS” confirmando con la tecla .
5 Elegir la receta deseada por medio de las flechas y confirmar con la tecla .
6 Cuando la receta ha sido seleccionada aparece la pantalla siguiente en el display.
La función Recetas en el horno da la posibilidad de cocinar alimentos sin configurar cada vez el horno manualmente. Al seleccionar una receta “CONFIGURADA”, el modo de cocción, la temperatura y el tiempo quedan configurados automáticamente según la receta que ha elegido en el menú.
Lista de recetas Tipo de alimentos Condiciones de los alimentos
Lista de recetas Informaciones visualizadas
PRECONFIGURADO O PERSONAL
FRESCO
PAN PIZZA PRIMEROS
TIPO DE ACCESORIO
POSICIÓN NIVEL
PESO DE LOS ALIMENTOS
TIEMPO DE COCCIÓN
PRECALENTAMIENTO NECESARIO
(SÍ/NO)
CONGELADO
ENTERO
CARNE
EN PEDAZOS
ENTERO
AVES DE CORRAL
EN PEDAZOS
ENTERO
PESCADO
EN PEDAZOS
-
VERDURAS
-
-
TORTAS
-
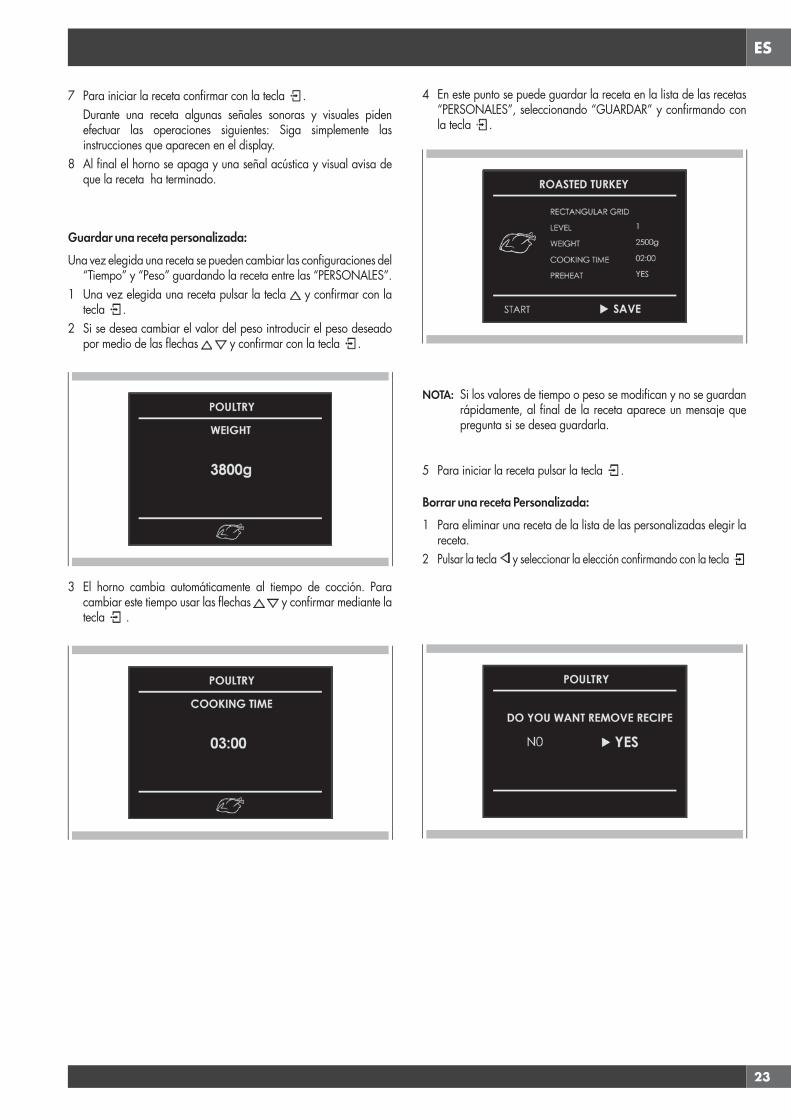
ES
23
7 Para iniciar la receta confirmar con la tecla . Durante una receta algunas señales sonoras y visuales piden
efectuar las operaciones siguientes: Siga simplemente las instrucciones que aparecen en el display.
8 Al final el horno se apaga y una señal acústica y visual avisa de que la receta ha terminado.
Guardar una receta personalizada:Una vez elegida una receta se pueden cambiar las configuraciones del
“Tiempo” y “Peso” guardando la receta entre las “PERSONALES”. 1 Una vez elegida una receta pulsar la tecla y confirmar con la
tecla .2 Si se desea cambiar el valor del peso introducir el peso deseado
por medio de las flechas y confirmar con la tecla .
3 El horno cambia automáticamente al tiempo de cocción. Para cambiar este tiempo usar las flechas y confirmar mediante la tecla .
4 En este punto se puede guardar la receta en la lista de las recetas “PERSONALES”, seleccionando “GUARDAR” y confirmando con la tecla .
NOTA: Si los valores de tiempo o peso se modifican y no se guardan rápidamente, al final de la receta aparece un mensaje que pregunta si se desea guardarla.
5 Para iniciar la receta pulsar la tecla .
Borrar una receta Personalizada:1 Para eliminar una receta de la lista de las personalizadas elegir la
receta.2 Pulsar la tecla y seleccionar la elección confirmando con la tecla

ES
24
14 - Para el instalador
Instalación del horno en la encimeraEl horno debe instalarse debajo de una superficie de cocción, en una columna o combinado con el correspondiente cajón calentador.Las dimensiones del espacio deben ser las que muestra la imagen.El material de la cabina debe poder resistir el calor.El horno debe estar centrado en las paredes de la cabina y fijado con los tornillos y los pernos suministrados.
560
min 460
50510
560
50 510
595
52826
144140
596
554
545
560min 450
50510
533
455
594
540
432
min 458
min 3
560
min 3
533
455
594
540
432

ES
25
DATOS TÉCNICOSAlimentación eléctrica 220-240 V~, 50 HzPotencia máxima absorbida: 3200 WPotencia microondas 900 WGrill 1500 WAire caliente 1500 WFrecuencia microondas 2450 MHz
Conexión eléctrica
Antes de efectuar la conexión eléctrica asegúrese de que: • las características del sistema eléctrico satisfacen el contenido de
la placa de número de serie que se encuentra en la parte frontal del horno;
• el sistema eléctrico tiene una conexión a tierra efectiva que respeta las normas y la legislación vigente.
La ley exige que exista conexión de tierra.El cable no debe alcanzar, bajo ningún concepto, una temperatura superior en 50º C a la temperatura ambiente.Este horno debe conectarse a la alimentación mediante un cable de alimentación con un enchufe adecuadamente evaluado compatible con la salida de clavija que se encuentra en el subcircuito final del cableado fijo que alimenta el horno. Si un aparato fijado no tiene un cable de potencia y una clavija u otro dispositivo que asegure la desconexión de la alimentación eléctrica con una distancia de apertura de los contactos que permita una desconexión completa en condiciones de voltaje excesivo de categoría III, dichos dispositivos de desconexión se suministrarán en las alimentaciones eléctricas conformes con las reglas de instalación.La clavija o el interruptor omnipolar debe ser fácil de alcanzar una vez instalado el aparato.
NOTA: El fabricante declina cualquier responsabilidad en caso de inobservancia de las normas para la prevención de accidentes y de las instrucciones anteriores.
TIPO Y DIÁMETRO MÍNIMO DE LOS CABLESSASO
H05RR-F 3x1,5 mm² H05RR-F 3x2,5 mm²
H05VV-F 3x1,5 mm² H05VV-F 3x2,5 mm²
H05RN-F 3x1,5 mm² H05RN-F 3x2,5 mm²
H05V2V2-F 3x1,5 mm² H05V2V2-F 3x2,5 mm²
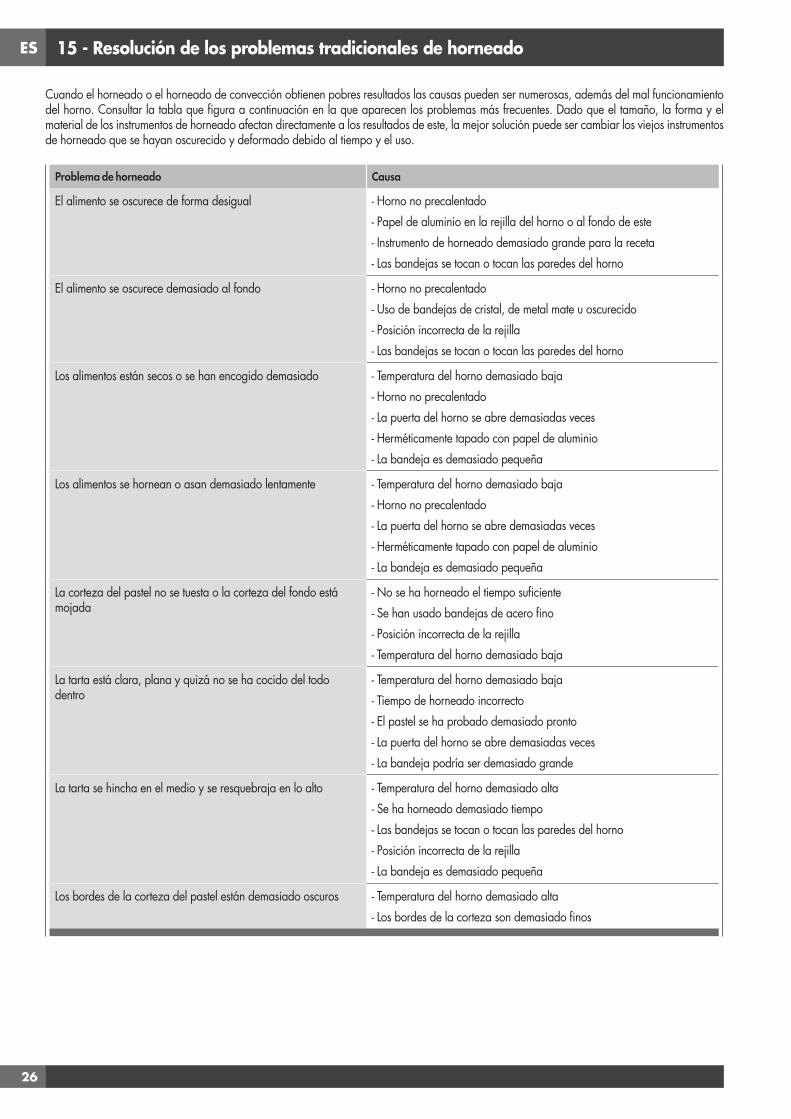
ES
26
15 - Resolución de los problemas tradicionales de horneado
Cuando el horneado o el horneado de convección obtienen pobres resultados las causas pueden ser numerosas, además del mal funcionamiento del horno. Consultar la tabla que figura a continuación en la que aparecen los problemas más frecuentes. Dado que el tamaño, la forma y el material de los instrumentos de horneado afectan directamente a los resultados de este, la mejor solución puede ser cambiar los viejos instrumentos de horneado que se hayan oscurecido y deformado debido al tiempo y el uso.
Problema de horneado Causa
El alimento se oscurece de forma desigual - Horno no precalentado- Papel de aluminio en la rejilla del horno o al fondo de este- Instrumento de horneado demasiado grande para la receta- Las bandejas se tocan o tocan las paredes del horno
El alimento se oscurece demasiado al fondo - Horno no precalentado- Uso de bandejas de cristal, de metal mate u oscurecido- Posición incorrecta de la rejilla- Las bandejas se tocan o tocan las paredes del horno
Los alimentos están secos o se han encogido demasiado - Temperatura del horno demasiado baja- Horno no precalentado- La puerta del horno se abre demasiadas veces- Herméticamente tapado con papel de aluminio- La bandeja es demasiado pequeña
Los alimentos se hornean o asan demasiado lentamente - Temperatura del horno demasiado baja- Horno no precalentado- La puerta del horno se abre demasiadas veces- Herméticamente tapado con papel de aluminio- La bandeja es demasiado pequeña
La corteza del pastel no se tuesta o la corteza del fondo está mojada
- No se ha horneado el tiempo suficiente- Se han usado bandejas de acero fino- Posición incorrecta de la rejilla- Temperatura del horno demasiado baja
La tarta está clara, plana y quizá no se ha cocido del todo dentro
- Temperatura del horno demasiado baja- Tiempo de horneado incorrecto- El pastel se ha probado demasiado pronto- La puerta del horno se abre demasiadas veces- La bandeja podría ser demasiado grande
La tarta se hincha en el medio y se resquebraja en lo alto - Temperatura del horno demasiado alta- Se ha horneado demasiado tiempo- Las bandejas se tocan o tocan las paredes del horno- Posición incorrecta de la rejilla- La bandeja es demasiado pequeña
Los bordes de la corteza del pastel están demasiado oscuros - Temperatura del horno demasiado alta- Los bordes de la corteza son demasiado finos
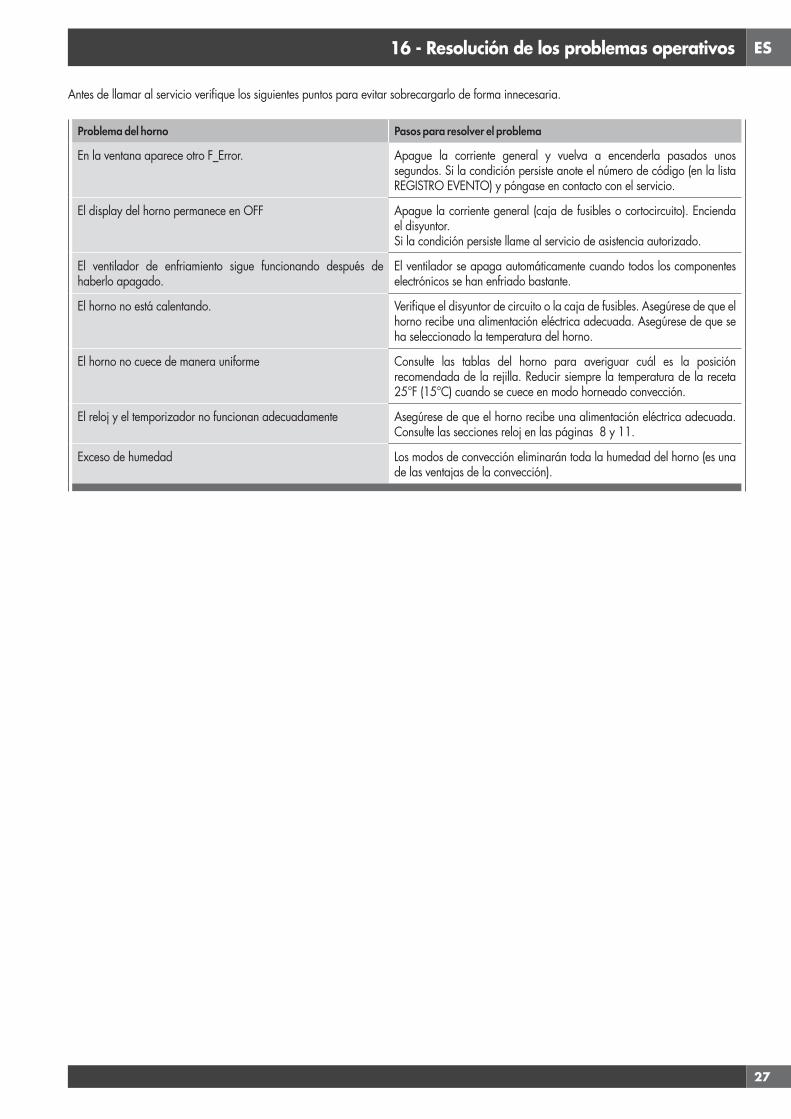
ES
27
16 - Resolución de los problemas operativos
Antes de llamar al servicio verifique los siguientes puntos para evitar sobrecargarlo de forma innecesaria.
Problema del horno Pasos para resolver el problema
En la ventana aparece otro F_Error. Apague la corriente general y vuelva a encenderla pasados unos segundos. Si la condición persiste anote el número de código (en la lista REGISTRO EVENTO) y póngase en contacto con el servicio.
El display del horno permanece en OFF Apague la corriente general (caja de fusibles o cortocircuito). Encienda el disyuntor.Si la condición persiste llame al servicio de asistencia autorizado.
El ventilador de enfriamiento sigue funcionando después de haberlo apagado.
El ventilador se apaga automáticamente cuando todos los componentes electrónicos se han enfriado bastante.
El horno no está calentando. Verifique el disyuntor de circuito o la caja de fusibles. Asegúrese de que el horno recibe una alimentación eléctrica adecuada. Asegúrese de que se ha seleccionado la temperatura del horno.
El horno no cuece de manera uniforme Consulte las tablas del horno para averiguar cuál es la posición recomendada de la rejilla. Reducir siempre la temperatura de la receta 25°F (15°C) cuando se cuece en modo horneado convección.
El reloj y el temporizador no funcionan adecuadamente Asegúrese de que el horno recibe una alimentación eléctrica adecuada. Consulte las secciones reloj en las páginas 8 y 11.
Exceso de humedad Los modos de convección eliminarán toda la humedad del horno (es una de las ventajas de la convección).

ES
28
17 - Servicio de asistencia
Antes de ponerse en contacto con el servicio consulte la "Resolución de problemas". Puede ahorrarle una llamada de asistencia.Si sigue necesitando ayuda consulte las siguientes instrucciones. Cuando llame tenga a mano la fecha de compra, el modelo completo y el número de serie del aparato. Esta información nos ayudará a responder a su pregunta.
Registro de datos para el servicio
Para obtener información sobre el servicio autorizado o sobre las piezas de recambio consulte la "GARANTÍA para aparatos domésticos".
Para localizar el número de registro de serie consulte la página 4. Ahora puede escribir esta información en el espacio que figura a continuación.Conserve la factura para validad la garantía.
Registro de datos para el servicio
Número de modelo _________________________________
Número de serie __________________________________
Fecha de instalación o de ocupación __________________

NL
1
INHOUDSOPGAVE Pagina
1 - Waarschuwingen voor Magnetronovens 4Voedselbereiding 4Pannen en bakblikken 4Magnetron vermogen en duur 4Verpakking 4Dranken 4Voeding voor baby’s 5Etenswaren met schil 5Het drogen van voedsel 5Olie 6Oorzaken van schade 6Eerste gebruik 8Monteren en demonteren van de platte grill 8Respect voor het milieu 9
2 - Het Bedieningspaneel 10Toetsenblok 10
3 - Algemene Oven Informatie 11Foutcodes 11Pieptonen 11Standaardinstellingen 11F Storing Nummercodes 11Voorverwarmen 11Timer 11De Oven Voorverwarmen 12Suggesties voor Gebruik 12Magnetronbediening 12Oven Condensatie en Temperatuur 12Op Grote Hoogte Bakken 12
4 - Algemene Oven Tips 12
5 - Aan de slag 13Instructies voor eerste keer inschakelen 13
6 - Gebruikersinstellingen 14Taal 14Temperatuur en Gewicht 14Tijd 14Datum 15Helderheid 15Volume 15
INHOUDSOPGAVE Pagina
7 - Systeeminstelling 16Logboek 16Demo 16
8 - Uw Oven Starten 17De oven in- en uitschakelen 17Bereidingsstandtabellen 18
9 - Traditionele Bereiding 19De bereidingsstand wijzigen 19De temperatuur wijzigen 19Voorverwarmingsfase 19
10 - Tijd Werking Ovenmodus 20Bereidingstijd 20Stoptijd 20
11 - Magnetronbereiding 21 Gecontroleerd Ontdooien Functie 21 Gewicht Ontdooien Functie 21 Magnetronfunctie 21 Magnetron + Grill Functie 22 Magnetron + Ring Functie 22Watt Vermogen Wijzigen 23Tijd Wijzigen 23Temperatuur Wijzigen 23Gewicht Wijzigen 23
12 - De Ovenlampen Gebruiken 24
13 - Recepten 25
14 - Voor de Installateur 27Elektrische Aansluiting 28
15 - Traditionele Bakproblemen Oplossen 29
16 - Bedieningsproblemen Oplossen 30
17 - Assistentie of Service 31Service Gegevensverslag 31
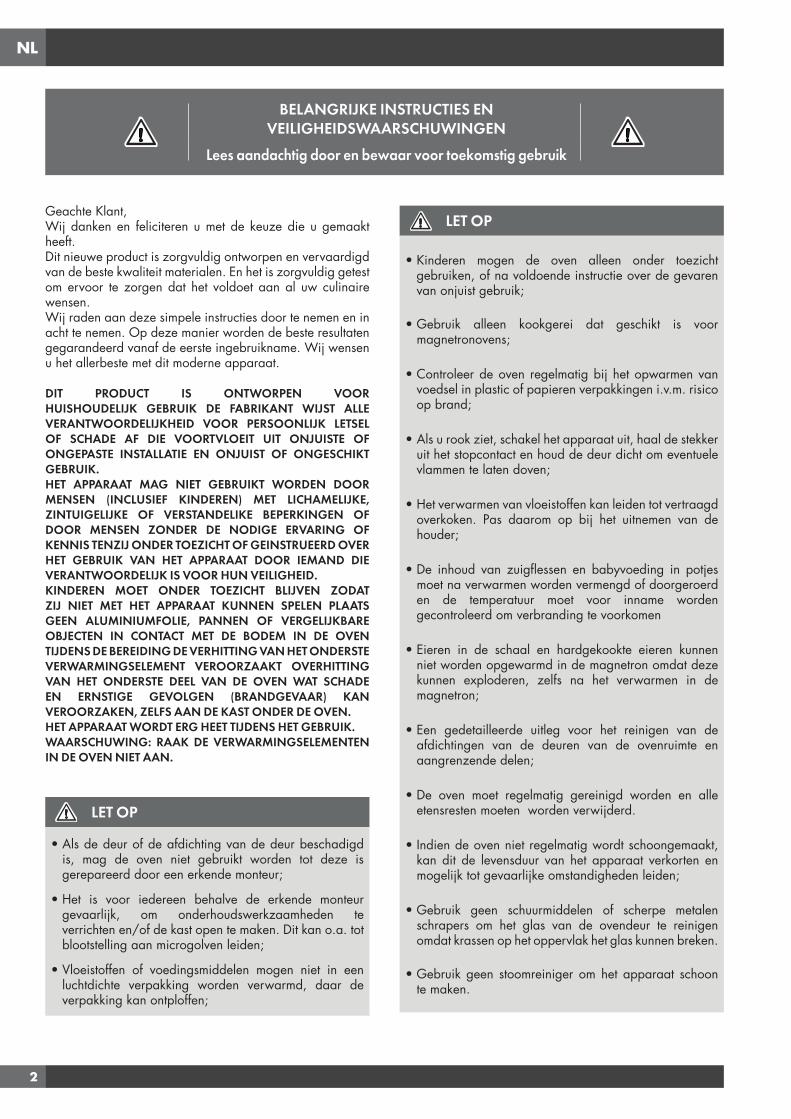
NL
2
Geachte Klant,Wij danken en feliciteren u met de keuze die u gemaakt heeft.Dit nieuwe product is zorgvuldig ontworpen en vervaardigd van de beste kwaliteit materialen. En het is zorgvuldig getest om ervoor te zorgen dat het voldoet aan al uw culinaire wensen.Wij raden aan deze simpele instructies door te nemen en in acht te nemen. Op deze manier worden de beste resultaten gegarandeerd vanaf de eerste ingebruikname. Wij wensen u het allerbeste met dit moderne apparaat.
DIT PRODUCT IS ONTWORPEN VOOR HUISHOUDELIJK GEBRUIK DE FABRIKANT WIJST ALLE VERANTWOORDELIJKHEID VOOR PERSOONLIJK LETSEL OF SCHADE AF DIE VOORTVLOEIT UIT ONJUISTE OF ONGEPASTE INSTALLATIE EN ONJUIST OF ONGESCHIKT GEBRUIK.HET APPARAAT MAG NIET GEBRUIKT WORDEN DOOR MENSEN (INCLUSIEF KINDEREN) MET LICHAMELIJKE, ZINTUIGELIJKE OF VERSTANDELIKE BEPERKINGEN OF DOOR MENSEN ZONDER DE NODIGE ERVARING OF KENNIS TENZIJ ONDER TOEZICHT OF GEINSTRUEERD OVER HET GEBRUIK VAN HET APPARAAT DOOR IEMAND DIE VERANTWOORDELIJK IS VOOR HUN VEILIGHEID.KINDEREN MOET ONDER TOEZICHT BLIJVEN ZODAT ZIJ NIET MET HET APPARAAT KUNNEN SPELEN PLAATS GEEN ALUMINIUMFOLIE, PANNEN OF VERGELIJKBARE OBJECTEN IN CONTACT MET DE BODEM IN DE OVEN TIJDENS DE BEREIDING DE VERHITTING VAN HET ONDERSTE VERWARMINGSELEMENT VEROORZAAKT OVERHITTING VAN HET ONDERSTE DEEL VAN DE OVEN WAT SCHADE EN ERNSTIGE GEVOLGEN (BRANDGEVAAR) KAN VEROORZAKEN, ZELFS AAN DE KAST ONDER DE OVEN.HET APPARAAT WORDT ERG HEET TIJDENS HET GEBRUIK.WAARSCHUWING: RAAK DE VERWARMINGSELEMENTEN IN DE OVEN NIET AAN.
LET OP
• Als de deur of de afdichting van de deur beschadigd is, mag de oven niet gebruikt worden tot deze is gerepareerd door een erkende monteur;
• Het is voor iedereen behalve de erkende monteur gevaarlijk, om onderhoudswerkzaamheden te verrichten en/of de kast open te maken. Dit kan o.a. tot blootstelling aan microgolven leiden;
• Vloeistoffen of voedingsmiddelen mogen niet in een luchtdichte verpakking worden verwarmd, daar de verpakking kan ontploffen;
LET OP
• Kinderen mogen de oven alleen onder toezicht gebruiken, of na voldoende instructie over de gevaren van onjuist gebruik;
• Gebruik alleen kookgerei dat geschikt is voor magnetronovens;
• Controleer de oven regelmatig bij het opwarmen van voedsel in plastic of papieren verpakkingen i.v.m. risico op brand;
• Als u rook ziet, schakel het apparaat uit, haal de stekker uit het stopcontact en houd de deur dicht om eventuele vlammen te laten doven;
• Het verwarmen van vloeistoffen kan leiden tot vertraagd overkoken. Pas daarom op bij het uitnemen van de houder;
• De inhoud van zuigflessen en babyvoeding in potjes moet na verwarmen worden vermengd of doorgeroerd en de temperatuur moet voor inname worden gecontroleerd om verbranding te voorkomen
• Eieren in de schaal en hardgekookte eieren kunnen niet worden opgewarmd in de magnetron omdat deze kunnen exploderen, zelfs na het verwarmen in de magnetron;
• Een gedetailleerde uitleg voor het reinigen van de afdichtingen van de deuren van de ovenruimte en aangrenzende delen;
• De oven moet regelmatig gereinigd worden en alle etensresten moeten worden verwijderd.
• Indien de oven niet regelmatig wordt schoongemaakt, kan dit de levensduur van het apparaat verkorten en mogelijk tot gevaarlijke omstandigheden leiden;
• Gebruik geen schuurmiddelen of scherpe metalen schrapers om het glas van de ovendeur te reinigen omdat krassen op het oppervlak het glas kunnen breken.
• Gebruik geen stoomreiniger om het apparaat schoon te maken.
BELANGRIJKE INSTRUCTIES ENVEILIGHEIDSWAARSCHUWINGEN
Lees aandachtig door en bewaar voor toekomstig gebruik
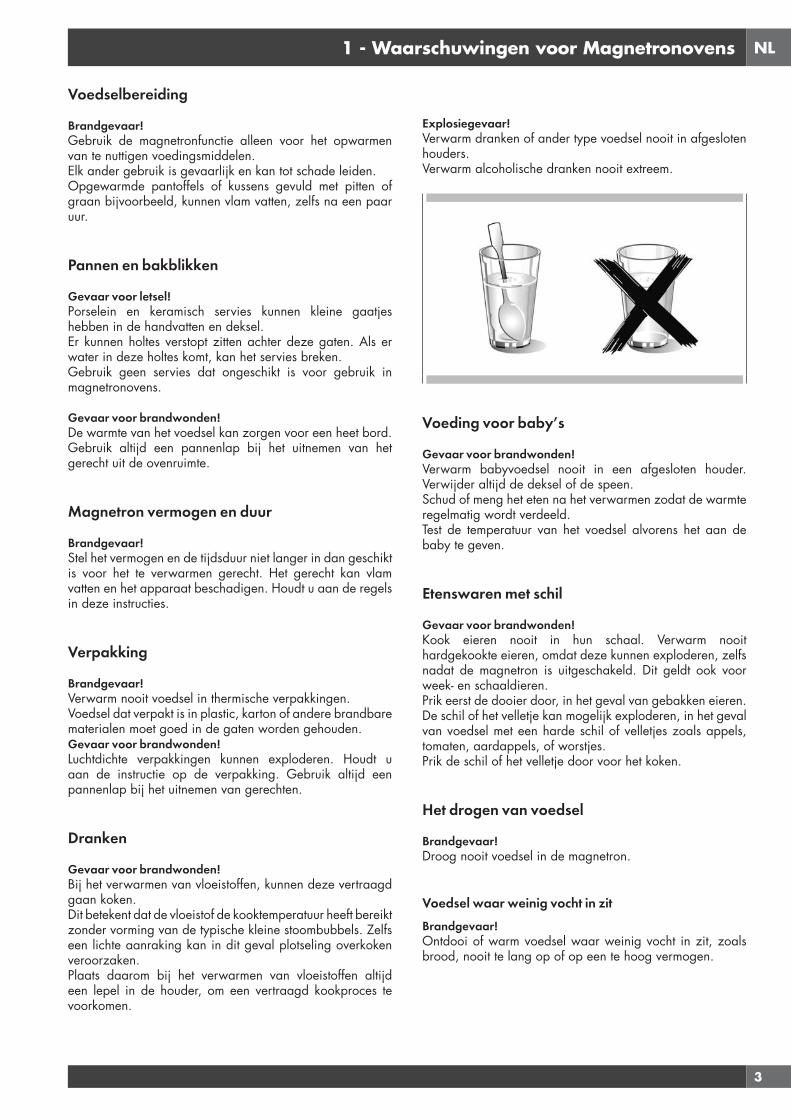
NL
3
1 - Waarschuwingen voor Magnetronovens
Voedselbereiding
Brandgevaar!Gebruik de magnetronfunctie alleen voor het opwarmen van te nuttigen voedingsmiddelen. Elk ander gebruik is gevaarlijk en kan tot schade leiden.Opgewarmde pantoffels of kussens gevuld met pitten of graan bijvoorbeeld, kunnen vlam vatten, zelfs na een paar uur.
Pannen en bakblikken
Gevaar voor letsel!Porselein en keramisch servies kunnen kleine gaatjes hebben in de handvatten en deksel.Er kunnen holtes verstopt zitten achter deze gaten. Als er water in deze holtes komt, kan het servies breken.Gebruik geen servies dat ongeschikt is voor gebruik in magnetronovens.
Gevaar voor brandwonden!De warmte van het voedsel kan zorgen voor een heet bord. Gebruik altijd een pannenlap bij het uitnemen van het gerecht uit de ovenruimte.
Magnetron vermogen en duur
Brandgevaar!Stel het vermogen en de tijdsduur niet langer in dan geschikt is voor het te verwarmen gerecht. Het gerecht kan vlam vatten en het apparaat beschadigen. Houdt u aan de regels in deze instructies.
Verpakking
Brandgevaar!Verwarm nooit voedsel in thermische verpakkingen.Voedsel dat verpakt is in plastic, karton of andere brandbare materialen moet goed in de gaten worden gehouden.Gevaar voor brandwonden!Luchtdichte verpakkingen kunnen exploderen. Houdt u aan de instructie op de verpakking. Gebruik altijd een pannenlap bij het uitnemen van gerechten.
Dranken
Gevaar voor brandwonden!Bij het verwarmen van vloeistoffen, kunnen deze vertraagd gaan koken.Dit betekent dat de vloeistof de kooktemperatuur heeft bereikt zonder vorming van de typische kleine stoombubbels. Zelfs een lichte aanraking kan in dit geval plotseling overkoken veroorzaken.Plaats daarom bij het verwarmen van vloeistoffen altijd een lepel in de houder, om een vertraagd kookproces te voorkomen.
Explosiegevaar!Verwarm dranken of ander type voedsel nooit in afgesloten houders. Verwarm alcoholische dranken nooit extreem.
Voeding voor baby’s
Gevaar voor brandwonden!Verwarm babyvoedsel nooit in een afgesloten houder. Verwijder altijd de deksel of de speen.Schud of meng het eten na het verwarmen zodat de warmte regelmatig wordt verdeeld.Test de temperatuur van het voedsel alvorens het aan de baby te geven.
Etenswaren met schil
Gevaar voor brandwonden!Kook eieren nooit in hun schaal. Verwarm nooit hardgekookte eieren, omdat deze kunnen exploderen, zelfs nadat de magnetron is uitgeschakeld. Dit geldt ook voor week- en schaaldieren.Prik eerst de dooier door, in het geval van gebakken eieren.De schil of het velletje kan mogelijk exploderen, in het geval van voedsel met een harde schil of velletjes zoals appels, tomaten, aardappels, of worstjes. Prik de schil of het velletje door voor het koken.
Het drogen van voedsel
Brandgevaar!Droog nooit voedsel in de magnetron.
Voedsel waar weinig vocht in zitBrandgevaar!Ontdooi of warm voedsel waar weinig vocht in zit, zoals brood, nooit te lang op of op een te hoog vermogen.
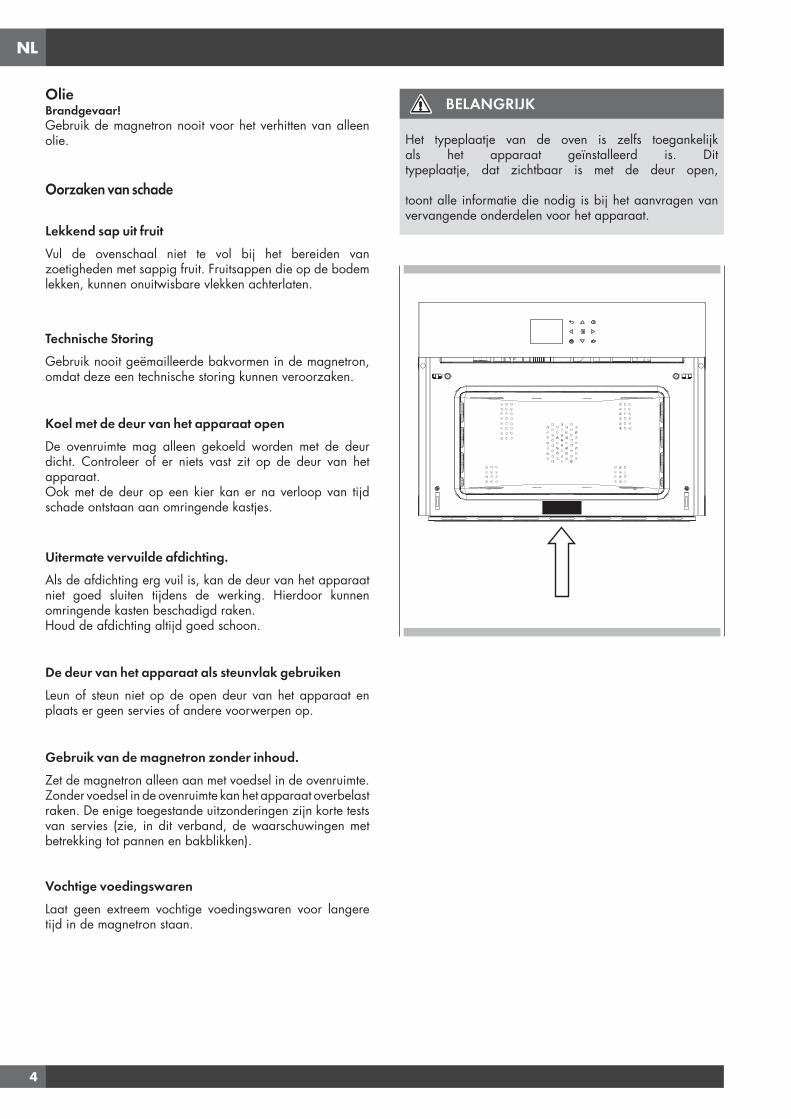
NL
4
OlieBrandgevaar!Gebruik de magnetron nooit voor het verhitten van alleen olie.
Oorzaken van schade
Lekkend sap uit fruitVul de ovenschaal niet te vol bij het bereiden van zoetigheden met sappig fruit. Fruitsappen die op de bodem lekken, kunnen onuitwisbare vlekken achterlaten.
Technische StoringGebruik nooit geëmailleerde bakvormen in de magnetron, omdat deze een technische storing kunnen veroorzaken.
Koel met de deur van het apparaat openDe ovenruimte mag alleen gekoeld worden met de deur dicht. Controleer of er niets vast zit op de deur van het apparaat.Ook met de deur op een kier kan er na verloop van tijd schade ontstaan aan omringende kastjes.
Uitermate vervuilde afdichting. Als de afdichting erg vuil is, kan de deur van het apparaat niet goed sluiten tijdens de werking. Hierdoor kunnen omringende kasten beschadigd raken.Houd de afdichting altijd goed schoon.
De deur van het apparaat als steunvlak gebruikenLeun of steun niet op de open deur van het apparaat en plaats er geen servies of andere voorwerpen op.
Gebruik van de magnetron zonder inhoud.Zet de magnetron alleen aan met voedsel in de ovenruimte. Zonder voedsel in de ovenruimte kan het apparaat overbelast raken. De enige toegestande uitzonderingen zijn korte tests van servies (zie, in dit verband, de waarschuwingen met betrekking tot pannen en bakblikken).
Vochtige voedingswarenLaat geen extreem vochtige voedingswaren voor langere tijd in de magnetron staan.
BELANGRIJK
Het typeplaatje van de oven is zelfs toegankelijk als het apparaat geïnstalleerd is. Dit typeplaatje, dat zichtbaar is met de deur open, toont alle informatie die nodig is bij het aanvragen van vervangende onderdelen voor het apparaat.

NL
5
BELANGRIJK
Haal, als voorzorgsmaatregel, altijd de stekker uit het stopcontact voor het reinigen van de oven. Vermijd bovendien het gebruik van zure of alkalische stoffen (zoals citroen, azijn, zout, tomaten, enz.). Vermijd het gebruik van producten met chloor, zuren of schuurmiddelen, in het bijzonder voor het reinigen van gelakte onderdelen.
Eerste gebruik
Reinig de oven grondig met water en zeep en spoel goed af.Verwarm de oven voor ongeveer 30 minuten op de maximale temperatuur; dit elimineert alle resterende productieoliën die onaangename geuren tijdens het koken kunnen veroorzaken. Gebruik hiervoor de geventileerd koken functie zonder accessoires in de oven. Maak de de accessoires voor het eerste gebruik voorzichtig schoon met een zeer hete alkalische wasoplossing en een zachte doek.
Monteren en demonteren van de platte grill
Om de platte grill te verwijderen, trekt u de grill naar u toe totdat deze stopt, til deze vervolgens op door naar boven te trekken, totdat de grill er helemaal uit is.Om de platte grill terug te plaatsen, houdt u deze in een hoek van 45 graden en vervolgens schuift u deze horizontaal in de geleiders tot de grill niet verder kan.Als de platte grill een lage lekbak (lade) heeft, is deze te verwijderen door deze iets op te tillen en naar voren te trekken. Schuif de lekbak terug tot deze goed op zijn plaats valt.
NL
6
Respect voor het milieu
De documentatie van dit apparaat is geprint op chloorvrij gebleekt of gerecycled papier om bij te dragen aan de bescherming van het milieu. De verpakkingen zijn ontworpen om schade aan het milieu te voorkomen; het zijn ecologische producten die kunnen worden teruggewonnen of gerecycled.Hergebruik van de verpakking bespaart grondstoffen en vermindert het volume van industrieel en huishoudelijk afval.
HET VERPAKKINGSMATERIAAL is 100% recyclebaar en is gemarkeerd met het recycling-symbool. Afvoeren in overeenstemming met de lokale wetgeving. Het verpakkingsmateriaal (plastic zakken, onderdelen in polystyreen, enz.) moet buiten het bereik van kinderen worden gehouden, want het is potentieel gevaarlijk.
DIT APPARAAT is gemarkeerd volgens de Europese Richtlijn EU/96/2002 betreffende Afgedankte Elektrische en Elektronische Apparatuur (AEEA). Door ervoor te zorgen dat dit product op correcte wijze wordt vernietigd, zal de gebruiker bijdragen om mogelijke negatieve gevolgen voor het milieu en de volksgezondheid te voorkomen.
DIT SYMBOOL op de bijgesloten documentatie geeft aan dat dit product niet mag worden behandeld als huishoudelijk afval, maar moet worden ingeleverd bij een speciaal inzamelpunt voor de recycling van elektrische enelektronische apparatuur.
AFVALVERWIJDERING MOET UITGEVOERD WORDEN in overeenstemming met de lokale wetten met betrekking tot afvalverwijdering.
VOOR MEER INFORMATIE over de behandeling, terugwinning en recycling van dit product, neemt u contact op met het lokale kantoor van bevoegdheden, de binnenlandse afvalinzamelingsdienst of de winkel waar het product is gekocht.
Maak het VOOR SLOOP onbruikbaar door het elektrische snoer door te snijden.
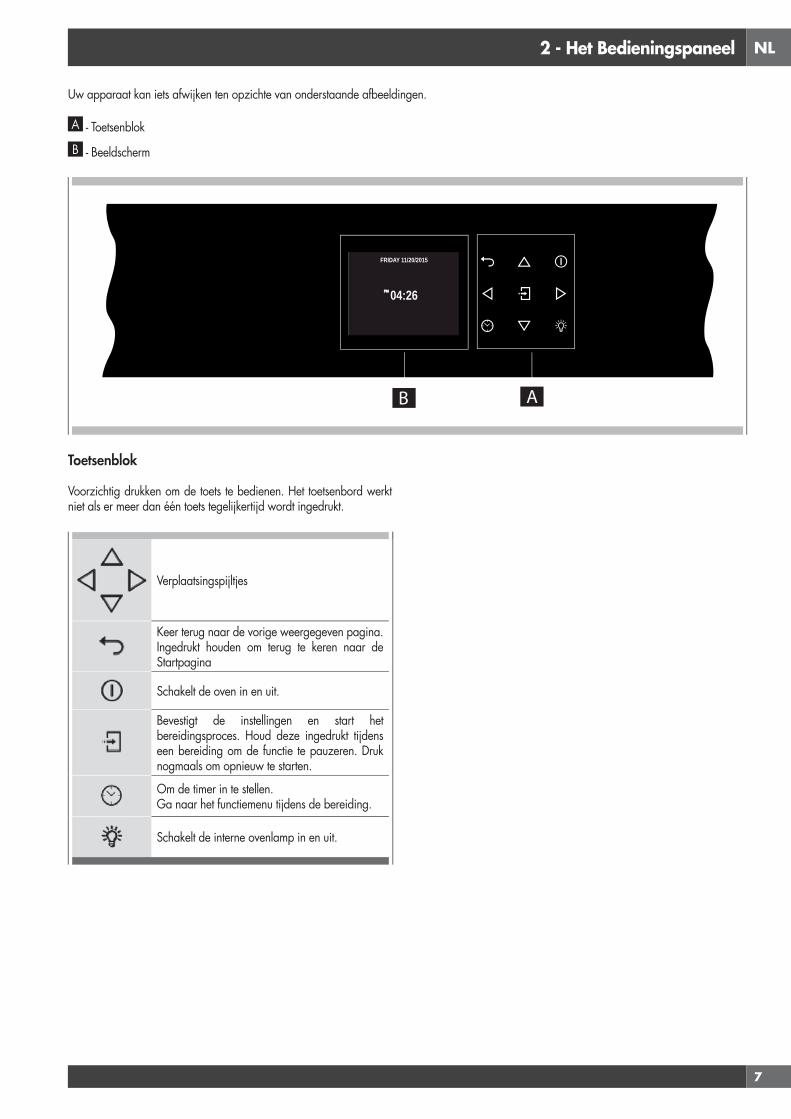
NL
7
2 - Het Bedieningspaneel
Toetsenblok
Voorzichtig drukken om de toets te bedienen. Het toetsenbord werkt niet als er meer dan één toets tegelijkertijd wordt ingedrukt.
Verplaatsingspijltjes
Keer terug naar de vorige weergegeven pagina. Ingedrukt houden om terug te keren naar de Startpagina
Schakelt de oven in en uit.
Bevestigt de instellingen en start het bereidingsproces. Houd deze ingedrukt tijdens een bereiding om de functie te pauzeren. Druk nogmaals om opnieuw te starten.
Om de timer in te stellen.Ga naar het functiemenu tijdens de bereiding.
Schakelt de interne ovenlamp in en uit.
Uw apparaat kan iets afwijken ten opzichte van onderstaande afbeeldingen.
A - Toetsenblok
B - Beeldscherm
PM
FRIDAY 11/20/2015
04:26
B A
NL
8
3 - Algemene Oven Informatie
Foutcodes
Deze code verschijnt in het geval de elektronische besturing een storing aangeeft. De huidige functie wordt geblokkeerd wanneer deze code verschijnt. Als het type fout betrekking heeft op een veiligheidsfunctie wordt de oven onbruikbaar en verschijnt dezelfde foutcode iedere keer dat er een startpoging wordt gedaan (bel de after-sales service in dit geval). Heeft de fout betrekking op een kleine storing, dan kan de oven bij een nieuwe start gebruikt worden voor alle functies die geen betrekking hebben op het defecte onderdeel (bijv. een verwarminsgelement).
Pieptonen
Bevestigt dat de opdracht is ontvangen nadat een toets is ingedrukt.Het geeft ook aan dat een tijdfunctie voltooid is (bijv. Timer of Kookwekker) Een akoestisch signaal waarschuwt de gebruiker tijdens het uitvoeren van een gerecht, dat de oven wacht op bediening van de gebruiker (bijv. plaats het gerecht of draai het om).Pieptonen signaleren ook een ovenstoring.
Standaardinstellingen
De bereidingsstanden selecteren automatisch een geschikte temperatuur wanneer de bereidingswijze is geselecteerd, deze kan aangepast worden wanneer een andere temperatuur nodig is.
F Storing Nummercodes
Deze codes worden getoond als de elektrische besturing een probleem vindt in de oven of in de elektronica.De foutcode wordt vastgelegd in het foutenlogboek in het Instellingenmenu. Deze fout kan worden meegedeeld aan de monteur, zodat hij/zij de mogelijke oorzaak van het probleem op voorhand kan begrijpen.
Voorverwarmen
Wanneer een bereidingsstand is ingesteld en de oven aan het opwarmen is, start het voorverwarmen, tijdens deze periode wordt de momentane temperatuur weergegeven samen met het thermometer symbool.Zodra de 100% is bereikt, klinkt er een ‘einde van de voorverwarming’ toon en verdwijnt de actuele temperatuurwaarde.
Timer
WAARSCHUWING
De timer op de oven schakelt het apparaat niet in of uit, het enige doel van de timer is om u te waarschuwen door middel van de zoemer. Gebruik de einde van de bereiding of uitgesteld koken functie als u de oven automatisch wil uitschakelen.
OPM.: Het drukken op de UIT toets stopt of stelt niet opnieuw de timer in.
1. Druk op de toets en stel de gewenste tijd in door middel van de pijlen en bevestig met de toets . Gebruik de pijlen
om te wisselen tussen de uren en minuten.2. De tijd kan ingesteld worden van 1 minuut tot 12 uur en 59 minuten
en de resterende tijd is, wanneer ingesteld, altijd zichtbaar in de onderste statusbalk tot de tijd is verstreken of opnieuw is ingesteld.
3. Om de ingestelde tijd te wijzigen of annuleren moet u de timer resetten door de toets een paar seconden ingedrukt te houden.
4. De tijd wordt meestal als UU:MIN aangegeven, gedurende de laatste minuut wordt overgeschakeld naar MIN:SEC.
5. Als de tijd verstreken is, toont het scherm 00:00 en de zoemer klinkt een minuut lang of tot de toets wordt ingedrukt.
Verwijder voor het eerste gebruik van de oven alle verpakking en vreemde materialen van de oven(s). Als dit materiaal niet wordt verwijderd uit de binnenkant van de oven, kan het smelten of verbranden als het apparaat wordt gebruikt.
NL
9
4 - Algemene Oven Tips
De Oven Voorverwarmen
• Het selecteren van een hogere temperatuur zal de voorverwarmingstijd niet verkorten.
• Voorverwarmen is noodzakelijk voor goede resultaten bij het bakken van cakes, koek, gebak en brood.
• Voorverwarmen helpt om gebraad dicht te schroeien en vleessappen te behouden.
• Plaats de ovenrekken in de juiste stand vóór het voorverwarmen.• Tijdens het voorverwarmen wordt altijd de geselecteerde
bereidingstemperatuur weergegeven.• Een pieptoon bevestigt dat de oven voorverwarmd is en de “huidige
temperatuur“ wordt uitgeschakeld.
Suggesties voor Gebruik
• Plaats geen bakblikkn op de open ovendeur.• Gebruik bij voorkeur de interne ovenlampen om de gerechten door het glas
de ovendeur te bekijken in plaats van de deur regelmatig te openen.
Magnetronbediening
De microgolven worden omgezet in warmte in het voedsel. De magnetron kan op zichzelf worden gebruikt of in combinatiemet andere soorten verwarming. Dit gedeelte bevat informatie over het servies en instructies voor het instellenvan de magnetronoven.
WAARSCHUWINGEN VOOR SERVIESGOED
Geschikt serviesU kunt hittebestendig vaatwerk van glas, keramiek, porselein, keramiek of vuurvast kunststof gebruiken. Deze materialen zijn doorlaatbaar voor microgolven. Het is ook mogelijk om normale borden te gebruiken. Op deze manier is het niet nodig om het voedsel over te brengen.Serviesgoed met gouden of zilveren decoraties kunnen alleen worden gebruikt indien de fabrikant garandeert dat deze kunnen worden gebruikt in magnetronovens.Bedenk dat, bij gebruik van de oven in magnetronstand, het gerecht geplaatst moet worden op het draaiplateau. Bij gebruik van de oven in combinatiestand, is het aan te bevelen het gerecht te plaatsen op de lage ronde grill, zodanig ondersteund dat het gerecht is gecentreerd op het draaiplateau.
Ongeschikt serviesMetaal serviesgoed kan niet worden gebruikt.Metaal is niet doorlaatbaar voor microgolven. Voedsel in metalen pannen blijft koud.Waarschuwing! Metalen componenten, zoals lepels in glazen, moeten ten minste 2 cm van de wanden van de oven en de binnenzijde van de deur blijven. Eventuele vonken kunnen ernstige schade aan de binnenkant van de glazen deur veroorzaken.Waarschuwing! De platte grill moet worden verwijderd bij het gebruik van de magnetron en gecombineerde standen. Alleen gebruikeb bij traditionele ovenfuncties.
Serviesgoed testenZet de magnetron nooit aan zonder dat er voedsel in staat.De enige uitzondering hierop is om serviesgoed te testen.Als u niet zeker weet of uw servies kan worden gebruikt in de magnetron, adviseren wij om de volgende test uit te voeren:Plaats het serviesgoed of een lege pan in het apparaat voor ½ - 1 minuut op het maximale vermogen. Controleer de temperatuur. De pan of het servies moet koud of lauw aanvoelen. Als het warm is of als er vonken afkomen tijdens het verwarmen, is de pan of het servies niet geschikt.
Oven Condensatie en Temperatuur
• Het is normaal dat een bepaalde hoeveelheid vocht verdampt uit het voedsel tijdens een bereidingsproces. De hoeveelheid is afhankelijk van het vochtgehalte in het voedsel. Het vocht kan op elk oppervlak koeler dan de binnenkant van de oven condenseren, zoals het bedieningspaneel.
• Uw nieuwe oven heeft een elektronische temperatuursensor die het handhaven van een nauwkeurige temperatuur mogelijk maakt.
Op Grote Hoogte Bakken
• Bij koken op grote hoogte, zullen recepten en de bereidingstijd afwijken van de standaard recepten en bereidingstijden.
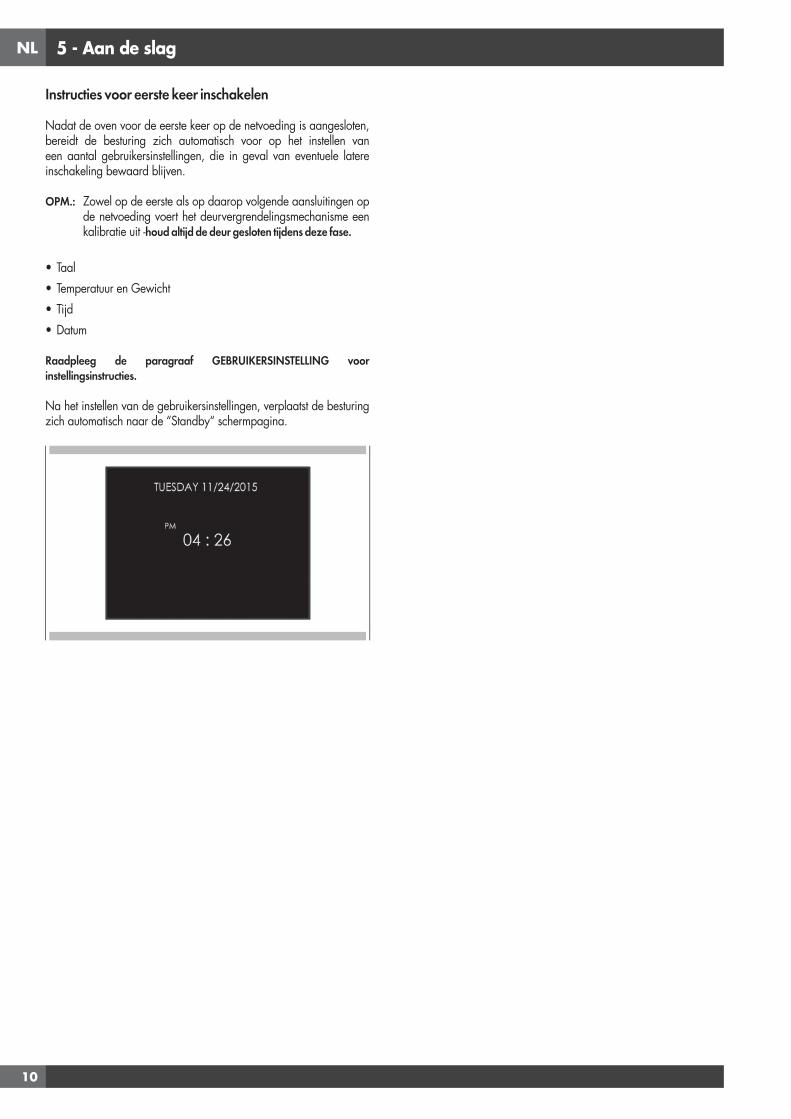
NL
10
5 - Aan de slag
Instructies voor eerste keer inschakelen
Nadat de oven voor de eerste keer op de netvoeding is aangesloten, bereidt de besturing zich automatisch voor op het instellen van een aantal gebruikersinstellingen, die in geval van eventuele latere inschakeling bewaard blijven.
OPM.: Zowel op de eerste als op daarop volgende aansluitingen op de netvoeding voert het deurvergrendelingsmechanisme een kalibratie uit -houd altijd de deur gesloten tijdens deze fase.
• Taal• Temperatuur en Gewicht• Tijd• Datum
Raadpleeg de paragraaf GEBRUIKERSINSTELLING voor instellingsinstructies.
Na het instellen van de gebruikersinstellingen, verplaatst de besturing zich automatisch naar de “Standby“ schermpagina.
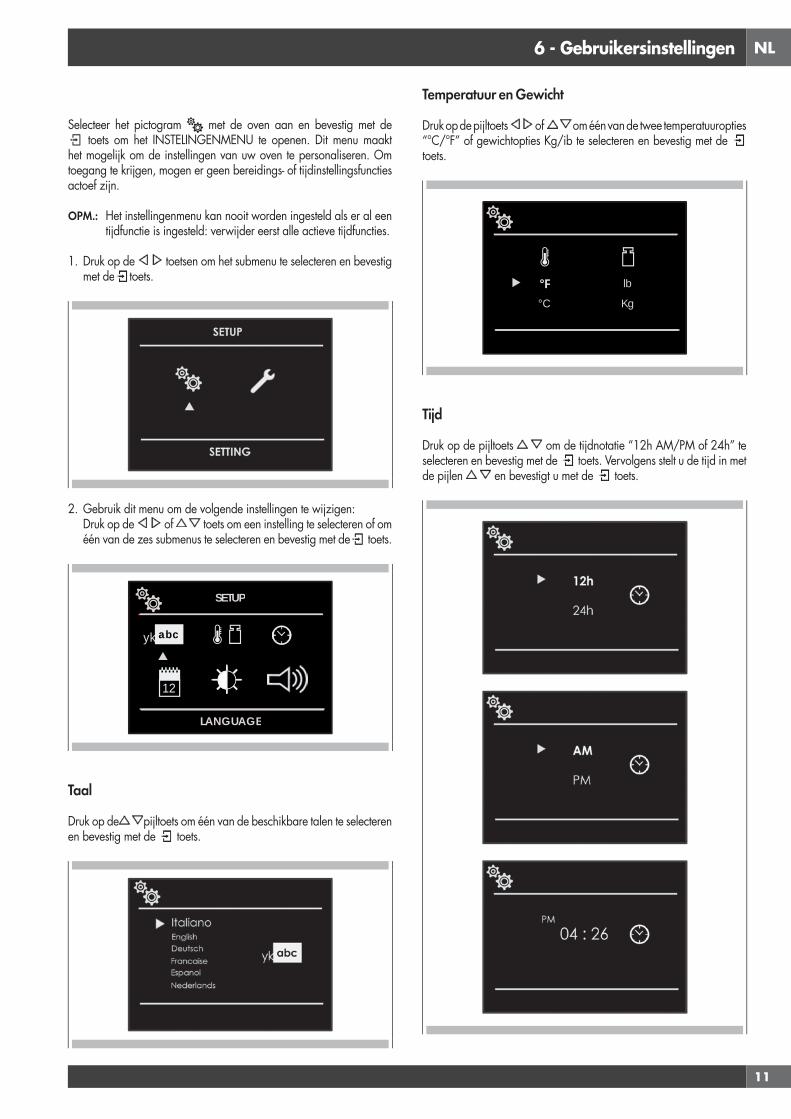
NL
11
6 - Gebruikersinstellingen
Selecteer het pictogram met de oven aan en bevestig met de toets om het INSTELINGENMENU te openen. Dit menu maakt
het mogelijk om de instellingen van uw oven te personaliseren. Om toegang te krijgen, mogen er geen bereidings- of tijdinstellingsfuncties actoef zijn.
OPM.: Het instellingenmenu kan nooit worden ingesteld als er al een tijdfunctie is ingesteld: verwijder eerst alle actieve tijdfuncties.
1. Druk op de toetsen om het submenu te selecteren en bevestig met de toets.
2. Gebruik dit menu om de volgende instellingen te wijzigen: Druk op de of toets om een instelling te selecteren of om
één van de zes submenus te selecteren en bevestig met de toets.
12
yk abc
SETUP
LANGUAGE
Taal
Druk op de pijltoets om één van de beschikbare talen te selecteren en bevestig met de toets.
Temperatuur en Gewicht
Druk op de pijltoets of om één van de twee temperatuuropties “°C/°F” of gewichtopties Kg/ib te selecteren en bevestig met de toets.
°F°C
lb
Kg
Tijd
Druk op de pijltoets om de tijdnotatie “12h AM/PM of 24h” te selecteren en bevestig met de toets. Vervolgens stelt u de tijd in met de pijlen en bevestigt u met de toets.

NL
12
Datum
Druk op de pijltoets om de datumnotatie te selecteren uit de volgende opties “D.M.J. – J.M.D. – M.D.J.” en bevestig met de toets. Vervolgens stelt u de waarde in met de pijlen en bevestigt u met de toets.
Helderheid
Druk op de pijltoets om te kiezen tussen de helderheidsinstelling AAN of STANDBY, selecteer vervolgens met de pijlen de vereiste mate van helderheid en bevestig met de toets.
Volume
Druk op de pijltoets om de vereiste mate van helderheid te selecteren en bevestig met de toets .
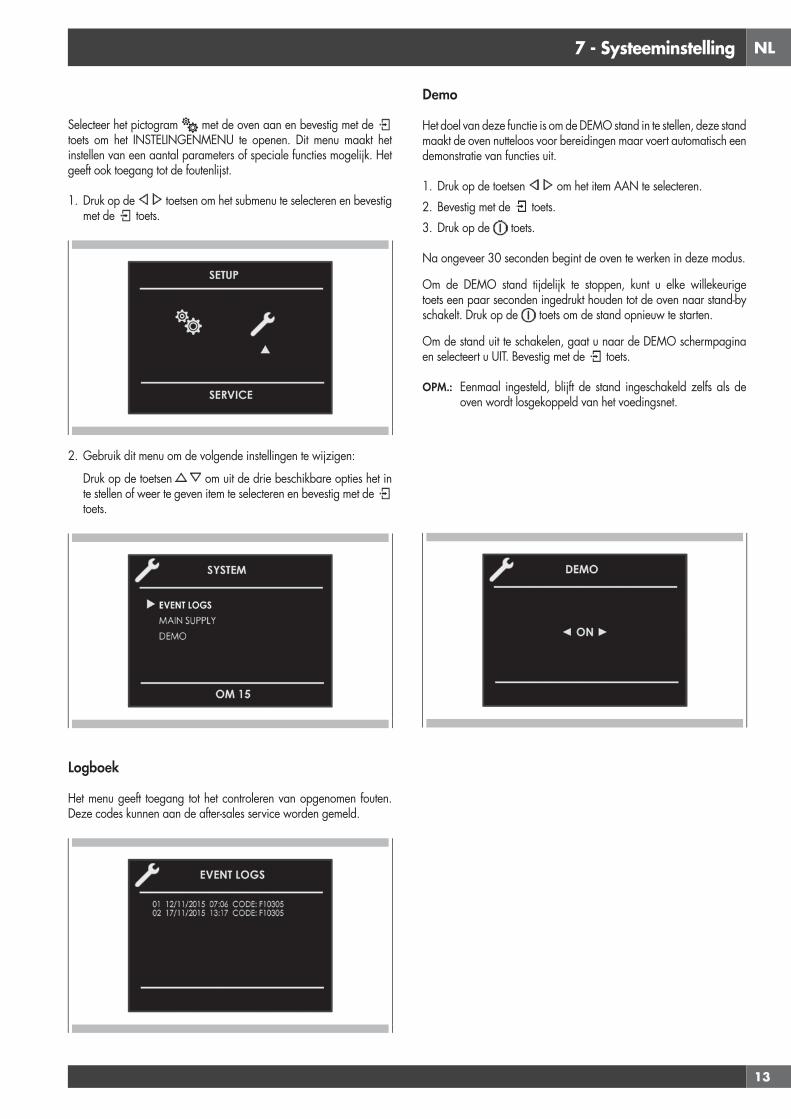
NL
13
7 - Systeeminstelling
Selecteer het pictogram met de oven aan en bevestig met de toets om het INSTELINGENMENU te openen. Dit menu maakt het instellen van een aantal parameters of speciale functies mogelijk. Het geeft ook toegang tot de foutenlijst.
1. Druk op de toetsen om het submenu te selecteren en bevestig met de toets.
2. Gebruik dit menu om de volgende instellingen te wijzigen:
Druk op de toetsen om uit de drie beschikbare opties het in te stellen of weer te geven item te selecteren en bevestig met de toets.
Logboek
Het menu geeft toegang tot het controleren van opgenomen fouten. Deze codes kunnen aan de after-sales service worden gemeld.
Demo
Het doel van deze functie is om de DEMO stand in te stellen, deze stand maakt de oven nutteloos voor bereidingen maar voert automatisch een demonstratie van functies uit.
1. Druk op de toetsen om het item AAN te selecteren.2. Bevestig met de toets.3. Druk op de toets.
Na ongeveer 30 seconden begint de oven te werken in deze modus.
Om de DEMO stand tijdelijk te stoppen, kunt u elke willekeurige toets een paar seconden ingedrukt houden tot de oven naar stand-by schakelt. Druk op de toets om de stand opnieuw te starten.
Om de stand uit te schakelen, gaat u naar de DEMO schermpagina en selecteert u UIT. Bevestig met de toets.
OPM.: Eenmaal ingesteld, blijft de stand ingeschakeld zelfs als de oven wordt losgekoppeld van het voedingsnet.

NL
14
8 - Uw Oven Starten
Multifunctionele Oven
Traditionele Bereiding
HETELUCHT VERWARMING
RING EN GRILL
HETELUCHT BRADEN
GRILL
Magnetronbereiding
ONTDOOIEN OP TIJD
ONTDOOIEN OP GEWICHT
MAGNETRONBEREIDING
MAGNETRON EN GRILL
MAGNETRON EN RING
Thermische Oven
Traditionele Bereiding
GRILL
Magnetronbereiding
ONTDOOIEN OP TIJD
ONTDOOIEN OP GEWICHT
MAGNETRONBEREIDING
MAGNETRON EN GRILL
1. Selecteer het pictogram en druk op de toets . Selecteer de gewenste bereidingswijze voor het te bereiden gerecht met behulp van de pijlen en bevestig met de toets .
2. Op deze schermpagina is het nog mogelijk de bereidingswijze te wijzigen met behulp van de toetsen.
3. Bevestig met de toets om te beginnen met de bereiding als de voorgestelde temperatuur juist is, anders, als de toets niet binnen 10 seconden wordt ingedrukt, schakelt de oven over op de automatische stand en wordt het pictogram van de bereidingsfunctie weergegeven.
De oven in- en uitschakelen
BELANGRIJK
• De toets stopt de functie niet.• Na het uitzetten van de oven kan de koelventilator nog blijven werken tot de binnenste delen van de oven afgekoeld zijn.
Druk op om de oven aan te zetten en druk opnieuw om uit te zetten. De oven keert terug naar de stand-by stand.

NL
15
Bereidingsstandtabellen
Traditionele BereidingBEREIDINGSSTAND PICTORGRAM TEMPERATUUR
Min. Vooraf instellen Max.
HETELUCHT VERWARMING 50° C 165° C 230° C
RING EN GRILL 50° C 210° C 230° C
HETELUCHT BRADEN 50° C 165° C 230° C
GRILL 50° C 230° C 230° C
MagnetronbereidingBEREIDINGSSTAND PICTORGRAM INSTELLEN GEWICHT WATT TEMPERATUUR
Min. Vooraf instellen
Max. Min. Vooraf instellen
Max. Min. Vooraf instellen
Max.
ONTDOOIEN OP TIJD 150 W
ONTDOOIEN OP GEWICHT
Brood 100 g 500 g 600 g 150 W
Groente 100 g 500 g 1000 g 150 W
Vlees 100 g 500 g 1500 g 150 W
Vis 100 g 500 g 800 g 150 W
MAGNETRONBEREIDING 150 W 900 W 900 W
MAGNETRON EN GRILL
150W 150 W 200° C
300W 300 W
450W 450 W
MAGNETRON EN RING
150W 150 W 50° C 100° C 200° C
300W 300 W
450W 450 W

NL
16
9 - Traditionele Bereiding
De bereidingsstand wijzigen
1. Tijdens de bereiding zonder tijd, kan een pauze worden ingelast door op de toets te drukken.
Alle instellingen van de uitgestelde bereiding blijven bewaard en kunnen worden geactiveerd door dezelfde toets nogmaals in te drukken.
2. Druk op de toets om de bereidingswijze te wijzigen terwijl de oven is ingeschakeld en bevestig met de
toets om de bereidingswijze te wijzigen terwijl de toets.
Uit de beschikbare standen in de groep kan op dit moment een andere bereidingswijze geselecteerd worden met behulp van de pijlen .
De temperatuur wijzigen
BELANGRIJK
• Aan het einde van een functie toont het scherm de temperatuur van de resterende warmte in het compartiment vanuit de stand-by pagina.
1. Vanuit de voorbeeldweergavepagina van de bereidingsfunctie kan de temperatuur gewijzigd worden met behulp van de pijlen , bevestig vervolgens met de toets.
2. Zodra de bereiding is begonnen, kan de temperatuur in elk geval en op elk moment worden gewijzigd met de pijlen .
Voorverwarmingsfase
Wanneer de oven in de voorverwarmingsfase is, wordt de momentane temperatuur weergegeven onder het pictogram van de bereidingswijze.
Zodra de ingestelde temperatuur is bereikt, klinkt er een akoestisch signaal en verdwijnt de momentane temperatuurindicator.
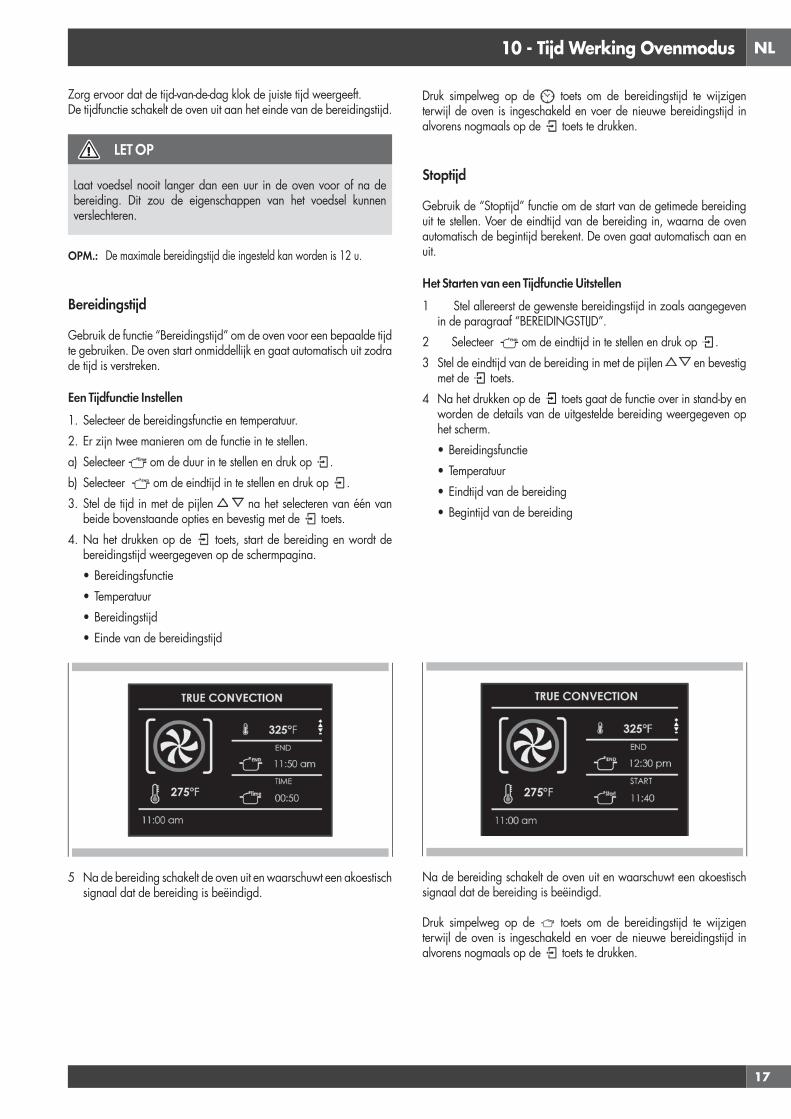
NL
17
10 - Tijd Werking Ovenmodus
Zorg ervoor dat de tijd-van-de-dag klok de juiste tijd weergeeft.De tijdfunctie schakelt de oven uit aan het einde van de bereidingstijd.
LET OP
Laat voedsel nooit langer dan een uur in de oven voor of na de bereiding. Dit zou de eigenschappen van het voedsel kunnen verslechteren.
OPM.: De maximale bereidingstijd die ingesteld kan worden is 12 u.
Bereidingstijd
Gebruik de functie “Bereidingstijd” om de oven voor een bepaalde tijd te gebruiken. De oven start onmiddellijk en gaat automatisch uit zodra de tijd is verstreken.
Een Tijdfunctie Instellen1. Selecteer de bereidingsfunctie en temperatuur.2. Er zijn twee manieren om de functie in te stellen.a) Selecteer om de duur in te stellen en druk op .b) Selecteer om de eindtijd in te stellen en druk op .3. Stel de tijd in met de pijlen na het selecteren van één van
beide bovenstaande opties en bevestig met de toets.4. Na het drukken op de toets, start de bereiding en wordt de
bereidingstijd weergegeven op de schermpagina.• Bereidingsfunctie• Temperatuur• Bereidingstijd• Einde van de bereidingstijd
5 Na de bereiding schakelt de oven uit en waarschuwt een akoestisch signaal dat de bereiding is beëindigd.
Druk simpelweg op de toets om de bereidingstijd te wijzigen terwijl de oven is ingeschakeld en voer de nieuwe bereidingstijd in alvorens nogmaals op de toets te drukken.
Stoptijd
Gebruik de “Stoptijd” functie om de start van de getimede bereiding uit te stellen. Voer de eindtijd van de bereiding in, waarna de oven automatisch de begintijd berekent. De oven gaat automatisch aan en uit.
Het Starten van een Tijdfunctie Uitstellen1 Stel allereerst de gewenste bereidingstijd in zoals aangegeven
in de paragraaf “BEREIDINGSTIJD”.2 Selecteer om de eindtijd in te stellen en druk op .3 Stel de eindtijd van de bereiding in met de pijlen en bevestig
met de toets.4 Na het drukken op de toets gaat de functie over in stand-by en
worden de details van de uitgestelde bereiding weergegeven op het scherm.• Bereidingsfunctie• Temperatuur• Eindtijd van de bereiding• Begintijd van de bereiding
Na de bereiding schakelt de oven uit en waarschuwt een akoestisch signaal dat de bereiding is beëindigd.
Druk simpelweg op de toets om de bereidingstijd te wijzigen terwijl de oven is ingeschakeld en voer de nieuwe bereidingstijd in alvorens nogmaals op de toets te drukken.

NL
18
11 - Magnetronbereiding
OPM.: om zeker te zijn van het gebruik op correcte wijze is het belangrijk om zorgvuldig de instructies en waarschuwingen door te lezen.
LET OP
De magnetronfuncties starten niet totdat de deur gesloten is. Als de deur geopend is terwijl de oven aan staat, gaat de oven over in de pauzestand en verschijnt het bericht “DEUR OPEN” op het scherm.Om de functie te herstarten, moet de deur gesloten worden.
De functie kan op elk moment gepauzeerd worden met de toets , de functie herstart bij het opnieuw drukken op .
Gecontroleerd Ontdooien Functie
Selecteer het gecontroleerd ontdooien pictogram met behulp van de pijlen en druk op de toets , stel vervolgens de ontdooitijd in met de pijlen en .Druk op de toets om de functie te starten.
Als de functie is gestart, wordt de aflopende tijd getoond op het scherm. De tijd kan op elk moment gewijzigd worden met de pijlen en . Wanneer het ontdooien voltooid is, verschijnt het bericht “ONTDOOIEN VOLTOOID” op het scherm.
Gewicht Ontdooien Functie
Selecteer het gewicht ontdooien pictogram met behulp van de pijlen en druk op de toets .
Selecteer het type maaltijd met de pijlen en stel vervolgens het gewicht in met de pijlen en , en start het dooien ten slotte met de toets .
Hier volgen type maaltijden en de relatieve gewichten die ingesteld kunnen worden:
MAALTIJD MIN Gewicht (g)
MAX Gewicht (g)
Brood Pizza Pasta 100 600
Groente 100 1000
Vlees 100 1500
Zeevruchten 100 800
De ontdooitijd wordt volledig automatisch berekend op basis van het type maaltijd en het gewicht zodat het niet nodig is tijdparameters in te stellen.
Wanneer het ontdooien voltooid is, verschijnt het bericht “ONTDOOIEN VOLTOOID” op het scherm.
Magnetronfunctie
Selecteer het pictogram van de magnetronfunctie met de pijlen en druk op de toets .
Als u de functie onmiddellijk wenst te starten met een vooraf ingestelde tijd van 30 sec en een vooraf ingesteld vermogen van 900W, druk dan op de toets .

NL
19
Voor het wijzigen van de tijd en het vermogen, opent u het submenu dat als volgt wordt beheerd:• TIJD: Selecteer het pictogram en gebruik de toetsen en
om de tijd te wijzigen.• MAGNETRONVERMOGEN Selecteer het pictogram en gebruik
de toetsen en om het vermogen uit de 6 mogelijke standen te selecteren , 150W - 300W - 450W - 600W - 750W - 900W.
Zodra de nieuwe parameters zijn ingesteld, druk op de toets om de bereiding te starten.
Als de bereiding is gestart, wordt de aflopende tijd getoond op het scherm. De tijd kan op elk moment gewijzigd worden met de pijlen
en .
Als de bereiding is beëindigd, verschijnt het bericht “BEREIDING VOLTOOID” op het scherm.
Magnetron + Grill Functie
Selecteer het Magnetron + Grill Functie pictogram met behulp van de pijlen en druk op de toets , stel vervolgens de ontdooitijd in met de pijlen en .
Als u de functie onmiddellijk wenst te starten met de vooraf ingestelde tijd en een vooraf ingesteld vermogen van 300W, druk dan op de toets .
Om het vermogen te wijzigen, opent u het submenu dat als volgt wordt beheerd:• MAGNETRONVERMOGEN Selecteer het pictogram en gebruik
de toetsen en om het magnetronvermogen uit de 3 mogelijke standen te selecteren, 150W - 300W - 450W.
Zodra de nieuwe parameter is ingesteld, druk op de toets om de bereiding te starten.
Als de bereiding is gestart, wordt de aflopende tijd getoond op het scherm. De tijd kan op elk moment gewijzigd worden met de pijlen
en .
Als de bereiding is beëindigd, verschijnt het bericht “BEREIDING VOLTOOID” op het scherm.
Magnetron + Ring Functie
Selecteer het Magnetron + Ring Functie pictogram met behulp van de pijlen en druk op de toets , stel vervolgens de ontdooitijd in met de pijlen en .
Als u de functie onmiddellijk wenst te starten met de vooraf ingestelde tijd, een vooraf ingestelde temperatuur van 100°C en een vooraf ingesteld magnetronvermogen van 300W, druk dan op de toets .
Voor het wijzigen van de temperatuur en het vermogen, opent u het submenu dat als volgt wordt beheerd:• TEMPERATUUR: Selecteer het pictogram en gebruik de toetsen
en om de temperatuur te wijzigen tussen de 50°C en 200°C.• MAGNETRONVERMOGEN Selecteer het pictogram en gebruik
de toetsen en om het magnetronvermogen uit de 3 mogelijke standen te selecteren, 150W - 300W - 450W.
NL
20
Zodra de nieuwe parameters zijn ingesteld, druk op de toets om de bereiding te starten.
Als de bereiding is gestart, wordt de aflopende tijd getoond op het scherm. De tijd kan op elk moment gewijzigd worden met de pijlen
en .
Als de bereiding is beëindigd, verschijnt het bericht “BEREIDING VOLTOOID” op het scherm.
Watt Vermogen Wijzigen
Selecteer the pictogram en druk op de toets . Selecteer het gewenste magnetronpictogram en wijzig het vermogen met de pijlen
en bevestig met de toets .
Tijd Wijzigen
Druk op het icoon en druk op de toets . Selecteer het tijdicoon en wijzig de tijd met de pijltjestoets en bevestig met de toets .
Temperatuur Wijzigen
(alleen beschikbaar bij magnetron en ring)Selecteer the pictogram en druk op de toets . Selecteer het bereidingswijzepictogram en wijzig de temperatuurinstelling met de pijlen en bevestig met de toets .
Gewicht Wijzigen
(alleen beschikbaar bij ontdooien op gewicht)Druk op het pictogram en wijzig het gewicht met de pijlen en bevestig met de toets .

NL
21
12 - De Ovenlampen Gebruiken
De lampen worden geactiveerd met één lichtknop.Druk in om de lampen aan of uit te doen.De ovenlampen gaan automatisch aan als de deur open is.Wanneer een oven in gebruik is, gaan de ovenlampen automatisch aan als er een functie wordt gestart.De ovenlampen gaan automatisch uit wanneer de ovenstand wordt geannuleerd.
OPM.: De lampen gaan automatisch uit na 3 minuten als deze zijn ingeschakeld. Druk op de toets of open de deur om de lampen weer aan te doen.

NL
22
13 - Recepten
Selecteer een reeds ingesteld recept:1. Zet de oven aan, selecteer het pictogram en druk op de toets
.
2. Selecteer de lijst tussen “INGESTELD” of “PERSOONLIJK” met de pijlen en bevestig met de .
3. Selecteer met de pijlen en de pijlen het te bereiden gerecht en bevestig met de toets.
4. Selecteer met de pijlen tussen “VERS” of “BEVROREN” of tussen “HEEL” of “IN STUKKEN” in andere gevallen, en bevestig met de toets.
5. Selecteer het vereiste recept met de pijlen en bevestig met de toets.
6. De volgende schermpagina verschijnt op het scherm als het recept is geselecteerd:
De Receptfunctie van uw oven biedt u de mogelijkheid om gerechten te bereiden zonder dat u de oven elke keer handmatig hoeft in te stellen. Met het selecteren van een “INGESTELD” recept worden automatisch de bereidingswijze, temperatuur en tijd ingesteld volgens het gekozen recept uit het menu.
Receptenlijst Type voedsel Staat van het voedsel Receptenlijst Getoonde informatie
VOORAF INGESTELD OF PERSOONLIJK
VERS
BROOD PIZZA EERST
TYPE TOEBEHOREN
NIVEAUSTAND
GEWICHT VAN HET VOEDSEL
BEREIDINGSTIJD
VOORVERWARMEN VEREIST(JA/NEE)
BEVROREN
HEEL
VLEES
IN STUKKEN
HEEL
GEVOGELTE
IN STUKKEN
HEEL
VIS
IN STUKKEN
-
GROENTEN
-
-
PASTEIEN
-
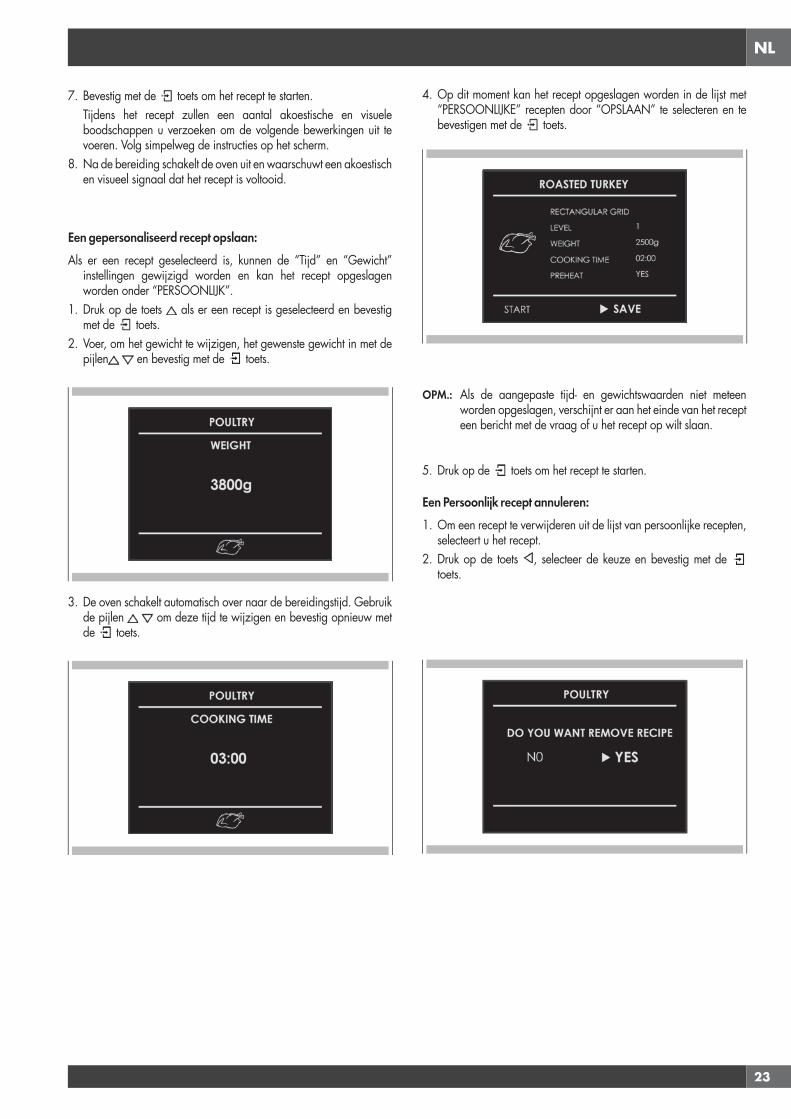
NL
23
7. Bevestig met de toets om het recept te starten. Tijdens het recept zullen een aantal akoestische en visuele
boodschappen u verzoeken om de volgende bewerkingen uit te voeren. Volg simpelweg de instructies op het scherm.
8. Na de bereiding schakelt de oven uit en waarschuwt een akoestisch en visueel signaal dat het recept is voltooid.
Een gepersonaliseerd recept opslaan:Als er een recept geselecteerd is, kunnen de “Tijd” en “Gewicht”
instellingen gewijzigd worden en kan het recept opgeslagen worden onder “PERSOONLIJK”.
1. Druk op de toets als er een recept is geselecteerd en bevestig met de toets.
2. Voer, om het gewicht te wijzigen, het gewenste gewicht in met de pijlen en bevestig met de toets.
3. De oven schakelt automatisch over naar de bereidingstijd. Gebruik de pijlen om deze tijd te wijzigen en bevestig opnieuw met de toets.
4. Op dit moment kan het recept opgeslagen worden in de lijst met “PERSOONLIJKE” recepten door “OPSLAAN” te selecteren en te bevestigen met de toets.
OPM.: Als de aangepaste tijd- en gewichtswaarden niet meteen worden opgeslagen, verschijnt er aan het einde van het recept een bericht met de vraag of u het recept op wilt slaan.
5. Druk op de toets om het recept te starten.
Een Persoonlijk recept annuleren:1. Om een recept te verwijderen uit de lijst van persoonlijke recepten,
selecteert u het recept.2. Druk op de toets , selecteer de keuze en bevestig met de
toets.
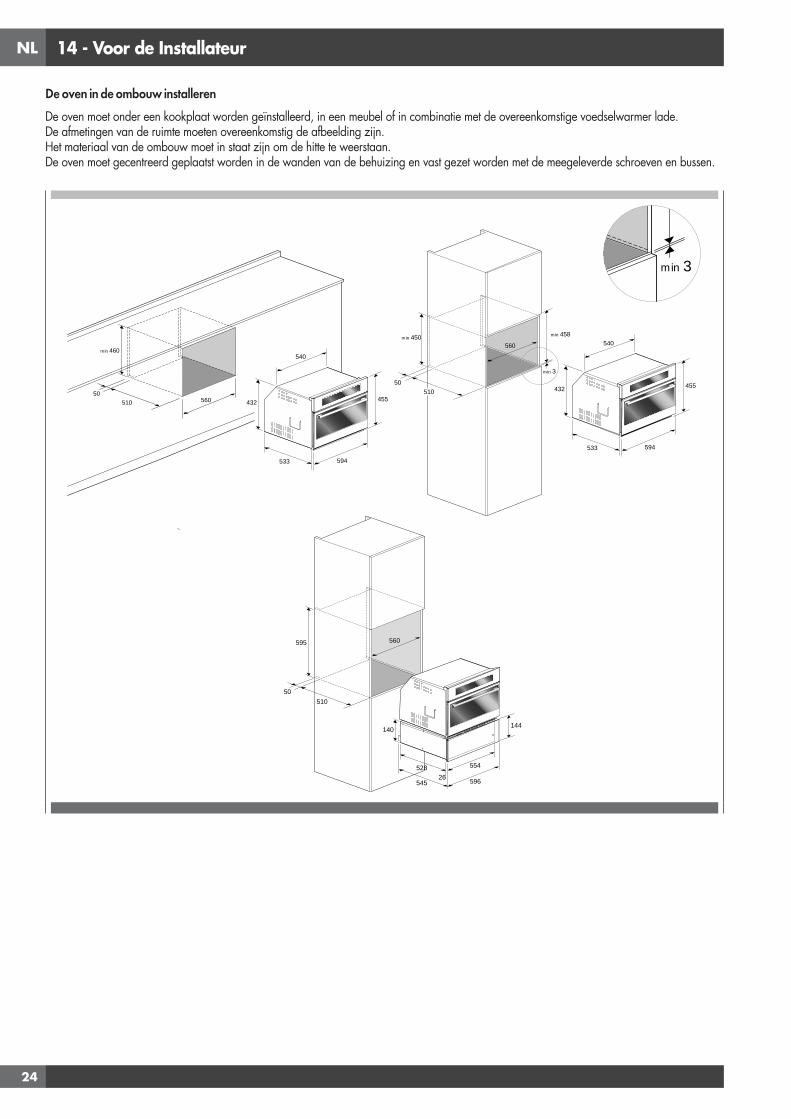
NL
24
14 - Voor de Installateur
De oven in de ombouw installerenDe oven moet onder een kookplaat worden geïnstalleerd, in een meubel of in combinatie met de overeenkomstige voedselwarmer lade.De afmetingen van de ruimte moeten overeenkomstig de afbeelding zijn.Het materiaal van de ombouw moet in staat zijn om de hitte te weerstaan.De oven moet gecentreerd geplaatst worden in de wanden van de behuizing en vast gezet worden met de meegeleverde schroeven en bussen.
560
min 460
50510
560
50 510
595
52826
144140
596
554
545
560min 450
50510
533
455
594
540
432
min 458
min 3
560
min 3
533
455
594
540
432

NL
25
TECHNISCHE GEGEVENSStroomvoorziening 220-240 V~, 50 HzMaximaal opgenomen vermogen: 3200 W
Magnetronvermogen 900 WGrill 1500 WHete lucht 1500 WMagnetronfrequentie 2450 MHz
Elektrische Aansluiting
Zorg er voor de aansluiting voor dat:• de kenmerken van het elektrische systeem voldoen aan wat op het
typeplaatje op de voorzijde van de oven is aangeduid;• het elektrische systeem een effectieve aarding heeft die voldoet aan
de normen en huidige wetgevingen.De aardaansluiting is wettelijk verplicht.De kabel mag op geen enkel moment een temperatuur hoger dan 50 °C boven de omgevingstemperatuur bereiken.Deze oven moet worden aangesloten op de netvoeding met een snoer die is uitgerust met een geschikt gewaardeerde stekker die past op het stopcontact gemonteerd op het laatste sub-circuit in de vaste bedrading die bedoeld is om de oven van stroom te voorzien.Indien een vast toestel niet is voorzien van een stroomkabel met een stekker, of een andere inrichting die kan worden losgekoppeld van het elektriciteitsnet, met een kloof tussen de contacten groot genoeg om klasse III overspanningsbeveiliging te garanderen, zal een dergelijk apparaat moeten worden gemonteerd op de stroomvoorziening voor de naleving van de regelgeving voor elektrische installaties.Het stopcontact of de schakelaar moet gemakkelijk te bereiken zijn als de apparatuur geïnstalleerd is.
OPM.: De fabrikant wijst elke aansprakelijkheid voor schade en/of letsel af als de bovenstaande instructies niet worden opgevolgd.
TYPE EN MINIMALE DIAMETER VAN DE KABELSSASO
H05RR-F 3x1,5 mm² H05RR-F 3x2,5 mm²
H05VV-F 3x1,5 mm² H05VV-F 3x2,5 mm²
H05RN-F 3x1,5 mm² H05RN-F 3x2,5 mm²
H05V2V2-F 3x1,5 mm² H05V2V2-F 3x2,5 mm²
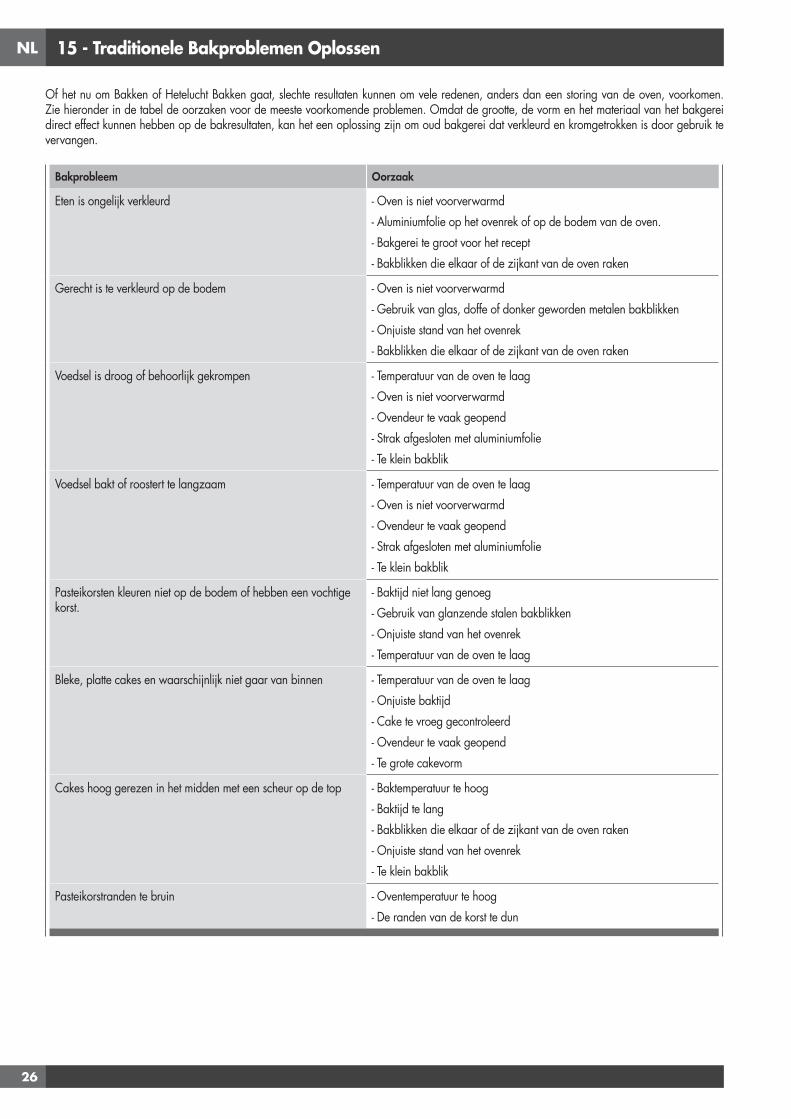
NL
26
15 - Traditionele Bakproblemen Oplossen
Of het nu om Bakken of Hetelucht Bakken gaat, slechte resultaten kunnen om vele redenen, anders dan een storing van de oven, voorkomen. Zie hieronder in de tabel de oorzaken voor de meeste voorkomende problemen. Omdat de grootte, de vorm en het materiaal van het bakgerei direct effect kunnen hebben op de bakresultaten, kan het een oplossing zijn om oud bakgerei dat verkleurd en kromgetrokken is door gebruik te vervangen.
Bakprobleem Oorzaak
Eten is ongelijk verkleurd - Oven is niet voorverwarmd- Aluminiumfolie op het ovenrek of op de bodem van de oven.- Bakgerei te groot voor het recept- Bakblikken die elkaar of de zijkant van de oven raken
Gerecht is te verkleurd op de bodem - Oven is niet voorverwarmd- Gebruik van glas, doffe of donker geworden metalen bakblikken- Onjuiste stand van het ovenrek- Bakblikken die elkaar of de zijkant van de oven raken
Voedsel is droog of behoorlijk gekrompen - Temperatuur van de oven te laag- Oven is niet voorverwarmd- Ovendeur te vaak geopend- Strak afgesloten met aluminiumfolie- Te klein bakblik
Voedsel bakt of roostert te langzaam - Temperatuur van de oven te laag- Oven is niet voorverwarmd- Ovendeur te vaak geopend- Strak afgesloten met aluminiumfolie- Te klein bakblik
Pasteikorsten kleuren niet op de bodem of hebben een vochtige korst.
- Baktijd niet lang genoeg- Gebruik van glanzende stalen bakblikken- Onjuiste stand van het ovenrek- Temperatuur van de oven te laag
Bleke, platte cakes en waarschijnlijk niet gaar van binnen - Temperatuur van de oven te laag- Onjuiste baktijd- Cake te vroeg gecontroleerd- Ovendeur te vaak geopend- Te grote cakevorm
Cakes hoog gerezen in het midden met een scheur op de top - Baktemperatuur te hoog- Baktijd te lang- Bakblikken die elkaar of de zijkant van de oven raken- Onjuiste stand van het ovenrek- Te klein bakblik
Pasteikorstranden te bruin - Oventemperatuur te hoog- De randen van de korst te dun
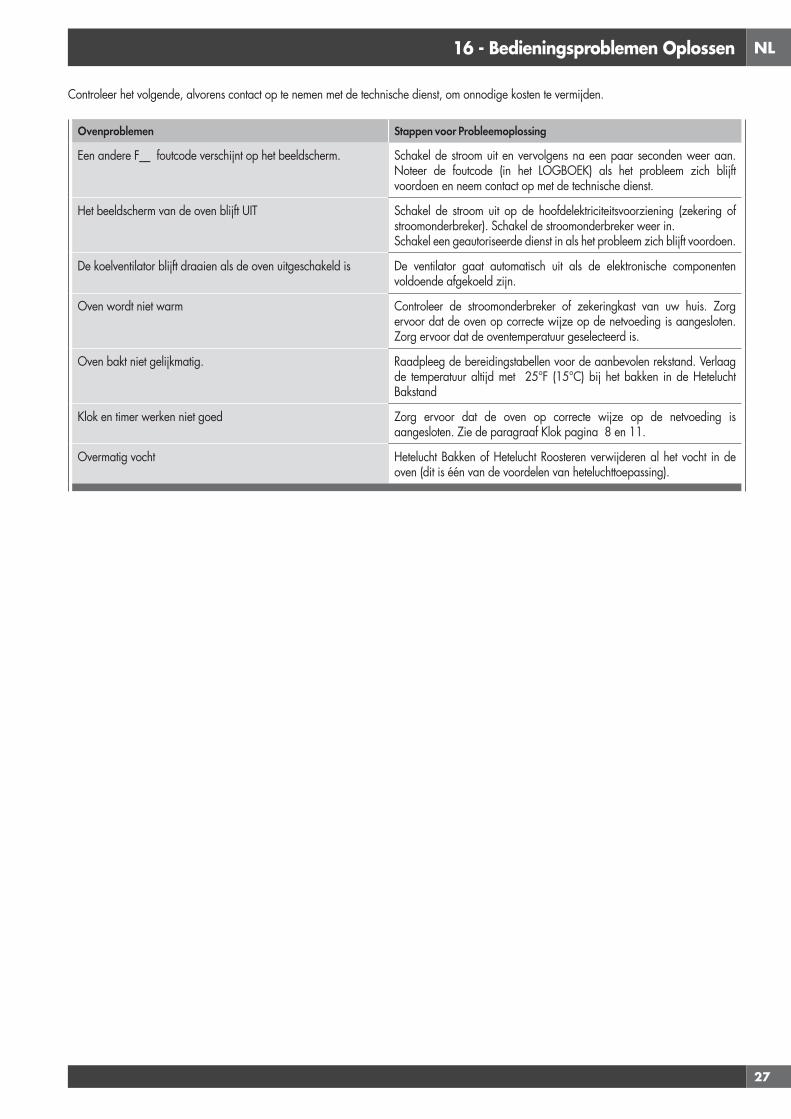
NL
27
16 - Bedieningsproblemen Oplossen
Controleer het volgende, alvorens contact op te nemen met de technische dienst, om onnodige kosten te vermijden.
Ovenproblemen Stappen voor Probleemoplossing
Een andere F__ foutcode verschijnt op het beeldscherm. Schakel de stroom uit en vervolgens na een paar seconden weer aan. Noteer de foutcode (in het LOGBOEK) als het probleem zich blijft voordoen en neem contact op met de technische dienst.
Het beeldscherm van de oven blijft UIT Schakel de stroom uit op de hoofdelektriciteitsvoorziening (zekering of stroomonderbreker). Schakel de stroomonderbreker weer in.Schakel een geautoriseerde dienst in als het probleem zich blijft voordoen.
De koelventilator blijft draaien als de oven uitgeschakeld is De ventilator gaat automatisch uit als de elektronische componenten voldoende afgekoeld zijn.
Oven wordt niet warm Controleer de stroomonderbreker of zekeringkast van uw huis. Zorg ervoor dat de oven op correcte wijze op de netvoeding is aangesloten. Zorg ervoor dat de oventemperatuur geselecteerd is.
Oven bakt niet gelijkmatig. Raadpleeg de bereidingstabellen voor de aanbevolen rekstand. Verlaag de temperatuur altijd met 25°F (15°C) bij het bakken in de Hetelucht Bakstand
Klok en timer werken niet goed Zorg ervoor dat de oven op correcte wijze op de netvoeding is aangesloten. Zie de paragraaf Klok pagina 8 en 11.
Overmatig vocht Hetelucht Bakken of Hetelucht Roosteren verwijderen al het vocht in de oven (dit is één van de voordelen van heteluchttoepassing).
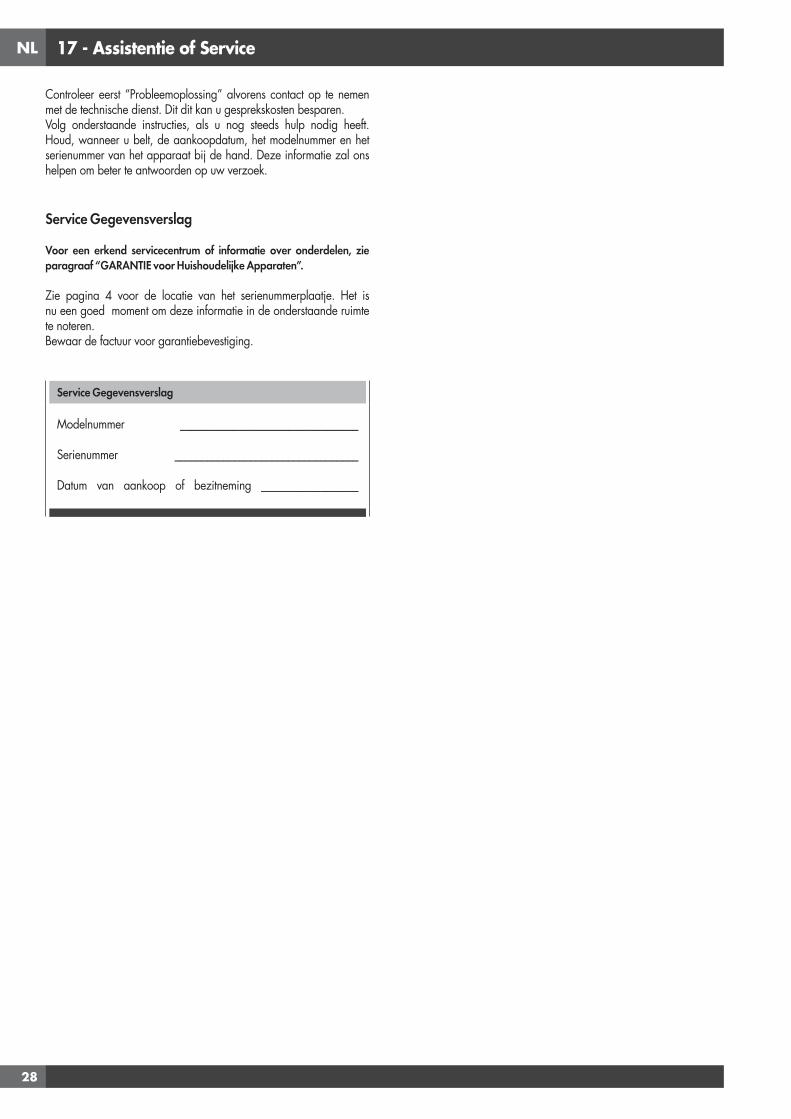
NL
28
17 - Assistentie of Service
Controleer eerst “Probleemoplossing” alvorens contact op te nemen met de technische dienst. Dit dit kan u gesprekskosten besparen.Volg onderstaande instructies, als u nog steeds hulp nodig heeft. Houd, wanneer u belt, de aankoopdatum, het modelnummer en het serienummer van het apparaat bij de hand. Deze informatie zal ons helpen om beter te antwoorden op uw verzoek.
Service Gegevensverslag
Voor een erkend servicecentrum of informatie over onderdelen, zie paragraaf “GARANTIE voor Huishoudelijke Apparaten”.
Zie pagina 4 voor de locatie van het serienummerplaatje. Het is nu een goed moment om deze informatie in de onderstaande ruimte te noteren.Bewaar de factuur voor garantiebevestiging.
Service Gegevensverslag
Modelnummer _________________________________
Serienummer __________________________________
Datum van aankoop of bezitneming __________________
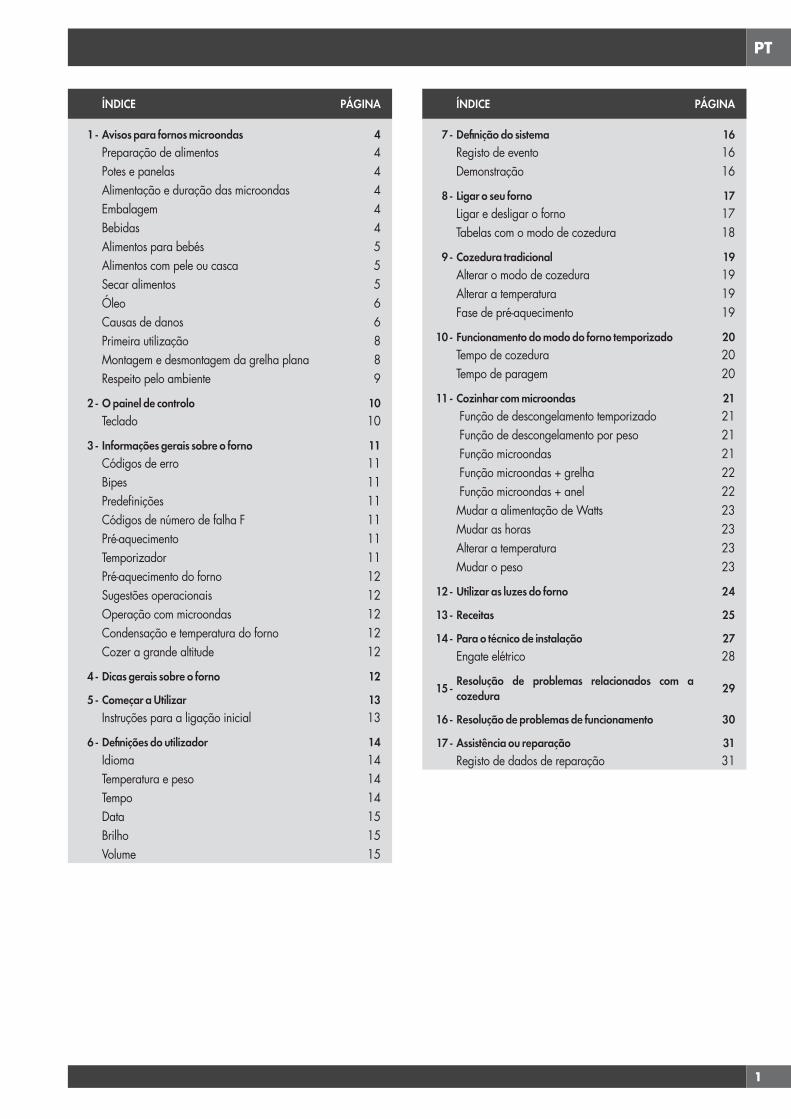
PT
1
ÍNDICE PÁGINA
1 - Avisos para fornos microondas 4Preparação de alimentos 4Potes e panelas 4Alimentação e duração das microondas 4Embalagem 4Bebidas 4Alimentos para bebés 5Alimentos com pele ou casca 5Secar alimentos 5Óleo 6Causas de danos 6Primeira utilização 8Montagem e desmontagem da grelha plana 8Respeito pelo ambiente 9
2 - O painel de controlo 10Teclado 10
3 - Informações gerais sobre o forno 11Códigos de erro 11Bipes 11Predefinições 11Códigos de número de falha F 11Pré-aquecimento 11Temporizador 11Pré-aquecimento do forno 12Sugestões operacionais 12Operação com microondas 12Condensação e temperatura do forno 12Cozer a grande altitude 12
4 - Dicas gerais sobre o forno 12
5 - Começar a Utilizar 13Instruções para a ligação inicial 13
6 - Definições do utilizador 14Idioma 14Temperatura e peso 14Tempo 14Data 15Brilho 15Volume 15
ÍNDICE PÁGINA
7 - Definição do sistema 16Registo de evento 16Demonstração 16
8 - Ligar o seu forno 17Ligar e desligar o forno 17Tabelas com o modo de cozedura 18
9 - Cozedura tradicional 19Alterar o modo de cozedura 19Alterar a temperatura 19Fase de pré-aquecimento 19
10 - Funcionamento do modo do forno temporizado 20Tempo de cozedura 20Tempo de paragem 20
11 - Cozinhar com microondas 21 Função de descongelamento temporizado 21 Função de descongelamento por peso 21 Função microondas 21 Função microondas + grelha 22 Função microondas + anel 22Mudar a alimentação de Watts 23Mudar as horas 23Alterar a temperatura 23Mudar o peso 23
12 - Utilizar as luzes do forno 24
13 - Receitas 25
14 - Para o técnico de instalação 27Engate elétrico 28
15 - Resolução de problemas relacionados com a cozedura 29
16 - Resolução de problemas de funcionamento 30
17 - Assistência ou reparação 31Registo de dados de reparação 31
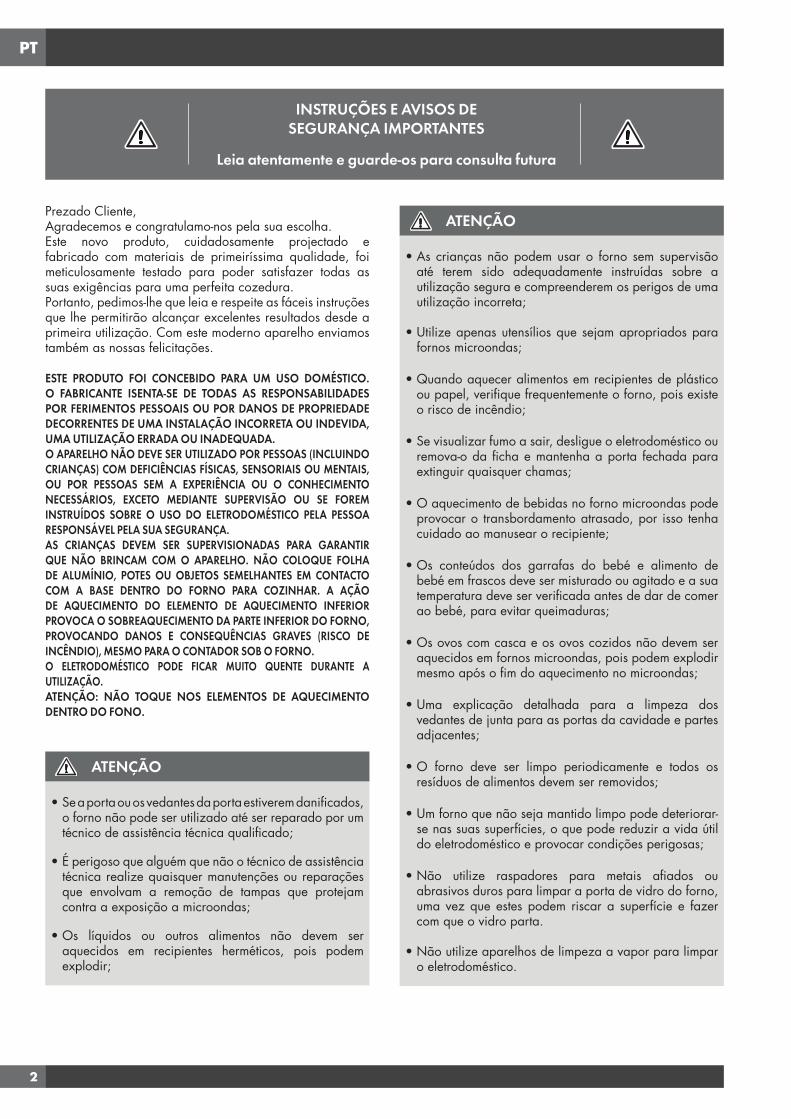
PT
2
Prezado Cliente,Agradecemos e congratulamo-nos pela sua escolha.Este novo produto, cuidadosamente projectado e fabricado com materiais de primeiríssima qualidade, foi meticulosamente testado para poder satisfazer todas as suas exigências para uma perfeita cozedura.Portanto, pedimos-lhe que leia e respeite as fáceis instruções que lhe permitirão alcançar excelentes resultados desde a primeira utilização. Com este moderno aparelho enviamos também as nossas felicitações.
ESTE PRODUTO FOI CONCEBIDO PARA UM USO DOMÉSTICO. O FABRICANTE ISENTA-SE DE TODAS AS RESPONSABILIDADES POR FERIMENTOS PESSOAIS OU POR DANOS DE PROPRIEDADE DECORRENTES DE UMA INSTALAÇÃO INCORRETA OU INDEVIDA, UMA UTILIZAÇÃO ERRADA OU INADEQUADA.O APARELHO NÃO DEVE SER UTILIZADO POR PESSOAS (INCLUINDO CRIANÇAS) COM DEFICIÊNCIAS FÍSICAS, SENSORIAIS OU MENTAIS, OU POR PESSOAS SEM A EXPERIÊNCIA OU O CONHECIMENTO NECESSÁRIOS, EXCETO MEDIANTE SUPERVISÃO OU SE FOREM INSTRUÍDOS SOBRE O USO DO ELETRODOMÉSTICO PELA PESSOA RESPONSÁVEL PELA SUA SEGURANÇA.AS CRIANÇAS DEVEM SER SUPERVISIONADAS PARA GARANTIR QUE NÃO BRINCAM COM O APARELHO. NÃO COLOQUE FOLHA DE ALUMÍNIO, POTES OU OBJETOS SEMELHANTES EM CONTACTO COM A BASE DENTRO DO FORNO PARA COZINHAR. A AÇÃO DE AQUECIMENTO DO ELEMENTO DE AQUECIMENTO INFERIOR PROVOCA O SOBREAQUECIMENTO DA PARTE INFERIOR DO FORNO, PROVOCANDO DANOS E CONSEQUÊNCIAS GRAVES (RISCO DE INCÊNDIO), MESMO PARA O CONTADOR SOB O FORNO.O ELETRODOMÉSTICO PODE FICAR MUITO QUENTE DURANTE A UTILIZAÇÃO.ATENÇÃO: NÃO TOQUE NOS ELEMENTOS DE AQUECIMENTO DENTRO DO FONO.
ATENÇÃO
• Se a porta ou os vedantes da porta estiverem danificados, o forno não pode ser utilizado até ser reparado por um técnico de assistência técnica qualificado;
• É perigoso que alguém que não o técnico de assistência técnica realize quaisquer manutenções ou reparações que envolvam a remoção de tampas que protejam contra a exposição a microondas;
• Os líquidos ou outros alimentos não devem ser aquecidos em recipientes herméticos, pois podem explodir;
ATENÇÃO
• As crianças não podem usar o forno sem supervisão até terem sido adequadamente instruídas sobre a utilização segura e compreenderem os perigos de uma utilização incorreta;
• Utilize apenas utensílios que sejam apropriados para fornos microondas;
• Quando aquecer alimentos em recipientes de plástico ou papel, verifique frequentemente o forno, pois existe o risco de incêndio;
• Se visualizar fumo a sair, desligue o eletrodoméstico ou remova-o da ficha e mantenha a porta fechada para extinguir quaisquer chamas;
• O aquecimento de bebidas no forno microondas pode provocar o transbordamento atrasado, por isso tenha cuidado ao manusear o recipiente;
• Os conteúdos dos garrafas do bebé e alimento de bebé em frascos deve ser misturado ou agitado e a sua temperatura deve ser verificada antes de dar de comer ao bebé, para evitar queimaduras;
• Os ovos com casca e os ovos cozidos não devem ser aquecidos em fornos microondas, pois podem explodir mesmo após o fim do aquecimento no microondas;
• Uma explicação detalhada para a limpeza dos vedantes de junta para as portas da cavidade e partes adjacentes;
• O forno deve ser limpo periodicamente e todos os resíduos de alimentos devem ser removidos;
• Um forno que não seja mantido limpo pode deteriorar-se nas suas superfícies, o que pode reduzir a vida útil do eletrodoméstico e provocar condições perigosas;
• Não utilize raspadores para metais afiados ou abrasivos duros para limpar a porta de vidro do forno, uma vez que estes podem riscar a superfície e fazer com que o vidro parta.
• Não utilize aparelhos de limpeza a vapor para limpar o eletrodoméstico.
INSTRUÇÕES E AVISOS DE SEGURANÇA IMPORTANTES
Leia atentamente e guarde-os para consulta futura
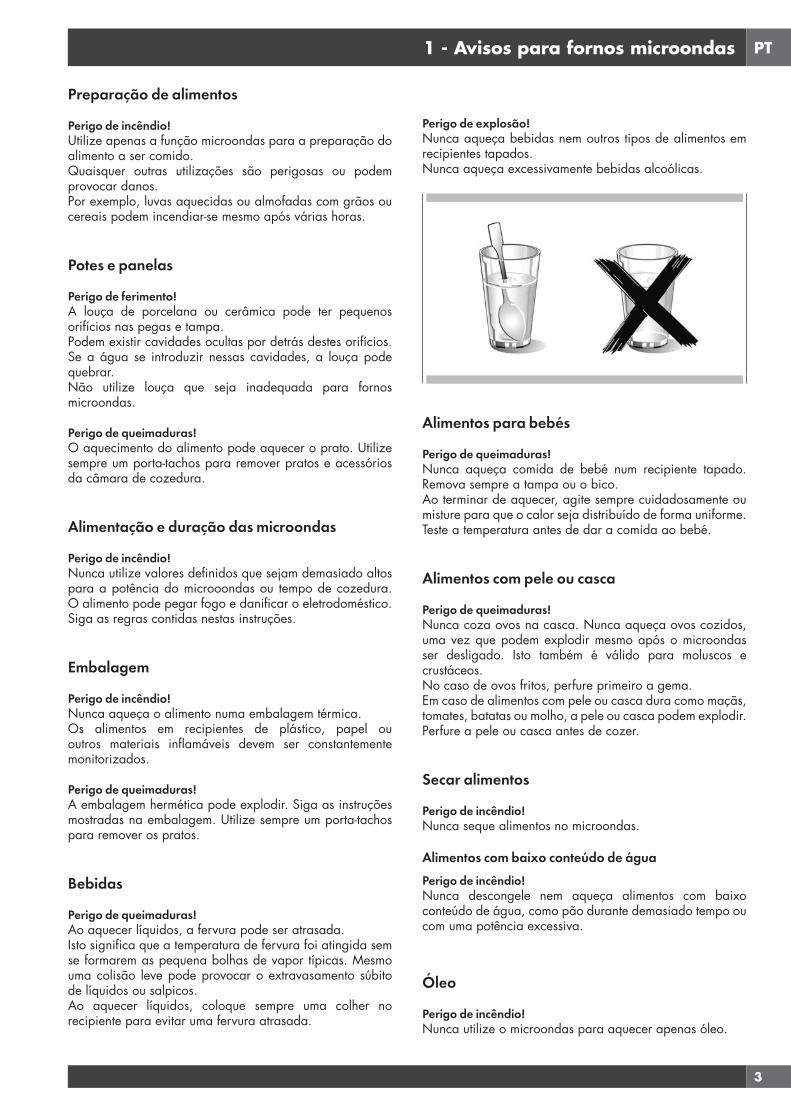
PT
3
1 - Avisos para fornos microondas
Preparação de alimentos
Perigo de incêndio!Utilize apenas a função microondas para a preparação do alimento a ser comido.Quaisquer outras utilizações são perigosas ou podem provocar danos.Por exemplo, luvas aquecidas ou almofadas com grãos ou cereais podem incendiar-se mesmo após várias horas.
Potes e panelas
Perigo de ferimento!A louça de porcelana ou cerâmica pode ter pequenos orifícios nas pegas e tampa.Podem existir cavidades ocultas por detrás destes orifícios. Se a água se introduzir nessas cavidades, a louça pode quebrar.Não utilize louça que seja inadequada para fornos microondas.
Perigo de queimaduras!O aquecimento do alimento pode aquecer o prato. Utilize sempre um porta-tachos para remover pratos e acessórios da câmara de cozedura.
Alimentação e duração das microondas
Perigo de incêndio!Nunca utilize valores definidos que sejam demasiado altos para a potência do microoondas ou tempo de cozedura. O alimento pode pegar fogo e danificar o eletrodoméstico. Siga as regras contidas nestas instruções.
Embalagem
Perigo de incêndio!Nunca aqueça o alimento numa embalagem térmica.Os alimentos em recipientes de plástico, papel ou outros materiais inflamáveis devem ser constantemente monitorizados.
Perigo de queimaduras!A embalagem hermética pode explodir. Siga as instruções mostradas na embalagem. Utilize sempre um porta-tachos para remover os pratos.
Bebidas
Perigo de queimaduras!Ao aquecer líquidos, a fervura pode ser atrasada.Isto significa que a temperatura de fervura foi atingida sem se formarem as pequena bolhas de vapor típicas. Mesmo uma colisão leve pode provocar o extravasamento súbito de líquidos ou salpicos.Ao aquecer líquidos, coloque sempre uma colher no recipiente para evitar uma fervura atrasada.
Perigo de explosão!Nunca aqueça bebidas nem outros tipos de alimentos em recipientes tapados.Nunca aqueça excessivamente bebidas alcoólicas.
Alimentos para bebés
Perigo de queimaduras!Nunca aqueça comida de bebé num recipiente tapado. Remova sempre a tampa ou o bico.Ao terminar de aquecer, agite sempre cuidadosamente ou misture para que o calor seja distribuído de forma uniforme.Teste a temperatura antes de dar a comida ao bebé.
Alimentos com pele ou casca
Perigo de queimaduras!Nunca coza ovos na casca. Nunca aqueça ovos cozidos, uma vez que podem explodir mesmo após o microondas ser desligado. Isto também é válido para moluscos e crustáceos.No caso de ovos fritos, perfure primeiro a gema.Em caso de alimentos com pele ou casca dura como maçãs, tomates, batatas ou molho, a pele ou casca podem explodir.Perfure a pele ou casca antes de cozer.
Secar alimentos
Perigo de incêndio!Nunca seque alimentos no microondas.
Alimentos com baixo conteúdo de águaPerigo de incêndio!Nunca descongele nem aqueça alimentos com baixo conteúdo de água, como pão durante demasiado tempo ou com uma potência excessiva.
Óleo
Perigo de incêndio!Nunca utilize o microondas para aquecer apenas óleo.
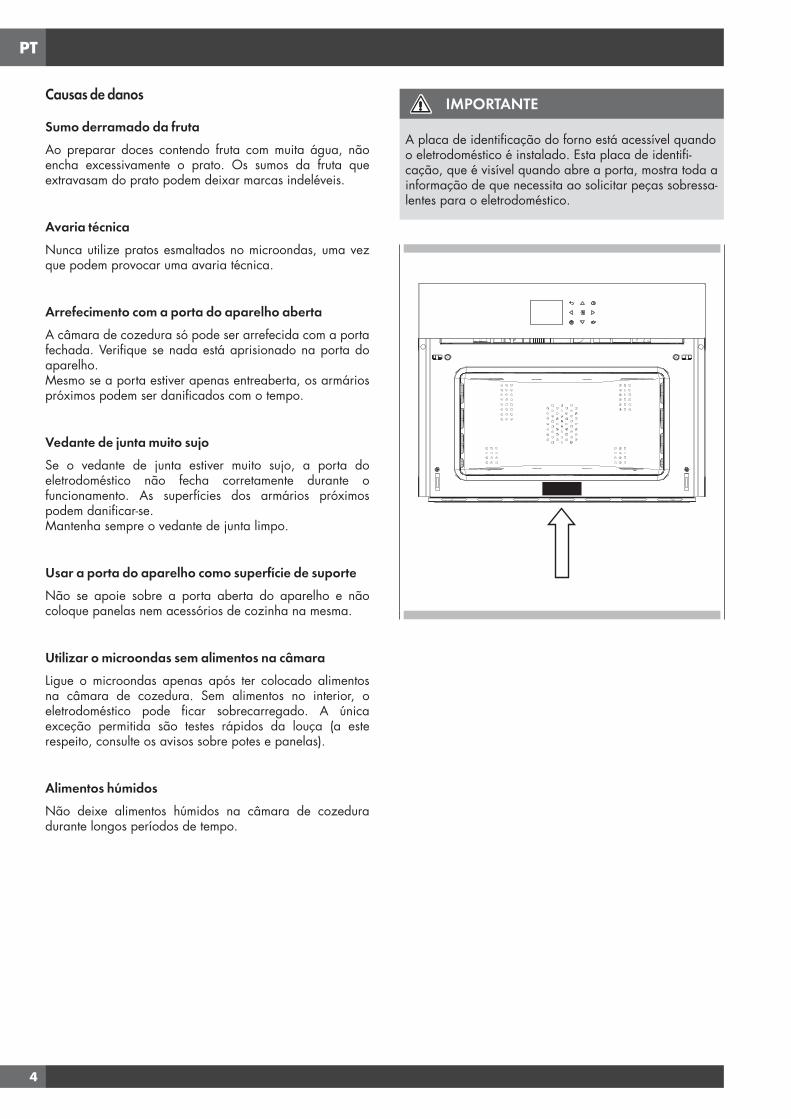
PT
4
Causas de danos
Sumo derramado da frutaAo preparar doces contendo fruta com muita água, não encha excessivamente o prato. Os sumos da fruta que extravasam do prato podem deixar marcas indeléveis.
Avaria técnicaNunca utilize pratos esmaltados no microondas, uma vez que podem provocar uma avaria técnica.
Arrefecimento com a porta do aparelho abertaA câmara de cozedura só pode ser arrefecida com a porta fechada. Verifique se nada está aprisionado na porta do aparelho.Mesmo se a porta estiver apenas entreaberta, os armários próximos podem ser danificados com o tempo.
Vedante de junta muito sujoSe o vedante de junta estiver muito sujo, a porta do eletrodoméstico não fecha corretamente durante o funcionamento. As superfícies dos armários próximos podem danificar-se.Mantenha sempre o vedante de junta limpo.
Usar a porta do aparelho como superfície de suporteNão se apoie sobre a porta aberta do aparelho e não coloque panelas nem acessórios de cozinha na mesma.
Utilizar o microondas sem alimentos na câmaraLigue o microondas apenas após ter colocado alimentos na câmara de cozedura. Sem alimentos no interior, o eletrodoméstico pode ficar sobrecarregado. A única exceção permitida são testes rápidos da louça (a este respeito, consulte os avisos sobre potes e panelas).
Alimentos húmidosNão deixe alimentos húmidos na câmara de cozedura durante longos períodos de tempo.
IMPORTANTE
A placa de identificação do forno está acessível quando o eletrodoméstico é instalado. Esta placa de identifi-cação, que é visível quando abre a porta, mostra toda a informação de que necessita ao solicitar peças sobressa-lentes para o eletrodoméstico.

PT
5
IMPORTANTE
Como precaução de segurança, antes de limpar o forno, desligue sempre a ficha da tomada ou remova o cabo de alimentação do eletrodoméstico. Além disso, evite utilizar substâncias ácidas ou alcalinas (como limões, vinagre, sal, tomate, etc.). Evite usar produtos que contenham cloro, ácidos ou abrasivos, especialmente nas paredes pintadas ao limpar.
Primeira utilização
O forno deve ser bem limpo com água e sabão e cuidadosamente lavado.Aqueça o forno durante cerca de 30 minutos à temperatura máxima; isto elimina óleos de fabrico residuais que podem provocar odores desagradáveis durante a cozedura. Utilize a função de ventilador circular mais sem acessórios no forno. Antes de usar os acessórios pela primeira vez, limpe-os cuidadosamente com uma solução de limpeza alcalina muito quente e um pano macio.
Montagem e desmontagem da grelha plana
Para remover a grelha plana, puxe a grelha para si até esta parar e depois levante-a, puxando para cima, até sair completamente.Para colocar a grelha plana de novo, insira-a a um ângulo de 45 graus e, de seguida, coloque-a na horizontal e puxe-a até ao fim da calha da grelha.Se a grelha plana tiver um tabuleiro de gotejamento, para removê-lo levante-o ligeiramente e deslize-o para si. Para reintroduzi-lo, deslize-o novamente até estar corretamente alojado.
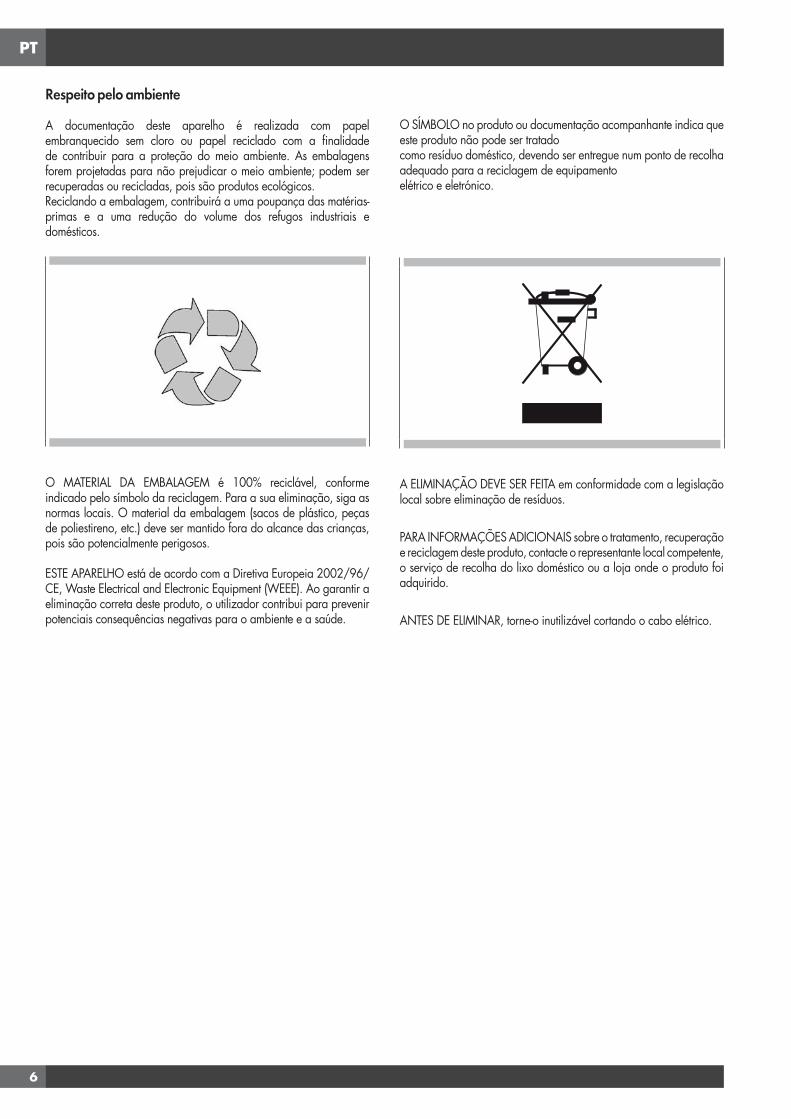
PT
6
Respeito pelo ambiente
A documentação deste aparelho é realizada com papel embranquecido sem cloro ou papel reciclado com a finalidade de contribuir para a proteção do meio ambiente. As embalagens forem projetadas para não prejudicar o meio ambiente; podem ser recuperadas ou recicladas, pois são produtos ecológicos.Reciclando a embalagem, contribuirá a uma poupança das matérias-primas e a uma redução do volume dos refugos industriais e domésticos.
O MATERIAL DA EMBALAGEM é 100% reciclável, conforme indicado pelo símbolo da reciclagem. Para a sua eliminação, siga as normas locais. O material da embalagem (sacos de plástico, peças de poliestireno, etc.) deve ser mantido fora do alcance das crianças, pois são potencialmente perigosos.
ESTE APARELHO está de acordo com a Diretiva Europeia 2002/96/CE, Waste Electrical and Electronic Equipment (WEEE). Ao garantir a eliminação correta deste produto, o utilizador contribui para prevenir potenciais consequências negativas para o ambiente e a saúde.
O SÍMBOLO no produto ou documentação acompanhante indica que este produto não pode ser tratadocomo resíduo doméstico, devendo ser entregue num ponto de recolha adequado para a reciclagem de equipamentoelétrico e eletrónico.
A ELIMINAÇÃO DEVE SER FEITA em conformidade com a legislação local sobre eliminação de resíduos.
PARA INFORMAÇÕES ADICIONAIS sobre o tratamento, recuperação e reciclagem deste produto, contacte o representante local competente, o serviço de recolha do lixo doméstico ou a loja onde o produto foi adquirido.
ANTES DE ELIMINAR, torne-o inutilizável cortando o cabo elétrico.

PT
7
2 - O painel de controlo
Teclado
Para utilizar a tecla, prima suavemente. O teclado não irá funcionar se forem premidas em simultâneo mais do que uma tecla.
Setas de movimento
Volte à página do ecrã anterior. Mantenha premido para voltar à página inicial
Liga e desliga o forno.
Confirma as definições e inicia as operações de cozedura. Quando é premida durante uma operação de cozedura, a função é colocada em pausa. Prima novamente para reiniciar.
Para definir o temporizador.Entre no menu de funções durante a cozedura.
Liga a desliga o forno interior.
O seu aparelho pode diferir ligeiramente quando comparado às ilustrações seguintes.
A - Teclado
B - Ecrã de exibição
PM
FRIDAY 11/20/2015
04:26
B A
PT
8
3 - Informações gerais sobre o forno
Códigos de erro
Este código aparece caso o controlo eletrónico indique uma falha. Quando o erro aparece, a função atual é bloqueada. Se o tipo de erro estiver relacionado com uma função de segurança, o forno torna-se inutilizável e sempre que for feita uma tentativa de ligação, o mesmo erro aparece (em cujo caso deve telefonar para o serviço pós-venda), enquanto que se o erro estiver relacionado com uma falha menor, após ter sido reiniciado o forno pode ser usado para funções que não envolvem a peça defeituosa (por ex., o elemento de aquecimento).
Bipes
Confirma se o comando foi recebido após uma tecla ter sido premida.Indica ainda que foi concluída uma função de temporização (por ex. Temporizador ou Cozedura Temporizada). Durante a execução de uma receita, um sinal acústico avisa o utilizador de que o forno está a aguardar uma operação por parte do utilizador (por ex., insira o prato ou volte-o ao contrário).Os bipes também sinalizam uma falha do forno.
Predefinições
Os modos de cozedura automaticamente selecionam uma temperatura adequada quando o modo de cozedura é selecionado. Estes podem ser alterados quando é necessário um diferente.
Códigos de número de falha F
Estes códigos são apresentados quando o controlo eletrónico deteta um problema com o forno ou a eletrónica.O código de erro é registado no Registo de Erro, no menu Configuração. Este erro pode ser comunicado ao técnico de assistência técnica para que este possa compreender a causa possível do problema com antecedência.
Pré-aquecimento
Sempre que um modo de cozedura é definido e o forno é aquecido, o pré-aquecimento inicia. Durante este período, a temperatura instantânea é exibida juntamente com o ícone do termómetro.Mal seja atingido 100%, o controlo faz soar o “fim do pré-aquecimento” e o valor da temperatura atual desaparece.
Temporizador
ATENÇÃO
O temporizador no seu forno não liga nem desliga o aparelho, o seu único objetivo é alertá-lo através do alarme. Quando quiser desligar o forno automaticamente, utilize as funções fim de cozedura e cozedura com atraso.
NOTA: Premir o botão DESLIGAR não reinicia nem para o temporizador.
1. Prima o botão e defina o tempo desejado usando as setas e confirme com o botão . Para alternar a seleção entre
horas e minutos, utilize as setas .2. As horas podem ser definidas desde 1 minuto a 12 horas e
59 minutos e, quando definidas, o tempo restante fica sempre visível na barra de estado ao fundo, até o tempo expirar ou ser redefinido.
3. Para alterar ou cancelar a definição de tempo, deve redefinir o temporizador, premindo e mantendo premido o botão durante alguns segundos.
4. O formato do temporizador é normalmente HR:MIN, alterando para MIN:SEG durante o último minuto.
5. Quando o tempo expira, o visor mostra 00:00 e o alarme irá soar durante um minuto ou até o botão ser premido .
Antes de utilizar o seu forno pela primeira vez, remova as embalagens e os materiais estranhos do(s) forno(s). Qualquer material deste tipo deixado no interior pode derreter ou queimar, quando o aparelho é utilizado.
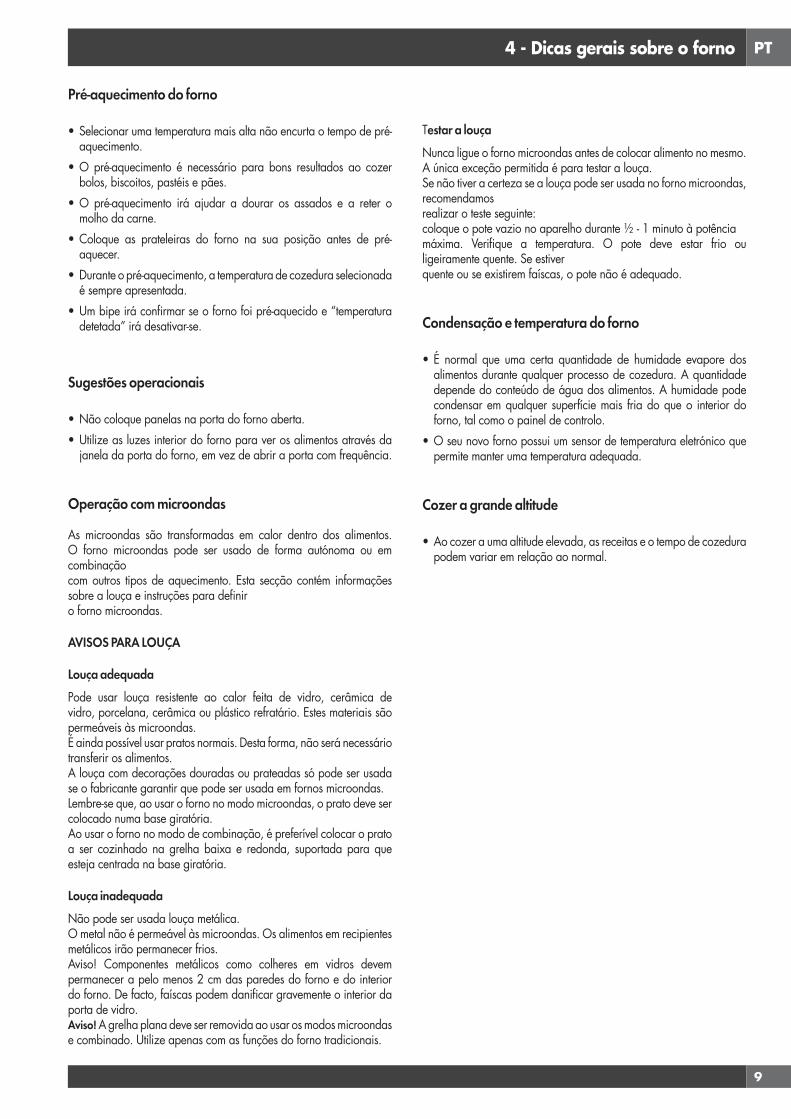
PT
9
4 - Dicas gerais sobre o forno
Pré-aquecimento do forno
• Selecionar uma temperatura mais alta não encurta o tempo de pré-aquecimento.
• O pré-aquecimento é necessário para bons resultados ao cozer bolos, biscoitos, pastéis e pães.
• O pré-aquecimento irá ajudar a dourar os assados e a reter o molho da carne.
• Coloque as prateleiras do forno na sua posição antes de pré-aquecer.
• Durante o pré-aquecimento, a temperatura de cozedura selecionada é sempre apresentada.
• Um bipe irá confirmar se o forno foi pré-aquecido e “temperatura detetada” irá desativar-se.
Sugestões operacionais
• Não coloque panelas na porta do forno aberta.• Utilize as luzes interior do forno para ver os alimentos através da
janela da porta do forno, em vez de abrir a porta com frequência.
Operação com microondas
As microondas são transformadas em calor dentro dos alimentos. O forno microondas pode ser usado de forma autónoma ou em combinaçãocom outros tipos de aquecimento. Esta secção contém informações sobre a louça e instruções para definiro forno microondas.
AVISOS PARA LOUÇA
Louça adequadaPode usar louça resistente ao calor feita de vidro, cerâmica de vidro, porcelana, cerâmica ou plástico refratário. Estes materiais são permeáveis às microondas.É ainda possível usar pratos normais. Desta forma, não será necessário transferir os alimentos.A louça com decorações douradas ou prateadas só pode ser usada se o fabricante garantir que pode ser usada em fornos microondas.Lembre-se que, ao usar o forno no modo microondas, o prato deve ser colocado numa base giratória.Ao usar o forno no modo de combinação, é preferível colocar o prato a ser cozinhado na grelha baixa e redonda, suportada para que esteja centrada na base giratória.
Louça inadequadaNão pode ser usada louça metálica.O metal não é permeável às microondas. Os alimentos em recipientes metálicos irão permanecer frios.Aviso! Componentes metálicos como colheres em vidros devem permanecer a pelo menos 2 cm das paredes do forno e do interior do forno. De facto, faíscas podem danificar gravemente o interior da porta de vidro.Aviso! A grelha plana deve ser removida ao usar os modos microondas e combinado. Utilize apenas com as funções do forno tradicionais.
Testar a louçaNunca ligue o forno microondas antes de colocar alimento no mesmo.A única exceção permitida é para testar a louça.Se não tiver a certeza se a louça pode ser usada no forno microondas, recomendamosrealizar o teste seguinte:coloque o pote vazio no aparelho durante ½ - 1 minuto à potênciamáxima. Verifique a temperatura. O pote deve estar frio ou ligeiramente quente. Se estiverquente ou se existirem faíscas, o pote não é adequado.
Condensação e temperatura do forno
• É normal que uma certa quantidade de humidade evapore dos alimentos durante qualquer processo de cozedura. A quantidade depende do conteúdo de água dos alimentos. A humidade pode condensar em qualquer superfície mais fria do que o interior do forno, tal como o painel de controlo.
• O seu novo forno possui um sensor de temperatura eletrónico que permite manter uma temperatura adequada.
Cozer a grande altitude
• Ao cozer a uma altitude elevada, as receitas e o tempo de cozedura podem variar em relação ao normal.
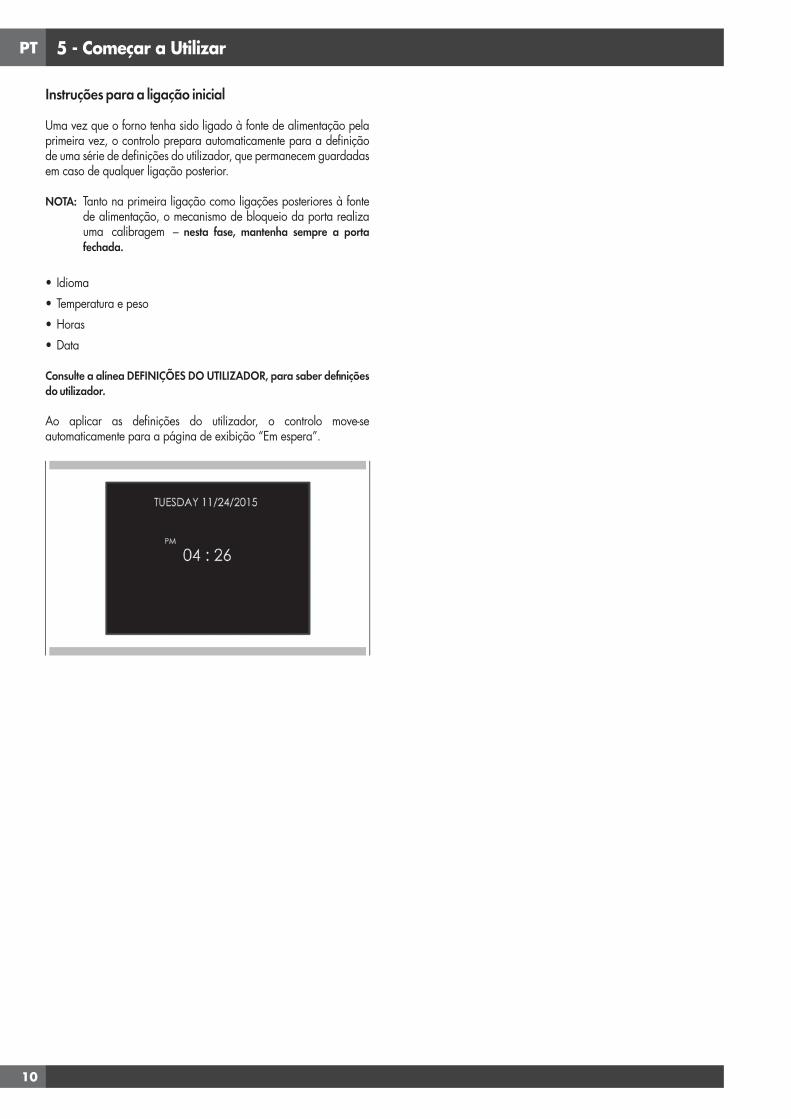
PT
10
5 - Começar a Utilizar
Instruções para a ligação inicial
Uma vez que o forno tenha sido ligado à fonte de alimentação pela primeira vez, o controlo prepara automaticamente para a definição de uma série de definições do utilizador, que permanecem guardadas em caso de qualquer ligação posterior.
NOTA: Tanto na primeira ligação como ligações posteriores à fonte de alimentação, o mecanismo de bloqueio da porta realiza uma calibragem – nesta fase, mantenha sempre a porta fechada.
• Idioma• Temperatura e peso• Horas• Data
Consulte a alínea DEFINIÇÕES DO UTILIZADOR, para saber definições do utilizador.
Ao aplicar as definições do utilizador, o controlo move-se automaticamente para a página de exibição “Em espera”.
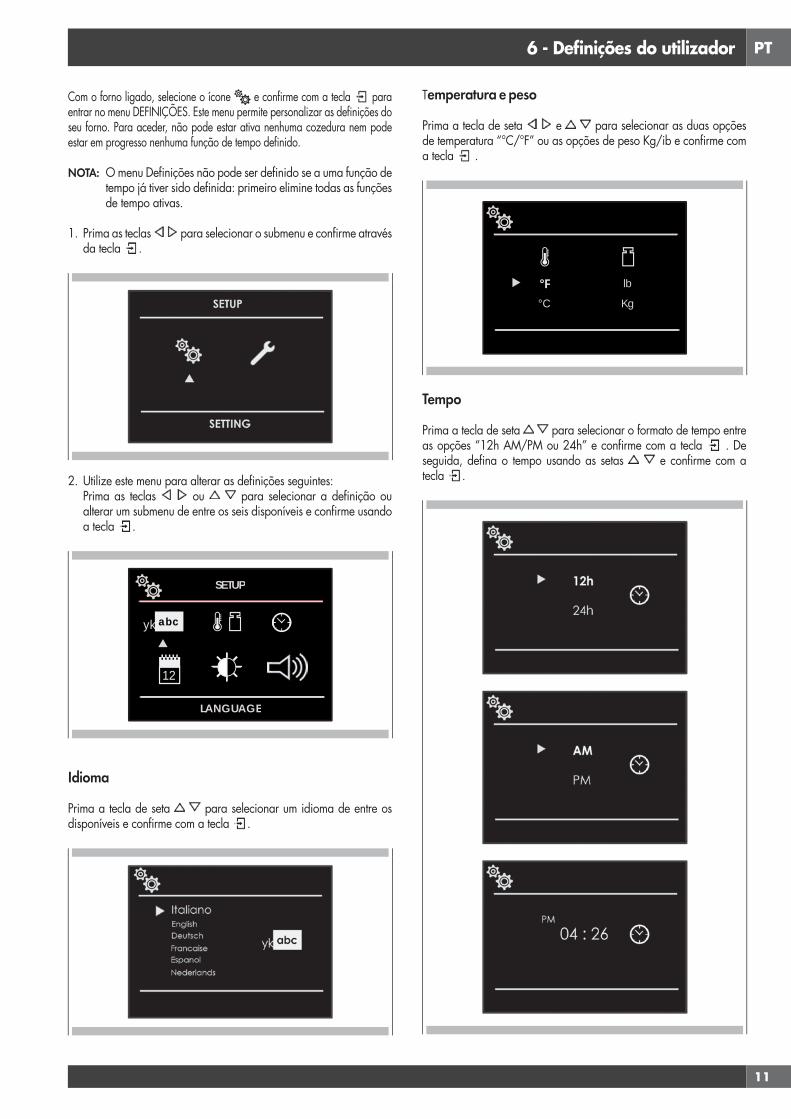
PT
11
6 - Definições do utilizador
Com o forno ligado, selecione o ícone e confirme com a tecla para entrar no menu DEFINIÇÕES. Este menu permite personalizar as definições do seu forno. Para aceder, não pode estar ativa nenhuma cozedura nem pode estar em progresso nenhuma função de tempo definido.
NOTA: O menu Definições não pode ser definido se a uma função de tempo já tiver sido definida: primeiro elimine todas as funções de tempo ativas.
1. Prima as teclas para selecionar o submenu e confirme através da tecla .
2. Utilize este menu para alterar as definições seguintes: Prima as teclas ou para selecionar a definição ou
alterar um submenu de entre os seis disponíveis e confirme usando a tecla .
12
yk abc
SETUP
LANGUAGE
Idioma
Prima a tecla de seta para selecionar um idioma de entre os disponíveis e confirme com a tecla .
Temperatura e peso
Prima a tecla de seta e para selecionar as duas opções de temperatura “°C/°F” ou as opções de peso Kg/ib e confirme com a tecla .
°F°C
lb
Kg
Tempo
Prima a tecla de seta para selecionar o formato de tempo entre as opções “12h AM/PM ou 24h” e confirme com a tecla . De seguida, defina o tempo usando as setas e confirme com a tecla .

PT
12
Data
Prima a tecla de seta para selecionar o formato da data de entre as opções “D.M.A. – A.M.D. – M.D.A.” e confirme com a tecla . De seguida, defina o valor usando as setas e confirme com a tecla .
Brilho
Prima a tecla de seta para escolher a definição de luminosidade, alternando entre LIGADO ou EM ESPERA, de seguida, usando as setas selecione o grau de luminosidade requerido e confirme com a tecla .
Volume
Prima a tecla de seta para selecionar o grau requerido de luminosidade e confirme com a tecla .

PT
13
7 - Definição do sistema
Com o forno ligado, selecione o ícone e confirme com a tecla para entrar no menu DEFINIÇÕES. Este menu permite definir um
número de parâmetros ou funções especiais. Permite ainda aceder à lista de eventos de erro.
1. Prima as teclas para selecionar o submenu e confirme através da tecla .
2. Utilize este menu para alterar as definições seguintes:
Prima as teclas para selecionar o item a ser definido ou a ser apresentado de entre os três disponíveis e confirme com a tecla .
Registo de evento
O menu permite verificar quaisquer erros registados. Estes códigos podem ser notificados ao serviço pós-vendas.
Demonstração
O objetivo desta função é definir o modo DEMONSTRAÇÃO, que desativa a função de cozedura mas realiza automaticamente uma demonstração das funções.
1. Prima as teclas para selecionar o item LIGAR.2. Confirme com a tecla .3. Prima a tecla .
Após cerca de 30 segundos, o forno começa a funcionar neste modo.
Para parar temporariamente esta função de DEMONSTRAÇÃO, mantenha simplesmente qualquer tecla premida durante alguns segundos até o forno alternar para “em espera”. Para iniciar novamente, prima a tecla .
Para desativar a função, entre na página de visualização DEMONSTRAÇÃO e defina-a para DESLIGADO. Confirme usando a tecla .
NOTA: Uma vez definida, a função permanece ativa mesmo se o forno for desligado da corrente elétrica.
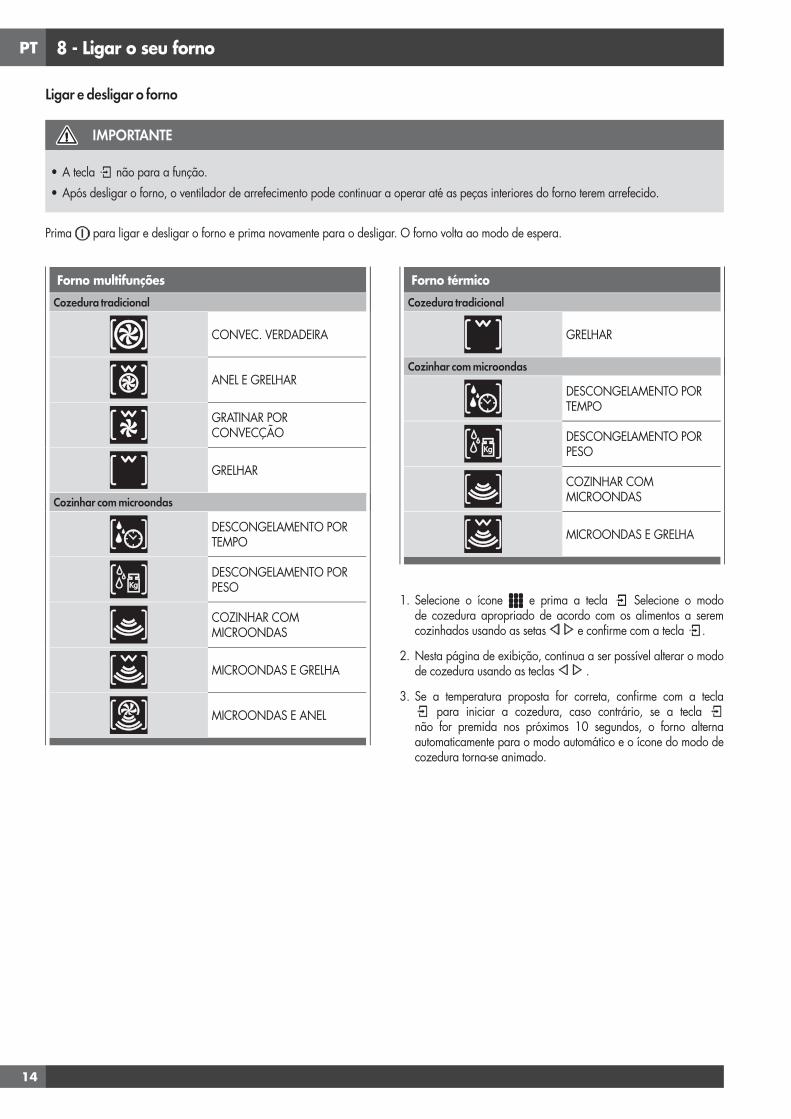
PT
14
8 - Ligar o seu forno
Forno multifunções
Cozedura tradicional
CONVEC. VERDADEIRA
ANEL E GRELHAR
GRATINAR POR CONVECÇÃO
GRELHAR
Cozinhar com microondas
DESCONGELAMENTO POR TEMPO
DESCONGELAMENTO POR PESO
COZINHAR COM MICROONDAS
MICROONDAS E GRELHA
MICROONDAS E ANEL
Forno térmico
Cozedura tradicional
GRELHAR
Cozinhar com microondas
DESCONGELAMENTO POR TEMPO
DESCONGELAMENTO POR PESO
COZINHAR COM MICROONDAS
MICROONDAS E GRELHA
1. Selecione o ícone e prima a tecla Selecione o modo de cozedura apropriado de acordo com os alimentos a serem cozinhados usando as setas e confirme com a tecla .
2. Nesta página de exibição, continua a ser possível alterar o modo de cozedura usando as teclas .
3. Se a temperatura proposta for correta, confirme com a tecla para iniciar a cozedura, caso contrário, se a tecla
não for premida nos próximos 10 segundos, o forno alterna automaticamente para o modo automático e o ícone do modo de cozedura torna-se animado.
Ligar e desligar o forno
IMPORTANTE
• A tecla não para a função.• Após desligar o forno, o ventilador de arrefecimento pode continuar a operar até as peças interiores do forno terem arrefecido.
Prima para ligar e desligar o forno e prima novamente para o desligar. O forno volta ao modo de espera.

PT
15
Tabelas com o modo de cozedura
Cozedura tradicionalMODO DE COZEDURA ÍCONE TEMPERATURA
Min. Predefinir Máx.
CONVECÇÃO VERDADEIRA 50° C 165° C 230° C
ANEL E GRELHAR 50° C 210° C 230° C
GRATINAR POR CONVECÇÃO 50° C 165° C 230° C
GRELHAR 50° C 230° C 230° C
Cozinhar com microondasMODO DE COZEDURA ÍCONE DEFINIR PESO WATT TEMPERATURA
Min. Predefinir Máx. Min. Predefinir Máx. Min. Predefinir Máx.
DESCONGELAMENTO POR TEMPO 150 W
DESCONGELAMENTO POR PESO
Pão 100 g 500 g 600 g 150 W
Vegetais 100 g 500 g 1000 g 150 W
Carne 100 g 500 g 1500 g 150 W
Peixe 100 g 500 g 800 g 150 W
COZINHAR COM MICROONDAS 150 W 900 W 900 W
MICROONDAS E GRELHA
150W 150 W 200° C
300W 300 W
450W 450 W
MICROONDAS E ANEL
150W 150 W 50° C 100° C 200° C
300W 300 W
450W 450 W
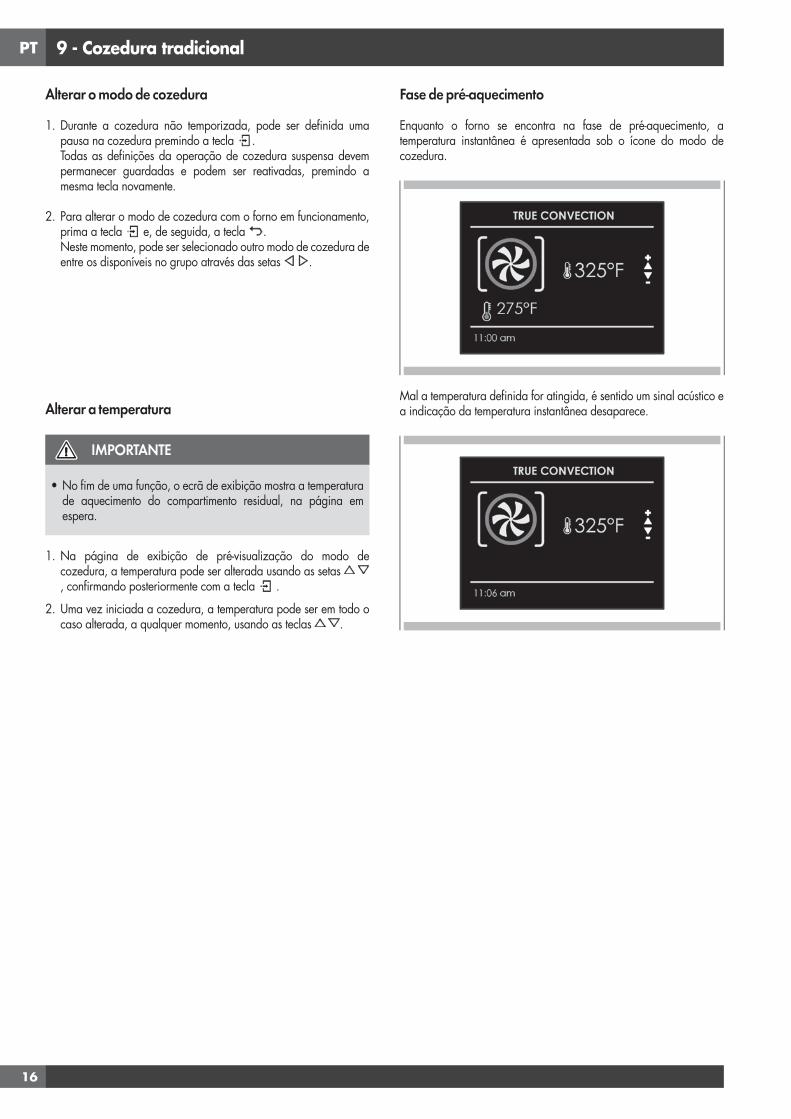
PT
16
9 - Cozedura tradicional
Alterar o modo de cozedura
1. Durante a cozedura não temporizada, pode ser definida uma pausa na cozedura premindo a tecla .
Todas as definições da operação de cozedura suspensa devem permanecer guardadas e podem ser reativadas, premindo a mesma tecla novamente.
2. Para alterar o modo de cozedura com o forno em funcionamento, prima a tecla e, de seguida, a tecla .
Neste momento, pode ser selecionado outro modo de cozedura de entre os disponíveis no grupo através das setas .
Alterar a temperatura
IMPORTANTE
• No fim de uma função, o ecrã de exibição mostra a temperatura de aquecimento do compartimento residual, na página em espera.
1. Na página de exibição de pré-visualização do modo de cozedura, a temperatura pode ser alterada usando as setas , confirmando posteriormente com a tecla .
2. Uma vez iniciada a cozedura, a temperatura pode ser em todo o caso alterada, a qualquer momento, usando as teclas .
Fase de pré-aquecimento
Enquanto o forno se encontra na fase de pré-aquecimento, a temperatura instantânea é apresentada sob o ícone do modo de cozedura.
Mal a temperatura definida for atingida, é sentido um sinal acústico e a indicação da temperatura instantânea desaparece.
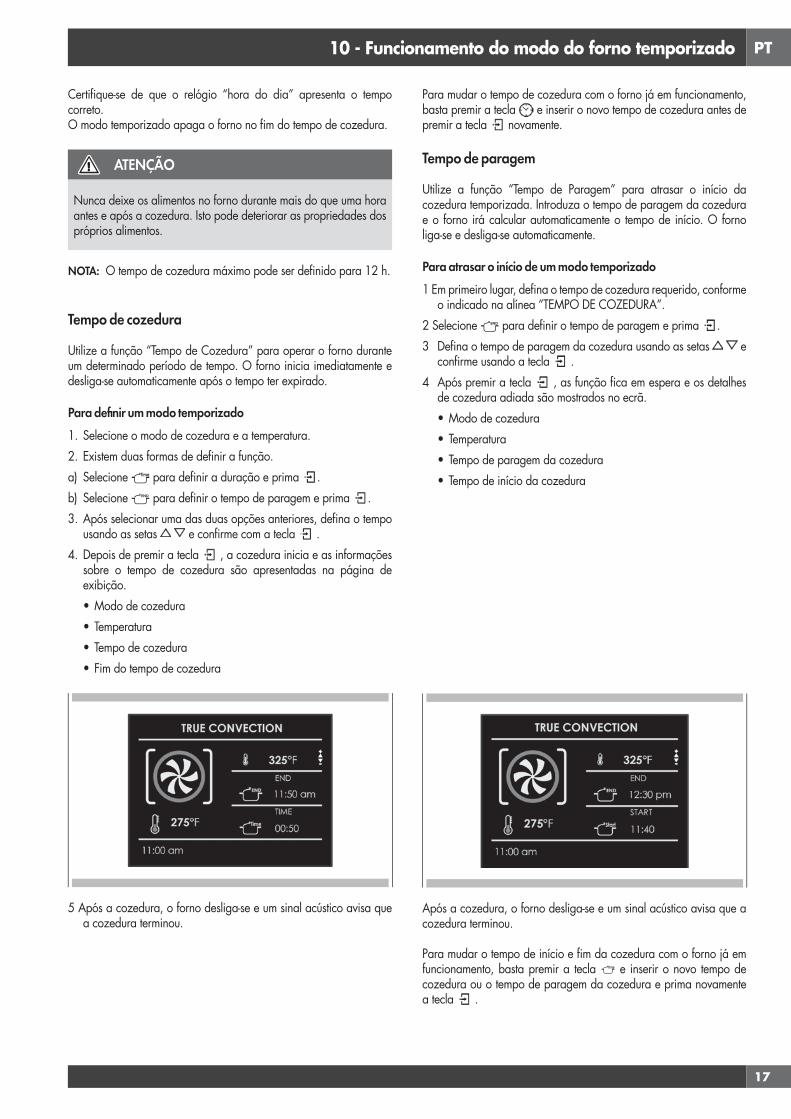
PT
17
10 - Funcionamento do modo do forno temporizado
Certifique-se de que o relógio “hora do dia” apresenta o tempo correto.O modo temporizado apaga o forno no fim do tempo de cozedura.
ATENÇÃO
Nunca deixe os alimentos no forno durante mais do que uma hora antes e após a cozedura. Isto pode deteriorar as propriedades dos próprios alimentos.
NOTA: O tempo de cozedura máximo pode ser definido para 12 h.
Tempo de cozedura
Utilize a função “Tempo de Cozedura” para operar o forno durante um determinado período de tempo. O forno inicia imediatamente e desliga-se automaticamente após o tempo ter expirado.
Para definir um modo temporizado1. Selecione o modo de cozedura e a temperatura.2. Existem duas formas de definir a função.a) Selecione para definir a duração e prima .b) Selecione para definir o tempo de paragem e prima .3. Após selecionar uma das duas opções anteriores, defina o tempo
usando as setas e confirme com a tecla .4. Depois de premir a tecla , a cozedura inicia e as informações
sobre o tempo de cozedura são apresentadas na página de exibição.• Modo de cozedura• Temperatura• Tempo de cozedura• Fim do tempo de cozedura
5 Após a cozedura, o forno desliga-se e um sinal acústico avisa que a cozedura terminou.
Para mudar o tempo de cozedura com o forno já em funcionamento, basta premir a tecla e inserir o novo tempo de cozedura antes de premir a tecla novamente.
Tempo de paragem
Utilize a função “Tempo de Paragem” para atrasar o início da cozedura temporizada. Introduza o tempo de paragem da cozedura e o forno irá calcular automaticamente o tempo de início. O forno liga-se e desliga-se automaticamente.
Para atrasar o início de um modo temporizado1 Em primeiro lugar, defina o tempo de cozedura requerido, conforme
o indicado na alínea “TEMPO DE COZEDURA”.2 Selecione para definir o tempo de paragem e prima .3 Defina o tempo de paragem da cozedura usando as setas e
confirme usando a tecla .4 Após premir a tecla , as função fica em espera e os detalhes
de cozedura adiada são mostrados no ecrã.• Modo de cozedura• Temperatura• Tempo de paragem da cozedura• Tempo de início da cozedura
Após a cozedura, o forno desliga-se e um sinal acústico avisa que a cozedura terminou.
Para mudar o tempo de início e fim da cozedura com o forno já em funcionamento, basta premir a tecla e inserir o novo tempo de cozedura ou o tempo de paragem da cozedura e prima novamente a tecla .
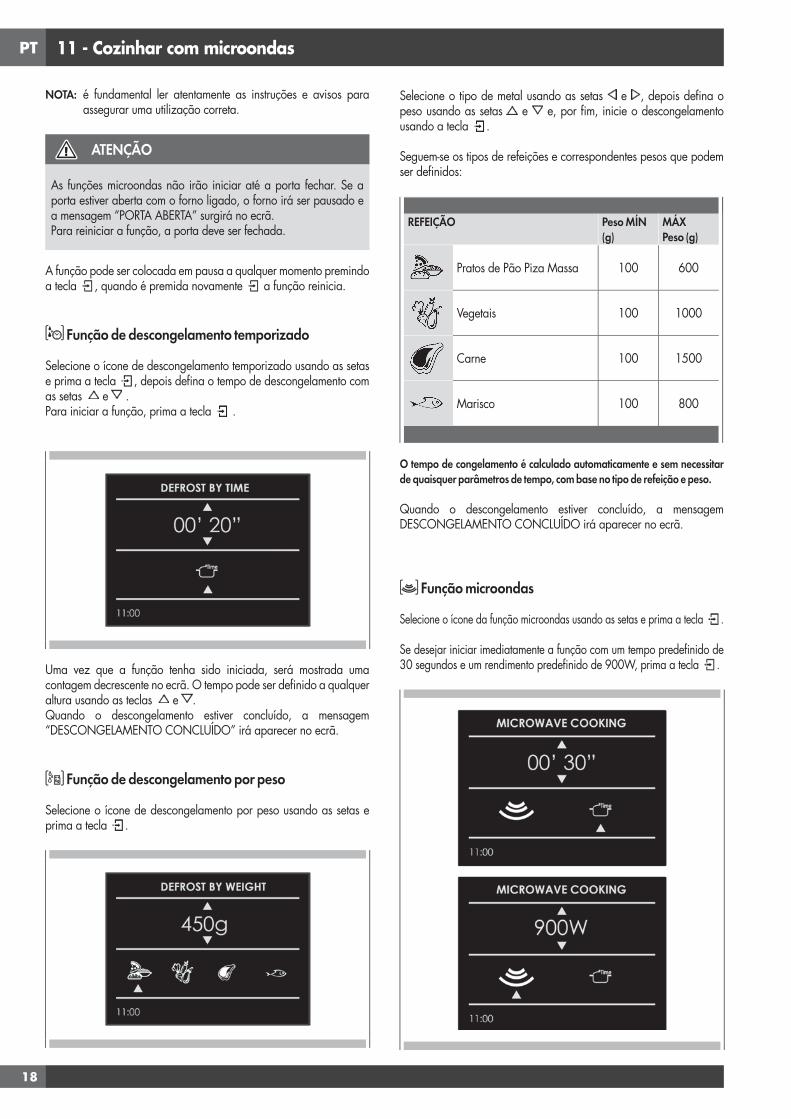
PT
18
11 - Cozinhar com microondas
NOTA: é fundamental ler atentamente as instruções e avisos para assegurar uma utilização correta.
ATENÇÃO
As funções microondas não irão iniciar até a porta fechar. Se a porta estiver aberta com o forno ligado, o forno irá ser pausado e a mensagem “PORTA ABERTA” surgirá no ecrã.Para reiniciar a função, a porta deve ser fechada.
A função pode ser colocada em pausa a qualquer momento premindo a tecla , quando é premida novamente a função reinicia.
Função de descongelamento temporizado
Selecione o ícone de descongelamento temporizado usando as setas e prima a tecla , depois defina o tempo de descongelamento com as setas e .Para iniciar a função, prima a tecla .
Uma vez que a função tenha sido iniciada, será mostrada uma contagem decrescente no ecrã. O tempo pode ser definido a qualquer altura usando as teclas e . Quando o descongelamento estiver concluído, a mensagem “DESCONGELAMENTO CONCLUÍDO” irá aparecer no ecrã.
Função de descongelamento por peso
Selecione o ícone de descongelamento por peso usando as setas e prima a tecla .
Selecione o tipo de metal usando as setas e , depois defina o peso usando as setas e e, por fim, inicie o descongelamento usando a tecla .
Seguem-se os tipos de refeições e correspondentes pesos que podem ser definidos:
REFEIÇÃO Peso MÍN (g)
MÁX Peso (g)
Pratos de Pão Piza Massa 100 600
Vegetais 100 1000
Carne 100 1500
Marisco 100 800
O tempo de congelamento é calculado automaticamente e sem necessitar de quaisquer parâmetros de tempo, com base no tipo de refeição e peso.
Quando o descongelamento estiver concluído, a mensagem DESCONGELAMENTO CONCLUÍDO irá aparecer no ecrã.
Função microondas
Selecione o ícone da função microondas usando as setas e prima a tecla .
Se desejar iniciar imediatamente a função com um tempo predefinido de 30 segundos e um rendimento predefinido de 900W, prima a tecla .

PT
19
Se desejar personalizar o tempo e rendimento, abra o submenu gerido conforme se segue:• TEMPO: Selecione o ícone e use as teclas e para
personalizar o tempo.• RENDIMENTO DO MICROONDAS: Selecione o ícone e use
as teclas e para selecionar a definição de rendimento do microondas de entre 6 níveis possíveis, 150W - 300W - 450W - 600W - 750W - 900W.
Uma vez definidos os novos parâmetros, prima a tecla para começar a cozer.
Uma vez que a cozedura tenha sido iniciada, será mostrada uma contagem decrescente no ecrã. O tempo pode ser definido a qualquer altura usando as teclas e .
No fim da cozedura, a mensagem “FIM DE COZEDURA” irá aparecer no ecrã.
Função microondas + grelha
Selecione o ícone de função Microondas+Grelha usando as setas e prima a tecla , depois defina o tempo de descongelamento com as setas e .
Se desejar iniciar imediatamente a função com um tempo predefinido e um rendimento predefinido de 300W, prima a tecla .
Se desejar personalizar o rendimento, abra o submenu gerido conforme se segue:• RENDIMENTO DO MICROONDAS: Selecione o ícone e use
as teclas e para selecionar a definição de rendimento do microondas de entre 3 níveis possíveis, 150W - 300W - 450W.
Uma vez definido o novo parâmetro, prima a tecla para começar a cozer.
Uma vez que a cozedura tenha sido iniciada, será mostrada uma contagem decrescente no ecrã. O tempo pode ser definido a qualquer altura usando as teclas e .
No fim da cozedura, a mensagem “FIM DE COZEDURA” irá aparecer no ecrã.
Função microondas + anel
Selecione o ícone de função Microondas+Anel usando as setas e prima a tecla , depois defina o tempo de descongelamento com as setas e .
Se desejar iniciar imediatamente a função com um tempo predefinido e uma temperatura de 100°C, com um rendimento predefinido do microondas de 300W, prima a tecla .
Se desejar personalizar a temperatura e o rendimento, abra o submenu gerido conforme se segue:• TEMPERATURA: Selecione o ícone e use as teclas e para
personalizar a temperatura entre 50°C e 200°C.• RENDIMENTO DO MICROONDAS: Selecione o ícone e use
as teclas e para selecionar a definição de rendimento do microondas de entre 3 níveis possíveis, 150W - 300W - 450W.
PT
20
Uma vez definidos os novos parâmetros, prima a tecla para começar a cozer.
Uma vez que a cozedura tenha sido iniciada, será mostrada uma contagem decrescente no ecrã. O tempo pode ser definido a qualquer altura usando as teclas e .
No fim da cozedura, a mensagem “FIM DE COZEDURA” irá aparecer no ecrã.
Mudar a alimentação de Watts
Selecione o ícone e prima a tecla Selecione o ícone microondas e mude os watts de potência usando as setas e confirme com a tecla .
Mudar as horas
Prima o ícone e prima a tecla . Selecione o ícone do tempo e mude o valor do tempo usando as setas e confirme com a tecla .
Alterar a temperatura
(só disponível para microondas e anel)Selecione o ícone e prima a tecla Selecione o modo de cozedura e mude a temperatura definida usando as setas e confirme com a tecla .
Mudar o peso
(só disponível para descongelamento e peso)Prima o ícone e mude o peso usando as setas e confirme com a tecla .

PT
21
12 - Utilizar as luzes do forno
Uma tecla de luz única acende as luzes.Toque em para apagar ou acender as luzes .As luzes do forno acendem-se automaticamente quando a porta é aberta.Quando um forno está em utilização, as luzes do forno ligam-se automaticamente quando um modo é iniciado.As luzes do forno irão apagar-se automaticamente quando o modo do forno é cancelado.
NOTA: Uma vez acesas, as luzes apagam-se automaticamente após 3 minutos. Para voltar a ligá-las, prima a tecla ou abra a porta.

PT
22
13 - Receitas
Selecione uma receita já definida:1. Ligue o forno, selecione o ícone e prima o botão .
2. Utilizando as setas selecione a lista entre “PREDEFINIDO” ou “PESSOAL” e confirme usando a tecla .
3. Escolha o tipo de alimento a ser cozinhado usando as setas e as setas e confirme usando a tecla .
4. Usando as setas escolha entre “FRESCO” ou “CONGELADO” ou, noutros casos, entre “INTEIRO” ou “EM PEDAÇOS” e confirme com a tecla .
5. Selecione a receita requerida usando as setas e confirme usando a tecla .
6. Quando a receita é selecionada, aparece a página de exibição seguinte no ecrã:
A função Receitas do seu forno dá-lhe a possibilidade de cozinhar alimentos sem ter de definir sempre manualmente o forno. Ao selecionar uma receita “DEFINIDA”, o modo de cozedura, a temperatura e as horas são automaticamente definidos de acordo com a receita selecionada do menu.
Lista de receitas Tipo de alimento Condição do alimento Lista de receitas Informações apresentadas
PREDEFINIDO OU PESSOAL
FRESCO
PIZA DE PÃO PRIMEIRO
TIPO DE ACESSÓRIO
POSIÇÃO DO NÍVEL
PESO DO ALIMENTO
TEMPO DE COZEDURA
PRÉ-AQUECIMENTO REQUERIDO(SIM/NÃO)
CONGELADO
INTEIRO
CARNE
EM PEDAÇOS
INTEIRO
AVES
EM PEDAÇOS
INTEIRO
PEIXE
EM PEDAÇOS
-
VEGETAIS
-
-
TARTES
-
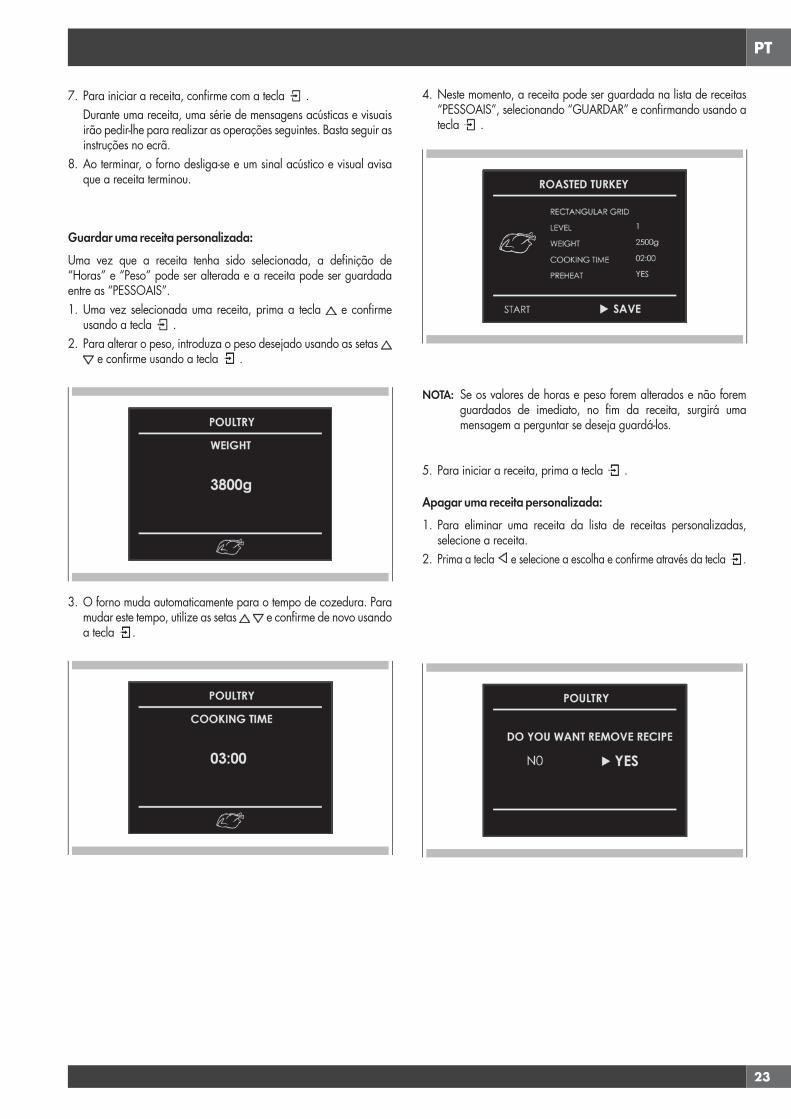
PT
23
7. Para iniciar a receita, confirme com a tecla . Durante uma receita, uma série de mensagens acústicas e visuais
irão pedir-lhe para realizar as operações seguintes. Basta seguir as instruções no ecrã.
8. Ao terminar, o forno desliga-se e um sinal acústico e visual avisa que a receita terminou.
Guardar uma receita personalizada:Uma vez que a receita tenha sido selecionada, a definição de “Horas” e “Peso” pode ser alterada e a receita pode ser guardada entre as “PESSOAIS”. 1. Uma vez selecionada uma receita, prima a tecla e confirme
usando a tecla .2. Para alterar o peso, introduza o peso desejado usando as setas
e confirme usando a tecla .
3. O forno muda automaticamente para o tempo de cozedura. Para mudar este tempo, utilize as setas e confirme de novo usando a tecla .
4. Neste momento, a receita pode ser guardada na lista de receitas “PESSOAIS”, selecionando “GUARDAR” e confirmando usando a tecla .
NOTA: Se os valores de horas e peso forem alterados e não forem guardados de imediato, no fim da receita, surgirá uma mensagem a perguntar se deseja guardá-los.
5. Para iniciar a receita, prima a tecla .
Apagar uma receita personalizada:1. Para eliminar uma receita da lista de receitas personalizadas,
selecione a receita.2. Prima a tecla e selecione a escolha e confirme através da tecla .
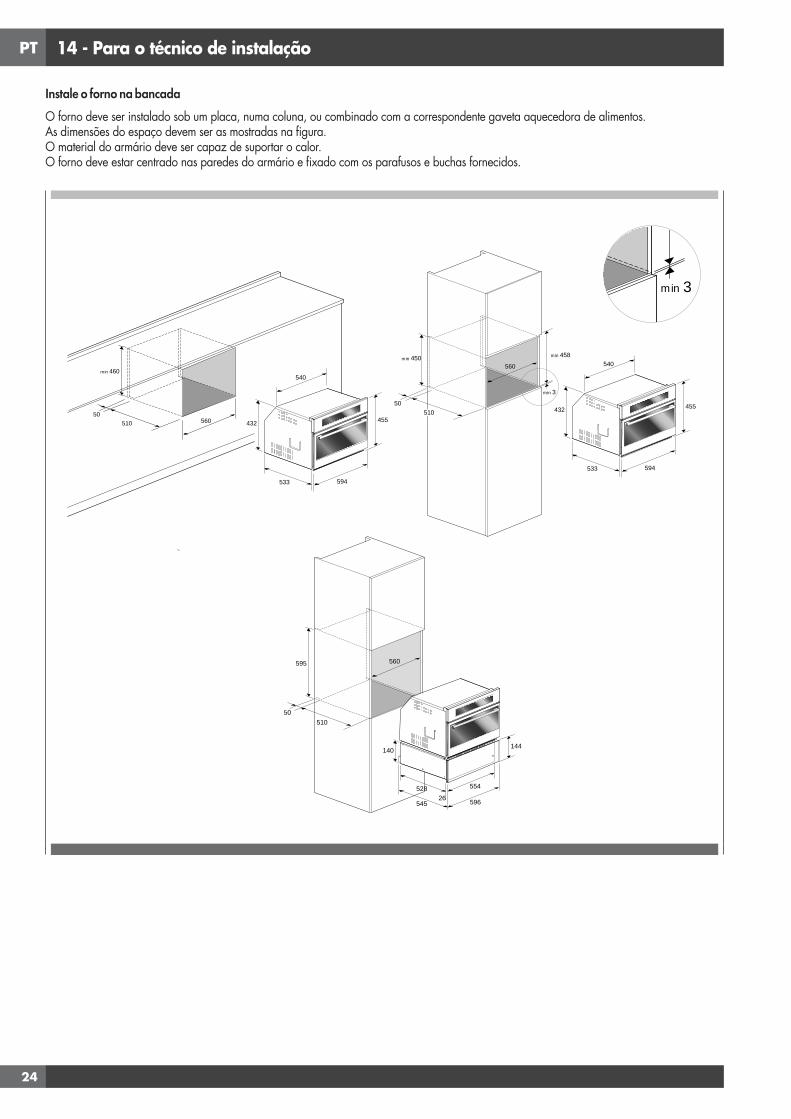
PT
24
14 - Para o técnico de instalação
Instale o forno na bancadaO forno deve ser instalado sob um placa, numa coluna, ou combinado com a correspondente gaveta aquecedora de alimentos.As dimensões do espaço devem ser as mostradas na figura.O material do armário deve ser capaz de suportar o calor.O forno deve estar centrado nas paredes do armário e fixado com os parafusos e buchas fornecidos.
560
min 460
50510
560
50 510
595
52826
144140
596
554
545
560min 450
50510
533
455
594
540
432
min 458
min 3
560
min 3
533
455
594
540
432
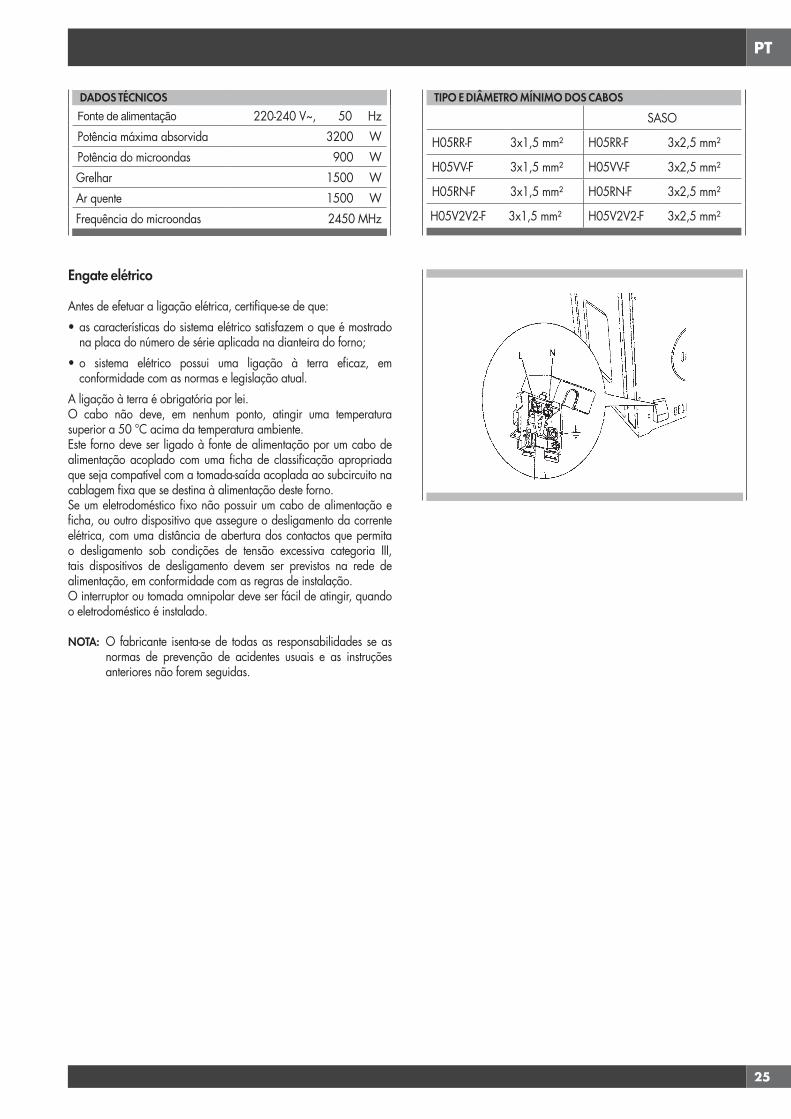
PT
25
DADOS TÉCNICOSFonte de alimentação 220-240 V~, 50 HzPotência máxima absorvida 3200 WPotência do microondas 900 WGrelhar 1500 WAr quente 1500 WFrequência do microondas 2450 MHz
Engate elétrico
Antes de efetuar a ligação elétrica, certifique-se de que:• as características do sistema elétrico satisfazem o que é mostrado
na placa do número de série aplicada na dianteira do forno;• o sistema elétrico possui uma ligação à terra eficaz, em
conformidade com as normas e legislação atual.A ligação à terra é obrigatória por lei.O cabo não deve, em nenhum ponto, atingir uma temperatura superior a 50 °C acima da temperatura ambiente.Este forno deve ser ligado à fonte de alimentação por um cabo de alimentação acoplado com uma ficha de classificação apropriada que seja compatível com a tomada-saída acoplada ao subcircuito na cablagem fixa que se destina à alimentação deste forno.Se um eletrodoméstico fixo não possuir um cabo de alimentação e ficha, ou outro dispositivo que assegure o desligamento da corrente elétrica, com uma distância de abertura dos contactos que permita o desligamento sob condições de tensão excessiva categoria III, tais dispositivos de desligamento devem ser previstos na rede de alimentação, em conformidade com as regras de instalação.O interruptor ou tomada omnipolar deve ser fácil de atingir, quando o eletrodoméstico é instalado.
NOTA: O fabricante isenta-se de todas as responsabilidades se as normas de prevenção de acidentes usuais e as instruções anteriores não forem seguidas.
TIPO E DIÂMETRO MÍNIMO DOS CABOSSASO
H05RR-F 3x1,5 mm² H05RR-F 3x2,5 mm²
H05VV-F 3x1,5 mm² H05VV-F 3x2,5 mm²
H05RN-F 3x1,5 mm² H05RN-F 3x2,5 mm²
H05V2V2-F 3x1,5 mm² H05V2V2-F 3x2,5 mm²
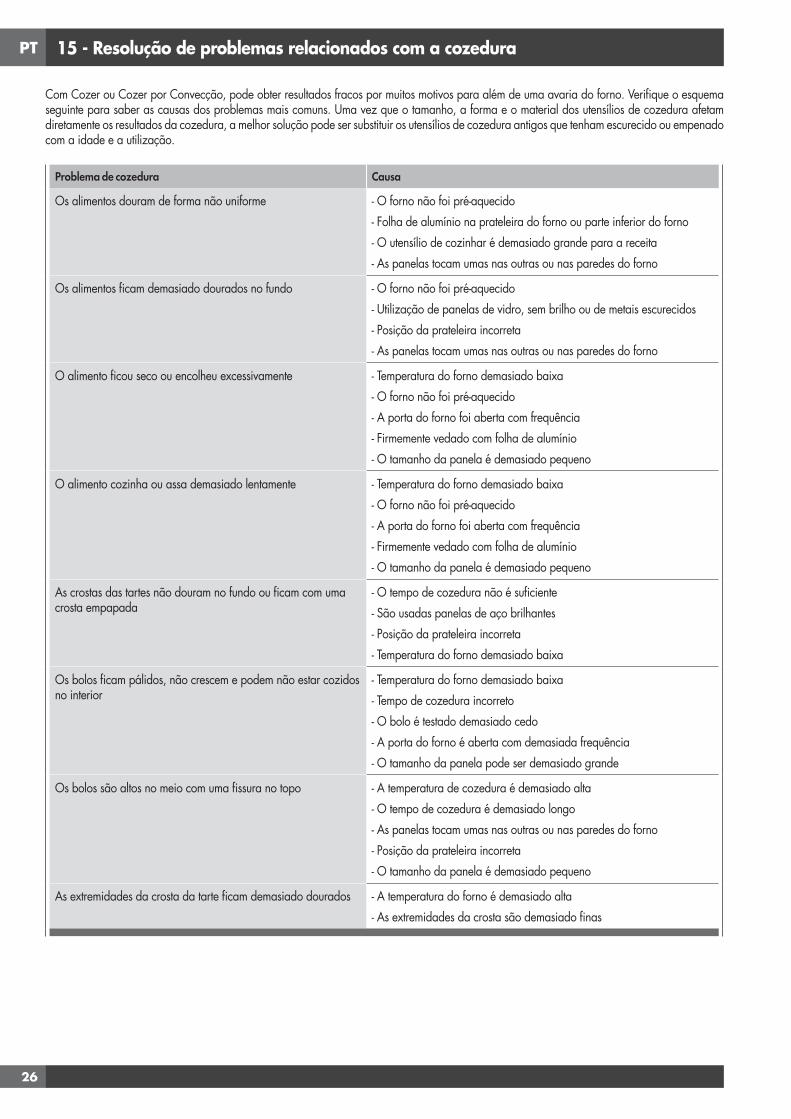
PT
26
15 - Resolução de problemas relacionados com a cozedura
Com Cozer ou Cozer por Convecção, pode obter resultados fracos por muitos motivos para além de uma avaria do forno. Verifique o esquema seguinte para saber as causas dos problemas mais comuns. Uma vez que o tamanho, a forma e o material dos utensílios de cozedura afetam diretamente os resultados da cozedura, a melhor solução pode ser substituir os utensílios de cozedura antigos que tenham escurecido ou empenado com a idade e a utilização.
Problema de cozedura Causa
Os alimentos douram de forma não uniforme - O forno não foi pré-aquecido- Folha de alumínio na prateleira do forno ou parte inferior do forno- O utensílio de cozinhar é demasiado grande para a receita- As panelas tocam umas nas outras ou nas paredes do forno
Os alimentos ficam demasiado dourados no fundo - O forno não foi pré-aquecido- Utilização de panelas de vidro, sem brilho ou de metais escurecidos- Posição da prateleira incorreta- As panelas tocam umas nas outras ou nas paredes do forno
O alimento ficou seco ou encolheu excessivamente - Temperatura do forno demasiado baixa- O forno não foi pré-aquecido- A porta do forno foi aberta com frequência- Firmemente vedado com folha de alumínio- O tamanho da panela é demasiado pequeno
O alimento cozinha ou assa demasiado lentamente - Temperatura do forno demasiado baixa- O forno não foi pré-aquecido- A porta do forno foi aberta com frequência- Firmemente vedado com folha de alumínio- O tamanho da panela é demasiado pequeno
As crostas das tartes não douram no fundo ou ficam com uma crosta empapada
- O tempo de cozedura não é suficiente- São usadas panelas de aço brilhantes- Posição da prateleira incorreta- Temperatura do forno demasiado baixa
Os bolos ficam pálidos, não crescem e podem não estar cozidos no interior
- Temperatura do forno demasiado baixa- Tempo de cozedura incorreto- O bolo é testado demasiado cedo- A porta do forno é aberta com demasiada frequência- O tamanho da panela pode ser demasiado grande
Os bolos são altos no meio com uma fissura no topo - A temperatura de cozedura é demasiado alta- O tempo de cozedura é demasiado longo- As panelas tocam umas nas outras ou nas paredes do forno- Posição da prateleira incorreta- O tamanho da panela é demasiado pequeno
As extremidades da crosta da tarte ficam demasiado dourados - A temperatura do forno é demasiado alta- As extremidades da crosta são demasiado finas
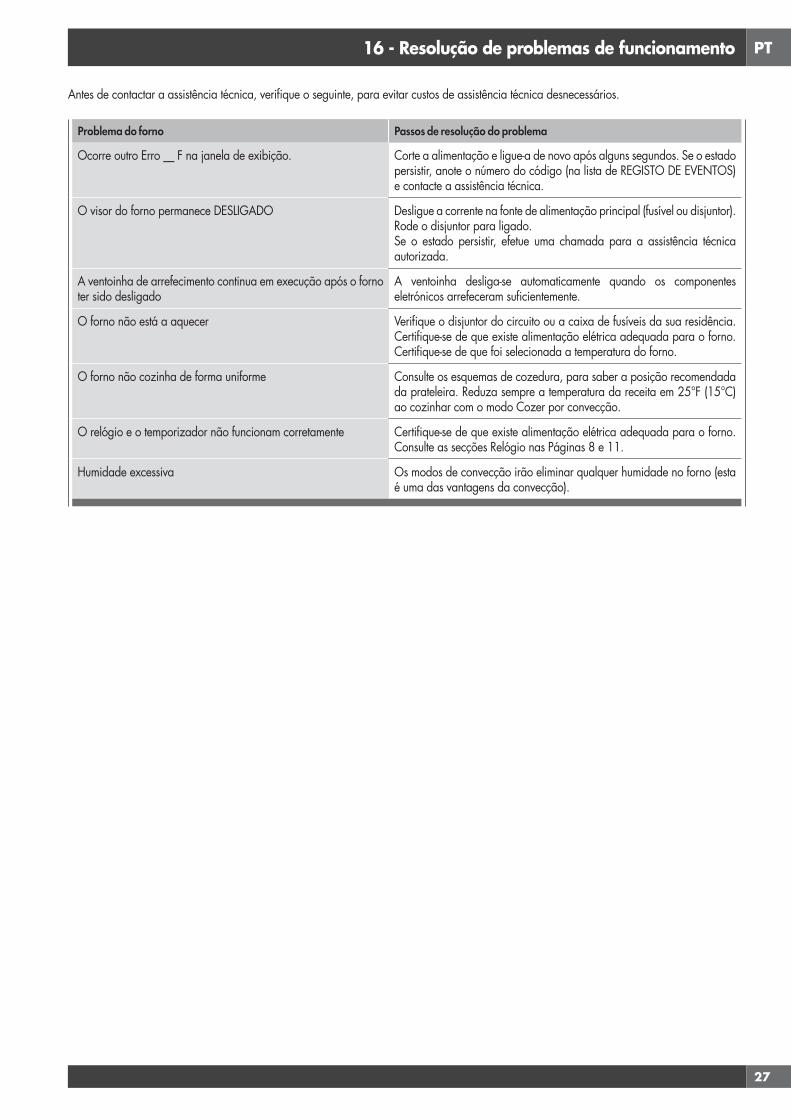
PT
27
16 - Resolução de problemas de funcionamento
Antes de contactar a assistência técnica, verifique o seguinte, para evitar custos de assistência técnica desnecessários.
Problema do forno Passos de resolução do problema
Ocorre outro Erro __ F na janela de exibição. Corte a alimentação e ligue-a de novo após alguns segundos. Se o estado persistir, anote o número do código (na lista de REGISTO DE EVENTOS) e contacte a assistência técnica.
O visor do forno permanece DESLIGADO Desligue a corrente na fonte de alimentação principal (fusível ou disjuntor). Rode o disjuntor para ligado.Se o estado persistir, efetue uma chamada para a assistência técnica autorizada.
A ventoinha de arrefecimento continua em execução após o forno ter sido desligado
A ventoinha desliga-se automaticamente quando os componentes eletrónicos arrefeceram suficientemente.
O forno não está a aquecer Verifique o disjuntor do circuito ou a caixa de fusíveis da sua residência. Certifique-se de que existe alimentação elétrica adequada para o forno. Certifique-se de que foi selecionada a temperatura do forno.
O forno não cozinha de forma uniforme Consulte os esquemas de cozedura, para saber a posição recomendada da prateleira. Reduza sempre a temperatura da receita em 25°F (15°C) ao cozinhar com o modo Cozer por convecção.
O relógio e o temporizador não funcionam corretamente Certifique-se de que existe alimentação elétrica adequada para o forno. Consulte as secções Relógio nas Páginas 8 e 11.
Humidade excessiva Os modos de convecção irão eliminar qualquer humidade no forno (esta é uma das vantagens da convecção).
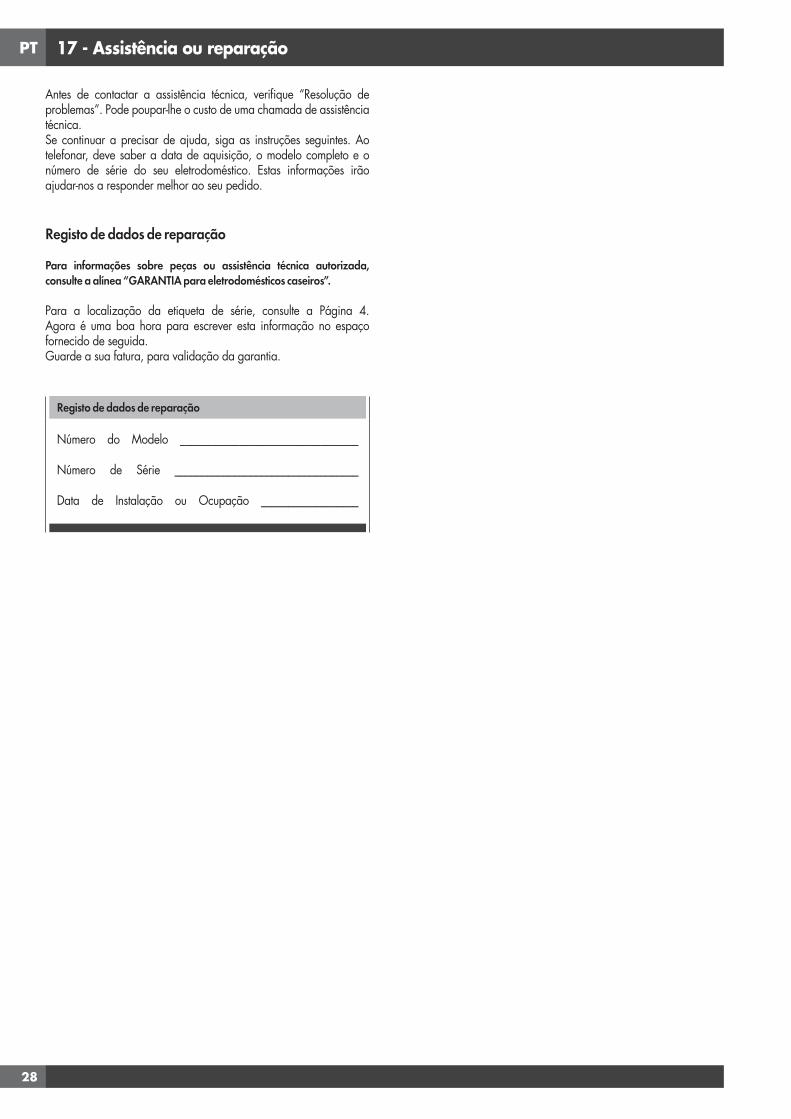
PT
28
17 - Assistência ou reparação
Antes de contactar a assistência técnica, verifique “Resolução de problemas”. Pode poupar-lhe o custo de uma chamada de assistência técnica.Se continuar a precisar de ajuda, siga as instruções seguintes. Ao telefonar, deve saber a data de aquisição, o modelo completo e o número de série do seu eletrodoméstico. Estas informações irão ajudar-nos a responder melhor ao seu pedido.
Registo de dados de reparação
Para informações sobre peças ou assistência técnica autorizada, consulte a alínea “GARANTIA para eletrodomésticos caseiros”.
Para a localização da etiqueta de série, consulte a Página 4. Agora é uma boa hora para escrever esta informação no espaço fornecido de seguida.Guarde a sua fatura, para validação da garantia.
Registo de dados de reparação
Número do Modelo _________________________________
Número de Série __________________________________
Data de Instalação ou Ocupação __________________


PRODUCT COD. 2.006.49.1
DOC COD. 2.006.49.1 - 11/16