Database for a 'Car vehicle insurance compnay' (CDM,LDM,PDM anddatabase design)
Upload
khangminh22Category
view
0download
0
/ Visualize
INSTALLATION GUIDESOLIDWORKS PDM 2020/SOLIDWORKS Manage 2020

Contents
Legal Notices............................................................................................................8
1 SOLIDWORKS PDM and SOLIDWORKS Manage Installation Guide................11
2 Installation Overview............................................................................................13Required Installation Components...............................................................................................14Optional Installation Components (SOLIDWORKS PDM Professional Only)..............................16SOLIDWORKS PDM Deployment Scenarios...............................................................................17System Requirements..................................................................................................................20Installation Summary....................................................................................................................20Installation Assistance..................................................................................................................21
3 Installing and Configuring SQL Server.................................................................22SQL Server 2016 and SQL Server 2017 Support ........................................................................23Installing SQL Server 2016 or SQL Server 2017.........................................................................23
Before Installing SQL Server 2016 or SQL Server 2017.........................................................23Performing the SQL Server 2016 or SQL Server 2017 Installation.........................................23After Installing SQL Server 2016 or SQL Server 2017............................................................27Verifying SQL Server 2016 or SQL Server 2017 Installation..................................................27
Upgrading to SQL Server 2016 or SQL Server 2017...................................................................27Performing the Upgrade to SQL Server 2016 or SQL Server 2017........................................27After Upgrading to SQL Server 2016 or SQL Server 2017.....................................................29
SQL Server 2014 Support ............................................................................................................29Installing SQL Server 2014...........................................................................................................30
Before Installing SQL Server 2014..........................................................................................30Performing the SQL Server 2014 Installation..........................................................................30After Installing SQL Server 2014.............................................................................................35Verifying SQL Server 2014 Installation...................................................................................35
Upgrading to SQL Server 2014....................................................................................................35Performing the Upgrade to SQL Server 2014.........................................................................35After Upgrading to SQL Server 2014......................................................................................37
SQL Server Troubleshooting........................................................................................................38Clients Cannot Work in the File Vault ......................................................................................38SOLIDWORKS PDM Administrative Features Fail .................................................................38SOLIDWORKS PDM Cannot Connect to the Server..............................................................38
Changing the SQL Server Login Account....................................................................................39Creating a New SQL Login Account........................................................................................39Using the New SQL Login with the SOLIDWORKS PDM Archive..........................................40
2

Giving an SQL User db_owner Access to Existing SOLIDWORKS PDM File VaultDatabases..........................................................................................................................40
Insufficient SQL Permissions..................................................................................................41
4 Installing and Configuring SQL Server Express...................................................42Installing and Managing SQL Server 2014 Express.....................................................................42
Before Installing SQL Server 2014 Express............................................................................42Installing the SQL Server Express Database Engine..............................................................43After Installing SQL Server 2014 Express...............................................................................47Verifying SQL Server 2014 Express Installation.....................................................................48Upgrading SQL Server Express 2014 to SQL Server 2014....................................................48
5 Installing SOLIDWORKS PDM............................................................................49Downloading the Installation Media..............................................................................................50Initiating the Installation Via SOLIDWORKS Installation Manager...............................................50Initiating the Installation via the InstallShield Wizard....................................................................50Installing SOLIDWORKS PDM Database Server.........................................................................51
Before Installing the Database Server.....................................................................................52Performing the Database Server Installation...........................................................................52
Installing SOLIDWORKS PDM Archive Server............................................................................54Before Installing the Archive Server........................................................................................54Performing the Archive Server Installation..............................................................................55Opening Ports for Client/Server Communication....................................................................59Adding Archive Servers in a WAN Environment.....................................................................61
Installing and Configuring SolidNetWork Licensing......................................................................62Installing a SolidNetWork License Manager............................................................................62Activating a SolidNetWork License ........................................................................................63Using SolidNetWork License Server with Firewalls.................................................................64SolidNetWork License Administration.....................................................................................65Licensing .................................................................................................................................68
Installing SOLIDWORKS PDM Web2 (For SOLIDWORKS PDM Professional only) ...................72Before Installing Web2............................................................................................................72Performing the Web2 Server Installation.................................................................................76Creating a Vault View on the IIS Server Running Web2.........................................................76Configuring SOLIDWORKS PDM Web2.................................................................................77
Installing SOLIDWORKS PDM Web API Server (For SOLIDWORKS PDM ProfessionalOnly) ........................................................................................................................................87Performing the Web API Server Installation............................................................................87
Installing the SOLIDWORKS PDM Client.....................................................................................88Before Installing Clients...........................................................................................................88Installing Clients Using the Installation Wizard........................................................................90Installing eDrawings................................................................................................................92Upgrading the SOLIDWORKS PDM Standard Client/Server to Professional.........................92Enabling Logging to Troubleshoot Installation........................................................................92Creating SOLIDWORKS PDM Client Administrative Image....................................................93Deploying Clients Using Windows Active Directory................................................................94
3
Contents

Enabling Logging When Deploying SOLIDWORKS PDM.......................................................96Scripting a Silent Installation of SOLIDWORKS PDM.............................................................96
6 Using SOLIDWORKS Installation Manager.......................................................101SOLIDWORKS PDM..................................................................................................................101Listing of PDM Server Components...........................................................................................102Understanding Differences between PDM Clients.....................................................................103Before Installing PDM Server.....................................................................................................105Installing a PDM Server with SLDIM..........................................................................................105Installing a PDM Client with SLDIM............................................................................................106
7 Creating and Distributing File Vault Views.........................................................108Vault Creation.............................................................................................................................108
Prerequisites..........................................................................................................................108Adding an Archive Server......................................................................................................109Logging In to an Archive Server............................................................................................110Creating a Vault .....................................................................................................................110
Configuring the SolidNetWork License Server for the File Vault ................................................115Creating a File Vault View Using the View Setup Wizard..........................................................116
Enabling Broadcast with Windows Firewalls.........................................................................118Using a Shared File Vault View with Multiple User Profiles..................................................119Using SOLIDWORKS PDM on a Terminal Server................................................................120Creating a File Vault View Setup File....................................................................................121Scripting File Vault View Setup.............................................................................................121
Distributing the File Vault View Using Microsoft Windows Active Directory...............................122Finding the SOLIDWORKS PDM Vault ID............................................................................124Receiving a Distributed File Vault View.................................................................................124
Distributing File Vault Views in a WAN Environment.................................................................125Manually Configuring the Archive Server That Is Announced to SOLIDWORKS PDM
Clients ..............................................................................................................................125Specifying SOLIDWORKS PDM Settings Group Policy Manually........................................126SOLIDWORKS PDM Settings Policy Options.......................................................................126
8 Upgrading a Vault from Standard to Professional.............................................130Upgrading the SolidNetWork License from Standard to Professional........................................130Activating the Professional License............................................................................................131Upgrading the Standard Vault ....................................................................................................132Upgrading the SOLIDWORKS PDM Standard Client/Server to Professional............................132After Upgrading the File Vault ....................................................................................................133
9 Configuring Content Search (For SOLIDWORKS PDM Professional only).......134Content Search Overview...........................................................................................................134Recommended Computer Configuration....................................................................................135Using Windows Search for Content Search...............................................................................135Installing Windows Search Service............................................................................................136
Enabling Windows Search Service on Windows 7................................................................136
4
Contents

Enabling Windows Search Service on Windows Server 2016 and Later..............................136Setting Up Windows Search.......................................................................................................137Indexing the Archives for Windows Search................................................................................137Verifying Microsoft Indexing Service Installation........................................................................138Monitoring and Tuning the Microsoft Indexing Service..............................................................138Indexing SOLIDWORKS PDM Professional File Vault Archives................................................138Configuring the Index Service on a Non-SQL Server System....................................................139
Updating the File Vault Database with the Index Server Name............................................140Changing the Database Server Login Account.....................................................................140Changing the SQL Server Login Account.............................................................................141
Adding Index Server Filters........................................................................................................141Compressed Archives (gzip) Filter........................................................................................142
Managing File Vault Index Catalogs...........................................................................................142Removing a File Vault Index.......................................................................................................143
10 Backing Up and Restoring File Vaults.............................................................144Backing Up the File Vault Database...........................................................................................144Backing Up the SOLIDWORKS PDM Master Database............................................................145Backing Up the Archive Server Settings....................................................................................145Backing Up the Archive Files......................................................................................................146Scheduling Database Backups..................................................................................................146
Starting the SQL Server Agent..............................................................................................147Setting Up aMaintenance Plan for Database Backup (For SOLIDWORKSPDMProfessional
only) ..................................................................................................................................147Restoring a File Vault .................................................................................................................149
Restoring the SQL Server File Vault Databases...................................................................150Verifying the ConisioMasterDb Restore................................................................................150Restoring the Archive Server and File Vault Archives...........................................................150
11 Upgrading SOLIDWORKS PDM......................................................................152About Enterprise PDM Upgrade.................................................................................................152
Before Upgrading..................................................................................................................152Determining the Current Version...........................................................................................153Determining Which Updates Have Been Applied..................................................................154
Upgrading the Archive Server....................................................................................................154Upgrading the Database Server.................................................................................................155Installing or Upgrading the SolidNetWork License Manager......................................................156Upgrading File Vaults.................................................................................................................157
Upgrading the File Vault Database.......................................................................................157Upgrading File Vault Archives...............................................................................................158
Upgrading Toolbox in SOLIDWORKS PDM...............................................................................166
12 Upgrading SOLIDWORKS Files......................................................................168Upgrading SOLIDWORKS Files.................................................................................................168Required Upgrade Utility Software.............................................................................................169System Requirements................................................................................................................169
5
Contents

Installing the File Version Upgrade Utility...................................................................................170Preparing to Upgrade.................................................................................................................170Selecting Version Settings..........................................................................................................171
Creating New Versions of Files.............................................................................................172Overwriting Existing Versions of Files...................................................................................176
Performing a Trial File Upgrade.................................................................................................183Running the Upgrade Utility........................................................................................................183Creating and Using Work Instruction Files.................................................................................184Completing an Interrupted Upgrade...........................................................................................185After Upgrading..........................................................................................................................185
File Name Formats for Upgrade Logs...................................................................................186Managing Backup Files..............................................................................................................186
Backup File Creation.............................................................................................................186Restoring an Incorrectly Upgraded Version from a Backup..................................................187
13 Additional Configuration...................................................................................188Managing the SQL Transaction Log Size...................................................................................188
Changing to the Simple Recovery Model..............................................................................188Shrinking the Transaction Log...............................................................................................189
Configuring SOLIDWORKS PDM to Communicate Using IP Addresses Only..........................189Updating the Archive Server to Communicate Using IP Addresses......................................189Updating the SQL Server to Communicate Using IP Addresses..........................................190Updating SOLIDWORKS PDM Clients to Communicate Using IP Addresses......................190Verifying IP Address Communication....................................................................................190
Moving Server Components to Another System........................................................................191Copying Files to the New Server...........................................................................................191Configuring the Moved SQL File Vault Database..................................................................192Moving the SolidNetWork License Manager.........................................................................192Moving the SOLIDWORKS PDM Database Server..............................................................193Configuring the Moved Archive Server..................................................................................193Updating Client Registry Keys...............................................................................................194Updating Replication Settings (For SOLIDWORKS PDM Professional only) .......................195Updating Administration Settings (For SOLIDWORKS PDM Professional Only)..................195Verifying the Server Move.....................................................................................................196
14 Installing SOLIDWORKS Manage Professional...............................................197Listing of SOLIDWORKS Manage Server Components.............................................................197SOLIDWORKS Manage Client Types and Licenses..................................................................198Prerequisites and System Requirements for SOLIDWORKS Manage......................................199Using SOLIDWORKS Installation Manager for SOLIDWORKS Manage...................................200
Installing the SOLIDWORKS Manage Server.......................................................................200Installing the SOLIDWORKS Manage Client.........................................................................201
Editing the SOLIDWORKS Manage Configuration File..............................................................202
15 Configuring SOLIDWORKS Manage Professional and Microsoft IIS..............203Logging In to SOLIDWORKS Manage for the First Time...........................................................203
6
Contents

Using the SOLIDWORKS Manage Add-In for SOLIDWORKS PDM..........................................206Using the SOLIDWORKS Manage Add-in for SOLIDWORKS...................................................207Configuring IIS............................................................................................................................207
Verifying the IIS File Server ..................................................................................................208Troubleshooting IIS...............................................................................................................209
7
Contents

Legal Notices
© 1995-2019, Dassault Systemes SolidWorks Corporation, a Dassault Systèmes SE company,175 Wyman Street, Waltham, Mass. 02451 USA. All Rights Reserved.
The information and the software discussed in this document are subject to change withoutnotice and are not commitments by Dassault Systemes SolidWorks Corporation (DS SolidWorks).
No material may be reproduced or transmitted in any form or by any means, electronically ormanually, for any purpose without the express written permission of DS SolidWorks.
The software discussed in this document is furnished under a license and may be used orcopied only in accordance with the terms of the license. All warranties given by DS SolidWorksas to the software and documentation are set forth in the license agreement, and nothingstated in, or implied by, this document or its contents shall be considered or deemed amodification or amendment of any terms, including warranties, in the license agreement.
Patent NoticesSOLIDWORKS® 3D mechanical CAD and/or Simulation software is protected by U.S. Patents6,611,725; 6,844,877; 6,898,560; 6,906,712; 7,079,990; 7,477,262; 7,558,705; 7,571,079;7,590,497; 7,643,027; 7,672,822; 7,688,318; 7,694,238; 7,853,940; 8,305,376; 8,581,902;8,817,028; 8,910,078; 9,129,083; 9,153,072; 9,262,863; 9,465,894; 9,646,412; 9,870,436;10,055,083; 10,073,600; 10,235,493 and foreign patents, (e.g., EP 1,116,190 B1 and JP3,517,643).
eDrawings® software is protected by U.S. Patent 7,184,044; U.S. Patent 7,502,027; andCanadian Patent 2,318,706.
U.S. and foreign patents pending.
Trademarks and Product Names for SOLIDWORKS Products and ServicesSOLIDWORKS, 3D ContentCentral, 3D PartStream.NET, eDrawings, and the eDrawings logoare registered trademarks and FeatureManager is a jointly owned registered trademark of DSSolidWorks.
CircuitWorks, FloXpress, PhotoView 360, and TolAnalyst are trademarks of DS SolidWorks.
FeatureWorks is a registered trademark of HCL Technologies Ltd.
SOLIDWORKS 2020, SOLIDWORKS Standard, SOLIDWORKS Professional, SOLIDWORKSPremium, SOLIDWORKS PDM Professional, SOLIDWORKS PDM Standard, SOLIDWORKSSimulation Standard, SOLIDWORKS Simulation Professional, SOLIDWORKS Simulation Premium,SOLIDWORKS Flow Simulation, SOLIDWORKS CAM, SOLIDWORKS Manage, eDrawings Viewer,eDrawings Professional, SOLIDWORKS Sustainability, SOLIDWORKS Plastics, SOLIDWORKSElectrical Schematic Standard, SOLIDWORKS Electrical Schematic Professional, SOLIDWORKSElectrical 3D, SOLIDWORKS Electrical Professional, CircuitWorks, SOLIDWORKS Composer,SOLIDWORKS Inspection, SOLIDWORKS MBD, SOLIDWORKS PCB powered by Altium,SOLIDWORKS PCB Connector powered by Altium, and SOLIDWORKS Visualize are productnames of DS SolidWorks.
8

Other brand or product names are trademarks or registered trademarks of their respectiveholders.
COMMERCIAL COMPUTER SOFTWARE - PROPRIETARY
The Software is a “commercial item” as that term is defined at 48 C.F.R. 2.101 (OCT 1995),consisting of “commercial computer software” and “commercial software documentation” assuch terms are used in 48 C.F.R. 12.212 (SEPT 1995) and is provided to the U.S. Government(a) for acquisition by or on behalf of civilian agencies, consistent with the policy set forth in48 C.F.R. 12.212; or (b) for acquisition by or on behalf of units of the Department of Defense,consistent with the policies set forth in 48 C.F.R. 227.7202-1 (JUN 1995) and 227.7202-4 (JUN1995)
In the event that you receive a request from any agency of the U.S. Government to provideSoftware with rights beyond those set forth above, you will notify DS SolidWorks of the scopeof the request and DS SolidWorks will have five (5) business days to, in its sole discretion,accept or reject such request. Contractor/Manufacturer: Dassault Systemes SolidWorksCorporation, 175 Wyman Street, Waltham, Massachusetts 02451 USA.
Copyright Notices for SOLIDWORKS Standard, Premium, Professional, andEducation ProductsPortions of this software © 1986-2018 Siemens Product Lifecycle Management Software Inc.All rights reserved.
This work contains the following software owned by Siemens Industry Software Limited:
D-Cubed® 2D DCM © 2019. Siemens Industry Software Limited. All Rights Reserved.
D-Cubed® 3D DCM © 2019. Siemens Industry Software Limited. All Rights Reserved.
D-Cubed® PGM © 2019. Siemens Industry Software Limited. All Rights Reserved.
D-Cubed® CDM © 2019. Siemens Industry Software Limited. All Rights Reserved.
D-Cubed® AEM © 2019. Siemens Industry Software Limited. All Rights Reserved.
Portions of this software © 1998-2019 HCL Technologies Ltd.
Portions of this software incorporate PhysX™ by NVIDIA 2006-2010.
Portions of this software © 2001-2019 Luxology, LLC. All rights reserved, patents pending.
Portions of this software © 2007-2019 DriveWorks Ltd.
© 2012, Microsoft Corporation. All rights reserved.
Includes Adobe® PDF Library technology.
Copyright 1984-2016 Adobe Systems Inc. and its licensors. All rights reserved. Protected byU.S. Patents 6,563,502; 6,639,593; 6,754,382; Patents Pending.
Adobe, the Adobe logo, Acrobat, the Adobe PDF logo, Distiller and Reader are registeredtrademarks or trademarks of Adobe Systems Inc. in the U.S. and other countries.
For more DS SolidWorks copyright information, see Help > About SOLIDWORKS.
Copyright Notices for SOLIDWORKS Simulation ProductsPortions of this software © 2008 Solversoft Corporation.
9
Legal Notices

PCGLSS © 1992-2017 Computational Applications and System Integration, Inc. All rightsreserved.
Copyright Notices for SOLIDWORKS PDM Professional ProductOutside In® Viewer Technology, © 1992-2012 Oracle
© 2012, Microsoft Corporation. All rights reserved.
Copyright Notices for eDrawings ProductsPortions of this software © 2000-2014 Tech Soft 3D.
Portions of this software © 1995-1998 Jean-Loup Gailly and Mark Adler.
Portions of this software © 1998-2001 3Dconnexion.
Portions of this software © 1998-2017 Open Design Alliance. All rights reserved.
The eDrawings® for Windows® software is based in part on the work of the Independent JPEGGroup.
Portions of eDrawings® for iPad® copyright © 1996-1999 Silicon Graphics Systems, Inc.
Portions of eDrawings® for iPad® copyright © 2003 – 2005 Apple Computer Inc.
Copyright Notices for SOLIDWORKS PCB ProductsPortions of this software © 2017-2018 Altium Limited.
Copyright Notices for SOLIDWORKS Visualize ProductsNVIDIA GameWorks™ Technology provided under license from NVIDIA Corporation. Copyright© 2002-2015 NVIDIA Corporation. All rights reserved.
10
Legal Notices

1SOLIDWORKS PDM andSOLIDWORKSManage InstallationGuide
SOLIDWORKS® PDM and SOLIDWORKS Manage Installation Guide provides installation andconfiguration instructions for SOLIDWORKS PDM, SOLIDWORKS Manage, SQL Server Express,and SQL Server.
SOLIDWORKS PDM Standard is a new product based on SOLIDWORKS Enterprise PDM. It isincluded with SOLIDWORKS Professional and SOLIDWORKS Premium.
SOLIDWORKS PDM Professional is the name of the product previously called SOLIDWORKSEnterprise PDM. It is available as a separately purchased product.
Required and optional installation components, deploymentscenarios, and installation summary.
Installation Overview on page13
SQL Server 2014 installation and upgrade. Includes changingthe SQL Server login account.
Installing and ConfiguringSQL Server on page 22
SQL Server 2014 Express installation.Installing and ConfiguringSQL Server Express
The installation of SOLIDWORKS PDM database server,archive server, SolidNetWork License Manager, Web server,and SOLIDWORKS PDM clients. Client installation includescreating and deploying admin images, and scripting silentinstallations.
Installing SOLIDWORKS PDMon page 49
Creating file vault views using the View Setup wizard.Includes applying licenses, using shared views, scripting filevault view setup, and distributing file vault views.
Creating and Distributing FileVault Views on page 108
Configuration of the SOLIDWORKS PDM Professional IndexService. Includes indexing file vault archives, updating theindex server name, changing login accounts, and addingindex server filters.
Configuring Content Search(For SOLIDWORKS PDMProfessional only) on page 134
Upgrade of the database, archive, and Web servers, the filevault database and archives, and SOLIDWORKS PDM clients.
Upgrading SOLIDWORKSPDMon page 152
11

Backing up the file vault database and SOLIDWORKS PDMMaster database, including archive server settings. Includesscheduling database backups and restoring file vaults.
Backing Up and Restoring FileVaults on page 144
Managing the SQL transaction log size, configuringSOLIDWORKS PDM communication with IP addresses only,and moving server components to another system.
Additional Configuration onpage 188
SOLIDWORKS Manage Professional provides advanced data management tools to SOLIDWORKSPDM Professional. It offers capabilities for advanced version control, and for project, process,and item management. Users must have a SOLIDWORKS PDM Professional license to useSOLIDWORKS Manage.
SOLIDWORKS Manage Professional has a similar architecture as SOLIDWORKS PDM Professional.It uses a client-server architecture, with a Microsoft SQL Server database to manage item andproject data. There are three services for database, file server, and web server functions,which support both thick clients and web browser clients. The three services can be hostedon the same server or separate servers. Users with SOLIDWORKS Manage Professional Editorlicenses can use a SOLIDWORKS Manage Add-in to access Manage data directly from withinSOLIDWORKS.
Installation requirements and installation processes ofSOLIDWORKS Manage Server and Client.
Installing SOLIDWORKSManage Professional on page197
Configuring and logging into SOLIDWORKS Manage.Configuring SOLIDWORKSManage Professional andMicrosoft IIS on page 203
12
SOLIDWORKS PDM and SOLIDWORKS Manage Installation Guide

2Installation Overview
This chapter includes the following topics:
• Required Installation Components• Optional Installation Components (SOLIDWORKS PDM Professional Only)• SOLIDWORKS PDM Deployment Scenarios• System Requirements• Installation Summary• Installation Assistance
You can install SOLIDWORKS PDM Standard or SOLIDWORKS PDM Professional using:
• SOLIDWORKS Installation Manager (SLDIM)• SOLIDWORKS PDM InstallShield Wizard
Based on the installation method you use, client and server components are installed underdifferent folders:
• Using SLDIM
C:\Program Files\SOLIDWORKS Corp\SOLIDWORKS PDM
• Using InstallShield Wizard
C:\Program Files\SOLIDWORKS PDM
The installation guide refers to either path, use the path that is appropriate to yourenvironment.
You must install the SolidNetWork License Manager separately.
You can install SOLIDWORKS PDM client and SOLIDWORKS PDM server either on differentmachines or on the same machine. To install both on the same machine, you must run theserver install.
You cannot install client and server on the same machine by running separate installs.
You can select a product type based on the license available. The following add-ins specific tothe product type are available.
13

Product types and add-insClient
SOLIDWORKS PDM CAD Editor• SOLIDWORKS• DraftSight
SOLIDWORKS PDM Contributor
• DraftSight
SOLIDWORKS PDM Viewer: No add-in
SOLIDWORKS PDM Standard
SOLIDWORKS PDM CAD Editor• Microsoft Office Integration• SOLIDWORKS• DraftSight• Autodesk Inventor• AutoCAD
SOLIDWORKS PDM Contributor
• Microsoft Office Integration• DraftSight
SOLIDWORKS PDM Viewer
• Microsoft Office Integration
SOLIDWORKS PDM Professional
Required Installation ComponentsTo use SOLIDWORKS PDM, these components must be installed and configured.
The SOLIDWORKS PDM Professional file vault databasemust be hosted on SQL Server 2017, SQL Server2016, or SQL Server 2014 Service Pack 3 or later.
The SQL Server software is not included on theSOLIDWORKS DVD and must be installed separately.
Microsoft SQL Server
The SOLIDWORKS PDM Standard file vault databasemust be hosted on SQL Server 2014 Express ServicePack 3 or later.
Microsoft SQL Server Express
The database server periodically polls SOLIDWORKSPDM databases for updates such as notifications, localview refresh, replication schedule updates, and indexserver changes. It also manages data import andexport rules.
SOLIDWORKS PDM databaseserver
The archive server hosts the physical files stored in afile vault, and manages users and their credentials.
SOLIDWORKS PDM archive server
14
Installation Overview

The SolidNetWork License Manager manages licensingof SOLIDWORKS PDM.
If you already have a SolidNetWork License Managerinstalled for SOLIDWORKS, you can use it withSOLIDWORKS PDM. Ensure that it is updated to theSOLIDWORKS PDM release version.
SolidNetWork License Manager
Each computer accessing the SOLIDWORKS PDMProfessional file vault must have one of the followingclients installed:
Supports working with all filetypes, including enhancedmanagement and previewing ofCAD formats such asSOLIDWORKS. CAD add-insallow users to accessSOLIDWORKS PDM Professionalfrom within the CAD application.
SOLIDWORKSPDMProfessionalCAD Editor &Web
Supports working with all filetypes, including CAD files.However, the CAD add-ins arenot supported on this client type.
SOLIDWORKSPDMProfessionalContributor &Web
Allows read-only access to filevaults; user cannot add ormodify (check out, check in,update values) files or use CADadd-ins.
SOLIDWORKSPDMProfessionalViewer
SOLIDWORKS PDM Professionalclient
15
Installation Overview

Each computer accessing the SOLIDWORKS PDMStandard file vault must have one of the followingclients installed:
Supports working withSOLIDWORKS, DWG/DXF format,Microsoft Word, and MicrosoftExcel files. All file formats thatOffice plug-in handles behave inthe same way in SOLIDWORKSPDM Standard except Preview.
SOLIDWORKSPDM StandardCAD Editor
Supports working withSOLIDWORKS, DWG/DXF format,Microsoft Word, and MicrosoftExcel files.
SOLIDWORKSPDM StandardContributor
Allows read-only access to filevaults; user cannot add ormodify (check out, check in,update values) files.
SOLIDWORKSPDM StandardViewer
SOLIDWORKS PDM Standard
Optional InstallationComponents (SOLIDWORKSPDM Professional Only)
The following installation components are optional:
The Web server provides access to a file vault from theInternet or an intranet.
SOLIDWORKS PDMWeb server
The SOLIDWORKS PDM index server provides for fullcontent search in many file types stored in a file vault.
SOLIDWORKS PDM indexserver
EXALEAD® OnePart users can use a Web API server toindex and retrieve SOLIDWORKS PDM data.
You must install Microsoft Internet Information Services7 or higher versions (IIS).
SOLIDWORKS PDM Web APIServer
16
Installation Overview

SOLIDWORKS PDM Deployment ScenariosThe deployment of SOLIDWORKS PDM components depends on the size and type oforganization where SOLIDWORKS PDM is used.
Medium Office NetworkA server running SQL Server for SOLIDWORKS PDM Professional or SQL Server Expressfor SOLIDWORKS PDM Standard hosts the archive server, database server, and SNLserver. Windows workstations installed with the SOLIDWORKS PDM client attach to theserver.
SQL, Database, SNL, and Archive Servers1
Clients2
Large Office NetworkOne server running SQL Server hosts the file vault databases and the database server.One server hosts the archive server and another server hosts the SNL server. Workstationsinstalled with the SOLIDWORKS PDM Professional client attach to the servers. A Webserver allows access over the Internet using SOLIDWORKS PDM Web clients.
17
Installation Overview

Web ServerS4SQL and Database ServersS1
ClientsC1Archive ServersS2
Web ClientsC2SNL ServerS3
WAN Connected OfficesOne main server running SQL Server hosts the central database server. A second serverhosts the archive server and a third server hosts the SNL server. Each WAN office has aserver hosting a local archive server with a replicated file vault archive.
Workstations installed with the SOLIDWORKS PDM Professional client attach to their localarchive server and to the central database server.
18
Installation Overview

19
Installation Overview

Web ServerS5SQL and Database ServersS1
ClientsC1Archive ServersS2
Web ClientsC2SNL ServerS3
Archive Server with Replicated FileVault
S4
System RequirementsSOLIDWORKS PDM system requirements are available on the SOLIDWORKS Web site.
http://www.solidworks.com/sw/support/pdmsystemrequirements.html.
Installation SummaryAlthough components can be installed in any order, the recommended sequence for aLAN installation is described.
To install SOLIDWORKS PDM Professional components:
1. Install SQL Server on the system that hosts the SOLIDWORKS PDM Professional filevault database or install SQL Express on the system that hosts the SOLIDWORKSPDM Standard file vault database, unless you have an existing SQL Server or SQLExpress running.For details, see Installing and Configuring SQL Server on page 22.
2. Install the database server component on the system running the SQL Server.For details, see Installing SOLIDWORKS PDM Database Server on page 51.
3. Install the archive server on the system running the SQL Server or on a separatesystem.
For details, see Installing SOLIDWORKS PDM Archive Server on page 54.
4. Install and configure the SolidNetWork License Manager on a server that is accessibleto all clients, preferably the SQL database server.
For details, see Installing and Configuring SolidNetWork Licensing on page 62.
5. Install the SOLIDWORKS PDM client on all workstations that will work in the file vault.For details, see Installing the SOLIDWORKS PDM Client on page 88.
6. Create a new file vault using the SOLIDWORKS PDM administration tool on a systemwhere the SOLIDWORKS PDM client is installed.For details, see Vault Creation.
7. Attach the remaining clients to the archive server and create local file vault viewsusing the View Setup wizard.For details, see Creating a File Vault View Using the View Setup Wizard on page116.
20
Installation Overview

8. Optionally, set up the SOLIDWORKS PDM Professional index server for content searchsupport.For details, see Configuring Content Search (For SOLIDWORKS PDM Professionalonly) on page 134.
Installation AssistanceFirst level technical support for SOLIDWORKS products is provided by your reseller.
For help contacting your reseller:
• Refer tohttp://www.solidworks.com/sw/support/customer-software-support.htm.
• Call 1-800-693-9000 from the USA or Canada.• Call 1 978-371-5011 from other locations.• Send e-mail to [email protected].
21
Installation Overview

3Installing and Configuring SQLServer
This chapter includes the following topics:
• SQL Server 2016 and SQL Server 2017 Support• Installing SQL Server 2016 or SQL Server 2017• Upgrading to SQL Server 2016 or SQL Server 2017• SQL Server 2014 Support• Installing SQL Server 2014• Upgrading to SQL Server 2014• SQL Server Troubleshooting• Changing the SQL Server Login Account
SOLIDWORKS PDM Professional uses a Microsoft SQL-based database to store informationabout files and activities in a file vault. File vaults support SQL Server 2014 Service Pack 3 orlater versions up to 2017.
Recommendation: Use SQL Server 2017 versions to host the file vault database.
If you already have the required version of SQL Server installed, continue to InstallingSOLIDWORKS PDM on page 49.
If you are uncertain about which SQL Server version is installed, visit the Microsoft Supportpage and search for the Knowledge Base article 321185 to identify the version and edition.
The following table summarizes SOLIDWORKS PDM Professional versions and the supportedSQL Server versions:
SQL Server VersionSOLIDWORKS PDM Version
2014 SP3 and later2016 and later
20162017 and later
2017 and earlier2019 and later
22

SQL Server 2016 and SQL Server 2017 SupportSOLIDWORKS PDM Professional 2017 and later support the use of SQL Server 2016.SOLIDWORKS PDM Professional 2018 and later support the use of SQL Server 2017 andearlier.
Ensure that there are sufficient SQL Client Access Licenses for the existing SQL server.
For details about Microsoft SQL Server support, see System Requirements.
Installing SQL Server 2016 or SQL Server 2017The SQL Server 2016 and SQL Server 2017 installers provide help for installation.
For hardware and software requirements and detailed installation instructions, seehttps://msdn.microsoft.com/en-us/library/bb500469.aspx.
Before Installing SQL Server 2016 or SQL Server 2017For local installations, you must run Setup as an administrator. If you install SQL Server2016 or 2017 from a remote share, you must use a domain account that has read andexecute permissions on the remote share.
If SOLIDWORKS PDM is installed on the system, use Uninstall a program to uninstallthe Microsoft SQL Server 2014 Backward Compatibility package before starting theSQL Server 2016 or 2017 installation.
Microsoft .Net framework version 3.5 SP01 and Windows Installer 4.5 are required. Ifthey are not installed, the Installation Wizard installs them before starting the SQL Server2016 or 2017 installation. These installations may require you to restart your computer.
For Windows Server 2008 R2 x64, to install .Net framework 3.5 SP01, right-click MyComputer and selectManage > Features. In the Add Features Wizard, on the Featurespage, expand .Net Framework 3.5.1 Features and select .Net Framework 3.5.1(Installed).
Performing the SQL Server 2016 or SQL Server 2017Installation
1. Close all Windows applications, including Windows File Explorer.
23
Installing and Configuring SQL Server

2. Insert the SQL Server 2016 or SQL Server 2017 installation media. From the rootfolder, double-click setup.exe and use the default selections unless otherwiseinstructed.
ActionScreen
In the left pane, click Installation.SQL Server InstallationCenter/Planning
Click New SQL Server stand-alone installation oradd features to an existing installation.
SQL Server InstallationCenter/Installation
Product Key a. Select Enter the product key and enter yourlicense key.
b. Click Next.
License Terms a. Read and accept the license agreement.b. Click Next.
The installer performs an additional check:Install Rules• If no problems are reported, click Next.• If problems are reported:
a. Click Show details to list the components thatfailed or prompted warnings.
b. Click Cancel to stop the installation and fix theproblems.
Feature Selection a. Under Instance Features, selectDatabase EngineServices.
b. Under Shared Features, select:
• Client Tools Connectivity• Integration Services• Client Tools Backward Compatibility• Documentation Components
When installing SQL Server 2017, theDocumentation Components option is notavailable.
c. Click Next.
24
Installing and Configuring SQL Server

ActionScreen
If this is a new installation:
a. Select Default instance.b. Click Next.
If SQL Server is installed on the system and you optednot to upgrade:
a. Select Named Instance.b. Enter a unique instance name for this installation:
computername\instancename.
c. Click Next.
Instance Configuration
SQL Server Agent:
• Account Name: NT Service\SQLSERVERAGENT• Startup Type: Automatic
ServerConfiguration/ServiceAccount tab
SQL Server Database Engine:
• Account Name: NT Service\MSSQLSERVER• Startup Type: Automatic
SQL Server Integration Services 13.0:
• Account Name: NT Service\MsDtsServer130• Startup Type: Automatic
For SQL Server 2017:SQL Server IntegrationServices 14.0
• Account Name: NT Service\MsDtsServer140• Startup Type: Automatic
SQL Server Browser:
• Account Name: NT AUTHORITY\LOCAL SERVICE• Startup Type: Automatic
25
Installing and Configuring SQL Server

ActionScreen
a. Select Mixed Mode (SQL Server authenticationand Windows authentication). SOLIDWORKSPDM Professional uses SQL Server authenticationfor database communication.
b. Enter a strong password for the systemadministrator account (sa). Do not leave thepassword blank. For password rules, click Help.
Re-enter the password to confirm it.
Remember the password for use when setting upSOLIDWORKS PDM Professional file vaultdatabases.
c. Under Specify SQL Server administrators, clickAdd Current User.
d. Click Next.
Database EngineConfiguration
Do not change settingson the Data Directoriesor Filestream tabs.
The installer checks for problems that will prevent theinstallation of SQL Server 2016 or SQL Server 2017.• If no problems are reported, click Next.• If problems are reported:
a. Click Show details to list the components thatfailed or prompted warnings.
b. Click Cancel to stop the installation and fix theproblems.
Installation Rules
Click Install.Ready to Install
Installation may take a long time.If you get an error regarding the SQL ServerBackwards-Compatibility Files, cancel the installation.Use Uninstall a program to uninstall the Microsoft SQLServer 2014 Backward Compatibility package. Thenrestart the SQL Server 2016 or SQL Server 2017installation.
When the progress bar shows Setup processcomplete, click Next.
Installation Progress
Click Close.
If you receive a message that a computer restart isrequired, click OK. If a restart does not beginautomatically, manually restart your computer.
Complete
26
Installing and Configuring SQL Server

After Installing SQL Server 2016 or SQL Server 2017To use secure SQL communication over the network and have a certificate server, youcan enable SSL encryption.
For details, see the Microsoft articles:
• https://msdn.microsoft.com/en-us/library/bb500395.aspx• https://msdn.microsoft.com/en-us/library/ms143219.aspx
Verifying SQL Server 2016 or SQL Server 2017 InstallationTo verify that SQL Server 2016 or 2017 was installed correctly:
1. Start the SQL Server Configuration Manager.2. Click SQL Server 2016 Services or SQL Server 2017 Services, and see whether
SQL Server (MSSQLSERVER) is running.3. If it is not, start the service by right-clicking SQL Server (MSSQLSERVER) and
clicking Start.4. Exit the SQL Server Configuration Manager.
Upgrading to SQL Server 2016 or SQL Server2017
Follow these instructions to upgrade an existing SQL Server SQL 2012 instance to SQLServer 2016 or SQL Server 2017.
If upgrading to SQL Server 2016 or SQL Server 2017, visit Microsoft Docs page andsearch for the upgrade information.
If you are uncertain about which SQL Server version is installed, visit Microsoft Supportpage and search for the Knowledge Base article 321185 to identify version and edition.
All file vault databases are automatically upgraded to SQL Server 2016 format when theserver instance is upgraded.
Performing the Upgrade to SQL Server 2016 or SQL Server2017
1. Close all Windows applications, including Windows File Explorer.
27
Installing and Configuring SQL Server

2. Insert the SQL Server 2016 or SQL Server 2017 installation media. From the rootfolder, double-click setup.exe and use the default selections unless otherwiseinstructed.Use the default selections unless otherwise instructed.
ActionScreen
In the left pane, click Installation.SQL Server InstallationCenter/Planning page
Click Upgrade from a previous version of SQLServer.
SQL Server InstallationCenter/Installation page
Product Key a. Select Enter the product key and enter yourlicense key.
b. Click Next.
License Terms a. Read and accept the license agreement.b. Click Next.
The installer performs an additional check.Upgrade Rules• If no problems are reported, click Next.• If problems are reported:
a. Click Show details to list the componentsthat failed or prompted warnings.
b. Click Cancel to stop the installation and fixthe problems.
Select the SQL Server instance to upgrade.MSSQLSERVER is the default.
Select Instance
Lists the installed SQL features that will beupgraded.Click Next.
Select Features
Lists the named instance that will be upgraded.Click Next.
Instance Configuration
Click Next.Server Configuration
28
Installing and Configuring SQL Server

ActionScreen
The installer checks for problems that will preventthe upgrade to SQL Server 2014.• If no problems are reported, click Next.• If problems are reported:
a. Click Show details to list the componentsthat failed or prompted warnings.
b. Click Cancel to stop the installation and fixthe problems.
Upgrade Rules
Click Upgrade.Ready to Upgrade
When the upgrade finishes for all components,click Next.
Upgrade Progress
Click Close.Complete
Click X in the upper right corner to close.SQL Server Installation Center
After Upgrading to SQL Server 2016 or SQL Server 2017• Verify the upgrade.
For details, see Verifying SQL Server 2016 or SQL Server 2017 Installation onpage 27.
• Troubleshoot problems.
For details, see SQL Server Troubleshooting.
SQL Server 2014 SupportSOLIDWORKS PDM Professional 2020 supports the use of SQL Server 2014 Service Pack3 or later.
• To upgrade your SQL Server 2014 or SQL Server 2014 Express installation to SP3,download the service pack here.
• Ensure that there are sufficient SQL Client Access licenses for the existing SQL server.
29
Installing and Configuring SQL Server

Installing SQL Server 2014The SQL Server 2014 installer provides help, including considerations for running onWindows Vista or later. The SQL Server 2014 Books Online provide hardware and softwarerequirements and detailed installation instructions.
For details, seehttps://docs.microsoft.com/en-us/previous-versions/sql/sql-server-2008/ms130214(v=sql.100).
Before Installing SQL Server 2014For local installations, you must run Setup as an administrator. If you install SQL Server2014 from a remote share, you must use a domain account that has read and executepermissions on the remote share.
If SOLIDWORKS PDM is installed on the system, use Uninstall a program to uninstallthe Microsoft SQL Server 2012 Backward Compatibility package before starting theSQL Server 2014 installation.
Microsoft .Net framework version 3.5 SP01 and Windows Installer 4.5 are required. Ifthey are not installed, the Installation Wizard installs them before starting the SQL Server2014 installation. These installations may require you to restart your computer.
For Windows Server 2008 R2 x64, to install .Net framework 3.5 SP01, right-click MyComputer and selectManage > Features. In the Add Features Wizard, on the Featurespage, expand .Net Framework 3.5.1 Features and select .Net Framework 3.5.1(Installed).
Performing the SQL Server 2014 Installation1. Close all Windows applications, including Windows File Explorer.
30
Installing and Configuring SQL Server

2. Insert the SQL Server 2014 installation media. From the root folder, double-clicksetup.exe and use the default selections unless otherwise instructed.
ActionScreen
In the left pane, click Installation.SQL Server InstallationCenter/Planning
Click New SQL Server stand-alone installation oradd features to an existing installation.
SQL Server InstallationCenter/Installation
The installer checks for problems that will prevent theinstallation of the SQL Server support files:
Setup Support Rules
• If no problems are reported, click OK.• If problems are reported:
a. Click Show details to list the components thatfailed or prompted warnings.
b. Click Cancel to stop the installation and fix theproblems.
Product Key a. Select Enter the product key and enter yourlicense key.
b. Click Next.
License Terms a. Read and accept the license agreement.b. Click Next.
Click Install.Setup Support Files
The installer performs an additional check:Setup Support Rules• If no problems are reported, click Next.• If problems are reported:
a. Click Show details to list the components thatfailed or prompted warnings.
b. Click Cancel to stop the installation and fix theproblems.
31
Installing and Configuring SQL Server

ActionScreen
a. Under Instance Features, selectDatabase EngineServices.
b. Under Shared Features, select:
• Client Tools Connectivity• Integration Services• Client Tools Backward Compatibility• Documentation Components• Management Tools - Basic• Management Tools - Complete
c. Click Next.
Feature Selection
If this is a new installation:
a. Select Default instance.b. Click Next.
If SQL Server is already installed on the system and youopted not to upgrade:
a. Select Named Instance.b. Enter a unique instance name for this installation:
computername\instancename.
c. Click Next.
Instance Configuration
If disk space requirements are met, click Next.
If disk space requirements are not met:
a. Note the space required.b. Click Cancel.c. Add the required space.d. Run the installation again.
Disk Space Requirements
32
Installing and Configuring SQL Server

ActionScreen
SQL Server Agent:
• Account Name: NTService\SQLAgent$*INSTANCENAME*
• Startup Type: Automatic
ServerConfiguration/ServiceAccount tab
SQL Server Database Engine:
• Account Name: NTService\MSSQL$*INSTANCENAME*
• Startup Type: Automatic
SQL Server Integration Services 12.0:
• Account Name: NT Service\MsDtsServer120• Startup Type: Automatic
SQL Server Browser:
• Account Name: NT AUTHORITY\LOCAL SERVICE• Startup Type: Automatic
a. For Database Engine, click Customize.b. In the dialog box, select Windows Collation
designator and sort order, and the Collationdesignator that matches your locale. Keep theother selections.
You cannot use SOLIDWORKS PDM on a serverusing binary settings.
c. Click Next.
ServerConfiguration/Collation tab
33
Installing and Configuring SQL Server

ActionScreen
a. Select Mixed Mode (SQL Server Authenticationand Windows Authentication). SOLIDWORKSPDM Professional uses SQL Server authenticationfor database communication.
b. Type a strong password for the system administratoraccount (sa). Do not leave the password blank. Forpassword rules, click Help.
Retype the password to confirm it.
Remember the password for use when setting upSOLIDWORKS PDM Professional file vaultdatabases.
c. Under Specify SQL Server administrators, clickAdd.
d. In the Select Users, Computers, or Groups dialogbox, enter the name of the local administrator ofthe system or the Administrators group.
e. Click Next.
Database EngineConfiguration/AccountProvisioning tab
Do not change settingson the Data Directoriesor Filestream tabs.
(Optional) To change the default folder where databasescreated by SOLIDWORKS PDM Professional are stored,change the location for User database directory andUser database log directory.
Database EngineConfiguration/DataDirectories tab
Click Next.Error and Usage Reporting
The installer checks for problems that will prevent theinstallation of SQL Server 2014.• If no problems are reported, click Next.• If problems are reported:
a. Click Show details to list the components thatfailed or prompted warnings.
b. Click Cancel to stop the installation and fix theproblems.
Installation Rules
Click Install.Ready to Install
Installation may take a long time.If you get an error regarding the SQL ServerBackwards-Compatibility Files, cancel the installation.Use Uninstall a program to uninstall the Microsoft SQLServer 2012 Backward Compatibility package. Thenrestart the SQL Server 2014 installation.
When the progress bar shows Setup processcomplete, click Next.
Installation Progress
34
Installing and Configuring SQL Server

ActionScreen
Click Close.
If you receive a message that computer restart isrequired, click OK. If a restart does not beginautomatically, manually restart your computer.
Complete
After Installing SQL Server 2014To use secure SQL communication over the network and have a certificate server, youcan enable SSL encryption.
For details, visit Microsoft Support page and search for the Knowledge Base article318605.
Verifying SQL Server 2014 InstallationTo verify that SQL Server 2014 was installed correctly:
1. Start the SQL Server Configuration Manager.2. Click SQL Server 2014 Services and see whether SQL Server (MSSQLSERVER)
is running.3. If it is not, start the service by right-clicking SQL Server (MSSQLSERVER) and
selecting Start.4. Exit the SQL Server Configuration Manager.
Upgrading to SQL Server 2014Follow these instructions to upgrade an existing Server SQL 2008R2 or SQL Server SQL2012 instance to SQL Server 2014 Service Pack 3 or later.
If you are upgrading to SQL Server 2014, visit the Microsoft Docs page and search forthe upgrade information.
To upgrade your SQL Server 2014 or SQL Server 2014 Express installation to SP3,download the service pack here.
If you are uncertain about which SQL Server version is installed, visit the MicrosoftSupport page and search for the Knowledge Base article 321185 to identify the versionand edition.
All file vault databases are automatically upgraded to the SQL Server 2014 format whenthe server instance is upgraded.
Performing the Upgrade to SQL Server 20141. Close all Windows applications, including Windows File Explorer.
35
Installing and Configuring SQL Server

2. Insert the SQL Server 2014 installation media, and from the root folder, double-clicksetup.exe.Use the default selections unless otherwise instructed.
ActionScreen
In the left pane, click Installation.SQL Server InstallationCenter/Planning page
Click Upgrade from SQL Server 2005, SQLServer 2008, SQL Server 2008 R2 or SQLServer 2012.
SQL Server InstallationCenter/Installation page
The installer checks for problems that will preventthe installation of the SQL Server support files:
Setup Support Rules
• If no problems are reported, click OK.• If problems are reported:
a. Click Show details to list the componentsthat failed or prompted warnings.
b. Click Cancel to stop the installation and fixthe problems.
Product Key a. Select Enter the product key and enter yourlicense key.
b. Click Next.
License Terms a. Read and accept the license agreement.b. Click Next.
Click Install.Setup Support Files
The installer performs an additional check.Setup Support Rules
• If no problems are reported, click Next.• If problems are reported:
a. Click Show details to list the componentsthat failed or prompted warnings.
b. Click Cancel to stop the installation and fixthe problems.
Select the SQL Server instance to upgrade.MSSQLSERVER is the default.
Select Instance
Lists the installed SQL features that will beupgraded.Click Next.
Select Features
36
Installing and Configuring SQL Server

ActionScreen
Lists the named instance that will be upgraded.Click Next.
Instance Configuration
If disk space requirements are met, click Next.
If disk space requirements are not met:
a. Note the space required.b. Click Cancel.c. Add the required space.d. Run the installation again.
Disk Space Requirements
Click Next.Server Configuration
Select Import and click Next.Full-text Upgrade
Click Next.Error and Usage Reporting
The installer checks for problems that will preventthe upgrade to SQL Server 2014.
• If no problems are reported, click Next.• If problems are reported:
a. Click Show details to list the componentsthat failed or prompted warnings.
b. Click Cancel to stop the installation and fixthe problems.
Upgrade Rules
Click Upgrade.Ready to Upgrade
When the upgrade finishes for all components,click Next.
Upgrade Progress
Click Close.Complete
Click X in the upper right corner to close.SQL Server Installation Center
After Upgrading to SQL Server 2014• Verify the upgrade.
For details, see Verifying SQL Server 2014 Installation on page 35.
• Troubleshoot problems.
For details, see SQL Server Troubleshooting on page 38.
37
Installing and Configuring SQL Server

SQL Server Troubleshooting
Clients Cannot Work in the File VaultThe SQL password has expired or the account has been lockedout.
Cause
Unlock the account by logging in using Windows Authentication.Solution
To unlock the SQL Server Account
1. Open Microsoft SQL Server Management Studio.2. In the Connect to Server dialog box:
a) For Authentication, select Windows Authentication.b) Click Connect.
3. In the left pane, expand Security and select Logins.4. Right-click the SQL login that is defined for use in the archive server (typically the
sa account) and select Properties.5. In the Login Properties dialog box, in the left pane, click Status.6. Under Status, for SQL Server authentication, clear Login is locked out.7. Exit Microsoft SQL Server Management Studio.
SOLIDWORKS PDM Administrative Features FailRemote connections are not allowed.Cause
Enable the SQL Server remote access option.Solution
To enable the SQL server remote access option:
1. Open Microsoft SQL Server Management Studio.2. Log in as system administrator.3. Right-click the server and select Properties.4. In the Server Properties dialog box, click Connections.5. In the right pane, under Remote server connections, verify that Allow remote
connections to this server is selected, and click OK.6. Exit Microsoft SQL Server Management Studio.
SOLIDWORKS PDM Cannot Connect to the ServerTCP/IP is not enabled, or the TCP port is wrong.Cause
Activate the TCP/IP protocol for client connections and ensurethat TCP port 1433 is open.
Solution
To activate the SQL Server TCP/IP protocol:
1. Open the SQL Server Configuration Manager.
38
Installing and Configuring SQL Server

2. In the left pane, expand SQL Server 2008 Network Configuration, and clickProtocols for MSSQLSERVER.
3. In the right pane, verify that TCP/IP is enabled.4. Right-click TCP/IP and select Properties.5. On the IP Addresses tab, ensure that TCP is using port 1433.6. Exit the SQL Server Configuration Manager.
Changing the SQL Server Login AccountThe archive and/or database server services must be able to reach any SOLIDWORKSPDM Professional databases they manage using an SQL login that has at least db_owneraccess to the databases. Normally when SQL Server is installed, a system administratorlogin (sa) is created that has full access to all databases on the SQL Server.
Use this system administrator, or create a new user with db_owner access to theSOLIDWORKS PDM Professional databases.
If you plan to create new file vault databases using a db_owner SQL login, create thisSQL login first.
To create a new file vault database, you must log in as a SQL system administrator. Ifyou use a db_owner SQL login, you are prompted for the system administrator (sa)login during vault creation.
Creating a New SQL Login Account1. Open Microsoft SQL Server Management Studio.2. Log in as a system administrator.3. In the left pane, expand Security.4. Right-click Logins and select New Login.5. In the Login - New dialog box, select General:
a) Type a Login name for the new SQL user.b) Select SQL Server Authentication and enter a password.c) Clear Enforce password policy.d) Click OK.
6. Close Microsoft SQL Server Management Studio.
This login does not need any additional permissions to be used by SOLIDWORKS PDMProfessional.
39
Installing and Configuring SQL Server

Using the New SQL Login with the SOLIDWORKS PDMArchive
1. On the system running the SOLIDWORKS PDM archive server, open the SOLIDWORKSPDM Archive Server dialog box by doing one of the following:
• On Windows 7, from the Windows Start menu, click All Programs >SOLIDWORKS PDM > Archive Server Configuration.
• On Windows 10 and Windows Server 2016 or later, from the Windows Startmenu,select SOLIDWORKS PDM > Archive Server Configuration.
2. Select Tools > Default settings.3. In the Settings dialog box, under SQL login, click Change.4. In the Change SQL User Login dialog box, enter the SQL user login and password of
the new SQL user and click OK twice.
From now on, new file vault databases that are created are assigned db_owneraccess for this user.
5. Exit the SOLIDWORKS PDM Archive Server dialog box.6. On the system running the SOLIDWORKS PDM database server, open the
SOLIDWORKS PDM Database Server dialog box by doing one of the following:
• On Windows 7, from the Windows Start menu, click All Programs >SOLIDWORKS PDM > Database Server Configuration.
• On Windows 10 and Windows Server 2016 or later, from the Windows Startmenu,select SOLIDWORKS PDM > Database Server Configuration.
7. Enter the new SQL user login and password, and click OK.8. Restart the SOLIDWORKS PDM Database Server service.
Giving an SQL User db_owner Access to ExistingSOLIDWORKS PDM File Vault Databases
1. On the SQL server that hosts the new SOLIDWORKS PDM databases, open MicrosoftSQL Server Management Studio.
2. Log in as a system administrator.3. In the left pane, expand Security and click Logins.4. Right-click the SQL user and select Properties.5. In the Login Properties dialog box:
a) In the left pane, select User Mapping.b) In the right pane, under Users mapped to this login, select Map for all
SOLIDWORKS PDM databases (file vault databases and ConisioMasterDb.)c) For each database, under Database role membership, select db_owner.d) Click OK.
6. Right-click the server and select New Query.
40
Installing and Configuring SQL Server

7. In the right pane, enter the following query statement on the new db_owner userand click Execute.GRANT VIEW SERVER STATE TO [SQL_USER_NAME]
8. Exit Microsoft Microsoft SQL Server Management Studio.9. On the system running the SOLIDWORKS PDM archive server, open the SOLIDWORKS
PDM Archive Server dialog box by doing the following:
• On Windows 10 and Windows Server 2016 or later, from Windows Start menu,select SOLIDWORKS PDM > Archive Server Configuration.
10. Select Tools > Default settings.11. In the Settings dialog box, under SQL login, click Change.12. In the Change SQL User Login dialog box, enter the SQL user login and password of
the new SQL user and click OK.13. Close the SOLIDWORKS PDM Archive Server dialog box.14. On the system running the SOLIDWORKS PDM database server, open the
SOLIDWORKS PDM Database Server dialog box by doing the following:
• On Windows 10 and Windows Server 2016 or later, from Windows Start menu,select SOLIDWORKS PDM > Database Server Configuration.
15. Enter the new SQL user login and password and click OK.16. Restart the SOLIDWORKS PDM Database Server service.
Insufficient SQL PermissionsIf you do not assign the SQL user sufficient SQL permissions, you cannot log in to anyfile vault views.
Warning messages are displayed if the SQL user does not have at least db_owner access:
• To the ConisioMasterDb database
For example:
Could not log in to the database “filevault on Server servername".
• To the file vault database
For example:
Could not access the item in the database.
41
Installing and Configuring SQL Server

4Installing and Configuring SQLServer Express
This chapter includes the following topics:
• Installing and Managing SQL Server 2014 Express
SOLIDWORKS PDM Standard supports the use of Microsoft SQL Server 2014 Express.
SOLIDWORKS PDM Standard uses a Microsoft SQL Server Express database to store informationabout files and activities in a file vault.
Use SQL Server 2014 Express Service Pack 3 or later to host the file vault database. To upgradethe SQL Server 2014 Express installation to SP3, download the service pack here.
Installing and Managing SQL Server 2014Express
To install and manage SQL Server 2014 Express, install the SQL Server database engineand the SQL Server Management Studio.
You can install the SQL Server database engine from the installation package that isavailable on the SOLIDWORKS installation media. For details, see Installing the SQLServer Express Database Engine on page 43. For more details on installing SQL ServerManagement Studio, click https://docs.microsoft.com/en-us/, SQL Server, and thenclick SQL Server Management Studio (SSMS).
To install the SQL Server database engine and the SQL Server Management Studio at thesame time, download and install the combined installation packageSQLEXPRWT_x64_ENU.exe available athttps://www.microsoft.com/en-us/download/details.aspx?id=42299.
Before Installing SQL Server 2014 ExpressFor local installations, you must run the installation as an administrator.
If Microsoft SQL Server 2012 Backward Compatibility is installed on the system, useUninstall a program to uninstall the Microsoft SQL Server 2012 BackwardCompatibility package before starting the SQL Server 2014 Express installation.
42

Microsoft .Net framework version 3.5 SP01 and Windows Installer 4.5 are required. Ifthey are not installed, the Installation Wizard installs them before starting the SQL Server2014 Express installation. These installations may require you to restart your computer.
For Windows Server 2008 R2 x64, to install .Net framework 3.5 SP01, right-click MyComputer and selectManage > Features. In the Add Features Wizard, on the Featurespage, expand .Net Framework 3.5.1 Features and select .Net Framework 3.5.1(Installed).
Installing the SQL Server Express Database Engine1. Close all Windows applications, including Windows File Explorer.2. Browse to \PreReqs\SQLServer\sqlexpr_x64_enu.exe and click Run as
administrator.
The extraction begins and starts the InstallShield wizard.
43
Installing and Configuring SQL Server Express

3. Use the default selections unless otherwise instructed.
ActionScreen
Click New SQL Server stand-aloneinstallation or add features to anexisting installation.
SQL Server Installation Center/Installation
License Terms a. Read and accept the licenseagreement.
b. Click Next.
The installer performs an additional check:Install Rules• If no problems are reported, clickNext.
• If problems are reported:
a. Click Show details to list thecomponents that failed orprompted warnings.
b. Click Cancel to stop theinstallation and fix the problems.
Feature Selection a. Under Instance Features, selectDatabase Engine Services.
b. Under Shared Features, select:
• Client Tools Connectivity• Client Tools BackwardCompatibility
• Client Tools SDK
c. Click Next.
If this is a new installation:Instance Configuration
a. Select Default instance.b. Click Next.
If SQL Server is already installed on thesystem and you opted not to upgrade:
a. Select Named Instance.b. Enter a unique instance name.c. Click Next.
44
Installing and Configuring SQL Server Express

ActionScreen
SQL Server Database Engine:
• Account Name: NTService\MSSQL$*INSTANCENAME*
• Startup Type: Automatic
SQL Server Browser:
• Account Name: NTAUTHORITY\LOCAL SERVICE
• Startup Type: Automatic
Server Configuration/Service Accountstab
a. Keep the default value,SQL_Latin1_General_CP1_CI_AS.
b. Optionally, click Customize, selectWindows collation designator andsort order, and the Collationdesignator that matches your locale.Keep the other selections.
You cannot use SOLIDWORKS PDMStandard on a server using binarysettings.
c. Click Next.
Server Configuration/Collation tab
45
Installing and Configuring SQL Server Express

ActionScreen
a. Select Mixed Mode (SQL ServerAuthentication and WindowsAuthentication). SOLIDWORKS PDMStandard uses SQL Serverauthentication for databasecommunication.
b. Type a strong password for thesystem administrator account (sa).Do not leave the password blank. Forpassword rules, click Help.
Retype the password to confirm it.
Remember the password for usewhen setting up SOLIDWORKS PDMStandard file vault databases.
c. Under Specify SQL Serveradministrators, click Add.
d. In the Select Users, Computers, orGroups dialog box, enter the name ofthe local administrator of the systemor the Administrators group.
e. Click Next.
Database Engine Configuration/ServerConfiguration tab
Optionally, set the remaining paths.Keep the default settings in theFILESTREAM tab.
Database Engine Configuration/DataDirectories tab/ FILESTREAM tab
Installation may take a long time.If you get an error regarding the SQLServer Backwards-Compatibility Files,cancel the installation. Use Uninstall aprogram to uninstall the Microsoft SQLServer 2012 Backward Compatibilitypackage. Then restart the SQL Server2014 installation.
When the progress bar shows Setupprocess complete, click Next.
Installation Progress
Click Close.
If you receive a message that computerrestart is required, click OK. If a restartdoes not begin automatically, manuallyrestart your computer.
Complete
46
Installing and Configuring SQL Server Express

After Installing SQL Server 2014 ExpressTo connect to the SQL Server Express instance from remote clients ensure to configurethe server to accept remote connections and enable the TCP/IP protocol. You must setthe SQL server TCP port to a fixed port number instead of the default dynamic portnumber.
Enabling the SQL Server Remote Access OptionTo enable the SQL server remote access option:
1. Open Microsoft SQL Server Management Studio.2. Select the SQL Server instance name and log in as system administrator.3. Right-click the server and select Properties.4. In the Server Properties dialog box, click Connections.5. In the right pane, under Remote server connections, verify that Allow remote
connections to this server is selected, and click OK.6. Exit Microsoft SQL Server Management Studio.
Activating the SQL Server TCP/IP ProtocolTo activate the SQL Server TCP/IP protocol:
1. Open the SQL Server 2014 Configuration Manager.2. In the left pane, expand SQL Server Network Configuration, and click Protocols
for <instance name>.3. In the right pane, verify that TCP/IP is enabled.
If TCP/IP is disabled, right-click TCP/IP and select Enable.
4. In the left pane, select SQL Server Services.5. Right-click SQL Server(<instance name >) and select Restart.6. Exit the SQL Server Configuration Manager.
Configuring the SQL Server Express Instance to Listen to aFixed TCP PortThe SQL Server Express instance listens to a dynamic port by default. When the SQLServer service starts up, the port number changes. If the server has a firewall enabled,it is difficult to configure the port exceptions to allow client access.
For details about configuring the firewall for SQL Server access, seehttps://msdn.microsoft.com/en-us/library/cc646023(v=sql.120).aspx.
To configure the SQL Server Express Instance to Listen to a Fixed TCP Port:
1. Open the SQL Server 2014 Configuration Manager.2. In the left pane, expand SQL Server Network Configuration, and click Protocols
for <instance name>.3. Double-click TCP/IP and select the IP Addresses tab.4. Under IPAll, clear the value in TCP Dynamic Ports.
47
Installing and Configuring SQL Server Express

5. Set the TCP Port to the static port number that you want the SQL Server Expressinstance to listen to.
• If SQL Express is the only SQL Server instance on the system, set the port to 1433.• If other SQL Server instances exist on the system, set the port to a unique value,for example 1440.
6. Click OK.7. In the left pane, select SQL Server Services.8. Right-click SQL Server(<instance name >) and select Restart.9. Double-click SQL Server Browser and select the Service tab.10. Set the Start Mode to Automatic and click OK.11. Right-click SQL Server Browser and start the service if it is not running.
Verifying SQL Server 2014 Express Installation1. Start the SQL Server Configuration Manager.2. Click SQL Server Services and see whether SQL Server (<instance name >) is
running.3. If it is not, start the service by right-clicking SQL Server (<instance name >) and
selecting Start.4. Exit the SQL Server Configuration Manager.
Upgrading SQL Server Express 2014 to SQL Server 20141. Close all Windows applications, including Windows File Explorer.2. Insert the SQL Server 2014 installation media, and from the root folder, double-click
setup.exe.3. On the SQL Server Installation Center page, in the left pane, select Maintenance.4. Select Edition Upgrade.5. Complete the steps in the Upgrade the Edition for SQL Server 2014 dialog box.6. Upgrade SQL Server 2014 to Service Pack 3 or later.
48
Installing and Configuring SQL Server Express

5Installing SOLIDWORKS PDM
This chapter includes the following topics:
• Downloading the Installation Media• Initiating the Installation Via SOLIDWORKS Installation Manager• Initiating the Installation via the InstallShield Wizard• Installing SOLIDWORKS PDM Database Server• Installing SOLIDWORKS PDM Archive Server• Installing and Configuring SolidNetWork Licensing• Installing SOLIDWORKS PDM Web2 (For SOLIDWORKS PDM Professional only)• Installing SOLIDWORKS PDMWeb API Server (For SOLIDWORKS PDM Professional
Only)• Installing the SOLIDWORKS PDM Client
The SOLIDWORKS media contains the server and client components.
You can install each server component separately, or select multiple components to install ina single operation.
For example, to install the database server and archive server on the same computer, youcan select both options on the Server Installation screen.
When you install multiple components, the screens appropriate to those components aredisplayed. For simplicity, the procedures in this chapter describe the component installationsseparately.
You can install SOLIDWORKS PDM Standard or SOLIDWORKS PDM Professional using:
• SOLIDWORKS PDM InstallShield Wizard• SOLIDWORKS Installation Manager (SLDIM)
If you use SOLIDWORKS PDM InstallShield Wizard, you must install the SolidNetWork LicenseManager separately. The SolidNetWork License Manager can be installed with SOLIDWORKSPDM when using SLDIM.
You can install SOLIDWORKS PDM client and SOLIDWORKS PDM server either on differentmachines or on the same machine. To install both on the same machine, you must run theserver install.
You cannot install client and server on the same machine by running separate installs.
Install the following components before you install SOLIDWORKS PDM:
• MSXML 6.0• .NET Framework 4.0 or newer• Visual C++ 2010 Redistributable - x86
49

• Visual C++ 2010 Redistributable - x64• Visual C++ 2013 Redistributable - x86• Visual C++ 2013 Redistributable - x64• Visual C++ 2015 Redistributable - x64• Visual C++ 2017 Redistributable - x64• Microsoft ODBC Driver 17.3 or later
You can find the installation files for the prerequisite components on the Installation mediaunder the \PreReqs\ directory.
If you use the SOLIDWORKS Installation Manager to install SOLIDWORKS PDM, theprerequisite components are automatically installed.
Install Microsoft ODBC driver 17.3 or later for SQL Server on the client and the servers.
Downloading the Installation MediaYou can use SOLIDWORKS Installation Manager (SLDIM) to download the installationmedia. You can then use either SLDIM or the InstallShield Wizard to install SOLIDWORKSPDM.
To download the installation media:
1. Use the SOLIDWORKS Installation Manager to download the server and client productsthat you want to install.The downloaded files are your installation media.
2. Optional: To install on other computers, copy the installation media to a shared orportable drive.
Initiating the Installation Via SOLIDWORKSInstallation Manager
To initiate the installation via SOLIDWORKS Installation Manager (SLDIM):
1. Browse to the installation media.2. Run setup.exe.
For details about installing via SLDIM, see Using SOLIDWORKS InstallationManageron page 101.
Initiating the Installation via the InstallShieldWizard
Ensure that you meet all prerequisites. For details, see Installing SOLIDWORKS PDMon page 49.
50
Installing SOLIDWORKS PDM

You perform the same initial steps to begin all SOLIDWORKS PDM installations.
To initiate the installation via the InstallShield Wizard:
1. Browse to the installation media.2. In the SWPDMServer folder, run \SWPDMServer\setup.exe to install SOLIDWORKS
PDM server.3. In the SWPDMClient folder, run \SWPDMClient\setup.exe to install SOLIDWORKS
PDM client.
When done, the installation wizard continues. Initiate the installation using theseinstructions:
ActionScreen
Click Next.Welcome
Accept the license agreement and click Next.License Agreement
To accept the default installation location, click Next.
To specify a different installation location:
1. Click Change.2. Browse to the new location.3. Click OK.4. Click Next.
Destination Folder
Select one of the following to install:• SOLIDWORKS PDM Standard• SOLIDWORKS PDM Professional
Select PDM Product
Installing SOLIDWORKS PDM Database ServerThe database server periodically polls SOLIDWORKS PDM databases for updates such asnotifications, local view refresh, replication schedule updates, and index server changes.
It must be installed for:
Workflow and other automatic notifications, such as changestate, check out, check in, add, and deadline
Automatic notifications
Automatic updates (refresh) of listings in file vault viewsand add-ins
View updates
Periodic updates of card lists that use SQL queries for theircontent
Card list updates
Updates of archive servers with changes made to cold storeschedules
Cold store scheduling
51
Installing SOLIDWORKS PDM

Updates of archive servers with changes made to replicationschedules
Replication scheduling
Administration of the indexing service for content searchesIndex server administration
Execution of data import and export rules at predefinedintervals
Data import/export
It is recommended that you install the database server on the same system as MicrosoftSQL Server. You can install it on another system, but some network overhead may occur.
Before Installing the Database Server• Ensure that the database server has access to the archive server over TCP port 3030and to the SQL Server over TCP port 1433.
• Obtain the following information:
• SQL Server name• Name and password of an SQL user account with read/write access
If you do not know the name of a user with read and write access, you can use theSQL sa account that has these permissions. You can also create a login for this purpose.
For details, see Changing the SQL Server Login Account.
Performing the Database Server Installation1. Login locally or remotely as a user with local administrative rights on the system
where you are installing the database server.2. Begin the installation, as described in Initiating SOLIDWORKS PDM Installations.
52
Installing SOLIDWORKS PDM

3. Complete the installation using these instructions:
ActionScreen
Select Database Server and click Next.
You can install multiple server components on thesame system.
If you want to install SOLIDWORKS PDM client onthe machine, you must also select Client.
For details on client installation, see Installing Clientsusing the Installation Wizard.
Server Installation
SOLIDWORKS PDMDatabase Server SQL Login a. Enter the name of the SQL server to host the
file vault databases.
If the SQL server is running on a namedinstance, enter the server name in the format:
servername\instancename
b. In the Login name field, type the name of anSQL user on the server who has read and writeaccess (i.e., db_owner permission) to allSOLIDWORKS PDM databases hosted on the SQLserver (the file vault databases andConisioMasterDb.)
c. In the Password field, enter the SQL user'spassword.
d. Click Next.
The login information is verified. If it is incorrect, awarning is displayed.
Click Install.Ready to Install theProgram
Click Finish.InstallShield WizardCompleted
53
Installing SOLIDWORKS PDM

Installing SOLIDWORKS PDM Archive ServerThe archive server hosts the physical files (drawings, documents, etc.) stored in a filevault and manages users and their credentials.
All clients using SOLIDWORKS PDM must connect to one or more archive servers hostingone or more file vault archives.
The archive server runs as a service on the system account of the computer where it isinstalled, sending and receiving files between the clients and the file vault archive. It alsostores passwords and user login information. Only one archive server installation isrequired per computer, hosting one or more file vault archives.
In a replicated environment, multiple archive servers can be set up to host replicatedcopies of the same file vault archive. See the SOLIDWORKS PDM Professional ReplicationGuide.
To prevent problems attaching to the archive server, the server name should be 15characters or less.
Before Installing the Archive ServerSet up the users, accounts, and permissions required to complete the archive serverinstallation.
The system account must have full access rights to create foldersand files under the folder to be designated as the archive folder.The archive folder can also be on a network share that allowsthe archive server service to both read and write files.
You can change the archive server service log-on account tousers other than the system account in the service properties.
Archive folder access
The SQL user that communicates with file vault databases musthave at least db_owner permissions to any existing file vaultdatabases on the SQL Server.You can use the sa account that was created when the SQLServer was installed.
For more information about SQL logins, see Changing the SQLServer Login Account.
SQL user account
54
Installing SOLIDWORKS PDM

If you want to assign user and group access rights to the archiveserver during the installation, create the users and groups beforeyou begin.
To use domain users, create a domain group on the domaincontroller and add domain users that should be able to loginto SOLIDWORKS PDM Professional.
• During installation, add the domain group using the FindUser or Group dialog; the users will appear in theSOLIDWORKS PDM administration tool.
• After installation, you can run the Archive ServerConfiguration tool to add or change user and groupassignments.
User and groupaccounts
Performing the Archive Server Installation1. Login as a user with local administrative rights on the system where you are installing
the archive server.2. Begin the installation, as described in Initiating the Installation via the
InstallShield Wizard on page 50.
55
Installing SOLIDWORKS PDM

3. Complete the installation using the following instructions:
ActionScreen
Select Archive Server and click Next.
You can install multiple server components on thesame system.
Server Installation
If you want to install SOLIDWORKS PDM client onthe machine, you must also select Client.
For details on client installation, see Installing Clientsusing the Installation Wizard.
Click Install.
If you see a message that your local securitynetwork access is set to “Guests only” and should
Ready to Install theProgram
be changed to “Classic,” click Yes to accept thechange.
If it is new install, when the installation finishes, theArchive Server Configuration wizard appears.
Archive Server Configuration Wizard
Click Next.Welcome
Archive folder a. Do one:
• Accept the default location for the archive folder.• Change the location by doing one of the following:
• Click Browse and browse to a folder.• Type the path.
If the folder you specified does not exist, you areasked if it should be created.
The archive folder path is assigned the name Archives,which is used when setting up or attaching to a file vaultfrom the View Setup wizard on a client.
You must include the archive folder and its subfolders(i.e., file vault archives) in the daily backup routines.
b. Click Next.
56
Installing SOLIDWORKS PDM

Archive Server Configuration Wizard
a. Type and confirm a password for the Admin user.
The Admin user account is assigned full administrative rightsto file vaults. Admin can create users, set up workflows, deletefiles, etc. It is the only user present in a newly created filevault.
You can change the password at any time using the ArchiveServer Configuration tool.
b. Click Next.
Adminpassword
a. Type the login information for the SQL user who willcommunicate with the file vault databases hosted on the SQLServer.
You can use the SQL Server system administrator user sa.
If you specify an SQL user with low permissions on the SQLServer, this user will be assigned db_owner access to any newfile vaults created.
b. Click Next.
SQL user loginand password
To define the Windows user accounts that are allowed access tothis archive server, by select the accounts under Available usersand groups and click the arrow pointing to Administrativeaccess or Attach access.
All local users and groups found on the systemare listed by default.
To add domain accounts to the list:
Availableusers andgroups
a. Click Find User or Group.b. In the Find User or Group dialog box, search
for additional user or group accounts. Toadd a domain group, for example, typedomain\groupname and click OK.
Provides sufficient access to create new filevaults, or remove, attach, or upgrade existingfile vaults on this archive server.
When you create a file vault, enter the usernameand password of an account added to thissection.
Administrativeaccess
Provides sufficient access to attach to existingfile vaults managed by this archive server.
When you create a file vault view or connect toa file vault, enter the username and passwordof an account added to this section.
Attach access
Security
57
Installing SOLIDWORKS PDM

Archive Server Configuration Wizard
Select one of the following authentication methods to use bydefault when creating new file vaults managed by this archiveserver:
SOLIDWORKS PDM user names and passwordsare stored on the archive server. You can addand remove them using the administration toolon SOLIDWORKS PDM client.
SOLIDWORKSPDM login
Synchronizes logins to a file vault with thelogged-in Windows users (Active Directory).Passwords and names are defined usingstandard Windows account management.
In the Windows login settings dialog box, selectaccounts under Available users and groupsand add them to Added users and groupsby clicking the right-arrow button.
To add domain accounts to the list:
Windows login(SOLIDWORKSPDMProfessionalonly)
a. Click Find User or Group.b. In the Find User or Group dialog box,
search for additional user or groupaccounts. To add a domain group, forexample, type domain\groupname andclick OK.
Retrieves user accounts from a server usingthe LDAP method (for example, Novell servers).The users are available when adding users toa file vault using the administration tool.Passwords and user names are defined on theLDAP server managing the accounts.
To define the connection settings to the serverusing LDAP:
LDAP login(SOLIDWORKSPDMProfessionalonly)
Login type
Type the name or IP address of an LDAP server.Server name
Type the port used for LDAP on the server. Thedefault port is 389.
Port
Add at least one context with users that shouldbe listed in the user manager.The context names must be entered asdistinguished names; for example, O-company,OU=department, O=company or CN=Users,DC=company, DC=com.
Contexts
Type a context for the user login used by thearchive server to connect to the LDAP server.
User Context
58
Installing SOLIDWORKS PDM

Archive Server Configuration Wizard
Username Type a username that exists in the user contextselected. This user is used by the archive serverto connect to the LDAP server.
Type the password for the selected user.Password
Click Finish.Completed
Opening Ports for Client/Server CommunicationWindows Server and Windows 7 have built-in firewalls activated by default. These canrestrict network access to applications requiring connections over the TCP/IP interface.
The archive server uses TCP port 3030 to communicate with the clients. This port mustbe fully opened in the firewall for a SOLIDWORKS PDM installation to accept incomingconnections. If the port is not opened, the archive server is not available.
Recommendation: Allow inbound traffic on the corresponding UDP ports to allow theservers to broadcast (announce themselves) on the network. For example, by showingthe name in a list for users to attach to a server from a client.
To allow the SQL server to communicate with clients, you must open TCP ports 1433 and1434.
To check out a client license, you must open ports 25734 and 25735 on the SolidNetWorkLicense Server.
This table summarizes the ports that must be reachable. You open the firewall ports onthe listening/receiving side.
Communication Originating From
Listening andReceiving
WebServer
SQL ServerDatabaseService
ArchiveServer
Client
Client
3030303030303030Archive Server
Database Service
1433/14341433/14341433/14341433/1434SQL Server
25734/2573525734/25735SNL Server
Microsoft disables outbound filtering by default. However, your administrators may havecreated outbound rules that restrict traffic to applications that are approved on yourorganization's network. If a SOLIDWORKS PDM client or replicated server cannot reachthe SQL server or Archive server, make sure that the network administrator has notrestricted access to the server ports in the Windows firewall settings.
59
Installing SOLIDWORKS PDM

SOLIDWORKS PDM Standard vaults use SQL Server Express that listens to a dynamicport by default. Set the SQL Server instance to a static port that you open in the firewall.This is also applicable to the additional named SQL Server instances. For details, seeConfiguring the SQL Server Express Instance to Listen to a Fixed TCP Port.
Opening Ports on Windows and Windows Server SystemsYou use Windows Firewall with Advanced Security to open the ports needed tocommunicate with clients.
You create port rules that enable TCP and UPD ports for inbound SOLIDWORKS PDMtraffic.
Open the ports for the archive server first. Then follow the same instructions to open theports for the SQL server and Web Server.
To open the ports for the archive server:
1. Open the Control Panel.2. On the Adjust your computer’s settings page, click System and Security.3. In the right pane, click Windows Firewall.4. In the left pane, click Advanced settings.5. In the right pane, under View and create firewall rules, click Inbound Rules.6. In the far right pane, under Actions, Inbound Rules, click New Rule.7. In the New Inbound Rule Wizard , on the Rule Type screen, in the right pane, select
Port and click Next.8. In the right pane of the Protocol and Ports screen:
a) Select TCP.b) Select Specific local ports and type 3030.c) Click Next.
9. In the right pane of the Action screen, select Allow the connection and click Next.10. In the right pane of the Profile screen, clear Public and click Next.11. In the Name screen, for Name, type the exception name – for example, Enable TCP
port 3030 for inbound SOLIDWORKS PDM traffic and click Finish.
The wizard closes and the rule is added to the list of inbound rules. It is enabled bydefault.
12. Repeat steps 6 through 11 to create an inbound rule for UDP port 3030.13. On the system hosting the SQL Server, repeat steps 6 through 12 to create inbound
TCP and UDP rules for ports 1433 and 1434.14. On the system hosting the SolidNetwork License Server, repeat steps 6 through 12
to create inbound TCP rules for ports 25734 and 25735.15. On the system hosting the Web Server, repeat steps 6 through 12 to create inbound
TCP and UDP rules for ports 80 and 443.16. Click File > Exit to close the Windows Firewall with Advanced Security window.17. Close the Control Panel.
60
Installing SOLIDWORKS PDM

Adding Archive Servers in a WAN EnvironmentSOLIDWORKS PDM clients are normally set up to communicate with the Archive Serverand SQL server using the server system names. These system names are resolved to IPaddresses.
If this name lookup fails or is slow it can cause the following problems:
• Clients cannot find the servers at all. This is a common problem when using subnetsor WAN configurations.
• Overall performance using SOLIDWORKS PDM features such as logging in, browsing,or adding files is slow.
• In case of SOLIDWORKS PDM Professional, replication between servers fails.
Verifying That the Server Name Can Be ResolvedTo ensure optimal performance, make sure that the DNS server configuration is set upto resolve names correctly and efficiently.
1. Open the command prompt by clicking Start > Run > CMD.2. Type Ping server_name.
If the server can be reached by name, a reply with the server IP address appears.For example:
PING SRV-DEV-15Reply from 192.168.1.71: bytes=32 time<1ms TTL=128
3. Verify that the correct IP is returned.
If DNS returns the wrong IP address, a different system than the server responds.
If the server name cannot be resolved, the DNS server configuration is not correctlyconfigured. For example:
PING SRV-DEV-15Ping request could not find host SRV-DEV-15. Please check the nameand try again.
Configuring the Hosts File to Resolve the Server NameIf the DNS servers cannot be configured or performance is still bad, update the client’shosts file with the correct server name and IP address. This ensures that the hosts file isqueried for the server address directly instead of waiting for the DNS name resolve.
To configure the hosts file to resolve the server name:
1. On the SOLIDWORKS PDM client, locate the Hosts file.The default location is:
C:\Windows\System32\Drivers\Etc\
2. Open the file as an administrator in a text editor (for example, Notepad).
61
Installing SOLIDWORKS PDM

3. Add a new line and enter the server IP address followed by the server name.For example:
192.168.1.71 SRV-DEV-15
4. Repeat Step 3 for any additional servers used by SOLIDWORKS PDM.5. Save and close the hosts file.
Installing and Configuring SolidNetWork LicensingSOLIDWORKS PDM manages licensing using SolidNetWork License (SNL) Manager.Installing SolidNetWork Licensing includes:
• Installing the SolidNetWork License Manager.
If you already have a SolidNetWork License Manager installed for SOLIDWORKS,you can use it with SOLIDWORKS PDM. You must ensure that it is updated to theSOLIDWORKS PDM release version.
• Activating client licenses.• Configuring the SolidWorks NetWork License server for use with the file vault.• Ensuring that the SolidNetWork License server is accessible to all clients.
Installing a SolidNetWork License ManagerYou use the SolidNetWork License serial number to install the SolidNetWork LicenseManager on a server that is accessible to all clients, preferably the SQL database server.
The SolidNetWork License software is included with the SOLIDWORKS installation media.
To install SolidNetWork License Manager from the standalone installer:
1. Change directory to the appropriate setup folder on the SOLIDWORKS installationmedia.
2. Cancel SOLIDWORKS Installation Manager, if it starts.3. Start the installation by running swlicmgr\setup.exe.4. Enter the SolidNetWork License serial number.
If you have multiple serial numbers, enter and separate them by comma.
5. Retain the default install folder and click Next.6. Click Install.
62
Installing SOLIDWORKS PDM

Activating a SolidNetWork LicenseYou can activate a SolidNetWork License to log in to the SOLIDWORKS PDM vault as aclient.
To activate the SolidNetWork License:
1. Start the SolidNetWork License Manager by doing one of the following:
• On Windows 7, click Start > All Programs > SOLIDWORKS version >SOLIDWORKS Toolsversion > SolidNetWork License Manager Serverversion.
• On Windows 10 and Windows Server 2016 or later, from the Windows Startmenu,click SOLIDWORKS Tools version > SolidNetWork License Manager Serverversion.
2. When prompted to activate, click Yes.If you have an activated SolidNetWork License, click Modify.
3. On the SolidNetWork License Server Information screen:
• If your company uses a firewall, select A firewall is in use on this server.
For more information, see Using SolidNetWork License Server with Firewallson page 64.
• Use the default value for Port Number (and for Vendor Daemon Port Numberif you have a firewall) or specify the port numbers your company uses.
The port number is a TCP/IP port number in the 1024-60000 range, usedexclusively by this process. Normally, the default (25734) is suitable and isunlikely to be the same as any other FlexNet server process available on thelicense manager server.
4. On the Activate Your SOLIDWORKS Product screen:
• Select the internet or email procedure.• Supply email contact information.• Click Next to proceed.
• Internet: Activation occurs automatically.• Email: Press Save to create a request file, then send the file [email protected]. When you receive the email containing the responsefile, extract the file from email and then click Open to load it.
If required, you can exit and rerun the activation procedure to open theresponse file.
5. Click Finish.
63
Installing SOLIDWORKS PDM

Using SolidNetWork License Server with FirewallsIf your server uses a firewall, you must configure ports to support SolidNetWork Licensing.
You must configure the firewall on the server side.
Modifying SolidNetWork License Manager Settings for WindowsFirewallIf you are using Windows Firewall, you must modify the SolidNetWork License file to usethe firewall ports to distribute licenses to the license client computers.
1. Start the SolidNetWork License Manager by doing one of the following:
• On Windows 7, click Start > All Programs > SOLIDWORKS version >SOLIDWORKS Tools version > SolidNetWork License Manager Serverversion.
• On Windows 10 and Windows Server 2016 or later, from the Windows Startmenu,select SOLIDWORKS Tools version > SolidNetWork License Manager Serverversion.
2. On the Server Administration tab, under License Server, click Stop. (Click Yes whenprompted for confirmation and OK to complete stopping the license server.)
3. Under License Information, click Modify.4. Under Server Type, select the server arrangement for your network (Single or
Triad) and then click Next.5. Under Server Information:
a) Select A firewall is in use on this server.b) Port Number and Vendor Daemon Port Number should contain the port numbers
specified for the Windows Firewall.c) Select Options File and click Browse to locate the file. Click Edit to change any
of its parameters.
The options file allows the license administrator to control various operatingparameters of FlexNet Licensing.
Recommendation: The location for the options file is in the SolidNetWork LicenseManager installation directory(SolidNetWork_License_Manager_install_dir\Licenses \sw_d.opt).This file must be in the same directory as the sw_d.lic file.
For more information about the options file, see the FlexNet Publisher LicenseAdministration Guide in the SolidNetWork License Manager installation directory(\Docs\flexuser\licensingenduserguide.pdf).
d) Click Next and then click Finish.
6. On the Server Administration tab, under License Server, click Start.7. Click OK to close the SolidNetWork License Manager.
64
Installing SOLIDWORKS PDM

SolidNetWork License AdministrationTasks include starting, upgrading, and uninstalling the license manager licenses.
Starting the SolidNetWork License ManagerYou can start the SolidNetWork License Manager from the Windows Start menu.
Start the SolidNetWork License Manager by doing one of the following:
• On Windows 7, click Start > All Programs > SOLIDWORKS version >SOLIDWORKS Tools version > SolidNetWork License Manager Server version.
• On Windows 10 and Windows Server 2016 or later, from the Windows Start menu,click SOLIDWORKS Tools version > SolidNetWork License Manager Serverversion .
Upgrading the SolidNetWork License ManagerFor major releases of SOLIDWORKS PDM, upgrading the license manager consists ofuninstalling the old license manager, installing a new one, and reactivating theSolidNetWork License.
To upgrade the SolidNetWork License Manager:
1. Start the SolidNetWork License Manager by doing one of the following:
• On Windows 7, click Start > All Programs > SOLIDWORKS version >SOLIDWORKS Tools version > SolidNetWork License Manager Serverversion.
• On Windows 10 and Windows Server 2016 or later, from Windows Start menu,select SOLIDWORKS Tools version > SolidNetWork License Manager Serverversion.
2. On the License Usage tab, verify that no client computers on the network are runningSOLIDWORKS PDM.
3. Uninstall the old license manager. For details, see Uninstalling the SolidNetWorkLicense Manager.
4. Install the new license manager and reactivate the SolidNetWork License on thelicense manager server. For details, see Installing a SolidNetWork License Manageron page 62.
65
Installing SOLIDWORKS PDM

Uninstalling the SolidNetWork License ManagerIf you want to upgrade the SolidNetWork License Manager, you must uninstall it beforeinstalling the new one. If you want to transfer the SolidNetWork License to another server,you must transfer it before removing it from this server.
1. Start the SolidNetWork License Manager by doing one of the following:
• On Windows 7, click Start > All Programs > SOLIDWORKS version >SOLIDWORKS Tools version > SolidNetWork License Manager Serverversion.
• On Windows 10 and Windows Server 2016 or later, from the Windows Startmenu,click SOLIDWORKS Tools version > SolidNetWork License Manager Serverversion.
2. Verify that no clients on the network are running SOLIDWORKS PDM.The License Usage tab shows the clients using the licenses.
3. On the Server Administration tab, under License Server, click Stop.4. Click OK to exit the license manager.5. In Windows, open Control Panel > Programs > Programs and Features.6. Select SOLIDWORKS SolidNetWork License Manager, click Uninstall, and confirm
the deletion.
You now are ready to install a new version of the license manager. For details, seeInstalling a SolidNetWork License Manager and Activating a SolidNetWork Licenseon page 63.
Transferring a SolidNetWork LicenseTo transfer a SolidNetWork License to a new or upgraded server, first transfer the licenseto the license key server at Dassault Systèmes SolidWorks Corporation, then reactivateit on the other server.
If you were unable to transfer the license to Dassault Systèmes SOLIDWORKSCorporation (because of hard disk drive failure, for example), reactivation is stillsuccessful in most cases. If not, contact your VAR for help.
You can have only one activated SolidNetWork License server per serial number.
To transfer a SolidNetWork License back to the server:
1. Start the SolidNetWork License Manager by doing one of the following:
• On Windows 7, click Start > All Programs > SOLIDWORKS version >SOLIDWORKS Tools version > SolidNetWork License Manager Serverversion.
• On Windows 10 and Windows Server 2016 or later, from the Windows Startmenu,click SOLIDWORKS Tools version > SolidNetWork License Manager Serverversion.
2. Under License Information, click Modify. The SOLIDWORKS Product Activationwizard starts.
66
Installing SOLIDWORKS PDM

3. UnderWhat would you like to do?, select Transfer a software license and thenclick Next.
4. Under How would you like to transfer?, select Automatically over the internet(recommended).
5. Under Contact Information, specify an email contact address.6. Click Next. The product license transfer completes.
Installing Temporary LicensesYou can use the temporary "ANY" license temporarily when the original SolidNetWorkLicense is not available.
By installing the "ANY" license file, you agree to implement the traditional license onreceipt of a SolidNetWork license from Dassault Systèmes SolidWorks Corporation.Compliance with license restrictions still is required.
To install an "ANY" license:
1. If you are an existing SolidNetWork user, uninstall the SolidNetWork License Managerand delete the installation folder. For details, see Uninstalling the SolidNetWorkLicense Manager on page 66.
2. Install the SolidNetWork License Manager from SOLIDWORKS PDM installer.
You can also install the SolidNetWork License Manager from a stand-alone installer.For details, see Installing a SolidNetWork License Manager on page 62.
a) On the SOLIDWORKS SolidNetWork License Manager Setup page, enter theSolidNetWork License serial number and click Next.
b) Click Install.
3. Start the SolidNetWork License Manager (Start > SOLIDWORKS Tools version >SolidNetWork License Manager Server version).
4. If you are prompted to activate, click No.
The Server Administration tab of the SOLIDWORKS SolidNetWork License Managerappears.
5. Under Advanced Options, click Options.
The Advanced Options dialog box appears.
6. Under SolidNetWork Server License Mode, click Use a License File and click OK.
The Advanced Options dialog box closes.
7. Under License Information, click Modify.
The SolidNetWork License File Wizard appears.
8. Under Server Type, select Single and click Next.
67
Installing SOLIDWORKS PDM

9. When you see this message:Could not read the dongle ID number. Click Cancel.
The ID "ANY" appears automatically.
If your computer uses a firewall, you might have to make some additionalspecifications on this screen. For more information, see Using SolidNetWorkLicense Server with Firewalls on page 64.
10. Continue with the installation.
Troubleshooting SolidNetWork LicensesIf the SolidNetWork License Manager installation fails, check for these possibleexplanations.
Accessing the SolidNetWork License log filesWhen a license error occurs, the answer often appears in theSNL_Manager_install_dir\lmgrd.log file.
Could not obtain a license for SOLIDWORKS PDM or Cannot connect tolicense serverTypically, these problems are caused by port settings.
• Port settings between the SolidNetWork License Manager and the license client mightnot match.
• Additional port settings for multiple versions of SolidNetWork License Managers mightnot have been specified.
• Check that the client machine can accurately resolve and route to the server, giventhe server name. Also, check that the server can accurately resolve and route to theclient, given the client machine name.
• Check that the port number in the log file under Server Administration tab is correct.• Check that the firewall on the SolidNetWork License server does not block the portaccess.
When a log error occurs, you can check the Log File in the Administration tool.
Licensing
License TypesSOLIDWORKS PDM uses floating client licenses. When you log in to a vault, the licenseinstalled on your system is taken from a pool of licenses that are managed by the
68
Installing SOLIDWORKS PDM

SolidNetWork License Server. When you log out or exit SOLIDWORKS PDM, the licenseis returned to the pool and can be used by another client.
Licenses for SOLIDWORKS PDM Professional
License Types IncludedLicense
Editor: Supports working with all file types, includingenhanced management and previewing of CAD formatssuch as SOLIDWORKS. CAD add-ins allow users toaccess SOLIDWORKS PDM Professional functionalityfrom within the CAD application.
Web: Remote users can use the WEB client to searchthe vault and perform basic functions to enable remotework processes.
SOLIDWORKS PDM ProfessionalCAD Editor & Web
Contributor: Users on a local area network (LAN), widearea network (WAN or virtual private network (VPN)can perform the same functions as with the Editorlicense type, except that CAD add-ins are not enabled.Web: Remote users can use the WEB client to searchthe vault and perform basic functions to enable remotework processes.
SOLIDWORKS PDM ProfessionalContributor & Web
Allows read-only access to vaults. Users cannot add ormodify (check out, check in, update values) files oruse CAD add-ins.
SOLIDWORKS PDM ProfessionalViewer
Licenses for SOLIDWORKS PDM Standard
License Types IncludedLicense
Supports working with SOLIDWORKS, DWG/DXFformat, Microsoft Word, and Microsoft Excel files. Allfile formats that Office plug-in handles behave in thesame way in SOLIDWORKS PDM Standard exceptPreview.
SOLIDWORKS PDM StandardCAD Editor
Supports working with SOLIDWORKS, DWG/DXFformat, Microsoft Word, and Microsoft Excel files.
SOLIDWORKS PDM StandardContributor
Allows read-only access to file vaults; user cannot addor modify (check out, check in, update values) files.
SOLIDWORKS PDM StandardViewer
69
Installing SOLIDWORKS PDM

Changing the Client License TypeYou select the client license type during installation.
Pre-requisites:
• To change the license type, you must have local administrative permissions to Windows.• For clients installed from an administrative image (via active directory deployment ora similar scripted install), you must reinstall the client using another administrativeimage of the specified client type.
You can change the license type by:
• Using Control Panel > Programs > Uninstall a program to remove SOLIDWORKSPDM and then reinstalling.
• Opening the Uninstall or change a program dialog box, and selecting SOLIDWORKSPDM Client > Change. In the SOLIDWORKS PDM Installation Wizard, select Modify.
In the Uninstall or change a program dialog box, SOLIDWORKS PDM Client orSOLIDWORKS PDM Server is listed if you have installed SOLIDWORKS PDM usingMSIs. You must modify SOLIDWORKS installation if you have installed SOLIDWORKSPDM using SLDIM.
• Using the About SOLIDWORKS PDM dialog box.
To change the client license type from the About SOLIDWORKS PDM dialog box:
1. Click Help > SOLIDWORKS PDM Administration.2. Use the Client type drop-down list to select a different client license type.3. Click OK.4. When instructed to restart your computer, click OK.5. Restart your computer.
Depending on the license type that was used when the client was installed, changingto the CAD Editor license type from the About SOLIDWORKS PDM dialog box might notenable the CAD Add-in. If it does not, remove SOLIDWORKS PDM as described aboveand select SOLIDWORKS PDM CAD Editor when you reinstall.
Viewing Version Information for Non-client SystemsTo find the version of SOLIDWORKS PDM software on a server that does nothave a client installed:
1. Open the Control Panel > Programs > Uninstall a program.2. Click SOLIDWORKS PDM Server .
The Version column displays the currently installed version.
Viewing Version Information for Client SystemsTo find the version of SOLIDWORKS PDM software on a client:
1. Log in to the SOLIDWORKS PDM Administration tool.
70
Installing SOLIDWORKS PDM

2. Click Help > SOLIDWORKS PDM Administration.3. View the Client version and click OK.
Adding and Modifying SolidNetWork License ServerTo log in to a vault from a SOLIDWORKS PDM client, a license that matches the installedlicense type and version must be available. The license is retrieved from the SolidNetWorkLicense server that is defined in the license setting. To add or modify SolidNetWork Licenseserver, you use the Set License dialog box available from the Administration tool.
To add or modify license server:
1. Open the Administration tool by doing one of the following:
• On Windows 7, click Start > All Programs > SOLIDWORKS PDM >Administration.
• On Windows 10 and Windows Server 2016 or later, from the Windows Startmenu,click SOLIDWORKS PDM > Administration.
2. Create a file vault or expand the existing file vault.3. Right-click the License node and select Open.4. On the Server List tab, click Add.5. Enter the SolidNetWork License Manager's address in the form: port@SNLServerName
The default port number is 25734. You can enter either the host name or IP addressof the SolidNetWork License server for SNLServerName. Ensure that all clients areable to connect to the server by IP address or host name.
6. Click OK.7. Click the License Usage tab to ensure that SOLIDWORKS PDM licenses are available.8. Click OK.
Set License Dialog BoxUse the Set License dialog box to add or modify license servers. To log in to a vault froma SOLIDWORKS PDM client, a license that matches the currently installed license typeand version must be available.
To open this dialog box, do one of the following:
• Double-click License.• Right-click License and select Open.
Server
Lists the SolidNetWork License servers.For example, Port@SNLServerName
Server List
Lets you add license servers.Add
Lets you remove selected license servers.Remove
71
Installing SOLIDWORKS PDM

License Usage
Lets you select the SolidNetWork License server.Server
Lets you select the SOLIDWORKS PDM license type to viewlicense details.
See License Types on page 68.
Product
Shows total number of licenses.Total licenses
Shows number of available licenses.Free licenses
Shows details of used licenses.Licenses used by
Installing SOLIDWORKS PDM Web2 (ForSOLIDWORKS PDM Professional only)
Web2 lets users connect to SOLIDWORKS PDM Professional vault from the most deviceswith an Internet browser. Web2 client is beneficial for external and internal users whoare not connected to their office network or have an unsupported operating system.
Before Installing Web2The following components must be installed to install Web2:
• Microsoft .NET 4• Microsoft Internet Information Services 7 or higher versions (IIS)
You must install the SOLIDWORKS PDM client and create the local vault view thatis accessed by Web2 on the server running IIS.
• Windows Server 2016 or higher operating systems• Microsoft Visual C++ 2013 runtime
Installing Microsoft .NET Framework 4.0For details to install Microsoft .NET Framework 4.0, seehttp://www.microsoft.com/en-us/download/details.aspx?id=17718.
Enabling Microsoft IIS on Windows 7
Microsoft Windows 7 is not recommended for running SOLIDWORKS PDM Web2 in aproduction environment.
72
Installing SOLIDWORKS PDM

To enable Microsoft IIS on Windows 7:
1. In Windows, open Control Panel > Programs > Programs and Features > TurnWindows features on or off.
2. In the dialog box, turn on Internet Information Services.3. Expand Web Management Tools and select IIS Management Console.4. Expand World Wide Web Services and select the following options:
OptionFolder
.NET Extensibility
ASP.NET
CGI
ISAPI Extensions
ISAPI Filters
Application DevelopmentFeatures
Static Content
Default Document
Directory Browsing
HTTP Errors
Common HTTP Features
5. Click OK.
Enabling Microsoft IIS on Windows 10
Recommendation: Do not use Microsoft Windows 10 for running SOLIDWORKS PDMWeb2 in a production environment.
To enable Microsoft IIS on Windows 10:
1. In Windows, open Control Panel > Programs > Programs and Features > TurnWindows features on or off.
2. In the dialog box, turn on Internet Information Services.3. Expand Web Management Tools and select IIS Management Console.
73
Installing SOLIDWORKS PDM

4. Expand World Wide Web Services and select the following options:
OptionFolder
.NET Extensibility 4.5
ASP.NET 4.5
ISAPI Extensions
ISAPI Filters
Server-Side Includes
Application DevelopmentFeatures
Static Content
Default Document
Directory Browsing
HTTP Errors
Common HTTP Features
HTTP LoggingHealth and Diagnostics
Static Content CompressionPerformance Features
Request FilteringSecurity
Enabling Microsoft IIS on Windows Server 2016To enable Microsoft IIS on Windows Server 2016:
1. From the Windows Start screen, type Server Manager.2. Click Server Manager.3. Select Manage > Add Roles and Features.
74
Installing SOLIDWORKS PDM

4. Complete the Add Roles and Features wizard:a) On the Select Server Roles screen, select Web Server (IIS) and click Next.b) If you are prompted to add the features required for IIS, click Add Required
Features. Otherwise, click Next.c) On the Features screen, click Next.d) On the Select Role Services screen, expandWeb Server and select the following
options. Select the other options only if required by other IIS applications.
OptionFolder
Default Document
Directory Browsing
HTTP Errors
Static Content
Common HTTP Features
HTTP LoggingRequest Monitor
Health and Diagnostics
Static Content CompressionPerformance
Request FilteringSecurity
.NET Extensibility 4.6 (and 3.5 if installed)
ASP
ASP.NET 4.6 (and 3.5 if installed)
CGI
ISAPI Extensions
ISAPI Filters
Application Development
IIS Management ConsoleManagement Tools
5. Complete the wizard and click Install.6. Click Close.7. Exit the Server Manager.
Registering ASP .Net 4You must register ASP .Net 4 and make it available to the IIS server if you are runningIIS on Windows 7.
To register ASP .Net 4:
1. In Windows File Explorer, browse to C:\Windows\Microsoft.NET\Framework64and verify the name of the .NET 4.0 framework folder.
75
Installing SOLIDWORKS PDM

2. In the Windows Start menu, type cmd, right-click cmd.exe, and select Run asadministrator.
3. Type cd C:\Windows\Microsoft.NET\Framework64\v4.0.30319.4. Type aspnet_regiis –iru.5. Close the command prompt when it displays Finished installing ASP.Net.
Performing the Web2 Server InstallationTo perform the Web2 server installation:
1. Log on to the IIS system as a user with local administrative rights.2. Browse to the installation media.3. In the SWPDMServer folder, run \SWPDMServer\setup.exe.4. Follow the instructions on the installation screens until you get to the Select PDM
Product screen.5. On the Select PDM Product screen, select SOLIDWORKS PDM Professional.6. On the Server Installation screen, select Web2 Server and Client.
• The Web2 server requires a client be installed on the same machine.• The client type must be a Contributor or CAD Editor if files are to be edited oradded via Web2. If Web2 users are limited to Viewer functions only, a Viewerclient must be installed or enabled on the server (regardless of the license typethey choose on the log in screen).
• You can install multiple server components on the same system.
7. On the Ready to Install the Program screen, click Install.8. On the InstallShield Wizard Completed screen, click Finish.
Creating a Vault View on the IIS Server Running Web2You can create a local file vault view to the file vault that is accessible by the Web2 server.
• Ensure that the view is created as a Shared view for all users.• Later in this process, you define a Windows user as an application pool identity. Thisuser must have browsed into the vault view and right-clicked a file or a folder at leastonce to ensure add-ins and registry settings are properly registered.
If the vault is using a Windows login, you must disable Automatic login to the vault viewon the Web2 server by doing the following:
1. Start the SOLIDWORKS PDM Administration tool.2. In the left pane, expand Local Settings > Settings.3. In the Automatic Login tab, select the vault that is accessed by Web2 from the Vault
list.4. Turn off Use server default and Use automatic login for this vault.5. Click OK.
76
Installing SOLIDWORKS PDM

Configuring SOLIDWORKS PDM Web2You can configure SOLIDWORKS PDM Web2 by accessing the Application Settings functionin the IIS Manager or by editing the Web.config file that is located atinetpub\wwwroot\SOLIDWORKSPDM\Web2.
Editing the Web.config FileTo access the file vaults for which you have created local file vault views on the IIS server,you must update the VaultName and VisibleVaults keys in the Web.config file.
You can edit the XML-based Web.config file using Notepad or any XML editing application.
Ensure that the Web.config file is not read-only. When you edit Web.config file,ensure to include values inside double quotes.
1. Open Web.config in the XML editing application.2. Add the primary vault name that you want to access via Web2 to the VaultName key.
For example:
<add key="VaultName" value="PDM_Pro_Vault">
This name is case-sensitive.
3. Optional: To access multiple vaults, enter their names separated by ¦ forVisibleVaults.
<add key="VisibleVaults" value="PDM_Test|PDM_Pro_Vault" />
77
Installing SOLIDWORKS PDM

4. Optional: To control download permissions for users and groups, add and configurethe following settings into the <configuration> node of the Web.config file.
<vaultSettings><vault name="EPDM" defaultDelimiter="|" denyDownloadGroups="">
<user name="admin" denyDownload="false"/></vault>
</vaultSettings>
DescriptionVault setting
The name of the vault. Create a separate<vaultSettings> section for each vault that needsdownload permissions controlled.
name
The delimiter used to separate group names in thedenyDownloadGroups setting. The default delimiter is |.
defaultDelimiter
The groups that can have download denied in the specifiedvault. Group names can be separated by the delimiterspecified in the defaultDelimiter setting.
denyDownloadGroups
DescriptionUser setting
The login name of the user. Create a separate <user>node for each user.
name
The setting to deny or allow download for the specifieduser. If set to false, the groups can download the files.If set to true, the groups cannot download the files.
denyDownload
5. Optional: To change the default login license type to Viewer, setDefaultLicenseType to "Viewer".
<add key="DefaultLicenseType" value="Viewer"></add>
Configuring Microsoft IIS1. In the Windows Start menu, type IIS to open Internet Information Services (IIS)
Manager.2. In the left pane, expand the computer name, select Application Pools.3. Right-click SOLIDWORKS PDM Web2 > Advanced Settings.4. Ensure that Load User Profile is set to True.
78
Installing SOLIDWORKS PDM

5. In the Advanced Settings dialog box, click the button to set the Identity.a) In the Application Pool Identity dialog box, select Custom account and click Set.b) In the Set Credentials dialog box, type windows credentials of the user that has
currently logged into windows or a user that has logged into the IIS system,browsed the file vault, and clicked a folder at least once.
c) Click OK thrice.
If the password for this user changes, the application pool stops working until theuser updates the password.
Ensure that the custom account user is a member of the IIS_IUSRS group:Right-click Computer > Manage > Local Users and Groups > Groups >IIS_IUSRS.
Ensure that the custom account user is a member of the local Administratorsgroup.
When you upgrade SOLIDWORKS PDM Web2 server, you must configure MicrosoftIIS to modify the application pool, SOLIDWORKS PDM Web2.
Accessing Web2You can access Web2 on a computer or on a mobile device.
Type the following URL into the address field of a web browser:
http://ComputerName/SOLIDWORKSPDM
If the Web2 login page is not displayed, ensure that the Windows firewall on the IISserver allows access over port 80 and the IIS server service is started.
Creating a New Web2 ApplicationWhen you install the Web2 server, a Web2 application named SOLIDWORKSPDM isautomatically created under the default web site.
To create a new Web2 application:
1. Open the Internet Information Services (IIS) Manager.2. In the left pane, expand the computer name and expand Sites.3. Right-click Default Web Site and select Add Application.4. In the Alias field, type a name.
This alias is a part of the connection address to the Web2 application i.e.http://ComputerName/applicationalias.
5. Click Select and choose SOLIDWORKS PDM Web2 for Application pool.6. For Physical path, browse to inetpub\wwwroot\SOLIDWORKSPDM\Web2.
79
Installing SOLIDWORKS PDM

7. Click OK twice.If you want to create separate Web2 URL addresses to access different vaults youcan copy the inetpub\wwwroot\SOLIDWORKSPDM\Web2 and point the new applicationphysical path to this copy. Update the Web.config in the copied folder with the vaultname to access.
80
Installing SOLIDWORKS PDM

Settings in the Application Settings Dialog BoxYou can configure SOLIDWORKS PDM Professional by accessing the Application Settingsfunction in the IIS Manager or by editing the Web.config file located in the applicationfiles.
Default ValueTypeSetting
TrueTrue/FalseAllowDataCardEdit
TrueTrue/FalseAllowLicenseChange
TrueTrue/FalseClientValidationEnabled
ExplorerTextColumnSetName
MM/dd/yyTextDateFormat
enTextDefaultLanguage
WebTextDefaultLicenseType
*TextEditableDataCardVariables
\Content\Uploads\TextFileUploadPath
FalseTrue/FalseFreeSearch
TrueTrue/FalseOnlySearchLatestVersion
30NumberPreviewGenerationTimeOut
7NumberRememberMe_Days
TrueTrue/FalseRememberMe_Visible
Comment|DescriptionSeparated text listSearchDataCardVariables
TrueTrue/FalseUnobtrusiveJavaScriptEnabled
SWPDMTextVaultName
SWPDM_Test|SWPDMSeparated text listVisibleVaults
81
Installing SOLIDWORKS PDM

Default ValueTypeSetting
webpages:Version 1.0.0.0Number string
Variables in the Application Settings Dialog Box
DescriptionVariable
If you set this variable to True, you can edit the valueof data fields with checkout permissions assigned. Usethis setting with the EditableDataCardVariablessetting that controls variables to be edited.
SOLIDWORKS PDM Web2 does not automaticallyupdate all configuration values. Variable values thatare set using transition actions update allconfigurations as specified.
AllowDataCardEdit
If this variable is set to True, you can change thelicense type to use either theWeb or Viewer license.If this variable is set to False, you can use only thelicense type specified by the DefaultLicenseTypesetting.
AllowLicenseChange
Do not change.ClientValidationEnabled
SOLIDWORKS PDMWeb2 displays the custom columnset that is defined in your vault. You can display onlyone-column set and it is the same for all users.
Custom column sets that have columns defined asName, Checked Out, Size, State, Modified, andVersion are not supported because these namesare reserved for default Web2 columns.
ColumnSetName
DateFormat
82
Installing SOLIDWORKS PDM

DescriptionVariable
Controls the display of date fields in SOLIDWORKSPDM Web2. You can set the date using differentdelimiters. Various options for displaying date fields:
"M">1-12, "MM">01-12,"MMM">Dec, "MMMM">December
"MB"Month
"d">1-31, "dd">01-31,"ddd">Sat, "dddd">Saturday
"d"Day
"y">0-99, "yy">00-99,"yyyy">0000-9999
"y"Year
Examples:• "MM/dd/yy">06/07/09• "dddd, MMMM-d, yyyy">Sunday, June-7,
2009
Sets the default language, en, that appears in the firstlogin. You can change the language from the Web2user interface.
The Web2 user interface displays thechanged language until you clear internetcookies.
The language codes used for this setting are:
esSpanishenEnglish
itItalianfrFrench
koKoreanjaJapanese
plPolishdeGerman
ptPortuguesezhsChinesesimplified
ruRussianzhtChinesetraditional
trTurkishcsCzech
DefaultLanguage
DefaultLicenseType
83
Installing SOLIDWORKS PDM

DescriptionVariable
Sets the default license type for all users on the Web2login page. You can set the license type as Web orViewer.
If AllowDataCardEdit is set to True, this settingcontrols variables to be edited. The default value is *that lets you edit all non-read-only variables. Separatemultiple values with | . For example, to editDescription and Number, enter”Description|Number”.
EditableDataCardVariables
When you upload new files or create new versions,SOLIDWORKS PDM Web2 copies the files to theUploads folder. The full path to this folder dependson the location of Web2 application files. For example,if the Web2 application files are located in C:\ProgramFiles\SOLIDWORKS Corp\SOLIDWORKS PDM\Web2then the path to the Uploads folder would beC:\Program Files\SOLIDWORKS Corp\SOLIDWORKSPDM\Web2\Content\Uploads.
FileUploadPath
Enables SOLIDWORKS PDM Web2 to search all fileand folder names, variable values, configurationnames, comments, and labels.
FreeSearch
When this option is set to True, the search findsvalues only in the latest versions.
OnlySearchLatestVersion
Controls how long the preview converter waits (inseconds) before ending the conversion operation. Theminimum value for this setting is 30 seconds (with nolimit on the maximum value). Large files and files withcomplex formatting or graphics take longer for theconversion process.
Time out errors in the file preview page indicate thatthe conversion time required for a file exceeds thisvalue. Increasing the timeout value allows theconverter more time to complete the longer-runningconversions.
PreviewGenerationTimeOut
Sets the number of days the system remembers userlogin information for the vault name, license type,and user name.
RememberMe_Days
Controls the display of the Remember me check boxon the log in screen.
RememberMe_Visible
SearchDataCardVariables
84
Installing SOLIDWORKS PDM

DescriptionVariable
If you set FreeSearch to False, SOLIDWORKS PDMWeb2 searches on file names, folder names, andvariable names entered. Separate variable names with|. The search box in the user interface displays:
• Free Search if it is set to True.• File/Folder name, variable1, variable2, if FreeSearch is set to False.
Do not change.UnobtrusiveJavaScriptEnabled
Specifies the vault name that SOLIDWORKS PDMWeb2 connects to and displays it in the login screen.If you want to access only a single vault, clear valuesin the VisibleVaults setting.
VaultName
Lists all vaults that appear in the vault selection liston the login page. Separate the vault names by |.
VisibleVaults
Do not change.webpages:Version
Variable Name and Variable Value Alias SettingsIf a vault contains variable names that are not user friendly, you can set alias’ so thatthe names that appear on the data card preview are meaningful.
For example: If a vault contains the variable, PAR_NUM, that holds a part number value,it is meaningful to display the variable as Part Number on the data card preview. Youcan set this in the property name alias setting.
The data card Preview page displays the variables and their values in list form. It doesnot display the data card as it appears in the thick clients or the existing web client,so any formatting, pictures, labels, and other card controls are not supported.
You can also specify an alias for the variable value. For example: If a text type variableis connected to a check box control that displays whether the file is a spare part or not,the values in SOLIDWORKS PDM Web2 appear as 1 or 0 depending on the check boxselected or cleared. You can set the variable value to display Yes or No via the transformalias value settings.
Setting Variable Name Alias1. Open the Web.config file in either Notepad or an XML editing program.<!-- Section
used to handle property alias and value mappings --><propertySettings> <property name="SPARE_PART" alias="Spare part"><transform value="1" alias="Yes" /> <transform value="" alias="No"/> </property> </propertySettings>
85
Installing SOLIDWORKS PDM

2. Scroll down to the propertySettings section.3. Enter the following:
ExampleActionAttribute
name="SPARE_PART"Actual variable namename
alias="Spare part"Desired variable namealias
4. To set alias' for variable values, enter the actual values in the transform valueattribute.This step is optional. You can delete the transform lines if the variable values do notneed alias'.
Desired ValueValueAlias
alias="Yes""1"value
alias="No"""value
Setting Up a Secured Connection for Web2You must set up a secured connection for Web2 using HTTPS.
To set up a secured connection:
1. On Windows 10 and Windows Server 2016 or later, open the Internet InformationServices (IIS) Manager.
2. In the left pane, expand the computer name and expand Sites.3. Right-click Default Web Site and select Edit Bindings.4. In the Site Bindings dialog box, click Add.5. In the Add Site Binding dialog box, Select Type as https.6. Select IP address.7. Enter the Port and the Host name. The default port number is 443.8. Under SSL certificate, click Select.9. You can search for the certificate and then select it.10. Click OK.11. Optional: Click View to display the Certificate dialog box that has details of the
selected certificate.12. Click OK.13. Click Close.
86
Installing SOLIDWORKS PDM

System MaintenanceYou should monitor and empty two folders periodically for disk space availability.
The folders to be monitored are:
Uploads: The folder in which the system adds files that are uploaded before they arecopied into the vault.
tempFiles: The folder that is located under the Content folder in the application filelocation and used for previewing purposes.
Installing SOLIDWORKS PDM Web API Server(For SOLIDWORKS PDM Professional Only)
EXALEAD® OnePart users can use Web API server to index and retrieve SOLIDWORKSPDM data.
They can install the Web API server on the same computer with other SOLIDWORKS PDMserver components or separately on another computer.
Before Installing the Web API ServerYou must install and enable Microsoft Internet Information Services 7 or higher versions(IIS).
Performing the Web API Server InstallationTo perform the Web API server installation:
1. Log on to the IIS system as a user with local administrative rights.2. Browse to the installation media.3. Run \SWPDMServer\setup.exe to start the server install.4. Follow the instructions on the installation screens until you get to the Select PDM
Product screen.5. On the Select PDM Product screen, select SOLIDWORKS PDM Professional.6. On the Server Installation screen, select Web API Server.
You can install multiple server components on the same system.
7. Optional: Specify a value for HTTP port number that is between 0 and 65535. Thedefault value is 65453.
8. On the Ready to Install the Program screen, click Install.9. On the InstallShield Wizard Completed screen, click Finish.
The Web API server components are installed in the IIS directory.
87
Installing SOLIDWORKS PDM

Installing the SOLIDWORKS PDM ClientFor a system to work with a SOLIDWORKS PDM file vault, it must have the SOLIDWORKSPDM client installed.
The following types of SOLIDWORKS PDM Professional client are available:
Supports working with all file types, including enhancedmanagement and previewing of many CAD formats such as
SOLIDWORKS PDMProfessional CAD Editor& Web SOLIDWORKS, AutoCAD, Inventor, SolidEdge, and
Pro/ENGINEER. Should be used on any system working withCAD files.
To work with Pro/ENGINEER files, install the Pro/ENGINEERCAD add-in after installing the SOLIDWORKS PDMProfessional client. The Pro/ENGINEER connector requiresseparate installation media. Contact your SOLIDWORKSValue Added Reseller for more information.
Includes support for SOLIDWORKS PDM Web client access.
Supports working with all file types, including CAD files.However, CAD add-ins are not supported on this client type.
SOLIDWORKS PDMProfessionalContributor & Web Includes support for SOLIDWORKS PDM Web client access.
Allows read-only access to file vaults; user cannot add ormodify (check out, check in, update values) any files. CADadd-ins are not supported on this client type.
SOLIDWORKS PDMProfessionalProfessional Viewer
The following types of SOLIDWORKS PDM Standard client are available:
Supports working with SOLIDWORKS, DWG/DXF format,and Microsoft Word, and Microsoft Excel files. All file
SOLIDWORKS PDMStandard CAD Editor
formats that Office plug-in handles behave in the sameway in SOLIDWORKS PDM Standard except Preview.
Supports working with SOLIDWORKS, DWG/DXF format,and Microsoft Word, and Microsoft Excel files.
SOLIDWORKS PDMStandard Contributor
Allows read-only access to file vaults; user cannot addor modify (check out, check in, update values) files.
SOLIDWORKS PDMStandard Viewer
You can install clients:
• By using the InstallShield Wizard.• By using the SOLIDWORKS Installation Manager.• By creating an administrative deployment image to install multiple seats.
Before Installing Clients• Find out the type of client your license agreement entitles you to use.
The floating license manager in SOLIDWORKS PDM prevents logging into a file vaultif the wrong client type is installed.
88
Installing SOLIDWORKS PDM

• If you are installing the SOLIDWORKS PDM Editor Client, you can install optionaladd-ins.
Add-ins make version management features such as check out, check in, and getavailable from menus and toolbars within your CAD and Office software. They areoptional and do not affect which file formats can be managed by SOLIDWORKS PDMusing the Windows File Explorer interface or file open/save dialogs.
SOLIDWORKS PDM Standard provides DraftSight add-in and SOLIDWORKS add-in.
• To log in to the Professional vault, you must have SOLIDWORKS PDM Professionallicense available on the license server. Similarly, to log in to the Standard vault, youmust have SOLIDWORKS PDM Standard license available on the license server.
To install both client and server components, ensure to select Client option in theserver installation.
The following product-specific prerequisites apply:
You can manage SOLIDWORKS files without havingSOLIDWORKS installed. It is recommended to have theeDrawings viewer installed for previewing.
SOLIDWORKS
To manage Inventor files (add, check out, check in,preview, etc.), the client system must have either the full
Autodesk Inventor (ForSOLIDWORKS PDMProfessional only) Autodesk Inventor application or the Inventor Design
Assistant software installed. For previewing Inventor files,Inventor View should be installed.
AutoCAD does not have to be installed to manageDWG/DXF format files. It is recommended to have the
Autodesk AutoCAD (ForSOLIDWORKS PDMProfessional only) eDrawings or DWG TrueView application installed for
previewing DWG files and the DWF viewer for previewingDWF files.
You can install Microsoft Office Add-in when you installSOLIDWORKS PDM Professional. You do not need
Microsoft OfficeIntegration (For
additional licenses to use the Microsoft Office Add-in butSOLIDWORKS PDMProfessional only) must have a Contributor, CAD Editor, or PSL license to
check files out and in.
SOLIDWORKS PDM Professional requires the full SolidEdge application installed for managing and previewingSolid Edge files.
Solid Edge (ForSOLIDWORKS PDMProfessional only)
SOLIDWORKS PDM Professional requires the fullPro/ENGINEER application installed for managing andpreviewing Pro/ENGINEER files.
The Pro/ENGINEER Connector requires a separateinstallation after the SOLIDWORKS client installation.The software can be obtained from your SOLIDWORKSValue Added Reseller.
Pro/ENGINEER (ForSOLIDWORKS PDMProfessional only)
These requirements apply to installations performed from the SOLIDWORKS PDM mediaor from an administrative image.
89
Installing SOLIDWORKS PDM

Installing Clients Using the Installation Wizard1. Log on to the client computer as a user with local administrative rights.2. Begin the installation, as described in Initiating the Installation via the
InstallShield Wizard on page 50.
90
Installing SOLIDWORKS PDM

3. Complete the installation using the following instructions:
ActionScreen
Select the type of client to install:Select PDM Product• SOLIDWORKS PDM Professional: Select ifyou connect to SOLIDWORKS PDM Professionalserver only.
To install the client with Item Explorer, selectCustomize and click Next.
• SOLIDWORKS PDM Standard: Select if youconnect to SOLIDWORKS PDM Standard serveronly.
Select Item Explorer and click Next.
This option is available for SOLIDWORKS PDMProfessional only.
Custom Setup
Choose Product Type a. Select the type of client to install, based onyour license:
• SOLIDWORKS PDM CAD Editor• SOLIDWORKS PDM Contributor• SOLIDWORKS PDM Viewer
b. Click Next.
If the product type is SOLIDWORKS PDM CADEditor,
Select Add-Ins
a. You can select:
• Microsoft Office Integration,SOLIDWORKS , DraftSight, Inventor,and AutoCAD add-ins for SOLIDWORKSPDM Professional client.
• SOLIDWORKS and DraftSight add-insfor SOLIDWORKS PDM Standard client.
b. Click Next.
Click Install.Ready to Install the Program
Click Finish.InstallShield Wizard Completed
91
Installing SOLIDWORKS PDM

Installing eDrawingsYou can install eDrawings on the SOLIDWORKS PDM client to preview SOLIDWORKS files.eDrawings® is also available as a free download.
To install eDrawings:
1. Browse to the installation media.2. Run \eDrawings\setup.exe.3. Click Next.4. Do not enter the license keys and click Next.
eDrawings runs as a Professional license if it is installed on a SOLIDWORKS PDMProfessional client.
5. Click Install.The installation continues.
6. Click Finish after the installation is complete.
Upgrading the SOLIDWORKS PDM Standard Client/Serverto Professional
If you have installed the Standard client/server via InstallShield Wizard, perform thefollowing steps.
To upgrade:
1. In Windows, open Control Panel > Programs and Features.2. Right-click SOLIDWORKS PDM Client or SOLIDWORKS PDM Server and select
Change.If you have installed the client via SLDIM, modify the SOLIDWORKS installation toupgrade the client install.
3. On the Welcome screen, click Next.4. On the Program Maintenance screen, click Modify.5. On Select PDM Product screen, select SOLIDWORKS PDM Professional.6. Continue with the installation of SOLIDWORKS PDM Professional.
If you have installed the Standard client/server via SLDIM, modify SOLIDWORKS2016 listed under Programs and Features for an upgrade.
Enabling Logging to Troubleshoot InstallationAn installation log is useful when troubleshooting a failing installation.
1. Open a command prompt.2. Change directory to the appropriate setup folder where the msi files are loaded.
92
Installing SOLIDWORKS PDM

3. Type the appropriate command to start a logged installation:
• For client:
MSIEXEC /i "SOLIDWORKS PDM Client.msi" /L*v C:\LOGFILE.TXT
• For server:
MSIEXEC /i "SOLIDWORKS PDM Server.msi" /L*v C:\LOGFILE.TXT
An installation log is created with information about the installation.
Creating SOLIDWORKS PDM Client Administrative ImageAn administrative installation image lets you control the installation and upgrade of theclient on multiple client machines.
You can create one image for all client license types and select a script for a specific clienttype to install on a machine.
The installation wizard creates a setup package (SOLIDWORKS PDM Client.msi andrequired files) that you can distribute using Microsoft Active Directory or anotherdistribution method.
Keep a copy of the administration image, which includes all options you select, to makeit easier to uninstall when doing an upgrade.
To create an administrative image:
1. From the Windows Start menu, run command prompt.2. Change directory to the appropriate setup folder where the setup.exe is loaded.3. Add the command switch E:\SWPDMClient\setup.exe /a.
You can drag setup.exe on the command prompt and add the command switch.
4. Click OK.
93
Installing SOLIDWORKS PDM

5. Create the administrative image using these instructions:
ActionScreen
Click Next.Welcome
Read and accept the license agreement and clickNext.
License Agreement
Enter a location where the SOLIDWORKS PDMclient administrative image should be created.
If you plan to distribute this image, place it ona network resource that is available to all clientsystems.
Network Location
Click Install.Ready to Install the Program
Click Finish.InstallShield Wizard Completed
Deploying Clients Using Windows Active DirectoryBy using the Group Policy features of Windows Active Directory, you can centrally deploy,install, and manage SOLIDWORKS PDM clients throughout an organization.
You can also perform routine maintenance tasks such as upgrading, patching, andremoving clients from a central location, without going to individual workstations.
If you distribute the clients using an administrative image, you must deploy MicrosoftXML Core Services (MSXML) 6.0 and .Net Framework 4.0 to all clients.
For information on distributing MSXML and .Net Framework, seehttps://docs.microsoft.com/en-us/dotnet/framework/deployment/guide-for-administrators.
Only the SOLIDWORKS PDM client can be deployed using this method. Install the archiveserver and database server using the standard installation method.
Active Directory deployment considerations:
• Because SOLIDWORKS PDM is installed on a computer level, before any user has loggedon, the deployment package should be available (i.e. shared with sufficient accessrights) to all systems assigned for deployment.
• When you deploy a client, SOLIDWORKS PDM changes the default language thatmatches the locale of the machine. If the locale is not a supported language,SOLIDWORKS PDM sets the default language as English.
• Once deployed, you can add file vault views to the clients:
• Using a policy
For details, see Distributing the File Vault View Using Microsoft WindowsActive Directory on page 122.
• Using a scripted view installation
94
Installing SOLIDWORKS PDM

For details, see Scripting File Vault View Setup on page 121.
To deploy a client admin image using Windows Server 2016 Active Directory:
1. Create an administrative image (SOLIDWORKS PDM Client.msi) in a network locationthat is accessible by UNC path to all systems where SOLIDWORKS PDM should bedeployed.For details, see Creating SOLIDWORKS PDM Client Administrative Image onpage 93.
2. Open the Control Panel and click System and Security > Administrative Tools> Active Directory Users and Computers.
3. Create a security group, or use an existing security group.To create a security group:a) In the Active Directory User and Computers dialog box, right-click Users and
select New > Group.b) In the New Object - Group dialog box, type a Group name.c) Under Group type, select Security and click OK.
4. Add the computers where SOLIDWORKS PDM should be deployed.To add domain computers to the security group:a) Right-click the security group and select Properties.b) On the Members tab, click Add and add the computers.
5. Exit the Active Directory User and Computers dialog box.6. In the Control Panel, click System and Security > Administrative Tools > Group
Policy Management.7. In the Group Policy Management console, create a new group policy for the security
group you created in steps 3 and 4.8. Expand Group Policy Objects in the forest and domain that contains the new group
policy and select the group policy.9. In the right pane, on the Settings tab, right-click Computer Configuration and click
Edit.10. In the Group Policy Management Editor, navigate to Computer Configuration >
Policies > Software Settings > Software Installation.11. Right-click and select New > Package.12. Browse to the SOLIDWORKS PDM Client.msi file in the location where you created
the SOLIDWORKS PDM client administrative image.
You should browse to the location through My Network Places to use the UNCpath correctly. Do not use a mapped drive.
13. Click Open.14. In the Deploy Software dialog box, select Assigned and click OK.15. Select Advanced published or Assigned.
95
Installing SOLIDWORKS PDM

16. On the Modifications tabbed page, click Add to select one or more transforms tobe applied.Ensure that the transform files are available on a network drive that is accessible byremote computers, preferably where the source image is available.
You can use MSI tools, like Orca, to generate the transform files. For syntax, seeScripting a Silent Installation of SOLIDWORKS PDM.
17. Exit the Group Policy Management Editor and Group Policy Management console.
The client image is ready for deployment and will be installed to the computers in thesecurity group the next time the systems start up.
Enabling Logging When Deploying SOLIDWORKS PDMTo troubleshoot installation problems that occur when you deploy a SOLIDWORKS PDMclient administrative image using Windows Active Directory, you should enable loggingof the installation procedure. This is done through a Group Policy.
1. On the Active Directory server, locate the OU where the deployment package isassigned.
2. Right-click the OU, and select Properties.3. In the Properties dialog box, on the Group Policy tab, click New to add a new Group
Policy object. Name the policy (for example, Logging) and click OK.4. Select the new policy (or an existing deployment policy) and click Edit.5. In the Group Policy Object Editor, expand Computer Configuration >
Administrative Templates > Windows Components > Windows Installer.6. In the right pane, double-click the Logging setting.7. In the policy object’s Properties dialog box:
a) Enable the policy.b) In the Logging text box, type the full logging arguments:
iwearucmpvo
c) Click OK.
8. On the Group Policy tab, if you created a new group policy object, make sure thatthe new policy is listed at the top of the list.
When you deploy SOLIDWORKS PDM, an .msi installation log will be created in the Tempfolder under the Windows system folder.
Scripting a Silent Installation of SOLIDWORKS PDMYou can script the client installation from an administrative image (for example, to runthe installation from a .bat file).
To script a silent installation:
96
Installing SOLIDWORKS PDM

1. Create an administrative image for the client type you are installing to create theSOLIDWORKS PDM Client.msi installation package that is used in the followingcommands.For details, see Creating SOLIDWORKS PDM Client Administrative Image.
2. Update your installation script using the following command line options inSOLIDWORKS PDM Command-Line Properties.
Silent Installation Switches
DescriptionSwitch
No UI/qn
Basic UI/qb
Reduced UI with a modal dialog box displayed at the end of theinstallation
/qr
Full UI with a modal dialog box displayed at the end of theinstallation
/qf
No UI except for a modal dialog box displayed at the end of theinstallation
/qn+
Basic UI with a modal dialog box displayed at the end of theinstallation
/qb+
Basic UI with no modal dialog boxes/qb-
Do not prompt for rebootREBOOTYESNO=NO
Suppresses the prompt for reboot when used with REBOOTYESNO
If you upgrade a previous installation with this option, youmust perform a reboot at the end of the installation to reloadany replaced files that are in use.
REBOOT=REALLYSUPPRESS
Excludes a feature from installingREMOVE=[string]
SOLIDWORKS PDM Command-Line Properties
DescriptionProperty
Installation directoryINSTALLDIR=[string]
97
Installing SOLIDWORKS PDM

DescriptionProperty
Client type• 0 = PDM Standard• 1 = PDM Professional
PDMTYPE=0, 1
{CC72DD26-1A34-4209-B50B-21C7DD5E29F6}SOLIDWORKSPDM Viewer
{E2BE88CF-6E17-43e2-A837-C1051F3E4EDB}SOLIDWORKSPDMContributor
{05AD35C4-8A9A-4114-B51F-32186222ABA1}SOLIDWORKSPDMCAD Editor
PTID=
ClientMain feature
OfficeOffice Add-in
SolidWorksSolidWorks Add-in
InsoViewerOracle Viewer
WebClientWeb Client helper
ItemExplorerItem Explorer
AutoCAD64Autocad Add-in(only support x64now)
InventorInventor Add-in
DraftSightDraftSight Add-in
SharedCommon files
Shared64Common Files 64-bit
ADDLOCAL=
98
Installing SOLIDWORKS PDM

DescriptionProperty
R17.0AutoCAD 2007
R17.1AutoCAD 2008
R17.2AutoCAD 2009
R18.0AutoCAD 2010
R18.1AutoCAD 2011
R18.2AutoCAD 2012
R19.0AutoCAD 2013
R19.1AutoCAD 2014
R20.0AutoCAD 2015
R20.1AutoCAD 2016
R21.0AutoCAD 2017
R22.0AutoCAD 2018
ACADVERSION64=
For more details, refer to the following sample scripts:
• SOLIDWORKS PDM Professional Viewer with no add-ins
Msiexec /I <path to SOLIDWORKS PDM Client.msi> INSTALLDIR="C:\ProgramFiles\SOLIDWORKS PDM" PDMTYPE=1PTID={CC72DD26-1A34-4209-B50B-21C7DD5E29F6}ADDLOCAL=Client,Shared,Shared64,WebClient,InsoViewer /qb
• SOLIDWORKS PDM Professional CAD Editor with SOLIDWORKS and Office Add-ins
Msiexec /I <path to SOLIDWORKS PDM Client.msi> INSTALLDIR="C:\ProgramFiles\SOLIDWORKS PDM" PDMTYPE=1PTID={05AD35C4-8A9A-4114-B51F-32186222ABA1}ADDLOCAL=Client,Shared,Shared64,WebClient,InsoViewer,SolidWorks,Office/qb
• SOLIDWORKS PDM Professional CAD Editor with SOLIDWORKS, Office, and AutoCAD2014 Add-in
Msiexec /I <path to SOLIDWORKS PDM Client.msi> INSTALLDIR="C:\ProgramFiles\SOLIDWORKS PDM" PDMTYPE=1PTID={05AD35C4-8A9A-4114-B51F-32186222ABA1}ADDLOCAL=Client,Shared,Shared64,WebClient,InsoViewer,SolidWorks,Office,AutoCAD64ACADVERSION=R19.1 /qb
• SOLIDWORKS PDM Standard CAD Editor with SOLIDWORKS Add-in
Msiexec /I <path to SOLIDWORKS PDM Client.msi> INSTALLDIR="C:\ProgramFiles\SOLIDWORKS PDM" PDMTYPE=0PTID={05AD35C4-8A9A-4114-B51F-32186222ABA1}ADDLOCAL=Client,Shared,Shared64,SolidWorks /qb
99
Installing SOLIDWORKS PDM

When scripting upgrades, the administrator must add REINSTALLMODE=vomusREINSTALL=ALL
100
Installing SOLIDWORKS PDM

6Using SOLIDWORKS InstallationManager
This chapter includes the following topics:
• SOLIDWORKS PDM• Listing of PDM Server Components• Understanding Differences between PDM Clients• Before Installing PDM Server• Installing a PDM Server with SLDIM• Installing a PDM Client with SLDIM
SOLIDWORKS Installation Manager (SLDIM) facilitates the installation of PDM servers andclient components. To configure and troubleshoot PDM components and SQL Server databasesrefer to advanced topics in other sections of this guide.
SOLIDWORKS PDMSOLIDWORKS PDM is a document management product based on the client/serverarchitecture known formerly as SOLIDWORKS Enterprise PDM.
SOLIDWORKS PDM is available in two types:
• SOLIDWORKS PDM Standard• SOLIDWORKS PDM Professional
SOLIDWORKS PDM uses a Microsoft SQL Server database to manage file vaults.
This table lists the database systems, server components, and client options availablefor each product type.
PDM ProfessionalPDM Standard
Large office networks,large numbers ofconcurrent users
Small to medium officenetworks, generally with lessthan 20 concurrent users.
Designed for
SQL Standard limits:Lesser of 4 sockets or 16cores, 128 GB of RAM, and524 PB database size
Lesser of 1 socket or 4 cores,1 GB of RAM, and 10 GBdatabase size
Limits
101

PDM ProfessionalPDM Standard
Microsoft SQL Server 2014Service Pack 3 or later, orpreviously installedinstances of Microsoft SQLServer 2014 Service Pack3 or later.
Microsoft SQL Server Express2014 Service Pack 3 or later(included and installed withSOLIDWORKS)
Database ManagementSystem
YesYesRequires SolidNetWorkLicense Manager?
YesYesIncludes Archive Server andDatabase Server?
YesNoIncludes SOLIDWORKS PDMWeb Server, Web2 Server,and Web API Server?
Native, browser-basedNativeClient types
SOLIDWORKS, DraftSight,Microsoft OfficeIntegration, AutodeskInventor, AutoCAD
SOLIDWORKS, DraftSightClient add-ins for CADEditors
DraftSight, Microsoft OfficeIntegration
DraftSightClient add-ins forContributors
Microsoft Office IntegrationClient add-ins for Viewers
Listing of PDM Server ComponentsThis table summarizes the server components of the SOLIDWORKS PDM Server.
InstallationFunctionServer
Can install with PDMStandard, or use a versionpreviously licensed andinstalled.
Manages data inSOLIDWORKS PDM datavaults.
Microsoft SQL Server Expressfor PDM Standard
Required. You can also usea version previously licensedand installed.
Manages data inSOLIDWORKS PDM datavaults.
Microsoft SQL Server forPDM Professional
102
Using SOLIDWORKS Installation Manager

InstallationFunctionServer
Must be installed before newvaults can be created.
Can be installed withSOLIDWORKS PDM servercomponents when usingSLDIM.
Manages SOLIDWORKS PDMlicenses.
SolidNetWork LicenseManager
Required. Install with PDMStandard or Professional.
Manages transfers of filesbetween clients and the filevault archive, and managesusers and their credentials.
Archive Server
Required. Install with PDMStandard or Professional.
Polls PDM databases forupdates, manages dataimport and export rules,manages the messagesystem, and schedulesreplication and cold storage.
Database Server
Optional. Install with PDMProfessional only.
Provides access to file vaultsover the internet frombrowser-based clients.
Web Server and Web2Server
Optional. Install with PDMProfessional only.
EXALEAD OnePart users canuse a Web API server toindex and retrieveSOLIDWORKS PDM data.
Web API Server
Archive servers run as services on the system account of the computers where they areinstalled. One archive server can host multiple file vaults on the same computer.
In a stand-alone installation, the archive server, database server, license server, and webAPI server, as well as the SQL Express or SQL Server database, can all be installed onthe same machine.
In a distributed environment, the server components can reside on different machines.Also, you can set up multiple archive servers on different computers to host replicatedcopies of the same file vault archive. See the SOLIDWORKS PDM Professional ReplicationGuide.
Understanding Differences between PDMClientsBefore installing the client software, you must determine what clients are neededdepending on your PDM environment.
This table summarizes the clients for SOLIDWORKS PDM Standard:
103
Using SOLIDWORKS Installation Manager

DescriptionStandard Client type
Supports working with SOLIDWORKS,DWG/DXF format, Microsoft Word, andMicrosoft Excel files. All file formats, thatOffice plug-in handles, behave in the sameway in SOLIDWORKS PDM Standard exceptPreview.
CAD Editor
Supports working with SOLIDWORKS,DWG/DXF format, Microsoft Word, andMicrosoft Excel files.
Contributor
Allows read-only access to file vaults. Usercan transition files through a workflow, butuser cannot add or modify (check out, checkin, update values) files.
Viewer
This table summarizes the clients for SOLIDWORKS PDM Professional:
DescriptionProfessional Client type
Supports working with all file types,including enhanced management andpreviewing of CAD formats such asSOLIDWORKS. CAD add-ins allow users toaccess SOLIDWORKS PDM Professional fromwithin the CAD application. Remote userscan search vaults and perform basicfunctions over the Internet using the Weband Web2 clients.
CAD Editor & Web
Supports working with all file types,including CAD files. However, the CADadd-ins are not supported on this clienttype. Remote users can search vaults andperform basic functions over the Internetusing the Web and Web2 clients.
Contributor & Web
Allows read-only access to file vaults. Usercan transition files through a workflow, usercannot add or modify (check out, check in,update values) files or use CAD add-ins.
Viewer
104
Using SOLIDWORKS Installation Manager

Before Installing PDM ServerKeep these requirements in mind before installing PDM server components:
• Obtain full administrative rights to the machines on which you are going to installservers and clients.
• Ensure that the database server has access to the archive server over TCP port 3030and to the SQL Server over TCP port 1433.
• If you are going to use an existing SQL Server Express or SQL Server database, obtainthe name of the SQL Server database and the account ID and password of a SQLServer administrator or database owner with read/write access to the database. Youcannot use the tew user.
• If a PDM client is already installed on the system, uninstall it. If you want the PDMServer and PDM Client on the same system, you can install them both from the Serverproducts page in the SOLIDWORKS Installation Manager.
Installing a PDM Server with SLDIMWhen you install the PDM Server for PDM Standard, you can install the archive server,the database server, and the PDM CAD Editor client on the same machine. You do notneed to run the client installation separately.
When installing the PDM Server for PDM Professional, you can include these components,and also the Web server, Web2 server, and Web API server.
To install a PDM Server and its components:
1. Start the SOLIDWORKS Installation Manager.2. On the Welcome page, select Server Products, and check the following:
• Install SOLIDWORKS PDM Server components on this computer.• Install SolidNetWork License Manager on this computer.
If the SolidNetWork License Manager is installed, this option does not display.
3. If the SolidNetwork License Manager Options page displays, enter a serial numberand specify a location for the directory, and click Next.
4. Follow instructions for system warnings and click Next.5. On the Summary page, for SOLIDWORKS PDM Server, click Change.
105
Using SOLIDWORKS Installation Manager

6. In the SOLIDWORKS PDM Server Options page:a) For Select Server Product, click SOLIDWORKS PDM Standard or
Professional.b) For Installation Location, click Browse to specify a file path.c) In Select Features:
1. Click Archive Server, Database Server, and Client to install thesecomponents on the same machine. If you are in a distributed environment,you can install the archive server and database server by running theInstallation Manager on another machine.
If a PDM client is already installed on the machine, you must cancel theinstallation and uninstall the client. You can then run the SLDIM to installthe PDM server with the client together.
2. If you are installing PDM Professional, you can also clickWeb server,Web2server, and Web API Server.
If you are installing Web API server, you can specify a value for HTTP portnumber that is between 0 and 65535. The default value is 65453.
d) In SQL Server, you can install a new instance of the database tools that comewith PDM Server (SQL Server Express for PDM Standard), or you can specify thedatabase name, username, and password of an existing instance.
A full edition of SQL Server must be installed for SOLIDWORKS PDM Professional.
e) Click Back to Summary.
7. On the Summary page, accept the terms of the SOLIDWORKS License Agreementand click Install Now.
When the SOLIDWORKS Installation Manager completes installing, the Archive ServerConfiguration Tool starts. Follow the prompts in the wizard to configure the archiveserver.
To set up, configure, and troubleshoot the archive server, database server, Web andWeb2 servers, and SQL Server databases, see the relevant topics in the SOLIDWORKSPDM 2020 Installation Guide.
Installing a PDM Client with SLDIMThe major version of the SOLIDWORKS PDM Client must match the major version of theSOLIDWORKS PDM Server. When you install or upgrade the SOLIDWORKS PDM Client,make sure the versions match.
To install a PDM Client:
1. Start the SOLIDWORKS Installation Manager.2. On the Welcome page, select Individual.
106
Using SOLIDWORKS Installation Manager

3. On the Serial Number page, click Next.
SOLIDWORKS PDM clients do not require a separate serial number.
4. Follow instructions for system warnings and click Next.5. On the Summary page, under Products, click Change.6. On the Product Selection page, click Select different packages or products.7. In the Select the package you want to show dialog box, select an edition of
SOLIDWORKS. Then click OK.8. On the Product Selection page, select SOLIDWORKS PDM Client. Then select
eDrawings to enable the PDM Preview functionality. If you are using SOLIDWORKSPDM Professional, you can also select Item Explorer.
9. On the Summary page, expand SOLIDWORKS PDM Options and click Change.10. On the SOLIDWORKS PDM Client Options page, select the following and click Back
to Summary:
• PDM product type• PDM client type• Add-ins
11. On the Summary page, accept the terms of the SOLIDWORKS License Agreementand click Install Now.
Administrators can also use the Administrative Image Option Editor to create and deployimages of PDM clients. For details, see Using Administrative Images in the SOLIDWORKSInstallation and Administration Guide.
107
Using SOLIDWORKS Installation Manager

7Creating and Distributing File VaultViews
This chapter includes the following topics:
• Vault Creation• Configuring the SolidNetWork License Server for the File Vault• Creating a File Vault View Using the View Setup Wizard• Distributing the File Vault View Using Microsoft Windows Active Directory• Distributing File Vault Views in a WAN Environment
SOLIDWORKS PDM file vaults store the files and information managed by SOLIDWORKS PDM.
To add a file to a file vault, you place it in a local file vault view, which is a working folderwhere all intermediate file modifications are performed.
The file vault view is directly connected to:
• The archive server, which stores the physical files in a file vault archive• The file vault database, which stores information about files and activities in the file vault
You can access files and information stored in a file vault only from a system with theSOLIDWORKS PDM client installed by logging in as a user with sufficient access rights.
Vault CreationUse the SOLIDWORKS PDM Administration tool to create the vault on the archive server.
PrerequisitesBefore creating a vault:
• Verify that all SOLIDWORKS PDM components have been installed.• Ensure the archive server is available.
If the archive server you want to use is on another system, you may need to add it.
The archive server may not be accessible if a firewall on the archive system is blockingTCP port 3030.
• If the SQL Server is on a different system than the archive server, ensure that it isavailable. It may not be accessible if a firewall is blocking port 1433.
108

If the SQL server is using a named instance or is SQL Server Express, the TCP portmay be set to a dynamic value instead of 1433. For details, see Configuring theSQL Server Express Instance to Listen to a Fixed TCP Port.
• Ensure you have sufficient access rights.
Your Windows user account must have Administrative access to the archive server. Ifyou create the vault on the same system as the archive server, the local administratorhas this access by default.
• Obtain SQL Server information.
You must know:
• The SQL server name.• Login information for a user with sufficient system administrator privileges to createa vault.
Adding an Archive ServerTo create a vault, you must be able to connect to an archive server. If an archive serveris installed but is not visible in the Administration tool, you can add it.
1. Start the Administration tool by doing one of the following:
• On Windows 7, click Start > All Programs > SOLIDWORKS PDM >Administration.
• On Windows 10 and Windows Server 2016 or later, from the Windows Startmenu,click SOLIDWORKS PDM > Administration.
2. Click File > Add Server.3. In the Add Server dialog box, for Server name, select or enter the server to add.
Use the server system name, not the IP address, unless the environment is configuredfor IP-only communication, as described in the Installation Guide.
When adding an archive server to a wide-area network (WAN), DNS can fail whenlooking up the IP address of the server host name. As a workaround, ensure that theclient can successfully ping the server by name. If the ping does not work, updatethe local HOSTS file.
For details, see Adding Archive Servers in a WAN Environment in the SOLIDWORKSPDM/SOLIDWORKS Manage Installation Guide.
4. Click OK.
109
Creating and Distributing File Vault Views

Logging In to an Archive ServerBefore creating a new vault, you may need to log in. If the logged in Windows user accounthas administrative access on the archive server, login is not required.
To log in to an archive server:
1. In the Login dialog box, enter the Windows user name and password of a user withaccess to vaults on the archive server.
• To add the archive server and list its vaults, log in as a user who is a member ofthe attach access list in the Archive Server Configuration tool.
• To perform administrative tasks such as creating, upgrading, or removing a vault,log in as a user with administrative access.
2. If the Login dialog box includes a Domain list, do one of the following:
• If you are using a local user account on the archive server, select the system namethat is followed by (local account).
• If you are using a domain account, select or type the correct domain.
3. Click Log In.
Creating a VaultTo create a vault:
1. Log in to a system where the SOLIDWORKS PDM client is installed.2. Start the Administration tool by doing one of the following:
• On Windows 7, from the Windows Start menu, select All Programs >SOLIDWORKS PDM > Administration.
• On Windows 10 and Windows Server 2016 or later, from the Windows Startmenu,select SOLIDWORKS PDM > Administration.
3. If the archive server you want to work with is not listed, add it as described in Addingan Archive Server on page 109.
4. In the left pane, right-click the archive server in which to create the vault, then selectCreate new vault.
If you are prompted to log in, see Logging In to an Archive Server.
110
Creating and Distributing File Vault Views

5. In the vault setup wizard:
ActionScreen
Click Next.Welcome
Select either SOLIDWORKS PDM Standard Vault orSOLIDWORKS PDM Professional Vault.
This screen appears only for SOLIDWORKS PDMProfessional.
Choose Vault Type
Type a name and description for the new vault.Choose vault name
Under Vault archive folder, select the archive folder to storethe vault archives.
The default archive folder is Archives.
Select vault archivefolder
The vault database contains information about files andactivities in the vault.Select or enter the SQL Server Express to host the vaultdatabase in Select database server.
A Standard vault database must be hosted on SQL ServerExpress.
Choose database
Type the Database name.
The SQL login dialog box appears in one of the followingcases:
• Stored SQL login has insufficient privileges• User is invalid on the SQL server• Username or password is incorrect
Specify a SQL user such as sa with sufficient permissions.
Enter the SolidNetWork License server address in the form:port@SNLServerName.
For SOLIDWORKS PDM Standard vault, add the server namethat has activated license for the Standard vault.
License Server forVault
For SOLIDWORKS PDM Professional vault, add the servername that has activated license for the Professional vault.
LanguageSelect the language to use in the vault.
Select regional settings
111
Creating and Distributing File Vault Views

ActionScreen
Do one of the following:• Select Use the default 'admin' password for thisarchive server.
The Admin user password defined during the archive serverinstallation is used for the vault's admin user.
• Clear the option to enter and confirm a password.
This login is set to the vault-specific admin login settingsfor the new vault.
Create the admin user
Do one of the following:• Use a configuration based on an administrativeexport file (*.cex)
Browse to a .cex file containing the settings to use for thevault, for example vault settings you have exported fromanother vault.
If you import a .cex file to use for a Standard vault,features specific to Standard get imported. Any featurethat contains elements that are not supported byStandard will not be imported.
• Use a predefined configuration
Select one:
Empty
Creates a data folder with no files, which makes it easierto import or create data cards, workflows, and so on.
Default
Installs the data set installed with previous versions ofSOLIDWORKS PDM.
Quick Start
Installs a simple data set, including predefined groups andpermissions, which enable companies installingSOLIDWORKS PDM for the first time to quickly use thesoftware in a production environment.
Configure vault
Your choice on the Configure vault screen determines whatis displayed on this screen.
Select configurationdetails
• If you chose to use a configuration based on anadministrative export file, this screen does not display.
112
Creating and Distributing File Vault Views

ActionScreen
• If you chose Empty, no data options are installed to thevault to make it easier to import custom .cex files youhave created.
• If you chose SOLIDWORKS Quick Start, the followingoptions, designed for an entry-level SOLIDWORKSimplementation, are installed:
Bills of Materials
• Standard Bill of Materials• Weldment Bill of Materials• Weldment Cut List
Cards
• Default Folder Card• SOLIDWORKS
Single card used for all SOLIDWORKS files.
Search Support
Displayed to users when they search the vault
• Complete File Search• Quick Start Search
• If you chose the Default option, the following options areavailable. Click an option name to display a description.
Add-ins• Dispatch (SOLIDWORKS PDM Professional)
The SWTaskAddin is added to the vault if you selectConvert and Print under Task Execution.
Bills of Materials• Standard Bill of Materials• Weldment Bill of Materials• Weldment Cut List
113
Creating and Distributing File Vault Views

ActionScreen
CardsFile and folder data cards for SOLIDWORKS PDM Professional:
• Adobe Acrobat• AutoCAD• Autodesk Inventor• Bitmap Images• CAL• Default Folder Card• Microsoft Office• MP3• Pro/ENGINEER
Pro/ENGINEER requires a separate Pro/ENGINEERConnector installation.
• Solid Edge• SOLIDWORKS• Text Files• XML
File and folder data cards for SOLIDWORKS PDM Standard:
• AutoCAD• Default Folder Card• Microsoft Office• SOLIDWORKS• Text Files
Items (SOLIDWORKS PDM Professional)• Support items
Support of items includes the item search cards.
Search SupportDisplayed to users when they search the vault
• Complete File Search
Only the items that are supported for Standard areavailable.
• User Search
114
Creating and Distributing File Vault Views

ActionScreen
Task Execution (Server-side Add-ins)Tasks available with the SWTaskAddin.dll
• Convert• Design Checker (SOLIDWORKS PDM Professional)• Print (SOLIDWORKS PDM Professional)
Review the vault parameters, then click Finish.Review Information
Click CloseCompleted
Configuring the SolidNetWork License Server forthe File Vault
You can configure the server for the file vault after you install the SolidNetWork LicenseManager and activate the license on the server.
You need to configure the license server only once since all SOLIDWORKS PDM vaultson the SQL server use the same SNL server.
1. Open the Administration tool by doing one of the following:
• On Windows 7, click Start > All Programs > SOLIDWORKS PDM >Administration.
• On Windows 10 and Windows Server 2016 or later, from the Windows Startmenu,click SOLIDWORKS PDM > Administration.
2. Create a file vault or expand the existing file vault.3. Right-click the License node and select Open.4. On the Server List tab, click Add.5. Enter the SolidNetWork License Manager's address in the form: port@SNLServerName.
The default port number is 25734. You can enter either the host name or IP addressof SolidNetWork License server for SNLServerName. All clients must be able toconnect to the server by IP address or host name.
6. Click OK.7. Click the License Usage tab to ensure that SOLIDWORKS PDM licenses are available.8. Click OK.
115
Creating and Distributing File Vault Views

Creating a File Vault View Using the View SetupWizard
Users managing files must connect to a file vault through a local file vault view (workingfolder) created on each client.
To set up the file vault view, the SOLIDWORKS PDM client must be installed.
You also can create a local file vault view using the SOLIDWORKS PDM Administrationtool. See the section on creating a local file vault view in the SOLIDWORKS PDMAdministration Guide.
To create the file vault view using the View Setup wizard:
1. Run View Setup by doing one of the following:
• On Windows 7, click Start > All Programs > SOLIDWORKS PDM > View Setup.• On Windows 10 and Windows Server 2016 or later, from the Windows Startmenu,click SOLIDWORKS PDM > View Setup.
116
Creating and Distributing File Vault Views

2. Create the file vault view using the following instructions:
ActionScreen
Click Next.Welcome
The available archive servers on the network are listed.Select archiveserver(s) a. If the archive server you want to attach to is listed, select it.
b. If the archive server you want is not shown:
1. Click Add.2. In the Add Server manually dialog box, enter the system
name and click OK.
A login dialog box appears if your account does not havesufficient access rights. Log in with a user account withattach access to file vaults on the archive server.
3. Select the new archive server.
c. To connect to other archive servers with file vaults, selectthem.
d. Click Next.
All file vaults on the selected archive servers are listed.Select vault(s)
a. Select the vaults for which you want to create a local file vaultview.
b. Click Next.
117
Creating and Distributing File Vault Views

ActionScreen
a. Choose where the file vault view will be created.
You can place the view in any location. However, for a sharedview that is accessible to all profiles on the system, create itin the root of the local hard disk drive to make it easilyaccessible.
b. Select the type of view to create:
The local view is only accessible to theWindows profile that is logged in the system.Use this option when multiple users are usingthe same system. Place the local file vault viewin a user folder that is accessible to thelogged-in profile.
For details, see Using SOLIDWORKS PDM on aTerminal Server.
Only forme
The local view is accessible to all Windowsprofiles on this system (preferred). The loggedin user must have local administrator rights touse this option because it requires updatingthe local system registry.
For details, see Using a Shared File Vault Viewwith Multiple User Profiles.
For allusers onthiscomputer
c. Click Next.
Select location
Click Finish.Review actions
Click Closed.Completed
Enabling Broadcast with Windows FirewallsIf you are running SOLIDWORKS PDM on a workstation where the Windows firewall isactivated, you must enable broadcast to list archive servers when users create file vaultviews using View Setup.
This is because SOLIDWORKS PDM uses a broadcast method to get a list of all availablearchive servers on the network. This broadcast is sent to the default port 3030 on theserver system from a dynamic port on the client. By default, Windows firewall only allowsa three-second time period to return the broadcast result from the server to the dynamicclient port. After that, the broadcast reply is stopped by the firewall.
For the archive server broadcast to work correctly on a client with Windows firewall active,you must allow the applications that request the broadcast through the firewall. ForSOLIDWORKS PDM, these are the View Setup wizard (ViewSetup.exe) and theSOLIDWORKS PDM administration tool (ConisioAdmin.exe).
118
Creating and Distributing File Vault Views

Enabling Broadcast on Windows 7If you are running SOLIDWORKS PDM on Windows 7 to enable broadcast, you add theapplications to the list of allowed programs.
1. From the Windows Start menu, click Control Panel.2. On the Adjust your computer’s settings page, click Windows Firewall.3. In the left pane, click Allow a program or feature through Windows Firewall.4. On the Allow programs to communicate through Windows Firewall screen, under the
list of allowed programs, click Allow another program.5. In the Add a Program dialog box, click Browse to locate ViewSetup.exe (found by
default in \Program Files\SOLIDWORKS PDM\) and then click Open.If the product is installed via SLDIM, browse to locate ViewSetup.exe at ProgramFiles\SOLIDWORKS Corp\SOLIDWORKS PDM.
6. Click Add.
The dialog box closes and the program is added to the list of allowed programs andfeatures.
7. Repeat steps 4 through 6 to add ConisioAdmin.exe, which displays list asAdministration.
8. Click OK to close the Allow programs to communicate through Windows Firewallscreen.
9. Close the Control Panel.
Using a Shared File Vault View with Multiple User ProfilesA shared file vault view is created by a user with local administrative Windows permissions.The local administrator group is, by default, given full file permissions to any files created(or cached) in that view.
On many systems, the local user or power user groups have only limited file permissionsto folders in Windows. If a user with local administrative permissions caches a file in theshared vault view, other Windows user profiles with only user or power user accesspermissions might not have sufficient permissions to fully access the file or change theread-only state when checking out the file.
If you plan to use a shared file vault view with Windows user or power user profiles, youshould define folder access permissions for those groups.
Changing Access Permissions on a Shared View Using theProperties Dialog Box1. Log into the system as a user with local administrative permissions.2. In Windows File Explorer, navigate to the file vault view folder and select it.3. Right-click the file vault view folder and select Properties.4. In the file vault view’s Properties dialog box, click the Security tab.
119
Creating and Distributing File Vault Views

5. Under Group or user names, select the Windows profile groups to use the sharedfile vault view and make sure that they have all access permissions checked (that is,,Full Control).
6. Click OK.
Changing Access Permissions on a Shared View Using theCommand Prompt1. Log into the system as a user with local administrative permissions.2. Open a command prompt and open the parent folder containing the file vault view
(usually C:\).3. Use the cacls command to assign sufficient access control to the user and power
user groups.
CACLS “vault_view_name” /E /G “group_or_username”:F
For example, to grant a local users group sufficient access control, type:
CACLS “c:\EPDM File Vault” /E /G “users”:F
For details about the cacls command, visitMicrosoft Support page and search withthe cacls keyword.
Using SOLIDWORKS PDM on a Terminal ServerThe following recommendation applies to installing SOLIDWORKS PDM clients in a TerminalServer environment:
• The client software is installed once on the terminal server because all terminal profilesuse the same core system and program files. You cannot combine different clientlicense types on the same terminal system; the same license type is used by all terminalclient profiles.
• When creating local file vault views for terminal clients, you must be logged in as theWindows profile that should have access to the view. Make the views private by selectingthe Only for me or For all users on this computer (requires local administratorrights) option.
To make it easier to administer views to multiple terminal client profiles, use theSOLIDWORKS PDM policy or create an administrative view setup file.
Only the Windows profile for which the view was created can log in to the file vaultview because the view information is stored in the current user section of the registry,which is only available to the current profile.
• To have the private views rooted to the same location for all profiles, place them inthe terminal user’s home folder. For example, use the environment variables%HOMEDRIVE%%HOMEPATH%. These have the same path for most users.
• You should not create a shared view accessible by everyone on the terminal server ina terminal environment. If using a shared view, all terminal users will work in the samelocal cache, meaning they may overwrite each others file changes.
120
Creating and Distributing File Vault Views

Creating a File Vault View Setup FileIf you create a view setup file (.cvs), you can attach clients to a file vault by runningthe .cvs file, without having to use the View Setup wizard.
The .cvs file can also be launched silently using triggers, as described in Scripting FileVault View Setup.
You can create a .cvs file from any existing SOLIDWORKS PDM client.
To create the .cvs file:
1. Launch View Setup using the trigger /a.For example, from the Windows Startmenu, click Run and then enter this command:
“C:\Program Files\SOLIDWORKS PDM\ViewSetup.exe” /a
2. Step through the View Setup wizard as if creating local views.See Creating a File Vault View Using the View Setup Wizard. You can select anynumber of views.
On the Review Actions screen, the available action is Save to file.
3. Click Finish and specify a location and filename for the view setup file.4. Click Close.
Using a File Vault View Setup FileYou can attach clients to a file vault by running the .cvs file, without having to use theView Setup wizard.
The .cvs file can also be launched silently using triggers, as described in Scripting FileVault View Setup.
To use the View Setup file:
1. Copy the .cvs file to a client that you want to attach to the file vault.2. Double-click the .cvs file.
The View Setup wizard opens to the Finish screen, which lists the vaults for whichlocal views will be created.
3. Click Finish.
Scripting File Vault View SetupThe View Setup wizard can be launched using the ViewSetup.exe command with thefollowing triggers to automate view installations. This can be useful when you want todistribute the file vault view using login scripts or a similar distribution method.
ActionOption or Argument
Creates a view setup file./a
121
Creating and Distributing File Vault Views

ActionOption or Argument
Opens the view setup file and lets you attach using theinformation from the file.
The complete path to the .cvs file must be used.
path_to_.cvs_file
Performs attach silently without showing wizard. Will onlywork in combination with /s switch or a .cvs file.
/q
Find the Vault ID by selecting the properties of the vaultin the SOLIDWORKS PDM administration tool.
If you have more than one archive server hosting thevault, see Distributing File Vault Views in a WANEnvironment.
/s {VaultID}
Examples• Create a vault view silently from the .cvs file:
ViewSetup.exe PDMWEVault.cvs /q
• Create a .cvs file with the two file vaults supplied by ID:
ViewSetup.exe /s{A8E07E93-F594-42c9-A01B-F613DBA53CB5}{699C4EC3-60FC-452f-940E-8786A7AAF1B2}/a
Distributing the File Vault View Using MicrosoftWindows Active Directory
By using the SOLIDWORKS PDM user policy for Microsoft Windows Active Directory, youcan centrally deploy file vault views on client workstations.
Before you configure Active Directory, find the unique vault ID of the vault view you wantto distribute, as described in Finding the SOLIDWORKS PDM Vault ID on page 124.
Most policy dialog boxes have an Explain tab with descriptive text about the policy.
To distribute a vault view using Windows Server Active Directory:
1. Open the Control Panel and click System and Security > Administrative Tools> Active Directory Users and Computers.
2. Create a security group (or use an existing group).3. Right-click the security group and select Properties.4. In the security group’s Properties dialog box, on the Members tab, add the users to
which the SOLIDWORKS PDM file vault view should be deployed.5. Right-click the top domain container (or any top organizational unit (OU) containing
the target users) and select Properties.
122
Creating and Distributing File Vault Views

6. In the domain Properties dialog box, on the Group Policy tab, click New to create anew policy object.
7. Select the new object and click Properties.8. In the object’s Properties dialog box, on the Security tab:
a) Add the group containing the users to the list and select it.b) Under Permissions, in the Allow column, select Apply Group Policy to assign
the policy to the group.
If you do not want the policy to be set on other domain groups, make sure thatthe permission is turned off on the other groups.
c) Click OK.
9. In the domain Properties dialog box, select the new object again and click Edit.10. In the Group Policy Object Editor:
a) Browse to User Configuration > Administrative Templates.b) Right-click and select Add/Remove Templates.
11. In the Policy Templates dialog box, navigate to \SWPDMClient\Support\Policies.Select PDMWorks Enterprise.ADM and click Open.
12. When the policy is loaded, click Close.
A new SOLIDWORKS PDM Settings option appears under AdministrativeTemplates > Classic Administrative Templates (ADM).
13. Browse to the View Setup folder and double-click Automatic View Setup.14. In the Automatic View Setup Properties dialog box:
a) Select Enabled.b) Click Show to show the views to install.c) In the Show Contents dialog box, click Add to add the file vault view.d) In the Add Item dialog box, assign a name for the view to be distributed
(preferably the same name as the file vault).e) Add the Vault ID to the item value field.f) Click OK three times.
If you have more than one archive server hosting the vault, see Distributing FileVault Views in a WAN Environment on page 125.
15. For the new view to be announced when the user logs in, SOLIDWORKS PDM mustbe started. To automate this, browse to the Login Manager folder and enable theStart SOLIDWORKS PDM Login manager at Windows login policy.
16. Close the Policy Editor.
123
Creating and Distributing File Vault Views

Finding the SOLIDWORKS PDM Vault IDTo find the vault ID:
1. On a client computer, open the Administration tool by doing one of the following:
• On Windows 7, click Start > All Programs > SOLIDWORKS PDM >Administration.
• On Windows 10 and Windows Server 2016 or later, from the Windows Startmenu,click SOLIDWORKS PDM > Administration.
2. Right-click the vault view and click Properties.3. In the File Vault Properties dialog box, you can copy the vault ID and paste it into a
file.
You can also find the vault ID in the vault database SystemInfo table.
Receiving a Distributed File Vault ViewWhen you distribute a file vault view, users receive automatic notifications.
• When users in the distributed group next log in, the following balloon tip informs themthat a new vault view is available:
Your system administrator has assigned new vaults for you to attach.Click here to attach them.
Clicking the message box displays the Select Location screen of the View Setup wizardto let the user select where the view should be placed.
If the user does not click the message box before it disappears, clicking theSOLIDWORKS PDM icon in the system tray shows an Attach option where thedistributed views are available.
• If the automatic view setup policy had the option Setup Views Silent selected, userssee the following message:
Your system administrator has attached you to new vaults.Click here to browse.
Clicking the message box opens the vault view in Windows File Explorer.
For the silent view setup policy to work, the domain user profiles that use the policymust be part of the Attach access (or administrative access) list in the security sectionof the Archive Server Configuration tool. Otherwise, the view must be manually createdusing the Attach option.
124
Creating and Distributing File Vault Views

Distributing File Vault Views in a WANEnvironment
By default, an archive server announces itself over the network to clients using a broadcastinterface (over port 3030). When creating views, this lets the View Setup wizard orAdministration tool list the archive server automatically.
When a script or Active Directory policy distributes a file vault view, the client uses thefirst archive server that is announced to it. In some situations such as a replicatedenvironment with multiple servers, this may not be the correct server.
If you have problems using scripted views or policies over WAN or restricted networks,add the appropriate server manually using the SOLIDWORKS PDM Settings policy.
Manually Configuring the Archive Server That Is Announcedto SOLIDWORKS PDM Clients
To configure the Archive Server manually:
1. Open the Administration tool by doing one of the following:
• On Windows 7, click Start > All Programs > SOLIDWORKS PDM >Administration.
• On Windows 10 and Windows Server 2016 or later, from the Windows Startmenu,click SOLIDWORKS PDM > Administration.
2. Under Local Settings, click Group Policies.3. In the Group Policy dialog box, click User Configuration > Administrative
Templates > SOLIDWORKS PDM Settings.4. Disable the normal broadcast for the SOLIDWORKS PDM policy:
a) In the right pane, double-click Disable broadcast.b) In the Disable Broadcast Properties dialog box, select Disabled, and click OK.
5. Add the archive server to which the clients have to connect:a) Click View Setup.b) Double-click Configure Select Server Page.c) In the Configure Select Server Page Properties dialog box, select Enabled.d) Click Show to show the default servers.e) In the Show Contents dialog box, click Add to add the server.f) In the Add Item dialog box, enter the archive server name and port, normally
3030.g) Click OK to close each dialog box.
When file vault views are distributed, clients are forced to use the specified archive server.
125
Creating and Distributing File Vault Views

Specifying SOLIDWORKS PDM Settings Group PolicyManually
You can use Windows Active Directory policy options to distribute the SOLIDWORKS PDMsettings. If you are not using Active Directory to distribute group policies, you can addthe SOLIDWORKS PDM Settings policy manually on a client as a local group policy.
For details about using Active Directory to distribute SOLIDWORKS PDM settings, seeDistributing the File Vault View Using Microsoft Windows Active Directory on page122.
To add the policy manually:
1. Open the Administration tool by doing one of the following:
• On Windows 7, click Start > All Programs > SOLIDWORKS PDM >Administration.
• On Windows 10 and Windows Server 2016 or later, from the Windows Startmenu,click SOLIDWORKS PDM > Administration.
2. Select Local settings.3. Right-click Group policies and click Open.4. In the Group Policy dialog box, select User Configuration.5. Right-click Administrative Templates and select Add/Remove Templates.6. In the Add/Remove Templates dialog box, click Add.7. In the Policy Templates dialog box, browse to the PDMWorks Enterprise.ADM policy
template in \SWPDMClient\Support\Policies and click Open.8. Click Close.
The SOLIDWORKS PDM Settings policy options appear under AdministrativeTemplates > Classic Administrative Templates (ADM).
SOLIDWORKS PDM Settings Policy Options
DescriptionPolicy
Settings
Defines the port used for broadcast, by default, port 3030.This port must match the archive server port. You should nothave to change it.
Configure Broadcast Port
Prevents users from using broadcast to find archive serverson the local subnet. Only manually added servers will be used.Use this policy to make sure that a specific archive server isused.For details, see Distributing the File Vault View Using MicrosoftWindows Active Directory.
Disable Broadcast
126
Creating and Distributing File Vault Views

DescriptionPolicy
Normally, broadcast updates (refreshes) the Explorer file viewwhen another SOLIDWORKS PDM client modifies somethingin the view (for example, by renaming or checking out a file).
Use this option to prevent views from being updatedautomatically. Users must press F5 to manually refresh thefolder listing in a view.
Disable Automatic ViewRefresh
Login Manager Settings
If a file vault is replicated, enabling this policy creates a listin the login dialog box of archive servers hosting the replicatedvault that the user can connect to.Use this policy if working on a laptop and working in bothlocations hosting a replicated vault. Only the servers that arebroadcasted are listed. You might have to include the serverin the Add alternative servers policy.
Enable Alternative Servers
Set this policy when you distribute views with the AutomaticView Setup policy. It starts the SOLIDWORKS PDM loginmanager at login so that views can be added.
Start SOLIDWORKS PDMLogin Manager atWindows Login
The alternative servers list contains available broadcastedservers hosting the replicated vault. If the broadcast doesnot list the server, you might have to add it manually usingthis policy. Add the server name as the Value Name, andserver port as the Value.
Add Alternative Servers
DescriptionPolicy
View Setup settings
Prevents the user from manually adding servers to the listof vault sources in the View Setup wizard. Use this policy incombination with Disable Broadcast and Select Serverpage to restrict clients to a specified set of servers.
Disable Add Server
Controls the Select Location screen of the View Setup wizard.It should be defined when adding views silently.
Sets the default file vault attach location. Thiscan be used in terminal services environmentsto force file vault views to be created in a specificdirectory (commonly the user's home drive).
Location
Sets the default file vault attach type. A restrictedWindows user does not typically have the rightto add file vault views per computer.
Type
Select Attach Page
127
Creating and Distributing File Vault Views

DescriptionPolicy
Controls the Select Archive Server screen of the View Setupwizard. Adds default archive server names to the list ofservers to choose from in the wizard. Type the name of thearchive server and the port (3030) as value.
Use this in combination with Disable Broadcast and DisableAdd Server to force clients to use a specified set of servers.You should also use this policy when broadcast preventsarchive servers from being listed in the View Setup wizard(for example, over a WAN).
Select Server Page
Use this policy to distribute file vault views to clientcomputers. Add the vault name and vault ID for the viewsthat should be announced.When using Setup views silent, the views are added withoutany user interaction. When you use this option, to make surethat the view is created in the correct location, you shouldalso define the Select Attach Page policy. If the clientcomputers reside in different subnets and cannot receivebroadcast, you must define the Select Server Page policy.
Automatic View Setup
DescriptionPolicy
Explorer settings
Defines the size and color depth of thumbnails that arecreated on the archive server.
Configure Thumbnails
Lets you can add other extensions that should behave likedrawings in the BOM view. By default, SLDDRW and IDW filesare counted as drawings.When you clear the Bill Of Material view option Includeselected, drawing files are normally not considered thetop-node; therefore both drawing and assembly are excluded.
Drawing Extensions
Removes the Copy Tree item from the shortcut menu forthe root of the vault.
Remove Copy Tree FromRoot
Configure thread options used when retrieving files to theclient. Use a value between 1 and 20. The default is 5.
Configure Get File
SQL
128
Creating and Distributing File Vault Views

DescriptionPolicy
Configures when to use bulk operations when communicatingwith the SQL server.When not doing bulk operations, the statement is built up bytext and concatenated to the execute statement if possible.
For use only when directed by SOLIDWORKS support.
Configure bulk operations
129
Creating and Distributing File Vault Views

8Upgrading a Vault from Standard toProfessional
This chapter includes the following topics:
• Upgrading the SolidNetWork License from Standard to Professional• Activating the Professional License• Upgrading the Standard Vault• Upgrading the SOLIDWORKS PDM Standard Client/Server to Professional• After Upgrading the File Vault
Once upgraded, you cannot downgrade a Professional vault to a Standard vault. The procedurecannot be undone without a backup.
To upgrade a vault from Standard to Professional:
1. Back up the file vault database for the SOLIDWORKS PDM Standard vault.For details, see Backing Up the File Vault Database on page 144.
2. Upgrade the license from Standard to Professional.For details, see Upgrading the SolidNetWork License from Standard to Professionalon page 130.
3. Upgrade the vault.4. Upgrade SQL Server 2014 Express to SQL Standard 2014.
For details, see Upgrading SQL Server Express 2014 to SQL Server 2014 on page 48.
5. Upgrade SOLIDWORKS PDM Standard Client/Server to Professional Client/Server.For details, see Upgrading the SOLIDWORKS PDM Standard Client/Server toProfessional on page 92.
Upgrading the SolidNetWork License fromStandard to Professional
Before you upgrade a vault, you must upgrade the SolidNetWork License from Standardto Professional.
To upgrade the SolidNetWork License from Standard to Professional:
1. In Windows, open Control Panel > Programs > Programs and Features.
130

2. On the current license server, right-click SOLIDWORKS SolidNetWork LicenseManager, click Change > Next .
3. On the Program Maintenance screen, select Modify.4. On the License Information screen, type the serial number for Professional and click
Next.5. Click Install.
Activating the Professional LicenseYou can activate the license to log in to the Professional vault.
To activate the Professional license:
1. Start the SolidNetWork License Manager by doing one of the following:
• On Windows 7 click Start > All Programs > SOLIDWORKS version >SOLIDWORKS Tools version > SolidNetWork License Manager Serverversion.
• On Windows 10 and Windows Server 2016 or later, from the Windows Startmenu,click SOLIDWORKS Tools version > SolidNetWork License Manager Serverversion.
2. When prompted to activate, click Yes.If you have an activated SolidNetWork License, click Modify.
3. On the SolidNetWork License Server Information screen:
• If your company uses a firewall, select A firewall is in use on this server.
For more information, see Using SolidNetWork License Server with Firewalls.
• Use the default value for Port Number (and for Vendor Daemon Port Numberif you have a firewall) or specify the port numbers your company uses.
The port number is a TCP/IP port number in the 1024-60000 range, usedexclusively by this process. Normally, the default (25734) is suitable and isunlikely to be the same as any other FlexNet server process on the licensemanager server.
4. On the Activate Your SOLIDWORKS Product screen:
• Select the internet or email procedure.• Supply email contact information.• Click Next to proceed.
• Internet: Activation occurs automatically.• Email: Click Save to create a request file, then email the file [email protected]. When you receive the email containing theresponse file, extract the file from email and then click Open to load it.
If required, you can exit and rerun the activation procedure to open theresponse file.
131
Upgrading a Vault from Standard to Professional

5. Click Finish.
Upgrading the Standard VaultTo upgrade a Standard vault to a Professional vault, you must have the Professionallicense activated on the license server.
To upgrade a vault from Standard to Professional:
1. Log in to the SOLIDWORKS PDM Administration tool with File vault managementpermission.
You must log in to the computer with an account that has Administrative accesson the Archive server. If you are not, you will be prompted to enter credentials fora user with Administrative access to the server.
2. Right-click the vault and select Upgrade to Professional Vault.3. On Upgrade to Professional Vault screen, click Next.4. Select the check box and click Next.5. Select the license server that has activated Professional license.6. Click Finish.
Upgrading the SOLIDWORKS PDM StandardClient/Server to Professional
If you have installed the Standard client/server via InstallShield Wizard, perform thefollowing steps.
To upgrade:
1. In Windows, open Control Panel > Programs and Features.2. Right-click SOLIDWORKS PDM Client or SOLIDWORKS PDM Server and select
Change.If you have installed the client via SLDIM, modify the SOLIDWORKS installation toupgrade the client install.
3. On the Welcome screen, click Next.4. On the Program Maintenance screen, click Modify.5. On Select PDM Product screen, select SOLIDWORKS PDM Professional.6. Continue with the installation of SOLIDWORKS PDM Professional.
If you have installed the Standard client/server via SLDIM, modify SOLIDWORKS2016 listed under Programs and Features for an upgrade.
132
Upgrading a Vault from Standard to Professional

After Upgrading the File VaultAfter upgrading the file vault, complete the post-processing configuration steps.
After upgrading to the Professional vault:
• The Administration tool displays the Professional specific features.• Administrators must configure the Professional vault explicitly.• Administrative Permissions and Folder Permissions (specific to Professional) areassigned to the built in admin user. The admin user must assign these permissions tousers and groups.
• The admin user must reconfigure convert task and configure other tasks.
133
Upgrading a Vault from Standard to Professional

9Configuring Content Search (ForSOLIDWORKS PDM Professionalonly)
This chapter includes the following topics:
• Content Search Overview• Recommended Computer Configuration• Using Windows Search for Content Search• Installing Windows Search Service• Setting Up Windows Search• Indexing the Archives for Windows Search• Verifying Microsoft Indexing Service Installation• Monitoring and Tuning the Microsoft Indexing Service• Indexing SOLIDWORKS PDM Professional File Vault Archives• Configuring the Index Service on a Non-SQL Server System• Adding Index Server Filters• Managing File Vault Index Catalogs• Removing a File Vault Index
When you index a file vault archive, the search tool can use the content search option to searcha document’s contents or properties.
For example, you can search for all documents containing the word “product” or you can searchfor all Microsoft Office documents written by a specific author.
Content Search OverviewSOLIDWORKS PDM Professional content search uses the Microsoft Indexing Service orWindows Search Service to create a catalog for each indexed file vault. The catalogcontains index information and stored properties for all versions of all documents in thefile vault archive folders.
Administrators can choose an indexing method, Indexing Service, or Windows Search.Administrators of upgraded systems can still use the Indexing Service, while administratorsof new systems that have not been previously indexed can use Windows Search.
134

The following table summarizes content search categories and the supported operatingsystems:
Operating SystemContent Search Category
Windows 7Microsoft Indexing Service
Windows 7
Windows 10
Windows Server 2016 or later
Windows Search Service
The Indexing Server periodically scans the file vault archive folders and extracts thecontent using filter components. Microsoft Indexing Service supplies filters for MicrosoftOffice files, HTML files, MIME messages, and plain-text files. You can install other documentfilters for content search in, for example, PDF files.
The indexing process creates a catalog with a master index that stores words and theirlocations within a set of indexed documents. SOLIDWORKS PDM Professional contentsearch queries the catalogs for word combinations using the master index as well as wordlists and shadow indexes to execute content searches.
Recommended Computer ConfigurationThe minimum hardware configuration for the index server is the same as for theSOLIDWORKS PDM Professional database server. However, the performance of the indexingand search tool depends on the number and size of documents to be indexed and theresources available to the indexing service.
If the number of documents (and versions) in the file vault is very large, insufficientmemory on the index server will seriously affect performance.
The total size of the documents to be indexed affects the disk space required for storingindex server data. The space required for the catalog is about 15% of the amount ofdocuments indexed.
Using Windows Search for Content SearchSOLIDWORKS PDM can use the Windows Search service to perform content searches.
Microsoft does not support the Indexing Service for Windows 10 or Windows Server 2016operating systems. SOLIDWORKS PDM uses the Windows Search service to supportcontent search on these operating systems.
To use the Windows Search for Content Search:
• The administrator must configure the Windows Search service and index a file vaultarchive folder.
• The file vault archive folder that is being indexed must be:
• On the same machine as the configured Windows Search service.
135
Configuring Content Search (For SOLIDWORKS PDM Professional only)

Windows Search does not support indexing remote network shares or mappednetwork drives. The archive folders must be accessible on locally attached storageor SAN storage.
• Accessible to the Windows Search service to build a system index.
• If the archive server is on a different machine than the SQL server:
• The administrator must share the file vault archive folder.• The logged in user running the SQL server service must have full permission to theshared folder.
• The Windows Search service must be installed on the SQL server machine as wellas the Archive server hosting the vault archives.
When the Windows Search service builds the system index, the administrator can set upSOLIDWORKS PDM to use the system index.
Installing Windows Search ServiceInstall the Windows Search Service on the Archive Server system. If the vault databaseis hosted on a separate SQL server system, you must also install Windows Search Serviceon that SQL server.
Enabling Windows Search Service on Windows 7Windows Search Service is on by default on client operating systems. If it is turned off,you must turn it on.
To enable Windows Search Service on Windows 7:
1. In Windows, open Control Panel > Programs > Programs and Features > TurnWindows features on or off .
2. Select Windows Search.3. Click OK.
EnablingWindows Search Service onWindows Server 2016and Later
To enable Windows Search service on Windows Server 2016 and later:
1. In Windows, open Control Panel > System and Security > Administrative Tools> Server Manager.
2. Select Manage > Add Roles and Features.3. On the Select Features page, select Windows Search Service and click Next.4. Click Install.5. After Windows Search is installed, click Close to exit the Add Roles and Features
Wizard.
136
Configuring Content Search (For SOLIDWORKS PDM Professional only)

Setting Up Windows SearchConfiguring the SOLIDWORKS PDM Professional Content Search to use Windows Searchrequires installing the Windows Search Service, adding the archive folder path to theindexing settings, and indexing the file vault archives.
To set up Windows Search:
1. In the Administration tool, log into the file vault to be indexed as SOLIDWORKS PDMuser with Can update index settings permissions.
2. Right-click Indexing and click Open.3. In the Indexing Settings dialog box, select Index File Vault Archives.4. Under Select the File Vault Indexing Method, select Windows Search.5. Under Archive Locations, double-click the archive path to configure index locations.6. In the Edit File Vault Archive Folder Path dialog box, type a path to a file vault archive
folder from the SQL server.
• If the Archive server is on a different machine than the SQL server, enter a UNCpath to the archive folder share.
• The archive folders must be accessible on locally attached storage or SAN storageon the archive server machine.
7. Click OK twice.For details, see SOLIDWORKS PDM/SOLIDWORKS Manage Installation Guide: InstallingWindows Search Service.
Indexing the Archives for Windows SearchFor SOLIDWORKS PDM content search to find indexed documents, the archive foldersneed to be indexed by the Windows Search Service.
To index the Archives for Windows Search:
1. On the archive server, open Windows Indexing Options by doing one of thefollowing:
• On Windows 7, click Start, type Indexing Options, and click Indexing Options.• On Windows Server 2016 or later, on the Start screen, type Indexing Optionsand click Indexing Options.
2. In the Indexing Options dialog box, click Modify.3. In the Indexed Locations dialog box, browse to the folder containing the file vault
archives.If the Archive Server hosts multiple file vault archives that should be indexed, addthe archive folder of all archives in this dialog box.
4. Select the check box next to the archive folder and ensure that the individual 0-Fsubfolders are also included.
5. Click OK.
137
Configuring Content Search (For SOLIDWORKS PDM Professional only)

6. Make sure that the archive folder is listed under the Included Locations column.The Windows Search indexer starts scanning the archive folders and builds an indexof the content found in the files. This process runs in the background and dependingon archive size can take several hours to complete. Content searches might beincomplete until the index is fully rebuilt.
Verifying Microsoft Indexing Service InstallationTo verify installation of the Microsoft indexing service:
1. On the SQL Server hosting the file vault to be indexed, open Control Panel >Programs > Programs and Features > Turn Windows features on or off.
2. In the Windows Features dialog box, verify that Indexing Service is enabled(checked). If not, select it to install it.
Monitoring and Tuning the Microsoft IndexingService
1. In the Start menu, right-click Computer and select Manage.2. In the Computer Management dialog box, expand Services and Application >
Indexing Service.
Indexing SOLIDWORKS PDM Professional FileVault Archives
This procedure describes index server setup when the index server and database serverare installed on the SQL Server hosting the file vault databases.
The indexing service is not supported on operating systems later than Windows 7.
To install the index server on a separate system, see Configuring the Index Serviceon a Non-SQL Server System on page 139.
Before indexing the file vault archives:
• Make sure that the database server has been installed and configured.• Obtain the user name and password of a SOLIDWORKS PDM Professional user withCan update index settings permissions.
• If the index server is located on a system other than the archive server, obtain one ofthe following:
• The domain login information of a user with full (read and write) access to the UNCshare to the archive folder.
• The login information of a local Windows user on the index server.
138
Configuring Content Search (For SOLIDWORKS PDM Professional only)

To set up the index server on the SQL Server system:
1. On a client system, to open the Administration tool, click Start > All Programs >SOLIDWORKS PDM > Administration.
2. Log into the file vault to be indexed as SOLIDWORKS PDM user with Can updateindex settings permissions.
3. In the left pane, under the file vault, right-click Indexing and select Open.4. If prompted, log into the archive server as a user with administrative access.5. In the Indexing Settings dialog box, to enable content search in this file vault, select
Index File Vault Archives.6. Under the Select the File Vault Indexing Method, select Indexing Service.7. Under Archive Locations, double-click the archive path.8. In the Edit File Vault Archive Folder Path dialog box, in the second field, specify the
path to the archive as seen from the system running the Indexing Service. You canuse the Browse button to locate the archive folder.
• If the index server (typically, the SQL Server) is located on the same system asthe archive server, copy the path displayed in the first field and paste it into thesecond field.
• If the index server is located on a system other than the archive server, providea UNC path to the archive folder.
Type one of the following:
• The domain login of a user, such as the domain administrator, with full accessto the UNC share
• The username and password of a local Windows user on the index server
9. Click OK and close the Index Settings dialog box.
A new index service catalog for the file vault, named Conisio_vaultID, is createdon the index server. Any file vault archives containing supported file types are indexedwhen the indexing service runs, which may be instantly or somewhat delayed.
10. To verify, right-click My Computer and select Manage.11. In the Computer Management dialog box, expand Services and Application >
Indexing Service and ensure that the Conisio catalog has been created.
Configuring the Index Service on a Non-SQLServer System
To set up the indexing service, the SOLIDWORKS PDM database server and MicrosoftSQL Server must be able to communicate with the system used as the index server.
To use a system other than the SQL Server as the index server, perform the followingsteps before setting up the indexing for a file vault:
1. Update the vault database with the index server name. For details, refer to Updatingthe File Vault Database with the Index Server Name on page 140.
If the server name includes hyphens (-), enclose the name in double quotes (" ").
139
Configuring Content Search (For SOLIDWORKS PDM Professional only)

2. Change the database server login account. For details, refer to Changing theDatabase Server Login Account on page 140.
3. Change the SQL Server login account. For details, refer to Changing the SQL ServerLogin Account on page 141.
4. After you have configured the service accounts and file vault database, add theindexing service and index the file vault archives as described in IndexingSOLIDWORKS PDM Professional File Vault Archives on page 138.
Updating the File Vault Database with the Index Server Name1. Open Microsoft SQL Server Management Studio and click Connect.2. In the left pane, expand Databases > file_vault_database > Tables.3. Right-click the SystemInfo table (dbo.SystemInfo) and select Open Table.4. In the right pane, update the IndexServer column with the name of the index server
system.
If the server name includes hyphens (-), enclose the name in double quotes (" ").
If you do not update the SystemInfo table with the correct index server name,the Microsoft Indexing Service on the SQL server is used as the index server.
5. Save your changes and exit Microsoft SQL Server Management Studio.
Changing the Database Server Login AccountIf the database and archive services and the index server service are running on separatesystems, they must be able to communicate using a service account other than the systemaccount.
Before changing the database server login account, obtain the login information of aWindows user with local administrative rights on the database server and the index server.
The user must have the same name, password, and local account privileges on bothsystems.
To change the login account for the database server:
1. From the Windows Start menu, click Control Panel > Administrative Tools >Services.
2. Right-click SOLIDWORKS PDM Database Server and select Properties.3. In the SOLIDWORKS PDM Database Server Properties dialog box, on the Log On tab,
under Log on as, select This account.4. Specify a Windows user account, such as a domain administrator, with local
administrative rights on both the system running the database server and the indexserver and click OK.
5. Stop and start the SOLIDWORKS PDM Database Server service.
If the database server cannot communicate with the index server, you will not beable to create or remove indexing for the file vault archives. The following errormessage may be displayed: Access is denied. The SOLIDWORKS PDM DatabaseServer failed to contact servername.
140
Configuring Content Search (For SOLIDWORKS PDM Professional only)

Changing the SQL Server Login AccountIf the SQL Server service and index server service are running on separate systems andare not part of the same domain, they must be able to communicate using a serviceaccount other than the system account. If they are in the same domain, this procedureis not necessary.
Before changing the SQL Server login account, obtain the login information of a Windowsuser with local administrative rights on the SQL Server and the index server.
The user must have the same name, password, and local account privileges on bothsystems.
To change the login account for the Microsoft SQL Server:
1. From the Windows Start menu, click Control Panel > Administrative Tools >Services.
2. Scroll down to the SQL Server (MSSQLSERVER), right-click it, and select Properties.3. In the SQL Server (MSSQLSERVER) Properties dialog box, on the Log On tab, under
Log on as, select This account.4. Specify a Windows user account such as a domain administrator, with local
administrative rights on both the system running the Microsoft SQL Server and theindex server and click OK.
5. Stop and start the MSSQL Service.
If the SQL server cannot communicate with the index server, running a contentsearch in SOLIDWORKS PDM fails and results in the following error message:
A communication link failure occurred when accessing the databaseserver. The database service might have been restarted or thenetwork might have gone down. Please try the operation again andcontact your system administrator if the problem persists.“vaultname”
Adding Index Server FiltersBy default, the Microsoft Indexing Service and Windows Search Service support contentindexing for the following file formats: Microsoft Office files, HTML files, MIME messages,and plain-text files. By installing third party index filters (iFilters) on the index server,you can include content search support for many other file formats.
After you install a new index filter on an Index Server that has already indexed the archivesyou will have to rebuild the indexes. For details, see Rebuilding the Index Catalog.
141
Configuring Content Search (For SOLIDWORKS PDM Professional only)
Compressed Archives (gzip) FilterWhen installing the SOLIDWORKS PDM Server components the GZ iFilter is automaticallyregistered. This filter allows the index server to catalog archives that have beencompressed using archive server compression (gzip).
Rebuilding the Index CatalogIf the index server has already indexed the archives, you must launch a re-scan of theentire index catalog to refresh its content.
Rebuilding the index can take several hours to complete. Content searches might beincomplete until the index is fully rebuilt.
Rebuilding the Windows Search Service CatalogTo rebuild the windows search service catalog:
1. On the archive server, open Windows Indexing Options by doing one of thefollowing:
• On Windows 7, click Start, type Indexing Options, and click Indexing Options.• On Windows Server 2016 or later, on the Start screen, type Indexing Optionsand click Indexing Options.
2. In the Indexing Options dialog box, click Advanced.3. In the Advanced Options dialog box, click the Index Settings tab, and click Rebuild.
Rebuilding the Microsoft Indexing Service Catalog1. Right-click My Computer and select Manage.2. In the Computer Management dialog box, expand Services and Applications >
Indexing Service, Conisio_vaultID.3. Click Directories.4. In the right pane, right-click the directory and select All Tasks > Rescan (Full).
Managing File Vault Index CatalogsThere are many ways to configure the behavior of the Microsoft indexing service.
For detailed information, about configuring Windows Search and Microsoft Indexingservice, see the Windows Help regarding the index server node and online athttp://support.microsoft.com.
142
Configuring Content Search (For SOLIDWORKS PDM Professional only)

Removing a File Vault IndexWhen you remove a file vault index, only the index catalog is removed; no physical filearchives are affected by this operation.
Before removing a file vault index, obtain login information for a user with the followingpermissions:
• Administrative access to the archive server• SOLIDWORKS PDM permission to update index settings
To remove an index for a file vault archive:
1. On a client system to open the Administration tool on Windows 7, click Start > AllPrograms > SOLIDWORKS PDM > Administration.
2. Log into the file vault from which you want to remove the index.3. Right-click Indexing and select Open.4. If prompted, log into the archive server as a user that has administrative access to
the archive server.5. Clear Index File Vault Archives and click OK.
143
Configuring Content Search (For SOLIDWORKS PDM Professional only)

10Backing Up and Restoring FileVaults
This chapter includes the following topics:
• Backing Up the File Vault Database• Backing Up the SOLIDWORKS PDM Master Database• Backing Up the Archive Server Settings• Backing Up the Archive Files• Scheduling Database Backups• Restoring a File Vault
File vault backups must be part of the daily management of SOLIDWORKS PDM. They are alsorequired before you upgrade your SOLIDWORKS PDM components.
You can use the SQL Maintenance Wizard in SQL Server Standard to schedule a planned backupof the file vault databases. The physical file vault archives on all archive servers must bebacked up regularly using scheduled file backup software.
When backing up the vault, the latest updates in files that are still checked out and modifiedon client workstations are not included since they are stored in the local file vault view (cache)of the client. To ensure that the latest information of all files is always included in a backup,the files should be checked in.
A complete file vault backup must include backing up the file vault database and all physicalfile vault archive files. The database backup must be performed at the same time as the archivefile backup to avoid any data loss from mismatched backup sets. Without both the databaseand archives it is not possible to recover the vault in case of failure.
Backing Up the File Vault DatabaseBack up the file vault database hosted on the SQL Server ideally using a professionalbackup solution that supports live SQL database backups. You can also perform the backupusing the SQL Management tools that are included with the SQL Server.
1. Open SQL Server Management Studio.2. Expand the Databases folder.3. Right-click the database to be backed up, and select Tasks > Back Up.4. In the Back Up Databases dialog box, under Source:
a) For Backup type, select Full.b) For Backup component, select Database.
144

5. Under Destination, click Add.6. In the Select Backup Destination dialog box, enter a destination path and filename
for the backed up database and click OK.7. Click OK to start the backup.8. When the backup completes, click OK.9. Repeat the backup procedure for any additional file vault databases.10. Exit SQL Server Management Studio.
Backing Up the SOLIDWORKS PDM MasterDatabase
In addition to the file vault database(s), the SOLIDWORKS PDM master database calledConisioMasterDb must be backed up.
To back up this database, follow the same instructions used for backing up the file vaultdatabase. For details, see Backing Up the File Vault Database.
Backing Up the Archive Server SettingsThe archive server contains file vault settings such as passwords and defined login types.It is also the physical location of the SOLIDWORKS PDM vault archive files. Backing upthe archive server settings does not back up the archive files.
After backing up the archive server settings, include the backup file in your normal filebackup.
To back up the archive server settings:
1. On the archive server, open the SOLIDWORKS PDM Archive Server dialog box bydoing one of the following:
• On Windows 7, click Start > All Programs > SOLIDWORKS PDM > ArchiveServer Configuration.
• On Windows 10 and Windows Server 2016 or later, from the Windows Startmenu,click SOLIDWORKS PDM > Archive Server Configuration.
2. Select Tools > Backup settings.
145
Backing Up and Restoring File Vaults

3. In the Backup Settings dialog box:a) Select Include all vaults. (preferred setting)
Alternatively, you can select Include selected vaults and specify the file vaultsfor which settings will be backed up.
b) Specify or select the Backup location.The default location is the archive folder.
c) To schedule an automatic backup, click Schedule and specify the schedule.d) Type and confirm a password for the backup file.
This password is required to restore settings.
e) Do one of the following:
• To perform the backup immediately, click Launch backup. When a messageconfirms the backup, click OK.
• To perform the backup at the scheduled time, click OK.
4. Close the SOLIDWORKS PDM Archive Server dialog box.
The backup file is saved in the specified location and called Backup.dat.
Backing Up the Archive FilesThe file vault archives contain the physical files that are stored in a file vault. A file addedto the vault is stored in the archive folder specified by the archive server.
1. Locate the archive folder with the same name as the file vault.This folder is stored under the defined archive folder path on the archive server. Fordetails, see Installing SOLIDWORKS PDM Archive Server.
If you are uncertain where the file vault archives are stored, view the registry keyHKEY_LOCAL_MACHINE\SOFTWARE\SOLIDWORKS\Applications\PDMWorksEnterprise\ArchiveServer\Vaults\vaultname\ArchiveTable.
2. Use a backup application such as Backup Exec to back up this folder and its contents.
Scheduling Database BackupsYou can schedule database backups using a maintenance plan in SQL Server Standardedition. You must take daily file vault backups in SQL Express because there are no inbuilt maintenance plans or automated backup options.
To set up a recurring automatic backup of the file vault SQL databases, you can use theSQL Server Management Studio maintenance plans. A maintenance plan lets you createcomplete backups of the databases, which you can include in your normal file backuproutine.
Before scheduling database backups:
146
Backing Up and Restoring File Vaults

• The SSIS (Integration Services) must be installed on the SQL Server. The IntegrationServices are normally included as part of the Workstation Components step in the SQLServer install wizard.
• The SQL Server Agent must be running.
The SQL Server Express edition is a free version of SQL Server and does not include theSQL Management Tools and SQL agent. For Standard vaults, to set a daily file vaultbackup, visitMicrosoft Support page and search for the Knowledge Base article 2019698.
Starting the SQL Server AgentIf the SQL Server Agent is not running, you could see a message that the ‘Agent XPs’component is turned off as part of the security configuration of your computer.
1. Open the SQL Server Configuration Manager.2. In the left pane, select SQL Server Services.3. If the state of SQL Server Agent is Stopped, right-click it and select Start.
Ensure that the Start Mode of the agent is set to Automatic. If it is not, right-clickthe agent and select Properties, then configure the Start Mode on the Servicestab.
4. Exit the SQL Server Configuration Manager.
Setting Up a Maintenance Plan for Database Backup (ForSOLIDWORKS PDM Professional only)
The easiest way to set up a backup maintenance plan in SQL Server Standard is usingthe SQL Maintenance wizard.
When the backup maintenance plan is run, the file vault databases are backed up andplaced in a folder you specify. Include the backup folder in your normal daily backupprocedure.
To set up a backup maintenance plan:
1. Open Microsoft SQL Server Management Studio and click Connect.2. In the left pane, under the SQL Server, expand Management.
147
Backing Up and Restoring File Vaults

3. Right-click Maintenance Plans and select Maintenance Plan Wizard.
ActionScreen
Click Next.SQL Server Maintenance PlanWizard
Select Plan Properties a. Enter a name and description for the maintenanceplan.
b. Click Change to set up a schedule.
In the Job Schedule Properties dialog box, specifya name for the schedule and choose the recurringtimes to run the database backups. Set the timesclose to the start time of the normal daily filebackups. The backup of a database to a harddrive usually completes within minutes.
c. Click OK.d. Click Next.
Select Maintenance Tasks a. Select Back Up Database (Full).
If you rely on daily backups, you can selectBack Up Database (Differential) as well.You should create at least one full backup seteach week.
b. Click Next.
Select Maintenance Task Order a. Ensure that the backup task is listed.b. Click Next.
148
Backing Up and Restoring File Vaults

ActionScreen
a. Expand the Databases list.b. Select All user databases.
This selects all SOLIDWORKS PDM databases andexcludes the SQL system databases, which arenot required by SOLIDWORKS PDM.
To select databases individually, select Thesedatabases and make your selections. Be sureto select the file vault database(s) and theConisioMasterDb database.
c. Click OK.d. Select Backup set will expire and define how
many days the existing backup set files shouldbe kept.
e. Select Back up to Disk.f. Select Create a backup file for every
database.g. For Folder, enter a local path on the SQL Server
to an existing folder where the backup filesshould be created.
h. Click Next.
Define Back Up Database(Full) Task
a. For backup task report, select Write a reportto a text file or E-mail report, and specifywhere it should be saved or sent.
b. Click Next.
Select Report Options
Click Finish.Complete the Wizard
When all tasks have been completed, click Close.Maintenance Plan WizardProgress
4. Exit Microsoft SQL Server Management Studio.
Restoring a File VaultRestoring a file vault requires recent backups of the file vault databases, ConisioMasterDbdatabase, archive server configuration settings, and file vault archive files.
Use SQL Server Express to restore the Standard vault database.
149
Backing Up and Restoring File Vaults

Restoring the SQL Server File Vault Databases1. Install the SQL Server:
a) Configure the SQL login type to mixed mode.b) Select to install the management tools.For details, see Installing and Configuring SQL Server.
2. Apply the latest SQL service pack.3. Restore the SQL database backup files to a temporary folder on the SQL Server.4. Open Microsoft SQL Server Management Studio and click Connect.5. In the left pane, right-click Databases and select Restore Database.6. In the Restore Database dialog box, in the To database field, enter the name of the
file vault database exactly as it was named when backed up.7. Under Source for restore, select From device and click the Browse button.8. In the Specify Backup dialog box, click Add.9. In the Locate Backup File dialog box, select the database backup file and click OK
twice to return to the Restore Database dialog box.10. Under Select the backup sets to restore, click Restore for the database to restore.11. In the left pane, select Options.12. In the right pane, verify that the paths to the database files are correct.
SQL defaults to the paths used when backing up the database.
13. Click OK to start the restore.14. Repeat this procedure for additional file vault databases, including the
ConisioMasterDb database.15. Exit Microsoft SQL Server Management Studio.
Verifying the ConisioMasterDb RestoreAfter you restore the ConisioMasterDb database, ensure that information in theVaultName and DatabaseName columns of the FileVaults table is correct. If eitherentry is missing, notifications cannot be processed.
1. Open Microsoft SQL Server Management Studio and click Connect.2. Expand Databases > ConisioMasterDb > Tables > dbo.FileVaults.3. Click Columns, and verify the VaultName and DatabaseName.4. Exit Microsoft SQL Server Management Studio.
Restoring the Archive Server and File Vault ArchivesYou can use this procedure to restore the archive server settings to the previous settings,including all login settings and user information.
1. On the new archive server, restore the physical vault archives from the backup (folders0-F) to the same location as before the backup.
2. Install the archive server.Use the settings you used in the original install. If unsure, use the default options.Define the archive folder path as you defined it originally.
150
Backing Up and Restoring File Vaults

3. Restore the archive server configuration settings backup file Backup.dat to thearchive folder.
4. Open the SOLIDWORKS PDM Archive Server dialog box by doing one of the following:
• On Windows 7, click Start > All Programs > SOLIDWORKS PDM > ArchiveServer Configuration.
• On Windows 10 and Windows Server 2016 or later, from the Windows Startmenu,click SOLIDWORKS PDM > Archive Server Configuration.
5. Select Tools > Backup settings.6. In the Backup Settings dialog box, click Load Backup.7. Locate the archive server settings backup file Backup.dat and click Open.8. In the Enter Password dialog box, enter the backup file password.9. When the settings are restored, click OK.10. Close the SOLIDWORKS PDM Archive Server dialog box.
151
Backing Up and Restoring File Vaults

11Upgrading SOLIDWORKS PDM
This chapter includes the following topics:
• About Enterprise PDM Upgrade• Upgrading the Archive Server• Upgrading the Database Server• Installing or Upgrading the SolidNetWork License Manager• Upgrading File Vaults• Upgrading Toolbox in SOLIDWORKS PDM
You can upgrade from Enterprise PDM 2015 or earlier to SOLIDWORKS PDM Professional usingthe SOLIDWORKS PDM installation wizard. The wizard automatically uninstalls any old softwarecomponents found and then installs the new software.
You cannot upgrade from Enterprise PDM to SOLIDWORKS PDM Standard.
Follow these instructions when upgrading from a previous PDMWorks Enterprise or SOLIDWORKSPDM version or service pack. For preliminary System Requirements, see SystemRequirements.
SOLIDWORKS PDM allows a service pack mismatch between client and server componentswithin the same major version.
To find out which version is currently installed, see Determining the Current Version onpage 153.
About Enterprise PDM Upgrade
Before UpgradingPerform these tasks before upgrading SOLIDWORKS PDM.
• Ensure your SOLIDWORKS PDM serial number has valid activated licenses for the newversion.
• Check in all files.• Back up:
• SQL Server file vault database• Complete file vault archive• Archive server settings
152

• Make sure that no users are working in the old file vault. On all clients, users shouldclose all tools started using the file vault, click the SOLIDWORKS PDM icon on theright side of the task bar, and choose Log Off.
Determining the Current VersionYou can find out the current version of Conisio or SOLIDWORKS Enterprise PDM softwareand the file vault database.
1. Open Windows Control Panel.2. Double-click Uninstall a program.3. On the Uninstall or change a program screen, locate Conisio or SOLIDWORKS
Enterprise PDM.The Version column shows the currently installed version.
If the Version column is not shown, right-click the column headings and selectVersion.
You can also determine the current version by opening the SOLIDWORKS EnterprisePDM Administration tool and clicking Help > About.
The version numbers correspond to the following installed versions:
Installed Product VersionPublisher Version Number
Conisio 6.26.02
Conisio 6.36.03
Conisio 6.46.04
PDMWorks Enterprise 20066.05
PDMWorks Enterprise 2007 32-bit Edition7.00.0027 through 7.05.0074
PDMWorks Enterprise 2007 64-bit Edition7.07.0032 through 7.09.0042
PDMWorks Enterprise 20088.00
SOLIDWORKS Enterprise PDM 20099.00
SOLIDWORKS Enterprise PDM 201010.00
SOLIDWORKS Enterprise PDM 201111.00
SOLIDWORKS Enterprise PDM 201212.00
SOLIDWORKS Enterprise PDM 201313.00
SOLIDWORKS Enterprise PDM 201414.00
153
Upgrading SOLIDWORKS PDM

Installed Product VersionPublisher Version Number
SOLIDWORKS Enterprise PDM 201515.00
SOLIDWORKS PDM 201616.00
Determining Which Updates Have Been Applied1. Start the Administration tool by doing one of the following:
• On Windows 7, click Start > All Programs > SOLIDWORKS Enterprise PDM> Administration.
• On Windows 10 and Windows Server 2016 or later, from the Windows Startmenu,click SOLIDWORKS Enterprise PDM > Administration.
2. In the left pane, right-click the file vault name and select Properties.3. In the File Vault Properties dialog box, check the Installed Updates list.
This list shows the updated product, version, and upgrade date.
Upgrading the Archive ServerIf both the archive server and database server software are installed on the same system,you can upgrade and install both components at the same time.
All settings from the previous installation of the archive server are retained.
1. Log in locally or remotely as a user with local administrative rights on the systemwhere the archive server is installed.
2. In the SWPDMServer folder, run \SWPDMServer\setup.exe to start the SOLIDWORKSPDM server upgrade.
A warning is displayed stating that older versions of the SOLIDWORKS PDM softwarehave been found and will be upgraded.
3. Click OK.4. Follow the install wizard steps by clicking Next at each screen.5. The Select Product screen defaults to SOLIDWORKS PDM Professional if upgrading
from a previous Enterprise PDM or SOLIDWORKS PDM Professional version.6. On the Setup Type screen, select Server Installation and click Next.7. On the Server Installation screen, ensure that the Archive Server is selected and
click Next.If you want to install SOLIDWORKS PDM client on the machine, you must also selectClient.
8. When the upgrade is complete, click Finish.
154
Upgrading SOLIDWORKS PDM

Upgrading the Database ServerIf you upgraded the database server while upgrading the archive server, skip to Upgradingthe File Vault Database on page 157.
Before upgrading the database server, obtain the following:
• Login information for a user with local administrative rights• SQL Server name• Name and password of an SQL user with sysadmin permissions
You can use the SQL sa account that has these permissions.
To upgrade the database server:
1. Log in locally or remotely to the SQL Server where the vault database is hosted.2. In the SWPDMServer folder, run setup.exe to start the SOLIDWORKS PDM server
upgrade.
A message states that an older version of the SOLIDWORKS PDM server software hasbeen found and will be upgraded.
3. Click OK.
155
Upgrading SOLIDWORKS PDM

4. Follow the install wizard steps by clicking Next at each screen.
ActionScreen
Select Database Server and click Next.
If you want to install SOLIDWORKS PDM clienton the machine, you must also select Client.
Server Installation
SOLIDWORKS PDM DatabaseServer SQL Login a. Do one of the following:
• Type the name of the SQL Server to hostthe file vault databases the databaseserver will manage.
• Click Browse to display a list of availableSQL servers and instances on thenetwork.
Select the appropriate name and clickOK.
b. In the Login name field, enter the name ofan SQL user on the server who has read andwrite access (that is, db_owner permission)to all SOLIDWORKS PDM databases hostedon the SQL Server (the file vault databasesand ConisioMasterDb.)
Use the sa login if unsure.
c. In the Password field, enter the SQL user’spassword.
d. Click Next.
The login information is verified. If it is incorrect,a warning is displayed.
Click Install.Ready to Install the Program
Click Finish.InstallShield Wizard Completed
Installing or Upgrading the SolidNetWork LicenseManager
If you upgrade SOLIDWORKS PDM, you need to install or upgrade the SolidNetWorkLicense Manager.
Upgrade the SolidNetWork License Manager.
For more information, see Upgrading the SolidNetWork License Manager.
156
Upgrading SOLIDWORKS PDM

Upgrading File VaultsTo upgrade file vaults, you first upgrade the file vault database and then optionally thefile vault archives.
Upgrading the File Vault DatabaseYou can run the SOLIDWORKS PDM Database Upgrade Wizard on the archive or databaseserver, or from a system running the SOLIDWORKS PDM client.
However, all installed SOLIDWORKS PDM software on the system must match the upgradewizard version. You cannot run the upgrade wizard on a client or server system that isstill using an older version of the software. The database upgrade process may take sometime to finish, depending on the database size and version.
Before upgrading the file vault database:
• Ensure that your SOLIDWORKS PDM serial number has valid licenses for the newversion.
• Make sure that no users are working in the vault.• Back up the file vault database.
For details, see Backing Up the File Vault Database on page 144.
• Install or upgrade the archive server software.
For details, see Upgrading the Archive Server on page 154.
• Install or upgrade the database server software.
For details, see Upgrading the Database Server on page 155.
Do not uninstall old clients until the database upgrade has been completed.
You can upgrade the file vault from SOLIDWORKS Enterprise PDM 2015 or earlier toSOLIDWORKS PDM Professional. This tool is used for upgrading major versions orservice packs and not for upgrading vaults from Standard to Professional.
To upgrade the file vault database:
1. In the SWPDMServer\Upgrade folder, run Upgrade.exe to start the upgrade wizardmanually.
2. When a message box warns that the database and file vault upgrade wizard mustonly be run by administrators, click Yes.
157
Upgrading SOLIDWORKS PDM

3. Complete the steps of the SOLIDWORKS PDM Database Update Wizard.
ActionScreen
Verify that you have performed all of the upgrade prerequisites,and click Next.
Step 1
Step 2 a. From the server list, select the SQL Server hosting the filevault database you want to upgrade.
If the server is not listed, you can enter the name of theSQL system.
b. Click Next.c. In the login dialog box, enter the user name and password
of an SQL user with sysadmin permissions, such as sa, andclick Login.
Select one or more file vault databases to upgrade and clickNext.
Step 3
Click Next to begin the upgrade process.
Do not close the upgrade wizard or turn off the SQL Serveruntil the upgrade is completed.
Step 4
When the file vault database upgrade finishes, a log is displayedwith the actions and results of the upgrade.To keep a copy of the upgrade log, select and copy the resultsand paste them to a text file.
Click Finish.
Step 5
4. Reboot the Microsoft SQL Server after the databases have been upgraded.If you do not, you may experience performance drops until you reboot the server.
Upgrading File Vault ArchivesAfter you upgrade the file vault database, you can upgrade the file vault archives usingthe SOLIDWORKS PDM administration tool, which is only available on client installations.
You must upgrade the file vault archive if you are upgrading a file vault from EnterprisePDM 2008 or earlier version.
Upgrading archives are not needed if upgrading newer versions.
Upgrading file vault archives consists of these tasks:
• Upgrading or installing an initial SOLIDWORKS PDM client on the computer where youwill upgrade the file vault archives.
158
Upgrading SOLIDWORKS PDM

You will upgrade other clients after the file vault archives are updated.
• Upgrading the file vault archive using the SOLIDWORKS PDM administration tool onthe initial client computer.
• Upgrading the remaining SOLIDWORKS PDM clients.
The vault archive upgrade process can take several hours to complete depending on thenumber of files and size of the archive. During the upgrade, users cannot work in the filevault.
Upgrading the Initial SOLIDWORKS PDM Client1. Log in to a client workstation as a user with local administrative rights.2. Browse to the installation media.3. Run \SWPDMClient\setup.exe to start the SOLIDWORKS PDM server upgrade.4. On the SOLIDWORKS PDM installation screen:
If an older version of SOLIDWORKS PDM client is installed, click Upgrade.
At the message that the current client software will be upgraded, click OK.
5. On the Select PDM Product screen, ensure that SOLIDWORKS PDM Professionalis selected.
6. To include the Item Explorer, select Customize.7. On the Custom Setup screen, under Client, click Item Explorer, and select This
feature will be installed on local hard drive.8. Follow the install wizard steps by clicking Next in each screen.9. Follow the installation wizard as you would if you were installing a new client.
For details, see Installing Clients Using the Installation Wizard on page 90 .
On the Choose Product Type screen, select the correct product for your client licensetype.
Upgrading the File Vault ArchivesUpgrading archives are only required if upgrading from EPDM 2008 or older.
To upgrade the file vault archive:
1. Start the Administration tool by doing one of the following:
• On Windows 7, click Start > All Programs > SOLIDWORKS PDM >Administration.
• On Windows 10 and Windows Server 2016 or later, from the Windows Startmenu,click SOLIDWORKS PDM > Administration.
159
Upgrading SOLIDWORKS PDM

2. If the archive server hosting the upgraded file vault does not appear in the left pane:a) Select File > Add Server.b) In the Add Server dialog box, select or enter the name of the archive server,
specify the port, and click OK.c) Log in to the archive server using a Windows user account with administrative
access to the archive server.
3. Expand the archive server in the left pane. File vault archives that require upgrading
are listed under the archive server with a red icon .
• If the icon is not shown, refresh the view by right-clicking the archive server nameand selecting Refresh.
• If the icon does not appear after refreshing, the file vault archive is up-to-dateand no upgrade is required.
4. Right-click the archive name and click Upgrade.If you are prompted to log in, enter a SOLIDWORKS PDM username and passwordfor a user with file vault management permission (usually Admin).
Two messages appear:
• The first warns that the upgrade can take a long time and that no users should belogged in.
• The second states that a backup of the archive server should exist.
If you have met these prerequisites, click Yes for both.
During the archive upgrade, the Work Monitor window displays a progress bar. Donot end the process until the word “Completed!” appears.
If you have multiple file vault archives to upgrade, you can start the upgrade onthose also. They are added to the Work Monitor.
When the upgrade finishes, you can view a log of the upgrade results by clickingShow Log.
5. Close the Work Monitor.6. To verify that the upgrade was successful, log in to the file vault view and try to
retrieve a file.
Upgrading a Replicated File Vault Archive (For SOLIDWORKS PDMProfessional Only)Upgrading file vault archives replicated on other servers requires additional configurationprocesses.
When upgrading archive servers hosting a replicated file vault, file vaults that require
upgrading are listed with a red icon .
If the icon is not shown, refresh the view by right-clicking the archive server name andselecting Refresh. If the icon is still now shown, no upgrade is required.
If the icon is shown:
160
Upgrading SOLIDWORKS PDM

• You must upgrade the archive server software on all servers hosting the replicatedvault. The selected archive will still be upgraded and you will have to launch the archiveupgrade for the replicated servers separately once the software is upgraded.
• If the archive server software is upgraded on all replicated archive servers and theyshow up in the administration tree, the replicated file vault archive will be upgradedon all servers simultaneously.
• If the vault is replicated and the replicated archive servers are not listed in theadministration tree, a dialog is shown where you can select to attach to the replicatedserver. If you opt not to connect, only the selected archive will be upgraded and youwill have to launch the archive upgrade for the replicated servers separately.
After Upgrading File Vault DatabasesSOLIDWORKS Enterprise PDM 2009 SP02 or later includes functionality to create andmanage items. If you install this version and then upgrade a vault database from aprevious installation, the upgraded database will not include the default item cards, itemBOM, or the serial number that is used to generate item numbers.
To work with items in this vault, use the SOLIDWORKS PDM Administration tool to importthe following cards and serial number:
• all(Item Card)_gb.crd• all(Item Search Property)_gb.crd• all(Item Search Simple)_gb.crd• all(Item Search)_gb.crd• all_Item Setup_languagecode.cex, where languagecode is the code for yourlanguage
Importing ItemCards (For SOLIDWORKSPDMProfessional ProfessionalOnly)1. Start the Administration tool by doing one of the following:
• On Windows 7, click Start > All Programs > SOLIDWORKS PDM >Administration.
• On Windows 10 and Windows Server 2016 or later, from the Windows Startmenu,click SOLIDWORKS PDM > Administration.
2. Right-click Cards and click Open.3. In the Card Editor, click File > Import.4. In the Open dialog box, for Look in, navigate to install_dir\Default Cards.5. In the card list, select all(item Card)_gb.crd, and click Open.6. Click File > Save to save the card to the vault.7. Repeat steps 3 through 6 to import the rest of the item data cards.
Importing the Serial Number and Item BOM (For SOLIDWORKS PDMProfessional Professional Only)1. Right-click the upgraded vault and select Import.
161
Upgrading SOLIDWORKS PDM

2. In the Open dialog box, for Look in, navigate to install_dir\Default Data.3. In the file list, select all_Item Setup_language.cex, and click Open.4. In the confirmation message, click OK.
Upgrading the Remaining ClientsWhen the file vault database and archive have been upgraded and you have verified thatthe upgraded vault is accessible, you can upgrade the remaining clients to SOLIDWORKSPDM.
Use the same procedure as when you upgraded the first client. For details, see Upgradingthe Initial SOLIDWORKS PDM Client.
After Upgrading ClientsAfter updating SOLIDWORKS PDM clients, complete the post-processing configurationsteps.
After upgrading:
• In the SOLIDWORKS PDM administration tool, ensure that you have valid license.• Update the dispatch and task add-ins.
When you perform these tasks on one client, they are distributed to other clientsautomatically.
Viewing the License Server for the Vault1. Start the Administration tool by doing one of the following:
• On Windows 7, click Start > All Programs > SOLIDWORKS PDM >Administration.
• On Windows 10 and Windows Server 2016 or later, from the Windows Startmenu,click SOLIDWORKS PDM > Administration.
2. Browse to the file vault in the left pane and log in as Admin.3. Under the file vault, double-click License.4. In the Set License dialog box, ensure that a valid license server is displayed.
Updating Dispatch Add-in (For SOLIDWORKS PDM Professional Only)1. In the SOLIDWORKS PDM administration tool, under the file vault, expand Add-ins.
162
Upgrading SOLIDWORKS PDM

2. To update the Dispatch add-in:a) Right-click Dispatch and click Remove.b) Click Yes to confirm that you want to remove the add-in.c) Select File > Open and browse to C:\Program Files\SolidWorks
Corp\SOLIDWORKS PDM\Default Data.d) Change filter to show .caf files.e) Open Dispatch.caf.f) Drag and drop Dispatch add-in from the .caf file under the Add-ins node for
the vault.g) Close the administration vault.
The updated add-ins are distributed automatically to the other clients when they log in.
Upgrading the SOLIDWORKS Task Add-in (For SOLIDWORKSPDM Professional Only)To ensure that the latest, updated version of an add-in such as the SOLIDWORKS TaskAdd-in is running, you must manually upgrade the add-in.
When you upgrade a file vault to a new service pack or version, existing add-ins are notautomatically updated. This is to prevent updated information in the add-ins fromoverwriting your customizations.
For example, you may have customized the tasks controlled by the SOLIDWORKS TaskAdd-in. You can continue to use your customized tasks and not upgrade. However, youwill not be able to use new task functionality and may have problems starting tasks andprocessing upgraded SOLIDWORKS files.
To upgrade the tasks manually, copy the .cex files that contain updates for theSWTaskAdd-in, Convert, Design Checker, and Print tasks. The location of the .cex filesdepends on the method of installation of the client. If you install the client via theInstallShield Wizard, copy the .cex files to C:\Program Files\SOLIDWORKSPDM\Default Data\ folder. If you install the client via the SOLIDWORKS InstallationManager, copy the .cex files to C:\Program Files\SOLIDWORKS Corp\Default Data\folder. You import one or more of these files to update the SWTaskAdd-in and the tasksit supports.
163
Upgrading SOLIDWORKS PDM

Determining the Current Versions of SOLIDWORKS PDM and theSOLIDWORKS Task Add-inTo ensure that you have the latest updates to the SOLIDWORKS Task Add-in, theSOLIDWORKS PDM Professional version and the SWTaskAddin version should be thesame.
1. To determine the SOLIDWORKS PDM version, in the SOLIDWORKS PDM administrationtool, click Help > About SOLIDWORKS PDM Administration.The Client version field shows the version as:
YY.SS.BBBB
where:
• YY is the last two digits of the major version. For example, 15 = 2015.• SS is the service pack. For example, 03 = SP03.• BBBB is the build number. For example, 903.
2. To determine the version number of the currently installed SWTaskAddin:
a) In the Windows notification area, right-click the SOLIDWORKS PDM icon andclick Task Host Configuration.
b) In the Task Host Configuration dialog box, select the vault for which you want toverify the SWTaskAddin version.The Version column displays the version in the following format:
YYYYSSBBBB
where:
• YYYY is the major version.• SS is the service pack.• BBBB is the build number.
Performing the SWTaskAddin Upgrade (For SOLIDWORKS PDMProfessional Only)If the version of SWTaskAddin is earlier than the version of SOLIDWORKS PDM Professional,you can upgrade SWTaskAddin by importing a .cex file.
1. Start the administration tool by doing one of the following:
• On Windows 7, click Start > All Programs > SOLIDWORKS PDM >Administration.
• On Windows 10 and Windows Server 2016 or later, from the Windows Startmenu,click SOLIDWORKS PDM > Administration.
2. Log in to the vault where you want to upgrade SWTaskAddin as an administrator.3. Click File > Open.4. Navigate to C:\Program Files\SOLIDWORKS PDM\Default Data\ and select
Convert_GB.cex.5. In the dialog box that appears, expand Convert_GB.cex, select SWTaskAddin, and
drag it to the Addins node in the left pane.
164
Upgrading SOLIDWORKS PDM

6. In the message box, select Yes to update the existing add-in.
7. In the Windows notification area, right-click the SOLIDWORKS PDM icon and clickTask Host Configuration to verify that SWTaskAddin has been upgraded.
If the client you just upgraded acts as a task host, exit SOLIDWORKS PDM and login again before performing the verification.
Upgrading TasksAfter you upgrade the SWTaskAddin, you can import the latest versions of the Convert,Print, and Design Checker tasks.
This procedure describes how to upgrade the Convert task.
1. In the Administration tool, expand the Tasks node.2. If any tasks have the default names Convert, Print, or Design Checker, rename
them so that customizations you have made to the tasks are not overwritten.3. Click File > Open.4. To upgrade the Convert task, navigate to C:\Program Files\SOLIDWORKS
PDM\Default Data\ and select Convert_GB.cex.If the product is installed via SLDIM, the default path is C:\ProgramFiles\SOLIDWORKS Corp\SOLIDWORKS PDM.
5. In the dialog box that appears, under Tasks, select Convert, and drag it to the Tasksnode in the left pane.
6. Make changes to the newly imported task to match the previously used task andconfigure any new options as required.This includes the file paths and name formats, conversions types, which computersrun as a task host, permissions for the task, notifications etc.
7. If the existing task had modifications to the Advanced Scripting options (accessedfrom the Output File Details page), make those changes to the new version of thescript.The Advanced Script is often updated for a new version of SOLIDWORKS PDM to makeuse of new features in SOLIDWORKS or to add new features to the task. Thereforeyou may need to merge the new scripting with your custom scripting.
Add comments to the script to make it easier to understand and easier to transferthe customization the next time you update.
Retain the default Convert task for reference and for testing if problems arise with acustomized Convert task. Set permissions so that it can only be seen by the Adminuser.
8. Modify workflow transitions that caused the original task to be executed and selectthe updated task as the task to execute.Save the workflow changes.
165
Upgrading SOLIDWORKS PDM

Upgrading Toolbox in SOLIDWORKS PDMIf you have integrated SOLIDWORKS Toolbox with SOLIDWORKS PDM, when you upgradethe SOLIDWORKS software, Toolbox is upgraded if parts have been added.
Before you run SOLIDWORKS Installation Manager to start the upgrade, you must preparethe Toolbox folder.
• On the first computer to perform the upgrade, you must check out the Toolbox databaseso that the SOLIDWORKS Installation Manager can write to it. Use Get Latest Versionto download the Toolbox parts to the local cache so that the installer can verify whetherparts need to be updated or added.
• To upgrade additional computers, get the latest versions of the Toolbox files fromSOLIDWORKS PDM before running SOLIDWORKS Installation Manager.
To upgrade the first SOLIDWORKS PDM computer:
1. In Windows File Explorer, log in to the vault as a user with full permissions (checkout, check in, add, delete).
2. Navigate to the Toolbox folder in the vault.3. Right-click the Toolbox folder and click Get Latest Version to copy all Toolbox files
and the toolbox database to the local cache.
If your archive server is remote, this may take several minutes.
4. For upgrades, you must check out the Toolbox database file:
• From SOLIDWORKS 2014 or earlier, check out:vault_name\Toolbox_folder_name\lang\your_language\SWBrowser.mdb.
• From later versions of SOLIDWORKS, check out:vault_name\Toolbox_folder_name\lang\your_language\swbrowser.sldedb.
5. Run the SOLIDWORKS Installation Manager to upgrade the SOLIDWORKS software(including SOLIDWORKS Toolbox).
6. On the Summary screen, ensure that the Toolbox Options installation location isthe location in the vault.
If it is not, click Change, select Reference or upgrade an existing Toolbox, andbrowse to the Toolbox location in the vault.
7. For upgrades from SOLIDWORKS 2014 or earlier, when the upgrade completes, inWindows File Explorer, browse to the folder noted in step 4. Add the Toolbox databasefile swbrowser.sldedb to the vault.You can add other local files that are created in this folder to the vault.
8. For all upgrades, check in the Toolbox folder to add any new or updated files to thevault so that other users can work with Toolbox.
9. For upgrades to SOLIDWORKS 2012 or later, navigate to your Toolbox folder in thevault and ensure that the following are present:
• \Toolbox_folder_name\Updates• \Toolbox_folder_name\ToolboxStandards.xml• \Toolbox_folder_name\Browser\ToolboxFiles.index
If they are not, contact your Value Added Reseller.
166
Upgrading SOLIDWORKS PDM

To upgrade additional computers, before initiating the SOLIDWORKS PDM upgrade, useGet Latest Version to download the vault Toolbox folder to the local cache.
SOLIDWORKS Installation Manager will verify that the Toolbox files are up-to-date whenyou run the installation.
167
Upgrading SOLIDWORKS PDM

12Upgrading SOLIDWORKS Files
This chapter includes the following topics:
• Upgrading SOLIDWORKS Files• Required Upgrade Utility Software• System Requirements• Installing the File Version Upgrade Utility• Preparing to Upgrade• Selecting Version Settings• Performing a Trial File Upgrade• Running the Upgrade Utility• Creating and Using Work Instruction Files• Completing an Interrupted Upgrade• After Upgrading• Managing Backup Files
Upgrading SOLIDWORKS FilesThe SOLIDWORKS® PDM File Version Upgrade tool upgrades SOLIDWORKS files from anearlier version to a later SOLIDWORKS file format.
After you upgrade files, you cannot open them in older SOLIDWORKS versions.
The tool automatically checks out, upgrades, and checks in SOLIDWORKS files that arestored in the SOLIDWORKS PDM vaults. File references, revision tags, and workflow statesare kept intact.
The only file formats that are upgraded are .sldprt, .slddrw, and .sldasm. UpgradeSOLIDWORKS template and block files manually.
Several workstations, each running the upgrade tool, can perform concurrent upgradesto reduce the upgrade time. The first workstation to run the upgrade tool acts as themaster workstation, which creates the upgrade plan. The plan consists of several workinstruction files, one for each workstation participating in the upgrade process. For moredetails, see Creating and Using Work Instruction Files.
168

The work instruction files contain tree structures that reflect the parent-child relationshipsof the SOLIDWORKS files. Both master and slave workstations can run additional workinstruction files after they finish processing the first one. Although parts and subassembliescan be shared by other assemblies, each file is only upgraded once.
If an assembly references parts that are not at the latest version, you can choose aversion setting that links the assembly with the latest version of the parts it references.Alternatively, you can choose a version setting that overwrites the existing version ofreferenced files with the latest version of the files. See Selecting Version Settings.
Required Upgrade Utility SoftwareThe SOLIDWORKS PDM 2020 file version upgrade tool can be used with SOLIDWORKS2020, 2019, and 2018.
System RequirementsSystem requirements depend on the vault database being upgraded. They are affectedby the structure of the database, including the number of files, versions, and referencesbeing converted.
Use powerful workstations. As files are opened and resaved in SOLIDWORKS, it is importantthat the workstations used have sufficient resources to handle even the largest assemblystructures. Use powerful workstations with at least 4GB RAM and plenty of free hard diskspace.
Stop any non-essential processes to free up as many resources as possible on theworkstations being used.
The following are specific recommendations:
169
Upgrading SOLIDWORKS Files

• Archive server
When the conversion is performed by overwriting existing versions of files, a backupis created for each overwritten file. The archive server must have disk capacity to storethese backup files.
Before the upgrade begins, a screen message notifies you of the space needed, basedon the files you have selected to upgrade.
• Workstations
All workstations that will be used for the upgrade must have enough RAM to open thelargest assembly to be converted. A minimum of 4 GB RAM is recommended.
SOLIDWORKS recommends a minimum of 6 GB RAM (or more on Windows 7 x64operating systems).
Installing the File Version Upgrade UtilityThe File Version Upgrade Utility is provided on the SOLIDWORKS installation media inthe SWPDMClient\Support\File Version Upgrade\ directory.
To install the File Version Upgrade Utility:
1. Navigate to the SWPDMClient\Support\File Version Upgrade\ on the Installationmedia.
2. Double-click File Version Upgrade.exe.3. In the Welcome screen, click Next.4. Accept the license agreement and click Next.5. Click Install.6. Click Finish.
Preparing to UpgradePrepare the workstations involved in the upgrade before you begin the upgrade process.
Perform a complete vault backup, including:
• File vault database• Archive files
On the master and slave workstations that are participating in the upgrade process:
1. Install the same version and revision level of SOLIDWORKS PDM client.2. Create local views of the file vault to be upgraded.3. Check all files into the vault.4. Close SOLIDWORKS.
On the master workstation:
1. Give participating clients read/write access to all files in the vault you are upgrading.2. Create a folder for the work instruction files and share it with full (read/write)
permissions for all participating clients.
170
Upgrading SOLIDWORKS Files

Selecting Version SettingsThe Version Settings screen lets you specify which versions and revisions of your selectedfile type will be upgraded and whether old versions will be overwritten.
Before you perform a full conversion, test the conversion of older files by opening asample set in the target version of SOLIDWORKS to check for any conversion errors.
Select Create new version of files if you want only the most recent versions of files tobe upgraded and to preserve the existing versions of the files in the older file format.New SOLIDWORKS PDM versions are created.
Select Overwrite existing versions of files if you want to:
• Overwrite all versions of files with upgraded files.• Specify which versions of files to overwrite by selecting one or both of the following:
• Latest version The tool upgrades the latest versions of files plus all files that theyreference.
• Versions with a revision The tool upgrades all files with revision tags.
If you choose to overwrite existing versions, the File Version Upgrade tool creates abackup of files before upgrading them. You can delete backed up files after confirmingthat the upgrade is successful. See Managing Backup Files.
Assemblies that contain cyclic references are not upgraded if you select to overwriteexisting versions of files.
Upgrade ScenariosThe following topics illustrate the possible upgrade scenarios for the set of files below.
171
Upgrading SOLIDWORKS Files

version increment
reference
Creating New Versions of FilesWhen you create new versions of files, the older versions still exist and can continue tobe opened in the older version of SOLIDWORKS.
Relinking to the Latest Version of Referenced FilesYou can relink an assembly to the latest version of the files that it references.
If the assembly and its subassemblies reference versions of parts that are not the latestversion, the references are moved to the latest versions of the parts.
Older versions of the parts, assembly, and subassembly are not upgraded and theirreferences are not affected.
If the newer versions of referenced files have undergone geometry modifications, usingthis option could result in unwanted assembly changes or rebuild errors. In addition,if file properties such as Part Number, Description, or Material have changed, in thenewer versions, this could cause changes in Bills of Materials.
Selections represented In the diagram below are:
172
Upgrading SOLIDWORKS Files

SelectionsOptionScreen
<All SW file types>Files of typeSearch Files toUpgrade
Files referencing older versions• Are re-linked to the new version
Update revisions
• Do not update revision
Create new versionof files
Version Settings
Files before upgradeReference links beforeupgrade
Upgraded filesReference links afterupgrade
173
Upgrading SOLIDWORKS Files

Moving Existing Revision TagsYou can move the latest revision tag to the latest version of a file you are upgrading.
Selections represented In the diagram below are:
SelectionsOptionScreen
<All SW file types>Files of typeSearch Files toUpgrade
Files referencing older versions• Are excluded
Update revisions
• Move revision
Create new versionof files
Version Settings
Files before upgrade, showing revision that is moved
Upgraded files
174
Upgrading SOLIDWORKS Files

Incrementing Revision TagsYou can increment the revision tags on the latest versions of files as you upgrade thefiles.
Selections represented In the diagram below are:
SelectionsOptionScreen
<All SW file types>Files of typeSearch Files toUpgrade
Files referencing older versions• Are re-linked to the new version
Update revisions
• Increment revision
Create new versionof files
Version Settings
Files before upgrade, showing revision thatis moved and incremented
Reference links beforeupgrade
175
Upgrading SOLIDWORKS Files

Upgraded filesReference links afterupgrade
Overwriting Existing Versions of FilesWhen you overwrite the existing versions of files, the existing files are replaced withupgraded files. New versions are not created.
Overwriting the Latest Versions of FilesYou can upgrade by overwriting the latest version of all files of the selected file type. Anyversion of a file that is used in a reference from an upgraded file is also upgraded.
Overwriting the Latest Versions of All Files
SelectionsOptionScreen
<All SW file types>Files of typeSearch Files toUpgrade
Overwrite• Latest version
Overwrite existingversions of files
Version Settings
176
Upgrading SOLIDWORKS Files

Overwriting the Latest Version of Parts
SelectionsOptionScreen
*.sldprtFiles of typeSearch Files toUpgrade
Overwrite• Latest version
Overwrite existingversions of files
Version Settings
By default, part drawings are not upgraded. However, because drawings are parentsto parts, a Broken reference warning screen lets you select to upgrade the drawingsthat reference the parts that are being upgraded.
Overwriting the Latest Version of Assemblies
SelectionsOptionScreen
*.sldasmFiles of typeSearch Files toUpgrade
Overwrite• Latest version
Overwrite existingversions of files
Version Settings
177
Upgrading SOLIDWORKS Files

In a referenced version stream, the File Version Upgrade tool also upgrades the latest
parts, as indicated by the blue boxes.
By default, part and assembly drawings are not upgraded. However, because drawingsare parents to parts and assemblies, a Broken reference warning screen lets you selectto upgrade the drawings that reference parts and assembles that are being upgraded.
Overwriting the Latest Version of Drawings
SelectionsOptionScreen
*.slddrwFiles of typeSearch Files toUpgrade
Overwrite• Latest version
Overwrite existingversions of files
Version Settings
178
Upgrading SOLIDWORKS Files

Overwriting Files with Revision TagsYou can include files with revision tags as files that are upgraded.
These examples show the files that are upgraded when you choose both Latest versionand Version with a revision. Red boxes indicate files that are upgraded because theyhave revision tags, even though they are not the latest version.
Overwriting All Files with Revision Tags
SelectionsOptionScreen
<All SW file types>Files of typeSearch Files toUpgrade
Overwrite• Latest version• Version with a revision
Overwrite existingversions of files
Version Settings
179
Upgrading SOLIDWORKS Files

Overwriting Parts with Revision Tags
SelectionsOptionScreen
*.sldprtFiles of typeSearch Files toUpgrade
Overwrite• Latest version• Version with a revision
Overwrite existingversions of files
Version Settings
180
Upgrading SOLIDWORKS Files

By default, part drawings are not upgraded. However, because drawings are parentsto parts, a Broken reference warning screen lets you select to upgrade the drawingsthat reference the parts that are being upgraded.
Overwriting Assemblies with Revision Tags
SelectionsOptionScreen
*.sldasmFiles of typeSearch Files toUpgrade
Overwrite• Latest version• Version with a revision
Overwrite existingversions of files
Version Settings
181
Upgrading SOLIDWORKS Files

In a referenced version stream, the File Version Upgrade tool also upgrades the latest
parts, as indicated by the blue boxes.
By default, part and assembly drawings are not upgraded. However, because drawingsare parents to parts and assemblies, a Broken reference warning screen lets you selectto upgrade the drawings that reference parts and assembles that are being upgraded.
Overwriting Drawings with Revision Tags
SelectionsOptionScreen
*.slddrwFiles of typeSearch Files toUpgrade
Overwrite• Latest version• Version with a revision
Overwrite existingversions of files
Version Settings
182
Upgrading SOLIDWORKS Files

Performing a Trial File UpgradeBefore upgrading the SOLIDWORKS files in a production vault, perform the upgrade ona copy of the production vault to ensure that there are no upgrade problems. You cancontact your Value Added Reseller for help with creating a copy of your vault.
1. Restore a complete backup of the file vault to a separate server.2. Start the File Version Upgrade Utility by doing one of the following:
• On Windows 7, click Start > All Programs > SOLIDWORKS PDM > File VersionUpgrade.
• On Windows 10 and Windows Server 2016 or later, from the Windows Startmenu,click SOLIDWORKS PDM > File Version Upgrade.
3. Follow the instructions in the upgrade wizard.4. Verify that the upgrade is successful.
See After Upgrading on page 185.
Running the Upgrade UtilityTo run the upgrade utility:
1. Start the File Version Upgrade Utility by doing one of the following:
• On Windows 7, click Start > All Programs > SOLIDWORKS PDM > File VersionUpgrade.
• On Windows 10 and Windows Server 2016 or later, from the Windows Startmenu,click SOLIDWORKS PDM > File Version Upgrade.
183
Upgrading SOLIDWORKS Files

2. On the Welcome screen, do one of the following:
• To set up the upgrade, click Initiate a new upgrade process (MasterWorkstation).
• To run a work instruction file created for the upgrade, click Participate in anupgrade process (Slave Workstation).
• To retry an upgrade that was terminated unexpectedly, click Restart aninterrupted upgrade process (Master and Slave Workstation).
3. Follow the instructions in the upgrade wizard.
Creating and Using Work Instruction FilesBy creating work instruction files, you can run the upgrade tool concurrently on severalworkstations to reduce the upgrade time.
You create the work instruction files on the first workstation that runs the upgrade tool,which becomes the master workstation.
To create and use work instruction files:
1. Create a shared folder and give each workstation that will participate in the upgradeRead/Write access.
2. Start the File Version Upgrade Utility by doing one of the following:
• On Windows 7, click Start > All Programs > SOLIDWORKS PDM > File VersionUpgrade.
• On Windows 10 and Windows Server 2016 or later, from the Windows Startmenu,click SOLIDWORKS PDM > File Version Upgrade.
3. On the Welcome screen, select Initiate a new upgrade process (MasterWorkstation) and click Next.
4. Complete the wizard screens.5. On the Upgrade Settings screen:
a) Under Upgrade Settings, select Divide the upgrade work into multiple workinstruction files.
b) Specify the number of work instruction files to create.c) For Shared location for work instruction files, enter the name of the shared
folder you created in step 1 or click the browse to navigate to the folder.
The folder name must be in UNC format.
d) Click Next.
6. On the Ready to Upgrade Files screen, do one of the following:
• To upgrade now, click Yes.
When a completion message appears, click OK.
• To exit the upgrade utility and run work instruction files later, click No.
7. If you selected No in step 6, run the File Version Upgrade tool again to perform theupgrade using the work instruction files.
184
Upgrading SOLIDWORKS Files

8. On the Welcome screen, select Participate in an upgrade process [SlaveWorkstation].
9. On the Select Work Instruction File screen:a) Browse to the location of the work instruction files.b) Select the work instruction file to process.c) Click Next.
The Work Instruction File Summary displays with a read-only summary of thesettings specified for the upgrade.
d) Click Next.
10. On the Ready to Upgrade Files screen:a) Click View Files to see a list of files that will be upgraded.b) To upgrade the files, click Yes.c) When a completion message appears, click OK.
Completing an Interrupted UpgradeSometimes an upgrade is interrupted unexpectedly, for example, when you lose a networkconnection or lose power.
To complete an interrupted upgrade:
1. Click Retry in the error message.2. In the message indicating that the conversion did not complete successfully, click OK3. Click Exit.4. Solve the problem that caused the interruption.
For example, restore the network or restart the computer.
5. Run the Upgrade utility again.6. On the Welcome screen, select Restart an interrupted upgrade process (Master
and Slave Workstation).7. On the Continue Interrupted Migration screen, click Next.8. On the Work Instruction File Summary screen, click Next.9. On the Ready to Upgrade Files screen, click Finish.
After UpgradingWhen the upgrade is complete:
• View the upgrade log files.• Manually upgrade files that the tool was unable to upgrade automatically.
Manual upgrade creates new versions. If you upgraded using Overwriteexisting versions, manual upgrade will invalidate the reference structure.
• Optionally, use Get Latest Version to create local copies of files that were convertedon other workstations.
185
Upgrading SOLIDWORKS Files

• Open a subset of converted files in SOLIDWORKS to verify that the conversion wassuccessful.
• If you selected to overwrite existing versions of files, after ensuring that the upgradewas successful, remove the backup files from the archive server.
File Name Formats for Upgrade LogsFiles names in upgrade logs take the following formats:
• Files that have been upgraded
Upgrade Utility <id>Batch<n>.log
where:
• <id> is a unique alphanumeric string• <n> is the number of the batch file for which the log was created
Example: Upgrade Utility 471F2FDS Batch 4.log
• Files that could not be upgraded
Upgrade Utility <id> Batch <n>.logExcluded.log
Example: Upgrade Utility 471F2FDS Batch 4.logExcluded.log
Managing Backup FilesIf you choose to overwrite existing versions of files when you upgrade, the upgrade toolcreates a backup file for each overwritten file.
These backup files remain after the upgrade. You can remove them after you verify thatthe upgrade succeeded.
Backup File CreationIt is not possible to disable the backup option, so ensure that you have sufficient freedisk space on the archive server before you start the upgrade.
The Ready to Upgrade Files screen gives an estimate of the amount of space that isneeded.
For each file that is overwritten:
1. The upgrade tool retrieves the original version of the file from the file archive folderto the client system that is running a work instruction file to perform the upgrade.
2. The tool opens the file in SOLIDWORKS, upgrades it, and send it back to the archivefolder when the batch process completes.
186
Upgrading SOLIDWORKS Files

3. Before the version is replaced, the original version in the archive is renamed usingthe following format:bak_counter_version.extension
Where:
• bak is the prefix for all backup files.• counter is a unique counter in case the existing file with the same backup nameexists from a previous upgrade.
• version is the number, in hexadecimal format, of the file version that is beingreplaced.
• extension is the file extension.
4. The upgrade tool places the upgraded version of the file in the archive using theoriginal file name.
Restoring an Incorrectly Upgraded Version from a BackupIf an upgraded version of a file is incorrect, you can use the backup file to restore theoriginal content of the file.
1. In the local file vault view, determine the name of the file to find.2. Open Microsoft SQL Server Management Studio and click Connect.3. Expand Databases and select the vault containing the file you want to restore.4. Click New Query.5. In the right pane, type a query in the following format:
select * from documentswhere filename like 'filename.ext'
For example:
select * from documentswhere filename like 'speaker_frame.sldprt'
6. Click Execute.
Record the files DocumentID, which is listed in the Results tab.
7. Exit the SQl Server Management Studio.8. Use a calculator to convert the DocumentID to hexadecimal format.9. In an Explorer window, navigate to install_dir\Program Files\SOLIDWORKS
PDM\Data\vault_name.10. Expand the vault archive that matches the last digit of the hexadecimal number.
For example, if the hexadecimal number is 3B, expand the folder labeled B.
11. Expand the folder that matches the hexadecimal number.12. Rename or delete the version of the file you want to restore.
For example, rename 00000002.sldprt to 00000002.backup.
13. Rename the appropriate bak_ file to the original file name.For example, rename bak_0_00000002.sldprt to 00000002.sldprt.
14. Exit Microsoft SQL Server Management Studio.
187
Upgrading SOLIDWORKS Files

13Additional Configuration
This chapter includes the following topics:
• Managing the SQL Transaction Log Size• Configuring SOLIDWORKS PDM to Communicate Using IP Addresses Only• Moving Server Components to Another System
Managing the SQL Transaction Log SizeEach SQL database contains one database file (.mdf) and at least one transaction log file(.ldf). The database file stores the physical data added to the database, and thetransaction log keeps records of database modifications. The SQL Server uses thetransaction log to maintain database integrity, particularly during recovery.
By default, the recovery method of an SQL database is set to full recovery model, whichmeans that every change to the database is logged. A large transaction log can growuntil it is out of disk space and causes the performance of the SQL Server to drop.
The full recovery model is the best choice when you need to restore to an exact point intime. However, if you rely on nightly database backups, use the simple recovery modelto limit transaction log size and maintain SQL Server performance.
To reduce the size of a large transaction log after you change to simple recovery model,shrink the transaction log.
For more details about changing the recovery model, see the SQL Server books onlineand search for Microsoft Knowledge Base article 873235 onhttps://support.microsoft.com/en-us.
Changing to the Simple Recovery Model1. Open Microsoft SQL Server Management Studio and click Connect.2. In the left pane, expand the Databases folder, right-click the database name and
select Properties.3. In the Database Properties dialog box, in the left pane, select Options.4. In the Recovery model list, select Simple and click OK.5. Close Microsoft SQL Server Management Studio.
188

Shrinking the Transaction Log1. Right-click the database name, and select Tasks > Shrink > Files.2. In the Shrink File dialog box, in the File type list, select Log.3. Click OK.
Configuring SOLIDWORKSPDM toCommunicateUsing IP Addresses Only
By default, when setting up a SOLIDWORKS PDM environment, clients communicate withservers using system names. If the DNS lookup is unstable or not sufficient for the networksetup, you can configure SOLIDWORKS PDM to use only IP-numbers to communicate.
This setup involves:
1. Updating the archive server2. Updating the SQL Server3. Updating the SOLIDWORKS PDM clients
When connecting to the archive server, you can remove and re-attach the file vaultview using the archive server IP address instead of updating the registry manually.
Updating the Archive Server to Communicate Using IPAddresses
1. On the system running the archive server, from the Windows Start menu, click Run> regedit to open the registry.
2. Find the key for the archive server:HKEY_LOCAL_MACHINE\SOFTWARE\SOLIDWORKS\Applications\PDMWorksEnterprise\ArchiveServer
3. In the right pane, right-click and select New > String value and name the stringvalue ServerName.
4. Double-click ServerName.5. In the Edit string dialog box, in the Value data field, type the IP address of the archive
server and click OK.6. Find the key for the file vault:
HKEY_LOCAL_MACHINE\SOFTWARE\SOLIDWORKS\Applications\PDMWorksEnterprise\ArchiveServer\Vaults\vaultname
7. Double-click Server, update the Value data field with the IP address to the SQLServer hosting the vault database, and click OK.
8. Restart the archive server service.
189
Additional Configuration

Updating the SQL Server to Communicate Using IPAddresses
1. Open Microsoft SQL Server Management Studio and click Connect.2. In the left pane, expand Databases, the vault database, and Tables.3. Right-click dbo.ArchiveServers and select Open Table.4. Under ArchiveServerName, change the entry to the IP address of the archive server
hosting the vault.5. Right-click dbo.SystemInfo and select Open Table.6. Under ArchiveServerName, change the entry to the IP address of the archive server
hosting the vault.7. Exit Microsoft SQL Server Management Studio.
Updating SOLIDWORKSPDMClients to CommunicateUsingIP Addresses
1. If started, exit SOLIDWORKS PDM by clicking the SOLIDWORKS PDM icon on theright side of the task bar and selecting Exit. Ensure the administration tool is notrunning.
2. On the system running the archive server, from the Windows Start menu, click Run> regedit to open the registry.
3. Find the key for the file vault view:HKEY_LOCAL_MACHINE\SOFTWARE\SOLIDWORKS\Applications\PDMWorksEnterprise\Databases\vaultname
4. Update the DbServer value with the IP address to the SQL Server hosting the vaultdatabase.
5. Update the ServerLoc value with the IP address to the archive server hosting thevault archive.
6. If the administration tool was used on the client, delete the following key:HKEY_CURRENT_USER\Software\SOLIDWORKS\Applications\PDMWorksEnterprise\ConisioAdmin
The key is recreated when starting the administration tool.
Verifying IP Address Communication1. When all servers and clients are updated, verify that you can:
• Log into the file vault.• Add a new file.• Retrieve an existing file.
2. If the vault is replicated, ensure you are using IP addresses in the replication settingsdialog.
190
Additional Configuration

3. If you experience problems connecting with the new addresses:
• Check the client and archive server log for errors.• Ensure that you can ping the servers from the client using the supplied IP addresses.
Moving Server Components to Another SystemUse these procedures when moving SOLIDWORKS PDM server components from onesystem to another or when changing the name on the server system to verify whichdatabase and registry entries should be updated.
Ensure to move the components of SOLIDWORKS PDM Standard server on a machinethat has SQL Server Express.
These instructions describe moving both the database and archive server. If you aremoving only one, follow only those instructions that apply.
Before you start, tell users to exit all SOLIDWORKS PDM vaults. Users can work off-linewhile you are performing the move. After client registry keys are updated, users cancheck the work they do off-line into the new vault location.
Copying Files to the New Server1. On the old SQL Server, back up the file vault database and the ConisioMasterDb.
For details, see Backing Up the File Vault Database.
2. Copy the backup file to the new server.3. Open the SOLIDWORKS PDM Archive Server dialog box by doing one of the following:
• On Windows 7, click Start > All Programs > SOLIDWORKS PDM > ArchiveServer Configuration.
• On Windows 10 and Windows Server 2016 or later, from the Windows Startmenu,click SOLIDWORKS PDM > Archive Server Configuration.
4. To make a backup of the archive server settings:a) Select Tools > Backup settings.
For details, see Backing Up the Archive Server Settings.
b) Clear or set a password, and click Launch backup.c) Close the SOLIDWORKS PDM Archive Server dialog box.d) Copy the backup file (backup.dat) to the new server.
5. Copy the entire file vault archive folder from the old server to the new server,maintaining the same path.
If you are unsure where the archives are located, check this registry key:
HKEY_LOCAL_MACHINE\SOFTWARE\SOLIDWORKS\Applications\PDMWorksEnterprise\ArchiveServer\Vaults\vaultname\ArchiveTable
191
Additional Configuration

Configuring the Moved SQL File Vault Database1. On the new server, install the SQL Server software.
For details, see Installing and Configuring SQL Server.
2. To keep the collation settings the same as the old server:a) Open the Microsoft SQL Server Management Studio and click Connect.b) Right-click the server and select Properties.c) In the Server Properties dialog box, in the right pane, note the Server Collation
setting of the old server.d) During the new SQL install, select Custom and set the same collation.
3. Restore the backed-up database, keeping the original name.
Stop the old SQL Server service or take the old databases offline so that you donot have two servers with the same vault database active.
4. In the restored file vault database, update with the new archive server name in tablesArchiveServers and SystemInfo.
In a replicated environment, the ArchiveServers table contains each replicatedserver. Be sure to update only the moved server entry. Do not change theVaultName entry.
5. To allow indexing of the moved file vault database, create a linked server entry:
You need to create a linked server entry only while using Microsoft Indexing Serviceon Windows 7 or Windows Server 2008 R2.
a) Open Microsoft SQL Server Management Studio and click Connect.b) Right-click on the moved file vault database and select New Query.c) Enter the following command in the query window, then press Execute (F5) to
run the query.Exec Sys_IndexServerLink 1
If indexing is already set up on the old server, remove and recreate the indexcatalog on the new server using the Indexing node in the Administration tool.
6. Exit Microsoft SQL Server Management Studio.
Moving the SolidNetWork License ManagerIf you need to move your license manager software to another server, you must transferactivated licenses to the license key server at Dassault Systèmes SOLIDWORKSCorporation.
To move the SolidNetWork License Manager software:
1. Transfer the activated license to the license key server.For more information, see Transferring a SolidNetWork License on page 66.
2. Install the SolidNetwork License Manager on the new server.
192
Additional Configuration

3. Reactivate the license.For more information, see Installing and Configuring SolidNetWork Licensingon page 62.
Moving the SOLIDWORKS PDM Database ServerIf you move the SOLIDWORKS PDM database to a new system, you must move or reinstallthe database server component.
Moving or reinstalling the database server component ensures that the database serverreceives updates such as notifications, local view refresh, replication schedule updates,and index server changes from the SOLIDWORKS PDM database.
To move the SOLIDWORKS PDM database server:
1. Uninstall the SOLIDWORKS PDM database server from the old server.2. Install the SOLIDWORKS PDM database server on the new server.3. When prompted to specify the SQL server that hosts the file vault databases, specify
the name of the SQL server where you have moved the vault database.4. To verify the Mail Service configuration:
a) On the new server, expand the Start menu and type regedit in the Searchprograms and files field.
b) Under Programs, right-click regedit.exe and click Run as administrator.c) In the Registry Editor, expand HKEY_LOCAL_MACHINE > SOFTWARE >
SOLIDWORKS > Applications > PDMWorksEnterprise > MailService.d) Verify the Server value.
The value is:
• Blank if you have installed the SOLIDWORKS PDM database server on the samesystem as the SQL server and databases are running under the default SQLinstance.
• The SQL server name or instance name if the SQL server is on a differentsystem or using a named SQL instance.
Configuring the Moved Archive Server1. Install the archive server on the new server. Use the default settings used on the old
server, if you can remember them.For details, see Installing SOLIDWORKS PDM Archive Server.
2. Open the SOLIDWORKS PDM Archive Server dialog box by doing one of the following:
• On Windows 7, click Start > All Programs > SOLIDWORKS PDM > ArchiveServer Configuration.
• On Windows 10 and Windows Server 2016 or later, from the Windows Startmenu,click SOLIDWORKS PDM > Archive Server Configuration.
3. Select Tools > Backup settings.4. In the Backup Settings dialog box, click Load Backup.
The old archive server settings are imported.
193
Additional Configuration

5. On the new archive server, from the Windows Start menu, click Run > regedit toopen the registry.
6. Update and verify the following keys, which may differ from the old server settings:
• HKEY_LOCAL_MACHINE\SOFTWARE\SOLIDWORKS\Applications\PDMWorksEnterprise\ArchiveServer\Computers\local\Archives
Ensure that the default value points to the correct archive folder (=parent) wherethe file vault archive is stored (that is, the path where the file vault archive folderwas copied to). For example, type:
C:\Program Files\SOLIDWORKS PDM\Data
If the product is installed via SLDIM, the default path is C:\ProgramFiles\SOLIDWORKS Corp\SOLIDWORKS PDM.
• HKEY_LOCAL_MACHINE\SOFTWARE\SOLIDWORKS\Applications\PDMWorksEnterprise\ArchiveServer\Vaults\vaultname
Ensure that Server value is updated to the new SQL Server name and SQLDbNamematches the restored file vault database name. Do not change the DbName entry.
• HKEY_LOCAL_MACHINE\SOFTWARE\SOLIDWORKS\Applications\PDMWorksEnterprise\ArchiveServer\Vaults\vaultname\ArchiveTable
Make sure all paths point to the file vault archive location where you copied thefiles to (from the old server.)
7. Stop the old archive server from running.Preferably disconnect the old server from the network so that it is not available untilall clients are updated, or stop the archive server and SQL Server service.
Updating Client Registry Keys1. On each client, update the following registry key:
HKEY_LOCAL_MACHINE\SOFTWARE\SOLIDWORKS\Applications\PDMWorksEnterprise\Databases\vaultname
Update the DbServer (database server) and ServerLoc (archive server) with thenew server name.
On 64-bit clients update the DbServer and ServerLoc in this registry key:
HKEY_LOCAL_MACHINE\SOFTWARE\Wow6432Node\SOLIDWORKS\Applications\PDMWorksEnterprise\Databases\vaultname
2. On each client, delete the following registry key:HKEY_CURRENT_USER\Software\SOLIDWORKS\Applications\PDMWorksEnterprise\ConisioAdmin
194
Additional Configuration
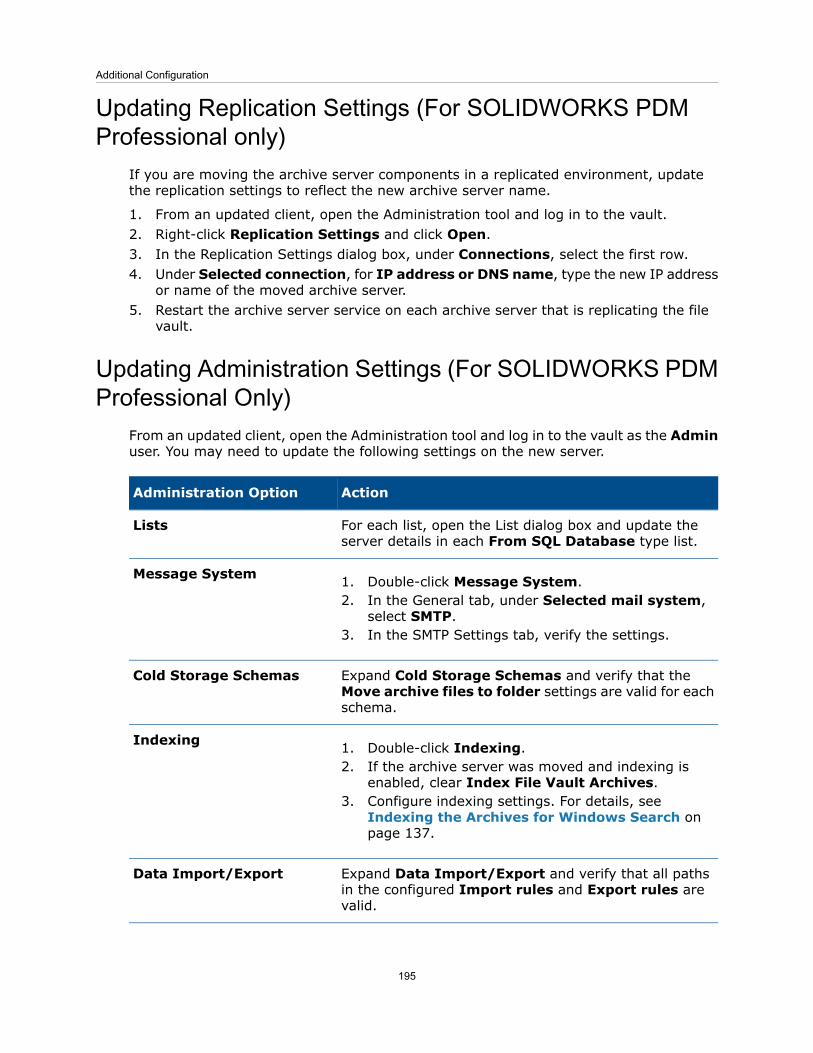
Updating Replication Settings (For SOLIDWORKS PDMProfessional only)
If you are moving the archive server components in a replicated environment, updatethe replication settings to reflect the new archive server name.
1. From an updated client, open the Administration tool and log in to the vault.2. Right-click Replication Settings and click Open.3. In the Replication Settings dialog box, under Connections, select the first row.4. Under Selected connection, for IP address or DNS name, type the new IP address
or name of the moved archive server.5. Restart the archive server service on each archive server that is replicating the file
vault.
Updating Administration Settings (For SOLIDWORKS PDMProfessional Only)
From an updated client, open the Administration tool and log in to the vault as the Adminuser. You may need to update the following settings on the new server.
ActionAdministration Option
For each list, open the List dialog box and update theserver details in each From SQL Database type list.
Lists
1. Double-click Message System.2. In the General tab, under Selected mail system,
select SMTP.3. In the SMTP Settings tab, verify the settings.
Message System
Expand Cold Storage Schemas and verify that theMove archive files to folder settings are valid for eachschema.
Cold Storage Schemas
1. Double-click Indexing.2. If the archive server was moved and indexing is
enabled, clear Index File Vault Archives.3. Configure indexing settings. For details, see
Indexing the Archives for Windows Search onpage 137.
Indexing
Expand Data Import/Export and verify that all pathsin the configured Import rules and Export rules arevalid.
Data Import/Export
195
Additional Configuration

ActionAdministration Option
Expand Tasks. For each configured task, update theExecution Method and output settings, if required.
Tasks
Double-click License and update the license servername.
License
Verifying the Server Move1. Log in as the Admin user and view the file vault listing.2. Make sure that the archive server fully works by adding a text file, checking it in, and
deleting it.
If you cannot login to the vault, or add, check out, or modify files, make sure that thepath to the file vault archive folder that you specified in step 5 of Copying Files to theNew Server is correct.
196
Additional Configuration

14Installing SOLIDWORKS ManageProfessional
This chapter includes the following topics:
• Listing of SOLIDWORKS Manage Server Components• SOLIDWORKS Manage Client Types and Licenses• Prerequisites and System Requirements for SOLIDWORKS Manage• Using SOLIDWORKS Installation Manager for SOLIDWORKS Manage• Editing the SOLIDWORKS Manage Configuration File
SOLIDWORKS Manage Professional has a similar architecture to SOLIDWORKS PDM Professional.It uses a client-server architecture, with a Microsoft SQL Server database to manage item andproject data. There are three services for database, file server, and web server functions,which support both thick clients and web browser clients. The three services can be hostedon the same server or separate servers.
Listing of SOLIDWORKS Manage ServerComponents
This table summarizes the components of SOLIDWORKS Manage Server.
InstallationFunctionComponent
Can install withSOLIDWORKS Manage, oruse a version previouslyinstalled for SOLIDWORKSPDM.
Controls SOLIDWORKSManage and SOLIDWORKSPDM licenses.
SolidNetWork LicenseManager
Required; install withSOLIDWORKS Manage.
Manages data, reports, andother elements ofSOLIDWORKS Manage.
SOLIDWORKS Manage FileServer
Optional; install withSOLIDWORKS Manage.
Provides access toSOLIDWORKS Managefeatures over the Internetfrom browser-based clients.
SOLIDWORKS Manage WebServer
197

InstallationFunctionComponent
Optional; install withSOLIDWORKS Manage.
Allows SOLIDWORKSManageto send email messages.
SOLIDWORKS Manage EmailServer
Generated when theSOLIDWORKS ManageServer is installed.
Contains connectioninformation forSOLIDWORKSManage serverand clients to the SQL Serverdatabase and theSolidNetWork LicenseManager.
SWmanage.swmc
SOLIDWORKS Manage Client Types andLicenses
Three client types are available for SOLIDWORKS Manage Professional:
• Editor• Contributor• Viewer
The SOLIDWORKS Manage clients all provide access to information stored in SOLIDWORKSManage Professional and SOLIDWORKS PDM Professional, but the editing capabilities ofeach client type vary, as listed in the following table.
Manage ViewerManageContributorManage EditorCapability
XXXSearch, view andprint documents andrecords
XXXView CAD data
XCreate and edit CADdata
XXXView non-CAD data
XXCreate and editnon-CAD data
XXXView project statusand timesheets
XXUpdate project statusand timesheets
198
Installing SOLIDWORKS Manage Professional

Manage ViewerManageContributorManage EditorCapability
XXXView dashboards, runand export reports
XXXView processes andhistory
XXXStart and updateprocesses on anyobject
XXXStart processes viaPDM Workflow action
XXXView BOMs
XXCreate and edit BOMs
XXXView Tasks
XXAssign and updateTasks
XXXParticipate in PDMworkflows
Each SOLIDWORKS Manage Professional license includes a SOLIDWORKS PDM Professionallicense of the same client type. For example, a SOLIDWORKS Manage Professional Editorlicense includes a license to use SOLIDWORKS PDM Professional CAD Editor on the samemachine.
You can upgrade existing licenses of SOLIDWORKS PDM Professional to SOLIDWORKSManage licenses. With the upgrade, users can access both Manage Professional and PDMProfessional on the same machine.
You must upgrade to SOLIDWORKS PDM Professional 2018 before licensingSOLIDWORKS Manage Professional. SOLIDWORKS Manage Professional does not workwith SOLIDWORKS PDM 2017 or earlier versions.
Users with SOLIDWORKS Manage Professional Editor licenses can also run theSOLIDWORKS Manage Add-in to access Manage data directly from within the SOLIDWORKSsoftware.
Prerequisites and System Requirements forSOLIDWORKS Manage
Before installing SOLIDWORKS Manage Professional:
199
Installing SOLIDWORKS Manage Professional

• Obtain full administrative rights to the machines on which you are going to installSOLIDWORKS Manage servers and clients.
• If you are going to use an existing SQL Server database, obtain the name of the SQLServer instance, and the account ID and password of a SQL Server administrator ordatabase owner with read/write access to the database. You cannot use the tew user.
If you are installing a new SQL Server database for SOLIDWORKS Manage, followthe instructions in Installing and Configuring SQL Server on page 22.
• If you are going to use a license server that has already been installed, obtain the portnumber and server name for the SolidNetWork (SNL) server.
• Microsoft .NET Framework 4.6.2 and Visual C++ Redistributable Runtimes(vc_redist.x64.exe) must be installed on the machine where the SOLIDWORKSManage Server is installed. These files are automatically installed when you use theSOLIDWORKS Installation Manager to install SOLIDWORKS Manage.
• Install and configure Microsoft Internet Information Services (IIS). Instructions areavailable in Configuring SOLIDWORKS Manage Professional and Microsoft IISon page 203.
SOLIDWORKS Manage Professional has the same system requirements as SOLIDWORKSPDM Professional. You can review requirements athttp://www.solidworks.com/sw/support/pdmsystemrequirements.html.
Using SOLIDWORKS Installation Manager forSOLIDWORKS Manage
Installing the SOLIDWORKS Manage ServerWhen you install the SOLIDWORKS Manage Server, you can install the File Server, WebServer, and Email Server on the same machine. The File Server is required, but the WebServer and Email Server are optional.
To install the SOLIDWORKS Manage Server:
1. Start the SOLIDWORKS Installation Manager.2. On the Welcome page, select Server Products, and select Install SOLIDWORKS
Manage Server components on this computer.
The Install SOLIDWORKS PDM Server components on this computer and the InstallSolidNetWork License Manager (distributed licensing) on this computer boxes areselected automatically. Clear them if you do not want to install the SOLIDWORKSPDM Server or the SolidNetWork License Manager on this machine.
200
Installing SOLIDWORKS Manage Professional

3. On the Summary page, for SOLIDWORKS Manage Server, click CHANGE.a) For Installation Location, accept the default path or click Browse to specify a
different path.b) In the SQL Server section:
1. For Name, accept the default or click Browse to specify a new host name.2. Enter the Login Name and password of a SQL Server administrator or
database owner with read/write access to the database.3. To create a new database, select Create New Database, and select a
template.4. To use an existing database, select Use Existing Database, and enter the
name of the existing database or browse to it
c) In the License Server section, enter the port number and server name of theSolidNetwork (SNL) server.
d) A File Server must be installed for the SOLIDWORKS Manage Server to operate.Clear options to install the Web Server and the Email Server if you do not wantto install them.
e) Click Back to Summary.
4. On the Summary page, accept the terms of the SOLIDWORKS License Agreementand click Install Now.
Installing the SOLIDWORKS Manage ClientThis procedure lists the steps for installing the SOLIDWORKS Manage client with theSOLIDWORKS PDM client. If you already have the SOLIDWORKS PDM client installed orif you do not need to install the PDM client, the steps are slightly modified.
To install a SOLIDWORKS Manage client:
1. Start the SOLIDWORKS Installation Manager.2. On the Welcome page, select Individual.3. On the Serial Number page, click Next.4. Follow instructions for system warnings and click Next.5. On the Summary page, under Products, click Change.6. On the Product Selection page, click Select different packages or products.7. On the Product Selection page, select SOLIDWORKS Manage Client. The
SOLIDWORKS PDM Client is also selected automatically. Click Back to Summary.8. On the Product Selection page, select SOLIDWORKS PDM Client.9. On the SOLIDWORKS PDM Client Options page:
a) Select SOLIDWORKS PDM Professional.b) Select the PDM client type that matches your SOLIDWORKS Manage client type.c) If you have a license for SOLIDWORKS Manage Professional Editor, you can select
SOLIDWORKS Add-in to access Manage data directly within the SOLIDWORKSsoftware.
d) Click Back to Summary.
10. On the Summary page, accept the terms of the SOLIDWORKS License Agreementand click Install Now.
201
Installing SOLIDWORKS Manage Professional

The SOLIDWORKS Manage client and the SOLIDWORKS PDM client does not have tobe the same version or service pack as the SOLIDWORKS software.
Editing the SOLIDWORKSManage ConfigurationFile
SOLIDWORK Manage uses a configuration file named SWmanage.swmc that provides clientswith information about the database server and the license server. This file stores theSQL Server user name and password, which are encrypted in the file, and the licenseserver information that was entered during the server installation.
When you install SOLIDWORKS Manage Server, the configuration file is createdautomatically and stored in the SOLIDWORKS Manage Server installation folder, typicallyC:\Program Files\SOLIDWORKS Corp\SOLIDWORKS Manage Server\Fileserver. Allusers must have access to this configuration file. It cannot be stored in a PDM vault.
To edit the SWmanage.swmc file:
1. Browse to the Server Utilities folder located under the SOLIDWORKS Manageinstallation folder, typically C:\Program Files\SOLIDWORKS Corp\SOLIDWORKSManage Server\Server Utils. Then double-click the SWM.configwizrd.exe file.
2. When the Configuration Wizard opens, click Open and browse to the Manageconfiguration file, SWmanage.swmc.
3. Type the SQL Server sa username entered during the server installation.4. Modify any of the information in the file, if needed, and click Save.5. Type a password for the file. This password can be the same as the SQL Server
password used previously or different.6. Copy and store the modified .swmc file in each of these server components.
• Fileserver• Webforms• Notifications
7. Make sure that the modified .swmc file is available to every SOLIDWORKS Manageclient.
202
Installing SOLIDWORKS Manage Professional

15Configuring SOLIDWORKSManageProfessional and Microsoft IIS
This chapter includes the following topics:
• Logging In to SOLIDWORKS Manage for the First Time• Using the SOLIDWORKS Manage Add-In for SOLIDWORKS PDM• Using the SOLIDWORKS Manage Add-in for SOLIDWORKS• Configuring IIS
Logging In to SOLIDWORKSManage for the FirstTime
This procedure does not provide details on each of the dialog boxes in the wizard. Itdescribes how to connect a PDM vault to SOLIDWORKS Manage with minimal configuration.
To log in to SOLIDWORKS Manage for the first time:
1. In Windows, click Start > SOLIDWORKS version > SOLIDWORKS Manageversion.
A warning that the configuration file does not exist appears.
2. Click OK.3. In the SOLIDWORKS Manage dialog box:
a) Click .b) Browse to the SOLIDWORKS Manage configuration file, SWmanage.swmc.c) (Optional.) Click Options to set interface schemes or set a different license type.d) Type the User Name and Password that have administrator privileges.e) Click OK.
4. In the SOLIDWORKS Manage dialog box, on the Options tab, click AdministrationOptions.
The System Administration dialog box appears, where you can configure SOLIDWORKSManage and access the SOLIDWORKS PDM Administration tool.
203

5. Optional: In the System Administration dialog box, connect to a PDM vault:
a) Click Structures .
b) Click Documents & Records .c) Click New PDM Object .
6. In the SW PDM Configuration dialog box, on the Connection screen, click Next.7. Under Object:
a) Enter a Name.You can use any name, but it is typically the name of the PDM vault to which youconnect.
b) In Numbering Scheme, select Simple.Every object in SOLIDWORKS Manage requires a number. Even though partnumbers for PDM records in SOLIDWORKS Manage often come from PDM variables,you must specify a Numbering Scheme in SOLIDWORKS Manage.
c) (Optional.) In Database, select a vault.The SQL Server and PDM vault database are preselected. SOLIDWORKS Managereads all of the PDM Professional vaults that exist on the server.
d) Click Next.
8. On the Fields screen, click Next.9. On the Bill of Materials screen, click Next.10. On the Part Number, Description and Revision mapping screen, click the following:
a) (Optional.) Auto map All. SOLIDWORKS Manage uses PDM variables namedNumber, Description, and Revision. If a variable on each of the listed datacards exists with those names, it changes the values in the table.
b) (Optional.) Number, Description, and Revision. Maps only those variables.On this screen, you can configure which PDM data card variables are used for therequired Part Number, Description, and Revision fields. By default,SOLIDWORKS Manage uses the file name as the part number and description andthe PDM version number for the revision. If the variables on your PDM data cardsdo not match the default names, you can set the variable for each item in thetable.
There are reported issues with auto mapping with the Number variable. If youexperience this problem, manually set the Number variable.
c) Click Next.
204
Configuring SOLIDWORKS Manage Professional and Microsoft IIS

11. On the Configuration Options screen:a) Select Create records based on the following conditions, but do not enter
any conditions.SOLIDWORKS Manage can create one record for each SOLIDWORKS part andassembly file or create records for all configurations. When records are createdfor each configuration, some configurations can be designated as Active so theycan be used in items such as Bills of Materials, Processes, and Projects. Inactiveconfigurations are not visible in the main areas of SOLIDWORKS Manage and onlyappear when viewing the details of a record.To automatically designate certain configurations as being Active or Inactive,you can configure conditions. If you select Do not create records based onthe following conditions and no conditions are listed, then an activeconfiguration record is created for every configuration in the SOLIDWORKS file.If you select Create records based on the following conditions and noconditions are listed, then only the PDM @ configuration is designated as active.For the purpose of this initial setup, you select Create records based on thefollowing conditions.
b) Click Next.
12. On the PDM Projects screen:a) In the folder structure list, click the root folder.b) Select Any State.c) Click Save.d) Click Next.SOLIDWORKS Manage can configure when a record is created for files in aSOLIDWORKS PDM Professional vault based on the PDM workflow state. This is helpfulin a hybrid environment where SOLIDWORKS Manage and SOLIDWORKS PDMProfessional users work in the same PDM vault or other scenarios. Once a record iscreated in SOLIDWORKS Manage for a PDM file, the only way you can edit it is witha SOLIDWORKS Manage client. SOLIDWORKS Manage licenses allow a logged in userto access a PDM vault.
SOLIDWORKS Manage can automatically create a process whenever you send a filein SOLIDWORKS PDM Professional through a specific transition. For instance, thiscould be used to start an Engineering Change Request process when you use theRequest Change transition. For the purposes of this initial setup, do not specify anyprocesses to start.
13. On the SW PDM - SW Manage Users and Groups screen:a) In the Admin row, click the SWManage User column and select Admin System.b) Click Next.SOLIDWORKS Manage can read and create users and groups from SOLIDWORKS PDMProfessional. It is important to set up the system administrator for SOLIDWORKSManage and SOLIDWORKS PDM Professional to be the same user with the samepassword. The other PDM users and groups should already be set.
14. On the Access Rights screen, accept the default settings where all users in theorganization have Full control and click Next.
205
Configuring SOLIDWORKS Manage Professional and Microsoft IIS

15. On the Attached Files screen, accept the default settings of only allowing RelatedFiles and the Files folder and click Next.SOLIDWORKS Manage has different ways of connecting records to other records andnoncontrolled files. Related files are noncontrolled files that you can attach to a recordand are only visible from within the record. These files can be items such as emailmessages, image files, and reports. References are links to other records inSOLIDWORKS Manage. To organize Related Files, you can define a series of foldersas required.
16. On the Tab Properties screen:a) Under Enabled, select the check boxes for Properties, BOM, SWConfigurations,
RelatedFiles, WhereUsed, and ToDo.SOLIDWORKS Manage has property tabs that display information about eachrecord, similar to the SOLIDWORKS PDM Professional tabs displayed in WindowsFile Explorer. Access rights are automatically assigned to all users.
b) (Optional.) Change the tab names by clicking any row under Display Name.You can configure each property tab to change the Display Name and whethera certain user or group can see a particular tab.
c) Click Next.
17. On the following screens, click Next:
• Reports• Special Objects• Notifications
18. On the Email screen, click Finish.19. If you are asked to resync the data, click Yes.20. Close the SOLIDWORKS Manage Administration Tool dialog box.21. Optional: In the SOLIDWORKS Manage dialog box, on the left pane, right-click an
empty space and click Refresh Tree.
This shows the SOLIDWORKS PDM Professional vault inside the SOLIDWORKS ManageDocuments & Records.
Using the SOLIDWORKS Manage Add-In forSOLIDWORKS PDM
SOLIDWORKS Manage has an add-in for SOLIDWORKS PDM Professional so thatSOLIDWORKS Manage functions and data are available within Windows File Explorer. Thisincludes a tab in Windows File Explorer that displays SOLIDWORKS Manage informationrelated to a selected file.
To use the SOLIDWORKS Manage Add-in for SOLIDWORKS PDM:
1. Open the SOLIDWORKS PDM Professional Administration tool.2. Log in to the vault that you connected to in Logging In to SOLIDWORKS Manage
for the First Time on page 203.3. Right-click Add-ins and click New Add-in.
206
Configuring SOLIDWORKS Manage Professional and Microsoft IIS

4. Navigate to the SOLIDWORKS Manage client installation (such as C:\ProgramFiles\SOLIDWORKS Corp\SOLIDWORKS Manage Client) and select SWM.swpdm.dlland EPDM.Interop.epdm.dll.
5. Click Open.6. Click OK twice to close the Add-in dialog box and the message about restarting client
machines.7. If you are logged in to SOLIDWORKS PDM Professional, right-click the icon in the
taskbar and click Exit.8. In the SOLIDWORKS Manage add-in, log in to the vault's local view.
There is a SOLIDWORKS Manage tab and new menu items available.
Using the SOLIDWORKS Manage Add-in forSOLIDWORKS
SOLIDWORKS Manage has an add-in for the SOLIDWORKS software that you can usewith the SOLIDWORKS PDM add-in. An advantage of the SOLIDWORKS Manage add-inis that it has a built-in search function. You can check files out and in from either add-in.
To use the SOLIDWORKS Manage add-in for SOLIDWORKS:
1. In SOLIDWORKS, click Tools > Add-Ins.2. Select SOLIDWORKS Manage and click OK.3. Log in to SOLIDWORKS Manage.
Logging in does not consume another license.
SOLIDWORKS Manage is available in the Task Pane.
Configuring IISTo configure Internet Information Services (IIS):
1. In Windows, click Start > Control Panel.2. In the Control Panel dialog box, click Programs.3. Click Turn Windows features on or off.
207
Configuring SOLIDWORKS Manage Professional and Microsoft IIS

4. In the Windows Features dialog box:a) Expand the following:
1. Internet Information Services2. Web Management Tools3. World Wide Web Services
b) Under Web Management Tools, select IIS Management Console.c) UnderWorldWideWeb Services, select Application Development Features
and the following:
• .NET Extensibility• ASP• ASP.NET• CGI• ISAPI Extensions• ISAPI Filters• Server-Side Includes
d) Under Common HTTP Features, select:
• Default Document• Directory Browsing• HTTP Errors• HTTP Redirection• Static Content
e) Under Health and Diagnostics, select:
• HTTP Logging• Request Monitor
f) Under Performance Features, select Static Content Compression.g) Under Security, select Request Filtering.h) Click OK.
5. Close the Control Panel.
Verifying the IIS File ServerAfter installing the SOLIDWORKS Manage Server, you must verify that the InternetInformation Services (IIS) file server is operating. The IIS file server is a web service.SOLIDWORKS Manage Server creates a website in IIS called SWManage, and twoapplication pools called SWMfs and SWMweb.
To verify that the IIS File Server is operating:
1. In the Windows Start menu, type IIS and select Internet Information Services(IIS) Manager.
2. Expand the Sites node and expand the SWManage node.
208
Configuring SOLIDWORKS Manage Professional and Microsoft IIS

3. Select the SWMfs folder. Then in the Actions pane, under Manage Application, clickBrowse *.port number.
Your default web browser opens. The server name, port number, and SWMfs(SOLIDWORKS Manage File Server website) appear in the address bar.
Troubleshooting IISIf you are unable to browse to the SOLIDWORKS Manage File Server website, there aresome items you can check. For more information, see Microsoft's help for InternetInformation Services (IIS).
To troubleshoot IIS:
1. Right-click the SWMfs website and click Edit Permissions.This ensures that IIS users have proper access to the websites.
2. In the Fileserver Properties dialog box, on the Security tab, click Edit.3. In the Permissions for Fileserver dialog box, click Add.4. In the Select Users or Groups dialog box:
a) Click Advanced.b) Click Find Now.c) Under Search results, select IIS_USRS and IUSR.d) Click OK twice.
5. In the Permissions for Fileserver dialog box, in the Allow column, select Modify forboth groups and click OK.
6. In the Fileserver Properties dialog box, click OK.
209
Configuring SOLIDWORKS Manage Professional and Microsoft IIS

Our 3DEXPERIENCE® platform powers our brand applications, serving 11 industries, and provides a rich portfolio of industry solution experiences.
Dassault Systèmes, the 3DEXPERIENCE® Company, provides business and people with virtual universes to imagine sustainable innovations. Its world-leading solutions transform the way products are designed, produced, and supported. Dassault Systèmes’ collaborative solutions foster social innovation, expanding possibilities for the virtual world to improve the real world. The group brings value to over 250,000 customers of all sizes in all industries in more than 140 countries. For more information, visit www.3ds.com.
Europe/Middle East/AfricaDassault Systèmes10, rue Marcel DassaultCS 4050178946 Vélizy-Villacoublay CedexFrance
AmericasDassault Systèmes175 Wyman StreetWaltham, Massachusetts02451-1223USA
Asia-PacificDassault Systèmes K.K.ThinkPark Tower2-1-1 Osaki, Shinagawa-ku,Tokyo 141-6020Japan
©20
18 D
assa
ult S
ystè
mes
. All
righ
ts re
serv
ed. 3
DEX
PER
IEN
CE®
, the
Com
pass
icon
, the
3D
S lo
go, C
ATI
A, S
OLI
DW
OR
KS, E
NO
VIA
, DEL
MIA
, SIM
ULI
A, G
EOVI
A, E
XALE
AD
, 3D
VIA
, B
IOVI
A, N
ETVI
BES
, IFW
E an
d 3D
EXCI
TE a
re c
omm
erci
al tr
adem
arks
or r
egis
tere
d tr
adem
arks
of
Das
saul
t Sys
tèm
es, a
Fre
nch
“soc
iété
eur
opée
nne”
(Ver
saill
es C
omm
erci
al R
egis
ter #
B 3
22 3
06 4
40),
or it
s su
bsid
iari
es in
the
Uni
ted
Stat
es a
nd/o
r oth
er c
ount
ries
. All
othe
r tra
dem
arks
are
ow
ned
by th
eir r
espe
ctiv
e ow
ners
. Use
of a
ny D
assa
ult S
ystè
mes
or i
ts s
ubsi
diar
ies
trad
emar
ks is
sub
ject
to th
eir e
xpre
ss w
ritt
en a
ppro
val.
Copyright © 2022 FDOKUMEN