INA-W910R - alpine.ee
105
Designed by ALPINE Japan 68-16909Z49-A EN DE FR ES IT SE NL RU PL GR ADVANCED NAVI STATION INA-W910R • OWNER’S MANUAL Please read before using this equipment. • ANVÄNDARHANDLEDNING Innan du använder utrustningen bör du läsa igenom denna användarhandledning. • BEDIENUNGSANLEITUNG Lesen Sie diese Bedienungsanleitung bitte vor Gebrauch des Gerätes. • GEBRUIKERSHANDLEIDING Lees deze aanwijzingen aandachtig alvorens dit toestel te gebruiken. • MODE D’EMPLOI Veuillez lire avant d’utiliser cet appareil. • РУКОВОДСТВО ПО ЭКСПЛУАТАЦИИ Прочтите настоящее руководство перед началом использования оборудования. • MANUAL DE OPERACIÓN Léalo antes de utilizar este equipo. • INSTRUKCJA OBSŁUGI Prosimy zapoznać się z tą instrukcją przed przystąpieniem do użytkowania urządzenia. • ISTRUZIONI PER L’USO Si prega di leggere prima di utilizzare il attrezzatura. • ΕΓΕΙΡΙΔΙ ΡΗΣΤΗ Παρακαλύμε διαάστε τ πριν ρησιμπιήσετε τη συσκευή. ALPINE ELECTRONICS MARKETING, INC. 1-1-8 Nishi Gotanda, Shinagawa-ku, Tokyo 141-0031, Japan Phone 03-5496-8231 ALPINE ELECTRONICS OF AMERICA, INC. 19145 Gramercy Place, Torrance, California 90501, U.S.A. Phone 1-800-ALPINE-1 (1-800-257-4631) 1-888-NAV-HELP (1-888-628-4357) ALPINE ELECTRONICS OF CANADA, INC. 777 Supertest Road, Toronto, Ontario M3J 2M9, Canada Phone 1-800-ALPINE-1 (1-800-257-4631) 1-888-NAV-HELP (1-888-628-4357) ALPINE ELECTRONICS OF AUSTRALIA PTY. LTD. 161-165 Princes Highway, Hallam Victoria 3803, Australia Phone 03-8787-1200 ALPINE ELECTRONICS GmbH Wilhelm-Wagenfeld-Str. 1-3, 80807 München, Germany Phone 089-32 42 640 ALPINE ELECTRONICS OF U.K. LTD. Alpine House Fletchamstead Highway, Coventry CV4 9TW, U.K. Phone 0870-33 33 763 ALPINE ELECTRONICS FRANCE S.A.R.L. (RCS PONTOISE B 338 101 280) 98, Rue de la Belle Etoile, Z.I. Paris Nord Il, B.P. 50016, 95945 Roissy Charles de Gaulle Cedex, France Phone 01-48638989 ALPINE ITALIA S.p.A. Viale C. Colombo 8, 20090 Trezzano Sul Naviglio (MI), Italy Phone 02-484781 ALPINE ELECTRONICS DE ESPAÑA, S.A. Portal de Gamarra 36, Pabellón, 32 01013 Vitoria (Alava)-APDO 133, Spain Phone 945-283588 ALPINE ELECTRONICS (BENELUX) GmbH Leuvensesteenweg 510-B6, 1930 Zaventem, Belgium Phone 02-725-13 15 R R FOR CAR USE ONLY/NUR FÜR AUTOMOBIL GEBRAUCH/POUR APPLICATION AUTOMOBILE UNIQUEMENT/PARA USO EN AUTOMÓVILES/SOLO PER L’UTILIZZO IN AUTOMOBILE/ENDAST FÖR BILBRUK/ALLEEN VOOR GEBRUIK IN DE AUTO/ТОЛЬКО ДЛЯ ИСПОЛЬЗОВАНИЯ В АВТОМОБИЛЯХ/DO UŻYCIA TYLKO W SAMOCHODZIE/ΓΙΑ ΡΗΣΗ ΜΝ ΣΕ ΑΥΤΚΙΝΗΤ
-
Upload
khangminh22 -
Category
Documents
-
view
0 -
download
0
Transcript of INA-W910R - alpine.ee

FOR CAR USE ONLY/NUR FÜR AUTOMOBIL GEBRAUCH/POUR APPLICATION AUTOMOBILE UNIQUEMENT/PARA USO EN AUTOMÓVILES/SOLO PER L’UTILIZZO IN AUTOMOBILE/ENDAST FÖR BILBRUK/ALLEEN VOOR GEBRUIK IN DE AUTO/ТОЛЬКО ДЛЯ ИСПОЛЬЗОВАНИЯ В АВТОМОБИЛЯХ/DO UŻYCIA TYLKO W SAMOCHODZIE/ΓΙΑ �ΡΗΣΗ ΜΝ ΣΕ ΑΥΤΚΙΝΗΤ
N
E
R
S
T
E
L
U
L
R
Designed by ALPINE Japan
E
D
F
E
I
S
N
R
P
G
ADVANCED NAVI STATION
INA-W910R
• OWNER’S MANUAL Please read before using this equipment.
• ANVÄNDARHANDLEDNING Innan du använder utrustningen bör du läsa igenom denna användarhandledning.
• BEDIENUNGSANLEITUNG Lesen Sie diese Bedienungsanleitung bitte vor Gebrauch des Gerätes.
• GEBRUIKERSHANDLEIDING Lees deze aanwijzingen aandachtig alvorens dit toestel te gebruiken.
• MODE D’EMPLOI Veuillez lire avant d’utiliser cet appareil.
• РУКОВОДСТВО ПО ЭКСПЛУАТАЦИИ Прочтите настоящее руководство перед началом использования оборудования.
• MANUAL DE OPERACIÓN Léalo antes de utilizar este equipo.
• INSTRUKCJA OBSŁUGI Prosimy zapoznać się z tą instrukcją przed przystąpieniem do użytkowania urządzenia.
• ISTRUZIONI PER L’USO Si prega di leggere prima di utilizzare il attrezzatura.
• ΕΓ�ΕΙΡΙΔΙ� �ΡΗΣΤΗ Παρακαλ�ύμε δια�άστε τ� πριν �ρησιμ�π�ιήσετε τη συσκευή.
ALPINE ELECTRONICS MARKETING, INC.1-1-8 Nishi Gotanda,
Shinagawa-ku,Tokyo 141-0031, JapanPhone 03-5496-8231
ALPINE ELECTRONICS OF AMERICA, INC.19145 Gramercy Place, Torrance,
California 90501, U.S.A.Phone 1-800-ALPINE-1 (1-800-257-4631)
1-888-NAV-HELP (1-888-628-4357)
ALPINE ELECTRONICS OF CANADA, INC.777 Supertest Road, Toronto,
Ontario M3J 2M9, CanadaPhone 1-800-ALPINE-1 (1-800-257-4631)
1-888-NAV-HELP (1-888-628-4357)
ALPINE ELECTRONICS OF AUSTRALIA PTY. LTD.161-165 Princes Highway, Hallam
Victoria 3803, AustraliaPhone 03-8787-1200
ALPINE ELECTRONICS GmbHWilhelm-Wagenfeld-Str. 1-3, 80807 München, Germany
Phone 089-32 42 640
ALPINE ELECTRONICS OF U.K. LTD.Alpine House
Fletchamstead Highway, Coventry CV4 9TW, U.K.Phone 0870-33 33 763
ALPINE ELECTRONICS FRANCE S.A.R.L.(RCS PONTOISE B 338 101 280)
98, Rue de la Belle Etoile, Z.I. Paris Nord Il,B.P. 50016, 95945 Roissy Charles de Gaulle
Cedex, FrancePhone 01-48638989
ALPINE ITALIA S.p.A.Viale C. Colombo 8, 20090 Trezzano
Sul Naviglio (MI), ItalyPhone 02-484781
ALPINE ELECTRONICS DE ESPAÑA, S.A.Portal de Gamarra 36, Pabellón, 32
01013 Vitoria (Alava)-APDO 133, SpainPhone 945-283588
ALPINE ELECTRONICS (BENELUX) GmbHLeuvensesteenweg 510-B6,
1930 Zaventem, BelgiumPhone 02-725-13 15
RR
68-16909Z49-A


ENGLISH
Contents
Operating Instructions
PRECAUTIONS
IMPORTANT INFORMATION, PLEASE READ CAREFULLY BEFORE USING THIS PRODUCT. ......................................... 7
END USER LICENSE AGREEMENT (Microsoft) .................................................... 7
END USER LICENSE AGREEMENT (NAVTEQ) .................................................... 9
WARNING
Points to Observe for Safe Usage ................... 10WARNING ............................................... 10
WARNING ............................................... 10
CAUTION ................................................ 11
PRECAUTIONS ...................................... 12
Discs Playable on This Unit ................. 13
Getting StartedAccessory List ................................................ 17
Location of Controls ...................................... 17
Turning Power On or Off ............................... 18
Inserting/Ejecting a Disc ................................ 18
Inserting/Removing the SD Memory Card .... 18
Adjusting the Monitor Viewing Angle ........... 18
Adjusting the Volume ..................................... 19
Lowering Volume Quickly ............................. 19
How to view the Display ................................ 19TOUCH PANEL operation ......................... 19Recalling the Source ................................... 19Displaying the Numeric Keypad
Input Screen ............................................. 20
RadioListening to the Radio .................................... 20
Presetting Stations Manually .......................... 21
Presetting Stations Automatically .................. 21
Tuning to Preset Stations ................................ 21
RDS OperationTurning AF (Alternative Frequencies)
On or Off .....................................................21
Receiving Traffic Information ........................22
PTY (Programme Type) Tuning .....................22
Receiving Traffic Information While Playing CD or Radio .................................................22
Priority News ..................................................22
Displaying Radio Text ....................................22
CD/MP3/WMA/AACPlayback ..........................................................23
Repeat Play .....................................................23
M.I.X. (Random Play) ....................................24
Selecting Folders (concerning MP3/WMA/AAC) ...................24
About MP3/WMA/AAC .................................24
DVD/Video CDPlaying a Disc ................................................26
To display the DVD mode screen ...............26If a menu screen appears .............................27Displaying the Top Menu Screen ...............28Displaying the Menu Screen ......................28Displaying the Menu Operation
Mode Screen ...........................................28Stopping Playback (Pre Stop) ........................28
Stopping Playback .........................................28
Fast-forwarding/Fast-reversing ......................29
Finding the Beginnings of Chapters/Tracks/Files .................................29
Playing Still Frames (Pausing) .......................29
Forward/reverse frame-by-frame Playback .....................................................29
Slow Motion Playback ...................................29
Selecting Folders ............................................29
Repeat Playback .............................................30
Searching by Title/Group/Folder Number .....30
Searching Directly by Chapter, Track or File Number ................................................31
Switching the Angle .......................................31
Scroll to Move the Page Forward or Backward ....................................................31
Switching the Audio Tracks ...........................31
3-EN
Switching the Subtitles (Subtitle Language) .................................... 32
Switching from the disc menu ....................... 32
About DivX .................................................... 32
Other Useful FeaturesAdjusting the Audio ........................................ 33
Storing Settings in the Memory ...................... 36
Calling up the Preset Memory ........................ 36
Search Function .............................................. 36
Switching Display Modes ............................... 37
Setup
DVD Setup
DVD Setup Operation ..................................... 38Changing the language setting .................... 38Setting of the Menu Language .................... 38Setting of the Audio Language ................... 39Setting of the Subtitle Language ................. 39Changing the Country Code Setting ........... 39Setting the Rating Level
(Parental Lock) ........................................ 39Changing the Digital Output Setting ........... 39Setting the Downmix Mode ........................ 41Setting the TV Screen ................................. 41Setting of the Bonus Code .......................... 41Setting the DVD-Audio
Playback Mode ....................................... 41Playing MP3/WMA/AAC Data
(File Play Mode) ...................................... 41Setting the compressed File
Playback Data .......................................... 42Displaying DivX Disc Information ............ 42Setting the Video CD Play Mode ................ 42
Source Setup
Source Setup Operation .................................. 42Radio Setup ................................................. 43USB Search ................................................. 43
Display Setup
Display Setup Operation ................................ 44Visual EQ Setting Operation ....................... 44Setting the Brightness of the
Backlighting ............................................ 45Adjusting the Minimum Level of
Backlight .................................................. 45Setting the Function Guide display
ON/OFF ................................................... 45Switching the Font Back Display
Colour ...................................................... 45Adjusting the Touch Panel .......................... 45Display On and Off ..................................... 45
General Setup
General Setup Operation ................................ 46Displaying the Time .................................... 46Demonstration Function ............................. 46Sound (Beep) Guide Function .................... 46Setting the Scroll ......................................... 46Changing the Language Font ...................... 46Adjusting the Dimmer of Button
Lighting at Night ..................................... 46Setting Security code .................................. 47
System Setup
System Setup Operation ................................. 47Switching the function of the remote
sensor ....................................................... 47Setting the Camera Input ............................ 48Setting the AUX Mode ............................... 48Setting the Picture Output ........................... 49Setting the BLUETOOTH Connection
(BLUETOOTH IN) ................................. 49Setting the Digital Output ........................... 49Setting Speed pulse type ............................. 49Setting the Rear Entertainment System ...... 49
4-EN

IMPRINT Operation (Optional)Changing MultEQ mode ................................ 50
Adjusting Sound Setting in Manual Mode ..... 50Setting the MX Level (Media Xpander) ..... 50Adjusting the Crossover Settings
(X-Over) .................................................. 51Adjusting the Time Correction ................... 52Setting the Time Correction Unit
(T.Corr Parameter) ................................... 52Graphic Equalizer Adjustments (G-EQ) ..... 52Adjusting the Parametric Equalizer Curve
(P-EQ) ..................................................... 52Equalizer Presets (F-EQ) ............................ 53Setting the Response Slope for the High
Range Speaker (TW Setup) ..................... 53Storing Settings in the Memory ..................... 53
Calling up the Preset Memory ........................ 53
About Time Correction .................................. 54
About the Crossover ....................................... 55
External Audio Processor Operation (Optional)
Adjustment Procedure for Dolby Surround ...................................................... 56
Setting the External Audio Processor ............ 56Set MX Mode of the External Audio
Processor ................................................. 57Setting Bass Sound Control ........................ 57Using the Pro Logic II Mode ...................... 57X-OVER Adjustment .................................. 58Performing Time Correction Manually
(Time Correction) .................................... 58Phase Switching .......................................... 59Graphic Equalizer Adjustments .................. 59Parametric Equalizer Adjustments .............. 59Setting the Speakers .................................... 59Setting of Dolby Digital .............................. 60Speaker Setup ............................................. 60Adjusting the DVD Level ........................... 61Linear PCM Setting .................................... 61
Storing Settings in the Memory ..................... 61
Calling up the Preset Memory ........................ 61
BT Hands Free CallingSetup Before Using .........................................61
About BLUETOOTH ..................................61Before Using Hands-Free Function .............61How to connect to a BLUETOOTH
compatible device (Pairing) .....................61BLUETOOTH Setup .......................................62
BLUETOOTH Setup Operation ..................62Hands-Free Phone Control ..............................64
About the Hands-Free Phone .......................64Answering a Call ............................................64
Hanging up the Telephone ..............................64
Adjusting the volume when receiving a Call ............................................................64
Redial Function ...............................................64
Call Switching Operation ................................64
Call History .....................................................65Redialing a Number in Dialed Numbers
History ......................................................65Dialing a Number in Received
Calls History ............................................65Dialing a Number in Missed
Calls History ............................................65Dialing a Number In the Phone Book
(Phone Book) ...........................................65Voice Dial Operation ...................................66Dialing a Number Using Direct
Dial Input .................................................66Phone book alphabet search function .............66
Second incoming call function .......................67
Preset a number in the Phone Book (Shortcut dial) ..............................................67
Dialing the preset number ...............................67
Camera Operation (Optional)Front camera Operation ..................................68
Display the front view video manually ........68Rear camera Operation ...................................68
Display the rear view video manually .........68Display the rear view video while
the car is in reverse ...................................68Adjusting Alarm Volume
(HCE-C300R only) ..................................69Adjusting Detection Sensitivity
(HCE-C300R only) ..................................69
5-EN

SD Memory VideoSwitching the SD Memory Video Screen ....... 70
Auxiliary Device (Optional)Operating Auxiliary Devices (Optional) ........ 70
TUE-T200DVB Operation (Optional)Operating the TUE-T200DVB (Optional) ...... 71
Changer (Optional)Controlling CD Changer (Optional) ............... 71
Multi-Changer Selection (Optional) ............... 72
USB Memory/Portable audio player (Optional)
BANK Function (Tag search mode only) ....... 72
Playback .......................................................... 73
Repeat Play ..................................................... 73
Random Play Shuffle (M.I.X.) ....................... 74
Searching for a desired Song .......................... 74Searching by Tag information ..................... 74Searching by artist name ............................. 74Searching by Explorer (File Name) mode
(USB Memory only) ................................ 74Alphabet Skip Function
(Tag search mode only) ............................... 75
Selecting Playlist/Artist/Album/Genre/Composer (Tag search mode only) ............................... 75
Select the desired Folder (Folder up/down) ......................................... 75
Creating the playlist from the Artist/Album information of the current song (Tag search mode only) ............................... 75
About MP3/WMA/AAC File of USB Memory .............................................. 76
iPod/iPhone (Optional)Connecting an iPod/iPhone ............................ 76
Setting the iPod Control ................................. 77
Playback .......................................................... 77
Searching for a desired Song .......................... 77Searching by artist name ............................. 77
Direct Search Function ................................... 78
Alphabet Skip Function .................................. 78
Selecting Playlist/Artist/Album/Genre/Composer/Episode/Category ....................... 79
Random Play Shuffle (M.I.X.) ....................... 79
Repeat Play ..................................................... 79
Remote ControlControls on Remote Control .......................... 80
When Using the Remote Control ................... 81
Battery Replacement ...................................... 82
InformationAbout DVDs ................................................... 82
Terminology ................................................... 83
List of Language Codes .................................. 84
List of Country Codes .................................... 85
In Case of Difficulty ....................................... 87
Specifications ................................................. 91
Installation and ConnectionsWarning .................................................. 93
Caution ................................................... 93
Precautions ........................................... 93
Installation ...................................................... 94
Calibration when connected to HCE-C300R ................................................ 97
Connections .................................................... 98
System Example ........................................... 101
6-EN
Operating Instructions
IMPORTANT INFORMATION, PLEASE READ CAREFULLY BEFORE USING THIS PRODUCT.This product is intended to safely provide turn-by-turn instructions to get you to a desired destination. Please read the following precautions to ensure that you use this navigation system correctly.
• This product is not a substitute for your personal judgment. Any route suggestions made by this navigation system should never supersede any local traffic regulations or your personal judgment and/or knowledge of safe driving practices. Do not follow route suggestions if the navigation system instructs you to perform an unsafe or illegal manoeuvre, places you in an unsafe situation, or routes you into an area which you consider unsafe.
• Glance at the screen only when necessary and safe to do so. If prolonged viewing of the screen is necessary, stop in a safe and legal manner and location.
• Do not input destinations, change settings, or access any functions requiring a prolonged view of the monitor while you are driving. Stop in a safe and legal manner and location before attempting to access the system.
• When using the navigation system to find/route to an emergency service, please contact the facility to validate and verify availability, prior to driving to it. Not all locations of emergency service providers such as police and fire stations, hospitals, and clinics are contained in the database. Please use your own judgment and your ability to ask for directions in these situations.
• The map database contained within the media (SD memory card) in which it is stored is the most recent map data available at the time of production. Because of changes in streets and neighborhoods, there may be situations where the navigation system may not be able to route you to your desired destination. In these cases, use your own personal judgment.
• The map database is designed to provide you with route suggestions, it does not take account of the relative safety of a suggested route, or of factors which may affect the time required to reach your destination. The system does not reflect road closures or construction, road characteristics (i.e. type of road surface, slope or grade, weight or height restrictions, etc.), traffic congestion, weather conditions, or any other factors which may affect the safety or timing of your driving experience. Use your personal judgment if the navigation system is unable to provide you with an alternate route.
• There may be situations where the navigation system may display the vehicle’s location erroneously. Use your own driving judgment in this situation, taking into account current driving conditions. Please be aware that in this situation, the navigation system should correct the vehicle’s position automatically; however, there may be times where you may have to correct the position yourself. If this is the case, stop in a safe and legal manner and location before attempting operation.
• Make certain that the volume level of the unit is set to a level which still allows you to hear outside traffic and emergency vehicles. Driving while unable to hear outside sounds could cause an accident.
• Please make certain that any other person who intends on using this navigation system reads these precautions and the following instructions carefully.
If there is anything in the manual about the operation of the navigation system which you are uncertain about, please contact your local Alpine authorized navigation dealer before using the navigation system.
END USER LICENSE AGREEMENT (Microsoft)You have acquired a device (“DEVICE”) that includes software licensed by Alpine Electronics, Inc. (collectively “ALPINE”) from an affiliate of Microsoft Corporation (collectively “MS”). Those installed software products of MS origin, as well as associated media, printed materials, and “online” or electronic documentation (“SOFTWARE”) are protected by international intellectual property laws and treaties. The SOFTWARE is licensed, not sold. All rights reserved.
IF YOU DO NOT AGREE TO THIS END USER LICENSE AGREEMENT (“EULA”), DO NOT USE THE DEVICE OR COPY THE SOFTWARE INSTEAD, PROMPTLY CONTACT ALPINE FOR INSTRUCTIONS ON RETURN OF THE UNUSED DEVICE(S) FOR A REFUND. ANY USE OF THE SOFTWARE, INCLUDING BUT NOT LIMITED TO USE ON THE DEVICE, WILL CONSTITUTE YOUR AGREEMENT TO THIS EULA (OR RATIFICATION OF ANY PREVIOUS CONSENT).
GRANT OF SOFTWARE LICENSE,This EULA grants you the following license: You may use the SOFTWARE only on the DEVICE.
NOT FAULT TOLERANT.THE SOFTWARE IS NOT FAULT TOLERANT. ALPINE HAS INDEPENDENTLY DETERMINED HOW TO USE THE SOFTWARE IN THE DEVEICE, AND MS HAS RELIED UPON ALPINE TO CONDUCT SUFFICIENT TESTING TO DETERMINE THAT THE SOFTWARE IS SUITALE FOR SUCH USE.
NO WARRANTIES FOR THE SOFTWARE,THE SOFTWARE is provided “AS IS“ and with all faults. THE ENTIRE RISK AS TO SATISFACTORY QUALITY, PERFORMANCE, ACCURACY, AND EFFORT (INCLUDING LACK OF NEGALIGENCE) IS WITH YOU. ALSO, THERE IS NO WARRANTY AGAINST INTERFERENCE WTH YOUR ENJOYMENT OF THE SOFTWARE OR AGAINST INFRINGEMENT. IF YOU HAVE RECEIVED ANY WARRANTIES REGARDING THE DEVICE OR SOFTWARE THOSE WARRANTIES DO NOT ORIGINATE FROM, AND ARE NOT BINDING ON, MS.
PRECAUTIONS
7-EN

NO LIABILITY FOR CERTAIN DAMAGES.EXCEPTAS PROHIBITED BY LAW, MS SHALL HAVE NO LIAVILITY FOR ANY INDIRECT, SPECIAL, CONSEQUENTIAL OR THE SOFTWARE. THIS LIMITATION SHALL APPLY EVEN IF ANY REMEDY FAILS OF ITS ESSENTIAL PURPOSE. IN NO EVENT SHALL MS BE LIABLE FOR ANY AMOUNT IN EXCESS OF U.S. TWO HUNDRED FIFTY DOLLARS (U.S. $250.00).
LIMITATIONS ON REVERSE ENGINEERING, DECOMPILATION, AND DISASSEMBLYYou may not reverse engineer, decompile, or disassemble the SOFTWARE, except and only to the extent that such activity is expressly permitted by applicable law notwithstanding this limitation.
ADDITIONAL SOFTWARE/SERVICES.The SOFTWARE may permit ALPINE, MS, Microsoft Corporation or their affiliates to provide or make available to you SOFTWARE updates, supplements, add-on components, or Internet – base service components of the SOFTWARE after the date you obtain your initial copy of the SOFTWARE (“Supplemental Components”).• If ALPINE provides or makes available to you
Supplemental Components and no other EULA terms are provided along with the Supplemental Components, then the terms of this EULA shall apply.
• If MS, Microsoft Corporation or their affiliates make available Supplemental Components, and no other EULA terms are provided, then the terms of this EULA shall apply, except that MS, Microsoft Corporation or affiliate entity providing the Supplemental Component(s) shall be licensor of the Supplemental Component(s).
• ALPINE, MS, Microsoft Corporation and their affiliates reserve the right to discontinue any Internet-based services provided to you or made available to you through the use of the SOFTWARE.
RECOVERY MEDIA.If SOFTWARE is provided by ALPINE on separate media and labelled “Recovery Media” you may use the Recovery Media solely to restore or reinstall the SOFTWARE originally installed on the DEVICE.
UPGRADES.If the SOFTWARE is provided by ALPINE separate from the DEVICE on separate media or via web download or other means, and is labelled “For Upgrade Purposes Only” you may install one (1) copy of such SOFTWARE onto the DEVICE as a replacement copy for the existing SOFTWARE, and use it in accordance with this EULA, including any additional EULA terms accompanying the upgrade SOFTWARE.
TERMINATION.Without prejudice to any other rights, ALPINE or MS may terminate this EULA if you fail to comply with the terms and conditions of this EULA. In such event, you must destroy all copies of the SOFTWARE and all of its component parts.
INTELLECTUAL PROPERTY RIGHTS.All title and intellectual property rights in and to the SOFTWARE (including but not limited to any images, photographs, animations, video, audio, music, text and “applets,” incorporated into the SOFTWARE), the accompanying printed materials, and any copies of the SOFTWARE, are owned by MS, Microsoft Corporation, their affiliates or suppliers. The SOFTWARE is licensed, not sold.You may not copy the printed materials accompanying the SOFTWARE. All title and intellectual property rights in and to the content which may be accessed through use of the SOFTWARE is the property of the respective content owner and may be protected by applicable copyright or other intellectual property laws and treaties. This EULA grants you no rights to use such content. All rights not specifically granted under this EULA are reserved by MS, Microsoft Corporation, their affiliates and suppliers. Use of any on-line services which may be accessed through the SOFTWARE may be governed by the respective terms of use relating to such services. If this SOFTWARE contains documentation that is provided only in electronic form, you may print one copy of such electronic documentation.
TRADEMARKS.This EULA does not grant you any rights in connection with any trademarks or service marks of ALPINE, MS, Microsoft Corporation, their affiliates or suppliers.
PRODUCT SUPPORT.Product support for the SOFTWARE is not provided by MS, its parent corporation Microsoft Corporation, or their affiliates or subsidiaries. For product support, please refer to ALPINE support number provided in the documentation for the DEVICE. Should you have any questions concerning this EULA, or if you desire to contact ALPINE for any other reason, please refer to the address provided in the documentation for the DEVICE.
SOFTWARE TRANSFER ALLOWED BUT WITH RESTRICTIONS.You may permanently transfer rights under this EULA only as part of a permanent sale or transfer of the Device, and only if the recipient agrees to this EULA. If the SOFTWARE is an upgrade, any transfer must also include all prior versions of the SOFTWARE.
EXPORT RESTRICTION.You acknowledge that SOFTWARE is of US-origin. You agree to comply with all applicable international and national laws that apply to the SOFTWARE, including the U.S. Export Administration Regulations, as well as end-user, end-use and country destination restrictions issued by U.S. and other governments. For additional information on exporting the SOFTWARE, see http://www.microsoft.com/exporting/
8-EN

END USER LICENSE AGREEMENT (NAVTEQ)PLEASE READ THIS END USER LICENSE AGREEMENT CAREFUL BEFORE USING THE NAVTEQ DATABASE
NOTICE TO THE USERTHIS IS A LICENSE AGREEMENT - AND NOT AN AGREEMENT FOR SALE - BETWEEN YOU AND NAVTEQ B.V. FOR YOUR COPY OF THE NAVTEQ NAVIGABLE MAP DATABASE, INCLUDING ASSOCIATED COMPUTER SOFTWARE, MEDIA AND EXPLANATORY PRINTED DOCUMENTATION PUBLISHED BY NAVTEQ (JOINTLY ”THE DATABASE”). BY USING THE DATABASE, YOU ACCEPT AND AGREE TO ALL TERMS AND CONDITIONS OF THIS END USER LICENSE AGREEMENT (“AGREEMENT”). IF YOU DO NOT AGREE TO THE TERMS OF THIS AGREEMENT, PROMPTLY RETURN THE DATABASE, ALONG WITH ALL OTHER ACCOMPANYING ITEMS, TO YOUR SUPPLIER FOR A REFUND.
OWNERSHIPThe Database and the copyrights and intellectual property or neighboring rights therein are owned by NAVTEQ or its licensors. Ownership of the media on which the Database is contained is retained by NAVTEQ and/or your supplier until after you have paid in full any amounts due to NAVTEQ and/or your supplier pursuant to this Agreement or similar agreement(s) under which goods are provided to you.
LICENSE GRANTNAVTEQ grants you a non-exclusive license to use the Database for your personal use or, if applicable, for use in your business’ internal operations. This license does not include the right to grant sub-licenses.
LIMITATIONS ON USEThe Database is restricted for use in the specific system for which it was created. Except to the extent explicitly permitted by mandatory laws (e.g. national laws based on the European Software Directive (91/250) and the Database Directive (96/9)), you may not extract or reutilize substantial parts of the contents of the Database nor reproduce, copy, modify, adapt, translate, disassemble, decompile, reverse engineer any portion of the Database. If you wish to obtain interoperability information as meant in (the national laws based on) the European Software Directive, you shall grant NAVTEQ reasonable opportunity to provide said information on reasonable terms, including costs, to be determined by NAVTEQ.
TRANSFER OF LICENSE You may not transfer the Database to third parties, except when installed in the system for which it was created or when you do not retain any copy of the Database, and provided that the transferee agrees to all terms and conditions of this Agreement and confirms this in writing to NAVTEQ. Multi-disc sets may only be transferred or sold as a complete set as provided by NAVTEQ and not as subset thereof.
LIMITED WARRANTYNAVTEQ warrants that, subject to the warnings set out below, for a period of 12 months after acquisition of your copy of the Database, it will perform substantially in accordance with NAVTEQ’s Criteria for Accuracy and Completeness existing on the date you acquired the Database; these criteria are available from NAVTEQ at your request. If the Database does not perform in accordance with this limited warranty, NAVTEQ will use reasonable efforts to repair or replace your non-conforming copy of the Database. If these efforts do not lead to performance of the Database in accordance with the warranties set out herein, you will have the option to either receive a reasonable refund of the price you paid for the Database or to rescind this Agreement. This shall be NAVTEQ’s entire liability and your sole remedy against NAVTEQ. Except as expressly provided in this section, NAVTEQ does not warrant nor make any representations regarding the use of results of the use of the Database in terms of its correctness, accuracy, reliability, or otherwise. NAVTEQ does not warrant that the Database is or will be error free. No oral or written information or advice provided by NAVTEQ, your supplier or any other person shall create a warranty or in any way increase the scope of the limited warranty described above. The limited warranty set forth in this Agreement does not affect or prejudice any statutory legal rights that you may have under the legal warranty against hidden defects.
If you did not acquire the Database from NAVTEQ directly, you may have statutory rights against the person from whom you have acquired the Database in addition to the rights granted by NAVTEQ hereunder according to the law of your jurisdiction. The above warranty of NAVTEQ shall not affect such statutory rights and you may assert such rights in addition to the warranty rights granted herein.
LIMITATION OF LIABILITYThe price of the Database does not include any consideration for assumption of risk of consequential, indirect or unlimited direct damages which may arise in connection with your use of the Database. Accordingly, in no event shall NAVTEQ be liable for any consequential or indirect damages, including without limitation, loss of revenue, data, or use, incurred by you or any third party arising out of your use of the Database, whether in an action in contract or tort or based on a warranty, even if NAVTEQ has been advised of the possibility of such damages. In any event NAVTEQ’s liability for direct damages is limited to the price of your copy of the Database.
THE LIMITED WARRANTY AND LIMITATION OF LIABILITY, SET FORTH IN THIS AGREEMENT, DO NOT AFFECT OR PREJUDICE YOUR STATUTORY RIGHTS WHERE YOU HAVE ACQUIRED THE DATABASE OTHERWISE THAN IN THE COURSE OF A BUSINESS.
WARNINGSThe Database may contain inaccurate or incomplete information due to the passage of time, changing circumstances, sources used and the nature of collecting comprehensive geographic data, any of which may lead to incorrect results. The Database does not include or reflect information on - inter alia - neighborhood safety; law enforcement; emergency assistance; construction work; road or lane closures; vehicle or speed restrictions; road slope or grade; bridge height, weight or other limits; road or traffic conditions; special events; traffic congestion; or travel time.
9-EN

GOVERNING LAWThis Agreement shall be governed by the laws of the jurisdiction, in which you reside at the date of acquisition of the Database. Should you at that moment reside outside the European Union or Switzerland, the law of the jurisdiction within the European Union or Switzerland where you acquired the Database shall apply. In all other cases, or if the jurisdiction where you acquired the Database cannot be defined, the laws of the Netherlands shall apply. The courts competent at your place of residence at the time you acquired the Database shall have jurisdiction over any dispute arising out of, or relating to this Agreement, without prejudice to NAVTEQ’s right to bring claims at your then current place of residence.
Points to Observe for Safe Usage
• Read this manual carefully before using this disc and the system components. They contain instructions on how to use this product in a safe and effective manner. Alpine cannot be responsible for problems resulting from failure to observe the instructions in this manual.
• This manual uses various pictorial displays to show you how to use this product safely and to alert you to potential dangers resulting from improper connections and operation. Following are the meanings of these pictorial displays. It is important to fully understand the meanings of these pictorial displays in order to use this manual and the system properly.
INSTALL THE PRODUCT CORRECTLY SO THAT THE DRIVER CANNOT WATCH TV/VIDEO UNLESS THE VEHICLE IS STOPPED AND THE EMERGENCY BRAKE IS APPLIED.It is dangerous for the driver to watch TV/Video while driving a vehicle. Installing this product incorrectly enables the driver to watch TV/Video while driving. This may cause a distraction, preventing the driver from looking ahead, thus causing an accident. The driver or other people could be severely injured.
DO NOT WATCH VIDEO WHILE DRIVING.Watching the video may distract the driver from looking ahead of the vehicle and cause an accident.
DO NOT OPERATE ANY FUNCTION THAT TAKES YOUR ATTENTION AWAY FROM SAFELY DRIVING YOUR VEHICLE.Any function that requires your prolonged attention should only be performed after coming to a complete stop. Always stop the vehicle in a safe location before performing these functions. Failure to do so may result in an accident.
WARNING
WARNING• Operation of the system while driving is dangerous. Users
should stop vehicle before operating the software.• Road conditions and regulations take precedence over
information contained on the map display: observe actual traffic restrictions and circumstances while driving.
• This software is designed for use exclusively in the INA-W910R. It cannot and may not be used in conjunction with other hardware.
WARNINGThis symbol means important instructions. Failure to heed them can result in serious injury or death.
10-EN
DO NOT FOLLOW ROUTE SUGGESTIONS IF THE NAVIGATION SYSTEM INSTRUCTS YOU TO PERFORM AN UNSAFE OR ILLEGAL MANEUVER, OR PLACES YOU IN AN UNSAFE SITUATION OR AREA. This product is not a substitute for your personal judgment. Any route suggestions by this system should never supersede any local traffic regulations or your personal judgment or knowledge of safe driving practice.
KEEP THE VOLUME AT A LEVEL WHERE YOU CAN STILL HEAR OUTSIDE NOISES WHILE DRIVING.Excessive volume levels that obscure sounds such as emergency vehicle sirens or road warning signals (train crossings, etc.) can be dangerous and may result in an accident. LISTENING AT LOUD VOLUME LEVELS IN A CAR MAY ALSO CAUSE HEARING DAMAGE.
MINIMIZE DISPLAY VIEWING WHILE DRIVING.Viewing the display may distract the driver from looking ahead of the vehicle and cause an accident.
DO NOT DISASSEMBLE OR ALTER.Doing so may result in an accident, fire or electric shock.
USE ONLY IN CARS WITH A 12 VOLT NEGATIVE GROUND.(Check with your dealer if you are not sure.) Failure to do so may result in fire, etc.
KEEP SMALL OBJECTS SUCH AS BOLTS OR SCREWS OUT OF THE REACH OF CHILDREN.Swallowing them may result in serious injury. If swallowed, consult a physician immediately.
USE THE CORRECT AMPERE RATING WHEN REPLACING FUSES.Failure to do so may result in fire or electric shock.
DO NOT BLOCK VENTS OR RADIATOR PANELS.Doing so may cause heat to build up inside and may result in fire.
USE THIS PRODUCT FOR MOBILE 12V APPLICATIONS.Use for other than its designed application may result in fire, electric shock or other injury.
DO NOT PLACE HANDS, FINGERS OR FOREIGN OBJECTS IN INSERTION SLOTS OR GAPS.Doing so may result in personal injury or damage to the product.
HALT USE IMMEDIATELY IF A PROBLEM APPEARS.Failure to do so may cause personal injury or damage to the product. Return it to your authorized Alpine dealer or the nearest Alpine Service Centre for repairing.
KEEP FINGERS AWAY WHILE THE MOTORIZED FRONT PANEL OR MOVING MONITOR IS IN MOTION.Failure to do so may result in personal injury or damage to the product.
CAUTIONThis symbol means important instructions. Failure to heed them can result in injury or material property damage.
11-EN

PRECAUTIONSProduct CleaningUse a soft dry cloth for periodic cleaning of the product. For more severe stains, please dampen the cloth with water only. Anything else has the chance of dissolving the paint or damaging the plastic.
TemperatureBe sure the temperature inside the vehicle is between +45°C (+113°F) and 0°C (+32°F) before turning your unit on.
Moisture CondensationYou may notice the disc playback sound wavering due to condensation. If this happens, remove the disc from the player and wait about an hour for the moisture to evaporate.
Damaged DiscDo not attempt to play cracked, warped, or damaged discs. Playing a bad disc could severely damage the playback mechanism.
MaintenanceIf you have problems, do not attempt to repair the unit yourself. Return it to your Alpine dealer or the nearest Alpine Service Station for servicing.
Never Attempt the FollowingDo not grip or pull out the disc while it is being pulled back into the player by the automatic reloading mechanism.Do not attempt to insert a disc into the unit when the unit power is off.
Inserting DiscsYour player accepts only one disc at a time for playback. Do not attempt to load more than one disc.Make sure the label side is facing up when you insert the disc. “Disc Error” will be displayed on your player if you insert a disc incorrectly. If “Disc Error” continues to be displayed even though the disc has been inserted correctly, push the RESET switch with a pointed object such as a ballpoint pen.Playing a disc while driving on a very bumpy road may result in skips, but this will not scratch the disc or damage the player.
Irregular Shaped DiscsBe sure to use round shaped discs only for this unit and never use any special shaped discs. Use of special shaped discs may cause damage to the mechanism.
New DiscsTo prevent the CD from jamming, “Disc Error” is displayed if discs with irregular surfaces are inserted or if discs are inserted incorrectly. When a new disc is ejected immediately after initial loading, use your finger to feel around the inside of the centre hole and outside edge of the disc. If you feel any small bumps or irregularities, this could inhibit proper loading of the disc. To remove the bumps, rub the inside edge of the hole and outside edge of the disc with a ballpoint pen or other such instrument, then insert the disc again.
Installation LocationMake sure the INA-W910R will not be installed in a location subjected to:
• Direct sun and heat• High humidity and water• Excessive dust• Excessive vibrations
Correct HandlingDo not drop the disc while handling. Hold the disc so you will not leave fingerprints on the surface. Do not affix tape, paper, or gummed labels to the disc. Do not write on the disc.
Disc CleaningFingerprints, dust, or soil on the surface of the disc could cause the DVD player to skip. For routine cleaning, wipe the playing surface with a clean, soft cloth from the centre of the disc to the outer edge. If the surface is heavily soiled, dampen a clean, soft cloth in a solution of mild neutral detergent before cleaning the disc.
Centre Hole
Bumps
Centre HoleNew Disc
Outside (Bumps)
CORRECT
INCORRECT CORRECT
12-EN
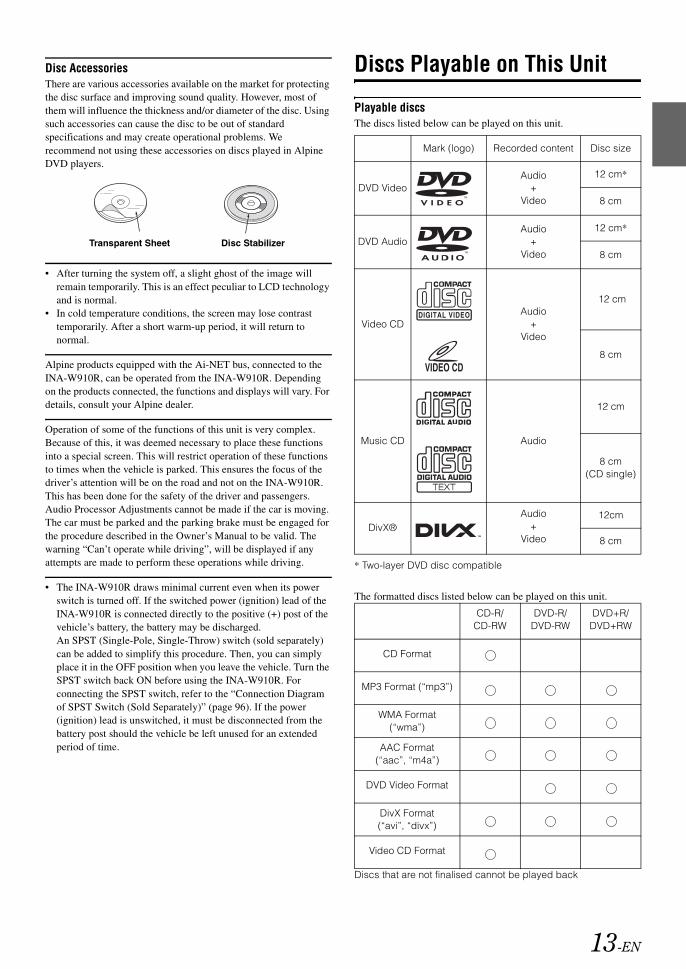
Disc AccessoriesThere are various accessories available on the market for protecting the disc surface and improving sound quality. However, most of them will influence the thickness and/or diameter of the disc. Using such accessories can cause the disc to be out of standard specifications and may create operational problems. We recommend not using these accessories on discs played in Alpine DVD players.
• After turning the system off, a slight ghost of the image will remain temporarily. This is an effect peculiar to LCD technology and is normal.
• In cold temperature conditions, the screen may lose contrast temporarily. After a short warm-up period, it will return to normal.
Alpine products equipped with the Ai-NET bus, connected to the INA-W910R, can be operated from the INA-W910R. Depending on the products connected, the functions and displays will vary. For details, consult your Alpine dealer.
Operation of some of the functions of this unit is very complex. Because of this, it was deemed necessary to place these functions into a special screen. This will restrict operation of these functions to times when the vehicle is parked. This ensures the focus of the driver’s attention will be on the road and not on the INA-W910R. This has been done for the safety of the driver and passengers.Audio Processor Adjustments cannot be made if the car is moving. The car must be parked and the parking brake must be engaged for the procedure described in the Owner’s Manual to be valid. The warning “Can’t operate while driving”, will be displayed if any attempts are made to perform these operations while driving.
• The INA-W910R draws minimal current even when its power switch is turned off. If the switched power (ignition) lead of the INA-W910R is connected directly to the positive (+) post of the vehicle’s battery, the battery may be discharged. An SPST (Single-Pole, Single-Throw) switch (sold separately) can be added to simplify this procedure. Then, you can simply place it in the OFF position when you leave the vehicle. Turn the SPST switch back ON before using the INA-W910R. For connecting the SPST switch, refer to the “Connection Diagram of SPST Switch (Sold Separately)” (page 96). If the power (ignition) lead is unswitched, it must be disconnected from the battery post should the vehicle be left unused for an extended period of time.
Discs Playable on This Unit
Playable discsThe discs listed below can be played on this unit.
* Two-layer DVD disc compatible
The formatted discs listed below can be played on this unit.
Discs that are not finalised cannot be played back
Transparent Sheet Disc Stabilizer
Mark (logo) Recorded content Disc size
DVD VideoAudio
+ Video
12 cm*
8 cm
DVD AudioAudio
+ Video
12 cm*
8 cm
Video CDAudio
+ Video
12 cm
8 cm
Music CD Audio
12 cm
8 cm (CD single)
DivX®Audio
+ Video
12cm
8 cm
CD-R/CD-RW
DVD-R/DVD-RW
DVD+R/DVD+RW
CD Format
MP3 Format (“mp3”)
WMA Format(“wma”)
AAC Format(“aac”, “m4a”)
DVD Video Format
DivX Format(“avi”, “divx”)
Video CD Format
13-EN

Discs that cannot be playedDVD-ROMs, DVD-RAMs, CD-ROMs (excluding MP3/WMA/AAC files), photo CDs, etc.
DualDiscThis unit is not compatible with DualDisc.Using a DualDisc may cause unit malfunction, and may cause disc damage when the disc is inserted/ejected.
DVD region number (playable region number)This DVD player will play back any disc whose region number is 2 (or All). DVDs with a region number other than those listed below, cannot be played on this DVD player.
Video CDsThis DVD head unit is compatible with playback control (PBC) compatible Video CDs (version 2.0).“PBC” is a function by which you can use menu screens recorded on the disc to find the scene you want to watch and view various types of information in dialogue style.
Using compact discs (CD/CD-R/CD-RW)If you use non-standard compact discs, correct performance cannot be guaranteed.You can play CD-Rs (CD-Recordable)/CD-RWs (CD-ReWritable) which have been recorded only on audio devices. You can also play CD-Rs/CD-RWs containing MP3/WMA/AAC formatted audio files.
• Some of the following discs may not play on this unit: Flawed discs, discs with fingerprints, discs exposed to extreme temperatures or sunlight (e.g., left in the car or this unit), discs recorded under unstable conditions, discs on which a recording failed or a re-recording was attempted, copy-protected CDs which do not conform to the audio CD industry standard.
• Use discs with compressed audio files written in a format compliant with this unit. For details, see pages 24 and 25.
To customers using CD-R/CD-RW• If a CD-R/CD-RW cannot be played back, make sure the last
recording session was closed (finalised).• Finalise the CD-R/CD-RW if necessary, and attempt playback
again.
Tips for making your own CDsThe INA-W910R plays DVD Video, DVD Audio, Video CD, Audio CD, DivX® and has a built in MP3/WMA/AAC decoder.
The following information is designed to help you create your own music CDs (either Audio CD or MP3/WMA/AAC encoded CD-R/RW files).
What is the difference between an Audio and MP3/WMA/AAC CD?An Audio CD is the same format as the commercial CDs you buy in the store (also known as CD-DA). MP3 (MPEG-1 Audio Layer 3)/WMA (Windows Media Audio)/AAC (Advanced Audio Coding) is a data file that uses a compression scheme to reduce the size of the music file.*
Hybrid Audio CD and Data (MP3/WMA/AAC) CD-R/RW discs:The INA-W910R can read either sector on the disc. Choose CD-DA to play the CD audio section or MP3/WMA/AAC to play the MP3/WMA/AAC section.*
Multi-session CD-R/RW:Once a recording has been stopped, this is considered one session. If the disc is not closed (finalised), additional data may be added. Once this additional data has been recorded, this becomes a “multi-session” CD. The INA-W910R can only read multi-session DATA Formatted discs (MP3/WMA/AAC files - Not Audio CD files).
Properly formatted MP3/WMA/AAC Discs:Use ISO9660 formatting to insure proper playback. You may use standard ISO naming Level 1 (8.3 DOS standard), Level 2 (32 characters) or Joliet (Windows or Macintosh long filenames) file naming conventions.*
*Please consult the Owner’s manual for additional information.
2 ALL
On handling compact discs (CD/CD-R/CD-RW)• Do not touch the surface.• Do not expose the disc to direct sunlight.• Do not affix stickers or labels.• Clean the disc when it is dusty.• Make sure that the disc is smooth and flat.• Do not use commercially available disc accessories.
Do not leave the disc in the car or the unit for a long time. Never expose the disc to direct sunlight.Heat and humidity may damage the disc and you may not be able to play it again.
14-EN
Using DVD-Rs/DVD-RWs/DVD+Rs/DVD+RWs• This unit is compatible with discs recorded in the standard DVD-
Video formats.• Note that discs not finalised (processed to enable to play on
playback-only DVD players) cannot be played on this DVD player.
• Some discs may not play back, depending on the recording device and disc format.
• Discs or files utilizing copy protection, may not be playable. Some recording systems may not properly format copied files to enable proper playback.
• In the following cases, the disc may not play on this unit: discs recorded by certain DVD recorders, certain irregular discs, flawed discs, dirty discs, when the pickup lens of this DVD player is dirty, or when moisture condensation has occurred inside the unit.
• Be sure to follow all cautions included with your DVD-Rs/ DVD-RWs/DVD+Rs/DVD+RWs discs.
• Do not put stickers, seals, or tape on the label side of DVD-Rs/DVD-RWs/DVD+Rs/DVD+RWs.
• Compared to the regular discs, DVD-Rs/DVD-RWs/DVD+Rs/DVD+RWs are more affected by heat, moisture, and direct sunlight. If left in a car, etc., damage may occur and it might not play on this unit.
• The operable temperature range for disc playback is as follows: DVD-R/DVD-RW: -25 ~ +70°C DVD+R/DVD+RW: +5 ~ +55°C
Disc terminology
TitleIf titles are programmed for the DVD, these are the largest units of division of the information recorded on the disc.
ChapterEach Title may also be divided into smaller divisions, called chapters. These can be specific scenes or musical selections.
Protecting the USB connector• Only an iPod/iPhone, USB memory or Portable audio player can
be connected to the USB connector on this unit. Correct performance using other USB products cannot be guaranteed.
• If the USB connector is used, be sure to use only the supplied connector cable with the unit. A USB hub is not supported.
• Depending on the connected USB memory device, the unit may not function or some functions may not be performed.
• The audio file format that can be played back on the unit is MP3/WMA/AAC.
• Artist/song name, etc., can be displayed, however characters may not be correctly displayed.
On Handling USB Memory• This unit can control a memory storage device that supports the
USB Mass Storage Class (MSC) protocol. Playable audio file formats are MP3, WMA and AAC.
• USB memory function is not guaranteed. Use USB memory according to the terms of agreement. Read the USB memory Owner’s Manual thoroughly.
• Fix the USB memory in a location where driver operation will not be hindered.
• USB memory may not function correctly at high or low temperature.
• Use only certified USB memory. Note that even certified USB memory, may not function correctly depending on its type or state.
• Depending on the settings of the USB memory type, memory state or encoding software, the unit may not play back or display properly.
• Files protected by DRM (Digital Rights Management), cannot be played back on this unit. These include AAC formatted files purchased from the iTunes Store and WMA or other files with some form of copyright protection.
• USB memory may take time to start playback. If there is a particular file other than audio in the USB memory, it may take considerable time before the file is played back or searched.
• The unit can play back “mp3”, “wma” or “m4a” file extensions.• Do not add the above extensions to a file other than audio data.
This non-audio data will not be recognised. The resulting playback may contain noise that can damage speakers and/or amplifiers.
• It is recommended to back up important data on a personal computer.
• Do not remove the USB device while playback is in progress. Change SOURCE to something other than USB, then remove the USB device to prevent possible damage to its memory.
CAUTIONAlpine accepts no responsibility for lost data, etc., even if data, etc., is lost while using this product.
15-EN

On Handling Portable audio player• The unit can control a Portable audio player with the USB
interface. Playable audio file formats are MP3 and WMA.• Portable audio player function is not guaranteed. Use Portable
audio player according to the terms of agreement. Read the Portable audio player Owner’s Manual thoroughly.
• Avoid usage or storage in the following locations:Anywhere in the car exposed to direct sunlight or high temperatures. Anywhere the possibility of high humidity or corrosive substances are present.
• Fix the Portable audio player in a location where driver operation will not be hindered.
• Portable audio player may not function correctly at high or low temperature.
• Depending on the settings of the Portable audio player type, memory state or encoding software, the unit may not play back or display properly.
• If the Portable audio player has an MSC/MTP setting, set to MTP.
• A Portable audio player in which data is stored by USB Mass Storage may not be playable on the unit.
• Depending on the Portable audio player settings, USB Mass Storage may be supported. For setting, refer to the Owner’s Manual of the player.
• The unit can play back MP3/WMA files synchronised by Windows Media Player (Ver. 10 or 11), and are then forwarded to the player. The “mp3” or “wma” extensions are playable.
• If data is not synchronised by Windows Media Player and is forwarded in another way, the unit may not be able to correctly play back the files.
• WMDRM10 is supported by the unit. • A file that is copy-protected (copyright protection) cannot be
played back.• It is recommended to back up important data on a personal
computer.• Do not remove the USB device while playback is in progress.
Change SOURCE to something other than USB, then remove the USB device to prevent possible damage to its memory.
• When Nokia is used as a Portable audio player: Not all the Nokia mobile phones can be used as Portable audio players. If the Nokia phone fails to work as a Portable audio player while connected, set it to Mass Storage mode and reconnect to this unit. For details, refer to Owner’s Manual of the Nokia phone.
On Handling SD memory card• During the navigation system update, please use the SD memory
card that only contains the data for update. Otherwise, the display may be abnormal. In this case, please consult your ALPINE dealer. For the operation on update, refer to ALPINE website.
• This product incorporates copyright protection technology that is protected by U.S. patents and other intellectual property rights. Use of this copyright protection technology must be authorized by Macrovision, and is intended for home and other limited viewing uses only unless otherwise authorized by Macrovision. Reverse engineering or disassembly is prohibited.
• Manufactured under license from Dolby Laboratories. Dolby and the double-D symbol are trademarks of Dolby Laboratories.
• Manufactured under license under U.S. Patent #’s: 5,451,942; 5,956,674; 5,974,380; 5,978,762; 6,487,535 & other U.S. and worldwide patents issued & pending. DTS and the Symbol are registered trademarks, & DTS 2.0+ Digital Out and the DTS logos are trademarks of DTS, Inc. Product includes software. © DTS, Inc. All Rights Reserved.
• Windows Media, and the Windows logo are trademarks, or registered trademarks of Microsoft Corporation in the United States and/or other countries.
• iPhone, iPod, iPod classic, iPod nano, and iPod touch are trademarks of Apple Inc., registered in the U.S. and other countries.
• “Made for iPod,” and “Made for iPhone,” mean that an electronic accessory has been designed to connect specifically to iPod, or iPhone, respectively, and has been certified by the developer to meet Apple performance standards. Apple is not responsible for the operation of this device or its compliance with safety and regulatory standards.
• The BLUETOOTH® word mark and logos are registered trademarks owned by the Bluetooth SIG, Inc. and any use of such marks by Alpine Electronics, Inc. is under license.
• “MPEG Layer-3 audio coding technology licensed from Fraunhofer IIS and Thomson”
• “Supply of this product only conveys a license for private,non-commercial use and does not convey a license nor imply any right to use this product in any commercial (i.e. revenue-generation) real time broadcasting (terrestrial, satellite, cable and/or any other media), broadcasting/streaming via internet, intranets and/or other networks or in other electronic content distribution systems, such as pay-audio or audio-on-demand applications. An independent license for such use is required. For details, please visit http://www.mp3licensing.com”
• Audyssey MultEQ XT is a registered trademark of Audyssey Laboratories Inc.
• DivX®, DivX Certified® and associated logos are trademarks of DivX, Inc. and are used under license.
• “SD Logo is a trademark of SD-3C, LLC.”• © 2010 Nokia. All rights reserved. Nokia and Works with Nokia
are trademarks or registered trademarks of Nokia Corporation.
©1993-2010 NAVTEQ. All rights reserved.Portions ©2010, Microsoft Corporation. All Rights Reserved.
16-EN

Accessory List• Head unit .............................................................................1• Power Cable ........................................................................1• Mounting Sleeve ..................................................................1• Bracket key..........................................................................2• Flush Head Screw (M5x8) ...................................................6• Screw (M5×8) ......................................................................8• Face plate............................................................................1• Mounting Position Seal ........................................................2• GPS Antenna .......................................................................1• Pre OUT Cable ....................................................................1• AUX I/O Cable .....................................................................1• AV extension cable ..............................................................1• Rubber Cap .........................................................................1• Hex Bolt ...............................................................................1• USB extension cable ..........................................................1• USB 30P cable ....................................................................1• Microphone..........................................................................1• Remote Control ....................................................................1• Battery (CR2025) .................................................................1• Owner’s Manual .............................................................1 set
Location of Controls
buttonRecalls the Eject/Tilt screen.If the disc does not eject after touching [Eject] of Disc, press and hold for at least 3 seconds.
/ buttonPress to adjust the volume.
MUTE/PHONE button Lowers the volume by 20 dB instantly. Press the button again to cancel.Press and hold for at least 2 seconds to display the Telephone Menu screen. (Displayed only when BLUETOOTH IN is set to ON (page 49)).
SOURCE/ buttonTurns the power on. Press and hold for at least 3 seconds to turn the power off.Recalls the Source selection screen.
AUDIO /TA buttonReturn to the AV main source screen that is displayed before the Setup, Navigation, Telephone, Camera mode, etc. is started.Turn on GUIDEVIEW WINDOW™ mode when the current screen is audio source screen (Radio, CD, iPod, etc.). Press again to turn it off. For more information, refer to the Owner’s Manual of navigation system stored in the supplied CD-ROM.Press this button for at least 2 seconds to turn the T.INFO mode ON or OFF.
MAP buttonRecall the navigation map screen.For more information, refer to the Owner’s Manual of navigation system stored in the supplied CD-ROM.
NAVI MENU buttonRecall the navigation menu screen.For more information, refer to the Owner’s Manual of navigation system stored in the supplied CD-ROM.
RESET switchBe sure to press the RESET switch when using the unit for the first time, after installing the CD changer, after changing the car battery, etc.Turn off the unit power, press RESET with a ballpoint pen or similar pointed object.
Remote SensorPoint the supplied remote control transmitter towards the remote sensor within a range of 2 meters.
Getting Started
Connect to Remote Control Interface BoxYou can operate this unit from the vehicle’s control unit when an Alpine Remote Control Interface Box (optional) is connected. For details, contact your Alpine dealer.
• The buttons on the face of this unit are shown in bold (e.g. SOURCE/ ). The onscreen buttons that appear in the display are shown in bold enclosed by [ ] (e.g.[BAND]).
17-EN
Turning Power On or OffSome of this unit’s functions cannot be performed while the vehicle is in motion. Be sure to stop your vehicle in a safe location and apply the parking brake, before attempting these operations.
1 Press SOURCE/ to turn on the unit.
• The unit can be turned on by pressing any button.
2 Press and hold SOURCE/ for at least 3 seconds to turn off the unit.
Inserting/Ejecting a Disc
1 Press on the unit.The display changes to the Eject/Tilt screen.
2 Insert a disc:Touch [Open] on the Eject/Tilt screen.The movable monitor will open, then insert a disc into the disc slot. Inserting a disc will close the monitor automatically.
Eject the disc:Touch [Eject] of Disc on the Eject/Tilt screen.The movable monitor will open. Then the disc is ejected.After remove the disc, touch [Close] to close the movable monitor.
• Touching [Exit] returns to the earlier main source screen.• Do not apply shock to the movable monitor when it is open as it may
result in malfunction of the unit.• The monitor may be dim during low temperature and immediately
after turning on the power. The brightness will return to normal as time elapses.
• The monitor will stop at the set tilt angle when closing.
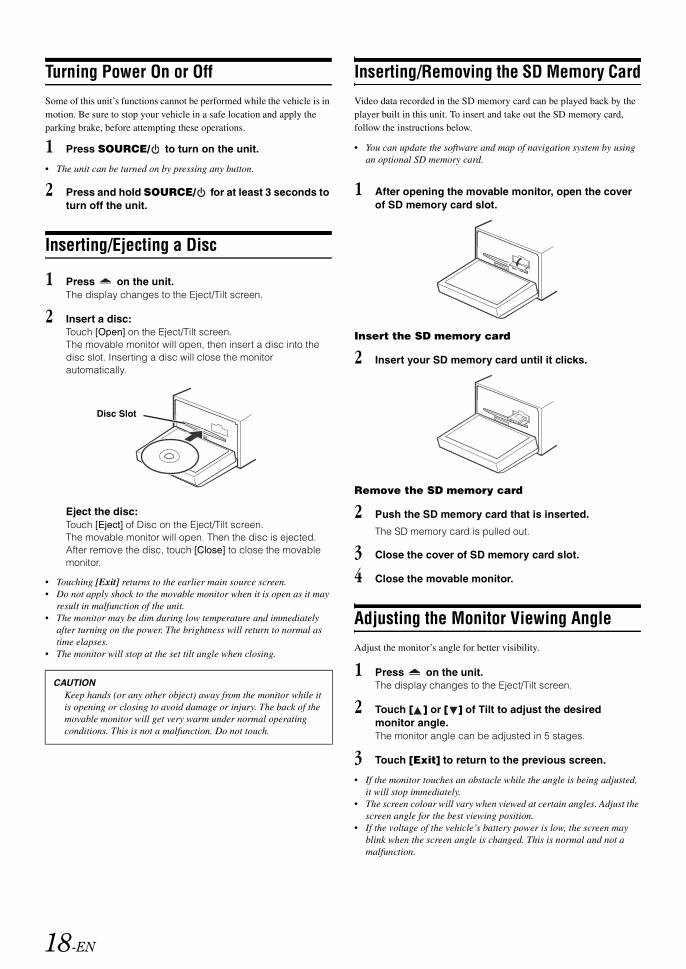
Inserting/Removing the SD Memory CardVideo data recorded in the SD memory card can be played back by the player built in this unit. To insert and take out the SD memory card, follow the instructions below.
• You can update the software and map of navigation system by using an optional SD memory card.
1 After opening the movable monitor, open the cover of SD memory card slot.
Insert the SD memory card
2 Insert your SD memory card until it clicks.
Remove the SD memory card
2 Push the SD memory card that is inserted.
The SD memory card is pulled out.
3 Close the cover of SD memory card slot.
4 Close the movable monitor.
Adjusting the Monitor Viewing AngleAdjust the monitor’s angle for better visibility.
1 Press on the unit.The display changes to the Eject/Tilt screen.
2 Touch [ ] or [ ] of Tilt to adjust the desired monitor angle.The monitor angle can be adjusted in 5 stages.
3 Touch [Exit] to return to the previous screen.
• If the monitor touches an obstacle while the angle is being adjusted, it will stop immediately.
• The screen colour will vary when viewed at certain angles. Adjust the screen angle for the best viewing position.
• If the voltage of the vehicle’s battery power is low, the screen may blink when the screen angle is changed. This is normal and not a malfunction.
CAUTIONKeep hands (or any other object) away from the monitor while it is opening or closing to avoid damage or injury. The back of the movable monitor will get very warm under normal operating conditions. This is not a malfunction. Do not touch.
Disc Slot
18-EN
Adjusting the Volume
Adjust the volume by pressing or .Volume decreases/increases continuously by pressing and holding or .Volume: 0 - 35
Lowering Volume QuicklyActivating the Audio Mute function will instantly lower the volume level by 20 dB.
Press MUTE to activate the MUTE mode. The audio level will decrease by about 20 dB.
Pressing MUTE again will bring the audio back to its previous level.
How to view the Display
• To protect the display, touch the onscreen button with the tip of your finger.
• If you touch a button and there is no reaction, remove your finger from the display once, and try again.
• If you touch two buttons at the same time, a malfunction may occur.
Here is an example explanation for the Radio mode display on how to recall a source.
1 Press SOURCE/ on the unit.The Source Select screen is displayed.
Display example for SOURCE selection screen
Changes the items of source selection list.Changes to the Telephone Menu screen.(Displayed only when BLUETOOTH IN is set to ON (page 49)).Displays the view video of camera.(When an optional camera is connected and Camera IN is set to Direct or RCA (page 48)).Changes to main source screen.
Displays the source selection list.(The kind of source modes that are displayed varies depending on connection and setting).Changes to Setup Select screen.
2 Touch [Radio].The screen changes to the Radio mode main display.
• If your desired source is not displayed on the screen, touch [ ] to change the items of the source selection list first. Then touch the desired source key.
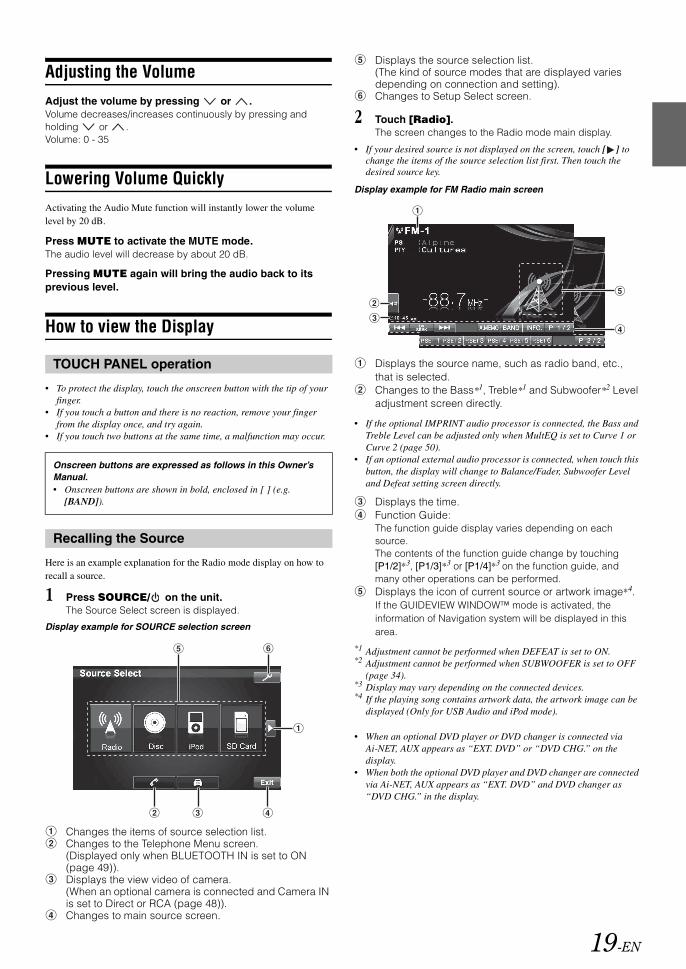
Display example for FM Radio main screen
Displays the source name, such as radio band, etc., that is selected.Changes to the Bass*1, Treble*1 and Subwoofer*2 Level adjustment screen directly.
• If the optional IMPRINT audio processor is connected, the Bass and Treble Level can be adjusted only when MultEQ is set to Curve 1 or Curve 2 (page 50).
• If an optional external audio processor is connected, when touch this button, the display will change to Balance/Fader, Subwoofer Level and Defeat setting screen directly.
Displays the time.Function Guide:The function guide display varies depending on each source. The contents of the function guide change by touching [P1/2]*3, [P1/3]*3 or [P1/4]*3 on the function guide, and many other operations can be performed.Displays the icon of current source or artwork image*4. If the GUIDEVIEW WINDOW™ mode is activated, the information of Navigation system will be displayed in this area.
*1 Adjustment cannot be performed when DEFEAT is set to ON.*2 Adjustment cannot be performed when SUBWOOFER is set to OFF
(page 34).*3 Display may vary depending on the connected devices.*4 If the playing song contains artwork data, the artwork image can be
displayed (Only for USB Audio and iPod mode).
• When an optional DVD player or DVD changer is connected via Ai-NET, AUX appears as “EXT. DVD” or “DVD CHG.” on the display.
• When both the optional DVD player and DVD changer are connected via Ai-NET, AUX appears as “EXT. DVD” and DVD changer as “DVD CHG.” in the display.
TOUCH PANEL operation
Onscreen buttons are expressed as follows in this Owner’s Manual.• Onscreen buttons are shown in bold, enclosed in [ ] (e.g.
[BAND]).
Recalling the Source
19-EN

The numeric keypad input screen is displayed when the DVD or Video CD mode is selected for searching a title or chapter, and also for entering a country code or password for the DVD setup item.
1 Touch [10KEY] on the main source screen.
2 Touch the desired numeric key.
Display example for numeric keypad
Input screen area.Closes numeric keypad input screen.All input numbers will be deleted.Previous number will be deleted.Input number is confirmed.Numeric keypad.The numeric keypad input screen closes if the area is touched while displayed.Changes to Image Brilliance adjustment screen directly. (Adjustable only when the vehicle is in parking mode.)
3 Touch [Enter] to confirm your entry.
Display example for FM Radio main screen
Displays the preset number/frequency[DX SEEK]*1 button: Displays the tuning mode selection list.[PTY SEARCH]*2 button: Search for a station by PTY (Programme Type) Tuning, refer to “PTY (Programme Type) Tuning” (page 22).
*1 The button displays the current tuning mode.*2The button displays only when the tuning mode of PTY is selected.
Listening to the Radio
1 Press SOURCE/ on the unit.The Source Select screen is displayed.
2 Touch [Radio].The radio mode is activated and the display changes to the Radio Mode screen.
3 Touch [BAND] to select the desired radio band.Each press changes the bands as follows:
4 Touch [DX SEEK] to choose the tuning mode.
• There are two modes you can select for auto tuning, DX and Local:- DX (Distance) mode;
Both strong and weak stations will be tuned in.- Local mode;
Only strong stations will be tuned in. The initial setting is DX.
5 Touch [ ], [ ] or [ ], [ ] to change the radio frequency up or down respectively.When touched and held in the manual mode, the frequency changes continuously.
Displaying the Numeric Keypad Input Screen Radio
FM-1 FM-2 FM-3 MW LW FM-1
DX SEEK Local SEEK MANUAL PTY
20-EN
Presetting Stations Manually
1 Tune in a desired radio station you wish to store in the preset memory by manual or automatic seek tuning.
2 Touch [P1/2] to change the function guide.
3 Touch and hold any one of the preset buttons [P.SET 1] through [P.SET 6] for at least 2 seconds.The selected station is stored.
4 Repeat the procedure to store up to 5 other stations onto the same band.To use this procedure for other bands, simply select the band desired and repeat the procedure.
A total of 30 stations can be stored in the preset memory (6 stations for each band; FM1, FM2, FM3, MW and LW).
• If a preset memory has already been set in the same preset number, it will be cleared and the new station will be memorized.
Presetting Stations AutomaticallyThe tuner can automatically seek and store 6 strong stations in the selected band in order of signal strength.
After selecting the desired band, touch and hold [A.MEMO] for at least 2 seconds.The tuner automatically seeks and stores 6 strong stations into [P.SET 1] to [P.SET 6] in order of signal strength.When the automatic storing has been completed, the tuner goes to the station stored in [P.SET 1].
• If no stations are stored, the tuner will return to the original station you were listening to before the automatic storing procedure began.
Tuning to Preset StationsYou can tune in the preset stations in memory on each band using the preset number.
1 After selecting the desired band, touch [P1/2] to change the function guide.
2 Touch any one of the preset buttons [P.SET 1] through [P.SET 6] that has a station stored to it.The preset station is received.
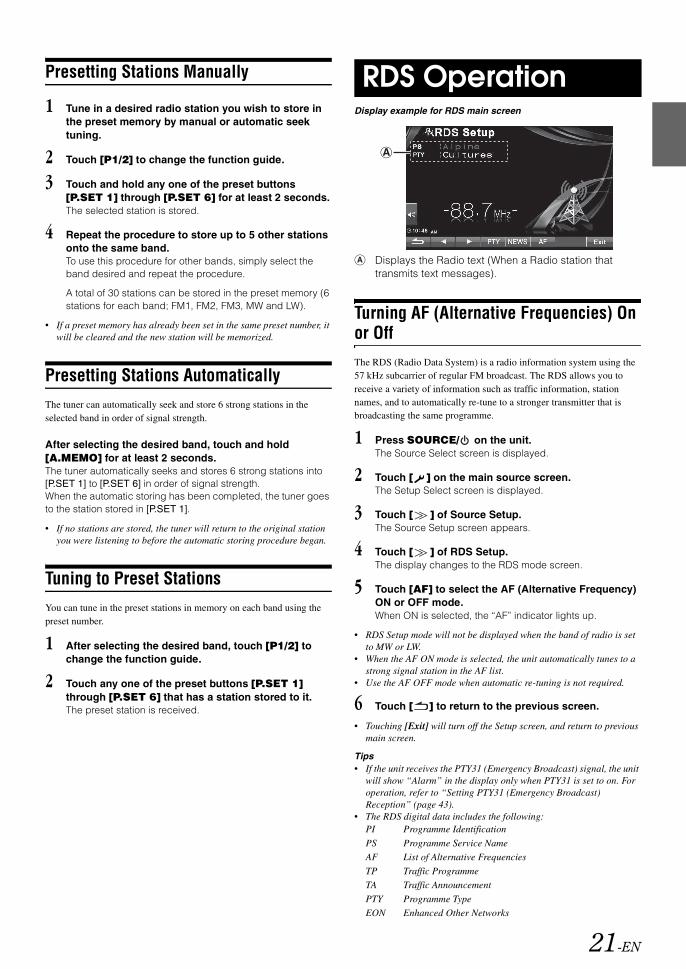
Display example for RDS main screen
Displays the Radio text (When a Radio station that transmits text messages).
Turning AF (Alternative Frequencies) On or OffThe RDS (Radio Data System) is a radio information system using the 57 kHz subcarrier of regular FM broadcast. The RDS allows you to receive a variety of information such as traffic information, station names, and to automatically re-tune to a stronger transmitter that is broadcasting the same programme.
1 Press SOURCE/ on the unit.The Source Select screen is displayed.
2 Touch [ ] on the main source screen.The Setup Select screen is displayed.
3 Touch [ ] of Source Setup.The Source Setup screen appears.
4 Touch [ ] of RDS Setup.The display changes to the RDS mode screen.
5 Touch [AF] to select the AF (Alternative Frequency) ON or OFF mode.When ON is selected, the “AF” indicator lights up.
• RDS Setup mode will not be displayed when the band of radio is set to MW or LW.
• When the AF ON mode is selected, the unit automatically tunes to a strong signal station in the AF list.
• Use the AF OFF mode when automatic re-tuning is not required.
6 Touch [ ] to return to the previous screen.
• Touching [Exit] will turn off the Setup screen, and return to previous main screen.
Tips• If the unit receives the PTY31 (Emergency Broadcast) signal, the unit
will show “Alarm” in the display only when PTY31 is set to on. For operation, refer to “Setting PTY31 (Emergency Broadcast) Reception” (page 43).
• The RDS digital data includes the following:
RDS Operation
PI Programme Identification
PS Programme Service Name
AF List of Alternative Frequencies
TP Traffic Programme
TA Traffic Announcement
PTY Programme Type
EON Enhanced Other Networks
A
21-EN
• Refer to page 43 about “PI Seek Setting”, “Receiving RDS Regional (Local) Stations”, “Switching the Display Language of PTY (Programme Type)” and “Setting PTY31 (Emergency Broadcast) Reception”.
Receiving Traffic Information
Press and hold AUDIO /TA for at least 2 seconds to turn on the Traffic Information mode.
When the traffic information station is tuned in, the TA indicator lights up.
Traffic information is heard only when it is being broadcast. If traffic information is not being broadcast, the unit is set in the standby mode.When a traffic information broadcast begins, the unit automatically receives it and the display shows “T. Info”.
When traffic information broadcast is over, the unit will automatically set in the standby mode.
• If the traffic information broadcast signal falls below a certain level, the unit remains in the receiving mode for 1 minute. If the signal remains below a certain level for over 70 seconds, “TA” blinks in the display.
• If you do not want to listen to the traffic information being received, lightly press MAP to skip that traffic information message. The T. INFO mode will remain in the ON position to receive the next traffic information message.
• If the volume level is changed while receiving traffic information, the changed volume level will be memorized. When traffic information is received next time, the volume level will be automatically adjusted to the level memorized.
PTY (Programme Type) Tuning
RDS SETUP mode
1 Touch [PTY] on the screen.
FM Radio mode
1 Touch [DX SEEK]* to choose the PTY tuning mode. The PTY mode is activated.The Programme Type of the station being currently received will be displayed.
* The button displays the current tuning mode.
2 Touch [ ] or [ ] after activating the PTY mode to choose the desired programme type while “PTY” (programme type) is displayed.Each press scrolls the programme type by one.
RDS SETUP mode
3 Touch [PTY] after selecting the programme type to start searching for a station of the selected programme type.
FM Radio mode
3 Touch [PTY SEARCH] after selecting the programme type to start searching for a station of the selected programme type.If no station is found, “NO PTY” will be displayed.
Receiving Traffic Information While Playing CD or RadioThe example explained here is how to receive the traffic information broadcast during CD playback.
1 In the CD mode, press and hold AUDIO /TA for at least 2 seconds to turn on the Traffic information mode.The unit automatically starts to search the receivable traffic broadcasts.
When the traffic information broadcast is searched out, the CD mode is switched to the Radio mode and the unit receives the traffic information broadcast.
• When the traffic information broadcast starts, the unit automatically mutes the CD.
• When the traffic information broadcast finishes, the unit automatically returns to the original source you were playing before the traffic information broadcast began.
• The receiver is equipped with the EON (Enhanced Other Networks) function so if the station being received does not broadcast the traffic information, the receiver automatically tunes in the related station that broadcasts the traffic information.
2 When the traffic information broadcast has finished, the unit returns to the CD mode.
Priority NewsThis function allows you to preset to give priority to the News programme. You will never miss the News programme as the unit automatically gives priority to the News programme whenever it begins broadcasting, and interrupts the programme you are currently listening. This feature is functional when your unit is set to a mode other than the LW and MW modes.
1 Touch [NEWS] on the RDS setup screen to activate the PRIORITY NEWS mode.The “NEWS” indicator appears in the display. Touch [NEWS] again to deactivate the Priority News mode and return to the programme you were previously listening.
2 Touch [ ] to return to the previous screen.
Displaying Radio TextText messages from a radio station can be displayed.
1 Tune in a radio station that transmits text messages.
2 Touch [INFO.] in the FM radio mode to activate the Radio Text mode.
3 To change the Radio Text display, touch [INFO.].
• If there is no receivable text message or the unit cannot receive a text message properly, the display is blank.
22-EN

Display example for MP3/WMA/AAC main screen
[ ] button: Refer to page 36CD: Displays the Track text*1/Disc text*1.
• If there is neither Track nor Disc name information, “No Text” will be displayed.
MP3/WMA/AAC:After displaying the file name in the upper line, the track name is displayed if there is ID3 tag information.After displaying the folder name in the lower line, the album name/artist name are displayed if there is ID3 tag information.CD:Displays play state/the disc number*2/track number/ progress bar/elapsed time/remain time.
MP3/WMA/AAC:Displays play state/the disc number*3/folder number/track number/progress bar/elapsed playback time/remain time.
*1 Displayed when a CD text disc is inserted.*2 Displayed when a CD changer is connected.*3 Displayed when an MP3 compatible CD changer is connected.
• When the CD/MP3 changer source is selected, progress bar, etc. will not be displayed.
Playback
1 Press SOURCE/ on the unit.The Source Select screen is displayed.
2 Touch [Disc].The display shows the Disc screen.
When a CD/MP3/WMA/AAC is inserted into the DISC SLOT of the INA-W910R, with the label side facing up, the unit starts to play the CD/MP3/WMA/AAC.
3 Touch [ ] or [ ] to select the desired track (file).
Returning to the beginning of the current track (file) :Touch [ ].
Fast reverse :Touch and hold [ ].
Advancing to the beginning of the next track (file) :Touch [ ].
Fast forward :Touch and hold [ ].
To pause playbackTouch [ / ].Touching [ / ] again will resume playback.
Inserting/Ejecting a DiscRefer to “Inserting/Ejecting a Disc” (page 18).
• If the disc does not eject, press and hold for at least 3 seconds.• The INA-W910R model includes a built-in MP3/WMA/AAC unit. You
can play CD-ROMs, DVD-ROMs, CD-Rs, CD-RWs, DVD-Rs, DVD-RWs, DVD+Rs and DVD+RWs containing MP3/WMA/AAC files on this unit. Use the format compliant with this unit. For further information about playing or storing MP3/WMA/AAC files, refer to pages 24 and 25 before using the unit.
• WMA format files that are protected by DRM (Digital Rights Management), AAC format files that have been purchased from iTunes Music Store that are not DRM-Free and files that are copy-protected cannot be played back on this unit.
• The unit can play discs containing both audio data and MP3/WMA/AAC data.
• The track display for CD audio data playback is the track numbers recorded on the disc.
• Three-inch (8cm) CD’s can be used.• “Playing MP3/WMA/AAC Data (File Play Mode)” is mentioned on
page 41.• If an MP3/WMA/AAC disc with many files and folders is played, it
takes a little longer than normal to start playback.• Touch [ ] to activate the search mode. For operations, refer to
“Search Function” on page 36. However, the search mode function does not work in the CD changer mode.
• The playback time may not be correctly displayed when a VBR (Variable Bit Rate) recorded file is played back.
Repeat Play
Touch [ ] to play back repeatedly the track currently being played.The track (file) will be played repeatedly.
Touch [ ] again and select OFF to deactivate Repeat play.
1 Touch [P1/2]*3 to change the function guide.2 Touch [ ] and select the desired Repeat play.
*1 If a CD Changer or an MP3 compatible CD changer is connected and the mode is selected, the unit repeatedly plays back all tracks (files) on the disc selected.
*2 Only files in a folder are repeatedly played back.*3 Display may vary depending on the connected devices.
CD/MP3/WMA/AAC
CD: *1 (off) (Repeat one) (Repeat disc)
MP3/WMA/AAC:
*2 *1 (off) (Repeat one) (Repeat folder) (Repeat disc)
23-EN

M.I.X. (Random Play)
Touch [ ] during playback.The tracks (files) on the disc will be played back in a random sequence.
To cancel M.I.X. play, touch [ ].
1 Touch [P1/2]*4 to change the function guide.2 Touch [ ] and select the desired M.I.X. play.
*1 If a CD Changer equipped with the ALL function is connected, ALL will also be selectable.
In this mode, the tracks on all the CDs in the current magazine will be included in the random playback sequence.
*2 If an MP3 compatible CD changer is connected, all files in a disc are played back in random sequence, and playback shifts to the next disc.
*3 Only files in a folder are played back in random sequence in the mode.
*4 Display may vary depending on the connected devices.
• If the search mode (page 36) is activated, the M.I.X. Play mode will be cancelled.
Selecting Folders (concerning MP3/WMA/AAC)
Touch [ ] or [ ] to select the folder.
About MP3/WMA/AAC
What is MP3?
MP3, whose official name is “MPEG-1, 2, 2.5 Audio Layer 3,” is a compression standard prescribed by the ISO, the International Standardization Organization and MPEG which is a joint activity institution of the IEC.
MP3 files contain compressed audio data. MP3 encoding is capable of compressing audio data at extremely high ratios, reducing the size of music files to as much as one-tenth their original size. This is achieved while still maintaining near CD quality. The MP3 format realises such high compression ratios by eliminating the sounds that are either inaudible to the human ear or masked by other sounds.
What is WMA?
WMA, or “Windows Media™ Audio,” is compressed audio data.WMA is similar to MP3 audio data and can achieve CD quality sound with small file sizes.
What is AAC?
AAC is the abbreviation for “Advanced Audio Coding,” and is a basic format of audio compression used by MPEG2 or MPEG4.
Method for creating MP3/WMA/AAC files
Audio data is compressed using software with MP3/WMA/AAC codecs. For details on creating MP3/WMA/AAC files, refer to the user’s manual for that software.MP3/WMA/AAC files that can be played back by this device have the following file extensions:MP3: “mp3”WMA: “wma” (ver. 7.1, 8, 9, 9.1 and 9.2 are supported)AAC: “m4a”WMA is not supported for the following files, Windows Media Audio Professional, Windows Media Audio 9 Voice or Windows Media Audio 9 Pro Lossless.
There are many different versions of the AAC format. Confirm that the software being used conforms to the acceptable formats listed above. It’s possible that the format may be unplayable even though the extension is valid. Playback of AAC files encoded by iTunes is supported.
Supported playback sampling rates and bit rates
MP3
WMA
AAC
This device may not play back correctly depending on sampling rates.
ID3 tags/WMA tags
This device supports ID3 tag v1 and v2, and WMA tag.If tag data is in an MP3/WMA/AAC file, this device can display the title (track title), artist name, and album name ID3 tag/WMA tag data (maximum 128 characters).
This device can only display single-byte alphanumeric characters and the underscore. For non-supported characters, “No Support” is displayed.The number of characters may be limited, or not correctly displayed, depending on the tag information.
Producing MP3/WMA/AAC discs
MP3/WMA/AAC files are prepared, then written to a CD-R or CD-RW (DVD-R/DVD-RW) using CD-R writing software. A disc can hold up to 4,096 files/256 folders (including Root Folders), and the maximum number of folders is 255.Playback may not be performed if a disc exceeds the limitations described above.
CD: ALL*1 (off)
MP3/WMA/AAC:
*3 *2 (off) *3
CAUTIONExcept for private use, duplicating audio data (including MP3/WMA/AAC data) or distributing, transferring, or copying it, whether for free or for a fee, without permission of the copyright holder is strictly prohibited by the Copyright Act and by international treaty.
Sampling rates: 48 kHz, 44.1 kHz, 32 kHz, 24 kHz, 22.05 kHz, 16 kHz, 12 kHz, 11.025 kHz, 8 kHz
Bit rates: 32 - 320 kbps
Sampling rates: 48 kHz, 44.1 kHz, 32 kHz
Bit rates: 48 - 192 kbps
Sampling rates: 48 kHz, 44.1 kHz, 32 kHz, 24 kHz, 22.05 kHz, 16 kHz, 12 kHz, 11.025 kHz, 8 kHz
Bit rates: 16 - 320 kbps
24-EN

Media supported
The media that this device can play back are CD-ROMs, CD-Rs, CD-RWs, DVD-Rs and DVD-RWs.
Corresponding File Systems
This device supports discs formatted with ISO9660 Level 1 or Level 2.
Under the ISO9660 standard, there are some restrictions to remember.The maximum nested folder depth is 8 (including the root directory). The number of characters for a folder/file name is limited.Valid characters for folder/file names are letters A-Z (all caps), numbers 0-9, and ‘_’ (underscore).
This device also can play back discs in Joliet, etc., and other standards that conform to ISO9660. However, sometimes the file names, folder names, etc., are not displayed correctly.
Formats supported
This device supports CD-ROM XA, Mixed Mode CD, Enhanced CD (CD-Extra) and Multi-Session.This device cannot correctly play back discs recorded with Track At Once or packet writing.
Order of files
Files are played back in the order that the writing software writes them to the disc. Therefore, the playback order may not be what's expected. Verify the writing order in the software's documentation. The playback order of the folders and files is as follows. (The following numbers may differ from actually displayed numbers.)
Terminology
Bit rate
This is the “sound” compression rate specified for encoding. The higher the bit rate, the higher the sound quality, but also the larger the files.
Sampling rate
This value shows how many times per second the data is sampled (recorded). For example, music CDs use a sampling rate of 44.1 kHz, so the sound is sampled (recorded) 44,100 times per second. The higher the sampling rate, the higher the sound quality, but also the larger the volume of data.
Encoding
Converting music CDs, WAVE (AIFF) files, and other sound files into the specified audio compression format.
Tag
Song information such as track titles, artist names, album names, etc., written into MP3/WMA/AAC files.
Root folder
The root folder (or root directory) is found at the top of the file system. The root folder contains all folders and files. It is created automatically for all burned discs.
Root Folder
Folder MP3/WMA/AAC File
25-EN

Display example for DVD Video main screen
Displays the disc (DVD VIDEO, DVD AUDIO, VIDEO CD) being played back. Displays tag information for DivX®.Displays the elapsed playback time.
• If [ ] on the DivX® mode screen is touched, the search list screen is displayed. Refer to “Search Function” (page 36).
• Some operations cannot be carried out depending on the disc or playback screen.
• Displays of the function guide [P1/2], etc., may vary depending on the connected device(s).
Changes the Contrast Level adjustment screen directly. For details, refer to “Adjusting Image Brilliance (Live Contrast)” on page 44.
Disc types that can be used for each heading are represented by the following marks.
Playing a Disc INA-W910R has a built-in DVD player. When an optional Alpine DVD/Video CD/CD player (or DVD changer) is connected to the INA-W910R, you can control it from the INA-W910R (except some operations).
• If you try to activate the auxiliary device while driving, the display will show the warning-Picture off for your safety.
DVD/Video CD
A
B
DVD Commercial Video discs (used for the distribution of movies, etc.) or a DVD-R/DVD-RW, DVD+R/DVD+RW recorded in a video mode can be used.(Including discs containing both DVD video and DVD audio data that are played back when “Video” is set in “Setting the DVD-Audio Playback Mode” (page 41)).
DVD Commercial Audio discs can be used.
Video-CD discs can be used.
CD-R/CD-RW/DVD-R/DVD-RW/DVD+R/DVD+RW discs that are recorded in the DivX® mode can be used.
WARNINGIt is dangerous for the driver to watch the TV/DVD/Video while driving the vehicle. The driver may be distracted from looking ahead and an accident could occur.
Install the INA-W910R correctly so that the driver cannot watch TV/DVD/Video unless the vehicle is stopped and the emergency brake is applied.
If the INA-W910R is not installed correctly, the driver will be able to watch the TV/DVD/Video while driving the vehicle and may be distracted from looking ahead causing an accident. The driver or other people could be severely injured.
To display the DVD mode screen
Caution• Not all functions will operate for every DVD. See the
individual DVD’s instructions for details on the features supported.
• Fingerprints on a disc may adversely affect playback. If a problem occurs, remove the disc and check for fingerprints on the playback side. Clean the disc if necessary.
• If you switch the power or Ignition Key OFF or change sources during playback, playback will continue where you left off when you resume playback.
• If you try to perform an invalid operation (based on the type of disc being played), the following mark is displayed on the monitor screen:
• Play Position Memory Function Even if you turn power off or switch the Ignition Key to OFF during playback or change the source, playback will continue from the point where playback stopped when the power is turned ON again.
26-EN
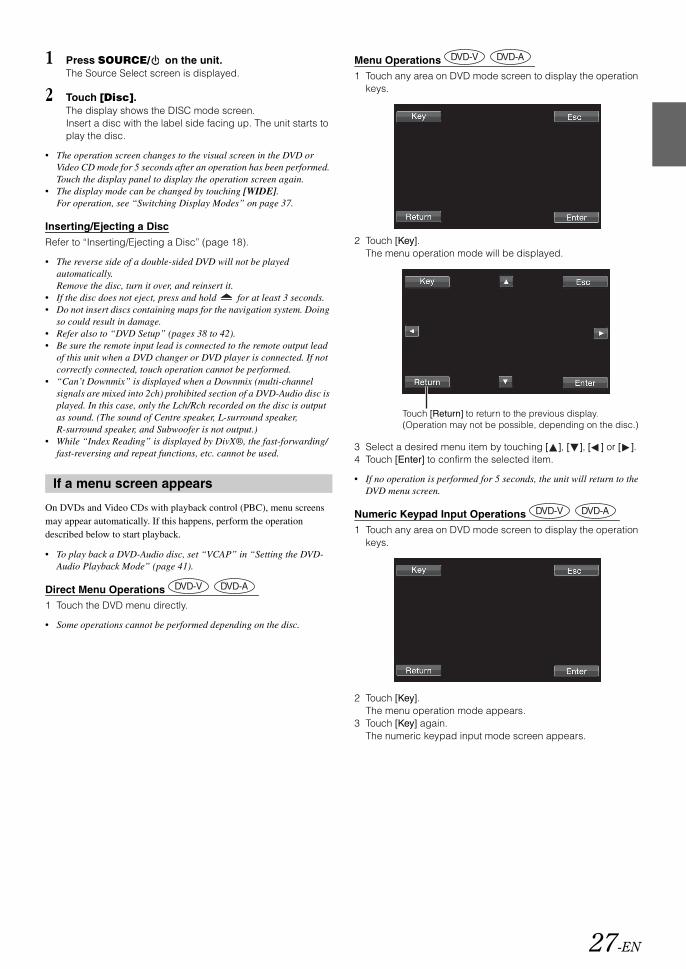
1 Press SOURCE/ on the unit.The Source Select screen is displayed.
2 Touch [Disc].The display shows the DISC mode screen.Insert a disc with the label side facing up. The unit starts to play the disc.
• The operation screen changes to the visual screen in the DVD or Video CD mode for 5 seconds after an operation has been performed. Touch the display panel to display the operation screen again.
• The display mode can be changed by touching [WIDE]. For operation, see “Switching Display Modes” on page 37.
Inserting/Ejecting a DiscRefer to “Inserting/Ejecting a Disc” (page 18).
• The reverse side of a double-sided DVD will not be played automatically. Remove the disc, turn it over, and reinsert it.
• If the disc does not eject, press and hold for at least 3 seconds.• Do not insert discs containing maps for the navigation system. Doing
so could result in damage.• Refer also to “DVD Setup” (pages 38 to 42).• Be sure the remote input lead is connected to the remote output lead
of this unit when a DVD changer or DVD player is connected. If not correctly connected, touch operation cannot be performed.
• “Can’t Downmix” is displayed when a Downmix (multi-channel signals are mixed into 2ch) prohibited section of a DVD-Audio disc is played. In this case, only the Lch/Rch recorded on the disc is output as sound. (The sound of Centre speaker, L-surround speaker, R-surround speaker, and Subwoofer is not output.)
• While “Index Reading” is displayed by DivX®, the fast-forwarding/fast-reversing and repeat functions, etc. cannot be used.
On DVDs and Video CDs with playback control (PBC), menu screens may appear automatically. If this happens, perform the operation described below to start playback.
• To play back a DVD-Audio disc, set “VCAP” in “Setting the DVD-Audio Playback Mode” (page 41).
Direct Menu Operations 1 Touch the DVD menu directly.
Menu Operations 1 Touch any area on DVD mode screen to display the operation
keys.
2 Touch [Key]. The menu operation mode will be displayed.
3 Select a desired menu item by touching [ ], [ ], [ ] or [ ].4 Touch [Enter] to confirm the selected item.
• If no operation is performed for 5 seconds, the unit will return to the DVD menu screen.
Numeric Keypad Input Operations 1 Touch any area on DVD mode screen to display the operation
keys.
2 Touch [Key].The menu operation mode appears.
3 Touch [Key] again.The numeric keypad input mode screen appears.
If a menu screen appears
• Some operations cannot be performed depending on the disc.
Touch [Return] to return to the previous display.(Operation may not be possible, depending on the disc.)
27-EN

4 Touch a desired number.5 Touch [Enter] on the numeric keypad mode screen to confirm
your selection.
Numeric Keypad Input Operations When PBC is turned OFF, the menu screen is not displayed. Turn it ON to display the screen (see “Setting the Video CD Play Mode” on page 42).
1 Touch [P1/2] in the Video CD mode to change to the function guide.
2 Touch [10KEY].The numeric keypad is displayed.
3 Touch and input a desired number.4 Touch [Enter] to confirm.
When a DVD contains two or more titles, the top menu screen appears.
Touch [TOP MENU] on the DVD mode main screen.The top menu screen appears.
• To perform necessary operations, see “If a menu screen appears” on page 27.
• To play back a DVD-Audio disc, set “VCAP” in “Setting the DVD-Audio Playback Mode” (page 41).
With a DVD having two or more menus, a menu screen will appear for the programmes available, in addition to the main programmes.
Touch [MENU] on the DVD mode main screen.The menu screen appears.
• To perform necessary operations, see “If a menu screen appears” on page 27.
1 Touch [P1/2]* on the DVD mode main screen.The function guide changes.
* The display differs, depending on the disc (mode).
2 Touch [MENU CONT].The menu operation mode screen appears.
• For further operation, see “If a menu screen appears” on page 27.• To play back a DVD-Audio disc, set “VCAP” in “Setting the DVD-
Audio Playback Mode” (page 41).
Stopping Playback (Pre Stop)
Press the stop button during playback to stop playback. That position is stored in the memory.
1 Touch [ ] once during playback.“Pre Stop” is displayed.
2 Touch [ / ] in the Pre Stop mode.Playback starts from the position at which it was stopped.
• For some discs, the position at which playback was stopped may not be accurate.
• To play back a DVD-Audio disc, set “VCAP” in “Setting the DVD-Audio Playback Mode” (page 41).
Stopping Playback
Touch [ ] twice or touch and hold [ ] for at least 2 seconds during playback.“Stop” is displayed, and playback stops.
• Playback starts from the beginning when [ / ] is touched while playback is stopped.
Displaying the Top Menu Screen
Displaying the Menu Screen
Touch [X] to close the numeric keypad input screen.
The numeric keypad input screen closes when the area is touched while displayed.
Displaying the Menu Operation Mode Screen
28-EN

Fast-forwarding/Fast-reversing
DVD-Video, Video-CD, DVD-Audio (VCAP mode)*, DivX®:
1 During playback, touch and hold [ ] (Fast-reverse) or [ ] (fast-forward).When touched and held for more than 1 second, the disc is forwarded/reversed at double speed. When held for 5 more seconds or longer, the disc is forwarded/reversed at 8 times the normal speed. When held for 10 seconds or longer, the disc is forwarded/reversed at 21 times the normal speed.
DVD-Audio (VOFF mode)*:
1 During playback, touch and hold [ ] (Fast-reverse) or [ ] (fast-forward).
2 Stop touching [ ] or [ ] to return to normal playback.
* When “VCAP” or “VOFF” is set in “Setting the DVD-Audio Playback Mode” (page 41).
• No sound is played during fast-forwarding/fast-reversing.• For DVDs and Video CDs with playback control (PBC), the menu
screen may reappear during fast-forwarding/fast-reversing.• Operation may not be possible, depending on the disc.
Finding the Beginnings of Chapters/Tracks/Files
During playback, touch [ ] or [ ].The chapter/track/file switches each time the button is touched, and playback of the selected chapter/track/file starts.
• Some DVDs do not have chapters.• Be sure to turn PBC off before starting the search (see “Setting the
Video CD Play Mode” on page 42).
Playing Still Frames (Pausing)
1 During playback, touch [ / ].
2 Touch [ / ] to resume playback.
• No sound is played during the still frame mode.• The image or sound may stop temporarily when playback starts from
the pause mode. This is not a malfunction.
Forward/reverse frame-by-frame Playback
1 In the pause mode, touch [ ] or [ ].The picture advances or reverses by one frame each time the button is touched.
2 Touch [ / ] to return to normal mode.
• No sound is output during forward/reverse frame-by-frame playback.• Reverse frame-by-frame cannot be carried out on the Video CD.
Slow Motion Playback
1 When [ ] or [ ] is touched and held while in the pause mode, the 1/8th speed slow motion playback mode is set. When held in for 5 more seconds, the slow motion speed switches to 1/2 the normal speed.
2 Stop touching [ ] or [ ] to pause, and touch [ / ] to play back.
• No sound is played during slow motion playback.• Reverse slow motion playback is not available on the Video CD.• 1/2, 1/8 are approximate speeds. The actual speed differs from disc to
disc.
Selecting Folders
Touch [ ] or [ ] to select the folder.
:Touch this to start playback from the beginning of the following chapter, track or file.
:Touch this to start playback from the beginning of the current chapter, track or file.
Supplementary explanation“Chapters” are divisions of movies or musical selections on DVDs.“Tracks” are divisions of movies or musical selections on Video CD, DVD Audio and music CDs.“Groups” associate a track (one song) with other tracks stored on a DVD-Audio. Group playback differs depending on the disc.
29-EN

Repeat Playback
Use this function to play the disc’s titles, chapters or tracks etc., repeatedly.
DVD Video
1 Touch [ ].The repeat mode switches every time the button is touched.
• Display may vary depending on the connected devices.• The REPEAT mode is always turned off when [ ] is touched and
held for at least 2 seconds.
Video CD
1 During playback, touch [ ].The repeat mode switches every time the button is touched.
* Displayed only in the changer mode.
• Display may vary depending on the connected devices.• The track/disc repeat modes cannot be used on Video CDs with
playback control (PBC). These modes can be carried out after turning PBC off. See “Setting the Video CD Play Mode” on page 42.
• For some discs it is not possible to switch the repeat mode.
DVD Audio
1 Touch [ ].The repeat mode switches every time the button is touched.
VCAP mode*1:
VOFF mode*1:
*1 When “VCAP” or “VOFF” is set in “Setting the DVD-Audio Playback Mode” (page 41).
DivX®
1 Touch [ ] after touching [P1/2].The repeat mode switches every time the button is touched.
• The REPEAT mode is always turned off when [ ] is touched and held for at least 2 seconds.
Searching by Title/Group/Folder Number
Use this function to easily find positions on the DVD using the DVD’s title, Group or Folder number.
1 Touch [P1/2]* while playback is stopped.The function guide appears.
* The display differs, depending on the disc (mode).
2 Touch [10KEY].The numeric keypad input mode screen appears.
3 Enter a desired title, Group or Folder by touching its title, Group or Folder number.See page 27 for operation of the numeric keypad.
4 Confirm your selection by touching [Enter].Playback will start from the title number selected.
• This function cannot be used on discs on which no title numbers are recorded.
• Playback starts from the beginning of the chapter/track number in the state of Pre Stop.
• Some disc may not accept any operation.
The chapter is played repeatedly.
The title is played repeatedly.
The playback returns to normal mode.
The track is played repeatedly.
The disc is played repeatedly.
Playback does not repeat.*
The track is played repeatedly.
The group is played repeatedly.
The playback returns to normal mode.
The track is played repeatedly.
The group is played repeatedly.
The disc is played repeatedly.
The file is played repeatedly.
The disc is played repeatedly.
The folder is played repeatedly.
30-EN

Searching Directly by Chapter, Track or File Number Use this function to easily move to the beginnings of the chapters, tracks or files on the disc.
1 Touch [P1/2]* in any mode other than stop mode.The function guide will appear.
* The display differs, depending on the disc (mode).
2 Touch [10KEY].The numeric keypad input mode screen will appear.
3 Touch and enter the chapter or track number you want to play.See page 27 for operation of the numeric keypad.
4 Touch [Enter] to confirm your selection.Playback will start from the selected chapter or track.
• This function is not available for a disc on which chapters or tracks are not stored.
• Be sure to turn PBC off before starting the search (See “Setting the Video CD Play Mode” on page 42).
Switching the Angle On DVDs in which scenes have been filmed from multiple angles, the angle can be switched during playback.
1 During playback, touch [P1/2]*.The function guide changes.
* The display differs, depending on the disc (mode).
2 Touch [ANGLE].The angle switches between the angles recorded on the disc every time the button is touched.
• Some time may be required for the angle to change.• Depending on the disc, the angle may switch in one of two ways.- Seamless: The angle switches smoothly.- Non-seamless: When the angle is switched, a still picture is displayed
first, after which the angle switches.• To play back a DVD-Audio disc, set “VCAP” in “Setting the DVD-
Audio Playback Mode” (page 41).
Scroll to Move the Page Forward or Backward “Page” is a still image stored on a DVD-Audio disc.
1 Touch [P1/3] twice while playing a DVD-Audio disc in VCAP mode*.
* Playing back a DVD-Audio disc when “VCAP” is set in “Setting the DVD-Audio Playback Mode” (page 41).
2 Touch PAGE [ ] or [ ].The display switches.Touch and hold to display the home page.
• For DVD-Audio discs without Pages, depending on the DVD-Audio disc, the “Page” function may not be operable if images are in slide show form.
Switching the Audio Tracks
DVDs with multiplex audio or audio languages allow switching the sound during playback.
1 During playback, touch [P1/2]*.
* The display differs, depending on the disc (mode).
2 Touch [AUDIO].The sound switches between the alternate audio tracks recorded on the disc every time the button is touched.
• The alternate track selected becomes the default setting every time the power is turned on or the disc is replaced. If the disc does not include that track, the disc’s default language is selected instead.
• Not all discs will allow changing the alternate audio tracks during playback. In these cases, select audio tracks from the DVDs menu.
• There may be a delay before the selected alternate track begins to play.
Video CDs with multiplex audio
1 During playback, touch [P1/2].The function guide changes.
2 Touch [AUDIO].The left and right channels will be output as shown, each time the button is touched.
Audio LR Audio LL Audio RR Audio LR
31-EN

Switching the Subtitles (Subtitle Language) With DVDs on which multiple subtitle languages are recorded, the subtitle language can be switched during playback; moreover, subtitles can be hidden.
1 During playback, touch [P1/2]*.The function guide changes.
* The display differs, depending on the disc (mode).
2 Touch [SUBT.].Touching this button repeatedly selects sequentially the subtitle languages recorded on the disc, and then turns the subtitles OFF.
• To play back a DVD-Audio disc, set “VCAP” in “Setting the DVD-Audio Playback Mode” (page 41).
• There may be a delay before the selected subtitle appears.• Not all discs will allow changing the subtitles during playback. In
these cases, select subtitles from the DVDs menu.• The subtitle language selected becomes the default setting every time
the power is turned on or the disc is replaced. If the disc does not include that language, the disc’s default language is selected instead. However, the subtitle language may differ depending on the disc.
• For some discs, the subtitles will be displayed even when this is set to OFF. However, the subtitle language may differ depending on the disc.
Switching from the disc menu
For some discs, the audio language, angle and subtitles can be switched from the disc menu.
1 Touch [MENU] or [TOP MENU] to display the menu.
2 Select an item to confirm it.See “If a menu screen appears” on page 27.
• To play back a DVD-Audio disc, set “VCAP” in “Setting the DVD-Audio Playback Mode” (page 41).
About DivXDivX® is a codec (software) programme to compress moving images while maintaining image quality using a highly advanced compression ratio and operating speed.
• Official DivX® Certified product• Plays all versions of DivX® video (including DivX® 5) with
standard playback of DivX® media files• DivX®, DivX Certified® and associated logos are trademarks of
DivX, Inc. and are used under license. DivX Certified® to play DivX® video, including premium content.
The unit can play back CD-R/CD-RW/DVD-R/DVD-RW/DVD+R/DVD+RW discs that are recorded in the DivX® mode with extension “avi” or “divx”.
The optimum size for DivX® disc playback is as follows:
With an aspect ratio other than 16:9, black bars may be displayed on the left and right sides, or at the top and bottom of the screen.
The following audio recording systems are supported.
ABOUT DIVX VIDEO:DivX® is a digital video format created by Divx, Inc.This is an official DivX Certified® device that plays DivX video. Visit divx.com for more information and software tools to convert your files into DivX video.
ABOUT DIVX VIDEO-ON-DEMAND:This DivX Certified® device must be registered in order to play purchased DivX Video-on-Demand (VOD) movies.To obtain your registration code, locate the DivX VOD section in your device setup menu. Go to vod.divx.com for more information on how to complete your registration.
Screen Size: 32 to 720 pixel (horizontal) × 32 to 576 pixel (vertical)
Image bit rate: “average 4 Mbps, Peak 8 Mbps” Home Theatre Profile supported
MPEG1 Layer II 64 to 384 kbpsMPEG1 Layer III 32 to 320 kbpsMPEG2 Layer III 8 to 160 kbpsMPEG2.5 Layer III 8 to 160 kbpsDolby Digital 64 to 448 kbps (Max. 5.1ch)
32-EN

\
Adjusting the Audio
1 Press SOURCE/ on the unit.The Source Select screen is displayed.
2 Touch [ ] on the main source screen.The Setup Select screen is displayed.
3 Touch [ ] of Audio Setup.The Audio Setup screen appears.
Display Example for Audio Setup Screen
• When the optional IMPRINT audio processor (PXA-H100) or an external audio processor is connected, the “A.Processor” list is displayed. For details on operation, refer to “IMPRINT Operation (Optional)” (page 50) or “External Audio Processor Operation (Optional)” (page 56).
• Touching [ ] or [ ] will scroll the list one line at a time.• Touching [ ] or [ ] will scroll the list one page at a time.• Touching [ ] to return to the previous screen.
...This item is controllable with the INA-W910R only.
...This item is available when the optional IMPRINT audio processor (PXA-H100) is connected.
...This item is available when an External Audio Processor is connected.
Adjusting Balance/Fader
Touch [ ] of Balance/Fader.The display changes to the Balance/Fader adjusting screen.
Display Example for Balance/Fader Screen
Adjusting the Fader
Touch [F] or [R] to adjust the volume of the front and rear speakers.
Setting range: F15 to R15
• If an IMPRINT audio processor (PXA-H100) is connected to this unit and you have set the 2.2ch (3WAY)/4.2ch (FRONT/REAR/SUBW.) switch of the IMPRINT audio processor (PXA-H100) to 2.2ch (3WAY), you cannot adjust the FADER mode. For details, refer to the Owner’s Manual of PXA-H100.
Adjusting the Balance
Touch [L] or [R] to adjust the sound volume of the left and right speakers.
Setting range: L15 to R15
Adjusting the Balance/Fader Directly
Touch and move [ ] to a desired setting.Or touch a desired setting range, and [ ] will move to that location.Touch [L] or [R] of Balance and [F] or [R] of Fader for fine-tuning.
Adjusting Bass/Treble
You can change the bass or treble frequency emphasis to create your own tonal preference.Touch [ ] of Bass/Treble to adjust screen.
• Adjustment cannot be performed when Defeat is set to ON.• If OFF is set in “Changing MultEQ mode” (page 50) when the
IMPRINT audio processor is connected, the list is not displayed.
Setting the Bass levelYou can emphasise or weaken the bass frequency.Touch [ ] or [ ] of Bass Level to select the desired bass level.
Setting range: –7 to +7
Setting the treble levelYou can emphasise the treble frequency.Touch [ ] or [ ] of Treble Level to select the desired treble level.
Setting range: –7 to +7
Other Useful Features
A
B
C
33-EN

Adjusting Bass/Treble
You can change the bass or treble frequency emphasis to create your own tonal preference.Touch [ ] of Bass/Treble to adjust screen.
• Adjustment cannot be performed when Defeat is set to ON.
Setting the Bass levelYou can emphasise or weaken the bass frequency.Touch [ ] or [ ] of Bass Level to select the desired bass level.
Setting range: –6 to +6
• When G-EQ is set in “Setting EQ mode” (page 35), the level value may change correspondingly with the value set in Band 1.
• When P-EQ is set in “Setting EQ mode” (page 35), the level value may change correspondingly with the value set in Band 1.
Setting the treble levelYou can emphasise or weaken the treble frequency.Touch [ ] or [ ] of Treble Level to select the desired treble level.
Setting range: –6 to +6
• When G-EQ is set in “Setting EQ mode” (page 35), the level value may change correspondingly with the value set in Band 7.
• When P-EQ is set in “Setting EQ mode” (page 35), the level value may change correspondingly with the value set in Band 5.
Setting the Bass Centre FrequencyThe displayed bass frequency is emphasized.Touch [ ] or [ ] of Bass Freq. to select the desired bass centre frequency.
Setting range: 63 Hz 80 Hz 100 Hz 200 Hz
• The operation can be performed only when the P-EG is selected in “Setting EQ mode” on page 35.
• When P-EQ is set in “Setting EQ mode” (page 35), the bandwidth value may change correspondingly with the value set in Band 1.
Setting the Bass BandwidthChanges the boosted bass bandwidth to wide or narrow. A wider setting will boost a wide range of frequencies above and below the centre frequency. A narrower setting will boost only frequencies near the centre frequency.Touch [ ] or [ ] of Bass Bandwidth to select the desired bass bandwidth.
Setting range: Wide (Narrow) 1 to Wide 4 (Wide)
• The operation can be performed only when the P-EG is selected in “Setting EQ mode” on page 35.
• When P-EQ is set in “Setting EQ mode” (page 35), the bandwidth value may change correspondingly with the value set in Band 1.
Setting the Treble Centre FrequencyThe displayed treble frequency is emphasized.Touch [ ] or [ ] of Treble Freq. to select the desired Treble centre frequency.
Setting range: 10 kHz 12.5 kHz 16 kHz 17.5 kHz
• The operation can be performed only when the P-EG is selected in “Setting EQ mode” on page 35.
• When P-EQ is set in “Setting EQ mode” (page 35), the frequency value may change correspondingly with the value set in Band 5.
Subwoofer On and Off Touch [ ] or [ ] of Subwoofer to set to ON or OFF.
Adjusting the Subwoofer LevelWhen ON is set in “Subwoofer On and Off ”, the item is displayed.When an External Audio Processor is connected, the list is not displayed.
1 Touch [ ] of Subwoofer. The display change to the Subwoofer Adjusting screen.
2 Touch [ ] or [ ] of Level to adjust the subwoofer output.
Setting range: 0 to 15
Switching the Subwoofer phaseWhen ON is set in “Subwoofer On and Off” while the car is parked, the item is displayed.The subwoofer output phase is toggled subwoofer normal (0°) or subwoofer reverse (180°).
1 Touch [ ] of Subwoofer. The display change to the Subwoofer Adjusting screen.
2 Touch [ ] or [ ] of Phase to select to 0° or 180°.
• When the IMPRINT audio processor is connected, set “Changing MultEQ mode” (page 50) to OFF while the car is parked.
Setting the Subwoofer SystemWhen ON is set in “Subwoofer On and Off” while the car is parked, the item is displayed.
1 Touch [ ] of Subwoofer. The display change to the Subwoofer Adjusting screen.
2 Touch [ ] or [ ] of System to select to System 1 or System 2.
System 1: Subwoofer level changes according to the main volume setting.
System 2: Subwoofer level change is different from the main volume setting. For example, even at low volume settings, the subwoofer is still audible.
Setting the Subwoofer ChannelWhen ON is set in “Subwoofer On and Off” while the car is parked, the item is displayed.
1 Touch [ ] of Subwoofer. The display change to the Subwoofer Adjusting screen.
2 Touch [ ] or [ ] of Channel to select to Stereo or Mono (monaural).
Stereo: Subwoofer stereo (L/R) outputMono: Subwoofer monaural output
• When the IMPRINT audio processor is connected, set “Changing MultEQ mode” (page 50) to OFF while the car is parked.
Adjusting the Subwoofer Level When an external audio processor is connected, the list is displayed.Touch [ ] or [ ] of Subw. Level to adjust the subwoofer output.
Setting range: 0 to 15
OFF: Subwoofer output is off.ON: Subwoofer output is on.
34-EN

Adjusting Nav. Mix Level
Touch [ ] or [ ] of Nav. Mix Level to adjust the volume of navigation interruption.
Setting range: 0 to 15
• The setting navigation interruption is not displayed if an external audio processor not compatible with Nav. Mix is connected.
• While an External audio processor is connected, this function may inoperable when Defeat is set to ON.
Setting the Media Xpander mode When the Media Xpander is on, you can adjust the Media Xpander level. While the car is parked, the item is displayed.
1 Select ON or OFF of MX by touching [ ] or [ ] of Media Xpander.
2 Touch [ ] of Media Xpander after setting to ON.The Media Xpander setup screen appears.
3 Touch [ ] or [ ] of the current MX mode.
• Music source (such as USB and CDs, etc.) level can be set.
MX CD (No Effect, Level 1 to 3)CD mode processes a large quantity of data. This data is used to reproduce the sound cleanly by making use of the data quantity.
MX CMPM (No Effect, Level 1 to 3)This corrects information that was omitted at the time of compression. This reproduces a well-balanced sound close to the original.
MX DVD (No Effect, Level 1 to 3)The dialog portion of the video is reproduced more clearly.
MX AUX (No Effect, Level 1 to 3)Choose the MX mode that corresponds to the media connected.
• When No Effect is selected, MX effect of each MX mode will be OFF.• Each music source, such as CD, MP3 can have its own MX setting.• There is no MX mode for FM, MW and LW radio.• MX CMPM is applied for MP3/WMA/AAC and iPod/iPhone.• The MX setting can be performed only when a source is currently
selected.• The function is inoperable when Defeat is set to ON.
Adjusting the Time Correction
While the car is parked, this item is displayed.Before performing the following procedures, refer to “About Time Correction” (page 54).
1 Touch [ ] of Time Correction.The Time Correction screen appears.
2 Adjust the distance (0.0 to 336.6 cm) of a desired speaker by touching the respective [ ] or [ ] button.
L = (distance to farthest speaker) – (distance to other speakers)
Refer to “Time Correction Value List” on page 54.
3 Repeat step 2 to set another speaker.By setting these values to make its sound reach the listening position at the same time as the sound of other speakers.
• The total adjustment distance for all speakers should be less than 680 cm (268.1 inch).
Setting the Time Correction Unit (T.Corr Parameter) While the car is parked, this item is displayed.You can change the unit, (cm or inch) of time correction.Touch [ ] or [ ] of T.Corr Parameter to select cm or Inch.
Setting item: T.Corr Parameter
cm Inch
Setting EQ mode While the car is parked, this item can be adjusted. This setting gives you a choice of 5-band parametric, or 7-band graphic equalizer.Touch [ ] or [ ] of EQ Select to select P-EQ or G-EQ.
• This setting item is ineffective when Defeat is ON or an external audio processor is connected.
Adjusting the parametric Equalizer Curve (P-EQ) When P-EQ is set in “Setting EQ mode” while the car is parked, this item can be adjusted.You can modify the Equalizer settings to create a response curve more appealing to your personal taste.
1 Touch [ ] of EQ Select after selecting P-EQ in “Setting EQ mode”.The P-EQ list screen appears.
2 Adjust the P-EQ to your preference.
Adjusting the BandTouch [ ] or [ ] of Band to select the band to be adjusted.
Band 1 / Band 2 / Band 3 / Band 4 / Band 5
OFF: Turns off the MX effect of every music source.ON: Turns on the specified MX mode.
cm: The unit of time correction is cm.Inch: The unit of time correction is Inch.
P-EQ: 5-band Parametric EQ.G-EQ: 7-band Graphic EQ.
35-EN

Adjusting the FrequencyTouch [ ] or [ ] of Freq. to adjust the frequency of the selected band.
Adjustable frequency bands: 63 Hz to 17.5 kHz (in 1/3 octave steps)
Band-1: 63 Hz~200 Hz (63 Hz) Band-2: 160 Hz~1 kHz (160 Hz) Band-3: 630 Hz~4 kHz (630 Hz) Band-4: 1.6 kHz~10 kHz (1.6 kHz) Band-5: 10 kHz~17.5 kHz (10 kHz)
Adjusting the LevelTouch [ ] or [ ] of Level to adjust the level of selected band.
Adjustable level: –6 to +6 dB
Setting the BandwidthTouch [ ] or [ ] of Q to select the bandwidth.
Adjustable bandwidth: 1, 2, 3, 4
3 To adjust another band, repeat step 2 and adjust all bands.
• The frequency value range of the current band should be higher than the previous band’s setting value and lower than the next band’s setting value.
• While adjusting the Parametric EQ, you should consider the frequency response of the connected speakers.
• When the Parametric EQ is adjusted, the adjustment for Graphic EQ becomes ineffective.
Adjusting the Graphic Equalizer Curve (G-EQ) When G-EQ is set in “Setting EQ mode” while the car is parked, this item can be adjusted.You can modify the equalizer settings to create a response curve more appealing to your personal taste.
1 Touch [ ] of EQ Select after selecting G-EQ in “Setting EQ mode”.The G-EQ list screen appears.
2 Adjust the G-EQ to your preference.
Band-1 (80 Hz) / Band-2 (250 Hz) / Band-3 (500 Hz) / Band-4 (1,000 Hz) / Band-5 (4,000 Hz) / Band-6 (8,000 Hz) / Band-7 (16,000 Hz)
Adjusting the LevelTouch [ ] or [ ] to adjust the level of selected band.
Adjustable level: –6 to +6 dB
3 To adjust another band, repeat step 2, and then adjust all bands.
• When Graphic EQ is adjusted, the adjustment for Parametric EQ becomes ineffective.
Adjusting Highpass Filter When Defeat is set to OFF, touch the title bar of H.P.F. to adjust screen.Touch [ ] or [ ] of Front H.P.F. to adjust the front speaker.
Setting range: OFF, 60 Hz, 80 Hz, 100 Hz
Touch [ ] or [ ] of Rear H.P.F. to adjust the rear speaker.
Setting range: OFF, 60 Hz, 80 Hz, 100 Hz
• Select OFF when no adjustment is required.
Turning Defeat ON or OFF
Touch [ ] or [ ] of Defeat to set to ON or OFF.
Storing Settings in the MemoryAdjustment or setting contents of Time Correction and P/G-EQ can be stored.Contents that can be stored vary depends on the audio processor used.
1 Check whether the Defeat mode is OFF.
2 Touch [MEMORY] on the right side of bottom screen.
3 Within 5 seconds, touch any one of the preset buttons [P.SET 1] through [P.SET 6] on the bottom screen.The setting contents are stored.
• The stored contents will not be deleted even when the battery power cord is detached.
Calling up the Preset Memory
1 Check whether the Defeat mode is OFF.
2 Touch any one of the preset buttons [P.SET 1] through [P.SET 6] on the bottom display to select the preset memory.
• It takes a few moments to call up the preset memory.
Search Function
1 Touch [ ] on the function guide while in the CD or MP3/WMA/AAC or DivX® mode.The search list screen is displayed.
Select a desired track or folderTouch [ ] for direct playback.
When a hierarchical list is prepared, [ ] will be displayed. Touch [ ] to display the respective hierarchy list screens.
36-EN
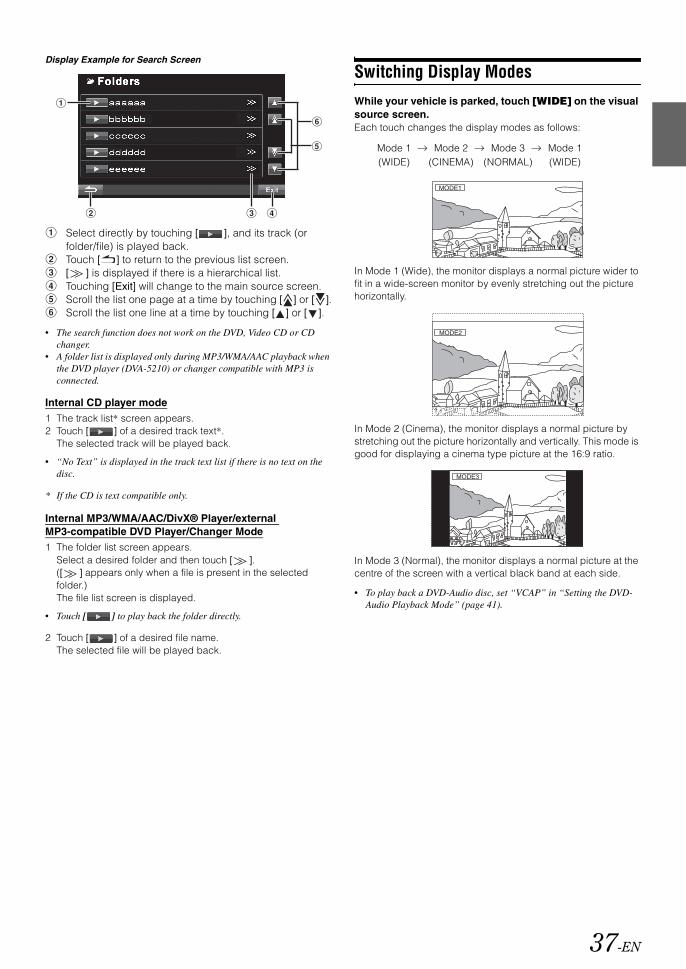
Display Example for Search Screen
Select directly by touching [ ], and its track (or folder/file) is played back.Touch [ ] to return to the previous list screen.[ ] is displayed if there is a hierarchical list.Touching [Exit] will change to the main source screen.Scroll the list one page at a time by touching [ ] or [ ].Scroll the list one line at a time by touching [ ] or [ ].
• The search function does not work on the DVD, Video CD or CD changer.
• A folder list is displayed only during MP3/WMA/AAC playback when the DVD player (DVA-5210) or changer compatible with MP3 is connected.
Internal CD player mode1 The track list* screen appears.2 Touch [ ] of a desired track text*.
The selected track will be played back.
* If the CD is text compatible only.
Internal MP3/WMA/AAC/DivX® Player/external MP3-compatible DVD Player/Changer Mode1 The folder list screen appears.
Select a desired folder and then touch [ ]. ([ ] appears only when a file is present in the selected folder.) The file list screen is displayed.
2 Touch [ ] of a desired file name.The selected file will be played back.
Switching Display Modes
While your vehicle is parked, touch [WIDE] on the visual source screen.Each touch changes the display modes as follows:
In Mode 1 (Wide), the monitor displays a normal picture wider to fit in a wide-screen monitor by evenly stretching out the picture horizontally.
In Mode 2 (Cinema), the monitor displays a normal picture by stretching out the picture horizontally and vertically. This mode is good for displaying a cinema type picture at the 16:9 ratio.
In Mode 3 (Normal), the monitor displays a normal picture at the centre of the screen with a vertical black band at each side.
• To play back a DVD-Audio disc, set “VCAP” in “Setting the DVD-Audio Playback Mode” (page 41).
• “No Text” is displayed in the track text list if there is no text on the disc.
• Touch [ ] to play back the folder directly.
Mode 1 Mode 2 Mode 3 Mode 1(WIDE) (CINEMA) (NORMAL) (WIDE)
37-EN

DVD Setup Operation
The DVD Setup operation can be carried out after removing the disc from the unit.
1 Press SOURCE/ on the unit.The Source Select screen is displayed.
2 Touch [ ] on the main source screen.The Setup Select screen is displayed.
3 Touch [ ] of Source Setup.The Source Setup screen appears.
4 Touch [ ] of DVD Setup.The DVD Setup screen appears.
5 Touch [ ], [ ], etc., of the desired item to change its setting.
Setting items:Menu Language / Audio Language / SUBT. Language / Country Code / Parental / Digital Out Mode / Downmix Mode / TV Screen / Bonus Code / DVD-A Setup / File Play Mode / DVD Play Mode / DivX Info. / PBC
Display example for DVD setup screen
Touch [Code] to display the numeric keypad input screen.Touch [ ] or [ ] to set a desired language.Touch [ ] or [ ] to scroll a setting item list by one Line.Touch [ ] or [ ] to scroll a setting item list by one page.
The numeric keypad input screen closes when the area is touched while displayed.Numeric keypad input screen The numeric keypad is used if you want to play back in a language other than that displayed, or to input your parental lock password, etc.
6 Touch [ ] to return to the previous screen.Touch [Exit] to return to the main source screen that was displayed before the setup operation was started.
• Immediately after changing the settings of DVD mode (while the system is writing data automatically) do not turn the ignition key (engine key) to OFF. Otherwise, the settings may not be changed.
The audio language, subtitle language and menu language can be set according to your preferences.Once set, this becomes the default language. This function is convenient when you always want to listen in English. (The language setting is not effective on some discs. If not, the default language is set from the factory.)
• When the settings are changed, the old settings are overwritten. Make a note of the current settings before making changes. The settings are cleared when the vehicle’s battery is disconnected.
• To temporarily change the language of the current disc, either do so from the DVD menu or by using the operation described in the section “Switching the Audio Tracks” (page 31).
• If the disc does not include the selected language, the disc’s default language is set.
Set the language used for the menus (title menu, etc.).
Setting item: Menu Language Setting contents: Auto / EN / JP / DE / ES / FR / IT / SE / RU / CN
• When “Auto” is selected, the primary menu language among the recorded ones is played.
SetupDVD Setup
The Parking Brake must be engaged to access the DVD mode screen. Attempting to access this screen while driving will display the warning-Can’t operate while driving.
The following steps 1 to 6 are common operations to each “Setting item” of DVD Setup. Refer to each section for details.
Changing the language setting
Setting of the Menu Language
38-EN
Set the audio language produced from the speakers.
Setting item: Audio Language Setting contents: Auto / EN / JP / DE / ES / FR / IT / SE / RU / CN
• When “Auto” is selected, the primary audio language among the recorded ones is played.
Set the language of the subtitles displayed on the screen.
Setting item: SUBT. Language Setting contents: Auto / EN / JP / DE / ES / FR / IT / SE / RU / CN
• When “Auto” is selected, the primary subtitle language among the recorded ones is played.
To play in a language other than those displayed1 Touch [Code].
The numeric keypad screen is displayed.2 Touch the 4-digit numeral of the language number.
As for the language number, refer to “List of Language Codes” (page 84).
3 Touch [Enter] to memorize the number.
Set the country number of which you want to set the rating level (Parental lock).
Setting item: Country Code Setting contents: Auto / Other
• When the settings are changed, the old settings are overwritten. Make a note of the current settings before making changes. The settings are cleared when the vehicle’s battery is disconnected.
1 Touch [Code] of Country Code.2 Touch [Delete All] or [ ].
Delete the displayed country number.3 Touch the 4-digit country code.
As for the country number, refer to “List of Country Codes” (pages 85, 86).
4 Touch [Enter] to memorize the code.
This function can help restrict the viewing of movies to children of appropriate age levels only.
Setting item: Parental Setting content: Input
• When the settings are changed, the old settings are overwritten. Make a note of the current settings before making changes. The memory is cleared when the vehicle’s battery is disconnected.
• On unrated DVDs, playback will not be restricted even if the rating level is set.
• If you want to play back DVD software with the parental lock feature and its use is currently restricted, change the rating level and the country number in order to play back the DVD.
• Once set, this rating level remains in memory until changed. To enable playback of discs of higher rating levels or to cancel the parental lock, the setting must be changed.
• Not all DVDs provide a Parental Lock feature. If you are unsure about a DVD, play it first to confirm. Do not leave DVDs accessible to young children for whom you deem them inappropriate.
1 Touch [Input].The numeric keypad screen is displayed.
2 Touch the numeric keypad to input a 4-digit password.The initial number is 1111.Input number are displayed as “*”.
3 Touch [Enter] to memorize the number.The Parental screen appears.
Set the rating level of PARENTAL4 Touch [ ] of Parental to turn on.5 Touch [ ] or [ ] of Parental Level to select the rating
level (1 to 8).Select “OFF” to cancel the parental lock or if you do not want to set a rating level. The smaller the number, the higher the rating level.
6 Touch [ ] to return to the previous screen.
Changing the password4 Touch [Input] of Password Change.
The numeric keypad screen is displayed.5 Touch the input screen to enter a new 4-digit password.
• Keep a note of the number somewhere safe in case you should forget it.
6 Touch [Enter] to memorize the number.7 Touch [ ] to return to the previous screen.
Use the following procedure to set the digital audio signal output from the INA-W910R.
Setting item: Digital Out Mode Setting contents: Auto / LPCM
Setting of the Audio Language
Setting of the Subtitle Language
Changing the Country Code Setting
Auto: The primary country code among the recorded ones is played.
Other: The setting content changes to “Other” if the desired country code is input.
Setting the Rating Level (Parental Lock)
Changing the rating level temporarilySome discs may request that you change the rating level set in the default settings during playback. In this case, the message appears on the monitor screen “Parental level change OK? [Yes] / [No].”
If this screen appears, change the level as follows:• To change parental level and play, touch [Yes].
When [Yes] is touched, the numeric keypad input screen is displayed. Input the 4-digit password in “Setting the Rating Level (Parental Lock)” you set, then touch [Enter].
• To play without changing the parental level, touch [No]. (When [No] is touched, playback will be at the parental level set in “Setting the Rating Level (Parental Lock).”)
Changing the Digital Output Setting
Auto: The digital output is switched automatically according to the type of audio signals being played.Be sure to select “Auto” when you want to connect a digital audio processor and play Dolby Digital audio. “Auto” is the factory setting.
LPCM: The audio signals recorded on the disc are converted to 48 kHz/16 bit (for DVDs) or 44.1 kHz (for Video CDs and CDs) linear PCM audio signals for output.
39-EN
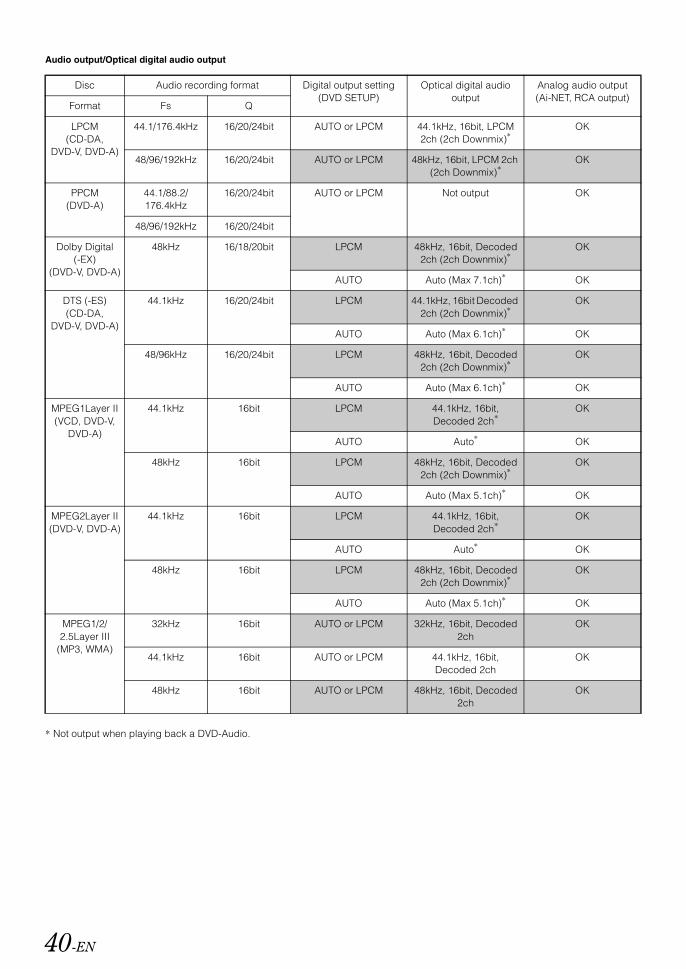
Audio output/Optical digital audio output
* Not output when playing back a DVD-Audio.
Disc Audio recording format Digital output setting(DVD SETUP)
Optical digital audio output
Analog audio output(Ai-NET, RCA output)
Format Fs Q
LPCM(CD-DA,
DVD-V, DVD-A)
44.1/176.4kHz 16/20/24bit AUTO or LPCM 44.1kHz, 16bit, LPCM 2ch (2ch Downmix)*
OK
48/96/192kHz 16/20/24bit AUTO or LPCM 48kHz, 16bit, LPCM 2ch (2ch Downmix)*
OK
PPCM(DVD-A)
44.1/88.2/176.4kHz
16/20/24bit AUTO or LPCM Not output OK
48/96/192kHz 16/20/24bit
Dolby Digital(-EX)
(DVD-V, DVD-A)
48kHz 16/18/20bit LPCM 48kHz, 16bit, Decoded 2ch (2ch Downmix)*
OK
AUTO Auto (Max 7.1ch)* OK
DTS (-ES)(CD-DA,
DVD-V, DVD-A)
44.1kHz 16/20/24bit LPCM 44.1kHz, 16bit Decoded 2ch (2ch Downmix)*
OK
AUTO Auto (Max 6.1ch)* OK
48/96kHz 16/20/24bit LPCM 48kHz, 16bit, Decoded 2ch (2ch Downmix)*
OK
AUTO Auto (Max 6.1ch)* OK
MPEG1Layer II(VCD, DVD-V,
DVD-A)
44.1kHz 16bit LPCM 44.1kHz, 16bit, Decoded 2ch*
OK
AUTO Auto* OK
48kHz 16bit LPCM 48kHz, 16bit, Decoded 2ch (2ch Downmix)*
OK
AUTO Auto (Max 5.1ch)* OK
MPEG2Layer II(DVD-V, DVD-A)
44.1kHz 16bit LPCM 44.1kHz, 16bit, Decoded 2ch*
OK
AUTO Auto* OK
48kHz 16bit LPCM 48kHz, 16bit, Decoded 2ch (2ch Downmix)*
OK
AUTO Auto (Max 5.1ch)* OK
MPEG1/2/2.5Layer III
(MP3, WMA)
32kHz 16bit AUTO or LPCM 32kHz, 16bit, Decoded 2ch
OK
44.1kHz 16bit AUTO or LPCM 44.1kHz, 16bit, Decoded 2ch
OK
48kHz 16bit AUTO or LPCM 48kHz, 16bit, Decoded 2ch
OK
40-EN

This function applies to Dolby Digital, DTS stream sound.
Setting item: Downmix Mode Setting contents: Surround / Stereo
Use the procedure described below to modify the output screen according to the type of TV monitor (rear monitor) being used.This setting can also be applied for the INA-W910R.If the rear monitor is not connected, the screen setting is 16:9.
Setting item: TV Screen Setting contents: 4:3 LB / 4:3 PS / 16:9
• For some discs, the picture may not be set to the selected screen size. (For details, refer to the explanation on the disc’s jacket.)
4:3 LETTER BOX:Select this when connected to a conventional 4:3 size (normal TV aspect ratio) monitor. There may be black stripes visible at the top and bottom of the screen (when playing a 16:9 size movie). The width of these stripes will depend upon the original aspect ratio of the theatrical release of the movie.
4:3 PAN-SCAN:Select this when connected to a conventional 4:3 size monitor. The picture will fill the entire TV screen. However, due to the mismatch in aspect ratio, parts of the movie at the extreme left and right sides will not be visible (when playing a 16:9 size movie).
16:9 WIDE:Select this when connected to a wide screen TV. This is the factory setting.
Some DVD-Audio discs include bonus group. The 4 digit code for the bonus group can be memorized. Refer to the information on the jacket, etc., of the disc, for the code number.
Setting item: Bonus Code Setting content: Code
1 Touch [Code].The 10 key input screen is displayed.
2 Input the 4 digit code number given on the jacket of the disc, etc.
3 Touch [Enter] to memorize the number.
• If the code number of the bonus group differs from the code number you set in this section, the 10 key input screen automatically appears in the display. If a new code number is input, this code number will be replaced.
To playback the DVD Audio Disc, you have a choice of 3 different settings. If the disc containing DVD Video and Audio, set VCAP (Video Capable Audio Player) or VOFF (Video OFF) to playback the DVD Audio.
Setting item: DVD-A Setup Setting contents: Video / VCAP / VOFF
When using discs containing both audio data and MP3/WMA/AAC data.
Setting item: File Play Mode Setting contents: CD / CMPM
• If a disc is inserted, remove it from this unit before setting.• When an MP3-compatible CD changer is used, this setting cannot be
applied.
Setting the Downmix Mode
Surround: Surround compatible DownmixStereo: Stereo Downmix
Setting the TV Screen
Setting of the Bonus Code
Setting the DVD-Audio Playback Mode
Video: Only DVD Video is played back if the disc contains DVD Video and Audio.
VCAP: DVD Audio is played back with Video.VOFF: DVD Audio is played back without Video.
Playing MP3/WMA/AAC Data (File Play Mode)
CD: Plays only the audio data on discs containing both audio data and MP3/WMA/AAC data.
CMPM:Plays only the MP3/WMA/AAC files on discs containing both audio data and MP3/WMA/AAC data.
41-EN

If a disc containing both a compressed video file and a compressed audio file is used, you have a choose to play back only a video or only audio.
Setting item: DVD Play Mode Setting contents: Video / Audio
Setting item: DivX Info. Further setting items: Registration / Deregistration *
By touching the title bar of Registration or Deregistration, the DivX® registration or deregistration code is displayed.
* Displayed only when this unit is already registered.
When playing a Playback Control (PBC) enabled Video CD, you can choose to set PBC ON or OFF.
Setting item: PBC Setting contents: OFF / ON
Source Setup Operation
1 Press SOURCE/ on the unit.The Source Select screen is displayed.
2 Touch [ ] on the main source screen.The Setup Select screen is displayed.
3 Touch [ ] of Source Setup.The Source Setup screen appears.
4 Touch [ ] of your desired Setup mode.
DVD Setup*1 / Radio Setup / BLUETOOTH Setup*3 / RDS Setup*2 / USB Search*4
*1 Refer to “DVD Setup” on page 38.*2 Refer to “RDS Operation” on page 21.*3 Displayed when“BLUETOOTH IN” is set to ON (page 49).*4 You can directly touch [ ] or [ ] to change this item.
5 Touch [ ], [ ] or [ ], etc. of the desired item to change its setting.
Radio Setup:FM Level / PI Seek / RDS Regional / PTY Language / PTY31 / Tuner Condition
BLUETOOTH Setup:Paired Devices / Device Search / Clear Device / Service Provider / Visible Mode / Auto Answer / Speaker Select / MIC Input / Firmware Version / Firmware Update / Hung Up / Echo Cancel / Navi Voice IN Call / BT Menu Language / Shortcut Memory
USB Search:Tag/File Name
• For BLUETOOTH Setup details, refer to “BLUETOOTH Setup” (page 62).
6 Touch [ ] to return to the previous screen.Touch [Exit] to return to the main source screen that was displayed before the setup operation was started.
Setting the compressed File Playback Data
Video: Only Video data is played back.Audio: Only Audio data is played back.
Displaying DivX Disc Information
Setting the Video CD Play Mode
OFF: The PBC menu is not displayed.ON: The PBC menu is displayed.
Source Setup
The Parking Brake must be engaged to access the Source mode screen. Attempting to access this screen while driving will display the warning-Can’t operate while driving.
The following steps 1 to 6 are common operations to each “Setting item” of Source Setup. Refer to each section for details.
42-EN

“Radio Setup” is selected on the source setup main menu in step 4.
Adjusting Source Signal LevelsIf the difference in volume level between the CD and FM radio is too great, adjust the FM signal level as follows.
Setting item: FM Level Setting contents: Low / High
PI Seek Setting
Setting item: PI Seek Setting contents: OFF / Auto
Receiving RDS Regional (Local) StationsWhen OFF is selected, the unit automatically keeps receiving the related local RDS station.
Setting item: RDS Regional Setting contents: OFF / ON
Switching the Display Language of PTY (Programme Type)You can select one of the patterns of the display languages.
Setting item: PTY Language Setting contents: GB / NL / F / D / I / E
Setting PTY31 (Emergency Broadcast) ReceptionPTY31 (Emergency Broadcast) reception can be set to ON/OFF.
Setting item: PTY31 Setting contents: OFF / ON
• The unit automatically gives priority to an Emergency Broadcast whenever it begins, and interrupts the programme you are currently listening to when PTY31 is set to ON.
• The unit will show “Alarm” in the display during PTY31 reception.
Setting the TUNER (FM) tone quality (Tuner Condition)This unit can set your preferred tone quality for FM radio source.
Setting item: Tuner Condition Setting contents: Normal / HiFi / Stable
• Noise may be more noticeable when HiFi is set, depending on the reception status. In this case, the Normal setting is recommended.
“USB Search” is selected on the source setup main menu in step 4.
Setting the USB Search ModeThe unit allows you to search for the USB Audio files by Tag information or Explorer (File Name) mode.
Setting item: USB Search Setting contents: Tag / File Name
• After the above setting, turn the ignition key off (ACC OFF) and on again (ACC ON).
• For search mode details, refer to “Searching for a desired Song” (page 74).
• When a portable audio player is connected, even though File Name is set, the Tag information search mode will be applied.
Radio Setup
Normal: Standard settingHiFi: High-quality settingStable: Control noise
USB Search
Tag: When Tag is selected, you can use Playlists/Artists/Albums/Songs/Genres/Composers/Folders/Files search mode to narrow searches.
File Name: When File Name is selected, you can search a folder/file as search files on PC.
43-EN

Display Setup Operation
1 Press SOURCE/ on the unit.The Source Select screen is displayed.
2 Touch [ ] on the main source screen.The Setup Select screen is displayed.
3 Touch [ ] of Display Setup.The Display Setup screen appears.
4 Touch [ ], [ ] or [ ] etc., of the desired item to change its setting.
Setting items:Visual EQ / Dimmer / Dimmer Low Level / Function Guide Fade / Base Color / Screen Alignment / Display
5 Touch [ ] to return to the previous screen.Touch [Exit] to return to the main source screen that was displayed before the setup operation was started.
• Immediately after changing the settings of Display Mode (While the system is writing data automatically) do not turn the ignition key (engine key) to OFF. Otherwise, the settings may not be changed.
The visual setting of Bright, colour, contrast, etc. can be adjusted in this mode.
Setting item: Visual EQFurther setting items:
Live Contrast* Visual EQ* Bright Color* Tint* Contrast Sharp* User Memory*
* The setting is unavailable in navigation mode.
Touch [ ] or [ ] etc., of the desired item to change its setting.
• The settings are available in the visual source mode only.• The further setting items can be changed by touching [ ]/[ ].• Only one setting item can be displayed on each page, you can select
the desired brightness, picture tint, etc through the screen displayed.
Adjusting Image Brilliance (Live Contrast)The over brightness/darkness part of image will be adjusted to a proper brilliance automatically.
Setting item: Live Contrast Setting contents: OFF / Low / High
• You can adjust this setting in visual source mode by touching [ ] directly. (In this case, the “Live Contrast” is displayed as “Contrast”.)
Selecting the Visual EQ Mode (Factory’s setting)You can select a mode suitable for the subject image.
Further setting item: Visual EQSetting contents: OFF (Initial setting) / Night M. / Soft / Sharp /
Contrast / P-1 / P-2
• To return to the default video settings, set this function to OFF. Any Visual EQ selection or changes made are reset their initial settings.
• If any adjustments are made to the existing Visual EQ selections (Night M., etc.), “Custom” is displayed.
Adjusting Brightness
Further setting item: Bright Setting content: -15 ~ +15
You can adjust the brightness between Min (-15) and Max (+15). When it reaches the minimum or maximum point, the display shows “Min” or “Max” respectively.
• When any Visual EQ Preset is selected, the brightness is automatically adjusted according to the car’s interior lighting as long as Auto is set in “Setting the Brightness of the Backlighting” (page 45).
Adjusting Colour of Picture
Further setting item: Color Setting content: -15 ~ +15
You can adjust the colour between Min (-15) and Max (+15). When it reaches the minimum or maximum point, the display shows “Min” or “Max” respectively.
• Colour adjustment can be made only in the iPod video, DVD, Video CD, AUX modes.
Display Setup
The Parking Brake must be engaged to access the Display mode screen. Attempting to access this screen while driving will display the warning-Can’t operate while driving.
The following steps 1 to 5 are common operations to each “Setting item” of Display Setup. Refer to each section for details.
Visual EQ Setting Operation
OFF: Initial SettingNight M.: Suitable for movies in which dark scenes
frequently appear.Soft: Suitable for CGs and animated films.Sharp: Suitable for old movies where images are not
clearly shown.Contrast: Suitable for recent movies.P-1: Recalls the Visual EQ mode being stored on
preset No.P-1 from “Storing Visual EQ” (page 45).P-2: Recalls the Visual EQ mode being saved on
preset No.P-2 from “Storing Visual EQ” (page 45).
44-EN

Adjusting Tint of Picture
Further setting item: Tint Setting content: G15 ~ R15
Adjust the colour from G15 to R15. “G Max” or “R Max” is displayed at the maximum of each colour.
• Tint adjustment can be made only in the iPod video, AUX modes.• When the picture from the external input is set to PAL, you cannot
adjust the Tint.
Adjusting Image Contrast
Further setting item: Contrast Setting content: -15 to +15
Contrast adjustment range is -15 to +15. “Low” and “High” appear as the minimum and maximum values specified.
Adjusting Picture Quality
Further setting item: Sharp Setting content: -5 to +5
Picture quality adjustment range is -5 to +5. “Soft” and “Hard” appear as the minimum and maximum values specified.
• Picture quality adjustment can be made only in the iPod video, DVD, Video CD, AUX modes.
Storing Visual EQYou can store the settings made for “Adjusting Image Brightness, Tint, Depth, Picture Quality and Contrast.”
Further setting item: User Memory Setting contents: P-1 / P-2
1 After completing “Adjusting Brightness, Tint, Depth, Picture Quality, and Contrast” (page 44), touch [ ] or [ ] of User Memory and then select preset No. “P-1” or “P-2” to which the settings are to be stored.
2 After selecting a preset No., touch [Memory].The adjusted Visual EQ mode is stored by the above operations.
• You can recall the Visual EQ mode stored here from P-1 or P-2 of “Selecting the Visual EQ Mode (Factory’s setting)” (page 44).
Backlighting is provided by a fluorescent light built into the liquid crystal panel. The illumination control adjusts the brightness of the backlighting based on the car ambient lighting for easier viewing.
Setting item: Dimmer Setting contents: OFF / ON / Auto
• When ON or Auto is set, the setting is also applied for the button lighting in “Adjusting the Dimmer of Button Lighting at Night” (page 46).
You can adjust the brightness of the backlight (LOW). This function could be used, for instance, to change the screen brightness while travelling at night.
Setting item: Dimmer Low Level Setting content: -15 to +15
You can adjust the level between Min (-15) and Max (+15). When it reaches the minimum or maximum point, the display shows “Min” or “Max” respectively.
When on is set, the function guide will be hidden automatically after no operation is performed for 5 seconds.
Setting item: Function Guide Fade Setting contents: OFF / ON
You can choose from 4 different display colors for the font back.
Setting item: Base Color Setting contents: Blue / Red / Green / Amber
Adjustment becomes necessary when the display position on the LCD and the touch position on the touch panel do not match.
Setting item: Screen Alignment Setting contents: / Reset
1 Touch [ ] of Screen Alignment.The adjustment screen appears.
2 Accurately touch the mark provided in the lower left corner of the screen.The screen changes to the adjustment screen.
3 Accurately touch the mark provided in the upper right corner of the screen.This completes adjustment, and returns to the Display setup mode screen.
• If you have touched a location other than the mark, touch [Reset] to restore the adjustment screen to the initial setting.
• If you touch [ ] on the adjustment screen, no adjustment is done and the Display Setup screen is restored.
You can turn off the screen display to reduce power consumption.This additional power enhances the sound quality.
Setting item: Display Setting contents: OFF / ON
• If any button on the unit is pressed during display off mode, the screen will be displayed for 5 seconds to show the operation before returning to display off mode.
Setting the Brightness of the Backlighting
OFF: Deactivate Auto Dimmer mode to keep the background illumination of the monitor bright.
ON: Keep the background illumination of the monitor dark.Auto: Adjust the brightness of the background illumination of
the monitor automatically to the brightness of the car interior.
Adjusting the Minimum Level of Backlight
Setting the Function Guide display ON/OFF
Switching the Font Back Display Colour
Adjusting the Touch Panel
Display On and Off
45-EN

General Setup Operation
1 Press SOURCE/ on the unit.The Source Select screen is displayed.
2 Touch [ ] on the main source screen.The Setup Select screen is displayed.
3 Touch [ ] of General Setup.The General Setup screen appears.
4 Touch [ ] or [ ] of the desired item to change its setting.
Setting items:Clock / Demonstration / Beep / Auto Scroll / Language Sel. / Key Dimmer Level / Security Code
5 Touch [ ] to return to the previous screen.Touch [Exit] to return to the main source screen that was displayed before the setup operation was started.
• Immediately after changing the settings of General Mode (While the system is writing data automatically) do not turn the ignition key (engine key) to OFF. Otherwise, the settings may not be changed.
The clock indication on the monitor display is turned on or off respectively.
Setting item: Clock Setting contents: OFF / ON
• The clock of the unit will be automatically updated according to the data that the Navigation System provides, and cannot be adjusted manually.
• If the GPS antenna is not connected correctly, the clock indication on the unit may be wrong because the time information cannot be received. In this case, it is suggested to set “Clock” to “OFF”.
This unit is equipped with a demonstration function capable of showing basic operations of respective sources on the monitor display.
Setting item: Demonstration Setting contents: OFF / ON
• The demonstration operation is automatically repeated until the function is turned off.
Setting item: Beep Setting contents: OFF / ON
• This setting is unavailable for the navigation mode.
Scroll display is available if CD text, folder name, file name or tag information is entered.
Setting item: Auto Scroll Setting contents: OFF / ON
• The display scrolls on the unit when the screen is filled up.• Song, artist and album name, etc. scrolls when an iPod/iPhone is
connected.
Four types of font can be selected.
Setting item: Language Sel. Setting contents: Mode1 / Mode2 / Mode3 / Mode4
You can adjust the brightness of the button lighting at night with the dimmer.
Setting item: Key Dimmer Level Setting level: -2 to +2
General Setup
The Parking Brake must be engaged to access the General mode screen. Attempting to access this screen while driving will display the warning-Can’t operate while driving.
The following steps 1 to 5 are common operations to each “Setting item” of General Setup. Refer to each section for details.
Displaying the Time
Demonstration Function
ON: Turns on the demonstration mode to show the basic operations.
OFF: Turns off the demonstration mode.
Sound (Beep) Guide Function
ON: Activate the Sound Guide mode.OFF: Deactivate the Sound Guide mode. The sound guide
beep will not be produced when a button is pressed/touched.
Setting the Scroll
OFF: Turns off the Auto scroll mode. Scroll display is done once as a track is changed.
ON: Turns on the Auto scroll mode. Scroll display is repeated as long as the mode is turned on.
Changing the Language Font
Mode1: Normal Font Display (ISO8859-1).Mode2: Russian Font Display (WINDOWS-1251)
You cannot use this font for display in RDS, Tuner mode.
Mode3: European Font Display (WINDOWS-1252)Mode4: Hebrew Font Display
Adjusting the Dimmer of Button Lighting at Night
46-EN
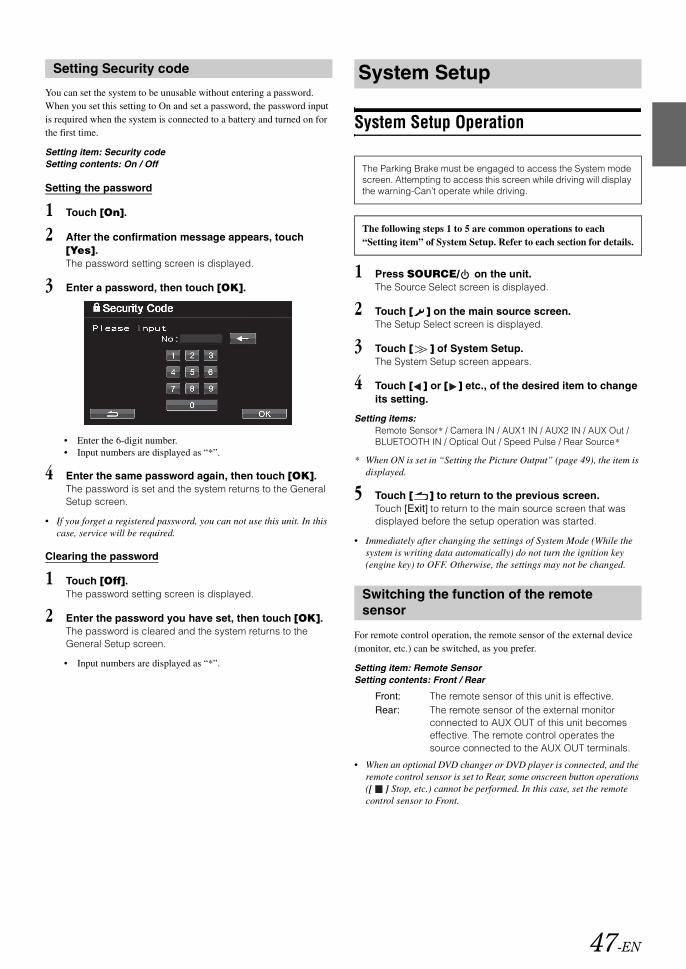
You can set the system to be unusable without entering a password. When you set this setting to On and set a password, the password input is required when the system is connected to a battery and turned on for the first time.
Setting item: Security code Setting contents: On / Off
Setting the password
1 Touch [On].
2 After the confirmation message appears, touch [Yes].The password setting screen is displayed.
3 Enter a password, then touch [OK].
• Enter the 6-digit number.• Input numbers are displayed as “*”.
4 Enter the same password again, then touch [OK].The password is set and the system returns to the General Setup screen.
• If you forget a registered password, you can not use this unit. In this case, service will be required.
Clearing the password
1 Touch [Off].The password setting screen is displayed.
2 Enter the password you have set, then touch [OK].The password is cleared and the system returns to the General Setup screen.
• Input numbers are displayed as “*”.
System Setup Operation
1 Press SOURCE/ on the unit.The Source Select screen is displayed.
2 Touch [ ] on the main source screen.The Setup Select screen is displayed.
3 Touch [ ] of System Setup.The System Setup screen appears.
4 Touch [ ] or [ ] etc., of the desired item to change its setting.
Setting items:Remote Sensor* / Camera IN / AUX1 IN / AUX2 IN / AUX Out / BLUETOOTH IN / Optical Out / Speed Pulse / Rear Source*
* When ON is set in “Setting the Picture Output” (page 49), the item is displayed.
5 Touch [ ] to return to the previous screen. Touch [Exit] to return to the main source screen that was displayed before the setup operation was started.
• Immediately after changing the settings of System Mode (While the system is writing data automatically) do not turn the ignition key (engine key) to OFF. Otherwise, the settings may not be changed.
For remote control operation, the remote sensor of the external device (monitor, etc.) can be switched, as you prefer.
Setting item: Remote SensorSetting contents: Front / Rear
• When an optional DVD changer or DVD player is connected, and the remote control sensor is set to Rear, some onscreen button operations ([ ] Stop, etc.) cannot be performed. In this case, set the remote control sensor to Front.
Setting Security code System Setup
The Parking Brake must be engaged to access the System mode screen. Attempting to access this screen while driving will display the warning-Can’t operate while driving.
The following steps 1 to 5 are common operations to each “Setting item” of System Setup. Refer to each section for details.
Switching the function of the remote sensor
Front: The remote sensor of this unit is effective.Rear: The remote sensor of the external monitor
connected to AUX OUT of this unit becomes effective. The remote control operates the source connected to the AUX OUT terminals.
47-EN
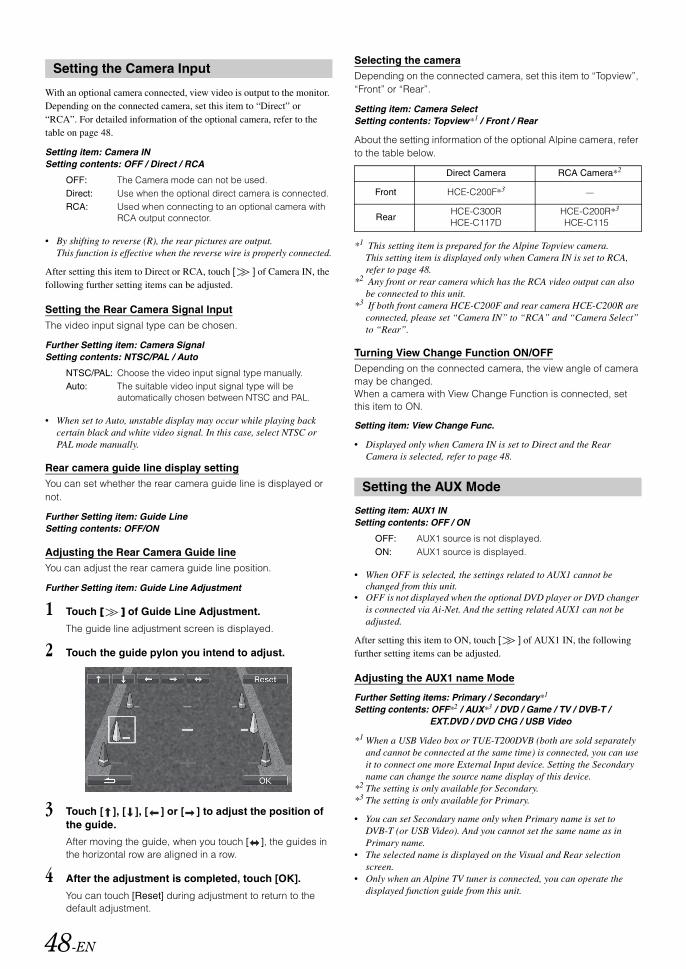
With an optional camera connected, view video is output to the monitor. Depending on the connected camera, set this item to “Direct” or “RCA”. For detailed information of the optional camera, refer to the table on page 48.
Setting item: Camera INSetting contents: OFF / Direct / RCA
• By shifting to reverse (R), the rear pictures are output.This function is effective when the reverse wire is properly connected.
After setting this item to Direct or RCA, touch [ ] of Camera IN, the following further setting items can be adjusted.
Setting the Rear Camera Signal InputThe video input signal type can be chosen.
Further Setting item: Camera SignalSetting contents: NTSC/PAL / Auto
• When set to Auto, unstable display may occur while playing back certain black and white video signal. In this case, select NTSC or PAL mode manually.
Rear camera guide line display settingYou can set whether the rear camera guide line is displayed or not.
Further Setting item: Guide LineSetting contents: OFF/ON
Adjusting the Rear Camera Guide lineYou can adjust the rear camera guide line position.
Further Setting item: Guide Line Adjustment
1 Touch [ ] of Guide Line Adjustment.
The guide line adjustment screen is displayed.
2 Touch the guide pylon you intend to adjust.
3 Touch [ ], [ ], [ ] or [ ] to adjust the position of the guide.
After moving the guide, when you touch [ ], the guides in the horizontal row are aligned in a row.
4 After the adjustment is completed, touch [OK].
You can touch [Reset] during adjustment to return to the default adjustment.
Selecting the cameraDepending on the connected camera, set this item to “Topview”, “Front” or “Rear”.
Setting item: Camera SelectSetting contents: Topview *1 / Front / Rear
About the setting information of the optional Alpine camera, refer to the table below.
*1 This setting item is prepared for the Alpine Topview camera. This setting item is displayed only when Camera IN is set to RCA, refer to page 48.
*2 Any front or rear camera which has the RCA video output can also be connected to this unit.
*3 If both front camera HCE-C200F and rear camera HCE-C200R are connected, please set “Camera IN” to “RCA” and “Camera Select” to “Rear”.
Turning View Change Function ON/OFFDepending on the connected camera, the view angle of camera may be changed.When a camera with View Change Function is connected, set this item to ON.
Setting item: View Change Func.
• Displayed only when Camera IN is set to Direct and the Rear Camera is selected, refer to page 48.
Setting item: AUX1 INSetting contents: OFF / ON
• When OFF is selected, the settings related to AUX1 cannot be changed from this unit.
• OFF is not displayed when the optional DVD player or DVD changer is connected via Ai-Net. And the setting related AUX1 can not be adjusted.
After setting this item to ON, touch [ ] of AUX1 IN, the following further setting items can be adjusted.
Adjusting the AUX1 name Mode
Further Setting items: Primary / Secondary*1
Setting contents: OFF*2 / AUX*3 / DVD / Game / TV / DVB-T / EXT.DVD / DVD CHG / USB Video
*1 When a USB Video box or TUE-T200DVB (both are sold separately and cannot be connected at the same time) is connected, you can use it to connect one more External Input device. Setting the Secondary name can change the source name display of this device.
*2 The setting is only available for Secondary.*3 The setting is only available for Primary.
• You can set Secondary name only when Primary name is set to DVB-T (or USB Video). And you cannot set the same name as in Primary name.
• The selected name is displayed on the Visual and Rear selection screen.
• Only when an Alpine TV tuner is connected, you can operate the displayed function guide from this unit.
Setting the Camera Input
OFF: The Camera mode can not be used.Direct: Use when the optional direct camera is connected.RCA: Used when connecting to an optional camera with
RCA output connector.
NTSC/PAL: Choose the video input signal type manually.Auto: The suitable video input signal type will be
automatically chosen between NTSC and PAL.
Direct Camera RCA Camera*2
Front HCE-C200F*3 —
RearHCE-C300RHCE-C117D
HCE-C200R*3
HCE-C115
Setting the AUX Mode
OFF: AUX1 source is not displayed.ON: AUX1 source is displayed.
48-EN

• The selected source name is displayed instead of AUX source name. Select SOURCE to switch to the guide function of each mode.
Setting item: AUX2 IN Setting contents: iPod Video / AUX
• When the current source is iPod video, this setting cannot be adjusted.
Touch [ ] of AUX1 IN or AUX2 IN, the following further setting items can be adjusted.
Adjusting the External Input Audio Level
Further Setting item: Level Setting contents: Low / High
• For AUX1, this setting item is adjustable only when AUX1 IN is set to ON.
• For AUX2, this setting item is adjustable only when AUX2 IN is set to AUX.
Switching the Visual Input Signal System
Further Setting item: Signal Setting contents: NTSC/PAL / Auto
• The video input type can be changed.• When set to Auto, unstable display may occur while playing back
certain black and white video signal. In this case, select NTSC or PAL mode manually.
• For AUX1, this setting item is adjustable only when AUX1 IN is set to ON.
• For AUX2, this setting item is adjustable only when AUX2 IN is set to AUX.
Outputs the picture of the source selected on the INA-W910R connected to the rear monitor.
Setting item: AUX OutSetting contents: OFF/ON
Setting item: BLUETOOTH IN Setting contents: OFF / ON
• For details on BLUETOOTH operation, refer to “BT Hands Free Calling” (page 61).
• If mobile phone compatible with the Voice-Dial function is connected, the Voice-Dial function can be used.
To connect an audio processor using the optical digital output, set to “ON” by the following procedure.
Setting item: Optical Out Setting contents: OFF / ON
• Afterwards, set ACC to OFF once, then turn it ON again. The setting of Digital Output is decided.
You can set the vehicle speed pulse division setting. When you set to Type 2, the vehicle speed pulse divider is enabled. Usually, you do not need to change this setting.
Setting item: Speed Pulse Setting contents: Type1 / Type2
The rear entertainment function independently routes different sources to the front and the rear inside a car. For example, while listening to the radio or other audio source in the front, DVD can be enjoyed in the rear with the optional rear monitor and headphones.
Setting item: Rear SourceSetting contents: OFF / Disc / iPod / AUX / Game / DVD / TV /
DVB-T / EXT.DVD / DVD CHG / USB Video / AUX2
• Select OFF to cancel the rear entertainment mode.• The display of setting contents may vary depending on the setting
and connected device.
iPod Video: Set when a video compatible iPod or an iPhone is connected to the iPod (V)/AUX Input Connector.
AUX: Set when an optional AV/RCA interface cable (4-pole mini AV plug to 3-RCA) is connected. A DVD player etc., with RCA audio/video output can be connected to this unit. In this case, the iPod video will not be displayed.
Low: Decreases the external input audio level.High: Increases the external input audio level.
Setting the Picture Output
OFF: The “Remote Sensor” and “Rear Source” items are not displayed on the System Setup screen.
ON: The “Remote Sensor” and “Rear Source” items are displayed on the System Setup screen.
Setting the BLUETOOTH Connection (BLUETOOTH IN)
OFF: BLUETOOTH function is not used.ON: Select when you would like to pair your
BLUETOOTH compatible phone with this unit.
Setting the Digital Output
Setting Speed pulse type
Setting the Rear Entertainment System
49-EN

Alpine introduces IMPRINT - the world’s first technology that thoroughly eliminates in-car acoustic problems that normally degrade sound quality, which enables us to experience music the way the artist intended. When the IMPRINT audio processor (PXA-H100) (sold separately) is connected to this unit, MultEQ and the following sound adjustment can be performed.
Changing MultEQ modeMultEQ, developed by Audyssey Labs, automatically corrects the audio for the listening environment. The system is optimized for selected positions in the vehicle. To accomplish this, MultEQ must take measurements of the vehicles response characteristics. For details on the set up procedure, consult your authorized Alpine dealer.
1 Press SOURCE/ on the unit.The Source Select screen is displayed.
2 Touch [ ] on the main source screen.The Setup Select screen is displayed.
3 After touching [ ] to display the IMPRINT Setup adjusting item, touch [ ] of IMPRINT Setup, the MultEQ mode selection screen will be displayed.
4 Touch [ ] or [ ] to change the setting.
Setting range : OFF (Manual Mode) / Curve1 (MultEQ-1) / Curve2 (MultEQ-2)
• The Curve mode can be selected only when Curve 1 and Curve 2 are stored.
• When MultEQ is set to Curve 1 or 2, Media Xpander, X-Over, Time Correction, T.Corr Parameter, Subwoofer Phase, Subwoofer Channel, P-EQ, G-EQ, F-EQ and TW Setup are set automatically. They are no longer user adjustable.
Adjusting Sound Setting in Manual ModeYou can change these sound settings to create your own preference when the MultEQ mode is set to OFF (Manual Mode).
1 Check whether the Defeat mode is off.
2 Press SOURCE/ on the unit.The Source Select screen is displayed.
3 Touch [ ] on the source selection screen.The Setup Select screen is displayed.
4 Touch [ ] of Audio Setup.The Audio Setup screen appears.
5 Touch [ ] of A.Processor.The A.Processor list screen appears.
6 Touch [ ], [ ] or [ ], etc., of the desired item to change its setting.
Setting items : Media Xpander / X-Over / Time Correction / T.Corr Parameter / G-EQ / P-EQ / F-EQ / TW SETUP *
* This function can be operable only when PXA-H100 (sold separately) is connected and 2.2ch (3WAY) mode is set. For details, refer to the Owner’s Manual of PXA-H100.
• Touching [Exit] will change to the main source screen.• Touching [ ] to return to the previous screen.• Media Xpander, F-EQ, P-EQ and G-EQ Adjustment are inoperable
when Defeat is set to ON.
MX (Media Xpander) makes vocals or instruments sound distinct regardless of the music source. The CD, DVD, USB Memory and iPod/iPhone, will be able to reproduce the music clearly even in cars with a lot of road noise.
Setting item : Media Xpander
1 Touch [ ] or [ ] of Media Xpander to select ON or OFF.
2 Touch [ ] of Media Xpander after setting to ON.The Media Xpander setup screen appears.
IMPRINT Operation (Optional)
The Parking Brake must be engaged to access the IMPRINT mode screen. Otherwise, some functions are not adjustable.
Use steps 1 to 6 to select one of the Sound menu modes to modify. See the applicable section below for details about the selected item.
Setting the MX Level (Media Xpander)
OFF: Turns off the MX effect of every music source.ON: Turns on the specified MX mode.
50-EN

3 Touch [ ] or [ ] of the desired MX mode.
• Music source (such as CDs, iPod, etc.) level can be set.
MX CD (OFF, CD MX 1 to 3)CD mode processes a large quantity of data. This data is used to reproduce the sound cleanly by making use of the data quantity.
MX CMPM (OFF, CMPM MX 1 to 3)This corrects information that was omitted at the time of compression. This reproduces a well-balanced sound close to the original.
MX DVD (OFF, Movie MX 1 to 2)The dialogue portion of the video is reproduced more clearly.
MX AUX (OFF, CMPM MX, Movie MX, Music MX)Choose the MX mode (CMPM, Music, or Movie) that corresponds to the media connected.
• When OFF is selected, MX effect of each MX mode will be OFF.• Each music source, such as CD, and MP3 can have its own MX
setting.• MX mode does not function when MX is ON for FM, MW, LW radio. • MX CMPM is applied for MP3/WMA/AAC and iPod/iPhone.• The MX setting can be performed only when a source is currently
selected.• This function is inoperable when Defeat is set to ON.
Before performing the following procedures, refer to “About the Crossover” (page 55).
Setting item : X-Over
1 Touch [ ] or [ ] of X-Over to select L/R or L+R.
2 Touch [ ] of X-Over.A speaker list on the X-OVER screen is displayed.
3 Touch [ ] of the band to be adjusted.The screen changes to the X-Over screen to be adjusted.
4.2ch (FRONT/REAR/SUBW.) System / (L+R)
Setting contents: Low (SUB-W) / Mid (REAR) / High (FRONT)
4.2ch (FRONT/REAR/SUBW.) System / (L/R)
Setting contents: Low (SUB-W)-L / Low (SUB-W)-R / Mid (REAR)-L / Mid (REAR)-R / High (FRONT)-L / High (FRONT)-R
4 Adjust the crossover to your preference.
Selecting the Cut-Off Frequency
Touch [ ] or [ ] of Freq., then select the cut-off frequency (crossover point).The adjustable bandwidth differs depending on the speaker (channel).
4.2ch (FRONT/REAR/SUBW.) System
Setting contents:Low (SUB-W) 20 Hz~200 HzMid (REAR) 20 Hz~200 HzHigh (FRONT) 20 Hz~200 Hz
Adjusting the Slope
Touch [ ] or [ ] of Slope, then adjust the HPF or LPF slope.
Adjustable slope: FLAT, –6 dB/oct., –12 dB/oct., –18 dB/oct., –24 dB/oct.
Adjusting the Level
Touch [ ] or [ ] of Level, then adjust the HPF or LPF level.
Adjustable output level: -12 to 0 dB.
5 Repeat steps 3 to 4 to make adjustment to the other bands.
2.2ch (3WAY) System / (L+R)
Setting contents: Low / Mid-L / Mid-H / High
2.2ch (3WAY) System / (L/R)
Setting contents: Low-L / Low-R / Mid-L-L / Mid-L-R / Mid-H-L / Mid-H-R / High-L / High-R
4 Adjust the crossover to your preference.
Selecting the Cut-Off Frequency
Touch [ ] or [ ] of Freq., then select the cut-off frequency (crossover point).The adjustable bandwidth differs depending on the speaker (channel).
2.2ch (3WAY) System
Setting contents: Low / Mid-L 20 Hz~200 HzMid-H 20 Hz~20 kHzHigh (1 kHz~20 kHz)*1/(20 Hz~20 kHz)*2
*1 When Factory’s is selected, refer to “Setting the Response Slope for the High Range Speaker (TW Setup)” (page 53).
*2 When User’s is selected, refer to “Setting the Response Slope for the High Range Speaker (TW Setup)” (page 53).
(DVD Music)This disc contains a large quantity of data such as music clip. MX uses this data to reproduce the sound accurately.
Adjusting the Crossover Settings (X-Over)
L/R: Different adjustment values can be set for the left and right channels.
L+R: Sets the same adjustment values for the left and right channels.
4.2ch (FRONT/REAR/SUBW.) System
2.2ch (3WAY) System
51-EN
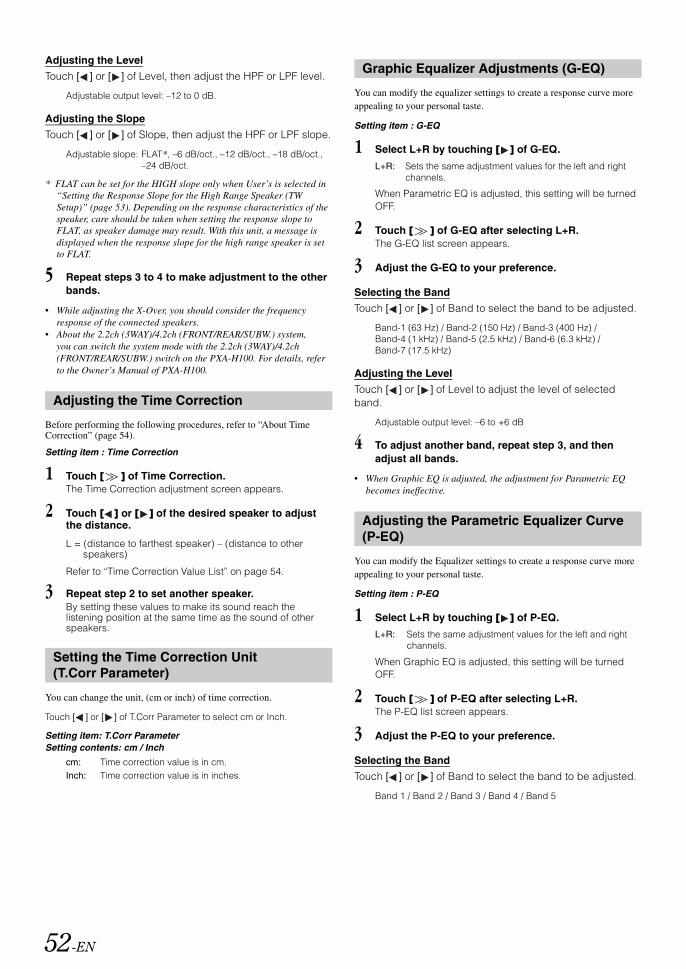
Adjusting the Level
Touch [ ] or [ ] of Level, then adjust the HPF or LPF level.
Adjustable output level: –12 to 0 dB.
Adjusting the Slope
Touch [ ] or [ ] of Slope, then adjust the HPF or LPF slope.
Adjustable slope: FLAT*, –6 dB/oct., –12 dB/oct., –18 dB/oct., –24 dB/oct.
* FLAT can be set for the HIGH slope only when User’s is selected in “Setting the Response Slope for the High Range Speaker (TW Setup)” (page 53). Depending on the response characteristics of the speaker, care should be taken when setting the response slope to FLAT, as speaker damage may result. With this unit, a message is displayed when the response slope for the high range speaker is set to FLAT.
5 Repeat steps 3 to 4 to make adjustment to the other bands.
• While adjusting the X-Over, you should consider the frequency response of the connected speakers.
• About the 2.2ch (3WAY)/4.2ch (FRONT/REAR/SUBW.) system, you can switch the system mode with the 2.2ch (3WAY)/4.2ch (FRONT/REAR/SUBW.) switch on the PXA-H100. For details, refer to the Owner’s Manual of PXA-H100.
Before performing the following procedures, refer to “About Time Correction” (page 54).
Setting item : Time Correction
1 Touch [ ] of Time Correction.The Time Correction adjustment screen appears.
2 Touch [ ] or [ ] of the desired speaker to adjust the distance.
L = (distance to farthest speaker) – (distance to other speakers)
Refer to “Time Correction Value List” on page 54.
3 Repeat step 2 to set another speaker.By setting these values to make its sound reach the listening position at the same time as the sound of other speakers.
You can change the unit, (cm or inch) of time correction.
Touch [ ] or [ ] of T.Corr Parameter to select cm or Inch.
Setting item: T.Corr ParameterSetting contents: cm / Inch
You can modify the equalizer settings to create a response curve more appealing to your personal taste.
Setting item : G-EQ
1 Select L+R by touching [ ] of G-EQ.
When Parametric EQ is adjusted, this setting will be turned OFF.
2 Touch [ ] of G-EQ after selecting L+R.The G-EQ list screen appears.
3 Adjust the G-EQ to your preference.
Selecting the Band
Touch [ ] or [ ] of Band to select the band to be adjusted.
Band-1 (63 Hz) / Band-2 (150 Hz) / Band-3 (400 Hz) / Band-4 (1 kHz) / Band-5 (2.5 kHz) / Band-6 (6.3 kHz) / Band-7 (17.5 kHz)
Adjusting the Level
Touch [ ] or [ ] of Level to adjust the level of selected band.
Adjustable output level: –6 to +6 dB
4 To adjust another band, repeat step 3, and then adjust all bands.
• When Graphic EQ is adjusted, the adjustment for Parametric EQ becomes ineffective.
You can modify the Equalizer settings to create a response curve moreappealing to your personal taste.
Setting item : P-EQ
1 Select L+R by touching [ ] of P-EQ.
When Graphic EQ is adjusted, this setting will be turned OFF.
2 Touch [ ] of P-EQ after selecting L+R.The P-EQ list screen appears.
3 Adjust the P-EQ to your preference.
Selecting the Band
Touch [ ] or [ ] of Band to select the band to be adjusted.
Band 1 / Band 2 / Band 3 / Band 4 / Band 5
Adjusting the Time Correction
Setting the Time Correction Unit (T.Corr Parameter)
cm: Time correction value is in cm.Inch: Time correction value is in inches.
Graphic Equalizer Adjustments (G-EQ)
L+R: Sets the same adjustment values for the left and right channels.
Adjusting the Parametric Equalizer Curve (P-EQ)
L+R: Sets the same adjustment values for the left and right channels.
52-EN

Adjusting the Frequency
Touch [ ] or [ ] of Freq. to adjust the frequency of the selected band.
Adjustable frequency bands: 20 Hz to 20 kHz (in 1/3 octave steps)
Band-1: 20 Hz~80 Hz (63 Hz) Band-2: 50 Hz~200 Hz (150 Hz) Band-3: 125 Hz~3.2 kHz (400 Hz) Band-4: 315 Hz~8 kHz (1 kHz) Band-5: 800 Hz~20 kHz (2.5 kHz)
Adjusting the Level
Touch [ ] or [ ] of Level to adjust the level of selected band.
Adjustable level: –6 to +6 dB
Setting the Bandwidth
Touch [ ] or [ ] of Q to select the bandwidth.
Adjustable bandwidth: 1, 1.5, 3
4 To adjust another band, repeat step 3 and adjust all bands.
• When the Parametric EQ is adjusted, the adjustment for Graphic EQ becomes ineffective.
• The frequencies of adjacent bands cannot be adjusted within 4 steps.• While adjusting the Parametric EQ, you should consider the
frequency response of the connected speakers.
10 typical equalizer settings are preset at the factory for a variety of musical source material.
Setting contents: F-EQ
1 Touch [ ] of F-EQ.The F-EQ list screen appears.
2 Touch [ ] or [ ] of the desired type to set to ON.
Flat / Pops / Rock / News / Jazz&Blues / Electrical Dance / Hip Hop&Rap / Easy Listening / Country / Classical / User1 / User2 / User3 / User4 / User5 / User6
• Only one type can be set to ON.• By selecting User 1 to 6, you can recall the stored preset number in
“Graphic Equalizer Adjustments (G-EQ)” (page 52) or “Adjusting the Parametric Equalizer Curve (P-EQ)” (page 52).
Depending on the response characteristics of the speaker, care should be taken when setting the response slope of the high range speaker to FLAT in 2.2ch (3WAY) mode (see “Adjusting the Crossover Settings (X-Over)” on page 51), as speaker damage may result.
Setting item: TW Setup
Touch [ ] or [ ] of TW Setup to select Factory’s or User’s.
• Only if the 2.2ch (3WAY) switch is toggled between 4.2ch (FRONT/REAR/SUBW.) and 2.2ch (3WAY) on the IMPRINT audio processor (PXA-H100), you can select the TW Setup mode.
Storing Settings in the MemoryAdjustment or setting contents of X-Over, Time Correction and P-EQ, etc. can be stored.Contents that can be stored vary depends on the IMPRINT audio processor used.
1 Check whether the Defeat mode is OFF.
2 Touch [MEMORY] on the A.Processor list display.
3 Within 5 seconds, touch any one of the preset buttons [P.SET 1] through [P.SET 6] on the A.Processor list screen.The setting contents are stored.
• The stored contents will not be deleted even when the battery power cord is detached.
• This operation cannot be performed when a typical equalizer setting (e.g. pops) is selected in “Equalizer Presets (F-EQ)” (page 53).
Calling up the Preset Memory
1 Check whether the Defeat mode is OFF.
2 Touch any one of the preset buttons [P.SET 1] through [P.SET 6] on the A.Processor list display to select the preset memory.
• It takes a few moment to recall the preset memory.
Equalizer Presets (F-EQ)
Setting the Response Slope for the High Range Speaker (TW Setup)
Factory’s: As protection from possible speaker damage, FLAT cannot be set for the response slope of the high range speaker in 2.2ch (3WAY) mode.
User’s: The FLAT setting is possible in 2.2ch (3WAY) mode.
53-EN

About Time CorrectionThe distance between the listener and the speakers in a car vary widely due to the complex speaker placement. This difference in the distances from the speakers to the listener creates a shift in the sounds image and frequency characteristics. This is caused by the time delay between the sound reaching the listener’s right versus the left ear.To correct this, this unit is able to delay the audio signal to the speakers closest to the listener. This effectively creates a perception of increased distance for those speakers. The listener can be placed at an equal distance between the left and right speakers for optimum staging.The adjustment will be made for each speaker in 3.4cm steps.
Adjust the time correction level of the front left speaker to a high value and the rear right to zero or a low value.
The sound is not balanced because the distance between the listening position and the various speakers is different.The difference in distance between the front left speaker and the rear right speaker is 1.75 m (68-7/8").Here we calculate the time correction value for the front left speaker in the diagram on the above.
Conditions:Farthest Speaker – listening position : 2.25 m (88-9/16")Front left speaker – listening position : 0.5 m (19-11/16")Calculation: L = 2.25 m – 0.5 m = 1.75 m (68-7/8")Time correction = 1.75 ÷ 343*1 × 1,000 = 5.1 (ms)
*1 Speed of sound: 343 m/s (765 mph) at 20°C
In other words, giving the front left speaker a time correction value of 5.1 ms makes it seem as if its distance from the listener is the same as the distance to the farthest speaker.
Time correction eliminates the differences in the time required for the sound to reach the listening position.The time of the front left speaker is corrected by 5.1 ms so that its sound reaches the listening position at the same time as the sound of other speakers.
Adjust the time correction level of each speaker to almost the same level.
1 Sit in the listening position (driver’s seat, etc.) and measure the distance (in meters) between your head and the various speakers.
2 Calculate the difference between the distance correction value to the farthest speaker and the other speakers.
L = (distance to farthest speaker) – (distance to other speakers)
These values are the time correction values for the different speakers. Setting these values to make each sound reach the listening position at the same time as the sound of other speakers.
Time Correction Value List
Example 1. Listening Position: Front Left Seat
Example 2. Listening Position: All Seats
5.1ms
2.25m
0.5m
Delay Number
Time Difference
(ms)
Distance(cm)
Distance(inch)
Delay Number
Time Difference
(ms)
Distance(cm)
Distance(inch)
1 0.0 0.0 0.0 51 5.0 170.0 67.0
2 0.1 3.4 1.3 52 5.1 173.4 68.3
3 0.2 6.8 2.7 53 5.2 176.8 69.7
4 0.3 10.2 4.0 54 5.3 180.2 71.0
5 0.4 13.6 5.4 55 5.4 183.6 72.4
6 0.5 17.0 6.7 56 5.5 187.0 73.7
7 0.6 20.4 8.0 57 5.6 190.4 75.0
8 0.7 23.8 9.4 58 5.7 193.8 76.4
9 0.8 27.2 10.7 59 5.8 197.2 77.7
10 0.9 30.6 12.1 60 5.9 200.6 79.1
11 1.0 34.0 13.4 61 6.0 204.0 80.4
12 1.1 37.4 14.7 62 6.1 207.4 81.7
13 1.2 40.8 16.1 63 6.2 210.8 83.1
14 1.3 44.2 17.4 64 6.3 214.2 84.4
15 1.4 47.6 18.8 65 6.4 217.6 85.8
16 1.5 51.0 20.1 66 6.5 221.0 87.1
17 1.6 54.4 21.4 67 6.6 224.4 88.4
18 1.7 57.8 22.8 68 6.7 227.8 89.8
19 1.8 61.2 24.1 69 6.8 231.2 91.1
20 1.9 64.6 25.5 70 6.9 234.6 92.5
21 2.0 68.0 26.8 71 7.0 238.0 93.8
22 2.1 71.4 28.1 72 7.1 241.4 95.1
23 2.2 74.8 29.5 73 7.2 244.8 96.5
24 2.3 78.2 30.8 74 7.3 248.2 97.8
25 2.4 81.6 32.2 75 7.4 251.6 99.2
26 2.5 85.0 33.5 76 7.5 255.0 100.5
27 2.6 88.4 34.8 77 7.6 258.4 101.8
28 2.7 91.8 36.2 78 7.7 261.8 103.2
29 2.8 95.2 37.5 79 7.8 265.2 104.5
30 2.9 98.6 38.9 80 7.9 268.6 105.9
31 3.0 102.0 40.2 81 8.0 272.0 107.2
32 3.1 105.4 41.5 82 8.1 275.4 108.5
33 3.2 108.8 42.9 83 8.2 278.8 109.9
34 3.3 112.2 44.2 84 8.3 282.2 111.2
35 3.4 115.6 45.6 85 8.4 285.6 112.6
36 3.5 119.0 46.9 86 8.5 289.0 113.9
37 3.6 122.4 48.2 87 8.6 292.4 115.2
38 3.7 125.8 49.6 88 8.7 295.8 116.6
39 3.8 129.2 50.9 89 8.8 299.2 117.9
40 3.9 132.6 52.3 90 8.9 302.6 119.3
41 4.0 136.0 53.6 91 9.0 306.0 120.6
42 4.1 139.4 54.9 92 9.1 309.4 121.9
43 4.2 142.8 56.3 93 9.2 312.8 123.3
44 4.3 146.2 57.6 94 9.3 316.2 124.6
45 4.4 149.6 59.0 95 9.4 319.6 126.0
46 4.5 153.0 60.3 96 9.5 323.0 127.3
47 4.6 156.4 61.6 97 9.6 326.4 128.6
48 4.7 159.8 63.0 98 9.7 329.8 130.0
49 4.8 163.2 64.3 99 9.8 333.2 131.3
50 4.9 166.6 65.7 100 9.9 336.6 132.7
54-EN

About the Crossover
Crossover (X-Over):This unit is equipped with an active crossover. The crossover limits the frequencies delivered to the outputs. Each channel is controlled independently. Thus, each speaker pair can be driven by the frequencies for which they have been optimally designed.The crossover adjusts the HPF (high pass filter) or LPF (low pass filter) of each band, and also the slope (how fast the filter rolls off the highs or lows).Adjustments should be made according to the reproduction characteristics of the speakers. Depending on the speakers, a passive network may not be necessary. If you are unsure about this point, please consult your authorized Alpine dealer.
4.2ch (FRONT/REAR/SUBW.) mode
2.2ch (3WAY) mode
* Only when selecting User’s in “Setting the Response Slope for the High Range Speaker (TW Setup)” (page 53).
• HPF (high pass filter): Cuts the lower frequencies and allows the higher frequencies to pass.
• LPF (low pass filter): Cuts the higher frequencies and allows the lower frequencies to pass.
• Slope: The level change (in dB) for a frequency change of one octave.• The higher the slope value, the steeper the slope becomes.• Adjust the slope to FLAT to bypass the HP or LP filters.• Do not use a tweeter without the HPF on or set to a low frequency, as
it may cause damage to the speaker due to the low frequency content.• You cannot adjust the crossover frequency higher than the HPF or
lower than the LPF.• Adjustment should be made according to the recommended crossover
frequency of the connected speakers. Determine the recommended crossover frequency of the speakers. Adjusting to a frequency range outside that recommended may cause damage to the speakers. For the recommended crossover frequencies of Alpine speakers, refer to the respective Owner’s Manual. We are not responsible for damage or malfunction of speakers caused by using the crossover outside the recommended value.
Cut-off frequency (1/3 octave steps) Slope
LevelHPF LPF HPF LPF
Low range speaker ----
20 Hz - 200 Hz
----
FLAT, 6, 12, 18, 24 dB/
oct.
0 to–12 dB
Rear high range speaker
20 Hz - 200 Hz
----FLAT, 6, 12, 18,
24 dB/oct.----
0 to–12 dB
Front high range speaker
20 Hz - 200 Hz
----FLAT, 6, 12, 18,
24 dB/oct.----
0 to–12 dB
Cut-off frequency (1/3 octave steps) Slope
LevelHPF LPF HPF LPF
Low range speaker
----20 Hz - 200 Hz
----FLAT, 6, 12, 18, 24 dB/oct.
0 to –12 dB
Mid range speaker
20 Hz - 200 Hz
20 Hz - 20 kHz
FLAT, 6, 12, 18, 24 dB/oct.
FLAT, 6, 12, 18, 24 dB/oct.
0 to –12 dB
High range speaker
1 kHz - 20 kHz, (20 Hz ~ 20 kHz)*
----FLAT* 6, 12, 18, 24 dB/oct.
----0 to –12 dB
Low range High range
(Different from actual display)
Low range Mid range High range
(Different from actual display)
Level adjusting(0 to –12 dB) Output frequency range
Slope FLAT
Slope adjusting
20 HzHPF cut-offfrequency
LPF cut-offfrequency
(Different from actual display)
55-EN

A compatible, external audio processor is operable from this unit when connected. Some audio processors may require a wired controller. The explanations below use the PXA-H700/PXA-H701 as an example. Refer to the operating instructions of the audio processor for more details.
• The adjustments or settings performed on the connected audio processor cannot be operated properly from this unit.
• The setting “Setting the Speakers”, “Setting Bass Sound Control”, and “Graphic Equalizer Adjustments” are not available if the MRA-D550 is connected. Additionally, if the MRA-F350 is connected, the following setting “Setting the MX mode” is not available. Also, the setting content differs between the PXA-H700 and PXA-H701.
• This unit cannot be connected to the PXA-H510 and PXA-H900.
Adjustment Procedure for Dolby SurroundMake the adjustments described below in order to reproduce Dolby Digital and DTS sound with greater accuracy.
Adjustment procedure
In case of combining the Automatic adjustments, etc.We recommend to make the Automatic adjustments before the Dolby Surround adjustments.
Setting the External Audio Processor
1 Check whether the Defeat mode is OFF.
2 Press SOURCE/ on the unit.The Source Select screen is displayed.
3 Touch [ ] on the source selection screen.The Setup Select screen is displayed.
4 Touch [ ] of Audio Setup.The Audio Setup screen appears.
5 Touch [ ] of A.Processor.The A.Processor list screen appears.
6 Touch [ ], [ ] or [ ], etc., of the desired item to change its setting.
Setting items :Media Xpander / Bass Sound Cont. / Dolby PLII / Rear Fill / X-Over / Time Correction / Phase / G-EQ / P-EQ / Speaker Select / Multi Ch Setup / Speaker Setup / DVD Level / PCM Mode
7 Touch [ ] to return to the previous screen.
• Touching [Exit] will change to the main source screen.
External Audio Processor Operation (Optional)
The Parking Brake must be engaged to access the Audio Processor mode screen. Attempting to access this screen while driving will display the warning-Can’t operate while driving.
1
2
3
Speaker Setup (page 60)(Turning the speakers to be used on and off and setting their response)
Adjusting the speaker levels (page 60)(Adjusting the signal output level to the various speakers)
Mixing bass sound to the rear channel (page 60)(Achieving smooth sound in the rear seat by mixing the front audio signals with the rear speaker signals)
4
5
6
7
Following Steps 1 to 7 describe the common procedures for operating the Audio Processor setting function. For details of the setting function items, refer to descriptions of respective items.
Adjusting the acoustic image (page 60)(Adjusting the acoustic image to achieve a sound as if the centre speaker were directly in front of the listener)
Achieving powerful high volume sound (page 60)(Achieving energetic sound with even greater power, like the sound in a movie theatre)
Adjusting the DVD Level (page 61)(Adjust the volume (signal level) in the Dolby Digital, Pro Logic II, DTS and PCM modes.)
Storing Settings in the Memory (page 61)(Storing all the settings and adjustments made on the INA-W910R (not only the above settings/adjusts) in the memory)
56-EN

Before performing the operations below, set MX (Media Xpander) mode of the PXA-H700 to “AUTO” when the PXA-H700 is connected.
Setting item : Media Xpander
1 Select ON or OFF of MX by touching [ ] or [ ] of Media Xpander.
2 Touch [ ] of Media Xpander after setting to ON.The Media Xpander setup screen appears.
3 Touch [ ] or [ ] of the desired MX mode.
• Music source (such as CDs, iPod) level can be set.
MX CD (OFF, CD MX 1 to 3)CD mode processes a large quantity of data. This data is used to reproduce the sound cleanly by making use of the data quantity.
MX CMPM (OFF, CMPM MX 1 to 3)This corrects information that was omitted at the time of compression. This reproduces a well-balanced sound close to the original.
MX DVD (OFF, Movie MX 1 to 2)The dialogue portion of the video is reproduced more clearly.
MX AUX (OFF, CMPM MX, Movie MX, Music MX)Choose the MX mode (CMPM, Music, or Movie) that corresponds to the media connected.
• The contents of MX set here is reflected to PXA-H700 or PXA-H701.• When OFF is selected, MX effect of each MX mode will be OFF.• Each music source, such as CD, and MP3 can have its own MX
setting.• There is no MX mode for FM, MW and LW radio.• MX CMPM is applied for MP3/WMA/AAC and iPod/iPhone.• The MX setting can be performed only when a source is currently
selected.• This function is inoperable when Defeat is set to ON.
Setting item: Bass Sound Cont.
Setting Bass CompressorYou can adjust the sound of low frequencies as desired.
Touch [ ] or [ ] of Bass Comp. to select the desired mode.Bass sound is emphasised more as the mode is sequentially switched as Mode 1 2 3, offering you vivid low frequencies.Select OFF when the setting is not necessary.
Setting Bass FocusUsing the previously specified delay number (time difference) allows you to set a time difference between the front-rear/left-right speakers. Namely, it enables a time correction based on your preference. With an initial delay of 0.05 ms for each of the 0 to 400 steps, audible time correction can be achieved.
Set the delay number in the front and rear, and on the right and left of the desired speaker by touching the respective [ ] or [ ] button.
• Any setting in Bass Focus is applied in time correction, too (page 58).
Pro Logic processing can be conducted on the music signals recorded on two channels to achieve Dolby Pro Logic II surround sound. For two-channel Dolby Digital and DTS signals, there is also a “Rear Fill” function for outputting the signals of the front channel to the rear channel.
Setting item: Dolby PLII / Rear Fill
Touch [ ] or [ ] of Dolby PLII/Rear to select the desired mode.
If PLII Music is selected, the centre width can be adjusted with following operations.
This function offers the optimum vocal position by adjusting the centre channel position between the centre speaker and the L/R speaker. (The adjustments established in “Adjusting the acoustic image (Bi-Phantom)” (page 60) are ineffective while this function is activated.)
Touch [ ] or [ ] of Centre Width Cont. to adjust the level.The level can be adjusted between 0 to +7. When the level increases, the centre channel position moves from the centre speaker position to both sides.Touch [Off] of Centre Width Cont. to turn off the centre width control.
• This adjustment is effective when the setting of the centre speaker is Small or Large in the Speaker Setup (page 60).
• “Rear Fill” function: Depending on the input signals, the sound may only be output from the front speakers. In this case, the “Rear Fill” function can be used to output signals from the rear speakers as well.
• Avoid stopping, pausing, switching the disc, cueing, fast-forwarding or switching the audio channel of this unit while making this adjustment. The setting is cancelled if the Decode mode is switched.
• This adjustment is ineffective when the speaker is set Centre to OFF in “Setting the Speakers” (page 59).
• This function only works with two-channel signals. This operation is ineffective when 5.1-channel DTS or Dolby Digital signals are input.
• If the setting of Rear Fill is made when Rear Mix is ON, sound is unchanged in the Rear Fill setting because Rear Mix is given priority during 2 channel decoder other than linear PCM.
• For linear PCM signals, the voice is output from the rear speaker regardless of the Rear Fill and Rear Mix setting.
Set MX Mode of the External Audio Processor
OFF: Turns off the MX effect of every music source.ON: Turns on the specified MX mode.
(DVD Music)This disc contains a large quantity of data such as music clip. MX uses this data to reproduce the sound accurately.
Setting Bass Sound Control
Using the Pro Logic II Mode
PLII Movie: Suits the stereo TV shows and all programmes encoded in Dolby Surround. It improves the sound field directivity to near that of discrete 5.1-channel sound.
PLII Music: Can be used for all stereo music recordings, and provides a wide, deep sound field.
OFF: Turns Dolby PLII function to OFF.
57-EN

Setting item: X-Over
1 Touch [ ] or [ ] of X-Over to select L+R or L/R.
2 Touch [ ] of X-Over.A speaker list on the X-Over screen is displayed.
3 Touch [ ] of the speaker to be adjusted.The screen changes to the X-Over screen to be adjusted.
4 Adjust the crossover to your preference.
Selecting the Cut-Off Frequency
Touch [ ] or [ ] of Freq., then select the cut-off frequency (crossover point).The adjustable bandwidth differs depending on the speaker (channel).
Adjusting the Level
Touch [ ] or [ ] of Level, then adjust the HPF or LPF level.
Adjusting the Slope
Touch [ ] or [ ] of Slope, then adjust the HPF or LPF slope.
• When the speaker is set to the “OFF” mode, the X-Over for that speaker cannot be set. Refer to “Setting the Speakers” (page 59).
• Check the playback frequencies of the connected speakers before adjusting.
• In order to protect the speakers, there is no OFF setting for the subwoofer low pass filter (the slope remains the same).
• The HPF cannot be set Slope to OFF if Tweeter (TW) is selected for Front1. Or, only the subwoofer is adjustable if Stereo is selected for the subwoofer.
Because of the particular conditions inside the vehicle, there can be major differences in the distances between the various speakers and the listening position. It is possible to calculate the optimum correction values and eliminate the time error at the listening position yourself using this function.
Setting item: Time Correction
1 Sit in the listening position (the driver’s seat, for example) and measure the distance (in meters) between your head and the various speakers.
2 Calculate the difference in distance between the farthest speaker and the other speakers.
3 Divide the distances calculated for the different speakers by the speed of sound (343 m/s temperature 20°C).This value is the time correction value for the various speakers.
Concrete examplesCalculating the time correction value for the front left speaker on the diagram below.
In other words, setting the time correction value for the front left speaker to 5.1 (ms) sets a virtual distance matching the distance to the farthest speaker.
4 Touch [ ] or [ ] of Time Correction.Select L+R or L/R.
5 Touch [ ] of Time Correction.The Time Correction adjustment screen appears.
6 Adjust the time correction value (0.00 ~ 20.00ms) of a desired speaker by touching the respective [ ] or [ ] button (1 step = 0.05ms).
• When the speaker is set to the “OFF” mode, the TCR for that speaker cannot be set. Refer to “Setting the Speakers” (page 59).
• The adjustment value for Front2 (Speakers) which is adjusted in time correction, is also applied to the front speakers in “Setting Bass Focus” (page 57).
• The adjustment (AUTO TCR) cannot be automatically set on this unit.
X-OVER Adjustment
L+R: Sets the same adjustment values for the left and right channels.
L/R: Different adjustment values can be set for the left and right channels.
Performing Time Correction Manually (Time Correction)
L = (distance of farthest speaker) – (distance of other speakers)
Conditions:Distance between farthest speaker and listening position:
2.25 m (88-3/4")Distance between front left speaker and listening position:
0.5 m (20")Calculation:
L = 2.25 m (88-3/4") – 0.5 m (20")= 1.75 m (68-3/4")Compensation time = 1.75 ÷ 343 x 1,000 = 5.1 (ms)
L+R: Sets the same adjustment values for the left and right channels.
L/R: Different adjustment values can be set for the left and right channels.
2.25m
0.5m
5.1ms
The sound is uneven because the distance between the listening position and the different speakers is different.The difference in the distance between the front left and rear right speakers is 1.75 meters (68-3/4").
Time correction eliminates the difference between the time required for the sound from the different speakers to reach the listening position.Setting the time correction of the front left speaker to 5.1 ms makes it possible to coordinate the distance from the listening position to the speaker.
58-EN

Setting item: Phase
Switch the phase (0° or 180°) by touching [ ] or [ ] of the desired speaker.
The graphic equalizer allows you to modify the sound using 31 bands each for the front (left and right), rear (left and right) and centre speakers. An additional 10 bands are available for the subwoofer. This allows you to customize the sound to suit your taste.
Setting item: G-EQ
1 Select L+R or L/R by touching [ ] or [ ] of G-EQ.
When parametric EQ is adjusted, this setting will be turned off.
2 Touch [ ] of G-EQ.The G-EQ list screen appears.
3 Touch [ ] of the desired speaker (channel).The G-EQ adjustment screen appears.
4 Adjust the G-EQ to your preference.
Adjusting the Level
Touch [ ] or [ ] of the desired frequency to adjust the level.
• When the speaker is set to the “OFF” mode, the graphic equalizer for that speaker cannot be set. Refer to “Setting the Speakers” (page 59).
• Check the playable frequency ranges of the connected speakers before making the equalizer adjustments. If the speaker’s playable frequency range is 55 Hz to 30 kHz, for example, adjusting the 40 Hz or 20 Hz band has no effect. Additionally, you may overload and damage the speakers.
• When Graphic EQ is adjusted, the adjustment for Parametric EQ becomes ineffective.
The frequency bands of the graphic equalizer are fixed. This makes it very difficult to correct for undesired peaks and dips at specific frequencies. The parametric equalizer’s centre frequency can be tuned to these specific frequencies. Then, the bandwidth (Q) and level are fine-tuned, independently, to make the necessary corrections. The parametric equalizer function is an advanced tool for serious audiophiles.
Setting item: P-EQ
1 Select L+R or L/R by touching [ ] or [ ] of P-EQ.
When Graphic EQ is adjusted, this setting will be turned off.
2 Touch [ ] of P-EQ.The P-EQ list screen appears.
3 Touch [ ] of the desired speaker (channel).The P-EQ adjustment screen appears.
4 Adjust the P-EQ to your preference.
Selecting the Band
Touch [ ] or [ ] of Band to select the desired band.
Adjusting the Frequency
Touch [ ] or [ ] of Freq. to adjust the frequency of the selected band.
Adjusting the Level
Touch [ ] or [ ] of Level to adjust the level of the selected band.
Setting the Bandwidth
Touch [ ] or [ ] of Q to select the bandwidth.
• When the speaker is set to the “OFF” mode, the parametric equalizer for that speaker cannot be set. Refer to “Setting the Speakers” (page 59).
• It is not possible to adjust the frequencies of adjacent bands within 7 steps.
• Check the playable frequency ranges of the connected speakers before making the equalizer adjustments. If the speaker’s playable frequency range is 55 Hz to 30 kHz, for example, adjusting the 40 Hz or 20 Hz band has no effect. Additionally, you may overload and damage the speakers.
• When the Parametric EQ is adjusted, the adjustment for Graphic EQ becomes ineffective.
Setting item: Speaker Select
Set the connected speaker by touching the respective [ ] or [ ] button.
• Set the speaker which is not connected to OFF.• Settings above can be carried out even when the speaker is set to
OFF in “Speaker Setup” (page 60).• To use the subwoofer in Mono with PXA-H700 or PXA-H701
connected, connect the subwoofer to the subwoofer output terminal of PXA-H700 or PXA-H701.
Phase Switching
Graphic Equalizer Adjustments
L+R: Sets the same adjustment values for the left and right channels.
L/R: Different adjustment values can be set for the left and right channels.
Parametric Equalizer Adjustments
L+R: Sets the same adjustment values for the left and right channels.
L/R: Different adjustment values can be set for the left and right channels.
Setting the Speakers
Front1: OFF/Full (Full Range)/TW (Tweeter)Front2: OFF/ONRear: OFF/ONCentre: OFF/ONSubw.: OFF/Mono/Stereo
59-EN

Setting item: Multi Ch Setup
Adjusting the acoustic image (Bi-Phantom)In most installations, the centre speaker must be placed directly between the front passenger and driver. Using this function, the centre channel information is distributed to the left and right speakers. This creates an acoustic image simulating a centre speaker directly in front of each listener. Adjusting the centre width in PLII Music (see “Using the Pro Logic II Mode” on page 57), makes this function ineffective.
• Avoid stopping, pausing, switching the disc, cueing, fast-forwarding or switching the audio channel of this unit while making this adjustment. The setting is cancelled if the Decode mode is switched.
Touch [ ] or [ ] of Bi-Phantom to adjust the level.The level can be adjusted within the range of -5 to +5. The higher the level, the more the position of the centre speaker is shifted to the sides.The Bi-Phantom function is turned off by touching [Off].
• This adjustment is effective when the setting of the centre speaker to Small or Large in the speaker setup settings.
• This adjustment is ineffective when the speaker is set Centre to OFF in “Setting the Speakers” (page 59).
Mixing bass sound to the rear channel (Rear Mix)This function mixes the front channel audio signals to the audio signals output from the rear speakers, improving the sound in the vehicle’s rear seat.
• Avoid stopping, pausing, switching the disc, cueing, fast-forwarding or switching the audio channel of this unit while making this adjustment. The setting is cancelled if the Decode mode is switched.
Touch [ ] or [ ] of Rear Mix to adjust the level.The level can adjusted in five steps: -6, -3, ±0, +3 and +6. The higher the level, the more bass is output from the rear speakers. (The effect differs according to the software (DVD, etc.).)The Rear Mix function is turned off by touching [Off].
• This adjustment is ineffective when the rear speaker setup setting is set to “OFF”.
• For linear PCM signals, the voice is output from the rear speaker regardless of the Rear Fill and Rear Mix setting.
Achieving powerful high volume sound (Listening Mode)With Dolby Digital, the dynamic range is compressed so that powerful sound can be achieved at regular volume levels. This compression can be cancelled to achieve an energetic sound with even greater power, like the sound in a movie theatre. This function works only in the Dolby Digital mode.
Touch [ ] or [ ] of Listening Mode to select STD or MAX.
• Keep the volume to a level at which sounds outside the vehicle can still be heard.
Adjusting the speaker levels (Output Level)The test tones help to make the volume adjustments of the different speakers. When levels are equal, a strong sense of presence can be heard from the different speakers at the listening position.
• Avoid stopping, pausing, switching the disc, cueing, fast-forwarding or switching the audio channel of this unit while making this adjustment. The setting is cancelled if the decode mode is switched.
1 Touch [On] of Output Level.Test tone output is repeated for each of the different speaker channels. They will be repeated in the order shown below.If no operation is performed for 2 seconds, the channel switches to the next channel.
2 While the test tone is being produced from the speakers, touch [ ] or [ ] of Output Level balance the output from all the speakers.
3 Touch [On] again to turn off.
• If a speaker is set to off mode, that speaker’s level adjustment cannot be made. Refer to “Speaker Setup” (page 60).
The PXA-H700 or PXA-H701 can be set according to the playable frequency range of your speakers.Check the playable frequency range of the speakers (not including the subwoofer) before performing this operation to verify whether the speakers can play low frequencies (of about 80 Hz or less).
• Avoid stopping, pausing, switching the disc, cueing, fast-forwarding or switching the audio channel of this unit while making this adjustment. The setting is cancelled if Decode mode is switched.
Setting item: Speaker Setup
Select the speaker characteristic by touching [ ], [ ] of the desired speaker setting.
*1 It is not possible to set the front speakers to “OFF”.*2 If the front speakers are set to “Small”, the rear and centre speakers
cannot be set to “Large”.
• The subwoofer can be set only to ON/OFF.• If the centre speaker is turned “OFF”, the centre channel’s audio
signals are added to the audio signals output from the front speakers.• If you set the speaker response to “OFF”, also set the speaker setting
to “OFF” (page 59).• Perform the setup for all the speakers (“Front”, “Centre” ,“Rear”
and “Subwoofer”). If not, the sound may not be balanced.• When centre is set to “OFF”, the setting is ineffective even if centre
is set with this function.• Through changing the settings on each speaker, a change in the
output of the other speakers may occur due to the setting requirements.
• When using the PRO Logic II, if the rear speaker is set to “Large”, then there will be no output from the subwoofer.
Setting of Dolby Digital
STD: For powerful sound at regular volume levelsMAX.: For powerful sound at high volumes
Left Centre Right Right Surround Left Surround Left
• The adjustment range for the different speakers is –10 dB - +10 dB.
• Adjust based on the front speakers.
Speaker Setup
OFF*1: When no speaker is connected.Small: When a speaker that cannot play low frequencies
(80 Hz or less) is connected.Large*2: When a speaker that can play low frequencies
(80 Hz or less) is connected.
60-EN
The volume (signal level) for Dolby Digital, Dolby PLII, DTS and PCM modes can be set.
• Avoid stopping, pausing, switching the disc, cueing, fast-forwarding or switching the audio channel of this unit while making this adjustment. The setting is cancelled if the Decode mode is switched.
Setting item: DVD Level
Adjust the level by touching [ ] or [ ] of the desired adjusting mode.
The output when playing discs recorded in linear PCM can be set to 2 or 3 channels.
Setting item: PCM Mode
Touch [ ] or [ ] of PCM Mode to select 2CH or 3CH.
• This adjustment is ineffective when the speaker is set Centre to OFF in “Setting the Speakers” (page 59).
Storing Settings in the MemoryAdjustment or setting contents can be stored.Contents that can be stored vary depends on the audio processor used.
1 Touch [MEMORY] on the A.Processor list display.
2 Within 5 seconds, touch any one of the preset buttons [P.SET 1] through [P.SET 6] on the A.Processor list screen.The setting contents are stored.
• The stored contents will not be deleted even when the battery power cord is detached.
Calling up the Preset Memory
Touch any one of the preset buttons [P.SET 1] through [P.SET 6] on the A.Processor list display to select the preset memory.
• It takes a few moments to call up the preset memory.
• BT Audio source is not available with this unit.
Setup Before Using
BLUETOOTH is a wireless technology allowing communication between a mobile device or personal computer over short distances. This enables a hands-free call or data transmission between BLUETOOTH compatible devices. BLUETOOTH transmission is available in the unlicensed 2.4 GHz spectrum if the distance between devices is within 10 meters. For details, refer to the BLUETOOTH Home page (http://www.bluetooth.com).
• Depending on the BLUETOOTH version, a BLUETOOTH compatible device may not be able to communicate with this unit.
• Proper function of this unit with all BLUETOOTH compatible devices is not guaranteed. For handling of the BT compatible device, consult your ALPINE dealer or ALPINE website.
• Depending on the surroundings, BLUETOOTH wireless connection may be unstable.
• When you place a call, or perform setup operations, be sure to stop your car in a safe place.
• Depending on the connected BLUETOOTH compatible device(s), the function may differ. Also refer to the Owner’s Manual of the connected device(s).
Before using the hands-free phone function, the following settings need to be made.
Set “BLUETOOTH IN” to ON (page 49).
• Before using a hands-free phone, it must be paired with this unit. Refer to “BLUETOOTH Setup” (pages 62-64).
For details on the control from a BLUETOOTH compatible device, refer to the Owner’s Manual of the BLUETOOTH compatible device.
1 Set a BLUETOOTH connection from a BLUETOOTH compatible device.
2 The PIN code (“0000”) is displayed on the unit.
3 Input the PIN code (“0000”) in a BLUETOOTH compatible device.
4 If this unit is successfully connected to a BLUETOOTH compatible device, “Connected/(Device name)” is displayed, and then the unit returns to normal mode.
Adjusting the DVD Level
Linear PCM Setting
2CH: 2ch output (L/R)3CH: 3ch output (L/R/CENTRE)
BT Hands Free Calling
About BLUETOOTH
Before Using Hands-Free Function
How to connect to a BLUETOOTH compatible device (Pairing)
61-EN
• Set “Setting the Search Mode” (page 63) to Visible Mode ON to enable this unit to recognise a mobile phone. For mobile phone passkey (passcode) input operation, refer to the mobile’s Owner’s Manual. Additionally, the mobile phone can be searched directly from this unit. Refer to “Registering the BLUETOOTH Device” (page 62).
• If a BLUETOOTH compatible device is successfully connected, the next time when the ignition key of the car is turned to on, the unit will automatically connect to the previously connected device. However, the connection may fail. If the auto connection fails, try the connection manually.
BLUETOOTH Setup
The following steps 1 to 6 are common to the various BLUETOOTH functions. For details, refer to each individual function.
• While calling, BLUETOOTH Setup operation cannot be performed.• Set “BLUETOOTH IN” to ON (page 49), and then perform
BLUETOOTH Setup operation.
1 Press SOURCE/ on the unit.The Source Select screen is displayed.
2 Touch [ ] on the main source screen.The Setup Select screen is displayed.
3 Touch [ ] of Source Setup.The Source Setup screen appears.
4 Touch [ ] of BLUETOOTH Setup.The BLUETOOTH Setup screen appears.
5 Touch [ ], [ ] or [ ] of the desired item to change its setting.
Setting items:Paired Devices / Device Search / Clear Device / Service Provider / Visible Mode / Auto Answer / Speaker Select / MIC Input / Firmware Version / Firmware Update / Hung Up / Echo Cancel / Navi Voice IN Call / BT Menu Language / Shortcut Memory
6 Touch [ ] on the left side of screen to return to the previous screen.Touch [Exit] to return to the main source screen that was displayed before the setup operation was started.
Setting the BLUETOOTH DeviceSelect one of 5 connected BLUETOOTH compatible devices that you previously registered.
Setting item: Paired Devices
Touch a BLUETOOTH compatible device to use (change connection) from the Paired Device list.
• If the connection is successfully changed, “Connected NO./(Device name)” is displayed for 2 seconds, and then the display returns to the Setup screen.
• If you input the wrong passcode or communications fail, “Failed” is displayed.
• If you want to connect another BLUETOOTH compatible device, after disconnecting the current BLUETOOTH compatible device, connect the BLUETOOTH compatible device you want to change to.
• The registration number 5 is deleted when you set ignition from ACC to OFF. If all the 5 positions have been registered, you cannot register the 6th device. To register another device, you need to delete one of the devices from position 1 to 5 first.
Registering the BLUETOOTH DeviceThe BLUETOOTH device is used when a connectable BLUETOOTH compatible device is searched and connected from this unit, or a new BLUETOOTH compatible device is registered.
Setting item: Device Search
1 When Device Search is selected, “Now Searching” is displayed, and searching starts.
2 Touch the device name to be connected from the Device Search list.
3 If this unit is successfully connected to a BLUETOOTH compatible device, a paired device name and a registered number (No. 1 to 5) are displayed, and then the unit returns to normal mode.
• If a mobile phone is registered for the first time: Input a passcode when the numeric keypad screen is displayed, then input the same passcode in the BLUETOOTH compatible device to make the pairing. After the pairing is completed, the unit will automatically connect to the BLUETOOTH compatible device.
• If you input the wrong passcode or communications fail, “Failed” is displayed.
• A passcode input on the unit is maximum 4-digit. If a passcode on the BLUETOOTH compatible device exceeds 4 digits, reset the passcode and make this setting again.
BLUETOOTH Setup Operation
62-EN

Deleting a BLUETOOTH Device from the listYou can delete the history of a previously connected BLUETOOTH compatible device.
Setting item: Clear Device
1 Touch the BLUETOOTH compatible device you want to delete from the Clear Device list.A message is displayed.
2 Touch [Yes] if you want to delete.
• Touching [No] will cancel the setting.• The registration number 5 is deleted once the ignition key goes from
ACC to OFF.
Displaying the phone service provider name
Setting item: Service Provider
The service provider name of the connected BLUETOOTH compatible device will be displayed. If a BLUETOOTH compatible device is not connected, “ID Unsent” will be displayed.
• Depending on the character type some phone service provider name cannot be displayed.
Setting the Search ModeYou can set whether this unit can be recognised or not from a BLUETOOTH compatible device. Normally set this to Visible Mode ON.
Setting item: Visible Mode
• Depending on the mobile phone, it may be necessary to input a passcode. For inputting the mobile phone’s passcode, refer to the mobile phone’s Owner’s Manual.
Setting the Received Calls automatically (Auto Answer)When a call is received, you can set whether to receive it automatically or not.
Setting item: Auto Answer
• If the received call setting on the mobile phone is on, the call will be answered automatically even though this setting is set to OFF.
• If a second call caution is displayed, auto calling is unavailable even if Auto Answer is set to “ON”.
Selecting the output speakerYou can select the connected speaker in car to output the sound signal of telephone.
Setting item: Speaker Select
• The setting cannot be adjusted during a phone call. Adjust the setting before placing a call.
• When an IMPRINT audio processor (PXA-H100) or External Audio processor (PXA-H701, etc.) is connected, the default setting All will be set and cannot be adjusted.
Adjusting the volume for the microphone inputYou can emphasise or weaken the microphone input volume level.
Setting item: MIC Input
Touch [ ] or [ ] to select the desired volume level (0 ~ 7).
• The setting cannot be adjusted during a phone call. Adjust the setting before placing a call.
• The setting can be adjusted only when the BLUETOOTH compatible device is connected.
Displaying the firmware version
Setting item: Firmware Version
The current firmware version will be displayed.
Updating the firmware
Setting item: Firmware Update
Future BLUETOOTH firmware update (for phone compatibility) at customer end will be available for this unit.For information to update your BLUETOOTH firmware, please visit your local Alpine web site or choose your country from Alpine Europe top page (http://www.alpine-europe.com).
Setting the Hang Up ModeWhen there’s an inserted call, Hung UP button is displayed in the bottom right of the navigation screen during a phone call.
Setting item: Hung Up
Turning the Echo Cancel ON or OFF
Setting item: Echo CancelThe echo of hands-free phone will be avoided correspondingly by setting the Echo Cancel to ON.
ON: Enables recognition of this unit from the BLUETOOTH compatible device.
OFF: Disables recognition of this unit from the BLUETOOTH compatible device.
ON: When a call is received, it will be taken automatically after about 5 seconds.
OFF:When a call is received, it will not be received automatically. If a message is displayed and [ ] is touched when a call is received, you can receive the call.
All: The sound be output from all of speakers in car.F-L: The sound only be output from the front left speaker.F-R: The sound only be output from the front right speaker.F-LR: The sound be output from the front left and front right
speaker.
ON: The [ ] is displayed.OFF: The [ ] is not displayed.
63-EN
Receving Navigation Voice while calling
Setting item: Navi Voice IN CallThe voice guidance of the navigation system will be mixed with the call by setting the Navi Voice IN Call to ON.
Setting the BT Menu languageThe BT Menu can be switched within 7 languages. The items selected are indicated in yellow.
Setting item: BT Menu LanguageSetting contents: English / Deutsch / Francais / Espanol /
Italiano / Nederlands / Hebrew
Deleting the stored shortcut memoryYou can delete the stored shortcut memory telephone number by using here.
Setting item: Shortcut Memory
Touch [Delete] of preset 1-5 to delete the shortcut memory.
• About how to store the telephone number as a shortcut dial, refer to page 67.
Hands-Free Phone Control
Hands-free calls are possible when using a HSP (Head Set Profile) and HFP (Hands-Free Profile) compatible mobile phone with this unit.
• Avoid performing a hands-free call in heavy traffic or on narrow or winding streets.
• Close the windows while calling to reduce background noise.• If both calling parties are using hands-free devices, or the call is
made in a noisy location, difficulty hearing the other person’s voice is normal.
• Depending on telephone line conditions or certain mobile devices used, voices may sound unnatural.
• When using a microphone, speak as directly as you can into the microphone to pick up the best sound quality.
• Certain mobile phone features are dependent on the capabilities and settings of your service provider’s network. Additionally, certain features may not be activated by your service provider, and/or the provider’s network settings may limit the feature’s functionality. Always contact your service provider about feature availability and functionality. All features, functionality, and other product specifications, as well as the information contained in the Owner’s Manual are based upon the latest available information and are believed to be accurate at the time of printing. Alpine reserves the right to change or modify any information or specifications without notice or obligation.
Answering a CallIncoming calls are announced by the received call ring tone and a displayed message (Caller name/PHONE No.).
Touch [ ].The call starts.
• Indicator (Signal Strength): While calling, the indicator will display the current signal strength of mobile phone. While in the mode other than Calling, the unit cannot read the signal strength of the mobile phone exactly. In this case, the indicator displays the signal strength of last call.
• When “Setting the Received Calls automatically (Auto Answer)” (page 63) is set to ON, you can receive a call automatically.
• While calling, the source sound on the unit is muted. After calling, playback will resume.
Hanging up the Telephone
Touch [ ].The call finishes.
Adjusting the volume when receiving a CallWhile calling, you can adjust the volume. The adjusted volume level is stored.
Press / on this unit to adjust the volume.
• You may need to increase volume from your regular audio listening source level. However, increasing the volume excessively may result in feedback. If feedback is noticed as feedback is directly related to the volume, turn down the volume as low as acceptable to eliminate it. Positioning the microphone in a direction away from the main car speakers (e.g. clipped on sun visor) may also reduce feedback at high volume.
Redial FunctionYou can redial the person you have previously called.
After finishing a call, touch [ ] on the screen within 5 seconds.The telephone is redialed.
Call Switching OperationWhile making a call, this function allows you to initiate the transfer of the audio between the mobile phone and the speakers in the car.
While calling, touch [ ] to switch the call sound between the unit and mobile phone.
• Depending on the mobile phone, this operation may not be performed.
About the Hands-Free Phone
64-EN

Call HistoryCall History is recorded for the last dialed/received/missed calls. There are various ways of making calls based on the “Call History”. The following steps 1 to 3 are common to the various ways of making these calls. For details, refer to each individual category for making calls.
1 Press and hold MUTE/PHONE for at least 2 seconds.The Telephone Menu screen is displayed.
2 Touch [ ] of the desired item to place the call.
Setting items:When “BT Menu Language” is set to “English”, the Telephone Menu is displayed as:
Dialled Numbers / Received Calls / Missed Calls / Phone Book / Voice Dial / Dial Input
When “BT Menu Language” is set to “Deutsch”, the Telephone Menu is displayed as:
When “BT Menu Language” is set to “Francais”, the Telephone Menu is displayed as:
When “BT Menu Language” is set to “Espanol”, the Telephone Menu is displayed as:
When “BT Menu Language” is set to “Italiano”, the Telephone Menu is displayed as:
When “BT Menu Language” is set to “Nederlands”, the Telephone Menu is displayed as:
When “BT Menu Language” is set to “Hebrew”, the Telephone Menu is displayed as:
For details, refer to “Setting the BT Menu language” (page 64).
• The unit will update the information in the Call History automatically each time a mobile phone is connected or receiving/dialing a call. At this time, if you select any outgoing mode, “Now Updating” will be displayed.
• It may take some time for the list to be displayed, and also directly after connection, the list may not be brought up to date.
3 Touch [ ] to return to the previous screen.Touch [Exit] to return to the main source screen that was displayed before the setup operation was started.
• If you place a call directly from the paired mobile phone, the phone number is not displayed, you cannot redial from the unit in this case.
Previously dialed telephone numbers are stored in dialed numbers history. You can redial a number by searching from dialed numbers history.
Setting item: Dialled Numbers
Touch [Call] of the person name or the telephone number you want to call from the Dialed Numbers list.The call is placed.
Telephone numbers from received calls are stored in the received calls history. You can redial these numbers by searching here.
Setting item: Received Calls
Touch [Call] of the person name or the telephone number you want to call from the Received Calls list.The call is placed.
Telephone numbers for received calls that are missed, are stored in the missed calls history. You can redial these numbers by searching here.
Setting item: Missed Calls
Touch [Call] of the person name or the telephone number you want to call from the Missed Calls list.The call is placed.
Up to 1,000 telephone numbers are downloadable to the BLUETOOTH compatible unit from a mobile phone. Dial a call by selecting a person from the phone book list.
Setting item: Phone Book
Scroll the list one line at a time by touching [ ] or [ ].Scroll the list one page at a time by touching [ ] or [ ].Activate alphabet search function. For details, refer to “Phone book alphabet search function” (page 66).
Redialing a Number in Dialed Numbers History
Dialing a Number in Received Calls History
Dialing a Number in Missed Calls History
Dialing a Number In the Phone Book (Phone Book)
Display example for Phone book screen
65-EN
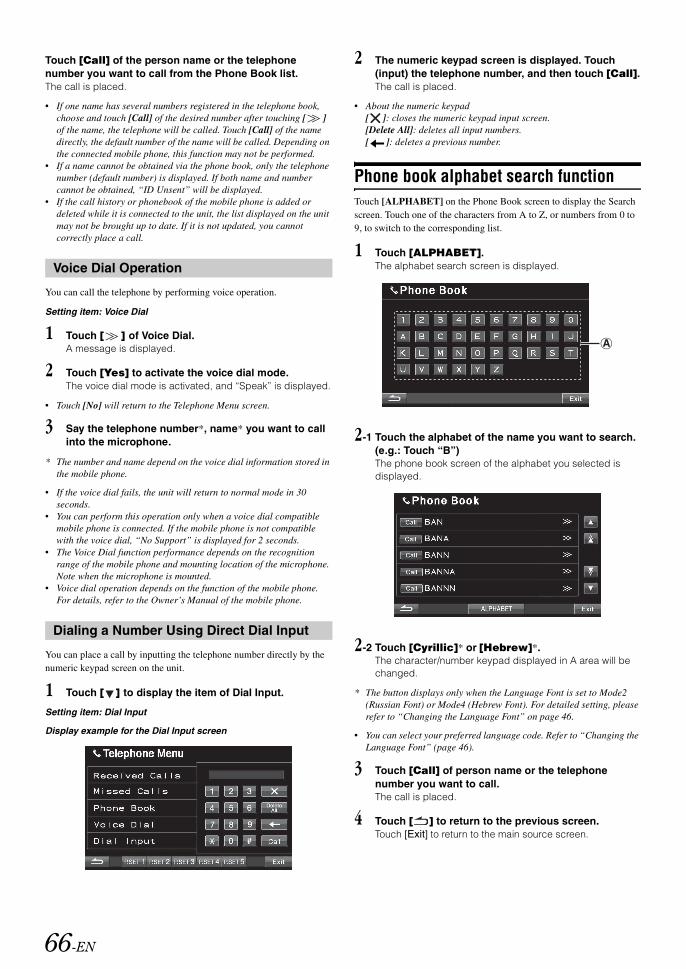
Touch [Call] of the person name or the telephone number you want to call from the Phone Book list.The call is placed.
• If one name has several numbers registered in the telephone book, choose and touch [Call] of the desired number after touching [ ] of the name, the telephone will be called. Touch [Call] of the name directly, the default number of the name will be called. Depending on the connected mobile phone, this function may not be performed.
• If a name cannot be obtained via the phone book, only the telephone number (default number) is displayed. If both name and number cannot be obtained, “ID Unsent” will be displayed.
• If the call history or phonebook of the mobile phone is added or deleted while it is connected to the unit, the list displayed on the unit may not be brought up to date. If it is not updated, you cannot correctly place a call.
You can call the telephone by performing voice operation.
Setting item: Voice Dial
1 Touch [ ] of Voice Dial.A message is displayed.
2 Touch [Yes] to activate the voice dial mode.The voice dial mode is activated, and “Speak” is displayed.
• Touch [No] will return to the Telephone Menu screen.
3 Say the telephone number*, name* you want to call into the microphone.
* The number and name depend on the voice dial information stored in the mobile phone.
• If the voice dial fails, the unit will return to normal mode in 30 seconds.
• You can perform this operation only when a voice dial compatible mobile phone is connected. If the mobile phone is not compatible with the voice dial, “No Support” is displayed for 2 seconds.
• The Voice Dial function performance depends on the recognition range of the mobile phone and mounting location of the microphone. Note when the microphone is mounted.
• Voice dial operation depends on the function of the mobile phone. For details, refer to the Owner’s Manual of the mobile phone.
You can place a call by inputting the telephone number directly by the numeric keypad screen on the unit.
1 Touch [ ] to display the item of Dial Input.
Setting item: Dial Input
Display example for the Dial Input screen
2 The numeric keypad screen is displayed. Touch (input) the telephone number, and then touch [Call].The call is placed.
• About the numeric keypad [ ]: closes the numeric keypad input screen. [Delete All]: deletes all input numbers. [ ]: deletes a previous number.
Phone book alphabet search functionTouch [ALPHABET] on the Phone Book screen to display the Search screen. Touch one of the characters from A to Z, or numbers from 0 to 9, to switch to the corresponding list.
1 Touch [ALPHABET].The alphabet search screen is displayed.
2-1 Touch the alphabet of the name you want to search. (e.g.: Touch “B”)The phone book screen of the alphabet you selected is displayed.
2-2 Touch [Cyrillic]* or [Hebrew]*.The character/number keypad displayed in A area will be changed.
* The button displays only when the Language Font is set to Mode2 (Russian Font) or Mode4 (Hebrew Font). For detailed setting, please refer to “Changing the Language Font” on page 46.
• You can select your preferred language code. Refer to “Changing the Language Font” (page 46).
3 Touch [Call] of person name or the telephone number you want to call.The call is placed.
4 Touch [ ] to return to the previous screen.Touch [Exit] to return to the main source screen.
Voice Dial Operation
Dialing a Number Using Direct Dial Input
66-EN

Second incoming call functionIf a second call is received during a current call, you can have the first caller wait momentarily while you take the second call. When you are finished with one call, you can switch to the other one.
1 If a second call is received during a current call, an incoming call message can be displayed on the calling screen. Touch [ ] on the incoming call message. In this case, the current call on hold, while you take the new call. The name and telephone number of the person on hold are displayed.
Display example for the 2nd incoming call screen
Second call messageHang up the first call and the second incoming call is answered.Hang up the second incoming call.
Display example for the connected 2nd incoming call screen
Feedback of the connected second call
2 By touching [ ] on the call waiting screen, you can switch between the calling person and the person on hold.
Preset a number in the Phone Book (Shortcut dial)Numbers that you dial frequently can be as signed to preset for quick recall.You can assign up to five frequently called phone numbers to number presets.
1 Touch [ ] of the person’s name you want to preset from the Phone Book list.The Phone Book number screen is displayed.
Display example for Phone Book number list screen
2 Touch [Preset].The phone number you selected is stored in presets.
• The [Preset] Key in the Phone Book screen is unavailable when memory is full.
• If all the 5 positions have been used, you cannot assign the 6th number. To assign another number, you need to delete one of the preset number from position 1 to 5 first. About how to delete the preset number, refer to “Deleting the stored shortcut memory” on page 64.
Dialing the preset number
Display example for Telephone Menu screen
Touch any one of the preset buttons [P.SET 1] through [P.SET 5] that has a number stored to it on the Telephone Menu screen.The stored preset number is dialed directly.
A
B
67-EN

When an optional camera is connected, the view video of camera can be output to the monitor.Topview camera, Front camera or Rear camera can be connected to this unit.Depending on your camera, please choose the connection method (Direct or RCA) and camera type (Topview, Front or Rear) first. For details, refer to “Setting the Camera Input” (page 48).For the information of the Alpine camera, refer to the table below.
Front camera*2
When the HCE-C200F is connected, conditions in front of the vehicle, such as a poor-visibility road, can be determined.
Rear camera*2
If an HCE-C300R/HCE-C200R/HCE-C117D/HCE-C115 series camera is connected, when the vehicle is reversed, the rear camera view (guide marks for vehicle width and available distance) is displayed automatically on the screen of this unit.
*1 When connecting to HCE-C300R, calibration must be performed. For details on calibration, refer to “Calibration when connected to HCE-C300R” (page 97) and “Calibration” in the owner’s manual of HCE-C300R.
*2 A commodity camera (with RCA video output) can also be connected to the Camera Video Input connector as the front or rear camera.
Front camera Operation
1 Press SOURCE/ on the unit.The Source Select screen is displayed.
2 Touch (CAMERA).The Camera mode is activated and view video is displayed.
3 Touch any area of the screen to display the view change function keys.
4 Touch [Panorama], [Corner] or [Top] to choose the view angle.Touch [ ], the view change function keys will disappear.
• For more information, please refer to the owner’s manual of connected front camera.
Rear camera Operation
1 Press SOURCE/ on the unit.The Source Select screen is displayed.
2 Touch (CAMERA).The Camera mode is activated and view video is displayed.
3 Touch any area of the screen to display the view change function keys.*3
4 Touch [Back], [Panorama], [Corner] or [Top] to choose the view angle.
5 Touch [Guide On] or [Guide Off] to set whether the rear camera guide line*4 is displayed.Touch [ ], the view change function keys will disappear.
1 Shift the gear lever to the reverse (R) position.The rear view image is displayed while the car remains in reverse.
2 Touch any area of the screen to display the view change function keys.*3
3 Touch [Back], [Panorama], [Corner] or [Top] to choose the view angle.
4 Touch [Guide On] or [Guide Off] to set whether the rear camera guide line*4 is displayed.Touch [ ], the view change function keys will disappear.
*3 Displays only when the rear camera with view change function is connected and View Change Func. is set to ON (page 48).
*4 Displays only on the Back view screen of rear camera.
• Be sure to also check behind the car visually. Use the camera image to assist in showing conditions behind the car.
• This function is effective when the reverse wire is properly connected.• For more information, please refer to the owner’s manual of
connected rear camera.
Camera Operation (Optional)
Direct Camera RCA Camera
Front HCE-C200F —
RearHCE-C300R*1
HCE-C117DHCE-C200RHCE-C115
Display the front view video manually
[Panorama]: Panorama View[Corner]: Corner View[Top]: Ground View
Display the rear view video manually
[Back]: Rear View[Panorama]: Panorama View[Corner]: Corner View[Top]: Ground View
Display the rear view video while the car is in reverse
[Back]: Rear View[Panorama]: Panorama View[Corner]: Corner View[Top]: Ground View
68-EN
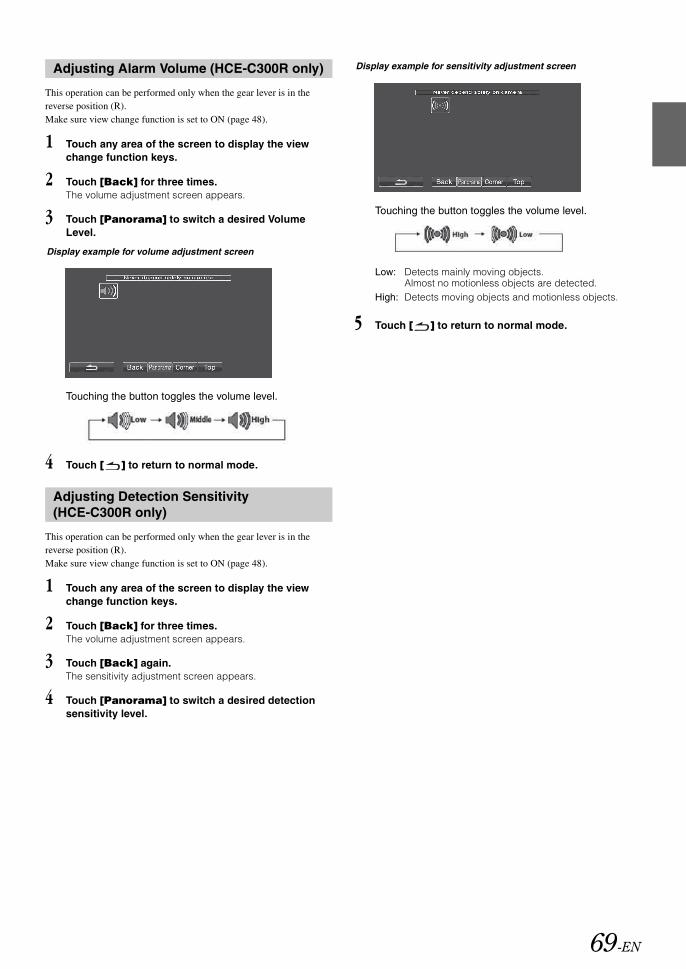
This operation can be performed only when the gear lever is in the reverse position (R).Make sure view change function is set to ON (page 48).
1 Touch any area of the screen to display the view change function keys.
2 Touch [Back] for three times.The volume adjustment screen appears.
3 Touch [Panorama] to switch a desired Volume Level.
Touching the button toggles the volume level.
4 Touch [ ] to return to normal mode.
This operation can be performed only when the gear lever is in the reverse position (R).Make sure view change function is set to ON (page 48).
1 Touch any area of the screen to display the view change function keys.
2 Touch [Back] for three times.The volume adjustment screen appears.
3 Touch [Back] again.The sensitivity adjustment screen appears.
4 Touch [Panorama] to switch a desired detection sensitivity level.
Touching the button toggles the volume level.
5 Touch [ ] to return to normal mode.
Adjusting Alarm Volume (HCE-C300R only)
Adjusting Detection Sensitivity (HCE-C300R only)
Display example for volume adjustment screen
Low: Detects mainly moving objects. Almost no motionless objects are detected.
High: Detects moving objects and motionless objects.
Display example for sensitivity adjustment screen
69-EN

Switching the SD Memory Video ScreenVideo data recorded in the SD memory card can be played back by the player built in this unit.
• If you try to activate the auxiliary device while driving, the display will show the warning-Picture off for your safety.
1 Press SOURCE/ on the unit.The Source Select screen is displayed.
2 Touch [SD card].The playback starts.
• For Memory video operation, refer to the Owner’s Manual of “SD Video Player Owner’s Manual” stored in the supplied CD-ROM.
• The SD-Video picture cannot be displayed on Rear monitor via AUX OUT port.
• The SD-Video source can only output Mono sound.
Operating Auxiliary Devices (Optional)To operate your devices connected to the AUX terminals on the rear panel of INA-W910R (AUX1 mode) or to the iPod (V)/AUX Input connector by using an AV/RCA interface cable (sold separately) (AUX2 mode), follow the procedure described below.
• If you try to activate the auxiliary device while driving, the display will show the warning-Picture off for your safety.
1 Press SOURCE/ on the unit.The Source Select screen is displayed.
2 Touch [Aux1]* or [Aux2].The external input screen is displayed.
3 Touch [NTSC/PAL] to change the video input.
* The name which is given as the source name in “Setting the AUX Mode” on page 48 is displayed.
• If the AUX mode is not displayed on the main menu, set AUX1 IN to ON or AUX2 IN to AUX by following “Setting the AUX Mode” (page 48).
• The setting of switching NTSC/PAL, which you have set in this section, can be used in same way in “Switching the Visual Input Signal System” on page 49.
• The display mode changes by touching [WIDE]. For operation, refer to “Switching Display Modes” on page 37.
SD Memory Video
WARNINGIt is dangerous for the driver to watch the TV/Video while driving the vehicle. The driver may be distracted from looking ahead and an accident could occur.
Install the INA-W910R correctly so that the driver cannot watch TV/Video unless the vehicle is stopped and the emergency brake is applied.
If the INA-W910R is not installed correctly, the driver will be able to watch the TV/Video while driving the vehicle and may be distracted from looking ahead and cause an accident. The driver or other people could be severely injured.
Auxiliary Device (Optional)
WARNINGIt is dangerous for the driver to watch the TV/Video while driving the vehicle. The driver may be distracted from looking ahead and an accident could occur.
Install the INA-W910R correctly so that the driver cannot watch TV/Video unless the vehicle is stopped and the emergency brake is applied.
If the INA-W910R is not installed correctly, the driver will be able to watch the TV/Video while driving the vehicle and may be distracted from looking ahead and cause an accident. The driver or other people could be severely injured.
70-EN
Operating the TUE-T200DVB (Optional)Operable when optional TUE-T200DVB is connected.When DVB-T is selected in “Setting the AUX Mode” (page 48), the source is displayed in Source selection screen.
1 While your vehicle is parked, press SOURCE/ on the unit.The Source Select screen is displayed.
2 Touch [DVB-T].The DVB-T screen is displayed.
3 Perform the desired operation.
Channel Number UP/Down or Favourite Channel Number Up/DownTouch [CH.]* to select changing the Channel or the Favourite Channel.Touch CH. [ ] or [ ] to move the Channel number Up/Down.Touch FAV [ ] or [ ] to move the Favourite Channel number Up/Down.
* The button displays the current changing mode ([CH.] or [FAV]).
Calling up Main Menu Screen
Touch [MENU] to call up the main menu screen.
Calling up Menu Operation Mode
Touch [MENU CONT] to call up the menu operation mode.
Switching the Source
Touch [A/V].The source switches with each touch.
Calling up Electronic Programme Guide (EPG)
Touch [EPG] to call up the Electronic Programme Guide.
Scanning Mode
1 Touch [P1/3].The function guide appears.
2 Touch [SCAN] to start the auto scan procedure.
• For detail, refer to the Owner’s Manual of the TUE-T200DVB sold separately.
Video Menu Operation of TUE-T200DVB
1 Touch [P1/3] twice.The direct touch mode screen is displayed.
• When the optional TUE-T200DVB is connected, you can control it by the touch key (except the [Control] key) on the display screen of the unit.
2 Touch [Control].Return to DVB-T main screen.
• If no operation is performed for 5 seconds, the screen will automatically switch to the full screen mode.
Controlling CD Changer (Optional)An optional 6-disc or 12-disc CD Changer may be connected to the INA-W910R if it is Ai-NET compatible. With a CD Changer connected to the Ai-NET input of the INA-W910R, the CD Changer will be controllable from the INA-W910R.If you connect a changer compatible with MP3, you can play CD-ROMs, CD-Rs, and CD-RWs containing MP3 files on the INA-W910R.
Using the KCA-410C (Versatile Link Terminal) multiple changers can be controlled by the INA-W910R.See the Multi-Changer Selection section for selecting the CD Changers (explained on page 72).
1 Press SOURCE/ on the unit.The Source Select screen is displayed.
2 Touch [CD CHG].The display changes to the CD changer mode screen.
When a 6 Disc CD Changer is connected;1 Touch [P1/2]*.
The Function Guide display appears.
* When an MP3 compatible CD changer or DVD changer is connected, touch repeatedly until the disc number is displayed.
2 Touch any one of the select buttons [DISC 1] through [DISC 6]. DISC 1 through DISC 6 select the discs from the first disc to 6th disc.
When an MP3 compatible CD changer is connected;1 Touch [P1/3] twice to change the Function Guide display.2 Touch any one of the select buttons [DISC 1] through
[DISC 6].DISC 1 through DISC 6 select the discs from the first disc to 6th disc.
When a 12-Disc CD Changer is connected;You can select the disc numbers 1 to 6 in the same manner as for 6-disc Changer.Touch [P1/3] twice to select disc numbers 7 to 12.The function guide display changes so that DISC 7 through DISC 12 represent disc numbers 7 to 12.
• After selecting the desired disc, you can operate in the same way as for the CD player. For details, see the CD/MP3/WMA/AAC section.
• When an MP3 compatible CD changer is connected, the unit can play discs containing both audio data and MP3 data.
• The DVD changer (optional) is controllable from the INA-W910R as well as the CD changer.
• For operation of the connected DVD changer (DHA-S690), refer to the section “CD/MP3/WMA/AAC” or “DVD/Video CD” described in this manual, or the Owner’s Manual of the DHA-S690.
• When the optional DVD changer (DHA-S690) is connected to this unit, touching [NTSC/PAL] after touching [P1/4] three times will change the video input.
TUE-T200DVB Operation (Optional)
Changer (Optional)
71-EN

Multi-Changer Selection (Optional)When using KCA-410C (Versatile Link Terminal), you can connect two changers.
1 In changer mode, touch [CHG SEL] or press BAND on the remote control (sold separately) to select the next changer.
2 To operate the selected changer, see “CD/MP3/WMA/AAC” section.
A USB memory or Portable audio player can be connected to this unit through the USB Connector of this unit. If a USB memory device or Portable audio player is connected to the unit, MP3/WMA/AAC files of USB memory and MP3/WMA files of Portable audio player can be played back.
BANK Function (Tag search mode only)When a USB Memory is connected, the following description is available only when Tag is set in “Setting the USB Search Mode” (page 43).
What is a Bank?
A bank is a unit of up to 1,000 songs, which is stored in memory/portable audio player. “Banking” refers to the grouping of songs available in USB Memory/portable audio player, in banks of 1,000 songs each. However, when a USB Memory is connected, 1BANK can store up to 1,000 songs under the following conditions. Otherwise, the number of songs that can be stored may be less than 1,000.Conditions (general estimate values)
Playlists: 20 (32 characters; 64 bytes)Genres: 10 (32 characters; 64 bytes)Composers: 30 (32 characters; 64 bytes)Artists: 30 (32 characters; 64 bytes)Albums: 100 (32 characters; 64 bytes)Titles: 1,000 (32 characters; 64 bytes)Folders: 100 (32 characters; 64 bytes)Files: 1,000 (32 characters; 64 bytes)File Paths: 1,000 (128 characters; 256 bytes)
About Banking
While a bank is being built up, “Banking” is displayed. Banking occurs whenever a USB Memory device/Portable audio player is connected or after power to the head unit turns on.It can take anywhere from a few seconds to up to several minutes for banking to complete. This depends on the number of files and folders in USB Memory/Portable audio player.
Order of files while Banking
Files are divided in different Banks according to the time and hierarchy they are stored into the USB memory, up to 1,000 files for each Bank.The order of the files is as follows:The files in the hierarchy 1 are divided first and the files in other hierarchies are divided according to the time when its superior directory folder in hierarchy 1 is stored.
USB Memory/Portable audio player (Optional)
72-EN
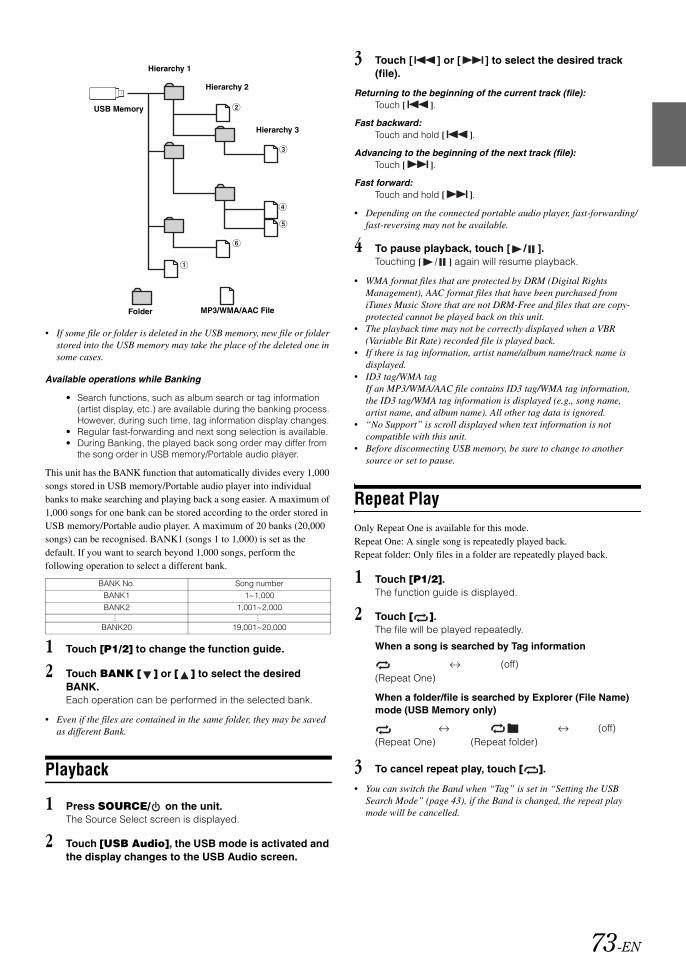
• If some file or folder is deleted in the USB memory, new file or folder stored into the USB memory may take the place of the deleted one in some cases.
Available operations while Banking
• Search functions, such as album search or tag information (artist display, etc.) are available during the banking process. However, during such time, tag information display changes.
• Regular fast-forwarding and next song selection is available.• During Banking, the played back song order may differ from
the song order in USB memory/Portable audio player.
This unit has the BANK function that automatically divides every 1,000 songs stored in USB memory/Portable audio player into individual banks to make searching and playing back a song easier. A maximum of 1,000 songs for one bank can be stored according to the order stored in USB memory/Portable audio player. A maximum of 20 banks (20,000 songs) can be recognised. BANK1 (songs 1 to 1,000) is set as the default. If you want to search beyond 1,000 songs, perform the following operation to select a different bank.
1 Touch [P1/2] to change the function guide.
2 Touch BANK [ ] or [ ] to select the desired BANK.Each operation can be performed in the selected bank.
• Even if the files are contained in the same folder, they may be saved as different Bank.
Playback
1 Press SOURCE/ on the unit.The Source Select screen is displayed.
2 Touch [USB Audio], the USB mode is activated and the display changes to the USB Audio screen.
3 Touch [ ] or [ ] to select the desired track (file).
Returning to the beginning of the current track (file):Touch [ ].
Fast backward:Touch and hold [ ].
Advancing to the beginning of the next track (file):Touch [ ].
Fast forward:Touch and hold [ ].
• Depending on the connected portable audio player, fast-forwarding/fast-reversing may not be available.
4 To pause playback, touch [ / ].Touching [ / ] again will resume playback.
• WMA format files that are protected by DRM (Digital Rights Management), AAC format files that have been purchased from iTunes Music Store that are not DRM-Free and files that are copy-protected cannot be played back on this unit.
• The playback time may not be correctly displayed when a VBR (Variable Bit Rate) recorded file is played back.
• If there is tag information, artist name/album name/track name is displayed.
• ID3 tag/WMA tag If an MP3/WMA/AAC file contains ID3 tag/WMA tag information, the ID3 tag/WMA tag information is displayed (e.g., song name, artist name, and album name). All other tag data is ignored.
• “No Support” is scroll displayed when text information is not compatible with this unit.
• Before disconnecting USB memory, be sure to change to another source or set to pause.
Repeat PlayOnly Repeat One is available for this mode.Repeat One: A single song is repeatedly played back.Repeat folder: Only files in a folder are repeatedly played back.
1 Touch [P1/2].The function guide is displayed.
2 Touch [ ].The file will be played repeatedly.
When a song is searched by Tag information
When a folder/file is searched by Explorer (File Name) mode (USB Memory only)
3 To cancel repeat play, touch [ ].
• You can switch the Band when “Tag” is set in “Setting the USB Search Mode” (page 43), if the Band is changed, the repeat play mode will be cancelled.
BANK No. Song number
BANK1 1~1,000
BANK2 1,001~2,000
... ...
BANK20 19,001~20,000
USB Memory
Hierarchy 1
Hierarchy 2
Hierarchy 3
Folder MP3/WMA/AAC File
(off)(Repeat One)
(off)(Repeat One) (Repeat folder)
73-EN
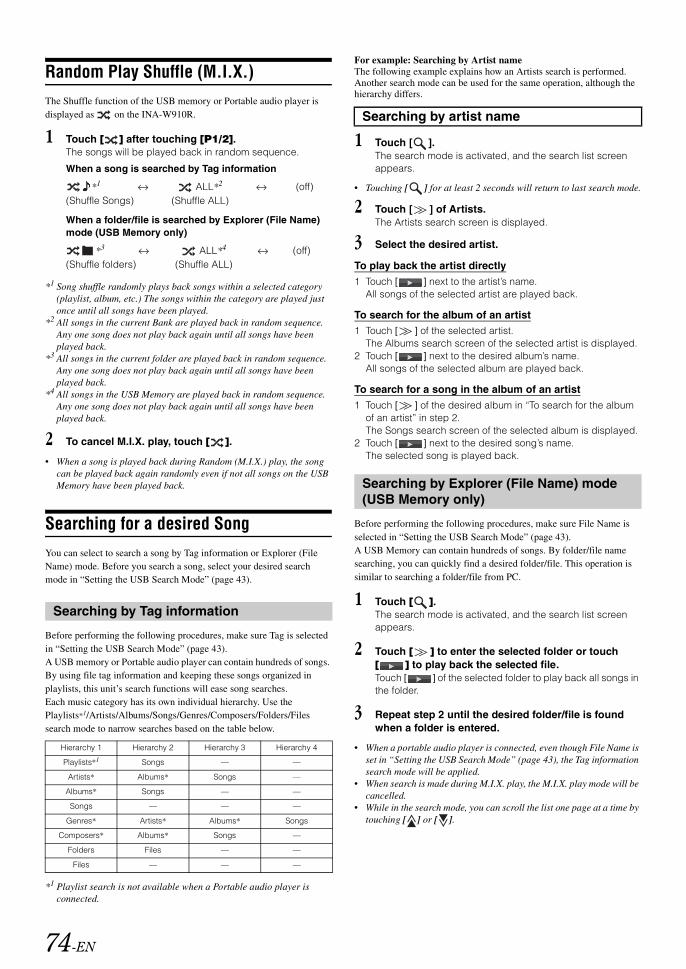
Random Play Shuffle (M.I.X.)The Shuffle function of the USB memory or Portable audio player is displayed as on the INA-W910R.
1 Touch [ ] after touching [P1/2].The songs will be played back in random sequence.
When a song is searched by Tag information
When a folder/file is searched by Explorer (File Name) mode (USB Memory only)
*1 Song shuffle randomly plays back songs within a selected category (playlist, album, etc.) The songs within the category are played just once until all songs have been played.
*2 All songs in the current Bank are played back in random sequence. Any one song does not play back again until all songs have been played back.
*3 All songs in the current folder are played back in random sequence. Any one song does not play back again until all songs have been played back.
*4 All songs in the USB Memory are played back in random sequence. Any one song does not play back again until all songs have been played back.
2 To cancel M.I.X. play, touch [ ].
• When a song is played back during Random (M.I.X.) play, the song can be played back again randomly even if not all songs on the USB Memory have been played back.
Searching for a desired SongYou can select to search a song by Tag information or Explorer (File Name) mode. Before you search a song, select your desired search mode in “Setting the USB Search Mode” (page 43).
Before performing the following procedures, make sure Tag is selected in “Setting the USB Search Mode” (page 43).A USB memory or Portable audio player can contain hundreds of songs. By using file tag information and keeping these songs organized in playlists, this unit’s search functions will ease song searches.Each music category has its own individual hierarchy. Use the Playlists*1/Artists/Albums/Songs/Genres/Composers/Folders/Files search mode to narrow searches based on the table below.
*1 Playlist search is not available when a Portable audio player is connected.
For example: Searching by Artist nameThe following example explains how an Artists search is performed. Another search mode can be used for the same operation, although the hierarchy differs.
1 Touch [ ].The search mode is activated, and the search list screen appears.
• Touching [ ] for at least 2 seconds will return to last search mode.
2 Touch [ ] of Artists.The Artists search screen is displayed.
3 Select the desired artist.
To play back the artist directly1 Touch [ ] next to the artist’s name.
All songs of the selected artist are played back.
To search for the album of an artist1 Touch [ ] of the selected artist.
The Albums search screen of the selected artist is displayed.2 Touch [ ] next to the desired album’s name.
All songs of the selected album are played back.
To search for a song in the album of an artist1 Touch [ ] of the desired album in “To search for the album
of an artist” in step 2.The Songs search screen of the selected album is displayed.
2 Touch [ ] next to the desired song’s name.The selected song is played back.
Before performing the following procedures, make sure File Name is selected in “Setting the USB Search Mode” (page 43). A USB Memory can contain hundreds of songs. By folder/file name searching, you can quickly find a desired folder/file. This operation is similar to searching a folder/file from PC.
1 Touch [ ].The search mode is activated, and the search list screen appears.
2 Touch [ ] to enter the selected folder or touch [ ] to play back the selected file.Touch [ ] of the selected folder to play back all songs in the folder.
3 Repeat step 2 until the desired folder/file is found when a folder is entered.
• When a portable audio player is connected, even though File Name is set in “Setting the USB Search Mode” (page 43), the Tag information search mode will be applied.
• When search is made during M.I.X. play, the M.I.X. play mode will be cancelled.
• While in the search mode, you can scroll the list one page at a time by touching [ ] or [ ].
*1 ALL*2 (off)(Shuffle Songs) (Shuffle ALL)
*3 ALL*4 (off)(Shuffle folders) (Shuffle ALL)
Searching by Tag information
Hierarchy 1 Hierarchy 2 Hierarchy 3 Hierarchy 4
Playlists*1 Songs — —
Artists* Albums* Songs —
Albums* Songs — —
Songs — — —
Genres* Artists* Albums* Songs
Composers* Albums* Songs —
Folders Files — —
Files — — —
Searching by artist name
Searching by Explorer (File Name) mode (USB Memory only)
74-EN

• While in the search mode, you can jump to an assigned position by touching the direct search bar for quick search. For details, refer to “Direct Search Function” (page 78).
• After touching [ ] of ALL in the Tag search mode will play back all songs in the list when you are in a hierarchy with an asterisk “*” (see table on the previous page).
• Touching [ ] of ALL in the Tag search mode will display the search list in the next hierarchy.
• In the Tag search mode, a search can be made quickly by Alphabet skip function to find the desired artist or song, etc. For details, refer to “Alphabet Skip Function (Tag search mode only)” on page 75.
Alphabet Skip Function (Tag search mode only)The unit is provided with a alphabet skip function for effective searching. When you use this function in the search mode, you can quickly search an artist or a song, etc.
Displays the current search mode.Scroll the list one line at a time by touching [ ] or [ ].Skip the list one page at a time by touching [ ] or [ ]. Touching and holding [ ] or [ ], the display continuously changes.Skip the list one alphabet at a time by touching ALPHABET [ ] or [ ].Touch [ ] to return to the previous menu.
• The alphabet select object is only the alphabet that is recorded by UTF-16 character code.
Selecting Playlist/Artist/Album/Genre/Composer (Tag search mode only)Playlist*/Artist/Album/Genre/Composer can be easily changed.For example, if you listen to a song from a selected album, the album can be changed.
Touch [ ] or [ ] to select the desired (Playlist) / (Artist) / (Album) / (Genre) / (Composer).
* This item is invalid when a portable audio player is connected.
• If search selection mode is not activated, a Song search is not possible.
• If an album is selected from an artist search, the album can be searched.
• During shuffle (M.I.X.) playback, this operation is not possible.
Select the desired Folder (Folder up/down)If you listen to a file from a selected folder, the folder can be changed.
Touch [ ] or [ ] to select the folder.
• During M.I.X. ALL playback, this operation is not possible.• When Folder up/down is made during M.I.X. Folder play, the M.I.X.
Folder play mode will be cancelled.
Creating the playlist from the Artist/Album information of the current song (Tag search mode only)When a song is played back, a playlist about all the songs with the same Artist or Album stored in the USB memory or Portable audio player can be created.
1 Touch [P1/2] when a song is played back.The function guide changes.
2 Touch [X-RPT ARTIST] or [X-RPT ALBUM] to create the playlist.
• According to the artist/album information of the current song, a playlist about all the songs with the same artist/album of the BANK are made into a playlist, which then starts to play back.
Alphabet skip function: The alphabet skip function is skipped to the next alphabet such as from A to B, B to C by pressing ALPHABET [ ]. You can also skip in reverse order such as from B to A by pressing ALPHABET [ ].
Display example for Albums search screen
75-EN

About MP3/WMA/AAC File of USB Memory
Playing back MP3/WMA/AAC
MP3/WMA/AAC files are prepared, then stored to a USB memory. A media player or jukebox can also be used to sync music to a portable device. Do not make a file’s playback time more than 1 hour.
Media supported
This device can play back USB memory/Portable audio player media.
Corresponding File Systems
This device supports FAT 12/16/32 for USB memory device/Portable audio player.
Connecting an iPod/iPhoneAn iPod/iPhone can be connected to this unit, by using the USB connection cable. When an iPod/iPhone is connected to this unit, you can choose to control the iPod/iPhone using its own controls or by the head unit controls. For details, refer to “Setting the iPod Control” (page 77).The Owner’s Manual only introduces on how to control an iPod/iPhone via this unit. So before the following operation, make sure to set HU mode in “Setting the iPod Control” (page 77). On how to control an iPod/iPhone on itself, refer to Owner’s Manual of iPod/iPhone.
• Other applications (Internet function, etc.) of the iPod touch or iPhone are not controllable from the unit; however, these functions can be controlled from the iPod touch or iPhone itself.
• If you connect an iPhone to this unit, it can be used as an iPod.
• To watch the video screen of the file from iPod/iPhone (iPhone, iPod touch, iPod classic, iPod 5th generation, iPod nano (3rd generation), iPod nano (4th generation) and iPod nano (5th generation)), using the USB connection and the Parking Brake must be engaged, set “AUX2 IN” to “iPod Video” in “Setting the AUX Mode” (page 48).
• For automatic transmission vehicles, place the transmission lever in the Park position.
iPod/iPhone models usable with this unit
• Confirmed devices regarding Made for iPod. Correct function of earlier versions cannot be guaranteed.
iPod touch (4th generation): Ver.4.2.1iPod nano (6th generation): Ver.1.0iPod touch (3rd generation): Ver.4.2.1iPod nano (5th generation): Ver.1.0.2iPod classic (Late 2009): Ver.2.0.4iPod touch (2nd generation): Ver.4.2.1iPod nano (4th generation): Ver.1.0.4iPod classic (120 GB): Ver.2.0.1iPod touch (1st generation): Ver.3.1.3iPod nano (3rd generation): Ver.1.1.3 PCiPod classic (80 GB, 160 GB): Ver.1.1.2iPod nano (2nd generation): Ver.1.1.3iPod (5th generation): Ver.1.3iPod nano (1st generation): Ver.1.3.1
• Confirmed devices regarding Made for iPhone. Correct function of earlier versions cannot be guaranteed.
iPhone 4: Ver.4.2.1iPhone 3GS: Ver.4.2.1iPhone 3G: Ver.4.2.1iPhone: Ver.3.1.3
• For clarity in identifying your model of iPod, please see Apple’s own document “Identifying iPod models” at http://support.apple.com/kb/HT1353.
iPod/iPhone (Optional)
76-EN

Setting the iPod ControlWhen an iPod/iPhone is connected, operate it from its own controls or from the head unit.
1 Touch and hold [ ] for at least 2 seconds on the iPod mode screen.“iPod mode” indicator appears on the screen.
2 In the iPod mode screen, touching and holding [ ] again will switch to the HU mode.“HU mode” indicator appears on the screen.
For “HU mode”: Operate the iPod/iPhone via this unit.For “iPod mode”: Operate the iPod/iPhone using its own controls. When iPod is selected, some functions will not be operable via the head unit.
• Once the control mode is changed, this will set pause status. Touch [ / ] to continue.
• When using the iPod control mode, make sure the USB 30P cable is connected to the iPod(V)/AUX Input Connector correctly by using the AV extension cable.
• In the iPod control mode, if nothing is played back by the iPod, “Stop” will be displayed on this unit.
• Depending upon the iPod used, iPod control may not be selectable. Or, if iPod is selected, operation must still be from the head unit.
Playback
1 Press SOURCE/ on the unit.The Source Select screen is displayed.
2 Touch [iPod].The display shows the iPod mode screen.
3 Touch [ ] or [ ] to select the desired song.
Return to the beginning of the current song:Touch [ ].
Fast backward the current song:Touch and hold [ ].
Advance to the beginning of the next song:Touch [ ].
Fast forward the current song:Touch and hold [ ].
4 To pause playback, touch [ / ].Touching [ / ] again will resume playback.
• If a song is playing on the iPod/iPhone when it is connected to this unit, it will continue playing after the connection.
• If the artist, album or song name, created in iTunes, has too many characters, songs may not be played back when connected to this unit. Therefore, a maximum of 250 characters is recommended. The maximum number of characters for the head unit is 128 (128 byte).
• Some characters may not be correctly displayed. • “No Support” is displayed when text information is not compatible
with the this unit.• If an iPhone or a video-compatible iPod is connected, touching
[WIDE] on the function guide will change the display mode. For operation, refer to “Switching Display Modes” (page 37).
• An episode may have several chapters. The chapter can be changed by pressing [ ] or [ ].
Searching for a desired SongAn iPod/iPhone can contain hundreds of songs. By keeping these songs organized in playlists, this unit can use these to ease song searches.Using the search mode’s individual hierarchy, you can narrow down your search as shown in the table below.
<MUSIC Search Menu>
• Video search mode depends on the iPod/iPhone. If the specification of the iPod/iPhone is changed, the search mode on this unit will also be changed.
For example: Searching by Artist nameThe following example explains how an Artist search is performed. Another search mode can be used for the same operation, although the hierarchy differs.
1 Touch [ ].The search mode is activated, and the search list screen appears.
• Touching and holding [ ] for at least 2 seconds will return to last search mode.
• This function is unavailable when iPod mode is selected in “Setting the iPod Control” (page 77).
2 Touch [ ] of Music.The Music search menu screen is displayed.
Hierarchy 1 Hierarchy 2 Hierarchy 3 Hierarchy 4
Playlists Songs — —
Artists* Albums* Songs —
Albums* Songs — —
Songs — — —
Podcasts Episodes — —
Genres* Artists* Albums* Songs
Composers* Albums* Songs —
Audiobooks — — —
Searching by artist name
77-EN

• If Video mode is selected, the Video playlists/Movies/Music Videos/TV Shows/Video Podcasts search mode may be used depending on the connected iPod/iPhone (Only for iPhone or iPod compatible Video).
• If you want to select Video search mode, set AUX2 IN to iPod Video in advance. Refer to “Setting the AUX Mode” on page 48.
3 Touch [ ] of Artists.The Artist search screen is displayed.
4 Select the desired artist.
To play back the artist directly1 Touch [ ] next to the artist’s name.
All songs of the selected artist are played back.
To search for the album of an artist1 Touch [ ] of the selected artist.
The Album search screen of the selected artist is displayed.2 Touch [ ] next to the desired album’s name.
All songs of the selected album are played back.
To search for a song in the album of an artist1 Touch [ ] of the desired album in “To search for the album
of an artist” in step 2.The Song search screen of the selected album is displayed.
2 Touch [ ] next to the desired song’s name.The selected song is played back.
• Touching [ ] of ALL will play back all songs in the list when you are in a hierarchy with an asterisk “*” (see table on the previous page).
• Touching [ ] of ALL will display the search list in the next hierarchy.
• In search mode, you can jump to an assigned position by touching the direct search bar for quick search. For details, refer to “Direct Search Function” (page 78).
• If Alphabet Skip Function is activated in the search mode, a search can be made quickly by Alphabet skip function to find the desired artist or song, etc. For details, refer to “Alphabet Skip Function” on page 78.
• When search is made during M.I.X. play, the M.I.X. play mode will be cancelled.
• In search mode, touch [ ] to return to the previous menu.• In search mode, touch [Exit] to return to iPod main screen.
Direct Search FunctionThe unit’s direct search function can be used to search for an album, song, etc., more efficiently. In Playlists/Artists/Albums/Songs/Genres/Composers/Podcasts/Audiobooks mode, you can quickly target any song.
Direct search barReturns to the previous screen.Touching [Exit] will turn off the search screen, and return to main screen.
In search mode, touch anywhere on the Direct search bar to step through items. The search list display also changes according to the selected song position.
Alphabet Skip FunctionThe unit is provided with a alphabet skip function for effective searching. When you use this function in the search mode, you can quickly search an artist or a song, etc.
Alphabet skip function: The alphabet skip function is skipped to the next alphabet such as from A to B, B to C by pressing ALPHABET [ ]. You can also skip in reverse order such as from B to A by pressing ALPHABET [ ].
Display example for Albums search screen
78-EN

Displays the current search mode.Scroll the list one line at a time by touching [ ] or [ ].Skip the list one page at a time by touching [ ] or [ ]. Touching and holding [ ] or [ ], the display continuously changes.Skip the list one alphabet at a time by touching ALPHABET [ ] or [ ].Touch [ ] to return to the previous screen.
Selecting Playlist/Artist/Album/Genre/Composer/Episode/CategoryPlaylist/Artist/Album/Genre/Composer/Episode/Category* can be easily changed.For example, if you listen to a song from a selected album, the album can be changed.
Press [ ] or [ ] to select the desired (Playlist) / (Artist) / (Album) / (Genre) / (Composer) /
(Episode) / Category*.
* Category can be changed only when playback the video files of iPod/iPhone.
• If search selection mode is not activated, a Song search is not possible.
• During shuffle (M.I.X.) playback, this operation is not possible.• If Playlist/Artist/Album/Genre/Composer/Episode are not searched,
this operation is not possible.• If an album is selected from an artist search, the album can be
searched.• This function is unavailable when iPod mode is selected in “Setting
the iPod Control” (page 77).
Random Play Shuffle (M.I.X.)The Shuffle function of the iPod is displayed as on the INA-W910R.
Shuffle ALL ALL:All songs in the iPod are played back in random sequence. Any one song does not play back again until all songs have been played back.
Shuffle Albums :The songs on each album are played back in proper order. Upon completing of all the songs on the album, the next album is selected randomly. This continues until all albums have been played.
Shuffle Songs :Song shuffle randomly plays back songs within a selected category (playlist, album, etc.). The songs within the category are played just once until all songs have been played.
1 Touch [ ALL]*.The songs will be played back in random sequence.
ALL (off)(Shuffle ALL)
Touch [ ] after touching [P1/2].
2 To cancel M.I.X. play, touch [ ALL] or [ ].
• For details of the search mode, refer to “Searching for a desired Song” (page 77).
• If a song is selected in the album search mode before selecting Shuffle (M.I.X.), the songs will not play back randomly even when Shuffle album is selected.
* This operation cannot be performed for the video files of iPod/iPhone.
Repeat PlayOnly Repeat One is available for the iPod.Repeat One: A single song is repeatedly played back.
1 Touch [P1/2].The function guide is displayed.
2 Touch [ ].The file will be played repeatedly.
3 To cancel repeat play, touch [ ].
• Depending on the connected iPod, track up/down may be not available during Repeat play.
Display example for Albums search screen
(Shuffle Albums)
(Shuffle Songs)(off)
(off)(Repeat One) (Repeat the list
being played back)
79-EN

Controls on Remote Control
PWR ButtonTurns the power ON and OFF.SRC ButtonSelects the audio source.DN Button
VOLUME / ButtonIncrease or decreases the volume level.RETURN Button
DVD/Video CD (PBC ON)/DivX mode: Returns to the previous display. (Does not return in some discs.)
Button
/ Button
ButtonPerforms stop.
MENU Button
CLR ButtonDelete the previous number on numeric keypad or close the numeric keypad screen.
DISP/TOP M. Button
Remote Control
Radio mode: Selects, in descending order, stations programmed into the radio’s presets.
MP3/WMA/AAC/DivX mode:Folder Select (DN) Button selects the folder.
Changer mode:DISC Select (DN) Button selects a disc in descending order.
iPod/iPhone mode:
Selects playlist/artist/album/genre/composer/episode in descending order.
Radio mode: SEEK (DN) buttonCD/Changer mode:
Press the button to go back to the beginning of the current track. Press and hold to fast reverse.
MP3/WMA/AAC iPod mode:Press the button to go back to the beginning of the current file. Press and hold to fast reverse.
DVD Video/Video CD/DivX:• Move to the desired position on the disc.• During playback, press and hold for
more than 1 second to reverse the disc at double speed. Hold for more than 5 seconds to reverse the disc at 8 times the normal speed. Hold for more than 10 seconds to reverse the disc at 21 times the normal speed.
DVD Video: • When pressed and held in while in the pause mode, the disc is played in reverse slow motion at 1/8th the normal speed. When held in for 5 more seconds, the reverse slow motion speed switches to 1/2 the normal speed.
• The picture is reversed by one frame each time the button is pressed in the pause mode.
Radio mode: Chooses the tuning mode.By pressing it more than 2 seconds, Automatic Memory will be operated.
Disc/iPod mode: Switches between play and pause.• SEARCH Button: Not used.
DVD Video/Video CD/DivX:Pressing once stops the PRE stop; Pressing twice sets stop.
DVD Video mode:Shows the menu display.
DVD Video/Video CD mode:Shows playback status (only when car is stopped).
DVD Video mode:By pressing more than 2 seconds, shows the top menu display.
80-EN
SETUP ButtonNot used.AUDIO ButtonDVD Video/Video CD/DivX mode: Switches audio.BAND Button
A.PROC Button
MUTE ButtonLowers the volume by 20 dB instantly. Press the button again to cancel.UP Button
, , ,
ENT. ButtonEnters the selected item and press the button to confirm your selection as on the numeric keypad input screen.
Button
Numeric KeypadInputs numbers.MONITOR ButtonNot used.ANGLE Button
SUBTITLE Button
• The SETUP operation of the unit cannot be carried out from the remote control.
• Some operations may not be possible depending on the disc.
When Using the Remote Control
• Point the remote control at the remote sensor within about 2 metres.
• It may not be possible to operate the remote control if the remote control sensor is exposed to direct sunlight.
• The remote control is a small, lightweight precision device. To avoid damage, short battery life, operational errors and poor response, observe the following.- Do not subject the remote control to excessive
shock.- Do not put in a trouser pocket.- Keep away from food, moisture and dirt.- Do not place in direct sunshine.
Radio mode: Changes the band.Changer mode: Switches the disc mode.
(when an optional KCA-410C is connected)DVD Video/Video CD mode:
While playing a DVD or Video CD, the display mode is switched (only when car is stopped).
When an external audio processor is connected:Press the button to display the audio processor setting screen.
When an external audio processor is non-connected:Press the button to display the audio mode screen.
Radio mode: Selects, in ascending order, stations programmed into the radio’s presets.
MP3/WMA/AAC/DivX mode:Folder Select (UP) Button to selects the folder.
Changer mode:DISC Select (UP) Button selects a disc in ascending order.
iPod/iPhone mode:Selects a playlist/artist/album/genre/composer/podcast in ascending order.
DVD Video mode:Selects an item displayed in the screen.
Radio mode: SEEK (UP) buttonCD/Changer mode:
Press the button to advance to the beginning of the next track. Press and hold to fast forward.
MP3/WMA/AAC iPod mode:Press the button to advance to the beginning of the next file. Press and hold to fast forward.
DVD Video/Video CD/DivX:• Move to the desired position on the disc.• During playback, press and hold for more
than 1 second to forward the disc at double speed. Hold for more than 5 seconds to forward the disc at 8 times the normal speed. Hold for more than 10 seconds to forward the disc at 21 times the normal speed.
DVD Video/Video CD:• When pressed and held in while in the
pause mode, the disc is played in slow motion at 1/8th the normal speed. When held in for 5 more seconds, the slow motion speed switches to 1/2 the normal speed.
• The picture is forwarded by one frame each time the button is pressed in the pause mode.
DVD Video mode:Switches the angle of the picture.
DVD Video/DivX mode:Switches the subtitle.
81-EN
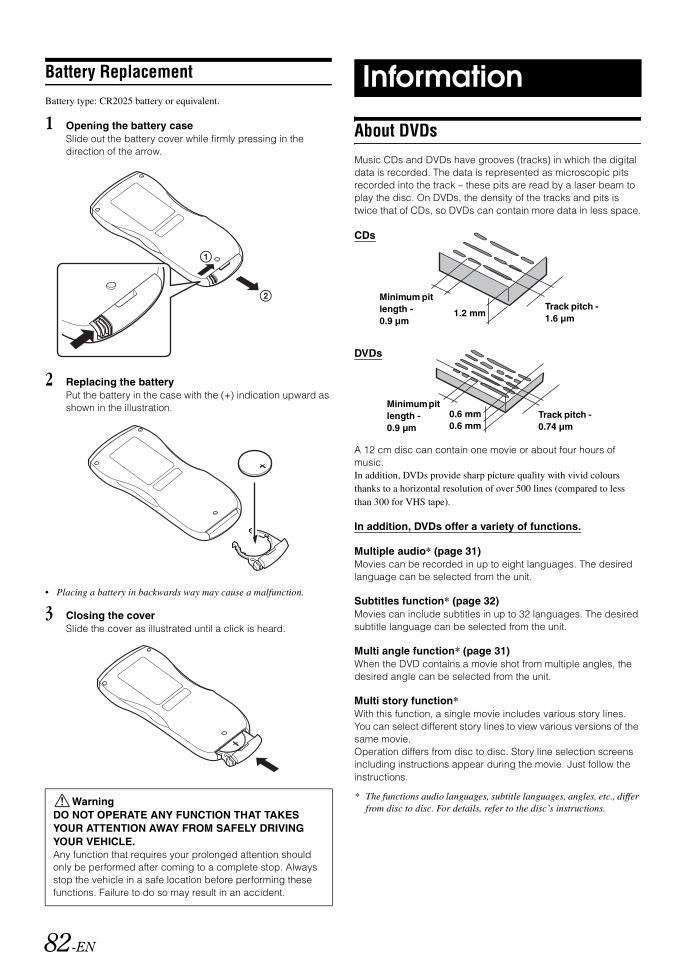
Battery ReplacementBattery type: CR2025 battery or equivalent.
1 Opening the battery caseSlide out the battery cover while firmly pressing in the direction of the arrow.
2 Replacing the batteryPut the battery in the case with the (+) indication upward as shown in the illustration.
• Placing a battery in backwards way may cause a malfunction.
3 Closing the coverSlide the cover as illustrated until a click is heard.
About DVDsMusic CDs and DVDs have grooves (tracks) in which the digital data is recorded. The data is represented as microscopic pits recorded into the track – these pits are read by a laser beam to play the disc. On DVDs, the density of the tracks and pits is twice that of CDs, so DVDs can contain more data in less space.
A 12 cm disc can contain one movie or about four hours of music.In addition, DVDs provide sharp picture quality with vivid colours thanks to a horizontal resolution of over 500 lines (compared to less than 300 for VHS tape).
In addition, DVDs offer a variety of functions.
Multiple audio* (page 31)Movies can be recorded in up to eight languages. The desired language can be selected from the unit.
Subtitles function* (page 32)Movies can include subtitles in up to 32 languages. The desired subtitle language can be selected from the unit.
Multi angle function* (page 31)When the DVD contains a movie shot from multiple angles, the desired angle can be selected from the unit.
Multi story function*With this function, a single movie includes various story lines. You can select different story lines to view various versions of the same movie.Operation differs from disc to disc. Story line selection screens including instructions appear during the movie. Just follow the instructions.
* The functions audio languages, subtitle languages, angles, etc., differ from disc to disc. For details, refer to the disc’s instructions.
WarningDO NOT OPERATE ANY FUNCTION THAT TAKES YOUR ATTENTION AWAY FROM SAFELY DRIVING YOUR VEHICLE.Any function that requires your prolonged attention should only be performed after coming to a complete stop. Always stop the vehicle in a safe location before performing these functions. Failure to do so may result in an accident.
Information
CDs
Minimum pit length - 0.9 µm
1.2 mmTrack pitch - 1.6 µm
DVDs
Minimum pit length - 0.9 µm
0.6 mm Track pitch - 0.74 µm0.6 mm
82-EN

Terminology
Dolby DigitalDolby Digital is a digital audio compression technology developed by Dolby Laboratories that allows large quantities of audio data to be efficiently recorded on discs. It is compatible with audio signals from mono (1 channel) all the way up to 5.1-channel surround sound. The signals for the different channels are completely independent, and since the sound is high quality digital there is no loss of sound quality.
DTSThis is a home-use digital sound format of the DTS Sound System. This is a high quality sound system, developed by DTS, Inc. for use in movie theatres.DTS has six independent sound tracks. The theatre presentation is fully realised in the home and other settings. DTS is the abbreviation for Digital Theatre System.
* To enjoy DTS surround sound you need the separately sold DTS digital audio processor (PXA-H700, etc.). The DVD video software must also have a DTS sound track.
The INA-W910R has a built-in DTS 2-channel audio decoder. Analogue audio outputs are available.
Dolby Pro Logic IIDolby Pro Logic II plays 2-channel sources in 5 channels over the entire frequency range.This is done with an advance, high sound quality matrix surround decoder which draws out the spatial properties of the original recording without adding any sounds to or changing the sound of the source.
* The separately sold digital audio processor (PXA-H700, etc.) is required to enjoy Dolby Pro Logic II surround sound.
Linear PCM audio (LPCM)LPCM is a signal recording format used for music CDs. Whereas music CDs are recorded at 44.1 kHz/16 bits, DVDs are recorded at 48 kHz/16 bits to 96 kHz/24 bits, thereby achieving higher sound quality than music CDs.
Rating levels (parental lock)This is a function of the DVD for restricting the viewing age as stipulated by laws in different countries. The way in which viewing is restricted differs from DVD to DVD. Sometimes the DVD cannot be played at all, other times certain scenes are skipped, and other times certain scenes are replaced with other scenes.
Centre speaker
Front speakers
Rear speakers
Subwoofer
Speaker layout for enjoying Dolby Digital sound/DTS sound
83-EN

List of Language Codes(For details, see page 39.)
LanguageKirundiRomanianRussianKinyarwandaSanskritSindhiSanghoSerbo-CroatianSinghaleseSlovakSlovenianSamoanShonaSomaliAlbanianSerbianSiswatiSesothoSundaneseSwedishSwahiliTamilTeluguTajikThaiTigrinyaTurkmenTagalogSetswanaTongaTurkishTsongaTatarTwiUkrainianUrduUzbekVietnameseVolapukWolofXhosaYorubaChineseZulu
AbbreviationAAABAFAMARASAYAZBABEBGBHBIBNBOBRCACOCSCYDADEDZELENEOESETEUFAFIFJFOFRFYGAGDGLGNGUHAHIHRHUHYIA
LanguageAfarAbkhazianAfrikaansAmharicArabicAssameseAymaraAzerbaijaniBashkirByelorussianBulgarianBihariBislamaBengali, BanglaTibetanBretonCatalanCorsicanCzechWelshDanishGermanBhutaniGreekEnglishEsperantoSpanishEstonianBasquePersianFinnishFijiFaroeseFrenchFrisianIrishScots GaelicGalicianGuaraniGujaratiHausaHindiCroatianHungarianArmenianInterlingua
Code6565656665706577658265836589659066656669667166726673667866796682676567796783678968656869689069766978697969836984698570657073707470797082708971657168717671787185726572737282728572897365
AbbreviationIEIKINISITIWJPJIJWKAKKKLKMKNKOKSKUKYLALNLOLTLVMGMIMKMLMNMOMRMSMTMYNANENLNOOCOMORPAPLPSPTQURM
Code7369737573787383738473877465747374877565757575767577757875797583758575897665767876797684768677717773777577767778777977827783778477897865786978767879796779777982806580768083808481858277
LanguageInterlingueInupiakIndonesianIcelandicItalianHebrewJapaneseYiddishJavaneseGeorgianKazakhGreenlandicCambodianKannadaKoreanKashmiriKurdishKirghizLatinLingalaLaothianLithuanianLatvian, LettishMalagasyMaoriMacedonianMalayalamMongolianMoldavianMarathiMalayMalteseBurmeseNauruNepaliDutchNorwegianOccitan(Afan) OromoOriyaPunjabiPolishPashto, PushtoPortugueseQuechuaRhaeto-Romance
AbbreviationRNRORURWSASDSGSHSISKSLSMSNSOSQSRSSSTSUSESWTATETGTHTITKTLTNTOTRTSTTTWUKURUZVIVOWOXHYOCNZU
Code82788279828582878365836883718372837383758376837783788379838183828383838483858386838784658469847184728473847584768478847984828483848484878575858285908673867987798872897990729085
84-EN

List of Country Codes(For details, see page 39.)
7573757775787580
75827587758975907665
7666766776737675768276837684768576867689776577677768777177727775
77767777777877797780778177827783778477857786778777887789779078657867786978707871787378767879788078827885789079778065
AbbreviationADAEAFAGAIALAMANAOAQARASATAUAWAZBABBBDBEBFBGBHBIBJBMBNBOBRBSBTBVBWBYBZCACCCD
CFCGCHCICKCLCMCNCOCRCUCVCXCYCZDEDJDK
CountryAndorraUnited Arab EmiratesAfghanistanAntigua and BarbudaAnguillaAlbaniaArmeniaNetherlands AntillesAngolaAntarcticaArgentinaAmerican SamoaAustriaAustraliaArubaAzerbaijanBosnia and HerzegovinaBarbadosBangladeshBelgiumBurkina FasoBulgariaBahrainBurundiBeninBermudaBrunei DarussalamBoliviaBrazilBahamasBhutanBouvet IslandBotswanaBelarusBelizeCanadaCocos (Keeling) IslandsCongo, the DemocraticRepublic of theCentral African RepublicCongoSwitzerlandCote d’lvoireCook IslandsChileCameroonChinaColombiaCosta RicaCubaCape VerdeChristmas IslandCyprusCzech RepublicGermanyDjiboutiDenmark
Code65686569657065716573657665776578657965816582658365846585658765906665666666686669667066716672667366746677667866796682668366846686668766896690676567676768
677067716772677367756776677767786779678267856786678867896790686968746875
DMDODZECEEEGEHERESETFIFJFKFMFOFRGAGBGDGEGFGHGIGLGMGNGPGQGRGS
GTGUGWGYHKHM
HNHRHTHUIDIEILINIOIQIRISITJMJOJPKEKGKH
687768796890696769696971697269826983698470737074707570777079708271657166716871697170717271737176717771787180718171827183
718471857187718972757277
7278728272847285736873697376737873797381738273837384747774797480756975717572
DominicaDominican RepublicAlgeriaEcuadorEstoniaEgyptWestern SaharaEritreaSpainEthiopiaFinlandFijiFalkland IslandsMicronesia, Federated States ofFaroe IslandsFranceGabonUnited KingdomGrenadaGeorgiaFrench GuianaGhanaGibraltarGreenlandGambiaGuineaGuadeloupeEquatorial GuineaGreeceSouth Georgia and theSouth Sandwich Islands
GuatemalaGuamGuinea-BissauGuyanaHong KongHeard Island andMcDonald IslandsHondurasCroatiaHaitiHungaryIndonesiaIrelandIsraelIndiaBritish Indian Ocean TerritoryIraqIran, Islamic Republic ofIcelandItalyJamaicaJordanJapanKenyaKyrgyzstanCambodia
KIKMKNKP
KRKWKYKZLA
LBLCLILKLRLSLTLULVLYMAMCMDMGMHMK
MLMMMNMOMPMQMRMSMTMUMVMWMXMYMZNANCNENFNGNINLNONPNRNUNZOMPA
KiribatiComorosSaint Kitts and NevisKorea, DemocraticPeople’s Republic of
Korea, Republic ofKuwaitCayman IslandsKazakstanLao People’sDemocratic Republic
LebanonSaint LuciaLiechtensteinSri LankaLiberiaLesothoLithuaniaLuxembourgLatviaLibyan Arab JamahiriyaMoroccoMonacoMoldova, Republic ofMadagascarMarshall IslandsMacedonia, The formerYugoslav Republic ofMaliMyanmarMongoliaMacauNorthern Mariana IslandsMartiniqueMauritaniaMontserratMaltaMauritiusMaldivesMalawiMexicoMalaysiaMozambiqueNamibiaNew CaledoniaNigerNorfolk IslandNigeriaNicaraguaNetherlandsNorwayNepalNauruNiueNew ZealandOmanPanama
Country CountryCode CodeAbbreviation Abbreviation
85-EN
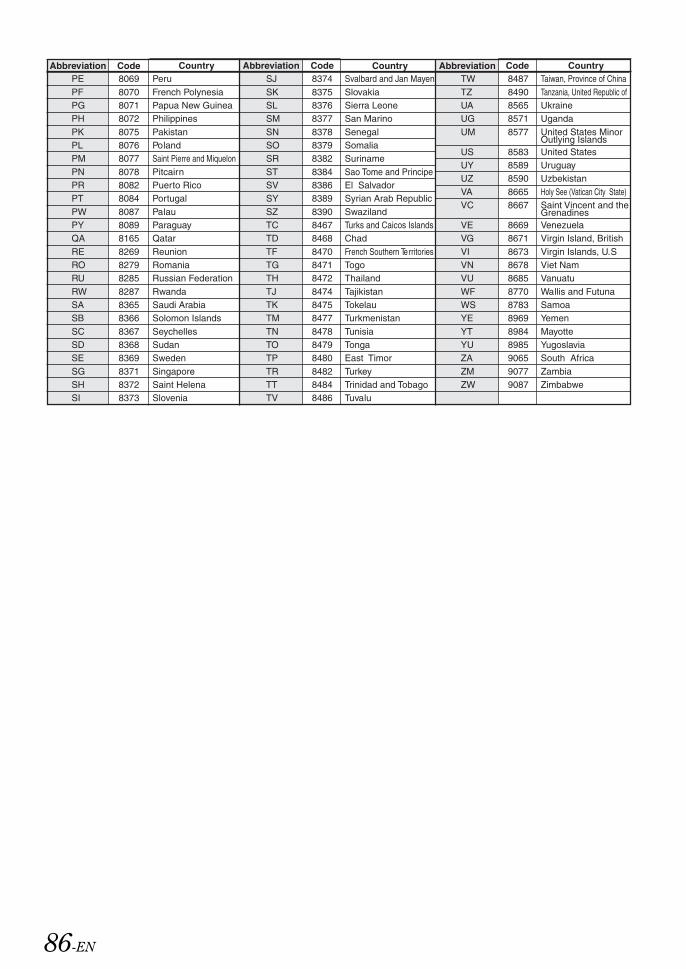
PeruFrench PolynesiaPapua New GuineaPhilippinesPakistanPolandSaint Pierre and MiquelonPitcairnPuerto RicoPortugalPalauParaguayQatarReunionRomaniaRussian FederationRwandaSaudi ArabiaSolomon IslandsSeychellesSudanSwedenSingaporeSaint HelenaSlovenia
Svalbard and Jan MayenSlovakiaSierra LeoneSan MarinoSenegalSomaliaSurinameSao Tome and PrincipeEl SalvadorSyrian Arab RepublicSwazilandTurks and Caicos IslandsChadFrench Southern TerritoriesTogoThailandTajikistanTokelauTurkmenistanTunisiaTongaEast TimorTurkeyTrinidad and TobagoTuvalu
8069807080718072807580768077807880828084808780898165826982798285828783658366836783688369837183728373
8374837583768377837883798382838483868389839084678468847084718472847484758477847884798480848284848486
84878490856585718577
85838589859086658667
8669867186738678868587708783896989848985906590779087
PEPFPGPHPKPLPMPNPRPTPWPYQARERORURWSASBSCSDSESGSHSI
SJSKSLSMSNSOSRSTSVSYSZTCTDTFTGTHTJTKTMTNTOTPTRTTTV
TWTZUAUGUM
USUYUZVAVC
VEVGVIVNVUWFWSYEYTYUZAZMZW
Taiwan, Province of ChinaTanzania, United Republic ofUkraineUgandaUnited States MinorOutlying IslandsUnited StatesUruguayUzbekistanHoly See (Vatican City State)Saint Vincent and theGrenadinesVenezuelaVirgin Island, BritishVirgin Islands, U.SViet NamVanuatuWallis and FutunaSamoaYemenMayotteYugoslaviaSouth AfricaZambiaZimbabwe
Country CountryCode CodeAbbreviation Abbreviation CountryCodeAbbreviation
86-EN

In Case of Difficulty
Basic
No function or display.• Vehicle’s ignition is off.
- If connected according to the instructions, the unit will not operate with the vehicle’s ignition off.
• Improper power lead connections.- Check power lead connections.
• Blown fuse.- Check the fuse on the battery lead of the unit; replace with the
proper value if necessary.• Internal micro-computer malfunctioned due to interference
noise, etc.- Press the RESET switch with a ballpoint pen or other pointed
article.• Display OFF mode is activated.
- Cancel Display OFF mode.
No sound or unnatural sound.• Incorrect setting of volume/balance/fader controls.
- Readjust the controls.• Connections are not properly or securely made.
- Check the connections and firmly connect.
Screen not displayed.• Brightness control is set at the minimum position.
- Adjust the Brightness control.• Temperature in the vehicle is too low.
- Increase the vehicle’s interior temperature to operation temperature range.
• Connections to the DVD, CD player are not securely made.- Check the connections and firmly connect.
Movement of displayed picture is abnormal.• Temperature in the vehicle is too high.
- Allow the vehicle’s interior temperature to cool.
Unclear or noisy display.• TFT-LCD MODULE is worn out.
- Replace the TFT-LCD MODULE.
The remote control is inoperative.• The remote control sensor setting of “Rear Entertainment
Function” is not set to this unit.- Set for this unit.
Navigation
The vehicle’s position is erroneous. • The GPS reception is poor.
- Drive the vehicle in an area of good GPS reception to allow the unit to recalibrate itself. Move to a location where strong GPS reception is possible.
No operation• Moisture condensation
- Allow enough time for the condensation to evaporate (about 1 hour).• Ambient Temperature
- Make sure the temperature inside the vehicle is between 0°C and 45°C (32°F and 113°F).
Radio
Unable to receive stations.• No antenna, or open connection in the antenna cable.
- Make sure the antenna is properly connected; replace the antenna or cable if necessary.
Unable to tune stations in the seek mode.• You are in a weak signal area.
- Make sure the tuner is in DX mode.• If the area you are in is a primary signal area, the antenna may
not be grounded and connected properly.- Check your antenna connections; make sure the antenna is
properly grounded at its mounting location.• The antenna may not be the proper length.
- Make sure the antenna is fully extended; if broken, replace the antenna with a new one.
Broadcast is noisy.• The antenna is not the proper length.
- Extend the antenna fully; replace it if it is broken.• The antenna is poorly grounded.
- Make sure the antenna is grounded properly at its mounting location.
• The station signal is weak and noisy.- If above solution does not work, tune in another station.
CD/MP3/WMA/AAC/DVD/Video CD
Disc playback sound is wavering.• Moisture condensation in the disc Module.
- Allow enough time for the condensation to evaporate (about 1 hour).
Disc insertion not possible.• A disc is already in the DVD player.
- Eject the disc and remove it.• The disc is being improperly inserted.
- Make sure the disc is being inserted following the instructions in the CD/MP3/WMA/AAC, DVD/Video CD Player Operation section.
If you encounter a problem, please turn the power off, then on again. If the unit is still not functioning normally, please review the items in the following checklist. This guide will help you isolate the problem if the unit is at fault. Otherwise, make sure the rest of your system is properly connected, or then consult your authorized Alpine dealer.
87-EN

Disc ejection not possible.• There is dust in the DVD Player.
- After touching [Eject] of Disc on the Eject/Tilt screen, insert another disc into the Disc Slot*. A part of the blocked disc will be ejected, and then pull the disc out.
* Insert the disc as the Disc Slot space allows, and stop inserting while an obstacle occurs. Do not force it into the slot to avoid a malfunction.
If the above mentioned solution does not solve the problem, consult your nearest Alpine dealer.
Unable to fast forward or backward the disc.• The disc has been damaged.
- Eject the disc and discard it; using a damaged disc in your unit can cause damage to the mechanism.
Disc playback sound skips due to vibration.• Improper mounting of the unit.
- Securely re-mount the unit.• Disc is very dirty.
- Clean the disc.• Disc has scratches.
- Change the disc.• The pick-up lens is dirty.
- Do not use a commercial available lens cleaner disc. Consult your nearest Alpine dealer.
Disc playback sound skips without vibration.• Dirty or scratched disc.
- Clean the disc; damaged disc should be replaced.
CD-R/CD-RW playback not possible.• Close session (finalisation) has not been performed.
- Perform finalisation and attempt playback again.
Error displays.• Mechanical error.
- Touch [Eject] of Disc on the Eject/Tilt screen. After the error indication disappears, insert the disc again. If the above-mentioned solution does not solve the problem, consult your nearest Alpine dealer.
MP3/WMA/AAC is not played back.• Writing error occurred. The CD format is not compatible.
- Make sure the CD has been written in a supported format. Refer to “About MP3/WMA/AAC” (pages 24 and 25), then rewrite in the format supported by this device.
Unit does not operate.• Monitor’s power is not turned on.
- Turn on the monitor’s power.• Condensation.
- Wait a while (about 1 hour) for the condensation to dry.
No picture is produced.• Monitor’s mode is not switched to the mode you want to see.
- Switch to the mode you want to see.• Monitor’s parking brake lead is not connected.
- Connect the monitor’s parking brake wire and set the parking brake. (For details, refer to the monitor’s instructions.)
Playback does not start.• Disc is loaded upside-down.
- Check the disc and load it with the labelled side facing upward.• Disc is dirty.
- Clean the disc.• A disc not able to play back with this unit is loaded.
- Check if the disc is able to be played back.• Parental lock is set.
- Cancel the parental lock or change the rating level.
Picture is unclear or noisy.• Disc is being fast-forwarded or fast-reversed.
- The picture may be slightly disturbed, but this is normal.• Vehicle’s battery power is weak.
- Check the battery power and wiring. (The unit may malfunction if the battery power is under 11 volts with a load applied.)
Image stops sometimes.• Disc is scratched.
- Replaced with a non-scratched disc.
Playing back a DRM protected DivX® FileSome operations cannot be performed while displaying the following message.
“Authorization Error This player is not authorized to play this video.”• If an unauthorized DRM protected DivX® file is played back,
the following message is displayed for 2 seconds: “Authorization Error This player is not authorized to play this video”. This means the file’s registration code does not match the player’s and cannot be played back. After the message has been displayed, the beginning of the next file will automatically begin playing.
“Rental expired”• A DivX® rental is set for a fixed number of viewings. If viewing
time has counted down to 0, “Rental expired” is displayed for 2 seconds. This indicates that the file can no longer be played. After the message has been displayed, the beginning of the next file will automatically begin playing.
“Rental Countdown OK?”• While playing back a rental file, if B.SKIP or ENTER is selected
in the file selection menu, “Rental Countdown OK?” is displayed. The rental file playback is interrupted (viewing time is reduced by 1). To confirm stopping playback, touch [Yes], or touch [No] to continue playing the file.
“View DivX® VOD RentalThis rental has (remaining times) views left.Do you want to use one of your (remaining times) views now?”• If audio/visual times still remain, the remaining number of
playback times is displayed. To play back, touch [Yes]. If the next file is to be played back, touch [No].
88-EN
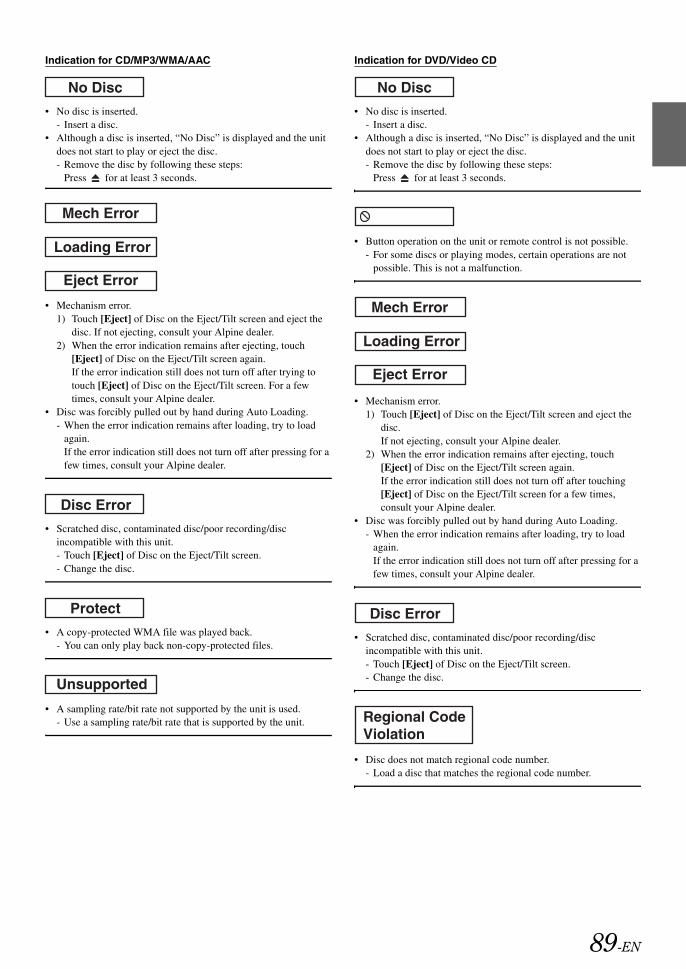
Indication for CD/MP3/WMA/AAC
• No disc is inserted.- Insert a disc.
• Although a disc is inserted, “No Disc” is displayed and the unit does not start to play or eject the disc.- Remove the disc by following these steps:
Press for at least 3 seconds.
• Mechanism error.1) Touch [Eject] of Disc on the Eject/Tilt screen and eject the
disc. If not ejecting, consult your Alpine dealer.2) When the error indication remains after ejecting, touch
[Eject] of Disc on the Eject/Tilt screen again. If the error indication still does not turn off after trying to touch [Eject] of Disc on the Eject/Tilt screen. For a few times, consult your Alpine dealer.
• Disc was forcibly pulled out by hand during Auto Loading.- When the error indication remains after loading, try to load
again. If the error indication still does not turn off after pressing for a few times, consult your Alpine dealer.
• Scratched disc, contaminated disc/poor recording/disc incompatible with this unit.- Touch [Eject] of Disc on the Eject/Tilt screen.- Change the disc.
• A copy-protected WMA file was played back.- You can only play back non-copy-protected files.
• A sampling rate/bit rate not supported by the unit is used.- Use a sampling rate/bit rate that is supported by the unit.
Indication for DVD/Video CD
• No disc is inserted.- Insert a disc.
• Although a disc is inserted, “No Disc” is displayed and the unit does not start to play or eject the disc.- Remove the disc by following these steps:
Press for at least 3 seconds.
• Button operation on the unit or remote control is not possible.- For some discs or playing modes, certain operations are not
possible. This is not a malfunction.
• Mechanism error.1) Touch [Eject] of Disc on the Eject/Tilt screen and eject the
disc. If not ejecting, consult your Alpine dealer.
2) When the error indication remains after ejecting, touch [Eject] of Disc on the Eject/Tilt screen again. If the error indication still does not turn off after touching [Eject] of Disc on the Eject/Tilt screen for a few times, consult your Alpine dealer.
• Disc was forcibly pulled out by hand during Auto Loading.- When the error indication remains after loading, try to load
again. If the error indication still does not turn off after pressing for a few times, consult your Alpine dealer.
• Scratched disc, contaminated disc/poor recording/disc incompatible with this unit.- Touch [Eject] of Disc on the Eject/Tilt screen.- Change the disc.
• Disc does not match regional code number.- Load a disc that matches the regional code number.
89-EN

• The DVD setup operation was attempted when a disc is inserted in the unit.- Eject the disc before the DVD setup operation.
• A sampling rate/bit rate not supported by the unit is used.- Use a sampling rate/bit rate that is supported by the unit.
Indication for CD changer
• Protective circuit is activated due to high temperature.- The indicator will disappear when the temperature returns to
within operation range.
• Malfunction in the CD Changer.- Consult your Alpine dealer. Press the magazine eject button
and pull out the magazine. Check the indication. Insert the magazine again. If the magazine cannot be pulled out, consult your Alpine dealer.
• Magazine ejection not possible.- Press the magazine eject button. If the magazine does not eject,
consult your Alpine dealer.
• A disc is left inside the CD Changer.- Press the Eject button to activate the eject function. When the
CD Changer finishes the eject function, insert an empty CD magazine into the CD Changer to receive the disc left inside the CD Changer.
• No magazine is loaded into the CD Changer.- Insert a magazine.
• No indicated disc.- Choose another disc.
Indication for USB Memory/Portable audio player
• Database error or decoder error.- You can solve the problem by reconnecting the USB Memory/
Portable audio player.
• Communication error or boot error, etc.- You can solve the problem by reconnecting the USB memory/
Portable audio player or changing source.
• The Portable audio player is not verified.- Change another Portable audio player.
• Abnormal current is run to the USB connector device.- Connect another USB memory/Portable audio player.
• A USB device that is not supported by the unit is connected.- Connect a USB device that is supported by the unit.
• A USB Memory/Portable audio player is not connected.- Make sure the USB Memory device is correctly connected and
the cable is not excessively bent.
• No song (file) is stored in the USB Memory/Portable audio player.- Connect the USB Memory device/Portable audio player after
storing songs (files).
• A sampling rate/bit rate not supported by the unit is used.- Use a sampling rate/bit rate that is supported by the unit.
• A copy-protected WMA file was played back.- You can only play back non-copy-protected files.
(DivX® mode)
90-EN
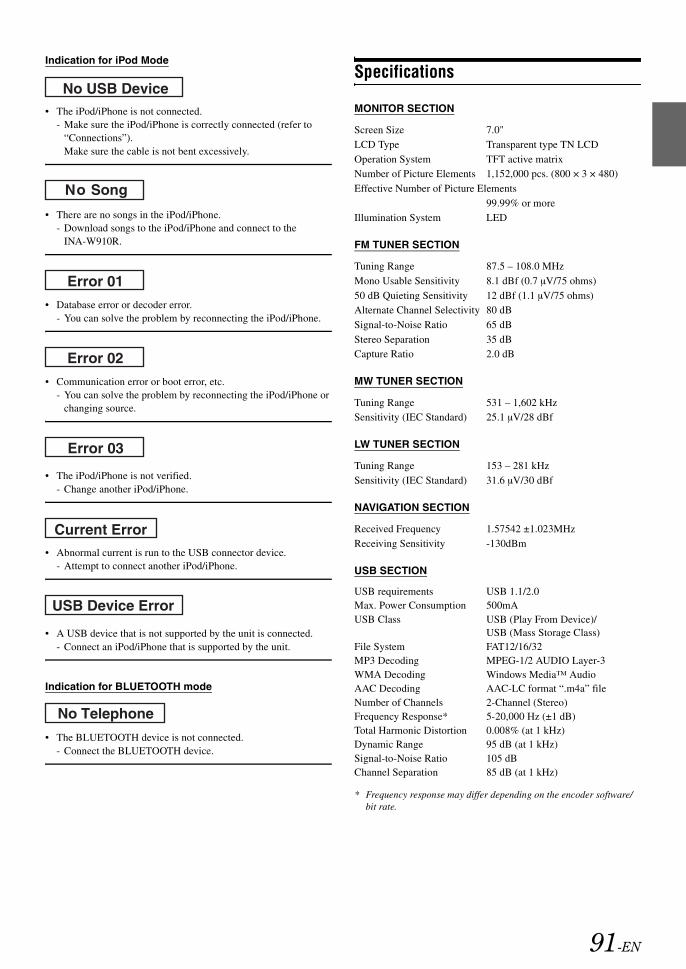
Indication for iPod Mode
• The iPod/iPhone is not connected.- Make sure the iPod/iPhone is correctly connected (refer to
“Connections”). Make sure the cable is not bent excessively.
• There are no songs in the iPod/iPhone.- Download songs to the iPod/iPhone and connect to the
INA-W910R.
• Database error or decoder error.- You can solve the problem by reconnecting the iPod/iPhone.
• Communication error or boot error, etc.- You can solve the problem by reconnecting the iPod/iPhone or
changing source.
• The iPod/iPhone is not verified.- Change another iPod/iPhone.
• Abnormal current is run to the USB connector device.- Attempt to connect another iPod/iPhone.
• A USB device that is not supported by the unit is connected.- Connect an iPod/iPhone that is supported by the unit.
Indication for BLUETOOTH mode
• The BLUETOOTH device is not connected.- Connect the BLUETOOTH device.
Specifications
MONITOR SECTION
FM TUNER SECTION
MW TUNER SECTION
LW TUNER SECTION
NAVIGATION SECTION
USB SECTION
* Frequency response may differ depending on the encoder software/bit rate.
Screen Size 7.0"LCD Type Transparent type TN LCDOperation System TFT active matrixNumber of Picture Elements 1,152,000 pcs. (800 × 3 × 480)Effective Number of Picture Elements
99.99% or moreIllumination System LED
Tuning Range 87.5 – 108.0 MHzMono Usable Sensitivity 8.1 dBf (0.7 µV/75 ohms)50 dB Quieting Sensitivity 12 dBf (1.1 µV/75 ohms)Alternate Channel Selectivity 80 dBSignal-to-Noise Ratio 65 dBStereo Separation 35 dBCapture Ratio 2.0 dB
Tuning Range 531 – 1,602 kHzSensitivity (IEC Standard) 25.1 µV/28 dBf
Tuning Range 153 – 281 kHzSensitivity (IEC Standard) 31.6 µV/30 dBf
Received Frequency 1.57542 ±1.023MHzReceiving Sensitivity -130dBm
USB requirements USB 1.1/2.0Max. Power Consumption 500mAUSB Class USB (Play From Device)/
USB (Mass Storage Class)File System FAT12/16/32MP3 Decoding MPEG-1/2 AUDIO Layer-3WMA Decoding Windows Media™ AudioAAC Decoding AAC-LC format “.m4a” fileNumber of Channels 2-Channel (Stereo)Frequency Response* 5-20,000 Hz (±1 dB)Total Harmonic Distortion 0.008% (at 1 kHz)Dynamic Range 95 dB (at 1 kHz)Signal-to-Noise Ratio 105 dBChannel Separation 85 dB (at 1 kHz)
91-EN

BLUETOOTH SECTION
REMOTE CONTROL
CD/DVD SECTION
PICKUP
GENERAL
CHASSIS SIZE
• Due to continuous product improvement, specifications and design are subject to change without notice.
• The LCD panel is manufactured using an extremely high precision manufacturing technology. Its effective pixel ratio is over 99.99%. This means that there is a possibility that 0.01% of the pixels could be either always ON or OFF.
CAUTION
BLUETOOTH Specification Bluetooth V2.0Output Power +4 dBm Max. (Power class 2)Profile HFP (Hands-Free Profile)
HSP (Head Set Profile)
Battery Type CR2025 batteryWidth 51 mm (2")Height 119 mm (4-11/16")Depth 13 mm (1/2")Weight 40 g (1.4 oz) (battery excluded)
Frequency Response 5 – 20,000 Hz (±1 dB)Wow & Flutter (% WRMS) Below measurable limitsTotal Harmonic Distortion 0.008% (at 1 kHz)Dynamic Range 95 dB (at 1 kHz)Channel Separation 85 dB (at 1 kHz)Signal system NTSC/PALHorizontal resolution 500 lines or greaterVideo output level 1Vp-p (75 ohms)Video S/N ratio DVD: 60 dBAudio S/N ratio 105 dB
Wave length DVD: 666 nmCD: 785 nm
Laser power CLASS II
Power Requirement 14.4 V DC(11–16 V allowable)
Operating temperature +32°F to +113°F(0°C to + 45°C)
Maximum Power Output 50 W × 4Output Voltage 4,000 mV/10k ohmsBass ±14 dB at 60 HzTreble ±14 dB at 10 kHzWeight 2.7 kg
(5 lbs. 15 oz)Audio output level
Preout (Front, Rear): 4V/10k ohms (max.)Preout (Subwoofer): 4V/10k ohms (max.)AUX OUT: 1.2V/10k ohmsAi-NET: 850 mV
Width 178 mm (7")Height 100 mm (3-15/16")Depth 164.6 mm (6-1/2")
CLASS 1LASER PRODUCT
(Bottom side of player)
CAUTION-Laser radiation when open, DO NOT STARE INTO BEAM
(Bottom side of player)
92-EN

Installation and ConnectionsBefore installing or connecting the unit, please read the following and pages 7 to 16 of this manual thoroughly for proper use.
WarningMAKE THE CORRECT CONNECTIONSFailure to make the proper connections may result in fire or product damage.
USE ONLY IN CARS WITH A 12 VOLT NEGATIVE GROUND.(Check with your dealer if you are not sure.) Failure to do so may result in fire, etc.
BEFORE WIRING, DISCONNECT THE CABLE FROM THE NEGATIVE BATTERY TERMINAL.Failure to do so may result in electric shock or injury due to electrical shorts.
DO NOT ALLOW CABLES TO BECOME ENTANGLED IN SURROUNDING OBJECTS.Arrange wiring and cables in compliance with the manual to prevent obstructions when driving. Cables or wiring that obstruct or hang up on places such as the steering wheel, shift lever, brake pedals, etc. can be extremely hazardous.
DO NOT SPLICE INTO ELECTRICAL CABLES.Never cut away cable insulation to supply power to other equipment. Doing so will exceed the current carrying capacity of the wire and result in fire or electric shock.
DO NOT DAMAGE PIPE OR WIRING WHEN DRILLING HOLES.When drilling holes in the chassis for installation, take precautions so as not to contact, damage or obstruct pipes, fuel lines, tanks or electrical wiring. Failure to take such precautions may result in fire.
DO NOT USE BOLTS OR NUTS IN THE BRAKE OR STEERING SYSTEMS TO MAKE GROUND CONNECTIONS.Bolts or nuts used for the brake or steering systems (or any other safety-related system), or tanks should NEVER be used for installations or ground connections. Using such parts could disable control of the vehicle and cause fire etc.
KEEP SMALL OBJECTS SUCH AS BOLTS OR SCREWS OUT OF THE REACH OF CHILDREN.Swallowing them may result in serious injury. If swallowed, consult a physician immediately.
DO NOT INSTALL IN LOCATIONS WHICH MIGHT HINDER VEHICLE OPERATION, SUCH AS THE STEERING WHEEL OR SHIFT LEVER.Doing so may obstruct forward vision or hamper movement etc. and results in serious accident.
CautionHAVE THE WIRING AND INSTALLATION DONE BY EXPERTS.The wiring and installation of this unit requires special technical skill and experience. To ensure safety, always contact the dealer where you purchased this product to have the work done.
USE SPECIFIED ACCESSORY PARTS AND INSTALL THEM SECURELY.Be sure to use only the specified accessory parts. Use of other than designated parts may damage this unit internally or may not securely install the unit in place. This may cause parts to become loose resulting in hazards or product failure.
ARRANGE THE WIRING SO IT IS NOT CRIMPED OR PINCHED BY A SHARP METAL EDGE.Route the cables and wiring away from moving parts (like the seat rails) or sharp or pointed edges. This will prevent crimping and damage to the wiring. If wiring passes through a hole in metal, use a rubber grommet to prevent the wire’s insulation from being cut by the metal edge of the hole.
DO NOT INSTALL IN LOCATIONS WITH HIGH MOISTURE OR DUST.Avoid installing the unit in locations with high incidence of moisture or dust. Moisture or dust that penetrates into this unit may result in product failure.
Precautions• Be sure to disconnect the cable from the (–) battery post before
installing your INA-W910R. This will reduce any chance of damage to the unit in case of a short-circuit.
• Be sure to connect the colour coded leads according to the diagram. Incorrect connections may cause the unit to malfunction or damage to the vehicle’s electrical system.
• When making connections to the vehicle’s electrical system, be aware of the factory installed components (e.g. on-board computer). Do not tap into these leads to provide power for this unit. When connecting the INA-W910R to the fuse box, make sure the fuse for the intended circuit of the INA-W910R has the appropriate amperage. Failure to do so may result in damage to the unit and/or the vehicle. When in doubt, consult your ALPINE dealer.
• The INA-W910R uses female RCA-type jacks for connection to other units (e.g. amplifier) having RCA connectors. You may need an adapter to connect other units. If so, please contact your authorized ALPINE dealer for assistance.
• Be sure to connect the speaker (–) leads to the speaker (–) terminal. Never connect left and right channel speaker cables to each other or to the vehicle body.
• The Display must be completely retracted in the casing when installing. If it is not, problems may occur.
• When installing in automobiles, make sure the Display can open/close without coming in contact with the shift lever.
IMPORTANTPlease record the serial number of your unit in the space provided below and keep it as a permanent record. The serial number plate is located on the bottom of the unit.
SERIAL NUMBER:INSTALLATION DATE:INSTALLATION TECHNICIAN:PLACE OF PURCHASE:
93-EN

Installation
Caution concerning the installation location
1 Before installing, make sure that the opening and closing of the display will not interfere with operation of the gear shift.
2 Angle of installation About the installation angle, please install as horizontally as possible within the following angle range. If the installation angle is beyond the range, the current position may not be correctly displayed and a maloperation may be caused for the navigation mode.
3 Remove the mounting sleeve from the main unit (see “Removal” on page 95).The unit can be installed in the mounting sleeve in three positions by aligning its mounting holes (A to C) on the sides of the unit. Position A will be used in most cases. If B or C are to be used, the hole positions need to be modified.First, determine the mounting position in the mounting sleeve, then affix the supplied seal (refer to “How to use a Seal” (page 95)). Slide the unit into the mounting sleeve and secure it.
• If B or C is used, make sure that there is a enough space depthwise before installing the unit. If the unit is forcibly pushed into the mounting sleeve, damage may occur.
*1 If the installed mounting sleeve is loose in the dashboard, the pressure plates may be bent slightly to remedy the problem.
CautionDo not block the unit’s fan or heat sink, thus preventing air circulation. If blocked, heat will accumulate inside the unit and may cause a fire.
Air ventilation hole
Rear of the Unit
Movable Display
Front of the unitTop of the unit
10°(±5°)
0°
0-30°
Side of the unit
<Mounting Hole Position>
Position APosition B
Position C
• Depending on the position chosen, the front panel will protrude differently.
Position A
Position B
Position C
Mounting Sleeve (Included) Dashboard
This unit
Seal (Included)
Face Plate*2 (Included)
Pressure
Plates*1
Rubber Cap (Included)Bracket
Hex Bolt (Included)
Front Panel
Dashboard
Front Panel
Dashboard
Front Panel
Dashboard
94-EN
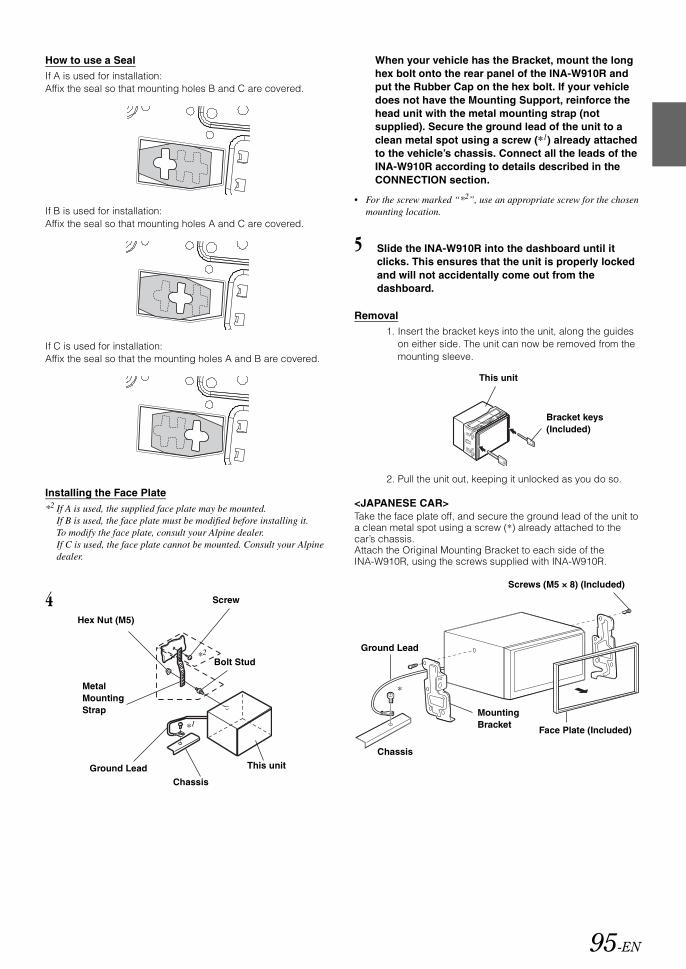
How to use a SealIf A is used for installation:Affix the seal so that mounting holes B and C are covered.
If B is used for installation:Affix the seal so that mounting holes A and C are covered.
If C is used for installation:Affix the seal so that the mounting holes A and B are covered.
Installing the Face Plate*2 If A is used, the supplied face plate may be mounted.
If B is used, the face plate must be modified before installing it. To modify the face plate, consult your Alpine dealer. If C is used, the face plate cannot be mounted. Consult your Alpine dealer.
Removal1. Insert the bracket keys into the unit, along the guides
on either side. The unit can now be removed from the mounting sleeve.
2. Pull the unit out, keeping it unlocked as you do so.
<JAPANESE CAR>Take the face plate off, and secure the ground lead of the unit to a clean metal spot using a screw (*) already attached to the car’s chassis.Attach the Original Mounting Bracket to each side of the INA-W910R, using the screws supplied with INA-W910R.
4 Screw
Bolt Stud
This unit
ChassisGround Lead
Metal Mounting Strap
Hex Nut (M5)
*2
*1
When your vehicle has the Bracket, mount the long hex bolt onto the rear panel of the INA-W910R and put the Rubber Cap on the hex bolt. If your vehicle does not have the Mounting Support, reinforce the head unit with the metal mounting strap (not supplied). Secure the ground lead of the unit to a clean metal spot using a screw (*1) already attached to the vehicle’s chassis. Connect all the leads of the INA-W910R according to details described in the CONNECTION section.
• For the screw marked “*2”, use an appropriate screw for the chosen mounting location.
5 Slide the INA-W910R into the dashboard until it clicks. This ensures that the unit is properly locked and will not accidentally come out from the dashboard.
This unit
Bracket keys (Included)
Ground Lead
Chassis
Screws (M5 × 8) (Included)
Face Plate (Included)
MountingBracket
*
95-EN

Install the GPS antenna
<For inside vehicle>1. Stick the ground pad at the centre of dash board and close to windshield with one inch distance.2. Attach GPS antenna to the centre of ground pad. (the cable side faces the back of vehicle)<For outside vehicle>At the front or back of vehicle roof.Wiring the GPS antenna cableDo not bend or fold the GPS antenna cable.• When installing the INA-W910R to the vehicle, make sure the back of unit and the cable must not be bent.Connect the GPS antennaSecurely connect the GPS antenna connector to INA-W910R.Connection of USB extension cable (Included)Connect the USB extension cable to the USB connector of the unit, and then secure the connection using the lock case supplied with USB extension cable as shown below.
To prevent external noise from entering the audio system.• Locate the unit and route the leads at least 10 cm away from the car harness.• Keep the battery power leads as far away from other leads as possible.• Connect the ground lead securely to a bare metal spot (remove any paint, dirt or grease if necessary) of the car chassis.• If you add an optional noise suppressor, connect it as far away from the unit as possible. Your Alpine dealer carries various
noise suppressors, contact them for further information.• Your Alpine dealer knows best about noise prevention measures so consult your dealer for further information.
INA-W910R
USB Connector Cable (Supplied)
INA-W910R(Red)
(Yellow)
SPST SW (Optional)FUSE (5A) (Optional)
FUSE (20A) (Optional)
Battery
ACC
BATTERY
Connection Diagram of SPST Switch (Sold Separately)(If the ACC power supply is not available)
• If your vehicle has no ACC power supply, add an SPST (Single-Pole, Single-Throw) switch (sold separately) and fuse (sold separately).• The diagram and the fuse amperage shown above are in the case when INA-W910R is used individually.• If the switched power (ignition) lead of the INA-W910R is connected directly to the positive (+) post of the vehicle’s battery, the
INA-W910R draws some current (several hundred milliamperes) even when its switch is placed in the OFF position and the battery may be discharged.
96-EN
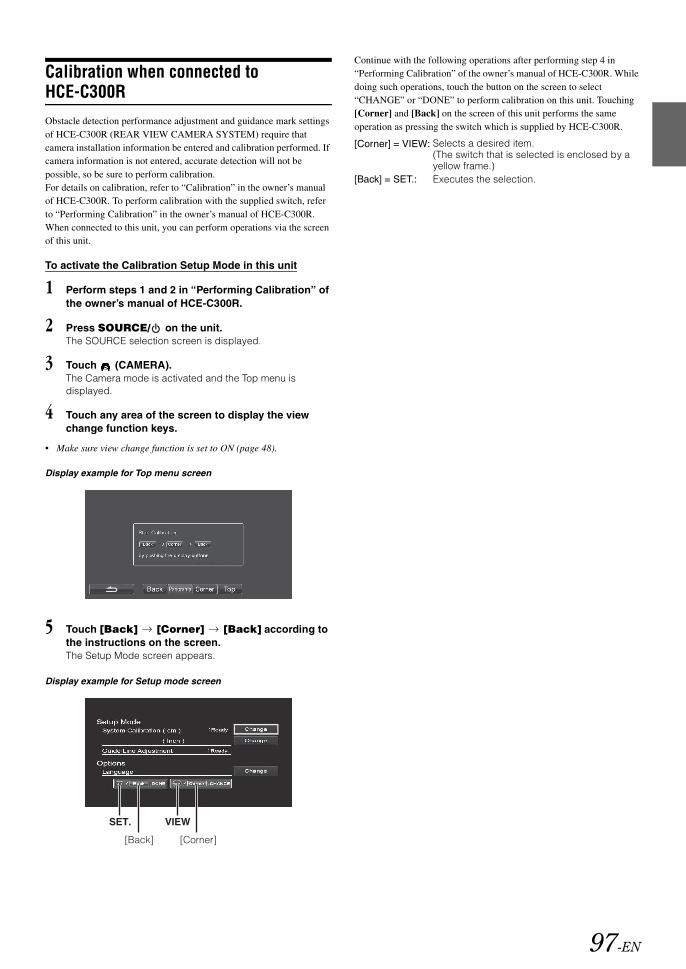
97-EN
Calibration when connected to HCE-C300RObstacle detection performance adjustment and guidance mark settings of HCE-C300R (REAR VIEW CAMERA SYSTEM) require that camera installation information be entered and calibration performed. If camera information is not entered, accurate detection will not be possible, so be sure to perform calibration.For details on calibration, refer to “Calibration” in the owner’s manual of HCE-C300R. To perform calibration with the supplied switch, refer to “Performing Calibration” in the owner’s manual of HCE-C300R. When connected to this unit, you can perform operations via the screen of this unit.
To activate the Calibration Setup Mode in this unit
1 Perform steps 1 and 2 in “Performing Calibration” of the owner’s manual of HCE-C300R.
2 Press SOURCE/ on the unit.The SOURCE selection screen is displayed.
3 Touch (CAMERA).The Camera mode is activated and the Top menu is displayed.
4 Touch any area of the screen to display the view change function keys.
• Make sure view change function is set to ON (page 48).
Display example for Top menu screen
5 Touch [Back] [Corner] [Back] according to the instructions on the screen. The Setup Mode screen appears.
Display example for Setup mode screen
Continue with the following operations after performing step 4 in “Performing Calibration” of the owner’s manual of HCE-C300R. While doing such operations, touch the button on the screen to select “CHANGE” or “DONE” to perform calibration on this unit. Touching [Corner] and [Back] on the screen of this unit performs the same operation as pressing the switch which is supplied by HCE-C300R.
[Corner] = VIEW: Selects a desired item. (The switch that is selected is enclosed by a yellow frame.)
[Back] = SET.: Executes the selection.

Connections
• Set the system switch to “NORM” when only a changer is connected (when the Ai-NET compatible equalizer is not used).When the IMPRINT audio processor is connected, set to EQ/DIV position.
* The system switches are located on the bottom of the unit.
(Red)
CD Changer (Sold Separately)
Amplifier
Amplifier
AmplifierRear Left
Rear Right
Front Left
Front Right
Subwoofers
(White)
(Yellow)
(Red)
(White)
(Yellow)
AntennaISO Antenna Plug
Battery
Ignition key
Front left
Rear left
Rear right
Front right
Speakers
(Blue/White)
(Blue)
(Pink/Black)
(Yellow/Blue)
(Yellow)
(Black)
(Red)
(Green)
(Green/Black)
(White/Black)
(Grey)
(Violet/Black)
(Violet)
AUDIO INTERRUPT IN
REMOTE TURN-ON
PARKING BRAKE
ACC
GND
POWER ANT
BATTERY
(Grey/Black)
(White)
To remote input lead
To remote output lead
To plus side of the back lamp signal lead of the car
Not used
To guide control input terminal
To steering remote control interface box
Microphone (Included)
GPS Antenna
To Video Output terminal
To Audio Output terminals(R,L)
To Video Input terminal
To Audio Input terminals(R,L)
To Guide Input terminal
To Camera with RCA Output terminal
To power antenna
To the vehicle speed pause line
To the parking brake signal lead
To amplifier or equalizer
Not used
(Green/White) SPEED SENSOR
GUIDE
(Black)
CAMERA IN
(Yellow)
GUIDE CONT
(White/Green)
CAMERA SW
(Black)
REVERSE
(Orange/White)
REMOTE IN
(White/Brown)
REMOTE OUT
(White/Brown)
To USB memory/ Portable audio player
To iPod/iPhone
or
(Black)
98-EN
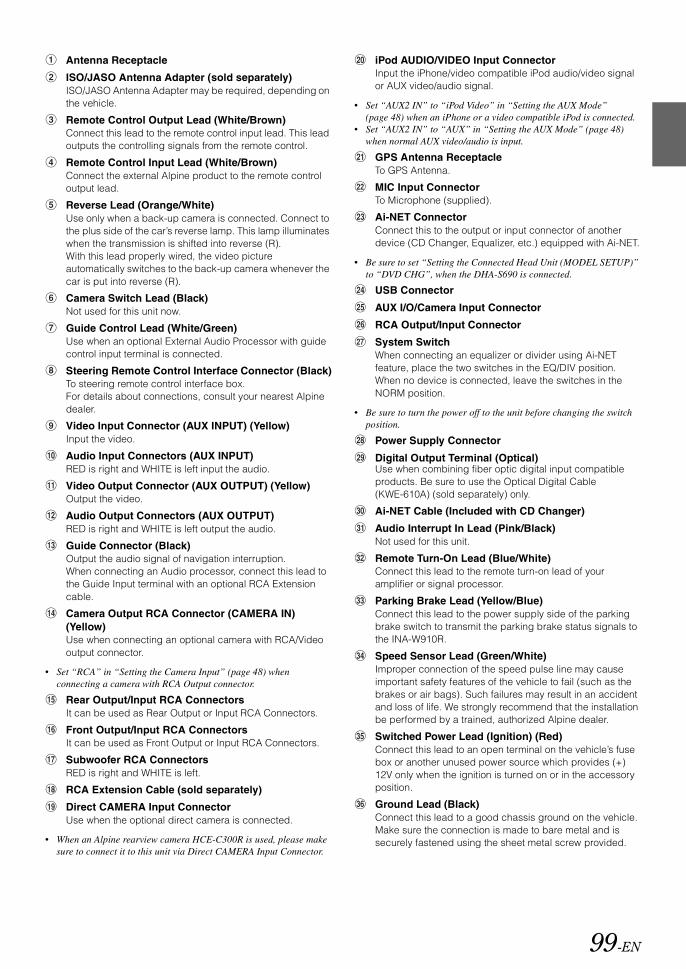
Antenna Receptacle
ISO/JASO Antenna Adapter (sold separately)ISO/JASO Antenna Adapter may be required, depending on the vehicle.
Remote Control Output Lead (White/Brown)Connect this lead to the remote control input lead. This lead outputs the controlling signals from the remote control.
Remote Control Input Lead (White/Brown)Connect the external Alpine product to the remote control output lead.
Reverse Lead (Orange/White)Use only when a back-up camera is connected. Connect to the plus side of the car’s reverse lamp. This lamp illuminates when the transmission is shifted into reverse (R).With this lead properly wired, the video picture automatically switches to the back-up camera whenever the car is put into reverse (R).
Camera Switch Lead (Black)Not used for this unit now.
Guide Control Lead (White/Green)Use when an optional External Audio Processor with guide control input terminal is connected.
Steering Remote Control Interface Connector (Black)To steering remote control interface box.For details about connections, consult your nearest Alpine dealer.
Video Input Connector (AUX INPUT) (Yellow)Input the video.
Audio Input Connectors (AUX INPUT)RED is right and WHITE is left input the audio.
Video Output Connector (AUX OUTPUT) (Yellow)Output the video.
Audio Output Connectors (AUX OUTPUT)RED is right and WHITE is left output the audio.
Guide Connector (Black)Output the audio signal of navigation interruption.When connecting an Audio processor, connect this lead to the Guide Input terminal with an optional RCA Extension cable.
Camera Output RCA Connector (CAMERA IN) (Yellow)Use when connecting an optional camera with RCA/Video output connector.
• Set “RCA” in “Setting the Camera Input” (page 48) when connecting a camera with RCA Output connector.
Rear Output/Input RCA ConnectorsIt can be used as Rear Output or Input RCA Connectors.
Front Output/Input RCA ConnectorsIt can be used as Front Output or Input RCA Connectors.
Subwoofer RCA ConnectorsRED is right and WHITE is left.
RCA Extension Cable (sold separately)
Direct CAMERA Input ConnectorUse when the optional direct camera is connected.
• When an Alpine rearview camera HCE-C300R is used, please make sure to connect it to this unit via Direct CAMERA Input Connector.
iPod AUDIO/VIDEO Input ConnectorInput the iPhone/video compatible iPod audio/video signal or AUX video/audio signal.
• Set “AUX2 IN” to “iPod Video” in “Setting the AUX Mode” (page 48) when an iPhone or a video compatible iPod is connected.
• Set “AUX2 IN” to “AUX” in “Setting the AUX Mode” (page 48) when normal AUX video/audio is input.
GPS Antenna Receptacle To GPS Antenna.
MIC Input Connector To Microphone (supplied).
Ai-NET ConnectorConnect this to the output or input connector of another device (CD Changer, Equalizer, etc.) equipped with Ai-NET.
• Be sure to set “Setting the Connected Head Unit (MODEL SETUP)” to “DVD CHG”, when the DHA-S690 is connected.
USB Connector
AUX I/O/Camera Input Connector
RCA Output/Input Connector
System SwitchWhen connecting an equalizer or divider using Ai-NET feature, place the two switches in the EQ/DIV position. When no device is connected, leave the switches in the NORM position.
• Be sure to turn the power off to the unit before changing the switch position.
Power Supply Connector
Digital Output Terminal (Optical)Use when combining fiber optic digital input compatible products. Be sure to use the Optical Digital Cable (KWE-610A) (sold separately) only.
Ai-NET Cable (Included with CD Changer)
Audio Interrupt In Lead (Pink/Black)Not used for this unit.
Remote Turn-On Lead (Blue/White)Connect this lead to the remote turn-on lead of your amplifier or signal processor.
Parking Brake Lead (Yellow/Blue)Connect this lead to the power supply side of the parking brake switch to transmit the parking brake status signals to the INA-W910R.
Speed Sensor Lead (Green/White)Improper connection of the speed pulse line may cause important safety features of the vehicle to fail (such as the brakes or air bags). Such failures may result in an accident and loss of life. We strongly recommend that the installation be performed by a trained, authorized Alpine dealer.
Switched Power Lead (Ignition) (Red)Connect this lead to an open terminal on the vehicle’s fuse box or another unused power source which provides (+) 12V only when the ignition is turned on or in the accessory position.
Ground Lead (Black)Connect this lead to a good chassis ground on the vehicle. Make sure the connection is made to bare metal and is securely fastened using the sheet metal screw provided.
99-EN
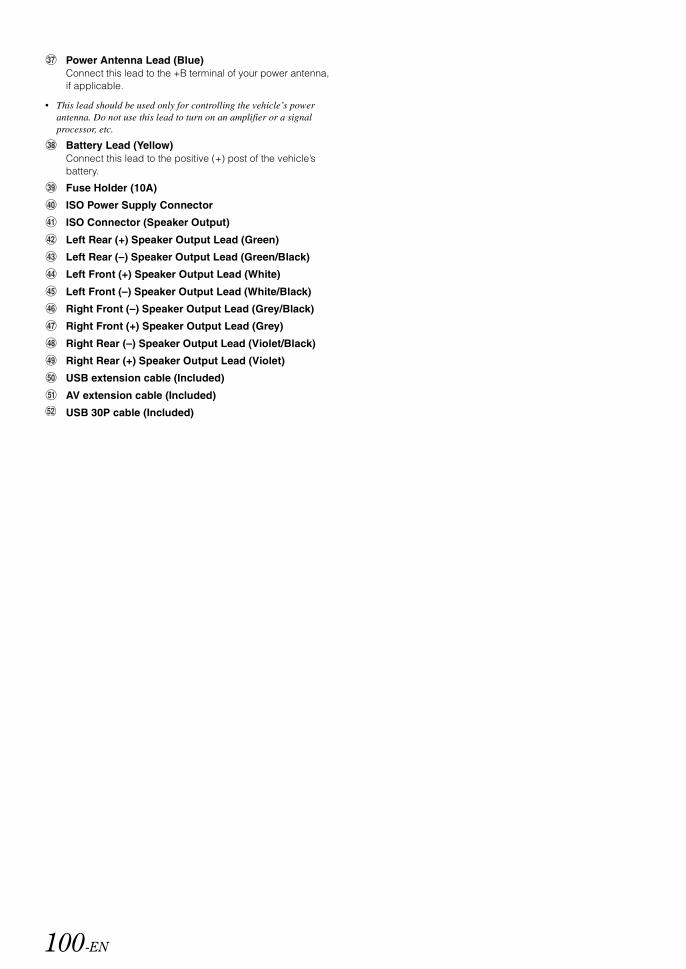
Power Antenna Lead (Blue)Connect this lead to the +B terminal of your power antenna, if applicable.
• This lead should be used only for controlling the vehicle’s power antenna. Do not use this lead to turn on an amplifier or a signal processor, etc.
Battery Lead (Yellow)Connect this lead to the positive (+) post of the vehicle’s battery.
Fuse Holder (10A)
ISO Power Supply Connector
ISO Connector (Speaker Output)
Left Rear (+) Speaker Output Lead (Green)
Left Rear (–) Speaker Output Lead (Green/Black)
Left Front (+) Speaker Output Lead (White)
Left Front (–) Speaker Output Lead (White/Black)
Right Front (–) Speaker Output Lead (Grey/Black)
Right Front (+) Speaker Output Lead (Grey)
Right Rear (–) Speaker Output Lead (Violet/Black)
Right Rear (+) Speaker Output Lead (Violet)
USB extension cable (Included)
AV extension cable (Included)
USB 30P cable (Included)
100-EN

System Example
Connect the Ai-NET compatible audio processor (Fiber optic digital compatible), DVD player and changer.
Audio Processor (Ai-NET) (Fiber optic digital compatible) (sold separately)
Ai-NET cable
CD Changer (Ai-NET) (sold separately)
DVD Video Player (Ai-NET) (DVA-5210, etc.) (sold separately)
REMOTE INREMOTE OUT
(White/Brown) (White/Brown)
(Yellow)
Ai-NET cable
• When the fiber optic digital compatible product is connected, it is necessary to set the mode of this unit. Refer to “Setting the Digital Output” (page 49).
Please observe the following when using Fiber optic Cable.• Do not coil the Fiber optic Cable smaller than a 30 mm radius.• Do not place anything on top of the Fiber optic Cable.• Be careful not to bend the Fiber optic Cable at a sharp angle.
Fiber optic cable
Ai-NET cable
Fiber optic digital Input terminal (for DVD Player)
Fiber optic digital Input terminal (for head unit)
Optical Digital Cable (KWE-610A)
* Only connect Fiber optic digital compatible CD Changer
Guide Control
101-EN

Ai-NET ConnectorConnect this to the output or input connector of other product equipped with Ai-NET.
System SwitchWhen connecting an equalizer or divider using Ai-NET feature, place the two switches in the EQ/DIV position. When no device is connected, leave the switches in the NORM position.
• Be sure to turn the power off to the unit before changing the switch position.
Ai-NET Cable (Included with DVD video player)
Remote Control Output Lead (White/Brown)Connect this lead to the remote control input lead. This lead outputs the controlling signals from the remote control.
To Ai-NET Connector (Grey)
RCA Extension Cable (Included with DVD video player)
Video Input Connector (AUX INPUT) (Yellow)Connect the video output lead of a DVD video player or DVD changer to this terminal.
AUX I/O/Camera Input Connector
To Ai-NET Connector (Black)
Ai-NET Cable (Included with IMPRINT Audio Processor (PXA-H100))
Fiber optic Cable (sold separately)
Guide Connector (Yellow)Output the audio signal of navigation interruption.
RCA Extension Cable (sold separately)
Navigation audio input jack (RCA input)Used to input the audio output signals of a navigation system.
Optical Digital Cable (KWE-610A) (sold separately)
Ai-NET Cable (Included with CD Changer)
Guide Control Lead (White/Green)
Digital Output Terminal (Optical)
102-EN

When Connecting External Equipment
To Video Output terminal
System SwitchWhen connecting an equalizer or divider using Ai-NET feature, place the two switches in the EQ/DIV position. When no device is connected, leave the switches in the NORM position.
• Be sure to turn the power off to the unit before changing the switch position.
AUX I/O/Camera Input Connector
Camera Output RCA Connector (CAMERA IN) (Yellow)Use when connecting a camera with RCA Output connector.
• Set “RCA” in “Setting the Camera Input” (page 48) when connecting a camera with RCA Output connector.
Video/Audio Output Connectors (AUX OUTPUT)Use when connecting an optional monitor etc.
Video/Audio Input Connectors (AUX INPUT)
Remote Control Output Lead (White/Brown)Connect this lead to the remote control input lead. This lead outputs the controlling signals from the remote control.
Remote Control Input Lead (White/Brown)
Reverse Lead (Orange/White)Use only when a back-up camera is connected. Connect to the plus side of the car’s reverse lamp. This lamp illuminates when the transmission is shifted into reverse (R).With this lead properly wired, the video picture automatically switches to the back-up camera whenever the car is put into reverse (R).
To Video Input terminal
To Audio Output terminal
DVE-5027, etc. (sold separately)
Rear monitor (sold separately)
(White/Brown) REMOTE OUT REMOTE IN (White/Brown)
(White/Brown) REMOTE IN REMOTE OUT (White/Brown)
REVERSEUse only when back-up camera is connected.
TV Tuner (sold separately)
To Video Output terminal
(Orange/White)
To Audio Output terminal
Direct rearview camera HCE-C117D, etc. (sold separately)
To Video Output terminal
Camera with RCA video output (sold separately)
To Audio Input terminal
103-EN

RCA Extension Cable (sold separately)
Video/Audio Input ConnectorsYELLOW is for input video, RED is right and WHITE is left input the audio.
AV/RCA interface cable (4-pole mini AV plug to 3-RCA) (sold separately)
Usable 4-pole mini AV plug
Wiring convention of this system is as follows:
• Configuration commercially available 4-pole mini AV plugs is not unified.
iPod (V)/AUX Input ConnectorInput the iPhone/video compatible iPod audio/video signal or AUX video/audio signal.
• Set “AUX2 IN” to “AUX” in “Setting the AUX Mode” (page 48) when normal AUX video/audio is input.
• When you use this connector as normal video/audio input connector (AUX 2 Input), an optional AV/RCA interface cable should be used. For details, refer to .
Camera extension cable (Included with direct rearview camera)
Direct CAMERA Input ConnectorUse when the optional direct rearview camera HCE-C117D, etc. is connected.
Audio L (White)
Audio R (Red)
Ground
Video (Yellow)
About the Rules of Bluetooth Electromagnetic Radiation Regulation
Declaration of Conformity
104-EN
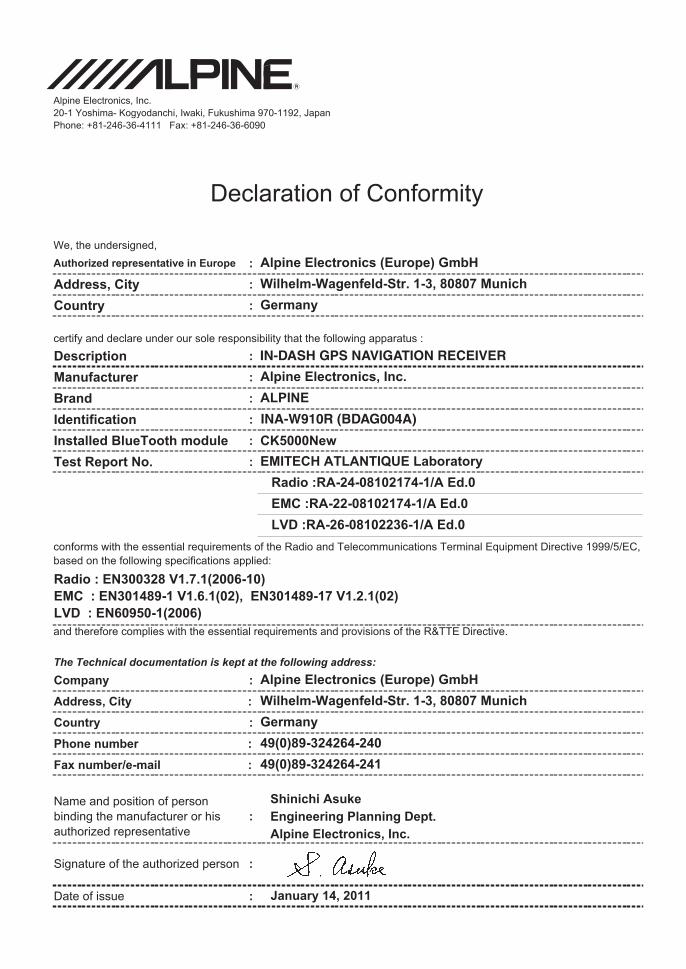


![Unraveling the Polymorphism of [(p-cymene) Ru (κN-INA) Cl2] through Dispersion-Corrected DFT and NMR GIPAW Calculations](https://static.fdokumen.com/doc/165x107/6335c67502a8c1a4ec01ea37/unraveling-the-polymorphism-of-p-cymene-ru-kn-ina-cl2-through-dispersion-corrected.jpg)