important safeguards
19
-
Upload
khangminh22 -
Category
Documents
-
view
2 -
download
0
Transcript of important safeguards


2
IMPORTANT SAFEGUARDS
When using electrical appliances, basic safety precautions should always be followed, including
the following:
1. Read carefully the instructions provided with appliance.
2. Keep hands away from hot parts of appliance, including filter holder and steam nozzle. Use
handles or knobs.
3. Do not remove the filter holder during water flow or coffee flow as the unit is under pressure.
4. Do not immerse the appliance in water or any other liquid to protect against electric shock.
5. Never leave the appliance unsupervised when there are children in the area. To protect
children from the dangers posed by electrical appliances, make sure that the cable is not
hanging from the surface where the appliance is and the children do not have access to the
appliance.
6. Unplug from outlet when not in use and before cleaning. Clean the appliance only when the
unit has been switched off and allowed to cool completely.
7. Do not operate any electrical appliance with a damaged cord or plug, or after the appliance
has malfunctioned or has been damaged in any manner. If damage is suspected, return the
appliance to the nearest authorized service facility for examination, repair or adjustment.
8. Do not use your appliance with accessory attachments unless it is recommended by the
appliance manufacturer to reduce injuries.
9. Do not use outdoors.
10. Do not let the power cord of an appliance hang over the edge of the table or countertop, or
touch any hot surface, and do not allow the power cord to come in contact with the hot parts of
the appliance (filter holder, steam nozzle).
11. Always connect your appliance to a power outlet of the voltage (A/C only) marked in the
appliance.
12. Do not place any appliance on or near a hot gas flame, electric element or on a heated oven.
Do not place it on top of any other appliance.
13. Always attach the plug to the appliance first, then plug cord into the wall outlet and turn the
power off before you insert or remove the plug.
14. Do not use the appliance for any purpose other than its intended use.
SAVE THESE INSTRUCTIONS
Household Use Only

3
SHORT CABLE INSTRUCTIONS
A short power supply cable is provided to reduce the risk resulting from becoming entangled in or
tripping over a longer cable. An extension cable may be used if care is exercised in their use. If
an extension cable is used, the marked electrical rating of the extension cable should be at least
as great as the electrical rating of the appliance. This appliance is of the grounded type, the
extension cable should have a grounding 3-wire cord. The extension cable should be arranged so
that it will not drape over the countertop or tabletop where it can be pulled on by children or
tripped over unintentionally.
POLARIZED PLUG
This appliance has a polarized plug (one blade is wider than the other). To reduce the risk of
electric shock, this plug is intended to fit into a polarized outlet only one way. If the plug does not
fit fully into the outlet, reverse the plug. If it still does not fit, contact a qualified electrician. Do not
attempt to modify the plug in any way.
4
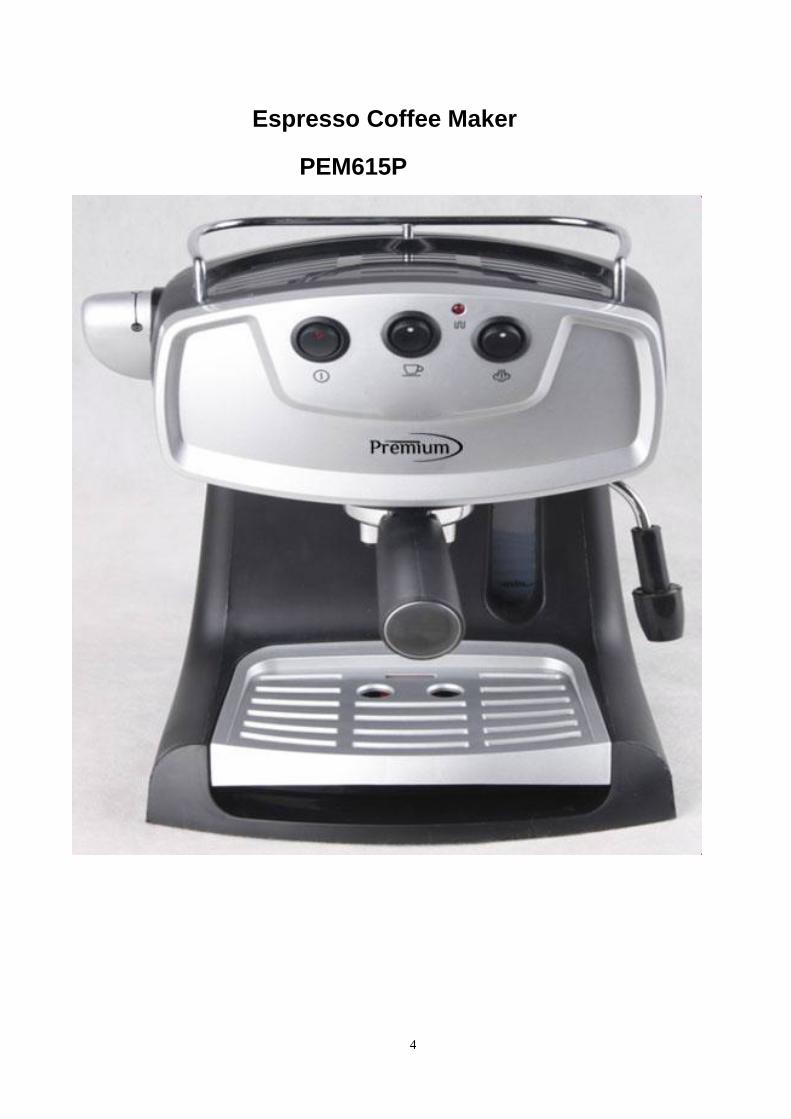
Espresso Coffee Maker
PEM615P

5
Instructions Manual
Know your appliance
Power switch
Coffee switch
Heating Indicator Light
Control
Knob Steam switch
Steam nozzle
Drip tray
Filter
Holder
Power Indicator Light
Water Tank
Frothing
attachment
Filter
Basket
(inside)
2 sizes
provided

6
HOW TO USE YOUR APPLIANCE
Brew Espresso Coffee
1) Make sure the Espresso Makers is unplugged, the
control knob is in OFF position and Power switch is in
OFF.
2) Open the water tank lid, pull out the water tank and fill
the tank with water. Never fill with the Espresso Maker
ON.
3) Replace the tank. Make sure that water reaches at
least the “Min” level and does not surpass the “Max”
marking in the tank.
4)Turn the Power Switch ON. The Power Indicator Light
will light to show that the machine is ON.

7
5)Place filter basket into filter holder. The small filter
basket is used for brewing 4 ounces of coffee. The big
filter basket is used for brewing 6 to 8 ounces of coffee.
6)Fill filter basket with desired amount of coffee.
Note:Use the measuring scoop provided for easy filling.
Do not tamp coffee. Be sure to use a fine drip grind
coffee.
7)Insert filter holder by placing handle under the center of
the Espresso Maker. Push it upward so it will be aligned
with matching slots.
8) Turn handle to the right until securely locked. DO NOT
REMOVE FILTER HOLDER DURING THE BREWING
PROCESS AS SCALDING MAY OCCUR

8
9) Place a cup to collect the coffee. Push the coffee
switch and espresso coffee will begin brewing.
10) When the amount of coffee in cup is the desired, turn
the coffee switch OFF. This will stop the flow of brewed
coffee.
Frothing milk
1) Push the steam switch and the Heating Indicator Light
will be ON until the ideal steam setting temperature is
reached. Once the steam temperature is reached, the
Heating Indicator Light will turn OFF automatically.
2) Hold a cup half filled with milk by the handle (for best
result, milk should be chilled in the refrigerator prior to
use)
3) Insert steam nozzle with frothing attachment just under
the surface of the milk (for best results, milk should be
chilled and preferably skim or 1%).
4) Slowly turn the selector knob with free hand clockwise
to the steam position. This step must be done only when
the Heating Indicator Light has turned OFF.
5) Move the cup in a circular motion and allow steam to
froth the milk for several seconds.
6) After frothing, insert the steam nozzle and frothing
attachment to the bottom of the cup for just 2 to 3
seconds to warm the milk. Remember cold skim milk
froths more easily. Overheating milk will break down the
bubbles.
7) After removing the steam nozzle from the frothed milk,
turn selector knob to steam position momentarily to clear
the nozzle of remaining milk.
Slowly turn
the selector
knob
Heat
Indicator
Light
Frothing
attachment

9
8) When steam process has finished, turn selector knob
to the initial position and turn OFF the Steam Switch.
9) Pour your espresso from the carafe into your
cappuccino cups.
10) Top off by spooning your frothed milk on top of your
espresso. The froth will not readily pour from the
container, since it separated from the heated milk.
11) Top off your cappuccino with a dash of nutmeg,
cinnamon or chocolate shavings.
Top rack may be used for keeping cups warm while coffee is brewing. Place cups
upside down on top rack and leaning against a corner while brewing coffee or
frothing milk.
CARE AND CLEANING
The coffee making process involves extracting oils out of coffee grinds to make espresso coffee.
Deposits of these oils build up over time and affect the taste of the coffee made and the espresso
machine operation.
Regular cleaning to remove these oils is essential for the espresso machine to keep operating
effectively.
Flushing water through the brewing head and the steam nozzle is the easiest way to keep your
machine clean after making each coffee, and at the end of your coffee making session.
Important: Do not wash parts in the dishwasher. Do not immerse the unit in water.
IMPORTANT INFORMATION FOR CORRECT DISPOSAL OF THE PRODUCT IN ACCORDANCE
WITH EC DIRECTIVE 2002/98/EC
10
At the end of its working life the product must not be disposed of as urban waste.
It must be taken to a special local authority or waste collection center or to a dealer providing the
service.
Disposing a household appliance separately avoids possible negative consequences for the
environment and health deriving from inappropriate disposal and enables the constituent materials
to be recycled to obtain significant savings in energy and resources. As a reminder of the need to
dispose of household appliances separately, the product is marked with a crossed-out wheeled
dustbin.

11
AVISOS IMPORTANTES DE SEGURIDAD
Siempre siga las precauciones básicas de seguridad cuando utilice aparatos eléctricos,
incluyendo las siguientes:
filtro y la boquilla de vapor. Utilice asas o tiradores.
está bajo presión.
niños de los peligros que suponen los aparatos eléctricos, asegúrese de que el cable no está
colgando de la superficie donde está el equipo y los niños no tienen acceso al equipo.
Limpie el dispositivo sólo cuando la unidad se haya apagado y se haya enfriado
completamente.
equipo haya presentado fallas o se haya dañado de alguna manera. Si sospecha daños,
devuelva el equipo al centro servicio autorizado más cercano para su examen, reparación o
ajuste.
del equipo para reducir el riesgo de lesiones.
superficie, ni toque ninguna superficie caliente y no permita que el cable de alimentación
entre en contacto con las partes calientes del dispositivo (soporte para el filtro, boquilla de
vapor).
solamente) sea igual a la marcada en el dispositivo.
horno caliente. No coloque encima de ningún otro dispositivo.
y apague el sistema antes de insertar o quitar el enchufe.
GUARDE ESTAS INSTRUCCIONES
Sólo para uso doméstico
10. No permita que el cable de alimentación del equipo cuelgue sobre el borde de la mesa o
12. No coloque ningún equipo en o cerca de una llama de gas caliente, hornilla eléctrica o en un
13. Siempre conecte el enchufe primero al equipo, luego enchufe el cable en el enchufe de pared
14. No utilice el equipo para ningún otro uso distinto al previsto.
2. Mantenga las manos lejos de las partes calientes del equipo, incluyendo el soporte para el
1. Lea atentamente las instrucciones proporcionadas con el equipo.
3. No remueva el soporte para el filtro mientras el agua o el café estén fluyendo ya que la unidad
4. No sumerja el equipo en agua ni en ningún otro líquido para evitar choques eléctricos.
5. Nunca deje el dispositivo sin supervisión cuando haya niños en el área. Para proteger a los
6. Desconecte de la fuente de electricidad cuando el equipo no esté en uso y antes de limpiar.
7. No opere ningún aparato eléctrico con el cable o enchufe dañado, ni después de que el
8. No utilice el equipo con accesorios a menos que estos sean recomendado por el fabricante
9. No utilice al aire libre.
11.Siempre conecte el dispositivo a una toma de corriente cuya tensión (corriente alterna
12
INSTRUCCIONES DE CABLE CORTO
Se provee un cable de alimentación corto para reducir el riesgo resultante de enredarse o
tropezar con un cable largo. Puede utilizarse un cable de extensión si se usa con cuidado. Si se
utiliza un cable de extensión, la calificación eléctrica marcada del cable de extensión debe ser al
menos tan grande como la clasificación eléctrica del dispositivo. Este dispositivo es del tipo con
conexión a tierra, el cable de extensión debe tener un cable de 3 alambres con tierra. El cable de
extensión debe colocarse de manera que no cuelgue sobre el borde de la mesa o el mostrador
donde pueda ser halado los niños o tropezado accidentalmente.
ENCHUFE POLARIZADO
Este equipo está provisto de un enchufe polarizado (una hoja es más ancha que la otra). Para
reducir el riesgo de electrocución, este enchufe puede insertarse en un enchufe polarizado sólo
de una manera. Si el enchufe no se ajusta plenamente a la toma, invierta el enchufe. Si aun
entonces no encaja, póngase en contacto con un electricista calificado. No intente modificar el
enchufe de ninguna manera.

13
Espresso Coffee Maker
PEM615P

14
Manual de Instrucciones
Conozca su electrodoméstico
Interruptor de
Poder
Interruptor de
Café
Luz Indicadora de
Calentamiento
Perilla
de
Control
Interruptor de
vapor
Vaporizador
Bandeja de
Goteo
Porta
Filtro
Luz Indicadora de
Encendido
Tanque de
Agua
Espumadera
Cesta
Filtro
(adentro)
viene en
2
tamanos

15
COMO USAR SU APARATO
Hacer Café Espresso
1) Asegúrese de que la cafetera está
desenchufada, la perilla de control está en posición
inicial y el Interruptor de Poder está apagado.
2) Abra la tapa del tanque de agua, saque el tanque
de agua y llene el tanque con agua. Nunca vierta el
agua con la cafetera encendida.
3) Vuelva a colocar el tanque. Asegúrese que el nivel
del agua llegue por lo menos a la marca “Min” y no
sobrepase el nivel “Max” marcado en el tanque.
4)Encienda la cafetera en el Interruptor de Poder. La
Luz Indicadora de Encendido se activara para indicar
que la maquina está encendida.

16
5)Coloque una cesta filtro dentro del porta filtro.
La cesta pequeña es utilizada para hacer 50 mililitros
de café. La cesta grande es utilizada para hacer de
80 a 100 mililitros de café.
6)Llene la cesta filtro con la cantidad deseada de
café. Nota: utilice la cuchara dosificadora prevista
para fácil llenado. No presione el café. Asegúrese de
utilizar café molido fino.
7)Introduzca el porta filtro colocándolo bajo el centro
de la cafetera. Empújelo hacia arriba, de tal modo que
se alinee con las ranuras de ajuste.
8) Gire la manija hacia la derecha hasta que ajuste.
NO QUITE PORTAFILTRO DURANTE LA
ELABORACIÓN DE CAFE YA QUE EL PROCESO
PUEDE GENERAR QUEMADURAS.
17
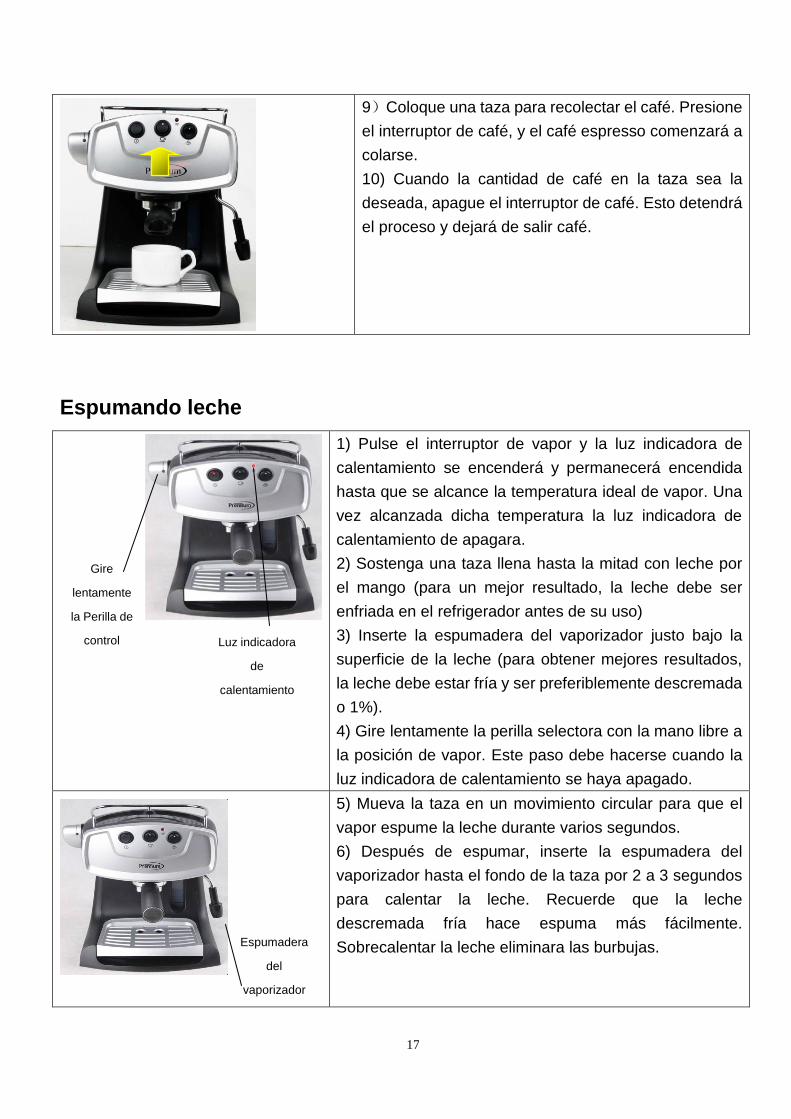
9)Coloque una taza para recolectar el café. Presione
el interruptor de café, y el café espresso comenzará a
colarse.
10) Cuando la cantidad de café en la taza sea la
deseada, apague el interruptor de café. Esto detendrá
el proceso y dejará de salir café.
Espumando leche
1) Pulse el interruptor de vapor y la luz indicadora de
calentamiento se encenderá y permanecerá encendida
hasta que se alcance la temperatura ideal de vapor. Una
vez alcanzada dicha temperatura la luz indicadora de
calentamiento de apagara.
2) Sostenga una taza llena hasta la mitad con leche por
el mango (para un mejor resultado, la leche debe ser
enfriada en el refrigerador antes de su uso)
3) Inserte la espumadera del vaporizador justo bajo la
superficie de la leche (para obtener mejores resultados,
la leche debe estar fría y ser preferiblemente descremada
o 1%).
4) Gire lentamente la perilla selectora con la mano libre a
la posición de vapor. Este paso debe hacerse cuando la
luz indicadora de calentamiento se haya apagado.
5) Mueva la taza en un movimiento circular para que el
vapor espume la leche durante varios segundos.
6) Después de espumar, inserte la espumadera del
vaporizador hasta el fondo de la taza por 2 a 3 segundos
para calentar la leche. Recuerde que la leche
descremada fría hace espuma más fácilmente.
Sobrecalentar la leche eliminara las burbujas.
Gire
lentamente
la Perilla de
control Luz indicadora
de
calentamiento
Espumadera
del
vaporizador

18
7) Después de sacar la espumadera de la leche
espumada, gire la perilla a la posición de vapor
momentáneamente para limpiar la boquilla del resto de la
leche.
8) Cuando haya terminado el proceso de vapor, gire la
perilla a la posición inicial y apague el Interruptor de
vapor
9) Vierta el café de la jarra en sus tazas de capuchino.
10) Coloque una cucharada de leche batida encima de su
café espresso. La espuma no se vierte fácilmente del
recipiente, ya que se separó de la leche caliente.
11) Remate su capuchino con una pizca de nuez
moscada, canela u hojuelas de chocolate.
El estante superior se puede usar para mantener los pocillos tibios mientras se hace
el café. Coloque los pocillos boca abajo en el estante superior y recuéstelos contra
el borde mientras hace el café o espuma la leche.
CUIDADO Y LIMPIEZA
El proceso de elaboración de café consiste en extraer aceites del café molido para hacer café
espresso. Con el tiempo, se acumulan depósitos de estos aceites y afectan el sabor del café y el
funcionamiento de la máquina de café espresso. La limpieza regular de la máquina de café
espresso es esencial para eliminar estos aceites y mantenerla funcionando correctamente. Deje
correr agua sobre el cabezal de colado y la boquilla de vapor para mantener su equipo limpio
después de cada café y al final de cada sesión de café.
Importante: No lave las piezas en el lavaplatos. No sumerja la unidad en el agua.
19
INFORMACIÓN IMPORTANTE PARA LA ELIMINACION DE PRODUCTOS DE CONFORMIDAD
CON LA DIRECTIVA 2002/98/CE de la CE.
Al final de su vida útil, el producto correcto no debe ser eliminado como residuo urbano normal.
Debe llevarse a la autoridad local o centro de recogida de residuos o a un distribuidor que preste el
servicio de recolección.
Desechar un electrodoméstico de esta manera evita posibles consecuencias negativas para el
medio ambiente y la salud, derivados del desecho no adecuado, y permite que los materiales del
equipo sean reciclados a fin de obtener ahorros importantes en energía y recursos. Como
recordatorio de la necesidad de desechar los electrodomésticos por separado, el producto está
marcado con un basurero con ruedas tachado.