
imageRUNNER ADVANCE 8105/8095/8085 Getting Started
238
ENG Please read this guide before operating this product. After you finish reading this guide, store it in a safe place for future reference. Getting Started Read this guide first.
-
Upload
khangminh22 -
Category
Documents
-
view
3 -
download
0
Transcript of imageRUNNER ADVANCE 8105/8095/8085 Getting Started

ENGPlease read this guide before operating this product.After you finish reading this guide, store it in a safe place for future reference.
Getting Started
Read this guide first.


imageRUNNER ADVANCE
8105/8095/8085
Getting Started

Flow of Settings for Using Each Function This sectioin describes the fl ow of settings for using each function.
Please read Chapter 1, “Before You Start Using This Machine” fi rst.
→ Confi rm the Following Settings: p. 1-21
→ Logging In to the Machine as an Administrator: p. 1-22
For information on system requirements for using functions shown below, see Chapter 2, “Before Connecting to a Network.” • Print (USB/Network) → Printing from a Computer: p. 2-2
• Scan and Send (Send to a File Server) → Sending Data: p. 2-6
• Scan and Send (E-mail/I-fax) → Using E-Mail/I-Fax: p. 2-5
Optional products may be required depending on the function. For more information on the optional products required for each
function, see e-Manual > Optional Products/Software.
Connecting to a Network
→ Connecting to a Network: p. 3-3
→ Interface Settings: p. 3-6
SMB/CIFS→ SMB/CIFS Network Setup Procedures: p. 6-2 → Protocol Settings (SMB/CIFS): p. 6-3
TCP/IP
→ TCP/IP Network Setup Procedures: p. 4-2
→ Protocol Settings (TCP/IP): p. 4-3
Network Settings
Connecting via a USB
→ Connecting to a USB Interface: p. 3-4
Print(USB)
Print(Network)
Scan and StoreAccess Stored Files・Advanced Box/Network
Scan and Send・Sending Data to a File Server
Connecting to a Network
→ Connecting to a Network: p. 3-3
→ Interface Settings: p. 3-6
→ Communication Environment Setup: p. 3-8
SMB/CIFS→ SMB/CIFS Network Setup Procedures: p. 6-2 → Protocol Settings (SMB/CIFS): p. 6-3
Network Settings
AppleTalk→ AppleTalk Network Setup Procedures: p. 7-2 → Protocol Settings (AppleTalk): p. 7-3
TCP/IP→ TCP/IP Network Setup Procedures: p. 4-2
→ Protocol Settings (TCP/IP): p. 4-3
NetWare→ NetWare Network Setup Procedures: p. 5-2
→ Protocol Settings (NetWare): p. 5-3
Settings for Printing from a
Computer
→ Chapter 13, "Before Printing from Computers"
Settings for Printing from a
Computer
→ Chapter 13, "Before Printing from Computers"
Copy
Scan and Store Access Stored Files
・Mail Box
・Memory Media
Register/Update
Software*1
User Access Control for Advanced Box
Settings
→ User Access Control for Advanced Box: p. 12-2
Advanced Box Open
to Public Settings
→ Advanced Box Open to Public Settings: p. 12-6
Setting Up a Computer as a File
Server*2
FTP Server→ FTP Server Settings:
p. 4-29
WebDAV Server→ WebDAV Server Settings:
p. 4-36
Windows Shared Folder
Samba Shared Folder→ Setting Up a Computer
as a File Server (TCP/IP):
p. 4-28
Available Functions without Settings
*1 If you access the delivery server and register/update software, “Connecting to a Network” and “Network Settings” in this flow are required.
If you register/update software using the Remote UI, “Connecting to a Network,” “Network Settings,” and “Remote UI Settings” are required.

TCP/IP
→ TCP/IP Network Setup Procedures: p. 4-2
→ Protocol Settings (TCP/IP): p. 4-3
Network Settings
Scan and Send・E-Mail/I-Fax
Remote UI MEAP Remote Scan
Connecting to a Network
→ Connecting to a Network: p. 3-3
→ Interface Settings: p. 3-6
Remote UI
Settings
→ System Requirementsfor Using the Remote UI: p. 8-2
→ Before You Start the Remote UI: p. 8-3
MEAP Service Management Service
(SMS)Settings
→ System Requirements for Using SMS: p. 8-5
→ Before Starting SMS (Preparations): p. 8-6
Remote Scan
Settings
→ Chapter 14, "Before Using the Remote Scan Function"
E-Mail/I-Fax
Settings
→ E-Mail/I-Fax Settings: p. 4-25
*2 The available file server may differ, depending on the network you are using. See the following for the network you are using.
- If you are using TCP/IP Network: Setting Up a Computer as a File Server (TCP/IP) (→ p. 4-28)
- If you are using SMB/CIFS Network: Setting Up a Computer as a File Server (SMB/CIFS) (→ p. 6-6)

Manuals for the Machine The manuals for this machine are divided as follows. Please refer to them for detailed information.
Guides with this symbol are printed manuals.Guides with this symbol are included on the accompanying CD-ROM. (See footnote on the next page.)
• Precautions for Using Your Machine and Settings Required after Machine Installation Getting Started
(This Document)
• Quick Reference for Basic and Useful OperationsQuick Reference
• Maintenance and TroubleshootingMaintenance Guide
• Frequently Asked Questions and AnswersFrequently Asked Questions
• Windows Printer Driver Installation and Instructions
Printer Driver Installation Guide
• Mac Printer Driver Installation and InstructionsThe Mac UFR II Driver Guide and the Mac PS Driver Guide Mac Printer Driver Installation Guide
• Windows Network ScanGear Installation and Instructions
Network ScanGear Installation Guide

• Comprehensive Manual for Basic Operations and Handling Your Machine
- Before You Start Using This Machine - Basic Operations - Optional Products/Software- Settings/Registration - Paper Type Management Settings- Problem Solving - Maintenance - Practical Workflows - Purpose Classified Links
- Copy - Scan and Send - Scan and Store - Access Stored Files - Fax/I-Fax Inbox - Secured Print - Hold - Scanner - Web Access- Quick Menu - Status Monitor/Cancel - Print - Network - Remote UI - MEAP - Security
e-Manual
• To view the manual in PDF format, Adobe Reader/Acrobat Reader/Acrobat is required. If Adobe Reader/Acrobat Reader/Acrobat is not installed on your system, please download it from the Adobe Systems Incorporated website (http://www.adobe.com).
• The machine illustration on the cover may differ slightly from your machine.

How This Manual Is Organized
Chapter 1 Before You Start Using This Machine
Chapter 2 Before Connecting to a Network
Chapter 3 Settings Common to the Network Protocols
Chapter 4 Using a TCP/IP Network
Chapter 5 Using a NetWare Network (Windows)
Chapter 6 Using an SMB/CIFS Network
Chapter 7 Using an AppleTalk Network (Macintosh)
Chapter 8 Managing the Machine from a Computer
Chapter 9 Installing the System Options/MEAP Applications
Chapter 10 Updating the Firmware
Chapter 11 Managing the “Register/Update Software” Function
Chapter 12 Before Using the Advanced Box
Chapter 13 Before Printing from Computers
Chapter 14 Before Using the Remote Scan Function
Chapter 15 Appendix
Includes other useful information, such as the Reports and the Relationship between Original Orientation and Preprinted Paper Output Chart.
Considerable effort has been made to ensure that this manual is free of inaccuracies and omissions. However, as we are constantly improving our products, if you need an exact specification, please contact Canon.

vii
Contents
Preface . . . . . . . . . . . . . . . . . . . . . . . . . . . . . . . . . . . . . . . . . . . . . . . . . . . . . . . . . . . . . . . . . . . . . . . . . . . . . . . . . . . . . . . . . xi
How To Use This Manual . . . . . . . . . . . . . . . . . . . . . . . . . . . . . . . . . . . . . . . . . . . . . . . . . . . . . . . . . . . . . . . . . . . . . . . . . xi
Symbols Used in This Manual . . . . . . . . . . . . . . . . . . . . . . . . . . . . . . . . . . . . . . . . . . . . . . . . . . . . . . . . . . . . . . . . . . . . . . . . . . . . . . . xi
Keys and Buttons Used in This Manual . . . . . . . . . . . . . . . . . . . . . . . . . . . . . . . . . . . . . . . . . . . . . . . . . . . . . . . . . . . . . . . . . . . . . xii
Displays Used in This Manual . . . . . . . . . . . . . . . . . . . . . . . . . . . . . . . . . . . . . . . . . . . . . . . . . . . . . . . . . . . . . . . . . . . . . . . . . . . . . . xii
Illustrations Used in This Manual . . . . . . . . . . . . . . . . . . . . . . . . . . . . . . . . . . . . . . . . . . . . . . . . . . . . . . . . . . . . . . . . . . . . . . . . . . .xiii
Abbreviations Used in This Manual . . . . . . . . . . . . . . . . . . . . . . . . . . . . . . . . . . . . . . . . . . . . . . . . . . . . . . . . . . . . . . . . . . . . . . . .xiii
Trademarks . . . . . . . . . . . . . . . . . . . . . . . . . . . . . . . . . . . . . . . . . . . . . . . . . . . . . . . . . . . . . . . . . . . . . . . . . . . . . . . . . . . . . . . . . . . . . . .xiv
Operations and Terms Used in This Manual . . . . . . . . . . . . . . . . . . . . . . . . . . . . . . . . . . . . . . . . . . . . . . . . . . . . . . xvi
Legal Notices . . . . . . . . . . . . . . . . . . . . . . . . . . . . . . . . . . . . . . . . . . . . . . . . . . . . . . . . . . . . . . . . . . . . . . . . . . . . . . . . .xviii
Product Name . . . . . . . . . . . . . . . . . . . . . . . . . . . . . . . . . . . . . . . . . . . . . . . . . . . . . . . . . . . . . . . . . . . . . . . . . . . . . . . . . . . . . . . . . . xviii
FCC (Federal Communications Commission) . . . . . . . . . . . . . . . . . . . . . . . . . . . . . . . . . . . . . . . . . . . . . . . . . . . . . . . . . . . . . xviii
Laser Safety . . . . . . . . . . . . . . . . . . . . . . . . . . . . . . . . . . . . . . . . . . . . . . . . . . . . . . . . . . . . . . . . . . . . . . . . . . . . . . . . . . . . . . . . . . . . . . .xix
International ENERGY STAR Program . . . . . . . . . . . . . . . . . . . . . . . . . . . . . . . . . . . . . . . . . . . . . . . . . . . . . . . . . . . . . . . . . . . . . . .xix
IPv6 Ready Logo . . . . . . . . . . . . . . . . . . . . . . . . . . . . . . . . . . . . . . . . . . . . . . . . . . . . . . . . . . . . . . . . . . . . . . . . . . . . . . . . . . . . . . . . . . xx
Information Security Standard (IEEE 2600) . . . . . . . . . . . . . . . . . . . . . . . . . . . . . . . . . . . . . . . . . . . . . . . . . . . . . . . . . . . . . . . . . xx
Copyright . . . . . . . . . . . . . . . . . . . . . . . . . . . . . . . . . . . . . . . . . . . . . . . . . . . . . . . . . . . . . . . . . . . . . . . . . . . . . . . . . . . . . . . . . . . . . . . . . xx
Third Party Software . . . . . . . . . . . . . . . . . . . . . . . . . . . . . . . . . . . . . . . . . . . . . . . . . . . . . . . . . . . . . . . . . . . . . . . . . . . . . . . . . . . . . .xxi
The Software Subjected to Other Conditions . . . . . . . . . . . . . . . . . . . . . . . . . . . . . . . . . . . . . . . . . . . . . . . . . . . . . . . . . . . . . . xxii
The Software Licensed under Open Source Licenses . . . . . . . . . . . . . . . . . . . . . . . . . . . . . . . . . . . . . . . . . . . . . . . . . . . . . . . xxii
Disclaimers . . . . . . . . . . . . . . . . . . . . . . . . . . . . . . . . . . . . . . . . . . . . . . . . . . . . . . . . . . . . . . . . . . . . . . . . . . . . . . . . . . . . . . . . . . . . . . xxii
Legal Limitations on the Usage of Your Product and the Use of Images . . . . . . . . . . . . . . . . . . . . . . . . . . . . . . . . . . . . . xxii
Important Safety Instructions . . . . . . . . . . . . . . . . . . . . . . . . . . . . . . . . . . . . . . . . . . . . . . . . . . . . . . . . . . . . . . . . . xxiii
Installation . . . . . . . . . . . . . . . . . . . . . . . . . . . . . . . . . . . . . . . . . . . . . . . . . . . . . . . . . . . . . . . . . . . . . . . . . . . . . . . . . . . . . . . . . . . . . . .xxiii
Power Supply . . . . . . . . . . . . . . . . . . . . . . . . . . . . . . . . . . . . . . . . . . . . . . . . . . . . . . . . . . . . . . . . . . . . . . . . . . . . . . . . . . . . . . . . . . . . xxv
Handling . . . . . . . . . . . . . . . . . . . . . . . . . . . . . . . . . . . . . . . . . . . . . . . . . . . . . . . . . . . . . . . . . . . . . . . . . . . . . . . . . . . . . . . . . . . . . . . .xxvi
Maintenance and Inspections . . . . . . . . . . . . . . . . . . . . . . . . . . . . . . . . . . . . . . . . . . . . . . . . . . . . . . . . . . . . . . . . . . . . . . . . . . . .xxix
Consumables . . . . . . . . . . . . . . . . . . . . . . . . . . . . . . . . . . . . . . . . . . . . . . . . . . . . . . . . . . . . . . . . . . . . . . . . . . . . . . . . . . . . . . . . . . . .xxxi
Other Warnings . . . . . . . . . . . . . . . . . . . . . . . . . . . . . . . . . . . . . . . . . . . . . . . . . . . . . . . . . . . . . . . . . . . . . . . . . . . . . . . . . . . . . . . . . .xxxi
Periodic Inspection of the Breaker . . . . . . . . . . . . . . . . . . . . . . . . . . . . . . . . . . . . . . . . . . . . . . . . . . . . . . . . . . . . xxxii
Checking the Breaker . . . . . . . . . . . . . . . . . . . . . . . . . . . . . . . . . . . . . . . . . . . . . . . . . . . . . . . . . . . . . . . . . . . . . . . . . . . . . . . . . . . xxxii
Check Sheet for the Periodic Inspection of the Breaker . . . . . . . . . . . . . . . . . . . . . . . . . . . . . . . . . . . . . . . . . xxxv
Chapter 1 Before You Start Using This Machine
Installation Location and Handling . . . . . . . . . . . . . . . . . . . . . . . . . . . . . . . . . . . . . . . . . . . . . . . . . . . . . . . . . . . . . .1-2
Installation Precautions . . . . . . . . . . . . . . . . . . . . . . . . . . . . . . . . . . . . . . . . . . . . . . . . . . . . . . . . . . . . . . . . . . . . . . . . . . . . . . . . . . 1-2Avoid Installing the Machine in the Following Locations . . . . . . . . . . . . . . . . . . . . . . . . . . . . . . . . . . . . . . . . . . . . . . 1-2Select a Safe Power Supply . . . . . . . . . . . . . . . . . . . . . . . . . . . . . . . . . . . . . . . . . . . . . . . . . . . . . . . . . . . . . . . . . . . . . . . . . . . 1-5Moving the Machine . . . . . . . . . . . . . . . . . . . . . . . . . . . . . . . . . . . . . . . . . . . . . . . . . . . . . . . . . . . . . . . . . . . . . . . . . . . . . . . . . 1-6
Handling Precautions . . . . . . . . . . . . . . . . . . . . . . . . . . . . . . . . . . . . . . . . . . . . . . . . . . . . . . . . . . . . . . . . . . . . . . . . . . . . . . . . . . . . 1-6
Backing Up/Exporting Data . . . . . . . . . . . . . . . . . . . . . . . . . . . . . . . . . . . . . . . . . . . . . . . . . . . . . . . . . . . . . . . . . . . . .1-9
Parts and Their Functions . . . . . . . . . . . . . . . . . . . . . . . . . . . . . . . . . . . . . . . . . . . . . . . . . . . . . . . . . . . . . . . . . . . . . 1-10
External View . . . . . . . . . . . . . . . . . . . . . . . . . . . . . . . . . . . . . . . . . . . . . . . . . . . . . . . . . . . . . . . . . . . . . . . . . . . . . . . . . . . . . . . . . . . 1-10
Internal View . . . . . . . . . . . . . . . . . . . . . . . . . . . . . . . . . . . . . . . . . . . . . . . . . . . . . . . . . . . . . . . . . . . . . . . . . . . . . . . . . . . . . . . . . . . . 1-12
Control Panel Parts and Functions . . . . . . . . . . . . . . . . . . . . . . . . . . . . . . . . . . . . . . . . . . . . . . . . . . . . . . . . . . . . . . . . . . . . . . . 1-13
Main Power and Control Panel Power . . . . . . . . . . . . . . . . . . . . . . . . . . . . . . . . . . . . . . . . . . . . . . . . . . . . . . . . . . 1-14
How to Turn ON the Main Power . . . . . . . . . . . . . . . . . . . . . . . . . . . . . . . . . . . . . . . . . . . . . . . . . . . . . . . . . . . . . . . . . . . . . . . . . 1-14
Control Panel Power Switch . . . . . . . . . . . . . . . . . . . . . . . . . . . . . . . . . . . . . . . . . . . . . . . . . . . . . . . . . . . . . . . . . . . . . . . . . . . . . 1-16
Shutting Down the Machine . . . . . . . . . . . . . . . . . . . . . . . . . . . . . . . . . . . . . . . . . . . . . . . . . . . . . . . . . . . . . . . . . . . . . . . . . . . . . 1-17
What This Machine Can Do. . . . . . . . . . . . . . . . . . . . . . . . . . . . . . . . . . . . . . . . . . . . . . . . . . . . . . . . . . . . . . . . . . . . 1-18
Operations Required to Use the Machine . . . . . . . . . . . . . . . . . . . . . . . . . . . . . . . . . . . . . . . . . . . . . . . . . . . . . . 1-21
Confirm the Following Settings . . . . . . . . . . . . . . . . . . . . . . . . . . . . . . . . . . . . . . . . . . . . . . . . . . . . . . . . . . . . . . . . . . . . . . . . . . 1-21
Logging In to the Machine as an Administrator . . . . . . . . . . . . . . . . . . . . . . . . . . . . . . . . . . . . . . . . . . . . . . . . . . . . . . . . . . . 1-22Logging In from the Touch Panel Display . . . . . . . . . . . . . . . . . . . . . . . . . . . . . . . . . . . . . . . . . . . . . . . . . . . . . . . . . . . . 1-22Logging In from the Remote UI . . . . . . . . . . . . . . . . . . . . . . . . . . . . . . . . . . . . . . . . . . . . . . . . . . . . . . . . . . . . . . . . . . . . . 1-23

viii
Chapter 2 Before Connecting to a Network
Optional Equipment and System Requirements for Connecting to a Network . . . . . . . . . . . . . . . . . . . . . .2-2
Printing from a Computer . . . . . . . . . . . . . . . . . . . . . . . . . . . . . . . . . . . . . . . . . . . . . . . . . . . . . . . . . . . . . . . . . . . . . . . . . . . . . . . . 2-2Optional Equipment Requirements. . . . . . . . . . . . . . . . . . . . . . . . . . . . . . . . . . . . . . . . . . . . . . . . . . . . . . . . . . . . . . . . . . . 2-2System Requirements . . . . . . . . . . . . . . . . . . . . . . . . . . . . . . . . . . . . . . . . . . . . . . . . . . . . . . . . . . . . . . . . . . . . . . . . . . . . . . . . 2-3
Using E-Mail/I-Fax . . . . . . . . . . . . . . . . . . . . . . . . . . . . . . . . . . . . . . . . . . . . . . . . . . . . . . . . . . . . . . . . . . . . . . . . . . . . . . . . . . . . . . . . 2-5Optional Equipment Requirements. . . . . . . . . . . . . . . . . . . . . . . . . . . . . . . . . . . . . . . . . . . . . . . . . . . . . . . . . . . . . . . . . . . 2-5System Requirements . . . . . . . . . . . . . . . . . . . . . . . . . . . . . . . . . . . . . . . . . . . . . . . . . . . . . . . . . . . . . . . . . . . . . . . . . . . . . . . . 2-5
Sending Data . . . . . . . . . . . . . . . . . . . . . . . . . . . . . . . . . . . . . . . . . . . . . . . . . . . . . . . . . . . . . . . . . . . . . . . . . . . . . . . . . . . . . . . . . . . . 2-6Optional Equipment Requirements. . . . . . . . . . . . . . . . . . . . . . . . . . . . . . . . . . . . . . . . . . . . . . . . . . . . . . . . . . . . . . . . . . . 2-6System Requirements . . . . . . . . . . . . . . . . . . . . . . . . . . . . . . . . . . . . . . . . . . . . . . . . . . . . . . . . . . . . . . . . . . . . . . . . . . . . . . . . 2-6
Checking Your Network Environment . . . . . . . . . . . . . . . . . . . . . . . . . . . . . . . . . . . . . . . . . . . . . . . . . . . . . . . . . 2-10
Sample Windows Network. . . . . . . . . . . . . . . . . . . . . . . . . . . . . . . . . . . . . . . . . . . . . . . . . . . . . . . . . . . . . . . . . . . . . . . . . . . . . . . 2-10
Sample Macintosh Network . . . . . . . . . . . . . . . . . . . . . . . . . . . . . . . . . . . . . . . . . . . . . . . . . . . . . . . . . . . . . . . . . . . . . . . . . . . . . 2-11
Sample UNIX Network . . . . . . . . . . . . . . . . . . . . . . . . . . . . . . . . . . . . . . . . . . . . . . . . . . . . . . . . . . . . . . . . . . . . . . . . . . . . . . . . . . . 2-11
Using a Network with Various Types of Computers . . . . . . . . . . . . . . . . . . . . . . . . . . . . . . . . . . . . . . . . . . . . . . . . . . . . . . . 2-12
Chapter 3 Settings Common to the Network Protocols
Network Environment Setup Procedures . . . . . . . . . . . . . . . . . . . . . . . . . . . . . . . . . . . . . . . . . . . . . . . . . . . . . . . .3-2
Connecting the Machine to a Computer or Network . . . . . . . . . . . . . . . . . . . . . . . . . . . . . . . . . . . . . . . . . . . . . .3-3
Connecting to a Network . . . . . . . . . . . . . . . . . . . . . . . . . . . . . . . . . . . . . . . . . . . . . . . . . . . . . . . . . . . . . . . . . . . . . . . . . . . . . . . . . 3-3
Connecting to a USB Interface . . . . . . . . . . . . . . . . . . . . . . . . . . . . . . . . . . . . . . . . . . . . . . . . . . . . . . . . . . . . . . . . . . . . . . . . . . . . 3-4
Specifying Network Settings from the Touch Panel Display . . . . . . . . . . . . . . . . . . . . . . . . . . . . . . . . . . . . . . .3-5
Interface Settings . . . . . . . . . . . . . . . . . . . . . . . . . . . . . . . . . . . . . . . . . . . . . . . . . . . . . . . . . . . . . . . . . . . . . . . . . . . . . .3-6
Communication Environment Setup . . . . . . . . . . . . . . . . . . . . . . . . . . . . . . . . . . . . . . . . . . . . . . . . . . . . . . . . . . . .3-8
Chapter 4 Using a TCP/IP Network
TCP/IP Network Setup Procedures. . . . . . . . . . . . . . . . . . . . . . . . . . . . . . . . . . . . . . . . . . . . . . . . . . . . . . . . . . . . . . .4-2
Protocol Settings (TCP/IP) . . . . . . . . . . . . . . . . . . . . . . . . . . . . . . . . . . . . . . . . . . . . . . . . . . . . . . . . . . . . . . . . . . . . . .4-3
TCP/IPv4 Settings . . . . . . . . . . . . . . . . . . . . . . . . . . . . . . . . . . . . . . . . . . . . . . . . . . . . . . . . . . . . . . . . . . . . . . . . . . . . . . . . . . . . . . . . 4-3
TCP/IPv6 Settings . . . . . . . . . . . . . . . . . . . . . . . . . . . . . . . . . . . . . . . . . . . . . . . . . . . . . . . . . . . . . . . . . . . . . . . . . . . . . . . . . . . . . . . . 4-9
Settings Common to TCP/IPv4 and TCP/IPv6 . . . . . . . . . . . . . . . . . . . . . . . . . . . . . . . . . . . . . . . . . . . . . . . . . . . . . . . . . . . . . 4-15
Confirming TCP/IPv4 Settings . . . . . . . . . . . . . . . . . . . . . . . . . . . . . . . . . . . . . . . . . . . . . . . . . . . . . . . . . . . . . . . . . . . . . . . . . . . 4-23
Confirming TCP/IPv6 Settings . . . . . . . . . . . . . . . . . . . . . . . . . . . . . . . . . . . . . . . . . . . . . . . . . . . . . . . . . . . . . . . . . . . . . . . . . . . 4-24
E-Mail/I-Fax Settings . . . . . . . . . . . . . . . . . . . . . . . . . . . . . . . . . . . . . . . . . . . . . . . . . . . . . . . . . . . . . . . . . . . . . . . . . . . . . . . . . . . . 4-25
Startup Time Settings . . . . . . . . . . . . . . . . . . . . . . . . . . . . . . . . . . . . . . . . . . . . . . . . . . . . . . . . . . . . . . . . . . . . . . . . . . . . . . . . . . . 4-27
Setting Up a Computer as a File Server (TCP/IP) . . . . . . . . . . . . . . . . . . . . . . . . . . . . . . . . . . . . . . . . . . . . . . . . 4-28
FTP Server Settings. . . . . . . . . . . . . . . . . . . . . . . . . . . . . . . . . . . . . . . . . . . . . . . . . . . . . . . . . . . . . . . . . . . . . . . . . . . . . . . . . . . . . . 4-29Windows 2000/XP/Vista/7/Server 2003/Server 2008 . . . . . . . . . . . . . . . . . . . . . . . . . . . . . . . . . . . . . . . . . . . . . . . . . 4-29UNIX/Linux . . . . . . . . . . . . . . . . . . . . . . . . . . . . . . . . . . . . . . . . . . . . . . . . . . . . . . . . . . . . . . . . . . . . . . . . . . . . . . . . . . . . . . . . . 4-33Mac OS X . . . . . . . . . . . . . . . . . . . . . . . . . . . . . . . . . . . . . . . . . . . . . . . . . . . . . . . . . . . . . . . . . . . . . . . . . . . . . . . . . . . . . . . . . . . 4-34
WebDAV Server Settings . . . . . . . . . . . . . . . . . . . . . . . . . . . . . . . . . . . . . . . . . . . . . . . . . . . . . . . . . . . . . . . . . . . . . . . . . . . . . . . . 4-36IIS for Windows 2000/XP/Vista/7/2000 Server/Server 2003/Server 2008 . . . . . . . . . . . . . . . . . . . . . . . . . . . . . . . 4-36Apache for Windows 2000/XP/Vista/7/2000 Server/Server 2003/Server 2008/UNIX/Linux/Mac OS X . . . 4-38
Chapter 5 Using a NetWare Network (Windows)
NetWare Network Setup Procedures . . . . . . . . . . . . . . . . . . . . . . . . . . . . . . . . . . . . . . . . . . . . . . . . . . . . . . . . . . . .5-2
Protocol Settings (NetWare) . . . . . . . . . . . . . . . . . . . . . . . . . . . . . . . . . . . . . . . . . . . . . . . . . . . . . . . . . . . . . . . . . . . .5-3
Chapter 6 Using an SMB/CIFS Network
SMB/CIFS Network Setup Procedures . . . . . . . . . . . . . . . . . . . . . . . . . . . . . . . . . . . . . . . . . . . . . . . . . . . . . . . . . . . .6-2
Protocol Settings (SMB/CIFS) . . . . . . . . . . . . . . . . . . . . . . . . . . . . . . . . . . . . . . . . . . . . . . . . . . . . . . . . . . . . . . . . . . .6-3
TCP/IP Settings . . . . . . . . . . . . . . . . . . . . . . . . . . . . . . . . . . . . . . . . . . . . . . . . . . . . . . . . . . . . . . . . . . . . . . . . . . . . . . . . . . . . . . . . . . . 6-3
SMB and WINS Settings . . . . . . . . . . . . . . . . . . . . . . . . . . . . . . . . . . . . . . . . . . . . . . . . . . . . . . . . . . . . . . . . . . . . . . . . . . . . . . . . . . 6-3
Setting Up a Computer as a File Server (SMB/CIFS) . . . . . . . . . . . . . . . . . . . . . . . . . . . . . . . . . . . . . . . . . . . . . . .6-6
Connecting to a TCP/IP Network . . . . . . . . . . . . . . . . . . . . . . . . . . . . . . . . . . . . . . . . . . . . . . . . . . . . . . . . . . . . . . . . . . . . . . . . . . 6-6
Connecting to an SMB/CIFS Network and Configuring a Shared Folder . . . . . . . . . . . . . . . . . . . . . . . . . . . . . . . . . . . . . 6-7Windows 2000/XP/Vista/7/Server 2003/Server 2008 . . . . . . . . . . . . . . . . . . . . . . . . . . . . . . . . . . . . . . . . . . . . . . . . . . 6-7Samba (UNIX/Linux/Mac OS X 10.3/10.4) . . . . . . . . . . . . . . . . . . . . . . . . . . . . . . . . . . . . . . . . . . . . . . . . . . . . . . . . . . . . 6-12

ix
Chapter 7 Using an AppleTalk Network (Macintosh)
AppleTalk Network Setup Procedures . . . . . . . . . . . . . . . . . . . . . . . . . . . . . . . . . . . . . . . . . . . . . . . . . . . . . . . . . . .7-2
Protocol Settings (AppleTalk) . . . . . . . . . . . . . . . . . . . . . . . . . . . . . . . . . . . . . . . . . . . . . . . . . . . . . . . . . . . . . . . . . . .7-3
Chapter 8 Managing the Machine from a Computer
System Requirements for Using the Remote UI . . . . . . . . . . . . . . . . . . . . . . . . . . . . . . . . . . . . . . . . . . . . . . . . . . .8-2
Before You Start the Remote UI . . . . . . . . . . . . . . . . . . . . . . . . . . . . . . . . . . . . . . . . . . . . . . . . . . . . . . . . . . . . . . . . .8-3
Enabling the Remote UI . . . . . . . . . . . . . . . . . . . . . . . . . . . . . . . . . . . . . . . . . . . . . . . . . . . . . . . . . . . . . . . . . . . . . . . . . . . . . . . . . . 8-4
System Requirements for Using SMS . . . . . . . . . . . . . . . . . . . . . . . . . . . . . . . . . . . . . . . . . . . . . . . . . . . . . . . . . . . .8-5
Before Starting SMS (Preparations) . . . . . . . . . . . . . . . . . . . . . . . . . . . . . . . . . . . . . . . . . . . . . . . . . . . . . . . . . . . . .8-6
Specifying the SSL Settings . . . . . . . . . . . . . . . . . . . . . . . . . . . . . . . . . . . . . . . . . . . . . . . . . . . . . . . . . . . . . . . . . . . . . . . . . . . . . . . 8-6
Enabling the Machine to be Accessed from Web Browsers . . . . . . . . . . . . . . . . . . . . . . . . . . . . . . . . . . . . . . . . . . . . . . . . . 8-7
Chapter 9 Installing the System Options/MEAP Applications
Overview . . . . . . . . . . . . . . . . . . . . . . . . . . . . . . . . . . . . . . . . . . . . . . . . . . . . . . . . . . . . . . . . . . . . . . . . . . . . . . . . . . . . . .9-2
To Install by Connecting This Machine to an Outside Network . . . . . . . . . . . . . . . . . . . . . . . . . . . . . . . . . . . . . . . . . . . . . 9-2
To Install by Not Connecting This Machine to an Outside Network . . . . . . . . . . . . . . . . . . . . . . . . . . . . . . . . . . . . . . . . . 9-3
Using the System Options/MEAP Applications That Require License Registration . . . . . . . . . . . . . . . . . . .9-4
System Options/MEAP Applications . . . . . . . . . . . . . . . . . . . . . . . . . . . . . . . . . . . . . . . . . . . . . . . . . . . . . . . . . . . . . . . . . . . . . . 9-4
Installing the System Options/MEAP Applications . . . . . . . . . . . . . . . . . . . . . . . . . . . . . . . . . . . . . . . . . . . . . . . . . . . . . . . . . 9-5To Install by Connecting this Machine to an Outside Network . . . . . . . . . . . . . . . . . . . . . . . . . . . . . . . . . . . . . . . . . 9-5To Install by Not Connecting this Machine to an Outside Network . . . . . . . . . . . . . . . . . . . . . . . . . . . . . . . . . . . . . 9-5
Installing by Connecting this Machine to an Outside Network . . . . . . . . . . . . . . . . . . . . . . . . . . . . . . . . . . . . .9-6
Using the Touch Panel Display to Install (Delivery) . . . . . . . . . . . . . . . . . . . . . . . . . . . . . . . . . . . . . . . . . . . . . . . . . . . . . . . . . 9-6
Using the Remote UI to Install (Delivery) . . . . . . . . . . . . . . . . . . . . . . . . . . . . . . . . . . . . . . . . . . . . . . . . . . . . . . . . . . . . . . . . . . 9-9
Installing by Not Connecting this Machine to an Outside Network . . . . . . . . . . . . . . . . . . . . . . . . . . . . . . . 9-12
Obtaining the License Key/License File . . . . . . . . . . . . . . . . . . . . . . . . . . . . . . . . . . . . . . . . . . . . . . . . . . . . . . . . . . . . . . . . . . . 9-12
Installing the System Options Using the Touch Panel Display . . . . . . . . . . . . . . . . . . . . . . . . . . . . . . . . . . . . . . . . . . . . . 9-13
Installing the System Options Using the Remote UI (Manual) . . . . . . . . . . . . . . . . . . . . . . . . . . . . . . . . . . . . . . . . . . . . . 9-14
Installing the MEAP Applications Using the Remote UI (Manual) . . . . . . . . . . . . . . . . . . . . . . . . . . . . . . . . . . . . . . . . . . 9-16
Starting the MEAP Applications . . . . . . . . . . . . . . . . . . . . . . . . . . . . . . . . . . . . . . . . . . . . . . . . . . . . . . . . . . . . . . . . . . . . . . . . . . 9-19
Downloading the Manuals and Related Software . . . . . . . . . . . . . . . . . . . . . . . . . . . . . . . . . . . . . . . . . . . . . . 9-20
Chapter 10 Updating the Firmware
Updating the Firmware . . . . . . . . . . . . . . . . . . . . . . . . . . . . . . . . . . . . . . . . . . . . . . . . . . . . . . . . . . . . . . . . . . . . . . . 10-2
Using the Remote UI to Update (Manual) . . . . . . . . . . . . . . . . . . . . . . . . . . . . . . . . . . . . . . . . . . . . . . . . . . . . . . 10-3
Chapter 11 Managing the “Register/Update Software” Function
Managing by Using the Touch Panel Display . . . . . . . . . . . . . . . . . . . . . . . . . . . . . . . . . . . . . . . . . . . . . . . . . . . 11-2
Displaying the Installation Log Using the Touch Panel Display . . . . . . . . . . . . . . . . . . . . . . . . . . . . . . . . . . . . . . . . . . . . 11-2
Testing Communication Using the Touch Panel Display . . . . . . . . . . . . . . . . . . . . . . . . . . . . . . . . . . . . . . . . . . . . . . . . . . . 11-4
Managing by Using the Remote UI . . . . . . . . . . . . . . . . . . . . . . . . . . . . . . . . . . . . . . . . . . . . . . . . . . . . . . . . . . . . 11-6
Displaying the Installation Log Using the Remote UI . . . . . . . . . . . . . . . . . . . . . . . . . . . . . . . . . . . . . . . . . . . . . . . . . . . . . . 11-6
Testing Communication Using the Remote UI . . . . . . . . . . . . . . . . . . . . . . . . . . . . . . . . . . . . . . . . . . . . . . . . . . . . . . . . . . . . 11-8
Chapter 12 Before Using the Advanced Box
User Access Control for Advanced Box . . . . . . . . . . . . . . . . . . . . . . . . . . . . . . . . . . . . . . . . . . . . . . . . . . . . . . . . . 12-2
Advanced Box Open to Public Settings . . . . . . . . . . . . . . . . . . . . . . . . . . . . . . . . . . . . . . . . . . . . . . . . . . . . . . . . 12-6
Using a WebDAV/SMB Server . . . . . . . . . . . . . . . . . . . . . . . . . . . . . . . . . . . . . . . . . . . . . . . . . . . . . . . . . . . . . . . . . . . . . . . . . . . . 12-6
Setting the Authentication Management . . . . . . . . . . . . . . . . . . . . . . . . . . . . . . . . . . . . . . . . . . . . . . . . . . . . . . . . . . . . . . . . 12-7
x
Chapter 13 Before Printing from Computers
Installing the Printer Driver . . . . . . . . . . . . . . . . . . . . . . . . . . . . . . . . . . . . . . . . . . . . . . . . . . . . . . . . . . . . . . . . . . . 13-2
System Requirements . . . . . . . . . . . . . . . . . . . . . . . . . . . . . . . . . . . . . . . . . . . . . . . . . . . . . . . . . . . . . . . . . . . . . . . . . . . . . . . . . . . 13-2
Selecting the Appropriate Printer Driver . . . . . . . . . . . . . . . . . . . . . . . . . . . . . . . . . . . . . . . . . . . . . . . . . . . . . . . . . . . . . . . . . 13-3
Installation . . . . . . . . . . . . . . . . . . . . . . . . . . . . . . . . . . . . . . . . . . . . . . . . . . . . . . . . . . . . . . . . . . . . . . . . . . . . . . . . . . . . . . . . . . . . . . 13-5
Setting the Printer Options . . . . . . . . . . . . . . . . . . . . . . . . . . . . . . . . . . . . . . . . . . . . . . . . . . . . . . . . . . . . . . . . . . . 13-7
For Windows . . . . . . . . . . . . . . . . . . . . . . . . . . . . . . . . . . . . . . . . . . . . . . . . . . . . . . . . . . . . . . . . . . . . . . . . . . . . . . . . . . . . . . . . . . . . 13-7
For Mac . . . . . . . . . . . . . . . . . . . . . . . . . . . . . . . . . . . . . . . . . . . . . . . . . . . . . . . . . . . . . . . . . . . . . . . . . . . . . . . . . . . . . . . . . . . . . . . . . 13-8
Other Software Programs . . . . . . . . . . . . . . . . . . . . . . . . . . . . . . . . . . . . . . . . . . . . . . . . . . . . . . . . . . . . . . . . . . . . 13-9
Chapter 14 Before Using the Remote Scan Function
Installing the Scanner Driver . . . . . . . . . . . . . . . . . . . . . . . . . . . . . . . . . . . . . . . . . . . . . . . . . . . . . . . . . . . . . . . . . 14-2
System Requirements . . . . . . . . . . . . . . . . . . . . . . . . . . . . . . . . . . . . . . . . . . . . . . . . . . . . . . . . . . . . . . . . . . . . . . . . . . . . . . . . . . . 14-3
Installation . . . . . . . . . . . . . . . . . . . . . . . . . . . . . . . . . . . . . . . . . . . . . . . . . . . . . . . . . . . . . . . . . . . . . . . . . . . . . . . . . . . . . . . . . . . . . . 14-4
Settings Required Prior to Remote Scanning . . . . . . . . . . . . . . . . . . . . . . . . . . . . . . . . . . . . . . . . . . . . . . . . . . . 14-5
Chapter 15 Appendix
Reports . . . . . . . . . . . . . . . . . . . . . . . . . . . . . . . . . . . . . . . . . . . . . . . . . . . . . . . . . . . . . . . . . . . . . . . . . . . . . . . . . . . . . 15-2
Counter Report . . . . . . . . . . . . . . . . . . . . . . . . . . . . . . . . . . . . . . . . . . . . . . . . . . . . . . . . . . . . . . . . . . . . . . . . . . . . . . . . . . . . . . . . . 15-2
Print Log List . . . . . . . . . . . . . . . . . . . . . . . . . . . . . . . . . . . . . . . . . . . . . . . . . . . . . . . . . . . . . . . . . . . . . . . . . . . . . . . . . . . . . . . . . . . . 15-3
Device Information Delivery Destination List . . . . . . . . . . . . . . . . . . . . . . . . . . . . . . . . . . . . . . . . . . . . . . . . . . . . . . . . . . . . . 15-4
Device Information Communication Log Report . . . . . . . . . . . . . . . . . . . . . . . . . . . . . . . . . . . . . . . . . . . . . . . . . . . . . . . . . 15-5
Send Job List . . . . . . . . . . . . . . . . . . . . . . . . . . . . . . . . . . . . . . . . . . . . . . . . . . . . . . . . . . . . . . . . . . . . . . . . . . . . . . . . . . . . . . . . . . . . 15-6
Send TX Report/Send Error TX Report . . . . . . . . . . . . . . . . . . . . . . . . . . . . . . . . . . . . . . . . . . . . . . . . . . . . . . . . . . . . . . . . . . . . 15-7
Activity Report . . . . . . . . . . . . . . . . . . . . . . . . . . . . . . . . . . . . . . . . . . . . . . . . . . . . . . . . . . . . . . . . . . . . . . . . . . . . . . . . . . . . . . . . . . 15-8
Forwarding Conditions List . . . . . . . . . . . . . . . . . . . . . . . . . . . . . . . . . . . . . . . . . . . . . . . . . . . . . . . . . . . . . . . . . . . . . . . . . . . . . . 15-9
Registered LDAP Server List . . . . . . . . . . . . . . . . . . . . . . . . . . . . . . . . . . . . . . . . . . . . . . . . . . . . . . . . . . . . . . . . . . . . . . . . . . . . . 15-9
Address Book List . . . . . . . . . . . . . . . . . . . . . . . . . . . . . . . . . . . . . . . . . . . . . . . . . . . . . . . . . . . . . . . . . . . . . . . . . . . . . . . . . . . . . . . 15-9
Store Log Report . . . . . . . . . . . . . . . . . . . . . . . . . . . . . . . . . . . . . . . . . . . . . . . . . . . . . . . . . . . . . . . . . . . . . . . . . . . . . . . . . . . . . . . 15-10
User’s Data List . . . . . . . . . . . . . . . . . . . . . . . . . . . . . . . . . . . . . . . . . . . . . . . . . . . . . . . . . . . . . . . . . . . . . . . . . . . . . . . . . . . . . . . . . 15-10
System Information . . . . . . . . . . . . . . . . . . . . . . . . . . . . . . . . . . . . . . . . . . . . . . . . . . . . . . . . . . . . . . . . . . . . . . . . . . . . . . . . . . . . 15-11
Number of Enterable Characters and Capacity of Various Functions . . . . . . . . . . . . . . . . . . . . . . . . . . . . 15-13
Number of Enterable Characters . . . . . . . . . . . . . . . . . . . . . . . . . . . . . . . . . . . . . . . . . . . . . . . . . . . . . . . . . . . . . . . . . . . . . . . . 15-13Settings/Registration . . . . . . . . . . . . . . . . . . . . . . . . . . . . . . . . . . . . . . . . . . . . . . . . . . . . . . . . . . . . . . . . . . . . . . . . . . . . . . 15-13
Capacity of Various Functions. . . . . . . . . . . . . . . . . . . . . . . . . . . . . . . . . . . . . . . . . . . . . . . . . . . . . . . . . . . . . . . . . . . . . . . . . . . 15-15Settings/Registration . . . . . . . . . . . . . . . . . . . . . . . . . . . . . . . . . . . . . . . . . . . . . . . . . . . . . . . . . . . . . . . . . . . . . . . . . . . . . . 15-15Copy . . . . . . . . . . . . . . . . . . . . . . . . . . . . . . . . . . . . . . . . . . . . . . . . . . . . . . . . . . . . . . . . . . . . . . . . . . . . . . . . . . . . . . . . . . . . . . 15-16Scan and Store . . . . . . . . . . . . . . . . . . . . . . . . . . . . . . . . . . . . . . . . . . . . . . . . . . . . . . . . . . . . . . . . . . . . . . . . . . . . . . . . . . . . 15-16Access Stored Files . . . . . . . . . . . . . . . . . . . . . . . . . . . . . . . . . . . . . . . . . . . . . . . . . . . . . . . . . . . . . . . . . . . . . . . . . . . . . . . . . 15-16Scan and Send. . . . . . . . . . . . . . . . . . . . . . . . . . . . . . . . . . . . . . . . . . . . . . . . . . . . . . . . . . . . . . . . . . . . . . . . . . . . . . . . . . . . . 15-16
Relationship between Original Orientation and Preprinted Paper Output Chart . . . . . . . . . . . . . . . . . 15-17
Index . . . . . . . . . . . . . . . . . . . . . . . . . . . . . . . . . . . . . . . . . . . . . . . . . . . . . . . . . . . . . . . . . . . . . . . . . . . . . . . . . . . . . . 15-20

xi
Preface Thank you for purchasing the Canon imageRUNNER ADVANCE 8105/8095/8085. Please read this manual thoroughly before operating the
machine to familiarize yourself with its capabilities, and to make the most of its many functions. After reading this manual, store it in a
safe place for future reference.
The System Manager or the System Administrator (Administrator) for SSO-H (Single Sign-On H) can specify all of the system settings
for the machine. Unless otherwise stated, "administrator" in this manual indicates the System Manager or the System Administrator
(Administrator). For information on the types of administrators, see e-Manual > Security.
How To Use This Manual
Symbols Used in This Manual
The following symbols are used in this manual to explain procedures, restrictions, handling precautions, and instructions that
should be observed for safety.
Indicates a warning concerning operations that may lead to death or injury to persons if not performed correctly. To use the machine safely, always pay attention to these warnings.
Indicates a caution concerning operations that may lead to injury to persons if not performed correctly. To use the machine safely, always pay attention to these cautions.
Indicates operational requirements and restrictions. Be sure to read these items carefully to operate the machine correctly, and avoid damage to the machine or property.
Indicates a clarification of an operation, or contains additional explanations for a procedure. Reading these notes is highly recommended.
Indicates an operation that must not be performed. Read these items carefully, and make sure not to perform the described operations.

xii
Keys and Buttons Used in This Manual
The following symbols and key/button names are a few examples of how keys and buttons to be clicked or pressed are expressed
in this manual:
• Control Panel Keys: Key Icon (Key Name) Example: (Start)
(Stop)
• Touch Panel Display Keys: [Key Name]
Example: [Cancel]
[Close]
• Buttons on Computer Operation Screens: [Button Name]
Example: [OK]
[Add]
Displays Used in This Manual
Screen shots of the touch panel display used in this manual are those taken when the optional Duplex Color Image Reader Unit is
attached to the imageRUNNER ADVANCE 8105.
Note that functions that cannot be used depending on the model or options, are not displayed on the touch panel display.
Screen shots used in this manual may differ from the ones you actually see.
The keys or buttons which you should click or press are marked with a , as shown below.
When multiple buttons or keys can be clicked or pressed, they will be highlighted and mentioned in the order in which they
should be clicked or pressed.
Example:
1 On the Network screen, press [Confirm Network Connection Set. Changes] →
specify the following.

xiii
Illustrations Used in This Manual
Illustrations used in this manual may differ from the one you actually use, because of the optional equipment and so on.
Abbreviations Used in This Manual
Microsoft Windows 2000 Operating System: Windows 2000
Microsoft Windows 2000 Professional Operating System: Windows 2000 Professional
Microsoft Windows 2000 Server Operating System: Windows 2000 Server
Microsoft Windows Server 2003 Operating System: Windows Server 2003
Microsoft Windows Server 2003 R2 Operating System: Windows Server 2003 R2
Microsoft Windows XP Professional Operating System: Windows XP Professional
Microsoft Windows XP Operating System: Windows XP
Microsoft Windows Vista Operating System: Windows Vista
Microsoft Windows Server 2008 Operating System: Windows Server 2008
Microsoft Windows 7 Operating System: Windows 7
Microsoft Windows Operating System: Windows
Novell NetWare: NetWare
Apple Macintosh: Macintosh
Apple Mac: Mac

xiv
Trademarks
MEAP and the MEAP logo are trademarks of Canon Inc.
This product contains the Universal Font Scaling Technology or UFST® under license from Monotype Imaging, Inc.. UFST® is a
trademark of Monotype Imaging, Inc. registered in the United States Patent and Trademark Office and may be registered in certain
jurisdictions.
UFST: Copyright © 1989 - 1996, 1997, 2003, 2004, 2008, all rights reserved, by Monotype Imaging Inc.
Apple, AppleTalk, EtherTalk, LocalTalk, Macintosh, Mac, Mac OS, and Safari are trademarks of Apple Inc., registered in the U.S. and
other countries.
Windows, Windows logo, Windows Vista, and Windows Vista logo are trademarks or registered trademarks of Microsoft
Corporation in the U.S. and/or other countries.
Adobe, PostScript, and the PostScript logo are either registered trademarks or trademarks of Adobe Systems Incorporated in the
United States and/or other countries.
Copyright © 2007 -08 Adobe Systems Incorporated. All rights reserved.
Protected by U.S. Patents 5,737,599; 5,781,785; 5,819,301; 5,929,866; 5,943,063; 6,073,148; 6,515,763; 6,639,593; 6,754,382;
7,046,403; 7,213,269; 7,242,415; Patents pending in the U.S. and other countries.
All instances of the name PostScript in the text are references to the PostScript language as defined by Adobe Systems
Incorporated unless otherwise stated. The name PostScript also is used as a product trademark for Adobe Systems'
implementation of the PostScript language interpreter.
Except as otherwise stated, any reference to a "PostScript printing device," "PostScript display device," or similar item refers to a
printing device, display device or item (respectively) that contains PostScript technology created or licensed by Adobe Systems
Incorporated and not to devices or items that purport to be merely compatible with the PostScript language.
Adobe, the Adobe logo, PostScript, the PostScript logo, and PostScript 3 are either registered trademarks or trademarks of Adobe
Systems Incorporated in the United States and/or other countries.
Linux is a registered trademark of Linus Torvalds. Microsoft and Windows are either registered trademarks or trademarks of
Microsoft Corporation in the United States and/or other countries.

xv
The PDF logo is a trademark or registered trademark of Adobe Systems Incorporated in the United States and other countries.
Copyright © 2008 Adobe Systems Incorporated. All rights reserved.
Protected by U.S. Patents 6,185,684; 6,205,549; 7,213,269; 7,272,628; 7,278,168; Patents pending in the U.S. and other countries.
All instances of the name PostScript in the text are references to the PostScript language as defined by Adobe Systems
Incorporated unless otherwise stated. The name PostScript also is used as a product trademark for Adobe Systems'
implementation of the PostScript language interpreter.
Except as otherwise stated, any reference to a "PostScript printing device," "PostScript display device," or similar item refers to a
printing device, display device or item (respectively) that contains PostScript technology created or licensed by Adobe Systems
Incorporated and not to devices or items that purport to be merely compatible with the PostScript language.
Adobe, the Adobe logo, PostScript, the PostScript Logo, and PostScript 3 are either registered trademarks or trademarks of Adobe
Systems Incorporated in the United States and/or other countries.
Other product and company names herein may be the trademarks of their respective owners.

xvi
Operations and Terms Used in This Manual
This machine makes effective use of memory to perform print operations efficiently. For example, as soon as the machine has scanned the original that you want to copy, it can immediately scan the next person's original. You can also print from this machine, using a function other than the Copy function. In this machine, these operations take place in a complex way, so that not only copies, but also various kinds of prints may sometimes have to wait their turn before they can be printed.
To avoid confusion when reading this manual, the terms "scanning," "printing," and "copying," used throughout this manual, are defined below. When making a copy, the process of scanning originals and printing copies may be described as separate functions.
■ Scanning
Scanning an original to be copied, scanning an original to be sent, or scanning an original to be stored as data in the machine.
■ Printing
Outputting a copy, outputting data stored in the machine, or outputting data sent from the computer to the machine.

xvii
■ Copying
Printing data scanned from an original, followed by finishing options, such as stapling.

xviii
Legal Notices
Product Name
Safety regulations require the product's name to be registered. In some regions where this product is sold, the following name(s) in parenthesis may be registered instead.
- imageRUNNER ADVANCE 8105/8095/8085 (F155400)
FCC (Federal Communications Commission)
Note: This equipment has been tested and found to comply with the limits for a Class A digital device, pursuant to Part 15 of
the FCC Rules, and the limits for an ISM equipment, pursuant to Part 18 of the FCC Rules. These limits are designed to provide
reasonable protection against harmful interference when the equipment is operated in a commercial environment. This
equipment generates, uses, and can radiate, radio frequency energy and, if not installed and used in accordance with the
Operator’s Manual, may cause harmful interference to radio communications. Operation of this equipment in a residential area is
likely to cause harmful interference in which case the user will be required to correct the interference at his own expense.
If this equipment does cause harmful interference to other equipment, which can be determined by turning the equipment off
and on, the user is encouraged to try to correct the interference by one or more of the following measures:
• Increase the separation between the equipment and other equipment.
• Connect the equipment into an outlet on a circuit different from that to which the other equipment is connected.
• Consult the dealer for help.
Use of shielded cables are required to comply with Class A limits in Subpart B of Part 15 of the FCC Rules.
Do not make any changes or modifications to the equipment unless otherwise specified in the manual. If you make such changes
or modifications, you could be required to stop operation of the equipment.
If your equipment malfunctions, please contact your local authorized Canon dealer from whom you purchased the equipment (if
under warranty), or with whom you have a servicing contract. If you are not sure who to contact, and have both purchased and
are using the equipment in the U.S.A., please refer to the “SUPPORT” page on Canon U.S.A.’s Web site (http://www.usa.canon.com).

xix
Laser Safety
This product complies with 21 CFR Chapter 1 Subchapter J as a Class I laser product under the U.S. Department of Health and
Human Services (DHHS) Radiation Performance Standard according to the Radiation Control for Health and Safety Act of 1968.
Also, this product is certified as a Class I laser product under IEC60825-1: 2007. This means that the product does not produce
hazardous laser radiation.
Since radiation emitted inside the product is completely confined within protective housings and external covers, the laser beam
cannot escape from the machine during any phase of user operation. Do not remove protective housings or external covers,
except as directed by the equipment's manual.
The labels shown below are attached to the Main Unit’s Upper Right Cover and Front Cover.
Use of controls, adjustments, or performance of procedures other than those specified in the manuals for this machine may result in hazardous radiation exposure.
International ENERGY STAR® Program
As an ENERGY STAR® Partner, Canon USA, Inc. has determined that this machine meets the international
ENERGY STAR ® Program for energy efficiency.
The International ENERGY STAR ® Office Equipment Program is an international program that promotes energy saving through the use of computers and other office equipment. The program backs the development and dissemination of products with functions that effectively reduce energy consumption. It is an open system in which business proprietors can participate voluntarily. The targeted products are office equipment, such as computers, displays, printers, facsimiles, and copiers. The standards and logos are uniform among participating nations.

xx
IPv6 Ready Logo
The protocol stack included in this machine has obtained the IPv6 Ready Logo Phase-1 established by the IPv6 Forum.
Information Security Standard (IEEE 2600)
This machine is compliant with IEEE Std 2600™ - 2008 (hereinafter referred to as IEEE 2600), a global information security standard
for multifunction peripherals and printers, and is able to achieve the security requirements defined in IEEE 2600.*
For information on how this machine meets the security requirements defined in IEEE 2600, see e-Manual > Security > IEEE 2600
Security Standard.
* IEEE 2600.1 CC Authentication has not been obtained for this machine by itself.
Copyright
Copyright 2010 by Canon Inc. All rights reserved.
No part of this publication may be reproduced or transmitted in any form or by any means, electronic or mechanical, including
photocopying and recording, or by any information storage or retrieval system without the prior written permission of Canon Inc.
This product includes software and/or software modules that are licensed by Canon Inc. or its licensors from third parties. Use and
distribution of this software and/or software modules are subject to conditions (a) through (d) below.
(a)
Copyright (C) 1999, 2000, 2002 Aladdin Enterprises. All rights reserved.(b)
UFST: Copyright © 1989 - 1996, 1997, 2003, 2004, 2008, all rights reserved, by Monotype Imaging Inc.(c)
Copyright © Unpublished Work of Novell, Inc. All Rights Reserved.(d)
Portions of this software are copyright © 2007 The FreeType Project (www.freetype.org). All rights reserved.

xxi
Third Party Software
A. This Canon product (the “PRODUCT”) includes third-party software modules. Use and distribution of these software modules
(the “SOFTWARE”) are subject to the conditions below.
(1) You agree that you will comply with any applicable export control laws, restrictions or regulations of the countries involved in the event that this product including the SOFTWARE is shipped, transferred or exported into any country.
(2) Rights holders of the SOFTWARE retain in all respects the title, ownership and intellectual property rights in and to the SOFTWARE. Except as expressly provided herein, no license or right, expressed or implied, is hereby conveyed or granted by rights holders of the SOFTWARE to you for any intellectual property of rights holders of the SOFTWARE.
(3) You may use the SOFTWARE solely for use with the PRODUCT.
(4) You may not assign, sublicense, market, distribute, or transfer the SOFTWARE to any third party without prior written consent of rights holders of the SOFTWARE.
(5) Notwithstanding the foregoing, you may transfer the SOFTWARE only when (a) you assign to a transferee all of your rights to the PRODUCT and all rights and obligations under the conditions governing the SOFTWARE and PRODUCT and (b) such transferee agrees in writing to be bound by all these conditions.
(6) You may not decrypt, decompile, reverse engineer, disassemble or otherwise reduce the code of the SOFTWARE to human readable form.
(7) You may not modify, adapt, translate, rent, lease or loan the SOFTWARE or create derivative works based on the SOFTWARE.
(8) You are not entitled to remove or make separate copies of the SOFTWARE from the PRODUCT.
(9) The human-readable portion (the source code) of the SOFTWARE is not licensed to you.
B. In case this PRODUCT includes software modules and/or related documentation made by Adobe Systems Incorporated, use and
distribution of these software modules and/or related documentation (the “ADOBE SOFTWARE”) are subject to conditions below
in addition to (1) through (9) above.
The ADOBE SOFTWARE is a “commercial item,” as that term is defined at 48 C.F.R. 2.101 (Oct 1995), consisting of “commercial
computer software” and “commercial computer software documentation,” as such terms are used in 48 C.F.R. 12.212 (Sept 1995).
Consistent with 48 C.F.R. 12.212 and 48 C.F.R. 227.7202-1 through 227.7202-4 (June 1995), all U.S. Government End Users shall
acquire The ADOBE SOFTWARE with only those rights set forth herein.
C. Notwithstanding A and B above, in case any other license conditions accompany third-party software modules, including
license terms of open source software, these software modules are subject to these other conditions, as well.
ACCEPTANCE
THE TERMS OF THIS THIRD PARTY SOFTWARE STATED HERE OR IN RELATED WARRANTY PROVISIONS SHALL BE DEEMED ACCEPTED
UPON YOUR USE OF THE PRODUCT FOR ONE OR MORE OF ITS NORMAL PURPOSES, IF THERE HAS BEEN NO OTHER PRIOR EXPRESS
ACCEPTANCE.
THE TERMS OF THIS THIRD PARTY SOFTWARE GOVERN THE THIRD PARTY SOFTWARE AS DELIVERED WITH THE PRODUCT AND
ALL UPDATED VERSIONS OF THE THIRD PARTY SOFTWARE PROVIDED UNDER MAINTENANCE AGREEMENTS OR OTHER SERVICE
ARRANGEMENTS FOR THE PRODUCT WITH CANON USA OR CANON CANADA OR THEIR RESPECTIVE AUTHORIZED SERVICE
ORGANIZATIONS.

xxii
The Software Subjected to Other Conditions
Please refer to the e-Manual on a CD-ROM bundled with this product, for more detail and corresponding license conditions.
The Software Licensed under Open Source Licenses
If you need source code of certain open source, under respective Open Source Licenses, used for this PRODUCT, please send your
request by email in English or Japanese at: <[email protected]>. The request must identify the open source and the applicable
Open Source License.
Please refer to e-Manual on a CD-ROM bundled with this product, for more detail and corresponding license conditions.
Disclaimers
The information in this document is subject to change without notice.
CANON INC. MAKES NO WARRANTY OF ANY KIND WITH REGARD TO THIS MATERIAL, EITHER EXPRESS OR IMPLIED, EXCEPT AS
PROVIDED HEREIN, INCLUDING WITHOUT LIMITATION, THEREOF, WARRANTIES AS TO MARKETABILITY, MERCHANTABILITY, FITNESS
FOR A PARTICULAR PURPOSE OR USE, OR NON-INFRINGEMENT. CANON INC. SHALL NOT BE LIABLE FOR ANY DIRECT, INCIDENTAL,
OR CONSEQUENTIAL DAMAGES OF ANY NATURE, OR LOSSES OR EXPENSES RESULTING FROM THE USE OF THIS MATERIAL.
LAMP(S) INSIDE THIS PRODUCT CONTAIN MERCURY AND MUST BE RECYCLED OR DISPOSED OF ACCORDING TO LOCAL,
STATE OR FEDERAL LAWS.
The following applies in California, USA only:
The battery included with your product contains Perchlorate Material and may require special handling.
See http://www.dtsc.ca.gov/hazardouswaste/perchlorate/ for details.
Legal Limitations on the Usage of Your Product and the Use of Images
Using your product to scan, print or otherwise reproduce certain documents, and the use of such images as scanned, printed or
otherwise reproduced by your product, may be prohibited by law and may result in criminal and/or civil liability. A non-exhaustive
list of these documents is set forth below. This list is intended to be a guide only. If you are uncertain about the legality of using
your product to scan, print or otherwise reproduce any particular document, and/or of the use of the images scanned, printed or
otherwise reproduced, you should consult in advance with your legal advisor for guidance.
•Paper Money •Travelers Checks
•Money Orders •Food Stamps
•Certificates of Deposit •Passports
•Postage Stamps(canceled or uncanceled)
• Immigration Papers
• Identifying Badges or Insignias • Internal Revenue Stamps(canceled or uncanceled)
•Selective Service or Draft Papers •Bonds or Other Certificates of Indebtedness
•Checks or Drafts Issued by Governmental Agencies •Stock Certificates
•Motor Vehicle Licenses and Certificates of Title •Copyrighted Works/Works of Art without Permission of Copyright Owner

xxiii
Important Safety Instructions
Please read these "Important Safety Instructions" thoroughly before operating the machine. As these instructions are intended to prevent injury to the user or other persons or destruction of property, always pay attention to these instructions. Also, since it may result in unexpected accidents or injuries, do not perform any operation unless otherwise specified in the manual. Improper operation or use of this machine could result in personal injury and/or damage requiring extensive repair that may not be covered under your Limited Warranty.
Installation
• Do not install the machine near alcohol, paint thinner, or other flammable substances. If flammable substances come into contact with electrical parts inside the machine, it may result in a fire or electrical shock.
• Do not place the following items on the machine. If these items come into contact with a high-voltage area inside the machine, it may result in a fire or electrical shock.If these items are dropped or spilled inside the machine, immediately turn OFF the main power switch, and disconnect the power cord from the power outlet. Then, contact your local authorized Canon dealer.
- Necklaces and other metal objects
- Cups, vases, flowerpots, and other containers filled with water or liquids

xxiv
• Do not install the machine in unstable locations, such as unsteady platforms or inclined floors, or in locations subject to excessive vibrations, as this may cause the machine to fall or tip over, resulting in personal injury.
• Never block the ventilation slots and louvers on the machine. These openings are provided for proper ventilation of working parts inside the machine. Blocking these openings can cause the machine to overheat. Never place the machine on a soft surface, such as a sofa or rug.
• Do not install the machine in the following locations:
- A damp or dusty location
- A location near water faucets or water
- A location exposed to direct sunlight
- A location subject to high temperatures
- A location near open flames
• Do not remove the machine's leveling feet after the machine has been installed, as this may cause the machine to fall or tip over, resulting in personal injury.

xxv
Power Supply
• Do not damage or modify the power cord. Also, do not place heavy objects on the power cord, or pull on or excessively bend it, as this could cause electrical damage and result in a fire or electrical shock.
• Keep the power cord away from a heat source; failure to do this may cause the power cord coating to melt, resulting in a fire or electrical shock.
• Do not connect or disconnect the power cord with wet hands, as this may result in electrical shock.
• Do not connect the power cord to a multiplug power strip, as this may cause a fire or electrical shock.
• Do not bundle up or tie the power cord in a knot, as this may result in a fire or electrical shock.
• Insert the power plug completely into the power outlet, as failure to do so may result in a fire or electrical shock.
• Do not use power cords other than the power cord provided, as this may result in a fire or electrical shock.
• As a general rule, do not use extension cords. Using an extension cord may result in a fire or electrical shock.
• Do not use power supplies with voltages other than those specified herein, as this may result in a fire or electrical shock.
• Always grasp the power plug when disconnecting the power cord. Pulling on the power cord may expose or snap the core wire, or otherwise damage the power cord. If the power cord is damaged, this could cause current to leak, resulting in a fire or electrical shock.
• Leave sufficient space around the power plug so that it can be unplugged easily. If objects are placed around the power plug, you will be unable to unplug it in an emergency.
• Make sure to contact your local authorized Canon dealer when repairing or replacing the power cord. Do not attempt to repair or replace the cord yourself.

xxvi
Handling
• Do not attempt to disassemble or modify the machine. There are high-temperature and high-voltage components inside the machine which may result in a fire or electrical shock.
• If the machine makes strange noises, or gives off smoke, heat, or strange smells, immediately turn OFF the main power switch, and disconnect the power cord from the power outlet. Then, contact your local authorized Canon dealer. Continued use of the machine in this condition may result in a fire or electrical shock.
• Do not use highly flammable sprays near the machine. If gas from these sprays comes into contact with the electrical components inside the machine, it may result in a fire or electrical shock.
• To avoid damage to the power cord and creating a fire hazard, always turn OFF the main power switch, and unplug the interface cable when moving the machine. Otherwise, the power cord or interface cable may be damaged, resulting in a fire or electrical shock.
• Make sure that the power plug is firmly inserted into the power outlet if the machine was moved. Do not use the machine while the connection is loose, as doing so may cause a fire.
• Do not drop paper clips, staples, or other metal objects inside the machine. Also, do not spill water, liquids, or flammable substances (alcohol, benzene, paint thinner, etc.) inside the machine. If these items come into contact with a high-voltage area inside the machine, it may result in a fire or electrical shock. If these items are dropped or spilled inside the machine, immediately turn OFF the main power switch, and disconnect the power cord from the power outlet. Then, contact your local authorized Canon dealer.
• Do not use the product for uses other than as a digital multitasking machine.
• Do not place heavy objects on the machine, as they may tip over or fall resulting in personal injury.
• Close the feeder gently to avoid catching your hands, as this may result in personal injury.
• Do not press down hard on the feeder when using the platen glass to make copies of thick books. Doing so may damage the platen glass and result in personal injury.
• Do not touch the finisher while the machine is printing, as this may result in personal injury.
• Paper that has just been output from the machine may be hot . Be careful when removing or aligning paper from the output tray. Touching paper right after it is output may result in low-temperature burns.
• Turn OFF the control panel power switch for safety when the machine will not be used for a long period of time, such as overnight. Also, turn OFF the main power switch, and disconnect the power cord for safety when the machine will not be used for an extended period of time, such as during consecutive holidays.

xxvii
• Do not place your hands, hair, clothing, etc., near the exit and feed rollers. Even if the machine is not in operation, your hands, hair, or clothing may get caught in the rollers, which may result in personal injury or damage if the machine suddenly starts printing.
• Do not place your hands in the part of the tray where stapling is performed (near the rollers) when a finisher is attached, as this may result in personal injury.
Staple Finisher/Booklet Finisher
• The laser beam can be harmful to human bodies. Since radiation emitted inside the product is completely confined within protective housings and external covers, the laser beam cannot escape from the machine during any phase of user operation. Read the following remarks and instructions for safety.
• Never open covers other than those instructed in the manuals for this machine.

xxviii
• Do not remove the following caution label which is attached to the machine. If the label has been removed, contact your local authorized Canon dealer.
• If the laser beam escapes from the machine, exposure may cause serious damage to your eyes.
• Controlling, adjusting, or operating the machine in ways not mentioned in the manuals for this machine may cause dangerous radiation to escape from the machine.

xxix
Maintenance and Inspections
• When cleaning the machine, first turn OFF the main power switch, then disconnect the power cord. Failure to observe these steps may result in a fire or electrical shock.
• Disconnect the power cord from the power outlet regularly, and clean the area around the base of the power plug's metal pins and the power outlet with a dry cloth to ensure that all dust and grime is removed. If the power cord is connected for a long period of time in a damp, dusty, or smoky location, dust can build up around the power plug and become damp. This may cause a short circuit and result in a fire.
• Clean the machine using a slightly dampened cloth with a mild detergent mixed with water. Do not use alcohol, benzene, paint thinner, or other flammable substances. Check detergent for flammability prior to use. If flammable substances come into contact with a high-voltage area inside the machine, it may result in a fire or electrical shock.
• There are some areas inside the machine which are subject to high-voltages. When removing jammed paper or when inspecting the inside of the machine, do not allow necklaces, bracelets, or other metal objects to touch the inside of the machine, as this may result in burns or electrical shock.
• Do not burn or throw used toner cartridges into open flames, as this may cause the toner remaining inside the cartridges to ignite, resulting in burns or a fire.
• Make sure that the power plug is firmly inserted into the power outlet after cleaning the machine. Do not use the machine while the connection is loose, as doing so may cause a fire.
• Check the power cord and power plug regularly. If the following conditions occur, contact your local authorized Canon dealer, as the condition may cause a fire:
- There are burn marks on the power plug.
- The blade on the power plug is deformed or broken.
- The power goes OFF and ON when the power cord is bent.
- There are cuts, cracks, or indentations on the power cord.
- A part of the power cord becomes hot.
• Check the power cord and power plug regularly to make sure that they are not handled in the following manner, as this may result in a fire or electrical shock:
- The connection part of the power plug is loose.
- Stress is being applied to the power cord by a heavy object or by affixing it with staples.
- The power plug is loose.
- The power cord is tied in a bundle.
- The power cord protrudes into a walkway.
- The power cord is in front of a heater.
xxx
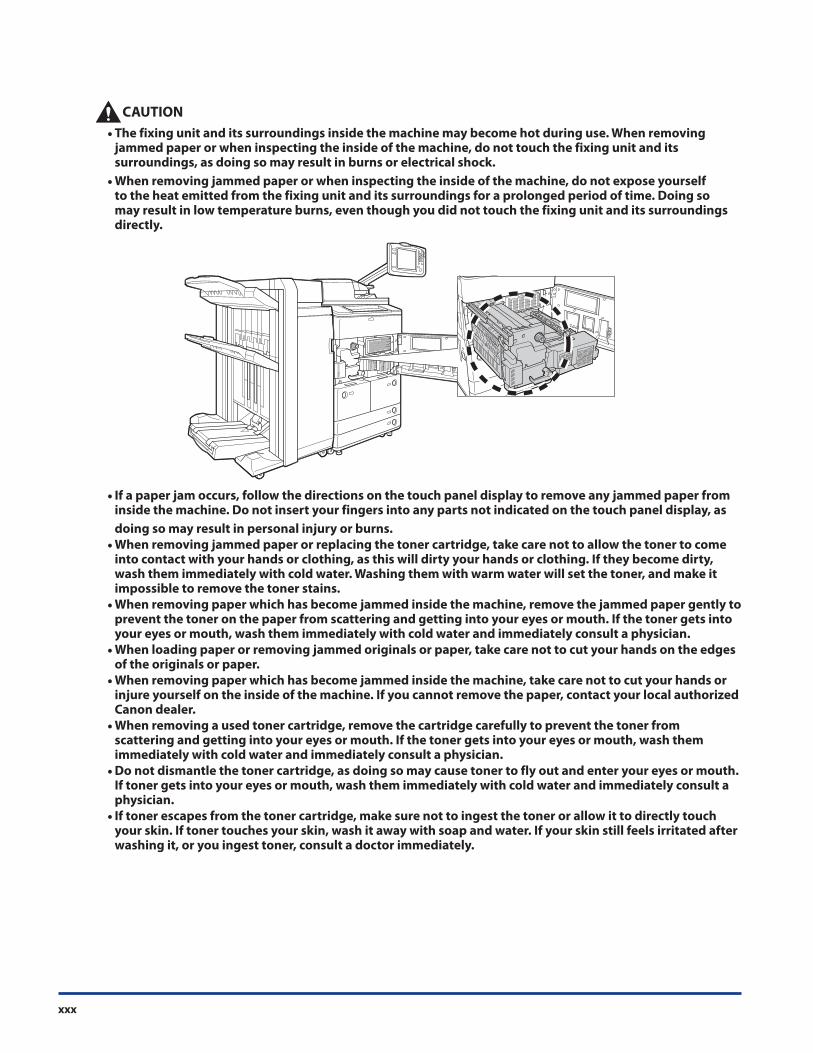
• The fixing unit and its surroundings inside the machine may become hot during use. When removing jammed paper or when inspecting the inside of the machine, do not touch the fixing unit and its surroundings, as doing so may result in burns or electrical shock.
• When removing jammed paper or when inspecting the inside of the machine, do not expose yourself to the heat emitted from the fixing unit and its surroundings for a prolonged period of time. Doing so may result in low temperature burns, even though you did not touch the fixing unit and its surroundings directly.
• If a paper jam occurs, follow the directions on the touch panel display to remove any jammed paper from inside the machine. Do not insert your fingers into any parts not indicated on the touch panel display, as
doing so may result in personal injury or burns.
• When removing jammed paper or replacing the toner cartridge, take care not to allow the toner to come into contact with your hands or clothing, as this will dirty your hands or clothing. If they become dirty, wash them immediately with cold water. Washing them with warm water will set the toner, and make it impossible to remove the toner stains.
• When removing paper which has become jammed inside the machine, remove the jammed paper gently to prevent the toner on the paper from scattering and getting into your eyes or mouth. If the toner gets into your eyes or mouth, wash them immediately with cold water and immediately consult a physician.
• When loading paper or removing jammed originals or paper, take care not to cut your hands on the edges of the originals or paper.
• When removing paper which has become jammed inside the machine, take care not to cut your hands or injure yourself on the inside of the machine. If you cannot remove the paper, contact your local authorized Canon dealer.
• When removing a used toner cartridge, remove the cartridge carefully to prevent the toner from scattering and getting into your eyes or mouth. If the toner gets into your eyes or mouth, wash them immediately with cold water and immediately consult a physician.
• Do not dismantle the toner cartridge, as doing so may cause toner to fly out and enter your eyes or mouth. If toner gets into your eyes or mouth, wash them immediately with cold water and immediately consult a physician.
• If toner escapes from the toner cartridge, make sure not to ingest the toner or allow it to directly touch your skin. If toner touches your skin, wash it away with soap and water. If your skin still feels irritated after washing it, or you ingest toner, consult a doctor immediately.

xxxi
Consumables
• Do not burn or throw used toner cartridges into open flames, as this may cause the toner remaining inside the cartridges to ignite, resulting in burns or a fire.
• Do not store toner cartridges or copy paper in places exposed to open flames, as this may cause the toner or paper to ignite, resulting in burns or a fire.
• When discarding used toner cartridges, put the cartridges into a bag to prevent the toner remaining inside the cartridges from scattering, and dispose of them in a location away from open flames.
• Keep toner and other consumables out of the reach of small children. If these items are ingested, consult a physician immediately.
• Do not dismantle the toner cartridge, as doing so may cause toner to fly out and enter your eyes or mouth. If toner gets into your eyes or mouth, wash them immediately with cold water and immediately consult a physician.
• If toner escapes from the toner cartridge, make sure not to ingest the toner or allow it to directly touch your skin. If toner touches your skin, wash it away with soap and water. If your skin still feels irritated after washing it, or you ingest toner, consult a doctor immediately.
Other Warnings
For cardiac pacemaker users:This product emits low level magnetic flux. If you use a cardiac pacemaker and feel abnormalities, please move away from the product and consult your doctor.

xxxii
Periodic Inspection of the Breaker
This machine has a breaker that detects excess current or leakage current. Make sure to test the breaker once or twice a month using the following procedure.
• Make sure that the main power is turned OFF, before inspecting the breaker. • If a malfunction occurs after an inspection, contact your local authorized Canon dealer.
Checking the Breaker
1 Push the test button on the rear of the machine with the tip of a ball-point pen, or a similar object.
Briefly push the test button.
• The breaker is located on the rear of the machine.
• For more information on the location of the breaker, see “External View,” on p. 1-10.

xxxiii
2 Confirm that the breaker lever is switched to the OFF (“ ” side) position.
ON( )
OFF( )
• Do not use the test button to turn the power ON and OFF.
• If the breaker lever does not switch to the OFF (“ ” side) position, repeat step 1.
• If the breaker lever does not switch to the OFF (“ ” side) position, despite carrying out the above procedure two or three times, contact your local authorized Canon dealer.
3 Switch the breaker lever to ON ("I" side).
ON( )
OFF( )

xxxiv
4 Press the main power switch to the ON ( "I" side) position.
5 Fill in the check sheet, located on the next page, to document your periodic inspections of the
breaker.

xxxv
Check Sheet for the Periodic Inspection of the Breaker
Copy this page for future use, and store it in a safe place near the machine to document your periodic inspections of the breaker.
■ How to Inspect the Breaker Periodically Follow the procedure described in “Periodic Inspection of the Breaker,” on p. xxxii, once or twice a month.
■ How to Fill in This Check Sheet Fill in the date of inspection and the name of the inspector.
When the inspection is completed successfully, write a check mark under " ."
If not, contact your local authorized Canon dealer. (Also, write a check mark under "X.")
Date of Inspection
Date of Inspection
Inspector InspectorResult Result
X X

xxxvi

1-1
CHAPTER
1 Before You Start Using This Machine
This chapter describes what you should know before using the machine.
Installation Location and Handling. . . . . . . . . . . . . . . . . . . . . . . . . . . . . . . . . . . . . . . . . . . . . . . . . . . . . . . . . . . . . . . . . . . . . . . . . . . 1-2Installation Precautions . . . . . . . . . . . . . . . . . . . . . . . . . . . . . . . . . . . . . . . . . . . . . . . . . . . . . . . . . . . . . . . . . . . . . . . . . . . . . . . . . . . . . . . . . . . . . . . . 1-2Handling Precautions . . . . . . . . . . . . . . . . . . . . . . . . . . . . . . . . . . . . . . . . . . . . . . . . . . . . . . . . . . . . . . . . . . . . . . . . . . . . . . . . . . . . . . . . . . . . . . . . . . 1-6
Backing Up/Exporting Data. . . . . . . . . . . . . . . . . . . . . . . . . . . . . . . . . . . . . . . . . . . . . . . . . . . . . . . . . . . . . . . . . . . . . . . . . . . . . . . . . . 1-9
Parts and Their Functions. . . . . . . . . . . . . . . . . . . . . . . . . . . . . . . . . . . . . . . . . . . . . . . . . . . . . . . . . . . . . . . . . . . . . . . . . . . . . . . . . . . 1-10External View . . . . . . . . . . . . . . . . . . . . . . . . . . . . . . . . . . . . . . . . . . . . . . . . . . . . . . . . . . . . . . . . . . . . . . . . . . . . . . . . . . . . . . . . . . . . . . . . . . . . . . . . . 1-10Internal View. . . . . . . . . . . . . . . . . . . . . . . . . . . . . . . . . . . . . . . . . . . . . . . . . . . . . . . . . . . . . . . . . . . . . . . . . . . . . . . . . . . . . . . . . . . . . . . . . . . . . . . . . . 1-12Control Panel Parts and Functions . . . . . . . . . . . . . . . . . . . . . . . . . . . . . . . . . . . . . . . . . . . . . . . . . . . . . . . . . . . . . . . . . . . . . . . . . . . . . . . . . . . . . 1-13
Main Power and Control Panel Power . . . . . . . . . . . . . . . . . . . . . . . . . . . . . . . . . . . . . . . . . . . . . . . . . . . . . . . . . . . . . . . . . . . . . . . 1-14How to Turn ON the Main Power. . . . . . . . . . . . . . . . . . . . . . . . . . . . . . . . . . . . . . . . . . . . . . . . . . . . . . . . . . . . . . . . . . . . . . . . . . . . . . . . . . . . . . . 1-14Control Panel Power Switch . . . . . . . . . . . . . . . . . . . . . . . . . . . . . . . . . . . . . . . . . . . . . . . . . . . . . . . . . . . . . . . . . . . . . . . . . . . . . . . . . . . . . . . . . . . 1-16Shutting Down the Machine. . . . . . . . . . . . . . . . . . . . . . . . . . . . . . . . . . . . . . . . . . . . . . . . . . . . . . . . . . . . . . . . . . . . . . . . . . . . . . . . . . . . . . . . . . . 1-17
What This Machine Can Do . . . . . . . . . . . . . . . . . . . . . . . . . . . . . . . . . . . . . . . . . . . . . . . . . . . . . . . . . . . . . . . . . . . . . . . . . . . . . . . . . 1-18
Operations Required to Use the Machine . . . . . . . . . . . . . . . . . . . . . . . . . . . . . . . . . . . . . . . . . . . . . . . . . . . . . . . . . . . . . . . . . . . 1-21Confirm the Following Settings . . . . . . . . . . . . . . . . . . . . . . . . . . . . . . . . . . . . . . . . . . . . . . . . . . . . . . . . . . . . . . . . . . . . . . . . . . . . . . . . . . . . . . . . 1-21Logging In to the Machine as an Administrator. . . . . . . . . . . . . . . . . . . . . . . . . . . . . . . . . . . . . . . . . . . . . . . . . . . . . . . . . . . . . . . . . . . . . . . . . 1-22

Installation Location and Handling1-2
1
Be
fore
Yo
u S
tart
Usi
ng
Th
is M
ach
ine
Installation Location and Handling
This section describes precautions for installation location and handling. We recommend that you read this section prior to using
this machine.
Installation Precautions
Avoid Installing the Machine in the Following Locations
■ Avoid locations subject to temperature and humidity extremes, whether low or high. For example, avoid installing the machine near water faucets, hot water heaters, humidifiers, air conditioners, heaters, or stoves.
■ Avoid installing the machine in direct sunlight. If this is unavoidable, use curtains to shade the machine. Be sure that the curtains do not block the machine's ventilation slots or louvers, or interfere with the electrical cord or power supply.

Installation Location and Handling 1-3
1
Be
fore
Yo
u S
tart
Usi
ng
Th
is M
ach
ine
■ Avoid poorly ventilated locations. This machine generates a slight amount of ozone and other substances during normal use. Although sensitivity to these substances may vary, this amount is not harmful. Ozone may be more noticeable during extended use or long production runs, especially in poorly ventilated rooms. It is recommended that the room be appropriately ventilated, sufficient to maintain a comfortable working environment, in areas of machine operation.
■ Avoid locations where a considerable amount of dust accumulates.
■ Avoid locations where ammonia gas is emitted.
■ Avoid locations near volatile or flammable materials, such as alcohol or paint thinner.

Installation Location and Handling1-4
1
Be
fore
Yo
u S
tart
Usi
ng
Th
is M
ach
ine
■ Avoid locations that are subject to vibration. For example, avoid installing the machine on unstable floors or stands.
■ Avoid exposing the machine to rapid changes in temperature. If the room in which the machine is installed is cold but rapidly heated, water droplets (condensation) may form inside the machine. This may result in a noticeable degradation in the quality of the copied image, the inability to properly scan an original, or the copies having no printed image at all.
■ Avoid installing the machine near computers or other precision electronic equipment. Electrical interference and vibrations generated by the machine during printing can adversely affect the operation of such equipment.
■ Avoid installing the machine near televisions, radios, or similar electronic equipment. The machine might interfere with sound and picture signal reception. Insert the power plug into a dedicated power outlet, and maintain as much space as possible between the machine and other electronic equipment.
■ Contact an authorized Canon dealer if communication is unavailable. Depending on your locale or your telephone connection, you may be unable to perform data communication. In this case, contact your local authorized Canon dealer.
■ Do not remove the machine's leveling feet. Do not remove the machine's leveling feet after the machine has been installed. If you put weight on the front of the machine while the drawers, paper decks, or units within the machine are pulled out, the machine may fall forward. To prevent this from happening, make sure that the machine's leveling feet are in place.

Installation Location and Handling 1-5
1
Be
fore
Yo
u S
tart
Usi
ng
Th
is M
ach
ine
Select a Safe Power Supply
■ Specification of the main unit’s power source is 120 to 127 V AC and maximum 16 A. Connect the plug of
this machine to an outlet that is 120 to 127 V AC 16 A or greater.
■ Make sure that the power supply for the machine is safe, and has a steady voltage.
■ Do not connect other electrical equipment to the same power outlet to which the machine is connected.
■ Do not connect the power cord to a multiplug power strip, as this may cause a fire or electrical shock.
■ The power cord may become damaged if it is stepped on, affixed with staples, or if heavy objects are placed
on it. Continued use of a damaged power cord can lead to an accident, such as a fire or electrical shock.
■ The power cord should not be taut, as this may lead to a loose connection and cause overheating, which
could result in a fire.
■ If excessive stress is applied to the connection part of the power cord, it may damage the power cord or the
wires inside the machine may disconnect. This could result in a fire.
■ Avoid the following situations: • Connecting and disconnecting the power cord frequently.
• Tripping over the power cord.
• The power cord is bent near the connection part, and continuous stress is being applied to the power outlet or the connection part.
• Applying excessive force on the power plug.

Installation Location and Handling1-6
1
Be
fore
Yo
u S
tart
Usi
ng
Th
is M
ach
ine
Moving the Machine
■ If you intend to move the machine, even to a location on the same floor of your building, contact your local
authorized Canon dealer beforehand. Do not attempt to move the machine yourself.
Handling Precautions
We recommend that you read this section prior to using this machine.
■ Do not attempt to disassemble or modify the machine.
■ Some parts inside the machine are subject to high-voltages and temperatures. Take adequate precautions
when inspecting the inside of the machine. Do not carry out any inspections that are not described in the
manuals for this machine.

Installation Location and Handling 1-7
1
Be
fore
Yo
u S
tart
Usi
ng
Th
is M
ach
ine
■ Be careful not to spill liquid or drop any foreign objects, such as paper clips or staples inside the machine.
If a foreign object comes into contact with electrical parts inside the machine, it might cause a short circuit
and result in a fire or electrical shock.
■ If there is smoke, or unusual noise, immediately turn the main power switch OFF, disconnect the power
cord from the power outlet, and then call your local authorized Canon dealer. Using the machine in this
state may cause a fire or electrical shock. Also, avoid placing objects around the power plug so that the
machine can be disconnected whenever necessary.
■ Do not turn the main power switch OFF or open the front covers while the machine is in operation. This may
result in paper jams.
■ Do not use flammable sprays, such as spray glue, near the machine. There is a danger of ignition.

Installation Location and Handling1-8
1
Be
fore
Yo
u S
tart
Usi
ng
Th
is M
ach
ine
■ This machine generates a slight amount of ozone and other substances during normal use. Although
sensitivity to these substances may vary, this amount is not harmful. Ozone may be more noticeable during
extended use or long production runs, especially in poorly ventilated rooms. It is recommended that the
room be appropriately ventilated, sufficient to maintain a comfortable working environment, in areas of
machine operation.
■ For safety reasons, turn OFF the control panel power switch of the machine when it will not be used for
a long period of time, such as overnight. As an added safety measure, turn OFF the main power switch,
and disconnect the power cord when the machine will not be used for an extended period of time, such as
during consecutive holidays.
■ Use a modular cable that is shorter than 9' 10" (3 meters).
■ Use a USB cable that is shorter than 9' 10" (3 meters).
■ Paper that has just been output from the machine may be hot. Be careful when removing or aligning paper
from the output tray. Touching paper right after it is output may result in low-temperature burns.

Backing Up/Exporting Data 1-9
1
Be
fore
Yo
u S
tart
Usi
ng
Th
is M
ach
ine
Backing Up/Exporting Data
Various data such as the received data, stored data, address book, and Settings/Registration settings are stored on the internal hard disk of the machine.
A malfunction in the hard disk may cause these data to be lost. Please regularly back up/export your important data.
Please note that Canon will not be held responsible for any damages caused by the loss of data.
You can backup/export the following data:
• By using the HDD Mirroring Kit , you can store the same data on two hard disks that are set to the machine and synchronize them. Even in this case, we recommend that you regularly back up/export your important data, as it is possible that a malfunction in both hard disks may cause the data to be lost.
• Also the passwords are backed up at the same time. However, some of the passwords may not be backed up, depending on the type of the password.
■ Document data in the Advanced Box/Mail Box, forms for the Superimpose Image mode For information on backing up this data, see e-Manual > Remote UI.
■ Address book, device settings, Settings/Registration settings, favorite settings for Web Access, Printer
settings, paper information For information on exporting each data, see e-Manual > Remote UI or Web Access.
■ Quick Menu information For information on exporting the Quick Menu information, see e-Manual > Quick Menu.
■ User information of the Advanced Box For information on exporting the user information of the Advanced Box, see e-Manual > Security.
■ Data relating to MEAP • License files for MEAP applications
For information on backing up (downloading) license files, see e-Manual > MEAP.
• Data stored by MEAP applications
You may be able to back up data stored by MEAP applications, depending on the application. For more information, see the documentation for each MEAP application.
• User authentication information registered for the Local Device Authentication system of SSO-H (Single Sign-On H)
For information on exporting user authentication information, see e-Manual > MEAP.
If your machine is not connected to a network, it is recommended that you print and store important information such as the Address Book. (See e-Manual > Settings/Registration.)

Parts and Their Functions1-10
1
Be
fore
Yo
u S
tart
Usi
ng
Th
is M
ach
ine
Parts and Their Functions
This section provides you with the names and functions of all the parts on the outside and inside of the main unit, upright control
panel, and the touch panel display. An illustration of the machine with some optional products attached to it is also provided.
For more information on optional products, parts and their functions, see e-Manual > Optional Products/Software.
External View
The optional Duplex Color Image Reader Unit is attached.
(1)
(3)
(4)
(5)
(6)
(8)
(7)
(2)
(1) Upright Control Panel
Includes the keys, touch panel display, and indicators required for operating the machine. (See “Control Panel Parts and Functions,” on p. 1-13.)
(2) USB Port
Use the USB port to connect external hard disks and other devices to the machine.
(3) Multi-Purpose Tray
Use the multi-purpose tray to feed paper manually and for loading nonstandard paper stock. (See e-Manual > Basic Operations.)
(4) Main Unit’s Upper Right Cover
Open this cover when clearing a paper jam inside the main unit. (See e-Manual > Problem Solving.)
(5) Main Unit’s Lower Right Cover
Open this cover when clearing a paper jam inside the main unit. (See e-Manual > Problem Solving.)
(6) Main Power Switch
Press to the “I” side to turn the main power ON. (See “Main Power and Control Panel Power,” on p. 1-14.)
(7) Paper Drawers 3 and 4
Hold up to approximately 680 sheets of paper (17 lb bond (64 g/m2)) or 550 sheets of paper (20 lb bond (80 g/m2)).
(8) Paper Drawers 1 and 2
Hold up to approximately 1,700 sheets of paper (17 lb bond (64 g/m2)) or 1,500 sheets of paper (20 lb bond (80 g/m2)).

Parts and Their Functions 1-11
1
Be
fore
Yo
u S
tart
Usi
ng
Th
is M
ach
ine
The optional Booklet Finisher-F1 PRO is attached.
(1)
(1) Printer Cover
Instead of the feeder, you can attach the Printer Cover.
For more information on the optional products that can be attached to the machine, see e-Manual > Optional Products/Software.

Parts and Their Functions1-12
1
Be
fore
Yo
u S
tart
Usi
ng
Th
is M
ach
ine
Internal View
The optional Booklet Finisher-F1 PRO and Duplex Color Image Reader Unit are attached.
(1)
(2)
(3)
(4)
(5)
(1) Toner Replacement Cover
Open this cover to replace the toner cartridge. (See e-Manual > Maintenance.)
(2) Front Cover
Open this cover to clear a paper jam in the fixing transport unit. (See e-Manual > Problem Solving.)
(3) Fixing Transport Unit
Pull out the fixing unit to clear a paper jam. (See e-Manual > Problem Solving.)
(4) Test Button
Press this button to periodically test the circuit breaker.
(5) Breaker
Detects excess current or leakage current. (See “Periodic Inspection of the Breaker,” on p. xxxii.)

Parts and Their Functions 1-13
1
Be
fore
Yo
u S
tart
Usi
ng
Th
is M
ach
ine
Control Panel Parts and Functions
(3) (4)(1) (2)
(12)(13)(17)(18)
(19)
(16) (14)
(5)
(6)
(10)
(11)
(7)
(8)(9)
(15)
(20)
(21)
(1) Processing/Data Indicator
Flashes or blinks green when the machine is performing operations, and maintains a steady green light when received data is stored in memory.
(2) Error Indicator
Flashes or lights if there is an error in the machine. When the Error indicator flashes, follow the instructions that appear on the touch panel display. When the Error indicator maintains a steady red light, contact your local authorized Canon dealer.
(3) Settings/Registration key
Press to specify settings/registration.
(4) Energy Saver key
Press to set or cancel the Energy Saver mode.
(5) Control Panel Power Switch (Sub Power Supply)
Press to set or cancel the Sleep mode.
(6) Counter Check key
Press to display the copy and print count totals on the touch panel display.
(7) Numeric keys
Press to enter numerical values.
(8) Clear key
Press to clear entered values or characters.
(9) USB Port
Use to connect memory media to the machine via USB.
(10) Main Power IndicatorLights when the main power is turned ON.
(11) Edit PenUse when operating the touch panel display, such as to enter characters. If you lose the edit pen, contact your local authorized Canon dealer. Do not use an object with a sharp end on the control panel, such as a pencil or ballpoint pen, in place of the edit pen.
(12) Stop keyPress to stop a job in progress, such as a scan or copy job.
(13) Start keyPress to start an operation.
(14) Reset keyPress to restore the default settings of the machine.
(15) ID (Log In/Out) keyPress to log in/out when a login service such as Department ID Management or SSO-H has been set.
(16) Touch Panel DisplayThe settings screen for each function is shown on this display.Press [Show All] to show functions which are not displayed on the Main Menu.
(17) Brightness Adjustment DialUse to adjust the brightness of the touch panel display.
(18) Volume Settings KeyPress to display the screen for adjusting volume settings.
(19) Status Monitor/Cancel keyPress to check the status of jobs or to cancel print jobs. Also, press to check status of the machine, such as checking the amount of paper remaining.
(20) Quick Menu keyPress to retrieve favorite functions stored in Quick Menu. Also, if you are using authentication, quick Menu set for each individual user can be displayed. (See e-Manual > Quick Menu.)
(21) Main Menu keyPress to return to the Main Menu screen such as when you want to switch functions. The 8 function keys are displayed as the default.
The 8 function keys are displayed as the default.

Main Power and Control Panel Power1-14
1
Be
fore
Yo
u S
tart
Usi
ng
Th
is M
ach
ine
Main Power and Control Panel Power
The machine is provided with two power switches, a main power switch and a control panel power switch, as well as a breaker
that detects excess current or leakage current.
How to Turn ON the Main Power
This section explains how to turn ON the main power.
If you want to turn OFF the main power and then back ON again, wait for at least 10 seconds after the main power indicator is turned OFF before turning ON the main power.
1 Make sure that the power plug is firmly inserted into the power outlet.
Do not connect or disconnect the power cord with wet hands, as this may result in electrical shock.
2 Turn ON the power of the optional equipment (the Finisher, Professional Puncher, Professional
Puncher Integration Unit, etc.).
3 Press the main power switch to the ON ("I" side) position.
The main power indicator on the control panel lights when the main power switch is turned ON.
When operating the main power switch, open the main power switch cover.
If the main power indicator on the control panel does not light even though the main power switch is ON, be sure to check the breaker to see if it is OFF. (See e-Manual > Problem Solving.)

Main Power and Control Panel Power 1-15
1
Be
fore
Yo
u S
tart
Usi
ng
Th
is M
ach
ine
4 The screens shown below are displayed while the system software is loading.
If you are using a login service, log in using the procedure for the login service you are using.
• You can select which functions to display on the screen when turning ON the main power, according to the Settings/Registration settings. (See e-Manual > Settings/Registration.)
• If a Macintosh, which has been shut down, is connected to the machine via a USB cable, when you turn the machine ON, the Macintosh may also turn ON. In this case, disconnect the Macintosh from the machine. (You may also be able to solve this problem by using a USB hub between the machine and the Macintosh).
• If you are using Department ID Management with the Card Reader, see e-Manual > Optional Products/Software.
• If you are using Department ID Management, see e-Manual > Basic Operations.
• If you are using SSO-H, see e-Manual > Basic Operations.

Main Power and Control Panel Power1-16
1
Be
fore
Yo
u S
tart
Usi
ng
Th
is M
ach
ine
Control Panel Power Switch
Press the control panel power switch to cancel the Sleep mode and resume normal machine operations.
• The machine can receive and print documents from a personal computer when it is in the Sleep mode. I-fax documents can also be received while the machine is in the Sleep mode.
• It takes approximately 1 minute for the machine to recover after the Sleep mode is deactivated.
• If Sleep Mode Energy Use is set to ‘Low’, it may take approximately 10 seconds for the touch panel display to be displayed after pressing the control panel power switch.

Main Power and Control Panel Power 1-17
1
Be
fore
Yo
u S
tart
Usi
ng
Th
is M
ach
ine
Shutting Down the Machine
This section explains how to turn OFF the main power. If there are any jobs currently being processed, or a MEAP application is
running when the Shutdown mode is activated, the machine asks you to confirm and cancel any existing jobs, and then access to
the hard disk is restricted. This procedure protects the hard disk from access errors the next time the machine is turned ON. When
the machine shuts down, it also performs an internal cooling down process, which enables the machine to be shut down safely.
1 Press the main power switch to the “ ” side.
When operating the main power switch, open the main power switch cover.
• Do not turn the main power OFF if you are sending or receiving I-fax documents. Sending or receiving I-fax documents cannot be done when the main power is turned OFF.
• The machine may continue to operate during the shutdown process. Do not unplug the power cord until the main power indicator of the machine is OFF.
• If the main power is turned OFF during scanning or printing, a paper jam may occur.

What This Machine Can Do1-18
1
Be
fore
Yo
u S
tart
Usi
ng
Th
is M
ach
ine
What This Machine Can Do
All the elements you will ever need in a digital multitasking machine.
Copy
Scan
Send Remote UI
Printer
The imageRUNNER ADVANCE 8105/8095/8085 incorporates a rich array of
input and output features that can greatly enhance your effi ciency. Equipped
with features that meet the needs of document work in a digitized offi ce,
the imageRUNNER ADVANCE 8105/8095/8085 represents the ultimate in
digital multitasking machines.
An asterisk (*) indicates functions which require optional equipment. For
information on the optional equipment required to use each function, and
the available combinations of optional equipment, see “Confi rm the Following
Settings,” on p. 1-21.
Copying* See e-Manual > Copy
In addition to normal copying functions, convenient new functions, such as “Copy Sample”
which helps to avoid copy errors, “Booklet” for making copies into booklets, and “Different
Size Originals” for copying originals of different sizes together in one copy operation, are
provided to increase your productivity.
Storing Scanned Data*/Printing Stored Data See e-Manual > Scan and Store, Access Stored Files
The Scan and Store function enables you to save document data that has been scanned
from the scanner unit or created on a computer. The saved data can be printed at a
specified time, or merged with separately saved data or data created on a computer for
simultaneous processing.
Also, if you use the functions of the Advanced Box, you can set a file format (PDF, JPEG,
TIFF) to the scanned original, so that it can be accessed from your computer. The Advanced
Box can be opened to the public as an SMB server or WebDAV server. You can access the
Advanced Box from your computer and move files from your computer to the machine or
vice-versa.

What This Machine Can Do 1-19
1
Be
fore
Yo
u S
tart
Usi
ng
Th
is M
ach
ine
Sending Function* See e-Manual > Scan and Send
The Send function enables you to send scanned image or document data to file servers, or
send it by e-mail or I-fax. A variety of file formats are supported (PDF, JPEG, TIFF, and XPS),
which offer you greater flexibility in accommodating digital workplace environments.
Printing See e-Manual > Print
You can use this machine as a high-speed network printer. Various outputs are also possible
when printing, such as 2-sided printing and page alignment.
If the PS Printer Kit is activated, or if the imagePASS is attached, you can use this machine as
the postscript printer with the Adobe PostScript3 software.

What This Machine Can Do1-20
1
Be
fore
Yo
u S
tart
Usi
ng
Th
is M
ach
ine
Using the Remote User Interface See e-Manual > Remote UI
You can control functions, such as confirming the status of the machine, job operations, and
printing instructions for saved scanned documents and data, all from your computer’s Web
browser.
Web
Browser
Applying MEAP See e-Manual > MEAP
By itself, “The MEAP” (Multifunctional Embedded Application Platform) feature incorporated
in the machine enables you to install applications to expand the functions of the machine.
Scanning Documents into Your Computer* See e-Manual > Scanner
The Network Scan function enables you to use the imageRUNNER ADVANCE
8105/8095/8085 as a conventional scanner. You can scan a document using the machine,
and read the data in an application you are using on your computer. You can scan images of
up to 11”x17” in size at a resolution of 600 x 600 dpi.
*The Network ScanGear software is supplied on the accompanying CD-ROM. For more
information on the Network Scan function, see e-Manual > Scanner.
Applying Utilities See e-Manual > Optional Products/Software
You can specify various settings of the machine connected to a network when using utility
software. You can specify initial settings, confirm the status of the machine, and manage
documents. xxxxxxxxxxxxxxx

Operations Required to Use the Machine 1-21
1
Be
fore
Yo
u S
tart
Usi
ng
Th
is M
ach
ine
Operations Required to Use the Machine
This section describes the flow of operations and settings for the functions you will use.
Confirm the Following Settings
Some functions of the machine require optional equipment and operations/settings.
If you want to use functions that require license registration, see Chapter 9, “Installing the System Options/MEAP Applications.”
See “Flow of Settings for Using Each Function” on the beginning of this guide, for functions that require operations or settings.
For more information on the optional equipment required to connect the machine to a network, see Chapter 2, “Before Connecting to a Network.”
Function Optional Equipment Required License Registration
Copying Duplex Color Image Reader Unit -
Scanning and Storing Documents
Mail Box Duplex Color Image Reader Unit -
Advanced Box/Network Duplex Color Image Reader Unit -
Memory Media *2 Duplex Color Image Reader Unit -
Using the Stored Documents
Mail Box None -
Advanced Box/Network None -
Memory Media*2 None -
Scanning and Sending Documents
E-Mail/I-Fax Duplex Color Image Reader Unit -
Sending Documents to File Servers Duplex Color Image Reader Unit -
Printing None*1 -*1
Remote UI None -
MEAP Management Function (SMS) None -
Registering/Updating Software (Delivery) None -
Registering/Updating Software (Manual) None -
Scanning Duplex Color Image Reader Unit -
*1 Optional equipment and/or license registration may be required, depending on the print function.
*2 The default setting for displaying memory media is 'Off'. To use the memory media, press [Display Settings] in Preferences (Settings/Registration) → press [Store Location Display Settings] → [Memory Media] → [On].

Operations Required to Use the Machine1-22
1
Be
fore
Yo
u S
tart
Usi
ng
Th
is M
ach
ine
Logging In to the Machine as an Administrator
To specify the settings, you must log in to the machine as an administrator.
The operations available on the Settings/Registration screen vary between administrator and general user.
- For Administrator: The administrator or the SSO-H (Single Sign-On H) Administrator can specify all of the system settings for the machine. For information on the types of administrators, see e-Manual > Security.As a default, system manager settings (System Manager ID/System Password) are set on the machine. Thus, the system manager must log in by entering the System Manager ID and the System Password. The default setting for both the System Manager ID and System Password is ‘7654321’. We recommend that you change both the System Manager ID and System Password. For information on the system manager settings, see e-Manual > Security. For information on the Settings/Registration items available with administrator privileges, see e-Manual > Security or Remote UI.
- For General Users: Some items on the Settings/Registration screen may be restricted for general users. Items that a user does not have operating privileges for are grayed out and cannot be selected on the touch panel display. Items that a user does not have operating privileges for are not displayed on the Remote UI.
This section describes the procedures assuming that the machine is in default setting. If the Department ID Management or authentication for SSO-H is set, enter the necessary items for each log in.
Logging In from the Touch Panel Display After press (Settings/Registration) on the control panel, log in as an administrator using the touch panel display.
1 Press (Settings/Registration).
2 Press [Log In].

Operations Required to Use the Machine 1-23
1
Be
fore
Yo
u S
tart
Usi
ng
Th
is M
ach
ine
3 Enter the System Manager ID and System Password → press [Log in].
When you are finished with the operation, press [Log Out] or (Log In/Out) on the control panel to log out.
Logging In from the Remote UI Connect to the machine using the Remote UI and log in as an administrator.
• For information on the log in service, see e-Manual > MEAP. If the authentication function is not set, the Log In screen is not displayed.
• For information on necessary system environment and preparation to start the Remote UI, see “System Requirements for Using the Remote UI,” on p. 8-2. and “Before You Start the Remote UI,” on p. 8-3.
1 Start your Web browser.
2 Enter the following URL in [Address]:
http://<IP address of the machine or host name>

Operations Required to Use the Machine1-24
1
Be
fore
Yo
u S
tart
Usi
ng
Th
is M
ach
ine
3 Enter the System Manager ID and System Password → click [Administrator Login].
When you are finished with the operation, click [Log Out] to log out.

2-1
CHAPTER
2 Before Connecting to a Network
This section describes what you need to know before connecting the machine to a network, including the network environments with which the
machine is compatible, and how to check the network environment you are using.
Optional Equipment and System Requirements for Connecting to a Network . . . . . . . . . . . . . . . . . . . . . . . . . . . . . . . . . 2-2Printing from a Computer . . . . . . . . . . . . . . . . . . . . . . . . . . . . . . . . . . . . . . . . . . . . . . . . . . . . . . . . . . . . . . . . . . . . . . . . . . . . . . . . . . . . . . . . . . . . . . 2-2Using E-Mail/I-Fax . . . . . . . . . . . . . . . . . . . . . . . . . . . . . . . . . . . . . . . . . . . . . . . . . . . . . . . . . . . . . . . . . . . . . . . . . . . . . . . . . . . . . . . . . . . . . . . . . . . . . . 2-5Sending Data . . . . . . . . . . . . . . . . . . . . . . . . . . . . . . . . . . . . . . . . . . . . . . . . . . . . . . . . . . . . . . . . . . . . . . . . . . . . . . . . . . . . . . . . . . . . . . . . . . . . . . . . . . 2-6
Checking Your Network Environment . . . . . . . . . . . . . . . . . . . . . . . . . . . . . . . . . . . . . . . . . . . . . . . . . . . . . . . . . . . . . . . . . . . . . . . 2-10Sample Windows Network . . . . . . . . . . . . . . . . . . . . . . . . . . . . . . . . . . . . . . . . . . . . . . . . . . . . . . . . . . . . . . . . . . . . . . . . . . . . . . . . . . . . . . . . . . . . 2-10Sample Macintosh Network . . . . . . . . . . . . . . . . . . . . . . . . . . . . . . . . . . . . . . . . . . . . . . . . . . . . . . . . . . . . . . . . . . . . . . . . . . . . . . . . . . . . . . . . . . . 2-11Sample UNIX Network. . . . . . . . . . . . . . . . . . . . . . . . . . . . . . . . . . . . . . . . . . . . . . . . . . . . . . . . . . . . . . . . . . . . . . . . . . . . . . . . . . . . . . . . . . . . . . . . . 2-11Using a Network with Various Types of Computers . . . . . . . . . . . . . . . . . . . . . . . . . . . . . . . . . . . . . . . . . . . . . . . . . . . . . . . . . . . . . . . . . . . . . 2-12

Optional Equipment and System Requirements for Connecting to a Network2-2
2
Be
fore
Co
nn
ect
ing
to
a N
etw
ork
Optional Equipment and System Requirements for Connecting to a Network
This section describes the optional equipment and system environments required to connect the machine to a network.
For more information on the equipment needed, consult your local authorized Canon dealer.
By connecting the machine to the network, its settings and operations can be performed on computers using the Remote UI and other utilities, without the need for any optional equipment. For more information on the Remote UI, see e-Manual > Remote UI. For more information on utilities, see e-Manual > Optional Products/Software.
Printing from a Computer
Optional Equipment Requirements
■ Printing
• If you want to use the UFR II printer driver
- Optional equipment is unnecessary
• If you want to use the PCL printer driver
- PCL Printer Kit
• If you want to use the PS printer driver (one of the following)
- PS Printer Kit
- imagePASS
• If you are using a Macintosh, you cannot use the PCL printer driver.
• To print with Mac OS 9, you need to use a PS printer driver provided by Apple Inc. with the Mac OS, via an AppleTalk network.
• If you are using the UFR II printer driver or PS printer driver in a Macintosh environment, you cannot print documents via an AppleTalk network.
• If you are using the imagePASS , see the manual provided with the imagePASS .
• If you are using the imagePASS , some functions are not available with this machine. For details, see the manual provided with the imagePASS .

Optional Equipment and System Requirements for Connecting to a Network 2-3
2
Be
fore
Co
nn
ect
ing
to
a N
etw
ork
System Requirements The following network and system environments are compatible when printing from a computer:
If you are using Windows 2000, you need to install Service Pack 2 or later.
■ With a TCP/IP Network :
• Compatible OS
- Windows 2000 Server
- Windows 2000 Professional
- Windows XP Professional
- Windows XP Home Edition
- Windows Server 2003
- Windows Server 2008
- Windows Vista Ultimate
- Windows Vista Business
- Windows Vista Home Premium
- Windows Vista Home Basic
- Windows Vista Enterprise
- Windows 7 Ultimate
- Windows 7 Enterprise
- Windows 7 Professional
- Windows 7 Home Premium
- Solaris Version 1.1x (SunOS Version 4.1x) or later
- Solaris Version 2.5x (SunOS Version 5.5x) or later
- Mac OS X 10.4.9 or later
• Computers/memory
- Any computer which runs the above operating system software properly
If you are using Mac OS X, for details on the printer drivers, see Chapter 13, “Before Printing from Computers.”

Optional Equipment and System Requirements for Connecting to a Network2-4
2
Be
fore
Co
nn
ect
ing
to
a N
etw
ork
■ With an SMB/CIFS Network :
• Compatible OS
- Windows 2000 Server
- Windows 2000 Professional
- Windows XP Professional
- Windows XP Home Edition
- Windows Server 2003
- Windows Server 2008
- Windows Vista Ultimate
- Windows Vista Business
- Windows Vista Home Premium
- Windows Vista Home Basic
- Windows Vista Enterprise
- Windows 7 Ultimate
- Windows 7 Enterprise
- Windows 7 Professional
- Windows 7 Home Premium
- Mac OS X 10.3.9 or later
- Mac OS X 10.4
• Compatible Protocol
- NetBIOS over TCP/IP (NetBT)
• Computers/memory
- Any computer which runs the above operating system software properly
When you are using Mac OS X 10.3.9 or later/10.4, you can only print via an SMB/CIFS network if you are using a PS printer driver provided by Apple Inc. with the Mac OS.
■ With a NetWare Network:
• Compatible Servers
- Novell NetWare Version 3.2/4.1/4.11/4.2/5/5.1/6/6.5
• Compatible Clients
- Windows 2000 Server
- Windows 2000 Professional
- Windows XP Professional
- Windows XP Home Edition
- Windows Server 2003
- Windows Server 2008
- Windows Vista Ultimate
- Windows Vista Business
- Windows Vista Home Premium
- Windows Vista Home Basic
- Windows Vista Enterprise
- Windows 7 Ultimate
- Windows 7 Enterprise
- Windows 7 Professional
- Windows 7 Home Premium
• Computers/memory
- Any computer which runs the above operating system software properly

Optional Equipment and System Requirements for Connecting to a Network 2-5
2
Be
fore
Co
nn
ect
ing
to
a N
etw
ork
■ With an AppleTalk Network :
• Compatible AppleTalk
- EtherTalk Phase 2
• See Chapter 13, “Before Printing from Computers,” for compatible operating systems and computers.
The machine does not support Macintosh LocalTalk networks.
■ With a Server-Based Computing Environment:
• Compatible Windows Terminal Server (Services)
- Windows 2000 Server
- Windows Server 2003
- Windows Server 2008
• Compatible Software
- Citrix MetaFrame 1.8
- Citrix MetaFrame XP
Using E-Mail/I-Fax
Optional Equipment Requirements Optional equipment is not required for using the e-mail/I-fax functions.
• If you are using the imagePASS , see the manual provided with the imagePASS . • If you are using the imagePASS , some functions are not available with this machine. For details, see the manual provided with the imagePASS .
System Requirements The following system environments are confirmed for using the e-mail/I-fax functions:
• Compatible mail forwarding server software
- Sendmail 8.93 or later (UNIX)
- Microsoft Exchange Server (Windows) (Microsoft Exchange Server 5.5 + Service Pack 1 or later)
- Lotus Domino R4.6 or later (Windows)
• Compatible mail receiving server software
- Qpopper 2.53 or later (UNIX)
- Microsoft Exchange Server (Windows) (Microsoft Exchange Server 5.5 + Service Pack 1 or later)
- Lotus Domino R4.6 or later (Windows)
If you are using Windows 2000, you need to install Service Pack 2 or later.
• The machine sends e-mail or I-fax messages to mail servers using SMTP. The machine can receive incoming messages from a mail server using the POP3 protocol or directly using the machine’s own SMTP receiving function. If the latter method is used, it is not necessary for the mail server to support the POP3 protocol.
• The machine can receive I-fax images and error e-mail messages sent when errors occur during communication, but not any other type of e-mail.

Optional Equipment and System Requirements for Connecting to a Network2-6
2
Be
fore
Co
nn
ect
ing
to
a N
etw
ork
Sending Data
Optional Equipment Requirements Optional equipment is not required for sending data.
• If you are using the imagePASS , see the manual provided with the imagePASS . • If you are using the imagePASS , some functions are not available with this machine. For details, see the manual provided with the imagePASS .
System Requirements The following network and system environments are compatible when sending data from the machine to a file server, depending
on the type of network used:
■ With a TCP/IPv4 Network (Using FTP ):
• Compatible servers
- Windows 2000 Server and Internet Information Services (IIS) 5.0
- Windows XP Professional and IIS 5.1
- Windows Server 2003 and IIS 6.0
- Windows Server 2008 and IIS 7.0
- Windows Vista Ultimate and IIS 7.0
- Windows Vista Business and IIS 7.0
- Windows Vista Home Premium and IIS 7.0
- Windows Vista Home Basic and IIS 7.0
- Windows Vista Enterprise and IIS 7.0
- Windows 7 Ultimate and IIS 7.5
- Windows 7 Enterprise and IIS 7.5
- Windows 7 Professional and IIS 7.5
- Windows 7 Home Premium and IIS 7.5
- Windows Server 2008 R2 and IIS 7.5
- Solaris Version 2.6 or later
- Red Hat Linux 7.2 or later
- Mac OS X
• Compatible protocol
- TCP/IPv4

Optional Equipment and System Requirements for Connecting to a Network 2-7
2
Be
fore
Co
nn
ect
ing
to
a N
etw
ork
■ With a TCP/IPv6 Network (Using FTP):
• Compatible servers
- Windows 7 Ultimate and IIS 7.5
- Windows 7 Enterprise and IIS 7.5
- Windows 7 Professional and IIS 7.5
- Windows 7 Home Premium and IIS 7.5
- Windows Server 2008 R2 and IIS 7.5
- Solaris Version 9 or later
- Red Hat Enterprise Linux AS/ES/WS 4.0 or later
- Mac OS X 10.3 or later
• Compatible protocol
- TCP/IPv6
■ With a TCP/IPv4 Network (Using WebDAV):
• Compatible servers
- Windows 2000 Server and IIS 5.0
- Windows 2000 Professional and IIS 5.0
- Windows XP Professional and IIS 5.1
- Windows Server 2003 and IIS 6.0
- Windows Server 2008 and IIS 7.0
- Windows Vista Ultimate and IIS 7.0
- Windows Vista Business and IIS 7.0
- Windows Vista Home Premium and IIS 7.0
- Windows Vista Home Basic and IIS 7.0
- Windows Vista Enterprise and IIS 7.0
- Windows 7 Ultimate and IIS 7.5
- Windows 7 Enterprise and IIS 7.5
- Windows 7 Professional and IIS 7.5
- Windows 7 Home Premium and IIS 7.5
- Windows Server 2008 R2 and IIS 7.5
- Windows 2000 Server and Apache 2.0 for Win 32
- Windows XP Professional and Apache 2.0 for Win 32
- Windows Server 2003 and Apache 2.0 for Win 32
- Windows Server 2008 and Apache 2.0 or later
- Windows Vista Ultimate and Apache 2.0 or later
- Windows Vista Business and Apache 2.0 or later
- Windows Vista Home Premium and Apache 2.0 or later
- Windows Vista Home Basic and Apache 2.0 or later
- Windows Vista Enterprise and Apache 2.0 or later
- Windows 7 Ultimate and Apache 2.0 or later
- Windows 7 Enterprise and Apache 2.0 or later
- Windows 7 Professional and Apache 2.0 or later
- Windows 7 Home Premium and Apache 2.0 or later
- Windows Server 2008 R2 and Apache 2.0 or later
- Solaris Version 2.6 or later, and Apache 2.0 or later
- Red Hat Enterprise Linux AS/ES/WS 4.0 or later, and Apache 2.0 or later
- Mac OS X
• Compatible protocol for the WebDAV server
- TCP/IPv4

Optional Equipment and System Requirements for Connecting to a Network2-8
2
Be
fore
Co
nn
ect
ing
to
a N
etw
ork
■ With a TCP/IPv6 Network (Using WebDAV):
• Compatible servers
- Windows Server 2003 and IIS 6.0
- Windows Server 2008 and IIS 7.0
- Windows Vista Ultimate and IIS 7.0
- Windows Vista Business and IIS 7.0
- Windows Vista Home Premium and IIS 7.0
- Windows Vista Home Basic and IIS 7.0
- Windows Vista Enterprise and IIS 7.0
- Windows 7 Ultimate and IIS 7.5
- Windows 7 Enterprise and IIS 7.5
- Windows 7 Professional and IIS 7.5
- Windows 7 Home Premium and IIS 7.5
- Windows Server 2008 R2 and IIS 7.5
- Windows Server 2008 and Apache 2.0 or later
- Windows Vista Ultimate and Apache 2.0 or later
- Windows Vista Business and Apache 2.0 or later
- Windows Vista Home Premium and Apache 2.0 or later
- Windows Vista Home Basic and Apache 2.0 or later
- Windows Vista Enterprise and Apache 2.0 or later
- Windows 7 Ultimate and Apache 2.0 or later
- Windows 7 Enterprise and Apache 2.0 or later
- Windows 7 Professional and Apache 2.0 or later
- Windows 7 Home Premium and Apache 2.0 or later
- Windows Server 2008 R2 and Apache 2.0 or later
- Solaris Version 9 or later, and Apache 2.0 or later
• Compatible protocol for the WebDAV server
- TCP/IPv6
If you connect to the Internet via a proxy, the proxy server must support IPv6.

Optional Equipment and System Requirements for Connecting to a Network 2-9
2
Be
fore
Co
nn
ect
ing
to
a N
etw
ork
■ With an SMB/CIFS Network:
• Compatible servers
- Windows 2000 Server
- Windows 2000 Professional
- Windows XP Professional
- Windows XP Home Edition
- Windows Server 2003
- Windows Server 2008
- Windows Vista Ultimate
- Windows Vista Business
- Windows Vista Home Premium
- Windows Vista Home Basic
- Windows Vista Enterprise
- Windows 7 Ultimate
- Windows 7 Enterprise
- Windows 7 Professional
- Windows 7 Home Premium
- Windows Server 2008 R2
• Compatible server software for sending data
- Samba 2.2.8a or later (UNIX/Linux/Mac OS X 10.3/10.4)
• Compatible protocol
- NetBIOS over TCP/IP (NetBT)

Checking Your Network Environment2-10
2
Be
fore
Co
nn
ect
ing
to
a N
etw
ork
Checking Your Network Environment
Refer to the following examples to confirm the network environment that is connected to the machine, and then perform the necessary operations for that environment.
• If you are using the imagePASS , see the manual provided with the imagePASS . • If you are using the imagePASS , some functions are not available with this machine. For details, see the manual provided with the imagePASS .
Sample Windows Network
In a Windows network environment, the TCP/IP or NetBIOS (NetBIOS over TCP/IP) protocol can be used. Multiple protocols can be
used at the same time.
In addition to IPv4 (Internet Protocol Version 4), the machine also supports IPv6 (Internet Protocol Version 6), and has a dual stack
configuration that enables it to communicate with both IPv4 networks and IPv6 networks. You can select whether to use the
functions of IPv4 or IPv6. You can also enable the functions of both IPv4 and IPv6. The IPv4 network and IPv6 network used by the
machine supports IPSec (Security Architecture for Internet Protocol). (See e-Manual > Network.) For information on the optional
products required to use the IPSec function, see e-Manual > Optional Products/Software.
To use the e-mail/I-fax function, the TCP/IP protocol is required.
After configuring the settings in accordance with Chapter 3, "Settings Common to the Network Protocols," see the following,
depending on the protocol:
• Chapter 4, "Using a TCP/IP Network"
• Chapter 6, "Using an SMB/CIFS Network"
• The machine does not support NetBEUI.
• If you are using the imagePASS , some functions are not available with this machine. For details, see the manual provided with the imagePASS .

Checking Your Network Environment 2-11
2
Be
fore
Co
nn
ect
ing
to
a N
etw
ork
Sample Macintosh Network
In Mac OS 8/9, the AppleTalk ( EtherTalk) protocol is used. In Mac OS X, either the AppleTalk (EtherTalk), TCP/IP, or NetBIOS (NetBIOS
over TCP/IP) protocol can be used.
To use the e-mail/I-fax function or to send data, the TCP/IP protocol is required.
After configuring the settings in accordance with Chapter 3, "Settings Common to the Network Protocols," see the following,
depending on the protocol:
• Chapter 4, "Using a TCP/IP Network"
• Chapter 6, "Using an SMB/CIFS Network"
• Chapter 7, "Using an AppleTalk Network (Macintosh)"
The protocol you can use differs depending on the version of Mac OS or type of printer driver. For details, see Chapter 13, “Before Printing from Computers.”
Sample UNIX Network
With UNIX computers, the TCP/IP protocol is used.
After configuring the settings in accordance with Chapter 3, "Settings Common to the Network Protocols," see the following:
• Chapter 4, "Using a TCP/IP Network"

Checking Your Network Environment2-12
2
Be
fore
Co
nn
ect
ing
to
a N
etw
ork
Using a Network with Various Types of Computers
If there are various types of computers on the network, the network operations you are required to perform depend on the type
of computers being used.
For example, if you are using Windows XP and Macintosh computers, you will need to specify the settings described in both
"Sample Windows Network" and "Sample Macintosh Network."
To use the e-mail/I-fax function, the TCP/IP protocol is required.
To use the data sending function, either the TCP/IP or NetBIOS protocol is required.
After configuring the settings in accordance with Chapter 3, "Settings Common to the Network Protocols," see the following,
depending on the protocol:
• Chapter 4, "Using a TCP/IP Network"
• Chapter 6, "Using an SMB/CIFS Network"
• Chapter 7, "Using an AppleTalk Network (Macintosh)"

3-1
CHAPTER
3 Settings Common to the Network Protocols
This chapter describes setting items common to the network protocols, which are required for using the machine in a network environment.
Before specifying the settings of the desired protocol (Chapters 4 to 7), be sure to set the items explained in this chapter.
Network Environment Setup Procedures. . . . . . . . . . . . . . . . . . . . . . . . . . . . . . . . . . . . . . . . . . . . . . . . . . . . . . . . . . . . . . . . . . . . . 3-2
Connecting the Machine to a Computer or Network. . . . . . . . . . . . . . . . . . . . . . . . . . . . . . . . . . . . . . . . . . . . . . . . . . . . . . . . . . 3-3Connecting to a Network . . . . . . . . . . . . . . . . . . . . . . . . . . . . . . . . . . . . . . . . . . . . . . . . . . . . . . . . . . . . . . . . . . . . . . . . . . . . . . . . . . . . . . . . . . . . . . . 3-3Connecting to a USB Interface . . . . . . . . . . . . . . . . . . . . . . . . . . . . . . . . . . . . . . . . . . . . . . . . . . . . . . . . . . . . . . . . . . . . . . . . . . . . . . . . . . . . . . . . . . 3-4
Specifying Network Settings from the Touch Panel Display . . . . . . . . . . . . . . . . . . . . . . . . . . . . . . . . . . . . . . . . . . . . . . . . . . . 3-5
Interface Settings . . . . . . . . . . . . . . . . . . . . . . . . . . . . . . . . . . . . . . . . . . . . . . . . . . . . . . . . . . . . . . . . . . . . . . . . . . . . . . . . . . . . . . . . . . . 3-6
Communication Environment Setup . . . . . . . . . . . . . . . . . . . . . . . . . . . . . . . . . . . . . . . . . . . . . . . . . . . . . . . . . . . . . . . . . . . . . . . . . 3-8

Network Environment Setup Procedures3-2
3
Se
ttin
gs
Co
mm
on
to
th
e N
etw
ork
Pro
toco
ls
Network Environment Setup Procedures
Before using the machine in a network environment, it is necessary to perform the following setup procedures.
1 Network Cable Connection (See “Connecting the Machine to a Computer or Network,” on p. 3-3.)
Connect the machine to the network using the network cables.
2 Interface Settings (See “Interface Settings,” on p. 3-6.)
Specify the interface settings for communication between the machine and computers on your network. To specify the settings, use:
• The machine's control panel
• The Remote UI (via a web browser)
3 Communication Environment Setup (See “Communication Environment Setup,” on p. 3-8.)
Set up the environment for communication between the machine and computers on your network.
4 IEEE802.1X Authentication Settings (see e-Manual > Network.)
Specify the settings of IEEE802.1X authentication.
• If you are using the imagePASS , see the manual provided with the imagePASS . • If you are using the imagePASS , some functions are not available with this machine. For details, see the manual provided with the imagePASS .

Connecting the Machine to a Computer or Network 3-3
3
Se
ttin
gs
Co
mm
on
to
th
e N
etw
ork
Pro
toco
ls
Connecting the Machine to a Computer or Network
The machine can be connected to a computer or network with a USB cable or 10Base-T/100Base-TX/1000Base-T Ethernet cable.
• External USB devices (e.g., memory, keyboard, mouse, etc.) are not supported.
• A USB cable or network cable are not included in this package. Please obtain a suitable cable for your computer or network.
Connecting to a Network
The machine supports TCP/IP, AppleTalk, and NetWare, which enables it to be used by Windows, Macintosh, UNIX, and Linux
computers. It also has a 10Base-T / 100Base-TX /1000Base-T connector that can be used on most LANs.
When using 10Base-T/100Base-TX, connect the machine's RJ-45 connector to a hub port using a Category 5 twisted pair LAN
cable. When using 1000Base-T, it is recommended you use an Enchanced Category 5 twisted pair LAN cable.
Computer with100Base-TX/1000Base-T
ConnectorComputer with
10 Base - T Connector
Hub
Ethernet Cable
When connecting the interface cable or network cable, be sure to observe the following precautions to avoid electrical shock.
- Turn OFF the machine's main power switch before disconnecting the power cord from the power outlet. (See Chapter 1, “Before You Start Using This Machine.”)
- Turn OFF the computer and disconnect the power cord from the power outlet.
• You cannot use the machine as a repeater, bridge, or gateway.
• If two or more machines are on an AppleTalk network, they should be switched 'ON' 10 seconds or more apart.
• The machine can automatically detect the type of Ethernet (10Base-T, 100Base-TX, or 1000Base-T).
• If you are using a mixed 10Base-T/100Base-TX/1000Base-T environment, devices on the network (hubs, routers, etc.) must support the mixed environment. For more information, consult your local authorized Canon dealer.
• After connecting the network cable, perform the following operations. (For more information, see the relevant descriptions.)
- Set the date and time, and System Manager settings. (See e-Manual > Settings/Registration and Security.)
- Set the network settings.
- Install a driver if necessary. (See Chapter 13, “Before Printing from Computers.”)
- Install a utility if necessary. (See the manuals provided with the utility.)

Connecting the Machine to a Computer or Network3-4
3
Se
ttin
gs
Co
mm
on
to
th
e N
etw
ork
Pro
toco
ls
Connecting to a USB Interface
You can connect the machine to a computer with a USB port via a USB cable. The machine is USB 2.0 Hi-Speed compatible. The
drivers, and utility that matches the operating system on your computer will be installed. For more information on installing the
driver through a USB connection, see Chapter 13, “Before Printing from Computers.” For information on installing a utility, see the
manuals provided with the utility.
USB Connector
USB Port
USB Cable
DriverSoftware
If you connect or disconnect the USB cable while the machine's main power switch is ON, do not touch the metal parts around the connector, as this may result in electrical shock.
• Do not connect or disconnect the USB cable in the following situations, as it may cause your computer or the machine to operate poorly:
- When installing the driver
- When the computer is booting up
- When printing
• If you disconnect the USB cable with the computer or machine's main power switch ON, always wait at least five seconds before reconnecting the cable. Immediately reconnecting the cable may cause your computer or machine to operate poorly.
• When the machine is connected to a computer via the USB cable, you will not be able to use some of the utilities.
• If you connect the machine to a computer via a USB cable, confirm that [Use USB Device] (in the USB Settings screen) is set to 'On'. (See e-Manual > Security.)
• If you connect the machine to a Macintosh via a USB cable, the Macintosh, if shut down, may start up when the machine starts up or returns from the Sleep mode. If this happens, disconnect the USB cable (the use of a USB hub between the machine and the Macintosh may solve this problem).
• If the machine is connected to a computer with a USB cable, you can print a document from your computer using the printer driver.
• You cannot specify a computer connected to the machine through a USB connection as a destination for Send jobs or forwarded jobs. Also, with that computer, you cannot use the Remote UI and the Network Scan function.
• The appropriate USB interface differs depending on the operating system of the connected computer as follows. For more information, consult your local authorized Canon dealer.
- Windows 2000/XP/Server 2003/Server 2008/Vista/7: USB 2.0 Hi-Speed/USB Full-Speed (USB 1.1 equivalent)
- Mac OS 8/9/X (10.3.2 or earlier): USB Full-Speed (USB 1.1 equivalent)
- Mac OS X (10.3.3 or later): USB 2.0 Hi-Speed/USB Full-Speed (USB 1.1 equivalent)

Specifying Network Settings from the Touch Panel Display 3-5
3
Se
ttin
gs
Co
mm
on
to
th
e N
etw
ork
Pro
toco
ls
Specifying Network Settings from the Touch Panel Display
To specify the network settings for the machine, press (Settings/Registration) on the control panel → log in as the administrator using the touch panel display. (See “Logging In to the Machine as an Administrator,” on p. 1-22.)
You can specify the network settings in [Network] in [Preferences], according to the type of network environment you are using.
The following screen shots show the flow of operations for specifying the network settings.
See this diagram to specify the various network settings, in accordance with the procedures in Chapters 4 to 7.
Settings/Registration screen
Preferences screen
Network screen TCP/IP Settings screen
To move up one level, press [Up].
Settings specified from the control panel become effective after the machine is restarted, after the procedure. Turn OFF the machine, wait at least 10 seconds, and then turn it ON. (See Chapter 1, “Before You Start Using This Machine.”)

Interface Settings3-6
3
Se
ttin
gs
Co
mm
on
to
th
e N
etw
ork
Pro
toco
ls
Interface Settings
This section describes how to specify the interface settings from the control panel. If you are configuring the settings for the first time, use the control panel of the machine.
After configuring the settings, you can change them using software other than the control panel of the machine. For details, see e-Manual > Settings/Registration.
1 On the Network screen, press [Confirm Network Connection Set. Changes] → specify the following.
[On]: If errors related to network connections occur, an error message is displayed on the touch panel display of the machine. If you want to use the machine in a network environment, select [On].
[Off ]: Messages related to network connections are no longer displayed. If you want to use the machine without connecting to a network, select [Off ].
Even if you switch the [Confirm Network Connection Set. Changes] setting from 'On' to 'Off', if the network connections are correctly set they will not be disconnected. The settings in the Network screen will not be changed.

Interface Settings 3-7
3
Se
ttin
gs
Co
mm
on
to
th
e N
etw
ork
Pro
toco
ls
2 On the Network screen, press [ Ethernet Driver Settings] → specify the following.
● If you want the machine to automatically determine the communication mode and Ethernet type:
☐ <Auto Detect>: [On]
If you reconnect the network cable (for example, reconnect the cable to a different Ethernet hub) with the machine's main power switch ON, the Auto Detect function will not work even if you set <Auto Detect> to [On]. Turn OFF the machine, wait at least 10 seconds, and then turn it ON. (Connect the cable with the machine's main power switch OFF.)
• The machine automatically determines the Ethernet type. Press [On] unless you want to specify a particular Ethernet setting. • If you set <Auto Detect> to 'On', the machine will not enter a complete Sleep mode.
● If you want to manually set the communication mode and Ethernet type for specifying a particular Ethernet
type setting:
☐ <Auto Detect>: [Off ].
Select the appropriate items for <Communication Mode> and <Ethernet Type>, according to the network environment you are using.
• To connect with 1000Base-T, select [Full Duplex] for <Communication Mode>. • If you select [10 Base-T] or [100 Base-TX] for <Ethernet Type>, the machine will not enter a complete Sleep mode.

Communication Environment Setup3-8
3
Se
ttin
gs
Co
mm
on
to
th
e N
etw
ork
Pro
toco
ls
Communication Environment Setup
This section describes how to set up the environment for communication between the machine and computers on your network. If you are configuring the settings for the first time, use the control panel of the machine.
After configuring the settings, you can change them using software other than the control panel of the machine. For details, see e-Manual > Settings/Registration.
[SNMP Settings] does not support AppleTalk networks.
1 On the Network screen, press [ SNMP Settings] → specify the settings for SNMP v. 1.
[On] for <Use SNMP v. 1>: Follow the procedure below to specify the MIB access permissions and community names.
• The machine supports the SNMP v. 1 and SNMP v. 3 management functions. You can use them simultaneously. The [Read Only]/[Read/Write] functions of SNMP v. 1 and the security functions of SNMP v. 3, such as an encrypted communication path, enable you to manage devices more securely. The available combinations of SNMP v. 1 and SNMP v. 3 functions you can use are shown below:
SNMP v. 1 SNMP v. 3
DescriptionUse SNMP v. 1
MIB Access Permission
Use SNMP v. 3
On Read/Write On/Off You can set or browse each item of the machine with a utility that uses SNMP v. 1 to obtain information.As the write access with SNMP v. 1 is enabled, the security functions of SNMP v. 3 are not available, regardless of the settings for <Use SNMP v. 3>.
On Read Only On You can only browse each item of the machine with a utility that uses SNMP v. 1 to obtain information.Only users who have been assigned access rights can set each item of the machine with a utility that uses SNMP v. 3.
On Read Only Off You can only browse each item of the machine with a utility that uses SNMP v. 1 to obtain information.
Off - On Only users who have been assigned access rights can set or browse each item of the machine with a utility that uses SNMP v. 3.
Off - Off You cannot set or browse each item of the machine with a utility.
• If you want to use a Canon printer or utility, specify the following settings:
- Press [On] for <Use SNMP v. 1> → select [Dedicated Comm. Settings] → press [On] for <Dedicated Community] → [Read/Write] for <MIB Access Permission>.
- Set [Dedicated Port Settings] to ‘On’.
• You can restrict the IP addresses of computers on which items can be set or browsed. If you restrict IP addresses, it is not possible to set or browse detailed information concerning the machine on computers other than those whose IP addresses are allowed to send or receive data, even if <Use SNMP v. 1>, <Use SNMP v. 3>, and [Dedicated Port Settings] are set to 'On'. For details, see “TCP/IPv4 Settings,” on p. 4-3 or see “TCP/IPv6 Settings,” on p. 4-9.

Communication Environment Setup 3-9
3
Se
ttin
gs
Co
mm
on
to
th
e N
etw
ork
Pro
toco
ls
● If you want to specify the Dedicated Community Settings
☐ Press [Dedicated Comm. Settings] → [On] → specify the settings for <MIB Access Permission>.
● If you want to specify a Community Name 1
☐ Press [Set Community Name 1] → [On] → specify the settings for <MIB Access Permission> and the community name in [Community Name].
You can also change the community name in [Community Name] to a name other than 'public'.
● If you want to specify a Community Name 2
☐ Press [Set Community Name 2 ] → [On] → specify the settings for <MIB Access Permission> and the community name in [Community Name].
You can also change the community name in [Community Name] to a name other than 'public2'.

Communication Environment Setup3-10
3
Se
ttin
gs
Co
mm
on
to
th
e N
etw
ork
Pro
toco
ls
2 Specify the settings for SNMP v. 3.
[On] for <Use SNMP v. 3>: Specify the user and context according to the following procedures.
An SNMP v. 3 user with the following settings is registered by default. Delete or change these settings as necessary.
- User: initial
- MIB Access Permis.: Read/Write
- Security Settings: Auth. Yes/Encry. Yes
- Authent. Algorithm: MD5
- Authent. Password: initial
- Encryption Algorithm: DES
- Encryption Password: initial
● If you want to add an SNMP v. 3 user:
☐ Press [User Settings] → [Register] → specify the user name, MIB permissions, and security settings.
If you select [Auth. Yes/Encry. Yes] from the Security Settings drop-down list, select the authentication algorithm → enter the passwords for authentication and encryption. If you select [Auth. Yes/Encry. No] from the Security Settings drop-down list, select the authentication algorithm → enter the password for authentication.
● If you want to confirm or change the SNMP v. 3 user settings:
☐ Press [User Settings] to select the user whose settings you want to confirm or change → press [Details/Edit].
Confirm the displayed information → change the settings if necessary.
● If you want to delete an SNMP v. 3 user:
☐ Press [User Settings] to select the user whose settings you want to delete → press [Delete].
● If you want to change the status of an SNMP v. 3 user:
☐ Press [User Settings] → select the user whose status you want to change → press [User On/Off ].

Communication Environment Setup 3-11
3
Se
ttin
gs
Co
mm
on
to
th
e N
etw
ork
Pro
toco
ls
● If you want to edit the context:
☐ Press [Context Settings] → edit the context.
If you want to add a context, press [Register] to add a new context. If you want to change a context, select the context you want to change → press [Edit] to change the context. If you want to delete a context, select the context you want to delete → press [Delete].
A context named 'NULL' is registered by default. The 'NULL' context cannot be deleted, and is not displayed on the Context Settings screen.
3 Set monitoring for the printer management information.
[On] for <Get Printer Mgmt Info from Host>: If you are using Windows Server 2008/Vista/7 and set [Standard TCP/IP Port] for the printer driver port, the SNMP port monitoring function will be enabled automatically to obtain printer management information such as information on print applications and printer ports.

Communication Environment Setup3-12
3
Se
ttin
gs
Co
mm
on
to
th
e N
etw
ork
Pro
toco
ls
4 On the Network screen, press [Dedicated Port Settings] → specify the following.
[On]: You can set or browse detailed information on the machine with a Canon printer driver or utility (UFR II/PCL/PS printer drivers, etc.).
• If you want to use a Canon printer or utility, specify the following settings:
- Press [On] for <Use SNMP v. 1> → select [Dedicated Comm. Settings] → press [On] for <Dedicated Community] → [Read/Write] for <MIB Access Permission>.
- Set [Dedicated Port Settings] to ‘On’.
• You can restrict the IP addresses of computers on which items can be set or browsed. If you restrict IP addresses, it is not possible to set or browse detailed information concerning the machine on computers other than those whose IP addresses are allowed to send or receive data, even if <Use SNMP v. 1>, <Use SNMP v. 3>, and [Dedicated Port Settings] are set to 'On'. For details, see “TCP/IPv4 Settings,” on p. 4-3 or see “TCP/IPv6 Settings,” on p. 4-9.
5 On the Network screen, press [Use Spool Function] → specify the following.
[On]: You can spool print jobs transmitted to this machine on the machine's hard disk.
If the PS Printer Kit is activated, take note of the following:
- If you print a file in PDF, XPS, or PS format by specifying its URL on the Remote UI, the print job will always be spooled, regardless of the settings made under this option.
When you spool a print job on the machine's hard disk, the time required to release a computer outputting a print job is shortened.

4-1
CHAPTER
4 Using a TCP/IP Network
This chapter describes the settings and procedures necessary to connect and use the machine with a TCP/IP network.
TCP/IP Network Setup Procedures . . . . . . . . . . . . . . . . . . . . . . . . . . . . . . . . . . . . . . . . . . . . . . . . . . . . . . . . . . . . . . . . . . . . . . . . . . . 4-2
Protocol Settings (TCP/IP) . . . . . . . . . . . . . . . . . . . . . . . . . . . . . . . . . . . . . . . . . . . . . . . . . . . . . . . . . . . . . . . . . . . . . . . . . . . . . . . . . . . 4-3TCP/IPv4 Settings . . . . . . . . . . . . . . . . . . . . . . . . . . . . . . . . . . . . . . . . . . . . . . . . . . . . . . . . . . . . . . . . . . . . . . . . . . . . . . . . . . . . . . . . . . . . . . . . . . . . . . 4-3TCP/IPv6 Settings . . . . . . . . . . . . . . . . . . . . . . . . . . . . . . . . . . . . . . . . . . . . . . . . . . . . . . . . . . . . . . . . . . . . . . . . . . . . . . . . . . . . . . . . . . . . . . . . . . . . . . 4-9Settings Common to TCP/IPv4 and TCP/IPv6 . . . . . . . . . . . . . . . . . . . . . . . . . . . . . . . . . . . . . . . . . . . . . . . . . . . . . . . . . . . . . . . . . . . . . . . . . . . 4-15Confirming TCP/IPv4 Settings . . . . . . . . . . . . . . . . . . . . . . . . . . . . . . . . . . . . . . . . . . . . . . . . . . . . . . . . . . . . . . . . . . . . . . . . . . . . . . . . . . . . . . . . . 4-23Confirming TCP/IPv6 Settings . . . . . . . . . . . . . . . . . . . . . . . . . . . . . . . . . . . . . . . . . . . . . . . . . . . . . . . . . . . . . . . . . . . . . . . . . . . . . . . . . . . . . . . . . 4-24E-Mail/I-Fax Settings . . . . . . . . . . . . . . . . . . . . . . . . . . . . . . . . . . . . . . . . . . . . . . . . . . . . . . . . . . . . . . . . . . . . . . . . . . . . . . . . . . . . . . . . . . . . . . . . . . 4-25Startup Time Settings . . . . . . . . . . . . . . . . . . . . . . . . . . . . . . . . . . . . . . . . . . . . . . . . . . . . . . . . . . . . . . . . . . . . . . . . . . . . . . . . . . . . . . . . . . . . . . . . . 4-27
Setting Up a Computer as a File Server (TCP/IP) . . . . . . . . . . . . . . . . . . . . . . . . . . . . . . . . . . . . . . . . . . . . . . . . . . . . . . . . . . . . . 4-28FTP Server Settings. . . . . . . . . . . . . . . . . . . . . . . . . . . . . . . . . . . . . . . . . . . . . . . . . . . . . . . . . . . . . . . . . . . . . . . . . . . . . . . . . . . . . . . . . . . . . . . . . . . . 4-29WebDAV Server Settings . . . . . . . . . . . . . . . . . . . . . . . . . . . . . . . . . . . . . . . . . . . . . . . . . . . . . . . . . . . . . . . . . . . . . . . . . . . . . . . . . . . . . . . . . . . . . . 4-36

TCP/IP Network Setup Procedures4-2
4
Usi
ng
a T
CP
/IP
Ne
two
rk
TCP/IP Network Setup Procedures
To use a TCP/IP network, it is necessary to perform the following procedures.
1 Protocol Settings (TCP/IP) (See “Protocol Settings (TCP/IP),” on p. 4-3.)
Specify the protocol settings. To specify the settings, use:
• The machine’s control panel
• The Remote UI (via a web browser)
• Canon utilities
2 Computer Settings for Printing (TCP/IP) (See e-Manual > Network.)
Specify the settings for each computer you use for printing. (Optional equipment is required to print from a computer. For the equipment needed, see “Optional Equipment and System Requirements for Connecting to a Network,” on p. 2-2.)
3 Computer Settings for a File Server (TCP/IP) (See “Setting Up a Computer as a File Server (TCP/IP),” on p. 4-28.)
Specify the settings of the computer receiving data sent from the machine.
• It is recommended that you consult the administrator for the network you are using when performing steps 1 and 3 above.
• The machine or printing equipment does not come with printer driver software that can be used on a UNIX platform. (Use LPD to set up a printer in UNIX.)
• If you are using the imagePASS , see the manual provided with the imagePASS .
• If you are using the imagePASS , some functions are not available with this machine. For details, see the manual provided with the imagePASS .
• A pre-determined port must be opened in order to initiate network communication using TCP/IP. The required port can be opened by selecting [On] for all of the [Network] settings in the machine. It is recommended that any unused functions be set to ‘Off’. When a port is opened, it is possible for a third person to gain unauthorized access.

Protocol Settings (TCP/IP) 4-3
4
Usi
ng
a T
CP
/IP
Ne
two
rk
Protocol Settings (TCP/IP)
This section describes how to specify the protocol settings for the machine using the control panel. If you are configuring the settings for the first time, use the control panel of the machine.
After configuring the settings, you can change the content by using software other than the control panel of the machine. For details, see e-Manual > Settings/Registration or Remote UI.
• When using functions to access external servers on the internet, you may not be able to access them due to the settings of firewalls, etc. In this case, consult the administrator for the network you are using. • If you are using the imagePASS , see the manual provided with the imagePASS . • If you are using the imagePASS , some functions are not available with this machine. For details, see the manual provided with the imagePASS .
TCP/IPv4 Settings
This section describes the procedure for setting TCP/IPv4 using the control panel. After specifying the settings for TCP/IPv4, follow
the procedure in “Settings Common to TCP/IPv4 and TCP/IPv6,” on p. 4-15 to specify the required settings, and the procedure
in "Confirming TCP/IPv4 Settings," on p. 4-23 to check whether the network settings are correct. If the settings for TCP/IPv6 are
already specified and you have finished specifying the settings common to TCP/IPv4 and TCP/IPv6, only check the network
settings after completing this procedure.
If you want to use IPv6 communications at the same time, follow the procedure in "TCP/IPv6 Settings," to specify the required
settings, and the procedure in "Confirming TCP/IPv6 Settings," on p. 4-24 to confirm the settings.
1 On the TCP/IP Settings screen, press [IPv4 Settings] → [Use IPv4].

Protocol Settings (TCP/IP)4-4
4
Usi
ng
a T
CP
/IP
Ne
two
rk
2 In <Use IPv4>, specify the following.
[On] for <Use IPv4>: IPv4 networks can be used.[Off ] for <Use IPv4>: IPv4 networks cannot be used, regardless of the settings specified for IPv4 on the Settings/Registration screen. The ARP (Address Resolution Protocol) table is also disabled.
3 On the TCP/IPv4 Settings screen, press [ IP Address Settings] → specify the following.
● Using a fixed IP address:
☐ [ DH CP], [ RA RP], and [ BOO TP]: [Off ]
Enter the appropriate values in [IP Address], [ Subnet Mask], and [ Gateway Address].
It takes about two minutes to check whether the DHCP, RARP, or BOOTP settings can be used. If you do not plan to use one of these settings, it is recommended that you turn them off.

Protocol Settings (TCP/IP) 4-5
4
Usi
ng
a T
CP
/IP
Ne
two
rk
● Obtaining automatically an IP address:
☐ [DHCP], [RARP], or [BOOTP]: [On]
If this information cannot be obtained via DHCP, RARP, or BOOTP after you restart the machine, enter the IP address, subnet mask, and gateway address to use the settings entered in this step.
• If the machine is restarted after DHCP, RARP, or BOOTP settings are specified, the TCP/IP Settings screen displays the IP address setting values obtained from the DHCP, RARP, or BOOTP server. (If the IP address, host name, and domain name have been previously set, these will be overwritten by the setting values obtained from DHCP, RARP, or BOOTP.)
• If you use DHCP without the DNS dynamic update function, it is recommended that an identical IP address be assigned to the machine at all times. (If the IP address is not identical, the host name for the machine will not correspond to the IP address.)
4 On the TCP/IP Settings screen, press [ DNS Settings] → [DNS Server Address Settings].
5 In <IPv4>, specify the following.
If you want to use dynamic DNS updating, enter the IPv4 address of the DNS server in [Primary DNS Server].
If you do not want to set up a secondary DNS server, enter <0.0.0.0>.
If you set [BOOTP] or [DHCP] to 'On' in step 3, the IP address of a DNS server you set manually will be overwritten.

Protocol Settings (TCP/IP)4-6
4
Usi
ng
a T
CP
/IP
Ne
two
rk
6 On the DNS Settings screen, press [DNS Host/Domain Name Settings] → in <IPv4>, specify the
following.
Enter the name of the machine as [ Host Name], and the network domain name of the machine as [ Domain Name].
If you want to use dynamic DNS updating, it is necessary to set a host name and domain name.
If you set [BOOTP] or [DHCP] to 'On' in step 3, the host name and domain name you set manually will be overwritten.
7 On the DNS Settings screen, press [DNS Dynamic Update Settings] → in <IPv4>, specify the
following.
[On] for <DNS Dynamic Update>: If your environment includes a dynamic DNS server, you can automatically register the IPv4 address, host name, and domain name set for the machine in the DNS server using dynamic DNS updating.

Protocol Settings (TCP/IP) 4-7
4
Usi
ng
a T
CP
/IP
Ne
two
rk
• If you have a DHCP server running Windows 2000 Server that uses the DHCP service and want to register the machine's DNS record, configure the following settings in the DHCP server:
- In the DHCP server, right-click the [Scope] icon → click [Properties]. In the [DNS] sheet of the displayed dialog box, select [Automatically update DHCP client information in DNS] → [Update DNS only if DHCP client requests].
• If you have a DHCP server running Windows 2003 Server that uses the DHCP service and want to register the machine's DNS record, configure the following settings in the DHCP server:
- In the DHCP server, right-click the [Scope] icon → click [Properties]. In the [DNS] sheet of the displayed dialog box, select [Enable DNS dynamic updates according to the settings below] → [Dynamically update DNS A and PTR (Pointer Record) records only if requested by the DHCP clients].
- In the Active Directory environment, right-click the icon of the DHCP server you are using → select [Properties]. In the [Advanced] sheet of the displayed dialog box, click [Credentials]. In the [DNS dynamic update credentials] dialog box, enter the user name, domain, and password for the Active Directory.
• If you have a DHCPv4 server running Windows 2008 Server that uses the DHCPv4 service and want to register the machine’s DNS record, configure the following settings in the DHCPv4 server:
- In the DHCPv4 server, right-click the [Scope] icon → click [Properties]. In the [DNS] sheet of the displayed dialog box, select [Enable DNS dynamic updates according to the settings below] → [Dynamically update DNS A and PTR records only if requested by the DHCP clients].
- In the Active Directory environment, right-click the icon of the DHCPv4 server you are using → select [Properties]. In the [Advanced] sheet of the displayed dialog box, click [Credentials]. In the [DNS dynamic update credentials] dialog box, enter the user name, domain, and password for the Active Directory.
8 On the Network screen, press [Firewall Settings] → [IPv4 Address Filter] → specify the following.
By specifying the settings described below, you can filter received packets and transmitted packets using IPv4 addresses and improve security when sending and receiving data between your computer and the machine. The possibility of a third person gaining unauthorized access can be reduced by configuring the settings for [IPv4 Address Filter] in accordance with the environment you are using.
If you want to deny data transmission/reception between a computer with a specified IPv4 address and the machine, set the default policy for the transmission or reception filter so as to allow transmission/reception, and enter the IPv4 address to be denied. Data transmission/reception between the computer having the specified IPv4 address and the machine will be disabled. Also, the Remote UI cannot be used, and information regarding the machine cannot be displayed or set using a utility on the computer whose IPv4 address has been specified.
If you want to enable data transmission/reception only with a computer having a specified IPv4 address, set the default policy for the transmission or reception filter so as to deny transmission/reception, and enter the IPv4 address to be allowed. Data transmission/reception will be enabled only between the computer having the specified IPv4 address and the machine. The Remote UI can be used, and information regarding the machine can be displayed and set using a utility only on the computer whose IPv4 address has been specified.
● If you want to deny transmission/reception of data with the computer having the specified IPv4 address:
☐ Press [TX Filter] or [RX Filter] → set <Use Filter> to 'On'.

Protocol Settings (TCP/IP)4-8
4
Usi
ng
a T
CP
/IP
Ne
two
rk
☐ Set <Default Policy> to [Allow].
☐ Press [Register] → set the IPv4 address or range of addresses for which data transmission/reception is to be denied, or specify the prefix and prefix length of the IPv4 address(es).
If data transmission/reception is attempted between the device having the IPv4 address specified in this procedure and the machine, a block log will be generated. To display the block log, see e-Manual > Network.
● If you want to allow transmission/reception of data only with the computer having the specified IPv4 address:
☐ Press [TX Filter] or [RX Filter] → set <Use Filter> to 'On'.
☐ Set <Default Policy> to [Reject].
☐ Press [Register] → set the IPv4 address or range of addresses for which data transmission/reception is to be allowed, or specify the prefix and prefix length of the IPv4 address(es).
● If you do not want to restrict data transmission/reception:
☐ Press [TX Filter] or [RX Filter] → set <Use Filter> to 'Off'.
• You can register up to 16 IPv4 addresses, IPv4 address ranges, or IPv4 address prefixes. • The value of [First Address] should be less than or equal to that of [Last Address]. • If the usage of a protocol or print application is not permitted on your device, it cannot be used even after settings in [Firewall Settings] have been changed; on your device, configure the settings to permit the protocol or print application. • If you enter '255' in [Prefix Length], no IPv4 addresses will be set. • If you enter '0' in [Prefix Length], all IPv4 addresses will be set.

Protocol Settings (TCP/IP) 4-9
4
Usi
ng
a T
CP
/IP
Ne
two
rk
TCP/IPv6 Settings
This section describes the procedure for setting TCP/IPv6 using the control panel. After specifying the settings for TCP/IPv6, follow
the procedure in “Settings Common to TCP/IPv4 and TCP/IPv6,” on p. 4-15 to specify the required settings, and the procedure
in “Confirming TCP/IPv6 Settings,” on p. 4-24 to check whether the network settings are correct. If the settings for TCP/IPv4 are
already specified and you have finished specifying the settings common to TCP/IPv4 and TCP/IPv6, only check the network
settings after completing this procedure. If you want to use IPv4 communications at the same time, follow the procedure in “TCP/
IPv4 Settings,” on p. 4-3 to specify the required settings, and the procedure in “Confirming TCP/IPv4 Settings,” on p. 4-23 to check
the settings.
The machine can use up to seven of the following IPv6 addresses. With IPv6 communication, multiple IPv6 addresses can be used
at the same time.
If the IPv6 address assigned to the machine is the same as another node, you may not be able to perform IPv6 communication, even though an IPv6 address is displayed on the screen.
■ Link local address (1) An address that is only valid within the same link. A link local address is automatically set using a specific prefix (fe80::) and an interface identifier generated from the MAC address of the machine. When the machine is using the functions of IPv6, one link local address is always registered.
■ Manual address (0 or 1) A fixed address that is set from the control panel.
■ Stateless address (0 to 4) A stateless address is automatically set using the machine's MAC address and the prefix (information indicating the network belonged to) included in the RA (Router Advertisement) notified by the router when the machine is started.
■ Stateful address (0 or 1) A stateful address can be obtained from a DHCP server using DHCPv6.
1 On the TCP/IP Settings screen, press [IPv6 Settings] → [Use IPv6].

Protocol Settings (TCP/IP)4-10
4
Usi
ng
a T
CP
/IP
Ne
two
rk
2 In [Use IPv6], specify the following.
[On] for <Use IPv6>: You can use an IPv6 network. A link local address is automatically set.
3 On the IPv6 Settings screen, press [Stateless Address Settings] → specify the following.
[On] for <Use Stateless Address>: A stateless address is automatically set when the machine is started.
The stateless address is discarded when the machine is restarted (with the machine's main power switch ON).
4 On the IPv6 Settings screen, press [Manual Address Settings] → specify the following.
[On] for <Use Manual Address>: You can set the IPv6 address manually.
Enter the IPv6 address value in [Manual Address] and the IPv6 address prefix length in [Prefix Length].
Enter the default router address value in [Default Router Addr.]. If you do not want to specify the default router address, leave [Default Router Addr.] blank.

Protocol Settings (TCP/IP) 4-11
4
Usi
ng
a T
CP
/IP
Ne
two
rk
• You cannot use a manual address if you leave [Manual Address] blank. You also cannot set any of the following types of address for [Manual Address]:
- Multicast address
- Address composed entirely of zeros
- IPv4 compatible address (an IPv6 address with the top 96 bits set to '0' and an IPv4 address in the lower 32 bits)
- IPv4 mapped address (an IPv6 address with the top 96 bits set to '0:0:0:0:0:ffff:' and an IPv4 address in the lower 32 bits)
• You cannot enter a multicast address or an address composed entirely of zeros in [Default Router Addr.].
5 On the IPv6 Settings screen, press [Use DHCPv6] → specify the following.
[On] for <Use DHCPv6>: You can use DHCPv6 to obtain a stateful address from a DHCP server.
6 On the Network screen, press [Firewall Settings] → [IPv6 Address Filter] → specify the following.
By specifying the settings described below, you can filter received packets and transmitted packets using IPv6 addresses and improve security when sending and receiving data between your computer and the machine. The possibility of a third person gaining unauthorized access can be reduced by configuring the settings for [IPv6 Address Filter] in accordance with the environment you are using.
If you want to deny data transmission/reception between a computer with a specified IPv6 address and the machine, set the default policy for the transmission or reception filter so as to allow transmission/reception, and enter the IPv6 address to be denied. Data transmission/reception between the computer having the specified IPv6 address and the machine will be disabled. Also, the Remote UI cannot be used, and information regarding the machine cannot be displayed or set using a utility on the computer whose IPv6 address has been specified.
If you want to enable data transmission/reception only with a computer having a specified IPv6 address, set the default policy for the transmission or reception filter so as to deny transmission/reception, and enter the IPv6 address to be allowed. Data transmission/reception will be enabled only between the computer having the specified IPv6 address and the machine.
● If you want to deny transmission/reception of data with the computer having the specified IPv6 address:
☐ Press [TX Filter] or [RX Filter] → set <Use Filter> to 'On'.

Protocol Settings (TCP/IP)4-12
4
Usi
ng
a T
CP
/IP
Ne
two
rk
☐ Set <Default Policy> to [Allow].
☐ Press [Register] → set the IPv6 address or range of addresses for which data transmission is to be denied, or specify the prefix and prefix length of the IPv6 address(es).
If data transmission/reception is attempted between the device having the IPv6 address specified in this procedure and the machine, a block log will be generated. To display the block log, see e-Manual > Network.
● If you want to allow transmission/reception of data only with the computer having the specified IPv6 address:
☐ Press [TX Filter] or [RX Filter] → set <Use Filter> to 'On'.
☐ Set <Default Policy> to [Reject].
☐ Press [Register] → set the IPv6 address or range of addresses for which data transmission is to be allowed, or specify the prefix and prefix length of the IPv6 address(es).
● If you do not want to restrict data transmission/reception:
☐ Press [TX Filter] or [RX Filter] → set <Use Filter> to 'Off'.
• You can register up to 16 IPv6 addresses or IPv6 address prefixes.
• You cannot specify a multicast address for an IPv6 address.
• If the usage of a protocol or print application is not permitted on your device, it cannot be used even after settings in [Firewall Settings] have been changed; on your device, configure the settings to permit the protocol or print application.
• If you enter '255' in [Prefix Length], no IPv6 addresses will be set.
• If you enter '0' in [Prefix Length], all IPv6 addresses will be set.
7 On the TCP/IP Settings screen, press [DNS Settings] → [DNS Server Address Settings].

Protocol Settings (TCP/IP) 4-13
4
Usi
ng
a T
CP
/IP
Ne
two
rk
8 In <IPv6>, specify the following.
If you want to use dynamic DNS updating, enter the IPv6 address of the DNS server in [Primary DNS Server].
If you do not want to specify a secondary DNS server, leave [Secondary DNS Server] blank.
• You cannot enter any of the following types of address for [Primary DNS Server] or [Secondary DNS Server]:
- Multicast address
- Address composed entirely of zeros
• If you set <Use DHCPv6> to 'On' in step 5, the IPv6 address of a DNS server you set manually will be overwritten.
9 On the DNS Settings screen, press [DNS Host/Domain Name Settings] → in <IPv6>, specify the
following.
[On] for <Use Same Host Name/Domain Name as IPv4>: You can set the same host name or domain name used with IPv4 communication for IPv6 communication. If you set <Use Same Host Name/Domain Name as IPv4> to 'Off', enter the name of the machine in [Host Name] and the name of the domain the machine belongs to in [Domain Name]. It is necessary to set a host name and domain name if you want to use dynamic DNS updating.
If you set <Use DHCPv6> to 'On' in step 5, the domain name you set manually will be overwritten. Even if you set <Use Same Host Name/Domain Name as IPv4> to 'On', the domain name obtained from the DHCPv6 server is used.

Protocol Settings (TCP/IP)4-14
4
Usi
ng
a T
CP
/IP
Ne
two
rk
10 On the DNS Settings screen, press [DNS Dynamic Update Settings] → in <IPv6>, specify the
following.
[On] for <DNS Dynamic Update>: If your environment includes a dynamic DNS server, you can automatically register the IPv6 address, host name, and domain name set for the machine in the DNS server using dynamic DNS updating.
[On] for <Register Stateless Address>: You can automatically register a stateless address in the DNS server using dynamic DNS updating.
[On] for <Register Manual Address>: You can automatically register a manual address in the DNS server using dynamic DNS updating.
[On] for <Register Stateful Address>: You can automatically register a stateful address in the DNS server using dynamic DNS updating.
Windows 2000 Server and Windows Server 2003 do not support DHCPv6 servers.
If you have a DHCPv6 server running Windows 2008 Server that uses the DHCPv6 service and want to register the machine’s DNS record, configure the following settings in the DHCPv6 server:
- In the DHCPv6 server, right-click the [Scope] icon → click [Properties]. In the [DNS] sheet of the displayed dialog box, select [Enable DNS dynamic updates according to the settings below] → [Dynamically update DNS AAAA and PTR records only if requested by the DHCP clients].
- In the Active Directory environment, right-click the icon of the DHCPv6 server you are using → select [Properties]. In the [Advanced] sheet of the displayed dialog box, click [Credentials]. In the [DNS dynamic update credentials] dialog box, enter the user name, domain, and password for the Active Directory.

Protocol Settings (TCP/IP) 4-15
4
Usi
ng
a T
CP
/IP
Ne
two
rk
Settings Common to TCP/IPv4 and TCP/IPv6
This section describes the procedure for specifying the settings common to TCP/IPv4 and TCP/IPv6 using the control panel.
Specify the settings required for your network environment. If you want to use both TCP/IPv4 communications and TCP/IPv6
communications, specify the settings required for both protocols.
After performing this procedure, follow the procedure in “Confirming TCP/IPv4 Settings,” on p. 4-23 and “Confirming TCP/IPv6
Settings,” on p. 4-24 to check whether the network settings are correct.
1 On the TCP/IP Settings screen, press [ LPD Print Settings] → specify the following.
[On]: You can use LPD as the print application.
• You can only output a banner page if you are using the PCL Printer Kit or the PS Printer Kit.
• Output of a banner page is set on a print-job basis. Even if [On] is selected for < LPD Banner Page >, a banner page cannot be output for a print job unless it is set.
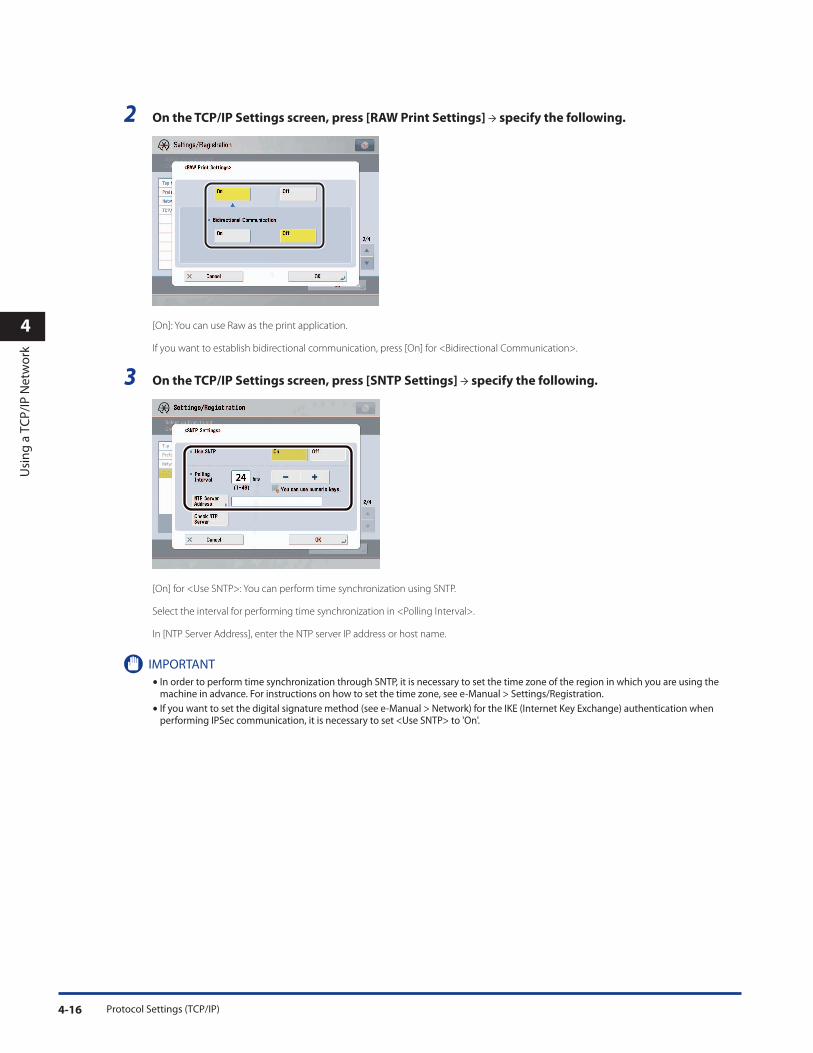
Protocol Settings (TCP/IP)4-16
4
Usi
ng
a T
CP
/IP
Ne
two
rk
2 On the TCP/IP Settings screen, press [ RAW Print Settings ] → specify the following.
[On]: You can use Raw as the print application.
If you want to establish bidirectional communication, press [On] for <Bidirectional Communication>.
3 On the TCP/IP Settings screen, press [SNTP Settings] → specify the following.
[On] for <Use SNTP>: You can perform time synchronization using SNTP.
Select the interval for performing time synchronization in <Polling Interval>.
In [NTP Server Address], enter the NTP server IP address or host name.
• In order to perform time synchronization through SNTP, it is necessary to set the time zone of the region in which you are using the machine in advance. For instructions on how to set the time zone, see e-Manual > Settings/Registration.
• If you want to set the digital signature method (see e-Manual > Network) for the IKE (Internet Key Exchange) authentication when performing IPSec communication, it is necessary to set <Use SNTP> to 'On'.

Protocol Settings (TCP/IP) 4-17
4
Usi
ng
a T
CP
/IP
Ne
two
rk
4 On the TCP/IP Settings screen, press [ FTP Print Settings ] → specify the following.
[On] for <Use FTP Printing>: You can use FTP as the print application.
In [User], enter the login user name for access to the FTP server.
In [Password], enter the login password for access to the FTP server.
• If you do not specify [User] and [Password], all user names and passwords will be valid.
• The password will appear in the job list as a user name if you enter “anonymous” as a login user name for access to an FTP server without specifying [User] and [Password], or if you enter “anonymous” in [User]. (To display the job list, press (Status Monitor/Cancel)→ [Print] → [Log] on the touch panel display.)
5 On the TCP/IP Settings screen, press [WSD Print Settings] → specify the following.
Specify the WSD print settings if you are using Windows Vista/7/Server 2008.
[On] for <Use WSD>: You can use WSD (Web Services on Devices) as the print application. [Use HTTP] is automatically set to 'On' if you select [On].
<Use WSD Browsing> is automatically set to 'On' if you set <Use WSD> to 'On', and enables device information to be obtained using WSD.
If you want to respond to multicast discovery requests, set <Use Multicast Discovery> to 'On'.

Protocol Settings (TCP/IP)4-18
4
Usi
ng
a T
CP
/IP
Ne
two
rk
6 On the TCP/IP Settings screen, press [Use FTP PASV Mode] → specify the following.
Whether you use the PASV mode for FTP depends on the network environment you are using and the settings of the file server you are sending to. Before specifying the PASV mode for FTP, consult the administrator for the network you are using.
7 On the TCP/IP Settings screen, press [ IPP Print Settings ] → specify the following.
[On]: You can use IPP as the print application. Pressing [On] for [IPP Print Settings] automatically sets [Use HTTP] to 'On'.
To use SSL to encrypt the IPP data, press [On] for <Use SSL>.
If you are using IPP authentication, press [On] for <Use Authentication> → enter the user name to use for IPP authentication in [User], and the password to use for IPP authentication in [Password].
In order to select [On] for <Use SSL> to allow SSL communication, a key pair is necessary. You can use the preinstalled key pair, or generate an original key pair with the machine, to set as the default key. For information on the default key, and instructions on how to generate an original key pair, see e-Manual > Security.

Protocol Settings (TCP/IP) 4-19
4
Usi
ng
a T
CP
/IP
Ne
two
rk
8 On the TCP/IP Settings screen, press [Multicast Discovery Settings] → specify the following.
[On] for <Response>: You can use Auto Search of Device Information Delivery Settings from other devices, or respond to a multicast discovery from utilities.
Optionally, press [Scope Name] and enter the scope name for a multicast discovery.
For instructions on how to deliver and share device information, such as the Address Book and Department ID Management settings with multiple devices, see e-Manual > Security.
9 On the TCP/IP Settings screen, press [ Use HTTP ] → specify the following.
[On]: You can use the Remote UI, IPP printing, WSD printing, Department ID management password confirmation and WebDAV server.

Protocol Settings (TCP/IP)4-20
4
Usi
ng
a T
CP
/IP
Ne
two
rk
10 On the TCP/IP Settings screen, press [ Proxy Settings ] → specify the following.
In the following cases, specify the proxy settings, according to the network environment you are using:
• If you perform direct printing from the Remote UI when the Direct Print Kit (for PDF/XPS) is activated
• If you are using the Web Access Software (The Web Access Software is optional software for viewing web pages on the touch panel display of the machine. For details, see e-Manual > Web Access.)
• If you connect the WebDAV client to the Internet via a proxy, when using a WebDAV server
In [ Server Address ], enter a proxy server IP address or FQDN (for example, starfish.company.com).
In [ Port Number ], enter the port number of a proxy server using - (numeric keys).
If you want to use a proxy in the same domain, press [On] for <Use Proxy within the Same Domain>.
If you want to use proxy authentication, press [Set Authentication] → [On] for <Use Proxy Auth.> → enter the user name to use for proxy authentication in [User], and the password to use for proxy authentication in [Password].
If you are using the Direct Print Kit (for PDF/XPS) , you can print a file in the PDF, XPS, or PS format by specifying its URL using the Remote UI. To print a file by specifying its URL using the Remote UI, you need to specify the proxy settings suitable for your environment. (Set in this step.)

Protocol Settings (TCP/IP) 4-21
4
Usi
ng
a T
CP
/IP
Ne
two
rk
11 On the Network screen, press [Firewall Settings] → [MAC Address Filter] → specify the following.
By specifying the settings described below, you can filter received packets and transmitted packets using MAC (Media Access Control) addresses and improve security when sending and receiving data. The possibility of a third person gaining unauthorized access can be reduced by configuring the settings for [MAC Address Filter] in accordance with the environment you are using.
If you want to deny data transmission/reception between a device with a specified MAC address and the machine, set the default policy for the transmission or reception filter so as to allow transmission/reception, and enter the MAC address to be denied. Data transmission/reception between the device having the specified MAC address and the machine will be disabled.
If you want to enable data transmission/reception only with a device having a specified MAC address, set the default policy for the transmission or reception filter so as to deny transmission/reception, and enter the MAC address to be allowed. Data transmission/reception will be enabled only between the device having the specified MAC address and the machine.
Up to 100 MAC addresses can be specified.
● If you want to deny transmission/reception of data with the device having the specified MAC address:
☐ Press [TX Filter] or [RX Filter] → set <Use Filter> to 'On'.
☐ Set <Default Policy> to [Allow].
☐ Press [Register] → set the MAC address for which data transmission/reception is to be denied.
● If you want to allow transmission/reception of data only with the device having the specified MAC address:
☐ Press [TX Filter] or [RX Filter] → set <Use Filter> to 'On'.
☐ Set <Default Policy> to [Reject].
☐ Press [Register] → set the MAC address for which data transmission/reception is to be allowed.
If you set <Default Policy>to [Reject], data transmission/reception is only possible with the device having the MAC address specified in this procedure. Be sure to confirm the MAC address when configuring the settings. If a corresponding MAC address does not exist, data transmission/reception will not be possible.
● If you do not want to restrict data transmission/reception:
☐ Press [TX Filter] or [RX Filter] → set <Use Filter> to ‘Off’.

Protocol Settings (TCP/IP)4-22
4
Usi
ng
a T
CP
/IP
Ne
two
rk
12 On the TCP/IP Settings screen, press [Confirm Dept. ID PIN] → specify the following.
[On]: You can confirm the Department ID and password when printing using a driver that supports Windows Vista/7. [Use HTTP] is automatically set to ‘On’ if you select [On].
• A key pair to use for encrypted SSL communication is required to confirm Department IDs and passwords. Even if you set <Confirm Dept. ID PIN> to 'On', Department IDs and passwords cannot be confirmed if the key pair is corrupted or invalid. In this case, erase the key pair and see e-Manual > Security to register a new key pair.
• If there is no key pair, you cannot set <Confirm Dept. ID PIN> to 'On'. You can use the preinstalled key pair, or generate an original key pair with the machine, to set as the default key. For information on the default key, and instructions on how to generate an original key, see e-Manual > Security.
13 On the TCP/IP Settings screen, press [Use WebDAV Server] → specify the following.
[On]: You can access the Advanced Box of the machine from a computer using a WebDAV server. [Use HTTP] is automatically set to 'On' if you select [On].
Authentication of a computer accessing the Advanced Box, and SSL encrypted communication between the computer and the machine, are possible using a WebDAV server.

Protocol Settings (TCP/IP) 4-23
4
Usi
ng
a T
CP
/IP
Ne
two
rk
Confirming TCP/IPv4 Settings
The following is the procedure for confirming that the network connections are properly set.
1 On the TCP/IP Settings screen, press [IPv4 Settings] → [ PING Command].
2 In [ PING Command], check the following.
Pressing [Start] after entering the desired IP address existing on the network displays the result of the PING command on the touch panel display.
If this result is inappropriate, check the settings described in “Interface Settings,” on p. 3-6, “TCP/IPv4 Settings,” on p. 4-3 and “Settings Common to TCP/IPv4 and TCP/IPv6,” on p. 4-15.
• If you set the startup time of the machine's network function by following the procedure in “Startup Time Settings,” on p. 4-27, execute the PING command only after the time set as the startup time passes.
• If you connect the machine to a switching hub, the machine may not be able to connect to a network even though your network settings are appropriate. This problem may be resolved by delaying the startup of network communications for the machine. See “Startup Time Settings,” on p. 4-27 for information on how to set up the startup time.
3 On the TCP/IP Settings screen, press [SNTP Settings] → check the following.
After pressing [Check NTP Server], if <OK> is displayed, time synchronization is working correctly via SNTP.
If <Error> is displayed, check the settings for [NTP Server Address] set in step 3 of “Settings Common to TCP/IPv4 and TCP/IPv6,” on p. 4-15.
Even if you perform [Check NTP Server], time settings are not updated. Check that communications are possible between the machine and the NTP server.

Protocol Settings (TCP/IP)4-24
4
Usi
ng
a T
CP
/IP
Ne
two
rk
Confirming TCP/IPv6 Settings
The following is the procedure for confirming that the TCP/IPv6 network connections are properly set.
1 On the TCP/IP Settings screen, press [IPv6 Settings] → [PING Command].
2 In [PING Command], check the following.
Pressing [Start] after entering an IPv6 address existing on the network in [IPv6 Address] displays the result of the PING command on the touch panel display.
Pressing [Start] after entering the machine's host name in [Host Name] displays the result of the PING command on the touch panel display.
If this result is inappropriate, check the settings described in “Interface Settings,” on p. 3-6, “TCP/IPv6 Settings,” on p. 4-9 and “Settings Common to TCP/IPv4 and TCP/IPv6,” on p. 4-15.
• If you set the startup time of the machine's network functions by following the procedure in “Startup Time Settings,” on p. 4-27, execute the PING command only after the time set as the startup time passes.
• If you connect the machine to a switching hub, the machine may not be able to connect to a network even though your network settings are appropriate. This problem may be resolved by delaying the startup of network communications for the machine. See “Startup Time Settings,” on p. 4-27 for information on how to set up the startup time.
3 On the TCP/IP Settings screen, press [SNTP Settings] → check the following.
After pressing [Check NTP Server], if <OK> is displayed, time synchronization is working correctly via SNTP.
If <Error> is displayed, check the settings for [NTP Server Address] set in step 3 of “Settings Common to TCP/IPv4 and TCP/IPv6,” on p. 4-15.
Even if you perform [Check NTP Server], time settings are not updated. Check that communications are possible between the machine and the NTP server.

Protocol Settings (TCP/IP) 4-25
4
Usi
ng
a T
CP
/IP
Ne
two
rk
E-Mail/I-Fax Settings
1 Press (Settings/Registration)→ [Function Settings] → [Send] → [E-Mail/I-Fax Settings] →
[Communication Settings].
2 Specify the mail server for receiving e-mail/I-faxes.
The machine supports both the SMTP and POP3 functions.
The machine can receive I-fax images and communication error notices only.
● If you want to receive e-mail/I-faxes using the machine's own SMTP receiving function:
☐ Register the host name of the machine with the DNS server → specify the following.
Press [On] for <SMTP RX> → press [Off ] for <POP>.
In [E-Mail Address], enter the e-mail address your machine will use. You can specify any user name (the part of the address located in front of the @ symbol). Enter the host name after the "@" symbol in the e-mail address.
If you select [Always SSL] for <Allow SSL (SMTP Receive)>, reception of only data encrypted using SSL is allowed and communications from the host not using SSL are rejected.
If you select [On] for <Allow SSL (SMTP Receive)>, depending on the request from the host, reception of data encrypted using SSL is allowed only when there is a request from the host.
• Even if you select [On] for <Allow SSL (SMTP Receive)>, the data will not be encrypted if the SMTP host does not support encryption.
• In order to select [Always SSL] or [On] for <Allow SSL (SMTP Receive)> to allow SSL transmission, it is necessary to generate a key pair in advance. For instructions on how to generate a key pair, see e-Manual > Security.
● If you want to receive e-mail/I-faxes using a POP server:
☐ Press [On] for <POP> → press [Off ] for<SMTP RX>.
In [E-Mail Address], enter the e-mail address your machine will use.
In [POP Server], enter the IP address or name of the POP server using the keyboard on the touch panel display.
In [POP Address], enter the login name for access to the POP server.
In [POP Password], enter the password for access to the POP server.
Set <POP Interval> to the interval you want the POP server to check for incoming e-mail. If the interval is set to '0', the POP server is not checked automatically. For instructions on how to manually check the POP server, see e-Manual > Status Monitor/Cancel.
Select the authentication method supported by the POP server from [Standard], [APOP], or [POP AUTH] for <POP AUTH Method>.
If you want to send encrypted data, press [On] for <Allow SSL (POP)>.
• If you set less than 10 minutes (excluding ‘0 min’) for <POP Interval>, the machine will not enter a complete Sleep mode.
• If the POP server does not support SSL encryption, data is not encrypted when [On] is selected for <Allow SSL (POP)>.
• In order to select [On] for <Allow SSL (POP)> to allow SSL transmission, it is necessary to generate a key pair in advance. For instructions on how to generate a key pair, see e-Manual > Security.

Protocol Settings (TCP/IP)4-26
4
Usi
ng
a T
CP
/IP
Ne
two
rk
3 Specify the mail server for sending e-mail/I-faxes.
● If you are using an SMTP server that requires POP before SMTP (method for authenticating users who have
logged in the POP server before sending e-mail):
☐ In [SMTP Server], enter the IP address or name of the SMTP server using the keyboard on the touch panel display.
Press [On] for <POP Authentication Before Send> → press [Off ] for <SMTP Authentication (SMTP AUTH)>.
To encrypt data to be sent using SSL, select [On] for <Allow SSL (SMTP Send)> or <Allow SSL (POP)>.
● If you are using an SMTP server that requires SMTP Authentication (method for authenticating users who have
logged in the SMTP server before sending e-mail):
☐ In [SMTP Server], enter the IP address or name of the SMTP server using the keyboard on the touch panel display.
Press [On] for <SMTP Authentication (SMTP AUTH)> → press [Off ] for <POP Authentication Before Send>.
In [User], enter the user name used for logging in to the SMTP server. If you are using a Microsoft SMTP server, enter the user name in [User] using the following format: user name@domain name.
In [Password], enter the password used for logging in to the SMTP server.
To encrypt data to be sent using SSL, select [On] for <Allow SSL (SMTP Send)>.
If you want to display the authentication screen when sending, set [Display Auth. Screen When Send].
If the SMTP host does not support encryption, data is not encrypted when [On] is selected for <Allow SSL (SMTP Send)>.
● If you are using an SMTP server that does not require authentication for sending e-mail:
☐ In [SMTP Server], enter the SMTP server IP address or name using the keyboard on the touch panel display.
Press [Off ] both for <SMTP Authentication (SMTP AUTH)> and <POP Authentication before Send>.
To encrypt data to be sent using SSL, select [On] for <Allow SSL (SMTP Send)> or <Allow SSL (POP)>.

Protocol Settings (TCP/IP) 4-27
4
Usi
ng
a T
CP
/IP
Ne
two
rk
Startup Time Settings
If you connect the machine to a switching hub, it may not be able to connect to a network even though your network settings are
set correctly.
This occurs because the spanning tree process performed between switching hubs prevents them from communicating with each
other immediately after the machine connects to a switching hub.
In this case, use the following procedure to delay the start of communication.
1 On the Network screen, press [Startup Settings] → specify the following.
Press [-] or [+] to set the time period to delay the startup of network communications for the machine.

Setting Up a Computer as a File Server (TCP/IP)4-28
4
Usi
ng
a T
CP
/IP
Ne
two
rk
Setting Up a Computer as a File Server (TCP/IP)
To send data from the machine to a computer on your network, you need to specify the settings of the computer for receiving data.
You can send data over a TCP/IP network to any of the following:
• FTP server (Windows 2000/XP/Vista/7/Server 2003/Server 2008, UNIX, Linux, Mac OS X)
• WebDAV server (Windows 2000 Professional/XP/Vista/7/2000 Server/Server 2003/Server 2008, UNIX, Linux, Mac OS X)
• Windows shared folder (Windows 2000/XP/Vista/7/Server 2003/Server 2008)
• Samba shared folder (UNIX/Linux/Mac OS X)
This section describes how to set up a computer as an FTP/WebDAV server.
For instructions on how to configure a Windows and Samba shared folder, see “Setting Up a Computer as a File Server (SMB/CIFS),”
on p. 6-6.
• Samba 2.2.8a or later is supported.
• This section describes only the procedures for setting up a computer to receive data sent from the machine. To send data from the machine to a server on the network, you must enter an address setting from the control panel. For instructions on how to specify recipient address settings, see e-Manual > Scan and Send.
• The following procedure explains a sample FTP/WebDAV server setup. Depending on your environment, the actual setup procedure may differ.

Setting Up a Computer as a File Server (TCP/IP) 4-29
4
Usi
ng
a T
CP
/IP
Ne
two
rk
FTP Server Settings
Windows 2000/XP/Vista/7/Server 2003/Server 2008 This section describes the procedures for using the default home directory under [Default FTP Site]. To use other settings, enter
the FTP site and home directory by referring to the IIS documentation.
It is recommended that you consult the administrator for the network you are using when configuring the FTP server.
In the following procedures, items displayed on the screens for Windows 2000 are used. The items displayed may differ according
to your operating system.
• The use of Windows 2000/XP/Vista/7/Server 2003/Server 2008 as an FTP server requires the installation of IIS. If IIS is not installed in the computer you are using, you will need to install the version of IIS for the operating system you are using before entering these settings. (See "System Requirements" in “Sending Data,” on p. 2-6.) For installation procedures, see the manuals provided with your operating system.
• User authentication for access to FTP servers is performed using the local account database of Windows 2000/XP/Vista/7/Server 2003/Server 2008 used as the FTP server. Therefore, it is not possible to use the account of a domain user registered in Windows 2000/XP/Vista/7/Server 2003/Server 2008 to send data directly from the machine to FTP servers in other domains.
If you are using Windows Vista or later, a dialog box may be displayed while you are performing the procedure. In this case, enter a user name and password. For more information, see the manuals provided with the operating system.
1 Log on to Windows as a member of the group with access rights to the directory to be designated as
the FTP site directory → start IIS.
Depending on your environment, the access rights settings for a drive or directory may differ. For details, see the Windows manual.
2 In the [Default FTP Site Properties] dialog box, on the [Security Accounts] sheet, deselect the option
which allows only anonymous connection.

Setting Up a Computer as a File Server (TCP/IP)4-30
4
Usi
ng
a T
CP
/IP
Ne
two
rk
3 In the [Default FTP Site Properties] dialog box, on the [Home Directory] sheet, select both [Read]
and [Write].
4 Right-click [My Computer] → click [Properties] to open the [System Properties] dialog box → confirm
[Full computer name].

Setting Up a Computer as a File Server (TCP/IP) 4-31
4
Usi
ng
a T
CP
/IP
Ne
two
rk
5 Right-click [My Computer] → click [Manage] to open the [Computer Management] window → under
[System Tools], in [Local Users and Groups], right-click the [Users] folder → click [New User].
6 In the [New User] dialog box, enter the user name in [User name] → enter the password in [Password]
→ re-enter the password in [Confirm password] → click [Create].
Enter a user name and a password not longer than 24 alphanumeric characters.
If [User must change password at next logon] is selected, any new users added must change their passwords in order to send data from the machine. (You cannot change the password from the control panel.)
In the Active Directory environment, the procedures for setting up users differ from the above. For details, see the Windows manual.

Setting Up a Computer as a File Server (TCP/IP)4-32
4
Usi
ng
a T
CP
/IP
Ne
two
rk
7 Set a recipient address using the control panel.
Sample recipient setting:
• Server side settings:
Full Computer Name: starfish.organization.company.com
Create a directory named “share” in the home directory “\lnetpub\ftproot” under [Default FTP Site], and then set “share” as the data destination.
• The machine's recipient settings:
<Protocol>: FTP
[Host Name]: starfish.organization.company.com
[Folder Path]: share
[User]: User name entered in step 5
[Password]: Password for the above user
• To use [Full computer name], which was confirmed in step 4, as the host name for [Host Name] as shown in the above example, it is necessary to use a DNS server. (This applies even if the machine and the FTP server are in the same subnet.) If no DNS server is available, the host name setting should be specified using the IP address of the FTP server.
• Up to 128 alphanumeric characters can be entered for [Host Name] on the control panel. Also, up to 255 alphanumeric characters can be entered for [Folder Path].
• If you switch the language of the touch panel display, [Host Name] and [Folder Path] may not be displayed correctly.
• If you want to send to an IPv4 host using an FTP port other than port 21, set [Host Name] using the following format:<IPv4 address of FTP server>:<Port number>Example: 192.168.1.21:21000
• To send to an IPv6 host, set [Host Name] using the following format:<IPv6 address>:<Port number>Example: [5aed:90a0:bc05:01d2:568a:2fc0:0001:12ee]:21000

Setting Up a Computer as a File Server (TCP/IP) 4-33
4
Usi
ng
a T
CP
/IP
Ne
two
rk
UNIX/Linux For more information on the system requirements for using a UNIX/Linux computer as an FTP server, see "System Requirements"
in “Sending Data,” on p. 2-6.
In some environments, detailed settings may be required in order to use FTP. For details, consult the administrator for the network
you are using.
1 Log in to a workstation as a superuser → set up the users who send documents from the machine,
and their passwords.
Enter a user name and a password not longer than 24 alphanumeric characters.
2 Create a shared directory to be used for recipient addresses, and then enable read access and write
access by the users who will be sending data.
3 Set a recipient address using the control panel.
Sample recipient setting:
• Server side settings:
Host Name: starfish
Domain: organization.company.com
The user’s home directory is /home/hsato, and /home/hsato/share is the data destination
• The machine's recipient settings:
<Protocol>: FTP
[Host Name]: starfish.organization.company.com
[Folder Path]: Enter one of the following:
share (when using relative path)/home/hsato/share (when using absolute path)
[User]: User name entered in step 1
[Password]: Password for the above user
For a sample screen, see the example of Windows 2000/XP/Vista/7/Server 2003/Server 2008 screen (See “Windows 2000/XP/Vista/7/Server 2003/Server 2008,” on p. 4-29.)
• To use the host name of the above example for [Host Name], it is necessary to use a DNS server. (This applies even if the machine and the FTP server are in the same subnet.) If no DNS server is available, the host name setting should be specified using the IP address of the FTP server.
• Up to 128 alphanumeric characters can be entered for [Host Name] on the control panel. Also, up to 255 alphanumeric characters can be entered for [Folder Path].
• If you switch the language of the touch panel display, [Host Name] and [Folder Path] may not be displayed correctly.
• If you want to send to an IPv4 host using an FTP port other than port 21, set [Host Name] using the following format:<IPv4 address of FTP server>:<Port number>Example: 192.168.1.21:21000
• To send to an IPv6 host, set [Host Name] using the following format:<IPv6 address>:<Port number>Example: [5aed:90a0:bc05:01d2:568a:2fc0:0001:12ee]:21000

Setting Up a Computer as a File Server (TCP/IP)4-34
4
Usi
ng
a T
CP
/IP
Ne
two
rk
Mac OS X
1 Log in to Mac OS X as Administrator → start the FTP services under Mac OS X.
2 Click the [Sharing] icon → [FTP Access] → click [Show All] on the toolbar.
3 Click [Accounts] to open the [Accounts] window → enter the name of the user to whom you want to
send data from the machine through Mac OS X → enter the password.
Enter a user name, and a password not longer than 24 alphanumeric characters.
4 Create a shared folder to which files are to be sent.
Sample setting:
Create a folder named “FTP_Folder” in the [Public] folder in the [Home] folder.
5 Select the shared folder created in step 4 → select [Get Info] from the [File] menu → select [Details]
from [Ownership & Permissions] → enable read & write access to the folder by the owner and
members of the group to which the owner belongs.

Setting Up a Computer as a File Server (TCP/IP) 4-35
4
Usi
ng
a T
CP
/IP
Ne
two
rk
6 Set a recipient address using the control panel.
Sample recipient setting:
• Server side settings (set using the above procedure):Create a folder named “FTP_Folder” in the [Public] folder in the [Home] folder of the user named “yoko,” and then specify the FTP_Folder as the folder to which files are sent.
• The machine's recipient settings:
<Protocol>: FTP
[Host Name]: IP address of Macintosh
[Folder Path]: Enter one of the following:
Public/FTP_Folder (If you enter a relative path)/Users/yoko/Public/FTP_Folder (If you enter an absolute path)
[User]: User name entered in step 3
[Password]: Password for the above user
• Up to 255 alphanumeric characters can be entered for [Folder Path] on the control panel.
• If you switch the language of the touch panel display, [Host Name] and [Folder Path] may not be displayed correctly.
• If you want to send to an IPv4 host using an FTP port other than port 21, set [Host Name] using the following format:<IPv4 address of FTP server>:<Port number>Example: 192.168.1.21:21000
• To send to an IPv6 host, set [Host Name] using the following format:<IPv6 address>:<Port number>Example: [5aed:90a0:bc05:01d2:568a:2fc0:0001:12ee]:21000

Setting Up a Computer as a File Server (TCP/IP)4-36
4
Usi
ng
a T
CP
/IP
Ne
two
rk
WebDAV Server Settings
The WebDAV sending function is a function for sending scanned image files or image files sent from the mail boxes or Memory RX
Inbox of the machine, to a WebDAV server directory on the Internet or your intranet, using the WebDAV protocol.
This section describes the procedure for setting up a WebDAV publishing directory. Setting up a publishing directory enables
users who have the necessary access privileges to manage files in the directory.
It is recommended that you consult the administrator for the network you are using when configuring the WebDAV server.
IIS for Windows 2000/XP/Vista/7/2000 Server/Server 2003/Server 2008 The procedure below uses items of Windows 2000 as an example. Depending on your environment, the items you see on the
screen may differ.
• If IIS is not installed in the computer you are using, you will need to install the version of IIS for the operating system you are using before entering these settings. (See "System Requirements" in “Sending Data,” on p. 2-6.) For installation procedures, see the manuals provided with your operating system.
• Server authentication is required for sending to a WebDAV server. Enable authentication before using a WebDAV server. The authentication methods available for the server are Anonymous, Basic, or Digest authentication, and authentication errors will occur if you try to use another authentication method. If the Anonymous authentication method is enabled, access rights are assigned to all users, and IIS always performs anonymous authentication, even if either of the other two authentication methods are enabled. (The priority level is Anonymous authentication > Digest authentication > Basic authentication.) If a high level of security is required, disable anonymous authentication. Use the user names and passwords registered in the address book of the WebDAV server for the Basic and Digest authentication methods. For instructions on how to set the authentication method for IIS, see the IIS documentation.
• If you use WebDAV transmission with IIS 7.0/IIS 7.5, use either Basic authentication or Digest authentication.
• When connecting to a WebDAV server via a proxy with Digest authentication set using IIS 6.0, it is necessary to set <Use Chunked Encoding with WebDAV Sending> to ‘On’ from the control panel of the machine. (See e-Manual > Settings/Registration.)
• If you use WebDAV with IIS 7.0, you must download the Microsoft WebDAV Extension from the IIS web site and install it separately. For details, refer to the IIS documentation.
1 Right-click [My Computer] → in the [C:/Inetpub] folder, create a physical directory to use as the
sending destination.
The physical directory cannot be created in the [C: /Inetpub/wwwroot] folder, because the default DACL of wwwroot differs from that of other directories.
2 Create a virtual directory.
☐ Start IIS → from the IIS snap-in, select the Web site to add a directory to.
☐ On the [Action] menu, point to [New] → select [Virtual Directory].
☐ Follow the instructions on the Virtual Directory Creation Wizard to complete the creation of the directory.
Specify the directory path created in step 1 as a physical path to the virtual directory.
For IIS 7.0/IIS 7.5, start IIS and right-click [Default Web Site] in the Connections panes on the left side of the IIS Manager, then select [Add Virtual Directory] and enter an alias and physical path.

Setting Up a Computer as a File Server (TCP/IP) 4-37
4
Usi
ng
a T
CP
/IP
Ne
two
rk
3 Select [Write] in the virtual directory properties to give access for writing files to the WebDAV
clients.
If you are using IIS 6.0, click [Allow] for [WebDAV] in [Web Service Extensions] in IIS Manager.
If you are using IIS 7.0/IIS 7.5, select the virtual directory you have created from the Connections panes on the left side of the IIS Manager, then double-click [WebDAV Authoring Rules] in [Home]. Click [Add Authoring Rule] in [Actions], and enter the appropriate access settings in the [Add Authoring Rule] dialog box. Select the virtual directory again from the Connections pane on the left side of the IIS Manager. Click [Edit Permissions] in [Actions], and set the access permissions for the physical directory in the [Security] tab of the properties dialog box.
4 See the IIS documentation to specify the settings for SSL encrypted communication.
5 Set a recipient address from the control panel.
Sample recipient settings:
• Server side settings:
Create a physical directory named "C:/Inetpub/export/share/home/users/", and then create a virtual directory that links to the physical directory as the folder to which files are sent.
• The machine's address settings:
<Protocol>: WebDAV
[Host Name]: https://starfish.cse.canon.co.jp/
[Folder Path]: /export/share/home/users/
[User]: User name for the Basic and Digest authentication methods of the WebDAV server
[Password]: Password for the Basic and Digest authentication method of the WebDAV server
• Up to 128 alphanumeric characters can be entered for [Host Name] on the control panel. Also, up to 255 alphanumeric characters can be entered for [Folder Path].
• If you switch the language of the touch panel display, [Host Name] and [Folder Path] may not be displayed correctly.
• If the language of the touch panel display differs from the computer used as a master browser, [Host name] and [Folder path] may not be displayed correctly, or you may not be able to browse the directories.
• To send to an IPv6 host, set [Host Name] using the following format:<IPv6 address>:<Port number>Example: [5aed:90a0:bc05:01d2:568a:2fc0:0001:12ee]:21000

Setting Up a Computer as a File Server (TCP/IP)4-38
4
Usi
ng
a T
CP
/IP
Ne
two
rk
Apache for Windows 2000/XP/Vista/7/2000 Server/Server 2003/Server 2008/UNIX/Linux/Mac
OS X The following procedures describe how to create the "users/user_name/WebDAV" directory using the procedure for creating the
directory under "C:/Program Files/Apache Group/Apache2" in the Windows file system as an example.
• Apache 1.3 is provided with Mac OS X. If Apache is not installed in the computer you are using, install the version for the operating system you are using (downloadable from the Apache Software Foundation Web site at http://www.apache.org/.) before entering these settings. (See "System Requirements" in “Sending Data,” on p. 2-6.) If you want to use SSL, install a version of Apache that supports SSL (downloadable from the Apache-SSL official Web site at http://www.apache-ssl.org/). After installing Apache, start it and confirm that the Apache service is working properly.
• If you are using Mac OS X, root has ownership of the Apache setting file (/etc/httpd/httpd.conf). In this case, perform one of the following procedures before specifying the WebDAV settings. For more information, see the documentation provided with your Macintosh or the Apache Software Foundation Web site at http://www.apache.org/.
- Obtain root access from the Terminal, using the sudo or su command
- In the Finder, temporarily change the permissions for the Apache setting file to give permission to the user who will set the WebDAV server (return the permissions for the Apache setting file to their original values after setting the WebDAV server.)
• Server authentication is required for sending to a WebDAV server. Enable authentication before using a WebDAV server. The authentication methods available for the server are the Basic and Digest authentication methods, and authentication errors will occur if you try to use another authentication method. If you set both the Basic and Digest authentication methods, the authentication method you set last will be enabled. Use the user names and passwords registered in the address book of the WebDAV server for authentication. For instructions on how to set authentication methods, see the Apache Software Foundation Web site at http://www.apache.org/.
1 Edit httpd.conf.
☐ Erase # on the left of the line to enable the WebDAV modules.
Directive to be changed:
• Before change#LoadModule dav_module modules/mod_dav.so#LoadModule dav_fs_module modules/mod_dav_fs.so
• After changeLoadModule dav_module modules/mod_dav.soLoadModule dav_fs_module modules/mod_dav_fs.so
☐ Specify the server name.
Directive to be changed:
• Before change#ServerName localhost:80
• After change#ServerName localhost:80ServerName Apache-Server.ccm.canon.co.jp:80
☐ Change the user directory.
Directive to be changed:
• Before changeUserDir "My Documents/My Website"
• After change#UserDir “My Documents/My Website”UserDir “C:/Program Files/Apache Group/Apache2/users”
☐ To enable the DAV function, add the following directive:
<Location /~user_name/WebDAV>
DAV On
</Location>

Setting Up a Computer as a File Server (TCP/IP) 4-39
4
Usi
ng
a T
CP
/IP
Ne
two
rk
2 After specifying the settings for SSL encrypted communication, configure httpd.conf so that the
Apache service starts with SSL support.
For more information, see the Apache Software Foundation Web site at http://www.apache.org/.
3 Restart Apache.
4 Set a recipient address from the control panel of the machine.
Sample recipient settings:
• Server side settings:
Create the "users/user_name/WebDAV" directory under "C:/Program Files/Apache Group/Apache2" as the folder to send files to.
• The machine's address settings:
<Protocol>: WebDAV
[Host Name]: https://Apache-Server.ccm.canon.co.jp/
[Folder Path]: /~user_name/WebDAV/
[User]: User name for the Basic and Digest authentication methods of the WebDAV server
[Password]: Password for the Basic and Digest authentication method of the WebDAV server
• Up to 128 alphanumeric characters can be entered for [Host Name] on the control panel. Also, up to 255 alphanumeric characters can be entered for [Folder Path].
• If you switch the language of the touch panel display, [Host Name] and [Folder Path] may not be displayed correctly.
• If the language of the touch panel display differs from the computer used as a master browser, [Host name] and [Folder path] may not be displayed correctly, or you may not be able to browse the directories.
• To send to an IPv6 host, set [Host Name] using the following format:<IPv6 address>:<Port number>Example: [5aed:90a0:bc05:01d2:568a:2fc0:0001:12ee]:21000.

Setting Up a Computer as a File Server (TCP/IP)4-40
4
Usi
ng
a T
CP
/IP
Ne
two
rk

5-1
CHAPTER
5 Using a NetWare Network (Windows)
This chapter describes settings and procedures for using the machine with a NetWare network.
NetWare Network Setup Procedures . . . . . . . . . . . . . . . . . . . . . . . . . . . . . . . . . . . . . . . . . . . . . . . . . . . . . . . . . . . . . . . . . . . . . . . . . 5-2
Protocol Settings (NetWare) . . . . . . . . . . . . . . . . . . . . . . . . . . . . . . . . . . . . . . . . . . . . . . . . . . . . . . . . . . . . . . . . . . . . . . . . . . . . . . . . . 5-3

NetWare Network Setup Procedures5-2
5
Usi
ng
a N
etW
are
Ne
two
rk (
Win
do
ws)
NetWare Network Setup Procedures
To use a NetWare network, it is necessary to perform the following procedures.
1 NetWare Print Service Settings (See e-Manual > Network)
Specify the NetWare print service settings. (Optional equipment is required to print from a computer. For the equipment needed, see “Optional Equipment and System Requirements for Connecting to a Network,” on p. 2-2.)
To specify the settings from the computer, use:
• NWADMIN or PCONSOLE (Novell software provided with NetWare)
• Canon utilities
2 Protocol Settings (NetWare) (See “Protocol Settings (NetWare),” on p. 5-3.)
Specify the protocol settings. To specify the settings, use:
• The machine’s control panel
• The Remote UI (via a web browser)
• Canon utilities
3 Computer Settings for Printing (NetWare) (See e-Manual > Network)
Specify the settings of each computer you use for printing. (Optional equipment is required to print from a computer. For the equipment needed, see “Optional Equipment and System Requirements for Connecting to a Network,” on p. 2-2.)
• It is recommended that you consult the administrator for the network you are using when performing steps 1 and 2 above.
• To configure settings with software other than the control panel of the machine, NWADMIN, or PCONSOLE, TCP/IPv4 protocol must be supported by your network environment (IPv6 is not supported).
• If you are using the imagePASS , see the manual provided with the imagePASS .
• If you are using the imagePASS , some functions are not available with this machine. For details, see the manual provided with the imagePASS .

Protocol Settings (NetWare) 5-3
5
Usi
ng
a N
etW
are
Ne
two
rk (
Win
do
ws)
Protocol Settings (NetWare)
This section describes how to specify the protocol settings for the machine using the control panel. If you are configuring the settings for the first time, use the control panel of the machine.
After configuring the settings, you can change them using software other than the control panel of the machine. For details, see e-Manual > Settings/Registration.
1 On the Network screen, press [NetWare Settings] → specify the following.
< Use NetWare>: [On]
Select the frame type for your environment from the Frame Type drop-down list. If you select [Auto Detect], the frame type is automatically determined.
Select the print service specified in "NetWare Print Service Settings" (e-Manual > Network) from the Print Service drop-down list.
The following print services are available:
• [ Bindery PServer]:Used in the queue server mode ( Bindery mode print service).
• [ RPrinter]:Used in the remote printer mode ( Bindery mode print service).
• [ NDS PServer ]:Used in the queue server mode ( NDS print service).
• [ NPrinter ]:Used in the remote printer mode (NDS print service).
• If [NetWare Settings] is not displayed, consult your local authorized Canon dealer. • If you set <Use NetWare> to 'On', the machine will not enter a complete Sleep mode.

Protocol Settings (NetWare)5-4
5
Usi
ng
a N
etW
are
Ne
two
rk (
Win
do
ws)
2 Press [Set] → specify the print service details.
Screen for setting NDS PServer Screen for setting Bindery PServer
Specify the same tree, context, file server, and print server names that you specified in "NetWare Print Service Settings." (Settings differ depending on the print service. For print service settings, see e-Manual > Network.)
You can specify the print service settings either by selecting the desired options from the list on the screen that appears when you press [Browse], or by entering the desired character string for each item.
If you want to use [Browse] to specify each item, make sure you press [Browse] after the expiration of the time specified in “Startup Time Settings,” on p. 4-27.
● Setting NDS PServer or NPrinter in the Browse screen (If the browse right is not limited to the specific user):
☐ Press [Skip Log In] in the Browse screen.
If the browse right is not limited to the specific user, you can specify the print service without having to log in to NetWare.
☐ Select the tree to which the desired print server belongs → select the context to which the desired print server belongs → select the desired print server.
☐ For NDS PServer, specify each item on the screen for setting NDS PServer if necessary.
● Setting NDS PServer or NPrinter in the Browse screen (If the browse right is limited to the specific user):
☐ In the Browse screen, press the tree to which you want to log in → select the context to which you want to log in.
☐ Press [Log In] → in the Enter Network Password screen, enter the name and password of a user to whom the browse right is granted.
If the browse right is limited to the specific user, it is necessary to log in to NetWare as a user to whom the browse right is granted.
Enter a user name prefixed with 'CN='. If the password is not specified, leave [Password] blank.
☐ Select the tree to which the desired print server belongs → select the context to which the desired print server belongs → select the desired print server.
☐ For NDS PServer, specify each item on the screen for setting NDS PServer if necessary.

Protocol Settings (NetWare) 5-5
5
Usi
ng
a N
etW
are
Ne
two
rk (
Win
do
ws)
● Setting Bindery PServer or RPrinter in the Browse screen:
☐ In the Browse screen, select the file server to which the desired print server belongs.
☐ In the Enter Network Password screen, enter the name and password of a user on the file server.
If the password is not specified, leave [Password] blank.
☐ Select the desired print server.
☐ Specify each item on the screen for setting Bindery PServer if necessary.
● Setting NDS PServer or NPrinter using the keyboard on the touch panel display:
☐ In [Tree Name], enter the name of the tree to which the desired print server belongs → in [ Context Name ], enter the name of the context to which the desired print server belongs → in [Print Server Name], enter the name of the desired print server.
Sample settings:
CANON*1
o=CANON_SALES
ou=SALES
ou=SALES_1
cn=IR_PSV*2
*1 Tree name
*2 Print server
In an environment like the one above, the tree name and the context name are entered as follows:
Tree: <CANON>
Context: <ou=SALES_1.ou=SALES.o=CANON_SALES> or <SALES_1.SALES.CANON_SALES>
☐ For NDS PServer, specify each of the other items if necessary.
● Setting Bindery PServer or RPrinter using the keyboard on the touch panel display:
☐ In [File Server Name], enter the name of the file server to which the desired print server belongs → in [Print Server Name], enter the name of the desired print server.
☐ For Bindery PServer, specify each of the other items if necessary.

Protocol Settings (NetWare)5-6
5
Usi
ng
a N
etW
are
Ne
two
rk (
Win
do
ws)

6-1
CHAPTER
6 Using an SMB/CIFS Network
This chapter describes settings and procedures for using the machine with an SMB/CIFS network.
SMB/CIFS Network Setup Procedures . . . . . . . . . . . . . . . . . . . . . . . . . . . . . . . . . . . . . . . . . . . . . . . . . . . . . . . . . . . . . . . . . . . . . . . . 6-2
Protocol Settings (SMB/CIFS) . . . . . . . . . . . . . . . . . . . . . . . . . . . . . . . . . . . . . . . . . . . . . . . . . . . . . . . . . . . . . . . . . . . . . . . . . . . . . . . . 6-3TCP/IP Settings. . . . . . . . . . . . . . . . . . . . . . . . . . . . . . . . . . . . . . . . . . . . . . . . . . . . . . . . . . . . . . . . . . . . . . . . . . . . . . . . . . . . . . . . . . . . . . . . . . . . . . . . . 6-3SMB and WINS Settings. . . . . . . . . . . . . . . . . . . . . . . . . . . . . . . . . . . . . . . . . . . . . . . . . . . . . . . . . . . . . . . . . . . . . . . . . . . . . . . . . . . . . . . . . . . . . . . . . 6-3
Setting Up a Computer as a File Server (SMB/CIFS) . . . . . . . . . . . . . . . . . . . . . . . . . . . . . . . . . . . . . . . . . . . . . . . . . . . . . . . . . . . 6-6Connecting to a TCP/IP Network . . . . . . . . . . . . . . . . . . . . . . . . . . . . . . . . . . . . . . . . . . . . . . . . . . . . . . . . . . . . . . . . . . . . . . . . . . . . . . . . . . . . . . . . 6-6Connecting to an SMB/CIFS Network and Configuring a Shared Folder. . . . . . . . . . . . . . . . . . . . . . . . . . . . . . . . . . . . . . . . . . . . . . . . . . . 6-7

SMB/CIFS Network Setup Procedures6-2
6
Usi
ng
an
SM
B/C
IFS
Ne
two
rk
SMB/CIFS Network Setup Procedures
To use an SMB/CIFS network, it is necessary to perform the following procedures.
1 Protocol Settings (SMB/CIFS) (See “Protocol Settings (SMB/CIFS),” on p. 6-3.)
Specify the protocol settings. To specify the settings, use:
• The machine’s control panel
• The Remote UI (via a web browser).
2 Computer Settings for Printing (SMB/CIFS) (See e-Manual > Network)
Specify the settings of each computer you use for printing. (Optional equipment is required to print from a computer. For the equipment needed, see “Optional Equipment and System Requirements for Connecting to a Network,” on p. 2-2.)
3 Computer Settings for a File Server (SMB/CIFS) (See “Setting Up a Computer as a File Server (SMB/CIFS),” on p. 6-6.)
Specify the settings of the computer receiving data sent from the machine.
• It is recommended that you consult the administrator for the network you are using when performing steps 1 and 3 above.
• The only base protocols supported by the machine for SMB/CIFS networks are TCP/IPv4 and TCP/IPv6. NetBEUI is not supported (SMB is used as a print application).
• If you are using the imagePASS, see the manual provided with the imagePASS .
• If you are using the imagePASS , some functions are not available with this machine. For details, see the manual provided with the imagePASS .

Protocol Settings (SMB/CIFS) 6-3
6
Usi
ng
an
SM
B/C
IFS
Ne
two
rk
Protocol Settings (SMB/CIFS)
This section describes how to specify the protocol settings for the machine using the control panel. If you are configuring the settings for the first time, use the control panel of the machine.
After configuring the settings, you can change them using software other than the control panel of the machine. For details, see e-Manual > Settings/Registration or Remote UI.
TCP/IP Settings
1 Specify the TCP/IP settings.
If you have not entered the TCP/IP settings yet, enter them now. (For more information, see “TCP/IPv4 Settings,” on p. 4-3, “TCP/IPv6 Settings,” on p. 4-9 and “Settings Common to TCP/IPv4 and TCP/IPv6,” on p. 4-15.)
SMB and WINS Settings
To use the machine on an SMB/CIFS network, specify the SMB settings.
To resolve a name with WINS(Windows Internet Name Service), specify the WINS settings using the following procedure. WINS is
a service for associating a NetBIOS name (which is a computer name or printer name on an SMB/CIFS network) with an IP address.
To use WINS, specify the IP address settings for the WINS server.
1 On the Network screen, press [SMB Server Settings] → select [On] for <Use SMB Server>.
If you set <Use SMB Server> to 'On', the machine will not enter a complete Sleep mode.

Protocol Settings (SMB/CIFS)6-4
6
Usi
ng
an
SM
B/C
IFS
Ne
two
rk
2 On the SMB Server Settings screen, specify the following.
[Server Name]: Enter the name of the computer that the machine will belong to. Be sure to enter a name that is not being used by another computer or printer on the network.
[Workgroup]: Enter the name of the workgroup that the machine will belong to. If there are no workgroups in the environment you are using, create a workgroup in Windows and enter the name of that workgroup.
[Comment]: If necessary, you can enter a comment relating to the machine. When the printer information is displayed, the comment entered here is also displayed.
[On] for <LM Announce>: The LAN Manager can be informed of the existence of the machine.
[Off ] for <LM Announce>: If the LAN Manager is not required to browse the machine, setting <LM Announce> to 'Off' reduces network traffic.
• You cannot enter the domain name as [Workgroup].
• You cannot enter a character string in [Server Name] and [Workgroup] that includes blanks.
3 To set up an SMB printer, press [Set SMB Printer] → specify the following.
[On] for <Use SMB>: You can use SMB print.
[Printer]: Enter the printer name of the machine.
• You cannot enter a character string in [Printer] that includes blanks. • Depending on the machine you are using, optional equipment is required for printing from a computer. For the equipment needed, see e-Manual > Network.

Protocol Settings (SMB/CIFS) 6-5
6
Usi
ng
an
SM
B/C
IFS
Ne
two
rk
4 To use the authentication function for SMB printing, press [SMB Auth. Settings] → specify the
following.
[On] for <Use SMB Authentication>: Only users who have User Access Control for Advanced Box authentication can perform SMB printing. (For information on User Access Control for Advanced Box, see e-Manual > Security.) For SMB printing, NTLMv1 and NTLMv2 can be selected both individually or together.
[NTLMv1] for <Authentication Type>: You can use NTLMv1 authentication.
[NTLMv2] for <Authentication Type>: You can use NTLMv2 authentication. Select this setting when using Windows Vista/7/Server 2008.
5 On the TCP/IP Settings screen, press [WINS Settings] → specify the following.
[On] for <WINS Resolution>: You can resolve the name with WINS. Enter the IP address of a WINS server in [WINS Server Address].
Enter the [Scope ID] settings if a scope ID is set on the computer in the network environment you are using. The scope ID is an identifier for determining the range available to a printer or computer. The scope ID set here is used regardless of the setting for <WINS Resolution>.
• If DHCP determines the IP address, the IP address obtained from a DHCP server is overwritten with the IP address of a WINS server (obtained from the DHCP server), whenever possible.
• If you set a scope ID, the machine cannot communicate with any computer whose scope ID is different from the scope ID you set here.
• If a scope ID is not set on any of the computers in your network environment, leave [Scope ID] blank.
• If you set <WINS Resolution> to ‘On’ with both [Server Name] and [Workgroup] set in [SMB Server Settings], the WINS name registration function will be enabled even if you set <Use SMB Server> to ‘Off’.

Setting Up a Computer as a File Server (SMB/CIFS)6-6
6
Usi
ng
an
SM
B/C
IFS
Ne
two
rk
Setting Up a Computer as a File Server (SMB/CIFS)
To send data from the machine to a computer on your network, you need to specify the settings of the computer for receiving data. You can send data over an SMB/CIFS network to a Windows or Samba (UNIX/Linux/Mac OS X) shared folder. This section describes how to configure a shared folder.
• Samba 2.2.8a or later is supported.
• This section describes only the procedures for setting up a computer receiving data sent from the machine. To send data from the machine to a server on the network, you must enter an address setting from the control panel. For instructions on how to specify recipient address settings, see e-Manual > Scan and Send.
• The following procedures describe a sample shared folder configuration. Depending on your environment, the actual configuration procedure may differ.
Connecting to a TCP/IP Network
A computer that receives data sent from the machine must have TCP/IP client software installed and must be enabled for TCP/IP
network use. For details, see the manuals provided with your operating system.
You can send data over a TCP/IP network from the machine to an FTP server. For instructions on how to set up an FTP server, see
“Setting Up a Computer as a File Server (TCP/IP),” on p. 4-28.

Setting Up a Computer as a File Server (SMB/CIFS) 6-7
6
Usi
ng
an
SM
B/C
IFS
Ne
two
rk
Connecting to an SMB/CIFS Network and Configuring a Shared Folder
Windows 2000/XP/Vista/7/Server 2003/Server 2008 It is recommended that you consult the administrator for the network you are using when configuring the file server.
The number of users or clients that can access a server running Windows 2000/XP/Vista/7/Server 2003/Server 2008 is limited. After
this number of users or clients is reached, it is not possible to send to a server running Windows 2000/XP/Vista/7/Server 2003/
Server 2008.
In the following procedures, items displayed on the screens for Windows 2000 are used. The items displayed may differ according
to your operating system.
If you are using Windows Vista or later, a dialog box may be displayed while you are performing the procedure. In this case, enter a user name and password. For more information, see the manuals provided with the operating system.
1 Log on to Windows as an Administrator → in the [Local Area Connection Properties] dialog box,
select all [Client for Microsoft Networks], [File and Printer Sharing for Microsoft Networks], and
[Internet Protocol (TCP/IP)].
2 Double-click [Internet Protocol (TCP/IP)] to open the [Internet Protocol (TCP/IP) Properties] dialog
box.
3 On the [General] sheet, click [Advanced] → on the [WINS] sheet, click [Enable NetBIOS over TCP/IP].
4 Restart the computer if prompted.

Setting Up a Computer as a File Server (SMB/CIFS)6-8
6
Usi
ng
an
SM
B/C
IFS
Ne
two
rk
5 Confirm the computer name.
If you are using Windows 2000, right-click the [My Computer] icon → click [Manage] to open the [Computer Management] window. Right-click the [Computer Management (Local)] icon → click [Properties] to open the [Computer Management (Local) Properties] dialog box. On the [Network Identification] sheet, confirm the [Computer name] setting.
If you are using Windows XP/Server 2003, right-click [My Computer] → click [Properties] → on the [Computer Name] sheet, click [Change]. In the [Computer Name Changes] dialog box, click [More] to open the [DNS Suffix and NetBIOS Computer Name] dialog box → confirm [NetBIOS computer name].
If you are using Windows 7/Vista/Server 2008, from the [Start] menu, right-click [Computer] → select [Properties] → click [Change settings] for <Computer name, domain, and workgroup settings>. In the [System Properties] dialog box, on the [Computer Name] page, click [Change]. In the [Computer Name/Domain Changes] dialog box, click [More] → confirm [NetBIOS computer name] in the displayed dialog box.
6 Right-click the [My Computer] icon → click [Manage] to open the [Computer Management] window →
under [System Tools], in [Local Users and Groups], from the [Users] folder, click [New User].

Setting Up a Computer as a File Server (SMB/CIFS) 6-9
6
Usi
ng
an
SM
B/C
IFS
Ne
two
rk
7 In the [New User] dialog box, enter the user name in [User name] → enter the password in [Password]
→ re-enter the password in [Confirm password] → click [Create].
Enter a user name not longer than 20 alphanumeric characters, and a password not longer than 14 alphanumeric characters.
If [User must change password at next logon] is selected, any new users added must change their passwords in order to send data from the machine. (You cannot change the password from the control panel.)
• In an Active Directory environment, the procedures for setting up users differ from the above. For details, see the Windows manual. • When a computer that one or more users log on to is restricted by the administrator in an Active Directory environment, the name of the computer must be registered in the Active Directory. Set the computer name in the user account properties dialog box to “CANON + the last 8 digits of the MAC address of the computer + 00”. For example, if the MAC address of the computer you are using is “00:00:11:22:33:44”, set “CANON1122334400”.
8 Open the properties dialog box of the folder you want to share → on the [Sharing] sheet, click [Share
this folder] → enter the share name in [Share name].

Setting Up a Computer as a File Server (SMB/CIFS)6-10
6
Usi
ng
an
SM
B/C
IFS
Ne
two
rk
9 Set permissions.
● To create a shared folder on a FAT or FAT32 format disk (If the [Security] tab is not displayed):
☐ Click [Permissions] to display the dialog box.
Select or add the users or groups to whom you want to give access to the shared folder → under [Permissions], select both [Change] and [Read].
● To create a shared folder on an NTFS format disk:
☐ Display the [Security] sheet.
☐ Select or add the users or groups to whom you want to give access to the shared folder → under [Permissions], select both [Write] and [Read & Execute], or a higher access authority. For data in the folder, check both [Write] and [Read], or a higher access authority.
• To display the [Security] tab in Windows XP, open Folder Options → deselect [Use simple file sharing (Recommended)]. However, you can share folders and files with [Use simple file sharing (Recommended)] selected. Select or deselect [Use simple file sharing (Recommended)] to suit your environment. For more information, see the manual provided with Windows XP.
• In the Active Directory environment, the procedures for specifying the security settings of the shared folder differ from above. For more information, see the Windows manual.

Setting Up a Computer as a File Server (SMB/CIFS) 6-11
6
Usi
ng
an
SM
B/C
IFS
Ne
two
rk
10 Set a recipient address using the control panel.
There are three methods for specifying the recipient address; selecting the desired address from the list that appears when you press [Browse], searching for the address by pressing [Search Host], or entering the address using the keyboard on the touch panel display.
Sample recipient setting:
• Server side settings (set and confirmed in the above step.):
[Computer name]/[NetBIOS computer name]: swan
[Share Name]: share
Create a folder called ‘Images’ within share, and then specify Images as the recipient for sending.
• The machine's Recipient Settings:
<Protocol>: Windows (SMB)
[Host Name]: \\swan\share (Shared folder path)
[Folder Path]: \Images
[User]: User name entered in the above step.
[Password]: Password for the above user.
• If you want to use [Browse] to specify each item, make sure you press [Browse] after the expiration of the time specified in see “Startup Time Settings,” on p. 4-27.
• Up to 128 alphanumeric characters can be entered for [Host Name] on the control panel. Also, up to 255 alphanumeric characters can be entered for [Folder Path].
• If you change the language of the touch panel display, [Host Name] and [Folder Path] may not be displayed correctly, or you may not be able to browse the directories.
• If the language of the touch panel display differs from the computer used as a master browser, [Host Name] and [Folder Path] may not be displayed correctly, or you may not be able to browse the directories.
• You can send data using the following formats. A DNS server is required for the latter case:\\192.168.2.100\share\\host_name.organization.company.com\share
• You can also specify the user name in the address using the following formats:
- domain_name\user_name (up to 15 alphanumeric characters for the domain name, and up to 20 for the user name)If you specify the user name in this format, the user authority for the specified domain is applied to SMB communication.
- [email protected] (up to 128 characters in total) Note that the latter is only applicable when sending to a Windows 2000/XP/Vista/7/Server 2003/Server 2008 computer that belongs to a domain containing Windows 2000/XP/Vista/7/Server 2003/Server 2008 domain controllers.

Setting Up a Computer as a File Server (SMB/CIFS)6-12
6
Usi
ng
an
SM
B/C
IFS
Ne
two
rk
Samba (UNIX/Linux/Mac OS X 10.3/10.4) Samba 2.2.8a or later is supported.
In some environments, detailed settings may be required in order to use the Samba. For details, consult the administrator for the
network you are using.
1 Set up the users who access the Samba shared folder, and their passwords.
Set a user name not longer than 20 alphanumeric characters, and a password not longer than 14 alphanumeric characters.
● UNIX/Linux:
☐ Log in to a workstation as a superuser, and set the user name and password.
● Mac OS X 10.3/10.4:
☐ See the documentation provided with your Macintosh to set the user name and password.
2 Set a recipient address using the control panel.
There are three methods for specifying the recipient address; selecting the desired address from the list that appears when you press [Browse], searching for the address by pressing [Search Host], or entering the address using the keyboard on the touch panel display.
Sample recipient setting:
• Server side settings:
Computer name: swan
Share Name: share
Create a folder called 'Images' within share, and then specify Images as the recipient for sending.
• The machine's recipient settings:
<Protocol>: Windows (SMB)
[Host Name]: \\swan\share (Shared folder path)
[Folder Path]: \Images
[User]: User name entered in the above step.
[Password]: Password for the above user.
For a sample screen, see the example of Windows 2000/XP/Vista/7/Server 2003/Server 2008 screen (see p. 6-7).
• If you use [Browse] to specify each item, press [Browse] after the expiration of the time specified in “Startup Time Settings,” on p. 4-27.
• Up to 128 alphanumeric characters can be entered for [Host Name] on the control panel. Also, up to 255 alphanumeric characters can be entered for [Folder Path].
• If you change the language of the touch panel display, [Host Name] and [Folder Path] may not be displayed correctly, or you may not be able to browse the directories.
• If the language of the touch panel display differs from the computer used as a master browser, [Host name] and [Folder path] may not be displayed correctly, or you may not be able to browse the directories.
• You can send data using the following formats. A DNS server is required for the latter case.\\192.168.2.100\share\\host_name.organization.company.com\share
• You can also specify the user name in the address using the following format.
- domain_name\user_name (up to 15 alphanumeric characters for the domain name, and up to 20 for the user name)If you specify the user name in this format, the user authority for the specified domain is applied to SMB communication.

7-1
CHAPTER
7 Using an AppleTalk Network (Macintosh)
This chapter describes settings and procedures for printing via an AppleTalk network.
AppleTalk Network Setup Procedures. . . . . . . . . . . . . . . . . . . . . . . . . . . . . . . . . . . . . . . . . . . . . . . . . . . . . . . . . . . . . . . . . . . . . . . . 7-2
Protocol Settings (AppleTalk) . . . . . . . . . . . . . . . . . . . . . . . . . . . . . . . . . . . . . . . . . . . . . . . . . . . . . . . . . . . . . . . . . . . . . . . . . . . . . . . . 7-3

AppleTalk Network Setup Procedures7-2
7
Usi
ng
an
Ap
ple
Ta
lk N
etw
ork
(M
aci
nto
sh)
AppleTalk Network Setup Procedures
To print via an AppleTalk network, it is necessary to perform the following procedures.
1 Macintosh Network Settings
To specify AppleTalk network settings, enable AppleTalk according to the instructions in the documentation provided with your Macintosh.
2 Protocol Settings (AppleTalk) (See “Protocol Settings (AppleTalk),” on p. 7-3.)
Specify the protocol settings. To specify the settings, use:
• The machine’s control panel
• The Remote UI (via a web browser)
• Canon utilities
3 Macintosh Print Settings (AppleTalk) (See e-Manual > Network)
Specify the settings for each computer you use for printing.
• Depending on the machine you are using, you may have to use optional equipment to print via an AppleTalk network. For the equipment needed, see “Optional Equipment and System Requirements for Connecting to a Network,” on p. 2-2.
• It is recommended that you consult the administrator for the network you are using when performing steps 2 above.
• If you are using the imagePASS , see the manual provided with the imagePASS .
• If you are using the imagePASS, some functions are not available with this machine. For details, see the manual provided with the imagePASS .

Protocol Settings (AppleTalk) 7-3
7
Usi
ng
an
Ap
ple
Ta
lk N
etw
ork
(M
aci
nto
sh)
Protocol Settings (AppleTalk)
This section describes how to specify the protocol settings for the machine using the control panel. If you are configuring the settings for the first time, use the control panel of the machine.
After configuring the settings, you can change them using software other than the control panel of the machine. For details, see e-Manual > Settings/Registration or Remote UI.
Depending on the machine you are using, you may have to use optional equipment to print via an AppleTalk network. For the equipment needed, see “Optional Equipment and System Requirements for Connecting to a Network,” on p. 2-2.
1 On the Network screen, press [ AppleTalk Settings] → specify the following.
[On] for < Use AppleTalk>: You can use the AppleTalk network.
In [ Service Name], enter a name for the printer not longer than 32 characters.The name you enter here appears on the Macintosh screen.
If you are using a network that is set up in zones, enter the name of the zone in [ Zone].
If you want to use the PS printer driver with the PS Printer Kit , set whether to apply spooling to the print job.
[Spool]: The machine specified in [Service Name] prints only after spooling the print job to the hard disk. If you entered "Printer1" for [Service Name] and select [Spool] for <Print Mode>, "Printer1_S" is displayed on the Macintosh printer screen.
[Direct]: The machine specified in [Service Name] prints without spooling the print job to the hard disk. If you entered "Printer2" for [Service Name] and select [Direct] for <Print Mode>, "Printer2_D" is displayed on the Macintosh printer screen.
[Both]: The machine specified in [Service Name] prints either with or without spooling the print job to the hard disk. If you entered "Printer3" for [Service Name] and select [Both] for <Print Mode>, "Printer3_S" and "Printer3_D" are displayed on the Macintosh printer screen, enabling you to select whether to spool a print job on the Macintosh screen whenever you perform printing.
• If you set <Use AppleTalk> to ‘On’, the machine will not enter a complete Sleep mode.
• If there is more than one printer in the same zone, each printer must have a unique name.
• You can also enter a zone name by pressing [Browse] and selecting the appropriate name from the displayed list.

Protocol Settings (AppleTalk)7-4
7
Usi
ng
an
Ap
ple
Ta
lk N
etw
ork
(M
aci
nto
sh)

8-1
CHAPTER
8 Managing the Machine from a Computer
This section describes the system requirements and preparations required for starting the Remote UI and SMS, which are used to manage the
machine from a computer.
System Requirements for Using the Remote UI . . . . . . . . . . . . . . . . . . . . . . . . . . . . . . . . . . . . . . . . . . . . . . . . . . . . . . . . . . . . . . . 8-2
Before You Start the Remote UI . . . . . . . . . . . . . . . . . . . . . . . . . . . . . . . . . . . . . . . . . . . . . . . . . . . . . . . . . . . . . . . . . . . . . . . . . . . . . . 8-3Enabling the Remote UI . . . . . . . . . . . . . . . . . . . . . . . . . . . . . . . . . . . . . . . . . . . . . . . . . . . . . . . . . . . . . . . . . . . . . . . . . . . . . . . . . . . . . . . . . . . . . . . . 8-4
System Requirements for Using SMS . . . . . . . . . . . . . . . . . . . . . . . . . . . . . . . . . . . . . . . . . . . . . . . . . . . . . . . . . . . . . . . . . . . . . . . . . 8-5
Before Starting SMS (Preparations). . . . . . . . . . . . . . . . . . . . . . . . . . . . . . . . . . . . . . . . . . . . . . . . . . . . . . . . . . . . . . . . . . . . . . . . . . . 8-6Specifying the SSL Settings . . . . . . . . . . . . . . . . . . . . . . . . . . . . . . . . . . . . . . . . . . . . . . . . . . . . . . . . . . . . . . . . . . . . . . . . . . . . . . . . . . . . . . . . . . . . . 8-6Enabling the Machine to be Accessed from Web Browsers . . . . . . . . . . . . . . . . . . . . . . . . . . . . . . . . . . . . . . . . . . . . . . . . . . . . . . . . . . . . . . . 8-7

System Requirements for Using the Remote UI8-2
8
Ma
na
gin
g t
he
Ma
chin
e f
rom
a C
om
pu
ter
System Requirements for Using the Remote UI
The system requirements for the Remote UI are as follows:
■ Windows
Operating System Software Web Browsers
Windows 2000 ProfessionalWindows XPWindows VistaWindows 7
Microsoft Internet Explorer 6, or later
■ Macintosh
Operating System Software Web Browsers
Mac OS 10.3, or later Safari 1.3.2, or later
• Available browsers may be limited depending on the login services for the MEAP function you are using. For instructions on how to use the login services, see e-Manual > MEAP.
• The appearance of the Remote UI screens may vary, depending on the type and version of the Web browser that you are using.
• This machine is compliant with IPv6 addresses. To access IPv6 addresses, your environment must be compliant with IPv6.
Apart from those mentioned above, no other software, such as a web server, is necessary. (There already is a web server inside the machine.)

Before You Start the Remote UI 8-3
8
Ma
na
gin
g t
he
Ma
chin
e f
rom
a C
om
pu
ter
Before You Start the Remote UI
Before you start the Remote UI, the administrator should perform the following:
■ Specify the Network Settings Specify the settings under the [Network] in [Preferences] (Settings/Registration) and find out the machine’s IP address. (See “Protocol Settings (TCP/IP),” on p. 4-3.)
■ Enable the Remote UI Set [Remote UI] in [Management Settings] (Settings/Registration) to ‘On’. It is also recommended that [Device Information Settings] in [Device Management] (Settings/Registration) is configured.
• Connection via a proxy server is not possible. If your system environment has a proxy server, perform the following setting. (As settings vary according to the system environment, consult the administrator for the network you are using.)
- Enter the IP address of the machine into Exceptions in the web browser proxy server settings.
• You must set your web browser to enable all cookies and use JavaScript. Otherwise, you will not be able to change the machine's settings using the Remote UI.
• If the control panel of the machine is being used for a particular operation and if you use the same operation on the Remote UI, the last setting is activated.
• If multiple Remote UIs are running simultaneously, the latest setting that was made is enabled. It is recommended that only one Remote UI be running at a time.
• To enter characters from a web browser, use the characters that you can enter from the touch panel display of the machine. If you use the other characters, they may not be displayed/recognized properly on the machine.

Before You Start the Remote UI8-4
8
Ma
na
gin
g t
he
Ma
chin
e f
rom
a C
om
pu
ter
Enabling the Remote UI
You must use the machine's control panel to enable the Remote UI.
• By setting [Remote UI] to ‘On’, you can open a necessary port. However, it is recommended that it is set to ‘Off’, if a port is not used. If you leave the port open, an unauthorized user may access the machine. • For information on the flow of operations on the Settings/Registration screen using the touch panel display, see e-Manual > Settings/Registration.
1 Press (Settings/Registration) → [Management Settings] → [License/Other] → [Remote UI].
2 Select [On] → select whether to use SSL.
Select [Off ] to disable the Remote UI.
<Use SSL>:
[On]: Allows secured transmission using SSL.[Off ]: Prohibits secured transmission using SSL.
<Use Reference Print>:
[On]: Allows printing by entering its URL.[Off ]: Prohibits printing by entering its URL.
Any changes made to <Use SSL> are also applied to [Use SSL] in [License/Other] in [Management Settings] (Settings/Registration).
3 Press [OK].
The selected mode is set.
4 Turn the main power of the machine OFF, wait 10 seconds, and then turn the power ON.
The [Remote UI] setting is made effective only after turning the machine’s main power OFF, and then ON. For information on how to turn ON and OFF the main power of the machine, see Chapter 1, “Before You Start Using This Machine.”

System Requirements for Using SMS 8-5
8
Ma
na
gin
g t
he
Ma
chin
e f
rom
a C
om
pu
ter
System Requirements for Using SMS
SMS can be used in the following system environments:
■ Operating System/Web Browsers
Operating System Software Web Browsers
Windows 2000 Professional SP4 Internet Explorer 6 SP1
Windows XP Professional SP3 Internet Explorer 7
Windows Vista SP2 Internet Explorer 8
Windows 7 Internet Explorer 8
Mac OS X 10.3 Safari 1.3.2
Mac OS X 10.4 Safari 2.0.4
Mac OS X 10.5 Safari 3.1.2
Mac OS X 10.6 Safari 4.0.3
Your browser requires the following settings:
- JavaScript should be enabled.
- Cookies should be enabled for each session.
No web server or software other than that described above is required (a web server is included in the supported machine).

Before Starting SMS (Preparations)8-6
8
Ma
na
gin
g t
he
Ma
chin
e f
rom
a C
om
pu
ter
Before Starting SMS (Preparations)
Before logging in to the SMS, an administrator must start the machine and perform the following procedure:
■ Specify the Network Settings Specify the settings under [Network] in [Preferences] (Settings/Registration) and find out the machine’s IP address. (See “Protocol Settings (TCP/IP),” on p. 4-3.)
■ Specify the SSL Settings Set [Use SSL] to ‘On’ in [MEAP Settings] in [License/Other] in [Management Settings] (Settings/Registration). If it is not set to ‘On’, you cannot log in to SMS.
■ Enable Access to the Machine from the Web Browser Set [Use HTTP] to ‘On’ in [TCP/IP Settings] in [Network] in Preferences (Settings/Registration). If it is not set to ‘On’, you cannot access the machine from the Web browser.
• You cannot connect to the machine via a proxy server. Specify the following settings if you are working in an environment using a proxy server (as these settings differ depending on the network environment, consult the administrator for the network you are using).
- In the proxy server settings of your web browser, add the IP address of the machine to the [Exceptions] (addresses that do not use a proxy) list.
• You cannot use SMS if your web browser is not set to enable cookies and JavaScript.
• When entering characters from your web browser, use characters that can be entered from the touch panel display of the machine. Otherwise, the characters may not be displayed or recognized correctly on the touch panel display.
Specifying the SSL Settings
To use SMS, it is necessary to use SSL communication.
The default setting is ‘Off’.
1 Press (Settings/Registration)→ [Management Settings].
2 Press [License/Other] → [MEAP Settings] → [SSL Settings].

Before Starting SMS (Preparations) 8-7
8
Ma
na
gin
g t
he
Ma
chin
e f
rom
a C
om
pu
ter
3 Press [On].
[On]: SSL communication is used.
[Off ]: SSL communication is not used.
• The settings for [Use SSL] are also applied to the settings for <Use SSL> in [Remote UI] in [Management Settings] (Settings/Registration).
• To set [Use SSL] to ‘On’, it is necessary to set the key pair and server certificate required for performing encrypted SSL communications in [Certificate Settings] in [Management Settings] (Settings/Registration). For information on generating the key for SSL, see e-Manual > Security.
4 Press [OK].
The selected mode is set.
5 Turn the main power of the machine OFF, wait 10 seconds, and then turn the power ON.
The setting for [SSL Settings] is activated only after you restart the machine (the main power switch is turned OFF, and then back ON). For instructions on turning the power ON/OFF, see Chapter 1, “Before You Start Using This Machine.”
Enabling the Machine to be Accessed from Web Browsers
Use to access the machine from a Web browser to use the MEAP function.
By setting [Use HTTP] to ‘On’, you can open a necessary port. However, it is recommended that it is set to ‘Off’, if a port is not used. If you leave the port open, an unauthorized user may access the machine.
• The default setting is ‘On’.
• To specify the Management Settings (Settings/Registration), you must log in by entering the System Manager ID and System Password.
1 Press (Settings/Registration) → [Preferences].

Before Starting SMS (Preparations)8-8
8
Ma
na
gin
g t
he
Ma
chin
e f
rom
a C
om
pu
ter
2 Press [Network] → [TCP/IP Settings] → [Use HTTP].
3 Press [On].
[On]: HTTP server is used.
[Off ]: HTTP server is not used.
4 Press [OK].
The selected mode is set.
5 Turn the main power of the machine OFF, wait 10 seconds, and then turn the power ON.
The setting for [Use HTTP] is activated only after you restart the machine (the main power switch is turned OFF, and then back ON). For instructions on turning the power ON/OFF, see Chapter 1, “Before You Start Using This Machine.”

9-1
CHAPTER
9 Installing the System Options/MEAP Applications
This chapter describes how to install the system options and MEAP applications.
Overview . . . . . . . . . . . . . . . . . . . . . . . . . . . . . . . . . . . . . . . . . . . . . . . . . . . . . . . . . . . . . . . . . . . . . . . . . . . . . . . . . . . . . . . . . . . . . . . . . . . 9-2To Install by Connecting This Machine to an Outside Network . . . . . . . . . . . . . . . . . . . . . . . . . . . . . . . . . . . . . . . . . . . . . . . . . . . . . . . . . . . 9-2To Install by Not Connecting This Machine to an Outside Network . . . . . . . . . . . . . . . . . . . . . . . . . . . . . . . . . . . . . . . . . . . . . . . . . . . . . . . 9-3
Using the System Options/MEAP Applications That Require License Registration . . . . . . . . . . . . . . . . . . . . . . . . . . . . . . 9-4System Options/MEAP Applications . . . . . . . . . . . . . . . . . . . . . . . . . . . . . . . . . . . . . . . . . . . . . . . . . . . . . . . . . . . . . . . . . . . . . . . . . . . . . . . . . . . . 9-4Installing the System Options/MEAP Applications . . . . . . . . . . . . . . . . . . . . . . . . . . . . . . . . . . . . . . . . . . . . . . . . . . . . . . . . . . . . . . . . . . . . . . . 9-5
Installing by Connecting this Machine to an Outside Network . . . . . . . . . . . . . . . . . . . . . . . . . . . . . . . . . . . . . . . . . . . . . . . . 9-6Using the Touch Panel Display to Install (Delivery). . . . . . . . . . . . . . . . . . . . . . . . . . . . . . . . . . . . . . . . . . . . . . . . . . . . . . . . . . . . . . . . . . . . . . . 9-6Using the Remote UI to Install (Delivery) . . . . . . . . . . . . . . . . . . . . . . . . . . . . . . . . . . . . . . . . . . . . . . . . . . . . . . . . . . . . . . . . . . . . . . . . . . . . . . . . 9-9
Installing by Not Connecting this Machine to an Outside Network . . . . . . . . . . . . . . . . . . . . . . . . . . . . . . . . . . . . . . . . . . . 9-12Obtaining the License Key/License File. . . . . . . . . . . . . . . . . . . . . . . . . . . . . . . . . . . . . . . . . . . . . . . . . . . . . . . . . . . . . . . . . . . . . . . . . . . . . . . . . 9-12Installing the System Options Using the Touch Panel Display . . . . . . . . . . . . . . . . . . . . . . . . . . . . . . . . . . . . . . . . . . . . . . . . . . . . . . . . . . . 9-13Installing the System Options Using the Remote UI (Manual) . . . . . . . . . . . . . . . . . . . . . . . . . . . . . . . . . . . . . . . . . . . . . . . . . . . . . . . . . . . 9-14Installing the MEAP Applications Using the Remote UI (Manual) . . . . . . . . . . . . . . . . . . . . . . . . . . . . . . . . . . . . . . . . . . . . . . . . . . . . . . . . 9-16Starting the MEAP Applications. . . . . . . . . . . . . . . . . . . . . . . . . . . . . . . . . . . . . . . . . . . . . . . . . . . . . . . . . . . . . . . . . . . . . . . . . . . . . . . . . . . . . . . . 9-19
Downloading the Manuals and Related Software. . . . . . . . . . . . . . . . . . . . . . . . . . . . . . . . . . . . . . . . . . . . . . . . . . . . . . . . . . . . 9-20

Overview9-2
9
Inst
alli
ng
th
e S
yste
m O
pti
on
s/M
EA
P A
pp
lica
tio
ns
Overview
Using the “Register/Update Software” function, you can install the System Options/MEAP Applications to the machine. You can use
this function from both the touch panel display and the computer (Remote UI).
• Multiple users cannot use the “Register/Update Software” function at the same time. • If another user is logged in to SMS (Service Management Service), you cannot use the “Register/Update Software” function from the Remote UI.
• If the following procedure is performed, you cannot use the “Register/Update Software” function from the Remote UI for a specified time:
- when Remote Login Service of the SMS is set and the Web browser was closed without pressing [To Portal] or [Log Out]
- when Remote Login Service of the SMS is not set and the Web browser was closed without pressing [To Portal]
- when the Web browser was closed without pressing [Log Out from SMS], [To Remote UI], or [Log Out] of the SMS
• For more information on SMS, see e-Manual > MEAP.
To Install by Connecting This Machine to an Outside Network
You can install the System Options/MEAP Applications by accessing the delivery server from this machine.
Access Using the Touch Panel Display
Access Using the Remote UI
License Authentication/MEAP Application Delivery
Delivery ServerThis Machine
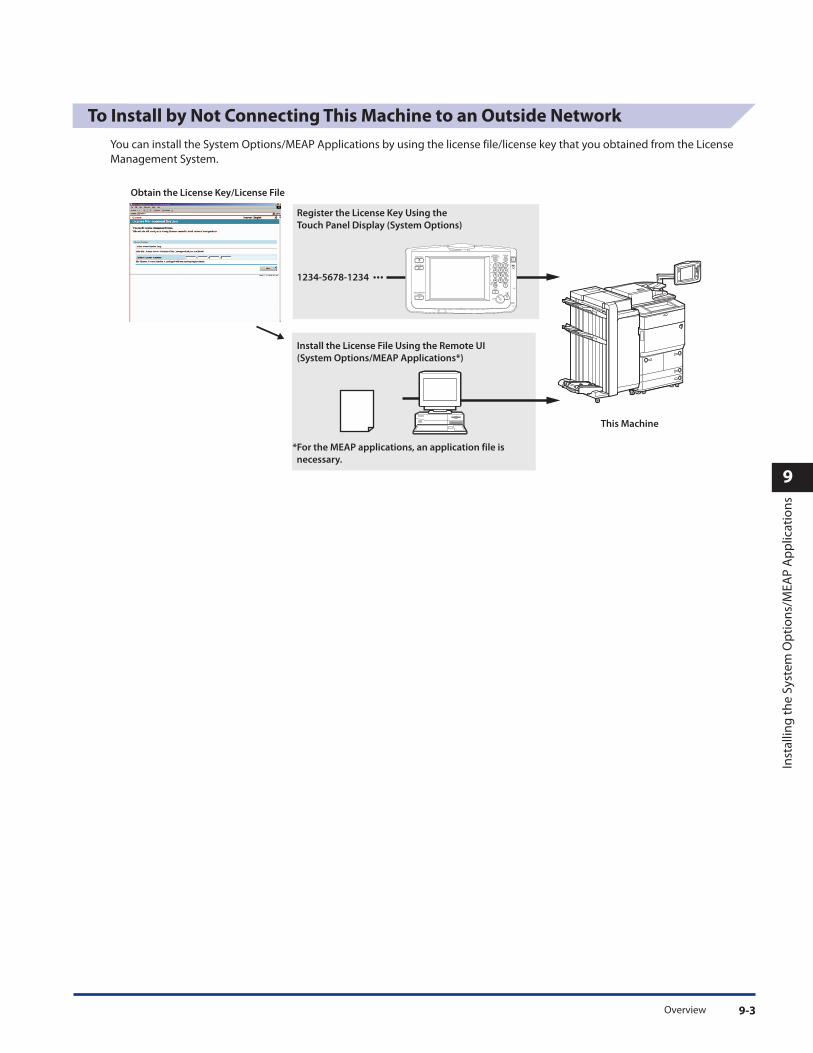
Overview 9-3
9
Inst
alli
ng
th
e S
yste
m O
pti
on
s/M
EA
P A
pp
lica
tio
ns
To Install by Not Connecting This Machine to an Outside Network
You can install the System Options/MEAP Applications by using the license file/license key that you obtained from the License
Management System.
Register the License Key Using the
Touch Panel Display (System Options)
Install the License File Using the Remote UI
(System Options/MEAP Applications*)
Obtain the License Key/License File
*For the MEAP applications, an application file is
necessary.
This Machine
1234-5678-1234 ...

Using the System Options/MEAP Applications That Require License Registration9-4
9
Inst
alli
ng
th
e S
yste
m O
pti
on
s/M
EA
P A
pp
lica
tio
ns
Using the System Options/MEAP Applications That Require License Registration
System Options/MEAP Applications
You can enhance the functions of the machine by installing various system options and MEAP applications.
■ System Options The following are the system options you can install on this machine.
• PCL Printer Kit
• PS Printer Kit
• Direct Print Kit (for PDF/XPS)
• Barcode Printing Kit
• Universal Send Advanced Feature Set
• Universal Send Security Feature Set
• Universal Send Digital User Signature Kit
• Encrypted Secure Print Software*
• Secure Watermark
• Document Scan Lock Kit
• Data Erase Kit
• Web Access Software
• Remote Operators Software Kit
* Name of this option may differ depending on the region.
■ MEAP Applications To enhance the functions of the machine without using the above system options, install the MEAP applications.
If you want to perform MEAP applications management such as the ones shown below, use SMS (Service Management Service).(See e-Manual > MEAP.)
- Checking the MEAP applications installed on this machine
- Checking the amount of space the MEAP applications are using on the hard disk
- Adding a license to an installed MEAP application

Using the System Options/MEAP Applications That Require License Registration 9-5
9
Inst
alli
ng
th
e S
yste
m O
pti
on
s/M
EA
P A
pp
lica
tio
ns
Installing the System Options/MEAP Applications
The procedures to install the system options or MEAP applications on the machine differ, depending on whether the machine is
connected or not to an outside network. Select the procedure that matches your conditions using the references below.
For instructions on connecting the machine to an outside network, see Chapter 4, “Using a TCP/IP Network.”
To Install by Connecting this Machine to an Outside Network Install using one of the following procedures.
To check that the transmission with the delivery server is properly operating, if necessary, perform transmission test before installation.(See “Testing Communication Using the Touch Panel Display,” on p. 11-4 and “Testing Communication Using the Remote UI,” on p. 11-8.)
Procedure Reference Page
Using the touch panel display to install Using the Touch Panel Display to Install (Delivery) (p. 9-6)
Using the Remote UI to install Using the Remote UI to Install (Delivery) (p. 9-9)
To Install by Not Connecting this Machine to an Outside Network
■ Installing System Options Install using one of the following procedures.
If you want to install multiple system options, we recommend to use the Remote UI.
Procedure Necessary Steps Reference Page
Using the touch panel display to install 1. Obtain the license key from the License Management System
Obtaining the License Key/License File (p. 9-12)
2. Register the license key using the touch panel display
Installing the System Options Using the Touch Panel Display (p. 9-13)
Using the Remote UI to install 1. Obtain the license file from the License Management System
Obtaining the License Key/License File (p. 9-12)
2. Install the license file using the Remote UI Installing the System Options Using the Remote UI (Manual) (p. 9-14)
■ Installing MEAP Applications Use the following procedure to install.
Procedure Necessary Steps Reference Page
Using the Remote UI to install 1. Obtain the license file from the License Management System
Obtaining the License Key/License File (p. 9-12)
2. Install the license file and application file using the Remote UI
Installing the MEAP Applications Using the Remote UI (Manual) (p. 9-16)
3. Start the MEAP applications from SMS Starting the MEAP Applications (p. 9-19)

Installing by Connecting this Machine to an Outside Network9-6
9
Inst
alli
ng
th
e S
yste
m O
pti
on
s/M
EA
P A
pp
lica
tio
ns
Installing by Connecting this Machine to an Outside Network
If the machine is connected to an outside network, you can install the system options and MEAP applications by linking with the delivery server.
Make sure that the license access number that is included with the package is available.
Using the Touch Panel Display to Install (Delivery)
You can install the system options or MEAP applications to the machine using the touch panel display.
To perform the procedures described in this section, you must log in to the machine as an administrator. (See e-Manual > Remote UI.)
• The maximum number of MEAP applications that can be installed is 19. • The maximum amount of hard disk space allocated to install MEAP applications is 1GB. • There may be other system requirements for installation, depending on the MEAP applications. For instructions on settings, see the manual provided with the MEAP application.
1 Press (Settings/Registration) → [Management Settings] → [License/Other] → [Register/Update
Software].
2 Press [Install Applications/Options].
3 Press [License Access Number].

Installing by Connecting this Machine to an Outside Network 9-7
9
Inst
alli
ng
th
e S
yste
m O
pti
on
s/M
EA
P A
pp
lica
tio
ns
4 Enter the license access number four digits at a time.
Enter four digits of the license access number → press [OK]. Repeat this step four times to enter a total of 16 digits for the license access number.
5 Press [Start].

Installing by Connecting this Machine to an Outside Network9-8
9
Inst
alli
ng
th
e S
yste
m O
pti
on
s/M
EA
P A
pp
lica
tio
ns
6 Select the system options and MEAP applications → press [Install].
[Do Not Start]: Press to only install the MEAP application and not start the application.
If [Do Not Start] is selected when installing MEAP applications, you must start the application before using the MEAP application. (See “Starting the MEAP Applications,” on p. 9-19.)
You can select multiple system options and MEAP applications, but you cannot select the same product with different version at the same time.
If the agreement screen is displayed, read the agreement. If you abide with the agreement, click [Accept].
7 Check the Installation Result screen.
When the installation of the system options is completed, the message <Enabled After Restart> appears on the <Installation Result>.Restart the machine to enable the function.
You can download the manuals for the installed system options/MEAP applications from your computer by accessing the URL for the manual download site displayed on the Installation Result screen. (See “Downloading the Manuals and Related Software,” on p. 9-20.)

Installing by Connecting this Machine to an Outside Network 9-9
9
Inst
alli
ng
th
e S
yste
m O
pti
on
s/M
EA
P A
pp
lica
tio
ns
Using the Remote UI to Install (Delivery)
You can install the system options or MEAP applications to the machine using the Remote UI.
To perform the procedures described in this section, you must log in to the machine as an administrator. (See e-Manual > Remote UI.)
1 From the top page of the Remote UI, click [Settings/Registration] → [License/Other] → [Register/
Update Software].
2 Click [Delivered Installation].

Installing by Connecting this Machine to an Outside Network9-10
9
Inst
alli
ng
th
e S
yste
m O
pti
on
s/M
EA
P A
pp
lica
tio
ns
3 Enter the license access number → click [Next].
Once the license access number is confirmed after contacting the delivery server, information for the system options/MEAP applications you can install are displayed.
If the license access number is incorrect, an error page is displayed.
4 Select the system options and MEAP applications → click [Start Installation].
Status after Installation:Start: Starts the installed MEAP applications.Stop: Stops the installed MEAP applications.
If [Stop] is selected when installing MEAP applications, you must start the application before using the MEAP application. (See “Starting the MEAP Applications,” on p. 9-19.)
If the agreement screen is displayed, read the agreement. If you abide with the agreement, click [Accept].

Installing by Connecting this Machine to an Outside Network 9-11
9
Inst
alli
ng
th
e S
yste
m O
pti
on
s/M
EA
P A
pp
lica
tio
ns
5 Check the Installation Result page.
When the installation of the system options is completed, the message <Restart the device.> appears. Restart the machine to enable the function.
To return to the delivery install page, click [To Delivered Installation].
You can download the manual for the installed system options/MEAP applications by accessing the URL for the manual download site displayed on the Installation Result page. (See “Downloading the Manuals and Related Software,” on p. 9-20.)

Installing by Not Connecting this Machine to an Outside Network9-12
9
Inst
alli
ng
th
e S
yste
m O
pti
on
s/M
EA
P A
pp
lica
tio
ns
Installing by Not Connecting this Machine to an Outside Network
This section describes how to install the system options and MEAP applications without connecting the machine to an outside network.
Obtaining the License Key/License File
Obtain the license key or license file.
• License key: Obtain the license key when installing the system options using the touch panel display.
• License file: Obtain the license file when installing the system options/MEAP applications using the Remote UI.
• Make sure that the license access number that is included with the package is available.
• If the license access number is not printed on the package of the MEAP application you are using, the license file is issued by the distributor of the MEAP application. You do not need to obtain the license key/license file explained in this section. For more information, see the manual for each MEAP application.
1 Check the management number you need to obtain the license key or the license file.
To obtain the license key or the license file, the following management number is required.
• License Access Number: Check the license access number certificate.
• Device Serial Number: Check and note the serial number which is displayed at the bottom left of the screen when you press (Counter Check) on the machine.
2 Access http://www.canon.com/lms/license/.
3 Follow the instructions on the screen and obtain the license key/license file.
If the license key is obtained, see “Installing the System Options Using the Touch Panel Display,” on p. 9-13.
If the license file is obtained, see “Installing the System Options Using the Remote UI (Manual),” on p. 9-14 or “Installing the MEAP Applications Using the Remote UI (Manual),” on p. 9-16.

Installing by Not Connecting this Machine to an Outside Network 9-13
9
Inst
alli
ng
th
e S
yste
m O
pti
on
s/M
EA
P A
pp
lica
tio
ns
Installing the System Options Using the Touch Panel Display
You can install the system options to the machine by registering the license key using the touch panel display.
To perform the procedures described in this section, you must log in to the machine as an administrator. (See e-Manual > Settings/Registration.)
1 Press (Settings/Registration) → [Management Settings] → [License/Other] → [Register License].
2 Enter the license key using - (numeric keys) → press [Start].
[ ][ ]:Press to move the cursor.
[Backspace]: Press when you entered a wrong number. The number in front of the cursor is deleted and you can reenter the correct number.
If the message <The value of the license key is incorrect. Check the license key.> is displayed, press [OK] → enter the correct license key.
If the message <The feature required for installation is not present.> is displayed, you cannot register the license key. Press [OK] → cancel the registration.
3 Press [OK].
The registered functions can be used only after you restart the machine.
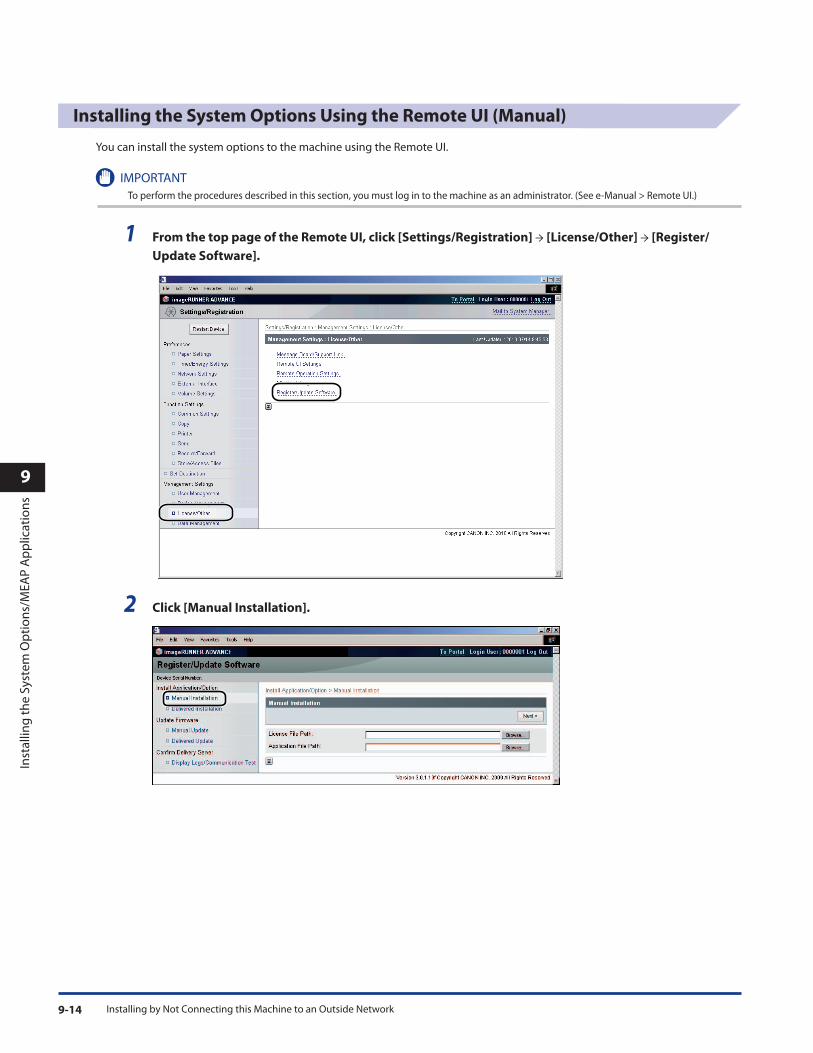
Installing by Not Connecting this Machine to an Outside Network9-14
9
Inst
alli
ng
th
e S
yste
m O
pti
on
s/M
EA
P A
pp
lica
tio
ns
Installing the System Options Using the Remote UI (Manual)
You can install the system options to the machine using the Remote UI.
To perform the procedures described in this section, you must log in to the machine as an administrator. (See e-Manual > Remote UI.)
1 From the top page of the Remote UI, click [Settings/Registration] → [License/Other] → [Register/
Update Software].
2 Click [Manual Installation].

Installing by Not Connecting this Machine to an Outside Network 9-15
9
Inst
alli
ng
th
e S
yste
m O
pti
on
s/M
EA
P A
pp
lica
tio
ns
3 Click [Browse] → select the license file to install → click [Next].
File extensions:
License file: File with “.lic” extension.
• You do not have to use Application File Path. • You can also specify the file path by entering it directly.
4 Check the contents that will be installed on the confirmation screen → click [Install].

Installing by Not Connecting this Machine to an Outside Network9-16
9
Inst
alli
ng
th
e S
yste
m O
pti
on
s/M
EA
P A
pp
lica
tio
ns
Installing the MEAP Applications Using the Remote UI (Manual)
You can install the MEAP applications to the machine using the Remote UI.
To perform the procedures described in this section, you must log in to the machine as an administrator. (See e-Manual > Remote UI.)
• The maximum number of MEAP applications that can be installed is 19. • The maximum amount of hard disk space allocated to install MEAP applications is 1GB. • There may be other system requirements for installation, depending on the MEAP applications. For instructions on settings, see the manual provided with the MEAP application.
1 From the top page of the Remote UI, click [Settings/Registration] → [License/Other] → [Register/
Update Software].
2 Click [Manual Installation].

Installing by Not Connecting this Machine to an Outside Network 9-17
9
Inst
alli
ng
th
e S
yste
m O
pti
on
s/M
EA
P A
pp
lica
tio
ns
3 Click [Browse] → select the application file and the license file to install → click [Next].
File extensions:
Application File: A file with the ‘jar’ extension.
License File: A file with the ‘lic’ extension.
• You cannot install license files only.
• When installing the MEAP application, make sure you specify the license file. You cannot install the MEAP application without specifying the license file.
You can also specify the file path by entering it directly.

Installing by Not Connecting this Machine to an Outside Network9-18
9
Inst
alli
ng
th
e S
yste
m O
pti
on
s/M
EA
P A
pp
lica
tio
ns
4 Confirm the information displayed on the install confirmation page → click [Yes].
Depending on the MEAP application, a software license agreement screen may be displayed. Confirm the information displayed on the screen → click [OK].
If you are installing a new MEAP application, the following information is displayed on the screen.
• Application Information
• License Information
The following information is displayed when you overwrite a MEAP application.
• Current Application Information
• Application Information after Overwrite
Installation will start after the message <Installing... Please wait.> is displayed again. After the installation, click [To Manual Installation] to display the Manual Installation screen.
To use the installed MEAP application, you must start the MEAP application (See “Starting the MEAP Applications,” on p. 9-19.)

Installing by Not Connecting this Machine to an Outside Network 9-19
9
Inst
alli
ng
th
e S
yste
m O
pti
on
s/M
EA
P A
pp
lica
tio
ns
Starting the MEAP Applications
This section describes how to start the installed MEAP application from the SMS screen.
For more information on SMS, see e-Manual > MEAP.
1 From the top page of the SMS, click [MEAP Application Management].
2 Select the application you want to start → click [Start].

Downloading the Manuals and Related Software9-20
9
Inst
alli
ng
th
e S
yste
m O
pti
on
s/M
EA
P A
pp
lica
tio
ns
Downloading the Manuals and Related Software
You can download the manuals for the installed system options/MEAP applications and their related software from the following URL.
http://canon.com/fau/downloads
• Make sure that the license access number that is included with the package is available.
• If you cannot find a manual to download, see the function descriptions in the e-Manual included with this machine.
• If you installed from the Remote UI, you can jump to the above URL from the link displayed on the installation result screen. If you do so, the license access number is entered automatically.
1 Start the Web browser on your computer.
2 Enter the URL in [Address].
3 After entering the license access number, follow the instructions on the screen to download the
manuals and related software.
If software is downloaded, refer to the manual of that software to install.

10-1
CHAPTER
10 Updating the Firmware
This chapter describes how to update the firmware of the machine.
Updating the Firmware. . . . . . . . . . . . . . . . . . . . . . . . . . . . . . . . . . . . . . . . . . . . . . . . . . . . . . . . . . . . . . . . . . . . . . . . . . . . . . . . . . . . . 10-2
Using the Remote UI to Update (Manual). . . . . . . . . . . . . . . . . . . . . . . . . . . . . . . . . . . . . . . . . . . . . . . . . . . . . . . . . . . . . . . . . . . . 10-3

Updating the Firmware10-2
10
Up
da
tin
g t
he
Fir
mw
are
Updating the Firmware
Using the “Register/Update Software” function, you can update the firmware of the machine to the most recent version. You can use this function from the computer (Remote UI).
• Multiple users cannot use the “Register/Update Software” function at the same time.
• If another user is logged in to SMS (Service Management Service), you cannot use the “Register/Update Software” function from the Remote UI.
• If the following procedure is performed, you cannot use the “Register/Update Software” function from the Remote UI for a specified time:
- when Remote Login Service of the SMS is set and the Web browser was closed without pressing [To Portal] or [Log Out]
- when Remote Login Service of the SMS is not set and the Web browser was closed without pressing [To Portal]
- when the Web browser was closed without pressing [Log Out from SMS], [To Remote UI], or [Log Out] of the SMS
• For more information on SMS, see e-Manual > MEAP.
You can update the firmware using the data that is distributed separately from the machine.
Registering the Firmware from the Remote UIObtaining the Firmware
Updating the
Firmware

Using the Remote UI to Update (Manual) 10-3
10
Up
da
tin
g t
he
Fir
mw
are
Using the Remote UI to Update (Manual)
You can update the firmware from the Remote UI that is connected to the machine.
To perform the procedures described in this section, you must log in to the machine as an administrator. (See e-Manual > Remote UI.)
To perform the procedures described in this section, the data of the firmware that is distributed separately from the machine is necessary.
1 From the top page of the Remote UI, click [Settings/Registration] → [License/Other] → [Register/
Update Software].
2 Click [Manual Update].

Using the Remote UI to Update (Manual)10-4
10
Up
da
tin
g t
he
Fir
mw
are
3 Click [Browse] → select the firmware to update → click [Next].
4 Check the contents that will be updated on the confirmation screen → click [Yes].
The new firmware is applied to the machine. When the message <The firmware is updated. Restart the device.> appears, restart the machine.

11-1
CHAPTER
11 Managing the "Register/Update Software" Function
This chapter describes how to manage the “Register/Update Software” function when the machine is used with an outside network connected.
Managing by Using the Touch Panel Display . . . . . . . . . . . . . . . . . . . . . . . . . . . . . . . . . . . . . . . . . . . . . . . . . . . . . . . . . . . . . . . . 11-2Displaying the Installation Log Using the Touch Panel Display . . . . . . . . . . . . . . . . . . . . . . . . . . . . . . . . . . . . . . . . . . . . . . . . . . . . . . . . . . 11-2Testing Communication Using the Touch Panel Display . . . . . . . . . . . . . . . . . . . . . . . . . . . . . . . . . . . . . . . . . . . . . . . . . . . . . . . . . . . . . . . . 11-4
Managing by Using the Remote UI. . . . . . . . . . . . . . . . . . . . . . . . . . . . . . . . . . . . . . . . . . . . . . . . . . . . . . . . . . . . . . . . . . . . . . . . . . 11-6Displaying the Installation Log Using the Remote UI. . . . . . . . . . . . . . . . . . . . . . . . . . . . . . . . . . . . . . . . . . . . . . . . . . . . . . . . . . . . . . . . . . . . 11-6Testing Communication Using the Remote UI . . . . . . . . . . . . . . . . . . . . . . . . . . . . . . . . . . . . . . . . . . . . . . . . . . . . . . . . . . . . . . . . . . . . . . . . . . 11-8

Managing by Using the Touch Panel Display11-2
11
Ma
na
gin
g t
he
“R
eg
iste
r/U
pd
ate
So
ftw
are
” F
un
ctio
n
Managing by Using the Touch Panel Display
You can display the installation logs and test communication using the touch panel display.
To perform the procedures described in this section, you must log in to the machine as an administrator. (See e-Manual > Settings/Registration.)
Displaying the Installation Log Using the Touch Panel Display
You can check the installation logs of the system options and MEAP applications.
1 Press (Settings/Registration) → [Management Settings] → [License/Other]→ [Register/Update
Software].
2 Press [Software Management Settings].
3 Press [Select Log Display].

Managing by Using the Touch Panel Display 11-3
11
Ma
na
gin
g t
he
“R
eg
iste
r/U
pd
ate
So
ftw
are
” F
un
ctio
n
4 Press [Display Update Logs].
The installation logs of the system options and MEAP applications are displayed.

Managing by Using the Touch Panel Display11-4
11
Ma
na
gin
g t
he
“R
eg
iste
r/U
pd
ate
So
ftw
are
” F
un
ctio
n
Testing Communication Using the Touch Panel Display
You can check whether the machine can properly communicate with the delivery server.
1 Press (Settings/Registration) → [Management Settings] → [License/Other] → [Register/Update
Software].
2 Press [Software Management Settings].
3 Press [Test Communication].

Managing by Using the Touch Panel Display 11-5
11
Ma
na
gin
g t
he
“R
eg
iste
r/U
pd
ate
So
ftw
are
” F
un
ctio
n
4 Press [Yes].
Contents for the test are downloaded from the delivery server.
When the communication test is completed, the communication test result screen is displayed.
If 'Failed' is displayed on the communication test result screen, check that the network cable is connected and that the network settings are correct.If the problem is not resolved, contact your local authorized Canon dealer.

Managing by Using the Remote UI11-6
11
Ma
na
gin
g t
he
“R
eg
iste
r/U
pd
ate
So
ftw
are
” F
un
ctio
n
Managing by Using the Remote UI
You can display the installation logs and test communication using the Remote UI.
To perform the procedures described in this section, you must log in to the machine as an administrator. (See e-Manual > Remote UI.)
Displaying the Installation Log Using the Remote UI
You can check the installation logs of the system options and MEAP applications.
1 From the top page of the Remote UI, click [Settings/Registration] →[License/Other] → [Register/
Update Software].

Managing by Using the Remote UI 11-7
11
Ma
na
gin
g t
he
“R
eg
iste
r/U
pd
ate
So
ftw
are
” F
un
ctio
n
2 Click [Display Logs /Communication Test].
3 From the Log View drop-down list, select [Update Logs] → click [Switch].
The installation logs of the system options and MEAP applications are displayed.

Managing by Using the Remote UI11-8
11
Ma
na
gin
g t
he
“R
eg
iste
r/U
pd
ate
So
ftw
are
” F
un
ctio
n
Testing Communication Using the Remote UI
You can check whether the machine can properly communicate with the delivery server.
1 From the top page of the Remote UI, click [Settings/Registration] → [License/Other] → [Register/
Update Software].

Managing by Using the Remote UI 11-9
11
Ma
na
gin
g t
he
“R
eg
iste
r/U
pd
ate
So
ftw
are
” F
un
ctio
n
2 Click [Display Logs /Communication Test] → [Communication Test].
When the confirmation dialog is displayed, click [Yes].
Contents for the test are downloaded from the delivery server.
When the communication test is completed, the communication test result screen is displayed.
If ‘Failed’ is displayed on the communication test result screen, check that the network cable is connected and that the network settings are correct.If the problem is not resolved, contact your local authorized Canon dealer.

Managing by Using the Remote UI11-10
11
Ma
na
gin
g t
he
“R
eg
iste
r/U
pd
ate
So
ftw
are
” F
un
ctio
n

12-1
CHAPTER
12 Before Using the Advanced Box
The following operations and settings are required to manage the Advanced Box users and open the Advanced Box to the public by SMB or
WebDAV.
User Access Control for Advanced Box . . . . . . . . . . . . . . . . . . . . . . . . . . . . . . . . . . . . . . . . . . . . . . . . . . . . . . . . . . . . . . . . . . . . . . 12-2
Advanced Box Open to Public Settings. . . . . . . . . . . . . . . . . . . . . . . . . . . . . . . . . . . . . . . . . . . . . . . . . . . . . . . . . . . . . . . . . . . . . . 12-6Using a WebDAV/SMB Server . . . . . . . . . . . . . . . . . . . . . . . . . . . . . . . . . . . . . . . . . . . . . . . . . . . . . . . . . . . . . . . . . . . . . . . . . . . . . . . . . . . . . . . . . . 12-6Setting the Authentication Management . . . . . . . . . . . . . . . . . . . . . . . . . . . . . . . . . . . . . . . . . . . . . . . . . . . . . . . . . . . . . . . . . . . . . . . . . . . . . . 12-7

User Access Control for Advanced Box12-2
12
Be
fore
Usi
ng
th
e A
dv
an
ced
Bo
x
User Access Control for Advanced Box
User Access Control for Advanced Box is an authentication application that enables you to perform user authentication when you want to access the Shared/Personal Space in the Advanced Box with authentication management and to use the SMB Print function when SMB authentication is set. The Advanced Box administrator can set access privilege for the general user for the Shared/Personal Space to restrict access and output of data for each user.
To specify each setting for User Management Service, it is necessary to access and then log in to the machine from the Web browser. You can access the machine from the portal page of the Remote UI.
1 Start your Web browser.
2 Enter the following URL in [Address].
http://<IP address of the machine or host name>
The [Login] page is displayed.
3 Enter the Department ID and password → click [Administrator Login].
The default setting for both the System Manager ID and System Password is '7654321'. We recommend that you change both the System Manager ID and System Password.
The portal page of the Remote UI is displayed.

User Access Control for Advanced Box 12-3
12
Be
fore
Usi
ng
th
e A
dv
an
ced
Bo
x
4 Click [User Access Control for Advanced Box] from the applications on the portal screen.
The Log In page for the user management of the Advanced Box is displayed.

User Access Control for Advanced Box12-4
12
Be
fore
Usi
ng
th
e A
dv
an
ced
Bo
x
5 Enter the user name and password → click [Log In].
The default setting for user name is 'Administrator' and the password is 'password'. We recommend that you change both the user name and password.
The [User Management] page is displayed.
6 Click [Add User].

User Access Control for Advanced Box 12-5
12
Be
fore
Usi
ng
th
e A
dv
an
ced
Bo
x
7 Enter each item, click [Add].
The new user information is registered.

Advanced Box Open to Public Settings12-6
12
Be
fore
Usi
ng
th
e A
dv
an
ced
Bo
x
Advanced Box Open to Public Settings
You can set whether to make the Advanced Box of the machine open to the public as a WebDAV server or SMB server on the network. Also, you can set whether to manage authentication for the users of the Advanced Box which is open to the public. If the authentication management is used, only the users registered in User Access Control for Advanced Box can use the Advanced Box. (See e-Manual > Security).
The Advanced Box cannot be opened to the public as a WebDAV server and SMB server at the same time.
Using a WebDAV/SMB Server
1 Press (Settings/Registration) → [Function Settings] → [Store/Access Files] → [Advanced Box
Settings] → [Open to Public].
2 Set whether to open the Advanced Box to public → press [OK].
[Off ]: The Advanced Box is not open to the public.
[By WebDAV]: The Advanced Box is open to the public as a WebDAV server.
[By SMB]: The Advanced Box is open to the public as an SMB server.
• To open the Advanced Box to the public by SMB, <Use SMB Server> in Preferences (Settings/Registration) must be set to 'On'. (See “SMB and WINS Settings,” on p. 6-3.) • To open the Advanced Box to the public by WebDAV, [Use WebDAV Server] in [Network] in Preferences (Settings/Registration) must be set to ‘On’.

Advanced Box Open to Public Settings 12-7
12
Be
fore
Usi
ng
th
e A
dv
an
ced
Bo
x
Setting the Authentication Management
1 Press (Settings/Registration) → [Function Settings] → [Store/Access Files] → [Advanced Box
Settings] → [Authentication Management].
● If you set the Advanced Box to be open to the public as an SMB server and use authentication management:
☐ Press [On] → [OK].
To use the authentication management, <Use SMB Authentication> in [SMB Auth. Settings] in Preferences (Settings/Registration) must be set to 'On' and the authentication type must be set. (See “SMB and WINS Settings,” on p. 6-3.)
● If you set the Advanced Box to be open to the public as a WebDAV server and use authentication management:
☐ Press [On].
☐ Press [Advanced Box Settings] → [WebDAV Server Settings] → [Basic] for the authentication type.
In the Advanced Box settings, in addition to specifying the open to public settings and managing authentication, you can initialize the shared space and set whether to allow personal space to be created. For more information, see e-Manual > Security.
Also, if you want to access the open to public Advanced Box (Network) of another machine from this machine, you must register the Advanced Box of another machine as the Network Place. For more information, see e-Manual > Security.

Advanced Box Open to Public Settings12-8
12
Be
fore
Usi
ng
th
e A
dv
an
ced
Bo
x
13-1
CHAPTER
13 Before Printing from Computers
To print from a computer, you must install the printer driver and set up the printer configuration using the printer driver.
Installing the Printer Driver . . . . . . . . . . . . . . . . . . . . . . . . . . . . . . . . . . . . . . . . . . . . . . . . . . . . . . . . . . . . . . . . . . . . . . . . . . . . . . . . . 13-2System Requirements . . . . . . . . . . . . . . . . . . . . . . . . . . . . . . . . . . . . . . . . . . . . . . . . . . . . . . . . . . . . . . . . . . . . . . . . . . . . . . . . . . . . . . . . . . . . . . . . . 13-2Selecting the Appropriate Printer Driver . . . . . . . . . . . . . . . . . . . . . . . . . . . . . . . . . . . . . . . . . . . . . . . . . . . . . . . . . . . . . . . . . . . . . . . . . . . . . . . 13-3Installation. . . . . . . . . . . . . . . . . . . . . . . . . . . . . . . . . . . . . . . . . . . . . . . . . . . . . . . . . . . . . . . . . . . . . . . . . . . . . . . . . . . . . . . . . . . . . . . . . . . . . . . . . . . . 13-5
Setting the Printer Options . . . . . . . . . . . . . . . . . . . . . . . . . . . . . . . . . . . . . . . . . . . . . . . . . . . . . . . . . . . . . . . . . . . . . . . . . . . . . . . . . 13-7For Windows. . . . . . . . . . . . . . . . . . . . . . . . . . . . . . . . . . . . . . . . . . . . . . . . . . . . . . . . . . . . . . . . . . . . . . . . . . . . . . . . . . . . . . . . . . . . . . . . . . . . . . . . . . 13-7For Mac . . . . . . . . . . . . . . . . . . . . . . . . . . . . . . . . . . . . . . . . . . . . . . . . . . . . . . . . . . . . . . . . . . . . . . . . . . . . . . . . . . . . . . . . . . . . . . . . . . . . . . . . . . . . . . . 13-8
Other Software Programs. . . . . . . . . . . . . . . . . . . . . . . . . . . . . . . . . . . . . . . . . . . . . . . . . . . . . . . . . . . . . . . . . . . . . . . . . . . . . . . . . . . 13-9

Installing the Printer Driver13-2
13
Be
fore
Pri
nti
ng
fro
m C
om
pu
ters
Installing the Printer Driver
The printer driver is software that is required to print from applications on your computer. The printer driver also enables you to configure settings relating to printing.
System Requirements
The following system environments are necessary in order to use the printer driver.
Supported operating systems may differ according to the printer driver version you are using.
■ For Windows:
• Operating Systems:
- Windows 2000
- Windows XP
- Windows Server 2003
- Windows Vista
- Windows Server 2008
- Windows 7
• Computer:
- Any computer that runs the above systems
• Memory:
- The amount of memory required to run the above systems correctly
■ For Mac:
• Operating Systems:
- UFR II Printer Driver: Mac OS X 10.4.9 or later
- PS Printer Driver: Mac OS X 10.4.9 or later
• Computer:
- Any computer that runs the above systems
• Memory:
- The amount of memory required to run the above systems correctly

Installing the Printer Driver 13-3
13
Be
fore
Pri
nti
ng
fro
m C
om
pu
ters
Selecting the Appropriate Printer Driver
The printer driver is installed from a User Software CD-ROM. If there is more than one CD-ROM, use the following information as a
reference and select the appropriate CD-ROM and printer driver.
The available CD-ROM may differ, depending on the machine and the system environment you are using.
■ Content of Each CD-ROM:
Mac UFR II Printer Driver
Installation Guide
Mac PS Printer Driver
Installation Guide

Installing the Printer Driver13-4
13
Be
fore
Pri
nti
ng
fro
m C
om
pu
ters
■ Features of the Printer Driver UFR II Printer Driver:
Using the UFR II printer driver, the various data processing tasks conventionally executed within the printer are appropriately divided between the host PC and the printer to greatly reduce the overall printing time.
The workload can be delegated to match the output data, thus realizing a significant increase in speed through optimization.
PCL Printer Driver:
The PCL5c, PCL5e, and PCL6 printer drivers can be used with most kinds of business application. The PCL5c printer driver is for color printers, the PCL5e printer driver is for black-and-white printers, and the PCL6 printer driver is for both color and black-and-white printers. PCL6 is an advanced version of PCL5c and PCL5e, and offers superior printing quality and speed. The PCL5e printer driver is provided as standard with black-and-white printers.
PS Printer Driver:
The PS printer driver converts print data from applications into data for use with PS printers, and sends it to the printer. As well as converting print data, it can also enable you to configure settings relating to finishing and detailed settings such as color adjustment, and provides an appropriate print environment for desktop publishing and publishing on demand.
You can confirm witch printer driver(s) you can use by following the procedure below. 1. Press [Counter Check] on the touch panel. 2. In the Check Counter screen, press [Chk. Device Config.]. 3. Confirm the printer driver name displayed under [Option].

Installing the Printer Driver 13-5
13
Be
fore
Pri
nti
ng
fro
m C
om
pu
ters
Installation
For details about the installation procedure, refer to the "Printer Driver Installation Guide" if you are using Windows, or the “Mac
UFR II Printer Driver Installation Guide” or “Mac PS Printer Driver Installation Guide” if you are using a Mac OS.
■ CD-ROM Menu (Windows): From the menu screen of the User Software CD-ROM, you can install the printer driver or display the “Printer Driver Installation
Guide.”
Click this button to install the printer driver.
Click this button first.
Click this button to view
the Printer Driver Installation Guide.
You cannot view the Printer Driver Installation Guide after installation has started. If you want to view the Printer Driver Installation Guide, do so before you start the installation.

Installing the Printer Driver13-6
13
Be
fore
Pri
nti
ng
fro
m C
om
pu
ters
■ Starting Installation (Mac): Insert the CD-ROM into your Mac CD-ROM drive and double-click the CD icon that appears on your desktop. You can find the installer and Printer Driver Installation Guide in the folder(s) with the printer driver name(s).
Double-click the installation icon in the installer set folder to start the installation.
■ Displaying the Printer Driver Installation Guide (Mac):
Double-click the PDF icon in the installation set folder to display the Printer Driver Installation Guide.

Setting the Printer Options 13-7
13
Be
fore
Pri
nti
ng
fro
m C
om
pu
ters
Setting the Printer Options
To correctly use the functions of this product, you must specify the printer driver settings for options (paper drawers, finisher, etc.) attached to the machine.
For Windows
Normally, printer options are automatically set when the printer driver is installed. You can confirm the settings on the [Device
Settings] page for the printer driver.
The [Device Settings] sheet is displayed by right-clicking the printer you are using in the [Printers] folder and selecting
[Properties].
See the Printer Driver Installation Guide or the online help for details.
If no settings were specified during installation, click [Get Device Status] to obtain information about options for the machine. If
you cannot obtain the device information, manually specify the settings for options attached to the machine.
If you are using a shared printer, you need to install Canon Driver Information Assist Service in the print server computer in order
to use the [Get Device Status] function. For details about how to install the Canon Driver Information Assist Service, see the Printer
Driver Installation Guide.

Setting the Printer Options13-8
13
Be
fore
Pri
nti
ng
fro
m C
om
pu
ters
For Mac
Display the [Printer Information] dialog box of the printer driver to obtain the device status.
The [Printer Information] dialog box is displayed by clicking [Printer Info] in any of the preferences panes of the printer driver.
See the Mac Printer Driver Installation Guide or the help for details.
Depending on the type and version of the printer driver and the printer connection method, you may have to set the printer options manually. For details, see the Mac Printer Driver Installation Guide.

Other Software Programs 13-9
13
Be
fore
Pri
nti
ng
fro
m C
om
pu
ters
Other Software Programs
The following software programs are included on the User Software CD-ROM. Available software programs vary depending on the system configuration and CD-ROM.
■ Canon Font Manager (Windows) Use this software to manage fonts and view them accurately in Windows. Double-click [Canonfm] → the [Setup.exe] icon to install the software. For more information, see the Readme.txt file located in \Canonfm\program files\Canon\Font Manager\English.
Only the PCL User Software CD-ROM includes this software.
■ PPD file Use the PPD (PostScript Printer Description) file to print from QuarkXPress and PageMaker with the PS Printer Driver.
For information on installing the PPD file, see the following documents.
Windows: Printer Driver Installation GuideMac OS 9: Readme.pdf located in \PS_PPD\us_eng\MacOS9Mac OS X: PPD_GUIDE.pdf located in \PS_PPD\us_eng\MacOSX
Only the PS User Software CD-ROM includes this software.

Other Software Programs13-10
13
Be
fore
Pri
nti
ng
fro
m C
om
pu
ters

14-1
CHAPTER
14 Before Using the Remote Scan Function
In order to use this product as a network scanner, you must install the scanner driver.
Installing the Scanner Driver. . . . . . . . . . . . . . . . . . . . . . . . . . . . . . . . . . . . . . . . . . . . . . . . . . . . . . . . . . . . . . . . . . . . . . . . . . . . . . . . 14-2System Requirements . . . . . . . . . . . . . . . . . . . . . . . . . . . . . . . . . . . . . . . . . . . . . . . . . . . . . . . . . . . . . . . . . . . . . . . . . . . . . . . . . . . . . . . . . . . . . . . . . 14-3Installation. . . . . . . . . . . . . . . . . . . . . . . . . . . . . . . . . . . . . . . . . . . . . . . . . . . . . . . . . . . . . . . . . . . . . . . . . . . . . . . . . . . . . . . . . . . . . . . . . . . . . . . . . . . . 14-4
Settings Required Prior to Remote Scanning . . . . . . . . . . . . . . . . . . . . . . . . . . . . . . . . . . . . . . . . . . . . . . . . . . . . . . . . . . . . . . . . 14-5

Installing the Scanner Driver14-2
14
Be
fore
Usi
ng
th
e R
em
ote
Sca
n F
un
ctio
n
Installing the Scanner Driver
To scan and enable the computer to receive data from the scanner, you need to install a scanner driver (Color Network ScanGear) on the computer. Also, you need to select a scanner with the ScanGear Tool.
The scanner driver is installed from the same User Software CD-ROM as the printer driver.
■ Color Network ScanGear These are scanner drivers that are called from TWAIN-compatible applications. Originals are scanned using these drivers.
Examples of applications that support TWAIN include the following.• Adobe Photoshop• Adobe Acrobat• Microsoft Word/Excel/PowerPoint etc. in Office 2000 or later

Installing the Scanner Driver 14-3
14
Be
fore
Usi
ng
th
e R
em
ote
Sca
n F
un
ctio
n
System Requirements
The following system environments are necessary in order to use the scanner driver.
■ Software:
• Operating Systems:
- Windows 2000
- Windows XP
- Windows Server 2003
- Windows Vista
- Windows Server 2008
- Windows 7
• Applications:
- TWAIN-compatible applications (Adobe Photoshop, Adobe Acrobat, Microsoft Word/Excel/PowerPoint etc. in Office 2000 or later)
■ Hardware:
• Computer
- Any computer that can run the supported systems
• Hard disk space
- Any hard disk with the capacity required to operate the compatible operating systems
• Main memory
- Any memory with the capacity required to operate the compatible operating systems
• A display with a resolution of at least 640 x 480 (800 x 600 or more recommended) and capable of displaying at least 256 colors.
• A network host adapter capable TCP/IP and UDP/IP communication on an Ethernet network.
When scanning large numbers of images or images containing large amounts of image data, an insufficient memory error or notable loss of scanning speed may occur. If this happens, the following procedures should prove useful.
- Increase the amount of hard disk space by deleting or otherwise appropriately processing unnecessary files on the hard disk etc. to ensure sufficient hard disk space.
- Rescan with reduced resolution.
- Increase the amount of RAM.
- Increase the amount of virtual memory to the highest possible.
- Divide originals into several sets and then scan them separately.

Installing the Scanner Driver14-4
14
Be
fore
Usi
ng
th
e R
em
ote
Sca
n F
un
ctio
n
Installation
For details about the installation procedure, refer to the "Network ScanGear Installation Guide".
From the menu screen of the CD-ROM, you can begin installing the scanner driver, or display the Network ScanGear Installation
Guide.
Click this button to install the scanner driver.
Click this button first.
Click this button to view
the Network ScanGear Installation Guide.
You cannot view the Network ScanGear Installation Guide after installation has started. If you want to view the Network ScanGear Installation Guide, do so before you start the installation.

Settings Required Prior to Remote Scanning 14-5
14
Be
fore
Usi
ng
th
e R
em
ote
Sca
n F
un
ctio
n
Settings Required Prior to Remote Scanning
Once you have installed the scanner driver, the following settings are required in order to perform remote scanning.
For details about this procedure, see the Network ScanGear Installation Guide.
■ Switching the Scanner Online and Offline In order to start the scanner driver and scan, the scanner must be set to [Online] beforehand at the device.
When the scanner is online, communication with devices connected over a network is possible and the scanner can receive data from computers.
■ Selecting the Network Scanner You Want to Use In order to scan using Color Network ScanGear, select the device on the network that you want to use as a scanner using the ScanGear Tool. Because a scanner is not selected immediately after installation, this operation must be performed before use.
The ScanGear Tool is software that is installed together with Color Network ScanGear.

Settings Required Prior to Remote Scanning14-6
14
Be
fore
Usi
ng
th
e R
em
ote
Sca
n F
un
ctio
n

15-1
CHAPTER
15 Appendix
This chapter provides additional useful information and index.
Reports . . . . . . . . . . . . . . . . . . . . . . . . . . . . . . . . . . . . . . . . . . . . . . . . . . . . . . . . . . . . . . . . . . . . . . . . . . . . . . . . . . . . . . . . . . . . . . . . . . . . 15-2Counter Report . . . . . . . . . . . . . . . . . . . . . . . . . . . . . . . . . . . . . . . . . . . . . . . . . . . . . . . . . . . . . . . . . . . . . . . . . . . . . . . . . . . . . . . . . . . . . . . . . . . . . . . 15-2Print Log List . . . . . . . . . . . . . . . . . . . . . . . . . . . . . . . . . . . . . . . . . . . . . . . . . . . . . . . . . . . . . . . . . . . . . . . . . . . . . . . . . . . . . . . . . . . . . . . . . . . . . . . . . . 15-3Device Information Delivery Destination List . . . . . . . . . . . . . . . . . . . . . . . . . . . . . . . . . . . . . . . . . . . . . . . . . . . . . . . . . . . . . . . . . . . . . . . . . . . 15-4Device Information Communication Log Report. . . . . . . . . . . . . . . . . . . . . . . . . . . . . . . . . . . . . . . . . . . . . . . . . . . . . . . . . . . . . . . . . . . . . . . . 15-5Send Job List. . . . . . . . . . . . . . . . . . . . . . . . . . . . . . . . . . . . . . . . . . . . . . . . . . . . . . . . . . . . . . . . . . . . . . . . . . . . . . . . . . . . . . . . . . . . . . . . . . . . . . . . . . 15-6Send TX Report/Send Error TX Report . . . . . . . . . . . . . . . . . . . . . . . . . . . . . . . . . . . . . . . . . . . . . . . . . . . . . . . . . . . . . . . . . . . . . . . . . . . . . . . . . . 15-7Activity Report . . . . . . . . . . . . . . . . . . . . . . . . . . . . . . . . . . . . . . . . . . . . . . . . . . . . . . . . . . . . . . . . . . . . . . . . . . . . . . . . . . . . . . . . . . . . . . . . . . . . . . . . 15-8Forwarding Conditions List . . . . . . . . . . . . . . . . . . . . . . . . . . . . . . . . . . . . . . . . . . . . . . . . . . . . . . . . . . . . . . . . . . . . . . . . . . . . . . . . . . . . . . . . . . . . 15-9Registered LDAP Server List . . . . . . . . . . . . . . . . . . . . . . . . . . . . . . . . . . . . . . . . . . . . . . . . . . . . . . . . . . . . . . . . . . . . . . . . . . . . . . . . . . . . . . . . . . . 15-9Address Book List . . . . . . . . . . . . . . . . . . . . . . . . . . . . . . . . . . . . . . . . . . . . . . . . . . . . . . . . . . . . . . . . . . . . . . . . . . . . . . . . . . . . . . . . . . . . . . . . . . . . . 15-9Store Log Report . . . . . . . . . . . . . . . . . . . . . . . . . . . . . . . . . . . . . . . . . . . . . . . . . . . . . . . . . . . . . . . . . . . . . . . . . . . . . . . . . . . . . . . . . . . . . . . . . . . . . 15-10User’s Data List. . . . . . . . . . . . . . . . . . . . . . . . . . . . . . . . . . . . . . . . . . . . . . . . . . . . . . . . . . . . . . . . . . . . . . . . . . . . . . . . . . . . . . . . . . . . . . . . . . . . . . . 15-10System Information . . . . . . . . . . . . . . . . . . . . . . . . . . . . . . . . . . . . . . . . . . . . . . . . . . . . . . . . . . . . . . . . . . . . . . . . . . . . . . . . . . . . . . . . . . . . . . . . . . 15-11
Number of Enterable Characters and Capacity of Various Functions . . . . . . . . . . . . . . . . . . . . . . . . . . . . . . . . . . . . . . . . .15-13Number of Enterable Characters . . . . . . . . . . . . . . . . . . . . . . . . . . . . . . . . . . . . . . . . . . . . . . . . . . . . . . . . . . . . . . . . . . . . . . . . . . . . . . . . . . . . . . 15-13Capacity of Various Functions . . . . . . . . . . . . . . . . . . . . . . . . . . . . . . . . . . . . . . . . . . . . . . . . . . . . . . . . . . . . . . . . . . . . . . . . . . . . . . . . . . . . . . . . 15-15
Relationship between Original Orientation and Preprinted Paper Output Chart . . . . . . . . . . . . . . . . . . . . . . . . . . . . .15-17
Index . . . . . . . . . . . . . . . . . . . . . . . . . . . . . . . . . . . . . . . . . . . . . . . . . . . . . . . . . . . . . . . . . . . . . . . . . . . . . . . . . . . . . . . . . . . . . . . . . . . . .15-20

Reports15-2
15
Ap
pe
nd
ix
Reports
All of the following conditions must be set for the report to be printed.
• There is a paper drawer with [Other] in [Paper Drawer Auto Selection On/Off ] in [Paper Feed Settings] in [Common] in Function Settings (Settings/Registration) set to 'On'.
• In that paper drawer, paper with one of the following sizes is loaded.
- 11” x 17”
- LGL
- LTR
- LTRR
• That paper is one of the following types.
- Plain (17 to 24 lb bond (64 to 90 g/m2))
- Recycled (17 to 24 lb bond (64 to 90 g/m2))
- Thin (14 to 16 lb bond (52 to 63 g/m2))
- Color (17 to 24 lb bond (64 to 90 g/m2)) However, if [Consider Paper Type] for Copy is set to 'On' in [Paper Drawer Auto Selection On/Off ] in [Paper Feed Settings] in [Common] in [Function Settings] (Settings/Registration), paper is not fed from the paper drawer specified for color paper.
Counter Report
You can print the Copy, Print, and Send counter as a counter report. You can print a counter report from the counter confirmation
screen. (See e-Manual > Basic Operations.)
■ Total Counter Type Prints the total counter type that is displayed on the counter confirmation screen.
■ Count Prints the number for each total counter type.
■ Send Counter Type Prints the counter type that is displayed on the send counter confirmation screen.
■ Count Prints the number for each counter type.

Reports 15-3
15
Ap
pe
nd
ix
Print Log List
The print log list contains information about past print jobs. You can print the print log list from the Status Monitor/Cancel screen.
(See e-Manual > Status Monitor/Cancel)
■ DEPT. ID If a Department ID is set, it is listed at the top of the log. Print logs are printed for each Department ID.
■ JOB NO. Prints the four digit number which is automatically assigned to a print job that is accepted.
■ TIME Prints the date and time (in 24-hour notation) when a print job was completed.
■ JOB NAME Prints the name of the printed document, or the type of print job.
■ USER Prints the name of the user who sent the print job to the machine.
■ PGS. Prints the number of pages in each copy set and the number of sets made.
■ RESULT Prints "OK" or "NG."
"OK" is printed when the print job completes successfully.
"NG" (No Good) is printed if an error occurs during the print job. The error code or "STOP" is also printed next to "NG."

Reports15-4
15
Ap
pe
nd
ix
Device Information Delivery Destination List
The Device Information Delivery Destination List contains information about registered delivery destinations. You can print this
list from Register Destinations under Transmitting Settings in Device Information Delivery Settings in Management Settings (from
the Settings/Registration screen). (See e-Manual > Security.)
■ DESTINATION The IP addresses of the registered destination machines are printed.
■ DEST. RECEIVABLE DATA The data receivable at the registered destinations is printed.
■ AUTO DELIVERY "On" is printed if Auto Delivery Settings in Transmitting Settings in Device Information Delivery Settings in Management Settings (from the Settings/Registration screen) are set for the registered destination. "Off" is printed if Auto Delivery Settings are not set for the registered destination.
■ AUTO DELIVERY DATA The data that is delivered automatically is printed if Auto Delivery Settings in Transmitting Settings in Device Information Delivery Settings in Management Settings (from the Settings/Registration screen) are set for the destination.

Reports 15-5
15
Ap
pe
nd
ix
Device Information Communication Log Report
The Device Information Communication Log Report contains information about device information that has been delivered and
received. You can select to print the Device Information Communication Log Report manually or automatically.
You can also select to either print the Communication Log after the number of send and receive transmissions reaches 100, or
specify to print it at a specified time. The send and receive logs can also be printed separately. (See e-Manual > Security.)
■ START TIME Prints the date and time (in 24-hour notation) when device information communication started. (An asterisk (*) indicates that a report has already been printed.)
■ END TIME Prints the date and time (in 24-hour notation) when device information delivery/reception completed.
■ TYPE Displays whether the device information was delivered or received.
■ TO/FROM Prints the delivery destination if the device information was delivered.
Prints the delivery source if the device information was received.
■ DATA DETAILS Prints the device information that was delivered/received.
■ RESULT Prints "OK" if the communication was completed successfully, or "NG" (No Good) if there was a communication error.
If an error occurred during communication, the error code is also printed.

Reports15-6
15
Ap
pe
nd
ix
Send Job List
You can view the list of send jobs and their statuses. The Send Job List can be printed from the Status Monitor/Cancel screen. (See
e-Manual > Status Monitor/Cancel.)
A list of e-mail, I-fax, and file server transmissions is printed on the Send Job List.
■ SET TIME The date and time that the send job was specified is printed in 24-hour notation. If SSO-H is set as the login service, the user name used for login is printed below the set time. When the machine cannot specify the user (for example, when automatically forwarding), the user name is not printed.
■ ST. TIME (Start Time) The time (in 24-hour notation) at which the document started to be transmitted is printed. The start time is printed only for send jobs that have been set with the Delayed Send setting.
■ DESTINATION ADDRESS The address of the recipient is printed.
■ DESTINATION ID The name of the recipient is printed.
■ JOB NO. The four digit number, that is automatically assigned when the document is accepted for sending, is printed.
■ MODE The type and mode of transmission are printed.
Transmission type: Send (TX)
Mode of transmission: FTP, SMB, IPX, WebDAV, Mail Box (BOX), I-Fax (I-FAX), E-mail (MAIL).
■ PGS. The number of pages that were sent is printed.
If a field exceeds its display capacity, only those characters that fit in the display are printed.

Reports 15-7
15
Ap
pe
nd
ix
Send TX Report/Send Error TX Report
The Send TX Report is a printed report that informs you of whether a send job has been successfully delivered to its destination. A
Send TX Report can be set to print automatically after each job is sent, or only when there are transmission errors. (See e-Manual >
Settings/Registration.)
• A list of e-mail, I-fax, file server, and Mail Box transmissions is printed on the Send TX Report. Even if [Report with TX Image] is set to 'On', the contents of the sent document are not printed on the report if the document was sent using the Encrypted PDF mode.
• You can also print a Send TX Report with an image of the sent original attached to it. (See e-Manual > Settings/Registration.)
■ JOB NO. The four digit number, that is automatically assigned when the document is accepted for sending, is printed.
■ DEPT. ID If Department ID Management is set, the Department ID is printed.
■ ST. TIME (Start Time) The date and time (in 24-hour notation) at which the document started to transmit are printed.
■ PGS. The number of pages that were sent is printed.
■ SEND DOCUMENT NAME The name given to the document when the send settings were specified is printed.
■ TX/RX INCOMPLETE If the transmission has been interrupted, the name and address of the destination are printed.
■ TRANSACTION OK If the transmission completed successfully, the name and address of the destination are printed.
■ ERROR If a sending error occurs, the name and address of the destination are printed.
If a field exceeds its display capacity, only those characters that fit in the display are printed.

Reports15-8
15
Ap
pe
nd
ix
Activity Report
This report is a list which enables you to check the results of all sending and receiving transactions. An Activity Report can be
printed either automatically or manually.
An Activity Report is automatically printed when either the number of communication results reaches 100, or a specified time is
reached. The send and receive logs can also be printed separately.
An Activity Report can be printed manually at any time from the Status Monitor/Cancel screen. (See e-Manual > Status Monitor/
Cancel.)
• A list of e-mail, I-fax, file server, and Mail Box transmission logs is printed on the Activity Report.
• When the message <Check the printer. Call service representative.> is displayed to indicate that the Print function is unavailable, the machine automatically prints an Activity Report after it recovers from the problem. The latest 100 communication results are printed on the report.
■ DEPT. ID If Department ID Management is set, the Department ID is printed. Transmission logs are listed according to Department ID.
■ ST. TIME (Start Time) The date and time (in 24-hour notation) at which the document started to be transmitted or received are printed. An asterisk (*) indicates a job that has already been printed. If SSO-H is set as the login service, the user name used for login is printed below the start time. When the machine cannot specify the user (for example, when automatically forwarding), the user name is not printed.
■ DESTINATION ADDRESS The address of the recipient is printed.
If the send job is sent to a file server (FTP, SMB, IPX, or WebDAV), the path name is printed on the second line.
■ DESTINATION ID The name of the recipient is printed.
■ JOB NO. The four digit number, that is automatically assigned when the document is accepted for sending or receiving, is printed. Numbers between 0001 and 4999 are for sending, while numbers between 5001 and 9999 are for receiving.
■ MODE The type and mode of transmission are printed.
Transmission type: Send (TX), Receive (RX)
Mode of transmission: FTP, SMB, IPX, WebDAV, Mail Box (BOX), I-Fax (I-FAX), E-mail (MAIL).

Reports 15-9
15
Ap
pe
nd
ix
■ PGS. The number of pages that were sent or received is printed.
■ RESULT "OK," "NG," or "- -," and the transmission time are printed.
If the documents have been received successfully by the recipient, "OK" is printed.
If a sending error occurs, "NG" (No Good) is printed, and the error code is printed on the second line.
When sending is successful, but it is not confirmed whether the e-mail message or I-fax, or the file that you sent was actually delivered, "--" is printed.
If a field exceeds its display capacity, only those characters that fit in the display are printed.
Forwarding Conditions List
You can print the contents of the forwarding settings that have been specified. Manually print the Forwarding Conditions List
whenever necessary. (See e-Manual > Settings/Registration.)
Registered LDAP Server List
You can print the registered LDAP server settings. Manually print the Registered LDAP Server List whenever necessary. (See
e-Manual > Settings/Registration.)
Address Book List
You can print the contents of the Address Book (address lists 1 to 10 or One-Touch). Manually print the list of the selected Address
Book whenever necessary. (See e-Manual > Settings/Registration.)
A list of e-mail, I-fax, file server, and group destinations is printed on the Address Book List.
■ DESTINATION NAME The name of the specified destination is printed.
When printing the contents of a one-touch button, the number of the one-touch button is printed on the first line.
■ CLASS The specified destination's class (transmission mode) is printed.
■ DESTINATION ADDRESS • If the Class is "FTP," "SMB," "IPX," or "WebDAV" (file server):
The host name is printed on the first line, and the folder path on the second line.
• If the Class is "BOX":
The number of the Mail Box is printed.
• If the Class is "I-FAX" or "MAIL":
The I-fax address or e-mail address is printed.
• If the Class is "GROUP":
The destinations stored in the group address are printed on the second line and continue down in a list. If a file server is stored in the group address, no additional information is printed on the second line.

Reports15-10
15
Ap
pe
nd
ix
Store Log Report
You can print a log of store locations of the files. A Store Log Report can be printed manually at any time from the Status Monitor/
Cancel screen. (See e-Manual > Status Monitor/Cancel.)
■ Stored At Prints the date and time (in 24-hour notation) of when the storing of a file was completed. (An asterisk (*) indicates a job that has been printed on the Store Log Report before.)
■ Job No. Prints the four digit number which is automatically assigned when a file is stored.
■ User Prints the name of the user who stored the file.
■ Stored To The name and path for the store location of the file are printed.
■ Protocol The type of store location is printed.
There are three types of store location. The store location that meets the following condition is printed.
- Memory Media: If a file is stored in a removable media such as USB memory from "Scan and Store."
- Local: If a file is stored in the Advanced Box of this machine from "Scan and Store."
- Network: If a file is stored in the Advanced Box of another machine from "Scan and Store."
■ Result "OK" is printed when storing is completed successfully.
"NG" is printed if an error occurred during storing.
For NG (No Good), the error code or "STOP" is printed next to "NG."
If a field exceeds its display capacity, only those characters that fit in the display are printed.
User’s Data List
Prints the registration information for Settings/Registration. Manually print the User's Data List whenever necessary. (See
e-Manual > Settings/Registration.)
The following types of user data list are available.
- Send/Receive: Prints all of the registered information related to send and receive jobs in Settings/Registration. For instructions on printing the user data list, see e-Manual > Settings/Registration.
- Network: Prints all of the registered information related to network in Settings/Registration. For instructions on printing the user data list, see e-Manual > Network.

Reports 15-11
15
Ap
pe
nd
ix
System Information
■ MEAP Contents Prints the version of the MEAP contents.
■ MEAP Specifications Prints the version compatible with MEAP.
■ MEAP Function IDs Prints the ID compatible with MEAP.
■ Application Name Prints the name of the application.
■ Application ID/System Application Name Prints the system application's file name or the Application ID of a standard application.
■ Application Version Prints the application's version number.
■ Status Prints the status of the application.
■ Installed on Prints the date and time the application was installed.
■ Vendor Prints the name of the application vendor.
■ License Status Prints the license status.

Reports15-12
15
Ap
pe
nd
ix
■ License Expires After Prints the expiration date of the license.
■ License Upper Limit Prints the upper license limit for each counter.
■ Counter Value Prints the current value for each counter.
■ Free Register Prints the current value for each register.
■ Maximum Memory Usage Prints the maximum amount of memory that can be used by each application. The Maximum Memory Usage number is printed in kilobytes (KB).
■ Registered Service Prints the service registered on the MEAP framework from the application. The Registered Service is printed only if there is data that corresponds to it.
The printed items are subject to change, as we are constantly improving our products.

Number of Enterable Characters and Capacity of Various Functions 15-13
15
Ap
pe
nd
ix
Number of Enterable Characters and Capacity of Various Functions
Number of Enterable Characters
Settings/Registration
Function Settings
Common Print Settings Register Form Form Name 24 characters maximum
Register Characters for Page No./Watermark
Characters 32 characters maximum
Copy Set Numbering Option Settings
Characters 16 characters maximum
Forced Secure Watermark/Doc. Scan Lock
Characters 32 characters maximum
Printer Driver Watermark/Doc. Scan Lock
Characters 32 characters maximum
Copy Register/Edit Favorite Settings
Register Name 10 characters maximum
Send Common Settings
Register/Edit Favorite Settings
Register Name (10 characters maximum)x2
E-mail/I-Fax Settings
Register Unit Name 24 characters maximum
Default Subject 40 characters maximum
Receive/Forward Common Settings
Forwarding Settings Forwarding Condition Name 50 characters maximum
File Name 24 characters maximum
Set Fax/I-Fax Inbox Set/Register Confidential Fax Inboxes
Register Inbox Name
24 characters maximum
Store/Access Files Common Settings
Scan and Store Settings
Register/Edit Favorite Settings
Register Name 10 characters maximum
Settings of Access Stored File
Register/Edit Favorite Settings
Register Name 10 characters maximum
Mail Box Settings Set/Register Mail Boxes
Register Mail Box Name 24 characters maximum
Network Settings Network Place Settings
Register Name 32 characters maximum
Folder Path 128 characters maximum

Number of Enterable Characters and Capacity of Various Functions15-14
15
Ap
pe
nd
ix
Set Destination
Register LDAP Server Server Name 24 characters maximum
Server Address 48 characters maximum
Position to Start Search 128 characters maximum
Register Address List Name Name 16 characters maximum
Acquire Remote Address Book
Remote Address Book Server Address IP Address or Host Name 128 characters maximum
Address Book Settings E-mail Name 24 characters maximum
One-touch Button Name* 12 characters maximum
E-mail Address 128 characters maximum
I-Fax Name 24 characters maximum
One-touch Button Name* 12 characters maximum
I-Fax Address 128 characters maximum
Standard Field 1 40 characters maximum
Standard Field 2 16 characters maximum
File Name 24 characters maximum
One-touch Button Name* 12 characters maximum
Host Name 128 characters maximum
Folder Path 255 characters maximum
User FTP, IPX: 24 characters maximumSMB, WebDAV: 128characters maximum
Password SMB, FTP, IPX, WebDAV: 24characters maximum
Group Name 24 characters maximum
One-touch Button Name* 12 characters maximum

Number of Enterable Characters and Capacity of Various Functions 15-15
15
Ap
pe
nd
ix
Management Settings
User Management System Manager Information Settings System Manager 32 characters maximum
E-mail Address 64 characters maximum
Contact Information 32 characters maximum
Comment 32 characters maximum
Device Management Device Information Settings Device Name 32 characters maximum
Location Information 32 characters maximum
*One-touch button name can be entered only when you are setting the one-touch buttons.
Capacity of Various Functions
Settings/Registration
Preferences
Timer/Energy Settings Date/Time Settings Year, Month, day, hour
Function Settings
Receive/Forward Common Settings Set Fax/I-Fax Inbox Set/Register Confidential Fax Inboxes
Number of Inboxes 50
Memory RX Inbox PIN 7 digits maximum
Store/Access Files Mail Box Settings Set/Register Mail Boxes
Number of Mail Boxes 100
PIN 7 digits maximum
Set Destination
Address Book PIN 7 digits maximum
Address Book Capacity 1600 destinations
One-touch Button Capacity 200 destinations
Management Settings
User Management System Manager Information Settings System Manager ID 7 digits maximum
System PIN Settings 7 digits maximum
Department ID Management Dept. ID 7 digits maximum
PIN 7 digits maximum
Page Limits 0-999999

Number of Enterable Characters and Capacity of Various Functions15-16
15
Ap
pe
nd
ix
Copy
Copy
Favorite Settings Number of Keys 9
Reserving Copy Jobs Number of Jobs 20 jobs
Scan and Store
Scan and Store
Favorite Settings Number of Keys 9
Access Stored Files
Access Stored Files
Favorite Settings Number of Keys 9
Sending Documents Number of Documents 32 documents maximum
Number of Pages 999 pages maximum
Reserving Print Jobs Number of Jobs 32 jobs
Scan and Send
Scan and Send
Favorite Settings Number of Keys 18
Send Jobs Number of pages 999 pages maximum
Reserving Send Jobs E-mailI-FaxFileMail Box
120 jobs

Relationship between Original Orientation and Preprinted Paper Output Chart 15-17
15
Ap
pe
nd
ix
Relationship between Original Orientation and Preprinted Paper Output Chart
Please use this chart when printing on preprinted paper (i.e., paper with logos or letterheads).
If you want to copy on the back side of preprinted paper, place the side you want to copy on:
- face down when using a paper drawer
- face up when using the Paper Deck Unit-C1, POD Deck Lite-A1, or multi-purpose tray
● If You Want to Set Right Side Stapling:
Confidential
Confidential
Confidential
Confidential
ConfidentialConfidential
ConfidentialConfidential
Confidential
Confidential
Co
nfi
de
nti
al
ConfidentialConfidential
Confidential
Confidential
Confidential
Either On or Off Either On or Off
Either On or Off (Set to
'On' when paper
orientation in the
multi-purpose tray/
POD Deck Lite-A1
is vertical.)
Either On or OffAuto Orientation Setting
Corner: Top Right
Double: RightCorner: Top Right
Corner: Top Right
Double: Right
Corner: Top RightCorner: Top Right
Double: Right
Corner: Top Left
Double: Left
Corner: Top Right
Double: Right
Corner: Top Right
Double: Right
Platen glass
Original side:
Face down
Feeder
Original side:
Face up
Staple position
Staple position
Ori
gin
al
Pre
pri
nte
d P
ap
er
Corner: Top Right
Double: Right
Corner: Top Right
Double: TopCorner: Top Right Corner: Top Right
Double: Right
Settings
Output Example
StaplePosition
LTR 11" x 17", LGL, LTRR LTR
11" x 17", LGL, LTRR
Paper Deck Unit-C1
Preprinted side:
Face up
Co
nfi
de
nti
al
Co
nfi
de
nti
al
Confidential
ConfidentialConfidential
Multi-purpose tray,
POD Deck Lite-A1,
Preprinted side:
Face up
Paper Drawer 1
and 2
Preprinted side:
Face down
Paper Drawer 3
and 4
Preprinted side:
Face down

Relationship between Original Orientation and Preprinted Paper Output Chart15-18
15
Ap
pe
nd
ix
● If You Want to Set Left Side Stapling:
Confidential
Confidential
Confidential
ConfidentialConfidential
ConfidentialConfidential
Corner: Top Left
Double: Left
Corner: Top Left
Double: TopCorner: Top Left Corner: Top Left
Double: Left
Confidential
Confidential
Confidential
Co
nfi
de
nti
alConfidential
Confidential
Confidential
Confidential
Confidential
Either On or Off Either On or Off
Either On or Off (Set to
'On' when paper
orientation in the
multi-purpose tray/
POD Deck Lite-A1
is vertical.)
Either On or OffAuto Orientation Setting
Corner: Top Left
Double: LeftCorner: Top LeftCorner: Top Right
Double: Right
Corner: Top LeftCorner: Top Left
Double: Left
Corner: Top Right
Double: Right
Corner: Top Left
Double: Left
Corner: Top Left
Double: Left
Platen glass
Original side:
Face down
Feeder
Original side:
Face up
Staple position
Staple position
Ori
gin
al
Pre
pri
nte
d P
ap
er
Settings
Output Example
StaplePosition
LTR 11" x 17", LGL, LTRR LTR
11" x 17", LGL, LTRR
Paper Deck Unit-C1
Preprinted side:
Face up
Co
nfi
de
nti
al
Co
nfi
de
nti
alConfidential
Confidential
Confidential
Multi-purpose tray,
POD Deck Lite-A1
Preprinted side:
Face up
Paper Drawer 1
and 2
Preprinted side:
Face down
Paper Drawer 3
and 4
Preprinted side:
Face down

Relationship between Original Orientation and Preprinted Paper Output Chart 15-19
15
Ap
pe
nd
ix
● If You Do Not Want to Set the Staple Mode:
ConfidentialConfidential
Confidential
Confidential
Confidential
Confidential
Confidential
Co
nfi
de
nti
al
Confidential
Confidential
Confidential
Confidential
Confidential
Either On or Off
Either On or Off (Set to
'On' when paper
orientation in the
multi-purpose tray/
POD Deck Lite-A1
is vertical.)
Either On or OffAuto Orientation Setting
Platen glass
Original side:
Face down
Feeder
Original side:
Face up
Ori
gin
al
Pre
pri
nte
d P
ap
er
Settings
Output Example
LTR 11" x 17", LGL, LTRR LTR 11" x 17", LGL, LTRR
Paper Deck Unit-C1
Preprinted side:
Face up
Co
nfi
de
nti
al
Co
nfi
de
nti
al
Confidential
ConfidentialConfidential
Multi-purpose tray,
POD Deck Lite-A1
Preprinted side:
Face up
Paper Drawer 1
and 2
Preprinted side:
Face down
Paper Drawer 3
and 4
Preprinted side:
Face down
Either On or Off (Set to
'On' when paper
orientation in the
multi-purpose tray/
POD Deck Lite-A1
is horizontal.)
Confidential

Index15-20
15
Ap
pe
nd
ix
Index
Numbers10Base-T, 3-3
100Base-TX, 3-3
AAccessing machine from web, 8-7
Activity Report, 15-8
Address Book List, 15-9
AppleTalk, 2-11, 7-2, 7-3
AppleTalk network, 2-5, 7-2
AppleTalk network setup procedures, 7-2
AppleTalk settings, 7-3
Auto Detect, 3-7, 5-3
BBefore using the Remote UI
Enable the Remote UI, 8-3Specify the network settings, 8-3
Bindery Remote Printer Mode (RPrinter), 5-3
BOOTP, 4-4
BreakerAbout the breaker, 1-12Periodic inspection, xxxiiPeriodic inspection check sheet, xxxv
Brightness Adjustment Dial, 1-13
CChecking your network, 2-10
Macintosh network, 2-11UNIX network, 2-11Using network with various types of computers, 2-12Windows network, 2-10
Clear key, 1-13
Communication environment setup, 3-8
Community Name, 3-9
Connecting the machine to computer or networkConnecting to network, 3-3Connecting to USB interface, 3-4
Connecting to an SMB/CIFS Network and Configuring a Shared FolderSamba (UNIX/Linux/Mac OS X), 6-12Windows 2000/XP/Vista/7/Server2003/Server 2008, 6-7
ConsumablesSafety instructions, xxxi
Context, 5-5
Context name, 5-5
Control panel, 3-6, 3-8, 4-3, 4-9, 5-3, 6-3, 7-3About the control panel, 1-10Control panel power switch, 1-13Parts and their functions, 1-13Power, 1-14, 1-16
Control panel power switch, 1-13, 1-14, 1-16
Copy function, 1-18
Copying, definition, xvii
Copy log list, 15-2
Copyright, xx
Counter Check key, 1-13
Counter Report, 15-2
DDevice Information Communication Log Report, 15-5
Device Information Delivery Destination List, 15-4
DHCP, 4-4
Displays used in this manual, xii
DNS Dynamic Update, 4-5
DNS Settings, 4-5
Domain Name, 4-6
EEdit Pen, 1-13
E-Mail/I-Fax Settings (TCP/IP), 4-25
Enabling the Remote UI, 8-3, 8-4
Energy Saver key, 1-13
Error Indicator, 1-13
Ethernet Driver Settings, 3-7
Ethernet Type, 3-710Base-T, 3-3100Base-TX, 3-3
EtherTalk, 2-5, 2-11
FFixing Transport Unit, 1-12
Forwarding Conditions List, 15-9
Frame Type, 5-3
Front Cover, 1-12
FTP, 2-6
FTP Print Settings, 4-17
FTP server settings, 4-29Mac OS X, 4-34UNIX/Linux, 4-33
GGateway Address, 4-4
HHandling precautions, 1-6
Host Name, 4-6

Index 15-21
15
Ap
pe
nd
ix
IID (Log In/Out) key, 1-13
InstallationLocation and handling, 1-2Power supply, 1-5Precautions, 1-2Safety instructions, xxiii
Interface settings, 3-6
IP Address Settings, 4-4
IPP, 4-18
IPP Print Settings, 4-18
KKeys and Buttons Used in This Manual, xii
LLaser safety, xix
Legal noticesCopyright, xxDisclaimers, xxiiLaser safety, xixLegal limitations on the usage of your product and the use of images,
xxiiTrademarks, xiv
LocalTalk, 2-5
Log on, 4-29
LPD, 4-2, 4-15
LPD Banner Page, 4-15
LPD Print Settings, 4-15
MMacintosh network, 2-11
Main Menu key, 1-13
Main Power Indicator, 1-13
Main power switch, 1-10, 1-14, 1-17
Main Unit’s Lower Right Cover, 1-10
Main Unit’s Upper Right Cover, 1-10
MEAP Settings, 8-7
Moving machine, 1-6
Multi-Purpose Tray, 1-10
NNDS (Novell Directory Service), 5-3
NDS Pserver, 5-3
NDS remote printer mode (NPrinter), 5-3
NetBEUI, 2-10, 6-2
NetWare, 2-4, 5-3
NetWare network setup procedures, 5-2
NetWare Settings, 5-3
NPrinter (NDS remote printer mode), 5-3
Numeric keys, 1-13
O
Operations required to use the machine, 1-21Confirm the following settings, 1-21
Optional equipment and system requirementsPrinting from a computer, 2-2Sending data, 2-6Using E-Mail/I-Fax, 2-5
PPaper Drawers 1 and 2, 1-10
Paper Drawers 3 and 4, 1-10
Parts and functions of the main unitControl panel, 1-13External view, 1-10Internal view, 1-12
PING Command, 4-23
Port Number, 4-20
Power supply, xxv, 1-5
Printer Cover, 1-11
Printing, definition, xvi
Printing from a computerInstallation, 13-5Optional Equipment Requirements, 2-2Printer Driver, 13-3Printer options, 13-7System requirements, 2-2, 13-2
Print log list, 15-3
Print server name, 5-3
Print Service, 5-3Bindery PServer, 5-3Bindery Remote Printer Mode (RPrinter), 5-3NDS PServer, 5-3NDS remote printer mode (NPrinter), 5-3
Processing/Data Indicator, 1-13
Protocol, 2-10, 2-12, 4-3, 5-3, 6-3, 7-3
Protocol settingsAppleTalk, 7-3Confirming TCP/IPv4 settings, 4-23Confirming TCP/IPv6 settings, 4-24E-Mail/I-Fax settings (TCP/IP), 4-25NetWare, 5-3SMB and WINS settings (SMB/CIFS), 6-3Startup time settings (TCP/IP), 4-27TCP/IP Settings (SMB/CIFS), 6-3TCP/IPv4 settings, 4-3TCP/IPv6 Settings, 4-9
Proxy Settings, 4-20
QQuick Menu key, 1-13
RRARP, 4-4
Raw, 4-16
RAW Print Settings, 4-16
Registered LDAP Server List, 15-9
Relationship between original orientation and preprinted paper output
chart, 15-17
Reports, 15-2
Reset key, 1-13
RPrinter, 5-3

Index15-22
15
Ap
pe
nd
ix
SSafety instructions
Consumables, xxxiHandling, xxviImportant safety instructions, xxiiiInstallation, xxiiiMaintenance and inspections, xxixOther warnings, xxxiPower supply, xxv
Samba, 6-12
Sample reports, 15-2Activity Report, 15-8Address Book List, 15-9Copy log list, 15-2Device Information Communication Log Report, 15-5Device information delivery destination list, 15-4Forwarding Conditions List, 15-9Print log list, 15-3Registered LDAP Server List, 15-9Send Job List, 15-6Send TX Report/Send Error TX Report, 15-7System Information, 15-11User’s Data List, 15-10
Scanning, definition, xvi
Send Function, 1-19
Sending data, 2-6Optional equipment requirements, 2-6System requirements, 2-6
Send Job List, 15-6
Send TX Report/Send Error TX Report, 15-7
Server Address, 4-20
Service Name, 7-3
Settings/Registration key, 1-13
Setting up computer as file serverSMB/CIFS network, 6-6TCP/IP network, 4-28
Setup proceduresAppleTalk network, 7-2NetWare network, 5-2Network environment, 3-2SMB/CIFS network, 6-2TCP/IP network, 4-2
SMB/CIFS, 2-4
SMB/CIFS network, 6-3
SMB/CIFS network setup procedures, 6-2
SMB Server Settings, 6-3
SMS (Service Management System), 8-6
SMTP, 4-25
SNMP Settings, 3-8
Spool, 3-12
Start key, 1-13
Status Monitor/Cancel key, 1-13
Stop key, 1-13
Subnet Mask, 4-4
Switching hub, 4-23, 4-27
Symbols used in this manual, xi
System Information, 15-11
System requirements, 8-5Macintosh, 8-2SMS, 8-5Windows, 8-2
TTCP/IP, 2-10, 2-11
TCP/IP network, 2-3, 4-2, 6-6
TCP/IPv4 settings, 4-3
TCP/IP SettingsBOOTP, 4-4DHCP, 4-4DNS Dynamic Update, 4-5DNS Settings, 4-5FTP Print Settings, 4-17Gateway Address, 4-4IPP Print Settings, 4-18LPD Banner Page, 4-15LPD Print Settings, 4-15PING Command, 4-23Port Number, 4-20Proxy Settings, 4-20RARP, 4-4RAW Print Settings, 4-16Server Address, 4-20Subnet Mask, 4-4Use HTTP, 4-19
TCP/IPv4 Settings, 4-3
TCP/IPv6 Settings, 4-9
Test Button, 1-12
Toner Replacement Cover, 1-12
Touch Panel Display, 1-13
Touch panel display transition, 3-5
Trademarks, xiv
UUNIX network, 2-11
Upright Control Panel, 1-10
USB Port, 1-13
Use HTTP, 4-19
User’s Data List, 15-10
Using E-Mail/I-Fax, 2-5Optional equipment requirements, 2-5System requirements, 2-5
Using network with various types of computers, 2-12
Using the remote scan functionInstallation, 14-4Settings required prior to remote scanning, 14-5System requirements, 14-3
VVolume Settings Key, 1-13
WWebDAV, 2-8
WebDAV server settings, 4-36
What this machine can do, 1-18
Windows network, 2-10
WINS settings, 6-3
WINS(Windows Internet Name Service), 6-3
ZZone, 7-3


USRM1-7968-01 © CANON INC. 2010
CANON INC.30-2, Shimomaruko 3-chome, Ohta-ku, Tokyo 146-8501, JapanCANON U.S.A., INC.One Canon Plaza, Lake Success, NY 11042, U.S.A.CANON CANADA INC.6390 Dixie Road Mississauga, Ontario L5T 1P7, CanadaCANON EUROPA N.V.Bovenkerkerweg 59-61 1185 XB Amstelveen, The Netherlands(See http://www.canon-europe.com/ for details on your regional dealer)CANON LATIN AMERICA, INC.703 Waterford Way Suite 400 Miami, Florida 33126 U.S.A.CANON AUSTRALIA PTY. LTD1 Thomas Holt Drive, North Ryde, Sydney, N.S.W. 2113, AustraliaCANON CHINA CO., LTD15F Jinbao Building No.89 Jinbao Street, Dongcheng District, Beijing 100005, ChinaCANON SINGAPORE PTE. LTD.1 HarbourFront Avenue #04-01 Keppel Bay Tower, Singapore 098632CANON HONGKONG CO., LTD19/F., The Metropolis Tower, 10 Metropolis Drive, Hunghom, Kowloon, Hong Kong