Ice Rink - Galleon Centre
46
1
-
Upload
khangminh22 -
Category
Documents
-
view
6 -
download
0
Transcript of Ice Rink - Galleon Centre

1

2
ICE RINK CONTENTS
PAGES
1. INTRODUCTION 4
2. SUMMER/WINTER SCHEDULE 5
3. COSTS 6
4. MINIMUM AGE 7
5. MAXIMUM NUMBERS 7
6. ENTRY 7
7. EXIT 7
8. ICE MASTERS ROLE AND HOURS OF WORK 7 - 9
9. TEA BREAKS 9
10. SPECIAL NEEDS 10
11. EQUIPMENT 10
12. CLEANING 10
13. MAINTENANCE 11
13.1 MAINTENANCE LOG 11
13.2 ZAMBONI MAINTENANCE 12
13.3 HAND EDGER, BATTERY ICE KING & ICE BOSS 12 & 13
13.4 ICE PIT HEATING SYSTEM 13
13.5 HAND CHIPPER 13
14. I) FIRE & EMERGENCY PROCEDURES 14 - 18
II) TERRORISTS & BOMB WARNING POLICY 18 - 20
III) POWER FAILURE PROCEDURES 20 - 24
15. FIRST AID PROTOCOL 24 - 28
16. CHANGES TO PROCEDURES 29
17. ICE HOCKEY SET UP 29
18. H & S SAFE WORK METHODS & RISK ASSESSMENT 30 – 48
19. APPENDIX 1 ZAMBONI BLADE CHANGE 37
20. APPENDIX 2 ZAMBONI OPERATION 38 – 42
21. APPENDIX 3 TROLLY JACK 43
22. APPENDIX 4 BRINE TANK 44
23. APPENDIX 5 TESTING BRINE 45
24. APPENDIX 6 STAFF PLANT DUTIES 45
24. APPENDIX 7 WHEELCHAIR PLATFORM 46

3
ICE RINK
UPDATES
1. ICE PIT HEATING SYSTEM 15.12.04
2. HAND CHIPPER 27.01.05
3. SUMMER/WINTER SCHEDULE, COSTS, MAXIMUM NUMBER 19.12.07
4. ICE MASTER ROLE, TEA BREAKS, CLEANIN, MAINTENANCE 19.12.07
5. ICE HOCKEY SET UP NOP 06.07.09
6. FULL UPDATE 26.10.10
7. UPDATED PAGES 10, 11 AND 35 09.11.10
8. COMBINED ICE RINK NOPS INTO ONE 27.08.13
9. FULL UPDATE 10.09.13

4
1. INTRODUCTION The Ice Rink N.O.P provides a detailed description of all tasks and duties to be performed in this area. It is important that you read and understand the content of this document particularly within the sections where Health and Safety is of paramount importance. Please refer to the manual as often as required as people will need reminding occasionally of the procedures that are in place.
5
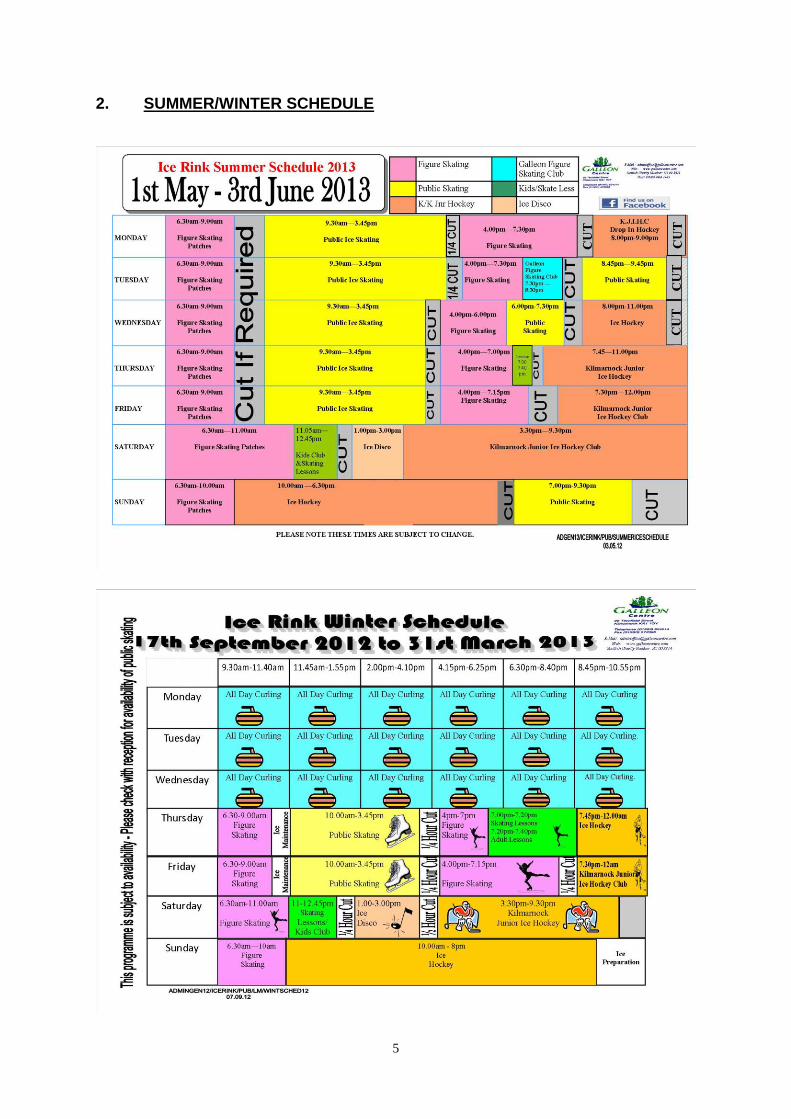
2. SUMMER/WINTER SCHEDULE

6
3. COSTS
The cost to use the Ice Hall facility at 1st April 2013 prices are as follows:
Skating Adult £3.55
Skating Junior/Senior £2.90
Skating Unemployed £2.90
Skating Patches AM £3.05
Skating Patches PM £4.00
Skating Patches 2 hours £5.80
Skating Lessons (6) £27.00
Skate Hire £1.50
Skate Sharpen £3.80
Ice Disco Adult £3.65
Ice Disco Junior £3.65
ADMISSIONS
Adult £1.45
Junior £1.15
Senior £1.15
Unemployed £1.15
CURLING
Curling VAT Inclusive £10.35
Curling VAT Exclusive £8.80
Day Curling VAT Inclusive £8.80
Day Curling VAT Exclusive £7.60
Junior Curling £4.35
Junior Curling Coaching £2.50
Adult Curling Coaching £3.60
Curling Practice £3.75
7
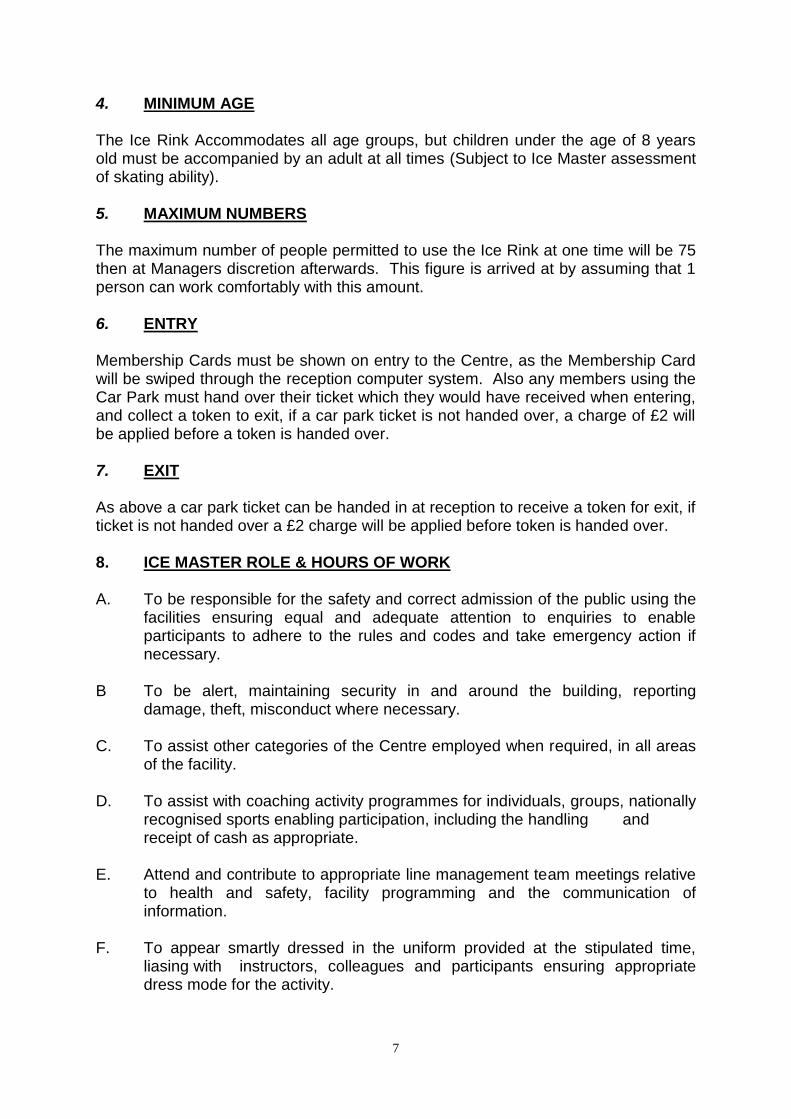
4. MINIMUM AGE The Ice Rink Accommodates all age groups, but children under the age of 8 years old must be accompanied by an adult at all times (Subject to Ice Master assessment of skating ability). 5. MAXIMUM NUMBERS The maximum number of people permitted to use the Ice Rink at one time will be 75 then at Managers discretion afterwards. This figure is arrived at by assuming that 1 person can work comfortably with this amount. 6. ENTRY Membership Cards must be shown on entry to the Centre, as the Membership Card will be swiped through the reception computer system. Also any members using the Car Park must hand over their ticket which they would have received when entering, and collect a token to exit, if a car park ticket is not handed over, a charge of £2 will be applied before a token is handed over. 7. EXIT As above a car park ticket can be handed in at reception to receive a token for exit, if ticket is not handed over a £2 charge will be applied before token is handed over. 8. ICE MASTER ROLE & HOURS OF WORK A. To be responsible for the safety and correct admission of the public using the facilities ensuring equal and adequate attention to enquiries to enable participants to adhere to the rules and codes and take emergency action if necessary. B To be alert, maintaining security in and around the building, reporting damage, theft, misconduct where necessary. C. To assist other categories of the Centre employed when required, in all areas of the facility. D. To assist with coaching activity programmes for individuals, groups, nationally recognised sports enabling participation, including the handling and receipt of cash as appropriate. E. Attend and contribute to appropriate line management team meetings relative to health and safety, facility programming and the communication of information. F. To appear smartly dressed in the uniform provided at the stipulated time, liasing with instructors, colleagues and participants ensuring appropriate dress mode for the activity.

8
G. Identify, issue and check equipment for wear and tear referring suggestions, problems and improvements to senior management whilst maintaining feedback with customers to encourage the identification of possible future problems regarding suitability and safety of equipment. H. To maintain in a clean and tidy condition all areas of the Centre internal and external, including the surrounding areas using the correct cleaning equipment and materials, having consideration of all hazards and spillages warning and conforming to Health and Safety at Work and COSHH requirements and notifying customers of potentially unsafe areas. I. To have full thorough knowledge and enforce where necessary the safety policy of the Galleon Centre including fire alarm, accidents, bomb and emergency evacuation procedures. J. To assist in developing customer care providing relevant and accurate information, in the approved organisational format in a courteous and polite manner, avoiding any discriminatory behaviour. K. To maintain all plant and equipment conforming to the Centre’s operational guidelines in association with manufacturers guidelines and safety standards adhering to approved procedures and instructions. L. Report and respond to signs of illness or injury, notifying qualified assistance, as quickly as possible and appropriate to the degree or level of injury/illness. M. To monitor levels of heating, lighting and ventilation in all areas of the facility ensuring customer comfort, taking corrective action to the individuals level of responsibility. N. Participate in a personal development programme with regard to training needs
identifying opportunities for self development. O. To fill in all paperwork i.e. cleaning rota, readings folder, zamboni maintenance sheet. All can be found in Ice Masters office. P. To empty de-humidifier bottles on a regular basis or when required.

9
8. ICE MASTER ROLE & HOURS OF WORK
9. TEA BREAKS Tea Breaks will be available when working more that 4 hours. Tea Breaks will be available to ice staff working 4 hours in any one shift. The tea breaks will be suitable to the Galleon Centre.
HOURS TIME OF BREAK
4 15 MINUTES
6 30 MINUTES
9+ 40 MINUTES
Under 4 NO BREAK
Ice staff will be paid for their breaks so must be on call to return to their place of work in the event of an emergency. The staff room on the ground floor is the recognised area for tea breaks. It should be noted that the staff room is a designated no smoking area. So anyone wishing to smoke should use the designated area at the front of the building.

10
10. SPECIAL NEEDS
Any individual who has special needs and requires assistance will be permitted to have a helper with them. The helper will receive free access to the centre unless also participating in curling or ice skating, which the helper must pay the appropriate charges.
11. EQUIPMENT
Zamboni Steven Hood (0194) 2681472
Ice King Olympia (01794) 342047
Ice Boss Kays of Scotland (01290) 550256
Battery Edger Olympia (01794)342047
De-Humidifiers (01563) 528721
Score Boards Ice Hockey Club
Skate Grinder Robertsons Sports (01592) 599929
Curling Brush Corston Sinclair (01355) 238161
Curling Stones Kay Bonspiel (01290) 550256
Sweeping Brush GMC Hygiene (01563) 539737
12. CLEANING
In an effort to attain the highest standards it will be necessary to follow the cleaning programme on a daily, weekly and monthly basis.
The cleaning programmes will be stored on the desk in the Ice Master office, and should be signed by the individual completing each task.
A. Brush - Use a brush appropriate to the surface.
B. Blue Scrubbing Machine - For rubber floor. Position warning signs. Fill up with hot water, cleaning solution. Use rough scrubbing head and move in straight line back and fourth until all area is clean. Empty machine after use if required ask a cleaner for assistance.
C Dust - Wipe over with a dry cloth to remove dust from all surfaces. Alternatively use feather duster or specified dusting brush.
D. Squeegee - Removal of liquid by hand operated squeegee (rubber) blade. Remove to drain. E. Mop - Position warning signs at spectator seating. Mop area with warm water and cleaning solution keep signs in position till area is dry.
F. Bins - Empty contents and dispose of to rubbish compound area. Wash lids and bins with germicidal detergent/disinfectant and where appropriate replace bin liner. G. Showers - Remove all dirt/stains from walls/floors using designate chemicals, wash down walls/floors. Clean/polish pipe work, remove all debris from drains. H. Chewing Gum Removal - Remove ALL chewing gum by spraying designated chemical onto affected area. Remove by scraping up ALL gum on surface affected.

11
13. MAINTENANCE
Zamboni (See Zamboni checklist in Ice
Office)
Steven Hood (0194) 2681472
Ice King & Boss (See checklist for Ice King &
Edger in Ice Office)
Kays of Scotland (01290) 550256
Battery Edger Olympia (01794) 342047
De-Humidifiers Polar Refrigeration (01292) 266123
Ice Plant Johnson Controls (01236)) 784120
Blade Sharpening Swemco (08450) 760960
13.1 MAINTENANCE
MAINTENANCE LOG
To assist in maintaining a permanent record of your maintenance program for your new Olympia, keep track of all maintenance performed in the following log.
Date Hours of Operation Maintenance Performed

12
13.2 MAINTENANCE
ZAMBONI MAINTENANCE
MONTH:-
GREASE POINTS DATE
COMPLETED CHECKS DATE
COMPLETED
Foot Pedal Engine Oil Level Checked
Lift Bar Assembly (6 Points) Blade Changed
Horizontal Auger Bearings (2 Points) Hydrolic Oil Checked
Vertical Auger Bearings (2 Points)
OTHER COMMENTS
Blade Adjust Joint
Snow Tank Cylinder (4 Points)
Snow Tank Hinge Pins (2 Points)
Snow Tank Lid Pivots (2 Points)
Board Brush Assembly (4 Points)
13.3 MAINTENANCE MAINTENANCE LOG
OLYMPIA HAND EDGER The following procedure should be carried out on a weekly basis:- 1. Check oil and top up if required.
2. Check that all blades are intact and secure. 3. Check machine for any damage and log.
4. Grease machine every month. In carrying out these tasks it will help in keeping machine in good working order and to also repair any damage to edger as quickly as possible.

13
13.3 MAINTENANCE MAINTENANCE LOG
BATTERY ICE KING & ICE BOSS
The following procedure should be carried out on a weekly basis:- 1. Check battery water level and top up if required. 2. Check blade has no significant damage. 3. Keep blade sharp by using honing stone. 4. Check machine for any damage and log. 5. Check hydrostat oil level. 13.4 ICE PIT HEATING SYSTEM The ice pit heating system consists of a network of stainless steel pipes in the ice pit itself. The pipes carry hot water, heated from the boilers, through the pit to increase the temperature of the water, which in turn melts the snow. The system is controlled by an on/off switch situated beside the ice plant. The set point temperature is controlled by a wind-up or down mechanism below the on/off switch—this has been set by Dalkia and must not be changed, unless instructed by a Manager.
The ice pit has a temperature probe inside it and once the water reaches the required set-point temperature the pump will stop the hot water circulating.
The system should be used as follows: · Turn on at the start of a back shift (3.30pm) · Turn off once snow has melted · Always turn off at end of night · Turn off if water level is low
13.5 HAND CHIPPER
· Store at rear of Ice Hall on appropriate hooks next to Zamboni. · Place blade on top of a piece of wood when not in use. · Wear safety gloves and goggles when using hand chipper.
· Wipe down blade and spray with WD-40 after use. Make sure gloves are worn during this.
· Take due care when handling and using hand chipper.

14
14. EMERGENCY ACTION PLAN The Emergency Action Plan (E.A.P) will consist of the following procedures: (i) Fire and Emergency Procedures (ii) Power Failure Procedures (iii) Injured / Unconscious Casualty Procedures 14 I) FIRE AND EMERGENCY PROCEDURES Introduction The Fire and Emergency Procedures for the Galleon Centre provide the management and staff with a general guide in the event of any emergency. The roles outlined within this document should be adhered to at all times although each member of staff should assess and deal with any incident occurring outwith the normal as and when required. In certain situations additional responsibilities may be given to a particular member of staff by the Duty Manager. The Fire and Emergency Procedures are designed to afford maximum cover where possible to ensure the safety of the public and staff in the facility. Safety is everyone’s responsibility and all employees are required to: (a) Obey the regulations laid down. (b) Become conversant with the equipment installed to deal with emergencies. (c) Acquaint themselves with all exits and where they lead to. (d) Be aware of dangerous materials and their storage. The latest technology does not eliminate completely the risks of fire. A careless act by anyone can lead to danger and all staff must incorporate the available technology into a broad framework of good safety practices. Each employee will have access to a copy of the Fire and Emergency Procedures and fire drills will be conducted on a regular basis to ensure that each member of staff is familiar with their role and responsibilities in the event of an emergency. Staff will also receive training on how to operate the fire and safety equipment available in the Centre. 14 I) FIRE AND EMERGENCY PROCEDURES These procedures have been established to help ensure the safety of both public and staff in the Centre. Every member of staff should: (a) Read and digest (b) Enquire (c) Question (d) Suggest

15
GENERAL PRECAUTIONS
Housekeeping 1 Ensure that premises are kept clean and tidy. In particular, all stairs,
passenger lifts, gangways and adjacent areas must be kept clean, dry and free from obstructions, especially fire exits.
2 All dangerous substances, e.g. broken glass, ice, etc must be cleared away
immediately (glass must be kept separate from other waste). 3 All spillages on floors must be mopped up and thoroughly dried (areas wet
from cleaning purposes must be identified). Staff Must Never: 1 Act in any way prejudicial to the interest of health and safety of (a)
themselves, (b) other persons with whom they come into contact at work. 2 Leave any articles, substances and equipment where they could be a safety
hazard. 3 Allow electric cables or other lines to trail unnecessarily across the floor in a
manner that could cause people to trip. 4 Leave open the doors or drawers or filing/store cabinets when not in use. 5 Operate or use machinery or equipment unless trained and authorised. 6 Carelessly discard cigarette ends or lighted matches.
GENERAL FIRE PROCEDURE
Although the Fire and Emergency Procedures provide a guide for all members of staff in the event of an emergency, it is everyone’s responsibility to prevent fire occurring by being careful with all sources of heat, e.g. electrical appliances, smoking heaters, etc. However, it is impossible to guarantee that there will be no risk of a fire and/or any other emergency occurring in the Centre. 14 I) FIRE AND EMERGENCY PROCEDURES Therefore:
On discovering a fire
(a) Raise the alarm by breaking the nearest fire alarm glass. (b) Warn people in the vicinity of the fire.

16
(c) Try to extinguish the fire by using the nearest fire fighting appliance. HOWEVER, DO NOT TAKE ANY UNNECESSARY PERSONAL RISK.
(d) Assist with the evacuation of the facility by completing the duties assigned to
you within the Fire and Emergency Procedures.
On hearing the alarm: (a) Go to your designated area and assist with the evacuation of the facility. (b) Escort members of the public to a safe position outside the building or to the
collection point, i.e. Galleon Centre allocated assembly points and remain with them.
(c) Selected members of staff (as outlined in this document) should report to the
Duty Manager. (d) The Duty Manager will liase with the Fire and Emergency authorities. (e) The Duty Manager will inform staff when to allow the public to re-enter the
facility. Staff Must Never: (a) Abuse the Centres equipment or property (b) Interfere with or misuse anything provided in the interest of health, safety and
welfare. (c) Act unsafely or recklessly within the precincts of the Centres premises, or at
any workplace.
14 I) FIRE AND EMERGENCY PROCEDURES
FIRE AND EMERGENCY CONTROL TEAM
Due to the size of the Galleon Centre and the scale of the operation within, a Fire and Emergency Control Team will be used to co-ordinate and supervise the evacuation of the facility and to assist the emergency services as and when necessary. It will be staffed by the Duty Manager, Senior Centre Attendants and Centre Attendants and it is their responsibility to become familiar with ALL aspects of the Fire and Emergency Procedures for the Centre. The Fire and Emergency Control Team is as follows:
Duty Manager (Incident Controller)
Senior Centre Attendants (Assistant Control)

17
Centre Attendants Centre Attendants (Poolside) (Dryside)
Area 1 - Ground Floor Area 2 Level One
Poolside Fitness/Conditioning Suite Bowling Hall Function Suite
Sauna/Solarium Suite Sports Hall Bonspiel Bar and Toilets
Squash Courts Excells Changing and Toilets Crèche Activities Hall
Ice Rink Squash Spectating Sports Medicine Clinic
Dry/Wet Changing/Toilets Cordwainer Bar
Plant Room
All other staff will assist the Fire and Emergency Control Team by completing their designated tasks as outlined in this document. All Management staff on duty at the time of a fire or emergency should report to the Duty Manager. The three (3) main evacuation points are:- No1 GALLEON CENTRE CAR PARK No2 BACK OF THE GALLEON CENTRE AT THE COMPOUND No3 DOUGLAS STREET NEXT TO CAR PARK On the event of an evacuation, staff should escort customers to the nearest fire exit, then to the relevant evacuation meeting point.
14 I) FIRE AND EMERGENCY PROCEDURES Ice Rink On hearing the fire alarm the, Ice Master, Ice Rink Attendant and/or Ice Stewards should adopt the following procedures. 1 Assist the Centre Attendant in the evacuation of the ice rink and ice toilets.
Members of the public must be escorted from the building immediately and under no circumstances must skates be exchanged for shoes at skate hire.
2 You should ensure that all locations in your area are fully checked. 3 Escort members of the public to a safe position outside the building and
remain with them at the designated Fire Assembly point until obtaining further instruction from the Duty Manager and/or Senior Centre Attendant.

18
Action in the event of other emergencies: Should any other emergency arise, i.e. if in the event of a bomb scare the procedure for evacuation is as for fire, although the following must be considered. (a) When a call is received claiming a device has been placed in the building, you
must contact Duty Manager who will contact the police and enlist their help. (b) Instruct the receptionist to make the prepared announcement (ref:
Receptionist). (c) Liaise with the Senior Centre Attendant and evacuate the building. (d) Initiate a search of the building with the Emergency Services. (e) After receiving and assessing all information available to him/her the Duty
Manager will make the decision that the building is safe and inform the public. The decision to evacuate must remain with the Duty Manager at the time the call is received. Until further notice the policy from the Manager is to evacuate on all calls.
14 II) TERRORISTS THREATS AND BOMB WARNING POLICY Introduction
The Kilmarnock Leisure Centre Trust recognise their responsibility to their staff on a regular basis and take into account the possibility of a Terrorist Attack on the Galleon Centre.
The Emergency Evacuation Plan as detailed in the Health and Safety Manual (Fire Safety) is the model to be used. Staff in the Galleon Centre can all assist reduce the rink of a terrorist leaving a concealed package in the Galleon Centre by keeping all areas uncluttered, clean and tidy. This particularly in public and communal areas. Entrances, stairs, toilets and changing rooms should be checked on a regular basis. External areas should also be kept clean and tidy. Emergency Planning In terms of a terrorist attack, we will look at our response to a worst case scenario and how we might function during the aftermath of an attack. This will cover evacuation routes and means of communicating with staff and the emergency services. The Emergency Evacuation Plan is the model to be used. In planning for a terrorist attack we will – Ensure that staff understand the plan and have access to it in an emergency

19
Identify all staff, including reception, and administration staff who might receive a bomb threat and ensure that they are trained in all handling procedures (see 1 – what to do if you receive a bomb warning). Ensure that all staff are aware of their roles and that communication is paramount. Rehearse the Emergency Evacuation Plan/Bomb Threat procedures. Use the Fire Safety Assembly Areas as outlined taking into consideration the proximity of the threat. Staff and the public must be evacuated away from the threat. Bomb Warning
Staff must stay calm, listen and try to obtain as much information as possible.
Ask the caller to be precise about the location and timing of the alleged bomb threat and try to establish the organisation that they represent. Keep the caller talking.
Ensure that any recording facility is switched on. If there is no facility, make
notes for the police or Duty Manager.
When the caller rings off, try and obtain the number either from the phones automatic number display of by dialling 1471.
Immediately inform the designated manager who will automatically inform the
police.
Do not leave your post until contacted by the manager of the police or ordered to evacuate.
14 II) TERRORISTS THREATS AND BOMB WARNING POLICY
Identifying a Letter Bomb
Obvious warning signs that a package is suspect may include the presence of protruding wires, a pen sized hole in the package and/or strange smells (particularly of almonds or marzipan). Other warning signs include whether or not the package:-
· Is unexpected or of unusual origin · Has a verifiable return address · Has an address that is inaccurate, printed in an uneven or unusual style (for
example be Letterset) or is written in an unfamiliar foreign style · Has unusual postmarks or an excessive value of stamps · Is in a padded bag · Is unusually heavy for its size (most effective letter bombs weigh 50-100g
and are at least 5mm thick). · Is marked ‘personal’ or ‘confidential’ · Is oddly shaped or lopsided · Has flaps that are stuck down completely (a standard letter will normally
have an ungummed gap of a few millimetres at the corners) · Feels like a book or · Has an inner envelope, particularly one that is tightly taped or tied

20
Eyes and Ears Whatever the physical precautionary emergency plans, they will be ineffective without trained and alert employees. As employers we must:-
· Involve, inform and explain to the staff why they are taking action
· Train staff in awareness, emergency and evacuation procedures and rehearse them regularly
· Regularly update staff on what they should be looking for
· Encourage staff to report anything they regard as suspicious, without fear of
sanction if the alarm proves false. All of the above are appropriate to the Galleon Centre but we must forever be alert and implement measures that are practicable, consistent with our assessment of this threat to our staff, operations and customers.
14 III) POWER FAILURE PROCEDURES
Introduction These instructions provide the Management and staff of the Galleon Centre with guidelines to follow in the event of loss of electrical power to or within the Centre. If the power failure coincides with an outbreak of fire, the fire and emergency procedures would come into force and take precedence over these instructions. Every employee will have access to a copy of these instructions. The designated roles within this document must be adhered to at all times. It follows that all employees must be so familiar with their given roles that they carry them out without hesitation when called upon to do so. These procedures have been laid down to help ensure the safety of the public and staff in the Centre and also to prevent damage to electrical circuits and equipment.
General Information 1. In the event of a power failure it must be quickly established if this is a total power
and lighting failure or partial loss. 2. If it is a partial loss e.g. 1st floor lighting only this would indicate the problem is a
failure of a main circuit break of fuse within the building. 3. If it is found there is a total loss of power and lighting within the building we can
assume the cause is a loss of electricity supplying the building. 4. Scottish Power are responsible for the supply of electricity to the Centre. The
Galleon Centre is responsible for all the electrical equipment within the building after the metering equipment. This is the main incomer and not individual meters on the main board in the Games Hall Store.

21
5. A failure of power would result in all motors and pumps ceasing to operate until power was restored. It must be noted by all staff that most of the motors and pumps will re-start automatically with the restoration of power. Therefore stay clear of movable parts and machinery.
6. No work must be carried out on equipment or plant without first switching off the
isolator for the relevant equipment or plant. 7. The lift would stop running in the event of power failure. Possibly with
members of the public trapped inside. 8. A total power failure would result in all swimming pool plant, all air handling units,
all heating, lifts, refrigeration plant, boilers, bar pumps, freezers, coolers, all main lighting going off simultaneously.
14 III) POWER FAILURE PROCEDURES
9. The telephone system would not operate. There would however be one “power fail” outside line available. This is positioned at:- 1. “Mustard” phone - Administration (across from Duty Managers office door) 10. The tannoy system would not operate, therefore full use of the hand held
radio sets would have to be made. 11. The alarm systems would operate for 8 hours on battery power. 12. The emergency lighting would switch to battery power. This would activate
an alarm at reception and a light would indicate a “mains failure”. Once the red button was pressed, (“audio reset”) it would cancel the alarm. The mains failure light would stay illuminated until power was restored. (The position of the emergency lights can be found on the floor plan Appendix 1).
13. Immediately there is a loss of main lighting all members of the public will be
told to cease their activities and to prepare to evacuate the building. 14. As members of the public are dressing the Duty Manager will be assessing
the situation (i.e. to evacuate the building or not).
Partial Loss The partial loss of power within the building could be caused by:- 1. A short circuit within a distribution board, tripping the 100 amp circuit
breaker. This would result in the loss of power to all the power and lighting circuits supplied by this distribution board.
2. An Earth Leakage Circuit Breaker being “tripped” because of an earth fault e.g. the neutral and earth “shortening”. All the circuit protected by this E.L.C.B. would lose power.

22
3. A “short circuit” in the cable supplying a distribution board would “blow” the main fuses in the main in-comer distribution board. (in the games hall store) Only a qualified electrician would be called upon to correct/repair all of the above faults.
Total Power Loss The total loss of power to the Centre could be caused by:- 1. Workmen accidentally cutting through mains cable supplying the Centre. 2. A Safety device “tripping” within the power station supplying the Centre. 3. A fault on the local transformer which supplies the Centre with 240/415v power. 14 III) POWER FAILURE PROCEDURES
EMERGENCY LIGHTING
In the event of a mains power failure to the Centre the Emergency lighting would operate on battery power for 3 hours. On the restoration of mains power it would take 24 hours for the batteries to be fully charged. There is an emergency lighting alarm panel in reception. The alarm will sound if the following occurs. 1. Mains failure (total mains failure or blown fuse) 2. Charge Fail (charger faulty or blown fuse) 3. Low Voltage Alarm (output below correct operating voltage) 4. Low Electrolyte (batteries require topping up) This alarm can be cancelled by pressing the red audio re-set button on the bottom of the panel. This of course does not cure any fault. The light indication will remain illuminated until the fault has been attended to.
23
14 III) POWER FAILURE PROCEDURES
CONTROL TEAM
The power failure control team is as follows:-
DUTY MANAGER
SENIOR CENTRE ATTENDANT
CENTRE ATTENDANTS CENTRE ATTENDANTS POOLSIDE DRYSIDE AREA 1 GROUND FLOOR AREA 2 LEVEL ONE POOLSIDE FITNESS ROOM PLANT ROOM FUNCTION SUITE BOWLING HALL BONSPIEL BAR SAUNA EXCELLS CHANGING ROOMS SPORTS HALL/PLANT ROOM TOILETS (Bonspiel) SQUASH COURTS ACTIVITIES HALL CRECHE SQUASH SPECTATING ICE RINK LIFT SPORTS MEDICINE CLINIC KITCHEN DRY/WET CHANGE AND TOILETS CORDWAINER BAR LIFT All other staff will assist the control team by completing their designated tasks as outlined within this document. All Management staff on duty at the time of a power failure should report to the Duty Manager.
ICE HALL STAFF
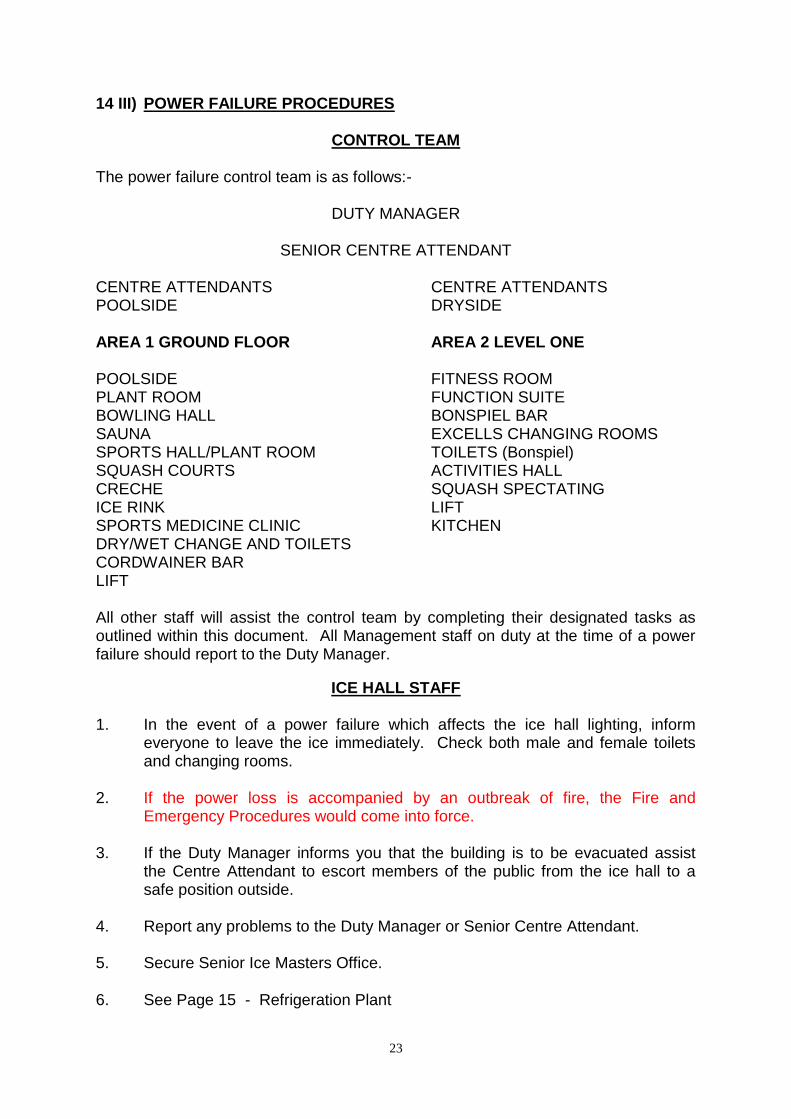
1. In the event of a power failure which affects the ice hall lighting, inform everyone to leave the ice immediately. Check both male and female toilets and changing rooms. 2. If the power loss is accompanied by an outbreak of fire, the Fire and Emergency Procedures would come into force. 3. If the Duty Manager informs you that the building is to be evacuated assist the Centre Attendant to escort members of the public from the ice hall to a safe position outside. 4. Report any problems to the Duty Manager or Senior Centre Attendant. 5. Secure Senior Ice Masters Office. 6. See Page 15 - Refrigeration Plant

24
14 III) POWER FAILURE PROCEDURES
POWER FAILURE REFRIGERATION PLANT
ICE MASTER/SENIOR CENTRE ATTENDANT
CHANGES REQUIRED
In the event of a power failure the ice plant compressors will stop running. Johnson Controls will be aware that there is a problem as they have a direct link thought the telstar unit. The Ice Master should phone Johnson Controls on 01236 784 120 (9am-5pm) or 0151 630 1800 (Out of Hours) and inform them of the situation. If the plant does not re-start when power is restored carry out the following:- 1. Cancel fault on main panel by pressing cancel button. 2. Cancel fault on Telstar panel by pressing 1099E. 3. The ice plant should now start. 4. If it does not there is a further re-set button inside the box on the left hand side of the main panel. The key for this box is in the key Safe in Senior Ice Masters Office. Open the box and press the red button on the printed circuit then repeat steps 1 and 2. 5. If the plant does not start, phone Johnson Controls again and get assistance urgently.
25
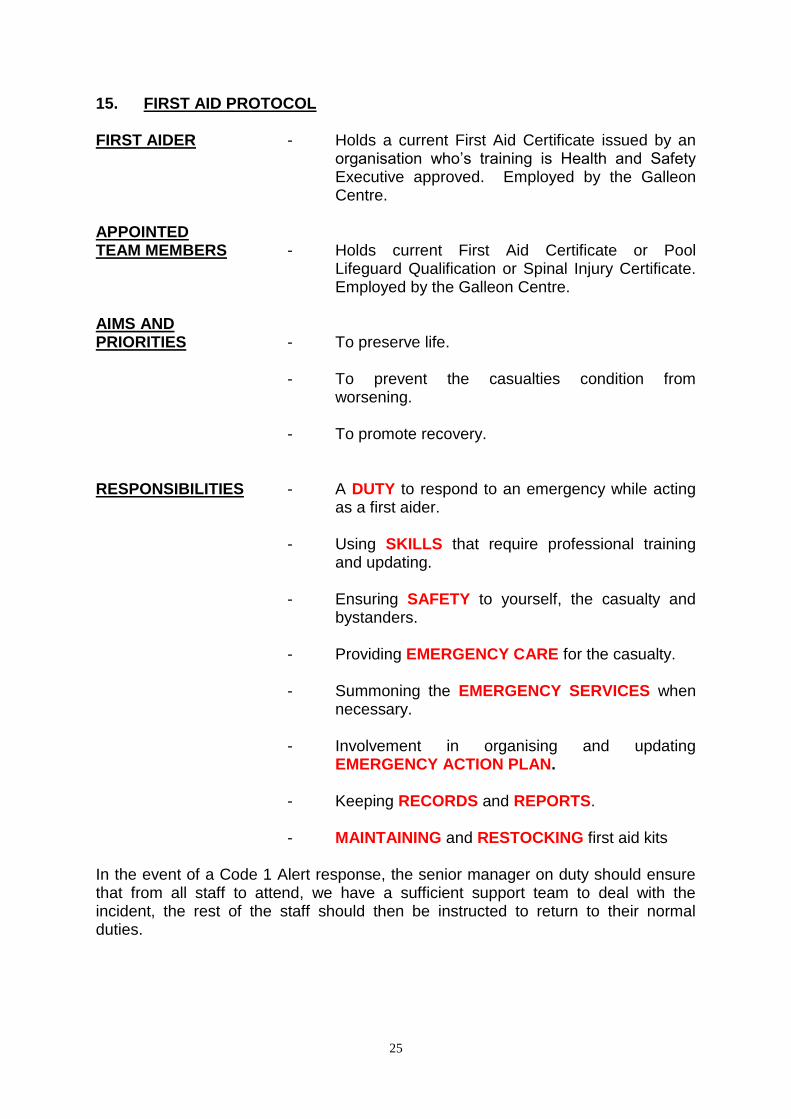
15. FIRST AID PROTOCOL
FIRST AIDER - Holds a current First Aid Certificate issued by an organisation who’s training is Health and Safety Executive approved. Employed by the Galleon Centre. APPOINTED TEAM MEMBERS - Holds current First Aid Certificate or Pool Lifeguard Qualification or Spinal Injury Certificate. Employed by the Galleon Centre. AIMS AND PRIORITIES - To preserve life. - To prevent the casualties condition from worsening. - To promote recovery. RESPONSIBILITIES - A DUTY to respond to an emergency while acting as a first aider. - Using SKILLS that require professional training and updating. - Ensuring SAFETY to yourself, the casualty and bystanders. - Providing EMERGENCY CARE for the casualty. - Summoning the EMERGENCY SERVICES when necessary. - Involvement in organising and updating EMERGENCY ACTION PLAN. - Keeping RECORDS and REPORTS. - MAINTAINING and RESTOCKING first aid kits In the event of a Code 1 Alert response, the senior manager on duty should ensure that from all staff to attend, we have a sufficient support team to deal with the incident, the rest of the staff should then be instructed to return to their normal duties.

26
15. FIRST AID PROTOCOL INCIDENT MANAGEMENT - AVAILABILITY, AWARENESS
- SAFETY
- SITE SURVEY
- EMERGENCY AID
- SEND FOR HELP
- SECONDARY SURVEY
- AMBULANCE
- HOSPITAL
- RETURN TO NORMAL
- RECORD
- REPORT
- RESTOCK
PROTECTION FROM INFECTION - Use Personal Protective Equipment
PRIORITIES OF TREATMENT - DANGER
- RESPONSE
- AIRWAY
- BREATHING
- CIRCULATION
- SPINAL INJURY
MANAGEMENT
- BLEEDING
- BONES
- MISCELLANEOUS
CONDITIONS
- REASSURANCE
- OXYGEN
- PAIN/POSITIONING
- TREATMENT/TRANSPORT

27
15. FIRST AID PROTOCOL
FIRST AID STATION
ITEM MINIMUM
Ice Packs 1 Box/12 Singles
Latex Gloves ½ Box
Assorted Plasters ½ Box
Medi Wipes ½ Box
7.5cm Swabs 2 Packets
Sterile Bandages 10cm 2 Single
Sterile Bandages 7.5cm 2 Single
Sterile Bandages 5cm 2 Single
Eye Bandage 2 Single
Micropore Tape 2.5cm 2 Single
Eye Irrigation 5 Single
Triangular Bandage 2 Single
Melolin Dressing 2 Single
Public Accident Report
Forms
10
Employee Accident Report
Forms
10
28
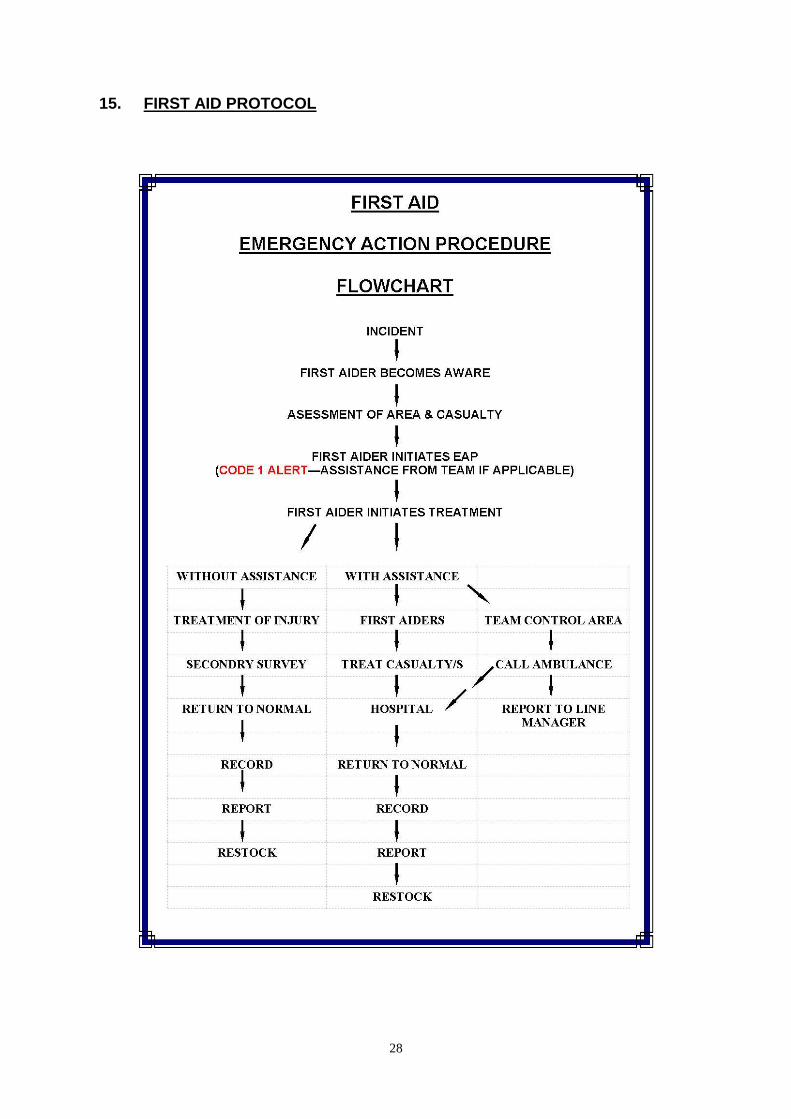
15. FIRST AID PROTOCOL

29
16. CHANGES TO PROCEDURES Procedures for all operations in the Galleon Centre are continually being improved to keep up with all the progress and development of the business. If any employee feels that changes in ay procedures outlined at present would improve the operations please detail them on a changes of procedures form and then forward to the Duty Manager. The changes of procedures form can be obtained from the Duty Manager. 17. ICE HOCKEY SET UP · Cut Ice with Zamboni laying down a small amount of water. · Pull out front and back nets and secure. · Put Hockey Goals into place and allow time to melt into the ice. · Speak to Coaches and cut ice as required during the games or training. · Please consult Zamboni N.O.P for driving and cutting instruction.

30
18. HEALTH AND SAFETY THE GALLEON CENTRE, ICE HALL
SAFE WORK METHODS AND RISK ASSESSMENT The following safe work methods for the Galleon Centre Ice Hall Staff has been
written to supplement other existing Health and Safety procedures given to all
Galleon Centre Staff i.e. Health and Safety Policy, Induction Training, Fire and
Emergency Procedures, Power Failure Procedures and Staff Health and Safety
Training Seminars.
The principle hazards to Health and Safety within the Galleon Centre Ice Hall are
from the ice preparation machinery and the skate sharpening abrasive wheel
machine. Other hazards are the ice pit, hot water urn, flooring, flammable fuels and
hard ice edger's. Ice Preparation Machine:-
* Zamboni Ice Machine
* Edging Machine
* Ice Boss Machine (Battery)
* Ice King Machine (Battery
No member of staff should operate specialised ice preparation equipment without
having first undergone such training that they become competent in the machines
operation.
No member of staff may operate the skate sharpening abrasive wheel until they have
successfully passed the abrasive wheel operators course and they are named as a
competent operator in the Galleon Centre’s register. The following procedures are
set down to protect the public and Galleon Centre staff from risk to their Health and
Safety. Failure to comply with these instructions will be seen as a serious
neglection of duty and may result in Disciplinary Procedures against the employee
(s) involved. The certificates for those competent to operate the skate sharpening
machine are on show in the area beside the machine.
ZAMBONI ICE MACHINE
Hazards (Fuel)
The “Zamboni” can operate on either Gas or Petrol, both of these give rise to a fire
hazard. The gas used to drive the machine is Propane “R” which is flammable and
explosive. Propane can also cause frost burns to the bodies tissues and eye injury.
Petrol is also used to drive the “Zamboni”. Petrol is a flammable liquid whose gases
can cause an explosion.

31
Precautions (Propane) Propane Cylinders must be stored in an upright position, in the caged store at the rear of the building. The only cylinder in the ice hall should be the one on the machine. NEVER ignite a naked flame or smoke in the vicinity of a propane cylinder. When handling cylinders, wear stout gloves and goggles. A full cylinder is heavy and the correct lifting technique must be followed (see handling and lifting H.S.E. guidance notes in the health and safety file, administration office). If necessary assistance should be sought to position the cylinder upon the machine. Gas connections should be secure but not over tightened. Do not turn on gas valve until the gas pipe is securely connected. (see separate health and safety notes on propane pinned to ice hall notice board). Precautions (Petrol) Never ignite a naked flame or smoke in the vicinity of petrol. Use only the red plastic containers for storing petrol. Do not have more petrol than is necessary in stock. Store petrol in the bottom of the ice hall.
ZAMBONI
Hazards (Battery) The Health Hazards associated with the battery is from explosion and acid burns. Precautions (Battery) When charging the battery always:- 1. Always wear gloves and goggles when charging a battery 2. Disconnect the battery leads 3. Loosen the battery caps 4. Set the charger to 12 volts 5. Connect the red lead to the positive (+) pole on the battery and the black lead to
the negative(-) pole 6. Never ignite a naked flame or smoke in the vicinity of the battery When using the booster to start the engine, leave the battery leads connected. Set the booster to 12 volts. Connect the leads positive to positive (red to red) and negative to negative (black to black). At the same time, shout out a 3, 2, 1, go command, someone must then turn the ignition whilst another person turns the booster to the boost start position. The booster must only be held in this position for a maximum of 3 seconds. Try this start method for a maximum of 5 starts. If the machine fails to start do not attempt to use the booster after the fifth attempt. Hazard (Blade Changing) (See Appendix 1 Zamboni Blade Change) There is the hazard of cuts or trapping of the hands when changing the blade but not if the work is done competently.

32
Precautions (Blade Changing)
Sufficient staff should be available to set the blade down onto wooden blocks. Wear stout gloves. Use the correct sized spanners or sockets. Work as a team, but have one person co-ordinating the work giving instructions.
Hazards (Engine)
Entanglement/Trapping in moving machinery, burns from hot metal work, heated water.
Precautions (Engine)
No work or inspection should be done whilst the engine is running, other than by a trained competent mechanic. When checking oil or water the ignition should be off and the key removed. Any mechanic working on the engine should remove all jewellery, tie and not have any loose clothing.
Hazards (Driving) (See Appendix 2 “Zamboni Operation”)
The hazards associated with driving the Zamboni are hitting or running down a person or persons whilst ice cutting or snow dumping due to a restricted view.
Precautions (Driving)
Always test the brakes before driving onto the ice, never drive the Zamboni whilst there is anyone on the ice. Never become distracted, keep watch on the ice. Do not drive the vehicle at speed or unsafely. Always be aware of your surroundings never reverse without first checking the area behind is clear. Before dumping snow check carefully the area is clear (there could be a small child behind the barrier). Always ensure that the area is cordoned off using the moveable posts and chains. Always park the machine safely. Take care of other equipment, ensure there is no one in the parking area. Only trained and competent persons are allowed to drive the Zamboni Machine.
Precautions Puncture On Ice
Should a puncture on ice occur, and the Zamboni cannot be driven off, the following procedure must be followed when attempting to change a tyre. (see safety precautions for Sealey Hydraulic Trolley Jack at the back of this manual. (Appendix 3).
2 Person job.
Use the four ton hydraulic jack for this purpose.
Always ensure that a sheet of plywood is put under the jack to prevent it slipping.
Loosen the wheel nuts slightly.
Position the jack under the jacking point.
Pump the jack lever until the wheel being changed can spin when turned.
Loosen the wheel nuts and remove the punctured wheel.
Replace with the spare wheel.
Replace the wheel nuts and hand tighten.
Lower the jack in accordance with the operating procedures.
Tighten wheel nuts with the necessary spanner or wheel brace

33
ICE KING & ICE BOSS OPERATION
Put out wooden ramp Disconnect battery charger from Ice King Pull up belt tension lever Ensure blade guard is on Switch on machine Reverse out to edge of ramp Clean tyres using old towel Reverse down ramp and onto ice Place at edge of rink and chill blade (15 minutes plus) Now ready to cut ice
Blade Changing
The Ice King must first be unplugged from the electrical supply before the procedure is
attempted.
Hazards
There is the hazard of cuts or trapping of the hands when changing the blade, but this is eliminated if the work is done competently.
Precautions Wear stout gloves, these are supplied at all times. Use the correct sized spanners or sockets. If unsure ask before continuing.
ICE KING & ICE BOSS BLADE CHANGE (2 PERSONS)
· Wear P.P.E
· Remove front bolts and detach knife unit
· Store blunt blade carefully
· Attach sharp blade unit through bolt holes and tighten
· Adjust blade as required when in use
Hazards Battery Operated Ice King
This Ice King operates from 2 x pre-charged batteries and a shock from these could be given if both poles of the battery are connected by a metal implement i.e. screwdriver. Gloves, goggles and an apron must be used when attempting to change or work on the batteries or blades of this Ice King.
Hazards Battery
The Health hazards associated with the battery are from explosions and acid burns.

34
ICE AND HAND EDGERS
Hazards (Ice Edger) The hazards associated with the ice edger are from the revolving cutting blades, flying ice particles, the battery (see Zamboni, Precautions Battery) Precautions (Ice Edger) Always wear stout footwear when operating the edger. Always operate the machine at a controlled pace. Always keep feet behind the machine and never at the side. Always cone off the area you are working within, never allow anyone into the coned off area whilst the machine is being used.
BATTERY EDGER (STARTING)
· Check petrol and fill if required
· Put Edger onto ice
· Make sure blade is fully up
· Pull up dead man switch
· Put throttle ½ way
· Turn ignition key
· Open choke out fully
· If edger does not start repeat process using pull cord instead of key
· Adjust blade height as required
BATTERY EDGER (STOPPING)
Reduce throttle
Put choke in
Wait 20-30 seconds
Release dead man switch
Hazards (Hand Edger’s)
The hazards associated with the hand ice edger’s are from the sharp edges on the face of the edger used, the ice surface, the handle from impact and flying ice particles.
35
Precautions Wear goggles Always wear stout gloves and footwear when hand edging Control the pace of edging at all times Cone off the area you are edging Set correct stance i.e. feet about 12/18 inches apart
SKATE SHARPENER
No one is allowed to operate this machine with the exception of those persons who have undergone and passed the abrasive wheel operators course, then have been named in the Galleon Centre’s register of competent operators. Everyone named in the register has received all the Health and Safety Precautions relevant to the safe operation of the abrasive wheel machine. Operational instructions, settings, warning notices and regulations are clearly fixed adjacent to the machine. Hot Water Urn (Hazards) Burns/Scolds from contact with hot water or the urn. Electrical shock. Tripping over lead. Precautions (Hot Water Urn) Never overfill the urn. Where possible place the urn out of reach of children. Always keep the urn positioned on a sound, secure base. Do not allow anyone, other than ice staff, to operate or move the urn. Keep members of the public away from the urn, do not leave the tap in a position where it may drip onto a child standing underneath the tap. Do not leave the electrical lead trailing over a walkway where it may cause a tripping hazard. Do not leave the urn in a position where it can be toppled over. The lead and plug must be checked regularly, report any defects immediately.
Flooring (Hazards) Tripping, slipping, falling through space, obstruction of means of escape. Precautions (Flooring) Rubber floor matting must be level, secure and with no gaps. Any spillage of water must be mopped up immediately. Never leave trailing electrical leads around or over walkways. Always replace ice pit covers immediately, NEVER leave pit covers up, this would cause a very real fall hazard. Keep pit covers level with the floor. Always cover ice pit immediately after use, in addition ensure that the people control chains and posts are in place. Always wear rubber soled shoes when on the ice surface, never obstruct the walkway down the right hand side of the Ice Hall, this is a means of escape. Never obstruct a fire escape door or its immediate surroundings.

36
Hazards Barrier/Gates Cuts/Grazes from protruding screws. Injuries to hand caught in gate. Fall from barrier.
Precautions (Barrier/Gates) Inspect the barriers regularly for protruding screws. The two barrier gates at the skate hire end should be fully opened to allow free access, and egress. Never allow children to play with the barrier gate or near the hinges. Never allow anyone to sit upon the barrier. Hazards (Steps and Seated Areas) The steps at both seated areas in the ice rink should be clear at all times. There is a no smoking policy in the Galleon Centre, No Storing of machinery, tools or any other substance on equipment is allowed under the seated area. Precaution Two coloured tape, visible should there be a power failure must be positioned to the step edges at all times. Replace any damaged or worn tape regularly or replace by using nosing strips.
REFRIGERATION PLANT
The Refrigeration Plant is under contract, therefore there is no need for ice hall staff to work on this equipment. However, it may be necessary to re-set trip buttons. This should always be done with an insulated screwdriver. Only trained and competent persons may work within the electrical panel, this is 3 phase equipment and under no circumstances should untrained staff work within the high voltage panel. It is also necessary for the Ice Staff to carry out regular checks on the ice plant (See Appendix 6). There is always a hazard associated with refrigeration plant and gloves must be worn at all times when working on or around Ice Refrigerant Machinery. Ice burns can be severe so always wear gloves. It is the ice hall staff’s responsibility to add Calcium Flake to the mixer tank when necessary. There is protective waterproof overalls provided for this work. When handling Calcium Flake, gloves and goggles should be worn. (See Appendix 4). The Ice staff must also test the brine levels on a regular basis (See Appendix 5).
WHEELCHAIR PLATFORM A wheelchair Platform was constructed at the request of the Ice Hockey Club to allow a person in a wheelchair gain a better view of the ice over the top of the barrier. This piece of equipment will only be used during Ice Hockey games and will only be handled by Ice Staff and/or persons from the Ice Hockey Committee (See Appendix 7).

37
APPENDIX 1
ZAMBONI BLADE CHANGE (TWO PERSONS)
Wear P.P.E
Remove both end bolts
Insert blade holding device at both ends and secure
Loosen and remove all remaining bolts
Release blade holder and carefully slide blade down and out from conditioner
Carefully store and label blunt blade
Carefully attach sharp blade to blade holder
Slide sharp blade under conditioner and position in both end bolt holes,
secureblade holder
Put in all bolts and hand tighten, remove blade holder and put in the last two
bolts
Starting from the middle! Tighten all bolts
Use blade adjuster and side adjustors to level blade
Now ready to use

38
APPENDIX 2
ZAMBONI OPERATION
ZAMBONI BASICS BASIC MECHANICS OF ZAMBONI
Accelerator/Brake Pedal
Ignition Key
Conditioner
Conveyor – Vertical & Horizontal
Flood Water
Wash Water and Pump
Dump Tank
Blade Adjustment
Snow Breaker
Blade
Towel
Gears
Rev’s
Brush
ZAMBONI CUT – HOCKEY
Rev’s Up – Ignition
Reverse out
Conditioner down when moving slowly forward
Conveyor’s on
Brush out (only when beside barrier)
Floor water on ⅓
Wash water on full
Wash water pump out *
Complete cutting pattern – remember to snow break
On last pass turn wash water off and water pump*
On turning into ice pit turn flood water off
Dump snow in pit – remember conveyor’s off conditioner up *
Rev’s down *
Idle for a moment Ignition off These steps are not set in stone. Experience and personal preference will help you to decide how much ice to cut and how much water to lay.

39
APPENDIX 2
ZAMBONI CUT – FIGURE SKATING
Rev’s up – Ignition
Reverse out
Conditioner down while moving slowly forward
Conveyor’s on
Brush out (only when beside barrier)
Floor water on ¾’s
Wash water on full
Wash water pump out *
Complete cutting pattern – remember to snow break
On last pass turn wash water and pump off *
On turning into ice pit turn flood water off
Dump snow in pit remember conveyor’s off conditioner up *
Drive off ice
Rev’s down *
Idle for a moment Ignition off These steps are not set in stone. Experience and personal preference will help you to decide how much ice to cut and how much water to lay.
ZAMBONI FLOOD
Rev’s up – ignition
Reverse out to around halfway
Conditioner down while driving slowly forward
Conveyors on
Brush out (only when beside barrier)
Flood water on full
Wash water on full
Wash water pump out *
Complete cutting pattern – remember to snow break regularly
On last pass turn wash water an pump off *
On turning into ice pit turn flood water off
Dump snow in pit. Remember conveyor’s off conditioner up *
Drive Zamboni off ice
Rev’s Down *
Idle for a moment Ignition off These steps are not set in stone. Experience and personal preference will help you to decide how much ice to cut and how much to lay.

40
APPENDIX 2
ZAMBONI DRY CUT
Take towel up before starting
Rev’s up – ignition
Reverse out
Conditioner down while moving slowly forward
Conveyor’s on
Brush out (only when next to barrier)
Complete cutting pattern – Remember conveyor’s off conditioner up *
Drive off ice
Rev’s Down *
Idle for a moment
Ignition off These steps are not set in stone. Experience and personal preference will help you to decide how much ice to cut and how much water to lay.

41
APPENDIX 2
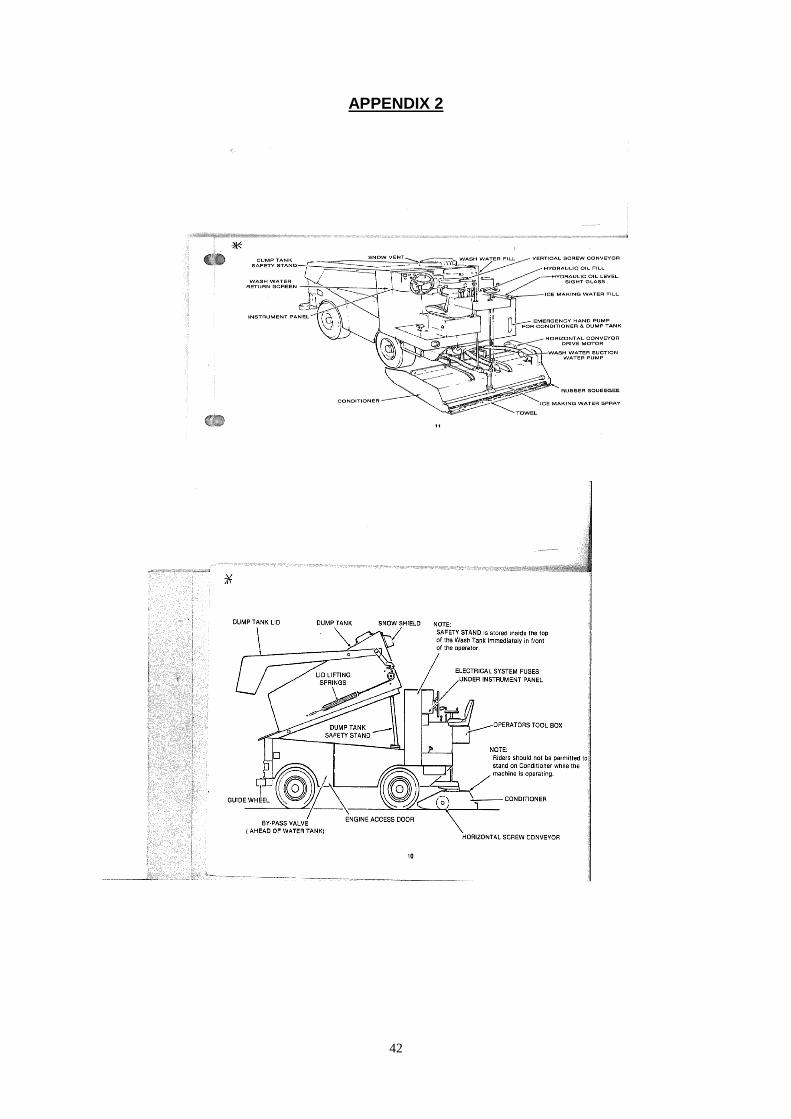
42
APPENDIX 2

43
APPENDIX 3 The Hydraulic 4 tonne trolly jack is a robust and heavy piece of equipment. It will take 2 men to manoeuvre and operate this awkward piece of equipment. Only competent and trained personnel such as ice or maintenance staff should operate the jack. When not in use the jack should be fully lowered, put in a safe, dry and childproof area. The following Do’s and Don’t’s should be adhered to at all times in conjunction with the safe works methods. TROLLY JACK SAFETY PRECAUTIONS DO’S Ensure jack is in sound condition and good working order Make sure you are in a well lit working area Keep working area clean and tidy Use jack on level ground Place wedges under wheels of vehicle (ensure jack wheels can move freely) Ensure vehicle hand brake is on and engine switched off Ensure 1/2m gap between vehicle and any static objects to allow for tilt Make sure there are no passengers in vehicle Keep all non-essential persons clear Place jack under recommended jacking point (see vehicles handbook) Check lifting point is stable and centred on jack saddle Ensure the jack wheels are free to move Use suitable capacity axle stands under the vehicle before proceeding with any
task Ensure that there are no obstructions or persons below the vehicle Use a qualified person to repair or maintain the jack’s hydraulic system. DO NOT
Operate the jack if damaged Allow untrained persons to operate the jack Exceed the rated capacity of the jack (4 tonne, 4000kg) Allow the vehicle to move while supported by the jack. Don’t use the jack to
move the vehicle Work under the vehicle until axel stands have been correctly positioned Jack the vehicle if there is a risk of spillage of fuel, battery acid or any other
dangerous substance Use the jack for purposes other that that for which it is designed Top up hydraulic system with brake fluid. Use hydraulic jack oil only Adjust the safety overlaod valve

44
APPENDIX 4
FILLING BRINE HEADER TANK/MIXING BRINE To fill brine tank you must firstly mix up enough brine Put on proper P.P.E (goggles, gloves, mask, apron) Thoroughly clean out and empty HTH tub Pour ½ a 25kg bag of CA CI2 (Calcium Flakes) into the tub Use flood hose to fill tub with water and stir constantly to ensure all flakes have
dissolved into the solution Use submersible pump to pump mixture from the ground up to the tank If pump not available transfer the brine mixture into smaller buckets and carry up to
the tank using ladders Repeat process until you reach the desired level (normally around 19 inch). Valve ‘B’ and valve ‘C’ should be open at all times, this allows brine to flow from the
header tank if there is a leak in either the main header or heater mat. Use a piece of wood to mark the level of brine in the tank and check at least once a
week to calculate any brine loss To circulate new brine (only if required) open valve ‘A’ for around half an hour. NOTES: 1. Always shut valve ‘A’ after any job. 2. Do not let header tank run dry, as air will be drawn into the system. 3. This process requires at least two persons. 4. In the event of a major brine leak shut valve ‘B’ and ‘C’.
Valv
e C Valve B
Brine
In
Brine
Out
27 3
7 i
n
Brine
Tank
28
117
inch From
floor
to botto
m of
Valve A
Brine from main Header
To
main Header
To
Heater
Mat Floor
45
APPENDIX 5
TESTING BRINE
1. Wear P.P.E
2. Slowly open Brine valve found at end of chiller chamber. 3. Collect sample in bottle.
4. Use hygrometer to obtain reading (room temperature).
5. Record details on daily readings sheet.
APPENDIX 6
ICE RINK STAFF PLANT DUTIES
1. To contact Star Refrigeration in-between visits in the event of requiring
assistance for plant breakdown issues and to forward a customer order number to cover the cost involved.
2. To restrict access to the plant room area to your maintenance/engineering and security personnel. 3. To allow vehicular access to the vicinity of the plant room to enable
unloading of tools, spares, equipment etc. 4. Check compressor oil levels daily (1/4—3/4). 5. Listen for abnormal noises in the equipment. 6. Replace transmitter paper and ribbon if required. 7. Thoroughly clean the plant of all traces of oil on pipe and joints. 8. Completely test the plant for leaks.

46
APPENDIX 7
WHEELCHAIR PLATFORM FOR USE IN THE ICE HALL
A wooden platform has been constructed to help a person in a wheelchair get a
better view over the barrier during an ice hockey game.
The features are as follows:-
1.2m x 1.12m square wooden base
20cm off the ground
4cm high edge around the base
Removable ramp
The platform should only be used by a member of the Committee and the person on
the platform will have someone with them at all times. The platform should be
operated as follows:-
2 persons required to lift the platform into position.
Position platform just to the left of skate hire next to the barrier.
Attach the ramp and assist the person onto the platform.
Remove the ramp and make sure the wheelchair brake is activated.
Someone must remain with the person at all times.
Re-attach ramp to get the wheelchair down from the platform.
Store platform on the left hand wall of rink and secure with rope.
Any problems with the platform must be reported to a Duty Manager immediately
and a copy of this N.O.P must remain attached to the platform at all times.