
HP ProLiant BL490c Generation 7 (G7) Server Blade - HP-pro ...
Upload
khangminh22Category
view
1download
0
Software Version: 12.53
User Guide
HP Unified Functional Testing
Document Release Date: June 2016 | Software Release Date: June 2016
Legal Notices
WarrantyThe only warranties for Hewlett Packard Enterprise Development LP products and services are set forth inthe express warranty statements accompanying such products and services. Nothing herein should beconstrued as constituting an additional warranty. HPE shall not be liable for technical or editorial errors oromissions contained herein.
The information contained herein is subject to change without notice.
Restricted Rights LegendConfidential computer software. Valid license from HPE required for possession, use or copying. Consistentwith FAR 12.211 and 12.212, Commercial Computer Software, Computer Software Documentation, andTechnical Data for Commercial Items are licensed to the U.S. Government under vendor's standardcommercial license.
Copyright Notice© Copyright 1992 - 2016 Hewlett Packard Enterprise Development LP
Trademark NoticesAdobe® and Acrobat® are trademarks of Adobe Systems Incorporated.
Google™ and Google Maps™ are trademarks of Google Inc
Intel® and Pentium® are trademarks of Intel Corporation in the U.S. and other countries.
Microsoft®, Windows®, Windows® XP, and Windows Vista ® are U.S. registered trademarks of MicrosoftCorporation.
Oracle and Java are registered trademarks of Oracle and/or its affiliates.
Documentation UpdatesThe title page of this document contains the following identifying information:
l Software Version number, which indicates the software version.l Document Release Date, which changes each time the document is updated.l Software Release Date, which indicates the release date of this version of the software.
To check for recent updates or to verify that you are using the most recent edition of a document, go to:https://softwaresupport.hpe.com.
This site requires that you register for an HPE Passport and sign in. To register for an HPE Passport ID, go tohttps://softwaresupport.hpe.com and click Register.
SupportVisit the HPE Software Support Online web site at: https://softwaresupport.hpe.com
User Guide
HP Unified Functional Testing (12.53) Page 2 of 938
This web site provides contact information and details about the products, services, and support that HPESoftware offers.
HPE Software online support provides customer self-solve capabilities. It provides a fast and efficient way toaccess interactive technical support tools needed to manage your business. As a valued support customer,you can benefit by using the support web site to:
l Search for knowledge documents of interestl Submit and track support cases and enhancement requestsl Download software patchesl Manage support contractsl Look up HPE support contactsl Review information about available servicesl Enter into discussions with other software customersl Research and register for software training
Most of the support areas require that you register as an HPE Passport user and sign in. Many also require asupport contract. To register for an HPE Passport ID, go to: https://softwaresupport.hpe.com and click Register.
To find more information about access levels, go to:https://softwaresupport.hpe.com/web/softwaresupport/access-levels.
HPE Software Solutions & Integrations and Best PracticesVisit HPE Software Solutions Now at https://softwaresupport.hpe.com/group/softwaresupport/search-result/-/facetsearch/document/KM01702710 to explore how the products in the HPE Software catalog worktogether, exchange information, and solve business needs.
Visit the Cross Portfolio Best Practices Library at https://hpln.hpe.com/group/best-practices-hpsw to access awide variety of best practice documents and materials.
User Guide
HP Unified Functional Testing (12.53) Page 3 of 938
Contents
HP Unified Functional Testing 1
Part 1: UFT Introduction 35Chapter 1: Overview 36
UFT program use 39Licensing 39Required permissions for UFT 40Required permissions for ALM 41Required permissions for BPT 41Demo applications 41Accessibility 42Unicode Compliancy 42
Known Issues- Multilingual Applications 43Known Issues - UFT Tools and Programs 45
UFT program tools 45Characters do not display correctly 46UFT and DEP (Data Execution Prevention) 46
Chapter 2: UFT Licensing 47Seat licenses 47Concurrent licenses 47Commuter licenses 47Install licenses using the LicenseWizard 48Install licenses from the command line 51UFT licensing FAQs 53
Can I usemy old license (from before UFT 12.50) with the new License Server? 54How do I get a new license? 54What if I have trouble regenerating licenses on the HP License Portal? 54Which license should I install? 54How do I install the Autopass License Server? 55Can I install the License Server with silent installation? 55If I am using concurrent licenses, how do I get UFT to work with the License Server? 55How do I install licenses if I am deploying UFT across an enterprise network? 56How do I manage the concurrent licenses on the License Server? 56Can I set upmy License Server to work with a redundant (backup) License Server? 56What is a cleanup license? 56My demo license is expiring early. What can I do? 57
Known issues with UFT licenses 57Chapter 3: UFT Document Management 58
UFT and version control systems 59
User Guide
HP Unified Functional Testing (12.53) Page 4 of 938

Set up UFT to work with GIT 59Update changes for a document 59Commit changes for a document 60Compare a document with the repository version 61Revert a document 61Resolve conflicts between document versions 61
Relative paths for test resources 62Portable copies of tests 63Opening tests with locked resources 64Upgrading documents from previous versions 64
Upgrading QuickTest tests or components 64For Service Test tests or components 66
Naming conventions 70Known Issues - Opening documents 74
Part 2: UFT Panes 76Chapter 4: Active Screen Pane 77
Saving Active Screen content 77The Active Screen and Insight 78The Active Screen andWeb-based applications 78Stop saving Active Screen information 78Update a single Active Screen capture 79
Chapter 5: Bookmarks Pane 80Chapter 6: The Canvas 81Chapter 7: Data Pane 82
Data table content 82Data table values 82Changing column headers 82Importing Excel files to the Data Pane 82Data Pane Specifications 83
Chapter 8: Debug Panes 84Chapter 9: Document Pane 85Chapter 10: Errors Pane 86
Code syntax errors 86Missing resources 86Missing references 87Missing property values 87
Chapter 11: Output Pane 88Chapter 12: Properties Pane 90Chapter 13: Run Step Results Pane 91Chapter 14: Search Results Pane 92
User Guide
HP Unified Functional Testing (12.53) Page 5 of 938
Chapter 15: Solution Explorer Pane 93Chapter 16: Tasks Pane 94
Manage TODO comments 94Chapter 17: Toolbox Pane 95
The Toolbox pane andGUI testing 95The Toolbox pane and API testing 95The Toolbox pane and Business Process Testing 96
Part 3: UFT Configuration 97Chapter 18: Global Options 98Chapter 19: Document Settings 100Chapter 20: Set Options Programmatically 102
Part 4: GUI Test Design 104Chapter 21: GUI Test Creation Overview 105
Keyword-drivenmethodology 105Recording 106Importing tests from Sprinter 106Enhancing your tests 107
Checkpoints 107Parameterization 107Output Values 107Programming Statements 107Active Screen Updates 108
Create a keyword-driven GUI test 108Analyze your application 108Prepare the testing infrastructure 109Add steps to the actions in your test action repository 111Enhance your test 111
Sample test 111Chapter 22: Record GUI Tests and Components 113
Normal Recording 113Analog Recording 114Record aGUI test or component 116
Prerequisites 116Start a recording session 116Record steps into the test 116Use the Record toolbar to manage your recording session 117Capture objects to an object repository 117Switch to other recordingmodes 117
Known Issues When Recording 119
User Guide
HP Unified Functional Testing (12.53) Page 6 of 938
Chapter 23: Actions in GUI Testing 121Structure your test with actions 122Display / modify action data 123
Create an action template 123Action and action call properties 124Exit an action using programming statements 124
Known Issues with Actions 125Copies of tests 125
Chapter 24: Keyword View 126Standard steps in the Keyword View 127
Define or modify an item value 127Parameterize an Item value for an argument 128Encode a password 128Add a standard step after a conditional or loop block 129
Comments in the Keyword View 129Comments in actions 129Comments in components 130
Conditional and loop statements 130Known Issues - Keyword View 133
Chapter 25: Running API Tests with GUI Tests 134Using API tests in a GUI test - Use-case scenario 137Calling API tests with parameters - Use-case scenario 139
Chapter 26: Maintaining Tests or Components 147Application errors 147Application changes 147Missing objects 148Maintenance Runmode 148
When do you useMaintenanceMode? 149Maintenance RunMode prerequisites 150Determine UFT wait time 150Run the test or component in Maintenance RunMode 150Merge changes to your shared object repository 151
Maintenance RunWizardWorkflow 152Update Runmode 153
Smart Identification 153Update test object descriptions, checkpoints, or output values, or Active Screencaptures 155
Run in Update RunMode 156Export andmerge changes 156Analyze the results 156
Known Issues inMaintenance and Update RunModes 157Chapter 27: Recovery Scenarios 159
User Guide
HP Unified Functional Testing (12.53) Page 7 of 938
When to use recovery scenarios 160Programmatically controlling the recovery mechanism 161Manage recovery scenarios 161
Create a new recovery scenario operation 162Associate a recovery scenario in the Test Settings 162Associate a recovery scenario in the Solution Explorer 162Associate a recovery scenario with a component/ application area 162Enable/disable specific recovery scenarios 163Set default recovery scenario settings 163
Known Issues- Recovery Scenarios 164Chapter 28: Using Performance Testing and Business ServiceManagement Products withUFT GUI Tests 165
Designing tests for HP performance testing products 166Running GUI tests from HP performance testing products 167Running GUI tests from HP Business Process Monitor 167Measuring transactions 168Insert and runGUI tests in Performance Center and LoadRunner 170Silent Test Runner 170
Part 5: Test Objects / Checkpoints / Output Values 172Chapter 29: The Test Object Model 173
How UFT learns objects 173How UFT applies the test object model concept 174
Test object descriptions 176UFT test object hierarchy 178Properties and operations for test objects and run-time objects 178
How UFT identifies objects during a run session 180Object identification process workflow 183Use theObject Spy 184
Prerequisites 184Use the pointing hand to select the application object 184Add objects to the object repository 185
Use the Remote Object Spy 185Prerequisites 185Open the Remote Object Spy dialog box 186Use themouse to select the application object 186View object details or add it to your object repository 186
Chapter 30: Configuring Object Identification 188Mandatory and assistive properties 189Ordinal identifiers 190
Index identifiers 190
User Guide
HP Unified Functional Testing (12.53) Page 8 of 938
Location identifiers 191Visual relation identifiers 192
How UFT interprets horizontal and vertical visual relations 193Smart identification 195
The Smart identification process 196How UFT uses smart identification - Use-case scenario 197
Test object mapping for unidentified or custom classes 199Configure object identification for a test object class 199
Set properties for identifying an object 199Set properties for Smart Identification 200
Map an unidentified or custom class to a StandardWindows class 200Define a visual relation identifier for a test object - Use-Case scenario 201
Background 201Open the Visual Relation Identifier dialog box 202Highlight the objects that match the test object's description 202Define the first related test object using horizontal visual relations 203Define the second related object using vertical visual relations 204Define the third related object using distance visual relations 204Results 205
Chapter 31: Test Objects in Object Repositories 206TheObject Repository window vs. the Object Repository Manager 208aLocal copies of objects in shared object repositories 209Adding and deleting test objects 210Maintaining identification properties 211Repository parameters 213
Repository parameter valuemappings 214Managing shared object repositories using automation 215Add a test object to an object repository 216
Add test objects to the object repository 216Add an Insight test object to the object repository 217Add a test object to the local object repository while adding a step 217Define a new test object 217Add a test object to the object repository with the Object Spy 218Add a test object to the local object repository from the Active Screen 218Add a test object to the local object repository by inserting a step from the ActiveScreen 218
Maintain test objects in object repositories 219Specify an identification property value 219Update identification properties 219Restore themandatory property set 220Rename test objects 220Add properties to a test object description 220
User Guide
HP Unified Functional Testing (12.53) Page 9 of 938
Define a new identification property 220Remove properties from a test object description 221Specify an ordinal identifier 221Define related objects for a specific test object 221Export the objects from a local object repository 222Copy an object to the local object repository 222Modify identification properties during a run session 223
Create andmanage shared object repositories 223Prerequisites 223Enable editing for a shared object repository 223Associate a shared object repository with actions or components 223Merge object repositories into shared ones 224Manage repository parameters 224Import a shared object repository from XML 225Export a shared object repository to XML 225
Locate an object in an object repository 225Find an object 225Highlight an object in your application 226Locate an object from your application in the object repository 226
Known Issues- Object Repositories 227Chapter 32: Comparing and Merging Object Repositories 228
Object conflicts 229Different Objects with the SameNameConflict 230Identical Description Different NameConflict (Test Objects Only) 230Similar Description Conflict (Test Objects Only) 231
Compare two object repositories 231Prerequisites 232Select the SharedObject Repositories to compare 232Analyze the initial comparison results 232Analyze the detailed comparison results 232Utilize additional tools to help you perform the comparison - optional 232
Merge two shared object repositories 232Prerequisites 233Select the shared object repositories tomerge 233Analyze the initial merge results 233Analyze the detailedmerge results 233Utilize additional tools to help you perform the comparison - optional 233Adjust object conflict resolutions 233Save the target object repository 234
Update a shared object repository from a local object repository 234Prerequisites 234
User Guide
HP Unified Functional Testing (12.53) Page 10 of 938
Select the shared object repository and the local repositories that you want to mergeinto it 234Analyze the initial merge results 235Analyze the detailedmerge results 235Adjust object conflict resolutions 235Save the target object repository 235
Chapter 33: Extending UFT Object Identification 236Identifying objects using Insight 236
Creating Insight test objects 237Creating steps with Insight Test Objects 238Running tests with Insight 238
Work with Insight test objects 239Add an Insight object 239Modify an Insight test object's image 240Retrieve text from an Insight Object 241Update Insight test object details 241
UI Automation in UFT 242Enable UI Automation support 243How does UFT use the UI Automation framework? 243
Control Types and UFT Test Objects 243Supported Patterns and Test Object Methods 244
When should you use UFT UI Automation support? 246Native UI Automationmethods 251
Use UFT UI Automation support 253Learn objects in UI Automationmode 253Record steps in UI Automationmode 254
Identifying unsupported objects in test runtime 255Create a programmatic description of the object 256Set the unsupported/unidentified object as Static object type 257Assign the unsupported/unidentified object to a supported object type 257Use non-test object methods 257
Known Issues - UI Automation Support 258Chapter 34: Virtual Objects 260
How virtual objects are defined and recognized 260Define virtual objects for unsupported objects 261
Display the object to define as a virtual object 261Use the Virtual Object wizard 261
Chapter 35: Checkpoints in GUI Testing 262Adding existing checkpoints 262Checkpoint types 263
Standard checkpoints 266Accessibility checkpoints 267
User Guide
HP Unified Functional Testing (12.53) Page 11 of 938
Bitmap checkpoints 267Fine-tuning the bitmap comparison 269
Database checkpoints 271File Content checkpoints 272Table checkpoints 273Page checkpoints 273Text and text area checkpoints 274
Text recognition in run-time 275Checking Text in an image - Use-case scenario 277
XML checkpoints 279Insert a checkpoint step 280
Important information before inserting the checkpoint 281Define automatic page checkpoints - optional 282Set global accessibility checkpoint preferences 283Insert a checkpoint step while recording your test or component 283Insert a checkpoint step while editing your test or component 283Use programming to insert checkpoints in a test or scripted component 285Set options for the checkpoint 285Move checkpoint objects from the local object repository to a shared object repository- optional 287
Include and ignore areas when comparing a bitmap - Use-case scenario 288Configure text recognition settings 291
Prerequisites 291Analyze the characteristics of the text 291Set the appropriate options 291Check the text recognition settings 293Adjust the settings as necessary 293
Known Issues- Using Checkpoints 294Chapter 36: Developing Custom Comparers for Bitmap Checkpoints 296
Custom bitmap comparer development 297Custom comparer for images whose location changes - Use-case scenario 297Develop a custom comparer 299
Prerequisites 299Develop the custom comparer COM object 299Prepare the custom comparer installation 299Install the custom comparer 300Test the custom comparer 300
Implement the bitmap comparer Interfaces 300Prerequisite - Reference the type library 301Implement the CompareBitmaps method 301Implement the CompareBitmaps method 301Implement IBitmapCompareConfiguration 302
User Guide
HP Unified Functional Testing (12.53) Page 12 of 938

Install your custom comparer and register it to UFT 303Prerequisites 303Install the custom comparer COM object on the UFT computer 304Place the custom comparer documentation in the correct location 304Set the Custom Comparer Name - Optional 305Results 305
Use the bitmap checkpoint custom comparer samples 306Prerequisites 306Generate the sample comparer 306Install the custom comparer on a UFT computer 306Register the custom comparer to the component category 307Study the custom comparer functionality 308
Develop a custom comparer - Tutorial 309Create a new ATL project—SampleCPPCustomComparer 309Create a new class—CBitmapComparer 310Implement the comparer interfaces for the CBitmap Comparer class 310Move the function bodies for the comparer interfacemethods 311Implement the bitmap checkpoint comparer interfacemethods 312Design your custom comparer to register to the component category 314Compile and run your DLL 316Test your custom comparer 316
Bitmap checkpoint comparer Interfaces 317Chapter 37: Output Values in GUI Testing 322
Output Value types 322Storing output values 324Create or modify an output value step 326
Chapter 38: Parameterizing Object Values 330Data table parameters 331
Global and local (Action) data table parameters 333Environment variable parameters 335Automatically parameterizing steps 337Data Driver 338Parameterize values for operations 339
Parameterize a value for an operation 339Use the Data Driver to parameterize a constant value 339Enter parameters as values in the Editor 339
Parameterize a checkpoint property value 340Parameterize a value for a property in a checkpoint 340Use the Data Driver to parameterize a constant value 340Enter parameters as values in the Editor 340
Test and action parameters 340Sharing action information 343
User Guide
HP Unified Functional Testing (12.53) Page 13 of 938
Adding action parameters as steps in the Editor 346Use action parameters 346Data tables and sheets in GUI tests and components 348
Using different data tables 349Formulas in data tables 350
Define andmanage data tables 351Add an external data table file 351Manually enter information 352Import information into the data table 352Add a data table file to your ALM project 352Define the number of iterations for an action or test 352Change a column name 353Use an autofill list 353
Insert formulas into data tables for use in checkpoints 354Import data usingMicrosoft Query 354Use user-defined external environment variables 355
Create an external environment variables file 355Upload the environment resource file to ALM 355Use environment variables in your test 355Results 355
Create an external environment variables file 355Create an external environment variable file in the Test Settings 356Create an external environment variable file manually 356
Regular expressions 357Regular expression characters and usage options 358
Chapter 39: Value Configuration and Parameterization 363Local and component parameters 363Configure constant and parameter values 364Parameterize input values 365
Part 6: API Test Design 367Chapter 40: API Test Creation Overview 368
Automatically generating API tests 370Create an API test 372
Prerequisite - Analyze your application 372Prerequisite - Configure UFT according to your testing needs 372Prerequisite - Prepare the service references (optional) 372Build your test structure 373Enhance yhour test steps 374Results 375
Create an API test - Use-case scenario 376
User Guide
HP Unified Functional Testing (12.53) Page 14 of 938
Analyze the Flight API application 376Create or import your test resources 378Create your test steps 379Enhance your test steps 382Run the test 383
Automatically generate API tests 383Generate your test from aWSDL file 383Generate your test from a SOAPUI test file 384
Chapter 41: Standard Activities 386Checkpoint validation 386
XPath checkpoints 387Test with Docker activities 388
Configure ports 388Pull an image from the Docker registry 389Create a container 389Run a container 390Run an image 390Add additional test steps 391Stop the Docker container image 391
Set array checkpoints 391Enable active content on your computer 391Add a step with an array output 391Select an array validationmethod 392Validate individual array elements 392
Set XPath checkpoints 393Add a step with XML output 393Set the namespace setting 393Add an XPath checkpoint 393
Use Flow Control activities 393Add a conditional step 393Add a loop 395Add steps to pause and restart the test 396Add a wait step 397
Send amultipart HTTP or REST Service request 397Add an HTTP or REST Service step 397Set the properties for the first part of the request 397Set the properties for the other parts 397
Create a call to a Java class 398Implement the UFT API Java interface 398Compile the Java source code 398Package your custom step - optional 399Set up the Java environment - optional 399
User Guide
HP Unified Functional Testing (12.53) Page 15 of 938
Add a Call Java Class activity 399Set the Java step property values 399
Call external tests or actions 400Prerequisites 400Call an API Test or Action or Service Test test 401Call a GUI Test or QuickTest action or test 401Add a LoadRunner script activity 402
Prepare and run a Load test 403Prerequisite 403Create a load-enabled API test 403Add test steps 403Prepare for load testing 403Set the data retrieval properties - optional 404Set the run configuration to Release 404Run in Load Testingmode to validate the test 404Incorporate the test into LoadRunner 404
Test Web sockets communication 405Open aWeb socket connection 405Send amessage to anotherWeb socket 405Receive amessage from anotherWeb socket 406Close theWeb socket connection 407
Known Issues- Standard Activities 408System activities 408Java activities 408Network 408Database 409FTP 409IBMWebsphereMQ 409JSON 409Load Testing 409Web Sockets 410XPath Activity Checkpoints 410
Chapter 42: Custom Activities 411Web Services 411REST Services 411Web Application Services 412Network Capture Activities 412.NET Assemblies 413SAP-based Services 413Activity sharing 414Perform activity sharing 414
Connect to ALM 414
User Guide
HP Unified Functional Testing (12.53) Page 16 of 938
Set up the repository paths 414Import aWSDL or create a REST service 415Move the activity to a repository 415
Negative testing of Web services 415Passing REST service properties 416Exposing REST service properties 420Import aWSDL-basedWeb service 421
Import your service 421Validate theWSDL file - optional 422Update yourWSDL information - optional 422Add input attachments to the test - optional 423Validate output attachments 423Configure SOAP Fault information - optional 424
Create a REST servicemodel 424Prerequisite 424Create the servicemodel hierarchy 424Set the General properties 425Set the URL property values 425Define themethod's HTTP properties 425Define custom properties - optional 425Enter the request body directly - optional 426Link the body request to a data source - optional 426Test themethod 427Save the servicemodel to your test 428Expose input and output properties 428
Import a REST servicemodel 428Import the service 429Set authentication and response settings for a SAP HANA service 429Use the service's methods in your test 430
Send and receive a JSON request for a REST service 430Set the HTTP properties 430Load the request body 430Add a request header - optional 431Modify the JSON body - optional 431
Import aWeb Application service 432Prerequisite 432Import theWADL document 432
Import a Network Capture file 434Create a capture file 434Prerequisite - study the structure of your network capture file 434Import the network capture file 435
Create an SAP API test step 436
User Guide
HP Unified Functional Testing (12.53) Page 17 of 938
Prerequisite 436Define an SAP Connection 436Select an iDoc from your SAP server 436
Import and create a .NET Assembly API test step 436Prerequisite 436Import a .NET assembly 437Select a GAC assembly - optional 437Add an ExecuteEvent event handler 437Add custom input and output properties - optional 438
Known Issues- Custom Activities 439Web services 439REST services 439Web Application Services 440Network Capture Activities 440.NET Assembly Activities 440
Chapter 43: Actions for API Tests 441Actions and data sources 442Use actions in an API test 443
Create a new action 443Call an existing action or a test 443Set action properties 443Enable an action's data for editing when called by another test 444Override data from an action called by another test 444
Chapter 44: Data Usage in API Tests 445Data assignment in arrays 445Add data sources to an API test 449
Add an Excel data source 449Add an XML data source 450Add a database data source 451Add a local data table 453
Assign data to API test/component steps 454Manually enter the data for your test step properties 454Link your test step to a data source 454Link your test step to another step 455Link your test step tomultiple sources 455Link your test steps to a test or user-defined variable 456Data drive the test step 457Add data keywords 457
Assign data to API test steps - Tutorial 458Prerequisite - import theWeb Servicemethods for the sample application 458Associate a data source with your test 459Create your test steps 459
User Guide
HP Unified Functional Testing (12.53) Page 18 of 938
Manually enter the input properties for the GetFlights step 459Link the CreateFlightOrder input properties to the data source 460Link the Report step input properties to the CreateFlightOrder step 460View the run results 461
Define API test properties or user/system variables 461Define test parameters 461Define user variables 462Set user variable values 462Define user variable profiles 462Set OS variable values for the test - optional 463
Parameterize XML data 463Data drive array checkpoints 466
Enable active content on your computer 466Add a step with an array output 466Data drive the array 466Set the evaluation expression 467Provide data for the array 467Select an array validationmethod 467Set the number of iterations - optional 467
Navigating within a data source 468Parent/Child data source relations 469
Set the data source navigation properties 470Add a data source to the Test Flow or test loop 470Specify the navigation properties for the data source 470Create a new child relation 471
Known Issues- Using data in API tests and components 472Chapter 45: Updating Services and Assemblies 473
Update aWeb Service 474Prerequisites 475Update the service 475Run the Update Port Security wizard - optional 475Run the Update Step wizard 476
Update a .NET Assembly 476Select the assembly to update 477Import a new .NET assembly 477Handle warnings - optional 477Modify custom code - optional 477
Resolve conflicts in a REST service test step 477Modify the step as required 477Open the wizard 477Run the wizard 478
Update an SAP RFC or IDoc 478
User Guide
HP Unified Functional Testing (12.53) Page 19 of 938
Update the RFC/IDoc from its original location 478Update the RFC/IDoc from a different location 478Run the Update Step wizard 478
Known Issues- Updating Services 480Chapter 46: Web Service Security 481
Security scenarios 481Web Service scenario 482WCF Service scenarios 485
Set security for a standardWeb Service 489Create aWeb Service scenario 489Configure the HTTP settings 489Addmessage level security with a Username Token 489Addmessage level security by signing with an X.509 Certificate 490Encrypt aWeb servicemessage using a Certificate 491Send a username token and encrypt the token with an X.509 Certificate 492Sign and encrypt aWeb servicemessage 492Configure theWS-Addressing (optional) 493
Customize security forWCF-typeWeb services 493Create aWCF scenario 493Configure the settings for aWeb Service usingWSHTTPBinding 493Configure the settings for aWeb Service using CustomBinding 494Configure the settings for aWCF FederationWeb service 494Configure the settings for aWCF service using netTcp or namedPipe transport 495Configure the settings for aWeb service usingWSE3 security configuration with aserver certificate 495Configure the settings forWCF service usingmutual certificate authentication 496Configure the settings for aWCF scenario using binding with TCP transport to requirean X.509 client certificate 496
Set up Advanced Standards testing 497Test aWeb Service usingMTOM 497Change theWS-Addressing version of a service 497Enable support for a service or activity that uses 256-bit SSL encoding 497
Known Issues- Web Service Security 498Chapter 47: Asynchronous Service Calls 500
Test an asynchronous Web service 502Create a test forWS-Addressing 502Create a test for HTTP Receiver 503Create a test for aWeb service publish subscribe pattern 504Create a test for Dual WSDL Files 504
Known Issues- Asynchronous Testing 506Chapter 48: API Testing Extensibility 507
Custom Activity files 507
User Guide
HP Unified Functional Testing (12.53) Page 20 of 938
Runtime files 508Signature files 509
Property definitions 513Addin files 517Resource files 519
Use theWizard to create a custom Activity - C# 520Run the Activity Wizard 520Add execution code 520Add Logger code - optional 521Add a Report statement - optional 521Compile the project into a DLL 521Deploy the activity in UFT 522
Use theWizard to create a custom Activity - Java 522Prerequisite 522Run the Activity Wizard 522Edit the code 522Add Logger code - optional 523Add a Report statement - optional 523Compile the Java into a class 523Deploy the activity 523
Manually create a custom Activity in C# 524Prerequisite - create a runtime file 524Create a signature file 524Create an addin file 525Provide a graphic for your activity - optional 526Check the implementation 526
Create a runtime file 526Add Using statements 526Specify the namespace and class 527Set the internal logging 527Initialize the properties 527Retrieve the property values 528Define events 529Execute the step 529Set the status 530Compile the runtime file 530
Known Issues - Extensibility (API Testing) 531
Part 7: Creating and Enhancing UFT Tests with Code 532Chapter 49: The Editor 533
Statement completion 533
User Guide
HP Unified Functional Testing (12.53) Page 21 of 938
Automatic code completion 535Searching and replacing 536Use code snippets and templates 538
Insert code snippets into your document in the Editor 538Modify an existing list of code templates 539
Search for references or classes 540Search for references to the currently selected function or method 540Search for classes derived from the currently selected class 540Search for methods that override a virtual method 540Search for the base class of the current class 541
Known Issues - Statement Completion 541Chapter 50: Programming Tests 542
Programmatic descriptions 542Static programmatic descriptions 545Dynamic programmatic descriptions 548Retrieving child objects with programmatic descriptions 550Using the Index property 551Programmatic description checks 552
Opening and closing applications 553Comments, control-flow, and other VBScript statements 554Retrieving and setting identification property values 555Checkpoint and output statements 556Native properties and operations 556Use theWindows API in test steps 557Basic VBScript syntax 559
General syntax rules and guidelines 560Formatting text 562Comments 563Parameter indications 564Parentheses 565Calculations 567Variables 568Do...Loop statement 569For...Each Statement 570For...Next Statement 571If...Then...Else Statement 571While...Wend Statement 573With Statement 573
Chapter 51: User-Defined Functions 575Associated function libraries 575User-defined functions 576Registered user-defined functions 578
User Guide
HP Unified Functional Testing (12.53) Page 22 of 938
Preparing the user-defined function for registration 580Registering user-defined functions as test object methods 580Unregistering user-defined test object methods 581Running an overriding user-defined test object method 582
Loading function libraries during a run session 584Manage function library associations 585
View the list of associated function libraries 585Associate the currently active function library 585Associate a function library using the Test Settings dialog box 586Associate a function library with the Solution Explorer pane 586Associate a function library with an application area 586Modify the priority of an associated function library 587Remove a function library association 587Specify default function libraries for all new tests 587Load a function library dynamically during a run session 587
Create and work with a user-defined function 588Prerequisites - Open the function library or test 588Create the function 588Register the function to a test object class - optional 589Associate the function library with a test or application area 590Call the function 591Navigate to the function's definition - optional 591Unregister the function - optional 591
Create and register a user-defined function using the Function Definition Generator 591Open the function library/test and the Function Definition Generator 591Specify the details for the function definition 592Register the function to a test object class - optional 592Add arguments to the function - optional 592Add documentation details to the function - optional 593Insert the function in your active document 593Add the content (code) of the function 593
Known Issues- Function Libraries and user-defined functions 594Chapter 52: Generated ProgrammingOperations 597
Message statements 597Run sessionmessages in the HTML report 597Run sessionmessages in the Run Results Viewer 598Stepmessages in the Run Results Viewer 598Display messages during the run session 598
Test synchronization 599StepGenerator 601GenerateWith statements 602
Instruct UFT to generateWith statements while recording 602
User Guide
HP Unified Functional Testing (12.53) Page 23 of 938
GenerateWith statements for existing actions in the Editor 602RemoveWith statements from an action in the Editor 604
Chapter 53: UFT Automation Scripts 605When to use UFT automation scripts 606Application Object 607UFT Automation Object Model Reference 608Generated automation scripts 608Create a UFT automation script 609
Prerequisites 609Create the Application object 610Run your automation script 613
Run Automation scripts on a remote computer 613Set DCOMConfiguration Properties on the Remote Computer 613Create an Application Object on the Remote Computer 614
Known Issues- Automation Scripts 615Chapter 54: Event Handlers for API Test Steps 616
Writing code for API test events 618Writing events for API tests - Use-case Scenarios 619Custom code steps 628Open a window for writing custom code 629
Open the Events tab 630Select an event 630Edit the code 631
ManipulateWeb Service call/HTTP Request/SOAP Request Step input/outputproperties 631
Access and set property values for input properties 632Add checkpoint property values 633Specify a SOAP Fault and SOAP Fault values 634Assign a specific request file to a test step 635Assign a specific request file to aWeb service step in the OnSendRequest event 635Set asynchronous Web service call properties 636Add an input attachment to aWeb service call 637Access an attachment from aWeb service call response 639Add a HTTP Header forWeb Service Calls 640HTTP Headers for REST Service Calls 641Modify a SOAP Request security header in runtime 642
Stop an API test run 643Manipulate data programmatically 644
Prerequisite 644Retrieve a value from a data source 644Set a property value from a data source 645Import a data source file to your test 646
User Guide
HP Unified Functional Testing (12.53) Page 24 of 938
Export the property values to a file 647Data drive test step property/parameter values 648
Access and set the value of step input, output, or checkpoint properties 650Access an step property 650Access a step's parent activity 651Set the value of a step's properties 652Access the value of a step's property in runtime 653Enable or ignore selected checkpoints - optional 654Set the value of a checkpoint 655
Report test run-time information 656Report a custommessage to the run results 656Report run-time values to the Output pane 657
Retrieve and set test or user variables 659Prerequisite - create user variables. 659Optional - set the test profile 659Retrieve a variable value 659Set a variable value 660
Encrypt and decrypt passwords 661Encrypt the password 661Decrypt the password - optional 661
API test events structure 662Standard event structure 662Web Service event structure 665
API Test Event Coding CommonObjects 669Activity Object 669Assert Object 670Checkpoint Object 671CurrentIterationNumber Object 671EncryptionMngr Object 672EnvironmentProfile Object 673InputAttachment Object 673InputEnvelopeObject 675OutputAttachment Object 676OutputEnvelopeObject 678Parent Object 678TestProfile Object 679UserLogger Object 680
API Test Event Coding Common Methods 680Export Method 681ExportToExcelFile Method 682GetDataSourceMethod 683GetValueMethod 684
User Guide
HP Unified Functional Testing (12.53) Page 25 of 938
GetVariableNames Method 685GetVariableValueMethod 686Import Method 687ImportFromExcelFile Method 688InfoMethod 689Report Method 690SelectSingleNodeMethod 690SetValue Method 691SetVariableValueMethod 692
Part 8: Run / Debug Tests 694Chapter 55: aRunning Tests and Components 695
Run a test or component 697Prerequisites 697Set the number of iterations for the test 697Run an entire test or component 698Run to a selected step or action (GUI testing only) 699Run a single action, test, or a component from a selected step (GUI testing only) 699Interrupt a run session 700Run an API test from the command line 700View the run results 701
Running GUI tests with a disconnected Remote Desktop Connection 702Run aGUI test with a disconnected Remote Desktop Connection 702
Prerequisites 703Log in to the remote computer running UFT 703Configure the Remote Desktop Connection options in the remote computer 703Configure theWindows Task Scheduler options for automation runs - optional 704Start the test and disconnect from the Remote Desktop connection 704
UFT Runtime Engine 705Test Batch Runner 707Create and run a test batch 707
Open Test Batch Runner 707Add batches or tests 708Select the tests to be part of the test batch run 708Run the test batch 708Run the test batch via the command line 708View the test batch run results 708
Using UFT for continuous integration 709Optional steps 709Log tracking 710
Manually configure log tracking settings 711
User Guide
HP Unified Functional Testing (12.53) Page 26 of 938
Open the relevant log configuration file and specify your preferences 711Configure the settings in the Log Tracking pane so that UFT will use the samesettings that you defined in the previous step 712Results 712
Known Issues - Run Sessions 713Chapter 56: Using Run Results 716
Checkpoint andOutput Value results 722Interpret run results 731
Set run result reporting options 732View step details for each test step 732Analyze errors in your test or component 733Analyze checkpoint results (GUI tests and components only) 733View the data source included with your test or component 734View the call stack to isolate errors in the test flow 735View the step properties capture for an API test step 735View custommessages sent to the run results 735Send the run results by email 736
Chapter 57: Running Tests with Virtualized Services and Networks 737Virtualized services 738
Assigning data and performancemodels to a virtualized service 738Network emulation 740Use a virtualized service for a UFT test 741
Prerequisite - Deploy the Service Virtualization server 741Add services from a virtualization project to your test in UFT 741Add virtualized services from a server to the test in UFT 742Undeploy a virtualized service 742Update service details (optional) 743Set the data and performancemodels for the virtualization project 743Pause a deployed service for a test run 744Put a service on standby 744Use the virtualization project in your GUI test 744Use the virtualization project in your API test 745Run the test with a virtualized service 745
Run a test using an emulated network 745Prerequisites 745Enter your credentials for accessing the NV Test Manager 746Start a network emulation session 746Stop a network emulation 746Optional - exclude specific IP addresses from a network emulation 747Run the test using the network emulation 747
Chapter 58: Debugging Tests and Components 749Modifying and watching the values of variables and properties of objects 750
User Guide
HP Unified Functional Testing (12.53) Page 27 of 938
Debug a test, component, function library, or user code file 751Prerequisites 751Slow your debugging session (GUI testing only) 751Step into, out of, or over a specific step during a debug session 751Start or pause your debugging session at a specific step or action 752Use breakpoints in your document 752Check the values of variables and expressions 753Modify the values of variables or expressions during a run session 754Manually run code commands during a debug session 754View the current call stacks 755View currently running threads 755View the loadedmodules associated with the run session 755
Debug a function - Exercise 755Create a new action or function 755Associate the function library with a test) 756Add a call to the function in your test 756Add breakpoints 756Begin running the test or component 756Check the value of the variables in the debug panes 756Check the value of the variables at the next breakpoint 757Modify the value of a variable using the Console pane 757Repeat a command from the command history 757
Step Into, Out of, or Over a specific step - Exercise 758Create the sample function library and test 758Run the function library and use the commands 758
Debug an API user code file - Exercise 759Create test steps 759Set properties for themath steps 759Create parameters for the Custom Code activity 760Link the Custom Code activity to existing steps 760Create events for the Custom Code activity 761Run the test 761Check the value of the variables at the first breakpoint 761Add a variable to theWatch Pane 761Check the value of the variables at the next breakpoint 762
Use breakpoints 763Set a breakpoint 763Enable or disable a breakpoint 763Enable or disable all breakpoints 764Remove a single breakpoint or all breakpoints 764Navigate to a specific breakpoint 764
Known Issues - Debugging 765
User Guide
HP Unified Functional Testing (12.53) Page 28 of 938
Chapter 59: Running Tests with the Runtime Engine 767
Part 9: UFT Integration With HP ALM 768Chapter 60: ALM Integration 769
Work with tests and components in ALM 771Prerequisites 771Connect to an ALM Project 771Enable ALM to run tests or components 772Enable full access to tests from ALM 772Enable the Remote Agent 772Install an external certificate for your ALM server 773Create a template test 774Set UFT Remote Agent Preferences 774Disconnect from the ALM project 774
Resources and Dependencies for ALM assets 774Relative paths for tests/resources saved in ALM 776
ALM template tests 777Create a template GUI test 778Data drive a test in ALM 778
Prerequisites 778Import data into a test (API testing only) 779Data drive the test steps (API testing only) 779Create a data resource file in your ALM project 779Specify a default data table resource for all new test configurations 779Define your test configurations 780Link your configurations to requirements to create requirements coverage - optional 781Run your test configuration 781
Known Issues- Resources and Dependencies 783Known Issues- General ALM integration 783Known Issues- ALM Integration with GUI Testing 786Known Issues- ALM integration with API Testing 787
Chapter 61: Running Tests from ALM 788Running tests in Server-Side Execution 788
AUT environment parameters 789Run a test using Server-Side Execution 790
Prerequisites 790Create tests and save them in ALM 791Create functional test sets in ALM 791Set up AUT Parameters in ALM and link your test parameters to them in UFT -optional 791Set up hosts in ALM for the UFT tests 792
User Guide
HP Unified Functional Testing (12.53) Page 29 of 938
Schedule the tests in ALM - optional 792Run the tests from ALM 792
Test parameterization and test configurations 793Test Combinations Generator 795Use-Case Scenario: Use the Test Combinations Generator 796
Set up and run test configurations 800Prerequisite 800Create a test configuration 801Enter static data configuration values 801Map test parameters to the Excel file 801View component parameter mapping details 802Run the test with the selected configuration 803
Use the Test Combinations Generator to create test configurations 803Prerequisites 803Open the Test Combinations Generator 803Set the value of your parameters 803Automatically generate values for parameters 804Add a custom data generator 804Set values as Happy Path or Error Path 807View the selected parameter combinations 807Change the testing combination algorithm 808Select the configurations to generate 808Generate the test configurations 808
Known Issues - Running tests from ALM 808Run results 808ALM versioning 809External authentication 809Stopping a test in themiddle of a run 809Test Combinations Generator 810Running API tests onWindows 2012 R2 810
Chapter 62: Version Control in ALM 811Asset Comparison Tool and Asset Viewer 813Use ALM version control 816
Check in the currently open asset 817Check out the latest version of an asset 817Cancel a check-out operation 817View the version history 818
Work with the Asset Comparison Tool and Asset Viewer 818Open the Asset Viewer 818Open the Asset Comparison Tool 820View a comparison of two asset versions (Asset Comparison Tool) 822Drill down to compare or view a specific element 822
User Guide
HP Unified Functional Testing (12.53) Page 30 of 938
View the UFT location of an element 823View the number of differences for a specific element 823
Known Issues - ALM Version Control 824Chapter 63: HP Sprinter 826
Part 10: Business Process Testing in UFT 829Chapter 64: Business Process Testing in UFT 830
Business Process Testingmethodologies 831Comparing BPT in UFT to BPT in ALM 834Set up UFT for Business Process Testing 836
Prerequisites 836Install and load the correct addins in UFT 837Configure settings for your application's technology 838Select a test creationmethodology 839
Create andmaintain business process tests and flows in UFT 839Prerequisites 839Create application areas for each area of your application 840Create components 840Add components to business process tests and flows 840Add steps to your component 841Group components and flows 841Use parameters in your test 842Iterate components and flows 842Add a test configuration 842Debug and run your test 842View the run results 843
Business Process Testing in UFT - End-to-end scenario 843Analyze your application 844Prepare your test infrastructure. 845Create the business process test and add steps to the test. 847Enhance your test. 851Run your test. 852
Chapter 65: Business Components and Application Areas 854Convertingmanual components to UFT components 857Create andmanageGUI business components 857
Prerequisites 857Update a component from an earlier QuickTest version 858Create a new business component 858Convert a manual component to an automated component 858Convert the keyword GUI component to a scripted GUI component 859Associate a different application area with your component 859
User Guide
HP Unified Functional Testing (12.53) Page 31 of 938
Delete a component 860Manage application areas 860Known Issues- Business Components and Application Areas 861
Chapter 66: Creating Business Process Test Steps 862Create test steps in a business process test 863
Prerequisites 864Create shared object repositories 864Add test objects using Capture 864Add object repositories to an application area 864Manually add steps to your component 864Add steps to your component by recording 865
Record a business process test 865Prerequisite 865Set recording options 866Set default parameter behavior 866Start the test record 866Perform steps on your application 866Add additional components to the test (optional) 867Stop recording 867
Add test objects to a component with Capture 867Prerequisites 867Set Capture options 867Capture the test objects in the application 868Capture a selected area of the application 869Open the object repository for editing 870Export the local object repository 870
Chapter 67: Using Data in Business Process Testing 871Linking parameters 872Promoting parameters 876Use data in a business process test 877
Design data 878Create parameters and set default values 878Use component parameters in component steps 878Link parameters 878Promote parameters 879Add iterations for a component or flow 880Set data values for the parameters for each iteration 880Export component parameters to an Excel 880Import parameter iteration values from an Excel 881
Using data with Business Process Testing in UFT - Known Issues 882Chapter 68: Running Business Process Tests 883
Running iterations 884
User Guide
HP Unified Functional Testing (12.53) Page 32 of 938
Running iterations of component groups 885Run conditions 888Set run conditions 889
Prerequisites 889Select the flow or component to set run conditions 889Set On Failure settings 889Set run conditions 890
Chapter 69: Business Process Testing with the BPT Packaged Apps Kit 892Learning tests and flows 893Detecting and resolving changes 894Learn business process tests and flows 895Detect and resolve changes using Change DetectionMode 901Business Process Testing with the BPT Packaged Apps Kit - Known Issues 904
Part 11: Appendix 905Appendix A: UFT Terminology Quick Reference 906Appendix B: GUI Checkpoints andOutput Values Per Add-in 916
Supported Checkpoints 917Supported Output Values 921
Appendix C: Frequently AskedQuestions for GUI Testing 925Programming in the Editor and function libraries 926
Can I store functions and subroutines in a function library? 926How can I enter information during a run session? 926I have aMicrosoft Access database that contains data I would like to use inmy test.How do I do this? 926How do I customize the run results? 927
Working with dynamic content 927How can I create and run tests or components on objects that change dynamicallyfrom viewing to viewing? 927How can I check that an object or child object exists (or does not exist)? 927How does UFT record on dynamically generated URLs andWeb pages? 928How does UFT handle tabs in browsers? 928
AdvancedWeb issues 929How does UFT handle cookies? 929Where can I find aWeb page's cookie? 929How does UFT handle session IDs? 929How does UFT handle server redirections? 929How does UFT handlemeta tags? 930Does UFT work with .asp and .jsp? 930How does UFT support AJAX? 930Does UFT work with COM? 930
User Guide
HP Unified Functional Testing (12.53) Page 33 of 938
Does UFT work with XML? 930How can I access HTML tags directly? 931How can I send keyboard key commands (such as shortcut commands) to objectsthat do not support the Typemethod? 931
Working withWindows applications 931How can I record on nonstandardmenus? 931Can I copy and paste to and from the Clipboard during a run session? 932
Test and component maintenance 932How do I maintain my test or component whenmy application changes? 932Can I increase or decrease Active Screen information after I finish recording a test? 933
Testing localized applications 934Improving GUI testing performance 934
How can I improve the working speed of UFT when working with GUI testing? 934How can I decrease the disk space used by UFT for GUI tests and components? 936Is there a recommended length for tests? 936
Send Us Feedback 937
User Guide
HP Unified Functional Testing (12.53) Page 34 of 938

HP Unified Functional Testing (12.53) Page 35
Part 1: UFT Introduction
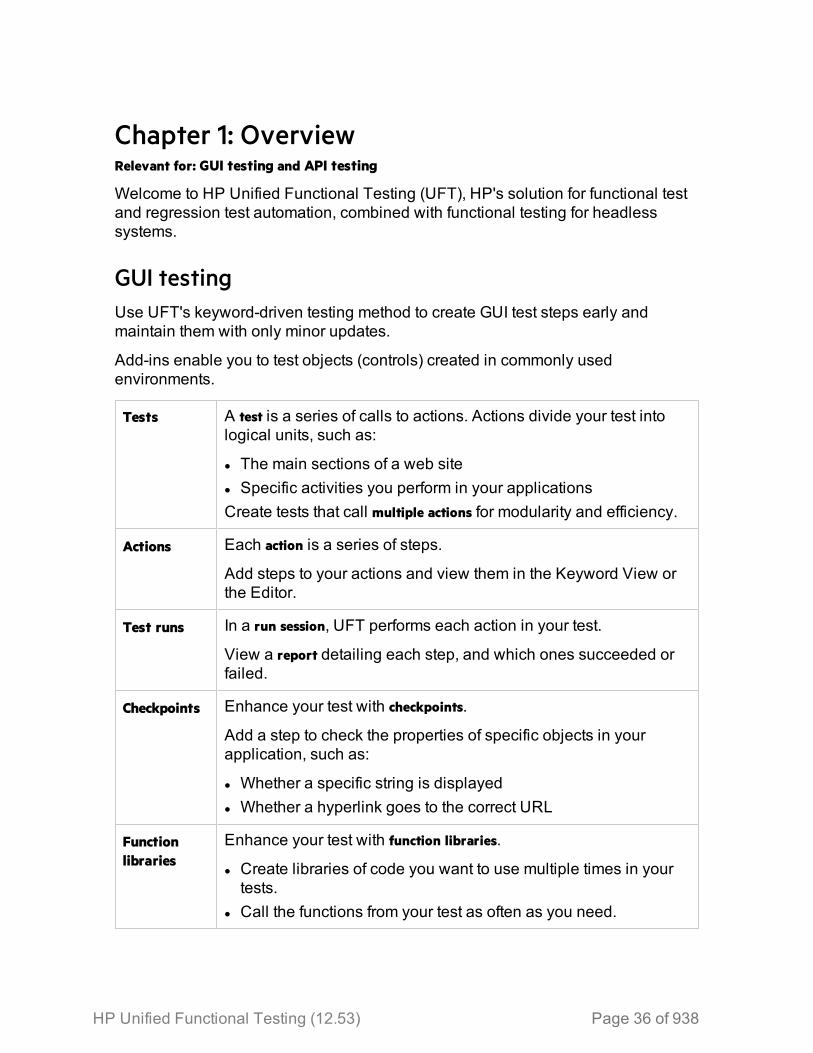
Chapter 1: OverviewRelevant for: GUI testing and API testing
Welcome to HP Unified Functional Testing (UFT), HP's solution for functional testand regression test automation, combined with functional testing for headlesssystems.
GUI testingUse UFT's keyword-driven testing method to create GUI test steps early andmaintain them with only minor updates.
Add-ins enable you to test objects (controls) created in commonly usedenvironments.
Tests A test is a series of calls to actions. Actions divide your test intological units, such as:
l The main sections of a web sitel Specific activities you perform in your applicationsCreate tests that call multiple actions for modularity and efficiency.
Actions Each action is a series of steps.
Add steps to your actions and view them in the Keyword View orthe Editor.
Test runs In a run session, UFT performs each action in your test.
View a report detailing each step, and which ones succeeded orfailed.
Checkpoints Enhance your test with checkpoints.
Add a step to check the properties of specific objects in yourapplication, such as:
l Whether a specific string is displayedl Whether a hyperlink goes to the correct URL
Functionlibraries
Enhance your test with function libraries.
l Create libraries of code you want to use multiple times in yourtests.
l Call the functions from your test as often as you need.
HP Unified Functional Testing (12.53) Page 36 of 938
API testingUFT's API (service) testing solution provides tools for the construction andexecution of functional tests for headless (GUI-less) systems. For example, you canuse UFT to test standard Web Services, non-SOAP Web Services, such as REST,and so on.
Create an API test by dragging and dropping activities from the UFT Toolbox paneinto the test, displayed in the canvas. The toolbox provides a collection of activitiesfor functional testing in areas such as REST, Web Services, JMS, and HTTP. Youcan add more activities to the toolbox by importing WSDLs or providing othercontract definitions.
Integrated testingUFT is able to provide cross-capability and cross product integration.
Integration between GUI and API Testing
Integrate your GUI and service testing processes in a single test by including callsfrom your GUI test to API tests, or from your API tests to GUI tests. When you inserta call to another test, the call is displayed as nested under the relevant action in thecanvas.
For details about calling API tests from GUI tests, see "Running API Tests with GUITests" on page 134.
Fore details about calling GUI tests from API tests, see "Call external tests oractions" on page 400.
Integration with ALM
Use UFT together with ALM to manage the entire testing process. For example,use ALM to:
l Create a project (central repository) of manual and automated testsl Report and track defectsTests and components created in UFT can be saved directly to your ALM project.Run UFT tests and review and manage the results in ALM.
For details see "ALM Integration" on page 769, and the HP Application LifecycleManagement User Guide.
Note: Unless otherwise specified, references to Application LifecycleManagement or ALM apply to all currently supported versions of ALM and
User GuideChapter 1: Overview
HP Unified Functional Testing (12.53) Page 37 of 938
Quality Center. Note that some features and options may not be supported inthe specific edition of ALM or Quality Center that you are using.
Business Process Testing in UFTBusiness Process Testing (BPT) works within UFT or ALM as a component-basedtesting framework. Working with a testing framework provides many advantages toenterprises, including streamlining the creation and maintenance of both manualand automated tests, and maximizing efficiency for testing complete businessprocesses.
For more details, see "Business Process Testing in UFT" on page 829.
User GuideChapter 1: Overview
HP Unified Functional Testing (12.53) Page 38 of 938
UFT program useTo check for software updates, patches, or service packs for UFT, visit the HPSoftware Support Site. The HP Update program does not provide updates for UFT.
LicensingWorking with UFT requires a license. When you install UFT, you select one of thefollowing license types:
l A permanent seat license that is specific to the computer on which it is installed(includes a 30-day demo license)
l A network-based concurrent license that can be used by multiple UFT usersYou can change your license type at any time (as long as you are logged in withadministrator permissions on your computer). For example, if you are currentlyworking with a seat license, you can choose to connect to a concurrent licenseserver, if one is available on your network.
For information on modifying your license information, see the HP Unified FunctionalTesting Installation Guide.
Note: You can also open UFT using a legacy license, although thefunctionality will be limited to the service that you are licensed to use. Forexample, you can open UFT using a legacy QuickTest Professional orService Test license and access GUI testing or API testing functionality.
HP Unified Functional Testing (12.53) Page 39 of 938
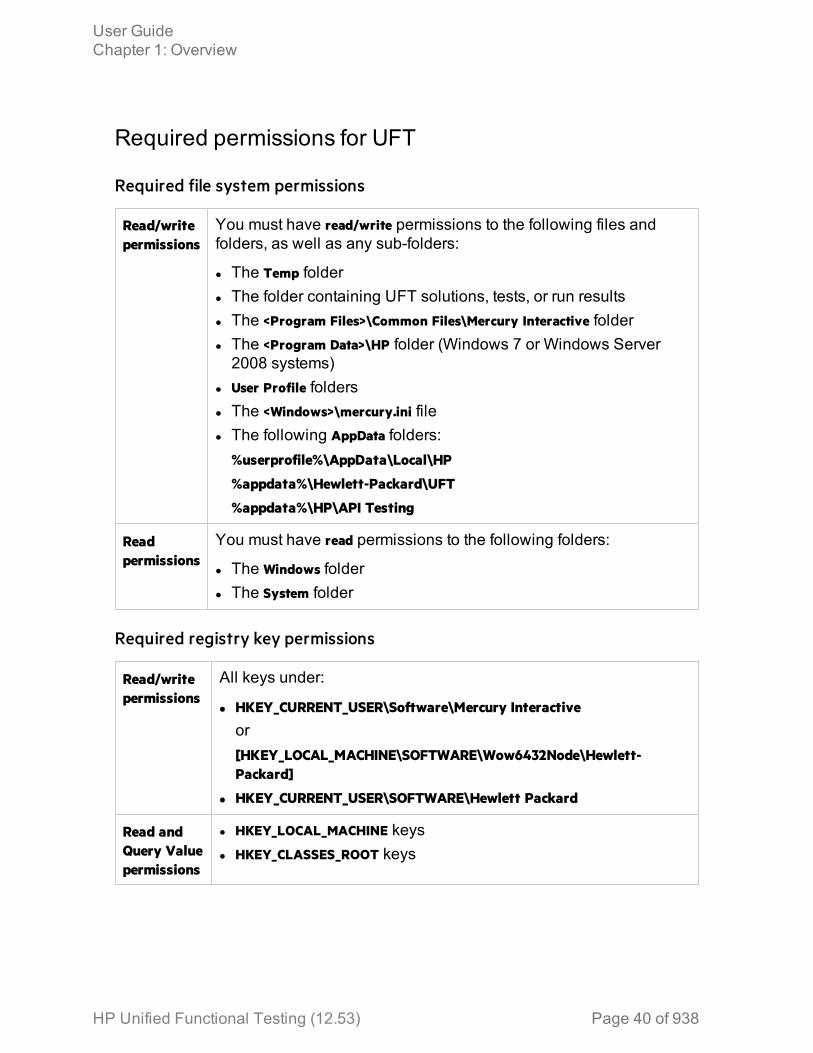
Required permissions for UFT
Required file system permissions
Read/writepermissions
You must have read/write permissions to the following files andfolders, as well as any sub-folders:
l The Temp folderl The folder containing UFT solutions, tests, or run resultsl The <Program Files>\Common Files\Mercury Interactive folderl The <Program Data>\HP folder (Windows 7 or Windows Server2008 systems)
l User Profile foldersl The <Windows>\mercury.ini filel The following AppData folders:
%userprofile%\AppData\Local\HP
%appdata%\Hewlett-Packard\UFT
%appdata%\HP\API Testing
Readpermissions
You must have read permissions to the following folders:
l The Windows folderl The System folder
Required registry key permissions
Read/writepermissions
All keys under:
l HKEY_CURRENT_USER\Software\Mercury Interactive
or[HKEY_LOCAL_MACHINE\SOFTWARE\Wow6432Node\Hewlett-Packard]
l HKEY_CURRENT_USER\SOFTWARE\Hewlett Packard
Read andQuery Valuepermissions
l HKEY_LOCAL_MACHINE keysl HKEY_CLASSES_ROOT keys
User GuideChapter 1: Overview
HP Unified Functional Testing (12.53) Page 40 of 938
Required permissions for ALM
Read/write permissions l ALM cache folderl <Program Data>\HP folderl UFT Add-in for ALM installation folder
Administrative permissions For the first connection to ALM
Required permissions for BPTEnsure that you have the required ALM permissions before working with businesscomponents and application areas.
Component steps
To work with component steps in ALM, you must have the appropriate Add Step,Modify Step, or Delete Step permissions set.
You do not need Modify Component permission to work with component steps.
The Modify Component permission enables you to work with component properties(the fields in the component Details tab).
Parameters in ALM or other testing tools
To work with parameters in ALM or in a testing tool, you must have all theparameter task permissions set in ALM.
Application areas
To modify application areas, you must have the separate permissions for resourcesrequired for modifying components, and adding, modifying, and deleting steps.
All four permissions are required.
If one of these permissions is not assigned, you can open application areas only inread-only format.
Demo applicationsMany examples in this guide use the Mercury Tours sample Web site. The URL forthis Web site is: http://newtours.demoaut.com.
Note that you must register a user name and password to use this site.
User GuideChapter 1: Overview
HP Unified Functional Testing (12.53) Page 41 of 938
A sample Flight Windows-based application is also provided with the UFTinstallation. You can access it from:
l Start > Programs > HP Software > HP Unified Functional Testing > Sample Applications >Flight API or Flight GUI
l <UFT installation folder>/samples/Flights Application/FlightsGUI.exe (for the Flight GUIapplication)
l <UFT installation folder>/samples/Flights Application/FlightsAPI.exe (for the Flight APIapplication)
l Windows 8 and higher: C:\Program Files (x86)\HP\Unified Functional Testing
AccessibilityMany operations are performed using the mouse.
In accordance with Section 508 of the W3C accessibility standards, UFT alsorecognizes operations performed using the MouseKeys option in the WindowsAccessibility Options utility.
Additionally, you can perform many operations using shortcut keys.
Unicode Compliancy
Unified Functional Testing is Unicode compliant according to therequirements of the Unicode standard, enabling you to test applications in manyinternational languages.
Test non-English language applications as long as the relevant Windowslanguage support is installed on the UFT computer.
Names and paths of tests and resources (for example, function libraries, objectrepositories, and recovery scenarios) are not Unicode compliant and thereforeshould be specified in English or in the language of the operating system.
User GuideChapter 1: Overview
HP Unified Functional Testing (12.53) Page 42 of 938
Known Issues- Multilingual ApplicationsRelevant for: GUI tests and components
This section includes general limitations about multilingual issues in UFT.
VMwareUFT may behave unexpectedly when using multi-byte string inputs if it is installedon a VMware operating system.
Workaround: Set the hardware acceleration of the display driver to None. If this doesnot work, uninstall the VMware display adapter.
RecordingWhen using Chinese IME to record multiline objects:
l Some mouse operations on the IME are recorded and are not executed duringthe run session.Workaround: Avoid performing mouse operations on the IME window whilerecording.
l Selecting a character from the IME Candidate window is not supported.
Running testsl There may be cases during a run session when UFT loses the focus of theapplication you are testing when working in a Korean, Chinese, or Japaneseoperating system. This may result in a loss of data during the run session.Workaround: Run an Activate method on the application's window to ensure focuson the window before performing the next step. For example:
Window("Notepad").Activate
l Running the Type method on computers with Japanese, Korean, or Chineseoperating systems may not work as expected.Workaround: Add an English input locale to the computer (using the RegionalOptions or Regional and Language Options in your Control Panel).
Localized versions of UFTThe image displayed when selecting View Sample Snapshot in the UFT AssetComparison tool is not localized
HP Unified Functional Testing (12.53) Page 43 of 938
Additionally, some user interface items are not localized.
Workaround: Install the relevant user interface language .NET FrameworkLanguage Pack. You can download it from the Microsoft download center:http://www.microsoft.com/en-us/download/default.aspx
Examples of interface items that are not localized include:
l Tooltips in the Properties Panel Tooltips and context menu in the editor of the File Content Checkpoint dialogbox
l Compilation information in the Output pane for an API Testl Context menu for the search box in the toolbar of the File Content CheckpointProperties dialog box
l Error messages when importing a WSDL Web servicel The default value string for a Date parameter in the Add Input Parameter dialogbox for an API test
l Warning or error messages in the Test Batch Runner, for example, when savingfiles using the Save As command
l Strings displayed when adding a date-type input parameter in the Propertiespane of an API test
l Some of the UFT user interface related to XML operationsl XML Validation results in the Run Results Viewer
User GuideChapter 1: Overview
HP Unified Functional Testing (12.53) Page 44 of 938
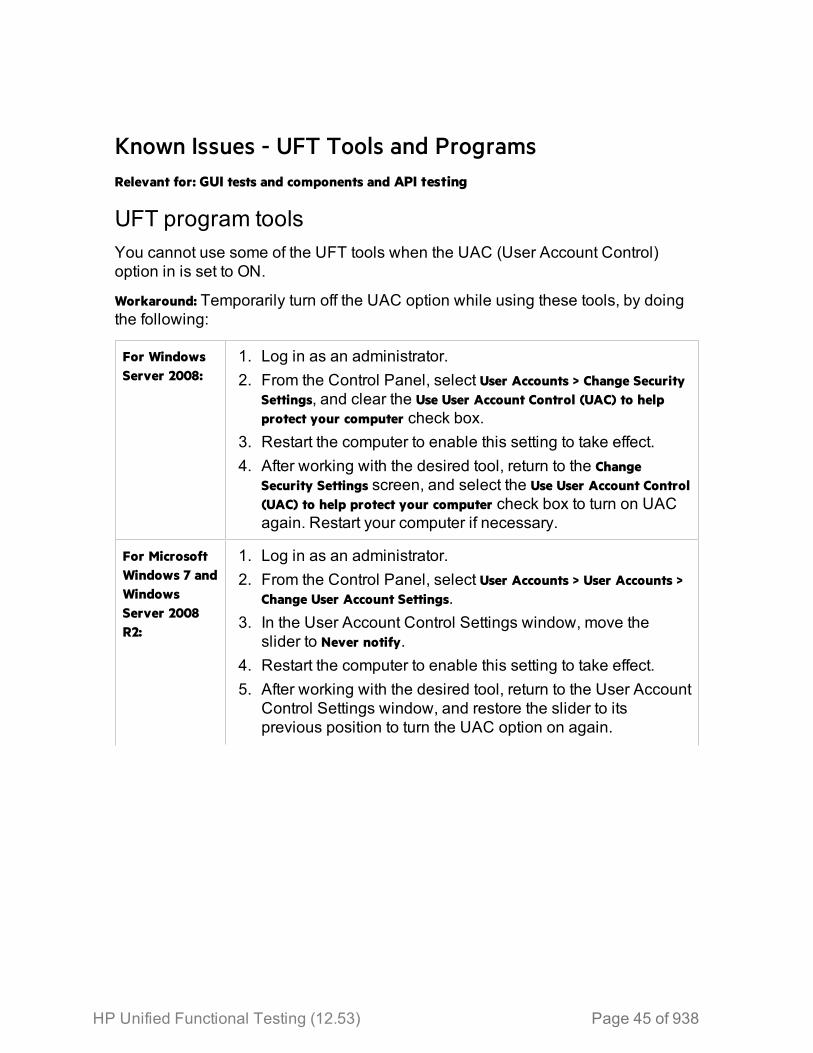
Known Issues - UFT Tools and ProgramsRelevant for: GUI tests and components and API testing
UFT program toolsYou cannot use some of the UFT tools when the UAC (User Account Control)option in is set to ON.
Workaround: Temporarily turn off the UAC option while using these tools, by doingthe following:
For WindowsServer 2008:
1. Log in as an administrator.2. From the Control Panel, select User Accounts > Change Security
Settings, and clear the Use User Account Control (UAC) to helpprotect your computer check box.
3. Restart the computer to enable this setting to take effect.4. After working with the desired tool, return to the Change
Security Settings screen, and select the Use User Account Control(UAC) to help protect your computer check box to turn on UACagain. Restart your computer if necessary.
For MicrosoftWindows 7 andWindowsServer 2008R2:
1. Log in as an administrator.2. From the Control Panel, select User Accounts > User Accounts >
Change User Account Settings.3. In the User Account Control Settings window, move the
slider to Never notify.4. Restart the computer to enable this setting to take effect.5. After working with the desired tool, return to the User Account
Control Settings window, and restore the slider to itsprevious position to turn the UAC option on again.
HP Unified Functional Testing (12.53) Page 45 of 938
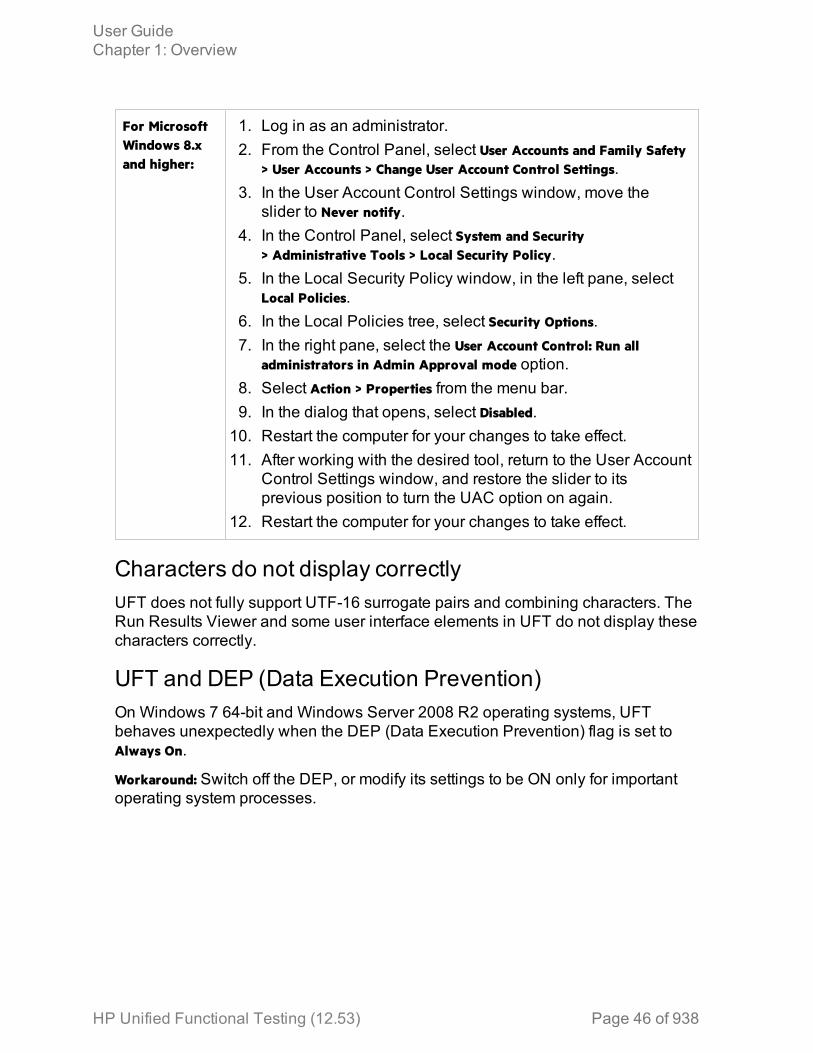
For MicrosoftWindows 8.xand higher:
1. Log in as an administrator.2. From the Control Panel, select User Accounts and Family Safety
> User Accounts > Change User Account Control Settings.3. In the User Account Control Settings window, move the
slider to Never notify.4. In the Control Panel, select System and Security
> Administrative Tools > Local Security Policy.5. In the Local Security Policy window, in the left pane, select
Local Policies.6. In the Local Policies tree, select Security Options.7. In the right pane, select the User Account Control: Run all
administrators in Admin Approval mode option.8. Select Action > Properties from the menu bar.9. In the dialog that opens, select Disabled.10. Restart the computer for your changes to take effect.11. After working with the desired tool, return to the User Account
Control Settings window, and restore the slider to itsprevious position to turn the UAC option on again.
12. Restart the computer for your changes to take effect.
Characters do not display correctlyUFT does not fully support UTF-16 surrogate pairs and combining characters. TheRun Results Viewer and some user interface elements in UFT do not display thesecharacters correctly.
UFT and DEP (Data Execution Prevention)On Windows 7 64-bit and Windows Server 2008 R2 operating systems, UFTbehaves unexpectedly when the DEP (Data Execution Prevention) flag is set toAlways On.
Workaround: Switch off the DEP, or modify its settings to be ON only for importantoperating system processes.
User GuideChapter 1: Overview
HP Unified Functional Testing (12.53) Page 46 of 938

Chapter 2: UFT LicensingUFT supports various types of licenses. You can install licenses using the LicenseWizard or from the command line.
Seat licensesA machine-specific license based on a specific locking code per computer.
The key must be entered once only, and provides one installation per key.
A computer with multiple bootable partitions may generate a different locking codefor each partition.
When obtaining a seat license key, you must use the locking code for the partitionon which you want to use UFT.
Concurrent licensesA license taken from a license server on a per-session basis. You must have anactive network connection to install and check out commuter licenses.
Each time UFT starts, UFT tries to connect to the License Server for an availablelicense.
Each key provides unlimited installations . The license server regulates the numberof licenses in use at any given time.
Note: Install a special tool to track license usage (both for UFT and otherproducts) across your network. This tool is availablehere: https://hpln.hpe.com/contentoffering/hpe-usage-hub
Commuter licensesA license checked out for a period of time to use when you are not connected to thelicense server.
You or another user must have an active network connection to install and checkout commuter licenses.
The license key is based on the machine identification, and is specific for thecomputer making the request.
A commuter license key needs to be entered only once, and provides oneinstallation for a limited period of time.
HP Unified Functional Testing (12.53) Page 47 of 938
After the commuter license expires, UFT automatically returns to the previouslyused license type.
See also:l "Install licenses using the License Wizard" belowl "Install licenses from the command line" on page 51l "UFT licensing FAQs" on page 53l "Known issues with UFT licenses" on page 57
Install licenses using the License WizardThe Functional Testing License Wizard enables you install, check out, or switchbetween license types, and requires administrator permissions.
Access the wizard from the Start menu (HP Software > HP Unified Functional Testing> Tools > Functional Testing License Wizard) or the file system (C:\Program Files (x86)\HP\Unified Functional Testing\bin\HP.UFT.LicenseInstallationWizard)
Exit the wizard when the installation is complete. Restart the LeanFT runtimeengine to apply the new license.
Note: See also: "Install licenses from the command line" on page 51
You can view current license information from the Help > About Unified FunctionalTesting screen by clicking the License button.
Additionally, UFT warns you if your license is about to expire. If you have multiplelicenses, UFT displays the date of the license closest to expiration.
Install a Seat license (wizard)1. In the License Wizard start screen, select Seat license.2. In the Seat License installation screen, do one of the following:
l Click Load License Key File and select your license key .dat file.l Paste the license key in the edit field.If you don't yet have a license key, expand the How can I get a license key filesection.
3. Verify that the license key is valid, and click Install.
Note:
User GuideChapter 2: UFT Licensing
HP Unified Functional Testing (12.53) Page 48 of 938

l If you install a time-limited seat license, do not modify the date on yourcomputer. Doing so will block your active seat license and prevent futureUFT seat license installations on that computer.For questions about this issue, contact your HP license supplier.
l If you modify the MAC address or host name of the computer afterinstalling a seat license, you must regenerate and install your seatlicenses again.
Install a Concurrent license (wizard)1. Prerequisite: Make sure you are connected to the network and can access the
License Server.2. In the License Wizard start screen, select Concurrent license.3. In the Concurrent License Installation screen, enter the License Server address
in the following format:<license server address>:<port>
Default port = 5814
The address format must identical the one used in the Main tab of the LicenseServer Configuration pane.For details, see the AutoPass License Server User Guide.
4. Click Connect to connect to the License Server.5. (Optional) Define a redundant License Server.
If your primary License Server is unavailable, UFT will connect to theredundant License Server to obtain a license. For more details, see theAutoPass License Server User Guide.Expand the Add Redundant Server link and enter the address for the redundantLicense Server.
6. From the product license drop-down list, select the appropriate license andclick Install.
Check out and install a Commuter licenseCommuter licenses can be checked out only if your License Server has availableconcurrent licenses.
1. Prerequisite: Make sure you are connected to the network and can access theLicense Server.Alternative, if you cannot access the License Server: "Check out and install aRemote Commuter license" on page 51
User GuideChapter 2: UFT Licensing
HP Unified Functional Testing (12.53) Page 49 of 938
2. In the License Wizard start screen, select Additional Options > Commuter License.3. In the Commuter License Installation screen, enter the License Server address
in the following format:<license server address>:<port>
Default port = 5814
The address format must identical the one used in the Main tab of the LicenseServer Configuration pane.For details, see the AutoPass License Server User Guide.
4. Click Connect to connect to the License Server.5. After the list of available licenses is displayed, ensure that Available is selected
below the License Server address field.6. From the list of available licenses, select the licenses you need.7. In the Check out licenses for (days) field, enter the number of days for which you
need the commuter license.Maximum = 180 days
8. Click Check Out, and then Next to install the license.
Return a Commuter licenseIf you do not want to return all the licenses that you checked out, you must stillreturn all your checked out commuter licenses and then re-check out the licensesyou need.
1. Prerequisite: Make sure you are connected to the network and can access theLicense Server.Alternative, if you cannot access the License Server: "Check out and install aRemote Commuter license" on the next page
2. Select Commuter License.3. In the Commuter License Installation screen, the License Server address
should already be displayed and connected.If needed, enter the License Server address in the following format:<license server address>:<port>
Default port = 5814
The address format must identical the one used in the Main tab of the LicenseServer Configuration pane.For details, see the AutoPass License Server User Guide.
4. After the list of available licenses is displayed, ensure that Checked Out isselected below the License Server address field.
User GuideChapter 2: UFT Licensing
HP Unified Functional Testing (12.53) Page 50 of 938
5. Click Check In All Licenses, and then Next. The list of checked out licenses iscleared.
Check out and install a Remote Commuter licenseRemote commuter licenses can be checked out only if your License Server hasavailable concurrent licenses.
1. In the License Wizard start screen, select Additional Options > Remote Commuterlicense.
2. In the Remote Commuter License Installation screen, ensure that GenerateRequest File is selected.
3. From the list of available licenses, select the license you need.4. In the Check out licenses for (days) field, enter the number of days for which you
need the commuter license.Maximum = 180 days
5. Click Generate Request File.Send the generated .lcor request file to a License Server administrator or to auser with access permissions to the License Server.The other user must check out and send you a license key file.
6. Save the file, and then click Choose File to browse to the file you received.7. Click Install to install the license.
Return a Remote Commuter license1. In the License Wizard start screen, select Additional Options > Remote Commuter
license.2. In the Remote Commuter License Installation screen, ensure that Generate
Request File is selected.3. In the Generation screen, click Generate and Save Check In Request, and save the
.lcir check in request file.4. Click Next to uninstall the license.The license wizard reports that the remote commuter license is uninstalled. UFTreverts to the previous license type as the active license.
Install licenses from the command lineInstall and verify the statuses of seat or concurrent licenses directly from thecommand line.
Enter the following command, followed by a set of parameters described below.
User GuideChapter 2: UFT Licensing
HP Unified Functional Testing (12.53) Page 51 of 938
"<UFT installation directory>\bin\HP.UFT.LicenseInstall.exe"
Install a Seat license (command line)Add one of the following to install a UFT seat license:
l seat "<license key string>"
l seat "<path to the license key file"
For example:
Install a seat license key from a file saved locally:
"C:\Program Files (x86)\HP\UFT \bin\HP.UFT.LicenseInstall.exe" seat"Downloads\HP UFT-licfile.dat"
Install a seat license key from a license key string:
"C:\Program Files (x86)\HP\UFT\bin\HP.UFT.LicenseInstall.exe" seat "9CDG C9MAH9P9 8HW3 UXB5 HWWF Y9JL KMPL B89H MZVU 6R4Q LHWE JHRP 3FQ3 CMRG HPMR MFVU A5K9MWEC EKW9 HKDU LWWP SRL7 QPJQ YMM5 YQVW NV6G AG2A QZWD HY9B N4ZF BGWB B8GX 7YRFT8XT W7VB QW54 G83H 2TRY KBTD EQUZ M8LB DZU7 WE6H 4NMU BG55 4XKB 27LX ATQB UKF83F9N JQY5 \" HP Unified Functional Testing
Note: If the license key contains a quotation mark character (") in the licensekey string, add a backslash character (\) before the quotes.
Install a Concurrent license (command line)Add the following to install a UFT concurrent license:
concurrent <license ID> <license version> <server name/address> [<redundantserver name/address>] [/force]
Use the following format for the server or redundant server name/address:
<license server address>:<port>
Default port = 5814
The address format must identical the one used in the Main tab of the LicenseServer Configuration pane.
For details, see the AutoPass License Server User Guide.
For example:
User GuideChapter 2: UFT Licensing
HP Unified Functional Testing (12.53) Page 52 of 938

"C:\Program Files (x86)\HP\UFT\bin\HP.UFT.LicenseInstall.exe" concurrent11.11.111.111:5814 /force
/forceparameter
The /force parameter saves the license installation informationeven if the current installation fails.
In subsequent sessions, LeanFT will check the listed licenseserver for the listed license.
Optionalparameters
Optional parameters include:
l portl redundant server name/addressl force
Modify server connection detailsAdd one of the following:
Modify the primary License Server address config protocol.primary <http/https>
Modify the secondary License Server address config protocol.second <http/https>
Verify available licensesAdd the following:
licenses <server name/address> [<redundant server name address>]
For example:
"C:\Program Files (x86)\HP\UFT\bin\HP.UFT.LicenseInstall.exe" licenses11.11.111.111:5814
UFT licensing FAQsThis topic answers a number of frequently asked questions about using andinstalling UFT licenses:
User GuideChapter 2: UFT Licensing
HP Unified Functional Testing (12.53) Page 53 of 938
Can I use my old license (from before UFT 12.50) with thenew License Server?No. UFT 12.50 has changed the license mechanism and the concurrent licenseserver to the Autopass License Server.
Prior versions of UFT used the Sentinel Concurrent License Server.
Note: The Autopass License Server and accompanying documentation isprovided with the UFT Setup program.
In order to use your licenses with versions of UFT 12.50 and later, or to install themon the Autopass License Server, you must upgrade your licenses.
For details, see the topic on upgrading licenses in the HP Unified Functional TestingInstallation Guide.
How do I get a new license?In order to use UFT 12.50 and higher, you have to upgrade your license. Thisenables you to convert your old license to a license compatible with UFT 12.50and higher and the new Autopass License Server.
You upgrade your license through the HP Licensing portal. For details, see thetopic on upgrading licenses in the HP Unified Functional Testing Installation Guide.
What if I have trouble regenerating licenses on theHP License Portal?Contact your regional support for HP Licensing. You can find the appropriateperson for yourself here:https://h30580.www3.hpe.com/poeticWeb/portalintegration/hppWelcome.htm?stepaction=contactLicenseSupport
Which license should I install?In UFT, you can install a number of different license types. The following tableshould help you to identify the one to install.
Scenario License Type to Install
Are you assigned a specific license (withits own unique license key)?
Seat
User GuideChapter 2: UFT Licensing
HP Unified Functional Testing (12.53) Page 54 of 938
Are you part of a group that useslicenses on an as-needed basis?
Concurrent.
You will need the IP address of yourLicense Server where the licenses areinstalled.
Are you assigned the IP address fromwhich to check out a license?
Concurrent
Are you traveling and will not haveaccess to a license server?
Commuter
Are you already traveling and cannotaccess the License Server to get alicense?
Remote Commuter
How do I install the Autopass License Server?In the UFT Setup, there is a link to the License Server setup.
If you click the link, a second window opens with links to install the License Serverand view the Autopass License Server User Guide.
The User Guide contains full instructions for setup and installation.
Can I install the License Server with silent installation?Yes. The UFT installation uses the LICSVR command (as in previous versions ofUFT).
For details on silent installation, see the silent installation section of the HP UnifiedFunctional Testing Installation Guide.
If I am using concurrent licenses, how do I get UFT to workwith the License Server?In the UFT License Wizard, if you select Concurrent license, you must enter theLicense Server IP address.
This checks the connection between UFT and the License Server, and also givesyou a list of possible licenses to install.
After you initially install the license, UFT checks the specified License Serveraddress each time UFT starts and takes the requested license.
User GuideChapter 2: UFT Licensing
HP Unified Functional Testing (12.53) Page 55 of 938
How do I install licenses if I am deploying UFT across anenterprise network?UFT provides a command-line tool that enables you to install UFT licenses withoutusing the License Wizard interface.
For details on the commands to install these licenses, see "Install licenses from thecommand line" on page 51.
The command line license installation is supported for seat and concurrentlicenses.
How do I manage the concurrent licenses on the LicenseServer?The Autopass License Server has a full Web-based interface that enables you toinstall, manage, and administer all your licenses (both concurrent and commuter).
You can see full details on how to use and manage this License Server in theAutopass License Server User Guide, provided with the UFT Setup program (in theLicense Server link).
You can also install a special tool to track license usage (both for UFT and otherproducts) across your network. This tool is availablehere: https://hpln.hpe.com//contentoffering/usage-tracking.
Can I set up my License Server to work with a redundant(backup) License Server?Yes. You need to install the License Server on two separate servers, and then setone server to be the primary and the other to be the redundant server. Thisconfiguration is done in the Autopass License Server Web UI.
You also can supply this information to UFT in the License Wizard, which enablesUFT to take a concurrent license from the redundant License Server in the eventthat the primary License Server is not available.
For details on the redundant License Server setup, see the Autopass License ServerUser Guide.
What is a cleanup license?If your computer is clock-tampered after installing the License Server, both theLicense Server and UFT's connection to the License Server do not work.
In this case, you must get a cleanup license for your License Server. This enablesyou to reset all license capabilities.
User GuideChapter 2: UFT Licensing
HP Unified Functional Testing (12.53) Page 56 of 938
For details on cleanup licenses, contact your HP license supplier.
My demo license is expiring early. What can I do?If you are having problems with the trial license period (30 days maximum), ensurethe following:
l Ensure that you have full permissions to the C:\ProgramData\Hewlett-Packarfd\UFTfolder and all its subfolders
l Ensure that you have not changed the system time. If you have moved thesystem time, the license mechanism can reduce the trial period based on thenumber of days that were back-dated.
Known issues with UFT licensesRelevant for: GUI testing and API testing
Modifyingthecomputerdate
If you install a time-limited seat license, do not modify the date onyour computer.
Doing so will block your active seat license and prevent future UFTseat license installations on that computer.
For questions about this issue, contact your HP license supplier.
NAT The License Server does not support the use of Network AddressTranslation (NAT).
Demolicenses
The concurrent license does not include a demo license and doesnot work without an active connection to a License Server and aninstalled license key.
Changingtypes
You must have administrator permissions to change the licensetype from seat to concurrent or vice versa.
User GuideChapter 2: UFT Licensing
HP Unified Functional Testing (12.53) Page 57 of 938
Chapter 3: UFT Document ManagementRelevant for: GUI tests and components and API testing
A testing document is any file that enables you to test your application. You create,maintain, and edit steps, parameters, functions, and other details in the documentto enable the testing of your application.
Testing documents can include:
GUI testingdocuments
l GUI testsl GUI actionsl Function libraries
API testingdocuments
l API testsl API actionsl C# files containing event handler code (TestUserCode.cs files)l C# files containing user-generated code
BPT documents l Business process testsl Business process flowsl Business components, including API, keyword GUI, andscripted GUI components
l Application areas
Work with testing documents in the "Document Pane", which supports the followingtypes of views and functionality:
Canvas Graphically displays and enables you to edit the flow of your test,action, or component.
KeywordView
Enables you to create and view the steps of your action orcomponent in a keyword-driven, modular, table format.
Editor Provides text and code editing features that facilitate the design ofyour text, script, and code documents.
ApplicationArea
Displays and enables you to edit the application area settings andresource associations.
BPT inUFT
Displays and enables you to create and edit business process testsand flows that are stored in ALM.
HP Unified Functional Testing (12.53) Page 58 of 938
UFT and version control systemsRelevant for: GUI tests, API tests, and function libraries
Work with version control systems, such as SVN or GIT, directly from UFT.
Note:
If you are using SVN, you must use SVN version 1.8.x. If you are using GIT,use the GIT client version 2.5.2 or later.
If your documents and resources are saved in an ALM project or a version-controlled ALM project, see "Version Control in ALM" on page 811
Set up UFT to work with GITBefore using GIT inside UFT you must configure GIT locally:
1. Install the GIT or SVN client on the computer running UFT.2. Create your GIT workspace on your computer.3. In UFT, create the test and save it in the folder configured to work with GIT or
SVN.4. When prompted, enter your user credentials:
SVN You are prompted for your user credentials the first time you add,update, or commit to an SVN repository from UFT.
GIT You are prompted for your user credentials the first time you push tothe remote repository.
Note: If you need to clear your user credentials, select Tools > Clear AllCredentials. Your user credentials for the SVN or GIT repository areremoved and you will be prompted to enter them on the next update orcommit.
After you set up the GIT workspace, the relevant icons are displayed in your testingdocuments in the Solution Explorer and you can use GIT commands for yourdocuments directly from the Solution Explorer.
Update changes for a documentUpdate changes directly from the Solution Explorer.
User GuideChapter 3: UFT Document Management
HP Unified Functional Testing (12.53) Page 59 of 938

Only documents that stand alone - those not dependent on a parent document, likean action to a test - can be updated directly from UFT.
For example, if you want to update changes from one action in a test or a localobject repository in a test, you must commit the test.
To update a document, do the following:
SVN Right-click the document name (or the parent document name), and selectUpdate.
GIT Make sure that the folder containing the document is synced with the Gitrepository.
Right-click the document name and select Git Pull.
Note: If you need to clear your user credentials, select Tools > Clear AllCredentials. Your user credentials for the SVN or GIT repository are removedand you will be prompted to enter them on the next update or commit.
Commit changes for a documentCommit changes directly from the Solution Explorer.
Only documents that stand alone - those not dependent on a parent document, likean action to a test - can be committed directly from UFT. For example, if you want tocommit changes from one action in a test or a local object repository in a test, youmust commit the test.
To commit changes, do the following after creating the test or document in UFT:
SVN In the Solution Explorer, right-click the document (or parent document)name and select Commit.
GIT 1. Make sure that the folder containing the document is synced with theGit repository.
2. In the Solution Explorer, right-click the document and select Git Commit.This adds the test/document to the local repository (if necessary) andcommits the changes.You can commit only tests and external resource files (like a functionlibrary, object repository, or recovery scenario to a repository.
3. (Optional, when committing to the remote repository) In the SolutionExplorer, right-click the document and select Git Push.
User GuideChapter 3: UFT Document Management
HP Unified Functional Testing (12.53) Page 60 of 938
Note: If you have external documents associated with a test (such as anexternal action or a function library), the external documents are not savedand committed when you commit the test. You must save the externaldocument separately.
Compare a document with the repository versionUse the default diff functionality, or specify another diff tool, including the UFTAsset Comparison Tool.
These tools are specified in the Version Control Systems pane of the Options dialogbox (Tools > Options > General tab > Version Control Systems node).
Do the following to perform a diff comparison of your documents:
1. In the Version Control System pane of the Options dialog box (Tools > Options> General tab > Version Control Systems node), specify a diff tool for each type ofdocument.
2. In the Solution Explorer, right-click the document name, and select Diff withPrevious Version.The selected diff tool opens, enabling you to perform your diff comparison.
Revert a documentRight-click the document name in the Solution Explorer, and select Revert. UFTreloads the previous version as saved in the local copy of the repository and yourchanges are removed.
Resolve conflicts between document versionsWhen there are conflicts between document versions, UFT displays a dialog listingthe conflicts, and enables you to choose which version of the document to save.You can also merge two versions of the document if necessary.
Do the following to resolve the conflicts:
1. In the conflict list dialog that opens, select a document with repository conflicts.2. At the bottom of the dialog, choose one of the following options:
Use MyChanges
Saves the changes you made to the document and overwrites theversion saved in the repository.
User GuideChapter 3: UFT Document Management
HP Unified Functional Testing (12.53) Page 61 of 938

UseTheirChanges
Takes the version in the repository and overwrites your changes.
Merge Merges both versions together.You must define a specific tool for merging in the Version Systempane of the Options dialog box (Tools > Options > General tab> Version System pane).
View inExplorer
Open the folder containing the document, where you can manuallymodify the conflicts.
3. Commit the updated version.
Relative paths for test resourcesRelevant for: GUI tests and components
Relative paths are useful if your test's resources are stored in the file system andyou want other users or HP products to be able to run this test on other computers.
During a run session, UFT searches for the resource file in the folder for the currenttest or component, and then in the folders listed in the Folders pane of the Optionsdialog box (Tools > Options > GUI Testing tab > Folders node).
Note: If you are working with the Resources and Dependencies model withALM, specify an absolute ALM path.
UFT enables you to specify whether to convert the path to a relative path or storean absolute path. One of the following message boxes opens, depending onwhether the path you specified, or a part of the path, exists in the Folders pane:
PathExists intheFoldersPane
If the resource path you specify matches an existing search path inthe Folders pane, you are prompted whether to define the path usingonly the relative part of the path.
In cases where a part of the path you enter matches more than onepath in the Folders pane, the closest match is applied. For example, ifboth C:\Current_Version and C:\Current_Version\Libraries are defined inthe search path list, the latter is applied.
User GuideChapter 3: UFT Document Management
HP Unified Functional Testing (12.53) Page 62 of 938
PathDoes NotExist intheFoldersPane
If the resource path you specify does not match an existing searchpath in the Folders pane, you are prompted whether to add theresource's location path to the Folders pane and define the pathrelatively.
Portable copies of testsRelevant for: GUI tests and API tests
You may need to create a portable copy of a test for use when you do not haveaccess to a test's resources.
PortableGUItests
File > Save (Other) > Save with Resources
Save a standalone copy of your GUI test and its resource files to alocal drive or to another storage device.
UFT creates a copy of the following and saves the files in the locationyou specify:
l Source test.l Resource files, such as function libraries and shared objectrepositories.
l Called actions, including actions stored in other tests.UFT does not save the resource files associated with other tests. Ifyou call actions from other tests, ensure that the relevant resourcesare associated with your test.
l Called API tests.
PortableAPItests
Save a standalone copy of your API test and its resources to a localdrive or to another storage device by saving the activity as a localactivity.
To save a copy of an API test with its resources, do the following:
1. In the Toolbox pane, right-click on the service name and selectMove to > File System Activities. The service moves to the FileSystem Activities section of the Toolbox pane.
2. Select File > Save (Other) > Save with Resources.
Tip: If you use UFT with a concurrent license but do not have access to the
User GuideChapter 3: UFT Document Management
HP Unified Functional Testing (12.53) Page 63 of 938

concurrent license server (for example, during a business trip), install acommuter license.
For more details, see the HP Unified Functional Testing Installation Guide.
Opening tests with locked resourcesRelevant for: GUI tests only and API tests
The Locked Resources message box opens when you try to open a document that isassociated with a locked resource file, such as a locked data table or objectrepository file.
Open the document as one of the following:
Read-Only(recommended)
Opens the document in read-only mode, enabling you to run itbut not make any changes to it.
You can:
l Save the document under a new name, and then edit thedocument.
l Run the document, and choose to save the results file.
Read-Write Opens the document in read-write mode, enabling you to runand edit it, and save any changes you make to it.
However, any changes to referenced and locked UFT filescannot be saved.
Locked resource files are opened in read-only mode even if thereferencing document is opened in read-write mode.
Upgrading documents from previous versionsIf you have documents created in QuickTest, Service Test, or previous versions ofUFT, you can upgrade them for UFT.
Upgrading QuickTest tests or componentsl Files last saved in QuickTest 9.5
UFT will open the asset in read-only mode.l Files last saved in QuickTest earlier than 9.5
User GuideChapter 3: UFT Document Management
HP Unified Functional Testing (12.53) Page 64 of 938
An error message is displayed in the UFT Error Pane.l If the asset is saved in the file system, you must first open it in QuickTest 10.00or 11.00 to upgrade it.
l If the asset is saved in Quality Center or ALM, you must use the QuickTestAsset Upgrade Tool for HP ALM (available with the QuickTest Professional10.00 or 11.00 DVD).
l Files saved in QuickTest 10.00 or later
Assets last saved in QuickTest 10.00 or later can be opened in UFT.l QuickTest components
Sharing values between components in a BPT test cannot be done using user-defined environment variables.Instead, use user-defined run-time settings that you create using the Setting.Addmethod.If your QuickTest components used any user-defined environment variables, youmust change them to use run-time settings when you upgrade to UFT.
l QuickTest 11.00 and Chrome
If you previously had QuickTest 11.00 installed on your computer and youinstalled one of the patches or hotfixes that added support for working with theGoogle Chrome browser (QPTWEB00088 or another Chrome-related patch orhotfix), you must delete your user profile in the Chrome browser before you canuse UFT to test applications in Chrome.To do this, open the Chrome Settings window in your Chrome browser. In theUsers section, click the Delete this user button.
l RunScript methods
If you previously used the Frame.RunScript, Frame.RunScriptFromFile, Page.RunScript,or Page.RunScriptFromFile methods in your tests of a Web site or Web application,you should update the RunScript argument to use either an eval function or ananonymous function.For example, if you used this syntax previously:
Browser("MySearchEngine").Page("MySearchEngine").Frame("Web Search").RunScript"var remove = document.getElementById('logo'); remove.parentNode.removeChild(remove)"
you should update this to:
Browser("MySearchEngine").Page("MySearchEngine").Frame("Web Search").RunScript"eval(var remove = document.getElementById('logo');remove.parentNode.removeChild(remove););"
OR
User GuideChapter 3: UFT Document Management
HP Unified Functional Testing (12.53) Page 65 of 938
Browser("MySearchEngine").Page("MySearchEngine").Frame("Web Search").RunScript"(function(){var remove = document.getElementById('logo');remove.parentNode.removeChild(remove);})();"
For Service Test tests or componentsUFT 12.53 provides a Batch Upgrader command line tool, STBatchUpgrader.exe,located in the <UFT installation>/bin folder.
This tool lets you run a batch file to upgrade tests last saved in Service Test,version 11.10 or 11.20, making them compatible for UFT12.53.
l If you do not upgrade your tests with the Batch Upgrader tool, when you open atest created in version 11.10 or 11.20, it prompts you to upgrade the test.
l For tests and components created in Service Test 11.00, you must first open andsave them in Service Test 11.10, before you can upgrade them to UFT12.53.
Upgrade a test last saved in Service Test version 11.10 or 11.20
1. Make sure that UFT is not running.If you ran the upgrader tool once while UFT was running, the logs may becomecorrupted. Backup and delete all of the existing logs in the <Unified FunctionalTesting installation>\bin\logs folder before proceeding.If desired, create a backup copy of the older tests.
2. In the command line, enter the location of the STBatchUpgrader.exe file in theUnified Functional Testing/bin sub-folder.
3. Add the relevant command line options as described in "API Test BatchUpgrader Command Line Options" on the next page.Use the following syntax:
STBatchUpgrader.exe source [destination] [/ALM url domain project] [/loginusername password] [/log logfile] [/report reportfile]
For example, the following string runs the upgrade on all tests in the ST_11_1folder on the ALM server, pumpkin, for the TEST1 project in the AUTOMATIONdomain. It places the report in c:\logs\MyLogfile.log.
STBatchUpgrader.exe Subject\ST11_1 /ALM http://pumpkin:8080/qcbin AUTOMATIONTEST1 /login user password /log c:\logs\MyLogfile.log.
4. Run the command. Verify the validity of the tests in the destination folder.
User GuideChapter 3: UFT Document Management
HP Unified Functional Testing (12.53) Page 66 of 938
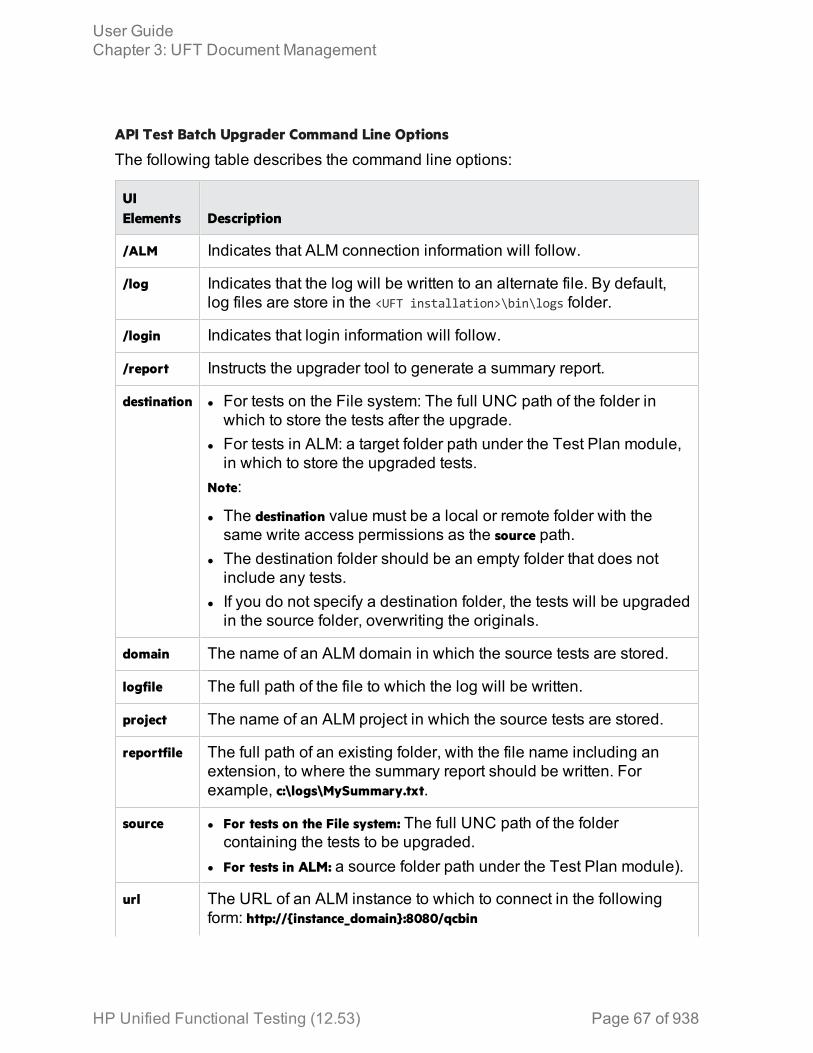
API Test Batch Upgrader Command Line Options
The following table describes the command line options:
UIElements Description
/ALM Indicates that ALM connection information will follow.
/log Indicates that the log will be written to an alternate file. By default,log files are store in the <UFT installation>\bin\logs folder.
/login Indicates that login information will follow.
/report Instructs the upgrader tool to generate a summary report.
destination l For tests on the File system: The full UNC path of the folder inwhich to store the tests after the upgrade.
l For tests in ALM: a target folder path under the Test Plan module,in which to store the upgraded tests.
Note:
l The destination value must be a local or remote folder with thesame write access permissions as the source path.
l The destination folder should be an empty folder that does notinclude any tests.
l If you do not specify a destination folder, the tests will be upgradedin the source folder, overwriting the originals.
domain The name of an ALM domain in which the source tests are stored.
logfile The full path of the file to which the log will be written.
project The name of an ALM project in which the source tests are stored.
reportfile The full path of an existing folder, with the file name including anextension, to where the summary report should be written. Forexample, c:\logs\MySummary.txt.
source l For tests on the File system: The full UNC path of the foldercontaining the tests to be upgraded.
l For tests in ALM: a source folder path under the Test Plan module).
url The URL of an ALM instance to which to connect in the followingform: http://{instance_domain}:8080/qcbin
User GuideChapter 3: UFT Document Management
HP Unified Functional Testing (12.53) Page 67 of 938

UIElements Description
username,password
For ALM mode, the username and password with which to log in tothe ALM project.
If you were unable to upgrade
If the UFT API test upgrade was unable to upgrade the test, you may need tomodify the event handler code to make it compatible with the current version:
l Change the user code file to TestUserCode.cs.l Change the namespace at the beginning of the file to Script.l Change the class definition to public class TestUserCode : TestEntities
For example:
namespace Script{ using System; using System.Xml; using System.Xml.Schema; using HP.ST.Ext.BasicActivities; using HP.ST.Fwk.RunTimeFWK; using HP.ST.Fwk.RunTimeFWK.ActivityFWK; using HP.ST.Fwk.RunTimeFWK.Utilities; using HP.ST.Fwk.RunTimeFWK.CompositeActivities; using System.Windows.Forms; using HP.ST.Ext.FTPActivities;
[Serializable()] public class TestUserCode : TestEntities ...
Known issues with Service Test tests
Security When upgrading a Service Test test from Service Test version11.00 (via 11.10), UFT does not retain the Security settings.
To upgrade the security settings as well, save the SecurityScenario to an .stss file in Service Test 11.00. Then import this filefor your service when you upgrade the test.
User GuideChapter 3: UFT Document Management
HP Unified Functional Testing (12.53) Page 68 of 938

CallQuickTestProfessionalTest steps
Tests last modified in Service Test 11.20 that contain a CallQuickTest Professional Test step, cannot be opened in UFT.
User GuideChapter 3: UFT Document Management
HP Unified Functional Testing (12.53) Page 69 of 938

Naming conventionsRelevant for: GUI tests and components and API testing
The following table lists the restrictions to consider when naming items in UFT:
Item Naming Convention
Action(for GUI tests)
l Must be unique in the test.l Cannot be named Global, since Global is the namereserved for the Global sheet in the Data pane.If you create an action called Global, you will not be able toselect the local or global data sheet when parameterizing aidentification property.
l Cannot begin or end with a space.l Cannot contain the following characters: \ / : * ? " < > | % ' ! { }
Action parameter(for tests)
l Case-sensitive.l Must begin with a letterl Cannot contain spaces.l Cannot contain the following characters: ! @ # $ % ^ & * ( ) +
= [ ] \ { } | ; ' : " , . / < >
Action(for API tests)
l Cannot begin or end with a spacel Cannot exceed 1,023 charactersl Cannot contain the following characters: \ / : * ? " < > | % ' ! { }
Application area(for components)
l Cannot exceed 220 characters (including the path).l Cannot contain, begin, or end with spaces.l Cannot contain the following characters: \ / : " ? < > | * ! { } ' %
; ,l Cannot contain multibyte punctuation symbols and othermultibyte special characters, such as multibyte questionmarks, multibyte spaces, and multibyte brackets.
Componentparameter
l Cannot contain brackets in the name (e.g. {Param1})
HP Unified Functional Testing (12.53) Page 70 of 938
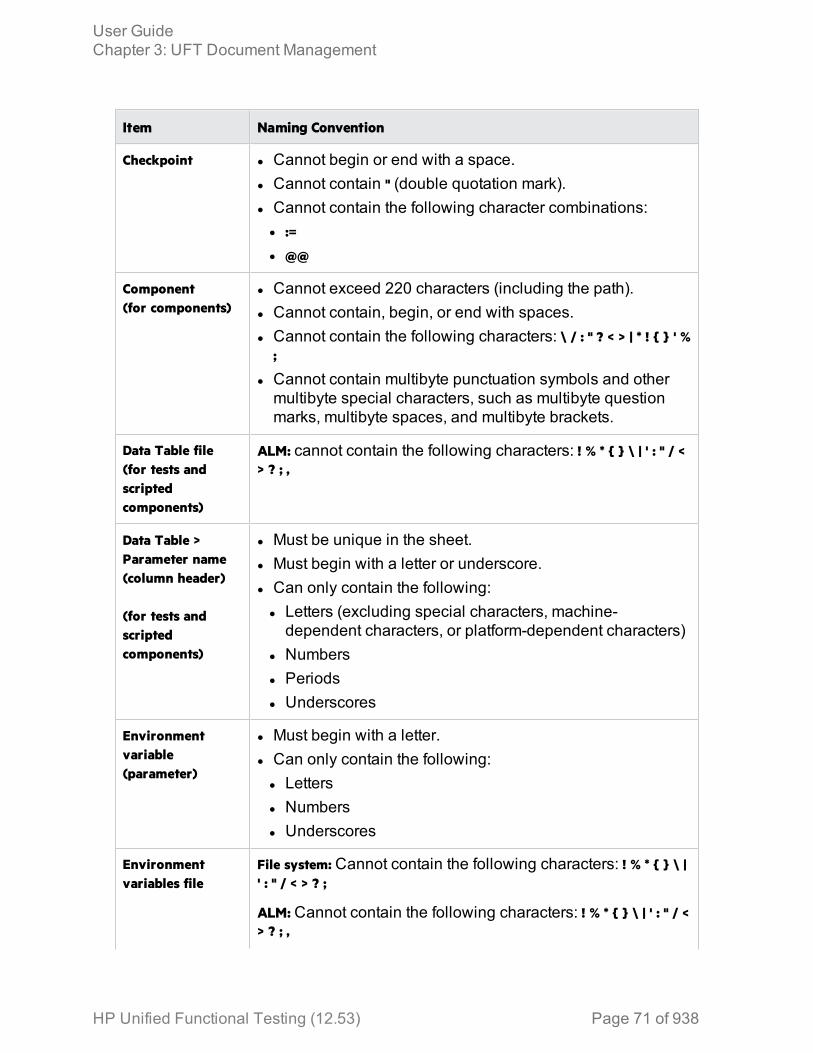
Item Naming Convention
Checkpoint l Cannot begin or end with a space.l Cannot contain " (double quotation mark).l Cannot contain the following character combinations:l :=
l @@
Component(for components)
l Cannot exceed 220 characters (including the path).l Cannot contain, begin, or end with spaces.l Cannot contain the following characters: \ / : " ? < > | * ! { } ' %
;
l Cannot contain multibyte punctuation symbols and othermultibyte special characters, such as multibyte questionmarks, multibyte spaces, and multibyte brackets.
Data Table file(for tests andscriptedcomponents)
ALM: cannot contain the following characters: ! % * { } \ | ' : " / <> ? ; ,
Data Table >Parameter name(column header)
(for tests andscriptedcomponents)
l Must be unique in the sheet.l Must begin with a letter or underscore.l Can only contain the following:l Letters (excluding special characters, machine-dependent characters, or platform-dependent characters)
l Numbersl Periodsl Underscores
Environmentvariable(parameter)
l Must begin with a letter.l Can only contain the following:l Lettersl Numbersl Underscores
Environmentvariables file
File system: Cannot contain the following characters: ! % * { } \ |' : " / < > ? ;
ALM: Cannot contain the following characters: ! % * { } \ | ' : " / <> ? ; ,
User GuideChapter 3: UFT Document Management
HP Unified Functional Testing (12.53) Page 71 of 938

Item Naming Convention
Function libraryfile
File system: Cannot contain the following characters: ! % * { } \ |' : " / < > ? ;
ALM:
l Cannot contain the following characters: ! % * { } \ | ' : " / < > ?; ,
l Cannot contain non-English characters
Function /Function argument
l Cannot contain non-English letters or characters.l Function names cannot be the same as a VBScriptregistered keyword.
l Must begin with a letter.l Cannot contain spaces or any of the following characters: !
@ # $ % ^ & * ( ) + = [ ] \ { } | ; ' : "" , / < > ?
Object repositoryfile
File system: Cannot contain the following characters: ! % * { } \ |' : " / < > ? ;
ALM: Cannot contain the following characters: ! % * { } \ | ' : " / <> ? ; ,
Output value l Cannot begin or end with a space.l Cannot contain " (double quotation mark).l Cannot contain the following character combinations:l :=
l @@
ALM file or foldername
l Cannot exceed 90 characters (including the path).l Cannot begin or end with a space.l Cannot contain the following characters: \ : * ? " < > | % ' ;
l Cannot contain multibyte punctuation symbols and othermultibyte special characters, such as multibyte questionmarks, multibyte spaces, and multibyte brackets.
Recovery Scenario File system: Cannot contain the following characters: ! % * { } \ |' : " / < > ? ;
ALM: Cannot contain the following characters: ! % * { } \ | ' : " / <> ? ; ,
User GuideChapter 3: UFT Document Management
HP Unified Functional Testing (12.53) Page 72 of 938
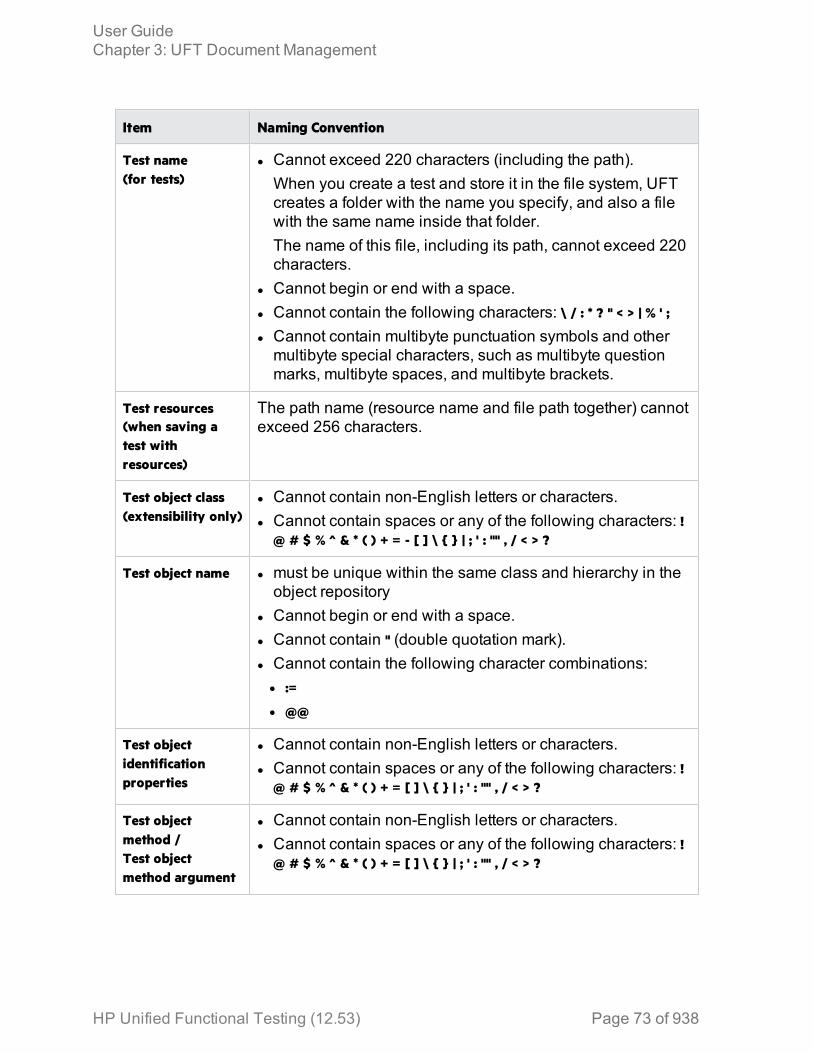
Item Naming Convention
Test name(for tests)
l Cannot exceed 220 characters (including the path).When you create a test and store it in the file system, UFTcreates a folder with the name you specify, and also a filewith the same name inside that folder.The name of this file, including its path, cannot exceed 220characters.
l Cannot begin or end with a space.l Cannot contain the following characters: \ / : * ? " < > | % ' ;
l Cannot contain multibyte punctuation symbols and othermultibyte special characters, such as multibyte questionmarks, multibyte spaces, and multibyte brackets.
Test resources(when saving atest withresources)
The path name (resource name and file path together) cannotexceed 256 characters.
Test object class(extensibility only)
l Cannot contain non-English letters or characters.l Cannot contain spaces or any of the following characters: !
@ # $ % ^ & * ( ) + = - [ ] \ { } | ; ' : "" , / < > ?
Test object name l must be unique within the same class and hierarchy in theobject repository
l Cannot begin or end with a space.l Cannot contain " (double quotation mark).l Cannot contain the following character combinations:l :=
l @@
Test objectidentificationproperties
l Cannot contain non-English letters or characters.l Cannot contain spaces or any of the following characters: !
@ # $ % ^ & * ( ) + = [ ] \ { } | ; ' : "" , / < > ?
Test objectmethod /Test objectmethod argument
l Cannot contain non-English letters or characters.l Cannot contain spaces or any of the following characters: !
@ # $ % ^ & * ( ) + = [ ] \ { } | ; ' : "" , / < > ?
User GuideChapter 3: UFT Document Management
HP Unified Functional Testing (12.53) Page 73 of 938
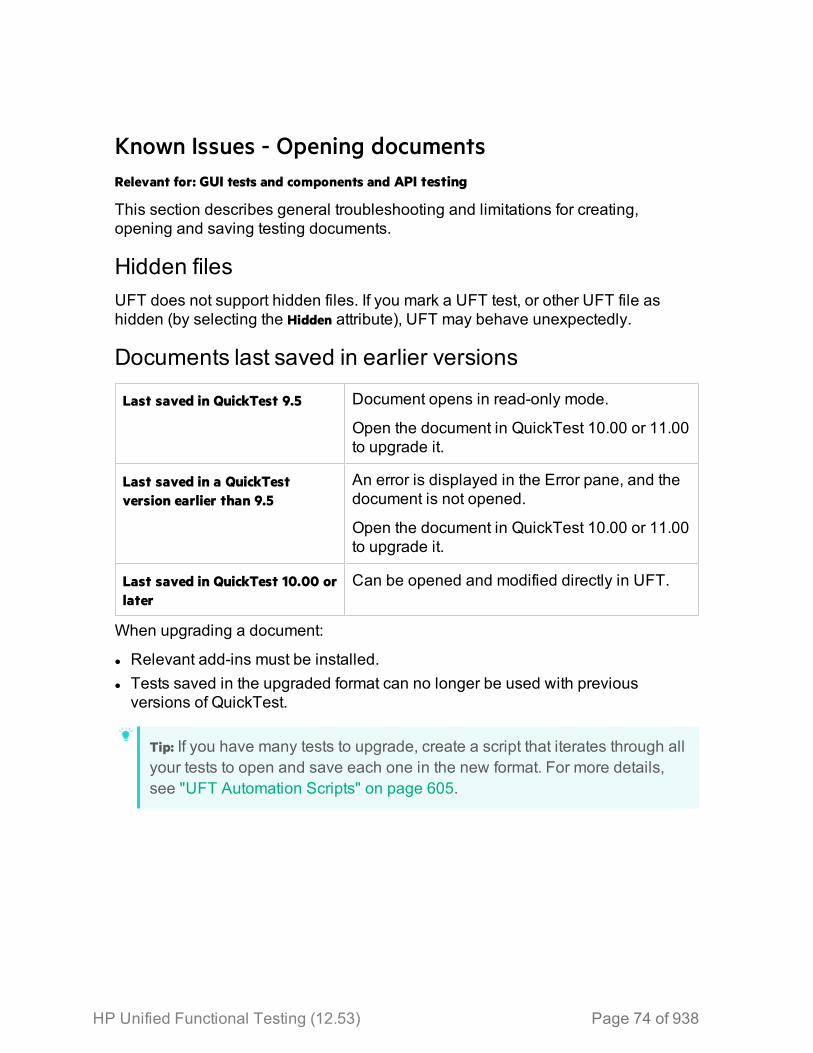
Known Issues - Opening documentsRelevant for: GUI tests and components and API testing
This section describes general troubleshooting and limitations for creating,opening and saving testing documents.
Hidden filesUFT does not support hidden files. If you mark a UFT test, or other UFT file ashidden (by selecting the Hidden attribute), UFT may behave unexpectedly.
Documents last saved in earlier versions
Last saved in QuickTest 9.5 Document opens in read-only mode.
Open the document in QuickTest 10.00 or 11.00to upgrade it.
Last saved in a QuickTestversion earlier than 9.5
An error is displayed in the Error pane, and thedocument is not opened.
Open the document in QuickTest 10.00 or 11.00to upgrade it.
Last saved in QuickTest 10.00 orlater
Can be opened and modified directly in UFT.
When upgrading a document:
l Relevant add-ins must be installed.l Tests saved in the upgraded format can no longer be used with previousversions of QuickTest.
Tip: If you have many tests to upgrade, create a script that iterates through allyour tests to open and save each one in the new format. For more details,see "UFT Automation Scripts" on page 605.
HP Unified Functional Testing (12.53) Page 74 of 938
Opening and saving tests with resourcesWhen you save a test together with its resources, UFT also saves any testscontaining external actions.
However, these called tests contain only the specific actions called from your test,and not all the actions in the called test. These called tests cannot be opened fromthe local copy.If you need full access to all called tests, as well as your main test, save all testslocally, and then manually edit all references to the relevant actions from the maintest.
You cannot save a test with resources when the test calls an external action which,in turn, calls another external action.
Libraries in Windows 7 and higherThe Windows Libraries feature of is not supported. If you attempt to open a testfrom a library location or save a test to a library location, UFT may behaveunexpectedly.
Browse to your saved tests using standard file paths, even if they are included in alibrary.
User Account Control (UAC)If you open a test from a protected location (such as Program Files) and UAC isenabled, the test is opened in read-only mode.
To modify the test, copy it to another location and open the files from there.
Renaming UFT documents in ALMl Renaming a UFT test or component from ALMmay cause the test or componentto behave unexpectedly.Workaround: To rename a test or component, open it in UFT and rename it usingthe Save As option. If the test or component has already been renamed from ALM,use the rename option again to restore the old name, and then use the Save Asoption in UFT.
User GuideChapter 3: UFT Document Management
HP Unified Functional Testing (12.53) Page 75 of 938

HP Unified Functional Testing (12.53) Page 76
Part 2: UFT Panes
Chapter 4: Active Screen PaneRelevant for: GUI tests and scripted GUI components
The Active Screen pane enables you to view snapshots of your application as itappeared during a step in a recording session.
Use the Active Screen when you want to view the application state during aparticular step in the test, or if you need to add steps, checkpoints, or output valuesafter editing and running the test.
The Active Screen enables you to add these additional steps without the need tohave the application open.
View objects, or insert steps, output values, and checkpoints, by right-clicking theobject in the Active Screen and selecting the relevant option. To insert steps, selectStep Generator.
To access 1. Do one of the following:l Ensure that a GUI test, action, or component is in focus in thedocument pane.
l In the solution explorer, select a GUI test or component node,or one of its child nodes.
2. Select View > Active Screen.
Importantinformation
When you are recording on an MDI (Multiple Document Interface)application, the Active Screen does not capture information for non-active child frames.
If you are testing an application using a UFT add-in, see theHP Unified Functional Testing Add-ins Guide to determine whetherspecial Active Screen screen capture options exist for thatenvironment.
Saving Active Screen contentSave the content of the Active Screen with your test if you want to edit the savedtest directly from the Active Screen.
If you need to conserve disk space after you finish editing the test, and you plan touse the test only for test runs you can save the test again without the content of theActive Screen.
HP Unified Functional Testing (12.53) Page 77 of 938

The Active Screen and Insightl For steps that contain Insight test objects, the Active Screen provides only avisual reference to the application and the test object's context. The ActiveScreen displays the Insight test object highlighted within a screen capture of itsparent object.You cannot use the Active Screen of an Insight step to view object properties, toinsert checkpoints or output values, or to add objects to the object repository.
l The OCR text recognition mechanism is not supported for objects in the ActiveScreen.
l When creating objects, checkpoints, or output values from the Active Screen forobjects in a modal dialog box within a Web browser, they are created under theBrowser object and not under the Window object.Workaround: Add the object directly from the application, for example by using theAdd Objects to Local button in the Object Repository window.
The Active Screen and Web-based applicationsThe Active Screen displays the captured HTML content using an Internet Explorerbrowser control, even if you ran your steps on another browser.
Additionally, depending on your settings, the Active Screen may capture yourHTML page before or after various scripts ran on the page.
Some pages may look slightly different in the Active Screen than they appearedduring your record or update run session, and some property values may bedifferent or may not be available.
UFT stores the URL path to images and other resources on the page, rather thandownloading and storing the images with your test. Therefore, you may need toprovide login information to view password-protected resources in the ActiveScreen.
Stop saving Active Screen informationWhen you stop saving Active Screen information, Active Screen files are no longersaved, and you can no longer edit your test from the Active Screen.
1. Open the relevant test.2. Select File > Save As and clear the Save Active Screen files check box.3. Click Save to apply your changes.
User GuideChapter 4: Active Screen Pane
HP Unified Functional Testing (12.53) Page 78 of 938

Update a single Active Screen capture1. Make sure that your application is displaying the window or page that you want
to use to replace what is currently displayed in the Active Screen pane.2. In the Keyword View, click a step that you want to change. The window or page
is displayed in the Active Screen pane.3. Select Tools > Change Active Screen. The UFT window is hidden and the mouse
pointer becomes a pointing hand.4. Click the window or page displayed in your application.5. When a message prompts you to change your current Active Screen display,
click Yes.
User GuideChapter 4: Active Screen Pane
HP Unified Functional Testing (12.53) Page 79 of 938

Chapter 5: Bookmarks PaneRelevant for: GUI actions, scripted GUI components, function libraries, and user code files.
The Bookmarks pane displays the location of bookmarks in your action, scriptedcomponent, function library, or user code files, and enables you to navigate tothese bookmarks.
Use bookmarks when editing files in the Editor. When you assign a bookmark, abookmark icon is added to the left of the selected line of your document.
To access Select View > Bookmarks.
Importantinformation
Bookmarks are saved, per solution, on your file system on a per-user basis.
When working with documents saved in ALM, bookmarks aremaintained until you close UFT.
HP Unified Functional Testing (12.53) Page 80 of 938
Chapter 6: The CanvasRelevant for: GUI tests and API testing
The canvas provides a visual representation of the GUI or API test flow. It opens asa tab in the document pane.
GUI tests in the canvasWorking with the canvas closed can improve UFT's performance when creating oropening a GUI test.
Drag actions to reorder them.
Right-click an element in the canvas to access settings, or to run or debug a testfrom a specific action.
API tests in the canvasManipulate steps by dragging them to reorder, copying and pasting, or deleting.
Add special steps, including:
Loop steps Define loop step details in the Properties pane.
Two-branched conditionalsteps.
Add activities as part of the conditionalbranches.
Break steps Move the test run to the step after a loop.
Continue steps Begin the next iteration.
Test individual steps using the Run Step command.
User GuideChapter 6: The Canvas
HP Unified Functional Testing (12.53) Page 81 of 938
Chapter 7: Data PaneRelevant for: GUI testing, API testing, and business process testing
UFT enables you to insert and run steps that are driven by data, includingmathematical formulas, in the Data pane.
Data table contentEnter data top to bottom and left to right, leaving no gaps of entire rows or columns.
Very large numbers in the data table may cause unexpected behavior.
UFT does not support colors, formatting, and special cell formats.
Data table valuesValues returned from the data table are always converted to strings. Use VBScriptconversion functions to convert values to other types.
For example:
Window("Flight Reservation").WinComboBox("Fly From:").Select CInt(DataTable("ItemNumber", dtGlobalSheet))
Changing column headersIf you change a data parameter (column header), also update the relevant name ofthe parameter wherever else it is used, such as checkpoint or output values, or anyALM parameter mappings.
Importing Excel files to the Data PaneExcel files may be incompatible with UFT if they contains features or functionalityunavailable for GUI tests. Remove the incompatible functionality and try again.
Special formatting in Excel files are not imported, and data is displayed in the Datapane with fixed values.
UFT does not support cross references to other Excel sheets.
For details on supported versions of Microsoft Excel, see the HP Unified FunctionalTesting Product Availability Matrix.
User GuideChapter 7: Data Pane
HP Unified Functional Testing (12.53) Page 82 of 938
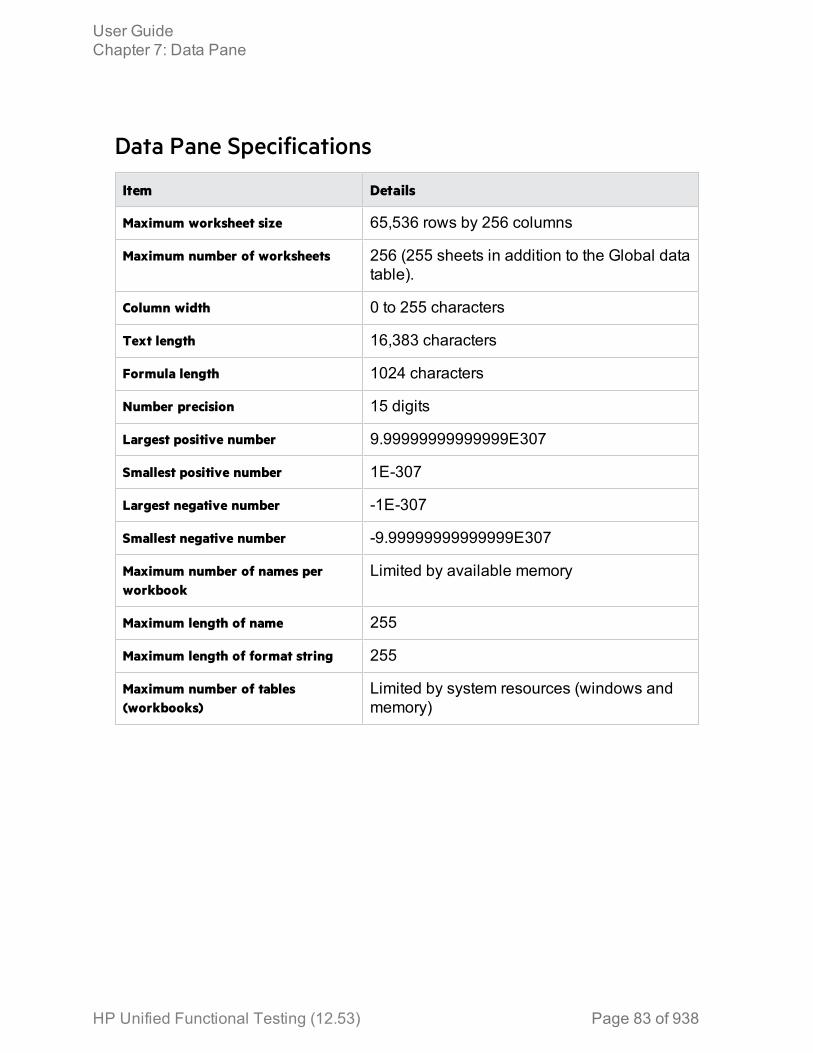
Data Pane Specifications
Item Details
Maximum worksheet size 65,536 rows by 256 columns
Maximum number of worksheets 256 (255 sheets in addition to the Global datatable).
Column width 0 to 255 characters
Text length 16,383 characters
Formula length 1024 characters
Number precision 15 digits
Largest positive number 9.99999999999999E307
Smallest positive number 1E-307
Largest negative number -1E-307
Smallest negative number -9.99999999999999E307
Maximum number of names perworkbook
Limited by available memory
Maximum length of name 255
Maximum length of format string 255
Maximum number of tables(workbooks)
Limited by system resources (windows andmemory)
User GuideChapter 7: Data Pane
HP Unified Functional Testing (12.53) Page 83 of 938
Chapter 8: Debug PanesRelevant for: GUI actions, scripted GUI components, function libraries and user code files
After creating a test, component, function library, or user code file, you can check tosee if they run properly. Using the debug panes, you can then debug your tests,components, function libraries, or user code files using UFT's debuggingcapabilities.
The debug panes are the primary interface for viewing information about yourapplication during run sessions, as well as addressing any errors in the runsession.
The debug panes include:
l Breakpoints Panel Call Stack Panel Loaded Modules Panel Threads Pane ( Testing)l Local Variables Panel Console Panel Watch Pane
Note:For GUI testing: (Relevant only if Microsoft PDM 9.x or later is installed on yourcomputer.) If you add Action automation objects to the Watch pane, and thenclose and re-open your test without closing and re-opening UFT, theseactions may not load successfully in the re-opened test.
If this occurs, restart UFT and open your test.
HP Unified Functional Testing (12.53) Page 84 of 938

Chapter 9: Document PaneRelevant for: GUI tests and components and API testing
The document pane is the main design area in UFT and displays all opendocuments as separate tabs.
You use this pane to view and edit UFT documents.
To access Create or open a document.
Documents open in the following views:
Canvas Graphically displays and enables you to edit the flow of your test,action, or component.
For details, see: "The Canvas" on page 81
KeywordView
Enables you to create and view the steps of your action orcomponent in a keyword-driven, modular, table format.
Editor Provides text and code editing features that facilitate the design ofyour text, script, and code documents.
For details:
l "The Editor" on page 533l "Programming Tests" on page 542l "Open a window for writing custom code" on page 629
BPT in UFT Displays and enables you to edit business process tests and flows,including grouping components and flows, and modifying run order.
Applicationarea
Displays and enables you to edit the application area settings andresource associations.
For details: "Manage application areas" on page 860
HP Unified Functional Testing (12.53) Page 85 of 938
Chapter 10: Errors PaneRelevant for: GUI tests and components, function libraries and API testing
The Errors pane lists syntax errors found in your testing documents. Double-clickan error to locate its source.
To access Select View > Errors.
Errors may have the following severity levels: Message, Warning, or Error, andinclude the following types.
Code syntax errors
GUItesting
UFT checks for syntax errors when switching from the Editor to Keywordview and vice versa. Check manually by selecting Design > Check Syntax.
View a description of each of the VBScript errors in the VBScriptReference.
APItesting
See the Microsoft C# Reference for help resolving code errors.
Missing resourcesMissing resources may cause a run to fail, and include:
l Missing GUI actions.l Missing function libraries.l Missing object repositories.l Missing recovery scenariosl Missing environment variable filesl Unmapped Shared Object Repository Parameter ValuesDouble-click an error description to resolve the error. Navigate to the missingresource and associate it with your test.
Note:
Missing actions are not displayed if a test is open in read-only format.
HP Unified Functional Testing (12.53) Page 86 of 938
Resources located in password-protected areas are always listed as missingif they are opened after opening the test or application area.
Missing referencesReference files located in password-protected areas are always listed as missing ifthey are opened after opening the test.
To locate a missing reference file:
1. Locate the source of the missing reference files.The relevant test code file opens and the cursor flashes at the place in whichthe missing reference file is called during a test run displaying the referencefile's name.
2. In the Solution Explorer, right-click the References node located under an APItest and select Add Reference.
3. Navigate to the missing reference file and associate it with your test.
Missing property valuesFor details on input properties for API test steps, see "Standard Activities" on page386.
To locate a missing test step property value:
1. Locate the source of the missing reference files.The field requiring the missing property value is highlighted in the Propertiespane.
2. Enter the required information for the property value.
User GuideChapter 10: Errors Pane
HP Unified Functional Testing (12.53) Page 87 of 938
Chapter 11: Output PaneRelevant for: GUI tests and components and API testing
The Output pane displays information set to the output in a test or component step.This includes:
l Details about assets that cannot be located or loaded during a run session.l Information sent using the Print Utility statement during a GUI testing runsession.
l Run-time logs of an API testing run session.
To access Select View > Output.
During a paused run session, click the Output Pane toolbar button.
Importantinformation
The Output tab may be unable to display the run results for verylarge tests, exceeding more than a thousand steps.
User interface elements are described below (unlabeled elements are shown inangle brackets):
UIElement Description
<Showoutputfrom>
The type of output to display:
l Build Displays all API test build information. Click a row to navigateto the relevant code.
l Debug: Includes debug information, such as all Print command (printlog) outputs and details about API tests called from GUI tests.
Clear All Lines. Clears all of the messages from the message list.
Toggle Word Wrap. Wraps the text of each message onto the next line.
Locate Jumps to the location in the API testing source document relevant tothe selected output message.
HP Unified Functional Testing (12.53) Page 88 of 938
UIElement Description
<Find box>.The text string you want to find.
Click arrows to jump to the previous or next instance.
Refine your search using the following options:
l Match Case.
l Match Whole Word.
l Use Regular Expression.
Extended regular expressions and multi-line searches are notsupported.
Save Output to a Text File. Enables you to save the contents of themessage list as a text file.
User GuideChapter 11: Output Pane
HP Unified Functional Testing (12.53) Page 89 of 938

Chapter 12: Properties PaneRelevant for: GUI tests and components, API testing, and business process tests and flows
The properties pane is used for viewing and editing global and specific propertiesof your tests and components.
The view and information displayed in the Properties pane is different dependingon what you are testing:
GUItesting
Properties of your test, component, and associated add-ins.
Related parameters
Tests saved in ALM that call a selected action.
APItesting
The Properties pane is the primary place for providing the values yoursteps you use to run the test.
The Properties pane displays tabs that enable you customize the stepproperties or parameters, including:
l General properties of the stepl Input or checkpoint propertiesl Data source propertiesl Event handlers to use with your test stepl HTTP and security information for your HTTP, SOAP, or WebService call steps
BusinessProcessTesting
The information displayed is dependent upon the type of businessprocess document selected:
l When a business process test or flow is selected, the Properties panedisplays basic information about the test or flow and enables you tomanage the test or flow parameters.
l When a component is selected in the document pane, the Propertiespane enables you set On Failure conditions for the component aswell as parameters for the individual component. You can also viewthe general properties for the component.
HP Unified Functional Testing (12.53) Page 90 of 938
Chapter 13: Run Step Results PaneRelevant for: API testing only
The Run Step Results pane displays the results of a single step performed usingthe Run Step command:
l For a simple built-in activity, it shows the status of the run.l For SOAP messages, it shows the Input and Output envelopes.
To access In the canvas, right-click a step and select Run Step. The RunResults Pane automatically opens displaying the run step result.
Importantinformation
l When working in non-English operating systems, certain entriesin the Run Step Results pane are hard-coded in English and nottranslated.
l The Run Step command is not supported for Java or JMSactivities.
HP Unified Functional Testing (12.53) Page 91 of 938

Chapter 14: Search Results PaneRelevant for: GUI tests and components and API testing
The Search Results pane displays all occurrences of the search criteria youdefined.
Note: Searches are not supported in the Keyword View or in the canvas.
Toaccess
Do one of the following:
l Select View > Search Results to view the results of your last search.l In the Find dialog box, define the search criteria and click Find All.l Perform a search for API testing references using the Search menuoptions.
HP Unified Functional Testing (12.53) Page 92 of 938
Chapter 15: Solution Explorer PaneRelevant for: GUI tests and components and API testing
The Solution Explorer displays the currently open solution, with its associateddocuments and their associated files.
A solution is a collection of testing documents and other resources, similar to abinder or notebook. Use solutions to organize your testing documents to help youperform comprehensive application testing.
Example: Suppose you want to test a Web application for a flight bookingapplication. You can create a solution containing several tests orcomponents that verify various aspects of your application, such as loggingin, booking a reservation, verifying the connection between your applicationand database, and verifying the transfer of booking information from yourapplication to an airline server.
To access Click the Solution Explorer toolbar button .
Importantinformation
l New documents are automatically assigned to a solution.l To open a document that is part of the current solution withoutclosing any other documents you currently have open, alwaysopen the document from the Solution Explorer.
l When using UFT on Windows Server 2012, some items are notdisplayed correctly in the Solution Explorer. Restart the computerto display the items correctly.
l Solutions stored on a network location are not locked whenopened by UFT.
HP Unified Functional Testing (12.53) Page 93 of 938

Chapter 16: Tasks PaneRelevant for: GUI tests and components and user code files
The Tasks pane enables you to view and access TODO comments in GUI actions,GUI components, function libraries, or user code files.
TODO comments are reminders that are inserted as comments adjacent to therelevant steps in your testing document. For example, provide instructions tosomeone else during a handover, or you can remind yourself to do something.
To access Select View > Tasks
Important information Text display is limited to 260 characters.
Manage TODO comments
Addcomments
In the Editor, insert comments adjacent to the relevant step in yourdocument, beginning with any of the following:
l To Do
l todo
l to-do
l TODO
When you create event handlers in an API test, the editorautomatically inserts TODO text, indicating where you need to enteryour code.
Deletecomments
Delete the source line in the document.
Sortcomments
Click a column header.
Rearrangecolumns
Drag column headers.
Filtercomments
Click Show Tasks From, and select a source document.
/ <Show / Hide comments>. Toggle to show or hide comments stored inexternal actions or function libraries.
Export comments. Click Export Task List
HP Unified Functional Testing (12.53) Page 94 of 938
Chapter 17: Toolbox PaneRelevant for: tests, components, actions, function libraries, and flows
The Toolbox pane contains items that you can use to create steps in your testingdocument.
The Toolbox pane and GUI testingThe Toolbox pane displays the test objects and functions available for the currentaction, component, or function library.
Add objects and functions to your document by dragging and dropping or copyingand pasting.
Example:
l If you drag and drop a button object into an action or component, a step isadded using the button with a Click operation (the default operation for abutton object).
l If you drag and drop a function into an action, component, or functionlibrary, a comment and a call to that function are added.
The Toolbox pane and API testingThe Toolbox pane provides a collection of service activities for functional testing.To add these activities to a test, drag and drop them in the test canvas.
StandardActivities
Standard API application activities, such as File System activities,Date/Time Activities, Network communication activities, and the like.
LocalActivities
These are custom activities imported into the test by importing aWSDL/WADL file or creating the REST Service prototype.
FileSystemActivities
These are custom activities that have been moved to the file system.By default, local activities are saved only with the test, but can bemoved to a common location on the file system. Once they are movedto the file system, they are displayed as File System Activities.
Add additional activities to the Toolbox pane by importing WSDL and WADL files,or creating REST Service methods. Create new custom activities using the ActivityWizard tool.
HP Unified Functional Testing (12.53) Page 95 of 938

The Toolbox pane and Business Process TestingThe Toolbox pane displays the components and flows that are available for you toadd the current business process test flow. Double click or drag and drop acomponent or flow to add it to the BPT test or flow that is open in the documentpane.
Components and flows are organized according to their ALM path, and you canuse the search bar to find a specific component or flow by name.
User GuideChapter 17: Toolbox Pane
HP Unified Functional Testing (12.53) Page 96 of 938

HP Unified Functional Testing (12.53) Page 97
Part 3: UFT Configuration

Chapter 18: Global OptionsRelevant for: GUI testing and API testing
The Options dialog box enables you to modify the general appearance andbehavior of UFT. The values you set remain in effect for all documents and forsubsequent testing sessions.
For example, you can define the user interface language, set startup options, ormodify the font and colors of code elements in the Editor.
To access Tools > Options
Importantinformation
The Restore Factory Defaults button resets all Options dialog boxoptions to their defaults.
In the Options dialog, set your options in the following panes:
Tab Available Panes
General l Startup Optionsl Run Sessions Panel Output Panel Network Virtualization Panel Version Control Systems Pane
GUI Testing tab l General Panel Text Recognition Panel Test Runs Panel Folders Panel Active Screen Panel Screen Capture Panel Insight Panel Remote Connection Pane
API Testing tab l General Panel Auto-Values Panel SAP Connections Pane
HP Unified Functional Testing (12.53) Page 98 of 938
BPT Testing tab l General Panel Recording Settings panel BPT Packaged Apps Kit Pane
Coding tab l Code Templates Pane
Text Editor tab l General Panel Fonts and Colors Pane
User GuideChapter 18: Global Options
HP Unified Functional Testing (12.53) Page 99 of 938
Chapter 19: Document SettingsRelevant for: GUI tests and components
Use the Test or Business Component Settings dialog box or the AdditionalSettings pane in an application area to set testing options that affect how UFTworks with a specific test or component.
Different panes and settings are available, depending on the document in focus(test, component, or application area), as well as the Add-ins loaded.
To access l Have a test open in the document pane, or selected in thesolution explorer.Select File > Settings.
l Create or open an application area.
Importantinformation
The Restore Factory Defaults button resets all Options dialog boxoptions to their defaults.
Most business components inherit settings from the component'sapplication area and are displayed as read-only in the BusinessComponent Settings dialog box.
Note: You can also set testing options that affect all tests and components.For details, see "Global Options" on page 98.
The table below lists the panes contained in the Settings dialog box.
Node Options
Properties The properties of the test or component, for example, itsdescription and associated add-ins. You can also set the statusof a component.
Snapshot(componentsonly)
Options for capturing or loading a snapshot image to be savedwith the component for display in ALM.
Run(tests only)
The run session preferences for your test.
Applications(componentsonly)
The Windows-based applications on which the component canrecord and run.
HP Unified Functional Testing (12.53) Page 100 of 938
Node Options
Resources The resources associated with your test or component, such asfunction libraries, shared object repositories, and data tables.
Environment(tests/scriptedcomponentsonly)
Options for viewing existing built-in and user-definedenvironment variables, adding, modifying and saving user-defined environment variables, and selecting the active externalenvironment variables file.
Recovery Options for setting how UFT recovers from unexpected eventsand errors that occur in your testing environment during a runsession.
Log Tracking Options for activating and setting run-time preferences fortracking log messages generated by the log framework thatmonitors events occurring in your application.
Local SystemMonitor
Options for activating and setting preferences for trackingsystem counters during a run session.
User GuideChapter 19: Document Settings
HP Unified Functional Testing (12.53) Page 101 of 938
Chapter 20: Set Options ProgrammaticallyRelevant for: GUI tests and scripted GUI components
Use the Setting object in the Editor to control how UFT runs tests by setting andretrieving testing options during a run session.
Set an option using the following syntax:
Setting (testing_option) = new_value
To change an option, insert the Setting object statement at a relevant point in theaction, such as after a specific page opens. Then, insert another statement with theSetting object to reset the changed setting before the next part of your test.
The defined setting remains in effect until it is changed again, either by anotherSetting statement or my modifying an option in the UI, or until the end of your currentUFT session.
Note: If you make and save other changes in a related Options or Settingsdialog box pane, the settings defined by the Setting statement are saved foryour next session.
For detailed information on all the available methods and properties for the Settingobject, see the Utility Objects section of the UFT Object Model Reference for GUI Testing.
Example: Setting options for an entire test
If you run the following statement with the Web Add-in loaded:
Setting("AutomaticLinkRun")=1
UFT disables automatically created checkpoints in the test.
This is the same as selecting the Ignore automatic checkpoints whilerunning tests or components option in the Web Advanced pane of theOptions dialog box.
If you run the following statement:
Setting("WebTimeOut")=50000
UFT automatically changes the amount of time it waits for a Web pageto load before running a test step to 50000 milliseconds.
This is the same as setting the Browser Navigation Timeout option inthe Web pane of the Test Settings dialog box.
HP Unified Functional Testing (12.53) Page 102 of 938
Example: Setting options for a specific section of a test
If you want to change the DefaultTimeOut testing option to 5 secondsfor objects on one Web page only, insert the following statement afterthe Web page opens in your test script:
'Keep the original value of the DefaultTimeOut testing optionold_delay = Setting ("DefaultTimeOut")'Set temporary value for the DefaultTimeOut testing optionSetting("DefaultTimeOut")= 5000
To return the DefaultTimeOut testing option to its original value atthe end of the Web page, insert the following statement immediatelybefore linking to the next page in the script:
'Change the DefaultTimeOut testing option back to its original value.Setting("DefaultTimeOut")=old_delay
User GuideChapter 20: Set Options Programmatically
HP Unified Functional Testing (12.53) Page 103 of 938

HP Unified Functional Testing (12.53) Page 104
Part 4: GUI Test Design
Chapter 21: GUI Test Creation OverviewRelevant for: GUI tests and components
You can create tests using the keyword-driven methodology, step recording,importing steps from HP Sprinter, or a combination of all of these methods.
Keyword-driven methodologyThis methodology requires an infrastructure for all of the required resources,including shared object repositories, function libraries, and recovery scenarios.
Setting up the infrastructure requires in-depth knowledge of your application and ahigh level of UFT expertise.
Although setting up the infrastructure may initially require a longer time-investmentin comparison to recording tests, using the keyword-driven methodology enablesyou to create tests that are more application-specific and have a more structureddesign.
This enables you to maintain your tests more efficiently and provides you with moreflexibility than a recorded test.
Advantages of the keyword-driven methodology:
Designedat thebusinesslevel
Keyword-driven testing enables you to design tests at a businesslevel rather than at the object level.
For example, UFT may recognize a single option selection in yourapplication as several steps: a click on a button object, a mouseoperation on a list object, and then a keyboard operation on a listsub-item. You can create an appropriately-named function torepresent all of these lower-level operations in a single, business-level keyword.
Easier toread
Technical operations, such as a synchronization statement that waitsfor client-server communications to finish, are incorporated intohigher level keywords.
This makes tests easier to read and easier for less technicalapplication testers to maintain when the application changes.
Separatedresourcesand tests
Keyword-driven testing naturally leads to a more efficient separationbetween resource maintenance and test maintenance. This enablesthe automation experts to focus on maintaining objects and functionswhile application testers focus on maintaining the test structure anddesign.
HP Unified Functional Testing (12.53) Page 105 of 938
Earlierstart
Automation experts can add objects and functions based on detailedproduct specifications even before a feature has been added to aproduct. Using keyword-driven testing, you can begin to developtests for a new product or feature earlier in the development cycle.
RecordingLet UFT generate test steps by recording the typical processes that you perform onyour application.
As you navigate through your application, each step you perform is graphicallydisplayed as a row in the Keyword View.
A step is anything a user does that changes the content of a page or object in yourapplication, such as clicking a link or typing data into an edit box.
Recording may be easier for new UFT users or when beginning to design tests fora new application or a new feature.
Advantages of recording
Better fornew users
Recording helps novice UFT users learn how UFT interprets theoperations you perform on your application, and how it convertsthem to UFT objects and built-in operations.
Better fornewapplicationsor features
Recording can be useful for more advanced UFT users whenworking with a new application or major new features of anexisting application.
Recording is also helpful while developing functions thatincorporate built-in UFT keywords.
Quick testcreation
Recording can be useful when you need to quickly create a testthat tests the basic functionality of an application or feature, butdoes not require long-term maintenance.
Importing tests from SprinterSprinter, HP's manual testing solution, enables the manual tester to performoperations (user actions) on an application while Sprinter captures and savesinformation about each user action in the background. This process is similar torecording steps on your application in UFT.
After the Sprinter run session ends, the manual tester can export the captured useractions, test objects, and comments, to an automated test data file in XML format.
Import this file to UFT to convert it to a UFTGUI test with a local object repository.
User GuideChapter 21: GUI Test Creation Overview
HP Unified Functional Testing (12.53) Page 106 of 938
This method helps to increase testing coverage for the application, as it creates amore seamless workflow between manual testers and automation experts that aretesting the same application.
Enhancing your testsRelevant for: GUI tests only
After creating an initial test, you can further enhance it by adding and modifyingsteps in the Keyword View or the Editor.
CheckpointsAdd checkpoints to your test to compare specified items during a run session withthe values stored for the same items within the test.
Checkpoints enable you to identify whether or not your application is functioningcorrectly, and have several types. For details, see "Checkpoints in GUI Testing" onpage 262
Tip: You can also use the CheckProperty method, which enables you toverify the property value of an object without using the checkpoint interface.
ParameterizationParameterizing your test is when you replace fixed values with values from anexternal source during your run session.
Do this to test the same operations with different data.
You can supply data from a data table, environment variables you define, or valuesthat UFT generates during the run session.
For more details, see "Parameterizing Object Values" on page 330.
Output ValuesRetrieve values from your test and store them in the data table as output values tosubsequently use these values as an input parameter in your test.
For more details, see "Output Values in GUI Testing" on page 322.
Programming StatementsUse special UFT options to enhance your test with programming statements.
User GuideChapter 21: GUI Test Creation Overview
HP Unified Functional Testing (12.53) Page 107 of 938

l The Step Generator guides you step-by-step through the process of addingrecordable and non-recordable operations (methods and properties) to your test.
l Synchronize your test to ensure that your application is ready for UFT to performthe next step in your test.
l Measure the amount of time it takes for your application to perform steps in a testby defining and measuring transactions.
For more details, see "Generated Programming Operations" on page 597.
You can also manually enter standard VBScript statements, as well as statementsusing UFT test objects and operations. For details, see "Programming Tests" onpage 542.
Active Screen UpdatesAs the content of your application changes, update the selected Active Screendisplay.
Then, use the Active Screen to add new steps to your test instead of re-recordingsteps on new or modified objects.
For details, see "Update test object descriptions, checkpoints, or output values, orActive Screen captures" on page 155.
Create a keyword-driven GUI testRelevant for: GUI tests only
This task describes how to create a test using the keyword-driven methodology.
After creating your test, run it to test your application and analyze the results, debugthe test, or run in Maintenance Mode or Update Run Mode to maintain changes.
For details, see "Run / Debug Tests" on page 694"Run / Debug Tests" on page694 and "Maintaining Tests or Components " on page 147.
Analyze your applicationBefore you begin creating a test, analyze your application and determine yourtesting needs. You need to determine:
Thedevelopmentenvironments
Determine the development environments in which yourapplication controls were developed, such as Web, Java, or .NET,so that you can load the required UFT add-ins.
User GuideChapter 21: GUI Test Creation Overview
HP Unified Functional Testing (12.53) Page 108 of 938

Thefunctionalityto test
Determine the functionality that you want to test.
To do this, consider the various activities that customers performin your application to accomplish specific tasks.
l Which objects and operations are relevant for the set ofbusiness processes that need to be tested?
l Which operations require customized keywords to provideadditional functionality?
How toorganizeyour test
Decide how to divide these processes into smaller units that willbe represented by your test's actions.
Each action should emulate an activity that a customer mightperform when using your application.
As you plan, try to keep the amount of steps you plan to include ineach action to a minimum. Creating small, modular actions helpsmake your tests easier to read, follow, and maintain.
Prepare the testing infrastructurePrepare the infrastructure needed for your test.
Build the set of resources for your test
This includes:
Shared objectrepositories
Contain test objects, which are representations of the objects inyour application.
For details, see "Test Objects in Object Repositories" on page206.
Functionlibraries
Contain functions that enhance UFT functionality.
For details, see "User-Defined Functions" on page 575
Recoveryscenarios
Instruct UFT to recover from unexpected events and errors thatoccur in your testing environment during a run session.
For details, see "Recovery Scenarios" on page 159.
Additionaloptional files
Includes data table files and environment variable files.
For details, see "Parameterizing Object Values" on page 330.
User GuideChapter 21: GUI Test Creation Overview
HP Unified Functional Testing (12.53) Page 109 of 938

Configure UFT according to your testing needs
This can include setting up global testing and test-specific preferences, as well asrun session preferences.
Associate any recovery scenarios with your test, and create automation scripts toset required configurations at the start of a run session.
For details, see:
l "Global Options" on page 98l "Document Settings" on page 100l "Recovery Scenarios" on page 159l "UFT Automation Scripts" on page 605
Create one or more tests that serve as action repositories
This enables you to store the actions to be used in your test and maintain youractions in one central location.
For details, see "Actions in GUI Testing" on page 121.
Associate your resources with your test and the relevant actions
Associate your function libraries and recovery scenarios with the relevant tests sothat you can insert steps using keyworks.
Also, associate object repositories with relevant actions so you can insert stepsusing the stored test objects.
For details, see:
l "Test Objects in Object Repositories" on page 206l "User-Defined Functions" on page 575l "Recovery Scenarios" on page 159
User GuideChapter 21: GUI Test Creation Overview
HP Unified Functional Testing (12.53) Page 110 of 938

Add steps to the actions in your test action repositoryCreate steps using keyword-driven functionality. You can use the table-like,graphical Keyword View—or you can use the Editor if you prefer to program stepsdirectly in VBScript.
You can add steps to your test in one or both of the following ways:
Drag objects from yourobject repository orfrom the Toolbox pane
This adds keyword-driven steps in the Keyword View orthe Editor.
The object repository and Toolbox pane contain all ofthe objects that you want to test in your application.
Record on yourapplication
As you navigate through your application during arecording session, each step you perform is graphicallydisplayed as a row in the Keyword View.
For details, see "Keyword View" on page 126.
Enhance your testEnhance the testing process by modifying your test with special testing optionsand/or with programming statements.
For details, see:
l "Checkpoints in GUI Testing" on page 262l "Output Values in GUI Testing" on page 322l "Parameterizing Object Values" on page 330l "User-Defined Functions" on page 575l "Generated Programming Operations" on page 597
Sample testRelevant for: GUI tests only
The following is a sample action of a login procedure to the Mercury Tours site, thesample Web site. When you create tests, UFT creates both a graphicalrepresentation and script of the steps you perform on your application.
User GuideChapter 21: GUI Test Creation Overview
HP Unified Functional Testing (12.53) Page 111 of 938
The graphical representation of these steps is displayed in the Keyword View.
The table below provides an explanation of each step in the Keyword View.
Step Description
The browser invokes the Welcome: Mercury Tours Web site.
Welcome: Mercury Tours is the name of the Web page test object.
userName is the name of the edit box test object. Set is the methodperformed on the edit box. tutorial is the value property of this edit box.
password is the name of the edit box test object. SetSecure is an encryptionmethod performed on the edit box.4ff405198a68b24867227da98b21e547cfc0c2f47d31 is the encrypted value of thepassword.
Sign-In is the name of the image link test object. Click is the methodperformed on the image. 26, 4 are the x- and y-coordinates where theimage was clicked.
The Editor displays these same steps using a VBScript program based on the UFTobject model.
Browser("Welcome: Mercury Tours").Page("Welcome: Mercury Tours").WebEdit("userName").Set "tutorial"Browser("Welcome: Mercury Tours").Page("Welcome: Mercury Tours").WebEdit("password").SetSecure "4ff405198a68b24867227da98b21e547cfc0c2f47d31"Browser("Welcome: Mercury Tours").Page("Welcome: Mercury Tours").Image("Sign-In").Click 26,4
User GuideChapter 21: GUI Test Creation Overview
HP Unified Functional Testing (12.53) Page 112 of 938

Chapter 22: Record GUI Tests and ComponentsRelevant for: GUI tests and components
You can create the main body of a test or component by recording the typicalprocesses that users perform on your application.
UFT records the operations you perform, adding them as steps to the selected testaction or component.
Then, during a run session, UFT uses the recorded steps to replicate theoperations you performed while recording.
While you record the steps, UFT creates test objects representing the objects inyour application on which you perform operations, and stores them in the test orcomponent's local object repository. This enables UFT to identify the objects inyour application both while creating the test or component and during a runsession.
UFT also enters the correct methods, and argument values for the objects in yourapplication. During a recording session, you can also add checkpoint and outputvalue steps, to check or retrieve values from your application.
UFT provides the following recording modes:
l "Normal Recording" belowl "Analog Recording" on the next pagel "Insight recording" on page 115l "Low-level recording" on the next page
Note: UFT supports an additional recording mode, Standard Windowsrecording, which is relevant when recording tests or components on SAPGUI for Windows applications.
For details, see the SAP GUI for Windows section of the HP Unified FunctionalTesting Add-ins Guide.
Normal RecordingRecords the objects in your application and the operations performed on them.
This mode is the default and takes full advantage of the UFT test object model,recognizing the objects in your application regardless of their location on thescreen.
HP Unified Functional Testing (12.53) Page 113 of 938
Analog RecordingRecords the exact mouse and keyboard operations that you perform, in relation toeither the screen or the application window.
This mode is useful for recording operations that cannot be recorded at the level ofan object, such as a digital signature produced by dragging the mouse.
The steps recorded are saved in a separate data file stored with the action.
A single RunAnalog statement is added to your action or component, which calls therecorded analog file.
Note:
l You cannot edit analog recording steps from within UFT.l Analog recording requires more disk space than normal recording mode.
Low-level recording
Records on any object in your application, whether or not UFT recognizes thespecific object or the specific operation.
Use low-level recording:
l For recording on environments or objects not supported by UFT, if the appearanceof the objects might change, but their location will not. If the object’s appearancewill not change, you can use Insight recording for unsupported environments orobjects.
l If the location of the object is important to your test or scripted component. Thisway, the step will pass only if the object is in the correct position.
This mode records all parent level objects as Window test objects and all otherobjects as WinObject test objects. They are displayed in the Active Screen asstandard Windows objects.
The following methods are supported:
User GuideChapter 22: Record GUI Tests and Components
HP Unified Functional Testing (12.53) Page 114 of 938
Window test objects
l Activatel Clickl DblClickl Dragl Dropl Maximizel Minimizel Restorel Type
WinObject test objects
l Clickl DblClickl Dragl Dropl Type
Note:
l Low-level recording mode is not fully supported for multibyte characterinput.
l Steps recorded using low-level recording mode may not run correctly onall objects.
l Low-level recording requires more disk space than normal recordingmode.
Insight recording
Records on any objec) displayed on your screen, whether or not UFT recognizesthe object's technology and is able to retrieve its properties or activate its methods.
UFT recognizes objects based on their appearance, and not their native properties.This can be useful to test controls from an environment that UFT does not supportor even from a remote computer running a non-Windows operating system.
For more details, see "Identifying objects using Insight" on page 236.
Note: Insight recording requires more disk space than normal recordingmode.
To control the amount of space used, adjust the number of snapshots savedand their size in the Insight pane of the Options Dialog Box.
User GuideChapter 22: Record GUI Tests and Components
HP Unified Functional Testing (12.53) Page 115 of 938
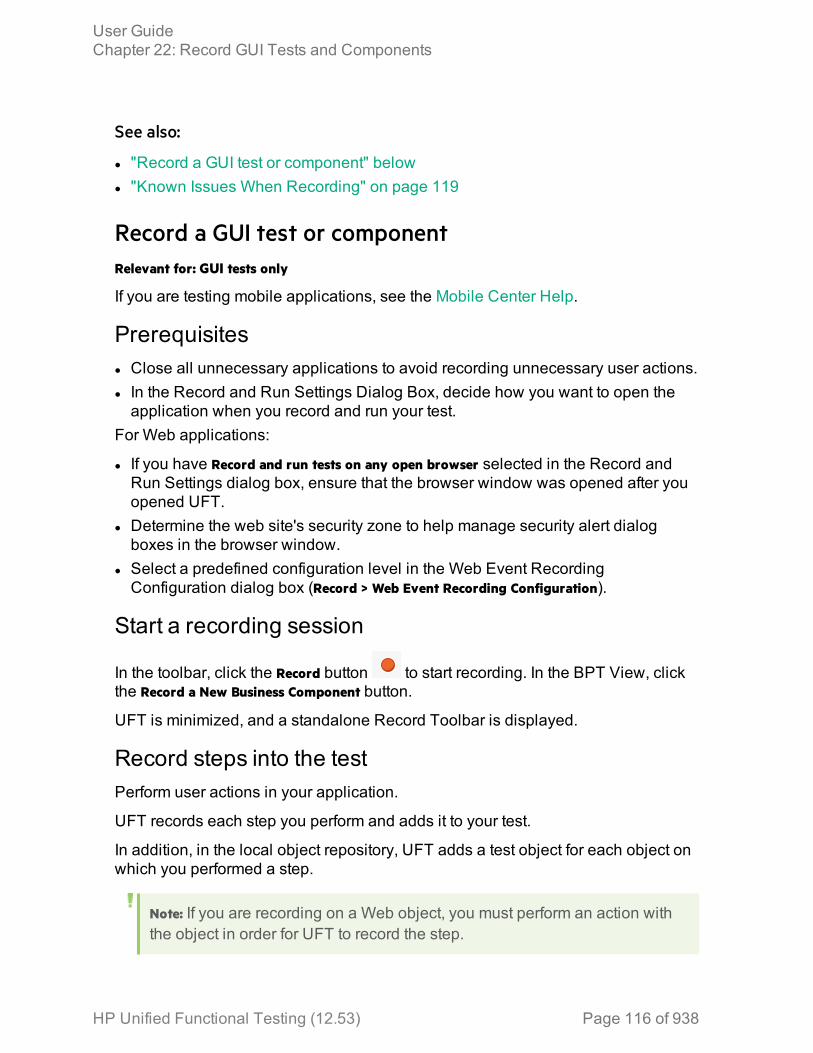
See also:
l "Record a GUI test or component" belowl "Known Issues When Recording" on page 119
Record a GUI test or componentRelevant for: GUI tests only
If you are testing mobile applications, see the Mobile Center Help.
Prerequisitesl Close all unnecessary applications to avoid recording unnecessary user actions.l In the Record and Run Settings Dialog Box, decide how you want to open theapplication when you record and run your test.
For Web applications:
l If you have Record and run tests on any open browser selected in the Record andRun Settings dialog box, ensure that the browser window was opened after youopened UFT.
l Determine the web site's security zone to help manage security alert dialogboxes in the browser window.
l Select a predefined configuration level in the Web Event RecordingConfiguration dialog box (Record > Web Event Recording Configuration).
Start a recording session
In the toolbar, click the Record button to start recording. In the BPT View, clickthe Record a New Business Component button.
UFT is minimized, and a standalone Record Toolbar is displayed.
Record steps into the testPerform user actions in your application.
UFT records each step you perform and adds it to your test.
In addition, in the local object repository, UFT adds a test object for each object onwhich you performed a step.
Note: If you are recording on a Web object, you must perform an action withthe object in order for UFT to record the step.
User GuideChapter 22: Record GUI Tests and Components
HP Unified Functional Testing (12.53) Page 116 of 938
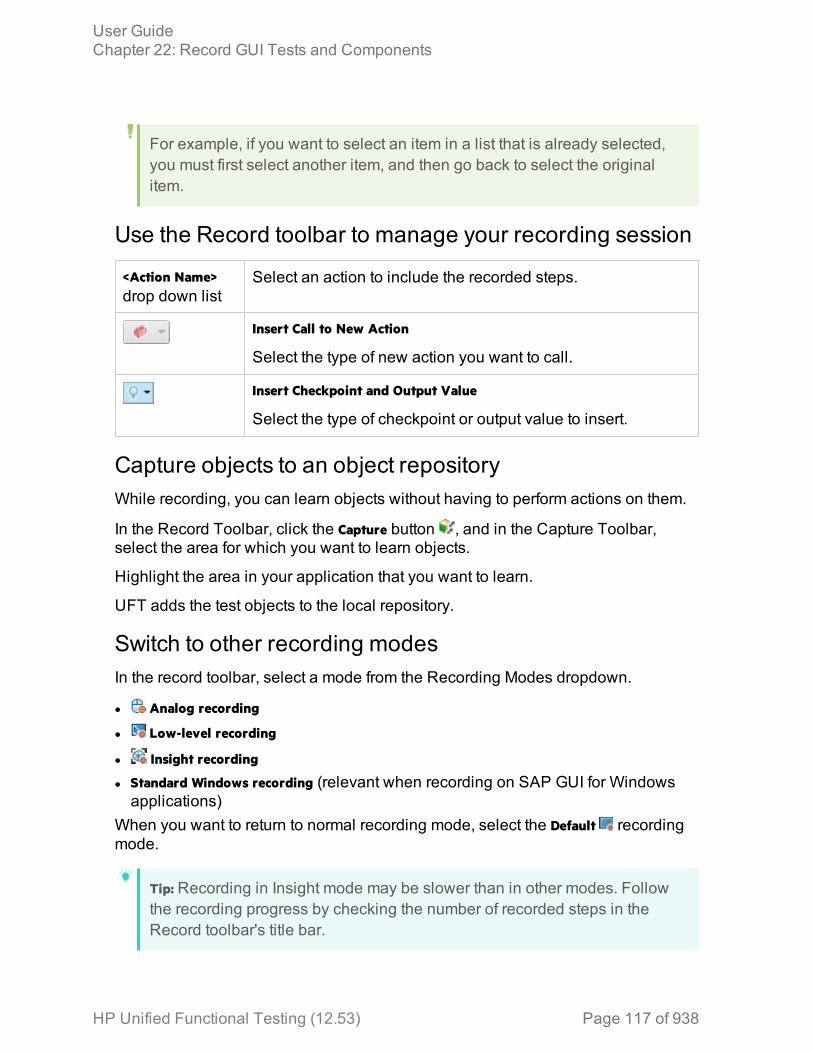
For example, if you want to select an item in a list that is already selected,you must first select another item, and then go back to select the originalitem.
Use the Record toolbar to manage your recording session
<Action Name>drop down list
Select an action to include the recorded steps.
Insert Call to New Action
Select the type of new action you want to call.
Insert Checkpoint and Output Value
Select the type of checkpoint or output value to insert.
Capture objects to an object repositoryWhile recording, you can learn objects without having to perform actions on them.
In the Record Toolbar, click the Capture button , and in the Capture Toolbar,select the area for which you want to learn objects.
Highlight the area in your application that you want to learn.
UFT adds the test objects to the local repository.
Switch to other recording modesIn the record toolbar, select a mode from the Recording Modes dropdown.
l Analog recording
l Low-level recording
l Insight recording
l Standard Windows recording (relevant when recording on SAP GUI for Windowsapplications)
When you want to return to normal recording mode, select the Default recordingmode.
Tip: Recording in Insight mode may be slower than in other modes. Followthe recording progress by checking the number of recorded steps in theRecord toolbar's title bar.
User GuideChapter 22: Record GUI Tests and Components
HP Unified Functional Testing (12.53) Page 117 of 938
After recording in Insight mode
l Delete extra Insight snapshots from the Object Repository (Tools > Delete InsightSnapshots).
l Delete any unnecessary steps or make other adjustments. For example:
RecordingTypesteps
UFT records the Type method on a Standard Windows test object,and not on the Insight test object.After recording, you can delete this step, and replace it with a Typestep performed on the relevant Insight test object.
Clickingbeforetyping
If you click or press TAB to focus on a control before typing, UFTrecords a step for the click or TAB press.However, by default, the InsightObject's Type method clicks in thecontrol before typing, and the preceding step is redundant. Afterrecording, delete the redundant Click or Type step.
User GuideChapter 22: Record GUI Tests and Components
HP Unified Functional Testing (12.53) Page 118 of 938
Known Issues When RecordingRelevant for: GUI tests and components
This section describes troubleshooting and limitations for recording tests andcomponents.
Identification properties
UFT does not record the visual relation identifier property.
This property can be added only manually from the Object Properties dialog box orthe Object Repository Manager or window.
Start menu / Quick Launch panel
l Windows 7 / Windows Server 2008 R2: You must restart your computer afterinstalling in order to record on the Start menu or Quick Launch panel.
l UFT does not record launching Windows Help from the Start menu.l To record Start menu items customized as menus, customize them as linksinstead, or record their activation in some other way.
HP Unified Functional Testing (12.53) Page 119 of 938

Dragging the Record toolbar
By default, dragging the Record toolbar to the top of the screen in Windows 7 orWindows 8.x or higher is not allowed.
To allow this, in the Windows Control Panel, select Ease of Access > Ease of AccessCenter Make the mouse easier to use, and disable the Prevent windows from beingautomatically arranged when moved to the edge of the screen option.
Limited access to application objects
UFT cannot record or run steps if it has limited access to the processes of theapplication you are testing.
Workarounds:
l Make sure that the application you are testing is started by the same Windowsuser as UFT.
l Make sure that neither you nor the tested application actively prevent UFT fromaccessing the application's processes.
Changes in the application during a recording session
When the title of a window changes during recording, UFT may fail to recognizeobjects within that window while running the test or component.
Workaround: Remove the text property from the window's test object description inthe Object Repository window.
User GuideChapter 22: Record GUI Tests and Components
HP Unified Functional Testing (12.53) Page 120 of 938
Chapter 23: Actions in GUI TestingRelevant for: GUI tests only
In a GUI test, each test is comprised of calls to actions. An action is a separatemodular test script, including all of the steps in that action, and any objects in itslocal object repository and any associated shared object repositories.
Each new test contains a call to a single action. Add calls to other new or existingactions, or copies of actions, both in the same or a different test. Ideally, eachaction should contain no more than a few dozen test steps.
The actions used in the test, and the order in which they are run, are displayed inthe canvas.
Tip: Create tests that call multiple actions to make your test more logical,modular, and efficient. For example, separate your actions by the mainsections of a Web site, or specific activities that you perform in yourapplication.
UFT provides the following types of actions:
Action type Description
Reusable actions l Default type.l Can be called multiple times by the local test and othertests.
l Must be updated from the original test.l Can be marked as non-resusable to change its type.
Non-reusableactions
l Can be called only once, and in the local test.l Can be copied.l Can be marked as reusable to change its type.
External l Stored with another test.l Read-only in the calling test.You can choose to use a local, editable copy of the Datapane information.
Nested l Called from another action
See also:
"Naming conventions" on page 70
HP Unified Functional Testing (12.53) Page 121 of 938
Structure your test with actionsRelevant for: GUI tests only
l Insert a call to a new action, an existing action, or a copy of an action from theDesign menu or the Record toolbar, or by right-clicking in the Solution Explorer orthe canvas.
l Nest an action within an existing action from the Keyword View. Highlight the stepafter which you want to insert the call, and add the call as you would any otheraction.
l Change the run order of actions from the canvas by right-clicking, dragging, or usingthe arrow keys.Dragging is supported for top-level actions only.
l Remove calls to actions from the following locations:
SolutionExplorer
Remove all calls to a specific action. If the action is local, theaction is also deleted.
Canvas /KeywordView
Remove specific calls to an action. If the action is local,removing all calls to the action also deletes the action.
Caution: Be careful when deleting a local reusable action. If the action iscalled by other tests, deleting the action may cause the other tests to fail.
You can also call actions dynamically during a run session using theLoadAndRunAction statement.
Organizing Actions in Your Test
Iterative actions
If your action runs more than one iteration, the action must end at the same point inyour application as it started, so that it can run another iteration without interruption.
For example, suppose you are testing a sample flight reservation site. If the actionstarts with a blank flight reservation form, it should conclude with a blank flightreservation form.
Changing actions
If you expect certain elements of your application to change regularly, it is a goodidea to divide the steps related to changeable elements into a separate action so
User GuideChapter 23: Actions in GUI Testing
HP Unified Functional Testing (12.53) Page 122 of 938
that it will be easy to change the required steps, if necessary, after the applicationis modified.
Associated Object Repositories
Right-click an action to open the associated object repository.
Multiple associated object repositories
You can associate as many object repositories as needed with an action, and thesame object repository can be associated with different actions as needed. Youcan also set the default object repositories to be associated with all new actions ina test.
Order of object repositories
The order of the object repositories in the list determines the order in which UFTsearches for a test object description.
If there are test objects in different object repositories with the same name, objectclass, and parent hierarchy, UFT uses the first one it finds based on the priorityorder defined in the Associated Repositories Tab of the Action Properties DialogBox.
The local object repository is always listed first and cannot be moved down thepriority list or deleted.
Relative paths to object repositories
You can enter an associated object repository as a relative path. During the runsession, UFT searches for the file in the folders listed in the Folders pane of theOptions dialog box (Tools > Options > GUI Testing tab > Folders node), in the order inwhich the folders are listed.
Associate an object repository dynamically
You can associate an object repository dynamically during a run session using theRepositoriesCollection statement.
Display / modify action dataRelevant for: GUI tests only
Double-click an action to show only that action in the Keyword View or Editor.
Create an action template1. Create a single text file containing the comments, function calls, and other
statements that you want to include in all new actions.
User GuideChapter 23: Actions in GUI Testing
HP Unified Functional Testing (12.53) Page 123 of 938
The text file must be in the structure and format used in the Editor.2. Save the text file in your UFT installation folder under \dat\ActionTemplate.mst.
All new actions you create contain the script lines from the action template.
Action and action call propertiesAction and action call properties are displayed in the Properties pane and theAction Properties dialog box.
The following tabs are included:
Action Properties dialog box l General Tab (Action Properties Dialog Box)l Parameters Tab (Action Properties Dialog Box)l Associated Repositories Tab (Action PropertiesDialog Box)
l Used By Tab (Action Properties Dialog Box)l External Action Tab (Action Properties DialogBox)
Action Call Properties dialogbox
l Run Tab (Action Call Properties Dialog Box)l Parameter Values Tab (Action Call PropertiesDialog Box)
Action Properties pane l General Properties Tab (Properties Pane -Testing)
l Parameters Tab (Properties Pane - Testing)l Used By Tab (Properties Pane - Testing)
Exit an action using programming statementsUse one of the following exit action statements:
l ExitAction. Exits the current action, regardless of its iteration attributes.l ExitActionIteration. Exits the current iteration of the action.
User GuideChapter 23: Actions in GUI Testing
HP Unified Functional Testing (12.53) Page 124 of 938
Known Issues with ActionsRelevant for: GUI tests only
Test names in actions
If a test contains a call to an action stored in another test, and that other test wasrenamed in ALM, the original test name still appears (in square brackets) in thecanvas.
The obsolete name in the canvas does not affect UFT's ability to locate and run theaction.
If it is important to display the correct test name, delete the action call from the testand reinsert it.
Nested actions
You cannot add a new action as a nested action to an external action.
Instead, open the external action and add the call to the nested action directly.
Copies of testsIf you make a copy of an existing test, you cannot insert call to parallel actions inboth tests from the same test.
Instead of copying the test, use Save As to create a duplicate of the test.
HP Unified Functional Testing (12.53) Page 125 of 938
Chapter 24: Keyword ViewRelevant for: GUI tests and components
The Keyword View enables you to create and view the steps of your actions orcomponents in a modular, table-like format.
l Right-click the table header and select the columns to view in the Keyword ViewOptions dialog box.
l Drag columns and steps to reorder them.l Right-click a step to view its properties.l When a Value cell is selected, press CTRL+F11 to open the Value ConfigurationOptions Dialog Box.
Working in the Keyword View does not require any programming knowledge. Theprogramming required to actually perform each test step is done automaticallybehind the scenes by UFT.
When working with a business component, the Keyword View that you see in UFTis the same as the Automation tab in ALM.
Add steps, comments, and programming to your test as follows:
A standard step A test step, with an object in your application with a specificoperation performed on the object.
For details, see "Standard steps in the Keyword View" on thenext page.
A checkpointstep
A step to test the state of an object in your application at aspecific point in the application/test flow.
For details, see "Standard steps in the Keyword View" on thenext page.
An output valuestep
A step to produce a value from an object which can be usedlater in the test.
For details, see "Output Values in GUI Testing" on page 322.
Comments Lines in the script designed to add descriptive details about thetest/component or the specific step.
For details, see "Comments in the Keyword View" on page 129.
HP Unified Functional Testing (12.53) Page 126 of 938

Steps usingprogramminglogic
You can use programming logic to perform a number of tasks:
l send information to the run resultsl put a comment line in your testl synchronize your test with your applicationl measure a transaction in your testl insert conditional or loop statementsFor details, see "Generated Programming Operations" on page597, "Conditional and loop statements" on page 130.
Standard steps in the Keyword ViewRelevant for: GUI actions and components
Add a new step using the NEW STEP button, right-clicking, or dragging and droppingfrom the Toolbox pane.
You can also click in the Item cell, and select an object for your step. To specify afunction instead of an object, select Operation from the Item list.
Define or modify an item valueIn the Item column, click in the Value cell to activate it, and enter a value for eachargument.
l You can enter constant or parameterized values.l Separate multiple argument values with commas.In tests, after first defining a regular statement (such as x=10), it can be edited onlyin the Editor.
User GuideChapter 24: Keyword View
HP Unified Functional Testing (12.53) Page 127 of 938
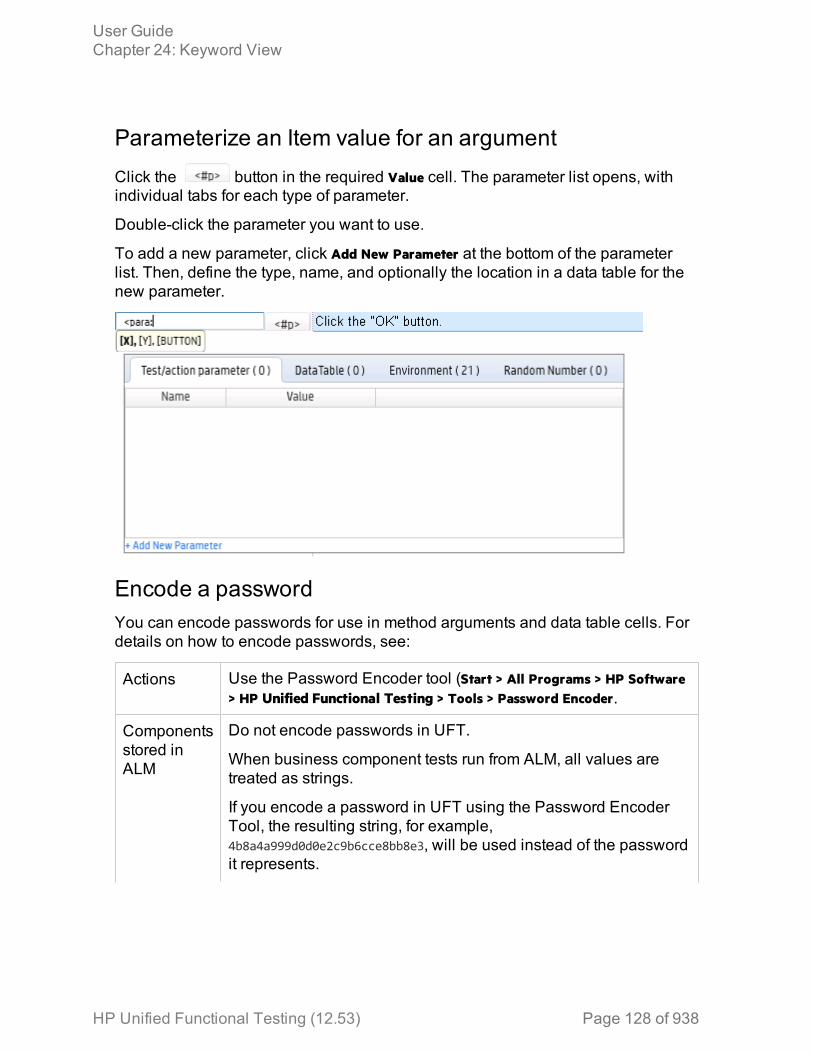
Parameterize an Item value for an argumentClick the button in the required Value cell. The parameter list opens, withindividual tabs for each type of parameter.
Double-click the parameter you want to use.
To add a new parameter, click Add New Parameter at the bottom of the parameterlist. Then, define the type, name, and optionally the location in a data table for thenew parameter.
Encode a passwordYou can encode passwords for use in method arguments and data table cells. Fordetails on how to encode passwords, see:
Actions Use the Password Encoder tool (Start > All Programs > HP Software> HP Unified Functional Testing > Tools > Password Encoder.
Componentsstored inALM
Do not encode passwords in UFT.
When business component tests run from ALM, all values aretreated as strings.
If you encode a password in UFT using the Password EncoderTool, the resulting string, for example,4b8a4a999d0d0e2c9b6cce8bb8e3, will be used instead of the passwordit represents.
User GuideChapter 24: Keyword View
HP Unified Functional Testing (12.53) Page 128 of 938
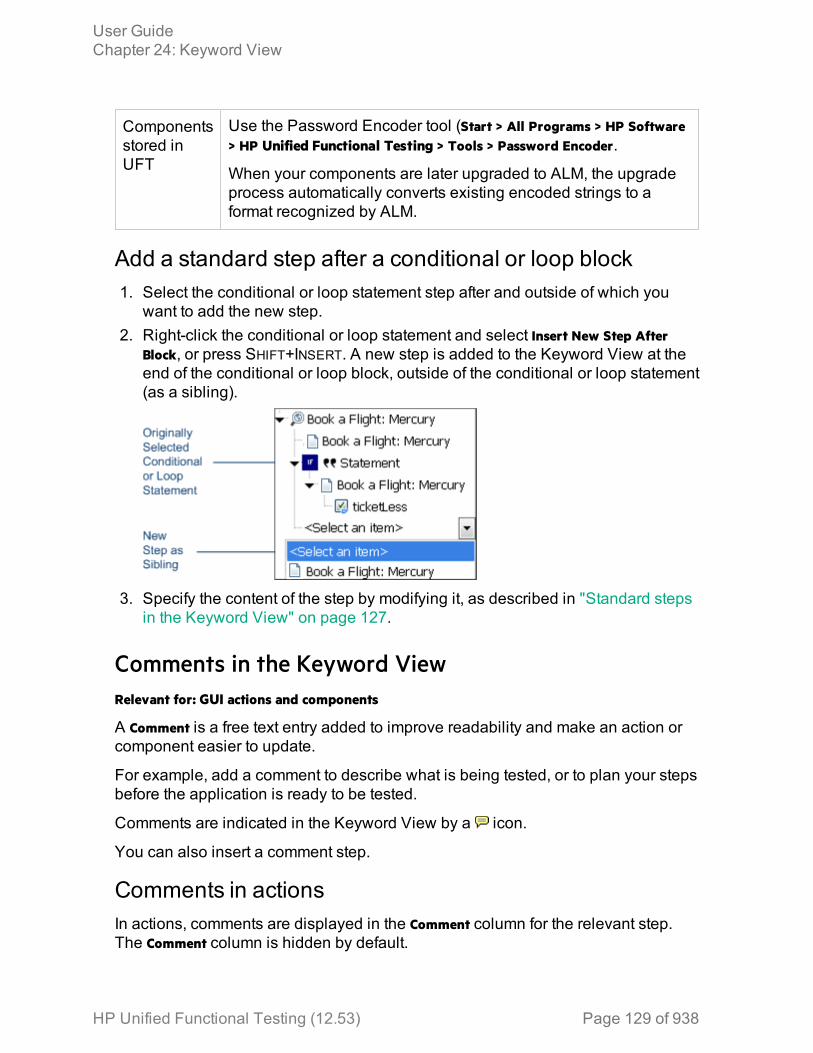
Componentsstored inUFT
Use the Password Encoder tool (Start > All Programs > HP Software> HP Unified Functional Testing > Tools > Password Encoder.
When your components are later upgraded to ALM, the upgradeprocess automatically converts existing encoded strings to aformat recognized by ALM.
Add a standard step after a conditional or loop block1. Select the conditional or loop statement step after and outside of which you
want to add the new step.2. Right-click the conditional or loop statement and select Insert New Step After
Block, or press SHIFT+INSERT. A new step is added to the Keyword View at theend of the conditional or loop block, outside of the conditional or loop statement(as a sibling).
3. Specify the content of the step by modifying it, as described in "Standard stepsin the Keyword View" on page 127.
Comments in the Keyword ViewRelevant for: GUI actions and components
A Comment is a free text entry added to improve readability and make an action orcomponent easier to update.
For example, add a comment to describe what is being tested, or to plan your stepsbefore the application is ready to be tested.
Comments are indicated in the Keyword View by a icon.
You can also insert a comment step.
Comments in actionsIn actions, comments are displayed in the Comment column for the relevant step.The Comment column is hidden by default.
User GuideChapter 24: Keyword View
HP Unified Functional Testing (12.53) Page 129 of 938
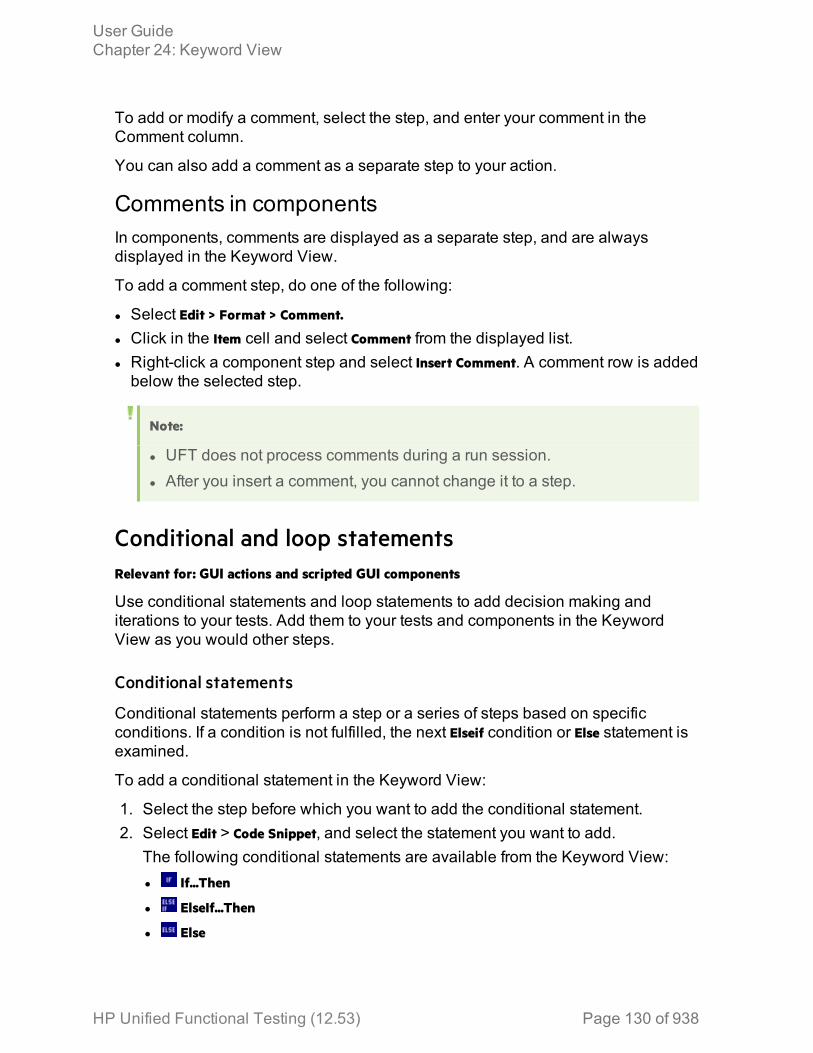
To add or modify a comment, select the step, and enter your comment in theComment column.
You can also add a comment as a separate step to your action.
Comments in componentsIn components, comments are displayed as a separate step, and are alwaysdisplayed in the Keyword View.
To add a comment step, do one of the following:
l Select Edit > Format > Comment.
l Click in the Item cell and select Comment from the displayed list.l Right-click a component step and select Insert Comment. A comment row is addedbelow the selected step.
Note:
l UFT does not process comments during a run session.l After you insert a comment, you cannot change it to a step.
Conditional and loop statementsRelevant for: GUI actions and scripted GUI components
Use conditional statements and loop statements to add decision making anditerations to your tests. Add them to your tests and components in the KeywordView as you would other steps.
Conditional statements
Conditional statements perform a step or a series of steps based on specificconditions. If a condition is not fulfilled, the next Elseif condition or Else statement isexamined.
To add a conditional statement in the Keyword View:
1. Select the step before which you want to add the conditional statement.2. Select Edit > Code Snippet, and select the statement you want to add.
The following conditional statements are available from the Keyword View:l If...Then
l ElseIf...Then
l Else
User GuideChapter 24: Keyword View
HP Unified Functional Testing (12.53) Page 130 of 938
Each part of the conditional statement is added as a separate step.For example, select If to add an If statement. After defining the details of the Ifstatement, add a Then statement as a separate step.
3. In the row for the new conditional statement:l Click in the Item cell, and select the object on which you want to perform theconditional statement.
l Click in the Operation cell, and select the operation you want to perform.l If needed, click in the Value cell and enter the required condition.
4. Add the second part of your conditional statement, for example a Thenstatement.Right-click the new conditional statement and select Insert New Step After Block.Set the values for the new step in the Operation and Value columns.You can also record steps. After adding a conditional statement, all recordedsteps are automatically inserted within the conditional statement block.
5. If the conditional statement replaces the statement just before it, delete the rowimmediately above the new statement.
6. Complete a statement with an Else statement, or by nesting an additional levelin your statement.Select the new statement, and then select Edit > Code Snippet, and select thenew statement you want to add.
Loop statements
Use loop statements to run a group of steps repeatedly, while or until a condition istrue, or a specific number of times without any conditions.
1. Select the step before which you want to add the loop statement.2. Select Edit > Code Snippet, and select the statement you want to add.
The following loop statements are available from the Keyword View:While...Wend. Performs a series of statements as long as a specified condition
is True.For...Next. Uses a counter to perform a group of statements a specified
number of times.Do...While. Performs a series of statements indefinitely, as long as a specified
condition is True.Do...Until. Performs a series of statements indefinitely, until a specified
condition becomes True.3. In the Value column, enter a required condition.
User GuideChapter 24: Keyword View
HP Unified Functional Testing (12.53) Page 131 of 938
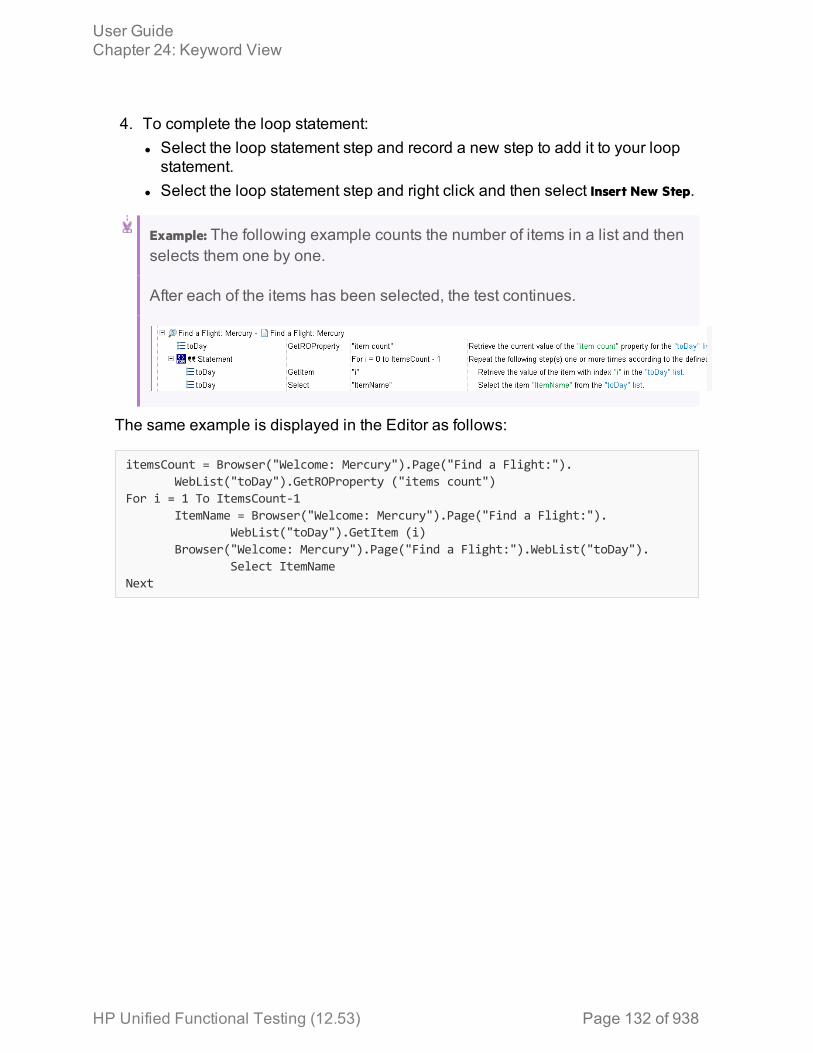
4. To complete the loop statement:l Select the loop statement step and record a new step to add it to your loopstatement.
l Select the loop statement step and right click and then select Insert New Step.
Example: The following example counts the number of items in a list and thenselects them one by one.
After each of the items has been selected, the test continues.
The same example is displayed in the Editor as follows:
itemsCount = Browser("Welcome: Mercury").Page("Find a Flight:").WebList("toDay").GetROProperty ("items count")
For i = 1 To ItemsCount-1ItemName = Browser("Welcome: Mercury").Page("Find a Flight:").
WebList("toDay").GetItem (i)Browser("Welcome: Mercury").Page("Find a Flight:").WebList("toDay").
Select ItemNameNext
User GuideChapter 24: Keyword View
HP Unified Functional Testing (12.53) Page 132 of 938
Known Issues - Keyword ViewRelevant for: GUI actions and components
Objectproperties
If you use the Object property in a step in the Keyword View, it maytake a long time for UFT to retrieve the object information from theapplication.
This may affect UFT's response time when you open and select fromthe various drop-down lists in the step.
If this occurs, use the Editor when working with the Object property.
Calls tootheractions
If you insert a call to another action, you cannot expand the actionnode to view the steps in the called action.
Instead, double-click the called action node to open the action stepsin another tab.
HP Unified Functional Testing (12.53) Page 133 of 938
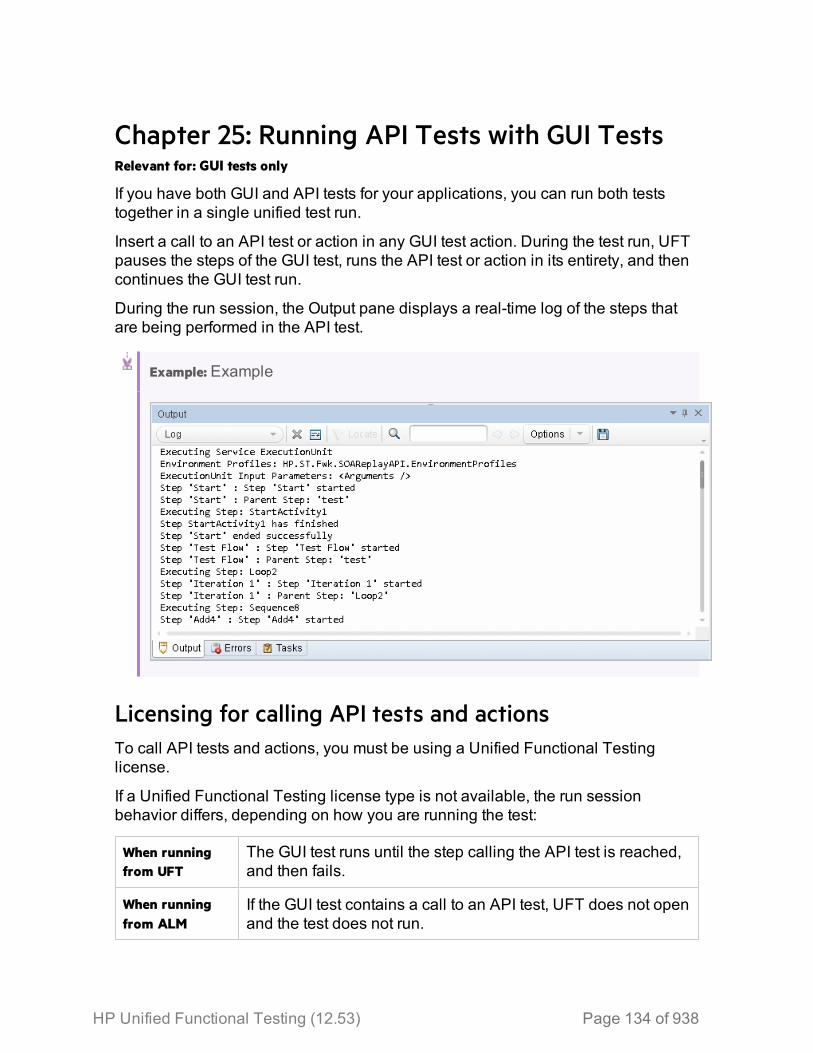
Chapter 25: Running API Tests with GUI TestsRelevant for: GUI tests only
If you have both GUI and API tests for your applications, you can run both teststogether in a single unified test run.
Insert a call to an API test or action in any GUI test action. During the test run, UFTpauses the steps of the GUI test, runs the API test or action in its entirety, and thencontinues the GUI test run.
During the run session, the Output pane displays a real-time log of the steps thatare being performed in the API test.
Example: Example
Licensing for calling API tests and actionsTo call API tests and actions, you must be using a Unified Functional Testinglicense.
If a Unified Functional Testing license type is not available, the run sessionbehavior differs, depending on how you are running the test:
When runningfrom UFT
The GUI test runs until the step calling the API test is reached,and then fails.
When runningfrom ALM
If the GUI test contains a call to an API test, UFT does not openand the test does not run.
HP Unified Functional Testing (12.53) Page 134 of 938
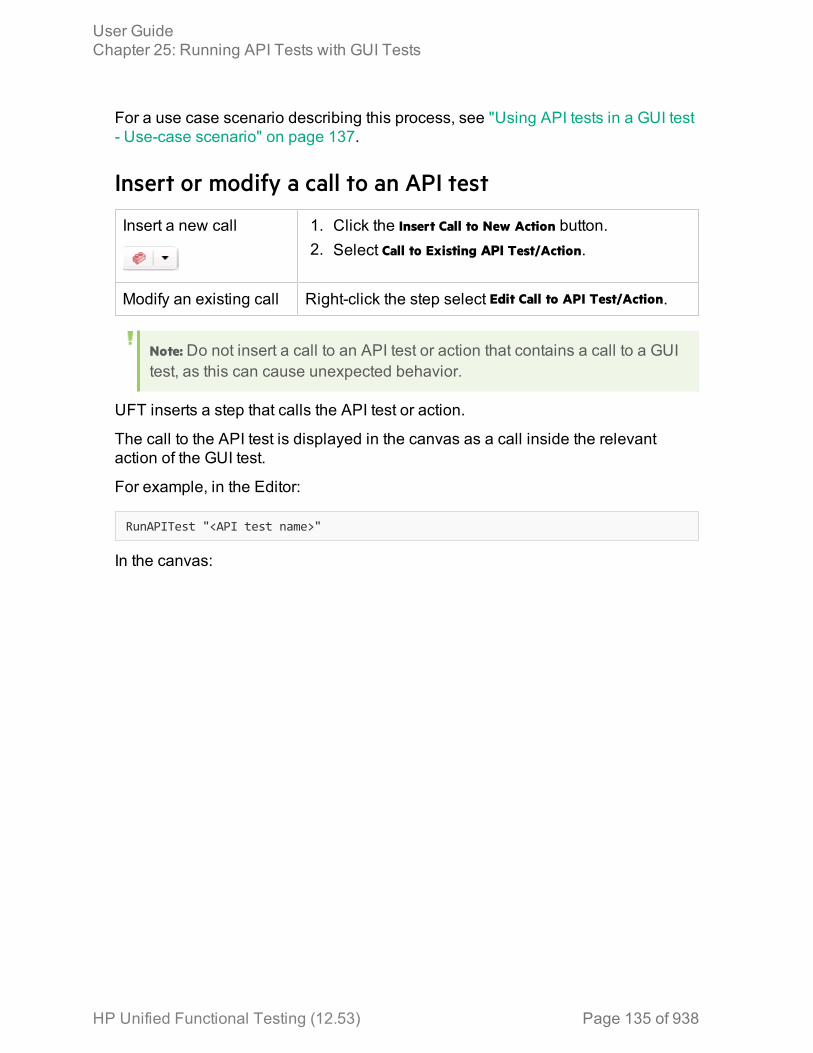
For a use case scenario describing this process, see "Using API tests in a GUI test- Use-case scenario" on page 137.
Insert or modify a call to an API test
Insert a new call 1. Click the Insert Call to New Action button.2. Select Call to Existing API Test/Action.
Modify an existing call Right-click the step select Edit Call to API Test/Action.
Note: Do not insert a call to an API test or action that contains a call to a GUItest, as this can cause unexpected behavior.
UFT inserts a step that calls the API test or action.
The call to the API test is displayed in the canvas as a call inside the relevantaction of the GUI test.
For example, in the Editor:
RunAPITest "<API test name>"
In the canvas:
User GuideChapter 25: Running API Tests with GUI Tests
HP Unified Functional Testing (12.53) Page 135 of 938

Use API test parameters in a GUI testAfter you add a call to an API test or action, the input and output parameters areavailable for use in your GUI test.
Inputparameters
If you want to use values for the API test input parameters during aGUI test run, specify the parameter value in the Call to Test/ActionDialog Box.
When the API test is run during the GUI test, UFT uses the valuesyou specified for the appropriate parameters in the API test.
Outputparameters
If you want to use values for the API test output parameters, youmust assign a variable name to the output parameter in the Call toTest/Action Dialog Box, or assign the API test output value to avariable or a data table parameter in the GUI test.
This variable or data table parameter is then available to use inother steps of the GUI test.
User GuideChapter 25: Running API Tests with GUI Tests
HP Unified Functional Testing (12.53) Page 136 of 938
Using API tests in a GUI test - Use-case scenarioRelevant for: GUI tests only
This use-case scenario describes an example of how to incorporate tests for theAPI (service) layer of your application into a GUI test.
For the purposes of this scenario, you will be using a flight booking applicationsimilar to the Mercury Tours Flight GUI and Flight API applications provided withthe UFT installation and used in the GUI tutorial for Web applications.
In your application, you have four different pages, which correspond to the differenttasks involved in booking a flight:
Logging in to the booking site Login page
Finding flight options based on customer selections Flight Finder page
Selecting a flight from the list of flight options Select Flight page
Booking and confirming a customer's flight selection Book Flight page
In addition, your application has a number of API processes to help the applicationprocess flight booking requests:
Finding user login credentials in the database Login operation
Searching for a list of all available flights anddisplaying the flight list
FindFlights operation
Creating a flight order CreateFlight operation
Confirming a flight booking ConfirmBookFlightoperation
Updating a flight order UpdateFlightOrderoperation
Deleting a flight order DeleteFlightOrderoperation
Deleting all flight orders DeleteAllFlightOrdersoperation
You do the following:
1. Create a separate GUI action for each application page, giving it the samename as the page name.
User GuideChapter 25: Running API Tests with GUI Tests
HP Unified Functional Testing (12.53) Page 137 of 938
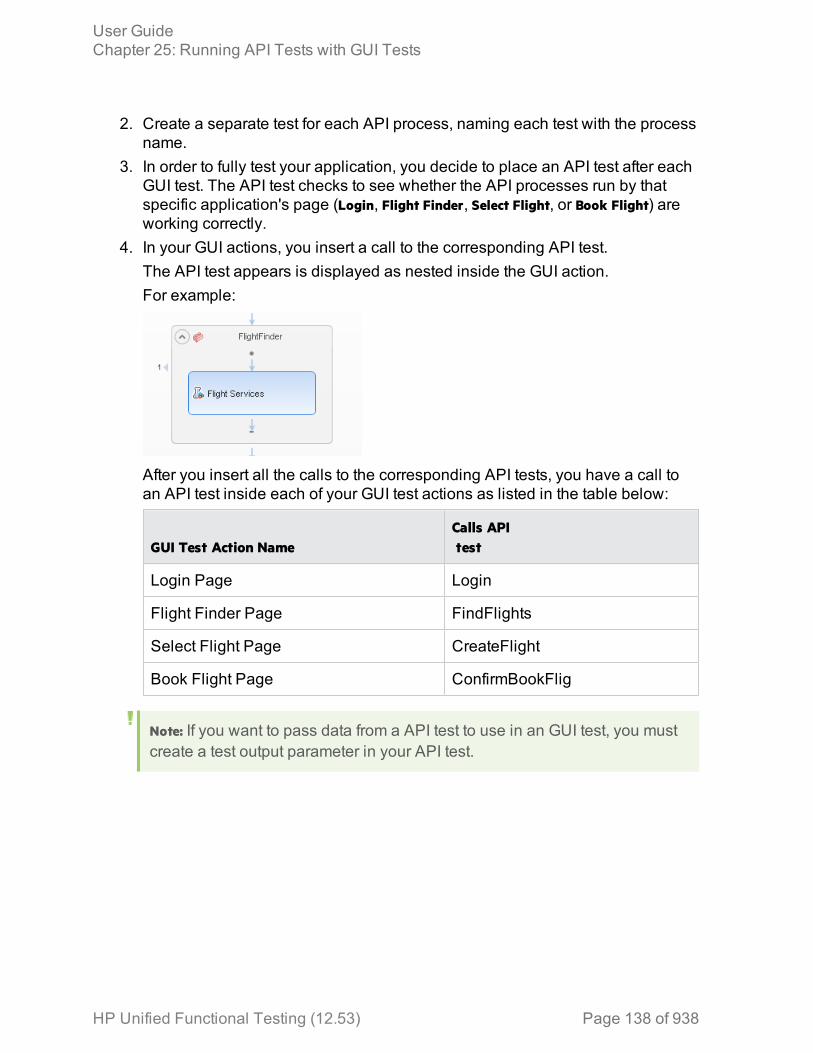
2. Create a separate test for each API process, naming each test with the processname.
3. In order to fully test your application, you decide to place an API test after eachGUI test. The API test checks to see whether the API processes run by thatspecific application's page (Login, Flight Finder, Select Flight, or Book Flight) areworking correctly.
4. In your GUI actions, you insert a call to the corresponding API test.The API test appears is displayed as nested inside the GUI action.For example:
After you insert all the calls to the corresponding API tests, you have a call toan API test inside each of your GUI test actions as listed in the table below:
GUI Test Action NameCalls APItest
Login Page Login
Flight Finder Page FindFlights
Select Flight Page CreateFlight
Book Flight Page ConfirmBookFlig
Note: If you want to pass data from a API test to use in an GUI test, you mustcreate a test output parameter in your API test.
User GuideChapter 25: Running API Tests with GUI Tests
HP Unified Functional Testing (12.53) Page 138 of 938
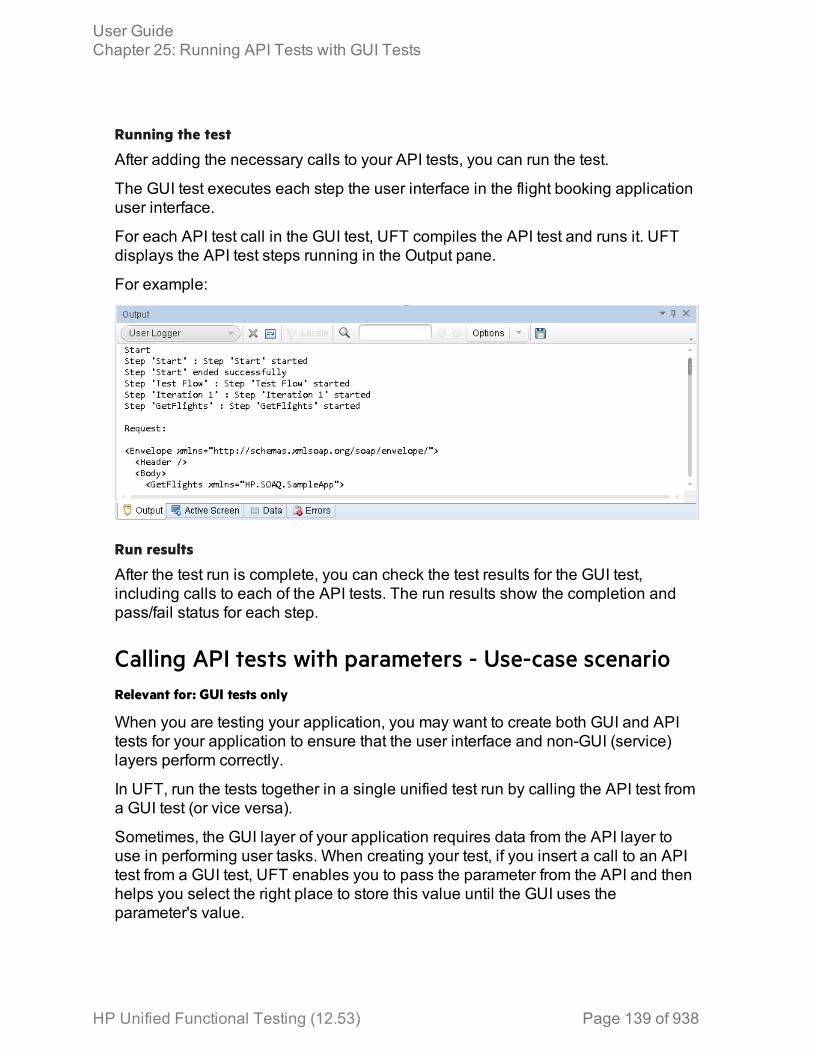
Running the test
After adding the necessary calls to your API tests, you can run the test.
The GUI test executes each step the user interface in the flight booking applicationuser interface.
For each API test call in the GUI test, UFT compiles the API test and runs it. UFTdisplays the API test steps running in the Output pane.
For example:
Run results
After the test run is complete, you can check the test results for the GUI test,including calls to each of the API tests. The run results show the completion andpass/fail status for each step.
Calling API tests with parameters - Use-case scenarioRelevant for: GUI tests only
When you are testing your application, you may want to create both GUI and APItests for your application to ensure that the user interface and non-GUI (service)layers perform correctly.
In UFT, run the tests together in a single unified test run by calling the API test froma GUI test (or vice versa).
Sometimes, the GUI layer of your application requires data from the API layer touse in performing user tasks. When creating your test, if you insert a call to an APItest from a GUI test, UFT enables you to pass the parameter from the API and thenhelps you select the right place to store this value until the GUI uses theparameter's value.
User GuideChapter 25: Running API Tests with GUI Tests
HP Unified Functional Testing (12.53) Page 139 of 938
This use-case scenario demonstrates how a GUI test can call an API test and passa parameter value from the API test back to the calling GUI test. For the purposes ofthis scenario, you will be using the flight booking application included with the UFTinstallation.
In the flight reservation application, you have five main user areas:
l A login areal A flight finder window, where users enter their flight preferencesl A flight selection window, where users select the best flight for their flightpreferences
l A flight booking windowl A flight order searchThe application has an API that retrieves a flight order, including details about theairline, departure and arrival cities for the flight, departure and arrival times for theflight, flight number, and the price of the flight. You use this information in the userinterface of the application to retrieve flight orders saved in the database.
You want to test multiple things:
l The API retrieves the flight informationl The GUI performs searches in the flight database correctlyl The GUI can take a value retrieved by the API and use it to search the flightdatabase
To perform the tests of the application, you must run both the API and GUI tests, butalso call the API test from the GUI test.
1. Since the flight number data (retrieved from the API) is contained in theresponse of the Get step, the GUI test has no ability to access individual stepoutputs.To retrieve this value, you must create a test output parameter in the API testthat enables you to pass the API test step output to the GUI test.In the API test, click on the End step.In the Test Input/Output Parameters tab of the Properties pane, create a newoutput parameter, called FlightNumber.The test output parameter type must be Float.
2. After you create the parameter, you must link the test output parameter to theGet step output.Click the Link to data source button in the Test Input/Output Parameters tab,and then select the Get steps from the Available steps option.
User GuideChapter 25: Running API Tests with GUI Tests
HP Unified Functional Testing (12.53) Page 140 of 938
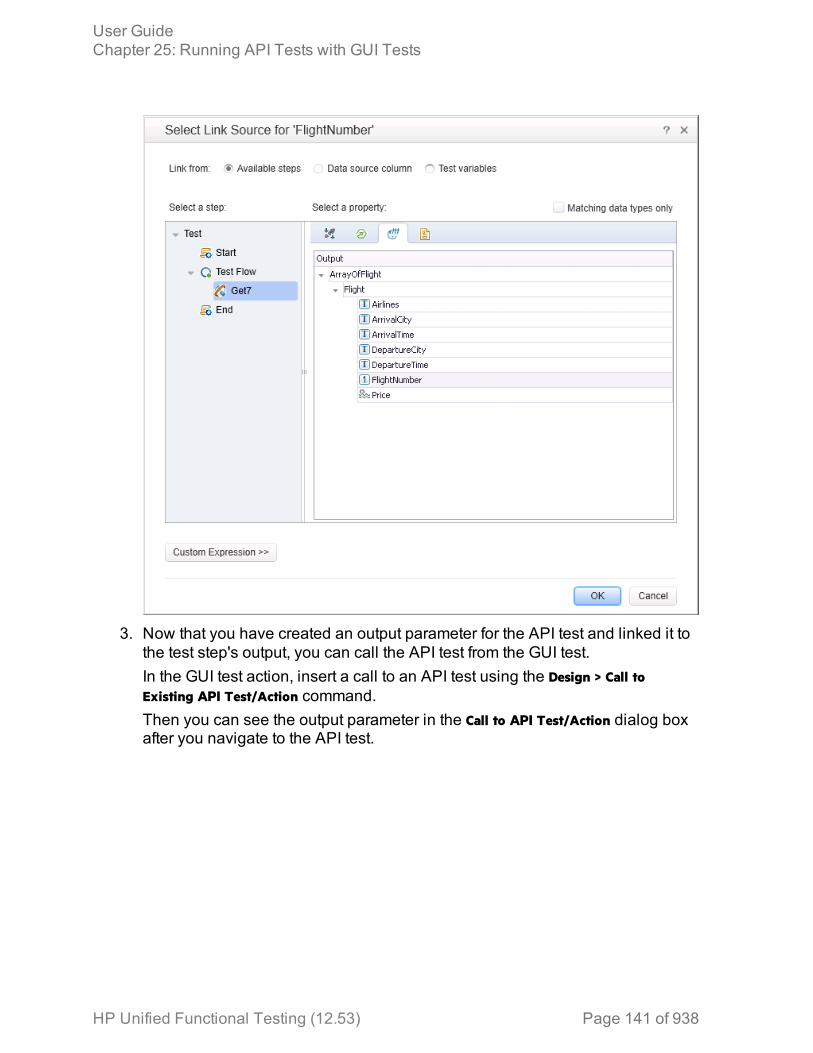
3. Now that you have created an output parameter for the API test and linked it tothe test step's output, you can call the API test from the GUI test.In the GUI test action, insert a call to an API test using the Design > Call toExisting API Test/Action command.Then you can see the output parameter in the Call to API Test/Action dialog boxafter you navigate to the API test.
User GuideChapter 25: Running API Tests with GUI Tests
HP Unified Functional Testing (12.53) Page 141 of 938
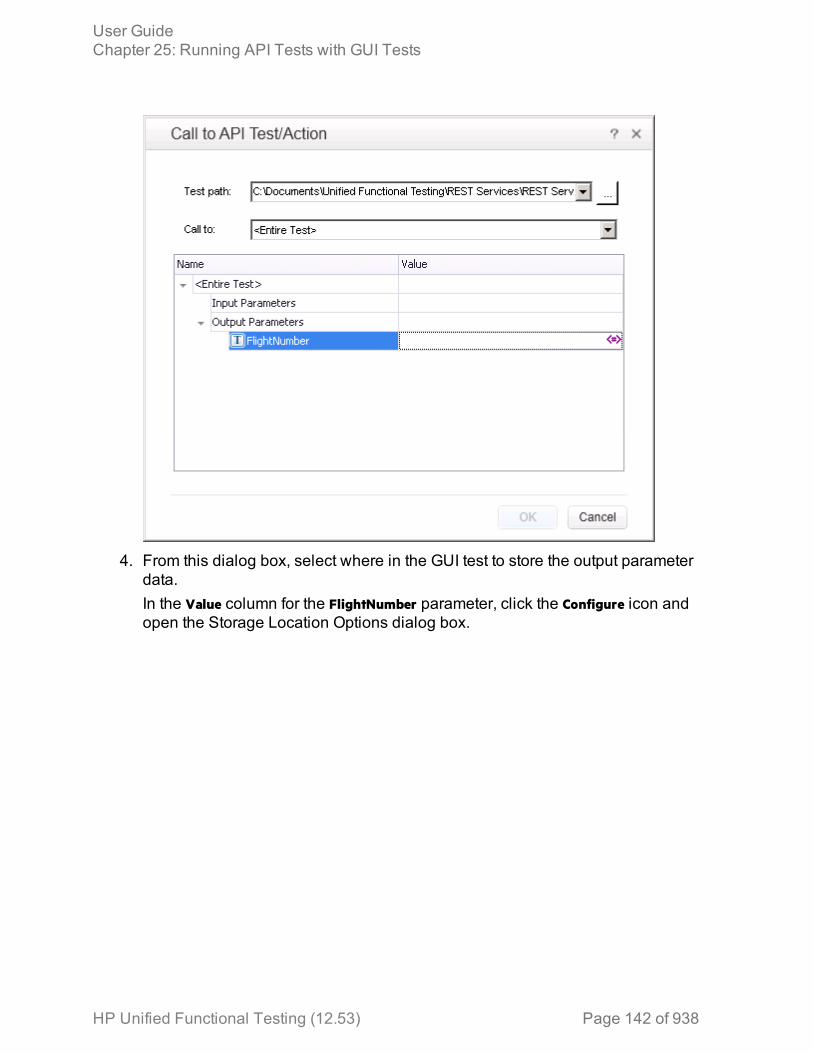
4. From this dialog box, select where in the GUI test to store the output parameterdata.In the Value column for the FlightNumber parameter, click the Configure icon andopen the Storage Location Options dialog box.
User GuideChapter 25: Running API Tests with GUI Tests
HP Unified Functional Testing (12.53) Page 142 of 938

For this use-case scenario, you will save the output parameter as a GUI testdata table parameter in the Global data table:
5. In order for the steps in the action to access this value, however, you mustcreate an action parameter in the GUI test and link this action parameter to thedata table.In the Parameters tab of the Properties pane, add an input parameter for theaction called FlightNumber of type Number.
User GuideChapter 25: Running API Tests with GUI Tests
HP Unified Functional Testing (12.53) Page 143 of 938
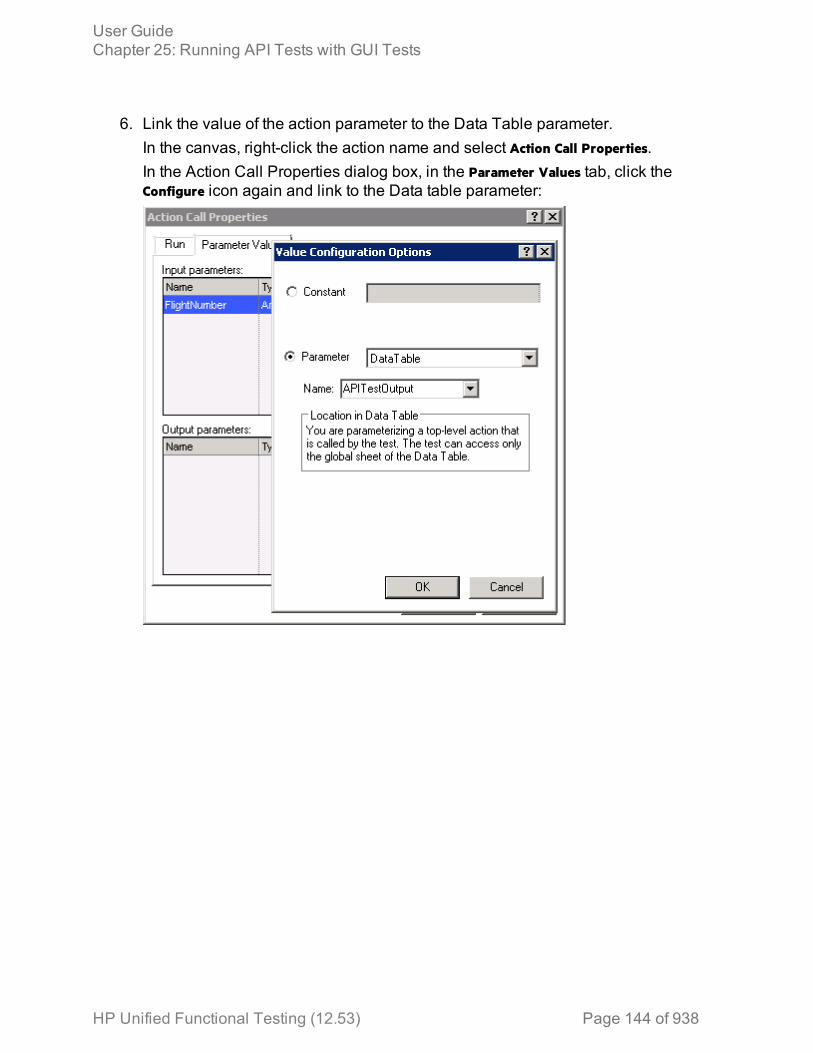
6. Link the value of the action parameter to the Data Table parameter.In the canvas, right-click the action name and select Action Call Properties.In the Action Call Properties dialog box, in the Parameter Values tab, click theConfigure icon again and link to the Data table parameter:
User GuideChapter 25: Running API Tests with GUI Tests
HP Unified Functional Testing (12.53) Page 144 of 938

7. Once the action parameter is linked to a GUI Data table parameter, you canparameterize the GUI test steps.In the test steps, parameterize the byNumberWatermark.Set step with this datatable parameter:
Your test steps now look like this:
In the Editor, the steps are displayed like this:
RunAPITest "REST Services" ,DataTable("APITestOutput", dtGlobalSheet)WpfWindow("HP MyFlight Sample Application").WpfTabStrip("WpfTabStrip").Select "SEARCH ORDER"WpfWindow("HP MyFlight Sample Application").WpfRadioButton("byNumberRadio").SetWpfWindow("HP MyFlight Sample Application").WpfEdit("byNumberWatermark").SetParameter("FlightNumber")WpfWindow("HP MyFlight Sample Application").WpfButton("SEARCH").ClickWpfWindow("HP MyFlight Sample Application").WpfTable("ordersDataGrid").SelectCell "1", "1"
User GuideChapter 25: Running API Tests with GUI Tests
HP Unified Functional Testing (12.53) Page 145 of 938

WpfWindow("HP MyFlight Sample Application").WpfButton("SELECT ORDER").Click0
When the test runs, UFT stores the output parameter value from the API test in theData table, and this parameter is then used in the GUI test step:
User GuideChapter 25: Running API Tests with GUI Tests
HP Unified Functional Testing (12.53) Page 146 of 938

Chapter 26: Maintaining Tests or ComponentsRelevant for: GUI tests and components
Tests or components fail when UFT encounters a step it cannot perform or theresults of a step indicate failure. As a result, UFT enables you to maintain andupdate these test and components.
You can encounter many types of errors.
Application errorsIn many cases this is due to the application being tested not functioning properly,such as when checkpoints encounter conditions in the application being tested thatare unexpected.
UFT then provides you with run results that assist you in understanding how to fixyour application.
Application changesSometimes a test or component fails because the application being tested haschanged and the test or component needs to be updated to reflect those changes.
For checkpoints, use Update Run Mode to update the checkpoints in your test orcomponent to reflect changes in the application.
Example: For example:
l Suppose your application has an edit box whose default value used to be<Enter value>.
l You have a checkpoint that checks this value before a new value isentered in the edit box.
l If the default value in the application changes to be <Enter name> then yourcheckpoint will fail.
Update Run Mode enables you to update the expected values of yourcheckpoint to reflect the change in the application.
For details, see "Update Run mode " on page 153.
HP Unified Functional Testing (12.53) Page 147 of 938

Missing objectsYour object repository may also be missing some of the objects it needs to run thetest.
UFT provides tools that help identify and resolve some of these issues.
The objectdoes notexist in theapplication
UFT cannot find an object in the application that matches thedescription of the object in the object repository.
The Maintenance Run Wizard enables you to identify the object thatyou want your test or component to use.
The parentobjectchanged
UFT cannot find an object in the application that matches and hasthe same hierarchy as the object in the object repository.
The Maintenance Run Wizard enables you to identify the object thatyou want your test or component to use.
The objectdescriptionpropertyvalueschanged
UFT cannot find an object in the application that is similar to, andhas the same description property values as the object in the objectrepository.
The Maintenance Run Wizard enables you to identify the object thatyou want your test or component to use.
The objectdoes notexist in theobjectrepository
UFT looks for the object to which the test or component refers, inthe associated object repositories before attempting to identify thatobject in the application.
If the object in your test or component cannot be found in anyassociated object repository, the Maintenance Run Wizard enablesyou to identify the object in your application that you want to add toyour repository and use in your test or component.
For details, see "Maintenance Run mode" below.
Maintenance Run modeRelevant for: GUI tests and components
Use Maintenance Run Mode to update the test objects in the object repositoriesassociated with your test or component when UFT cannot locate one or moreobjects in your application during a run session.
User GuideChapter 26: Maintaining Tests or Components
HP Unified Functional Testing (12.53) Page 148 of 938
When do you use Maintenance Mode?When you run a test or component in Maintenance Run Mode, the MaintenanceRun Wizard opens each time it encounters any of following problems and providesthe described solutions:
Problem Solution
Object cannotbe identifiedin application
If you point to an object in the application being tested, theMaintenance Run Wizard compares that object to the objects inthe associated object repositories.
Depending on how the property values of the object to which youpoint compare to the property values of the objects in theassociated repositories, the Maintenance Run Wizard suggestsone of several options for updating your test or component toreflect the changes in the application.
You can also choose to add a comment to your test or componentbefore the failed step.
Object ismissing fromthe objectrepository
The Maintenance Run Wizard helps you add the missing objectto the repository.
You can also choose to add a comment to your test or componentbefore the failed step.
Object existsbut can onlybe identifiedthroughSmartIdentification
Identifying objects using Smart Identification may cause tests orcomponents to run slower.
The Maintenance Run Wizard helps you modify the description ofthe object, so that Smart Identification is not needed.
For more details, see "Smart identification" on page 195.
Note: Maintenance Run Mode does not support complex checkpoint or outputvalue types such as File and XML checkpoints and output values.
During the Maintenance Run, these checkpoints and output values run asthey would in a regular run session and will fail if there are differencesbetween expected and actual values.
Tip: Alternately, update individual test object descriptions from the object inyour application using the Update from Application option in the Object
User GuideChapter 26: Maintaining Tests or Components
HP Unified Functional Testing (12.53) Page 149 of 938

Repository window or Object Repository Manager.
For details, see "Maintaining identification properties" on page 211.
Maintenance Run Mode prerequisites
InstallMicrosoft ScriptDebugger
If it is not installed, you can use the UFT Additional InstallationRequirements Utility to install it.
Access the Additional Installation Requirements Utility from theStart menu or the <UFT installation folder>\bin\UFTInstallReqs.exe.
UFT set toNormal test runmode
Maintenance Run Mode can be run only when UFT is set to usethe Normal run mode.
User interface Maintenance Run Mode can only be run on applications thathave a user interface
Determine UFT wait timeDetermine how long UFT waits for an object to be displayed before determiningthat it cannot be found. The default setting is 20 seconds.
Change the object synchronization timeout in the Run pane of the Test Settingsdialog box.
Tip: After Maintenance Run Mode finishes you may want to return this settingto its previous value for regular test runs.
Run the test or component in Maintenance Run Mode1. Click the down arrow next to the Run button in the toolbar and select Maintenance
Run Mode.2. Specify the results location and the input parameter values (if applicable) for
the Maintenance Run Mode session.3. Follow the steps in the Maintenance Run Wizard .The run results open by default when the run session ends.
User GuideChapter 26: Maintaining Tests or Components
HP Unified Functional Testing (12.53) Page 150 of 938

Merge changes to your shared object repositoryAfter using the Maintenance Run Wizard, you may want to merge the objects fromthe local repository back to a shared object repository.
Use the Update from Local Repository option in the Object Repository Manager.
For details, see "Update a shared object repository from a local object repository"on page 234.
User GuideChapter 26: Maintaining Tests or Components
HP Unified Functional Testing (12.53) Page 151 of 938
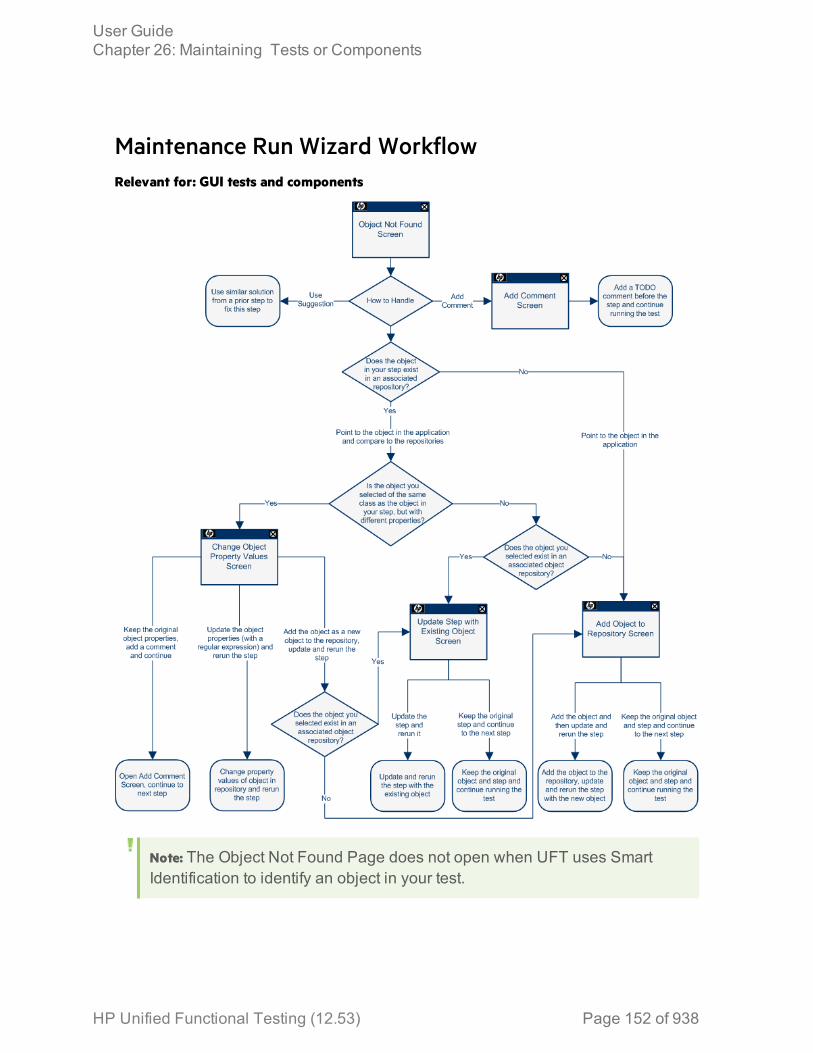
Maintenance Run Wizard WorkflowRelevant for: GUI tests and components
Note: The Object Not Found Page does not open when UFT uses SmartIdentification to identify an object in your test.
User GuideChapter 26: Maintaining Tests or Components
HP Unified Functional Testing (12.53) Page 152 of 938
In that case, the Maintenance Run Wizard suggests updating the objectproperties according to the properties currently defined in the ObjectIdentification Dialog Box.
Update Run modeRelevant for: GUI tests and components
Update Run Mode runs the test or component to update the following:
l The set of identification properties used for test object descriptionsl The Active Screen images and valuesl The expected checkpoint valuesUFT updates the set of identification properties for each object class in yourassociated object repositories according to the properties currently defined in theObject Identification Dialog Box.
Example: Suppose you design a test or component for the English version ofpart of your application.
You now want to use the same test or component for the French version ofyour application.
To do this:
1. Define a property that is not language-dependent, such as target, so thatUFT can use these properties instead of text-based properties for objectidentification.
2. Perform an update run on the English version of this part of yourapplication using these new properties.
3. Run the test or component on the French version of your application.
Smart IdentificationIf your objects are identified using Smart Identification, you can use Update runmode to change the set of properties:
User GuideChapter 26: Maintaining Tests or Components
HP Unified Functional Testing (12.53) Page 153 of 938
Objectsidentifiedusing SmartIdentification
If you have a test or component that runs successfully, but in whichcertain objects are identified using Smart Identification, you canchange the set of properties used for object identification.
Then, use the Update test object descriptions option to update the testobject description to use the set of properties that SmartIdentification used to identify the object.
When you run the test or component with Update test objectdescriptions selected, UFT finds the test object specified in eachstep based on its current test object description.
If UFT cannot find the test object based on its description, it usesthe Smart Identification properties to identify the test object (ifSmart Identification is enabled).
After UFT finds the test object, it then updates its description basedon the mandatory and assistive properties that you define in theObject Identification Dialog Box.
User GuideChapter 26: Maintaining Tests or Components
HP Unified Functional Testing (12.53) Page 154 of 938
Parametersor RegularExpressions
Any properties that were used in the previous test objectdescription and are no longer part of the description for that testobject class, as defined in the Object Identification Dialog Box, areremoved from the new description.
This occurs even if the values were parameterized or defined asregular expressions.
If the same property appears both in the test object's new andprevious descriptions, and the property value in the previousdescription was parameterized or specified as a regularexpression, one of the following occurs:
l If the previous value and the current value match ...... UFT keeps theproperty's previous parameterized or regular expression value.For example, if the previous property value was defined as theregular expression button, and the new value is button1, theproperty value remains button.
l If the previous value and the current value do not match ...... but theobject is found using Smart Identification, UFT updates theproperty value to the new, constant property value.For example, if the previous property value was button, and thenew value is My button, if Smart Identification definition enabledUFT to find the object, My button becomes the new propertyvalue.In this case, any parameterization or use of regular expressionsis removed from the test object description.
PropertyCase-Sensitivity
In some cases, the case-sensitivity of some identificationproperties may change from one version of UFT to the next, or as aresult of a patch or hotfix installation.
In those cases, when you use Update Run to update test objectdescriptions, UFT also updates any case-sensitivity settings thatmay have changed.
Update test object descriptions, checkpoints, or outputvalues, or Active Screen capturesRelevant for: GUI tests and components
This task describes how to update your test or component data so that it is accuratefor subsequent runs.
User GuideChapter 26: Maintaining Tests or Components
HP Unified Functional Testing (12.53) Page 155 of 938
Run in Update Run Mode1. Specify the settings for the update run process.2. In the Run dialog box, enter any required input parameter values in the Input
Parameters tab.When UFT updates tests, it runs through only one iteration of the test and oneiteration of each action in the test, according to the run option selected.When a test runs in Update Run Mode, it does not update parameterizedvalues, such as Data pane data and environment variables or property valuesof existing object descriptions in the object repository. To fix the object propertyvalues to match your application, use Maintenance Run Mode.
Export and merge changesWhen UFT updates tests or components, it always saves the updated objects inthe local object repository, even if the objects being updated were originally from ashared object repository. The next time you run the tests or components, UFT usesthe objects from the local object repository, as the local object repository has ahigher priority than any shared object repositories.
After using Update Run Mode to update the test or component, you may want touse the Update from Local Repository option in the Object Repository Manager tomerge the objects from the local repository back to a shared object repository. Fordetails, see "Update a shared object repository from a local object repository" onpage 234.
Analyze the resultsThe run results for an update run session are always saved in a temporary location.
Test objects that cannot be identified during the update process are not updated.As in any run session, if an object cannot be found during the update run, the runsession fails, and information on the failure is included in the Run Results. In thesesituations, you may want to use Maintenance Run Mode to resolve these problems.
Because Update Run does not support updating complex checkpoint types suchas File checkpoints and XML checkpoints, then these checkpoints run as theywould in a regular run session and will fail if there are differences betweenexpected and actual values.
When the update run ends, the run results show:
l Updated values for checkpoints.l Updated test object descriptions.
User GuideChapter 26: Maintaining Tests or Components
HP Unified Functional Testing (12.53) Page 156 of 938
Known Issues in Maintenance and Update Run ModesRelevant for: GUI tests and components
Maintenance Mode
Usingprogrammaticdescriptions
When running in Maintenance Mode, if a step contains aprogrammatic description for an object that is not found in anapplication, it may take a while for Maintenance Mode to indicatethere is a problem. If you use the option to point to the object, itmay take a while for Maintenance Mode to reopen afterward.
Objectswithoutmandatory orassistiveproperties
When the Maintenance Run Wizard cannot find an object, andthe test object description for that object does not have anymandatory or assistive properties (it is identified only by itsordinal identifier, such as a Browser test object), then when youpoint to the object, the wizard is unable to fix the problem anddisplays a message that the object you pointed to has a testobject description that is similar to the object that UFT could notidentify.
Workaround: Use the Update from Application option in the ObjectRepository window (for objects in the local respiratory) or in theObject Repository Manager (for objects in a shared objectrepository) to fix the test object description.
Updating astep bypointing to adifferentobject class
When the Maintenance Run Wizard cannot find an object in theapplication, and you point to a different object class to replace it,the Maintenance Run Wizard offers to add a step with that objectand the object's default method. However, the wizard does notinsert any method arguments for the step. If the step method hasrequired arguments and you accept the step that the MaintenanceRun Wizard proposes without modifying it, the step fails whenyou run it.
Workaround: Enter valid method arguments for the step.
UpdatingXPath orCSS properties
When running in Maintenance Mode, UFT may replace testobjects with XPath or CSS identifier property values with newobjects from your application.
Workaround: Use the Update from Application option in the ObjectRepository Manager to update specific test objects with XPath orCSS identifier property values.
HP Unified Functional Testing (12.53) Page 157 of 938

Objects usedin functionlibrary
Maintenance Mode cannot fix problems in an object's properties,if the object is used in function library that is called by a step. IfMaintenance Mode detects a problem in an object in a functionlibrary, a message is displayed indicating that the test is read-only and that Maintenance Mode is disabled.
Update Run Mode
Insight The Update Run mode does not update Insight test objects.
To update an Insight test object, open the object in the objectrepository, and click the Change Test Object Image button in theTest object image area.
Checkpointsand outputvalues
Update Run does not support updating complex checkpoint andoutput value types such as File and XML.
During the Update Run, these checkpoints and output values runas they would in a regular run session and will fail if there aredifferences between expected and actual values.
User GuideChapter 26: Maintaining Tests or Components
HP Unified Functional Testing (12.53) Page 158 of 938
Chapter 27: Recovery ScenariosRelevant for: GUI tests and components
Unexpected events, errors, and application crashes during a run session candisrupt your run session and distort results. This is a problem particularly whentests or components run unattended—the run pauses until you perform theoperation needed to recover. To handle situations such as these, UFT enables youto create recovery scenarios and associate them with specific tests or applicationareas. Recovery scenarios activate specific recovery operations when triggerevents occur.
The Recovery Scenario Manager provides a wizard that guides you through theprocess of defining a recovery scenario, which includes a definition of anunexpected event and the operations necessary to recover the run session. Forexample, you can instruct UFT to detect a Printer out of paper message and recoverthe run session by clicking the OK button to close the message and continuerunning.
A recovery scenario consists of the following:
l Trigger Event. The event that interrupts your run session. For example, a windowthat pops up on the screen, or a run error.
l Recovery Operations. The operations to perform to enable the run session tocontinue after the trigger event interrupts the session. For example, clicking anOK button in a pop-up window, or restarting Microsoft Windows.
l Post-Recovery Test Run Option. The instructions on how UFT should proceed afterthe recovery operations are performed, and from which step to continue, if at all.You may want to restart the run from the beginning, or skip a step entirely andcontinue with the next step.
After you create recovery scenarios, you associate them with selected tests orcomponents (via the application area) so that the appropriate scenarios can run if atrigger event occurs. You can prioritize the scenarios and set the order in which toapply the scenarios during the run session. You can also choose to disablespecific scenarios, or all scenarios, that are associated with a test or applicationarea.
You can also define which recovery scenarios will be used as the default scenariofor all new tests.
For tests: You can associate, remove, enable, disable, prioritize, and view theproperties of the recovery scenarios associated with a GUI test in the SolutionExplorer.
For components: You define recovery scenarios for components in the Recoverypane of the Additional Settings tab in the application area.
HP Unified Functional Testing (12.53) Page 159 of 938
When to use recovery scenariosRelevant for: GUI tests and components
Recovery scenarios are intended for use only with events that you cannot predict inadvance, or for events that you cannot otherwise synchronize with a specific step inyour test or component.
By default, recovery scenario operations are activated only after a step returns anerror. This can potentially occur several steps after the step that originally causedthe error. The alternative, checking for trigger events after every step, may slowperformance. For this reason, it is best to handle predictable errors directly in yourtest or component.
If you can predict that a certain event may happen at a specific point in your test orcomponent, it is highly recommended to handle that event directly within your testor component, rather than depending on a recovery scenario. To do this in a test,add steps such as If statements or optional steps. To do this in a component, use auser-defined function with conditional steps.
Handling an event directly within your test or component enables you to handleerrors more specifically than recovery scenarios, which by nature are designed tohandle a more generic set of unpredictable events. It also enables you to controlthe timing of the corrective operation with minimal resource usage and maximumperformance.
Example:
l If you know that an Overwrite File message box may open when a Savebutton is clicked during a run session:You can handle this event with an If statement that clicks OK if themessage box opens or by adding an optional step in the test to click OK inthe message box. (For keyword components, you define this If statementin a user-defined function and make it available via the associatedapplication area.)
l You can define a recovery scenario to handle printer errors. Then if aprinter error occurs during a run session, the recovery scenario couldinstruct UFT to click the default button in the Printer Error message box.You would use a recovery scenario in this example because you cannothandle this type of error directly in your test or component. This is becauseyou cannot know at what point the network will return the printer error.Even if you try to handle this event by adding an If statement in a user-
User GuideChapter 27: Recovery Scenarios
HP Unified Functional Testing (12.53) Page 160 of 938
defined function or in your test immediately after a step that sends a file tothe printer, your test or component may progress several steps before thenetwork returns the actual printer error.
Programmatically controlling the recovery mechanismRelevant for: GUI tests and components
You can use the Recovery object to control the recovery mechanismprogrammatically during the run session. For example, you can enable or disablethe entire recovery mechanism or specific recovery scenarios for certain parts of arun session, retrieve status information about specific recovery scenarios, andexplicitly activate the recovery mechanism at a certain point in the run session.
By default, UFT checks for recovery triggers when an error is returned during therun session. You can use the Recovery object's Activate method to force UFT tocheck for triggers after a specific step in the run session. For example, suppose youknow that an object property checkpoint will fail if certain processes are open whenthe checkpoint is performed. You want to be sure that the pass or fail of thecheckpoint is not affected by these open processes, which may indicate a differentproblem with your application.
However, a failed checkpoint does not result in a run error. So by default, therecovery mechanism would not be activated by the object state. You can define arecovery scenario that looks for and closes specified open processes when anobject's properties have a certain state. This state shows the object's propertyvalues as they would be if the problematic processes were open. You can instructUFT to activate the recovery mechanism if the checkpoint fails so that UFT cancheck for and close any problematic open processes and then perform thecheckpoint again. This ensures that when the checkpoint is performed the secondtime it is not affected by the open processes.
For details on the Recovery object and its methods, see the Recovery object topic inthe Utility Objects section of the UFT Object Model Reference for GUI Testing.
Manage recovery scenariosRelevant for: GUI tests and components
This task describes how to perform different recovery scenario management andassociation operations using the Recovery pane in the Test Settings dialog box oran application area's Additional Settings pane.
User GuideChapter 27: Recovery Scenarios
HP Unified Functional Testing (12.53) Page 161 of 938
Create a new recovery scenario operation1. In the Recovery Scenario Manager Dialog Box, click the New Scenario button
. The Recovery Scenario Wizard opens.2. Follow the on-screen instructions.
Associate a recovery scenario in the Test Settings
1. In the Recovery Pane of the Settings dialog box, click the Add button .2. In the Add Recovery Scenario dialog box, click the Browse button and navigate
to the recovery scenario file. A list of recovery scenario operations contained inthis file opens.
3. In the list of recovery scenarios, select a recovery scenario and click AddScenario.The recovery scenario is displayed in the Recovery pane of the Settings dialogbox and is added under the Recovery Scenarios node found under your GUItest in the Solution Explorer.
Associate a recovery scenario in the Solution Explorer1. In the Solution Explorer, do one of the following:
a. Right-click a GUI test node and select Add > Associate Recovery Scenario.
b. Right-click the Recovery Scenarios Node and select Associate RecoveryScenario.
2. In the Add Recovery Scenario dialog box, click the Browse button and navigateto the recovery scenario file. A list of recovery scenario operations contained inthis file opens in the Add Recovery Scenario dialog box.
3. In the list of recovery scenarios, select a recovery scenario and click AddScenario.The recovery scenario is added under the Recovery Scenarios node, foundunder your GUI test in the Solution Explorer.
Associate a recovery scenario with a component/application area1. In Recovery pane of the Additional Settings pane of your application area, click
the Add button .2. In the Add Recovery Scenario dialog box, click the Browse button and navigate
to the recovery scenario file. A list of all recovery scenario operations containedin this file opens in the Add Recovery Scenario dialog box.
User GuideChapter 27: Recovery Scenarios
HP Unified Functional Testing (12.53) Page 162 of 938

3. In the list of recovery scenarios, select a recovery scenario and click AddScenario.The recovery scenario is displayed in the Recovery pane in the AdditionalSettings pane of your application area and is associated with the componentthrough its application area or is associated with the application area.
Enable/disable specific recovery scenariosDo one of the following:
l In the Scenarios box of the Recovery Pane of the Settings dialog box, perform oneof the following:l Select the check box to the left of one or more individual scenarios to enablethem.
l Clear the check box to the left of one or more individual scenarios to disablethem.
l In the Solution Explorer, right-click the scenario you want to disable and selectDisable Recovery Scenario.
Set default recovery scenario settingsClick the Set as Default button in the Recovery pane of the Test Settings dialog boxto set the current list of recovery scenarios to be the default scenarios for all newtests. Any future changes you make to the current recovery scenario list only affectthe current test, and do not change the default list that you defined.
User GuideChapter 27: Recovery Scenarios
HP Unified Functional Testing (12.53) Page 163 of 938

Known Issues- Recovery ScenariosRelevant for: GUI tests and components
l If you specify multiple function libraries from different locations with the samename in the same recovery scenario, only the first function library is used.Workaround: Rename the function libraries so that each function library has aunique name.
HP Unified Functional Testing (12.53) Page 164 of 938

Chapter 28: Using Performance Testing andBusiness Service Management Products withUFT GUI TestsRelevant for: GUI tests only
UFT enables you to create complex tests that examine the full spectrum of yourapplication's functionality to confirm that every element of your application works asexpected in all situations.
After you use UFT to create and run a suite of tests that test the functionalcapabilities of your application, you may want to test how much load yourapplication can handle or to monitor your application as it runs.
l HP performance testing products (LoadRunner and Performance Center) test theperformance and reliability of an entire system under controlled and peak loadconditions. To generate load, these performance testing products run hundredsor thousands of virtual users. These virtual users provide consistent, repeatable,and measurable load to exercise your application just as real users would.
l HP Business Service Management (formerly HP Business Availability Center) enablesreal-time monitoring of the end user experience. Business Process Monitor runssynthetic users to perform typical activities on the monitored application.
If you have already created and perfected a test in UFT that is a goodrepresentation of your user’s actions, you may be able to use your test as the basisfor performance testing and application management activities.
You can use Silent Test Runner to check in advance that a test will run correctly fromLoadRunner, Performance Center, and Business Process Monitor.
UFT offers several features that are designed specifically for integration withLoadRunner, Performance Center, and Business Process Monitor.
Note: These products are designed to run tests using virtual or syntheticusers representing many users simultaneously performing standard useroperations. Some features may not be available when integrating theseproducts with UFT.
You can use the Services object and its associated methods to insert statements thatare specifically relevant to Performance Testing and Business ServiceManagement. These include:
AddWastedTime EndTransaction SetTransaction
HP Unified Functional Testing (12.53) Page 165 of 938

EndDistributedTransaction LogMessage SetTransactionStatus
GetEnvironmentAttribute Rendezvous ThinkTime
StartDistributedTransaction StartTransaction UserDataPointUserDataPoint
For details on these methods, see the Services object of the UFT Object ModelReference for GUI Testing and your HP performance testing or Business ServiceManagement documentation.
For details on transactions, see "Measuring transactions" on page 168.
Designing tests for HP performance testing productsRelevant for: GUI tests only
Consider the following guidelines when designing tests for use with performancetesting products:
l The tests you use with LoadRunner and Performance Center should be simple,designed to pinpoint specific operations, and should avoid using external actionsand references to other external files (including resources stored in ALM). Also,when working with action iterations, corresponding StartTransaction andEndTransaction statements must be contained within the same action.
l Every test must contain at least one transaction to provide useful information inthe performance test. LoadRunner and Performance Center use only the datathat is included within a transaction, and ignore any data in a test outside of atransaction.
l Do not include references to external actions or other external resources(including resources stored in ALM), such as an external data table file,environment variable file, shared object repositories, function libraries, and soforth. This is because LoadRunner or Performance Center may not have accessto the external action or resource.(However, if the resource can be found on the network, UFT will use it. Forexample, you can try defining external resources via an absolute path, or byadding them as supplementary files and transferring them to Load Generator inthe GUI test folder.)
l Make sure that the last step(s) in the test closes the application being tested, aswell as any child processes that are running. This enables the next iteration ofthe test to open the application again.
l When measuring a distributed transaction over two different Business ProcessMonitor profiles or Business Transaction Flows (depending on the version), theprofile with the StartDistributedTransaction statement must be run before the profilewith the associated EndDistributedTransaction.
User GuideChapter 28: Using Performance Testing and Business Service Management Products
HP Unified Functional Testing (12.53) Page 166 of 938
l When measuring distributed transactions, make sure that you relate the tests to asingle Business Process Monitor instance. Business Process Monitor searchesfor the end transaction name in all instances, and may close the wrongdistributed transaction if it is included in more than one instance.
l When measuring a distributed transaction over two Business Process Monitorprofiles, make sure that the timeout value you specify is large enough so that theprofile or Business Transaction Flow (depending on the version) that containsthe StartDistributedTransaction step and all the profiles that run before the profilethat contains the EndDistributedTransaction step, will finish running in a time that isless than the value of the specified timeout.
Running GUI tests from HP performance testingproductsRelevant for: GUI tests only
Consider the following guidelines when running tests from HP PerformanceTesting Products:
l You can run only one GUI Vuser concurrently per computer. (A GUI Vuser is aVuser that runs a GUI test.)
l Ensure that UFT is closed on the UFT computer before running a test inPerformance Center or LoadRunner.
l The settings in the LoadRunner or Performance Center Run-time Settings dialogbox are not relevant for tests.
l You cannot use the ResultDir environment variable when running a performancetest.
l Transaction breakdown is not supported for tests (scripts) created with UFT.l UFT cannot run on a computer that is:
l Logged off or locked. In these cases, consider running UFT on a terminalserver.
l Already running a test. Make sure that the test is finished before starting to runanother test.
Running GUI tests from HP Business Process MonitorRelevant for: GUI tests only
Consider the following guidelines when running tests from HP Business ProcessMonitor:
l Before you try to run a test in Business Process Monitor, check which versions ofUFT are supported by your version of Business Process Monitor. For details, see
User GuideChapter 28: Using Performance Testing and Business Service Management Products
HP Unified Functional Testing (12.53) Page 167 of 938
the Business Process Monitor documentation.l To run a test in Business Process Monitor, UFT must be installed and closed onthe Business Process Monitor computer
l Business Process Monitor can run only one test at a time. Make sure that theprevious UFT run session is finished before starting to run another test.
l Transaction breakdown is not supported for tests created with UFT.l Tests must be zipped before uploading them to Business Service ManagementAdmin.If you make changes to your local copy of a test after uploading it to BusinessService Management, upload the zipped test again to enable Business ProcessMonitor to run the test with your changes.
l UFT cannot run tests on a computer that is logged off, locked, or running UFT asa non-interactive service.
l You should start Business Process Monitor by running the magentproc.exeprogram when running tests from Business Process Monitor.
l You cannot use the ResultDir environment variable when running a test inBusiness Process Monitor.
Tip: You can simulate how the test will run from Business Process Monitor byusing Silent Test Runner. For details, see "Silent Test Runner" on page 170.
Measuring transactionsRelevant for: GUI tests only
You can measure how long it takes to run a section of your test by definingtransactions. A transaction represents the process in your application that you areinterested in measuring. Your test must include transactions to be used byLoadRunner, Performance Center, or the Business Process Monitor. Theseproducts use only the data that is included within a transaction, and ignore anydata in a test outside of a transaction.
You define transactions within your test by enclosing the appropriate sections ofthe test with start and end transaction statements. For example, you can define atransaction that measures how long it takes to reserve a seat on a flight and for theconfirmation to be displayed on the client's terminal.
During the run session, the StartTransaction step signals the beginning of the timemeasurement. The time measurement continues until the EndTransaction step isreached. The test results for the EndTransaction step include the transaction's name,end status, total duration, and wasted time.
User GuideChapter 28: Using Performance Testing and Business Service Management Products
HP Unified Functional Testing (12.53) Page 168 of 938
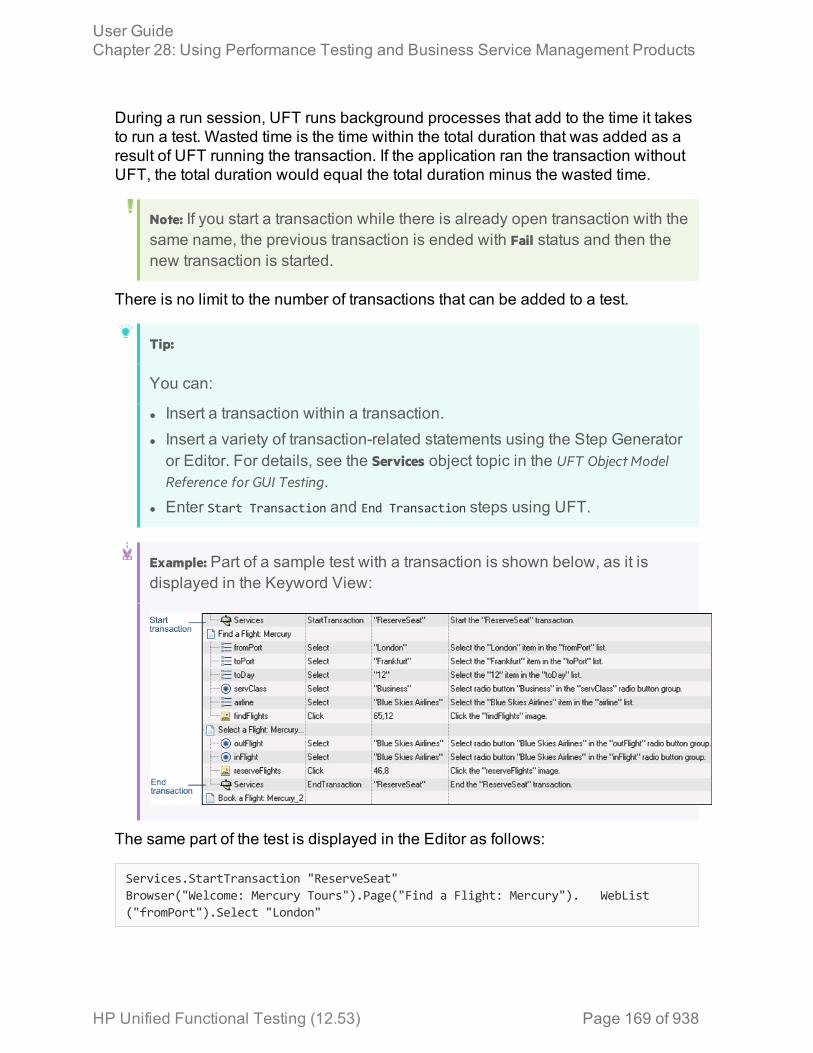
During a run session, UFT runs background processes that add to the time it takesto run a test. Wasted time is the time within the total duration that was added as aresult of UFT running the transaction. If the application ran the transaction withoutUFT, the total duration would equal the total duration minus the wasted time.
Note: If you start a transaction while there is already open transaction with thesame name, the previous transaction is ended with Fail status and then thenew transaction is started.
There is no limit to the number of transactions that can be added to a test.
Tip:
You can:
l Insert a transaction within a transaction.l Insert a variety of transaction-related statements using the Step Generatoror Editor. For details, see the Services object topic in the UFT Object ModelReference for GUI Testing.
l Enter Start Transaction and End Transaction steps using UFT.
Example: Part of a sample test with a transaction is shown below, as it isdisplayed in the Keyword View:
The same part of the test is displayed in the Editor as follows:
Services.StartTransaction "ReserveSeat"Browser("Welcome: Mercury Tours").Page("Find a Flight: Mercury"). WebList("fromPort").Select "London"
User GuideChapter 28: Using Performance Testing and Business Service Management Products
HP Unified Functional Testing (12.53) Page 169 of 938
Browser("Welcome: Mercury Tours").Page("Find a Flight: Mercury"). WebList("toPort").Select "Frankfurt"Browser("Welcome: Mercury Tours").Page("Find a Flight: Mercury"). WebList("toDay").Select "12"Browser("Welcome: Mercury Tours").Page("Find a Flight: Mercury").WebRadioGroup("servClass").Select "Business"Browser("Welcome: Mercury Tours").Page("Find a Flight: Mercury"). WebList("airline").Select "Blue Skies Airlines"Browser("Welcome: Mercury Tours").Page("Find a Flight: Mercury"). Image("findFlights").Click 65,12Browser("Welcome: Mercury Tours").Page("Select a Flight: Mercury").WebRadioGroup("outFlight").Select "Blue Skies Airlines"Browser("Welcome: Mercury Tours").Page("Select a Flight: Mercury").WebRadioGroup("inFlight").Select "Blue Skies Airlines"Browser("Welcome: Mercury Tours").Page("Select a Flight: Mercury"). Image("reserveFlights").Click 46,8Services.EndTransaction "ReserveSeat"
Insert and run GUI tests in Performance Center andLoadRunnerRelevant for: GUI tests only
Insert a test in a LoadRunner scenario
In the Controller Open Test dialog box, browse to the test folder and selectQuickTest Tests or GUI Scripts (for tests created in the SAP environment) in the Files oftype box. This enables you to view the tests in the folder.
Use a UFT test in Performance Center
Create a zipped version of the test, and upload it to the Performance Center UserSite Vuser Scripts Page.
Run multiple GUI Vusers on the same application
Open a terminal server session for each GUI Vuser. For details, refer to the HPperformance testing documentation.
Silent Test RunnerRelevant for: GUI tests only
Silent Test Runner enables you to simulate the way a test runs from LoadRunner,Performance Center, and Business Service Management. When you run a testusing Silent Test Runner, it runs without opening the UFT user interface, and thetest runs at the same speed as when it is run from LoadRunner, Performance
User GuideChapter 28: Using Performance Testing and Business Service Management Products
HP Unified Functional Testing (12.53) Page 170 of 938
Center, or Business Service Management At the end of the test run, you can viewinformation about the test run and transaction times.
You can also use Silent Test Runner to verify that your test is compatible withLoadRunner, Performance Center, and Business Service Management. A test willfail when run using Silent Test Runner if it uses a feature that is not supported bythese products.
Silent Test Runner provides test run information in log files. Each test generates atest run log, and any test with transactions generates an additional transactionsummary.
The test run log is saved as output.txt in the <Unified Functional Testing>\Tests\<testname> folder. A log file is saved for each test run with Silent Test Runner and isoverwritten when you rerun the test. To open the log file, click Test Run Log.
The log file displays information about the test run. For example, information isshown about each iteration, action call, step transaction, failed step, and so forth.Each line displays a message or error ID. For details on message and error codesin the log file, see your Performance Center or Business Service Managementdocumentation.
The transaction summary is saved as transactions.txt in the <Unified FunctionalTesting>\Tests\<test name> folder. A transaction summary is saved for each test thatincludes transactions and is overwritten when you rerun the test. To open the logfile, click Transaction Summary. The transaction summary displays a line for eachtransaction in the test. For each transaction, the status is displayed together withthe total duration time and any wasted time (in seconds). The transactionmeasurements in Silent Test Runner are exactly the same as if the test was runfrom LoadRunner, Performance Center, or Business Service Management.
User GuideChapter 28: Using Performance Testing and Business Service Management Products
HP Unified Functional Testing (12.53) Page 171 of 938

HP Unified Functional Testing (12.53) Page 172
Part 5: Test Objects / Checkpoints /Output Values
Chapter 29: The Test Object ModelRelevant for: GUI tests and components
UFT tests your dynamically changing application by learning and identifying testobjects and their expected properties and values. To do this, UFT analyzes eachobject in your application in much the same way that a person would look at aphotograph and remember its details.
The following sections introduce the concepts related to the test object model anddescribe how UFT uses the information it gathers to test your application.
How UFT learns objectsRelevant for: GUI tests and components
UFT learns objects just as you would. For example, suppose as part of anexperiment, Alex is told that he will be shown a photograph of a picnic scene for afew seconds during which someone will point out one item in the picture. Alex istold that he will be expected to identify that item again in identical or similarpictures one week from today.
Before he is shown the photograph, Alex begins preparing himself for the test bythinking about which characteristics he wants to learn about the item that the testerindicates. Obviously, he will automatically note whether it is a person, inanimateobject, animal, or plant. Then, if it is a person, he will try to commit to memory thegender, skin color, and age. If it is an animal, he will try to remember the type ofanimal, its color, and so forth.
The tester shows the scene to Alex and points out one of three children sitting on apicnic blanket. Alex notes that it is a Caucasian girl about 8 years old. In looking atthe rest of the picture, however, he realizes that one of the other children in thepicture could also fit that description. In addition to learning his planned list ofcharacteristics, he also notes that the girl he is supposed to identify has long,brown hair.
Now that only one person in the picture fits the characteristics he learned, he isfairly sure that he will be able to identify the girl again, even if the scene the testershows him next week is slightly different.
Since he still has a few moments left to look at the picture, he attempts to noticeother, more subtle differences between the child he is supposed to remember andthe others in the picture—just in case.
If the two similar children in the picture appeared to be identical twins, Alex mightalso take note of some less permanent feature of the child, such as the child'sposition on the picnic blanket. That would enable him to identify the child if he were
HP Unified Functional Testing (12.53) Page 173 of 938
shown another picture in which the children were sitting on the blanket in the sameorder.
UFT uses a very similar method when it learns objects.
First, it "looks" at the object being learned and stores it as a test object, determiningin which test object class it fits. In the same way, Alex immediately checkedwhether the item was a person, animal, plant, or inanimate object. UFT mightclassify the test object as a standard Windows dialog box (Dialog), a Web button(WebButton), or a Visual Basic scroll bar object (VbScrollBar), for example.
Then, UFT "considers" the identification properties for the test object. For each testobject class, UFT has a list of mandatory properties that it always learns; similar tothe list of characteristics that Alex planned to learn before seeing the picture. WhenUFT learns an object, it always learns these default property values, and then"looks" at the rest of the objects on the page, dialog box, or other parent object tocheck whether this description is enough to uniquely identify the object. If not, UFTadds assistive properties, one by one, to the description, until it has compiled aunique description; similar to when Alex added the hair length and colorcharacteristics to his list. If no assistive properties are available, or if thoseavailable are not sufficient to create a unique description, UFT adds a specialordinal identifier, such as the object's location on the page or in the source code, tocreate a unique description, just as Alex would have remembered the child'sposition on the picnic blanket if two of the children in the picture had been identicaltwins.
How UFT applies the test object model conceptRelevant for: GUI tests and components
The test object model is a large set of object types or classes that UFT uses torepresent the objects in your application. Each test object class has a list ofidentification properties that UFT can learn about the object, a sub-set of theseproperties that can uniquely identify objects of that class, and a set of relevantoperations that UFT can perform on the object.
A test object is an object that UFT creates in a test or component to represent theactual object in your application. UFT stores information on the object that will helpit identify and check the object during the run session.
A run-time object is the actual object in your application on which methods areperformed during the run session.
When UFT learns an object in your application, it adds the corresponding testobject to an object repository, which is a storehouse for objects. You can add testobjects to an object repository in several ways. For example, you can use theNavigate and Learn option, add test objects manually, or perform an operation on
User GuideChapter 29: The Test Object Model
HP Unified Functional Testing (12.53) Page 174 of 938
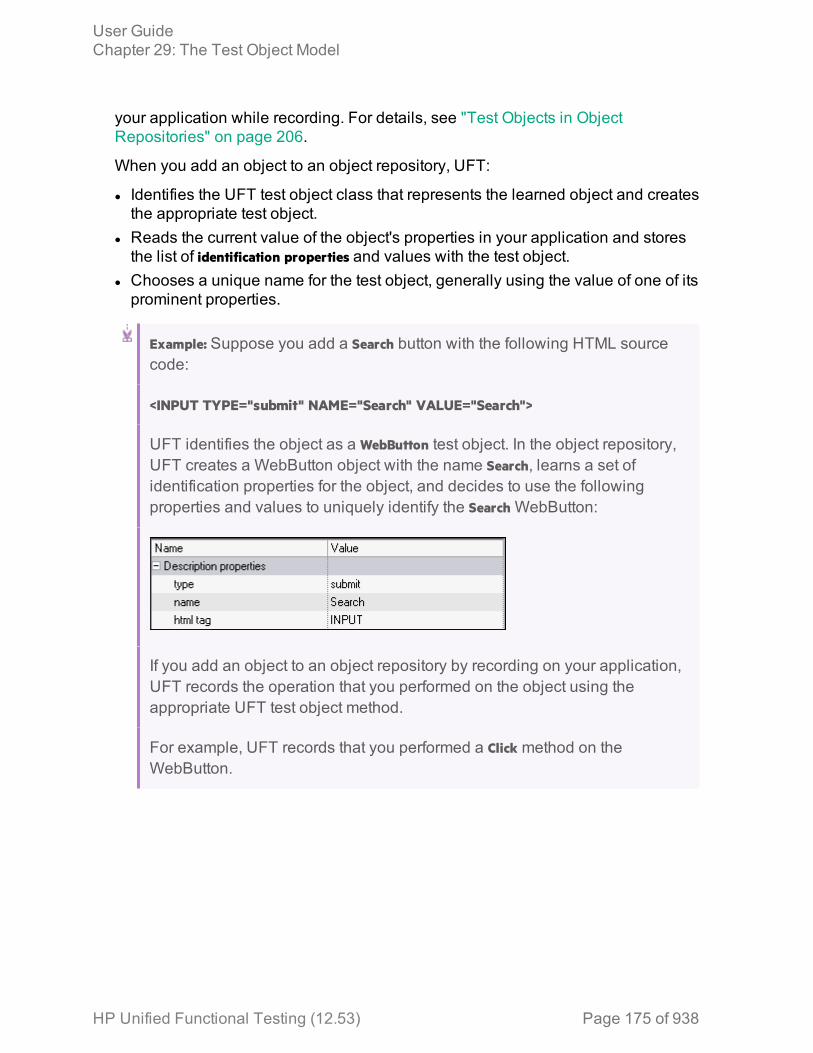
your application while recording. For details, see "Test Objects in ObjectRepositories" on page 206.
When you add an object to an object repository, UFT:
l Identifies the UFT test object class that represents the learned object and createsthe appropriate test object.
l Reads the current value of the object's properties in your application and storesthe list of identification properties and values with the test object.
l Chooses a unique name for the test object, generally using the value of one of itsprominent properties.
Example: Suppose you add a Search button with the following HTML sourcecode:
<INPUT TYPE="submit" NAME="Search" VALUE="Search">
UFT identifies the object as a WebButton test object. In the object repository,UFT creates a WebButton object with the name Search, learns a set ofidentification properties for the object, and decides to use the followingproperties and values to uniquely identify the Search WebButton:
If you add an object to an object repository by recording on your application,UFT records the operation that you performed on the object using theappropriate UFT test object method.
For example, UFT records that you performed a Click method on theWebButton.
User GuideChapter 29: The Test Object Model
HP Unified Functional Testing (12.53) Page 175 of 938
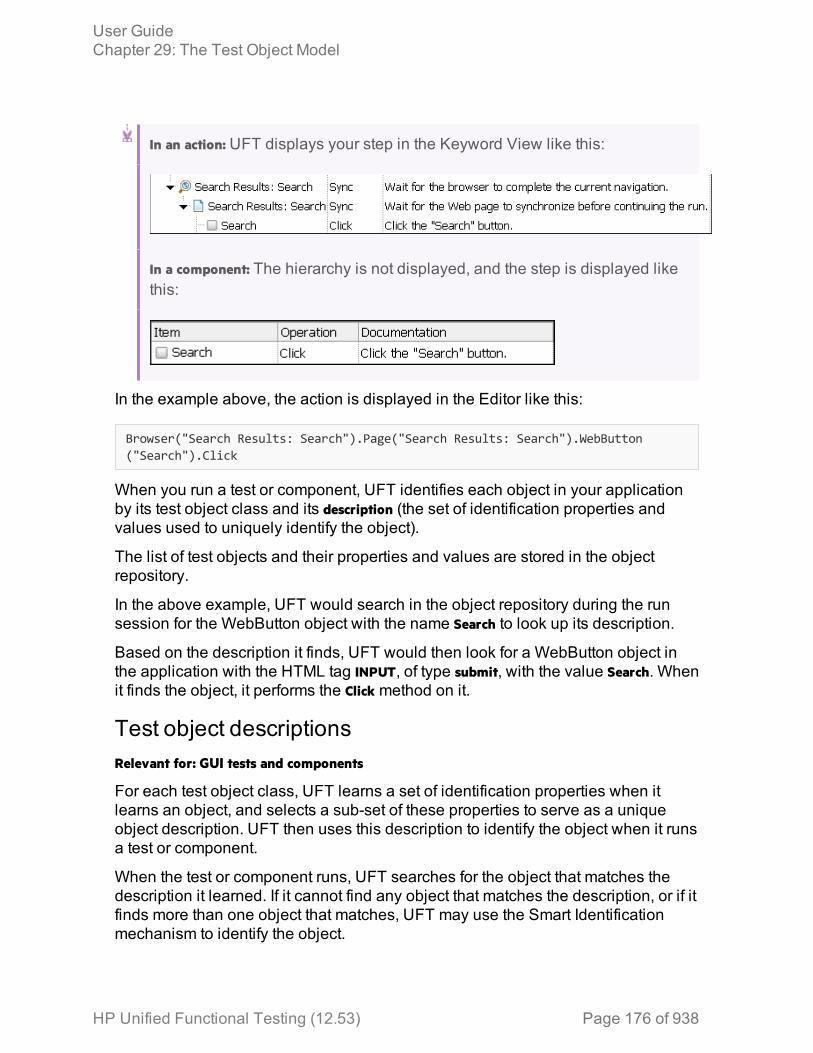
In an action: UFT displays your step in the Keyword View like this:
In a component: The hierarchy is not displayed, and the step is displayed likethis:
In the example above, the action is displayed in the Editor like this:
Browser("Search Results: Search").Page("Search Results: Search").WebButton("Search").Click
When you run a test or component, UFT identifies each object in your applicationby its test object class and its description (the set of identification properties andvalues used to uniquely identify the object).
The list of test objects and their properties and values are stored in the objectrepository.
In the above example, UFT would search in the object repository during the runsession for the WebButton object with the name Search to look up its description.
Based on the description it finds, UFT would then look for a WebButton object inthe application with the HTML tag INPUT, of type submit, with the value Search. Whenit finds the object, it performs the Click method on it.
Test object descriptionsRelevant for: GUI tests and components
For each test object class, UFT learns a set of identification properties when itlearns an object, and selects a sub-set of these properties to serve as a uniqueobject description. UFT then uses this description to identify the object when it runsa test or component.
When the test or component runs, UFT searches for the object that matches thedescription it learned. If it cannot find any object that matches the description, or if itfinds more than one object that matches, UFT may use the Smart Identificationmechanism to identify the object.
User GuideChapter 29: The Test Object Model
HP Unified Functional Testing (12.53) Page 176 of 938
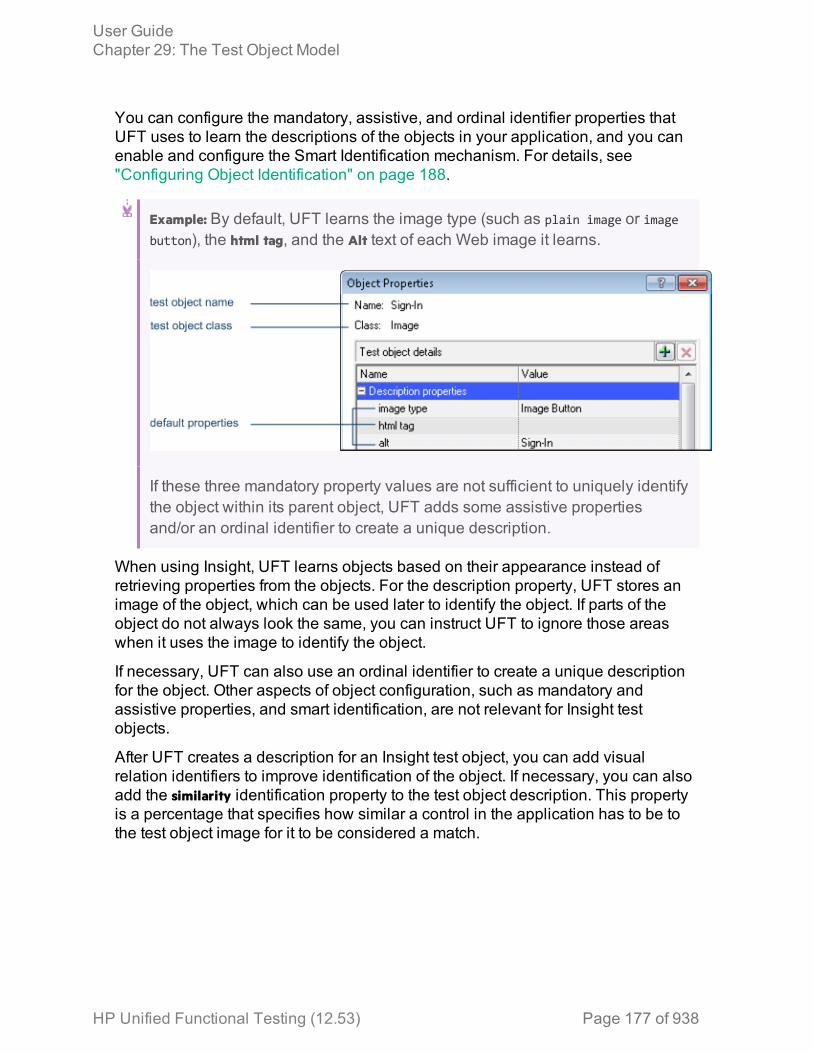
You can configure the mandatory, assistive, and ordinal identifier properties thatUFT uses to learn the descriptions of the objects in your application, and you canenable and configure the Smart Identification mechanism. For details, see"Configuring Object Identification" on page 188.
Example: By default, UFT learns the image type (such as plain image or imagebutton), the html tag, and the Alt text of each Web image it learns.
If these three mandatory property values are not sufficient to uniquely identifythe object within its parent object, UFT adds some assistive propertiesand/or an ordinal identifier to create a unique description.
When using Insight, UFT learns objects based on their appearance instead ofretrieving properties from the objects. For the description property, UFT stores animage of the object, which can be used later to identify the object. If parts of theobject do not always look the same, you can instruct UFT to ignore those areaswhen it uses the image to identify the object.
If necessary, UFT can also use an ordinal identifier to create a unique descriptionfor the object. Other aspects of object configuration, such as mandatory andassistive properties, and smart identification, are not relevant for Insight testobjects.
After UFT creates a description for an Insight test object, you can add visualrelation identifiers to improve identification of the object. If necessary, you can alsoadd the similarity identification property to the test object description. This propertyis a percentage that specifies how similar a control in the application has to be tothe test object image for it to be considered a match.
User GuideChapter 29: The Test Object Model
HP Unified Functional Testing (12.53) Page 177 of 938
UFT test object hierarchyRelevant for: GUI tests and components
The UFT test object hierarchy comprises one or more levels of test objects. The toplevel object may represent a window, dialog box, or browser type object,depending on the environment. The actual object on which you perform anoperation may be learned as a top level object, a second level object, for example,Window.WinToolbar, or a third level object, for example, Browser.Page.WebButton.
In some cases, even though the object in your application may be embedded inseveral levels of objects, the hierarchy does not include these objects. Forexample, if a WebButton object in your application is actually contained in severalnested WebTable objects, which are all contained within a Browser and Page, thelearned object hierarchy is only Browser.Page.WebButton.
An object that can potentially contain a lower-level object is called a containerobject. All top-level objects in the object hierarchy are container objects. If asecond-level object contains third-level objects according to the UFT objecthierarchy, then that object is also considered a container object. For example, inthe step Browser.Page.Edit.Set "David", Browser and Page are both container objects.
Properties and operations for test objects and run-timeobjectsRelevant for: GUI tests and components
UFT uses unique terms to differentiate between the properties and operations fortest objects and run-time objects. The table below introduces some of these terms.
UFT Test Objects Run-time Objects From Your Application
Identification properties are UFT-specificproperties that UFT uses to identifyobjects in applications, to retrieve andstore information about those objects, orto compare stored values with thecurrent values of an object in anapplication.
The identification properties availablefor a test object are determined by itstest object class (and not by the actualproperties available for the object in theapplication).
Native properties are the propertiescreated by the object creator for eachrun-time object. (Examples of objectcreators include Microsoft forMicrosoft Internet Explorer objectsand the product developer for ActiveXobjects.)
User GuideChapter 29: The Test Object Model
HP Unified Functional Testing (12.53) Page 178 of 938
UFT Test Objects Run-time Objects From Your Application
A test object operation is a method orproperty that UFT can perform on anobject from a particular test object class.
Example: UFT can perform the Clickmethod on a WebButton test object.
Native operations are the methods ofthe object in your application asdefined by the object creator.
As you add steps to your test or component, you specify which operation to performon each test object. If you record steps, UFT records the relevant operation as it isperformed on an object. During a run session, UFT performs the specified testobject operation on the run-time object.
You can view and modify properties and operations for test objects and run-timeobjects in a number of ways:
Testobjects
l Retrieve or modify identification property values manually whiledesigning your test or component, or use SetTOProperty statementsduring a run session.For details, see "Test Objects in Object Repositories" on page 206,"Retrieving and setting identification property values" on page 555,and the SetTOProperty method in the Common Methods and Propertiessection of the UFT Object Model Reference for GUI Testing.
l Use regular expressions in function libraries to identify property valuesbased on conditions or patterns you define. For details, see "Regularexpressions" on page 357.
l Parameterize identification property values with data table parameters sothat a different value is used during each iteration of the test. Fordetails, see "Parameterizing Object Values" on page 330.
l View or modify the identification property values that are stored with yourtest or component in the Object Properties or Object Repositorywindow. For details, see "Maintaining identification properties" onpage 211.
l View the current identification property values of any visible object usingthe Properties tab of the Object Spy. For details, see "Use the ObjectSpy" on page 184.
l You can view the syntax of the test object operations of any visible objectusing the Operations tab of the Object Spy. For details, see "Use theObject Spy" on page 184.
User GuideChapter 29: The Test Object Model
HP Unified Functional Testing (12.53) Page 179 of 938

Run-timeobjects
l View the syntax of the native operations of any visible object using theOperations tab of the Object Spy. For details, see "Use the ObjectSpy" on page 184.
l Retrieve native property values from the run-time object during the runsession by adding GetROProperty statements. For details, see"Retrieving and setting identification property values" on page 555.
l If the available test object operations and identification properties donot provide the functionality you need, access the internal operations andnative properties of the run-time object using the Object property. You canalso use the attribute object property to identify Web objects in yourapplication according to user-defined properties. For details, see"Native properties and operations" on page 556 and the Objectproperty in the Common Methods and Properties section of the UFT ObjectModel Reference for GUI Testing.
l When using Insight test objects, which UFT recognizes in theapplication based on the object's appearance, UFT does not use theobject's programming interface and therefore native operations andproperties are not relevant.
How UFT identifies objects during a run sessionRelevant for: GUI tests and components
UFT uses a human-like technique for identifying objects during the run session.
Suppose as a continuation to the experiment (described in "How UFT applies thetest object model concept" on page 174), Alex is now asked to identify the same"item" he initially identified but in a new, yet similar environment.
The first photograph he is shown is the original photograph. He searches for thesame Caucasian girl, about eight years old, with long, brown hair that he wasasked to remember and immediately picks her out. In the second photograph, thechildren are playing on the playground equipment, but Alex is still able to easilyidentify the girl using the same criteria.
Similarly, during a run session, UFT searches for a run-time object that exactlymatches the description of the test object it learned previously. It expects to find aperfect match for both the mandatory and any assistive properties it used to createa unique description while learning the object. As long as the object in theapplication does not change significantly, the description learned is almost alwayssufficient for UFT to uniquely identify the object. This is true for most objects, butyour application could include objects that are more difficult to identify duringsubsequent run sessions.
User GuideChapter 29: The Test Object Model
HP Unified Functional Testing (12.53) Page 180 of 938
For example, Alex is told he will have to recognize a particular tree out of multipletrees in the photo, and he knows he is going to have to be able to identify it again ina photo taken from a different angle. If there isn't enough clearly identifyinginformation about the tree itself, then he might take note of where the tree is locatedrelative to some other permanent item, such as a nearby lamp post or picnic table.Then he will be able to identify the tree again, even if the next picture he sees isfrom a different angle (as long as all the required items are still visible in thepicture).
This is similar to the visual relation identifier property, which enables UFT to identifytest objects according to their neighboring objects in the application. You use thisproperty to link less stable test objects to more unique test objects, and as long asthose objects in the application maintain their relative location to your object, UFTshould still be able to identify the test object even after predictable user interfacechanges in the application.
Consider the final phase of Alex's experiment. In this phase, the tester shows Alexanother photograph of the same family at the same location, but the children areolder and there are also more children playing on the playground. Alex firstsearches for a girl with the same characteristics he used to identify the girl in theother pictures (the test object), but none of the Caucasian girls in the picture havelong, brown hair. Luckily, Alex was smart enough to remember some additionalinformation about the girl's appearance when he first saw the picture the previousweek. He is able to pick her out (the run-time object), even though her hair is nowshort and dyed blond.
How is he able to do this? First, he considers which features he knows he mustfind. Alex knows that he is still looking for a Caucasian female, and if he were notable to find anyone that matched this description, he would assume she is not inthe photograph.
After he has limited the possibilities to the four Caucasian females in this newphotograph, he thinks about the other characteristics he has been using to identifythe girl—her age, hair color, and hair length. He knows that some time has passedand some of the other characteristics he remembers may have changed, eventhough she is still the same person.
Thus, since none of the Caucasian girls have long, dark hair, he ignores thesecharacteristics and searches for someone with the eyes and nose he remembers.He finds two girls with similar eyes, but only one of these has the petite nose heremembers from the original picture. Even though these are less prominentfeatures, he is able to use them to identify the girl.
UFT uses a very similar process of elimination with its Smart Identificationmechanism to identify an object, even when the learned description is no longeraccurate. Even if the values of your identification properties change, UFT maintainsthe reusability of your test or component by identifying the object using Smart
User GuideChapter 29: The Test Object Model
HP Unified Functional Testing (12.53) Page 181 of 938
Identification. For details on Smart Identification, see "Configuring ObjectIdentification" on page 188.
The remainder of this guide assumes familiarity with the concepts presented here,including test objects, run-time objects, identification properties (includingmandatory and assistive properties), visual relation identifiers, and SmartIdentification. An understanding of these concepts will enable you to create well-designed, functional tests and components for your application.
User GuideChapter 29: The Test Object Model
HP Unified Functional Testing (12.53) Page 182 of 938

Object identification process workflowRelevant for: GUI tests and components
The following flowchart provides a general overview of the main process of UFTobject identification.
Note for Web-based objects:
User GuideChapter 29: The Test Object Model
HP Unified Functional Testing (12.53) Page 183 of 938
l If you defined Web object identifiers (such as XPath/CSS properties) forthese test objects, they are used before the description properties. If one ormore objects are found, UFT continues to identify the object using thedescription properties. For details, see the section on Web ObjectIdentifiers (described in the HP Unified Functional Testing Add-ins Guide).
l Additional UFT-generated properties, such as source index or automaticXPath, may also affect the object identification process. You enable theseproperties in the Advanced Web Options tab of the Options dialog box(described in the HP Unified Functional Testing Add-ins Guide) (Tools > Options >GUI Testing tab > Web > Advanced node).
Use the Object SpyRelevant for: GUI tests and components
Note: If you are working with Web applications running in Safari on a remoteMac computer, see "Use the Remote Object Spy" on the next page.
PrerequisitesOpen your application to the page containing the object on which you want to spy.
Use the pointing hand to select the application objectIn the Object Spy, click the pointing hand button and then mouse over or click anobject in your application. In most environments, as you mouse over objects in yourapplication, the Object Spy highlights the object it identifies and displays therelevant information in the Object Spy, according to the options you selected in theObject Spy dialog box.
Note: If UFT does not recognize your objects in the correct location, check tosee that you are viewing the page at 100%, and are not zooming in or out ofthe page.
For example, if you view the page at 90% or 120%, you may be required toclick or select an area to the left or the right of the actual object in order torecognize it.
User GuideChapter 29: The Test Object Model
HP Unified Functional Testing (12.53) Page 184 of 938
When you click an object in your application, the Object Spy captures itsinformation, and you can:
l Change the selected radio button or tab in the Object Spy to view additionaldetails.
l View properties, values, or operations of other test objects currently displayed inthe Object hierarchy tree, by selecting that test object in the tree.
l Highlight the object in the application, by clicking the Highlight in Application
button .
Note: The Object Spy does not support Insight test objects.
Add objects to the object repositoryAfter clicking an object you can add it (or any other object in the Object hierarchy
tree) to the object repository using the Add to Repository button .
If an object in the Object hierarchy tree already exists in a repository associated withthe active action or component, a repository icon is displayed in the lower-rightcorner of the object's icon.
Use the Remote Object SpyRelevant for: GUI tests and components
Use the Remote Object Spy when working with Web applications running in Safarion a Remote Mac computer. The object information and abilities provided by theRemote Object Spy are similar to those provided by the Object Spy.
Note: You perform some of the steps in UFT and some on the Mac computer.You can perform the Mac steps directly on the Mac computer or using aremote access program, such as Virtual Network Computing (VNC).
Prerequisites1. In UFT: Make sure that UFT is connected to a Remote Mac computer, using the
Remote Connection button in UFT's toolbar.2. On the Mac computer: Open Safari to the page containing the object on which you
want to spy, and make sure that the relevant object is visible.
User GuideChapter 29: The Test Object Model
HP Unified Functional Testing (12.53) Page 185 of 938

Open the Remote Object Spy dialog box1. In UFT, make sure that a GUI test or action is in focus in the document pane or
selected in the Solution Explorer.
2. In the toolbar, click the down arrow near the Object Spy button , and select
the Remote Object Spy button.
Use the mouse to select the application objectl When you click the pointing hand in UFT, the Unified Functional Testing Agent
Extension icon in the Safari toolbar on the Mac changes to a UFT Spy
button , indicating that the Spy mode is active.You may want to suspend the Spy mode and use your mouse as usual on theMac, to load Web pages, move applications, or perform any other stepsnecessary to display the object on which you want to spy.
l Click the Pause/Resume UFT Spy toggle button in the Safari toolbar to pauseand resume the Spy session. This affects all open Safari browserssimultaneously.
l Hold the Mac's Command key to momentarily suspend the Spy mode.
Tip: The Command key may be mapped to your Windows start key, or tothe ALT key, depending on how you connect to your Mac computer.
l While the Spy mode is active, as you mouse over Web objects in Safari, theObject Spy highlights the object and displays the relevant Web element's classand html tag properties. Use this information to select the object on which youwant to Spy.
l When you click a Web object in Safari, the Remote Object Spy captures itsproperties and hierarchy, and displays the information in UFT.
View object details or add it to your object repositoryDo any of the following:
l Select the various radio buttons and tabs to view the details of the object's testobject properties and operations and its native properties and operations.
l Select other test objects currently displayed in the Object hierarchy tree, and viewtheir properties, values, or operations.
l Click Highlight in Application to highlight the object in Safari on the Mac.
User GuideChapter 29: The Test Object Model
HP Unified Functional Testing (12.53) Page 186 of 938

UFT highlights only objects that are currently visible on the Mac computer.
l Click Add to Repository to add the object currently selected in the Objecthierarchy tree to the object repository.
l Click Copy Identification Properties to Clipboard to copy all of the properties andvalues for the object currently selected in the Object hierarchy tree. You can pastethe copied data from the Clipboard into any document.
User GuideChapter 29: The Test Object Model
HP Unified Functional Testing (12.53) Page 187 of 938
Chapter 30: Configuring Object IdentificationRelevant for: GUI tests and components
When UFT learns an object, it learns a set of properties and values that uniquelydescribe the object within the object hierarchy. In most cases, this description issufficient to enable UFT to identify the object during the run session.
If you find that the description UFT uses for a certain object class is not the mostlogical one for the objects in your application, or if you expect that the values of theproperties in the object description may change frequently, you can configure theway that UFT learns and identifies objects. You can also map user-defined objectsto standard test object classes and configure the way UFT learns objects from youruser-defined object classes.
UFT has a predefined set of properties that it learns for each test object. If thesemandatory property values are not sufficient to uniquely identify a learned object,UFT can add some assistive properties and/or an ordinal identifier to create aunique description.
Mandatory properties are properties that UFT always learns for a particular testobject class.
Assistive properties are properties that UFT learns only if the mandatory propertiesthat UFT learns for a particular object in your application are not sufficient to createa unique description. If several assistive properties are defined for an object class,then UFT learns one assistive property at a time, and stops as soon as it creates aunique description for the object. If UFT does learn assistive properties, thoseproperties are added to the test object description.
If the combination of all defined mandatory and assistive properties is not sufficientto create a unique test object description, UFT also learns the value for theselected ordinal identifier. For details, see "Ordinal identifiers" on page 190. If aspecific test object relies mainly on ordinal identifiers, you can also define visualrelation identifiers for that test object, to help improve identification reliability for thatobject. For details, see "Visual relation identifiers" on page 192.
When you run a test or component, UFT searches for the object that matches thedescription it learned (without the ordinal identifier). If it cannot find any object thatmatches the description, or if more than one object matches the description, UFTuses the Smart Identification mechanism (if enabled) to identify the object. In manycases, a Smart Identification definition can help UFT identify an object, if it ispresent, even when the learned description fails due to changes in one or moreproperty values. The test object description is used together with the ordinalidentifier only in cases where the Smart Identification mechanism does notsucceed in narrowing down the object candidates to a single object.
HP Unified Functional Testing (12.53) Page 188 of 938

You use the Object Identification Dialog Box to configure the mandatory, assistive,and ordinal identifier properties that UFT uses to learn descriptions of the objects inyour application, and to enable and configure the Smart Identification mechanism.The Object Identification dialog box also enables you to configure new user-defined classes and map them to an existing test object class so that UFT canrecognize objects from your user-defined classes when you run your test orcomponent.
Mandatory and assistive propertiesRelevant for: GUI tests and components
If you find that the description UFT uses for a certain object class is not the mostlogical one for the objects in your application, or if you expect that the values of theproperties currently used in the object description may change, you can modify themandatory and assistive properties that UFT learns when it learns an object of agiven class.
Howeer, during a run session, UFT looks for objects that match all properties in thetest object description—it does not distinguish between properties that werelearned as mandatory properties and those that were learned as assistiveproperties.
For example, the default mandatory properties for a Web Image object are the alt,html tag, and image type properties. There are no default assistive propertiesdefined. Suppose your Web site contains several space holders for differentcollections of rotating advertisements. You want to create a test or component thatclicks on the images in each one of these space holders.
However, since each advertisement image has a different alt value, one alt valuewould be added when you create the test or component, and most likely another altvalue will be captured when you run the test or component, causing the run to fail.In this case, you could remove the alt property from the Web Image mandatoryproperties list. Instead, since each advertisement image displayed in a certainspace holder in your site has the same value for the image name property, youcould add the name property to the mandatory properties to enable UFT to uniquelyidentify the object.
Also, suppose that whenever a Web image is displayed more than once on a page(for example, a logo displayed on the top and bottom of a page), the Web designeradds a special ID property to the Image tag. The mandatory properties are sufficientto create a unique description for images that are displayed only once on the page,but you also want UFT to learn the ID property for images that are displayed morethan once on a page. To do this, you add the ID property as an assistive property,so that UFT learns the ID property only when it is necessary for creating a uniquetest object description.
User GuideChapter 30: Configuring Object Identification
HP Unified Functional Testing (12.53) Page 189 of 938

Ordinal identifiersRelevant for: GUI tests and components
In addition to learning the mandatory and assistive properties specified in theObject Identification Dialog Box, UFT can also learn a backup ordinal identifier foreach test object. The ordinal identifier assigns the object a numerical value thatindicates its order relative to other objects with an otherwise identical description(objects that have the same values for all properties specified in the mandatory andassistive property lists). This ordered value enables UFT to create a uniquedescription when the mandatory and assistive properties are not sufficient to do so.
The assigned ordinal property value is a relative value and is accurate only inrelation to the other objects displayed when UFT learns an object. Therefore,changes in the layout or composition of your application page or screen can causethis value to change, even though the object itself has not changed in any way. Forthis reason, UFT learns a value for this backup ordinal identifier only when itcannot create a unique description using all available mandatory and assistiveproperties.
In addition, even if UFT learns an ordinal identifier, it will use the identifier duringthe run session only if:
l The learned description and the Smart Identification mechanism are notsufficient to identify the object in your application.
l A visual relation identifier is not defined for the test object. For details, see"Visual relation identifiers" on page 192.
Index identifiersWhile learning an object, UFT can assign a value to the test object's Index propertyto uniquely identify the object. The value is based on the order in which the objectappears within the source code. The first occurrence is 0.
Index property values are object-specific. Therefore, if you use Index:=3 to describea WebEdit test object, UFT searches for the fourth WebEdit object in the page.However, if you use Index:=3 to describe a WebElement object, UFT searches forthe fourth Web object on the page—regardless of the type—because theWebElement object applies to all Web objects.
For example, suppose a page contains the following objects:
l An image with the name Apple
l An image with the name UserName
l A WebEdit object with the name UserName
User GuideChapter 30: Configuring Object Identification
HP Unified Functional Testing (12.53) Page 190 of 938

l An image with the name Password
l A WebEdit object with the name Password
The following statement refers to the third item in the list, as this is the first WebEditobject on the page with the name UserName:
WebEdit("Name:=UserName", "Index:=0")
In contrast, the following statement refers to the second item in the list, as that is thefirst object of any type (WebElement) with the name UserName:
WebElement("Name:=UserName", "Index:=0")
Location identifiersWhile learning an object, UFT can assign a value to the test object's Locationproperty to uniquely identify the object. The value is based on the order in whichthe object appears within the window, frame, or dialog box, in relation to otherobjects with identical properties. The first occurrence of the object is 0. Values areassigned in columns from top to bottom, and left to right.
In the following example, the radio buttons in the dialog box are numberedaccording to their Location property:
Location property values are object-specific. Therefore, if you use Location:=3 todescribe a WinButton test object, UFT searches from top to bottom, and left to rightfor the fourth WinButton object in the page. However, if you use Location:=3 todescribe a WinObject object, UFT searches from top to bottom, and left to right forthe fourth standard object on the page—regardless of the type—because theWinObject object applies to all standard objects.
Creation time identifers
User GuideChapter 30: Configuring Object Identification
HP Unified Functional Testing (12.53) Page 191 of 938

While learning a browser object, UFT assigns a value to the CreationTimeidentification property. This value indicates the order in which the browser wasopened relative to other open browsers. The first browser that opens receives thevalue CreationTime = 0.
During the run session, if UFT is unable to identify a browser object based solelyon its test object description, it examines the order in which the browsers wereopened, and then uses the CreationTime property to identify the correct one.
Example: For example, if UFT learns three browsers that are opened at9:01 pm, 9:03 pm, and 9:05 pm, UFT assigns the CreationTime values, asfollows: CreationTime = 0 to the 9:01 am browser, CreationTime = 1 to the9:03 am browser, and CreationTime = 2 to the 9:06 am browser.
At 10:30 pm, when you run a test or component with these browser objects,suppose the browsers are opened at 10:31 pm, 10:33 pm, and 10:34 pm.UFT identifies the browsers, as follows: the 10:31 pm browser is identifiedwith the Browser test object with CreationTime = 0, 10:33 pm browser isidentified with the test object with CreationTime = 1, 10:34 pm browser isidentified with the test object with CreationTime = 2.
If a step was created on a Browser object with a specific CreationTime value, butduring a run session there is no open browser with that CreationTime value, the stepwill run on the browser that has the highest CreationTime value. For example, if astep was created on a Browser object with CreationTime = 6, but during the runsession there are only two open browsers, with CreationTime = 0 andCreationTime = 1, then the step runs on the last browser opened, which in thisexample is the browser with CreationTime = 1.
Note: It is possible that at a particular time during a session, the availableCreationTime values may not be sequential. For example, if you open sixbrowsers during a record or run session, and then during that session, youclose the second and fourth browsers (CreationTime values 1 and 3), then atthe end of the session, the open browsers will be those with CreationTimevalues 0, 2, 4, and 5.
Visual relation identifiersRelevant for: GUI tests and components
When testing applications with multiple identical objects, UFT assigns an ordinalidentifier to each test object. This may lead to unreliable object identification.
User GuideChapter 30: Configuring Object Identification
HP Unified Functional Testing (12.53) Page 192 of 938
However, it may not (immediately) result in a failed step.
To improve object identification, you can create a visual relation identifier, which is aset of definitions that enable you to identify the object in the application accordingto the relative location of its neighboring objects. You can select neighboringobjects that will maintain the same relative location to your object, even if the userinterface design changes. This enables you to help UFT identify similar objectsmuch as a human tester would, and helps create more stable object repositoriesthat can withstand predictable changes to the application's user interface.
For example, suppose that someone shows you a photograph of identical twinssitting at different desks in a classroom and asks you to remember the differencesbetween them so that you can identify each twin successfully when shown differentphotographs at a later time.
You are told that one differentiating characteristic is that one twin (twin A) alwayscarries a blue school bag, and that the other twin (twin B) always carries a redschool bag. You are then told that each twin has an assigned desk partner, whichmeans that even if the twins sit at different desks in other photographs, they alwayssit next to their assigned partners.
One way to remember which twin is which is by identifying twin A in this manner:Always look for the blue school bag and the twin's desk partner to locate twin A.
UFT uses visual relation identifiers in a similar manner. It compares the relativelocations of the test objects you defined in the visual relation identifier with themultiple identical objects. UFT uses visual relation identifiers only when one ormore objects match the test object's description properties during the identificationprocess. If no objects in the application match the test object's descriptionproperties, then the visual relation identifier you defined is ignored, and UFTcontinues to Smart Identification (if defined for that test object class).
HowUFT interprets horizontal and vertical visual relationsRelevant for: GUI tests and components
User GuideChapter 30: Configuring Object Identification
HP Unified Functional Testing (12.53) Page 193 of 938
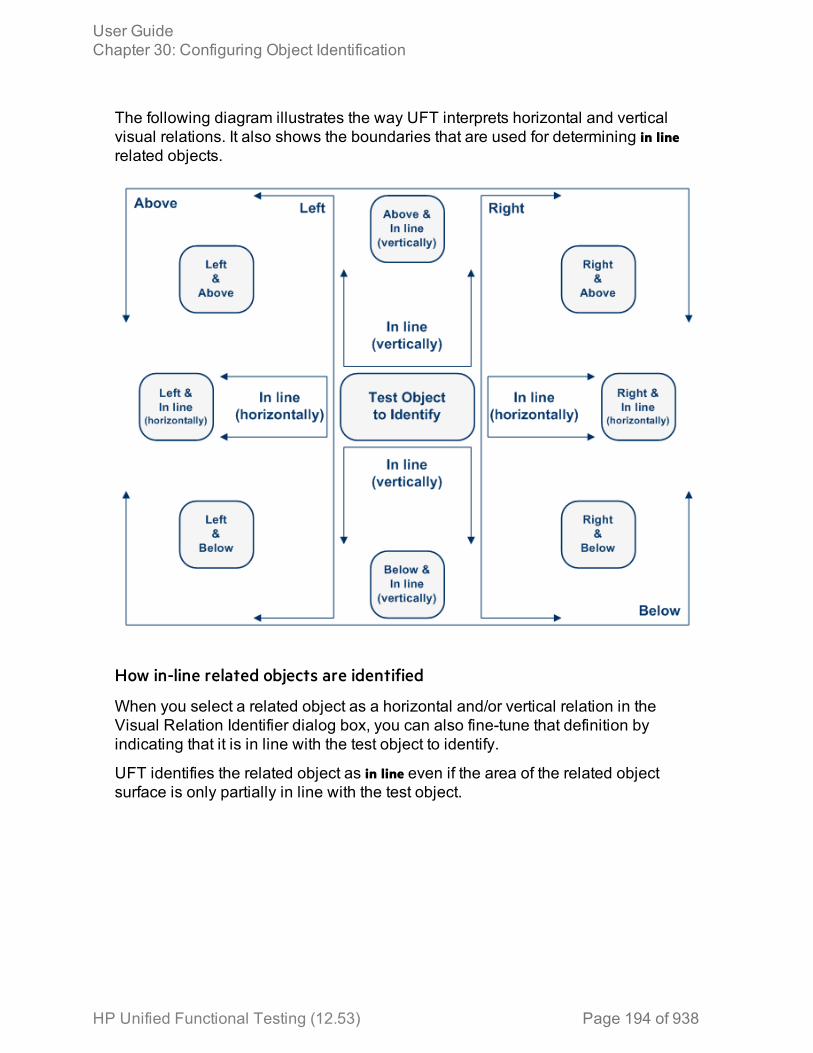
The following diagram illustrates the way UFT interprets horizontal and verticalvisual relations. It also shows the boundaries that are used for determining in linerelated objects.
How in-line related objects are identified
When you select a related object as a horizontal and/or vertical relation in theVisual Relation Identifier dialog box, you can also fine-tune that definition byindicating that it is in line with the test object to identify.
UFT identifies the related object as in line even if the area of the related objectsurface is only partially in line with the test object.
User GuideChapter 30: Configuring Object Identification
HP Unified Functional Testing (12.53) Page 194 of 938
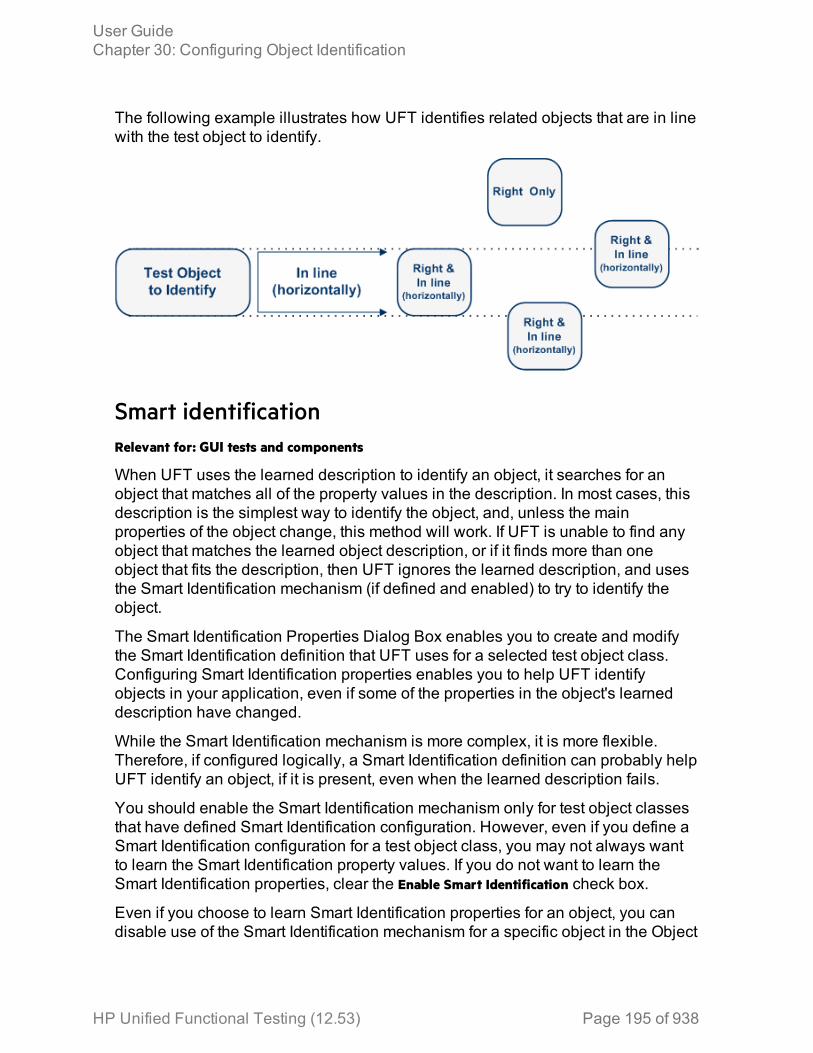
The following example illustrates how UFT identifies related objects that are in linewith the test object to identify.
Smart identificationRelevant for: GUI tests and components
When UFT uses the learned description to identify an object, it searches for anobject that matches all of the property values in the description. In most cases, thisdescription is the simplest way to identify the object, and, unless the mainproperties of the object change, this method will work. If UFT is unable to find anyobject that matches the learned object description, or if it finds more than oneobject that fits the description, then UFT ignores the learned description, and usesthe Smart Identification mechanism (if defined and enabled) to try to identify theobject.
The Smart Identification Properties Dialog Box enables you to create and modifythe Smart Identification definition that UFT uses for a selected test object class.Configuring Smart Identification properties enables you to help UFT identifyobjects in your application, even if some of the properties in the object's learneddescription have changed.
While the Smart Identification mechanism is more complex, it is more flexible.Therefore, if configured logically, a Smart Identification definition can probably helpUFT identify an object, if it is present, even when the learned description fails.
You should enable the Smart Identification mechanism only for test object classesthat have defined Smart Identification configuration. However, even if you define aSmart Identification configuration for a test object class, you may not always wantto learn the Smart Identification property values. If you do not want to learn theSmart Identification properties, clear the Enable Smart Identification check box.
Even if you choose to learn Smart Identification properties for an object, you candisable use of the Smart Identification mechanism for a specific object in the Object
User GuideChapter 30: Configuring Object Identification
HP Unified Functional Testing (12.53) Page 195 of 938

Properties or Object Repository window. For tests, you can also disable use of themechanism for an entire test in the Run pane of the Test Settings dialog box.
However, if you do not learn Smart Identification properties, you cannot enable theSmart Identification mechanism for an object later.
The Smart Identification mechanism uses two types of properties:
l Base Filter Properties. The most fundamental properties of a particular test objectclass; those whose values cannot be changed without changing the essence ofthe original object. For example, if a Web link's tag was changed from <A> to anyother value, you could no longer call it the same object.
l Optional Filter Properties. Other properties that can help identify objects of aparticular class. These properties are unlikely to change on a regular basis, butcan be ignored if they are no longer applicable.
Smart identification is not relevant for Insight test objects.
The Smart identification processRelevant for: GUI tests and components
If UFT activates the Smart Identification mechanism during a run session (becauseit was unable to identify an object based on its learned description), it follows thefollowing process to identify the object:
1. UFT "forgets" the learned test object description and creates a new objectcandidate list containing the objects (within the object's parent object) that matchall of the properties defined in the Base Filter Properties list.
2. UFT filters out any object in the object candidate list that does not match thefirst property listed in the Optional Filter Properties list. The remaining objectsbecome the new object candidate list.
3. UFT evaluates the new object candidate list:l If the new object candidate list still has more than one object, UFT uses thenew (smaller) object candidate list to repeat the filter for the next optionalfilter property in the list.
l If the new object candidate list is empty, UFT ignores this optional filterproperty, returns to the previous object candidate list, and repeats the filterfor the next optional filter property in the list.
l If the object candidate list contains exactly one object, then UFT concludesthat it has identified the object and performs the statement containing theobject.
4. UFT continues the filtering process described above until it either identifies oneobject, or runs out of optional filter properties to use.
User GuideChapter 30: Configuring Object Identification
HP Unified Functional Testing (12.53) Page 196 of 938
If, after completing the Smart Identification elimination process, UFT still cannotidentify the object, then UFT uses the learned description plus the ordinalidentifier to identify the object.If the combined learned description and ordinal identifier are not sufficient toidentify the object, then UFT pauses the run session and displays a Run Errormessage.
HowUFT uses smart identification - Use-case scenarioRelevant for: GUI tests and components
The following example walks you through the object identification process for anobject:
Suppose you have the following statement in your test or component:
Browser("Mercury Tours").Page("Mercury Tours").Image("Login").Click 22,17
When you created your test or component, UFT learned the following objectdescription for the Login image:
However, at some point after you created your test or component, a second loginbutton (for logging into the VIP section of the Web site) was added to the page, sothe Web designer changed the original Login button's alt tag to: basic login.
The default description for Web Image objects (alt, html tag, image type) works formost images in your site, but it no longer works for the Login image, because thatimage's alt property no longer matches the learned description. Therefore, whenyou run your test or component, UFT is unable to identify the Login button basedon the learned description. However, UFT succeeds in identifying the Login buttonusing its Smart Identification definition.
The following explanation describes the process that UFT uses to find the Loginobject using Smart Identification:
1. According to the Smart Identification definition you have for Web imageobjects, UFT learned the values of the following properties when it learned theLogin image:
User GuideChapter 30: Configuring Object Identification
HP Unified Functional Testing (12.53) Page 197 of 938
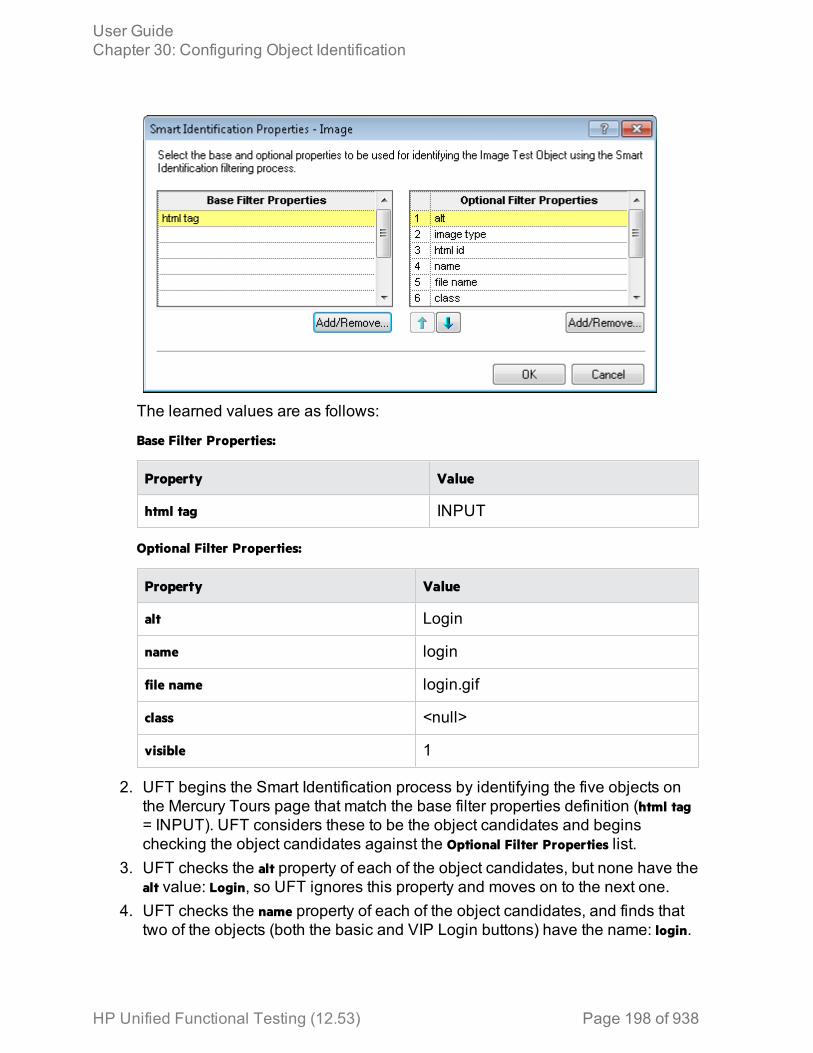
The learned values are as follows:
Base Filter Properties:
Property Value
html tag INPUT
Optional Filter Properties:
Property Value
alt Login
name login
file name login.gif
class <null>
visible 1
2. UFT begins the Smart Identification process by identifying the five objects onthe Mercury Tours page that match the base filter properties definition (html tag= INPUT). UFT considers these to be the object candidates and beginschecking the object candidates against the Optional Filter Properties list.
3. UFT checks the alt property of each of the object candidates, but none have thealt value: Login, so UFT ignores this property and moves on to the next one.
4. UFT checks the name property of each of the object candidates, and finds thattwo of the objects (both the basic and VIP Login buttons) have the name: login.
User GuideChapter 30: Configuring Object Identification
HP Unified Functional Testing (12.53) Page 198 of 938
UFT filters out the other three objects from the list, and these two login buttonsbecome the new object candidates.
5. UFT checks the file name property of the two remaining object candidates. Onlyone of them has the file name login.gif, so UFT correctly concludes that it hasfound the Login button and clicks it.
Test object mapping for unidentified or custom classesRelevant for: GUI tests and components
The Object Mapping Dialog Box enables you to map an object of an unidentified orcustom class to a standard Windows class. For example, if your application has abutton that cannot be identified, this button is learned as a generic WinObject.
You can teach UFT to identify your object as if it belonged to a standard Windowsbutton class. Then, when you click the button while recording, UFT records theoperation in the same way as a click on a standard Windows button.
When you map an unidentified or custom object to a standard object, your object isadded to the list of standard Windows test object classes as a user-defined testobject class. You can configure the object identification settings for a user-definedtest object class just as you would any other test object class.
You should map an object that cannot be identified only to a standard Windowsclass with comparable behavior. For example, do not map an object that behaveslike a button to the Edit class.
Configure object identification for a test object classRelevant for: GUI tests and components
Set properties for identifying an object1. Select Tools > Object Identification.2. In the Object Identification Dialog Box, set the properties that are learned for
the test object description:a. Select the environment.b. Select the test object class.c. Set mandatory and assistive properties. Click Add/Remove under the
mandatory or assistive property lists and select the necessary propertiesfrom the Add/Remove Properties Dialog Box.
d. Select an ordinal identifier.
User GuideChapter 30: Configuring Object Identification
HP Unified Functional Testing (12.53) Page 199 of 938
Set properties for Smart Identification1. In the Object Identification Dialog Box, select the environment and test object
class for which you want to configure Smart Identification.2. Select the Enable Smart ID check box. The Configure button is enabled.3. Click the Configure button to open the Smart Identification Properties Dialog
Box.4. In the Smart Identification Properties dialog box, set the base and optional
properties.5. Set the order in which the optional properties are used.6. If you do not want UFT to learn the Smart Identification properties, clear the
Enable Smart Identification check box. The configuration is saved, but not used.
Map an unidentified or custom class to a StandardWindows classRelevant for: GUI tests and components
This task describes how to map an unidentified or custom class to a standardWindows class. This instructs UFT to identify objects of the specified class in thesame way as it identifies objects of the Windows class to which it is mapped.
1. In the Object Identification dialog box (Tools > Object Identification), in theEnvironment drop-down list, select Standard Windows and then click the User-defined button.
2. In the Object Mapping Dialog Box, click the pointing hand and then clickthe object whose class you want to add as a user-defined test objectclass. Thename of the user-defined object is displayed in the Class name box.
3. In the Map to box, select the standard object class to which you want to mapyour user-defined test object class and click Add. The class name and mappingis added to the object mapping list.
4. Click OK. The Object Mapping dialog box closes and your object is added tothe list of standard Windows test object classes as a user-defined test objectclass. Note that your object has an icon with a red U in the lower-right corner,identifying it as a user-defined class.
5. Configure the object identification settings for your user defined test objectclass just as you would any other test object class. For details, see "Configureobject identification for a test object class" on the previous page.
Caution: If you click the down arrow on the Reset Test Object button and
User GuideChapter 30: Configuring Object Identification
HP Unified Functional Testing (12.53) Page 200 of 938
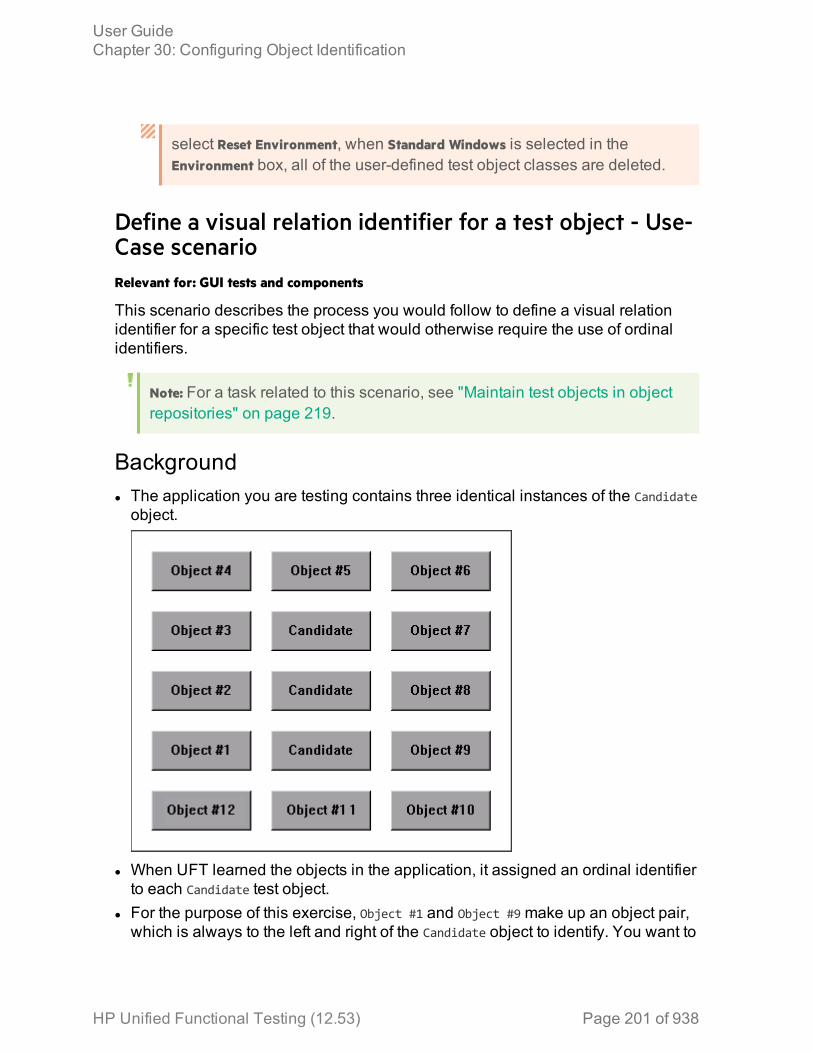
select Reset Environment, when Standard Windows is selected in theEnvironment box, all of the user-defined test object classes are deleted.
Define a visual relation identifier for a test object - Use-Case scenarioRelevant for: GUI tests and components
This scenario describes the process you would follow to define a visual relationidentifier for a specific test object that would otherwise require the use of ordinalidentifiers.
Note: For a task related to this scenario, see "Maintain test objects in objectrepositories" on page 219.
Backgroundl The application you are testing contains three identical instances of the Candidateobject.
l When UFT learned the objects in the application, it assigned an ordinal identifierto each Candidate test object.
l For the purpose of this exercise, Object #1 and Object #9make up an object pair,which is always to the left and right of the Candidate object to identify. You want to
User GuideChapter 30: Configuring Object Identification
HP Unified Functional Testing (12.53) Page 201 of 938
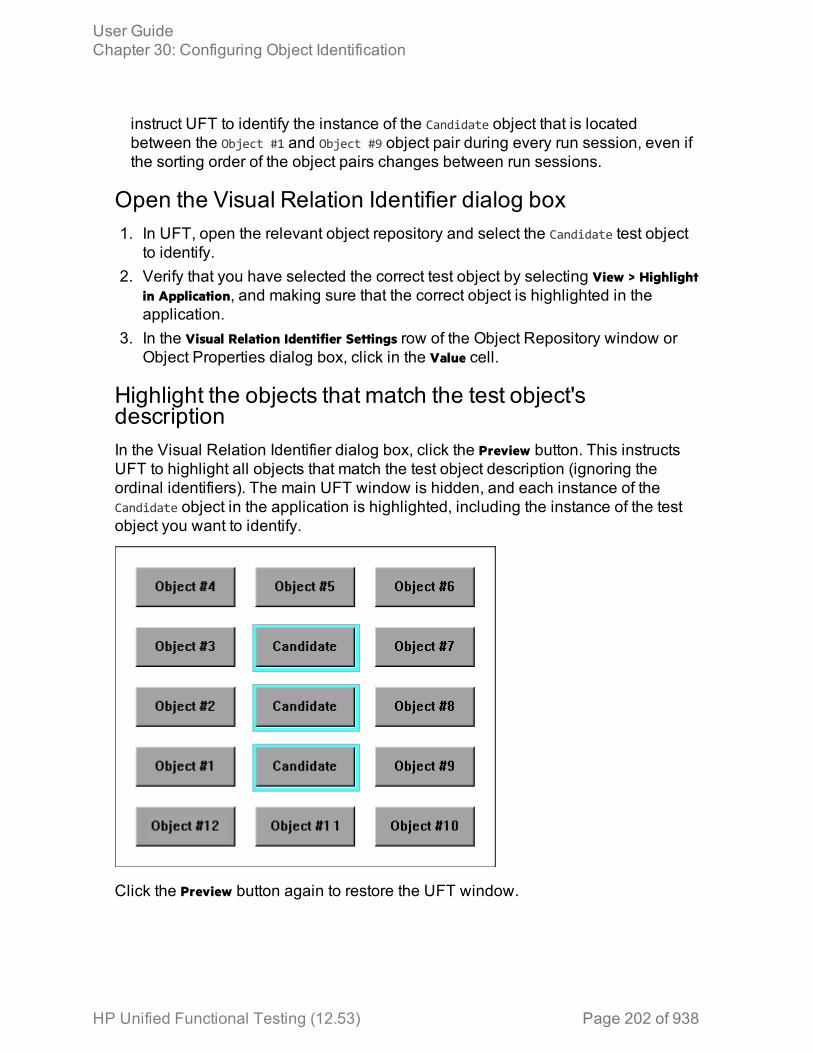
instruct UFT to identify the instance of the Candidate object that is locatedbetween the Object #1 and Object #9 object pair during every run session, even ifthe sorting order of the object pairs changes between run sessions.
Open the Visual Relation Identifier dialog box1. In UFT, open the relevant object repository and select the Candidate test object
to identify.2. Verify that you have selected the correct test object by selecting View > Highlight
in Application, and making sure that the correct object is highlighted in theapplication.
3. In the Visual Relation Identifier Settings row of the Object Repository window orObject Properties dialog box, click in the Value cell.
Highlight the objects that match the test object'sdescriptionIn the Visual Relation Identifier dialog box, click the Preview button. This instructsUFT to highlight all objects that match the test object description (ignoring theordinal identifiers). The main UFT window is hidden, and each instance of theCandidate object in the application is highlighted, including the instance of the testobject you want to identify.
Click the Preview button again to restore the UFT window.
User GuideChapter 30: Configuring Object Identification
HP Unified Functional Testing (12.53) Page 202 of 938
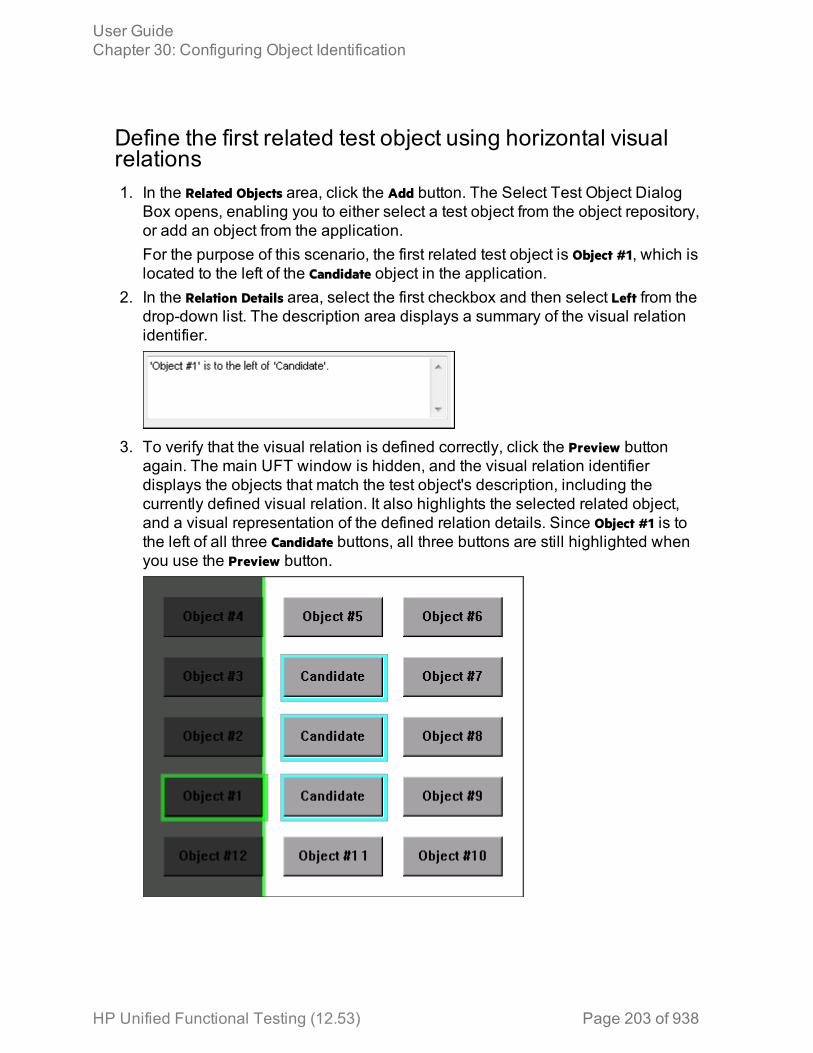
Define the first related test object using horizontal visualrelations1. In the Related Objects area, click the Add button. The Select Test Object Dialog
Box opens, enabling you to either select a test object from the object repository,or add an object from the application.For the purpose of this scenario, the first related test object is Object #1, which islocated to the left of the Candidate object in the application.
2. In the Relation Details area, select the first checkbox and then select Left from thedrop-down list. The description area displays a summary of the visual relationidentifier.
3. To verify that the visual relation is defined correctly, click the Preview buttonagain. The main UFT window is hidden, and the visual relation identifierdisplays the objects that match the test object's description, including thecurrently defined visual relation. It also highlights the selected related object,and a visual representation of the defined relation details. Since Object #1 is tothe left of all three Candidate buttons, all three buttons are still highlighted whenyou use the Preview button.
User GuideChapter 30: Configuring Object Identification
HP Unified Functional Testing (12.53) Page 203 of 938
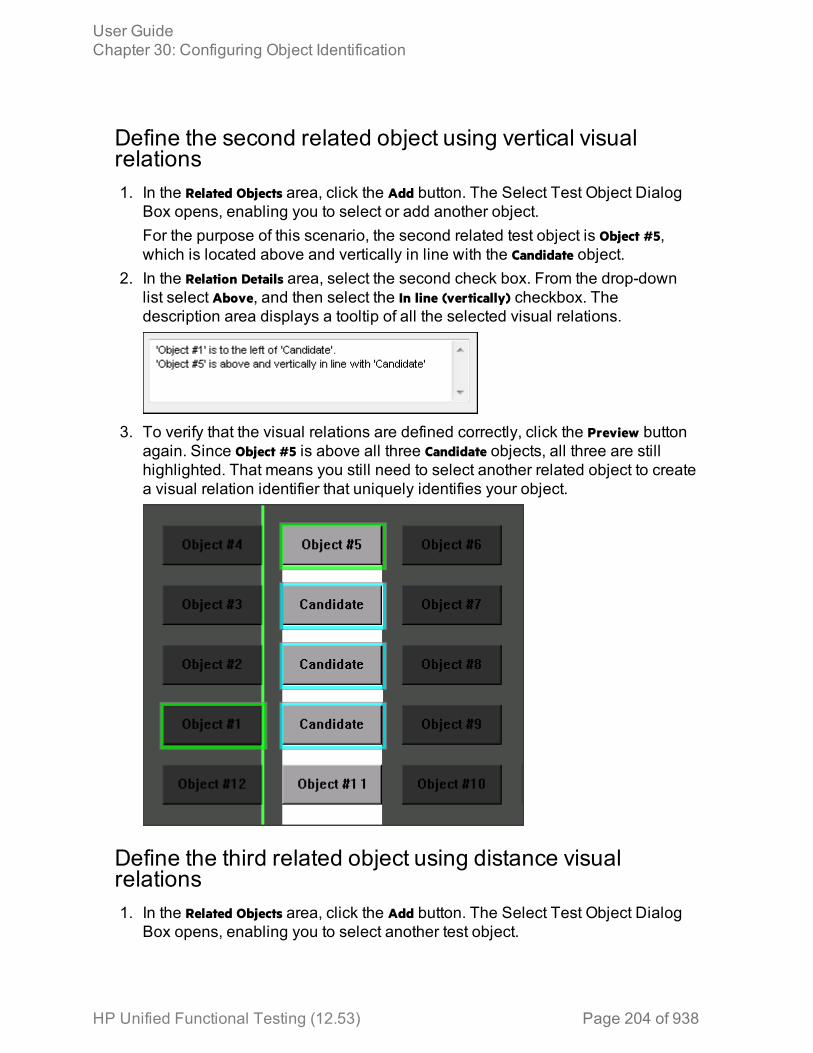
Define the second related object using vertical visualrelations1. In the Related Objects area, click the Add button. The Select Test Object Dialog
Box opens, enabling you to select or add another object.For the purpose of this scenario, the second related test object is Object #5,which is located above and vertically in line with the Candidate object.
2. In the Relation Details area, select the second check box. From the drop-downlist select Above, and then select the In line (vertically) checkbox. Thedescription area displays a tooltip of all the selected visual relations.
3. To verify that the visual relations are defined correctly, click the Preview buttonagain. Since Object #5 is above all three Candidate objects, all three are stillhighlighted. That means you still need to select another related object to createa visual relation identifier that uniquely identifies your object.
Define the third related object using distance visualrelations1. In the Related Objects area, click the Add button. The Select Test Object Dialog
Box opens, enabling you to select another test object.
User GuideChapter 30: Configuring Object Identification
HP Unified Functional Testing (12.53) Page 204 of 938

For the purpose of this scenario, the third related test object is Object #9, whichis the closest object to the right of the Candidate object.
2. In the Relation Details area, select the third checkbox and then select Closest onthe Y-axis from the drop-down list. The description area displays an updatedsummary of the visual relation identifier.
3. To verify that the visual relations are defined correctly, click the Preview buttonagain. you can now see that this third related object enables UFT to uniquelyidentify the correct object.
ResultsAfter you finish defining all of the necessary visual relations:
l The desired Candidate object is the only object in the application that is identifiedwhen you use Preview.
l UFT can now correctly identify the desired Candidate object during every runsession, even if the user interface changes, as long as the Candidate objectmaintains it's relative location to the three related objects you defined.
l The Ordinal Identifier property is disabled in the Object Repository Manager orwindow.
User GuideChapter 30: Configuring Object Identification
HP Unified Functional Testing (12.53) Page 205 of 938
Chapter 31: Test Objects in Object RepositoriesRelevant for: GUI tests an components
Objects can be stored in two types of object repositories—a shared objectrepository and a local object repository.
A shared object repository stores objects in a file that can be accessed by multipletests or components (via their application areas) (in read-only mode). You can usethe same shared object repository for multiple actions or components. You can alsouse multiple object repositories for each action or component.
A local object repository stores objects in a file that is associated with one specificaction or component, so that only that action or component can access the storedobjects. The local object repository is automatically created when you create a newaction or component.
When you plan and create tests or components, you must consider how you wantto store their test objects. You can:
l Store the objects for each action or component in its corresponding local objectrepository.
l Store the objects in one or more shared object repositories. By storing objects inshared object repositories and associating these repositories with your actions orcomponent’s application areas, you enable multiple actions and components touse the objects. Use a combination of objects from your local and shared objectrepositories, according to your needs.
To choose where to save objects, you need to understand the differences betweenlocal and shared object repositories:
HP Unified Functional Testing (12.53) Page 206 of 938
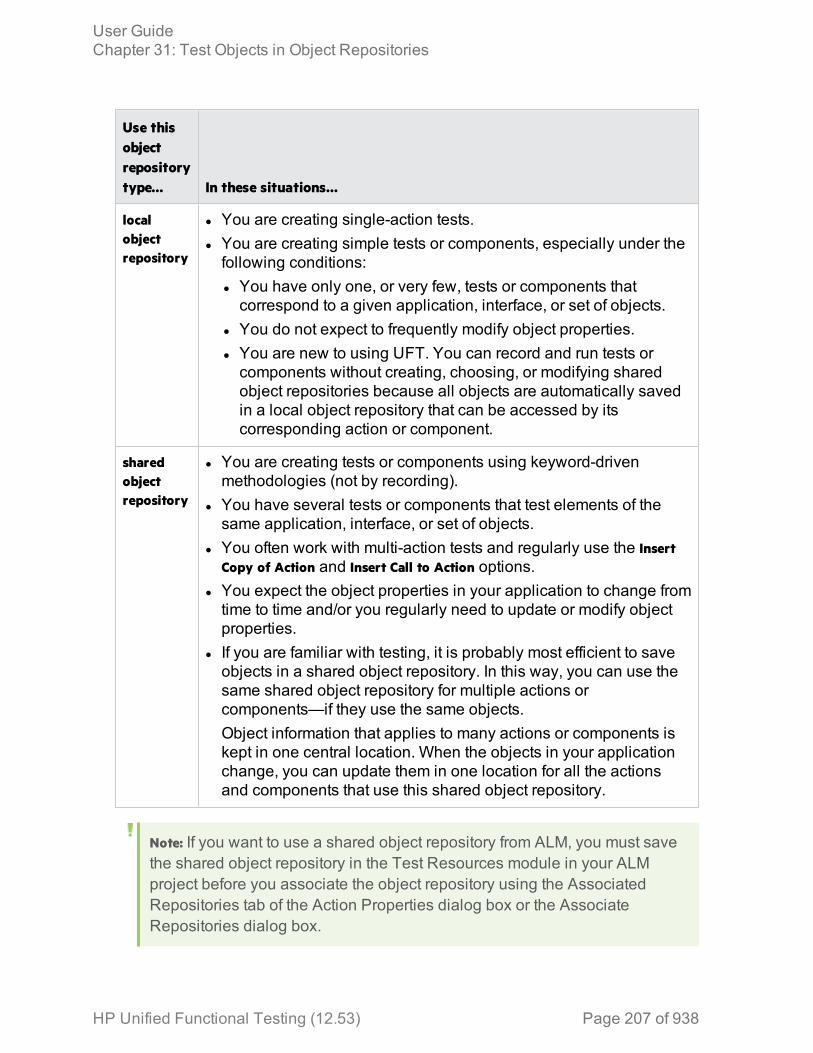
Use thisobjectrepositorytype... In these situations...
localobjectrepository
l You are creating single-action tests.l You are creating simple tests or components, especially under thefollowing conditions:l You have only one, or very few, tests or components thatcorrespond to a given application, interface, or set of objects.
l You do not expect to frequently modify object properties.l You are new to using UFT. You can record and run tests orcomponents without creating, choosing, or modifying sharedobject repositories because all objects are automatically savedin a local object repository that can be accessed by itscorresponding action or component.
sharedobjectrepository
l You are creating tests or components using keyword-drivenmethodologies (not by recording).
l You have several tests or components that test elements of thesame application, interface, or set of objects.
l You often work with multi-action tests and regularly use the InsertCopy of Action and Insert Call to Action options.
l You expect the object properties in your application to change fromtime to time and/or you regularly need to update or modify objectproperties.
l If you are familiar with testing, it is probably most efficient to saveobjects in a shared object repository. In this way, you can use thesame shared object repository for multiple actions orcomponents—if they use the same objects.Object information that applies to many actions or components iskept in one central location. When the objects in your applicationchange, you can update them in one location for all the actionsand components that use this shared object repository.
Note: If you want to use a shared object repository from ALM, you must savethe shared object repository in the Test Resources module in your ALMproject before you associate the object repository using the AssociatedRepositories tab of the Action Properties dialog box or the AssociateRepositories dialog box.
User GuideChapter 31: Test Objects in Object Repositories
HP Unified Functional Testing (12.53) Page 207 of 938
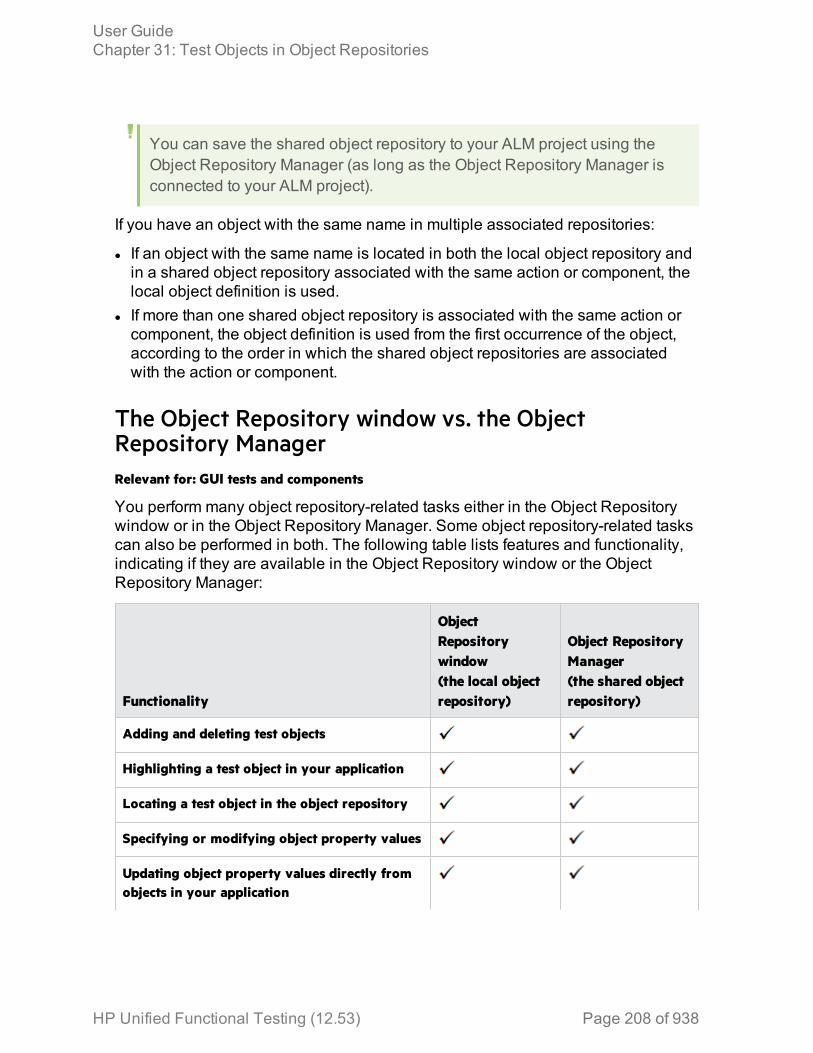
You can save the shared object repository to your ALM project using theObject Repository Manager (as long as the Object Repository Manager isconnected to your ALM project).
If you have an object with the same name in multiple associated repositories:
l If an object with the same name is located in both the local object repository andin a shared object repository associated with the same action or component, thelocal object definition is used.
l If more than one shared object repository is associated with the same action orcomponent, the object definition is used from the first occurrence of the object,according to the order in which the shared object repositories are associatedwith the action or component.
The Object Repository window vs. the ObjectRepository ManagerRelevant for: GUI tests and components
You perform many object repository-related tasks either in the Object Repositorywindow or in the Object Repository Manager. Some object repository-related taskscan also be performed in both. The following table lists features and functionality,indicating if they are available in the Object Repository window or the ObjectRepository Manager:
Functionality
ObjectRepositorywindow(the local objectrepository)
Object RepositoryManager(the shared objectrepository)
Adding and deleting test objects
Highlighting a test object in your application
Locating a test object in the object repository
Specifying or modifying object property values
Updating object property values directly fromobjects in your application
User GuideChapter 31: Test Objects in Object Repositories
HP Unified Functional Testing (12.53) Page 208 of 938

Functionality
ObjectRepositorywindow(the local objectrepository)
Object RepositoryManager(the shared objectrepository)
Restoring default mandatory object propertyvalues
Renaming test objects
Adding properties to an object's description
Defining new identification properties
Removing properties from a test objectdescription
Exporting local objects to a shared objectrepository
Adding a test object
Using repository parameters
Merging multiple object repositories
Exporting the repository an XML file
aLocal copies of objects in shared object repositoriesRelevant for: GUI tests and components
You can create a local copy of any object stored in a shared object repository thatis associated with the action or component currently displayed in the in the objectrepository tree.
Copying an object to the local repository is useful, for example, if you want tomodify an object in the current action or component, without affecting other actionsor components that use the shared object repository.
When you create a local copy of an object and modify it in the Object Repositorywindow, the changes you make affect only the action or component in which youmake the change. Conversely, if you modify the object in the shared objectrepository using the Object Repository Manager, the changes you make arereflected in all actions or components that use the shared object repository.
User GuideChapter 31: Test Objects in Object Repositories
HP Unified Functional Testing (12.53) Page 209 of 938
However, if you modify an object in a shared object repository, and a copy of theobject (with the same name) exists in the local repository, your changes do notaffect the local copy of the object in your action or component.
During a run session, UFT uses the test object in the local object repository toidentify the object in your application. This is because the local object repositoryhas higher priority than any shared object repository associated with the action orcomponent.
If you copy an object to the local object repository, its parent objects are alsocopied to the local object repository. However, you cannot copy an object to thelocal object repository if an object or its parent objects use unmapped repositoryparameters.
If an object or its parent objects are parameterized using repository parameters, therepository parameter values are converted when you copy the object to the localobject repository. If the value is a constant value, the property receives the sameconstant value.
Adding and deleting test objectsRelevant for: GUI tests and components
When you create an object repository, you can add test objects to it in variousways:
l Use the Navigate and Learn option to add objects to a shared object repositoryl Record steps to add objects on which you perform an operation to the localobject repository. (This occurs for objects that do not already exist in anassociated shared object repository.)
l Add test objects to the local object repository while editing your test orcomponent. For example, for tests and scripted components, you can add testsobjects from the Active Screen.
When you add test objects to an object repository, you can choose to add only aselected test object, to add all test objects of a certain type (such as all buttonobjects), or to add all test objects of a specific class (such as all WebButton objects).
For example, you may find that users need to perform a step on an object that is notin the object repository. You may also find that an additional object was added tothe application you are testing after you built the object repository. You can add theobject directly to a shared object repository using the Object Repository Manager,so that it is available in all actions and components that use this shared objectrepository. Alternatively, you can add it to the local object repository of the action orcomponent.
User GuideChapter 31: Test Objects in Object Repositories
HP Unified Functional Testing (12.53) Page 210 of 938

For task details on how to add and delete objects, see "Add a test object to anobject repository" on page 216.
Maintaining identification propertiesRelevant for: GUI tests and components
As applications change, you may need to change the property values of the stepsin your action or component. Suppose an object in your application is modified. Ifthat object is part of your action or component, you should modify its values so thatUFT can continue to identify it. For example, if a company Web site contains aContact Us hypertext link, and the text string in this link is changed to Contact MyCompany, you need to update the object's details in the object repository so thatUFT can continue to identify the link properly (assuming that the text property isincluded in the test object's description).
If you are using an Insight object and the text is included in the test object image,you might need to update the test object so that UFT can continue to identify it. Youcan modify the test object's image to include the updated text, or you can add asimilarity identification property to the test object description, or lower the property'svalue, to enable UFT to match the test object with the object in the applicationdespite the differences in the text.
There are a number of things you can do to maintain your object's properties:
Specify ormodifypropertyvalues
You can:
l specify or modify values for properties in the test objectdescription by using a constant value (either a simple value or aconstant value that includes regular expressions) or a parameter
l change the set of properties used to identify that object.l automatically update the description of one or more test objectsin your object repository based on the actual updated objectproperties in your application
User GuideChapter 31: Test Objects in Object Repositories
HP Unified Functional Testing (12.53) Page 211 of 938
Updateidentificationpropertiesfrom anobject inYourapplication
You can update a test object in your object repository by selectingthe corresponding object in your application and relearning itsproperties and property values from the application. When youupdate a test object description in this way, all currently definedproperties and values are overwritten. An Insight test object'simage is not updated.
The updated object description is based on the current definitionsin the Object Identification Dialog Box. Only the object-specificcomments, if any, are retained.
This is useful if an object's properties have changed since youadded it to the object repository, since UFT may not be able torecognize the object unless you update its description.
Restoredefaultmandatorypropertiesfor a testobject
You can restore the default properties for a selected test object.When you restore the default properties, it restores the mandatoryproperty set defined for the selected object class, based on thesettings that were set in the Object Identification Dialog Box at thetime the object was learned.
If you added or removed properties to or from the description, thosechanges are overwritten. However, if property values were definedor modified for any of the mandatory properties, those values arenot modified when you choose this option. In addition, restoring thedefault mandatory property set does not change the values for theordinal identifier or Smart Identification settings for the test object.
Rename testobjects
When an object changes in your application, or if you are notsatisfied with the current name of a test object for any reason, youcan change the name that UFT assigns to the stored object. Youcan also provide test objects with meaningful names to assistusers in identifying them when using them in steps.
Renaming a test object does not affect the way UFT recognizesthe object in your application, as the test object name is notincluded in the test object description.
If you do not want to automatically update test object names in theaction or component for all occurrences of the test object, you canclear the Automatically update test and component steps when yourename test objects check box in the General pane of the Optionsdialog box (Tools > Options > GUI Testing tab > General node).
User GuideChapter 31: Test Objects in Object Repositories
HP Unified Functional Testing (12.53) Page 212 of 938
Addproperties toa test objectdescription
You can add to the list of properties that UFT uses to identify anobject. For each object class, UFT has a default property set that ituses for the object description for a particular test object. You canuse the Add Properties Dialog Box to change the properties thatare included in the test object description.
Adding to the list of properties is useful when you want to createand run tests or components on an object that changesdynamically. An object may change dynamically if it is frequentlyupdated, or if its property values are set using dynamic content (forexample, from a database).
You can also change the properties that identify an object if youwant to reference objects using properties that UFT did not learnautomatically when it learned the object.
Define newidentificationproperties
You can add any valid identification property to a test objectdescription, even if it does not appear in the Add Properties DialogBox.
Add ordinalidentifiers
An ordinal identifier assigns a numerical value to a test object thatindicates its order or location relative to other objects with anotherwise identical description. This ordered value provides abackup mechanism that enables UFT to create a uniquedescription to recognize an object when the defined properties arenot sufficient to do so.
Repository parametersRelevant for: GUI tests and components
Repository parameters enable you to specify that certain property values should beparameterized, but leave the actual parameterization to be defined in each test orcomponent that is associated with the shared object repository that contains theparameterized identification property values.
Repository parameters are useful when you want to create and run tests andcomponents on an object that changes dynamically. An object may changedynamically if it is frequently updated in the application, or if its property values areset using dynamic content, for example, from a database.
If you delete a repository parameter that is used in a test object definition, theidentification property value remains mapped to the parameter, even though theparameter no longer exists. Therefore, before deleting a repository parameter, youshould make sure that it is not used in any test object descriptions, otherwise testsor components that have steps using these test objects will fail when you run them.
User GuideChapter 31: Test Objects in Object Repositories
HP Unified Functional Testing (12.53) Page 213 of 938
Example: Suppose you have a button whose text property value changes in alocalized application depending on the language of the user interface. Youcan parameterize the name property value using a repository parameter, andthen in each test or component that uses the shared object repository youcan specify the location from which the property value should be taken. Forexample, in one test or component that uses this shared object repositoryyou can specify that the property value comes from an environment variableor a component parameter, respectively. In another test or component it cancome from the Data pane or a local parameter, respectively. In a third test orcomponent you can specify it as a constant value.
For task details, see "Manage repository parameters" on page 224.
Repository parameter value mappingsRelevant for: GUI tests and components
You use repository parameters to specify that certain property values of an object in ashared object repository should be parameterized, but that the actual values shouldbe defined in each action or component associated with the shared objectrepository.
After defining the repository parameter, mapping a repository parameter specifiesthat the property values are taken from:
Tests l Data tablel random numberl environmentl test or action parameter
Components l local parameterl component parameter
For example, you may want to retrieve the username object's text property valuefrom an environment variable parameter for one test or component, and from aconstant value, Data pane parameter, or local parameter for another.
Before you map repository parameters, if you have more than one repositoryparameter with the same name in different shared object repositories that areassociated with the same action or component, the repository parameter from theshared object repository with the highest priority (as defined in the shared objectrepositories list) is used.
User GuideChapter 31: Test Objects in Object Repositories
HP Unified Functional Testing (12.53) Page 214 of 938
If you do not map a repository parameter, the default value that was defined withthe parameter, if any, is used during the run session. If the parameter is unmapped,meaning no default value was specified for it, the test or component run may fail if atest object cannot be identified because it has an unmapped parameter value.
Managing shared object repositories using automationRelevant for: GUI tests and components
UFT provides an Object Repository automation object model that enables you tomanage UFT shared object repositories and their contents from outside of UFT.The automation object model enables you to use a scripting tool to access UFTshared object repositories via automation.
Just as you use the UFT automation object model to automate your UFToperations, you can use the objects and methods of the Object Repositoryautomation object model to write scripts that manage shared object repositories,instead of performing these operations manually using the Object RepositoryManager. For example, you can add, remove, and rename test objects; import fromand export to XML; retrieve and copy test objects; and so forth.
After you retrieve a test object, you can manipulate it using the methods andproperties available for that test object class. For example, you can use theGetTOProperty and SetTOProperty methods to retrieve and modify its properties.
Automation programs are especially useful for performing the same tasks multipletimes or on multiple shared object repositories. You can write your automationscripts in any language and development environment that supports automation.For example, you can use VBScript, JavaScript, Visual Basic, Visual C++, orVisual Studio .NET.
Using the Unified Functional Testing Object RepositoryAutomation ReferenceThe Unified Functional Testing Object Repository Automation Reference is a Helpfile that provides detailed descriptions, syntax information, and examples for theobjects and methods in the UFT shared object repository automation object model.
The Help topic for each automation object includes a list and description of themethods associated with that object. Method Help topics include detaileddescription, syntax, return value type, and argument value information.
User GuideChapter 31: Test Objects in Object Repositories
HP Unified Functional Testing (12.53) Page 215 of 938
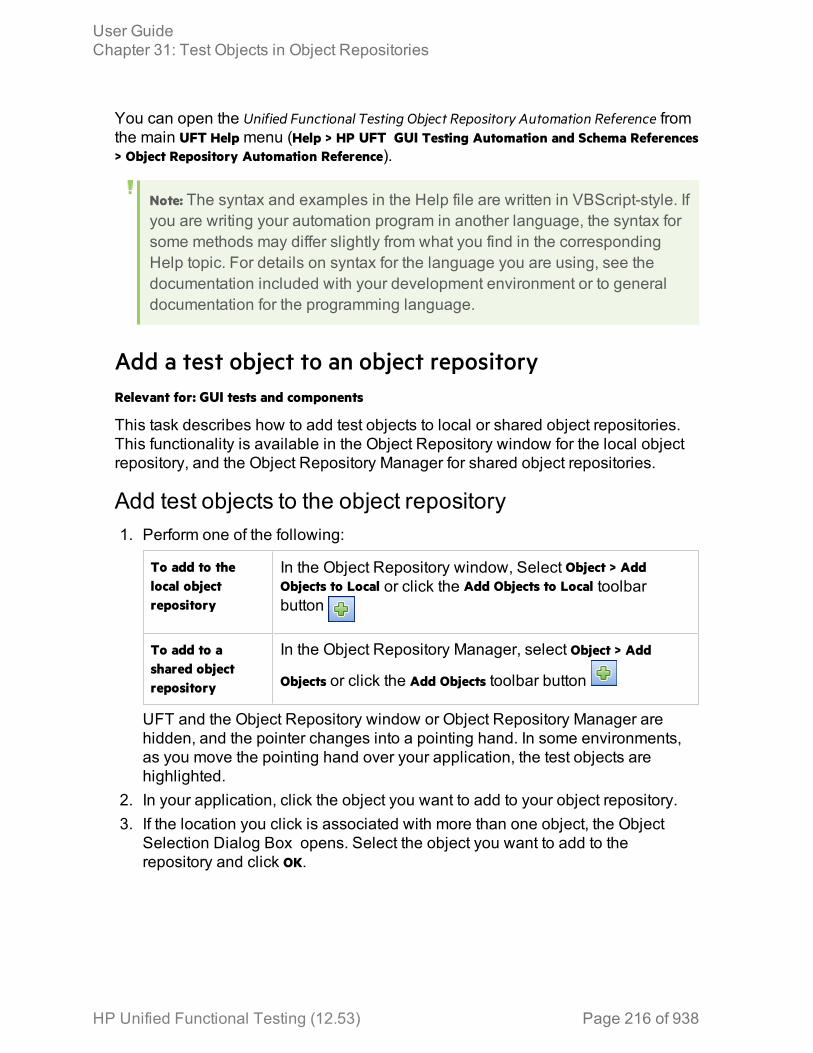
You can open the Unified Functional Testing Object Repository Automation Reference fromthe main UFT Help menu (Help > HP UFT GUI Testing Automation and Schema References> Object Repository Automation Reference).
Note: The syntax and examples in the Help file are written in VBScript-style. Ifyou are writing your automation program in another language, the syntax forsome methods may differ slightly from what you find in the correspondingHelp topic. For details on syntax for the language you are using, see thedocumentation included with your development environment or to generaldocumentation for the programming language.
Add a test object to an object repositoryRelevant for: GUI tests and components
This task describes how to add test objects to local or shared object repositories.This functionality is available in the Object Repository window for the local objectrepository, and the Object Repository Manager for shared object repositories.
Add test objects to the object repository1. Perform one of the following:
To add to thelocal objectrepository
In the Object Repository window, Select Object > AddObjects to Local or click the Add Objects to Local toolbarbutton
To add to ashared objectrepository
In the Object Repository Manager, select Object > Add
Objects or click the Add Objects toolbar button
UFT and the Object Repository window or Object Repository Manager arehidden, and the pointer changes into a pointing hand. In some environments,as you move the pointing hand over your application, the test objects arehighlighted.
2. In your application, click the object you want to add to your object repository.3. If the location you click is associated with more than one object, the Object
Selection Dialog Box opens. Select the object you want to add to therepository and click OK.
User GuideChapter 31: Test Objects in Object Repositories
HP Unified Functional Testing (12.53) Page 216 of 938

If the selectedobjects is thebottom of thehierarchy
The object is added directly to the object repository.
If the selectedobject is a parent(container) object
the Define Object Filter Dialog Box opens. The DefineObject Filter dialog box retains the settings that youdefined in the previous add object session.
The new object's parent objects are also added, if they do not already exist inthe object repository. Local objects are shown in black in the object repositorytree to indicate they are editable; shared objects are shown in gray and can beedited only in the Object Repository Manager.
Add an Insight test object to the object repositoryFor details, see "Add an Insight object" on page 239.
Add a test object to the local object repository while addinga step1. In the Item cell of the Keyword View, from the drop-down list, select Object from
repository.2. In the Select Test Object Dialog box, select the object to add.3. Click OK to create a step using the selected object.The selected step is added to the test and the object is added to the action orcomponent's local object repository.
Define a new test object1. Select the object under which you want to define the new object, according to
the correct object hierarchy.
2. Click the Define New Test Object button or select Object > Define New TestObject. The Define New Test Object Dialog Box opens.
3. In the Environment drop-down list, select the UFT add-in environment for yourobject.
4. In the Class drop-down list, select the object type.5. In the Name edit box, give the object a name.6. In the Test Object details area, provide the necessary identification properties for
the object.7. Click Add to insert the new object in the object repository.8. Click Close to return to the main object repository window.
User GuideChapter 31: Test Objects in Object Repositories
HP Unified Functional Testing (12.53) Page 217 of 938
Add a test object to the object repository with the ObjectSpy
1. Click the Object Spy button from UFT or the Object Repository Manager.2. In the Object Spy window, click the pointing hand. UFT is minimized.3. In your application, click on the object you want to add. The properties of the
object are displayed in the main part of the Object Spy window.4. In the Object Spy, select the appropriate object from the hierarchy to add.
5. Click the Add Object button . Depending on from where you opened theObject Spy dialog box, the object is added to the local or shared objectrepository.
Add a test object to the local object repository from theActive Screen1. If the Active Screen is not displayed, select View > Active Screen.2. Select a step in your test whose Active Screen contains the object that you
want to add to the object repository.3. In the Active Screen, right-click the object you want to add and select View/Add
Object.4. If the location you clicked is associated with more than one object, the Object
Selection Dialog Box opens. Select the object you want to add to the objectrepository, and click OK to close the Object Selection dialog box.
5. The Object Properties Dialog Box opens and displays the default identificationproperties for the object.
Add a test object to the local object repository by insertinga step from the Active Screen1. If the Active Screen is not displayed, select View > Active Screen.2. Select a step in your test whose Active Screen contains the object for which
you want to add a step.3. In the Active Screen, right-click the object for which you want to add a step and
select the type of step you want to insert (checkpoint, output value, StepGenerator, and so forth).
4. If the location you clicked is associated with more than one object, the ObjectSelection Dialog Box opens. Select the object for which you want to add astep, and click OK.
User GuideChapter 31: Test Objects in Object Repositories
HP Unified Functional Testing (12.53) Page 218 of 938
The appropriate dialog box opens, enabling you to configure your preferencesfor the step you want to insert.
5. Set your preferences and select whether to insert the step before or after thestep currently selected in the Keyword View or in the Editor. Click OK to closethe dialog box. A new step is inserted in your test, and the object is added tothe local object repository for the current action (if it was not yet included).
Maintain test objects in object repositoriesRelevant for: GUI tests and components
The following steps describe different options for maintaining and modifying thetest object details of objects in your repositories.
Specify an identification property value1. In the Object Repository window or the Object Repository Manager, select the
test object whose property value you want to specify.2. In the Test object details area, click in the value cell for the required property.3. Specify the property value in one of the following ways:
l If you want to specify a constant value, enter it in the value cell.l If you want to parameterize the value or specify a constant value using aregular expression, click the parameterization button in the value cell .
Update identification properties1. In the object repository tree, select the test object whose description you want
to update.2. Select Object > Update from Application or click the Update from Application button
. UFT is hidden, and the pointer changes into a pointing hand.3. Find the object in your application whose properties you want to update in the
object repository and click it. You must choose an object of the same objectclass as the test object you selected in the object repository tree.The properties and property values for the selected object are updated in theobject repository, according to the properties and values required to identify theobject that were learned by UFT when you clicked the object in yourapplication. Note that all properties and property values in the Test object detailsarea are updated, together with the ordinal identifier and Smart Identificationselections. Any object-specific comments that you may have entered are notremoved.
User GuideChapter 31: Test Objects in Object Repositories
HP Unified Functional Testing (12.53) Page 219 of 938
Restore the mandatory property set1. In the object repository tree, select the test object whose description you want
to restore.
2. In the Test object details area, click the Restore mandatory property set button .3. Click Yes to confirm the operation. The test object's description properties are
restored to the mandatory property set for the selected object class at the timethat the object was learned.
Rename test objects1. In the object repository tree of the Object Repository window or Manager,
select the test object that you want to rename.2. In the Name box in the Object Properties pane, enter the new name for the test
object. Then click anywhere else to remove the focus from the object. Testobject names are not case-sensitive.
Add properties to a test object description1. In the object repository tree of the Object Repository window or Manager,
select the test object whose description you want to modify.
2. In the Test object details area, click the Add description properties button .3. The Add Properties Dialog Box opens listing the properties that can be used to
identify the object (properties that are not already part of the test objectdescription).
Tip: For a test object in the local object repository, you can also select therequired test object and select Edit > Step Properties > Object Properties,click the Add description properties button , and then perform thefollowing steps in the Add Properties dialog box.
Define a new identification property1. In the object repository tree of the Object Repository window or Manager,
select the test object for which you want to define a new property.
2. In the Test object details area, click the Add description properties button . TheAdd Properties Dialog Box opens.
Tip: For a test object in the local object repository, you can also select the
User GuideChapter 31: Test Objects in Object Repositories
HP Unified Functional Testing (12.53) Page 220 of 938
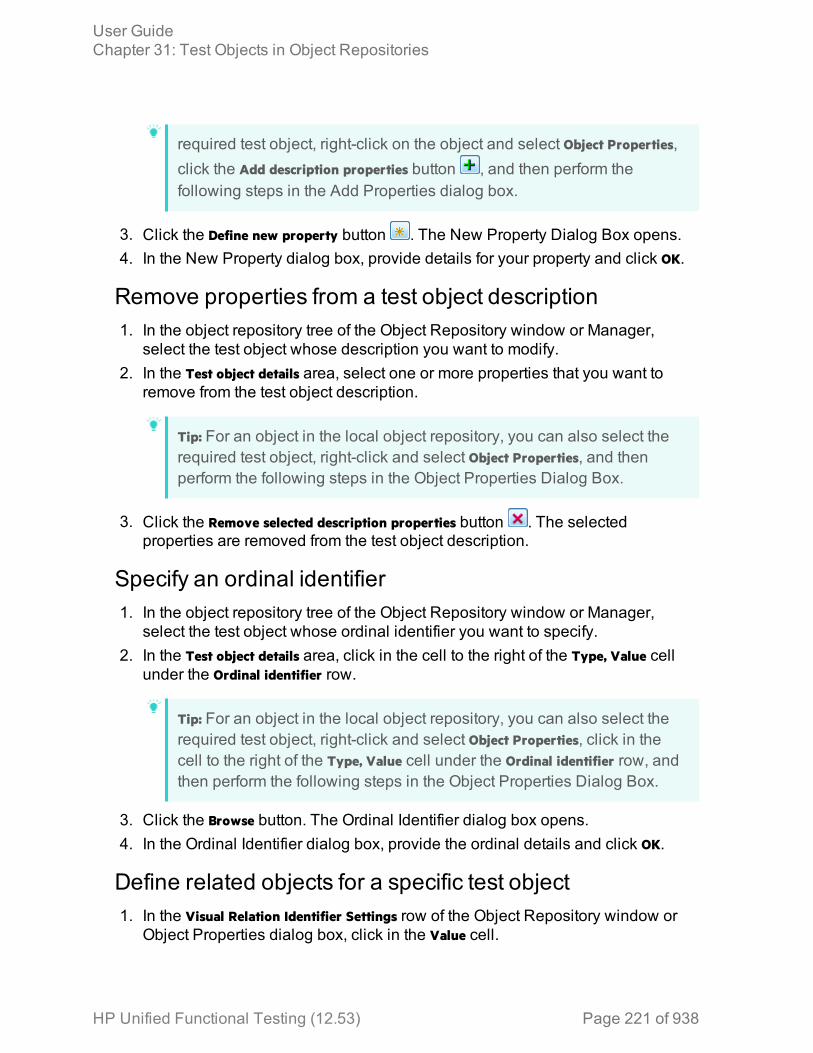
required test object, right-click on the object and select Object Properties,click the Add description properties button , and then perform thefollowing steps in the Add Properties dialog box.
3. Click the Define new property button . The New Property Dialog Box opens.4. In the New Property dialog box, provide details for your property and click OK.
Remove properties from a test object description1. In the object repository tree of the Object Repository window or Manager,
select the test object whose description you want to modify.2. In the Test object details area, select one or more properties that you want to
remove from the test object description.
Tip: For an object in the local object repository, you can also select therequired test object, right-click and select Object Properties, and thenperform the following steps in the Object Properties Dialog Box.
3. Click the Remove selected description properties button . The selectedproperties are removed from the test object description.
Specify an ordinal identifier1. In the object repository tree of the Object Repository window or Manager,
select the test object whose ordinal identifier you want to specify.2. In the Test object details area, click in the cell to the right of the Type, Value cell
under the Ordinal identifier row.
Tip: For an object in the local object repository, you can also select therequired test object, right-click and select Object Properties, click in thecell to the right of the Type, Value cell under the Ordinal identifier row, andthen perform the following steps in the Object Properties Dialog Box.
3. Click the Browse button. The Ordinal Identifier dialog box opens.4. In the Ordinal Identifier dialog box, provide the ordinal details and click OK.
Define related objects for a specific test object1. In the Visual Relation Identifier Settings row of the Object Repository window or
Object Properties dialog box, click in the Value cell.
User GuideChapter 31: Test Objects in Object Repositories
HP Unified Functional Testing (12.53) Page 221 of 938
2. Click the Browse button in the cell. The Visual Relation Identifier Dialog Boxopens.
3. Set the options for the visual relation identifier.Results:
l The visual relation identifier is added to the selected test object, and the text inthe Value cell indicates that a visual relation identifier is defined.
l Any related objects you specified are linked to the test object for which you areusing a visual relation identifier. You cannot define visual relations for thoseobjects.
l The Ordinal identifier property is disabled in the Object Details area of the local orshared object repository, and is not used during the object identification process.However, UFT still uses this property during the learn process, when comparingexisting objects with the objects to be learned, and therefore the ordinal identifiervalue should not be manually changed or removed.
Export the objects from a local object repositoryIn the local object repository window, select File > Export Local Objects, or, for actionsonly, File > Export and Replace Local Objects. The Save Shared Object Repositorywindow opens.
If you chose Export Local Objects, the local objects are exported to the specifiedshared object repository (a file with a .tsr extension). Your test or componentcontinues to use the objects in the local object repository, and the new sharedobject repository is not associated with your test.
If you chose Export and Replace Local Objects, the new shared object repository (a filewith a .tsr extension) is associated with your test, and the objects in the local objectrepository are deleted. The objects in the Object Repository window are read-only,as they are now in a shared object repository. In the Object Properties section ofthe Object Repository window, the repository location indicates the path andfilename of the new shared object repository instead of Local.
In addition, when you export local objects to a shared object repository, theparameters of any parameterized objects are converted to repository parameters,using the same name as the source parameter. The default (mapped) value of eachrepository parameter is the corresponding source parameter.
Copy an object to the local object repositoryThis task describes how to copy an object from a shared object repository to thelocal object repository.
1. Open the test or component that contain the local object repository to whichyou want to copy the object.
User GuideChapter 31: Test Objects in Object Repositories
HP Unified Functional Testing (12.53) Page 222 of 938
2. Open the Object Repository window by selecting Resources > Object Repository or
clicking the Object Repository button .3. In the object repository tree of the Object Repository window, select the action
or component associated with the shared object repository containing theobject you want to copy.
4. Select the object that you want to copy to the local object repository. (Objects ina shared object repository are read-only.) You can select multiple objects aslong as the selected objects have the same parent object.
5. Select Object > Copy to Local or right-click the objects and select Copy to Local.The objects (and parent objects, if any) are copied to the local object repositoryand are made editable.
Modify identification properties during a run sessionAdd a SetTOProperty statement in a user-defined function, or in your action with thefollowing syntax:
Object(description).SetTOPropertyProperty, Value
Create and manage shared object repositoriesRelevant for: GUI tests and components
This task describes the different operations you can perform to manage sharedobject repositories using the Object Repository Manager.
PrerequisitesIf your shared object repository is stored in ALM, connect to ALM either from UFT or
from the Object Repository Manager by clicking the ALM Connection button .
Enable editing for a shared object repository
Select File > Enable Editing or click the Enable Editing button . The shared objectrepository becomes editable.
Associate a shared object repository with actions orcomponentsDo one of the following:
User GuideChapter 31: Test Objects in Object Repositories
HP Unified Functional Testing (12.53) Page 223 of 938
To associate itwith an action
1. In the Solution Explorer, right-click the action name nodeand select Associate Repository with Action.
2. In the Open Shared Object Repository dialog box, selectyour object repository and click Open.
To associate itwith acomponent
1. In the application area, open the Object Repositories tab.2. In the Object Repositories tab, at the top of the tab, click the
New button . A new row is added to the list of objectrepositories.
3. At the right side of the object repositories list, in the new row,click the Browse button.
4. In the Open Shared Object Repository dialog box, selectyour object repository and click Open.
Merge object repositories into shared onesIn the Object Repository Manager, select Tools > Update from Local Repository andselect the object repositories to merge.
Add test objects using Navigate and Learn
1. Select Object > Navigate and Learn. The Navigate and Learn toolbar opens.
Note: You cannot learn Insight test objects using this option.
2. Click the parent object (for example, Browser, Dialog, Window) you want to add tothe shared object repository to focus it. The Learn button in the toolbar isenabled.
3. Click the Learn button. A flashing highlight surrounds the focused window andthe object and its descendants are added to the shared object repositoryaccording to the defined filter.
4. When you finish adding the required objects to the shared object repository,click the Close button in the Navigate and Learn toolbar. The Object RepositoryManager is redisplayed, showing the objects you just added to the sharedobject repository.
Manage repository parameters1. In the Object Repository Manager, select Tools > Manage Repository Parameters.2. In the Manage Repository Parameters dialog box, add and edit repository
parameters as needed.
User GuideChapter 31: Test Objects in Object Repositories
HP Unified Functional Testing (12.53) Page 224 of 938
Import a shared object repository from XMLYou can import an XML file (created using the required format) as a shared objectrepository. The XML file can either be a shared object repository that you exportedto XML format using the Object Repository Manager, or an XML file created using atool such as UFT Siebel Test Express or a custom built utility. You must adhere tothe XML structure and format.
1. In the Object Repository Manager, select File > Import from XML. In the OpenDialog Box, navigate to the XML file to import..The XML file is imported and a summary message box opens showinginformation regarding the number of test objects, checkpoint and outputobjects, parameters, and metadata that were successfully imported from thespecified file.
2. Click OK to close the message box. The imported XML file is opened as a newshared object repository. You can now modify it as required and save it as ashared object repository.
Export a shared object repository to XML1. Make sure that the shared object repository whose objects you want to export
is the active window.2. Make sure that the shared object repository is saved.3. In the Object Repository Manager, select File > Export to XML. In the Open
Dialog Box, select a location and provide a name for the XML file.UFT exports the objects in the shared object repository to the specified XMLfile, and a summary message box opens showing information regarding thenumber of test objects, checkpoint and output objects, parameters, andmetadata that were successfully exported to the specified file.
4. Click OK to close the message box. You can now open the XML file and view ormodify it with any XML editor.
Locate an object in an object repositoryRelevant for: GUI tests and components
Find an object1. Make sure that the relevant object repository is open (in the Object Repository
window or Object Repository Manager).
2. Click the Find & Replace button . The Find and Replace Dialog Box (ObjectRepository) opens.
User GuideChapter 31: Test Objects in Object Repositories
HP Unified Functional Testing (12.53) Page 225 of 938
Highlight an object in your application1. Make sure your application is open to the correct window or page.
Tip: If you want to highlight an Insight test object located on the desktop(and not in an application), make sure that UFT is not hiding part of theobject.
2. Select the test object you want to highlight in your object repository.
3. Click the Highlight in Application button .
Locate an object from your application in the objectrepository1. Make sure your application is open to the correct window or page.2. In the test object tree, select the object you want to view.
Note: This option is not supported for Insight test objects.
3. Click the Locate in Repository button .UFT is hidden, and the pointer changes into a pointing hand. In someenvironments, as you move the pointing hand over your application, the testobjects are highlighted.
4. Use the pointing hand to click the required object in your application.If the location you clicked is associated with more than one object, the ObjectSelection Dialog Box opens. The selected object is highlighted in the objectrepository.
User GuideChapter 31: Test Objects in Object Repositories
HP Unified Functional Testing (12.53) Page 226 of 938
Known Issues- Object RepositoriesRelevant for: GUI tests and components
l If you modify the name of a test object in the Object Repository while your test orcomponent script contains a syntax error, the new name is not updated correctlywithin your test or component steps.Workaround: Clear the Automatically update test and component steps when yourename test objects check box (Tools > Options > GUI Testing tab > General node) andperform the renames in the steps manually (recommended) or solve the syntaxerror, and then close and reopen the document in UFT to display the renamedobjects in your steps.
l For actions: If you use the Export and Replace Local Objects option for an objectrepository that contains action parameters, the created repository parameters aremapped to test parameters instead of action parameters.Workaround: Manually adjust the mapping in the exported object repository.
l You can add a test object to the local object repository only if that test objectdoes not already exist in a shared object repository that is associated with theaction or component. If a test object already exists in an associated sharedobject repository, you can add it to the local object repository using the Copy toLocal option. For details, see "aLocal copies of objects in shared objectrepositories " on page 209.
l You cannot add WinMenu objects directly to an object repository using the AddObjects to Local button in the Object Repository window or the Add Objects button inthe Object Repository Manager. If you want to add a WinMenu object to the objectrepository, you can use the Add Objects or Add Objects to Local button to add itsparent object and then select to add the parent object together with itsdescendants, or you can record a step on a WinMenu object and then delete therecorded step.
HP Unified Functional Testing (12.53) Page 227 of 938

Chapter 32: Comparing and Merging ObjectRepositoriesRelevant for: GUI tests and components
When working with object repositories, you may need to compare objectrepositories to see differences or merge multiple object repositories to simplify yourtesting assets.
To assist with this UFT provides tools to help you compare and merge objectrepositories:
ObjectRepositoryComparisonTool
The Object Repository Comparison Tool enables you to comparetwo shared object repositories, and view the differences in theirobjects, such as different object names, different test objectdescriptions, and so on. The tool is accessible from the ObjectRepository Manager.
Differences between objects in the two object repository files areidentified according to default rules. During the comparison process,the object repository files remain unchanged.
After the comparison process, the Comparison Tool provides agraphic presentation of the objects in the object repositories, whichare shown as nodes in a hierarchy. Objects that have differences,as well as unique objects that are included in one object repositoryonly, can be identified according to a color configuration that youcan specify. Objects that are included in one object repository onlyare indicated in the other object repository by the text "Does notexist". You can also view the properties and values of each objectthat you select in either object repository.
The Object Repository Comparison Tool is designed for comparingrepositories that are different, but have a set of overlapping objects.This tool is useful if you want to decide whether to merge tworepositories without performing the actual merge and addressingobject conflicts in the Object Repository Merge Tool.
HP Unified Functional Testing (12.53) Page 228 of 938
ObjectRepositoryMerge Tool
UFT enables you to merge two shared object repositories into asingle shared object repository using the Object Repository MergeTool.
This tool also enables you to merge objects from the local objectrepository of one or more actions or components into a sharedobject repository. For example, if UFT learned objects locally in aspecific action in your test or in a component, you may want to addthe objects to the shared object repository, so that they are availableto all actions (even in different tests) or components that use thatobject repository.
When you have multiple shared object repositories that contain testobjects from the same area of your application, it may be useful tocombine those test objects into a single object repository for easiermaintenance. You could do this by manually moving or copyingobjects in the Object Repository Manager. However, if you have testobjects in different object repositories that represent the same objectin your application, and the descriptions for these objects in thedifferent object repositories are not identical, it may be difficult torecognize and handle these conflicts.
The Object Repository Merge Tool helps you to solve the aboveproblem by merging two selected object repositories for you, andproviding options for addressing test objects with conflictingdescriptions. Using this tool, you merge two shared objectrepositories (called the primary object repository and the secondaryobject repository), into a new, third object repository, called thetarget object repository. Objects in the primary and secondary objectrepositories are automatically compared, and then added to thetarget object repository according to configurable rules that definethe defaults for how conflicts between objects are resolved.
For task details, see "Merge two shared object repositories" onpage 232.
Object conflictsRelevant for: GUI tests and components
Merging two object repositories can result in conflicts arising from similaritiesbetween the objects they contain.
Conflicts between objects in the primary and secondary object repositories areresolved automatically by the Object Repository Merge Tool, according to thedefault resolution settings that you can configure before performing the merge.
User GuideChapter 32: Comparing and Merging Object Repositories
HP Unified Functional Testing (12.53) Page 229 of 938
Conflicts between checkpoint or output value objects with the same name butdifferent content are always resolved by merging both objects into the newrepository and renaming one of them.
The Object Repository Merge Tool also allows you to change the way the mergewas performed for each individual object that causes a conflict.
Changes that you make to the default conflict resolution can themselves affect thetarget object repository by causing new conflicts. In the above example, keepingboth objects would cause a name conflict. Therefore, the target object repository isupdated after each conflict resolution change and redisplayed.
Different Objects with the Same Name ConflictAn object in the primary object repository and an object in the secondary objectrepository have the same name, but completely different content.
Resolve this conflict type by:
l Keeping the object added from the primary object repository only.l Keeping the object added from the secondary object repository only.l Keeping the objects from both object repositories. In this case, the ObjectRepository Merge Tool automatically renames the object that is added from thesecondary file by adding an incremental numeric suffix to the name, for example,Edit_1.
l Ignoring the object from the local object repository and keeping the object fromthe shared object repository (when updating a shared object repository from alocal object repository).
By default, the conflict resolution settings for conflicts of this type are configured sothat the target object repository takes the object from both files. The object that isadded from the secondary file is renamed by adding an incremental numeric suffixto the name, for example, Edit_1.
Note: Test objects with different visual relation identifier definitions aretreated as objects with different descriptions.
Identical Description Different Name Conflict (Test ObjectsOnly)A test object in the primary object repository and a test object in the secondaryobject repository have different names, but the same description properties andvalues.
User GuideChapter 32: Comparing and Merging Object Repositories
HP Unified Functional Testing (12.53) Page 230 of 938
Resolve this conflict type by:
l Taking the test object name from the object in the primary object repository.l Taking the test object name from the object in the secondary object repository.l Ignoring the test object from the local object repository and keeping the testobject from the shared object repository (when updating a shared objectrepository from a local object repository).
By default, the conflict resolution settings for conflicts of this type are configured sothat the target object repository takes the object name from the primary source file.
Similar Description Conflict (Test Objects Only)A test object in the primary object repository and a test object in the secondaryobject repository have the same name, and they have similar, but not identical,description properties and values. One of the test objects always has a subset ofthe properties set of the other test object. For example, a test object named Buttonin the secondary object repository has the same description properties and valuesas a test object named Button in the primary object repository, but also hasadditional properties and values.
Resolve this conflict type by:
l Keeping the test object added from the primary object repository only.l Keeping the test object added from the secondary object repository only.l Keeping the test objects from both object repositories. In this case, the ObjectRepository Merge Tool automatically renames the test object that is added fromthe secondary file by adding an incremental numeric suffix to the name, forexample, Button_1.
l Ignoring the test object from the local object repository and keeping the testobject from the shared object repository (when updating a shared objectrepository from a local object repository).
By default, the conflict resolution settings for conflicts of this type are configured sothat the target object repository takes the test object that has fewer identifyingproperties than the test object with which it conflicts.
Compare two object repositoriesRelevant for: GUI tests and components
This task describes how to compare two object repositories according topredefined settings that define how comparisons between objects are identified.
User GuideChapter 32: Comparing and Merging Object Repositories
HP Unified Functional Testing (12.53) Page 231 of 938

Prerequisitesl Make sure that a GUI test or component is currently open.l Make sure that the Object Repository Manager window is open.l Make sure the color settings are configured to match your needs.
Select the Shared Object Repositories to compare1. In the Object Repository Manager window, select Tools > Object Repository
Comparison Tool.2. In the New Comparison dialog box, specify the two object repository files you
want to compare.
Analyze the initial comparison resultsAfter the comparison is complete, view the results summary in the ComparisonStatistics Dialog Box.
Analyze the detailed comparison resultsReview and analyze the comparisons between the repositories in the ObjectRepository Comparison Tool Main Window.
Utilize additional tools to help you perform thecomparison - optionall Synchronize the object repositories to display the same object in both views byclicking the Synchronized Nodes button.
l Filter the objects and show only the objects that you want to view using the FilterDialog Box (Object Repository Comparison Tool).
l Locate one or more objects in a selected object repository whose name containsa specified string using the Find Dialog Box (Object Repository ComparisonTool).
l Adjust the colors of text and background of object names, and empty nodesrepresenting objects that exist in the other object repository only, using the ColorSettings Dialog Box (Object Repository Comparison Tool).
Merge two shared object repositoriesRelevant for: GUI tests and components
This task describes how to merge two shared object repositories according topredefined settings that define how conflicts between objects are resolved.
User GuideChapter 32: Comparing and Merging Object Repositories
HP Unified Functional Testing (12.53) Page 232 of 938
Prerequisitesl Make sure that a GUI test or component is in focus.l Make sure that the Object Repository Manager window is open.l Make sure the resolution and color settings are configured to match your needs.
Select the shared object repositories to merge1. In the Object Repository Manager window, select Tools > Object Repository Merge
Tool to open the Object Repository Merge Tool. The New Merge Dialog Boxopens.
2. Specify the two object repository files you want to merge.
Analyze the initial merge resultsAfter the merge is complete, you can view the results summary in the MergeStatistics Dialog Box (Object Repository Merge Tool).
Analyze the detailed merge resultsReview and analyze the merge between the repositories in the Object RepositoryMerge Tool Main Window.
Utilize additional tools to help you perform the comparison- optionall Change the view presented by the Object Repository Merge Tool according toyour working preferences, by dragging the edges of the panes to resize them, orselecting the appropriate option from the View menu.
l Filter the objects and show only the objects that you want to view by using theFilter Dialog Box (Object Repository Merge Tool).
l Locate one or more objects in a selected object repository whose name containsa specified string using the Find Dialog Box (Object Repository Merge Tool).
Adjust object conflict resolutionsIf one or more of the merge resolutions does not match your needs, follow the stepsbelow to adjust them:
1. In the target object repository, select an object that had a conflict, as indicatedby the icon to the left of the object name. The conflicting objects are highlightedin the source object repositories.
User GuideChapter 32: Comparing and Merging Object Repositories
HP Unified Functional Testing (12.53) Page 233 of 938
A description of the conflict and the resolution method used by the ObjectRepository Merge Tool is described in the Resolution Options pane. A radiobutton for each possible alternative resolution method is displayed.
2. In the Resolution Options pane, select a radio button to choose an alternativeresolution method. The target object repository is updated according to yourselection and redisplayed.
3. In the Resolution Options pane, click the Previous Conflict or Next Conflict buttonsto jump directly to the next or previous conflict in the target object repositoryhierarchy.
Save the target object repositoryWhen the object conflicts are resolved satisfactorily, save the new merged sharedobject repository.
Update a shared object repository from a local objectrepositoryRelevant for: GUI tests and components
Prerequisitesl Make sure that the shared object repository you want to update from the localobject repositories is already associated with the repository actions orcomponents.
l Make sure the tests or components containing the local object repositories arenot part of an open solution.
l Make sure that a GUI test or component is in focus.l Make sure that the Object Repository Manager window is open.l Make sure the resolution and color settings are configured to match your needs.
Select the shared object repository and the localrepositories that you want to merge into it1. In the Object Repository Manager, open the shared object repository into which
you want to merge the local repositories. If the object repository opened inread-only mode, select File > Enable Editing.
2. Select Tools > Update from Local Repository to open the Update from LocalRepository Dialog Box.
3. In the Update from Local Repository Dialog Box, select the tests orcomponents that contain the local object repositories you want to merge, andclick Update All.
User GuideChapter 32: Comparing and Merging Object Repositories
HP Unified Functional Testing (12.53) Page 234 of 938
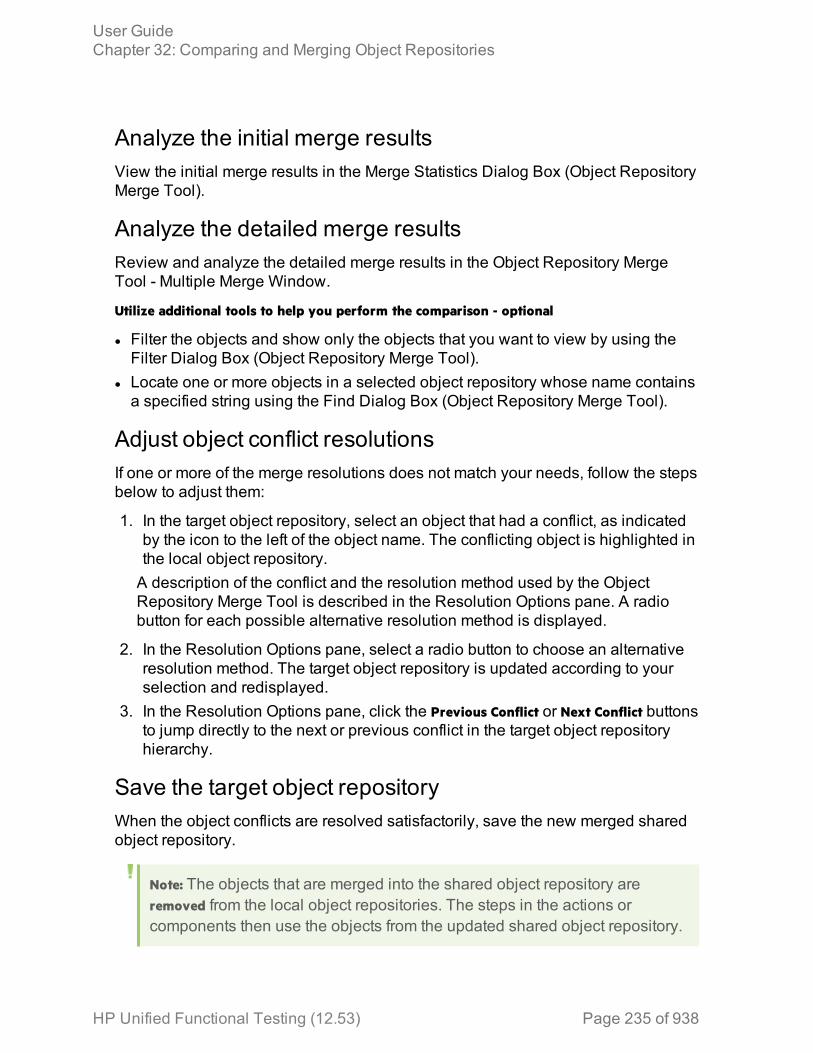
Analyze the initial merge resultsView the initial merge results in the Merge Statistics Dialog Box (Object RepositoryMerge Tool).
Analyze the detailed merge resultsReview and analyze the detailed merge results in the Object Repository MergeTool - Multiple Merge Window.
Utilize additional tools to help you perform the comparison - optional
l Filter the objects and show only the objects that you want to view by using theFilter Dialog Box (Object Repository Merge Tool).
l Locate one or more objects in a selected object repository whose name containsa specified string using the Find Dialog Box (Object Repository Merge Tool).
Adjust object conflict resolutionsIf one or more of the merge resolutions does not match your needs, follow the stepsbelow to adjust them:
1. In the target object repository, select an object that had a conflict, as indicatedby the icon to the left of the object name. The conflicting object is highlighted inthe local object repository.A description of the conflict and the resolution method used by the ObjectRepository Merge Tool is described in the Resolution Options pane. A radiobutton for each possible alternative resolution method is displayed.
2. In the Resolution Options pane, select a radio button to choose an alternativeresolution method. The target object repository is updated according to yourselection and redisplayed.
3. In the Resolution Options pane, click the Previous Conflict or Next Conflict buttonsto jump directly to the next or previous conflict in the target object repositoryhierarchy.
Save the target object repositoryWhen the object conflicts are resolved satisfactorily, save the new merged sharedobject repository.
Note: The objects that are merged into the shared object repository areremoved from the local object repositories. The steps in the actions orcomponents then use the objects from the updated shared object repository.
User GuideChapter 32: Comparing and Merging Object Repositories
HP Unified Functional Testing (12.53) Page 235 of 938
Chapter 33: Extending UFT Object IdentificationRelevant for: GUI tests and components
UFT uses an object's identification properties to locate it in an application, and thenmaps these properties to a test object type.
UFT provides numerous types of test objects across many technologies. However,there are times when UFT cannot locate or learn an object in your application.
For example:
l UFT does not support the technology, or the technology versionl UFT cannot uniquely identify the objectl UFT identifies the object at too basic a level, such as identifying a table controlas a general Object
In cases such as these, use one of the following methods to create test objects, andby extension meaningful functional tests:
l Insight, an image-based object recognition method. For details, see "Identifyingobjects using Insight" below.
l Support for the Microsoft UI Automation framework. For details, see "UIAutomation in UFT" on page 242.
Identifying objects using InsightRelevant for: GUI tests and components
Insight enables UFT to recognize objects in your application based on what theylook like, instead of properties that are part of their design. This can be useful if youare working with an application whose technology is not supported by UFT, or withan application running on a remote computer.
With Insight, UFT stores an image of the object with the Insight test object (alongwith ordinal identifiers, if necessary), and uses this image as the main descriptionproperty to identify the object in the application
You can create InsightObject test objects during recording sessions, or whenadding test objects to an object repository manually.
When adding objects to an object repository, you can add an object directly fromthe application, or even from a picture of the object displayed on your screen.
In the object repository, you can edit the object's properties, such as its name andimage, and the default location to click in the control when performing test objectmethods. You can also define visual relation identifiers to improve UFT's ability toaccurately identify the object.
HP Unified Functional Testing (12.53) Page 236 of 938

Note: Insight is supported only on the primary monitor.
Creating Insight test objectsUFT learns Insight objects using the following elements:
Descriptionproperty
UFT stores an image of the object for the description property.This image is used later to identify the object.
Ignore areas If parts of the object do not always look the same, you can instructUFT to ignore those areas when it uses the image to identify theobject.
Objectconfiguration
UFT can use an ordinal identifier to create a unique descriptionfor the object.
Other aspects of object configuration, such as mandatory andassistive properties, and smart identification, are not relevant forInsight test objects.
Visualrelationidentifiers
After UFT creates a description for an Insight test object, addvisual relation identifiers to improve identification of the object.
Similarityidentificationproperty
Add the similarity identification property to the test objectdescription.
This property is a percentage that specifies how similar a controlin the application has to be to the test object image for it to beconsidered a match.
The Insight object is always added to the object repository as a child of the testobject that represents its containing application, such as a Window or Browserobject. (The new object's parent object is also added if it does not already exist inthe object repository.)
Note: Insight test objects require more disk space than other test objects,because of the test object images and the snapshots stored with the testobjects.
To control the amount of space used, limit the size of the snapshot in theInsight Pane of the Options Dialog Box.
User GuideChapter 33: Extending UFT Object Identification
HP Unified Functional Testing (12.53) Page 237 of 938
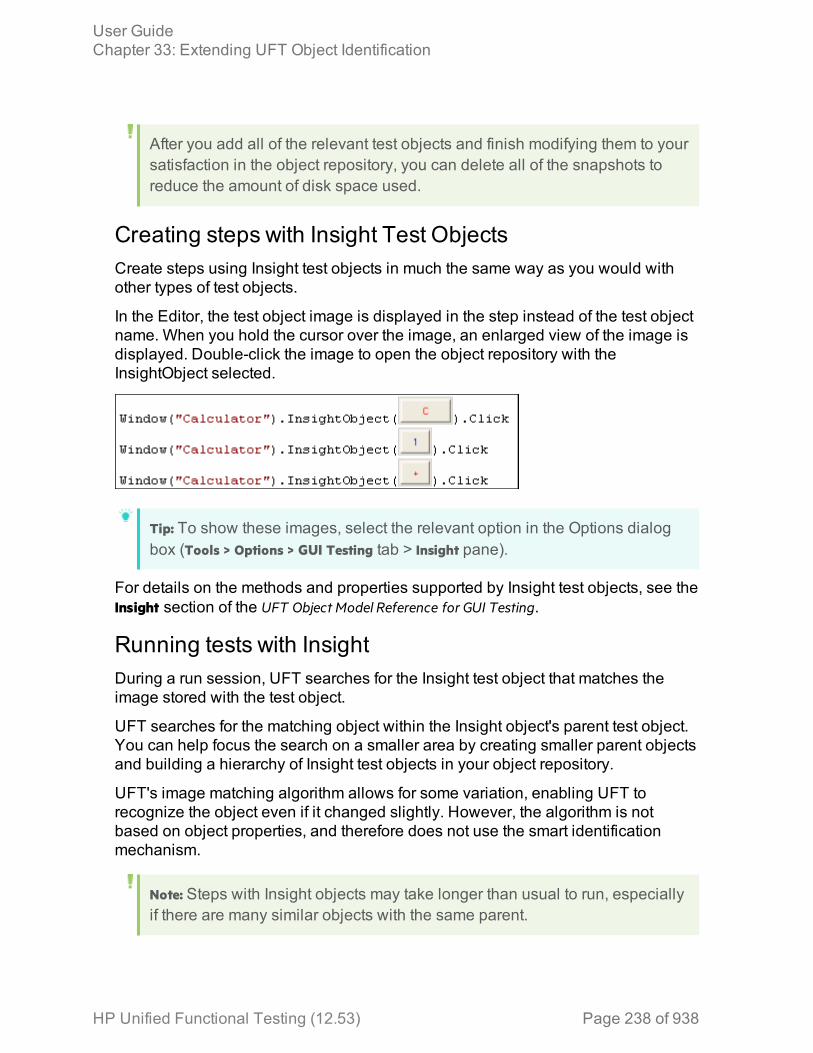
After you add all of the relevant test objects and finish modifying them to yoursatisfaction in the object repository, you can delete all of the snapshots toreduce the amount of disk space used.
Creating steps with Insight Test ObjectsCreate steps using Insight test objects in much the same way as you would withother types of test objects.
In the Editor, the test object image is displayed in the step instead of the test objectname. When you hold the cursor over the image, an enlarged view of the image isdisplayed. Double-click the image to open the object repository with theInsightObject selected.
Tip: To show these images, select the relevant option in the Options dialogbox (Tools > Options > GUI Testing tab > Insight pane).
For details on the methods and properties supported by Insight test objects, see theInsight section of the UFT Object Model Reference for GUI Testing.
Running tests with InsightDuring a run session, UFT searches for the Insight test object that matches theimage stored with the test object.
UFT searches for the matching object within the Insight object's parent test object.You can help focus the search on a smaller area by creating smaller parent objectsand building a hierarchy of Insight test objects in your object repository.
UFT's image matching algorithm allows for some variation, enabling UFT torecognize the object even if it changed slightly. However, the algorithm is notbased on object properties, and therefore does not use the smart identificationmechanism.
Note: Steps with Insight objects may take longer than usual to run, especiallyif there are many similar objects with the same parent.
User GuideChapter 33: Extending UFT Object Identification
HP Unified Functional Testing (12.53) Page 238 of 938

Work with Insight test objectsRelevant for: GUI tests and components
Add Insight objects to the object repository directly from the application, or evenfrom a picture of the object displayed on your screen.
Add an Insight object
1. Click the Add Insight Object to Local toolbar button .2. In the Select Learn Mode dialog box, select the mode you want for learning the
Insight object, and then select the control.
Note: If you previously selected Do not show me again on the Select LearnMode dialog box, the learning session automatically begins using themode you used most recently.
To display the Select Learn Mode dialog box, enable this option in theOptions dialog box (Tools > Options > GUI Testing tab > Insight node).
Automatic The pointer changes to a pointing hand. Click on the control inthe application.UFT automatically detects the borders of the control, and takes asnapshot of it.This mode is the faster mode and should be satisfactory in mostcases.
User GuideChapter 33: Extending UFT Object Identification
HP Unified Functional Testing (12.53) Page 239 of 938
Manual The pointer changes to a crosshair, with an adjacent circledisplaying a magnified image of the area around the center of thecrosshair.For example:
Take a snapshot of the control in the application, manuallyspecifying the borders of the control.Use this mode in cases where the automatic mode does notcorrectly detect the borders of the control, such as when it selectsan area of the application which is much larger than the control.By holding the left CTRL, you can temporarily change the pointinghand or crosshair to a standard pointer.This enables you to change the window focus or performoperations in UFT or in your application.
UFT takes a snapshot of the control, and the Add Insight Test Object dialogbox opens.
3. In the Add Insight Test Object dialog box, you can:l Adjust the borders of the image saved with the test object in the objectrepository.
l Take a new snapshot to replace the image entirely.l Specify areas to exclude from the test object image. UFT will ignore theseareas when it searches for the image on the screen to identify the object.
l Modify the test object's ClickPoint. This is the location to click in the controlwhen running a test object method on it.
An InsightObject, named InsightObject, is added to the object repository, under thetest object that represents the application or window that contains the control.
Modify an Insight test object's image1. In the Object Repository window or Manager, select the test object whose
image you want to modify.
User GuideChapter 33: Extending UFT Object Identification
HP Unified Functional Testing (12.53) Page 240 of 938

If you are in the Editor, double-click the test object's image in a step.
2. In the Test object image area, click the Change Test Object Image button.
Retrieve text from an Insight ObjectUse the Insight.GetVisibleText test object method to retrieve text displayed on theobject. UFT uses the OCR mechanism to recognize and return the text.
Use this text for verification purposes, or as a way of differentiating between objectsor states of the application.
Example:
l If the text on a button in your application changes when an operationsucceeds, check that text to verify success.Make sure to use "exclude areas" to ignore the text area in the Insightobject definition.
l If you have two similar objects in your application, that are different onlybecause of their text, learn them both as the same object, using "excludeareas" to ignore the text in the image.Then, use GetVisibleText to check the text on the object and differentiatebetween the two objects in your test or component.
For more details, see the Insight section of the UFT Object Model Reference for GUITesting.
Update Insight test object detailsDo any of the following to improve the readability and efficiency of your test orcomponent:
l Rename the test object to a name that describes the control it represents.(Recommended)
l Move the test object within the test object hierarchy:
If you place it under another testobject...
...UFT searches for the object in theapplication only within its parent test object.
If you move the Insight testobject to be a top-level object...
...UFT searches for the object anywhere onthe screen.
l Add a similarity identification property to the test object description.
User GuideChapter 33: Extending UFT Object Identification
HP Unified Functional Testing (12.53) Page 241 of 938
For details, see the InsightObject identification properties topic in the UFT ObjectModel Reference for GUI Testing.
l Modify the ordinal identifier created for the test object. For details, see "Ordinalidentifiers" on page 190.
l Define visual relation identifiers for the test object. For details, see "Visual relationidentifiers" on page 192.
For more details , see "Maintain test objects in object repositories" on page 219.
Tip: When you have finished modifying all of the Insight test objects, deleteall of the snapshots to reduce the amount of disk space used. This does notdelete the test object images used for object identification.
Select Tools > Delete Insight Snapshots.
UI Automation in UFTRelevant for: GUI tests and components
Microsoft UI Automation is a framework that enables you to access, identify, andmanipulate UI elements of any application by providing programmatic access tothese user interface elements.
The UI Automation API enables this access by using the IUIAutomationElementinterface to make each element into a separate object. You can then view theproperties and operations of each of the objects in the application.
UFT uses the different parts of the framework to create both test objects based onyour application, and the object's supported test object methods.
Use the following elements to understand the framework:
Elementtree
The hierarchy of elements in the application, which displays a logicaldivision and hierarchy of all user interface elements in the application
ControlTypeproperty
The appearance and functionality of the object.
ControlPatterns
These patterns also contain methods specific for the patten. Controlpatterns are a way to categorize and expose a control's functionindependent of the control type or the appearance of the control.
There is no one-to-one matching of the control type property to controlpatterns - each control type can support multiple types of patterns andeach pattern can be used by multiple control types.
User GuideChapter 33: Extending UFT Object Identification
HP Unified Functional Testing (12.53) Page 242 of 938
For full details on the UI Automation framework, see the UI Automation section onMSDN.
Enable UI Automation supportUse the UFT UI Automation support with any Windows-based application that hasimplemented UI Automation provider interfaces. The support is loaded as withother add-ins, by selecting UI Automation in the Add-ins Manager when startingUFT.
Note: UFT support has been validated with Telerik UI for Windows Forms,Telerik UI for .NET WPF, and JavaFX.
When in use, UFT UI Automation support overrides other technology support.UI Automation support can be used with existing technology support, but not at thesame time.
How does UFT use the UI Automation framework?UFT uses the UIAutomation framework elements to:
l Create UI Automation test objects based on the objects in your applicationl Create supported methods for these test objects based on the patterns supportedfor each object/control type
l Create the test object hierarchy based on the UI Automation element tree
Control Types and UFT Test ObjectsFor a control that uses the UI Automation framework, the Control Type propertydescribes the basic appearance and functionality of the control in the application.
UFT translates the Control Type property of an element/object in the application'suser interface into a corresponding test object in UFT:
If the Control Typeproperty is... UFT creates this test object:
50000 UIAButton
50001 UIACalendar
50002 UIACheckBox
50003 UIAComboBox
User GuideChapter 33: Extending UFT Object Identification
HP Unified Functional Testing (12.53) Page 243 of 938

50004 UIAEdit
50005 UIAHyperLink
50008 UIAList
50013 UIARadioButton
50015 UIASlider
50018 UIATab
50023 UIATree
50028 UIATable
50031 UIASplitButton
50032 UIAWindow
50036 UIATable
This object must also have implemented the Grid patternto be recognized as a table.
If the controls in your application use a different value for the Control Type property,or do not have a Control Type property implemented, they are identified as aUIAObject.
For a full listing of all the available values for the Control Type property, see theControl Type Identifers page on MSDN.
Supported Patterns and Test Object MethodsUFT creates test object methods based on a control type's supported patterns.These patterns define a particular aspect of a control's functionality or feature. For afull explanation of how these patterns are used in your applications, seehttps://msdn.microsoft.com/en-us/library/ms752362(v=vs.110).aspx.
Each test object also supports all UFT common methods and properties, as well asadditional UI Automation-specific methods, including .Click, ,.SetFocus and .Type. Anumber of test objects also have object-specific test object methods available foruse.
For full details on these test object methods, see the UI Automation section of theUFT Object Model Reference for GUI Testing.
Note: The test objects and methods available are completely dependent on
User GuideChapter 33: Extending UFT Object Identification
HP Unified Functional Testing (12.53) Page 244 of 938
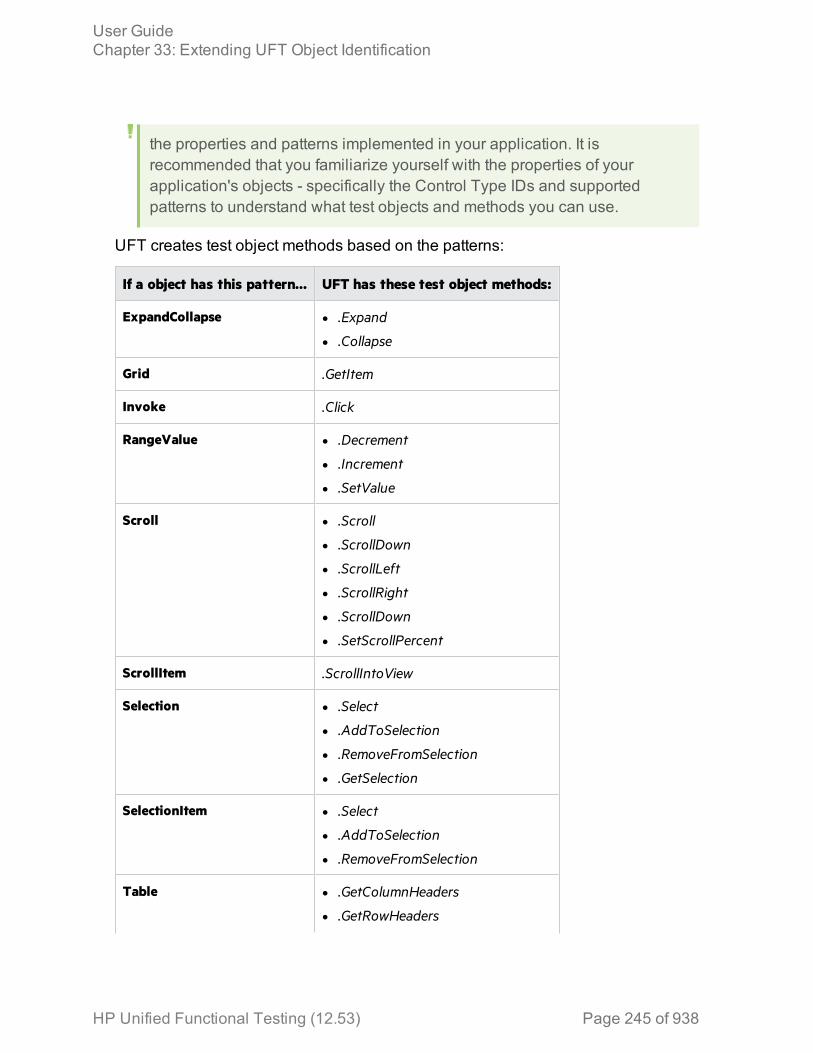
the properties and patterns implemented in your application. It isrecommended that you familiarize yourself with the properties of yourapplication's objects - specifically the Control Type IDs and supportedpatterns to understand what test objects and methods you can use.
UFT creates test object methods based on the patterns:
If a object has this pattern... UFT has these test object methods:
ExpandCollapse l .Expand
l .Collapse
Grid .GetItem
Invoke .Click
RangeValue l .Decrement
l .Increment
l .SetValue
Scroll l .Scroll
l .ScrollDown
l .ScrollLeft
l .ScrollRight
l .ScrollDown
l .SetScrollPercent
ScrollItem .ScrollIntoView
Selection l .Select
l .AddToSelection
l .RemoveFromSelection
l .GetSelection
SelectionItem l .Select
l .AddToSelection
l .RemoveFromSelection
Table l .GetColumnHeaders
l .GetRowHeaders
User GuideChapter 33: Extending UFT Object Identification
HP Unified Functional Testing (12.53) Page 245 of 938
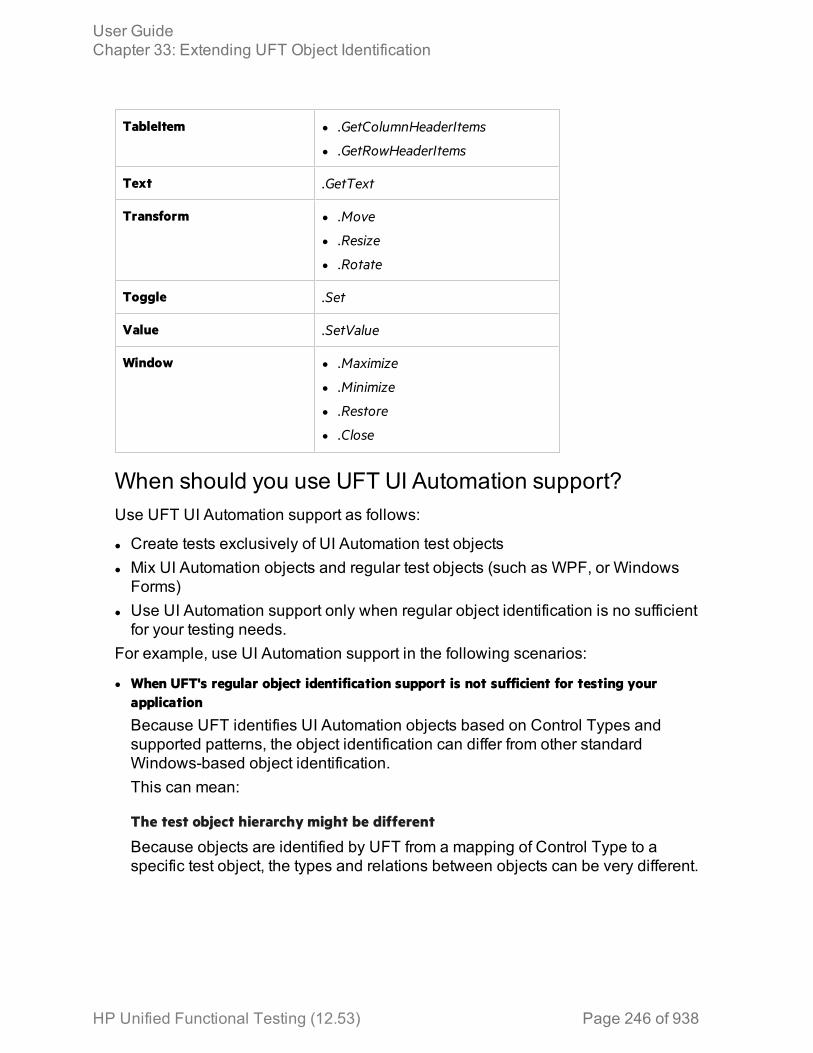
TableItem l .GetColumnHeaderItems
l .GetRowHeaderItems
Text .GetText
Transform l .Move
l .Resize
l .Rotate
Toggle .Set
Value .SetValue
Window l .Maximize
l .Minimize
l .Restore
l .Close
When should you use UFT UI Automation support?Use UFT UI Automation support as follows:
l Create tests exclusively of UI Automation test objectsl Mix UI Automation objects and regular test objects (such as WPF, or WindowsForms)
l Use UI Automation support only when regular object identification is no sufficientfor your testing needs.
For example, use UI Automation support in the following scenarios:
l When UFT's regular object identification support is not sufficient for testing yourapplication
Because UFT identifies UI Automation objects based on Control Types andsupported patterns, the object identification can differ from other standardWindows-based object identification.This can mean:
The test object hierarchy might be different
Because objects are identified by UFT from a mapping of Control Type to aspecific test object, the types and relations between objects can be very different.
User GuideChapter 33: Extending UFT Object Identification
HP Unified Functional Testing (12.53) Page 246 of 938

For example, when viewing the learned hierarchy of objects in the Flight Finderpage of the HP MyFlight sample application, you get very different views of theoverall structure.
Regular WPF object identification UI Automation object identification
The same object might be identified completely differently
Objects can be seen as completely different types of objects.
User GuideChapter 33: Extending UFT Object Identification
HP Unified Functional Testing (12.53) Page 247 of 938
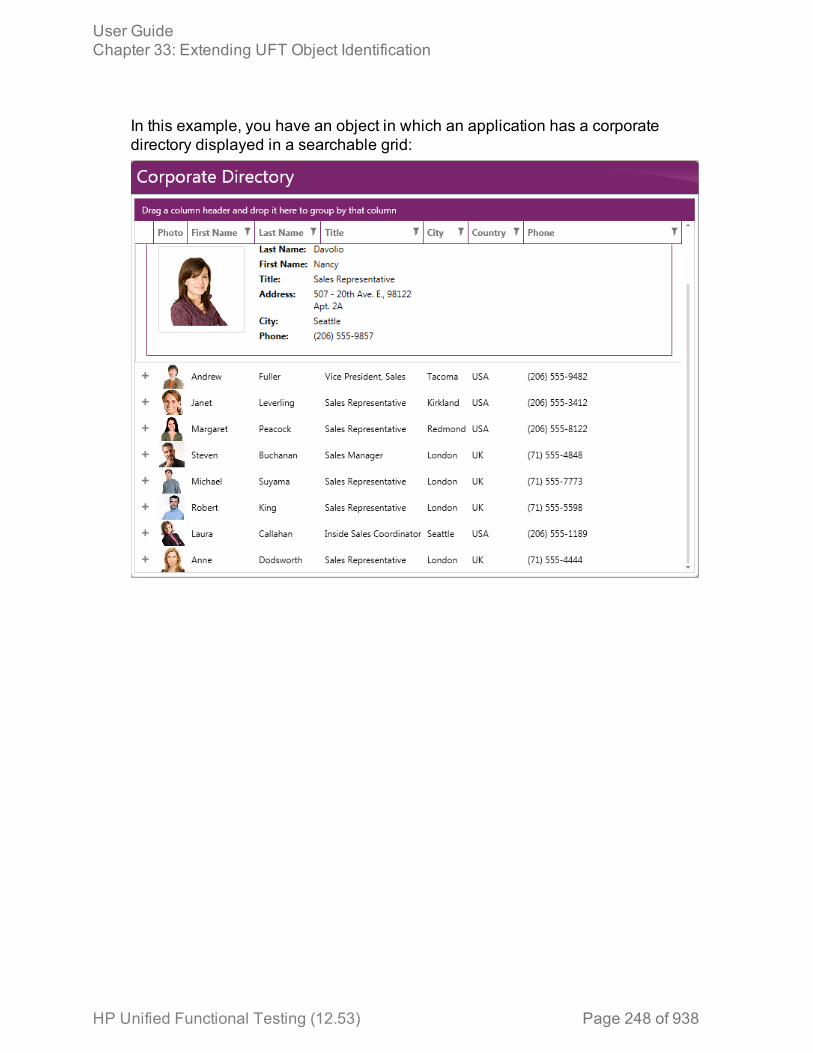
In this example, you have an object in which an application has a corporatedirectory displayed in a searchable grid:
User GuideChapter 33: Extending UFT Object Identification
HP Unified Functional Testing (12.53) Page 248 of 938
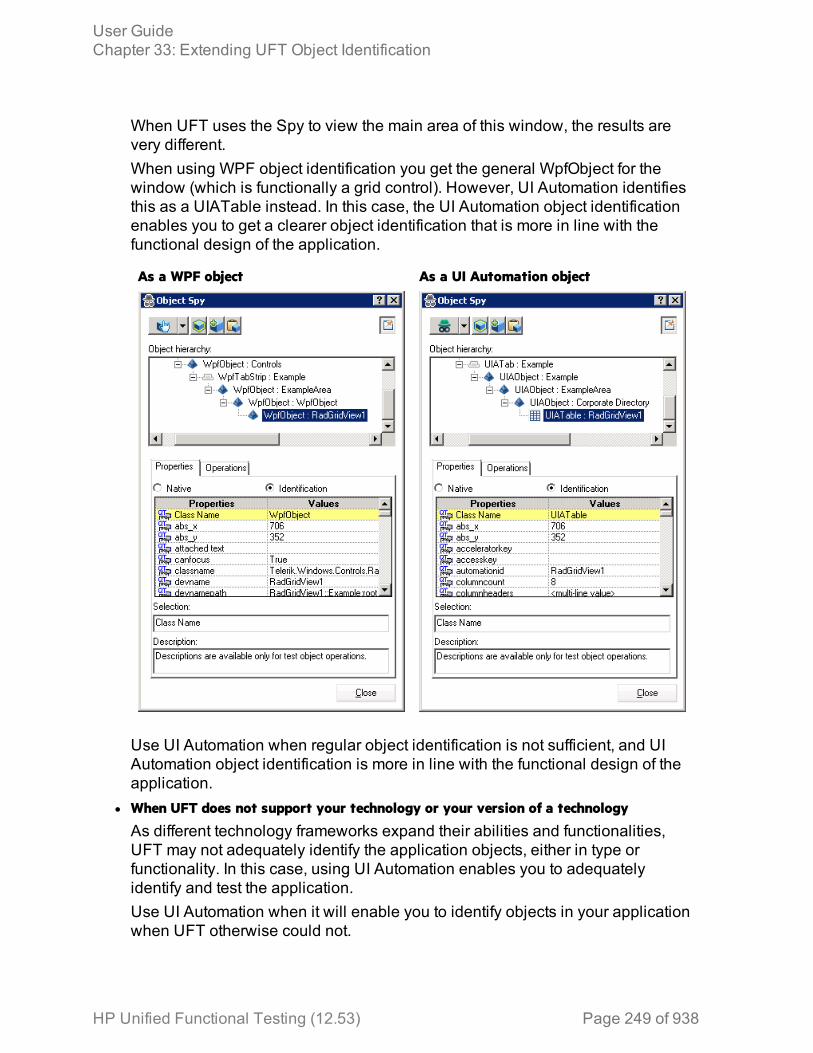
When UFT uses the Spy to view the main area of this window, the results arevery different.When using WPF object identification you get the general WpfObject for thewindow (which is functionally a grid control). However, UI Automation identifiesthis as a UIATable instead. In this case, the UI Automation object identificationenables you to get a clearer object identification that is more in line with thefunctional design of the application.
As a WPF object As a UI Automation object
Use UI Automation when regular object identification is not sufficient, and UIAutomation object identification is more in line with the functional design of theapplication.
l When UFT does not support your technology or your version of a technology
As different technology frameworks expand their abilities and functionalities,UFT may not adequately identify the application objects, either in type orfunctionality. In this case, using UI Automation enables you to adequatelyidentify and test the application.Use UI Automation when it will enable you to identify objects in your applicationwhen UFT otherwise could not.
User GuideChapter 33: Extending UFT Object Identification
HP Unified Functional Testing (12.53) Page 249 of 938
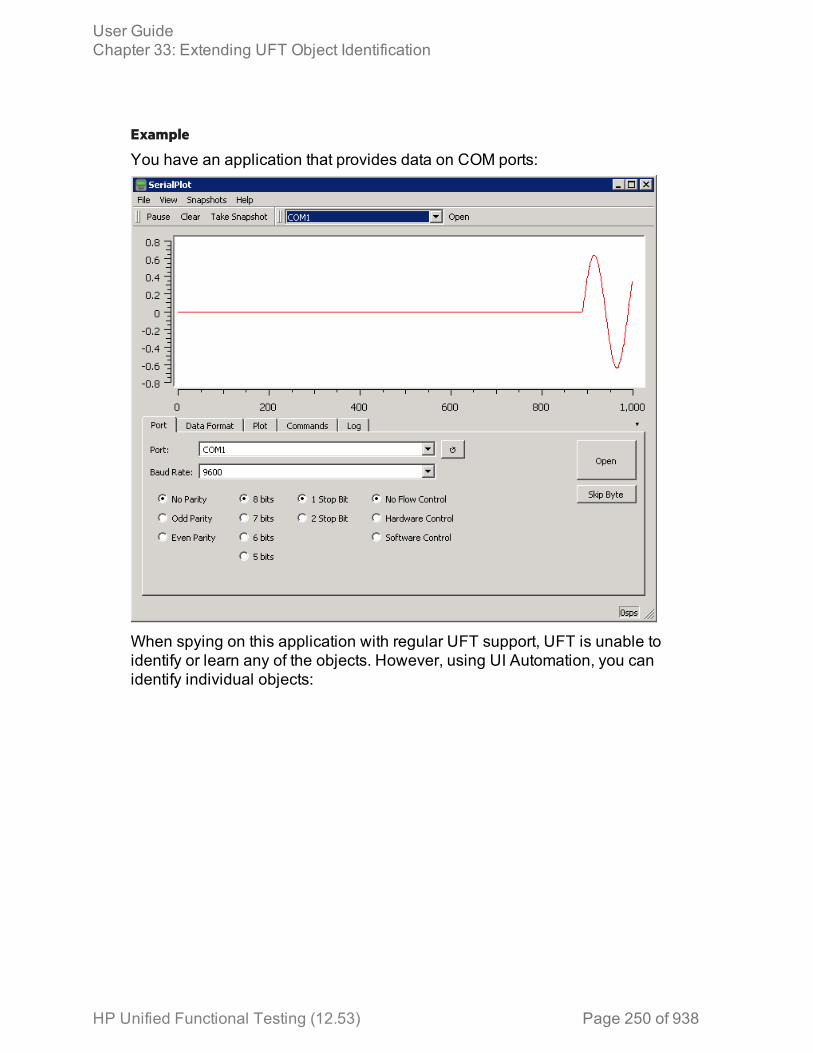
Example
You have an application that provides data on COM ports:
When spying on this application with regular UFT support, UFT is unable toidentify or learn any of the objects. However, using UI Automation, you canidentify individual objects:
User GuideChapter 33: Extending UFT Object Identification
HP Unified Functional Testing (12.53) Page 250 of 938

Native UI Automation methodsRelevant for: GUI tests and components
UFT UI Automation support provides for a number of native methods accessiblewith the .Object method. These methods are available for all UI Automation objects.
Each object is assumed to be a collection, even if it is a regular object. Thisenables UFT and the .Object method to work with both a single object and acollection.
Note: When using the .Object method, UFT returns the value "as-is", whichcan be complex and include several different flags. See the MSDN referencefor the value of these numerical properties. For example, for the Stateproperty, see here.
User GuideChapter 33: Extending UFT Object Identification
HP Unified Functional Testing (12.53) Page 251 of 938
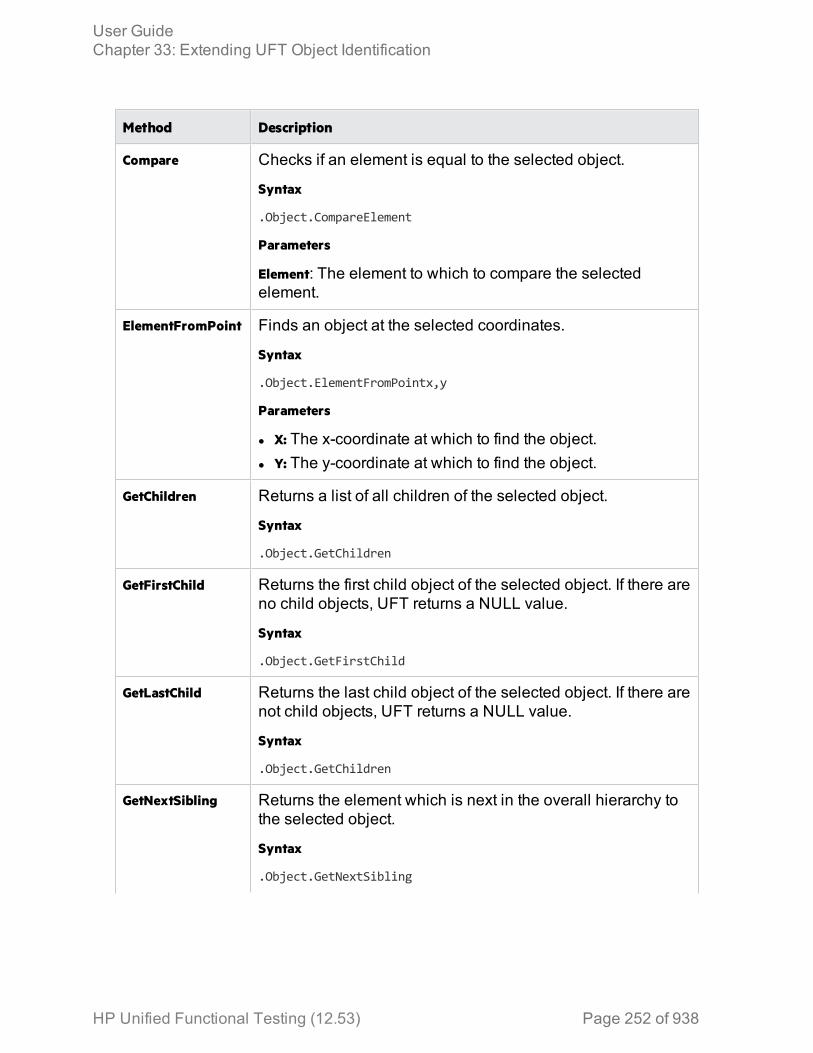
Method Description
Compare Checks if an element is equal to the selected object.
Syntax
.Object.CompareElement
Parameters
Element: The element to which to compare the selectedelement.
ElementFromPoint Finds an object at the selected coordinates.
Syntax
.Object.ElementFromPointx,y
Parameters
l X: The x-coordinate at which to find the object.l Y: The y-coordinate at which to find the object.
GetChildren Returns a list of all children of the selected object.
Syntax
.Object.GetChildren
GetFirstChild Returns the first child object of the selected object. If there areno child objects, UFT returns a NULL value.
Syntax
.Object.GetFirstChild
GetLastChild Returns the last child object of the selected object. If there arenot child objects, UFT returns a NULL value.
Syntax
.Object.GetChildren
GetNextSibling Returns the element which is next in the overall hierarchy tothe selected object.
Syntax
.Object.GetNextSibling
User GuideChapter 33: Extending UFT Object Identification
HP Unified Functional Testing (12.53) Page 252 of 938
Method Description
GetParent Returns the parent element for a selected object.
Syntax
.Object.GetParent
GetPreviousSibling Returns the element which is prior in the overall hierarchy tothe selected object.
Syntax
.Object.GetPreviousSibling
See also:l "Native properties and operations" on page 556l The .Object property in the UFT Object Model Reference for GUI Testing
Use UFT UI Automation supportRelevant for: GUI tests and components
This task describes how to properly use UFT's UI Automation support, which helpsyou identify objects in your application when UFT's regular object identificationsupport is not sufficient for your needs.
Note: Before you use UFT's UI Automation support, you must:
l Have an application that implements Microsoft UI Automation patterns. Fordetails on support, see the UI Automation overview on MSDN.
l Load UI Automation in the Add-in Manager when starting UFT
UFT's UI Automation support uses existing object identification functionality (suchas Object Spy, Navigate and Learn, and the like) However, each of these objectidentification tools must be used in UI Automation mode.
Learn objects in UI Automation mode1. Activate the UI Automation mode in UFT before learning the objects.
l Select the Use UI Automation by default open in the Windows Applications> Advanced pane of the Options dialog (Tools > Options > GUI Testing tab> Windows Applications > Advanced node).
User GuideChapter 33: Extending UFT Object Identification
HP Unified Functional Testing (12.53) Page 253 of 938
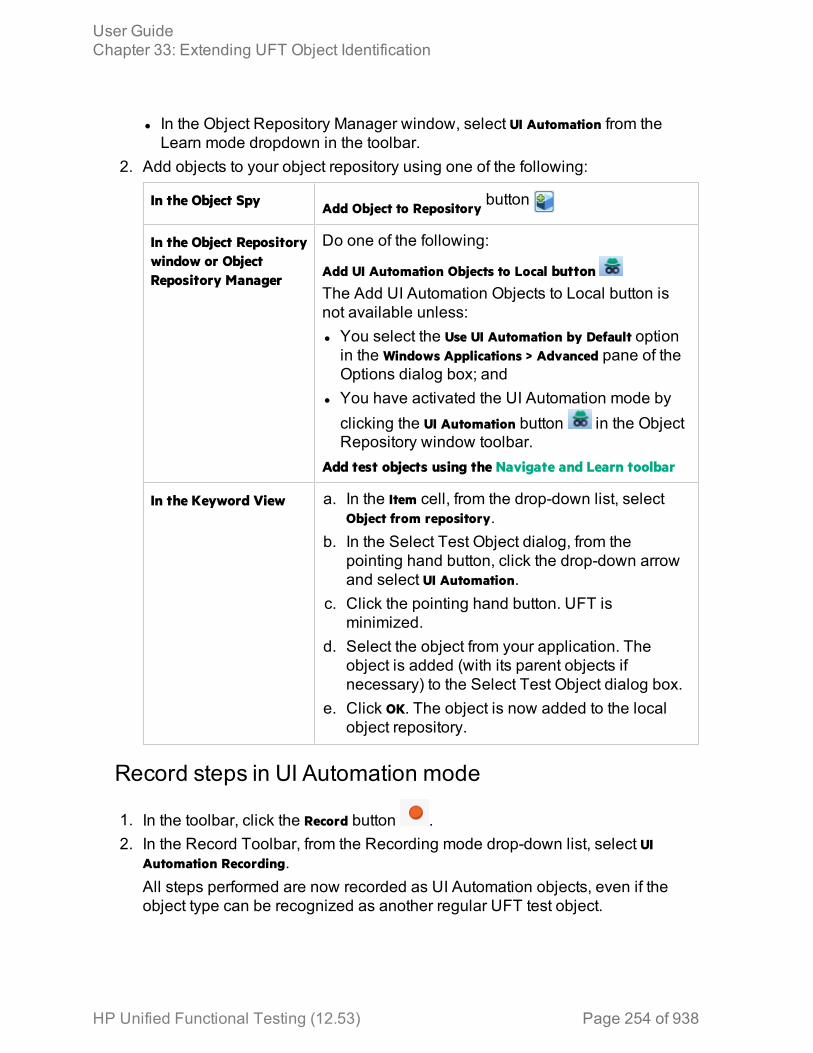
l In the Object Repository Manager window, select UI Automation from theLearn mode dropdown in the toolbar.
2. Add objects to your object repository using one of the following:
In the Object Spy Add Object to Repository button
In the Object Repositorywindow or ObjectRepository Manager
Do one of the following:
Add UI Automation Objects to Local buttonThe Add UI Automation Objects to Local button isnot available unless:l You select the Use UI Automation by Default optionin the Windows Applications > Advanced pane of theOptions dialog box; and
l You have activated the UI Automation mode byclicking the UI Automation button in the ObjectRepository window toolbar.
Add test objects using the Navigate and Learn toolbar
In the Keyword View a. In the Item cell, from the drop-down list, selectObject from repository.
b. In the Select Test Object dialog, from thepointing hand button, click the drop-down arrowand select UI Automation.
c. Click the pointing hand button. UFT isminimized.
d. Select the object from your application. Theobject is added (with its parent objects ifnecessary) to the Select Test Object dialog box.
e. Click OK. The object is now added to the localobject repository.
Record steps in UI Automation mode
1. In the toolbar, click the Record button .2. In the Record Toolbar, from the Recording mode drop-down list, select UI
Automation Recording.All steps performed are now recorded as UI Automation objects, even if theobject type can be recognized as another regular UFT test object.
User GuideChapter 33: Extending UFT Object Identification
HP Unified Functional Testing (12.53) Page 254 of 938
Note:
l Recording may add additional unnecessary steps to your test. Remove theunneeded steps manually after finishing your recording session.
l If you are recording to add a checkpoint or output value, ensure that theUI Automation Recording mode is selected before you click the Insert
Checkpoint or Output Value button .
l The speed of UI Automation recording can vary depending on theapplication.
Identifying unsupported objects in test runtimeUFT may fail to find a test object during a test run because the expected propertiesare incorrect, and may fail to identify and learn an object because it is not asupported object for a specific technology.
In such cases, use a Static test object or static identification properties to identifythe object.
Static objects exist in the application, but typically cannot be selected or have dataentered into them automatically. Since UFT does support Static objects, assigningthe Static object type to an unidentifiable object enables you to select the object inyour application.
User GuideChapter 33: Extending UFT Object Identification
HP Unified Functional Testing (12.53) Page 255 of 938
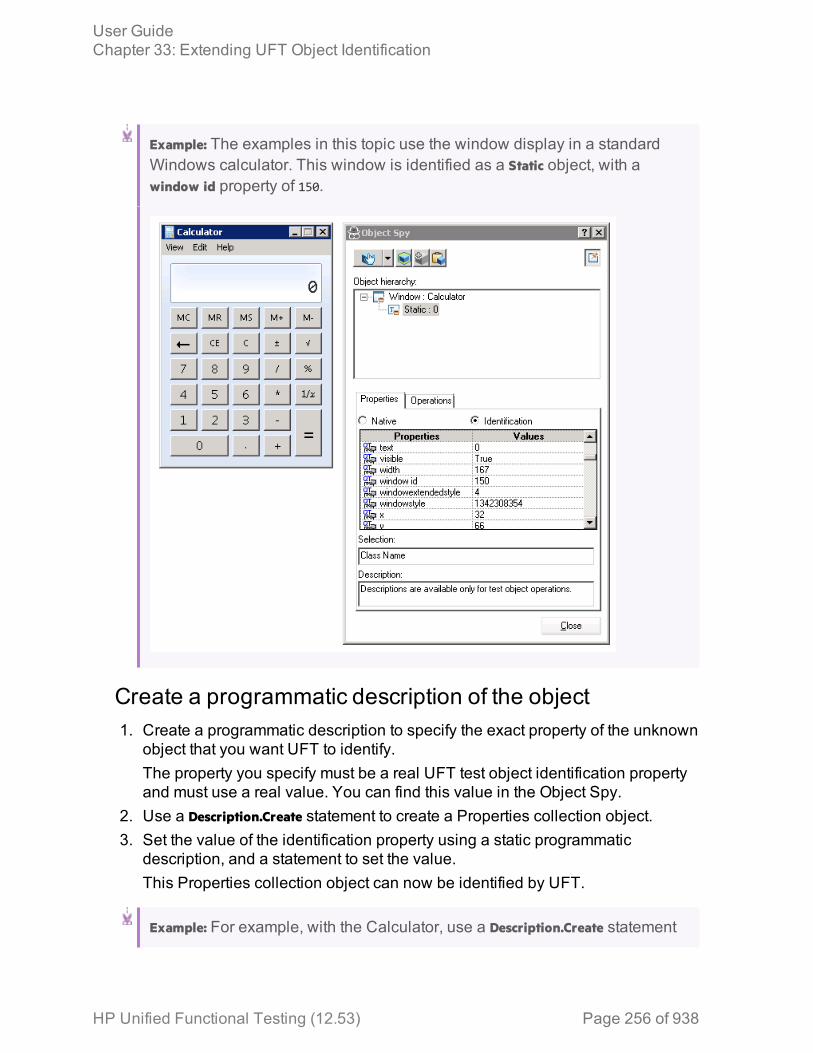
Example: The examples in this topic use the window display in a standardWindows calculator. This window is identified as a Static object, with awindow id property of 150.
Create a programmatic description of the object1. Create a programmatic description to specify the exact property of the unknown
object that you want UFT to identify. The property you specify must be a real UFT test object identification propertyand must use a real value. You can find this value in the Object Spy.
2. Use a Description.Create statement to create a Properties collection object.3. Set the value of the identification property using a static programmatic
description, and a statement to set the value.This Properties collection object can now be identified by UFT.
Example: For example, with the Calculator, use a Description.Create statement
User GuideChapter 33: Extending UFT Object Identification
HP Unified Functional Testing (12.53) Page 256 of 938
to specify that you are looking for an object in which the window id propertyvalue is 150:
Set des = Description.Createdes="window id:= 150"
Set the unsupported/unidentified object as Static objecttypeOnce you have created a Properties collection object and specified the value of theobject, assign this "object" as an object of Static type.
Example: For example, with the Calculator, assign UFT to find the object withthe window id value of 150 by assigning this "object" as a Static type:
Set des = Description.Createdes="window id:= 150"Window("Calculator").Static(des).Click
Assign the unsupported/unidentified object to a supportedobject typeAdditionally, assign the unsupported or unidentified object to a supported objecttype to perform a specific method (such as .Click or .Submit.). This enables UFT torun the step, as UFT thinks it is using a supported object type.
Example: For example, with the Calculator, with the Properties collectionobject created with the Description.Create statement, you can assign it to aWinButton object and click the different buttons:
Set des = Description.Createdes="text:=1"Window("Calculator").WinButton(des).ClickSet des1 = Description.Createdes1="text:=2"Window("Calculator").WinButton(des1).Click
Use non-test object methodsRun methods that are not supported for a specific UFT test object by assigning theProperties collection object to a supported UFT test object that supports events.
User GuideChapter 33: Extending UFT Object Identification
HP Unified Functional Testing (12.53) Page 257 of 938
Example: For example, with the Calculator, you can highlight the display:
Set des = Description.Createdes="window id:=150"Window("Calculator").Static(des).Highlight
This will highlight the test object during the test run.
Known Issues - UI Automation Support
Unsupported features The following features are not supported together withUI Automation:
l Active Screenl F1 support for objects and methodsl Table checkpointsl Using UI Automation with the UFT Add-in for ALMl Recording on Drag and Drop methods
UI Automation onWindows 10
UI Automation recording and UI Automation spy modecan experience unexpected behavior when runningUFT on Windows 10. (Note that these functionalitiesare not officially supported for UFT running onWindows 10.)
Recording onenvironments with slowGUI refresh
If you are using UI Automation to recordin anenvironment with a slow GUI refresh such as a slowRDP connection, recording can experience unexpectedand unstable behavior.
UI Automation and Javaapplications
When using UI Automation to test a Java application,objects added to your object repository from anapplication running on a computer with Java 8 installedwill not be recognized on a computer with Java 6installed.
This is due to changes in the Java framework betweenJava 6 and Java 8.
Regular expressions asproperty values
The controltype identification property cannot have avalue that is a regular expression.
User GuideChapter 33: Extending UFT Object Identification
HP Unified Functional Testing (12.53) Page 258 of 938
UIA container objectswith large numbers ofelements
When spying on UIA container objects, such as lists,trees, and tables with large numbers of elements in theobject, UFT may experience slow performance andunexpected behavior.
Workaround: Do one or more of the following:
l In your application, implement the ItemContainerpattern with the FindItemByProperty() method.
l Manually add additional identification properties forthe items in the object, such as index. Theseproperties are not added by default.
l Use .Object methods to access items within thecontrol.
UIA with other"spy" tools
If you start other "spy" tools, such as the MicrosoftInspect tool, UFT experiences unexpected behavior.
User GuideChapter 33: Extending UFT Object Identification
HP Unified Functional Testing (12.53) Page 259 of 938
Chapter 34: Virtual ObjectsRelevant for: GUI tests and scripted GUI components
Your application may contain objects that behave like standard objects but are notrecognized by UFT. You can define these objects as virtual objects and map themto standard classes, such as a button or a check box. UFT emulates the user'saction on the virtual object during the run session. In the run results, the virtualobject is displayed as though it is a standard class object.
For example, suppose you want to test a Web page containing a bitmap that theuser clicks. The bitmap contains several different hyperlink areas, and each areaopens a different destination page. When you create the test or scriptedcomponent, the Web site matches the coordinates of the click on the bitmap andopens the destination page.
To enable UFT to click at the required coordinates during a run session, you candefine a virtual object for an area of the bitmap, which includes those coordinates,and map it to the button class. When you run the test or scripted component, UFTclicks the bitmap in the area defined as a virtual object so that the Web site opensthe correct destination page.
Virtual object collections are groups of virtual objects that are stored in the VirtualObject Manager under a descriptive name.
The virtual object collections displayed in the Virtual Object Manager are stored onyour computer and not with the tests or scripted components that contain virtualobject steps. This means that if you use a virtual object in a step, the object isrecognized during the run session only if it is run on a computer containing theappropriate virtual object definition. To copy your virtual object collectiondefinitions to another computer, copy the contents of your <UFT installationfolder>\dat\VoTemplate folder (or individual .vot collection files within this folder) tothe same folder on the destination computer.
Note: UFT does not support virtual objects for analog or low-level recording.
How virtual objects are defined and recognizedRelevant for: GUI tests and scripted GUI components
UFT identifies a virtual object according to its boundaries. Marking an object'sboundaries specifies its size and position on a Web page or application window.When you assign a test object as the parent of your virtual object, you specify thatthe coordinates of the virtual object boundaries are relative to that parent object.When you record a test or scripted component, UFT recognizes the virtual object
HP Unified Functional Testing (12.53) Page 260 of 938
within the parent object and adds it as a test object in the object repository so thatUFT can identify the object during the run session. UFT also recognizes the virtualobject as a test object when you add it manually to the object repository.
To perform an operation in the Active Screen on a marked virtual object, you mustfirst record it, so that its properties are saved in the test object description in theobject repository. If you perform an operation in the Active Screen on a virtualobject that has not yet been recorded, UFT treats it as a standard object.
You can use virtual objects only when recording and running a test or scriptedcomponent. You cannot insert any type of checkpoint on a virtual object, or use theObject Spy to view its properties.
You can enable and disable recognition of virtual objects during recording, in theGeneral pane of the GUI Testing tab in the Options dialog box (Tools > Options > GUITesting tab > General node).
During a run session, make sure that the application window is the same size andin the same location as it was during recording, otherwise the coordinates of thevirtual object relative to its parent object may be different, and this may affect thesuccess of the run session.
Define virtual objects for unsupported objectsRelevant for: GUI tests and scripted GUI components
Display the object to define as a virtual objectWith UFT open (but not in record mode), open your application and display theobject containing the area you want to define as a virtual object.
Note: You can define virtual objects only for objects on which UFT recordsClick or DblClick methods. Otherwise, the virtual object is ignored.
Use the Virtual Object wizardOpen the Virtual Object wizard (Tools > Virtual Object > New Virtual Object).
User GuideChapter 34: Virtual Objects
HP Unified Functional Testing (12.53) Page 261 of 938
Chapter 35: Checkpoints in GUI TestingRelevant for: GUI tests and components
UFT enables you to add checks to your test or component. A checkpoint is averification that compares the current value for specified properties or current stateof other characteristics of an object with the expected value or characteristics. Thishelps you to identify whether your application is functioning correctly. For example,you can perform standard checkpoints to check that the actual object propertyvalues conform to the expected values, and you can perform bitmap checkpoints tocheck that the visible parts of your application are displayed correctly.
When you add a checkpoint, UFT inserts a checkpoint step to the current row in theKeyword View, and for tests and scripted components, also adds a Check CheckPointstatement in the Editor. By default, UFT names the checkpoint using the name ofthe test object on which the checkpoint was created. You can choose to specify adifferent name for the checkpoint or accept the default name.
When you run the test or component, UFT compares the expected results of thecheckpoint to the current results. If the results do not match, the checkpoint fails.You can view the results of the checkpoint in the run results.
Adding existing checkpointsRelevant for: GUI tests and scripted GUI components only
UFT enables you to reuse existing checkpoints. When you create checkpoints,consider which checkpoints can be reused in multiple locations in your test or inmultiple tests. For example:
l Checkpoints that check generic content or the state of your application may beuseful in multiple locations.
l Checkpoints that check the content of a specific area of your application aregenerally useful in only one particular place in your test.
The following examples illustrate situations in which inserting an existingcheckpoint may be useful:
l If each page of your application contains your organization's logo, you can reusea bitmap checkpoint to verify each occurrence in the application.
l If your application contains multiple edit boxes, you can reuse a checkpoint toconfirm the enabled status of these edit boxes throughout your test.
For details of how to insert existing checkpoints, see Add Existing CheckpointDialog Box.
HP Unified Functional Testing (12.53) Page 262 of 938
Checkpoint typesRelevant for: GUI tests and components
You can insert the following checkpoint types to check objects in an application:
CheckpointType Description
StandardCheckpoint
Checks property values of an object in your application.For example, you can check that a radio button is activated after it isselected or you can check the value of an edit box.
Standard checkpoints are supported for all add-in environments(see "Supported Checkpoints" on page 917).
For details on standard checkpoints, see "Standard checkpoints"on page 266.
ImageCheckpoint(tests andscriptedcomponentsonly)
Checks the value of an image in your application. For example, youcan check that a selected image's source file is correct.
You create an image checkpoint by inserting a standard checkpointon an image object.
Image checkpoints are supported for the Web add-in environment(see "Supported Checkpoints" on page 917).
For details on image checkpoints, see "Standard checkpoints" onpage 266.
AccessibilityCheckpoint(tests andscriptedcomponentsonly)
Identifies areas of your Web site that may not conform to the WorldWide Web Consortium (W3C) Web Content AccessibilityGuidelines. For example, guideline 1.1 of the W3C Web ContentAccessibility Guidelines requires you to provide a text equivalentfor every non-text element. You can add an Alt property check tocheck whether objects that require the Alt property under thisguideline, do in fact have this tag.
Accessibility checkpoints are supported for the Web add-inenvironment (see "Supported Checkpoints" on page 917).
For details on accessibility checkpoints, see "Accessibilitycheckpoints" on page 267.
User GuideChapter 35: Checkpoints in GUI Testing
HP Unified Functional Testing (12.53) Page 263 of 938
CheckpointType Description
BitmapCheckpoint
Checks an area of your application as a bitmap. For example,suppose you have a Web site that can display a map of a city theuser specifies. The map has control keys for zooming. Using thebitmap checkpoint, you can check that the map zooms in correctly.
You can also check that a specific bitmap exists in your application.For example, you can check that your company logo is displayedanywhere on your Web page.
You can create a bitmap checkpoint for any area in yourapplication.
Bitmap checkpoints are supported for all add-in environments. Fordetails, see "Supported Checkpoints" on page 917.
For details on bitmap checkpoints, see "Bitmap checkpoints" onpage 267.
DatabaseCheckpoint(tests andscriptedcomponentsonly)
Checks the contents of a database accessed by your application.For example, you can use a database checkpoint to check thecontents of a database containing flight information for your Website.
Database checkpoints are supported for all add-in environments(see "Supported Checkpoints" on page 917).
For details on database checkpoints, see "Database checkpoints"on page 271.
File ContentCheckpoint(tests only)
Checks the text in a dynamically generated (or accessed) file. Forexample, suppose your application generates a .pdf. You cancheck that the correct text is displayed on specific lines in onspecific pages in that .pdf.
File content checkpoints are supported for all add-in environments(see "Supported Checkpoints" on page 917).
For details on file content checkpoints, see "File Contentcheckpoints" on page 272.
User GuideChapter 35: Checkpoints in GUI Testing
HP Unified Functional Testing (12.53) Page 264 of 938
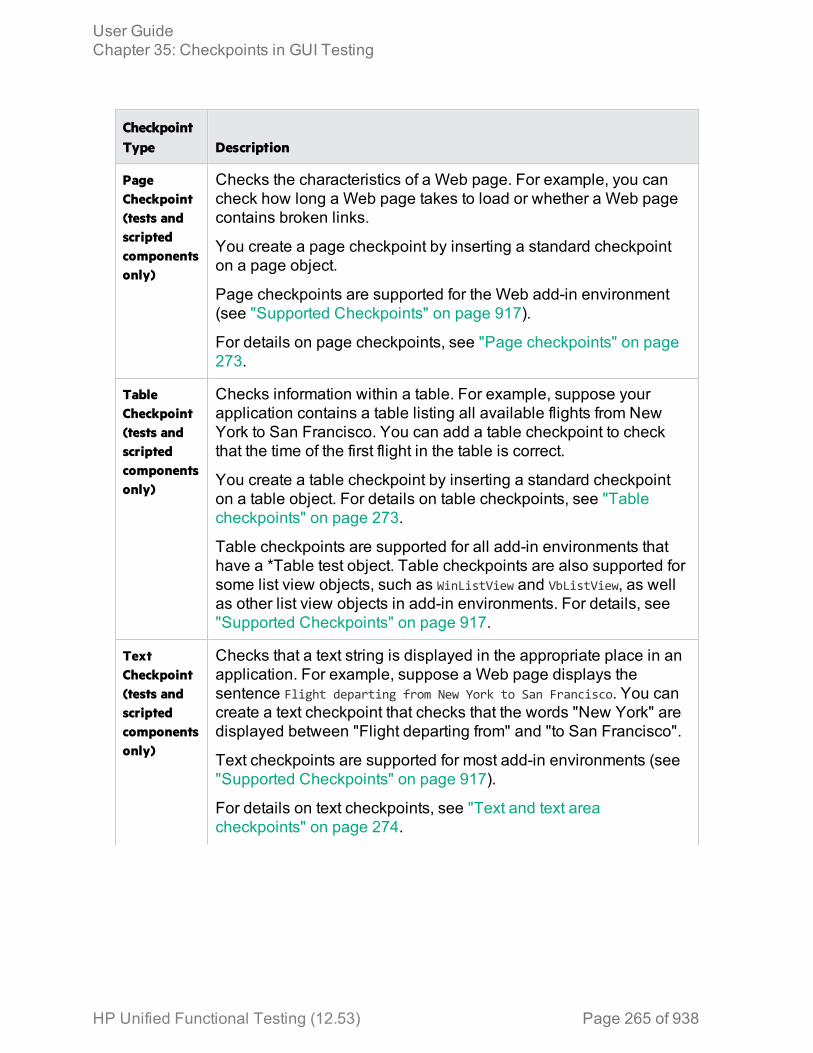
CheckpointType Description
PageCheckpoint(tests andscriptedcomponentsonly)
Checks the characteristics of a Web page. For example, you cancheck how long a Web page takes to load or whether a Web pagecontains broken links.
You create a page checkpoint by inserting a standard checkpointon a page object.
Page checkpoints are supported for the Web add-in environment(see "Supported Checkpoints" on page 917).
For details on page checkpoints, see "Page checkpoints" on page273.
TableCheckpoint(tests andscriptedcomponentsonly)
Checks information within a table. For example, suppose yourapplication contains a table listing all available flights from NewYork to San Francisco. You can add a table checkpoint to checkthat the time of the first flight in the table is correct.
You create a table checkpoint by inserting a standard checkpointon a table object. For details on table checkpoints, see "Tablecheckpoints" on page 273.
Table checkpoints are supported for all add-in environments thathave a *Table test object. Table checkpoints are also supported forsome list view objects, such as WinListView and VbListView, as wellas other list view objects in add-in environments. For details, see"Supported Checkpoints" on page 917.
TextCheckpoint(tests andscriptedcomponentsonly)
Checks that a text string is displayed in the appropriate place in anapplication. For example, suppose a Web page displays thesentence Flight departing from New York to San Francisco. You cancreate a text checkpoint that checks that the words "New York" aredisplayed between "Flight departing from" and "to San Francisco".
Text checkpoints are supported for most add-in environments (see"Supported Checkpoints" on page 917).
For details on text checkpoints, see "Text and text areacheckpoints" on page 274.
User GuideChapter 35: Checkpoints in GUI Testing
HP Unified Functional Testing (12.53) Page 265 of 938
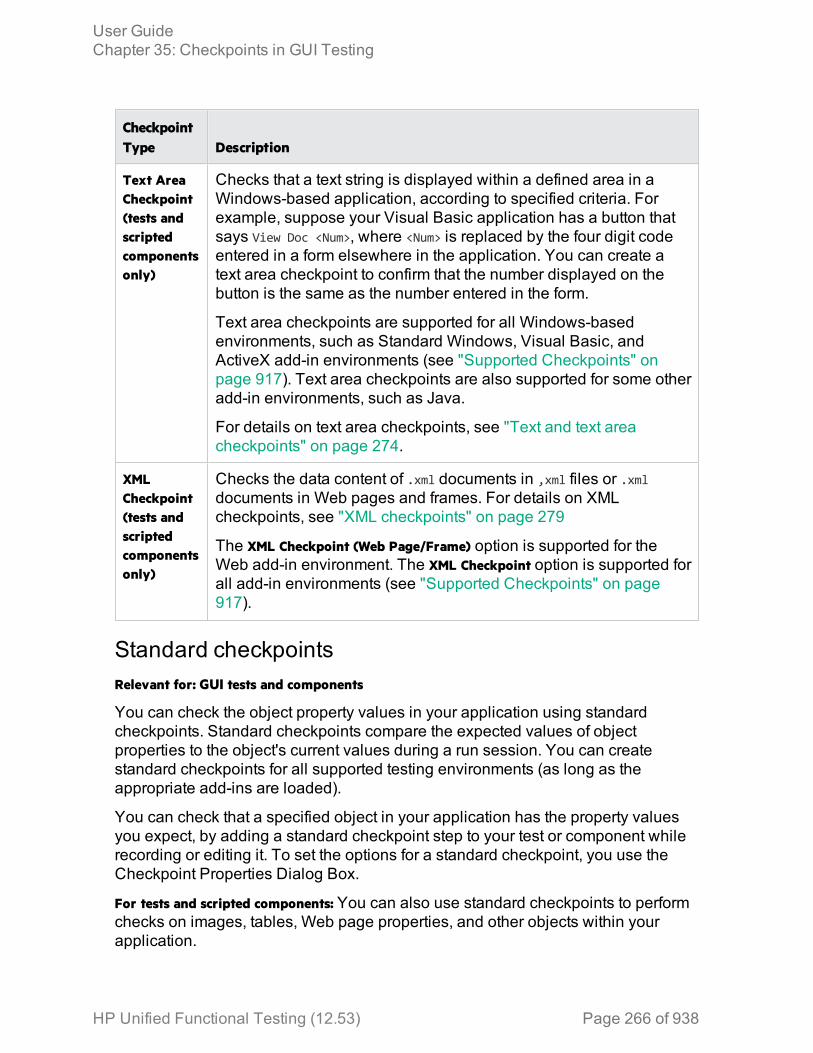
CheckpointType Description
Text AreaCheckpoint(tests andscriptedcomponentsonly)
Checks that a text string is displayed within a defined area in aWindows-based application, according to specified criteria. Forexample, suppose your Visual Basic application has a button thatsays View Doc <Num>, where <Num> is replaced by the four digit codeentered in a form elsewhere in the application. You can create atext area checkpoint to confirm that the number displayed on thebutton is the same as the number entered in the form.
Text area checkpoints are supported for all Windows-basedenvironments, such as Standard Windows, Visual Basic, andActiveX add-in environments (see "Supported Checkpoints" onpage 917). Text area checkpoints are also supported for some otheradd-in environments, such as Java.
For details on text area checkpoints, see "Text and text areacheckpoints" on page 274.
XMLCheckpoint(tests andscriptedcomponentsonly)
Checks the data content of .xml documents in ,xml files or .xmldocuments in Web pages and frames. For details on XMLcheckpoints, see "XML checkpoints" on page 279
The XML Checkpoint (Web Page/Frame) option is supported for theWeb add-in environment. The XML Checkpoint option is supported forall add-in environments (see "Supported Checkpoints" on page917).
Standard checkpointsRelevant for: GUI tests and components
You can check the object property values in your application using standardcheckpoints. Standard checkpoints compare the expected values of objectproperties to the object's current values during a run session. You can createstandard checkpoints for all supported testing environments (as long as theappropriate add-ins are loaded).
You can check that a specified object in your application has the property valuesyou expect, by adding a standard checkpoint step to your test or component whilerecording or editing it. To set the options for a standard checkpoint, you use theCheckpoint Properties Dialog Box.
For tests and scripted components: You can also use standard checkpoints to performchecks on images, tables, Web page properties, and other objects within yourapplication.
User GuideChapter 35: Checkpoints in GUI Testing
HP Unified Functional Testing (12.53) Page 266 of 938
Accessibility checkpointsRelevant for: GUI tests and scripted GUI components
You can add accessibility checkpoints to help you quickly identify areas of yourWeb site that may not conform to the W3C Web Content Accessibility Guidelines.
The Section 508 criteria for Web-based technology and information systems arebased on access guidelines developed by the Web Accessibility Initiative of theWorld Wide Web Consortium (W3C).
You can add automatic accessibility checkpoints to each page in your test, or youcan add individual accessibility checkpoints to individual pages or frames.
Accessibility checkpoints are not supported for keyword components.
You can instruct UFT to create automatic accessibility checkpoints for every pagein all tests. If you do not select to add accessibility checkpoints automatically whilerecording, you can add an accessibility checkpoint while recording or editing yourtest.
For details, see:
l "Insert a checkpoint step" on page 280l Checkpoint Properties Dialog Box
Bitmap checkpointsRelevant for: GUI tests and components
UFT enables you to check that the visible parts of your application are displayedcorrectly by comparing bitmaps of objects in your application to bitmaps capturedpreviously and stored with the test or component.
You can create bitmap checkpoints for all supported testing environments (as longas the appropriate add-ins are loaded).
Bitmap checkpoints enable you to do the following:
l Compare an entire object or areas within an object. For example, suppose you have aWeb site that can display a map of a city that the user specifies. The map hascontrol keys for zooming. You can zoom in on a map, and then insert a bitmapcheckpoint on the zoomed-in map to check that the map zooms in correctly.
l Locate a specified image within an object. For example, suppose you want to checkthat your company logo is displayed on your Web page. You can either selectthe logo in the actual Web page, or load a bitmap file containing the logo fromyour computer.
User GuideChapter 35: Checkpoints in GUI Testing
HP Unified Functional Testing (12.53) Page 267 of 938
When you create a bitmap checkpoint, UFT captures the visible part of the specifiedobject as a bitmap and inserts a checkpoint in the test or component. (UFT doesnot capture any part that is scrolled off the screen, or hidden by another object, forexample.)
You can specify areas of the object to ignore or include in the checkpoint. Forexample, if your Web page includes a dynamic counter that may cause thecheckpoint to fail, you can instruct UFT to ignore it during the run session byexcluding the area in which it is located from the comparison.
When you run the test or component, UFT captures a bitmap of the actual object inthe application and compares this runtime bitmap (or the selected areas within it)with the bitmap stored in the checkpoint. You can fine-tune this comparison bydefining tolerance settings in the checkpoint. For details, see "Fine-tuning thebitmap comparison" on the next page.
If there are differences, UFT saves the runtime bitmap and displays it next to theexpected bitmap in the run results. You can also view a bitmap that reflects thedifference between the two bitmaps, to assist you in identifying the nature of thediscrepancy.
User GuideChapter 35: Checkpoints in GUI Testing
HP Unified Functional Testing (12.53) Page 268 of 938
Fine-tuning the bitmap comparisonRelevant for: GUI tests and components
When running a bitmap checkpoint, UFT compares the area that you are checkingin the application with the bitmap stored in the checkpoint, pixel by pixel. Bydefault, if any pixels are different, the checkpoint fails. The advanced settings in theBitmap Checkpoint Properties dialog box provides various options for fine-tuningthe bitmap comparison:
RGBTolerance
NOTE: This functionality is available only when comparing expectedbitmaps with runtime bitmaps. It is not available when locating aspecified bitmap within the runtime bitmap.
The RGB (Red, Green, Blue) tolerance determines the percent bywhich the RGB values of the pixels in the runtime bitmap can differfrom those of the expected bitmap and allow the checkpoint to pass.(The RGB tolerance option is limited to bitmaps with a color depth of24 bits.)
For example, a bitmap checkpoint on identical bitmaps could fail ifdifferent display drivers are used when you create your checkpointand when you run your test. Suppose one display driver displays thecolor white as RGB (255, 255, 255) and another driver displays thecolor white as RGB (231, 231, 231). The difference between thesetwo values is about 9.4%. By setting the RGB tolerance to 10%, yourcheckpoint will pass when running your test with either of thesedrivers.
UFT applies the RGB tolerance settings when comparing each pixelin the expected and runtime bitmaps. The Red, Green, and Bluevalues for each pixel are compared separately. If any of the valuesdiffers more than the tolerance allows, the pixel fails the comparison.
User GuideChapter 35: Checkpoints in GUI Testing
HP Unified Functional Testing (12.53) Page 269 of 938
PixelTolerance
NOTE: This functionality is available only when comparing expectedbitmaps with runtime bitmaps. It is not available when locating aspecified bitmap within the runtime bitmap.
The pixel tolerance determines the number or percentage of pixels inthe runtime bitmap that can differ from those in the expected bitmapand allow the checkpoint to pass.
For example, suppose the expected bitmap has 4000 pixels. If youdefine the pixel tolerance to be 50 and select the Pixels radio button,up to 50 pixels in the runtime bitmap can be different from those inthe expected bitmap and the checkpoint passes. If you define thepixel tolerance to be 5 and select the Percent radio button, up to 200pixels (5 percent of 4000) in the runtime bitmap can be different fromthose in the expected bitmap and the checkpoint passes.
ImageSimilarity
NOTE: This functionality is available only when locating a specifiedbitmap within the runtime bitmap. It is not available when comparingexpected bitmaps with runtime bitmaps.
Image similarity settings can enable a checkpoint to pass, even if theexact bitmap is not found in your application. UFT attempts to locatethe specified bitmap in the runtime bitmap of the object in yourapplication during the run session. If UFT locates an exact match tothe specified bitmap, then the checkpoint passes.
If an exact match cannot be found and you specified less than 100%in the Similarity option in the advanced settings of theCheckpoint Properties Dialog Box, UFT adjusts the comparisonaccording to the similarity level. If the possible candidate has asimilarity that is equal to or greater than the percentage that youdefined, the checkpoint passes.
User GuideChapter 35: Checkpoints in GUI Testing
HP Unified Functional Testing (12.53) Page 270 of 938
CustomComparers
A custom comparer is a COM object that you or a third party candevelop to run the bitmap comparison in the checkpoint according toa more specific algorithm. If you use a custom comparer to performthe bitmap checkpoint, UFT sends the comparer two bitmaps tocompare: A screen capture of the object, created with the checkpointand saved as the expected bitmap, and a screen capture of theobject as it appears in the application during the run session. Thecomparer then compares these two bitmaps according to thespecifications in its algorithm. If you use a custom comparer, youcannot use the Checkpoint Properties Dialog Box to specifytolerance or similarity settings, or areas of the object to compare orignore.
If one or more custom comparers are installed and registered on theUFT computer, the Advanced Settings Dialog Box (BitmapCheckpoints Dialog Box) includes a Comparer option.
The Comparer option enables you to select the UFT default compareror a custom comparer that performs the bitmap comparisonaccording to your testing requirements. For an example of when itcan be useful to create a custom comparer, see "Custom comparerfor images whose location changes - Use-case scenario" on page297. For details on developing or installing custom comparers, see"Developing Custom Comparers for Bitmap Checkpoints" on page296.
If you select a custom comparer, some of the options in the BitmapCheckpoint Properties Advanced Settings dialog box are different.
If you define both RGB and pixel tolerances, the RGB tolerance is calculated first.The pixel tolerance then defines the maximum number of pixels that can fail theRGB criteria and allow the checkpoint to pass.
For example, suppose you define an RGB tolerance of 10 percent and a pixeltolerance of 5 percent, for a bitmap that has 4000 pixels. For the checkpoint topass, each pixel in the runtime bitmap must have RGB values that are no greaterthan or no less than 10 percent of the RGB values of the expected bitmap. If thatcriterion fails, UFT checks that the number of pixels that failed are less than 200. Ifthat criterion passes, the checkpoint passes.
Database checkpointsRelevant for: GUI tests and scripted GUI components
You can use database checkpoints to check databases accessed by yourapplication, and to detect defects. To do this, you define a query on your database.
User GuideChapter 35: Checkpoints in GUI Testing
HP Unified Functional Testing (12.53) Page 271 of 938
Then you create a database checkpoint that checks the results of the query.
Define a database query in the following ways:
l Using Microsoft Query. You can install Microsoft Query from the custominstallation of Microsoft Office.
l By manually defining an SQL statement.You create a database checkpoint based on the results of the query (result set) youdefined on a database. You can create a check on a database to check thecontents of the entire result set, or a part of it. UFT captures the current data fromthe database, saves this information as expected data, and inserts a databasecheckpoint step.
When you create a new database checkpoint, all cells contain a blue check mark,indicating they are selected for verification. You can select to check the entireresults set, specific rows, specific columns, or specific cells. UFT checks only cellscontaining a check mark.
You can also specify the way UFT identifies the selected cells. For example,suppose you want to check the data that is displayed in the first row and secondcolumn in the Checkpoint Properties Dialog Box. However, you know that eachtime you run your test or scripted component, it is possible that the rows may be ina different order, depending on the sorting that was performed in a previous step.Therefore, rather than finding the data based on row and column numbers, youmay want UFT to identify the cell based on the column name and the rowcontaining a known value in a key column.
During the run session, the database checkpoint compares the current data in thedatabase to the expected data defined in the Checkpoint Properties Dialog Box Ifthe expected data and the current results do not match, the database checkpointfails.
File Content checkpointsRelevant for: GUI tests and scripted GUI components
You can use file content checkpoints to compare the textual content of a file that isgenerated during a run session with the textual content of a source file. Thisenables you to verify that the generated file contains the expected results. Forexample, you may want to verified that a PDF file generated during a run sessiondisplays the local corporate address at the top of every page.
You can perform a checkpoint on text in one line, multiple lines, or the entiredocument, as needed. You can also specify what to ignore. For example, if youexpect certain lines or areas in the file to change, you can exclude them from thecheckpoint.
User GuideChapter 35: Checkpoints in GUI Testing
HP Unified Functional Testing (12.53) Page 272 of 938
When you select a source document to compare, UFT converts a copy of thisdocument to a text file and displays the content in the file content editor area of theCheckpoint Properties Dialog Box enabling you to configure your checkpoint. Youcan use parameters and regular expressions to augment your checkpoint, asneeded.
You can perform a file content checkpoint for any of the following file types:
l HTML l Microsoft Word l Text
l PDF l RTF
If a file content checkpoint step fails during a run session, the step summary in therun results displays a side-by-side comparison of the generated document and thesource document, enabling you to visually compare the differences between thedocuments, including lines or sections that were added or removed.
Table checkpointsRelevant for: GUI tests and scripted GUI components
You can use table checkpoints to check the content of tables displayed in yourapplication. For example, you can check that a specified value is displayed in acertain cell. For some environments, you can also check the property values of thetable object. For example, you can check that a table has the expected number ofrows and columns.
During a run session, the table checkpoint compares the actual data to theexpected data, as defined in the checkpoint. If the results match, the checkpointpasses.
The tables in your application may be very large. A table checkpoint on a largetable may take a long time to create and a long time to run. You can choose toinclude all rows in your table checkpoint or you can specify a smaller row range.
For some UFT add-ins, when creating a new table checkpoint object, you canspecify the range of rows you want to include using the Define/Modify Row RangeDialog Box.
Page checkpointsRelevant for: GUI tests and scripted GUI components
You can use page checkpoints to check statistical information about your Webpages. These checkpoints check the links and the sources of the images on a Webpage. You can also instruct page checkpoints to include a check for broken links.
User GuideChapter 35: Checkpoints in GUI Testing
HP Unified Functional Testing (12.53) Page 273 of 938

The following types of page checkpoints are available:
IndividualPageCheckpoints
You can manually add a page checkpoint to check the links andimage sources on a selected Web page during a recording orediting session.
AutomaticPageCheckpoints
You can instruct UFT to create automatic page checkpoints forevery page during a recording session by selecting the Create acheckpoint for each Web page while recording check box in the Web >Advanced pane of the Options dialog box (Tools > Options > GUITesting tab > Web > Advanced node). By default, the automatic pagecheckpoint includes the checks that you select from among theavailable options in the Web > Advanced pane.
Text and text area checkpointsRelevant for: GUI tests and scripted GUI components
You can check that a specified text string is displayed by adding one of thefollowing checkpoints.
l Standard Checkpoint. Enables you to check the text property of an object. You canuse standard checkpoints to check text in Windows-based and other types ofapplications (including Web-based applications).
Note: When checking text in an application window, it is highlyrecommended to check text by inserting a standard checkpoint for theobject containing the desired text, using its text (or similar) property.
l Text Area Checkpoint. Enables you to check that a text string appears within adefined area in a Windows application, according to specified criteria. Whenchecking text displayed in a Windows-based application, it is often advisable todefine a text area larger than the actual text you want UFT to check. You thenuse the Checkpoint Properties Dialog Box to configure the relative position of theChecked Text within the captured area. During a run session, UFT checks for theselected text within the defined area, according to the settings you configured.
l Text Checkpoint. Enables you to check that the text is displayed in a screen,window, or Web page, according to specified criteria. For example, suppose youwant to check the third occurrence of a particular text string in a page. To checkfor this string, you can specify which text precedes and/or follows it and to whichoccurrence of the specified text string you are referring.
Note: Text recognition is not supported for objects in the Active Screen.
User GuideChapter 35: Checkpoints in GUI Testing
HP Unified Functional Testing (12.53) Page 274 of 938
Text recognition in run-timeRelevant for: GUI tests and components
When working with tests and scripted components, you can use the text and textarea checkpoint or output value commands to verify or retrieve text in your objects.
In addition, when working with tests, keyword or scripted components, and functionlibraries, you can insert steps to capture the text from objects in your applicationusing the .GetVisibleText, the .GetTextLocation test object methods, the TextUtil.GetTextor TextUtil.GetTextLocation reserved object methods, or the .GetText (for TerminalEmulator objects).
Note: Text recognition is not supported for objects in the Active Screen.
When you use one of these options, UFT identifies text in your application uses anOCR (optical character recognition) mechanism. When using this OCR engine, youcan use the Abby OCR text recongition engine (the default option) or the TesseractOCR engine. When UFT uses the OCR mechanism, a number of factors can affectthe text it retrieves. Depending on the characteristics of the text you want toretrieve, you can adjust several OCR configuration options to optimize the way thetext is captured. You use the Text Recognition pane in the Options dialog box tospecify the preferred text recognition mechanism and OCR-specific settings.
You should also note the following considerations for performing effective textrecognition:
User GuideChapter 35: Checkpoints in GUI Testing
HP Unified Functional Testing (12.53) Page 275 of 938
Fonts inyour text
l Single text block mode and multiple text block mode sometimesresult in different captured text. If you are not sure which text blockmode to use, use the default multiple block mode. If the results arenot what you expect, then try using the single text block mode.If you want to use the text recognition mechanism for a large areacontaining different fonts and backgrounds, it is recommended tocreate several steps to capture the text for each single text blockinstead of creating one step to capture a multiple text block.
l If the text recognition mechanism retrieves unwanted textinformation (such as hidden text and shadowed text that appearsas multiple copies of the same string) when using the multiple textblock mode, use the single text block mode option. To do this, inthe Text Recognition pane of the Options dialog box (Tools > Options> GUI Testing tab > Text Recognition node), select Single text blockmode.
l If your application uses small fonts (less than 10 pt.) you shoulduse the Tesseract OCR engine with the Preprocess the image beforeusing text recognition option selected.
Colors andcolorcontrast
l The color schema of the background should be permanent andwithout gradient.
l High contrast between the background and text is best for textrecognition (for example, black text on a white background).
Textwithinimages
l If your text is found within an image, it is recommended to the usethe Preprocess the image before using text recognition option inthe Text Recognition pane of the Options dialog box (Tools> Options > GUI Testing tab > Text Recognition mode).
User GuideChapter 35: Checkpoints in GUI Testing
HP Unified Functional Testing (12.53) Page 276 of 938
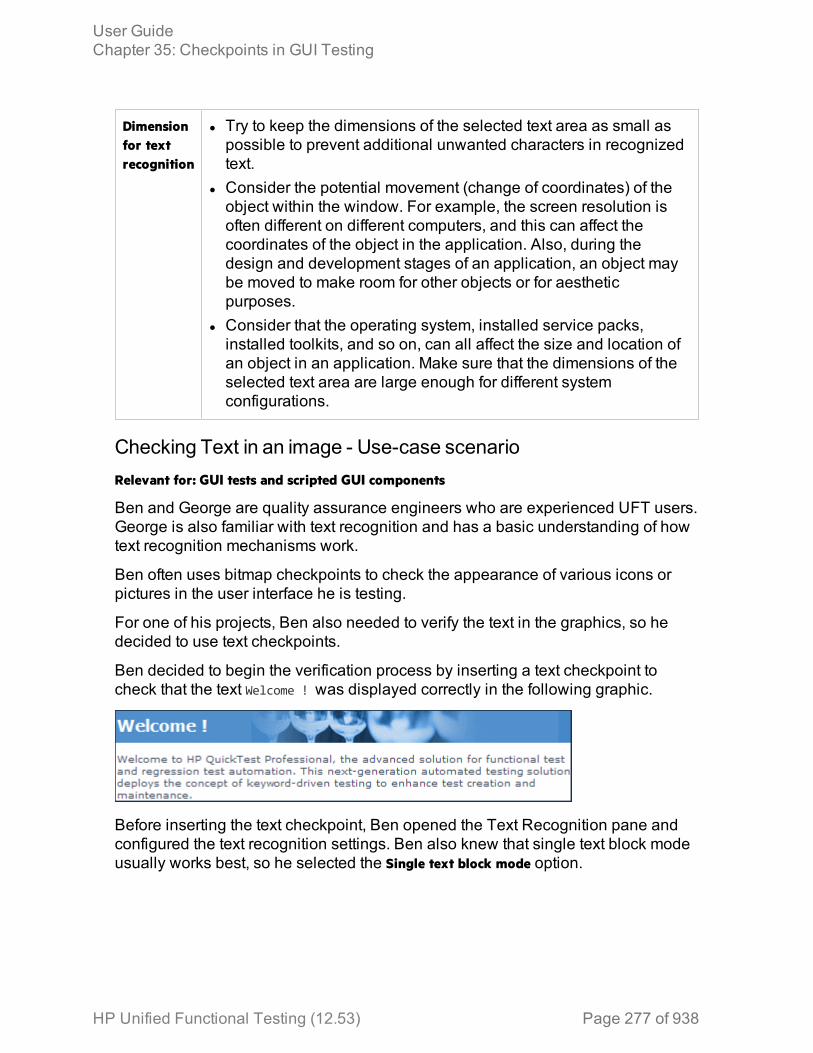
Dimensionfor textrecognition
l Try to keep the dimensions of the selected text area as small aspossible to prevent additional unwanted characters in recognizedtext.
l Consider the potential movement (change of coordinates) of theobject within the window. For example, the screen resolution isoften different on different computers, and this can affect thecoordinates of the object in the application. Also, during thedesign and development stages of an application, an object maybe moved to make room for other objects or for aestheticpurposes.
l Consider that the operating system, installed service packs,installed toolkits, and so on, can all affect the size and location ofan object in an application. Make sure that the dimensions of theselected text area are large enough for different systemconfigurations.
Checking Text in an image - Use-case scenarioRelevant for: GUI tests and scripted GUI components
Ben and George are quality assurance engineers who are experienced UFT users.George is also familiar with text recognition and has a basic understanding of howtext recognition mechanisms work.
Ben often uses bitmap checkpoints to check the appearance of various icons orpictures in the user interface he is testing.
For one of his projects, Ben also needed to verify the text in the graphics, so hedecided to use text checkpoints.
Ben decided to begin the verification process by inserting a text checkpoint tocheck that the text Welcome ! was displayed correctly in the following graphic.
Before inserting the text checkpoint, Ben opened the Text Recognition pane andconfigured the text recognition settings. Ben also knew that single text block modeusually works best, so he selected the Single text block mode option.
User GuideChapter 35: Checkpoints in GUI Testing
HP Unified Functional Testing (12.53) Page 277 of 938

Ben then inserted a text checkpoint on the entire area shown above and receivedthe following results in the Text Checkpoint Properties dialog box:
Ben noticed that there were extra characters in the Checkpoint Summary area of thetext checkpoint, but he did not know why.
Ben asked his colleague, George, for help. George explained to him that the textrecognition mechanism sometimes adds extra characters to the text checkpointwhen it does not recognize the text correctly.
George also pointed out that the area Ben defined for the text checkpoint consistedof multiple text blocks because the text was not uniform in font size, color, orbackground. The title area consisted of white characters on a blue-graybackground, while the remaining text was smaller and consisted of blue text on awhite background.
Ben remembered that he had selected the Single text block mode option in the TextRecognition pane (Tools > Options > GUI Testing tab > Text Recognition node) andunderstood that if he wanted to use single text block mode, he would have to createa text checkpoint only on the Welcome ! area of the graphic, and not on the entiregraphic. Ben tried this, and the OCR mechanism correctly identified the text, asshown below:
User GuideChapter 35: Checkpoints in GUI Testing
HP Unified Functional Testing (12.53) Page 278 of 938

Ben was pleased with the results, but he wanted to explore other possibilities, sohe inserted another text checkpoint—this time on the entire graphic. He selectedthe Multiple text block mode option in the Text Recognition pane, which resulted inthe following:
Ben was pleased that the OCR mechanism correctly recognized all of the text inthe graphic. But he needed to check only the title, Welcome !, so he finalized thischeckpoint by marking all of the text after Welcome ! as Text After.
Even though both checkpoints passed, Ben needed only one text checkpoint. Hedecided to keep the first checkpoint (that used Single text block mode), and hedeleted the second one. He selected the Single text block mode option in the TextRecognition pane to help ensure that the checkpoint would pass in future runsessions.
XML checkpointsRelevant for: GUI tests and scripted GUI components
You can use XML checkpoints to check the contents of individual XML data files ordocuments that are part of your Web application.
You can perform checkpoints on XML documents contained in Web pages orframes, on XML files, and on test objects that support XML (such as WebXML testobjects). An XML checkpoint is a verification point that compares a current value for
User GuideChapter 35: Checkpoints in GUI Testing
HP Unified Functional Testing (12.53) Page 279 of 938

a specified XML element, attribute and/or value with its expected value. During arun session, UFT compares the expected results of the checkpoint to the currentresults.
You can create the following types of XML checkpoints:
l XML Web Page/Frame Checkpoint. Checks an XML document within a Web page orframe.
l XML File Checkpoint. Checks a specified XML file.In addition, UFT provides several scripting methods that you can use with XMLdata. You can use these scripting methods to retrieve data and return new XMLobjects from existing XML data. You do this by using the XMLUtil, or WebXML objectsto return XML data and then using the supported XMLData objects and methods tomanipulate the returned data.
For details on XML objects and methods, see the Supplemental Objects section ofthe UFT Object Model Reference for GUI Testing.
Note: XML checkpoints are compatible with namespace standards. A changein namespace between expected and actual values results in a failedcheckpoint.
For details on XML standards, see: http://www.w3.org/XML/
For details on namespace standards, see: http://www.w3.org/TR/1999/REC-xml-names-19990114/
Insert a checkpoint stepRelevant for: GUI tests and components
This task describes how to insert a checkpoint step while recording or editing yourtest or component. You can also add an existing checkpoint to a test or scriptedcomponent. It is generally more convenient to define checkpoints after creating theinitial test or component.
For details on supported checkpoints per add-in environment, see "GUICheckpoints and Output Values Per Add-in" on page 916
This task describes both the general process for inserting a new checkpoint step toyour test or component and the prerequisites and considerations for the differenttypes of components.
User GuideChapter 35: Checkpoints in GUI Testing
HP Unified Functional Testing (12.53) Page 280 of 938
Important information before inserting the checkpoint
Objectvisibility inapplication
l During an editing session, make sure the object is visible in yourapplication before inserting a standard checkpoint.
l For bitmap checkpoints: During a run session, bitmap checkpointscan capture only the visible part of an object. Therefore, confirmthat the object to capture is always fully visible on the screenbefore a bitmap checkpoint step is performed. One way to do thisis to insert a MakeVisible statement (for relevant environments)prior to your bitmap checkpoint step. For details on the MakeVisiblemethod, see the specific object methods and properties in the UFTObject Model Reference for GUI Testing.
l For file content checkpoints: The source file must be located on thefile system.
Availability l Recording sessionsl Editing sessionsl Active Screen (not supported for file content checkpoints or XMLcheckpoints)
User GuideChapter 35: Checkpoints in GUI Testing
HP Unified Functional Testing (12.53) Page 281 of 938
ImportantInformation
l Checkpoints can be viewed in the following modes:l Simple Mode: Displays only the basic properties and expectedvalues of the checkpoint.
l Advanced Mode: Displays all supported properties and expectedvalues of the checkpoint.
l In ALM, you cannot create, edit, or rename checkpoints forkeyword GUI components.
l You cannot create image, table, or (Web) page checkpoints in akeyword GUI component. These special checkpoint types areonly available for tests and scripted GUI components. However, ifyou select a Web page or any table object when creating astandard checkpoint for your component, you can check theirobject properties like any other object.
l For bitmap checkpoints: If you want to create a bitmap checkpointthat contains multiple objects, you should select the highest levelobject that includes all the objects to include in the bitmapcheckpoint.
l For text or text area checkpoints:
l Before you create a text or text area checkpoint for a Windows-based application, make sure you configure the requiredcapture settings in the Text Recognition pane (Tools > Options> GUI Testing tab > Text Recognition node.
l You can also check the text property of an object in Windows-based and other types of applications (including Web-basedapplications) by using a standard checkpoint.
l For XML checkpoints: You can insert XML checkpoints to verify Webpages and frames and to directly access and verify specific XMLfiles in your system.
Define automatic page checkpoints - optionalIn the Web > Advanced pane of the Options dialog box (Tools > Options > GUI Testingtab > Web > Advanced node), do one or more of the following:
l To instruct UFT to create automatic page checkpoints for every page duringevery recording session, select the Create a checkpoint for each Web page whilerecording check box.
l To instruct UFT not to perform automatic page checkpoints during run sessions,select the Ignore checkpoints while running tests check box.
User GuideChapter 35: Checkpoints in GUI Testing
HP Unified Functional Testing (12.53) Page 282 of 938
Set global accessibility checkpoint preferencesIn the Web Advanced pane of the Options dialog box (Tools > Options > GUI Testingtab > Web > Advanced node), do one or more of the following:
l Define the checks to include in the checkpoints. All accessibility checkpoints inyour test use the options that are selected in the Advanced Web Options dialogbox at the time of the run session. You can also view these options in theAccessibility Checkpoint Properties dialog box.
l (Optional) To instruct UFT to insert an accessibility checkpoint for each page asyou record, select the Add Automatic accessibility checkpoint to each Web page whilerecording check box. This creates an accessibility checkpoint for each page asyou record.
Insert a checkpoint step while recording your test orcomponent1. Start a recording session before inserting a checkpoint.2. Insert a checkpoint by doing one of the following:
l In the Record toolbar, click the Insert Checkpoint or Output Value button andselect the type of checkpoint from the drop-down list.
l Select Design > Checkpoint and choose the relevant type of checkpoint.
l Click the Insert Checkpoint or Output Value button in the toolbar and selectthe type of checkpoint from the drop-down list.
3. UFT is hidden, and the pointer changes to a pointing hand. In your application,click the object that you want to check.
Note: If the object in your application is associated with more than onelocation, the Object Selection dialog box opens. This dialog box enablesyou to select an object to check from the object tree. The objects in thetree are displayed with hierarchical order, based on the location youclicked in the Active Screen or application.
Insert a checkpoint step while editing your test orcomponent1. You may need to open the application and display the relevant object before
inserting a checkpoint. This depends on the environment and the object typeyou are checking. For details, see the prerequisite information for your specificcheckpoint type.
2. Select the step where you want to add the checkpoint and do one of the
User GuideChapter 35: Checkpoints in GUI Testing
HP Unified Functional Testing (12.53) Page 283 of 938
following:l Select Design > Checkpoint, and then select the relevant checkpoint option.l Select Design > Checkpoint > Existing Checkpoint.l Right-click any object in the Active screen and select the relevantcheckpoint. You can create checkpoints for any object in the Active Screeneven if the object is not part of any step in the Keyword View.If you use the Active Screen to insert a checkpoint, ensure that the ActiveScreen contains sufficient data for the object you want to check.
Note: If the object in your application is associated with more than onelocation, the Object Select Dialog Box opens. This dialog box enablesyou to select an object to check from the object tree. The objects in thetree are displayed in hierarchical order, based on the location youclicked in the Active Screen or application.
Notes:
l For table checkpoints: When inserting a table checkpoint, for certain objectsin certain environments, before the Table Checkpoint Properties dialogbox opens, the Define/Modify Row Range Dialog Box opens. In thisdialog, select the row range to check.
l For text or text area checkpoints:
l To create the checkpoint, you first highlight a text string in the ActiveScreen then right-click the string, and select Insert Text Checkpoint.
l When you create a text area checkpoint, you first define the areacontaining the text you want UFT to check.When you select the Text Area Checkpoint option, the mouse turns intoa crosshairs pointer. Click and drag the crosshairs point to define thisarea. Release the mouse button after outlining the area required.
Tip: Hold down the left mouse button and use the arrow keys tomake precise adjustments to the defined area.
l For file content checkpoints: When inserting a file content checkpoint, the FileContent Checkpoint Properties dialog box displays by default the option toselect only All Supported Files. When this is selected, only files with theexpected extensions are displayed (for example, .htm or .pdf files). Youcan also select a file that uses a non-standard extension by selecting All
User GuideChapter 35: Checkpoints in GUI Testing
HP Unified Functional Testing (12.53) Page 284 of 938
Files in the Files of type box and then selecting the relevant file.l For database checkpoints:
When inserting a database checkpoint, the Database Query Wizardopens.a. In the Database Query Wizard, define the query for your checkpoint
using Microsoft Query or by manually entering a database connectionand SQL statement.
b. If you selected Microsoft Query as your data source, Microsoft Queryopens, enabling you to define a query. When you are done, in theFinish page of the Query Wizard, use one of the following:o Exit and return to HP Unified Functional Testing. Exits Microsoft Query.o View data or edit query in Microsoft Query. View or edit the query priorto exiting Microsoft Query.
c. If you selected Specify SQL statement manually, the Specify SQLstatement page opens, enabling you to specify the connection stringand the SQL statement.
Use programming to insert checkpoints in a test or scriptedcomponentl If you want to retrieve the return value of a checkpoint (a boolean value thatindicates whether the checkpoint passed or failed), you must add parenthesesaround the checkpoint argument in the statement in the Editor. For example:
a = Browser("MyBrowser").Page("MyPage").Check (CheckPoint("MyProperty"))
l You can also use the CheckProperty method and the CheckItemProperty method tocheck specific property or item property values. For details, see the specificobject methods and properties in the UFT Object Model Reference for GUI Testing.
Set options for the checkpointIn the Checkpoint Properties Dialog Box, specify the settings for the checkpointobject.
Example: For table checkpoints:
Define the cell selection for the table object in the Grid area of TableCheckpoint Properties dialog box, as follows:
User GuideChapter 35: Checkpoints in GUI Testing
HP Unified Functional Testing (12.53) Page 285 of 938

To: Do this:
Add a single cell to orremove it from the check
Double-click the cell
Add an entire row to orremove it from the check
Double-click the row header
Add an entire column to orremove it from the check
Double-click the column header.
Add all cells to or remove allcells from the check
Double-click the column header.
Add a range of cells to thecheck
Select the cells to add to the check and clickthe
Add to Checkbutton
Remove a range of cells fromthe check
Select the cells to remove from the checkand click the
Remove from Checkbutton
Example: For database checkpoints:
Define the cell selection for the database object in the Grid area of DatabaseCheckpoint Properties dialog box, as follows:
To: Do this:
Add a single cell to orremove it from the check
Double-click the cell
Add an entire row to orremove it from the check
Double-click the row header
Add an entire column to orremove it from the check
Double-click the column header.
Add all cells to or remove allcells from the check
Double-click the column header.
User GuideChapter 35: Checkpoints in GUI Testing
HP Unified Functional Testing (12.53) Page 286 of 938
Add a range of cells to thecheck
Select the cells to add to the check and clickthe
Add to Checkbutton
Remove a range of cells fromthe check
Select the cells to remove from the checkand click the
Remove from Checkbutton
To modify the SQL query definition, in the Keyword View or Editor, right-clickthe database object that you want to modify and select Object Properties.
Example: For file content checkpoints:
In the File Content Checkpoint Properties dialog box, scroll to each line youwant to compare and select it.
As you hover over a line, a checkbox and a regular expression icon aredisplayed in the sidebar to the left of that line.
l Click the check box to select (or clear) the line for verification.l Click the Treat Line as Regular Expression/Plain Text button to add (orremove) backslashes prior to all special characters in that line. You canthen modify any regular expressions, as needed.
Note:
l If the source file contains multiple ages, the File Content Editor isdivided into separate pages. You can then expand or collapsethe pages, select or clear entire pages for verification and so on.
Move checkpoint objects from the local object repository toa shared object repository - optionalAfter you insert a checkpoint step, the checkpoint object is added to the local objectrepository. If you are using shared object repositories, you can move the newcheckpoint object to your shared object repository.
User GuideChapter 35: Checkpoints in GUI Testing
HP Unified Functional Testing (12.53) Page 287 of 938

Include and ignore areas when comparing a bitmap -Use-case scenarioRelevant for: GUI tests and components
Suppose you want to compare an expected bitmap with an actual bitmap of theobject in your application, but there are areas of this runtime bitmap that might beaffected by dynamic values and parameters. If you include these areas in thecheckpoint, running the steps with different values may cause the checkpoint to fail.
This use-case scenario describes the process you would follow to define whichareas to ignore and include in a bitmap checkpoint that compares an expectedbitmap with a runtime bitmap.
Note: For a task related to this scenario, see "Insert a checkpoint step" onpage 280.
1. In UFT, start a recording session and open the Windows Calculator application(for example, Start > Programs > Accessories > Calculator).
2. Record steps that multiply 7 by 5 and display the result.3. Select Design > Checkpoint menu, or click the Insert Checkpoint or Output Value
button in the toolbar, and then select Bitmap Checkpoint. UFT is hidden, andthe pointer changes to a pointing hand.
User GuideChapter 35: Checkpoints in GUI Testing
HP Unified Functional Testing (12.53) Page 288 of 938
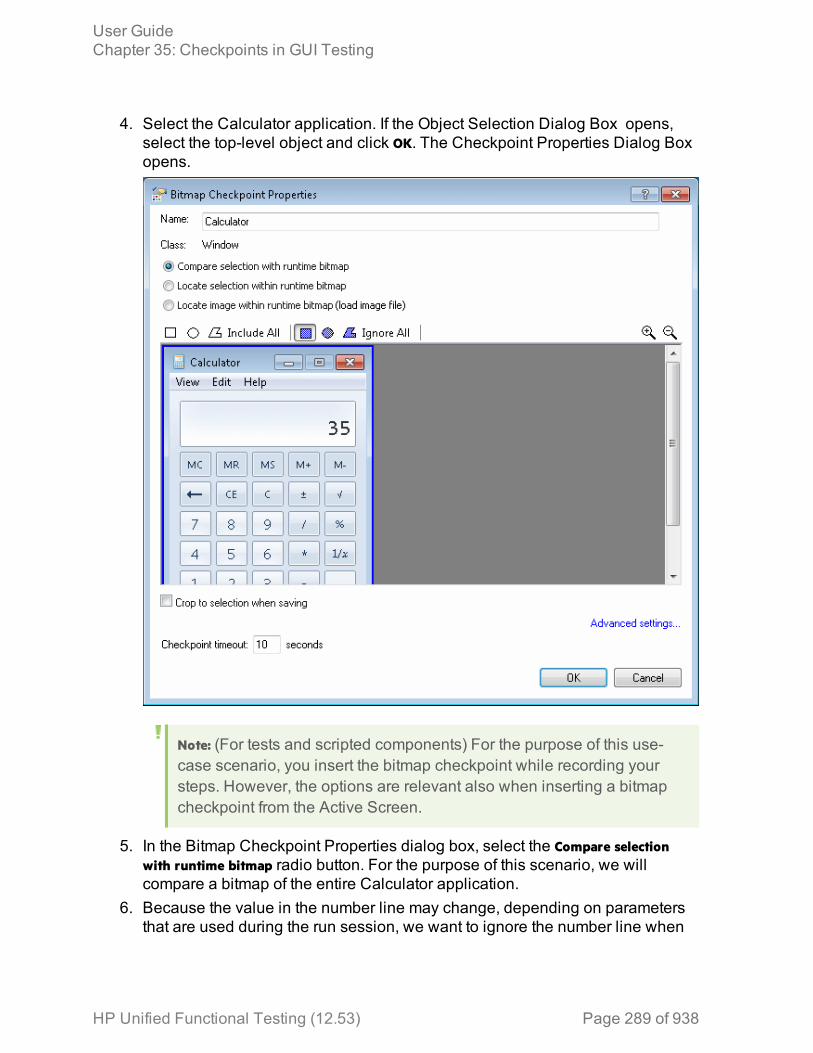
4. Select the Calculator application. If the Object Selection Dialog Box opens,select the top-level object and click OK. The Checkpoint Properties Dialog Boxopens.
Note: (For tests and scripted components) For the purpose of this use-case scenario, you insert the bitmap checkpoint while recording yoursteps. However, the options are relevant also when inserting a bitmapcheckpoint from the Active Screen.
5. In the Bitmap Checkpoint Properties dialog box, select the Compare selectionwith runtime bitmap radio button. For the purpose of this scenario, we willcompare a bitmap of the entire Calculator application.
6. Because the value in the number line may change, depending on parametersthat are used during the run session, we want to ignore the number line when
User GuideChapter 35: Checkpoints in GUI Testing
HP Unified Functional Testing (12.53) Page 289 of 938
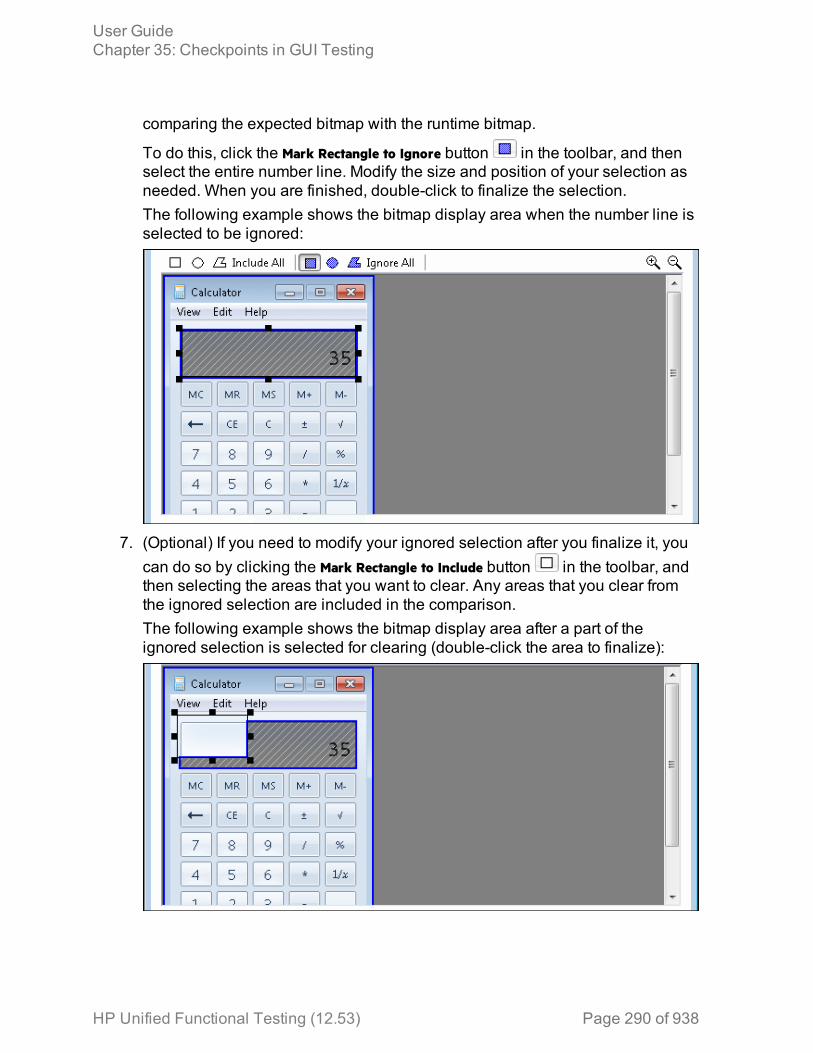
comparing the expected bitmap with the runtime bitmap.
To do this, click the Mark Rectangle to Ignore button in the toolbar, and thenselect the entire number line. Modify the size and position of your selection asneeded. When you are finished, double-click to finalize the selection.The following example shows the bitmap display area when the number line isselected to be ignored:
7. (Optional) If you need to modify your ignored selection after you finalize it, youcan do so by clicking the Mark Rectangle to Include button in the toolbar, andthen selecting the areas that you want to clear. Any areas that you clear fromthe ignored selection are included in the comparison.The following example shows the bitmap display area after a part of theignored selection is selected for clearing (double-click the area to finalize):
User GuideChapter 35: Checkpoints in GUI Testing
HP Unified Functional Testing (12.53) Page 290 of 938
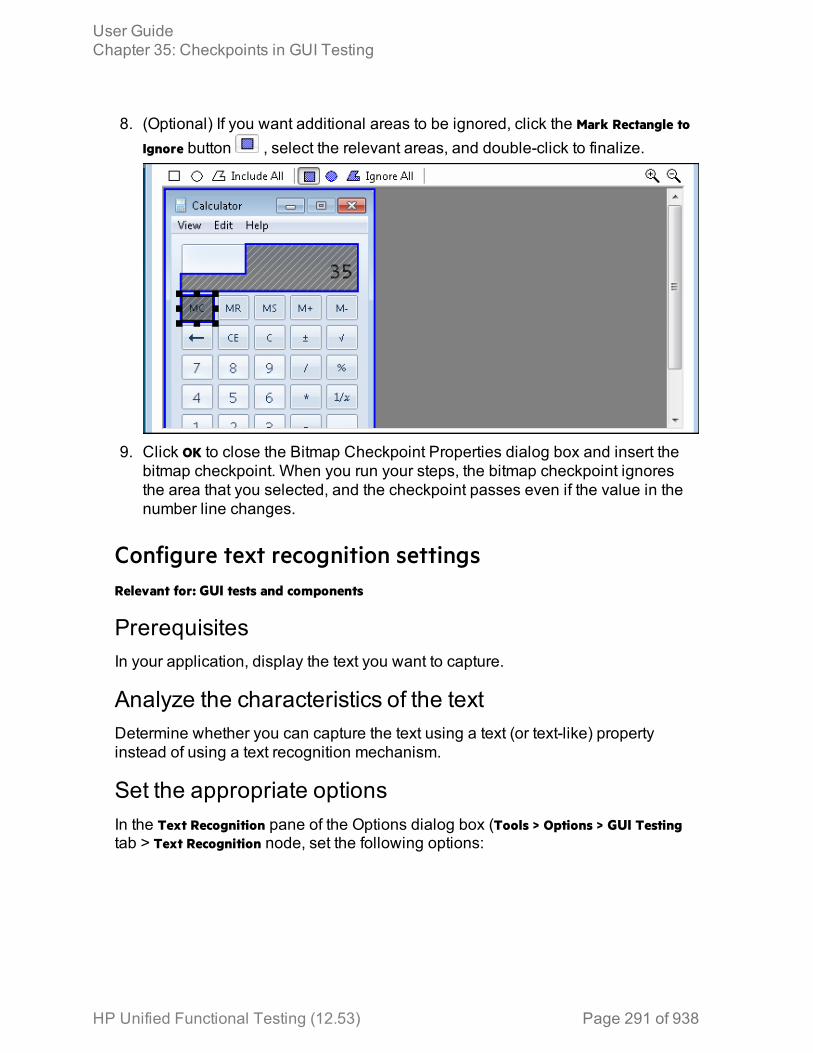
8. (Optional) If you want additional areas to be ignored, click the Mark Rectangle to
Ignore button , select the relevant areas, and double-click to finalize.
9. Click OK to close the Bitmap Checkpoint Properties dialog box and insert thebitmap checkpoint. When you run your steps, the bitmap checkpoint ignoresthe area that you selected, and the checkpoint passes even if the value in thenumber line changes.
Configure text recognition settingsRelevant for: GUI tests and components
PrerequisitesIn your application, display the text you want to capture.
Analyze the characteristics of the textDetermine whether you can capture the text using a text (or text-like) propertyinstead of using a text recognition mechanism.
Set the appropriate optionsIn the Text Recognition pane of the Options dialog box (Tools > Options > GUI Testingtab > Text Recognition node, set the following options:
User GuideChapter 35: Checkpoints in GUI Testing
HP Unified Functional Testing (12.53) Page 291 of 938
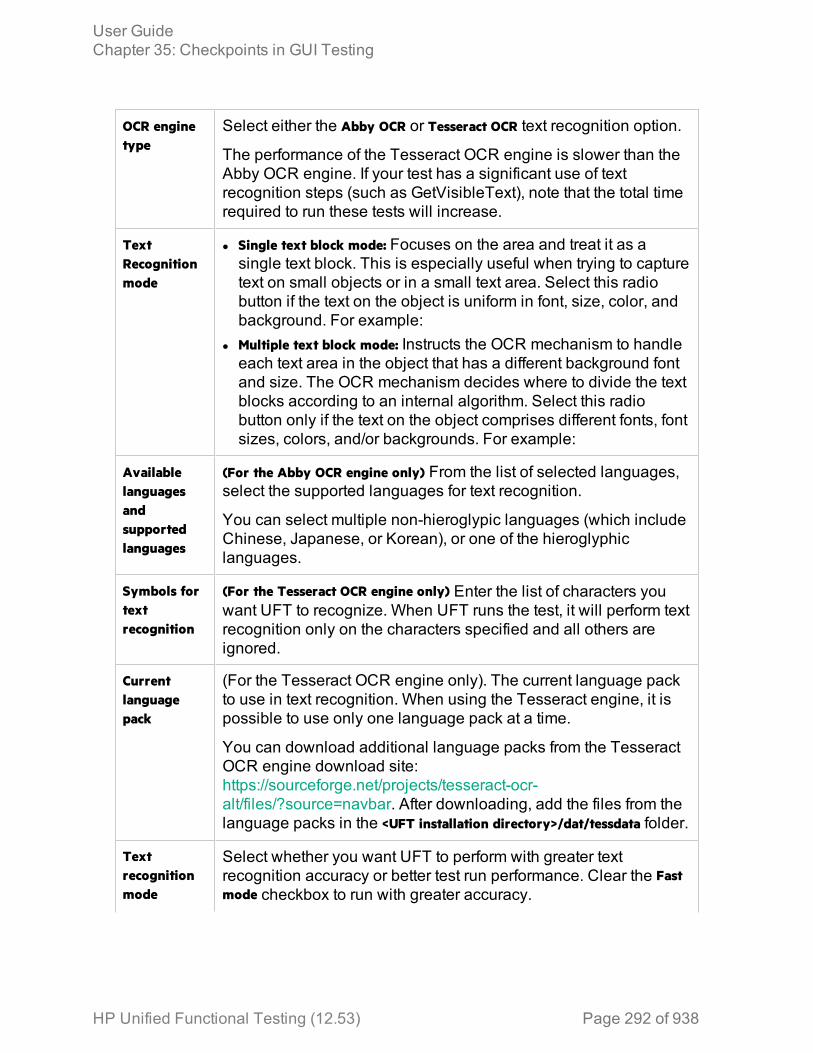
OCR enginetype
Select either the Abby OCR or Tesseract OCR text recognition option.
The performance of the Tesseract OCR engine is slower than theAbby OCR engine. If your test has a significant use of textrecognition steps (such as GetVisibleText), note that the total timerequired to run these tests will increase.
TextRecognitionmode
l Single text block mode: Focuses on the area and treat it as asingle text block. This is especially useful when trying to capturetext on small objects or in a small text area. Select this radiobutton if the text on the object is uniform in font, size, color, andbackground. For example:
l Multiple text block mode: Instructs the OCR mechanism to handleeach text area in the object that has a different background fontand size. The OCR mechanism decides where to divide the textblocks according to an internal algorithm. Select this radiobutton only if the text on the object comprises different fonts, fontsizes, colors, and/or backgrounds. For example:
Availablelanguagesandsupportedlanguages
(For the Abby OCR engine only) From the list of selected languages,select the supported languages for text recognition.
You can select multiple non-hieroglypic languages (which includeChinese, Japanese, or Korean), or one of the hieroglyphiclanguages.
Symbols fortextrecognition
(For the Tesseract OCR engine only) Enter the list of characters youwant UFT to recognize. When UFT runs the test, it will perform textrecognition only on the characters specified and all others areignored.
Currentlanguagepack
(For the Tesseract OCR engine only). The current language packto use in text recognition. When using the Tesseract engine, it ispossible to use only one language pack at a time.
You can download additional language packs from the TesseractOCR engine download site:https://sourceforge.net/projects/tesseract-ocr-alt/files/?source=navbar. After downloading, add the files from thelanguage packs in the <UFT installation directory>/dat/tessdata folder.
Textrecognitionmode
Select whether you want UFT to perform with greater textrecognition accuracy or better test run performance. Clear the Fastmode checkbox to run with greater accuracy.
User GuideChapter 35: Checkpoints in GUI Testing
HP Unified Functional Testing (12.53) Page 292 of 938
Useconfigurationfrom a file
Instructs UFT load text recognition configuration from an externallycreated file.
For details on creating a file, see http://www.sk-spell.sk.cx/tesseract-ocr-parameters-in-302-version.
Preprocessthe imagebefore usingtextrecognition
Instructs UFT to process the background image before performingtext recognition. This enables UFT to identify the image elementsbefore using text recognition.
Check the text recognition settings1. Create or open a test or component.2. Do any of the following:
l Insert a text checkpoint or output value step (tests and scripted componentsonly)
l Insert a step that uses one of the following test object methods:o testobject.GetVisibleTexto testobject.GetTextLocationo testobject.GetText (for Terminal Emulator objects)
l Insert a step that uses one of the following reserved object methods (testsand scripted components only):o TextUtil.GetTexto TextUtil.GetTextLocation
Adjust the settings as necessaryIf the captured text is not as expected, analyze the problems and adjust the TextRecognition options to fine tune the way UFT captures your text.
User GuideChapter 35: Checkpoints in GUI Testing
HP Unified Functional Testing (12.53) Page 293 of 938
Known Issues- Using CheckpointsRelevant for: GUI tests and components
Accessibilitycheckpoints
In ALM, you can view a comparison of accessibility checkpointsin the Asset Comparison Tool only if both UFT and the UFTAdd-in for ALM are installed on the ALM computer.
Bitmapcheckpoints
Bitmap checkpoints on objects containing text may fail if youcreate them using a Remote Desktop Connection and then runthem locally, or if you create them locally and then run thecheckpoint steps using a Remote Desktop Connection. In therun results, the image displayed when you click View Differencein the bitmap checkpoint results shows some text shapes.
Workaround: Enable the Font smoothing option in the RemoteDesktop Connection application.
Databasecheckpoints
l The format of captured values varies depending on thespecific system settings. For example, date and time valuesmay be set to different formats.Workaround: If you are running the test or scripted componenton a different system than the one you used to record the test,confirm that the systems use the same format settings.
l When you create a database checkpoint on one machine andtry to run it on different machine, you should have the sameODBC driver installed on both machines.
File contentcheckpoints
l File content checkpoints for htm/html files generateddynamically by third-party Javascript code are not supported.
l When creating File Content checkpoints, UFT gathersinformation from the application under test. This cansometimes take up to two minutes.
HP Unified Functional Testing (12.53) Page 294 of 938

XML checkpoints l When executing an XML checkpoint on an XML file thatcontains > as a value, an error message may occur.
l When you add a new value node to an XML node, in somecases the new value may not be displayed.Workaround: Close the Edit XML as Text dialog box andreopen it to display the new value node correctly.
l When inserting an XML file checkpoint on a file that cannotbe loaded, or a file that is formatted incorrectly, you mayreceive an error message.
l Creating and running XML checkpoints for large XMLdocuments may take a few minutes.
User GuideChapter 35: Checkpoints in GUI Testing
HP Unified Functional Testing (12.53) Page 295 of 938
Chapter 36: Developing Custom Comparers forBitmap CheckpointsRelevant for: GUI tests and components
This chapter is intended for COM programmers who want to customize thealgorithm used to compare bitmaps in bitmap checkpoints.
A custom comparer is a COM object that you develop to run the bitmap comparisonin a bitmap checkpoint according to a specific algorithm. This enables you to createbitmap checkpoints that perform the comparison according to your needs.
By default, a bitmap checkpoint in UFT compares the actual and expected bitmapspixel by pixel and fails if there are any differences. UFT provides various bitmapcheckpoint configuration options that enable you to refine the bitmap comparisonand make it more flexible. For example, you can define tolerance levels, or you caninstruct UFT not to compare complete images, but rather compare selected areaswithin them, or to locate a specific image within an object in your application.
If you need to further customize the way bitmaps are compared in checkpoints, youcan develop custom comparers and install and register them on the UFT computer.A UFT user can then choose to use a custom comparer to perform the comparisonin a bitmap checkpoint (on a per checkpoint basis).
The COM object that you develop must implement interfaces that UFT provides ina type library, and register to the component category that UFT defines for bitmapcomparers. The type library (BitmapComparer.tlb) and the category ID (defined inComponentCategory.h) are available in <UFT installationfolder>\dat\BitmapCPCustomization.
When a UFT user creates or edits a bitmap checkpoint, UFT displays anyregistered custom comparers in the advanced settings in the Bitmap CheckpointProperties dialog box (in addition to the UFT default comparer). The user can thenselect a comparer according to the testing requirements of the specific applicationor bitmap being tested. For more details about using custom comparers in UFT,see "Fine-tuning the bitmap comparison" on page 269.
You can find an example of a situation where developing a custom comparerenhanced the use of bitmap checkpoints, in "Custom comparer for images whoselocation changes - Use-case scenario" on the next page.
HP Unified Functional Testing (12.53) Page 296 of 938
Custom bitmap comparer developmentRelevant for: GUI tests and components
To develop a custom comparer, you create a COM object that implements the UFTbitmap checkpoint comparer interfaces to perform the following:
l Accept input from UFT and perform the bitmap comparison.l Provide comparison results to UFT.l (Optionally) Provide information that UFT can display in the advanced settings inthe Bitmap Checkpoint Properties dialog box when a user creates or edits abitmap checkpoint.
Custom comparers run within the UFT context. You must therefore exercise carewhen developing your custom comparer, as its behavior and performance willaffect the behavior and performance of UFT.
For UFT to recognize the custom comparer, it must be registered to the componentcategory that UFT defines for bitmap comparers. Depending on how youimplement your custom comparer, you can design the comparer to register itselfwhen it is installed, or you can provide an additional program that needs to be runat the time of installation. For details, see "Install your custom comparer andregister it to UFT" on page 303.
Perform the tutorial in "Develop a custom comparer - Tutorial" on page 309 to learnhow to create and use a custom comparer. You can then create your own customcomparers in much the same way. For task details, see "Develop a customcomparer" on page 299.
In addition to the tutorial, UFT provides source files that implement a samplecustom comparer in different languages. The source files are provided in C++ andin Visual Basic. Both projects generate a similar custom comparer.
You can study the samples to help you learn about developing custom comparersfor UFT bitmap checkpoints, or use them as a reference or template when youdevelop your own custom comparers. For details, see "Use the bitmap checkpointcustom comparer samples" on page 306.
Custom comparer for images whose location changes -Use-case scenarioRelevant for: GUI tests and components
Ben is a quality assurance engineer who is experienced in using UFT, and oftenuses bitmap checkpoints to test the appearance of different icons or pictures in theuser interface he is testing. He does not have a programming background.
User GuideChapter 36: Developing Custom Comparers for Bitmap Checkpoints
HP Unified Functional Testing (12.53) Page 297 of 938

Joanne is a software engineer who is experienced in image processing and isfamiliar with COM programming.
When Ben began testing the user interface of a furniture purchasing application, hecreated a bitmap checkpoint to test that the pictures of the items on sale weredisplayed properly. In the checkpoint, he captured an image of the pane in theapplication that contained the pictures he wanted to test. Ben found that the bitmapcheckpoint often failed, even though the graphic images displayed in theapplication during the run seemed identical to the ones he had captured whencreating the checkpoint.
Ben reviewed the actual, expected, and difference bitmaps displayed in the runresults. He also took a closer look at the application's user interface. Theapplication contained three panes. The left pane displayed general information, themiddle pane displayed the pictures of the items on sale, and the right panedisplayed the corresponding list of items and relevant details. Ben found thatdepending on the information displayed in the left pane, the images in the middlepane sometimes shifted slightly one way or the other within the pane. While theimages themselves were still identical, their changed location was causing thebitmap checkpoint to fail.
Ben did not want to use pixel tolerance to address this issue because he wantedthe checkpoint to fail when the pixels within the images themselves were notidentical.
When Ben mentioned his problem to a co-worker, she suggested that developing acustom comparer for his bitmap checkpoints could solve the problem, and referredhim to Joanne. Joanne developed a custom comparer that would accept as inputthe number of pixels that the images should be allowed to shift without failing thecheckpoint. The bitmap comparison that Joanne designed would pass thecheckpoint only if the images were identical and they had all shifted by the samenumber of pixels. This way, Ben knew that his checkpoint would still catch incorrectimages and cases where the application's interface looked bad because theimages were no longer aligned.
Ben installed and registered the custom comparer on his UFT computer, and thenselected the new custom comparer for his bitmap checkpoint. After someexperimenting, he found the optimal number of pixels to enter in the configurationstring, so that significant changes in the application's interface were detected, butinsignificant shifting of the images did not cause the checkpoint to fail.
After Ben successfully used this custom comparer for a while, his companydecided to install and register it on all of the UFT computers. The custom comparerwould now be available to everyone in the quality assurance team to use for similarsituations.
User GuideChapter 36: Developing Custom Comparers for Bitmap Checkpoints
HP Unified Functional Testing (12.53) Page 298 of 938
Develop a custom comparerRelevant for: GUI tests and components
Tip: To practice performing this task, see "Develop a custom comparer -Tutorial" on page 309.
Prerequisitesl Knowledge of image processingl Experience in developing COM objects
Develop the custom comparer COM object1. Create the custom comparer COM object. You can use any language and
development environment that supports creating COM objects.
Note: Depending on the language that you use for development, youmight be able to specify the custom comparer name when you create theCOM object. Otherwise the name can be specified on the UFT computerafter registering the object. For details, see "Set the Custom ComparerName - Optional" on page 305.
2. Program your COM object to implement the custom comparer interfaces. Fordetails, see "Implement the bitmap comparer Interfaces" on the next page.
Prepare the custom comparer installationYour custom comparer might need to be installed on more than one computer. Youcan create a program that automatically performs the steps necessary to install andregister the comparer and its documentation on those computers.
For details on the steps that such a program needs to perform, see "Install yourcustom comparer and register it to UFT" on page 303.
For example, when you design your custom comparer installation, you must ensurethat when it is installed on the UFT computer, it is also registered to the componentcategory for UFT bitmap comparers. This can be achieved in different ways, suchas:
l If you develop your custom comparer in C++ using Microsoft Visual Studio, youcan modify the DllRegisterServer and DllUnregisterServer methods to handle thisregistration. These methods are called when you run a .dll using the
User GuideChapter 36: Developing Custom Comparers for Bitmap Checkpoints
HP Unified Functional Testing (12.53) Page 299 of 938
regsvr32.exe program. You can see an example of this type of implementation in"Develop a custom comparer - Tutorial" on page 309.
l If you develop your custom comparer in an environment that does not enable youto modify the registration methods, you can add an additional program thathandles this registration and instruct users who install the custom comparer torun this program as well. You can see an example of this type of implementationin the Visual Basic sample custom comparer that UFT provides. For moredetails, see "Use the bitmap checkpoint custom comparer samples" on page306.
Install the custom comparerOn the computer where you want to use the custom comparer, do one of thefollowing:
l Run the installation program that automatically installs and registers thecomparer.
l Manually install and register the custom comparer. For details, see "Install yourcustom comparer and register it to UFT" on page 303.
Test the custom comparerCreate bitmap checkpoint steps in a test or component in UFT. In the BitmapCheckpoint Properties dialog box, click Advanced settings, select your customcomparer, and use it to perform bitmap checkpoints and check that they performcorrectly.
Tip: By default, UFT displays expected, actual, and difference bitmaps in therun results only for checkpoints that fail. When you test your customcomparer on UFT, you might want to see the expected, actual, anddifference bitmaps in the run results even for bitmap checkpoints that pass.To configure this, select Tools > Options > GUI Testing tab > Screen Capture nodein UFT and set the Save still image captures to results option to Always.
Implement the bitmap comparer InterfacesRelevant for: GUI tests and components
This task describes how to implement the bitmap comparer interfaces so that yourcustom comparer COM object performs the following:
l Accepts bitmaps and compares theml Provides comparison results to UFT
User GuideChapter 36: Developing Custom Comparers for Bitmap Checkpoints
HP Unified Functional Testing (12.53) Page 300 of 938
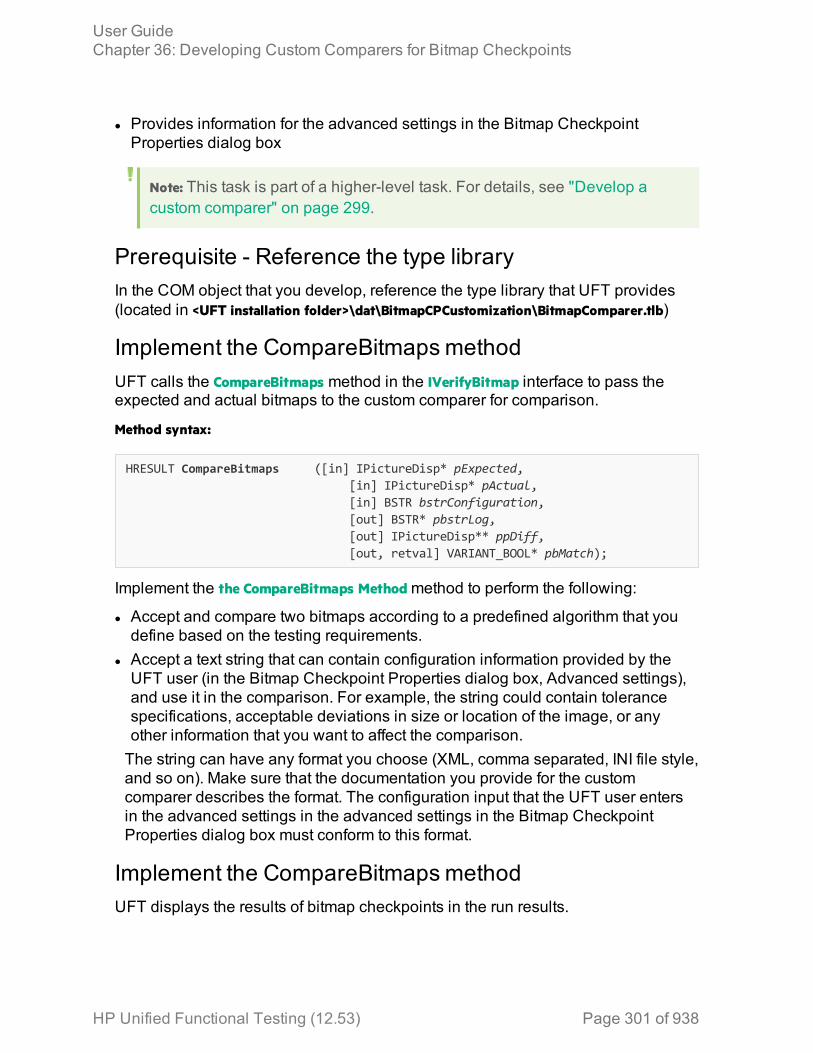
l Provides information for the advanced settings in the Bitmap CheckpointProperties dialog box
Note: This task is part of a higher-level task. For details, see "Develop acustom comparer" on page 299.
Prerequisite - Reference the type libraryIn the COM object that you develop, reference the type library that UFT provides(located in <UFT installation folder>\dat\BitmapCPCustomization\BitmapComparer.tlb)
Implement the CompareBitmapsmethodUFT calls the CompareBitmaps method in the IVerifyBitmap interface to pass theexpected and actual bitmaps to the custom comparer for comparison.
Method syntax:
HRESULT CompareBitmaps ([in] IPictureDisp* pExpected,[in] IPictureDisp* pActual,[in] BSTR bstrConfiguration,[out] BSTR* pbstrLog,[out] IPictureDisp** ppDiff,[out, retval] VARIANT_BOOL* pbMatch);
Implement the the CompareBitmaps Method method to perform the following:
l Accept and compare two bitmaps according to a predefined algorithm that youdefine based on the testing requirements.
l Accept a text string that can contain configuration information provided by theUFT user (in the Bitmap Checkpoint Properties dialog box, Advanced settings),and use it in the comparison. For example, the string could contain tolerancespecifications, acceptable deviations in size or location of the image, or anyother information that you want to affect the comparison.The string can have any format you choose (XML, comma separated, INI file style,and so on). Make sure that the documentation you provide for the customcomparer describes the format. The configuration input that the UFT user entersin the advanced settings in the advanced settings in the Bitmap CheckpointProperties dialog box must conform to this format.
Implement the CompareBitmapsmethodUFT displays the results of bitmap checkpoints in the run results.
User GuideChapter 36: Developing Custom Comparers for Bitmap Checkpoints
HP Unified Functional Testing (12.53) Page 301 of 938
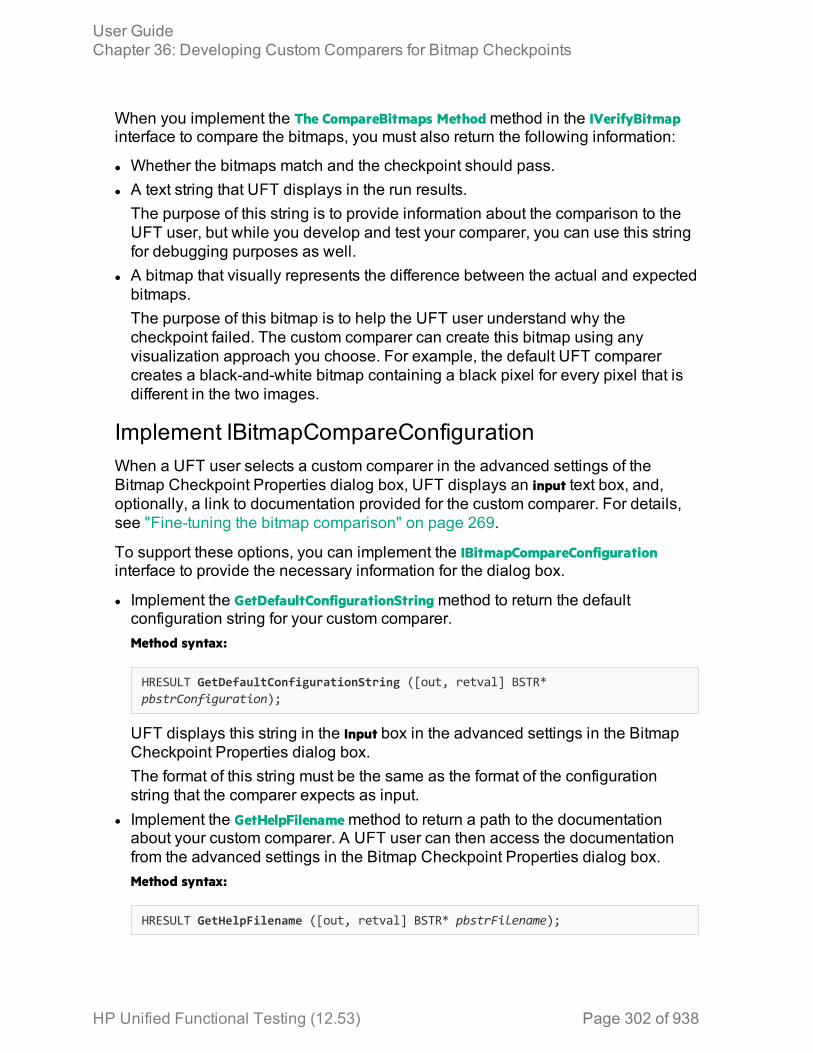
When you implement the The CompareBitmaps Method method in the IVerifyBitmapinterface to compare the bitmaps, you must also return the following information:
l Whether the bitmaps match and the checkpoint should pass.l A text string that UFT displays in the run results.The purpose of this string is to provide information about the comparison to theUFT user, but while you develop and test your comparer, you can use this stringfor debugging purposes as well.
l A bitmap that visually represents the difference between the actual and expectedbitmaps.The purpose of this bitmap is to help the UFT user understand why thecheckpoint failed. The custom comparer can create this bitmap using anyvisualization approach you choose. For example, the default UFT comparercreates a black-and-white bitmap containing a black pixel for every pixel that isdifferent in the two images.
Implement IBitmapCompareConfigurationWhen a UFT user selects a custom comparer in the advanced settings of theBitmap Checkpoint Properties dialog box, UFT displays an input text box, and,optionally, a link to documentation provided for the custom comparer. For details,see "Fine-tuning the bitmap comparison" on page 269.
To support these options, you can implement the IBitmapCompareConfigurationinterface to provide the necessary information for the dialog box.
l Implement the GetDefaultConfigurationString method to return the defaultconfiguration string for your custom comparer.Method syntax:
HRESULT GetDefaultConfigurationString ([out, retval] BSTR*pbstrConfiguration);
UFT displays this string in the Input box in the advanced settings in the BitmapCheckpoint Properties dialog box.The format of this string must be the same as the format of the configurationstring that the comparer expects as input.
l Implement the GetHelpFilename method to return a path to the documentationabout your custom comparer. A UFT user can then access the documentationfrom the advanced settings in the Bitmap Checkpoint Properties dialog box.Method syntax:
HRESULT GetHelpFilename ([out, retval] BSTR* pbstrFilename);
User GuideChapter 36: Developing Custom Comparers for Bitmap Checkpoints
HP Unified Functional Testing (12.53) Page 302 of 938
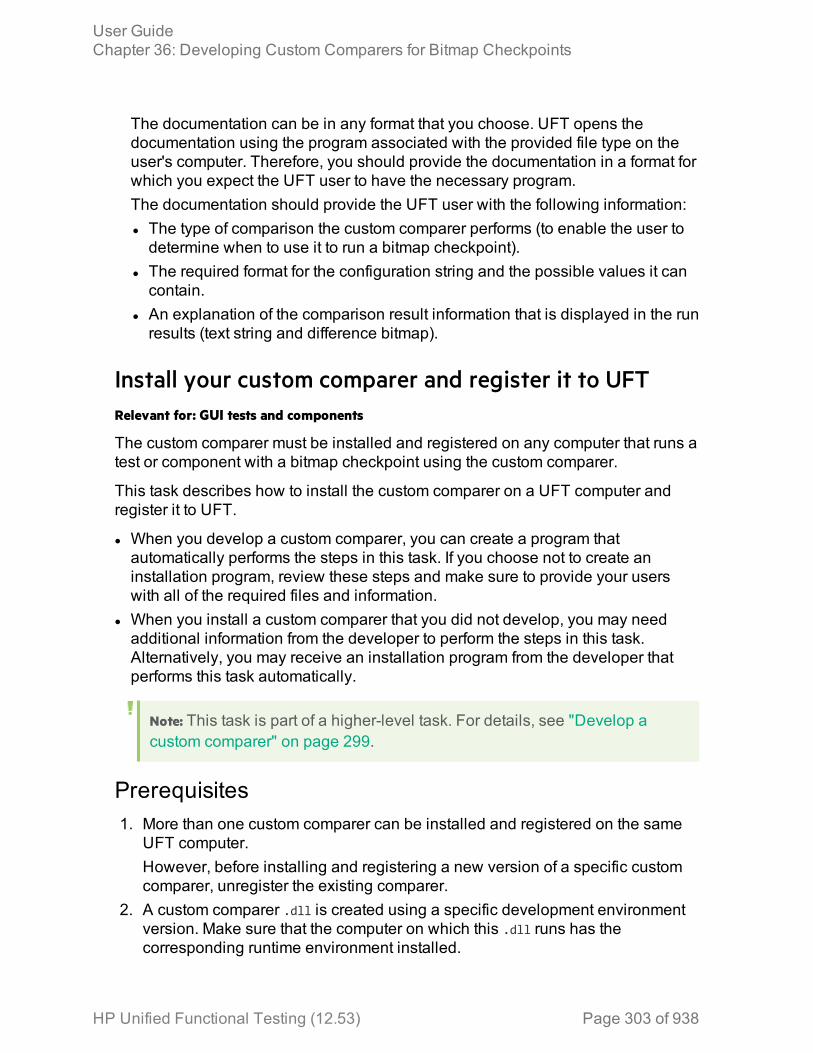
The documentation can be in any format that you choose. UFT opens thedocumentation using the program associated with the provided file type on theuser's computer. Therefore, you should provide the documentation in a format forwhich you expect the UFT user to have the necessary program.The documentation should provide the UFT user with the following information:l The type of comparison the custom comparer performs (to enable the user todetermine when to use it to run a bitmap checkpoint).
l The required format for the configuration string and the possible values it cancontain.
l An explanation of the comparison result information that is displayed in the runresults (text string and difference bitmap).
Install your custom comparer and register it to UFTRelevant for: GUI tests and components
The custom comparer must be installed and registered on any computer that runs atest or component with a bitmap checkpoint using the custom comparer.
This task describes how to install the custom comparer on a UFT computer andregister it to UFT.
l When you develop a custom comparer, you can create a program thatautomatically performs the steps in this task. If you choose not to create aninstallation program, review these steps and make sure to provide your userswith all of the required files and information.
l When you install a custom comparer that you did not develop, you may needadditional information from the developer to perform the steps in this task.Alternatively, you may receive an installation program from the developer thatperforms this task automatically.
Note: This task is part of a higher-level task. For details, see "Develop acustom comparer" on page 299.
Prerequisites1. More than one custom comparer can be installed and registered on the same
UFT computer.However, before installing and registering a new version of a specific customcomparer, unregister the existing comparer.
2. A custom comparer .dll is created using a specific development environmentversion. Make sure that the computer on which this .dll runs has thecorresponding runtime environment installed.
User GuideChapter 36: Developing Custom Comparers for Bitmap Checkpoints
HP Unified Functional Testing (12.53) Page 303 of 938
Install the custom comparer COM object on the UFTcomputerFor example, you can do this by double-clicking the .dll or running the .dll usingthe regsvr32.exe program.
Register the custom comparer to the component category for UFT bitmap comparers
Register the component category ID for UFT bitmap comparers, CATID_QTPBitmapComparers, as a registry key under the COM object's HKEY_CLASSES_ROOT\CLSID\<Object's CLSID>\Implemented Categories key.
Note: When UFT is installed, it adds this component category ID as a registrykey under the HKEY_CLASSES_ROOT\Component Categories key. The componentcategory ID is defined in <UFT installation folder>\dat\BitmapCPCustomization\ComponentCategory.h.
Place the custom comparer documentation in the correctlocationThe Bitmap Checkpoint Properties dialog box in UFT can display documentationabout the custom comparer, if such documentation is provided.
Place the custom comparer documentation in the location specified in the customcomparer object's GetHelpFilename method.
User GuideChapter 36: Developing Custom Comparers for Bitmap Checkpoints
HP Unified Functional Testing (12.53) Page 304 of 938
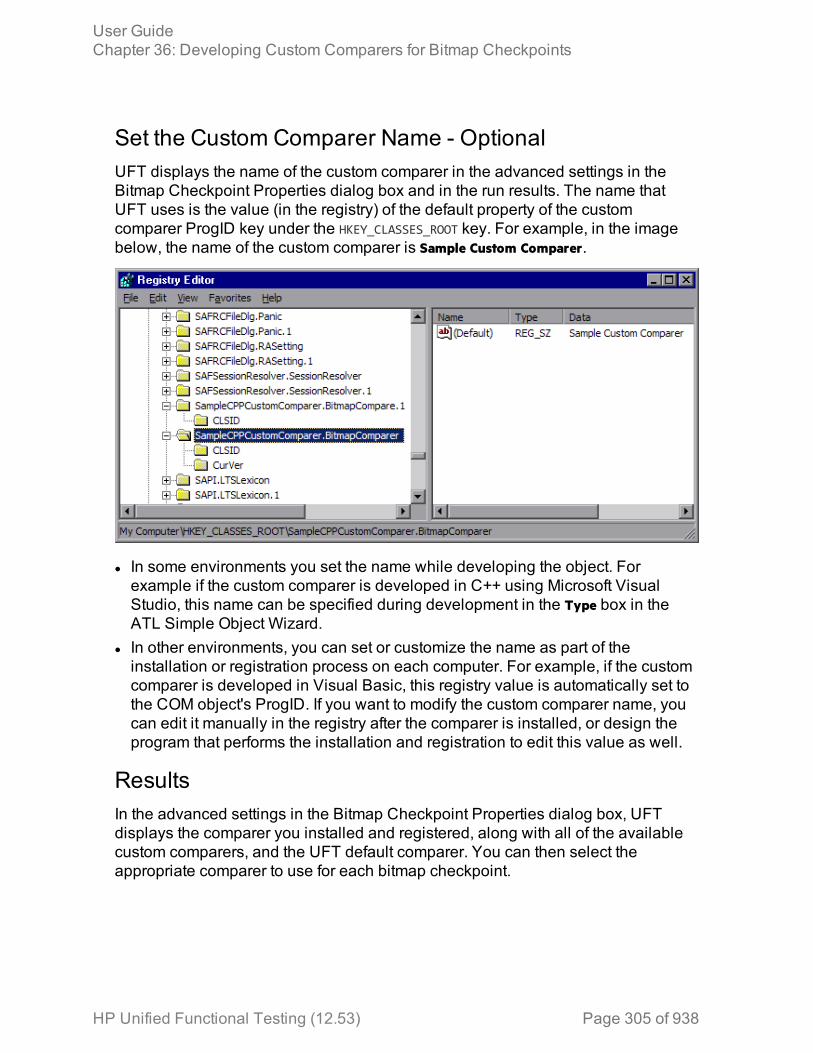
Set the Custom Comparer Name - OptionalUFT displays the name of the custom comparer in the advanced settings in theBitmap Checkpoint Properties dialog box and in the run results. The name thatUFT uses is the value (in the registry) of the default property of the customcomparer ProgID key under the HKEY_CLASSES_ROOT key. For example, in the imagebelow, the name of the custom comparer is Sample Custom Comparer.
l In some environments you set the name while developing the object. Forexample if the custom comparer is developed in C++ using Microsoft VisualStudio, this name can be specified during development in the Type box in theATL Simple Object Wizard.
l In other environments, you can set or customize the name as part of theinstallation or registration process on each computer. For example, if the customcomparer is developed in Visual Basic, this registry value is automatically set tothe COM object's ProgID. If you want to modify the custom comparer name, youcan edit it manually in the registry after the comparer is installed, or design theprogram that performs the installation and registration to edit this value as well.
ResultsIn the advanced settings in the Bitmap Checkpoint Properties dialog box, UFTdisplays the comparer you installed and registered, along with all of the availablecustom comparers, and the UFT default comparer. You can then select theappropriate comparer to use for each bitmap checkpoint.
User GuideChapter 36: Developing Custom Comparers for Bitmap Checkpoints
HP Unified Functional Testing (12.53) Page 305 of 938

Use the bitmap checkpoint custom comparer samplesRelevant for: GUI tests and components
This task describes how to generate the sample custom comparer, and thenregister it and work with it.
1. PrerequisitesDecide whether you want to use the sample C++ project or the Visual Basicone.The samples are located under <UFT installation folder>\samples\BitmapCPSample.
2. Generate the sample comparera. To open the sample project, do one of the following:
o To open the C++ project, use Microsoft Visual Studio 2005 or later.o To open the Visual Basic project, use Microsoft Visual Studio 6.0.
b. Compile the custom comparer, to build the .dll.
Note: If you are using Microsoft Visual Studio 2010 to compile the C++project, make the following modification before compiling: Open thestdafx.h file in<UFT installation folder>\samples\BitmapCPSample\CPPCustomComparer,locate the line #define _WIN32_WINNT 0x0400 and change it to #define _WIN32_WINNT 0x0501.
3. Install the custom comparer on a UFT computerRun the custom comparer using the regsvr32.exe program to install it on thecomputer.
User GuideChapter 36: Developing Custom Comparers for Bitmap Checkpoints
HP Unified Functional Testing (12.53) Page 306 of 938
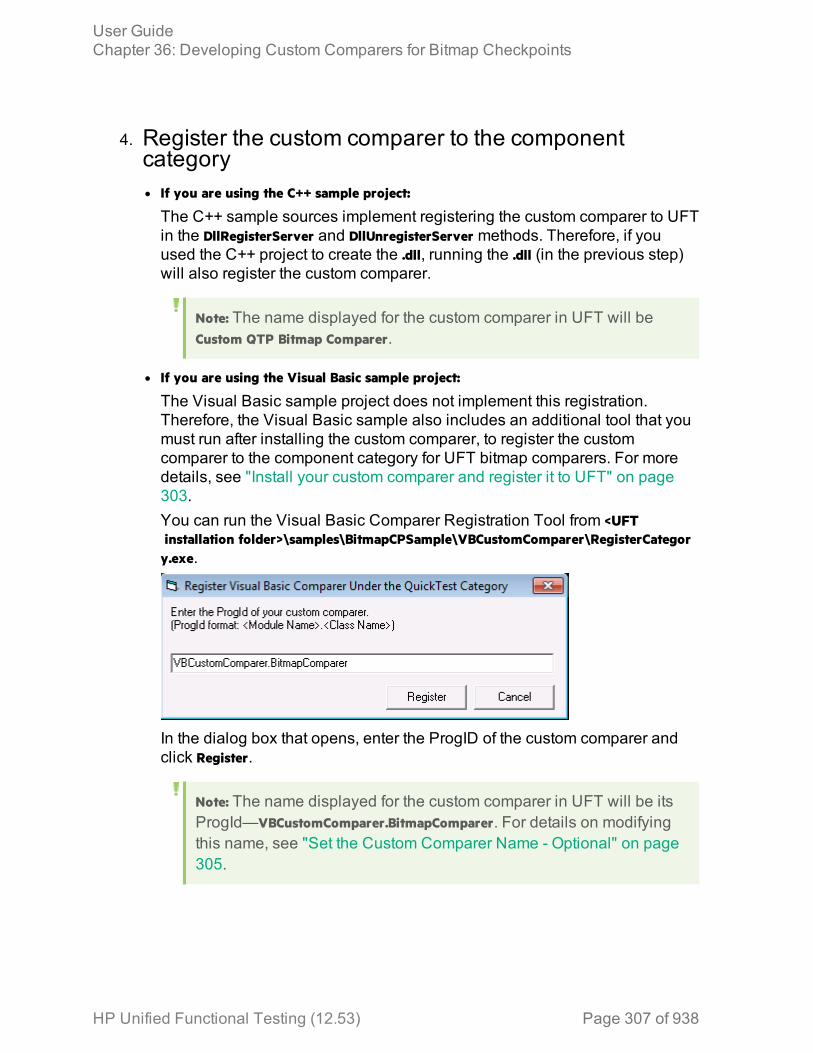
4. Register the custom comparer to the componentcategoryl If you are using the C++ sample project:
The C++ sample sources implement registering the custom comparer to UFTin the DllRegisterServer and DllUnregisterServer methods. Therefore, if youused the C++ project to create the .dll, running the .dll (in the previous step)will also register the custom comparer.
Note: The name displayed for the custom comparer in UFT will beCustom QTP Bitmap Comparer.
l If you are using the Visual Basic sample project:
The Visual Basic sample project does not implement this registration.Therefore, the Visual Basic sample also includes an additional tool that youmust run after installing the custom comparer, to register the customcomparer to the component category for UFT bitmap comparers. For moredetails, see "Install your custom comparer and register it to UFT" on page303.You can run the Visual Basic Comparer Registration Tool from <UFT installation folder>\samples\BitmapCPSample\VBCustomComparer\RegisterCategory.exe.
In the dialog box that opens, enter the ProgID of the custom comparer andclick Register.
Note: The name displayed for the custom comparer in UFT will be itsProgId—VBCustomComparer.BitmapComparer. For details on modifyingthis name, see "Set the Custom Comparer Name - Optional" on page305.
User GuideChapter 36: Developing Custom Comparers for Bitmap Checkpoints
HP Unified Functional Testing (12.53) Page 307 of 938

5. Study the custom comparer functionalityCreate bitmap checkpoint steps in a test or component in UFT. In the advancedsettings in the Bitmap Checkpoint Properties dialog box, you can select thesample custom comparer and use it to perform bitmap checkpoints.a. Note the customized information that is displayed in the dialog box when
you select the custom comparer.o The default configuration string that the sample comparer returns (andUFT displays in the Bitmap Checkpoint Properties dialog box) isMaxSurfAreaDiff=140000.
o The documentation provided with this sample comparer (and openedfrom the Bitmap Checkpoint Properties dialog box) is theSampleComparerDetails.txt text file located in <UFT installationfolder>\samples\BitmapCPSample\CPPCustomComparer.
b. Run bitmap checkpoints to test the behavior of the sample comparer. Forexample, you can run checkpoints on the Windows Calculator application,alternately setting the Calculator view to Standard or Scientific, to obtaindifferent size bitmaps for the same object.The sample custom comparer does not compare the content of the actualand expected bitmaps. It compares the total number of pixels they contain.For configuration input, this comparer expects a string that defines theMaxSurfAreaDiff parameter. The comparer fails the checkpoint if thedifference in total number of pixels is greater than the number defined forMaxSurfAreaDiff.
c. View the results of your checkpoint in the run results.This sample bitmap custom comparer returns the actual bitmap as thedifference bitmap. In addition, it provides a text string that specifies thedifference in total number of pixels. UFT displays this string in the runresults.
User GuideChapter 36: Developing Custom Comparers for Bitmap Checkpoints
HP Unified Functional Testing (12.53) Page 308 of 938
Develop a custom comparer - TutorialRelevant for: GUI tests and components
This tutorial walks you step-by-step through the process of creating a customcomparer in C++ using Microsoft Visual Studio. The custom comparer you create issimilar to the sample custom comparer provided with UFT. You can create yourown custom comparers in a similar way. For details about the sample customcomparer, see "Use the bitmap checkpoint custom comparer samples" on page306.
Note: For a task related to this tutorial, see "Develop a custom comparer" onpage 299.
By following the instructions in this section, you create a COM object that:
l Implements the CompareBitmaps method to receive two bitmaps to compare and aconfiguration string, compare the (size of) the two bitmaps, and return thenecessary results.
l Implements the GetDefaultConfigurationString method and the GetHelpFilenamemethod, to return the information that UFT displays in the advanced settings inthe Bitmap Checkpoint Properties dialog box.
l Registers to the component category for UFT bitmap comparers.When the design of your custom comparer is complete, you can install and registerit and use it in UFT to run a bitmap checkpoint.
Note: Depending on the version of Microsoft Visual Studio that you use toperform the tutorial, the command names may be different.
Create a new ATL project—SampleCPPCustomComparer1. In Microsoft Visual Studio, select New > Project. The New Project dialog box
opens.2. Select the ATL Project template, enter SampleCPPCustomComparer in the Name box
for the project, and click OK. The New ATL Project wizard opens.3. In Application Settings, make sure that the Attributed option is not selected, and
click Finish.
User GuideChapter 36: Developing Custom Comparers for Bitmap Checkpoints
HP Unified Functional Testing (12.53) Page 309 of 938
Create a new class—CBitmapComparer1. In the class view, select the SampleCPPCustomComparer project, right-click, and
select Add > Class. The Add Class dialog box opens.2. Select ATL Simple Object and click Add. The ATL Simple Object Wizard opens.3. In the Short name box, enter BitmapComparer. The wizard uses this name to create
the names of the class, the interface, and the files that it creates.4. In the Type box, enter Sample Custom Comparer. This is the custom comparer name
that UFT will display in the advanced settings in the Bitmap CheckpointProperties dialog box and in the run results. For details, see "Set the CustomComparer Name - Optional" on page 305.
5. Click Finish. The wizard creates the necessary files for the class that youadded, including .cpp and .h files with implementation of CBitmapComparer class.
Implement the comparer interfaces for the CBitmapComparer class1. In the class view, select CBitmapComparer, right-click, and select Add > Implement
Interface. The Implement Interface wizard opens.2. In the Implement interface from option, select File. Browse to or enter the location
of the UFT bitmap checkpoint comparer type library. The type library is locatedin: <UFT installation folder>\dat\BitmapCPCustomization\BitmapComparer.tlb.The wizard displays the interfaces available in the selected type library,IBitmapCompareConfiguration and IVerifyBitmap.
3. Add both interfaces to the list of interfaces to implement, and click Finish.In the BitmapComparer.h file, the wizard adds the declarations, classes, andmethod stubs that are necessary to implement the interfaces. In subsequentsteps you will need to add implementation to these method stubs.
Note: In Microsoft Visual Studio 2005, the wizard generates the signaturefor the CompareBitmaps method in the IVerifyBitmap interface incorrectly.To enable your project to compile correctly, manually change the type ofthe last argument (pbMatch) from BOOL* to VARIANT_BOOL*.
User GuideChapter 36: Developing Custom Comparers for Bitmap Checkpoints
HP Unified Functional Testing (12.53) Page 310 of 938
Move the function bodies for the comparer interfacemethods1. Open the BitmapComparer.h and BitmapComparer.cpp files.2. In BitmapComparer.h, create declarations for the bitmap checkpoint comparer
interface methods (based on the function bodies that the wizard created):CompareBitmaps, GetDefaultConfigurationString, and GetHelpFilename.
3. Move the function bodies that the wizard created for the bitmap checkpointcomparer interface methods from the BitmapComparer.h file to theBitmapComparer.cpp file.At the end of this step, BitmapComparer.cpp and BitmapComparer.h should containthe following code:
// BitmapComparer.cpp : Implementation of CBitmapComparer#include "stdafx.h"#include "BitmapComparer.h"// CBitmapComparer// IBitmapCompareConfiguration MethodsSTDMETHODIMP CBitmapComparer::GetDefaultConfigurationString
(BSTR * pbstrConfiguration){
return E_NOTIMPL;}STDMETHODIMP CBitmapComparer::GetHelpFilename(BSTR * pbstrFilename){
return E_NOTIMPL;}// IVerifyBitmap MethodsSTDMETHODIMP CBitmapComparer::CompareBitmaps
(IPictureDisp * pExpected, IPictureDisp * pActual, BSTR bstrConfiguration, BSTR * pbstrLog, IPictureDisp * * ppDiff, VARIANT_BOOL * pbMatch){
return E_NOTIMPL;}
// BitmapComparer.h : Declaration of the CBitmapComparer#pragma once#include "resource.h" // main symbols#include "SampleCPPCustomComparer.h"// CBitmapComparerclass ATL_NO_VTABLE CBitmapComparer : public CComObjectRootEx<CComSingleThreadModel>, public CComCoClass<CBitmapComparer, &CLSID_BitmapComparer>, public IDispatchImpl<IBitmapComparer, &IID_IBitmapComparer,
User GuideChapter 36: Developing Custom Comparers for Bitmap Checkpoints
HP Unified Functional Testing (12.53) Page 311 of 938
&LIBID_SampleCustomComparerLib, /*wMajor =*/ 1, /*wMinor=*/ 0>, public IDispatchImpl<IBitmapCompareConfiguration, &__uuidof(IBitmapCompareConfiguration), &LIBID_BitmapComparerLib, /* wMajor = */ 1, /*wMinor =*/0>, public IDispatchImpl<IVerifyBitmap, &__uuidof(IVerifyBitmap), &LIBID_BitmapComparerLib, /* wMajor = */ 1, /*wMinor =*/0>{ public: CBitmapComparer()
{ } DECLARE_REGISTRY_RESOURCEID(IDR_BITMAPCOMPARER) BEGIN_COM_MAP(CBitmapComparer) COM_INTERFACE_ENTRY(IBitmapComparer) COM_INTERFACE_ENTRY2(IDispatch, IBitmapCompareConfiguration) COM_INTERFACE_ENTRY(IBitmapCompareConfiguration) COM_INTERFACE_ENTRY(IVerifyBitmap) END_COM_MAP() DECLARE_PROTECT_FINAL_CONSTRUCT() HRESULT FinalConstruct()
{ return S_OK; } void FinalRelease() {} // IBitmapCompareConfiguration Methodspublic: STDMETHOD(GetDefaultConfigurationString)(BSTR * pbstrConfiguration); STDMETHOD(GetHelpFilename)(BSTR * pbstrFilename); // IVerifyBitmap Methodspublic: STDMETHOD(CompareBitmaps)(IPictureDisp * pExpected,
IPictureDisp * pActual, BSTR bstrConfiguration, BSTR *pbstrLog, IPictureDisp * * ppDiff, VARIANT_BOOL * pbMatch);};OBJECT_ENTRY_AUTO(__uuidof(BitmapComparer), CBitmapComparer)
Implement the bitmap checkpoint comparer interfacemethodsIn this tutorial, you implement a custom comparer similar to the sample customcomparer provided with UFT. For details about the sample custom comparer, see"Use the bitmap checkpoint custom comparer samples" on page 306.
User GuideChapter 36: Developing Custom Comparers for Bitmap Checkpoints
HP Unified Functional Testing (12.53) Page 312 of 938
When you create your own custom comparers, this is the step during which youdesign the custom comparer logic. You define the configuration input that it canreceive, the algorithm that it uses to compare the bitmaps, and the output that itprovides.
In the BitmapComparer.cpp file, add #include <atlstr.h>, and implement the bitmapcheckpoint comparer interface methods as follows:
l The GetDefaultConfigurationString method:
STDMETHODIMP CBitmapComparer::GetDefaultConfigurationString(BSTR * pbstrConfiguration)
{ CComBSTR bsConfig("MaxSurfAreaDiff=140000"); *pbstrConfiguration = bsConfig.Detach(); return S_OK;}
l The GetHelpFilename method:
STDMETHODIMP CBitmapComparer::GetHelpFilename(BSTR * pbstrFilename)
{ CComBSTR bsFilename ("..\\samples\\BitmapCPSample\\
CPPCustomComparer\\SampleComparerDetails.txt"); *pbstrFilename = bsFilename.Detach(); return S_OK;}
Note: When the GetHelpFilenamemethod returns a relative path, UFTsearches for this path relative to <UFT installation folder>\bin. Theimplementation above instructs UFT to use the documentation fileprovided with the CPP sample custom comparer.
l The CompareBitmaps method:
STDMETHODIMP CBitmapComparer::CompareBitmaps(IPictureDisp * pExpected, IPictureDisp *
pActual, BSTR bstrConfiguration, BSTR * pbstrLog, IPictureDisp * * ppDiff, VARIANT_BOOL *pbMatch){ HRESULT hr = S_OK; if (!pExpected || !pActual)
User GuideChapter 36: Developing Custom Comparers for Bitmap Checkpoints
HP Unified Functional Testing (12.53) Page 313 of 938
return S_FALSE; CComQIPtr<IPicture> picExp(pExpected); CComQIPtr<IPicture> picAct(pActual); // Try to get HBITMAP from IPicture HBITMAP HbmpExp, HbmpAct; hr = picExp->get_Handle((OLE_HANDLE*)&HbmpExp); if (FAILED(hr)) return hr; hr = picAct->get_Handle((OLE_HANDLE*)&HbmpAct); if (FAILED(hr)) return hr; BITMAP ExpBmp = {0}; if( !GetObject(HbmpExp, sizeof(ExpBmp), &ExpBmp) ) return E_FAIL; BITMAP ActBmp = {0}; if( !GetObject(HbmpAct, sizeof(ActBmp), &ActBmp) ) return E_FAIL; CString s, tol; tol = bstrConfiguration; int EPos = tol.ReverseFind('=); tol = tol.Right(tol.GetLength() - EPos - 1); int maxSurfaceAreaDiff = _ttoi(tol); // Set output parameters CComPtr<IPictureDisp> Diff(pActual); *ppDiff = Diff; int DiffPixelsNumber = abs (ExpBmp.bmHeight * ExpBmp.bmWidth -ActBmp.bmHeight * ActBmp.bmWidth); *pbMatch = DiffPixelsNumber <= maxSurfaceAreaDiff; s.Format(_T("The number of different pixels is: %d."),DiffPixelsNumber); CComBSTR bs (s); *pbstrLog = bs.Detach(); return hr;}
Design your custom comparer to register to thecomponent categoryFor UFT to recognize the COM object that you create as a custom comparer, youmust register it to the component category for UFT bitmap comparers. Thecomponent category ID is defined in <UFT installationfolder>\dat\BitmapCPCustomization\ComponentCategory.h.
You can implement this registration in the DllRegisterServer and DllUnregisterServermethods in the SampleCPPCustomComparer.cpp file that the wizard created as part of
User GuideChapter 36: Developing Custom Comparers for Bitmap Checkpoints
HP Unified Functional Testing (12.53) Page 314 of 938
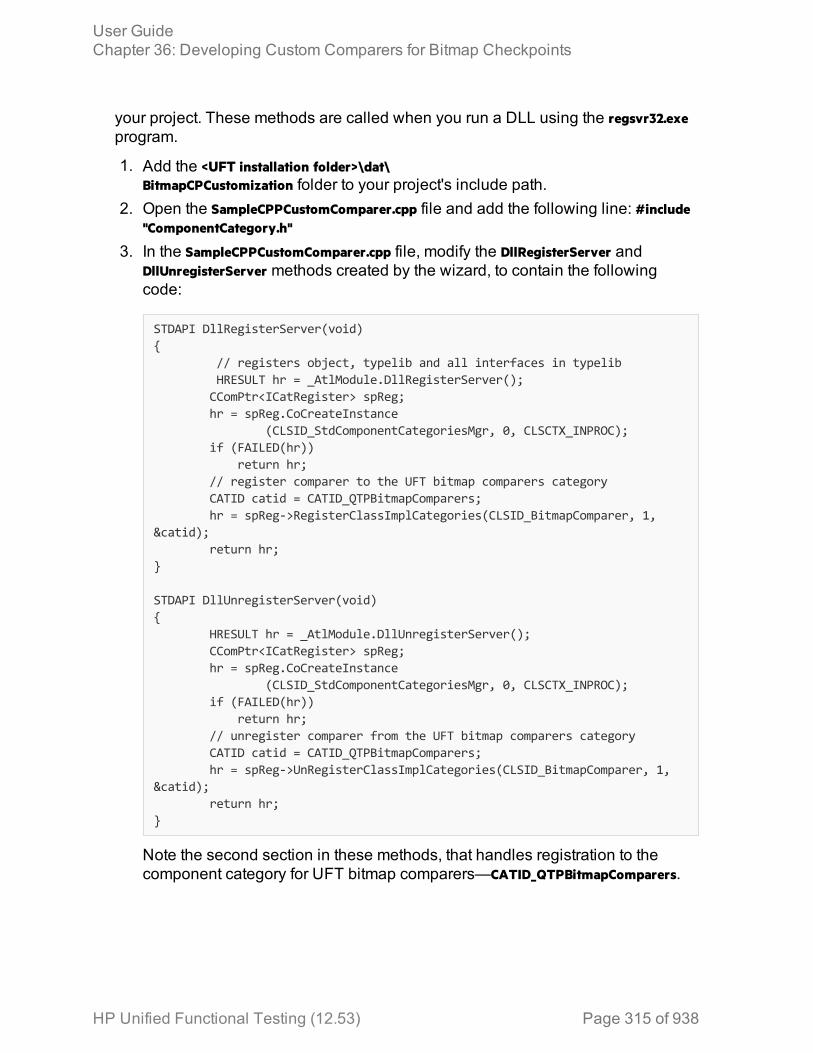
your project. These methods are called when you run a DLL using the regsvr32.exeprogram.
1. Add the <UFT installation folder>\dat\BitmapCPCustomization folder to your project's include path.
2. Open the SampleCPPCustomComparer.cpp file and add the following line: #include"ComponentCategory.h"
3. In the SampleCPPCustomComparer.cpp file, modify the DllRegisterServer andDllUnregisterServer methods created by the wizard, to contain the followingcode:
STDAPI DllRegisterServer(void){
// registers object, typelib and all interfaces in typelibHRESULT hr = _AtlModule.DllRegisterServer();
CComPtr<ICatRegister> spReg; hr = spReg.CoCreateInstance
(CLSID_StdComponentCategoriesMgr, 0, CLSCTX_INPROC); if (FAILED(hr)) return hr; // register comparer to the UFT bitmap comparers category CATID catid = CATID_QTPBitmapComparers; hr = spReg->RegisterClassImplCategories(CLSID_BitmapComparer, 1,&catid); return hr;}
STDAPI DllUnregisterServer(void){ HRESULT hr = _AtlModule.DllUnregisterServer(); CComPtr<ICatRegister> spReg; hr = spReg.CoCreateInstance
(CLSID_StdComponentCategoriesMgr, 0, CLSCTX_INPROC); if (FAILED(hr)) return hr; // unregister comparer from the UFT bitmap comparers category CATID catid = CATID_QTPBitmapComparers; hr = spReg->UnRegisterClassImplCategories(CLSID_BitmapComparer, 1,&catid); return hr;}
Note the second section in these methods, that handles registration to thecomponent category for UFT bitmap comparers—CATID_QTPBitmapComparers.
User GuideChapter 36: Developing Custom Comparers for Bitmap Checkpoints
HP Unified Functional Testing (12.53) Page 315 of 938

Compile and run your DLLUse regsvr32.exe to register your DLL after it is compiled.Your custom comparer cannow be used in UFT for bitmap checkpoints.
Test your custom comparer1. Open UFT and create a bitmap checkpoint on the Windows Calculator
application (Standard view).The advanced settings in the Bitmap Checkpoint Properties dialog box includethe Comparer option, in which you can select the default UFT comparer or yoursample custom comparer.
2. Change the Calculator view to Scientific. The size of the calculator object is nowlarger. Run the checkpoint using the default UFT comparer. The checkpointfails.
3. Edit the checkpoint in the Bitmap Checkpoint Properties dialog box:l Make sure the Compare selection with runtime bitmap checkpoint mode isselected.
l Click Advanced settings to open the Advanced Settings dialog box, and selectSample Custom Comparer in the Comparer Type box.
In the Input box, you can see the default configuration string returned by theGetDefaultConfigurationString method: MaxSurfAreaDiff=140000
In the Input box, you can see the default configuration string returned by theGetDefaultConfigurationString method: MaxSurfAreaDiff=140000
User GuideChapter 36: Developing Custom Comparers for Bitmap Checkpoints
HP Unified Functional Testing (12.53) Page 316 of 938
If you click Details, the text file containing documentation for the samplecustom comparer opens.
The comparer you designed in this exercise checks how different the expectedand actual bitmaps are in size, and fails the checkpoint if the difference isgreater than the number of pixels defined in the configuration string.If you run the checkpoint using default MaxSurfAreaDiff value, the checkpointpasses, because the difference in the total size of the calculator object when itis set to different views is less than 140000 pixels (the difference isapproximately 80000 pixels). If you set MaxSurfAreaDiff to 70000, the checkpointfails.View the run results to see the text string and difference bitmap that yourcustom comparer provides to UFT after the comparison.
Bitmap checkpoint comparer InterfacesRelevant for: GUI tests and components
Your custom comparer must implement the interfaces described in this section.UFT calls these interfaces' methods when creating or running a bitmap checkpointthat uses your custom comparer.
The comparer includes the following interfaces:
User GuideChapter 36: Developing Custom Comparers for Bitmap Checkpoints
HP Unified Functional Testing (12.53) Page 317 of 938
IVerifyBitmapInterface
This interface contains the CompareBitmapsmethod that youneed to implement to perform the bitmap comparison forthe checkpoint.
The CompareBitmaps method receives the actual andexpected bitmaps that need to be compared for the bitmapcheckpoint, and a string that can contain configurationinput for the custom comparer.
The method must compare the bitmaps according to thecomparison algorithm for which this custom comparer isdesigned, and return the results to UFT.
The results include:
l An indication whether the bitmaps match and thecheckpoint should pass.
l A text string that contains information about the results ofthe bitmap comparison.
l A bitmap that reflects the differences between the actualand expected bitmaps.
UFT displays the results that this method returns in the runresults. For details, see the section on "Using RunResults" on page 716.
Method syntax:
HRESULT CompareBitmaps ([in] IPictureDisp* pExpected,[in] IPictureDisp* pActual,[in] BSTR bstrConfiguration,[out] BSTR* pbstrLog,[out] IPictureDisp** ppDiff,[out, retval] VARIANT_BOOL* pbMatch);
Method Parameters:
l pExpected. A picture object (input).The expected bitmap stored in the checkpoint.
l pActual. A picture object (input).The actual bitmap captured from the application beingtested.
l bstrConfiguration. A text string (input).A string that contains configuration input for the customcomparer. This is the string displayed in the Input box inthe advanced settings in the Bitmap Checkpoint
User GuideChapter 36: Developing Custom Comparers for Bitmap Checkpoints
HP Unified Functional Testing (12.53) Page 318 of 938
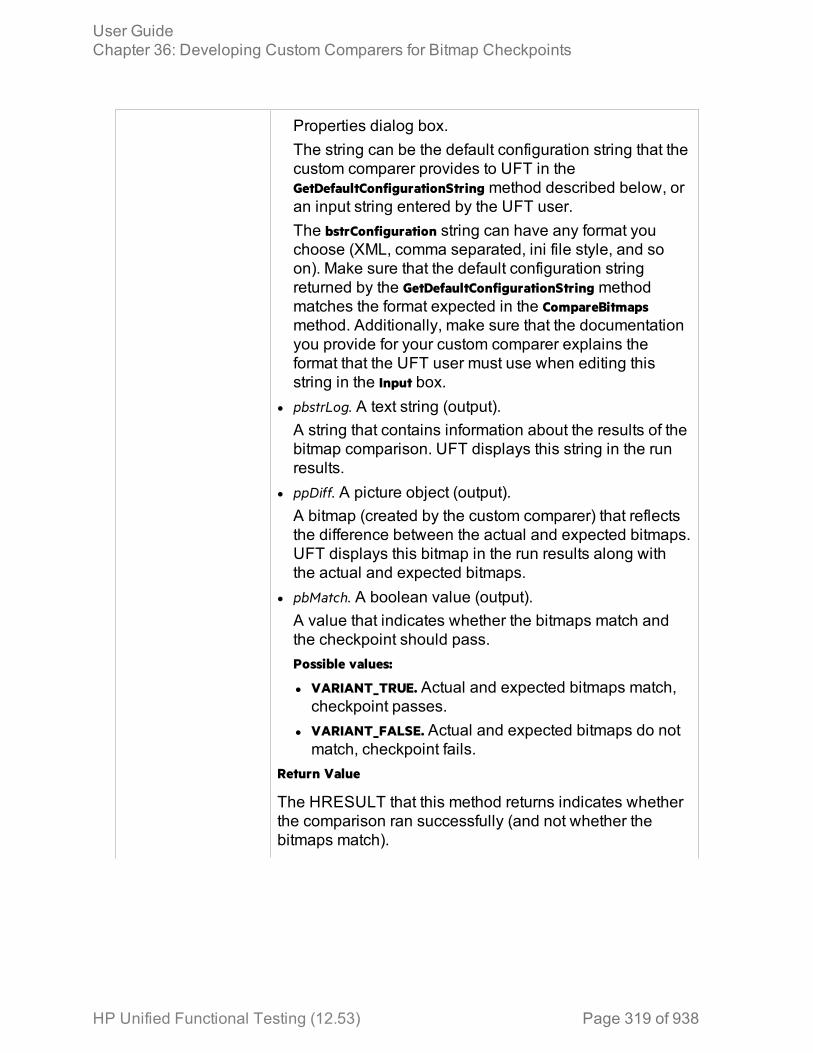
Properties dialog box.The string can be the default configuration string that thecustom comparer provides to UFT in theGetDefaultConfigurationString method described below, oran input string entered by the UFT user.The bstrConfiguration string can have any format youchoose (XML, comma separated, ini file style, and soon). Make sure that the default configuration stringreturned by the GetDefaultConfigurationString methodmatches the format expected in the CompareBitmapsmethod. Additionally, make sure that the documentationyou provide for your custom comparer explains theformat that the UFT user must use when editing thisstring in the Input box.
l pbstrLog. A text string (output).A string that contains information about the results of thebitmap comparison. UFT displays this string in the runresults.
l ppDiff. A picture object (output).A bitmap (created by the custom comparer) that reflectsthe difference between the actual and expected bitmaps.UFT displays this bitmap in the run results along withthe actual and expected bitmaps.
l pbMatch. A boolean value (output).A value that indicates whether the bitmaps match andthe checkpoint should pass.Possible values:
l VARIANT_TRUE. Actual and expected bitmaps match,checkpoint passes.
l VARIANT_FALSE. Actual and expected bitmaps do notmatch, checkpoint fails.
Return Value
The HRESULT that this method returns indicates whetherthe comparison ran successfully (and not whether thebitmaps match).
User GuideChapter 36: Developing Custom Comparers for Bitmap Checkpoints
HP Unified Functional Testing (12.53) Page 319 of 938
IBitmapCompareConfiguration Interface
This interface contains the methods that you need toimplement to support the custom comparer options thatUFT displays in the advanced settings in the BitmapCheckpoint Properties dialog box.
The GetDefaultConfigurationString Method
The GetDefaultConfigurationString method must return thedefault configuration string for your custom comparer. Fordetails on configuration strings, see "Implement theCompareBitmaps method" on page 301.
UFT displays this string in the Input box in the advancedsettings in the Bitmap Checkpoint Properties dialog boxwhen a user creating a new bitmap checkpoint selectsyour custom comparer.
If the UFT user does not modify the input string in thedialog box, the string provided byGetDefaultConfigurationString is passed to the customcomparer's CompareBitmaps method. You must thereforemake sure that the default configuration string matches theformat that your custom comparer expects to receive in theCompareBitmaps method.
Method syntax:
HRESULT GetDefaultConfigurationString ([out, retval]BSTR* pbstrConfiguration);
The GetHelpFilename Method
The GetHelpFilename method must return a path to thedocumentation that contains information about yourcustom comparer for UFT users.
UFT displays the documentation when a user selects yourcustom comparer in the advanced settings in the BitmapCheckpoint Properties dialog box and clicks Details. Makesure that when your custom comparer is installed, thedocumentation that you provide is installed in the locationspecified by the GetHelpFilename method.
The path can be one of the following:
l A full path to a file.
User GuideChapter 36: Developing Custom Comparers for Bitmap Checkpoints
HP Unified Functional Testing (12.53) Page 320 of 938

l A relative path to a file (UFT searches for this pathrelative to <UFT installation folder>\bin).
l A URL.If you do not provide documentation for your customcomparer, this method should return the HRESULT E_NOTIMPL. For details on the type of information you shouldprovide, see "Implement IBitmapCompareConfiguration"on page 302.
Method syntax:
HRESULT GetHelpFilename ([out, retval] BSTR*pbstrFilename);
User GuideChapter 36: Developing Custom Comparers for Bitmap Checkpoints
HP Unified Functional Testing (12.53) Page 321 of 938

Chapter 37: Output Values in GUI TestingRelevant for: GUI tests and components
Your test or component can retrieve values and store them in output value objects.You can then use these values as input at a later stage in a run session.
An output value step is a step in which one or more values are captured at a specificpoint in your test or component and stored for the duration of the run session. Thevalues can later be used as input at a different point in the run session.
You can output the property values of any object. You can also output values fromtext strings, table cells, databases, and .xml documents.
When you create output value steps, you can determine where the values arestored during the run session and how they can be used. During the run session,UFT retrieves each value at the specified point and stores it in the specifiedlocation. When the value is needed later in the run session, UFT retrieves it fromthis location and uses it as required.
Output values are stored only for the duration of the run session. When the runsession is repeated, the output values are reset.
For details about using output values for each add-in environment installed withUFT, see "Supported Output Values" on page 921.
Output Value typesRelevant for: GUI tests and components
You can create the following categories of output values:
StandardOutputValues
You can use standard output values to output the property values ofmost objects. For example, you can use standard output values tooutput text strings by specifying the text property of the object as anoutput value in a keyword component. In a Web-based application, thenumber of links on a Web page may vary based on the selections auser makes on a form on the previous page. You could create anoutput value in your test or scripted component to store the number oflinks on the page.
HP Unified Functional Testing (12.53) Page 322 of 938
FileContentOutputValues
You can use file content output values to output the contents from anyof the following file types:
l HTML filesl Word (.doc) filesl Text filesl PDF filesl RTF filesYou can create output values from the entire contents of a file, or froma part of it. During the run session, UFT retrieves the current data fromthe file and outputs the values according to the settings that youspecified.
TableOutputValues
Table output values are a subset of standard output values. You canuse table output values to output the contents of table cells. For sometypes of tables, you can specify a row range from which to choose thetable cells. During the run session, UFT retrieves the current data fromthe specified table cells according to the settings that you specifiedand outputs the values to the Data pane.
Text andTextAreaOutputValues
You can use text output values to output text strings displayed in anapplication. When creating a text output value, you can output a part ofthe object's text. You can also specify the text before and after theoutput text.
You can use text area output values to output text strings displayedwithin a defined area of a screen in a Windows-based application.
For example, suppose that you want to store the text of any errormessage that appears after a specific step in the Web application youare testing. Inside the If statement, you check whether a window existswith a known title bar value, for example Error. If it exists, you outputthe text in this window (assuming that the window size is the same forall possible error messages).
DatabaseOutputValues
You can use database output values to output the value of thecontents of database cells, based on the results of a query (result set)that you define on a database. You can create output values from theentire contents of the result set, or from a part of it. During the runsession, UFT retrieves the current data from the database and outputsthe values according to the settings that you specified.
User GuideChapter 37: Output Values in GUI Testing
HP Unified Functional Testing (12.53) Page 323 of 938
XMLOutputValues
You can use XML output values to capture and output the values ofXML elements and attributes in XML documents.
For example, suppose that an XML document in a Web page containsa price list for new cars. You can output the price of a particular car byselecting the appropriate XML element value to output.
ExistingOutputValues
When you insert an existing output value in your test or scriptedcomponent, consider which output values should be used in multiplelocations in your test or component. Each time an output value step isperformed, the value contained in the output value is overwritten withthe new output value. You should insert an existing output value only ifthe stored value will no longer be needed later in the run sessionwhen the output value object is used again.
For details, see Add Existing Output Value Dialog Box.
Storing output valuesRelevant for: GUI tests and scripted GUI components
When you define an output value, you can specify where and how each value isstored during the run session.
You can output a value to:
Test andActionParameters
You can output a value to an action parameter, so that values fromone part of a run session can be used later in the run session, or bepassed back to the application that ran (called) the test.
For example, suppose you are testing a shopping application thatcalculates your purchases and automatically debits your accountwith the amount that you purchased. You want to test that theapplication correctly debits the purchase amount from the accounteach time that the action is run with a different list of items topurchase. You could output the total amount spent to an actionparameter value, and then use that value later in your run sessionin the action that debits the account.
User GuideChapter 37: Output Values in GUI Testing
HP Unified Functional Testing (12.53) Page 324 of 938
Run-timeData Table
The option to output a value to the run-time data table is especiallyuseful with a data-driven test, action, or scripted component thatruns several times. In each repetition, or iteration, UFT retrieves thecurrent value and stores it in the appropriate row in the run-timedata table.
Example: Suppose you are testing a flight reservationapplication and you design a test to create a new reservationand then view the reservation details. Every time you run thetest, the application generates a unique order number for thenew reservation. To view the reservation, the applicationrequires the user to input the same order number. You do notknow the order number before you run the test.
To solve this problem, you output a value to the Data panefor the unique order number generated when creating a newreservation. Then, in the View Reservation screen, you usethe column containing the stored value to insert the outputvalue into the order number input field.
When you run the test, UFT retrieves the unique ordernumber generated by the site for the new reservation andenters this output value in the run-time data table. When thetest reaches the order number input field required to view thereservation, UFT inserts the unique order number stored inthe run-time data table into the order number field.
User GuideChapter 37: Output Values in GUI Testing
HP Unified Functional Testing (12.53) Page 325 of 938

EnvironmentVariables
When you output a value to an internal user-defined environmentvariable, you can use the environment variable input parameter ata later stage in the run session.
Example: Suppose you are testing an application that promptsthe user to input an account number on a Welcome pageand then displays the user's name. You can use a text outputvalue to capture the value of the displayed name and store itin an environment variable.
You can then retrieve the value in the environment variableto enter the user's name in other places in the application.For example, in an Order Checkbook Web page, which forsecurity reasons requires users to enter the name to appearon the checks, you could use the value to insert the user'sname into the Name edit box.
Create or modify an output value stepRelevant for: GUI tests and components
This task describes how to insert an output value step while recording or editingyour test or component. You can also add an existing output value to a test orscripted component. It is generally more convenient to define output values aftercreating the initial test or component.
For details on supported output values per add-in environment, see "GUICheckpoints and Output Values Per Add-in" on page 916
This task describes both the general process for inserting a new output value stepto your test or component and the prerequisites and considerations for the differenttypes of output values.
This task includes the following steps:
l "Important information before inserting the output value step" on the next pagel "Insert a new standard output value step while recording your test or component"on the next page
l "Insert a new output value step using the Active Screen while editing (tests andscripted components only)" on page 328
l "Insert an existing output value step while editing (tests and scripted componentsonly)" on page 329
l "Set the options for the output value object" on page 329
User GuideChapter 37: Output Values in GUI Testing
HP Unified Functional Testing (12.53) Page 326 of 938
Important information before inserting the output value step
Objectvisibility inapplication
l During an editing session, make sure the object is visible in yourapplication before inserting an output value step on it.
l For file content output values: The source file must be located on thefile system.
Availability l Recording sessionsl Editing sessionsl Active Screen
ActiveScreen
Make sure that the Active Screen contains sufficient data for theobject for which you want to define an output value.
ImportantInformation
l Output valuescan be viewed in the following modes:l Simple Mode: Displays only the basic properties and expectedvalues of the output value.
l Advanced Mode: Displays all supported properties and expectedvalues of the output value.
l For text/text area checkpoints:
l Before you create a text or text area output value for aWindows-based application, make sure you configure therequired capture settings in the Text Recognition pane of theOptions dialog box (Tools > Options > GUI Testing tab > TextRecognition node).
l When you use text-area selection to capture text displayed in aWindows application, it is often advisable to define a text arealarger than the actual text you want UFT to use as an outputvalue. During the run session, UFT outputs the selected text,within the defined area, according to the settings youconfigured.
l Because text may change its position during run sessions,make sure that the area defined is large enough so that theoutput text is always within its boundaries. For details, see"Text recognition in run-time" on page 275.
Insert a new standard output value step while recording your test or component
User GuideChapter 37: Output Values in GUI Testing
HP Unified Functional Testing (12.53) Page 327 of 938
1. Start a recording session.2. Do one of the following:
l Select Design > Output Value > Standard Output Value.
l In the record toolbar, click Insert Checkpoint or Output Value down arrowand select Standard Output Value.The pointer changes into a pointing hand.
If necessary, select the object or object sections you want to include in theoutput value. The specific dialog that opens differs depends on the type ofoutput value selected.
Insert a new output value step using the Active Screen while editing (tests and scriptedcomponents only)
1. Do one of the following:l Select View > Active Screen, click a step whose Active Screen contains theobject for which you want to specify an output value, and right-click theobject for which you want to specify an output value and select Insert OutputValue.
l Right-click the step and select Insert Output Value.If the location you clicked is associated with more than one object, theObject Selection Dialog Box opens.If necessary, select the object or object sections you want to include in theoutput value. The specific dialog that opens differs depends on the type ofoutput value selected.
Example: Note if you are creating a text/text area output value:
l To output text value while editing, you first highlight a text string in theActive Screen then right-click the string, and select Insert Text OutputValue.
l When you output a text area value, you first define the area containingthe text you want UFT to check. When you select Text Area OutputValue, the mouse turns into a crosshairs pointer. Click and drag thecrosshairs pointer to define this area. Release the mouse button afteroutlining the area required. For more details, see the section on textarea output values in "Output Value types" on page 322, and theimportant details in Output Value Properties Dialog Box.
Tip: Hold down the left mouse button and use the arrow keys tomake precise adjustments to the defined area.
User GuideChapter 37: Output Values in GUI Testing
HP Unified Functional Testing (12.53) Page 328 of 938
Insert an existing output value step while editing (tests and scripted components only)
1. Select the step after which you want to insert the output value.2. Select Design > Output Value > Existing Output Value. The Add Existing Output
Value Dialog Box opens, enabling you to select the test object from which youwant to output values.
Set the options for the output value object
For tests and scripted components: Set the options for the output value, including thevalues to add to the output value step.
For keyword components: Specify the settings in the Output Value Properties DialogBox.
User GuideChapter 37: Output Values in GUI Testing
HP Unified Functional Testing (12.53) Page 329 of 938
Chapter 38: Parameterizing Object ValuesRelevant for: GUI tests and scripted GUI components
You can enhance your test by parameterizing the values that it uses. A parameter isa variable that is assigned a value from an external data source or generator.
You can parameterize values of:
l Checkpoints.l Object properties for a selected step.l Operation arguments defined for a selected step.l One or more properties of an object stored in the local object or the ObjectRepository Window.
Example: Your application may include a form with an edit box into which theuser types the user name. You may want to test whether your applicationreads this information and displays it correctly in a dialog box. You can inserta text checkpoint that uses the built-in environment variable for the logged-inuser name, to check whether the displayed information is correct.
When you parameterize the value of an object property for a local object, youare modifying the test object description in the local object repository.Therefore, all occurrences of the specified object within the action areparameterized. For details on the local object repository, see "Test Objectsin Object Repositories" on page 206.
You can parameterize the values in steps or the values of action parameters usingone of the following parameter types:
l Test/action parameters. Test parameters enable you to use values passed fromyour test. Action parameters enable you to pass values from other actions in yourtest. For details, see "Test and action parameters" on page 340.
l DataTable parameters. Enable you to create a data-driven test (or action) that runsseveral times using the data you supply. In each repetition, or iteration, UFT usesa different value from the Data pane. For details, see "Data table parameters" onthe next page.
l Environment variable parameters. Enable you to use variable values from othersources during the run session. These may be values you supply, or values thatUFT generates for you based on conditions and options you choose. For details,see "Environment variable parameters" on page 335.
l Random number parameters. Enable you to insert random numbers as values inyour test. For example, to check how your application handles small and large
HP Unified Functional Testing (12.53) Page 330 of 938
ticket orders, you can instruct UFT to generate a random number and insert it in anumber of tickets edit box.
Tip:
l If you want to parameterize all the operation arguments in your test or inone or more actions of a test, consider using the Automaticallyparameterize steps option. For details, see "Automaticallyparameterizing steps" on page 337.
l If you want to parameterize the same value in several steps in your test,consider using the Data Driver rather than adding parameters manually.For details, see "Data Driver" on page 338.
Data table parametersRelevant for: GUI tests and scripted GUI components
You can supply the list of possible values for a parameter by creating a data tableparameter. Data table parameters enable you to create a data-driven test, or actionthat runs several times using the data you supply. In each repetition, or iteration,UFT uses a different value from the Data pane (taken from the subsequent row inthe Data pane).
When you create a new data table parameter, a new column is added at the end ofthe Data pane and the current value you parameterized is placed in the first row. Ifyou parameterize a value and select an existing data table parameter, the values inthe column for the selected parameter are retained and are not overwritten by thecurrent value of the parameter.
Note: If you parameterize a value that is defined as a variant value, thenwhen UFT retrieves the value from the Data pane, it retrieves it as a string.This occurs even if you enter a numeric value in the Data pane. Forexample, if you parameterize the argument of a step such as: WpfWindow("MyWindow").WpfComboBox("cb").Select 1 and you enter the value 1 in the Datapane, then when the step runs, it retrieves the value as a string: "1", and thestep fails.
Example:
l Suppose your application includes a feature that enables users to searchfor contact information from a membership database. When the user enters
User GuideChapter 38: Parameterizing Object Values
HP Unified Functional Testing (12.53) Page 331 of 938
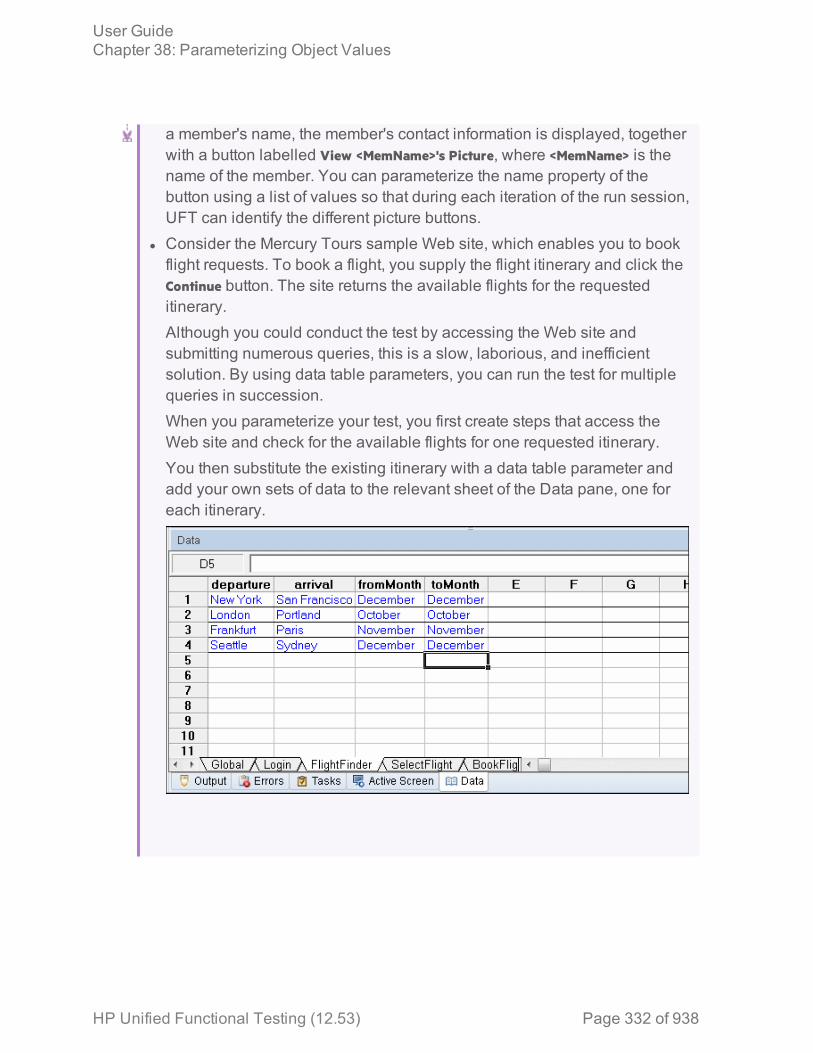
a member's name, the member's contact information is displayed, togetherwith a button labelled View <MemName>'s Picture, where <MemName> is thename of the member. You can parameterize the name property of thebutton using a list of values so that during each iteration of the run session,UFT can identify the different picture buttons.
l Consider the Mercury Tours sample Web site, which enables you to bookflight requests. To book a flight, you supply the flight itinerary and click theContinue button. The site returns the available flights for the requesteditinerary.Although you could conduct the test by accessing the Web site andsubmitting numerous queries, this is a slow, laborious, and inefficientsolution. By using data table parameters, you can run the test for multiplequeries in succession.When you parameterize your test, you first create steps that access theWeb site and check for the available flights for one requested itinerary.You then substitute the existing itinerary with a data table parameter andadd your own sets of data to the relevant sheet of the Data pane, one foreach itinerary.
User GuideChapter 38: Parameterizing Object Values
HP Unified Functional Testing (12.53) Page 332 of 938

In this example, UFT submits a separate query for each itinerary when yourun the test.
Global and local (Action) data table parametersRelevant for: GUI tests only
When you parameterize a step in a test using the Data pane, you must decidewhether you want to make it a global data table parameter or a local data tableparameter.
User GuideChapter 38: Parameterizing Object Values
HP Unified Functional Testing (12.53) Page 333 of 938
Global datatableparameters
Global data table parameters take data from the Global sheet in theData pane. The Global sheet contains the data that replaces globalparameters in each iteration of the test.
By default, the test runs one iteration for each row in the Globalsheet of the Data pane. You can also set the test to run only oneiteration. You can also set the test to run iterations on specified rowswithin the Global sheet of the Data pane.
You can use the parameters defined in the Global data sheet in anyaction.
By outputting values to the global Data pane sheet from one actionand using them as input parameters in another action, you can passvalues from one action to another. For details, see "Output Values inGUI Testing" on page 322.
Local datatableparameters
Local data table parameters take data from the action's sheet in theData pane. The data in the action's sheet replaces the action's datatable parameters in each iteration of the action. By default, actionsrun only one iteration.
You can also set a particular call of the action to run iterations for allrows in the action's sheet or to run iterations on specified rows withinthe action's sheet. When you set your action properties to runiterations on all rows, UFT inserts the next value from the action'sdata sheet into the corresponding action parameter during eachaction iteration, while the values of the global parameters stayconstant.
You use local data table parameters when you want the data to be used only for asingle action. You use global data table parameters when you want the data to beavailable to other actions, and when you want subsequent iterations to usedifferent data for a particular parameter (each time the test repeats or each time theaction repeats within the test).
User GuideChapter 38: Parameterizing Object Values
HP Unified Functional Testing (12.53) Page 334 of 938
If you have multiple rows in the Global data sheet, the entire test runs multipletimes. If you have multiple rows in a local data sheet, the corresponding action runsmultiple times before running the next action in the test. If you have multiple rows inboth Global and local data sheets, each single test iteration runs all iterations ofeach action before running the next iteration of the test.
Environment variable parametersRelevant for: GUI tests and scripted GUI components
UFT can insert a value from the Environment variable list, which is a list ofvariables and corresponding values that can be accessed from your test orcomponent. Throughout the run session, the value of an environment variableremains the same, regardless of the number of iterations, unless you change thevalue of the variable programmatically.
l When you add an environment variable to a GUI test, it is available to all actionsin the test and all steps in the test.
l If you add an environment variable to a component, it is available only to thatcomponent, even if the component is part of a BPT test. Environment variablescannot be used to pass data from one component to another in a BPT test.
Tip: Environment parameters are especially useful for localization testing,when you want to test an application where the user interface strings changeaccording to the selected language. Environment parameters can be usedfor testing the same application on different browsers. You can also vary theinput values for each language by selecting a different data table file eachtime you run the steps.
User GuideChapter 38: Parameterizing Object Values
HP Unified Functional Testing (12.53) Page 335 of 938

There are several types of environment variables:
Built-inenvironmentvariables
Variables that represent information about the test or scriptedcomponent and the computer on which they are run, such as Testpath and Operating system. These variables are accessible from alltests and scripted components, and are designated as read-only.
ALM provides a set of built-in variables that enable you to usecurrent information about the test or scripted component and theUFT computer running your test or component. These can includethe test or component name and path, the operating system typeand version, and the local host name.
For example, you may want to perform different checks in your testor component based on the operating system being used by thecomputer that is running the test or component. To do this, youcould include the OSVersion built-in environment variable in an Ifstatement.
You can also select built-in environment variables whenparameterizing values.
UFT also has a set of predefined environment variables that youcan use to set the values of the Record and Run Settings dialogoptions. You should not use the names of these variables for anyother purpose. For details, see the sections on how to definerecord and run settings for Windows-based and Web-basedapplications in the HP Unified Functional Testing Add-ins Guide.
User-DefinedInternalEnvironmentVariables
User-defined internal environment variables are defined within thetest or component. These variables are saved with the test orcomponent and are accessible only within the test or component inwhich they were defined.
You can create or modify internal, user-defined environmentvariables for your test or component in the:
l Environment pane of the Test or Component Settings dialog box.l Parameter Options dialog box.You can also create environment output values, which retrievevalues during the test run and output them to internal environmentvariable parameters for use in your test or component.
User GuideChapter 38: Parameterizing Object Values
HP Unified Functional Testing (12.53) Page 336 of 938
User-DefinedExternalEnvironmentVariables
User-defined external environment variables are predefined in theactive external environment variables file. You can create as manyfiles as you want and select an appropriate file for each test orcomponent, or change files for each run. External environmentvariable values are designated as read-only within the test orcomponent.
External environment variable files are comprised of a list ofvariable-value pairs in .xml format. You select the active externalenvironment variable file for a test or component in theEnvironment pane of the Test Settings or Component Settingsdialog box. Then you can use the variables from the file asparameters.
You can set up your environment variable XML files manually, oryou can define the variables as internal environment variables inthe Environment pane of the Test Settings dialog box and use theExport button to create the .xml file with the correct structure.
For details on creating and using user-defined externalenvironment variable files see, "Use user-defined externalenvironment variables" on page 355.
Automatically parameterizing stepsRelevant for: GUI tests only
You can instruct UFT to automatically parameterize the steps in your test actions atthe end of a recording session. This enables you to create actions that can be usedfor a variety of different purposes or scenarios by referencing different sets of data.
To activate this option, select the Automatically parameterize steps option in theGeneral node of the GUI Testing tab of the Options dialog box (Tools > Options > GUITesting tab > General node). You can set the option to use Global Data TableParameters or Test Parameters.
When you stop a recording session while this option is selected, UFT replaces theconstant values in the test object operation arguments of your steps with eitherData pane parameters or action parameters, based on your selection of globalData pane parameters or test parameters in the Options dialog box.
In general, simple, constant (string, number, boolean) test object and utility objectoperation arguments are parameterized. Therefore, if the following are contained ina method argument, they are not parameterized:
l arguments that are already parameterizedl variables
User GuideChapter 38: Parameterizing Object Values
HP Unified Functional Testing (12.53) Page 337 of 938
l enumeration constants, such as micLeftbtn
l expressions, such as: x = 3
l Assignments of values, such as: Window("Notepad").WinMenu("Menu").ExpandMenu =True
l mathematical or other concatenation operations, such as "Hello World" & micCtrl &"S"
l VBScript statements, such as msgbox "hello"
l VBScript language statements such as For, If, Do, While
l steps inside called functions from function libraries or in functions or sub-routinesdefined directly within the action
Data DriverRelevant for: GUI tests only
The Data Driver enables you to quickly parameterize several (or all) propertyvalues for test objects, checkpoints, and/or method arguments containing the sameconstant value within a given action.
You can choose to replace all occurrences of a selected constant value with aparameter, in the same way that you can use a Find and Replace All operationinstead of a step-by-step Find and Replace process.
UFT can also show you each occurrence of the constant so that you can decidewhether or not to parameterize the value.
Note:
l When finding multiple occurrences of a selected value, UFT conducts asearch that is case sensitive and searches only for exact matches. (It doesnot find values that include the selected value as part of a longer string.)
l You cannot use the Data Driver to parameterize the values of argumentsfor user-defined methods or VBScript functions.
User GuideChapter 38: Parameterizing Object Values
HP Unified Functional Testing (12.53) Page 338 of 938
Parameterize values for operationsRelevant for: GUI tests and scripted GUI components
Parameterize a value for an operation1. Do one of the following:
l For test step operations, in the Keyword View click in the Value column of therequired step.
l For property values for local objects, do one of the following:o Right-click a step and select Object Properties. The Object PropertiesDialog Box opens.
o Open the Object Repository Window and select the object.2. Open the Value Configuration Options dialog by: .
l For a value for an operation, in the Keyword View, click the parameterizationicon for the value that you want to parameterize.
l For property values for local objects, in the Object Repository click in theValue cell for the property that you want to parameterize, and click theparameterization icon .
The parameters list opens, displaying the available parameter types andparameters.
3. In the parameters list, select the type of parameter you want:l Test/action parameterl Data Table parameterl Environment parameterl Random number parameter
4. If you need to add a parameter, click the Add New Parameter button at the bottomof the parameter list.
5. Parameterize the value using the Value Configuration Options Dialog Box.
Use the Data Driver to parameterize a constant valueUse the Data Driver Dialog Box (Tools > Data Driver).
Enter parameters as values in the EditorYou can enter input and output parameters as values in the Editor using theParameter utility object.
User GuideChapter 38: Parameterizing Object Values
HP Unified Functional Testing (12.53) Page 339 of 938
Parameterize a checkpoint property valueRelevant for: GUI tests and scripted GUI components
Parameterize a value for a property in a checkpoint1. Open the dialog box for the checkpoint properties:
l Right-click the checkpoint and select Checkpoint Properties.l Open the Object Repository Window and select the checkpoint.
2. Use the options in the Configure Value area to parameterize the value.a. Select the property whose value you want to parameterize from the table of
properties.b. In the Configure value area, select Parameter.
c. Click the Parameter Options button . The Parameter Options DialogBox opens:
Use the Data Driver to parameterize a constant valueSelect Tools > Data Driver.
Enter parameters as values in the EditorYou can enter input and output parameters as values in the Editor using theParameter utility object.
Test and action parametersRelevant for: GUI tests only
You can parameterize a value in a step using a test or action parameter (both inputand output parameters). You can create parameters for:
Thetest
Test parameters enable you to share parameter and its value with eachaction (and subsequently each step in the action) in your test. Once youhave created a test parameter, any action parameter can take its valuefrom the test parameter.
Test parameters are created in the Parameters tab of the Properties pane.
User GuideChapter 38: Parameterizing Object Values
HP Unified Functional Testing (12.53) Page 340 of 938
Theaction
Action parameters enable you specify parameters that are available forall steps contained in the action.
Action parameters are stored with the action and are maintained to allcalls to the action. You can provide the action parameter value from anyof the following:
l A test parameterl The parameters of a parent action (if the action is nested)l The output of a previous action call (for sibling actions)You create parameters in the Parameters tab of the Properties pane or theParameters tab of the Action Properties dialog box. You set the actualvalue of the action parameter in the Parameter Values tab of the Action CallProperties dialog box.
Input action parameter values can be used only within the steps of thecurrent action. You can use an action input value from another action (orfrom the test) only if you pass the value from action to action down thetest hierarchy to the action in which you want to use it.
When you create test and action parameter values, you can use the parametersand values in numerous places throughout the test. For example, the value of anaction parameter can be taken from the test parameter value. Likewise, a test stepobject value can be taken from an action parameter.
However, there will be times where you want to use the value of a test parameteras the parameter value for a step, or use a parameter of an parent action in anested (child action). In these cases, you need to pass the parameter from the testto the action, or through the action hierarchy, to enable the step to access theparameter.
Example:
Suppose that Action3 is a nested action of Action1 (a top-level action), andyou want to parameterize a value in Action3 using a value that is passed intoyour test from the external application that runs (calls) the test.
You can pass the value from the test level to Action1, then to Action3, andthen parameterize the required value using this action input parameter value(that was passed through from the external application).
Alternatively, you can pass an output action parameter value from an actionstep to a later sibling action at the same hierarchical level. For example,
User GuideChapter 38: Parameterizing Object Values
HP Unified Functional Testing (12.53) Page 341 of 938
suppose that Action2, Action3, and Action4 are sibling actions at the samehierarchical level, and that these are all nested actions of Action1.
You can parameterize a call to Action4 based on an output value retrievedfrom Action2 or Action3. You can then use these parameters in your actionstep.
For task details on using test and action parameters, see "Use action parameters"on page 346.
User GuideChapter 38: Parameterizing Object Values
HP Unified Functional Testing (12.53) Page 342 of 938
Sharing action informationRelevant for: GUI tests only
There are several ways to share or pass values from one action to other actions:
SharingValuesUsingtheGlobalDataTable
You can share a value that is generated in one action with other actionsin your test, by storing the value in the data table. You can choose toplace the value in either the Global sheet or the Action sheet. If you putthe value in the Global sheet, other actions can then use the value inthe Data pane as an input parameter. You can store a value in the Datapane by outputting the value to the global data table, or by using DataTable, Sheet and Parameter objects and methods in the Editor to add ormodify a value.
If you create data table parameters or output value steps in your actionand select to use the Current action sheet (local) option, be sure that therelevant run settings for your action are set in the Run tab of the ActionCall Properties Dialog Box.
Example:
Suppose you are testing a flight reservation application. When auser logs into the application, the user's full name is displayed onthe top of the page. Later, when the user purchases the tickets,the user must enter the name that is listed on his or her creditcard.
Suppose your test contains three actions—Login, SelectFlight, andPurchaseTickets and the test is set to run multiple iterations with adifferent login name for each iteration. In the Login action, you cancreate a text output value to store the displayed name of the user.In the PurchaseTickets action, you can parameterize the value thatis set in the Credit Card Owner edit box using the Data panecolumn containing the user's full name.
User GuideChapter 38: Parameterizing Object Values
HP Unified Functional Testing (12.53) Page 343 of 938

SharingValuesUsingEnvironmentVariable
If you do not need to run multiple iterations of your test, or if you wantthe value you are sharing to stay constant for all iterations, you can usean internal, user-defined environment variable, which can be accessedby all local actions in your test.
For example, suppose you want to test that your flight reservationapplication correctly checks the credit card expiration date that the userenters. The application should request a different credit card if theexpiration date that was entered is earlier than the scheduled flightdeparture date. In the SelectFlight action, you can store the value enteredin the departure date edit box in an environment variable. In thePurchaseTickets action, you can compare the value of the expiration dateedit box with the value stored in your environment variable.
User GuideChapter 38: Parameterizing Object Values
HP Unified Functional Testing (12.53) Page 344 of 938

SharingValuesUsingtheDictionaryObject
As an alternative to using environment variables to share valuesbetween actions, you can use the Dictionary object. The Dictionaryobject enables you to assign values to variables that are accessiblefrom all actions called from the test in which the Dictionary object iscreated, including both local and external actions.
To use the Dictionary object, you must first add a reserved object to theregistry (in HKEY_CURRENT_USER\Software\Mercury Interactive\QuickTestProfessional\MicTest\ReservedObjects\) with ProgID = "Scripting.Dictionary".
HKEY_CURRENT_USER\Software\Mercury Interactive\QuickTestProfessional\MicTest\ReservedObjects\GlobalDictionary
After you add the reserved Dictionary object to the registry and restartUFT, you can add and remove values to and from the Dictionary in oneaction, and retrieve the values in another action called from the sametest.
For more information on the Dictionary object, see the VBScriptReference documentation (Help > HP Unified Functional Testing Help >VBScript Reference > Script Runtime).
Example:
Suppose you want to access the departure date set in theSelectFlight action from the PurchaseTickets action. You can add thevalue of the DepartDate WebEdit object to the dictionary in theSelectFlight action as follows:
GlobalDictionary.RemoveAll
Then you can retrieve the date from the PurchaseTickets action asfollows:
Dim CompareDateCompareDate=GlobalDictionary("DateCheck")
SharingValuesUsingOutputValues
You can create a output value step in your action to pass the output of astep. Then in the Output Options, you can pass the output value to anaction output parameter, which is then accessible to all subsequent orsibling actions.
User GuideChapter 38: Parameterizing Object Values
HP Unified Functional Testing (12.53) Page 345 of 938

Adding action parameters as steps in the EditorInstead of selecting input (or output) parameters from the appropriate dialog boxeswhile parameterizing steps or inserting output value steps, you can enter input andoutput parameters as values in the Editor using the Parameter utility object in theformat:
Example:
l Parameter("ParameterName")
l Parameter("ActionName", "ParameterName")
l Suppose you have test steps that enter information in a form to display alist of purchase orders in a table, and then return the total value of theorders displayed in the table.You can define input parameters, called SoldToCode and MaterialCode, forthe codes entered in the Sold to and Materials edit boxes of the form so thatthe Orders table that is opened is controlled by the input parameter valuespassed when the test is called.You can define an output parameter, for example TotalValue, to store thereturned value. The output value (TotalValue) can then be returned to theapplication that called the test.The example described above might look something like this (parametersare in bold font):
Browser("Mercury").Page("List Of Sales").WebEdit("Sold to").Set Parameter("SoldToCode")Browser("Mercury").Page("List Of Sales").WebEdit("Materials").Set Parameter("MaterialCode")Browser("Mercury").Page("List Of Sales").WebButton("Enter").ClickNumTableRows = Browser("Mercury").Page("List Of Sales").WebTable("Orders").RowCountParameter("TotalValue") = Browser("Mercury").Page("List Of Sales").WebTable("Orders").GetCellData(NumTableRows,"Total")
Use action parametersRelevant for: GUI tests only
Suppose you want to take a value from the external application that runs (calls)your test and use it in an action within your test. If your test has an Action4 that isnested within Action3, and Action3 is further nested within Action2, you would need to
User GuideChapter 38: Parameterizing Object Values
HP Unified Functional Testing (12.53) Page 346 of 938
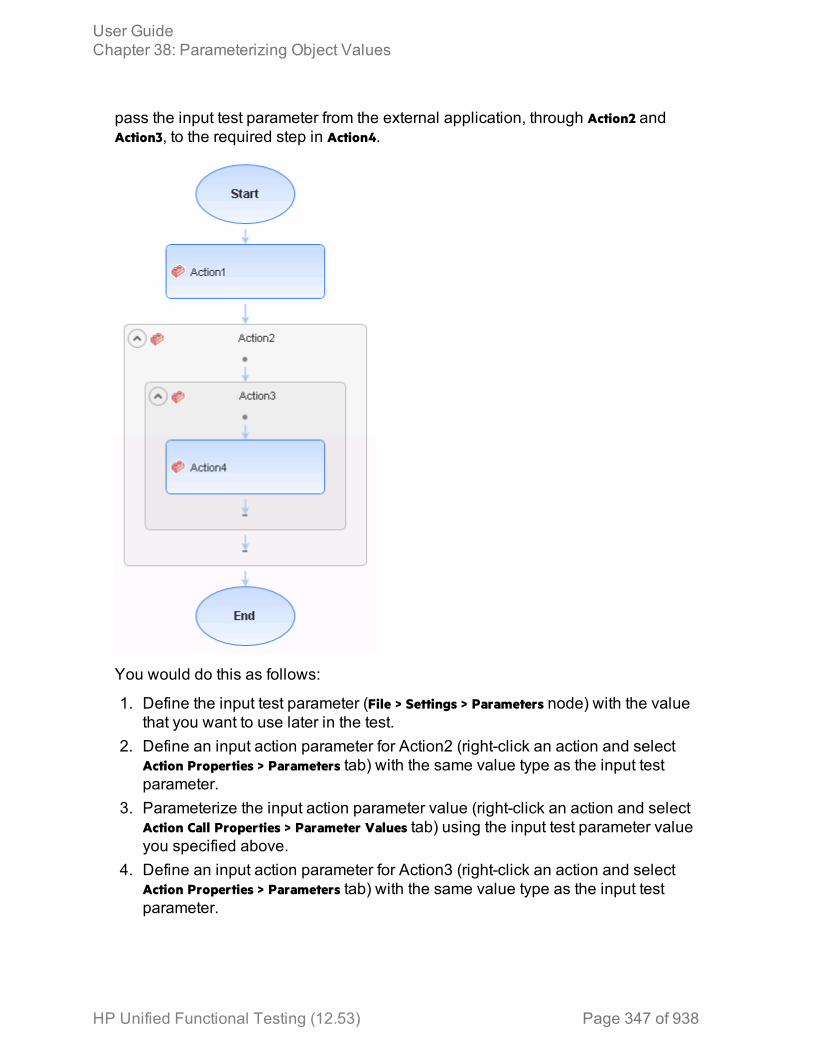
pass the input test parameter from the external application, through Action2 andAction3, to the required step in Action4.
You would do this as follows:
1. Define the input test parameter (File > Settings > Parameters node) with the valuethat you want to use later in the test.
2. Define an input action parameter for Action2 (right-click an action and selectAction Properties > Parameters tab) with the same value type as the input testparameter.
3. Parameterize the input action parameter value (right-click an action and selectAction Call Properties > Parameter Values tab) using the input test parameter valueyou specified above.
4. Define an input action parameter for Action3 (right-click an action and selectAction Properties > Parameters tab) with the same value type as the input testparameter.
User GuideChapter 38: Parameterizing Object Values
HP Unified Functional Testing (12.53) Page 347 of 938
5. Parameterize the input action parameter value.l Right-click an action and select Action Call Properties > Parameter Values taband select the input action parameter value you specified for Action2.
l Use the Parameter utility object to specify the action parameter as theParameters argument for the RunAction statement in the Editor.
6. Define an input action parameter for Action4 (right-click an action and selectAction Properties > Parameters tab) with the same value type as the input testparameter.
7. Parameterize the input action parameter value.l Right-click an action in the canvas or Keyword View and select Action Call
Properties > Parameter Values tab and select the input action parameter valueyou specified for Action3.
l Use the Parameter utility object to specify the action parameter as theParameters argument for the RunAction statement in the Editor.
8. Parameterize the value in the required step in Action4.
l Click the parameterization icon and specify the parameter in theValue Configuration Options Dialog Box using the input action parameteryou specified for Action 4.
l Use the Parameter utility object in the Editor to specify the value to use for thestep. For more information, see "Test and action parameters" on page 340.
Note: You can also modify many of the action properties from theProperties pane.
Data tables and sheets in GUI tests and componentsRelevant for: GUI tests and components
In the Data pane, when you are working with GUI tests or components, UFT usesExcel data sheets to store data. Depending on whether you are working with testsor components, you can use different types of data sheets:
Type ofSheet
Test orcomponent? Description
User GuideChapter 38: Parameterizing Object Values
HP Unified Functional Testing (12.53) Page 348 of 938
Globalsheet
Tests The global sheet is the "master" sheet for the test,containing data that is available to all actions/teststeps in the test.
If you save your test in ALM or use testconfigurations, you must store the test data in theGlobal sheet.
For each row in the Global data sheet, UFT can runan iteration of the entire test.
Actionsheet
Tests The action sheet contains the data relevant for aspecific action. Each action in your test has its ownaction tab, and the data stored in this sheet isavailable only to the steps contained in the action.
For each row in the Action data sheet, UFT can runan iteration of the action.
Componentsheet
Components The component sheet contains the data relevant for aspecific component. When you create a component, itis created with one sheet, and the data in thiscomponent is available only to the steps contained inthe component (even if the component is later addedto a BPT test.)
When you run the test, UFT creates a run-time data table—a live version of the datatable associated with your test. During the run session, UFT displays the run-timedata in the Data pane so that you can see any changes to the data table as theyoccur.
When the run session ends, the run-time data table closes, and the Data paneagain displays the stored design-time data table. Data entered in the run-time datatable during the run session is not saved with the test. The final data from the run-time data table is displayed in the run results (with a link to open the data table).
Using different data tablesRelevant for: GUI tests and scripted GUI components
When working with tests, the data table is saved with your test by default as an .xlsor .xlsx file. By default, UFT uses the entered values for the test's data table whenrunning the test.
However, when running a test, you can instruct UFT to use different datatables/sheets than the ones saved with your test. For example, you can save theentered data table in another location and instruct the test to use this data tablewhen running a test. You can also tell UFT to use an external saved data table.
User GuideChapter 38: Parameterizing Object Values
HP Unified Functional Testing (12.53) Page 349 of 938
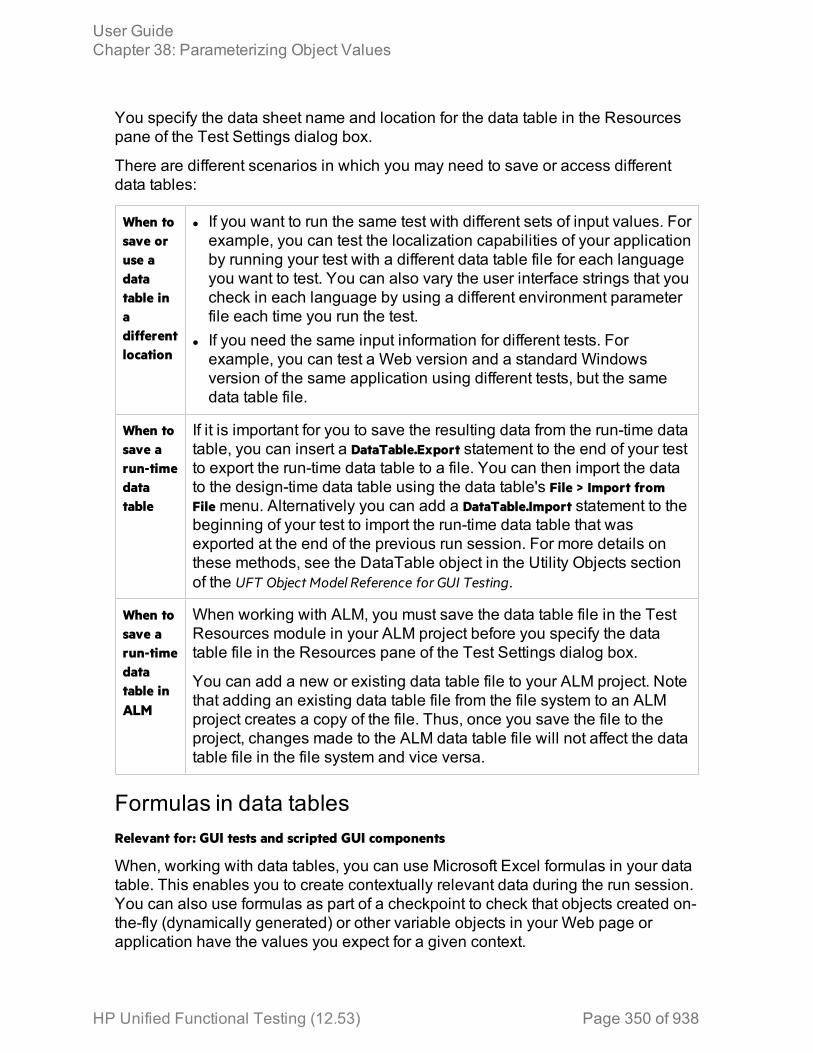
You specify the data sheet name and location for the data table in the Resourcespane of the Test Settings dialog box.
There are different scenarios in which you may need to save or access differentdata tables:
When tosave oruse adatatable inadifferentlocation
l If you want to run the same test with different sets of input values. Forexample, you can test the localization capabilities of your applicationby running your test with a different data table file for each languageyou want to test. You can also vary the user interface strings that youcheck in each language by using a different environment parameterfile each time you run the test.
l If you need the same input information for different tests. Forexample, you can test a Web version and a standard Windowsversion of the same application using different tests, but the samedata table file.
When tosave arun-timedatatable
If it is important for you to save the resulting data from the run-time datatable, you can insert a DataTable.Export statement to the end of your testto export the run-time data table to a file. You can then import the datato the design-time data table using the data table's File > Import fromFile menu. Alternatively you can add a DataTable.Import statement to thebeginning of your test to import the run-time data table that wasexported at the end of the previous run session. For more details onthese methods, see the DataTable object in the Utility Objects sectionof the UFT Object Model Reference for GUI Testing.
When tosave arun-timedatatable inALM
When working with ALM, you must save the data table file in the TestResources module in your ALM project before you specify the datatable file in the Resources pane of the Test Settings dialog box.
You can add a new or existing data table file to your ALM project. Notethat adding an existing data table file from the file system to an ALMproject creates a copy of the file. Thus, once you save the file to theproject, changes made to the ALM data table file will not affect the datatable file in the file system and vice versa.
Formulas in data tablesRelevant for: GUI tests and scripted GUI components
When, working with data tables, you can use Microsoft Excel formulas in your datatable. This enables you to create contextually relevant data during the run session.You can also use formulas as part of a checkpoint to check that objects created on-the-fly (dynamically generated) or other variable objects in your Web page orapplication have the values you expect for a given context.
User GuideChapter 38: Parameterizing Object Values
HP Unified Functional Testing (12.53) Page 350 of 938
When you use formulas in a data table to compare values (generally in acheckpoint), the values you compare must be of the same type, for exampleintegers, strings, and so forth. When you extract values from different places in yourapplications using different functions, the values may not be of the same type.Although these values may look identical on the screen, a comparison of them willfail, since, for example, 8.2 is not equal to "8.2".
When you use the data table formula option with a checkpoint, two columns arecreated in the data table. The first column contains a default checkpoint formula.The second column contains the value to be checked in the form of an outputparameter. The result of the formula is Boolean—TRUE or FALSE.
A FALSE result in the checkpoint column during a test run causes the test to fail.
After you finish adding the checkpoint, you can modify the default formula in thefirst column to perform the check you need.
Define and manage data tablesRelevant for: GUI tests and scripted GUI components
Add an external data table file1. Select File > Settings to open the Test Settings dialog box.2. In the Settings dialog box, select the Resources node.3. In the Resources pane, in the Data Table section, select one of the following:
l Default location: saved with the test in the same directoryl External file: click the Browse button and navigate to the directory where theexternal data table is stored.
Note: If you select an external file as your data table, make sure that:
o The column names in the external data table match the parameternames in the test.
o The sheets in the external data table match the action names in thetest.
User GuideChapter 38: Parameterizing Object Values
HP Unified Functional Testing (12.53) Page 351 of 938

Manually enter informationEdit information in the Data pane by typing directly into the table cells.
Import information into the data tableDo one of the following:
l Right-click in the Data pane and select File > Import from File from the Data panecommands.
l Right-click in the Data pane and select Sheet > Import > From File from the Datapane commands.
Note: You can also import data saved in Microsoft Excel, tabbed text file(.txt), or ASCII format.
Add a data table file to your ALM project1. Make sure you have an accessible Microsoft Excel file with an .xls or .xlsx
extension.2. In ALM, create a new data table resource and then upload the .xls or .xlsx file
you created in the previous step to the project's Test Resources module.3. In UFT, select File > Settings to open the Test Settings dialog box.4. In the Resources pane of the Test Settings dialog box, in the Data table section,
select Other location and click the Browse button to locate the data table file.5. Enter your data as needed. When you save the test, UFT saves the data table
file to the ALM project.
Define the number of iterations for an action or testDo one of the following:
User GuideChapter 38: Parameterizing Object Values
HP Unified Functional Testing (12.53) Page 352 of 938
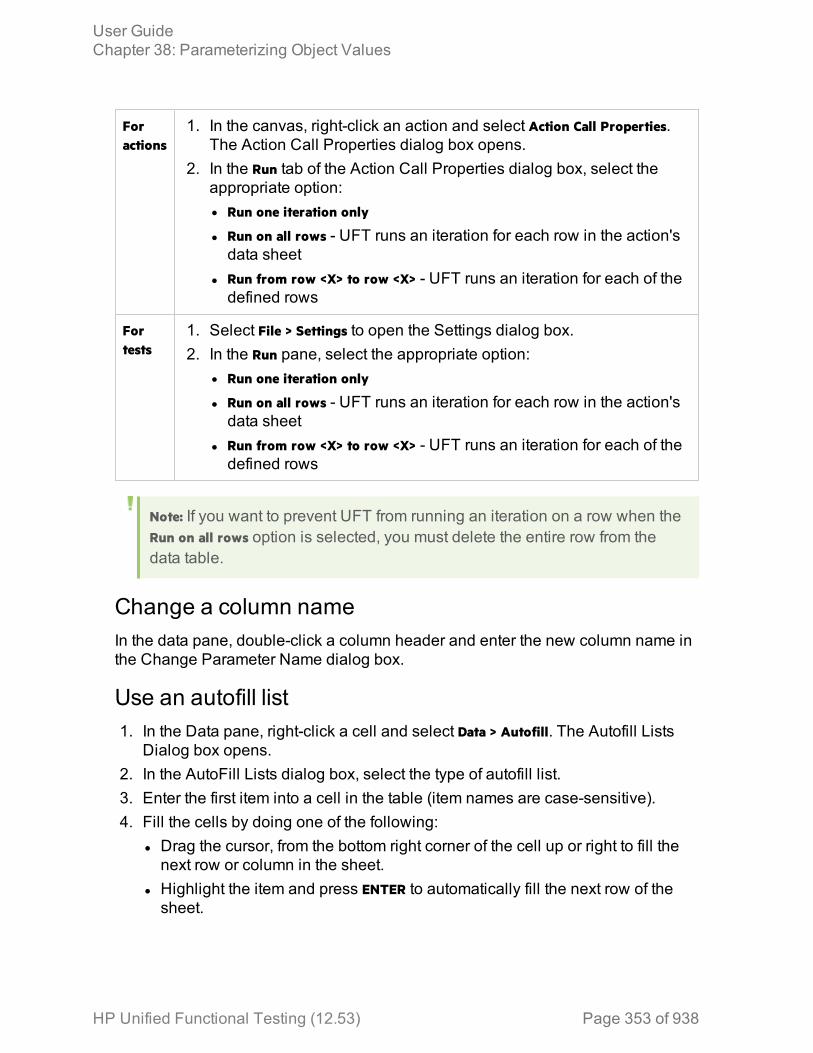
Foractions
1. In the canvas, right-click an action and select Action Call Properties.The Action Call Properties dialog box opens.
2. In the Run tab of the Action Call Properties dialog box, select theappropriate option:l Run one iteration only
l Run on all rows - UFT runs an iteration for each row in the action'sdata sheet
l Run from row <X> to row <X> - UFT runs an iteration for each of thedefined rows
Fortests
1. Select File > Settings to open the Settings dialog box.2. In the Run pane, select the appropriate option:
l Run one iteration only
l Run on all rows - UFT runs an iteration for each row in the action'sdata sheet
l Run from row <X> to row <X> - UFT runs an iteration for each of thedefined rows
Note: If you want to prevent UFT from running an iteration on a row when theRun on all rows option is selected, you must delete the entire row from thedata table.
Change a column nameIn the data pane, double-click a column header and enter the new column name inthe Change Parameter Name dialog box.
Use an autofill list1. In the Data pane, right-click a cell and select Data > Autofill. The Autofill Lists
Dialog box opens.2. In the AutoFill Lists dialog box, select the type of autofill list.3. Enter the first item into a cell in the table (item names are case-sensitive).4. Fill the cells by doing one of the following:
l Drag the cursor, from the bottom right corner of the cell up or right to fill thenext row or column in the sheet.
l Highlight the item and press ENTER to automatically fill the next row of thesheet.
User GuideChapter 38: Parameterizing Object Values
HP Unified Functional Testing (12.53) Page 353 of 938
l Highlight the item and press TAB to automatically fill the next column of thesheet.
Insert formulas into data tables for use in checkpointsRelevant for: GUI tests and scripted GUI components
1. Select the object or text for which you want to create a checkpoint and open theInsert Checkpoint dialog box as described in "Insert a checkpoint step" onpage 280.
2. In the Configure value area, click Parameter.3. Set the parameter options, in the Parameter Options Dialog Box.4. Specify your other checkpoint setting preferences as described in the
Checkpoint Properties Dialog Box.5. Highlight the value in the first (formula) column to view the formula and modify
the formula to fit your needs.6. If you want to run several iterations, add the appropriate formula in subsequent
rows of the formula column for each iteration in the test or action.
Tip: You can encode passwords to use the resulting strings as methodarguments or data table parameter values.
You can also encrypt strings in data table cells using the Encrypt optionin the Data pane menu.
Import data using Microsoft QueryRelevant for: GUI tests and scripted GUI components
You can use Microsoft Query to choose a data source and define a query within thedata source.
1. Open the Database Query Wizard and select Create query using Microsoft Query.2. When Microsoft Query opens, choose a new or an existing data source.3. Define a query.4. In the Finish screen of the Query Wizard, select one of the following:
l Exit and return to HP Unified Functional Testing > Finish to exit Microsoft Query.l View data or edit query in Microsoft Query > Finish to view the data.After viewing or editing the data, select File > Exit and return to HP UnifiedFunctional Testing to close Microsoft Query and return to UFT.
User GuideChapter 38: Parameterizing Object Values
HP Unified Functional Testing (12.53) Page 354 of 938
Use user-defined external environment variablesRelevant for: GUI tests only
1. Create an external environment variables fileYou can create an external environment variable file using the Test Settingsdialog box or manually. For details, see "Create an external environmentvariable file manually" on the next page.
2. Upload the environment resource file to ALMa. In the ALM Test Resources module, create a new environment variable
resource and then upload the .xml environment variable file you want touse with your test.
b. In UFT, connect to the ALM project.
3. Use environment variables in your testa. Open the Environment pane in the Test Settings dialog box (File > Settings >
Environment node).b. Select User-defined from the Variable type list.c. Select the Load variables and values from external file (reloaded each run session)
check box.d. Use the browse button to the right of the File edit box, or enter the full path of
the external environment variables file you want to use with your test. If yourtest is stored in ALM, you must select an file that is stored with your ALMproject.The variables defined in the selected file are displayed in the list of user-defined environment variables.
4. ResultsYou can now select the variables in the active file as external user-definedenvironment parameters in your test.
Create an external environment variables fileRelevant for: GUI tests only
Note: This task is part of a higher-level task. For details, see "Use user-
User GuideChapter 38: Parameterizing Object Values
HP Unified Functional Testing (12.53) Page 355 of 938
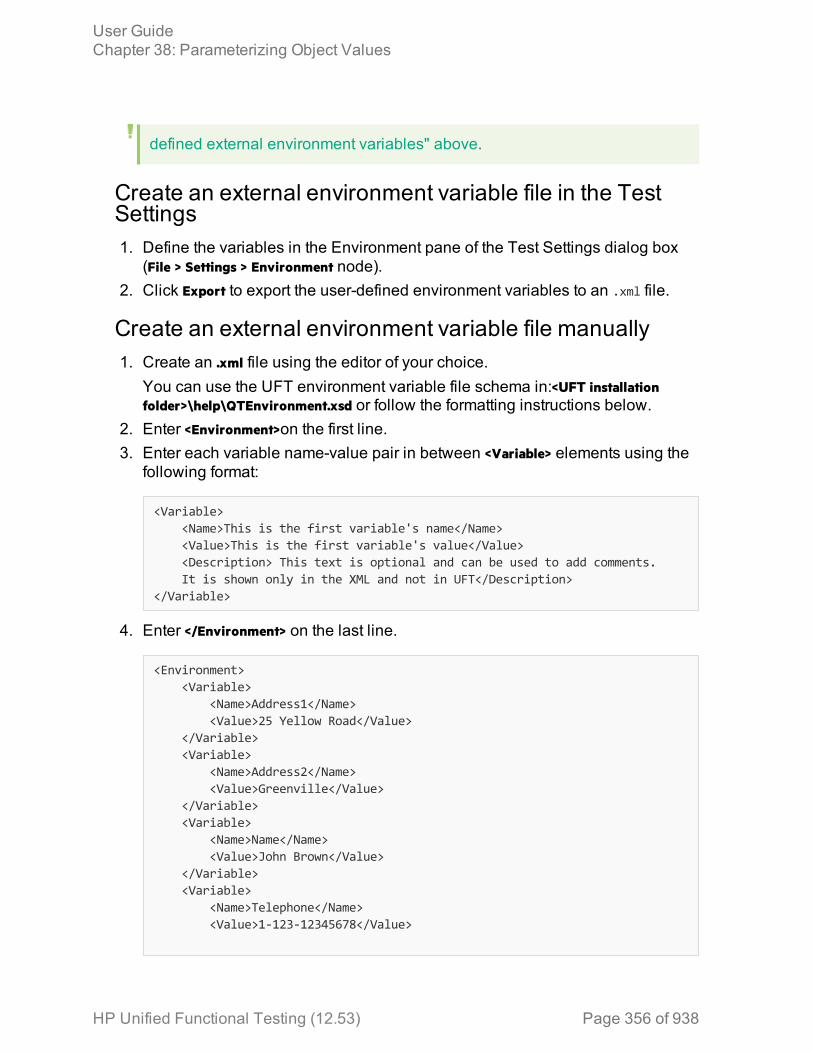
defined external environment variables" above.
Create an external environment variable file in the TestSettings1. Define the variables in the Environment pane of the Test Settings dialog box
(File > Settings > Environment node).2. Click Export to export the user-defined environment variables to an .xml file.
Create an external environment variable file manually1. Create an .xml file using the editor of your choice.
You can use the UFT environment variable file schema in:<UFT installationfolder>\help\QTEnvironment.xsd or follow the formatting instructions below.
2. Enter <Environment>on the first line.3. Enter each variable name-value pair in between <Variable> elements using the
following format:
<Variable> <Name>This is the first variable's name</Name> <Value>This is the first variable's value</Value> <Description> This text is optional and can be used to add comments. It is shown only in the XML and not in UFT</Description></Variable>
4. Enter </Environment> on the last line.
<Environment> <Variable> <Name>Address1</Name> <Value>25 Yellow Road</Value> </Variable> <Variable> <Name>Address2</Name> <Value>Greenville</Value> </Variable> <Variable> <Name>Name</Name> <Value>John Brown</Value> </Variable> <Variable> <Name>Telephone</Name> <Value>1-123-12345678</Value>
User GuideChapter 38: Parameterizing Object Values
HP Unified Functional Testing (12.53) Page 356 of 938
</Variable></Environment>
5. Save the file in a location that is accessible from the UFT computer. The filemust be in .xml format with an .xml file extension.
Regular expressionsRelevant for: GUI tests and components and API testing
A regular expression is a string that specifies a complex search phrase. By usingspecial characters, such as a period (.), asterisk (*), caret (^), and brackets ([ ]), youcan define the conditions of a search.
Regular expressions are used to identify objects and text strings with varyingvalues. You can use regular expressions to instruct UFT to find a value thatmatches a particular pattern or condition instead of a specific hard-coded value.
You can use regular expressions only for values of type string.
Example:l Suppose the name of a window's title bar changes according to a filename. You can use a regular expression in a test object description toidentify a window whose title bar has the specified product name, followedby a hyphen, and then any other text. When the relevant step runs, UFTcompares the regular expression that you provide with the correspondingvalue in your application.
l Suppose the text property of an object is a date value, but the displayeddate changes according to the current date. You can define a regularexpression for the date, so that UFT can identify the object that containstext with the expected date format, rather than the exact date value.
Whenever a UFT feature supports regular expressions, the relevant dialog boxincludes a Regular Expression check box. Selecting this check box instructs UFT totreat the provided value as a regular expression. Some dialog boxes that contain aRegular Expression check box, also contain a right arrow adjacent to the text box forthe value. Clicking this arrow enables you to select regular expression charactersfrom a drop-down list, and to test your regular expression to make sure it suits yourneeds.
User GuideChapter 38: Parameterizing Object Values
HP Unified Functional Testing (12.53) Page 357 of 938

For example, there are a number of scenarios in which you could use regularexpressions for a GUI test or component:
l Defining the property values of an object in dialog boxes or in programmaticdescriptions used within a function library
l Defining expected values for checkpoints in testsl Defining pop-up window conditions in a recovery scenariol When defining XML checkpoint property values where the property is a stringl HTTP Request test step checkpoint values, if the HTTP response is textFor details on defining regular expressions, including regular expression syntax,see "Regular expression characters and usage options" below.
Regular expression characters and usage optionsRelevant for: GUI tests and components and API testing
This section describes some of the more common options that can be used tocreate regular expressions:
User GuideChapter 38: Parameterizing Object Values
HP Unified Functional Testing (12.53) Page 358 of 938
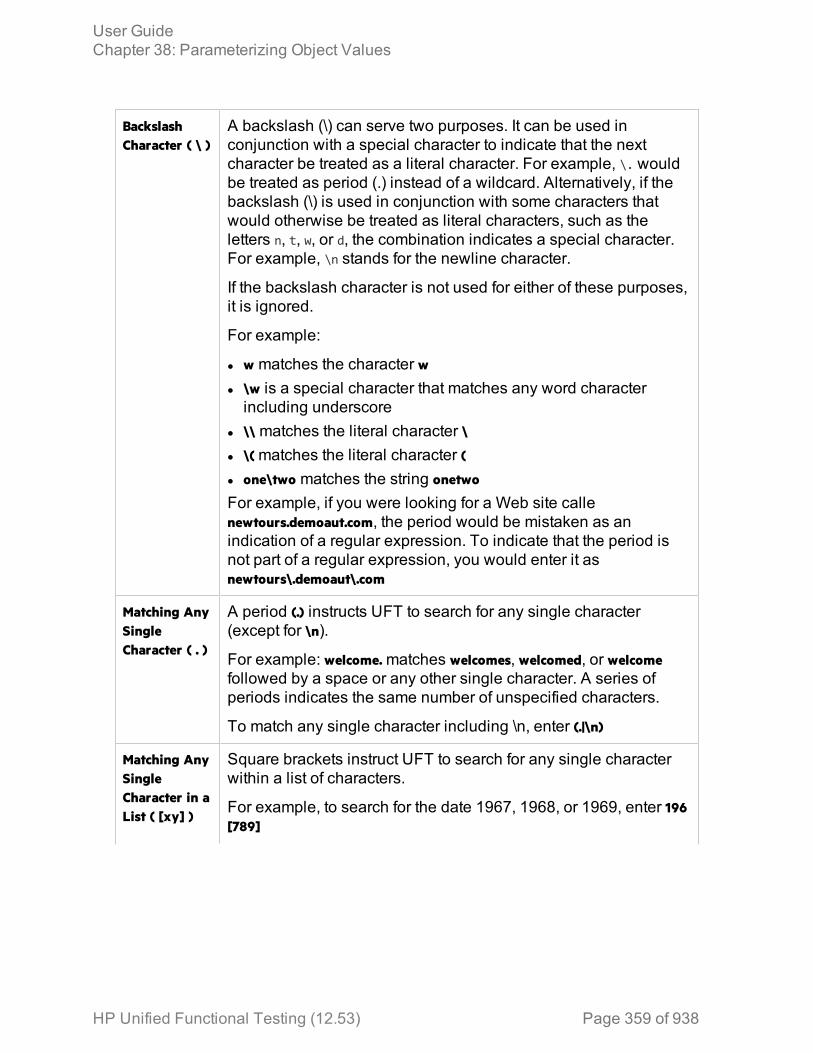
BackslashCharacter ( \ )
A backslash (\) can serve two purposes. It can be used inconjunction with a special character to indicate that the nextcharacter be treated as a literal character. For example, \. wouldbe treated as period (.) instead of a wildcard. Alternatively, if thebackslash (\) is used in conjunction with some characters thatwould otherwise be treated as literal characters, such as theletters n, t, w, or d, the combination indicates a special character.For example, \n stands for the newline character.
If the backslash character is not used for either of these purposes,it is ignored.
For example:
l w matches the character w
l \w is a special character that matches any word characterincluding underscore
l \\ matches the literal character \
l \( matches the literal character (
l one\two matches the string onetwo
For example, if you were looking for a Web site callenewtours.demoaut.com, the period would be mistaken as anindication of a regular expression. To indicate that the period isnot part of a regular expression, you would enter it asnewtours\.demoaut\.com
Matching AnySingleCharacter ( . )
A period (.) instructs UFT to search for any single character(except for \n).
For example: welcome. matches welcomes, welcomed, or welcomefollowed by a space or any other single character. A series ofperiods indicates the same number of unspecified characters.
To match any single character including \n, enter (.|\n)
Matching AnySingleCharacter in aList ( [xy] )
Square brackets instruct UFT to search for any single characterwithin a list of characters.
For example, to search for the date 1967, 1968, or 1969, enter 196[789]
User GuideChapter 38: Parameterizing Object Values
HP Unified Functional Testing (12.53) Page 359 of 938

Matching AnySingleCharacter Notin a List ( [^xy] )
When a caret (^) is the first character inside square brackets, itinstructs UFT to match any character in the list except for the onesspecified in the string.
For example [^ab] matches any character except a or b
The caret has this special meaning only when it is displayed firstwithin the brackets.
Matching AnySingleCharacterwithin aRange ( [x-y] )
To match a single character within a range, you can use squarebrackets ([ ]) with the hyphen (-) character.
For instance, to match any year in the 1960s, enter 196[0-9]
A hyphen does not signify a range if it is displayed as the first orlast character within brackets, or after a caret (^).
For example, [-a-z] matches a hyphen or any lowercase letter.
Within brackets, the characters ".", "*", "[" and "\" are literal. Forexample, [.*] matches . or *. If the right bracket is the first characterin the range, it is also literal.
Matching Zeroor MoreSpecificCharacters( * )
An asterisk (*) instructs UFT to match zero or more occurrences ofthe preceding character.
For example, ca*r matches car, caaaaaar, and cr.
Matching Oneor MoreSpecificCharacters( + )
A plus sign (+) instructs UFT to match one or more occurrences ofthe preceding character.
For example ca+r matches car and caaaaaar, but not cr
GroupingRegularExpressions ( ( ) )
Parentheses (()) instruct UFT to treat the contained sequence as aunit, just as in mathematics and programming languages.
Using groups is especially useful for delimiting the arguments toan alternation operator ( | ) or a repetition operator: ( * , + , ? , { } )
Matching Oneof SeveralRegularExpressions( | )
Matching One of Several Regular Expressions ( | )
A vertical line (|) instructs UFT to match one of a choice ofexpressions.
For example, foo|bar causes UFT to match either foo or bar. Bycontrast, fo(o|b)ar causes UFT to match either fooar or fobar
User GuideChapter 38: Parameterizing Object Values
HP Unified Functional Testing (12.53) Page 360 of 938

Matching theBeginning ofa Line ( ̂ )
A caret (^) instructs UFT to match the expression only at the startof a line, or after a newline character.
For example, book matches book within the lines—book, my book,and book list, while ^book matches book only in the lines—bookand book list
Matching theEnd of a Line( $ )
A dollar sign ($) instructs UFT to match the expression only at theend of a line.
For example book matches book within the lines—my book, andbook list, while a string that is followed by (\n), (\r), or ($), matchesonly lines ending in that string.
For example book$ matches book only in the line—my book
Matching aNewline orCarriageReturnCharacter( \n ) or ( \r )
\n or \r instruct UFT to match the expression only when followedby a newline or carriage return character.
l \n instructs UFT to match any newline characters.l \r instructs UFT to match any carriage return characters.For example, book matches book within the lines—my book, andbook list
A string that is followed by (\n) or (\r) matches only lines that arefollowed by a newline or carriage return character.
For example, book\r matches book only when book is followed bya carriage return
Matching AnyAlphaNumericCharacterIncluding theUnderscore( \w )
\w instructs UFT to match any alphanumeric character and theunderscore (A-Z, a-z, 0-9, _).
For example, \w* causes UFT to match zero or more occurrencesof the alphanumeric characters—A-Z, a-z, 0-9, and the underscore(_). It matches Ab, r9Cj, or 12_uYLgeu_435.
For example, \w{3} causes UFT to match 3 occurrences of thealphanumeric characters A-Z, a-z, 0-9, and the underscore (_). Itmatches Ab4, r9_, or z_M.
Matching AnyNon-AlphaNumericCharacter( \W )
\W instructs UFT to match any character other than alphanumericcharacters and underscores.
For example, \W matches &, *, ^, %, $, and #
User GuideChapter 38: Parameterizing Object Values
HP Unified Functional Testing (12.53) Page 361 of 938
Matching aDecimal Digit( \d )
\d instructs UFT to match any decimal digit.
For example, \d matches 1, 2, 4, and 5
Matching anInteger ( \D )
\D instructs UFT to match any whole integer.
For example, \D matches 145643, 20, 3426767, 4, and 5
CombiningRegularExpressionOperators
You can combine regular expression operators in a singleexpression to achieve the exact search criteria you need.
For example, you can combine the '.' and '*' characters to find zeroor more occurrences of any character (except \n).
For example, start.* matches start, started, starting, starter
You can use a combination of brackets and an asterisk to limit thesearch to a combination of non-numeric characters. For example,[a-zA-Z]*
To match any number between 0 and 1200, you need to matchnumbers with 1 digit, 2 digits, 3 digits, or 4 digits between 1000-1200.
This regular expression matches any number between 0 and1200: ([0-9]?[0-9]?[0-9]|1[01][0-9][0-9]|1200)
Note: For a complete list and explanation of supported regular expressionscharacters, see the Regular Expressions section in the Microsoft VBScriptdocumentation (select Help > HP Unified Functional Testing Help to open theUFT Help. Then select VBScript Reference > VBScript > VBScript User's Guide >Introduction to Regular Expressions).
User GuideChapter 38: Parameterizing Object Values
HP Unified Functional Testing (12.53) Page 362 of 938

Chapter 39: Value Configuration andParameterizationRelevant for: GUI tests and components
UFT enables you to configure the values for properties and other items by defininga value as a constant or a parameter. You can also use regular expressions forsome values to increase the flexibility and adaptability of your tests.
Some dialog boxes, such as the Checkpoint Properties dialog boxes, include aConfigure value area, in which you can define the value for a selected item as aconstant or a parameter. In other contexts, such as the Keyword View, StepGenerator, and Object Repository window, you can select a value directly andparameterize it or define it as a constant.
l Constant. A manually defined value that remains unchanged for the duration of thetest. In certain contexts, you can define a constant value using a regularexpression.
l Parameter. A value that is defined or generated externally and is retrieved duringa run session. For example, a parameter value may be defined in an external fileor generated by UFT.
When you define a value as a parameter, you can also specify other settingsaccording to the parameter type. For details on using parameters in your tests, see"Parameterizing Object Values" on page 330.
Local and component parametersRelevant for: Keyword GUI components
You can define input parameters that pass values into your keyword component,and output parameters that pass values from your component to external sourcesor from one step to another step. You can then use these parameters toparameterize input and output values in steps.
You can define two types of parameters—local parameters and component parameters:
ParameterType Description
Localparameter
Variable values defined within a component for use within the samecomponent.
Local input parameter values can be received and used by a laterparameterized step in the same component. You define local inputparameters in the Keyword View using the Value Configuration
HP Unified Functional Testing (12.53) Page 363 of 938

Options Dialog Box and the Parameters Tab of the Properties Pane.
Local output parameters can be returned by an operation orcomponent step for use within the same component. Local outputparameter values can be viewed in the business process run results.You define these local output parameters using the Output Optionsdialog box.
You cannot delete local parameters, but you can cancel the input oroutput to them.
Componentparameter
Variable values defined within a component for use in the samecomponent or later components in the business process test.
Component input parameter values can be received and used as thevalues for specific, parameterized steps in the component.
Component output parameters can be returned as input parametersin components that are used later in the test. These values can alsobe viewed in the business process test run results.
You define component input and output parameters in theParameters pane of the Component Settings dialog box, or in theALM Business Components module.
Additionally, if you are working with a business process test or flow,you can define parameters in the Properties pane.
After you define a parameter you can use it to parameterize a value. Alternatively,you can apply a constant value to the parameter by typing it directly in the Valuecell.
For instructions on how to parameterize input values, see "Parameterize inputvalues" on the next page.
For instructions on how to parameterize output values, see "Create or modify anoutput value step" on page 326.
Configure constant and parameter valuesRelevant for: GUI tests and components
This task describes how to define a value as a constant or a parameter:
Do one of the following:
1. In the Value area (available from the Keyword View, Step Generator, ObjectRepository window, and so on), click the parameterization button for a
User GuideChapter 39: Value Configuration and Parameterization
HP Unified Functional Testing (12.53) Page 364 of 938
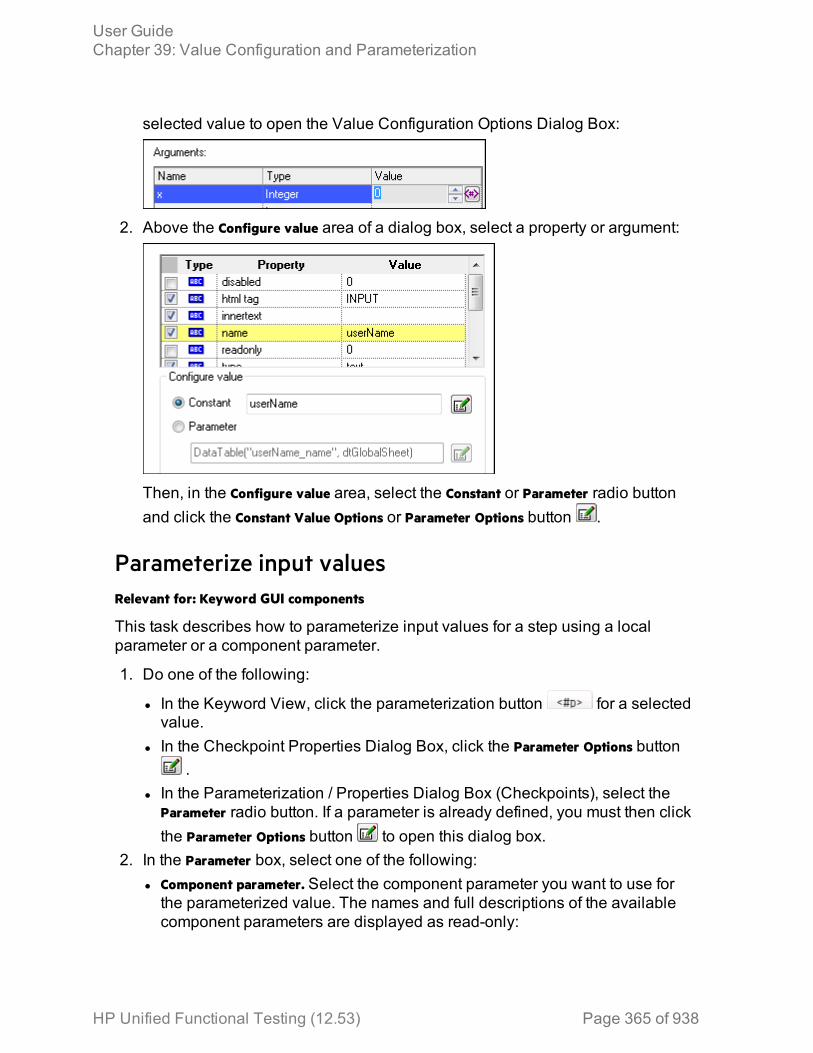
selected value to open the Value Configuration Options Dialog Box:
2. Above the Configure value area of a dialog box, select a property or argument:
Then, in the Configure value area, select the Constant or Parameter radio buttonand click the Constant Value Options or Parameter Options button .
Parameterize input valuesRelevant for: Keyword GUI components
This task describes how to parameterize input values for a step using a localparameter or a component parameter.
1. Do one of the following:
l In the Keyword View, click the parameterization button for a selectedvalue.
l In the Checkpoint Properties Dialog Box, click the Parameter Options button.
l In the Parameterization / Properties Dialog Box (Checkpoints), select theParameter radio button. If a parameter is already defined, you must then clickthe Parameter Options button to open this dialog box.
2. In the Parameter box, select one of the following:l Component parameter. Select the component parameter you want to use forthe parameterized value. The names and full descriptions of the availablecomponent parameters are displayed as read-only:
User GuideChapter 39: Value Configuration and Parameterization
HP Unified Functional Testing (12.53) Page 365 of 938
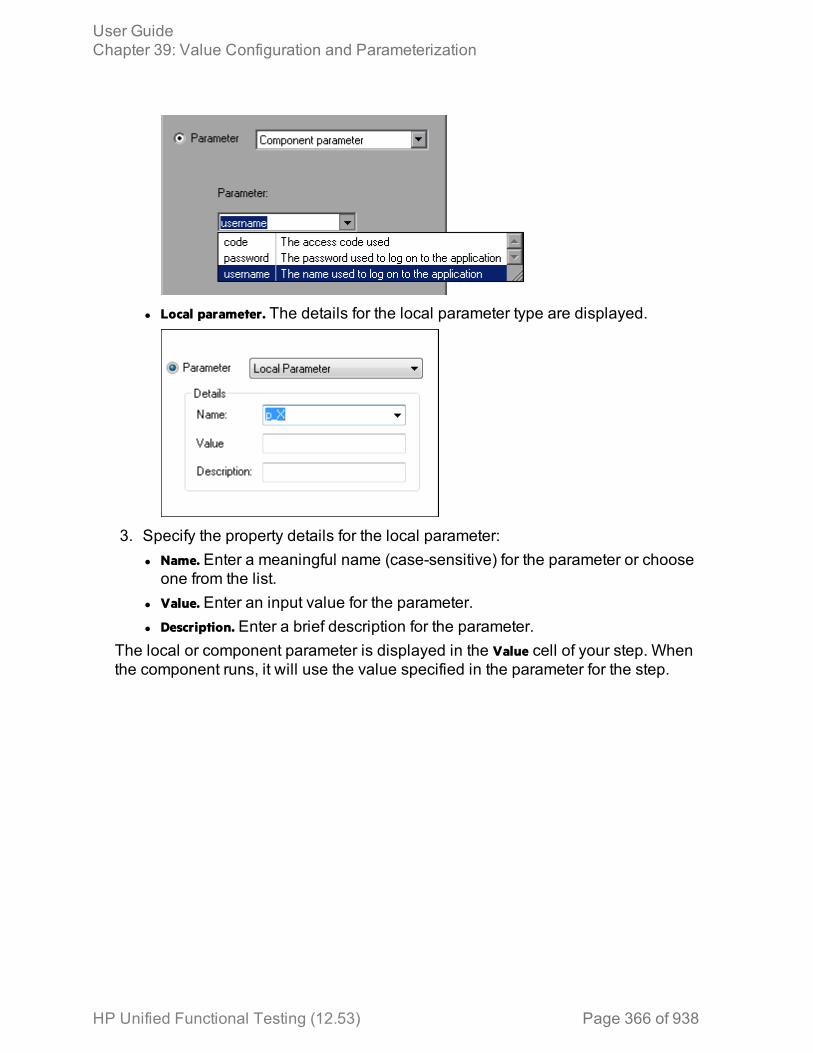
l Local parameter. The details for the local parameter type are displayed.
3. Specify the property details for the local parameter:l Name. Enter a meaningful name (case-sensitive) for the parameter or chooseone from the list.
l Value. Enter an input value for the parameter.l Description. Enter a brief description for the parameter.
The local or component parameter is displayed in the Value cell of your step. Whenthe component runs, it will use the value specified in the parameter for the step.
User GuideChapter 39: Value Configuration and Parameterization
HP Unified Functional Testing (12.53) Page 366 of 938

HP Unified Functional Testing (12.53) Page 367
Part 6: API Test Design
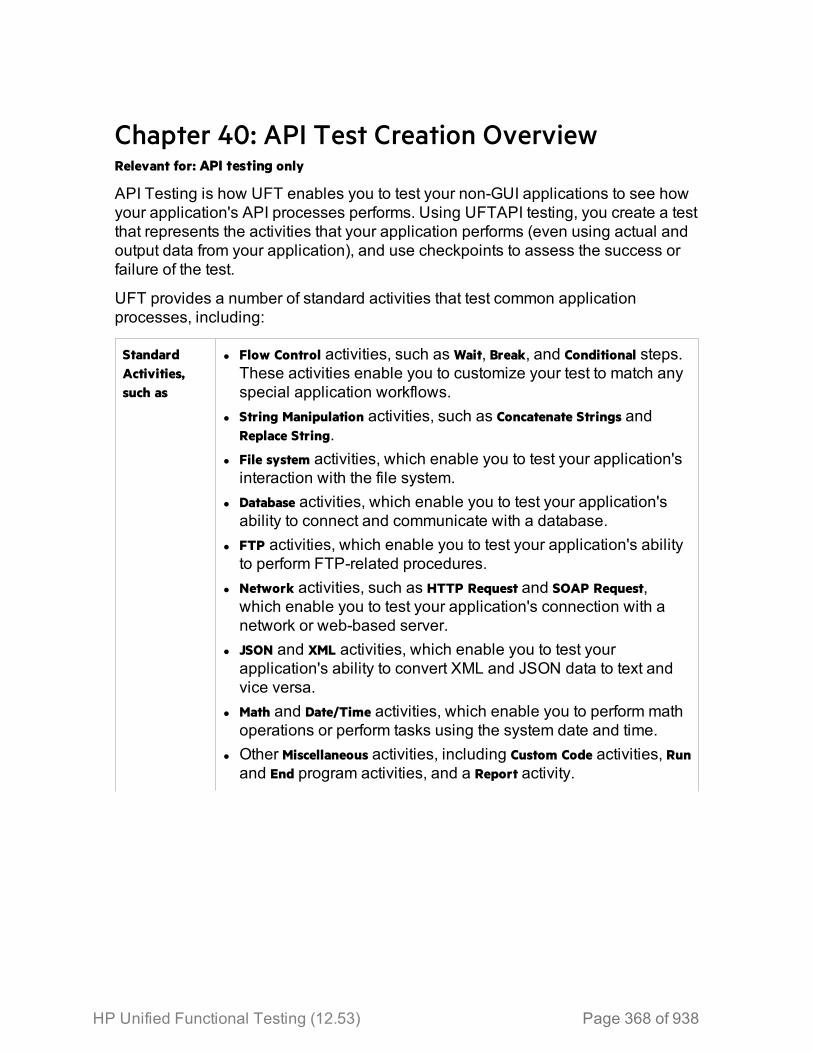
Chapter 40: API Test Creation OverviewRelevant for: API testing only
API Testing is how UFT enables you to test your non-GUI applications to see howyour application's API processes performs. Using UFTAPI testing, you create a testthat represents the activities that your application performs (even using actual andoutput data from your application), and use checkpoints to assess the success orfailure of the test.
UFT provides a number of standard activities that test common applicationprocesses, including:
StandardActivities,such as
l Flow Control activities, such as Wait, Break, and Conditional steps.These activities enable you to customize your test to match anyspecial application workflows.
l String Manipulation activities, such as Concatenate Strings andReplace String.
l File system activities, which enable you to test your application'sinteraction with the file system.
l Database activities, which enable you to test your application'sability to connect and communicate with a database.
l FTP activities, which enable you to test your application's abilityto perform FTP-related procedures.
l Network activities, such as HTTP Request and SOAP Request,which enable you to test your application's connection with anetwork or web-based server.
l JSON and XML activities, which enable you to test yourapplication's ability to convert XML and JSON data to text andvice versa.
l Math and Date/Time activities, which enable you to perform mathoperations or perform tasks using the system date and time.
l Other Miscellaneous activities, including Custom Code activities, Runand End program activities, and a Report activity.
HP Unified Functional Testing (12.53) Page 368 of 938

Technology-specificactivities,such as:
l A Call Java Class activity, which enables you to test Java-basedprocesses that run in your application
l JMS (Java Message Service) activities, which enable you to testyour application's ability to communicate, publish, browse,receive, and check messages from a JMS queue.
l IBM WebSphere MQ activities, which enable you to test yourapplication's ability to communicate with, publish, browse,receive, and check messages from the IBM WebSphereMQ queue or topic.
l SAP activities, which enable you to test your application's abilityto communicate with an SAP server using IDOCS and RFCs.
l Load Testing activities, which enable you to add steps for yourtest to be run as a load test in HP LoadRunner.
l HP Automated Testing Tools activities, which enable you to call aGUI test or action, API test or action, or Virtual User Generatorscript from UFT, QuickTest Professional, Service Test, orLoadRunner to use as part of your test.
Customactivities,based onyourservices, suchas:
l Web Service activities imported from a WSDL file. For details, see"Import a WSDL-based Web service" on page 421.
l Web Application activities imported from a WADL file. For details,see "Import a Web Application service" on page 432,
l REST Service activities created in UFT using the Add RESTService dialog box or by importing a Swagger REST API. Fordetails, see "Create a REST service model" on page 424.
l Network Capture activities imported from a Network Capture file
If the built-in activities are not sufficient for your needs, you can:
l Use custom code activities that seamlessly integrate with UFT. Using customized code,you can also customize the behavior of existing activities using event handlers.For details on creating and using custom code with your test, see "EventHandlers for API Test Steps" on page 616.
l Create custom test activities with the UFT Activity Wizard (Start > All Programs >HP Software > HP Unified Functional Testing > Tools > Activity Wizard or <UFTinstallation folder>\Tools\ActivityWizard\bin\ActivityWizard.exe). The ActivityWizard enables you to specify the activity type and properties. It then exports theactivity to the Toolbox pane for use in future testing sessions.For details on adding new activities and custom code, see "API TestingExtensibility" on page 507.
APItesting integrates with the following products:
User GuideChapter 40: API Test Creation Overview
HP Unified Functional Testing (12.53) Page 369 of 938
ApplicationLifecycleManagement(ALM).
You can save tests, business component, and test resources onALM, enabling multiple users to store and access a sharedrepository of tests and test resources. You can also use ALM'sdefect tracking abilities to record and manage application defectswhen running your tests.
ServiceVirtualization
In order to mimic services that your application may use, UFTintegrates with Service Virtualization. After creating your servicemodels in Service Virtualization, you then run them as a servicefor your test.
Other tools by using HP Automated Testing Tools activities you can integratewith additional HP functional testing products by creating teststeps that call a GUI test or action, API test or action, or aLoadRunner script. These tests or scripts are created in theoriginal application and call from within your test flow.
For task details, see "Call external tests or actions" on page 400.
Automatically generating API testsIn order to create API tests using the full IDE functionality, you must fullyunderstand your application's service layer: what processes are used, whatparameters are passed between layers of the service, and other similar details.This can sometimes be very difficult.
However, if you want to quickly create a test of your application, UFT provides toolsto automatically generate an API test, including test steps and step property values:
User GuideChapter 40: API Test Creation Overview
HP Unified Functional Testing (12.53) Page 370 of 938

API TestGeneratorWizard
This wizard takes the content from a WSDL file and creates afull API test, including all the steps in the test, and all theproperty values entered. After you select the appropriate file(which contains the meta description of your service), youselect the methods to include in the generated test.
In addition, UFT can create multiple and separate tests for anumber of different testing aspects:
l Positive Testing: A full positive test that checks that theservice's operations work as expected. This adds relevantcheckpoints for each step (although these are not enabledby default).
l Standard Compliance: Checks the service compliance withindustry standards such as WS-I and SOAP.
l Security Testing. Tests the security of the service. You canselect one of the following types of security testing:l SQL Injection Vulnerability. This checks if the service isvulnerable to SQL injections by injecting SQL statementsand errors into relevant parameters.
l Cross-site Scripting (XSS). Attempts to hack the service byinjecting code with relevant parameters that will disruptits functionality.
l Boundary Testing. Using the negative testing technique,creates tests to manipulate data, types, parameters, and theactual SOAP message to test the component to itslimits. You can select one of the following types of boundarytesting:l Extreme Values: Provides invalid data types to the servicesand verifies they are not accepted.
l Null Values. Provides NULL parameters to thecomponents to verify they are not accepted.
SOAPUI to TestConverter
If you have previously created tests in SOAPUI, you canconvert these tests into API tests. The test is automaticallygenerated, containing the steps and the test properties.
For task details on how to automatically generate your tests, see "Automaticallygenerate API tests" on page 383.
User GuideChapter 40: API Test Creation Overview
HP Unified Functional Testing (12.53) Page 371 of 938
Create an API testRelevant for: API testing only
This task describes the workflow and methodology to follow when you create andbuild a test.
Prerequisite - Analyze your applicationBefore creating a test, you need to analyze your application and determine yourtesting needs. You need to:
Determine thefunctionalityyou want totest.
To do this, you consider the various activities that the applicationperforms. What business processes run? What activities are mostrelevant for the business processes that you want to test?
Identify anyprocesses thatrunrepeatedly.
Plan to create actions in your test for such processes.
As you plan, try to keep the number of steps that you plan toinclude in each action to a minimum. Creating small, modularactions helps make your tests easier to read, follow, and maintain.
Prerequisite - Configure UFT according to your testingneedsThis can include:
l Setting up your global testing preferences.For details, see "Global Options" on page 98.
l Setting up test-specific preferences, including global properties, test input andoutput properties and parameters, or user profiles and variables.For details, see "Define API test properties or user/system variables" on page461.
l Configuring your run session preferences.
Prerequisite - Prepare the service references (optional)l Import or build the set of resources to be used by your tests, including:
l Importing WSDL or WADL files, which define the methods used for a Web serviceor Web application.For details, see "Import a WSDL-based Web service" on page 421 or "Import aWeb Application service" on page 432.
User GuideChapter 40: API Test Creation Overview
HP Unified Functional Testing (12.53) Page 372 of 938
l Creating REST service resources and methods if your application is based uponREST services.For details, see "Create a REST service model" on page 424.
l Importing .NET assemblies referenced by your test.For details, see "Import and create a .NET Assembly API test step" on page436.
l Adding any additional reference files that will be referenced by your test.
Note: Skip this step when you will be using only the built-in operations.These activities are available in the Toolbox pane under the StandardActivities section.
Build your test structure
Note: API tests cannot be created in a path containing an "equal sign" ('=')character.
To build your basic test structure, do the following:
Createadditionaltest flowsteps-optional
Expand the Toolbox pane nodes and drag Flow Control activities ontothe canvas:
l Loop. Enables you to add another loop (the Test Flow loop is alwayspart of a test, and cannot be removed). You specify the loopbehavior in the loop's input properties.
l Condition. Enables you to define conditional branches.l Sleep. Indicates a time delay in milliseconds.
Addactivitiesto the testto createtest steps
Expand the nodes of the Toolbox pane and drag activities into theText Flow or a Loop box within the canvas to create test steps. If youadded a Condition step, drag activities into the condition branches.
User GuideChapter 40: API Test Creation Overview
HP Unified Functional Testing (12.53) Page 373 of 938
Providethe stepproperties
Enter the input, output, and checkpoint properties (as needed) foreach activity. For details on the input, output, and checkpointproperties available for each activity, see "Standard Activities" onpage 386.
If you have a number of activities/steps that are repeated often in yourtest, consider creating an action and adding the steps to this action.After creating the action, you can call the action each time you needto repeat these steps in your test instead of adding the activities andsetting the activity's properties repeatedly.
Enhance yhour test stepsTo enhance your test steps, do any of the following:
Definedatasources forthetest
For details, see "Assign data to API test/component steps" on page 454.
CreateaCustomCodeactivity
1. Select the Custom Code activity from the Miscellaneous category anddrag it into a loop.
2. Click the Input/Checkpoints tab in the Properties pane.3. Click Add Properties and create the required input and output
properties.
4. Open the Events tab in the Properties pane.5. Double-click the Handler column of the ExecuteEvent row. UFT opens
a new tab TestUserCode.cs.6. Locate the Todo section and enter your custom code. Follow the
sample code in the comments and use autocompletion to write yourcode.
7. Click File > Save All to save the custom code and the test.
User GuideChapter 40: API Test Creation Overview
HP Unified Functional Testing (12.53) Page 374 of 938
Add aneventhandler -optional
For any activities, you can define default event handlers for checkpoints,and before and after step executions.
1. Select a step in the canvas and open the Events tab in theProperties pane.
2. In the row containing the event execution point you want (before,after,etc.), select Create a default handler.
3. Edit the code in the TestUserCode.cs tab. Locate the Todo section andadd your custom code. Follow the sample code in the commentsand use statement completion to create an expression.
4. To access the properties of an activity, cast it before the activityname. For example:
ConcatenateStringsActivity cat = args.Activity asConcatenateStringsActivity;args.Checkpoint.Assert.Equals(cat.Prefix+cat.Suffix, cat.Result);
5. Click File > Save All to save the TestUserCode.cs file and the test.For details and examples, see "Event Handlers for API Test Steps"on page 616.
ResultsAfter you create your test, you can perform different types of runs to achievedifferent goals. You can:
Run yourtest tocheck yourapplication.
The test starts running from the Start step in the canvas and stops atthe end of the test. While running, UFT performs each step in yourtest, including any checkpoints.
If you parameterized the test using data from a data source stored inthe Data pane, UFT repeats the test (or test flow loop, if needed)using the data as defined in the Input tab for the Test Flow or test flowsteps.
Run yourtest todebug it.
Before running a debugging session, make sure to enabledebugging capabilities by selecting the Run test in debugging modeoption in the General Pane of the API Testing tab of the Optionsdialog box.
For general details on debugging, see "Debugging Tests andComponents" on page 749.
User GuideChapter 40: API Test Creation Overview
HP Unified Functional Testing (12.53) Page 375 of 938
Run anindividualstep.
Select the step in the canvas and choose Run Step from the contextmenu to run the step with its property values. Note the results in theRun Step Results pane, in the lower section of the main window. Ifsomething needs to be modified, do so at this point.
Create an API test - Use-case scenarioRelevant for: API testing only
Creating a test is comprised of several stages. This section walks you through thestages you might perform when preparing a test for the Flight API application.
Analyze the Flight API applicationWhen analyzing the application to determine what application processes you maywant to test, you can consider the existing business processes that run in theapplication.
The business processes that should be tested for the Flight API applicationinclude:
l Connecting to the user database and confirming login informationl Retrieving the list of flightsl Retrieving a flight order based on user inputl Creating a flight orderl Updating a flight orderl Deleting a flight orderl Deleting all flight ordersl Logging a user out of the applicationAlthough the first and last items above have not yet been implemented in the FlightAPI application that you want to test, it is important to take them into account in theplanning stage.
Now that you have determined the primary application processes, you shouldanalyze each one to determine the breakdown of these application processes intosmaller, testable parts.
User GuideChapter 40: API Test Creation Overview
HP Unified Functional Testing (12.53) Page 376 of 938
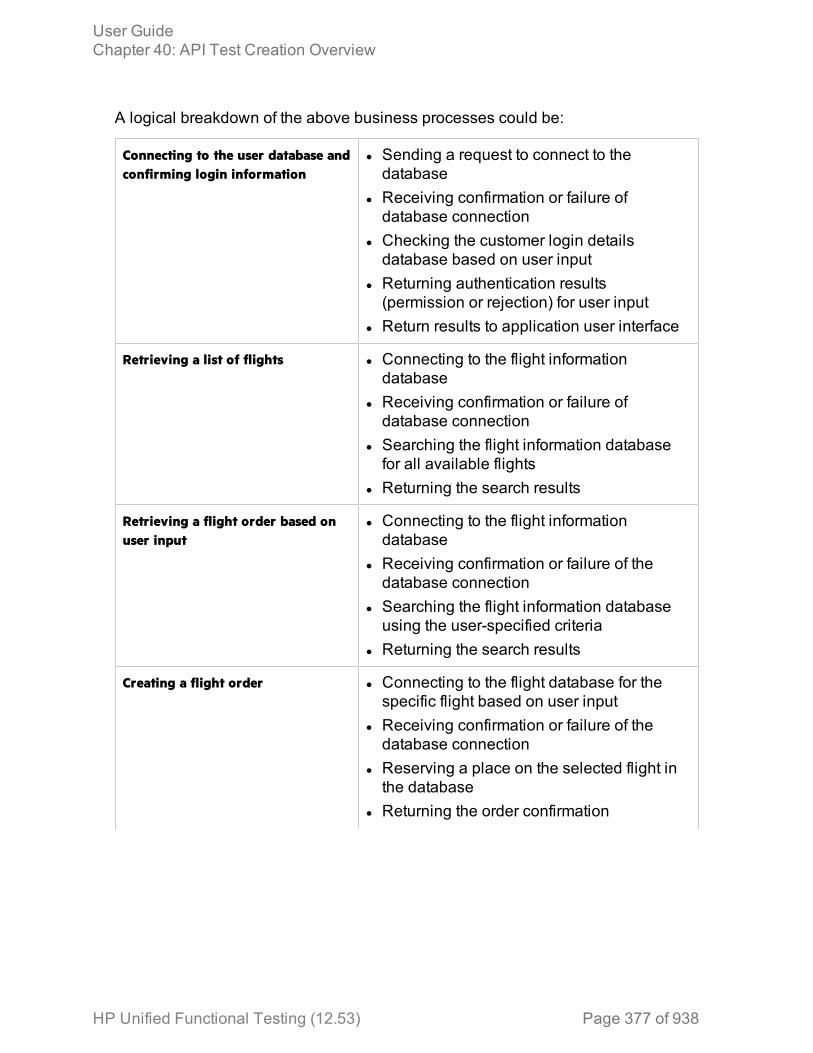
A logical breakdown of the above business processes could be:
Connecting to the user database andconfirming login information
l Sending a request to connect to thedatabase
l Receiving confirmation or failure ofdatabase connection
l Checking the customer login detailsdatabase based on user input
l Returning authentication results(permission or rejection) for user input
l Return results to application user interface
Retrieving a list of flights l Connecting to the flight informationdatabase
l Receiving confirmation or failure ofdatabase connection
l Searching the flight information databasefor all available flights
l Returning the search results
Retrieving a flight order based onuser input
l Connecting to the flight informationdatabase
l Receiving confirmation or failure of thedatabase connection
l Searching the flight information databaseusing the user-specified criteria
l Returning the search results
Creating a flight order l Connecting to the flight database for thespecific flight based on user input
l Receiving confirmation or failure of thedatabase connection
l Reserving a place on the selected flight inthe database
l Returning the order confirmation
User GuideChapter 40: API Test Creation Overview
HP Unified Functional Testing (12.53) Page 377 of 938
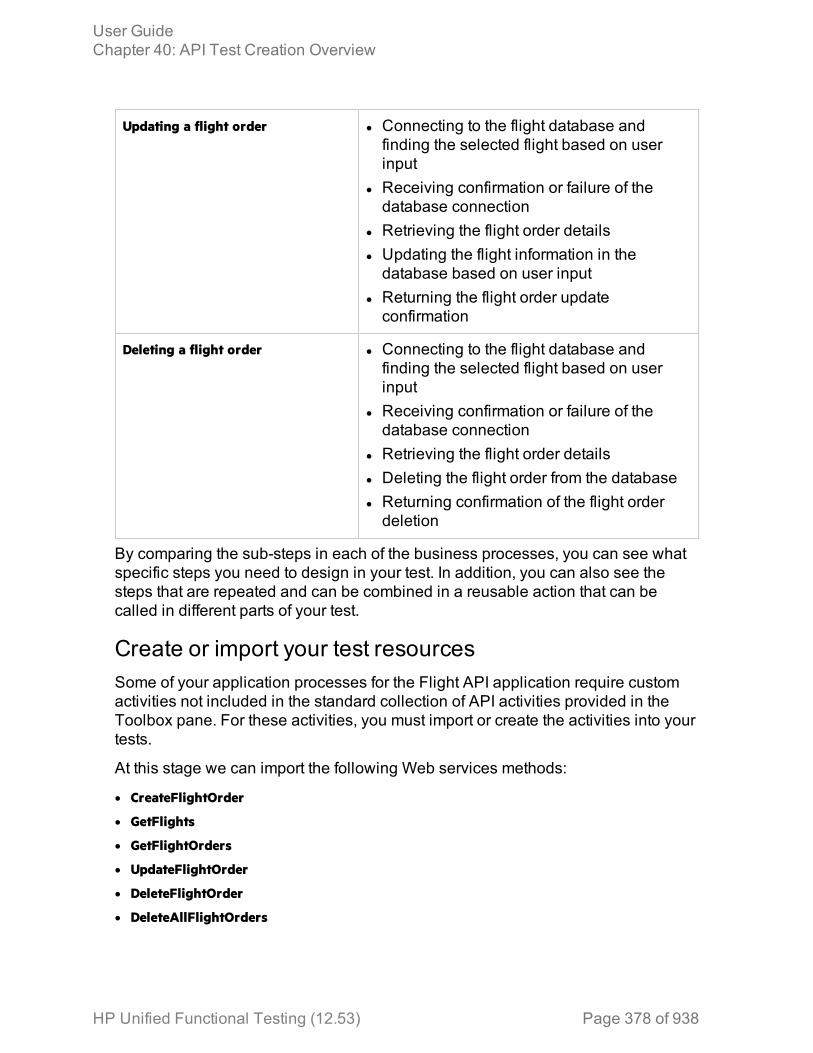
Updating a flight order l Connecting to the flight database andfinding the selected flight based on userinput
l Receiving confirmation or failure of thedatabase connection
l Retrieving the flight order detailsl Updating the flight information in thedatabase based on user input
l Returning the flight order updateconfirmation
Deleting a flight order l Connecting to the flight database andfinding the selected flight based on userinput
l Receiving confirmation or failure of thedatabase connection
l Retrieving the flight order detailsl Deleting the flight order from the databasel Returning confirmation of the flight orderdeletion
By comparing the sub-steps in each of the business processes, you can see whatspecific steps you need to design in your test. In addition, you can also see thesteps that are repeated and can be combined in a reusable action that can becalled in different parts of your test.
Create or import your test resourcesSome of your application processes for the Flight API application require customactivities not included in the standard collection of API activities provided in theToolbox pane. For these activities, you must import or create the activities into yourtests.
At this stage we can import the following Web services methods:
l CreateFlightOrder
l GetFlights
l GetFlightOrders
l UpdateFlightOrder
l DeleteFlightOrder
l DeleteAllFlightOrders
User GuideChapter 40: API Test Creation Overview
HP Unified Functional Testing (12.53) Page 378 of 938
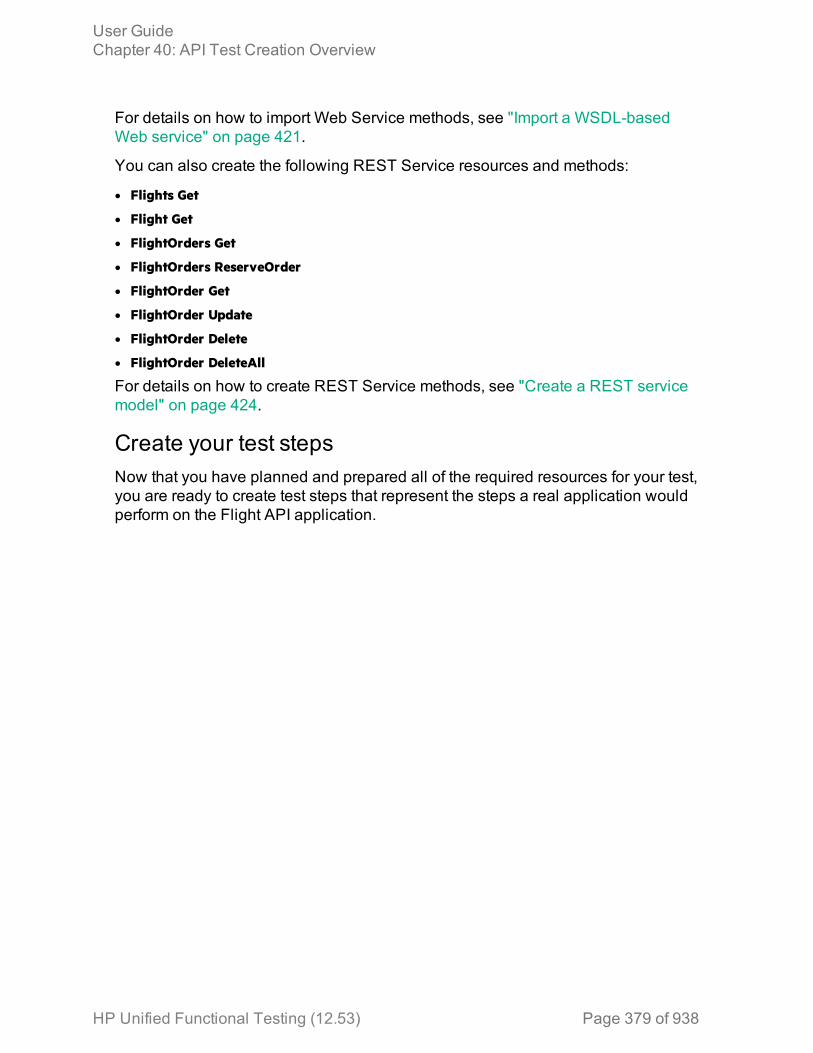
For details on how to import Web Service methods, see "Import a WSDL-basedWeb service" on page 421.
You can also create the following REST Service resources and methods:
l Flights Get
l Flight Get
l FlightOrders Get
l FlightOrders ReserveOrder
l FlightOrder Get
l FlightOrder Update
l FlightOrder Delete
l FlightOrder DeleteAll
For details on how to create REST Service methods, see "Create a REST servicemodel" on page 424.
Create your test stepsNow that you have planned and prepared all of the required resources for your test,you are ready to create test steps that represent the steps a real application wouldperform on the Flight API application.
User GuideChapter 40: API Test Creation Overview
HP Unified Functional Testing (12.53) Page 379 of 938
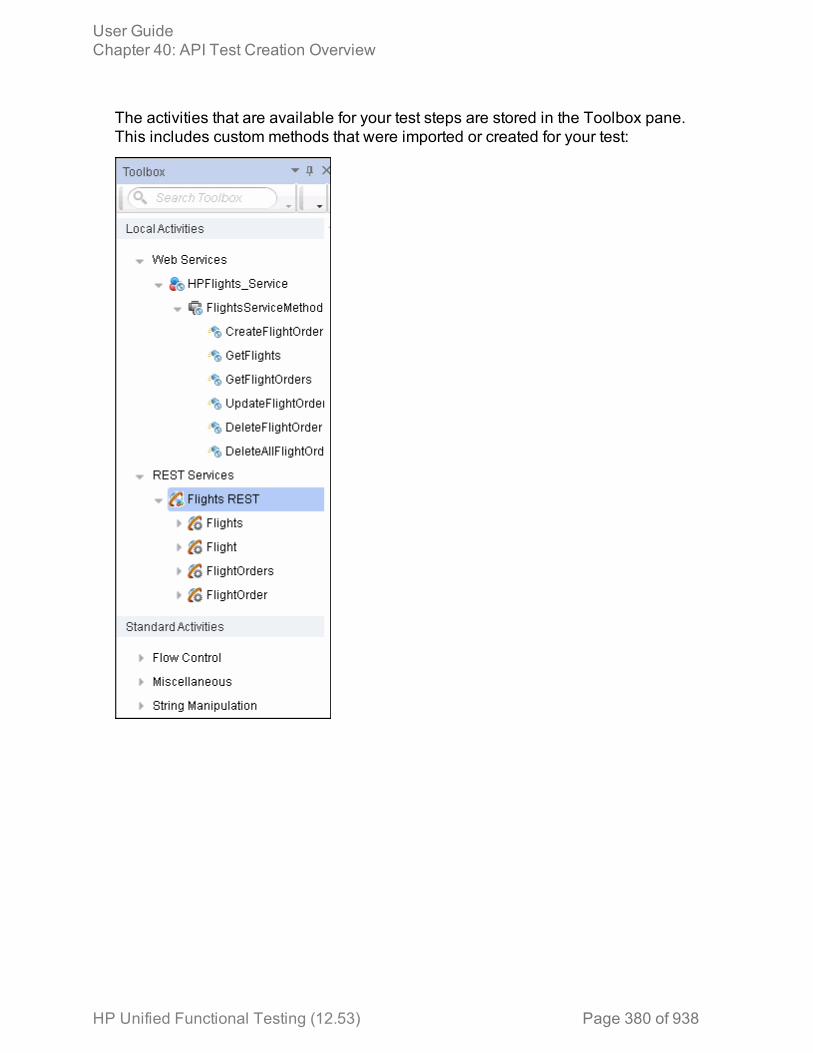
The activities that are available for your test steps are stored in the Toolbox pane.This includes custom methods that were imported or created for your test:
User GuideChapter 40: API Test Creation Overview
HP Unified Functional Testing (12.53) Page 380 of 938
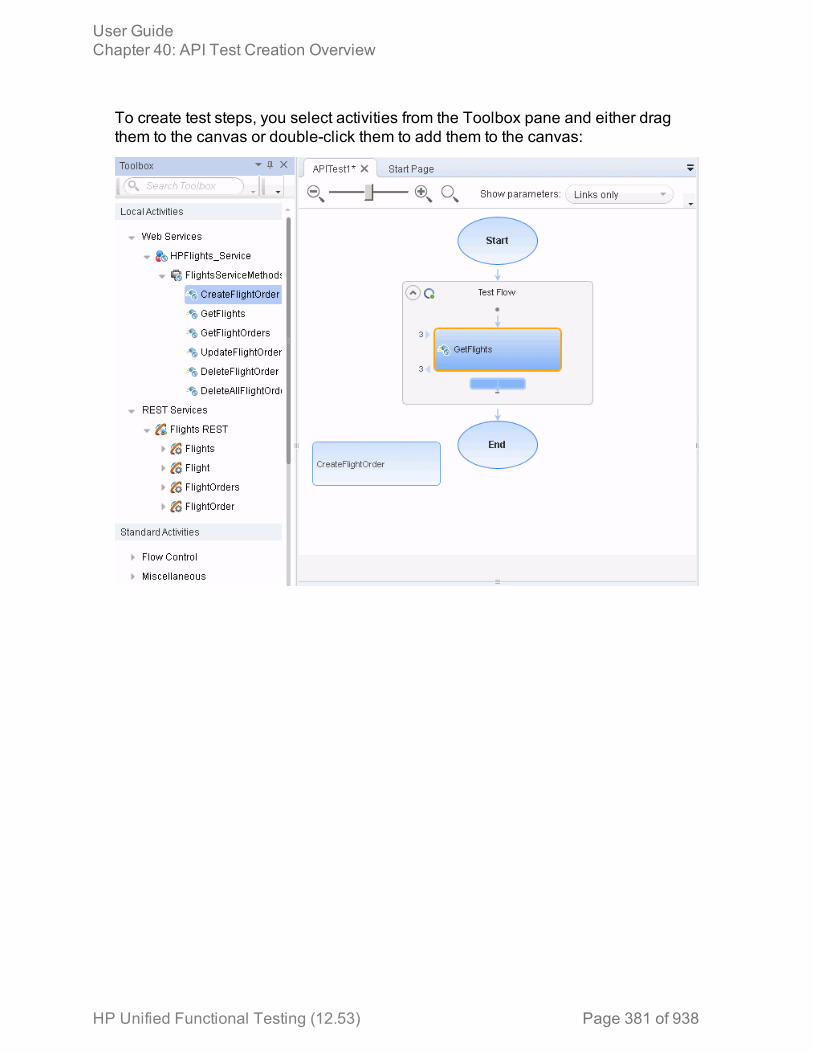
To create test steps, you select activities from the Toolbox pane and either dragthem to the canvas or double-click them to add them to the canvas:
User GuideChapter 40: API Test Creation Overview
HP Unified Functional Testing (12.53) Page 381 of 938
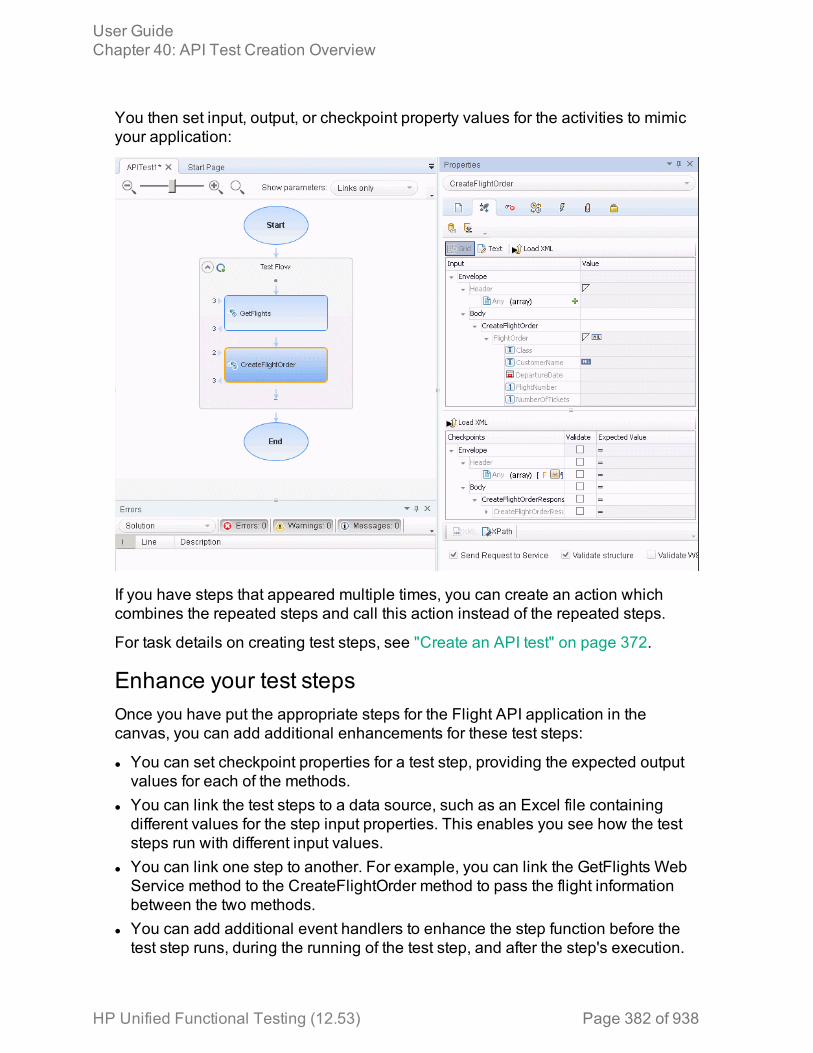
You then set input, output, or checkpoint property values for the activities to mimicyour application:
If you have steps that appeared multiple times, you can create an action whichcombines the repeated steps and call this action instead of the repeated steps.
For task details on creating test steps, see "Create an API test" on page 372.
Enhance your test stepsOnce you have put the appropriate steps for the Flight API application in thecanvas, you can add additional enhancements for these test steps:
l You can set checkpoint properties for a test step, providing the expected outputvalues for each of the methods.
l You can link the test steps to a data source, such as an Excel file containingdifferent values for the step input properties. This enables you see how the teststeps run with different input values.
l You can link one step to another. For example, you can link the GetFlights WebService method to the CreateFlightOrder method to pass the flight informationbetween the two methods.
l You can add additional event handlers to enhance the step function before thetest step runs, during the running of the test step, and after the step's execution.
User GuideChapter 40: API Test Creation Overview
HP Unified Functional Testing (12.53) Page 382 of 938
Run the testAfter you add your test steps, and provide the input, output, or checkpoint propertyvalues, you run your test and observe the results. In the run results, display the TestFlow and observe the results and response for each of the test steps.
If you want to test each individual step after entering its properties, you can right-click the step name in the canvas and select Run Step. UFT runs only that step anddisplays the step results in the Run Step Results pane.
Automatically generate API testsRelevant for: API tests only
This task describes how to automatically generate API tests from externaldocuments. This can be helpful if you have existing API resources (such as WSDLdocuments or other service model description documents) that need to be madeinto a functional test of your application's API.
Note: This task is part of a higher-level task. For details, see "Create an APItest" on page 372.
Generate your test from a WSDL fileUsing the API Test Generator Wizard, you can create full tests (with all steps andstep property values entered) from a WSDL file:
1. From the Start Menu, open the API Test Generator Wizard (Start > All Programs> HP Software > HP Unified Functional Testing > Tools > API Test Generator Wizard)and click Next.
2. In the Select Service window, select from where to import your WSDL file:l URL: The URL in which this file is stored. Make sure that the URL isaccessible when you try to select the service.
l File: A location on the file system.If needed, enter the authentication and proxy settings if you are importing theWSDL from a URL location.
3. Click Next.4. In the Select Methods window, select the methods to use in the test. These
methods are created from the metadata specified in your WSDL file.5. In the Select Aspects window, select the types of tests you would like to create:
User GuideChapter 40: API Test Creation Overview
HP Unified Functional Testing (12.53) Page 383 of 938

PositiveTesting
A full positive test that checks that the service's operationswork as expected. This adds relevant checkpoints for eachstep (although these are not enabled by default).
StandardCompliance
Checks the service compliance with industry standards suchas WS-I and SOAP.
SecurityTesting -SQL InjectionVulnerability
Checks if the service is vulnerable to SQL injections byinjecting SQL statements and errors into relevantparameters.
SecurityTesting -Cross-siteScripts (XSS)
Attempts to hack the service by injecting code with relevantparameters that will disrupt its functionality.
BoundaryTesting -ExtremeValues
Provides invalid data types to the services and verifies theyare not accepted.
BoundaryTesting - NullValues
Provides NULL parameters to the components to verify theyare not accepted.
6. In the bottom of the Select Aspects window, specify where to save the createdAPI test. By default, this folder is C:\GeneratedAPITests.
7. Click Next.UFT automatically generates the test. Generation progress and error detailsare displayed in the Generate window.If you need to view log details on the test generation, or open the test folder,you can access these from the Generate window.
Generate your test from a SOAPUI test fileIf you previously had tests created using SOAPUI, you can automatically importthese files into UFT to create Web service tests.
1. From the Start Menu, open the SOAPUI to API Test Converter (Start > AllPrograms > HP Software > HP Unified Functional Testing > Tools > SOAPUI to API TestConverter).
2. In the SOAPUI to API Test Converter window, navigate to the directory inwhich your SOAPUI test was saved.
3. Select a destination directory for the converted test and click Convert. A full API
User GuideChapter 40: API Test Creation Overview
HP Unified Functional Testing (12.53) Page 384 of 938
test (with a .st extension) is created in the specified folder.You can also use the following command line options to convert a test:
soapUI2APITestCMD.exe /<source soapUI_file> /destination <destinationdirectory>/logs <log_directory>
CommandLine Switch Description
/source The absolute path to the soapUI file with an .xml extension, tobe converted.
/destination The absolute path of the folder to where the created API testswill be written.
/logs(optional)
The absolute path of the folder in which to write the log file. Ifthis option is omitted, the log file is written to the destinationfolder.
-? or /? Show the parameters and their usage. For example:soapUI2APITestCMD.exe -?
User GuideChapter 40: API Test Creation Overview
HP Unified Functional Testing (12.53) Page 385 of 938

Chapter 41: Standard ActivitiesRelevant for: API testing only
Create a test by double-clicking or dragging activities from the Toolbox pane into acanvas. The Toolbox pane provides a collection of built-in standard activities forfunctional testing in areas such as file and string manipulation, and messagingthrough HTTP, FTP, and JMS.
The activities are divided into the following categories:
Standardactivities
This category includes the built-in activities, such as StringManipulation, Database, Network, File System, as well as new customactivities you create using the extensibility API provided with theproduct.
Localactivities
This category includes the activities that are stored as part of the testor business component. These can be imported services such as Webor REST service operations, and .NET assemblies.
Filesystemactivities
This category includes activities that reside in the file system on eitherlocal or network drives. These are Local activities that you moved intothe file system repository that can be shared between tests.
ALMactivities
This category includes the activities that reside in the ALM repository.These are Local activities that you moved into the ALM repository thatcan be shared between tests. This category only appears when aconnection to an ALM server is open.
See also:l "Custom Activities" on page 411l "API Testing Extensibility" on page 507l "API Test Creation Overview" on page 368
Checkpoint validationRelevant for: API testing only
When creating a test, it is helpful to confirm that the application performed itsactivities as expected. An application's response can contain several properties.Use checkpoints to define the expected values of the properties.
HP Unified Functional Testing (12.53) Page 386 of 938

Enter checkpoint values manually, link them to a data source, or load values thatwere captured during a prior replay. This is useful when you have many argumentvalues—instead of manually entering values, you automatically load them.
For WSDL-based Web Services and SOAP Requests, UFT includes two built-incheckpoints for the purpose of validation. One checkpoint validates the XMLstructure and the other checks its compliance with WS-I. Additional checkpointsettings let you trim the string, ignore case inconsistencies, and indicate whether tostop on failed checkpoints.
XPath checkpointsRelevant for: API testing only
For steps with XML output properties, such as Web Service and SOAP Request, Stringto XML, and so forth, you can validate the test results against XPath expressions.Specify a fully qualified XPath expression or instruct UFT to ignore thenamespaces and prefixes during the test run.
In the following example, to retrieve the contents of the second node, B, you wouldneed to write an expression that also indicates the namespace, such as //*[local-name(.)='Node' and namespace-uri(.)='ns2'].
<Root> <Body> <Node xmlns="ns1">A </Node> <Node xmlns="ns2">B </Node> </Body></Root>
User GuideChapter 41: Standard Activities
HP Unified Functional Testing (12.53) Page 387 of 938
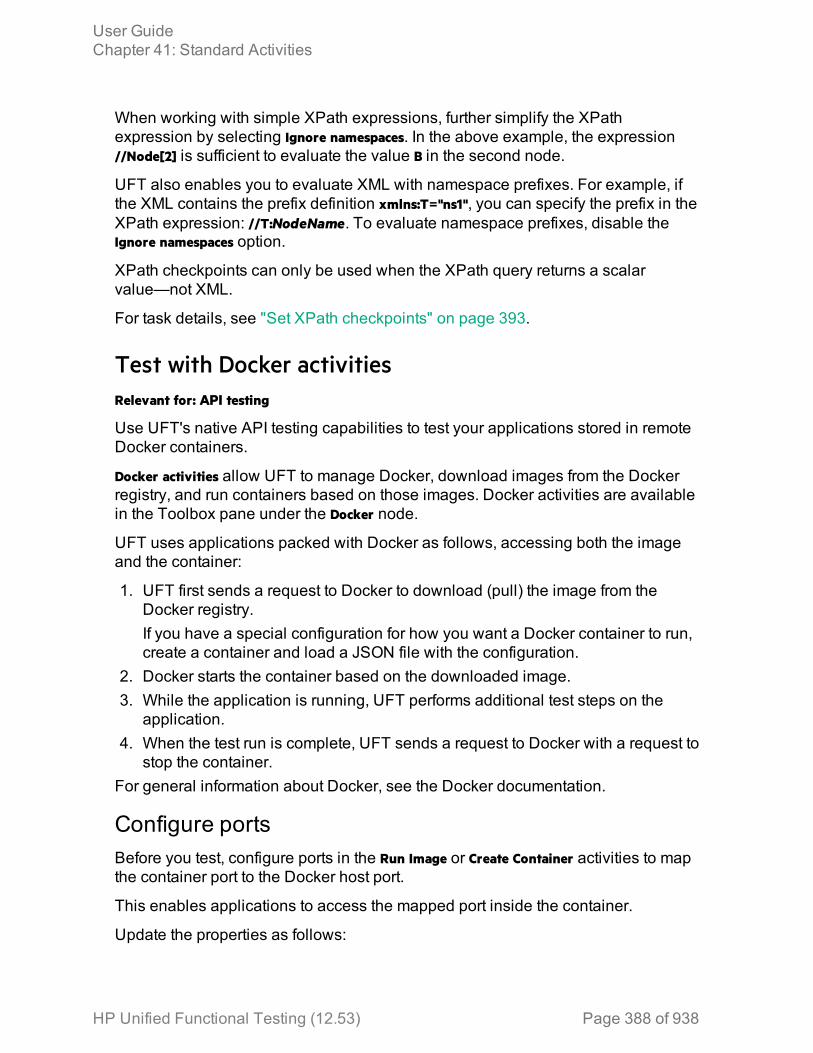
When working with simple XPath expressions, further simplify the XPathexpression by selecting Ignore namespaces. In the above example, the expression//Node[2] is sufficient to evaluate the value B in the second node.
UFT also enables you to evaluate XML with namespace prefixes. For example, ifthe XML contains the prefix definition xmlns:T="ns1", you can specify the prefix in theXPath expression: //T:NodeName. To evaluate namespace prefixes, disable theIgnore namespaces option.
XPath checkpoints can only be used when the XPath query returns a scalarvalue—not XML.
For task details, see "Set XPath checkpoints" on page 393.
Test with Docker activitiesRelevant for: API testing
Use UFT's native API testing capabilities to test your applications stored in remoteDocker containers.
Docker activities allow UFT to manage Docker, download images from the Dockerregistry, and run containers based on those images. Docker activities are availablein the Toolbox pane under the Docker node.
UFT uses applications packed with Docker as follows, accessing both the imageand the container:
1. UFT first sends a request to Docker to download (pull) the image from theDocker registry.If you have a special configuration for how you want a Docker container to run,create a container and load a JSON file with the configuration.
2. Docker starts the container based on the downloaded image.3. While the application is running, UFT performs additional test steps on the
application.4. When the test run is complete, UFT sends a request to Docker with a request to
stop the container.For general information about Docker, see the Docker documentation.
Configure portsBefore you test, configure ports in the Run Image or Create Container activities to mapthe container port to the Docker host port.
This enables applications to access the mapped port inside the container.
Update the properties as follows:
User GuideChapter 41: Standard Activities
HP Unified Functional Testing (12.53) Page 388 of 938
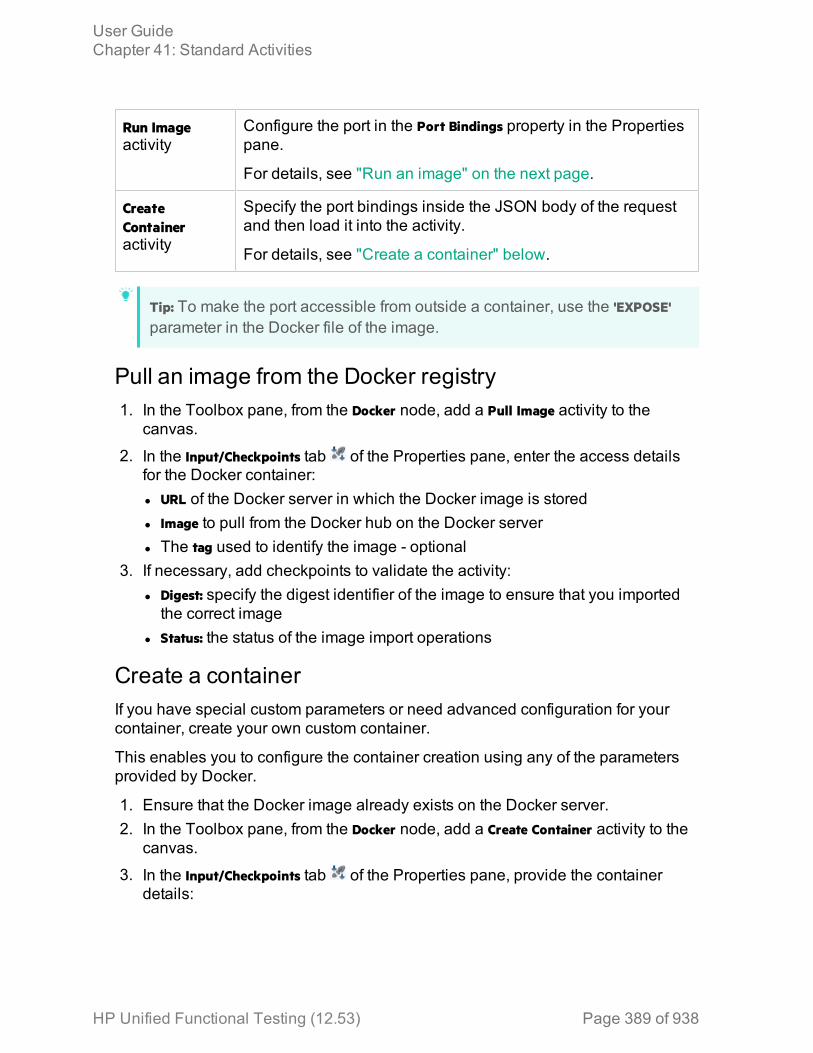
Run Imageactivity
Configure the port in the Port Bindings property in the Propertiespane.
For details, see "Run an image" on the next page.
CreateContaineractivity
Specify the port bindings inside the JSON body of the requestand then load it into the activity.
For details, see "Create a container" below.
Tip: To make the port accessible from outside a container, use the 'EXPOSE'parameter in the Docker file of the image.
Pull an image from the Docker registry1. In the Toolbox pane, from the Docker node, add a Pull Image activity to the
canvas.
2. In the Input/Checkpoints tab of the Properties pane, enter the access detailsfor the Docker container:l URL of the Docker server in which the Docker image is storedl Image to pull from the Docker hub on the Docker serverl The tag used to identify the image - optional
3. If necessary, add checkpoints to validate the activity:l Digest: specify the digest identifier of the image to ensure that you importedthe correct image
l Status: the status of the image import operations
Create a containerIf you have special custom parameters or need advanced configuration for yourcontainer, create your own custom container.
This enables you to configure the container creation using any of the parametersprovided by Docker.
1. Ensure that the Docker image already exists on the Docker server.2. In the Toolbox pane, from the Docker node, add a Create Container activity to the
canvas.
3. In the Input/Checkpoints tab of the Properties pane, provide the containerdetails:
User GuideChapter 41: Standard Activities
HP Unified Functional Testing (12.53) Page 389 of 938

l Server URL of the Docker serverl Container name for the created container. By default this argument shouldremain empty, as Docker generates the value automatically
4. In the Advanced Properties tab, click the Load JSON button.The .json file body is loaded with a REST request with parameters, ready to beused when the container is created.
Run a container1. In the Toolbox pane, from the Docker node, add a Start Container activity to the
canvas.
2. In the Input/Checkpoints tab of the Properties pane, provide the containerdetails:l Server URL of the Docker serverl Container ID of the container to start
Tip: Parameterize this value by linking this property to the Container IDproperty of a Create Container activity.
Run an imageAfter you have downloaded the image of your application to the Docker server, youcan run an image of the application on the container.
Running the image starts the image in its own container, and starts the specifiedapplication using the command provided.
1. In the Toolbox pane, from the Docker node, add a Run Image activity to thecanvas.
2. In the Input/Checkpoints tab of the Properties pane, provide the access detailsfor the Docker container:l URL of the Docker serverl Image to run from the Docker hub on the Docker serverl The Command used to run the application inside the Docker container
3. Below the main input properties, in the Port Bindings row, click the Add buttonto add a port binding array to the step.
4. In the array, provide the following ports:l Container port: the port inside the container that receives the output from theapplication
l Host port: the port on the Docker host machine
User GuideChapter 41: Standard Activities
HP Unified Functional Testing (12.53) Page 390 of 938
Once these ports are mapped to one another, all data that arrives at thecontainer port is forwarded to the host port.
Add additional test stepsOnce the container is started, the application is available for testing.
From the Toolbox pane, expand any necessary nodes and add activities to thecanvas.
Stop the Docker container imageWhen you finish running the test of the application, stop the container that iscurrently running.
1. In the Toolbox pane, from the Docker node, add a Stop Container step to thecanvas.
2. In the Input/Checkpoints tab of the Properties pane, set the properties used toidentify the container you want to stop:l URL of the Docker serverl Container's ID to stopl The Time to delay (in seconds) before stopping the container
Set array checkpointsRelevant for: API testing only
Enable active content on your computer1. In Internet Explorer, select Tools > Options.2. Select the Advanced tab.3. Enable the option Allow active content to run in files on My Computer in the Security
section.4. Click OK and close the browser.
Add a step with an array outputAdd a test step with output properties in the form of an array.
User GuideChapter 41: Standard Activities
HP Unified Functional Testing (12.53) Page 391 of 938
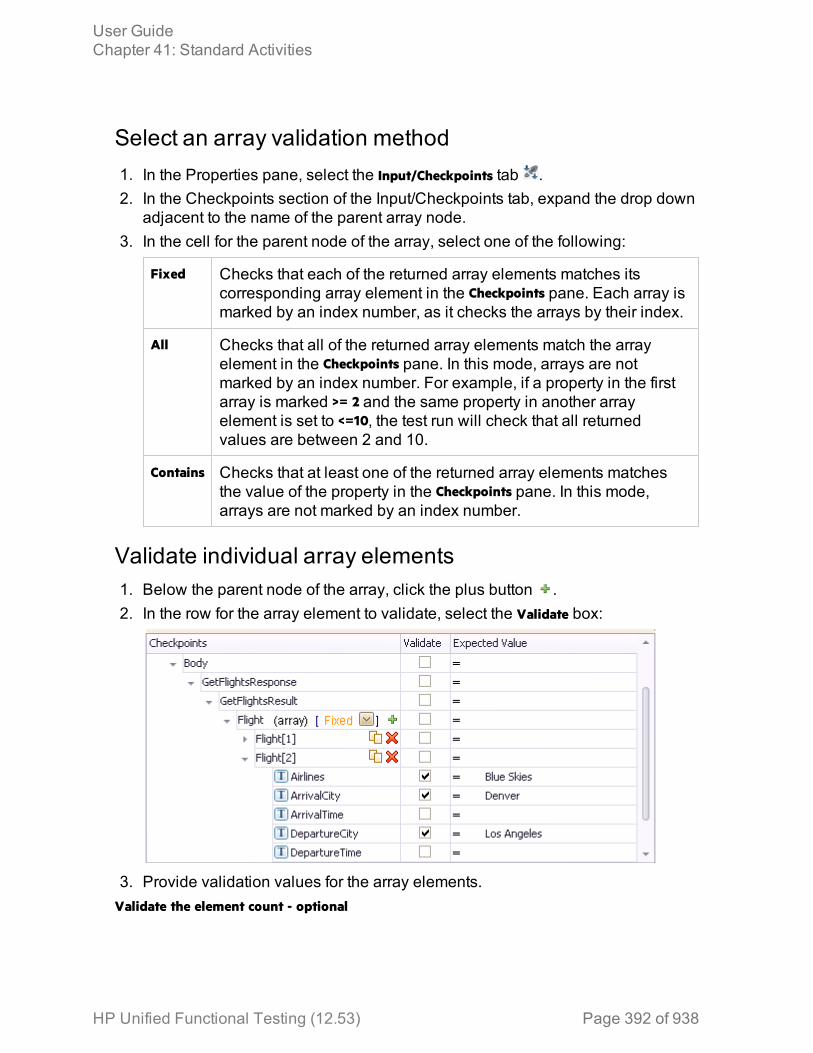
Select an array validation method1. In the Properties pane, select the Input/Checkpoints tab .2. In the Checkpoints section of the Input/Checkpoints tab, expand the drop down
adjacent to the name of the parent array node.3. In the cell for the parent node of the array, select one of the following:
Fixed Checks that each of the returned array elements matches itscorresponding array element in the Checkpoints pane. Each array ismarked by an index number, as it checks the arrays by their index.
All Checks that all of the returned array elements match the arrayelement in the Checkpoints pane. In this mode, arrays are notmarked by an index number. For example, if a property in the firstarray is marked >= 2 and the same property in another arrayelement is set to <=10, the test run will check that all returnedvalues are between 2 and 10.
Contains Checks that at least one of the returned array elements matchesthe value of the property in the Checkpoints pane. In this mode,arrays are not marked by an index number.
Validate individual array elements1. Below the parent node of the array, click the plus button .2. In the row for the array element to validate, select the Validate box:
3. Provide validation values for the array elements.Validate the element count - optional
User GuideChapter 41: Standard Activities
HP Unified Functional Testing (12.53) Page 392 of 938
In the Expected Value column of the parent row of the array, enter a desired countnumber and the evaluation expression, such as =, >, and so forth.
Set XPath checkpointsRelevant for: API testing only
This task describes how to validate your test results against XPath expressions.
Add a step with XML output1. From the Toolbox pane, add a test step with XML output, such as String to XML.
2. In the Properties pane, select the Input/Checkpoints tab .3. In the Value column for a step property, paste a source string or use the Link to
data source button to link to a value.
Set the namespace settingIn the bottom of the Input/Checkpoints tab, click the XPath tab, and indicate whetheror not to ignore namespaces.
By default, the Ignore namespaces option is enabled. If you plan to validate against afully qualified expression, or if you need to specify a namespace prefix, disable theoption.
Add an XPath checkpoint1. In the XPath tab, click the Add button .2. Type or paste the expression into the XPath Checkpoints column:
l To retrieve a simple XPath, click in the Value column, and select Copy XPathfrom the shortcut menu.
l To retrieve a complete qualified XPath, click in the Value column, and selectCopy Fully Qualified XPath from the shortcut menu.
3. Select the check box in the Validate column, select a comparison operator, andprovide an expected value.
Use Flow Control activitiesRelevant for: API testing only
Add a conditional stepConditional steps enable you to specify alternate test paths depending on theoutcome of a previous step. This is the equivalent of an If...Else function in an
User GuideChapter 41: Standard Activities
HP Unified Functional Testing (12.53) Page 393 of 938

application's code.
1. In the Toolbox pane, expand the Flow Control activities node and drag aCondition step to the canvas.The canvas displays a branched test step, with Yes and No branches:
2. Set the trigger for each branch of the step.You can the trigger for the Yes or No branches in the following ways:
Specify acondition for theoutput of a teststep
a. In the Condition tab in the Properties pane, select theUse condition option. The condition properties aredisplayed.
b. In the Variable field, click the Link to data source button.
c. In the Select Link Source dialog box, link to the outputof a previous step.You must link the Variable field to a previous step to setthe value to meet to trigger the condition.
d. Specify the expected Value and the Operator for the stepselected in the Variable field.
User GuideChapter 41: Standard Activities
HP Unified Functional Testing (12.53) Page 394 of 938
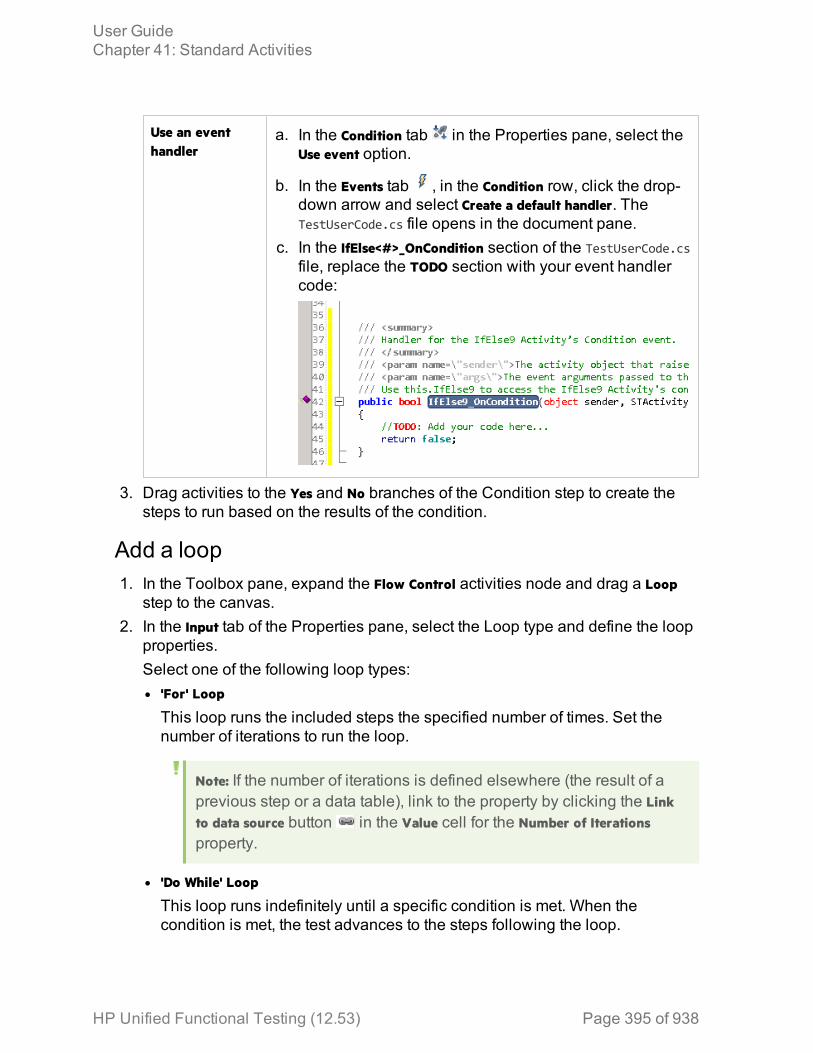
Use an eventhandler
a. In the Condition tab in the Properties pane, select theUse event option.
b. In the Events tab , in the Condition row, click the drop-down arrow and select Create a default handler. TheTestUserCode.cs file opens in the document pane.
c. In the IfElse<#>_OnCondition section of the TestUserCode.csfile, replace the TODO section with your event handlercode:
3. Drag activities to the Yes and No branches of the Condition step to create thesteps to run based on the results of the condition.
Add a loop1. In the Toolbox pane, expand the Flow Control activities node and drag a Loop
step to the canvas.2. In the Input tab of the Properties pane, select the Loop type and define the loop
properties.Select one of the following loop types:l 'For' Loop
This loop runs the included steps the specified number of times. Set thenumber of iterations to run the loop.
Note: If the number of iterations is defined elsewhere (the result of aprevious step or a data table), link to the property by clicking the Linkto data source button in the Value cell for the Number of Iterationsproperty.
l 'Do While' Loop
This loop runs indefinitely until a specific condition is met. When thecondition is met, the test advances to the steps following the loop.
User GuideChapter 41: Standard Activities
HP Unified Functional Testing (12.53) Page 395 of 938
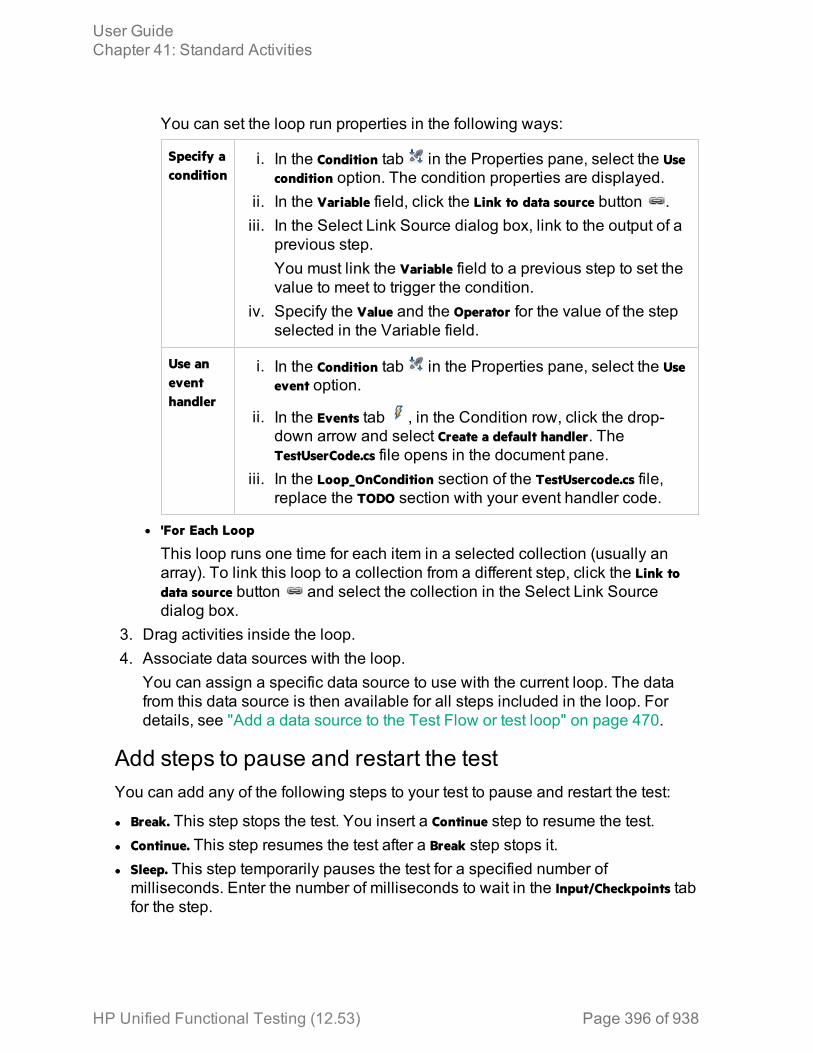
You can set the loop run properties in the following ways:
Specify acondition
i. In the Condition tab in the Properties pane, select the Usecondition option. The condition properties are displayed.
ii. In the Variable field, click the Link to data source button .iii. In the Select Link Source dialog box, link to the output of a
previous step.You must link the Variable field to a previous step to set thevalue to meet to trigger the condition.
iv. Specify the Value and the Operator for the value of the stepselected in the Variable field.
Use aneventhandler
i. In the Condition tab in the Properties pane, select the Useevent option.
ii. In the Events tab , in the Condition row, click the drop-down arrow and select Create a default handler. TheTestUserCode.cs file opens in the document pane.
iii. In the Loop_OnCondition section of the TestUsercode.cs file,replace the TODO section with your event handler code.
l 'For Each Loop
This loop runs one time for each item in a selected collection (usually anarray). To link this loop to a collection from a different step, click the Link todata source button and select the collection in the Select Link Sourcedialog box.
3. Drag activities inside the loop.4. Associate data sources with the loop.
You can assign a specific data source to use with the current loop. The datafrom this data source is then available for all steps included in the loop. Fordetails, see "Add a data source to the Test Flow or test loop" on page 470.
Add steps to pause and restart the testYou can add any of the following steps to your test to pause and restart the test:
l Break. This step stops the test. You insert a Continue step to resume the test.l Continue. This step resumes the test after a Break step stops it.l Sleep. This step temporarily pauses the test for a specified number ofmilliseconds. Enter the number of milliseconds to wait in the Input/Checkpoints tabfor the step.
User GuideChapter 41: Standard Activities
HP Unified Functional Testing (12.53) Page 396 of 938
Add a wait stepWait steps are mandatory when your application uses an asynchronous servicecall. After the call to the service, you insert the Wait step. While the test is waitingfor the rWesponse from the service call, the test waits the amount of time specifiedin this step.
1. In the Toolbox pane, expand the Flow Control activities node and drag a Waitstep to the canvas.
2. In the Input/Checkpoints tab in the Properties pane, Set the step properties:l Timeout: the number of milliseconds to pause the test.l Start timeout from step: the step for which UFT is waiting for a response.l Action on Timeout: what happens when the end of the timeout is reached andthe step's response is not received.
l Completion events: the events that signify completion of the timeout.
Send a multipart HTTP or REST Service requestRelevant for: API testing only
Add an HTTP or REST Service stepFrom the Toolbox pane, add one of the following to the canvas:
l From the Network activities, an HTTP Request
l From the Local Activities section, a REST service method.
Set the properties for the first part of the requestSet the request property values in the relevant tab:
l For an HTTP Request step, these properties are found in the Input/Checkpoints tab.
l For a REST Service step, these properties are found in the HTTP
Input/Checkpoints tab .
Set the properties for the other parts
1. In the Properties pane, open the Multipart tab .2. Select the Enable Multipart option.3. In the Input section, set the multipart type.4. Below the Type, provide the details for the general header:
User GuideChapter 41: Standard Activities
HP Unified Functional Testing (12.53) Page 397 of 938
a. Click the Add button to add a header.b. Expand the Headers (array) element.c. In the Headers[<number>] array property, enter the Name and Value for the
general header.5. Click the Add button and add the necessary number of parts in the multipart
request.6. Set the properties for the parts:
a. In the Headers (array) cell, click the Add button to add an request header.b. Expand the Headers[<number>] arrayc. In the Headers array, enter the value for the Name and Value properties for
the part request header.d. In the Value column for the Path property, enter the path to the request
header or click the Browse button and navigate to the reader header.
Create a call to a Java classRelevant for: API testing only
The Call Java Class activity lets you to add Java steps to your test script. Thisfeature enables you to incorporate existing Java code into your test.
Implement the UFT API Java interfaceOpen the <installation_folder>\addins\ServiceTest\JavaCall\JavaInterface\src\hp\st\ext\java folder and create an implementation for the java interface.For an example, see the sample subfolder.
This interface includes the essential information for the Java call, such as inputproperties, output properties, and a point of entry. The following methods areincluded:
l getInputProperties. Returns a mapping of the input property names and their Javaclass.
l getOutputProperties. Returns a mapping of the output property names and theirJava class.
l Execute. A method that receives the mapping of the input property names andtheir actual values i.e. their object instance. In this method, you process inputproperties and delegate them to your own Java artifacts. Afterward you processthe output properties and send their mappings and their actual values as themethod's output.
Compile the Java source codeIn your IDE, compile the java files located in the <installation_
User GuideChapter 41: Standard Activities
HP Unified Functional Testing (12.53) Page 398 of 938
folder>\addins\ServiceTest\JavaCall\Java Interface\src\hp\st\ext\java folder.
Tip: To determine which JDK to use for, check the version of Java JREinstalled with UFT. Open the <installation_folder>/jre/bin folder and right-clickthe java.exe file. Select Properties and open the Version tab.
Package your custom step - optionalPackage your java classes into a .jar file.
Set up the Java environment - optional1. In the canvas, select a Start or End step.
2. In the Properties pane, open the Test Settings tab in the Properties pane. Inthe Test Settings tab, set the values for the VM and JMS properties.
3. In the Toolbox pane, expand the JMS node in the Toolbox pane and drag a JMSactivity onto the canvas.
4. In the Input/Checkpoints tab of the Properties pane, set the step's properties.You must enter a value for the following properties:l Queue
l Subscription
l Topic name
5. If you are using a Send activity, specify a message.6. If you are using a Receive activity, in the Checkpoints section of the
Input/Checkpoints tab, select the output properties you want to validate andspecify the expectd values.
Add a Call Java Class activityIn the toolbox pane, expand the Java node, and drag the Call Java Class activity ontothe canvas.
Set the Java step property values1. In the canvas, select the Java step.
2. In the Properties, open the Input/Checkpoints tab .3. In the Input/Checkpoints tab, click the Java Class button to open the Java Class
Dialog Box.
User GuideChapter 41: Standard Activities
HP Unified Functional Testing (12.53) Page 399 of 938
4. In the Java Class dialog box, do the following:a. Provide a classpath. If you packaged your Java step, click the Browse button
adjacent to the Jar field and point to a .jar file. Alternatively, click the Browsebutton adjacent to the Package root field and point to a package root folder.
Note: To embed the jar file and save it with the test, select Embed Jar inTest. Due to a technological limitation, if you intend to specify a classfile, you must select the Embed Jar in Test option before you browse forthe class file.
b. For the Class file field, click the Browse button adjacent to the Class file field tolocate the class within the .jar file or the folder. Make sure it is a class thatimplements the ServiceTestCall interface.
c. To provide additional classpaths, click the Jar or Folder buttons in theAdditional Classpaths section and browse to a .jar file or classpath folder. ClickAdd to move the contents into the list.
d. Click OK to save the Java Call settings.
Call external tests or actionsRelevant for: API testing only
This task describes how to incorporate tests from other HP applications. You cancall any of the following types of tests:
l Unified Functional Testing tests (both GUI and API tests)l QuickTest Professional testsl Service Test testsl VuGen (Virtual User Generator ) scripts from HP LoadRunner
PrerequisitesMake sure you have installed the application whose test/script you want to call onthe same computer with UFT or have access to the directory containing the tests orscripts.
Example:
l If you are calling a test last modified in a version of Service Test prior toyour present version, make sure the test was modified with Service Test11.10 or higher or UFT.
User GuideChapter 41: Standard Activities
HP Unified Functional Testing (12.53) Page 400 of 938
l To call a test created in QuickTest Professional, ensure that the test wascreated with QuickTest 11.00. The first time you run the step, you mayneed to wait several seconds for UFT to invoke and load the test.
l If you are calling a test created in HP LoadRunner, ensure that youcreated or opened the test in LoadRunner version 11.00 or later.
Call an API Test or Action or Service Test test1. Make sure the action or test you want to call has been saved and run
successfully at least once.2. In the Standard Activities section of the Toolbox pane, expand the HP Automated
Testing Tools node.3. Add a Call API Action or Test activity to the canvas.4. In the Input/Output Properties tab in the Properties pane, click the Select Action
or Test button.5. In the Select Action or Test Dialog Box, select a test last modified with Service
Test 11.10 or higher, or with UFT.6. In the Input/Output Properties tab, edit the property values as needed.
Note:
l The property list remains empty until you select a test.l If the test you are calling has no input or output parameters, theInput/Output Properties tab will be empty.
7. Add other relevant steps to your test. You can link input properties ofsubsequent step to the output properties of the step containing the called APItest or action..
8. If the value of the input parameter for step containing the API test/action callmust be a string (such when the result of a previous step was XML), add anXML to String activity before the step containing the call to the action or test.
9. Optional - To specify a custom directory for the results, in the General tab of theProperties, click the Browse button in the Results directory row in the Generalview tab.
Call a GUI Test or QuickTest action or test1. Make sure the action or test you want to call has been saved and run
successfully at least once.
User GuideChapter 41: Standard Activities
HP Unified Functional Testing (12.53) Page 401 of 938
2. In the Toolbox pane, in the Standard Activities section, expand the HP AutomatedTesting Tools node.
3. Drag the Call GUI Action or Test activity onto the canvas.
Note: This activity is only available when working with an HP UnifiedFunctional Testing license.
Tip: Do not insert a call to a QuickTest or GUI action or test that containsa call to an API Test action or test, as this can cause unexpectedbehavior.
4. In the Input/Output Properties tab in the Properties pane, click the Select Actionor Test button. In the Select Action or Test Dialog Box, select an action or a test.
5. In the Select Action or Test Dialog Box, select an action or a test created inQuickTest 11.00 or UFT.
Note: If you want to use data from a GUI test in your API test, the GUI testor action that is called must have test or action parameters saved withthe test or action.
6. In the Input/Output Properties tab, edit the property values as needed. If youwant to use parameters from the called GUI test, in the Input/Checkpoints tab,click the Link to data source button in subsequent test steps. In the Select LinkSource dialog box, link the selected property to a GUI test or action parameter.
Note:
l The property list remains empty until you select a test.l If the test you are calling has no input or output parameters, theInput/Output Properties tab will be empty.
Add a LoadRunner script activity1. Make sure the action or test you want to call has been saved and run
successfully at least once.2. In the Toolbox pane, in the Standard Activities section, expand the HP Automated
Testing Tools node.3. Add a Call Virtual User Generator Script activity to the canvas.
User GuideChapter 41: Standard Activities
HP Unified Functional Testing (12.53) Page 402 of 938
4. In the Properties pane, select the General tab, and click the script selectionbutton .
5. Navigate to the directory where your VuGen script file (.usr) is saved.
Prepare and run a Load testRelevant for: API testing only
This task describes how to prepare a test for load testing in LoadRunner.
Prerequisitel Make sure that HP LoadRunner or a standalone version of VuGen (HP VirtualUser Generator) is installed. Without this installation, the Load Testing templatewill not be available.
l If you are running the test from a Performance Center host, ensure that UFT isinstalled on the same machine as the Performance Center host.
Create a load-enabled API testIn the New dialog box, in the Select type section, choose API Load Test.
If you have a test that was created with the standard API testing template, selectDesign > Operation > Enable Test for Load Testing or click the Enable Test for Load Testing
button .
Add test stepsDrag activities from the Toolbox pane onto the canvas to add steps to the test.
Prepare for load testingTo measure the performance of a group of steps, define a transaction.
Mark thebeginningof atransaction
l From the Toolbox pane, in the Load Testing node, add a StartTransaction activity to the canvas. Place it before the first step of thegroup of steps that you want to measure.
l In the Properties, select the Input/Checkpoints tab and enter aTransaction name in the Input section of the tab. This name will beused in LoadRunner Analysis.
User GuideChapter 41: Standard Activities
HP Unified Functional Testing (12.53) Page 403 of 938
Mark theend of atransaction
l From the Load Testing node, add a End Transaction activity to theend of the group of steps you want to measure.
l In the Input/Checkpoints tab in the Properties pane, type atransaction name. The name must be one that was already usedfor a prior Start Transaction step.
l In the End Transaction's Input properties, select a Status forreporting: PASS, FAIL, AUTO, or STOP.The End Transaction status is only the LoadRunner transaction'sstatus—not the status of step in UFT. For example, if you assign aFailed status to the transaction, UFT can still issue a Passed statusfor the test step.
Set thethink time
l If you want to emulate think time, add a Load Testing > Think Timeactivity between the relevant steps.
l In the Input/Checkpoints tab, in the Duration (sec) row, specify athink time in seconds.
Set the data retrieval properties - optionalIf you have data in the Data Pane, set the data retrieval properties. Click the Link toa data source button .
Set the run configuration to ReleaseIn the General pane of the API Testing tab in the Options dialog (Tools > Options >API Testing tab > General node), in the Run Sessions options, select Release. The Releasemode conserves resources, thus enhancing the load testing capabilities.
Run in Load Testing mode to validate the testExpand the toolbar Run button and select Run Test in Load Testing Mode. This run isonly for debugging purposes, to verify that the test is functional.
Note: When you run a test in Load Testing mode, the Output pane does notcontain data and the run results do not open. To view the results, select Runto run the test in functional mode.
Incorporate the test into LoadRunnerAdd the test to the LoadRunner Controller console to include it in a load test.
User GuideChapter 41: Standard Activities
HP Unified Functional Testing (12.53) Page 404 of 938
Test Web sockets communicationRelevant for: API testing only
Open a Web socket connectionIn order to test the communication between Web sockets, you must first open aconnection to the Web socket. This step is mandatory for testing thesending/receiving of messages from a Web socket connection.
1. In the Web Sockets section of the Toolbox pane, add a OpenSocket activity tothe canvas.
2. In the Input/Checkpoints tab in the Properties pane, in the Value cell for theURL property, enter the URL for the Web socket connection.
Send a message to another Web socket1. In the Web Sockets section of the Toolbox pane, add a SendMessage activity to
the canvas.
2. In the Input/Checkpoints tab in the Properties pane, in the Value cell for theSocketID property, click the Link to a data source button . The Select LinkSource dialog box opens.
3. In the Select Link Source dialog box, select the Available steps option.4. In the list of available steps, select the OpenSocket activity. A list of available
properties is displayed in the right pane.
5. In the right pane, select the General tab .6. In the General tab, select the SocketID property and click OK to link the
ReceiveMessage step to the OpenSocket step.
7. In the Properties pane, select the HTTP tab .8. In the HTTP tab, in the Request Body section, from the drop-down list, select the
format for your message body. You can send a message with Text, XML, orJSON.
9. In the Request Body section, in the Text Editor area, enter the body of yourmessage to send.
Note: You can load the XML or JSON for the sent message body from anexternal file by click the Load button in the text editor area.
10. In the Toolbox pane, expand the Flow Control activities section.
User GuideChapter 41: Standard Activities
HP Unified Functional Testing (12.53) Page 405 of 938
11. From the Flow Control activities, drag a Wait activity to the canvas. TheInput/Checkpoints tab opens in the Properties pane.
12. In the Input/Checkpoints tab, in the Value cell for the Completion event property,click the Link to a data source button . The Select Link Source dialog boxopens.
13. In the Select Link Source dialog box, select the Available steps option. A list ofavailable steps is displayed in the Select a step: (left) pane.
14. In the Select a step: pane, select the ReceiveMessage activity. A list of availableproperties is displayed in the Select a property: (right) pane.
15. In the Select a property pane, select the General tab .16. In the General tab, select the Completion event name property and click OK. UFT
links the ReceiveMessage step to the Wait step, instructing the test to wait toproceed until the message is received from the Web socket in theReceiveMessage step.
Receive a message from another Web socket1. Prerequisite: Create an OpenSocket step in your test.2. In the Web Sockets section of the Toolbox pane, add a ReceiveMessage activity
to the canvas.
3. In the Input/Checkpoints tab in the Properties pane, in the Value cell for theSocketID property, click the Link to a data source button . The Select LinkSource dialog box opens.
4. In the Select Link Source dialog box, select the Available steps option.5. In the list of available steps, select the OpenSocket activity. A list of available
properties is displayed in the right pane.
6. In the right pane, select the General tab .7. In the General tab, select the SocketID property and click OK to link the
SendMessage step to the OpenSocket step.
8. In the Properties pane, select the HTTP tab .9. In the HTTP tab, in the Received Message Body section, from the drop-down list,
select the format for your message text. You can receive a message body withText, XML, or JSON.
10. In the Received Message Body section, in the Text Editor area or the regularexpression grid area, enter the body of the expected message or a regularexpression representing the recieved message body.
User GuideChapter 41: Standard Activities
HP Unified Functional Testing (12.53) Page 406 of 938
Note: You can load the XML or JSON for the received message bodyfrom an external file by click the Load button in the text editor area.
Close the Web socket connection
Note: This step is optional. You should use this step if you want to send orreceive messages from a different Web socket in later test steps.
1. Prerequisite: Create an OpenSocket step in your test.2. In the Web Sockets section of the Toolbox pane, add a OpenSocket activity to
the canvas.
3. In the Input/Checkpoints tab in the Properties pane, in the Value cell for theSocketID property, click the Link to a data source button . The Select LinkSource dialog box opens.
4. In the Select Link Source dialog box, select the Available steps option.5. In the list of available steps, select the OpenSocket activity. A list of available
properties is displayed in the right pane.
6. In the right pane, select the General tab .7. In the General tab, select the SocketID property and click OK to link the
CloseSocket step to the OpenSocket step.8. (Optional)- In the Checkpoints section of the Input/Checkpoints tab, select the
Validate checkbox in the Result row to set a checkpoint to check if the Closeoperation succeeds.
User GuideChapter 41: Standard Activities
HP Unified Functional Testing (12.53) Page 407 of 938
Known Issues- Standard ActivitiesRelevant for: API testing only
System activitiesl End Program. You cannot specify Window Title as an input method for awindowless process, even if you are using a wildcard expression.
l End Program. If you are running on a 64-bit machine, the End Program activity willnot be able to terminate 64-bit applications. However, it can terminate other 32-bit applications.
Java activitiesl Call Java Class. Supports only Java primitive types.l Call Java Class. Once you select a Java file for the call, the Java Class button isdisabled. As a result, you cannot replace or update the Java file.Workaround: Remove the step containing the Call Java Class step and add a newone using the new Java file.
l Call Java Class. Java code loaded by the JVM (Java Virtual Machine) cannot bemodified or updated when the JVM is running.
Networkl HTTP Request/Receiver. Nested transactions are not support ed.
Workaround: Add a new loop activity within an existing transaction. Add the newtransactions steps to the newly created loop. Make sure to set the loop iterationto 1.
l HTTP Request/SOAP Request. XML file that use XSL, are not supported.l SOAP Request. Switching between Text and Grid views, may cause the grid todisplay an element added below the Body's Any node, under the Header's Anynode.Workaround: Open the Text view to view the correct XML..
l SOAP Request. By default, UFT validates the request received in a SOAP Requeststep using the SOAP 1.1 schema. If you expect your response to use the SOAP1.2 schema, the validation will fail.Workaround: Import the SOAP 1.2 schema for your SOAP Request step'sresponse body. This schema is available with the UFT installation at<UFT installation folder>\Addins\ServiceTest\WSImportTechnology\envelop1.2.xsd.
HP Unified Functional Testing (12.53) Page 408 of 938
Databasel Nested transactions are not supported in database transaction activities.
Workaround: Add a new loop activity within an existing transaction. Add the newtransactions steps to the newly created loop. Make sure to set the loop iterationto 1.
l Databases which are supported by ODBC, but not by OLEDB, cannot beaccessed by UFT.
FTPl FTP: When working with FTP activities that specify paths, you need to enter thefull path.
l FTP Download: When downloading from Linux servers, you cannot download anempty folder.
IBMWebsphere MQl Get Message from MQ Queue. The MQGMO_MARK_SKIP_BACKOUT option is notsupported.
l Put Message to MQ Queue, Publish Message to MQ Topic. The message body shouldnot exceed 64K bytes. If it exceeds this size, the execution issues a MQRC_CONVERTED_STRING_TOO_BIG status. This is a limitation of IBM MQ.
l MQ Steps. Automatic linking of IBMWebsphere MQ steps to the most recentConnect to MQ Queue Manager connection, is supported only when the steps are onthe same level in the container, or if the connection step is in a parent container.If the connection step is in a leaf container and the step using the connection isin a parent container or in another leaf, UFT does not create an automatic link.Workaround: Manually link to a MQManager property using the Select LinkSource dialog box.
JSONIf your JSON string contains non-ASCII characters, you should save this file withUFT-8 encoding. Otherwise, the characters in your file may not display correctly inUFT.
Load Testingl Related data mapping in a load-enabled test is not supported for theLoadRunner parameter advance policy of Each Occurrence.
l Tests created as Business Process Testing (BPT) components, cannot be used
User GuideChapter 41: Standard Activities
HP Unified Functional Testing (12.53) Page 409 of 938
in load testing.l If your tests use IBM's MQ client, make sure to install the MQ client on allmachines running these tests.
l You cannot run tests containing actions or calls to other tests on a remote loadgenerator. This limitation does not apply when running the test on a local loadgenerator.
l The data assignment method, Use a unique value for each Virtual User when loadtesting is not supported in all environments.
Web SocketsUsing a web socket open between actions in a test is not supported.
XPath Activity CheckpointsXPath aggregate functions are not supported.
User GuideChapter 41: Standard Activities
HP Unified Functional Testing (12.53) Page 410 of 938
Chapter 42: Custom ActivitiesRelevant for: API testing only
Custom activities enable you to create or import your service models, and thencreate activities for use in an API test.
Web ServicesTo create Web service activities, you must import a WSDL file. This file provides astructure for the test by describing the service in terms of its elements, argumentvalues, and properties.
The WSDL import supports both Document/Literal and RPC type Web services.
After you import the WSDL, UFT represents the data differently depending on thetype of Web service:
Document/LiteralWeb services
The Properties pane displays the input and output propertiesfor a Web service method in the grid, enabling you to assignvalues to the properties.
RPC-type Webservices
The WSDL file and SOAP body contain the complete operationname, its input and output properties, and their values. There isno schema for this type of service and it is not supported by theWS-I conformance standard. As a result, the Properties panedoes not display the input and outputproperties for RPC typeservices.
If your service document is unique and cannot be imported in the normal way, youcan use the SOAP Request activity to send a manual SOAP request to the server.
For details about importing a Web service, see "Import a WSDL-based Webservice" on page 421.
REST ServicesTo create REST service models in UFT, you have multiple options:
l Define the service's Service, Resource, and Method manually using theREST service editor. This model is stored as a prototype activity within your testand the test's methods are added as test steps.In addition, you can also define properties and parameters for your REST serviceat all levels of the hierarchy. You can then pass these properties or parametersfrom the service and resource levels to the resource and method levels.For details, see "Passing REST service properties" on page 416.
HP Unified Functional Testing (12.53) Page 411 of 938
l Import a service model from a Swagger API or OData REST Service API. UFTreads the service description from the file or URL and creates the correspondingservices, resources and models.
For more details, see "Create a REST service model" on page 424.
Web Application ServicesWeb Application services provide a description of an HTTP-based Web applicationin XML format, saved in a Web Application Description Language (WADL) file. TheWADL file describes the resources provided by a service and the methods used toaccess the service.
Like a Web Service, you import a Web application service into UFT. The resourcesand methods are then displayed in a hierarchy like a REST service, in aService/Resource/Method hierarchy.
The URL for a Web application is defined in the XML of the WADL file. You can,however, define other HTTP properties and add input and output parameters for anactivity's methods.
If you import a WADL from a URL, you cannot edit the WADL's propertiesmanually.
Like REST services, you can define parameters and their values at all levels of theWeb Application hierarchy. You can then pass these parameter values to lowerlevels of the hierarchy.
The imported Web Application service methods serve as a prototype for test steps.You can modify the parameter values of a method after dragging a method to thecanvas.
Network Capture ActivitiesNetwork capture activities enable you to create test steps by recording networktraffic. Importing a network capture file is another way to create test stepsmeasuring the network activity of your application or Web service.
Instead of using the standard Network activities to design steps for yourapplication's network processes, perform a network capture, and use the capturedinformation as a basis for your test.
Using a network capture program, capture the network traffic for your application orWeb service into a saved fill and then import this file into UFT.
UFT takes the TCP network stream and creates test steps based on the requestand response information for each TCP stream in the network traffic capture.
User GuideChapter 42: Custom Activities
HP Unified Functional Testing (12.53) Page 412 of 938

Based on the request and response information, UFT creates a test activitydifferently:
l If the TCP stream request and response is compatible with or matches analready existing Web service, UFT creates a Web Service step.
l If the TCP stream request has a SOAP request structure, UFT creates aSOAP Request step.
l If the TCP stream is not similar to an existing Web service method or a SOAPrequest transaction, UFT creates a HTTP Request step.
These activities are not stored in the Toolbox pane. If you need to reuse the stepsin your test, you can reimport the network capture file or cut and paste the existingsteps into your test.
For more details, see "Import a Network Capture file" on page 434.
.NET AssembliesThe .NET importer lets you create activities for testing APIs in the form of .NETassemblies. You can interface with the types defined in the assembly.
Begin by importing the .NET assembly into your test. The Toolbox pane thendisplays the assembly as an activity and you can add a .NET activity on to thecanvas.
When you import a .NET assembly, it saves a local copy of the assembly with thetest. This makes the test portable and allows you to copy it to another machine. Ifthe assembly calls other assemblies, the test may not run until you copy theadditional assemblies to the new machine.
For more details, see "Import and create a .NET Assembly API test step" on page436.
SAP-based ServicesCreate additional actitivites by importing SAP Intermediate Documents (IDoc) andRemote Function Calls (RFC).
These activities can be useful for testing the SAP server response in severalcommon scenarios:
l Sending an IDoc to an SAP server, and confirming that the IDoc was sentl Checking an IDoc's status on the SAP serverl Calling an RFC in SAP and ensure that it returned the expected results
User GuideChapter 42: Custom Activities
HP Unified Functional Testing (12.53) Page 413 of 938

These activities can be also be useful when upgrading a system to verify that theintegration patterns are still functional, such as Aggregator, Enricher, Router,Translation, Bridge, Splitter, and so forth.
For more details, see "Create an SAP API test step" on page 436.
Activity sharingRelevant for: API testing only
The activity sharing feature enables you to save locally stored services to arepository, so that they will be available for other tests.
Specify a repository on the file system or in ALM. The next time you create a test,you can access the service's activities from the repository instead of reimporting orrecreating them.
If the resource (WSDL or REST service) becomes unavailable, the canvas displaysalerts on the steps that use the resource. If you run the test when its resource is notavailable from its original source, it uses a copy of the test stored in its cache. Byclicking the alert, you can reload the steps when the resource becomes availableagain.
The Toolbox pane detects version updates for activities stored in a repository.When it detects a discrepancy between the step and the Toolbox pane activity, itdisplays an alert for the step. By clicking the alert, you can automatically update theresource from its source.
Perform activity sharingRelevant for: API testing only
This task describes how to save activities to a repository, update them, and viewtheir properties.
1. Connect to ALMIf you want to work with a repository on ALM, connect to the desired ALMserver.
2. Set up the repository pathsa. Select Tools > Options > API Testing tab > General node.b. In the Activity Repositories section, click the Browse button and navigate to
the location in the file system or in ALM.c. Click OK.
User GuideChapter 42: Custom Activities
HP Unified Functional Testing (12.53) Page 414 of 938
3. Import a WSDL or create a REST serviceImport a WSDL file or create a REST service method. The Toolbox panedisplays the service's methods in the Local Activities node.By default, the test stores these activities in its EmbeddedJavaResources subfolder.
4. Move the activity to a repositoryIn the Toolbox pane, right-click the service node, and select Move to > FileSystem Activities or ALM Activities. This moves the service from Local Activities toFile System Activities or ALM Activities in the Toolbox pane. The service is alsoremoved from the test's EmbeddedJavaResources subfolder and placed in therepository folder.The next time you create a test, these activities will be accessible from the FileSystem Activities or ALM Activities nodes.
Negative testing of Web servicesRelevant for: API testing only
When performing a functional test for your Web Service, you should approach thetesting in a variety of ways. The most common type of testing is called PositiveTesting—checking that the service does what it was designed to do.
In addition, you should perform Negative Testing, to confirm that the application didnot perform a task that it was not designed to perform. In those cases, you need toverify that the application issued an appropriate error—a SOAP Fault.
To illustrate this, consider a form accepting input data—you apply positive testingto check that your Web Service has properly accepted the name and other inputdata. You apply negative testing to make sure that the application detects aninvalid character, for example a letter character in a telephone number.
When your service sends requests to the server, the server responds in one of thefollowing ways:
l SOAP Result. A SOAP response to the request.l SOAP Fault. A response indicating that the SOAP request was invalid. NegativeTesting applies only to SOAP faults.
l HTTP Error. An HTTP error, such as Page Not Found, unrelated to Web Services.UFT can check for a standard SOAP result or a SOAP fault response. For example,if your Web Service attempts to access a Web page that cannot be found, it willissue a 404 HTTP error. Using negative testing you indicate that you expect a
User GuideChapter 42: Custom Activities
HP Unified Functional Testing (12.53) Page 415 of 938
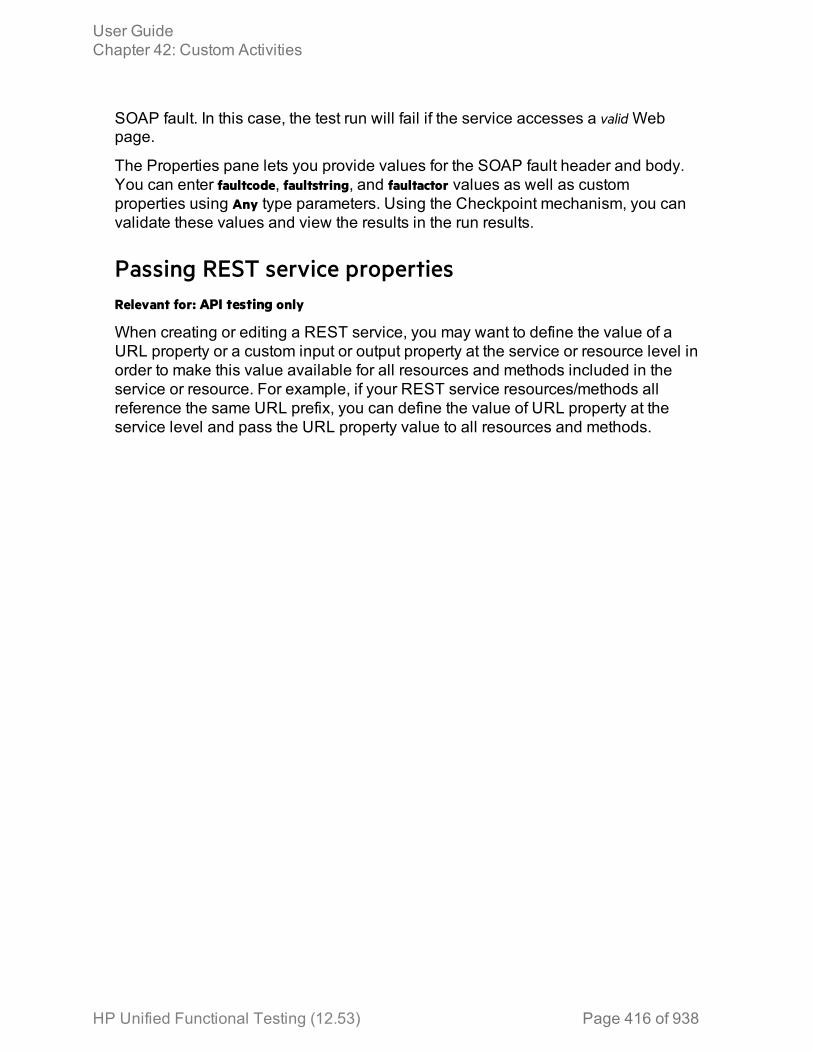
SOAP fault. In this case, the test run will fail if the service accesses a valid Webpage.
The Properties pane lets you provide values for the SOAP fault header and body.You can enter faultcode, faultstring, and faultactor values as well as customproperties using Any type parameters. Using the Checkpoint mechanism, you canvalidate these values and view the results in the run results.
Passing REST service propertiesRelevant for: API testing only
When creating or editing a REST service, you may want to define the value of aURL property or a custom input or output property at the service or resource level inorder to make this value available for all resources and methods included in theservice or resource. For example, if your REST service resources/methods allreference the same URL prefix, you can define the value of URL property at theservice level and pass the URL property value to all resources and methods.
User GuideChapter 42: Custom Activities
HP Unified Functional Testing (12.53) Page 416 of 938
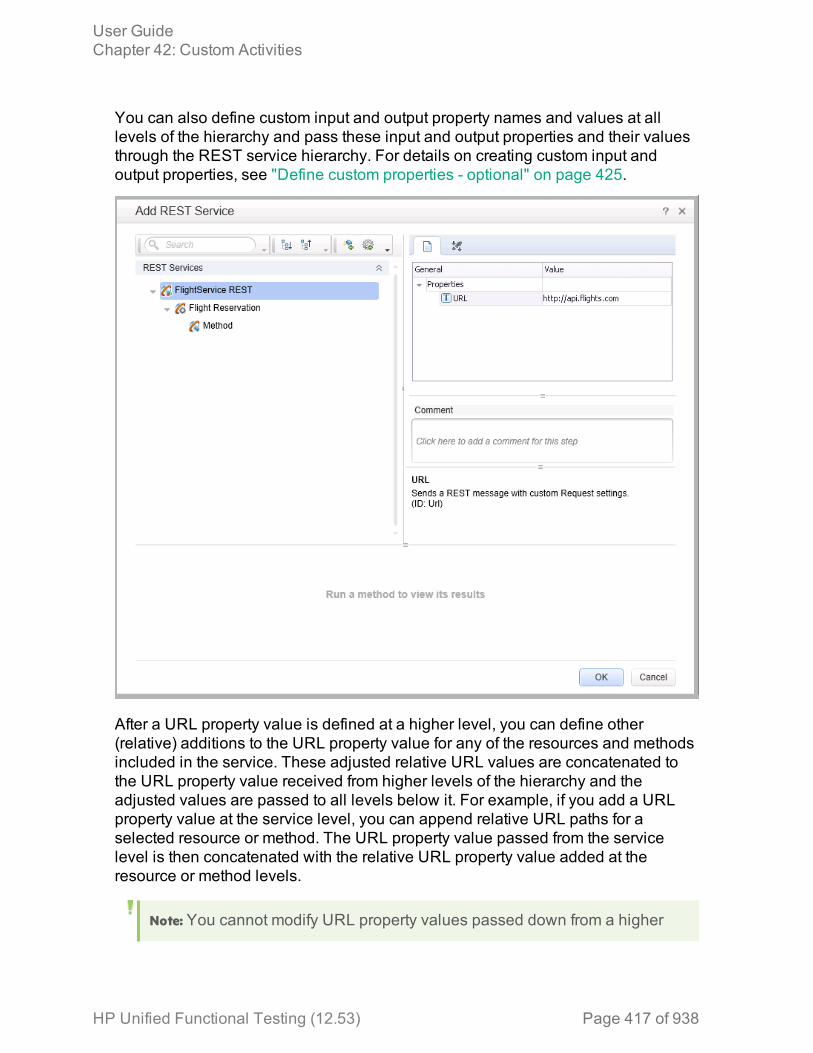
You can also define custom input and output property names and values at alllevels of the hierarchy and pass these input and output properties and their valuesthrough the REST service hierarchy. For details on creating custom input andoutput properties, see "Define custom properties - optional" on page 425.
After a URL property value is defined at a higher level, you can define other(relative) additions to the URL property value for any of the resources and methodsincluded in the service. These adjusted relative URL values are concatenated tothe URL property value received from higher levels of the hierarchy and theadjusted values are passed to all levels below it. For example, if you add a URLproperty value at the service level, you can append relative URL paths for aselected resource or method. The URL property value passed from the servicelevel is then concatenated with the relative URL property value added at theresource or method levels.
Note: You cannot modify URL property values passed down from a higher
User GuideChapter 42: Custom Activities
HP Unified Functional Testing (12.53) Page 417 of 938
level of the REST service hierarchy. You can only add to them with a relativeURL value.
After you add additional relative URL property values at lower levels of thehierarchy, such as at the resource or method level, you must assure that the fullURL is a proper URL. For example, if you define the URL property value at theresource level with http://, the relative URL property value appended at themethod level should not also use a http:// prefix.
Example:
You define a URL property value for the REST service at the service (top) level: http://flights.api.com. This value is then passed to any resources andmethods within this REST service.
You also create a resource for this service, called Flight Reservation. Youdefine the relative URL value as /reserve. This relative URL property value isthen concatenated with the URL property value passed from the servicelevel to create a URL for the resource: http://flights.api.com/reserve. This URLproperty value can also pass to any methods created for the resource.
You then create a method for the Flight Reservation resource, calledGetFlights and define the relative URL property value for this method as/getflights. This value is then further concatenated with the URL passed fromthe resource to make a complete URL for the method:http://flights.api.com/reserve/getflights.
User GuideChapter 42: Custom Activities
HP Unified Functional Testing (12.53) Page 418 of 938

The example below shows the URL property value passed from the service level(http://api.flights.com) and the relative URL property value defined at the resourcelevel (/reserve), with the relative URL property value for the method (/getflights) alsodefined. These URL parts are then concatenated in the URL property field to makethe complete URL for the method.
These properties and custom input or output properties then serve as a prototypetemplate for the REST service, and you can edit the URL property values or custominput and output property values after adding the method activities to the canvas.
Note: The relative URL is not displayed on the REST method when it isincluded in a test in the canvas. Only the full, concatenated URL for themethod displayed in the Add REST Service dialog box is displayed in theProperties pane for the selected method.
User GuideChapter 42: Custom Activities
HP Unified Functional Testing (12.53) Page 419 of 938
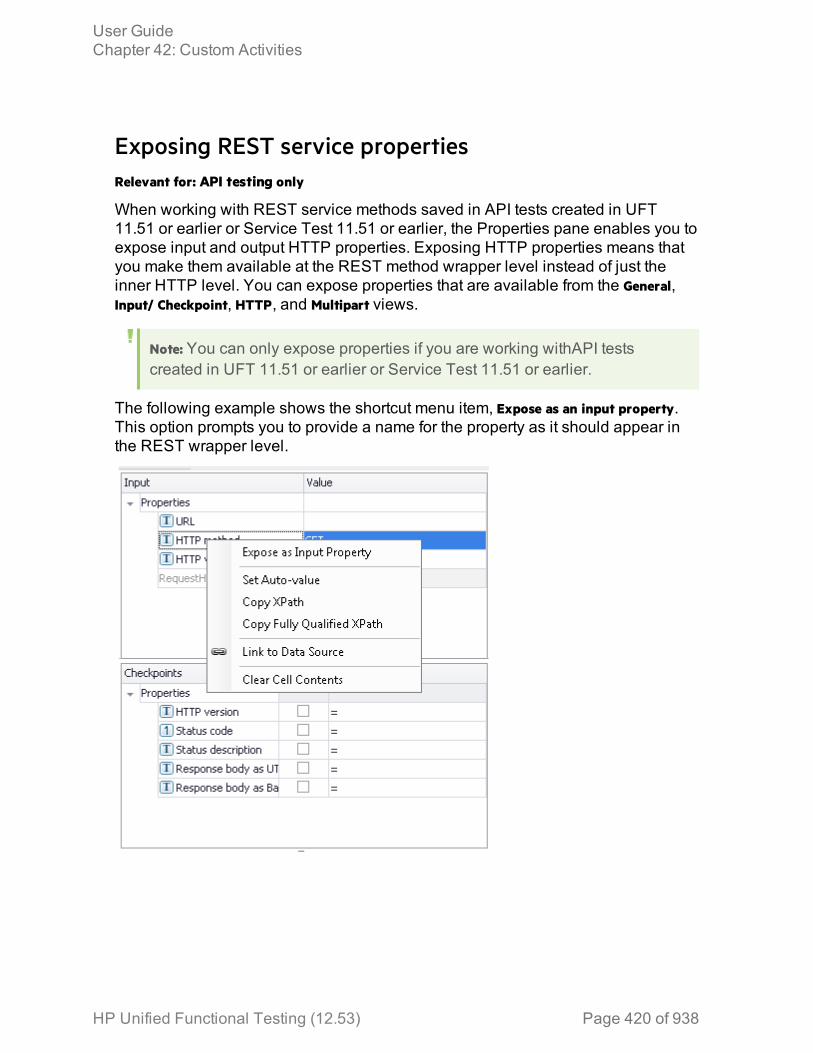
Exposing REST service propertiesRelevant for: API testing only
When working with REST service methods saved in API tests created in UFT11.51 or earlier or Service Test 11.51 or earlier, the Properties pane enables you toexpose input and output HTTP properties. Exposing HTTP properties means thatyou make them available at the REST method wrapper level instead of just theinner HTTP level. You can expose properties that are available from the General,Input/ Checkpoint, HTTP, and Multipart views.
Note: You can only expose properties if you are working withAPI testscreated in UFT 11.51 or earlier or Service Test 11.51 or earlier.
The following example shows the shortcut menu item, Expose as an input property.This option prompts you to provide a name for the property as it should appear inthe REST wrapper level.
User GuideChapter 42: Custom Activities
HP Unified Functional Testing (12.53) Page 420 of 938
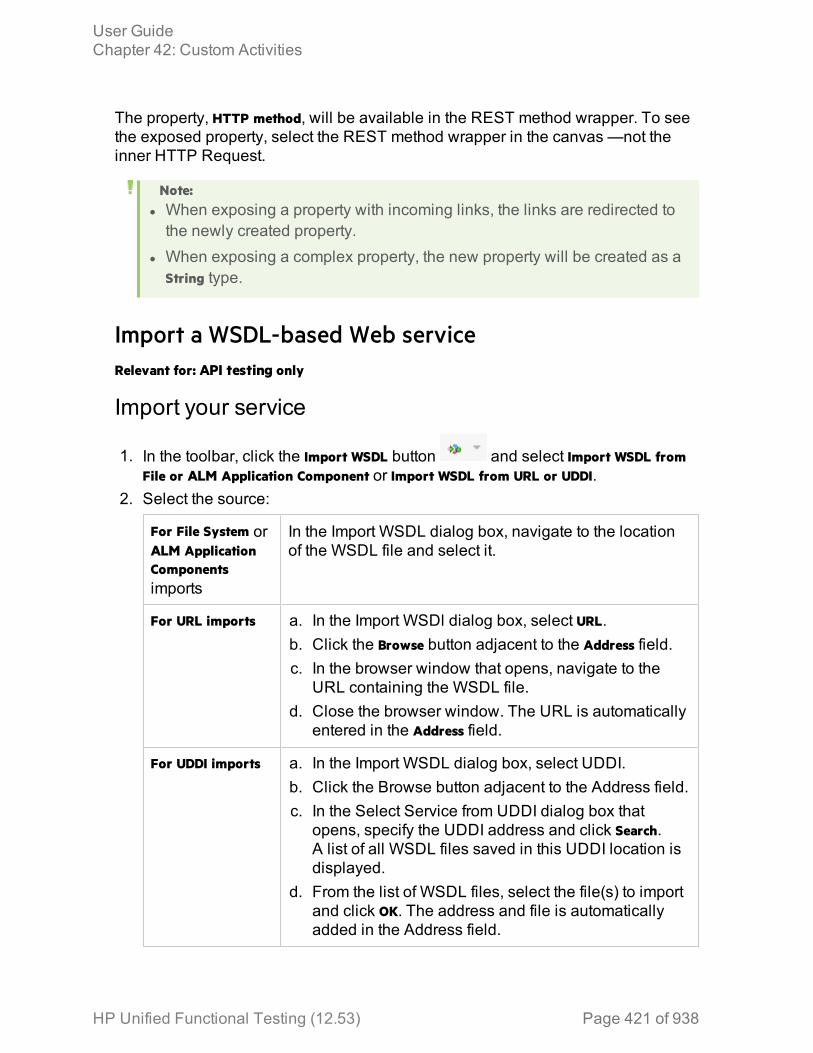
The property, HTTP method, will be available in the REST method wrapper. To seethe exposed property, select the REST method wrapper in the canvas —not theinner HTTP Request.
Note:l When exposing a property with incoming links, the links are redirected tothe newly created property.
l When exposing a complex property, the new property will be created as aString type.
Import a WSDL-based Web serviceRelevant for: API testing only
Import your service
1. In the toolbar, click the Import WSDL button and select Import WSDL fromFile or ALM Application Component or Import WSDL from URL or UDDI.
2. Select the source:
For File System orALM ApplicationComponentsimports
In the Import WSDL dialog box, navigate to the locationof the WSDL file and select it.
For URL imports a. In the Import WSDl dialog box, select URL.b. Click the Browse button adjacent to the Address field.c. In the browser window that opens, navigate to the
URL containing the WSDL file.d. Close the browser window. The URL is automatically
entered in the Address field.
For UDDI imports a. In the Import WSDL dialog box, select UDDI.b. Click the Browse button adjacent to the Address field.c. In the Select Service from UDDI dialog box that
opens, specify the UDDI address and click Search.A list of all WSDL files saved in this UDDI location isdisplayed.
d. From the list of WSDL files, select the file(s) to importand click OK. The address and file is automaticallyadded in the Address field.
User GuideChapter 42: Custom Activities
HP Unified Functional Testing (12.53) Page 421 of 938
3. If your WSDL must be accessed through a secure server or proxy machine setthe connection information:a. In the Import WSDL from URL or UDDI dialog box, click Advanced Settings to
expand the dialog box.b. Enter the authentication information or the proxy server details as needed.
4. Mark the WSDL as a server response (optional):a. In the Import WSDL from URL or UDDI dialog box, click Advanced Settings to
expand the dialog box.b. At the bottom of the dialog box, select the Import as server option.
5. Click OK to import the service. If the import succeeds, the Toolbox displays theservice, its ports, and operations under the Web Services node.
Validate the WSDL file - optionalTo check the WSDL's compliance with the WS-I standard, in the Toolbox pane,right-click the service nodeand select Validate WS-I Compliance. The Output windowshows the WS-I validation results.
Note: These validations apply only to Document/Literal type services, but notRPC.
Update your WSDL information - optional1. If the URL for your imported Web Service changes, you can update the
URL after importing without the need to reimport the service and recreate thetests using the imported service methods.
User GuideChapter 42: Custom Activities
HP Unified Functional Testing (12.53) Page 422 of 938

In the Toolbox pane, right-click the top-level service node and do one of thefollowing:
UpdateWSDL:
This updates the service details from the source provided whenyou first imported the WSDL file.
UpdateWSDLfrom:
This updates the service URL and details from one of thefollowing sources:l URL or UDDI: Enables you to reimport the WSDL file (containingthe service model details) from a different URL or UDDI source.
l File or ALM Component: Enables you to reimport the WSDL filefrom the file system or ALM.
The service model details are updated in the Toolbox pane and the steps usingthe service model methods are also updated.
IMPORTANT: The service or service location URL must be accessiblewhen updating the service.
Add input attachments to the test - optional
1. Select the Web Service call step in the canvas and open the Attachments tabin the Properties pane.
2. In the upper pane, select an attachment Type: DIME or MIME.
3. Click in the Attachments row and click the Add button to add an arrayelement.
4. Select a file as the Origin of the attachment using the Browse button .5. Select a Content Type. Specify a Content ID or keep the default value, Auto.
Validate output attachments
1. Select the Web Service call step in the canvas and open the Attachmentsview in the Properties pane.
2. Click in the Attachments row in the Checkpoints pane, and click Add to addan array element (it may be necessary to expand the column).
3. Select the check box adjacent to each item that you want to validate. Specifyvalues for the elements being validated: Content Type and/or Content ID.
4. To validate content, click the Calculate the file checksum button icon in theContent row. UFT calculates the specified file's checksum using the MD5 Hashfunction.
User GuideChapter 42: Custom Activities
HP Unified Functional Testing (12.53) Page 423 of 938
You can also check for received attachments in the test's folder, stored as fileswith a .bin extension.
Configure SOAP Fault information - optionalTo apply negative testing to a Web service:
1. In the canvas, select the step to which to apply the SOAP fault.2. In the Properties pane, open the SOAP Fault tab .3. Select Fault is expected.4. Provide SOAP Fault checkpoint values for the negative testing:
To work Inthe XMLlayout:
Expand the SOAP nodes and define Any elements for theSOAP Header and Body. If relevant, provide values forfaultcode, faultstring, or faultactor.
To workwith XPathexpressions:
Click the XPath tab and use the Add button to add new XPathentries. Copy the XPATH entry into the cell.
Create a REST service modelRelevant for: API testing only
PrerequisiteStudy the structure of the REST Service body and determine which resources andmethods you need to define.
Create the service model hierarchyIn order for UFT to create and use the service model, you must define the hierarchyof the service, including its resources and methods:
1. In the toolbar, click the Add REST Service button and select REST ServiceEditor.
2. In the Add REST Service editor, give the service a name.3. Add resources and methods as needed:
For new resources Click the Add Resource toolbar button andprovide a meaningful name for the resource.
User GuideChapter 42: Custom Activities
HP Unified Functional Testing (12.53) Page 424 of 938
For new methods Click the Add Method toolbar button and providea meaningful name for the method.
Set the General properties1. Select the service, resource or method for which you want to set its properties.
2. In the right pane's Properties list, open the General tab.3. Enter values for the properties.
Set the URL property values1. In the REST Service editor, select a REST service, resource, or method.2. In the General tab, enter the URL property value:
l If you are entering a URL property value for a REST service, enter theURL prefix in the URL property row, beginning with a http://
l If you are entering a URL property value for a REST resource or method,enter the URL property value in the Relative URL property row.
Note: If you enter a URL property value for the service or resource of yourREST service, the URL property values are passed to all resources ormethods included in the service or resource. For details, see "PassingREST service properties" on page 416
Define the method's HTTP properties1. Select a REST service method.2. In the REST service editor's right pane, click the HTTP Input/Checkpoints tab.3. For each method, modify the HTTP method and HTTP version.4. Use the plus sign in the RequestHeaders parent node to add name and value
pairs for the request header array.
Define custom properties - optionalFor methods that require input, such as PUT or POST, you can add custom inputproperties. For methods that provide an output such as GET, you add the requiredoutput properties. To create these properties:
1. In the right pane's Properties list, click the Custom Input/Checkpoints tab .
2. Expand the plus button and select Add Input/Output Property.
User GuideChapter 42: Custom Activities
HP Unified Functional Testing (12.53) Page 425 of 938
3. Provide a name, data type, and description (optional) for each property.4. Enter the property values in the Value column.
Enter the request body directly - optional
Note: This step describes how to enter the request body directly. (For detailson linking to a data source, see the next step.)
1. Return to the design document for the REST service and copy the Requestbody onto the clipboard.
2. In the right pane of the Add REST Service window, open the HTTP tab. Makesure the Body type in the drop down is set to Text, and click within the Bodysection. Press CTRL+V to paste the contents of the request into the pane. Makesure that there are no extra spaces before or after the body text.
3. Modify the element values within the XML body as required.
Note: If you need to use a multipart request with your REST Service methods,this is done after dragging the REST method to the canvas, For details, see"Send a multipart HTTP or REST Service request" on page 397.
Link the body request to a data source - optional
Note: This step describes how to enter the Request body through a datasource. (For details on entering the Request body directly, see the previousstep.)
1. Return to the design document for the REST service and copy the requestbody to the clipboard.
2. In the right pane of the Add REST Service dialog box, open the HTTP tab .Make sure the Body type in the drop down is set to Text, and click within theBody section.
3. Click the Link Body button to the right of the pane, to open the Select LinkSource dialog box.
4. In the Select Link Source dialog box, click Custom Expression to expand thedialog box. Paste the clipboard contents, the Request body, into the Expressionarea.
User GuideChapter 42: Custom Activities
HP Unified Functional Testing (12.53) Page 426 of 938

5. In the Expression area, highlight the value of the element you want to link. In theupper pane, double-click on the custom property you defined earlier in theproperties list. The property is now linked to a value.
6. The modified expression appears in the Expression area. In the followingexample the custom Class property is linked to Class element in the RESTdocument.
<Class>{Step.InputProperties.RestMethod.Class}</Class>
7. Click OK. UFT places the data in the Body area.If you need to use a multipart request with your REST Service methods, this isdone after dragging the REST method to the canvas, For details, see "Send amultipart HTTP or REST Service request" on page 397.
Test the method
Click the Run Method button on the toolbar to test the method with its propertyvalues. The results are displayed in the lower section of the window.
User GuideChapter 42: Custom Activities
HP Unified Functional Testing (12.53) Page 427 of 938

Save the service model to your testIn the REST Service editor, click OK in the Design REST Service dialog box. UFTadds the REST service along with its resources and methods to the Toolbox pane,under the Local Activities category.
Expose input and output propertiesYou can forward built-in HTTP properties to the REST method wrapper. This isuseful for making specific HTTP properties available at the wrapper level.
Note: If you created a REST method in UFT 11.52 or Service Test 11.52 orlater, all REST Service method properties are incorporated into the RESTactivity step itself without a wrapper.
1. Double-click a REST method from the Toolbox pane to add it to the canvas.Expand the method to show the HTTP Request frame.
2. Click in the HTTP Request frame. Select a property in the Properties pane andselect Expose as Input Property or Expose as Output Property from the right-clickmenu.
3. Provide a name for the property in the New Exposed Property dialog box.4. Click the REST method wrapper in the canvas, and view the newly exposed
property in the Properties pane's Custom Input/Checkpoints tab .
Import a REST service modelUFT supports importing REST service model descriptions fromWADL, Swagger,or OData REST APIs.
When you import service model descriptions, UFT automatically parses the servicedescription and creates any relevant methods and resources.
User GuideChapter 42: Custom Activities
HP Unified Functional Testing (12.53) Page 428 of 938
Import the service
1. In the toolbar, click the Add REST Service drop-down button and select one ofthe following:l Import Swagger Service from URL/File
l Import OData Service from URL/File
The Import WADL/Swagger/OData Service from URL/File dialog box opens.2. Do one of the following:
Whenimportingfrom a file
In the Import dialog box, navigate to the JSON file (for Swaggerservices) or EDMX file (for OData services) that contains theservice description.
Whenimportingfrom a URL
In the Import Service from URL dialog box, enter the full URL tothe file including the file name.
UFT parses the file for a few seconds, then adds the service's resources andmethods to the Local Activities node in the Toolbox.If the schema you import is missing values for some elements, one of thefollowing occurs:
Swagger UFT automatically generates the missing values.To do this it uses the values defined in the Autovalues pane ofthe Options dialog box (Tools > Options > API Testing tab> Autovalues pane).
WADL/OData These values remain empty.
Set authentication and response settings for aSAP HANA serviceIf you are importing an OData REST service model from a URL for a SAP HANAservice, you must provide the log-on credentials as part of the import.
1. In the Import OData Service from URL dialog box, click Advanced Settings.2. In the lower part of the dialog, select the Use authentication settings option.3. Provide the log-on credentials for the SAP HANA service.4. Select the Use SAP HANA SAML option.5. Click OK to import the service.
User GuideChapter 42: Custom Activities
HP Unified Functional Testing (12.53) Page 429 of 938
6. From the Local Activities section of the Toolbox pane, add a service method tothe canvas.
7. In the Properties pane, select the General tab .8. In the General tab, set the Use SAP SAML Authentication cell value to True or False.
Use the service's methods in your testAfter you import the service model into UFT, the methods are displayed in theToolbox pane under the Local Activities node.
Add these methods to your test as needed.
Send and receive a JSON request for a REST serviceRelevant for: API testing only
Note: The following tasks show how to send a single JSON request to aREST service method step (after it has been added to the canvas). To createa reusable model, create a prototype. For details, see "Create a RESTservice model" on page 424.
Set the HTTP properties
Note: If you are working with an API test created in UFT 11.51 or earlier orService Test 11.51 or earlier, you must expand the REST activity's wrapperand enter these properties in the HTTP Request step found inside theREST activity wrapper.
In the Properties pane's Input/Checkpoints tab , set the destination URL and theHTTP method, usually POST or PUT.
Load the request body1. In the Properties pane, open the HTTP tab .2. Select Body type JSON.3. Click the Load JSON button and navigate to the .json file.
Note: If your JSON file contains non-ASCII characters, you should savethis file with UFT-8 encoding. Otherwise, the characters in your file maynot display correctly in UFT.
User GuideChapter 42: Custom Activities
HP Unified Functional Testing (12.53) Page 430 of 938
Add a request header - optional
Note: If you are working with an API test created in UFT 11.51 or earlier orService Test 11.51 or earlier, you must expand the REST activity's wrapperand enter these properties in the HTTP Request step found inside theREST activity wrapper.
If your server requires you to specify JSON during content negotiation, you need toset the request header.
1. In the Properties pane, open the Input/Checkpoints tab .2. In the Input/Checkpoints tab, click the plus sign to add a RequestHeader array
element.3. Add a custom request header named Accept with the value application/json.
Modify the JSON body - optionalIf you intend to dynamically assign values to the JSON body from a data source,you need to add escape characters.
In the Input/Checkpoints tab, in the Input area, display the Text view of the JSONbody and add the escape character, \, for each occurrence of a square or curlybracket ({, }, [, and ]). Do not use an escape character for link expressions enclosedby curly brackets. For example:
\{"results":\[\{"name": "John", "id": 873829904, location: "NY"\},\{"name": "Linda", "id": 726371109, location: "LA"\},\{"name": "Mike", "id": 711029345, location: "NY"\},\]\}
When no links are used, this is not required.
User GuideChapter 42: Custom Activities
HP Unified Functional Testing (12.53) Page 431 of 938
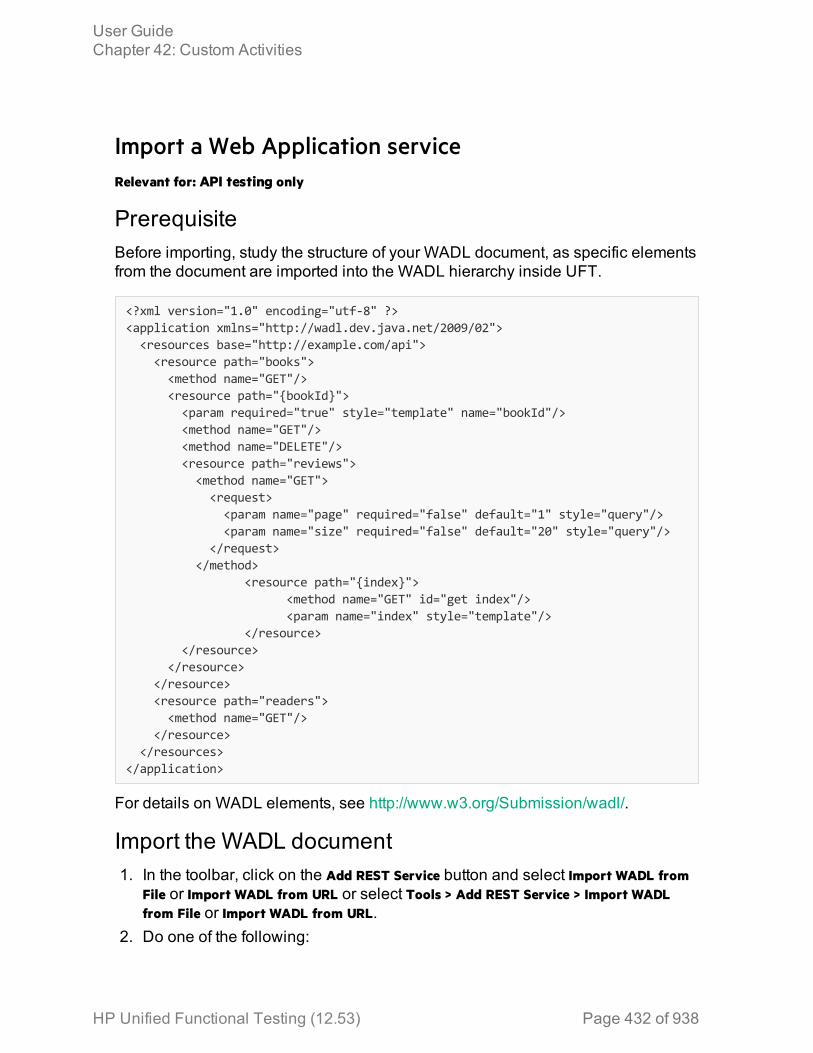
Import a Web Application serviceRelevant for: API testing only
PrerequisiteBefore importing, study the structure of your WADL document, as specific elementsfrom the document are imported into the WADL hierarchy inside UFT.
<?xml version="1.0" encoding="utf-8" ?><application xmlns="http://wadl.dev.java.net/2009/02"><resources base="http://example.com/api"><resource path="books"><method name="GET"/><resource path="{bookId}"><param required="true" style="template" name="bookId"/><method name="GET"/><method name="DELETE"/><resource path="reviews"><method name="GET"><request><param name="page" required="false" default="1" style="query"/><param name="size" required="false" default="20" style="query"/>
</request></method>
<resource path="{index}"><method name="GET" id="get index"/><param name="index" style="template"/>
</resource></resource>
</resource></resource><resource path="readers"><method name="GET"/>
</resource></resources>
</application>
For details on WADL elements, see http://www.w3.org/Submission/wadl/.
Import the WADL document1. In the toolbar, click on the Add REST Service button and select Import WADL from
File or Import WADL from URL or select Tools > Add REST Service > Import WADLfrom File or Import WADL from URL.
2. Do one of the following:
User GuideChapter 42: Custom Activities
HP Unified Functional Testing (12.53) Page 432 of 938
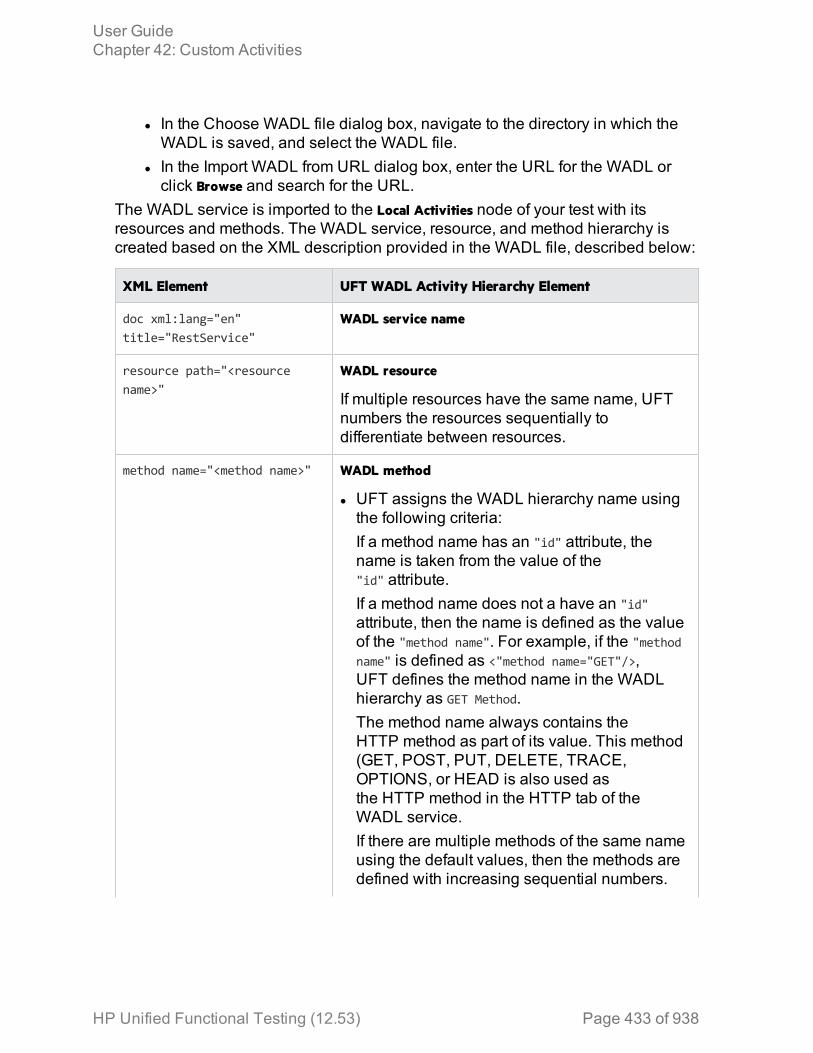
l In the Choose WADL file dialog box, navigate to the directory in which theWADL is saved, and select the WADL file.
l In the Import WADL from URL dialog box, enter the URL for the WADL orclick Browse and search for the URL.
The WADL service is imported to the Local Activities node of your test with itsresources and methods. The WADL service, resource, and method hierarchy iscreated based on the XML description provided in the WADL file, described below:
XML Element UFT WADL Activity Hierarchy Element
doc xml:lang="en"title="RestService"
WADL service name
resource path="<resourcename>"
WADL resource
If multiple resources have the same name, UFTnumbers the resources sequentially todifferentiate between resources.
method name="<method name>" WADL method
l UFT assigns the WADL hierarchy name usingthe following criteria:If a method name has an "id" attribute, thename is taken from the value of the"id" attribute.If a method name does not a have an "id"attribute, then the name is defined as the valueof the "method name". For example, if the "methodname" is defined as <"method name="GET"/>,UFT defines the method name in the WADLhierarchy as GET Method.The method name always contains theHTTP method as part of its value. This method(GET, POST, PUT, DELETE, TRACE,OPTIONS, or HEAD is also used asthe HTTP method in the HTTP tab of theWADL service.If there are multiple methods of the same nameusing the default values, then the methods aredefined with increasing sequential numbers.
User GuideChapter 42: Custom Activities
HP Unified Functional Testing (12.53) Page 433 of 938
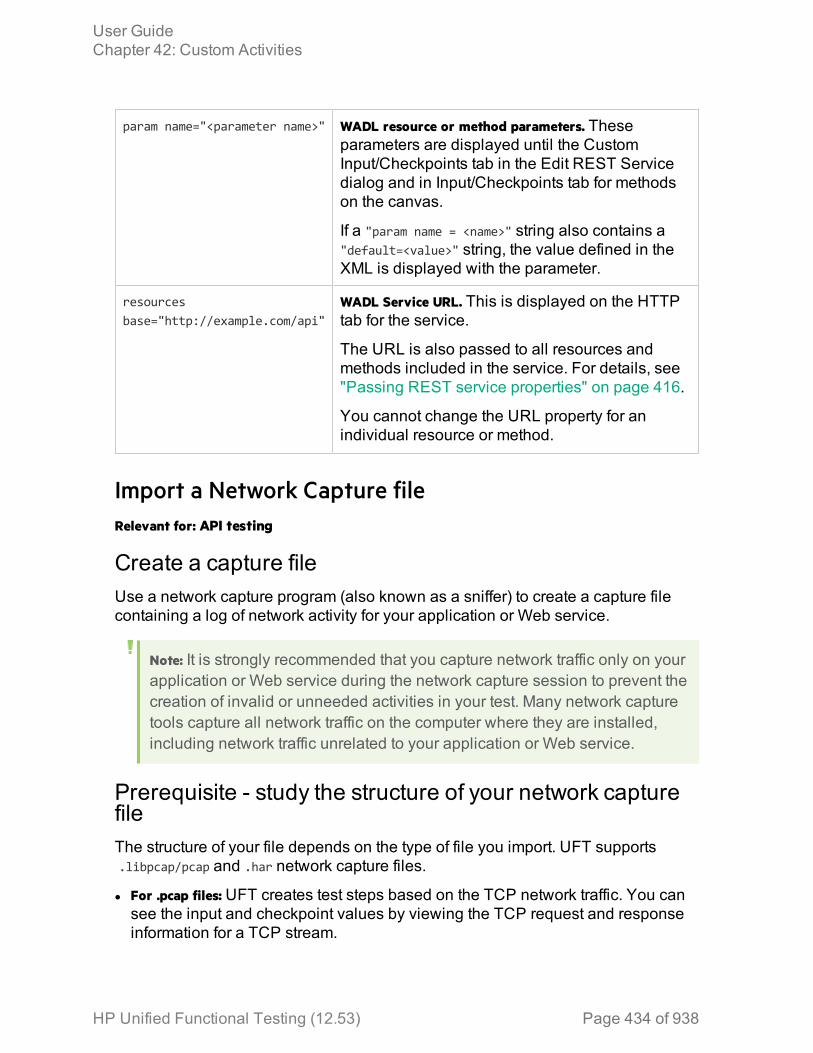
param name="<parameter name>" WADL resource or method parameters. Theseparameters are displayed until the CustomInput/Checkpoints tab in the Edit REST Servicedialog and in Input/Checkpoints tab for methodson the canvas.
If a "param name = <name>" string also contains a"default=<value>" string, the value defined in theXML is displayed with the parameter.
resourcesbase="http://example.com/api"
WADL Service URL. This is displayed on the HTTPtab for the service.
The URL is also passed to all resources andmethods included in the service. For details, see"Passing REST service properties" on page 416.
You cannot change the URL property for anindividual resource or method.
Import a Network Capture fileRelevant for: API testing
Create a capture fileUse a network capture program (also known as a sniffer) to create a capture filecontaining a log of network activity for your application or Web service.
Note: It is strongly recommended that you capture network traffic only on yourapplication or Web service during the network capture session to prevent thecreation of invalid or unneeded activities in your test. Many network capturetools capture all network traffic on the computer where they are installed,including network traffic unrelated to your application or Web service.
Prerequisite - study the structure of your network capturefileThe structure of your file depends on the type of file you import. UFT supports.libpcap/pcap and .har network capture files.
l For .pcap files: UFT creates test steps based on the TCP network traffic. You cansee the input and checkpoint values by viewing the TCP request and responseinformation for a TCP stream.
User GuideChapter 42: Custom Activities
HP Unified Functional Testing (12.53) Page 434 of 938
Note: You must use a network capture program to view the network capturetraffic for your .pcap file.
l For .har files: Using a text editor, you can view the Request and Responseinformation in the JSON hierarchy of the file.
Note: UFT creates a test activity based on its recognition of the TCP streamin the following ways:
l If UFT recognizes the TCP stream as being compatible with or matchingan already existing Web Service method, UFT creates a Web Service step.
l If UFT recognizes the TCP stream response as a SOAP networktransaction, it creates a SOAP Request step.
l If UFT does not recognize the TCP stream as being similar to an existingWeb Service step or a SOAP request network transaction, it creates anHTTP Request step.
Import the network capture file1. In UFT, with an API test open or selected, select Tools > Import Network Capture
File. The Import Network Capture Dialog Box opens.2. In the Import Network Capture Dialog Box, select the file containing your
network capture data.
Note: UFT supports only .pcap and .har network capture files.
3. View the file details in the Info Pane of the Import Network Capture Dialog Box.If there are errors in your file, return to your network capture tool and fix theerrors.
4. If you want UFT to create checkpoints for your test steps based on theresponse sections of the network capture file, select the Create checkpoints fromresponse option.
5. Click Import. If your network capture file contains many transactions, UFTdisplays the progress of your import.
Note: To stop an import, click Cancel in the import progress window. Alltest steps created prior to your cancellation are removed from the test.
User GuideChapter 42: Custom Activities
HP Unified Functional Testing (12.53) Page 435 of 938
UFT creates Web Service test steps, SOAP Request test steps, orHTTP Request test steps for each of the transactions contained in your networkcapture file.
Create an SAP API test stepRelevant for: API testing only
PrerequisiteYou must have the SAP .NET Connector installed on your machine. Theinstallation is available on the SAP Help portal, at http://help.sap.com/saphelp_NW04/helpdata/en/e9/23c80d66d08c4c8c044a3ea11ca90f/content.htm.
Define an SAP ConnectionIn the SAP Connections pane of the Options dialog box Tools > Options > API Testingtab > SAP Connections define one or more SAP connections.
Select an iDoc from your SAP server1. Select Tools > Import from SAP.2. In the SAP dialog box, select one of the connections that you added in the
SAP Connections pane of the Options dialog box.3. (Optional) Accept the default credentials entered in the SAP Connections pane
or click Override connection to provide different credentials.4. Select IDoc or RFC and specify a search string using an asterisk (*).5. Click Search.6. After the search is completed, select the necessary items and then click Import
Selected.These items are added in the Toolbox pane, to the Local Activities node, with aseparate node for SAP. You can now add them to the test as individual steps.
Import and create a .NET Assembly API test stepRelevant for: API testing only
PrerequisitePrepare a .dll assembly file and store it in an accessible location.
User GuideChapter 42: Custom Activities
HP Unified Functional Testing (12.53) Page 436 of 938
Import a .NET assembly1. In the toolbar, click the Import .NET Assembly button .2. In the Import .NET Assembly dialog box, select the .NET Assembly Browser tab.3. Navigate to the direction containing the assembly .dll or .exe file and select the
file.4. Click Select to add it to the Selected References list.5. Click OK to add the .NET assemblies to the Toolbox pane.
Tip: After importing the .NET assembly, you should save the test. Not savingthe test leads to unexpected behavior with the autocomplete functionalitywhen adding an event handler to a .NET assembly test step.
Select a GAC assembly - optionalEach computer where the common language runtime is installed has a machine-wide code cache called the GAC (Global Assembly Cache). The GAC storesassemblies specifically designated to be shared by several applications on thecomputer.
1. In the Import .NET Assembly dialog box, select the GAC tab.2. In the list of references, select one or more GAC assemblies and click Select to
add them to the Selected References list.
Add an ExecuteEvent event handler
1. In the Properties pane, open the Events tab2. In the ExecuteEvent row, in the Handler column, click the down arrow and select
Create a default handler.3. In the TestUserCode.cs file that opens, locate the CodeActivity<#>_ExecuteEvent
section of the code.4. Under the CodeActivity>#>_ExecuteEvent, edit the TODO area. You can access
input and output properties that you defined earlier, using autocompletion.
/// Use this.CodeActivity4 to access the CodeActivity4/// Activity's context, including input and output properties.public void CodeActivity4_OnExecuteEvent(object sender,STActivityBaseEventArgs args){this.CodeActivity4.Input.Property1...
User GuideChapter 42: Custom Activities
HP Unified Functional Testing (12.53) Page 437 of 938
...}
Add custom input and output properties - optionalBy default, the .NET Assembly step contains no input or output properties. Youmust add the necessary properties:
1. After adding a step, in the Properties pane, open the Input/Output Propertiestab .
2. In the Input/Output Properties tab, click the Add Input/Output Property button andadd input and output properties.
User GuideChapter 42: Custom Activities
HP Unified Functional Testing (12.53) Page 438 of 938
Known Issues- Custom ActivitiesRelevant for: API testing only
Web servicesl You cannot import WSDL files with names that are restricted by the Windowsoperating system. This list includes: CON, PRN, AUX, NUL, COM1, COM2, COM3,COM4, COM5, COM6, COM7, COM8, COM9, LPT1, LPT2, LPT3, LPT4, LPT5, LPT6, LPT7,LPT8, and LPT9.Workaround: Rename the WSDL file before the import.
l The following WSDLs are not supported:l WSDL version 2.0l WSDLs containing a <appInfo> element.l RPC Encoded WSDLs configured as Asynchronous Web services.l WSDLs authenticated by HTTP digest on Apache servers.
l When opening many tests in the same solution using one or more of the sameWeb services, UFT may develop a memory leak.Workaround: Move the Web service to the file system or ALM repository. To dothis, import a Web service and then, in the Toolbox pane, right-click the WebService activity and select Move to > File System Activities or ALM Activities.
l For a Web service imported as a server response:l RPC type WSDLs cannot be imported as a server response. If you attempt toupdate a service from an RPC encoded WSDL, it will create a duplicate entry.
l If you end the UFT.exe process during the listening stage, after the binding wasadded, the binding will not be removed from the system.Workaround: Remove the binding manually using a utility such as httpcfg.exe ornetsh.exe.
l When working with SSL, certificates from a file are not supported. If you movethe test to another machine, the certificate will not be saved with the test.Workaround: Add the certificate to the local machine store before the listenerstarts, and remove it at the end of the listening process.
REST servicesl Importing a schema to a REST, HTTP, or SOAP checkpoint may remove thelinks of the input properties.
l XPath checkpoints are not supported for HTTP and REST activities.
HP Unified Functional Testing (12.53) Page 439 of 938

l If you link between input and output properties in the same REST method andthen delete the input property without removing the link, the link expression stillremains in the output property. If you save the test in this state, you may beunable to reopen it.Workaround: Delete the link explicitly either before or immediately after deletingits source property.
l When defining a REST method prototype in the Add/Edit REST Service dialogbox - in order to use the Trim, Ignore, or Stop test options, select the check box inthe Validate column, in the Checkpoints pane.
l When running a REST method using the Run Step command, checkpoints ofdynamic property values in the method linked to other property values (input oroutput) are ignored.
l When building JSON content and loading it in the XML Grid Model for ODataand Swagger, all data types other than String are included as values in the JSONcontent.
Web Application ServicesThe following elements are not supported when importing your WADL. UFT doesnot import these elements into the WADL hierarchy inside your test:
l Grammars elementl Resource_type elementl Link elementAny child elements of these elements are also ignored by UFT and not added toyour WADL inside the test.
In addition, if you use the href attribute to link to other elements, you must refer toan element in the same WADL file. Linking between WADL files is not supported.
Network Capture ActivitiesSteps added to your test from a network capture file do not include:
l Security settings for Web service calls and SOAP requestsl Web authentication information for any type of stepl Cookies data for HTTP requestl Attachments sent as part of the Web Service call
.NET Assembly ActivitiesImporting or adding references to 64-bit .NET assemblies is not supported.
User GuideChapter 42: Custom Activities
HP Unified Functional Testing (12.53) Page 440 of 938
Chapter 43: Actions for API TestsRelevant for: API testing only
Actions are sequences of operations that you perform within the context of a test,consisting of either one or multiple steps. Actions also allow you use a repeatedactivity, such as logging in to a Web site multiple times. Each time the action iscalled, the test runs the action steps, its properties, and its data. Instead of addingthe necessary test steps again each time you need to perform an action in theapplication, you can call the action and UFT runs its steps instead.
You can call both actions defined within your current test or defined in other tests.When you call an action from another test, by default its data is read-only. If you callan action from an external test that has data assigned to its properties, you canindicate whether you want the data from action's data sheet to be imported as alocal, editable copy, or whether you want to use the (read-only) data from theoriginal action.
Note: To modify the steps of an action from an external test, you must openthe test in which the action is stored and make your modifications there. Themodifications apply to all tests that call that action.
Example: Suppose you want to create the following three tests for flightreservation--booking a flight, modifying a reservation, and deleting areservation. While planning your tests, you realize that for each test, youneed to log in and log out of the site.
HP Unified Functional Testing (12.53) Page 441 of 938
Test 1 would contain three actions (Logging In, Booking a Flight, andLogging Out). Test 2 would contain three actions (Logging In, Modifying aBooking, and Logging Out). Test 1 would contain three actions (Logging In,Cancelling a Booking, and Logging Out). The Logging In and Logging Outactions are defined in the same test, and called as external actions by allthree tests.
Actions can also be saved as business components to be used for BPT.
Actions and data sourcesRelevant for: API testing only
You can use the Data pane tables to provide property values for your actions. Eachaction uses its own data sources—not the test's data source.
Tip: If you want to use the same data for the test and in a specific action, youmust define the data source path twice, once for the test and once for theaction. See "Data Usage in API Tests" on page 445.
By default, data from actions called from other tests, are not visible in your currenttest. You can expose the data by enabling the Allow other tools to override the dataoption in the action’s test. As a result, you can view the data in the Data Pane. It ismarked with an icon indicating that this is data from an action.
User GuideChapter 43: Actions for API Tests
HP Unified Functional Testing (12.53) Page 442 of 938
An Update option allows you to reload the action's data in your test when it changesin its original location. This only applies to data that you did not make editable. Fordetails, see "Use actions in an API test" below.
Note: You can switch data from read-only to editable or vice versa. However,when changing from editable to read-only, any changes made to the data arelost.
If an action is called repeatedly in the test, only one set of the action's data isdisplayed in the Data Pane. If you make changes to the data at the action's originallocation and it is not marked as editable, then the changes are applied to all calls tothis action.
Use actions in an API testRelevant for: API testing only
Create a new action1. Select Design > Call to New Action.2. Specify the action name and description. Click OK to add the call to the action
to the canvas.3. In the Solution Explorer, double-click the action to open its canvas.4. Add steps to the action. Drag activities from the Toolbox onto the canvas.
Note: You can insert a call to another action, from an existing action call.
Call an existing action or a test1. From the Toolbox pane, expand the HP Automated Testing Tools node and add a
Call API Action or Test or Call GUI Action or Test to the canvas.2. In the Properties Pane, Open the Input/Checkpoints tab .3. In the Input/Checkpoints tab, click the Select Action or Test button.4. Select the test and action and click OK.
Set action propertiesTo set an action call's properties, you must set the values for each of the stepscontained in the action separately.
1. Select an activity within the action whose properties you want to set.2. In the Properties tab, provide values or data drive the properties.
User GuideChapter 43: Actions for API Tests
HP Unified Functional Testing (12.53) Page 443 of 938
3. The property values that you set will be the default values used when you adda call.
Note: If you reload the service using the Refresh button, the new versionmay add or remove properties. Properties that remain unchanged, willretain the default values.
Enable an action's data for editing when called by anothertestTo view or override an external action's data, you must expose it in its originallocation. This only applies to Excel type data sources, and only available fortests—not business components.
1. Define data for the action that you will be calling. Assign the data manually oruse data driving. For details, see "Assign data to API test/component steps" onpage 454.
2. In the Data Pane, select the data source's node.
3. In the Properties pane, open the Data Source Properties tab and select theAllow other tools to override the data option. The Data pane creates a local copyof the data which can be edited.
Override data from an action called by another test1. Make sure the action that you want to call has its data exposed.2. Open the test in which you want to add the call to the action.3. From the Toolbox pane, expand the HP Automated Testing Tools node and add a
Call API Action or Test or a Call GUI Action or Test activity onto the canvas.4. In the Input/Checkpoints tab in the Properties pane, click the Select Action or
Test button.5. In the Select Action or Test dialog box, navigate to the test and select the
desired action. Click OK.6. In the Data pane, select the data source node.
7. In the Properties pane, open the Data Source Properties tab and select the Usea local, editable copy option.
8. Edit the data tables in the Data pane.
User GuideChapter 43: Actions for API Tests
HP Unified Functional Testing (12.53) Page 444 of 938
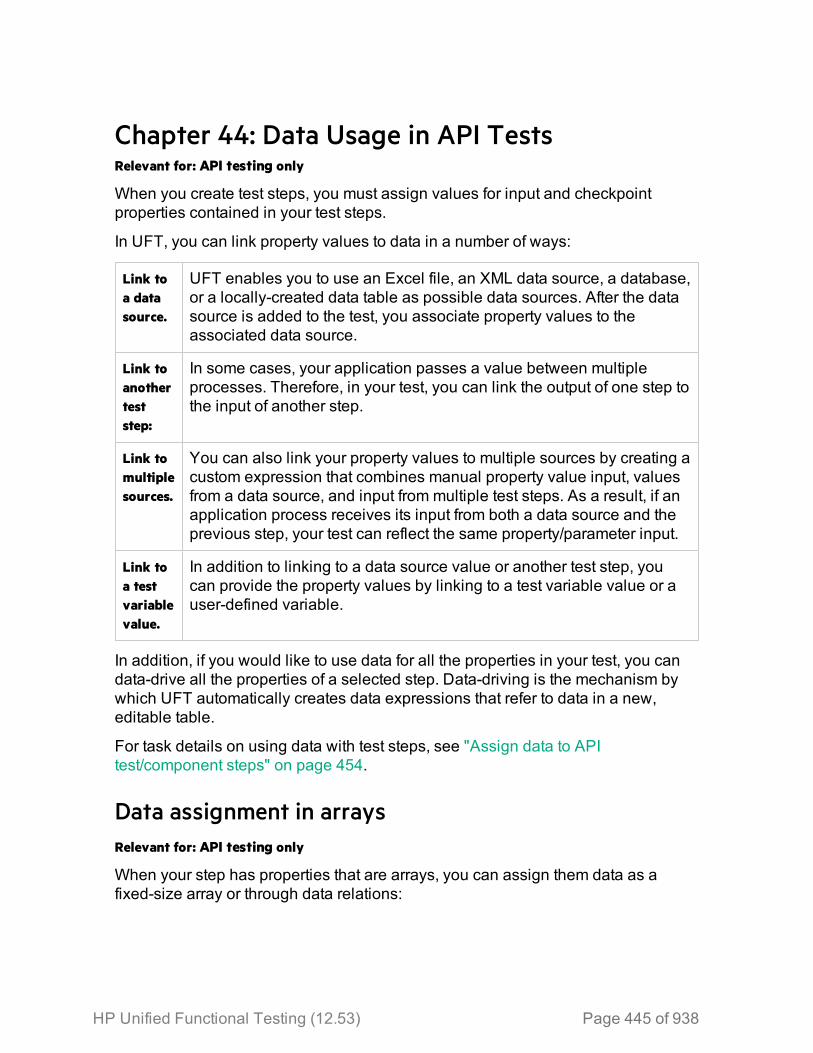
Chapter 44: Data Usage in API TestsRelevant for: API testing only
When you create test steps, you must assign values for input and checkpointproperties contained in your test steps.
In UFT, you can link property values to data in a number of ways:
Link toa datasource.
UFT enables you to use an Excel file, an XML data source, a database,or a locally-created data table as possible data sources. After the datasource is added to the test, you associate property values to theassociated data source.
Link toanotherteststep:
In some cases, your application passes a value between multipleprocesses. Therefore, in your test, you can link the output of one step tothe input of another step.
Link tomultiplesources.
You can also link your property values to multiple sources by creating acustom expression that combines manual property value input, valuesfrom a data source, and input from multiple test steps. As a result, if anapplication process receives its input from both a data source and theprevious step, your test can reflect the same property/parameter input.
Link toa testvariablevalue.
In addition to linking to a data source value or another test step, youcan provide the property values by linking to a test variable value or auser-defined variable.
In addition, if you would like to use data for all the properties in your test, you candata-drive all the properties of a selected step. Data-driving is the mechanism bywhich UFT automatically creates data expressions that refer to data in a new,editable table.
For task details on using data with test steps, see "Assign data to APItest/component steps" on page 454.
Data assignment in arraysRelevant for: API testing only
When your step has properties that are arrays, you can assign them data as afixed-size array or through data relations:
HP Unified Functional Testing (12.53) Page 445 of 938

Fixed-SizeArrayAssignment
In the fixed-size method, you assign each element of a fixed-sizearray to any column in a data table. You can assign each arrayelement to a different data table column.
The following example shows three array elements assigned todifferent columns of a data table.
User GuideChapter 44: Data Usage in API Tests
HP Unified Functional Testing (12.53) Page 446 of 938

ThroughDataRelations
When you have one or more data relations defined, as described in"Create a new child relation" on page 471, UFT assigns data from asingle column. You link the first element of the array to a column ina data source.
In order for UFT to assign data based on a data relation, thefollowing conditions must be present:
User GuideChapter 44: Data Usage in API Tests
HP Unified Functional Testing (12.53) Page 447 of 938
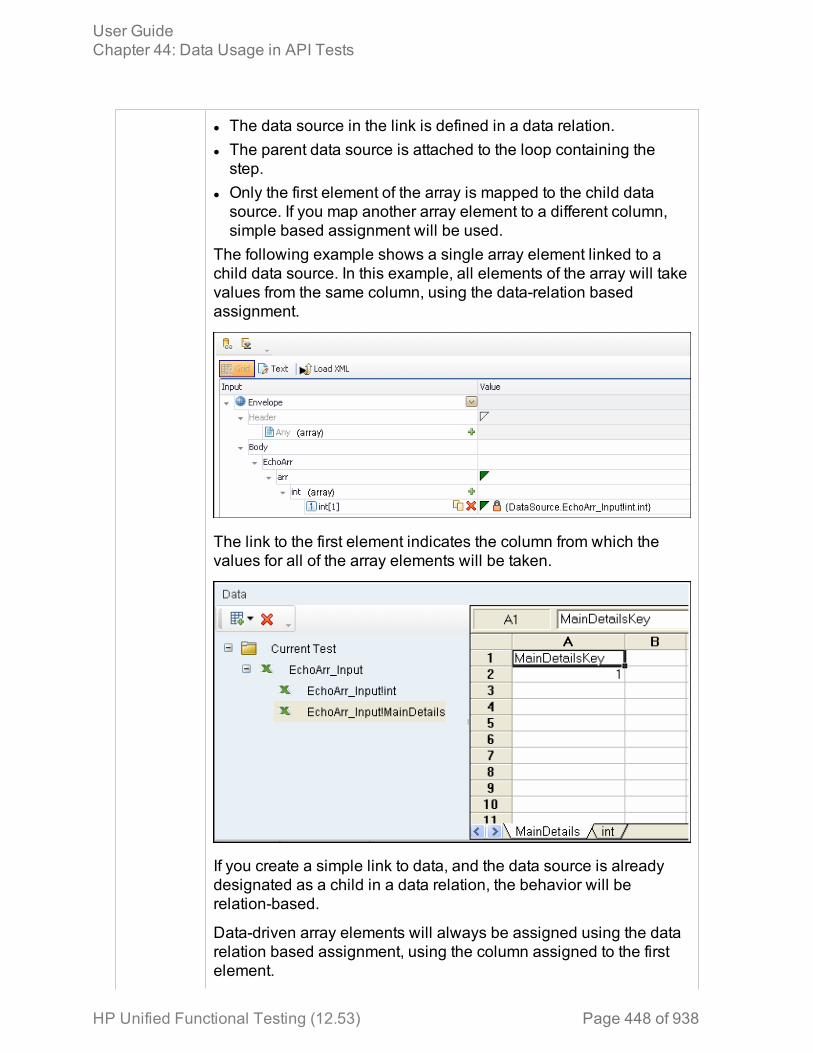
l The data source in the link is defined in a data relation.l The parent data source is attached to the loop containing thestep.
l Only the first element of the array is mapped to the child datasource. If you map another array element to a different column,simple based assignment will be used.
The following example shows a single array element linked to achild data source. In this example, all elements of the array will takevalues from the same column, using the data-relation basedassignment.
The link to the first element indicates the column from which thevalues for all of the array elements will be taken.
If you create a simple link to data, and the data source is alreadydesignated as a child in a data relation, the behavior will berelation-based.
Data-driven array elements will always be assigned using the datarelation based assignment, using the column assigned to the firstelement.
User GuideChapter 44: Data Usage in API Tests
HP Unified Functional Testing (12.53) Page 448 of 938
DataAssignmentfor ArrayCheckpoints
For relation-based data assignment, the drop down list adjacent tothe name of the parent array node provides the following options forcheckpoint validation:
l Fixed. Checks that each of the returned array elements matchesthe corresponding array element in the data table in the DataPane. Each array is marked by an index number, as it checks thearrays by their index.
l All. Checks that all of the returned array elements match the arrayelement in the Data Pane. In this mode, arrays are not marked byan index number. For example, if a property in the first array ismarked >= 2 and the same property in another array element isset to <=10, the test run will check that all returned values arebetween 2 and 10.
l Contains. Checks that at least one of the returned array elementsmatches the value of the property in the Checkpoints pane. In thismode, arrays are not marked by an index number.
Add data sources to an API testFor details about data handling for GUI tests and the GUI testing Data Pane, see"Data Pane" on page 82.
Relevant for: API testing only
Add an Excel data source
1. In the Data pane, click the New Data Source down arrow and select Excel.The New/Change Excel Data Source Dialog Box opens.
User GuideChapter 44: Data Usage in API Tests
HP Unified Functional Testing (12.53) Page 449 of 938
2. Browse to the file and indicate if the first row is a header row.3. Specify a name for the data source. If you do not provide a name, UFT sets it to
the Excel file name after you navigate to the file.4. Select whether to link to the Excel in its original location or create a local copy.
The advantage of making a local copy is that it becomes portable with the test.However, any updates to the data at its original location will not be not reflectedin the migrated test.
5. Select Allow other tools to override the data option to enable ALM to run the testwith different values. This allows you to overwrite the data from the importedExcel file with values from an ALM Data Resource.In addition, if you call a test or action with data assigned to its steps, this optionallows you to edit the data in the called test or action.
6. Click OK.7. In the Data pane, select the data source under the Excel node. In the right pane,
you can view and edit the values.
Caution: When entering values into the Excel sheet, you should use theExcel General format for values.
Add an XML data source
1. In the Data pane, click the New Data Source down arrow and select XML.The New XML Data Source Dialog Box opens.
2. Provide a Data Source name.3. Select the entity upon which to base the data source:
l Schema file: Browse to an .xsd file.l XML file: Browse to an .xml file.l Use existing: Browse to an existing XML-based data source from another test.
4. Click OK.
User GuideChapter 44: Data Usage in API Tests
HP Unified Functional Testing (12.53) Page 450 of 938

5. Select the data source's node in the Data pane.
6. Edit the XML data in the grid. Click the Add rows button to add row values.
7. To load XML values, click the Load data from an XML file button .
Add a database data source
1. In the Data pane, click the New Data Source down arrow and selectDatabase. The Add New Database Data Source Wizard opens. The Set DatabaseConnection page opens.
2. In the Set Database Connection pane, add the database connectioninformation as follows:
For anOleDB typeconnection:
a. Select OleDB as the Connection type.b. Set the connection string in one of the following ways:
o Paste an OLE DB connection string into the text area.o Select a previously defined connection string from thedrop down.
o Click the Build Connection String button to useMicrosoft's Data Link Properties dialog box.
c. Click Test Connection to verify that the connection is valid.d. Click Next. This button is only available for valid
connections.
User GuideChapter 44: Data Usage in API Tests
HP Unified Functional Testing (12.53) Page 451 of 938

For an ODBCtypeconnection:
a. Select ODBC as the Connection type.b. Click the Build Connection String button to select a DSN
type.c. Select a DSN type and provide the necessary credentials.
To create or edit a DSN entry, click the Manage ODBC DataSources button. For details, click the Help button in the ODBCData Source Administrator dialog box. After you close theadministrator dialog box, click the Reload DNS list button torefresh the list.
d. Test the connection. After the confirmation, click OK.
3. In the Set SQL Statement page:a. Provide a unique name for the data source, not used by another data
source. If you do not provide a name, the data source is automaticallyassigned the table name after you build the query.
b. Provide an SQL statement in one of the following ways:
Paste anexistingstatementinto thetext area
Take your preexisting statement and enter it.
Select apreviouslydefinedstatement
From the drop-down list, select a previously-used statement.
User GuideChapter 44: Data Usage in API Tests
HP Unified Functional Testing (12.53) Page 452 of 938

Use theQueryDesigner
i. Click the Build Query Statement button to open theQuery Designer Dialog Box.
ii. Select a table or view. The Query Designer lists all of therows in the pane below and displays the correspondingSQL statement in the preview pane.
iii. Enable Auto execute to view the results of your query asyou make changes in the upper pane.
iv. By default, the Query Designer selects all columns in thetable. To remove a column from the query, clear theOutput check box for that column.
v. To set a sorting order, select Ascend or Descend from theSort column drop-down. If you have multiple rows thatyou are sorting, provide the Sort Order beginning with 1.The Query Designer adds an ORDER BY clause to thepreview pane.
vi. To add a GROUP BY or DISTINCT clause to your statements,select the appropriate check box.
vii. Click OK to accept the query and return to the wizard.
c. In the wizard's Set SQL Statement page, click the Check SQL Statement button.d. After the Query Preview is finished, click Close to return to the wizard.e. Click Finish. UFT shows the query details in the Properties pane's
"Database Data Source Properties Tab.
Note: By default the Data pane shows the first ten rows of the querydata. To change the number of displayed rows, use the GeneralPane.
Add a local data table
1. In the Data pane, click the New Data Source down arrow and select LocalTable. The New Local Table Data Source Dialog Box opens.
2. Click the Add button to create a column in the data table.3. In the columns list, specify a column name and description. Select a data type
from the drop down list.4. Repeat steps 3 and 4 for each column you want to create.5. When you are finished, click OK.
User GuideChapter 44: Data Usage in API Tests
HP Unified Functional Testing (12.53) Page 453 of 938

6. In the Data pane, select the table's node in the left pane and move within thetable using the keyboard arrows. Type within the cells to manually set values.
Assign data to API test/component stepsRelevant for: API testing only
This task describes the different ways to link test step properties (both for inputproperties and checkpoint properties) to data sources :
Manually enter the data for your test step properties1. In the canvas, select the test step to assign property values.
2. In the Properties pane, open the Input/Checkpoints tab .3. In the Value cell for the property, enter the value.
Note: If you are working with a step that uses XML or JSON input, youcan also enter the property values using the Text view in the Inputsection.
Tip:
l If the property value is a string, enter it exactly as you expect it appear(including spaces and special characters.)
l If you want to use the values from the previous test run, click the Loadfrom Replay button.
Link your test step to a data source1. In the Data pane, associate a data source with your test.2. In the canvas, select the test step for which you want to assign property values.
3. In the Properties pane, open the Input/Checkpoints tab .4. In the Value cell for the property, click the Link to data source button . The
Select Link Source dialog box opens.5. In the Select Link Source dialog box, select the Data source column option. A list
of all data sources is displayed.6. Select the data source containing your property's data value. A list of all
available data columns is displayed.7. In the data columns list, select the corresponding column name for your test
step property and click OK.
User GuideChapter 44: Data Usage in API Tests
HP Unified Functional Testing (12.53) Page 454 of 938
The property name in the Input/Checkpoints tab is now displayed with theassociated data source name and data source value.
Note:
l You can only link properties to data sources only if the data source isattached in a loop, such as Test Flow or custom loops.
l Linking a leaf node to a complex XML node is supported only forstring type data.
Link your test step to another step1. In the canvas, select the step for which you want to link a property value.
2. In the Properties pane, open the Input/Checkpoints tab .3. In the Value cell for the property, click the Link to data source button . The
Select Link Source dialog box opens.4. In the Select Link Source dialog box, select the Available steps option. A list of
all steps preceding the selected step is displayed.5. In the list of available steps, select the step you want to link to the selected
property value. A list of available properties is displayed in the right pane.6. In the right pane, open the tab containing the property to which to link.
Note: If you are linking to the output of a previous step, open theInput/Checkpoints tab .
7. Select the property to which to link and click OK.The property value is displayed in the Value column of the input property namewith an expression representing the output of the linked step. The canvas alsodisplays an arrow connecting he step property values.
Note: The Properties pane displays a down arrow next to any propertythat is set to be used as output data for another step. Click the icon todisplay a list of all steps linked to the selected property.
Link your test step to multiple sources1. If necessary, add a data source. For details on adding data sources, see "Add
data sources to an API test" on page 449.2. In the canvas, select the step for which you want to link a property value.
User GuideChapter 44: Data Usage in API Tests
HP Unified Functional Testing (12.53) Page 455 of 938
3. In the Properties pane, open the Input/Checkpoints tab .4. In the Value cell for the property, click the Link to data source button . The
Select Link Source dialog box opens.5. In the Select Link Source dialog box, click the Custom Expression button to
expand the expression area.6. Create your expression, with any combination of methods. Click Add after
linking to each source to add the value to your custom expression: l Manually enter the expressionl Link to data source values, as described in "Link your test step to a datasource"
Note: You can make a custom expression that includes multiple linksto data sources.
l Link to another step's property, as described in "Link your test step toanother step"
Caution: If you are entering a custom string, make sure to add the stringexactly as you want it to appear, including spaces and specialcharacters.
You can use these methods in any order and in any manner as needed tocreate your expression.
7. When you are finished entering all values, click OK.The custom expression is displayed in the Value column for the property namein the Input/Checkpoints tab exactly as you entered it in the expression area.
Link your test steps to a test or user-defined variable1. In the canvas, select the step you want to link to a test or user-defined variable.
2. In the Properties pane, open the Input/Checkpoints tab .3. In the Value cell for the property you want to link to a variable value, click the
Link to data source button . The Select Link Source dialog box opens.4. In the Select Link Source dialog box, select the Test variables option. The list of
available variables is displayed.5. In the list of available variables, select the variable for the link and click OK.
The value for the selected property is displayed as the expression of the testvariable.
User GuideChapter 44: Data Usage in API Tests
HP Unified Functional Testing (12.53) Page 456 of 938

Data drive the test step
1. In the Input/Checkpoints tab, click the Data Drive button. The Data DrivingDialog Box opens.
2. In the Data Driving dialog box, choose a Data provider: Excel or XML.
3. Select the properties upon which you want to apply data driving: inputproperties, checkpoints, or both.
4. If you specified an Excel provider and data-driving for both input properties andcheckpoints, specify whether to place the data for both sections in the sameExcel worksheet or different ones.
5. Indicate whether you want to Configure '<loop name>' as a For Each loop using thenew data source. This option repeats the steps in the loop frame according to thenumber of data rows in the Excel or XML data source. If you disable this option,you can manually set the number of iterations via the loop properties. Thissetting overrides the general loop properties.
6. Click OK.7. UFT prompts you to confirm the action. Click OK.
UFT populates the value column with data expressions. The expressions arepreceded by informational icons, indicating read-only status or unmatchingdata types.
Note: If your properties are within an array, you must create at least onearray element to allow data driving. To add an array element, select thearray's parent node and click the Add button . If you do not add at leastone element, then the array will not be data driven.
Add data keywordsYou can use keywords to customize the test run and validation. For example, SKIPomits a property in the request or in the validation.
1. In the Value column for a step property, do one of the following:l Select the property and choose Insert Keyword from the right-click menu.l Link to a data source containing the keyword.l Type to keyword into the Expected Value column (checkpoints only).
2. Select the appropriate keyword:
User GuideChapter 44: Data Usage in API Tests
HP Unified Functional Testing (12.53) Page 457 of 938
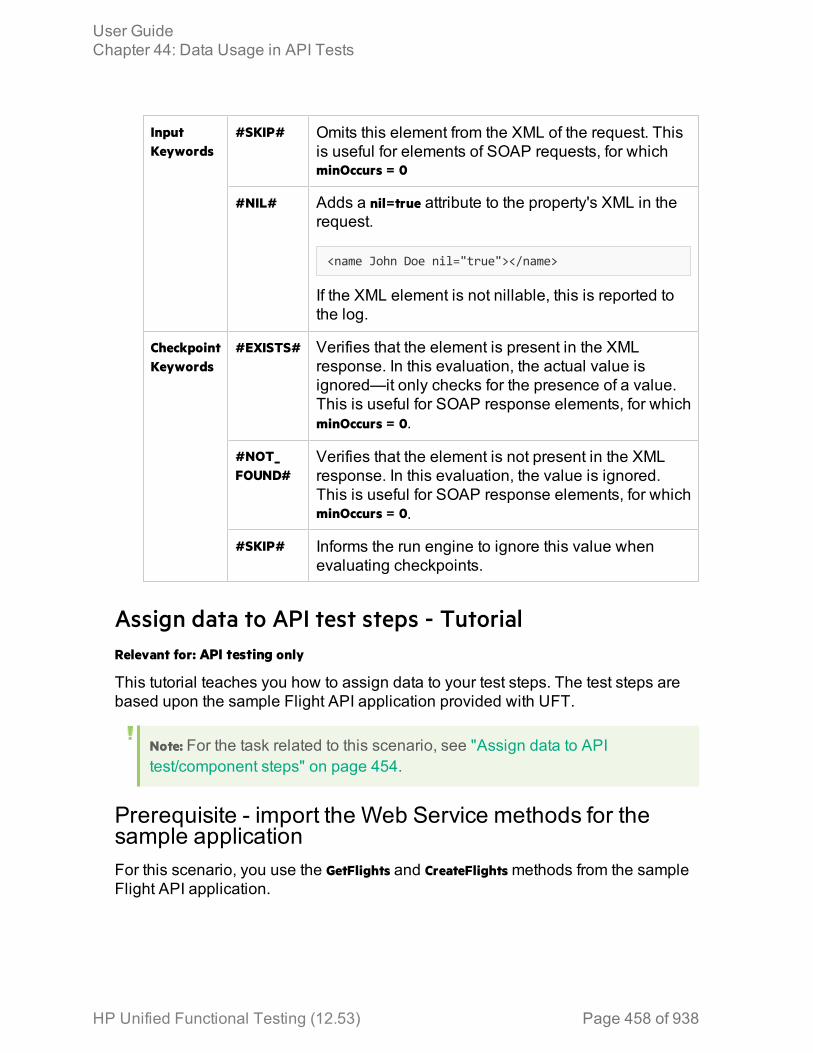
InputKeywords
#SKIP# Omits this element from the XML of the request. Thisis useful for elements of SOAP requests, for whichminOccurs = 0
#NIL# Adds a nil=true attribute to the property's XML in therequest.
<name John Doe nil="true"></name>
If the XML element is not nillable, this is reported tothe log.
CheckpointKeywords
#EXISTS# Verifies that the element is present in the XMLresponse. In this evaluation, the actual value isignored—it only checks for the presence of a value.This is useful for SOAP response elements, for whichminOccurs = 0.
#NOT_FOUND#
Verifies that the element is not present in the XMLresponse. In this evaluation, the value is ignored.This is useful for SOAP response elements, for whichminOccurs = 0.
#SKIP# Informs the run engine to ignore this value whenevaluating checkpoints.
Assign data to API test steps - TutorialRelevant for: API testing only
This tutorial teaches you how to assign data to your test steps. The test steps arebased upon the sample Flight API application provided with UFT.
Note: For the task related to this scenario, see "Assign data to APItest/component steps" on page 454.
Prerequisite - import the Web Service methods for thesample applicationFor this scenario, you use the GetFlights and CreateFlights methods from the sampleFlight API application.
User GuideChapter 44: Data Usage in API Tests
HP Unified Functional Testing (12.53) Page 458 of 938
To import the service, do the following:
1. Open the Flight API application from the Start menu or screen or the file system(<UFT installation folder\samples\Flights Application\Flights API.exe).
2. Copy the URL for the Web Service of the Flight API Application.3. Import the Web Service into UFT.
Associate a data source with your testAdd the sample application Excel data source to your test. This file(SampleAppData.xlsx) is found in the <UFT installation>\samples\Flights Applicationdirectory.
1. In the Data pane, click the New Data Source button and select Excel.2. In the New/Change Excel Data Source Dialog Box, navigate to sample
application Excel file. Click OK to add the Excel file to the test.The data source is displayed in the Data pane.
Create your test stepsFrom the Toolbox pane, drag the following steps to the canvas in order:
l GetFlights (found in the Local Activities > Web Services node)l CreateFlightOrder (found in the Local Activities > Web Services node)l Report Message (found in the Miscellaneous node)
Manually enter the input properties for the GetFlights stepTo provide property values for the GetFlights step, use the first method for providingdata by manually entering the property values.
To provide the property values, do the following:
1. In the canvas, make sure that the GetFlights step is selected.
2. In the Properties pane, open the Input/Checkpoints tab .3. In the Input/Checkpoints tab, manually select the following values from the
property value drop-down lists:l DepartureCity: Denverl Arrival City: Los Angeles
User GuideChapter 44: Data Usage in API Tests
HP Unified Functional Testing (12.53) Page 459 of 938

Link the CreateFlightOrder input properties to the datasourceWhen the GetFlights method runs in the Flight API application, it automaticallycreates a number of output properties, including the airline number, price, a flightnumber, and so on.
In this step, you link the input property values of the CreateFlightOrder step both tothe output of the GetFlights step and to the sample Excel file you associated withyour test.
1. In the canvas, select the CreateFlightOrder step.
2. In the Properties pane, open the Input/Checkpoints tab .3. In the Input/Checkpoints tab, in the Value cell for the FlightNumber input property,
select the Link to data source button .4. In the Select Link Source dialog box, link the FlightNumber property to the
GetFlights step output property of the same name. When prompted if you wouldlike to link the selected property as part of a loop, select No.For details on linking to another test step property, see "Link your test step toanother step" on page 455.
Note: By default, the FlightNumber property is not visible. Expand theGetFlightsResult node and click the Add button to expand all the outputproperties.
5. In the Input/Checkpoints tab, link the remaining input properties to the relevantcolumns in the Excel data source.
Note: Make sure to clear the NIL property on any property values.
Link the Report step input properties to theCreateFlightOrder stepFor the final step of this tutorial, you will create a custom expression to mimic theFlight API application's passing of flight data to a flight booking Web site page. Forthis, create the custom message that the results display.
1. In the canvas, select the Report Message step.
2. In the Properties pane, open the Input/Checkpoints tab .3. In the Input/Checkpoints tab, in the Value cell of the Message property, select
the Link to data source button .
User GuideChapter 44: Data Usage in API Tests
HP Unified Functional Testing (12.53) Page 460 of 938
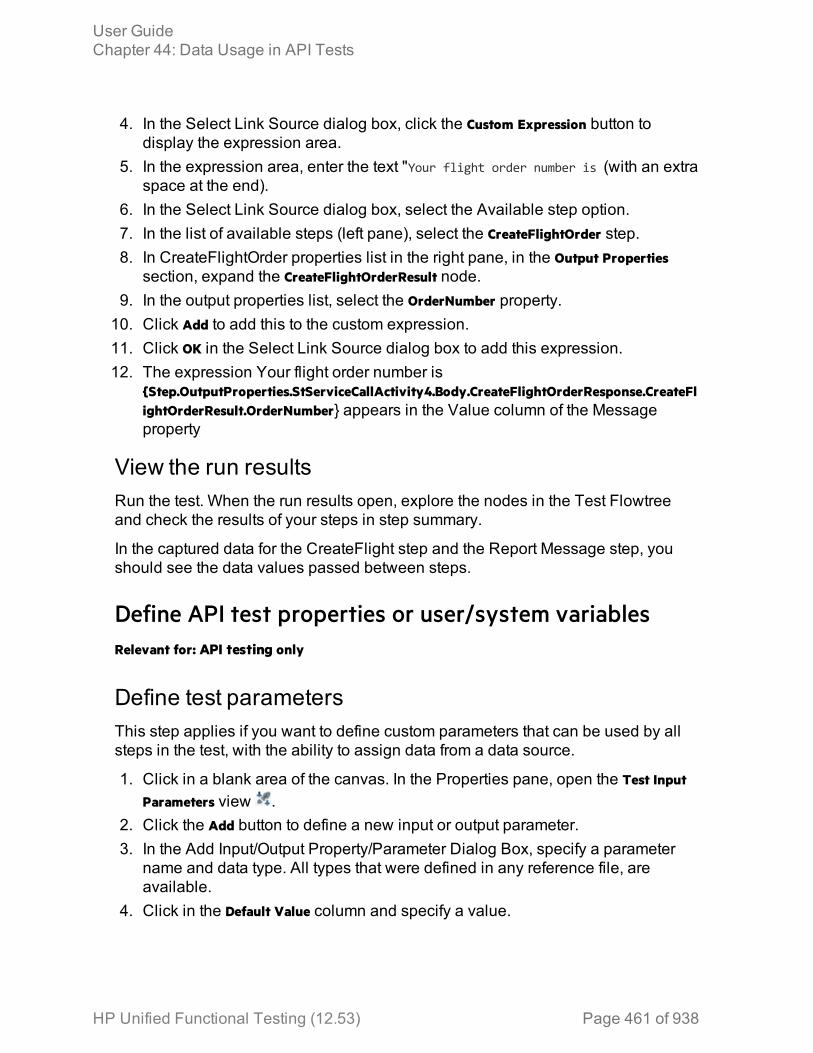
4. In the Select Link Source dialog box, click the Custom Expression button todisplay the expression area.
5. In the expression area, enter the text "Your flight order number is (with an extraspace at the end).
6. In the Select Link Source dialog box, select the Available step option.7. In the list of available steps (left pane), select the CreateFlightOrder step.8. In CreateFlightOrder properties list in the right pane, in the Output Properties
section, expand the CreateFlightOrderResult node.9. In the output properties list, select the OrderNumber property.10. Click Add to add this to the custom expression.11. Click OK in the Select Link Source dialog box to add this expression.12. The expression Your flight order number is
{Step.OutputProperties.StServiceCallActivity4.Body.CreateFlightOrderResponse.CreateFlightOrderResult.OrderNumber} appears in the Value column of the Messageproperty
View the run resultsRun the test. When the run results open, explore the nodes in the Test Flowtreeand check the results of your steps in step summary.
In the captured data for the CreateFlight step and the Report Message step, youshould see the data values passed between steps.
Define API test properties or user/system variablesRelevant for: API testing only
Define test parametersThis step applies if you want to define custom parameters that can be used by allsteps in the test, with the ability to assign data from a data source.
1. Click in a blank area of the canvas. In the Properties pane, open the Test Input
Parameters view .2. Click the Add button to define a new input or output parameter.3. In the Add Input/Output Property/Parameter Dialog Box, specify a parameter
name and data type. All types that were defined in any reference file, areavailable.
4. Click in the Default Value column and specify a value.
User GuideChapter 44: Data Usage in API Tests
HP Unified Functional Testing (12.53) Page 461 of 938
Define user variablesYou can create user variables and set their values. You can define multiple profilesfor the variable values. You select a profile to be active before the test run.
1. Click in a blank area of the canvas. In the Properties pane, open the Test
Variables tab .
2. Click the Add User Variable button to define a new user variable.3. Give the variable a description and a default value.
Set user variable valuesYou can set values for variables in one of the following ways:
l In the Properties pane's Test Variables view, click in the Profile column andmanually enter values.
l Open the Toolbox pane and drag the Set Test Variable activity from theMiscellaneous category into the Test Flow (or loop). In the Properties pane, definethe variable key and value. To obtain values, click the Link to a Data Sourcebutton in the row. In the Select Link Source Dialog Box, select the Test Variablesoption. Select a name and value for the Variable key and Variable value.
l Open the Properties pane's Events view for the step or define a Custom Codeactivity. Edit the event handler code and assign a value using the TestProfileobject. The following example sets the value of the Region user variable to NE.
activity.Context.TestProfile.SetVariableValue("Region", "NE");
Repeat this step for each variable for which you want to set values.
Define user variable profilesThis step applies only if you created user variables as described in the abovesteps.
1. Define one or more user variables as described above.
2. Click the Add New Profile button .3. In the New Test Profile Dialog Box, specify a name and indicate the profile (if
any) from which to copy the properties. If you do not copy the properties from anexisting profile, UFT copies the user variables from the active profile without itsvalues.
User GuideChapter 44: Data Usage in API Tests
HP Unified Functional Testing (12.53) Page 462 of 938
4. To rename or delete a profile, click the Manage Profiles button . In the ManageProfiles dialog box, , click Remove or Rename.
5. Click the Compare button to display the profiles side-by-side.6. Only the active profile is accessed during the test run. To make a profile active,
select it from the Active Profile list.
Set OS variable values for the test - optionalThis step lets you set global operating system variables that will apply to all stepsin the current test run.
1. From the Toolbox pane and drag the Set OS Environment Variable activity fromthe System category into the Test Flow or another custom loop.
2. In the Properties pane's Input/Checkpoints tab, define the variable key andvalue or click the Link to Source button to specify a data source.
Tip: To view a list of the test variables, click in a blank area of the canvas.
In the Properties pane, open the Test Variables tab . The Systemvariables are listed in the lower pane.
Parameterize XML dataRelevant for: API testing only
This task describes how to parameterize XML data. This enables you to replace aconstant value in the XML schema with a data source expression.
1. Prerequisites
Create a test step that uses XML text in the request body. This applies toNetwork and XML type activities. If you intend to parameterize the data with adata source, import or create the data source.
2. Add the XML body text
a. Using the Properties pane, open the HTTP tab .b. Click the Load File button and load an XML file or paste XML code directly
into the Body area.3. Select the text to parameterize
User GuideChapter 44: Data Usage in API Tests
HP Unified Functional Testing (12.53) Page 463 of 938

a. In the HTTP tab, select Text from the Body type drop-down list.b. In the Body area, select the text value that you want to replace and select
Link to Data Source from the right-click menu.
4. Select a link source
User GuideChapter 44: Data Usage in API Tests
HP Unified Functional Testing (12.53) Page 464 of 938

In the Select Link Source dialog box, select a data source type, such asAvailable steps or Data source column. Select the node that you want to use forparameterization. Click Add. Note that the expression changed.
5. Verify the value in the Properties pane
User GuideChapter 44: Data Usage in API Tests
HP Unified Functional Testing (12.53) Page 465 of 938
In the Properties pane, check the Body area, and verify that the constant valuewas replaced with the data source expression.
Data drive array checkpointsRelevant for: API testing only
This task describes how to set checkpoints for elements of an array through datadriving.
Enable active content on your computer1. In Internet Explorer, select Tools > Options.2. Select the Advanced tab.3. Enable the option Allow active content to run in files on My Computer in the Security
section.4. Click OK and close the browser.
Add a step with an array outputAdd a test step with output properties in the form of an array.
Data drive the array1. In the Properties pane, open the Input/Checkpoints tab .2. In the Checkpoints area, use the plus button . in the row of the parent node,
to add an array element.3. Provide property values. These values are transferred to the Data pane during
data driving. If you do not provide data, include the array element by selectingthe triangle icon in the parent node.
4. Select the array's parent node and click the Data Drive button .
User GuideChapter 44: Data Usage in API Tests
HP Unified Functional Testing (12.53) Page 466 of 938
5. In the Data Driving Dialog Box, select Only Input, Checkpoints or Both Input andCheckpoints as a Data Driven Section option.
6. Click OK. The data driving mechanism informs you that it succeeded.
Set the evaluation expressionIn the Properties pane, adjacent to the data driving expression, select anevaluation operator, such as =, <, and so forth.
Provide data for the array1. Once you data drive an array, you do not set property values from the
Checkpoints pane. Instead, you edit the table in the Data pane. In the Data pane,click the node in the left pane, corresponding to the array element that is to bevalidated.
2. In the <array_name> and MainDetails tables, enter the iteration number to which tocheckpoint should be applied in the MainDetails column. A "1" indicates the firstiteration. If you have several columns with "1" as the iteration number, thecheckpoints will be validated against all of those values.
Select an array validation methodIn the Input/Checkpoints tab, expand the drop down adjacent to the name of theparent array node. Select one of the following:
Fixed. Checks that each of the returned array elements matches thecorresponding array element in the data table in the Data pane. Eacharray is marked by an index number, as it checks the arrays by theirindex.
All. Checks that all of the returned array elements match the array elementin the Data pane. In this mode, arrays are not marked by an indexnumber. For example, if a property in the first array is marked >= 2 andthe same property in another array element is set to <=10, the test runwill check that all returned values are between 2 and 10.
Contains. Checks that at least one of the returned array elements matches thevalue of the property in the Checkpoints pane. In this mode, arrays arenot marked by an index number.
Set the number of iterations - optional1. Selelct the Test Flow or Loop box in the canvas.2. In the Properties pane, open the Input/Checkpoints tab.
User GuideChapter 44: Data Usage in API Tests
HP Unified Functional Testing (12.53) Page 467 of 938

3. Set the number of iterations for the test run.
Navigating within a data sourceRelevant for: API testing only
Sometimes, when you are running your test, your data is stored in multiple sourcesand called by many different step properties in the test. In these cases, you caninstruct UFT how to use the data sources, including where in the data source tobegin calling data values, how to move through the data source, and where to stopusing values from the data source. You specify these settings for each of the datasources associated with your test in the Data Navigation Dialog Box
This is useful to test your application's performance with constantly varying sets ofdata. In addition, this enables you to maintain your data source while still using it ina test. For example, if you are adding new data to a data source that is being usedin a test, but the new data is not complete, you can instruct UFT to begin at the rowcontaining the old data and stop before calling the new data values currently underconstruction.
User GuideChapter 44: Data Usage in API Tests
HP Unified Functional Testing (12.53) Page 468 of 938

The Data Navigation settings you create work with the loop settings for the TestFlow or selected test loop:
l If the loop is configured as a ForEach type, and you assign a specific data sourceas the loop's collection, then the Data Navigation settings affect the number ofiterations of the loop. Because you specify the number of rows to use from theselected data source, the test runs the same number of iterations as the numberof rows specified.
l For data sources that are not designated as the loop collection but whose valuesare called by steps within the loop, the Data Navigation policy affects the datadifferently. It indicates the order in which the values are called from the datasource and assigned to steps within the loop. For example, if you specify in theData Navigation dialog box to begin in the second row of your Excel data source,UFT populates the property value with the values from the second row (and soforth, as specified in the Data Navigation dialog box).
For task details, see "Set the data source navigation properties" on the next page.
Parent/Child data source relationsRelevant for: API testing only
If your test uses multiple data sources to provide data for your test step properties,you can create a hierarchy of relations between data sources that describes how touse the data sources in your test. You use data relations when you use onespecific data source as the primary data source for your test but require other datasources to populate property values within the same test.
When you use data relations, you assign the primary data source to the Test Flowor selected test loop. Then, using the Define New Data Relation dialog box, youspecify any necessary child data sources and map the columns of the parent datasource to the columns of the child data source.
User GuideChapter 44: Data Usage in API Tests
HP Unified Functional Testing (12.53) Page 469 of 938
When the test runs, UFT substitutes the child data as specified.
For task details, see "Create a new child relation" on the next page.
Set the data source navigation propertiesRelevant for: API testing only
This task describes how to set the navigation preferences for data stored in tables.You can set different navigation properties for each data source.
Add a data source to the Test Flow or test loop1. Associate the necessary data sources with your test.2. In the canvas, select the Test Flow or another test loop.
3. In the Properties pane, select the Data Sources tab . The list of all currentlyassociated data sources is displayed.
4. In the Data Sources tab, click Add. The Attach Data Source to Loop Dialog Box.5. In the Attach Data Source to Loop dialog box, select the data source to add to
the loop and click OK.The selected data source is now added to the loop and you can use it to linkproperty values.
Specify the navigation properties for the data source1. In the canvas, select the Test Flow or other test loop.
2. In the Properties pane, open the Data Sources tab . The list of data sourcesassociated with the current loop is displayed.
3. In the Data Sources tab, click Edit. The Data Navigation Dialog Box opens.4. In the Data Navigation dialog box, specify the Start and End rows.5. Indicate the direction in which to move when retrieving data from the table,
Forward or Backward, and the number of rows by which to advance for eachiteration. Alternatively, you can indicate to move to a random row.
6. Specify the action to do when reaching the last row- Wrap around or Keep usingthat row. Click OK.
User GuideChapter 44: Data Usage in API Tests
HP Unified Functional Testing (12.53) Page 470 of 938
Create a new child relationThis step enables you to specify parent-child data source relations betweenmultiple data sources. You can use parent-child relations for Excel, Local Table, andDatabase type data sources.
1. Add at least two or more Excel, Local Table, or Database data sources.
Note: This can also be a single Excel file with two worksheets.
2. In the Data pane, select the data source that you want to designate as a parent.
3. In the Properties, open the Data Source Properties tab .4. Click the Add button. The Define New/Edit Data Relation Dialog Box opens.5. Specify the details of the new relation:
l The data source to use as the child data sourcel The primary key - the data column in the parent data sourcel The foreign key - the data column in the child data source. This column isused in place of the primary key column in the parent data source whenrunning the test.
Click OK after specifying the data source details. The data relation is displayedin the Data Source Properties tab for the parent data source.
User GuideChapter 44: Data Usage in API Tests
HP Unified Functional Testing (12.53) Page 471 of 938
Known Issues- Using data in API tests and componentsRelevant for: API testing only
This section describes troubleshooting and limitations for working with data.
General l If a specified data source is or becomes inaccessible, the test will notfail. The Errors pane and report, however, indicate that there was anerror in retrieving the data.
l Keywords such as #SKIP#, and so forth, are not supported in the Inputproperty grid.Workaround: Link to a data source that contains the keyword.
l When adding a referenced Excel data source, if the file requiresspecial credentials (for example, a location on another domain or adrive requiring authentication), you must verify that the operatingsystem will allow access to the file.
l Data sources with parent-child relationships, should not be accessedtogether in the same loop, unless the child data source is used fordata-driving array elements. Accessing parent-child data sources inthe same loop, may corrupt the test.
l Linking to file names is not supported for HTTP Request and HTTPReceiver activities that use the File type message body.
l For data sources with child relations: If you change the name the Keycolumn in the child sheet, the Define New/Edit Data Relation dialogbox does not reflect the new column name in the drop down lists.
Datadriving
l Data driving for JSON requests or responses, is only supported forExcel.
l Data driving for an Excel data source is only effective for the first 254properties of a step. If a step has more than 254 properties, they willnot be data-driven.
l Data driving for an Excel data source is only supported for propertyvalues consisting of 255 characters or less. If a property value hasmore than 255 characters, the data driving mechanism offers totruncate the string.
l When data driving a test step that has an array with two or morenested levels, the data driving engine only copies the first element ofeach array to the Excel data tables.
l Keyword data driving to an XML data source is not supported.
HP Unified Functional Testing (12.53) Page 472 of 938
Chapter 45: Updating Services and AssembliesRelevant for: API testing only
You can update services that exist in the Toolbox pane, from their original locationsor from alternate locations.
ForWebServices
When you update a service, UFT first compares the service and portnames. If the port names match, UFT transfers all of the data from theupdated service, including new security information. If the new versionof the service contains a port that was not present in the originalservice, it adds it to the Toolbox pane, as an additional port for theservice.
If the port paths (<service name:port name> combination) do not match,and security was set for on the port level, UFT opens the Update PortSecurity Wizard.
When you update an RPC Web service, as long as the operationnames match, the properties are marked as resolved. If the operationnames cannot be resolved, UFT opens the wizard. If there is nooperation available to map to the original, the wizard suggests that youdelete the affected step.
For task details, see "Update a Web Service" on the next page.
HP Unified Functional Testing (12.53) Page 473 of 938
ForRESTservices
If you modify a REST step's properties after incorporating it into yourtest, it will no longer match the method in the Toolbox. You may want tokeep the change, or you may want to remove the conflicts so that yourstep will match the method defined in the toolbox.
You may encounter conflicts in the following areas:
l Adding or removing an input or output propertyl Renaming an input or output propertyl A change in the REST service URLl A change in the HTTP request/response body type or schemal Internal links between a REST property and its inner HTTP elements(if you are working with an API test created in UFT 11.51 or earlier orService Test 11.51 or earlier
l HTTP methodsThe Resolve REST Method Steps wizard enables you to view theconflicts and decide what to do with the conflicts in your test step—keep, remove, or map them. The wizard lets you resolve property-related conflicts. Other conflicts, such as discrepancies in the URLvalues, the HTTP body, and so forth, are resolved automatically.
ForSAPIDocsorRFCs
You can update SAP RFCs and IDocs from their original location orfrom another connection or location.
The Update option automatically updates the item from its originallocation. UFT loads the information for the RFC/IDoc with the samenames, from the original connection.
The Update from option lets you specify different connection information,or a name of a different RFC/IDoc on the same server.
If UFT detects an inconsistency between the original and updatedRFC/IDoc names or their properties, it enables the Update Step wizard.This wizard lets you map the original and new items. For details, see"Update an SAP RFC or IDoc" on page 478.
For task details, see "Update a Web Service" below, "Resolve conflicts in a RESTservice test step" on page 477, or "Update an SAP RFC or IDoc" on page 478.
Update a Web ServiceRelevant for: API testing only
This task describes how to update a WSDL-Based Web Service that was alreadyimported and incorporated into a test.
User GuideChapter 45: Updating Services and Assemblies
HP Unified Functional Testing (12.53) Page 474 of 938
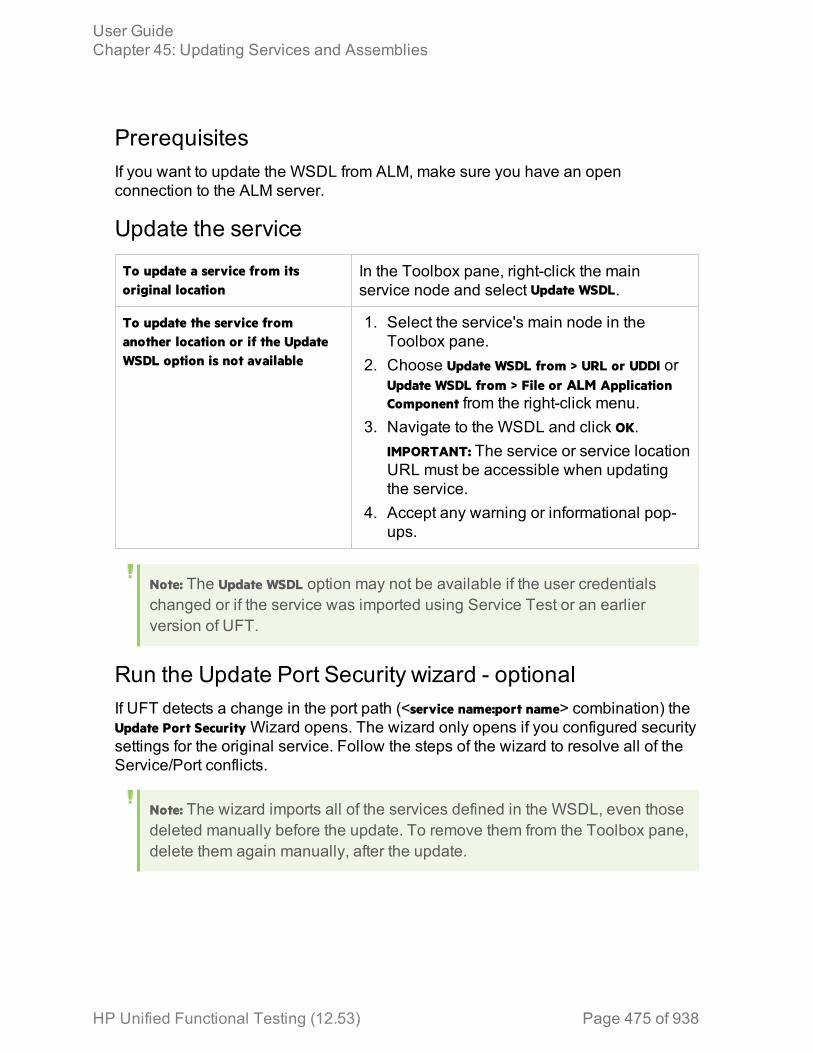
PrerequisitesIf you want to update the WSDL from ALM, make sure you have an openconnection to the ALM server.
Update the service
To update a service from itsoriginal location
In the Toolbox pane, right-click the mainservice node and select Update WSDL.
To update the service fromanother location or if the UpdateWSDL option is not available
1. Select the service's main node in theToolbox pane.
2. Choose Update WSDL from > URL or UDDI orUpdate WSDL from > File or ALM ApplicationComponent from the right-click menu.
3. Navigate to the WSDL and click OK.IMPORTANT: The service or service locationURL must be accessible when updatingthe service.
4. Accept any warning or informational pop-ups.
Note: The Update WSDL option may not be available if the user credentialschanged or if the service was imported using Service Test or an earlierversion of UFT.
Run the Update Port Security wizard - optionalIf UFT detects a change in the port path (<service name:port name> combination) theUpdate Port Security Wizard opens. The wizard only opens if you configured securitysettings for the original service. Follow the steps of the wizard to resolve all of theService/Port conflicts.
Note: The wizard imports all of the services defined in the WSDL, even thosedeleted manually before the update. To remove them from the Toolbox pane,delete them again manually, after the update.
User GuideChapter 45: Updating Services and Assemblies
HP Unified Functional Testing (12.53) Page 475 of 938
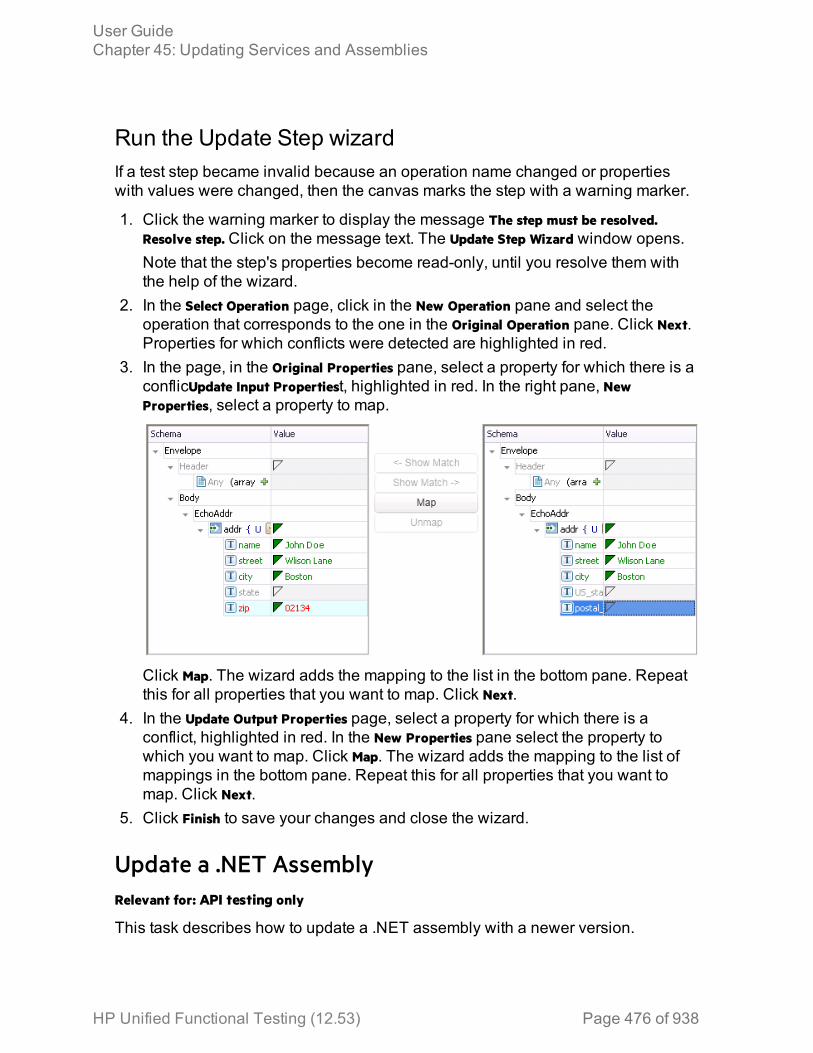
Run the Update Step wizardIf a test step became invalid because an operation name changed or propertieswith values were changed, then the canvas marks the step with a warning marker.
1. Click the warning marker to display the message The step must be resolved.Resolve step. Click on the message text. The Update Step Wizard window opens.Note that the step's properties become read-only, until you resolve them withthe help of the wizard.
2. In the Select Operation page, click in the New Operation pane and select theoperation that corresponds to the one in the Original Operation pane. Click Next.Properties for which conflicts were detected are highlighted in red.
3. In the page, in the Original Properties pane, select a property for which there is aconflicUpdate Input Propertiest, highlighted in red. In the right pane, NewProperties, select a property to map.
Click Map. The wizard adds the mapping to the list in the bottom pane. Repeatthis for all properties that you want to map. Click Next.
4. In the Update Output Properties page, select a property for which there is aconflict, highlighted in red. In the New Properties pane select the property towhich you want to map. Click Map. The wizard adds the mapping to the list ofmappings in the bottom pane. Repeat this for all properties that you want tomap. Click Next.
5. Click Finish to save your changes and close the wizard.
Update a .NET AssemblyRelevant for: API testing only
This task describes how to update a .NET assembly with a newer version.
User GuideChapter 45: Updating Services and Assemblies
HP Unified Functional Testing (12.53) Page 476 of 938
Select the assembly to updateIn the Toolbox pane, expand the .NET Assemblies node and select the assembly youwant to update.
Import a new .NET assembly1. In the Toolbar, click the Import .NET Assembly button .2. In the Import .NET Assembly dialog box, click the .NET Assembly Browser tab.3. In the .NET Assembly Browser tab, click Browse and navigate to the the .dll or
.exe file.4. Click Open to add it to the Selected References list.5. Click OK to begin the update.
Handle warnings - optionalIf the updated .NET assembly is missing types that are in use by existing activities,you will need to modify the step properties. The canvas displays warning iconsadjacent to the steps whose properties use the missing type.
Modify custom code - optionalIf you wrote custom code in an event handler, you may need to modify the stepproperties. If the updated .NET assembly is missing types that are used by thecustom code, make sure to modify the code to use only the types that are available.
Resolve conflicts in a REST service test stepRelevant for: API testing only
This task describes how to update a REST method step that was changed.
Modify the step as requiredIn the Properties pane, modify the REST service step as required: add or removeproperties, change property values, and so forth. If there are conflicts, the canvaswill display warning icons next to the relevant steps.
Open the wizardl To resolve conflicts for the selected step, click the warning icon in the top rightcorner of the REST method step in the canvas. Select This step should be resolved.Resolve step. The Resolve REST Method Steps wizard opens.
User GuideChapter 45: Updating Services and Assemblies
HP Unified Functional Testing (12.53) Page 477 of 938
l To resolve conflicts for all steps created with the prototype, right-click the methodin the Toolbox pane and select Apply Changes to all Steps.
Run the wizard1. Select the steps that you want to resolve (only relevant when opening the
wizard through the Toolbox pane).The left pane, Before Changes, shows the step's properties before they wereresolved. The right pane, After Changes, shows the step's properties after theywere resolved.
2. Proceed with the wizard, resolving or keeping the detected differences.
Update an SAP RFC or IDocRelevant for: API testing only
Update the RFC/IDoc from its original locationIn the Toolbox pane, right-click the RFC or iDoc and select Update.
Update the RFC/IDoc from a different location1. In the Toolbox pane, right-click the RFC or IDoc and select Update from. The
Update <Item_Name> dialog box opens.2. To change the connection or server information, do one of the following:
l In the Update dialog box, select Override connection and specify the detailsl In the SAP Connections pane in the Options dialog (Tools > Options > API
Testing tab > SAP Connections node), change the default connectioninformation.
3. In the bottom pane, search for and select a different RFC or IDoc.4. Click Update. Accept any warning or informational pop-ups.
Run the Update Step wizardIf a test step contains conflicts because an RFC or IDoc name or property changed,then the canvas marks the step with a warning marker.
1. In the canvas, click the warning marker to display the message The step must beresolved. Resolve step. Click on the message text. The Update Step Wizard windowopens.Note that the step's properties become read-only, until you resolve them withthe help of the wizard.
User GuideChapter 45: Updating Services and Assemblies
HP Unified Functional Testing (12.53) Page 478 of 938
2. In the wizard's Select Activity page, click in the New item area and select theoperation that corresponds to the one in the Original item pane. Click Next.Properties for which conflicts were detected are highlighted in red.
3. If there are conflicted input properties, the Update Input Properties page opens. Inthe Original Properties pane, select a property for which there is a conflict,highlighted in red. In the right pane, New Properties, select a property to map.Click Map. The wizard adds the mapping to the list in the bottom pane. Repeatthis for all properties that you want to map. Click Next.
4. If there are conflicted output properties, the Update Output Properties page opens.Select a property for which there is a conflict, highlighted in red. In the NewProperties pane select the property to which you want to map. Click Map. Thewizard adds the mapping to the list of mappings in the bottom pane. Repeatthis for all properties that you want to map. Click Next.
5. Click Finish to save your changes and close the wizard.
User GuideChapter 45: Updating Services and Assemblies
HP Unified Functional Testing (12.53) Page 479 of 938

Known Issues- Updating ServicesRelevant for: API testing only
When comparing a REST step to its prototype - a difference in therequest/response body contents is not considered a conflict. Therefore, whenresolving a REST step whose contents do not match the body contents of theprototype, the body contents will not be affected.
HP Unified Functional Testing (12.53) Page 480 of 938
Chapter 46: Web Service SecurityRelevant for: API testing only
When building Web Service applications, there is a challenge in building scalableapplications that are secure. You can secure Web Services by having the messagesent over a secure transport, such as Secure Sockets Layer (SSL), or by applyingsecurity at the message level, also known as WS-Security.
For testing a secured service, answering the following questions will help youdefine your security scenario.
l Is there transport security, such as SSL? What is the HTTPS URL?l Is basic authentication required?l Is mutual authentication required?l What type of security is required in the SOAP header?UFT lets you set the security for a service on two levels—port or operation. If youdefine a security for a port, all of its methods use these settings, by default. Whenworking in the canvas, you can override the default port security for a given teststep and customize the security for a particular operation.
Note: You set the basic authentication information for your Web Service calls(including REST Service methods, HTTP Request, and SOAP Requeststeps) in the General tab of the Properties pane (for HTTP and RESTmethod steps), the HTTP tab of the Security Settings dialog box, or Securitytab in the Properties pane (for Web Service and SOAP request steps).
Security scenariosRelevant for: API testing only
UFT provides several built-in scenarios for configuring security in Web Servicecalls.
A security scenario represents a typical security implementation for a Web Service.It contains information such as authentication, encoding, proxy, certificates, and soforth.
You can select one of the following types of Web Service security scenarios:
HP Unified Functional Testing (12.53) Page 481 of 938
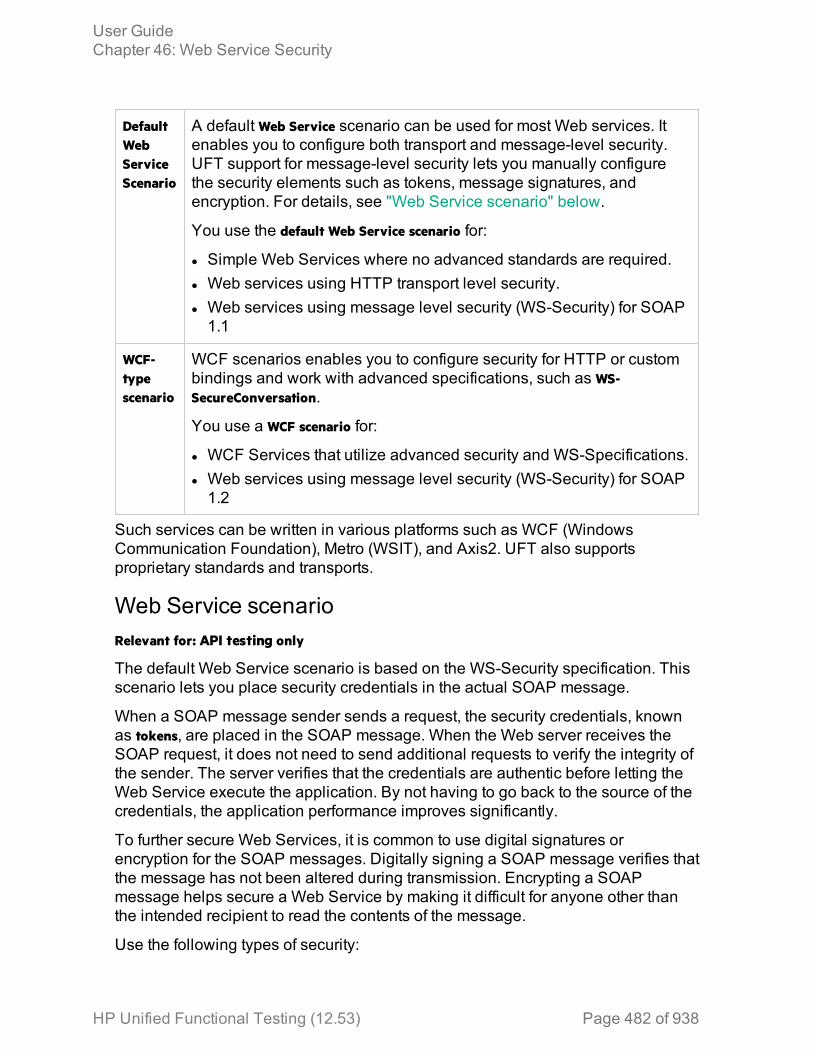
DefaultWebServiceScenario
A default Web Service scenario can be used for most Web services. Itenables you to configure both transport and message-level security.UFT support for message-level security lets you manually configurethe security elements such as tokens, message signatures, andencryption. For details, see "Web Service scenario" below.
You use the default Web Service scenario for:
l Simple Web Services where no advanced standards are required.l Web services using HTTP transport level security.l Web services using message level security (WS-Security) for SOAP1.1
WCF-typescenario
WCF scenarios enables you to configure security for HTTP or custombindings and work with advanced specifications, such as WS-SecureConversation.
You use a WCF scenario for:
l WCF Services that utilize advanced security and WS-Specifications.l Web services using message level security (WS-Security) for SOAP1.2
Such services can be written in various platforms such as WCF (WindowsCommunication Foundation), Metro (WSIT), and Axis2. UFT also supportsproprietary standards and transports.
Web Service scenarioRelevant for: API testing only
The default Web Service scenario is based on the WS-Security specification. Thisscenario lets you place security credentials in the actual SOAP message.
When a SOAP message sender sends a request, the security credentials, knownas tokens, are placed in the SOAP message. When the Web server receives theSOAP request, it does not need to send additional requests to verify the integrity ofthe sender. The server verifies that the credentials are authentic before letting theWeb Service execute the application. By not having to go back to the source of thecredentials, the application performance improves significantly.
To further secure Web Services, it is common to use digital signatures orencryption for the SOAP messages. Digitally signing a SOAP message verifies thatthe message has not been altered during transmission. Encrypting a SOAPmessage helps secure a Web Service by making it difficult for anyone other thanthe intended recipient to read the contents of the message.
Use the following types of security:
User GuideChapter 46: Web Service Security
HP Unified Functional Testing (12.53) Page 482 of 938

TransportLevelSecurity
The transport level security includes the authentication and proxyserver information. You can also specify Keep Alive preferences andconnection timeout.
User GuideChapter 46: Web Service Security
HP Unified Functional Testing (12.53) Page 483 of 938
MessageLevelSecurity
The WS-Security tab lets you set the message level security throughtokens, signatures and encryption.
To support WS-Security, UFT enables you to create security tokensfor your script. You can create multiple tokens and set their properties.After creating a token, you use it to sign or encrypt a SOAP message.
The Web Services security mechanism associates security tokenswith messages. This mechanism supports several security tokenformats to accommodate a variety of authentication requirements. Forexample, a client might need to provide a proof of identity or a securitycertificate.
The available tokens are: UserName, X509 Certificate, Kerberos,Kerberos2, and SAML:
l UserName: The User Name token contains user identificationinformation for the purpose of authentication: User Name andPassword. You can also specify Password Options, indicating howto send the password to the server for authentication: Text, None, orHash. and indicate whether to include a timestamp.
l X509 Certificate: This token is based on an X.509 certificate. Toobtain a certificate, you can either purchase it from a certificateauthority, such as VeriSign, Inc. or set up your own certificateservice to issue a certificate. Most Windows servers support thepublic key infrastructure (PKI), which enables you to createcertificates. You can then have it signed by a certificate authority oruse an unsigned certificate.
l Kerberos/Kerberos 2: The Kerberos protocol is used to mutuallyauthenticate users and services on an open and unsecurednetwork. Using shared secret keys, it encrypts and signs usercredentials. A third party, known as a KDC (Kerberos KeyDistribution Center), authenticates the credentials. Afterauthentication, the user may request a service ticket to access oneor more services on the network. The ticket includes the encrypted,authenticated identity of the user. The tickets are obtained using thecurrent user's credentials.The primary difference between the Kerberos and Kerberos2tokens, is that Kerberos2 uses the Security Support ProviderInterface (SSPI), so it does not require elevated privileges toimpersonate the client's identity. In addition, the Kerberos2 securitytoken can be used to secure SOAP messages sent to a WebService running in a Web farm.
l SAML Token: SAML is an XML standard for exchanging security-
User GuideChapter 46: Web Service Security
HP Unified Functional Testing (12.53) Page 484 of 938
related information, called assertions, between business partnersover the Internet. The assertions can include attribute statements,authentication, decision statements, and authorization decisionstatements.SAML uses brokered authentication with a security token issued bySTS (Security Token Service). The STS is trusted by the client andthe Web Service to provide interoperable security tokens. SAMLtokens are important for Web Service security because they providecross-platform interoperability and a means of exchanginginformation between clients and services that do not reside within asingle security domain.
When you add a security token to a SOAP message, it is added to the SOAPmessage in the form of an XML element in the WS-Security SOAP header. Themessage, however, is exposed and therefore requires additional security. This isespecially true when the credentials, including the password, are sent in plain textas it is with role-based security.
The two methods used to secure the data are message signatures and messageencryption:
l Message Signatures. Message Signatures are used by the recipients to verify thatmessages were not altered since their signing. The signature is in the form ofXML within the SOAP message. The recipient checks the signature to make sureit is valid.
l Message Encryption. Although the XML message signature offers a mechanism forverifying that the message has not been altered since it was signed, it does notencrypt the SOAP message—the message is still plain text in XML format. Tosecure the message in order that it should not be exposed, you encrypt it, makingit difficult for an intruder to view and obtain a user's password.
WCF Service scenariosIn addition to the default Web service scenario, you can select from one of thefollowing WCF-type service scenarios:
User GuideChapter 46: Web Service Security
HP Unified Functional Testing (12.53) Page 485 of 938

WCF Service(CustomBinding)Scenario
The WCF Service (CustomBinding) scenario enables the highestdegree of customization. Since it is based upon the WCFCustomBinding standard, it enables you to test most WCFservices, along with services on other platforms such as Java-based services that use the WS - <spec_name> specifications.
Use the WCF Service (CustomBinding) scenario to configure ascenario that does not comply with any of the predefinedsecurity scenarios. You can customize the transport andencoding settings:
l Transport. HTTP, HTTPS, TCP, or NamedPipe
l Encoding. Text, MTOM, or WCF Binary
You can also provide additional security information:
l Authentication mode. The type of authentication, such as None,AnonymousForCertificate, and so forth. The options areavailable from the drop down list.
l Bootstrap policy. For the SecureConversation authenticationmode, you can specify a bootstrap policy.
l Net Security. The network security for TCP and NamedPipe typetransports. Typical values are None, Windows stream security, orSSL stream security available from the field's drop down list.For services with HTTP transport, you should set the value toNone. To enable SSL for HTTP, select HTTPS transport.
For task details, see "Customize security for WCF-type Webservices" on page 493.
Note: For WSE3 security configurations, use the WCFService(CustomBinding) Scenario. For details, see"Customize security for WCF-type Web services" onpage 493.
User GuideChapter 46: Web Service Security
HP Unified Functional Testing (12.53) Page 486 of 938

WCF Service(Federation)Scenario
In the WCF Service (Federation) scenario, the client authenticatesagainst the STS (Security Token Service) to obtain a token.The client uses the token to authenticate against the applicationserver.
Therefore, two bindings are needed, one against the STS andanother against the application server.
You define the bindings in two stages:
l Provide security details for the application server's securityscenario in the following areas:l Server. The transport and encoding methods.l Security. The authentication mode, such as IssuedToken,
SecureConversation, and so forth.l Identity. Information about the server certificate andexpected DNS.
l STS. Settings related to the STS, such as the endpointaddress and binding.
l Define an STS binding in the Referenced binding field.For task details, see "Customize security for WCF-type Webservices" on page 493.
User GuideChapter 46: Web Service Security
HP Unified Functional Testing (12.53) Page 487 of 938

WCF Services(WSHttpBinding)Scenario
In the WCFService (WSHttpBinding) scenario, you can select fromseveral types of authentication: None, Windows, Certificate, orUsername (message protection).
No Authentication (Anonymous)
In this scenario, the client uses the server's certificate to encrypta message; there is no client authentication. Use this scenarioto test Web Services where the:
l Client uses the server's X.509 certificate for encryption.l Client is not authenticated.l Communication may utilize advanced standards such assecure conversation or MTOM.
Windows Authentication
This scenario uses Windows Authentication. If you are testing aWCF service that has not been customized and uses thedefault configuration, use this type of scenario.
Use this scenario to test Web Services where the:
l Client and server use Windows authentication.l Security is based on Kerberos or SPNEGO negotiations.l Communication may utilize advanced standards such assecure conversation or MTOM.
Certificate Authentication
In this WCF WSHttpBinding scenario, the client uses the server'sX.509 certificate to encrypt the message and its own certificatefor a signature.
Use this scenario to test Web Services where the:
l Client uses the server's X.509 certificate for encryption.l Client uses its own X.509 certificate for signatures.l Communication may utilize advanced standards such assecure conversation or MTOM.
Username Authentication (Message Protection)
In the WCF WSHttpBinding scenario, the client uses the server'sX.509 certificate to encrypt the message, and sends a username and password to authenticate itself.
User GuideChapter 46: Web Service Security
HP Unified Functional Testing (12.53) Page 488 of 938
Use this scenario to test Web Services where the:
l Client uses the server's X.509 certificate for encryption.l Client is authenticated with a username and password.l Communication may utilize advanced standards such assecure conversation or MTOM.
Set security for a standard Web ServiceRelevant for: API testing only
This task describes how to configure security settings for a standard Web Service.This mode lets you define the HTTP transport information and security elementssuch as tokens.
Create a Web Service scenario1. Open the Security Settings dialog in one of the following ways:
l To set security on a port level, right-click a Web Service port in the Toolboxand choose Security Settings.
l To set security for a specific Web Service step already on the canvas, selectthe step and open the Security Settings tab in the Properties pane. Clear theuse the port's security settings option.
l For a SOAP Request step, click the Security Settings tab in the Propertiespane.
2. In the Security Settings dialog box, select Web Service from the Service Detailsdropdown list (default).
Configure the HTTP settingsIn the main window of the Security Settings dialog box, select the HTTP tab, and setthe transport and proxy information.
Add message level security with a Username TokenTo send a message level username/password token (a UserName token):
1. In the Security Settings dialog box, from the Service Details dropdown list,select the Web Service scenario.
2. In the main part of the Security Settings dialog box, click the WS-Security tab.
3. In the WS-Security tab, click the Add Token button and add a Usernametoken.
User GuideChapter 46: Web Service Security
HP Unified Functional Testing (12.53) Page 489 of 938

4. In the lower pane, customize the token details, such as username andpassword.
Add message level security by signing with an X.509Certificate1. In the Security Settings dialog box, select the Web Service scenario from the
Service Details dropdown list.2. In the main part of the Security Settings dialog box, click the WS-Security tab.
3. In the WS-Security tab, click the Add Token button and select X509 Certificatefrom the dropdown list
4. In the lower pane, enter the token name.5. Click the Browse button to navigate to your certificate file. The certificate must
be installed in the Windows certificate store.6. Select a Reference type. Since this token is used for a signature, the most
common type is BinarySecurityToken.
7. Click the Add Message Signature button .8. In the Signing Token dropdown list, select the token you entered in the previous
steps.9. To sign a specific element with the certificate, scroll down to the XPath field and
provide an XPath expression.You cannot use an XPath expression to sign a timestamp or token that is underthe security element of a SOAP request.l To sign a SOAP Body, Timestamp, or WS-Addressing, select the check box in the
Predefined parts area.
User GuideChapter 46: Web Service Security
HP Unified Functional Testing (12.53) Page 490 of 938
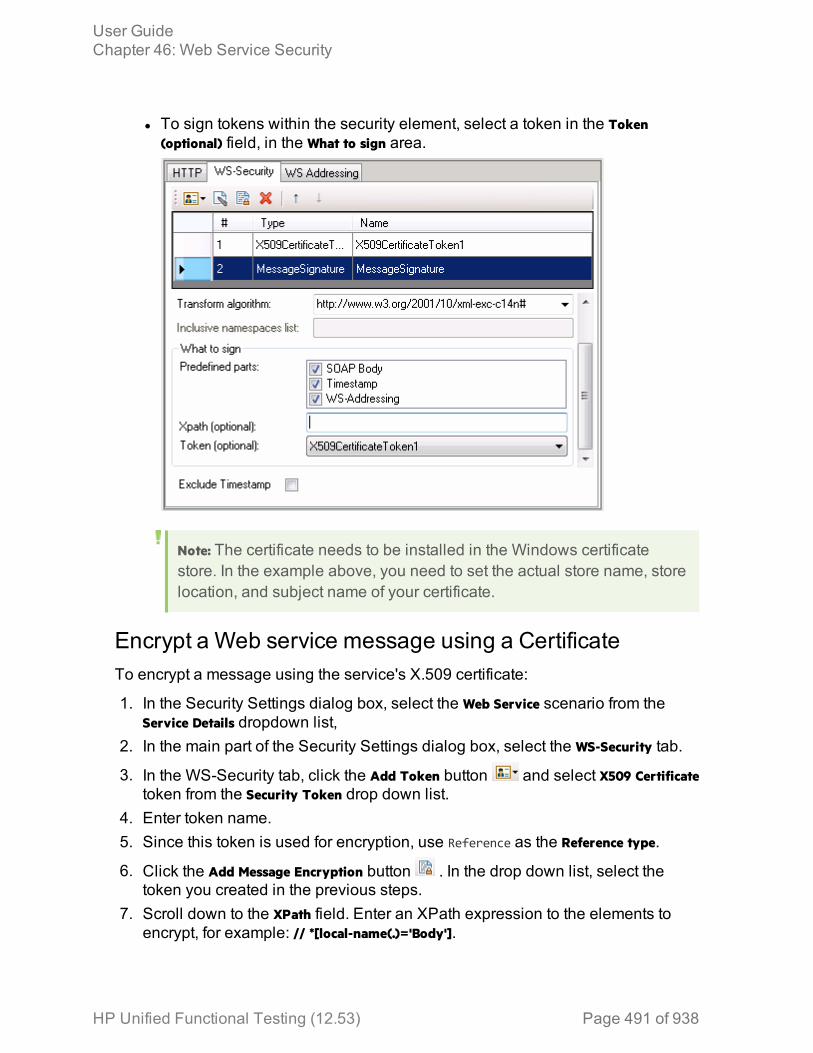
l To sign tokens within the security element, select a token in the Token(optional) field, in the What to sign area.
Note: The certificate needs to be installed in the Windows certificatestore. In the example above, you need to set the actual store name, storelocation, and subject name of your certificate.
Encrypt a Web service message using a CertificateTo encrypt a message using the service's X.509 certificate:
1. In the Security Settings dialog box, select the Web Service scenario from theService Details dropdown list,
2. In the main part of the Security Settings dialog box, select the WS-Security tab.
3. In the WS-Security tab, click the Add Token button and select X509 Certificatetoken from the Security Token drop down list.
4. Enter token name.5. Since this token is used for encryption, use Reference as the Reference type.
6. Click the Add Message Encryption button . In the drop down list, select thetoken you created in the previous steps.
7. Scroll down to the XPath field. Enter an XPath expression to the elements toencrypt, for example: // *[local-name(.)='Body'].
User GuideChapter 46: Web Service Security
HP Unified Functional Testing (12.53) Page 491 of 938
Send a username token and encrypt the token with anX.509 CertificateThe following section describes how to send a Username token to the service andencrypt it with the server's X.509 certificate:
1. In the Security Settings dialog box, select the Web Service scenario from theService Details dropdown list.
2. In the main part of the Security Settings dialog box, select the WS-Security stab.
3. In the WS-Security tab, click the Add Token button and select UsernameToken from the Security Token drop down list.
4. In the lower pane, Provide the token details for the Username token.
5. Click the Add Token button again and select X509 Certificate Token from theSecurity Token drop down list.
6. In the lower pane, enter the token details to reference the server's publiccertificate. Since this token is used for encryption, use Reference as the Referencetype.
7. Click the Add Message Encryption button . In the drop down list, select theX.509 token you created in the previous steps.
8. To encrypt a specific message, scroll down to the XPath field. Enter an XPathexpression, for example:, // *[local-name(.)='Body'].
Sign and encrypt a Web service messageThis example shows how to sign a message using a private key and then encrypt itusing the service's public key.
1. In the Security Settings dialog box, select the Web Service scenario from theService Details list.
2. In the main part of the Security Settings dialog box, select the WS-Security tab.
3. In the WS-Security tab, click the Add Token button and select X509 CertificateToken from the Security Token drop down list.
4. Enter the token details to reference your private certificate. SelectBinarySecurityToken as a Reference type, since this token is used for a signature.
5. Click the Add Token button again and select X509 Certificate Token from theSecurity Token drop down list to add another X.509 token.
6. Enter the token details to reference your private certificate. Select Reference asa Reference type, since this token is used for a encryption.
User GuideChapter 46: Web Service Security
HP Unified Functional Testing (12.53) Page 492 of 938
7. Click the Add Message Signature button . In the drop down list, select the firstX.509 token you created.
8. Click the Add Message Encryption button . In the drop down list, select thesecond token you created.
Configure the WS-Addressing (optional)1. In the main pane of the Security settings dialog box, click the WS-Addressing tab.2. In the WS-Addressing tab, select the relevant version or None if WS-Addressing
is not used.3. In the Reply to field, provide an alternate destination.
Customize security for WCF-type Web servicesRelevant for: API testing only
This section describes how to customize the security settings for Web servicesusing WCF.
Create a WCF scenario1. Open the Security Settings dialog box in one of the following ways:
l For port level security, right-click a service's port in the Toolbox pane andselect Security Settings.
l For step level security, open the Security Settings tab in the Properties pane.Clear the Use the port's security settings option.
2. In the Security Settings dialog box, select the type of WCF Servicefrom the ServiceDetails dropdown list.
Configure the settings for a Web Service usingWSHTTPBinding1. At the top of the Security Settings dialog box, in the dropdown list, select
WCF Service (WSHttpBinding).2. In the Client authentication type dropdown list, choose a client credential type
to use in your binding—Windows, Certificate, or Username. This valuecorresponds to the MessageClientCredentialType property of the WCF'sWSHttpBinding parameter.Windows authentication is the most common value for a WCF services. If youare using the WCF default settings for your service, use this option.
3. Define the security settings for your authentication type. The available options
User GuideChapter 46: Web Service Security
HP Unified Functional Testing (12.53) Page 493 of 938
differ per authentication type.
Note: For some scenarios you should indicate whether to use the WCFproprietary negotiation mechanism to get the service credentials.
4. Click Advanced to control the usage of a secure session.
Configure the settings for a Web Service usingCustomBinding1. In the Security Settings dialog box, in the dropdown list, select the WCFService
(Custom Binding) scenario.2. In the main pane of the Security Settings dialog box, set the Web service
security options, including:l Transport typel Encoding
l Authentication mode for the Web servicel Net security typel The identities for the custom bindings and authentication certificatel The client user information for the "user" who would access the Web service
Configure the settings for a WCF Federation Web service1. In the Security Settings dialog box, in the dropdown list, select the WCFService
Federation scenario.2. Provide the service and security transport details, including:
l Transport typel Encoding
l Authentication mode for the Web servicel Bootstrap policy for the Web servicel The identities for the custom bindings and authentication certificatel STS (Security Token Service) settings
Note: You must to define the communication properties for both the STS andthe application server
User GuideChapter 46: Web Service Security
HP Unified Functional Testing (12.53) Page 494 of 938
Configure the settings for a WCF service using netTcp ornamedPipe transport1. In the Security Settings dialog box, from the dropdown list, select the
WCFService (Custom Binding) scenario.2. Set the Transport option to TCP or NamedPipe.3. Set the other security settings as described in "Configure the settings for a Web
Service using CustomBinding" on the previous page.
Configure the settings for a Web service using WSE3security configuration with a server certificate1. Create a new test and import a WSDL containing the W3E3 service.2. Add a method from the Web service to the canvas.
3. In the Properties pane, select the Security Settings tab , or in the Toolboxpane right-click the Web service node and select Security Settings.
4. In the Security Settings dialog box, from the dropdown list, select theWCFService (Custom Binding) scenario.
5. In the main pane of the Security Settings dialog box, set the Transport option toHTTP, and the Encoding to Text.
6. In the Identities section, enter a username and password.7. Click the Browse button adjacent to the Server Certificate field and specify the
Store Location, Store Name and Search text (optional). Click Find, select thecertificate, and click Select.
8. Provide the Expected DNS.9. Click the Advanced button and configure the following settings in the Advanced
Settings dialog box:a. In the Encoding tab: Set the WS-Addressing version appropriatelyb. In the Security tab, set the following options:
o Enable secure session: Enabledo Negotiate service credentials: Enabledo Protection level: Encrypt and Signo Message protection order: Sign Before Encrypto Message security version:WSSecurity11WSTrustFebruary2005WSSecureConversationFebruary2005 (first entry)
o Require Derived keys: EnabledFor all other fields, use the default settings.
User GuideChapter 46: Web Service Security
HP Unified Functional Testing (12.53) Page 495 of 938

Configure the settings for WCF service using mutualcertificate authenticationThe following procedure describes how to set up a security scenario for mutualcertificates and how to comply with a WSE3 security configuration.
1. In the Security Settings dialog box, from the dropdown list, select theWCFService (CustomBinding) scenario.
2. Set the Transport option to HTTP, and the Encoding to Text.3. Set the authentication mode to MutualCertificate.4. In the Identities section, select the server and client certificates.5. Provide the Expected DNS.6. Click the Advanced button and configure the following settings in the Advanced
Settings dialog box:a. Encoding tab—WS-Addressing: WSA 04/08 (for a WSE3 security configuration).b. Security tab—Require Derived keys: DisabledFor all other fields, use the default settings.
Configure the settings for a WCF scenario using bindingwith TCP transport to require an X.509 client certificateThe following procedure describes how to configure a WCF custom scenario torequire an X.509 client certificate in nettcp.
1. In the Security Settings dialog box, from the dropdown list, select theWCFService (Custom Binding) scenario.
2. Set the Transport to TCP and the Net Security to SSL stream security.
3. In the Properties pane, open the Events tab .4. IIn the events list, select the BeforeApplyProtocolSettings event. Click in the
Handler column and select Create a default handler from the drop-down.5. In the TestUserCode.cs file, locate the TODO section of the code and add the
following definitions.
var wcf = (HP.ST.Ext.CommunicationChannels.Models.WcfChannelBinding)args[1];var ssl =
(HP.ST.Ext.CommunicationChannels.Models.WcfSslStreamSecurityChannel)wcf. Protocols.Channels[1];ssl.RequireClientCertificate = true;
For all other fields, use the default settings.
User GuideChapter 46: Web Service Security
HP Unified Functional Testing (12.53) Page 496 of 938

Set up Advanced Standards testingRelevant for: API testing only
This section provides guidelines for using UFT in advanced standards testing.
Test a Web Service using MTOM1. Select the WCFService (Custom Binding) scenario from the Service Details list.2. Configure the Encoding to MTOM.
If your service requires advanced settings, click the Advanced button.
Change the WS-Addressing version of a service1. Select the Web Service scenario from the Service Details list.
Note: If your service uses WCF, use the appropriate scenario andconfigure the addressing version from the Advanced Settings dialogbox's Encoding tab.
2. Click the WS-Addressing tab and select a version.
Enable support for a service or activity that uses 256-bitSSL encodingChange the SSL cipher order so that AES256 precedes AES128 in the cipher list:
Tip: Check with an IT professional before performing the following actions.
1. Type gpedit.msc at a command prompt to open your group policy editor.2. Choose Computer Configuration > Administrative Templates > Network > SSL
Configuration Settings.3. Open the only item—SSL Cipher Suite Order.4. Select Enabled.5. The first item in the list is TLS_RSA_WITH_AES_128_CBC_SHA
The second item is TLS_RSA_WITH_AES_256_CBC_SHA
6. Change the first 128 to 256. Then move the cursor forward and change the 256 to128.
7. Move the cursor through the list and change the cipher priorities as in theabove step.
8. Close the group policy editor and reboot.
User GuideChapter 46: Web Service Security
HP Unified Functional Testing (12.53) Page 497 of 938

Known Issues- Web Service SecurityRelevant for: API testing only
This section describes troubleshooting and limitations for working with Webservices security.
Security onWebservicesimportedfrom UDDI
Authentication and proxy security are not supported for WebServices imported from a UDDI.
WCF-typeWeb services
l Configuring different security settings for operations residing onthe same port is not supported.
l Some of the user event handlers (such as theAfterProcessRequestSecurity, BeforeProcessResponseSecurity,OnSendRequest, and OnReceiveResponse events) will not beinvoked.
l When working with Federation type scenarios that use STS(Security Token Service), you cannot change the SOAPversion.
Web serviceswith messagelevel security
When testing Web Services that require message-level security,the Web Service security scenario only supports SOAP version1.1. For SOAP 1.2 use a WCF type scenario.
SAML securitytokens
l When using a SAML security token for Web services security,user-provided content may contain creation and expirationtimestamps. To extend the life of the test, we recommend thatyou hard-code an expiration date in the distant future. In this isnot possible, change the timestamp by implementing theOnBeforeApplyProtocolSettings event.
l When using a SAML security token for Web services security, ifyou edit the values in Grid mode, they may not be updated inUFT.Workaround: To update the values, switch to Text mode andsave the test.
l Web Service steps are not supported when using a SAMLtoken with a certificate from the file system.Workaround: Install the certificate to the Windows store andselect the certificate from the store.
HP Unified Functional Testing (12.53) Page 498 of 938

SOAP 1.2 l You can choose only UserName or X509 tokens whenconfiguring the message level security.
l When configuring the canonicalization algorithm and thetransform algorithm for the message signature, you cannot usethe following format: http://docs.oasis-open.org/wss/2004/01/oasis-200401-wss-soap-message-security-1.0#STR-Transform.
User GuideChapter 46: Web Service Security
HP Unified Functional Testing (12.53) Page 499 of 938

Chapter 47: Asynchronous Service CallsRelevant for: API testing only
You can use UFT to emulate asynchronous services, such as Web Services,REST services, HTTP requests, JMS/MQ-based services, and so forth.
In synchronous messaging, the replay engine blocks step execution until the serverresponds. The client sends a request and receives a response immediately, usingthe same connection. During the waiting time, the replay engine is blocked anddoes not perform any other activity. If the timeout was reached without a responsefrom the server, the client returns an error.
In asynchronous mode, the replay engine executes the step without waiting forserver's response from previous requests.
UFT provides a solution for the following asynchronous patterns:
WS-Addressing
WS-Addressing is a specification that enables Web services tocommunicate addressing information. You can instruct the server torespond to any location, and not necessarily to the machine thatissued the request. To do this, you use the WS-Addressing replyToattribute.In this implementation, UFT pauses the test and uses a listenermechanism to verify that the response arrived at the specifiedaddress. After the listener acknowledges that the server respondedto the address or if it reaches the timeout, the test resumes. Upon thecompletion of the test, you can validate the response with thestandard API testing checkpoints.
HP Unified Functional Testing (12.53) Page 500 of 938

HTTPReceiver
In the HTTP Receiver pattern, the server sends an HTTP request to theclient, reversing the typical roles of the client and server.
This is useful, for example, if you want to test a service whichpublishes information over HTTP to a client. You define a receiver,which waits for a request from the server, sent over HTTP.
After a trigger, the receiver captures the request. The trigger can bean HTTP client request, a call to a Web service, an email, or anyother event that will trigger the server. If there are inner steps, thereceiver waits for them to finish and only then is the receiver activityconsidered complete.
Using the API testing interface, you can insert the necessary logicand validate the checkpoints in the captured request.
The response from the receiver should wait for the inner steps tocomplete and link to them.
The completion event name fired for the receiver should only be firedAFTER the inner steps are done.
WebServicePublishSubscribe
In the Web Service Publish Subscribe pattern, the server sends an HTTPrequest to the client, reversing the typical roles of the client andserver. it is similar to the HTTP Receiver, except that the request issent to the client through a Web Service call instead of exclusivelyvia HTTP.
Using UFT, you test the publishing of messages to the client. Youset up a receiver, which waits for a server request, sent from theserver as a Web service call.
After a trigger, the receiver captures the request. The trigger can bean HTTP client request, a call to a Web service, an email, or anyother event that will trigger the server.
Using the API testing interface, you can validate the response withstandard API testing checkpoints.
User GuideChapter 47: Asynchronous Service Calls
HP Unified Functional Testing (12.53) Page 501 of 938
WebServiceSolicitResponse
The Web Service Solicit Response pattern is a variation of the WebService Publish Subscribe pattern. It enables you test a a service whichpublishes information through a Web Service to a client.
In this pattern, however, the client is expected to send a response tothe server request. The response can be a simple acknowledgmentor a full SOAP message.
You set up a receiver activity, which waits for a server request. Thisserver request is sent from the server as a Web service call. Thereceiver then sends a client response back to the server.
After the trigger, the receiver captures the request. The trigger can bean HTTP client request, a call to a Web service, an email, or anyother event that will trigger the server.
Using the API testing interface, you can validate the response withstandard API testing checkpoints.
Dual WSDLFiles
The Dual WSDL technique is a standard request-response pattern.In this pattern, however, the client request is defined by one WSDL,and the server response is defined by another WSDL.
You implement this scenario in two stages:
l Import the Request WSDL file, using the Import WSDL from importcommand.
l Import the Response WSDL file, using the Import WSDL from importcommand, enabling the Import as Server Response option..
For task details, see "Test an asynchronous Web service" below.
Test an asynchronous Web serviceRelevant for: API testing only
This task describes how to create an API test for testing an asynchronous Webservice.
Create a test for WS-Addressing
1. In the toolbar, click the Import WSDL button and select Import WSDL fromURL or UDDI or Import WSDL from File or ALM Application Component.
2. In the Import WSDL dialog box, navigate to the location of your WSDL file andpress Import.
3. From the Toolbox pane, add a Web service step to the canvas.
User GuideChapter 47: Asynchronous Service Calls
HP Unified Functional Testing (12.53) Page 502 of 938
4. In the Properties pane, open the Asynchronous tab and select This is anasynchronous call box.
5. Specify a value for the Listen for response on property. This is the port to whichyou expect the server to respond.
6. In the Properties pane, open the Security Settings tab in the Properties pane.7. In the Security Settings tab, clear the Use the port's security settings option (if
necesssary).8. Select the WS Addressing tab.9. Select a WS-Addressing Version and provide and a URL and port (same port as
defined for the Listen for response on property) in the Reply to box, to indicate thedestination of the server response.
Create a test for HTTP ReceiverThis test enables you to have an HTTP Receiver in which the client receives theresponse:
1. In the Toolbox pane, expand the Network node and add a HTTP Receiver step tothe canvas.
Note: Make sure you are logged in as an administrator. Administratorprivileges are required to run HTTP Receiver steps.
2. In the Properties pane, open the General tab and set the property values forthe HTTP Receiver activity.
3. In the HTTP Receiver tab , set the values.
4. In the Filter tab , set a filter for the HTTP message received from the server.5. From the Toolbox pane, expand the Flow Control node and add a Wait step onto
the canvas.
6. In the Properties pane, open the Input/Checkpoints tab .7. In the Input/Checkpoints tab, specify values for the timeout properties and add
one or more completion events. You can link to the completion event from aprior HTTP Receiver step.
8. If required, add additional activities from the Toolbox pane into the HTTPReceiver flow.
Tip: If your test needs to listen to more than one message, receiver steps(such as HTTP Receiver or Web Service calls set up as receivers) can be data
User GuideChapter 47: Asynchronous Service Calls
HP Unified Functional Testing (12.53) Page 503 of 938
driven and placed inside a loop. The placement of the Wait step—inside oroutside of the loop—depends on whether the send order matters:
l If the messages to be sent to the receiver are expected in a specific order,you must place the Wait step inside the receiver step's frame. All steps thatare contained within the receiver can be data driven using this loop.
l If however, the messages are expected in a random order, place the Waitstep outside the receiver step. Steps that are contained within the receivershould not be data driven using the same loop as the receiver step andshould not link to other steps outside the receiver.
Create a test for a Web service publish subscribe patternThis test enables you to check that messages are properly published to the client:
1. In the toolbar, click the Import WSDL button and select Import WSDL fromURL or UDDI or Import WSDL from File or ALM Application Component.
2. In the Import WSDL dialog box, navigate to the location of your WSDL file andpress Import. Make sure to select the Import as server option when importing.
3. From the Toolbox pane, add a Web service step to the canvas.
4. In the Properties pane, open the Input/Checkpoints tab and set the input oroutput property values.
5. In the Toolbox pane, expand the Flow Control node and add a Wait step to thecanvas.
6. In the Input/Checkpoints tab, add values for the timeout properties and add oneor more completion events.
Create a test for Dual WSDL FilesThis test enables you to use one WSDL for the request and another for theresponse:
1. In the toolbar, click the Import WSDL button and select Import WSDL fromURL or UDDI or Import WSDL from File or ALM Application Component.
2. In the Import WSDL dialog box, navigate to the location of your WSDL file andpress Import. Make sure to select the Import as Server Response option whenimporting.
3. From the Toolbox pane, add a Web service step to the canvas.
User GuideChapter 47: Asynchronous Service Calls
HP Unified Functional Testing (12.53) Page 504 of 938

4. Drag a Web service operation with the response onto the canvas, after therequest step.
User GuideChapter 47: Asynchronous Service Calls
HP Unified Functional Testing (12.53) Page 505 of 938
Known Issues- Asynchronous TestingRelevant for: API testing only
For a Web service imported as a server response:
l When enabling the SSL option, UFT temporarily binds the SSL certificate to thespecified port on a system, http.sys, level. If you end the UFT.exe process from theTask Manager during the listening stage after the binding was added, thebinding will not be automatically removed from the system.Workaround: Remove the binding manually using a utility such as httpcfg.exe ornetsh.exe.
l When working with SSL, certificates from a file are not supported. If you move thetest to another machine, the certificate will not be available.Workaround: Add the certificate to the local machine store before running the test.If desired, remove it after you finish working with the test.
HP Unified Functional Testing (12.53) Page 506 of 938
Chapter 48: API Testing ExtensibilityRelevant for: API testing only
UFT enables you to create custom API testing activities to extend the capabilitiesof the product.
Once you create a new activity through this mechanism, it is available in theToolbox pane for all future tests.
For most custom activities, you can use the Activity Wizard. For C# users, thewizard creates a Visual Studio project into which you can add your own C# code.Java users can edit .java files which will be compiled into .class files. You thendeploy the new activity into UFT. For details, see "Use the Wizard to create acustom Activity - C#" on page 520.
Advanced users can build custom activities manually, without the wizard. Fordetails, see "Manually create a custom Activity in C#" on page 524.
Custom Activity filesRelevant for: API testing only
This section describes the structure and content of the files required to manuallydefine a new activity in UFT. The following information is not relevant if you areusing the Activity wizard.
To create a custom activity, you need to define the following files on all machinesupon which you intend to run the test:
"Runtime files" The DLL that UFT invokes to run the activity.
"Signature files" An XML file that defines the input and output properties,events, and the runtime class that executes the activity.
"Addin files" An XML file that references all of the activity component data.
"Resource files" on page 519
Files to store text strings used by your activity. These files areoptional.
All of the custom files—Signature, Addin, and Runtime—should be stored in the<Installation_folder>\addins\CustomerAddins\<addin_name> folder. This enables UFT toload them during startup.
The product's installation includes a sample project in the ExtensibilitySamplesfolder. Use this sample as a basis for a new activity.
HP Unified Functional Testing (12.53) Page 507 of 938
For more details, see "Manually create a custom Activity in C#" on page 524.
Note: This is a preliminary version of the SDK (Software Development Kit). Itenables you to extend the capabilities of the product. However, this SDK issubject to change in a future release, and these changes might require youto update any code that uses this preliminary version. Although HPendeavors to keep these changes to a minimum, we cannot guarantee thatextensions created using the preliminary version of the SDK will continue towork without modification when upgrading to a new version of HP UFT.
Runtime filesRelevant for: API testing only
When creating a custom activity, you must provide a DLL to run when executing theactivity.
Note the following when creating your activity's code:
l When creating a custom activity, you must use methods that are included in theSTActivityBase class.
l The STExecutionResult object is the return value of the ExecuteStep method. Itreceives the parameters: STExecutionStatus Status and optionally, string msg.
l STExecutionStatus is an enum type that can be set to the following values:l ActivityFailure
l ActivityStopTest
l ApplicationUnderTestFailure
l Equals
l ReferenceEquals
l Success
l TestStopped
l Place your executable code within the ExecuteStep function.l You must compile the DLL with a Target Framework of Framework 4.0, availablein Microsoft Visual Studio 10.
You can use the sample ReportMessageActivitySample.sln located in the product'sExtensibilitySamples folder as a basis for your project.
For task details and an example, see "Create a runtime file" on page 526.
User GuideChapter 48: API Testing Extensibility
HP Unified Functional Testing (12.53) Page 508 of 938

Signature filesRelevant for: API testing only
The signature file describes the activity to UFT. It typically has a Resource elementfollowed by the following sections: GeneralProperties, InputProperties,OutputProperties, Tabs, and Events. The signature file must have an .xml extension.
The signature file can contain the following information:
Element Attributes Description
User GuideChapter 48: API Testing Extensibility
HP Unified Functional Testing (12.53) Page 509 of 938
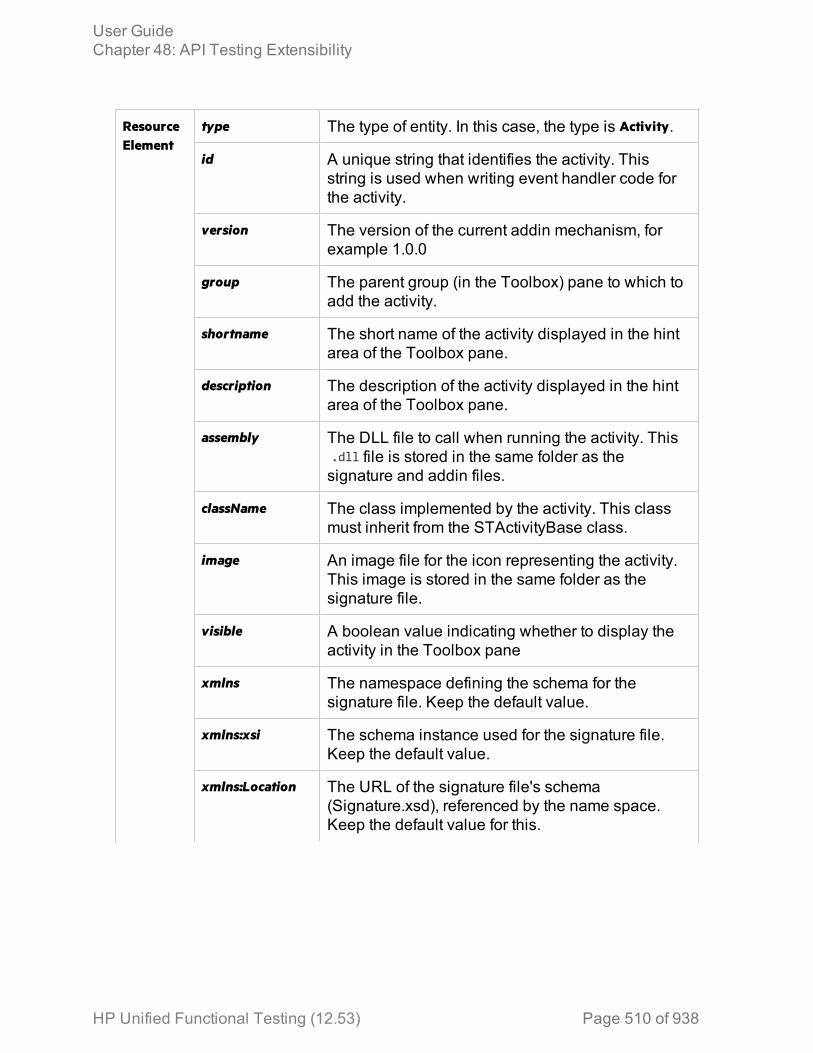
ResourceElement
type The type of entity. In this case, the type is Activity.
id A unique string that identifies the activity. Thisstring is used when writing event handler code forthe activity.
version The version of the current addin mechanism, forexample 1.0.0
group The parent group (in the Toolbox) pane to which toadd the activity.
shortname The short name of the activity displayed in the hintarea of the Toolbox pane.
description The description of the activity displayed in the hintarea of the Toolbox pane.
assembly The DLL file to call when running the activity. This.dll file is stored in the same folder as thesignature and addin files.
className The class implemented by the activity. This classmust inherit from the STActivityBase class.
image An image file for the icon representing the activity.This image is stored in the same folder as thesignature file.
visible A boolean value indicating whether to display theactivity in the Toolbox pane
xmlns The namespace defining the schema for thesignature file. Keep the default value.
xmlns:xsi The schema instance used for the signature file.Keep the default value.
xmlns:Location The URL of the signature file's schema (Signature.xsd), referenced by the name space.Keep the default value for this.
User GuideChapter 48: API Testing Extensibility
HP Unified Functional Testing (12.53) Page 510 of 938

SectionElement
name The internal name of the section.
If you use a sub-element, it is recommended thatyou set the value of the name of the sub-element,for example name="Tab" or name="Alerts".
source A boolean value indicating the source of thesection.
dest A bollean value indicating the destination path ofthe section.
checkpoint A boolean value indicating whether to display acheckpoint checkbox in the Validate column for theactivity.
isSharedMetadata A boolean value indicating whether to share thesection's meta data with other sections.
propertiesType The type of the properties in the section, forexample, "XML"
showXmlControls A boolean value indicating whether to display theText and XPath tabs in the Input/Checkpoints tab.
displayName The name of the section as it will be displayed inthe Properties pane.
User GuideChapter 48: API Testing Extensibility
HP Unified Functional Testing (12.53) Page 511 of 938
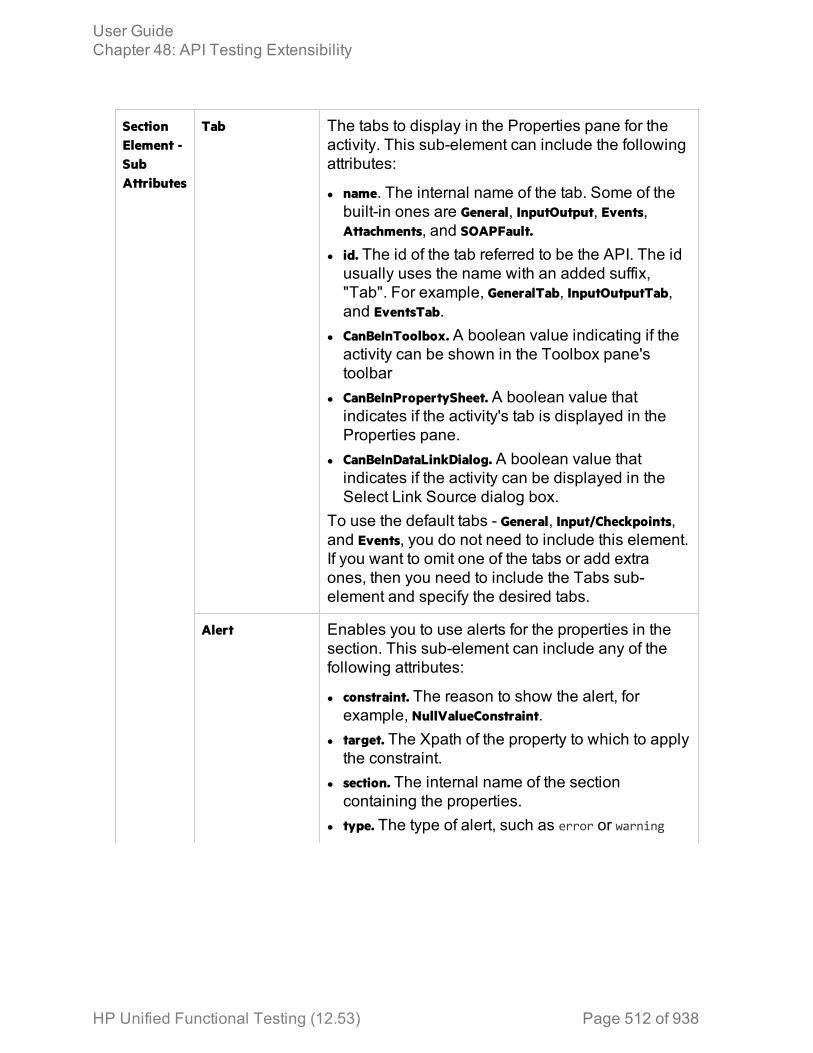
SectionElement -SubAttributes
Tab The tabs to display in the Properties pane for theactivity. This sub-element can include the followingattributes:
l name. The internal name of the tab. Some of thebuilt-in ones are General, InputOutput, Events,Attachments, and SOAPFault.
l id. The id of the tab referred to be the API. The idusually uses the name with an added suffix,"Tab". For example, GeneralTab, InputOutputTab,and EventsTab.
l CanBeInToolbox. A boolean value indicating if theactivity can be shown in the Toolbox pane'stoolbar
l CanBeInPropertySheet. A boolean value thatindicates if the activity's tab is displayed in theProperties pane.
l CanBeInDataLinkDialog. A boolean value thatindicates if the activity can be displayed in theSelect Link Source dialog box.
To use the default tabs - General, Input/Checkpoints,and Events, you do not need to include this element.If you want to omit one of the tabs or add extraones, then you need to include the Tabs sub-element and specify the desired tabs.
Alert Enables you to use alerts for the properties in thesection. This sub-element can include any of thefollowing attributes:
l constraint. The reason to show the alert, forexample, NullValueConstraint.
l target. The Xpath of the property to which to applythe constraint.
l section. The internal name of the sectioncontaining the properties.
l type. The type of alert, such as error or warning
User GuideChapter 48: API Testing Extensibility
HP Unified Functional Testing (12.53) Page 512 of 938
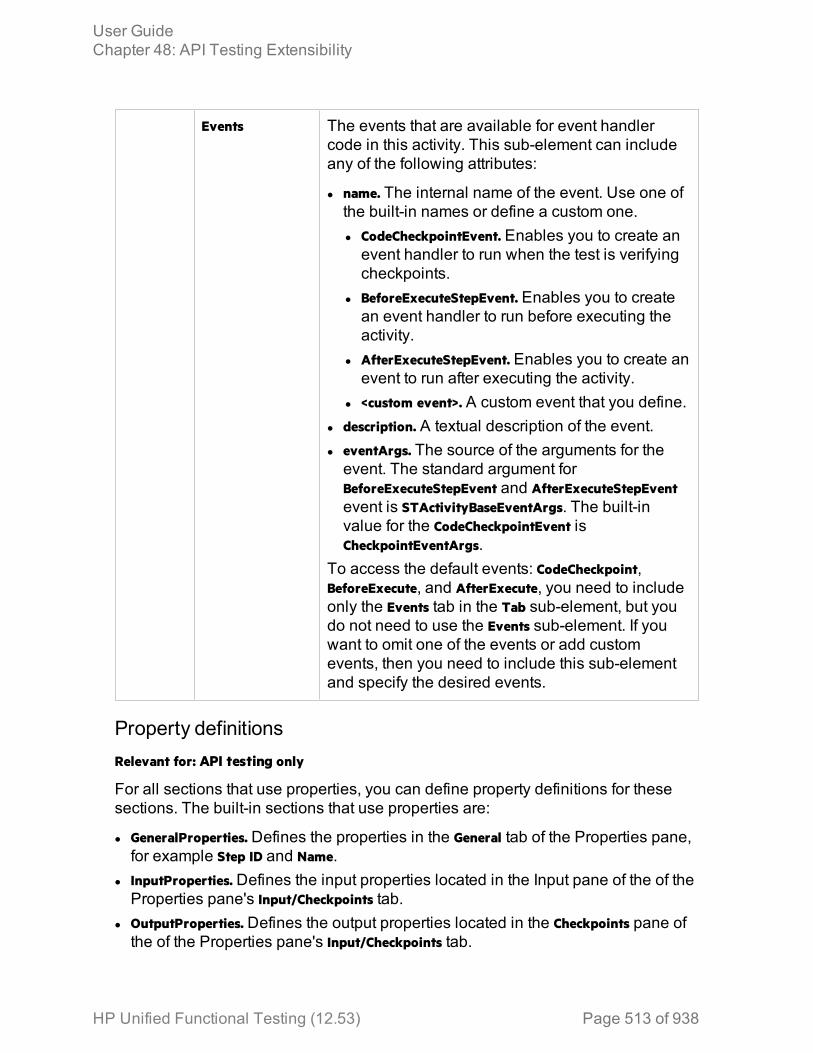
Events The events that are available for event handlercode in this activity. This sub-element can includeany of the following attributes:
l name. The internal name of the event. Use one ofthe built-in names or define a custom one.l CodeCheckpointEvent. Enables you to create anevent handler to run when the test is verifyingcheckpoints.
l BeforeExecuteStepEvent. Enables you to createan event handler to run before executing theactivity.
l AfterExecuteStepEvent. Enables you to create anevent to run after executing the activity.
l <custom event>. A custom event that you define.l description. A textual description of the event.l eventArgs. The source of the arguments for theevent. The standard argument forBeforeExecuteStepEvent and AfterExecuteStepEventevent is STActivityBaseEventArgs. The built-invalue for the CodeCheckpointEvent isCheckpointEventArgs.
To access the default events: CodeCheckpoint,BeforeExecute, and AfterExecute, you need to includeonly the Events tab in the Tab sub-element, but youdo not need to use the Events sub-element. If youwant to omit one of the events or add customevents, then you need to include this sub-elementand specify the desired events.
Property definitionsRelevant for: API testing only
For all sections that use properties, you can define property definitions for thesesections. The built-in sections that use properties are:
l GeneralProperties. Defines the properties in the General tab of the Properties pane,for example Step ID and Name.
l InputProperties. Defines the input properties located in the Input pane of the of theProperties pane's Input/Checkpoints tab.
l OutputProperties. Defines the output properties located in the Checkpoints pane ofthe of the Properties pane's Input/Checkpoints tab.
User GuideChapter 48: API Testing Extensibility
HP Unified Functional Testing (12.53) Page 513 of 938
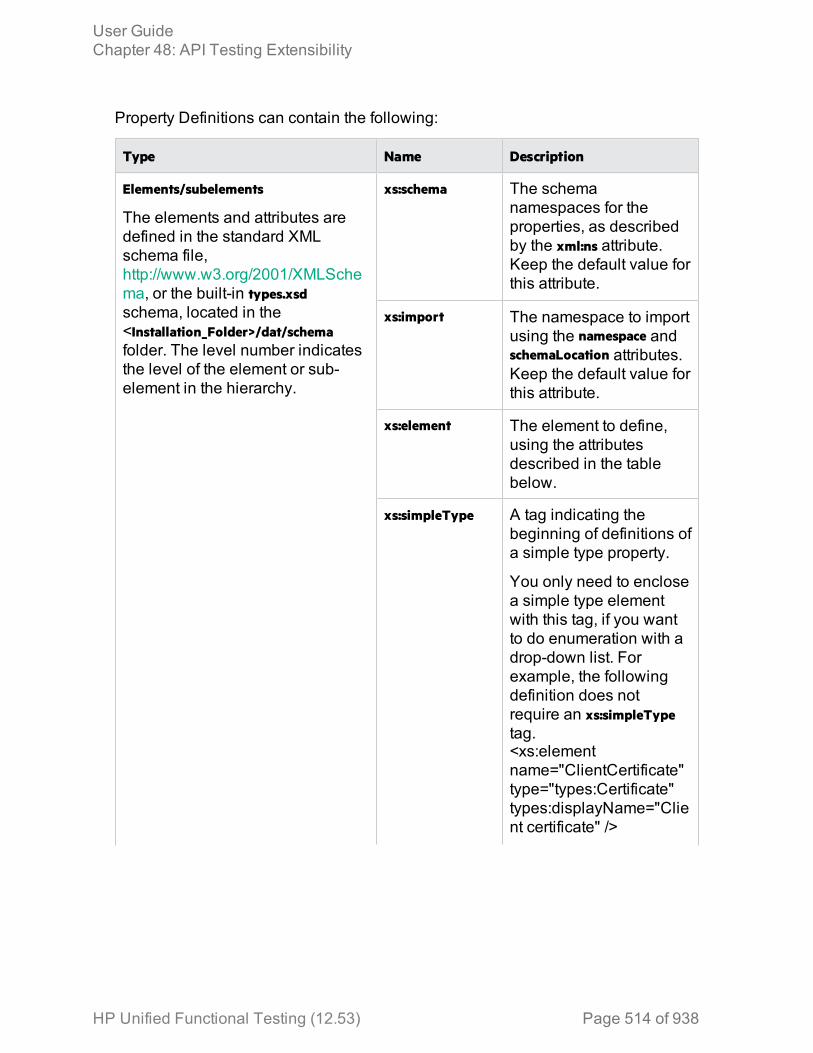
Property Definitions can contain the following:
Type Name Description
Elements/subelements
The elements and attributes aredefined in the standard XMLschema file,http://www.w3.org/2001/XMLSchema, or the built-in types.xsdschema, located in the<Installation_Folder>/dat/schemafolder. The level number indicatesthe level of the element or sub-element in the hierarchy.
xs:schema The schemanamespaces for theproperties, as describedby the xml:ns attribute.Keep the default value forthis attribute.
xs:import The namespace to importusing the namespace andschemaLocation attributes.Keep the default value forthis attribute.
xs:element The element to define,using the attributesdescribed in the tablebelow.
xs:simpleType A tag indicating thebeginning of definitions ofa simple type property.
You only need to enclosea simple type elementwith this tag, if you wantto do enumeration with adrop-down list. Forexample, the followingdefinition does notrequire an xs:simpleTypetag.<xs:elementname="ClientCertificate"type="types:Certificate"types:displayName="Client certificate" />
User GuideChapter 48: API Testing Extensibility
HP Unified Functional Testing (12.53) Page 514 of 938
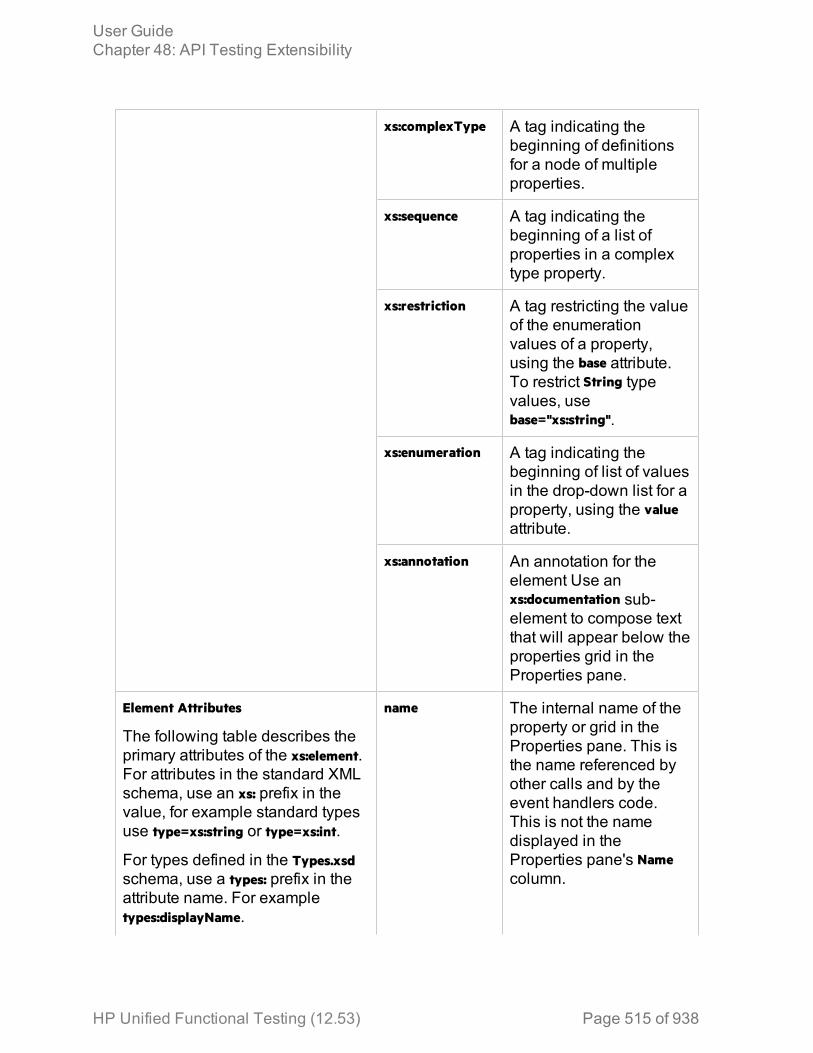
xs:complexType A tag indicating thebeginning of definitionsfor a node of multipleproperties.
xs:sequence A tag indicating thebeginning of a list ofproperties in a complextype property.
xs:restriction A tag restricting the valueof the enumerationvalues of a property,using the base attribute.To restrict String typevalues, usebase="xs:string".
xs:enumeration A tag indicating thebeginning of list of valuesin the drop-down list for aproperty, using the valueattribute.
xs:annotation An annotation for theelement Use anxs:documentation sub-element to compose textthat will appear below theproperties grid in theProperties pane.
Element Attributes
The following table describes theprimary attributes of the xs:element.For attributes in the standard XMLschema, use an xs: prefix in thevalue, for example standard typesuse type=xs:string or type=xs:int.
For types defined in the Types.xsdschema, use a types: prefix in theattribute name. For exampletypes:displayName.
name The internal name of theproperty or grid in theProperties pane. This isthe name referenced byother calls and by theevent handlers code.This is not the namedisplayed in theProperties pane's Namecolumn.
User GuideChapter 48: API Testing Extensibility
HP Unified Functional Testing (12.53) Page 515 of 938
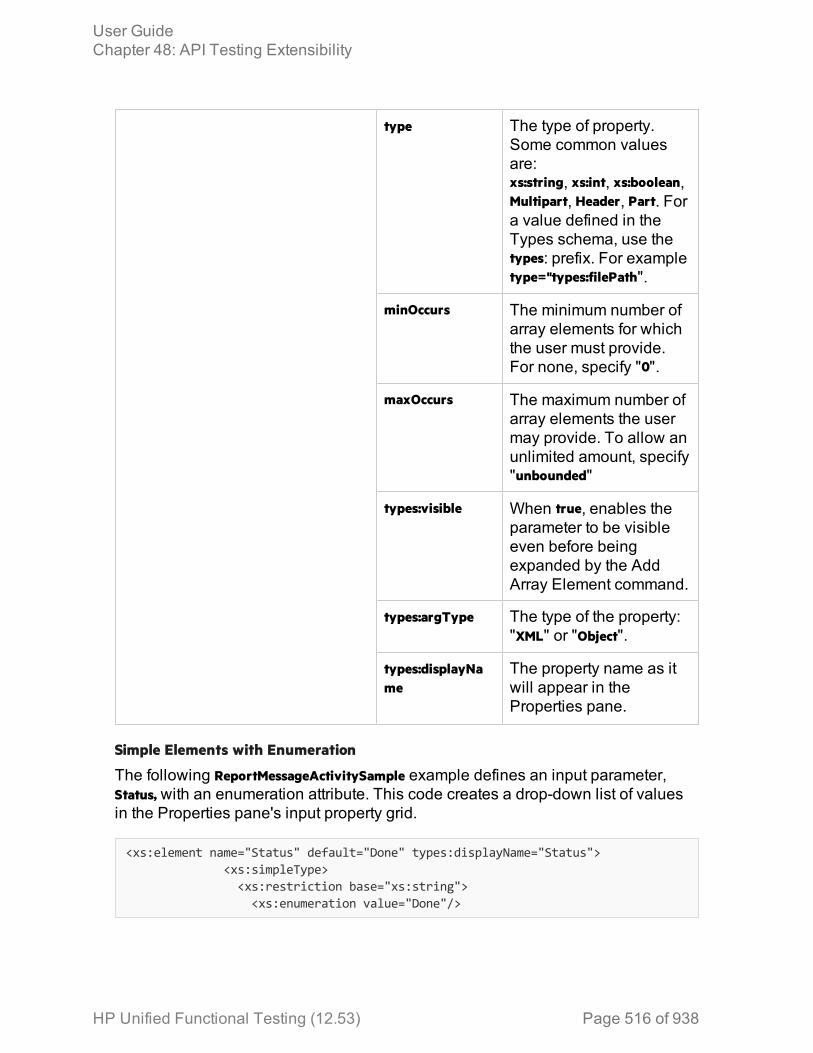
type The type of property.Some common valuesare:xs:string, xs:int, xs:boolean,Multipart, Header, Part. Fora value defined in theTypes schema, use thetypes: prefix. For exampletype="types:filePath".
minOccurs The minimum number ofarray elements for whichthe user must provide.For none, specify "0".
maxOccurs The maximum number ofarray elements the usermay provide. To allow anunlimited amount, specify"unbounded"
types:visible When true, enables theparameter to be visibleeven before beingexpanded by the AddArray Element command.
types:argType The type of the property:"XML" or "Object".
types:displayName
The property name as itwill appear in theProperties pane.
Simple Elements with Enumeration
The following ReportMessageActivitySample example defines an input parameter,Status, with an enumeration attribute. This code creates a drop-down list of valuesin the Properties pane's input property grid.
<xs:element name="Status" default="Done" types:displayName="Status"><xs:simpleType><xs:restriction base="xs:string"><xs:enumeration value="Done"/>
User GuideChapter 48: API Testing Extensibility
HP Unified Functional Testing (12.53) Page 516 of 938
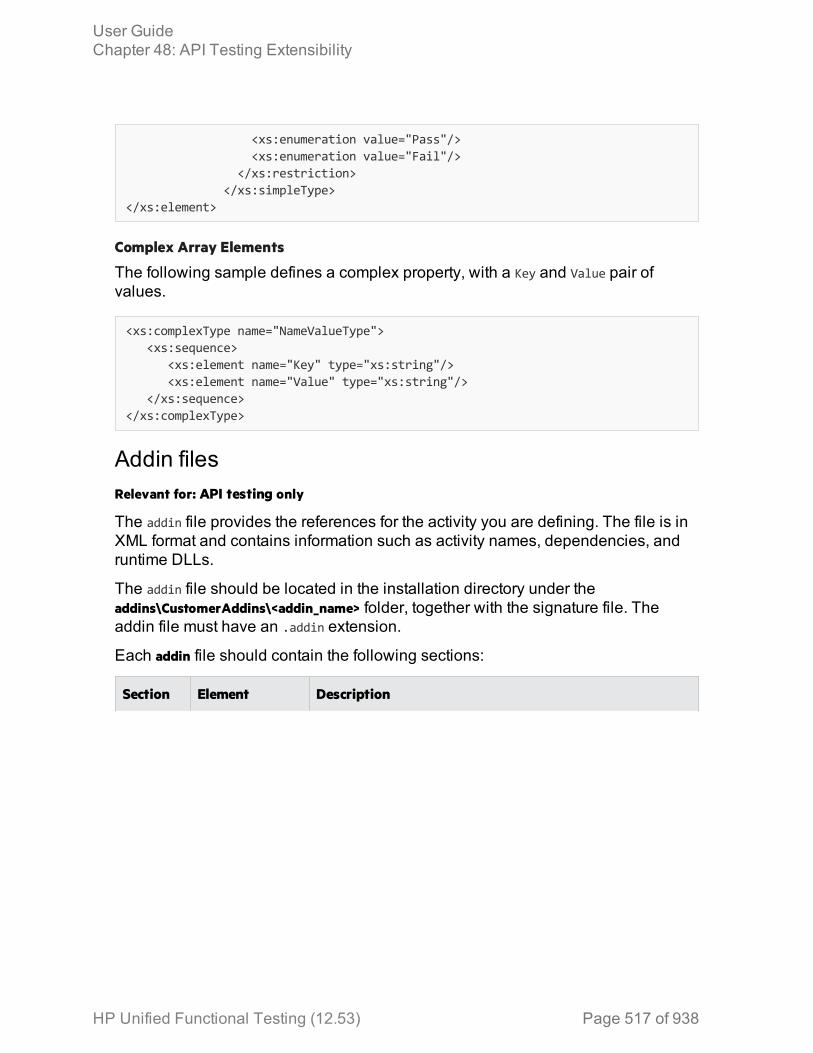
<xs:enumeration value="Pass"/><xs:enumeration value="Fail"/>
</xs:restriction></xs:simpleType>
</xs:element>
Complex Array Elements
The following sample defines a complex property, with a Key and Value pair ofvalues.
<xs:complexType name="NameValueType"><xs:sequence>
<xs:element name="Key" type="xs:string"/><xs:element name="Value" type="xs:string"/>
</xs:sequence></xs:complexType>
Addin filesRelevant for: API testing only
The addin file provides the references for the activity you are defining. The file is inXML format and contains information such as activity names, dependencies, andruntime DLLs.
The addin file should be located in the installation directory under theaddins\CustomerAddins\<addin_name> folder, together with the signature file. Theaddin file must have an .addin extension.
Each addin file should contain the following sections:
Section Element Description
User GuideChapter 48: API Testing Extensibility
HP Unified Functional Testing (12.53) Page 517 of 938
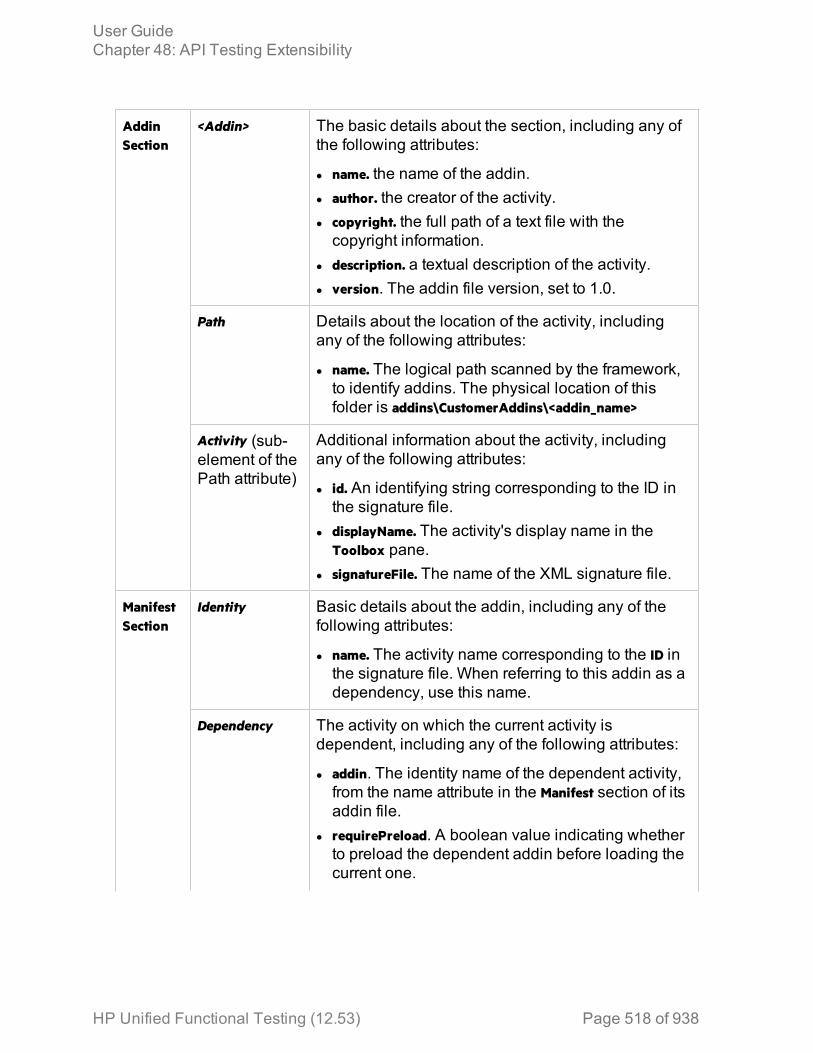
AddinSection
<Addin> The basic details about the section, including any ofthe following attributes:
l name. the name of the addin.l author. the creator of the activity.l copyright. the full path of a text file with thecopyright information.
l description. a textual description of the activity.l version. The addin file version, set to 1.0.
Path Details about the location of the activity, includingany of the following attributes:
l name. The logical path scanned by the framework,to identify addins. The physical location of thisfolder is addins\CustomerAddins\<addin_name>
Activity (sub-element of thePath attribute)
Additional information about the activity, includingany of the following attributes:
l id. An identifying string corresponding to the ID inthe signature file.
l displayName. The activity's display name in theToolbox pane.
l signatureFile. The name of the XML signature file.
ManifestSection
Identity Basic details about the addin, including any of thefollowing attributes:
l name. The activity name corresponding to the ID inthe signature file. When referring to this addin as adependency, use this name.
Dependency The activity on which the current activity isdependent, including any of the following attributes:
l addin. The identity name of the dependent activity,from the name attribute in the Manifest section of itsaddin file.
l requirePreload. A boolean value indicating whetherto preload the dependent addin before loading thecurrent one.
User GuideChapter 48: API Testing Extensibility
HP Unified Functional Testing (12.53) Page 518 of 938
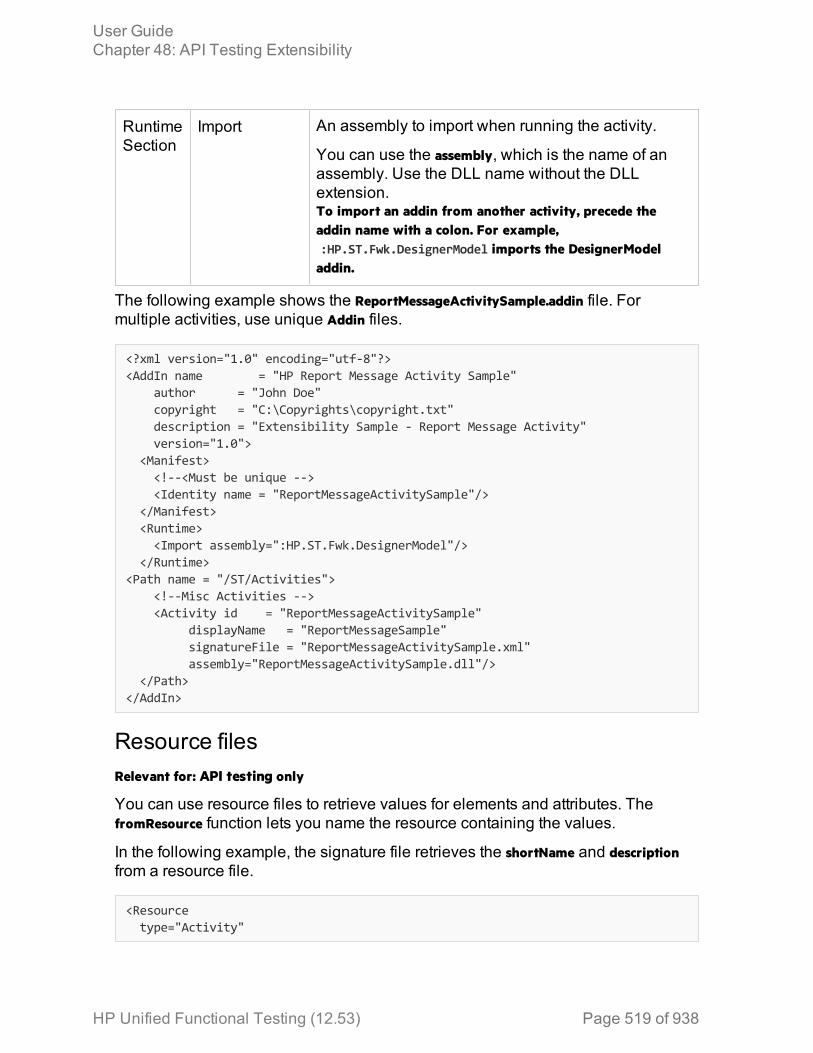
RuntimeSection
Import An assembly to import when running the activity.
You can use the assembly, which is the name of anassembly. Use the DLL name without the DLLextension.To import an addin from another activity, precede theaddin name with a colon. For example,:HP.ST.Fwk.DesignerModel imports the DesignerModel
addin.
The following example shows the ReportMessageActivitySample.addin file. Formultiple activities, use unique Addin files.
<?xml version="1.0" encoding="utf-8"?><AddIn name = "HP Report Message Activity Sample" author = "John Doe" copyright = "C:\Copyrights\copyright.txt" description = "Extensibility Sample - Report Message Activity" version="1.0"><Manifest><!--<Must be unique --><Identity name = "ReportMessageActivitySample"/>
</Manifest><Runtime><Import assembly=":HP.ST.Fwk.DesignerModel"/>
</Runtime><Path name = "/ST/Activities">
<!--Misc Activities --><Activity id = "ReportMessageActivitySample"
displayName = "ReportMessageSample"signatureFile = "ReportMessageActivitySample.xml"assembly="ReportMessageActivitySample.dll"/>
</Path></AddIn>
Resource filesRelevant for: API testing only
You can use resource files to retrieve values for elements and attributes. ThefromResource function lets you name the resource containing the values.
In the following example, the signature file retrieves the shortName and descriptionfrom a resource file.
<Resourcetype="Activity"
User GuideChapter 48: API Testing Extensibility
HP Unified Functional Testing (12.53) Page 519 of 938
id="ReportMessageActivitySample"version="1.0.0"group="Miscellaneous"shortName="fromResource(conc_str_short_name)"description="fromResource(conc_str_description)
The resources are defined in a standard Microsoft ResX Schema version 2.0Resource fie.
<data name="conc_str_description" xml:space="preserve"><value>Reports an activity's run status to the log</value>
</data><data name="conc_str_short_name" xml:space="preserve"><value>Report Message</value>
</data>
The resource reference must be a compiled file with a .resources extension,compiled from the ResX source file and stored in the same folder as the signaturefile.
You can generate the compiled file as a post-build operation using the resgen utility.For example:
resgen STBasicActivity.resx STBasicActivity.resources.
Use the Wizard to create a custom Activity - C#Relevant for: API testing only
This task describes how to create a new activity, using C#, and deploying it in UFT.
Run the Activity Wizard1. Open the Activity Wizard (Start > All Programs > HP Software > HP Unified
Functional Testing> Tools > Activity Wizard or <UFT installationfolder>\bin\ActivityWizard.exe).
2. In the wizard's General Properties pane, select the C# as the Language.3. Follow the steps of the wizard to create your activity.
Add execution code1. In the final screen of the wizard, click Open Folder to open the <Activity Name>
folder, corresponding to the activity name you specified in the wizard. Navigateto the SourceCode subfolder and locate the <Activity Name>.cs file.
User GuideChapter 48: API Testing Extensibility
HP Unified Functional Testing (12.53) Page 520 of 938
Caution: Do not close the Activity Wizard after this step.
2. In the <Activity Name>.cs file, add your execution code to the ExecuteStep function,as follows:
protected override STExecutionResult ExecuteStep(){try{ //**************************// Execution code goes here //**************************...
Add Logger code - optionalIn the <Activity Name>.cs file, add information for the log using the LogInfo, LogDebug,or LogError statements. For example:
protected override STExecutionResult ExecuteStep(){try{ LogInfo("Log Message 1"); LogDebug("Log Message 2"); LogError("Log Message 3");...
Add a Report statement - optionalIn the <Activity Name>.cs file, add a Report statement. For example:
protected override STExecutionResult ExecuteStep(){try{ DetailsReport = DetailsReport.Replace("\\n", "<BR>"); this.Report("Message", DetailsReport); ;...
Compile the project into a DLLIn your IDE, build the project and make sure the current <Activity Name> .dll file isin the new activity folder that you specified in the wizard.
User GuideChapter 48: API Testing Extensibility
HP Unified Functional Testing (12.53) Page 521 of 938
Deploy the activity in UFT1. In the final wizard screen, click Deploy in UFT.2. Click Finish to close the wizard and restart UFT.
Use the Wizard to create a custom Activity - JavaRelevant for: API testing only
This task describes how to create a new activity using Java code, and deploy it inUFT.
PrerequisiteMake sure you have a JAVA_HOME environment variable defined on your machineindicating the parent JDK folder.
Run the Activity Wizard1. Open the Activity Wizard from the product's start menu (Start > All Programs >
HP Software > HP Unified Functional Testing > Tools >Activity Wizard or <UFTinstallation folder>\bin\ActivityWizard.exe).
2. In the wizard's General Properties pane, select the Java as the Language.3. Follow the steps of the wizard to create your activity.
Edit the code1. On the final screen of the wizard, click Open Folder to open the <Activity Name>
folder, corresponding to the activity name you specified in the wizard. Navigateto the <Activity Name>\hp\st\ext\java subfolder and locate the MyLogic.java file.
Caution: Do not close the Activity Wizard after this step.
2. Edit the ExecuteLogic function inside the MyLogic.java file. Make sure to keep theProperties definition.
public Properties Props = new Properties();public ExecutionResult ExecuteLogic(){ try{ //************************** // Execution code goes here //**************************
User GuideChapter 48: API Testing Extensibility
HP Unified Functional Testing (12.53) Page 522 of 938
return ExecutionResult.Success; }...
Add Logger code - optionalIn the MyLogic.java file, add information for the log using the Logger.LogInfo,Logger.LogDebug, or Logger.LogError statements. For example:
try{ ... Logger.LogInfo("Log Message 1"); Logger.LogDebug("Log Message 2"); Logger.LogError("Log Message 3"); ... return ExecutionResult.Success; }
Add a Report statement - optionalIn the MyLogic.java file, add a Report statement, Reporter.Report, using key valuecombinations. For example:
try{ ... Reporter.Report{"Name","John"); ... return ExecutionResult.Success; }
Compile the Java into a class1. In your design IDE, add the ServiceTestCall.jar file to the build path.2. In UFT, run the CompileJavaFiles batch file in the <Activity
Name>\hp\custom\java\activity folder to compile all java files into a class. Thisutility only compiles the files in its folder.
Deploy the activity1. In the final wizard screen, click Deploy in UFT.2. Click Finish to close the wizard and restart UFT.
User GuideChapter 48: API Testing Extensibility
HP Unified Functional Testing (12.53) Page 523 of 938
Manually create a custom Activity in C#Relevant for: API testing only
This task describes how to create a new activity and implement it into UFT.
To run a test with the custom activity on another machine, you need to copy all ofthe custom files to its <Installation_Folder>\addins\CustomerAddins\<addin_name> folder.
Prerequisite - create a runtime fileCreate a C# project that implements your activity's actions in theaddins\CustomerAddins\<addin_name> folder. For task details, see "Create a runtimefile" on page 526.
Create a signature file1. Create a new signature file with an .xml extension. in the
addins\CustomerAddins\<addin_name> folder, together with the runtime file. Usethe sample project in the <installation folder>\ExtensibilitySamples folder as abasis for your custom signature file.
2. Customize the Resource section or copy the code provided below, modifying thebolded text for your needs.
<Resourcetype="Activity"id="ReportMessageActivitySample"version="1.0.0"group="Miscellaneous"shortName="ReportMessageActivitySample"description="ReportMessageActivitySample allows you to send a custom
message to the report and/or log. "assembly="ReportMessageActivitySample.dll"className="ReportMessageActivitySample.ReportMessageActivitySample"image="toolbox_ReportMessageActivitySample.png"visible="true"xmlns="http://hp.st.schemas/signature/v1.0"xmlns:xsi="http://www.w3.org/2001/XMLSchema-instance"xsi:schemaLocation="http://hp.st.schemas/signature/v1.0
../../../dat/schemas/Signature.xsd">
3. Add the required sections, such as GeneralProperties, InputProperties, Tabs,Events and so forth
User GuideChapter 48: API Testing Extensibility
HP Unified Functional Testing (12.53) Page 524 of 938

4. Add properties to the relevant sections.l GeneralProperties. Properties displayed in the Properties pane's General tab. Inmost cases you can use the section as it appears in the sample file, withoutany modifications. By default, it will provide the Step ID and Name properties.
l InputProperties. Properties displayed in the Properties pane'sInput/Checkpoints tab, in the Input pane.
l OutputProperties. Properties displayed in the Properties pane'sInput/Checkpoints tab, in the Checkpoints pane.
5. Specify any external resource files.6. Close the file with the </Resource> tag.For more details about the structure of the signature file, see "Signature files" onpage 509.
Create an addin file1. Create a new file with an .addin extension in the <installation
directory>\addins\CustomerAddins\<addin_name> folder, together with the signature file.
2. Use the sample addin file in the <installation folder>\ExtensibilitySamples folder asa basis, or copy the code provided below, modifying the bolded text for yourneeds.
<?xml version="1.0" encoding="utf-8"?><AddIn name = "HP Report Message Activity Sample"
author = "John Doe"copyright = "prj:///doc/copyright.txt"description = "Extensibility Sample - Report Message Activity"version="1.0">
<Manifest><!--<Must be unique --><Identity name = "ReportMessageActivitySample"/>
</Manifest><Runtime><Import assembly=":HP.ST.Fwk.DesignerModel"/>
</Runtime><Path name = "/ST/Activities"><!--Misc Activities --><Activity id = "ReportMessageActivitySample"
displayName = "ReportMessageSample"signatureFile = "ReportMessageActivitySample.xml"
assembly="ReportMessageActivitySample.dll"/></Path>
</AddIn>
User GuideChapter 48: API Testing Extensibility
HP Unified Functional Testing (12.53) Page 525 of 938
3. Create a unique Addin file for each activity—do not define multiple activities ina single Addin file.
4. Define post-build tasks such as resgen.5. Compile the project and copy the DLL to the <installation_
Folder>\addins\CustomerAddins\<addin_name> folder.For additional details, see "Runtime files" on page 508.
Provide a graphic for your activity - optional1. Copy an icon image for your activity into the <Installation_
Folder>\addins\CustomerAddins\<addin_name> folder. This file should meet thefollowing requirements:l a .png extensionl sized at 16 x 16 pixelsl 8-bit color depth
2. Specify the name of the image file in the signature file's Resource Element.
Check the implementation1. Reopen the application and drag the new activity into the Test Flow. Verify that
the activity and its properties appear as expected.2. Provide property values.3. Run the test and observe the Output log and the run results.4. Enable checkpoints to verify the results and rerun the test.
Create a runtime fileRelevant for: API testing only
Note: You must compile the DLL with a Target Framework of Framework 4.0.
Add Using statementsIn your runtime file, provide the mandatory using statements. In your solution, youmust also add a reference to the .dll files. The .dll files are located in the productsinstallation's /bin folder. You must always add a reference toHP.ST.Fwk.RunTimeFWK.dll. If you are using internal logging, you must also add areference to log4net.dll.
User GuideChapter 48: API Testing Extensibility
HP Unified Functional Testing (12.53) Page 526 of 938
The following example shows the Using statements in the sample .cs file.
using HP.ST.Fwk.RunTimeFWK;// If you need to implement Internal Loggingusing log4net;
Specify the namespace and classDefine the namespace and provide the activity's runtime code. The class youdefine for your custom activity must inherit from the STActivityBase class. Forexample:
namespace ReportMessageActivitySample{[Serializable]public class ReportMessageActivitySample : STActivityBase{
Set the internal loggingUse the built-in logger manager to instruct the activity to create an internal logduring runtime. This example gets the property values of the input properties andsends the output to either the run results only or to the run results and Outputwindow. For example:
/// <summary> /// Internal log/// </summary>private static readonly ILog log =
LogManager.GetLogger(typeof(ReportMessageActivitySample));const string runResults = "Run Results";const string runResultsAndOutputWindow = "Run Results and Output Window";
For details about other logging options, see "Assert Object" on page 670.
Initialize the propertiesInitialize the custom Input and Output properties that you define in the signature file.The following example initializes the three input properties: Status, Message, andDestination. For example:
/// <summary>/// Initializes properties./// </summary>/// <param name="ctx">The runtime context</param>public ReportMessageActivitySample(ISTRunTimeContext ctx, string name)
User GuideChapter 48: API Testing Extensibility
HP Unified Functional Testing (12.53) Page 527 of 938
: base(ctx, name){this.Status = String.Empty;this.Message = String.Empty;this.Destination = String.Empty;}
Retrieve the property valuesThis section retrieves or sets the input property values. For example:
/// <summary>/// Gets or sets the status of the message to report./// </summary>public string Status { get; set; }/// <summary>/// Gets or sets the details of the message to report./// </summary>public string Message { get; set; }/// <summary>/// Gets or sets the destination where the message should be reported to./// </summary>public string Destination { get; set; }
If you have array type properties that are not described by a schema, for example,key/value pairs, you must initialize all the members of the array explicitly, andindicate the actual number of elements.
The following example initializes 40 elements for the MyArrayName property. Itcontains 40 key and value pairs.
this. MyArrayName = new MyPair[40];for (int i=0; i<40; i++){this. MyArrayName [i] = new MyPair();}public MyPair[] MyArrayName;public class MyPair{string Key;string Value;}
For arrays defined by a schema or WSDL, you can use the standard Select LinkSource Dialog Box and link directly to the array element.
User GuideChapter 48: API Testing Extensibility
HP Unified Functional Testing (12.53) Page 528 of 938
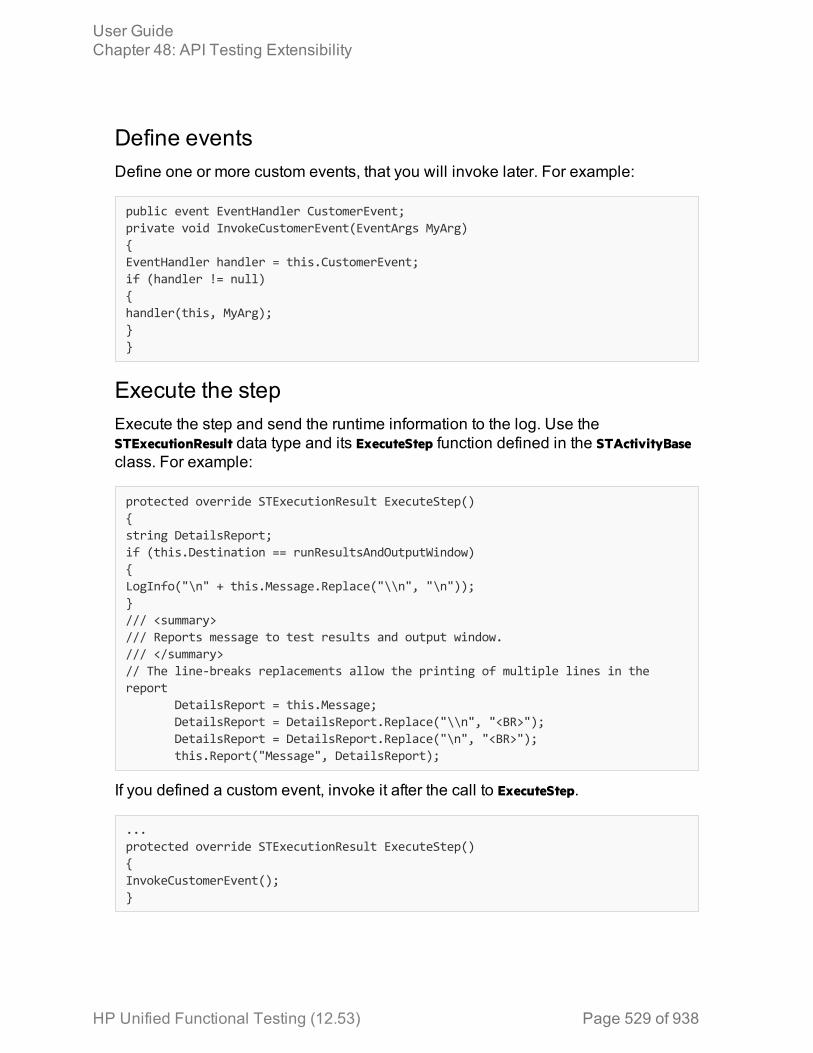
Define eventsDefine one or more custom events, that you will invoke later. For example:
public event EventHandler CustomerEvent;private void InvokeCustomerEvent(EventArgs MyArg){EventHandler handler = this.CustomerEvent;if (handler != null){handler(this, MyArg);}}
Execute the stepExecute the step and send the runtime information to the log. Use theSTExecutionResult data type and its ExecuteStep function defined in the STActivityBaseclass. For example:
protected override STExecutionResult ExecuteStep(){string DetailsReport;if (this.Destination == runResultsAndOutputWindow){LogInfo("\n" + this.Message.Replace("\\n", "\n"));}/// <summary>/// Reports message to test results and output window./// </summary>// The line-breaks replacements allow the printing of multiple lines in thereport
DetailsReport = this.Message;DetailsReport = DetailsReport.Replace("\\n", "<BR>");DetailsReport = DetailsReport.Replace("\n", "<BR>");this.Report("Message", DetailsReport);
If you defined a custom event, invoke it after the call to ExecuteStep.
...protected override STExecutionResult ExecuteStep(){InvokeCustomerEvent();}
User GuideChapter 48: API Testing Extensibility
HP Unified Functional Testing (12.53) Page 529 of 938

Set the statusSet the Status of the test run. The ReportMessageActivitySample.cs sample file usesenumeration to set the status, based on the STExecutionResult value. For example:
switch (this.Status){case "Done":this.Report(ReportKeywords.StatusKeywordTag, ReportKeywords.DoneValueTag);return new STExecutionResult(STExecutionStatus.Success);case "Pass":this.Report(ReportKeywords.StatusKeywordTag, ReportKeywords.SuccessValueTag);return new STExecutionResult(STExecutionStatus.Success);case "Fail":this.Report(ReportKeywords.StatusKeywordTag, ReportKeywords.FailureValueTag);return new STExecutionResult(STExecutionStatus.Success);default:return new STExecutionResult(STExecutionStatus.Success);}
Compile the runtime fileAfter you customize the code, you compile the .dll. The .dll name should be thesame as the name of the addin file. For example, the runtime file,ReportMessageActivitySample.dll corresponds to the ReportMessageActivitySample.addinfile.
After you create the runtime file in your development environment, you referencethe .dll from the signature file, and the signature file from the addin file.
User GuideChapter 48: API Testing Extensibility
HP Unified Functional Testing (12.53) Page 530 of 938
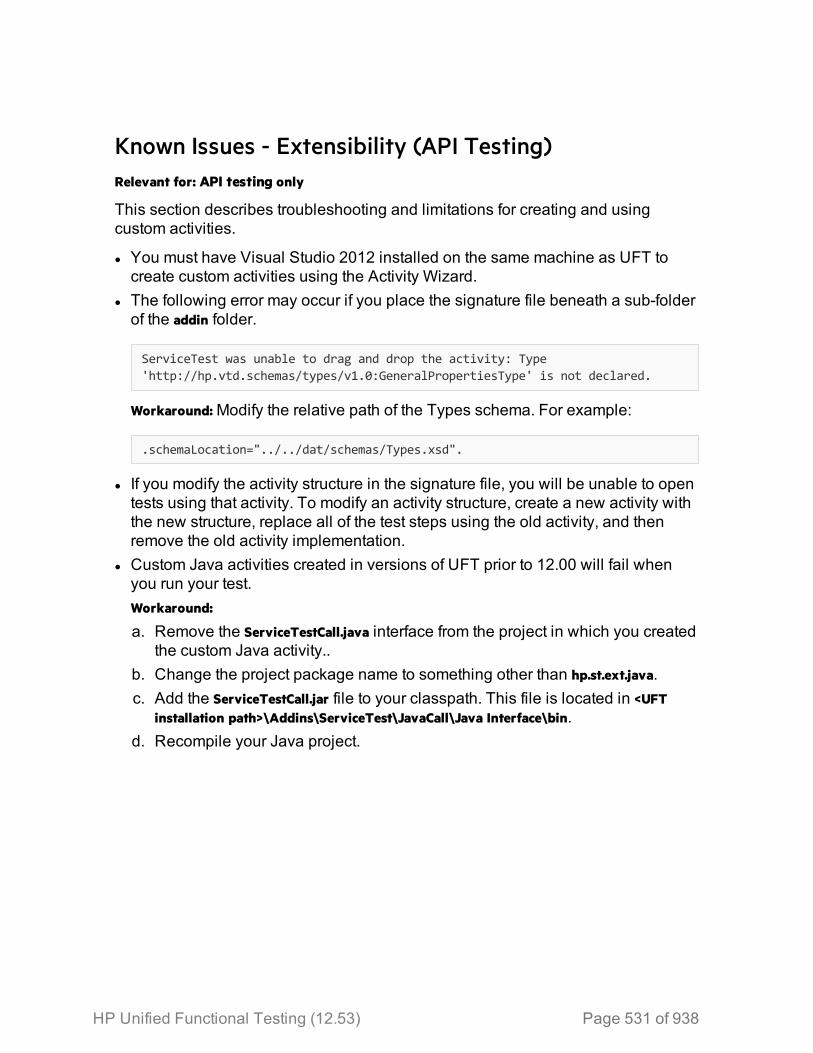
Known Issues - Extensibility (API Testing)Relevant for: API testing only
This section describes troubleshooting and limitations for creating and usingcustom activities.
l You must have Visual Studio 2012 installed on the same machine as UFT tocreate custom activities using the Activity Wizard.
l The following error may occur if you place the signature file beneath a sub-folderof the addin folder.
ServiceTest was unable to drag and drop the activity: Type'http://hp.vtd.schemas/types/v1.0:GeneralPropertiesType' is not declared.
Workaround: Modify the relative path of the Types schema. For example:
.schemaLocation="../../dat/schemas/Types.xsd".
l If you modify the activity structure in the signature file, you will be unable to opentests using that activity. To modify an activity structure, create a new activity withthe new structure, replace all of the test steps using the old activity, and thenremove the old activity implementation.
l Custom Java activities created in versions of UFT prior to 12.00 will fail whenyou run your test.Workaround:
a. Remove the ServiceTestCall.java interface from the project in which you createdthe custom Java activity..
b. Change the project package name to something other than hp.st.ext.java.c. Add the ServiceTestCall.jar file to your classpath. This file is located in <UFT
installation path>\Addins\ServiceTest\JavaCall\Java Interface\bin.d. Recompile your Java project.
HP Unified Functional Testing (12.53) Page 531 of 938

HP Unified Functional Testing (12.53) Page 532
Part 7: Creating and Enhancing UFT Testswith Code
Chapter 49: The EditorRelevant for GUI tests and components
You can write customized code for your tests by modifying actions, functionlibraries, and user code files in the Editor, as well as enhance your tests andfunction libraries using a few simple programming techniques.
The Editor supports common text and code editing features, including:
l Statement completion. For details, see "Statement completion" below and"Automatic code completion" on page 535.
l Bookmarks.
l Search and Replace. For details, see "Searching and replacing" on page 536l Collapsible code sections.
l Zoom in/zoom out of code documents using the mouse wheel.
l Code templates.
You can also define personalized options for using the Editor in the Text Editor tabof the Options dialog box (Tools > Options > Text Editor tab > General node.)
For a description of using the editor for GUI tests and components, see"Programming Tests" on page 542. For a description of using the editor for APItests, see "Event Handlers for API Test Steps" on page 616.
Statement completionRelevant for: GUI actions, scripted GUI components, function libraries, and user code files
Statement completion enables you to increase programming speed and accuracywhen typing in the Editor by providing dynamic lists of items in the form of tooltips,drop-down lists, or popup windows.
As you type in the Editor, UFT displays items you can add to your statement, aswell as the syntax relevant to what you are typing. UFT provides this type ofstatement completion information, when available, for:
l Activity-specific properties (API testing only)l Methods or objects you can use in your API test step event handlersl Function and method syntaxl Objects you create in your codel Operationsl Properties or operations that return objectsl Structured parametersl Variable definitions and methods
HP Unified Functional Testing (12.53) Page 533 of 938
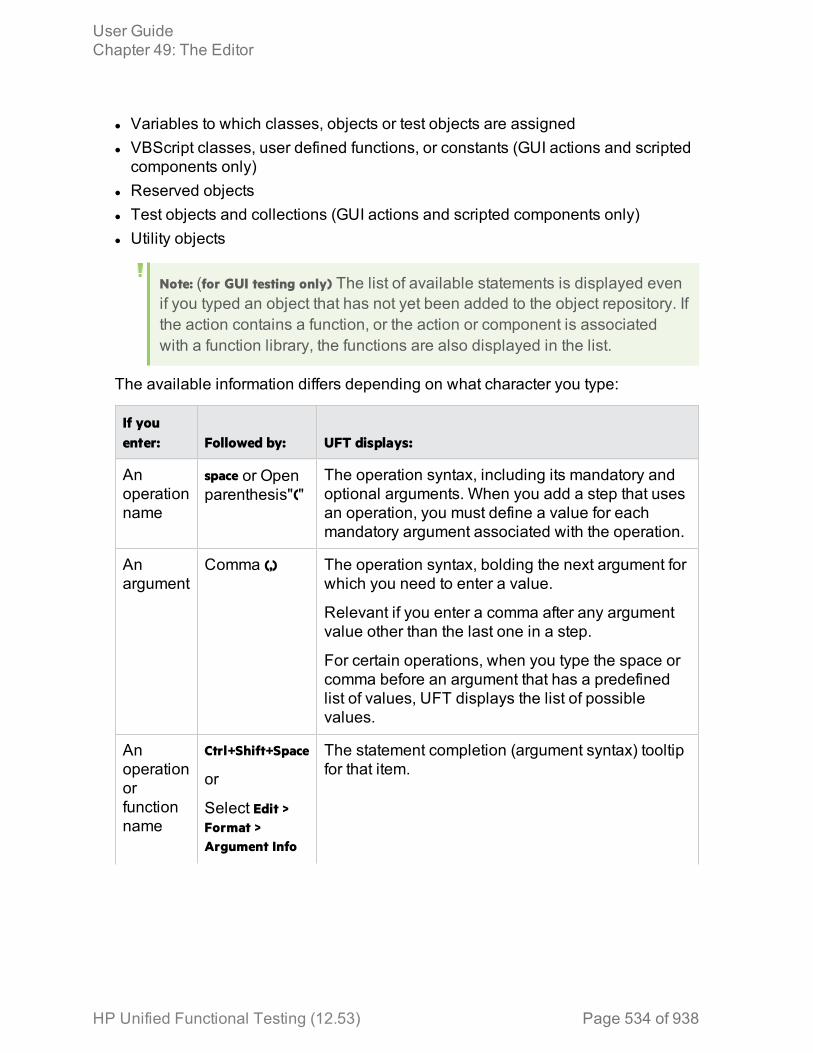
l Variables to which classes, objects or test objects are assignedl VBScript classes, user defined functions, or constants (GUI actions and scriptedcomponents only)
l Reserved objectsl Test objects and collections (GUI actions and scripted components only)l Utility objects
Note: (for GUI testing only) The list of available statements is displayed evenif you typed an object that has not yet been added to the object repository. Ifthe action contains a function, or the action or component is associatedwith a function library, the functions are also displayed in the list.
The available information differs depending on what character you type:
If youenter: Followed by: UFT displays:
Anoperationname
space or Openparenthesis"("
The operation syntax, including its mandatory andoptional arguments. When you add a step that usesan operation, you must define a value for eachmandatory argument associated with the operation.
Anargument
Comma (,) The operation syntax, bolding the next argument forwhich you need to enter a value.
Relevant if you enter a comma after any argumentvalue other than the last one in a step.
For certain operations, when you type the space orcomma before an argument that has a predefinedlist of values, UFT displays the list of possiblevalues.
Anoperationorfunctionname
Ctrl+Shift+Space
or
Select Edit >Format >Argument Info
The statement completion (argument syntax) tooltipfor that item.
User GuideChapter 49: The Editor
HP Unified Functional Testing (12.53) Page 534 of 938
If youenter: Followed by: UFT displays:
Ctrl+Space
or
Edit > Format > CompleteWord
A dynamic list of the relevant:
l operationsl propertiesl user-defined functionsl constants and local variables relevant to thecurrent programming scope
l functions and methods relevant to the currentprogramming scope
l options relevant to your GUI test or component,including:l test objectsl utility objectsl collections
If there is only one relevant item defined, its name isautomatically entered in the step, without openingthe list. For example, if you typed the beginning ofthe item name before pressing CTRL+SPACE, andonly one item matches the text you typed.
The beginning of an itemin the statementcompletion list
The list of items, highlighting the first item(alphabetically) that matches the text you typed.Pressing Enter or Space adds the highlighted word tothe step.
Automatic code completionRelevant for: GUI actions, scripted GUI components, and function libraries
UFT provides automatic code completion features, to facilitate coding in the Editor.This includes some basic, static code snippets that you can insert automaticallyinto your document, as well as templates that you can use to insert additional codesnippets by typing specific keywords.
For example, if you enter the letters if at the beginning of an empty line in a GUIaction, followed by a SPACE, UFT automatically enters:
If True ThenEnd If
User GuideChapter 49: The Editor
HP Unified Functional Testing (12.53) Page 535 of 938
The word True is highlighted, reminding you to replace it with the relevantcondition.
You can also modify the templates provided, or build your own customizedtemplates as needed, and define the keywords used to invoke the use of eachtemplate.
For example, you might repeat a complicated If...Then statement many times yourdocument. You can use an existing template for the If...Then statement to createyour own customized template with your more complicated code. You can alsocreate templates from scratch, such as a comment block template, which mightinclude information such as programmer identification, date added, or other detailsyou want included in all comments.
Code templates are defined in the Code Templates Pane, and are supported forthe following file types, used for actions and function libraries:
l .txt filesl .mts filesl .qfl filesl .vbs filesFor details, see "Use code snippets and templates" on page 538.
If you enter two characters that are the initial characters of multiple VBScriptkeywords, a drop-down menu appears with all of the relevant keywords, and youcan select the one you want. For example, if you enter the letters pr and then entera space, the drop-down menu is displayed, containing the keywords preserve,private, and property. You can then select a keyword from the list and press ENTERto insert it into your script.
Searching and replacingRelevant for: GUI actions, scripted GUI components, function libraries, and user code files
When searching in GUI tests you can search in the Editor for text strings only.When searching API tests, you can search in the Editor for text strings, as well asreferences, derived classes, base classes, or overriding methods, for the currentmethod, function or class.
Note: Search and replace functionality is not available in the Keyword View,the canvas, or an application area.
When performing text searches or replacements you can search throughout anentire solution, test, or folder (even if the file is currently closed). However, the
User GuideChapter 49: The Editor
HP Unified Functional Testing (12.53) Page 536 of 938

specific file and item types searched within the solution, test, or folder are definedby the search algorithm and cannot be modified by users.
Search strings can be either standard text or regular expressions.
Note: The search is limited to the text in the file at the time that the Find orReplace dialog box was opened. Any changes made after opening thedialog box are not included the search.
When searching for text, you can use standard text or regular expressions in yoursearch strings, and you can perform string replacements. You can also search indocuments that are closed but accessible by the search functionality, either bysearching an entire solution, or specifying a search folder.
The manner in which UFT searches differs for GUI tests and components and APItests:
GUI testsandscriptedcomponents
When you search for text strings in GUI tests, you can search inactions, function libraries, *.vbs files, or *.txt files. The search isperformed in the action scripts, for each action defined in the test.
When you search in scripted components, the search is performedin any defined function libraries.
API tests When you search for text strings in API tests, you can search inactions, *.cs files, or *.txt files. The search is performed in eachsource code module and in the test flow.
When you search in a specific C# source code file, the search isperformed throughout all user code in theAPI test, as a single textfile.
You can search for the following types of items in API tests:
l Activity or event display names or event handlesl Global environment variable display names and valuesl Link expressionsl Loaded XML or schema filesl Test setting definitionsl Visible checkpoint or property display names and valuesl X-paths
User GuideChapter 49: The Editor
HP Unified Functional Testing (12.53) Page 537 of 938
For details on searching and replacing, see "Search for references or classes" onpage 540.
Use code snippets and templatesRelevant for: GUI actions, scripted GUI components, and function libraries
This task describes how to insert pre-designed code snippets or blocks of text intoyour document, as well as how to manage templates for such snippets in the CodeTemplates Pane.
Insert code snippets into your document in the Editor1. Create or open an action, scripted GUI component,or function library.
(If you are editing a GUI action or scripted GUI component, open it in theEditor.)
2. Place your cursor at the point in the document that you want to insert the codesnippet and then enter text as described in the following table.
If you enter: Followed by: UFT does the following:
The keyword for acode snippetlisted in the Edit >Code Snippet menu
SPACE Inserts the first VBScript snippet definedfor the keyword you entered, as listed inthe Edit > Code Snippet menu.
The keyword for acode templatedefined in theOptions dialogbox
TAB Inserts the code snippet defined in therelevant template in the Code TemplatesPane.If multiple templates are defined for thekeyword you entered, the first template inthe list is inserted.
User GuideChapter 49: The Editor
HP Unified Functional Testing (12.53) Page 538 of 938
If you enter: Followed by: UFT does the following:
Part of a codetemplate keyword
CTRL+SPACE Displays a list of the code snippets andtemplates whose keywords match thecharacters you entered.The list includes the static VBScriptsnippets listed in the Edit > Code Snippetmenu, as well as the code templatesdefined for the relevant file type in theCode Templates Pane.In the drop-down list, browse to thekeyword for the template you want toinsert, and press Tab to insert its snippetinto your document.
Modify an existing list of code templates1. Open the Code Templates Pane.2. From the File Types drop-down list, select the item associated with the list of
templates you want to modify. The table lists all code templates defined for theselected file type or types.
3. To edit the file types associated with the selected list, click Edit List. In the EditList dialog box, enter the file type or types that should be supported by theselected list, separated by semi-colons (;).
4. To edit the list of code templates, select the table row for the code template youwant to modify and do one of the following:l Add a new template in the list: Click the empty space below the last row in thetable, above the syntax area.
l Edit the template name: Double-click the cell in the Template column, andupdate the name.
l Edit the keyword: Double-click the cell in the Keyword column, and update thekeyword. The keyword is the text that you enter in the Editor to insert thetemplate.
l Edit the code template description: Double-click the cell in the Descriptioncolumn and update the description text.
l Edit the code syntax inserted into your code: Click inside the code syntax areabelow the table and update the code.
Note: Note that changes made here do not affect the code snippets
User GuideChapter 49: The Editor
HP Unified Functional Testing (12.53) Page 539 of 938
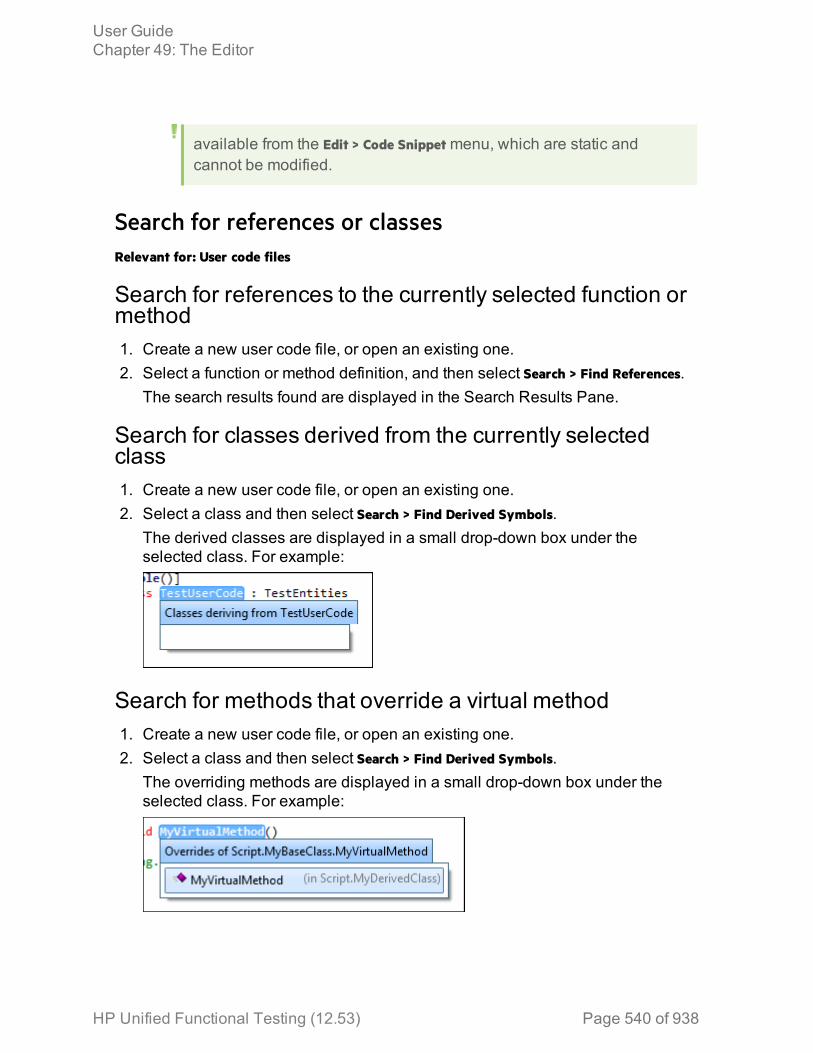
available from the Edit > Code Snippet menu, which are static andcannot be modified.
Search for references or classesRelevant for: User code files
Search for references to the currently selected function ormethod1. Create a new user code file, or open an existing one.2. Select a function or method definition, and then select Search > Find References.
The search results found are displayed in the Search Results Pane.
Search for classes derived from the currently selectedclass1. Create a new user code file, or open an existing one.2. Select a class and then select Search > Find Derived Symbols.
The derived classes are displayed in a small drop-down box under theselected class. For example:
Search for methods that override a virtual method1. Create a new user code file, or open an existing one.2. Select a class and then select Search > Find Derived Symbols.
The overriding methods are displayed in a small drop-down box under theselected class. For example:
User GuideChapter 49: The Editor
HP Unified Functional Testing (12.53) Page 540 of 938
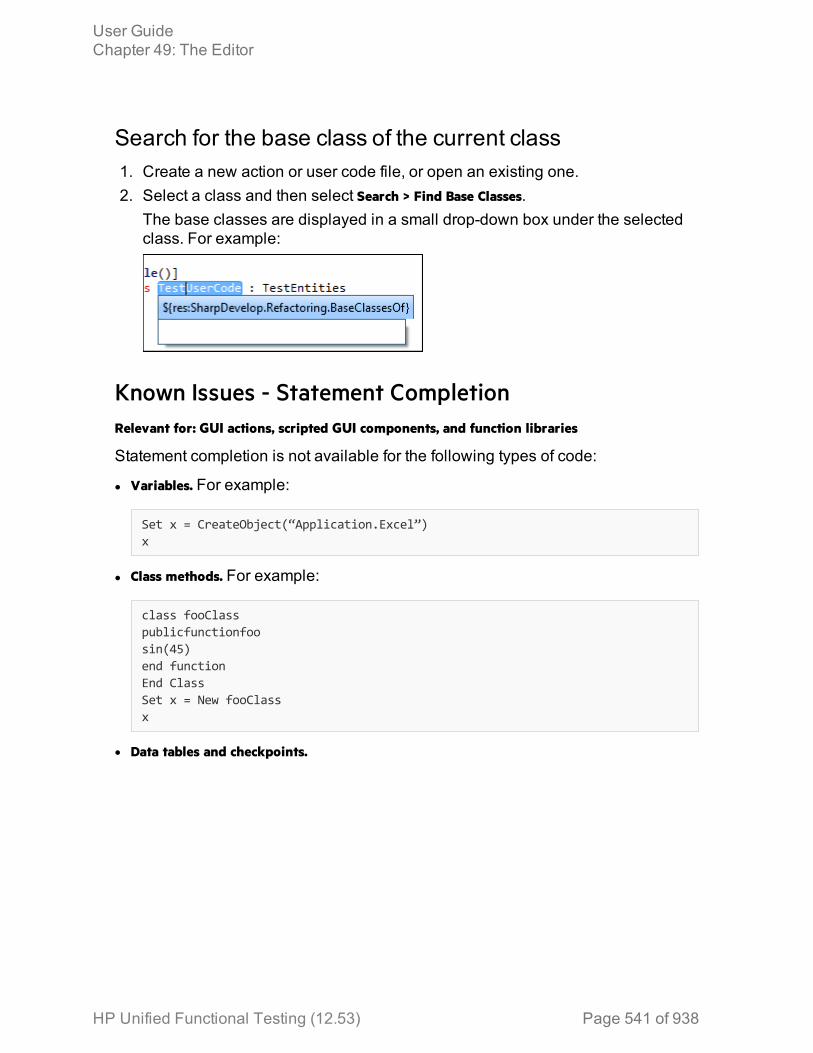
Search for the base class of the current class1. Create a new action or user code file, or open an existing one.2. Select a class and then select Search > Find Base Classes.
The base classes are displayed in a small drop-down box under the selectedclass. For example:
Known Issues - Statement CompletionRelevant for: GUI actions, scripted GUI components, and function libraries
Statement completion is not available for the following types of code:
l Variables. For example:
Set x = CreateObject(“Application.Excel”)x
l Class methods. For example:
class fooClasspublicfunctionfoosin(45)end functionEnd ClassSet x = New fooClassx
l Data tables and checkpoints.
User GuideChapter 49: The Editor
HP Unified Functional Testing (12.53) Page 541 of 938

Chapter 50: Programming TestsRelevant for: GUI tests, scripted GUI components, and function libraries
GUI test actions and scripted GUI components are composed of statements codedin the Microsoft VBScript programming language. The Editor provides analternative to the Keyword View for testers who are familiar with VBScript. In theEditor, you can view an action or scripted component in VBScript.
When working with GUI tests, and both scripted and keyword GUI components, youcan also create and work with function libraries in UFT using VBScript. Thisenables you to increase the power and flexibility of your tests and components.
If you are familiar with VBScript, you can add and update statements and enhanceyour tests, components, and function libraries with programming. This enables youto increase a test or component's power and flexibility.
This chapter provides a brief introduction to VBScript, and shows you how toenhance your actions, scripted components, and function libraries using a fewsimple programming techniques.
Note: For details about using the text and code editor abilities available in theEditor, see "The Editor" on page 533.
To learn about working with VBScript, you can view the VBScript documentationavailable from the UFTHelp menu (Help > HP Unified Functional Testing Help > VBScriptReference).
You can add statements that perform operations on objects or retrieve informationfrom your application. For example, you can add a step that checks that an objectexists, or you can retrieve the return value of an operation.
You can add steps to your action, component, or function library either manually orusing the Step Generator.
Programmatic descriptionsRelevant for: GUI actions, scripted GUI components, and function libraries
When UFT learns an object in your application, it adds the appropriate test objectto the object repository. After the object exists in the object repository, you can addstatements in the Editor to perform additional operations on that object. To addthese statements, you usually enter the name (not case sensitive) of each of theobjects in the object's hierarchy as the object description, and then add theappropriate operation.
HP Unified Functional Testing (12.53) Page 542 of 938
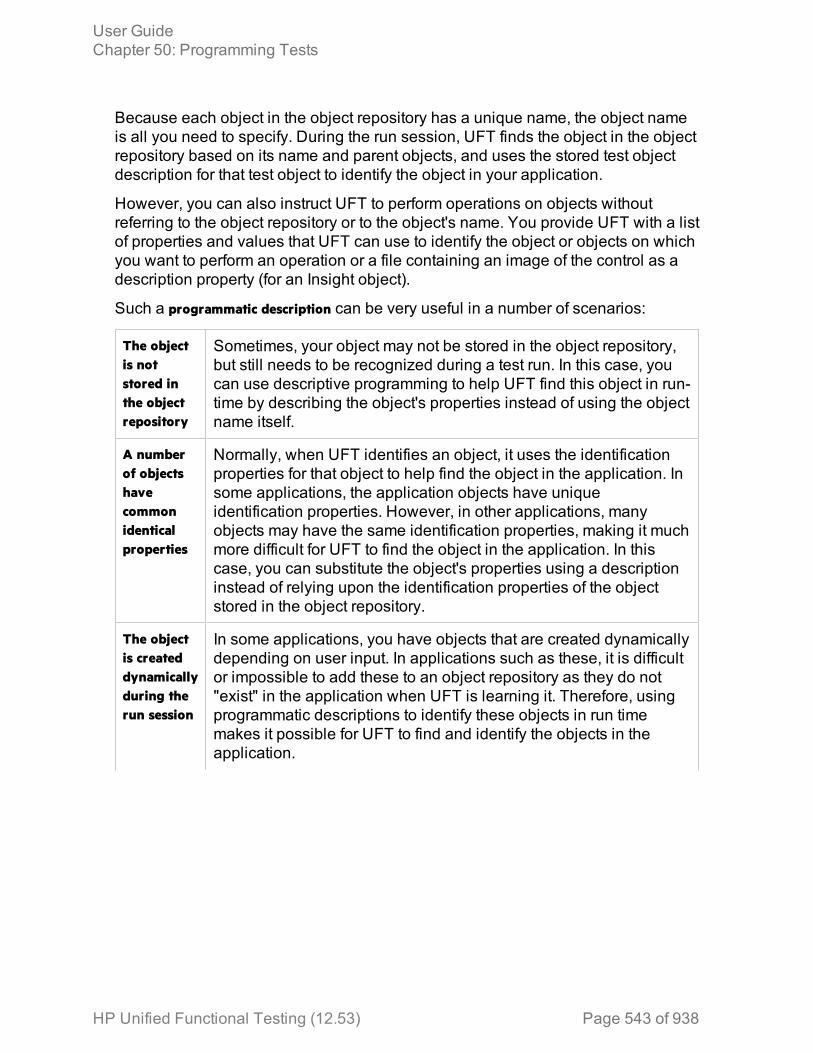
Because each object in the object repository has a unique name, the object nameis all you need to specify. During the run session, UFT finds the object in the objectrepository based on its name and parent objects, and uses the stored test objectdescription for that test object to identify the object in your application.
However, you can also instruct UFT to perform operations on objects withoutreferring to the object repository or to the object's name. You provide UFT with a listof properties and values that UFT can use to identify the object or objects on whichyou want to perform an operation or a file containing an image of the control as adescription property (for an Insight object).
Such a programmatic description can be very useful in a number of scenarios:
The objectis notstored inthe objectrepository
Sometimes, your object may not be stored in the object repository,but still needs to be recognized during a test run. In this case, youcan use descriptive programming to help UFT find this object in run-time by describing the object's properties instead of using the objectname itself.
A numberof objectshavecommonidenticalproperties
Normally, when UFT identifies an object, it uses the identificationproperties for that object to help find the object in the application. Insome applications, the application objects have uniqueidentification properties. However, in other applications, manyobjects may have the same identification properties, making it muchmore difficult for UFT to find the object in the application. In thiscase, you can substitute the object's properties using a descriptioninstead of relying upon the identification properties of the objectstored in the object repository.
The objectis createddynamicallyduring therun session
In some applications, you have objects that are created dynamicallydepending on user input. In applications such as these, it is difficultor impossible to add these to an object repository as they do not"exist" in the application when UFT is learning it. Therefore, usingprogrammatic descriptions to identify these objects in run timemakes it possible for UFT to find and identify the objects in theapplication.
User GuideChapter 50: Programming Tests
HP Unified Functional Testing (12.53) Page 543 of 938

The objectdiffersbetweendifferentversions oftheapplication
Especially when working with Web applications, objects havedifferent properties depending on the browser in which theapplication is displayed. As a result, even if an object is added tothe object repository for the application, UFT may have troubleidentifying the object due to how each browser type renders theobject. Using descriptive programming instead of static objectidentification properties makes your test objects more flexible inmany different situations or browser versions, and enables UFT tofind the object regardless of the environment in which the object isfound.
Example:
Suppose you are testing a Web site that generates a list of potentialemployers based on biographical information you provide, and offers to sendyour resume to the employer names you select from the list. You want yourtest to select all the employers displayed in the list, but when you designyour test, you do not know how many check boxes will be displayed on thepage, and you cannot, of course, know the exact object description of eachcheck box. In this situation, you can use a programmatic description toinstruct UFT to perform a Set "ON" method for all objects that fit thedescription: HTML TAG = input, TYPE = check box.
There are two types of programmatic descriptions:
l Static. You list the set of properties and values that describe the object directly ina VBScript statement. For details, see "Static programmatic descriptions" on thenext page.
l Dynamic. You add a collection of properties and values to a Description object,and then enter the Description object name in the statement. For details, see"Dynamic programmatic descriptions " on page 548.
Using the Static type to enter programmatic descriptions directly into yourstatements may be easier for basic object description needs. However, in mostcases, using the Dynamic type provides more power, efficiency, and flexibility.
In the run results, square brackets around a test object name indicate that the testobject was created dynamically during the run session using a programmaticdescription or the ChildObjects method.
User GuideChapter 50: Programming Tests
HP Unified Functional Testing (12.53) Page 544 of 938

Static programmatic descriptionsRelevant for: GUI actions, scripted GUI components, and function libraries
You can describe an object directly in a statement by specifying property:=valuepairs describing the object instead of specifying an object's name.
The general syntax is:
TestObject("PropertyName1:=PropertyValue1", "..." ,"PropertyNameX:=PropertyValueX")
The method parts include:
TestObject The test object class.
PropertyName:=PropertyValue. The identification property and its value. Eachproperty:=value pair should be separated bycommas and quotation marks.
To describe an Insight test object, specify theImgSrc property, with the PropertyValue providingthe file system path or ALM path to an image ofthe control. (To specify an ALM path to a filelocated in the ALM Test Resources module, type:[QualityCenter\Resources] Subject\<folder and filename>).
For example, the statement below specifies a WebEdit test object in the MercuryTours page with the Name author and an index of 3. During the run session, UFTfinds the WebEdit object with matching property values and enters the text MarkTwain.
Browser("Mercury Tours").Page("Mercury Tours").WebEdit ("Name:=Author","Index:=3").Set "Mark Twain"
The statement below specifies an InsightObject test object in the Calculatorwindow, with the image in the C:\AllMyFiles\Button6.bmp file. This file contains animage of the 6 button. During a run session, UFT finds the area on the calculatorthat looks like this image, and clicks its center.
Window("Calculator").InsightObject("ImgSrc:=C:\AllMyFiles\Button6.bmp").Click
Note the following special scenarios for static programmatic descriptions:
User GuideChapter 50: Programming Tests
HP Unified Functional Testing (12.53) Page 545 of 938
Regularexpressions inprogrammaticdescriptions
UFT evaluates all property values in programmatic descriptions asregular expressions. Therefore, if you want to enter a value thatcontains a special regular expression character (such as *, ?, or +), usethe \ (backslash) character to instruct UFT to treat the specialcharacters as literal characters.
Variables inprogrammaticdescriptions
You can enter a variable name as the property value if you want to findan object based on property values you retrieve during a run session.For example:
MyVar="some text string"Browser("Hello").Page("Hello").Webtable("table").Webedit("name:=" &MyVar)
User GuideChapter 50: Programming Tests
HP Unified Functional Testing (12.53) Page 546 of 938
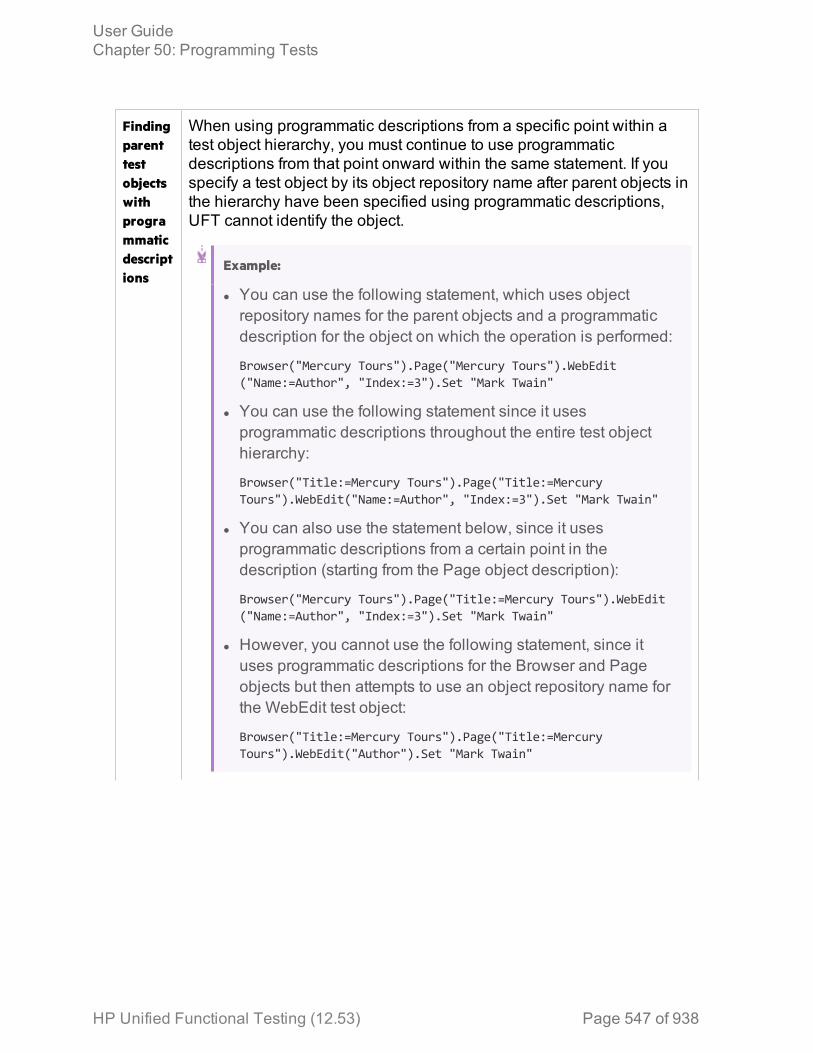
Findingparenttestobjectswithprogrammaticdescriptions
When using programmatic descriptions from a specific point within atest object hierarchy, you must continue to use programmaticdescriptions from that point onward within the same statement. If youspecify a test object by its object repository name after parent objects inthe hierarchy have been specified using programmatic descriptions,UFT cannot identify the object.
Example:
l You can use the following statement, which uses objectrepository names for the parent objects and a programmaticdescription for the object on which the operation is performed:
Browser("Mercury Tours").Page("Mercury Tours").WebEdit("Name:=Author", "Index:=3").Set "Mark Twain"
l You can use the following statement since it usesprogrammatic descriptions throughout the entire test objecthierarchy:
Browser("Title:=Mercury Tours").Page("Title:=MercuryTours").WebEdit("Name:=Author", "Index:=3").Set "Mark Twain"
l You can also use the statement below, since it usesprogrammatic descriptions from a certain point in thedescription (starting from the Page object description):
Browser("Mercury Tours").Page("Title:=Mercury Tours").WebEdit("Name:=Author", "Index:=3").Set "Mark Twain"
l However, you cannot use the following statement, since ituses programmatic descriptions for the Browser and Pageobjects but then attempts to use an object repository name forthe WebEdit test object:
Browser("Title:=Mercury Tours").Page("Title:=MercuryTours").WebEdit("Author").Set "Mark Twain"
User GuideChapter 50: Programming Tests
HP Unified Functional Testing (12.53) Page 547 of 938

Programmaticdescriptions forInsighttestobjects
To describe an Insight test object, specify the ImgSrc property, with thePropertyValue providing the file system path or ALM path to an image ofthe control. (To specify an ALM path to a file located in the ALM TestResources module, type: [QualityCenter\Resources] Subject\<folder and filename>).
When using programmatic descriptions for Insight test objects, considerthe following:
l The description can contain only the ImgSrc property (mandatory) andordinal identifier properties (optional).
l The description cannot contain regular expressions.l The file containing the image of the control (specified in the ImgSrcproperty):l must be a non-compressed image file that supports 24 or 32 bits-per-pixel (JPEG, BMP or PNG).
l must be accessible from any computer that runs the test orcomponent.
l When running the Click method on an Insight test object definedusing a programmatic description, UFT clicks in the center of thecontrol that matches the specified image.
Dynamic programmatic descriptionsRelevant for: GUI actions, scripted GUI components, and function libraries
You can use the Description object to return a Properties collection object containinga set of Property objects. A Property object consists of a property name and value.You can then specify the returned Properties collection in place of an object name ina statement. (Each property object contains a property name and value pair.)
To create the Properties collection, you enter a Description.Create statement using thefollowing syntax:
Set MyDescription = Description.Create()
After you have created a Properties object (such as MyDescription in the exampleabove), you can enter statements to add, edit, remove, and retrieve properties andvalues to or from the Properties object during the run session. This enables you todetermine which, and how many properties to include in the object description in adynamic way during the run session.
After you fill the Properties collection with a set of Property objects (properties andvalues), you can specify the Properties object in place of an object name in astatement.
User GuideChapter 50: Programming Tests
HP Unified Functional Testing (12.53) Page 548 of 938
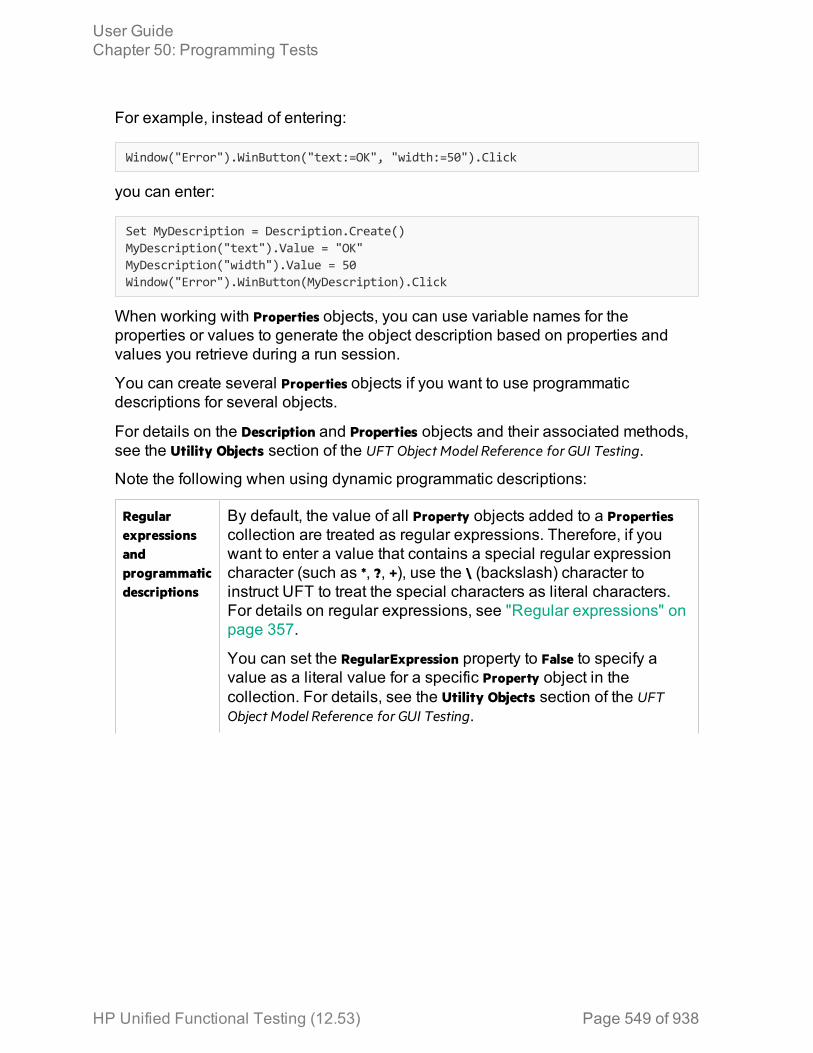
For example, instead of entering:
Window("Error").WinButton("text:=OK", "width:=50").Click
you can enter:
Set MyDescription = Description.Create()MyDescription("text").Value = "OK"MyDescription("width").Value = 50Window("Error").WinButton(MyDescription).Click
When working with Properties objects, you can use variable names for theproperties or values to generate the object description based on properties andvalues you retrieve during a run session.
You can create several Properties objects if you want to use programmaticdescriptions for several objects.
For details on the Description and Properties objects and their associated methods,see the Utility Objects section of the UFT Object Model Reference for GUI Testing.
Note the following when using dynamic programmatic descriptions:
Regularexpressionsandprogrammaticdescriptions
By default, the value of all Property objects added to a Propertiescollection are treated as regular expressions. Therefore, if youwant to enter a value that contains a special regular expressioncharacter (such as *, ?, +), use the \ (backslash) character toinstruct UFT to treat the special characters as literal characters.For details on regular expressions, see "Regular expressions" onpage 357.
You can set the RegularExpression property to False to specify avalue as a literal value for a specific Property object in thecollection. For details, see the Utility Objects section of the UFTObject Model Reference for GUI Testing.
User GuideChapter 50: Programming Tests
HP Unified Functional Testing (12.53) Page 549 of 938

Programmaticdescriptionsand the objecthierarchy
When using programmatic descriptions from a specific pointwithin a test object hierarchy, you must continue to useprogrammatic descriptions from that point onward within the samestatement. If you specify a test object by its object repository nameafter other objects in the hierarchy have been described usingprogrammatic descriptions, UFT cannot identify the object.
For example, you can use Browser(Desc1).Page(Desc1).Link(desc3),since it uses programmatic descriptions throughout the entire testobject hierarchy.
You can also use Browser("Index").Page(Desc1).Link(desc3), since ituses programmatic descriptions from a certain point in thedescription (starting from the Page object description).
However, you cannot use Browser(Desc1).Page(Desc1).Link("Example1"), since it uses programmatic descriptions for theBrowser and Page objects but then attempts to use an objectrepository name for the Link test object (UFT tries to locate theLink object based on its name, but cannot locate it in therepository because the parent objects were specified usingprogrammatic descriptions).
Retrieving child objects with programmatic descriptionsRelevant for: GUI actions, scripted GUI components, and function libraries
You can use the ChildObjects method to retrieve all objects located inside aspecified parent object, or only those child objects that fit a certain programmaticdescription. To retrieve this subset of child objects, you first create a descriptionobject, and then you add the set of properties and values that you want your childobject collection to match using the Description object.
Note: You must use the Description object to create the programmaticdescription for the ChildObjects description argument. You cannot enter theprogrammatic description directly into the argument using the property:=valuesyntax.
After you build a description in your description object, use the following syntax toretrieve child objects that match the description:
SetMySubSet=TestObject.ChildObjects(MyDescription)
User GuideChapter 50: Programming Tests
HP Unified Functional Testing (12.53) Page 550 of 938
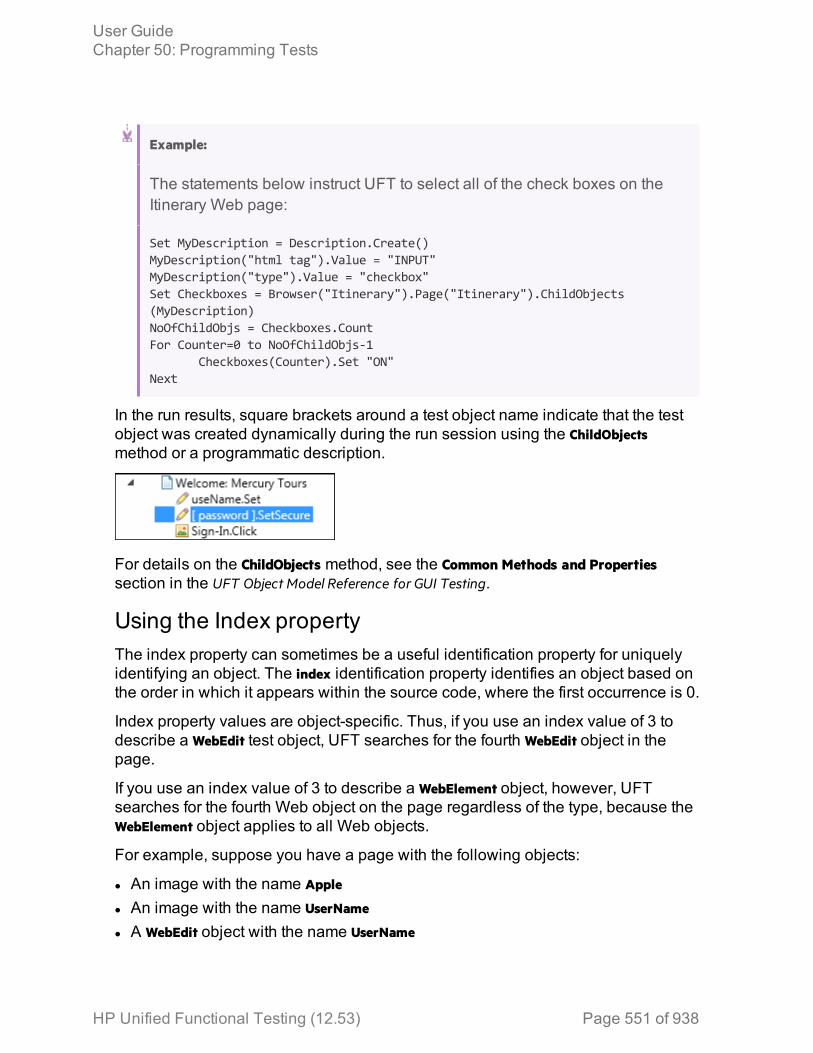
Example:
The statements below instruct UFT to select all of the check boxes on theItinerary Web page:
Set MyDescription = Description.Create()MyDescription("html tag").Value = "INPUT"MyDescription("type").Value = "checkbox"Set Checkboxes = Browser("Itinerary").Page("Itinerary").ChildObjects(MyDescription)NoOfChildObjs = Checkboxes.CountFor Counter=0 to NoOfChildObjs-1
Checkboxes(Counter).Set "ON"Next
In the run results, square brackets around a test object name indicate that the testobject was created dynamically during the run session using the ChildObjectsmethod or a programmatic description.
For details on the ChildObjects method, see the Common Methods and Propertiessection in the UFT Object Model Reference for GUI Testing.
Using the Index propertyThe index property can sometimes be a useful identification property for uniquelyidentifying an object. The index identification property identifies an object based onthe order in which it appears within the source code, where the first occurrence is 0.
Index property values are object-specific. Thus, if you use an index value of 3 todescribe a WebEdit test object, UFT searches for the fourth WebEdit object in thepage.
If you use an index value of 3 to describe a WebElement object, however, UFTsearches for the fourth Web object on the page regardless of the type, because theWebElement object applies to all Web objects.
For example, suppose you have a page with the following objects:
l An image with the name Apple
l An image with the name UserName
l A WebEdit object with the name UserName
User GuideChapter 50: Programming Tests
HP Unified Functional Testing (12.53) Page 551 of 938
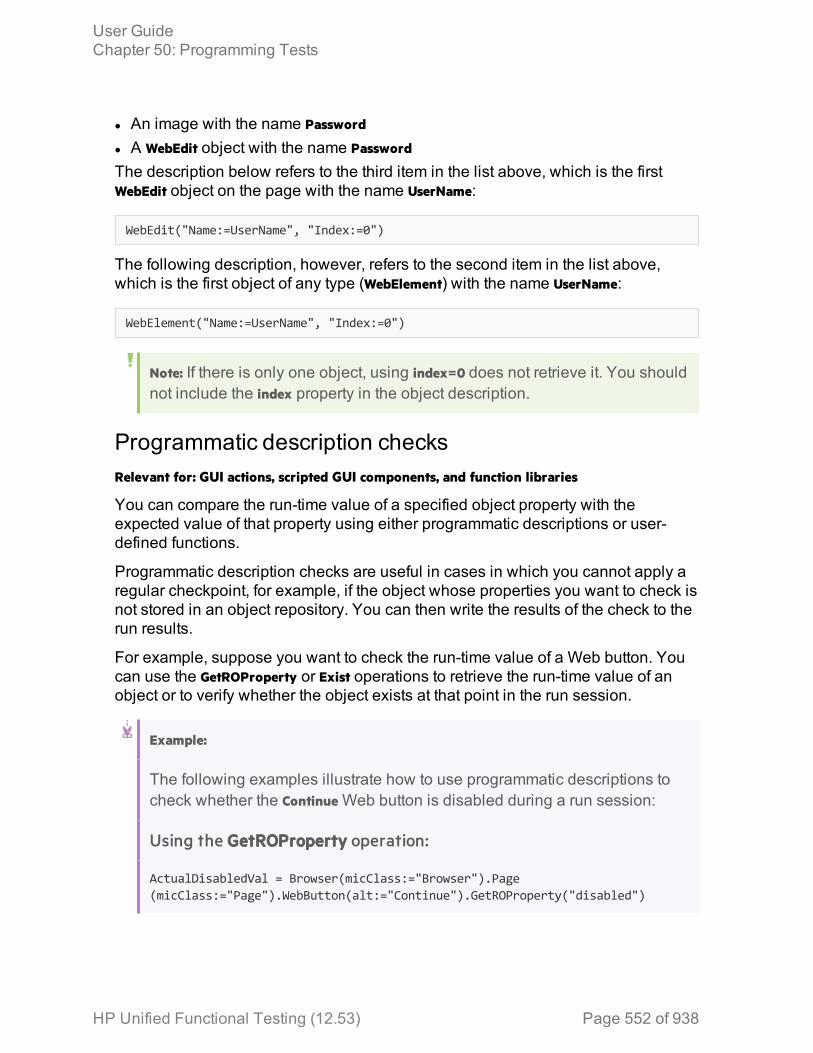
l An image with the name Password
l A WebEdit object with the name Password
The description below refers to the third item in the list above, which is the firstWebEdit object on the page with the name UserName:
WebEdit("Name:=UserName", "Index:=0")
The following description, however, refers to the second item in the list above,which is the first object of any type (WebElement) with the name UserName:
WebElement("Name:=UserName", "Index:=0")
Note: If there is only one object, using index=0 does not retrieve it. You shouldnot include the index property in the object description.
Programmatic description checksRelevant for: GUI actions, scripted GUI components, and function libraries
You can compare the run-time value of a specified object property with theexpected value of that property using either programmatic descriptions or user-defined functions.
Programmatic description checks are useful in cases in which you cannot apply aregular checkpoint, for example, if the object whose properties you want to check isnot stored in an object repository. You can then write the results of the check to therun results.
For example, suppose you want to check the run-time value of a Web button. Youcan use the GetROProperty or Exist operations to retrieve the run-time value of anobject or to verify whether the object exists at that point in the run session.
Example:
The following examples illustrate how to use programmatic descriptions tocheck whether the Continue Web button is disabled during a run session:
Using the GetROProperty operation:
ActualDisabledVal = Browser(micClass:="Browser").Page(micClass:="Page").WebButton(alt:="Continue").GetROProperty("disabled")
User GuideChapter 50: Programming Tests
HP Unified Functional Testing (12.53) Page 552 of 938
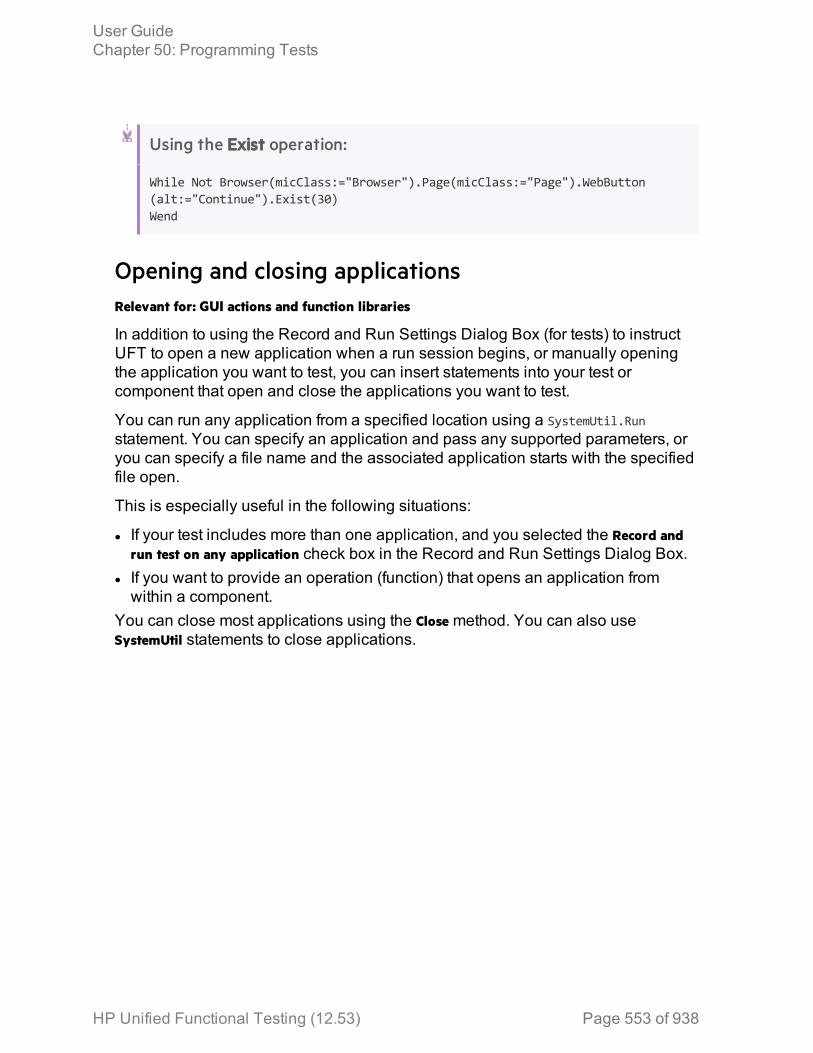
Using the Exist operation:
While Not Browser(micClass:="Browser").Page(micClass:="Page").WebButton(alt:="Continue").Exist(30)Wend
Opening and closing applicationsRelevant for: GUI actions and function libraries
In addition to using the Record and Run Settings Dialog Box (for tests) to instructUFT to open a new application when a run session begins, or manually openingthe application you want to test, you can insert statements into your test orcomponent that open and close the applications you want to test.
You can run any application from a specified location using a SystemUtil.Runstatement. You can specify an application and pass any supported parameters, oryou can specify a file name and the associated application starts with the specifiedfile open.
This is especially useful in the following situations:
l If your test includes more than one application, and you selected the Record andrun test on any application check box in the Record and Run Settings Dialog Box.
l If you want to provide an operation (function) that opens an application fromwithin a component.
You can close most applications using the Close method. You can also useSystemUtil statements to close applications.
User GuideChapter 50: Programming Tests
HP Unified Functional Testing (12.53) Page 553 of 938
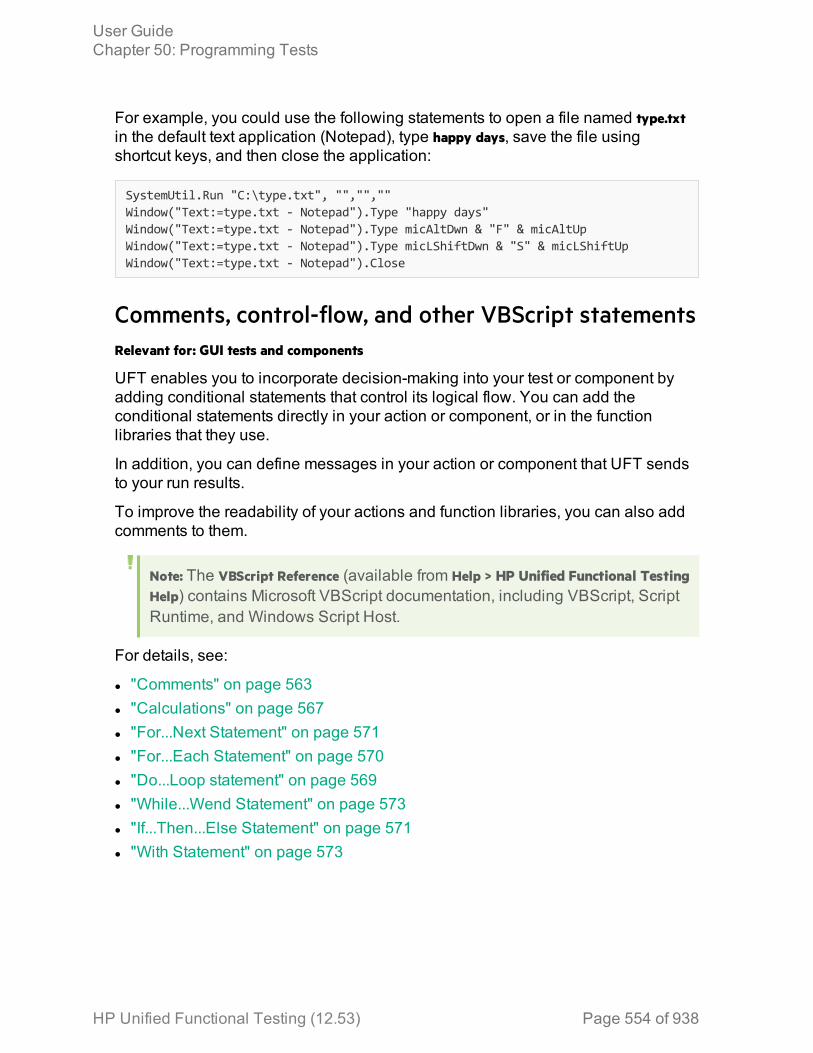
For example, you could use the following statements to open a file named type.txtin the default text application (Notepad), type happy days, save the file usingshortcut keys, and then close the application:
SystemUtil.Run "C:\type.txt", "","",""Window("Text:=type.txt - Notepad").Type "happy days"Window("Text:=type.txt - Notepad").Type micAltDwn & "F" & micAltUpWindow("Text:=type.txt - Notepad").Type micLShiftDwn & "S" & micLShiftUpWindow("Text:=type.txt - Notepad").Close
Comments, control-flow, and other VBScript statementsRelevant for: GUI tests and components
UFT enables you to incorporate decision-making into your test or component byadding conditional statements that control its logical flow. You can add theconditional statements directly in your action or component, or in the functionlibraries that they use.
In addition, you can define messages in your action or component that UFT sendsto your run results.
To improve the readability of your actions and function libraries, you can also addcomments to them.
Note: The VBScript Reference (available from Help > HP Unified Functional TestingHelp) contains Microsoft VBScript documentation, including VBScript, ScriptRuntime, and Windows Script Host.
For details, see:
l "Comments" on page 563l "Calculations" on page 567l "For...Next Statement" on page 571l "For...Each Statement" on page 570l "Do...Loop statement" on page 569l "While...Wend Statement" on page 573l "If...Then...Else Statement" on page 571l "With Statement" on page 573
User GuideChapter 50: Programming Tests
HP Unified Functional Testing (12.53) Page 554 of 938

Retrieving and setting identification property valuesRelevant for: GUI tests and components
Identification properties are the set of properties defined by UFT for each object.You can set and retrieve a test object's identification property values, and you canretrieve the values of identification properties from a run-time object.
When you run your test or component, UFT creates a temporary version of the testobject that is stored in the test object repository. You can use the GetTOProperty,GetTOProperties, and SetTOProperty methods in your action, component, or functionlibrary to set and retrieve the identification property values of the test object.
l The GetTOProperty and GetTOProperties methods enable you to retrieve a specificproperty value or all the properties and values that UFT uses to identify anobject.
l The SetTOProperty method enables you to modify a property value that UFT usesto identify an object.
Note: Because UFT refers to the temporary version of the test object duringthe run session, any changes you make using the SetTOProperty methodapply only during the course of the run session, and do not affect thevalues stored in the test object repository.
For example, the following statements would set the Submit button's name valueto my button, and then retrieve the value my button to the ButtonName variable:
Browser("QA Home Page").Page("QA Home Page").WebButton("Submit").SetTOProperty"Name", "my button"ButtonName=Browser("QA Home Page").Page("QA Home Page").WebButton("Submit").GetTOProperty("Name")
l You use the GetROProperty method to retrieve the current value of anidentification property from a run-time object in your application.For example, you can retrieve the target value of a link during the run session asfollows:
link_href = Browser("HP Technologies").Page("HP Technologies").Link("Jobs").GetROProperty("href")
For a list and description of identification properties supported by each object, andfor more details on the GetROProperty, GetTOProperty, GetTOProperties, andSetTOProperty methods, see the Common Methods and Properties section of the UFTObject Model Reference for GUI Testing.
User GuideChapter 50: Programming Tests
HP Unified Functional Testing (12.53) Page 555 of 938
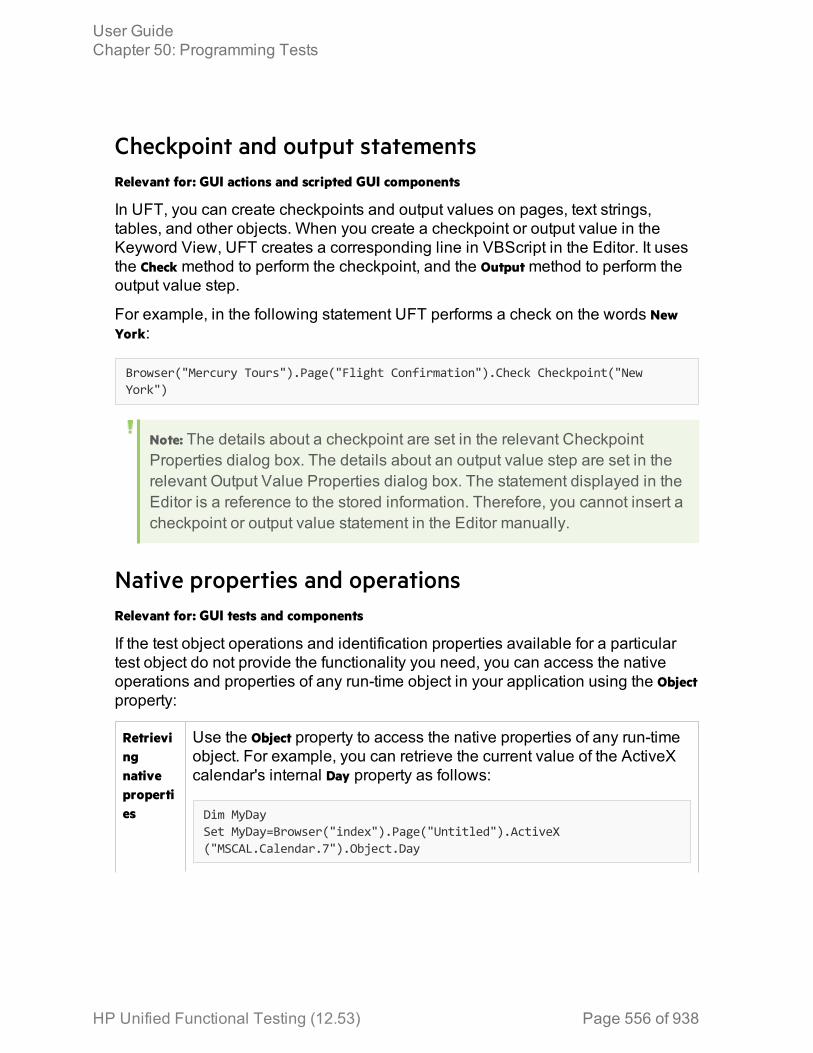
Checkpoint and output statementsRelevant for: GUI actions and scripted GUI components
In UFT, you can create checkpoints and output values on pages, text strings,tables, and other objects. When you create a checkpoint or output value in theKeyword View, UFT creates a corresponding line in VBScript in the Editor. It usesthe Check method to perform the checkpoint, and the Output method to perform theoutput value step.
For example, in the following statement UFT performs a check on the words NewYork:
Browser("Mercury Tours").Page("Flight Confirmation").Check Checkpoint("NewYork")
Note: The details about a checkpoint are set in the relevant CheckpointProperties dialog box. The details about an output value step are set in therelevant Output Value Properties dialog box. The statement displayed in theEditor is a reference to the stored information. Therefore, you cannot insert acheckpoint or output value statement in the Editor manually.
Native properties and operationsRelevant for: GUI tests and components
If the test object operations and identification properties available for a particulartest object do not provide the functionality you need, you can access the nativeoperations and properties of any run-time object in your application using the Objectproperty:
Retrievingnativeproperties
Use the Object property to access the native properties of any run-timeobject. For example, you can retrieve the current value of the ActiveXcalendar's internal Day property as follows:
Dim MyDaySet MyDay=Browser("index").Page("Untitled").ActiveX("MSCAL.Calendar.7").Object.Day
User GuideChapter 50: Programming Tests
HP Unified Functional Testing (12.53) Page 556 of 938

Activatingnativeoperations
Use the Object property to activate the internal operations of any run-time object. For example, you can activate the native focus method ofthe edit box as follows:
Dim MyWebEditSetMyWebEdit=Browser("Mercury Tours").Page("Mercury Tours").WebEdit("username").ObjectMyWebEdit.focus
After you insert the .Object method, use the statement completion feature withobject properties to view a list of the available native operations and properties ofan object.
Tip: If the object is a Web object, you can also reference its native propertiesin programmatic descriptions using the attribute/property notation. Fordetails, see the HP Unified Functional Testing Add-ins Guide.
For more details on the Object property, see your object's properties in the UFTObject Model Reference for GUI Testing.
Use the Windows API in test stepsRelevant for: GUI actions, scripted GUI components, and function libraries
1. In MSDN, locate the function you want to use.2. Read its documentation and understand all required parameters and return
values.3. Note the location of the Windows API function. Windows API functions are
located inside Windows DLLs. The name of the .dll in which the requestedfunction is located is usually identical to the Import Library section in thefunction's documentation. For example, if the documentation refers to User32.lib,the function is located in a .dll named User32.dll, typically located in yourSystem32 library.
4. Use the UFT Extern object to declare an external function.The following example declares a call to a function calledGetForegroundWindow, located in user32.dll:
extern.declare micHwnd, "GetForegroundWindow", "user32.dll","GetForegroundWindow"
User GuideChapter 50: Programming Tests
HP Unified Functional Testing (12.53) Page 557 of 938
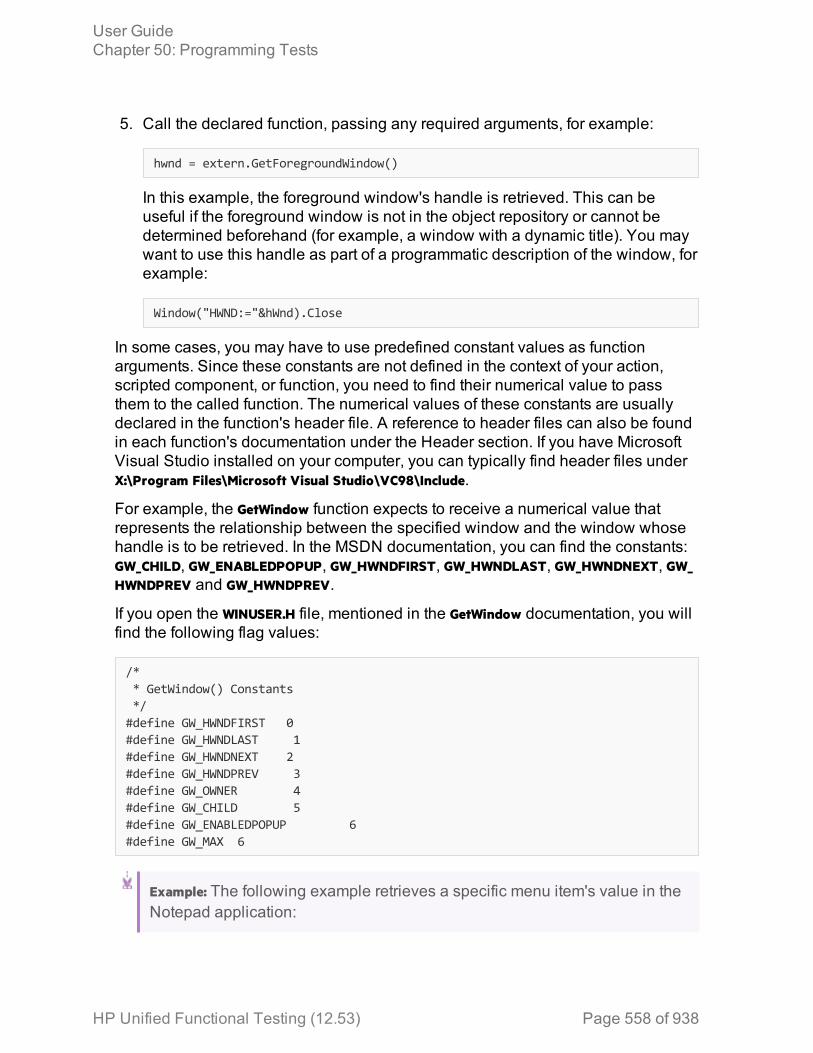
5. Call the declared function, passing any required arguments, for example:
hwnd = extern.GetForegroundWindow()
In this example, the foreground window's handle is retrieved. This can beuseful if the foreground window is not in the object repository or cannot bedetermined beforehand (for example, a window with a dynamic title). You maywant to use this handle as part of a programmatic description of the window, forexample:
Window("HWND:="&hWnd).Close
In some cases, you may have to use predefined constant values as functionarguments. Since these constants are not defined in the context of your action,scripted component, or function, you need to find their numerical value to passthem to the called function. The numerical values of these constants are usuallydeclared in the function's header file. A reference to header files can also be foundin each function's documentation under the Header section. If you have MicrosoftVisual Studio installed on your computer, you can typically find header files underX:\Program Files\Microsoft Visual Studio\VC98\Include.
For example, the GetWindow function expects to receive a numerical value thatrepresents the relationship between the specified window and the window whosehandle is to be retrieved. In the MSDN documentation, you can find the constants:GW_CHILD, GW_ENABLEDPOPUP, GW_HWNDFIRST, GW_HWNDLAST, GW_HWNDNEXT, GW_HWNDPREV and GW_HWNDPREV.
If you open the WINUSER.H file, mentioned in the GetWindow documentation, you willfind the following flag values:
/** GetWindow() Constants*/#define GW_HWNDFIRST 0#define GW_HWNDLAST 1#define GW_HWNDNEXT 2#define GW_HWNDPREV 3#define GW_OWNER 4#define GW_CHILD 5#define GW_ENABLEDPOPUP 6#define GW_MAX 6
Example: The following example retrieves a specific menu item's value in theNotepad application:
User GuideChapter 50: Programming Tests
HP Unified Functional Testing (12.53) Page 558 of 938
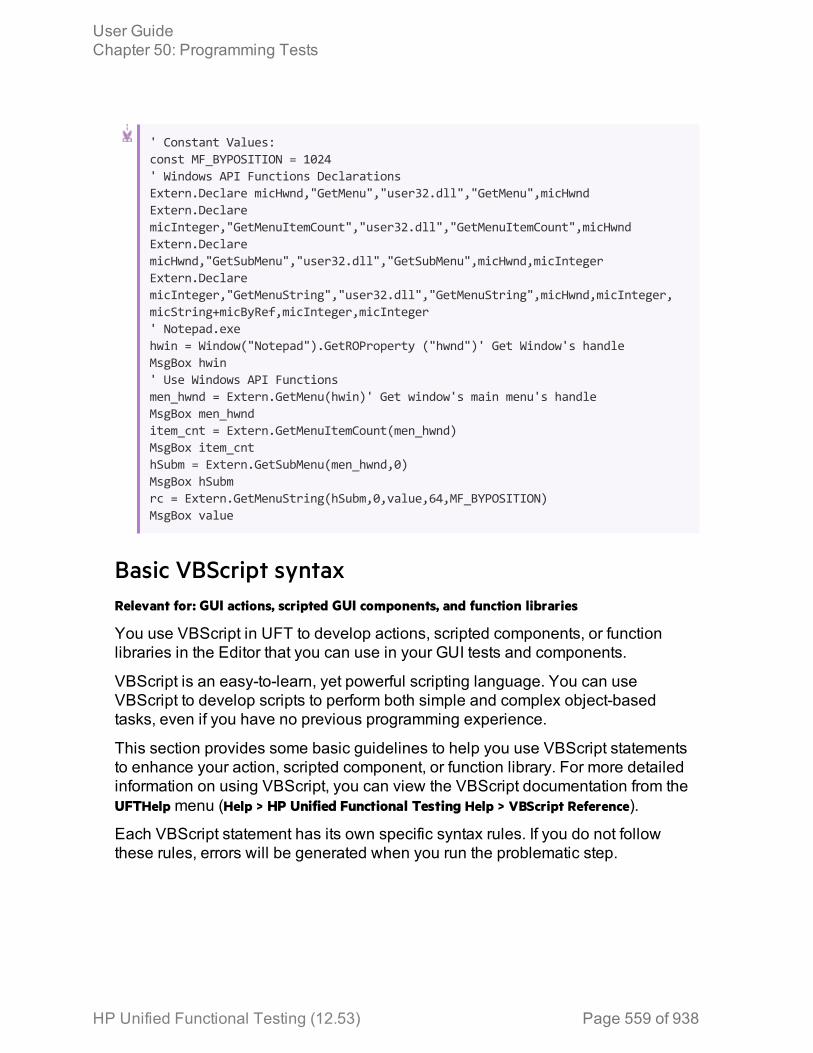
' Constant Values:const MF_BYPOSITION = 1024' Windows API Functions DeclarationsExtern.Declare micHwnd,"GetMenu","user32.dll","GetMenu",micHwndExtern.DeclaremicInteger,"GetMenuItemCount","user32.dll","GetMenuItemCount",micHwndExtern.DeclaremicHwnd,"GetSubMenu","user32.dll","GetSubMenu",micHwnd,micIntegerExtern.DeclaremicInteger,"GetMenuString","user32.dll","GetMenuString",micHwnd,micInteger,micString+micByRef,micInteger,micInteger' Notepad.exehwin = Window("Notepad").GetROProperty ("hwnd")' Get Window's handleMsgBox hwin' Use Windows API Functionsmen_hwnd = Extern.GetMenu(hwin)' Get window's main menu's handleMsgBox men_hwnditem_cnt = Extern.GetMenuItemCount(men_hwnd)MsgBox item_cnthSubm = Extern.GetSubMenu(men_hwnd,0)MsgBox hSubmrc = Extern.GetMenuString(hSubm,0,value,64,MF_BYPOSITION)MsgBox value
Basic VBScript syntaxRelevant for: GUI actions, scripted GUI components, and function libraries
You use VBScript in UFT to develop actions, scripted components, or functionlibraries in the Editor that you can use in your GUI tests and components.
VBScript is an easy-to-learn, yet powerful scripting language. You can useVBScript to develop scripts to perform both simple and complex object-basedtasks, even if you have no previous programming experience.
This section provides some basic guidelines to help you use VBScript statementsto enhance your action, scripted component, or function library. For more detailedinformation on using VBScript, you can view the VBScript documentation from theUFTHelp menu (Help > HP Unified Functional Testing Help > VBScript Reference).
Each VBScript statement has its own specific syntax rules. If you do not followthese rules, errors will be generated when you run the problematic step.
User GuideChapter 50: Programming Tests
HP Unified Functional Testing (12.53) Page 559 of 938
Additionally, if you try to move to the Keyword View from the Editor, UFT lists anysyntax errors found in the document in the Errors pane. You cannot switch to theKeyword View without fixing or eliminating the syntax errors.
See also:• General syntax rules and guidelines 560• Formatting text 562• Comments 563• Parameter indications 564• Parentheses 565• Calculations 567• Variables 568• Do...Loop statement 569• For...Each Statement 570• For...Next Statement 571• If...Then...Else Statement 571• While...Wend Statement 573• With Statement 573
General syntax rules and guidelinesRelevant for: GUI actions, scripted GUI components, and function libraries
When working with actions, scripted components, or function libraries in the Editor,you should consider the following general VBScript syntax rules and guidelines:
Case-sensitivity
By default, VBScript is not case sensitive and does not differentiatebetween upper-case and lower-case spelling of words, for example, invariables, object and operation names, or constants.
For example, the two statements below are identical in VBScript:
Browser("Mercury").Page("Find a Flight:").WebList("toDay").Select"31"browser("mercury").page("find a flight:").weblist("today").select"31"
User GuideChapter 50: Programming Tests
HP Unified Functional Testing (12.53) Page 560 of 938
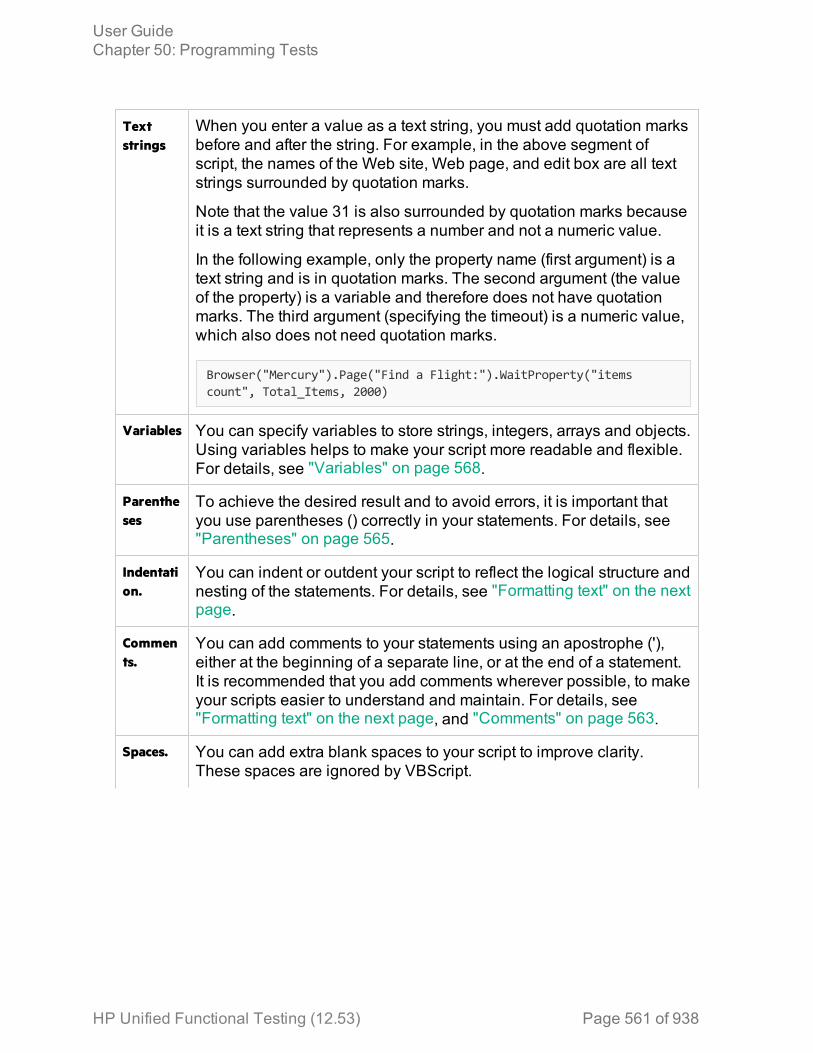
Textstrings
When you enter a value as a text string, you must add quotation marksbefore and after the string. For example, in the above segment ofscript, the names of the Web site, Web page, and edit box are all textstrings surrounded by quotation marks.
Note that the value 31 is also surrounded by quotation marks becauseit is a text string that represents a number and not a numeric value.
In the following example, only the property name (first argument) is atext string and is in quotation marks. The second argument (the valueof the property) is a variable and therefore does not have quotationmarks. The third argument (specifying the timeout) is a numeric value,which also does not need quotation marks.
Browser("Mercury").Page("Find a Flight:").WaitProperty("itemscount", Total_Items, 2000)
Variables You can specify variables to store strings, integers, arrays and objects.Using variables helps to make your script more readable and flexible.For details, see "Variables" on page 568.
Parentheses
To achieve the desired result and to avoid errors, it is important thatyou use parentheses () correctly in your statements. For details, see"Parentheses" on page 565.
Indentation.
You can indent or outdent your script to reflect the logical structure andnesting of the statements. For details, see "Formatting text" on the nextpage.
Comments.
You can add comments to your statements using an apostrophe ('),either at the beginning of a separate line, or at the end of a statement.It is recommended that you add comments wherever possible, to makeyour scripts easier to understand and maintain. For details, see"Formatting text" on the next page, and "Comments" on page 563.
Spaces. You can add extra blank spaces to your script to improve clarity.These spaces are ignored by VBScript.
User GuideChapter 50: Programming Tests
HP Unified Functional Testing (12.53) Page 561 of 938

ReservedWords.
Certain words are reserved by UFT or VBScript. You cannot use thesewords as variables, constants, or procedure names.
l Reserved words in UFT include the names of all UFT test objectclasses, methods, and properties, as well as F-keys (F1, F2, and soon).
l VBScript reserved words can be found in various online VBScriptguides.
For example, a run error occurs if you try to run either of the followingstatements, which use a test object class name as a variable:
Set Window = Window("Calculator")
or
WinButton = Window("Calculator").GetROProperty("hwnd")
A run error also occurs when running the following statement becauseit uses a reserved F-key as a variable:
Set F1 = createobject("Scripting.FileSystemObject")
Formatting textRelevant for: GUI actions, scripted GUI components, and function libraries
When working with actions, scripted components, or function libraries in the Editor,it is important to follow accepted VBScript practices for comments and indentation.
User GuideChapter 50: Programming Tests
HP Unified Functional Testing (12.53) Page 562 of 938
Comments Use comments to explain sections of an action, a scriptedcomponent, or a function library. This improves readability andmakes your scripts easier to maintain and update. For details, see"Comments" below.
l Adding Comments. You can add comments to your statements byadding an apostrophe ('), either at the beginning of a separateline, or at the end of a statement.You can comment a selected block of text by choosing Edit >Format > Comment. Each line in the block is preceded by anapostrophe.
l Removing Comments. You can remove comments from yourstatements by deleting the apostrophe ('), either at the beginningof a separate line, or at the end of a statement.You can remove the comments from a selected block or line of textby choosing Edit > Format > Uncomment.
Indentation Use indentation to reflect the logical structure and nesting of yourstatements.
l Indenting Statements. You can indent your statements by selectingthe text and choosing Edit > Format > Indent. If you want to indentmultiple lines, you can also select the text and press the TAB key.The text is indented according to the Tab spacing selected in theGeneral pane of the Text Editor tab in the Options dialog box (Tools> Options > Text Editor tab > General node).
l Outdenting Statements. You can outdent your statements byselecting Edit > Format > Outdent or by deleting the space at thebeginning of the statements.
For more detailed information on formatting in VBScript, you can view the VBScriptdocumentation from the UFT Help menu (Help > HP Unified Functional Testing Help >VBScript Reference).
CommentsRelevant for: GUI actions, scripted GUI components, and function libraries
A comment is a line or part of a line in a script that is preceded by an apostrophe (').During a run session, UFT does not process the comments. You can usecomments to explain sections of an action, a scripted component, or a functionlibrary, to improve readability, and to make your scripts easier to maintain andupdate.
User GuideChapter 50: Programming Tests
HP Unified Functional Testing (12.53) Page 563 of 938

The following example shows how a comment describes the purpose of thestatement below it:
'Sets the word "mercury" into the "username" edit box.Browser("Mercury Tours").Page("Mercury Tours").WebEdit("username").Set "mercury"
By default, comments are displayed in green inside your VBScript code. You cancustomize the appearance of comments in the Fonts and Colors pane of the TextEditor tab in the Options dialog box (Tools > Options > Text Editor tab > General node).
Tip:
l You can comment or uncomment a block of text by selecting Edit > Format >Comment/Uncomment.
l You can also add a comment line using the VBScript Rem statement. Fordetails, see the Microsoft VBScript Language Reference (select Help >HP Unified Functional Testing Help > VBScript Reference > VBScript).
Parameter indicationsRelevant for: GUI actions and scripted GUI components
You can use UFT to enhance your tests by parameterizing values. A parameter is avariable that is assigned a value from an external data source or generator.
When you create a parameter in the Keyword View, UFT creates a correspondingline in VBScript in the Editor.
For example, if you define the value of a method argument as a Data paneparameter, UFT retrieves the value from the Data pane using the following syntax:
Object_Hierarchy.Method DataTable (parameterID, sheetID)
Item Description
Object_Hierarchy
The hierarchical definition of the test object, consisting of one ormore objects separated by a dot.
Method The name of the method that UFT executes on the parameterizedobject.
DataTable The reserved object representing the data table.
parameterID The name of the column in the data table from which to take thevalue.
User GuideChapter 50: Programming Tests
HP Unified Functional Testing (12.53) Page 564 of 938

Item Description
sheetID The name of the sheet in which the value is stored. If the parameteris a global parameter, dtGlobalSheet is the sheet ID.
Example: Suppose you are creating a test for the Mercury Tours site, and youselect San Francisco as your destination. The following statement would beinserted into an action in your test in the Editor:
Browser("Welcome: Mercury").Page("Find a Flight:").WebList("toPort").Select"San Francisco"
Now suppose you parameterize the destination value, and you create aDestination column in the Data pane. The previous statement would bemodified to the following:
Browser("Welcome: Mercury").Page("Find a Flight:").WebList("toPort").SelectDataTable("Destination",dtGlobalSheet)
In this example, Select is the method name, DataTable is the object thatrepresents the data table, Destination is the Data pane parameter (columnname), and dtGlobalSheet indicates the Global sheet in the Data pane.
For more details on using and defining parameter values, see "ParameterizingObject Values" on page 330.
ParenthesesRelevant for: GUI actions, scripted GUI components, and function libraries
When programming in VBScript, it is important that you follow the rules for using ornot using parentheses () in your statements. You must use parentheses aroundmethod arguments if you are calling a method that returns a value and you areusing the return value.
For example, use parentheses around method arguments if you are returning avalue to a variable, if you are using the method in an If statement, or if you areusing the Call keyword to call an action or function. When working with actions, youalso need to add parentheses around the name of a checkpoint if you want toretrieve its return value.
Tip: If you receive an Expected end of statement error message when running astep, it may indicate that you need to add parentheses around the arguments
User GuideChapter 50: Programming Tests
HP Unified Functional Testing (12.53) Page 565 of 938
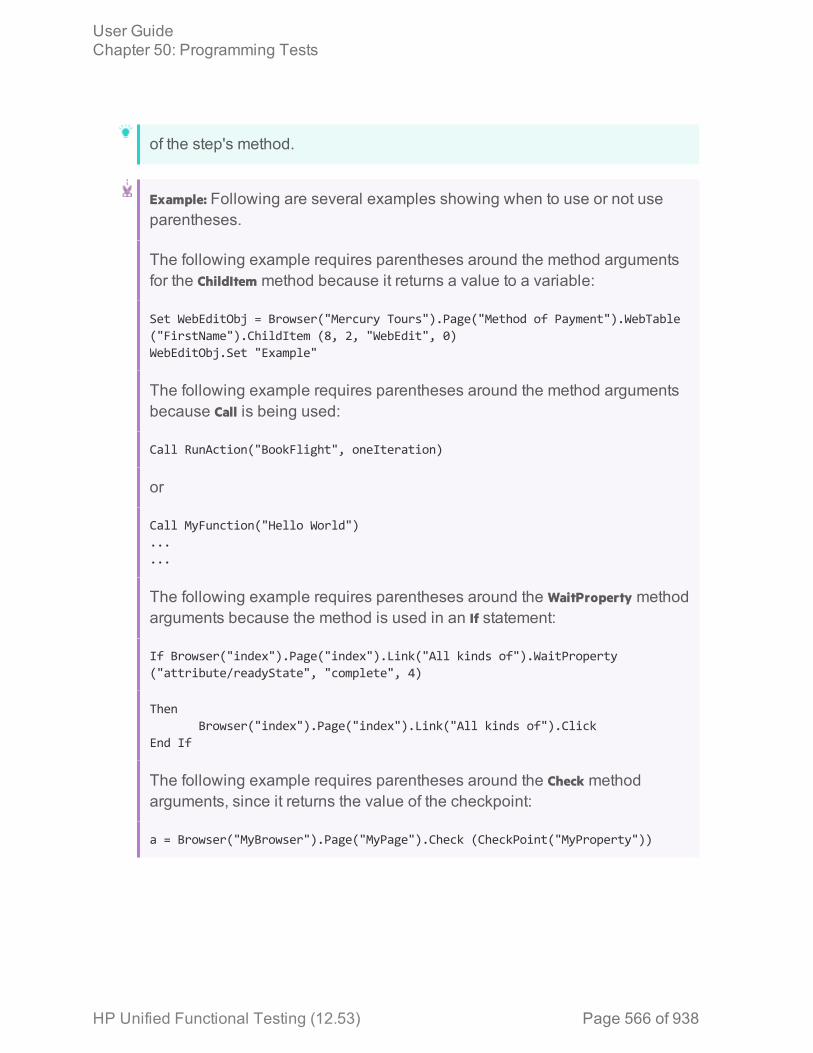
of the step's method.
Example: Following are several examples showing when to use or not useparentheses.
The following example requires parentheses around the method argumentsfor the ChildItem method because it returns a value to a variable:
Set WebEditObj = Browser("Mercury Tours").Page("Method of Payment").WebTable("FirstName").ChildItem (8, 2, "WebEdit", 0)WebEditObj.Set "Example"
The following example requires parentheses around the method argumentsbecause Call is being used:
Call RunAction("BookFlight", oneIteration)
or
Call MyFunction("Hello World")......
The following example requires parentheses around the WaitProperty methodarguments because the method is used in an If statement:
If Browser("index").Page("index").Link("All kinds of").WaitProperty("attribute/readyState", "complete", 4)
ThenBrowser("index").Page("index").Link("All kinds of").Click
End If
The following example requires parentheses around the Check methodarguments, since it returns the value of the checkpoint:
a = Browser("MyBrowser").Page("MyPage").Check (CheckPoint("MyProperty"))
User GuideChapter 50: Programming Tests
HP Unified Functional Testing (12.53) Page 566 of 938
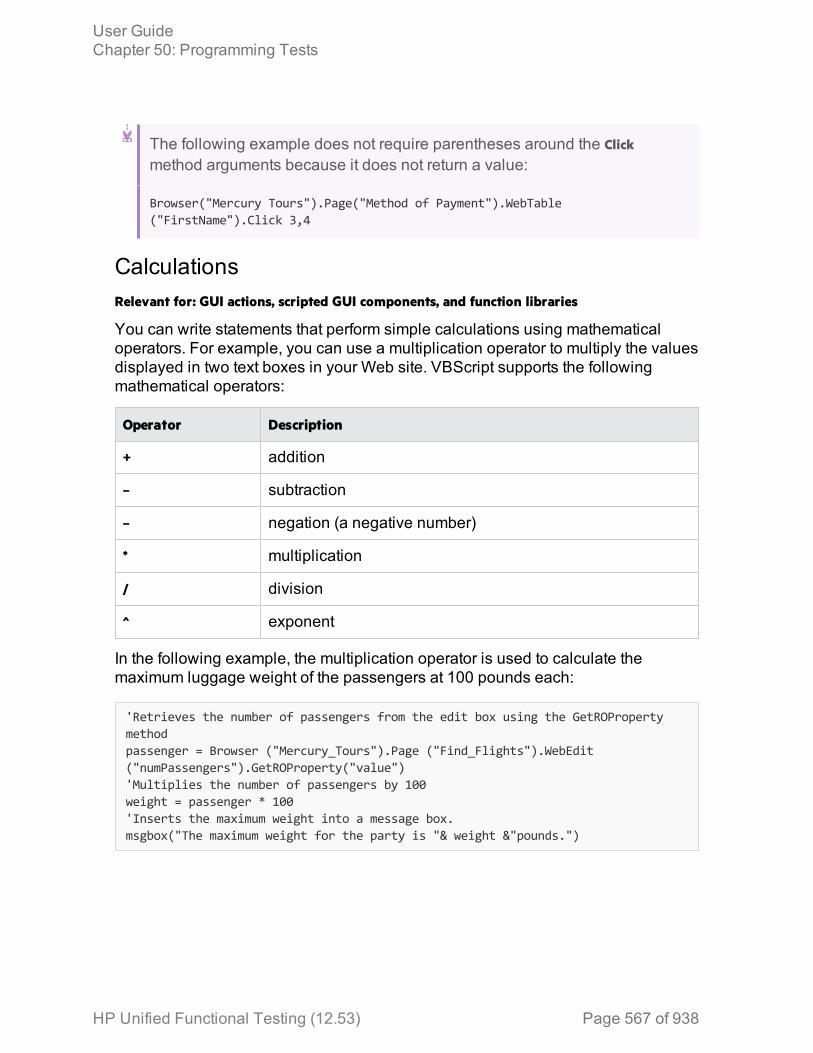
The following example does not require parentheses around the Clickmethod arguments because it does not return a value:
Browser("Mercury Tours").Page("Method of Payment").WebTable("FirstName").Click 3,4
CalculationsRelevant for: GUI actions, scripted GUI components, and function libraries
You can write statements that perform simple calculations using mathematicaloperators. For example, you can use a multiplication operator to multiply the valuesdisplayed in two text boxes in your Web site. VBScript supports the followingmathematical operators:
Operator Description
+ addition
– subtraction
– negation (a negative number)
* multiplication
/ division
^ exponent
In the following example, the multiplication operator is used to calculate themaximum luggage weight of the passengers at 100 pounds each:
'Retrieves the number of passengers from the edit box using the GetROPropertymethodpassenger = Browser ("Mercury_Tours").Page ("Find_Flights").WebEdit("numPassengers").GetROProperty("value")'Multiplies the number of passengers by 100weight = passenger * 100'Inserts the maximum weight into a message box.msgbox("The maximum weight for the party is "& weight &"pounds.")
User GuideChapter 50: Programming Tests
HP Unified Functional Testing (12.53) Page 567 of 938

VariablesRelevant for: GUI actions, scripted GUI components, and function libraries
You can specify variables to store test objects or simple values in your action,scripted component, or function library. When using a variable for a test object, youcan use the variable instead of the entire object hierarchy in other statements.Using variables in this way makes your statements easier to read and to maintain.
To specify a variable to store an object, use the Set statement, with the followingsyntax:
Set ObjectVar = ObjectHierarchy
In the example below, the Set statement specifies the variable UserEditBox to storethe full Browser.Page.WebEdit object hierarchy for the username edit box. The Setmethod then enters the value John into the username edit box, using the UserEditBoxvariable:
Set UserEditBox = Browser("Mercury Tours").Page("Mercury Tours").WebEdit("username")UserEditBox.Set "John"
Note: Do not use the Set statement to specify a variable containing a simplevalue (such as a string or a number). The example below shows how todefine a variable for a simple value:
MyVar = Browser("Mercury Tours").Page("Mercury Tours").WebEdit("username").GetTOProperty("type")
You can also use the Dim statement to declare variables of other types, includingstrings, integers, and arrays. This statement is not mandatory, but you can use it toimprove the structure of your action, scripted component, or function library.
Example: The examples below demonstrate using the Dim statement todeclare a variable:
In an action or scripted component (using the passengers variable):
Dim passengerspassengers = Browser("Mercury Tours").Page("Find Flights").WebEdit("numpassengers").GetROProperty("value")
User GuideChapter 50: Programming Tests
HP Unified Functional Testing (12.53) Page 568 of 938
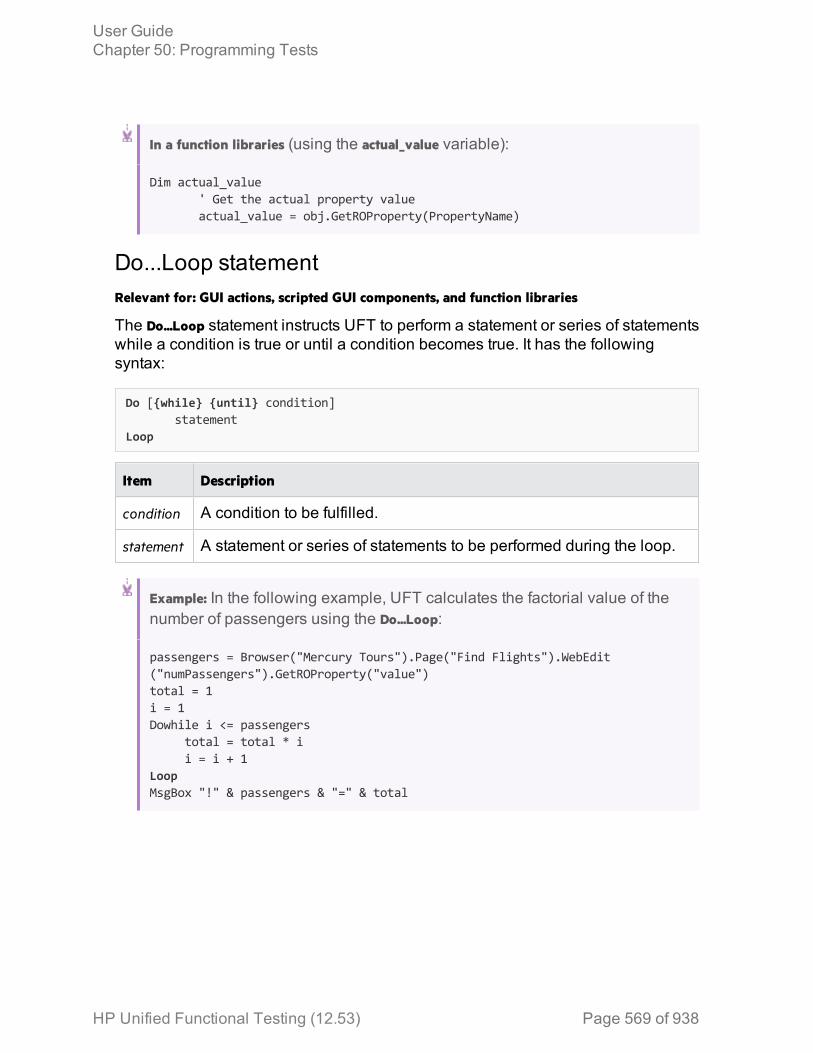
In a function libraries (using the actual_value variable):
Dim actual_value' Get the actual property valueactual_value = obj.GetROProperty(PropertyName)
Do...Loop statementRelevant for: GUI actions, scripted GUI components, and function libraries
The Do...Loop statement instructs UFT to perform a statement or series of statementswhile a condition is true or until a condition becomes true. It has the followingsyntax:
Do [{while} {until} condition]statement
Loop
Item Description
condition A condition to be fulfilled.
statement A statement or series of statements to be performed during the loop.
Example: In the following example, UFT calculates the factorial value of thenumber of passengers using the Do...Loop:
passengers = Browser("Mercury Tours").Page("Find Flights").WebEdit("numPassengers").GetROProperty("value")total = 1i = 1Dowhile i <= passengers
total = total * ii = i + 1
LoopMsgBox "!" & passengers & "=" & total
User GuideChapter 50: Programming Tests
HP Unified Functional Testing (12.53) Page 569 of 938
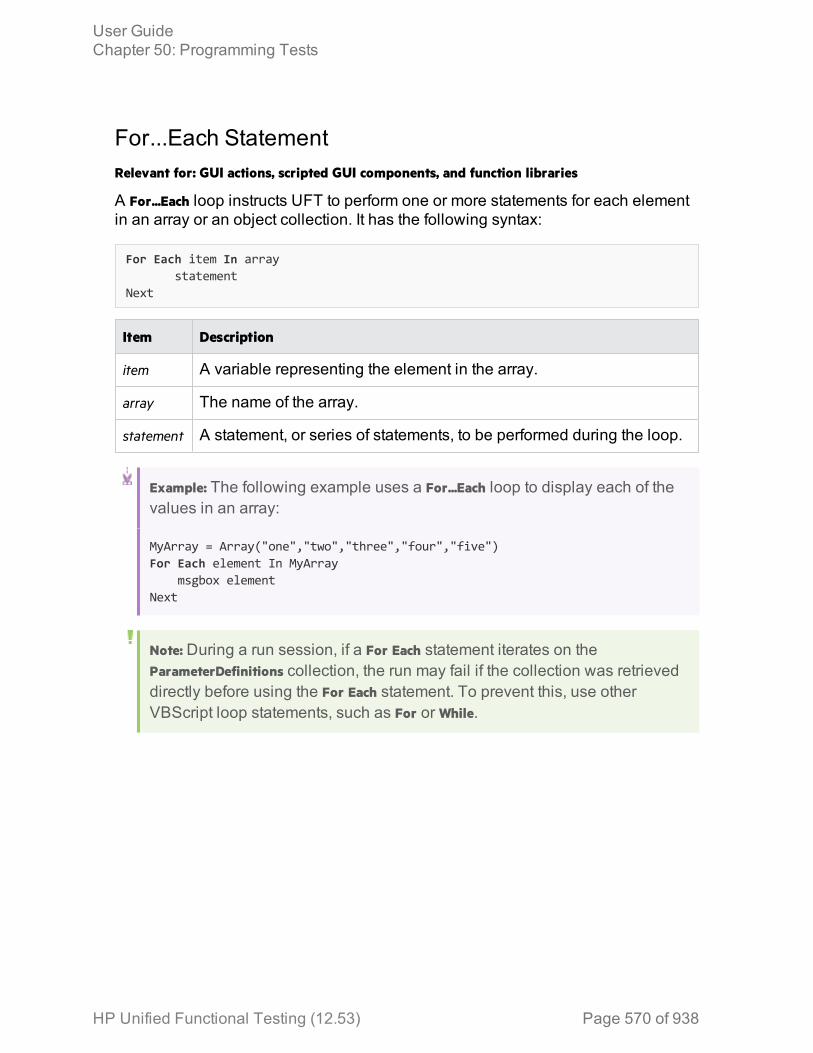
For...Each StatementRelevant for: GUI actions, scripted GUI components, and function libraries
A For...Each loop instructs UFT to perform one or more statements for each elementin an array or an object collection. It has the following syntax:
For Each item In arraystatement
Next
Item Description
item A variable representing the element in the array.
array The name of the array.
statement A statement, or series of statements, to be performed during the loop.
Example: The following example uses a For...Each loop to display each of thevalues in an array:
MyArray = Array("one","two","three","four","five")For Each element In MyArray msgbox elementNext
Note: During a run session, if a For Each statement iterates on theParameterDefinitions collection, the run may fail if the collection was retrieveddirectly before using the For Each statement. To prevent this, use otherVBScript loop statements, such as For or While.
User GuideChapter 50: Programming Tests
HP Unified Functional Testing (12.53) Page 570 of 938
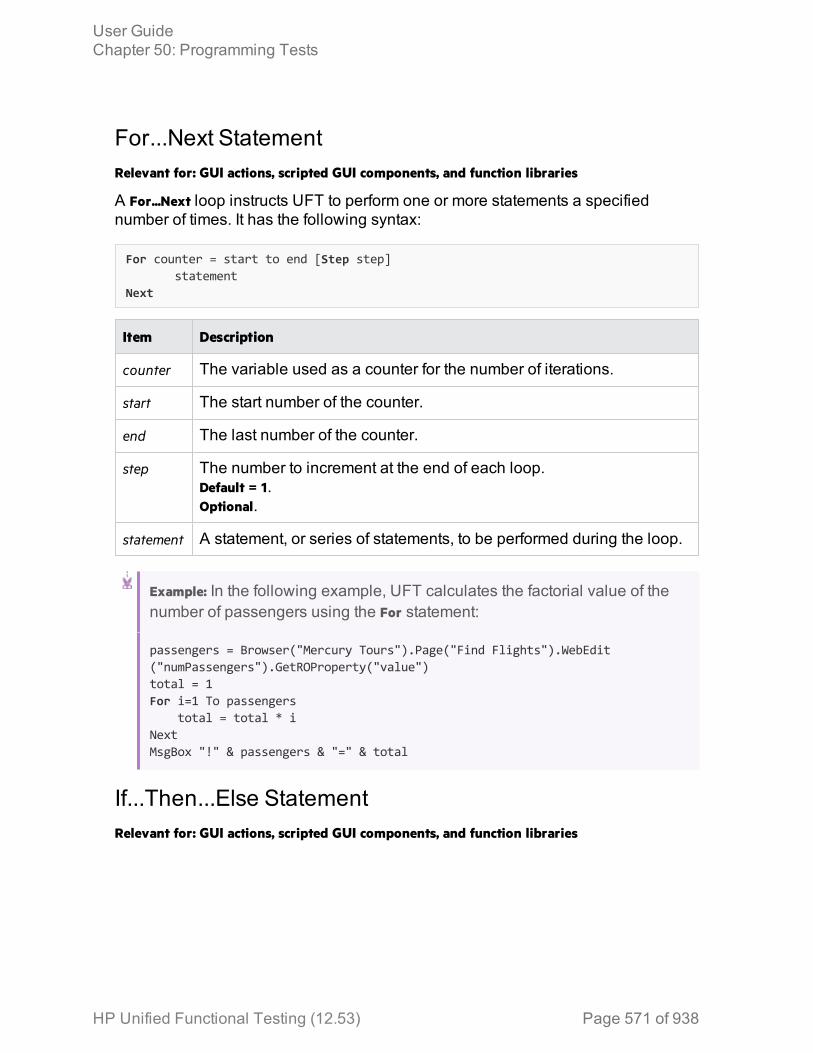
For...Next StatementRelevant for: GUI actions, scripted GUI components, and function libraries
A For...Next loop instructs UFT to perform one or more statements a specifiednumber of times. It has the following syntax:
For counter = start to end [Step step]statement
Next
Item Description
counter The variable used as a counter for the number of iterations.
start The start number of the counter.
end The last number of the counter.
step The number to increment at the end of each loop.Default = 1.Optional.
statement A statement, or series of statements, to be performed during the loop.
Example: In the following example, UFT calculates the factorial value of thenumber of passengers using the For statement:
passengers = Browser("Mercury Tours").Page("Find Flights").WebEdit("numPassengers").GetROProperty("value")total = 1For i=1 To passengers total = total * iNextMsgBox "!" & passengers & "=" & total
If...Then...Else StatementRelevant for: GUI actions, scripted GUI components, and function libraries
User GuideChapter 50: Programming Tests
HP Unified Functional Testing (12.53) Page 571 of 938
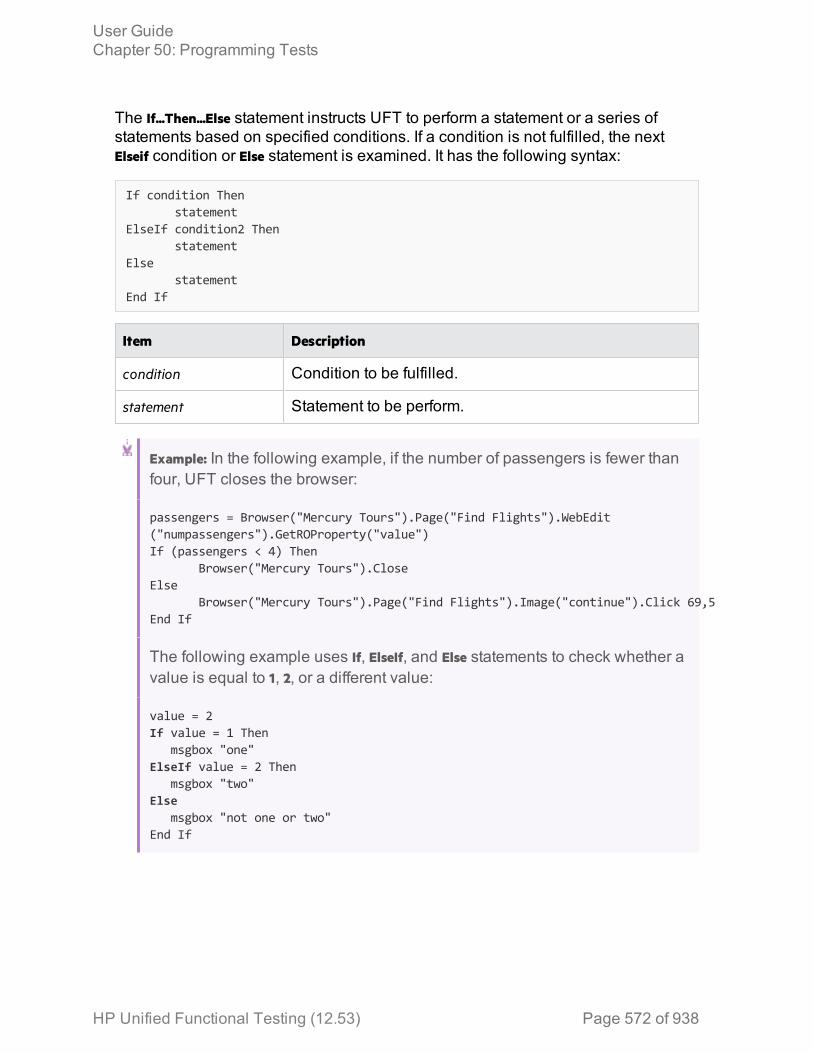
The If...Then...Else statement instructs UFT to perform a statement or a series ofstatements based on specified conditions. If a condition is not fulfilled, the nextElseif condition or Else statement is examined. It has the following syntax:
If condition Thenstatement
ElseIf condition2 Thenstatement
Elsestatement
End If
Item Description
condition Condition to be fulfilled.
statement Statement to be perform.
Example: In the following example, if the number of passengers is fewer thanfour, UFT closes the browser:
passengers = Browser("Mercury Tours").Page("Find Flights").WebEdit("numpassengers").GetROProperty("value")If (passengers < 4) Then
Browser("Mercury Tours").CloseElse
Browser("Mercury Tours").Page("Find Flights").Image("continue").Click 69,5End If
The following example uses If, ElseIf, and Else statements to check whether avalue is equal to 1, 2, or a different value:
value = 2If value = 1 Then
msgbox "one"ElseIf value = 2 Then
msgbox "two"Else
msgbox "not one or two"End If
User GuideChapter 50: Programming Tests
HP Unified Functional Testing (12.53) Page 572 of 938
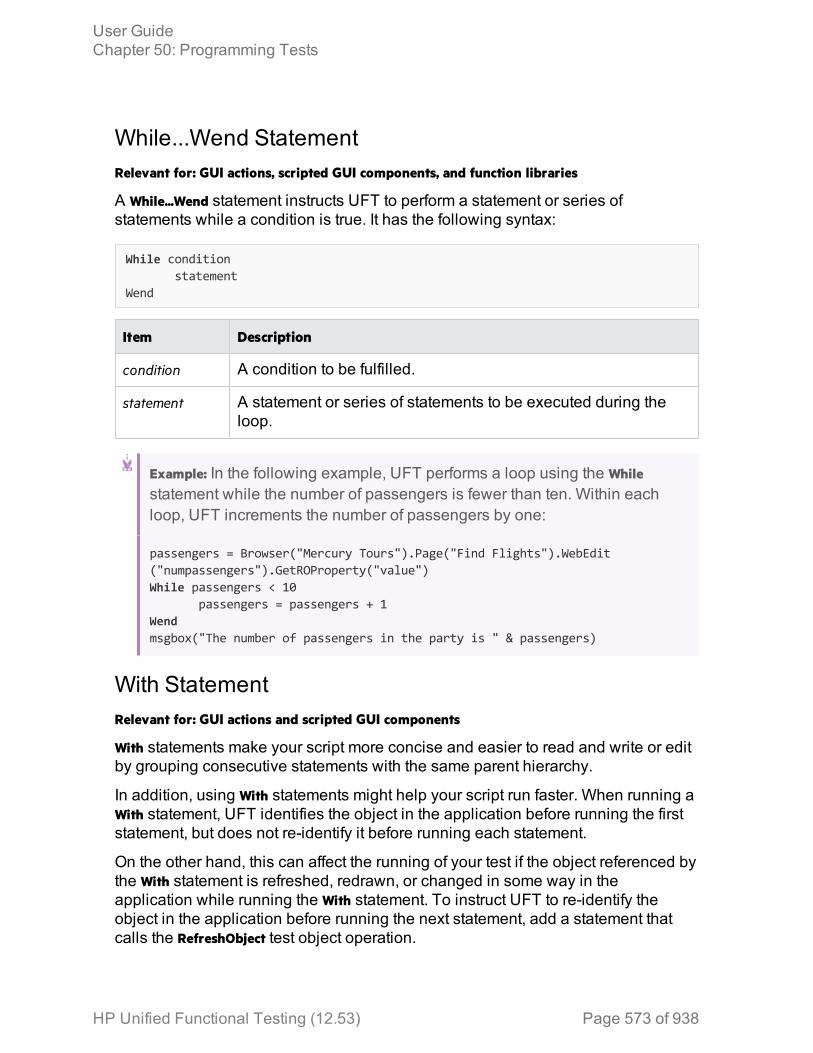
While...Wend StatementRelevant for: GUI actions, scripted GUI components, and function libraries
A While...Wend statement instructs UFT to perform a statement or series ofstatements while a condition is true. It has the following syntax:
While conditionstatement
Wend
Item Description
condition A condition to be fulfilled.
statement A statement or series of statements to be executed during theloop.
Example: In the following example, UFT performs a loop using the Whilestatement while the number of passengers is fewer than ten. Within eachloop, UFT increments the number of passengers by one:
passengers = Browser("Mercury Tours").Page("Find Flights").WebEdit("numpassengers").GetROProperty("value")While passengers < 10
passengers = passengers + 1Wendmsgbox("The number of passengers in the party is " & passengers)
With StatementRelevant for: GUI actions and scripted GUI components
With statements make your script more concise and easier to read and write or editby grouping consecutive statements with the same parent hierarchy.
In addition, using With statements might help your script run faster. When running aWith statement, UFT identifies the object in the application before running the firststatement, but does not re-identify it before running each statement.
On the other hand, this can affect the running of your test if the object referenced bythe With statement is refreshed, redrawn, or changed in some way in theapplication while running the With statement. To instruct UFT to re-identify theobject in the application before running the next statement, add a statement thatcalls the RefreshObject test object operation.
User GuideChapter 50: Programming Tests
HP Unified Functional Testing (12.53) Page 573 of 938
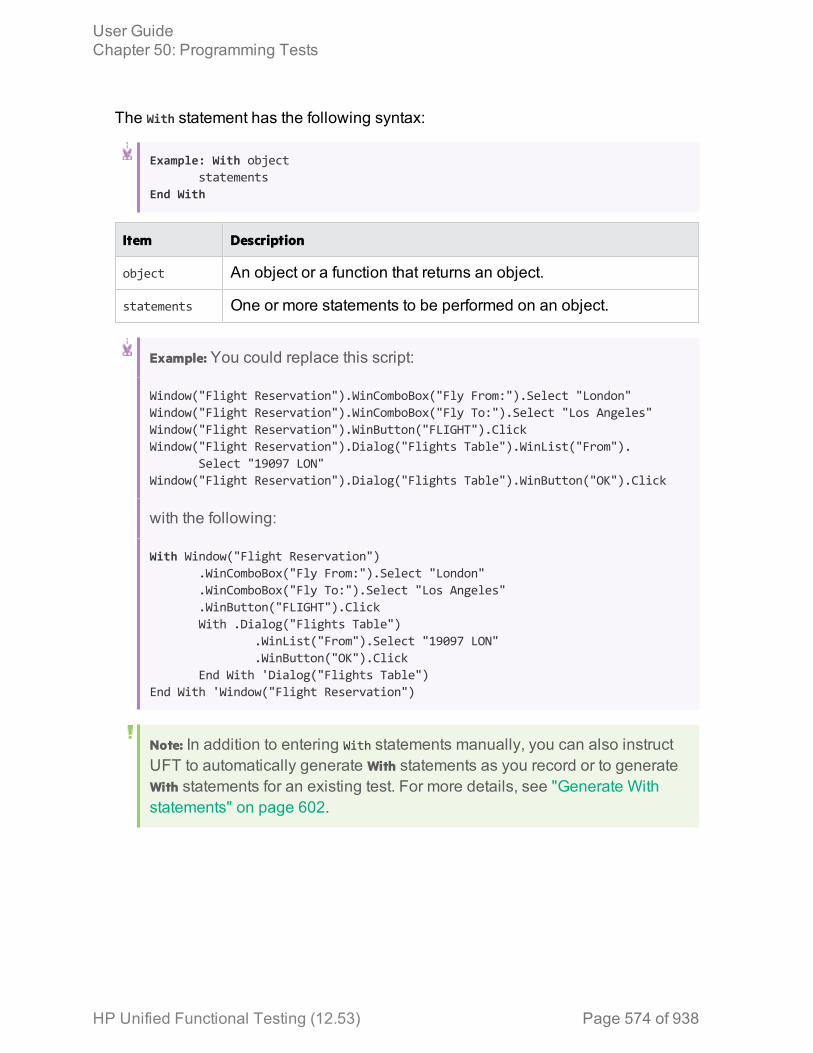
The With statement has the following syntax:
Example: With objectstatements
End With
Item Description
object An object or a function that returns an object.
statements One or more statements to be performed on an object.
Example: You could replace this script:
Window("Flight Reservation").WinComboBox("Fly From:").Select "London"Window("Flight Reservation").WinComboBox("Fly To:").Select "Los Angeles"Window("Flight Reservation").WinButton("FLIGHT").ClickWindow("Flight Reservation").Dialog("Flights Table").WinList("From").
Select "19097 LON"Window("Flight Reservation").Dialog("Flights Table").WinButton("OK").Click
with the following:
With Window("Flight Reservation").WinComboBox("Fly From:").Select "London".WinComboBox("Fly To:").Select "Los Angeles".WinButton("FLIGHT").ClickWith .Dialog("Flights Table")
.WinList("From").Select "19097 LON"
.WinButton("OK").ClickEnd With 'Dialog("Flights Table")
End With 'Window("Flight Reservation")
Note: In addition to entering With statements manually, you can also instructUFT to automatically generate With statements as you record or to generateWith statements for an existing test. For more details, see "Generate Withstatements" on page 602.
User GuideChapter 50: Programming Tests
HP Unified Functional Testing (12.53) Page 574 of 938
Chapter 51: User-Defined FunctionsRelevant for GUI tests and components
Note: The terms function, method, and operation are used interchangeably inthis chapter.
In addition to the test objects, methods, and built-in functions supported by the UFTTest Object Model, you can define your own function libraries containing VBScriptfunctions, subroutines, statement, and so on, and then call their functions from yourtest or use their functions as operations in your test or component.
A function library is a separate document that contains Visual Basic script. Any textfile written in standard VBScript syntax can be used as a function library.
Your function libraries can contain:
l Function definitions (function signature and code). You can call these functions fromother functions, from actions in your test, or from your component. To call afunction from a test or component, you must first associate the function librarywith the test or with the component's application area.
l VBScript statements. These are statements that are not contained within functiondefinitions (for example, RegisterUserFunc statements). UFT runs all of thesestatements when it loads the function library.
At the beginning of a run session, UFT loads all of the function libraries associatedwith your test or with your component's application area. If you need to dynamicallyload a function library during the test run, you can also use the LoadFunctionLibrarystatement.
Associated function librariesRelevant for: GUI tests and components
After you create your function libraries, you associate them with your test orapplication area. This enables you to insert a call to a public function or subroutinecontained in the associated function library from a test or component associatedwith that application area.
At the beginning of a run session, UFT loads the function libraries associated withthe test or application area, and can then access their functions during the runsession. Public functions stored in function libraries can be called from anyassociated test or component, whereas private functions can be called only fromwithin the same function library.
HP Unified Functional Testing (12.53) Page 575 of 938

The order in the list of associated function libraries determines the order in whichUFT searches for a function or subroutine that is called from a step in your test orcomponent. If there are two functions or subroutines with the same name, UFTuses the first one it finds. When UFT searches for the function, it searches from thebottom of the list upwards to find the function.
For details, see "Manage function library associations" on page 585.
To use a function library without associating it to your test or application area, youcan load the function library dynamically during a run session using theLoadFunctionLibrary statement. If you dynamically load a function library during arun session, and a later step calls a function that has the same name as a functionin an associated function library, the function in the dynamically loaded functionlibrary is used.
When working with ALM and associated function libraries, you must save thefunction library in the Test Resources module in your ALM project before you canassociate it with the test or application area. You can add a new or existing functionlibrary to your ALM project.
If you add an existing function library from the file system to an ALM project, youare actually adding a copy of that file to the project. Therefore, if you later makemodifications to either of these function libraries (in the file system or in your ALMproject), the other function library remains unaffected.
User-defined functionsRelevant for: GUI tests and components
For tests or scripted components, if you have segments of code that you need touse several times in your tests or you want to add additional functionality, you maywant to create a user-defined function.
You create the functions in VBScript.
A user-defined function encapsulates an activity (or a group of steps that requireprogramming) into a keyword (also called an operation). By using user-definedfunctions, your tests or components are shorter, and easier to design, read, andmaintain. You or a Subject Matter Expert can then call user-defined functions froman action or a component by inserting the relevant keywords (or operations) intothat action or component.
There are different kinds of user-defined functions:
User GuideChapter 51: User-Defined Functions
HP Unified Functional Testing (12.53) Page 576 of 938
GlobalFunctions
A user-defined function is automatically defined as a global function.You can call global functions by typing them in the step or selectingthem from the lists displayed in the following locations:
l The Operation box in the Step Generator, when the Functionscategory is selected (for function libraries)
l The Operation column in the Keyword View, when the Operation itemis selected from the Item list
l The Editor, when using the statement completion feature
Functionsregisteredto testobjects
You can also register a user-defined function as a method for a UFTtest object class (type). A registered method can either override thefunctionality of an existing test object method for the duration of a runsession, or be registered as a new method for a test object class. Youcan call the test object method by typing it in the step or selecting itfrom the list of operations available for the test object.
For more details, see "Registered user-defined functions" on the nextpage and "Create and register a user-defined function using theFunction Definition Generator" on page 591.
When deciding the name for your function, consider the following:
l During run-time, UFT searches the function libraries for the specified function inthe order in which they are listed in the Solution Explorer. This order determinesthe function library priority.For tests, UFT searches for the specified function in the action before searchingthe function libraries.If UFT finds more than one function that matches the function name in a specificaction or function library, it uses the last function it finds in that action or functionlibrary.If UFT finds two functions with the same name in two different function libraries, ituses the function from the function library that has the higher priority. To avoidconfusion, it is recommended that you verify that within the resources associatedwith a test or application area, each function has a unique name.
l When you create a user-defined function, do not give it the same name as a built-in function (for example, GetLastError, MsgBox, or Print). Similarly, do not useVBScript registered words (for example, cStr, F1, ESC) for function names. Built-infunctions take priority over user-defined functions, so if you call a user-definedfunction that has the same name as a built-in function, the built-in function iscalled instead. For a list of built-in functions, see the Built-in functions list in theStep Generator (Design > Step Generator).
User GuideChapter 51: User-Defined Functions
HP Unified Functional Testing (12.53) Page 577 of 938
Registered user-defined functionsRelevant for: GUI tests and components
You can register a public user-defined function to a test object to instruct UFT touse your user-defined function as a method of a specified test object class for theduration of a test or component run, or until you unregister the method.
A registered method applies only to the run session in which you register it. Allfunction registrations are cleared at the beginning of each run session.
When you register a function to a test object class, you can register the function asa new operation for the test object class, or you can choose to override thefunctionality of an existing operation. You can unregister the function to disablenew operations or to return existing operations to their original UFT behavior.
If you call an external action that registers a method (and does not unregister it atthe end of the action), the method registration remains in effect for the remainder ofthe test that called the action.
The availability of registered user-defined functions differs for tests andcomponents:
User GuideChapter 51: User-Defined Functions
HP Unified Functional Testing (12.53) Page 578 of 938
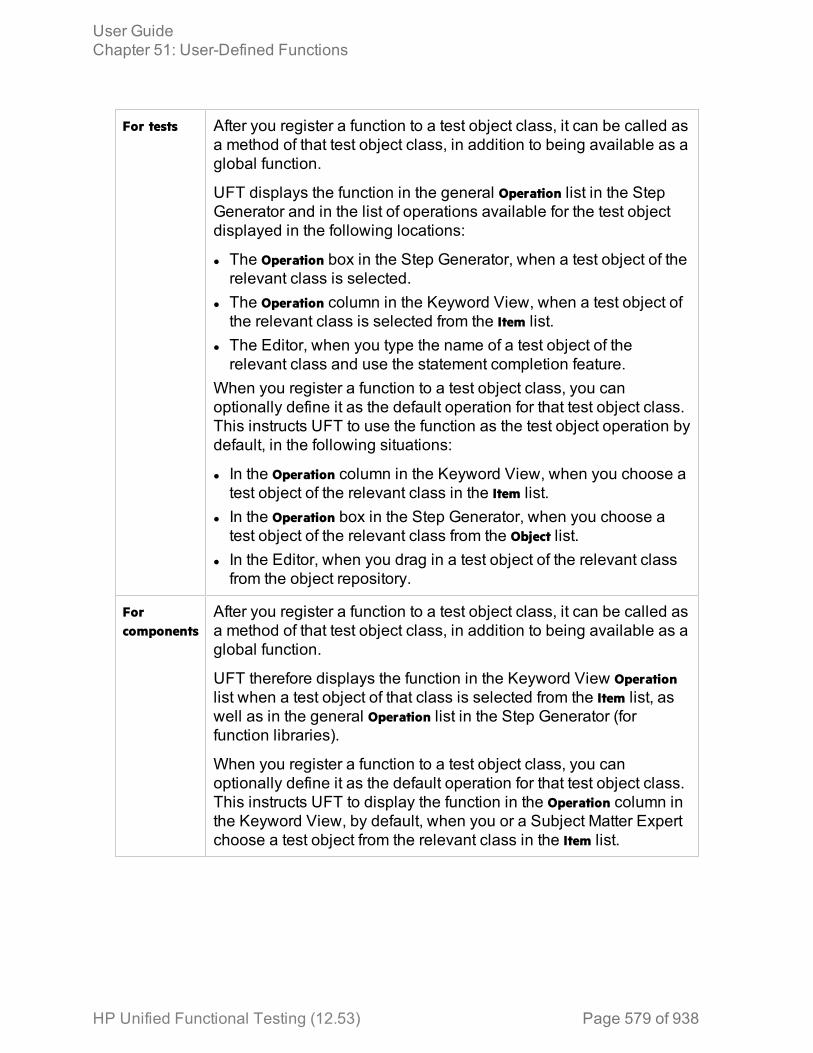
For tests After you register a function to a test object class, it can be called asa method of that test object class, in addition to being available as aglobal function.
UFT displays the function in the general Operation list in the StepGenerator and in the list of operations available for the test objectdisplayed in the following locations:
l The Operation box in the Step Generator, when a test object of therelevant class is selected.
l The Operation column in the Keyword View, when a test object ofthe relevant class is selected from the Item list.
l The Editor, when you type the name of a test object of therelevant class and use the statement completion feature.
When you register a function to a test object class, you canoptionally define it as the default operation for that test object class.This instructs UFT to use the function as the test object operation bydefault, in the following situations:
l In the Operation column in the Keyword View, when you choose atest object of the relevant class in the Item list.
l In the Operation box in the Step Generator, when you choose atest object of the relevant class from the Object list.
l In the Editor, when you drag in a test object of the relevant classfrom the object repository.
Forcomponents
After you register a function to a test object class, it can be called asa method of that test object class, in addition to being available as aglobal function.
UFT therefore displays the function in the Keyword View Operationlist when a test object of that class is selected from the Item list, aswell as in the general Operation list in the Step Generator (forfunction libraries).
When you register a function to a test object class, you canoptionally define it as the default operation for that test object class.This instructs UFT to display the function in the Operation column inthe Keyword View, by default, when you or a Subject Matter Expertchoose a test object from the relevant class in the Item list.
User GuideChapter 51: User-Defined Functions
HP Unified Functional Testing (12.53) Page 579 of 938
Preparing the user-defined function for registrationRelevant for: GUI tests and components
When you run a statement containing a registered method, UFT sends the testobject as the first argument. For this reason, your user-defined function must haveat least one argument. Your user-defined function can have any number ofarguments, or it can have only the test object argument.
If you register a user-defined function to override an existing test object method,then after the test object argument, the function must have the same number ofarguments as the method it overrides.
Tip: You can use the parent identification property to retrieve the parent of theobject represented by the first argument in your function. For example:
ParentObj = obj.GetROProperty("parent")
Registering user-defined functions as test object methodsRelevant for: GUI tests and components
To register a user-defined function as a test object method, you enter aRegisterUserFunc statement in an action or function library. The RegisterUserFuncstatement specifies the test object class, the name of your function, and the nameof the test object method that should call your function.
In this statement, you can also instruct UFT to use the function as the defaultoperation for the test object class.
You can register the same function to more than one test object class, using thesame operation name for different test object classes, or different names.
After the RegisterUserFunc statement runs, your method becomes a recognizedmethod of the specified test object class for the remainder of the run session, oruntil you unregister the method.
When UFT loads a function library it runs all the statements in the function library.Therefore, if the function you are registering is defined in a function library, it isrecommended to include the RegisterUserFunc statement in the function library aswell so that the method is immediately available for use in any test or componentusing that function library.
For task details, see "Register the function to a test object class - optional " onpage 589.
User GuideChapter 51: User-Defined Functions
HP Unified Functional Testing (12.53) Page 580 of 938
Unregistering user-defined test object methodsRelevant for: GUI tests and components
When you register a method using a RegisterUserFunc statement, your methodbecomes a recognized method of the specified test object class for the remainderof the run session, or until you unregister the method.
If your method overrides a UFT method, unregistering the method resets themethod to its normal behavior. Unregistering other methods removes them from thelist of methods supported by the test object class.
For task details, see "Unregister the function - optional" on page 591.
In certain situations, you must pay special care when unregistering user-definedmethods:
Unregisteringfunctions forresuableactions
Unregistering methods is especially important when a reusableaction contains registered methods that override UFT methods.For example, if you do not unregister a method that uses a functiondefined directly within a called action, then the calling test will failif the registered method is called again in a later action, because itwill not be able to find the function definition.
If you register a method within a reusable action, you shouldunregister the method at the end of the action (and then re-registerit at the beginning of the next action if necessary), so that testscalling your action are not affected by the method registration.
If the registered function was defined in a function library, then thecalling test may succeed (assuming the function library isassociated with the calling test). However, unexpected results maybe produced as the author of the calling test may not realize thatthe called action contained a registered function, and therefore,may use the registered method in later actions, expecting normalUFT behavior.
User GuideChapter 51: User-Defined Functions
HP Unified Functional Testing (12.53) Page 581 of 938
UnregisteringFunctionsThat WereRegisteredMore ThanOnce
You can re-register the same method to use different user-definedfunctions without first unregistering the method. However, whenyou do unregister the method, it resets to its original UFTfunctionality (or is cleared completely if it was a new method), andnot to the previous registration.
Example:
Suppose you enter the following statements:
RegisterUserFunc "Link", "Click", "MyClick"RegisterUserFunc "Link", "Click", "MyClick2"UnRegisterUserFunc "Link", "Click"
After running the UnRegisterUserFunc statement, the Clickmethod stops using the functionality defined in the MyClick2function, and returns to the original UFTClick functionality,and not to the functionality defined in the MyClick function.
Running an overriding user-defined test object methodRelevant for: GUI tests and components
You can register a user-defined function to (temporarily) override the functionality ofan existing test object method for a test object class.
When a user-defined function runs instead of the test object method it overrides, if itcalls any overridden test object methods, the standard functionality of thosemethods is used.
When you call the user-defined function directly, if it calls any overridden test objectmethods, their overriding user-defined functions are used.
Example: The following scenarios demonstrate various situations that areaffected by this functionality:
A Registered User Function That Calls the Test Object Method It Overrides
Suppose you want to report the current value of a Web edit box to the runresults before you set a new value for it. You can override the standard UFTSetmethod with a function that retrieves the current value of an edit box,
User GuideChapter 51: User-Defined Functions
HP Unified Functional Testing (12.53) Page 582 of 938
reports that value to the run results, and then sets the new value of the editbox using the standard Setmethod.
The function (and its registering line) would look something like this:
Function MySet (obj, x) dim y y = obj.GetROProperty("value") Reporter.ReportEvent micDone, "previous value", y obj.Set (x)End FunctionRegisterUserFunc "WebEdit", "Set", "MySet"
When a test or component step uses the WebEdit.Set method, the overridingMySet function runs, and in turn, calls the original UFT WebEdit Set method.
However, when a test or component step uses the MySet function, thefunction runs and calls the overridden WebEdit.Set method, running the MySetfunction once more. This time, MySet calls the original UFT WebEdit Setmethod.
A Registered User Function That Calls a Test Object Method That IsOverridden by Another Function
Suppose you want to override the VbButton's standard Click method to alwaysperform a double click. In addition, you want to override the standard UFTDblClick method with a function that retrieves the text of the button and reportsit to the run results before double-clicking the button.
The functions (and their registering lines) would look something like this:
Function MyDblClick (obj, x, y, button) dim button_name button_name = obj.GetROProperty("text") Reporter.ReportEvent micDone, "Clicking", button_name obj.DblClick x, y, buttonEnd FunctionRegisterUserFunc "VbButton", "DblClick", "MyDblClick"Function MyClick (obj, x, y, button) obj.DblClick x, y, buttonEnd FunctionRegisterUserFunc "VbButton", "Click", "MyClick"
When a test or component step uses the VbButton.Click method, theoverriding MyClick function runs. In this situation, MyClick will then run the
User GuideChapter 51: User-Defined Functions
HP Unified Functional Testing (12.53) Page 583 of 938
original UFT VbButton DblClick method.
When a test or component step uses the MyClick function, the function runsand calls the overridden VbButton.DblClick method, running MyDblClick.MyDblClick reports the button text to the run results and then calls the originalUFT VbButton DblClick method.
To ensure that the MyClick function always runs the overridden behavior forDblClick method, you could call MyDblClick directly within MyClick.
Loading function libraries during a run sessionRelevant for: GUI tests and components
If you decide not to associate a function library with a test, but do want to be able tocall its functions, subroutines, and so forth, you can do so by loading the functionlibrary during the run session. Similarly, if you want to call a function that is notstored in an action in your test or in an associated function library, store it in anindependent VBScript file, and load that function library during the run session.
To load a function library during a run session, insert a LoadFunctionLibrarystatement or ExecuteFile statement in your action, scripted component, or functionlibrary. When you run the test, this statement runs all global code in the specifiedfunction library, making all definitions in the file available for use..
The following table describes the differences between using each of thesestatements:
LoadFunctionLibrary ExecuteFile
In a test: After you run aLoadFunctionLibrary statement,the functions in the file areavailable to your entire test, untilthe end of the run session.
In a component:LoadFunctionLibrary works in thesame way as ExecuteFile. Afteryou run the statement, thefunctions in the file are availableonly within the scope of thecalling component.
After you run an ExecuteFile statement, youcan call the functions in the loaded file onlywithin the scope of the calling action orcomponent.
User GuideChapter 51: User-Defined Functions
HP Unified Functional Testing (12.53) Page 584 of 938
LoadFunctionLibrary ExecuteFile
LoadFunctionLibrary enables youto debug the functions in thefunction library during run-time.
You cannot debug a file that is called usingan ExecuteFile statement, or any of thefunctions contained in the file. In addition,when debugging a test or component thatcontains an ExecuteFile statement, theexecution marker may not be correctlydisplayed.
If you want functions in a function library (VBScript file) to always be available toyour test or component, associate the function library with your test or applicationarea.
Manage function library associationsRelevant for: GUI tests and components
This task describes the different ways that you can associate a function library witha test or application area or modify existing associations.
View the list of associated function librariesDo one of the following:
l In the Solution Explorer pane, expand the Function Libraries node within therelevant test or component's node.
l Select the test or component whose associated function libraries you want toview, and then select File > Settings > Resources. The Resources pane of theTest/Business Component dialog box opens.
Associate the currently active function library1. Make sure that the test or application area with which you want to associate the
function library is included in your open solution.2. Create or open a function library in UFT.3. Save the function library in the file system (for tests only) or in your ALM
project.4. In UFT, do one of the following:
l right-click the function library document tab and select Associate Library'<Function Library>' with '<Solution/Test/Application Area>'.
l right-click the test or application area name node in the Solution Explorerand select Associate Function Library.
User GuideChapter 51: User-Defined Functions
HP Unified Functional Testing (12.53) Page 585 of 938

Associate a function library using the Test Settings dialogbox1. Create or open a test.2. In the Test Settings dialog box (File > Settings), click the Resources node.
3. In the Associated function libraries list, click the Add button , UFT displays abrowse button enabling you to browse to a function library in the file system. Ifyou are connected to an ALM project, UFT also adds [ALM] to the file path,indicating that you can browse to a function library either in your ALM project orin the file system.
Tip: If you want to add a file from your ALM project but are not connected
to ALM, press and hold the SHIFT key and click the Add button . UFTadds [ALM], and you can enter the path manually. If you do, make surethere is a space after [ALM]. For example: [ALM] Subject\Tests
Note that UFT searches ALM project folders only when you areconnected to the corresponding ALM project.
4. Select the function library you want to associate with your test and click Open.
Associate a function library with the Solution ExplorerpaneIn the Solution Explorer pane, do one of the following:
l Right click a GUI<test name> node and select Associate Function Library.
l Right-click the Function Libraries node within the relevant test's node in the treeand select Associate Function Library.
The Open dialog box opens.
The function library that you select is associated with the test and displayed as anode under the Function Libraries node in the tree.
Associate a function library with an application area
1. In UFT, open your application area and click the Function Libraries buttonon the sidebar.
2. In the Associated function libraries list, click the Add button . UFT displays abrowse button enabling you to browse to a function library in your ALM project.
User GuideChapter 51: User-Defined Functions
HP Unified Functional Testing (12.53) Page 586 of 938
3. Select the function library you want to associate with your application area andclick Open.
Modify the priority of an associated function libraryl In the Solution Explorer, expand the Function Libraries node for your test orapplication area, right-click the function library you want to prioritize and selectMove up or Move down.
l In the list of associated function libraries in the Resources pane of the TestSettings dialog box (for tests) or the Function Libraries pane (for applicationareas), select the function library you want to prioritize and use the Up and Down
arrows .
Remove a function library associationDo one of the following:
l In the Solution Explorer, expand the Function Libraries node for your test orapplication area, right-click the function library and select Remove Function Libraryfrom List, or select the function library and press the DELETE key.
l In the list of associated function libraries in the Resources pane of the TestSettings dialog box (for tests) or the Function Libraries pane (for applicationareas), select the function library you want to remove and click the Remove button
.l Open an associated function library in UFT. Right-click the function librarydocument tab and select Dissociate Library '<Function Library>' from'<Test/Application Area>'.
Specify default function libraries for all new testsIn the Resources pane of the Settings dialog box, create the list of associatedfunction libraries that you want to use for every newly created test, and click the Setas Default button. (This does not affect existing tests.)
Load a function library dynamically during a run sessionAdd a the LoadFunctionLibrary statement to your action, scripted component, orassociated function library.
Tip: To include the same LoadFunctionLibrary statement in every action youcreate, you can add the statement to an action template.
User GuideChapter 51: User-Defined Functions
HP Unified Functional Testing (12.53) Page 587 of 938

Create and work with a user-defined functionRelevant for: GUI tests and components
Prerequisites - Open the function library or test1. Determine whether you want to store the function in an action or in a function
library.l If you insert the function in a function library, the function will be accessibleto any associated test.
l If you insert the function directly in an action in the Editor, it can be calledonly from within the specific action.
2. Create a new function library or action, open an existing one, or click on the tabof an open function library or action to bring it into focus.
Create the functionYou can define functions manually or using the Function Definition Generator,which creates the basic function definition for you automatically.
Tip: If you want to add a comment about your function, you can add acomment immediately above the function name with @description line and thestring describing the function. This description is displayed as a customtooltip in UFT's autocomplete window. For example
'@Description This function displays a Hello World message box.Function Hello_World
MsgBox "Hello world"End Function
Then, when you use UFT's autocomplete menu, you can see the tooltip:
User GuideChapter 51: User-Defined Functions
HP Unified Functional Testing (12.53) Page 588 of 938
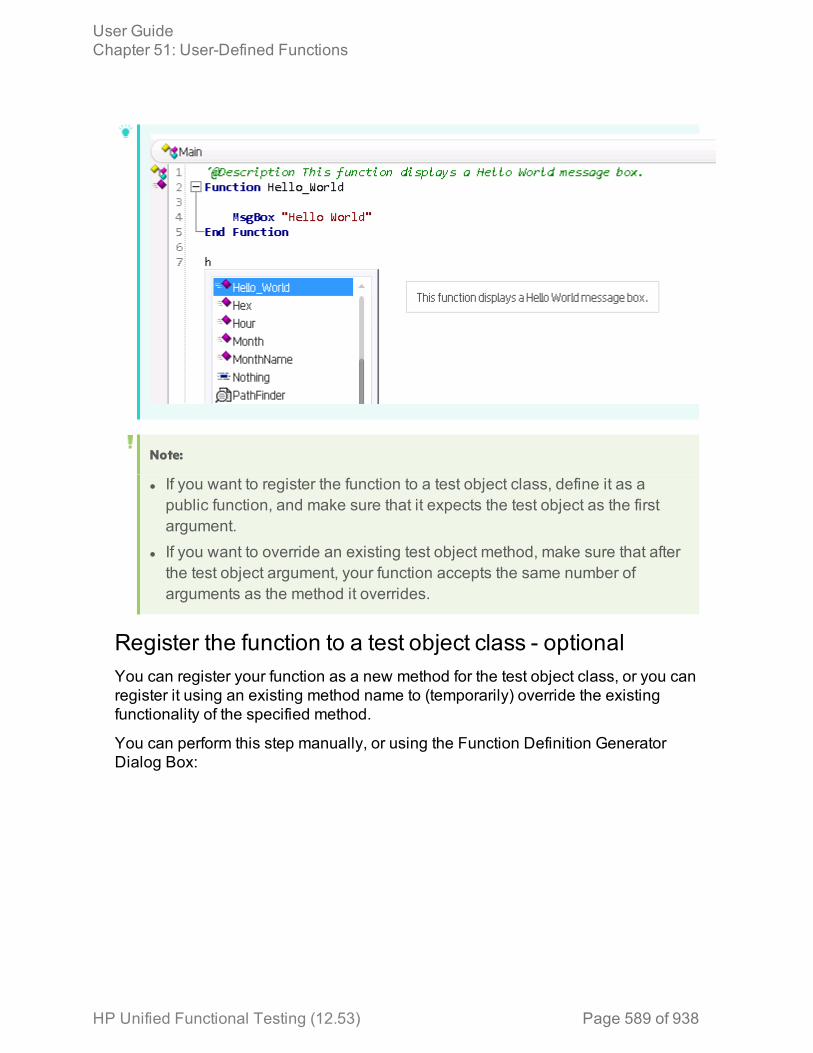
Note:
l If you want to register the function to a test object class, define it as apublic function, and make sure that it expects the test object as the firstargument.
l If you want to override an existing test object method, make sure that afterthe test object argument, your function accepts the same number ofarguments as the method it overrides.
Register the function to a test object class - optionalYou can register your function as a new method for the test object class, or you canregister it using an existing method name to (temporarily) override the existingfunctionality of the specified method.
You can perform this step manually, or using the Function Definition GeneratorDialog Box:
User GuideChapter 51: User-Defined Functions
HP Unified Functional Testing (12.53) Page 589 of 938
Manually Add a RegisterUserFunc statement in your action or function library. Thename of the test object operation you register cannot contain spaces.In this statement, you can also instruct UFT to use the function as thedefault operation for the test object class.
Example:
RegisterUserFunc "WebEdit", "MySet", "MySetFunc", True
After this statement runs (during the run session), the MySetmethod (operation) is added to the WebEdit test object classusing the MySetFunc user-defined function, and defined to bethe default operation (as specified in the last argument of thestatement).
If you or the Subject Matter Expert choose the WebEdit testobject from the Item list in the Keyword View, the MySetoperation is selected automatically in the Operation column. It isalso displayed in the Operation list together with other registeredand out of the box operations for the WebEdit test object.
Using theFunctionDefinitionGenerator
If you use the Function Definition Generator Dialog Box to create yourfunction definition, a RegisterUserFunc statement is automatically addedimmediately after the definition if you select the Register to a test objectoption.
If the function you are registering is defined in a function library, it isrecommended to include the RegisterUserFunc statement in the functionlibrary as well so that the method will be immediately available foruse in any test or component using that function library.
Associate the function library with a test or application areaIf you inserted the code in a function library, you must associate the function librarywith a test or application area to enable tests and components to access to theuser-defined functions.
Alternatively, you can add a LoadFunctionLibrary statement to your test orcomponent to load the function library during the run session and access itsfunctions.
User GuideChapter 51: User-Defined Functions
HP Unified Functional Testing (12.53) Page 590 of 938

Call the functionIn your test, component, or function library, do one or both of the following:
l Create steps that call your user-defined function as a global function.l Run the user-defined function by calling the test object method to which it isregistered.
Navigate to the function's definition - optionalYou can navigate directly from a function call to the function's definition.
1. In the Editor, in an action, click in the step containing the relevant function.2. Perform one of the following:
l Select Search > Go to > Definition.l Right-click the step and select Go to Definition from the context menu.UFT activates the relevant document (if the function definition is located in afunction library) and positions the cursor at the beginning of the functiondefinition.
Unregister the function - optionalIf you do not want your function to remain registered until the end of the runsession, add an UnregisterUserFunc statement in your test or function library.
If you register a method within a reusable action, you should unregister the methodat the end of the action (and then re-register it at the beginning of the next action ifnecessary), so that tests calling your action are not affected by the methodregistration.
Create and register a user-defined function using theFunction Definition GeneratorRelevant for: GUI tests and components
Open the function library/test and the Function DefinitionGenerator1. Make sure that the function library or action in which you want to insert the
function definition is the active document. This is because the FunctionDefinition Generator inserts the function in the currently active document afteryou finish defining it.
2. Select Design > Function Definition Generator.
User GuideChapter 51: User-Defined Functions
HP Unified Functional Testing (12.53) Page 591 of 938
Specify the details for the function definition1. In the Function definition section, give the function a unique name.2. Select the type for the function: Function or sub (subroutine).3. Specify the type for the function:
l Public: The function can be called by any test or component (via theapplication area) associated with the function library
l Private: The function can be called only from this function library.
Note: If you are overriding an existing test object class method, select thePublic option.
Register the function to a test object class - optional1. Below the function name, select the Register to a test object check box.2. Select the test object from the list of available objects.3. Enter the name of a new operation that you want to add to the test object class,
or select an existing operation to specify the operation that you want to overrideits standard functionality. The name of the method cannot contain spaces.
4. If necessary, specify that this operation is the default operation for test objectsof this type.
Tip: If you choose not to register your function at this time, you canmanually register it later by adding a RegisterUserFunc statement. You canalso add additional RegisterUserFunc statements, to register the function toadditional test object classes.
Add arguments to the function - optional1. In the Arguments box, click the Add button to add the necessary arguments
for the function.2. For each argument, in the Pass mode cell, specify how the value is passed to
the function:l By value: A value entered into the functionl By reference: The function references the value.
User GuideChapter 51: User-Defined Functions
HP Unified Functional Testing (12.53) Page 592 of 938
Add documentation details to the function - optionalIn the Additional information box, enter the details of the function:
l Description: The description of the function displayed as a tooltip when you hoverover the function name.
l Documentation: The description of the function displayed in the Documentationcolumn of the Keyword View after you enter the necessary arguments.
Insert the function in your active documentClick OK or Insert. UFT inserts the generated VBScript code in the active document.
Add the content (code) of the functionTo finalize the function, add content to the function code, as required, replacing theTODO comment.
The function is now available to your tests, components, or function libraries(depending on where the function was generated and the context in which you areworking). If you registered the function to a test object, this function is displayed inthe list of available functions for the test object (in the Keyword View and Editor).
User GuideChapter 51: User-Defined Functions
HP Unified Functional Testing (12.53) Page 593 of 938
Known Issues- Function Libraries and user-definedfunctionsRelevant for: GUI tests and components
Defining aVBScriptclass in afunction
If you define a VBScript class, it can be called only within the UFTaction or function library in which you defined it.
Workaround:
1. You can use an ExecuteFile statement to call a VBScript classdefined in an external function library.
2. In the function library in which you define the class, create afunction that sets an object as your class, and returns the object.Then you can call this function from anywhere in your test orcomponent, to assign an object of your class to a variable youdefine.
Example:
Suppose you want to use the class myClass. In the samefunction library as you define myClass, define the followingfunction:
public function myClassGenerator()set myClassGenerator = new myClassend function
Now, you can use the myClass class by callingmyClassGenerator, like this:
set myClassObject = myClassGenerator()
myClassGenerator() creates a new myClass object andassigns it to myClassObject.
HP Unified Functional Testing (12.53) Page 594 of 938

Calling atest objectmethodthat hasbeenoverwrittenby a fuction
You can use the RegisterUserFunc statement to register a user-defined function that overrides an existing test object method. Youcan also register a user-defined function to override a test objectmethod that was created using a UFT Extensibility SDK. If youoverride this type of test object method, the user-defined functionmust not (recursively) call the test object method that it overrides.
User-definedfunctions inthe runresults
By default, steps that use user-defined functions are not included inthe run results after a run session. If you want the function to appearin the run results, you must add a ReportEvent Method statement tothe function code. For example, you may want to provide additionalinformation or to modify the test, component, or business processtest status.
If a step within your user-defined function calls a standard UFT testobject method, this step will appear in the run results after the runsession. However, you can still add a Reporter.ReportEvent statementto the function code to provide additional information and to modifythe test, component, or business process test status, if required.
Partial testruns andmethodregistration
For tests: If you use a partial run or debug option, such as Run fromstep or Debug from step, to begin running a test from a point aftermethod registration was performed in a test step (and not in afunction library), UFT does not recognize the method registrationbecause it occurred prior to the beginning of the current run session.
Using theOptionExplicitmethod
l To use an Option Explicit statement in a function library associatedwith your test or component, you must include it in all of thefunction libraries associated with the test or component. If youinclude an Option Explicit statement in only some of the associatedfunction libraries, UFT ignores all of the Option Explicit statementsin all function libraries.In test actions, you can use Option Explicit statements directlywithout any restrictions.
Uniquevariables infunctionlibraries
Each function library must have unique variables in its global scope.If you have two associated function libraries that define the samevariable in the global scope using a Dim statement or define twoconstants with the same name, the second definition causes asyntax error. If you need to use more than one variable with thesame name in the global scope, include a Dim statement only in thelast function library (since function libraries are loaded in thereverse order).
User GuideChapter 51: User-Defined Functions
HP Unified Functional Testing (12.53) Page 595 of 938
Classdefinitionsin afunctionlibrary
Function libraries that run in the same run session must not containdifferent definitions for the same class. Make sure that each class isdefined in only one location.
Modifyingfunctionlibraries
If another user modifies a function library that is referenced by a testor component, or if you modify the function library using an externaleditor (not UFT), the changes take effect only after the test orcomponent is reopened.
Cyrilliccharactersin functionlibraries
Function libraries that contain the Cyrillic ' ' character and aresaved in ANSI encoding may be interpreted incorrectly in UFT. Forexample, the ' ' character may be interpreted as a newlinecharacter, causing the run to fail.
Workaround: If this problem occurs, use a text editor to convert thefunction library by saving it in Unicode encoding.
User GuideChapter 51: User-Defined Functions
HP Unified Functional Testing (12.53) Page 596 of 938
Chapter 52: Generated Programming OperationsRelevant for: GUI tests and scripted GUI components
When you design tests, you usually begin by adding steps that represent theoperations an end-user would perform as part of the business process you want totest. Then, to increase the power and flexibility of your test, you can add steps(programming statements) that contain programming logic to the basic framework.
Programming statements can contain:
l Test object operations. These are methods and properties defined by UFT. Theycan be operations that a user can perform on an object, operations that canretrieve or set information, or operations that perform operations triggered by anevent.
l Native operations. These are methods and properties defined within the object youare testing, and therefore are retrieved from the run-time object in the application.
l VBScript programming commands. These affect the way the test runs, such asconditional statements and synchronization points. These are often used tocontrol the logical flow of a test.
l Comments. Use comments to explain sections of your tests to improve readabilityand to make them easier to update. A comment is an explanatory remark in aprogram, and does not get processed when UFT runs.
Message statementsRelevant for: GUI tests and scripted GUI components
Message statements add notes to the run results, or to be displayed in the Outputpane while running your test.
For example, you might want to add notes to the run results about the applicationtested, or operating system used. Or, send a message to the run results indicatingthat a particular object was missing during a specific step.
Run session messages in the HTML reportIf you work with the HTML report, add a note by inserting aReporter.AddTestInformation step in your test or component.
Reporter.AddTestInformation "Test status","Passed"
In the run results, this information is displayed in the run results summary.
HP Unified Functional Testing (12.53) Page 597 of 938

Run session messages in the Run Results ViewerIf you work with the Run Results Viewer, add a note by inserting aReporter.ReportNote step in your test or component.
Reporter.ReportNote "This test was run from 12.34.56.89 using a wirelessconnection."
The note is displayed in the Run Results Viewer on the Executive Summary page.
Step messages in the Run Results ViewerSend messages about specific steps to the run results by inserting aReporter.ReportEvent step.
Example: Reporter.ReportEvent micFail, "Password edit box", "Password editbox does not exist"
In this example, micFail indicates the status of the report (failed). Password editbox is the report name, and Password edit box does not exist is the reportmessage.
Use the following statuses:
micPassed Causes this step to pass and sends the message to the report.
micFailed Causes this step (and therefore the test) to fail, and sends themessage to the report.
micDone Sends a message without passing or failing the step.
micWarning Sends a warning status for the step, but does not stop, pass, or failthe step.
Display messages during the run sessionUse the following methods to display messages during the run system.
MessageBoxVBScript function
Displays a message that pauses the run session until themessage box is closed.
Print Utilitystatement
Displays messages in the Output pane during a runsession.
User GuideChapter 52: Generated Programming Operations
HP Unified Functional Testing (12.53) Page 598 of 938
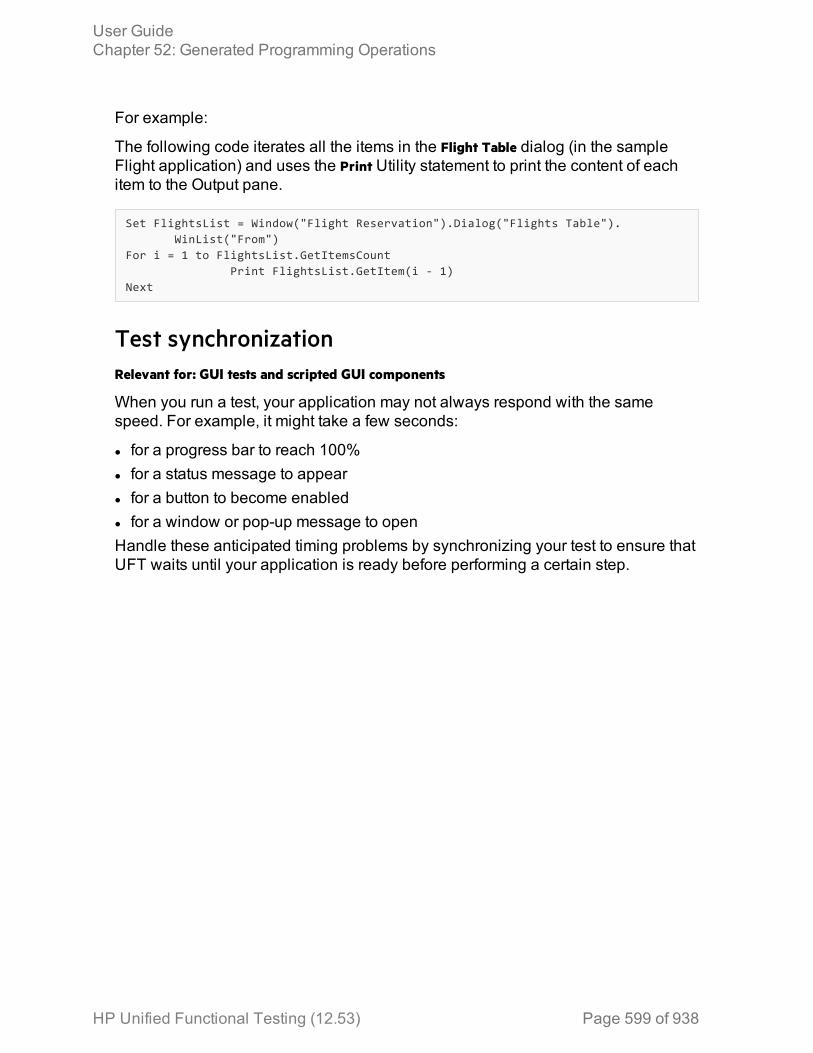
For example:
The following code iterates all the items in the Flight Table dialog (in the sampleFlight application) and uses the Print Utility statement to print the content of eachitem to the Output pane.
Set FlightsList = Window("Flight Reservation").Dialog("Flights Table").WinList("From")
For i = 1 to FlightsList.GetItemsCountPrint FlightsList.GetItem(i - 1)
Next
Test synchronizationRelevant for: GUI tests and scripted GUI components
When you run a test, your application may not always respond with the samespeed. For example, it might take a few seconds:
l for a progress bar to reach 100%l for a status message to appearl for a button to become enabledl for a window or pop-up message to openHandle these anticipated timing problems by synchronizing your test to ensure thatUFT waits until your application is ready before performing a certain step.
User GuideChapter 52: Generated Programming Operations
HP Unified Functional Testing (12.53) Page 599 of 938
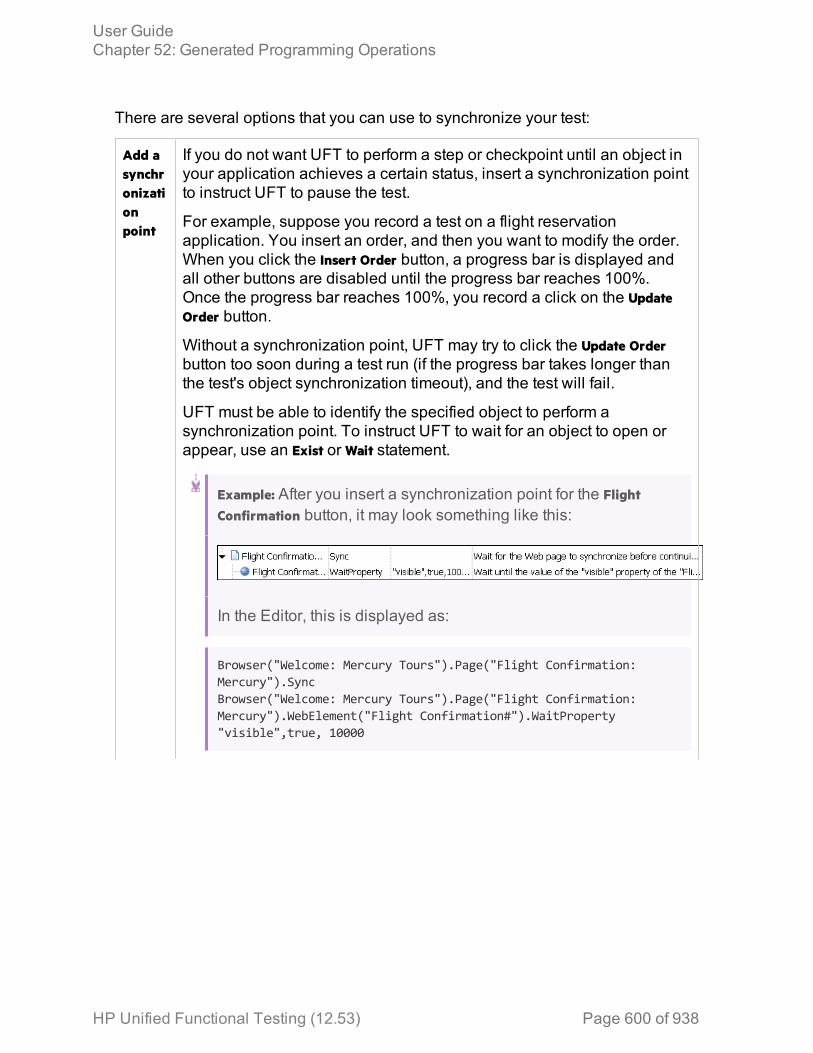
There are several options that you can use to synchronize your test:
Add asynchronizationpoint
If you do not want UFT to perform a step or checkpoint until an object inyour application achieves a certain status, insert a synchronization pointto instruct UFT to pause the test.
For example, suppose you record a test on a flight reservationapplication. You insert an order, and then you want to modify the order.When you click the Insert Order button, a progress bar is displayed andall other buttons are disabled until the progress bar reaches 100%.Once the progress bar reaches 100%, you record a click on the UpdateOrder button.
Without a synchronization point, UFT may try to click the Update Orderbutton too soon during a test run (if the progress bar takes longer thanthe test's object synchronization timeout), and the test will fail.
UFT must be able to identify the specified object to perform asynchronization point. To instruct UFT to wait for an object to open orappear, use an Exist or Wait statement.
Example: After you insert a synchronization point for the FlightConfirmation button, it may look something like this:
In the Editor, this is displayed as:
Browser("Welcome: Mercury Tours").Page("Flight Confirmation:Mercury").SyncBrowser("Welcome: Mercury Tours").Page("Flight Confirmation:Mercury").WebElement("Flight Confirmation#").WaitProperty"visible",true, 10000
User GuideChapter 52: Generated Programming Operations
HP Unified Functional Testing (12.53) Page 600 of 938
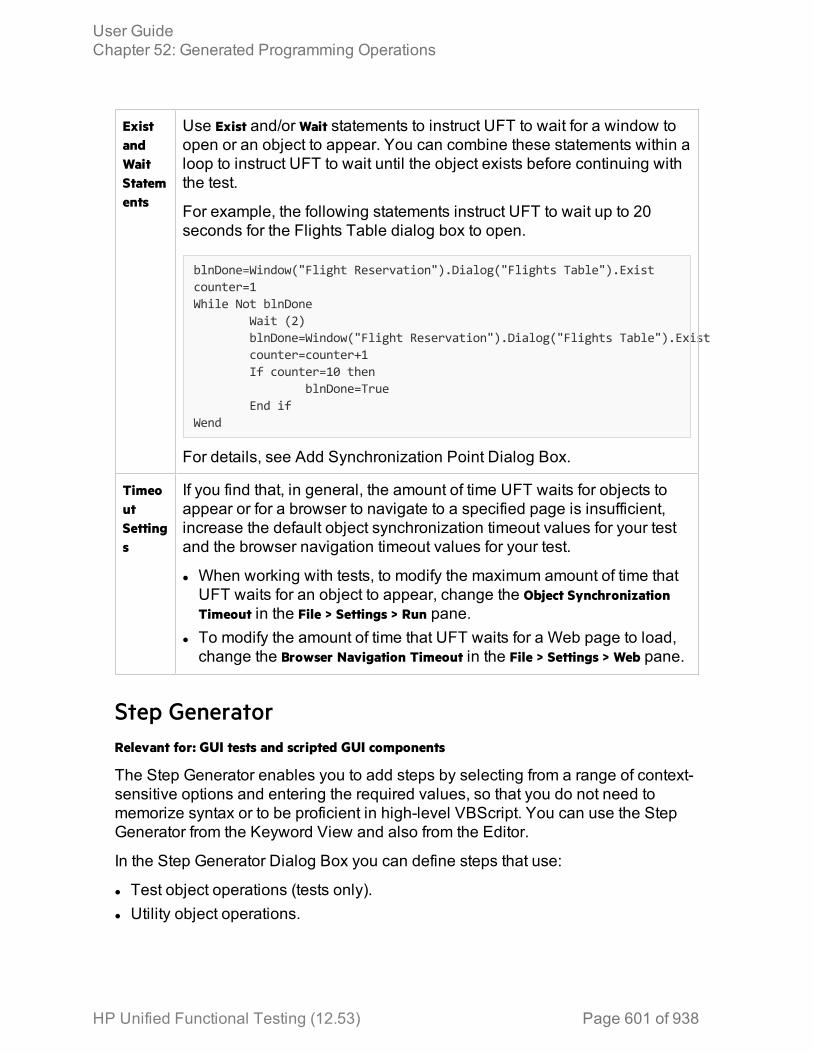
ExistandWaitStatements
Use Exist and/or Wait statements to instruct UFT to wait for a window toopen or an object to appear. You can combine these statements within aloop to instruct UFT to wait until the object exists before continuing withthe test.
For example, the following statements instruct UFT to wait up to 20seconds for the Flights Table dialog box to open.
blnDone=Window("Flight Reservation").Dialog("Flights Table").Existcounter=1While Not blnDone
Wait (2)blnDone=Window("Flight Reservation").Dialog("Flights Table").Existcounter=counter+1If counter=10 then
blnDone=TrueEnd if
Wend
For details, see Add Synchronization Point Dialog Box.
TimeoutSettings
If you find that, in general, the amount of time UFT waits for objects toappear or for a browser to navigate to a specified page is insufficient,increase the default object synchronization timeout values for your testand the browser navigation timeout values for your test.
l When working with tests, to modify the maximum amount of time thatUFT waits for an object to appear, change the Object SynchronizationTimeout in the File > Settings > Run pane.
l To modify the amount of time that UFT waits for a Web page to load,change the Browser Navigation Timeout in the File > Settings > Web pane.
Step GeneratorRelevant for: GUI tests and scripted GUI components
The Step Generator enables you to add steps by selecting from a range of context-sensitive options and entering the required values, so that you do not need tomemorize syntax or to be proficient in high-level VBScript. You can use the StepGenerator from the Keyword View and also from the Editor.
In the Step Generator Dialog Box you can define steps that use:
l Test object operations (tests only).l Utility object operations.
User GuideChapter 52: Generated Programming Operations
HP Unified Functional Testing (12.53) Page 601 of 938
l Calls to library functions (tests only), VBScript functions, and internal scriptfunctions.
For example, you can add a step that checks that an object exists, or that stores thereturned value of a method as an output value or as part of a conditional statement.You can parameterize any of the values in your step.
When you insert a new step using the Step Generator, it is added to your test afterthe selected step, and the new step is selected.
Generate With statementsRelevant for: GUI tests and scripted GUI components
Instruct UFT to generate With statements while recording1. In the General pane of the GUI Testing tab of the Options dialog box (Tools >
Options > GUI Testing tab > General tab), select Automatically generate "With"statements after recording option.
2. In the Generate "With" statements for __ or more objects box, enter the minimumnumber of consecutive, identical objects for which you want to apply the Withstatement. The default is 2.
3. Begin recording your test. While recording, statements are recorded normally.When you stop recording, the statements in all actions recorded during thecurrent recording session are automatically converted to the With format.
Generate With statements for existing actions in the Editor1. In the General pane of the GUI Testing tab of the Options dialog box (Tools >
Options > GUI Testing tab > General tab), select the Automatically generate "With"statements after recording option.
2. Confirm that the proper number is set for the Generate "With" statements for __ ormore objects. The default is 2.
3. Display the action for which you want to generate With statements.
User GuideChapter 52: Generated Programming Operations
HP Unified Functional Testing (12.53) Page 602 of 938
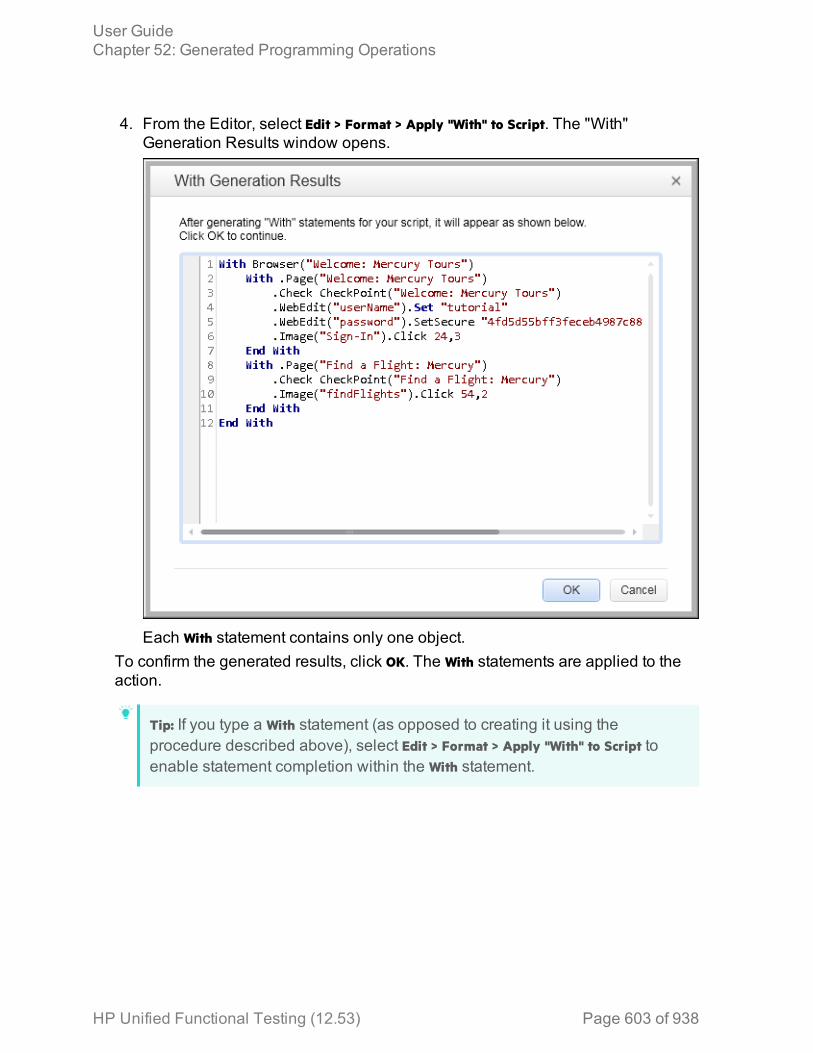
4. From the Editor, select Edit > Format > Apply "With" to Script. The "With"Generation Results window opens.
Each With statement contains only one object.To confirm the generated results, click OK. The With statements are applied to theaction.
Tip: If you type a With statement (as opposed to creating it using theprocedure described above), select Edit > Format > Apply "With" to Script toenable statement completion within the With statement.
User GuideChapter 52: Generated Programming Operations
HP Unified Functional Testing (12.53) Page 603 of 938

Remove With statements from an action in the Editor1. Display the action for which you want to remove With statements.2. In the Editor, select Edit > Format > Remove "With" Statements. The Remove "With"
Results window opens.
3. To confirm the results, click OK. The With statements are replaced with thestandard statement format.
User GuideChapter 52: Generated Programming Operations
HP Unified Functional Testing (12.53) Page 604 of 938
Chapter 53: UFT Automation ScriptsRelevant for: GUI tests and components
You can use the UFT automation object model to write scripts that automate yourUFT operations. The UFT automation object model provides objects, methods, andproperties that enable you to control UFT from another application.
Using the objects, methods, and properties exposed by the UFT automation objectmodel, you can write scripts that configure UFT options and run tests orcomponents instead of performing these operations manually using the UFTinterface.
Automation scripts are especially useful for performing the same tasks multipletimes or on multiple tests or components, or for quickly configuring UFT accordingto your needs for a particular environment or application.
What is Automation?
Automation is a Microsoft technology that makes it possible to access softwareobjects inside one application from other applications. These objects can becreated and manipulated using a scripting or programming language such asVBScript or VC++. Automation enables you to control the functionality of anapplication programmatically.
What is the UFT Automation Object Model?
An object model is a structural representation of software objects (classes) thatcomprise the implementation of a system or application. An object model defines aset of classes and interfaces, together with their properties, methods and events,and their relationships.
The UFT automation object model is a set of objects, methods, and properties thatenable you to control essentially all of the configuration and run functionalityprovided via the UFT interface. Although a one-on-one comparison cannot alwaysbe made, most dialog boxes in UFT have a corresponding automation object, mostoptions in dialog boxes can be set and/or retrieved using the corresponding objectproperty, and most menu commands and other operations have correspondingautomation methods.
You can use the objects, methods, and properties exposed by the UFT automationobject model, along with standard programming elements such as loops andconditional statements to design your script.
HP Unified Functional Testing (12.53) Page 605 of 938

Automation scripts are especially useful for performing the same tasks multipletimes or on multiple tests or components, or for quickly configuring UFT accordingto your needs for a particular environment or application.
Example: Example:
You can create and run an automation script from Microsoft Visual Basic thatdoes the following:
l Loads the required add-ins for a test or componentl Starts UFT in visible model Opens the test or componentl Configures settings that correspond to those in the:
l Options dialog boxl Test Settings or Business Component Settings dialog boxl Record and Run Settings dialog box (tests only)
l Runs the test or componentl Saves the test or component
You can then add a simple loop to your script so that your single script canperform the operations described above for multiple tests or components.
You can also create an initialization script that opens UFT with specificconfiguration settings. You can then instruct all of your testers to open UFTusing this automation script to ensure that all of your testers are alwaysworking with the same configuration.
When to use UFT automation scriptsRelevant for: GUI tests and components
Creating a useful UFT automation script requires planning, design time, andtesting. You must always weigh the initial investment with the time and human-resource savings you gain from automating potentially long or tedious tasks.
Any UFT operation that you must perform many times in a row or must perform on aregular basis is a good candidate for a UFT automation script.
User GuideChapter 53: UFT Automation Scripts
HP Unified Functional Testing (12.53) Page 606 of 938
The following are just a few examples of useful UFT automation scripts:
l Initialization scripts. The script automatically starts UFT and configures the optionsand the settings required for testing a specific environment.
l Maintaining your tests and components. The script iterates over your collection oftests and components to accomplish a certain goal. For example:l Updating values. The script opens each test or component with the proper add-ins, runs it in update run mode against an updated application, and saves itwhen you want to update the values in all of your tests or components tomatch the updated values in your application.
l Applying new options to existing tests and components. When you upgrade to anew version ofUFT, the new version it offers certain options that you want toapply to your existing tests and components. You can write a script that openseach existing test or component, sets values for the new options, then savesand closes it.
l Modifying actions and action parameters. You can retrieve the entire contents of anaction script, and add a required step, such as a call to a new action. You canalso retrieve the set of action parameters for an action and add, remove, ormodify the values of action parameters.
l Calling UFT from other applications. You can design your own applications withoptions or controls that run UFT automation scripts. For example, you couldcreate a Web form or simple Windows interface from which a product managercould schedule UFT runs, even if the manager is not familiar with UFT.
Application ObjectRelevant for: GUI tests and components
Like most automation object models, the root object of the UFT automation objectmodel is the Application object.
The Application object represents the application level of UFT. You can use thisobject to return other elements of UFT such as the:
l Test object (which represents a test or component document)l Options object (which represents the Options dialog box)l Addins collection (which represents a set of add-ins from the Add-in Managerdialog box)
You can also use the Application object to perform operations like loading add-ins,starting UFT, opening and saving tests or components, and closing UFT.
Each object returned by the Application object can return other objects, performoperations related to the object and retrieve and/or set properties associated withthat object.
User GuideChapter 53: UFT Automation Scripts
HP Unified Functional Testing (12.53) Page 607 of 938
Every automation script begins with the creation of the UFTApplication object.Creating this object does not start UFT. It simply provides an object from which youcan access all other objects, methods and properties of the UFT automation objectmodel.
Note: You can also optionally specify a remote UFT computer on which tocreate the object (the computer on which to run the script). For details, seeRunning Automation Programs on a Remote Computer in the Introduction sectionof the UFT Automation Object Model Reference in the UFT Help.
UFT Automation Object Model ReferenceRelevant for: GUI tests and components
The HP UFT Automation Object Model Reference is a Help file that provides detaileddescriptions, syntax information, and examples for the objects, methods, andproperties in the UFT automation object model.
You can open the HP UFT Automation Object Model Reference from:
l UFT program folder (Start > All Programs > HP Software > HP Unified FunctionalTesting > Documentation > Unified Functional Testing Automation Reference or <UFTinstallation folder>\help\AutomationObjectModel.chm)
l UFT GUI Testing Automation and Schema References Help (Help > HP UFT GUITesting Automation and Schema References Help > HP UFT Automation Object Model forGUI Testing)
Generated automation scriptsRelevant for: GUI tests and components
The Properties pane of the Test Settings dialog box, the General node of the paneof the GUITesting tab in the Options dialog box, and the Object Identification dialogbox each contain a Generate Script button. Clicking this button generates anautomation script file (.vbs) containing the current settings from the correspondingdialog box.
You can run the generated script as is to open UFT with the exact dialog boxconfiguration of the UFT application that generated the script, or you can copy andpaste selected lines from the generated files into your own automation script.
User GuideChapter 53: UFT Automation Scripts
HP Unified Functional Testing (12.53) Page 608 of 938
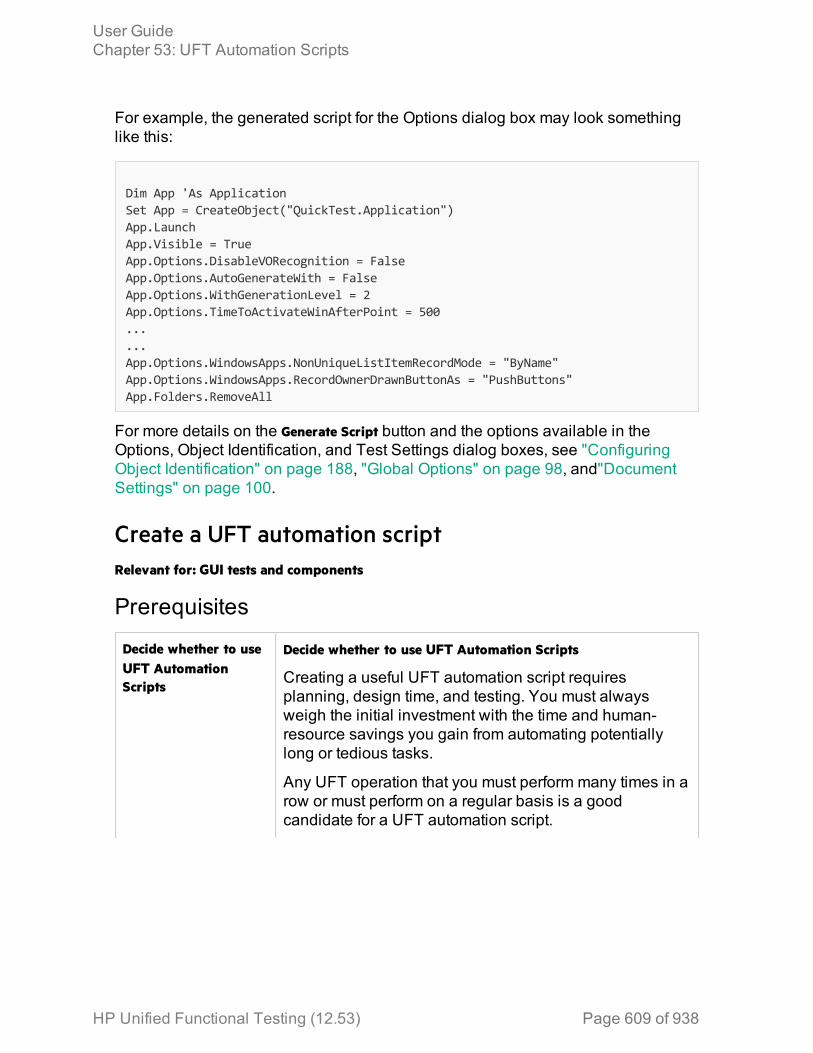
For example, the generated script for the Options dialog box may look somethinglike this:
Dim App 'As ApplicationSet App = CreateObject("QuickTest.Application")App.LaunchApp.Visible = TrueApp.Options.DisableVORecognition = FalseApp.Options.AutoGenerateWith = FalseApp.Options.WithGenerationLevel = 2App.Options.TimeToActivateWinAfterPoint = 500......App.Options.WindowsApps.NonUniqueListItemRecordMode = "ByName"App.Options.WindowsApps.RecordOwnerDrawnButtonAs = "PushButtons"App.Folders.RemoveAll
For more details on the Generate Script button and the options available in theOptions, Object Identification, and Test Settings dialog boxes, see "ConfiguringObject Identification" on page 188, "Global Options" on page 98, and"DocumentSettings" on page 100.
Create a UFT automation scriptRelevant for: GUI tests and components
Prerequisites
Decide whether to useUFT AutomationScripts
Decide whether to use UFT Automation Scripts
Creating a useful UFT automation script requiresplanning, design time, and testing. You must alwaysweigh the initial investment with the time and human-resource savings you gain from automating potentiallylong or tedious tasks.
Any UFT operation that you must perform many times in arow or must perform on a regular basis is a goodcandidate for a UFT automation script.
User GuideChapter 53: UFT Automation Scripts
HP Unified Functional Testing (12.53) Page 609 of 938

Choose a language anddevelopmentenvironment fordesigning and runningAutomation scripts
You can write your UFT automation scripts in anylanguage and development environment that supportsautomation. For example, you can use: VBScript,JavaScript, Visual Basic, Visual C++, or Visual Studio.NET.
For each language, there are a number of developmentenvironments available for designing and running yourautomation scripts.
Create the Application objectThe procedure for creating the Application object differs slightly from language tolanguage. Below are some examples for creating the UFTApplication object andstarting UFT in visible mode, using different programming languages
Visual Basic
The example below can be used only after setting a reference to the type library. Ifyou are not working in a development environment that allows referencing typelibraries, create the Application object as described for VBScript below.
Dim qtApp As QuickTest.Application ' Declare the objectSet qtApp = New QuickTest.Application ' Create the objectqtApp.Launch ' Start QuickTestqtApp.Visible = True ' Make it visible
VBScript
Dim qtAppSet qtApp = CreateObject("QuickTest.Application")qtApp.Launch 'Start QuickTestqtApp.Visible = True ' Make it visible
JavaScript
// Create the application objectvar qtApp = new ActiveXObject("QuickTest.Application");qtApp.Launch(); // Start QuickTestqtApp.Visible = true; // Make it visible
Visual C++
#import "QTObjectModel.dll" // Import the type library
User GuideChapter 53: UFT Automation Scripts
HP Unified Functional Testing (12.53) Page 610 of 938

// Declare the application pointerQuickTest::_ApplicationPtr spApp;// Create the application objectspApp.CreateInstance("QuickTest.Application");spApp->Launch(); // Launch the applicationspApp->Visible = VARIANT_TRUE; // Make it visible
Reference the type library - optional
Some development environments support referencing a type library. A type libraryis a binary file containing the description of the objects, interfaces, and otherdefinitions of an object model.
If you choose a development environment that supports referencing a type library,you can take advantage of features like Microsoft IntelliSense, automatic statementcompletion, and status bar help tips while writing your script. The UFT automationobject model supplies a type library file named QTObjectModel.dll. This file is storedin <UFT installation folder>\bin.
User GuideChapter 53: UFT Automation Scripts
HP Unified Functional Testing (12.53) Page 611 of 938
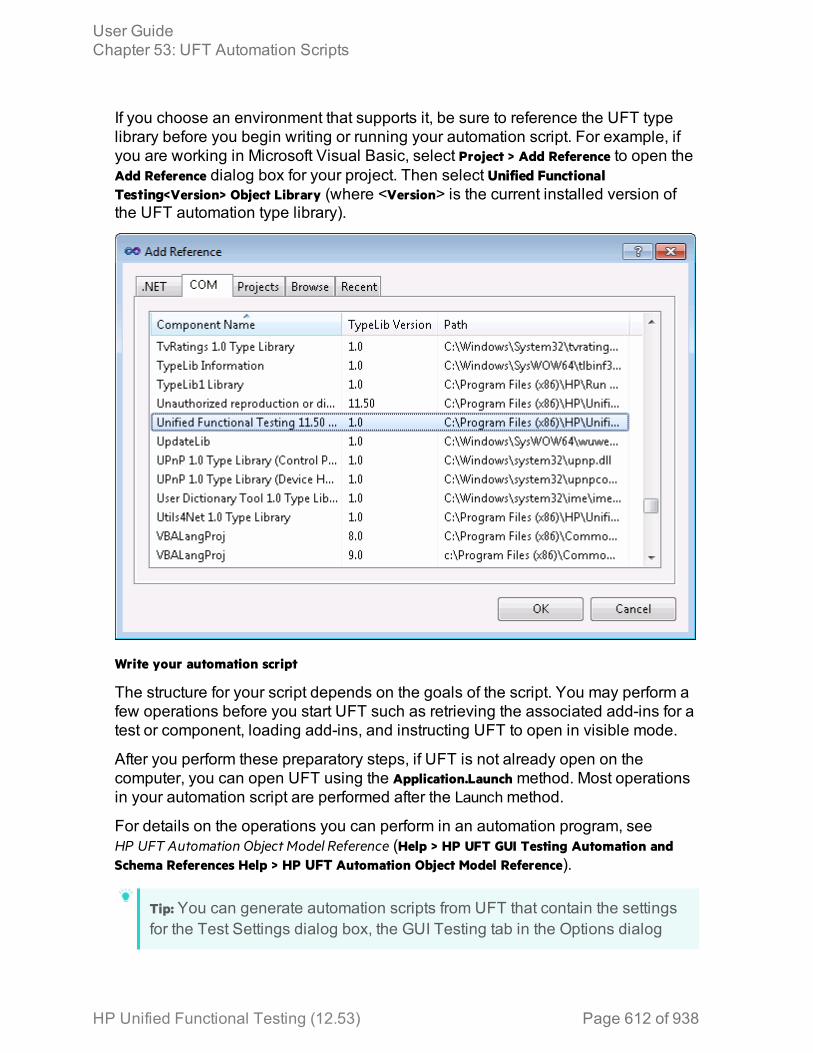
If you choose an environment that supports it, be sure to reference the UFT typelibrary before you begin writing or running your automation script. For example, ifyou are working in Microsoft Visual Basic, select Project > Add Reference to open theAdd Reference dialog box for your project. Then select Unified FunctionalTesting<Version> Object Library (where <Version> is the current installed version ofthe UFT automation type library).
Write your automation script
The structure for your script depends on the goals of the script. You may perform afew operations before you start UFT such as retrieving the associated add-ins for atest or component, loading add-ins, and instructing UFT to open in visible mode.
After you perform these preparatory steps, if UFT is not already open on thecomputer, you can open UFT using the Application.Launch method. Most operationsin your automation script are performed after the Launchmethod.
For details on the operations you can perform in an automation program, seeHP UFT Automation Object Model Reference (Help > HP UFT GUI Testing Automation andSchema References Help > HP UFT Automation Object Model Reference).
Tip: You can generate automation scripts from UFT that contain the settingsfor the Test Settings dialog box, the GUI Testing tab in the Options dialog
User GuideChapter 53: UFT Automation Scripts
HP Unified Functional Testing (12.53) Page 612 of 938

box, and the Object Identification dialog box as they are set on yourcomputer. You can then run each generated script as is to instruct UFT toopen on other computers with the exact dialog box configuration defined inthe generated script, or you can copy and paste selected lines from thegenerated files into your own automation script. For details, see "Generatedautomation scripts " on page 608.
When you finish performing the necessary operations, or you want to performoperations that require closing and restarting UFT (such as changing the set ofloaded add-ins), use the Application.Quit method.
Run your automation scriptThere are several applications available for running automation scripts. You canalso run automation scripts from the command line using Microsoft's WindowsScript Host.
For example, you could use the following command line to run your automationscript:
WScript.exe /E:VBSCRIPT myScript.vbs
Run Automation scripts on a remote computerRelevant for: GUI tests and components
By default, when you create an Application object in your automation script, it iscreated on your local computer (using your local copy of UFT). You can also runautomation scripts on a remote UFT computer.
Set DCOM Configuration Properties on the RemoteComputerUFT automation enables UFT to act as a COM automation server. To run a UFTautomation script on a remote computer, you must ensure that the DCOMconfiguration properties for that computer give you the proper permissions tolaunch and configure the UFT COM server.
The procedure below describes the steps you need to perform on the remotecomputer to enable your automation script to run on that computer. Note that theDCOM Configuration Property the appearance and names of the dialog boxes andoptions mentioned here may vary depending on the computer's operating system.
User GuideChapter 53: UFT Automation Scripts
HP Unified Functional Testing (12.53) Page 613 of 938
1. On the computer where you want to run the automation script, select Start > Run.The Run dialog box opens.
2. Enter dcomcnfg and click OK. The Distributed COM Configuration Propertiesdialog box or the Component Services window opens (depending on youroperating system) and displays the list of COM applications available on thecomputer.
3. Select QuickTest Professional Automation from the DCOM Config list and openthe Properties dialog box for the application. (Click the Properties button or right-click and select Properties, depending on your operating system.)
4. In the QuickTest Professional Automation Properties dialog box, click theSecurity tab.
5. In the launch permissions section, select the custom option and click Edit.6. Use the Add and Remove options to select the network users or groups for which
you want to allow or deny permission to launch UFT via an automation script.When you are finished, click OK to save your settings.
7. Repeat the previous two steps for the configuration permissions section toselect the users or groups who can modify UFT configuration options via anautomation script.
8. In the QuickTest Professional Automation Properties dialog box, click theIdentity tab and select the interactive user option.
9. Click OK to save the QuickTest Professional Automation Properties settings.10. Click OK to close the Distributed COM Configuration Properties dialog box or
the Component Services window.
Create an Application Object on the Remote ComputerAfter you set the necessary DCOM Configuration settings for a remote computer,you can specify that computer in your automation script.
In VBScript, you do this by specifying the computer name as the optional locationargument of the CreateObject function. The computer name should be the same asthe computer name portion of a share name. For example, to run an automationscript on a computer called MyServer, you could write:
Dim qtAppSet qtApp = CreateObject("QuickTest.Application", "MyServer"
For details on the syntax for specifying the remote computer in another languageyou are using, see the documentation included with your development environmentor the general documentation for the programming language.
User GuideChapter 53: UFT Automation Scripts
HP Unified Functional Testing (12.53) Page 614 of 938
Known Issues- Automation ScriptsRelevant for: GUI tests and components
This section describes troubleshooting and limitations for automation scripts.
In an automation script, if you run a GUI test that calls an API test, make sure to usethe Application.Quit method to close UFT, before ending the script. Otherwise, UFTwill behave unexpectedly.
Similarly, if you want to set the Application.Visible property to true after running sucha GUI test, first run the Application.Quit method, followed by Application.Launch toreopen UFT.
HP Unified Functional Testing (12.53) Page 615 of 938
Chapter 54: Event Handlers for API Test StepsRelevant for: API testing only
When testing your application's API, you can use event handlers to change orextend how you test your application's process. An event handler is a specificoccurrence of a defined code process triggered at a specific point in the overall testflow.
When you run a test of your application's API (or run the application itself), eachbusiness process is executed as defined in your application's code. Thesebusiness processes are represented in your test by the test steps you create.However, events (when running the application's code) and event handlers (whenrunning the test) are used at specific places in the application execution or the testrun. For example, if you are testing an application using a Web service, the corepart of your test is the Web service call processes in which data is sent to and fromthe Web service. Events and event handlers can be added before, after, and atother points in the test flow, such as a special event handler that runs after theapplication compiles the Web service call response, sets security for the Webservice response data, or adds attachments to the Web service call response.
Event handlers are designed to be run at a specific point in the application/testworkflow. As a result, the objects, methods, and properties available in a givenevent handler are limited to the context of where the event occurs in the applicationor test workflow. For example, when you are working in an event handler thatoccurs before an application process/test step, you cannot access theprocess's/test step's output properties, as these properties are in a part of theapplication/test that has not yet run.
HP Unified Functional Testing (12.53) Page 616 of 938
Example:
You have an application based on a Web service, in which the followingsteps occur:
1. The application generates the Web service request.2. The application sets the security for the Web service call request.3. The application adds the attachments for the Web service request.4. The application sends the request to the Web service.5. The application receives the responses from the Web service.6. The application reads the response and the attachments from the
response.
Using event handlers, you can code an event handler in your test for any ofthese steps. For example, if you want to set the request properties of onestep based on the response properties of a previous step, you can createcode in an event handler called BeforeExecuteStep, and enter the propertyvalues you would like your test to use. When writing the code for this eventhandler, the available properties/methods for your code are limited to theobjects contained in the context of the step's flow (the output/responseproperties available in the previous step and the input/request properties ofthe current step) and the event handler (which takes place immediately afterthe step).
You could also add another event handler that builds the attachment datainto an XML document to attach to the Web service request. Likewise, youcould add numerous other event handlers that supplement the coreprocesses that your application performs.
However, if you use an event handler out of the context in which it isdesigned, the properties/methods of the step with which the event should runare not accessible. Thus, if you try to code an event handler for one of theresponse steps above after a step involved in making the Web servicerequest (such as generating the Web service request), the properties of theresponse step - while accessible - are null in the response context, and yourtest run gets an exception when running this particular event handler code.
User GuideChapter 54: Event Handlers for API Test Steps
HP Unified Functional Testing (12.53) Page 617 of 938
Writing code for API test eventsRelevant for: API testing only
Each step has predetermined event handlers which are run at specific points in thetest execution. Within these event handlers, you can add additional code (aboveand beyond the test step's regular execution flow) which enables you to defineproperties, parameters, or variables and additional processes that help to facilitateyour test flow. For most test steps, there are three standard event handlers whichrun before the test step, after the test step, and as a checkpoint for the test step. ForWeb service and SOAP request steps, there are additional event handlers thatmimic the process of a Web service call. For details on the event handler structure,see "API test events structure" on page 662.
In addition, you can use Custom Code steps, for which the entire test step flow isevent handlers. For details about Custom Code steps, see "Custom code steps" onpage 628.
Example:
Case 1
Before entering customer information into a flight booking service, yourapplication must connect to a database located locally on your computer(which mimics the application connecting to a local database). However,using the existing UI framework of the UFT API test, you cannot connect tothe database. Using an event handler designed to run before the test step,you can write code that accesses your database and imports the informationto your test to be entered into the flight booking service.
Case 2
After receiving a response from your Web service (in XML format), you needto extract certain information from the response file to use as the input foranother test step. You can write an event handler to run after the test stepwhich can read and extract the information from this XML file.
Event handlers should be used to extend the behavior of existing test steps,instead of providing all the property/parameter values for test steps. It is notrecommended to use custom code to set the property/parameter values of yoursteps and execute the steps, but instead to use the grid in the Input/Properties tabin the Properties pane to set these values.
User GuideChapter 54: Event Handlers for API Test Steps
HP Unified Functional Testing (12.53) Page 618 of 938

Note: This functionality is in contrast to the manner GUI testing uses coding.GUI tests and components enable you to write the entire test or action flowusing code. However, an API event handler or custom code activity is only aportion of the larger test flow.
It is recommended to have experience and/or knowledge in writing code beforeattempting to write event handlers for your tests. All API test events use the C#language and syntax, even if your application uses a different language. For detailson C#, see the Microsoft C# Reference.
Note: Any add-ins you choose in the Add-in Manager when opening UFT donot affect API tests or event/custom coding.
Writing events for API tests - Use-case ScenariosRelevant for: API testing only
The following scenarios describe use-cases on how to use event coding in thecontext of a test of a realistic application. Each of the scenarios describes thegeneral context in which the application is used, the workflow of the application,and a test created for the application. The steps in the test include possible inputand output properties for each step, and also describe how event coding can beused to enhance various test steps.
You can view a use-case scenario for the following types of applications:
l "Web Service application" belowl "REST Service application" on page 623l "Standard application" on page 626
Web Service applicationScenario
A hotel has an application that deals with customer room charges and printsreceipts for customers. The application takes the customer’s room number,compiles customer charges of the customer into a bill, charges the customer’scredit card, and prints a receipt. This receipt must display the customer’s name,including any special characters in their name. However, the printer for the receiptcan only print English characters.
The billing application is based upon a Web service which works on a cloud-basedapplication and database.
User GuideChapter 54: Event Handlers for API Test Steps
HP Unified Functional Testing (12.53) Page 619 of 938
Application Flow
The billing application has the following workflow:
1. The billing application accesses the hotel booking application where customerinformation is stored. The hotel billing application retrieves the customer'sname, credit card number, and total charges.
2. The billing application sends the information for the bill to the receipt printer.3. The receipt is printed.
User GuideChapter 54: Event Handlers for API Test Steps
HP Unified Functional Testing (12.53) Page 620 of 938
Test Setup
You create the following test for the application, including a number of events:
1. GetBillingInformation stepThis step accesses the hotel booking application in order to retrieve thecustomer data, including the customer name, total charges, and customer creditcard number.Properties:
Input Properties Web service address for the hotel booking application.
User GuideChapter 54: Event Handlers for API Test Steps
HP Unified Functional Testing (12.53) Page 621 of 938
Output Properties l Customer Name
l Customer credit card number
These properties are contained in a description elementin the Web service response.
l Price
Checkpoints Checkpoint to check whether the connection to the hotelbooking application succeeded.
2. PrintReceipt stepThis step takes the customer information (from the description element of theGetBillingInformation step) and prints a receipt for the customer.Properties:
Input Properties Description. This property is linked to the data sourceimported in the first step.Price. The total price to charge to the customer.
Output Properties Response file containing the receipt from the
Checkpoints None
Events:
For this step, you must create an event handler for the BeforeExecuteStepEventevent. This event handler searches the description element for non-Englishcharacters and replaces them with the correct characters:
/// <summary>/// Handler for the StServiceCallActivity10 Activity’s
BeforeExecuteStepEvent event./// </summary>/// <param name=\"sender\">The activity object that raised the
BeforeExecuteStepEvent event.</param>/// <param name=\"args\">The event arguments passed to the
activity.</param>/// Use this.StServiceCallActivity10 to access the
StServiceCallActivity10 Activity's context, including input and outputproperties.
public void StServiceCallActivity10_OnBeforeExecuteStepEvent(objectsender, STActivityBaseEventArgs args)
{//Get the description textXmlNamespaceManager nsmgr = new XmlNamespaceManager
User GuideChapter 54: Event Handlers for API Test Steps
HP Unified Functional Testing (12.53) Page 622 of 938
(this.StServiceCallActivity10.InputEnvelope.NameTable);nsmgr.AddNamespace("a",
@"http://schemas.datacontract.org/2004/07/CustomerBillingService");var OriginalText =
this.StServiceCallActivity10.InputEnvelope.SelectSingleNode("//a:Description", nsmgr).InnerText;
//In case there are non-English characters in the description,convert them to English ones
var ConvertedText = ConvertSpecialCharactersToEnglishCharacters(OriginalText);
//Update the description with the converted textthis.StServiceCallActivity10.InputEnvelope.SelectSingleNode
("//a:Description", nsmgr).InnerText = ConvertedText;}
REST Service applicationScenario
Note: This scenario is based on the Flights API application included with theUFT installation.
You have a flight booking application built using REST services. Your flightapplication retrieves the flights from the service, creates a flight order, and thenreserves the customer order. The service then creates a flight order and total price,which is forwarded to the customer.
Application Flow
The billing application has the following workflow:
1. The flight application accesses the flights database through an HTTPconnection, stored externally.
2. The flight application retrieves the flights matching the specified parameters.You can search for flights using any of the following criteria:l Airlinesl Arrival Cityl Arrival Time at destination
User GuideChapter 54: Event Handlers for API Test Steps
HP Unified Functional Testing (12.53) Page 623 of 938
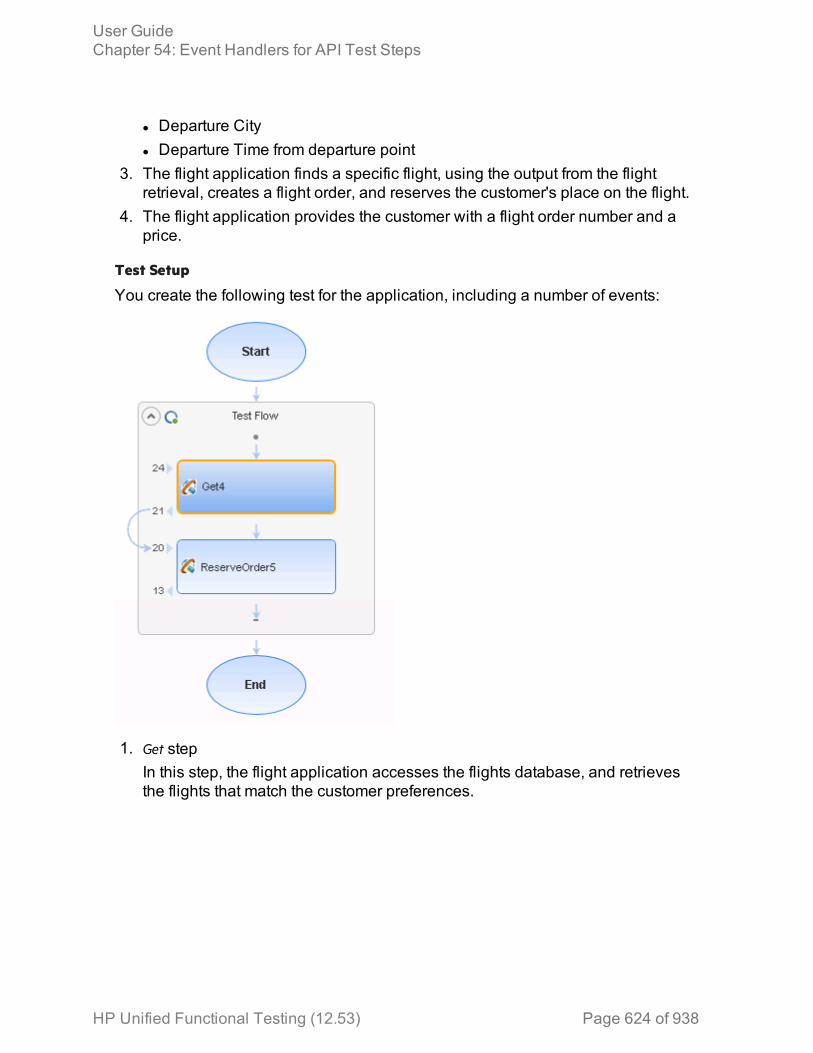
l Departure Cityl Departure Time from departure point
3. The flight application finds a specific flight, using the output from the flightretrieval, creates a flight order, and reserves the customer's place on the flight.
4. The flight application provides the customer with a flight order number and aprice.
Test Setup
You create the following test for the application, including a number of events:
1. Get stepIn this step, the flight application accesses the flights database, and retrievesthe flights that match the customer preferences.
User GuideChapter 54: Event Handlers for API Test Steps
HP Unified Functional Testing (12.53) Page 624 of 938
Properties:
Input Properties l Airlines.
l ArrivalCity
l ArrivalTime
l DepartureCity
l DepartureTime
l FlightNumber
Output Properties l Class
l DepartureDate
l FlightNumber
Note: The output properties are defined by importinga ResponseXML file, which details the requiredresponse parameters.
Checkpoints None
2. ReserveOrder stepIn this step, the flight application creates a flight order based on the specifiedoutput from the Get step, and reserves the customer's place on the flight.As part of this step, the test needs to add a checkpoint ensuring that the flightnumber meets standards of being greater than 999 and less than 100000.Properties:
Input Properties l Class. This property is linked to the Class output propertyof the Get step.
l CustomerName
l DepartureDate. This property is linked to the DepartureDateoutput parameter from the Get step.
l FlightNumber. This property is linked to the FlightNumberoutput property from the Get step.
l NumberofTickets
Output Properties l OrderNumber
l TotalPrice
User GuideChapter 54: Event Handlers for API Test Steps
HP Unified Functional Testing (12.53) Page 625 of 938

Checkpoints A checkpoint ensuring that the flight number meetsspecified parameters. This checkpoint is added with anevent handler.
Events:
For this test step, you add two additional events:l A CodeCheckpointEvent event. For this event, the code checks that the flightnumber is greater than 999 and less than 100000. In the event handler, youalso add code to stop the test if the checkpoint fails.
l An AfterExecuteStepEvent event. In this event, you add code to save theresponse XML document as an attachment for the customer to receive.
Standard applicationScenario
You have an application which delivers a response received from a Web-basedapplication. The application creates a file in which to save the response's data, andthen extracts the relevant data and adds it to the created file.
Application Flow
The application has the following workflow:
1. The application receives the response from the Web-based application.2. The application creates the file for the response data.3. The application extracts the necessary content from the response, and adds
this to the created file.
User GuideChapter 54: Event Handlers for API Test Steps
HP Unified Functional Testing (12.53) Page 626 of 938
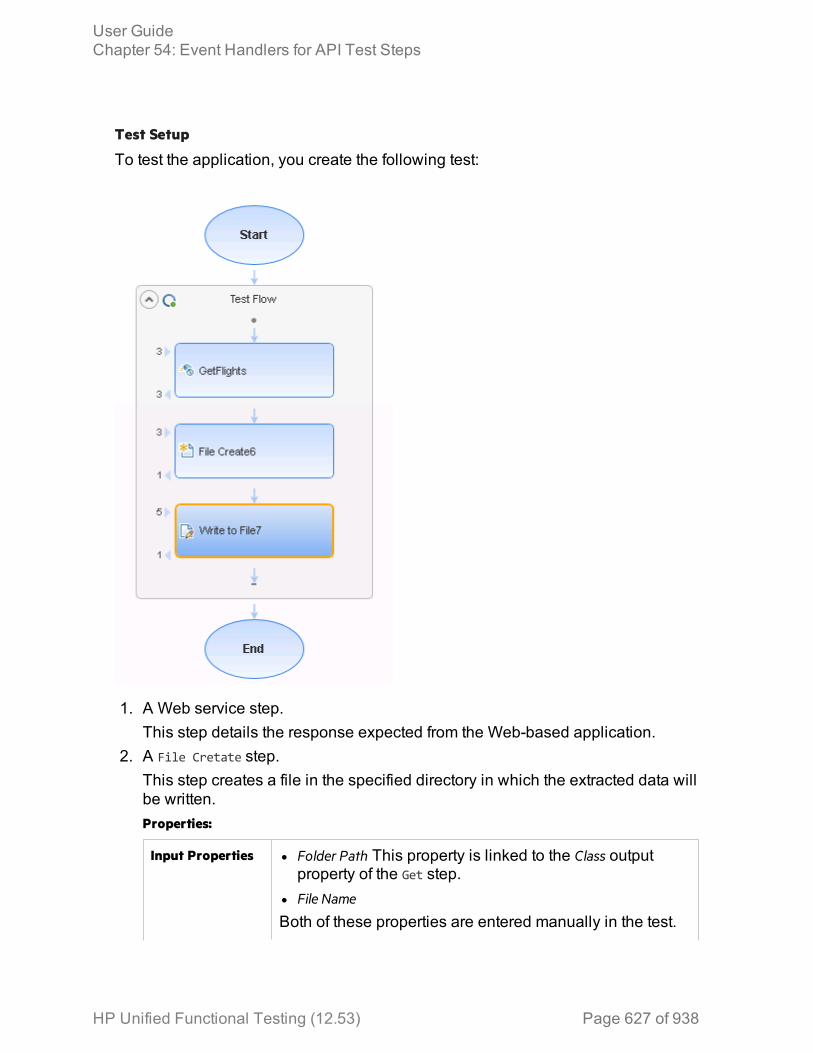
Test Setup
To test the application, you create the following test:
1. A Web service step.This step details the response expected from the Web-based application.
2. A File Cretate step.This step creates a file in the specified directory in which the extracted data willbe written.Properties:
Input Properties l Folder Path This property is linked to the Class outputproperty of the Get step.
l File Name
Both of these properties are entered manually in the test.
User GuideChapter 54: Event Handlers for API Test Steps
HP Unified Functional Testing (12.53) Page 627 of 938
Output Properties None
Checkpoints None
3. A Write To File step.In this step, you extract the data from the Web service response, and then addthe data to the file created in the CreateFile step.Properties:
Input Properties l File Path. This property is linked to the Folder Pathproperty of the CreateFile step. However, since you canonly link to output properties using the API testing UI,you must add an event handler to link the properties.
l Content. The content comes from the response of theWeb service. As this content is created dynamicallyduring the test run, you must use an event handler toaccess the content.
Output Properties None
Checkpoints None
Events:
For this step, you need 2 events:l A BeforeExecuteStepEvent event: This event links the File Path property of thecurrent step to the Folder Path property from the CreateFile step. The codepasses the value specified for the folder path to this test step so that theWriteToFile operation writes in the same folder and file that you created.
l An AfterExecuteStepEvent event: In this event, you access the response XMLfrom the Web service, and use the code to extract the binary data from theWeb service response. Then, you add the binary data as the content for theWriteToFile operation, in the folder and file specified in theBeforeExecuteStepEvent event.
Custom code stepsRelevant for: API testing only
In addition to using event handlers for your API test steps, you can add a CustomCode step to any test. This step enables you to create a step execution flow usingyour own special code.
Custom Code steps are like any other API test activity. They run at the specificpoint in the test flow, and follow the standard event model, beginning with any code
User GuideChapter 54: Event Handlers for API Test Steps
HP Unified Functional Testing (12.53) Page 628 of 938
entered for the BeforeExecuteStepEvent event, followed by the ExecuteEvent event, andfinishing with the AfterExecuteStepEvent event. However, unlike most API test steps,there is no predetermined step flow. For example, when you select a standardactivity test step, UFT has already preset how to perform the activity, and the onlymodifications you can make to the test step come by writing special event handlercode. For Custom Code events, the step execution is performed only with thespecial code you enter.
Because the step execution flow is limited only by the code you use, you can useCustom Code events in a number of ways:
l Creating unique steps not supported out of the box by UFT API tests.l Casting variables or parameters for use in other stepsEach Custom Code step can access properties, parameters, or variables from anytest step preceding the step or from a parent activity of the step. However, youshould not use Custom Code steps to set step properties or parameters for othersteps. Because the step runs at its place in the test flow - separate from other teststeps, setting a property or parameter value for a test step in a Custom Code stepdoes not affect the property values of the other test steps when they run in the TestFlow.
Each Custom Code step is composed of four events:
l BeforeExecuteStepEvent
l ExecuteStepEvent
l AfterExecuteStepEvent
l CodeCheckpointEvent
Only the ExecuteStepEvent event is mandatory when using a Custom Code step.When you add a Custom Code step to the canvas, UFT creates an alert in thecanvas with an error in the Errors pane reminding you to create an ExecuteEventevent in the TestUserCode.cs file. Until this error is resolved, you cannot run your test.
Open a window for writing custom codeRelevant for: API testing only
When creating or editing a test, you can use event handlers to test non-standardbehavior of your application's API. For non-custom code activities, the default eventhandlers include events for checkpoints, before step execution, and after stepexecution.
User GuideChapter 54: Event Handlers for API Test Steps
HP Unified Functional Testing (12.53) Page 629 of 938

Open the Events tab1. In the canvas, select an activity.
2. In the Properties pane, open the Events tab .
Note: You can also open the Events tab by double-clicking a Custom Codeactivity in the canvas.
Select an eventIn the Handler column, double-click the row for the event to which you want toprovide code.
The TestUserCode.cs file opens as a separate tab.
User GuideChapter 54: Event Handlers for API Test Steps
HP Unified Functional Testing (12.53) Page 630 of 938
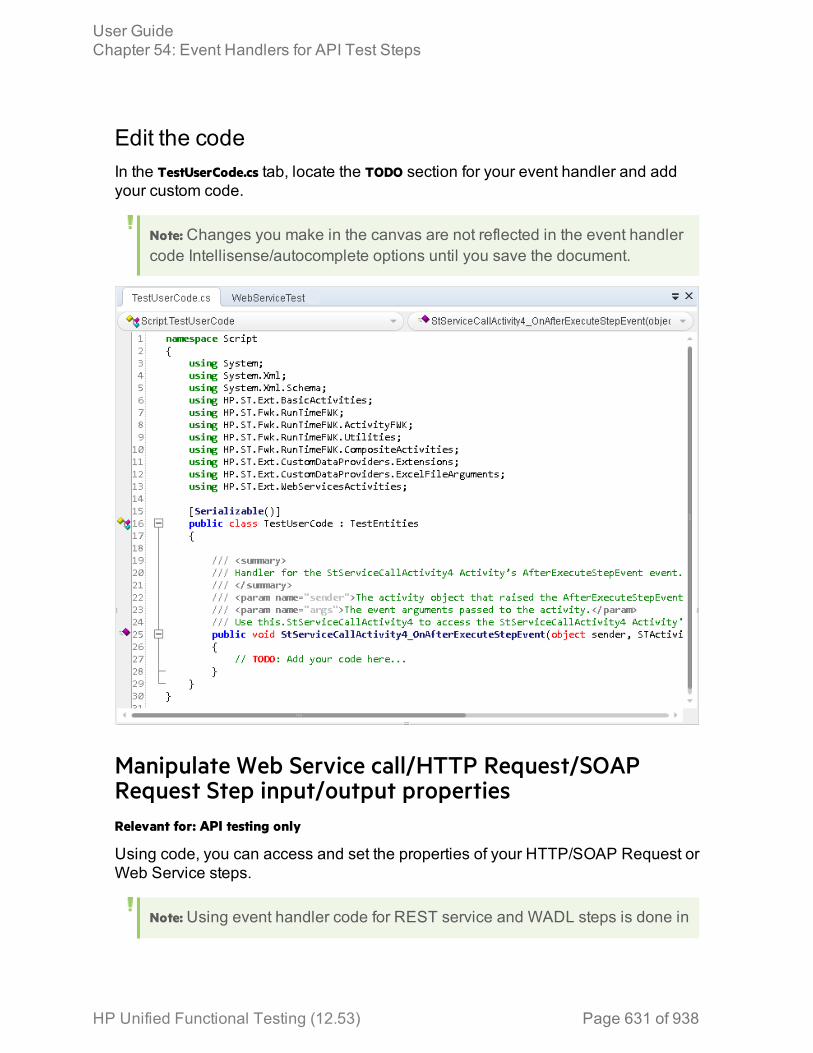
Edit the codeIn the TestUserCode.cs tab, locate the TODO section for your event handler and addyour custom code.
Note: Changes you make in the canvas are not reflected in the event handlercode Intellisense/autocomplete options until you save the document.
Manipulate Web Service call/HTTP Request/SOAPRequest Step input/output propertiesRelevant for: API testing only
Using code, you can access and set the properties of your HTTP/SOAP Request orWeb Service steps.
Note: Using event handler code for REST service and WADL steps is done in
User GuideChapter 54: Event Handlers for API Test Steps
HP Unified Functional Testing (12.53) Page 631 of 938
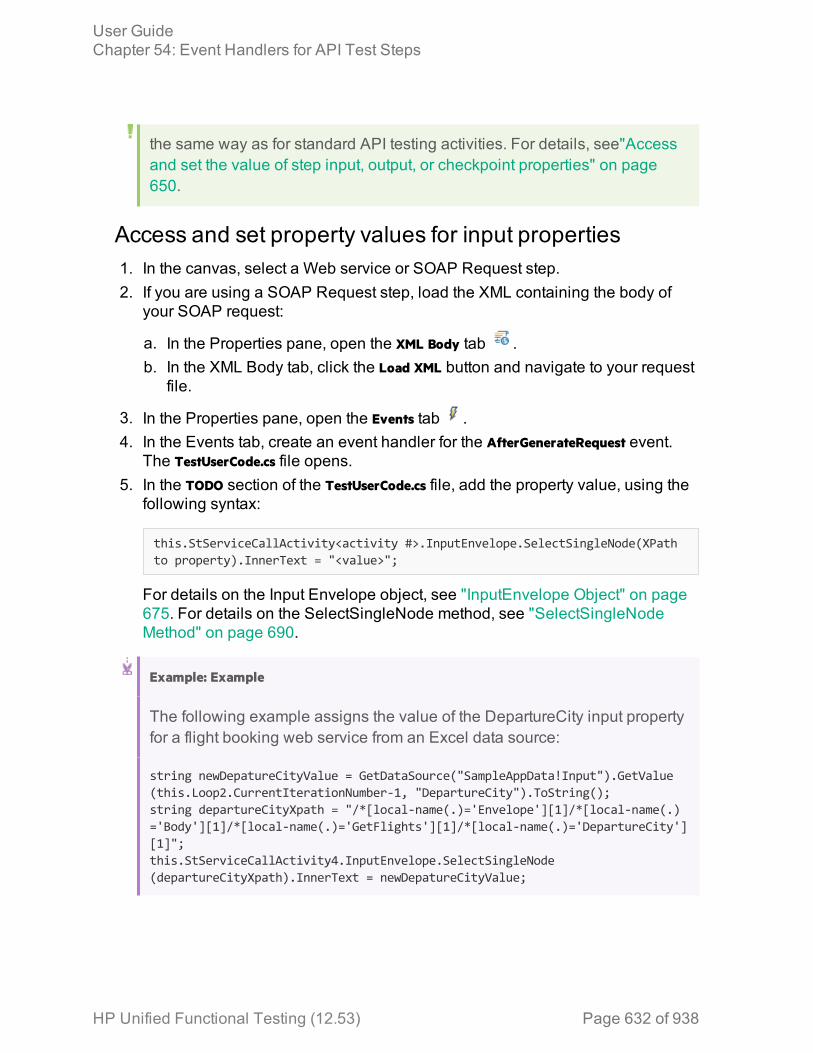
the same way as for standard API testing activities. For details, see"Accessand set the value of step input, output, or checkpoint properties" on page650.
Access and set property values for input properties1. In the canvas, select a Web service or SOAP Request step.2. If you are using a SOAP Request step, load the XML containing the body of
your SOAP request:
a. In the Properties pane, open the XML Body tab .b. In the XML Body tab, click the Load XML button and navigate to your request
file.
3. In the Properties pane, open the Events tab .4. In the Events tab, create an event handler for the AfterGenerateRequest event.
The TestUserCode.cs file opens.5. In the TODO section of the TestUserCode.cs file, add the property value, using the
following syntax:
this.StServiceCallActivity<activity #>.InputEnvelope.SelectSingleNode(XPathto property).InnerText = "<value>";
For details on the Input Envelope object, see "InputEnvelope Object" on page675. For details on the SelectSingleNode method, see "SelectSingleNodeMethod" on page 690.
Example: Example
The following example assigns the value of the DepartureCity input propertyfor a flight booking web service from an Excel data source:
string newDepatureCityValue = GetDataSource("SampleAppData!Input").GetValue(this.Loop2.CurrentIterationNumber-1, "DepartureCity").ToString();string departureCityXpath = "/*[local-name(.)='Envelope'][1]/*[local-name(.)='Body'][1]/*[local-name(.)='GetFlights'][1]/*[local-name(.)='DepartureCity'][1]";this.StServiceCallActivity4.InputEnvelope.SelectSingleNode(departureCityXpath).InnerText = newDepatureCityValue;
User GuideChapter 54: Event Handlers for API Test Steps
HP Unified Functional Testing (12.53) Page 632 of 938
Add checkpoint property valuesYou can use code to add checkpoint values in a Web service or SOAP requeststep. This can be very useful if the response on which the checkpoints is based isdynamically created.
Note: You cannot change the value of already existing checkpoints set in theWeb service call.
1. Create an event handler for the CodeCheckpointEvent, as described in "Set thevalue of a checkpoint" on page 655.
2. Following the line containing your code for enabling the checkpoint(args.Checkpoint.RunUICheckpoints = true), enter the value of your checkpoint,using the following syntax:
args.Checkpoint.Assert.Equals(<actual value>,<expected value>);
In the <actual value> and <expected value> parameters, you access the checkpointproperties through the step's output envelope. To access the outputparameters, use the same syntax as described in "Access and set propertyvalues for input properties" on the previous page. However, you must changethe InputEnvelope to OutputEnvelope to access the correct properties.
User GuideChapter 54: Event Handlers for API Test Steps
HP Unified Functional Testing (12.53) Page 633 of 938
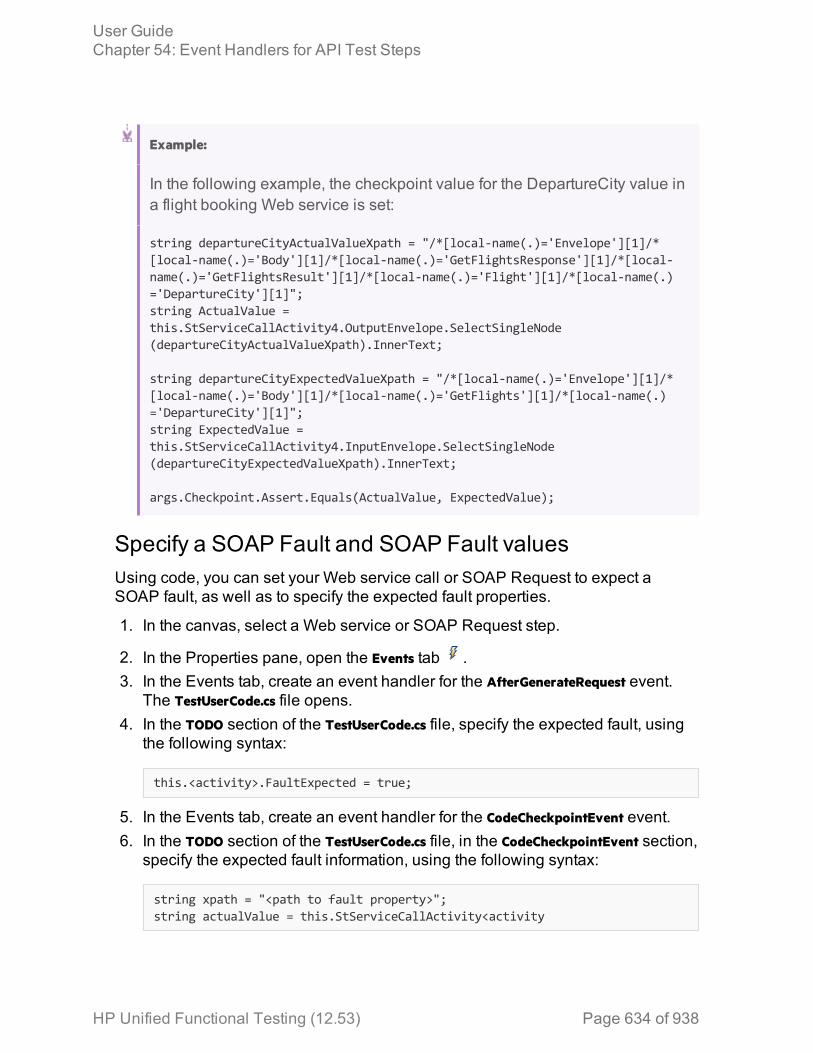
Example:
In the following example, the checkpoint value for the DepartureCity value ina flight booking Web service is set:
string departureCityActualValueXpath = "/*[local-name(.)='Envelope'][1]/*[local-name(.)='Body'][1]/*[local-name(.)='GetFlightsResponse'][1]/*[local-name(.)='GetFlightsResult'][1]/*[local-name(.)='Flight'][1]/*[local-name(.)='DepartureCity'][1]";string ActualValue =this.StServiceCallActivity4.OutputEnvelope.SelectSingleNode(departureCityActualValueXpath).InnerText;
string departureCityExpectedValueXpath = "/*[local-name(.)='Envelope'][1]/*[local-name(.)='Body'][1]/*[local-name(.)='GetFlights'][1]/*[local-name(.)='DepartureCity'][1]";string ExpectedValue =this.StServiceCallActivity4.InputEnvelope.SelectSingleNode(departureCityExpectedValueXpath).InnerText;
args.Checkpoint.Assert.Equals(ActualValue, ExpectedValue);
Specify a SOAP Fault and SOAP Fault valuesUsing code, you can set your Web service call or SOAP Request to expect aSOAP fault, as well as to specify the expected fault properties.
1. In the canvas, select a Web service or SOAP Request step.
2. In the Properties pane, open the Events tab .3. In the Events tab, create an event handler for the AfterGenerateRequest event.
The TestUserCode.cs file opens.4. In the TODO section of the TestUserCode.cs file, specify the expected fault, using
the following syntax:
this.<activity>.FaultExpected = true;
5. In the Events tab, create an event handler for the CodeCheckpointEvent event.6. In the TODO section of the TestUserCode.cs file, in the CodeCheckpointEvent section,
specify the expected fault information, using the following syntax:
string xpath = "<path to fault property>";string actualValue = this.StServiceCallActivity<activity
User GuideChapter 54: Event Handlers for API Test Steps
HP Unified Functional Testing (12.53) Page 634 of 938
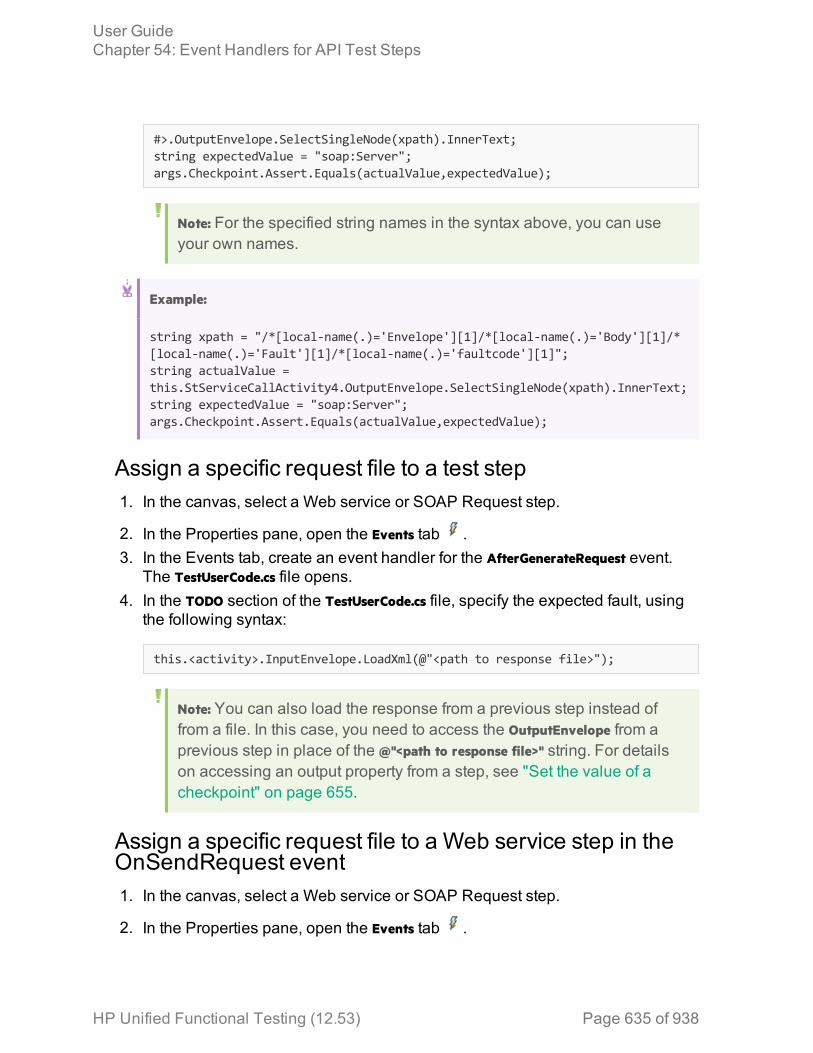
#>.OutputEnvelope.SelectSingleNode(xpath).InnerText;string expectedValue = "soap:Server";args.Checkpoint.Assert.Equals(actualValue,expectedValue);
Note: For the specified string names in the syntax above, you can useyour own names.
Example:
string xpath = "/*[local-name(.)='Envelope'][1]/*[local-name(.)='Body'][1]/*[local-name(.)='Fault'][1]/*[local-name(.)='faultcode'][1]";string actualValue =this.StServiceCallActivity4.OutputEnvelope.SelectSingleNode(xpath).InnerText;string expectedValue = "soap:Server";args.Checkpoint.Assert.Equals(actualValue,expectedValue);
Assign a specific request file to a test step1. In the canvas, select a Web service or SOAP Request step.
2. In the Properties pane, open the Events tab .3. In the Events tab, create an event handler for the AfterGenerateRequest event.
The TestUserCode.cs file opens.4. In the TODO section of the TestUserCode.cs file, specify the expected fault, using
the following syntax:
this.<activity>.InputEnvelope.LoadXml(@"<path to response file>");
Note: You can also load the response from a previous step instead offrom a file. In this case, you need to access the OutputEnvelope from aprevious step in place of the @"<path to response file>" string. For detailson accessing an output property from a step, see "Set the value of acheckpoint" on page 655.
Assign a specific request file to a Web service step in theOnSendRequest event1. In the canvas, select a Web service or SOAP Request step.
2. In the Properties pane, open the Events tab .
User GuideChapter 54: Event Handlers for API Test Steps
HP Unified Functional Testing (12.53) Page 635 of 938
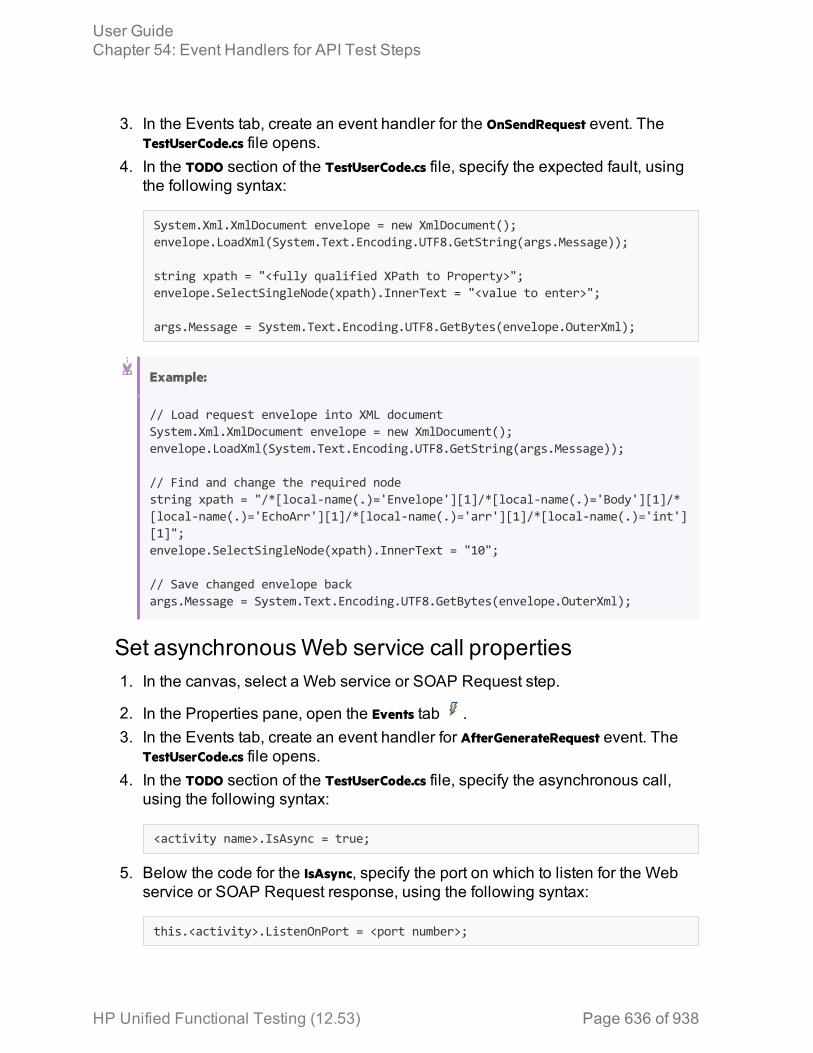
3. In the Events tab, create an event handler for the OnSendRequest event. TheTestUserCode.cs file opens.
4. In the TODO section of the TestUserCode.cs file, specify the expected fault, usingthe following syntax:
System.Xml.XmlDocument envelope = new XmlDocument();envelope.LoadXml(System.Text.Encoding.UTF8.GetString(args.Message));
string xpath = "<fully qualified XPath to Property>";envelope.SelectSingleNode(xpath).InnerText = "<value to enter>";
args.Message = System.Text.Encoding.UTF8.GetBytes(envelope.OuterXml);
Example:
// Load request envelope into XML documentSystem.Xml.XmlDocument envelope = new XmlDocument();envelope.LoadXml(System.Text.Encoding.UTF8.GetString(args.Message));
// Find and change the required nodestring xpath = "/*[local-name(.)='Envelope'][1]/*[local-name(.)='Body'][1]/*[local-name(.)='EchoArr'][1]/*[local-name(.)='arr'][1]/*[local-name(.)='int'][1]";envelope.SelectSingleNode(xpath).InnerText = "10";
// Save changed envelope backargs.Message = System.Text.Encoding.UTF8.GetBytes(envelope.OuterXml);
Set asynchronousWeb service call properties1. In the canvas, select a Web service or SOAP Request step.
2. In the Properties pane, open the Events tab .3. In the Events tab, create an event handler for AfterGenerateRequest event. The
TestUserCode.cs file opens.4. In the TODO section of the TestUserCode.cs file, specify the asynchronous call,
using the following syntax:
<activity name>.IsAsync = true;
5. Below the code for the IsAsync, specify the port on which to listen for the Webservice or SOAP Request response, using the following syntax:
this.<activity>.ListenOnPort = <port number>;
User GuideChapter 54: Event Handlers for API Test Steps
HP Unified Functional Testing (12.53) Page 636 of 938
Example:
StServiceCallActivity8.IsAsync = true;this.StServiceCallActivity8.ListenOnPort = 8822;
Add an input attachment to a Web service callYou can use code to send an attachment with a Web service call. This is veryuseful when the attachment is generated dynamically, and you cannot add thisattachment using the API testing interface during test design.
Note: If you are loading an attachment from outside your test, skip to step 5.
1. Add a custom code step to the canvas.
2. In the Properties pane, open the Input/Output Properties tab .3. In the Input/Output Properties, click Add and select Add Input Parameter. In the
Add Input Parameter dialog box, give the parameter a meaningful name.4. Link the parameter to the desired attachment. For details, see "Assign data to
API test/component steps" on page 454.5. In the canvas, select a Web service or SOAP Request step.
6. In the Properties pane, open the Events tab .7. In the Events tab, create the AfterGenerateRequest event. The TestUserCode.cs file
opens.8. In the TODO section of the TestUserCode.cs file, specify the attachment to add,
using the following syntax:
string attachmentsInfo =@"<InputAttachments>
<Type> <attachment type> </Type><Attachments>
<Origin> <path to file> </Origin><OriginType> File </OriginType><ContentType> <type of content> </ContentType><ContentID>Auto</ContentID>
</Attachments></InputAttachments>";
this.StServiceCallActivity<activity #>.InputAttachments = new XmlDocument();this.StServiceCallActivity<activity #>.InputAttachments.LoadXml(attachmentsInfo);
User GuideChapter 54: Event Handlers for API Test Steps
HP Unified Functional Testing (12.53) Page 637 of 938
You must define the attachment properties before the code that adds theattachment, as seen in the @<InputAttachments> of the code. These propertiesare then displayed for the test step in the Attachments tab in the Propertiespane.
Note: You can define multiple attachments between the opening<InputAttachments> tag and the closing </InputAttachments> tag, using thesyntax displayed above (between the <Attachments> and</Attachments> tags.
9. Optional - to override an attachment already defined in the Attachments tab inthe Properties pane, you can use the following syntax:
string <string name> = "<fully qualified XPath to attachment defined in theAttachments tab>";this.StServiceCallActivity<activity #>.InputAttachments.SelectSingleNode(<string name>).InnerText = @"<path to file>";
Note: This does not update the attachment's properties, but simplyoverwrites the attachment file.
User GuideChapter 54: Event Handlers for API Test Steps
HP Unified Functional Testing (12.53) Page 638 of 938
Example:
l The following example adds two text file attachments to your test:
string attachmentsInfo =@"<InputAttachments>
<Type>DIME</Type><Attachments>
<Origin>C:\somefile1.txt</Origin><OriginType>File</OriginType><ContentType>text/plain</ContentType><ContentID>Auto</ContentID>
</Attachments><Attachments>
<Origin>C:\somefile2.txt</Origin><OriginType>File</OriginType><ContentType>text/plain</ContentType><ContentID>Auto</ContentID>
</Attachments></InputAttachments>";
this.StServiceCallActivity5.InputAttachments = new XmlDocument();this.StServiceCallActivity5.InputAttachments.LoadXml(attachmentsInfo);
l The following example replaces an existing attachment with a text file:
string firstAttachmentOriginXpath = "/*[local-name(.)='InputAttachments'][1]/*[local-name(.)='Attachments'][1]/*[local-name(.)='Origin'][1]";this.StServiceCallActivity5.InputAttachments.SelectSingleNode(firstAttachmentOriginXpath).InnerText = @"c:\somefile.txt";
Access an attachment from a Web service call responseBy default, UFT saves attachments from a Web server response in the run resultsfolder contained within the test's folder. However, you can also access theseattachments using an event handler:
1. In the canvas, select the Web service or SOAP Request step for which youwant to save the Web service call.
2. In the Properties pane, open the Events tab .3. In the Events tab, create an event handler for the AfterExecuteStepEvent event.
The TestUserCode.cs file opens.
User GuideChapter 54: Event Handlers for API Test Steps
HP Unified Functional Testing (12.53) Page 639 of 938
4. In the TODO section of the TestUserCode.cs file, access the attachmentinformation, using the following syntax:
string <string name> = System.IO.Path.Combine(this.StServiceCallActivity<activity#>.Context.ReportDirectory,"Attachments");string[] <name> = System.IO.Directory.GetFiles(<string name>);
This event handler returns an array which contains the full paths to theattachments returned with the Web service response.
Example:
string responseAttachmentsFolder = System.IO.Path.Combine(this.StServiceCallActivity4.Context.ReportDirectory,"Attachments");string[] responseAttachments = System.IO.Directory.GetFiles(responseAttachmentsFolder);
Add a HTTP Header for Web Service CallsWhen you are editing your Web service call or SOAP Request steps, you can usean event to add an HTTP header. This is useful if the source for this information iscreated dynamically during a test run.
1. In the canvas, select a Web service or SOAP Request step.
2. In the Properties pane, open the Events tab .3. In the Events tab, create an event handler for the BeforeApplyProtocolSettings
event. The TestUserCode.cs file opens.4. In the TODO section of the TestUserCode.cs file, add the header element, using the
following syntax:
this.StServiceCallActivity4.HttpRequestHeaders.Add("<header key>", "< keyvalue>");
Note: You can also set the HTTP headers values by expanding theRequestHeader node in the Properties pane's Input/Checkpoints tab. You thenlink to a data source from the Name and Value rows.
If you modify the headers using code in an event handler, it will override thevalues in the Properties pane during the test run.
User GuideChapter 54: Event Handlers for API Test Steps
HP Unified Functional Testing (12.53) Page 640 of 938
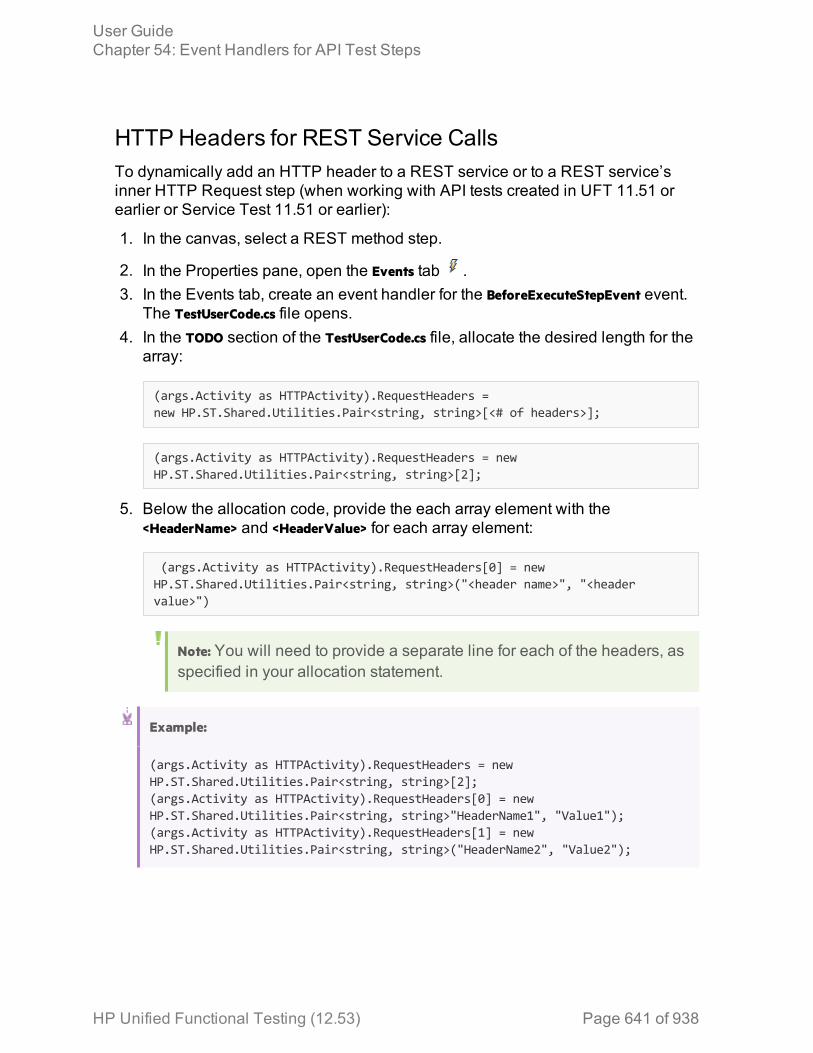
HTTP Headers for REST Service CallsTo dynamically add an HTTP header to a REST service or to a REST service’sinner HTTP Request step (when working with API tests created in UFT 11.51 orearlier or Service Test 11.51 or earlier):
1. In the canvas, select a REST method step.
2. In the Properties pane, open the Events tab .3. In the Events tab, create an event handler for the BeforeExecuteStepEvent event.
The TestUserCode.cs file opens.4. In the TODO section of the TestUserCode.cs file, allocate the desired length for the
array:
(args.Activity as HTTPActivity).RequestHeaders =new HP.ST.Shared.Utilities.Pair<string, string>[<# of headers>];
(args.Activity as HTTPActivity).RequestHeaders = newHP.ST.Shared.Utilities.Pair<string, string>[2];
5. Below the allocation code, provide the each array element with the<HeaderName> and <HeaderValue> for each array element:
(args.Activity as HTTPActivity).RequestHeaders[0] = newHP.ST.Shared.Utilities.Pair<string, string>("<header name>", "<headervalue>")
Note: You will need to provide a separate line for each of the headers, asspecified in your allocation statement.
Example:
(args.Activity as HTTPActivity).RequestHeaders = newHP.ST.Shared.Utilities.Pair<string, string>[2];(args.Activity as HTTPActivity).RequestHeaders[0] = newHP.ST.Shared.Utilities.Pair<string, string>"HeaderName1", "Value1");(args.Activity as HTTPActivity).RequestHeaders[1] = newHP.ST.Shared.Utilities.Pair<string, string>("HeaderName2", "Value2");
User GuideChapter 54: Event Handlers for API Test Steps
HP Unified Functional Testing (12.53) Page 641 of 938
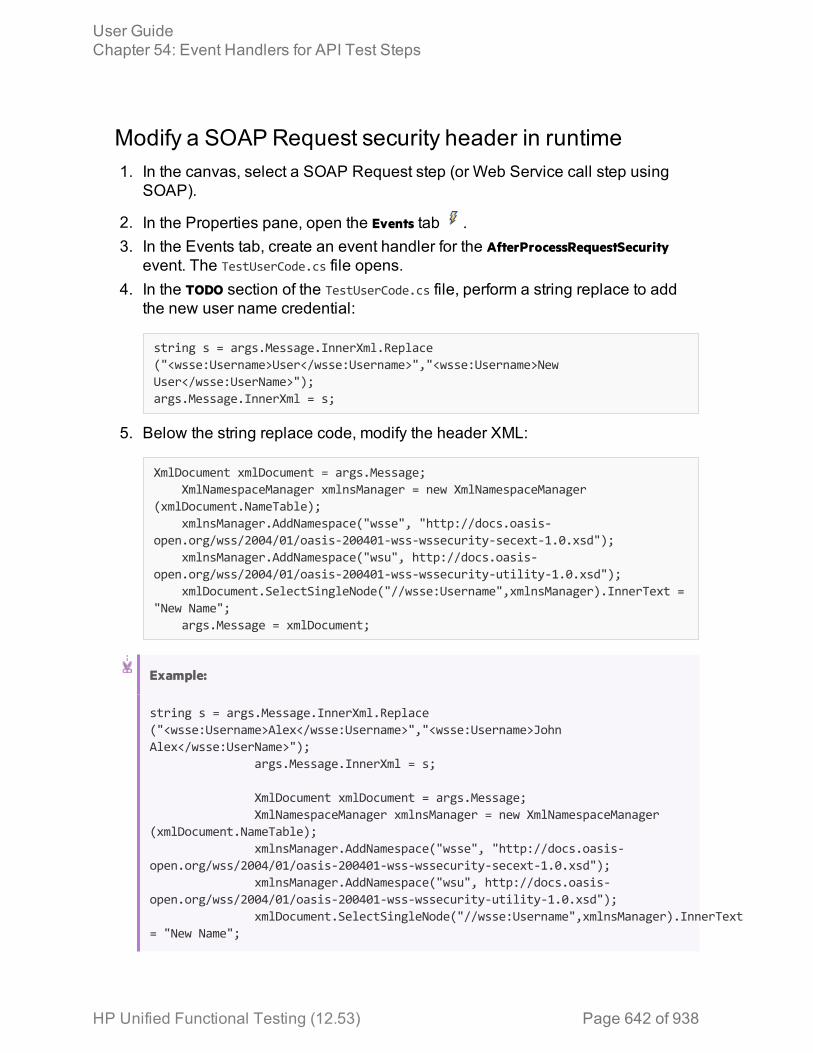
Modify a SOAP Request security header in runtime1. In the canvas, select a SOAP Request step (or Web Service call step using
SOAP).
2. In the Properties pane, open the Events tab .3. In the Events tab, create an event handler for the AfterProcessRequestSecurity
event. The TestUserCode.cs file opens.4. In the TODO section of the TestUserCode.cs file, perform a string replace to add
the new user name credential:
string s = args.Message.InnerXml.Replace("<wsse:Username>User</wsse:Username>","<wsse:Username>NewUser</wsse:UserName>");args.Message.InnerXml = s;
5. Below the string replace code, modify the header XML:
XmlDocument xmlDocument = args.Message;XmlNamespaceManager xmlnsManager = new XmlNamespaceManager
(xmlDocument.NameTable);xmlnsManager.AddNamespace("wsse", "http://docs.oasis-
open.org/wss/2004/01/oasis-200401-wss-wssecurity-secext-1.0.xsd");xmlnsManager.AddNamespace("wsu", http://docs.oasis-
open.org/wss/2004/01/oasis-200401-wss-wssecurity-utility-1.0.xsd");xmlDocument.SelectSingleNode("//wsse:Username",xmlnsManager).InnerText =
"New Name";args.Message = xmlDocument;
Example:
string s = args.Message.InnerXml.Replace("<wsse:Username>Alex</wsse:Username>","<wsse:Username>JohnAlex</wsse:UserName>");
args.Message.InnerXml = s;
XmlDocument xmlDocument = args.Message;XmlNamespaceManager xmlnsManager = new XmlNamespaceManager
(xmlDocument.NameTable);xmlnsManager.AddNamespace("wsse", "http://docs.oasis-
open.org/wss/2004/01/oasis-200401-wss-wssecurity-secext-1.0.xsd");xmlnsManager.AddNamespace("wsu", http://docs.oasis-
open.org/wss/2004/01/oasis-200401-wss-wssecurity-utility-1.0.xsd");xmlDocument.SelectSingleNode("//wsse:Username",xmlnsManager).InnerText
= "New Name";
User GuideChapter 54: Event Handlers for API Test Steps
HP Unified Functional Testing (12.53) Page 642 of 938
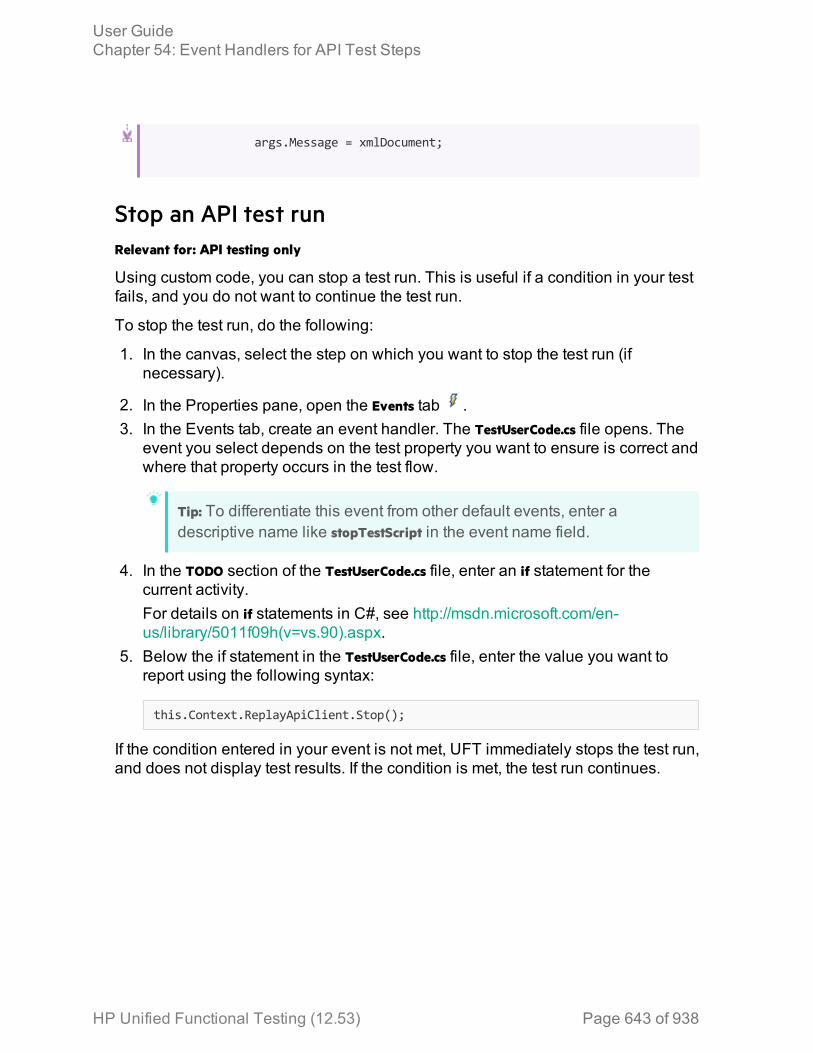
args.Message = xmlDocument;
Stop an API test runRelevant for: API testing only
Using custom code, you can stop a test run. This is useful if a condition in your testfails, and you do not want to continue the test run.
To stop the test run, do the following:
1. In the canvas, select the step on which you want to stop the test run (ifnecessary).
2. In the Properties pane, open the Events tab .3. In the Events tab, create an event handler. The TestUserCode.cs file opens. The
event you select depends on the test property you want to ensure is correct andwhere that property occurs in the test flow.
Tip: To differentiate this event from other default events, enter adescriptive name like stopTestScript in the event name field.
4. In the TODO section of the TestUserCode.cs file, enter an if statement for thecurrent activity.For details on if statements in C#, see http://msdn.microsoft.com/en-us/library/5011f09h(v=vs.90).aspx.
5. Below the if statement in the TestUserCode.cs file, enter the value you want toreport using the following syntax:
this.Context.ReplayApiClient.Stop();
If the condition entered in your event is not met, UFT immediately stops the test run,and does not display test results. If the condition is met, the test run continues.
User GuideChapter 54: Event Handlers for API Test Steps
HP Unified Functional Testing (12.53) Page 643 of 938

Example:
The following example stops a test run on a SOAP Response step. Thiscode is set on the OnReceiveResponse event, given the name stopTestScript. Itstops the test run if the SOAP response returns a fault:
String node_xpath = "/*local-name(.)='Envelope'][1]/*local-name(.)='Body'][1]";if(this.StServiceCallActivity10.OutputEnvelope.SelectSingleNode(node_xpath).FirstChild.Name=="soapenv:Fault")
this.Context.ReplayApiClient.Stop();
Manipulate data programmaticallyRelevant for: API testing only
Using code, you can retrieve or set test step property/parameter values, import orexport property/parameter values, or data-drive the property/parameter values ofyour test steps.
PrerequisiteAdd at least one data source to your test and save the test.
Retrieve a value from a data sourceIn order to get a value from a data source, you must use the GetDataSource andGetValue methods:
1. Select the step for which you want to retrieve a data source value.
2. In the Properties pane, open the Events tab .3. In the Events tab, create an event handler. The TestUserCode.cs file opens.4. In the TODO section of the TestUserCode.cs file, call the data source value you
want to retrieve using the following syntax:
GetDataSource("<data source name>").GetValue(<row index>, "<column name>");
Note: When entering the parameters for the GetValue function, your rowindex is based on 0.
User GuideChapter 54: Event Handlers for API Test Steps
HP Unified Functional Testing (12.53) Page 644 of 938
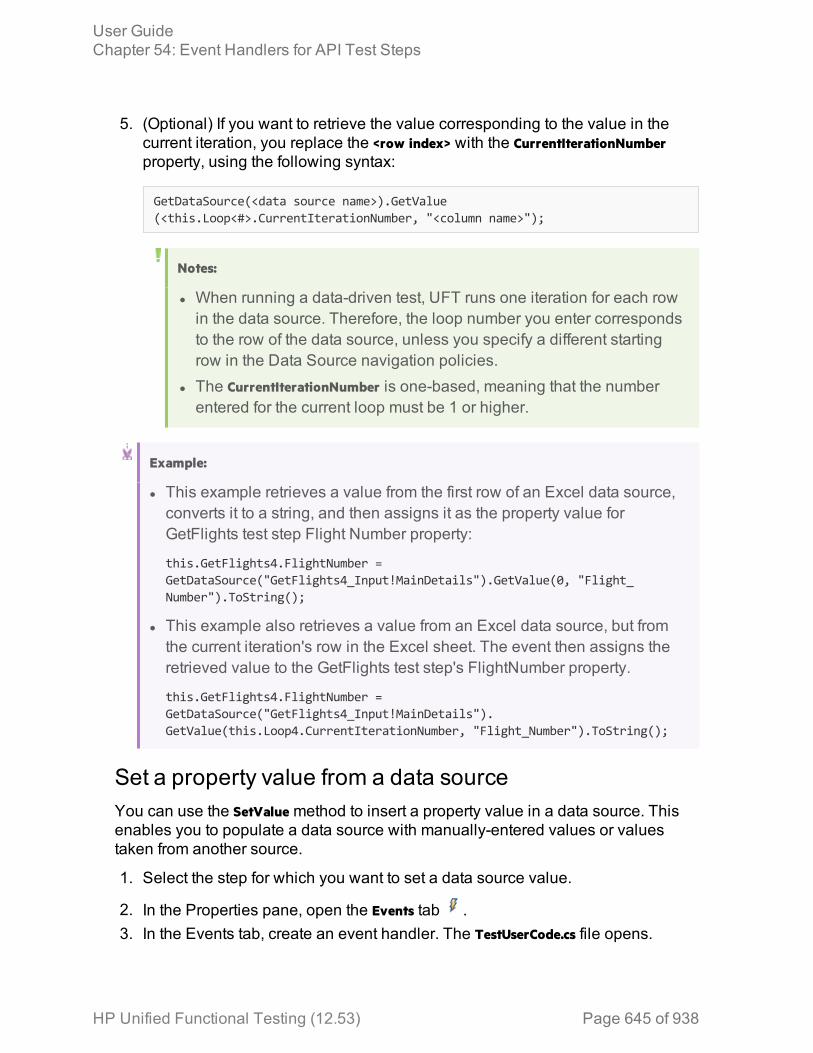
5. (Optional) If you want to retrieve the value corresponding to the value in thecurrent iteration, you replace the <row index> with the CurrentIterationNumberproperty, using the following syntax:
GetDataSource(<data source name>).GetValue(<this.Loop<#>.CurrentIterationNumber, "<column name>");
Notes:
l When running a data-driven test, UFT runs one iteration for each rowin the data source. Therefore, the loop number you enter correspondsto the row of the data source, unless you specify a different startingrow in the Data Source navigation policies.
l The CurrentIterationNumber is one-based, meaning that the numberentered for the current loop must be 1 or higher.
Example:
l This example retrieves a value from the first row of an Excel data source,converts it to a string, and then assigns it as the property value forGetFlights test step Flight Number property:
this.GetFlights4.FlightNumber =GetDataSource("GetFlights4_Input!MainDetails").GetValue(0, "Flight_Number").ToString();
l This example also retrieves a value from an Excel data source, but fromthe current iteration's row in the Excel sheet. The event then assigns theretrieved value to the GetFlights test step's FlightNumber property.
this.GetFlights4.FlightNumber =GetDataSource("GetFlights4_Input!MainDetails").GetValue(this.Loop4.CurrentIterationNumber, "Flight_Number").ToString();
Set a property value from a data sourceYou can use the SetValue method to insert a property value in a data source. Thisenables you to populate a data source with manually-entered values or valuestaken from another source.
1. Select the step for which you want to set a data source value.
2. In the Properties pane, open the Events tab .3. In the Events tab, create an event handler. The TestUserCode.cs file opens.
User GuideChapter 54: Event Handlers for API Test Steps
HP Unified Functional Testing (12.53) Page 645 of 938
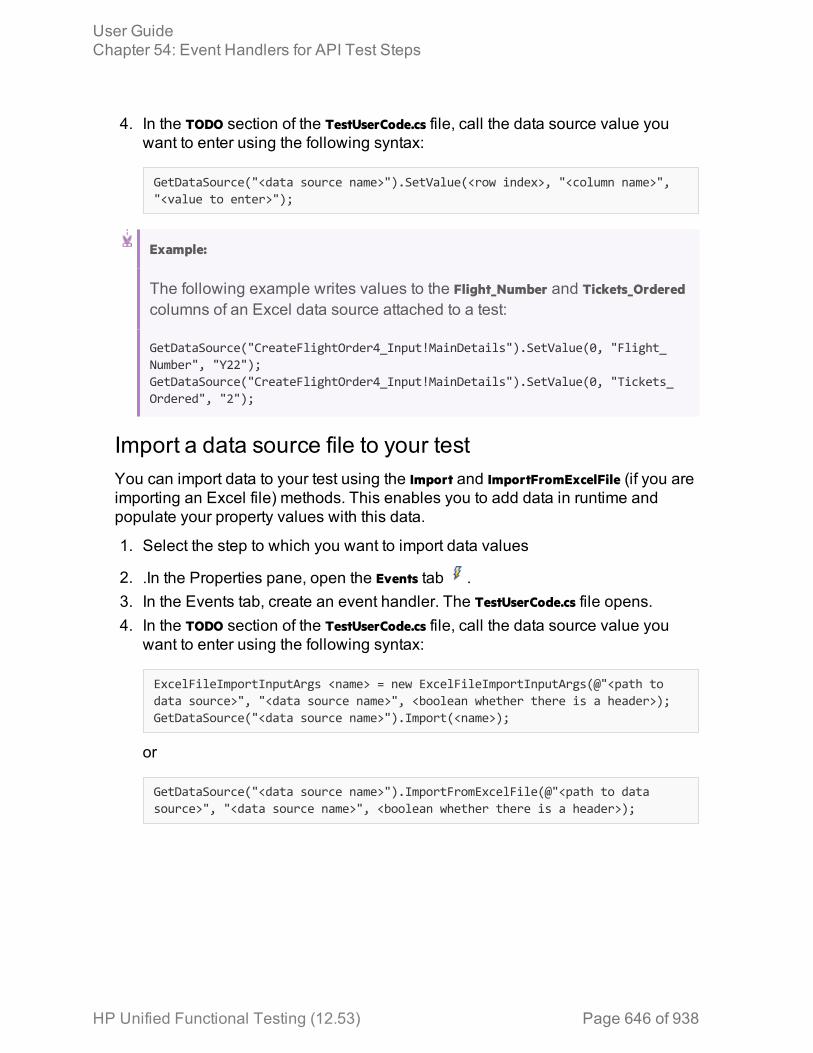
4. In the TODO section of the TestUserCode.cs file, call the data source value youwant to enter using the following syntax:
GetDataSource("<data source name>").SetValue(<row index>, "<column name>","<value to enter>");
Example:
The following example writes values to the Flight_Number and Tickets_Orderedcolumns of an Excel data source attached to a test:
GetDataSource("CreateFlightOrder4_Input!MainDetails").SetValue(0, "Flight_Number", "Y22");GetDataSource("CreateFlightOrder4_Input!MainDetails").SetValue(0, "Tickets_Ordered", "2");
Import a data source file to your testYou can import data to your test using the Import and ImportFromExcelFile (if you areimporting an Excel file) methods. This enables you to add data in runtime andpopulate your property values with this data.
1. Select the step to which you want to import data values
2. .In the Properties pane, open the Events tab .3. In the Events tab, create an event handler. The TestUserCode.cs file opens.4. In the TODO section of the TestUserCode.cs file, call the data source value you
want to enter using the following syntax:
ExcelFileImportInputArgs <name> = new ExcelFileImportInputArgs(@"<path todata source>", "<data source name>", <boolean whether there is a header>);GetDataSource("<data source name>").Import(<name>);
or
GetDataSource("<data source name>").ImportFromExcelFile(@"<path to datasource>", "<data source name>", <boolean whether there is a header>);
User GuideChapter 54: Event Handlers for API Test Steps
HP Unified Functional Testing (12.53) Page 646 of 938
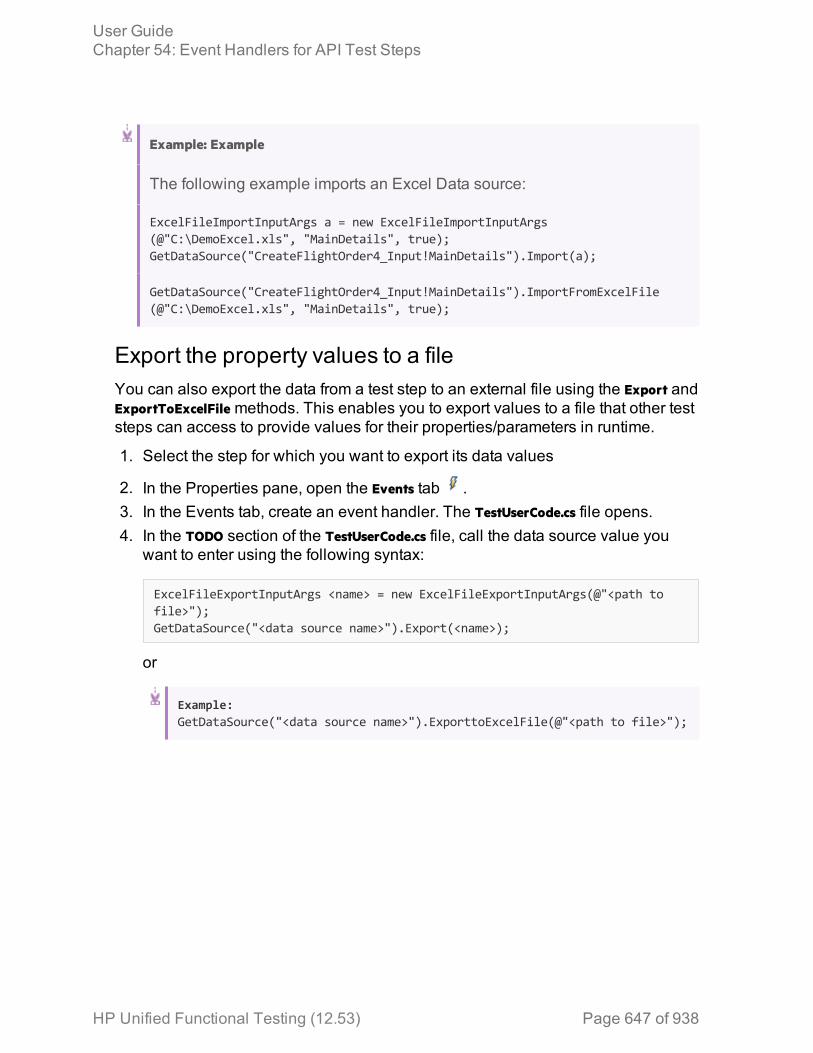
Example: Example
The following example imports an Excel Data source:
ExcelFileImportInputArgs a = new ExcelFileImportInputArgs(@"C:\DemoExcel.xls", "MainDetails", true);GetDataSource("CreateFlightOrder4_Input!MainDetails").Import(a);
GetDataSource("CreateFlightOrder4_Input!MainDetails").ImportFromExcelFile(@"C:\DemoExcel.xls", "MainDetails", true);
Export the property values to a fileYou can also export the data from a test step to an external file using the Export andExportToExcelFile methods. This enables you to export values to a file that other teststeps can access to provide values for their properties/parameters in runtime.
1. Select the step for which you want to export its data values
2. In the Properties pane, open the Events tab .3. In the Events tab, create an event handler. The TestUserCode.cs file opens.4. In the TODO section of the TestUserCode.cs file, call the data source value you
want to enter using the following syntax:
ExcelFileExportInputArgs <name> = new ExcelFileExportInputArgs(@"<path tofile>");GetDataSource("<data source name>").Export(<name>);
or
Example:GetDataSource("<data source name>").ExporttoExcelFile(@"<path to file>");
User GuideChapter 54: Event Handlers for API Test Steps
HP Unified Functional Testing (12.53) Page 647 of 938
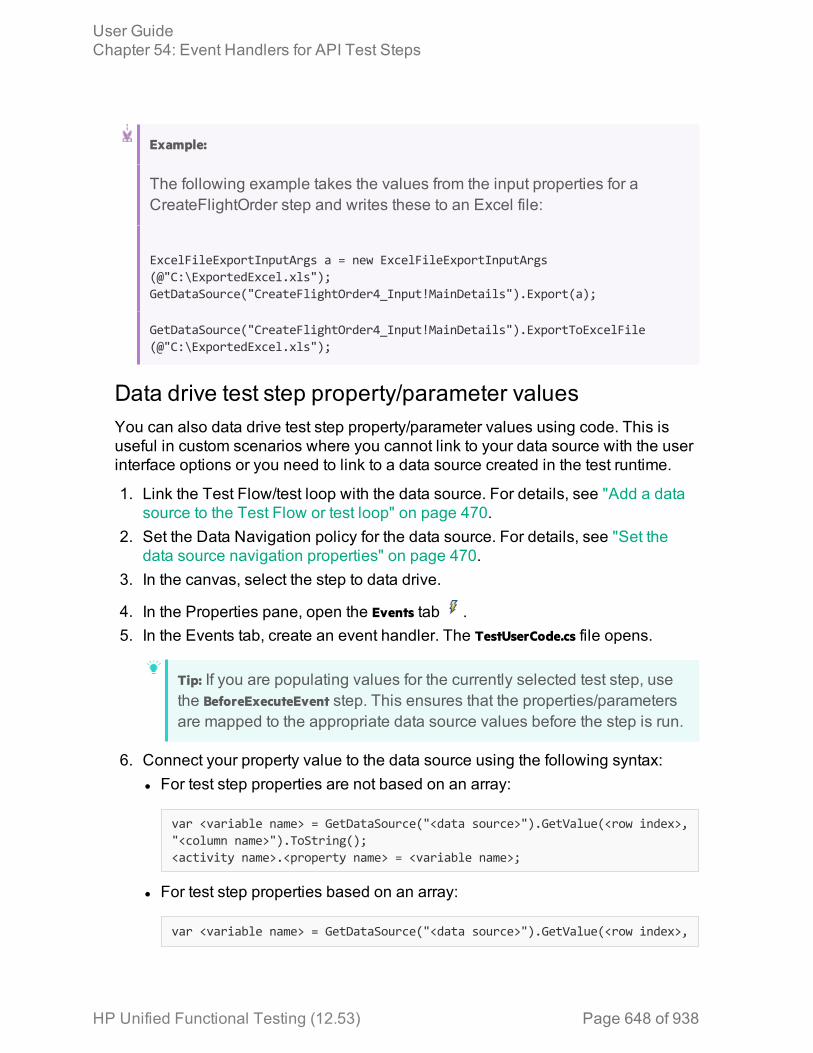
Example:
The following example takes the values from the input properties for aCreateFlightOrder step and writes these to an Excel file:
ExcelFileExportInputArgs a = new ExcelFileExportInputArgs(@"C:\ExportedExcel.xls");GetDataSource("CreateFlightOrder4_Input!MainDetails").Export(a);
GetDataSource("CreateFlightOrder4_Input!MainDetails").ExportToExcelFile(@"C:\ExportedExcel.xls");
Data drive test step property/parameter valuesYou can also data drive test step property/parameter values using code. This isuseful in custom scenarios where you cannot link to your data source with the userinterface options or you need to link to a data source created in the test runtime.
1. Link the Test Flow/test loop with the data source. For details, see "Add a datasource to the Test Flow or test loop" on page 470.
2. Set the Data Navigation policy for the data source. For details, see "Set thedata source navigation properties" on page 470.
3. In the canvas, select the step to data drive.
4. In the Properties pane, open the Events tab .5. In the Events tab, create an event handler. The TestUserCode.cs file opens.
Tip: If you are populating values for the currently selected test step, usethe BeforeExecuteEvent step. This ensures that the properties/parametersare mapped to the appropriate data source values before the step is run.
6. Connect your property value to the data source using the following syntax:l For test step properties are not based on an array:
var <variable name> = GetDataSource("<data source>").GetValue(<row index>,"<column name>").ToString();<activity name>.<property name> = <variable name>;
l For test step properties based on an array:
var <variable name> = GetDataSource("<data source>").GetValue(<row index>,
User GuideChapter 54: Event Handlers for API Test Steps
HP Unified Functional Testing (12.53) Page 648 of 938

"<column name>").ToString();<activity name>.InputEnvelope.SelectSingleNode("<fully qualified xpath toproperty value>").InnerText = <variable name>;
Notes:
l You can retrieve the XPath to a property name stored in an array byright-clicking the Property name in the Input/Checkpoints tab andselecting Copy Fully Qualified XPath.
l If you want to set the value of an output value or checkpoint stored inan array, change the InputEnvelope to OutputEnvelope in the syntaxdisplayed above.
l If you are running multiple iterations using data-driving, you can usethe this.Loop<#>.CurrentIterationValue property as the row index.However, since the CurrentIterationProperty is one-based, but the row-index is zero-based, add a -1 to the CurrentIterationProperty to ensurethat your last iteration does not fail.
Example:
The following example sets the DepartureCity and ArrivalCity values for a flightbooking Web service from an Excel data source called "WebServiceData."
var GetFlights_Input_Departure_City = GetDataSource("WebServiceData!Input").GetValue(this.Loop2.CurrentIterationNumber-1,"DepartureCity").ToString();StServiceCallActivity4.InputEnvelope.SelectSingleNode("/*[local-name(.)='Envelope'][1]/*[local-name(.)='Body'][1]/*[local-name(.)='GetFlights'][1]/*[local-name(.)='DepartureCity'][1]").InnerText = GetFlights_Input_Departure_City;var GetFlights_Input_Arrival_City = GetDataSource("WebServiceData!Input").GetValue(this.Loop2.CurrentIterationNumber-1,"ArrivalCity").ToString();StServiceCallActivity4.InputEnvelope.SelectSingleNode("/*[local-name(.)='Envelope'][1]/*[local-name(.)='Body'][1]/*[local-name(.)='GetFlights'][1]/*[local-name(.)='ArrivalCity'][1]").InnerText = GetFlights_Input_Arrival_City;
User GuideChapter 54: Event Handlers for API Test Steps
HP Unified Functional Testing (12.53) Page 649 of 938
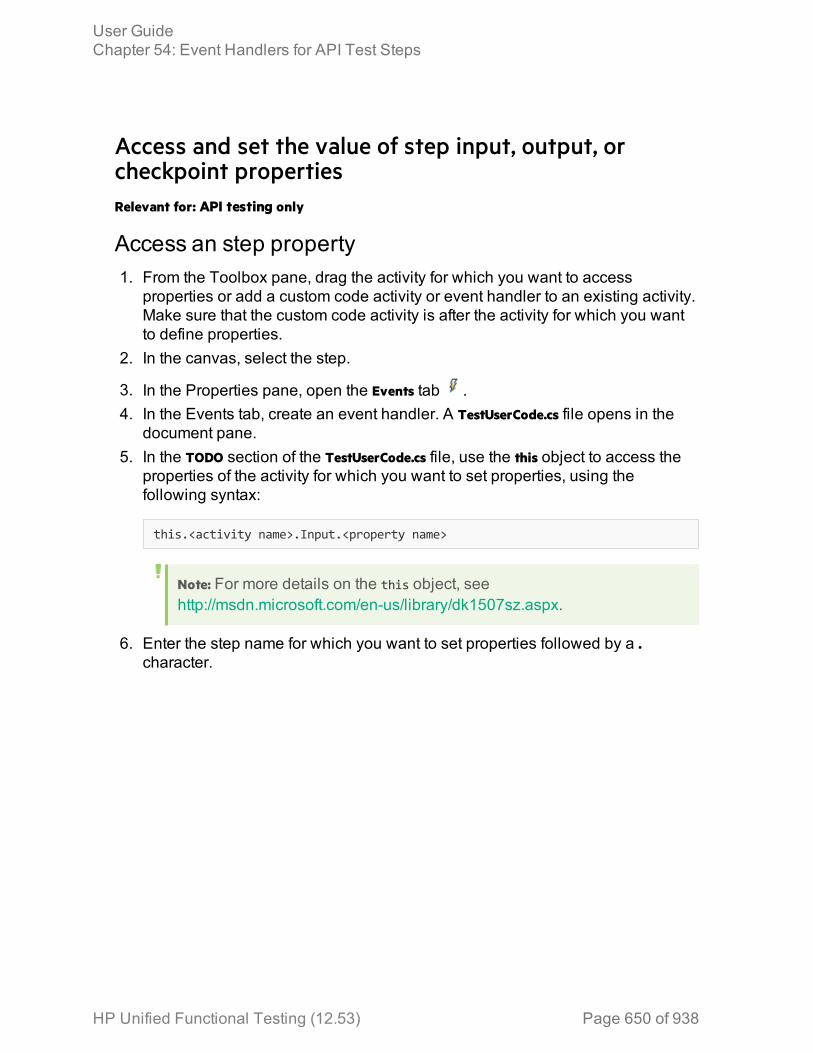
Access and set the value of step input, output, orcheckpoint propertiesRelevant for: API testing only
Access an step property1. From the Toolbox pane, drag the activity for which you want to access
properties or add a custom code activity or event handler to an existing activity.Make sure that the custom code activity is after the activity for which you wantto define properties.
2. In the canvas, select the step.
3. In the Properties pane, open the Events tab .4. In the Events tab, create an event handler. A TestUserCode.cs file opens in the
document pane.5. In the TODO section of the TestUserCode.cs file, use the this object to access the
properties of the activity for which you want to set properties, using thefollowing syntax:
this.<activity name>.Input.<property name>
Note: For more details on the this object, seehttp://msdn.microsoft.com/en-us/library/dk1507sz.aspx.
6. Enter the step name for which you want to set properties followed by a .character.
User GuideChapter 54: Event Handlers for API Test Steps
HP Unified Functional Testing (12.53) Page 650 of 938

7. Enter the property name of the activity to set properties, followed by a .character. In this example, you set the Prefix and Suffix properties for theConcatenateStringsActivity step.
Access a step's parent activityThe Parent property of a step refers to the loop, condition, or parent activity thatencloses a test step.
1. To access the activity's parent, use the this object as described in the "Accessan step property" on the previous page step,
2. Instead of entering the step's properties, enter the Parent property for the step.
User GuideChapter 54: Event Handlers for API Test Steps
HP Unified Functional Testing (12.53) Page 651 of 938
3. If you want to get the parent loop for an activity, enter the GetParentLoop method,using the following syntax:
this.<activity name>.GetParentLoop();
Example:
This example retrieves the parent activity and converts it into a string.
string ParentName = this.ConcatenateStringsActivity5.Parent.Name
Set the value of a step's properties1. In the canvas, select the step for which you want to set property values.
2. In the Properties pane, open the Events tab .3. In the Events tab, create an event handler. The TestUserCode.cs file opens.4. In the TODO section of the TestUserCode.cs file, enter the parameter value for the
parameters/properties, using this syntax:
this.<activity name>.Input.<parameter name> = <parameter value>;
or
this.<activity name>.Output.<parameter name> = <parameter value>;
You cannot set checkpoint values using the this.<activity name> object. You mustuse the args.Checkpoint object instead.
Important: Make sure that the value is the same type as the type enteredwhen you created the parameter, i.e. a string parameter must have astring value.
When your test runs, UFT passes the value as specified in your custom code stepto the other activity.
User GuideChapter 54: Event Handlers for API Test Steps
HP Unified Functional Testing (12.53) Page 652 of 938
Example: Example
This example sets the value of the Prefix and Suffix value for a ConcatenateStrings activity:
CodeActivity6.Input.a = "Hello";CodeActivity6.Input.b = "World";this.ConcatenateStringsActivity4.Prefix = CodeActivity6.Input.a;this.ConcatenateStringsActivity4.Suffix = CodeActivity6.Input.b;
Access the value of a step's property in runtimeYou can also report the runtime value of a test step's property or parameter in theOutput pane during a test run. This is useful if you want to watch the value of aparticular operation or object during the test run, without having to stop and debugthe test.
To do this, you can use a UserLogger object:
1. Add an event handler for the OnAfterExecuteStep event to the step for which youwant to watch a property/parameter value.
2. Use the UserLogger object to report the value to the compilation log in the Outputpane, using the following syntax:
Context.UserLogger.Info(<activity name>.<property name>);
Note: Using the Context object in an event handler or custom codeenables you to get the contextual value for the property/parameter (i.e.,the runtime value), instead of the entered value (what you enter in theProperties pane, for example).
User GuideChapter 54: Event Handlers for API Test Steps
HP Unified Functional Testing (12.53) Page 653 of 938
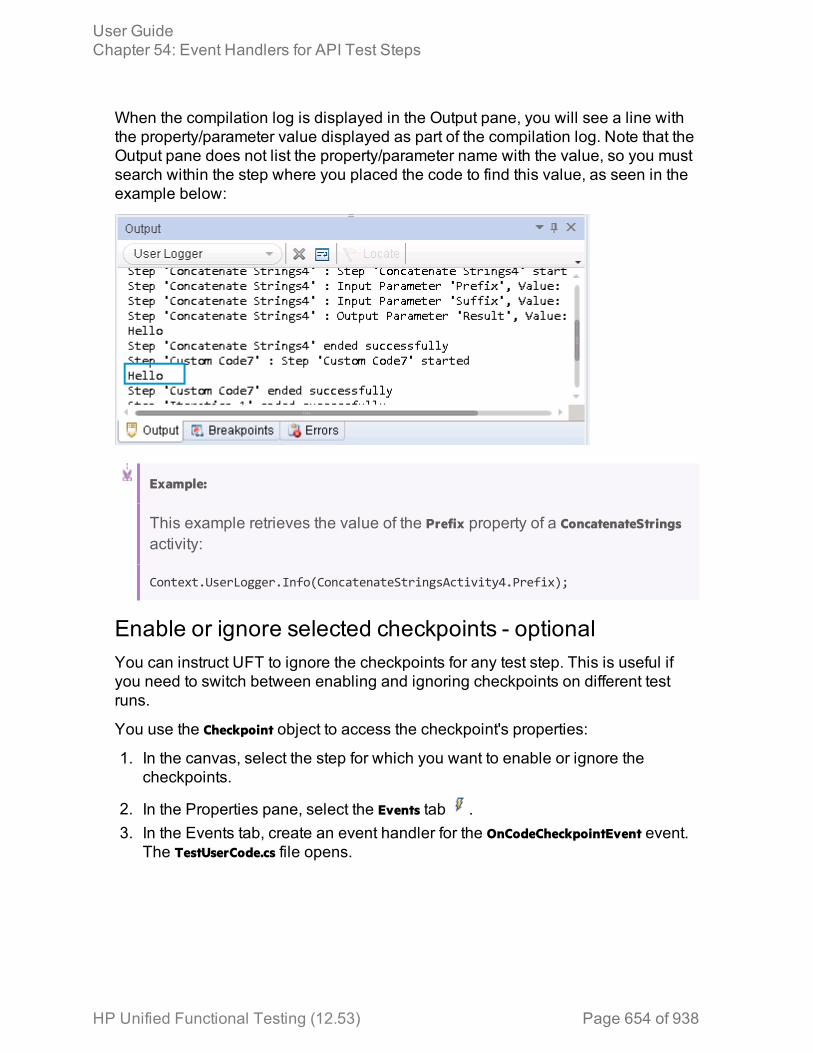
When the compilation log is displayed in the Output pane, you will see a line withthe property/parameter value displayed as part of the compilation log. Note that theOutput pane does not list the property/parameter name with the value, so you mustsearch within the step where you placed the code to find this value, as seen in theexample below:
Example:
This example retrieves the value of the Prefix property of a ConcatenateStringsactivity:
Context.UserLogger.Info(ConcatenateStringsActivity4.Prefix);
Enable or ignore selected checkpoints - optionalYou can instruct UFT to ignore the checkpoints for any test step. This is useful ifyou need to switch between enabling and ignoring checkpoints on different testruns.
You use the Checkpoint object to access the checkpoint's properties:
1. In the canvas, select the step for which you want to enable or ignore thecheckpoints.
2. In the Properties pane, select the Events tab .3. In the Events tab, create an event handler for the OnCodeCheckpointEvent event.
The TestUserCode.cs file opens.
User GuideChapter 54: Event Handlers for API Test Steps
HP Unified Functional Testing (12.53) Page 654 of 938
4. In the TODO section of the TestUserCode.cs file, enable or ignore a checkpoint foran event using the following syntax:
args.Checkpoint.RunUICheckpoints = true (to enable a checkpoint)
or
args.Checkpoint.RunUICheckpoints = false (to disable a checkpoint)
For more details on the args object, see http://msdn.microsoft.com/en-us/library/aa884376(v=ax.50).aspx.
Set the value of a checkpointIn addition to enabling or ignoring a checkpoint, you can also set the value(expected or not expected) of a checkpoint. This can be useful both to validate thatyour application works as expected but also does not allow unexpected behaviors.
1. Enable a checkpoint for the step, as described in "Enable or ignore selectedcheckpoints - optional" on the previous page.
2. Following the line containing your code for enabling the checkpoint(args.Checkpoint.RunUICheckpoints = true), enter the value of your checkpoint,using the following syntax:
args.Checkpoint.Assert.Equals("<actual value>", "<expected value>");
For more details on the args object, see http://msdn.microsoft.com/en-us/library/aa884376(v=ax.50).aspx. For details on the supported methods forthe args object in UFT, see "Assert Object" on page 670.
User GuideChapter 54: Event Handlers for API Test Steps
HP Unified Functional Testing (12.53) Page 655 of 938
Example: Examples
l The following example sets the value of a checkpoint for aConcatenateStrings step:
args.Checkpoint.Assert.Equals(this.ConcatenateStringsActivity4.Prefix+this.ConcatenateStringsActivity4.Suffix,this.ConcatenateStringsActivity4.Result);
l This example checks if the text value (alphabetical order for a string) of theprefix is less than the suffix. To ensure that the checkpoint succeeds, entera prefix value that is greater than the suffix, for example a prefix of aa and asuffix of bb.
args.Checkpoint.Assert.Less("Concatenate test", this.ConcatenateStringsActivity4.Prefix,this.ConcatenateStringsActivity4.Suffix, "The prefix is less than the suffix");
Report test run-time informationRelevant for: API testing only
Using custom events, you can report the run-time values or information of a givenstep, property, or parameter. You can choose either to report this to the Output paneor the run results. Viewing this information provides a simpler alternative towatching a object/property/parameter value while debugging.
To send run-time information, you can use the Report function or the UserLoggerobject.
Report a custom message to the run resultsUsing the Report function, you can send a custom message to the run results.
1. Select the step for which you want to report information.
2. In the Properties pane, open the Events tab .3. In the Events tab, create an event handler. The TestUserCode.cs file opens.
User GuideChapter 54: Event Handlers for API Test Steps
HP Unified Functional Testing (12.53) Page 656 of 938
4. In the TODO section of the TestUserCode.cs file, enter the value you want to reportusing the following syntax:
this.<activity name>.Report("<report information title>", "<reporteddata>");
or
<activity name>.Report("<report information title>", "<reported data>");
Tip: If you use the Context object after the <Activity Name> property. youreport the run-time value of the selected object, property, or parameter.
The Report method displays a custom message in the step's captured data.In thisexample, a ConcatenateStrings test step implemented the following code in an eventhandler:
Example:
The following example reports the value used for the Prefix property of aConcatenateStrings activity:
this.ConcatenateStringsActivity4.Report("Run-time Prefix Value",this.ConcatenateStringsActivity4.Prefix)
Report run-time values to the Output paneUsing a UserLogger object, you can view the run-time value of a particular property,parameter, or object. This value is reported in the UserLogger build log displayed inthe Output pane during test compilation.
UserLogger statements are useful in place of debugging. By viewing the run-timevalue of the selected property, parameter, or object, you can see the actual valuewithout having to use the more complex debugging features.
1. Select the step for which you want to report information.
2. In the Properties pane, open the Events tab .3. In the Events tab, create an event handler. The TestUserCode.cs file opens.
User GuideChapter 54: Event Handlers for API Test Steps
HP Unified Functional Testing (12.53) Page 657 of 938

4. In the TODO section of the TestUserCode.cs file, enter the value you want to reportusing the following syntax:
Context.UserLogger.<user logger info level>("<object/property/parameter>");
IMPORTANT: It is mandatory to use the Context object before theUserLogger object, as the Context object isolates the actual run-timecontext of the property, parameter, or object whose value you want tosee.
You can then see the value you selected in the Output pane:
Example:
The following example reports the run-time value of the CustomerNameproperty (whose value comes from a data source attached to the test) in aflight booking Web service. In this example the value to be reported was setwith the DataSourceValue variable.
var DataSourceValue = GetDataSource("WebServiceData!Input").GetValue(0,"CustomerName");Context.UserLogger.Info(DataSourceValue);
User GuideChapter 54: Event Handlers for API Test Steps
HP Unified Functional Testing (12.53) Page 658 of 938

Retrieve and set test or user variablesRelevant for: API testing only
Prerequisite - create user variables.See "Define user variables" on page 462 for details on creating user variables.
Note: You may also want to create multiple test profiles to vary the value ofthe variables for different users or different test runs. For details on creatingand editing user profiles, see "Define user variable profiles" on page 462
Optional - set the test profileIf you are using multiple test profiles, you must set the test profile you want to usebefore running test:
1. In the canvas, select either the Start or End steps.
2. In the Properties pane, open the Test Variables tab .3. In the Test Variables tab, choose the profile name from the Active Profile drop-
down list.If you have entered default values for any test or user variables, the values for thisprofile are used in the test run.
Retrieve a variable valueYou can use code to retrieve the value of a user variable during run-time. This isuseful to show you the value of the variable without having to start a debuggingsession.
1. In the canvas, select the step during which you want to retrieve a variablevalue.
2. In the Properties pane, open the Events tab .3. In the Events tab, create an event handler. The TestUserCode.cs file opens.4. In the TODO section of the TestUserCode.cs file, call the data source value you
want to retrieve using the following syntax:
this.<activity name>.Context.TestProfile.GetVariableValue("<variablename>");
User GuideChapter 54: Event Handlers for API Test Steps
HP Unified Functional Testing (12.53) Page 659 of 938
or
this.<activity name>.Context.EnvironmentProfile.GetVariableValue("<variablename>");
Example:
this.ConcatenateStringsActivity4.Context.TestProfile.GetVariableValue("Prefix");this.ConcatenateStringsActivity4.Report("Prefix Variable Value",this.ConcatenateStringsActivity4.Context.TestProfile.GetVariableValue("Prefix"))
Set a variable value1. In the canvas, select the step during which you want to retrieve a variable
value.
2. In the Properties pane, open the Events tab .3. In the Events tab, create an event handler. The TestUserCode.cs file opens.4. In the TODO section of the TestUserCode.cs file, call the data source value you
want to retrieve using the following syntax:
this.<activity name>.Context.TestProfile.SetVariableValue("<variablename>","<variable value>");
or
Example: this.<activity name>.Context.EnvironmentProfile.SetVariableValue("<variable name>","<variable value>");
User GuideChapter 54: Event Handlers for API Test Steps
HP Unified Functional Testing (12.53) Page 660 of 938
Example: Examples
l The following example retrieves the value of the TestName test variable:
string testName =this.StServiceCallActivity4.Context.TestProfile.GetVariableValue("TestName");
l The following example sets the value of the environment variablebeforeExecuteStepevent used to verify that the BeforeExecuteStepEvent eventran in the test step for the activity activity.
activity.Context.EnvironmentProfile.SetVariableValue("beforeExecuteStepEvent","true");
Encrypt and decrypt passwordsRelevant for: API testing only
Password fields expect an encrypted string - if you provide an unencrypted string,the authentication will fail.
The EncryptionMngr method lets you encrypt and decrypt strings within your events.
Encrypt the passwordUse the activity's context's EncryptionMngr method, and select Encrypt from theautocompletion drop-down. The following example encrypts a password.
string plainText = "myPassword";string encryptedText =this.StServiceCallActivity4.Context.EncryptionMngr.Encrypt(plainText);
Decrypt the password - optionalUse the Decrypt method from the autocompletion drop-down.
The following example decrypts a password and validates it against the originalstring.
string decryptedText =this.StServiceCallActivity4.Context.EncryptionMngr.Decrypt(encryptedText);bool equalText = decryptedText.Equals(plainText);
User GuideChapter 54: Event Handlers for API Test Steps
HP Unified Functional Testing (12.53) Page 661 of 938

API test events structureRelevant for: API testing only
When adding event handlers for your API tests, you can choose from a number ofdifferent event handlers. Each of these event handlers runs at a different place inthe test step's execution, and likewise can access different properties of the currentactivity.
For most of the API activities included in UFT, you can choose from the standardevent handlers: BeforeExecuteStepEvent, AfterExecuteStepEvent, or CodeCheckpointEvent.The function of these is the same regardless of which test step they are used withor the unique properties for each test step.
For Web service and SOAP Request activities, you can access additional eventhandlers that enable you to add specific functionalities to the Web service call orSOAP request.
The following sections detail the possible events you can use when adding eventhandlers:
• Standard event structure 662• WebService event structure 665
Standard event structureRelevant for: API testing only
For the majority of the activities supported for an API test in UFT, you can only usethe standard event handlers:
l BeforeExecuteStepEvent
l AfterExecuteStepEvent
l CodeCheckpointEvent
The following diagram shows how each event works within the individual test steprun:
User GuideChapter 54: Event Handlers for API Test Steps
HP Unified Functional Testing (12.53) Page 662 of 938
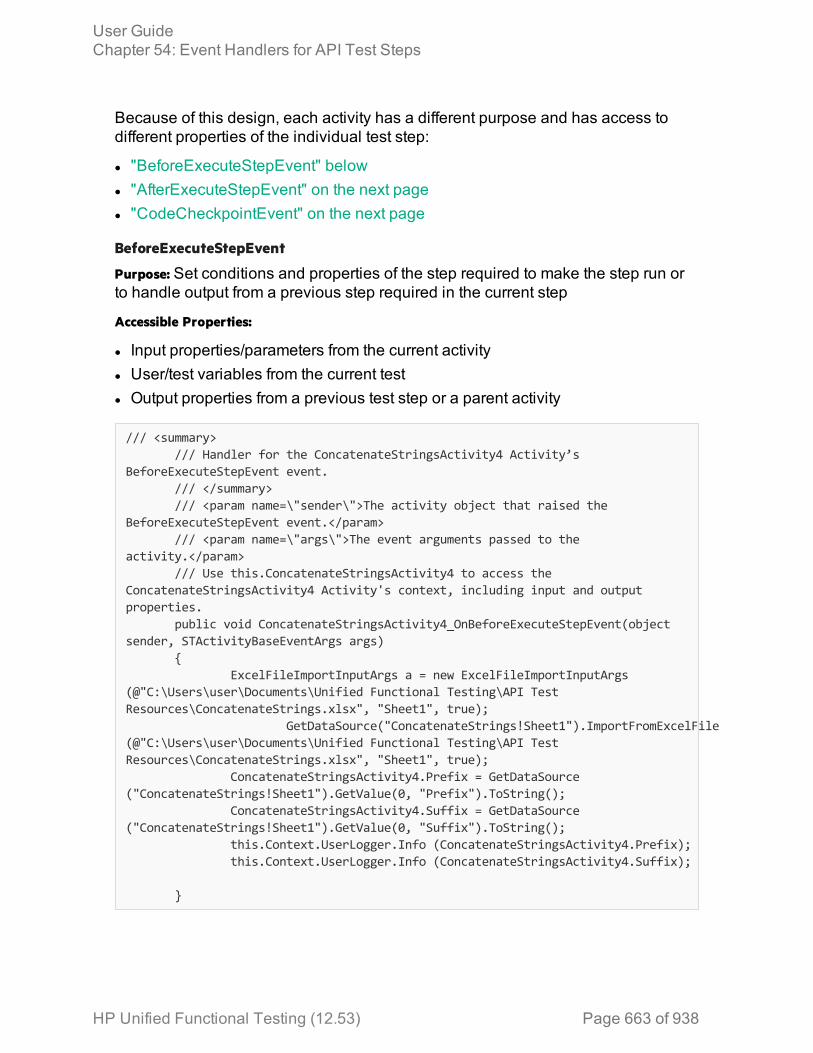
Because of this design, each activity has a different purpose and has access todifferent properties of the individual test step:
l "BeforeExecuteStepEvent" belowl "AfterExecuteStepEvent" on the next pagel "CodeCheckpointEvent" on the next page
BeforeExecuteStepEvent
Purpose: Set conditions and properties of the step required to make the step run orto handle output from a previous step required in the current step
Accessible Properties:
l Input properties/parameters from the current activityl User/test variables from the current testl Output properties from a previous test step or a parent activity
/// <summary>/// Handler for the ConcatenateStringsActivity4 Activity’s
BeforeExecuteStepEvent event./// </summary>/// <param name=\"sender\">The activity object that raised the
BeforeExecuteStepEvent event.</param>/// <param name=\"args\">The event arguments passed to the
activity.</param>/// Use this.ConcatenateStringsActivity4 to access the
ConcatenateStringsActivity4 Activity's context, including input and outputproperties.
public void ConcatenateStringsActivity4_OnBeforeExecuteStepEvent(objectsender, STActivityBaseEventArgs args)
{ExcelFileImportInputArgs a = new ExcelFileImportInputArgs
(@"C:\Users\user\Documents\Unified Functional Testing\API TestResources\ConcatenateStrings.xlsx", "Sheet1", true);
GetDataSource("ConcatenateStrings!Sheet1").ImportFromExcelFile(@"C:\Users\user\Documents\Unified Functional Testing\API TestResources\ConcatenateStrings.xlsx", "Sheet1", true);
ConcatenateStringsActivity4.Prefix = GetDataSource("ConcatenateStrings!Sheet1").GetValue(0, "Prefix").ToString();
ConcatenateStringsActivity4.Suffix = GetDataSource("ConcatenateStrings!Sheet1").GetValue(0, "Suffix").ToString();
this.Context.UserLogger.Info (ConcatenateStringsActivity4.Prefix);this.Context.UserLogger.Info (ConcatenateStringsActivity4.Suffix);
}
User GuideChapter 54: Event Handlers for API Test Steps
HP Unified Functional Testing (12.53) Page 663 of 938
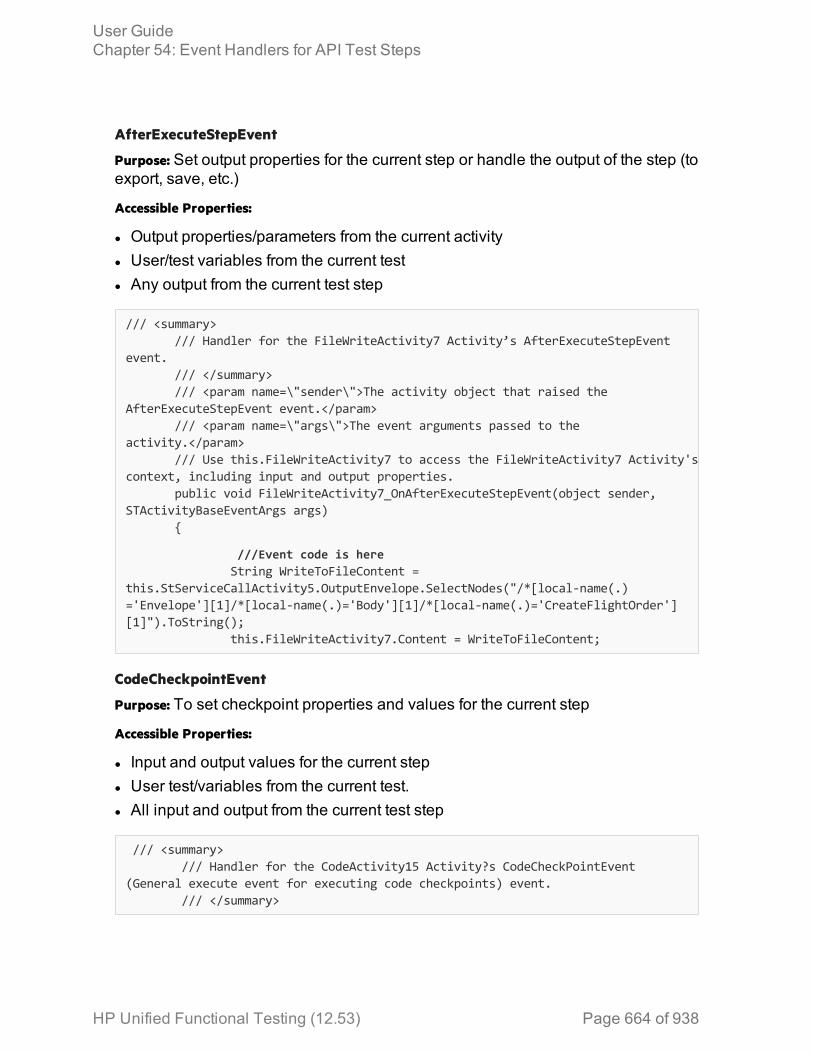
AfterExecuteStepEvent
Purpose: Set output properties for the current step or handle the output of the step (toexport, save, etc.)
Accessible Properties:
l Output properties/parameters from the current activityl User/test variables from the current testl Any output from the current test step
/// <summary>/// Handler for the FileWriteActivity7 Activity’s AfterExecuteStepEvent
event./// </summary>/// <param name=\"sender\">The activity object that raised the
AfterExecuteStepEvent event.</param>/// <param name=\"args\">The event arguments passed to the
activity.</param>/// Use this.FileWriteActivity7 to access the FileWriteActivity7 Activity's
context, including input and output properties.public void FileWriteActivity7_OnAfterExecuteStepEvent(object sender,
STActivityBaseEventArgs args){
///Event code is hereString WriteToFileContent =
this.StServiceCallActivity5.OutputEnvelope.SelectNodes("/*[local-name(.)='Envelope'][1]/*[local-name(.)='Body'][1]/*[local-name(.)='CreateFlightOrder'][1]").ToString();
this.FileWriteActivity7.Content = WriteToFileContent;
CodeCheckpointEvent
Purpose: To set checkpoint properties and values for the current step
Accessible Properties:
l Input and output values for the current stepl User test/variables from the current test.l All input and output from the current test step
/// <summary>/// Handler for the CodeActivity15 Activity?s CodeCheckPointEvent
(General execute event for executing code checkpoints) event./// </summary>
User GuideChapter 54: Event Handlers for API Test Steps
HP Unified Functional Testing (12.53) Page 664 of 938

/// <param name="sender">The activity object that raised theCodeCheckPointEvent event.</param>
/// <param name="args">The event arguments passed to theactivity.</param>
/// Use args to access the CodeActivity15 Activity's context, includingany input and output arguments.
/// <example></example>public void CodeActivity15_OnCodeCheckPointEvent(object sender,
CheckpointEventArgs args){
///Event code starts herestring attachPath = CodeActivity15.Input.attachmentPath;
string attachmentContent = File.ReadAllText(attachPath);string currDate = DateTime.Now.ToString();
currDate = currDate.Substring( 0,currDate.IndexOf(":") ) ;//args.Checkpoint.Assert.Equals( attachmentContent.Contains("
Current Time = "+currDateTime+" file was attached$") ,true);//bool status= attachmentContent.Contains(" Current Time =
"+currDate);bool status = attachmentContent.Contains(
CodeActivity16.Output.currentDateTime );bool status1 = attachmentContent.Contains("file was attached$");if (status && status1){args.Checkpoint.Report( attachmentContent," Current Time =
"+currDate+" file was attached$","contain", StatusEnum.Succeed );
}else
args.Checkpoint.Report( attachmentContent," Current Time ="+currDate+" file was attached$","contain", StatusEnum.Fail );
}
Web Service event structureRelevant for: API testing only
When working with a Web service call step or a SOAP Request step, there are anumber of additional events available that correspond with the unique run structureof a Web service call:
l BeforeExecuteStepEvent
l AfterExecuteStepEvent
l CodeCheckpointEvent
l AfterGenerateRequest
User GuideChapter 54: Event Handlers for API Test Steps
HP Unified Functional Testing (12.53) Page 665 of 938
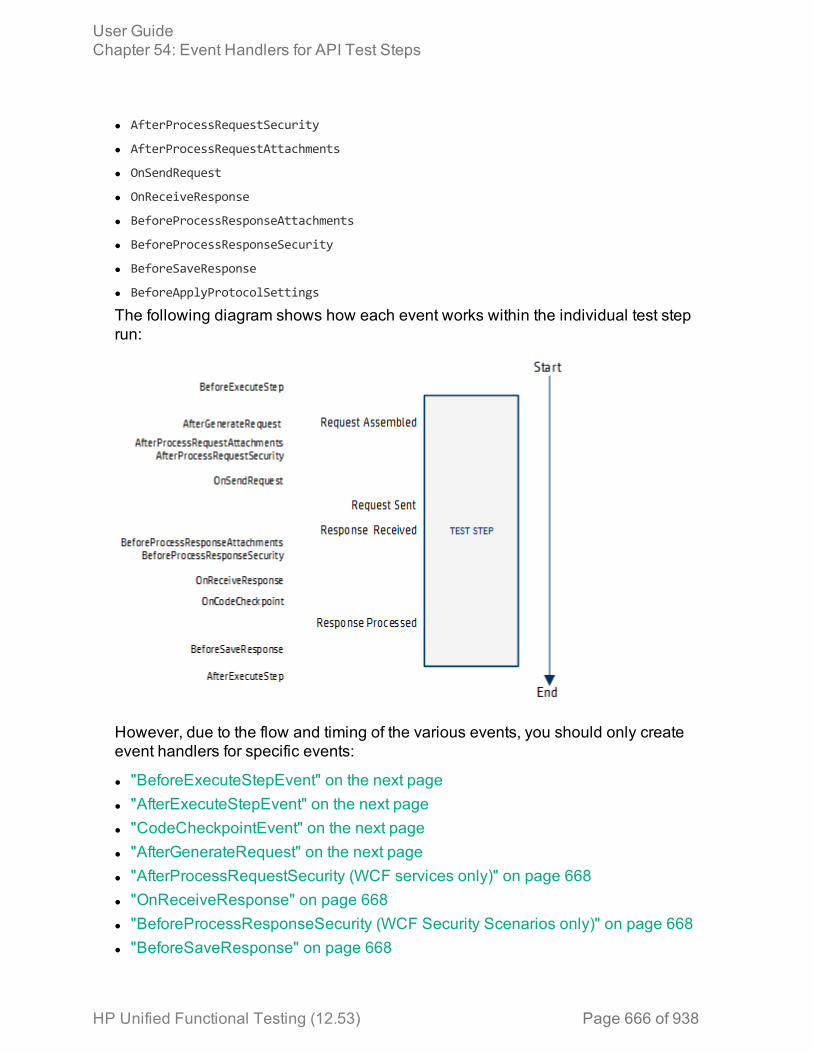
l AfterProcessRequestSecurity
l AfterProcessRequestAttachments
l OnSendRequest
l OnReceiveResponse
l BeforeProcessResponseAttachments
l BeforeProcessResponseSecurity
l BeforeSaveResponse
l BeforeApplyProtocolSettings
The following diagram shows how each event works within the individual test steprun:
However, due to the flow and timing of the various events, you should only createevent handlers for specific events:
l "BeforeExecuteStepEvent" on the next pagel "AfterExecuteStepEvent" on the next pagel "CodeCheckpointEvent" on the next pagel "AfterGenerateRequest" on the next pagel "AfterProcessRequestSecurity (WCF services only)" on page 668l "OnReceiveResponse" on page 668l "BeforeProcessResponseSecurity (WCF Security Scenarios only)" on page 668l "BeforeSaveResponse" on page 668
User GuideChapter 54: Event Handlers for API Test Steps
HP Unified Functional Testing (12.53) Page 666 of 938
BeforeExecuteStepEvent
Purpose: Set conditions and properties of the step required to make the step run orto handle output from a previous step required in the current step
Accessible Properties:
l Input properties/parameters from the current activityl User/test variables from the current testl Output properties from a previous test step or a parent activity
AfterExecuteStepEvent
Purpose: Set conditions and properties of the step required to make the step run orto handle output from a previous step required in the current step
Accessible Properties:
l Input properties/parameters from the current activityl User/test variables from the current testl Output properties from a previous test step or a parent activityl Response data from the current stepl Response attachments from the current step
CodeCheckpointEvent
Purpose: Set conditions and properties of the step required to make the step run orto handle output from a previous step required in the current step
Accessible Properties:
l Input properties/parameters from the current activityl User/test variables from the current testl Output properties from a previous test step or a parent activityl SOAP Fault properties
AfterGenerateRequest
Purpose: Set conditions and properties of the step required to make the step run orto handle output from a previous step required in the current step
User GuideChapter 54: Event Handlers for API Test Steps
HP Unified Functional Testing (12.53) Page 667 of 938

Accessible Properties:
l Input properties from the current stepl The input envelope from the current stepl The input attachments from the current stepl Asynchronous properties from the current step
AfterProcessRequestSecurity (WCF services only)
Purpose: Update the request envelope information for Web services using a WCFsecurity scenario with WSE defined. For details on the WCF security scenarios,see "Security scenarios" on page 481.
Use the args.Message property to access the response envelope
Accessible Properties:
l Input envelope information for the current test.
OnReceiveResponse
Purpose: Access the output envelope for the current test for Web services using aWeb Service security scenario with WSE defined. For details on the WCF securityscenarios, see "Security scenarios" on page 481.
Use the arg.Message property to access the response envelope
Accessible Properties:
l The response envelope information for the current step. When this runs, the Webservice call step returns a byte array containing the response envelope. Youmust add event handler code also to use the byte array data.Use the arg.Message property to access the response envelope
BeforeProcessResponseSecurity (WCF Security Scenarios only)
Purpose: Access the output envelope for the current step for Web services using aWCF security scenario with WSE defined. For details on the WCF securityscenarios, see "Security scenarios" on page 481.
Use the arg.Message property to access the response.
Accessible Properties:
l The response envelope information for the current step.
BeforeSaveResponse
Purpose: Access the current step's response.
User GuideChapter 54: Event Handlers for API Test Steps
HP Unified Functional Testing (12.53) Page 668 of 938
Accessible Properties:
l The response for the current step. Use the arg.Message property to access theresponse.
API Test Event Coding Common ObjectsRelevant for: API testing only
When writing custom code for events in your API test step events, you can use thefollowing objects:
• Activity Object 669• Assert Object 670• Checkpoint Object 671• CurrentIterationNumber Object 671• EncryptionMngr Object 672• EnvironmentProfile Object 673• InputAttachment Object 673• InputEnvelopeObject 675• OutputAttachment Object 676• OutputEnvelopeObject 678• Parent Object 678• TestProfile Object 679• UserLogger Object 680
Activity ObjectRelevant for: API testing only
DescriptionAccesses the current activity's properties and arguments.
Syntaxargs.Activity.<supported object/method>
SupportedMethodsl Comment objectl Context objectl EnableReporting objectl GetParentLoopmethodl GetRootLoopmethodl Name object
User GuideChapter 54: Event Handlers for API Test Steps
HP Unified Functional Testing (12.53) Page 669 of 938
l Parent objectl Reportmethodl StepEndedAt objectl StepId object (read-only)
Assert ObjectRelevant for: API testing only
DescriptionQualifies the preceding object.
Note: This object should be used only in the CodeCheckpointEvent event.
Syntax<object>.Assert.<supported operator method("<expected value>");
SupportedMethodsl Equalsl Greaterl GreaterorEquall Lessl LessorEquall NotEquals
Example
args.Checkpoint.Assert.Equals(this.ConcatenateStringsActivity4.Prefix+this.ConcatenateStringsActivity4.Suffix,this.ConcatenateStringsActivity4.Result);
User GuideChapter 54: Event Handlers for API Test Steps
HP Unified Functional Testing (12.53) Page 670 of 938
Checkpoint ObjectRelevant for: API testing only
DescriptionAccesses the current activity's checkpoint properties.
Note: This object is only accessible when using the OnCodeCheckpointEventevent.
Syntaxargs.Checkpoint.<supported object/method>
Note: You must use the args object before the Checkpoint object to access theselected activity's checkpoint properties.
Supported Objects andMethodsl Assert objectl RunUIcheckpoints objectl Report method
Examples
args.Checkpoint.RunUICheckpoints = true;
if (args.Checkpoint.Assert.Equals(this.ConcatenateStringsActivity4.Result))this.ConcatenateStringsActivity4.Report(ConcatenateStringsActivity4.Result,
"Passed");else
this.ConcatenateStringsActivity4.Report(ConcatenateStringsActivity4.Result,"Failed");
CurrentIterationNumber ObjectRelevant for: API testing only
DescriptionGets the current iteration number.
User GuideChapter 54: Event Handlers for API Test Steps
HP Unified Functional Testing (12.53) Page 671 of 938
Syntaxthis.<parent activity>.CurrentIterationNumber
SupportedMethodsNone
Example
var GetFlights_Input_Arrival_City = GetDataSource("WebServiceData!Input").GetValue(this.Loop2.CurrentIterationNumber-1,"ArrivalCity").ToString();StServiceCallActivity4.InputEnvelope.SelectSingleNode("/*[local-name(.)='Envelope'][1]/*[local-name(.)='Body'][1]/*[local-name(.)='GetFlights'][1]/*[local-name(.)='ArrivalCity'][1]").InnerText = GetFlights_Input_Arrival_City;
EncryptionMngr ObjectRelevant for: API testing only
DescriptionAccesses UFT API testing's encryption mechanism to enable you to encrypt ordecrypt strings (such as passwords).
Syntaxthis.<activity>.Context.EncryptionMngr.<supported method>
SupportedMethodsl Decryptl Encrypt
Example
string plainText = "myPassword";string encryptedText =this.StServiceCallActivity4.Context.EncryptionMngr.Encrypt(plainText);
User GuideChapter 54: Event Handlers for API Test Steps
HP Unified Functional Testing (12.53) Page 672 of 938

EnvironmentProfile ObjectRelevant for: API testing only
DescriptionAccesses the environmental variables for a test.
Note: If you are using test profiles for a test, you should use the TestProfileobject instead.
Syntaxthis.<activity>.Context.EnvironmentProfile.<supported method>
SupportedMethodsl GetType
l GetVariablesNames
l GetVariableValue
l SetVariableValue
l ToString
Example
this.ConcatenateStringsActivity4.Context.EnvironmentProfile.GetVariablesNames().ToString();
InputAttachment ObjectRelevant for: API testing only
DescriptionAccesses the properties of the test step's input attachments.
Syntaxthis.<activity>.Context.InputAttachments.<supported object or method>
SupportedMethodsl Attributes objectl BaseURL object
User GuideChapter 54: Event Handlers for API Test Steps
HP Unified Functional Testing (12.53) Page 673 of 938
l ChildNodes objectl CreateAttribute methodl CreateCDataSection methodl CreateComment methodl CreateElement methodl CreateEntityReference methodl CreateNode methodl CreateWhitespace methodl CreateXMLDeclaration methodl DocumentElement objectl DocumentType objectl FirstChild objectl GetElementsbyId methodl GetElementsbyTagName methodl GetEnumerator methodl GetNamespaceOfPrefix methodl HasChildNodes objectl ImportNode methodl InnerText objectl InnerXML objectl InsertAfter methodl InsertBefore methodl IsReadOnly objectl LastChild objectl Load methodl LoadXML methodl LocalName objectl Name objectl NamespaceURL objectl NameTable objectl NextSibling objectl NodeType objectl OwnerDocument objectl ParentNode objectl Prefix object
User GuideChapter 54: Event Handlers for API Test Steps
HP Unified Functional Testing (12.53) Page 674 of 938

l PrependChild methodl PreserveWhitespace objectl PreviousSibling objectl ReadNode methodl RemoveAll methodl RemoveChild methodl ReplaceChild methodl SchemaInfo objectl Schemas objectl SelectNodes methodl SelectSingleNode methodl Supports methodl Validate methodl Value objectl WriteContentTo methodl WriteTo method
Example
this.StServiceCallActivity8.InputAttachments.Load(@"<my file path>");
InputEnvelope ObjectRelevant for: API testing only
DescriptionAccesses the input property envelope for Web Service, HTTP Request, andSOAP Request activities.
Syntaxthis.<activity>.InputEnvelope.<supported object/method>
Supported Objects andMethodsThis object is a standard object of the XML Document class. All supported objectsand methods for the XML Document class can be used with this object.
User GuideChapter 54: Event Handlers for API Test Steps
HP Unified Functional Testing (12.53) Page 675 of 938
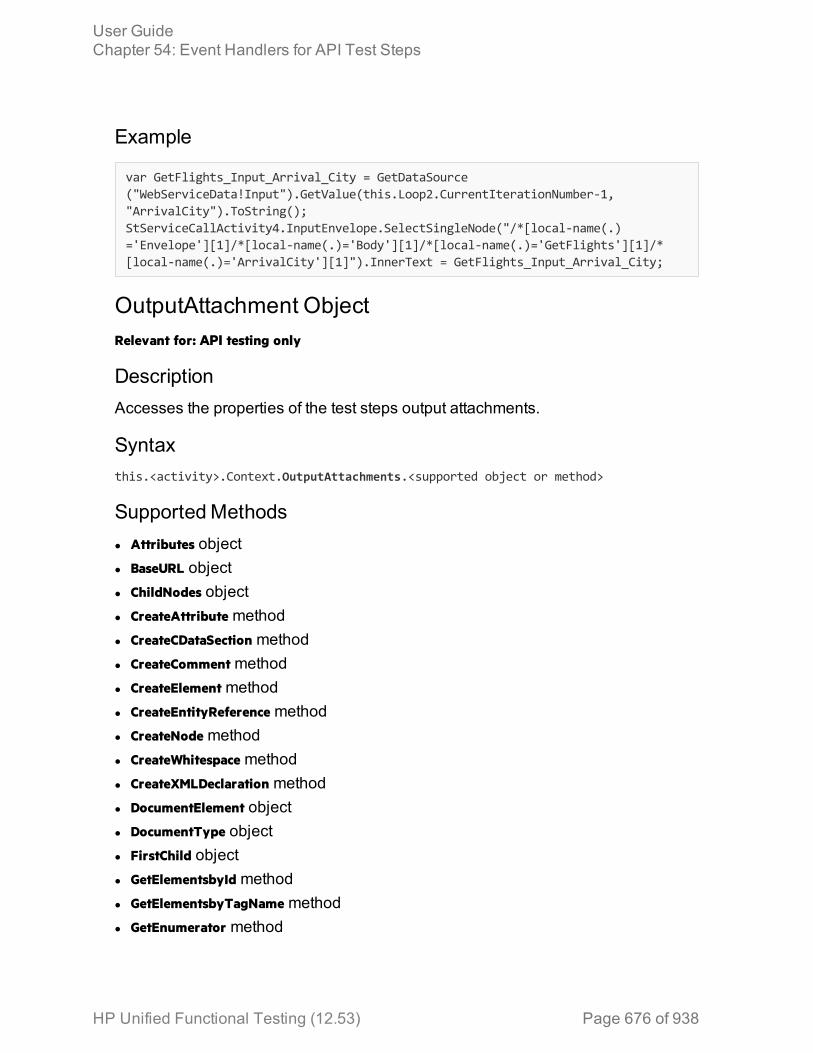
Example
var GetFlights_Input_Arrival_City = GetDataSource("WebServiceData!Input").GetValue(this.Loop2.CurrentIterationNumber-1,"ArrivalCity").ToString();StServiceCallActivity4.InputEnvelope.SelectSingleNode("/*[local-name(.)='Envelope'][1]/*[local-name(.)='Body'][1]/*[local-name(.)='GetFlights'][1]/*[local-name(.)='ArrivalCity'][1]").InnerText = GetFlights_Input_Arrival_City;
OutputAttachment ObjectRelevant for: API testing only
DescriptionAccesses the properties of the test steps output attachments.
Syntaxthis.<activity>.Context.OutputAttachments.<supported object or method>
SupportedMethodsl Attributes objectl BaseURL objectl ChildNodes objectl CreateAttribute methodl CreateCDataSection methodl CreateComment methodl CreateElement methodl CreateEntityReference methodl CreateNode methodl CreateWhitespace methodl CreateXMLDeclaration methodl DocumentElement objectl DocumentType objectl FirstChild objectl GetElementsbyId methodl GetElementsbyTagName methodl GetEnumerator method
User GuideChapter 54: Event Handlers for API Test Steps
HP Unified Functional Testing (12.53) Page 676 of 938
l GetNamespaceOfPrefix methodl HasChildNodes objectl ImportNode methodl InnerText objectl InnerXML objectl InsertAfter methodl InsertBefore methodl IsReadOnly objectl LastChild objectl Load methodl LoadXML methodl LocalName objectl Name objectl NamespaceURL objectl NameTable objectl NextSibling objectl NodeType objectl OwnerDocument objectl ParentNode objectl Prefix objectl PrependChild methodl PreserveWhitespace objectl PreviousSibling objectl ReadNode methodl RemoveAll methodl RemoveChild methodl ReplaceChild methodl SchemaInfo objectl Schemas objectl SelectNodes methodl SelectSingleNode methodl Supports methodl Validate methodl Value objectl WriteContentTo method
User GuideChapter 54: Event Handlers for API Test Steps
HP Unified Functional Testing (12.53) Page 677 of 938
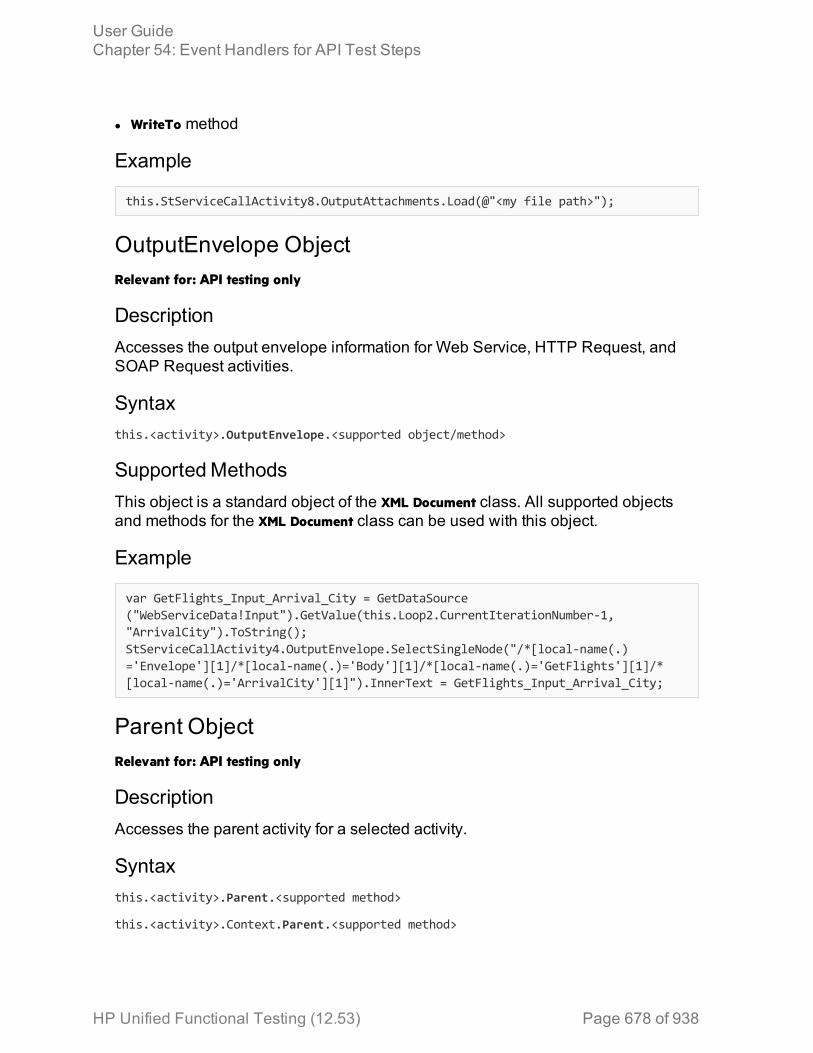
l WriteTo method
Example
this.StServiceCallActivity8.OutputAttachments.Load(@"<my file path>");
OutputEnvelope ObjectRelevant for: API testing only
DescriptionAccesses the output envelope information for Web Service, HTTP Request, andSOAP Request activities.
Syntaxthis.<activity>.OutputEnvelope.<supported object/method>
SupportedMethodsThis object is a standard object of the XML Document class. All supported objectsand methods for the XML Document class can be used with this object.
Example
var GetFlights_Input_Arrival_City = GetDataSource("WebServiceData!Input").GetValue(this.Loop2.CurrentIterationNumber-1,"ArrivalCity").ToString();StServiceCallActivity4.OutputEnvelope.SelectSingleNode("/*[local-name(.)='Envelope'][1]/*[local-name(.)='Body'][1]/*[local-name(.)='GetFlights'][1]/*[local-name(.)='ArrivalCity'][1]").InnerText = GetFlights_Input_Arrival_City;
Parent ObjectRelevant for: API testing only
DescriptionAccesses the parent activity for a selected activity.
Syntaxthis.<activity>.Parent.<supported method>
this.<activity>.Context.Parent.<supported method>
User GuideChapter 54: Event Handlers for API Test Steps
HP Unified Functional Testing (12.53) Page 678 of 938
Note: Using the Context object here enables you to access the run-timecontext of the selected activity and parent activity.
SupportedMethodsl Activities objectl Comment objectl Context objectl EnableReporting objectl GetParentLoop
l GetRootLoop
l Name objectl Report methodl StepEndedAt objectl StepId object
Example
string ParentName = this.ConcatenateStringsActivity5.Parent.Name
TestProfile ObjectRelevant for: API testing only
DescriptionAccesses the values of the environment and user variables for the currently activetest profile as specified in the Properties pane.
Syntaxthis.<activity>.Context.TestProfile.<supported method>
SupportedMethodsl GetType
l GetVariableNames
l GetVariableValue
l SetVariableValue
User GuideChapter 54: Event Handlers for API Test Steps
HP Unified Functional Testing (12.53) Page 679 of 938
Example
this.ConcatenateStringsActivity4.Context.TestProfile.GetVariableValue("Prefix");
UserLogger ObjectRelevant for: API testing only
DescriptionReports the specified conditions of the preceding object to the UserLogger buildlog in the Output pane.
Syntaxthis.<activity>.Context.UserLogger.<user logger detail supported method>
SupportedMethodsl Info
l InfoFormat
l Debug
l DebugFormat
l Error
l ErrorFormat
l Fatal
l FatalFormat
l Warn
l WarnFormat
For details on the supported methods, seehttp://www.codeproject.com/Articles/140911/log4net-Tutorial.
Example
var Variablenames =this.ConcatenateStringsActivity4.Context.EnvironmentProfile.GetVariablesNames();Context.UserLogger.Info(Variablenames);
API Test Event Coding Common MethodsRelevant for: API testing only
User GuideChapter 54: Event Handlers for API Test Steps
HP Unified Functional Testing (12.53) Page 680 of 938
When writing custom code for your API test activities, there are a number ofmethods that you can use:
• Export Method 681• ExportToExcelFile Method 682• GetDataSourceMethod 683• GetValueMethod 684• GetVariableNamesMethod 685• GetVariableValueMethod 686• Import Method 687• ImportFromExcelFile Method 688• Info Method 689• Report Method 690• SelectSingleNodeMethod 690• SetValue Method 691• SetVariableValueMethod 692
Note: The Query function implemented in versions 11.20 and earlier is notsupported in version 11.50 and later. To modify runtime data through anevent handler, replace all occurrences of the Query function withGetDataSource, using the arguments described in this section..
Export MethodRelevant for: API testing only
DescriptionExports the specified Excel data source from your test to an external file.
ClassDataSource
SyntaxExcelFileExportInputArgs <name> = new ExcelFileImportInputArgs(@"<path to datasource>");GetDataSource("<data source name>").Export (name);
Note: You must cast the data source in the first line of the syntax in order touse the Exportmethod. If you do not want to cast the data source, use theExportToExcelFile method.
User GuideChapter 54: Event Handlers for API Test Steps
HP Unified Functional Testing (12.53) Page 681 of 938
Parameters
Parameter Description
Name Name assigned to the data source.
Path to data source The Windows path to the file for the data source.
Return TypeAn Excel file with the specified data in the specified directory.
Example
ExcelFileExportInputArgs a = new ExcelFileExportInputArgs(@"C:\Users\brojerem\Documents\Unified Functional Testing\API TestResources\File.xls");
GetDataSource("ConcatenateStrings!Sheet1").Export(a);
ExportToExcelFile MethodRelevant for: API testing only
DescriptionExports the specified Excel data source from your test to an external file.
ClassDataSource
SyntaxGetDataSource("<data source>).ExportToExcelFile(@"<path to file>");
Parameters
Parameter Description
Path to data source The Windows path to the file for the data source.
Return TypeAn Excel file in the specified directory.
User GuideChapter 54: Event Handlers for API Test Steps
HP Unified Functional Testing (12.53) Page 682 of 938
Example
GetDataSource("ConcatenateStrings!Sheet1").ExportToExcelFile(@"C:\Users\brojerem\Documents\Unified Functional Testing\API TestResources\File.xls");
GetDataSource MethodRelevant for: API testing only
DescriptionAccesses the specified data source.
Note: This method is typically used when setting a value for a property,parameter, or variable. It is also used in conjunction with other methodswhich enable you to use the data from the data source, such as GetValue orSetValue.
ClassTest Entities
Syntaxproperty value = GetDataSource("<Data source name>").
Parameters
Parameter Description
Datasourcename
The name of the data source, exactly as it appears in the Data pane.
Note: You can right-click the data source in the Data pane andselect Copy to ensure that you use the correct name in yourcode.
Return TypeNo explicit return object - method only accesses the data source.
User GuideChapter 54: Event Handlers for API Test Steps
HP Unified Functional Testing (12.53) Page 683 of 938
Example
var DataSourceValue = GetDataSource("WebServiceData!Input").GetValue(0,"CustomerName");Context.UserLogger.Info(DataSourceValue);
GetValue MethodRelevant for: API testing only
DescriptionRetrieves a specified value from the selected data source.
Note: This method is a method of the data source. In order to use this methodto get a data source value, you must retrieve a data source using theGetDataSource method
ClassDataSource
SyntaxGetDataSource(<data source name>).GetValue(<row index>, "<column name>");
Parameters
Parameter Description
Row index Required. The row from which to take the value.
The row index is zero-based, meaning if you want to pull from thefirst row of the table, you must set the row index value to 0.
Columnname
Required. The name of the column from which to take the value.
Return TypeData value (format depends based on the data source type)
User GuideChapter 54: Event Handlers for API Test Steps
HP Unified Functional Testing (12.53) Page 684 of 938
Example
var TableDataSourceValue = GetDataSource("WebService Customer Table").GetValue(0, "CustomerName");
var GetFlights_Input_Departure_City = GetDataSource("WebServiceData!Input").GetValue(this.Loop2.CurrentIterationNumber-1,"DepartureCity").ToString();StServiceCallActivity4.InputEnvelope.SelectSingleNode("/*[local-name(.)='Envelope'][1]/*[local-name(.)='Body'][1]/*[local-name(.)='GetFlights'][1]/*[local-name(.)='DepartureCity'][1]").InnerText = GetFlights_Input_Departure_City;
GetVariableNamesMethodRelevant for: API testing only
DescriptionRetrieves the names of all variable values in the current test.
ClassTestProfile
Syntaxthis.<activity>.Context.TestProfile.GetVariableNames();
this.<activity>.Context.EnvironmentProfile.GetVariableNames();
ParametersNone
Return TypeA list of all environment/test variables in the current test or test profile.
Example
this.ConcatenateStringsActivity4.Context.EnvironmentProfile.GetVariablesNames().ToString();var Variablenames =this.ConcatenateStringsActivity4.Context.EnvironmentProfile.GetVariablesNames();
User GuideChapter 54: Event Handlers for API Test Steps
HP Unified Functional Testing (12.53) Page 685 of 938
Context.UserLogger.Info(Variablenames);
GetVariableValue MethodRelevant for: API testing only
DescriptionRetrieves the value of a selected test or environment variable.
ClassTestProfile
Syntaxthis.<activity>.Context.TestProfile.GetVariableValue("<variable name>");
this.<activity>.Context.EnvironmentProfile.GetVariableValue("<variable name>");
Parameters
Parameter Description
Variable name A string for the name of the variable. You can findthis value in the Test Variables tab in theProperties pane.
Return TypeNo explicit return - the variable value is set for the test run.
Examples
this.ConcatenateStringsActivity4.Context.TestProfile.GetVariableValue("Prefix");this.ConcatenateStringsActivity4.Report("Prefix Variable Value",this.ConcatenateStringsActivity4.Context.TestProfile.GetVariableValue("Prefix"));
this.ConcatenateStringsActivity4.Context.EnvironmentProfile.GetVariableValue("Prefix");this.ConcatenateStringsActivity4.Report("Prefix Variable Value 2",this.ConcatenateStringsActivity4.Context.EnvironmentProfile.GetVariableValue("Prefix"));
User GuideChapter 54: Event Handlers for API Test Steps
HP Unified Functional Testing (12.53) Page 686 of 938

Import MethodRelevant for: API testing only
DescriptionImports the specified Excel data source into your test.
ClassDataSource
SyntaxExcelFileImportInputArgs <name> = new ExcelFileImportInputArgs(@"<path to datasource>", "<data source name in the test>", "header row");GetDataSource("<data source name>").Import (name);
Note: You must cast the data source in the first line of the syntax in order touse the Importmethod. If you do not want to cast the data source, use theImportfromExcelFile method instead.
Parameters
Parameter Description
Name Name assigned to the data source.
Path to data source The Windows path to the file for the data source.
Data source name in thetest
The name the test gives the data source afterimporting.
Header row A boolean value if the data source has a header row.
Possible values are "true" or "false".
Return TypeAn Excel data source added to your test.
Example
ExcelFileImportInputArgs a = new ExcelFileImportInputArgs
User GuideChapter 54: Event Handlers for API Test Steps
HP Unified Functional Testing (12.53) Page 687 of 938
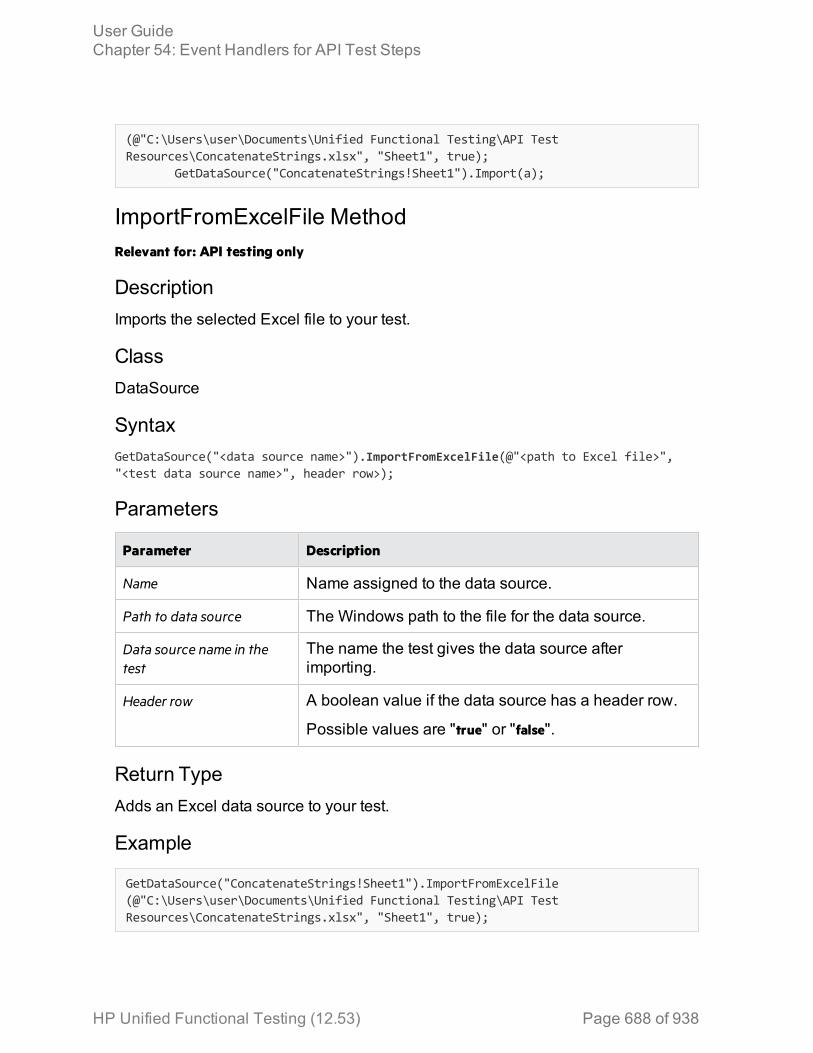
(@"C:\Users\user\Documents\Unified Functional Testing\API TestResources\ConcatenateStrings.xlsx", "Sheet1", true);
GetDataSource("ConcatenateStrings!Sheet1").Import(a);
ImportFromExcelFile MethodRelevant for: API testing only
DescriptionImports the selected Excel file to your test.
ClassDataSource
SyntaxGetDataSource("<data source name>").ImportFromExcelFile(@"<path to Excel file>","<test data source name>", header row>);
Parameters
Parameter Description
Name Name assigned to the data source.
Path to data source The Windows path to the file for the data source.
Data source name in thetest
The name the test gives the data source afterimporting.
Header row A boolean value if the data source has a header row.
Possible values are "true" or "false".
Return TypeAdds an Excel data source to your test.
Example
GetDataSource("ConcatenateStrings!Sheet1").ImportFromExcelFile(@"C:\Users\user\Documents\Unified Functional Testing\API TestResources\ConcatenateStrings.xlsx", "Sheet1", true);
User GuideChapter 54: Event Handlers for API Test Steps
HP Unified Functional Testing (12.53) Page 688 of 938

Info MethodRelevant for: API testing only
DescriptionReports the selected information to the UserLogger build log in the Output pane.
Note: You can also use other common .NET logging options. For details, seehttp://www.codeproject.com/Articles/140911/log4net-Tutorial.
ClassILog
Syntaxthis.<activity>.Context.UserLogger.Info(message)
Note: This method must always be used with a UserLogger object.
Parameters
Parameter Description
Message A string or value to report. You can use other code strings in thisparameter to report the run-time value of any object, property,parameter, or variable in run-time.
Return TypeA message displayed in the UserLogger build log in the output pane.
Example
this.ConcatenateStringsActivity4.Context.EnvironmentProfile.GetVariablesNames().ToString();var Variablenames =this.ConcatenateStringsActivity4.Context.EnvironmentProfile.GetVariablesNames();Context.UserLogger.Info(Variablenames);
User GuideChapter 54: Event Handlers for API Test Steps
HP Unified Functional Testing (12.53) Page 689 of 938
Report MethodRelevant for: API testing only
DescriptionReports a custom attribute in the Captured Data pane of the run results.
ClassAction
Syntaxthis.<activity>.Report("report attribute string", "<attribute value>");
Parameters
Parameter Description
Report attribute string A string for the custom field to enter into the run results.
Attribute value The value for the attribute to report.
Return TypeA custom field in the run results.
Example
var ActivityArguments = args.Activity.StepId.ToString();this.ConcatenateStringsActivity4.Report("Overall report", ActivityArguments);
SelectSingleNode MethodRelevant for: API testing only
DescriptionSelects a single node from an array containing input/output properties.
ClassThis method is not part of a UFT API testing class, but is invoked bythe InputEnvelope object.
User GuideChapter 54: Event Handlers for API Test Steps
HP Unified Functional Testing (12.53) Page 690 of 938
Syntax<activity>.InputEnvelope.SelectSingleNode("<fully qualified Xpath>").<supportedobject/method>
Parameters
Parameter Description
FullyqualifiedXPath
The XPath to the property node in the array. Right-click theproperty/parameter name in the Input/Checkpoints tab in theProperties pane and select Copy Fully Qualified XPathto retrieve thisinformation.
Return TypeNo explicit return - enables the test to access the property or parameter.
Example
var GetFlights_Input_Departure_City = GetDataSource("WebServiceData!Input").GetValue(this.Loop2.CurrentIterationNumber-1,"DepartureCity").ToString();StServiceCallActivity4.InputEnvelope.SelectSingleNode("/*[local-name(.)='Envelope'][1]/*[local-name(.)='Body'][1]/*[local-name(.)='GetFlights'][1]/*[local-name(.)='DepartureCity'][1]").InnerText = GetFlights_Input_Departure_City;
SetValue MethodRelevant for: API testing only
DescriptionSets the value of a specified item in the data source.
Notes:
l This method must be used with the GetDataSource method.l This method cannot be used for XML data sources.
ClassDataSource
User GuideChapter 54: Event Handlers for API Test Steps
HP Unified Functional Testing (12.53) Page 691 of 938
SyntaxGetDataSource(<data source name>).SetValue(<row index>, "<column name>");
Parameters
Parameter Description
Row index Required. The row from which to take the value.
The row index is zero-based, meaning if you want to pull from thefirst row of the table, you must set the row index value to 0.
Columnname
Required. The name of the column from which to take the value.
Return TypeNo explicit return object. Sets a value in the specified data source.
Example
GetDataSource("ConcActivity Strings").SetValue(1, "Suffix", "done.");
SetVariableValue MethodRelevant for: API testing only
DescriptionSets the value of a selected test or environment variable.
ClassTestProfile
Syntaxthis.<activity>.Context.TestProfile.SetVariableValue("<variable name>" , "<variablevalue>");
this.<activity>.Context.EnvironmentProfile.SetVariableValue("<variable name>" ,"<variable value>");
User GuideChapter 54: Event Handlers for API Test Steps
HP Unified Functional Testing (12.53) Page 692 of 938

Parameters
Parameter Description
Variablename
A string for the name of the variable. You can find this value in theTest Variables tab in the Properties pane.
Variablevalue
The value for the variable. The format differs on the expected use ofthe variable.
Return TypeNo explicit return - the variable value is set for use in the test run.
Example
var activity = ((HP.ST.Ext.WebServicesActivities.StServiceCallActivity)(args.Activity));activity.Report( "codeCheckPointEvent" , "code CheckPoint event" );args.Checkpoint.Report("CheckPoint","CheckPoint","=" ,HP.ST.Fwk.RunTimeFWK.CheckpointFWK.StatusEnum.Succeed );activity.Context.EnvironmentProfile.SetVariableValue( "codeCheckpointEvent","true");
User GuideChapter 54: Event Handlers for API Test Steps
HP Unified Functional Testing (12.53) Page 693 of 938

HP Unified Functional Testing (12.53) Page 694
Part 8: Run / Debug Tests
Chapter 55: aRunning Tests and ComponentsRelevant for: GUI tests and components and API testing
When you run a test or component, UFT performs the steps it contains. If you havedefined test or component parameters, UFT prompts you to enter values for them.When the run session is complete, UFT displays a report detailing the results.
For details about running business process tests, see "Create and maintainbusiness process tests and flows in UFT" on page 839.
You can run UFT tests from a number of different places:
l ALMl UFT Runtime Enginel Test Batch Runnerl Silent Test RunnerRunning tests differs slightly when running GUI tests/components or APItests/components:
GUI tests and components
UFT always runs a test or component from the first step, unless you specifyotherwise. You can:
Method ofRunning Description
Run the entiretest or componentfrom thebeginning
UFT runs each step, starting from the first step in the firstaction, in sequential order.
Run only a part ofa test
You can run sections of a test using these commands:
l Run from Action: Runs the test from the specified action tothe end of the test.
l Run to Action: Runs the test from the beginning of the test toa specific action
l Run from Step: Runs the test from a specified step to the endof the test.
l Run to Step: Runs the test from the beginning of the test tothe specified step
HP Unified Functional Testing (12.53) Page 695 of 938
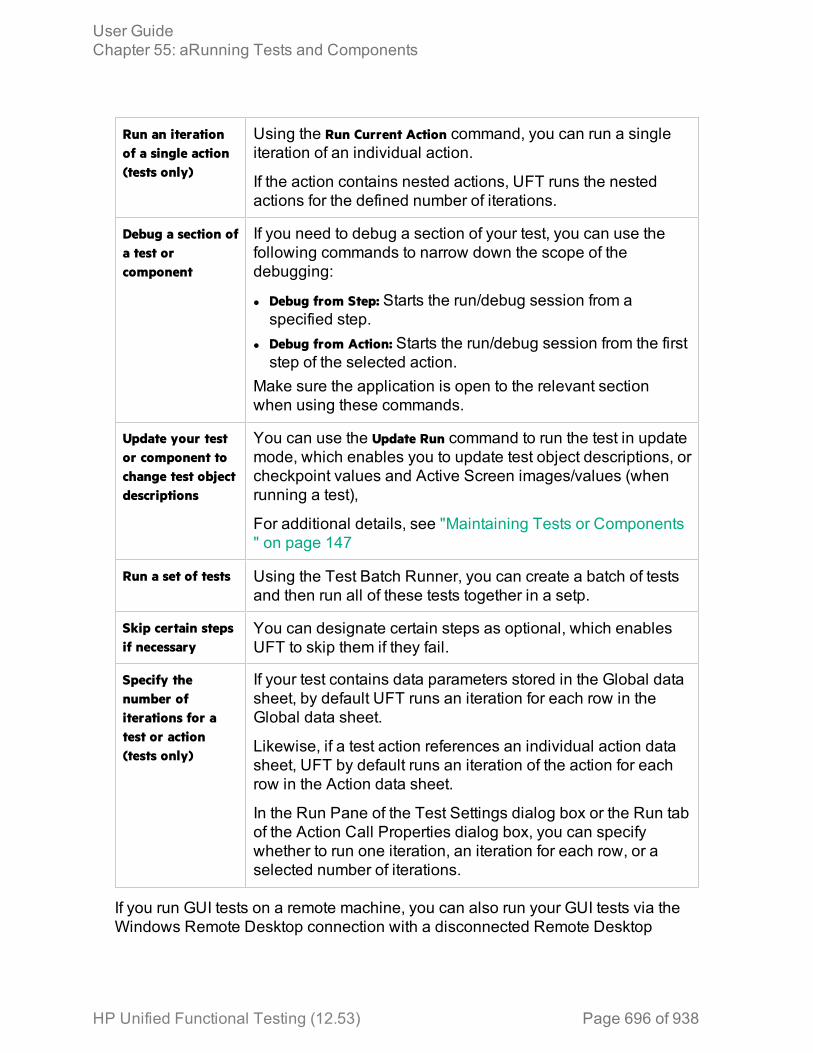
Run an iterationof a single action(tests only)
Using the Run Current Action command, you can run a singleiteration of an individual action.
If the action contains nested actions, UFT runs the nestedactions for the defined number of iterations.
Debug a section ofa test orcomponent
If you need to debug a section of your test, you can use thefollowing commands to narrow down the scope of thedebugging:
l Debug from Step: Starts the run/debug session from aspecified step.
l Debug from Action: Starts the run/debug session from the firststep of the selected action.
Make sure the application is open to the relevant sectionwhen using these commands.
Update your testor component tochange test objectdescriptions
You can use the Update Run command to run the test in updatemode, which enables you to update test object descriptions, orcheckpoint values and Active Screen images/values (whenrunning a test),
For additional details, see "Maintaining Tests or Components" on page 147
Run a set of tests Using the Test Batch Runner, you can create a batch of testsand then run all of these tests together in a setp.
Skip certain stepsif necessary
You can designate certain steps as optional, which enablesUFT to skip them if they fail.
Specify thenumber ofiterations for atest or action (tests only)
If your test contains data parameters stored in the Global datasheet, by default UFT runs an iteration for each row in theGlobal data sheet.
Likewise, if a test action references an individual action datasheet, UFT by default runs an iteration of the action for eachrow in the Action data sheet.
In the Run Pane of the Test Settings dialog box or the Run tabof the Action Call Properties dialog box, you can specifywhether to run one iteration, an iteration for each row, or aselected number of iterations.
If you run GUI tests on a remote machine, you can also run your GUI tests via theWindows Remote Desktop connection with a disconnected Remote Desktop
User GuideChapter 55: aRunning Tests and Components
HP Unified Functional Testing (12.53) Page 696 of 938

Connection. For details, see "Running GUI tests with a disconnected RemoteDesktop Connection" on page 702
API tests and components
UFT runs the test steps contained in the test flow in sequence, unless specifiedotherwise. You can:
Debug the test If you have inserted breakpoints in your custom code or eventhandler code, UFT pauses the test run to enable you to debugthe code.
In order to use debugging, you must run the test in Debug mode.This option is set in the API Testing General pane of the OptionsDialog Box.
Stop the testrun if acheckpoint fails
In the Test Settings tab for the test, you can instruct UFT to stopa test run if a test fails.
Run a set oftests
Using the Test Batch Runner, you can create a batch of testsand then run all of these tests together in a step.
Run a test or componentRelevant for: GUI tests and scripted GUI components
PrerequisitesDo one of the following:
l For GUI tests and components: Ensure that any required UFT add-ins are loaded inthe Add-in Manager when you open UFT.
l For API tests and components: Set the run mode as Release or Debug in the APITesting General pane in the Options dialog box.
Note: Release mode runs the test more quickly, as it does not load thedebugging mechanism.
Open the test or component you want to run.
Set the number of iterations for the testDo one of the following:
User GuideChapter 55: aRunning Tests and Components
HP Unified Functional Testing (12.53) Page 697 of 938
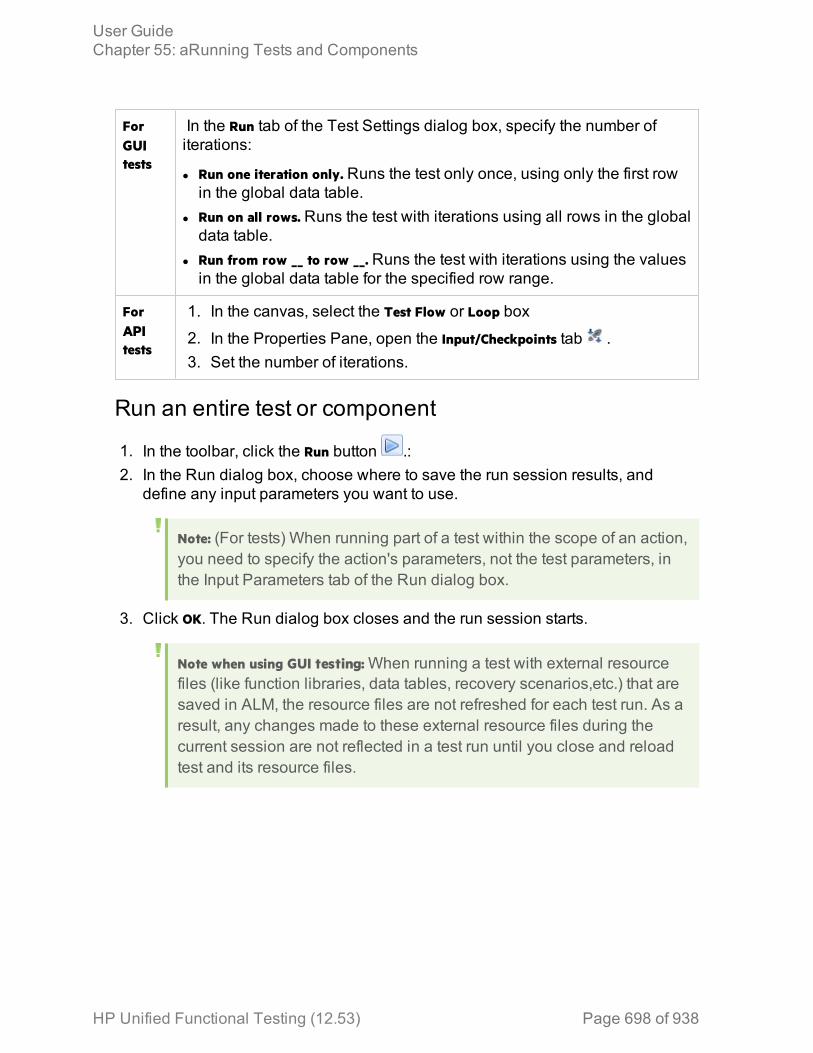
ForGUItests
In the Run tab of the Test Settings dialog box, specify the number ofiterations:
l Run one iteration only. Runs the test only once, using only the first rowin the global data table.
l Run on all rows. Runs the test with iterations using all rows in the globaldata table.
l Run from row __ to row __. Runs the test with iterations using the valuesin the global data table for the specified row range.
ForAPItests
1. In the canvas, select the Test Flow or Loop box
2. In the Properties Pane, open the Input/Checkpoints tab .3. Set the number of iterations.
Run an entire test or component
1. In the toolbar, click the Run button .:2. In the Run dialog box, choose where to save the run session results, and
define any input parameters you want to use.
Note: (For tests) When running part of a test within the scope of an action,you need to specify the action's parameters, not the test parameters, inthe Input Parameters tab of the Run dialog box.
3. Click OK. The Run dialog box closes and the run session starts.
Note when using GUI testing: When running a test with external resourcefiles (like function libraries, data tables, recovery scenarios,etc.) that aresaved in ALM, the resource files are not refreshed for each test run. As aresult, any changes made to these external resource files during thecurrent session are not reflected in a test run until you close and reloadtest and its resource files.
User GuideChapter 55: aRunning Tests and Components
HP Unified Functional Testing (12.53) Page 698 of 938
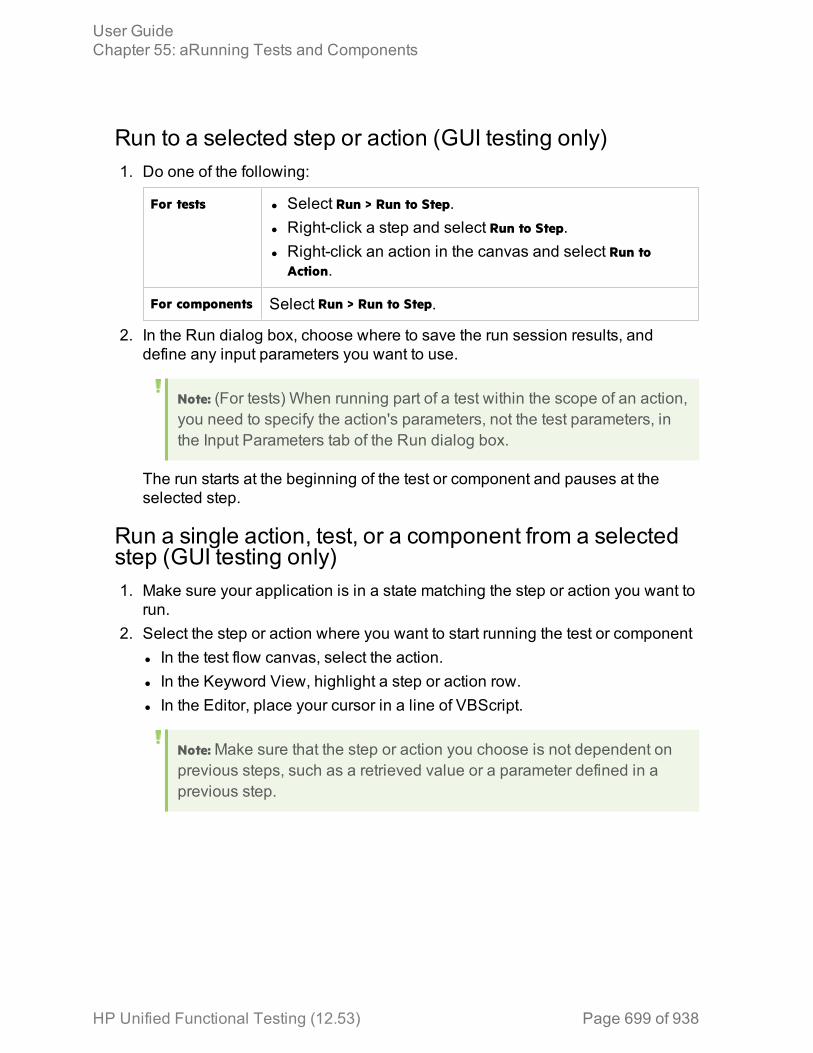
Run to a selected step or action (GUI testing only)1. Do one of the following:
For tests l Select Run > Run to Step.l Right-click a step and select Run to Step.l Right-click an action in the canvas and select Run to
Action.
For components Select Run > Run to Step.
2. In the Run dialog box, choose where to save the run session results, anddefine any input parameters you want to use.
Note: (For tests) When running part of a test within the scope of an action,you need to specify the action's parameters, not the test parameters, inthe Input Parameters tab of the Run dialog box.
The run starts at the beginning of the test or component and pauses at theselected step.
Run a single action, test, or a component from a selectedstep (GUI testing only)1. Make sure your application is in a state matching the step or action you want to
run.2. Select the step or action where you want to start running the test or component
l In the test flow canvas, select the action.l In the Keyword View, highlight a step or action row.l In the Editor, place your cursor in a line of VBScript.
Note: Make sure that the step or action you choose is not dependent onprevious steps, such as a retrieved value or a parameter defined in aprevious step.
User GuideChapter 55: aRunning Tests and Components
HP Unified Functional Testing (12.53) Page 699 of 938
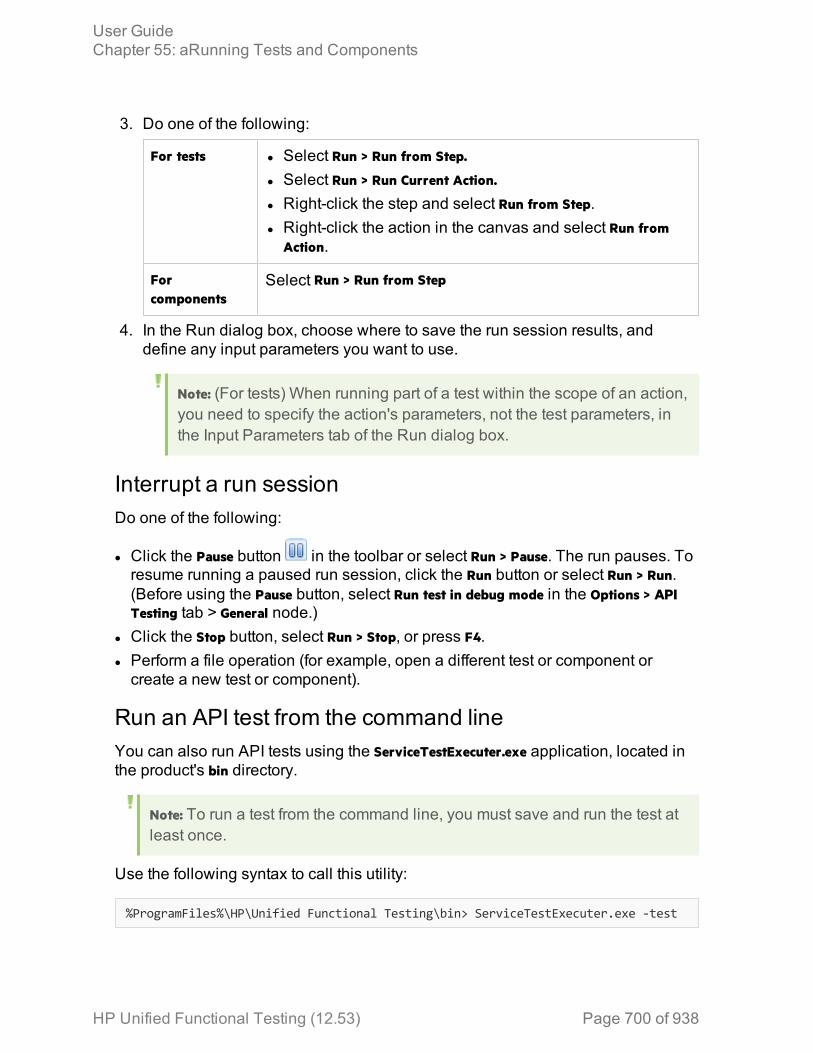
3. Do one of the following:
For tests l Select Run > Run from Step.
l Select Run > Run Current Action.
l Right-click the step and select Run from Step.l Right-click the action in the canvas and select Run from
Action.
Forcomponents
Select Run > Run from Step
4. In the Run dialog box, choose where to save the run session results, anddefine any input parameters you want to use.
Note: (For tests) When running part of a test within the scope of an action,you need to specify the action's parameters, not the test parameters, inthe Input Parameters tab of the Run dialog box.
Interrupt a run sessionDo one of the following:
l Click the Pause button in the toolbar or select Run > Pause. The run pauses. Toresume running a paused run session, click the Run button or select Run > Run.(Before using the Pause button, select Run test in debug mode in the Options > APITesting tab > General node.)
l Click the Stop button, select Run > Stop, or press F4.l Perform a file operation (for example, open a different test or component orcreate a new test or component).
Run an API test from the command lineYou can also run API tests using the ServiceTestExecuter.exe application, located inthe product's bin directory.
Note: To run a test from the command line, you must save and run the test atleast once.
Use the following syntax to call this utility:
%ProgramFiles%\HP\Unified Functional Testing\bin> ServiceTestExecuter.exe -test
User GuideChapter 55: aRunning Tests and Components
HP Unified Functional Testing (12.53) Page 700 of 938

You can use any of the following arguments:
Parametername Description
-test The full path of the test (required). Specify the test directory—not thesolution directory.
-inParams The full path of an XML file containing the input property values(optional).
-outParams
The full path of an XML file containing the output property values(optional).
-profile The name of an Test profile (optional). For details, see "Define APItest properties or user/system variables" on page 461.
-report The directory in which to store the report.
Note: If you use the -inParams or -outParams arguments, the XML file musthave this structure:
<TestParameters><Values>
<Arguments><a>1</a><b>2</b>
</Arguments></Values>
</TestParameters>
View the run resultsBy default, when the run session ends, the run results open.
Note: If you cleared the View results when run session ends check box in the RunSessions pane of the Options dialog box (Tools > Options > General tab > RunSessions node), the run results do not open at the end of the run session.
You can also optionally automatically upload your run results to ALM if you arerunning a test from ALM. This option is set in ALM as a site parameter for yourproject. For details, see the HP Application Lifecycle Management Administrator Guide.
User GuideChapter 55: aRunning Tests and Components
HP Unified Functional Testing (12.53) Page 701 of 938
Running GUI tests with a disconnected Remote DesktopConnectionRelevant for: GUI tests only
Using options set in the Run Sessions pane of the Options dialog box (Tools> Options > General tab > Run Sessions node), you can run a GUI test via the RemoteDesktop Connection if the Remote Desktop session is closed.
When running a GUI test with Remote Desktop Connection, you work in thefollowing manner:
1. On your local machine, you open the Remote Desktop connection and connectto the remote computer running UFT.
2. On the remote computer, you open UFT and run the test.3. You close the Remote Desktop connection on the local computer.The UFT
session and test on the Remote computer continue to run until completion.By enabling the options for the Remote Desktop connection, you can free yourlocal computer for other tasks, as well as not need to keep your local computerrunning and connected to the remote computer.
For task details, see "Run a GUI test with a disconnected Remote DesktopConnection" below
Run a GUI test with a disconnected Remote DesktopConnectionRelevant for: GUI tests only
This task describes how to run a GUI test after disconnecting an Remote DesktopConnection to a computer running UFT. This enables you to start a test run anddisconnect your computer from the UFT computer, enabling the test to runindependently while you continue work on your own computer.
Note: This feature is not supported in the Microsoft Windows® XPenvironment or the Hyper-V virtualization server.
User GuideChapter 55: aRunning Tests and Components
HP Unified Functional Testing (12.53) Page 702 of 938
PrerequisitesIf you want to run UFT in a minimized RDP session, and you are using an RDP 6.0or later client, enable this by setting a registry value on the computer that is runningthe Remote Desktop session
1. If necessary, create the RemoteDesktop_SuppressWhenMinimized registry value(DWORD type) in one of the following registry paths on the computer that isrunning the RDP client:l For 32-bit operating systems: <HKEY_CURRENT_USER or HKEY_LOCAL_
MACHINE>\Software\Microsoft\Terminal Server Client
l For 64-bit operating systems: <HKEY_CURRENT_USER>\Software\Wow6432Node\Microsoft\Terminal Server Client
2. Set the data for this value to 2.3. Restart your remote session in order for this setting to take effect.
Log in to the remote computer running UFTOn your local computer, open a Windows Remote Desktop Connection sessionand connect to the remote computer running UFT.
Configure the Remote Desktop Connection options in theremote computerYou must configure the Remote Connection options before beginning to run thetest:
1. In the Options dialog box, open the Run Sessions pane (Tools > Options > Generaltab > Run Sessions node).
2. Enable the Remote Desktop Connection options by selecting the Allow UFT tocontinue running GUI or business process tests after disconnection from anRDP computer option.
3. Enter the user name and password of the user connecting to the remotecomputer with the Remote Desktop connection.
User GuideChapter 55: aRunning Tests and Components
HP Unified Functional Testing (12.53) Page 703 of 938
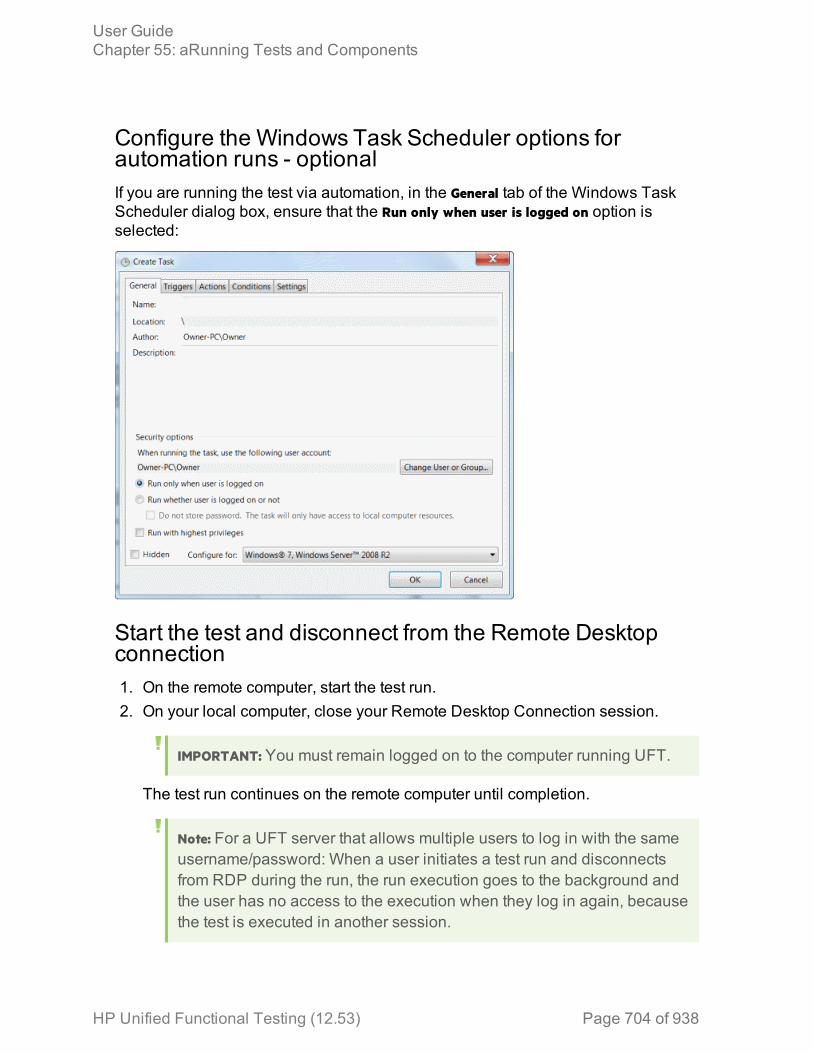
Configure the Windows Task Scheduler options forautomation runs - optionalIf you are running the test via automation, in the General tab of the Windows TaskScheduler dialog box, ensure that the Run only when user is logged on option isselected:
Start the test and disconnect from the Remote Desktopconnection1. On the remote computer, start the test run.2. On your local computer, close your Remote Desktop Connection session.
IMPORTANT: You must remain logged on to the computer running UFT.
The test run continues on the remote computer until completion.
Note: For a UFT server that allows multiple users to log in with the sameusername/password: When a user initiates a test run and disconnectsfrom RDP during the run, the run execution goes to the background andthe user has no access to the execution when they log in again, becausethe test is executed in another session.
User GuideChapter 55: aRunning Tests and Components
HP Unified Functional Testing (12.53) Page 704 of 938

UFT Runtime EngineRelevant for: GUI tests and components, API testing, and business process tests and flows
The UFTRuntime Engine enables you to run UFT tests (both GUI and API) andbusiness process tests on your computer without installing the entire UFT IDE. Inaddition, you can also install the Runtime Engine without the Run Results Viewer,UFT Add-in for ALM, sample applications, or Help documentation. This canpotentially save you valuable disk space on your computer.
When you run tests with the Runtime Engine, you can access and run the test froma number of different places without the need to open the UFT interface andconfigure UFT options. When the test runs it runs in the background. At the end ofthe test run, you can view the test results.
Using the Runtime Engine requires very little experience in using UFT - you do notneed to edit tests, change configurations or settings, or understand how to makeUFT work with your application. You simply select the test, run the test, and viewthe run results.
The Runtime Engine can be used in a number of different scenarios:
Runningtests andcomponentsfrom ALM
You can set up test runs from the Test Lab module in ALM, and runthese on a computer using the Runtime Engine. Using the RuntimeEngine enables you to run the test, without the need to interact withthe UFT interface (such as loading UFT add-ins in the Add-inManager dialog box).
Runningtests fromautomation:
You also can run tests using automation using the Runtime Engine.The Runtime Engine installation enables you to save disk space onthe computer running these tests, freeing up system resources onthat computer for other tasks
Runningtests usingthe Jenkinsplug-in:
The Runtime Engine can be installed on a build server or computerrunning builds of your applications. Using the Jenkins plug-in, yourun a UFT test as a post-build action of your application's buildprocess. Having the Runtime Engine installed on this computer torun the UFT test enables you to free up system resources for theimportant application build tasks.
User GuideChapter 55: aRunning Tests and Components
HP Unified Functional Testing (12.53) Page 705 of 938
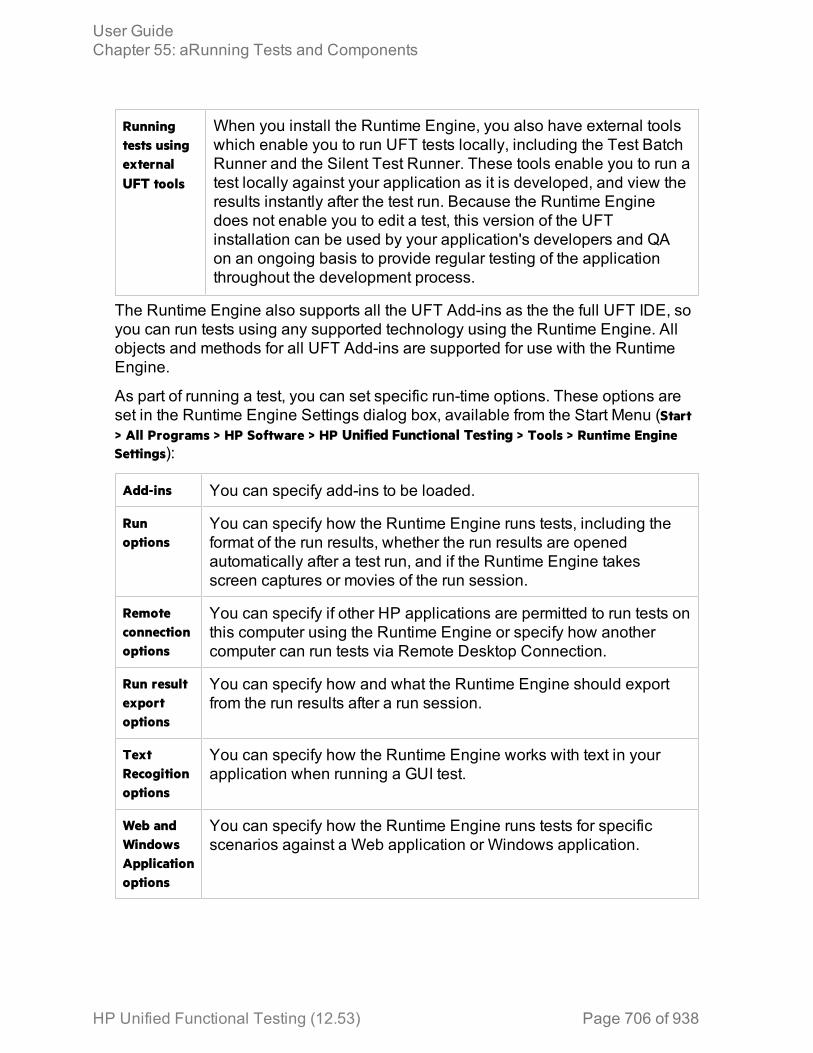
Runningtests usingexternalUFT tools
When you install the Runtime Engine, you also have external toolswhich enable you to run UFT tests locally, including the Test BatchRunner and the Silent Test Runner. These tools enable you to run atest locally against your application as it is developed, and view theresults instantly after the test run. Because the Runtime Enginedoes not enable you to edit a test, this version of the UFTinstallation can be used by your application's developers and QAon an ongoing basis to provide regular testing of the applicationthroughout the development process.
The Runtime Engine also supports all the UFT Add-ins as the the full UFT IDE, soyou can run tests using any supported technology using the Runtime Engine. Allobjects and methods for all UFT Add-ins are supported for use with the RuntimeEngine.
As part of running a test, you can set specific run-time options. These options areset in the Runtime Engine Settings dialog box, available from the Start Menu (Start> All Programs > HP Software > HP Unified Functional Testing > Tools > Runtime EngineSettings):
Add-ins You can specify add-ins to be loaded.
Runoptions
You can specify how the Runtime Engine runs tests, including theformat of the run results, whether the run results are openedautomatically after a test run, and if the Runtime Engine takesscreen captures or movies of the run session.
Remoteconnectionoptions
You can specify if other HP applications are permitted to run tests onthis computer using the Runtime Engine or specify how anothercomputer can run tests via Remote Desktop Connection.
Run resultexportoptions
You can specify how and what the Runtime Engine should exportfrom the run results after a run session.
TextRecogitionoptions
You can specify how the Runtime Engine works with text in yourapplication when running a GUI test.
Web andWindowsApplicationoptions
You can specify how the Runtime Engine runs tests for specificscenarios against a Web application or Windows application.
User GuideChapter 55: aRunning Tests and Components
HP Unified Functional Testing (12.53) Page 706 of 938

Test Batch RunnerRelevant for: GUI testing and API testing
Test Batch Runner enables you to run tests in a collective, successive test run.Tests are run individually but sequentially in a single session.
Using Test Batch Runner, you create a list of tests and save the list as a batch .mtbfile, so that you can run the same batch of tests again at another time. You canchoose to include or exclude a test in your batch list from running during aparticular batch run without affecting the other tests in the batch.
When running the test batch, the Output pane allows you view the results of the testrun in run time. During the test batch run, the Output pane displays the test's path inthe file system, the progress of the test, as well as any errors that occur during therun.
Following the test batch run, the results are saved to a run results file includingwhether the test passed or failed and errors in running the test. The Report columnof the Tests pane displays a link to the run results file.
If you do not want to run the test batch through the Test Batch Runner interface, youcan run the Test Batch Runner from the Windows Command Line. You provide thelocation of a .mtb file, a test folder, or a directory of tests as a command argumentand Test Batch Runner runs the test batch and displays the run results.
Tip: Using the command line options of the Test Batch Runner, you caninclude UFT tests in as part of build runs in a continuous integration system.
Create and run a test batchRelevant for: GUI tests and components and API testing
Open Test Batch RunnerSelect Start > All Programs > HP Software > HP Unified Functional Testing > Tools > TestBatch Runner or <UFT installation folder/bin/UFTBatchRunner.exe.
Note: You do not need to have UFT open to use Test Batch Runner.
User GuideChapter 55: aRunning Tests and Components
HP Unified Functional Testing (12.53) Page 707 of 938
Add batches or testsl To add a test batch file (.mtb), select File > Add or click the Add button .Navigate to the folder in which the batch file is saved.
l To add individual tests, select Tests > Add or click the Add button . In theBrowse For Folder dialog box, select the folder in which your tests are located. Allthe tests from the selected folder are added to the Tests pane in the main TestBatch Runner window.
Note: When adding tests through the Tests > Add menu command, you mustselect all the tests from the target folder. If you do not want to run all thetests in the target folder, select the check boxes next to the tests you wantto run before you run the test batch.
Select the tests to be part of the test batch runSelect the checkboxes for the tests that you want to include in the test batch run.
Run the test batch
Click the Run button to run the test batch. The Output pane provides run logdetails of the batch run while the batch is running.
Run the test batch via the command lineIn the Command Line window, enter UFTBatchRunnerCMD.exe and the source switchfollowed by the test batch file (.mtb) or folder containing the test.
For example, your command line might contain text like this:
UFTBatchRunnerCMD.exe -source "C:\users\MySample.mtb"UFTBatchRunnerCMD.exe -source "C:\users\APITest1"
View the test batch run resultsIn the Tests pane, click the results link for a specific test in the Run Results column.This opens the results for that test.
User GuideChapter 55: aRunning Tests and Components
HP Unified Functional Testing (12.53) Page 708 of 938
Using UFT for continuous integrationRelevant for: GUI testing and API testing
As more software companies utilize continuous integration practices, you may alsoneed to integrate functional tests into your testing process. This integration helpsdevelopers ensure that new builds did not introduce regressions.
The HP Application Automation Tools plugin for the Jenkins continuous integrationserver and Bamboo continous integration server provides a mechanism forexecuting UFT tests as part of a build script. This open source plugin allows you totrigger an HP test as a build step and present the results in the Jenkins or theBamboo user interface.
For more details, see
Jenkins: https://wiki.jenkins-ci.org/display/JENKINS/HP+Application+Automation+Tools
Bamboo:https://marketplace.atlassian.com/plugins/com.atlassian.plugins.bamboo.hpe.application.automation.bamboo
Optional stepsRelevant for: GUI tests and scripted GUI components
An optional step is a step that is not necessarily required to successfully complete arun session. For example, suppose that when creating a test or component, youadd login steps because the application you are testing prompts you to enter a username and password in a login window. Suppose, too, that this particularapplication remembers user login details, so that you do not need to log in everytime you open the application. During a run session, the application does notprompt you to enter your user name and password because it retained theinformation that was previously entered. In this case, the steps that you added forentering the login information are not required and should, therefore, be markedoptional.
During a run session, if the object of an optional step does not exist in theapplication, UFT bypasses this step and continues to run the test or component.When the run session ends, a message is displayed for the step indicating that thestep was not performed, but the step does not cause the run to fail.
However, if, during a run session, UFT cannot find the object from the optional stepin the object repository (for example, if the object name was modified in the test orcomponent but not in the object repository, or if the object was removed from the
User GuideChapter 55: aRunning Tests and Components
HP Unified Functional Testing (12.53) Page 709 of 938

object repository), an error message is displayed listing the required object, and therun fails.
During a recording session, UFT automatically marks steps that open certaindialog boxes as optional:
Dialog Box / Message Box Title Bar
AutoComplete
File Download
Internet Explorer
Enter Network Password
Error
Security Alert
Security Information
Security Warning
Username and Password Required
You can also manually designate steps as optional. For example, you can addconditional statements or use recovery scenarios to automatically click a button,press ENTER, or enter login information in a step.
To set an optional step:
l In the Keyword View, right-click the step and select Optional Step.l In the Editor, add OptionalStep to the beginning of the VBScript statement. Forexample:
OptionalStep.Browser("Browser").Dialog("AutoComplete").WinButton("Yes").Click
Log trackingRelevant for: GUI tests and components
If the Windows-based application you are testing uses a supported Java or .NETlog framework that includes a UDP appender, you can enable UFT to receive logmessages from that framework and send them to the run results.
User GuideChapter 55: aRunning Tests and Components
HP Unified Functional Testing (12.53) Page 710 of 938

Analyzing the log messages that were generated as a result of a particular step canhelp you pinpoint the causes of unexpected behavior in your application, such asapplication crashes during automated runs.
Do this by configuring your application's log configuration file, either in the LogTracking pane of the Settings dialog box, or manually.
For a list of supported log frameworks, see the HP Unified Functional Testing ProductAvailability Matrix.
Manually configure log tracking settings1. Verify the following prerequisites:
l Your Windows-based application must use a Java or .NET log frameworkthat includes a UDP appender.
l Logging must be enabled on your application. Verify that you know how toenable and disable logging.
l The log configuration file must be writable.
2. Open the relevant log configuration file and specify yourpreferencesa. Add an appender-ref ref attribute with the value of QtpUdpAppender to the root
element.b. Specify the minimum log message level that you want to include in the run
results.
Note: Log tracking messages are available only when viewing the runresults in the Run Results Viewer.
Example:
...<root>
<level value="DEBUG" />...
<appender-ref ref="QtpUdpAppender" /></root>
c. Add an appender element and its attributes, as shown in the followingexample.
<appender name="QtpUdpAppender"
User GuideChapter 55: aRunning Tests and Components
HP Unified Functional Testing (12.53) Page 711 of 938

type="log4net.Appender.UdpAppender"><remoteAddress value="1.1.1.1" /><remotePort value="18081" /><encoding value="utf-16" /><layout type="log4net.Layout.XmlLayoutSchemaLog4j">
<prefix value="" /></layout>
</appender>
Note: To enable UFT to receive log messages, the Add log messagesto run results area of the Log Tracking pane of the Settings dialog boxmust also be configured, as described below.
3. Configure the settings in the Log Tracking pane so thatUFT will use the same settings that you defined in theprevious stepThis step enables UFT to receive log messages during a run session.In the Log Tracking pane of the Settings dialog box:l Select the Add log messages to run results check box.
Note: Log tracking messages are available only when viewing the runresults in the Run Results Viewer.
l Specify the settings in the upper half of the pane:o Log messages sourceo Porto Minimum level to add node to results tree
l Clear the Auto-configure log mechanism check box. This prevents UFT frommodifying the configuration file.
4. ResultsDuring a run session, UFT receives any log messages that match or exceedthe minimum log message level that you specified in the Log Tracking paneand displays them in the run results.In the run results tree, a node is also inserted for the first message that matchesor exceeds the Minimum level to add node to results tree. This node is inserteddirectly after the step that triggered (or preceded) the relevant log message(according to its timestamp).
User GuideChapter 55: aRunning Tests and Components
HP Unified Functional Testing (12.53) Page 712 of 938
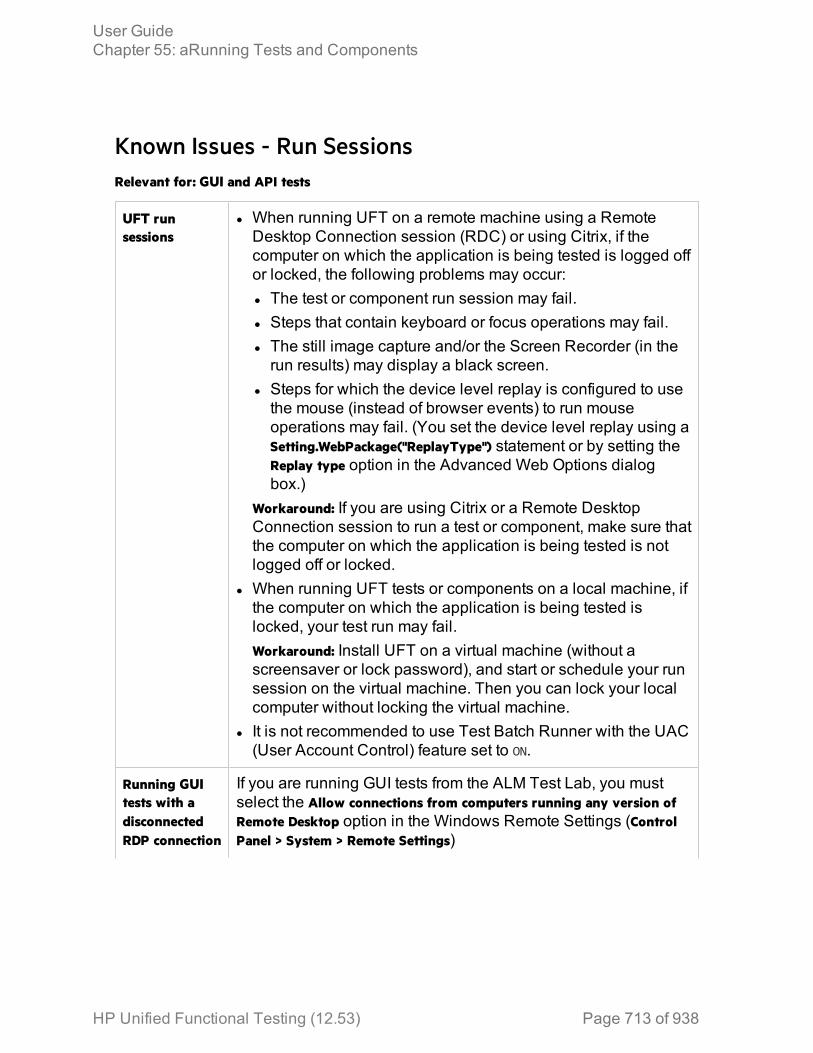
Known Issues - Run SessionsRelevant for: GUI and API tests
UFT runsessions
l When running UFT on a remote machine using a RemoteDesktop Connection session (RDC) or using Citrix, if thecomputer on which the application is being tested is logged offor locked, the following problems may occur:l The test or component run session may fail.l Steps that contain keyboard or focus operations may fail.l The still image capture and/or the Screen Recorder (in therun results) may display a black screen.
l Steps for which the device level replay is configured to usethe mouse (instead of browser events) to run mouseoperations may fail. (You set the device level replay using aSetting.WebPackage("ReplayType") statement or by setting theReplay type option in the Advanced Web Options dialogbox.)
Workaround: If you are using Citrix or a Remote DesktopConnection session to run a test or component, make sure thatthe computer on which the application is being tested is notlogged off or locked.
l When running UFT tests or components on a local machine, ifthe computer on which the application is being tested islocked, your test run may fail.Workaround: Install UFT on a virtual machine (without ascreensaver or lock password), and start or schedule your runsession on the virtual machine. Then you can lock your localcomputer without locking the virtual machine.
l It is not recommended to use Test Batch Runner with the UAC(User Account Control) feature set to ON.
Running GUItests with adisconnectedRDP connection
If you are running GUI tests from the ALM Test Lab, you mustselect the Allow connections from computers running any version ofRemote Desktop option in the Windows Remote Settings (ControlPanel > System > Remote Settings)
User GuideChapter 55: aRunning Tests and Components
HP Unified Functional Testing (12.53) Page 713 of 938
Running APITests
l If you are running an API test that is stored in ALM and calls aGUI test, you must either ensure that UFT is open with asolution open, or you must close UFT and allow ALM to openit. The test will not run if UFT is open with no solution.
l When you manually add a reference to an external .dll, UFTprompts you to save it locally. To change your preferenceabout a specific referenced file, remove the reference and addit again manually.
l Running tests on remote machines using shared folders, mayrequire adjusting the .NET 2.0 security settings.Suggestion: Open the Control Panel and locate the AdministrativeTools, either by browsing or through a search. In the list ofAdministrative Tools, look for the following entry: Microsoft .NETFramework 2.0 Configuration. If it is not present, you must installthe .NET Framework 2.0 SDK.
l The Validate Structure checkpoint fails if the expected value isa SOAP Fault and the Web Service call returns anUnsupportedMediaType status.
l When running an API test in Load Test mode, checkpointverification in API test steps is not supported.
User GuideChapter 55: aRunning Tests and Components
HP Unified Functional Testing (12.53) Page 714 of 938
Running stepsthat containInsight testobjects
l The computer session must be active, and the applicationvisible (and not minimized). for the steps to run successfully.This is because Insight uses data from the screen to compareto the images stored with your test.
l If you are testing an application running on a remote computer,and you use a minimized Remote Desktop Connectionwindow, these steps will fail.Workaround: Use a different program (for example, VirtualNetwork Computing) instead of Remote Desktop Connectionto run steps on a remote computer.
l For Insight object identification to succeed, the display sizedefined in the operating system and the browser zoom levels(if working on a browser) must be the same when the test runsas they were when the objects were learned or recorded.
l When using excluded areas in Insight, the included area mustcontain enough significant content to enable objectrecognition. If the remaining content is not detailed enough,UFT may locate too few or too many matching controls on thescreen.Workaround: Do one or both of the following:l Use a larger area of the screen for the test object image(make sure to adjust the ClickPoint such that UFT clicks thecorrect location on the control).
l Define Visual Relation Identifiers to help identify the control.l When searching for an Insight object within a parent Browsertest object, UFT searches within the selected browser tab, notin the whole browser window.
l Dual monitor support. Insight is supported only on the primarymonitor. Therefore, if you are working with dual monitors,make sure that your application is visible on the primarymonitor when you use UFT for Insight test objects.
User GuideChapter 55: aRunning Tests and Components
HP Unified Functional Testing (12.53) Page 715 of 938

Chapter 56: Using Run ResultsRelevant for: GUI tests and components,API testing, and business process tests and flows
After you run a test or component, UFT displays results that detail the success orfailure of each step, and the reasons behind each failure (if necessary). These runresults are opened automatically as a separate tab in the document paneimmediately after the test or component run.
The run results are saved on a single HTML page, with links to other resources,such as the data table used with a test run, screen captures of the application beingtested, and movies of the test run. Because the run results are saved in HTMLformat, they can be exported and/or sent to other people without the need to haveUFT installed.
To view the run results on your browser, you should use one of the followingbrowsers:
l Internet Explorer 10 or higher (with Compatibility Mode disabled)l The latest supported version of Chrome.If you are viewing the run results from a test run from ALM, the run results report issupported on when running a test from ALM versions 11.52 patch 5 or higher orALM 12.21.
The run results contain descriptions or links to a number of items:
HP Unified Functional Testing (12.53) Page 716 of 938
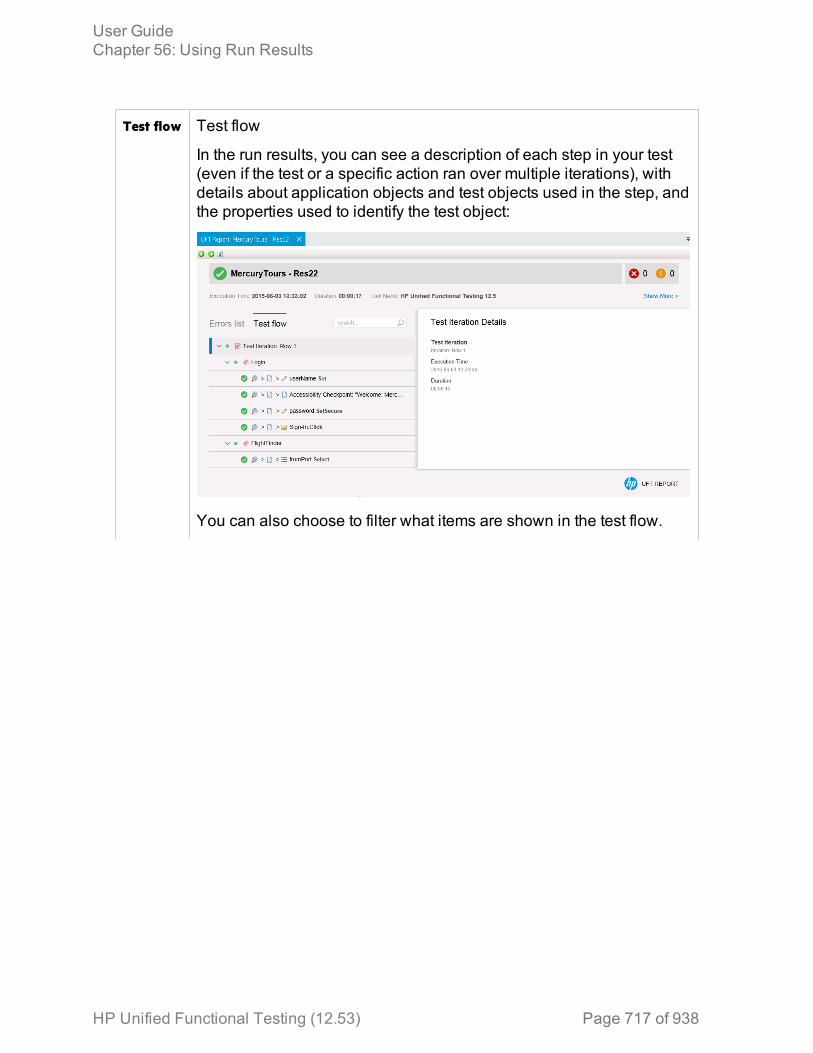
Test flow Test flow
In the run results, you can see a description of each step in your test (even if the test or a specific action ran over multiple iterations), withdetails about application objects and test objects used in the step, andthe properties used to identify the test object:
You can also choose to filter what items are shown in the test flow.
User GuideChapter 56: Using Run Results
HP Unified Functional Testing (12.53) Page 717 of 938
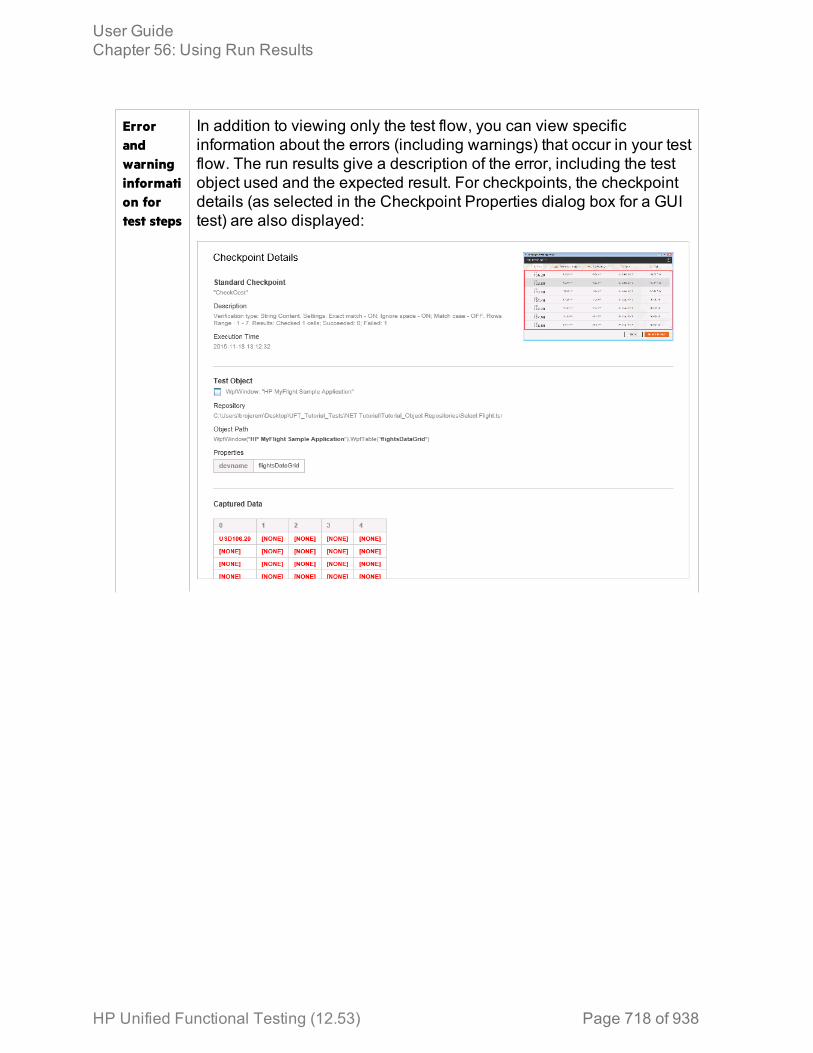
Errorandwarninginformation fortest steps
In addition to viewing only the test flow, you can view specificinformation about the errors (including warnings) that occur in your testflow. The run results give a description of the error, including the testobject used and the expected result. For checkpoints, the checkpointdetails (as selected in the Checkpoint Properties dialog box for a GUItest) are also displayed:
User GuideChapter 56: Using Run Results
HP Unified Functional Testing (12.53) Page 718 of 938
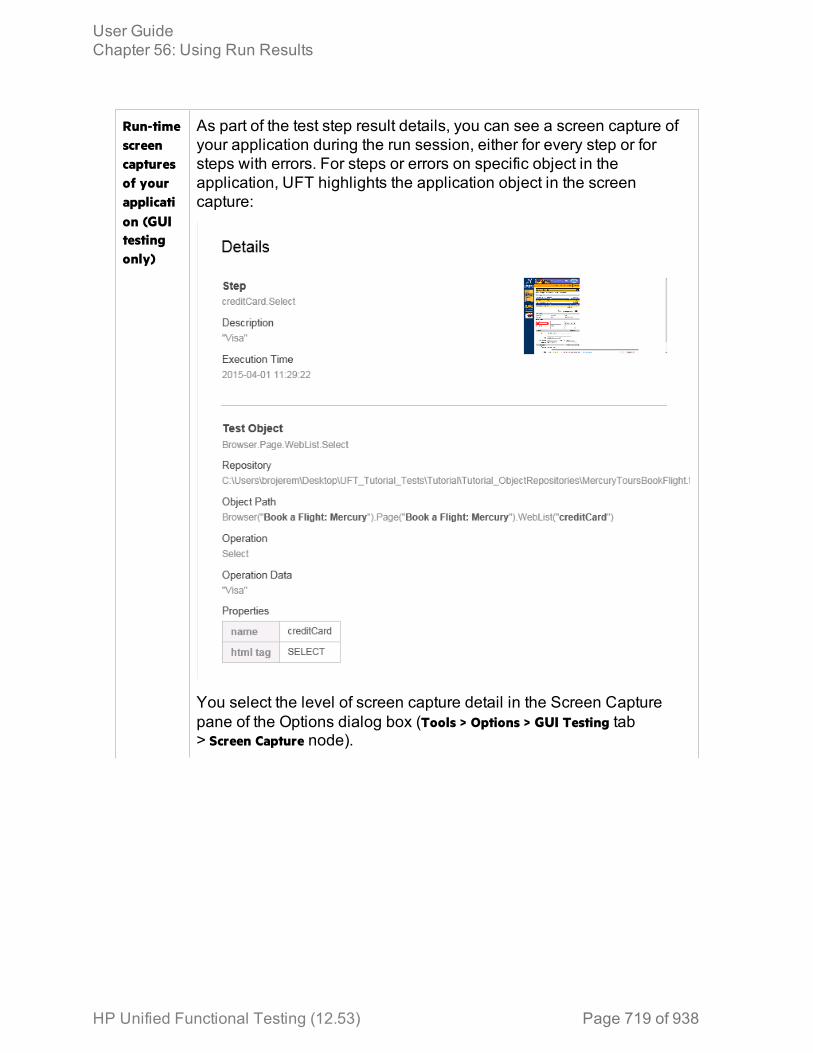
Run-timescreencapturesof yourapplication (GUItestingonly)
As part of the test step result details, you can see a screen capture ofyour application during the run session, either for every step or forsteps with errors. For steps or errors on specific object in theapplication, UFT highlights the application object in the screencapture:
You select the level of screen capture detail in the Screen Capturepane of the Options dialog box (Tools > Options > GUI Testing tab> Screen Capture node).
User GuideChapter 56: Using Run Results
HP Unified Functional Testing (12.53) Page 719 of 938
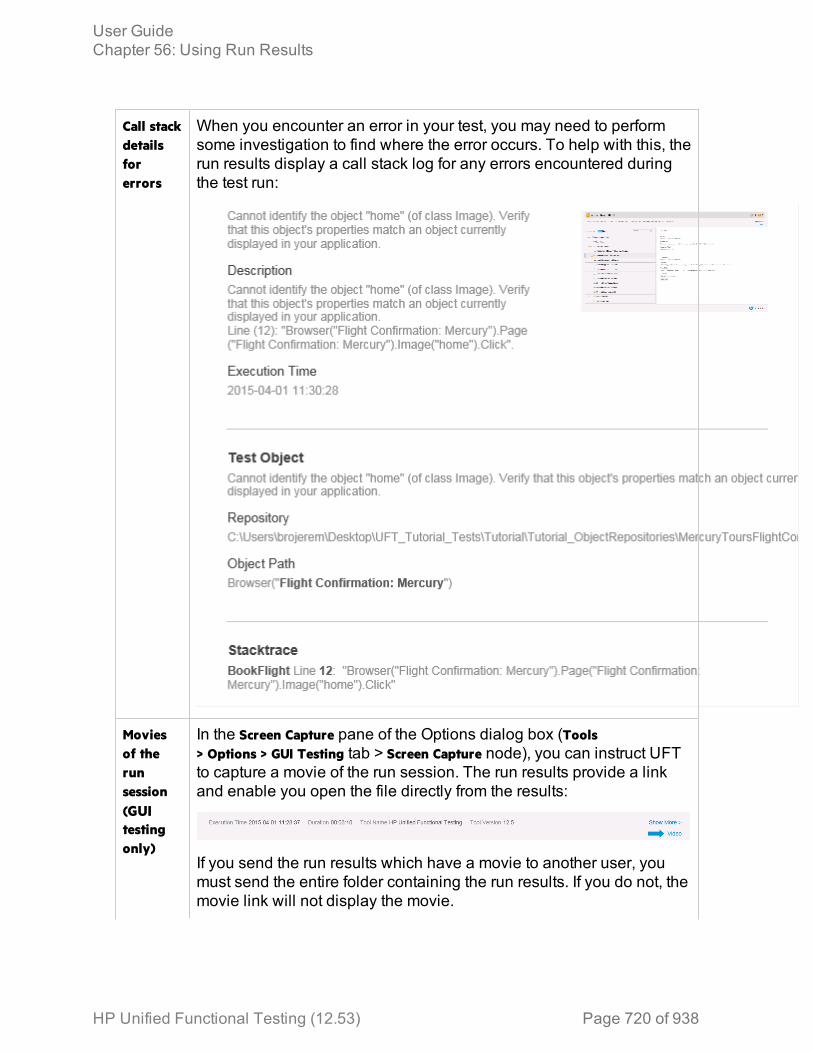
Call stackdetailsforerrors
When you encounter an error in your test, you may need to performsome investigation to find where the error occurs. To help with this, therun results display a call stack log for any errors encountered duringthe test run:
Moviesof therunsession(GUItestingonly)
In the Screen Capture pane of the Options dialog box (Tools> Options > GUI Testing tab > Screen Capture node), you can instruct UFTto capture a movie of the run session. The run results provide a linkand enable you open the file directly from the results:
If you send the run results which have a movie to another user, youmust send the entire folder containing the run results. If you do not, themovie link will not display the movie.
User GuideChapter 56: Using Run Results
HP Unified Functional Testing (12.53) Page 720 of 938
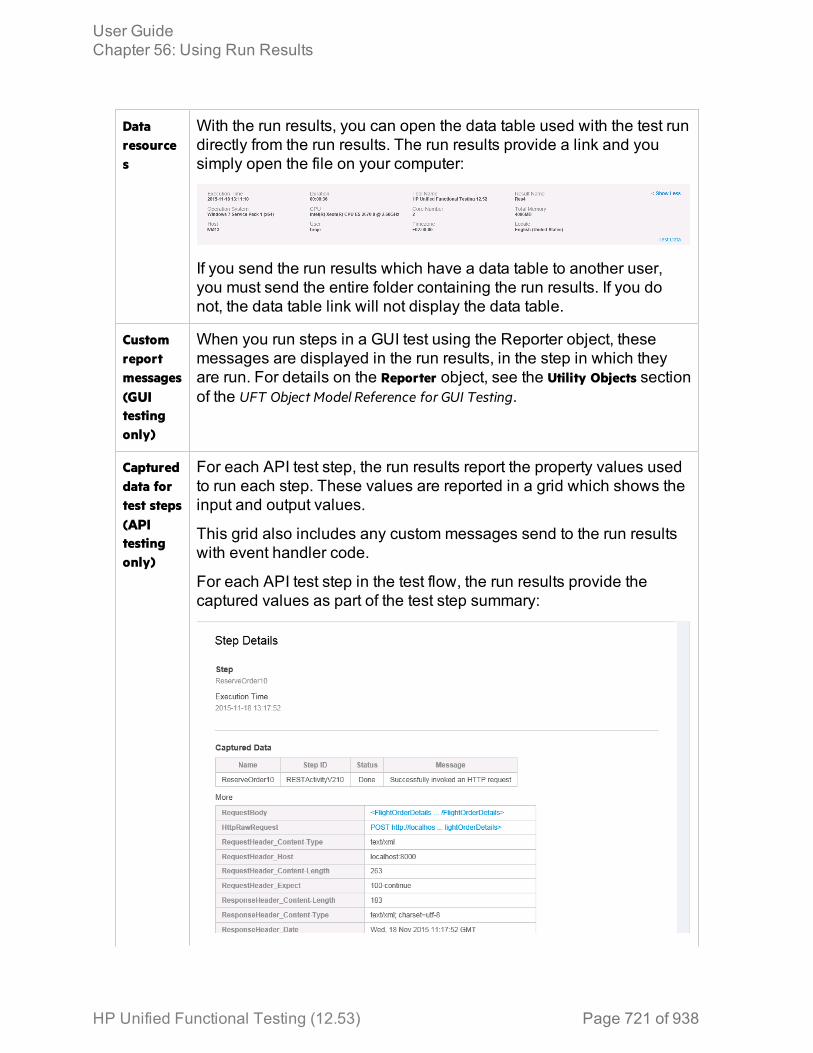
Dataresources
With the run results, you can open the data table used with the test rundirectly from the run results. The run results provide a link and yousimply open the file on your computer:
If you send the run results which have a data table to another user,you must send the entire folder containing the run results. If you donot, the data table link will not display the data table.
Customreportmessages(GUItestingonly)
When you run steps in a GUI test using the Reporter object, thesemessages are displayed in the run results, in the step in which theyare run. For details on the Reporter object, see the Utility Objects sectionof the UFT Object Model Reference for GUI Testing.
Captureddata fortest steps(APItestingonly)
For each API test step, the run results report the property values usedto run each step. These values are reported in a grid which shows theinput and output values.
This grid also includes any custom messages send to the run resultswith event handler code.
For each API test step in the test flow, the run results provide thecaptured values as part of the test step summary:
User GuideChapter 56: Using Run Results
HP Unified Functional Testing (12.53) Page 721 of 938
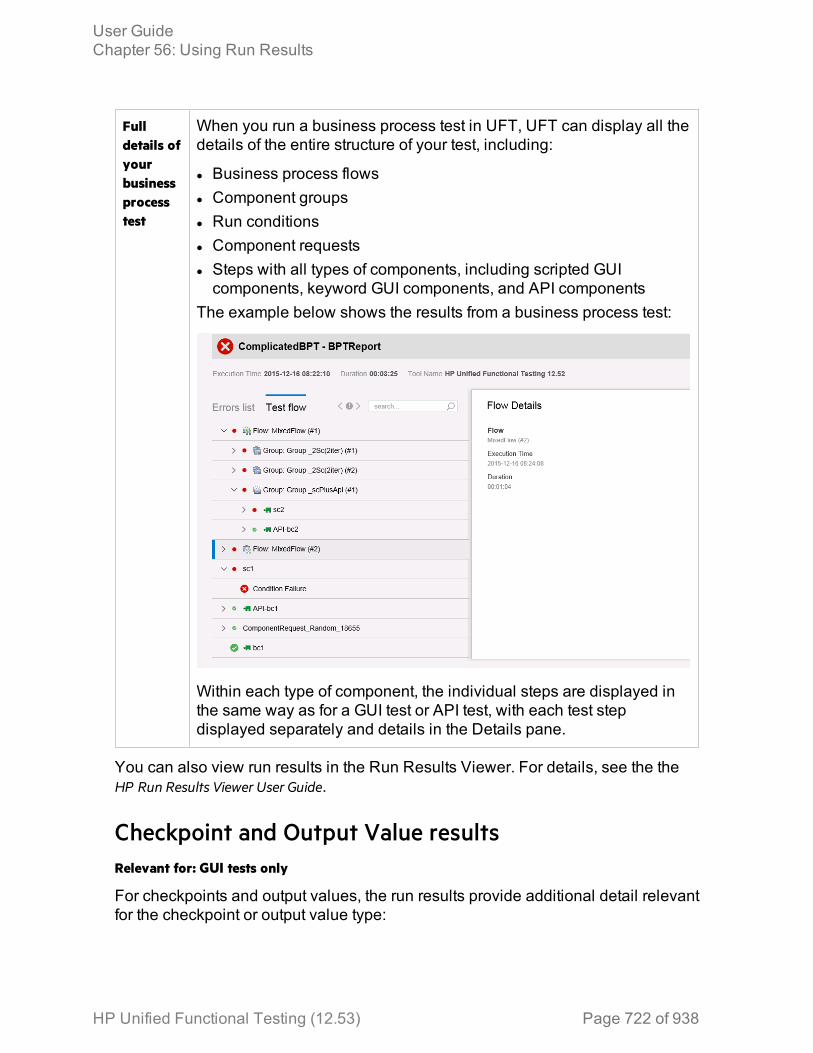
Fulldetails ofyourbusinessprocesstest
When you run a business process test in UFT, UFT can display all thedetails of the entire structure of your test, including:
l Business process flowsl Component groupsl Run conditionsl Component requestsl Steps with all types of components, including scripted GUIcomponents, keyword GUI components, and API components
The example below shows the results from a business process test:
Within each type of component, the individual steps are displayed inthe same way as for a GUI test or API test, with each test stepdisplayed separately and details in the Details pane.
You can also view run results in the Run Results Viewer. For details, see the theHP Run Results Viewer User Guide.
Checkpoint and Output Value resultsRelevant for: GUI tests only
For checkpoints and output values, the run results provide additional detail relevantfor the checkpoint or output value type:
User GuideChapter 56: Using Run Results
HP Unified Functional Testing (12.53) Page 722 of 938
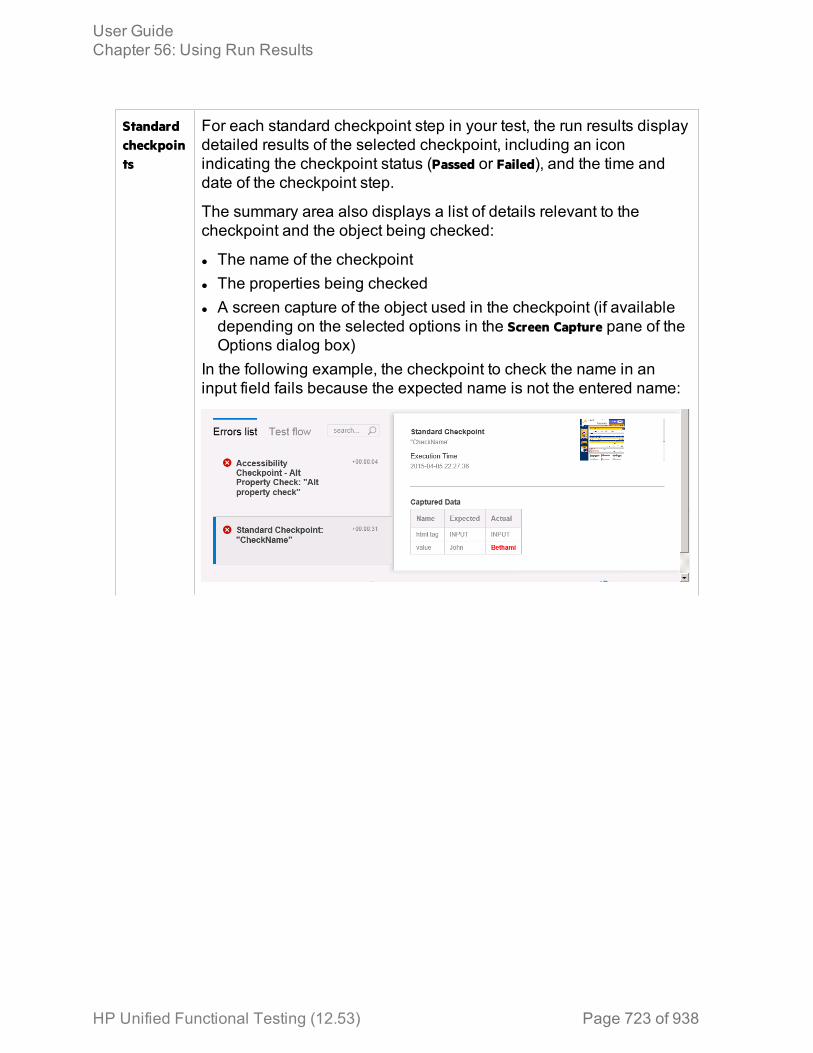
Standardcheckpoints
For each standard checkpoint step in your test, the run results displaydetailed results of the selected checkpoint, including an iconindicating the checkpoint status (Passed or Failed), and the time anddate of the checkpoint step.
The summary area also displays a list of details relevant to thecheckpoint and the object being checked:
l The name of the checkpointl The properties being checkedl A screen capture of the object used in the checkpoint (if availabledepending on the selected options in the Screen Capture pane of theOptions dialog box)
In the following example, the checkpoint to check the name in aninput field fails because the expected name is not the entered name:
User GuideChapter 56: Using Run Results
HP Unified Functional Testing (12.53) Page 723 of 938
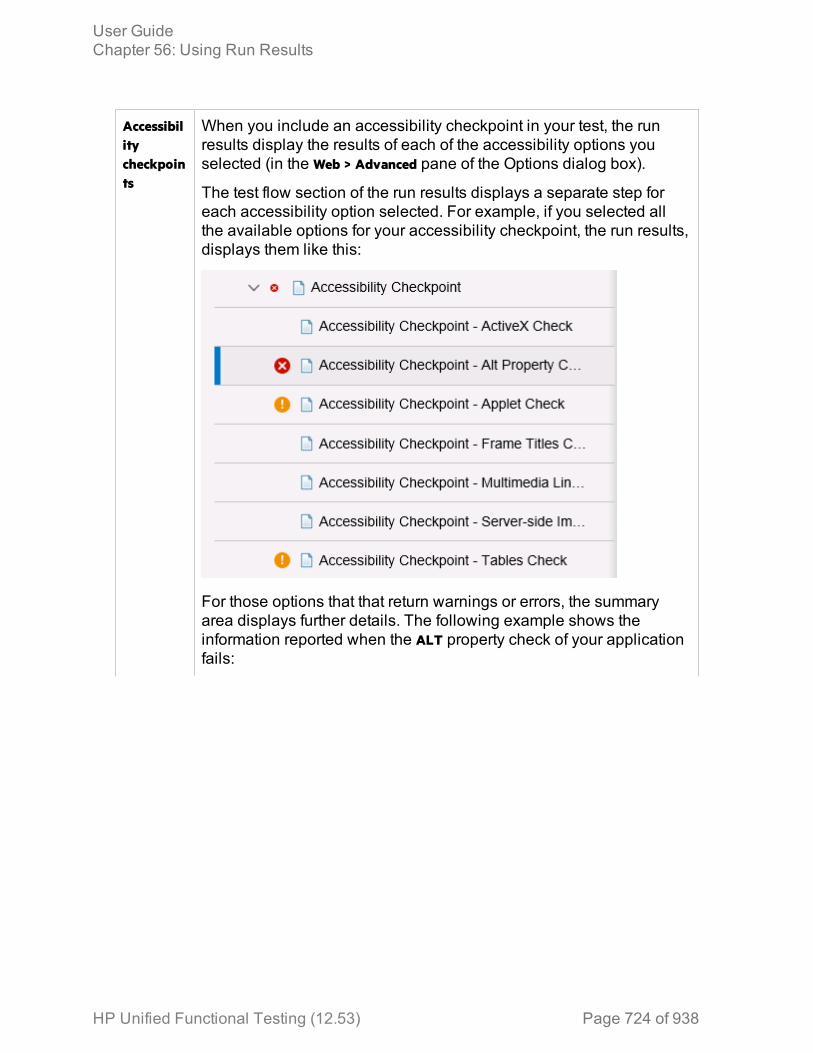
Accessibilitycheckpoints
When you include an accessibility checkpoint in your test, the runresults display the results of each of the accessibility options youselected (in the Web > Advanced pane of the Options dialog box).
The test flow section of the run results displays a separate step foreach accessibility option selected. For example, if you selected allthe available options for your accessibility checkpoint, the run results,displays them like this:
For those options that that return warnings or errors, the summaryarea displays further details. The following example shows theinformation reported when the ALT property check of your applicationfails:
User GuideChapter 56: Using Run Results
HP Unified Functional Testing (12.53) Page 724 of 938

Using the information in the run results, you can pinpoint parts of yourWeb site or Web application that do not conform to the W3C WebContent Accessibility Guidelines. The run results are based on theseW3C requirements.
User GuideChapter 56: Using Run Results
HP Unified Functional Testing (12.53) Page 725 of 938
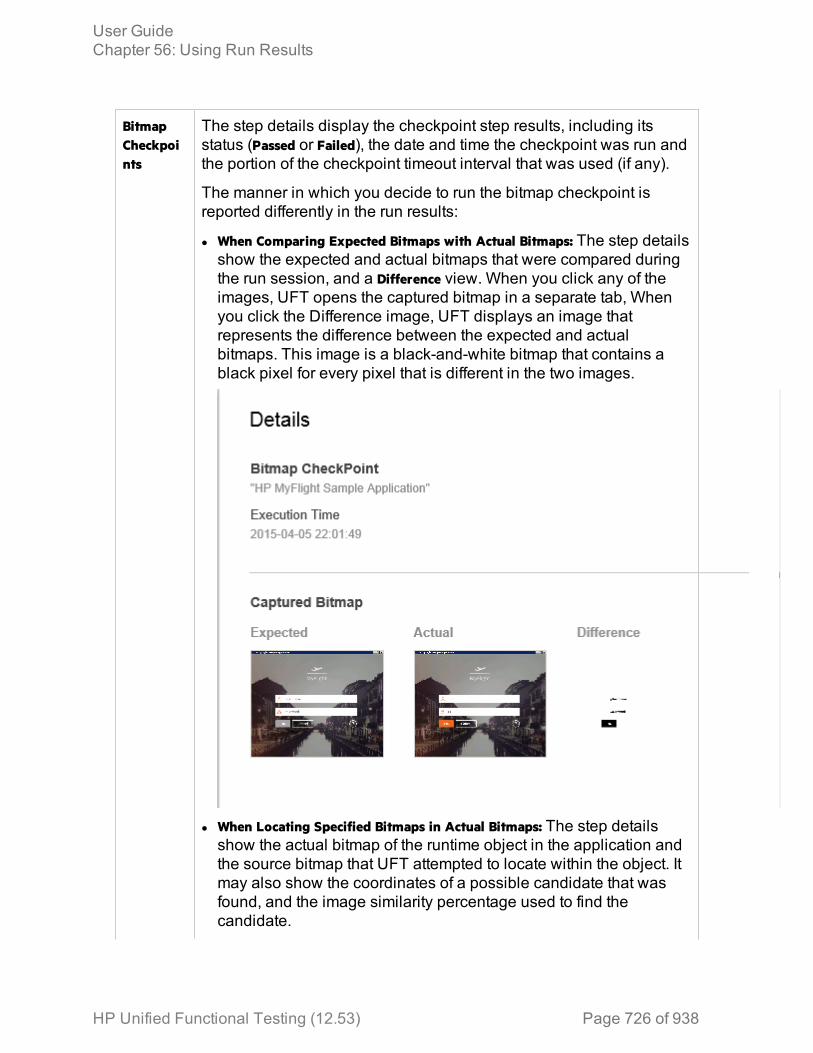
BitmapCheckpoints
The step details display the checkpoint step results, including itsstatus (Passed or Failed), the date and time the checkpoint was run andthe portion of the checkpoint timeout interval that was used (if any).
The manner in which you decide to run the bitmap checkpoint isreported differently in the run results:
l When Comparing Expected Bitmaps with Actual Bitmaps: The step detailsshow the expected and actual bitmaps that were compared duringthe run session, and a Difference view. When you click any of theimages, UFT opens the captured bitmap in a separate tab, Whenyou click the Difference image, UFT displays an image thatrepresents the difference between the expected and actualbitmaps. This image is a black-and-white bitmap that contains ablack pixel for every pixel that is different in the two images.
l When Locating Specified Bitmaps in Actual Bitmaps: The step detailsshow the actual bitmap of the runtime object in the application andthe source bitmap that UFT attempted to locate within the object. Itmay also show the coordinates of a possible candidate that wasfound, and the image similarity percentage used to find thecandidate.
User GuideChapter 56: Using Run Results
HP Unified Functional Testing (12.53) Page 726 of 938

By default, screen captures are available for bitmap checkpoints isavailable only if the bitmap checkpoint fails. You can change theconditions for when bitmaps are saved in the run results, using theSave still image captures to results option in the Screen Capture pane(Tools > Options > GUI Testing tab > Screen Capture node) of theOptions dialog box.
Note:
l When comparing bitmaps, if the checkpoint is defined tocompare only specific areas of the bitmap, the run resultsdisplay the actual and expected bitmaps with the selectedarea highlighted.
l When comparing bitmaps, if the dimensions of the actual andexpected bitmaps are different, UFT fails the checkpointwithout comparing the bitmaps. In this case the ViewDifference functionality is not available in the results.
l The View Difference functionality is not available whenviewing results generated in a version of QuickTest earlierthan 10.00.
l If the bitmap checkpoint is performed by a custom comparer:l UFT passes the bitmaps to the custom comparer forcomparison even if their dimensions are different.
l The Result Details pane also displays the name of thecustom comparer (as it appears in the Comparer box in theBitmap Checkpoint Properties dialog box), and anyadditional information provided by the custom comparer.
l The difference bitmap is provided by the customcomparer.
User GuideChapter 56: Using Run Results
HP Unified Functional Testing (12.53) Page 727 of 938
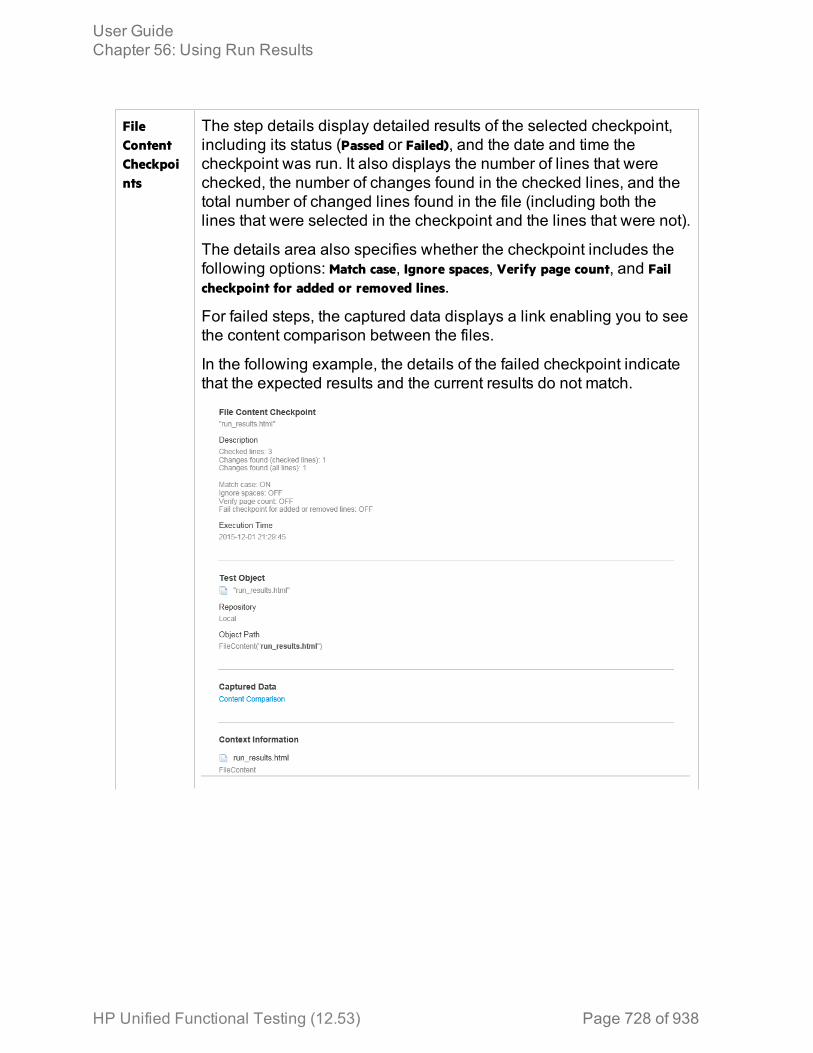
FileContentCheckpoints
The step details display detailed results of the selected checkpoint,including its status (Passed or Failed), and the date and time thecheckpoint was run. It also displays the number of lines that werechecked, the number of changes found in the checked lines, and thetotal number of changed lines found in the file (including both thelines that were selected in the checkpoint and the lines that were not).
The details area also specifies whether the checkpoint includes thefollowing options: Match case, Ignore spaces, Verify page count, and Failcheckpoint for added or removed lines.
For failed steps, the captured data displays a link enabling you to seethe content comparison between the files.
In the following example, the details of the failed checkpoint indicatethat the expected results and the current results do not match.
User GuideChapter 56: Using Run Results
HP Unified Functional Testing (12.53) Page 728 of 938
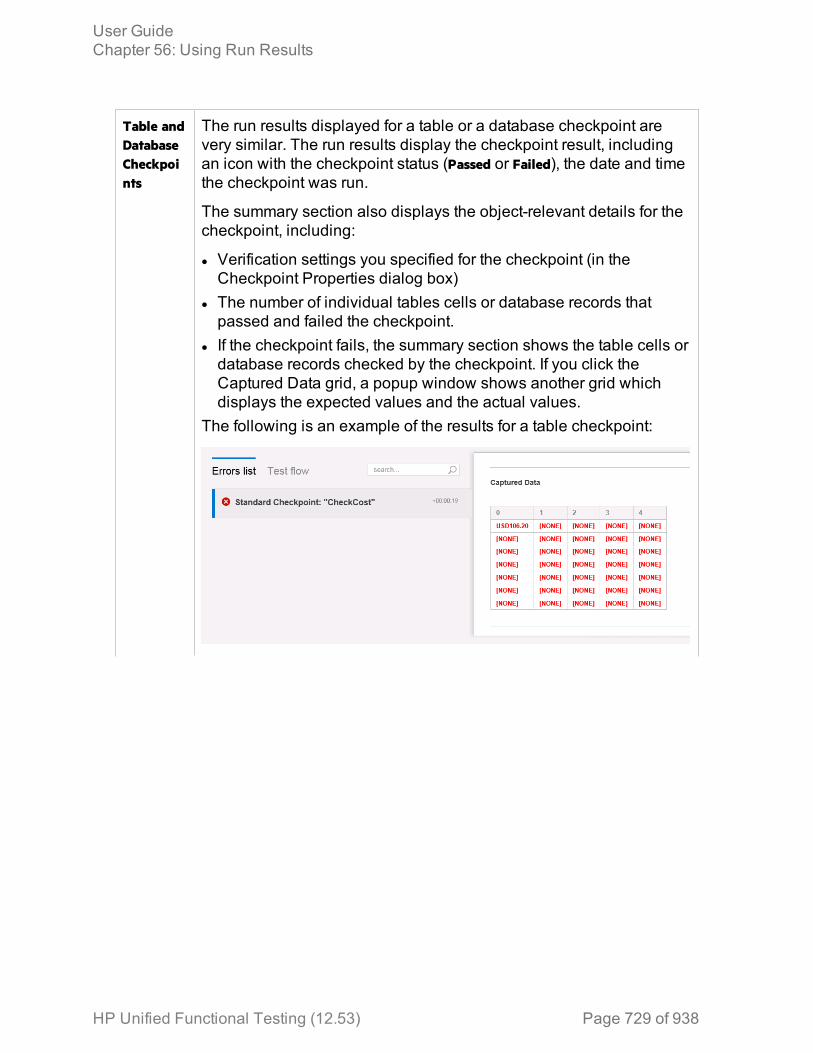
Table andDatabaseCheckpoints
The run results displayed for a table or a database checkpoint arevery similar. The run results display the checkpoint result, includingan icon with the checkpoint status (Passed or Failed), the date and timethe checkpoint was run.
The summary section also displays the object-relevant details for thecheckpoint, including:
l Verification settings you specified for the checkpoint (in theCheckpoint Properties dialog box)
l The number of individual tables cells or database records thatpassed and failed the checkpoint.
l If the checkpoint fails, the summary section shows the table cells ordatabase records checked by the checkpoint. If you click theCaptured Data grid, a popup window shows another grid whichdisplays the expected values and the actual values.
The following is an example of the results for a table checkpoint:
User GuideChapter 56: Using Run Results
HP Unified Functional Testing (12.53) Page 729 of 938
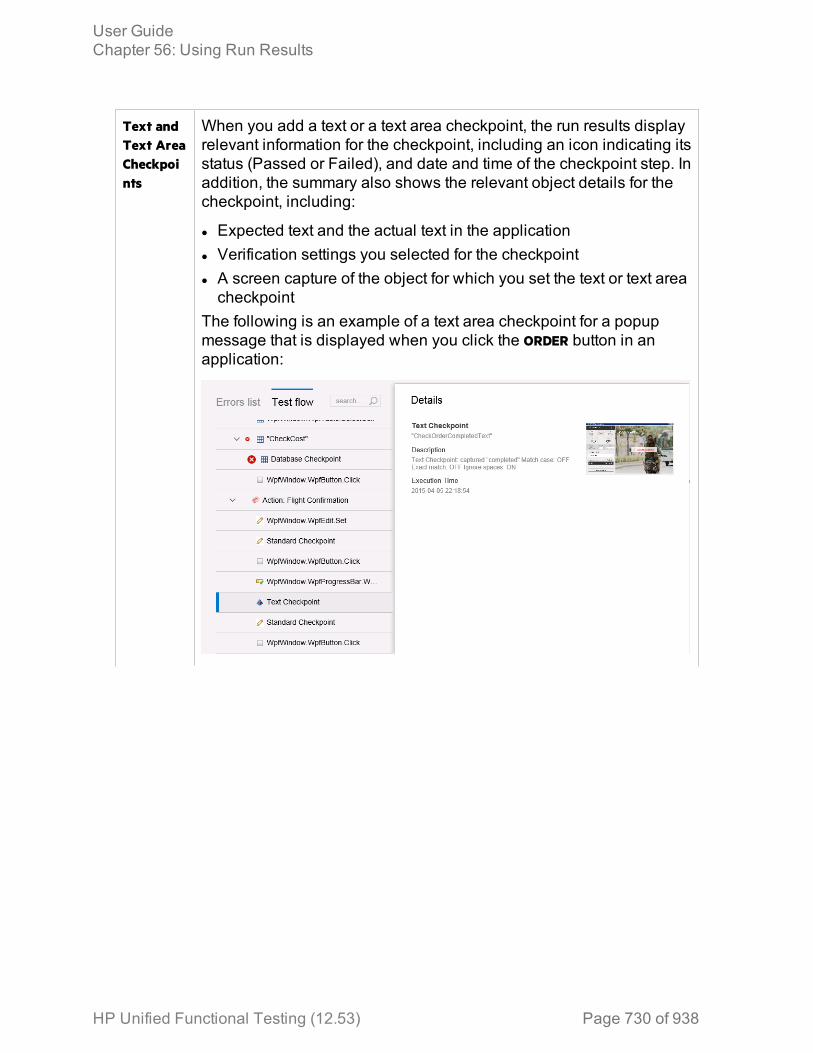
Text andText AreaCheckpoints
When you add a text or a text area checkpoint, the run results displayrelevant information for the checkpoint, including an icon indicating itsstatus (Passed or Failed), and date and time of the checkpoint step. Inaddition, the summary also shows the relevant object details for thecheckpoint, including:
l Expected text and the actual text in the applicationl Verification settings you selected for the checkpointl A screen capture of the object for which you set the text or text areacheckpoint
The following is an example of a text area checkpoint for a popupmessage that is displayed when you click the ORDER button in anapplication:
User GuideChapter 56: Using Run Results
HP Unified Functional Testing (12.53) Page 730 of 938
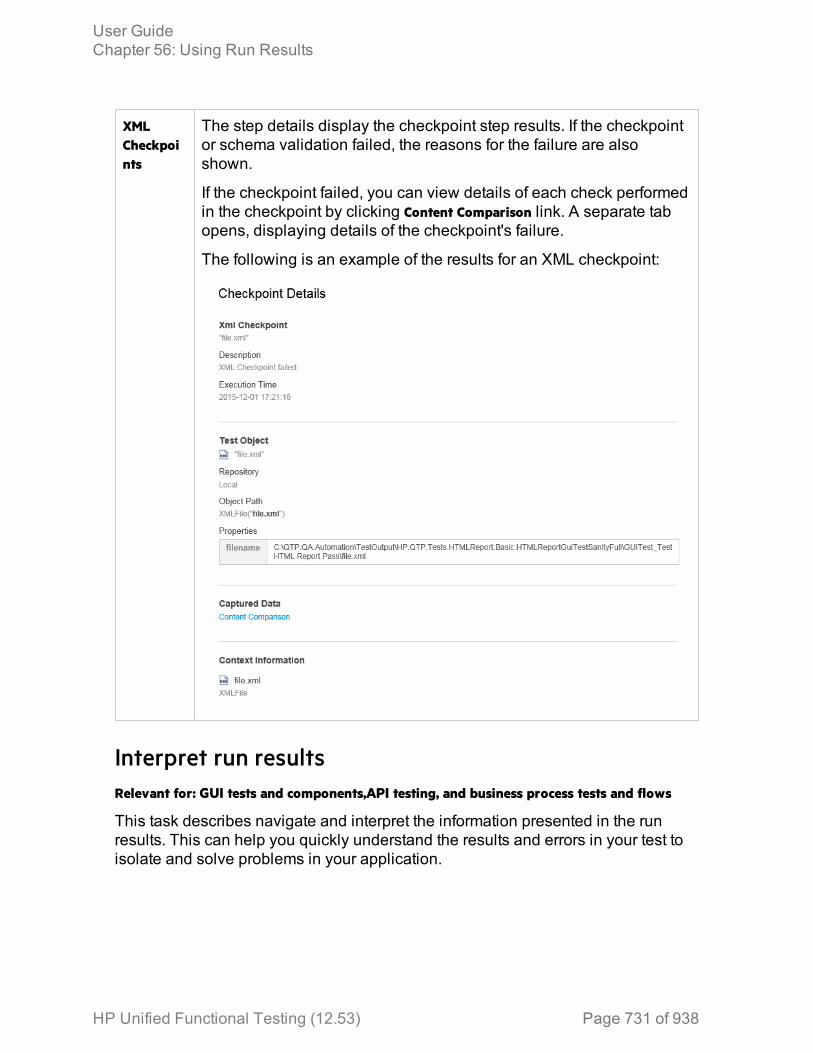
XMLCheckpoints
The step details display the checkpoint step results. If the checkpointor schema validation failed, the reasons for the failure are alsoshown.
If the checkpoint failed, you can view details of each check performedin the checkpoint by clicking Content Comparison link. A separate tabopens, displaying details of the checkpoint's failure.
The following is an example of the results for an XML checkpoint:
Interpret run resultsRelevant for: GUI tests and components,API testing, and business process tests and flows
This task describes navigate and interpret the information presented in the runresults. This can help you quickly understand the results and errors in your test toisolate and solve problems in your application.
User GuideChapter 56: Using Run Results
HP Unified Functional Testing (12.53) Page 731 of 938
Set run result reporting optionsBefore you begin a test run, set the options to change the information included withthe test results in the Options dialog box (Tools > Options):
Option Options Dialog pane Description
Instruct UFT toautomatically openthe run results
Run Sessions pane (General tab > RunSessions node)
Select the View results when runsession ends option.
Select the formatof the run results
Run sessions pane(General tab > RunSessions node)
Select either the HTML Report or RunResults Viewer Report option.
Take screencaptures of steps
Screen Capture pane(GUI Testing tab> Screen Capture pane)
Select the Save still image captures toresults option. You can specify tosave screen captures for:
l Always (all steps)l For errors
l For errors and warnings
Capture movies ofthe run session
Screen Capture pane(GUI Testing tab> Screen capture pane)
Select the Save movie to resultsoption. You can specify to capturethe movie:
l Always (all steps)l For errors
l For errors and warnings
View step details for each test stepIn the run results, you can see details for each test step. Do the following:
1. In the lower part of the run results, display the Test Flow. The run resultsdisplays a full list of all steps included in the test run.
2. From the step tree, select the step whose results you want to view. A summaryof the details for that step are displayed.
3. View the details for the step, including:l A description of the step, including the operation performedl The test object used in the test step and the test object description
User GuideChapter 56: Using Run Results
HP Unified Functional Testing (12.53) Page 732 of 938
l A screen capture of the application with the test object highlighted (if youselected the option)
l Call stack information, if the test step reported an error
Analyze errors in your test or componentIn addition to reporting the results of every test step, the run results also display aspecial section detailing the errors and warnings that occurred during the test run.You can view these errors without the test flow to determine the root cause of theerror:
1. In the lower part of the run results, display the Errors List.2. Select an error from the list of errors. A summary of the error details are
displayed.
Tip: If you are in the Test Flow view, you can also use the Previous Error
and Next Error buttons to quickly jump to the next error in the list.
3. Use the available details to isolate the cause of the error including:l A description of the errorl The test object being used in the stepl The properties of the test objectl The call stack of the current step
Analyze checkpoint results (GUI tests and componentsonly)For each checkpoint step, view information about the checkpoint:
For a checkpoint thatsucceeded
1. In the lower part of the run results, display the Test Flow.2. Select the checkpoint step from the step list. A summary
of the step details is displayed.3. Use the information in the summary to view the
checkpoint, including:l The properties checked in the checkpointl The test object used in the checkpointl The identification properties of the test object used inthe step
User GuideChapter 56: Using Run Results
HP Unified Functional Testing (12.53) Page 733 of 938
For a checkpoint thatfailed
1. In the lower part of the run results, display the Errors.2. Select the failed checkpoint from the list. A summary of
the error is displayed.3. Use the information in the summary to find the source of
the error, including:l The properties checked in the checkpointl The expected and actual values of the checkpointl The test object used in the checkpointl The identification properties of the test object used inthe step
View the data source included with your test or componentIf your test uses a data source, this data source is attached to the test as anexternal file. This enables you to see exactly which data was used for this test run.
The location of the data differs depending on the test type and the type of datasource:
Test typeData sourcetype Location
GUI test orcomponent
Data table A link named Data displayed in the See More sectionabove the Test Flow and Details area of the run results.The data table is opened as an Excel file.
You can also find the Excel file in the run resultsfolder: <run results folder>\Report\Default.xls
API test l Excell Localtable
l XMLl Database
A link named Data displayed in the See More sectionabove the Test Flow and Details area of the run results.This link opens a new browser page in which thespecific data sources for the test are displayed. Youcan click on the name of a data source to view it as anexternal file.
Note: The actual run-time values used in eachstep (taken from the data source) are displayedin the Details section for each test step.
Note: The run results do not sync the selected step in the Test Flow with the
User GuideChapter 56: Using Run Results
HP Unified Functional Testing (12.53) Page 734 of 938
data source.
View the call stack to isolate errors in the test flowWhen you have an error in your test, you can use the Call Stack to determineexactly where this error occurs. This helps you isolate the specific line in the testthat contains the order.
1. In the lower section of the run results, display the Errors.2. From the list of errors and warnings, select an error. The summary of the error
is displayed3. In the error details, find the section containing the StackTrace. This section
displays the following:l The section of the test containing the error (an action, function library, etc.)l The specific function containing the error (if the error occurred in the contextof a function call)
l The full script line in which the error occurredl The line number of the error in the relevant document
View the step properties capture for an API test stepWhen you run an API test, each test step requires specific property values to runthe step. In the run results, you can view the properties and the values used in thisspecific test run:
1. In the lower section of the run results, display the Test Flow.2. In the Test Flow, select the step you want to view. A summary of the test step is
displayed.3. In the summary, view the Captured Data section of the summary.
If the Captured Data contains links to external resources (for example a Webservice Request/Response), you can click the link in the Captured Data and afloating window displays the detailed data.
View custom messages sent to the run results
ForGUItests
Use the Reporter object to send custom messages to the run results. Thesemessages appear in the Test Flow in the step in which you inserted thestatement.
User GuideChapter 56: Using Run Results
HP Unified Functional Testing (12.53) Page 735 of 938
ForAPItests
When you send a custom message to the run results from an step's eventhandler, it is displayed as part of the step's captured data, which includesthe properties and values used for a specific test run.
1. In the lower section of the run results, display the Test Flow.2. In the Test Flow, select the step you want to view. The details of the
test step are displayed in the right pane.3. In the details, view the Captured Data. In the captured data, you can
see the custom field added in the data grid.
Send the run results by emailIn the tab displaying the run results, right-click the tab name and select Send byEmail. A mail message opens in your default mail application with the run resultsattached.
Note: On computers running Windows 7, after you open the mail messagewindow, you cannot use any user interface items in the UFT window until themail window is closed.
User GuideChapter 56: Using Run Results
HP Unified Functional Testing (12.53) Page 736 of 938

Chapter 57: Running Tests with VirtualizedServices and NetworksRelevant for: GUI tests and API tests
When running tests in UFT, you can use a virtualized service with your test in placeof your application's real service, or deploy an emulated network, to see how thenetwork performs under certain conditions when an application is running on thenetwork. Both these virtual/emulated services help you gain a fuller and deeperlevel of testing in your application.
HP Unified Functional Testing (12.53) Page 737 of 938
Virtualized servicesRelevant for: GUI tests and API tests
Application testing is usually performed on a real deployment of an application.However, sometimes the service upon which an application is based isunavailable or impractical for repeated use or testing. For example, it is impracticalto test a flight booking application which requires the entry of a customer's creditcard using the real credit card service run in combination with the application, aseach time the test is run, the customer's credit card is charged. In such cases, youcan replace your application's service with a virtualized service during testing.
Using Service Virtualization, you create a virtualized service by configuring thebehavior of the virtual service to match the expected behavior of the real service.When you are finished creating the service's details in Service Virtualization, theservice's details are saved as part of a virtualization project.
Then, in UFT, you add the virtualization project to a test. The project's settings aresaved with the test for future testing sessions.
After adding a virtualization project, when designing your test, you use the virtualservice address differently for GUI and API tests:
l For a GUI test, you insert the service address into your application's code in thefunction where the application calls the real service.
l For an API test, you insert the service's address in place of a URL or serviceaddress as a step property.
Then, before running the test containing the virtualized service, you deploy theservice on the Service Virtualization Server. Then, when you run your test, the testruns using the virtual service as needed.
For details on creating a virtualization project and virtual services, see the ServiceVirtualization User Guide.
For task details, see "Use a virtualized service for a UFT test" on page 741.
Assigning data and performance models to a virtualizedserviceRelevant for: GUI tests and API tests
When you create and design a virtualized service, part of the configuration processis defining the expected behavior for the service: how quickly it should respond,what the requests and responses to this service should be, and so forth. Becauseof this, you define performance models and data models for each virtualized
HP Unified Functional Testing (12.53) Page 738 of 938
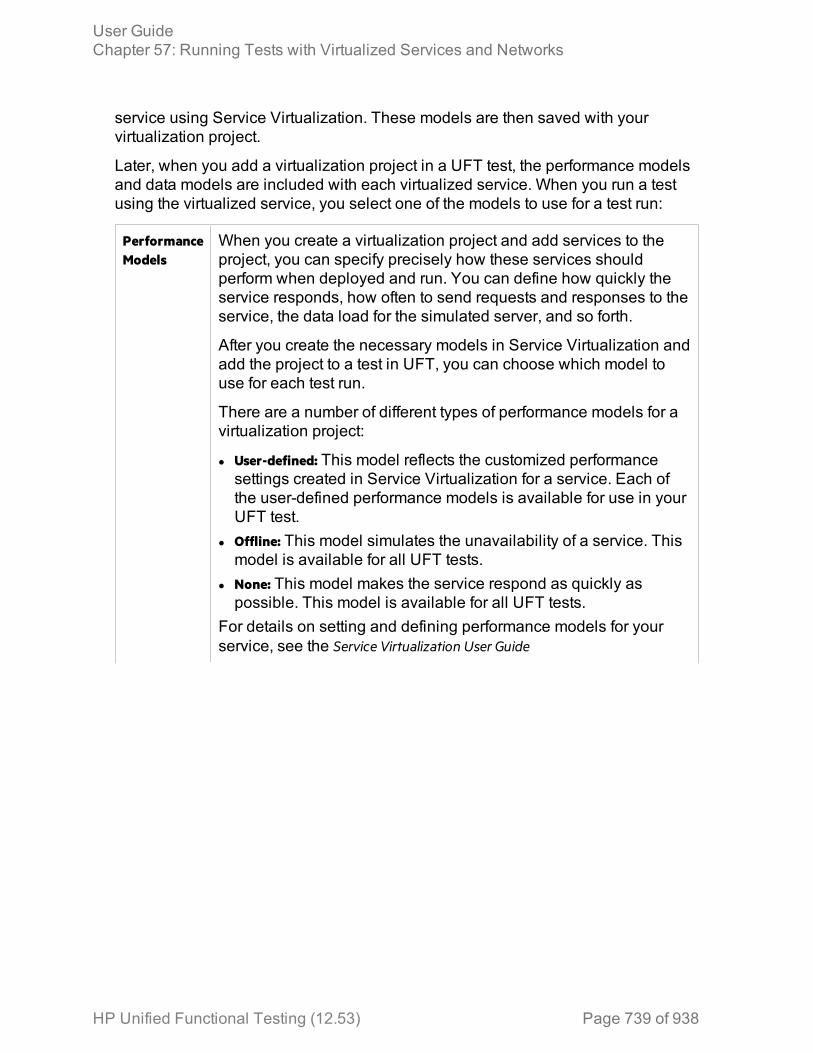
service using Service Virtualization. These models are then saved with yourvirtualization project.
Later, when you add a virtualization project in a UFT test, the performance modelsand data models are included with each virtualized service. When you run a testusing the virtualized service, you select one of the models to use for a test run:
PerformanceModels
When you create a virtualization project and add services to theproject, you can specify precisely how these services shouldperform when deployed and run. You can define how quickly theservice responds, how often to send requests and responses to theservice, the data load for the simulated server, and so forth.
After you create the necessary models in Service Virtualization andadd the project to a test in UFT, you can choose which model touse for each test run.
There are a number of different types of performance models for avirtualization project:
l User-defined: This model reflects the customized performancesettings created in Service Virtualization for a service. Each ofthe user-defined performance models is available for use in yourUFT test.
l Offline: This model simulates the unavailability of a service. Thismodel is available for all UFT tests.
l None: This model makes the service respond as quickly aspossible. This model is available for all UFT tests.
For details on setting and defining performance models for yourservice, see the Service Virtualization User Guide
User GuideChapter 57: Running Tests with Virtualized Services and Networks
HP Unified Functional Testing (12.53) Page 739 of 938
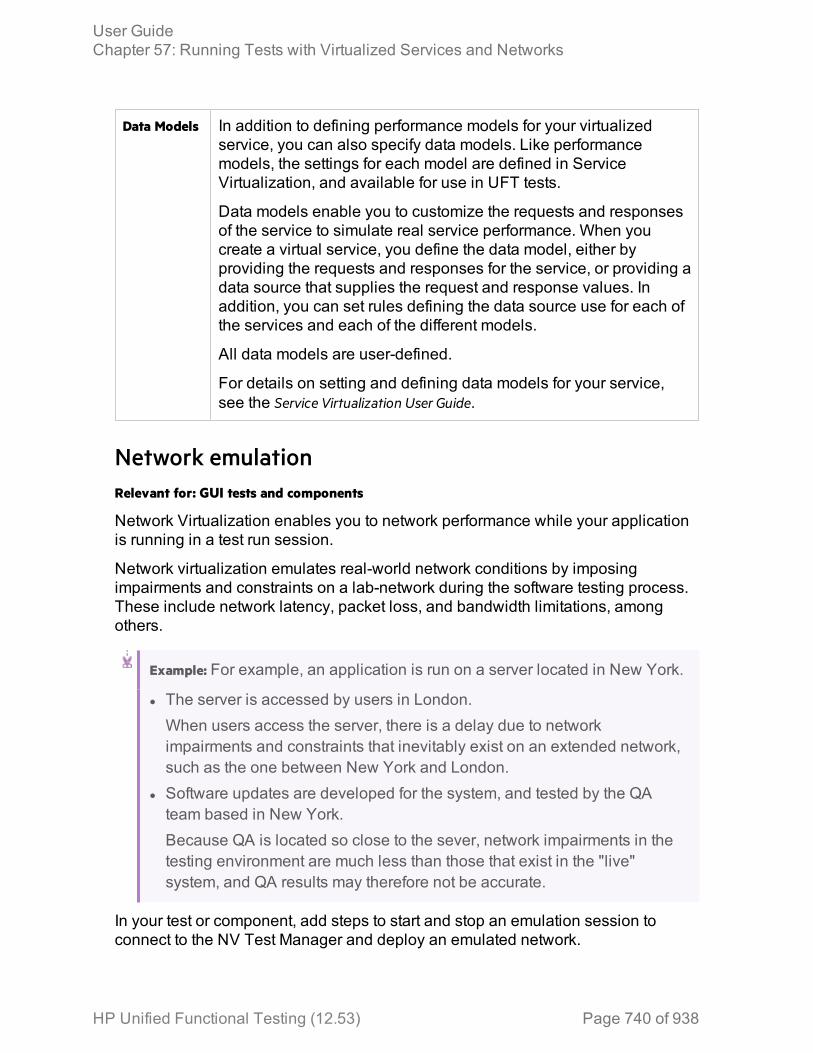
Data Models In addition to defining performance models for your virtualizedservice, you can also specify data models. Like performancemodels, the settings for each model are defined in ServiceVirtualization, and available for use in UFT tests.
Data models enable you to customize the requests and responsesof the service to simulate real service performance. When youcreate a virtual service, you define the data model, either byproviding the requests and responses for the service, or providing adata source that supplies the request and response values. Inaddition, you can set rules defining the data source use for each ofthe services and each of the different models.
All data models are user-defined.
For details on setting and defining data models for your service,see the Service Virtualization User Guide.
Network emulationRelevant for: GUI tests and components
Network Virtualization enables you to network performance while your applicationis running in a test run session.
Network virtualization emulates real-world network conditions by imposingimpairments and constraints on a lab-network during the software testing process.These include network latency, packet loss, and bandwidth limitations, amongothers.
Example: For example, an application is run on a server located in New York.
l The server is accessed by users in London.When users access the server, there is a delay due to networkimpairments and constraints that inevitably exist on an extended network,such as the one between New York and London.
l Software updates are developed for the system, and tested by the QAteam based in New York.Because QA is located so close to the sever, network impairments in thetesting environment are much less than those that exist in the "live"system, and QA results may therefore not be accurate.
In your test or component, add steps to start and stop an emulation session toconnect to the NV Test Manager and deploy an emulated network.
User GuideChapter 57: Running Tests with Virtualized Services and Networks
HP Unified Functional Testing (12.53) Page 740 of 938
Run results include steps for the emulation session statements. Emulated networkperformance is displayed only in the NV Test Manager results.
For details, see "Run a test using an emulated network" on page 745.
Emulation session steps include the following methods:
l NV.StartEmulation
l NV.StartEmulationExcludeIPs
l NV.StopEmulation
For details on creating network emulation profiles, see your Network Virtualization forMobile documentation.
Use a virtualized service for a UFT testRelevant for: GUI tests and API tests
Prerequisite - Deploy the Service Virtualization serverBefore you use a virtualization project in a UFT session, you must start the ServiceVirtualization Server. For details, see the Service Virtualization User Guide.
Add services from a virtualization project to your test inUFT
1. In UFT, click the Virtualized Services Settings button in the toolbar.2. In the Virtualized Services Settings Dialog Box, click the Add Services button.3. In the Add New Services dialog box, select the Project radio button and do one
of the following:l Click Browse and navigate to your virtualization project or virtualizationproject archive
l Enter the location of the project in the edit field.
Note: You can open virtualization projects saved in the file system or inan ALM project.
4. Click Next.5. In the next window, specify the Server address and click Next. If necessary,
specify the credentials for accessing your Service Virtualization server.UFT checks that the server is accessible and deployed.
6. In the next window, select the services to add to the test and click Finish.
User GuideChapter 57: Running Tests with Virtualized Services and Networks
HP Unified Functional Testing (12.53) Page 741 of 938

In the main UFT Service Virtualization dialog box, these services are nowlisted under the virtualization project name.
7. In the main Service Virtualization setup dialog box, click Save Setup to add thevirtualization project to your UFT test.
Note:
l You can add multiple virtualization projects to the same test.l If you loaded a test or a service from the file system or an ALM projectand you lost or changed the ALM connection information, any servicesand projects are reported as missing when you refresh the test. If youcheck the deployment of the services, they will still work as intended.
Add virtualized services from a server to the test in UFT
1. In UFT, click the Virtualized Services Settings button in the toolbar.2. In the Virtualized Services Settings Dialog Box, click the Add Services button.3. In the Add New Services dialog box, select the Running Server radio button and
enter the name of your Service Virtualization server.4. In the next window, provide the user name and password for the server.5. Click Next.6. In the next window, select the services to add to the test and click Finish.
In the main UFT Service Virtualization dialog box, these services are nowlisted under the virtualization project name.
7. In the main Service Virtualization Setup dialog box, click Save Setup to add thevirtualization project to your UFT test.
Note: You can add multiple virtualization projects to the same test.
Undeploy a virtualized serviceBy default, when you add a project or service to your test, it is automaticallydeployed. To stop the deployment, do the following:
1. In the Virtualized Services Settings Dialog Box, click the Show Runtime button.The Service Virtualization Runtime dialog box opens
2. In the Runtime dialog box, select the project you want to deploy.3. Click the Undeploy button. UFT pauses and checks, and removes the project on
the server.
User GuideChapter 57: Running Tests with Virtualized Services and Networks
HP Unified Functional Testing (12.53) Page 742 of 938
If a project did not deploy correctly, hover over the error indication to see adescription of the problem.
Update service details (optional)By default, the service information - including the location of the virtualizationproject or Service Virtualization server and the credentials required to access theserver - is entered when you first add the service. If you need to update thesedetails, do the following
1. In the Virtualized Services Settings Dialog Box, click the parent link (in blue) forthe services that you need to update. The service settings dialog box opens.
2. In the Service Settings dialog box, update any of the following:
Service Detail Where? How to update
Serveraddress andcredentials
SV Servertab
In the SV Server tab, enter:l The revised Service Virtualization addressl The revised user name or password for theService Virtualization server
Virtualizationproject details
SV ProjectLocationtab
Enter the path to the project (on the file system orALM) and the password (if necessary) for theproject.
3. Click Save Configuration to save the details. These revised details are usedwhen UFT runs the test again.
Set the data and performance models for the virtualizationprojectFor each of your virtualization projects, you can configure how the service usesdata when running the virtualized service. Before running a test using thevirtualized service, you need to instruct UFT which of the associated data modelsto use:
1. In the Virtualized Services Settings Dialog Box, select the virtualization projectto use for the current test run.
2. In the Data Model and Performance Model column for each service, from the drop-down list, select the name of the data model and performance model from thedrop-down list to use for the current test run.UFT uses the settings specified in the virtualization project for the service'sperformance and data usage.
User GuideChapter 57: Running Tests with Virtualized Services and Networks
HP Unified Functional Testing (12.53) Page 743 of 938
Pause a deployed service for a test runBy default, all services are deployed when you add them to your test. If you do notwant a particular service to run in a specific test run (but you do not want toundeploy the service), you can put it on standby:
1. In the main Service Virtualization Setup dialog, click the Show Runtime button.The Service Virtualization Runtime dialog box opens.
2. In the Service Virtualization Runtime dialog, select the services you want topause.
3. Above the service list, click the Stop button. UFT pauses for a moment while itstops the service on the Service Virtualization server.
Note: To restart the service for a test run, select the service again andclick Simulate.
4. Click Close to return to the main Service Virtualization setup dialog box.When UFT runs the test, it will use the run-time settings for your virtualizedservices.
Put a service on standbyYou can put an entire virtualized service on standby, so that it is not available to beused in a test run:
1. In the Service Virtualization setup window, select the service you want to puton standby.
2. Above the service list, click Stand-By.
Note: To restore the service's availability, select the services again andclick Simulate.
UFT pauses and sets the service to standby mode. The icon next to the servicename also changes to a pause symbol.
Use the virtualization project in your GUI testMake sure that your application is configured to use the virtual service address, asspecified in the virtualization project. For details on defining virtual serviceaddresses in your virtualization project, see the Service Virtualization User Guide.
User GuideChapter 57: Running Tests with Virtualized Services and Networks
HP Unified Functional Testing (12.53) Page 744 of 938
Use the virtualization project in your API testWhen creating your API test steps, you can use the virtualized services in place ofcalls or requests to real services, including:
l The URL for your Web Service stepsl The URL for your REST Service stepsl The URL for a HTTP Request or SOAP request step
Run the test with a virtualized serviceAfter making all necessary changes for your associated virtualization project, run
the test by selecting Run > Run or clicking the Run button .
Note: If you deployed a service with the Service Designer in ServiceVirtualization, you must stop the service simulation in the ServiceVirtualization Designer window, before running the test that uses thevirtualized service. Failure to do so will result in the service being locked forall other users.
When the test runs the step using the virtualized service, it accesses the necessaryservice as defined in your virtualization project and runs the service.
Run a test using an emulated networkRelevant for: GUI tests and components
This task describes how to trigger a network emulation session from UFT and runtests on the virtualized network. This enables you to view how your networkperforms while your application is running.
To see a blog post about this, see the UFT All About the Apps blog!
PrerequisitesBefore running a test with a virtualized network, you must:
l Have access to the Network Virtualization Test Manager location.l Create the necessary profiles in the NV Test Manager.l For details on creating network profiles, see the section on managing networkprofiles in the Network Virtualization for Mobile User Guide.
User GuideChapter 57: Running Tests with Virtualized Services and Networks
HP Unified Functional Testing (12.53) Page 745 of 938
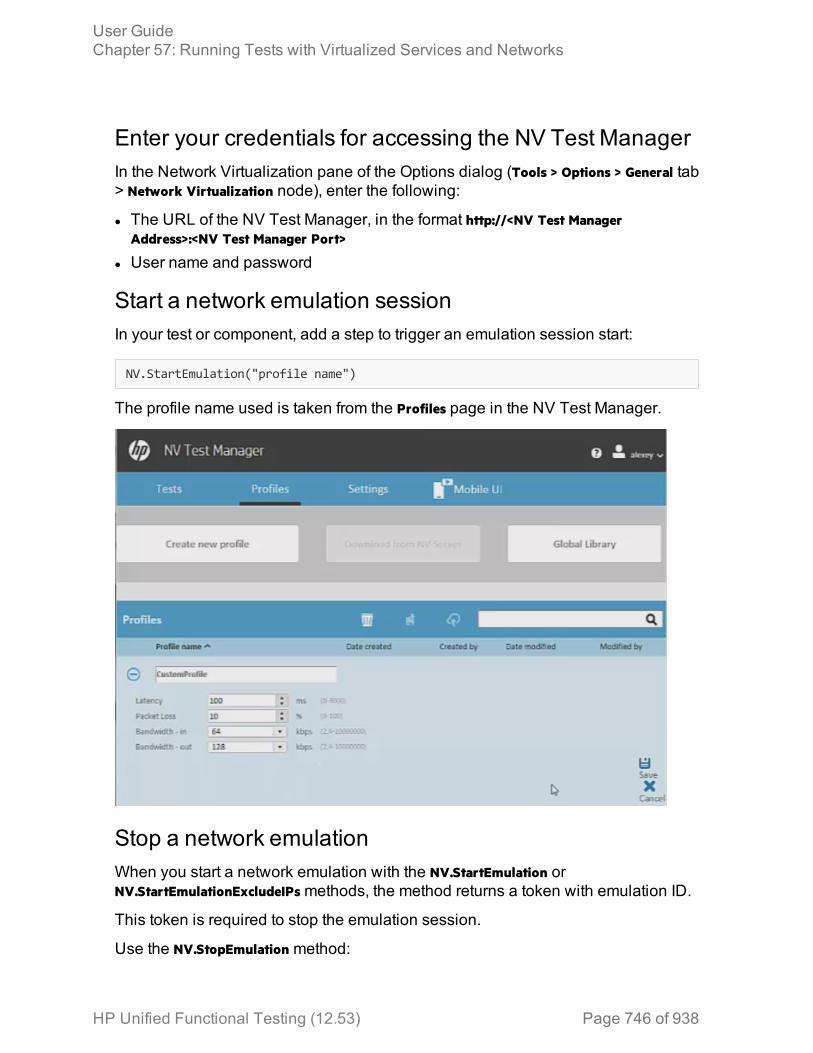
Enter your credentials for accessing the NV Test ManagerIn the Network Virtualization pane of the Options dialog (Tools > Options > General tab> Network Virtualization node), enter the following:
l The URL of the NV Test Manager, in the format http://<NV Test ManagerAddress>:<NV Test Manager Port>
l User name and password
Start a network emulation sessionIn your test or component, add a step to trigger an emulation session start:
NV.StartEmulation("profile name")
The profile name used is taken from the Profiles page in the NV Test Manager.
Stop a network emulationWhen you start a network emulation with the NV.StartEmulation orNV.StartEmulationExcludeIPs methods, the method returns a token with emulation ID.
This token is required to stop the emulation session.
Use the NV.StopEmulation method:
User GuideChapter 57: Running Tests with Virtualized Services and Networks
HP Unified Functional Testing (12.53) Page 746 of 938
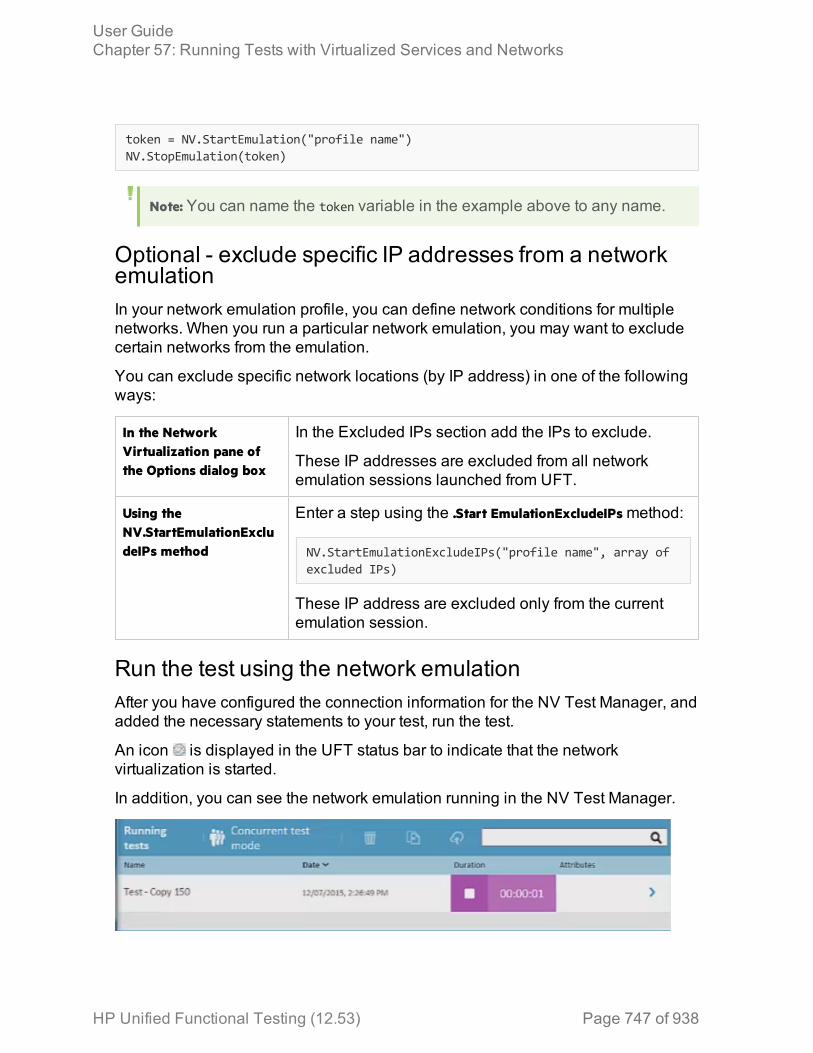
token = NV.StartEmulation("profile name")NV.StopEmulation(token)
Note: You can name the token variable in the example above to any name.
Optional - exclude specific IP addresses from a networkemulationIn your network emulation profile, you can define network conditions for multiplenetworks. When you run a particular network emulation, you may want to excludecertain networks from the emulation.
You can exclude specific network locations (by IP address) in one of the followingways:
In the NetworkVirtualization pane ofthe Options dialog box
In the Excluded IPs section add the IPs to exclude.
These IP addresses are excluded from all networkemulation sessions launched from UFT.
Using theNV.StartEmulationExcludeIPs method
Enter a step using the .Start EmulationExcludeIPs method:
NV.StartEmulationExcludeIPs("profile name", array ofexcluded IPs)
These IP address are excluded only from the currentemulation session.
Run the test using the network emulationAfter you have configured the connection information for the NV Test Manager, andadded the necessary statements to your test, run the test.
An icon is displayed in the UFT status bar to indicate that the networkvirtualization is started.
In addition, you can see the network emulation running in the NV Test Manager.
User GuideChapter 57: Running Tests with Virtualized Services and Networks
HP Unified Functional Testing (12.53) Page 747 of 938

In the run results, each emulation Start and Stop step is displayed separately. Forfull details on the network emulation performance, see your NV Test Manager testresults.
User GuideChapter 57: Running Tests with Virtualized Services and Networks
HP Unified Functional Testing (12.53) Page 748 of 938

Chapter 58: Debugging Tests and ComponentsRelevant for: GUI actions, scripted GUI components, function libraries, user code files, andbusiness process tests
After you create testing documents such as a test, component, function library,event handler, or user code file, you should check that it runs smoothly, withouterrors in syntax or logic. If there are problems, you can stop and debug your tests.
UFT provides different options that you can use to debug your tests in order todetect and isolate defects in a document. For example:
l You can control the run session and begin debugging by using the Pausecommand, breakpoints, and various step commands that enable you to step into,over, and out of a specific step.
l When a run session is suspended, you can use the Debug panes or QuickWatch to check and modify the values of code objects and variables and tomanually run script or code commands.
l If UFT displays a run error message during a run session, you can click theDebug button on the error message to suspend the run and debug the document.
l You can run a single step or step-by-step in a test, component, function library, oruser code file by using the Step Into, Step Out, and Step Over commands:
StepInto
Runs only the current step in the active document.When debugging a GUI test, if the current step calls another action or afunction, the called action or function is displayed in the document pane.The test or function library pauses at the first line of the called action orfunction.
StepOut
Continues the run to the end of the function, or user code file, returns tothe calling test, component, or function library, and then pauses the runsession at the next line (if one exists).
StepOver
If the current step calls a user-defined function, the called function isexecuted in its entirety, but the called function script is not displayed inthe document pane. The run session then returns to the callingdocument and pauses at the next step (if one exists).If the current step calls another action, the called action is displayed inthe document pane, and the run session pauses at the first line of thecalled action (like Step Into).
l Run to or from a specific step or action.
HP Unified Functional Testing (12.53) Page 749 of 938
Modifying and watching the values of variables andproperties of objectsRelevant for: GUI actions, scripted GUI components, function libraries, and user code files
During a run session, you can use the Watch pane, Local Variables pane, or QuickWatch to view the current value of different code expressions, variables, and objectproperties:
l The Local Variables pane displays the current values and types of all variables inthe main script of the current action, or in a selected function in your test, functionlibrary, or user code files.
l The WatchPane displays the current values and the types of code expressions andobjects that you add to the pane.
l The Quick Watch enables you to view the current value of a selected object in aline in your test or component, evaluate the value of an expression, or add anitem to the Watch Pane.
l You can hover over objects, variables, or expressions in the Editor and see thevalue of these expressions.
As you continue stepping through the subsequent steps in your test, functionlibrary, or user code file, UFT automatically updates the Watch pane and LocalVariables pane with the current value for any variable or expression whose valuechanges. In addition, UFT reevaluates the information displayed in the Watch paneand Local Variables pane as you make changes in the context of your debugsession (in the Console Pane).
You can also change the value of a variable or property manually in Watch paneand Local Variables pane. For example, for test objects that support the Objectproperty, you can edit the value of a run-time object property displayed in theWatch pane, thereby changing the value of the property in the application you aretesting before you resume the run session.
You can add any of the following types of expressions to the Watch pane or theQuick Watch:
l The name of a GUI test objectl The name of a variablel The name of a propertyl Any other type of code expression
Caution: UFT runs the expressions in the Watch pane to evaluate them.Therefore, do not add a method or any expression whose evaluation could
User GuideChapter 58: Debugging Tests and Components
HP Unified Functional Testing (12.53) Page 750 of 938
affect the state of the test or any GUI test object, as this can lead tounexpected behavior of your test, component, function library, or user codefile.
Expressions added to the Watch pane are saved with the document and updatedaccordingly as you make changes to your document.
For task details, see "Check the values of variables and expressions" on page 753.
Debug a test, component, function library, or user codefileRelevant for: GUI actions, scripted GUI components, function libraries, user code files, andbusiness process tests
This task describes different ways you can control and debug your run sessions soyou can identify and handle problems in your documents.
To practice this task, see "Debug a function - Exercise" on page 755 (for GUItesting) or"Debug an API user code file - Exercise" on page 759 (for API testing).
Prerequisitesl You must have the Microsoft Script Debugger installed to run tests orcomponents in debug mode. If it is not installed, you can use the UFT AdditionalInstallation Requirements Utility to install it. (Select Start > All Programs > HPSoftware > HP Unified Functional Testing > Tools > Additional Installation Requirementsor <UFT installation folder>\bin\UFTInstallReqs.exe.)
l To debug API tests, you must enable the debugger. Select Tools > Options > APITesting tab > General node and select Run test in debugging mode.
Slow your debugging session (GUI testing only)During a run session, UFT normally runs steps quickly. To slow the test run speedto enable more effective debugging, in the Test Runs pane of the Options dialog box(Tools > Options > GUI Testing tab > Test Runs node), specify the time (in milliseconds)UFT pauses between each step by modifying the Delay each step execution by option.
Step into, out of, or over a specific step during a debugsession
Step Into In the toolbar, press theStep Into
button .
User GuideChapter 58: Debugging Tests and Components
HP Unified Functional Testing (12.53) Page 751 of 938

Step Out In the toolbar, press the Step Out button .
Step Over In the toolbar, press the Step Over button .
Start or pause your debugging session at a specific step oractionl Select the step in your document at which you want UFT to stop and select Run >
Run to Step.l Select the step at which you want UFT to start the run and select Run > Debug
from Step.
Note: These commands can also be used to stop at a specific action. Right-click an action in the canvas and select Run to Action, Debug from Step, orRun from Action.
Use breakpoints in your documentFor details, see "Use breakpoints " on page 763.
Note:
l If you a run a test using the Run automation method, the test does not stopat breakpoints even if they are saved in the test.
l If you run a test with breakpoints using the Run automation method, thebreakpoints remain visible but are ignored during the test run.
l If you are running a test from the ALM Test Lab module in hidden mode (asspecified in the UFT Remote Agent, UFT will not stop the test at thebreakpoints.
l If you are running a test from the ALM Test Plan module not in hiddenmode, the test stops at breakpoints if you select the Run Test Sets in debugmode option in the UFT Remote Agent
User GuideChapter 58: Debugging Tests and Components
HP Unified Functional Testing (12.53) Page 752 of 938
Check the values of variables and expressions
In theWatchPane
The Watch pane displays the value of selected variables andexpressions that have been added to the Watch Pane.
To add an expression do one of the following:
l Click the Add New Watch Expression button and enter the name ofthe expression in the Add New Watch dialog box.
l For GUI actions, scripted GUI components, and function libraries only:Highlight the selected expression and select Run > Add to Watchright-click the expression and select Add to Watch from the contextmenu.
To add an identification property to the Watch pane, you must use anexpression that calls GetROProperty. This enables you to watch therun-time value of the object's identification property. For example, towatch the value currently displayed in the Calculator application, youcan add the expression:
Window("Calculator").WinEdit("Edit").GetROPRoperty("text")
You can add an expression to the Watch pane from the Editor or froma function library, but not from the Keyword View.
In theQuickWatch
1. In the line in your test or component containing the object,variable, or expression, do one of the following:l Right-click and select Quick Watch
l Select Run > Quick Watch
2. In the Quick Watch, do one of the following:l In the Expression field, enter the name of the object, variable, orexpression and click Evaluate. UFT displays the value in thecurrent context of the test or component.
l Enter the name of the object, variable, or expression and clickAdd to Watch. UFT adds it to the list in the Watch Pane
In theLocalVariablespane
UFT displays all variables in the test or component (up to the currentstep) and their value in the current context of the test or componentrun.
User GuideChapter 58: Debugging Tests and Components
HP Unified Functional Testing (12.53) Page 753 of 938
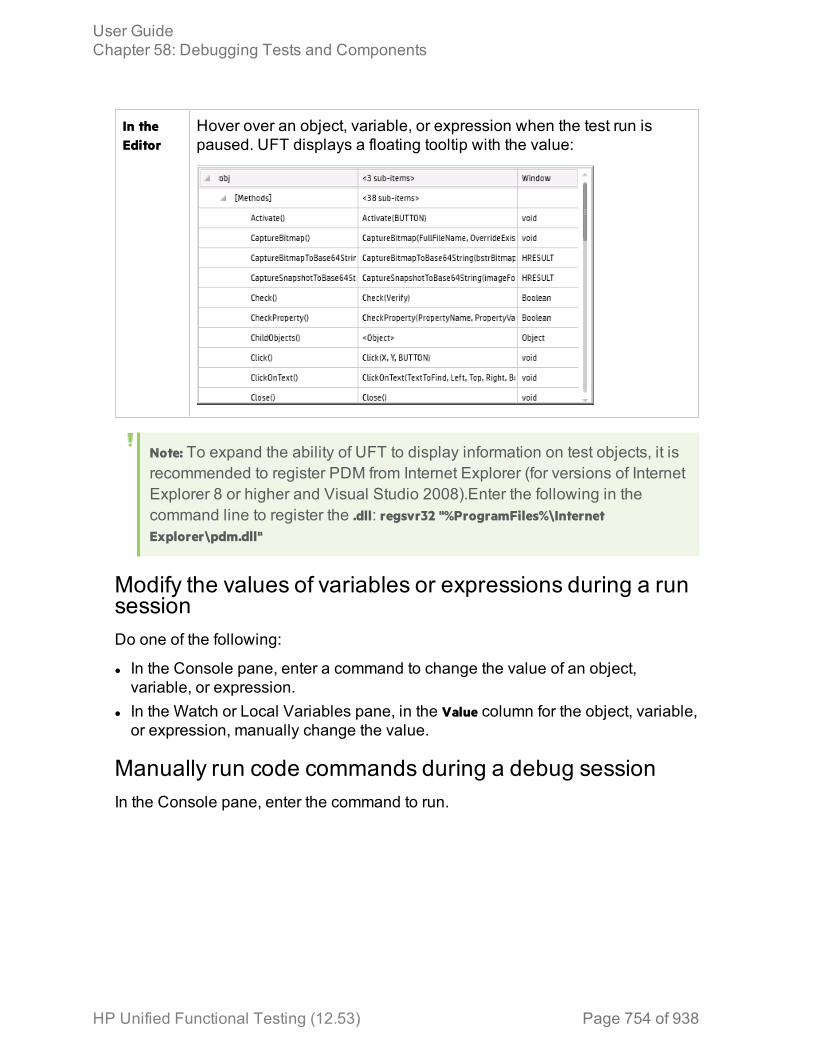
In theEditor
Hover over an object, variable, or expression when the test run ispaused. UFT displays a floating tooltip with the value:
Note: To expand the ability of UFT to display information on test objects, it isrecommended to register PDM from Internet Explorer (for versions of InternetExplorer 8 or higher and Visual Studio 2008).Enter the following in thecommand line to register the .dll: regsvr32 "%ProgramFiles%\InternetExplorer\pdm.dll"
Modify the values of variables or expressions during a runsessionDo one of the following:
l In the Console pane, enter a command to change the value of an object,variable, or expression.
l In the Watch or Local Variables pane, in the Value column for the object, variable,or expression, manually change the value.
Manually run code commands during a debug sessionIn the Console pane, enter the command to run.
User GuideChapter 58: Debugging Tests and Components
HP Unified Functional Testing (12.53) Page 754 of 938
View the current call stacksTo view the currently running call stacks in your run session, select View > Debug >Call Stack. You can double-click on a stack name in the pane to navigate directly tothe line of code that begins the call stack.
View currently running threadsSelect View > Debug > Threads. In the list of threads that is displayed, you candouble-click on the thread name to navigate directly to the beginning of the thread.
View the loaded modules associated with the run sessionSelect View > Debug > Loaded Modules. UFT displays the list of currently loadedmodules (depending where in the test you have paused).
Debug a function - ExerciseRelevant for: GUI actions. scripted GUI components, and function libraries
In this exercise, you create and debug an action or a function, to practice usingsome of UFT's debugging capabilities for GUI tests.
Suppose you create an action or a function that defines variables that are used inother parts of your test or function library. You can add breakpoints to the action orfunction to see how the value of the variables changes as the test or function libraryruns. To see how the test or function library handles the new value, you can alsochange the value of one of the variables during a breakpoint.
Note: For a task related to this exercise, see "Debug a test, component,function library, or user code file" on page 751.
Create a new action or function1. Create or open a function library.2. Create a new function called SetVariables.
Enter the VBScript code in the Editor of your action or the function library, asfollows:
Function SetVariables
Dim aa="hello"
User GuideChapter 58: Debugging Tests and Components
HP Unified Functional Testing (12.53) Page 755 of 938
b="me"MsgBox a
EndFunction
Associate the function library with a test)1. Bring the function library into focus.2. Right-click the function library document tab and select Associate Library
'<Function Library Name>' with '<Test Name>'. UFT associates the function librarywith your test or application area.
Add a call to the function in your testAdd a call to the function by typing the following in the Editor:
SetVariables
Add breakpointsClick in the left margin of the lines containing the text b="me" and MsgBox a.
Begin running the test or componentRun the test. The test stops at the first breakpoint, before executing that step (line ofscript).
Check the value of the variables in the debug panes1. Select View > Debug > Watch to open the Watch pane.2. In the Editor of your test action or in the function library, highlight the variable a
and select Run > Add to Watch.UFT adds the variable a to the Watch pane. The Value column indicates that thevalue of a is currently "hello", because the breakpoint stopped after the value ofvariable a was initiated. The Type column indicates that a is a String variable.
3. In the Editor displaying your test action or in the function library, highlight thevariable b and select Run > Add to Watch.UFT adds the variable b to the Debug Watch pane. The Value column indicates<Variable is undefined: 'b'> (and the Type column displays Incorrect expression),because the test or component stopped before variable b was declared.
User GuideChapter 58: Debugging Tests and Components
HP Unified Functional Testing (12.53) Page 756 of 938

4. Select View > Debug > Local Variables to open the Local Variables pane.Only variable a is displayed (with the value "hello"), because a is the onlyvariable that was initiated up to this point.Variable b is not displayed because the test or component stopped beforevariable b was declared.
Check the value of the variables at the next breakpointClick the Run button to continue running the test.
The test stops at the next breakpoint. Note that the values of variables a and b wereboth updated in the Watch and Local Variables panes.
Modify the value of a variable using the Console pane1. Select View > Debug > Console.2. At the command prompt at the bottom of the pane, enter:if b="me" then a="b is
me" else a="b is you" end if. Then press Enter on the keyboard.3. Click the Local Variables pane to verify that the value of variable a was updated
according to the command you entered and now displays the value: "b is me"
4. Click the Run button to continue running the test.The message box that opens displays "b is me" (which is the modified value ofa). This indicates that you successfully modified the values of both a and busing the Debug Console pane.
5. Click OK to close the message box.
Repeat a command from the command history1. Remove the first breakpoint and run the test or component again.
When the test at the breakpoint (before displaying the message box), modifythe value of variable b in the Console pane by running the command b="notme".
2. In the Console pane, highlight the command line that reads if b="me" then a="b isme" else a="b is you". Then right-click and select Copy.
3. In the command prompt, right-click and select Paste.4. Press ENTER to run the command, and then click the Run button to complete the
test or component run.A message box saying "b is you" opens. Click OK to close the message box.
User GuideChapter 58: Debugging Tests and Components
HP Unified Functional Testing (12.53) Page 757 of 938
Step Into, Out of, or Over a specific step - ExerciseRelevant for: GUI actions, scripted GUI components, and function libraries
In this exercise, you create a sample function library and run it using the Step Into,Step Out, and Step Over commands.
Note: For a task related to this exercise, see "Debug a test, component,function library, or user code file" on page 751.
Create the sample function library and test1. Select File > New > Function Library to open a new function library.2. In the function library, enter the following lines exactly:
public Function myfunc()msgbox "one"msgbox "two"msgbox "three"
The End Function is automatically added by UFT.
3. Save the function library to your ALM project or to the file system, with thename SampleFL.qfl.
4. Select File > New > Test and select GUI Test to open a new test.5. Click the document tab for the SampleFL.qfl function library to bring it into focus.6. Right-click the function library document tab and select Associate Library
'SampleFL.qfl' with 'Test' to associate the function library with your test.7. Click the document tab for the action you created to bring it into focus. Click the
Editor/Keyword View toggle button to display the Editor and enter the followinglines exactly:
myfuncmyfuncmyfuncendOfTest="true"
Run the function library and use the commands1. Select the first step of the action (the first call to the myfunc function) and add a
breakpoint by pressing F9 (Insert/Remove Breakpoint). The breakpoint symbol isdisplayed in the left margin .
User GuideChapter 58: Debugging Tests and Components
HP Unified Functional Testing (12.53) Page 758 of 938
2. Run the test. The test pauses at the breakpoint.3. Press F11 (Step Into). The execution arrow points to the first line (msgbox "one") of
the function in the function library.4. Press F11 (Step Into) again. A message box displays the text one.5. Click OK to close the message box. The execution arrow moves to the next line
in the function.6. Continue pressing F11 (Step Into) (and pressing OK on the message boxes that
open) until the execution arrow leaves the function and is pointing to thesecond step in the action (the second call to the myfunc function).
7. Press F11 (Step Into) to enter the function again. The execution arrow points tothe first msgbox line within the function.
8. Press SHIFT+F11 (Step Out). Close each of the message boxes that opens.Notice that the execution arrow continues to point to the first line in the functionuntil you close the last of the three message boxes. After you close the thirdmessage box, the execution arrow points to the next line in the action (the thirdcall to the myfunc function).
9. Press F10 (Step Over). The three message boxes open again—this time, in theKeyword View. The execution arrow remains on the same step in the actionuntil you close the last of the three message boxes. After you close the thirdmessage box, the execution arrow points to the next step in the action.
Debug an API user code file - ExerciseRelevant for: User code files
In this exercise, you create and debug an API user code file to practice using someof UFT's debugging capabilities for API tests.
Note: For a task related to this scenario, see "Debug a test, component,function library, or user code file" on page 751.
Create test steps1. Create an API test.2. From the Toolbox Pane, in the Math section, drag the Add activity, Multiply
activity, and the Custom Code activity to the canvas.
Set properties for the math steps1. In the Input/Checkpoints tab , in the Input pane, enter the values for the Add
operation.
User GuideChapter 58: Debugging Tests and Components
HP Unified Functional Testing (12.53) Page 759 of 938
l In the Value column for A, enter 10.l In the Value column for B, enter 6.
2. In the Input/Checkpoints tab, enter the values for the Multiply operation.l In the Value column for A, enter 2.l In the Value column for B, enter 4.
Create parameters for the Custom Code activity1. In the Add Input/Output Property/Parameter dialog box, enter the details for the
input parameter.l In the Name field, enter AddResult.l In the Type field, select String from the drop-down list (if it is not alreadyselected).
A new input property called AddResult appears in the Input pane inside theInput/Checkpoints tab.
2. Create another input parameter called MulResult:l In the Name field, enter MulResult.l In the Type field, select String from the drop-down list (if it is not alreadyselected).
A new input property called MulResult appears in the Input pane inside theInput/Checkpoints tab.
3. Click the Add button again and select Add Output Property.4. Enter the details for the output parameter.
l In the Name field, enter Result.l In the Type field select Decimal from the drop-down list.
5. In the Checkpoints pane, enter the value of 128.
Link the Custom Code activity to existing steps1. In the Select Link Source Dialog Box, select the AddActivity step. In the right
pane, select Result and click OK.
The link source Step.OutputProperties.AddActivity<number>.Result appears in theAddResult row.
2. In the dialog, select the Multiply step. In the right pane, select Result and clickOK.The link source Step.OutputProperties.MultiplyActivity<number>.Result appears inthe MulResult.
User GuideChapter 58: Debugging Tests and Components
HP Unified Functional Testing (12.53) Page 760 of 938
Create events for the Custom Code activity1. In the Properties pane, select the CustomCode activity from the drop-down list or
by clicking the CustomCode activity in the canvas.2. In the Properties pane, select the Events tab.3. In the Events Tab, create a default handler for ExecuteEvent and
AfterExecuteStepEvent. Two events, CodeActivity<number>_OnExecuteEvent andCodeActivity<number>_OnAfterExecuteEvent are added to the TestUserCode.cs file.
4. In the TestUserCode.cs file, enter the following text in the CodeActivity_OnExecuteEvent:
decimal AddResult = AddActivity.Result;decimal MulResult = MultiplyActivity.Result;CodeActivity<number>.Output.Result = AddResult*MulResult;
5. Enter a breakpoint on the last line of this method.6. In the TestUserCode.cs file, enter the following text in the CodeActivity<number>_
OnAfterExecuteStepEvent:
decimal result = CodeActivity<number>.Output.Result;
7. Enter a breakpoint on the last line of this method.8. Save the test.
Run the testSelect Run > Run or press F5.
Check the value of the variables at the first breakpoint1. When the test run stops at the first breakpoint, select View > Debug > Local
Variables to open the Local Variables pane.2. In the Local Variables pane, see the current values of the Add and Multiply
activity. The current values should be 16 for the AddActivity and 8 for theMultiplyActivity.You can expand the notes on various rows to see the variable values of thedifferent items used in your test run.
Add a variable to the Watch Pane1. In the TestUsercode.cs tab, highlight the text AddResult.2. Open the Watch pane by selecting View > Debug > Watch.
User GuideChapter 58: Debugging Tests and Components
HP Unified Functional Testing (12.53) Page 761 of 938
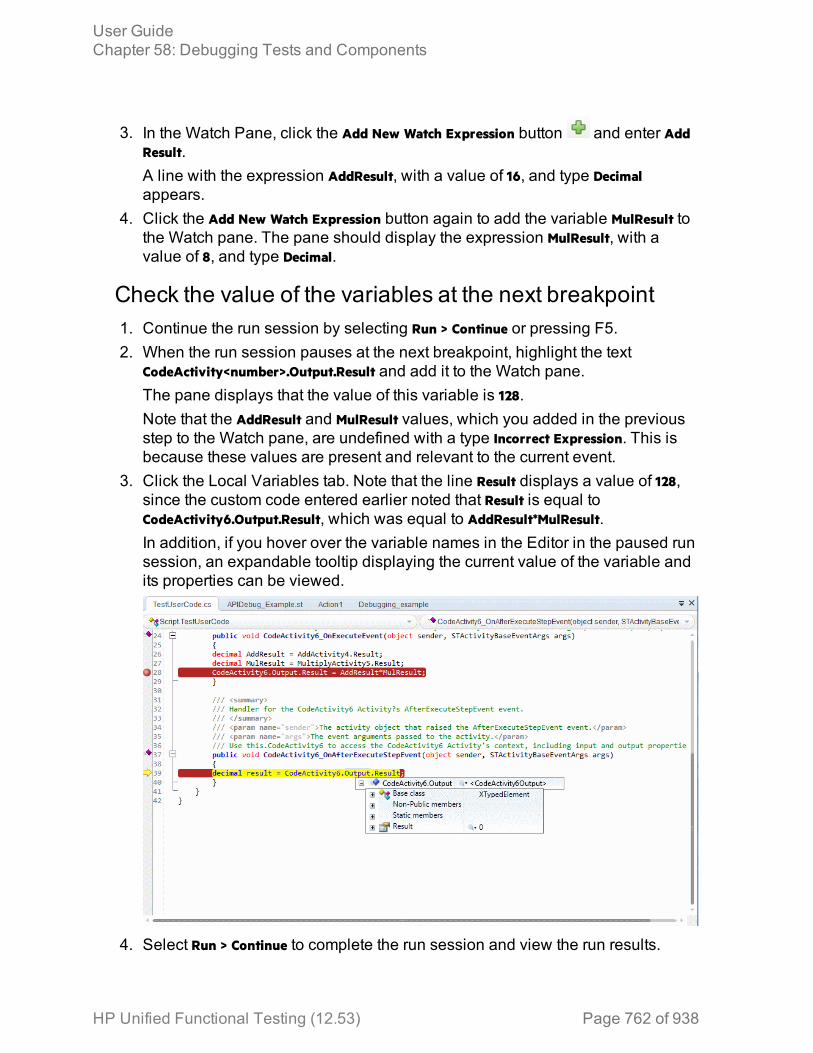
3. In the Watch Pane, click the Add New Watch Expression button and enter AddResult.A line with the expression AddResult, with a value of 16, and type Decimalappears.
4. Click the Add New Watch Expression button again to add the variable MulResult tothe Watch pane. The pane should display the expression MulResult, with avalue of 8, and type Decimal.
Check the value of the variables at the next breakpoint1. Continue the run session by selecting Run > Continue or pressing F5.2. When the run session pauses at the next breakpoint, highlight the text
CodeActivity<number>.Output.Result and add it to the Watch pane.The pane displays that the value of this variable is 128.Note that the AddResult and MulResult values, which you added in the previousstep to the Watch pane, are undefined with a type Incorrect Expression. This isbecause these values are present and relevant to the current event.
3. Click the Local Variables tab. Note that the line Result displays a value of 128,since the custom code entered earlier noted that Result is equal toCodeActivity6.Output.Result, which was equal to AddResult*MulResult.In addition, if you hover over the variable names in the Editor in the paused runsession, an expandable tooltip displaying the current value of the variable andits properties can be viewed.
4. Select Run > Continue to complete the run session and view the run results.
User GuideChapter 58: Debugging Tests and Components
HP Unified Functional Testing (12.53) Page 762 of 938
Use breakpointsRelevant for: GUI tests, scripted GUI components, function libraries, user code files, andbusiness process tests
The following steps describe how to set breakpoints, and temporarily enable ordisable them. After you finish using them, you can remove them from yourdocument.
Set a breakpointTo set a breakpoint, do one of the following:
l Click in the left margin of a step in the document where you want the run to stop.l Select the line where you want the run to stop and select Run > Insert/Remove
Breakpoint.The breakpoint symbol is displayed in the left margin adjacent to the selectedstep.
Note:
l If you a run a test using the Run automation method, the test does not stopat breakpoints even if they are saved in the test.
l If you run a test with breakpoints using the Run automation method, thebreakpoints remain visible but are ignored during the test run.
l If you are running a test from the ALM Test Lab module in hidden mode (asspecified in the UFT Remote Agent, UFT will not stop the test at thebreakpoints.
l If you are running a test from the ALM Test Plan module not in hiddenmode, the test stops at breakpoints if you select the Run Test Sets in debugmode option in the UFT Remote Agent
Enable or disable a breakpointTo enable/disable a specific breakpoint, do one of the following:
l Right-click the step containing the breakpoint and select Enable/Disable Breakpoint.l In the Breakpoints Pane, select the breakpoint you want to enable or disable andpress the Disable/enable breakpoint button .
User GuideChapter 58: Debugging Tests and Components
HP Unified Functional Testing (12.53) Page 763 of 938
Enable or disable all breakpointsTo enable/disable all breakpoints, select Run > Enable/Disable All Breakpoints. If atleast one breakpoint is enabled, UFT disables all breakpoints in the document.Alternatively, if all breakpoints are disabled, UFT enables them.
Remove a single breakpoint or all breakpointsTo remove a single breakpoint, click the breakpoint icon in the left margin of thestep. The breakpoint symbol is removed from the left margin of the document.
To remove all breakpoints, do one of the following:
l Select Run > Clear All Breakpoints.
l In the Breakpoints Pane, click the Remove all button or right-click and selectRemove all.
All breakpoint symbols are removed from the left margin of the document.
Navigate to a specific breakpoint1. In the Breakpoints Pane, select the specific breakpoint to which you want to
navigate.2. Do one of the following:
l Double-click the line containing the breakpoint name.
l Click the Go to source button .l Right-click the line containing the breakpoint and select Go to Source.The cursor flashes in the main document window in the line containing thebreakpoint.
User GuideChapter 58: Debugging Tests and Components
HP Unified Functional Testing (12.53) Page 764 of 938

Known Issues - DebuggingRelevant for: GUI actions and scripted GUI components, and function libraries
"Out ofmemory"exceptionwhendebugging
In some scenarios, when adding or viewing complex objects(objects with multiple levels) in the Watch or Local Variables panes,UFT reports an "Out of memory" exception.
Workaround: Register a newer version of Microsoft pdm.dll than theone provided with the UFT installation. You can find the currentpdm.dll version at this registry key: HKEY_CLASSES_ROOT\CLSID\{78A51822-51F4-11D0-8F20-00805F2CD064}\InprocServer32.
To register a newer version of the pdm.dll, do the following:
1. Locate the copy of the pdm.dll that you want to use. (This file isinstalled and registered with Microsoft Visual Studio andMicrosoft Office. It is also installed with Internet Explorer 8 andabove but not registered.) You can usually find this file atC:\Program Files (x86)\Internet Explorer or C:\Program Files\InternetExplorer.
2. Move the pdm.dll file and the msdbg.dll file from this folder to adifferent location (registering these dll files from the originallocation behaves differently.)
3. Run the following commands:l regsvr32 <full path to pdm.dll>\pdm.dll
l regsvr32 <full path to msdbg2.dll>\msdbg2.dll
Addingactionautomationobjects tothe Watchpane
GUI testing only: When Microsoft PDM 9.x or later is installed on yourcomputer, if you add action automation objects to the Debug > Watchpane and then close and reopen your test without closing andopening UFT, these actions may not load successfully.
Workaround: Restart UFT and open your test.
Breakpointson a lineafter a run-time error
If a run-time error occurs during a run session, you can click Skip inthe error message box that opens, to skip the problematic step andcontinue the run session. However, during a debugging session, ifyou set a breakpoint on a line immediately after a line that causes arun-time error, UFT does not stop at this breakpoint when the runsession continues after the error.
Workaround: Set the breakpoint at least two lines after the line thatcauses the run-time error.
HP Unified Functional Testing (12.53) Page 765 of 938

Opening afunctionlibraryafterpausing todebug
UFT may stop responding during a debug run session in thefollowing scenario: If there is a breakpoint at a function call from anassociated function library, and you open the function library afterthe run stops at the breakpoint, and then you insert or remove abreakpoint on the first line of the called function.
Debuggingfrom ALM
When debugging a test that is running from ALM, use the F9 key andDebug menu command to toggle breakpoints. Clicking the leftbanner in the Editor to toggle breakpoints is not supported in thisscenario.
DebuggingWindows-basedapplications
You might not be able to run the Microsoft Visual Studio debugger ifUFT is configured to record and run your test or component on anyopen Windows-based application. For tests, you can configure thisby selecting Run > Run Settings > Windows Applications.
Workaround: Do one of the following:
l In the MicIPC section of the mercury.ini file (located in %SYSTEMROOT%)add these entries:
devenv.exe=0msdev.exe=0msscrdbg.exe=0
l Open the debugging program from a user account other than theone running UFT.
Using theQuickWatchdebugger
l When using the floating tooltip to evaluate a With...End Withstatement, UFT only recognizes the first level of the stepscontained within this block.
l When using the Quick Watch on computers running Windows 8.Xor higher or Windows Server 2012, if you are watching an Insightobject, the object must be visible in your application to display thetooltip. If the object is not visible, UFT automatically switches tothe parent object of the Insight object and does not display thetooltip.
l If you want to evaluate an array expression using the QuickWatch, you must highlight the array expression to display thefloating tooltip. For example, if your expression is arr1(2), UFT willdisplay the value of the third element in the tooltip unless youhighlight the arr1 expression without the 2.
User GuideChapter 58: Debugging Tests and Components
HP Unified Functional Testing (12.53) Page 766 of 938
Chapter 59: Running Tests with the RuntimeEngineRelevant for: GUI tests and components, API testing, and business process tests and flows
In addition to running tests with the full UFT IDE, you can also run tests with onlythe Runtime Engine installed. This option provides you the ability to run any type ofUFT test without the need to install the entire UFT interface.
HP Unified Functional Testing (12.53) Page 767 of 938

HP Unified Functional Testing (12.53) Page 768
Part 9: UFT Integration With HP ALM
Chapter 60: ALM IntegrationRelevant for: GUI tests and components and API testing
Note: Unless otherwise specified, references to Application LifecycleManagement or ALM apply to all currently supported versions of ALM andQuality Center. Note that some features and options may not be supported inthe specific edition of ALM or Quality Center that you are using.
UFT integrates with ALM, the HP centralized quality solution. ALM helps youmaintain a project of all kinds of tests (such as tests, components, businessprocess tests, manual tests, tests created using other HP products, and so on) thatcover all aspects of your application's functionality. Each test or component in yourproject is designed to fulfill a specified testing requirement of your application. Tomeet the goals of a project, you organize the tests in your project in unique groups.
ALM provides an intuitive and efficient method for scheduling and running tests orcomponents, collecting results, analyzing the results, and managing test andcomponent versions. It also features a system for tracking defects, enabling you tomonitor defects closely from initial detection until resolution.
At its most basic level, integrating UFT with ALM enables you to store and accesstests, components, application areas, and resource files in an ALM project, whenUFT is connected to ALM. In addition, if you have the UFT Add-in for ALM installedon your computer, you can create and edit UFT tests and components directly fromALM. After you have created and edited tests and/or components, you can run themfrom ALM, and view the run results directly in ALM.
When UFT is connected to ALM, you can:
Create tests,components, andresources and savethem in your ALMproject.
You can save test and components in your project andthereby make them accessible to multiple users. Anychanges made by any user are then saved and updated forall users of the test.
View the contents ofyour tests.
This can help you decide if you want to run a test as part ofa test set. Note that the Test Flow in ALM and the canvasin UFT display only the actions that are run when thecurrently selected test runs. This means that if a nestedaction is commented out, for example, that action is notdisplayed in ALM or in the UFT canvas. You canuncomment it in the UFT Editor when needed.
HP Unified Functional Testing (12.53) Page 769 of 938
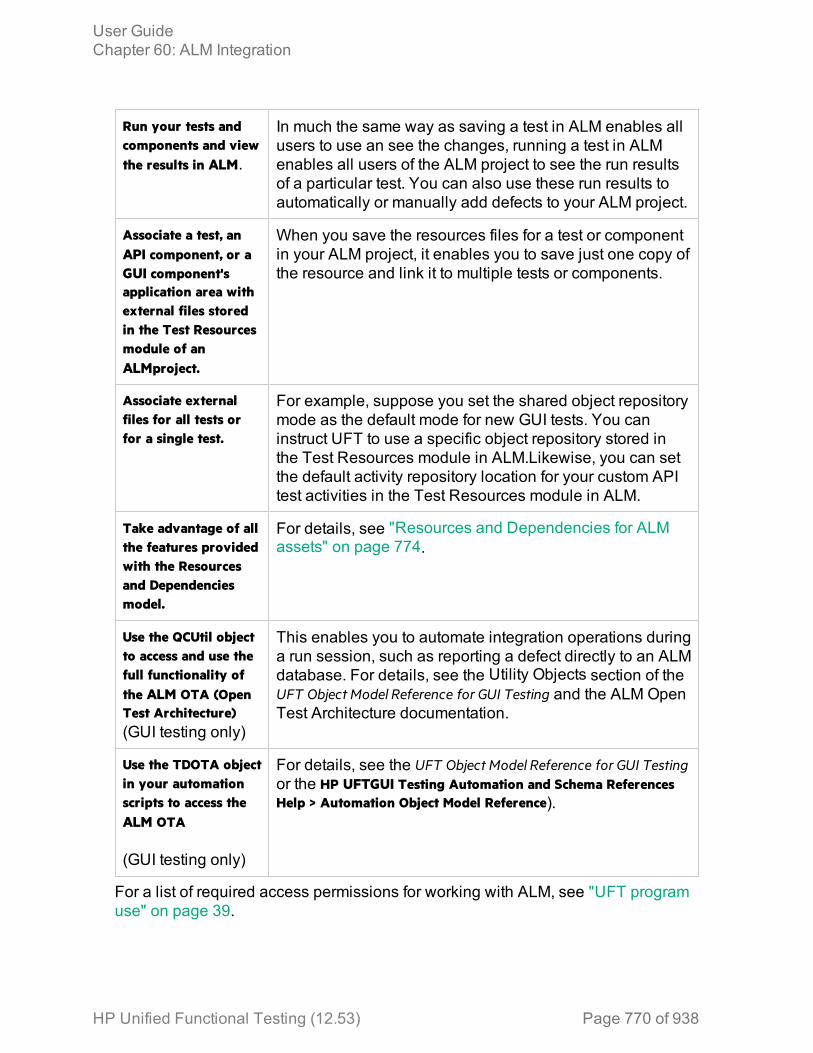
Run your tests andcomponents and viewthe results in ALM.
In much the same way as saving a test in ALM enables allusers to use an see the changes, running a test in ALMenables all users of the ALM project to see the run resultsof a particular test. You can also use these run results toautomatically or manually add defects to your ALM project.
Associate a test, anAPI component, or aGUI component'sapplication area withexternal files storedin the Test Resourcesmodule of anALMproject.
When you save the resources files for a test or componentin your ALM project, it enables you to save just one copy ofthe resource and link it to multiple tests or components.
Associate externalfiles for all tests orfor a single test.
For example, suppose you set the shared object repositorymode as the default mode for new GUI tests. You caninstruct UFT to use a specific object repository stored inthe Test Resources module in ALM.Likewise, you can setthe default activity repository location for your custom APItest activities in the Test Resources module in ALM.
Take advantage of allthe features providedwith the Resourcesand Dependenciesmodel.
For details, see "Resources and Dependencies for ALMassets" on page 774.
Use the QCUtil objectto access and use thefull functionality ofthe ALM OTA (OpenTest Architecture)(GUI testing only)
This enables you to automate integration operations duringa run session, such as reporting a defect directly to an ALMdatabase. For details, see the Utility Objects section of theUFT Object Model Reference for GUI Testing and the ALM OpenTest Architecture documentation.
Use the TDOTA objectin your automationscripts to access theALM OTA
(GUI testing only)
For details, see the UFT Object Model Reference for GUI Testingor the HP UFTGUI Testing Automation and Schema ReferencesHelp > Automation Object Model Reference).
For a list of required access permissions for working with ALM, see "UFT programuse" on page 39.
User GuideChapter 60: ALM Integration
HP Unified Functional Testing (12.53) Page 770 of 938

Work with tests and components in ALMRelevant for: GUI tests and components and API testing
PrerequisitesThe security settings in Windows 7 and Windows Server 2008 R2 may prevent youfrom connecting to an ALM project. This can occur when the UAC (User AccountControl) option is set to ON, and you have never connected to an ALM project.
To connect to ALM for the first time, you must disable the UAC option and restartyour computer. After you successfully connect to ALM, you can turn the UAC optionon again. Thereafter, you should be able to connect to ALM, as needed. Fordetails, see "UFT program tools" on page 45.
For details on setting up secure connections to your ALM server, see your ALMdocumentation.
Connect to an ALM Project1. In the toolbar, click the ALM Connection button . The ALM Connection dialog
box opens.2. In the ALM Connection dialog box, enter the server name and login credentials
for your users.
Note: Ensure that the format you are using for the URL is the same as theURL you use to access ALM via your browser. For example, if you usethe IP address to access the ALM server via the browser, you should usethe IP address to access ALM via UFT.
3. Click Connect to connect to the ALM server. UFT pauses for a few moments toconnect with the ALM server.
4. In the lower part of the ALM Connection dialog box, select the domain andproject to access.
5. Click Connect to access your ALM project.6. Click Close to close the ALM Connection dialog box and begin working with
your tests and components.
Note: If you are connecting to an ALM server using external authentication,you are prompted as part of the login to select your external certificate.
User GuideChapter 60: ALM Integration
HP Unified Functional Testing (12.53) Page 771 of 938
Enable ALM to run tests or componentsIn UFT, in the in the Test Runs pane of the Options dialog box (Tools > Options > GUITesting tab > Test Runs node), select the Allow other HP products to run tests andcomponents option.
For security reasons, remote access to your UFT application is not enabled bydefault. This option enables ALM (or other remote access clients) to open and runtests.
Enable full access to tests from ALMInstall the Add-in from:
l The main UFT installation Start screen, by selecting the Unified FunctionalTesting Add-in for ALM
l The ALM Add-ins page by choosing Help > Add-ins Page > HP ALM Connectivity inALM
Note: After you install the UFT Add-in for ALM as part of the standardinstallation, you must also install the Microsoft Visual C++ 2005 SP1Redistributable Package on your computer. You can download this file fromhttp://www.microsoft.com/en-us/download/details.aspx?id=5638.
Enable the Remote AgentIf the Windows Firewall is turned on on your computer, and you want to enable tests tobe run on your computer from a remote ALM client, then you must manually createa firewall exception for the remote agent.
1. Make sure you open the ALM or Quality Center client at least once on yourcomputer.
2. Run Firewall.cpl from the command line. The Windows Firewall dialog boxopens.
Note: The remaining steps in this procedure may be different in differentoperating systems.
3. Click the Exceptions tab.4. Click the Add Program button.
User GuideChapter 60: ALM Integration
HP Unified Functional Testing (12.53) Page 772 of 938
5. In the Add a Program dialog box, browse to the location where the ALM orQuality Center client is installed and select any of the following files that exist:l bp_exec_agent.exe
l ComWrapperRemoteAgent.exe
l BptRemoteAgenApplication.exe
Note: You may have to repeat this step a few times to add all relevantfiles.
6. Click OK in the Add a Program dialog box. The files you selected are added tothe Programs and Services list in the Windows Firewall dialog box.
7. Click OK to close the Windows Firewall dialog box.
Install an external certificate for your ALM serverThis is necessary when your ALM server is running in a CAC (Common AccessCard) environment.
1. Request the following from your certificate authority:l The certificate authority certificate in PEM format. Rename to TrustedCA.pem.l The web server certificate in PEM format. The full server name shouldappear in the certificate. Rename to WebServerPublicCert.pem.
l The server certificate private key file in PEM format. Rename toWebServerPrivateCert.pem.
l The software client certificate (if a Common Access Card is not used) for oneuser.
2. Place the certificate files in your web server configuration directory.
Note: If you receive certificates in different formats, you can use openssl toconvert them. To install openssl, go tohttp://www.openssl.org/related/binaries.html.
l To convert from CER, use openssl x509 -in /<webserver-directory>/conf/cert.cer -outform pem -out cert.pem.
l To convert from PFX, do the following: o Export the public key by using openssl pkcs12 -in /<webserver-
directory>/conf/cert.pfx -clcerts -nokeys -out certPublic.pem.o Export the private key by using openssl pkcs12 -in /<webserver-
directory>/conf/cert.pfx -nocerts -nodes -out certPrivate.pem.
User GuideChapter 60: ALM Integration
HP Unified Functional Testing (12.53) Page 773 of 938
Create a template testPerform this step to create a template test that has pre-defined test settings. Youcan then use this template test when creating new tests in ALM. For details, see"Create a template GUI test" on page 778.
Set UFT Remote Agent Preferences1. Select Start > All Programs > HP Software > HP Unified Functional Testing > Tools >
Remote Agent or <UFT installation folder>\bin\UFTRemoteAgent.exe.
The Remote Agent opens and the Remote Agent icon is displayed in the taskbar tray.
2. Right-click the Remote Agent icon and select Settings. The Remote AgentSettings Dialog Box dialog box opens.
3. View or modify the settings in the dialog box.
Disconnect from the ALM project1. In the toolbar, click the ALM Connection button .2. In the ALM Connection dialog box, in the Login to project section, click the
Logout button.3. In the Connect to server section, click the Disconnect button.4. Click Close to close the ALM Connection dialog box and continue working with
UFT.
Note: When you disconnect from a project, all open documents from theproject automatically close.
Resources and Dependencies for ALM assetsRelevant for: GUI tests and components and API testing
UFT enables you to use the Resources and Dependencies model to fully integrateyour tests and components into ALM projects:
User GuideChapter 60: ALM Integration
HP Unified Functional Testing (12.53) Page 774 of 938
Replaces theuse ofattachmentswith linkedassets.
For example, GUI tests, actions, and application areas can be linkedwith function libraries and shared object repositories, respectivelyor API tests can be linked with data tables, user code files, oractivities. You store your tests or components in the Test Plan orBusiness Components module, respectively, and you store yourresource files (including application areas) in the Test Resourcesmodule. When you associate a resource file to a test or a GUIcomponent's application area, these assets become linked.Linking assets improves runtime performance by decreasingdownload time. (Using attachments instead of resourcesincreases download time from Quality Center and ALM.) Linkingassets also helps to ensure that the relationships betweendependent assets are maintained.
Note: To ensure that your resource files are recognized asdependencies, they must be saved in the Test Resourcesmodule in ALM, and they must be associated using the fullALM path.
Supportsversioning
You can create versions of these assets in UFT or in ALM, andyou can manage asset versions in ALM. For details, see "VersionControl in ALM" on page 811.
Resource filesare all storedin one ALMmodule
Resource files are stored in the Test Resources module, enablingyou to manage your resources in one central location, and to viewat a glance which tests and application areas are using eachresource file.
Improvedruntimeperformance
Tests or components open and run faster when the associatedresource files are stored in the Test Resources module (insteadof being stored as attachments to tests in the Test Plan module).
Supportsbaselines
You can view baseline history in UFT, and you can view andmanage baselines in ALM.
View/compareassets
You can use the Asset Comparison Tool to compare versions ofindividual assets and the Asset Viewer for viewing an earlierversion of a asset. Both of these viewers are available in ALMand in UFT.
User GuideChapter 60: ALM Integration
HP Unified Functional Testing (12.53) Page 775 of 938
Share assetswith otherprojects andsynchronizethem
You can copy assets from other projects. This enables you toreuse your existing assets instead of creating new assetswhenever you create a new project. For example, you can createa "template" set of assets to use as a basis for new projects.
You can synchronize these assets in both projects when changesare made, or you can customize your assets to suit the uniqueneeds of each development project.
Easy deletionof assets
When you delete an asset (a reusable GUI action or componentor associated resource file), a warning message informs you if theasset is used by other tests (or more than once in the current test)or is associated with an application area. This message containsa Details section that lists the tests or application areas that areassociated with this asset or contain calls to this action so youcan modify the tests or application areas, as needed. This helpsyou manage your business process tests and GUI action calls sothat tests do not inadvertently fail.
Relative paths for tests/resources saved in ALMWhen you save a test and its resources in ALM, ALM creates a path to testresources to ensure that they are loaded when you run the test. In UFT, the path toyour test's resources is defined either as a relative or an absolute path.
UFT deals with the absolute vs. relative path mappings differently depending onwhere in ALM the resource is saved:
l If you associate resources from the Test Plan module, UFT prompts you toassociate the resource using a relative path. You can choose to change the pathto a relative path or maintain the full absolute path.
l If you associate a resource stored in the Test Resources module, the absolute pathis used.
If your test's associated resources are saved with a relative path, you have theoption to update these relative paths to an absolute path. This conversion improvesthe test run performance by reducing the amount of time necessary for UFT to findthe associated resources. It is recommended that you perform this conversionunless you have a specific reason for maintaining a relative path.
In order to convert your test's associated resources from a relative path toan absolute (full path), you can do the following:
1. If your test resources are associated with a relative path, UFT displays awarning message in the Errors pane.
User GuideChapter 60: ALM Integration
HP Unified Functional Testing (12.53) Page 776 of 938
2. If you double click on this warning message, UFT opens another dialog whichenables you to convert the relative paths to the full absolute ALM path forresources associated with the selected test.
3. In the dialog, select the tests and resources for which you want o convert thepath, and UFT performs the conversion automatically.
If you do not want to convert the associated test resource's relative paths, you cando one of the following:
l In the warning message, select the option for UFT to stop showing the warningmessage.
l Clear the Provide warning to replace relative paths for resources associated with testsaved in ALMoption in the Folders pane of the Options dialog box (Tools > Options> GUI Testing tab > Folders node.
Note: Converting the test's association to the ALM resources associated witha relative path is irreversible. Therefore, it is strongly recommended to backup your tests before performing the conversion.
If you want to later re-enable UFT to convert the associated resources relativepaths, you can enable the option in the Folders pane of the Options dialog box orenable the warning per test in the Properties pane of the Test Settings dialog box(File > Settings > Properties node).
ALM template testsRelevant for: GUI tests only
Template tests serve as the basis for all tests created in ALM. A template test is atest that contains default test settings and comments or steps to include in all tests.For example, a template test might specify the UFT add-ins, associated functionlibraries, and recovery scenarios that are associated with a test.
All template tests are saved in your ALM project (except for the default templatetest, which is located on the ALM client) and do not need to be copied to eachuser's local computer. This enables users to customize their local default templatetests, if needed, and still have access to globally maintained template tests. Whenan ALM user creates a new test in ALM, the default template test for the installedUFT version is automatically associated with the test unless the user selectsanother template test
A default template test is installed on each ALM client when the Unified FunctionalTesting Add-in for ALM is installed in the <Unified Functional Testingfolder>\bin\Templates folder on your computer. Because this test is installed locally,
User GuideChapter 60: ALM Integration
HP Unified Functional Testing (12.53) Page 777 of 938
any changes you make in the template test are applied only to the tests created onyour computer (using the ALM client).
For details on how to create and work with template tests, see "Create a templateGUI test" below.
Create a template GUI testRelevant for: GUI tests only
InUFT
1. Open an existing test with the required add-ins loaded.Make sure that the add-ins included in the opened test are actuallyinstalled on the UFT computer on which the test will eventually run.Otherwise, when the test is run, UFT will not be able to load therequired add-ins and the test may fail.
2. Define the required settings in the Test Settings dialog box (File >Settings).
3. If you want to include comments or steps in all tests based on thistemplate test, add them.
4. Select File > Save As. In the Open Dialog box, save the test to your ALMproject using a descriptive name that clearly indicates its purpose.
InALM
1. In ALM, click the Test Plan button on the sidebar to open the TestPlan module, and browse to the test you previously created in UFTand saved in your ALM project.
2. Right-click the test and select Mark as Template Test. The test isconverted to a template test.
Data drive a test in ALMRelevant for: GUI tests,API testing, and business process tests
This task provides a general overview of the steps involved in data driving a testwith data stored in ALM. After you are familiar with the steps, you can perform manyof them in the order you choose. Some steps may not be necessary in all cases.
Prerequisites1. Connect to ALM.2. Make sure that your test is saved in your ALM project.3. For GUI testing: Make sure you have a test that uses data table parameters from
the Global sheet.
User GuideChapter 60: ALM Integration
HP Unified Functional Testing (12.53) Page 778 of 938
Import data into a test (API testing only)
1. In the Data pane, click the New Data Source button and select Excel.2. In the New/Change Excel Data Source Dialog Box, select the .xls or .xlsx file
containing the data and select the Allow other tools to override the data option.3. Click OK to import the data source into your test.
Data drive the test steps (API testing only)For details, see "Assign data to API test/component steps" on page 454.
Create a data resource file in your ALM project1. In ALM, in the Test Resources module, expand the Resources tree and select
the required node.2. Select Resources > New Resource to add a resource under that node.3. In the New Resource dialog box:
l In the Type list, select Data table.l In the Name box, enter a name for the data resource, for example, the nameof the Microsoft Excel (.xls or .xlsx) file you plan to use.
l Fill in the remaining fields (optional) and click OK to close the dialog box.4. In the Resource Viewer tab, click Upload File. Then browse to and upload the
relevant .xls or .xlsx file.
Tip: You can convert an internal data table from an open test to anuploadable data resource file by right-clicking the Data pane, selectingFile > Export, saving the data table to the file system as an .xls or .xlsxfile, and then uploading it as described above.
Specify a default data table resource for all new testconfigurations1. In the Parameters tab of the Test Plan module, select the data table resource
you want to use as the default for all test configurations.For a GUI test, if you do not specify a data table resource, the data specified inthe Resources pane of the Test Settings dialog box (File > Settings) is usedinstead.
Note: In this tab, only the Parameter Name column is relevant for GUI
User GuideChapter 60: ALM Integration
HP Unified Functional Testing (12.53) Page 779 of 938
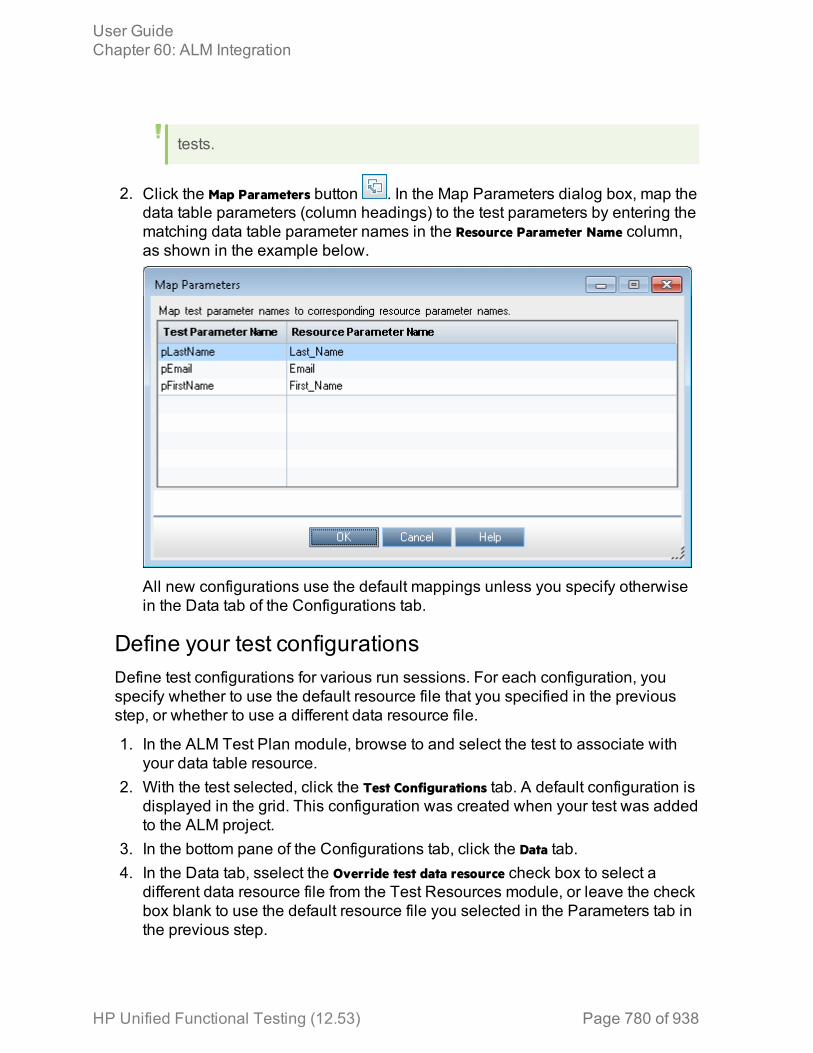
tests.
2. Click the Map Parameters button . In the Map Parameters dialog box, map thedata table parameters (column headings) to the test parameters by entering thematching data table parameter names in the Resource Parameter Name column,as shown in the example below.
All new configurations use the default mappings unless you specify otherwisein the Data tab of the Configurations tab.
Define your test configurationsDefine test configurations for various run sessions. For each configuration, youspecify whether to use the default resource file that you specified in the previousstep, or whether to use a different data resource file.
1. In the ALM Test Plan module, browse to and select the test to associate withyour data table resource.
2. With the test selected, click the Test Configurations tab. A default configuration isdisplayed in the grid. This configuration was created when your test was addedto the ALM project.
3. In the bottom pane of the Configurations tab, click the Data tab.4. In the Data tab, sselect the Override test data resource check box to select a
different data resource file from the Test Resources module, or leave the checkbox blank to use the default resource file you selected in the Parameters tab inthe previous step.
User GuideChapter 60: ALM Integration
HP Unified Functional Testing (12.53) Page 780 of 938
5. In the Data Resource box, browse to and select the relevant data resource file toassociate with this configuration. (Relevant only if you selected the Override testdata resource check box)
6. Click the Data Resource Settings button, and in the Filter Settings dialog box:l Map the data table parameters from your test to the column headers in thedata table file (Relevant only if you selected a different data resource file inthe previous step)
l Apply filter conditions (text strings), as needed. You can apply one filtercondition to each parameter.
l Specify the rows on which to run iterations. For example, if you run aconfiguration named Gold, and users of this type are listed in rows 2-114,then specify these rows only.
Note: If you apply filter conditions and specify rows, AND logic is used,meaning that the parameter value must equal the filter text value and theparameter value must be located in one of the specified rows.
Link your configurations to requirements to createrequirements coverage - optionalIf you want to make sure that your requirements are fully covered, link them toconfigurations. This enables you to select configurations to run based onrequirement coverage when you plan your run session.
1. In the Test Plan module, click the Req Coverage tab.2. Click the Select Req button. The Requirement Tree tab is displayed in the right
pane.3. From the Requirement Tree tab, select a requirement to add to the Req
Coverage grid. When you add the requirement, the Add Advanced Coveragedialog box opens.
4. Select the test configurations that cover this requirement.
Run your test configuration1. In UFT, make sure that in the Tools > Options > GUITesting tab > Test Runs node,
the Allow other HP products to run tests and components is selected.2. In the ALM Test Lab module, select or create a test set.3. In the right pane, select the Execution Grid tab.4. Click the Select Tests button to display the Test Plan Tree and Requirements Tree
tabs in the right pane.
User GuideChapter 60: ALM Integration
HP Unified Functional Testing (12.53) Page 781 of 938

5. Do one of the following to select the configurations to run:l From the Test Plan Tree tab, select a test to add to the Execution Grid. Whenyou add the test, all of its configurations are added to the Execution Grid.(The test itself is not added to the Execution Grid because ALM runsconfigurations, not tests.)
l Below the Test Plan Tree tab, expand the Test Configurations pane, and addthe specific configurations that you want to run to the Execution Grid.
l Below the Requirements Tree tab, expand the coverage pane, and select atest to add to the Execution Grid. When you add the test, all of itsconfigurations are added to the Execution Grid. (The test itself is not addedto the Execution Grid because ALM runs configurations, not tests.)
6. Click the Run button to run the selected configurations.7. After the run session, click the Launch Report button in the Last Run Report tab
to view the results.
User GuideChapter 60: ALM Integration
HP Unified Functional Testing (12.53) Page 782 of 938
Known Issues- Resources and DependenciesRelevant for: GUI tests and components and API testing
l When you save a resource to ALM (either from UFT or using the Upload optionfrom the ALM Test Resources module), and the resource file has a comma in thefile name, the resource appears to be saved successfully, but the file is notactually uploaded to the ALM server.
l For GUI testing: If you insert a call to an external action that is associated with adata table, and that data table was previously renamed or moved in the TestResources module of Quality Center or ALM, UFT tries to locate the data table inits original location.Workaround: Save the test, close it, and reopen it.
l If you are working with the Resources and Dependencies model, and the testcontaining the action you are renaming is stored the Test Plan module in ALM,the internal (default) action name is always displayed in the Used By Tab in theAction Properties Dialog Box). This is true even if you rename the action.
Known Issues- General ALM integrationRelevant for: GUI tests and components and API testing
ALM andWindowssecurityissues
l The security settings in Windows 7, Windows Server 2008 R2,and Windows 2012 may prevent you from performing a UFTrelated installation, such as a patch installation, or connectingto an ALM project (either directly or from UFT). This can occurwhen the UAC (User Account Control) option is set to ON, andyou have not yet connected to an ALM project (if relevant).Workaround: Temporarily turn off the UAC option. For details,see "Known Issues - UFT Tools and Programs" on page 45.After disabling the UAC option as described above, perform therequired installation or connect to ALM as usual. When you arefinished, you can turn the User Account Control (UAC) optionon again. Hereafter, you should be able to connect to ALM, asneeded.
HP Unified Functional Testing (12.53) Page 783 of 938

Connecting toALM onWindows 8.x
l In Windows 8.x, when trying connecting to ALM (for ALMversions earlier than 12.53) in UFT with the UAC turned off, youcannot connect to ALM.Workaround: Run UFT as an administrator (even if you are theadmin user).
l When running a test in UFT from ALM on Windows 8 or higher,you must connect to the ALM server running Internet Explorerwith Administrator permissions and with the URL formathttp://myserver:8080/qcbin/start_a.jsp?common=true
Connecting toALM onWindows 10
Connecting to ALM via UFT on Windows 10 withoutadministrative privileges is not supported.
Workaround: Connect to ALM with Administrator permissionsimmediately after performing your UFT installation.
Firstconnection toALM
The first time you connect to your ALM server, (either within UFTor through a browser) you must connect as an administrator. Thisallows the machine to properly install the ALM client with therequired connectivity. For all subsequent connections, you do notneed to log in as administrator. This step is also required afterinstalling ALM patches.
ALMauthentication
If there is a forward proxy with Basic Authentication between theserver and client machines, before the first connection to an ALMplatform, each ALM client must configure the proxy credentials byusing the Webgate Customization Tool. If you do not run WebGate,you may be unable to connect, or you may need to enter yourcredentials multiple times.
To run the tool:
1. Go the following location on the ALM client machine:http:\\<ALM Platform server name>[<:port number>]/qcbin/Apps/
2. Click on the Webgate Customization Tool link and select Run.3. In WebGate Customization, click in the Proxy Credentials area.
Select the Use these credentials check box, and type values inthe Proxy Username and Proxy Password boxes.
4. Click Save and then Close.
SwitchingALM servers
If you are connected to an ALM server, and you want to connect toa different server, disconnect from the first ALM server, restartUFT, and connect to the second server.
User GuideChapter 60: ALM Integration
HP Unified Functional Testing (12.53) Page 784 of 938
Running testsremotelyfrom ALM
Before you run tests remotely from ALM, you must perform thefollowing prerequisites:
1. You must enable COM+ access. For details, see theInstallation Guide.
2. Change DCOM permissions and open firewall ports. Fordetails, see the Installation Guide.
3. Run RmtAgentFix.exe from the <Unified Functional Testinginstallation>\bin folder, or use the Additional RequirementsUtility, which you open by selecting Start > Programs > HPSoftware > HP Unified Functional Testing > Tools > AdditionalInstallation Requirements.This is due to a problem with opening DCOM permissions onWindows 7 and Windows Server 2008 R2.
4. Disable User Account Control (UAC) in Windows and restartyour computer before you first connect to ALM. For details,see "Known Issues - UFT Tools and Programs" on page 45.
Working withdocumentssaved on ALM
l If UFT closes unexpectedly while an asset is open from ALM,the asset may remained locked by ALM for more than fifteenminutes. In some cases, you may be able to reopen UFT andreopen the test, but when trying to save it, you will receive anerror message indicating that the test entity is already locked byyou.Workaround: Wait fifteen minutes or more and try again.
l Renaming a test or component from ALMmay cause the test orcomponent to behave unexpectedly.Workaround: To rename a test or component, open it in UFT andrename it using the Save As option. If the test or component hasalready been renamed from ALM, use the rename option againto restore the old name, and then use the Save As option in UFT.Renaming a test parameter from UFT causes any run-timeparameter values already set for this parameter in ALM to belost.
l For tests or business components saved on ALM, if you performa checkout from within ALM, it is not reflected in UFT for thecurrent test—the test or business component still appears to bechecked in.Workaround: Close and reopen the test in UFT.
User GuideChapter 60: ALM Integration
HP Unified Functional Testing (12.53) Page 785 of 938
QuickTesttests saved inALM
If a test is stored in ALM, and was last modified using a version ofQuickTest earlier than 9.5, it opens in read-only mode.
To edit the test, it must be upgraded to QuickTest 11.00 using theQuickTest Asset Upgrade Tool for ALM (found on theQuickTest 11.00 installation DVD).
Addingdocumentsstored in ALMto a solution
Testing documents that are part of the same solution cannot bestored in different ALM projects, domains, or servers.
Working withnon-UnicodeALM projects
ALM supports non-Unicode projects. If you are working with anALM project that is not Unicode compliant:
l You should not use Unicode values (such as the name of thetest or component, the name of an application area, the defaultvalue of a test, action, or component parameter, methodargument values, and so forth).
l Data that is sent to UFT from ALM (such as values for test,action, or component parameters) is not Unicode compliant.
l UFT results containing Unicode characters may appearcorrupted in the ALM result grid. You can, however, open andview results containing Unicode characters in the UFTRunResults Viewer.For additional details on UFT Unicode issues, see "KnownIssues- Multilingual Applications" on page 43.
Known Issues- ALM Integration with GUI TestingRelevant for: GUI tests and components
Running aGUI testfrom ALM
To run a test or component from ALM, you must first invoke UFT atleast once. Otherwise, ALM may be unable to open UFT.
User GuideChapter 60: ALM Integration
HP Unified Functional Testing (12.53) Page 786 of 938
Parametersnames inthe Datatable
If the parameter names in your Global data table are identical to theparameter names in an external data table, running a testconfiguration with data table parameter mapping to other data tableparameters causes unexpected results. For example, if your Globaldata table parameters are Login and Password, and your external datatable parameters are Login, Password, Login_localized, and Password_localized, a test configuration run with mapping from Login to Login_localized and Password to Password_localized will cause unexpectedresults.
Workaround: Split the external data table into multiple tables.
Renamingparameters
Renaming a UFT test parameter from UFT will cause any run-timeparameter values already set for this parameter in ALM to be lost.
Known Issues- ALM integration with API TestingRelevant for: API testing
Changinglicenses
While connected to an ALM project, if you change the availablelicense for an API test, ALM continues to use the original license.
Workaround: Log out from your ALM project and restart InternetExplorer.
LinkingAPI testparameters
l When running API tests from ALM, using test parameters linked (inALM) to data tables stored in ALM is not supported.Workaround: Instead of associating test steps with test parameters,link the steps to an Excel data source added to the test.When you add the data source to the test, select Allow other toolsto override the data. Then, in the ALM Test Plan, instruct ALM tooverwrite this Excel with data tables stored in ALM. For details oninstructing ALM to overwrite data sources, see the ALMdocumentation.
User GuideChapter 60: ALM Integration
HP Unified Functional Testing (12.53) Page 787 of 938

Chapter 61: Running Tests from ALMRelevant for: GUI tests, API tests, and business process tests
If UFT is connected to ALM, you can run tests that are stored in an ALM databasevia:
l UFTl ALM client that is installed on your computerl A remote ALM client
Note: ALM cannot run tests using UFT if the UFT computer is logged off orlocked.
Before an ALM client can run GUI tests on your computer, you must give ALMpermission to use UFT
When you run a test or business process test from ALM, the UFT Remote Agentopens on the UFT computer where the test runs. The settings in the UFT RemoteAgent determines how UFT behaves when a test is run by a remote applicationsuch as ALM. By default, UFT opens and runs in hidden mode when ALM activatesit to run a test in a test set. This helps to improve performance. While UFT isrunning in hidden mode, you can open UFT to view the steps being run in theEditor by clicking the button in the status bar. If you do not want UFT to run inhidden mode, you can change this setting in the Remote Agent.
Running tests in Server-Side ExecutionRelevant for: GUI tests and API testing
Run tests in server-side execution when the tests are saved on a LabManagement-enabled ALM server. Server-side execution enables ALM to run UFTtests on remote hosts at predefined times or on an ad-hoc basis, without anyonelogged in to the host to initiate and control the test runs. By contrast, client-sideexecution requires a user to be logged in to the host computer on which ALM runsthe UFT test.
To set up server-side execution on ALM:
1. In the Testing > Test Lab module, create functional test sets. A functional test setis a group of automated tests or test configurations in an ALM project, designedto achieve a specific goal.
2. In the Lab Resources > Testing Hosts module, select hosts upon which the testscan run remotely.
HP Unified Functional Testing (12.53) Page 788 of 938
3. If you want to use different values for specific parameters when running thetests on different environments or situations, you can define AUT parameters inthe Lab Resources > AUT Environments module.
4. In the Testing > Timeslots module, schedule automatic test runs, or reservetimeslots to use for running manually.
Tip: You do not need to reserve a timeslot if you run the tests ad-hoc.
For additional information, see the HP Application Lifecycle Management User Guide.
In UFT, you can link your test parameters to ALM AUT Environment parameters.This enables the test to use AUT environment parameter values passed from ALMwhen your UFT test runs in server-side execution. For details, see "AUTenvironment parameters" below.
Note: Server-side execution is available only for ALM Edition andPerformance Center Edition, version 11.50 or later. You must also have LabManagement support for the ALM project.
For task details, see "Run a test using Server-Side Execution" on the next page.
AUT environment parametersRelevant for: GUI tests and API testing
In ALM, you can define AUT environments, which contain AUT environmentparameters, to use in tests that run using server-side execution. When ALM runsthe tests, ALM passes the values for the AUT parameters to the test.
To create multiple sets of parameter values for your test runs, you define multipleAUT environment configurations in your ALM project. This enables you to usedifferent values for various data in your test, depending on the application,situation, or environment on which the test runs. For example, you may want to runthe same test on different Web-based databases, each requiring a different URL,user name, and password.
In UFT, link UFT test parameters to AUT parameters defined in a specific AUTenvironment in ALM. Subsequently, when ALM runs the test in server-sideexecution, the test parameters will receive the AUT environment parameter valuespassed from ALM.
For details on how to link test parameters to AUT parameters, see "Run a testusing Server-Side Execution" on the next page
User GuideChapter 61: Running Tests from ALM
HP Unified Functional Testing (12.53) Page 789 of 938

Note: All of the AUT parameters that you use must be from the same ALMAUT environment.
If you save the test to the file system, the links to the AUT parameters are removed,and the test parameters become ordinary parameters. The default values remaindefined.
In the Properties pane, an ALM icon next to a parameter's default valueindicates that it is an AUT parameter.
What happens if the ALM AUT parameters linked to the UFT testparameters are deleted from ALM?
l If you open a GUI test with parameters linked to deleted AUT parameters, UFTdisplays a message specifying the missing parameters, and theAUT environment configuration to which they belonged. The the links to themissing AUT parameters are removed, and those test parameters becomeordinary parameters.
l If you open an API test with test parameters that are linked to deleted ALMAUT parameters, the links remain unchanged.
l If you run a test with test parameters linked to deleted ALM AUT parameters, thetest will fail to run.
Run a test using Server-Side ExecutionRelevant for: GUI tests and API testing
Most of the steps in this task must be performed on ALM. In UFT, you can link yourtest parameters to AUT parameters defined in ALM.
Prerequisitesl Connect to an ALM project with Lab Management support.l Make sure that HP ALM Lab Service is installed on the UFT computer.For details, see the ALM Lab Management Guide.
User GuideChapter 61: Running Tests from ALM
HP Unified Functional Testing (12.53) Page 790 of 938
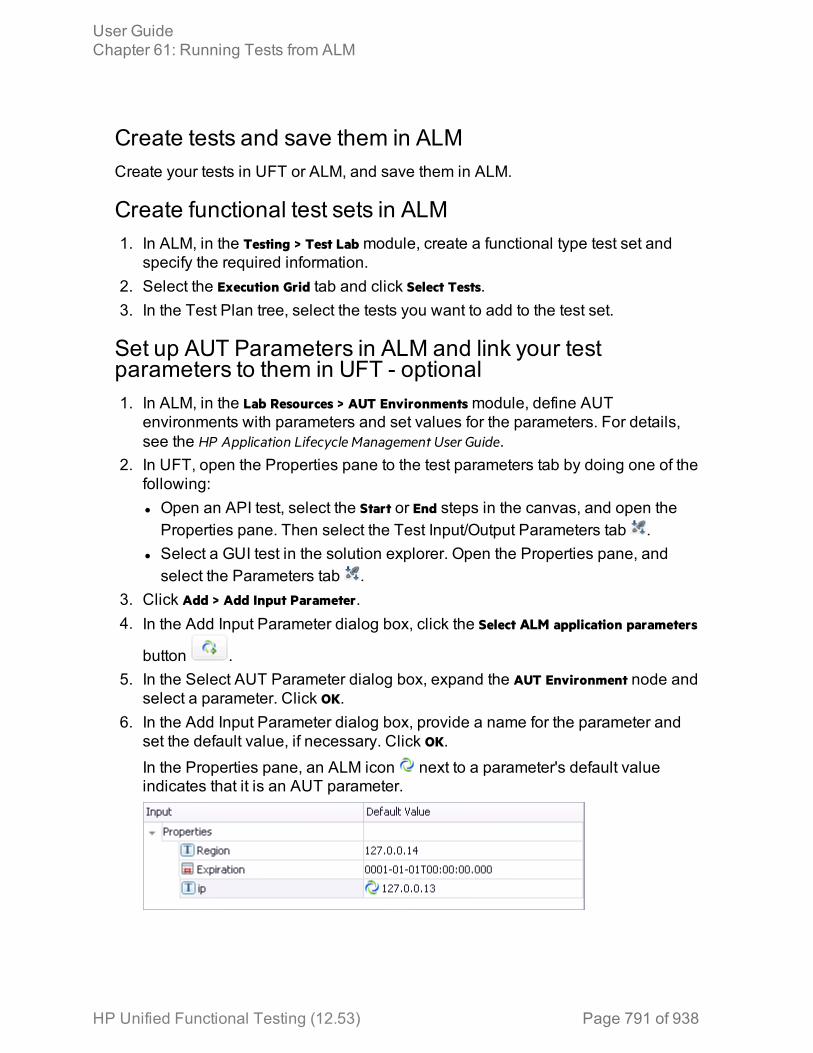
Create tests and save them in ALMCreate your tests in UFT or ALM, and save them in ALM.
Create functional test sets in ALM1. In ALM, in the Testing > Test Lab module, create a functional type test set and
specify the required information.2. Select the Execution Grid tab and click Select Tests.3. In the Test Plan tree, select the tests you want to add to the test set.
Set up AUT Parameters in ALM and link your testparameters to them in UFT - optional1. In ALM, in the Lab Resources > AUT Environments module, define AUT
environments with parameters and set values for the parameters. For details,see the HP Application Lifecycle Management User Guide.
2. In UFT, open the Properties pane to the test parameters tab by doing one of thefollowing:l Open an API test, select the Start or End steps in the canvas, and open theProperties pane. Then select the Test Input/Output Parameters tab .
l Select a GUI test in the solution explorer. Open the Properties pane, andselect the Parameters tab .
3. Click Add > Add Input Parameter.4. In the Add Input Parameter dialog box, click the Select ALM application parameters
button .5. In the Select AUT Parameter dialog box, expand the AUT Environment node and
select a parameter. Click OK.6. In the Add Input Parameter dialog box, provide a name for the parameter and
set the default value, if necessary. Click OK.In the Properties pane, an ALM icon next to a parameter's default valueindicates that it is an AUT parameter.
User GuideChapter 61: Running Tests from ALM
HP Unified Functional Testing (12.53) Page 791 of 938

Set up hosts in ALM for the UFT testsIn ALM, in the Lab Resources > Testing Hosts module, you can view the hosts definedin the Lab Management project for all projects on your ALM server. Optionally, youcan define additional host machines for your project.
When you define a new host, define its purpose, for example, QuickTest or ServiceTest, to indicate the type of test to run on this host. For details, see theHP Application Lifecycle Management User Guide.
Notes:
l Make sure that UFT is installed on the host computers you create or definein ALM.
l If UFT is not available in the list of purposes that you can select for a host,select QuickTest Professional for GUI tests or Service Test for API tests. Selectboth if you plan to run both types of tests.
l For each UFT host on which you want to run GUI tests, enable the Allowother HP products to run tests and components option in UFT.
Schedule the tests in ALM - optionalIn ALM, in the Testing > Timeslots module, schedule times for the tests to runautomatically, or reserve timeslots to use later to run the tests manually.
If you are running the tests ad-hoc, you can skip this step.
Run the tests from ALMIn ALM's Testing > Test Lab, specify the hosts on which you want to run the tests, andrun the tests.
You can also optionally automatically upload your run results to ALM if you arerunning a test from ALM. This option is set in ALM as a site parameter for yourproject.
For details, see the HP Application Lifecycle Management Administrator Guide.
Note:
If you do not configure the Remote Agent as an exception as described in"Enable the Remote Agent" on page 772, a Windows Security Alertmessage will display while running a test remotely.
User GuideChapter 61: Running Tests from ALM
HP Unified Functional Testing (12.53) Page 792 of 938
Click Unblock to solve this problem.
Test parameterization and test configurationsRelevant for: GUI tests and components,API testing, and business process tests
For each test saved in ALM, a test configuration can be applied for the test toenable you to run the test with variable data. This enables you to use the samedata file or data files repeatedly to provide changing data for a particular test run.Furthermore, you maintain fewer sets of data, in a central location in your ALMproject, which is accessible for all tests in the project.
When you save a test, a default configuration with the same name as the test iscreated simultaneously. A test configuration is specific setup of test data thatrepresents a business process use-case. This enables you to run the test with avariety of different data sources without manually editing the test steps. Testconfigurations essentially unbind the data from the test, making the test genericand facilitating test reuse.
Using test configurations, you can:
Sharecommondatasourcesacrossdifferenttests
When you create a test configuration, you associate a specific dataresource with that test configuration. However, since the testconfiguration - but not the data resource - is saved with the test, youcan associate a data resource with many tests. When UFT runs thebusiness process test using a test configuration, it calls the referenceddata source.
Testvarioususe-cases,eachtimewith adifferentset ofdata
As part of creating a test configuration, you both associate a specificdata source with the configuration and specify which parts of the dataresource should be used in this test configuration. When you changethe data resource with each test configuration, you are able to see howyour application performs with different sets of data. Furthermore, if youdo not change the data resource with each test configuration, butreference different parts of the data resource, you can also see how theapplication performs with differing data.
When running test configurations, there are different ways in which to associatedata with the test configuration:
User GuideChapter 61: Running Tests from ALM
HP Unified Functional Testing (12.53) Page 793 of 938
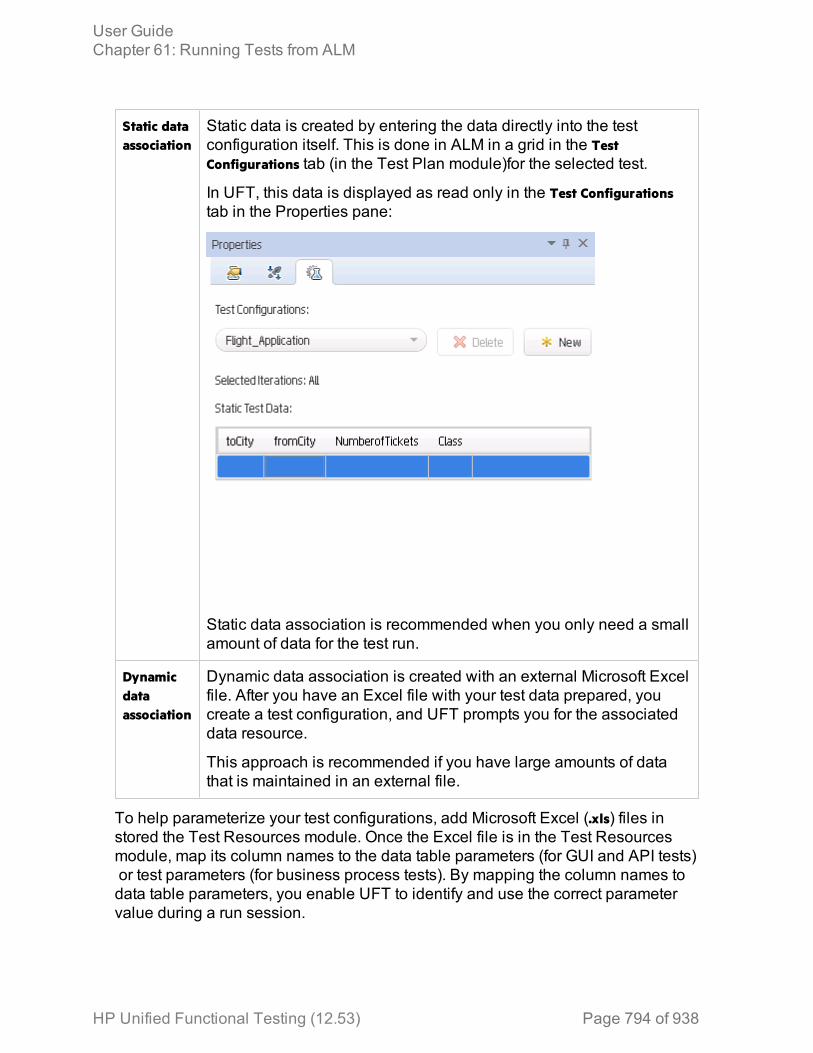
Static dataassociation
Static data is created by entering the data directly into the testconfiguration itself. This is done in ALM in a grid in the TestConfigurations tab (in the Test Plan module)for the selected test.
In UFT, this data is displayed as read only in the Test Configurationstab in the Properties pane:
Static data association is recommended when you only need a smallamount of data for the test run.
Dynamicdataassociation
Dynamic data association is created with an external Microsoft Excelfile. After you have an Excel file with your test data prepared, youcreate a test configuration, and UFT prompts you for the associateddata resource.
This approach is recommended if you have large amounts of datathat is maintained in an external file.
To help parameterize your test configurations, add Microsoft Excel (.xls) files instored the Test Resources module. Once the Excel file is in the Test Resourcesmodule, map its column names to the data table parameters (for GUI and API tests) or test parameters (for business process tests). By mapping the column names todata table parameters, you enable UFT to identify and use the correct parametervalue during a run session.
User GuideChapter 61: Running Tests from ALM
HP Unified Functional Testing (12.53) Page 794 of 938
Depending on the location in ALM you want to use for the test configuration's data,mapping is performed differently:
With the dataresource in thetest's Parameters tabin ALM
you do not need to map the data table parameters tocolumn names. You can, however, modify the filtersettings by applying text filters to any parameter, and/orselecting the rows on which the configuration can run.
If you use a differentdata resources oroverride the datawith anotherresource
you need to map the data table parameters to the columnnames in the .xls or .xlsx file.
Example: Suppose you define three configurations in a single test to test anapplication that provides different solutions for Gold Card, Silver card, andBronze Card users. You could use the same data resource for eachconfiguration by filtering the rows or text of the data resource to match therelevant user type. Similarly, if your data is stored in various .xls or .xlsx files,you might want to run the same test using a different data source each time.You would do this by associating a different data source with eachconfiguration.
Test Combinations GeneratorRelevant for: business process tests
The Test Combinations Generator helps you prepare test configurations by usingthe parameters in your test and their possible values to create multiple possibledata combinations. UFT can then generate them into a test configuration that youcan use when running a business process test.
Note: By default, you must provide this data yourself. Depending on thenumber of parameters in your test and their possible values, the possiblecombinations can grow exponentially and require a lot of time to prepare.Use the Test Combinations Generator to prepare this data for you.
The Test Combinations Generator creates configurations based on the followingalgorithms:
User GuideChapter 61: Running Tests from ALM
HP Unified Functional Testing (12.53) Page 795 of 938
Linear Includes all possible combinations of parameters and values.
May result in a very large amount of data.
Pairwise Includes all combinations of valid values for pairs of inputparameters.
Assumes that many errors in your application are not caused bysingle parameters, rather interactions between pairs of parameters.
Triplewise: Includes all combinations of valid values for triples of inputparameters.
Furthermore, you can specify values be added to special paths:
HappyPath:
No error or exception is expected to be raised by using this particularvalue
Error Path: An error or exception is expected to be raised by using this particularvalue
Once you have created a test with parameters, selected a combination algorithm,and added values to the Happy Path or Error Path sets, you can generate the testconfigurations. UFT generates the test configurations and adds them to your test.
Use-Case Scenario: Use the Test CombinationsGeneratorRelevant for: business process tests
Suppose you have a desktop application used for flight reservations. You want tocreate a business process test of this application.
You must test how the application performs with different sets of data. However,you have up to five fields that users can change, and the possible number ofcombinations is huge, and manually creating these data combinations is going totake too much time.
Use the Test Combinations Generator to help you create this large set of data andmake test coverage more manageable.
You've created the following business process test, with multiple components.
Component Area of Application
Login Login window
FlightFinder Page Window to specify flight details (departure, arrival, etc.)
User GuideChapter 61: Running Tests from ALM
HP Unified Functional Testing (12.53) Page 796 of 938

Select Flights Page Window to select an available flight
Flight Confirmation Page Window to book the flight with customer details.
For this scenario, we will focus on the FlightFinderPage component.
In the FlightFinderPage component, you have four different parameters,representing the fields a user can select.
For each of the fields, there aredifferent numbers of possible values:
l For the Departure and Arrival fields,there are 10 possible values.
l For the Class field, there are 3possible values.
l For the Tickets field, there are 99possible values.
If you were to manually created every possible combination, you would have tocreate 10 X 10 X 3 X 99 combinations - a huge total of 29700 combinations.
Use the Test Combinations Generator to generate the combinations automatically.
1. Provide the possible parameter values.
After opening the Test Combinations Generator in the Test Configurationspane, UFT displays the parameters in the Test Combinations Generator mainwindow.
You enter the possible values for each of the parameters.
Tip: If you click Generate Parameters in the upper left corner of the Test
User GuideChapter 61: Running Tests from ALM
HP Unified Functional Testing (12.53) Page 797 of 938
Combinations Generator window, UFT can automatically generateparameter values for these parameters (depending on the requiredformat of the value).
You could specify some of the values as Happy Path values (meaning that theyare not expected to cause an exception or error in the application) or Error Path(meaning that the values are expected to cause an exception or error).For this scenario, we are not going to specify any values in this manner.
Note: Although technically you can enter any number up to 99 in theTickets field, realistically most users will not use all these numbers. Sofor testing purposes you can limit it to tickets from 1 until 10.
2. View the value combinations.
Now that you have all the possible values entered, UFT can generate possiblecombinations for these parameter values. Once you click the View Combinations,UFT displays possible combinations.
3. Change the combination algorithm.
By default, when you displayed the possible combinations, UFT selected thePairwise algorithm, resulting in 112 combinations.
User GuideChapter 61: Running Tests from ALM
HP Unified Functional Testing (12.53) Page 798 of 938
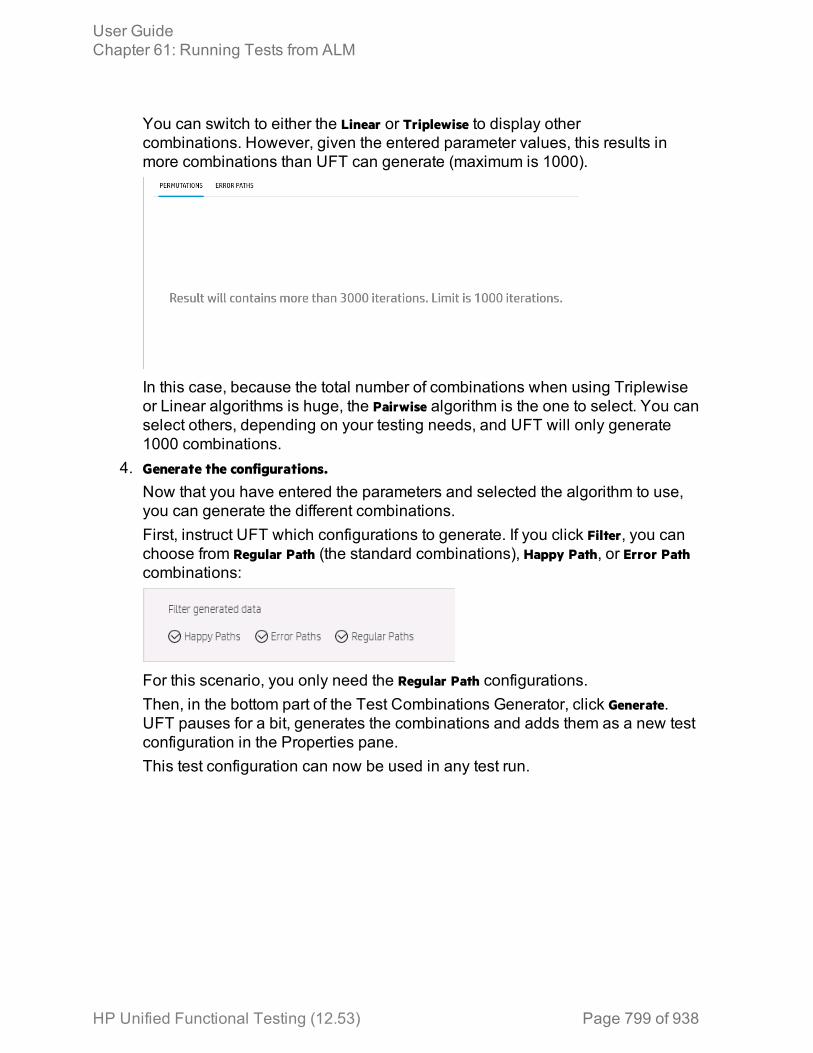
You can switch to either the Linear or Triplewise to display othercombinations. However, given the entered parameter values, this results inmore combinations than UFT can generate (maximum is 1000).
In this case, because the total number of combinations when using Triplewiseor Linear algorithms is huge, the Pairwise algorithm is the one to select. You canselect others, depending on your testing needs, and UFT will only generate1000 combinations.
4. Generate the configurations.
Now that you have entered the parameters and selected the algorithm to use,you can generate the different combinations.First, instruct UFT which configurations to generate. If you click Filter, you canchoose from Regular Path (the standard combinations), Happy Path, or Error Pathcombinations:
For this scenario, you only need the Regular Path configurations.Then, in the bottom part of the Test Combinations Generator, click Generate.UFT pauses for a bit, generates the combinations and adds them as a new testconfiguration in the Properties pane.This test configuration can now be used in any test run.
User GuideChapter 61: Running Tests from ALM
HP Unified Functional Testing (12.53) Page 799 of 938
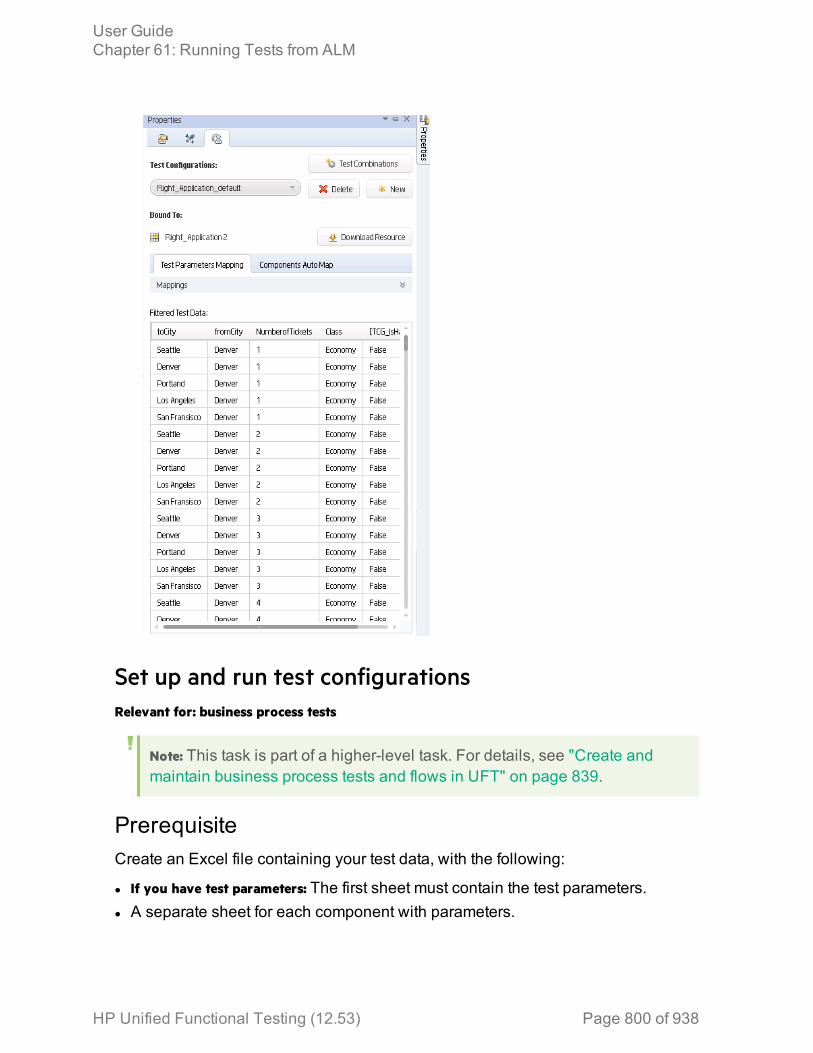
Set up and run test configurationsRelevant for: business process tests
Note: This task is part of a higher-level task. For details, see "Create andmaintain business process tests and flows in UFT" on page 839.
PrerequisiteCreate an Excel file containing your test data, with the following:
l If you have test parameters: The first sheet must contain the test parameters.l A separate sheet for each component with parameters.
User GuideChapter 61: Running Tests from ALM
HP Unified Functional Testing (12.53) Page 800 of 938
l In the sheets for the components, the columns with the parameter names mustuse the format <COMPONENT NAME>.<PARAMETER NAME>.
Tip: If you have iterations defined for the components included in yourbusiness process test, you can export the iteration and parameternames/values for these components into an Excel file. For details, see"Export component parameters to an Excel" on page 880.
Create a test configurationBy default, UFT automatically creates a static test configuration with each businessprocess test, using the name of the test. You can create other test configurations:
1. In the Properties pane, open the Test Configurations tab .2. Do one of the following:
From a dataset
a. In the Test Configurations tab, click the New button.b. In the Open dialog box, navigate to the location (in ALM or
the file system) where the Excel file is saved and select thefile.
c. Click OK to associate the Excel file with the testconfiguration. UFT displays the test configuration tabs.
From theTest CasesGenerator
a. In the Test Configurations tab, click the Test Combinationsbutton.
b. Generate your test configurations as described in "Use theTest Combinations Generator to create test configurations"on page 803
Enter static data configuration valuesIn UFT, static data configuration values are read-only. To add data to the staticconfiguration, edit the test configuration in ALM.
For details, see the task on how to associate static data in the HP Application LifecycleManagement User Guide.
Map test parameters to the Excel fileAfter you associate the Excel file with a specific test configuration, instruct UFTwhere to provide the values for your test parameters:
1. In the Test Configurations tab, select the Test Parameters Mapping tab. A list of alltest parameters is displayed.
User GuideChapter 61: Running Tests from ALM
HP Unified Functional Testing (12.53) Page 801 of 938

2. In the Resource Column, from the drop-down list, select the name of the column towhich you want to map the parameter.
3. (Optional) In the Filter column, select the value to use.
Tip: If you want UFT to automatically map all test parameters to the relevantcolumn in the Excel file, click the Automap button. UFT automatically finds
the correct column and displays an icon indicating that the parameter isautomatically mapped.
View component parameter mapping details1. In the Test Configurations tab, select the Components Automap tab. A list of all
components in the test is displayed.2. In the components list, select the component you want to view.3. Below the components list, UFT displays which sheet in the Excel file the
component and its parameters are mapped to, including the values for theparameters:
If there are errors, UFT displays a warning icon in the Components Automaptab and in the Data Mapping Status column. You can hover over the error nameto see a description of the error.Errors must be corrected in the Excel file.
User GuideChapter 61: Running Tests from ALM
HP Unified Functional Testing (12.53) Page 802 of 938
Run the test with the selected configuration1. In the Run dialog, expand the Options node.2. From the Options area, select the Test Configurations tab.3. In the Test Configurations tab, select the Test Configuration you want to use.
When the test runs, UFT takes the data from the file associated with theselected test configuration.
Use the Test Combinations Generator to create testconfigurationsRelevant for: business process tests
This task describes how to use the Test Combinations Generator to generate testconfigurations, enabling you to create a larger variety of test configuration datasets. These test configurations can be used to test a wider variety of scenarios foryour application.
Note: This task is part of a higher-level task. For details, see "Set up and runtest configurations" on page 800.
Tip: For a use-case scenario related to this task, see "Use-Case Scenario:Use the Test Combinations Generator" on page 796.
PrerequisitesBefore using the Test Combinations Generator, create test parameters.
Open the Test Combinations GeneratorIn the Properties pane, select the Test Configurations tab , and then click theTest Combinations button.
Set the value of your parametersEnter the possible values for your parameters as follows:
Manually Click on a cell and enter the values for the parameters as needed orcut and paste into the grid as needed.
User GuideChapter 61: Running Tests from ALM
HP Unified Functional Testing (12.53) Page 803 of 938
Import Click the Import button to automatically import values for theparameters. Import an Excel file from the file system or an ALMproject.
Automatically generate values for parameters1. In the Parameter Values pane of the Test Combinations Generator, in the
upper right hand corner, click Generate Parameters.2. In the Generate Parameters pane, from the Parameter drop-down list, select the
Parameter to generate.3. From the Generation Type drop-down list, select the type of value to generate.4. For certain types of values, select the other options as needed. For example,
for the First Name or Full Name value types, you can select English or Non-English types.
5. Specify the number of entries to generate.The Test Combinations Generator only generates unique items, withoutduplicating values. For example, if you instruct UFT to generate 20 entries, butlimit the available values to the numbers between 95 and 100, only 6 entriesare generated.
6. In the lower right corner of the pane, click Generate. The values are added theyour list of parameter values used to generate test cases.
Add a custom data generatorIn addition to using UFT's built-in dictionaries, you can create a custom datagenerator for the parameter types in your test:
1. Create an .xml file for your data generator.2. In the XML file, add the following XML:
<Generators><DataGenerator name="[CustomGeneratorName]" type="[GeneratorType]" title="
[GeneratorTitle]" returnType="[GeneratorResultType]">...</DataGenerator>
</Generators>
name A unique name for the generator type.
User GuideChapter 61: Running Tests from ALM
HP Unified Functional Testing (12.53) Page 804 of 938
type The generator type. Possible values:l HP.UFT.TCG.DataGeneration.Generators.RegExpGenerator: to specifythe value format using a regular expression
l HP.UFT.TCG.DataGeneration.Generators.BaseRepositoryGenerator: tospecify the values with standard strings, numbers, etc.
title The title of the Generation Type as it is displayed in the TestConfigurations Generator.
returnType The format of the values to return. Supported types include:l Stringl Passwordl Numberl Date
Note: You can add multiple generator types in this XML file.
3. In the Data Generator attribute, specify the parameter details using theParameter element:
<Generators><DataGenerator name="[CustomGeneratorName]" type="[GeneratorType]" title="
[GeneratorTitle]" returnType="[GeneratorResultType]"><Parameters>
<Parameter .... /></Parameters>
</DataGenerator></Generators>
The attribute values for the Parameter element differ if you are using the regularexpression type (HP.UFT.TCG.DataGeneration.Generators.RegExpGenerator) or theregular tyle (HP.UFT.TCG.DataGeneration.Generators.BaseRepositoryGenerator):
Regular expression l name: must be the string pattern
l defaultValue: the default regular expression patternl type: must be the string System.String
Non-regular expression l name: a unique name for the parameterl defaultValue: the default parameter valuel type: must be the string System.Boolean
l title: the parameter title
User GuideChapter 61: Running Tests from ALM
HP Unified Functional Testing (12.53) Page 805 of 938
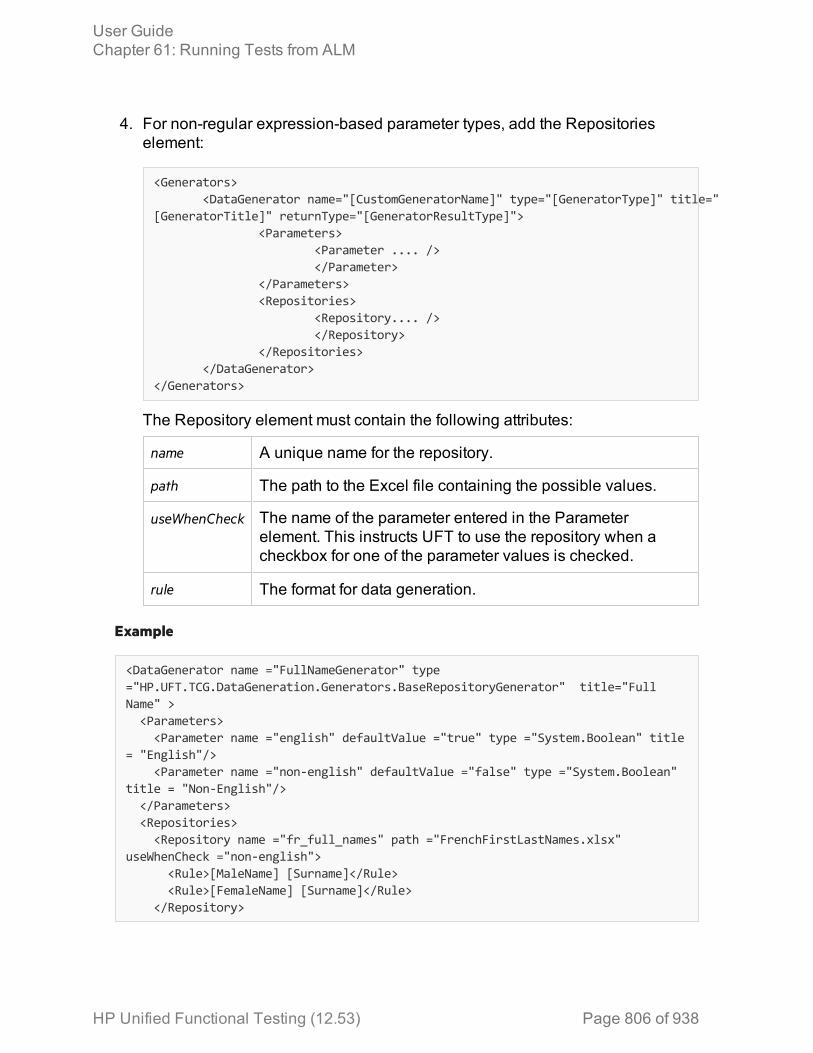
4. For non-regular expression-based parameter types, add the Repositorieselement:
<Generators><DataGenerator name="[CustomGeneratorName]" type="[GeneratorType]" title="
[GeneratorTitle]" returnType="[GeneratorResultType]"><Parameters>
<Parameter .... /></Parameter>
</Parameters><Repositories>
<Repository.... /></Repository>
</Repositories></DataGenerator>
</Generators>
The Repository element must contain the following attributes:
name A unique name for the repository.
path The path to the Excel file containing the possible values.
useWhenCheck The name of the parameter entered in the Parameterelement. This instructs UFT to use the repository when acheckbox for one of the parameter values is checked.
rule The format for data generation.
Example
<DataGenerator name ="FullNameGenerator" type="HP.UFT.TCG.DataGeneration.Generators.BaseRepositoryGenerator" title="FullName" ><Parameters><Parameter name ="english" defaultValue ="true" type ="System.Boolean" title
= "English"/><Parameter name ="non-english" defaultValue ="false" type ="System.Boolean"
title = "Non-English"/></Parameters><Repositories><Repository name ="fr_full_names" path ="FrenchFirstLastNames.xlsx"
useWhenCheck ="non-english"><Rule>[MaleName] [Surname]</Rule><Rule>[FemaleName] [Surname]</Rule>
</Repository>
User GuideChapter 61: Running Tests from ALM
HP Unified Functional Testing (12.53) Page 806 of 938
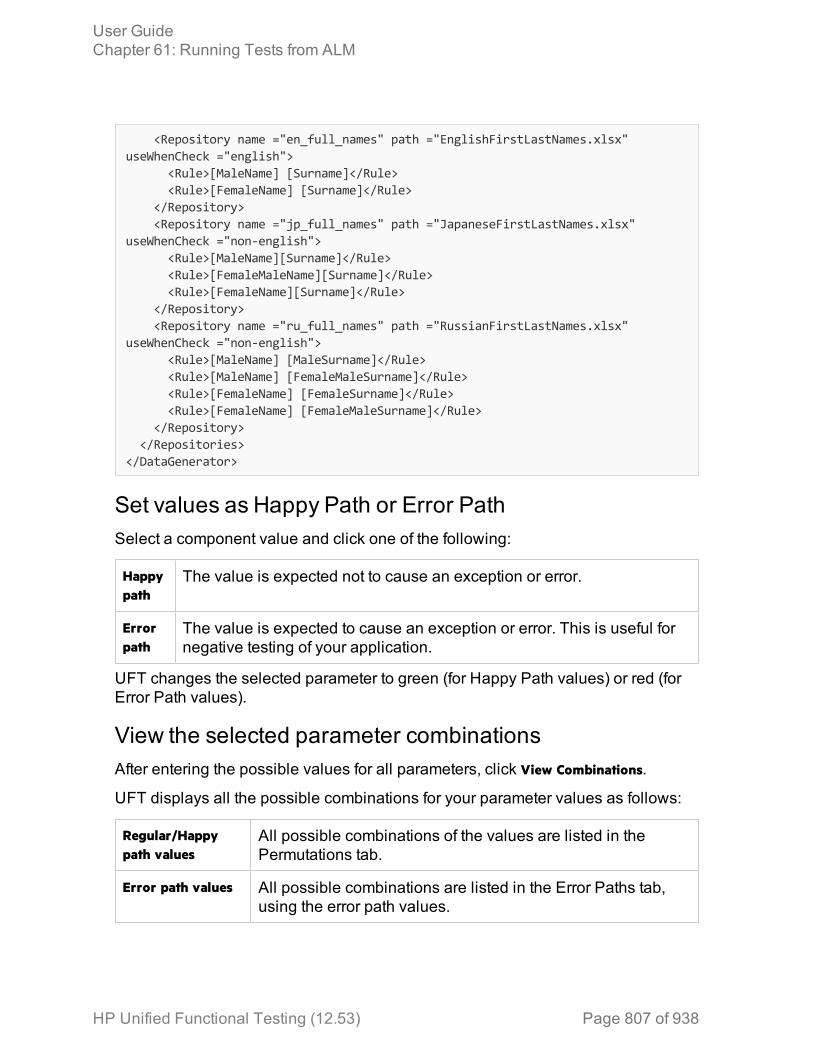
<Repository name ="en_full_names" path ="EnglishFirstLastNames.xlsx"useWhenCheck ="english">
<Rule>[MaleName] [Surname]</Rule><Rule>[FemaleName] [Surname]</Rule>
</Repository><Repository name ="jp_full_names" path ="JapaneseFirstLastNames.xlsx"
useWhenCheck ="non-english"><Rule>[MaleName][Surname]</Rule><Rule>[FemaleMaleName][Surname]</Rule><Rule>[FemaleName][Surname]</Rule>
</Repository><Repository name ="ru_full_names" path ="RussianFirstLastNames.xlsx"
useWhenCheck ="non-english"><Rule>[MaleName] [MaleSurname]</Rule><Rule>[MaleName] [FemaleMaleSurname]</Rule><Rule>[FemaleName] [FemaleSurname]</Rule><Rule>[FemaleName] [FemaleMaleSurname]</Rule>
</Repository></Repositories>
</DataGenerator>
Set values as Happy Path or Error PathSelect a component value and click one of the following:
Happypath
The value is expected not to cause an exception or error.
Errorpath
The value is expected to cause an exception or error. This is useful fornegative testing of your application.
UFT changes the selected parameter to green (for Happy Path values) or red (forError Path values).
View the selected parameter combinationsAfter entering the possible values for all parameters, click View Combinations.
UFT displays all the possible combinations for your parameter values as follows:
Regular/Happypath values
All possible combinations of the values are listed in thePermutations tab.
Error path values All possible combinations are listed in the Error Paths tab,using the error path values.
User GuideChapter 61: Running Tests from ALM
HP Unified Functional Testing (12.53) Page 807 of 938
Change the testing combination algorithmUFT can generate different configurations depending on the selected combinationalgorithm (Linear, Pairwise, or Triplewise):
In the Permutations tab, from the Algorithm drop-down list, select the appropriatealgorithm for your testing needs. UFT updates the list of permutations accordingly.
Note: Depending on the number of parameters, possible values, andcombination algorithm, you may generate a large number of possibleconfigurations. UFT can only display (and generate) up to 1000 possibleconfigurations.
Select the configurations to generateIf you define values as Happy Path or Error Path, you also have the option togenerate all the different parts of the configuration.
1. In the Permutations tab, click the Filter button.2. In the filter, select the combinations to generate.3. If necessary, enter a name for the generated configuration.
Generate the test configurationsIn the bottom of the Test Combinations Generator, click Generate.
UFT pauses for a few seconds or more (depending on the number ofcombinations), and creates the test configuration. The new configuration is thenadded in the Test Configurations tab of the Properties pane.
This configuration is saved with the test and is available to use in test runs.
Known Issues - Running tests from ALM
Run results
Fast runresults
If an ALM user manually changes the status of a test instance run,ALM creates fast run results to record the change of the test status. Thefast run results are not valid run results files.
However, when you try to select results to open or delete in the RunResults Viewer or Run Results Deletion tool, the fast run results areavailable in the list.
User GuideChapter 61: Running Tests from ALM
HP Unified Functional Testing (12.53) Page 808 of 938

ALMversionsearlierthan12.50
If you run tests from UFT that are stored in an ALM version lower than12.50, the Run Sessions > Report Format option is automatically set toRun Results Viewer Report. Run results are opened in the Run ResultsViewer (RRV).
ALM versioningWhen running a test from UFT with ALM 11.50 and later with an ALM project thatsupports versioning, the test instance run status will not be updated for tests thatare checked out.
External authentication
Accessingthe ALMTest Plan
In order to run a UFT test or open a test, component, or applicationarea stored in the Test Plan on an ALM server using externalauthentication, you must select the Non-interactive mode option in theWebgate Customization tool and select the external certificate in thesame dialog.
For details about setting up certificates and the WebgateCustomization tool, see the documentation for the WebgateCustomization tool included with your ALM server.
Unable toconnect
If a test running from an ALM server using external authentication failswith the message Unable to connect to the testing tool, make sure thatyour external certificate is selected in the Webgate Customizationtool.
Note: Make sure that the certificate authority that issued your client certificateis added to the Trusted Root Certification Authorities for the current user.
For details, see the documentation for the Webgate Customization tool foryour ALM server.
Stopping a test in the middle of a runWhen running a test set from the Test Lab module, if you stop a test set run in themiddle of the run, and then immediately start another run, UFT behavesunexpectedly.
Workaround: Wait after stopping the test set run.
User GuideChapter 61: Running Tests from ALM
HP Unified Functional Testing (12.53) Page 809 of 938

Test Combinations GeneratorThe Test Combinations Generator may work unexpectedly if BPT test inputparameters have names beginning with numbers.
For example: 1_name
To avoid issues, always start BPT test input parameter names with letters.
Running API tests on Windows 2012 R2Network COM+ access is not enabled by default on Windows 2012 R2, and isrequired for running API tests from ALM.
Enable it manually before running your API tests as follows:
1. Browse to the Windows Add or Remove Programs control panel.2. Click Turn Windows features on or off.3. In the Add Roles and Features Wizard, click Server Roles, and then select Application
Server.4. Expand the details of the child features, and select the COM+ Network Access
option.5. Click Next until you complete the Windows Components wizard, and then click
Install to install the features.
User GuideChapter 61: Running Tests from ALM
HP Unified Functional Testing (12.53) Page 810 of 938
Chapter 62: Version Control in ALMRelevant for: GUI tests and components, API testing, and business process tests and flows
Note: The references to ALM in this chapter apply to Quality Center and ALM.Note that some features and options may not be supported in the QualityCenter or ALM edition you are using. For information on Quality Center orALM editions, see the HP Quality Center User Guide or the HP Application LifecycleManagement User Guide.
When UFT is connected to an ALM project with version control support, you canupdate and revise your UFT assets while maintaining earlier versions of eachasset. This helps you keep track of the changes made to each asset and see whatwas modified from one version to another.
You can do any of the following:
Add assets You add an asset to the version control database by saving it in anALM project with version control support. When you save an assetfor the first time, UFT automatically checks the asset into the ALMversion control database, assigns it version number 1, andautomatically checks the asset out for you so that you can continueworking on it. When you check the asset in, the asset retainsversion number 1, since this is the first version that can containcontent. Then, each time the asset is checked out and in again, theversion number increases by 1.
Checkassets out
When you open an asset that is currently checked in to the versioncontrol database, it is opened in read-only mode. You can reviewthe checked-in asset. You can also run the asset and view theresults.
To modify the asset, you must check it out. When you check out anasset, ALM copies the asset to your unique check-out folder(automatically created the first time you check out an asset), andlocks the asset in the project database. This prevents other users ofthe ALM project from overwriting any changes you make to theasset. However, other users can still run the version that was lastchecked in to the database.
In UFT, the check out option accesses the latest version of theasset. In ALM, you can also check out earlier versions of any assetexcept for application areas.
HP Unified Functional Testing (12.53) Page 811 of 938
Checkassets in
While an asset is checked out, ALM users can run the previouslychecked-in version of your asset. For example, suppose you checkout version 3 of an asset and make a number of changes to it andsave the asset. Until you check the asset back into the versioncontrol database as version 4, ALM users can continue to runversion 3.
When you have finished making changes to an asset and you areready for ALM users to use your new version, you check it in to theversion control database.
When you check an asset back into the version control database,ALM deletes the asset copy from your checkout folder and unlocksthe asset in the database so that the asset version is available toother users of the ALM project.
Viewversioncontrolinformation
When you open a test from an ALM project with version controlsupport, you can view version control information for the test byusing the Details view in the Open dialog box.
The Checked Out To column specifies the user name of the ALM userto whom the test is checked out, if it is checked out. If the test iscurrently checked in to the version control database, there is noindication in the dialog box.
View andcompareassetversions
You can view and compare the versions of an asset using the AssetComparison Tool.
If your project administrator creates project baseline versions whena milestone is reached during product development, you can viewand compare the asset versions stored in these baselines.
User GuideChapter 62: Version Control in ALM
HP Unified Functional Testing (12.53) Page 812 of 938

Viewbaselinehistory
In ALM, a project administrator can create baselines that provide"snapshots" of an entire project (or part of a project) at differentstages of development. A baseline represents a version of a projectat a specific point in a project's life cycle. For example, baselinesare often created for each milestone or when specific phases in aproject are completed.
Baselines can be created for ALM projects that are enabled forversion control, and for projects for which version control is notenabled.
The project administrator creates the baseline in the Libraries tab ofthe Management module in ALM. Creating a baseline is a two-foldprocess. The administrator first creates a library, which specifies theroot folders from which to import the data. The administrator makessure to include all of the associated resource files, such as sharedobject repositories and function libraries. The administrator thencreates the actual baseline, which comprises the latest versions ofevery asset included in the library. If the project is version control-enabled, then these are the latest checked in versions of everyasset.
During the creation process, ALM verifies that all of these assets(such as associated resource files) are included in the baseline. Ifany assets are not included, ALM informs the administrator so thatthe library and baseline can be modified accordingly. For moredetails, see the ALM user guide.
Asset Comparison Tool and Asset ViewerRelevant for: GUI tests and components and API testing
An asset is a UFT testing document (such as a test, component, or application area)or any resource file that is used by a UFT testing document (such as a functionlibrary, a shared object repository, a data table, a recovery scenario, or anenvironment variable XML file). The Asset Comparison Tool and Asset Viewerenable you to view and compare versions of a particular asset.
User GuideChapter 62: Version Control in ALM
HP Unified Functional Testing (12.53) Page 813 of 938
Using these tools, you can:
View anyversion ofan assetusing theAssetViewer
After you select a specific version in the Version History dialog box,you can see specific details about that version of the asset, even if itis different from the working copy of the asset. Using this featureenables you to see where specific settings and details of the assethave been changed.
Comparetwoversions ofan assetusing theAssetComparisonTool
After you have selected the specific versions to view in the VersionHistory dialog bo, you can view differences between the twoversions.
Drill downto view orcompareversions
l View or compare versions of an integral element. An integralelement is a resource file that is a part of the test or component(not saved as an external resource), such as a local objectrepository (for GUI testing) or a data table (for API testing). Whenyou check in a test or component, these elements are checked in,too, because they are part of the test or component. Therefore,when you drill down in the asset, you can view or compare theversion that existed when the test or component was checked in,in addition to the currently saved version.
l View or compare versions of associated external assets. Anassociated asset is any external (not integral) resource file usedby an asset (such as a function library, a shared object repository,a data table, a recovery scenario, or an environment variable XMLfile).To view or compare by drilling down, the resource file must beassociated via an absolute or ALM path.
User GuideChapter 62: Version Control in ALM
HP Unified Functional Testing (12.53) Page 814 of 938

View ascreencapturedepctingthe UFTlocation ofan element(GUI testingonly)
The screen capture displays an example of the relevant dialog box.The option (or area) for the node you right-clicked is highlighted inthe screen capture.
Example: Suppose you are viewing a comparison of a test andyou notice that the Disable Smart Identification during the runsession node is highlighted, indicating that it was modified. Ifyou are not sure where this option is located in UFT, you canright-click the node in the comparison tree and select ViewSample Snapshot. UFT then opens a dialog box showing youthat this area is located in the Run pane of the Test Settingsdialog box. The title bar of the dialog box lists the selectedelement, and a highlighted rectangle outlines the option.
For components: Suppose you are viewing a comparison of acomponent and you notice that the Input parameters node ishighlighted, indicating that it was modified. If you are not sure
User GuideChapter 62: Version Control in ALM
HP Unified Functional Testing (12.53) Page 815 of 938
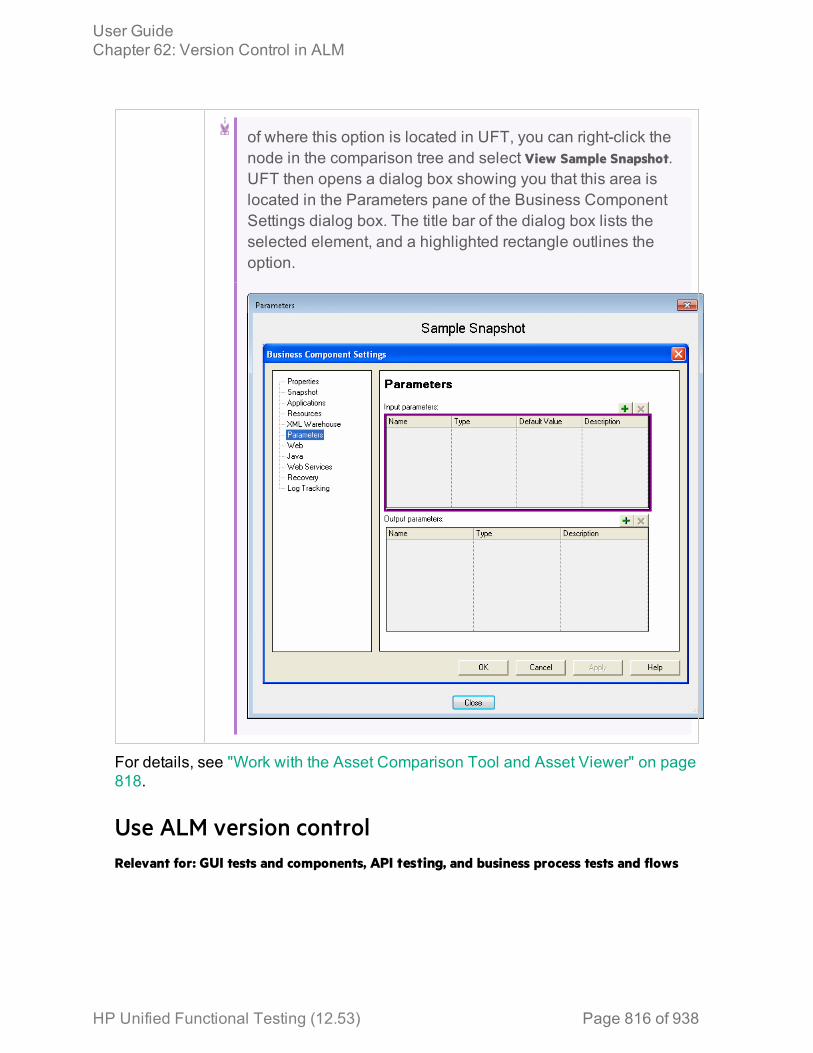
of where this option is located in UFT, you can right-click thenode in the comparison tree and select View Sample Snapshot.UFT then opens a dialog box showing you that this area islocated in the Parameters pane of the Business ComponentSettings dialog box. The title bar of the dialog box lists theselected element, and a highlighted rectangle outlines theoption.
For details, see "Work with the Asset Comparison Tool and Asset Viewer" on page818.
Use ALM version controlRelevant for: GUI tests and components, API testing, and business process tests and flows
User GuideChapter 62: Version Control in ALM
HP Unified Functional Testing (12.53) Page 816 of 938
Check in the currently open asset1. Confirm that the currently open asset is checked out to you.2. Select ALM > Check In, and check in the asset using the Check In dialog box.
Check out the latest version of an asset1. Make sure the asset you want to check out is currently checked in.2. Open the resource, as follows:
If the assetis a: Do this:
Test,Componentor FunctionLibrary
In the main UFT window, select File > Open > and select Test,Business Component, Function Library, or Application Area or click theOpen down arrow and select the asset type from the list.
SharedObjectRepository(GUI testingonly)
In the Object Repository Manager, select File > Open or click theOpen button.
RecoveryScenario(GUI testingonly)
In the Recovery Scenario Manager, click the Open button.
3. Browse to and open the asset.The document opens in the document pane as read-only with a lock icon in thedocument's tab.
4. Select ALM > Check Out to check out the document and edit it.
Cancel a check-out operation1. Open the asset if it is not already open.2. Select ALM > Undo Check out.
3. Click Yes to confirm the cancellation of your check out operation.The check out operation is cancelled. The checked out asset closes, and thepreviously checked in version reopens in read-only mode.
User GuideChapter 62: Version Control in ALM
HP Unified Functional Testing (12.53) Page 817 of 938

View the version history1. In the document pane or in the Solution Explorer, select the test or resource file
for which you want to view the history.2. Select ALM > Version History.
The Version History dialog box opens, displaying the information on theversions of the selected asset.
Work with the Asset Comparison Tool and Asset ViewerRelevant for: GUI tests and components and API testing
Open the Asset ViewerYou can open the Asset Viewer from any of the following:
ThemainUFTwindow
1. Open the test, component, or function library for which you want toview an earlier version.
2. Select ALM > Version History. The Version History dialog box opens.3. Select a version and click View. The Asset Viewer opens.
TheObjectRepositoryManager(GUITestingonly)
1. Open the Object Repository Manager (Resources > Object RepositoryManager).
2. Browse to and open the shared object repository for which youwant to view an earlier version. For details, see "Create andmanage shared object repositories" on page 223.
3. Select ALM > Version History. The Version History dialog box opens.4. Select a version and click View. The Asset Viewer opens.
TheRecoveryScenarioManager (GUITestingonly)
1. Open the Recovery Scenario Manager (Resources > RecoveryScenario Manager).
2. Open the recovery scenario file for which you want to view anearlier version.
3. Click the Version Control down arrow and select Version History.4. Select a version and click View. The Asset Viewer opens.
User GuideChapter 62: Version Control in ALM
HP Unified Functional Testing (12.53) Page 818 of 938
FromwithinALM
Connect to the project containing the asset you want to view, and doone of the following:
l To view the current version of an asset:
In the Test Resources module, select the resource and click theResource Viewer tab.
l To view the current or earlier version of an asset:
a. Do one of the following:o In the sidebar, click the Test Plan button (for tests) or the
Business Components button (for components) to open the TestPlan or Business Components module.
o Click the Test Resources button to open the Test Resourcesmodule. This module contains the resource files associatedwith your test or component, such as function libraries, sharedobject repositories, data tables, recovery scenarios, andenvironment variable XML files.
b. In the tree, select the file for which you want to view an earlierversion.
c. Click the History tab, and then click the Versions or Baselines tab.d. In the grid, select a version, and then click the View button. (You
cannot view a version that is currently checked out.) A windowopens with buttons in the sidebar enabling you to access version-specific information for the selected asset. (These buttons areidentical to the tabs displayed in the right pane of the mainwindow for the latest version of the selected asset.) For details,see the ALM user guide.
TheCommand LineInterpreter(cmd.exe)(testsonly)
1. Open the Command Line Interpreter.2. Enter the command using the following syntax:
"<UFT installation folder>\bin\UFTDiffApplication.exe" P1:"<file path 1>"
where P1 = the file system path to the asset.
Example: "%ProgramFiles%\HP\Unified FunctionalTesting\bin\UFTDiffApplication.exe"P1: "%ProgramFiles%\HP\Unified FunctionalTesting\Tests\Test1"
User GuideChapter 62: Version Control in ALM
HP Unified Functional Testing (12.53) Page 819 of 938
Open the Asset Comparison ToolYou can open the Asset Comparison Tool from any of the following:
ThemainUFTwindow
1. Open the test, component, or function library (GUI testing only)whose versions you want to compare.
2. Select ALM > Version History or Baseline History. The Version Historyor Baseline History dialog box opens.
3. Select two versions (using the CTRL key) and click Compare. TheAsset Comparison Tool opens.
TheObjectRepositoryManager(GUI testing only)
1. Open the Object Repository Manager (Resources > Object RepositoryManager).
2. Browse to and open the shared object repository whose versionsyou want to compare.
3. Select ALM > Version History or Baseline History. The Version Historyor Baseline History dialog box opens.
4. Select two versions (using the CTRL key) and click Compare. TheAsset Comparison Tool opens.
RecoveryScenarioManager(GUItestingonly)
1. Open the Recovery Scenario Manager (Resources > RecoveryScenario Manager).
2. Open the recovery scenario file whose versions you want tocompare.
3. Click the Version Control down arrow and select Version History orBaseline History.
4. Select two versions (using the CTRL key) and click Compare. TheAsset Comparison Tool opens.
User GuideChapter 62: Version Control in ALM
HP Unified Functional Testing (12.53) Page 820 of 938
FromwithinALM
1. In ALM, connect to the project containing the asset you want tocompare.
2. Do one of the following:l In the sidebar, click the Test Plan button (for tests) or the Business
Components button (for components) to open the Test Plan orBusiness Components module.
l Click the Test Resources button in the sidebar to open the TestResources module. This module contains the resource filesassociated with your test or component, such as functionlibraries, shared object repositories, data tables, recoveryscenarios, or environment variable XML files.
3. In the tree, select the file whose versions you want to compare.4. Click the History tab, and then click the Versions or Baselines tab.5. In the grid, select two versions to compare (using the CTRL key),
and then click the Compare button.6. In the sidebar of the window that opens, click the QTP
Comparison/ST Comparison or Automation button. The AssetComparison Tool opens.
Tip: You can also compare baselines from the Managementmodule. Click the Management button in the side bar to openthe Management module. Select a baseline in the tree and
click the Compare To button. For details, see the ALMuser guide.
User GuideChapter 62: Version Control in ALM
HP Unified Functional Testing (12.53) Page 821 of 938
TheCommand LineInterpreter(cmd.exe)(testsonly)
1. Open the Command Line Interpreter.2. Enter the command using the following syntax:
"<UFT installation folder>\bin\UFTDiffApplication.exe"P1: "<file path 1>" P2: "<file path 2>"
where P1 = the file system path to the first asset, and P2 = the filesystem path to the second asset.
Note: Make sure you insert a blank space after eachargument. The options are not case-sensitive and can beentered in any order.
Example: ""%ProgramFiles%\HP\Unified FunctionalTesting\bin\UFTDiffApplication.exe"P1: "%ProgramFiles%\HP\Unified FunctionalTesting\Tests\Test1"P2: "%ProgramFiles%\HP\Unified FunctionalTesting\Tests\Test2"
View a comparison of two asset versions (AssetComparison Tool)1. With a test or component selected, select ALM > Version History. The Version
History dialog box opens.2. In the Version History dialog box, select two versions to compare by pressing
the version row and the CTRL key.3. Click Compare. The Asset Comparison Tool window opens with a detailed list of
the similarities and differences between the selected versions.
Drill down to compare or view a specific element
Note: You can drill down any asset that has a blue drilldown arrow adjacentto it.
l Click the blue drilldown arrow adjacent to any asset that can be compared.(The pointer changes into a pointing hand in the proximity of the drilldownarrow.)
l Double-click the asset.
User GuideChapter 62: Version Control in ALM
HP Unified Functional Testing (12.53) Page 822 of 938
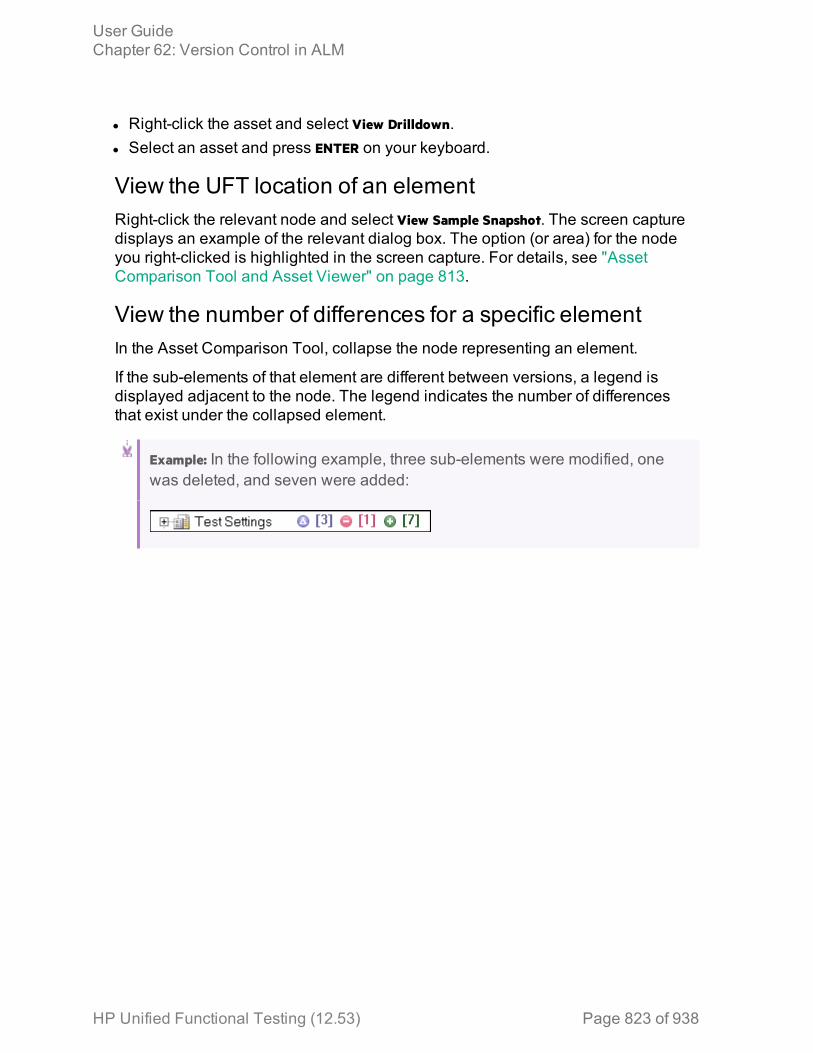
l Right-click the asset and select View Drilldown.l Select an asset and press ENTER on your keyboard.
View the UFT location of an elementRight-click the relevant node and select View Sample Snapshot. The screen capturedisplays an example of the relevant dialog box. The option (or area) for the nodeyou right-clicked is highlighted in the screen capture. For details, see "AssetComparison Tool and Asset Viewer" on page 813.
View the number of differences for a specific elementIn the Asset Comparison Tool, collapse the node representing an element.
If the sub-elements of that element are different between versions, a legend isdisplayed adjacent to the node. The legend indicates the number of differencesthat exist under the collapsed element.
Example: In the following example, three sub-elements were modified, onewas deleted, and seven were added:
User GuideChapter 62: Version Control in ALM
HP Unified Functional Testing (12.53) Page 823 of 938
Known Issues - ALM Version ControlRelevant for: GUI tests and components, API testing, and business process tests and flows
For GUItests andcomponents
l Sometimes, checkpoint and output value comparison informationdisappears from the bottom panes of the Asset Comparison Toolafter refreshing it. This can occur if you:a. Open the Asset Comparison Tool to view a comparison.b. Switch to the Object Repository Manager.c. Modify any of the current comparison's checkpoints or output
values.d. Save your changes.e. Switch back to the Asset Comparison Tool.f. Refresh the Asset Comparison Tool.g. Select the checkpoint or output value that you modified.Workaround: If this occurs, close the Asset Comparison Tool, andthen open it again after you save your changes.
l When comparing two baselines, if the only change in a resourceis its association to a test or component, the Asset ComparisonTool does not indicate any change in the resource even thoughALMmay indicate that the resource is Modified.
l When working with a localized installation of UFT, selecting theView Sample Snapshot option in the UFT Asset Comparison Toolopens a window containing a sample image of the selectedelement in UFT. The image displays the English user interface.
HP Unified Functional Testing (12.53) Page 824 of 938
For APItests andcomponents
l Sometimes, checkpoint and output value comparison informationdisappears from the bottom panes of the Asset Comparison Toolafter refreshing it. This can occur if you:a. Open the Asset Comparison Tool to view a comparison.b. Switch to the Object Repository Manager.c. Modify any of the current comparison's checkpoints or output
values.d. Save your changes.e. Switch back to the Asset Comparison Tool.f. Refresh the Asset Comparison Tool.g. Select the checkpoint or output value that you modified.Workaround: If this occurs, close the Asset Comparison Tool, andthen open it again after you save your changes.
l When comparing two baselines, if the only change in a resourceis its association to a test or component, the Asset ComparisonTool does not indicate any change in the resource even thoughALMmay indicate that the resource is Modified.
l When working with a localized installation of UFT, selecting theView Sample Snapshot option in the UFT Asset Comparison Toolopens a window containing a sample image of the selectedelement in UFT. The image displays the English user interface.
User GuideChapter 62: Version Control in ALM
HP Unified Functional Testing (12.53) Page 825 of 938
Chapter 63: HP SprinterRelevant for: GUI tests only
Although UFT automated tests can answer many of your testing needs, you mayalso need to perform some of your tests manually. You can run your manual testsusing HP Sprinter, HP's solution for manual testing. Sprinter provides advancedfunctionality and tools to make manual testing more efficient and effective.
Manual testing often requires that you leave your testing application to accomplishtasks related to your test. For example, you may need to use graphic software totake a screen capture of your application, you may want to record a movie of theapplication during the test, and you need to switch to your defect tracking softwareto report defects.
Sprinter addresses these needs in the manual testing process, and enables you toaccomplish these tasks without disrupting your test flow. Sprinter includes manytools to help you detect and submit defects. Sprinter can also perform many of therepetitive and tedious tasks of manual testing for you. These features ensure thatyou can perform all the tasks necessary for your manual test with minimuminterruptions to your testing work.
Sprinter is fully integrated with ALM 11.00 and later, enabling you to get themaximum benefit from both solutions.
Note: Unified Functional Testing (UFT) and Sprinter share a variety of systemresources. Consider the following when deciding whether to install Sprinteron your UFT computer:
l Sprinter and UFT can be installed on the same computer.l Sprinter and UFT cannot be run simultaneously on the same computer.l Any changes to the installation of one of these products will affect theother. If you uninstall, modify, or upgrade one product, the other may fail.You need to repair the installation of the affected product. For details, seethe HP Unified Functional Testing Installation Guide and the HP Sprinter Readme.
For details on the supported compatible versions of UFT and Sprinter, seethe HP Unified Functional Testing Product Availability Matrix.
HP Unified Functional Testing (12.53) Page 826 of 938
With Sprinter you can:
Run ALMmanualtests andBusinessProcesstests withnew stepdisplay
l Clear steps display. Steps are presented in a clear, organized, anduser-friendly design, making it easier to view step information andupdate step status.
l Move easily between tests in your run. You can easily move betweenthe tests in your run without interrupting your test flow. Sprinterupdates all your displayed step and run information to match yourcurrent test.
l Edit actual parameter values during your test run. You can easily editthe actual values of parameters in your test, during your test run.
l Multiple views. Change the way you view your steps depending onyour testing needs. View in normal mode when more details areneeded, or view in Subtitles mode if you need to see more of yourapplication.
l Actual value including screen captures. Attach a plain or annotatedscreen capture of your application to the step's actual value.
Createformal testsfromexploratorytests withno pre-definedsteps.
If you run a test without pre-defined steps, Sprinter can keep arecord of all the user actions you took during your test. You can thenexport this list to an Excel spreadsheet, modify the text as neededand import the spreadsheet to a test in ALM. This converts anexploratory test to a formal test, with pre-defined steps.
Submitdefects toALM
Submit an ALM defect directly from within Sprinter. You canoptionally let Sprinter create a defect scenario by automaticallygenerating a text description of all the user actions or steps in yourtest. You can also attach a screen capture or a movie of yourapplication to the defect.
Create andannotatescreencaptures ofyourapplication.
Sprinter provides tools that enable you to take and annotate ascreen capture of your application at any point in the testingprocess. Tools are included that make measuring and comparinguser interface elements easier. Report defects in the display byattaching the annotated screen capture to an ALM defect, saving itas a file, or attaching it to an email. You can also include annotatedscreen captures in the Actual Result of a step.
User GuideChapter 63: HP Sprinter
HP Unified Functional Testing (12.53) Page 827 of 938
LetSprinterperformsomemanualtestingtasks foryou.
You can create and run macros to automate a set of actions in yourapplication. Sprinter can also inject data automatically into fields inyour application.
Replicateyouractions onanothercomputer.
Replicate your user actions on multiple computers with differentconfigurations (operating system, browser). Sprinter detectsdifferences in the displays of these computers and enables you toreport defects on these differences.
View testresults.
Sprinter includes a powerful Storyboard that displays each actionyou performed in your test. For each action you can see a screencapture of the action, any defects that you reported, defectreminders, and comments. If you ran the test with multipleconfigurations you can view the differences between the displays ofdifferent computers.
Use Spintertests tocreate UFTtests andbusinesscomponents
Using Sprinter data files, you can automatically convert yourmanual tests into GUI tests or business components by importingthese files into UFT. UFT then converts the data into a test orbusiness component.
For more details, contact your HP representative.
User GuideChapter 63: HP Sprinter
HP Unified Functional Testing (12.53) Page 828 of 938

HP Unified Functional Testing (12.53) Page 829
Part 10: Business Process Testing in UFT
Chapter 64: Business Process Testing in UFTRelevant for: Business process tests and flows
Business Process Testing provides you with a customizable, component-basedtesting framework that supports:
Componentreuse andmodularization
Component reuse and modularization keep costs low byspeeding up test creation, maintenance, and execution.
Creation oftests for bothsimple andcomplexapplications
An application under test can be a simple, HTML-based webapplication or a complex business process involving packagedapplications and back-end services and databases.
Collaborationbetweenvariouspersonas
The testing framework is flexible enough to meet the needs ofvarious personas, such as manual testers, automation engineers,and subject matters experts.
Business Process Testing helps you document your componentsand tests, including screenshots illustrating how they should beused, and so on. This makes it possible for people with differentroles and skill sets to share others assets.
Managementof parts of atest
Managing parts of a test includes component documentation, testrun results, version control, reporting, and history. Additionally,using ALM, you can generate documents containing informationabout the tests, flow, and components in a given project.
When working with Business Process Testing, you can use both business processtests and business process flows to organize your testing.
Each business process test or flow consists of business components ( includingkeyword GUI components, scripted GUI components, or manual components),which are added and ordered (or grouped) together. When UFT runs a businessprocess test, it runs each of the components and their steps in sequence. You canalso include a business process flow inside a business process test.
While tests and flows are fundamentally the same as they both contain a specifiedorder of business components, there are differences:
l A business process test is a scenario comprising a sequence of businesscomponents or flows, designed to test a specific scenario in an application.
l A flow is a type of test that comprises a logical set of business components, in afixed sequence, that performs a specific task. Flows share the same functionality
HP Unified Functional Testing (12.53) Page 830 of 938
as business process tests (for example, iterations, parameters, and results).When designing flows, they can be considered as "compound components."In addition, flows cannot contain other flows.You can use a flow in multiple business process tests. When you modify a flowor any of its components, all business process tests containing that flow reflectthat modification.
Note: Business Process Testing is available with ALM Edition and QualityCenter Enterprise Edition. For more information about the HPBusinessProcess Testing editions and their functionality, see the HP ApplicationLifecycle Management User Guide. To find out what edition of HPBusinessProcess Testing you are using, ask your ALM site administrator.
Business Process Testing methodologiesRelevant for: business process tests and flows
BPT is flexible and does not require any one particular model for incorporatingbusiness processes into your testing environment. The actual workflow in anorganization may differ for different projects, or at different stages of the applicationdevelopment life cycle.
You can use any of the following methodologies:
User GuideChapter 64: Business Process Testing in UFT
HP Unified Functional Testing (12.53) Page 831 of 938
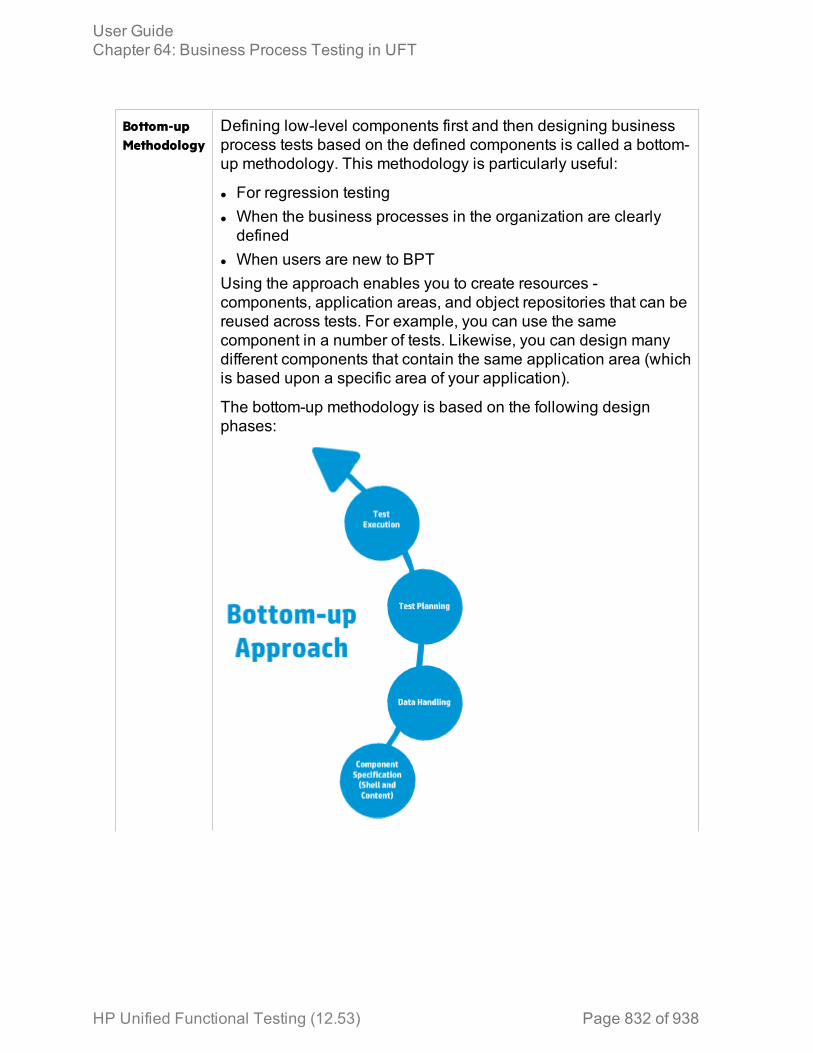
Bottom-upMethodology
Defining low-level components first and then designing businessprocess tests based on the defined components is called a bottom-up methodology. This methodology is particularly useful:
l For regression testingl When the business processes in the organization are clearlydefined
l When users are new to BPTUsing the approach enables you to create resources -components, application areas, and object repositories that can bereused across tests. For example, you can use the samecomponent in a number of tests. Likewise, you can design manydifferent components that contain the same application area (whichis based upon a specific area of your application).
The bottom-up methodology is based on the following designphases:
User GuideChapter 64: Business Process Testing in UFT
HP Unified Functional Testing (12.53) Page 832 of 938
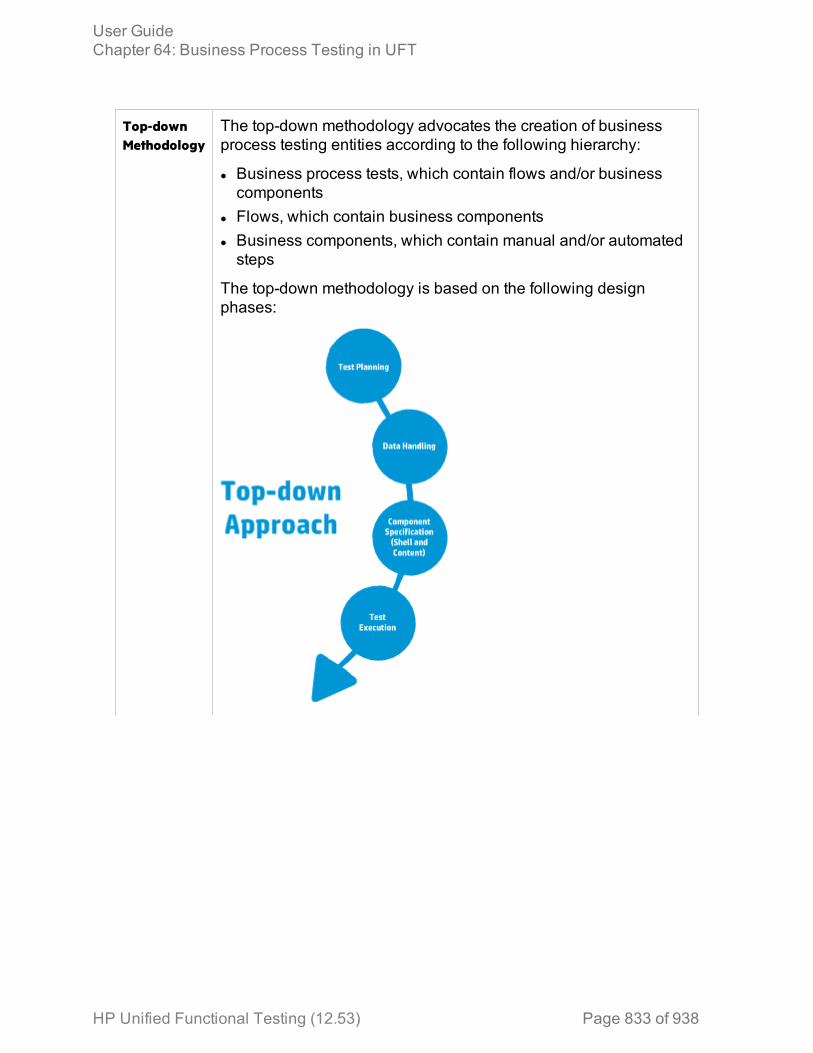
Top-downMethodology
The top-down methodology advocates the creation of businessprocess testing entities according to the following hierarchy:
l Business process tests, which contain flows and/or businesscomponents
l Flows, which contain business componentsl Business components, which contain manual and/or automatedsteps
The top-down methodology is based on the following designphases:
User GuideChapter 64: Business Process Testing in UFT
HP Unified Functional Testing (12.53) Page 833 of 938
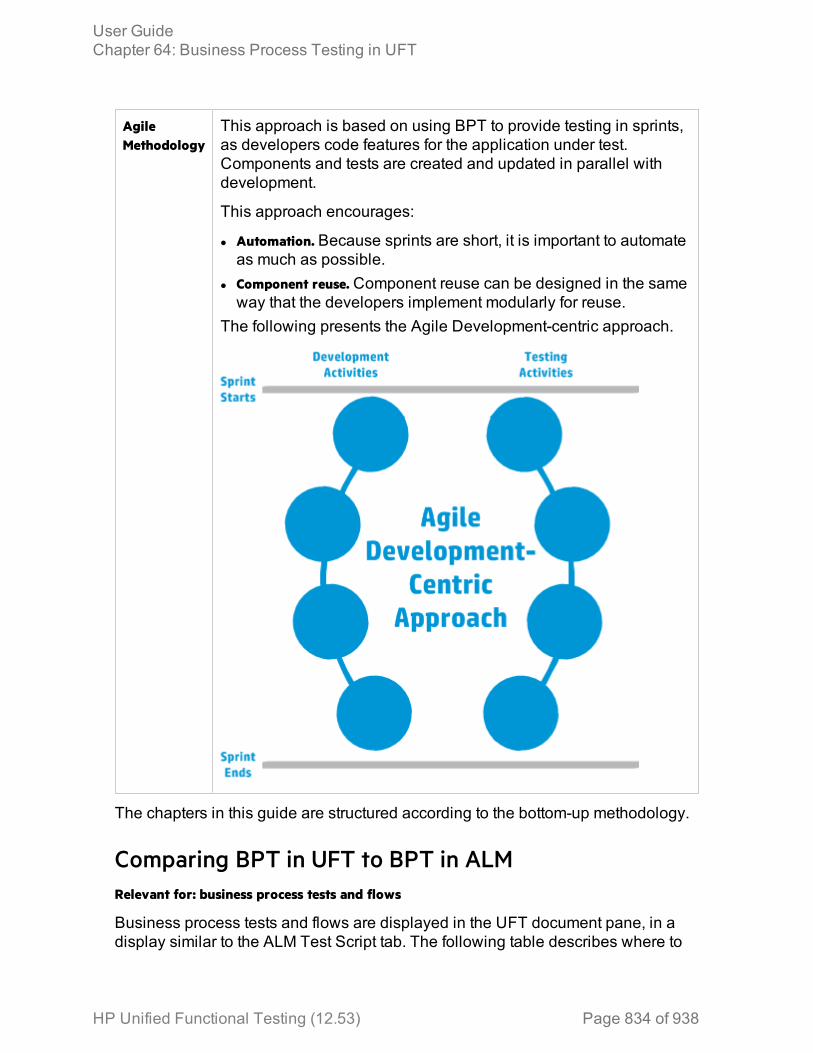
AgileMethodology
This approach is based on using BPT to provide testing in sprints,as developers code features for the application under test.Components and tests are created and updated in parallel withdevelopment.
This approach encourages:
l Automation. Because sprints are short, it is important to automateas much as possible.
l Component reuse. Component reuse can be designed in the sameway that the developers implement modularly for reuse.
The following presents the Agile Development-centric approach.
The chapters in this guide are structured according to the bottom-up methodology.
Comparing BPT in UFT to BPT in ALMRelevant for: business process tests and flows
Business process tests and flows are displayed in the UFT document pane, in adisplay similar to the ALM Test Script tab. The following table describes where to
User GuideChapter 64: Business Process Testing in UFT
HP Unified Functional Testing (12.53) Page 834 of 938
find the BPT functionality you are familiar with from working in ALM, when you areworking in UFT.
For details about using BPT in ALM, see the HP Business Process Testing User Guide.
Function ALM UFT
Create or open test orflow
Test Plan > New orDetails button
Open/New<Document>/<Resource>Dialog Box
Check in and check outtests and flows
Version Control userinterface
ALMmenu command
View test properties Test Plan > Test Detailsdialog box > Details tab
General Properties Tabin the Properties Pane
View, add, or modify testparameters
Test Plan > Parameterstab
Test Parameters Tab inthe Properties Pane
Add component or flowto test or flow
Test Plan > Test Scripttab > SelectComponents and Flowspane
Toolbox Pane
Reorder, group, or opencomponents or flows intests
View run conditions orfailure settings forcomponents or flows
Test Plan > Test Scripttab
BPT Test tab in thedocument pane
Edit run conditions forcomponents in flows
Test Plan > Test Scripttab > Run Conditionsbutton
Properties tab in theProperties pane
Edit failure settings forcomponents in flows
Test Plan > Test Scripttab > On Failure link ingrid
Properties tab in theProperties pane
Add or modifycomponent parameters
Business Components >Parameters tab
Parameters tab of theProperties pane
User GuideChapter 64: Business Process Testing in UFT
HP Unified Functional Testing (12.53) Page 835 of 938
Function ALM UFT
Link parameters Test Plan > I/OParameters link in grid >Link I/O column > SelectOutput Parameter dialogbox
Select Link Source dialogbox
Promote parameters Test Plan > Test Scripttab > SelectComponents and Flowspane > QuickAdd button> Add While SettingPromote Options
Parameters tab of theProperties pane
Data Pane
BPT Testing tab of theOptions dialog box
View and modify BPTcomments for a specificcomponent instance
Test Plan > Test Scripttab > Comments tab
Add and modifyiterations and iterationdata for components,flows, and groups
Test Plan > Test Scripttab > Iterations link ingrid
Data Pane
Run or debug test Test Plan > Test Scripttab > Run or Debug Testbutton
Run dialog box
Set up UFT for Business Process TestingRelevant for: business process tests and flows
Before you create business process tests and steps, you must set up UFT. Thisenables you to create your tests without having to stop frequently to troubleshootUFT program issues.
Prerequisitesl Have access to an ALM server with a Business Process Testing licensel Connect to ALMl Install a Unified Functional Testing license on the UFT machine
User GuideChapter 64: Business Process Testing in UFT
HP Unified Functional Testing (12.53) Page 836 of 938

Install and load the correct addins in UFT1. During the UFT installation, in the installation wizard, install the correct add-ins
in the Custom Setup screen. For details on the installation process, see theHP Unified Functional Testing Installation Guide.
2. When starting UFT, load the correct add-ins in the Add-in Manager:
After you load the add-in, UFT can communicate and recognize objects in yourapplication.
User GuideChapter 64: Business Process Testing in UFT
HP Unified Functional Testing (12.53) Page 837 of 938
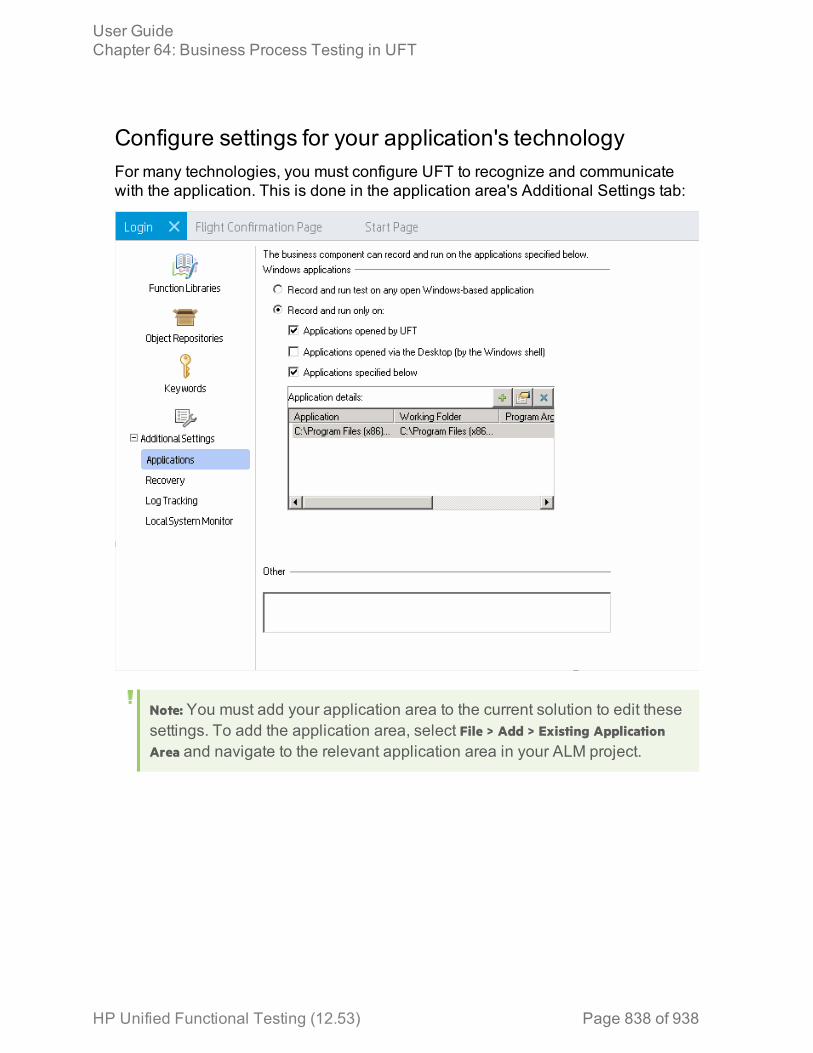
Configure settings for your application's technologyFor many technologies, you must configure UFT to recognize and communicatewith the application. This is done in the application area's Additional Settings tab:
Note: You must add your application area to the current solution to edit thesesettings. To add the application area, select File > Add > Existing ApplicationArea and navigate to the relevant application area in your ALM project.
User GuideChapter 64: Business Process Testing in UFT
HP Unified Functional Testing (12.53) Page 838 of 938

Select a test creation methodologyWhen creating a business process test, you have the option of creating your test indifferent ways:
Component-centered (orbottom-up)
Using this methodology, you first create individual components foreach area or page of your application, including test steps insideeach of the components. Then, in the business process test, youinsert the components in the desired order, grouping thecomponents as needed and running inidividual components formultiple iterations.
This approach enables you to reuse components in multiple tests.This approach, however, does not approach the test creation as anend-to-end scenario when planning the test. Instead, creating end-to-end tests of the business processes of your application mayrequired additional planning.
Test flow-centered (ortop-down)
Using this methodology, you create a high-level test flow, and thenseparate the test into components as needed. You can divide thetest steps into multiple components as you create the test.
This approach enables you to see the overall user or businessprocess flow when designing the test. As a result, you can ensurethat you create an end-to-end test flow of your application. Thisapproach, however, may make the reuse of components moredifficult.
Create and maintain business process tests and flows inUFTRelevant for: business process tests and flows
This task describes the high-level steps on how to create, maintain, and runbusiness process tests and flows in UFT.
Prerequisitesl Load the necessary add-ins in the Add-in Manager on UFT startup.l Connect to an ALM server and project.
User GuideChapter 64: Business Process Testing in UFT
HP Unified Functional Testing (12.53) Page 839 of 938
Create application areas for each area of your applicationBefore creating tests and their components, create application areas for each areaof your application. The application area contains the object repositories with thetest objects, function libraries, and specific settings to use for the component.
1. Do one of the following:
l In the toolbar, click the New button down arrow and select NewApplication Area.
l In the BPT View, click the Add a New Application Area button.2. In the New Application Area dialog box, navigate to the directory in your ALM
project in which you want to save the application area and provide a name forthe application area.
3. Click Create. UFT adds the application area to your ALM project and opens theapplication area in the document pane.
Create componentsComponents make up the building blocks of a business process test. Therefore,before creating the business process tests, you must create the individualcomponents.
Note: If you are recording the steps in your test, you do not need to createcomponents before beginning to record. For details on how to addcomponents to the test by recording, see "Add components to businessprocess tests and flows" below.
1. In the toolbar, click the New button down arrow and select NewBusiness Component.
2. In the New Business Component dialog box, select the type ofcomponent: Keyword GUI or Scripted GUI.
3. In the New Business Component dialog box, provide a Name and Location forthe new component.
4. In the Application Area field, click the Browse button and navigate to anapplication area to use with your component.
5. Click Create. UFT opens the new component in the document pane.
Add components to business process tests and flowsYour business process test consists of components, groups of components, orbusiness process flows. In order to run a business process test, you must build the
User GuideChapter 64: Business Process Testing in UFT
HP Unified Functional Testing (12.53) Page 840 of 938
test with its components.
From theToolboxpane
1. Open the Toolbox pane.2. Under the Components tree, expand the nodes and navigate to the
component or flow you want to add.3. Double-click or drag and drop the component to the test grid or
canvas.4. Order the items in your test or flow as needed by dragging and
dropping the individual components or using the arrow buttons
in the BPT toolbar.
Whilerecording 1. In the toolbar, click the Record button .
2. In the New Business Component dialog box, specify a Name,Location, and default Application Area for the test.
3. Record user actions on your application.4. As your record, in the Record toolbar, click the New Business
Component button .5. In the New Business Component dialog box, specify the name of
the new component. Components added during recording aresaved in the same location specified in the beginning of therecording session.
6. When you are finished recording, click the Stop button . UFTadds all the recording components to the test with the recordingsteps (from the steps you performed on your application).
Add steps to your componentFor details, see "Create test steps in a business process test" on page 863.
Group components and flowsIn the document pane (grid view or canvas view), select the components or flows
you want to group, and in the toolbar, click Group .
Note: When iterating groups, all items to be included in the group must havethe same number of iterations, or an error message is displayed when yougroup the items.
User GuideChapter 64: Business Process Testing in UFT
HP Unified Functional Testing (12.53) Page 841 of 938
Use parameters in your testFor details, see "Use data in a business process test" on page 877
Default values for component or flow parameters are used during the run session, ifno other value is supplied.
Iterate components and flowsBy default, each component or flow you add to your test has a single iteration. Ifyou need to run specific components multiple times, you can add iterations forthese components and specify different values for the component parameters ineach iteration.
For details on defining iterations and parameter values for the iterations, see "Additerations for a component or flow" on page 880 and "Set data values for theparameters for each iteration" on page 880.
Add a test configurationYou can add test configurations to your test to enable you to run the test withvarying sets of data. For details, see "Set up and run test configurations" on page800.
Debug and run your test
To debuga test orcomponent
Insert breakpoints in specific components or flows in your test, andthen run your test. The run session stops at each breakpoint.
If you run a BPT test from the ALM Test Plan module or from UFT,UFT stops the test at all breakpoints in both Debug and Normalmodes. However, before running the BPT test, you must open thebusiness components with the breakpoints and add them to thesolution in UFT.
To runyour test:
In the toolbar, click the Run button .
l Before running a test from ALM, you must enable the Allow otherHP products to run tests and components option in the Test Runs pane(Tools > Options > GUI Testing tab > Test Runs node)
l For improved performance when running business process testsor flows, UFT creates and runs a hosting test, named Test Runtime.The Test Runtime test is recreated each time the test or flow runs,and is not saved with the run.
User GuideChapter 64: Business Process Testing in UFT
HP Unified Functional Testing (12.53) Page 842 of 938

View the run resultsAfter the business process test run is complete, by default, the run results open.You can choose to display them in the Run Results Viewer or as an HTML-basedreport:
1. In the Run Sessions pane of the Options dialog box (Tools > Options > Generaltab > Run Sessions node), select the report format you want: HTML Report or RunResults Viewer Report.
2. Run your test.The results are displayed in the document pane (for a HTML report) or in the RunResults Viewer.
Note: You can view the report in HTML format only when your businessprocess test is stored in an ALM server running version 12.50.
Business Process Testing in UFT - End-to-end scenarioRelevant for: business process tests and flows
When you plan to use Business Process Testing in UFT to test your application,there are a number of stages, from planning to the test run. This use-case scenariowill show the end-to-end process of using Business Process Testing in UFT to testa real application.
For the purposes of this use-case-scenario, the application being tested is the UFTsample flight reservation application (Start > All Programs > HP Software > HP UnifiedFunctional Testing > Sample Applications > Flight GUI).
User GuideChapter 64: Business Process Testing in UFT
HP Unified Functional Testing (12.53) Page 843 of 938
1. Analyze your application
Determinethetechnologiesused in yourapplications.
This is important as you must load the appropriate add-ins inUFT to test your application's technologies. Depending onwhat technologies your application uses, UFT loads thenecessary tools that enable UFT to communicate with andrecognize objects in your application.For the flight reservation application, the application is basedon Windows Presentation Foundation (WPF) technologies, soyou must load the WPF Add-in in UFT.
Determinethefunctionalitythat youwant to test.
Before you begin, you must consider how a user uses theapplication. Once you do this, you can determine how whatresources you need and what components you need to createfor the different part of your applications.For the flight reservation application, you have a multipleareas of the application, with a number of user actions:a. Login window: The user logins into the flight reservation
applicationb. Flight search window: The user searches for available flights
or booked flights, including:o Find a flight based on departure and arrival cities anddeparture date
o Find a flight based on the seating class of the passengero Search for booked flights by customer name, flightnumber, or flight date
c. Flight selection window: Select a flight from the availableflights
d. Flight confirmation and booking window: Confirm the selectedflight and entering the customer details, including:o Entering the customer's nameo Entering the exact number of tickets neededo Booking the flighto Waiting for confirmation of the order from the applicationo Restarting the reservation process
User GuideChapter 64: Business Process Testing in UFT
HP Unified Functional Testing (12.53) Page 844 of 938
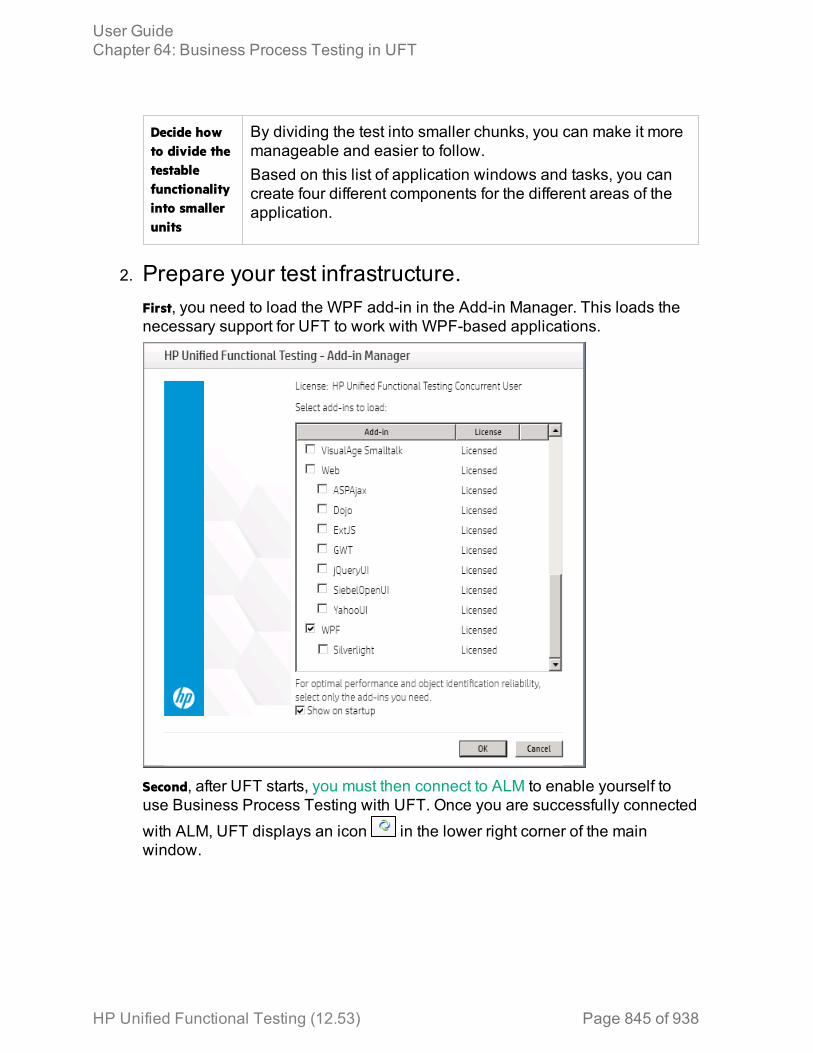
Decide howto divide thetestablefunctionalityinto smallerunits
By dividing the test into smaller chunks, you can make it moremanageable and easier to follow.Based on this list of application windows and tasks, you cancreate four different components for the different areas of theapplication.
2. Prepare your test infrastructure.First, you need to load the WPF add-in in the Add-in Manager. This loads thenecessary support for UFT to work with WPF-based applications.
Second, after UFT starts, you must then connect to ALM to enable yourself touse Business Process Testing with UFT. Once you are successfully connectedwith ALM, UFT displays an icon in the lower right corner of the mainwindow.
User GuideChapter 64: Business Process Testing in UFT
HP Unified Functional Testing (12.53) Page 845 of 938
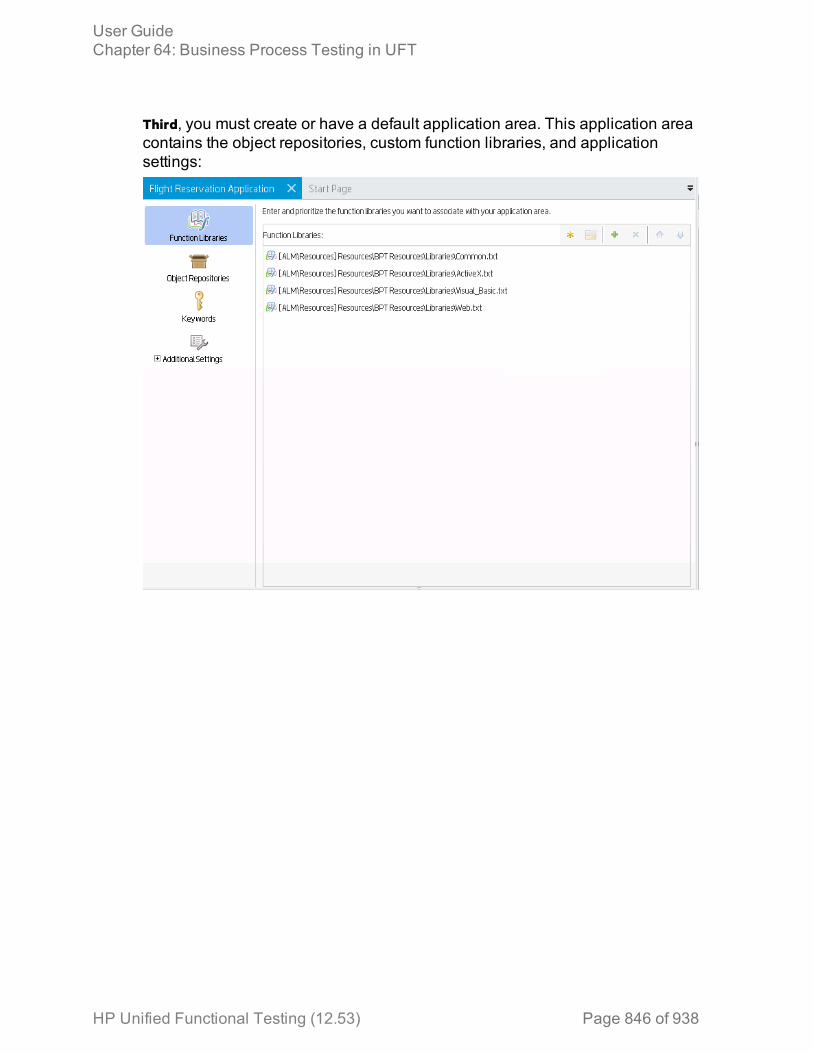
Third, you must create or have a default application area. This application areacontains the object repositories, custom function libraries, and applicationsettings:
User GuideChapter 64: Business Process Testing in UFT
HP Unified Functional Testing (12.53) Page 846 of 938
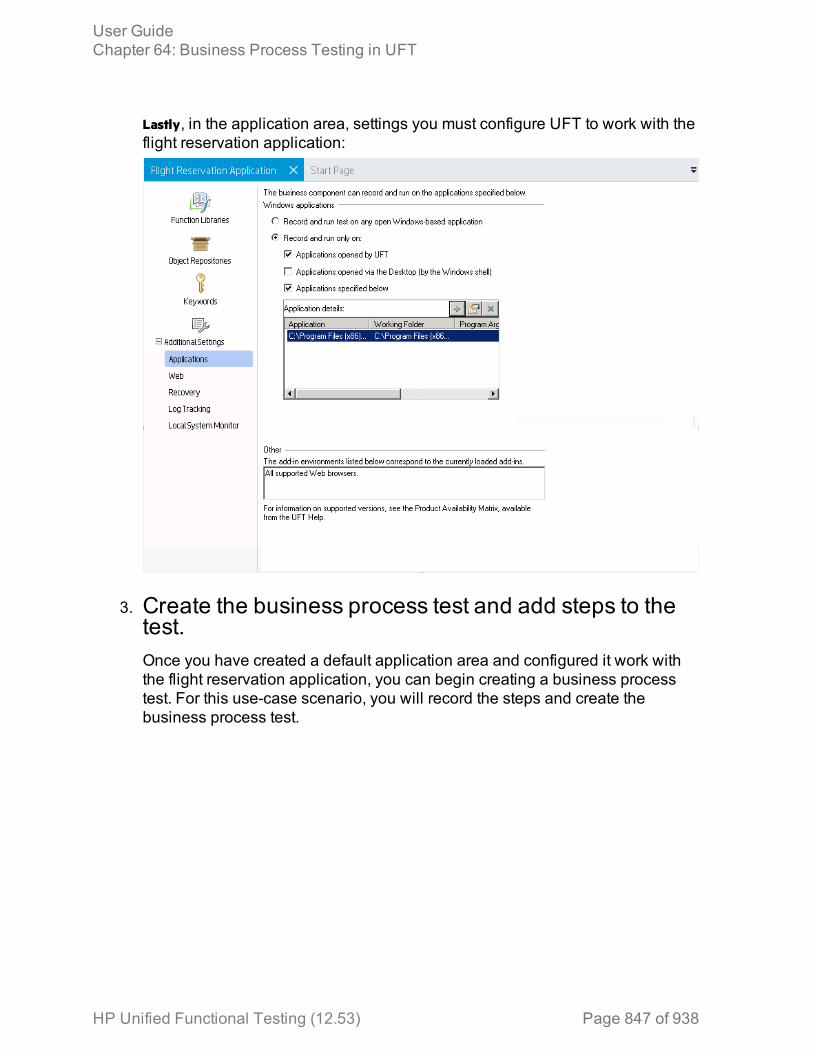
Lastly, in the application area, settings you must configure UFT to work with theflight reservation application:
3. Create the business process test and add steps to thetest.Once you have created a default application area and configured it work withthe flight reservation application, you can begin creating a business processtest. For this use-case scenario, you will record the steps and create thebusiness process test.
User GuideChapter 64: Business Process Testing in UFT
HP Unified Functional Testing (12.53) Page 847 of 938
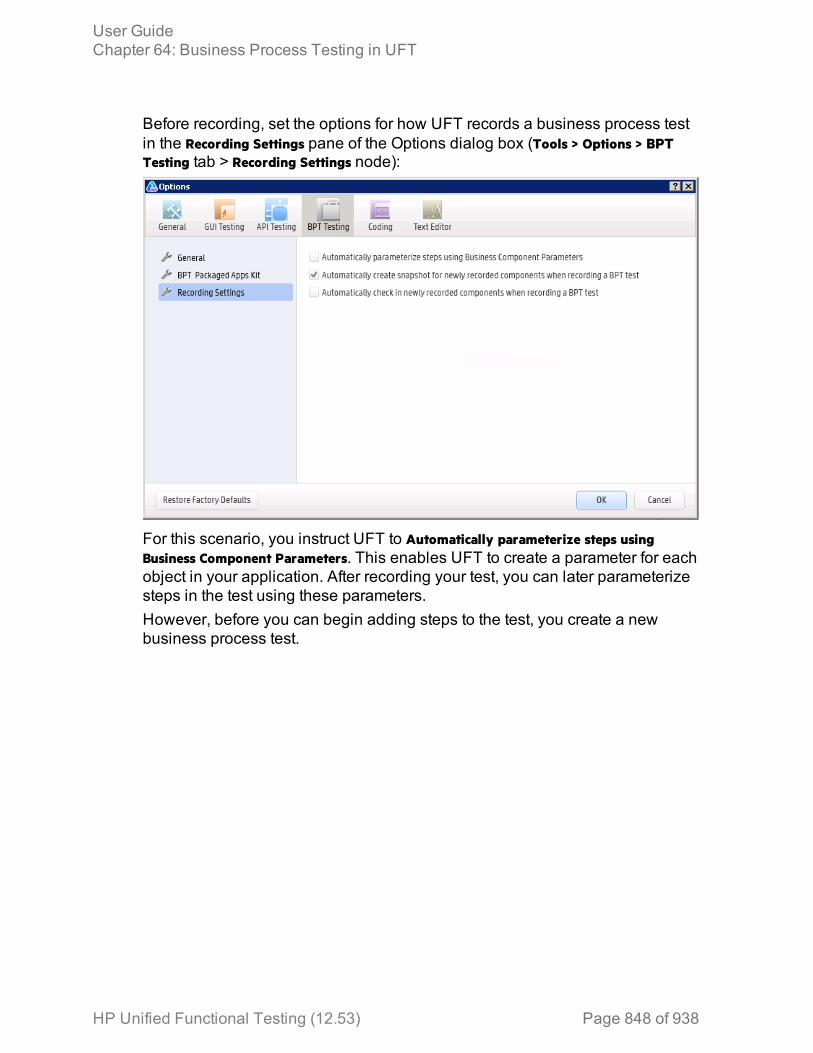
Before recording, set the options for how UFT records a business process testin the Recording Settings pane of the Options dialog box (Tools > Options > BPTTesting tab > Recording Settings node):
For this scenario, you instruct UFT to Automatically parameterize steps usingBusiness Component Parameters. This enables UFT to create a parameter for eachobject in your application. After recording your test, you can later parameterizesteps in the test using these parameters.However, before you can begin adding steps to the test, you create a newbusiness process test.
User GuideChapter 64: Business Process Testing in UFT
HP Unified Functional Testing (12.53) Page 848 of 938

After the test is created, then press the Record button in the toolbar to startcreating the test. UFT prompts you to create a business component. Whenspecifying the settings for the component, select the application area createdpreviously:
User GuideChapter 64: Business Process Testing in UFT
HP Unified Functional Testing (12.53) Page 849 of 938
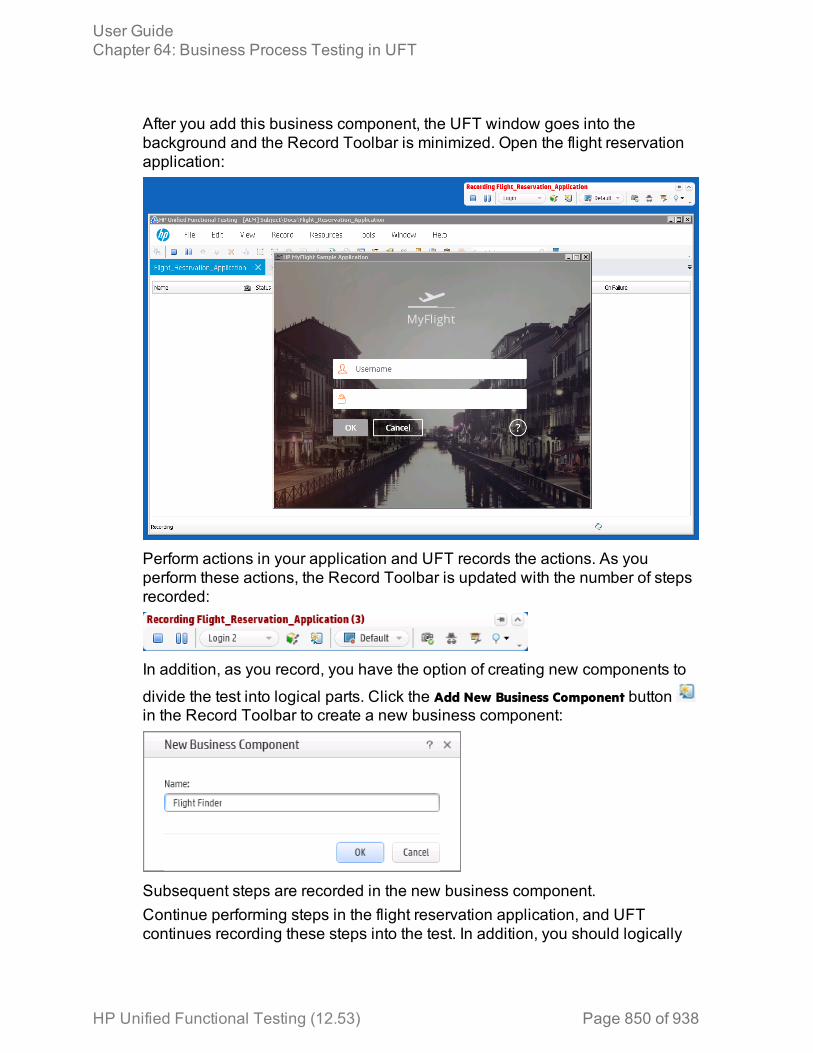
After you add this business component, the UFT window goes into thebackground and the Record Toolbar is minimized. Open the flight reservationapplication:
Perform actions in your application and UFT records the actions. As youperform these actions, the Record Toolbar is updated with the number of stepsrecorded:
In addition, as you record, you have the option of creating new components to
divide the test into logical parts. Click the Add New Business Component buttonin the Record Toolbar to create a new business component:
Subsequent steps are recorded in the new business component.Continue performing steps in the flight reservation application, and UFTcontinues recording these steps into the test. In addition, you should logically
User GuideChapter 64: Business Process Testing in UFT
HP Unified Functional Testing (12.53) Page 850 of 938
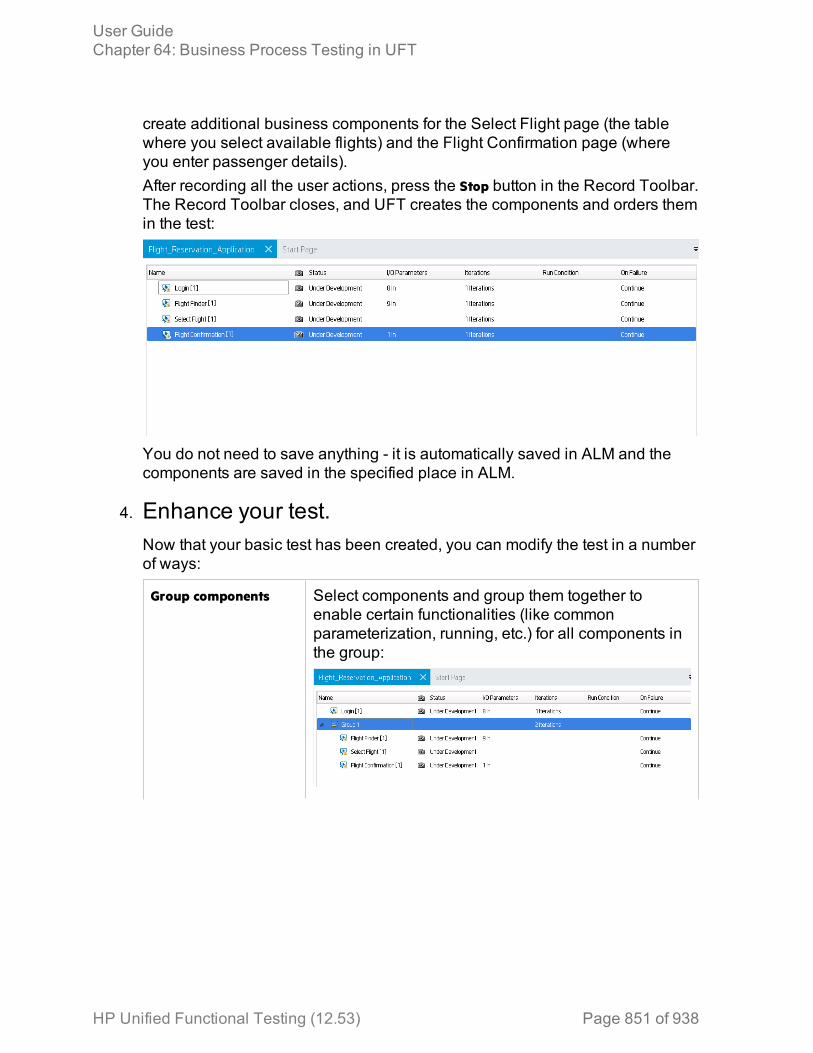
create additional business components for the Select Flight page (the tablewhere you select available flights) and the Flight Confirmation page (whereyou enter passenger details).After recording all the user actions, press the Stop button in the Record Toolbar.The Record Toolbar closes, and UFT creates the components and orders themin the test:
You do not need to save anything - it is automatically saved in ALM and thecomponents are saved in the specified place in ALM.
4. Enhance your test.Now that your basic test has been created, you can modify the test in a numberof ways:
Group components Select components and group them together toenable certain functionalities (like commonparameterization, running, etc.) for all components inthe group:
User GuideChapter 64: Business Process Testing in UFT
HP Unified Functional Testing (12.53) Page 851 of 938
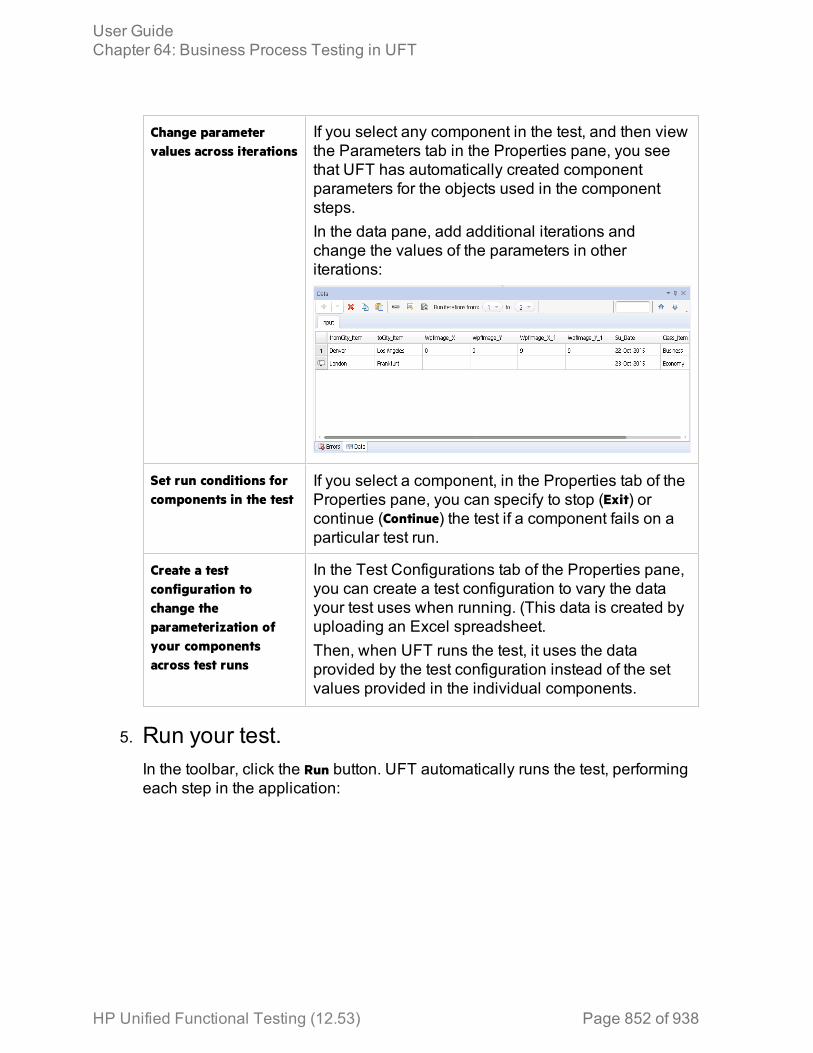
Change parametervalues across iterations
If you select any component in the test, and then viewthe Parameters tab in the Properties pane, you seethat UFT has automatically created componentparameters for the objects used in the componentsteps.In the data pane, add additional iterations andchange the values of the parameters in otheriterations:
Set run conditions forcomponents in the test
If you select a component, in the Properties tab of theProperties pane, you can specify to stop (Exit) orcontinue (Continue) the test if a component fails on aparticular test run.
Create a testconfiguration tochange theparameterization ofyour componentsacross test runs
In the Test Configurations tab of the Properties pane,you can create a test configuration to vary the datayour test uses when running. (This data is created byuploading an Excel spreadsheet.Then, when UFT runs the test, it uses the dataprovided by the test configuration instead of the setvalues provided in the individual components.
5. Run your test.In the toolbar, click the Run button. UFT automatically runs the test, performingeach step in the application:
User GuideChapter 64: Business Process Testing in UFT
HP Unified Functional Testing (12.53) Page 852 of 938
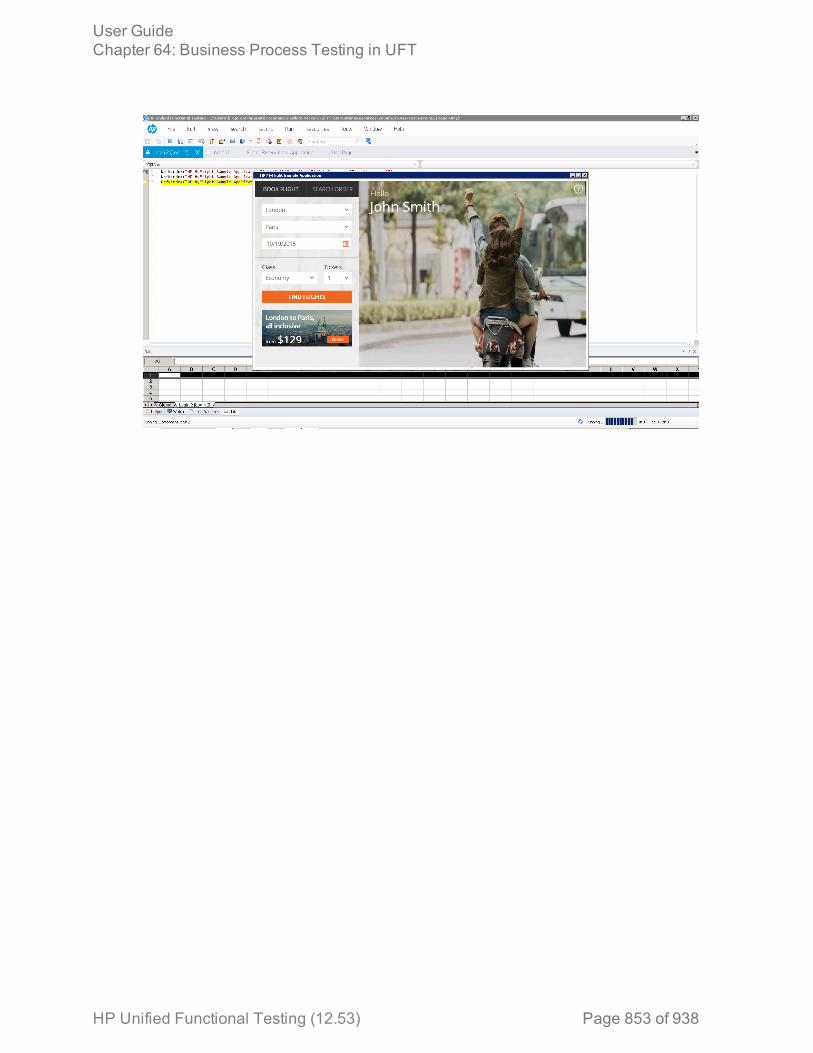
User GuideChapter 64: Business Process Testing in UFT
HP Unified Functional Testing (12.53) Page 853 of 938
Chapter 65: Business Components andApplication AreasRelevant for: GUI components only
Note: Unless otherwise specified, references to Application LifecycleManagement or ALM apply to all currently supported versions of ALM andQuality Center. Note that some features and options may not be supported inthe specific edition of ALM or Quality Center that you are using.
When building a business process test, your test consists of business components.Inside of each business component is an application area that contains thenecessary resources to run the component.
What are business components?Business components provide the basis for BPT and are incorporated intobusiness process tests and flows.
A business component is a reusable unit that:
l Performs a specific task in a business processl Describes the condition or state of the application before and after that taskYou can use one or more of the following methods to categorize components:
LogicalComponents
A logical component represents the use of a part of the screen withone or more controls, or a set of API calls which combine to performsome application logic. This category is based on a specific contextin the application under text.
Example:l A Login component represents the login process, based ona login window that allows you to enter a user name andpassword, and then click a Login button.
l A Search component represents search for an entity in theapplication under test. You can enter a string for which tosearch, indicate capitalization and/or whole word options,and click a Search button.
HP Unified Functional Testing (12.53) Page 854 of 938
ApplicationObjectComponents
An application object component might represent an object on thescreen or a call to a single API.
This category is usually independent of the context within theapplication under test, and can be used in many situations. Youdecide the level of granularity that most encourages reuse.
Example:
l A Button component represents the button object.l A Grid component represents a grid object in a pane orwindow.
l A Pane component represents a pane in a window orscreen.
l An Interrogate component represents the interrogation ofthe application under test's backend database.
GenericComponents
A generic component performs actions outside of the context of theapplication under test. It can be reused in tests of differentapplications.
Example: A Launch component represents the launching of abrowser.
When you create a component, you can select one of the following types:
KeywordGUIcomponents
In the Keyword View, keyword components are divided into steps ina modular, keyword-driven, table format. Each step is a row thatcomprises individual parts that you can easily modify. You createand modify steps selecting items and operations and enteringadditional information, as required.
Each step in a keyword component is automatically documented asyou complete it. This enables you to view a description of the stepin understandable sentences. In addition, if you added a functionlibrary to the application area associated with the keywordcomponent, when you define a step by selecting a user-definedoperation (function), the documentation that you added in thefunction library is displayed for the step.
User GuideChapter 65: Business Components and Application Areas
HP Unified Functional Testing (12.53) Page 855 of 938
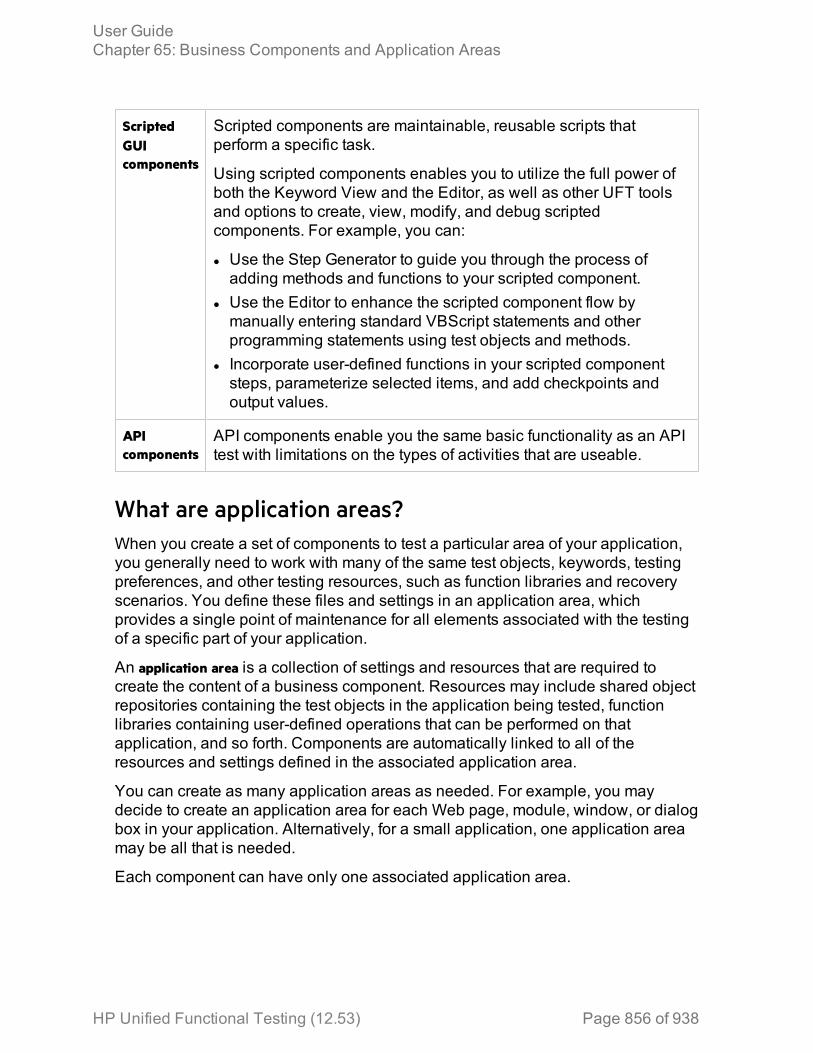
ScriptedGUIcomponents
Scripted components are maintainable, reusable scripts thatperform a specific task.
Using scripted components enables you to utilize the full power ofboth the Keyword View and the Editor, as well as other UFT toolsand options to create, view, modify, and debug scriptedcomponents. For example, you can:
l Use the Step Generator to guide you through the process ofadding methods and functions to your scripted component.
l Use the Editor to enhance the scripted component flow bymanually entering standard VBScript statements and otherprogramming statements using test objects and methods.
l Incorporate user-defined functions in your scripted componentsteps, parameterize selected items, and add checkpoints andoutput values.
APIcomponents
API components enable you the same basic functionality as an APItest with limitations on the types of activities that are useable.
What are application areas?When you create a set of components to test a particular area of your application,you generally need to work with many of the same test objects, keywords, testingpreferences, and other testing resources, such as function libraries and recoveryscenarios. You define these files and settings in an application area, whichprovides a single point of maintenance for all elements associated with the testingof a specific part of your application.
An application area is a collection of settings and resources that are required tocreate the content of a business component. Resources may include shared objectrepositories containing the test objects in the application being tested, functionlibraries containing user-defined operations that can be performed on thatapplication, and so forth. Components are automatically linked to all of theresources and settings defined in the associated application area.
You can create as many application areas as needed. For example, you maydecide to create an application area for each Web page, module, window, or dialogbox in your application. Alternatively, for a small application, one application areamay be all that is needed.
Each component can have only one associated application area.
User GuideChapter 65: Business Components and Application Areas
HP Unified Functional Testing (12.53) Page 856 of 938
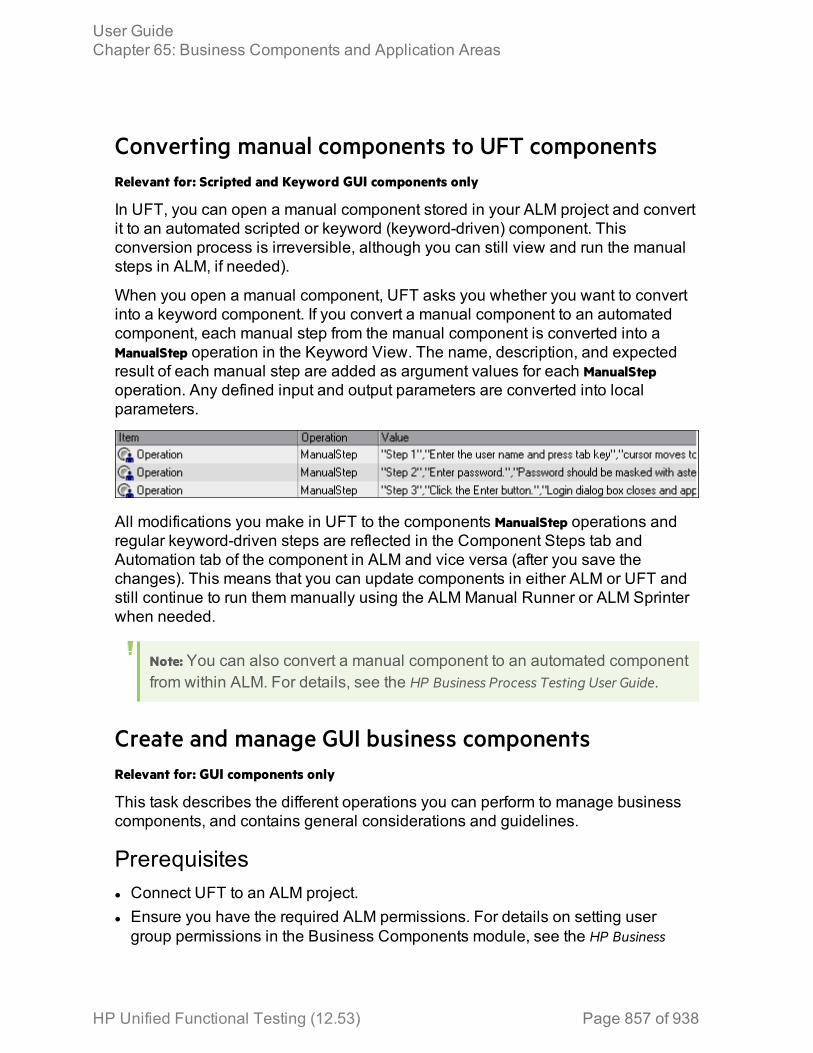
Converting manual components to UFT componentsRelevant for: Scripted and Keyword GUI components only
In UFT, you can open a manual component stored in your ALM project and convertit to an automated scripted or keyword (keyword-driven) component. Thisconversion process is irreversible, although you can still view and run the manualsteps in ALM, if needed).
When you open a manual component, UFT asks you whether you want to convertinto a keyword component. If you convert a manual component to an automatedcomponent, each manual step from the manual component is converted into aManualStep operation in the Keyword View. The name, description, and expectedresult of each manual step are added as argument values for each ManualStepoperation. Any defined input and output parameters are converted into localparameters.
All modifications you make in UFT to the components ManualStep operations andregular keyword-driven steps are reflected in the Component Steps tab andAutomation tab of the component in ALM and vice versa (after you save thechanges). This means that you can update components in either ALM or UFT andstill continue to run them manually using the ALMManual Runner or ALM Sprinterwhen needed.
Note: You can also convert a manual component to an automated componentfrom within ALM. For details, see the HP Business Process Testing User Guide.
Create and manage GUI business componentsRelevant for: GUI components only
This task describes the different operations you can perform to manage businesscomponents, and contains general considerations and guidelines.
Prerequisitesl Connect UFT to an ALM project.l Ensure you have the required ALM permissions. For details on setting usergroup permissions in the Business Components module, see the HP Business
User GuideChapter 65: Business Components and Application Areas
HP Unified Functional Testing (12.53) Page 857 of 938

Process Testing User Guide and the HP Application Lifecycle Management AdministratorGuide.
Update a component from an earlier QuickTest versionTo modify a component last modified using QuickTest 9.5 or earlier, you mustupgrade the component to the QuickTest 11.00 format using the QuickTest AssetUpgrade Tool for ALM (found on your QuickTest 11.00 installation DVD).
After upgrading the version of the component, open the upgraded component inUFT. Before it is upgraded, though, you can view it in read-only format, and youcan run it.
All components last modified in versions of QuickTest later than 9.5 can be openedin UFT without conversion.
Create a new business component1. Select one of the following:
l File > New > Business Component
l File > Add > New Business Component
l File > Add > Business Component from Sprinter Automated Test Data File
In the New Business Component Dialog Box, select a folder in the BusinessComponents module in ALM in which to store your component and give yourcomponent a name.
2. In the Application Area field , click the Browse button to select a suitableapplication area from within the ALM Test Resources module. After choosing yourapplication area, click OK.
3. If you are creating a business component from a Sprinter automated test datafile, specify the location (on the file system) of the test data file.
4. A new business components opens in the Keyword View (for keywordcomponents) or in the Editor (for scripted components).Although the component does not yet contain content, it does contain all of therequired settings and resources that were defined in the application area onwhich it is based. You can view these settings in read-only format by choosingFile > Settings. If you later need to change these settings, you can do so in theassociated application area.
Convert a manual component to an automated component
Caution: Converting manual components cannot be undone.
User GuideChapter 65: Business Components and Application Areas
HP Unified Functional Testing (12.53) Page 858 of 938
1. Do one of the following:l Select File > Open > Business Component. In the Open Dialog box, select amanual component. Manual components are represented by a componenticon with an M in the left corner of t
l Add a manual component to a business process test. In the test grid orcanvas, select Automate Component > Scripted/Keyword GUI.
2. UFT asks whether you want to convert the manual component to a keywordcomponent.
3. Click Yes to continue with the conversion (cannot be undone).4. In the New dialog box, select an application area for your component and click
OK. As UFT downloads, opens, and converts the component, the operations itperforms are displayed in the status bar.Each manual step from the manual component is converted into a ManualStepoperation in the Keyword view. You can now work with the component like anyother component.
Note: If the application area you select does not yet contain all of therequired resources and settings, you can still add steps using theManualStep function or the Comment option. This enables you to type inmanual steps as you would in ALM or in another application, such asMicrosoft Excel or Microsoft Word.
Convert the keyword GUI component to a scripted GUIcomponent1. Open the keyword component you want to convert.2. Select File > Convert to Scripted Component. When prompted, click OK to proceed
with the conversion.
Associate a different application area with your componentDo one of the following:
l Select File > Change Application Area.l Right-click on a component node and select Change Application Area.In the Change Application Area Dialog Box, you select a different application areaand click OK to change the application area associated with a component.
User GuideChapter 65: Business Components and Application Areas
HP Unified Functional Testing (12.53) Page 859 of 938
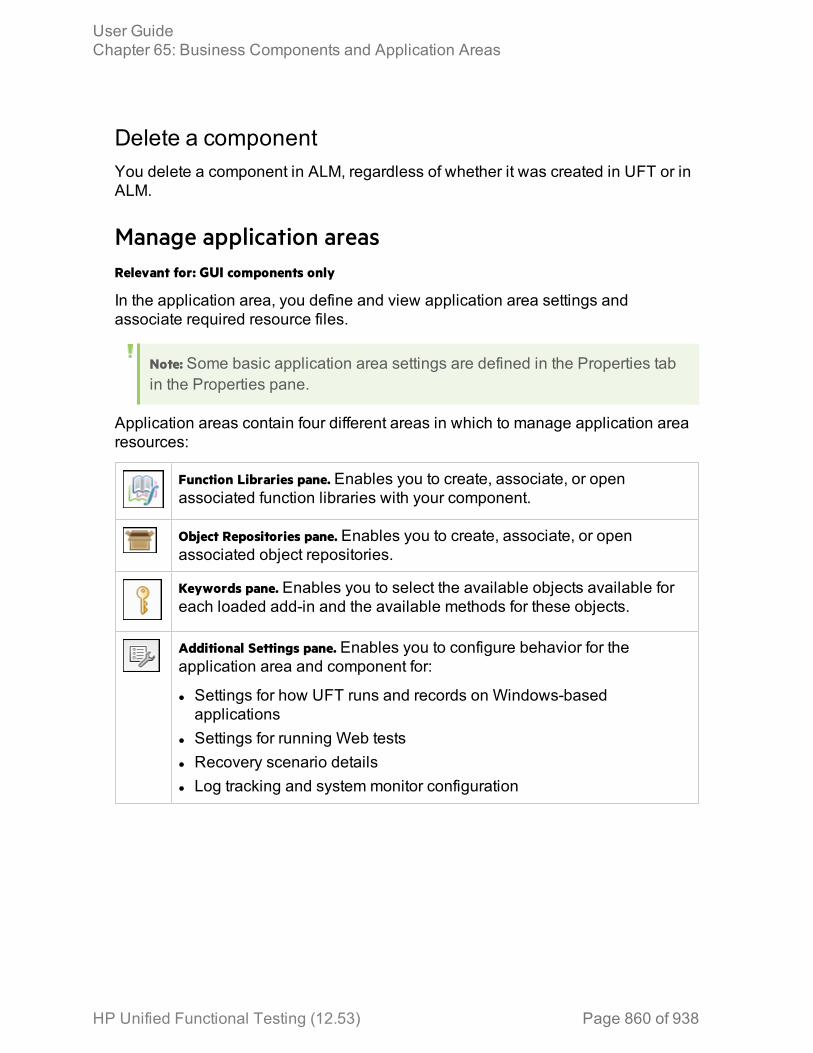
Delete a componentYou delete a component in ALM, regardless of whether it was created in UFT or inALM.
Manage application areasRelevant for: GUI components only
In the application area, you define and view application area settings andassociate required resource files.
Note: Some basic application area settings are defined in the Properties tabin the Properties pane.
Application areas contain four different areas in which to manage application arearesources:
Function Libraries pane. Enables you to create, associate, or openassociated function libraries with your component.
Object Repositories pane. Enables you to create, associate, or openassociated object repositories.
Keywords pane. Enables you to select the available objects available foreach loaded add-in and the available methods for these objects.
Additional Settings pane. Enables you to configure behavior for theapplication area and component for:
l Settings for how UFT runs and records on Windows-basedapplications
l Settings for running Web testsl Recovery scenario detailsl Log tracking and system monitor configuration
User GuideChapter 65: Business Components and Application Areas
HP Unified Functional Testing (12.53) Page 860 of 938
Known Issues- Business Components and ApplicationAreasRelevant for: GUI components only
This section describes troubleshooting and limitations for business components.
l Names and paths of components, application areas, and resources (for example,function libraries, object repositories, and recovery scenarios) are not Unicodecompliant and therefore should be specified either in English or in the languageof the operating system.
l Business component scripts that were created in QTP 11.00, and contain theActionName environment variable, return different values for the ActionNamevariable value when run in UFT.For example, an ActionName variable that returned the BC1 value as thecomponent name in QTP 11 returns the BC1[BC1] value in UFT.Workaround: Update your scripts as needed to use the new environment variablevalue.
l You can work with API components in much the same way as API tests, withsome limitations:l You cannot use Load Test activities in a component. If you save a load-enabled test as a business component, it will no longer be load-enabled.
l You cannot use Automated Testing Tool activities in a component.l Encoded password type properties are not supported. If the component has aproperty of type password (or encrypted in ALM 11.00 and later), the value willbe treated as an ordinary string, without encoding or decoding.
l Multiple User Variable profiles are not supported. Remove all but one of theprofiles.
HP Unified Functional Testing (12.53) Page 861 of 938

Chapter 66: Creating Business Process TestStepsRelevant for: business process tests
After you create the structure of your business process test or flow, you must thenadd test steps inside each component. These test steps perform user actions onyour application and actually test your application.
In order to create test steps, you must do a number of things:
Createobjectrepositories
To create test steps, you must have test objects. These test objectsare saved in object repositories which are then associated with thecomponent (if you record the test steps) or the component'sapplication area.
Add test objects to an object repository:
l In a component's local object repository: Using the Capture toolbar,scan all the objects in your application or in a specified area ofyour application. UFT saves these objects to the component'slocal object repository and the test objects are available for usein the associated component.For details on how to capture test objects from your application,see "Add test objects to a component with Capture" on page 867.
l In a shared object repository: In the Object Repository Manager,learn the objects in your application. Then, the shared objectrepositories is associated with one or more application areas.For more detail on creating shared object repositories, see "TestObjects in Object Repositories" on page 206.
Add objectrepositoriesto yourapplicationareas
In order for the individual components to access the test objects,the object repositories containing the objects must be included inan application area. Once you associate the object repository witha application area and the application area with a component, youcan see the test objects in the Toolbox pane and use the objects intest steps.
For details on how to associate an object repository with yourapplication area, see "Add object repositories to an applicationarea" on page 864.
HP Unified Functional Testing (12.53) Page 862 of 938
Add teststeps to thecomponent
After you have the test objects available to use in your component'ssteps, you can add the test steps to the component:
l By recording: You can use UFT's recording functionality to recorduser actions on the application. UFT then turns these actions intotest steps, including the test object on which the action wasperformed, the action (method), and any parameters of the action(such as the location on the screen where the action wasperformed).
l Manually: You can manually add test objects to the component bydragging them from the Toolbox pane, selecting them from thelist of available objects in the Keyword View, or addingstatements in the Editor.
Enhanceyourcomponent'stest steps
In addition to adding simple test steps that you perform on yourapplication's objects, you can add additional types of steps thatextend the test:
l Checkpoints: Checkpoint steps check the state of your applicationor its objects in the course of the test run. For additional detailson checkpoints, see "Checkpoints in GUI Testing" on page 262.
l Functions: Function steps enable you to run a custom processwithin the test progress. For additional details on functions, see"User-Defined Functions" on page 575.
l Output values: Output values enable you to output a property froma test object in order to use this value in other steps. Foradditional details on output values, see "Output Values in GUITesting" on page 322.
For task details on how to add steps to your business process test, see "Create teststeps in a business process test" below.
Create test steps in a business process testRelevant for: business process tests or business process flows
This task describes create steps in the components included in your businessprocess test or business process flow.
Note: This task is part of a higher-level task. For details, see "Create andmaintain business process tests and flows in UFT" on page 839.
User GuideChapter 66: Creating Business Process Test Steps
HP Unified Functional Testing (12.53) Page 863 of 938
Prerequisitesl If you are recording the steps in your components: Create a business process test orbusiness process flow
l If you are manually creating the steps in your component: Create or open a businessprocess test or business process flows and add components to the test or flow.
Create shared object repositoriesIn order to create steps of objects in your application, you must create test objectsin UFT to use in the test steps and store these objects in an object repository.
For details on creating shared object repositories containing these test objects, see"Test Objects in Object Repositories" on page 206.
Add test objects using CaptureFor details, see "Add test objects to a component with Capture" on page 867.
Add object repositories to an application areaIn order to use the test objects you create in the actual components, they must beadded to the application area for the component. This enables the component toaccess any of the test objects contained in the object repository.
1. In the application area, select the Object Repositories tab.
2. In the object repositories list, click the Add button . A new row is added tothe list of object repositories.
3. In the new row, click the Browse button.4. In the Open Shared Object Repository dialog box, navigate to where you saved
the object repository in your ALM project.5. Click Open. The object repository is now added to the list of shared object
repositories for the application area and the component.You can also view the test object included in the object repository in theToolbox pane when the component is selected in the document pane.
Manually add steps to your componentDo the following:
Note: Before editing a specific component included in your business processtest or flow, you must add it to the solution. To add the component to the
User GuideChapter 66: Creating Business Process Test Steps
HP Unified Functional Testing (12.53) Page 864 of 938
solution, in the test grid view, right-click the necessary component and select
Go to component/flow or click the Go to component/flow button on thetoolbar.
1. Select the component tab in the document pane.2. In the component's tab, click in the Item column and from the dropdown list,
select the relevant object or select Object from repository.3. In the Operation column, select the necessary method (action) to perform on the
object.4. Add the necessary argument values to use when performing the method
(action) on the object. If you hover over the Value cell you can see adescription of the necessary arguments.
Add steps to your component by recordingFor details, see "Record a business process test" below
Record a business process testRelevant for: business process tests or flows
This task describes how to record a business process test. Recording enables youto create component steps or even a full business process test in your applicationwithout the need to manually create separate components and their associatedapplication areas before starting to create steps. When recording, you perform useractions, create additional components as necessary, and your full businessprocess test is automatically created.
Note: This task is part of a higher-level task. For details, see "Create teststeps in a business process test" on page 863.
PrerequisiteCreate a business process test or business process flow or open an emptybusiness process test/flow.
Note: You cannot record steps into an existing test.
User GuideChapter 66: Creating Business Process Test Steps
HP Unified Functional Testing (12.53) Page 865 of 938
Set recording options1. In the Recording Settings pane of the Options dialog box (Tools > Options > BPT
Testing tab > Recording Options node), select or clear the following settings asneeded:
Automatically parameterizesteps using BusinessComponent Parameters
Instruct UFT to create component parametersfor each operation recorded and link the stepvalues to these parameters.
Automatically check in newlyrecorded components whencreating a BPT test
If you are working with a version-controlledALM project, this instructs UFT to prompt you tocheck in all new components after recording.
Automatically create snapshotfor newly recordedcomponents when recording aBPT test
Instructs UFT to take a snapshot of theapplication window when recording a BPT test.
Set default parameter behaviorIn the General pane of the Options dialog box (Tools > Options > BPT Testing tab> General node, select one of the following options in the Auto-parameterization levelsection:
l Parameterize user input only: UFT will parameterize only those objects where auser performs an action (such as text edits, etc.)
l Parameterize all steps:UFT will parameterize all objects in a given window of anapplication
Start the test record1. Do one of the following:
l In the UFT toolbar, press the Record button .l In the BPT View, click the Record a New Business Process Test or Flow button.
2. In the New Business Component dialog box, provide the Name, Component, anddefault Application Area for your component.
3. Click Create. UFT is minimized and the Record toolbar is displayed.
Perform steps on your applicationPerform user actions on your application. As you perform the steps, UFT lists thenumber of user actions performed in the Record Toolbar next to the name of the
User GuideChapter 66: Creating Business Process Test Steps
HP Unified Functional Testing (12.53) Page 866 of 938
test being recorded.
Add additional components to the test (optional)
1. In the Record toolbar, click the New Business Component button .2. In the New Business Component dialog box, provide a name for the
component. (The component is saved in the same location you entered whenbeginning the recording session.)Subsequent steps are recorded in the created component.
Stop recording
1. In the Record Toolbar, press the Stop button . UFT loads and creates thecomponents, displaying them in the test canvas or grid.If you selected the option to automatically parameterize objects in the RecordingSettings pane of the Options dialog box, the parameters are displayed in theData pane and in the Parameters tab of the Properties pane.
2. If necessary, when prompted, in the Check In dialog box, check in the newcomponents to your version controlled ALM project.
Add test objects to a component with CaptureRelevant for: business process tests or flows
This task describes how to add test objects to a component by scanning theapplication and capturing the application's objects into an object repository. Thisenables you to add the test objects in one step without having to first create andpopulate an object repository and then associate that object repository to thecomponent's application area.
Note: This task is part of a higher-level task. For details, "Create test steps ina business process test" on page 863.
PrerequisitesAdd a business component to the solution and open it.
Set Capture optionsIn the BPT General options pane of the Options dialog (Tools > Options > BPT Testingtab > General node), select the Automatically open Object Repository after Captureoption if you want to edit the test object information after the object capture.
User GuideChapter 66: Creating Business Process Test Steps
HP Unified Functional Testing (12.53) Page 867 of 938
When the object repository opens after the application capture, you can modify theobject names and properties as needed to suit your needs.
Capture the test objects in the application1. In the Solution Explorer pane, select the component in which you want to
include the captured objects.2. In the toolbar, click the Capture button . The Capture toolbar opens.
3. (Optional) In the Capture toolbar, press the Define Object Filter button .4. (Optional) In the Define Object Filter dialog box, select the level of detail to
capture:
Selectedobjectonly
Captures the selected object's properties and values, without itsdescendant objects.
Defaultobjecttypes
Captures the selected objects' properties and values, with theproperties and values of its descendant objects according to theobject types specified by the default filter. You can see whichobjects are in the default filter by selecting Selected object types,clicking the Select button, and then clicking the Default button.
Allobjecttypes
Captures all of the application page or window's objects, includingthe object properties and values, together with the properties andvalues of all of its descendant objects.
Selectedobjecttypes
Adds to the object repository the previously selected object'sproperties and values, as well as the properties and values of itsdescendant objects according to the object types and classes youspecify in the object filter. You specify the objects and classes inthe filter by clicking the Select button and selecting the requireditems.
5. Select the top level object for which you want to capture its test objects (i.e. aBrowser window, or an application screen).
6. In the Capture toolbar, click the Capture button.The application flickers and the Adding Objects message box is displayed asUFT captures representations of the objects on the page to the local objectrepository.
7. Click the Close button.If you selected the option to automatically open the Object Repository after anapplication capture, the local object repository opens, displaying the captured
User GuideChapter 66: Creating Business Process Test Steps
HP Unified Functional Testing (12.53) Page 868 of 938
objects. These test objects are stored in the component's local objectrepository and are available to use in the component test steps.
Capture a selected area of the application1. In the Solution Explorer pane, select the component in which you want to
include the captured objects.2. In the toolbar, click the Capture button . The Capture toolbar opens.
3. (Optional) In the Capture toolbar, press the Define Object Filter button .4. (Optional) In the Define Object Filter dialog box, select the level of detail to
capture:
Selectedobjectonly
Captures the selected object's properties and values, without itsdescendant objects.
Defaultobjecttypes
Captures the selected objects' properties and values, with theproperties and values of its descendant objects according to theobject types specified by the default filter. You can see whichobjects are in the default filter by selecting Selected object types,clicking the Select button, and then clicking the Default button.
Allobjecttypes
Captures all of the application page or window's objects, includingthe object properties and values, together with the properties andvalues of all of its descendant objects.
Selectedobjecttypes
Adds to the object repository the previously selected object'sproperties and values, as well as the properties and values of itsdescendant objects according to the object types and classes youspecify in the object filter. You specify the objects and classes inthe filter by clicking the Select button and selecting the requireditems.
5. Select the top level object for which you want to capture its test objects (i.e. aBrowser window, or an application screen).
6. In the Capture toolbar, press the Capture Area button. The mouse pointer turnsinto a crosshairs.
7. In your application, draw a box around the area to capture.The application flickers and the Adding Objects message box is displayed asUFT captures representations of the objects on the page to the local objectrepository.
8. Click the Close button.
User GuideChapter 66: Creating Business Process Test Steps
HP Unified Functional Testing (12.53) Page 869 of 938
If you selected the option to automatically open the Object Repository after anapplication capture, the local object repository opens, displaying the capturedobjects. These test objects are stored in the component's local objectrepository and are available to use in the component test steps.
Open the object repository for editingIf you did not select the option to automatically open the object repository after theapplication capture, you can still edit the object repository after capturing theobjects.
1. In the Solution Explorer, expand the node of your component.2. Under the component node, double-click the Local node. The Object Repository
window opens.3. In the Object Repository, edit the names and properties of the objects as
needed.
Export the local object repositoryYou may sometimes want to export the captured objects in the local objectrepository to a shared object repository which can be used by other components.
1. In the Object Repository window, select File > Export Local Objects.2. In the Save dialog, select the location in which to save the exported object
repository. (This object repository is automatically saved as a shared objectrepository with a .tsr extension.)
3. Click Create. The local object repository is now saved as a shared objectrepository which can be added to other components and application areas.
User GuideChapter 66: Creating Business Process Test Steps
HP Unified Functional Testing (12.53) Page 870 of 938
Chapter 67: Using Data in Business ProcessTestingRelevant for: business process testing
You can affect the behavior and results of a business process test by usingparameters to define the values that components and flows receive and return. Thisprocess is known as parameterization. Parameterization enables you to performoperations on the application you are testing with multiple sets of data. Each timeyou run a business process test, you can supply different values for the parametersin the test (or its components and flows).
Parameterization is performed at a number of different levels in a business processtest:
Testparameters
These parameters are created at the test level. The parameter andvalue is available to all flows and components contained in the test(provided they are linked).
Flowparameters
These parameters are created at the business process flow level.Like a test parameter, these parameters are available to allcomponents contained in the flow (provided they are linked).
Componentparameters
These parameters are created in the individual businesscomponent. The parameter and value is available to all test stepscontained in the component.
Component parameters can be used in any test that contains thecomponent (provided that you promote the parameter to the testlevel in a specific test).
Example: Example
To test the business process of a banker logging into an online bankingapplication, you might structure a business process test from componentsthat:
l Log into the application (Login)l Select a customer loan (SelectLoan)l View transactions for the loan (ViewLoan)l Log out (Logout)
HP Unified Functional Testing (12.53) Page 871 of 938
You can set up the steps in each of these business components to receivedata from the business process test that runs the components (for example,the loans that a customer has). You can also parameterize any element ofdata, which may have different values each time the business component isrun. For example, the banker may choose a different customer and customerloan to view each time he or she logs in.
Here are parameters that you might create for this scenario, listed bycategory:
Category Parameters
Inputparametersfor acomponent
l LoginName, entered as input by the banker when loggingin
l AccountNo, entered by the banker, perhaps from a writteninquiry.
These parameters are created as input parameters for anindividual component, and then you can use them for anystep inside the component.
Outputparametersfor acomponent
l SessionNo, a number for the login session, outputted bythe business component when the banker successfullylogs in
l SelectedAccountNo, outputted by the business componentafter the banker selects a loan from a list
TestParameters
CustomerLoans, a comma-delimited list of all loans for aparticular customer, accessed from the test level.
For task details, see "Use data in a business process test" on page 877.
Linking parametersRelevant for: business process testing
Parameter linkage enables you to pass data from test or flow parameters tocomponent parameters, or between components. This tests the ability of yourapplication to pass a value from one API to another in the course of theapplication's work.
User GuideChapter 67: Using Data in Business Process Testing
HP Unified Functional Testing (12.53) Page 872 of 938

Example:
A business component,(named CreateLoan) has an output parameter thatcontains a generated loan ID. A subsequent business component, (namedSearchLoan), can verify the loan if it has access to the CreateLoan loan IDvalue. This access is provided by linking the CreateLoan component outputparameter to SearchLoan component input parameter.
The component or flow in which the output parameter is defined is the source. Thecomponent or flow that links to that output parameter is the target. In the exampleabove, CreateLoan is the source component and SearchLoan is the target component.
Linking parameters when the component has iterationsAs part of data driving a business process test, you can set components (or groupsof components) to run multiple times in different iterations.
Linking can occur successfully only when UFT can determine the target iterationfor each source iteration. One of the following conditions must exist:
l Condition 1. The source has one iteration and the target has one or more iterations(a “1–to–n”relationship).
l Condition 2. The source and the target have the same number of iterations (an “n–to–n" relationship).
Note: When a source or target is a member of a group, the number ofiterations is that of the group.
If the component iterations are not represented by a “1–to–n” or “n–to–n”relationship, a warning message is displayed.
When you use the output parameter of a previous component as the value for aninput parameter of a subsequent component, the link between the output and inputparameter applies to all component iterations of the input parameter. Likewise,when iterations of a source component in a business process test result in multipleoutput parameter values, the value that is provided by a given iteration run ispassed as input to the corresponding iteration of the target component.
Example: For these examples, you create components corresponding to thedifferent processes of your application for processing a customer loanrequest:
User GuideChapter 67: Using Data in Business Process Testing
HP Unified Functional Testing (12.53) Page 873 of 938
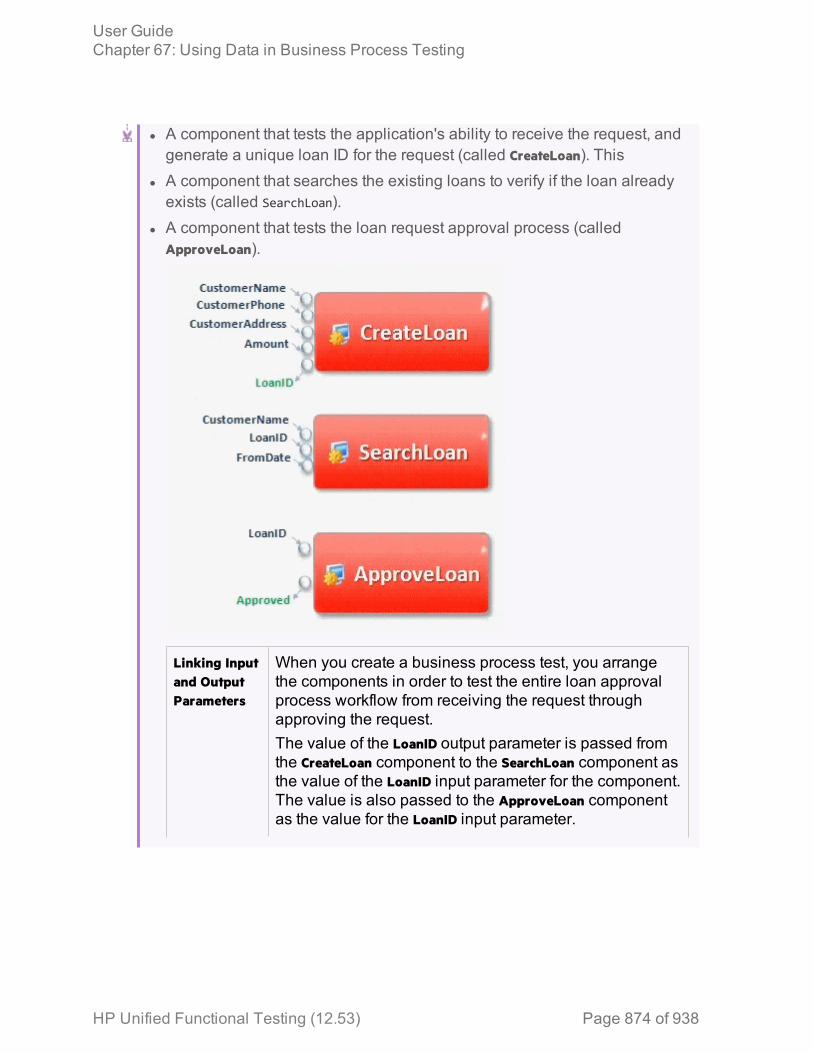
l A component that tests the application's ability to receive the request, andgenerate a unique loan ID for the request (called CreateLoan). This
l A component that searches the existing loans to verify if the loan alreadyexists (called SearchLoan).
l A component that tests the loan request approval process (calledApproveLoan).
Linking Inputand OutputParameters
When you create a business process test, you arrangethe components in order to test the entire loan approvalprocess workflow from receiving the request throughapproving the request.The value of the LoanID output parameter is passed fromthe CreateLoan component to the SearchLoan component asthe value of the LoanID input parameter for the component.The value is also passed to the ApproveLoan componentas the value for the LoanID input parameter.
User GuideChapter 67: Using Data in Business Process Testing
HP Unified Functional Testing (12.53) Page 874 of 938
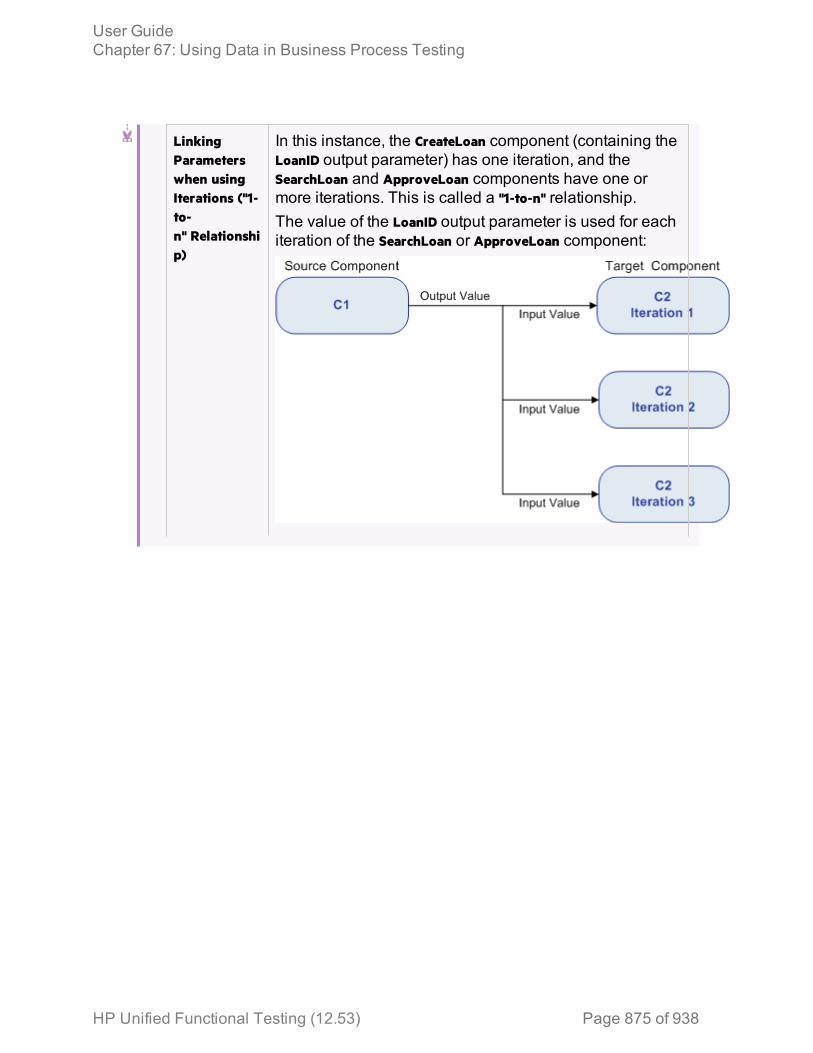
LinkingParameterswhen usingIterations ("1-to-n" Relationship)
In this instance, the CreateLoan component (containing theLoanID output parameter) has one iteration, and theSearchLoan and ApproveLoan components have one ormore iterations. This is called a "1-to-n" relationship.The value of the LoanID output parameter is used for eachiteration of the SearchLoan or ApproveLoan component:
User GuideChapter 67: Using Data in Business Process Testing
HP Unified Functional Testing (12.53) Page 875 of 938

LinkingParameterswhen usingIterations ("n-to-n"Relationship)
The CreateLoan component (containing the LoanID outputparameter) has the same number of iterations as theSearchLoan and ApproveLoan components. This is calledan "n-to-n" relationship.The different values for the LoanID output parameter ineach of the iterations are used in the respective iterationsof the SearchLoan or ApproveLoan components:
For task details, see "Link parameters" on page 878.
Promoting parametersRelevant for: business process testing
When editing a business process test, you can promote flow or componentparameters to the flow or test level at the same time as you add a component to aflow or test.
Example:
User GuideChapter 67: Using Data in Business Process Testing
HP Unified Functional Testing (12.53) Page 876 of 938
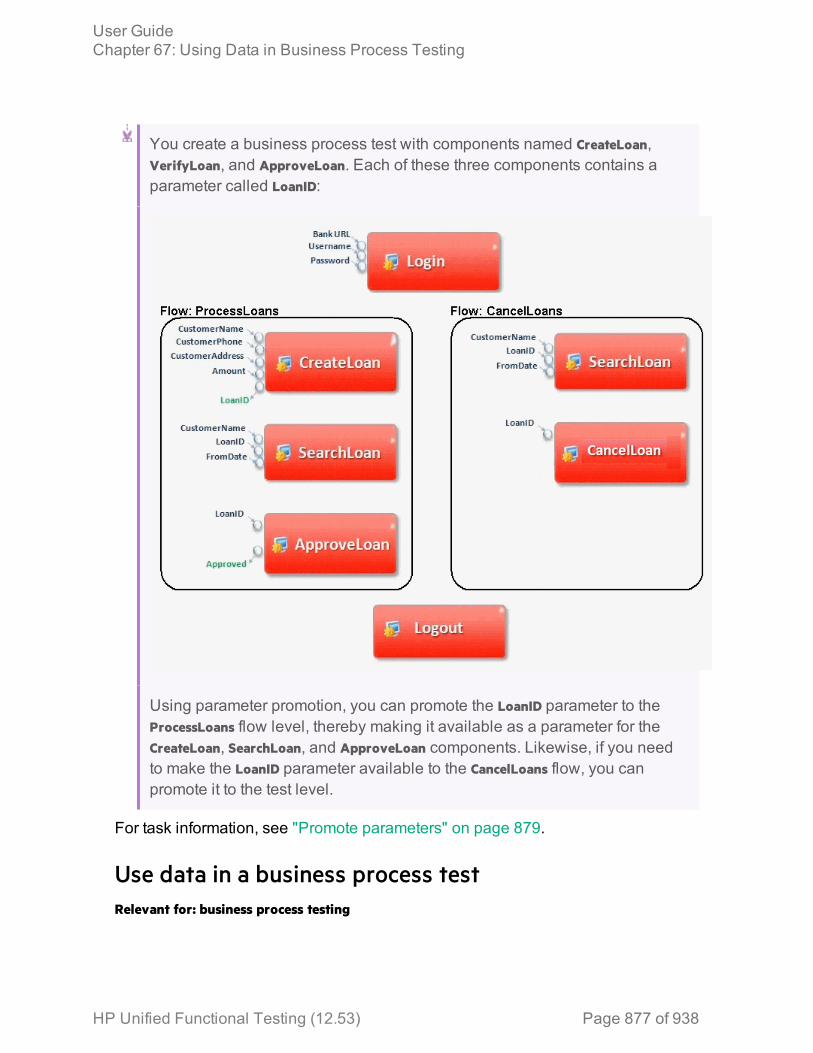
You create a business process test with components named CreateLoan,VerifyLoan, and ApproveLoan. Each of these three components contains aparameter called LoanID:
Using parameter promotion, you can promote the LoanID parameter to theProcessLoans flow level, thereby making it available as a parameter for theCreateLoan, SearchLoan, and ApproveLoan components. Likewise, if you needto make the LoanID parameter available to the CancelLoans flow, you canpromote it to the test level.
For task information, see "Promote parameters" on page 879.
Use data in a business process testRelevant for: business process testing
User GuideChapter 67: Using Data in Business Process Testing
HP Unified Functional Testing (12.53) Page 877 of 938
This task provides general information for how to work with parameters, anditerations in business process tests.
Note: This task is part of a higher-level task. For details, see "Create andmaintain business process tests and flows in UFT" on page 839.
Design dataConsider the following before using parameters:
l Determine which parameters are linked.l Determine which parameters should be available at the component, flow, andtest levels.
l Determine how may times each component, flow, and business process testshould run, and with what parameter values.
Create parameters and set default values1. In the Solution Explorer, select the test, flow, or component to which you want
to add a parameter.
2. In the Properties pane, open the Test Parameters or Parameters tab .3. In the Test Parameters/Parameters, tab, click the Add button and specify the
type of parameter to add (either input or output).4. In the Add Input Parameter/Add Output Parameter dialog box, enter the
parameter details. You can enter a default value or leave the field blank.If you enter a default value, you can use the default value in the event a valueis not supplied for the test run, or you can use the default value as an examplefor the type of value that can be provided (for example, a phone numberexample could be ###-##-####).
Use component parameters in component stepsFor details on using the parameters as step values, see "Parameterize values foroperations" on page 339.
Link parameters1. In the document pane, select a business process test or flow.2. In the business process test or flow tab, select a flow or component.3. In the Properties pane, open the Test Parameters or Parameters tab.4. Select the parameter you want to link.
User GuideChapter 67: Using Data in Business Process Testing
HP Unified Functional Testing (12.53) Page 878 of 938
5. In the Value cell of the parameter, click the Link button. The Select Link Sourcedialog box opens.
6. In the left pane of the Select Link Source dialog box, select the test or flow fromwhich you want to use a parameter.
7. In the right pane of the Select link Source dialog box, select the parameter towhich to link.The parameter name is displayed with a link icon in the value columnindicating the link.
Tip: You can also automatically link component parameters if they share thesame name as a test or flow parameter. In the BPT Testing tab of the Optionsdialog box (Tools > Options > BPT Testing tab), select the Always link to existingtest parameters option.
Promote parametersDo one of the following:
In theOptionsdialogbox
1. Open the BPT Testing tab (Tools > Options > BPT Testing tab).2. In the BPT Testing tab, select the Promote component parameters
option. Any parameters in components or flows added after thisoption is selected are promoted to test or flow parameters.If you do not want to automatically promote parameters for aselected component or flow, clear this option before adding theflow or component.
3. If you do not automatically promote parameters using the optionsin the BPT Testing pane of the Options dialog box, you can clickthe Promote Parameters button in the Parameters tab of theProperties pane.The selected parameter is promoted to the next level and theparameter value is linked to the value of the newly createdparameter.
In thePropertiespane
In the Parameters tab, click the Promote Parameters button .
The selected parameter is promoted to the next level and theparameter value is linked to the value of the newly createdparameter.
In theToolboxpane
In the title node, click the down arrow and then click the Promote
parameters to test level button .
User GuideChapter 67: Using Data in Business Process Testing
HP Unified Functional Testing (12.53) Page 879 of 938
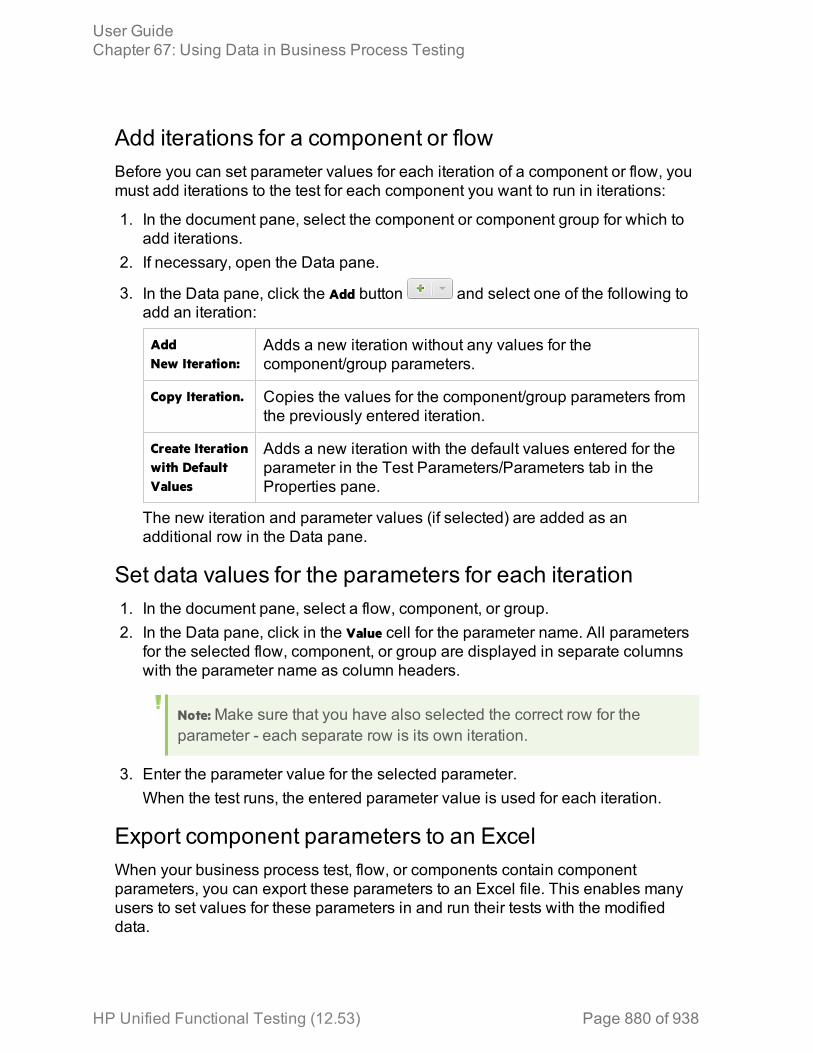
Add iterations for a component or flowBefore you can set parameter values for each iteration of a component or flow, youmust add iterations to the test for each component you want to run in iterations:
1. In the document pane, select the component or component group for which toadd iterations.
2. If necessary, open the Data pane.
3. In the Data pane, click the Add button and select one of the following toadd an iteration:
AddNew Iteration:
Adds a new iteration without any values for thecomponent/group parameters.
Copy Iteration. Copies the values for the component/group parameters fromthe previously entered iteration.
Create Iterationwith DefaultValues
Adds a new iteration with the default values entered for theparameter in the Test Parameters/Parameters tab in theProperties pane.
The new iteration and parameter values (if selected) are added as anadditional row in the Data pane.
Set data values for the parameters for each iteration1. In the document pane, select a flow, component, or group.2. In the Data pane, click in the Value cell for the parameter name. All parameters
for the selected flow, component, or group are displayed in separate columnswith the parameter name as column headers.
Note: Make sure that you have also selected the correct row for theparameter - each separate row is its own iteration.
3. Enter the parameter value for the selected parameter.When the test runs, the entered parameter value is used for each iteration.
Export component parameters to an ExcelWhen your business process test, flow, or components contain componentparameters, you can export these parameters to an Excel file. This enables manyusers to set values for these parameters in and run their tests with the modifieddata.
User GuideChapter 67: Using Data in Business Process Testing
HP Unified Functional Testing (12.53) Page 880 of 938
1. In the document pane OR the Solution Explorer, select the business processtest or flow for which you want to export the component iteration values.
2. In the toolbar, select the Export test iteration values into Excel Document button .3. In the Save dialog box, specify a location in which to save the modified Excel.4. Click Save. UFT confirms the successful export of the Excel file.5. Edit the parameter values as needed. Each component containing parameters
has its own Excel sheet.
Note: If a component does not contain parameters, the Excel does notcontain a sheet for that component.
Import parameter iteration values from an ExcelIf you previously exported your parameter iteration values to Excel, you can modifythe parameter values in the Excel file and then import that Excel file back into thebusiness process test. This enables you to use different data in different test runs tocheck how your application performs with different data.
1. In the document pane OR the Solution Explorer, select the business processtest or flow for which you want to import the component/flow parameter iterationvalues.
2. In the toolbar, select the Import Excel values to parameter iteration values button.
3. In the Open dialog, specify a location from which to import the modified Excel.4. Click Open. UFT confirms the successful import of the Excel file. The
component parameter iteration values are now displayed in the Data pane forthe component parameters and iterations.
User GuideChapter 67: Using Data in Business Process Testing
HP Unified Functional Testing (12.53) Page 881 of 938
Using data with Business Process Testing in UFT -Known IssuesRelevant for: business process testing
l When referencing data table sheets from a business process test, you shoulduse the data table sheet names, not the SheetIDs.
l Sharing values between components in a BPT test cannot be done using user-defined environment variables. Instead, use user-defined run-time settings thatyou create using the Setting.Add method.
l When using multiline values for component parameters:l If you create the parameter in ALM, you can view and edit the parameter inUFT.
l You cannot create a multiline parameter in UFT.
HP Unified Functional Testing (12.53) Page 882 of 938

Chapter 68: Running Business Process TestsRelevant for: business process testing
Running business process tests is much the same as running regular UFT GUItests. UFT opens the specified application, and opens each component in the testin sequence. Inside each component, UFT runs the steps contained in thecomponent.
However, when running a business process test, there are specific issues toconsider:
l The number of iterations: You can specify different numbers of iterations for anyflow, component, or component group included in your test. Furthermore, thenumber of iterations does not have to be the same for all members of the test.
l The run conditions: You can instruct UFT how to run a test, depending on thecondition of the component and your application before or after a specificcomponent's steps are complete.
l The data to use for a test run: You can change the data used for a specific businessprocess test run by creating test configurations and selecting a particular testconfiguration for each test run.
HP Unified Functional Testing (12.53) Page 883 of 938
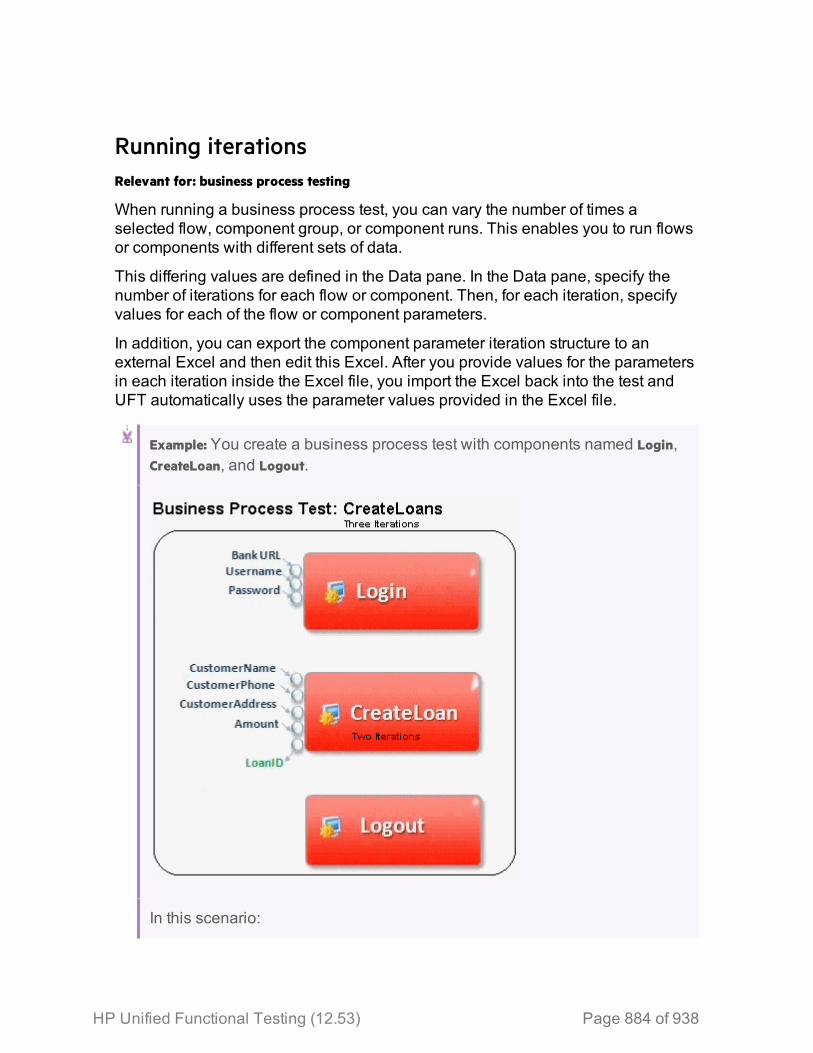
Running iterationsRelevant for: business process testing
When running a business process test, you can vary the number of times aselected flow, component group, or component runs. This enables you to run flowsor components with different sets of data.
This differing values are defined in the Data pane. In the Data pane, specify thenumber of iterations for each flow or component. Then, for each iteration, specifyvalues for each of the flow or component parameters.
In addition, you can export the component parameter iteration structure to anexternal Excel and then edit this Excel. After you provide values for the parametersin each iteration inside the Excel file, you import the Excel back into the test andUFT automatically uses the parameter values provided in the Excel file.
Example: You create a business process test with components named Login,CreateLoan, and Logout.
In this scenario:
HP Unified Functional Testing (12.53) Page 884 of 938
l The entire business process test is iterated three times.l You can use different values for the parameters BankURL, Username, and
Password in each test iteration.l Within each of the three test iterations, the CreateLoan component isiterated twice. This means that the CreateLoan component iterates a total ofsix times.
l Different values for the CustomerName, CustomerPhone, CustomerAddress, andthe Amount input parameters are used for each iteration of the CreateLoancomponent. Six different input parameters can be supplied in total.
l The CreateLoan component provides an output value for the LoanIDparameter for each iteration (six output values provided in total).
For task details, see "Set data values for the parameters for each iteration" on page880.
Running iterations of component groupsRelevant for: business process testing
Sometimes, it may be helpful to run a group of components together for multipleiterations. Component groups contained in your test flow are identified by a groupnode listed above its member components. This group node contains the groupicon and displays the number of iterations for the components included in thegroup.
When you group components, all the components in the group must include thesame number of iterations.
For a business component to run iterations successfully, it is essential that thepost-condition (the state of the application after the last step in the component runs)match the pre-condition (the state of the application before the first step in thecomponent runs).
For group iterations to be successful, the state of the application at the end of thelast item in the group must match the state of the application before the first item inthe group.
For example, if the first component in the group assumes that the Login dialog boxin an application is open, then at the point where the last component of the groupends, the Login dialog box must be in an open state before the next iterationbegins.
User GuideChapter 68: Running Business Process Tests
HP Unified Functional Testing (12.53) Page 885 of 938
Note: Components or flows in a group with input parameters must have thesame number of iterations.
Example:
You create a business process test with the following businesscomponents: C1, C2, C3, and C4. You set the iterations for the components asfollows:
l Component C1 - two iterationsl Component C2 - three iterationsl Component C3 - three iterationsl Component C4 - one iteration
These components run differently, depending on whether you group thecomponents or not:
WithoutGrouping
If you do not group any of the components, the business processtest runs each component in sequence: C1 for its iterations, C2 foreach of iterations, and so forth:
User GuideChapter 68: Running Business Process Tests
HP Unified Functional Testing (12.53) Page 886 of 938

WithGrouping
Instead of running all the iterations of component C1, then all theiterations of component C2, and so forth, grouping thecomponents together changes the manner in which the businessprocess test is run.
In this scenario, you group components C2 and C3 together as agroup, and set the group to run for three iterations. Thus, thebusiness process test runs in the following order:
l The first iteration of component C1
l The second iteration of component C1
l The first iteration of component C2
l The first iteration of component C3
l The second iteration of component C2
l The second iteration of component C3
l The third iteration of component C2
l The third iteration of component C3
l The single iteration of component C4
This process is illustrated graphically in the example below:
User GuideChapter 68: Running Business Process Tests
HP Unified Functional Testing (12.53) Page 887 of 938
Run conditionsRelevant for: business process testing
You can use run conditions to insert condition statements into your components orbusiness process flows. A run condition checks the current value of a componentparameter before running the component in a flow. Based on the parameter valueand the run condition definition, UFT determines whether to:
l Run the componentl Skip to the next component
User GuideChapter 68: Running Business Process Tests
HP Unified Functional Testing (12.53) Page 888 of 938

l End the component run and set the component status to faill Go to a selected flow, component, or group of componentsWhen you run business process tests containing flows with run conditions, the testrun results display the results of run conditions in the test, and lists the componentsthat did not run because a run condition was not met. If a run condition is not met,the test results also provide details about the condition that was not met to help youunderstand why the component run failed or did not run.
Set run conditionsRelevant for: business process testing
The following steps describe how to set run conditions for the flows andcomponents in a business process test or flow.
Note: This task is part of a higher-level task. For details, see "Create andmaintain business process tests and flows in UFT" on page 839.
PrerequisitesEnsure that the component for which you are setting run conditions has parametersor that the flow containing the component has a parameter.
Select the flow or component to set run conditionsDo one of the following:
l If you are setting run conditions for a flow, in the document pane, select the testcontaining the flow.
l If you are setting run conditions for a component, in the document pane, selectthe business process test or business process flow containing the component.
Set On Failure settingsIf you are editing a test, you can set On Failure options for all the flows orcomponents included in the test:
1. In the Solution Explorer or document pane, select the business process testyou are editing.
2. In the document pane, select the flow or component for which to set On Failuresettings.
3. In the Properties pane, open the Properties tab .4. In the Properties tab, set the options for the selected flow or component:
User GuideChapter 68: Running Business Process Tests
HP Unified Functional Testing (12.53) Page 889 of 938
l Continue. Continues the test regardless whether the test passes or fails.l Exits. Immediately stops the test and exists the test run.
Note: For versions ALM 12.20 and higher, if you defined a default On failurecondition in the component in ALM, UFT displays the default value.
Set run conditionsWhen you are editing a business process flow or component, you can setadditional run options for the components included in the flow:
1. In the Solution Explorer or the document pane, select the business process testor flow on which you are working.
2. In the document pane, select the component to which you want to add runconditions.
3. In the Properties tab in the Properties pane, select the Use run conditionoption.
4. In the middle section of the Properties tab, set the condition options:l Run if: Indicates what type of parameter (flow or component parameter) andthe name of parameter for which a condition must be met
l Is: the operator for the parameter valuel Else: Instructs UFT what to do with the test run if the condition is not met,including:
Skip tonextcomponentandcontinue
The selected component does not run, and the test runcontinues with the next component in the flow. Thecomponent is not displayed in the run results.
Endcomponentrun andfail.
The component for which the run condition is set does not run,but instead sets the status of the component run as Failed.The flow either continues to the next component or ends,depending on the failure condition set for the component.
User GuideChapter 68: Running Business Process Tests
HP Unified Functional Testing (12.53) Page 890 of 938
Go To UFT continues to the specified place in the test. You selectthe location in the Go To: dropdown list.The selected flow, component, or group of components mustexist in the test after the current component. For example, youcannot go to a component that has already run.
Note: The GOTO condition is supported only for ALMversions 12.50 patch 1 or higher.
User GuideChapter 68: Running Business Process Tests
HP Unified Functional Testing (12.53) Page 891 of 938
Chapter 69: Business Process Testing with theBPT Packaged Apps KitRelevant for: business process tests and flows
Normally, when you create business process tests of your application, you createtests in different ways:
l Create individual components of each area of the application. These components eachcontain their own application area that contains an object repository of theobjects in the area of the application.
l Record a business process test. You perform user actions in your application, andUFT changes these actions into steps inside the test's components. Whilerecording, you can also add additional components, enabling you to createindividual components for divisions of your application as needed.
To make creating business process tests of your SAP applications simpler, youuse the BPT Packaged Apps Kit. When you use the BPT Packaged Apps Kit, youcan:
l Automatically learn the steps you perform on the SAP application, and then generate atest with separate components based on the screens and transactions withinyour applications.
l Run tests in Change Detection Mode to determine how your application has changedsince the test or flow was created. After UFT determines the changes, you canautomatically update your tests, flows, and components as needed.
The BPT Packaged Apps Kit works with any supported version of ALM. ChangeDetection Mode is available for ALM versions 12.50, ALM 12.21, ALM 12.01 patch2 or higher, and ALM 11.52 patch 7 or higher.
For task details, see "Learn business process tests and flows" on page 895 and"Detect and resolve changes using Change Detection Mode" on page 901.
Note: (for testing SAP Fiori applications)
l SAP Fiori support is technology preview level.l When using the BPT Packaged Apps Kit to test Fiori applications, UFTcan learn the application but cannot run the test in Change DetectionMode.
l When learning a Fiori application or running a learned test of a Fioriapplication, you should open only one browser and an additional tab inthe browser (in addition to the application).
HP Unified Functional Testing (12.53) Page 892 of 938
Learning tests and flowsRelevant for: business process tests and flows
If you are testing an SAP application, UFT can "learn" components automaticallyfrom the application.
To learn, you simply perform user actions in your application. After you finish, UFTautomatically breaks down the learned areas of the application into individualbusiness components representing a different screen or tab (or "transaction") inyour application. Parameters are automatically added for the steps in thecomponents, based on the values you used when learning the components.
While UFT learns an application, it analyzes each of the components in the test orflow to see if there are already components similar to, or identical to, the learnedcomponents. If such a component exists, you can reuse the existing componentinstead of creating a new component.
Existing components in the project are compared to the learned component usingthe following criteria:
l Both components represent the same screen/area of the application.l Both components represent the same screen/area with exactly the same objects.l Both components contain the same steps.This is true also for checkpoint and output value steps, which must refer to thesame object properties.
Note: If two or more steps refer to the same method, they are consideredidentical only if they refer to the same objects, and contain the samenumber of arguments.
l Both components contain the same steps in the same order.Only components in the project that were created through the Learn process areanalyzed for similarity.
HP Unified Functional Testing (12.53) Page 893 of 938
Detecting and resolving changesRelevant for: business process tests and flows
When using business process tests in UFT with the BPT Packaged Apps Kit, youcan run business process tests and flows in Change Detection mode. When yourun a test in Change Detection Mode, UFT checks for changes made in theapplication since the test or flow was last updated and displays the changes in aChange Detection report.
Note: Running tests in Change Detection mode is supported only forSAP GUI applications.
For each change in the report, UFT offers possible resolutions. This enables you toupdate your test or flow automatically without learning or manually updating thecomponent's steps.
For example, you are testing a screen for adding new customer contact information.The screen contains the fields Name, Address, and Phone Number. You create a test thatverifies that information entered in these fields is correctly added to your customerdatabase. Suppose you now add an E-mail address field to the screen. If you runyour test in regular mode, the test may pass and you may not notice that there is anadditional field that should be tested. However, if you run the test in ChangeDetection mode, UFT notices that the field was added to the screen and suggestsadding a step to the component corresponding to the new field. You can then runan updated version of the test that includes verification of the additional field.
HP Unified Functional Testing (12.53) Page 894 of 938
Learn business process tests and flowsRelevant for: business process tests and flows
This task describes how to learn areas of your SAP application in order to createbusiness process tests and flows. This enables you to create components basedon screens or areas of your SAP application quickly.
This task includes the following steps:
1. "Prerequisites" below2. "Set component reuse options " below3. "Set parameter options" on the next page4. "Perform user actions your SAP application" on the next page5. "Optional - add checkpoints and output values while learning" on page 8976. "Select components" on page 8977. "Reuse an existing component" on page 8978. "Remove a learned component" on page 8989. "Resume learning components" on page 89810. "Edit table parameters" on page 8991. Prerequisites
Before learning business process tests and flows, you must do the following:l Install and load the Web and Add-in for SAP Solutions or the SAPUI5 add-in.
l Log in to your SAP application.
Note: If you are learning an SAP Fiori application, ensure that theSAPUI5 add-in is loaded and open the browser and an additional tabin the browser before learning.
l Create or open a business process test or flow.l You must be part of an ALM user group with the following taskpermissions: Modify Folder (Test Plan), Modify Test, Add Component Folder, AddComponent, Add Step, Add Parameter, Add Resource, Modify Component, ModifyStep, Modify Parameter, Modify Resource, and Delete Resource.
2. Set component reuse options
In the BPT Packaged Apps Kit pane of the Options dialog box (Tools > Options >BPT Testing tab > BPT Packaged Apps Kit node), select the appropriate option toinstruct UFT on how to reuse similar or identical components:
HP Unified Functional Testing (12.53) Page 895 of 938

Manually selectcomponents forreuse:
This option enables you to select the components in theLearn Summary dialog box after finishing the learningsession.
Automaticallyreuse identicalcomponents:
This automatically uses existing components that areidentical without prompting you after learning theapplication.
Ignore commentswhen comparingscripts
This instructs UFT to ignore comment steps whencomparing learned components to existing ones.
Component Type: Select from Keyword GUI or Scripted GUI components.
3. Set parameter options
In the BPT Packaged Apps Kit pane of the Options dialog (Tools > Options > BPTTesting tab > BPT Packaged Apps Kit node), select how you want UFT to reuseparameters:l Automatically parameterize steps using Business Component parameters: Enablesyou to use the Business component parameters as the step valueparameters
l Use the default values from the learned flow: Uses the values you entered whenlearning the flow
l Use the values from the reused components: Use the values from the componentsyou select for reuse.
4. Perform user actions your SAP application
a. Do one of the following:o In UFT, with a business process test or flow selected, in the toolbar,
press the Learn button . UFT is minimized and the Learn toolbar isdisplayed.
o In the BPT View, click the Smart Record a New Business Process Test or Flowbutton.
b. Perform user actions in your SAP application. As you perform actions, theLearn toolbar provides a count of the number of steps performed in theapplication:
c. When you are finished performing all the necessary actions, press the Stop
button . UFT displays a progress indicator, and adds the components toyour test and to your ALM project.
User GuideChapter 69: Business Process Testing with the BPT Packaged Apps Kit
HP Unified Functional Testing (12.53) Page 896 of 938
5. Optional - add checkpoints and output values while learning
Using the Learn Toolbar, you can also add checkpoints and output valueswhile learning your SAP application. This eliminates the need for you to addthese steps after learning components.a. While performing user actions in your SAP application, in the Learn toolbar,
click the Insert Checkpoint or Output Value button and select the type ofcheckpoint to insert.
b. If necessary, in the Object Selection dialog box, select the object on whichyou want to insert the checkpoint or output value.
c. In the Checkpoint Properties dialog that opens, select the test objectproperties to check and click OK. The Learn toolbar counter changes to notethat you added a checkpoint or output value step. In addition, thischeckpoint step will be part of the learned component that is created afteryou stop learning the application.
6. Select components
After you finish learning the screens/areas in your application, UFT displays asummary of the learning session in the Learn Summary dialog box.If you want to keep the learned components without reusing similar or identicalcomponents, click Create. UFT creates the new components and saves them inyour ALM project. In addition, the learned components are added to the openbusiness process test.
7. Reuse an existing component
If UFT detects that a learned component is similar or identical to an existingcomponent, UFT displays the number of similar components next to thecomponent name in the component tree.a. In the learned component list, select the component for comparison. In the
right pane, UFT displays the list of possible components to reuse.b. In the right pane, display the Available Components for Reuse section.
User GuideChapter 69: Business Process Testing with the BPT Packaged Apps Kit
HP Unified Functional Testing (12.53) Page 897 of 938
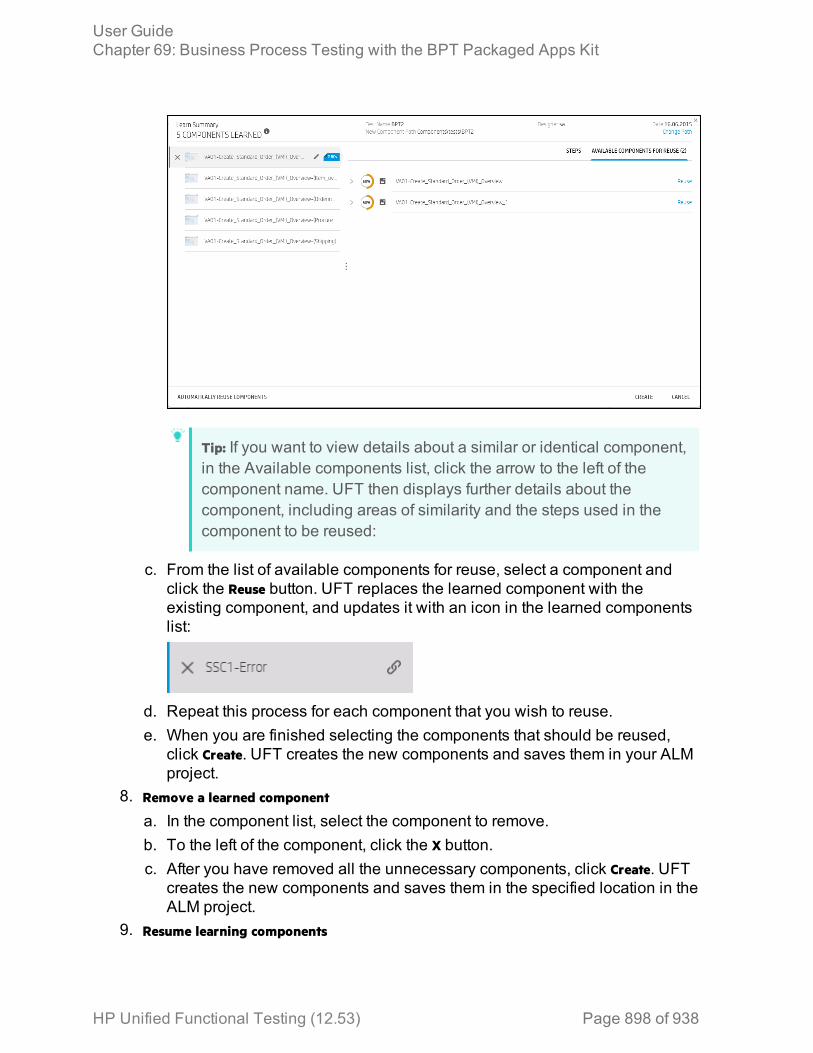
Tip: If you want to view details about a similar or identical component,in the Available components list, click the arrow to the left of thecomponent name. UFT then displays further details about thecomponent, including areas of similarity and the steps used in thecomponent to be reused:
c. From the list of available components for reuse, select a component andclick the Reuse button. UFT replaces the learned component with theexisting component, and updates it with an icon in the learned componentslist:
d. Repeat this process for each component that you wish to reuse.e. When you are finished selecting the components that should be reused,
click Create. UFT creates the new components and saves them in your ALMproject.
8. Remove a learned component
a. In the component list, select the component to remove.b. To the left of the component, click the X button.c. After you have removed all the unnecessary components, click Create. UFT
creates the new components and saves them in the specified location in theALM project.
9. Resume learning components
User GuideChapter 69: Business Process Testing with the BPT Packaged Apps Kit
HP Unified Functional Testing (12.53) Page 898 of 938
After you create an initial test with learned components, you can resumelearning components in the same test.a. In the document pane or the Solution Explorer, select the business process
test or flow to which you want to add learned components.b. In the toolbar, click the Learn button.c. When prompted, decide how to insert newly learned components:
Yes If you select Yes, the existing components in the test are removedand newly learned components are inserted instead.
No If you select No, UFT inserts the newly learned components afterthe already existing components in the test.
d. Continue learning the screens/areas in your application as described in"Perform user actions your SAP application" on page 896.
10. Edit table parameters
When learning your application, you have the additional option to learn andcreate special table parameters which represent a table object in theapplication. When UFT creates the components after learning, the parameter iscreated and you can edit the values of the parameter (like other test andcomponent parameters) using a special dialog.To create and edit table parameters, do the following:a. Create or open a GUI test.b. In the SAP General pane of the Options dialog box (Tools > Options > GUI
Testing tab > SAP > General node). select the Auto-parameterize table and gridcontrols option.
c. Close the GUI test.d. Create or open a business process test.e. Perform user actions on the table objects in your application. While you
perform these actions, UFT learns the application and creates componentsaccordingly.
f. After performing all necessary user actions, stop the learning session andapprove/reject the learned components in the Learn Summary report.
g. In the test grid, select the component containing the table parameter. TheProperties pane tabs are changed to represent the component properties.
h. In the Properties pane, select the Parameters tab .
User GuideChapter 69: Business Process Testing with the BPT Packaged Apps Kit
HP Unified Functional Testing (12.53) Page 899 of 938

i. In the Parameters tab, select the parameter representing your table object.The Properties pane identifies these by labeling them in the Value columnas Table Data:
j. In the row containing the table parameter, click the Table Parameter button .The Table Parameter Editor dialog box opens:
k. In the Parameter Table editor, edit the parameter values as needed.l. When you have finished editing the table parameter, click OK to save yourchanges.
User GuideChapter 69: Business Process Testing with the BPT Packaged Apps Kit
HP Unified Functional Testing (12.53) Page 900 of 938
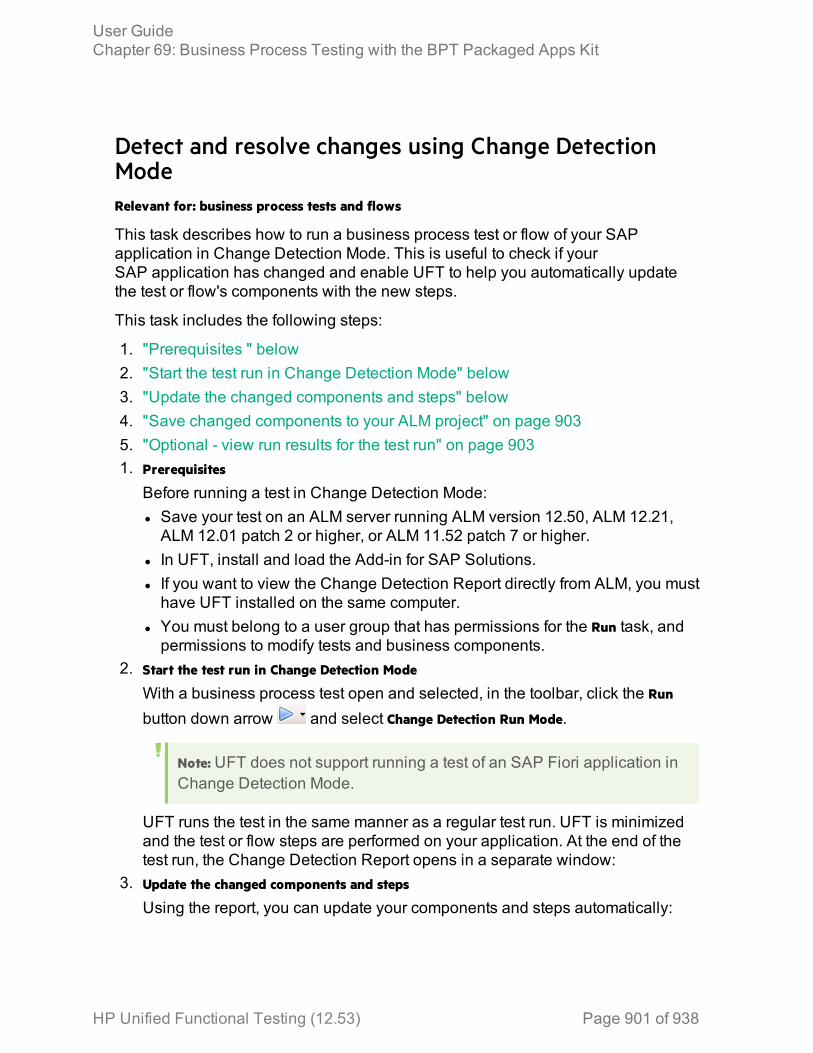
Detect and resolve changes using Change DetectionModeRelevant for: business process tests and flows
This task describes how to run a business process test or flow of your SAPapplication in Change Detection Mode. This is useful to check if yourSAP application has changed and enable UFT to help you automatically updatethe test or flow's components with the new steps.
This task includes the following steps:
1. "Prerequisites " below2. "Start the test run in Change Detection Mode" below3. "Update the changed components and steps" below4. "Save changed components to your ALM project" on page 9035. "Optional - view run results for the test run" on page 9031. Prerequisites
Before running a test in Change Detection Mode:l Save your test on an ALM server running ALM version 12.50, ALM 12.21,ALM 12.01 patch 2 or higher, or ALM 11.52 patch 7 or higher.
l In UFT, install and load the Add-in for SAP Solutions.l If you want to view the Change Detection Report directly from ALM, you musthave UFT installed on the same computer.
l You must belong to a user group that has permissions for the Run task, andpermissions to modify tests and business components.
2. Start the test run in Change Detection Mode
With a business process test open and selected, in the toolbar, click the Run
button down arrow and select Change Detection Run Mode.
Note: UFT does not support running a test of an SAP Fiori application inChange Detection Mode.
UFT runs the test in the same manner as a regular test run. UFT is minimizedand the test or flow steps are performed on your application. At the end of thetest run, the Change Detection Report opens in a separate window:
3. Update the changed components and steps
Using the report, you can update your components and steps automatically:
User GuideChapter 69: Business Process Testing with the BPT Packaged Apps Kit
HP Unified Functional Testing (12.53) Page 901 of 938
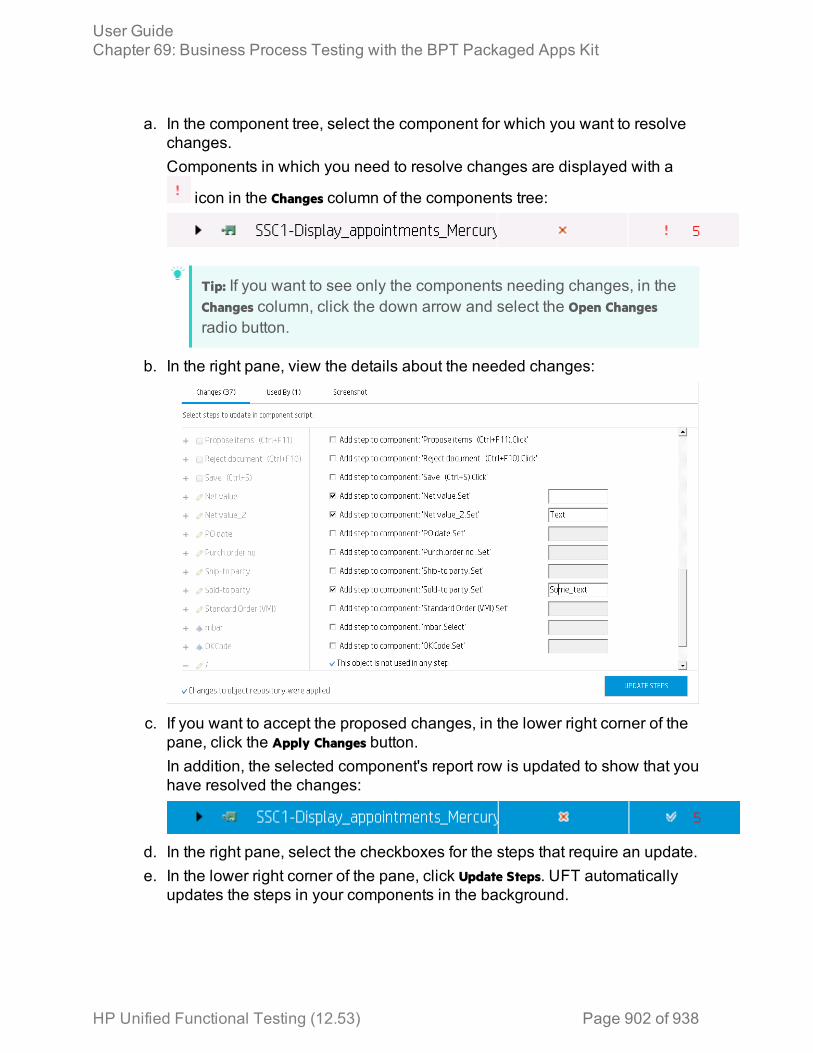
a. In the component tree, select the component for which you want to resolvechanges.Components in which you need to resolve changes are displayed with a
icon in the Changes column of the components tree:
Tip: If you want to see only the components needing changes, in theChanges column, click the down arrow and select the Open Changesradio button.
b. In the right pane, view the details about the needed changes:
c. If you want to accept the proposed changes, in the lower right corner of thepane, click the Apply Changes button. In addition, the selected component's report row is updated to show that youhave resolved the changes:
d. In the right pane, select the checkboxes for the steps that require an update.e. In the lower right corner of the pane, click Update Steps. UFT automatically
updates the steps in your components in the background.
User GuideChapter 69: Business Process Testing with the BPT Packaged Apps Kit
HP Unified Functional Testing (12.53) Page 902 of 938
Note: If you want to apply the changes in the components for the currenttest only, you should clear the Update changes will affect only current testcheckbox. If you do not clear this option, the changes to the componentsare applied to all tests containing these components.
4. Save changed components to your ALM project
After you have updated all the necessary components, in the lower right cornerof the Change Detection report, click Save. UFT saves the updated componentsin your ALM project.
Note: This process may take some time, depending on the number ofupdates. Ensure that you do not close UFT or the Change DetectionReport while UFT is saving the changes.
5. Optional - view run results for the test run
In addition to reporting changes in the application during a test run, the ChangeDetection Report gives a basic report on the success or failure of the test. Youcan view:l Overall run statusl Individual component run statusl Run status for individual steps in the componentsIf you see that a business component is reporting a Failed Status, you candouble-click the component name and open the Run Results Viewer to open adefect for this component.Note that the Change Detection Report does not provide data on the reasonsbehind the success or failure of a component. To see this information, you mustrun the test using the regular Run option and view the run results after the test.
User GuideChapter 69: Business Process Testing with the BPT Packaged Apps Kit
HP Unified Functional Testing (12.53) Page 903 of 938
Business Process Testing with the BPT Packaged AppsKit - Known Issuesl You must have the Add-in for SAP Solutions installed and loaded for the currentbusiness process test to learn flows and components or run business processtests in Change Detection Mode.
l Learning flows and components is supported only for SAP GUI for Windows andSAP Fiori applications only.
l Running tests and components in Change Detection mode is supported for SAPGUI for Windows applications only.
l If you have an open GUI test, the Record and Run Settings for the test areapplicable when you learn a business process test or flow. Workaround: Before starting the Learn process, change the Record and RunSettings to the default.
User GuideChapter 69: Business Process Testing with the BPT Packaged Apps Kit
HP Unified Functional Testing (12.53) Page 904 of 938

HP Unified Functional Testing (12.53) Page 905
Part 11: Appendix
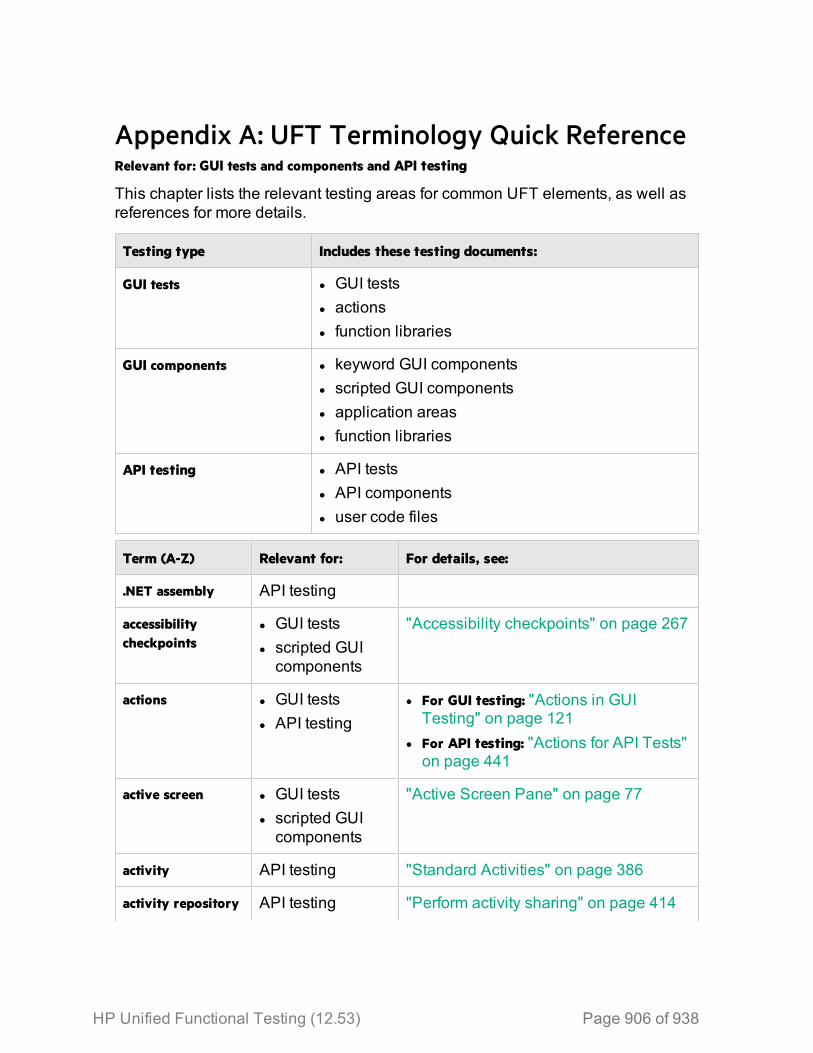
Appendix A: UFT Terminology Quick ReferenceRelevant for: GUI tests and components and API testing
This chapter lists the relevant testing areas for common UFT elements, as well asreferences for more details.
Testing type Includes these testing documents:
GUI tests l GUI testsl actionsl function libraries
GUI components l keyword GUI componentsl scripted GUI componentsl application areasl function libraries
API testing l API testsl API componentsl user code files
Term (A-Z) Relevant for: For details, see:
.NET assembly API testing
accessibilitycheckpoints
l GUI testsl scripted GUIcomponents
"Accessibility checkpoints" on page 267
actions l GUI testsl API testing
l For GUI testing: "Actions in GUITesting" on page 121
l For API testing: "Actions for API Tests"on page 441
active screen l GUI testsl scripted GUIcomponents
"Active Screen Pane" on page 77
activity API testing "Standard Activities" on page 386
activity repository API testing "Perform activity sharing" on page 414
HP Unified Functional Testing (12.53) Page 906 of 938
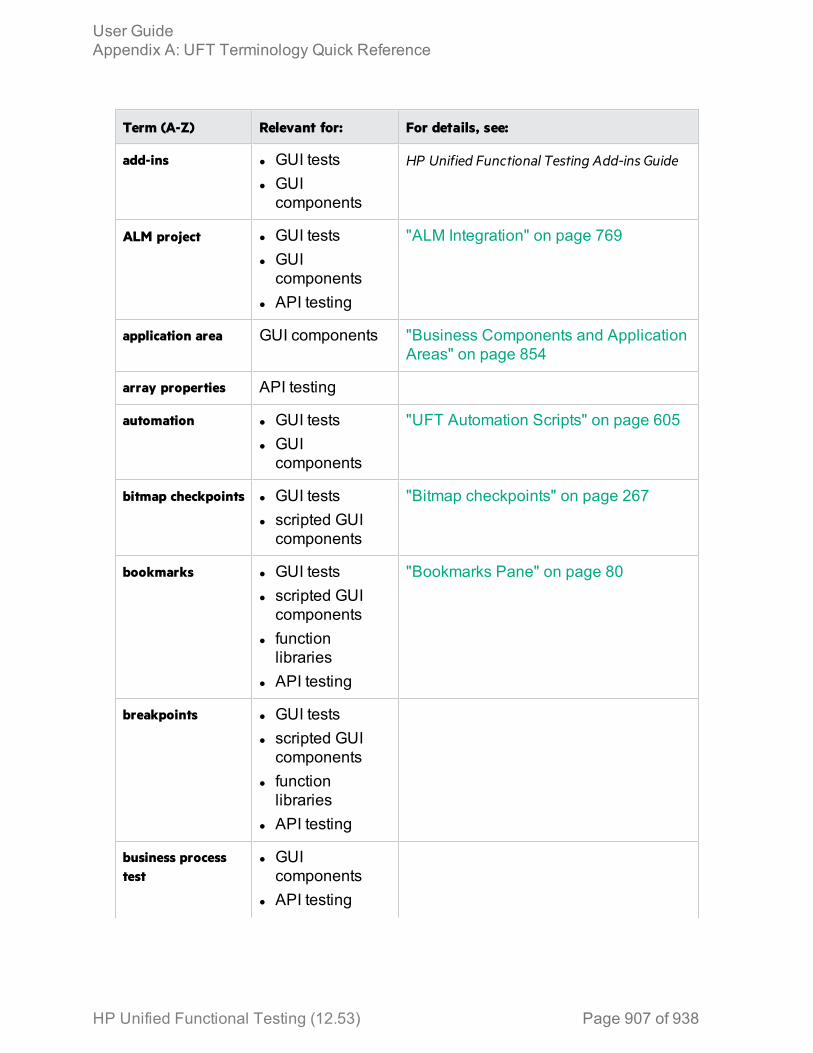
Term (A-Z) Relevant for: For details, see:
add-ins l GUI testsl GUIcomponents
HP Unified Functional Testing Add-ins Guide
ALM project l GUI testsl GUIcomponents
l API testing
"ALM Integration" on page 769
application area GUI components "Business Components and ApplicationAreas" on page 854
array properties API testing
automation l GUI testsl GUIcomponents
"UFT Automation Scripts" on page 605
bitmap checkpoints l GUI testsl scripted GUIcomponents
"Bitmap checkpoints" on page 267
bookmarks l GUI testsl scripted GUIcomponents
l functionlibraries
l API testing
"Bookmarks Pane" on page 80
breakpoints l GUI testsl scripted GUIcomponents
l functionlibraries
l API testing
business processtest
l GUIcomponents
l API testing
User GuideAppendix A: UFT Terminology Quick Reference
HP Unified Functional Testing (12.53) Page 907 of 938
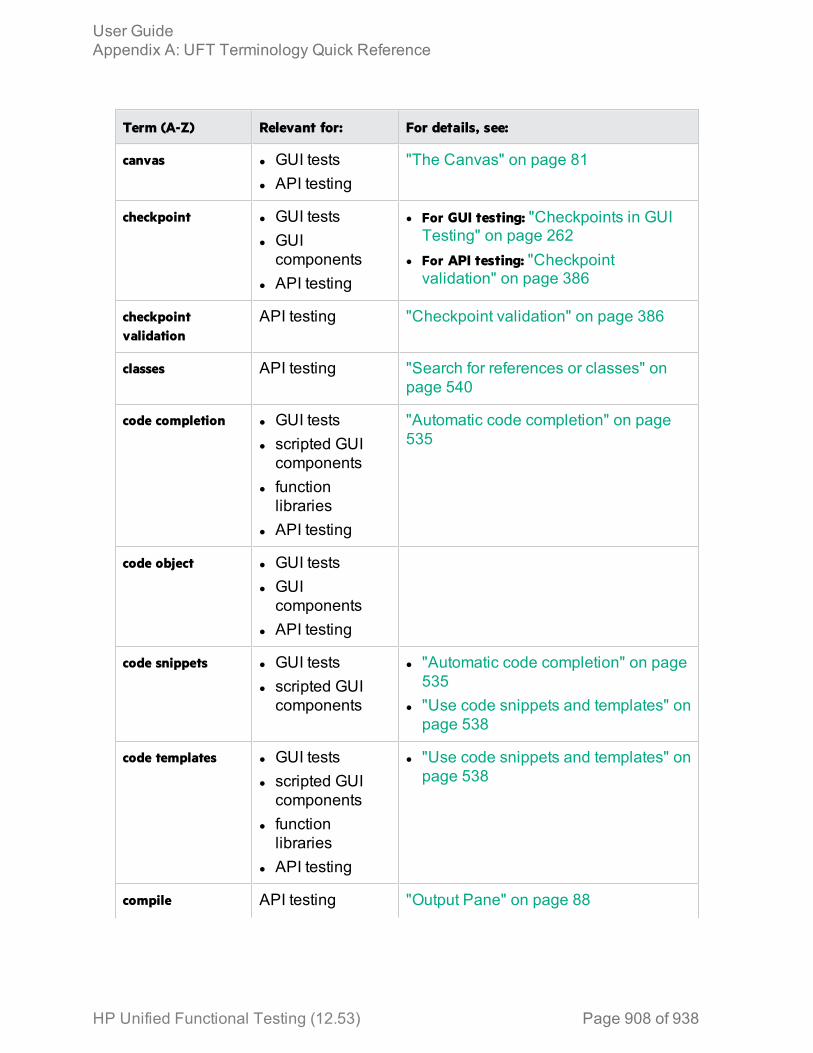
Term (A-Z) Relevant for: For details, see:
canvas l GUI testsl API testing
"The Canvas" on page 81
checkpoint l GUI testsl GUIcomponents
l API testing
l For GUI testing: "Checkpoints in GUITesting" on page 262
l For API testing: "Checkpointvalidation" on page 386
checkpointvalidation
API testing "Checkpoint validation" on page 386
classes API testing "Search for references or classes" onpage 540
code completion l GUI testsl scripted GUIcomponents
l functionlibraries
l API testing
"Automatic code completion" on page535
code object l GUI testsl GUIcomponents
l API testing
code snippets l GUI testsl scripted GUIcomponents
l "Automatic code completion" on page535
l "Use code snippets and templates" onpage 538
code templates l GUI testsl scripted GUIcomponents
l functionlibraries
l API testing
l "Use code snippets and templates" onpage 538
compile API testing "Output Pane" on page 88
User GuideAppendix A: UFT Terminology Quick Reference
HP Unified Functional Testing (12.53) Page 908 of 938
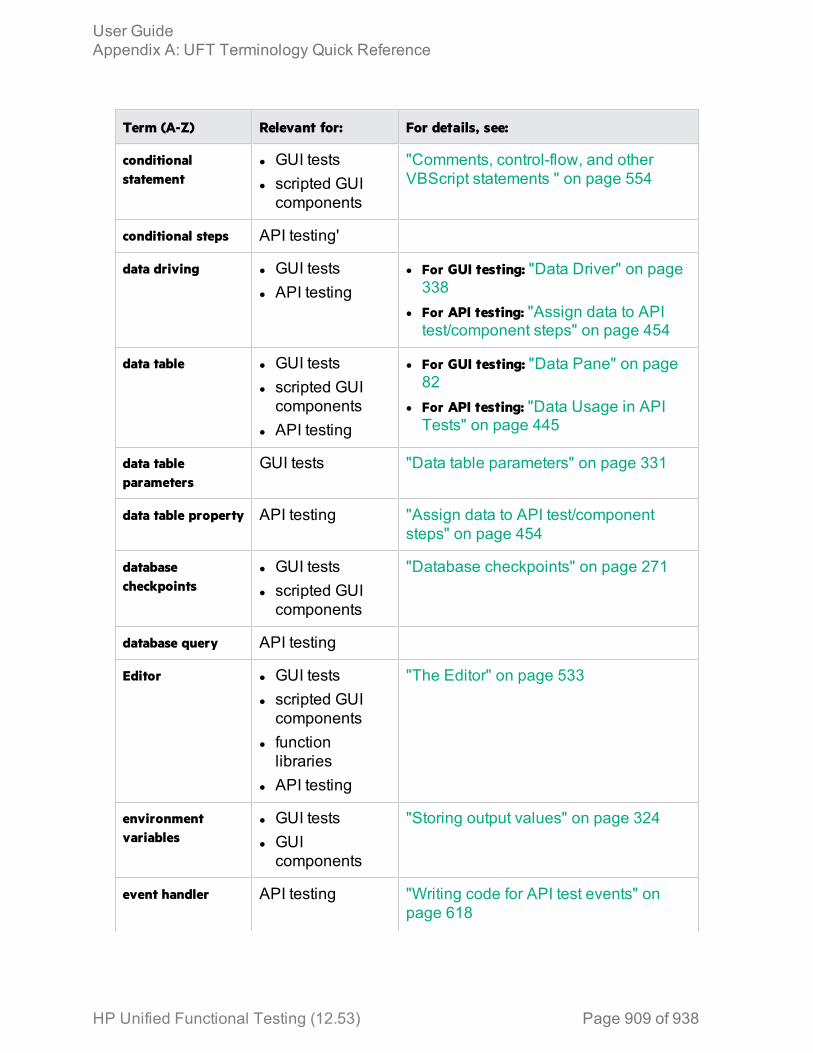
Term (A-Z) Relevant for: For details, see:
conditionalstatement
l GUI testsl scripted GUIcomponents
"Comments, control-flow, and otherVBScript statements " on page 554
conditional steps API testing'
data driving l GUI testsl API testing
l For GUI testing: "Data Driver" on page338
l For API testing: "Assign data to APItest/component steps" on page 454
data table l GUI testsl scripted GUIcomponents
l API testing
l For GUI testing: "Data Pane" on page82
l For API testing: "Data Usage in APITests" on page 445
data tableparameters
GUI tests "Data table parameters" on page 331
data table property API testing "Assign data to API test/componentsteps" on page 454
databasecheckpoints
l GUI testsl scripted GUIcomponents
"Database checkpoints" on page 271
database query API testing
Editor l GUI testsl scripted GUIcomponents
l functionlibraries
l API testing
"The Editor" on page 533
environmentvariables
l GUI testsl GUIcomponents
"Storing output values" on page 324
event handler API testing "Writing code for API test events" onpage 618
User GuideAppendix A: UFT Terminology Quick Reference
HP Unified Functional Testing (12.53) Page 909 of 938
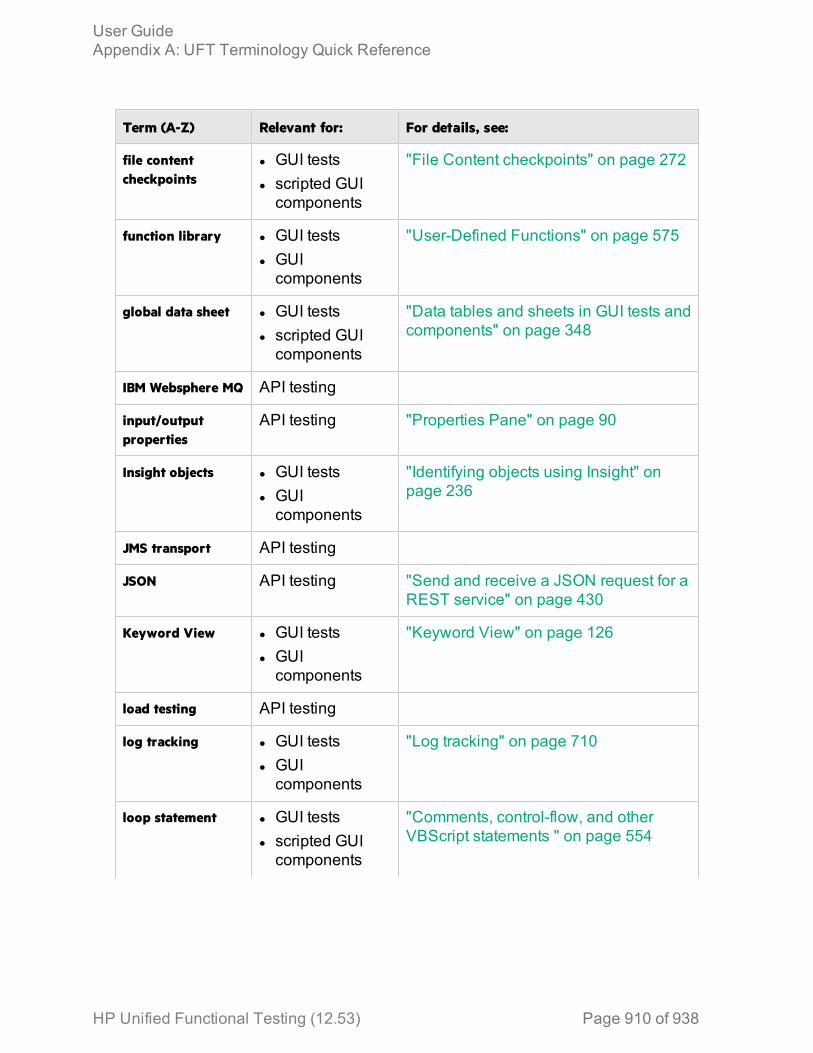
Term (A-Z) Relevant for: For details, see:
file contentcheckpoints
l GUI testsl scripted GUIcomponents
"File Content checkpoints" on page 272
function library l GUI testsl GUIcomponents
"User-Defined Functions" on page 575
global data sheet l GUI testsl scripted GUIcomponents
"Data tables and sheets in GUI tests andcomponents" on page 348
IBM Websphere MQ API testing
input/outputproperties
API testing "Properties Pane" on page 90
Insight objects l GUI testsl GUIcomponents
"Identifying objects using Insight" onpage 236
JMS transport API testing
JSON API testing "Send and receive a JSON request for aREST service" on page 430
Keyword View l GUI testsl GUIcomponents
"Keyword View" on page 126
load testing API testing
log tracking l GUI testsl GUIcomponents
"Log tracking" on page 710
loop statement l GUI testsl scripted GUIcomponents
"Comments, control-flow, and otherVBScript statements " on page 554
User GuideAppendix A: UFT Terminology Quick Reference
HP Unified Functional Testing (12.53) Page 910 of 938
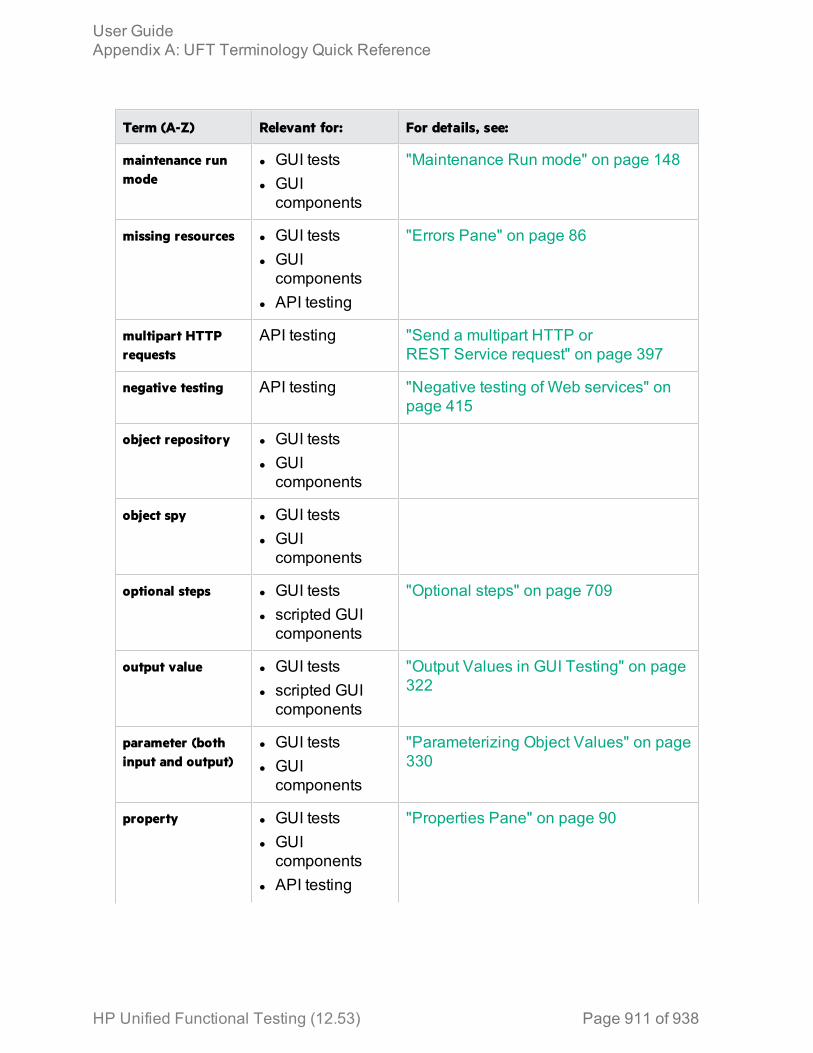
Term (A-Z) Relevant for: For details, see:
maintenance runmode
l GUI testsl GUIcomponents
"Maintenance Run mode" on page 148
missing resources l GUI testsl GUIcomponents
l API testing
"Errors Pane" on page 86
multipart HTTPrequests
API testing "Send a multipart HTTP orREST Service request" on page 397
negative testing API testing "Negative testing of Web services" onpage 415
object repository l GUI testsl GUIcomponents
object spy l GUI testsl GUIcomponents
optional steps l GUI testsl scripted GUIcomponents
"Optional steps" on page 709
output value l GUI testsl scripted GUIcomponents
"Output Values in GUI Testing" on page322
parameter (bothinput and output)
l GUI testsl GUIcomponents
"Parameterizing Object Values" on page330
property l GUI testsl GUIcomponents
l API testing
"Properties Pane" on page 90
User GuideAppendix A: UFT Terminology Quick Reference
HP Unified Functional Testing (12.53) Page 911 of 938
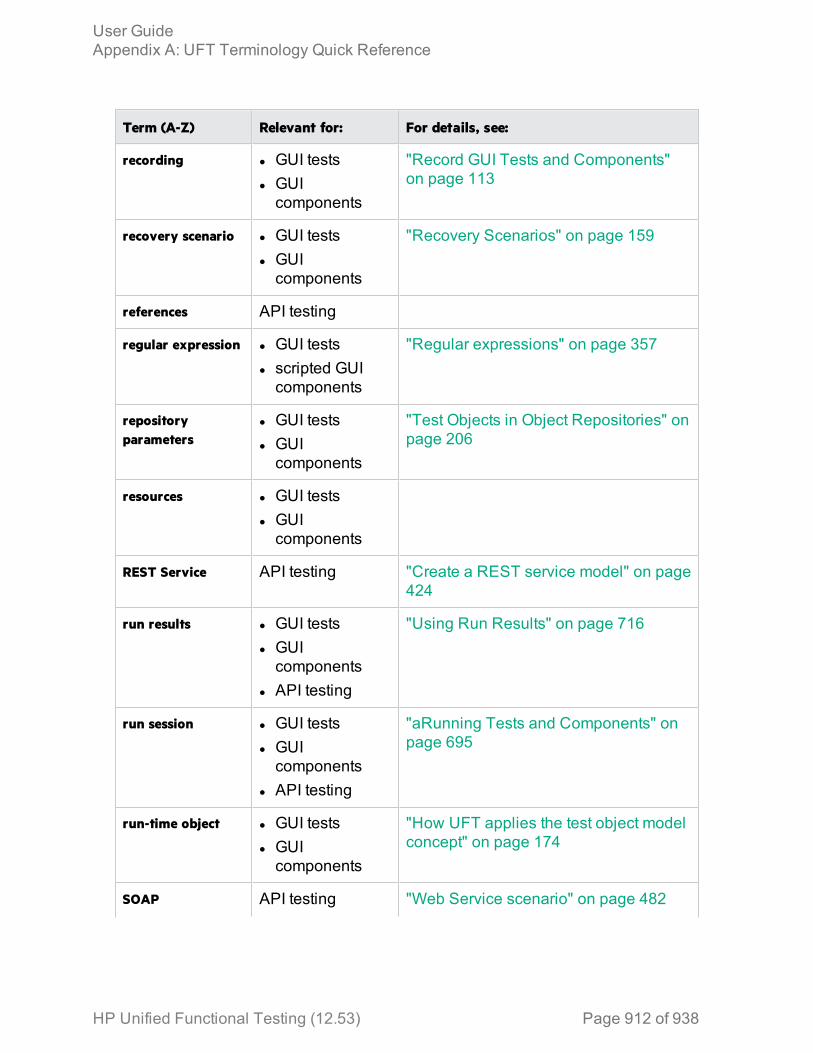
Term (A-Z) Relevant for: For details, see:
recording l GUI testsl GUIcomponents
"Record GUI Tests and Components"on page 113
recovery scenario l GUI testsl GUIcomponents
"Recovery Scenarios" on page 159
references API testing
regular expression l GUI testsl scripted GUIcomponents
"Regular expressions" on page 357
repositoryparameters
l GUI testsl GUIcomponents
"Test Objects in Object Repositories" onpage 206
resources l GUI testsl GUIcomponents
REST Service API testing "Create a REST service model" on page424
run results l GUI testsl GUIcomponents
l API testing
"Using Run Results" on page 716
run session l GUI testsl GUIcomponents
l API testing
"aRunning Tests and Components" onpage 695
run-time object l GUI testsl GUIcomponents
"How UFT applies the test object modelconcept" on page 174
SOAP API testing "Web Service scenario" on page 482
User GuideAppendix A: UFT Terminology Quick Reference
HP Unified Functional Testing (12.53) Page 912 of 938

Term (A-Z) Relevant for: For details, see:
solution l GUI testsl GUIcomponents
l API testing
"Solution Explorer Pane" on page 93
statementcompletion
l GUI testsl scripted GUIcomponents
l functionlibraries
l API testing
"Statement completion" on page 533
step generator l GUI testsl scripted GUIcomponents
syntax errors l GUI testsl GUIcomponents
l API testing
"Errors Pane" on page 86
system monitor l GUI testsl GUIcomponents
Test Batch Runner l GUI testsl API testing
"Test Batch Runner" on page 707
test loops API testing
test object l GUI testsl GUIcomponents
"The Test Object Model" on page 173
test variables API testing "Define API test properties oruser/system variables" on page 461
text checkpoint
text areacheckpoints
l GUI testsl scripted GUIcomponents
"Text and text area checkpoints" onpage 274
User GuideAppendix A: UFT Terminology Quick Reference
HP Unified Functional Testing (12.53) Page 913 of 938

Term (A-Z) Relevant for: For details, see:
text recognition l GUI testsl GUIcomponents
l "Text recognition in run-time" on page275
TODO comments l GUI testsl scripted GUIcomponents
l functionlibraries
l API testing
"Tasks Pane" on page 94
Toolbox l GUI actionsl GUIcomponentsfunctionlibraries
l API testingBusinessprocess testsand flows
"Toolbox Pane" on page 95
Update Run Mode l GUI testsl GUIcomponents
"Update Run mode " on page 153
UpdateService/Assembly
API testing "Updating Services and Assemblies" onpage 473
user code files API testing "Writing code for API test events" onpage 618
Userlogger API testing "UserLogger Object" on page 680
virtual object l GUI testsl scripted GUIcomponents
"Virtual Objects" on page 260
virtualized services API testing "Virtualized services" on page 738
Web services API testing
User GuideAppendix A: UFT Terminology Quick Reference
HP Unified Functional Testing (12.53) Page 914 of 938

Term (A-Z) Relevant for: For details, see:
WSDL API testing "Import a WSDL-based Web service" onpage 421
XML checkpoints l GUI testsl GUIcomponents
"XML checkpoints" on page 279
XPath Checkpoints API testing "XPath checkpoints" on page 387
User GuideAppendix A: UFT Terminology Quick Reference
HP Unified Functional Testing (12.53) Page 915 of 938

Appendix B: GUI Checkpoints and Output ValuesPer Add-inRelevant for: GUI tests and components
The tables in this chapter show the categories of checkpoints and output valuesthat are supported by UFT for each add-in.
For details about using checkpoints and output values in a specific add-in, see therelevant add-in section.
This chapter includes:
• Supported Checkpoints 917• Supported Output Values 921
HP Unified Functional Testing (12.53) Page 916 of 938
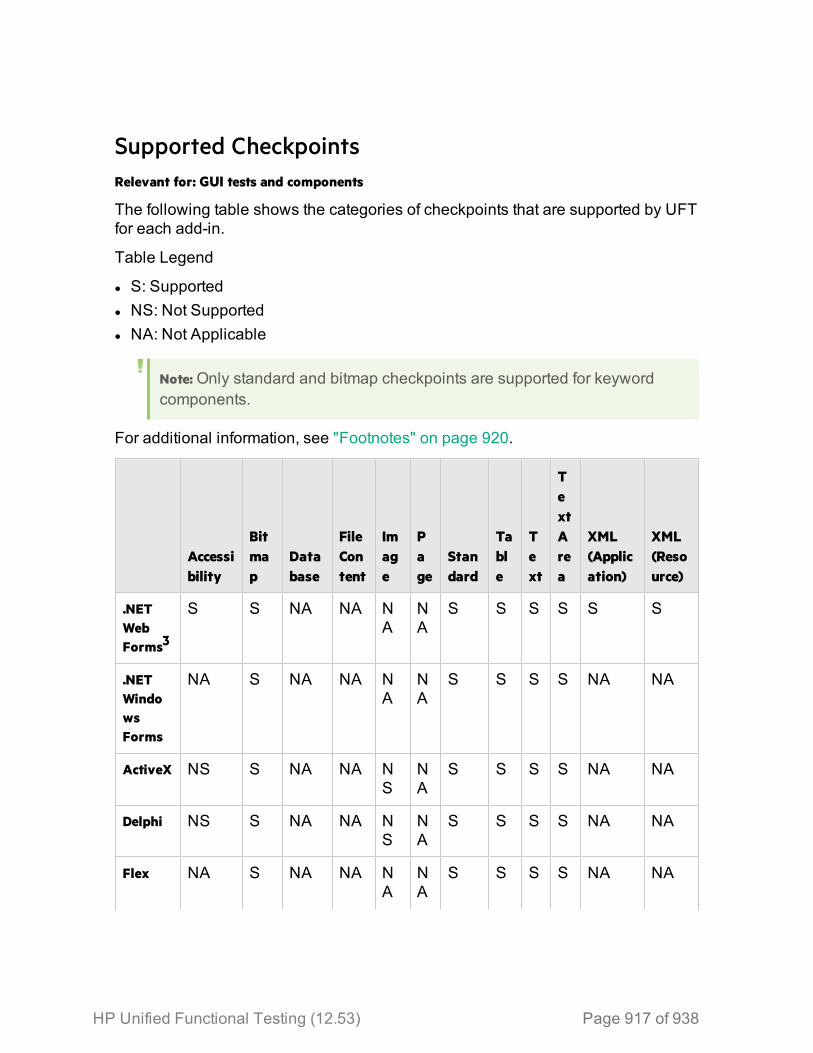
Supported CheckpointsRelevant for: GUI tests and components
The following table shows the categories of checkpoints that are supported by UFTfor each add-in.
Table Legend
l S: Supportedl NS: Not Supportedl NA: Not Applicable
Note: Only standard and bitmap checkpoints are supported for keywordcomponents.
For additional information, see "Footnotes" on page 920.
Accessibility
Bitmap
Database
FileContent
Image
Page
Standard
Table
Text
TextArea
XML(Application)
XML(Resource)
.NETWebForms3
S S NA NA NA
NA
S S S S S S
.NETWindowsForms
NA S NA NA NA
NA
S S S S NA NA
ActiveX NS S NA NA NS
NA
S S S S NA NA
Delphi NS S NA NA NS
NA
S S S S NA NA
Flex NA S NA NA NA
NA
S S S S NA NA
HP Unified Functional Testing (12.53) Page 917 of 938
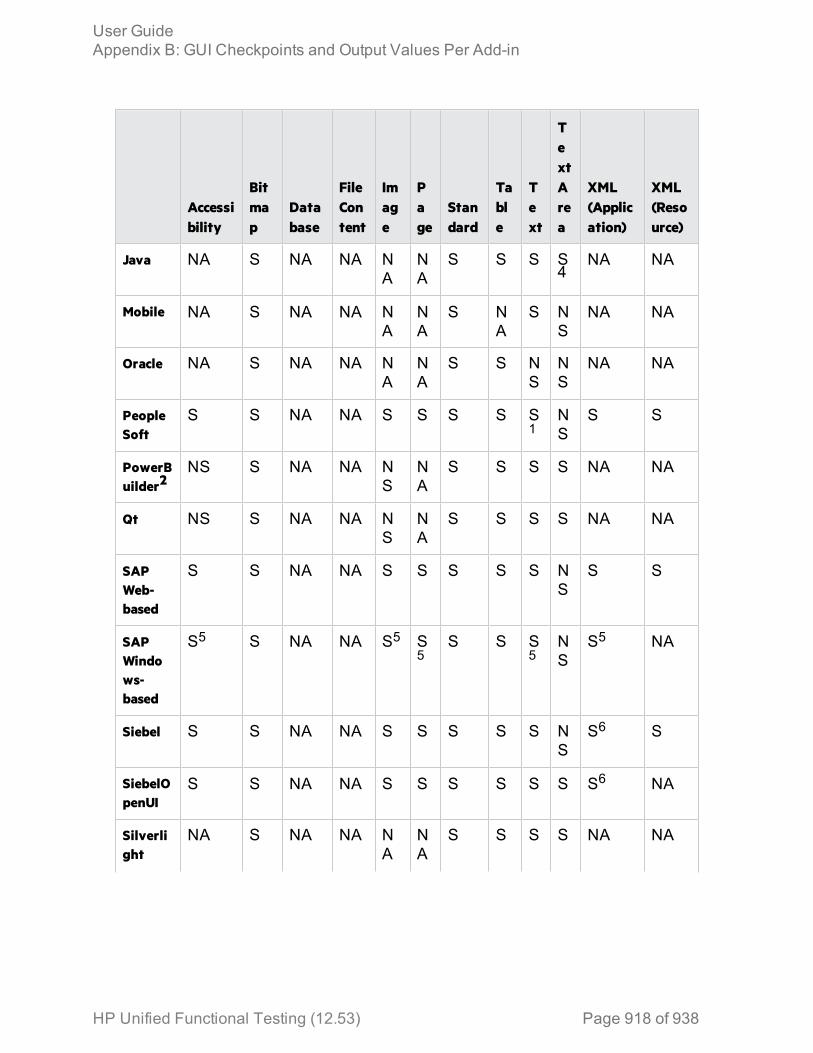
Accessibility
Bitmap
Database
FileContent
Image
Page
Standard
Table
Text
TextArea
XML(Application)
XML(Resource)
Java NA S NA NA NA
NA
S S S S4
NA NA
Mobile NA S NA NA NA
NA
S NA
S NS
NA NA
Oracle NA S NA NA NA
NA
S S NS
NS
NA NA
PeopleSoft
S S NA NA S S S S S1
NS
S S
PowerBuilder2
NS S NA NA NS
NA
S S S S NA NA
Qt NS S NA NA NS
NA
S S S S NA NA
SAPWeb-based
S S NA NA S S S S S NS
S S
SAPWindows-based
S5 S NA NA S5 S5
S S S5
NS
S5 NA
Siebel S S NA NA S S S S S NS
S6 S
SiebelOpenUI
S S NA NA S S S S S S S6 NA
Silverlight
NA S NA NA NA
NA
S S S S NA NA
User GuideAppendix B: GUI Checkpoints and Output Values Per Add-in
HP Unified Functional Testing (12.53) Page 918 of 938

Accessibility
Bitmap
Database
FileContent
Image
Page
Standard
Table
Text
TextArea
XML(Application)
XML(Resource)
StandardWindows
NS S NA NA NS
NA
S S S S NA NA
Stingray
NA S NA NA NA
NA
S S S S NA NA
TerminalEmulator
NA S NA NA NA
NA
S NA
S7
NA
NA NA
TestingExtensibility
NA S NA NA S NA
S S S1
S NA NA
UIAutomation
NS S NS NS NS
NS
S NS
S S NS NS
VisualAge forSmalltalk
NA S NA NA NA
NA
S S S S NA NA
VisualBasic
NS S NA NA NS
NA
S S S S NA NA
Web S S NA NA S S S S S1
S S6 NA
WindowsRuntime
NA S NA NA NA
NA
S S S S NA NA
WPF NA S NA NA NA
NA
S S S S NA NA
User GuideAppendix B: GUI Checkpoints and Output Values Per Add-in
HP Unified Functional Testing (12.53) Page 919 of 938
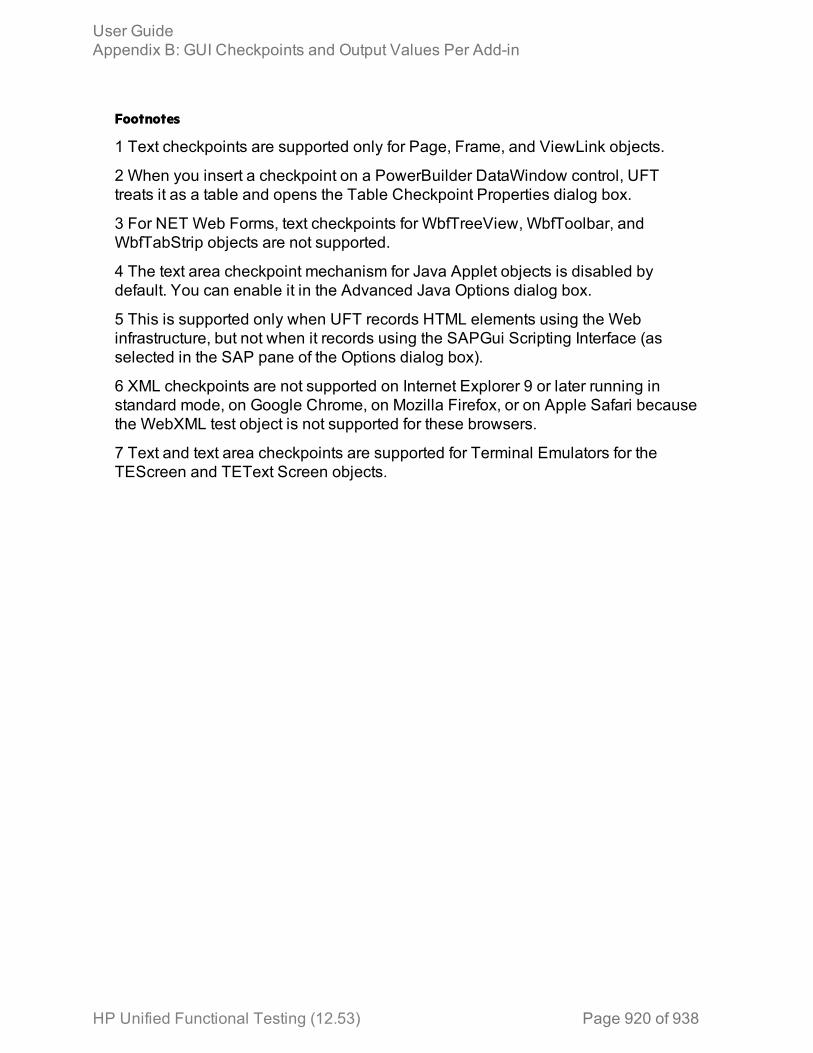
Footnotes
1 Text checkpoints are supported only for Page, Frame, and ViewLink objects.
2 When you insert a checkpoint on a PowerBuilder DataWindow control, UFTtreats it as a table and opens the Table Checkpoint Properties dialog box.
3 For NET Web Forms, text checkpoints for WbfTreeView, WbfToolbar, andWbfTabStrip objects are not supported.
4 The text area checkpoint mechanism for Java Applet objects is disabled bydefault. You can enable it in the Advanced Java Options dialog box.
5 This is supported only when UFT records HTML elements using the Webinfrastructure, but not when it records using the SAPGui Scripting Interface (asselected in the SAP pane of the Options dialog box).
6 XML checkpoints are not supported on Internet Explorer 9 or later running instandard mode, on Google Chrome, on Mozilla Firefox, or on Apple Safari becausethe WebXML test object is not supported for these browsers.
7 Text and text area checkpoints are supported for Terminal Emulators for theTEScreen and TEText Screen objects.
User GuideAppendix B: GUI Checkpoints and Output Values Per Add-in
HP Unified Functional Testing (12.53) Page 920 of 938
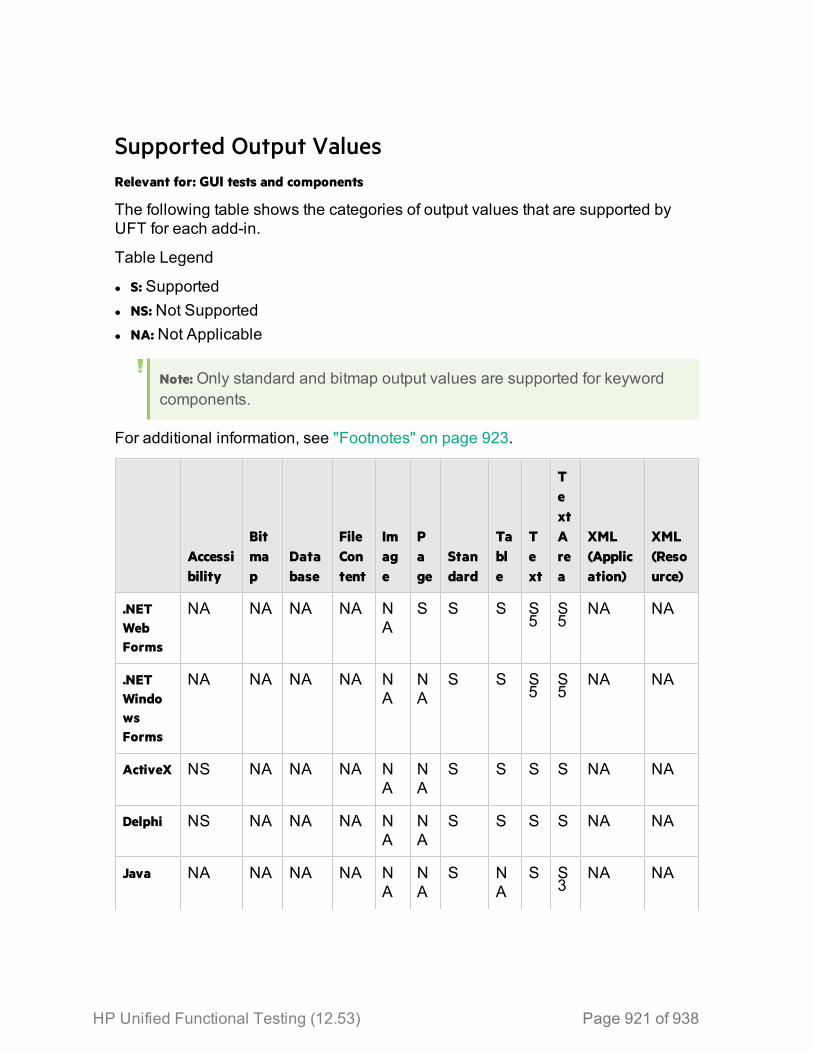
Supported Output ValuesRelevant for: GUI tests and components
The following table shows the categories of output values that are supported byUFT for each add-in.
Table Legend
l S: Supportedl NS: Not Supportedl NA: Not Applicable
Note: Only standard and bitmap output values are supported for keywordcomponents.
For additional information, see "Footnotes" on page 923.
Accessibility
Bitmap
Database
FileContent
Image
Page
Standard
Table
Text
TextArea
XML(Application)
XML(Resource)
.NETWebForms
NA NA NA NA NA
S S S S5
S5
NA NA
.NETWindowsForms
NA NA NA NA NA
NA
S S S5
S5
NA NA
ActiveX NS NA NA NA NA
NA
S S S S NA NA
Delphi NS NA NA NA NA
NA
S S S S NA NA
Java NA NA NA NA NA
NA
S NA
S S3
NA NA
HP Unified Functional Testing (12.53) Page 921 of 938

Accessibility
Bitmap
Database
FileContent
Image
Page
Standard
Table
Text
TextArea
XML(Application)
XML(Resource)
Mobile NA NA NA NA NA
NA
S NA
S NS
NA NA
Oracle NA NA NA NA NA
NA
S S NA
NA
NA NA
PeopleSoft
NA NA NA NA NA
S S S S1
NS
S S
PowerBuilder2
NA NA NA NA NA
NA
S NA
S S NA NA
Qt NA NA NA NA NA
NA
S S S S NA NA
SAPWeb-based
NA NA NA NA NA
S S S S NS
S S
SAPWindows-based
NA NA NA NA NA
S4
S S S4
NS
S4 S
Siebel NA NA NA NA NA
S S S S NS
S S
SiebelOpenUI
NA NA NA NA NA
S S S S1
S S6 NA
Silverlight
NA NA NA NA NA
NA
S S S S NA NA
StandardWindows
NA NA NA NA NA
NA
S S S S NA NA
User GuideAppendix B: GUI Checkpoints and Output Values Per Add-in
HP Unified Functional Testing (12.53) Page 922 of 938
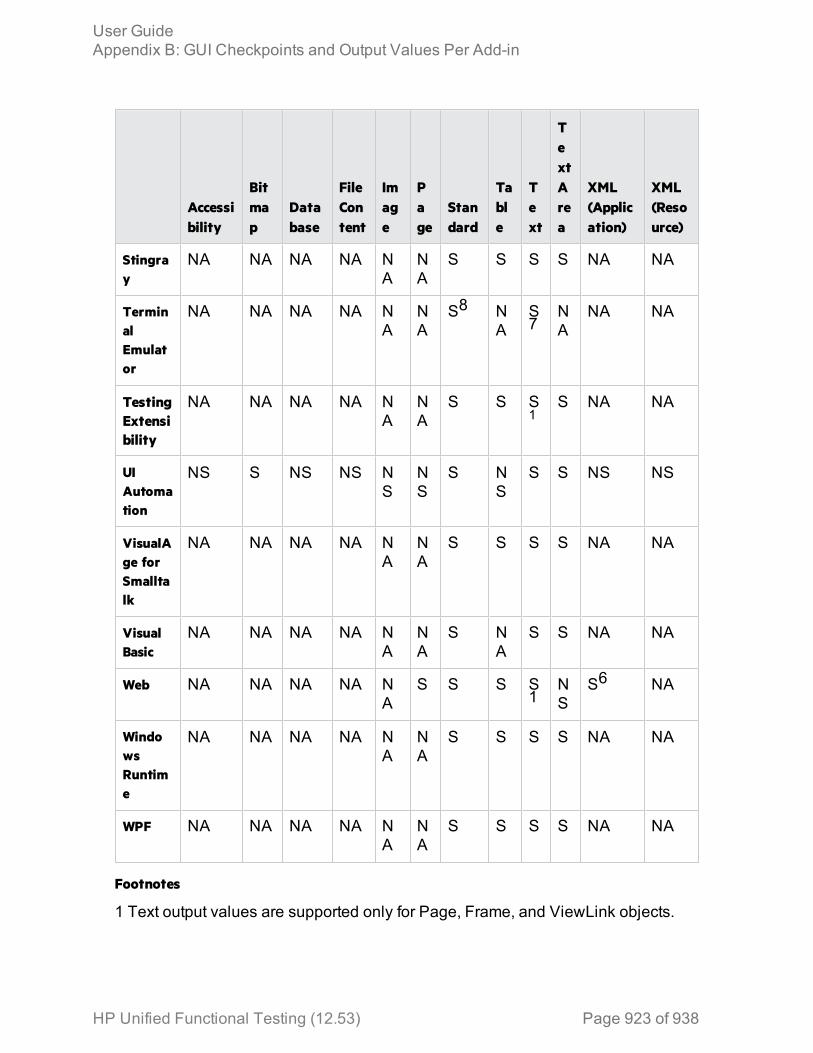
Accessibility
Bitmap
Database
FileContent
Image
Page
Standard
Table
Text
TextArea
XML(Application)
XML(Resource)
Stingray
NA NA NA NA NA
NA
S S S S NA NA
TerminalEmulator
NA NA NA NA NA
NA
S8 NA
S7
NA
NA NA
TestingExtensibility
NA NA NA NA NA
NA
S S S1
S NA NA
UIAutomation
NS S NS NS NS
NS
S NS
S S NS NS
VisualAge forSmalltalk
NA NA NA NA NA
NA
S S S S NA NA
VisualBasic
NA NA NA NA NA
NA
S NA
S S NA NA
Web NA NA NA NA NA
S S S S1
NS
S6 NA
WindowsRuntime
NA NA NA NA NA
NA
S S S S NA NA
WPF NA NA NA NA NA
NA
S S S S NA NA
Footnotes
1 Text output values are supported only for Page, Frame, and ViewLink objects.
User GuideAppendix B: GUI Checkpoints and Output Values Per Add-in
HP Unified Functional Testing (12.53) Page 923 of 938

2 When you insert an output value step on a PowerBuilder DataWindow control,UFT treats it as a table and opens the Table Output Value Properties dialog box.
3 The text area output mechanism for Java Applet objects is disabled by default.You can enable it in the Advanced Java Options dialog box.
4 This is supported only when UFT records HTML elements using the Webinfrastructure, but not when it records using the SAPGui Scripting Interface (asselected in the SAP pane of the Options dialog box).
5 This is supported only when UFT is configured to use the OCR (optical characterrecognition) mechanism.
6 XML output values are not supported on Internet Explorer 9 or later running instandard mode, on Google Chrome, or on Mozilla Firefox, because the WebXMLtest object is not supported for these browsers.
7 You can create text output values (tests only) only for TeScreen andTeTextScreen objects.
8 In the terminal emulator window you can add text checkpoints or output values(tests only) and standard checkpoints and output values for the status bar and thedialog boxes that open from the menu options. UFT recognizes these as standardWindows objects.
User GuideAppendix B: GUI Checkpoints and Output Values Per Add-in
HP Unified Functional Testing (12.53) Page 924 of 938
Appendix C: Frequently Asked Questions forGUI TestingRelevant for: GUI tests and components
This chapter answers some of the questions that are asked most frequently byadvanced users of UFT. The questions and answers are divided into the followingsections:
This chapter includes:
• Programming in the Editor and function libraries 926• Can I store functions and subroutines in a function library? 926• How can I enter information during a run session? 926• I have aMicrosoft Access database that contains data I would like to use inmy test.How do I do this? 926• How do I customize the run results? 927
• Working with dynamic content 927• How can I create and run tests or components on objects that change dynamicallyfrom viewing to viewing? 927• How can I check that an object or child object exists (or does not exist)? 927• How doesUFT record on dynamically generated URLs andWeb pages? 928• How doesUFT handle tabs in browsers? 928
• AdvancedWeb issues 929• How doesUFT handle cookies? 929• Where can I find aWeb page's cookie? 929• How doesUFT handle session IDs? 929• How doesUFT handle server redirections? 929• How doesUFT handlemeta tags? 930• DoesUFT work with .asp and .jsp? 930• How doesUFT support AJAX? 930• DoesUFT work with COM? 930• DoesUFT work with XML? 930• How can I accessHTML tags directly? 931• How can I send keyboard key commands (such as shortcut commands) to objectsthat do not support the Typemethod? 931
• Working withWindows applications 931• How can I record on nonstandardmenus? 931• Can I copy and paste to and from the Clipboard during a run session? 932
• Test and component maintenance 932• How do I maintain my test or component whenmy application changes? 932• Can I increase or decrease Active Screen information after I finish recording a test? 933
• Testing localized applications 934• Improving GUI testing performance 934• How can I improve the working speed of UFT whenworking with GUI testing? 934• How can I decrease the disk space used byUFT for GUI tests and components? 936
HP Unified Functional Testing (12.53) Page 925 of 938
• Is there a recommended length for tests? 936
Programming in the Editor and function librariesRelevant for: GUI tests and components
Can I store functions and subroutines in a function library?You can create function libraries to hold your function and then call the functionsfrom any test action or component by associating them with the test or with thecomponent's application area. You can also register your functions as methods forUFT test objects. Your registered methods override the functionality of an existingtest object method for the duration of a run session, or you can register a newmethod for a test object class.
For more details, see "User-Defined Functions" on page 575.
How can I enter information during a run session?The VBScript InputBox function enables you to display a dialog box that promptsthe user for input, and then continues running the test or component. You can usethe value that was entered by the user later in the run session. For details on theInputBox function, see the VBScript Reference. For example:
Browser("Mercury Tours").Page("Mercury Tours").WebEdit("username").Set"administrator"Passwd = InputBox ("Enter password", "User Input")Browser("Mercury Tours").Page("Mercury Tours").WebEdit("password").Set Passwd
I have a Microsoft Access database that contains data Iwould like to use in my test. How do I do this?The Editor enables you to access databases using ADO and ODBC. Below is asample test that searches for books written by an author in the "Authors" table ofthe database.
Dim MyDBDim MyEngSet MyEng = CreateObject("DAO.DBEngine.35")Dim TdDim rs' Specify the database to use.Set MyDB = MyEng.OpenDatabase("BIBLIO.MDB")' Read and use the name of the first 10 authors.Set Td = MyDB.TableDefs("Authors")
User GuideAppendix C: Frequently Asked Questions for GUI Testing
HP Unified Functional Testing (12.53) Page 926 of 938
Set rs = Td.OpenRecordsetrs.MoveFirstFor i = 1 To 10 Browser("Book Club").Page("Search Books").WebEdit("Author Name").Set rs("Author") Browser("Book Club").Page("Search Books").WebButton("Search").ClickNext
How do I customize the run results?You can add information to the run results by using the ReportEvent method to addan event to the Run Results Viewer-based report or the AddRunInformation orReportHtmlEvent methods to add an event to the HTML report. This adds a step tothe run results containing a free-text message and a step status that can potentiallyaffect the status of the run session. The step can also include an image, such as alogo, if you specify an image file path.
You can also add custom report statements using the Insert Report dialog box.
For more details, see the Reporter object in the Utility Objects section of the UFTObject Model Reference for GUI Testing.
Working with dynamic contentRelevant for: GUI tests and components
How can I create and run tests or components on objectsthat change dynamically from viewing to viewing?Sometimes the content of objects in an application changes due to dynamiccontent. You can create dynamic descriptions of these objects so that UFT willrecognize them when it runs the test or component using regular expressions, theDescription object, repository parameters, or SetTOProperty steps.
How can I check that an object or child object exists (ordoes not exist)?Some objects are created in an application only after you perform an operation. Forexample, a link in one window sometimes creates another window. The newlycreated window may be an independent object, or a child of the original window.
Before you perform operations on an object created during a run session, you maywant to verify that the object already exists.
User GuideAppendix C: Frequently Asked Questions for GUI Testing
HP Unified Functional Testing (12.53) Page 927 of 938
Use the Exist property to check whether the object exists in the application. Thisproperty looks for an object in the application that matches the test object'sdescription. For example:
If Window("Main").ActiveX("Slider").Exist Then. . .
Alternatively, you can use the ChildObjects method to retrieve all child objects (or thesubset of child objects that match a certain description) on the Desktop or withinany other parent object.
Set oDesc = Description.CreateoDesc("Class Name").Value = "Window"Set coll = Desktop.ChildObjects(oDesc)For i = 0 to coll.count -1 msgbox coll(i).GetROProperty("text")Next
l After you use the ChildObjects method to retrieve an object, UFT accesses theobject directly in the application and does not save a description for the object.Therefore, you must use the object immediately after retrieving it, before anythingin the application changes.
l The Exist property searches for objects based on their description, and istherefore not relevant for objects retrieved by the ChildObjects method. (The Existproperty always returns true when called for such objects).
For more details on the Exist property and ChildObjects method, see the CommonMethods and Properties section of the UFT Object Model Reference for GUI Testing.
How does UFT record on dynamically generated URLsand Web pages?UFT actually clicks links as they are displayed on the page. Therefore, UFTrecords how to find a particular object, such as a link on the page, rather than theobject itself. For example, if the link to a dynamically generated URL is an image,then UFT records the "IMG" HTML tag, and the name of the image. This enablesUFT to find this image in the future and click on it.
How does UFT handle tabs in browsers?UFT provides several methods that you can use with the Browser test object tomanage tabs in your Web browser.
User GuideAppendix C: Frequently Asked Questions for GUI Testing
HP Unified Functional Testing (12.53) Page 928 of 938
l OpenNewTab opens a new tab in the current Web browser.l IsSiblingTab indicates whether a specified tab is a sibling of the current tab objectin the same browser window.
l Close closes the current tab if more than one tab exists, and closes the browserwindow if the browser contains only one tab.
l CloseAllTabs closes all tabs in a browser and closes the browser window.For more details on these Browser-related methods, see the Web section of the UFTObject Model Reference for GUI Testing.
Advanced Web issuesRelevant for: GUI tests and components
How does UFT handle cookies?Server-side connections, such as CGI scripts, can use cookies both to store andretrieve information on the client side of the connection.
UFT stores cookies in the memory for each user, and the browser handles them asit normally would.
Where can I find a Web page's cookie?The cookie used by the Internet Explorer browser can be accessed through thebrowser's Document Object Model (DOM) using the .Object property (forcomponents, you do this in a user-defined function). In the following example thecookie collection is returned the from the browser:
Browser("Flight reservations").Page("Flight reservations").Object.Cookie
How does UFT handle session IDs?The server, not the browser, handles session IDs, usually by a cookie or byembedding the session ID in all links. This does not affect UFT.
How does UFT handle server redirections?When the server redirects the client, the client generally does not notice theredirection, and misdirections generally do not occur. In most cases, the client isredirected to another script on the server. This additional script produces the HTMLcode for the subsequent page to be viewed. This has no effect on UFT or thebrowser.
User GuideAppendix C: Frequently Asked Questions for GUI Testing
HP Unified Functional Testing (12.53) Page 929 of 938
How does UFT handle meta tags?Meta tags do not affect how the page is displayed. Generally, they containinformation only about who created the page, how often it is updated, what thepage is about, and which keywords represent the page's content. Therefore, UFThas no problem handling meta tags.
Does UFT work with .asp and .jsp?Dynamically created Web pages utilizing Active Server Page technology have an.asp extension. Dynamically created Web pages utilizing Java Server Pagetechnology have a .jsp extension. These technologies are completely server-sideand have no bearing on UFT.
How does UFT support AJAX?You can use UFT Web Add-in Extensibility to add your own support for customWeb controls. The Web Add-in Extensibility SDK installs a sample toolkit supportset that provides partial support for some ASP .NET AJAX controls. You can usethis sample to learn how to create your own support for your AJAX controls. Formore details, see the HP UFT Web Add-in Extensibility Developer Guide.
Does UFT work with COM?UFT complies with the COM standard.
UFT supports COM objects embedded in Web pages (which are currentlyaccessible only using Microsoft Internet Explorer), and you can drive COM objectsin VBScript.
Does UFT work with XML?XML is eXtensible Markup Language, a pared-down version of SGML for Webdocuments, that enables Web designers to create their own customized tags. UFTsupports XML and recognizes XML tags as objects.
For tests and scripted components: You can also create XML checkpoints to check thecontent of XML documents in Web pages, frames or files. UFT also supports XMLoutput and schema validation.
For more details, see "XML checkpoints" on page 279, and the XMLUtil object inthe Utility Objects section of the UFT Object Model Reference for GUI Testing.
User GuideAppendix C: Frequently Asked Questions for GUI Testing
HP Unified Functional Testing (12.53) Page 930 of 938
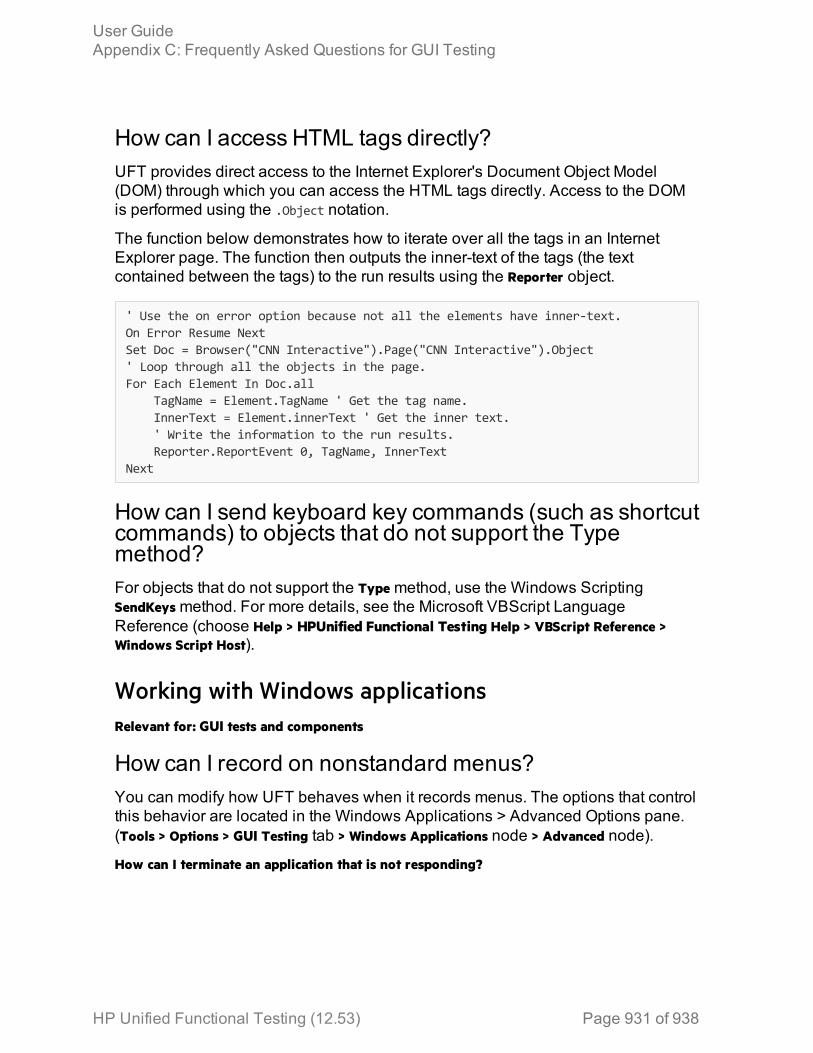
How can I access HTML tags directly?UFT provides direct access to the Internet Explorer's Document Object Model(DOM) through which you can access the HTML tags directly. Access to the DOMis performed using the .Object notation.
The function below demonstrates how to iterate over all the tags in an InternetExplorer page. The function then outputs the inner-text of the tags (the textcontained between the tags) to the run results using the Reporter object.
' Use the on error option because not all the elements have inner-text.On Error Resume NextSet Doc = Browser("CNN Interactive").Page("CNN Interactive").Object' Loop through all the objects in the page.For Each Element In Doc.all TagName = Element.TagName ' Get the tag name. InnerText = Element.innerText ' Get the inner text. ' Write the information to the run results. Reporter.ReportEvent 0, TagName, InnerTextNext
How can I send keyboard key commands (such as shortcutcommands) to objects that do not support the Typemethod?For objects that do not support the Type method, use the Windows ScriptingSendKeys method. For more details, see the Microsoft VBScript LanguageReference (choose Help > HPUnified Functional Testing Help > VBScript Reference >Windows Script Host).
Working with Windows applicationsRelevant for: GUI tests and components
How can I record on nonstandard menus?You can modify how UFT behaves when it records menus. The options that controlthis behavior are located in the Windows Applications > Advanced Options pane.(Tools > Options > GUI Testing tab > Windows Applications node > Advanced node).
How can I terminate an application that is not responding?
User GuideAppendix C: Frequently Asked Questions for GUI Testing
HP Unified Functional Testing (12.53) Page 931 of 938
You can terminate any standard application while running a test in UFT by addingone of the following steps to the test:
l SystemUtil.CloseProcessByName "<app.exe>"
l SystemUtil.CloseProcessByWndTitle "<Some Title>"
Can I copy and paste to and from the Clipboard during arun session?You can use the Clipboard object to copy, cut, and paste text during a UFT runsession.
The Clipboard object supports the same methods as the Clipboard object availablein Visual Basic, such as:
l Clear
l GetData
l GetText
l SetData
l SetText
For details on these methods, see http://msdn.microsoft.com/en-us/library/ms172962.aspx.
Below is an example of Clipboard object usage:
Set MyClipboard = CreateObject("Mercury.Clipboard")MyClipboard.ClearMyClipboard.SetText "TEST"MsgBox MyClipboard.GetText
Test and component maintenanceRelevant for: GUI tests and components
How do I maintain my test or component when myapplication changes?The way to maintain a test or component when your application changes dependson how much your application changes. This is one of the main reasons youshould create a small group of tests or components, rather than one large test orcomponent for your entire application.
You can also use UFT actions to design more modular and efficient tests. Divideyour test into several actions, based on functionality. When your applicationchanges, you can modify a specific action, without changing the rest of the test.
User GuideAppendix C: Frequently Asked Questions for GUI Testing
HP Unified Functional Testing (12.53) Page 932 of 938
Whenever possible, insert calls to reusable actions rather than creating identicalpieces of script in several tests. This way, changes to your original reusable actionare automatically applied to all tests calling that action.
If you have many tests, components, and actions that contain the same test objects,it is recommended to work with shared object repositories so that you can updateobject information in a centralized location.
You can use the Update Run Mode option to update changed information forcheckpoints or the Active Screen, or to change the set of identification propertiesused to identify the objects in your application.
If there is a discrepancy between the identification property values saved in theobject repository and the object property values in the application, you can use theMaintenance Run Mode to help correct this. When you run a test or component inMaintenance Run Mode, UFT runs your test or component, and then guides youthrough the process of updating your steps and object repository each time itencounters a step it cannot perform due to an object repository discrepancy. Formore details, see "Maintenance Run mode" on page 148.
Can I increase or decrease Active Screen information afterI finish recording a test?If you find that the information saved in the Active Screen after recording is notsufficient, or if you no longer need Active Screen information, and you want todecrease the size of your test or component, there are several methods of changingthe amount of Active Screen information saved.
l To decrease the disk space used by your test or component, you can deleteActive Screen information by selecting Save As, and clearing the Save ActiveScreen files check box.
l If you chose not to save all information in the Active Screen when testing aWindows application, you can use one of several methods to increase theinformation stored in the Active Screen.Confirm that the Active Screen capture preference in the Active Screen pane of theOptions dialog box (Tools > Options > GUI Testing tab > Active Screen node) is set tocapture the amount of information you need and then:l Perform an Update Run Mode operation to save the required amount ofinformation in the Active Screen for all existing steps.
l Re-record the steps containing the objects you want to add to the ActiveScreen.To re-record the step, select the step after which you want to record your step,position your application to match the selected location in your test orcomponent, and then begin recording. Alternatively, place a breakpoint in yourtest at the step before which you want to add a step and run your test or
User GuideAppendix C: Frequently Asked Questions for GUI Testing
HP Unified Functional Testing (12.53) Page 933 of 938
component to the breakpoint. This brings your application to the point fromwhich to record the step.
Testing localized applicationsRelevant for: GUI tests only
I am testing localized versions of a single application, each with localized user interfacestrings.
How do I create efficient tests in UFT?
You can parameterize these user interface strings using parameters from the globalEnvironment variable list. This is a list of variables and corresponding values thatcan be accessed from any test. For details, see "Parameterizing Object Values" onpage 330.
I am testing localized versions of a single application. How can I efficiently inputdifferent data in my tests, depending on the language of the application?
If you are running a single iteration of your test, or if you want values to remainconstant for all iterations of an action or test, use environment variables, and thenchange the active environment variable file for each test run.
If you are running multiple iterations of your test or action, and you want the inputdata to change in each iteration, you can create an external data table for eachlocalized version of your application. When you change the localized version of theapplication you are testing, you simply switch the data table file for your test in theResources pane of the Test Settings dialog box.
Improving GUI testing performanceRelevant for: GUI tests and components
How can I improve the working speed of UFT whenworking with GUI testing?You can improve the working speed of UFT by doing any of the following:
l Load only the add-ins you need for a specific UFT session when UFT starts.This will improve performance while learning objects and during run sessions.
l Run your tests or components in "fast mode." From the Test Runs pane in theOptions dialog box (Tools > Options > GUI Testing tab > Test Runs node), select theFast option. This instructs UFT to run your test or component without displayingthe execution arrow for each step, enabling the test or component to run faster.
User GuideAppendix C: Frequently Asked Questions for GUI Testing
HP Unified Functional Testing (12.53) Page 934 of 938
l Reduce disk space and improve test run time by saving screen captures andmovie segments only in certain situations, such as when errors occur, or by notsaving them at all.Use the Save still image captures to results and Save movie toresults options in the Screen Capture pane in the Options dialog box (Tools > Options> GUI Testing tab > Screen Capture node).
l If you are using Insight test objects, adjust the number and size of snapshotssaved with the test objects.In the object repository, you can delete all of the snapshots stored with theInsight test objects after you finalize the test object images and verify that theyenable correct object identification in all relevant scenarios. (In the ObjectRepository window or the Object Repository Manager, Tools > Delete InsightSnapshots.)
l Save the run results report to a temporary folder to overwrite the results from theprevious run session every time you run a test or component. For more details,see .
l Try to use the same application area for all components in a business processtest.
l Minimize the number of actions in a test. Ideally, a test should not contain morethan a few dozen actions.
l Store your functions in function libraries instead of as reusable actions.l Remove unwanted or obsolete run results from your system, according tospecific criteria that you define. This enables you to free up valuable disk space.
l If you are not using the Active Screen while editing your test, hide the ActiveScreen while editing your test to improve editing response time by right-clickingthe Active Screen pane and selecting Hide.
l Decide if and how much information you want to capture and save in the ActiveScreen. The more information you capture, the easier it is to add steps to yourtest or component using the many Active Screen options, but more capturedinformation also leads to slower recording and editing times. Set your options inthe Active Screen pane of the Options dialog box (Tools > Options > GUI Testing tab> Active Screen node).
l When you save a new test or component, or when you save a test or componentwith a new name using Save As, you can choose not to save the captured ActiveScreen files with the test or component by clearing the Save Active Screen filesoption in the Save or Save As dialog box.
l Decrease the timeout settings for your application. These settings depend on theapplication, objects in the application being tested, and the operation being runon the object. You can find these settings in the following locations:l In the Run pane of the Settings dialog box (File > Settings > Run), decrease theObject Synchronization timeout.
User GuideAppendix C: Frequently Asked Questions for GUI Testing
HP Unified Functional Testing (12.53) Page 935 of 938

l in the Web pane of the Settings dialog box (File > Settings > Web), decrease theBrowser Navigation timeout.
l In the Run pane of the Settings dialog box (File > Settings > Run), disable SmartIdentification by selecting the Disable Smart Identification during the run sessionoption.
l Save tests on the file system instead of network drives.
How can I decrease the disk space used by UFT for GUItests and components?l Save screen captures and movie segments only in certain situations, such aswhen errors occur, or by not saving them at all. with the Save still image captures toresults and Save movie to results options in the Screen Capture pane in the Optionsdialog box (Tools > Options > GUI Testing tab > Screen Capture node).
l If you are using Insight test objects, adjust the number and size of snapshotssaved with the test objects.In the object repository, you can delete all of the snapshots stored with theInsight test objects after you finalize the test object images and verify that theyenable correct object identification in all relevant scenarios.
l When you save a new test, or when you save a test with a new name using SaveAs, you can choose not to save the captured Active Screen files with the test byclearing the Save Active Screen files option in the Save or Save As dialog box. Thisis especially useful when you have finished designing your test and you plan touse your test only for test runs. Tests without Active Screen files use significantlyless disk space.
Is there a recommended length for tests?Although there is no formal limit regarding test length, it is recommended that youdivide your tests into actions and that you use reusable actions in tests, wheneverpossible. An action should contain no more than a few hundreds steps and, ideally,no more than a few dozen. For details, see Actions in Testing.
User GuideAppendix C: Frequently Asked Questions for GUI Testing
HP Unified Functional Testing (12.53) Page 936 of 938

Send Us FeedbackLet us know how we can improve your experience with the User Guide.
Send your email to: [email protected]
HP Unified Functional Testing (12.53) Page 937 of 938

Copyright © 2022 FDOKUMEN