HP TechPulse - FTP Directory Listing
31
HP Wolf Security Agent Installation Guide
-
Upload
khangminh22 -
Category
Documents
-
view
1 -
download
0
Transcript of HP TechPulse - FTP Directory Listing

HP Wolf Security Agent Installation Guide
Installation Guide – HP Wolf Security
1
Contents Introduction ................................................................................................................................................................. 3
Target Audience ......................................................................................................................................................... 3
Quick Links .................................................................................................................................................................. 3 System Requirements - Hardware and Software ................................................................................................ 3
Technical Support and FAQ ...................................................................................................................................... 3
Reporting Guide ......................................................................................................................................................... 3
Individual Client Download ....................................................................................................................................... 3
HP TechPulse Getting Started Guide ...................................................................................................................... 3
Network Requirements ............................................................................................................................................ 4
Antivirus Exclusion Requirements - MANDATORY ............................................................................................... 4
Installation .................................................................................................................................................................. 5 Unified Installer Method ........................................................................................................................................... 5
Unified Installer Command Line Syntax ............................................................................................................ 7
Manual Method .......................................................................................................................................................... 7
Downloading HP Wolf Security Agent ............................................................................................................... 7
Obtaining Your HP Sure Click Region Code & Enrollment Region– ................................................................... 8
Installing the HP Wolf Security Agent .................................................................................................................... 9
Verifying Installation Success and Restarting the Computer ........................................................................... 10
Automatic Deployment Options ............................................................................................................................. 13 Creating an InstallSureClick.CMD Script ............................................................................................................... 13
Installing The HP Wolf Security Agent Using the InstallSureClick.cmd File .................................................... 14
Deploying The HP Wolf Security Agent Using MS Active Directory (AD) Group Policy ..................................... 15 Create a Group Policy Object (GPO) and Install the HP Wolf Security Agent .................................................. 15
Deploying The HP Wolf Security Agent Using Microsoft System Center Configuration Manager (SCCM) ..... 16 Downloading the HP Wolf Security Agent and Editing the .VBS Files ............................................................. 16
Creating the HP Wolf Security Agent in SCCM ..................................................................................................... 16
Creating the Deployment Type ............................................................................................................................. 18
Modifying the HP Wolf Security Agent Settings .................................................................................................. 19
Copying the HP The HP Wolf Security Agent Deployment Package to the SCCM Distribution Points ....... 19
Verifying Package Status on Distribution Points (DPs) ..................................................................................... 20
Deploying the HP Wolf Security Agent with SCCM ............................................................................................. 20
Verifying the HP Wolf Security Agent Software Deployment ........................................................................... 24

Installation Guide – HP Wolf Security
2
Deploying the HP Wolf Security Agent with Microsoft ......................................................................................... 25 HP WOLF SECURITY AGENT as an intunewin (win32) deployment .................................................................. 25
HP WOLF SECURITY AGENT as a LOB application deployment ........................................................................ 26
Uninstalling Wolf Security Agent ............................................................................................................................ 28 METHOD A: Using Add and Remove Programs ................................................................................................... 28
METHOD B: Using the Command Prompt ............................................................................................................ 28
METHOD C: Using SCCM .......................................................................................................................................... 28
ADDITIONAL INFORMATION ..................................................................................................................................... 29 Definitions ................................................................................................................................................................. 29
Regional Support ..................................................................................................................................................... 29

Installation Guide – HP Wolf Security
3
Introduction This guide has all the information you need to successfully install and uninstall the HP Wolf Security Agent clients. Deployment setup guides for Intune, Microsoft System Center, Microsoft Group Policy, manual and Unified installer methods are available. Please consult your onboarding expert or contact the regional support if you need help with your specific deployment.
Target Audience This is a technical guide built for the IT administrator or Security administrator responsible for the deployment of the clients.
Quick Links System Requirements - Hardware and Software Our products must be installed with a minimum set of hardware and software to function properly, learn more:
https://www.hpdaas.com/requirements
Technical Support and FAQ Do you have questions? Maybe the answer is here:
https://enterprisesecurity.hp.com/support/s/toparticles
Reporting Guide This document has all the HP TechPulse reporting and descriptions:
HP TechPulse Reporting guide
Individual Client Download You can download the HP Wolf Security agent from here:
https://www.hpdaas.com/software
HP TechPulse Getting Started Guide This document has all the helpful links you will need to navigate and answer HP TechPulse questions:
HP TechPulse Getting Started Guide

Installation Guide – HP Wolf Security
4
Network Requirements The below URLs and Ports must be open for our security service to function. There is not a list of IP addresses since this is a cloud service and those could change without warning.
North America (NA), Asia, Pacific, & Japan (APJ) and All Other Regions
https://bec-hpdaas-na.bromium-online.com Port: 443
https://cdn-sureclick.bromium-online.com Port: 443
Europe (EU)
https://bec-hpdaas-eu.bromium-online.com Port: 443
https://cdn-sureclick.bromium-online.com Port: 443
Antivirus Exclusion Requirements - MANDATORY Are you currently using a security product such as Symantec End Point Protection, McAfee EPO, Sophos or any other major security vendor? You will need to put exclusions into those tools for our products to work side-by-side. This should be one of the first things you do while preparing your deployment.
The full list can be found here: https://enterprisesecurity.hp.com/support/s/article/Bromium-and-Third-Party-Software-Interoperability-Guide

Installation Guide – HP Wolf Security
5
Installation There are 3 main ways to install the applications.
1. Unified Installer Method
2. Manual Method
3. Enterprise Deployment Methods
Unified Installer Method You can use the unified installer to download and install all 3 applications. TechPulse, The HP Wolf Security Agent, Sure Sense Advanced can all be installed with this installer at the same time. If you currently have any of the applications installed it will simply skip that application and install the ones you still need.
1. Obtain the installer from your Onboarding Manager or contact support.
a. The Unified Installer consist of two parts
i. Pssetup.exe – This is the installer
ii. tpscassatenants.csv – This is the configuration file that can be used to deploy non-interactively. You put the customer specific pins in the file and just point the exe to that file.
2. Save it locally. The Desktop is a convenient place.
3. Right click on the Pssetup.exe and run as Administrator.
4. Pick language.
5. Accept the EULA .
6. Select Browse and point the unified installer to the CustomerName_tpscassatenantscustomer .csv file that is in the same folder.

Installation Guide – HP Wolf Security
6
7. Next select the applications you want to install.
a. TechPulse is ALWAYS installed unless it is already installed.
b. If any of the applications are already installed, you will not be able to reinstall with this installer. You will need to uninstall that application and re-run the Unified Installer.
8. Check the box for HP Sure Sense Advanced.
9. Check the box for HP Sure Click Pro Security.
10. Select Next.
11. Select Install.
12. You will now watch the installer download and install the selected applications.
13. At the end of installation you can select Open Log File if troubleshooting is required.
14. You can also find more log files by navigating to C:\%temp% in your explorer navigation bar.
Installation Guide – HP Wolf Security
7
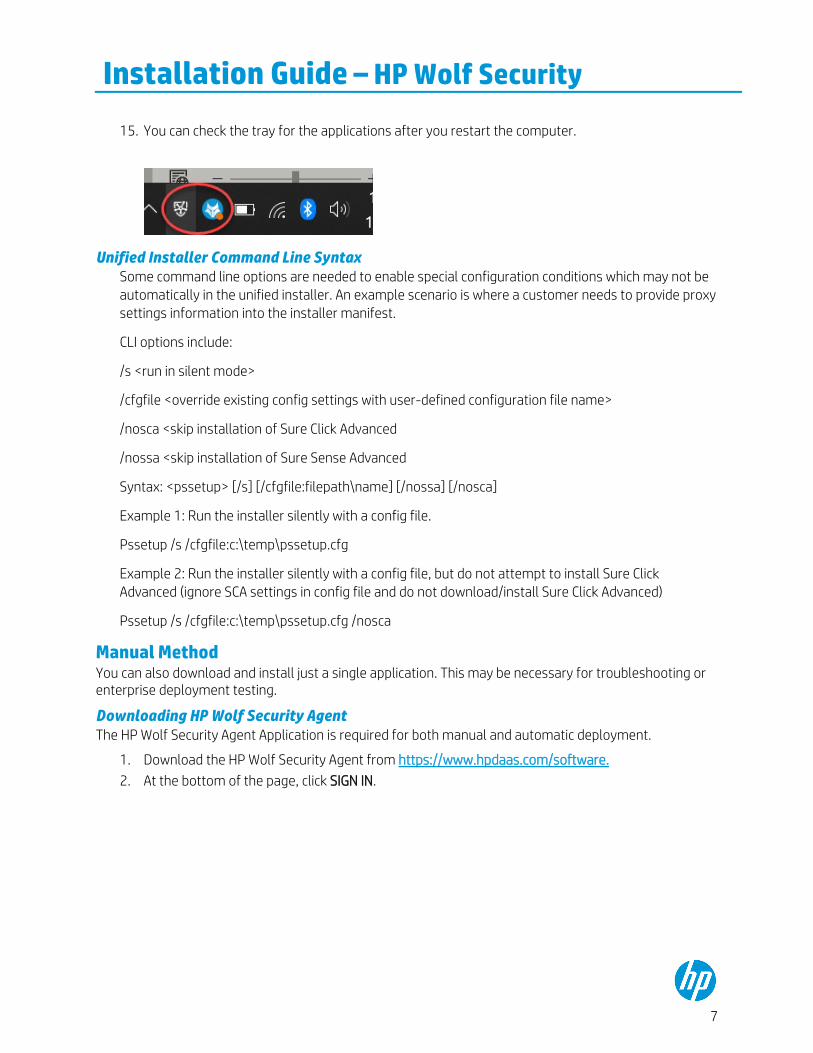
15. You can check the tray for the applications after you restart the computer.
Unified Installer Command Line Syntax Some command line options are needed to enable special configuration conditions which may not be automatically in the unified installer. An example scenario is where a customer needs to provide proxy settings information into the installer manifest.
CLI options include:
/s <run in silent mode>
/cfgfile <override existing config settings with user-defined configuration file name>
/nosca <skip installation of Sure Click Advanced
/nossa <skip installation of Sure Sense Advanced
Syntax: <pssetup> [/s] [/cfgfile:filepath\name] [/nossa] [/nosca]
Example 1: Run the installer silently with a config file.
Pssetup /s /cfgfile:c:\temp\pssetup.cfg
Example 2: Run the installer silently with a config file, but do not attempt to install Sure Click Advanced (ignore SCA settings in config file and do not download/install Sure Click Advanced)
Pssetup /s /cfgfile:c:\temp\pssetup.cfg /nosca
Manual Method You can also download and install just a single application. This may be necessary for troubleshooting or enterprise deployment testing.
Downloading HP Wolf Security Agent The HP Wolf Security Agent Application is required for both manual and automatic deployment.
1. Download the HP Wolf Security Agent from https://www.hpdaas.com/software.
2. At the bottom of the page, click SIGN IN.

Installation Guide – HP Wolf Security
8
3. You will then see the available security clients to download. Select HP Sure Click Pro Security Application. Download size is approximately: 330MB.
Obtaining Your HP Sure Click Region Code & Enrollment Region– Please contact an HP Service Expert for your HP Sure Click Reg Code. Also, confirm your enrollment region with an HP Service Expert.
Use the following chart to contact HP Managed Services, based on regions:

Installation Guide – HP Wolf Security
9
Region Managed Services Contact Address HP America [email protected] HP Asia, Pacific, Japan (APJ) [email protected]
HP China [email protected]
HP Europe, Middle East, & Africa (EMEA) [email protected]
HP India [email protected]
HP Japan [email protected]
HP Latin America [email protected]
Installing the HP Wolf Security Agent
Note: To complete the installation, use the HP Enrollment Code provided by HP Managed Services. For questions, please contact an HP Service Expert.
Follow these steps to install HP Wolf Security Agent:
1. Download the HP Wolf Security Agent Security Application installer from https://www.hpdaas.com/software. Save the file to a location such as C:\Temp.
2. Open an elevated command prompt. Click the search icon in the lower left of the Windows 10 desktop. Type CMD. Right click Command Prompt, then select Run as Administrator.
WARNING: You must use an elevated command prompt to install the application.
3. In the administrator command prompt, type CD\Temp or navigate to the location where you saved the install file.
4. Determine your installation type based on regions in the table below. Replace HPRegCode with the code provided by your HP Service Expert.
WARNING: Be sure to copy the below script into Notepad prior to running in the command prompt. Making sure that all hyphens (-) have copied over correctly.

Installation Guide – HP Wolf Security
10
North America (NA), Asia, Pacific, & Japan (APJ) and All Other Regions Msiexec.exe /I HPSureClickSetup.msi /qn /L*v bromiumlog.txt ServerURL=https://bec-hpdaas-na.bromium-online.com REGISTRATIONCODE=<HPRegCode>
Europe (EU) Msiexec.exe /I HPSureClickSetup.msi /qn /L*v bromiumlog.txt ServerURL=https://bec-hpdaas-eu.bromium-online.com REGISTRATIONCODE=<HPRegCode>
Note: If your company is headquartered in Europe use the EU server. For North America, Japan, and all other regions, use the North American server. If you have questions, please ask your HP Onboarding Manager.
5. After replacing <HPRegCode> with your company’s enrollment code and, paste the command into the command prompt window. Highlight the text, then press CTRL+C to copy the line. Use CTRL+V to paste into the command prompt window. Press Enter.
6. Th HP Wolf Security Agent will be installed silently without user interaction. Please wait at least 5 minutes for the installation to complete, then restart the computer to initialize Sure Click Pro.
NOTE: You will not see the The HP Wolf Security Agent icon in the system tray until after you restart your computer.
Verifying Installation Success and Restarting the Computer Follow the steps below to verify that HP Wolf Security Agent is installed correctly:
1. To make sure the instillation is running, type Services.msc in an Administrator command prompt and press Enter.
2. Verify that the HP Sure Click Remote Management Service appears in the list below and that the service status is ”Running.”

Installation Guide – HP Wolf Security
11
3. Click the Windows icon in the bottom left of the System Tray, then select the HP folder.
4. Search for HP Wolf Security Agent Desktop Console and Secure Browser to be sure that the application is installed.
5. Open the HP Wolf Security Agent Desktop Console and check the status of the protections.

Installation Guide – HP Wolf Security
12
6. Restart the computer when prompted by the Status.
WARNING: You must restart the computer after the application is installed. Otherwise, Sure Click Pro will not initialize properly.
7. After the computer restarts, check the HP Wolf Security Agent Desktop Console again for health and initialization information.

Installation Guide – HP Wolf Security
13
Automatic Deployment Options Creating an InstallSureClick.CMD Script Complete the following steps to create an InstallSureClick.cmd Script File. Use the same steps for Using AD Group Policy for Automatic Enrollment.
1. Download the HP Wolf Security Agent. For help, please see Downloading the HP HP Wolf Security Agent.
2. Place the HPSureClickSetup.msi file in a location that is accessible by all computers on the network. Or, place the HPSureClickSetup.msi file on a USB drive for computers that are not able to connect to the network.
3. Using a text editor such as Notepad, create a file named InstallSureClick.cmd.
4. Copy and paste the following text, based on region, into the body of the InstallSureClick.cmd script file:
NOTE: If you are in NA or APJ, use the NA install command. If you are in the EU or any other region, then use the EU install command.
North America (NA), Asia, Pacific, & Japan (APJ) REG QUERY " HKEY_LOCAL_MACHINE\SOFTWARE\Bromium\BEM\Agent " /s | Find "True" IF %ERRORLEVEL% == 0 goto end If %ERRORLEVEL% == 1 goto install goto end :install \\<NetworkShare>\Msiexec.exe /I HPSureClickSetup.msi /qn /L*v bromiumlog.txt ServerURL=https://bec-hpdaas-na.bromium-online.com REGISTRATIONCODE=<HPRegCode> goto end :end
Europe (EU) & All Other Regions REG QUERY " HKEY_LOCAL_MACHINE\SOFTWARE\Bromium\BEM\Agent " /s | Find "True" IF %ERRORLEVEL% == 0 goto end If %ERRORLEVEL% == 1 goto install goto end :install \\<NetworkShare>\Msiexec.exe /I HPSureClickSetup.msi /qn /L*v bromiumlog.txt ServerURL=https://bec-hpdaas-eu.bromium-online.com REGISTRATIONCODE=<HPRegCode> goto end :end
5. Replace <NetworkShare> with the location of the InstallSureClick.cmd script file.
6. Replace the <HPRegCode> with the HP Sure Click Registration Code provided by your HP service expert.
7. If copying the InstallSureClick.cmd file from a USB drive to a local computer, replace <NetworkShare> with a local path such as C:\Temp where files will be copied.

Installation Guide – HP Wolf Security
14
8. Save the InstallSureClick.cmd file.
9. If and only if installing the application on a computer not connected to the network, then copy both the InstallSureClick.cmd and HPSureClickSetup.msi file to a USB drive.
10. Otherwise, copy the InstallSureClick.cmd file and the HPSureClickSetup.msi file to a location accessible by all computers on the network.
Installing The HP Wolf Security Agent Using the InstallSureClick.cmd File Use this section to confirm that the InstallSureClick.cmd file works properly. Or, follow these steps to run the InstallSureClick.cmd file on a computer not connected to the network. Otherwise, skip ahead to the next section to install the application on multiple computers using AD GPO.
1. Browse to the location of the files on the USB drive and copy both files to C:\Temp.
2. Right click InstallSureClick.cmd then click Run as administrator.
3. Select Yes if prompted for permissions to run the script.
4. The HP Wolf Security Agent installs silently without user interaction. Please wait at least 15 minutes for the installation to complete, then restart the computer to initialize Sure Click Pro.
5. See Verifying Installation Success and Restarting the Computer to make certain The HP Wolf Security Agent initialized correctly.
WARNING: The network share path cannot contain spaces. Also, the network share path must be accessible by all computers on the network.

Installation Guide – HP Wolf Security
15
Deploying The HP Wolf Security Agent Using MS Active Directory (AD) Group Policy Information in this section contains advanced information intended for IT Professionals.
Create a Group Policy Object (GPO) and Install the HP Wolf Security Agent
Follow these steps to create a new AD GPO to silently install the HP Wolf Security Agent:
1. Create an InstallSureClick.cmd script file. For help, please see Create an InstallSureClick.cmd Script File.
2. On an AD Domain Controller, open a command prompt then type gpmc.msc to open the AD Group Policy Management Console.
3. Right click the domain name, then select Create a GPO in this Domain, and Link It Here.
4. Name the new Group Policy Object HP Sure Click Auto Install.
5. Right click the GPO HP Sure Click Auto Install, then select Edit.
6. Select Computer Configuration > Windows Settings > Scripts (Startup/Shutdown) > Startup.
7. In the Startup Properties Dialog Box, select Show Files.
8. Copy the InstallSureClick.cmd file into the folder.
9. In the Startup Properties Dialog Box, select Add, then browse to the location of and select the InstallSureClick.cmd file.
10. Select OK to close the dialog box. Computers will receive Group Policy Updates during the next refresh interval.
WARNING: Computers must be connected to your network for automatic software deployment with AD GPO.
NOTE: The installation requires local admin rights. Therefore, computers must restart to begin the software installation under the system context.
NOTE: Force group policy to refresh immediately on any computer. Open a command prompt on the target computer, then type gpupdate /force. Restart the computer to initialize the HP Wolf Security Agent.
NOTE: Sure Click Pro will not initialize until computers are restarted. Consider using GPO to automatically restart computers after The HP Wolf Security Agent is installed. Or, install the application and wait for another trigger to restart computers, such as automatic Windows Updates or an SCCM Maintenance Window.

Installation Guide – HP Wolf Security
16
Deploying The HP Wolf Security Agent Using Microsoft System Center Configuration Manager (SCCM) Information in this section contains advanced information intended for IT Professionals.
Follow these steps to deploy HP HP Wolf Security Agent using Microsoft SCCM. These instructions are intended for use with Microsoft (MS) SCCM v.2012 R2 but may apply to newer versions of SCCM as well.
There are four parts to deploying HP Proactive Management Device Application with SCCM. The process follows this sequence of steps:
1. Download the HP Wolf Security Agent and SCCM .VBS files.
2. Create an HP HP Wolf Security Agent.
3. Distribute the SCCM Application to Distribution Points (DPs).
4. Schedule the deployment for the HP HP Wolf Security Agent.
Downloading the HP Wolf Security Agent and Editing the .VBS Files Follow these steps to download the HP Wolf Security Agent and .VBS files. Then, edit the .VBS files to include the correct URLs and registration code.
1. Download the HP Wolf Security Agent. Please see Download the HP Wolf Security Agent.
2. Download the SCCM install.vbs and uninstall.vbs files from ftp://ftp.hp.com/pub/caps-softpaq/HP_DaaS/SCA%20Scripts/SureClickAdvancedScripts.zip.
3. Open the install.vbs file with Notepad or another text editor.
4. Edit the install.VBS file. Replace BecURL with the ServerURL for your region.
5. Replace YourSCAPIN with the registration code provided by your HP Service Expert.
NOTE: If you are in NA or APJ, use the NA install command. If you are in the EU or any other region, use the EU install command.
6. The line to edit in the install.vbs are as follows:
7. Copy the install.vbs, uninstall.vbs and HPSureClcikSetup.msi files to a network location accessible by SCCM. For example, copy the files to \{ServerName}\SCAInstaller, where ServerName is the name of the SCCM server.
Creating the HP Wolf Security Agent in SCCM Follow these steps to create a new SCCM Application to install the HP Wolf Security Agent:
1. Log into the SCCM Admin Console and start the Create Application Wizard.
2. In the SCCM Admin Console, click Software Library.

Installation Guide – HP Wolf Security
17
3. In the Software Library workspace, click Application Management > Applications > Create Application.
4. Click Manually specify the application information, and then click Next.
5. Specify information for the HP Wolf Security Agent, then select Next. Include the following: • Name: HP Sure Click Pro • Comments: Enter your own • Publisher: HP, Inc. • Software Version: Current version of the HPSureClickSetup.MSI file
6. Specify the details for the Application Catalog, including languages, then select Next.
7. Click Add to create a new deployment type.
8. Select Script Installer for the type. Be sure Manually specify the deployment type information is selected.
9. Type HP Sure Click Pro for the Deployment Name, and then click Next.
10. Enter the network location for the HPSureClickSetup.MSI and .VBS files. Then select the respective .VBS files as follows and click Next:
• Under Installation program, select Browse, choose All files (*.*) in the picklist for File Type. Select the install.vbs file, and then click Open.
• Under Uninstall program, select Browse. Choose All files )*.*) in the picklist for File Type. Select the uninstall.vbs file, then click Open,
11. Specify the detection rules. Click Add Clause. Enter rules to detect the presence of the Sure Click Pro registry key, as follows, then click OK and Next:
• Setting Type: Registry
• Hive: HKEY_LOCAL_MACHINE
• Key: SOFTWARE\Bromium\vSentry\State
• Value: Installer.RegistrationCode
• Data Type: String
• Select This registry setting must exist on the target system to indicate presence of this application
12. Specify User Experience Settings, as follows, then click Next: • Installation behavior: Install for system
• Logon requirement: Whether or not a user is logged on
• Installation program visibility: Hidden
13. Click Next to accept the default settings on the Installation Requirements Page.
14. Click Next again on the Software Dependencies Page to accept the defaults.

Installation Guide – HP Wolf Security
18
15. On the Summary Page, confirm the application settings then click Next. The Application Wizard creates the new HP Wolf Security Agent.
16. Click Close to complete the Application Wizard.
Creating the Deployment Type Follow these steps to create a new deployment type for Wolf Security Agent.
1. Log into the SCCM Admin Console. Start the Create Deployment Type Wizard. Click Create Deployment Type across the top.
2. For General Information, type HP Sure Click Pro Software for the name. Add your own comments (optional). Click Next.
3. For Content, browse to the file locations, then click Next:
• Content Location: Browse to the location of the install.vbs, uninstall.vbs, and HPSureClickSetup.msi files. Select the location. Recall these files must be in a network location accessible by SCCM.
• Installation Program: Browse to the location of the install.vbs file
• Uninstall Program: Browse to the location of the uninstall.vbs file.
4. For Detection Method, enter the following criteria, then click Next:
• Setting Type: Registry
• Hive: HKEY_Local_Machine
• Key: SOFTWARE\Bromium\vSentry\State
• Value: Installer.RegistrationCode
• Data Type: String
• Select the radio button This registry setting must exist on the target system to indicate presence of this app
5. For User Experience, make the following selections, then click Next:
• Installation behavior: Install for system if resource is device; otherwise install for user
• Logon requirement: Whether or not a user is logged on
• Installation program visibility: Normal
6. For Requirements, accept the defaults, then click Next.
7. For Dependencies, accept the defaults, then click Next.
8. On the Summary Page, confirm the deployment settings then click Next. The Deployment Type Wizard creates the new deployment. Click Close to complete the Deployment Wizard.

Installation Guide – HP Wolf Security
19
Modifying the HP Wolf Security Agent Settings Follow these steps to modify the application settings before copying the package to the SCCM Distribution Points (DPs).
1. In the left column of the SCCM Admin Console, click Software Library > Application Management> Applications.
2. In the right pane, right click the new HP Wolf Security Agent, then click Properties.
3. Click the Distribution Settings Tab, then select the radio button Automatically download content when packages are assigned to distribution points. Optionally, you may change the distribution priority. HP recommends setting the Distribution Priority to High.
4. Click Apply, then click OK.
Copying the HP The HP Wolf Security Agent Deployment Package to the SCCM Distribution Points Follow these steps to copy the HP Wolf Security Agent to all SCCM Distribution Points.
1. In the SCCM Admin Console, click Software Library > Application Management > Applications.
2. In the Application List, select the HP Wolf Security Agent.
3. Then on the Home Tab in the Deployment Group, click Distribute Content.
4. Specify where to distribute the package. In the Distribute Content Wizard on the General Page, make sure HP Wolf Security Agent is named, then click Next.
WARNING: Do not skip these steps. Failure to modify the application settings will prevent the package from copying to DPs.

Installation Guide – HP Wolf Security
20
5. Review the content to distribute, then click Next.
6. Click Add to specify the content destinations.
7. On the Add Distribution Points Page, select all available SCCM distribution points (DPs). Or, select a distribution point group that contains all distribution points. Click OK.
8. Click Next.
9. On the Summary Page, review the settings. Click Next.
10. A meter will appear showing distribution progress. Review the actions taken by the Deploy Software Wizard, then click Close.
Verifying Package Status on Distribution Points (DPs) In large environments where DPs are geographically dispersed it is best practice to verify the package status before deploying the HP Wolf Security Agent. Follow these steps:
1. In the SCCM Admin Console, click Monitoring > Distribution Status > Content Status.
2. Right click HP Sure Click Pro, then click View Status.
3. Verify that Sure Click Pro has been successfully copied to all DPs before proceeding.
Deploying the HP Wolf Security Agent with SCCM Follow these steps to deploy the HP Wolf Security Agent.
1. In the left column of the SCCM Admin Console, click Software Library > Application Management > Applications.
2. In the right pane, right click the new HP Wolf Security Agent, then click Deploy.
3. In the Deploy Software Wizard, click Browse next to collections.

Installation Guide – HP Wolf Security
21
NOTE: Be sure to select the correct collection(s) to which the software will be deployed. You may have to switch from user collections to device collections at the top of the left column.
4. Select the Device or User Collection(s) to which the application will be deployed. Click OK, then click Next.
5. Click Next to accept the content settings.

Installation Guide – HP Wolf Security
22
6. Specify the Deployment Settings. For Action, select Install from the picklist. For Purpose, select Required from the picklist. Check all four the following boxes, then click Next:
• Allow end users to attempt to repair the application
• Pre-deploy software to the user’s primary device
• Send wake-up packets
• Allow clients on a metered Internet Connection to download content after the deadline
NOTE: SCCM 2016 has all four boxes, but SCCM 2012 only has two. Please check all available boxes for your version of SCCM.
7. Specify a schedule.

Installation Guide – HP Wolf Security
23
a. Check the box Schedule the application to be available at, then enter a date and time.
b. Select Rerun if failed previous attempt in the Rerun Behavior Pick List at the bottom.
c. Click Edit, then select Assign Immediately after this event. In the pick list, select As Soon As Possible.
d. Click Ok, then click Next.
8. For User Experience, in the User Notifications picklist select Display in Software Center, and only show notifications for computer restarts. Check all of the following boxes, then click Next:
• Software Installation
• System Restart
• Commit change at deadline or during a maintenance window
9. For Distribution Points, make the following choices, then click Next:
a. Deployment options: Download content from distribution point and run locally
b. Deployment options: Do not run program

Installation Guide – HP Wolf Security
24
c. Check the box Allow clients to use distribution points from the default site boundary
10. On the Summary Page, confirm the deployment settings, then click Next. The Deployment Type Wizard creates the new deployment.
11. Click Close to complete the Deployment Wizard.
Verifying the HP Wolf Security Agent Software Deployment Check the date and time of the HP Wolf Security Agent Software Deployment. Follow these steps:
1. In the left column of the SCCM Admin Console, click Monitoring > Deployments.
2. In the search field at the top, type HP Sure Click Pro. Then click HP Sure Click Pro in the search results. A graph is displayed at the bottom right showing the number of computers from the SCCM collection with the software installed. Statuses include successful, not installed, error, or unknown state. Unknown state means that the computers have most likely not connected to SCCM to receive the HP Wolf Security Agent yet.

Installation Guide – HP Wolf Security
25
Deploying the HP Wolf Security Agent with Microsoft There are two ways in which we have documented and tested to deploy the Sure Click client.
HP WOLF SECURITY AGENT as an intunewin (win32) deployment 1. In the left column of the SCCM Admin Console, click Monitoring > Deployments.
2. Create a batch file with the following command inside: msiexec /i "%~dp0HPSureClickSetup.msi" SERVERURL=https://bec-hpdaas-test.bromium-online.com REGISTRATIONCODE=PUT 8 DIGIT PIN HERE /qn /L*v c:\InstallSCA.log
a. Name the file scainstall.bat. You will put this and the MSI into the same package.
3. This expands properly into the full path when executed on the endpoint. For the install command in Intune, add “scainstall.bat”
4. The uninstall cmd will be automatically filled in by Intune based off the MSI.
5. For detection, add the MSI product code: MSI {BBFFA35E-F1BC-11EA-96B8-3863BB3CB5A8}
6. The rest of the app properties are standard.
7. Note that while creating the IntuneWin file, the actual MSI should be the one specified as the ‘setup’ file, even though it’s the batch file that’s executed for the actual install.

Installation Guide – HP Wolf Security
26
HP WOLF SECURITY AGENT as a LOB application deployment 1. Create a new LOB application.
2. Upload the SCP MSI.
3. Added mandatory fields, seen below in the image.
4. Added the following command line only: SERVERURL=https://bec-hpdaas-test.bromium-online.com REGISTRATIONCODE=PUT 8 DIGIT PIN HERE

Installation Guide – HP Wolf Security
27

Installation Guide – HP Wolf Security
28
Uninstalling Wolf Security Agent Use either of the following methods to remove the HP Wolf Security Agent:
METHOD A: Using Add and Remove Programs 1. Close all applications.
2. Open the Control Panel > Add and Remove Programs.
3. Highlight the HP Wolf Security Agent. Select Uninstall.
4. Choose Automatically close applications and attempt to restart them after setup is complete, then click OK.
5. Click Restart when prompted.
METHOD B: Using the Command Prompt 1. Open an elevated command prompt.
2. Click the search icon in the lower left of the Windows 10 System Tray.
3. Type CMD then right click Command Prompt, then select Run as Administrator.
WARNING: Use credentials to remove the application.
4. Type Msiexec /x hpSure Clicksetup.msi CLEANALL=YES. Press Enter.
5. The HP Wolf Security Agent will be uninstalled.
METHOD C: Using SCCM If the application has been deployed using SCCM, remove the application from the targeted collections.

Installation Guide – HP Wolf Security
29
ADDITIONAL INFORMATION Definitions Company-Wide PIN (CPIN) - An 8-character alpha-numeric code provide by HP to enable The HP Wolf Security Agent during installation. This CPIN also provides administration for certain policies and permissions. Your CPIN is unique to your company and sent in the HP Proactive Security Welcome Kit.
PREFERREDPROXY - This installation parameter is only required if your company uses a proxy server.
Regional Support For additional support, please contact HP Managed Services for your region. Use the following chart for reference.
Region Managed Services Contact Address HP America [email protected] HP Asia, Pacific, Japan (APJ) [email protected]
HP China [email protected]
HP Europe, Middle East, & Africa (EMEA) [email protected]
HP India [email protected]
HP Japan [email protected]
HP Latin America [email protected]

Installation Guide – HP Wolf Security
30
© Copyright 2021 HP Development Company, L.P. The information contained herein is subject to change without notice. The only warranties for HP products and services are set forth in the express warranty statements accompanying such products and services. Nothing herein should be construed as constituting an additional warranty. HP shall not be liable for technical or editorial errors or omissions contained herein.
Microsoft and Windows are either registered trademarks or trademarks of Microsoft Corporation in the United States and/or other countries.
February 1, 2021 - 4AA7-8253ENW