How To use the App Inventor Merger for Development as a ...
12
This documentation was originally written for AI Classic by Kate Feeney of Mills College. The program is discussed in her thesis, Encouraging Collaboration through App Inventor . The tool runs outside of App Inventor, as a Java program. You’ll need to have Java installed on your computer to use it. Updated images and instructions were created by Nathan Nolte, a Project Lead The Way Computer Science Teacher. The original software and this documentation were updated by Arezu Esmaili of MIT. How To use the App Inventor Merger for Development as a Team The App Inventor Merger tool can be very useful when developing an app within a team. The tool allows for multiple developers to work on different screens of the app and then merge them together. Remember that the overall combined app is still subject to App Inventor’s recommended limit of at most 10 screens maximum. This document outlines the process of using the App Inventor Merger to develop an app in a team environment. It will use the example of a simple two-screen app developed by two different developers to demonstrate this. Overview Dividing Work Developer 1 Work In App Inventor Design View Blocks Editor Download Source Code Developer 2 Work In App Inventor Design View Blocks Editor Download Source Code Merging into one Project Launch the App Inventor Merger Find and Load Both Projects Merge the Projects Upload Final Project to App Inventor Extras Universal Assets and Databases Assets Databases Merging More Than Two Projects Renaming Second Project’s “Screen1” Appendix Appendix A: Complete Blocks for Screen1 of CountDownScreen1 Appendix B: Complete Blocks for SetTime Screen
-
Upload
khangminh22 -
Category
Documents
-
view
4 -
download
0
Transcript of How To use the App Inventor Merger for Development as a ...

This documentation was originally written for AI Classic by Kate Feeney of Mills College. The program isdiscussed in her thesis, Encouraging Collaboration through App Inventor.
The tool runs outside of App Inventor, as a Java program. You’ll need to have Java installed on your computerto use it.
Updated images and instructions were created by Nathan Nolte, a Project Lead The Way Computer ScienceTeacher.
The original software and this documentation were updated by Arezu Esmaili of MIT.
How To use the App Inventor Merger for Development as a TeamThe App Inventor Merger tool can be very useful when developing an app within a team. The tool allows formultiple developers to work on different screens of the app and then merge them together. Remember that theoverall combined app is still subject to App Inventor’s recommended limit of at most 10 screens maximum.
This document outlines the process of using the App Inventor Merger to develop an app in a team environment.It will use the example of a simple two-screen app developed by two different developers to demonstrate this.
Overview
Dividing Work
Developer 1 Work In App Inventor
Design View
Blocks Editor
Download Source Code
Developer 2 Work In App Inventor
Design View
Blocks Editor
Download Source Code
Merging into one Project
Launch the App Inventor Merger
Find and Load Both Projects
Merge the Projects
Upload Final Project to App Inventor
Extras
Universal Assets and Databases
Assets
Databases
Merging More Than Two Projects
Renaming Second Project’s “Screen1”
Appendix
Appendix A: Complete Blocks for Screen1 of CountDownScreen1
Appendix B: Complete Blocks for SetTime Screen

OverviewEach developer will work on their own separate project file. These project files can be either under the sameusername or different usernames. There can only be one “Screen1” per project, therefore only the developerdesigning the first screen to appear on the app should populate “Screen1.” All other developers should leave“Screen1” blank and only develop additional screens. In the case that another developer does populate“Screen1”, the merger tool will allow that screen to be renamed so it can be merged into the final project.
Developers can write code to call a screen they are not developing but they must know the name that has beenassigned to that screen by its developer. Also, two different developers/screens can use the same database orasset but they must be named the same (for more details on this see the Universal Databases and Assetssection below). Finally, no two different screens or assets can have the same name (with the exception of“Screen1” which can be renamed). For these reasons it is important to decide beforehand the name of eachscreen and a naming convention for assets that will insure no unwanted duplicates.
Once separate projects are complete th`ey can be merged together using the App Inventor Merger Tool.
Dividing WorkWork should be divided by screens. Each screen should be assigned to a developer and there should be onlyone version of each screen to be merged into the final app. This document will follow an example for whichthere are two screens and two developers working on an app named “CountDown.” The CountDown app willwork like a timer. The first screen shows the time counting down and allows the user to start, stop or reset thetimer. From the first screen the user can also switch to a second screen to set the amount of time to count down.
Developer1 will work on the first screen and call it “Screen1”. Developer2 will work on the second screen andcall it “SetTime”. The naming convention for assets will be the screen name followed by the asset name. Thereare no universal assets or databases. Screen1 will open the SetTime screen and when the SetTime screen isclosed it will pass a number, representing the total number of seconds to countdown to Screen1.

Developer 1 Work In App InventorDeveloper1 will log into App Inventor using their account and create a new project called “CountDownScreen1.”
Designer ViewThe Designer view for CountDownScreen1’s Screen1 is shown below in Figure 1. Note that the project name,the screen name and assets follow the predetermined naming convention.
Figure 1: CountDownScreen1’s Screen1 Designer View
Blocks EditorDeveloper1 then creates the blocks needed for Screen1. These blocks included a block to open the SetTimescreen when the “Set Time” button is clicked and a block to handle when the SetTime screen is closed. Views ofthe SetTime.Click block and the Screen1.OtherScreenClosed block are shown in Figure 2 and 3 respectively.The complete set of blocks for Screen1 are shown in Appendix A.
Figure 2: CountDownScreen1’s Screen1 SetTime.Click block
The SetTime.Click block opens the SetTime screen. Note that the string assigned to screenName must beexactly what was decided in advance as the name of the second screen.

Figure 3: CountDownScreen1’s Screen1 OtherScreenClosed block
The Screen1.OtherScreenClosed receives the number of seconds to countdown from the SetTime screen whenthe screen is closed and sets the startTimeInSeconds variable to it.
Download Source CodeOnce Developer1 completes Screen1 they download the source code. This is done by going to the My Projectsview and checking the checkbox next to the CountDownScreen1 project, then clicking on the “Project” dropdownand selecting “Export selected project (.aia) to my computer”. Figure 4 shows how to select a project and whereto click to download the project.
Figure 4: Steps to download the CountDownScreen1 project

Developer 2 Work In App InventorDeveloper2 will log into App Inventor using their account and create a new project called “CountDownSetTime.”
Designer ViewThe Designer view for CountDownSetTime’s Screen1 is shown below in Figure 5. The Screen1 is empty exceptfor a button that takes you to the SetTime screen. This button is only for Developer2 to get to the SetTimescreen during testing and debugging. This Screen1 will not be merged into the final app.
Figure 5: CountDownSetTime’s Screen1 Designer View
The Designer view for CountDownSetTime’s SetTime screen is shown below in Figure 6. Note that the projectname and the screen name follow the predetermined naming convention.
Figure 6: CountDownSetTime’s SetTime screen Designer View

Blocks EditorDeveloper2 then creates the blocks needed for the SetTime screen. These blocks include a block to send thenumber of seconds to countdown to Screen1 when the SetTime screen is closed. This block is the Done.Clickblock shown in Figure 7. A complete set of blocks for the SetTime screen are shown in Appendix B.
Figure 7: Done.Click block for CountDownSetTime’s SetTime screen
Download Source CodeDeveloper2 downloads the CountDownSetTime project following the same steps Developer1 followed todownload the CountDownScreen1 project.

Merging into one ProjectOnce both developers have downloaded their respective projects, the two projects can be merged into the finalapp using the following steps.
Launch the App Inventor 2 Merger If not already done, downloaded the latest version of the App Inventor Merger. This is a Java jar file. You canfind a link to the file on the MIT App Inventor Web site at
http://appinventor.mit.edu/explore/resources/ai2-project-merger.html
Download the jar file and save it to your computer. To launch the Project Merger simply double click on the jarfile.
Find and Load Both ProjectsThe main project will be CountDownScreen1 since Screen1 from this project will be the Screen1 for the final appand the second project will be CountDownSetTime.
Select the browse button for the main project. A file browser window will appear. Find and select theCountDownScreen1.aia file, then click Open to load the project into the App Inventor Merger. A list of the mainproject’s assets (including their extensions) and screens will appear in the lower left hand corner of the screenand this means that the main project has been loaded into the App Inventor Merger.
Click the browse button for the second project. A file browser window will appear. Find and select theCountDownSetTime.aia file, then click Open to load the project into the App Inventor Merger. A list of the secondproject’s assets (including their extensions) and screens will appear in the lower right hand corner of the screenand this means that the second project has been loaded into the App Inventor Merger.
Merge the ProjectsOnce two projects have been loaded a Merge button will appear between them as shown in Figure 8 below.

Figure 8: The App Inventor Merger Tool showing the projects loaded and ready to merge.
Check the boxes next to all of the screens and assets you wish to merge into the final app. For this example allassets and screens are selected except Screen1 from the second project.
In this case only one screen is being selected from each project and the second project’s Screen1 is not beingused, but in other cases multiple screens can be merged from the same project file and the second project’sScreen1 can be renamed and included. For more information about renaming your second project’s Screen1see the Renaming Second Project’s “Screen1” section below.
Click Merge. A save dialog window will appear. Browse to where you would like to save the project, enter theproject’s name and then click Save. The project will be saved as an .aia file.
A dialog box will appear letting you know that your projects have been successfully merged. There will now be anew .aia file saved at the location you specified. The dialog box will also ask if you would like to merge anotherproject. Since this example only has two developers working on two different project files, there is no need tomerge another project. Click No and confirm that you want to close the merger. For more information aboutmerging more than two project see the Merging More Than Two Projects section below.

Upload Final Project to App InventorThe .aia file created by the App Inventor Merger is your new project file. This project file can be uploaded to AppInventor so that you have a complete project in App Inventor.
To upload the file, launch App Inventor and go to the My Projects page. Click on the “Projects” dropdown andselect “Import project (.aia) from my computer...”
Figure 9: The My Projects page where you will upload the merged project file.
A dialog box will appear. Select Choose File. A file browsing window will appear. Find and select the .aia filethat was just created by the App Inventor Merger and then click Open followed by OK. Your new project will nowappear in your list of projects and will open in the App Inventor window.
Extras
Universal Assets and Databases
Assets
If your app uses the same asset on multiple screens, then you can make that asset universal. This is done bygiving it a name that does not follow the normal naming convention but instead is repeated by all screens. Whenthe projects are merged the universal asset will only need to be selected from one of the projects.
For example, imagine you have a logo, which is an image, that should appear at the top of every screen. Insteadof having every developer name the logo something different (Screen1Logo, Screen2Logo …), as the namingconvention would require, every developer can simply name it Logo. When the projects are merged only checkthe Logo asset listed under the main project so that the asset is only loaded into the final app once but all thescreens will be able to access it.
Databases
Apps that use databases can be merged using the App Inventor Merger very easily. Different developers caneven work on different screens that use the same database separately and then merge them together at the end.
The only requirement for merging screens that share a database is that the name assigned to the database foreach screen is the same. Once the projects are merged the same database will work for all the screens.
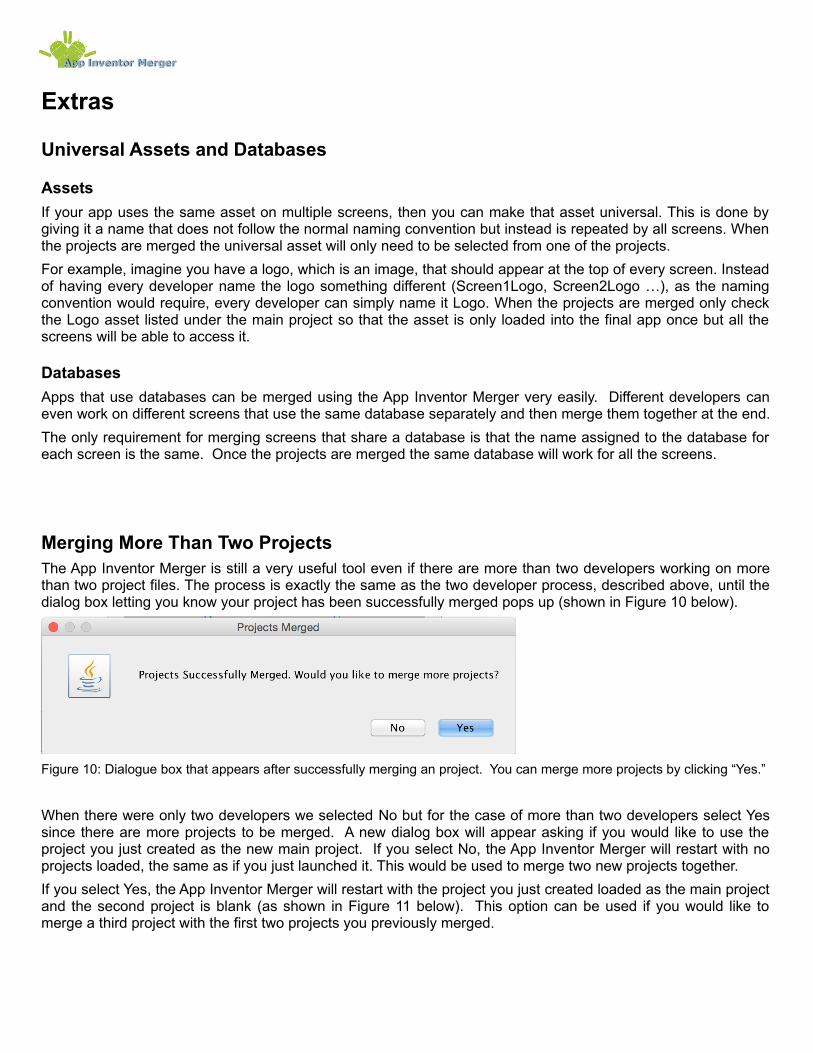
Merging More Than Two ProjectsThe App Inventor Merger is still a very useful tool even if there are more than two developers working on morethan two project files. The process is exactly the same as the two developer process, described above, until thedialog box letting you know your project has been successfully merged pops up (shown in Figure 10 below).
Figure 10: Dialogue box that appears after successfully merging an project. You can merge more projects by clicking “Yes.”
When there were only two developers we selected No but for the case of more than two developers select Yessince there are more projects to be merged. A new dialog box will appear asking if you would like to use theproject you just created as the new main project. If you select No, the App Inventor Merger will restart with noprojects loaded, the same as if you just launched it. This would be used to merge two new projects together.
If you select Yes, the App Inventor Merger will restart with the project you just created loaded as the main projectand the second project is blank (as shown in Figure 11 below). This option can be used if you would like tomerge a third project with the first two projects you previously merged.

Figure 11: By selecting “Yes” to merge another project with the one you just created will pre-populate the Main Project.
Renaming Second Project’s “Screen1”In the case that two developers populate “Screen1”, the merger tool will allow the “Screen1” of the secondproject to be renamed so it can be merged into the final project. The process for merging the projects is exactlythe same as described above, except you will check both Screen1s. Once you click merge, a dialog box willappear indicating that you have chosen more than one Screen1 (shown in Figure 12 below, left) and will directyou to enter a new name for the second project’s Screen1 (shown in Figure 13 below, right).
Figure 12: The dialogue that appears when you click merge with both Screen1s checked.
Figure 13: Rename the second project’s Screen1 by entering a new name in this textbox.
Once you’ve renamed your second project’s Screen1, the App Inventor Merger will combine your projects andoffer the same options as discussed above.

Appendix
Appendix A: Complete Blocks for Screen1 of CountDownScreen1
Appendix B: Complete Blocks for SetTime Screen