Human dissemination of genes and microorganisms in Earth's ...
Upload
khangminh22Category
view
1download
0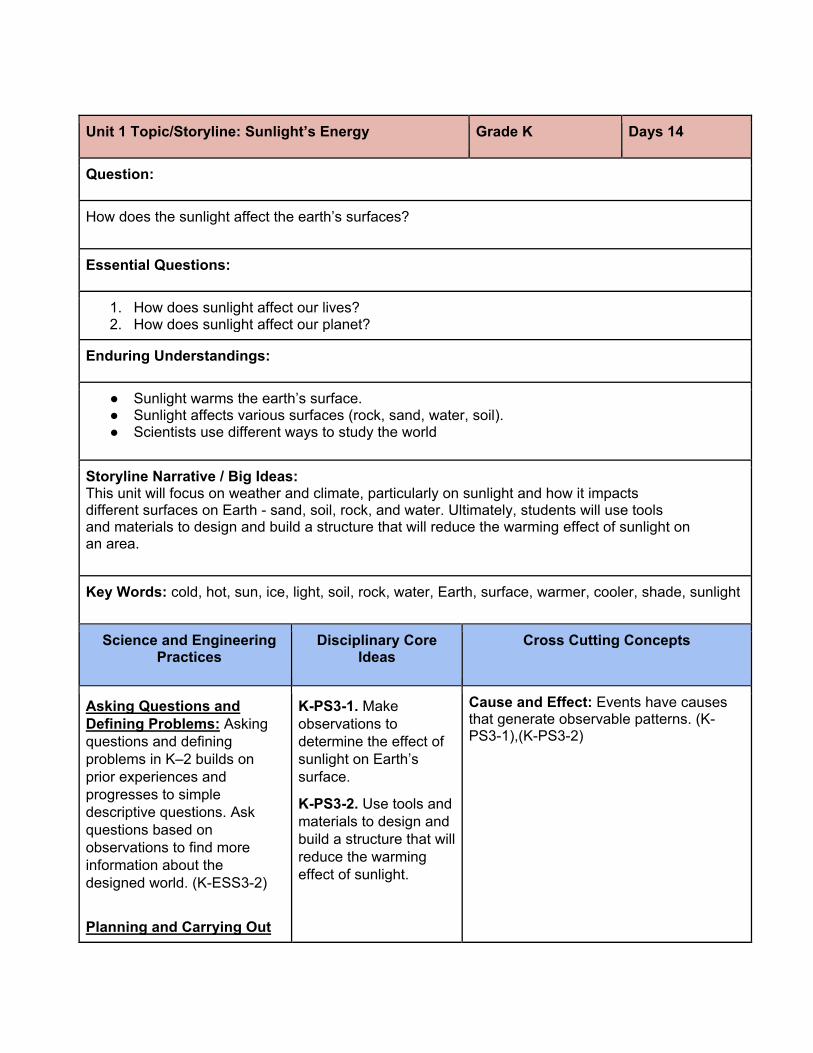
Unit 1 Topic/Storyline: Sunlight’s Energy Grade K Days 14
Question:
How does the sunlight affect the earth’s surfaces?
Essential Questions:
1. How does sunlight affect our lives? 2. How does sunlight affect our planet?
Enduring Understandings:
● Sunlight warms the earth’s surface. ● Sunlight affects various surfaces (rock, sand, water, soil). ● Scientists use different ways to study the world
Storyline Narrative / Big Ideas: This unit will focus on weather and climate, particularly on sunlight and how it impacts different surfaces on Earth - sand, soil, rock, and water. Ultimately, students will use tools and materials to design and build a structure that will reduce the warming effect of sunlight on an area.
Key Words: cold, hot, sun, ice, light, soil, rock, water, Earth, surface, warmer, cooler, shade, sunlight
Science and Engineering Practices
Disciplinary Core Ideas
Cross Cutting Concepts
Asking Questions and Defining Problems: Asking questions and defining problems in K–2 builds on prior experiences and progresses to simple descriptive questions. Ask questions based on observations to find more information about the designed world. (K-ESS3-2)
Planning and Carrying Out
K-PS3-1. Make observations to determine the effect of sunlight on Earth’s surface.
K-PS3-2. Use tools and materials to design and build a structure that will reduce the warming effect of sunlight.
Cause and Effect: Events have causes that generate observable patterns. (K-PS3-1),(K-PS3-2)
Investigations: Planning and carrying out investigations to answer questions or test solutions to problems in K–2 builds on prior experiences and progresses to simple investigations, based on fair tests, which provide data to support explanations or design solutions.
Consolidated Supply List - ● Science journals ● Aluminum foil ● Plastic page protectors ● Popsicles sticks for stem challenge ● Scotch tape ● post-its
Episode 1 Engage/Elicit Ideas Days: 2 Days
Lessons Resources
Lesson 1: Phenomena/Wonderings Gather: Show Phenomena Pictures and short video clip Block of Ice Melting in Sun. Hang them in the classroom (gallery walk) or show them in a slide format. Allow free discussion to happen between the students while they are looking at each picture. Feel free to encourage discussion by stating questions such as: What do the pictures and video have in common, what is happening, what are you noticing, what do you wonder, etc. Remind students to think of wonderings while they are observing each picture to write about in their wonder journal. Video Link: Block of Ice Melting in Sun Reason: Students create a model by illustrating what they wonder about the phenomena in their wonder journal. Students can draw a detailed picture using labels, pictures, and arrows. Communicate: Class Discussion - Share their noticings about the pictures and wonders. Keep students questions/
Episode Supply List: Lesson 1:
● Phenomena Pictures ● Video Link: Block of Ice Melting in
Sun ● Chart Paper ● Wonder Journal Template
Lesson 2:
● Phenomena Pictures ● KWL Chart
wonders for a Lesson 2 anchor chart. Based on class discussion students can sort the pictures into categories. *Teacher Note: You may want to use the student-made wonders to fill in the “Want to Know” Section of the KWL chart prior to Lesson 2 to save time. Lesson 2: Engage and Elicit Ideas Gather (Engage): Refer to the phenomena pictures and discuss the chart of noticing/wonderings about sunlight. Have them displayed while you discuss. Tell the class you are going to create a chart about what you know about sunlight, what you want to know about sunlight, and eventually what you learned about sunlight. Reason (Explore): As a class, create a KWL Chart of how the sunlight affects our lives and world. Have students give you examples of what they know about sunlight and fill that in together as a class. Use small pictures and symbols in addition to words to help students connect and understand. Communicate (Explain): Review what is on the KWL chart of what they know and what to know about how sunlight affects our lives and the world. Tell students next time they will be going outside to explore and investigate. *Keep KWL chart for the end of the unit.
Episode 2 Explore Days: 2 Days
Lessons Resources
Lesson 1: Exploring Temperatures Outside Gather: Refer back to the phenomena pictures and video clip and discuss as a class what it means to feel warmth versus cold. Create an anchor chart titled: “I wonder how sunlight affects things outside…” Explain to the class that you will go outside to make observations to help answer our wonder. Reason: Students will go outside and observe how the weather makes them feel; is it warm or cold? Depending on what you have available, have them touch things around them (playground material, rocks, grass, leaves,
Episode Supply List: Lesson 1:
● Phenomena pictures ● 1 Post-it for each student ● Anchor Chart (Wonder chart) ● Clipboards (optional) ● Pencils/Crayons
Lesson 2:
● Post-its ● Anchor Chart (Wonder chart)
bench, water pan, sand in sun, etc.). Are some things cooler or warmer? This will lead to more discussion during Lesson 2. Students will record observations through a detailed drawing on a post-it. Communicate: When you go back inside, have students put the post-its on your anchor chart. Have the class share and explain some of the pictures/drawings/labels that they came up with. Encourage all student responses so that they can develop their ideas and awareness of the heat/sun relationship. Lesson 2: Exploring Temperatures Outside (Day 2) Gather: Refer back to the student's observation from the previous lesson (refer to anchor chart with post-its). What did you notice? Discuss with partners then with the whole class. Reason: Students go outside and experiment standing in the shade. Students will notice; do they feel warm or cool in the shade? How is it different from standing in the sun? Have them touch things around them (playground material, rocks, grass, leaves, bench, water pan, sand in shade, etc.). Are things cooler or warmer in the shade? Students will record observations through a detailed drawing on a post-it. Communicate: When you go back inside, have students add their new post-it on your anchor wonder chart. Have a class discussion about the differences between how it felt in the shade vs. how it felt in the sun. What were some of the differences in our pictures? Temperatures can be compared (warmer, cooler). What was the effect of the sunlight on different materials? Tell students that next time we meet for science, they are going to become explorers and help solve a problem.
Episode 3 Explain Days: 4-5 days
Lessons Resources
Lesson 1: Vocabulary Splash Gather: Display all the unit’s vocabulary words on the board. Read each word to the class with a brief explanation of the words.
Episode Supply List: Lesson 1:
● Vocabulary Words: cold, hot, sun, ice, light, soil, rock, water,
Reason: As a class (can be an interactive writing type activity) sort these words in an open sort using their prior knowledge. Label each group of words. Categories suggestions: temperatures, earth’s surfaces, energy, other Communicate: Discuss as a group the final label headers of each group of words. Remind students that we will be using these vocabulary words throughout the unit. Additionally, we will be exploring them in our science journals. Lesson 2: How could you warm up a frozen playground? **Please preview mystery science activity prep to understand how to prepare for this lesson** Vocab. Focus - choose a few vocabulary words to focus on. Students write the word, draw a picture of the word and (optional) write the word in a sentence in their journals. Gather: Mystery Science Lesson: In this lesson, students think about their experiences with hot and cold weather, and learn about a real city where the sun never shines in winter. Reason: In the activity, Chill City, students experiment with different types of materials (opaque, transparent, and reflective) to figure out how to reflect light. They use this to bring light and warmth to an imaginary paper town. Students can work in pairs or independently. Start the Mystery Science Lesson, and follow along with instructions. Communicate: Ask the class what they did to make the playground warmer? How did they make sure the skating rink stayed cold? Afterwards, Use the Draw chill city to show what you would build to keep the playground warm in the winter as a closing activity. Lesson 3: Playground Map Vocab. Focus - choose a few vocabulary words to focus on. Students write the word, draw a picture of the word and (optional) write the word in a sentence in their journals.
Earth, surface, warmer, cooler, shade, sunlight
● Sentence Strips of vocab words or display digitally
Lesson 2: Mystery Science: How could you warm up a frozen playground?
● Chill City Activity Sheet 1 per student
● Draw Chill City Activity Sheet 1 per student
● Rulers (used for paper folding, optional)
● Aluminum Foil (at least 2 feet) ● Black Construction Paper to cut
up ● 2 Plastic Report Covers to cut up ● 2 Colored Construction Papers ● Tape or Dot Stickers ● Envelopes to hold material packs ● Index Cards
Lesson 3:
● A sunny day outside ● Playground Picture with Shade ● Different Surfaces:
(blacktop, brick, rocks, metal, soil, sand)
● Poster paper for map ● Post-its
Lesson 4: ● Mystery Science Cool
Cows Activity ● Paper for each
student to draw their shade design.
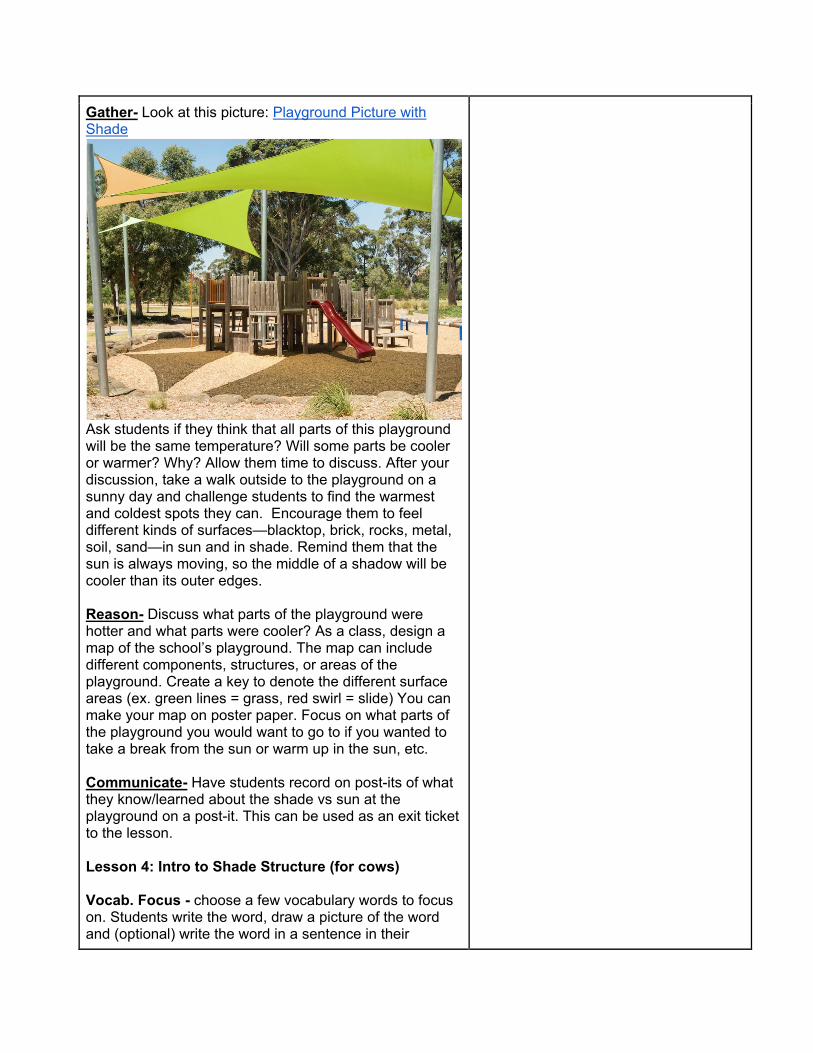
Gather- Look at this picture: Playground Picture with Shade
Ask students if they think that all parts of this playground will be the same temperature? Will some parts be cooler or warmer? Why? Allow them time to discuss. After your discussion, take a walk outside to the playground on a sunny day and challenge students to find the warmest and coldest spots they can. Encourage them to feel different kinds of surfaces—blacktop, brick, rocks, metal, soil, sand—in sun and in shade. Remind them that the sun is always moving, so the middle of a shadow will be cooler than its outer edges. Reason- Discuss what parts of the playground were hotter and what parts were cooler? As a class, design a map of the school’s playground. The map can include different components, structures, or areas of the playground. Create a key to denote the different surface areas (ex. green lines = grass, red swirl = slide) You can make your map on poster paper. Focus on what parts of the playground you would want to go to if you wanted to take a break from the sun or warm up in the sun, etc. Communicate- Have students record on post-its of what they know/learned about the shade vs sun at the playground on a post-it. This can be used as an exit ticket to the lesson. Lesson 4: Intro to Shade Structure (for cows) Vocab. Focus - choose a few vocabulary words to focus on. Students write the word, draw a picture of the word and (optional) write the word in a sentence in their
journals. Gather: In the activity, Cool Cows, students notice that cows (like people) use shade to stay cool. Then, they think through how they would design a shade structure for cows. Reason: The Cool Cows activity gets the students thinking about how they could build something to make shade. Take the activity further by having students draw the shade structure they’d like to build. Communicate: Have students share their drawings with a small group. Tell students they will be using these drawings for their next lesson in which they will bring their designs to life!
Episode 4 Elaborate/Build New Content/Apply new Content Days: 1-3 days
Activity Shade Structure Resources
Lesson 1: Introduce STEM challenge/Design Model on paper Gather: Students will be introduced to the idea of creating a STEM challenge project. Reason: Tell students that they are going to become engineers. They will use all that they have learned this far and design a shade structure. Before they start building, they need to do a lot of thinking and a lot of planning. You will tell the students what type of materials they will be given to work from. Show students the materials so they can have a realistic idea of what they are working with. Tell students that their goal is to keep the ice from melting outside. What can they design to help? Give students time to look at, feel, play around with the building materials. Have them go back to their tables to begin drawing their design. Encourage them to use labels. Communicate: Allow students to share with their classmates. Lesson 2: STEM Challenge
Episode Supply List: Materials for Shade Structure
● Popsicle sticks ● Plain white paper to
plan out picture ● Paper (White and
Black) ● Tape ● Link: Shade Structure
Lesson

Reason: Today students will Step 1: Students will design and build a shade structure. Refer to the link A Place in the Shade-An Engineering Challenge First have a discussion of what shade is/ means. Gather a list of examples of shade (trees, umbrella, hats, buildings, etc) Discuss as a class that shade is there to protect and keep us cool from the sun. Step 2: Tell students that they will be making a shade structure for an ice cube. The goal is to provide shade for the ice cube. You do not want your ice cube to melt. The icecube needs a surface that hides from the sun. Step 3: Show students the shade structure materials. Step 4: Students will first plan their shade structure by drawing a detailed picture. Students can share their illustrations with their tablemates or as a whole class. Step 5: After students plan out their shade structure they can build their shade structure. This may take a couple of days. Step 6: Once students are finished with their structures, students will check to see if their shade structure provides shade for the icecube by testing it on a sunny day. Have a class discussion about other structures. Step 7: As a class, have a discussion on what they notice, about their shade structures. What worked for their shade structure what didn’t work for their shade structure. Did the materials make a difference (ex. Using black paper instead of white paper) Step 8: Reflection- As a class, have a discussion of What did you notice and learned about your design? How would you improve your shade structure?
Episode 5 Evaluate Days: 2 Days
Assessment Resources
Lesson 1: Reflection Day 1 Gather: Students will begin to reflect on their shade structure and detail the effects that the sun had on their structure and ice cube.
Episode Supply List: Lesson 1: Shade structure Plain Paper and pencil
Reason: Students will draw a picture with details of their shade structure. They should include the source of the energy (heat) and where it was coming from (sun). They should include how their structure helped keep the sunlight off of the icecube, and if it helped it to melt slower. Communication: Students can share with their classmates to discuss the effects of sunlight. Lesson 2: Reflection Day 2 (KWL chart) Gather: Display the KWL chart that you used at the beginning of the unit. Review some of the things the students wanted to know before you started your lessons. Reason: Work together as a group to fill in what they now know about sunlight and its effects on our Earth. Make sure to highlight the effects it has on different surfaces that the students use/walk on/touch daily. Communicate: Show students the phenomena pictures and clip one last time. Have them explain what the effect of sunlight is on each picture/clip as a wrap up of the unit.
Lesson 2: ● KWL chart ● Phenomena
Pictures/Clip
Unit 2 Topic/Storyline: Pushes and Pulls Grade K Days 20
Question:
How do objects move by force?
Essential Questions:
1. How do different strengths or directions of pushes and pulls affect the motion of an
object? 2. How can a design solution work to determine the speed or direction of an object with a
push or a pull? 3. Kid Friendly Essential Questions 4. How does pushing and pulling affect how an object moves? 5. How can we create an object that can push or pull?
Enduring Understandings:
● Pushes and pulls can have different strengths and directions. ● Pushing or pulling on an object can change the speed or direction of its motion and
can start or stop it. ● When objects touch or collide, they push on one another and can change motion. ● A bigger push or pull makes things speed up or slow down more quickly. ● A situation that people want to change or create can be approached as a problem to
be solved through engineering. Such problems can have many acceptable solutions.
Storyline Narrative / Big Ideas: This unit will focus on students’ ability to apply an understanding of the effects of different strengths or different directions of pushes and pulls on the motion of an object to analyze a design solution.
Key Words: push, pull, ball, ramp, motion, gravity, friction, force, height, texture, surface, resistance
Science and Engineering Practices
Disciplinary Core Ideas
Cross Cutting Concepts
Planning and Carrying Out Investigations:
● Planning and carrying out investigations to answer questions or test solutions to problems in K–2 builds on prior experiences and progresses to simple investigations, based on fair tests, which provide data to support explanations or design solutions.
○ With guidance, plan and conduct an investigation in collaboration with peers. (K-
K-PS2.A: Forces and Motion
● Pushes and pulls can have different strengths and directions. (KPS2-1),(K-PS2-2)
● Pushing or pulling on an object can change the speed or direction of its motion and can start or stop it. (K-PS2-1),(K-PS2-2)
Cause and Effect ● Simple tests can be designed to
gather evidence to support or refute student ideas about causes. (K-PS2-1), (K-PS2-2)
● Connections to Nature of Science
Scientific Investigations Use a Variety of Methods Scientists use different ways to study the world. (K-PS2-1)
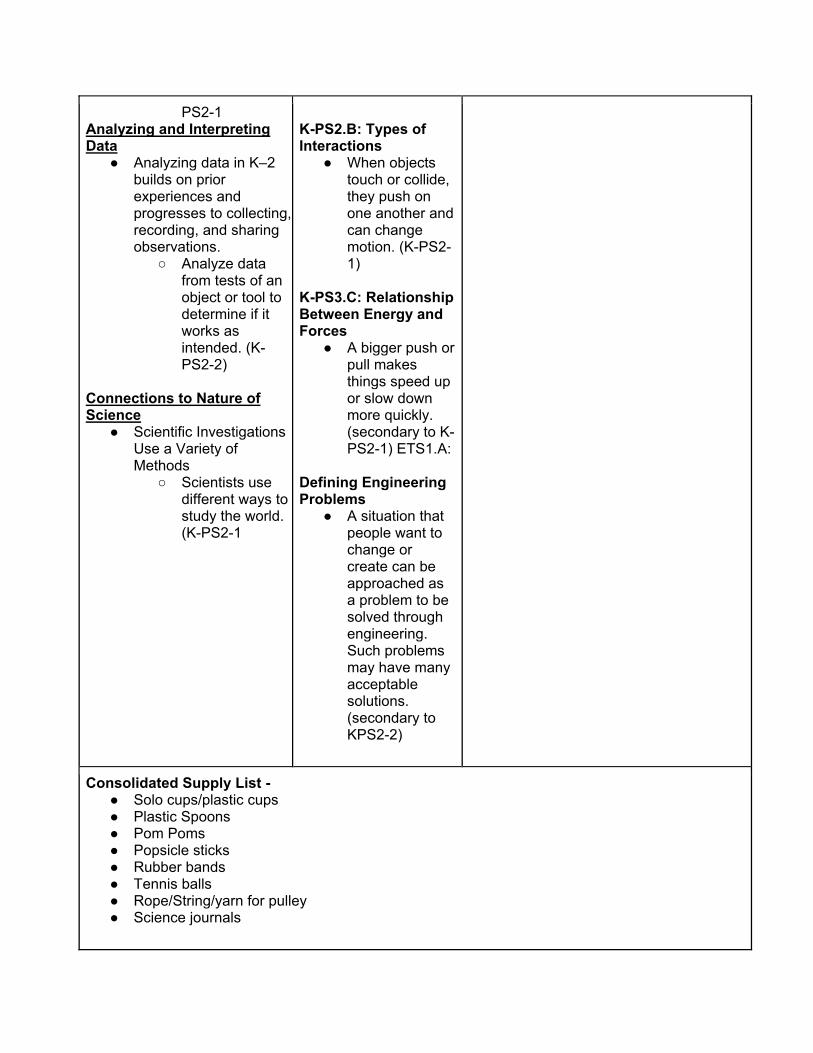
PS2-1 Analyzing and Interpreting Data
● Analyzing data in K–2 builds on prior experiences and progresses to collecting, recording, and sharing observations.
○ Analyze data from tests of an object or tool to determine if it works as intended. (K-PS2-2)
Connections to Nature of Science
● Scientific Investigations Use a Variety of Methods
○ Scientists use different ways to study the world. (K-PS2-1
K-PS2.B: Types of Interactions
● When objects touch or collide, they push on one another and can change motion. (K-PS2-1)
K-PS3.C: Relationship Between Energy and Forces
● A bigger push or pull makes things speed up or slow down more quickly. (secondary to K-PS2-1) ETS1.A:
Defining Engineering Problems
● A situation that people want to change or create can be approached as a problem to be solved through engineering. Such problems may have many acceptable solutions. (secondary to KPS2-2)
Consolidated Supply List - ● Solo cups/plastic cups ● Plastic Spoons ● Pom Poms ● Popsicle sticks ● Rubber bands ● Tennis balls ● Rope/String/yarn for pulley ● Science journals
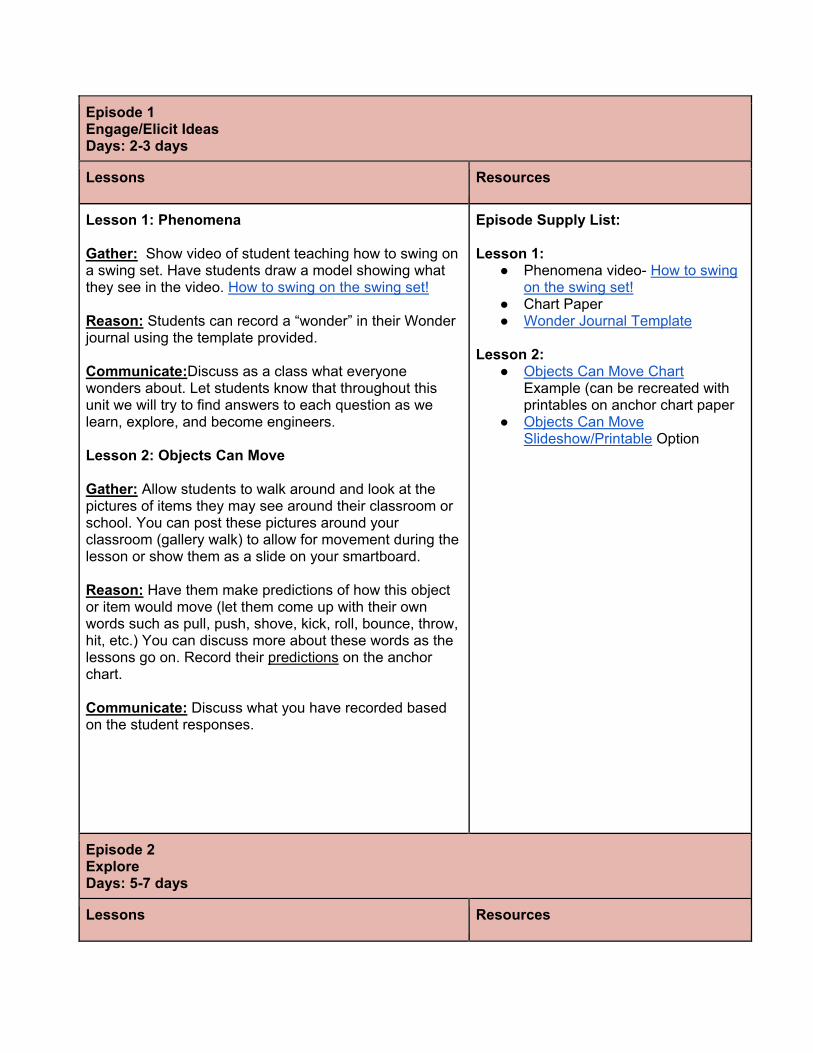
Episode 1 Engage/Elicit Ideas Days: 2-3 days
Lessons Resources
Lesson 1: Phenomena Gather: Show video of student teaching how to swing on a swing set. Have students draw a model showing what they see in the video. How to swing on the swing set! Reason: Students can record a “wonder” in their Wonder journal using the template provided. Communicate:Discuss as a class what everyone wonders about. Let students know that throughout this unit we will try to find answers to each question as we learn, explore, and become engineers. Lesson 2: Objects Can Move Gather: Allow students to walk around and look at the pictures of items they may see around their classroom or school. You can post these pictures around your classroom (gallery walk) to allow for movement during the lesson or show them as a slide on your smartboard. Reason: Have them make predictions of how this object or item would move (let them come up with their own words such as pull, push, shove, kick, roll, bounce, throw, hit, etc.) You can discuss more about these words as the lessons go on. Record their predictions on the anchor chart. Communicate: Discuss what you have recorded based on the student responses.
Episode Supply List: Lesson 1:
● Phenomena video- How to swing on the swing set!
● Chart Paper ● Wonder Journal Template
Lesson 2:
● Objects Can Move Chart Example (can be recreated with printables on anchor chart paper
● Objects Can Move Slideshow/Printable Option
Episode 2 Explore Days: 5-7 days
Lessons Resources
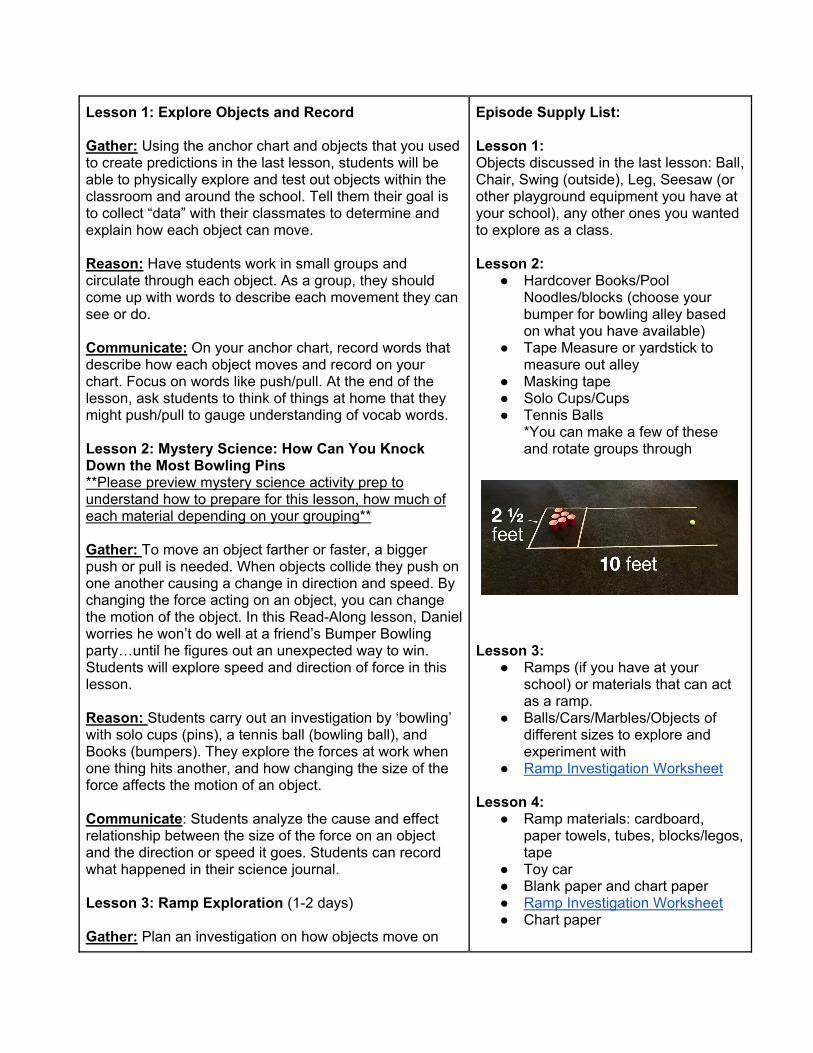
Lesson 1: Explore Objects and Record Gather: Using the anchor chart and objects that you used to create predictions in the last lesson, students will be able to physically explore and test out objects within the classroom and around the school. Tell them their goal is to collect “data” with their classmates to determine and explain how each object can move. Reason: Have students work in small groups and circulate through each object. As a group, they should come up with words to describe each movement they can see or do. Communicate: On your anchor chart, record words that describe how each object moves and record on your chart. Focus on words like push/pull. At the end of the lesson, ask students to think of things at home that they might push/pull to gauge understanding of vocab words. Lesson 2: Mystery Science: How Can You Knock Down the Most Bowling Pins **Please preview mystery science activity prep to understand how to prepare for this lesson, how much of each material depending on your grouping** Gather: To move an object farther or faster, a bigger push or pull is needed. When objects collide they push on one another causing a change in direction and speed. By changing the force acting on an object, you can change the motion of the object. In this Read-Along lesson, Daniel worries he won’t do well at a friend’s Bumper Bowling party…until he figures out an unexpected way to win. Students will explore speed and direction of force in this lesson. Reason: Students carry out an investigation by ‘bowling’ with solo cups (pins), a tennis ball (bowling ball), and Books (bumpers). They explore the forces at work when one thing hits another, and how changing the size of the force affects the motion of an object. Communicate: Students analyze the cause and effect relationship between the size of the force on an object and the direction or speed it goes. Students can record what happened in their science journal. Lesson 3: Ramp Exploration (1-2 days) Gather: Plan an investigation on how objects move on
Episode Supply List: Lesson 1: Objects discussed in the last lesson: Ball, Chair, Swing (outside), Leg, Seesaw (or other playground equipment you have at your school), any other ones you wanted to explore as a class. Lesson 2:
● Hardcover Books/Pool Noodles/blocks (choose your bumper for bowling alley based on what you have available)
● Tape Measure or yardstick to measure out alley
● Masking tape ● Solo Cups/Cups ● Tennis Balls
*You can make a few of these and rotate groups through
Lesson 3:
● Ramps (if you have at your school) or materials that can act as a ramp.
● Balls/Cars/Marbles/Objects of different sizes to explore and experiment with
● Ramp Investigation Worksheet Lesson 4:
● Ramp materials: cardboard, paper towels, tubes, blocks/legos, tape
● Toy car ● Blank paper and chart paper ● Ramp Investigation Worksheet ● Chart paper
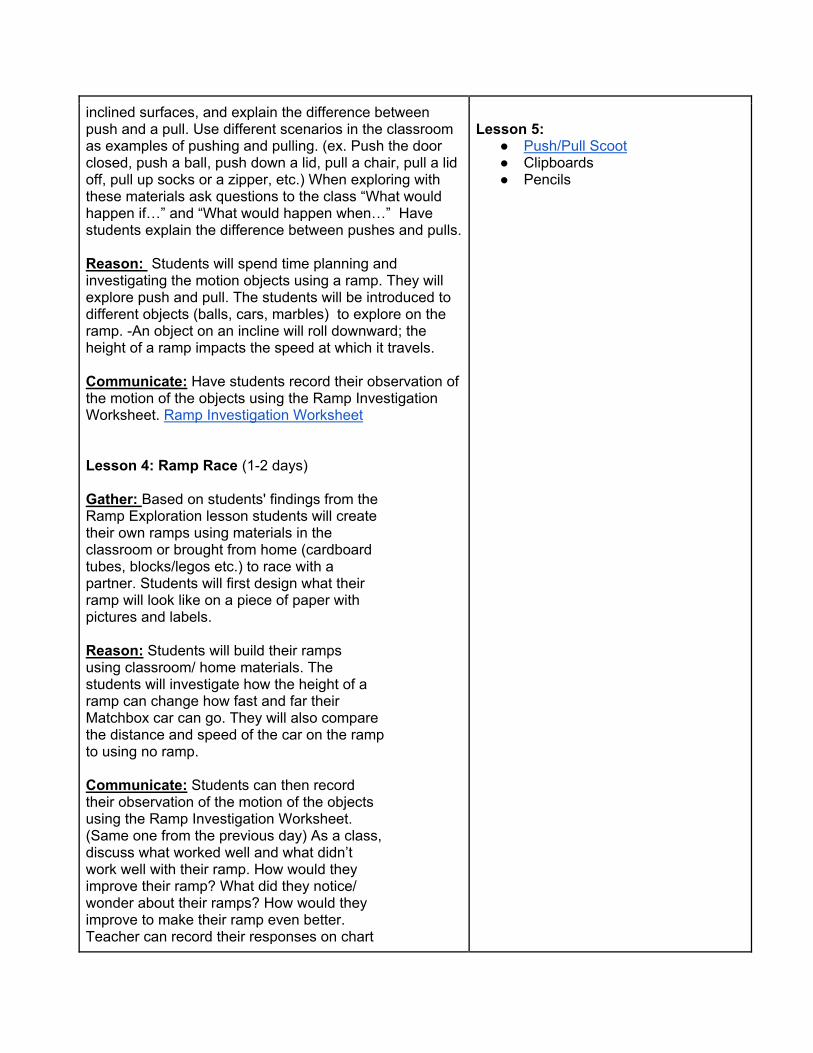
inclined surfaces, and explain the difference between push and a pull. Use different scenarios in the classroom as examples of pushing and pulling. (ex. Push the door closed, push a ball, push down a lid, pull a chair, pull a lid off, pull up socks or a zipper, etc.) When exploring with these materials ask questions to the class “What would happen if…” and “What would happen when…” Have students explain the difference between pushes and pulls. Reason: Students will spend time planning and investigating the motion objects using a ramp. They will explore push and pull. The students will be introduced to different objects (balls, cars, marbles) to explore on the ramp. -An object on an incline will roll downward; the height of a ramp impacts the speed at which it travels. Communicate: Have students record their observation of the motion of the objects using the Ramp Investigation Worksheet. Ramp Investigation Worksheet Lesson 4: Ramp Race (1-2 days) Gather: Based on students' findings from the Ramp Exploration lesson students will create their own ramps using materials in the classroom or brought from home (cardboard tubes, blocks/legos etc.) to race with a partner. Students will first design what their ramp will look like on a piece of paper with pictures and labels. Reason: Students will build their ramps using classroom/ home materials. The students will investigate how the height of a ramp can change how fast and far their Matchbox car can go. They will also compare the distance and speed of the car on the ramp to using no ramp. Communicate: Students can then record their observation of the motion of the objects using the Ramp Investigation Worksheet. (Same one from the previous day) As a class, discuss what worked well and what didn’t work well with their ramp. How would they improve their ramp? What did they notice/ wonder about their ramps? How would they improve to make their ramp even better. Teacher can record their responses on chart
Lesson 5:
● Push/Pull Scoot ● Clipboards ● Pencils
paper. Lesson 5: Push and Pull Scoot (Write The Room) **hang around classroom/hallway prior to lesson* Gather: Students will take part in a write the room activity around the classroom/hallway. This can be done in small groups or having students work in partners. Reason: Using what they know from previous lessons, students will walk around and look at different pictures (example: pulling a weed out) and record if the force is a push or a pull. Communicate: Students will share with their classmates to check for understanding.
Episode 3 Explain Days: 3 days
Lessons Resources
Lesson 1: Vocabulary Splash Gather: Display all the unit’s vocabulary words on the board. Read each word to the class with a brief explanation of the words. Reason: As a class (can be an interactive writing type activity) sort these words in an open sort using their prior knowledge. Label each group of words. Categories suggestions: temperatures, earth’s surfaces, energy, other Communicate: Discuss as a group the final label headers of each group of words. Remind students that we will be using these vocabulary words throughout the unit. Additionally, we will be exploring them in our science journals. Lesson 2: Read Aloud: And Everyone Shouted, Pull! Vocab. Focus - choose a few vocabulary words to focus on. Students write the word, draw a picture of the word and (optional) write the word in a sentence in their journals. Gather: Before reading the story, show students the cover of the book. In their science journals, have students
Episode Supply List: Lesson 1:
● Read Aloud: And Everyone Shouted, Pull!
● Printables And Everyone Shouted Pull Printables
● Science Journals Lesson 2:
● Science Journal ● Brain Pop Jr. Pushes
& Pulls

make a prediction about what they think will happen when the cart goes down the hill. They should draw/write/label. *You can use the printable in the science journal and have kids glue/tape in the notebook* Reason: Allow students to listen and watch the book. And Everyone Shouted, Pull! By: Claire Llewellyn, Illustrated By: Simone Abel Communicate: Have students draw a picture of a force that was demonstrated in the book using the printable page and record if it is a pull or push. Lesson 3: Vocab. Focus - choose a few vocabulary words to focus on. Students write the word, draw a picture of the word and (optional) write the word in a sentence in their journals. Gather Reason Communicate Lesson 4: Vocabulary Play Gather: Show the BrainPop Jr. Pushes and Pulls video. Pause the video as needed when discussing the vocabulary words in the video. (Motion, Speed, Force, etc.) You may choose to show the video twice, once to watch and once to focus on a vocabulary word to journal. Reason: Have students choose 1-2 words and write about them in their journal with a picture/labels. Communicate: Have students share with their classmates and explain which vocabulary word they chose.
Episode 4 Elaborate/Build New Content/Apply new Content Days: 5-7 Days
Activity Resources
Lesson 1: Pulley STEM challenge (3-4 days) Gather: Provide students with a rope, two chairs, a
Episode Supply List: Lesson 1:
basket, and a small portable object, (to be pulled in the basket). Students will sketch a pulley design, construct their design, test its efficacy, and revise to improve it. Students will work in groups or pairs to design this challenge. Reason: Plan an investigation on how objects move, explore motion and direction by using a pulley, and explain the difference between a push and a Pull. Students test out their pulley design to see if objects can be moved by pulling. Have students observe others' designs. Students go back and create a plan/revise their current model. Communicate: Reflection- As a class, have a discussion of What did you notice and learned about your design? How would you improve your pulley structure? Students can then record/ illustrate their observation about their design on a piece of paper. https://www.weareteachers.com/simple-physics-experiments-for-kids-pushing-and-pulling/?epik=dj0yJnU9dThFTzBvZHp1U0FlUGxpMjdtaHZzN1psUlc3UUVpRUsmcD0wJm49M1dIWlFTaTFLUWtMMDdKU2ZTWHlodyZ0PUFBQUFBR0RfRUU4/ Lesson 2: Catapult Project *Note* There are many websites with the same type of easy project. Choose which works best for your class, depending on what materials you have. Gather: To celebrate the unit, students will take part in a fun project, building a catapult. Reason: Students will experiment creating a catapult to see how far they can launch pom poms. As you build the catapult, have students experiment if it makes a difference how many sticks you use, where you place the rubber bands, etc. What makes the pom pom poms go the furthest? Communicate: Have students record what they find in their science journals. Have them draw a model and write short sentences to explain.
● Rope ● Two chairs ● Basket ● Small object to be
placed in the basket
Lesson 2: ● Catapult Project instructions ● Popsicle sticks/craft
sticks ● Rubber bands ● Plastic spoons ● Pom poms (any other
things to catapult)
Episode 5 Evaluate Days: 1-2 days
Assessment Resources
Lesson 1: Pushes & Pulls Class Book Gather: To demonstrate their understanding of the unit, students will create a class book depicting an example of a push and a pull. Have students brainstorm before going off to their seats. Reason: Students will be given a template to draw a picture and write about a push and a pull. Communicate: When student’s finish. Compile the pages together to create a book. Share the class book to present each child’s ideas!
Episode Supply List: Lesson 1:
● Class Book template ● Crayons ● Pencil
Unit 3 Topic/Storyline: Grade K Days
Question
Essential Questions:
3.
Enduring Understandings
-
Storyline Narrative / Big Ideas:
Key Words:
Science and Engineering Practices
Disciplinary Core Ideas Cross Cutting Concepts
Consolidated Supply List -
Episode 1 Engage/Elicit Ideas Days: Instructional Goals: Motivates students Phenomena - short video, text, picture, gifs, song, demonstration, maps Notice and Wonder Statements (10 observations and 10 Questions) Model Students draw a model to explain or predict. Then write about what they drew or label the model. Claim - make a claim about the phenomena.
Lessons Resources
Lesson 1: Gather Reason Communicate Lesson 2: Gather Reason Communicate
Episode Supply List:
Episode 2 Explore Days: Instructional Goals: Experience - Students explore and carry out investigations from wonder statements or claims from the first episode. Data - Collect data from the investigations. Research - obtain information. Model - Students revise their models
Lessons Resources
Lesson 1: Gather Reason Communicate Lesson 2: Gather Reason Communicate Lesson 3: Gather Reason Communicate
Episode Supply List:
Episode 3 Explain Days: Instructional Goals: Learn information to make sense of their science explorations from the explore phase. Analyze and interpret the data (SP4) . How does the Evidence support this claim? Reading, listening and/or discussing text, articles, videos Vocabulary Instruction Teacher directed lessons.
Lessons Resources
Lesson 1: Gather Reason Communicate Lesson 2: Gather Reason Communicate Lesson 3: Gather Reason Communicate Lesson 4: Gather Reason Communicate
Episode Supply List:

Episode 4 Elaborate/Build New Content/Apply new Content Days: Instructional Goals: Students have the opportunity to practice what they have learned in the introduction section to consolidate learning and develop understanding. Use what they learned to apply to another experience. Back to phenomena to explain the Reasoning Independent Activities STEM projects Choice Boards Debates
Activity Resources
Episode Supply List:
Episode 5 Evaluate Days: Instructional Goals: Assessment -problem solving, system analysis, decision making, rubrics, project, student self assessment, journal writing Reflect
Assessment Resources
Episode Supply List:
Unit 4 Topic/Storyline: Grade K Days
Question
Essential Questions:
4.
Enduring Understandings
-
Storyline Narrative / Big Ideas:
Key Words:
Science and Engineering Practices
Disciplinary Core Ideas Cross Cutting Concepts
Consolidated Supply List -
Episode 1 Engage/Elicit Ideas Days: Instructional Goals: Motivates students Phenomena - short video, text, picture, gifs, song, demonstration, maps Notice and Wonder Statements (10 observations and 10 Questions) Model Students draw a model to explain or predict. Then write about what they drew or label the model. Claim - make a claim about the phenomena.
Lessons Resources
Lesson 1: Gather Reason Communicate Lesson 2:
Episode Supply List:
Gather Reason Communicate
Episode 2 Explore Days: Instructional Goals: Experience - Students explore and carry out investigations from wonder statements or claims from the first episode. Data - Collect data from the investigations. Research - obtain information. Model - Students revise their models
Lessons Resources
Lesson 1: Gather Reason Communicate Lesson 2: Gather Reason Communicate Lesson 3: Gather Reason Communicate
Episode Supply List:
Episode 3 Explain Days: Instructional Goals: Learn information to make sense of their science explorations from the explore phase. Analyze and interpret the data (SP4) . How does the Evidence support this claim? Reading, listening and/or discussing text, articles, videos Vocabulary Instruction Teacher directed lessons.
Lessons Resources
Lesson 1: Gather Reason Communicate Lesson 2: Gather Reason Communicate Lesson 3: Gather Reason Communicate Lesson 4: Gather Reason Communicate
Episode Supply List:
Episode 4 Elaborate/Build New Content/Apply new Content Days: Instructional Goals: Students have the opportunity to practice what they have learned in the introduction section to consolidate learning and develop understanding. Use what they learned to apply to another experience. Back to phenomena to explain the Reasoning Independent Activities STEM projects Choice Boards Debates
Activity Resources
Episode Supply List:
Episode 5 Evaluate Days: Instructional Goals: Assessment -problem solving, system analysis, decision making, rubrics, project, student self assessment, journal writing Reflect
Assessment Resources
Episode Supply List:
Unit 5 Topic/Storyline: Grade K Days
Question
Essential Questions:
5.
Enduring Understandings
-
Storyline Narrative / Big Ideas:
Key Words:
Science and Engineering Practices
Disciplinary Core Ideas Cross Cutting Concepts
Consolidated Supply List -
Episode 1 Engage/Elicit Ideas Days: Instructional Goals: Motivates students Phenomena - short video, text, picture, gifs, song, demonstration, maps Notice and Wonder Statements (10 observations and 10 Questions) Model Students draw a model to explain or predict. Then write about what they drew or label the model. Claim - make a claim about the phenomena.
Lessons Resources
Lesson 1: Gather Reason Communicate Lesson 2: Gather Reason Communicate
Episode Supply List:
Episode 2 Explore Days: Instructional Goals: Experience - Students explore and carry out investigations from wonder statements or claims from the first episode. Data - Collect data from the investigations. Research - obtain information. Model - Students revise their models
Lessons Resources
Lesson 1: Gather Reason Communicate Lesson 2:
Episode Supply List:

Gather Reason Communicate Lesson 3: Gather Reason Communicate
Episode 3 Explain Days: Instructional Goals: Learn information to make sense of their science explorations from the explore phase. Analyze and interpret the data (SP4) . How does the Evidence support this claim? Reading, listening and/or discussing text, articles, videos Vocabulary Instruction Teacher directed lessons.
Lessons Resources
Lesson 1: Gather Reason Communicate Lesson 2: Gather Reason Communicate Lesson 3: Gather Reason Communicate Lesson 4: Gather Reason Communicate
Episode Supply List:
Episode 4 Elaborate/Build New Content/Apply new Content Days:
Instructional Goals: Students have the opportunity to practice what they have learned in the introduction section to consolidate learning and develop understanding. Use what they learned to apply to another experience. Back to phenomena to explain the Reasoning Independent Activities STEM projects Choice Boards Debates
Activity Resources
Episode Supply List:
Episode 5 Evaluate Days: Instructional Goals: Assessment -problem solving, system analysis, decision making, rubrics, project, student self assessment, journal writing Reflect
Assessment Resources
Episode Supply List:

Copyright © 2022 FDOKUMEN