
Guide to Oboe Reed Making
21
Guide to Oboe Reed Making Double Reed Day 2021 Siri Lyon Lyon Oboe Studio www.lyonoboestudio.com 949-431-6263
-
Upload
khangminh22 -
Category
Documents
-
view
5 -
download
0
Transcript of Guide to Oboe Reed Making

Guide to Oboe Reed Making Double Reed Day
2021
Siri Lyon Lyon Oboe Studio www.lyonoboestudio.com 949-431-6263

1
TABLE OF CONTENTS
Introduction: What is oboe cane? 2
Part One: Sorting, Splitting & Chopping 3
Part Two: Pre-Gouging 4
Part Three: Gouging 5
Part Four: Shaping 7
Part Five: Wrapping A Reed 9
Part Six: Anatomy of A Reed 11
Part Seven: Reed Making Tools 12
Part Eight: Scraping A Blank 13
Part Seven: Adjusting Your Reed 16
Conclusion: Where To Go From Here 17
Double Reed Resources 18

2
Introduction: What is oboe cane? The scientific name for oboe cane is Arundo donax, and it is the largest member of the grass family. There are different types of cane within the Arundo genus, however the donax species works best for reeds because of its resilience and ability to vibrate.
Fast Facts ● The stems of the Arundo donax plant can grow up to
20 ft. high.
● A field of cane needs to grow for 5 years before the first harvest.
● Harvested cane needs to be removed of all moisture. The drying process can take 4-18 months.
● Cane can be laid out in the sun for 3 weeks to 2 years! This gives the cane its golden color, hardens the bark and prevents cracking.
● The majority of cane is grown in the Var region of southern France, because of its ideal climate.
● Arundo donax does thrive in California, but it is considered an invasive species.
Common Misconception Most people think that oboe reeds are made of bamboo, or even sugar cane! Bamboo is too hard to vibrate, and sugar cane has a completely different genetic makeup.
Sugar cane Bamboo Arundo donax

3
Part One: Sorting, Splitting & Chopping
Sorting Once you receive your cane, the first step is to sort through the tubes to find the best pieces. This is very important! Not every tube in your bag will be usable, and you don’t want to waste your time later on a piece of cane that was bad from the start.
Characteristics of Good Cane ● Diameter measures between 10 -
10.5 mm ● Tube is straight & flat ● Walls are of medium thickness &
density
Characteristics of Bad Cane ● Diameter measures larger than
10.5 mm ● Tube is twisty, bowed or warped ● Walls are thin & grainy OR thick &
rock hard
PRO TIP: Use references rather than just your eyes alone. Check the size of each tube with a radius gauge, and use a light to look down the length of the tube to see if it’s twisted, place the tube on a flat surface to check if it lays flat, etc.
Splitting When you have found a good piece of cane, it’s time to split the tube apart!
● Hold the tube upright on the desk, with the section of the cane you’d like to use facing you.
● Take your knife and put the edge of the blade on the top of the tube. ● CAREFULLY, push your knife through the cane until it splits into two separate pieces.
Chopping Once you have a split piece of cane, the next step is to chop the piece to 77mm. This requires a piece of equipment called a guillotine. Place the piece of cane in the machine and push the lever down.
Image credit: Reeds N Stuff
4
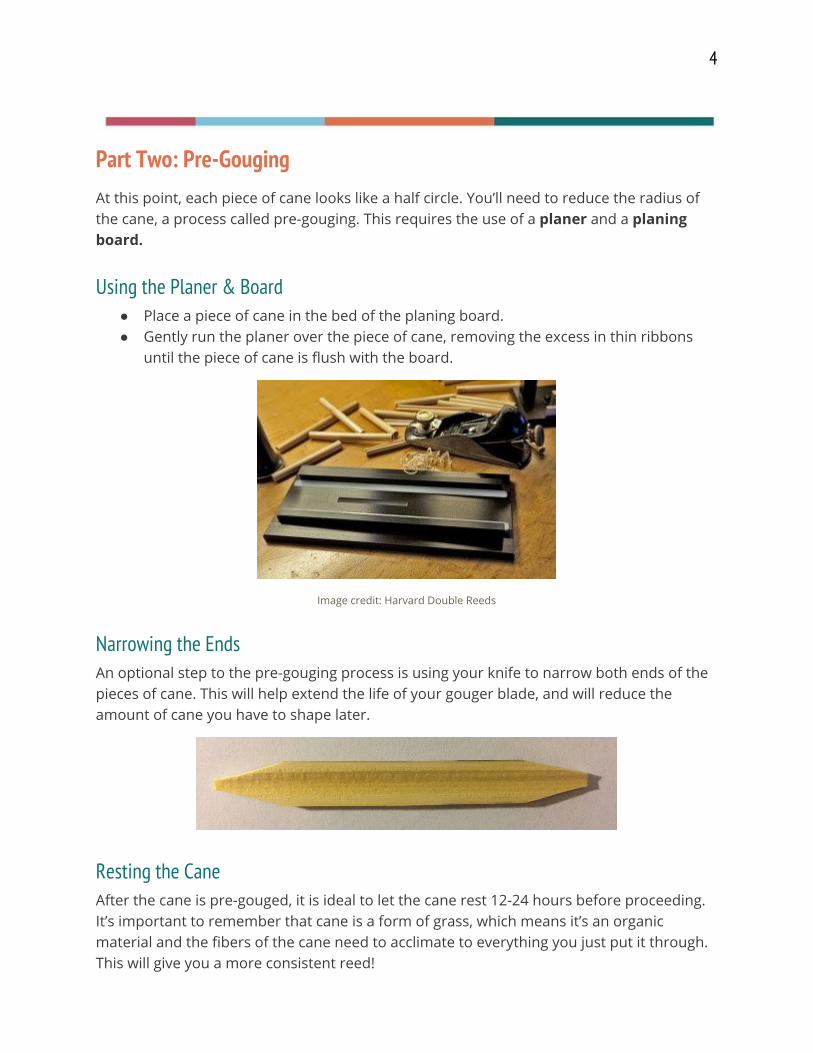
Part Two: Pre-Gouging At this point, each piece of cane looks like a half circle. You’ll need to reduce the radius of the cane, a process called pre-gouging. This requires the use of a planer and a planing board.
Using the Planer & Board ● Place a piece of cane in the bed of the planing board. ● Gently run the planer over the piece of cane, removing the excess in thin ribbons
until the piece of cane is flush with the board.
Image credit: Harvard Double Reeds
Narrowing the Ends An optional step to the pre-gouging process is using your knife to narrow both ends of the pieces of cane. This will help extend the life of your gouger blade, and will reduce the amount of cane you have to shape later.
Resting the Cane After the cane is pre-gouged, it is ideal to let the cane rest 12-24 hours before proceeding. It’s important to remember that cane is a form of grass, which means it’s an organic material and the fibers of the cane need to acclimate to everything you just put it through. This will give you a more consistent reed!
5
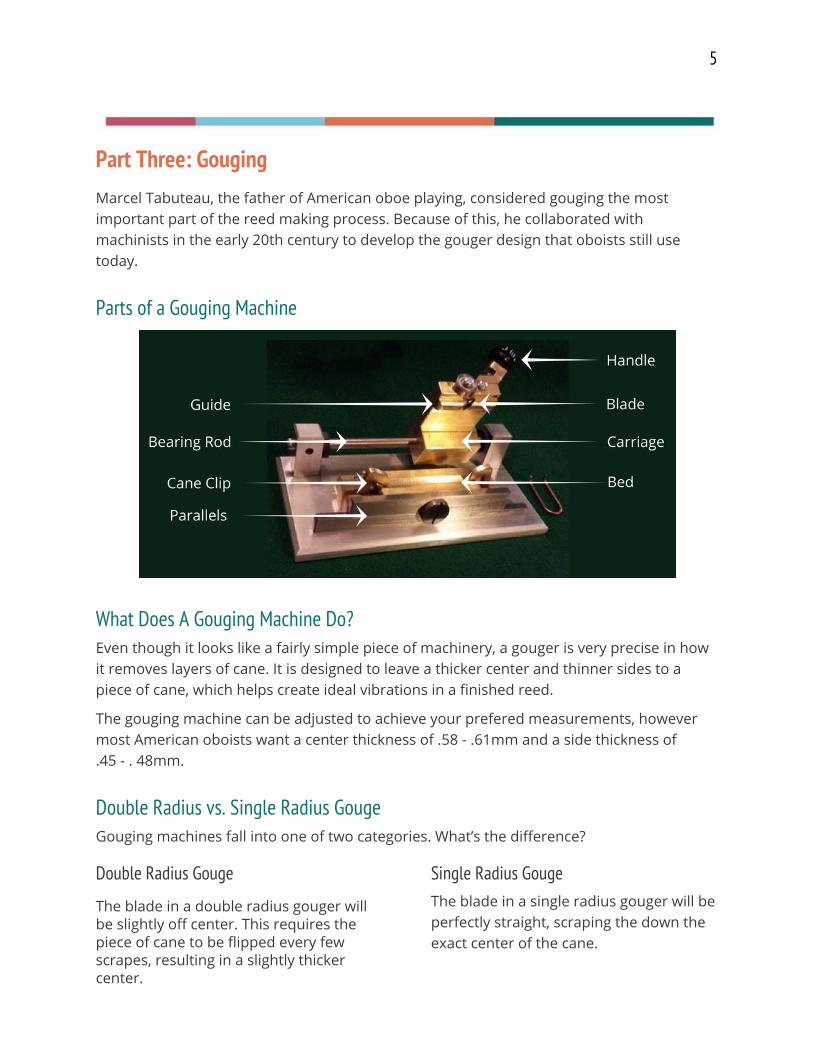
Part Three: Gouging Marcel Tabuteau, the father of American oboe playing, considered gouging the most important part of the reed making process. Because of this, he collaborated with machinists in the early 20th century to develop the gouger design that oboists still use today.
Parts of a Gouging Machine
What Does A Gouging Machine Do? Even though it looks like a fairly simple piece of machinery, a gouger is very precise in how it removes layers of cane. It is designed to leave a thicker center and thinner sides to a piece of cane, which helps create ideal vibrations in a finished reed.
The gouging machine can be adjusted to achieve your prefered measurements, however most American oboists want a center thickness of .58 - .61mm and a side thickness of .45 - . 48mm.
Double Radius vs. Single Radius Gouge Gouging machines fall into one of two categories. What’s the difference?
Double Radius Gouge
The blade in a double radius gouger will be slightly off center. This requires the piece of cane to be flipped every few scrapes, resulting in a slightly thicker center.
Single Radius Gouge The blade in a single radius gouger will be perfectly straight, scraping the down the exact center of the cane.

6
Image credit: Jeanne-Inc.
Soaking The Cane Before using your gouger, the cane needs to be fully soaked. This is important because it preserves the edge of the gouger’s blade - using dry cane in the machine will quickly dull the blade because it has to work harder to cut through the cane. It’s recommended that you soak your cane for about 1 hour in hot water.
Using the Gouger ● Remove any excess water from the piece of cane with a tissue or paper towel. ● Hold open the cane clips and place the piece of cane in the bed of the gouger. ● Lower the carriage and push the blade across the cane 4 - 5 times. Remove the thin
ribbons that emerge from the top of the carriage. ● Flip the piece of cane and push the carriage across the cane another 4-5 times.
○ If you are using a single radius gouging machine, this step is unnecessary. ● Repeat this process until the blade no longer removes any cane.
PRO TIP: If a piece of cane slips out of the bed while you are pushing the carriage, immediately remove it and throw it away! This means that the piece is not laying flat and will not yield a good reed.
Final Measurements To ensure consistency, every piece of cane should be measured after it’s gouged. For this, you will need a micrometer.
PRO TIP: Measure multiple spots in the center down the length of the cane, not just one!
Image credit: Crook & Staple
Drying The Cane Just like after the pre-gouging stage, let the cane rest and dry out for 12-24 hours. Not only does the cane need to acclimate to its new form, but mold can form if the cane is stored while still wet or damp.

7
Part Four: Shaping This is the stage where a piece of cane begins to look like a reed! It’s also a significant way that each oboist can customize their sound and playing experience. This process requires a shaper tip, shaper handle, easel, knife and razor blades.
Shaper Tips If the foundation for a good reed is in the gouging process, then the customization of a reed starts with shaping. There are many different shaper tips on the market, each with different measurements for the base and top. Oboists experiment with these different shapes to find one that fits with their embouchure, their level of air support and what sound they’d like to create.
Image credit: Hodge Products, Inc.
Shaping The Cane ● Soak the gouged cane in hot water for 30 minutes. ● Dab away any excess water from the cane with a
tissue or paper towel. ● Place the piece of cane on the easel. Using the
guide, score across the cane with a razor blade. Do not cut all the way through!
● Fold the piece of cane, gently squeezing the fold until it’s flat.
● Holding the fold of the cane against your thumb, carefully use your knife to slightly narrow each side. This will allow the cane to fit onto the shaper tip.
○ This is the same concept used earlier with narrowing the pre-gouged cane.
8
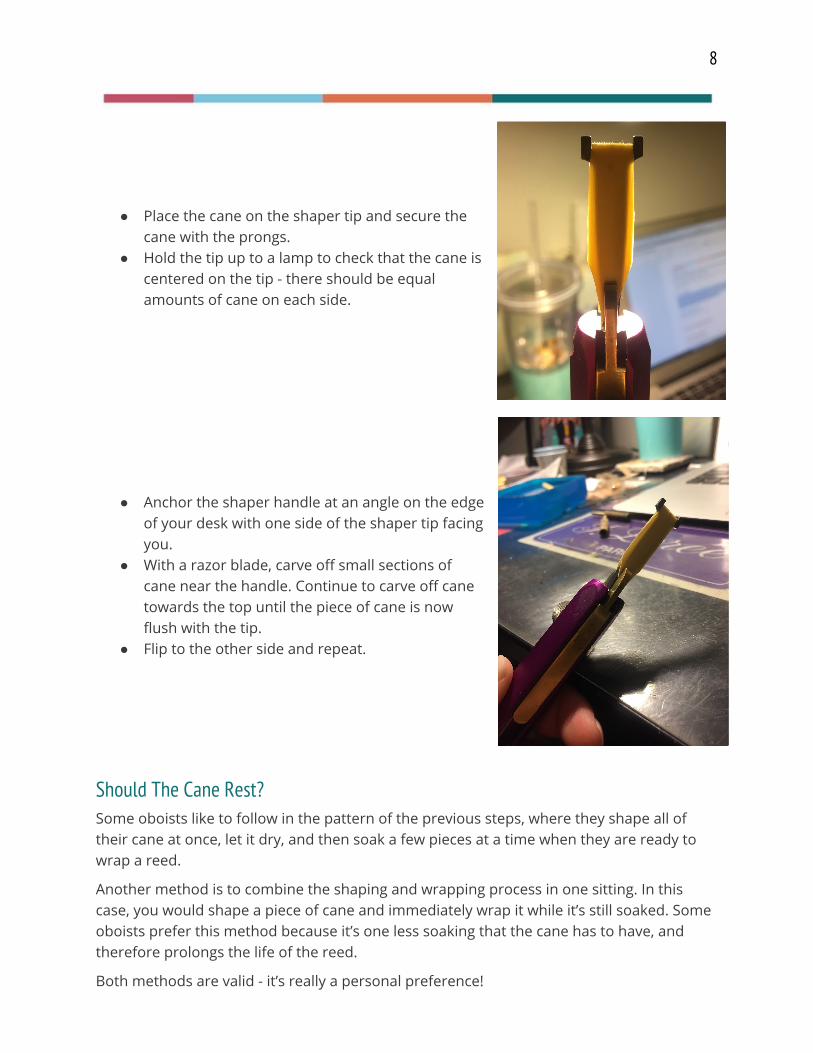
● Place the cane on the shaper tip and secure the cane with the prongs.
● Hold the tip up to a lamp to check that the cane is centered on the tip - there should be equal amounts of cane on each side.
● Anchor the shaper handle at an angle on the edge of your desk with one side of the shaper tip facing you.
● With a razor blade, carve off small sections of cane near the handle. Continue to carve off cane towards the top until the piece of cane is now flush with the tip.
● Flip to the other side and repeat.
Should The Cane Rest? Some oboists like to follow in the pattern of the previous steps, where they shape all of their cane at once, let it dry, and then soak a few pieces at a time when they are ready to wrap a reed.
Another method is to combine the shaping and wrapping process in one sitting. In this case, you would shape a piece of cane and immediately wrap it while it’s still soaked. Some oboists prefer this method because it’s one less soaking that the cane has to have, and therefore prolongs the life of the reed.
Both methods are valid - it’s really a personal preference!

9
Part Five: Wrapping A Reed The cane will now take the form of a reed. Finally! The wrapping process brings even more options for customization: staples & thread.
A Bit About Staples An oboe staple is a conical metal tube with a cork base. This is the part of the reed that gets inserted into the oboe, and is an extension of the instrument itself. Staples are made with different metals and have different shapes and lengths to achieve different tone colors and consistent intonation.
Most American oboists use 47mm staples made of brass or silver. Image credit: Hodge Products, Inc.
Express Yourself Let’s be honest. Thread is the best part about reed making because it’s so colorful and fun! Most oboists use size FF nylon thread because it’s very sturdy and doesn’t break as easily, however smaller sizes and silk threads are available.
Image credit: Squirrely Stash
Prep For Wrapping ● Tie your thread so a solid structure. This can be a table/desk leg, desk drawer
handle, or C clamp. ● Unravel a bit of the spool, rub beeswax on the thread and rewind the thread on the
spool. The wax helps get a better seal on the reed. ● Place a staple on your mandrel.
10
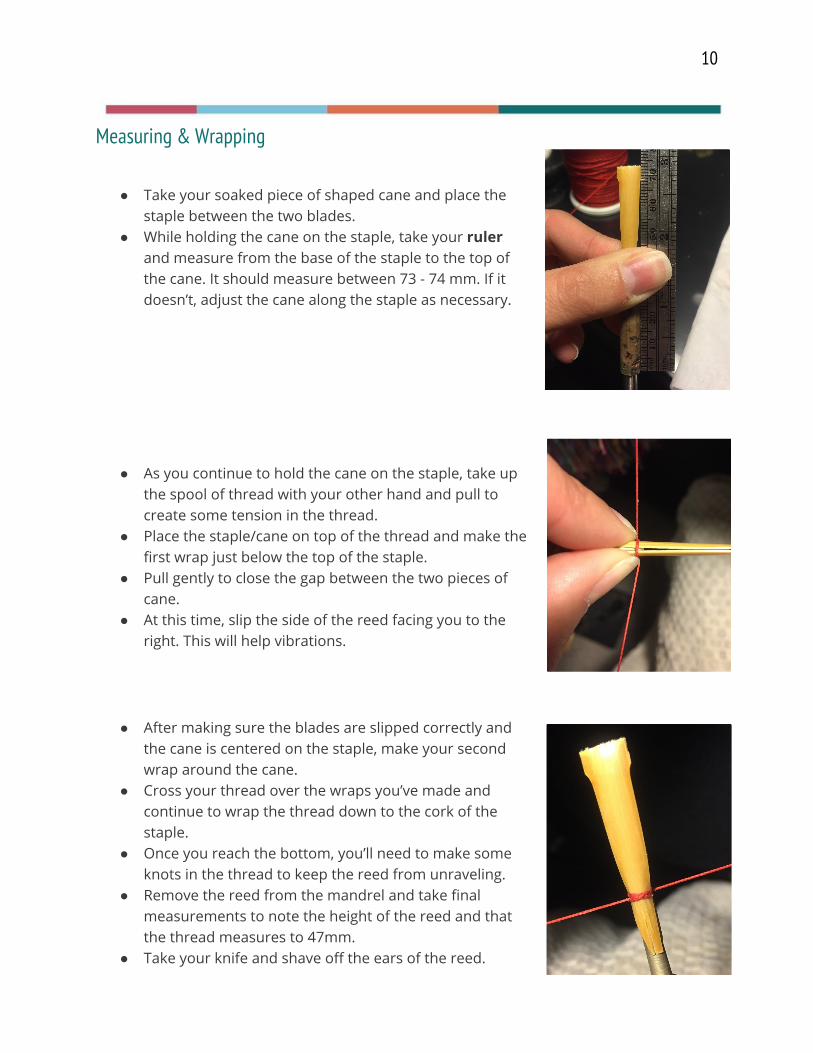
Measuring & Wrapping
● Take your soaked piece of shaped cane and place the staple between the two blades.
● While holding the cane on the staple, take your ruler and measure from the base of the staple to the top of the cane. It should measure between 73 - 74 mm. If it doesn’t, adjust the cane along the staple as necessary.
● As you continue to hold the cane on the staple, take up the spool of thread with your other hand and pull to create some tension in the thread.
● Place the staple/cane on top of the thread and make the first wrap just below the top of the staple.
● Pull gently to close the gap between the two pieces of cane.
● At this time, slip the side of the reed facing you to the right. This will help vibrations.
● After making sure the blades are slipped correctly and the cane is centered on the staple, make your second wrap around the cane.
● Cross your thread over the wraps you’ve made and continue to wrap the thread down to the cork of the staple.
● Once you reach the bottom, you’ll need to make some knots in the thread to keep the reed from unraveling.
● Remove the reed from the mandrel and take final measurements to note the height of the reed and that the thread measures to 47mm.
● Take your knife and shave off the ears of the reed.
11
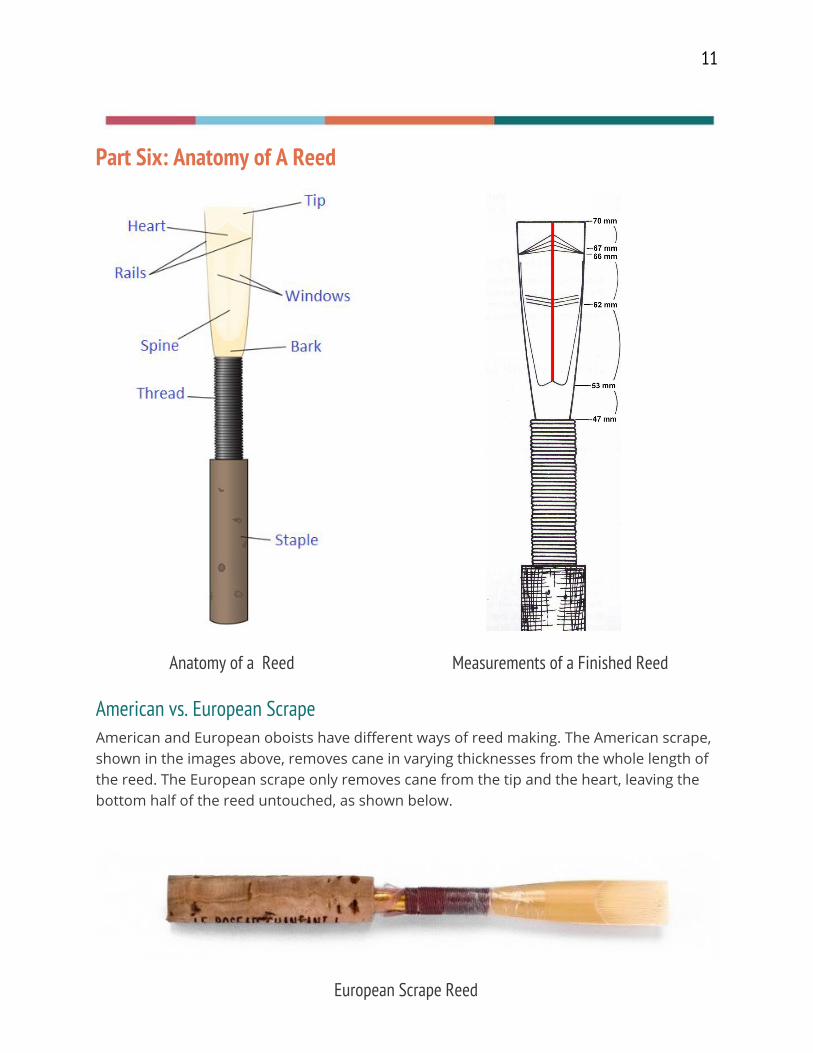
Part Six: Anatomy of A Reed
Anatomy of a Reed Measurements of a Finished Reed
American vs. European Scrape American and European oboists have different ways of reed making. The American scrape, shown in the images above, removes cane in varying thicknesses from the whole length of the reed. The European scrape only removes cane from the tip and the heart, leaving the bottom half of the reed untouched, as shown below.
European Scrape Reed
12
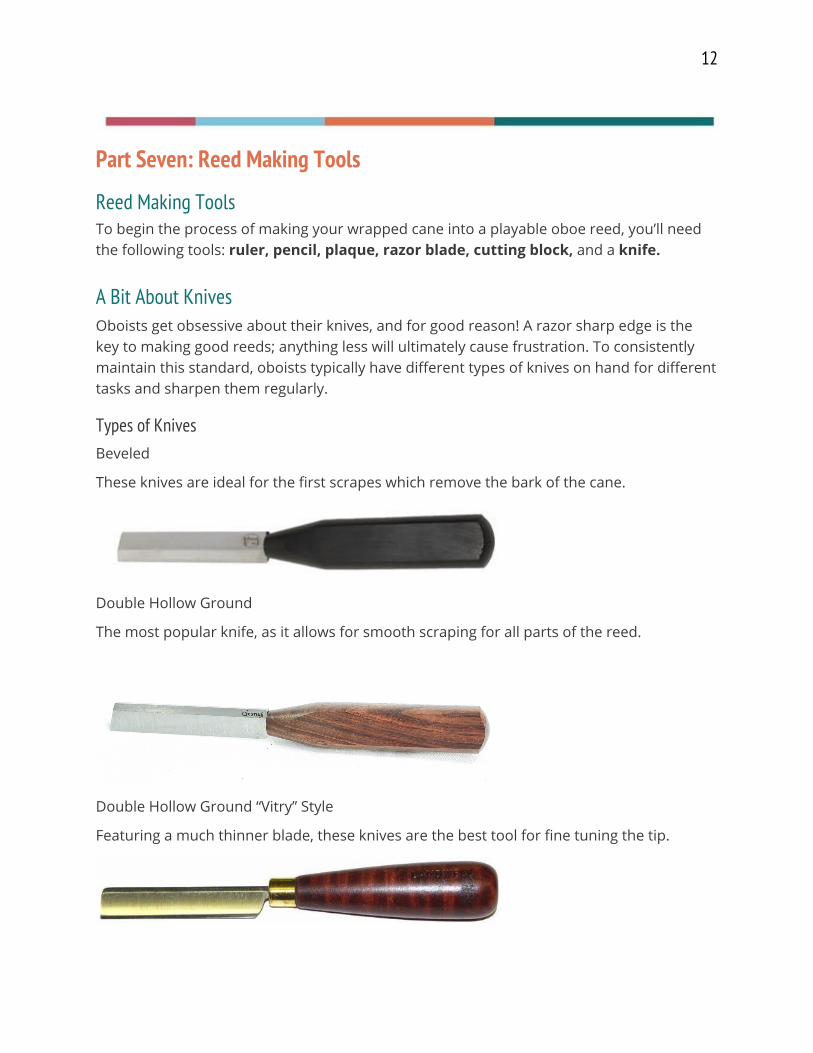
Part Seven: Reed Making Tools
Reed Making Tools To begin the process of making your wrapped cane into a playable oboe reed, you’ll need the following tools: ruler, pencil, plaque, razor blade, cutting block, and a knife.
A Bit About Knives Oboists get obsessive about their knives, and for good reason! A razor sharp edge is the key to making good reeds; anything less will ultimately cause frustration. To consistently maintain this standard, oboists typically have different types of knives on hand for different tasks and sharpen them regularly.
Types of Knives Beveled
These knives are ideal for the first scrapes which remove the bark of the cane.
Double Hollow Ground
The most popular knife, as it allows for smooth scraping for all parts of the reed.
Double Hollow Ground “Vitry” Style
Featuring a much thinner blade, these knives are the best tool for fine tuning the tip.

13
Part Eight: Scraping A Blank
What Is A Blank? A blank is a reed that has been wrapped, but is not yet playable. Some oboists consider a blank to be a reed that hasn’t been scraped at all, and others consider a blank to have its spine, rails and tip outlined and the tip cut to open the reed.
PRO TIP: Leaving a blank unscraped tends to lead to smaller openings, whereas scraping and clipping the reed immediately after wrapping tends to lead to wider openings.
The First Scrapes: Creating the Spine & Rails
● Hold your reed and ruler next to each other with your non-dominant hand, making sure the base of the reed cork and ruler are even.
● With your other hand, take your pencil and make a line at 50mm all the way across the reed.
● Put the ruler down, and make another line with your pencil down the middle of the reed from the 50mm mark all the way to the tip. This shows you where the spine will be and will help guide your first scrapes.
● While still holding the reed in your non-dominant hand, take your knife with your dominant hand and make one, long scrape on the right side of the reed from the 50mm mark to the tip. This will remove the first layer of bark.
● Continue making long scrapes on the right hand side until there is only a thin layer of bark on the outside edge of the reed and near the pencil mark indicating the spine.
● Follow this same process for the left hand side of the reed.
● Once the spine and rails are properly outlined, flip the reed over and repeat these steps on the other side.

14
Outlining & Scraping The Tip
● Hold your reed and ruler next to each other with your non-dominant hand, making sure the base of the reed cork and ruler are even.
● With your other hand, take your pencil and make a line at 66mm all the way across the reed. This marks the base of the tip.
● Starting at the right edge of the reed, take your knife and scrape the remaining bark off from the pencil mark all the way to the tip.
● When the bark is removed, place your knife at the base of the tip and with your knife at an angle.
● In even, continuous strokes, scrape towards the right hand corner of the reed to thin the tip.
● Follow this same process for the left hand side of the reed.
● Once the tip is thinned and properly outlined, flip the reed over and repeat these steps on the other side.
PRO TIP: Always be light and gentle while scraping the tip! Even at this early stage when there is a lot of cane still on the reed, it is very easy to press too hard with your knife and take a big chunk of cane out of the reed. Be patient and remove the cane a bit at a time.
Clipping the Tip & Further Thinning ● Place the tip of the reed in the center of the cutting
block with the thread cross over facing up and hold it there with your non-dominant hand.
● Take a razor blade with your dominant hand and cut the very top of the reed straight across with the blade at an angle. This makes one blade of the reed slightly shorter than the other, which improves vibrations and tone.
15
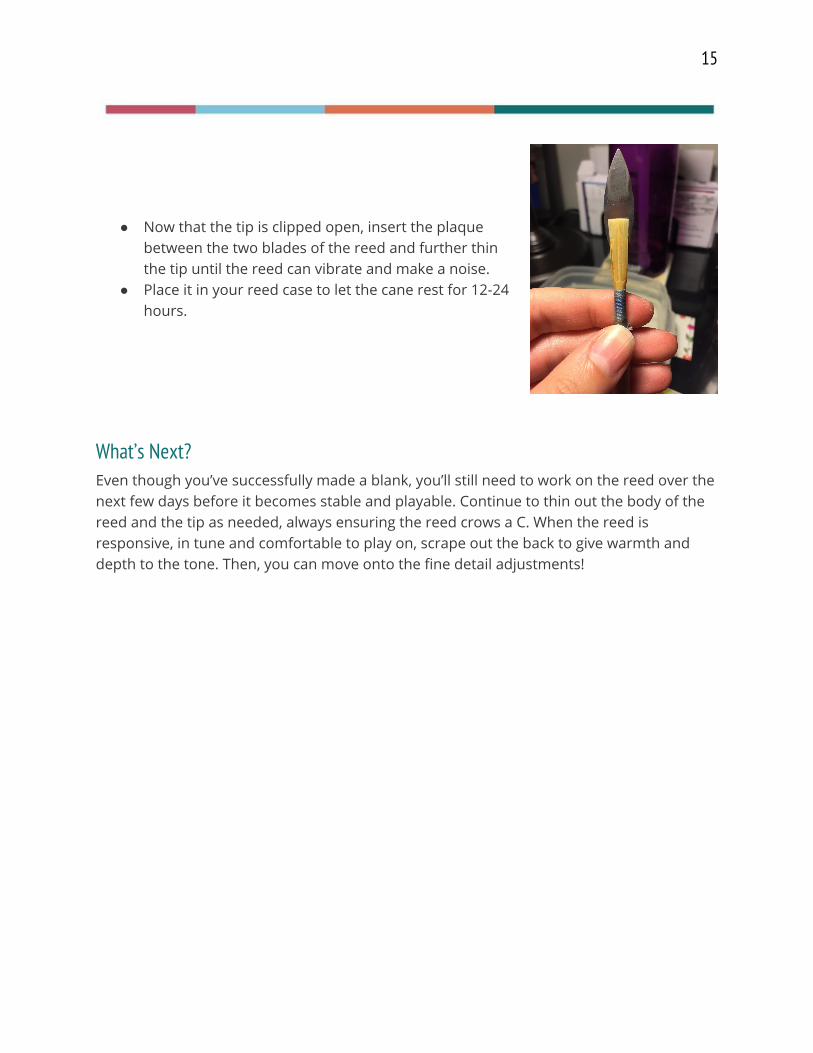
● Now that the tip is clipped open, insert the plaque between the two blades of the reed and further thin the tip until the reed can vibrate and make a noise.
● Place it in your reed case to let the cane rest for 12-24 hours.
What’s Next? Even though you’ve successfully made a blank, you’ll still need to work on the reed over the next few days before it becomes stable and playable. Continue to thin out the body of the reed and the tip as needed, always ensuring the reed crows a C. When the reed is responsive, in tune and comfortable to play on, scrape out the back to give warmth and depth to the tone. Then, you can move onto the fine detail adjustments!

16
Part Seven: Adjusting Your Reed
Before You Scrape
Do A Visual Check Is your reed missing a big chunk of the tip? Does it have loose sides even when it’s soaked? Is it cracked? If your reed has any of these symptoms, it’s time to stop playing it.
Length of Use
Have you been playing the same reed for every rehearsal, concert and practice session for the past month (or more)? If so, your reed is overplayed and the fibers are simply breaking down. It’s time to get a new reed.
If your reed is structurally intact, there’s good news! Your reed can be improved, and the best way to diagnose the problem is to analyze the crow of the reed.
How To Crow Wrap your lips around the base of the thread and blow. This allows you to hear how the reed is vibrating without your embouchure manipulating it.
The Ideal Crow If a reed is crowing correctly it should sound a clear, in tune C and produces a double octave. If not, some adjustments need to be made to the reed.
Diagnosing The Crow & Adjustment Tips
Crow Is Flat Thin out & clip the tip.
Crow Is Sharp Remove more cane from the heart or back.
Wild, Rattling Crow Take more cane off the reed overall, and focus on thinning the extreme edges of the tip.
No Octave Crow Remove cane directly behind the heart.
Reed Is Too Resistant Begin with thinning the tip, and if it’s still resistant remove some cane from the heart.
Reed Is Stuffy
Remove a bit of cane from the heart.
Reed Is Chirping Clip the tip. It’s too thin and out of balance with the rest of the reed.
Reed Is Vibrating Too Much Thin the tip of the tip and the transition between the heart and tip

17
PRO TIP: Always make small, calculated adjustments. You can always take more cane off a reed, but you can never put more back on!
Conclusion: Where To Go From Here For the professional oboist making reeds is a fact of life. Students, on the other hand, have a bit more freedom of choice. Reed making is not an all or nothing proposition! If you’re unsure if you should start making reeds, see where you fit in below!
Are you just starting to learn the oboe? That’s great! The community is glad to have you! But breathe easy - you don’t have to start making reeds just yet. Find a good reed supplier and focus on learning all the fundamentals of playing the oboe.
Are you a high schooler excelling in your band program? You are a perfect candidate to start learning how to adjust your own reeds! You are likely dealing with more advanced music that demands more of you, and knowing how to fix a problematic reed will be a big help!
Do you want to play music in college, and maybe beyond? In addition to learning how to adjust your own reeds, you should learn how to wrap and scrape a blank before going to college. You will be ahead of the pack, and you’ll be able to take more control of your sound!
Is your goal to be a professional oboist? Amazing! As soon as you’re in high school, the earlier you can begin the reed making process the better. You’ll get to learn it all!
Remember! These are guidelines, not rules! Consult your private teacher or band director when you want to start talking about reed making and they’ll help you make the best decision.

18
Double Reed Resources
Retail & Repair ● RDG Woodwinds, Inc.
○ Located in Los Angeles, this is a great local resource for purchasing your oboe needs. They also have an excellent repair shop for small maintenance or big repairs.
● Midwest Musical Imports
○ Located in Minneapolis, MN, this store has a wide selection of products for oboe, English horn and other woodwind instruments. Shipping is fast, reliable and reasonably priced.
● Forrests Music
○ Large double reed retailer located in Berkeley, CA.
● RS Woodwinds
○ Owned by San Diego Symphony bassoonist Ryan Simmons, RS Woodwinds is committed to providing superior quality specialty woodwind repair services in the San Diego and Southern California region.
● The Reedery
○ A great repair shop in Lakewood, CA owned and operated by oboist Angela Wells, catering to all woodwinds.
Music Sources ● International Music Score Library Project (IMSLP)
○ This online library provides free parts, scores, arrangements and recordings for thousands of pieces in public domain. This is a resource musicians use constantly!
● TrevCo Varner Music
○ TrevCo Varner Music is the "World's Foremost Purveyor of Fine Sheet Music for Double Reeds", with over 12,000 titles in stock.
● JDW Sheet Music
○ Music company that specializes in transcriptions for double reed ensembles of all combinations.

19
Summer Camps ● Bocal Majority & Operation O.B.O.E.
○ Bocal Majority is a camp for oboe and bassoon players of all levels. The camp in Southern California will offer reed making sessions as well as performance opportunities in small & large ensembles.
● Idyllwild Arts
○ Idyllwild Arts offers two week intensives for students ranging from age 9-18. Offerings include orchestra, wind ensemble and chamber music. These camps are great for students who would like to pursue a music career!
● Arrowbear Music Camp
○ Arrowbear is a small summer music camp located in the beautiful San Bernardino Mountains. Founded in 1942, they serve families from Southern California and the surrounding area. Their program includes orchestra, band, choral, jazz and chamber music with campers ranging from ages eight to early college. They blend a traditional sleepaway camp environment with rigorous musical instruction.
● Wildwood Music Camp
○ Founded in 1971, Wildwood continues to provide students with a quality music education each summer. Their faculty and staff come from across the education and performance industry joining together to create an exciting week of music discovery for students from across the country. Intermediate (grades 7-9) and advanced (grades 10-12) sessions available!
Connect with the Double Reed Community ● International Double Reed Society
○ The International Double Reed Society (IDRS) was established in December of 1971 and is a world-wide organization of double reed (oboe and bassoon family) players, instrument manufacturers and enthusiasts. The society has over 4,400 members from 56 countries.
● Double Reed Dish podcast
○ Double Reed Dish is a podcast by Galit Kaunitz and Jacqui Wilson. Released on the 1st and 15th of every month, Double Reed Dish is a positive, supportive program in which oboists and bassoonists of all ages and abilities can relate and "geek out" together.

20
○ Features interviews with professional oboists & bassoonists, showcasing different career paths in the music field and offering advice to aspiring musicians.
● Social Media
○ Facebook groups
■ There are tons of groups that you can join on Facebook to connect with fellow double reed players. International Double Reed Society, Oboe Reedmaking, etc. By joining these groups you’ll be be notified about performances taking place around the world, masterclasses, new music, and more!
○ Instagram & YouTube
■ Players: Claire Brazeau, Eryn Oft
■ Orchestras: LA Phil, Pacific Symphony, San Francisco Symphony
■ Groups: WindSync, Akropolis Reed Quintet, The Breaking Winds