GSM/GPRS/GPS Tracker - Stratoflights
11
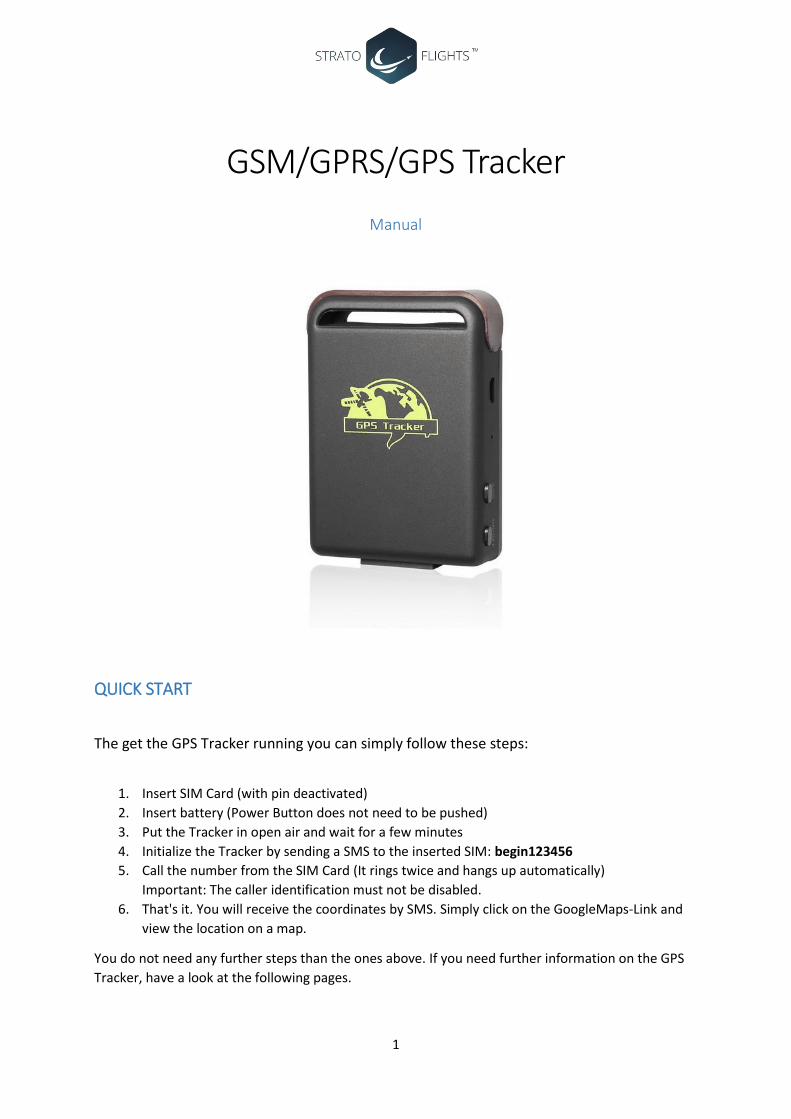
1 GSM/GPRS/GPS Tracker Manual QUICK START The get the GPS Tracker running you can simply follow these steps: 1. Insert SIM Card (with pin deactivated) 2. Insert battery (Power Button does not need to be pushed) 3. Put the Tracker in open air and wait for a few minutes 4. Initialize the Tracker by sending a SMS to the inserted SIM: begin123456 5. Call the number from the SIM Card (It rings twice and hangs up automatically) Important: The caller identification must not be disabled. 6. That's it. You will receive the coordinates by SMS. Simply click on the GoogleMaps-Link and view the location on a map. You do not need any further steps than the ones above. If you need further information on the GPS Tracker, have a look at the following pages.
-
Upload
khangminh22 -
Category
Documents
-
view
2 -
download
0
Transcript of GSM/GPRS/GPS Tracker - Stratoflights
1
GSM/GPRS/GPS Tracker
Manual
QUICK START
The get the GPS Tracker running you can simply follow these steps:
1. Insert SIM Card (with pin deactivated)
2. Insert battery (Power Button does not need to be pushed)
3. Put the Tracker in open air and wait for a few minutes
4. Initialize the Tracker by sending a SMS to the inserted SIM: begin123456
5. Call the number from the SIM Card (It rings twice and hangs up automatically)
Important: The caller identification must not be disabled.
6. That's it. You will receive the coordinates by SMS. Simply click on the GoogleMaps-Link and
view the location on a map.
You do not need any further steps than the ones above. If you need further information on the GPS
Tracker, have a look at the following pages.

2
Content Manual................................................................................................................................................. 1
1. Summary .............................................................................................................................................. 3
2. Applications ......................................................................................................................................... 3
3. Hardware ............................................................................................................................................. 3
4. Specifications ....................................................................................................................................... 3
5. Usage ................................................................................................................................................... 4
5.1 SIM Card Installation ..................................................................................................................... 4
5.2 Battery and Charger ...................................................................................................................... 4
5.3 Startup ........................................................................................................................................... 5
5.4 Initialization ................................................................................................................................... 5
5.5 Change the password .................................................................................................................... 5
5.6 Authorization ................................................................................................................................. 6
5.7 Single Locating ............................................................................................................................... 6
5.8 Auto Track ..................................................................................................................................... 6
5.9 Monitor (voice surveillance) .......................................................................................................... 7
5.10 Storage ........................................................................................................................................ 7
5.11 Data Load ..................................................................................................................................... 7
5.12 Shoch Sensor Alarm ..................................................................................................................... 8
5.13 Geo-Fence.................................................................................................................................... 8
5.14 Movement Alert .......................................................................................................................... 8
5.15 Overspeed alert ........................................................................................................................... 8
5.16 SOS button ................................................................................................................................... 9
5.17 Low battery alert ......................................................................................................................... 9
5.18 State Checking ............................................................................................................................. 9
5.19 IMEI checking: ............................................................................................................................. 9
5.20 Terminal (local) Time Setting....................................................................................................... 9
5.21 GPRS setting .............................................................................................................................. 10
5.22 Modes switch between “SMS” and “GPRS” .............................................................................. 10
6 .Cautions ............................................................................................................................................. 10
7 Fauls & the solutions .......................................................................................................................... 11

3
1. Summary
Working Based on existing GSM/GPRS network and GPS satellites, this product can locate and
monitor any remote targets by SMS.
2. Applications
Vehicle rental / Fleet management etc
Protect child / the old / the disabled / pet etc
Provide peace-of-mind for businessmen
Personnel Management
3. Hardware
4. Specifications
Content Specs.
Dimensions 64 x 46 x 17 mm (1.8" x 2.5" x 0.65")
Weight 50g
Network GSM/GPRS
Band 850/900/1800/1900 MHz
GPS Chip SIRF3 chip
GPS Sensitivity -159 dBm
GPS Accuracy 5 m
Time to First Fix Cold status: 45 s Warm status: 35 s Hot status: 1 s
Car Charger 12-24 V input 5V output
Wall Charger 110-220 V input 5 V output
Battery Chargeable changeable 3.7 V 800 mAh Li-ion Battery
Standby 48 hours
Storage Temperature -40 °C to + 85 °C
Operation Temperature -20 °C to + 55 °C
Humidity 5% - 95% non-condensing
1 = On / Off Button 2 = SOS Button 3 = Indicator for signals 4 = update software and charge battery 5 = Built-in GSM/GPRS antennas

4
5. Usage
5.1 SIM Card Installation Make sure that there is no call transfer and call display is on, and PIN code off. The SMS message must in Text format, can’t be identified for PDU format. Steps: 5.1.1 Open the rear cover, and pick out the battery. 5.1.2 Push the foil up according the arrow on the foil and load the micro SD card and push back.
5.1.3 Put the SIM card into the holder as picture shows.
5.2 Battery and Charger Do charge the battery to capacity in 8 -12 hours for first time. Please use the battery and charger provided by the manufacturer. This unit adopts built-in Li-ion battery, and full battery can standby 120 hours. After first use, the battery usually should be charged fully in 3-5 hours. Cautions:
1. For it’s Li-ion battery, which contains harmful chemicals and may burst, please don’t bump, puncture it violently and keep it off fire.
2. Please charge the battery in time to keep it working normally.

5
5.3 Startup
1. Put the SIM card and battery in place. 2. The unit turns on automatically when the sim card and battery is inserted 3. Put the unit to outdoors until the indicator is blink. 4. For first use, please initialize the unit and restore it to default setting. (Please refer to 5.4
for instruction.) 5. In 10 or 40 seconds, the unit will begin to work and acquire the GSM signals as well as
the GPS signals. The indicator will keep flashing every 3 seconds when the unit has received the signals.
6. When this unit receives GPS signals normally, you can use it and do any setting as the instructions of this manual.
5.4 Initialization
Send “begin+password” in SMS to the unit, it will reply “begin ok” and initialize all the settings. (Default password: 123456) For example, send SMS “begin123456” to the tracker via a cell phone, If succeeded, it will reply “begin ok”.
5.5 Change the password
5.5.1 Set Password: Send sms: “password+old password+space+new password” to the unit to change the password. For Example, pls send sms: “ password123456 888888” to terminal device, it will reply sms: “password OK”. New password 888888 changed in success. 5.5.2 Be sure keep the new password in mind, you have to upload the software to restore the original setting in case of losing the new password. 5.5.3 Make sure the new password is in 6 digits Arabic numbers, or the tracker can not recognize the password. 5.5.4 Make sure that all the symbol“+”in sms commends is just for quick understanding, which don’t need to enter “+” in sms, and “space” means press the spacebar button of the cell phone.

6
5.6 Authorization There are only 5 cell phone numbers able to be authorized, be sure to set the authorization phone number before use. 5.6.1 Call the tracker for 10 times continuously and get position correctly, then it will make the cell phone number as the authorized number automatically.
5.6.2 Send SMS:“ admin+password+space+cell phone number”to set up a authorized number. The other authorized numbers should be set by the first authorized number. If the number is successfully authorized, the unit will reply “admin ok!” in SMS.
5.6.3 Send SMS:“ noadmin+password+space+authorized number” to delete the authorized number. 5.6.4 For roaming purpose, you have to add your country code ahead of the cell phone number,
for example, please send:“ admin123456 +8613322221111” to tracker to set 13322221111 as an authorized number.
5.7 Single Locating
5.7.1 If there is no authorized number, when any number dials up the unit, it will report a Geo-info; If there is already an authorized number, then it will not respond when an unauthorized number calls it up. 5.7.2 When an authorized number dials up the unit, it will hang up and report a real-time Geo-info. When you send an sms with "smslink+password" (smslink123456) you will receive a Google Maps Link, as below:
5.8 Auto Track
5.8.1 Send SMS command “t030s005n+password” to the tracker device, it will report the Geo-info at 30s intervals for 5 times. (s:second, m:minute, h:hour). This command setting must be in 3 digits.

7
5.8.2 Unlimited times auto track: Send SMS “t030s***n+password” to the tracker device, it will reply the Geo-info continuously at 30 seconds intervals. 5.8.3 Cancellation: Send SMS “notn+password” to the tracker device. Note: the interval must not less than 20s.
5.9 Monitor (voice surveillance)
5.9.1 The command to switch between Track and Monitor are “tracker” and “ monitor”. 5.9.2 The default mode is “track” (Track mode). 5.9.3 Send SMS “monitor+password” to the unit, and it will reply “monitor ok!” and switch to “monitor” mode. 5.9.4 Send SMS “tracker+password” to the unit, it will reply “tracker ok!” and restore to "track mode"
5.10 Storage
5.12.1 Auto Storage:When the tracker devices lost GSM signals or fall offline from GPRS, tracker will store the tracking position and alerts automatically in the flash upon the pre-set condition, when GSM signals get back, all the event alerts will be auto-sent to the authorized numbers or monitoring platform (server), but the stored tracking data should be loaded to the monitoring platform via SMS command. 5.12.2 Storage upon times: Send SMS: “save030s005n+password” to the tracker unit, it will reply “save ok”, and will store the lat, long locations every 30 seconds for 5 times. (S: second, m: minute; h: hour).
5.12.3 Multi-Storage : Send sms:”save030s***n+ password” to tracker device, it will reply “save ok”. 5.12.4: Storage Clearance: send SMS: “clear+ password” to tracker device, it will reply “clear ok”.
5.12.5:Storage Volume: external TF card support 32GB at most.
5.11 Data Load 5.11.1 Current date Load: Send SMS: “load+ password” to tracker device, it will reply: “load ok” if the device is working well under GPRS mode; if not, it will reply “load fail! Please check gprs” that means device does not work under GPRS mode.
5.11.2 Specified date Load: Send SMS: “load+ password+ space+ year month date” to tracker
8
device, it will reply: “load ok” and load the tracking data to the monitoring platform upon the valid time you choose. For Example: send SMS: “load123456 20110425” to the tracker device, means to load the tracking data of 25th April 2011 to monitoring platform.
5.12 Shoch Sensor Alarm It is disabled as default, send “shock+password to tracker, tracker will reply “shock ok!”. “Sensor alarm+lat/long” will send to authorized phone number when tracker is being shocked, and one alarm for each shock event trigger. Cancel: Send “noshock+password” to cancel the shock sensor alarm.
5.13 Geo-Fence
Set up a geo-fence for the unit to restrict its movements within a district. The unit will send the message to the authorized numbers when it breaches the district. Set up: When the unit stays immobile in a place for 3-10 minutes, the user can Send SMS: “stockade+password+space+latitude,longitude; latitude,longitude” to unit to set the restricted district. In case of breach, it will send SMS “stockade!+geo-info” to the authorized numbers every 3 minutes. Remark: The first latitude&longitude is coordinate of the top left corner of the Geo-fence, while the second latitude&longitude is the coordinate of the bottom right corner.
Cancel: Send SMS:” nostockade+password” to deactivate this function.
5.14 Movement Alert
Set up: When the unit stays immobile in a place for 3-10 minutes, the user can send SMS: “move+password” to the unit, then the unit will reply “move ok!”. In case of such a movement (the unit default distance is 200M, it will send SMS “Move+ Geo-info” to the authorized numbers every 3 minutes. Cancel: Send SMS:” nomove+password” to deactivate the movement alert.
5.15 Overspeed alert
Set up: Send SMS:” speed+password+space+080” to the unit (suppose the speed is 80km/h), and it will reply “speed ok!”. When the target moves exceeding 80 km/h, the unit will send SMS :”speed+080!+Geo-info” to the authorized numbers every 3 minutes. Cancel: Send SMS “nospeed+password” to deactivate the overspeed alarm.

9
Remark: The recommended speed should be not less than 50km/h. For below that rate, it will be effected the accuracy by gps signals drift etc.
5.16 SOS button
Press the SOS for 3 seconds, it will send “help me!+ Geo-info” to all the authorized numbers every 3 minutes. It will stop sending such a SMS when any authorized number reply SMS “help me!” to the tracker.
5.17 Low battery alert
When GPS device battery is going to be about 3.7V, it will send SMS:”low battery+Ge-info” at 3 minutes interval.
5.18 State Checking
Send SMS:”check+password” to the tracker device, it will reply the recent status via SMS as: GSM: 100% GPS: OK/NO GPRS: ON/OFF battery: 100%.
5.19 IMEI checking: Send SMS command "imei+password" to the unit. E.g.: Send SMS command "imei123456" to the unit, an IMEI number in 15 digits will be replied to your cell phone.
5.20 Terminal (local) Time Setting Send SMS “time+space+zone+password+space+local time zone”. For example, Send SMS “time zone123456 8” (time zone of China). If the local time zone is negative as “-8”, then it should set as SMS: “time zone123456 -8”.

10
5.21 GPRS setting The device can auto set APN,the function support most countries,the default IP is our company IP.User can use SMS or our setting software set the parameter. Setting up APN APN standards for Access Point Name and differs from country to country. For more information about the local APN, inquire with your local GPRS network operator. Text the tracker a SMS “APN+password + Space + your local APN+APN user name+apn password”. If need no APN user,apn password,the SMS format is: “APN+password + Space + your local APN.for example:apn123456 cmnet claro claro,mean:local APN:cmnet,APN user:claro,APN password:claro. If need not APN user,APN password:the format is:apn123456 cmnet. Send SMS command “adminip123456 202.194.155.78 9999” to the tracker device, If
succeeded, “adminip OK” is returned by the device in SMS.( 123456 is default password ,
202.194.155.78 is IP,9999 is port).
5.22 Modes switch between “SMS” and “GPRS”
The default mode is “SMS” Send SMS “GPRS+password” to the unit, and it will reply “GPRS ok!” and switch to “GPRS” mode. Send SMS “SMS+password” to the unit, it will reply “SMS ok!” and restore to “SMS” mode.
6 .Cautions
Please comply with the instructions to extend the unit life: 6.1 Keep the unit dry. Any liquid, i.e. rain, moisture, may destroy or damage the inside circuitry. 6.2 Don’t use & store the unit in dusty places. 6.3 Don’t put the unit in overheated or overcooled places. 6.4 Handle carefully. Don’t vibrate or shake it violently. 6.5 Clear the unit with a piece of dry cloth. Don’t clean in chemicals, detergent. 6.6 Don’t paint the unit, this may cause some foreign materials left in between the parts. 6.7 Don’t disassemble or refit the unit. 6.8 Please use the battery and charger provided by manufacturer. Using other batteries and chargers will cause unwanted situation.

11
7 Fauls & the solutions
Faults Solution
Startup Fail Check the battery and see if it is fully charged or correctly installed.
Hang up Fail In existence of an authorized number, an unauthorized number dials up the unit. Please initialize the unit and re-set up the authorized numbers.
No GSM Signal Please make sure SIM Card is GSM Net and installed correctly; also call display should be on; but no call transfer and PIN code off.
Have a great flight!
Everybody needs an adventure!
www.stratoflights.com/tutorial