Geometry: Module 2
48
Geometry Module 2 Representations Grades 4 to 7 Teacher Document Malati staff involved in developing these materials: Kate Bennie Zonia Jooste Dumisani Mdlalose Rolene Liebenberg Piet Human Sarie Smit We acknowledge the assistance of Zain Davis, Shaheeda Jaffer, Mthunzi Nxawe and Raymond Smith in shaping our perspectives. COPYRIGHT All the materials developed by MALATI are in the public domain. They may be freely used and adapted, with acknowledgement to MALATI and the Open Society Foundation for South Africa. December 1999
-
Upload
khangminh22 -
Category
Documents
-
view
0 -
download
0
Transcript of Geometry: Module 2
Geometry
Module 2
Representations
Grades 4 to 7
Teacher Document
Malati staff involved in developing these materials:
Kate BennieZonia JoosteDumisani MdlaloseRolene LiebenbergPiet HumanSarie Smit
We acknowledge the assistance of Zain Davis, Shaheeda Jaffer, Mthunzi Nxawe andRaymond Smith in shaping our perspectives.
COPYRIGHT All the materials developed by MALATI are in the public domain. They may be freely used andadapted, with acknowledgement to MALATI and the Open Society Foundation for South Africa. December 1999
MALATI materials: Geometry, module 2 1
Representations of three-dimensional objects in two dimensions(Photographs Theme)
The previous activities required that learners1. Interact with actual objects in space.2. Interact informally with the representations of these objects in 2-dimensional
space (using perspective drawings).
It is important to remember that in the case of representations of 3-dimensionalobjects in 2 dimensions (in the form of plans, perspective drawing , non-perspective drawing and nets), there are certain conventions associated withthese representations. A knowledge of these conventions is necessary for theunderstanding of given visual representations as well as for communicatingvisual images in the form of drawings. Such knowledge is social knowledgethat needs to be provided by the teacher.
These activities are thus designed to explore some of the conventions associated withthe different forms of representation:• the relative position and size of objects and an observer in photographs• the notions of “aerial view” / plan, “side view” and “front view”• the difference between perspective and non-perspective drawing.Assistance is also provided for learners in making their own drawings (perspectiveand non-perspective drawings).
It is felt that once some understanding of the conventions is established, these visualrepresentations (rather than the actual objects) can then be used more extensively inthe exploration of space. The activities that follow this module make use of the visualrepresentations and require the use of some drawing skills.
An effort has been made in the design of these activities to provide learners withexperiences in various sized spaces:• “Small-Scale Space”: For example, visualising what a representation of a cereal
box will look like from different perspectives.• “Large-Scale Space”: This is space which surrounds the individual, for example,
the classroom or the school grounds. Some such space can be known to thelearner, for example, the neighbourhood, or might be unknown in the case of atown the learner has not visited.
We believe that the skills developed in this Module are vital if we wish learners to“describe and represent experiences with shape, space, time and motion” as requiredin Specific Outcome 7 of Curriculum 2005. The development of these skills ofrepresentation and description will equip learners to explore the position of an objectin space, changes in shape of an object, the orientation of an object, and theinterconnectedness of shape, space and time as required in Curriculum 2005.
MALATI materials: Geometry, module 2 2
LIST OF ACTIVITIES:Vusi’s Holiday Photos*In Front or Behind?*Near and Far*Practice Photos*Draw What You See*Which Camera?Different Photos*Block Buildings 1*Block Buildings 2*Block Buildings 3*A BoxDrawing a BoxStrange PicturesSorting 2*What Can Vusi See?*Hide-and-Seek*
Note that the activities marked with the symbol * require that the learners workwith the visual representations without the use of the actual objects. In order tobe able to do this the learners have to have had sufficient experienceinteracting with the real objects, as was the case in the activity Where are theObjects? in Spatial Module 1. If the teacher feels that some learners requiremore experiences with concrete objects s/he could use activities such as "DrawWhat You See" and "Different Photos", but using the concrete objects.
The marked activities should only be used by learners when they have had richexperiences with the concrete objects. These learners should be permitted touse the concrete objects as a checking mechanism for the solutions obtainedusing visual means. The concrete objects can also be used by learners toexplain their reasoning to one another.
MALATI materials: Geometry, module 2 3
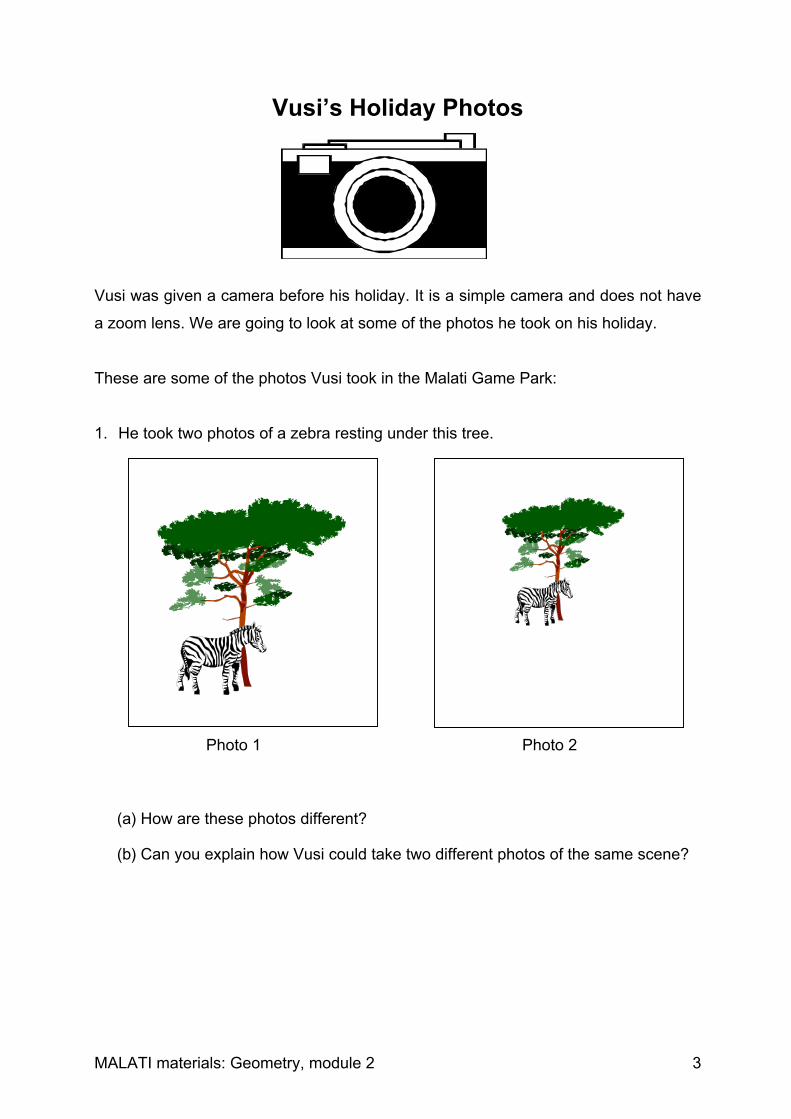
Vusi’s Holiday Photos
Vusi was given a camera before his holiday. It is a simple camera and does not have
a zoom lens. We are going to look at some of the photos he took on his holiday.
These are some of the photos Vusi took in the Malati Game Park:
1. He took two photos of a zebra resting under this tree.
(a) How are these photos different?
(b) Can you explain how Vusi could take two different photos of the same scene?
Photo 1 Photo 2

MALATI materials: Geometry, module 2 4
2. While Vusi was taking these photos he saw a springbok and he took this photo.
3. Vusi took this photo of the hut they stayed in. Can you help Vusi so that he will
take a better photo next time?
Vusi is very confused. He says he
knows that the tree is much bigger
than the springbok, but it does not
look like this in the photo.
Can you help him?
Photo 3
MALATI materials: Geometry, module 2 5
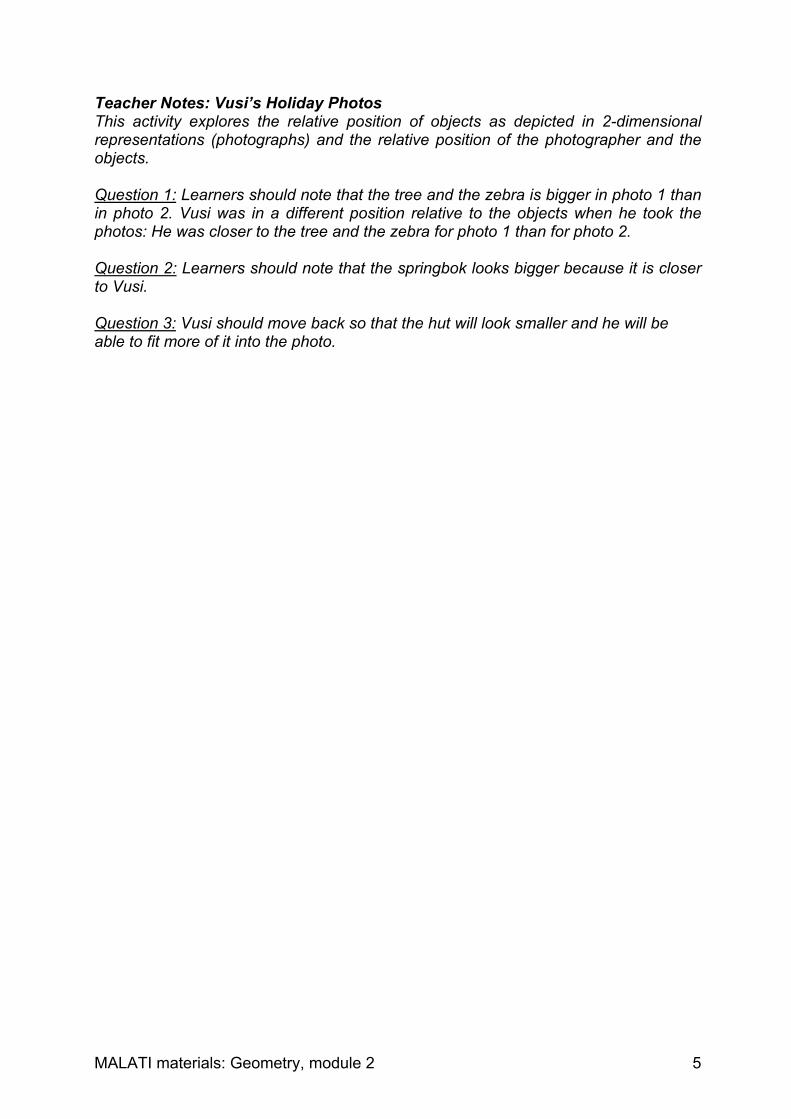
Teacher Notes: Vusi’s Holiday PhotosThis activity explores the relative position of objects as depicted in 2-dimensionalrepresentations (photographs) and the relative position of the photographer and theobjects.
Question 1: Learners should note that the tree and the zebra is bigger in photo 1 thanin photo 2. Vusi was in a different position relative to the objects when he took thephotos: He was closer to the tree and the zebra for photo 1 than for photo 2.
Question 2: Learners should note that the springbok looks bigger because it is closerto Vusi.
Question 3: Vusi should move back so that the hut will look smaller and he will beable to fit more of it into the photo.
MALATI materials: Geometry, module 2 6
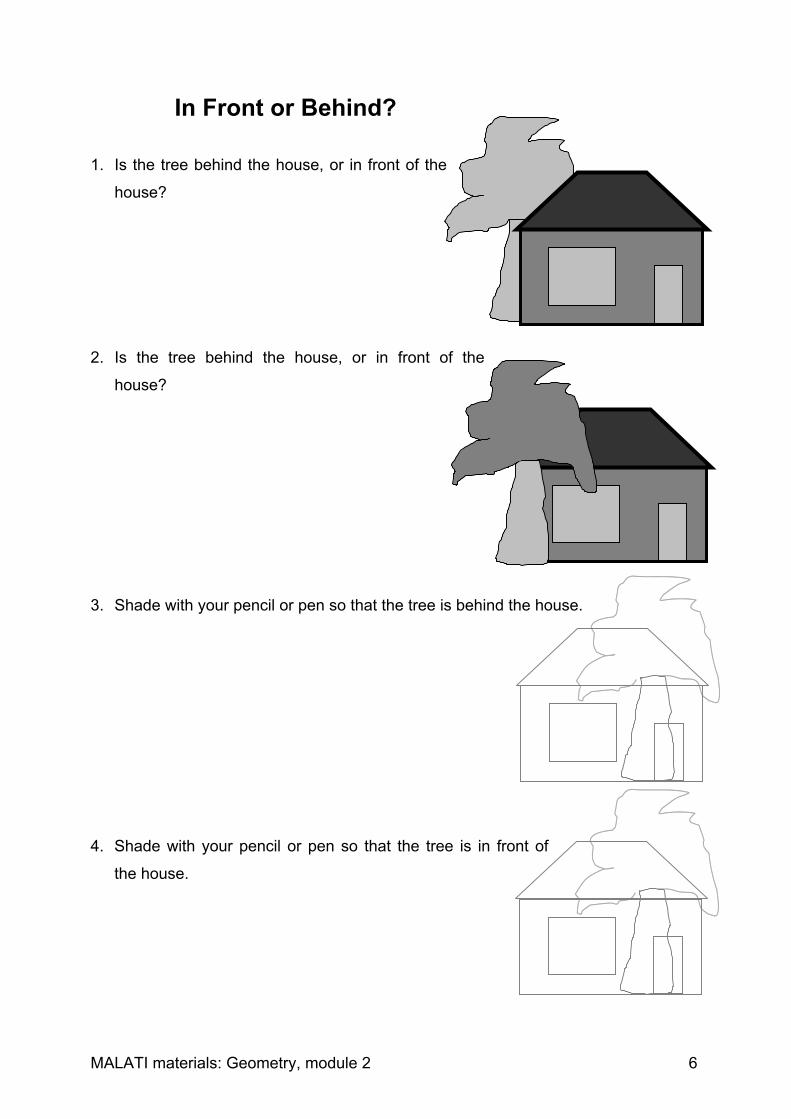
In Front or Behind?
1. Is the tree behind the house, or in front of the
house?
2. Is the tree behind the house, or in front of the
house?
3. Shade with your pencil or pen so that the tree is behind the house.
4. Shade with your pencil or pen so that the tree is in front of
the house.

MALATI materials: Geometry, module 2 7
Teacher Notes: In Front or Behind?This activity explores how objects that are in different positions in relation to theviewer are drawn in 2-dimensions. In question 1 we cannot see part of the tree, so itis behind the house. In questions 3 and 4 learners must shade the pictures to showthe relative positions of the tree and the house.
MALATI materials: Geometry, module 2 8
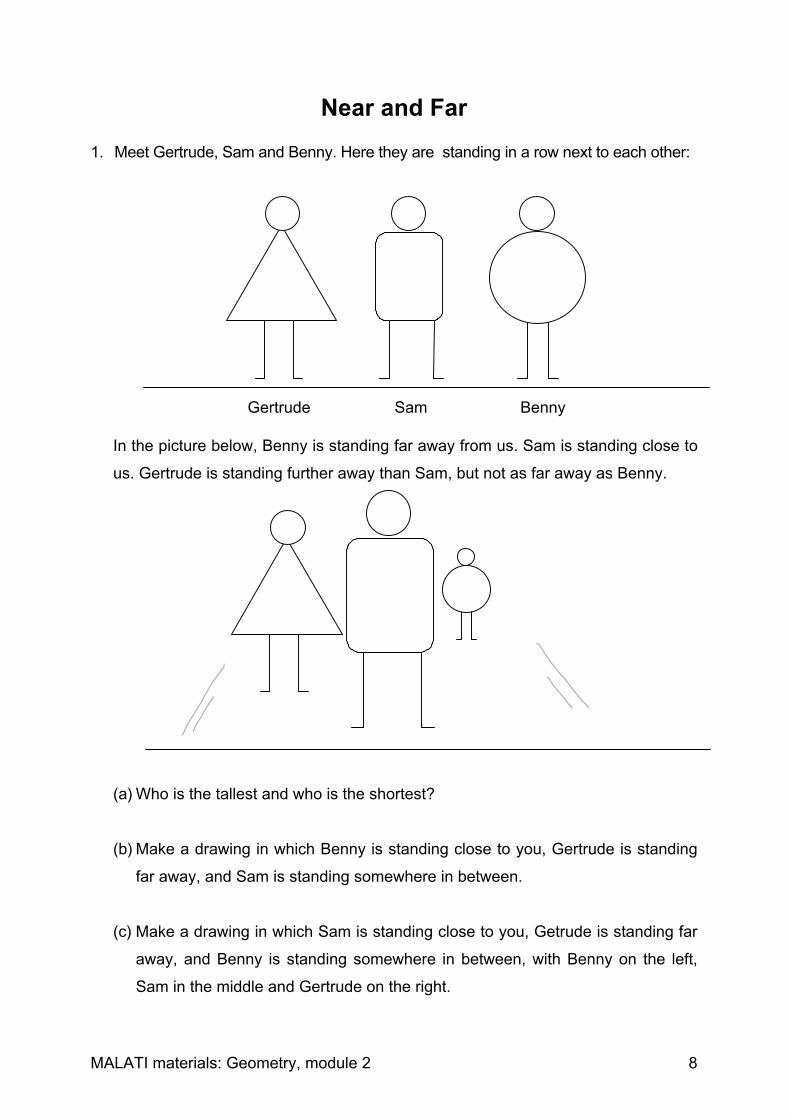
Near and Far1. Meet Gertrude, Sam and Benny. Here they are standing in a row next to each other:
Gertrude Sam Benny
In the picture below, Benny is standing far away from us. Sam is standing close to
us. Gertrude is standing further away than Sam, but not as far away as Benny.
(a) Who is the tallest and who is the shortest?
(b) Make a drawing in which Benny is standing close to you, Gertrude is standing
far away, and Sam is standing somewhere in between.
(c) Make a drawing in which Sam is standing close to you, Getrude is standing far
away, and Benny is standing somewhere in between, with Benny on the left,
Sam in the middle and Gertrude on the right.
MALATI materials: Geometry, module 2 9
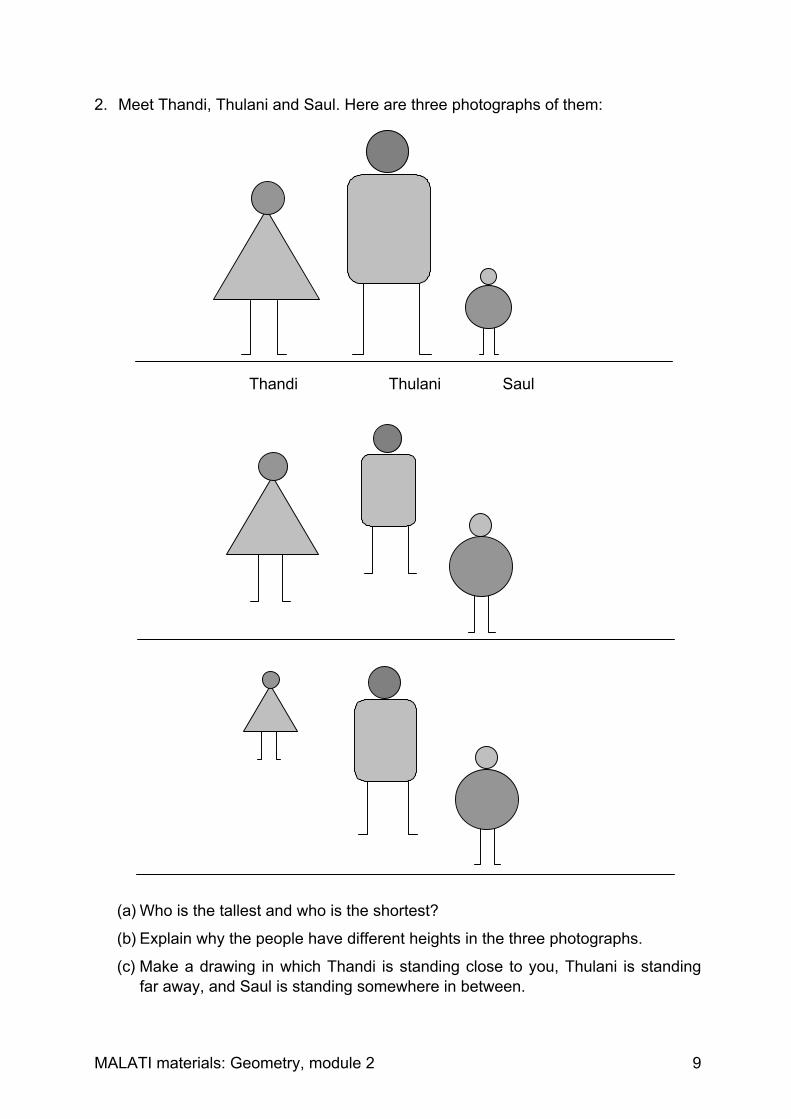
2. Meet Thandi, Thulani and Saul. Here are three photographs of them:
Thandi Thulani Saul
(a) Who is the tallest and who is the shortest?
(b) Explain why the people have different heights in the three photographs.
(c) Make a drawing in which Thandi is standing close to you, Thulani is standingfar away, and Saul is standing somewhere in between.
MALATI materials: Geometry, module 2 10
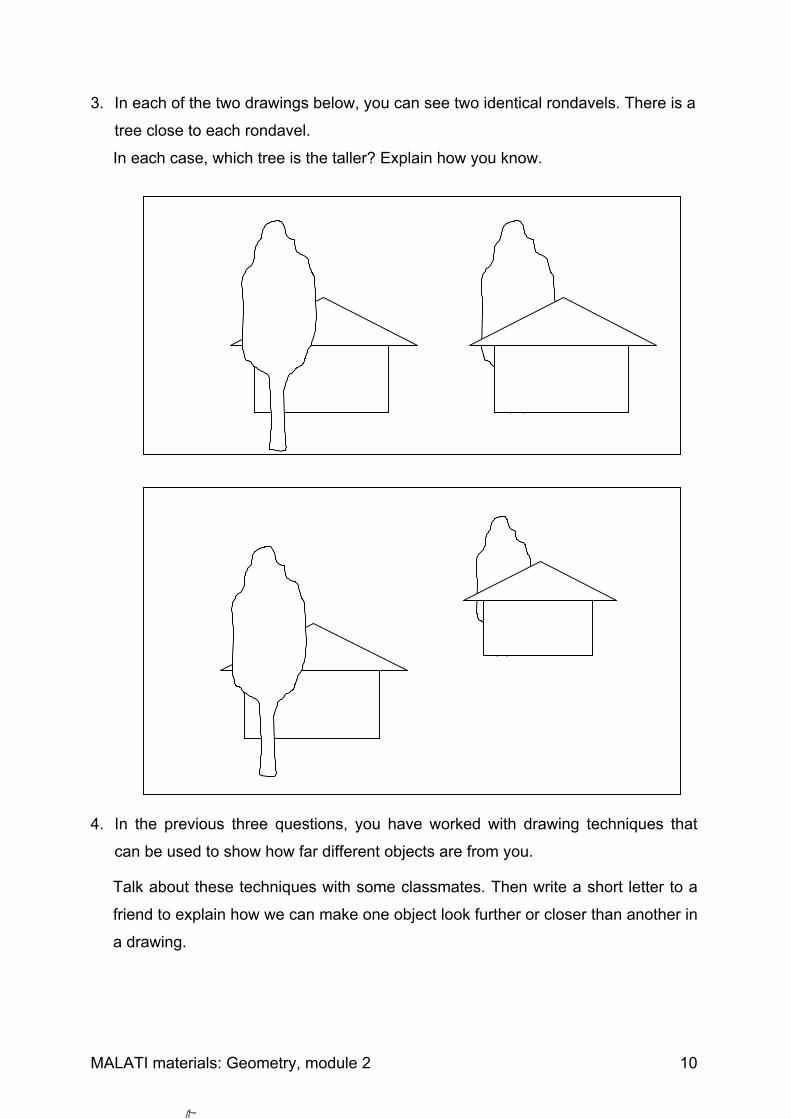
3. In each of the two drawings below, you can see two identical rondavels. There is a
tree close to each rondavel.
In each case, which tree is the taller? Explain how you know.
4. In the previous three questions, you have worked with drawing techniques that
can be used to show how far different objects are from you.
Talk about these techniques with some classmates. Then write a short letter to a
friend to explain how we can make one object look further or closer than another in
a drawing.
MALATI materials: Geometry, module 2 11
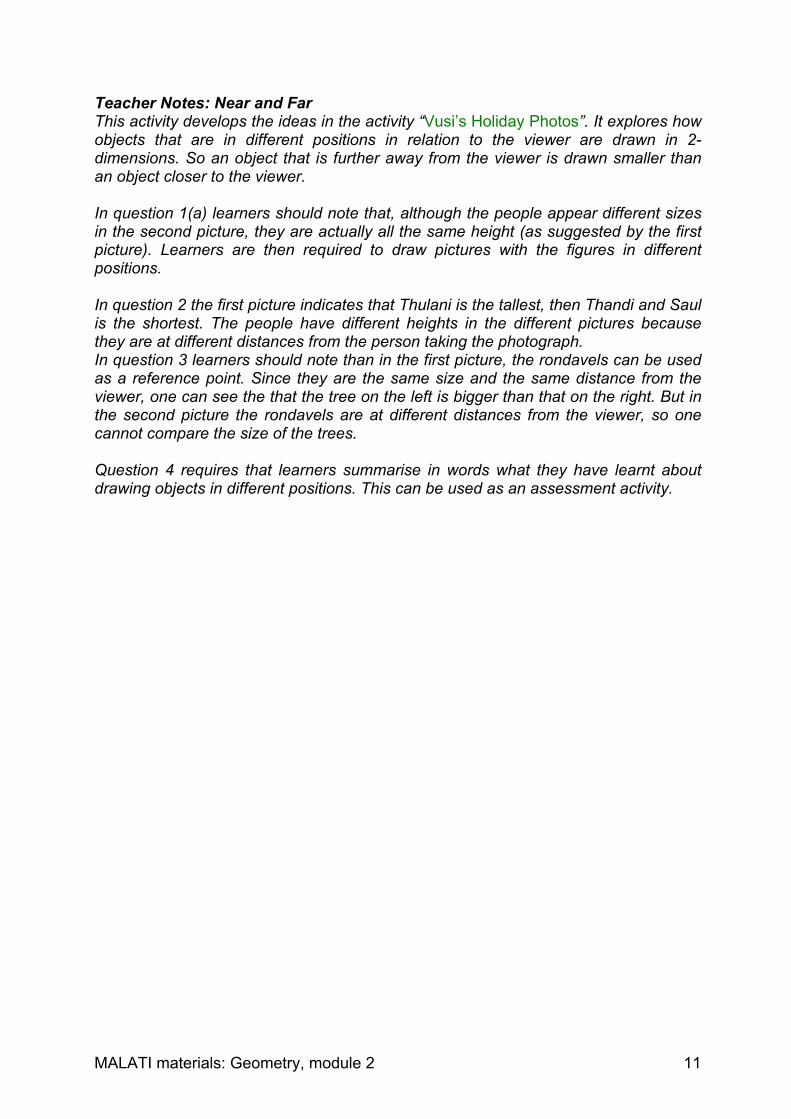
Teacher Notes: Near and FarThis activity develops the ideas in the activity “Vusi’s Holiday Photos”. It explores howobjects that are in different positions in relation to the viewer are drawn in 2-dimensions. So an object that is further away from the viewer is drawn smaller thanan object closer to the viewer.
In question 1(a) learners should note that, although the people appear different sizesin the second picture, they are actually all the same height (as suggested by the firstpicture). Learners are then required to draw pictures with the figures in differentpositions.
In question 2 the first picture indicates that Thulani is the tallest, then Thandi and Saulis the shortest. The people have different heights in the different pictures becausethey are at different distances from the person taking the photograph.In question 3 learners should note than in the first picture, the rondavels can be usedas a reference point. Since they are the same size and the same distance from theviewer, one can see the that the tree on the left is bigger than that on the right. But inthe second picture the rondavels are at different distances from the viewer, so onecannot compare the size of the trees.
Question 4 requires that learners summarise in words what they have learnt aboutdrawing objects in different positions. This can be used as an assessment activity.
MALATI materials: Geometry, module 2 12
Practice Photos
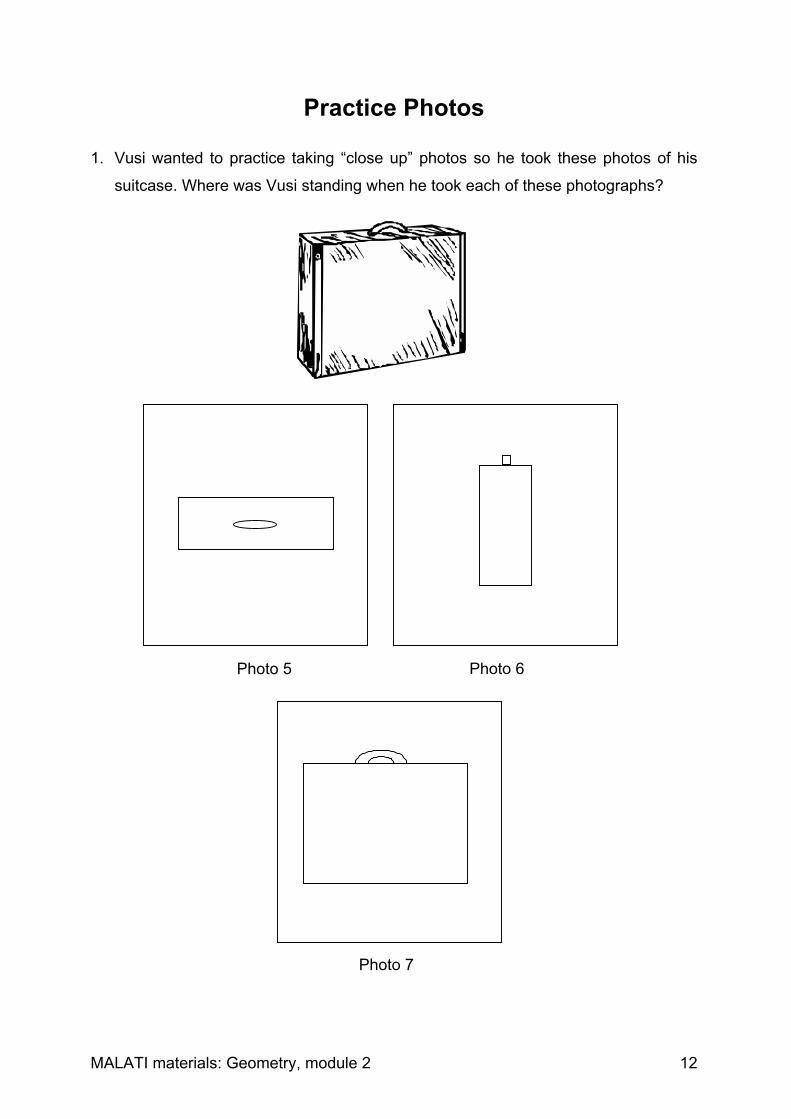
1. Vusi wanted to practice taking “close up” photos so he took these photos of his
suitcase. Where was Vusi standing when he took each of these photographs?
Photo 5 Photo 6
Photo 7

MALATI materials: Geometry, module 2 13
When we look at an object from directlyabove we see the aerial view.
The drawing of what we see is called
the plan of the object.
We cannot see any of the sides of thesuitcase.
When we look at an object directlyfrom the side what we see is called the
side view.
When we look at an object directlyfrom the front what we see is called the
front view.
We cannot see the top or the sides ofthe suitcase!
When we look at an object directlyfrom behind what we see is called the
rear view.
What do you notice about the front and
the rear view of this suitcase?
Give an example of an object where
this will not be the case.
MALATI materials: Geometry, module 2 14
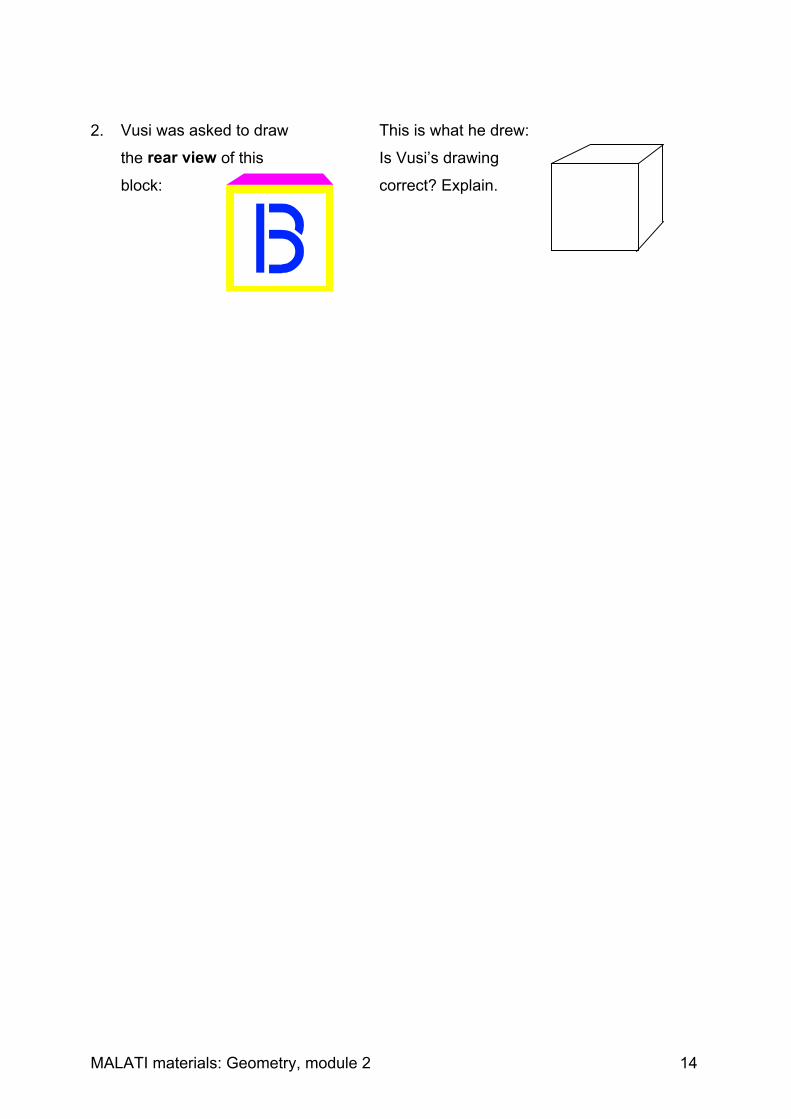
2. Vusi was asked to draw
the rear view of this
block:
This is what he drew:
Is Vusi’s drawing
correct? Explain.
MALATI materials: Geometry, module 2 15
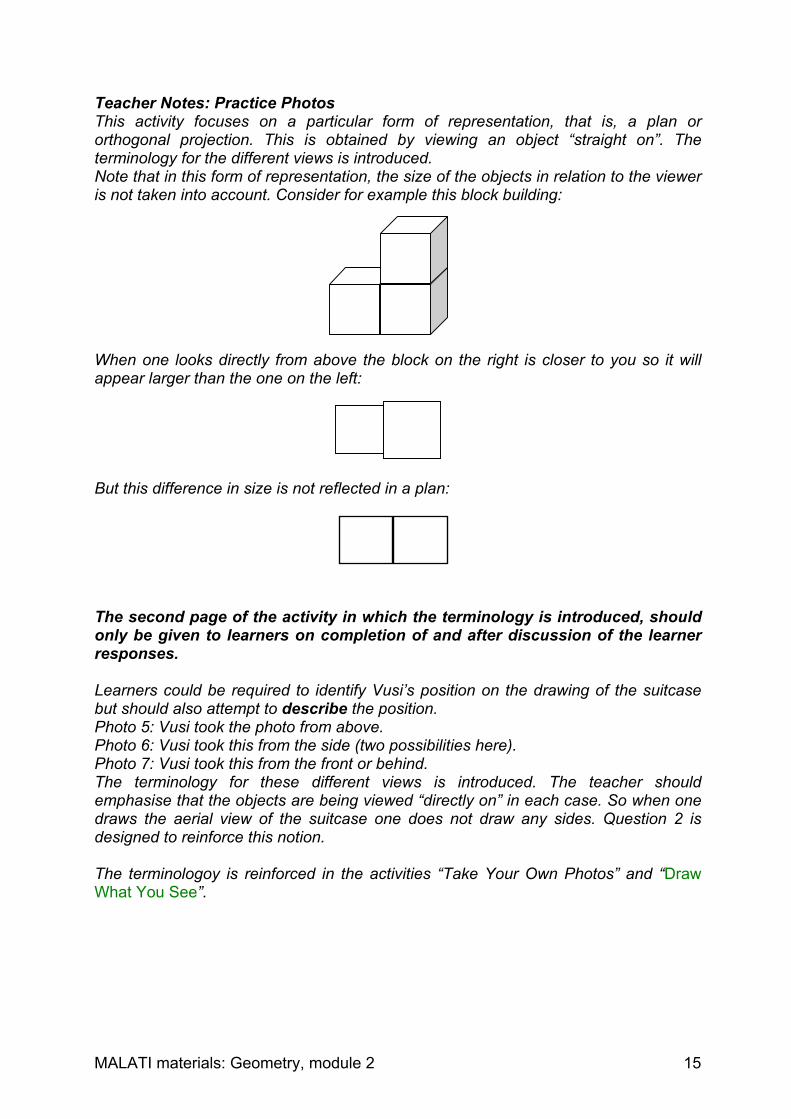
Teacher Notes: Practice PhotosThis activity focuses on a particular form of representation, that is, a plan ororthogonal projection. This is obtained by viewing an object “straight on”. Theterminology for the different views is introduced.Note that in this form of representation, the size of the objects in relation to the vieweris not taken into account. Consider for example this block building:
When one looks directly from above the block on the right is closer to you so it willappear larger than the one on the left:
But this difference in size is not reflected in a plan:
The second page of the activity in which the terminology is introduced, shouldonly be given to learners on completion of and after discussion of the learnerresponses.
Learners could be required to identify Vusi’s position on the drawing of the suitcasebut should also attempt to describe the position.Photo 5: Vusi took the photo from above.Photo 6: Vusi took this from the side (two possibilities here).Photo 7: Vusi took this from the front or behind.The terminology for these different views is introduced. The teacher shouldemphasise that the objects are being viewed “directly on” in each case. So when onedraws the aerial view of the suitcase one does not draw any sides. Question 2 isdesigned to reinforce this notion.
The terminologoy is reinforced in the activities “Take Your Own Photos” and “DrawWhat You See”.
MALATI materials: Geometry, module 2 16
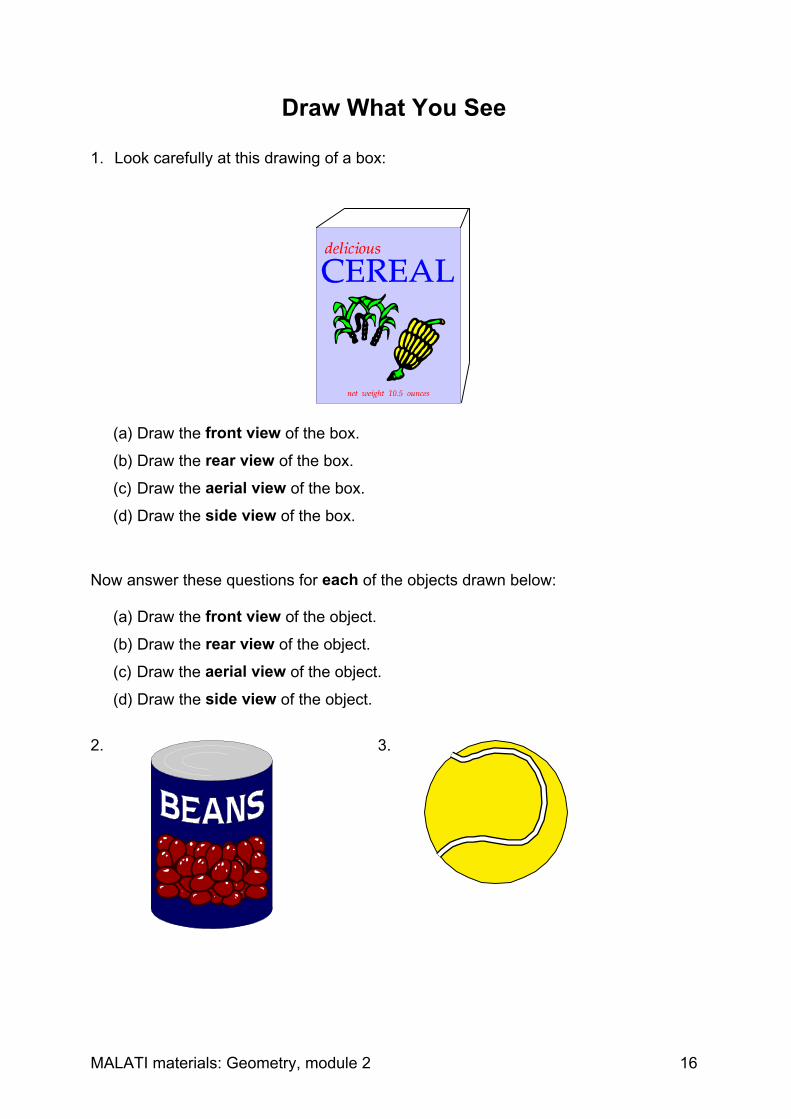
Draw What You See
1. Look carefully at this drawing of a box:
(a) Draw the front view of the box.
(b) Draw the rear view of the box.
(c) Draw the aerial view of the box.
(d) Draw the side view of the box.
Now answer these questions for each of the objects drawn below:
(a) Draw the front view of the object.
(b) Draw the rear view of the object.
(c) Draw the aerial view of the object.
(d) Draw the side view of the object.
2. 3.
MALATI materials: Geometry, module 2 17
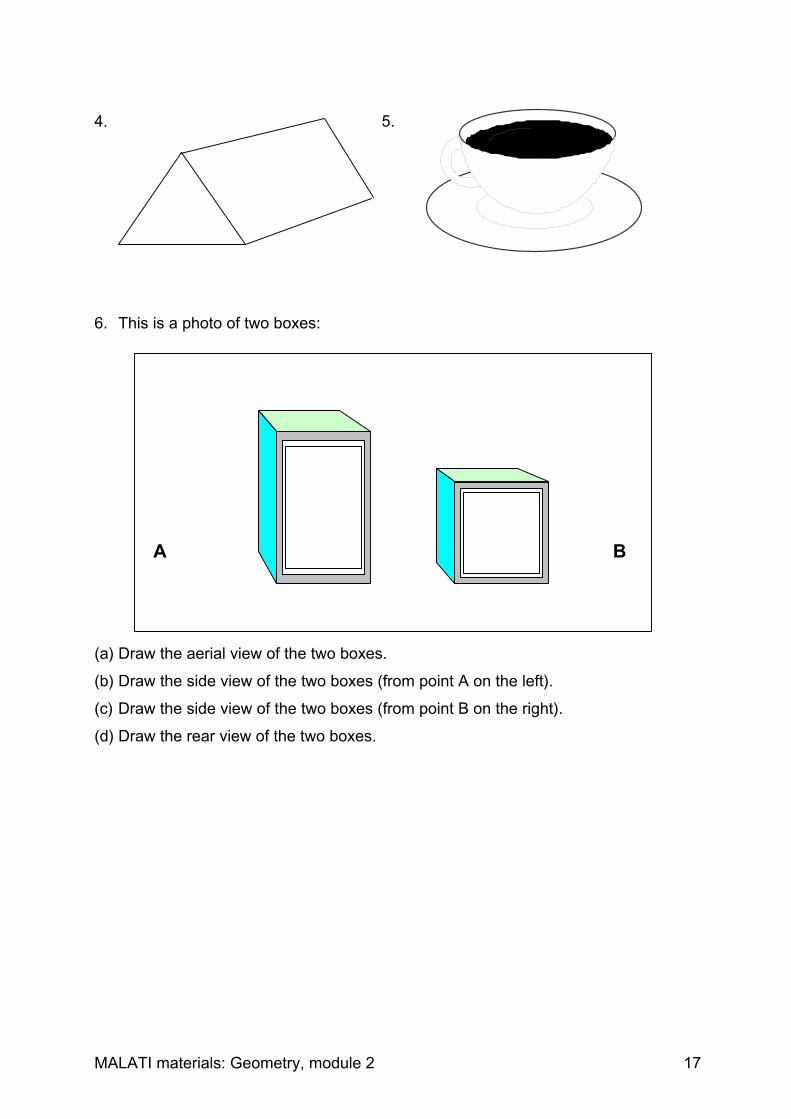
4. 5.
6. This is a photo of two boxes:
(a) Draw the aerial view of the two boxes.
(b) Draw the side view of the two boxes (from point A on the left).
(c) Draw the side view of the two boxes (from point B on the right).
(d) Draw the rear view of the two boxes.
A B
MALATI materials: Geometry, module 2 18
Teacher Notes: Draw What You SeeTeacher Aids:Teachers should have some of the objects in the classroom for learners to check theirdrawings. Learners should only be permitted to check once they havecompleted the activity.
Notes:In this activity learners are required to visualise what these 2-dimensionalrepresentations of 3-dimensional objects will look like when viewed from differentpositions.Again, the details in the drawings are not important, but the shape and the relativepositions of the different parts of an object should be emphasised. For example, thehandle of the cup in Question 5 should be in the correct position (on the right) whenviewed from behind. This ability to orient oneself in relation to other objects is animportant skill in map reading (see “Which Direction?”, “Giving Directions” and“Bafana Bafana”).
Encourage learners to consider which figures have the same shape when viewedfrom different viewpoints.Ask learners to describe their drawings so that they have to develop a vocabulary fortalking about the shapes.
Question 7 requires that learners consider the relative position of the boxes as well astheir own position relative to the boxes. In (b) the drawing should indicate that only thelarge box can be seen, whereas in (c) the top of the large box will be seen behind thesmall box. In the latter case learners can be challenged to consider at what point onewould not be able to see the larger box. Learners should note that the large box willbe on the right when viewed from behind in (d).

MALATI materials: Geometry, module 2 19
Which Camera?Which camera sees which picture?
Write your answer like this:
1 sees ….
2 sees ….
3 sees ….
4 sees ….
In each case, explain why you chose each picture.
MALATI materials: Geometry, module 2 20
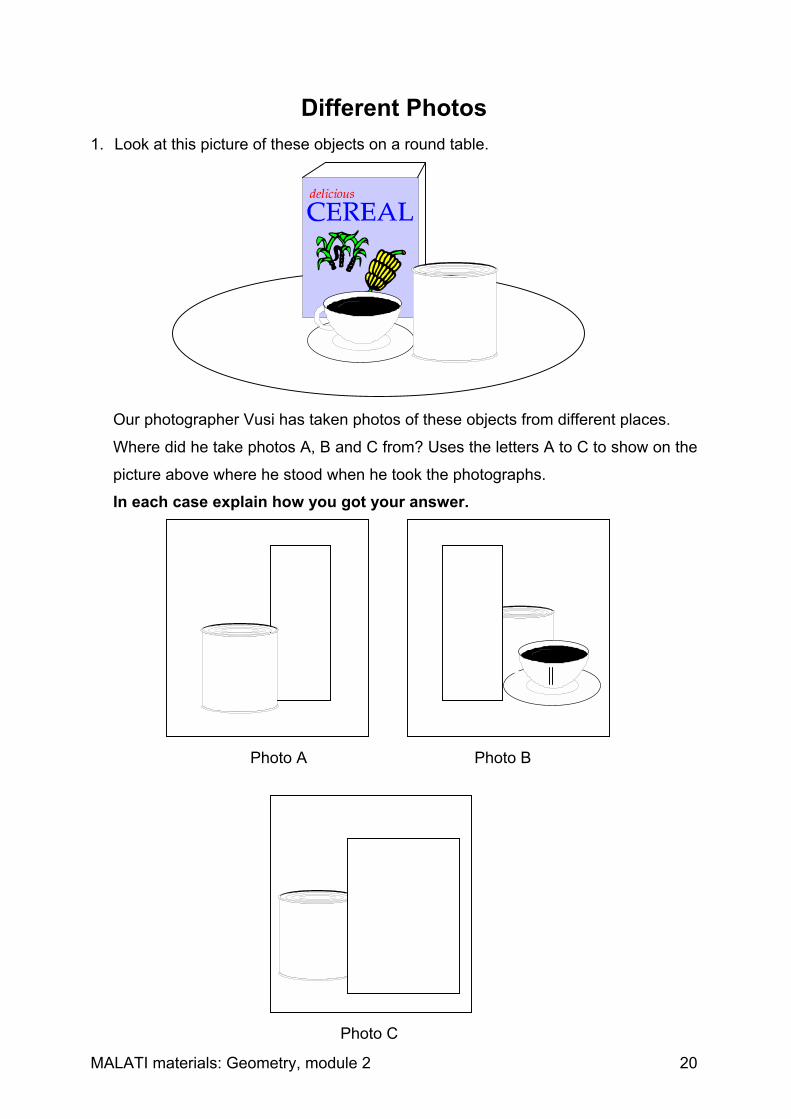
Different Photos1. Look at this picture of these objects on a round table.
Our photographer Vusi has taken photos of these objects from different places.
Where did he take photos A, B and C from? Uses the letters A to C to show on the
picture above where he stood when he took the photographs.
In each case explain how you got your answer.
Photo A Photo B
Photo C
MALATI materials: Geometry, module 2 21
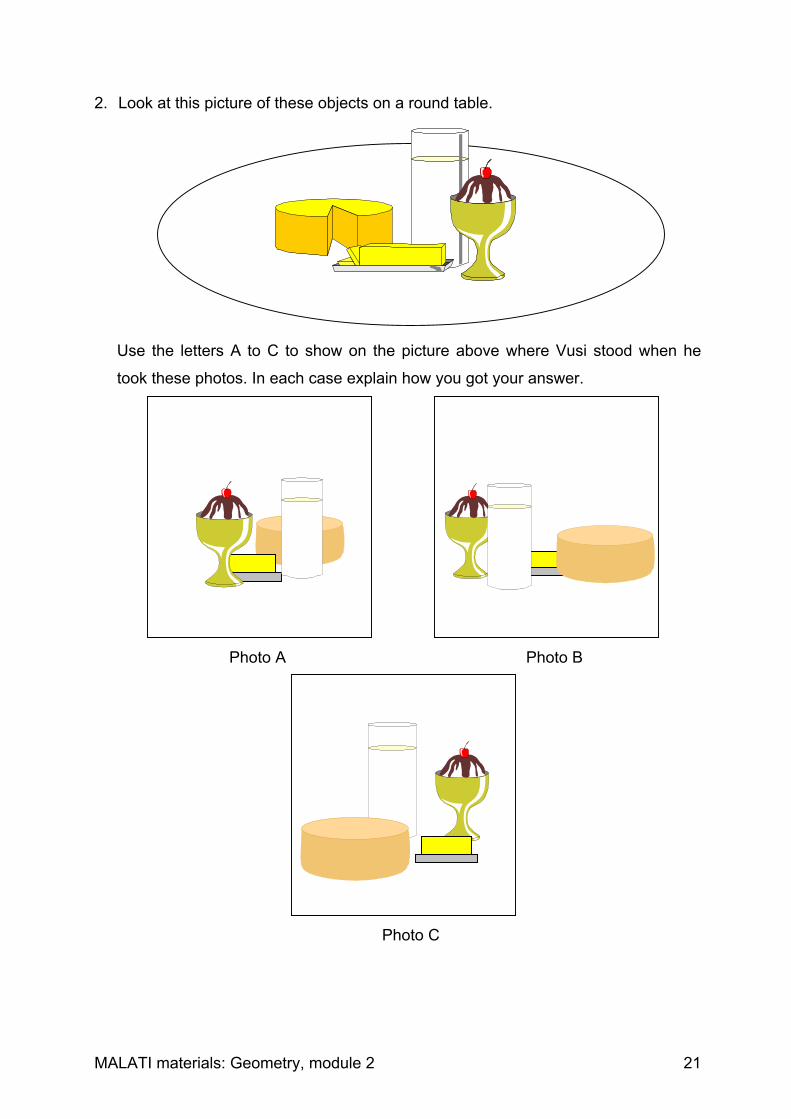
2. Look at this picture of these objects on a round table.
Use the letters A to C to show on the picture above where Vusi stood when he
took these photos. In each case explain how you got your answer.
Photo A Photo B
Photo C
MALATI materials: Geometry, module 2 22
Teacher Notes: Which Camera? and Different PhotosThese activities require that learners visualise what a group of objects looks like fromdifferent perspectives. The activities differ from “Draw What You See” as learners donot have to draw the objects, but have been given possible viewpoints. Learners arethus provided with an opportunity to respond to the task in a medium other thandrawing.
It is important that learners explain how they got their answers as this requires thatthey describe the relative positions and sizes of the objects.
MALATI materials: Geometry, module 2 23
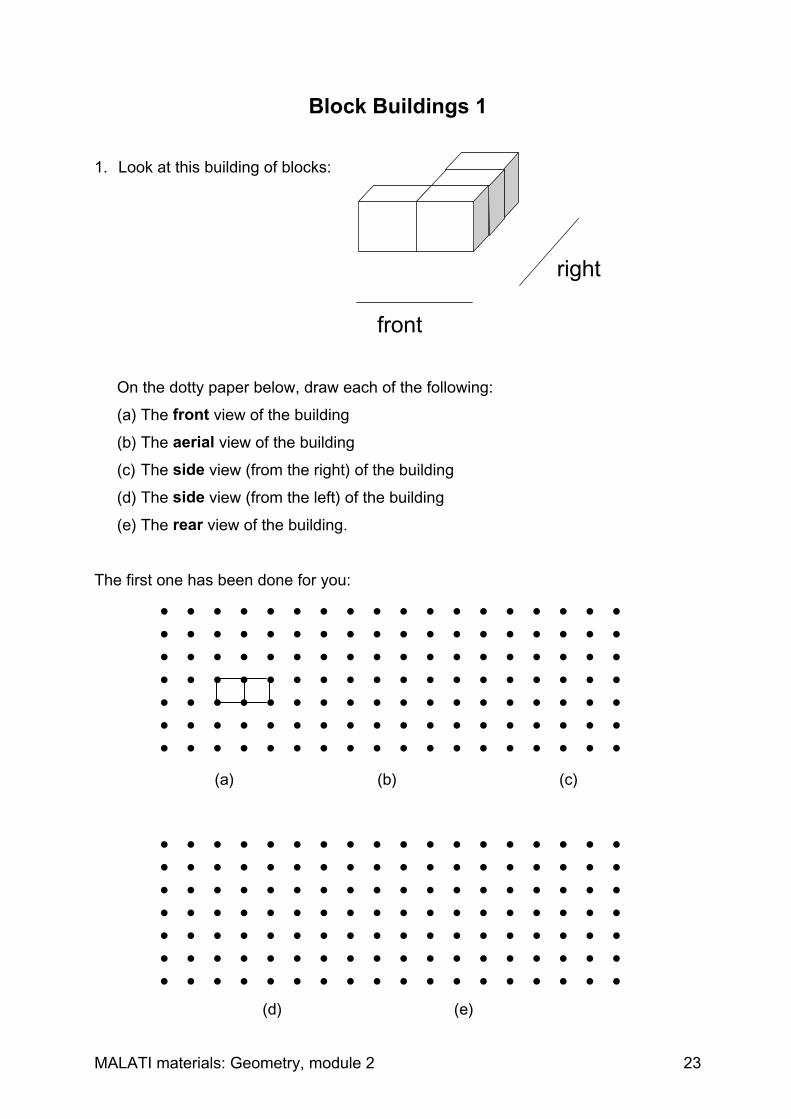
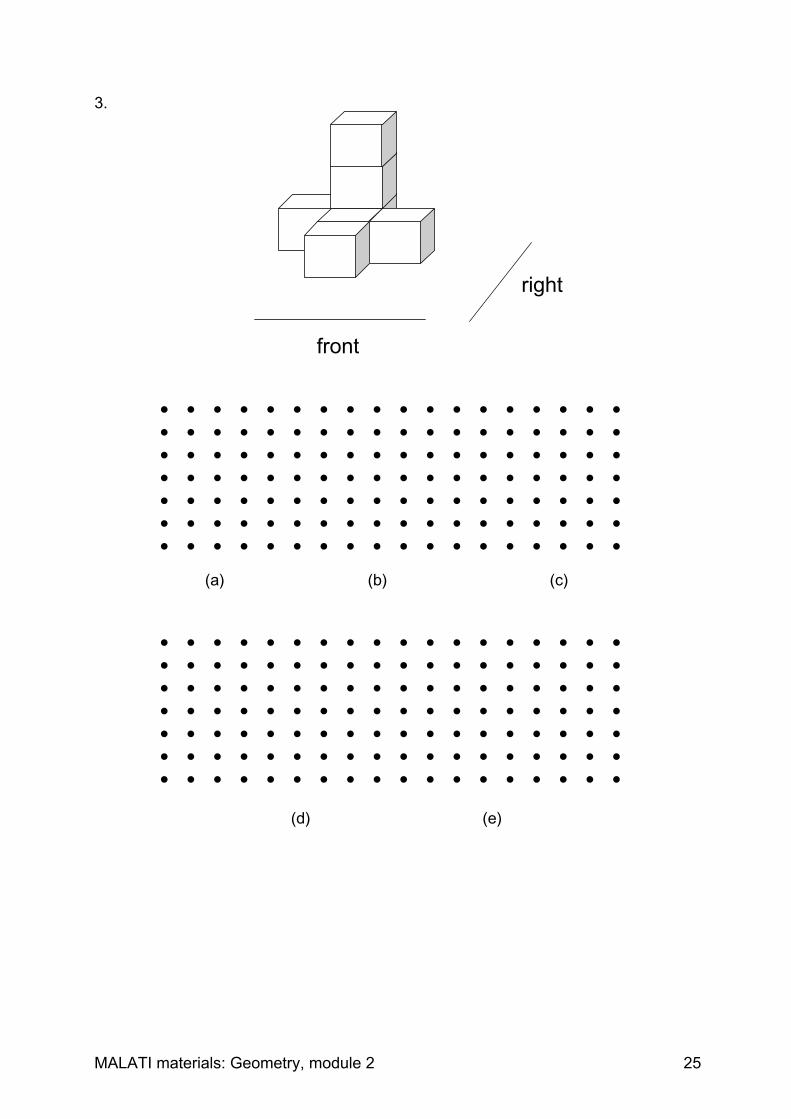
Block Buildings 1
1. Look at this building of blocks:
On the dotty paper below, draw each of the following:
(a) The front view of the building
(b) The aerial view of the building
(c) The side view (from the right) of the building
(d) The side view (from the left) of the building
(e) The rear view of the building.
The first one has been done for you:
• • • • • • • • • • • • • • • • • •• • • • • • • • • • • • • • • • • •• • • • • • • • • • • • • • • • • •• • • • • • • • • • • • • • • • • •• • • • • • • • • • • • • • • • • •• • • • • • • • • • • • • • • • • •• • • • • • • • • • • • • • • • • •
• • • • • • • • • • • • • • • • • •• • • • • • • • • • • • • • • • • •• • • • • • • • • • • • • • • • • •• • • • • • • • • • • • • • • • • •• • • • • • • • • • • • • • • • • •• • • • • • • • • • • • • • • • • •• • • • • • • • • • • • • • • • • •
(a) (b) (c)
(d) (e)
front
right
MALATI materials: Geometry, module 2 24
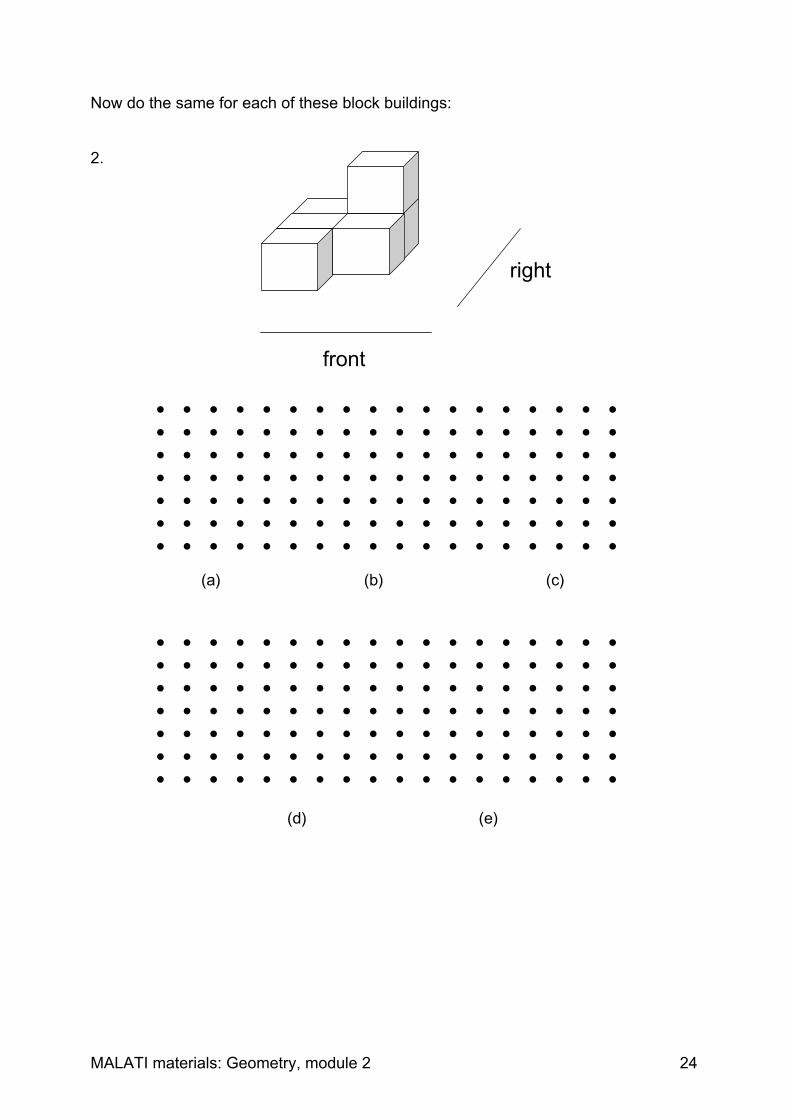
Now do the same for each of these block buildings:
2.
• • • • • • • • • • • • • • • • • •• • • • • • • • • • • • • • • • • •• • • • • • • • • • • • • • • • • •• • • • • • • • • • • • • • • • • •• • • • • • • • • • • • • • • • • •• • • • • • • • • • • • • • • • • •• • • • • • • • • • • • • • • • • •
• • • • • • • • • • • • • • • • • •• • • • • • • • • • • • • • • • • •• • • • • • • • • • • • • • • • • •• • • • • • • • • • • • • • • • • •• • • • • • • • • • • • • • • • • •• • • • • • • • • • • • • • • • • •• • • • • • • • • • • • • • • • • •
(a) (b) (c)
(d) (e)
front
right
MALATI materials: Geometry, module 2 25
3.
• • • • • • • • • • • • • • • • • •• • • • • • • • • • • • • • • • • •• • • • • • • • • • • • • • • • • •• • • • • • • • • • • • • • • • • •• • • • • • • • • • • • • • • • • •• • • • • • • • • • • • • • • • • •• • • • • • • • • • • • • • • • • •
• • • • • • • • • • • • • • • • • •• • • • • • • • • • • • • • • • • •• • • • • • • • • • • • • • • • • •• • • • • • • • • • • • • • • • • •• • • • • • • • • • • • • • • • • •• • • • • • • • • • • • • • • • • •• • • • • • • • • • • • • • • • • •
(a) (b) (c)
(d) (e)
right
front
MALATI materials: Geometry, module 2 26
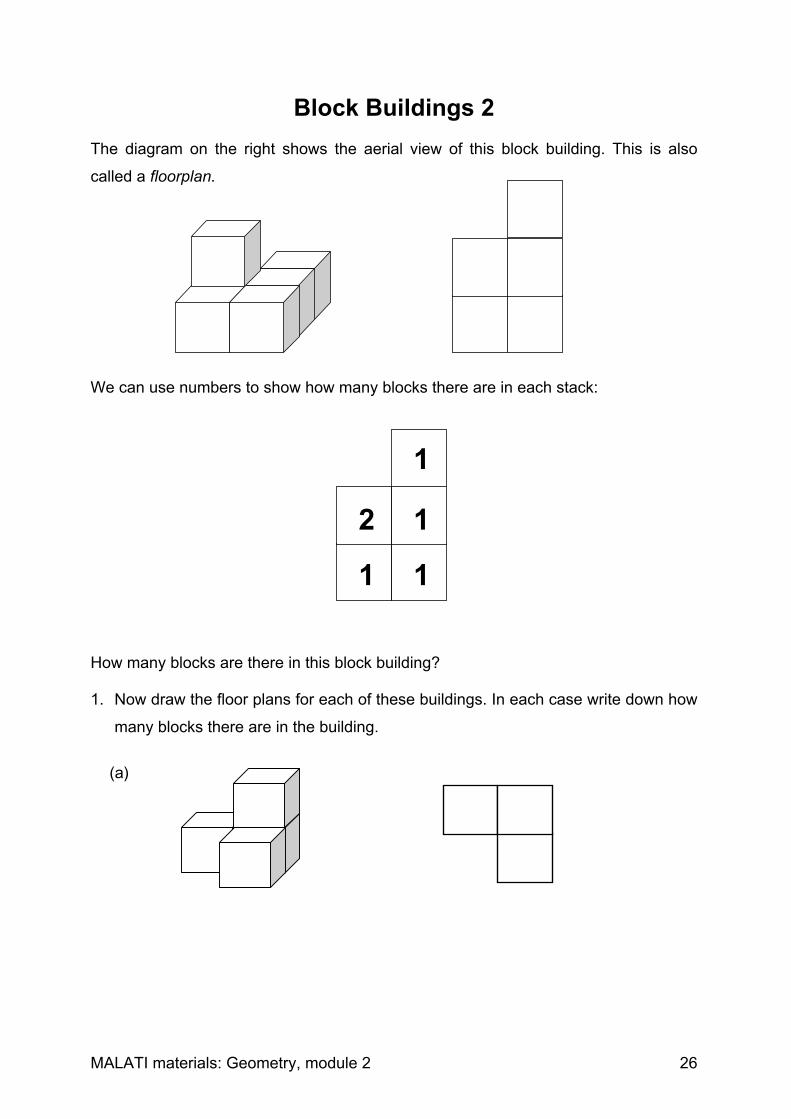
Block Buildings 2The diagram on the right shows the aerial view of this block building. This is also
called a floorplan.
We can use numbers to show how many blocks there are in each stack:
How many blocks are there in this block building? 1. Now draw the floor plans for each of these buildings. In each case write down how
many blocks there are in the building.
(a)
1 1
1
1
2
MALATI materials: Geometry, module 2 27
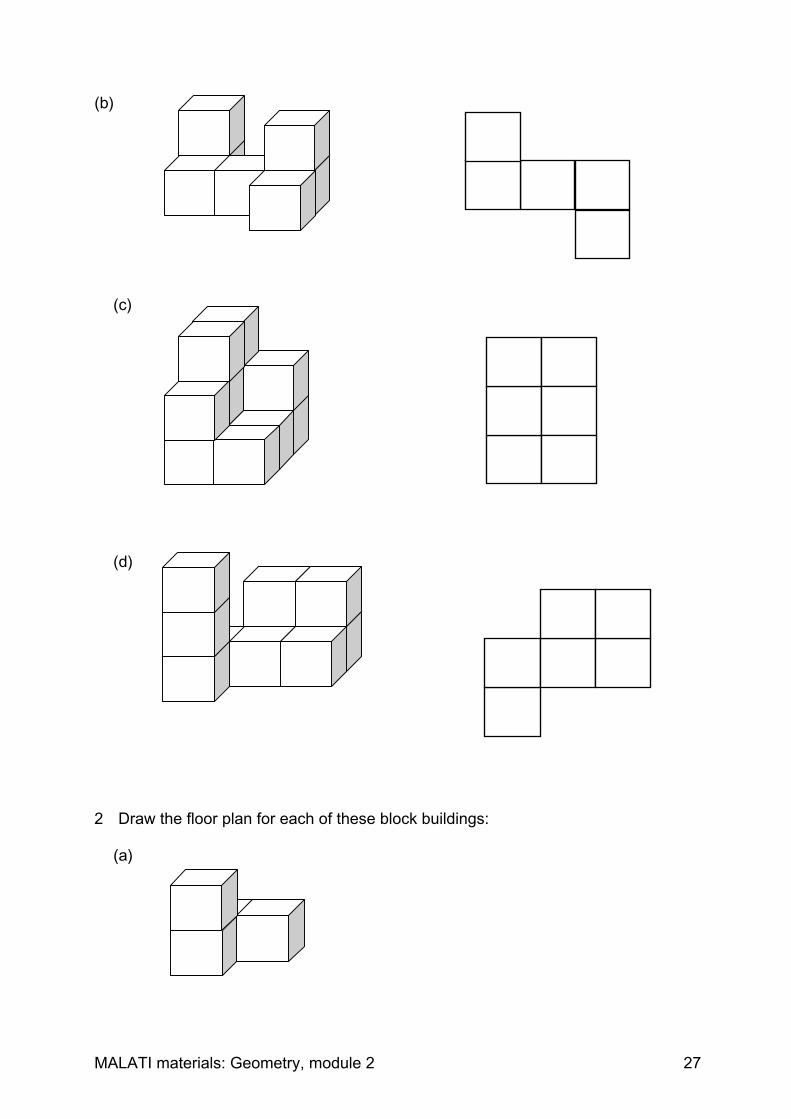
(b)
(c)
(d)
2 Draw the floor plan for each of these block buildings:
(a)
MALATI materials: Geometry, module 2 28
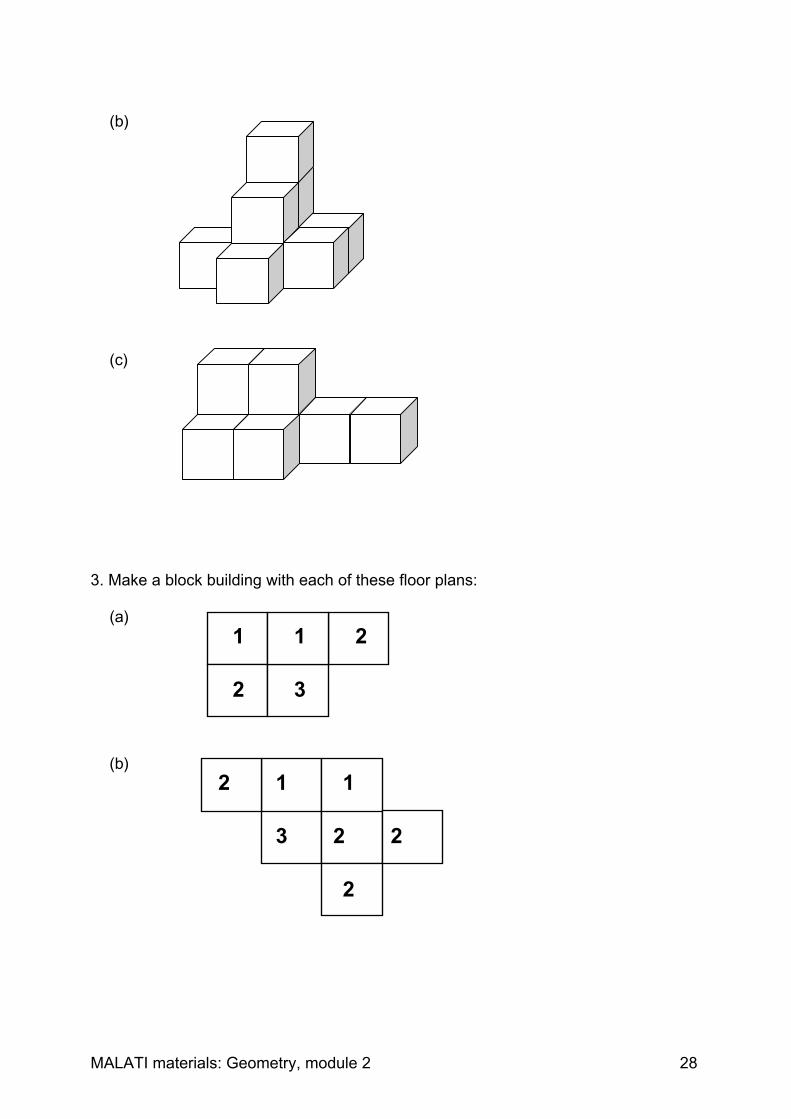
(b)
(c)
3. Make a block building with each of these floor plans:
(a)
(b)
1
2
1
3
2
1
22
2 1
3
2

MALATI materials: Geometry, module 2 29
Teacher Notes: Building Blocks 2Learners should note that in question 2(c )there is more than one possible solution asone cannot see what is “behind” the given cubes.
Further Activity:Give learners a fixed number of blocks, say five. How many different block buildingscan be made with five blocks. Then increase the number of blocks.
MALATI materials: Geometry, module 2 30
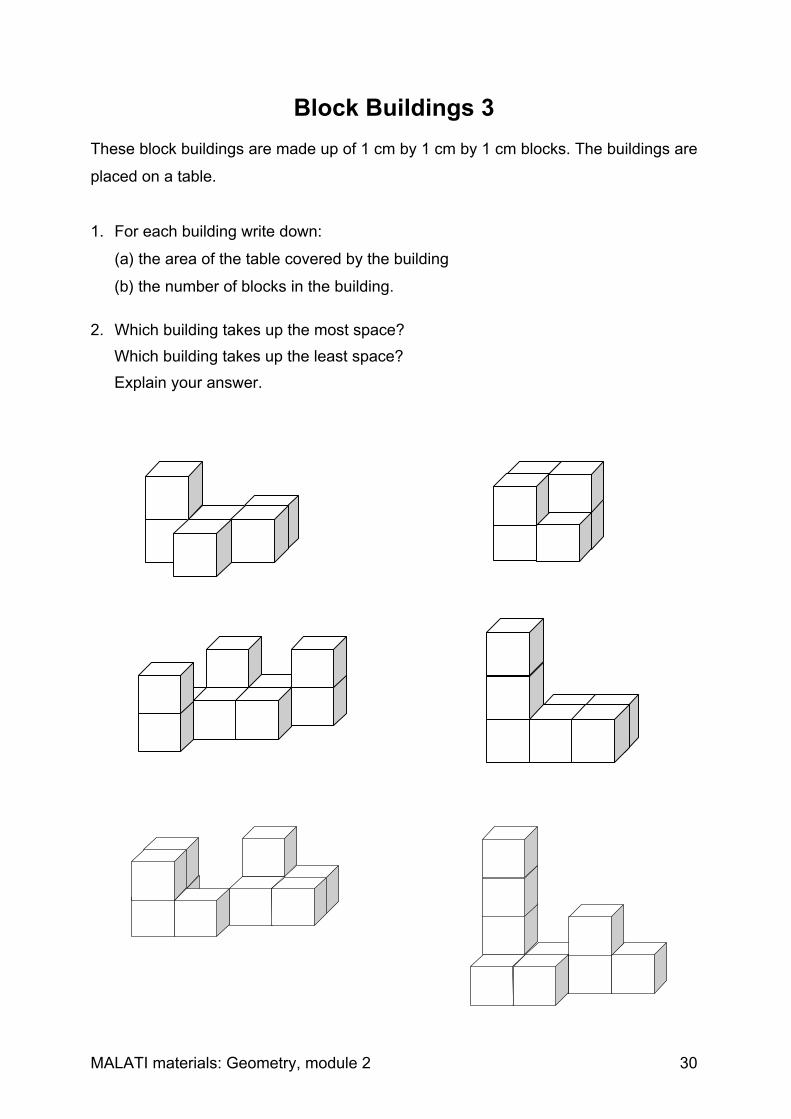
Block Buildings 3These block buildings are made up of 1 cm by 1 cm by 1 cm blocks. The buildings are
placed on a table.
1. For each building write down:
(a) the area of the table covered by the building
(b) the number of blocks in the building.
2. Which building takes up the most space?Which building takes up the least space?Explain your answer.
MALATI materials: Geometry, module 2 31
Teacher Notes: Block Buildings 3This activity requires that learners have a knowledge of area. The activity provides aninformal introduction to the concept of volume, that is, the amount of space occupiedby the solid. Learners might have different conceptions of what it means to take upspace, for example, they might consider the shape of the block building.
MALATI materials: Geometry, module 2 32
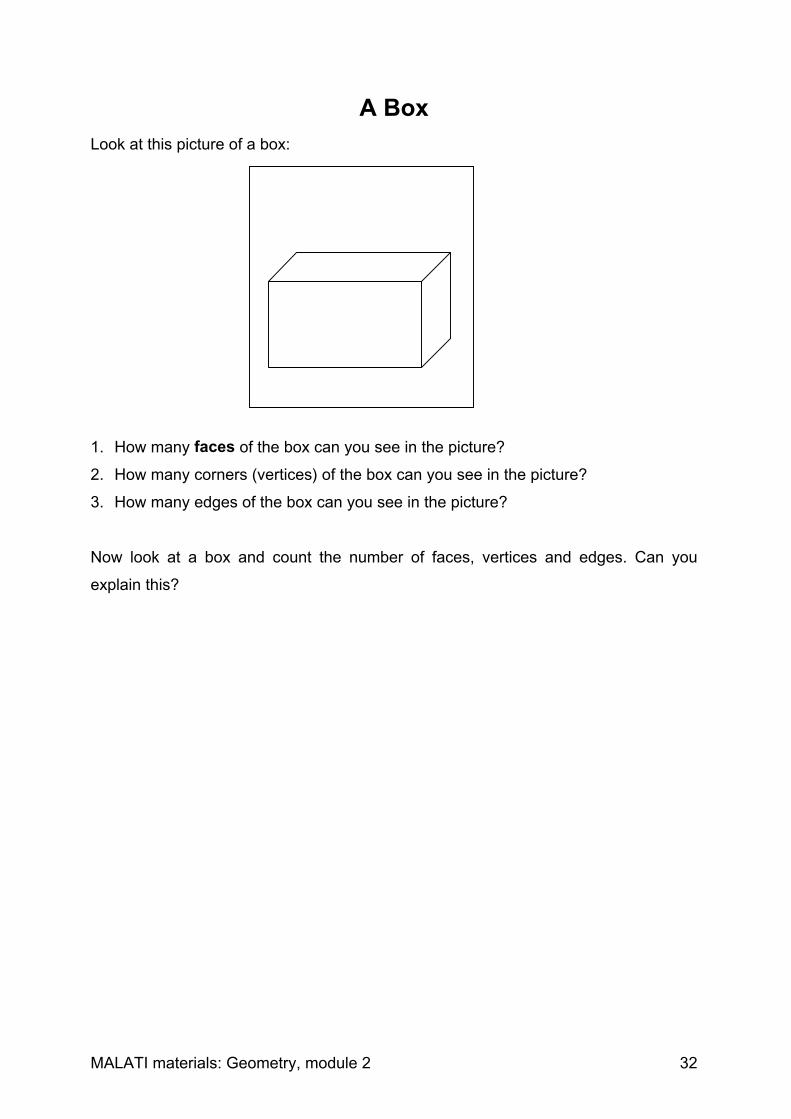
A BoxLook at this picture of a box:
1. How many faces of the box can you see in the picture?
2. How many corners (vertices) of the box can you see in the picture?
3. How many edges of the box can you see in the picture?
Now look at a box and count the number of faces, vertices and edges. Can you
explain this?
MALATI materials: Geometry, module 2 33
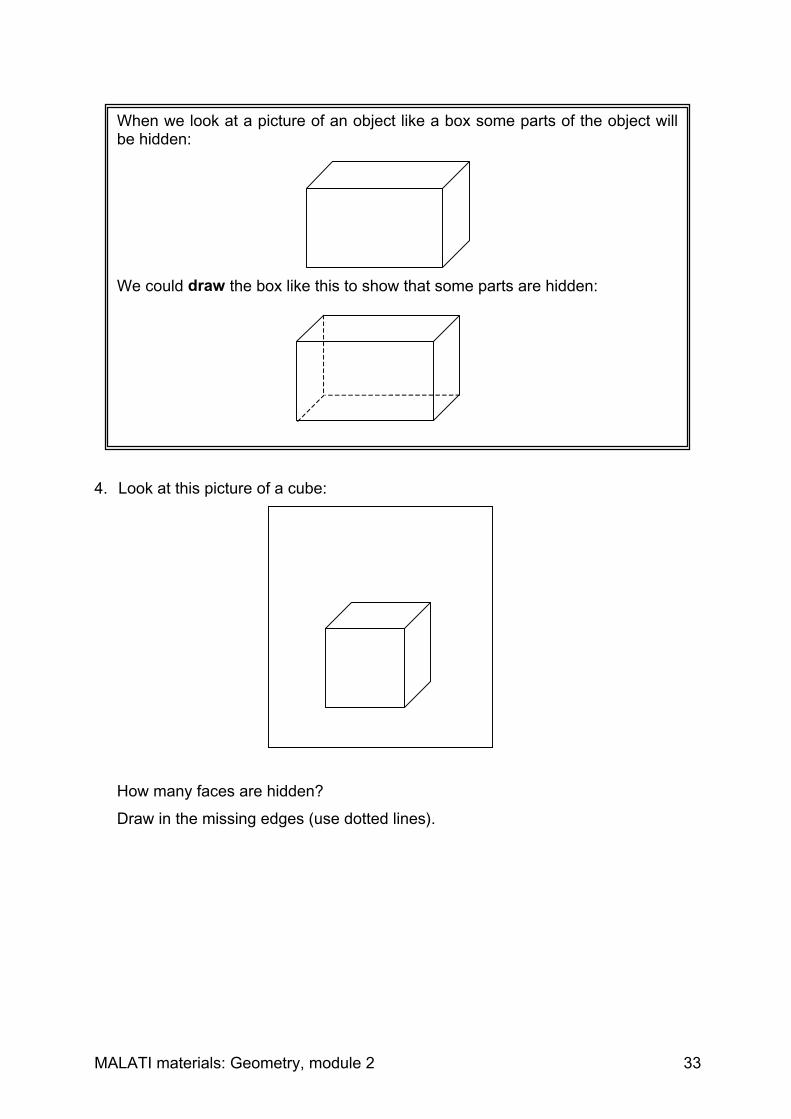
4. Look at this picture of a cube:
How many faces are hidden?
Draw in the missing edges (use dotted lines).
When we look at a picture of an object like a box some parts of the object willbe hidden:
We could draw the box like this to show that some parts are hidden:
MALATI materials: Geometry, module 2 34
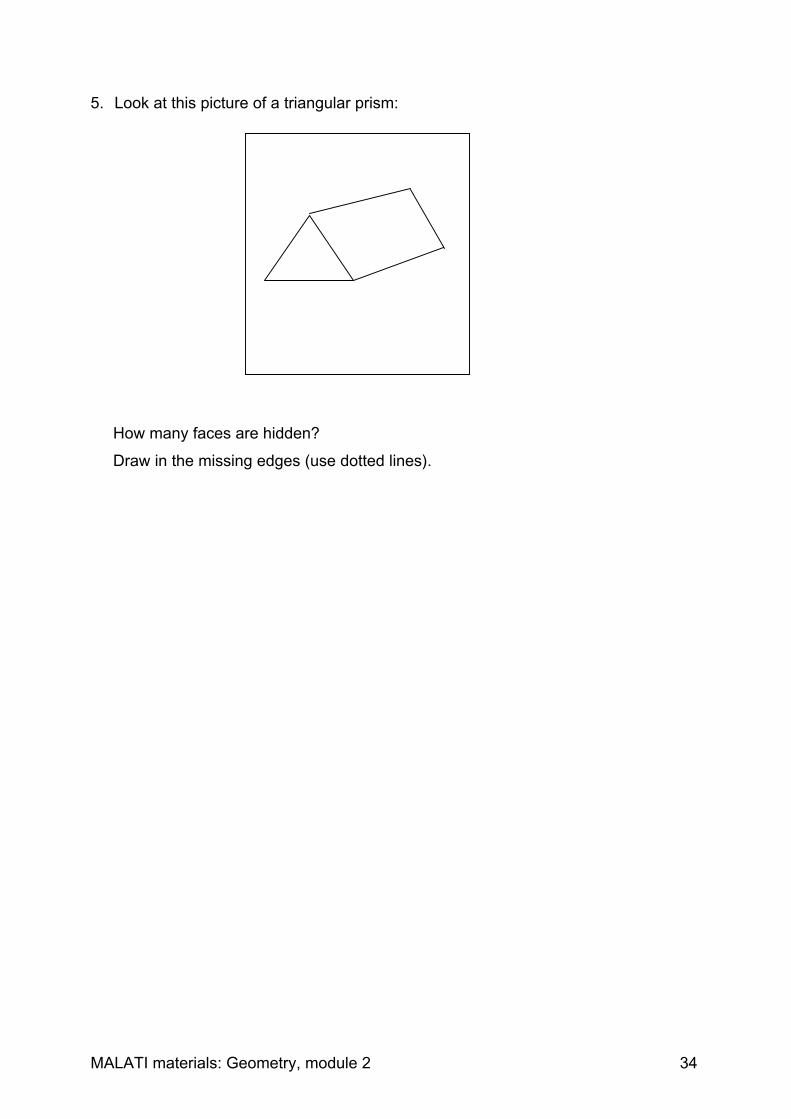
5. Look at this picture of a triangular prism:
How many faces are hidden?
Draw in the missing edges (use dotted lines).
MALATI materials: Geometry, module 2 35
Teacher Notes: A BoxLearners should not be given page 2 of the activity until page 1 has beencompleted and discussed.
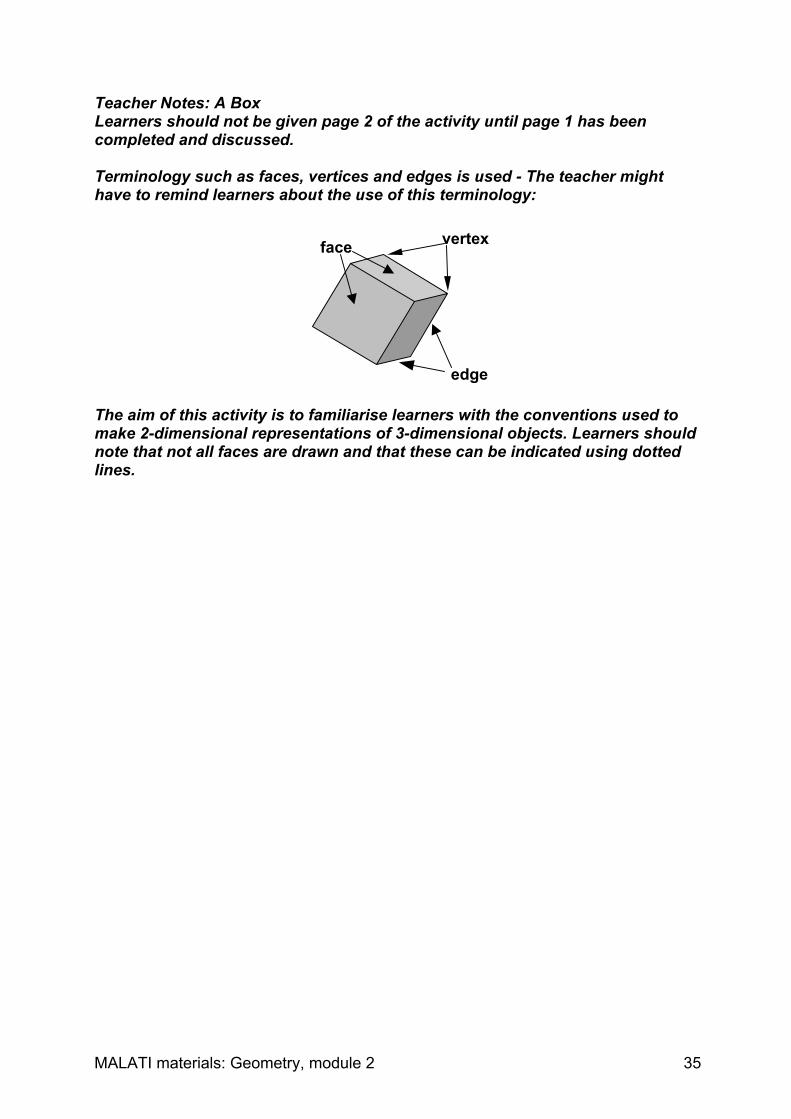
Terminology such as faces, vertices and edges is used - The teacher mighthave to remind learners about the use of this terminology:
The aim of this activity is to familiarise learners with the conventions used tomake 2-dimensional representations of 3-dimensional objects. Learners shouldnote that not all faces are drawn and that these can be indicated using dottedlines.
vertex
edge
face
MALATI materials: Geometry, module 2 36
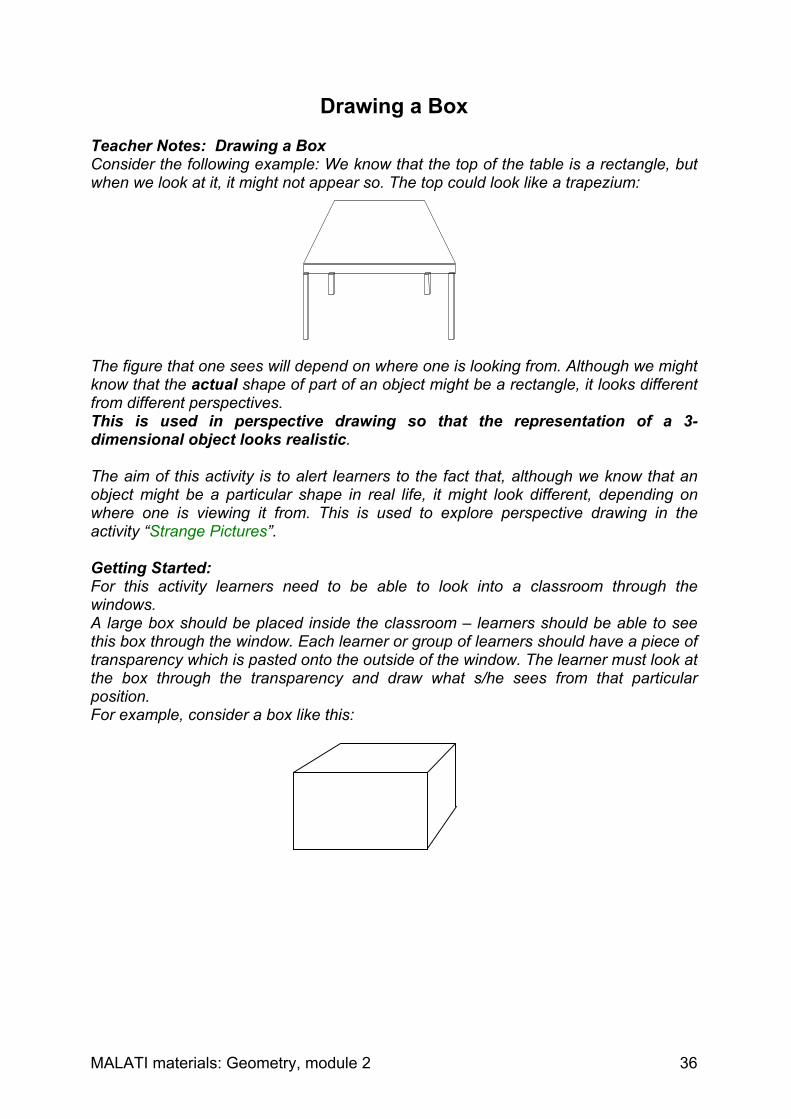
Drawing a BoxTeacher Notes: Drawing a BoxConsider the following example: We know that the top of the table is a rectangle, butwhen we look at it, it might not appear so. The top could look like a trapezium:
The figure that one sees will depend on where one is looking from. Although we mightknow that the actual shape of part of an object might be a rectangle, it looks differentfrom different perspectives.This is used in perspective drawing so that the representation of a 3-dimensional object looks realistic.
The aim of this activity is to alert learners to the fact that, although we know that anobject might be a particular shape in real life, it might look different, depending onwhere one is viewing it from. This is used to explore perspective drawing in theactivity “Strange Pictures”.
Getting Started:For this activity learners need to be able to look into a classroom through thewindows.A large box should be placed inside the classroom – learners should be able to seethis box through the window. Each learner or group of learners should have a piece oftransparency which is pasted onto the outside of the window. The learner must look atthe box through the transparency and draw what s/he sees from that particularposition.For example, consider a box like this:
MALATI materials: Geometry, module 2 37
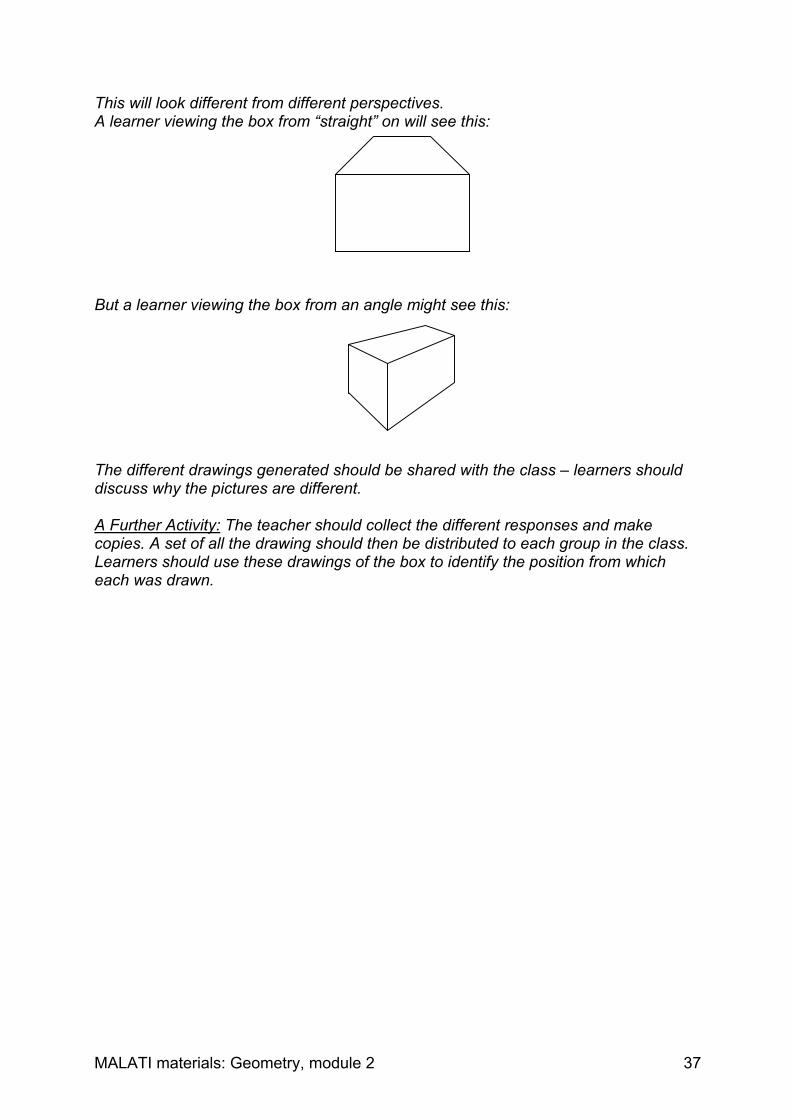
This will look different from different perspectives.A learner viewing the box from “straight” on will see this:
But a learner viewing the box from an angle might see this:
The different drawings generated should be shared with the class – learners shoulddiscuss why the pictures are different.
A Further Activity: The teacher should collect the different responses and makecopies. A set of all the drawing should then be distributed to each group in the class.Learners should use these drawings of the box to identify the position from whicheach was drawn.
MALATI materials: Geometry, module 2 38
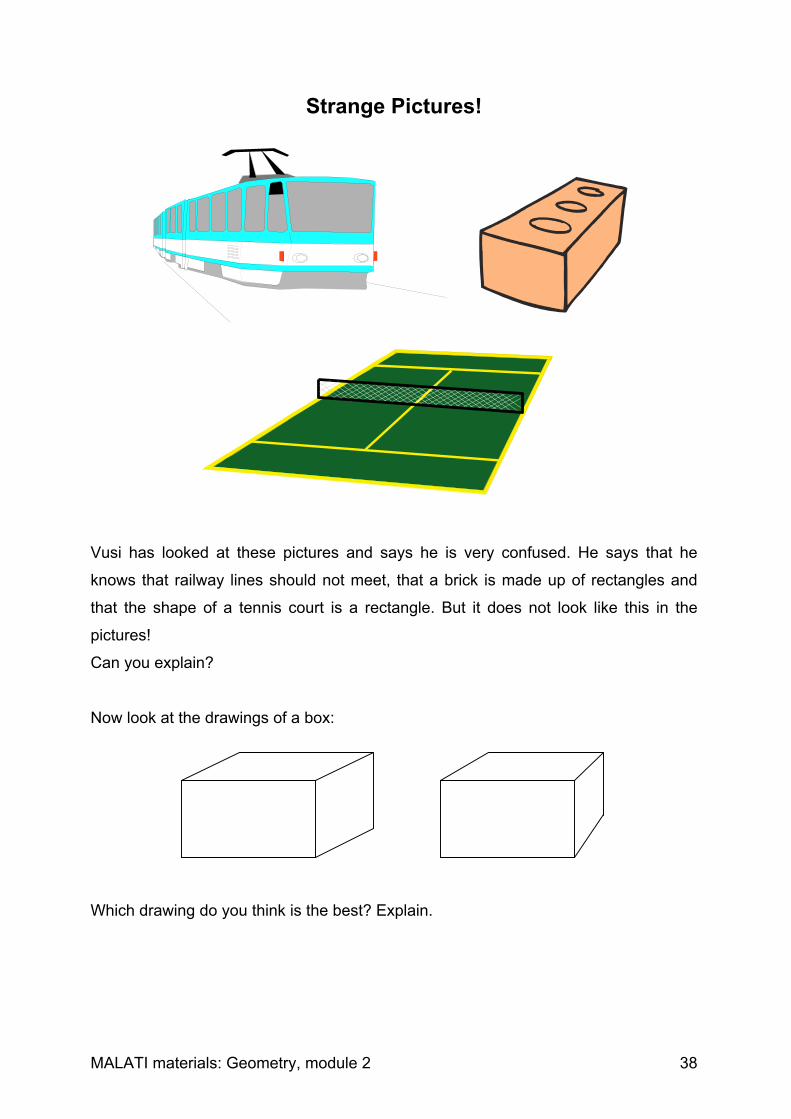
Strange Pictures!
Vusi has looked at these pictures and says he is very confused. He says that he
knows that railway lines should not meet, that a brick is made up of rectangles and
that the shape of a tennis court is a rectangle. But it does not look like this in the
pictures!
Can you explain?
Now look at the drawings of a box:
Which drawing do you think is the best? Explain.
MALATI materials: Geometry, module 2 39
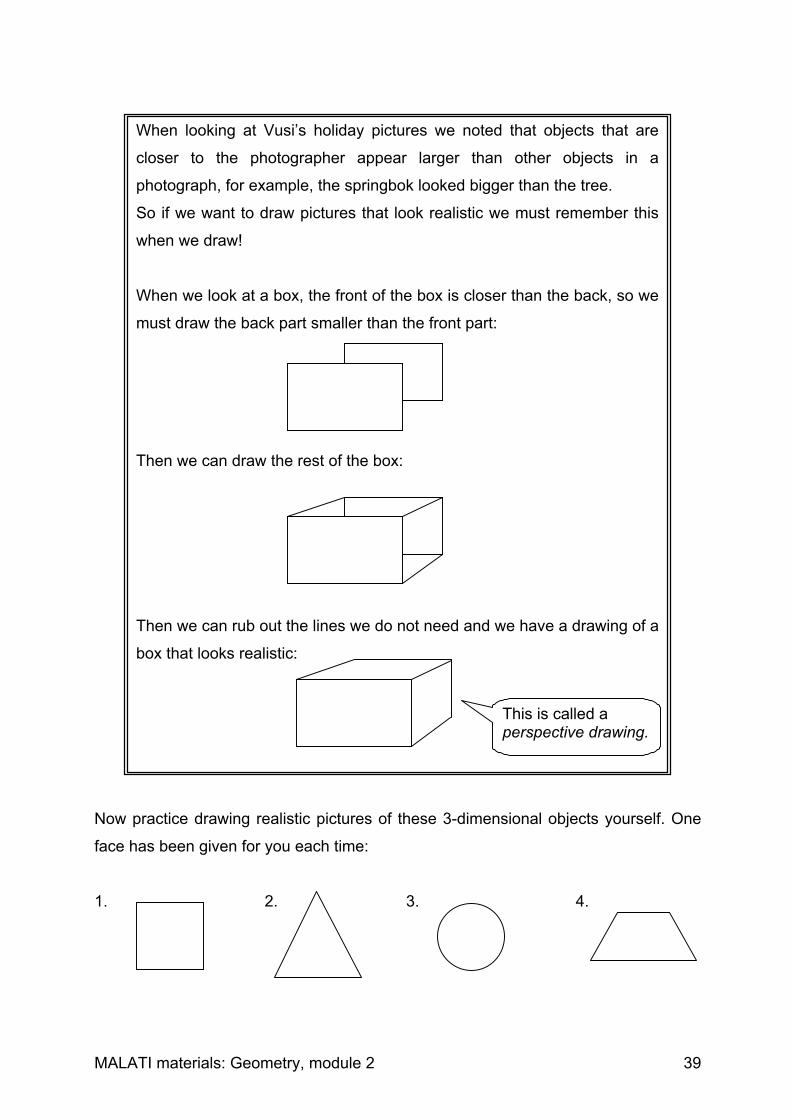
Now practice drawing realistic pictures of these 3-dimensional objects yourself. One
face has been given for you each time:
1. 2. 3. 4.
When looking at Vusi’s holiday pictures we noted that objects that are
closer to the photographer appear larger than other objects in a
photograph, for example, the springbok looked bigger than the tree.
So if we want to draw pictures that look realistic we must remember this
when we draw!
When we look at a box, the front of the box is closer than the back, so we
must draw the back part smaller than the front part:
Then we can draw the rest of the box:
Then we can rub out the lines we do not need and we have a drawing of a
box that looks realistic:
This is called aperspective drawing.
MALATI materials: Geometry, module 2 40
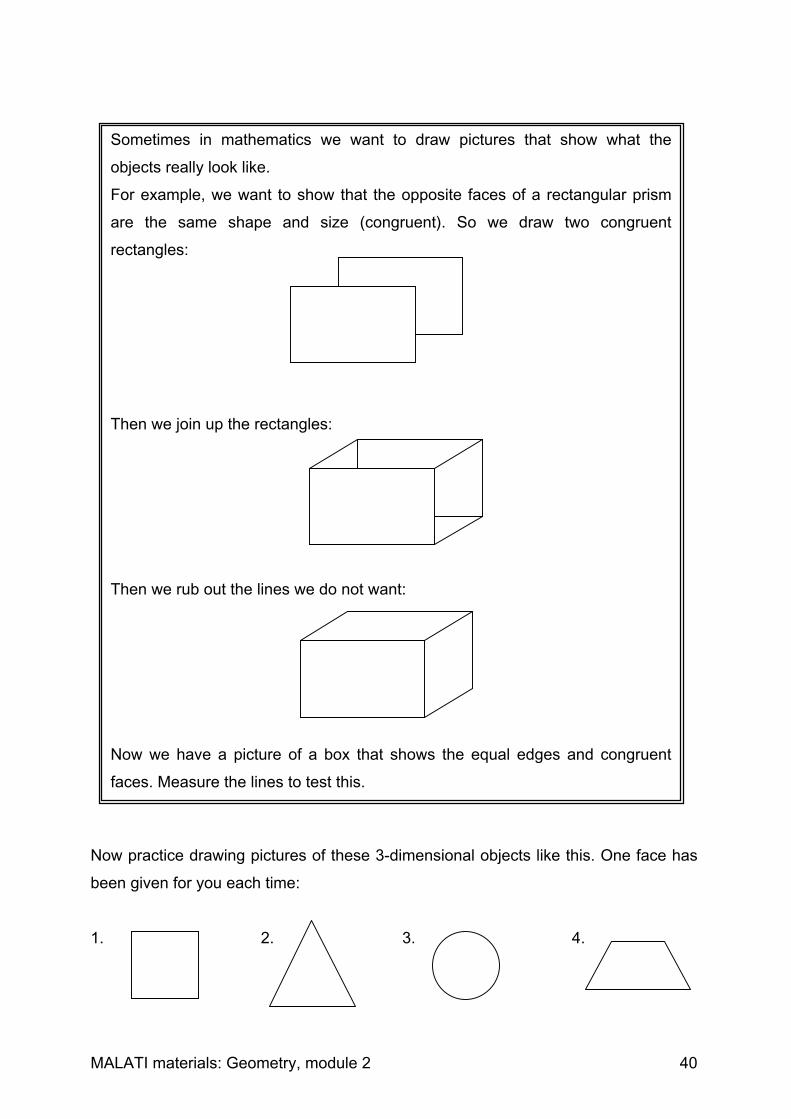
Now practice drawing pictures of these 3-dimensional objects like this. One face has
been given for you each time:
1. 2. 3. 4.
Sometimes in mathematics we want to draw pictures that show what the
objects really look like.
For example, we want to show that the opposite faces of a rectangular prism
are the same shape and size (congruent). So we draw two congruent
rectangles:
Then we join up the rectangles:
Then we rub out the lines we do not want:
Now we have a picture of a box that shows the equal edges and congruent
faces. Measure the lines to test this.

MALATI materials: Geometry, module 2 41
Teacher Notes: Strange Pictures!This activity explores the representation of 3-dimensional objects in 2-dimensionaldrawings.
Learners should note that, although we know that railway lines do not meet in real life,we draw them as if they will meet so that they look realistic. Learners can bereferred to photographs to look at the representations of a variety of objects.
Learners in the higher grades should note that, if one extends the parallel lines in aperspective drawing, the lines will meet in a point (called the “vanishing point”).
Learners are introduced to conventions for drawing. Two possibilities are discussedhere:• Perspective drawings in which the objects are drawn as they are seen so that they
look realistic. So those parts of an object which are behind others should be drawnsmaller than those in the front.
• Non-perspective drawings which show some of the mathematical properties ofobject, for example, congruent faces and sides of an object are reflected in thepicture.
At this level learners should be made aware of the differences between the tworepresentations and should be able to use both in drawings. Drawings in the rest ofthis Module are not drawn in perspective.
MALATI materials: Geometry, module 2 42
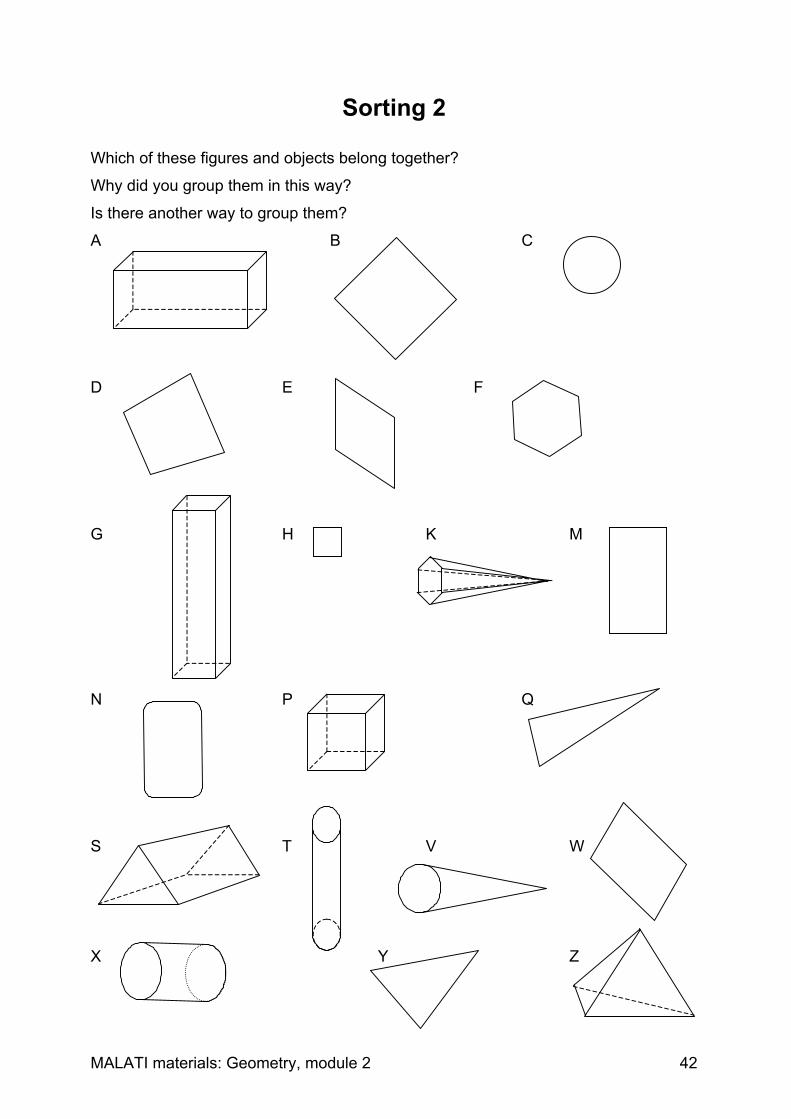
Sorting 2
Which of these figures and objects belong together?
Why did you group them in this way?
Is there another way to group them?
A B C
D E F
G H K M
N P Q
S T V W
X Y Z

MALATI materials: Geometry, module 2 43
Teacher Notes: Sorting 2This activity is similar to the sorting activities used in the first Module, but requires thatlearners work with 2-dimensional figures as well as 2-dimensional representations of3-dimensional objects. The use of this activity should be delayed until learners arefamiliar with the conventions for the representations, as is addressed in this Module.
There is likely to be a range of responses:• Some learners will be able to distinguish between the representations of the 3-
and 2-dimensional figures, whereas others might look at the individual figures, forexample, figures C and V both have circles.
• Some will regard figures B and H as different because the orientation is different,whereas other will see them both as squares. Some learners will include the cube(figure P) with the squares.
• Some learners will group figures M and N together, whereas others will indicatethat the “corners” in figure N are rounded.
After the learners have worked through the activity, a class discussion should be heldso that the varying responses can be explored. This is a useful opportunity for theteacher to focus the learners on different properties of the figures and to introduce orreinforce the appropriate terminology.
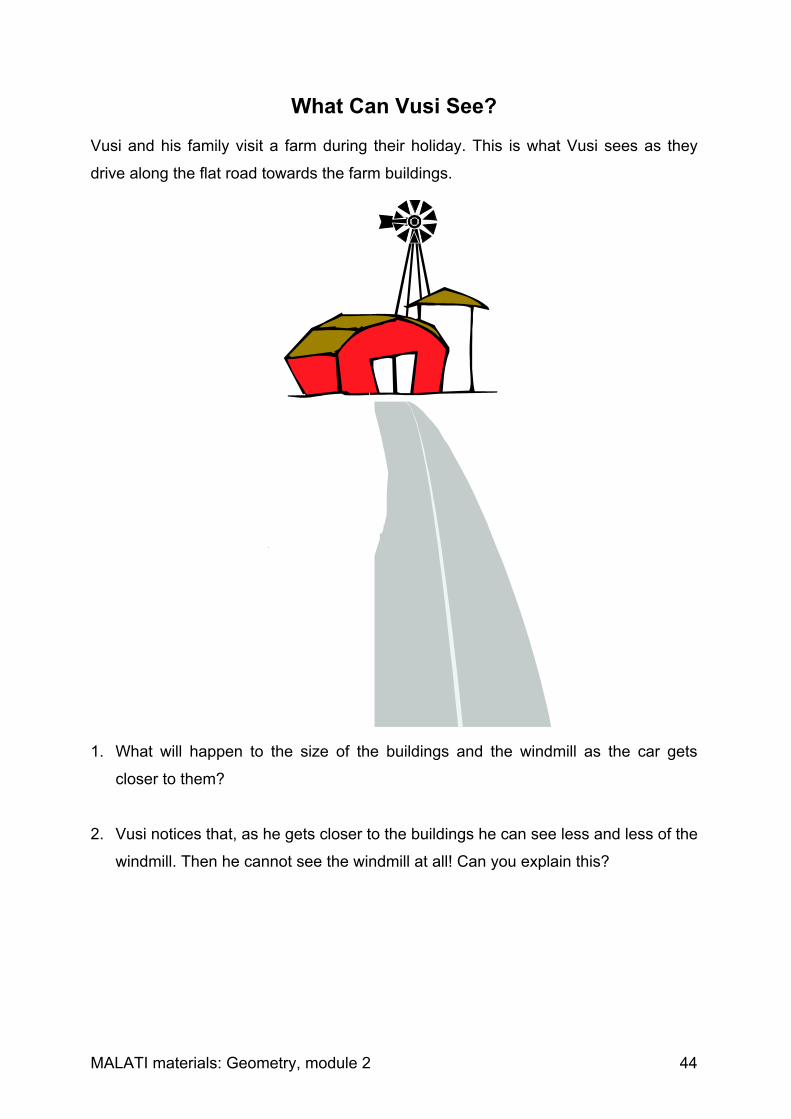
MALATI materials: Geometry, module 2 44
What Can Vusi See?Vusi and his family visit a farm during their holiday. This is what Vusi sees as they
drive along the flat road towards the farm buildings.
1. What will happen to the size of the buildings and the windmill as the car gets
closer to them?
2. Vusi notices that, as he gets closer to the buildings he can see less and less of the
windmill. Then he cannot see the windmill at all! Can you explain this?
MALATI materials: Geometry, module 2 45
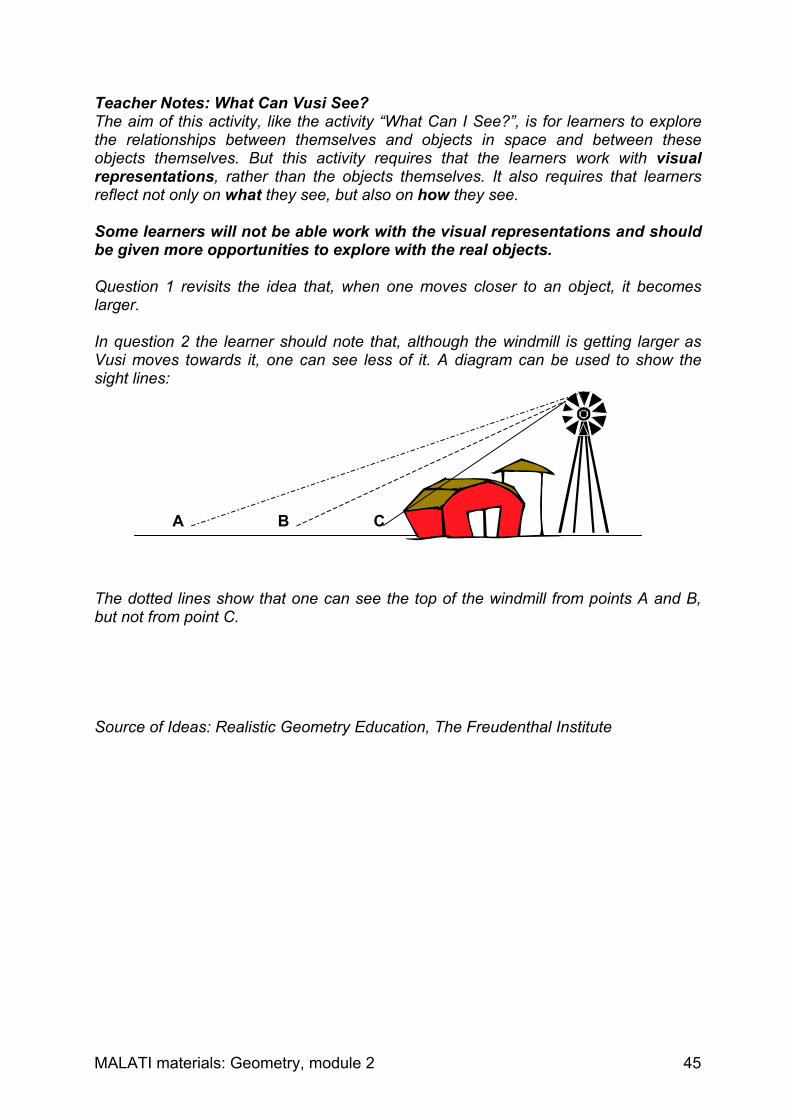
Teacher Notes: What Can Vusi See?The aim of this activity, like the activity “What Can I See?”, is for learners to explorethe relationships between themselves and objects in space and between theseobjects themselves. But this activity requires that the learners work with visualrepresentations, rather than the objects themselves. It also requires that learnersreflect not only on what they see, but also on how they see.
Some learners will not be able work with the visual representations and shouldbe given more opportunities to explore with the real objects.
Question 1 revisits the idea that, when one moves closer to an object, it becomeslarger.
In question 2 the learner should note that, although the windmill is getting larger asVusi moves towards it, one can see less of it. A diagram can be used to show thesight lines:
The dotted lines show that one can see the top of the windmill from points A and B,but not from point C.
Source of Ideas: Realistic Geometry Education, The Freudenthal Institute
CBA
MALATI materials: Geometry, module 2 46
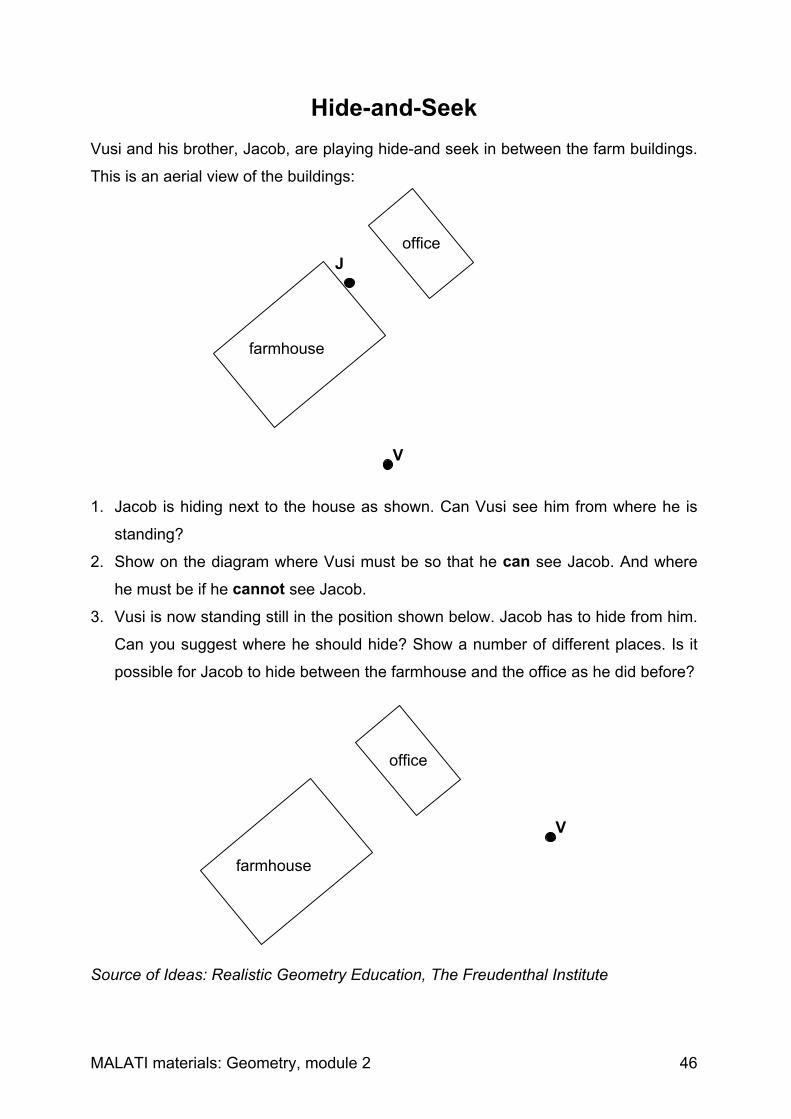
Hide-and-SeekVusi and his brother, Jacob, are playing hide-and seek in between the farm buildings.
This is an aerial view of the buildings:
1. Jacob is hiding next to the house as shown. Can Vusi see him from where he is
standing?
2. Show on the diagram where Vusi must be so that he can see Jacob. And where
he must be if he cannot see Jacob.
3. Vusi is now standing still in the position shown below. Jacob has to hide from him.
Can you suggest where he should hide? Show a number of different places. Is it
possible for Jacob to hide between the farmhouse and the office as he did before?
Source of Ideas: Realistic Geometry Education, The Freudenthal Institute
Joffice
farmhouse
V
office
farmhouse
V
MALATI materials: Geometry, module 2 47
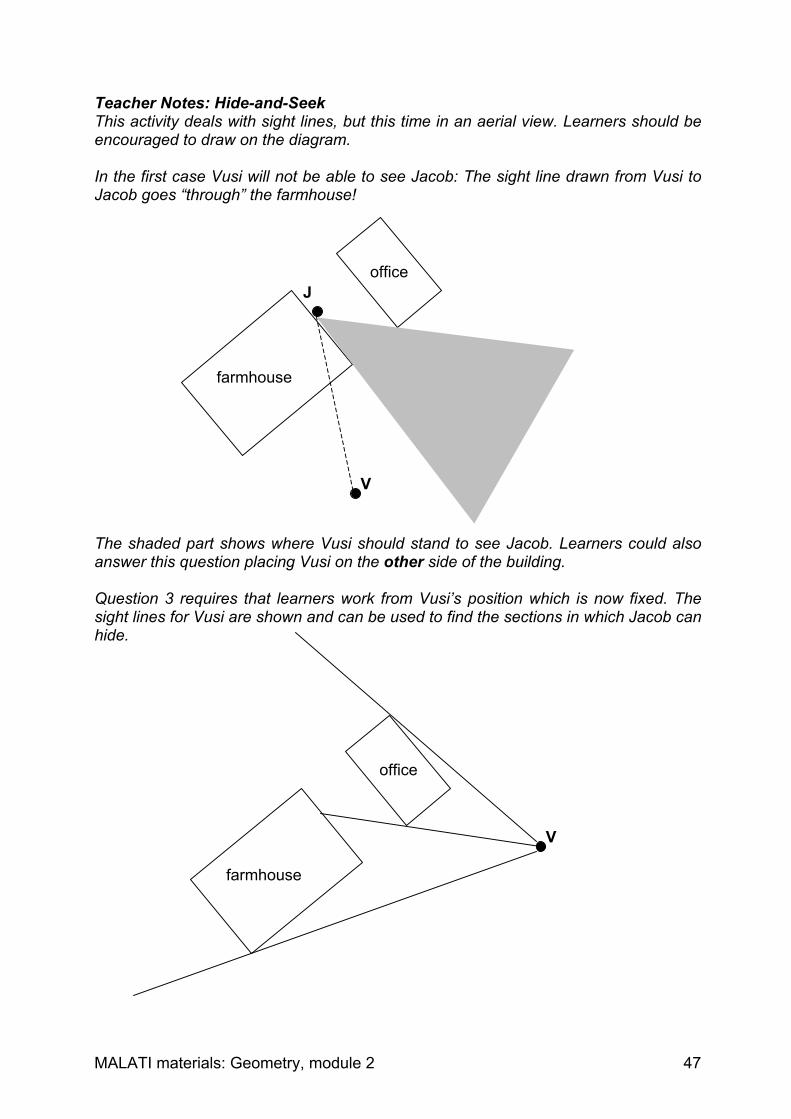
Teacher Notes: Hide-and-SeekThis activity deals with sight lines, but this time in an aerial view. Learners should beencouraged to draw on the diagram.
In the first case Vusi will not be able to see Jacob: The sight line drawn from Vusi toJacob goes “through” the farmhouse!
The shaded part shows where Vusi should stand to see Jacob. Learners could alsoanswer this question placing Vusi on the other side of the building.
Question 3 requires that learners work from Vusi’s position which is now fixed. Thesight lines for Vusi are shown and can be used to find the sections in which Jacob canhide.
Joffice
farmhouse
V
office
farmhouse
V