General Settings Guide
618
B1886607 Operating Instructions General Settings Guide Read this manual carefully before you use this machine and keep it handy for future reference. For safe and correct use, be sure to read the Safety Information in this manual before using the machine. Getting Started Combined Function Operations Document Server User Tools (System Settings) Registering Addresses and Users Troubleshooting Remarks Entering Text Specifications Type for 4800WD/A080/LW411/480W Printed in Japan EN USA B188-6607
-
Upload
khangminh22 -
Category
Documents
-
view
0 -
download
0
Transcript of General Settings Guide

Paper type: OK Prince Eco G100(55kg), Paper Thickness=80 µm // Pages in book=156 // Print scale=81%Gap (when printed at 81% scale) = Pages in book × Paper thickness / 2 = 6.240000 mm
B1886607
Operating Instructions
General Settings Guide
Read this manual carefully before you use this machine and keep it handy for future reference. For safe and correct use, be sure to read the SafetyInformation in this manual before using the machine.
Getting Started
Combined Function Operations
Document Server
User Tools (System Settings)
Registering Addresses and Users
Troubleshooting
Remarks
Entering Text
Specifications
Type for 4800WD/A080/LW411/480WPrinted in Japan
EN USA B188-6607

Paper type: OK Prince Eco G100(55kg), Paper Thickness=80 µm // Pages in book=156 // Print scale=81%Gap (when printed at 81% scale) = Pages in book × Paper thickness / 2 = 6.240000 mm
In accordance with IEC 60417, this machine uses the following symbols for the main power switch:
aaaa means POWER ON.
cccc means STAND BY.
In accordance with IEC 60417, this machine uses the following symbols for the anti-humidity heaterswitch:
aaaa means POWER ON.
bbbb means POWER OFF.
Introduction
This manual contains detailed instructions and notes on the operation and use of this machine. For yoursafety and benefit, read this manual carefully before using the machine. Keep this manual in a handyplace for quick reference.
Important
Contents of this manual are subject to change without prior notice. In no event will the company be li-able for direct, indirect, special, incidental, or consequential damages as a result of handling or oper-ating the machine.
Notes:
Some illustrations in this manual might be slightly different from the machine.
Certain options might not be available in some countries. For details, please contact your local dealer.
Notes:
Two kinds of size notation are employed in this manual. With this machine refer to the inch version.
For good copy quality, the supplier recommends that you use genuine toner from the supplier.
The supplier shall not be responsible for any damage or expense that might result from the use of partsother than genuine parts from the supplier with your office products.
Power Source
120V, 60Hz, 20A or more
Please be sure to connect the power cord to a power source as above. For details about power source,see P.122 “Power Connection”.
Copyright © 2005

i
Manuals for This Machine
The following manuals describe the operational procedures of this machine. Forparticular functions, see the relevant parts of the manual.
Note❒ Manuals provided are specific to machine type.❒ Adobe Acrobat Reader / Adobe Reader is necessary to view the manuals as
a PDF file.❒ Two CD-ROMs are provided:
• CD-ROM 1 “Operating Instructions”• CD-ROM 2 “Scanner Driver and Utilities”
❖❖❖❖ General Settings Guide (this manual)Provides an overview of the machine and describes System Settings (such asTray Paper Settings), Document Server functions, and troubleshooting.Refer to this manual for Address Book procedures such as registering e-mailaddress, and user codes.
❖❖❖❖ Security ReferenceThis manual is for administrators of this machine. It describes security func-tions that the administrators can use to protect data from being tampered, orprevent the machine from unauthorized use.Also refer to this manual for the procedures for registering administrators, aswell as setting user and administrator authentication.
❖❖❖❖ Network Guide (PDF file - CD-ROM1)Provides information about configuring and operating the scanner (Type 480)in a network environment.For details about network settings of the scanner (RW480) and printer(RW480), see the manual that comes with the related option.
❖❖❖❖ Copy ReferenceDescribes operations, functions, and troubleshooting for the machine's copierfunction.
❖❖❖❖ Scanner Reference (Scanner Unit Type 480) (PDF file - CD-ROM1) Describes operations, functions, and troubleshooting for the machine's scan-ner function.
DolphinC2_EN_zentai_F_pre_FM.book Page i Friday, February 25, 2005 7:09 PM

ii
❖❖❖❖ Manuals for DeskTopBinder LiteDeskTopBinder Lite is a utility included on the CD-ROM labeled “ScannerDriver and Utilities”.• DeskTopBinder Lite Setup Guide (PDF file - CD-ROM2)
Describes installation of, and the operating environment for DeskTop-Binder Lite in detail. This guide can be displayed from the [Setup] displaywhen DeskTopBinder Lite is installed.
• DeskTopBinder Introduction Guide (PDF file - CD-ROM2)Describes operations of DeskTopBinder Lite and provides an overview ofits functions. This guide is added to the [Start] menu when DeskTopBinderLite is installed.
• Auto Document Link Guide (PDF file - CD-ROM2)Describes operations and functions of Auto Document Link installed withDeskTopBinder Lite. This guide is added to the [Start] menu when Desk-TopBinder Lite is installed.
❖❖❖❖ Other manuals• Manuals for Printer (RW480) function.• Manuals for Scanner (RW480) function.
DolphinC2_EN_zentai_F_pre_FM.book Page ii Friday, February 25, 2005 7:09 PM

iii
What You Can Do with This Machine
The following introduces the functions of this machine, and the relevant manu-als containing detailed information about them.Products marked with * are optional. For details about optional products, seep.22 “Options”, or contact your local dealer.
Note❒ For functions of printer (RW480) and scanner (RW480), see manuals that
come with those options.❒ Scanner functions stated below apply to Scanner Unit Type 480 only.
Copier, Printer, and Scanner Functions
This machine provides copier, print-er* and scanner* functions.• You can make copies of originals.
See Copy Reference.• You can print documents created
using applications. See the rele-vant manuals of the printer.
• You can scan originals and sendthe scan file to a computer. SeeScanner Reference.
Utilizing Stored Documents
• You can store files of originalsscanned by this machine, or filessent from other computers, ontothe hard disk of the machine. Youcan print the stored documents, aswell as change print settings andprint multiple documents (Docu-ment Server). See p.39 “DocumentServer”.
• With DeskTopBinder Profession-al*/Lite, you can search, check,print, and delete stored documentsusing your computer. You can alsoretrieve stored documents scannedin scanner mode. With File FormatConverter*, you can even down-load documents stored in copy andprinter functions to your comput-er. See Network Guide and ScannerReference.
AGL010S
AGL011S
DolphinC2_EN_zentai_F_pre_FM.book Page iii Friday, February 25, 2005 7:09 PM

iv
Using the Scanner in a Network Environment
• You can send scanned documentsto other network computers usinge-mail (Sending stored scan file bye-mail). See Scanner Reference.
• With the ScanRouter delivery soft-ware, you can store scanned docu-ments in specified destinations onnetwork computers (File storage).See Scanner Reference.
• You can send scanned documentsto other network folders (Scan toFolder). See Scanner Reference.
Administrating the Machine/ Protecting Documents (Security Functions)
• You can protect documents fromunauthorized access and stopthem from being copied withoutpermission. See Security Reference.
• You can control the use of the ma-chine, as well as prevent machinesettings from being changed with-out authorization. See Security Ref-erence.
• By setting passwords, you can pre-vent unauthorized access via thenetwork. See Security Reference.
• You can erase the data on the harddisk to prevent the informationfrom leaking out. See the manualfor the DataOverWriteSecurityunit* and Security Reference.
AGL012S
AGL013S
DolphinC2_EN_zentai_F_pre_FM.book Page iv Friday, February 25, 2005 7:09 PM

v
Monitoring the Machine Via Computer
You can monitor machine status andchange settings using a computer.• Using SmartDeviceMonitor for Ad-
min, or a Web browser, you canuse a computer to view the ma-chine's status, such as checking onpaper quantities or misfeeds. SeeNetwork Guide.
• You can use a Web browser tomake network settings. See Net-work Guide.
• You can also use a Web browser toregister and manage items such asuser codes, e-mail addresses, andfolders in the Address Book. Seethe Web browser's Help.
AGL014S
DolphinC2_EN_zentai_F_pre_FM.book Page v Friday, February 25, 2005 7:09 PM

vi
TABLE OF CONTENTSManuals for This Machine ...................................................................................... iWhat You Can Do with This Machine.................................................................. iii
Copier, Printer, and Scanner Functions .................................................................... iiiUtilizing Stored Documents....................................................................................... iiiUsing the Scanner in a Network Environment .......................................................... ivAdministrating the Machine/ Protecting Documents (Security Functions) ................ ivMonitoring the Machine Via Computer....................................................................... v
Notice ......................................................................................................................1Copyrights and Trademarks .................................................................................4
Trademarks ................................................................................................................4Information about Installed Software..........................................................................5
How to Read This Manual ...................................................................................11Symbols ...................................................................................................................11Names of Major Options ..........................................................................................12Terms .......................................................................................................................12
Safety Information ...............................................................................................13Safety During Operation...........................................................................................13
Positions of RRRRWARNING and RRRRCAUTION Labels ...........................................15ENERGY STAR Program .....................................................................................17
1. Getting Started
Guide to Components .........................................................................................19Options.....................................................................................................................22
Control Panel........................................................................................................25Display Panel ...........................................................................................................26When the Authentication Screen is displayed..........................................................27
Turning On the Power .........................................................................................29Turning On the Main Power .....................................................................................29Turning On the Power ..............................................................................................29Turning Off the Power ..............................................................................................30Turning Off the Main Power .....................................................................................30Saving Energy..........................................................................................................31Anti-humidity Heater Switch .....................................................................................32
2. Combined Function Operations
Switching between Functions ............................................................................33Job List.....................................................................................................................33
Multi-Access.........................................................................................................36
DolphinC2_EN_zentai_F_pre_FM.book Page vi Friday, February 25, 2005 7:09 PM

vii
3. Document Server
Relationship between Document Server and Other Functions .......................39Document Server Display ........................................................................................40
Using the Document Server................................................................................41Storing Data .............................................................................................................41Changing a Stored Document's File Name, User Name, or Password....................44Searching for Stored Documents .............................................................................44Printing Stored Documents ......................................................................................45Deleting Stored Documents .....................................................................................48Viewing Stored Documents Using a Web Browser ..................................................49Downloading Stored Documents..............................................................................49
Settings for the Document Server......................................................................50
4. User Tools (System Settings)
User Tools Menu (System Settings)...................................................................51Accessing User Tools (System Settings) ..........................................................55
Changing Default Settings .......................................................................................55Exiting User Tools ....................................................................................................55
Settings You Can Change with User Tools .......................................................56General Features .....................................................................................................56Tray Paper Settings .................................................................................................62Timer Settings ..........................................................................................................63Administrator Tools ..................................................................................................65
5. Registering Addresses and Users
Address Book.......................................................................................................71Registering Names ..............................................................................................74
Registering a Name .................................................................................................74Changing a Registered Name..................................................................................75Deleting a Registered Name ....................................................................................75
Registering User Codes ......................................................................................76Registering a New User Code..................................................................................76Changing a User Code.............................................................................................77Deleting a User Code...............................................................................................77Displaying the Counter for Each User Code ............................................................78Printing the Counter for Each User Code.................................................................78Clearing the Counters ..............................................................................................79
E-mail Destination................................................................................................80Registering an E-mail Destination............................................................................80Changing a Registered E-mail Destination ..............................................................81Deleting a Registered E-mail Destination ................................................................82
Registering Folders .............................................................................................83Using SMB to Connect.............................................................................................83Using FTP to Connect..............................................................................................87
DolphinC2_EN_zentai_F_pre_FM.book Page vii Friday, February 25, 2005 7:09 PM

viii
Registering Names to a Group ...........................................................................90Registering a New Group.........................................................................................90Registering Names to a Group.................................................................................91Adding a Group to Another Group ...........................................................................91Displaying Names Registered in Groups .................................................................92Removing a Name from a Group .............................................................................92Deleting a Group within a Group..............................................................................93Changing a Group Name .........................................................................................93Deleting a Group ......................................................................................................94
Registering a Protection Code ...........................................................................95Registering a Protection Code for a Name in the Address Book .............................95Registering a Protection Code for a Group ..............................................................96
Registering SMTP and LDAP Authentication....................................................97SMTP Authentication ...............................................................................................97LDAP Authentication ................................................................................................98
6. Troubleshooting
If Your Machine Does Not Operate As You Want............................................101General ..................................................................................................................101Document Server ...................................................................................................103
Loading Paper ....................................................................................................105Loading Paper Roll.................................................................................................106Loading Cut Paper .................................................................................................107
DDDDAdding Toner..................................................................................................108xxxxClearing Misfeeds ..........................................................................................110
Original Misfeeds (P)..............................................................................................111Paper Misfeeds in the Paper Tray (A1, A2) ...........................................................111Paper Misfeeds in the Paper Bypass (A3, B).........................................................113Paper Misfeeds in the Rear Paper Output (C) .......................................................114
Changing the Paper Size...................................................................................115Changing the Paper Roll Size ................................................................................115Changing the Cut Paper Size.................................................................................117
7. Remarks
Dos and Don'ts...................................................................................................119Toner ...................................................................................................................120
Handling Toner.......................................................................................................120Toner Storage ........................................................................................................120Used Toner ............................................................................................................120
Where to Put Your Machine ..............................................................................121Machine Environment ............................................................................................121Moving....................................................................................................................121Power Connection..................................................................................................122Clearance Around the Machine..............................................................................122
Maintaining Your Machine ................................................................................123Cleaning inside the Original Cover.........................................................................123Cleaning the Imaging Unit......................................................................................124
DolphinC2_EN_zentai_F_pre_FM.book Page viii Friday, February 25, 2005 7:09 PM

ix
Other Functions .................................................................................................125Inquiry ....................................................................................................................125Changing the Display Language ............................................................................126
Counter ...............................................................................................................127Displaying the Total Counter..................................................................................127
8. Entering Text
Entering Text ......................................................................................................129Available Characters ..............................................................................................129Keys .......................................................................................................................129Entering Text..........................................................................................................130
9. Specifications
Main Unit.............................................................................................................131Options ...............................................................................................................135
Roll Feeder Type 480.............................................................................................135Paper Cassette Type 480 ......................................................................................135Carrier Sheet..........................................................................................................136Roll Holder Unit Type A..........................................................................................136Original Tray Type G..............................................................................................136
Copy Paper .........................................................................................................137Recommended Size and Type...............................................................................137Unusable Paper .....................................................................................................140Paper Storage ........................................................................................................141
Handling paper...................................................................................................142
INDEX....................................................................................................... 143
DolphinC2_EN_zentai_F_pre_FM.book Page ix Friday, February 25, 2005 7:09 PM

x
DolphinC2_EN_zentai_F_pre_FM.book Page x Friday, February 25, 2005 7:09 PM

1
Notice
Notice To Wireless LAN Interface (optional) Users
Notes to usersIt is strictly forbidden to use antenna(s) except designated. A The antenna(s) of this device must not be co-located or operating in conjunc-
tion with any other antenna or transmitter.B This equipment complies with FCC RF radiation exposure limits set forth for
an uncontrolled environment. End users must follow the specific operatinginstructions for satisfying RF exposure compliance.
Notes to users in the United States of AmericaNotice:
This equipment has been tested and found to comply with the limits for a ClassB digital device, pursuant to Part 15 of the FCC Rules. These limits are designedto provide reasonable protection against harmful interference in a residential in-stallation. This equipment generates, uses and can radiate radio frequency ener-gy and, if not installed and used in accordance with the instructions, may causeharmful interference to radio communications. However, there is no guaranteethat interference will not occur in a particular installation. If this equipment doescause harmful interference to radio or television reception, which can be deter-mined by turning the equipment off and on, the user is encouraged to try to cor-rect the interference by one more of the following measures:• Reorient or relocate the receiving antenna.• Increase the separation between the equipment and receiver.• Connect the equipment into an outlet on a circuit different from that to which
the receiver is connected.• Consult the dealer or an experienced radio/TV technician for help.
This device complies with part 15 of the FCC Rules.Operation is subject to the following two conditions:(1) This device may not cause harmful interference, and (2) this device must ac-cept any interference received, including interference that may cause undesiredoperation.
WarningChanges or modifications not expressly approved by the party responsible forcompliance could void the user's authority to operate the equipment.
DolphinC2_EN_zentai_F_pre_FM.book Page 1 Friday, February 25, 2005 7:09 PM

2
Note to users in CanadaNote:
This Class B digital apparatus complies with Canadian ICES-003.Operation is subject to the following two conditions:(1) This device may not cause interference, and (2) this device must accept anyinterference, including interference that may cause undesired operation of thedevice. IEEE 802.11b Interface Unit Type H:This device complies with RSS-210 of Industry Canada.The term “IC:” before the certification/registration number only signifies thatthe Industry Canada technical specifications were met.To prevent radio interference to the licensed service, this device is intended tobe operated indoors and away from windows to provide maximum shielding.Equipment (or its transmit antenna) that is installed outdoors is subject to licens-ing.To reduce potential radio interference to other users, the antenna type and itsgain should be so chosen that the equivalent isotropically radiated power (EIRP)is not more than that required for successful communication.This device has been designed to operate with an antenna having a maximumgain of [0.45] dBi. Antenna having a higher gain is strictly prohibited per regu-lations of Industry Canada. The required antenna impedance is [50] ohms.
DolphinC2_EN_zentai_F_pre_FM.book Page 2 Friday, February 25, 2005 7:09 PM

3
Remarque concernant les utilisateurs au CanadaAvertissement:
Cet appareil numérique de la classe B est conforme á la norme NMB-003 du Can-ada.L'utilisation de ce dispositif est autorisée seulement aux conditions suivantes: (1)il ne doit pas produire de brouillage et (2) l'utilisateur du dispositif doit être prêtá accepter tout brouillage radioélectrique reçu, même si ce brouillage est suscep-tible de compromettre le fonctionnement du dispositif. IEEE 802.11b Interface Unit Type H:Ce dispositif est conforme á la norme CNR-210 d'Industrie Canada.L'expression «IC:» avant le numéro d'homologation/enregistrement signifieseulement que les spécifications techniques d'Industrie Canada ont été re-spectées.Pour empêcher que cet appareil cause du brouillage au service faisant l'objetd'une licence, il doit être utilisé á l'intérieur et devrait être placé loin des fenêtresafin de fournir un écran de blindage maximal.Si le matériel (ou son antenne d'emission) est installe á l'extérieur, il doit fairel'objet d'une licence.Afin de réduire le risque d'interférence aux autres utilisateurs, le type d'antenneet son gain doivent être choisis de façon á ce que la puissance isotrope rayonnéeéquivalente (p.i.r.e.) ne soit pas supérieure au niveau requis pour obtenir unecommunication satisfaisante.Ce dispositif a été conçu pour fonctionner avec une antenne ayant un gain max-imal de [0.45] dBi.Une antenne ayant un gain plus élevé est strictement interditepar les réglements d'Industrie Canada.L'impédance d'antenne requise est [50]ohms.
DolphinC2_EN_zentai_F_pre_FM.book Page 3 Friday, February 25, 2005 7:09 PM

4
Copyrights and Trademarks
Trademarks
Microsoft®, Windows® and Windows NT® are registered trademarks of Mi-crosoft Corporation in the United States and/or other countries.Acrobat® is a registered trademark of Adobe Systems Incorporated.Other product names used herein are for identification purposes only and mightbe trademarks of their respective companies. We disclaim any and all rights tothose marks.The proper names of the Windows operating systems are as follows:• The product name of Windows® 95 is Microsoft® Windows® 95• The product name of Windows® 98 is Microsoft® Windows® 98• The product name of Windows® Me is Microsoft® Windows® Millennium
Edition (Windows Me)• The product names of Windows® 2000 are as follows:
Microsoft® Windows® 2000 Advanced ServerMicrosoft® Windows® 2000 ServerMicrosoft® Windows® 2000 Professional
• The product names of Windows® XP are as follows:Microsoft® Windows® XP ProfessionalMicrosoft® Windows® XP Home Edition
• The product names of Windows Server™ 2003 are as follows:Microsoft® Windows Server™ 2003 Standard EditionMicrosoft® Windows Server™ 2003 Enterprise EditionMicrosoft® Windows Server™ 2003 Web Edition
• The product names of Windows® NT are as follows:Microsoft® Windows NT® Server 4.0Microsoft® Windows NT® Workstation 4.0
DolphinC2_EN_zentai_F_pre_FM.book Page 4 Friday, February 25, 2005 7:09 PM

5
Information about Installed Software
expat
• The software including controller, etc. (hereinafter "software") installed onthis product uses the expat under the conditions mentioned below.
• The product manufacturer provides warranty and support to the software ofthe product including the expat, and the product manufacturer makes the ini-tial developer and copyright holder of the expat, free from these obligations.
• Information relating to the expat is available at:http://expat.sourceforge.net/
Copyright © 1998, 1999, 2000 Thai Open Source Software Centre, Ltd. and ClarkCooper.Copyright © 2001, 2002 Expat maintainers.Permission is hereby granted, free of charge, to any person obtaining a copy ofthis software and associated documentation files (the "Software"), to deal in theSoftware without restriction, including without limitation the rights to use,copy, modify, merge, publish, distribute, sublicense, and/or sell copies of theSoftware, and to permit persons to whom the Software is furnished to do so, sub-ject to the following conditions:The above copyright notice and this permission notice shall be included in allcopies or substantial portions of the Software.THE SOFTWARE IS PROVIDED "AS IS", WITHOUT WARRANTY OF ANYKIND, EXPRESS OR IMPLIED, INCLUDING BUT NOT LIMITED TO THEWARRANTIES OF MERCHANTABILITY, FITNESS FOR A PARTICULARPURPOSE AND NONINFRINGEMENT. IN NO EVENT SHALL THE AU-THORS OR COPYRIGHT HOLDERS BE LIABLE FOR ANY CLAIM, DAMAG-ES OR OTHER LIABILITY, WHETHER IN AN ACTION OF CONTRACT,TORT OR OTHERWISE, ARISING FROM, OUT OF OR IN CONNECTIONWITH THE SOFTWARE OR THE USE OR OTHER DEALINGS IN THE SOFT-WARE.
NetBSD
1. Copyright Notice of NetBSDFor all users to use this product:This product contains NetBSD operating system:For the most part, the software constituting the NetBSD operating system is notin the public domain; its authors retain their copyright.The following text shows the copyright notice used for many of the NetBSDsource code. For exact copyright notice applicable for each of the files/binaries,the source code tree must be consulted.A full source code can be found at http://www.netbsd.org/.Copyright © 1999, 2000 The NetBSD Foundation, Inc.All rights reserved.
DolphinC2_EN_zentai_F_pre_FM.book Page 5 Friday, February 25, 2005 7:09 PM

6
Redistribution and use in source and binary forms, with or without modifica-tion, are permitted provided that the following conditions are met:A Redistributions of source code must retain the above copyright notice, this list
of conditions and the following disclaimer.B Redistributions in binary form must reproduce the above copyright notice,
this list of conditions and the following disclaimer in the documentationand/or other materials provided with the distribution.
C All advertising materials mentioning features or use of this software mustdisplay the following acknowledgment:This product includes software developed by The NetBSD Foundation, Inc.and its contributors.
D Neither the name of The NetBSD Foundation nor the names of its contribu-tors may be used to endorse or promote products derived from this softwarewithout specific prior written permission.
THIS SOFTWARE IS PROVIDED BY THE NETBSD FOUNDATION, INC. ANDCONTRIBUTORS ''AS IS'' AND ANY EXPRESS OR IMPLIED WARRANTIES,INCLUDING, BUT NOT LIMITED TO, THE IMPLIED WARRANTIES OF MER-CHANTABILITY AND FITNESS FOR A PARTICULAR PURPOSE ARE DIS-CLAIMED. IN NO EVENT SHALL THE FOUNDATION OR CONTRIBUTORSBE LIABLE FOR ANY DIRECT, INDIRECT, INCIDENTAL, SPECIAL, EXEM-PLARY, OR CONSEQUENTIAL DAMAGES (INCLUDING, BUT NOT LIMIT-ED TO, PROCUREMENT OF SUBSTITUTE GOODS OR SERVICES; LOSS OFUSE, DATA, OR PROFITS; OR BUSINESS INTERRUPTION) HOWEVERCAUSED AND ON ANY THEORY OF LIABILITY, WHETHER IN CON-TRACT, STRICT LIABILITY, OR TORT (INCLUDING NEGLIGENCE OR OTH-ERWISE) ARISING IN ANY WAY OUT OF THE USE OF THIS SOFTWARE,EVEN IF ADVISED OF THE POSSIBILITY OF SUCH DAMAGE.2.Authors Name ListAll product names mentioned herein are trademarks of their respective owners.The following notices are required to satisfy the license terms of the softwarethat we have mentioned in this document:• This product includes software developed by the University of California,
Berkeley and its contributors.• This product includes software developed by Jonathan R. Stone for the NetB-
SD Project.• This product includes software developed by the NetBSD Foundation, Inc.
and its contributors.• This product includes software developed by Manuel Bouyer.• This product includes software developed by Charles Hannum.• This product includes software developed by Charles M. Hannum.• This product includes software developed by Christopher G. Demetriou.• This product includes software developed by TooLs GmbH.• This product includes software developed by Terrence R. Lambert.• This product includes software developed by Adam Glass and Charles Han-
num.• This product includes software developed by Theo de Raadt.
DolphinC2_EN_zentai_F_pre_FM.book Page 6 Friday, February 25, 2005 7:09 PM

7
• This product includes software developed by Jonathan Stone and Jason R.Thorpe for the NetBSD Project.
• This product includes software developed by the University of California,Lawrence Berkeley Laboratory and its contributors.
• This product includes software developed by Christos Zoulas.• This product includes software developed by Christopher G. Demetriou for
the NetBSD Project.• This product includes software developed by Paul Kranenburg.• This product includes software developed by Adam Glass.• This product includes software developed by Jonathan Stone.• This product includes software developed by Jonathan Stone for the NetBSD
Project.• This product includes software developed by Winning Strategies, Inc.• This product includes software developed by Frank van der Linden for the
NetBSD Project.• This product includes software developed for the NetBSD Project by Frank
van der Linden• This product includes software developed for the NetBSD Project by Jason R.
Thorpe.• The software was developed by the University of California, Berkeley.• This product includes software developed by Chris Provenzano, the Univer-
sity of California, Berkeley, and contributors.
Sablotron
Sablotron (Version 0.82) Copyright © 2000 Ginger Alliance Ltd. All Rights Re-serveda) The application software installed on this product includes the Sablotron soft-ware Version 0.82 (hereinafter, "Sablotron 0.82"), with modifications made bythe product manufacturer. The original code of the Sablotron 0.82 is provided byGinger Alliance Ltd., the initial developer, and the modified code of the Sa-blotron 0.82 has been derived from such original code provided by Ginger Alli-ance Ltd.b) The product manufacturer provides warranty and support to the applicationsoftware of this product including the Sablotron 0.82 as modified, and the prod-uct manufacturer makes Ginger Alliance Ltd., the initial developer of the Sa-blotron 0.82, free from these obligations.c) The Sablotron 0.82 and the modifications thereof are made available under theterms of Mozilla Public License Version 1.1 (hereinafter, "MPL 1.1"), and the ap-plication software of this product constitutes the "Larger Work" as defined inMPL 1.1. The application software of this product except for the Sablotron 0.82as modified is licensed by the product manufacturer under separate agree-ment(s).d) The source code of the modified code of the Sablotron 0.82 is available at: ht-tp://support-download.com/services/device/sablot/notice082.html
DolphinC2_EN_zentai_F_pre_FM.book Page 7 Friday, February 25, 2005 7:09 PM

8
e) The source code of the Sablotron software is available at: http://www.ginger-all.comf) MPL 1.1 is available at: http://www.mozilla.org/MPL/MPL-1.1.html
JPEG LIBRARY
• The software installed on this product is based in part on the work of the In-dependent JPEG Group.
SASL
CMU libsaslTim MartinRob EarhartRob SiemborskiCopyright © 2001 Carnegie Mellon University. All rights reserved.Redistribution and use in source and binary forms, with or without modifica-tion, are permitted provided that the following conditions are met:A Redistributions of source code must retain the above copyright notice, this list
of conditions and the following disclaimer. B Redistributions in binary form must reproduce the above copyright notice,
this list of conditions and the following disclaimer in the documentationand/or other materials provided with the distribution.
C The name "Carnegie Mellon University" must not be used to endorse or pro-mote products derived from this software without prior written permission.For permission or any other legal details, please contact:
Office of Technology TransferCarnegie Mellon University5000 Forbes AvenuePittsburgh, PA 15213-3890(412) 268-4387, fax: (412) [email protected]
D Redistributions of any form whatsoever must retain the following acknowl-edgment:"This product includes software developed by Computing Services at Carn-egie Mellon University (http://www.cmu.edu/computing/)."
CARNEGIE MELLON UNIVERSITY DISCLAIMS ALL WARRANTIES WITHREGARD TO THIS SOFTWARE, INCLUDING ALL IMPLIED WARRANTIESOF MERCHANTABILITY AND FITNESS, IN NO EVENT SHALL CARNEGIEMELLON UNIVERSITY BE LIABLE FOR ANY SPECIAL, INDIRECT OR CON-SEQUENTIAL DAMAGES OR ANY DAMAGES WHATSOEVER RESULTINGFROM LOSS OF USE, DATA OR PROFITS, WHETHER IN AN ACTION OFCONTRACT, NEGLIGENCE OR OTHER TORTIOUS ACTION, ARISING OUTOF OR IN CONNECTION WITH THE USE OR PERFORMANCE OF THISSOFTWARE.
DolphinC2_EN_zentai_F_pre_FM.book Page 8 Friday, February 25, 2005 7:09 PM

9
MD4
Copyright © 1990-2, RSA Data Security, Inc. All rights reserved.
License to copy and use this software is granted provided that it is identified asthe "RSA Data Security, Inc. MD4 Message-Digest Algorithm" in all materialmentioning or referencing this software or this function.
License is also granted to make and use derivative works provided that suchworks are identified as "derived from the RSA Data Security, Inc. MD4 Message-Digest Algorithm" in all material mentioning or referencing the derived work.
RSA Data Security, Inc. makes no representations concerning either the mer-chantability of this software or the suitability of this software for any particularpurpose. It is provided "as is" without express or implied warranty of any kind.
These notices must be retained in any copies of any part of this documentationand/or software.
MD5
Copyright © 1991-2, RSA Data Security, Inc. Created 1991. All rights reserved.
License to copy and use this software is granted provided that it is identified asthe "RSA Data Security, Inc. MD5 Message-Digest Algorithm" in all materialmentioning or referencing this software or this function.
License is also granted to make and use derivative works provided that suchworks are identified as "derived from the RSA Data Security, Inc. MD5 Message-Digest Algorithm" in all material mentioning or referencing the derived work.
RSA Data Security, Inc. makes no representations concerning either the mer-chantability of this software or the suitability of this software for any particularpurpose. It is provided "as is" without express or implied warranty of any kind.
These notices must be retained in any copies of any part of this documentationand/or software.
DolphinC2_EN_zentai_F_pre_FM.book Page 9 Friday, February 25, 2005 7:09 PM

10
RSA BSAFE®
• This product includes RSA BSAFE® cryptographic or security protocol soft-ware from RSA Security Inc.
• RSA and BSAFE are registered trademarks of RSA Security Inc. in the UnitedStates and/or other countries.
• RSA Security Inc. All rights reserved.
Samba(Ver 2.2.2-ja-1.1)
For SMB transmission, this machine uses Samba ver 2.2.2-ja-1.1 (hereinafter re-ferred to as Samba 2.2.2-ja-1.1).Copyright © Andrew Tridgell 1994-1998This program is free software; you can redistribute it and/or modify it under theterms of the GNU General Public License as published by the Free SoftwareFoundation; either version 2 of the License, or (at your option) any later version.This program is distributed in the hope that it will be useful, but WITHOUTANY WARRANTY; without even the implied warranty of MERCHANTABILI-TY or FITNESS FOR A PARTICULAR PURPOSE. See the GNU General PublicLicense for more details.You should have received a copy of the GNU General Public License along withthis program; if not, write to the Free Software Foundation, Inc., 675 Mass Ave,Cambridge, MA 02139, USA
Note❒ The source code for SMB transmission by this machine can be downloaded
from the following website: http://support-download.com/services/scbs
DolphinC2_EN_zentai_F_pre_FM.book Page 10 Friday, February 25, 2005 7:09 PM

11
How to Read This Manual
Symbols
This manual uses the following symbols:
R WARNING:This symbol indicates a potentially hazardous situation that might result indeath or serious injury if you misuse the machine by not following these instruc-tions under this symbol. Be sure to read these instructions, all of which are in-cluded in the Safety Information section.
R CAUTION:This symbol indicates a potentially hazardous situation that might result in mi-nor or moderate injury or property damage not involving bodily injury, if youmisuse the machine by not following these instructions under this symbol. Besure to read the instructions, all of which are included in the Safety Informationsection.* The above statements are for your safety.
ImportantIf this instruction is not followed, paper might be misfed, originals damaged, ordata lost. Be sure to read this.
PreparationThis symbol indicates the prior knowledge or preparation required before oper-ation.
NoteThis symbol indicates precautions for operation, or actions to take followingmal-operation.
LimitationThis symbol indicates numerical limits, functions that cannot be used together,or conditions under which a particular function cannot be used.
ReferenceThis symbol indicates where further relevant information can be found.
[ ]Keys that appear on the machine's display.
{ }Keys built into the machine's control panel.
DolphinC2_EN_zentai_F_pre_FM.book Page 11 Friday, February 25, 2005 7:09 PM

12
Names of Major Options
Major options for this machine are referred to as follows:• Roll Holder Unit Type A → Roll holder• Roll Feeder Type 480 → Lower Tray• Paper Cassette Type 480→ Cut paper tray• Original Tray Type G→ Original tray
Terms
• Long length original/paperOriginal/paper length longer than 1,189 mm, 46.8".
DolphinC2_EN_zentai_F_pre_FM.book Page 12 Friday, February 25, 2005 7:09 PM

13
Safety Information
When using this machine, the following safety precautions should always be fol-lowed.
Safety During Operation
In this manual, the following important symbols are used:
R WARNING:
R WARNING:Indicates a potentially hazardous situation which, if instructions are not followed, could result in death or serious injury.
R CAUTION:Indicates a potentially hazardous situation which, if instructions are not followed, may result in minor or moderate injury or damage to property.
• Connect the machine only to the power source described on the inside front cover of this manual. Connect the power cord directly into a wall outlet and do not use an extension cord.
• Do not damage, break or make any modifications to the power cord. Do not place heavy objects on it. Do not pull it hard nor bend it more than necessary. These actions could cause an electric shock or fire.
• Disconnect the power plug (by pulling the plug, not the cable) if the power cable or plug becomes frayed or otherwise damaged.
• To avoid hazardous electric shock or laser radiation exposure, do not remove any covers or screws other than those specified in this manu-al.
• Turn off the power and disconnect the power plug (by pulling the plug, not the cable) if any of the following occurs:
• You spill something into the machine.
• You suspect that your machine needs service or repair.
• The external housing of your machine has been damaged.
• Do not incinerate used toner or toner containers. Toner dust might ig-nite when exposed to an open flame. Dispose of used toner containers in accordance with local regulations.
• Dispose of the used toner bottle in accordance with the local regula-tions.
• Keep the machine away from flammable liquids, gases, and aerosols. A fire or an electric shock might occur.
DolphinC2_EN_zentai_F_pre_FM.book Page 13 Friday, February 25, 2005 7:09 PM

14
R CAUTION:
• Keep the machine away from humidity and dust. Otherwise a fire or an elec-
tric shock might occur.
• Do not place the machine on an unstable or tilted surface. If it topples over, an injury might occur.
• If you use the machine in a confined space, make sure there is a continuous air turnover.
• Unplug the power cord from the wall outlet before you move the machine. While moving the machine, you should take care that the power cord will not be damaged under the machine.
• When you disconnect the power plug from the wall outlet, always pull the plug (not the cable).
• Do not allow paper clips, staples, or other small metallic objects to fall inside the machine.
• Keep toner (used or unused) and toner bottle out of the reach of children.
• For environmental reasons, do not dispose of the machine or expended supply waste at household waste collection points. Disposal can take place at an authorized dealer.
• If toner or used toner is inhaled, gargle with plenty of water and move into a fresh air environment. Consult a doctor if necessary.
• If toner or used toner gets into your eyes, flush immediately with large amounts of water. Consult a doctor if necessary.
• If toner or used toner is swallowed, dilute by drinking a large amount of wa-ter. Consult a doctor if necessary.
• Avoid getting toner on your clothes or skin when removing a paper jam or replacing toner. If your skin comes into contact with toner, wash the affected area thoroughly with soap and water.
• If toner gets on your clothing, wash with cold water. Hot water will set the toner into the fabric and may make removing the stain impossible.
• Do not reuse stapled paper. Do not use aluminum foil, carbon-containing paper or other conductive paper. If you do, there is a danger of fire.
• Be careful when replacing the roll paper or removing misfed paper by follow-ing the operating instructions properly. Otherwise, an injury may result from the paper cutter inside.
• The inside of the machine could be very hot. Do not touch the parts with a label indicating the “hot surface”. Otherwise, an injury might occur.
• The fusing section of this machine might be very hot. Caution should be tak-en when removing misfed paper.
• Hold the paper roll horizontally with both hands. When you grab the paper holder and hold the paper roll vertically, the paper roll may fall off and injury may result.
DolphinC2_EN_zentai_F_pre_FM.book Page 14 Friday, February 25, 2005 7:09 PM

15
Positions of RRRRWARNING and RRRRCAUTION Labels
This machine has labels for RWARNING and RCAUTION at the positionsshown below. For safety, please follow the instructions and handle the machineas indicated.
AHD016S
DolphinC2_EN_zentai_F_pre_FM.book Page 15 Friday, February 25, 2005 7:09 PM

16
AHD017S
DolphinC2_EN_zentai_F_pre_FM.book Page 16 Friday, February 25, 2005 7:09 PM

17
ENERGY STAR Program
❖❖❖❖ Low power modeThis product automatically lowers its power consumption when it is not op-erated for a fixed time (default setting: 15 minutes). Printing is possible in thismode, but to use the copier, press the {{{{Energy Saver}}}} key.
ReferenceFor details about changing the default interval before entering Low powermode, see p.64 “Energy Saver”.
❖❖❖❖ Auto Off mode (Copier only)To conserve energy, this product automatically turns off when it is not oper-ated for a fixed time (default setting: 60 minutes). To use the copier, press theoperation switch.
ReferenceFor details about changing the default interval before entering Auto Offmode, see p.63 “Auto Off Timer”.
❖❖❖❖ Sleep mode (Printer installed)This product automatically lowers its power consumption even further whenit is not operated for a fixed time (default setting: 60 minutes). Printing is stillpossible in this mode, but if you want to make copies, press the operationswitch.
ReferenceFor details about changing the default interval before entering Sleep mode,see p.64 “Energy Saver”.
As an ENERGY STAR Partner, we have determined that this machine model meets the ENERGY STAR Guidelines for energy efficiency.
The ENERGY STAR Guidelines intend to establish an international energy-saving system for developing and introducing energy-efficient office equipment to deal with environmental is-sues, such as global warming.
When a product meets the ENERGY STAR Guidelines for energy efficiency, the Partner shall place the ENERGY STAR logo onto the machine model.
This product was designed to reduce the environmental impact associated with office equip-ment by means of energy-saving features, such as Low-power mode.
DolphinC2_EN_zentai_F_pre_FM.book Page 17 Friday, February 25, 2005 7:09 PM

18
Specification
Recycled paper
In accordance with the ENERGY STAR Program, we recommend using environ-mentally friendly recycled paper. Contact your sales representative for recom-mended paper.
Copier only Printer and Scanner installed
Low power mode Power consumption 195 Wh —
Default interval 15 minutes
Recovery time 60 seconds
Auto Off mode Power consumption 45 W —
Default interval 60 minutes —
Recovery time 120 seconds —
Sleep mode Power consumption — —
Default interval — 60 minutes
Recovery time — 120 seconds
DolphinC2_EN_zentai_F_pre_FM.book Page 18 Friday, February 25, 2005 7:09 PM

19
1. Getting Started
Guide to Components
❖❖❖❖ Front
1. Upper output stackerWhen the top original exit is selected,originals are stacked here. See “Origi-nal Output Locations”, Copy Reference.
2. Control panelSee p.25 “Control Panel”.
3. Original coverThis protects the original feed mecha-nism and the exposure glass.
4. Original cover release leverUse to open the original cover to clearjammed originals or to clean the ma-chine.
5. Front output auxiliary trayUse to receive copy paper. Whencopying rolled originals, this can alsoserve as an original tray.
6. Main power switchUse to turn the main power on or off.If you will not use the machine for along time, disconnect the power cord.Normally, the machine should be lefton.
7. Upper trayIncludes Tray 1 (front) and Tray 2(rear).
8. Lower tray (optional) or Cut pa-per trays (optional)
The illustration shows the cut papertrays. See p.22 “Options”.
9. Operation switchUse to turn the power on or off. Thepower indicator lights when the pow-er is on. See p.29 “Turning On thePower”.
AGL050S
DolphinC2_EN_zentai_F_pre_FM.book Page 19 Friday, February 25, 2005 7:09 PM

Getting Started
20
1
10. {{{{Scanner Stop}}}} keyUse if originals are feeding in slanted,or to cancel scanning while an originalis feeding in. You can also use this torelease the paper edge hold function.
11. Original tablePlace originals here scanning side up.
12. Original guideSet to the width of your originals.
13. Imaging unit release leverUse this lever to open the imagingunit when clearing paper jams insideor cleaning the machine.
Important❒ Do not leave the imaging unit
open more than 10 minutes,otherwise copy quality may de-teriorate.
Note❒ While holding down the imaging
unit, pull the release lever to openit.
14. Paper BypassUse to feed paper in manually. Loadpaper print side up. See “Copyingfrom the Paper Bypass”, Copy Refer-ence.
15. Paper bypass's paper guideSet to the width of the paper for by-pass copying.
❖❖❖❖ Rear
1. Document rollerRolls and stacks long length or rolledoriginals here.
2. Rear original exit (straight)Holds originals ejected at the back ofthe machine. See “Original OutputLocations”, Copy Reference.
3. Fusing unit coverProtects the fusing unit.
4. Ventilation holesPrevent overheating. Do not obstructthem by placing anything near or lean-ing objects against them. If the ma-chine overheats, a failure might occur.
AHD018S
DolphinC2_EN_zentai_F_pre_FM.book Page 20 Friday, February 25, 2005 7:09 PM

Guide to Components
21
1
5. Rear outputStacks copies delivered to the rear out-put.
6. Copy output (rear) auxiliaryguide
When ejecting A0(E) size paper to therear output, this guide prevents theleading edge of the paper to be caughtin the copy output tray.
❖❖❖❖ Upper Tray (Tray 1, Tray 2)
1. Anti-humidity heater switchWhen humidity is high, paper in thepaper tray may absorb moisture,which can affect copy quality. Theanti-humidity heater prevents this.Turn this switch on when humidity ishigh. See p.32 “Anti-humidity HeaterSwitch” .
2. Paper holderThe two paper holders grip the paperroll and are mounted on the paper rolltray's roll holder.
3. Paper feed knobUse when loading paper rolls or clear-ing paper jams. See p.105 “LoadingPaper” and p.110 “xClearing Mis-feeds”.
4. Cutter knobUse to manually cut paper if there arepaper jams in the cutter area of themachine. Always return the cutterknob to the left or right end.
5. Auto feed buttonUse this to clear misfeeds in the paperfeed area. Keep this button pressed tofeed the roll paper continuously.When approximately 100 mm, 3.9" ofpaper length is fed, release the buttonso that paper will be cut automatical-ly.
6. Roll holderAdjust this to the size of the paper rollyou are using. See p.115 “Changingthe Paper Size”.
ZEDH340J
1
2
3
4
2
5
6
DolphinC2_EN_zentai_F_pre_FM.book Page 21 Friday, February 25, 2005 7:09 PM
Getting Started
22
1
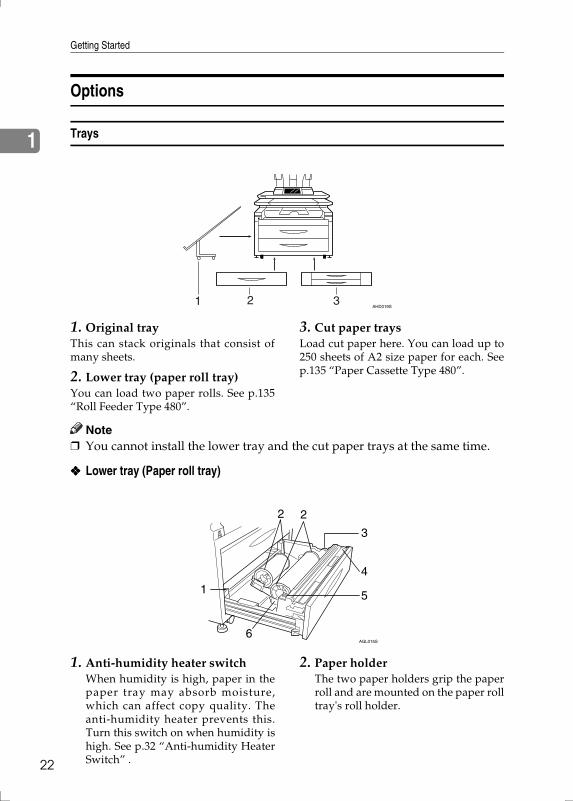
Options
Trays
1. Original trayThis can stack originals that consist ofmany sheets.
2. Lower tray (paper roll tray)You can load two paper rolls. See p.135“Roll Feeder Type 480”.
3. Cut paper traysLoad cut paper here. You can load up to250 sheets of A2 size paper for each. Seep.135 “Paper Cassette Type 480”.
Note❒ You cannot install the lower tray and the cut paper trays at the same time.
❖❖❖❖ Lower tray (Paper roll tray)
1. Anti-humidity heater switchWhen humidity is high, paper in thepaper tray may absorb moisture,which can affect copy quality. Theanti-humidity heater prevents this.Turn this switch on when humidity ishigh. See p.32 “Anti-humidity HeaterSwitch” .
2. Paper holderThe two paper holders grip the paperroll and are mounted on the paper rolltray's roll holder.
AHD019S
AGL015S
DolphinC2_EN_zentai_F_pre_FM.book Page 22 Friday, February 25, 2005 7:09 PM

Guide to Components
23
1
3. Paper feed knobUse when loading paper rolls or clear-ing paper jams. See p.105 “LoadingPaper” and p.110 “xClearing Mis-feeds”.
4. Cutter knobUse to manually cut paper if there arepaper jams in the cutter area of themachine. Always return the cutterknob to the left or right end.
5. Auto feed buttonUse this to clear misfeeds in the paperfeed area. Keep this button pressed tofeed the roll paper continuously.When approximately 100 mm, 3.9" ofpaper length is fed, release the buttonso that paper will be cut automatical-ly.
6. Roll holderAdjust this to the size of the paper rollyou are using. See p.115 “Changingthe Paper Size”.
❖❖❖❖ Cut paper trays
1. Back fenceAdjust to the paper length.
2. Anti-humidity heater switchWhen humidity is high, paper in thepaper tray may absorb moisture,which can affect copy quality. Theanti-humidity heater prevents this.Turn this switch on when humidity ishigh. See p.32 “Anti-humidity HeaterSwitch” .
3. Side guide pocketUse the side guide inside here to aligntranslucent paper. Keep coveredwhen not in use.
4. Side leverUse to fix the position of the side fenc-es.
5. Side fencesAdjust to the paper width.
AHD020S
DolphinC2_EN_zentai_F_pre_FM.book Page 23 Friday, February 25, 2005 7:09 PM

Getting Started
24
1
Other Options
❖❖❖❖ Printer unitAllows you to use the printer function.
❖❖❖❖ Scanner unitAllows you to use the scanner function.You can install either Type 480 or RW480 scanner unit.
❖❖❖❖ IEEE 802.11 Wireless LAN board (option of Scanner Unit Type 480) *1
You can install a wireless LAN interface.
❖❖❖❖ IEEE 1394 interface board (option of Scanner Unit Type 480) *1
Connects to an IEEE 1394 cable.
❖❖❖❖ DataOverwriteSecurity UnitAllows you to erase data on the hard disk.
❖❖❖❖ Carrier sheetUse to load bent, folded, creased, thin or pasted originals. See “Setting theCarrier Sheet”, Copy Reference.
❖❖❖❖ Paper holderUse to set a paper roll in the paper roll tray's roll holder.This is useful to change quickly to a different size paper roll from the paperholder.
*1 You cannot install both of the options at the same time below:IEEE 1394 interface board, and IEEE 802.11 Wireless LAN board.
ZEDP020J
ZEDP030J
DolphinC2_EN_zentai_F_pre_FM.book Page 24 Friday, February 25, 2005 7:09 PM

Control Panel
25
1
Control Panel
This illustration shows the control panel of a machine that has all options fullyinstalled.
1. Screen contrast knobAdjusts the brightness of the screen.
2. IndicatorsShow errors or machine status.
• m: Data In indicator • L: Service Call indicator• x: Misfeed indicator. See p.110
“xClearing Misfeeds”.• M: Open Cover indicator• D: Add Toner indicator. See p.108
“DAdding Toner”.
3. {{{{User Tools/Counter}}}}• Press to change default settings and
operating conditions to your require-ments. See p.51 “User Tools (SystemSettings)”.
• CounterPress to check or print the counter val-ue. For details, see p.127 “Counter”.
4. {{{{Job List}}}} keyShows the job list. See p.33 “Job List”.
5. Display panelShows operation status, error messages,and function menus.
6. {{{{Check Modes}}}} keyPress to check the entered copying set-tings.
7. {{{{Program}}}} key (copier mode)Press to store or select the programmode. See “Programs”, Copy Reference.
8. {{{{Clear Modes}}}} keyPress to clear a setting's contents. Thenumber of copies is cleared when youpress and hold down this key for threeseconds.
9. {{{{Energy Saver}}}}key Press to switch to and from the EnergySaver mode. For details, see p.31 “EnergySaver mode”.
10. {{{{Interrupt}}}} keyPress to make interrupt copies duringcopying or printing. See “InterruptCopy”, Copy Reference.
11. Main power indicator and OnindicatorThe main power indicator lights whenthe main power switch is turned on. TheOn indicator lights when the operationswitch is on.
Important❒ Do not turn off the main power
switch while On indicator is lit.Doing so may damage the harddisk.
AHD100S
DolphinC2_EN_zentai_F_pre_FM.book Page 25 Friday, February 25, 2005 7:09 PM

Getting Started
26
1
12. Operation switchPress to turn the power on (the On indi-cator goes on). To turn the power off,press it again (the On indicator goes off).
13. {{{{Sample Copy}}}} keyPress to make a single sample copy be-fore starting a long copy run. By checkingthe sample copy and making any neces-sary changes to the image quality settingsbefore you make multiple copies, you cansave time and paper. See “Sample Copy”,Copy Reference.
14. {{{{Start}}}} keyPress to start copying or scanning. Pressto start scanning and printing in Docu-ment Server mode.
15. {{{{Clear/Stop}}}} key• Clear
Press to clear a number entered.• Stop
Press to stop a copy job in progress.Press to stop scanning and printing inDocument Server mode.
16. {{{{#}}}} keyPress to confirm values entered.
17. Number keysPress to enter a value, such as the numberof copies.
18. Function keysPress to select the following functions:
• Copy• Document Server• Scanner
19. Function Status indicatorThese show the status of the above func-tions:
• Yellow: selected• Green: active• Red: interrupted
Display Panel
The display panel shows machine status, error messages, and function menus.The function items displayed serve as selector keys. You can select or specify anitem by lightly pressing them.When you select or specify an item on the display panel, it is highlighted like
. Keys appearing as cannot be used.
Important❒ A force or impact of more than 30 N (about 3 kgf) will damage the display
panel.The copying screen is displayed as default when the power is turned on.
❖❖❖❖ When the lower tray (paper roll) is installed
DolphinC2_EN_zentai_F_pre_FM.book Page 26 Friday, February 25, 2005 7:09 PM

Control Panel
27
1
❖❖❖❖ When the cut paper trays are installed
Common Key Operations
The following keys are common to all screens:
❖❖❖❖ Key list
When the Authentication Screen is displayed
When Basic Authentication, Windows Authentication, or LDAP Authenticationis set, the authentication screen is displayed. Unless a valid user name and pass-word are entered, operations are not possible with the machine.
Note❒ Consult the User Administrator about your login user name and login pass-
word. For details of the various types of user authentication, consult the re-spective administrators.
❒ When User Code Authentication is set, the screen for entering a user code isdisplayed instead.
AAAA Press [Enter] for Login User Name.
[OK] Acknowledges a selected function or entered values, and then returns to the previous display.
[Cancel] Deletes a selected function or entered values, and then returns to the previous display.
[UUUUPrev.] [TTTTNext] Moves to the previous or next display when all items cannot be shown on the display at once.
[OK] [Yes] Closes displayed messages.
[Clear] Clears entered values and does not change the settings.
[Exit] Returns to the previous display.
DolphinC2_EN_zentai_F_pre_FM.book Page 27 Friday, February 25, 2005 7:09 PM

Getting Started
28
1
BBBB Enter a login user name, and then press [OK].
CCCC Press [Enter] for Login Password.
DDDD Enter a login password, and then press [OK].
EEEE Press [Login].When the user is authenticated, the screen for the function you are using ap-pears.
Note❒ If authentication fails, “Authentication has failed” appears. Check
the login user name and password.
ReferenceIf the user code information has been specified, a different screen appears.For details, see p.76 “Registering User Codes”.
Log Off
Important❒ To prevent unauthorized users from using the machine, always log off when
you have finished using the machine.
AAAA Press {{{{User Tools /Counter}}}}.
BBBB Press [Logout].
CCCC Press [Yes].
DDDD Press {{{{User Tools /Counter}}}}.
AHD101S
DolphinC2_EN_zentai_F_pre_FM.book Page 28 Friday, February 25, 2005 7:09 PM
Turning On the Power
29
1
Turning On the Power
This machine has two power switches:
❖❖❖❖ Operation switch (right side of thecontrol panel)Press to activate the machine.When the machine finishes warm-ing up, you can make copies.
❖❖❖❖ Main power switch (left side of the ma-chine)Turning off this switch makes themain power indicator on the rightside of the control panel go off.When this is done, machine poweris completely off.
Note❒ This machine automatically enters
Energy Saver mode, Low powermode, or turns itself off if you donot use it for a certain amount oftime when the main power switchis on. See p.63 “Auto Off Timer”,p.64 “Energy Saver” and p.64“Panel Off Timer”.
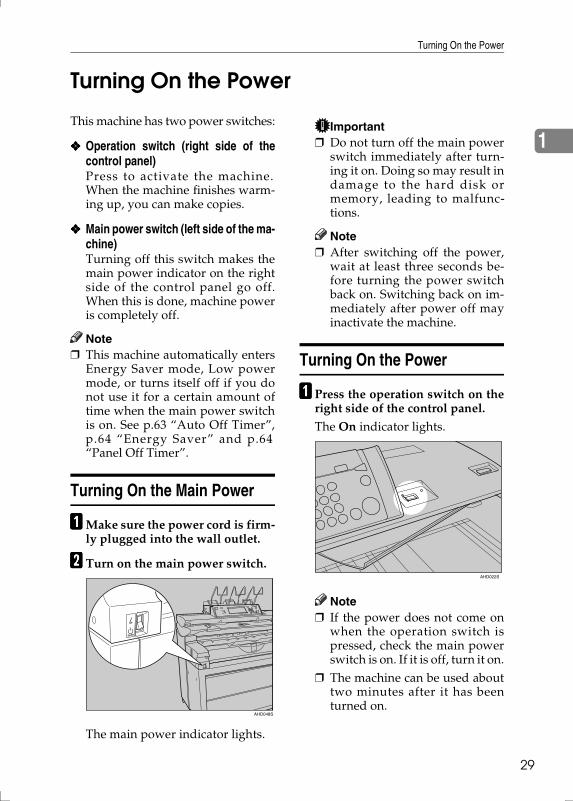
Turning On the Main Power
AAAA Make sure the power cord is firm-ly plugged into the wall outlet.
BBBB Turn on the main power switch.
The main power indicator lights.
Important❒ Do not turn off the main power
switch immediately after turn-ing it on. Doing so may result indamage to the hard disk ormemory, leading to malfunc-tions.
Note❒ After switching off the power,
wait at least three seconds be-fore turning the power switchback on. Switching back on im-mediately after power off mayinactivate the machine.
Turning On the Power
AAAA Press the operation switch on theright side of the control panel.
The On indicator lights.
Note❒ If the power does not come on
when the operation switch ispressed, check the main powerswitch is on. If it is off, turn it on.
❒ The machine can be used abouttwo minutes after it has beenturned on.
AHD048S
AHD022S
DolphinC2_EN_zentai_F_pre_FM.book Page 29 Friday, February 25, 2005 7:09 PM
Getting Started
30
1
❒ Immediately after the machineis turned on, or if the tempera-ture is low, or if making a lot ofcontinuous copies (more than30 sheets/A0(E) size), the con-tinuous copy speed may be re-duced to ensure the toner fusesto the paper.
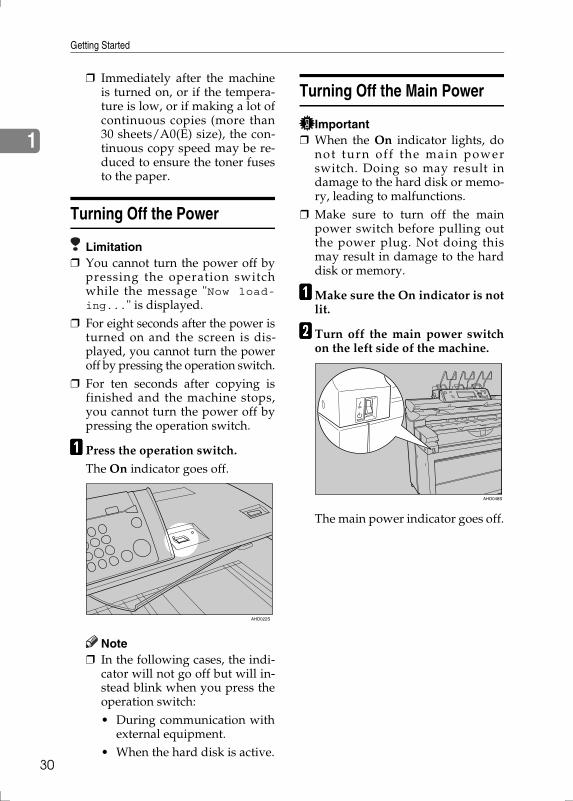
Turning Off the Power
Limitation❒ You cannot turn the power off by
pressing the operation switchwhile the message "Now load-ing..." is displayed.
❒ For eight seconds after the power isturned on and the screen is dis-played, you cannot turn the poweroff by pressing the operation switch.
❒ For ten seconds after copying isfinished and the machine stops,you cannot turn the power off bypressing the operation switch.
AAAA Press the operation switch.
The On indicator goes off.
Note❒ In the following cases, the indi-
cator will not go off but will in-stead blink when you press theoperation switch:• During communication with
external equipment.• When the hard disk is active.
Turning Off the Main Power
Important❒ When the On indicator lights, do
not turn off the main powerswitch. Doing so may result indamage to the hard disk or memo-ry, leading to malfunctions.
❒ Make sure to turn off the mainpower switch before pulling outthe power plug. Not doing thismay result in damage to the harddisk or memory.
AAAA Make sure the On indicator is notlit.
BBBB Turn off the main power switchon the left side of the machine.
The main power indicator goes off.
AHD022S
AHD048S
DolphinC2_EN_zentai_F_pre_FM.book Page 30 Friday, February 25, 2005 7:09 PM

Turning On the Power
31
1
Saving Energy
----Energy Saver modeIf you do not use the machine for acertain period (default: 60 seconds)after an operation, or when you pressthe {{{{Energy Saver}}}} key, the displaydisappears and the machine goes intoEnergy Saver mode. When you pressthe {{{{Energy Saver}}}} key again, the ma-chine returns to standby. The ma-chine uses less electricity in EnergySaver mode.
Note❒ You can change the amount of time
the machine waits before switch-ing to Energy Saver mode aftercopying finishes or the last opera-tion is performed. See p.64 “PanelOff Timer”.
----Low power modeIf you do not use the machine for acertain period (default: 15 minutes), itautomatically lowers its power con-sumption. When you press the {{{{Ener-gy Saver}}}} key, the machine returns tostandby.
Note❒ You can change the Low power
mode. See p.64 “Energy Saver”.
----Auto Off modeIf you do not use the machine for acertain period (default: 60 minutes), itautomatically turns itself off. Thisfunction is called “Auto Off”. Whenyou press the operation switch, themachine returns to standby.
Note❒ You can change the Auto Off
mode. See p.63 “Auto Off Timer”.❒ Specify whether or not to use the
Auto Off Timer function. See p.70“AOF (Always On)”.
❒ The Auto Off Timer function willnot operate in the following cases:• When a warning message appears.• When the service call indicator is lit.• When paper is jammed.• When the cover is open.• When the “Add toner” message
appears.• When toner is being replenished.• When the User Tools screen is
displayed.• When fixed warm-up is in progress.• When the scanner, or other
functions are active.• When operations are suspend-
ed during printing.• When the Data In indicator is on
or blinking.• When the sample print display
appears.• If copying is interrupted.• During copying (if only one
original is inserted when usingFormat Overlay).
• During copying (if all paper inthe paper bypass has not beencopied).
DolphinC2_EN_zentai_F_pre_FM.book Page 31 Friday, February 25, 2005 7:09 PM

Getting Started
32
1
Anti-humidity Heater Switch
During winter or humid periodswhen there can be sudden changes intemperature, the paper in the paperroll tray, or the cut paper tray can ab-sorb moisture. This may cause copyquality to deteriorate.To prevent this, the machine has abuilt-in anti-humidity heater.There is a switch for the anti-humidi-ty heater in the left side of papertrays. Turn this switch on if the hu-midity level becomes high and copyquality is affected. Turn the switch offat other times. See p.142 “Handlingpaper”.
❖❖❖❖ Upper tray and lower tray (paper roll trays)
❖❖❖❖ Cut paper trays
ZEDH120J
AGL017S
DolphinC2_EN_zentai_F_pre_FM.book Page 32 Friday, February 25, 2005 7:09 PM

33
2. Combined FunctionOperations
Switching between Functions
You can use this machine not only as a copier, but also as a printer or scanner.The default setting is to display the screen for copying when you turn the poweron. You can change the setting. For details about settings, see p.56 “Function Pri-ority”.
Note❒ Depending on the options you have installed, you may not be able to switch
to some functions.
Limitation❒ You cannot switch functions in the following circumstances:
• While copying.• While adjusting system settings.• While the machine is warming up.• When the machine has been turned off automatically.
----System ResetThe machine returns automatically to its initial condition when the job is fin-ished, after a certain period of time has elapsed. This function is called "SystemReset".
Note❒ You can change the System Reset time. See p.64 “System Auto Reset”.
Job List
You can check the contents of jobs in printing as well as those waiting in order,and also delete them.
Note❒ In the Job List, jobs reserved using Copy mode and Document Server mode
are displayed. When [Print Priority] in the System Settings is set to [Job Order],jobs reserved using Copy mode, Document Server mode or Netfile mode aredisplayed.
❒ For details on printing in the Netfile mode, see the manuals for DeskTopBind-er Professional/Lite.
DolphinC2_EN_zentai_F_pre_FM.book Page 33 Friday, February 25, 2005 7:09 PM

Combined Function Operations
34
2
Checking the Job List
AAAA Press the {{{{Job List}}}} key.
BBBB Select the job number of the list you want to check.
The job list is displayed.The icons below show the operation mode of stored documents.
Note❒ If more than six jobs are registered, press the [UUUUPrev.] or [TTTTNext] to scroll
down the screen.
CCCC Press [Detail].
DDDD Check the contents of the list.
EEEE Press [OK].The display returns to the job list menu.
Job printed using Copier mode.
Job printed using Document Server mode.
Job printed using Netfile mode.
AHD102S
DolphinC2_EN_zentai_F_pre_FM.book Page 34 Friday, February 25, 2005 7:09 PM

Switching between Functions
35
2
Deleting Jobs
Note❒ If you are unable to delete the job, contact the administrator.
AAAA Press the {{{{Job List}}}} key.
BBBB Select the job number to be deleted.
CCCC Press [Delete Job].
DDDD Press [Yes].The display returns to the job list menu.
AHD102S
DolphinC2_EN_zentai_F_pre_FM.book Page 35 Friday, February 25, 2005 7:09 PM

Combined Function Operations
36
2
Multi-Access
You can carry out another job using a different function while the current job isbeing performed. Performing multiple functions simultaneously in this manneris called “Multi-Access”.This allows you to handle your jobs efficiently, regardless of how the machine isbeing used. For example, while making copies, you can scan documents to storein the Document Server.
Note❒ See p.56 “Function Priority” to set function priority. By default, the [Display
Mode] is set to first priority.
----Function CompatibilityThe chart below shows sample operations when “Print Priority” is set to “Inter-leave”. See p.56 “Print Priority”.|: Simultaneous operations are possible.$: Operation is enabled when the relevant function key is pressed and remoteswitching (of the scanner) is done.❍: Operation is enabled when the {{{{Interrupt}}}} key is pressed to interrupt the pre-ceding operation.→: Operation is performed automatically once the preceding operation ends.×: The operation must be started once the preceding operation ends. (Simulta-neous operations are not available.)
DolphinC2_EN_zentai_F_pre_FM.book Page 36 Friday, February 25, 2005 7:09 PM

Multi-Access
37
2
Function you want to select
Cop
y
Inte
rru
pt C
opyi
ng
Sca
nn
er
Doc
um
ent S
erve
r
Des
kTop
Bind
er P
rofe
ssio
nal/L
ite
Web
Doc
um
ent S
erve
r
Function in progress Op
erat
ion
s fo
r C
opyi
ng
Sor
t
Op
erat
ion
s fo
r C
opyi
ng
Cop
yin
g
Op
erat
ion
s fo
r S
can
nin
g
Sca
nn
ing
Op
erat
ion
s fo
r D
ocu
men
t Ser
ver
Scan
ning
a D
ocum
ent t
o St
ore
in D
ocum
ent S
erve
r
Pri
nti
ng
from
Doc
um
ent S
erve
r
Pri
nti
ng
from
Doc
um
ent S
erve
r
Pri
nti
ng
Cop
y Operations for Copying × × ❍ ❍ $ $ $ $ *5 $ | |
Sort | *1 → *1 ❍ ❍ $ $ *2 $ $ *2 | | |
Inte
rrup
t C
opyi
ng
Operations for Copying ❍ ❍ × × × × × × × | |
Copying ❍ ❍ × × × × × × × → →
Scan
ner Operations for Scanning $ $ ❍ ❍ × × $ $ $ | |
Scanning × × × × × × × × | | |
Doc
umen
t Se
rver
Operations for Document Server
$ $ ❍ ❍ $ $ × × × | |
Scanning a Document to Store in Document Server
$ *4 × ❍ ❍ $ × × × × | |
Printing from Document Server
$ | ❍ ❍ | | | *3 | *3 | *3 | |
Des
kTop
Bin
der
Pr
ofes
sion
al/L
ite Printing from Document
Server| | | | | | | | | | |
Web
Doc
umen
t Se
rver
Printing | | | | | | | | | | |
DolphinC2_EN_zentai_F_pre_FM.book Page 37 Friday, February 25, 2005 7:09 PM

Combined Function Operations
38
2
*1 Simultaneous operations are only available after the preceding job documents are allscanned and [New Job] appears.
*2 You can scan a document after the preceding job documents are all scanned.*3 Simultaneous operations are possible once you press [New Job].*4 Depending on the scanner type installed, you may not be able to make copies while
the scanner is scanning data to store into the Document Server.*5 Depending on the scanner type installed, you may not be able to scan and store data
into the Document Server when copying is in progress.
Note❒ When using paper of A0(E) or above size, operations shown in the table above
may not be enabled.❒ While printing is in progress, scanning a document using another function
may take more time.
DolphinC2_EN_zentai_F_pre_FM.book Page 38 Friday, February 25, 2005 7:09 PM

39
3. Document Server
Relationship between Document Server and Other Functions
The following table describes the relationship between the Document Serverand other machine functions.
*1 Depending on the scanner type installed, functions of Document Server may not beavailable.
*2 You can display stored documents using the scanner function. See "Displaying theList of Stored Files", Scanner Reference.
*3 You can send stored documents using the scanner function. See "Sending Stored Filesby E-mail or Scan to Folder, or Delivering", Scanner Reference.
Function nameWhere to store
documentsDisplaying a list
Printing stored documents
Sending docu-ments
CopyCopy/Docu-ment Server
Available Enabled Not Available
Scanner *1 Scanner Not available *2 Disabled Available *3
DolphinC2_EN_zentai_F_pre_FM.book Page 39 Friday, February 25, 2005 7:09 PM
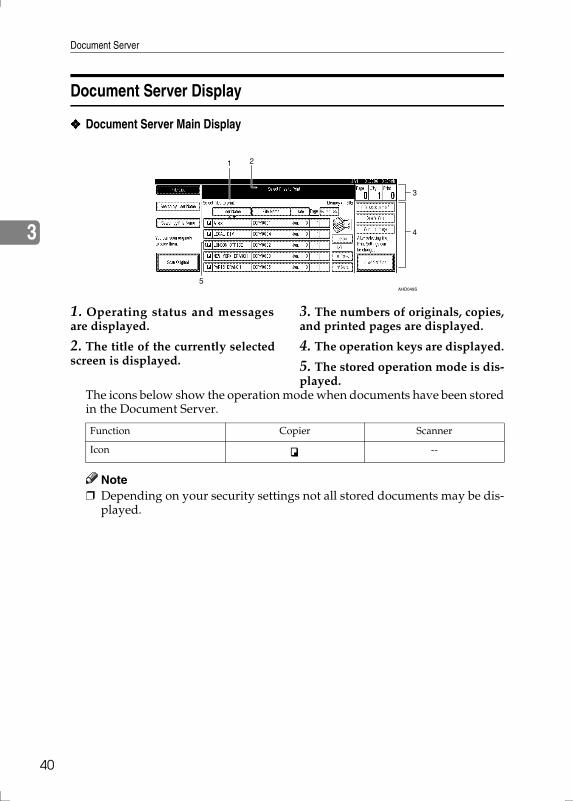
Document Server
40
3
Document Server Display
❖❖❖❖ Document Server Main Display
1. Operating status and messagesare displayed.
2. The title of the currently selectedscreen is displayed.
3. The numbers of originals, copies,and printed pages are displayed.
4. The operation keys are displayed.
5. The stored operation mode is dis-played.
The icons below show the operation mode when documents have been storedin the Document Server.
Note❒ Depending on your security settings not all stored documents may be dis-
played.
AHD049S
Function Copier Scanner
Icon --
DolphinC2_EN_zentai_F_pre_FM.book Page 40 Friday, February 25, 2005 7:09 PM

Using the Document Server
41
3
Using the Document Server
Storing Data
❖❖❖❖ File NameStored documents will automati-cally be named as “COPY0001”,“COPY0002”. You can change as-signed file names.
❖❖❖❖ User NameYou can register a user name todistinguish the user or user groupthat stored the documents. To reg-ister, you can either enter a nameor use the one assigned to the usercode.
ReferenceFor more information about theuser name, see p.74 “Register-ing Names”.
❖❖❖❖ PasswordYou can set a password for storeddocuments, and use it to preventothers printing them. When a pass-word is set for the documents,
mark appears next to the docu-ments.
ReferenceTo store documents in a mode oth-er than Document Server, see themanuals for the respective modes.
Important❒ Data stored in the machine might
be lost if some kind of failure oc-curs. The supplier shall not be re-sponsible for any damage thatmight result from the loss of data.
❒ Be careful not to let anyone knowyour password, especially whenentering a password or recordingit. Keep any record of your pass-word in a secure place.
❒ Avoid using a single number orconsecutive numbers for a pass-word such as “0000” or “1234”,since the numbers like this are easyto guess, so using them will notprovide a worthwhile level of se-curity.
❒ A document accessed with a cor-rect password remains selectedeven after operations are complete,and it can be accessed by other us-ers. To stop this, be sure to pressthe {{{{Clear Modes}}}} key to cancel thedocument selection.
❒ The user name used when addinga document to the Document Serv-er is to identify the document cre-ator and type. It is not to protectconfidential documents from oth-ers.
Note❒ Enter a four- to eight-digit pass-
word. ❒ By default, data stored in the Doc-
ument Server is deleted after threedays (72 hours). You can specifythe time taken for the stored datato be deleted automatically. Seep.70 “Auto Delete File”.
❒ If you do not want stored data tobe automatically deleted, select[No] in Auto Delete File before stor-ing a document. If you select [Yes]later, data stored afterward will beautomatically deleted.
❒ When the machine is printing adocument stored using the copierfunction, wait until printing hasfinished before you store a docu-ment in the Document Server.
❒ Before scanning documents usingthe scanner function, make sure allother operations have finished.
DolphinC2_EN_zentai_F_pre_FM.book Page 41 Friday, February 25, 2005 7:09 PM

Document Server
42
3
AAAA Press the {{{{Document Server}}}} key.
BBBB Press [Scan Original].
CCCC Enter a file name, user name, orpassword if necessary.
Note❒ If you do not enter a file name,
one will be automatically as-signed.
DDDD Place your originals.
ReferenceFor information on the types oforiginals and how to placethem, see “Placing Originals”,Copy Reference.
EEEE Make settings as desired.
ReferenceFor details, see Copy Reference.
FFFF Press the {{{{Start}}}} key.
The document is stored in the Doc-ument Server.
Note❒ To stop scanning, press the
{{{{Clear/Stop}}}} key. To resume apaused scanning job, press [Con-tinue] in the confirmation dialogbox. To delete stored imagesand cancel the job, press [Stop].
❒ When a password has been set, mark appears on the left side
of the file name.❒ The Select Files to Print display
appears when all the originalshave been scanned. If it is notdisplayed, press [Scanning Fin-ished].
To register or change a user name
AAAA Press [Scan Original].
The Scan Original display appears.
BBBB Press [User Name].
If user names have already beenregistered, the Change User Namedisplay appears. To use an unreg-istered user name, press [Non-pro-grammed Name].If no names are registered in theAddress Book, the User Name en-try display appears.
Referencep.74 “Registering Names”.
AHD103S
DolphinC2_EN_zentai_F_pre_FM.book Page 42 Friday, February 25, 2005 7:09 PM

Using the Document Server
43
3
When using a name registered in the Address Book
A Select a name from the list, andthen press [OK].
To change to an unregistereduser name, proceed to the nextstep.
When using an unregistered user name
A Press [Non-programmed Name].
B Enter a new user name, andthen press [OK].
Referencep.129 “Entering Text”.
When no names are registered in the Address Book
A Enter a new user name, andthen press [OK].
Referencep.129 “Entering Text”.
To change a file name
AAAA Press [Scan Original].
The Scan Original display appears.
BBBB Press [File Name].
The Change File Name display ap-pears.
CCCC Press [Delete All] to delete the oldfile name.
Note❒ You can also use [Backspace] to
delete unwanted characters.
DDDD Enter a new file name, and thenpress [OK].
Note❒ Up to 20 characters can be en-
tered as a file name, but only 16characters of each file name willbe displayed in the documentlist.
Referencep.129 “Entering Text”.
To set or change a password
AAAA Press [Scan Original].
The Scan Original display appears.
BBBB Press [Password].
DolphinC2_EN_zentai_F_pre_FM.book Page 43 Friday, February 25, 2005 7:09 PM

Document Server
44
3
CCCC Enter a four- to eight-digit pass-word using the number keys, andthen press the {{{{#}}}} key.
DDDD Reenter the password (four- toeight- digits) for verification, andthen press the {{{{#}}}} key.
EEEE Press [OK].
Changing a Stored Document's File Name, User Name, or Password
AAAA Press the {{{{Document Server}}}} key.
BBBB Select the document with the username, file name, or password youwant to change.
Note❒ If a password has been set for
the document, enter the pass-word and press [OK].
CCCC Press [File Management].
DDDD Press [Change File Name], [ChangeUser Name], or [Change Password].
EEEE Enter the new file name, user name,or password, and then press [OK].
Referencep.42 “To register or change auser name”.p.43 “To change a file name”.
p.43 “To set or change a pass-word”.
FFFF Press [OK].
Searching for Stored Documents
You can use either [Search by FileName] or [Search by User Name] tosearch for documents stored in theDocument Server. You can also liststored documents in your order ofpreference.
Note❒ If you install DeskTopBinder Pro-
fessional or DeskTopBinder Liteon your computer, you can searchand rearrange the documents fromyour computer.
ReferenceManuals for DeskTopBinder Pro-fessional/Lite or Help
To Search by File Name
AAAA Press the {{{{Document Server}}}} key.
BBBB Press [Search by File Name].
CCCC Enter the file name, and then press[OK].
Files beginning with the name en-tered appear in the Select Files toPrint display.
Referencep.129 “Entering Text”.
DolphinC2_EN_zentai_F_pre_FM.book Page 44 Friday, February 25, 2005 7:09 PM

Using the Document Server
45
3
Note❒ To display all files stored in the
Document Server, press [FileList].
To Search by User Name
AAAA Press the {{{{Document Server}}}} key.
BBBB Press [Search by User Name].
CCCC To specify a registered user name,select the user name from the dis-played list, and then press [OK].
Note❒ To specify an unregistered user
name, go to the next step.
DDDD To specify an unregistered username, press [Non-programmedName]. Enter the name, and thenpress [OK].
Referencep.129 “Entering Text”.
EEEE Press [OK].
Files beginning with the name en-tered appear in the Select Files toPrint display.
Note❒ To display all files stored in the
Document Server, press [FileList].
To Check Details of Stored Documents
AAAA Select the document.
Note❒ If a password has been set for
the document, enter the pass-word, and then press [OK] or the{{{{#}}}} key.
BBBB Press [Detail].
Detailed information about thedocument is displayed.
Note❒ If you have selected several doc-
uments, use [UUUU] and [TTTT] to viewthe details of each.
❒ Press [OK]. The Select Files toPrint display appears.
Printing Stored Documents
AAAA Select the document to be printed.
Note❒ If a password has been set for
the document, enter the pass-word and then press [OK] or the{{{{#}}}} key.
❒ You can search for a documentusing [Search by User Name] or[Search by File Name]. See p.44“Searching for Stored Docu-ments”.
❒ You can sort document namesin the list by user name, filename or date. To sort docu-ments, press [User Name], [FileName] or [Date].
DolphinC2_EN_zentai_F_pre_FM.book Page 45 Friday, February 25, 2005 7:09 PM

Document Server
46
3
❒ If you cannot determine thecontents of a document by itsfile name, you can print only thefirst page of the document forchecking purposes. See p.48“Printing the First Page”.
❒ To cancel a selection, press thehighlighted document again.
BBBB To print multiple documents, re-peat step AAAA in the order that youwant to print.
Note❒ You can select up to 30 docu-
ments.❒ If sizes or resolutions of selected
documents are not the same, thedocuments may not be printed.
❒ If you wish to change the orderfor printing, cancel the selec-tion, and reselect in the desiredorder.
❒ If you press the {{{{Clear Modes}}}}key, selection of all documentswill be canceled.
❒ If you press [Printg Odr], the doc-uments will be displayed in theorder of printing.
CCCC If you need to change the printsettings, press [Print Settings].The Print Settings display appears,and user names, file names andprinting order of the documentsare shown.
Note❒ The print settings made for print-
ing in copier mode remain effec-t ive after printing and areapplied to the next job.
❒ When multiple documents areselected, print settings made forthe first document will be effec-tive for only that document, andnot the subsequent ones.
❒ Print setting items are listed be-low. For details about the printresults, see Copy Reference.• Auto Image Density• Auto Reduce/Enlarge• Preset Reduce/Enlarge• Zoom• Fine Magnification• Stamp• Adjust Print Position• Copy Output Locations
❒ When multiple documents areprinted at the same time, youcan combine them into a singleset by adjusting the print order.
❒ When multiple documents areprinted at the same time, printsettings made for the first docu-ment will apply to all the subse-quent ones.
❒ If you select multiple files, youcan confirm file names or printorder you selected in step A byscrolling through the list with[TTTT] and [UUUU].
❒ Press [Select File] to return to theSelect Files to Print display.
DDDD Enter the required number of cop-ies using the number keys.
Note❒ Up to 99 can be entered.
DolphinC2_EN_zentai_F_pre_FM.book Page 46 Friday, February 25, 2005 7:09 PM

Using the Document Server
47
3
EEEE Press the {{{{Start}}}} key.
The machine starts printing.
To stop printing
A Press the {{{{Clear/Stop}}}} key.
B Press [Stop].
To change the number of copies during printing
Limitation❒ The number of copies can only
be changed when the Sort func-tion is selected in print settings.
A Press the {{{{Clear/Stop}}}} key.
B Press [Change Quantity].C Use the number keys to enter a
new number of copies.
D Press the {{{{#}}}} key.
E Press [Continue].Printing restarts.
Sample Copy
If you are printing multiple sets, youcan check if the print settings or sort-ing order is correct by first printingout a sample set.
PreparationSelect [Press Start Key] in the FeedStart Method under System Set-tings. You cannot make samplecopy if [Auto] is selected. See p.58“Feed Start Method”.
Limitation❒ This function can be used only
when the Sort function is selected.
AAAA Select the document to be printed.
Note❒ If a password has been set for
the document, enter the pass-word and then press [OK] or the{{{{#}}}} key.
❒ You can search for a documentusing [Search by User Name] or[Search by File Name]. See p.44“Searching for Stored Docu-ments”.
❒ You can sort document namesin the list by user name, filename, or date. To do so, press[User Name], [File Name] or [Date].
❒ To cancel a selection, press thehighlighted document again.
BBBB Press the {{{{Sample Copy}}}} key.
The first set is printed.
CCCC To print the remaining sets, press[Print].
Note❒ To change the settings, press
[Suspend] to return to the PrintSettings menu.
AHD104S
DolphinC2_EN_zentai_F_pre_FM.book Page 47 Friday, February 25, 2005 7:09 PM

Document Server
48
3
Printing the First Page
You can print the first page of a docu-ment selected in the Select Files toPrint display to check its contents.If more than one document is select-ed, the first page of each is printed.
AAAA Select the document.
Note❒ If a password has been set for
the document, enter the pass-word and then press [OK] or the{{{{#}}}} key.
Note❒ You can search for a document
using [Search by User Name] or[Search by File Name]. See p.44“Searching for Stored Docu-ments”.
❒ You can sort document namesin the list by user name, filename, or date. To do so, press[User Name], [File Name], or[Date].
❒ To cancel a selection, press thehighlighted document again.
BBBB Press [Print 1st Page].
CCCC Press the {{{{Start}}}} key.
Deleting Stored Documents
Important❒ You can store up to 3,000 documents
in the Document Server. No moredocuments can be stored when thelimit is reached, and you should de-lete unnecessary documents.
Note❒ You can delete all stored docu-
ments at once with User Tools. Seep.70 “Delete All Files”.
❒ You can also delete documents via aWeb browser from a computer in thenetwork. For details on how to startthe Web browser, see Network Guide.
AAAA Press the {{{{Document Server}}}} key.
BBBB Select the document.
Note❒ If a password has been set for
the document, enter the pass-word and then press [OK] or the{{{{#}}}} key.
Note❒ You can delete multiple docu-
ments at once.❒ You can search for a document
using [Search by User Name] or[Search by File Name]. See p.44“Searching for Stored Docu-ments”.
❒ You can sort document namesin the list by user name, filename, or date. To do so, press[User Name], [File Name] or [Date].
❒ If you cannot determine thedocument by its name, you canprint the first page to check itscontents. See p.48 “Printing theFirst Page”.
❒ To cancel a selection, press thehighlighted document again.
DolphinC2_EN_zentai_F_pre_FM.book Page 48 Friday, February 25, 2005 7:09 PM

Using the Document Server
49
3
CCCC Press [Delete File].
DDDD Press [Delete] to delete the docu-ment.
Viewing Stored Documents Using a Web Browser
Note❒ The optional scanner unit (Type
480) is required to use this func-tion.
ReferenceThe Web browser's Help
AAAA Start a Web browser.
BBBB Enter “http:// (IP address of thismachine) /” in the [Address] box.
The top page appears on the Webbrowser.
CCCC Click [Document Server].The “Document Server File List”appears.
Note❒ To switch the display format,
click [Details], [Thumbnails] or[Icons] from the [Display method]list.
DDDD Click the properties button of thedocument you want to check.
Information about that documentappears.
EEEE Check the contents of the docu-ment.
Note❒ To enlarge the document pre-
view, click [Enlarge Image].
Downloading Stored Documents
Note❒ The optional scanner unit (Type
480) is required to use this func-tion.
AAAA Start a Web browser.
BBBB Enter “http:// (IP address of thismachine) /” in the [Address] box.
The top page appears on the Webbrowser.
CCCC Click [Document Server].
The “Document Server File List”appears.
Note❒ To switch the display format,
click [Details], [Thumbnails] or[Icons] from the [Display method]list.
DDDD Click the properties button of thedocument you want to download.
EEEE Select [PDF], [JPEG], or [Multi-pageTIFF] in the [File Format] list.
Note❒ [JPEG] can only be selected for
documents stored in scannermode.
❒ [Multi-page TIFF] cannot be select-ed for documents stored incopier mode.
FFFF Click [Download].
GGGG Click [OK].
DolphinC2_EN_zentai_F_pre_FM.book Page 49 Friday, February 25, 2005 7:09 PM

Document Server
50
3
Settings for the Document Server
❖❖❖❖ System Settings (See p.51 “User Tools (System Settings)”.)
Items Default settings
General Features Warm Up Notice On
Copy Count Display Up
Paper Output Exit: Document Server
Front
Tray Paper Settings Paper Tray Priority: Copier Tray 1
Timer Settings Copier / Document Server Auto Reset Timer
On, 60 seconds
Administrator Tools Auto Delete File Yes, After 3 day(s)
Delete All Files --
DolphinC2_EN_zentai_F_pre_FM.book Page 50 Friday, February 25, 2005 7:09 PM

51
4. User Tools (System Settings)
User Tools Menu (System Settings)
Note❒ Depending on the options installed, not all items listed below may be displayed.
ReferenceFor details about Interface Settings and File Transfer, see “Setting Up the Ma-chine on a Network”, Network Guide.To register addresses and users, specify them under Address Book Manage-ment. See p.71 “Address Book”.
❖❖❖❖ General Features (see p.56 “General Features”)
User Tools item menu Default
Panel Tone On
Warm Up Notice On
Copy Count Display Up
Function Priority Copier
Print Priority Display Mode
Function Reset Timer 3 seconds
Interleave Print 10 sheet(s)
Original Feed Delay 1 1 second(s)
Original Feed Delay 2 1 second(s)
Feed Start Method Auto
Original Output Exit Top
Paper Thickness: Paper Tray Plain Paper: 2
Translucent Paper: 2
Film: 3
Recycled Paper: 2
Paper Thickness: Paper Bypass Plain Paper: 2
Translucent Paper: 2
Film: 3
Recycled Paper: 2
Paper Size Detect Method Architecture
Paper Volume Paper Roll 1: New (Full)
Paper Roll 2: New (Full)
Paper Roll 3: New (Full)
Paper Roll 4: New (Full)
DolphinC2_EN_zentai_F_pre_FM.book Page 51 Friday, February 25, 2005 7:09 PM

User Tools (System Settings)
52
4
❖❖❖❖ Tray Paper Settings (see p.62 “Tray Paper Settings”)
Fine Ratio Adjustment: Copier —
Fine Ratio Adjustment: Printer —
Paper Output Exit: Copier Front
Paper Output Exit: Document Serv-er
Front
Job List Time Display On, 15 seconds
User Tools item menu Default
Paper Tray Priority: Copier Tray 1
Tray Paper Size: Tray 1 • Metric versionA0 Width (841 mm)
• Inch versionEngineering: : 34 inchArchitecture: 36 inch
Tray Paper Size: Tray 2 • Metric versionA0 Width (841 mm)
• Inch versionEngineering: : 34 inchArchitecture: 36 inch
Tray Paper Size: Tray 3 • Metric versionPaper Roll Tray: A0 Width (841 mm)Cut Paper Tray: Auto
• Inch version (Engineering)Paper Roll Tray: 34 inchCut Paper Tray: Auto
• Inch version (Architecture)Paper Roll Tray: 36 inchCut Paper Tray: Auto
Tray Paper Size: Tray 4 • Metric versionPaper Roll Tray: A0 Width (841 mm)Cut Paper Tray: Auto
• Inch version (Engineering)Paper Roll Tray: 34 inchCut Paper Tray: Auto
• Inch version (Architecture)Paper Roll Tray: 36 inchCut Paper Tray: Auto
Paper Type: Bypass tray No Display
Paper Type: Tray 1 No Display / Auto Paper Select On
Paper Type: Tray 2 No Display / Auto Paper Select On
Paper Type: Tray 3 No Display / Auto Paper Select On
Paper Type: Tray 4 No Display / Auto Paper Select On
User Tools item menu Default
DolphinC2_EN_zentai_F_pre_FM.book Page 52 Friday, February 25, 2005 7:09 PM

User Tools Menu (System Settings)
53
4
❖❖❖❖ Timer Settings (see p.63 “Timer Settings”)
❖❖❖❖ Interface SettingsSee “Interface Settings”, Network Guide.
❖❖❖❖ File TransferSee “File Transfer”, Network Guide.
User Tools item menu Default
Auto Off Timer 60 minute(s)
Energy Saver Timer 15 minute(s)
Panel Off Timer 1 minute
System Auto Reset Timer On, 60 seconds
Copier/Document Server Auto Reset Timer
On, 60 seconds
Scanner Auto Reset Timer On, 60 seconds
Set Date –
Set Time –
Auto Logout Timer On, 60 seconds
DolphinC2_EN_zentai_F_pre_FM.book Page 53 Friday, February 25, 2005 7:09 PM

User Tools (System Settings)
54
4
❖❖❖❖ Administrator Tools (see p.65 “Administrator Tools”)For details about Address Book Management, Address Book: Pro-gram/Change/Delete Group, see p.71 “Address Book”.
User Tools item menu Default
User Authentication Management Off
Administrator Authentication Management Off
Program /Change Administrator —
Key Counter Management —
Extended Security —
Display/Print Counter —
Display/Clear/Print Counter per User —
Address Book Management —
Address Book: Program/Change/Delete Group
—
Address Book: Change Order —
Print Address Book: Destination List —
Address Book: Edit Title —
Address Book: Select Title Title 1
Auto Delete File Yes, After 3 day(s)
Delete All Files —
Program/Change/Delete LDAP Server —
Use LDAP Server Off
AOF (Always On) On
Firmware Version —
DolphinC2_EN_zentai_F_pre_FM.book Page 54 Friday, February 25, 2005 7:09 PM

Accessing User Tools (System Settings)
55
4
Accessing User Tools (System Settings)
User Tools allow you to change or setdefaults.
Note❒ Operations for System Settings dif-
fer from normal operations. Al-ways quit User Tools when youfinish making settings. See p.55“Exiting User Tools”.
❒ Any changes you make with UserTools remain in effect even if themain power switch or operationswitch is turned off, or the {{{{EnergySaver}}}} or {{{{Clear Modes}}}} key ispressed.
Changing Default Settings
Note❒ If the Administrator Authentica-
tion is specified, contact your ad-ministrator.
AAAA Press the {{{{User Tools/Counter}}}} key.
BBBB Press [System Settings].
CCCC Select the desired menu, and thenpress the desired key.
Referencep.51 “User Tools Menu (SystemSettings)”
DDDD Change settings by following in-structions on the display panel,and then press [OK].
Note❒ To cancel changing settings and
return to the initial display,press the {{{{Use Tools / Counter}}}}key.
Exiting User Tools
AAAA Press the {{{{User Tools/Counter}}}} key.
Note❒ You can also exit User Tools by
pressing [Exit].AHD101S
AHD101S
DolphinC2_EN_zentai_F_pre_FM.book Page 55 Friday, February 25, 2005 7:09 PM

User Tools (System Settings)
56
4
Settings You Can Change with User Tools
ReferenceTo access User Tools, see p.55 “Accessing User Tools (System Settings)”.
General Features
❖❖❖❖ Panel ToneThe beeper (key tone) sounds when a key is pressed.
Note❒ Default: On
❖❖❖❖ Warm Up NoticeYou can have the beeper sound when the machine becomes ready to copy af-ter leaving Energy Saver mode or when the power is turned on.
Note❒ Default: On❒ If the Panel Tone setting is [Off], the beeper does not sound, regardless of
the Warm Up Notice setting.
❖❖❖❖ Copy Count DisplayYou can specify the copy count display format.If you press [Up], the display counts upward, if you press [Down], the displaycounts downward.
Note❒ Default: Up
❖❖❖❖ Function PriorityYou can specify the mode to be displayed immediately after the operationswitch is turned on, or when System Reset mode is turned on.
Note❒ Default: Copier
❖❖❖❖ Print PriorityPrint Priority is given to the mode selected.
Referencep.36 “Multi-Access”
Note❒ Default: Display Mode
❒ When [Interleave] is selected, the current print job will be interrupted afterthe number of sheets specified in Interleave Print has been output.
DolphinC2_EN_zentai_F_pre_FM.book Page 56 Friday, February 25, 2005 7:09 PM

Settings You Can Change with User Tools
57
4
❒ You can specify an output tray for each function. See the following sec-tions:• p.62 “Paper Tray Priority: Copier”
❖❖❖❖ Function Reset TimerYou can set the length of time the machine waits before changing modeswhen using the multi-access function (see p.36 “Multi-Access”). This is usefulif you are making many copies and have to change settings for each copy. Ifyou set a longer reset period, you can prevent interruption from other func-tions.
Note❒ Default: Set Time (3 seconds)
❒ The Function Reset Timer setting is ignored if [Interleave Print] is set forPrint Priority (see p.56 “Print Priority”).
❒ When you select [Set Time], enter the time (3–30 seconds, in 1 second incre-ments) using the number keys.
❖❖❖❖ Interleave PrintYou can set the timing for changing modes when [Print Priority] has been set to[Interleave].
Note❒ Default: 10 sheet(s)❒ You can set the number from 1 to 20 sheets using the number keys.❒ Values set may change depending on the timing of printing.
❖❖❖❖ Original Feed Delay 1You can specify the duration of delay before an original is fed into the ma-chine after being set. If originals frequently feed in slanted, or you are usingspecial originals, set the delay accordingly.
Note❒ Default: 1 second
❒ The time can be set from 0 to 5 seconds.
❖❖❖❖ Original Feed Delay 2You can specify the duration of the pause immediately after originals are firstfed into the machine. If originals frequently feed in slanted, or you are usingspecial originals, set the delay accordingly.
Note❒ Default: 1 second
❒ The time can be set from 1 to 5 seconds.
DolphinC2_EN_zentai_F_pre_FM.book Page 57 Friday, February 25, 2005 7:09 PM

User Tools (System Settings)
58
4
❖❖❖❖ Feed Start MethodYou can specify whether feeding starts automatically or after pressing the{{{{Start}}}} key.
Note❒ Default: Auto
❖❖❖❖ Original OutputYou can specify the original output tray to use when the power is turned onor the {{{{Clear Modes}}}} key is pressed.
Note❒ Default: Top
❖❖❖❖ Paper Thickness: Paper TrayYou can specify the thickness of paper loaded in the paper trays. If the imageon copies is scratched, or the paper wrinkles when using translucent paper,you can change the setting to get better copies.• Default: 2 (Plain Paper, Translucent paper, and Recycled Paper), 3 (Film )
The paper thickness can be set from 1 (Thicker) to 5 (Thinner).
Note❒ Refer to the chart below when selecting the mode for the paper thickness.
*1 Out of guarantee
Thickness 1 2 3 4 5
Paper type
Plain paper 110 g/m2
(29.3 lb)
90 g/m2
(23.9 lb)
(Standard mode)
70 g/m2
(18.6 lb)
60 g/m2
(15.9 lb)
50 g/m2 or less
(13.3 lb)
Translucent paper
70 – 90 g/m2 (18.6 – 23.9 lb)
70 – 80 g/m2 (18.6 – 21.3 lb)(Standard mode)
70 – 80 g/m2 (18.6 – 21.3 lb)
50 – 70 g/m2 (13.3 – 18.6 lb)
Hemmed paper *1
* If the paper wrinkles when using mode 2, try using mode 1.
Film 0.07 mm – 0.095 mm (2.8 Mil – 3.7 Mil)
0.07 mm – 0.095 mm (2.8 Mil – 3.7 Mil)
0.07 mm – 0.095 mm (2.8 Mil – 3.7 Mil) (Stan-dard mode)
0.07 mm – 0.095 mm (2.8 Mil – 3.7 Mil)
—
Recycled paper
110 g/m2
(29.3 lb)
90 g/m2
(23.9 lb)
(Standard mode)
70 g/m2
(18.6 lb)
60 g/m2
(15.9 lb)
50 g/m2 or less
(13.3 lb)
DolphinC2_EN_zentai_F_pre_FM.book Page 58 Friday, February 25, 2005 7:09 PM

Settings You Can Change with User Tools
59
4
❒ Depending on paper type, operating conditions (low temperature and hu-midity), and paper feeding settings (multiple copies on paper of 542 mm,22" width or less), toner fusing conditions vary. To improve toner fusing,change the thickness level to 3→2→1.
❒ When using thin, soft, or limp paper, toner fusing may appear wrinkled orthe image may be blurred. If this happens, change the thickness level to3→4→5.
❒ When level 1 or 2 are selected for translucent paper , and you change thepaper type from plain or film to translucent, it may take longer for the ma-chine to get ready for copying (up to two minutes).
❒ When level 1 or 2 are selected for translucent paper, and you make copieson paper of size A1(D) or above continuously, the interval between eachcopying may take longer. Even if you make copy on one sheet only, it maytakes 1 minute until the next copy job starts.
❖❖❖❖ Paper Thickness: Paper BypassYou can specify the thickness of paper placed in the paper bypass. If the im-age on copies is scratched, or the paper wrinkles when using translucent pa-per, you can change the setting to get better copies.
Note❒ Default: 2 (Plain Paper, Translucent paper, and Recycled Paper), 3 (Film)❒ The paper thickness can be set from 1 (Thicker) to 5 (Thinner). See p.58 “Pa-
per Thickness: Paper Tray”. The results for hemmed paper cannot be guar-anteed.
❖❖❖❖ Paper Size Detect MethodYou can specify Engineering or Architecture as the default paper size detectmethod.
Note❒ Default: Architecture
❖❖❖❖ Paper VolumeYou can specify how the paper volume should be displayed when a paper rollis loaded in the paper roll tray. You can specify this setting for each paper rolltray. When a new roll is loaded, the display is “New (Full)”.
Note❒ Default: New (Full)
DolphinC2_EN_zentai_F_pre_FM.book Page 59 Friday, February 25, 2005 7:09 PM

User Tools (System Settings)
60
4
❖❖❖❖ Fine Ratio Adjustment: Copier
Depending on paper type, environment, and humidity, copy paper can ex-pand or shrink slightly. This means that the size of the copy and the originaldo not match. If this happens, specify the vertical and horizontal correctionratio. You can specify this setting for each paper type (plain, translucent, filmand recycled paper).
Note❒ Default: 0.0%
❒ From –1.0% to 1.0% (in 0.1% increments)❒ To set the Fine Ratio setting, measure the length of the original and the
copy image to calculate the ratio.
ABB009S
ZEDG010E
Calculating the Correction Value (%)
To copy at the same size as the original
Example)CopyOriginal
Horiz. Horiz.
... For the example above:
correction value(%)
Set the correction value (horizontal) to 0.8%.
DolphinC2_EN_zentai_F_pre_FM.book Page 60 Friday, February 25, 2005 7:09 PM

Settings You Can Change with User Tools
61
4
❖❖❖❖ Fine Ratio Adjustment: PrinterSpecifies the fine ratio when the optional printer is installed. Depending onpaper type, environment, and humidity, copy paper can expand or shrinkslightly. This means that the size of the copy and the original do not match.When the horizontal ratios are almost the same and there are differences be-tween the vertical ratios, you can specify the vertical correction ratio. You canmake this setting for each paper type (plain, translucent, film and recycled pa-per).
Note❒ Default: 0.0%
❒ From –1.0% to 1.0% (in 0.1% increments)❒ For details about how to set the fine ratio, see p.60 “Fine Ratio Adjustment:
Copier”.
❖❖❖❖ Paper Output Exit: CopierYou can specify a tray to which copies are delivered.• Front• Rear
Note❒ Default: Front
❖❖❖❖ Paper Output Exit: Document ServerYou can specify a tray to which documents are delivered.• Front• Rear
Note❒ Default: Front
❖❖❖❖ Job List Display TimeYou can set the length of time that the job list display is shown before the dis-play reverts back to the default screen.
Note❒ Default: On❒ When you select [On], enter the time from 10 to 999 seconds (in 1 second
increments) using the number keys.❒ The default time is 15 seconds.
DolphinC2_EN_zentai_F_pre_FM.book Page 61 Friday, February 25, 2005 7:09 PM
User Tools (System Settings)
62
4
Tray Paper Settings
❖❖❖❖ Paper Tray Priority: CopierYou can specify the tray to supply paper for output.
Note❒ Default: Tray 1
❖❖❖❖ Tray Paper Size: Tray 1, Tray 2You can specify the size of paper in Tray 1 and Tray 2.• Metric version:
• A Series: A0 Width (841 mm), A1 Width (594 mm), A2 Width (420 mm),A3 Width (297 mm), A4 Width (210 mm)
• JIS B Series: B1 JIS Width (728 mm), B2 JIS Width (515 mm), B3 JIS Width(364 mm), B4 JIS Width (267 mm)
• Others: 880 mm, 800 mm, 680 mm, 660 mm, 490 mm, 440 mm Inch version:• Engineering: 34 inch, 22 inch, 17 inch, 11 inch, 81/2 inch• Architecture: 36 inch, 24 inch, 18 inch, 12 inch, 9 inch• Others: 30 inch
Note❒ Default: metric version: A0 Width (841 mm)
❒ Default: inch version: 34 inch (Engineering), 36 inch(Architecture)
❖❖❖❖ Tray Paper Size: Tray 3, Tray 4 (when Paper Roll Trays are installed)You can specify the size of paper in Tray 3 and Tray 4.Metric version:• A Series: A0 Width (841 mm), A1 Width (594 mm), A2 Width (420 mm), A3
Width (297 mm), A4 Width (210 mm)• JIS B Series: B1 JIS Width (728 mm), B2 JIS Width (515 mm), B3 JIS Width
(364 mm), B4 JIS Width (267 mm)• Others: 880 mm, 800 mm, 680 mm, 660 mm, 490 mm, 440 mm Inch version:• Engineering: 34 inch, 22 inch, 17 inch, 11 inch, 81/2 inch• Architecture: 36 inch, 24 inch, 18 inch, 12 inch, 9 inch• Others: 30 inch
Note❒ Default: metric version: A0 Width (841 mm)
❒ Default: inch version: 34 inch (Engineering), 36 inch(Architecture)
DolphinC2_EN_zentai_F_pre_FM.book Page 62 Friday, February 25, 2005 7:09 PM

Settings You Can Change with User Tools
63
4
❖❖❖❖ Tray Paper Size: Tray 3, Tray 4 (when Cut Paper Trays are installed)You can specify the size of paper in Tray 3 and Tray 4.• The paper sizes you can select are as follows:
• Auto, A2L, A3K, A3L, A4K, A4L, B3 JISL, B4 JISL, B4 JISK,18"×24"L, 17"×22"L, 12"×18"K, 12"×18"L, 12"×141/2"L, 11"×17"K,11"×17"L,11"×15"L, 11"×14"K, 11"×14"L, 10"×14"K, 9"×12"K,9"×12"L, 81/2"×14"K, 81/2"×14"L, 81/2"×13"L, 81/2"×12"K,81/2"×12"L, 81/2"×11"K, 81/2"×11"L
Note❒ Default: Auto
❖❖❖❖ Paper Type: Bypass trayYou can specify the paper type in the paper bypass.• The paper types you can set for the paper bypass are as follows:
• No Display, Recycled Paper, Translucent Paper, Film
Note❒ Default: No Display
❖❖❖❖ Paper Type: Tray 1–4You can specify the paper type in Tray 1 to Tray 4.• The paper types you can set for the trays are as follows:
• No Display, Recycled Paper, Translucent Paper, Film
Note❒ Default:
• Paper Type: No Display
• Apply Auto Paper Select: Yes❒ When Cut Paper Trays are installed, you cannot select [Film] in Tray 3 and Tray 4.❒ A mark appears next to the paper tray if [No] is selected in Auto Paper Select.
Timer Settings
❖❖❖❖ Auto Off TimerAfter a specified period, following job completion, the machine automaticallyturns off, in order to conserve energy. This function is called "Auto Off". The machine status after Auto Off is referred to as "Off mode". You can spec-ify the time to elapse before Auto Off is activated.
Note❒ Default: 60 minutes
❒ Enter a time interval between 10 seconds and 240 minutes using the num-ber keys.
❒ Auto Off may not work when error messages appear.
DolphinC2_EN_zentai_F_pre_FM.book Page 63 Friday, February 25, 2005 7:09 PM

User Tools (System Settings)
64
4
❖❖❖❖ Energy SaverWhen no other key operations are performed, the machine switches to lowpower mode after a specified period.
Note❒ Default: 15 minutes
❒ Enter a time interval between 1 and 240 minutes in one minute incrementsusing the number keys.
❖❖❖❖ Panel Off TimerSet the amount of time the machine waits before switching the panel off aftercopying has finished or the last operation is performed.
Note❒ Default: On, 1 minute
❒ When selecting [On], enter a time interval between 10 seconds to 240 min-utes using the number keys.
❖❖❖❖ System Auto ResetThe System Reset setting automatically switches the display to its initial con-dition when no operations are in progress, or when an interrupted job iscleared. This setting determines the system reset interval. See p.56 “FunctionPriority”.
Note❒ Default: On, 60 seconds
❒ The time can be set from 10 to 999 seconds, in one second increments, usingthe number keys.
❖❖❖❖ Copier / Document Server Auto Reset TimerSpecifies the time to elapse before copier and Document Server modes reset.
Note❒ If [Off] is selected, the machine does not automatically switch to the user
code entry screen.❒ Default: On, 60 seconds
❒ The time can be set from 10 to 999 seconds, in one second increments, usingthe number keys.
❖❖❖❖ Scanner Auto Reset TimerSpecifies the time to elapse before the scanner function resets.
Note❒ If [Off] is selected, the machine does not automatically switch to the user
code entry screen.❒ Default: On, 60 seconds ❒ The time can be set from 10 to 999 seconds, in one second increments, using
the number keys.
DolphinC2_EN_zentai_F_pre_FM.book Page 64 Friday, February 25, 2005 7:09 PM

Settings You Can Change with User Tools
65
4
❖❖❖❖ Set DateSet the date for the machine's internal clock using the number keys.
Note❒ To change between year, month, and day, press [←←←←] and [→→→→].❒ Enter the date using the number keys.
❖❖❖❖ Set TimeSet the time for the machine's internal clock using the number keys.
Note❒ To change between hours, minutes and seconds, press[←←←←] and [→→→→].❒ Enter the time using the number keys.
❖❖❖❖ Auto Logout TimerYou can specify whether or not to automatically log out a user when the userdoes not operate the machine for a specified period of time after logging in.
Note❒ Default: On, 60 seconds
❒ When [On] is selected, the time can be set from 10 to 999 seconds, in one sec-ond increments, using the number keys.
Administrator Tools
Administrator Tools are used by the administrator. To change these settings,contact the administrator.We recommend specifying Administrator Authentication before making Ad-ministrator Tools settings.See “Administrator Authentication”, Security Reference.
❖❖❖❖ User Authentication Management• User Code Authentication
Using User Code Authentication, you can limit the available functions andsupervise their use.When using User Code Authentication, register the user code.See p.76 “Registering User Codes”.• Copy• Document Server• Scanner
• Basic Authentication• Windows Authentication• LDAP Authentication• Off
DolphinC2_EN_zentai_F_pre_FM.book Page 65 Friday, February 25, 2005 7:09 PM

User Tools (System Settings)
66
4
Note❒ Default: Off
ReferenceFor details about Basic Authentication, Windows Authentication, andLDAP Authentication, see Security Reference.
❖❖❖❖ Administrator Authentication ManagementSee Security Reference.
❖❖❖❖ Program / Change AdministratorSee Security Reference.
❖❖❖❖ Key Counter ManagementYou can specify that functions that you want to manage with the key counter.
❖❖❖❖ Extended SecurityYou can specify whether or not to use the extended security functions. For de-tails about the extended security functions, see Security Reference.
❖❖❖❖ Display / Print CounterAllows you to view and print the various counters.• Display/Print Counter
Displays counters for each functions (Total, Copier, Printer).• Print Counter List
Prints out a list of counters for each functions.• To print the counter list
A Press the {{{{User Tools/Counter}}}} key.B Press [System Settings].C Press [Administrator Tools].D Press [Display / Print Counter].E Press [Print Counter List].
F Press the {{{{Start}}}} key.G Press [Exit].
DolphinC2_EN_zentai_F_pre_FM.book Page 66 Friday, February 25, 2005 7:09 PM

Settings You Can Change with User Tools
67
4
❖❖❖❖ Display / Clear / Print Counter per UserAllows you to view and print the various counters accessed with users and toset the values to 0.
Note❒ Press [UUUUPrev.] and [TTTTNext] to show all counters.❒ The number of prints may differ from the counter value shown in Dis-
play/Print Counter.• Print Counter for All Users
Prints the counter values for all the users.• Clear Counter for All Users
Sets the counter value for all the users.• Print Counter per User
Prints the counter values for each user.• Clear Counter per User
Sets the counter value for each user.
Note❒ To print a list for each user, see p.78 “Printing the Counter for Each User
Code”.
❖❖❖❖ Address Book ManagementYou can add, change or delete information registered in the Address Book.For details, see p.71 “Registering Addresses and Users”.• [Program / Change]
You can register and change names as well as user codes.• Names
You can register a name, key display, registration number, and title selec-tion.
• Auth. InfoYou can register a user code, and specify the functions available to eachuser code. You can also register user names and passwords to be usedwhen sending e-mail, sending files to folders, or accessing an LDAP server.
• ProtectionYou can register a protection code.
• E-mailYou can register an e-mail address.
• Folderyou can register the protocol, path, port number, and server name.
• Add to GroupYou can put names registered in the Address Book into a group.
• [Delete]You can delete a name from the Address Book.
DolphinC2_EN_zentai_F_pre_FM.book Page 67 Friday, February 25, 2005 7:09 PM

User Tools (System Settings)
68
4
Note❒ You can register up to 2,000 names.❒ You can register up to 500 user codes.❒ You can also register user codes from SmartDeviceMonitor for Admin.
❖❖❖❖ Address Book: Program / Change / Delete GroupNames registered in the Address Book can be added into a group.You can then easily manage the names registered in each group. For details,see p.90 “Registering Names to a Group”.• [Program / Change]
You can register new groups, or changes a group name, key display, titleselection or registration number.
• DeleteYou can delete a group.
Note❒ You can register up to 100 groups.❒ You can also group users using a Web browser. For more information, see
the Web Browser help.
❖❖❖❖ Address Book: Change OrderYou can change the order of the names in the Address Book.
Note❒ You can rearrange the order of items that are on the same page, but you
cannot move the items to another page. For example, you cannot move anitem from “PLANNING” ([OPQ]) to “DAILY” ([CD]).
A Press the {{{{User Tools/Counter}}}} key.B Press [System Settings].C Press [Administrator Tools], and then press [TTTTNext].D Press [Address Book: Change Order].E Press the name key to be moved.
Note❒ You can also select a name using the number keys.
DolphinC2_EN_zentai_F_pre_FM.book Page 68 Friday, February 25, 2005 7:09 PM

Settings You Can Change with User Tools
69
4
F Press the name key in the place that you want to move to.
The name selected in step E moves to the place selected in step F, and thekeys for other names will be shifted accordingly.
Note❒ You can also select a name using the number keys.
❖❖❖❖ Print Address Book: Destination ListYou can print the list of names registered in the Address Book.• Print in Title 1 Order
Prints a list of the names according to the order in Title 1.• Print in Title 2 Order
Prints a list of the names according to the order in Title 2.• Print in Title 3 Order
Prints a list of the names according to the order in Title 3.• Print Group Dial List
Prints a list of the groups registered.A Select the print format.B Press the {{{{Start}}}} key.
The list is printed.
❖❖❖❖ Address Book: Edit TitleYou can edit the title to locate the desired user easily.A Press the {{{{User Tools/Counter}}}} key.B Press [System Settings].C Press [Administrator Tools], and then press [TTTTNext].D Press [Address Book: Edit Title].E Press the title key to be changed.
DolphinC2_EN_zentai_F_pre_FM.book Page 69 Friday, February 25, 2005 7:09 PM

User Tools (System Settings)
70
4
F Enter the new name, and then press [OK].G Press [OK].
❖❖❖❖ Address Book: Select TitleYou can specify the title to select a name.
Note❒ Default: Title 1
❖❖❖❖ Auto Delete FileYou can specify whether documents stored in the Document Server will orwill not be deleted after a specified period of time.
Note❒ Default: Yes After 3 day(s)
❒ If you select [Yes], documents stored subsequently will be deleted.❒ If you select [No], documents will not be deleted automatically.❒ If you select [Yes], enter a number of days in the range of 1 - 180.❒ The default setting is three days, which means documents will be deleted
three days (72 hours) after they have been stored.
❖❖❖❖ Delete All FilesAll documents stored in Document Server will be deleted.
Note❒ Even if a password has been set, all documents will be deleted.❒ A confirmation dialog box will appear. To delete all documents, select
[Yes].
❖❖❖❖ Program / Change / Delete LDAP ServerSee “Program / Change / Delete LDAP Server”, Network Guide.
❖❖❖❖ Use LDAP ServerYou can specify whether or not to use the LDAP server.
Note❒ Default: Off
❒ When Use LDAP Server is set to Off, [Search LDAP] will not appear on thesearching display.
❖❖❖❖ AOF (Always On)You can specify whether or not to use Auto Off Timer.
Note❒ Default: On
❒ For details about this function, contact your service representative.
❖❖❖❖ Firmware VersionYou can check the version of the software installed in this machine.
DolphinC2_EN_zentai_F_pre_FM.book Page 70 Friday, February 25, 2005 7:09 PM

71
5. Registering Addresses andUsers
Address Book
Registering information such as thenames of users and their e-mail ad-dresses in the Address Book allowsyou to manage them easily.
Important❒ Address Book data is stored on the
hard disk. It can be lost if there issome kind of hard disk failure. Themanufacturer shall not be respon-sible for any damages resultingdata loss.
Note❒ You can also use a Web browser to
register names in the AddressBook. With the SmartDeviceMoni-tor for Admin, you can registermultiple names at the same time.
❒ Using [Address Management Tool] inSmartDeviceMonitor for Admin,you can backup Address Book da-ta. We recommend backing updata when using the AddressBook.
ReferenceFor details about using a Webbrowser, see the Web browserHelp.For details about SmartDevice-Monitor for Admin and how to in-stall it, see Network Guide.For operating instructions, seeSmartDeviceMonitor for AdminHelp.
You can register and manage the fol-lowing items in the Address Book:
❖❖❖❖ NameYou can register the name of theuser and the key display. This isthe basic information required formanaging user of the machine.
❖❖❖❖ Authentication InformationYou can register user codes in or-der to restrict particular functionsto certain users, and to check theiruse of each function. You can alsoregister login user names and loginpasswords to be used when send-ing e-mail, sending to folders, oraccessing an LDAP server.
ReferenceFor details about each authenti-cation, see the following:SMTP Authentication p.97“SMTP Authentication”Folder Authentication p.83“Registering Folders”LDAP Authentication p.98“LDAP Authentication”
DolphinC2_EN_zentai_F_pre_FM.book Page 71 Friday, February 25, 2005 7:09 PM

Registering Addresses and Users
72
5
❖❖❖❖ ProtectionYou can set protection codes tostop sender's name from beingused or folders from being access-ed without authorization.
❖❖❖❖ E-mailYou can register e-mail destina-tions in the Address Book.
❖❖❖❖ FolderYou can register the protocol, pathname and server name.• SMB
• FTP
❖❖❖❖ Add to GroupYou can put registered e-mail andfolder destinations into a group foreasier management.
Managing names in the Address Book
By registering a name and key dis-play beforehand, you can specify e-mail and folder destinations simplyby selecting the name key.See p.74 “Registering Names”.
Sending e-mail by Quick Dial
By registering e-mail addresses in theAddress Book, you can specify e-maildestinations simply by selecting themfrom the scanner initial display whensending a document using the scan-ner function.A registered e-mail address can beused as the sender's address, and thesender's address are automaticallyentered in the “From” field of an e-mail header.See p.80 “E-mail Destination”.
Sending scanned files to a shared folder directly
After registering the path name, username and password, you can connectto a shared folder simply by selectingthe destination shown on the initialscanner display whenever sendingfiles using the scanner function to ashared folder. To share the folder using Windows,select the SMB protocol.To register the folder to the FTP serv-er, select the FTP protocol.See p.83 “Registering Folders”.
DolphinC2_EN_zentai_F_pre_FM.book Page 72 Friday, February 25, 2005 7:09 PM

Address Book
73
5
Preventing unauthorized user access to shared folders from the machine
After registering a protection code,you can specify the object of protec-tion to prevent an e-mail destinationfrom being used without permission.You can prevent unauthorized accessto registered folders. See p.95 “Regis-tering a Protection Code”.
Managing users and machine usage
Register user codes to limit users tothe following functions and checktheir use of each function:• Copier• Document Server• ScannerSee p.76 “Registering User Codes”.
DolphinC2_EN_zentai_F_pre_FM.book Page 73 Friday, February 25, 2005 7:09 PM

Registering Addresses and Users
74
5
Registering Names
If you register data such as a name ortitle in advance, you can enter addi-tional associated information such asan e-mail address or a folder later byselecting the registered names.
Registering a Name
AAAA Press the {{{{User Tools/Counter}}}} key.
BBBB Press [System Settings].
CCCC Press [Administrator Tools], and thenpress [TTTTNext].
DDDD Press [Address Book Management].
EEEE Press [New Program].
FFFF Press [Change] on the right of theName.The name entry display appears.
GGGG Enter the name, and then press[OK].
Note❒ The name can be used for docu-
ments in the Document Server.For details about the DocumentServer, see p.41 “Using the Doc-ument Server”.
Referencep.129 “Entering Text”
HHHH Press the key for the classificationyou want to use under Select Ti-tle.
Note❒ The keys you can select are as
follows:• [Freq.]… Added to the page
that is displayed first.• [AB], [CD], [EF], [GH], [IJK],
[LMN], [OPQ], [RST], [UVW],[XYZ], [1] to [10]… Added tothe list of items in the select-ed title.
❒ You can select [Freq.] and onemore page for each title.
IIII To continue registering the name,press [Continue to Program], andthen repeat the procedure fromstep FFFF.
JJJJ Press [OK].
KKKK Press [Exit].
LLLL Press the {{{{User Tools/Counter}}}} key.
AHD101S
DolphinC2_EN_zentai_F_pre_FM.book Page 74 Friday, February 25, 2005 7:09 PM

Registering Names
75
5
Changing a Registered Name
AAAA Press the {{{{User Tools/Counter}}}} key.
BBBB Press [System Settings].
CCCC Press [Administrator Tools], and thenpress [TTTTNext].
DDDD Press [Address Book Management].
EEEE Select the registered name youwant to change.
Press the name key, or enter theregistered number using the num-ber keys.
Note❒ If you press , you can search
by the registered name, usercode, folder name or e-mail ad-dress.
To change the name or key display
A Press [Change] on the right ofthe name or key display.
B Enter the name or key display,and then press [OK].
Referencep.129 “Entering Text”
To change the title
A Press the key for the classifica-tion you want to use from Se-lect Title.
FFFF Press [OK].
GGGG Press [Exit].
HHHH Press the {{{{User Tools/Counter}}}} key.
Deleting a Registered Name
If you delete a name, data associatedwith that name, such as e-mail ad-dresses and folder name, are also de-leted.
AAAA Press the {{{{User Tools/Counter}}}} key.
BBBB Press [System Settings].
CCCC Press [Administrator Tools], and thenpress [TTTTNext].
DDDD Press [Address Book Management].
EEEE Press [Delete].
FFFF Select the name you want to de-lete.
Press the key, or enter the regis-tered number using the numberkeys.
GGGG Press [Yes].
HHHH Press [Exit].
IIII Press the {{{{User Tools/Counter}}}} key.
DolphinC2_EN_zentai_F_pre_FM.book Page 75 Friday, February 25, 2005 7:09 PM

Registering Addresses and Users
76
5
Registering User Codes
Register user codes to limit users tothe following functions and checktheir use of each function:• Copier• Document Server• Scanner (when Type 480 is installed)
Note❒ The number of copies scanned us-
ing the scanner function is countedfor each user code. This allows youto check each user's usage.
Important❒ The functions associated with each
user code are the same. If youchange or delete user codes, man-agement data and limits associatedwith that code become invalid.
Registering a New User Code
AAAA Press the {{{{User Tools/Counter}}}} key.
BBBB Press [System Settings].
CCCC Press [Administrator Tools], and thenpress [TTTTNext].
DDDD Press [Address Book Management].
EEEE Press the name whose code is tobe registered, or enter the regis-tered number using the numberkey.
Note❒ To register the name, see p.74
“Registering Names”.
FFFF Press [Auth. Info].
GGGG Enter the user code using thenumber keys, and then press [#].
You can enter a one- to eight-digituser code.
Note❒ If you make a mistake, press
[Clear] or the {{{{Clear/Stop}}}} key,and then enter the code again.
HHHH Press [TTTTNext] twice.
IIII Select the functions to be usedwith the user code from AvailableFunctions.
JJJJ Press [OK].
Note❒ To continue registering user
codes, press [Continue to Pro-gram], and then repeat the pro-cedure from step E.
AHD101S
DolphinC2_EN_zentai_F_pre_FM.book Page 76 Friday, February 25, 2005 7:09 PM

Registering User Codes
77
5
KKKK Press [Exit].
LLLL Press the {{{{User Tools/Counter}}}} key.
Changing a User Code
Note❒ Even if you change a user code, the
counter value will not be cleared.
AAAA Press the {{{{User Tools/Counter}}}} key.
BBBB Press [System Settings].
CCCC Press [Administrator Tools], and thenpress [TTTTNext].
DDDD Press [Address Book Management].
EEEE Select the registered user codeyou want to change.Press the name key, or enter theregistered number using the num-ber keys.
Note❒ If you press , you can search
for a user by name/index, usercode, or e-mail address.
❒ To change the name, key dis-play and title, see p.75 “Chang-ing a Registered Name”.
FFFF Press [Auth. Info].
GGGG Press [Change], and then enter thenew user code using the numberkeys.
HHHH Press [#].
To change the available functions
A Press [TTTTNext] twice.
B Press the key to select the func-tions to enable them.
Note❒ Press the key to highlight it,
and then the function is en-abled. To cancel a selection,press the highlighted key.
IIII Press [OK].
JJJJ Press [Exit].
KKKK Press the {{{{User Tools/Counter}}}} key.
Deleting a User Code
Important❒ This operation deletes user codes
registered to multiple functions.User control via the deleted usercode is disabled.
Note❒ After clearing the user code, the
counter is automatically cleared.❒ To delete a name from the Address
Book entirely, see p.75 “Deleting aRegistered Name”.
AAAA Press the {{{{User Tools/Counter}}}} key.
BBBB Press [System Settings].
CCCC Press [Administrator Tools], and thenpress [TTTTNext].
DDDD Press [Address Book Management].
EEEE Select the name whose code is tobe deleted.
Press the name key, or enter theregistered number using the num-ber keys.
DolphinC2_EN_zentai_F_pre_FM.book Page 77 Friday, February 25, 2005 7:09 PM

Registering Addresses and Users
78
5
FFFF Press [Auth. Info].
GGGG Press [Change] to delete the usercode, and then press [#].
HHHH Press [OK].
IIII Press [Exit].
JJJJ Press the {{{{User Tools/Counter}}}} key.
Displaying the Counter for Each User Code
AAAA Press the {{{{User Tools/Counter}}}} key.
BBBB Press [System Settings].
CCCC Press [Administrator Tools].
DDDD Press [Display / Clear / Print Counterper User].
EEEE Select [Print Counter], or [ScannerCounter].
Counters for individual functionusage under each user code ap-pear.
Printing the Counter for Each User Code
You can print out the number ofprints for each user code.
To print the counters made under each user code
AAAA Press the {{{{User Tools/Counter}}}} key.
BBBB Press [System Settings].
CCCC Press [Administrator Tools].
DDDD Press [Display / Clear / Print Counterper User].
EEEE Select a user code from the leftside of the display.
Note❒ Press [Select All on the Page] to se-
lect all user codes on the page.
FFFF Press [Print Counter List] under PerUser.
Note❒ Enter the user code, and then
press [#] if the user code is regis-tered.
GGGG Select the function usage you wantto print from [Print Counter] and[Scanner Counter].
HHHH Press [Print].
To print the counters for all user codes
AAAA Press the {{{{User Tools/Counter}}}} key.
BBBB Press [System Settings].
CCCC Press [Administrator Tools].
DDDD Press [Display / Clear / Print Counterper User].
DolphinC2_EN_zentai_F_pre_FM.book Page 78 Friday, February 25, 2005 7:09 PM

Registering User Codes
79
5
EEEE Press [Print Counter List] under AllUsers.
Note❒ Enter the user code, and then
press [#] if the user code is regis-tered.
FFFF Select the function usage you wantto print from [Print Counter] and[Scanner Counter].
GGGG Press [Print].
Clearing the Counters
AAAA Press the {{{{User Tools/Counter}}}} key.
BBBB Press [System Settings].
CCCC Press [Administrator Tools].
DDDD Press [Display / Clear / Print Counterper User].
EEEE Select the user code to clear.
To clear the counters made under a user code
A Select the user code from theleft side of the display.
Note❒ Press [Select All on the Page] to
select all user codes on thepage.
B Press [Clear] under Per User.
C Select the function usage youwant to c lear f rom [P r in tCounter] and [Scanner Counter].
D Press [OK].
To clear the counters for all user codes
A Press [Clear] under All Users.
B Select the function usage youwant to c lear f rom [P r i n tCounter] and [Scanner Counter].
C Press [OK].
FFFF Press [Exit].
GGGG Press the {{{{User Tools/Counter}}}} key.
DolphinC2_EN_zentai_F_pre_FM.book Page 79 Friday, February 25, 2005 7:09 PM

Registering Addresses and Users
80
5
E-mail Destination
Register e-mail destinations so youdo not need to enter an e-mail addressevery time, and can send scan filesfrom scanner function by e-mail. • It is easy to select the e-mail desti-
nation if you register “Name” and“Key Display” as the e-mail desti-nation.
• You can register e-mail destina-tions as a group.
• You can use the e-mail address asthe sender's address when sendingscan files in scanner mode. If youwant to do this, set a protectioncode on the sender address to pre-vent unauthorized access. See p.95“Registering a Protection Code fora Name in the Address Book”.
Note❒ This registration is applicable when
Scanner Unit Type 480 is installed.❒ You can select an e-mail address
from an LDAP server, and thenregister it in the Address Book. See“Sending Scan File by E-mail”,Scanner Reference.
Registering an E-mail Destination
AAAA Press the {{{{User Tools/Counter}}}} key.
BBBB Press [System Settings].
CCCC Press [Administrator Tools], and thenpress [TTTTNext].
DDDD Press [Address Book Management].
EEEE Select the name whose e-mail ad-dress you want to register.
Press the name key, or enter theregistered number using the num-ber keys.
Note❒ To register a name in the Ad-
dress Book, see p.74 “Register-ing a Name”.
FFFF Press [E-mail].
GGGG Press [Change] under E-mail Ad-dress.
HHHH Enter the e-mail address, and thenpress [OK].
Note❒ You can enter an e-mail address
up to 128 characters.
Referencep.129 “Entering Text”
AHD101S
DolphinC2_EN_zentai_F_pre_FM.book Page 80 Friday, February 25, 2005 7:09 PM

E-mail Destination
81
5
Using the e-mail address as the sender
To enable this selection, you haveto register a user code in advance.See p.76 “Registering a New UserCode”.A Press [Protection].
B Press [Sender] on the right sideof Use Name as.
IIII Press [OK].
Note❒ When a group is registered, you
can add the e-mail destinationsto the group. See p.90 “Register-ing Names to a Group”.
JJJJ Press [Exit].
KKKK Press the {{{{User Tools/Counter}}}} key.
Changing a Registered E-mail Destination
AAAA Press the {{{{User Tools/Counter}}}} key.
BBBB Press [System Settings].
CCCC Press [Administrator Tools], and thenpress [TTTTNext].
DDDD Press [Address Book Management].
EEEE Select the name whose e-mail ad-dress you want to change.
Press the name key, or enter theregistered number using the num-ber keys.
Note❒ If you press , you can search
by the registered name, usercode, folder name or e-mail ad-dress.
❒ To change the name, key dis-play, and title, see p.75 “Chang-ing a Registered Name”.
FFFF Press [E-mail].
GGGG Press [Change] under E-mail Ad-dress.
HHHH Enter the e-mail address, and thenpress [OK].
Referencep.129 “Entering Text”
IIII Press [OK].
JJJJ Press [Exit].
KKKK Press the {{{{User Tools/Counter}}}} key.
AHD101S
DolphinC2_EN_zentai_F_pre_FM.book Page 81 Friday, February 25, 2005 7:09 PM

Registering Addresses and Users
82
5
Deleting a Registered E-mail Destination
To delete a name entirely, see p.75“Deleting a Registered Name”.
AAAA Press the {{{{User Tools/Counter}}}} key.
BBBB Press [System Settings].
CCCC Press [Administrator Tools], and thenpress [TTTTNext].
DDDD Press [Address Book Management].
EEEE Select the name whose e-mail ad-dress you want to delete.
Press the name key, or enter theregistered number using the num-ber keys.
FFFF Press [E-mail].
GGGG Press [Change] under E-mail Ad-dress.
HHHH Press [Delete All], and then press[OK].
IIII Press [OK].
JJJJ Press [Exit].
KKKK Press the {{{{User Tools/Counter}}}} key.
DolphinC2_EN_zentai_F_pre_FM.book Page 82 Friday, February 25, 2005 7:09 PM

Registering Folders
83
5
Registering Folders
By registering a shared folder, youcan send scan files to it directly.There are two types of protocol youcan use: • SMB
For sending files to shared Win-dows folders
• FTPUse when sending files to an FTPserver
Note❒ This registration is applicable when
Scanner Unit Type 480 is installed.❒ For details about protocols, server
names, and folder levels, consultyour network administrator.
❒ You can prevent unauthorized us-ers from accessing folders from themachine. See p.95 “Registering aProtection Code”.
❒ You can only select either SMB orFTP. If you change protocol afterfinishing your settings, all previ-ous entries are cleared.
❒ You can register folders as a group.
ReferenceFor details about network settings,see “Setting Up the Machine on aNetwork”, Network Guide.For details about Scan to Folder,see "Sending Scan Files by Scan toFolder", Scanner Reference.
Using SMB to Connect
Note❒ To register a folder in an FTP serv-
er, see p.87 “Using FTP to Con-nect”.
To register an SMB folder
AAAA Press the {{{{User Tools/Counter}}}} key.
BBBB Press [System Settings].
CCCC Press [Administrator Tools], and thenpress [TTTTNext].
DDDD Press [Address Book Management].
EEEE Select the name whose folder youwant to register.
Press the name key, or enter theregistered number using the num-ber keys.
Note❒ To register a name in the Ad-
dress Book, see p.74 “Register-ing a Name”.
AHD101S
DolphinC2_EN_zentai_F_pre_FM.book Page 83 Friday, February 25, 2005 7:09 PM

Registering Addresses and Users
84
5
FFFF Press [Auth. Info], and then press[TTTTNext].
GGGG Press [Specify Other Auth. Info] onthe right side of Folder Authenti-cation.
Note❒ When [Do not Specify] is selected,
the SMB User Name and SMBPassword that you have speci-fied in Default User Name /Password (Send) of File Trans-fer settings applies. For details,see "File Transfer", NetworkGuide.
❒ If User Authentication is speci-fied, contact your administra-tor.
HHHH Press [Change] under Login UserName.
IIII Enter the login user name, andthen press [OK].
Note❒ You can enter up to 128 charac-
ters for the login user name.
Referencep.129 “Entering Text”
JJJJ Press [Change] under Login Pass-word.
KKKK Enter the password, and thenpress [OK].
Note❒ You can enter up to 128 charac-
ters for the password.
LLLL Enter the password again for con-firmation, and then press [OK].
MMMM Press [Folder].
NNNN Confirm that [SMB] is selected.
Note❒ To specify a folder, you can ei-
ther enter the path manually orlocate the folder by browsingthe network.
Referencep.84 “To locate the folder manu-ally”p.85 “Using Browse Network tolocate the folder”
To locate the folder manually
A Press [Change] under Path.
B Enter the path where the folderis located.
Note❒ Enter the path using this for-
mat: “\\ServerName\Share-Name\PathName”.
❒ You can also enter an IP ad-dress.
❒ You can enter a path usingup to 128 characters.
C Press [OK].
Note❒ If the format of the entered
path is not correct, a messageappears. Press [Exit], andthen enter the path again.
DolphinC2_EN_zentai_F_pre_FM.book Page 84 Friday, February 25, 2005 7:09 PM

Registering Folders
85
5
Using Browse Network to locate the folder
A Press [Browse Network].
The client computers sharingthe same network as the ma-chine appear.
Note❒ The Browse Network display
only lists client computersyou are authorized to access.
B Select a client computer.
Shared folders under it appear.
Note❒ You can press [Up One Level]
to switch between levels.C Select the folder you want to
register.The Logon display appears.
Note❒ If you have logged in with an
authenticated user name andpassword, the Logon displaywill not appear. Proceed tostepF.
D Enter the user name.
Note❒ This is a user name which is
authorized to access the fold-er.
E Enter the user's password, andthen press [OK].The Browse Network displayreappears.
Note❒ If the entered user name or
password is not correct, amessage appears. Press [Exit],and then enter the user nameand password again.
F Press [OK].
OOOO Press [Connection Test] to check thepath is set correctly.
PPPP Press [Exit].
Note❒ If the connection test fails, check
the settings, and then try again.
QQQQ Press [OK].
RRRR Press [Exit].
SSSS Press the {{{{User Tools/Counter}}}} key.
Changing a registered folder
AAAA Press the {{{{User Tools/Counter}}}} key.
BBBB Press [System Settings].
CCCC Press [Administrator Tools], and thenpress [TTTTNext].
DDDD Press [Address Book Management].
EEEE Select the name whose folder youwant to change.
Press the user name key, or enterthe registered number using thenumber keys.
Note❒ If you press , you can search
by the registered name, usercode, folder name or e-mail ad-dress.
❒ To change the name, key dis-play, and title, see p.75 “Chang-ing a Registered Name”.
FFFF Press [Folder].
DolphinC2_EN_zentai_F_pre_FM.book Page 85 Friday, February 25, 2005 7:09 PM

Registering Addresses and Users
86
5
GGGG Select the items you want to change.
To change the protocol
A Press [FTP].
B A confirmation message appears.Press [Yes].
Note❒ Changing the protocol will
clear all settings made underthe previous protocol.
C Enter each item again.
Referencep.83 “To register an SMBfolder”.
Changing items under SMB
A Press [Change] under Path.B Enter the new path where the
folder is located, and thenpress [OK].
Note❒ You can also use Browse Net-
work to specify a new folder.For details, see p.85 “UsingBrowse Network to locatethe folder”.
HHHH Press [Connection Test] to check thepath is set correctly.
IIII Press [Exit].
Note❒ If the connection test fails, check
the settings, and then try again.
JJJJ Press [OK].
KKKK Press [Exit].
LLLL Press the {{{{User Tools/Counter}}}} key.
Deleting a registered folder
Note❒ To delete a name entirely, see p.75
“Deleting a Registered Name”.
AAAA Press the {{{{User Tools/Counter}}}} key.
BBBB Press [System Settings].
CCCC Press [Administrator Tools], and thenpress [TTTTNext].
DDDD Press [Address Book Management].
EEEE Select the name whose folder youwant to delete.
Press the name key, or enter theregistered number using the num-ber keys.
FFFF Press [Folder].
GGGG Press the protocol which is notcurrently selected.A confirmation message appears.
HHHH Press [Yes].
IIII Press [OK].
JJJJ Press [Exit].
KKKK Press the {{{{User Tools/Counter}}}} key.
DolphinC2_EN_zentai_F_pre_FM.book Page 86 Friday, February 25, 2005 7:09 PM

Registering Folders
87
5
Using FTP to Connect
Note❒ To register a shared folder config-
ured in Windows, see p.83 “UsingSMB to Connect”.
To register an FTP folder
AAAA Press the {{{{User Tools/Counter}}}} key.
BBBB Press [System Settings].
CCCC Press [Administrator Tools], and thenpress [TTTTNext].
DDDD Press [Address Book Management].
EEEE Select the name whose folder youwant to register.
Press the name key, or enter theregistered number using the num-ber keys.
Note❒ To register a name in the Ad-
dress Book, see p.74 “Register-ing a Name”.
FFFF Press [Auth. Info], and then press[TTTTNext].
GGGG Press [Specify Other Auth. Info] onthe right side of Folder Authenti-cation.
Note❒ When [Do not Specify] is selected,
the SMB User Name and SMBPassword that you have speci-fied in Default User Name /Password (Send) of File Trans-fer settings applies. For details,see "File Transfer", NetworkGuide.
❒ If User Authentication is speci-fied, contact your administra-tor.
HHHH Press [Change] under Login UserName.
IIII Enter the login user name, andthen press [OK].
Note❒ You can enter up to 128 charac-
ters for the login user name.
Referencep.129 “Entering Text”
JJJJ Press [Change] under Login Pass-word.
KKKK Enter the password, and thenpress [OK].
Note❒ You can enter up to 128 charac-
ters for the password.
LLLL Enter the password again for con-firmation, and then press [OK].
MMMM Press [Folder].
AHD101S
DolphinC2_EN_zentai_F_pre_FM.book Page 87 Friday, February 25, 2005 7:09 PM

Registering Addresses and Users
88
5
NNNN Press [FTP].
OOOO Press [Change] under Server Name.
PPPP Enter the server name, and thenpress [OK].
Note❒ You can enter a server name us-
ing up to 64 characters.
QQQQ Press [Change] under Path.
RRRR Enter the path.
Note❒ You can enter an absolute path,
us in g t h i s f o rm a t : “ /u s-er/home/username”; or a rela-tive path, using this format:“directory/sub-directory”.
❒ If you leave the path blank, thelogin directory is assumed to bethe current working directory.
❒ You can also enter an IP ad-dress.
❒ You can enter a path using up to128 characters.
SSSS Press [OK].
Note❒ To change the port number,
press [Change] under Port No..Enter the port number using thenumber keys, and then press [#].
❒ You can enter 1 to 65535.
TTTT Press [Connection Test] to check thepath is set correctly.
UUUU Press [Exit].
Note❒ If the connection test fails, check
the settings, and then try again.
VVVV Press [OK].
WWWW Press [Exit].
XXXX Press the {{{{User Tools/Counter}}}} key.
Changing a registered folder
AAAA Press the {{{{User Tools/Counter}}}} key.
BBBB Press [System Settings].
CCCC Press [Administrator Tools], and thenpress [TTTTNext].
DDDD Press [Address Book Management].
EEEE Select the name whose folder youwant to change.Press the name key, or enter theregistered number using the num-ber keys.
Note❒ If you press , you can search
for a user by name/index, usercode, folder name, or e-mail ad-dress.
❒ To change the name, key dis-play, and title, see p.75 “Chang-ing a Registered Name”.
FFFF Press [Folder].
DolphinC2_EN_zentai_F_pre_FM.book Page 88 Friday, February 25, 2005 7:09 PM

Registering Folders
89
5
GGGG Select the items you want to change.
To change the protocol
A Press [SMB].
B A confirmation message appears.Press [Yes].
Note❒ Changing the protocol will
clear all settings made underthe previous protocol.
C Enter each item again.
Referencep.87 “To register an FTP fold-er”.
Changing items under FTP
A Press [Change] under Port No.
B Enter the new port number,and then press [#].
C Press [Change] under ServerName.
D Enter the new server name, andthen press [OK].
E Press [Change] under Path.
F Enter the new path, and thenpress [OK].
HHHH Press [Connection Test] to check thepath is set correctly.
IIII Press [Exit].
Note❒ If the connection test fails, check
the settings, and then try again.
JJJJ Press [OK].
KKKK Press [Exit].
LLLL Press the {{{{User Tools/Counter}}}} key.
Deleting a registered folder
Note❒ To delete a name entirely, see p.75
“Deleting a Registered Name”.
AAAA Press the {{{{User Tools/Counter}}}} key.
BBBB Press [System Settings].
CCCC Press [Administrator Tools], and thenpress [TTTTNext].
DDDD Press [Address Book Management].
EEEE Select the name whose folder youwant to delete.
Press the name key, or enter theregistered number using the num-ber keys.
FFFF Press [Folder].
GGGG Press the protocol which is notcurrently selected.A confirmation message appears.
HHHH Press [Yes].
IIII Press [OK].
JJJJ Press [Exit].
KKKK Press the {{{{User Tools/Counter}}}} key.
DolphinC2_EN_zentai_F_pre_FM.book Page 89 Friday, February 25, 2005 7:09 PM

Registering Addresses and Users
90
5
Registering Names to a Group
You can register names to a group toenable easy management of e-mailaddresses and folders for each group.To add names to a group, the groupsmust be registered beforehand.
Note❒ You can register up to 500 names
for each group.❒ When using Scan to Folder func-
tion, you cannot send scan files to agroup with over 50 folders regis-tered.
❒ You can set a protection code toprevent unauthorized access to thefolders registered in a group. Fordetails, see p.96 “Registering a Pro-tection Code for a Group”.
Registering a New Group
AAAA Press the {{{{User Tools/Counter}}}} key.
BBBB Press [System Settings].
CCCC Press [Administrator Tools], and thenpress [TTTTNext].
DDDD Press [Address Book: Program / Change /Delete Group].
EEEE Press [New Program].
FFFF Press [Change] under Group Name.
GGGG Enter the group name, and thenpress [OK].
The Key Display name is set auto-matically.
Referencep.129 “Entering Text”
HHHH Press the title key under Select Ti-tle, if necessary.
Note❒ The keys you can select are as
follows:• [Freq.]… Added to the page
that is displayed first.• [AB], [CD], [EF], [GH], [IJK],
[LMN], [OPQ], [RST], [UVW],[XYZ], [1] to [10]… Added tothe list of items in the select-ed title.
❒ You can select [Freq.] and onemore page for each title.
IIII When you want to change the keydisplay, press [Change] under KeyDisplay. Enter the key display,and then press [OK].
JJJJ Press [OK].
KKKK Press [Exit].
LLLL Press the {{{{User Tools/Counter}}}} key.
AHD101S
DolphinC2_EN_zentai_F_pre_FM.book Page 90 Friday, February 25, 2005 7:09 PM

Registering Names to a Group
91
5
Registering Names to a Group
You can put names that have beenregistered in the Address Book into agroup.When registering new names, youcan also register groups at the sametime.
AAAA Press the {{{{User Tools/Counter}}}} key.
BBBB Press [System Settings].
CCCC Press [Administrator Tools], and thenpress [TTTTNext].
DDDD Press [Address Book Management].
EEEE Select the name to register in agroup.Press the name key, or enter theregistered number using the num-ber keys.
Note❒ If you press , you can search
by the registered name, usercode, folder name or e-mail ad-dress.
FFFF Press [Add to Group].
GGGG Select a group to which you wantto add the name to.
Note❒ If you press , you can search
for a group by entering thegroup name.
The group keys that you have se-lected becomes highlighted, andthe name is added to them.
To remove the name, press thehighlighted group again.
HHHH Press [OK].
IIII Press [Exit].
JJJJ Press the {{{{User Tools/Counter}}}} key.
Adding a Group to Another Group
You can add a group to anothergroup.
AAAA Press the {{{{User Tools/Counter}}}} key.
BBBB Press [System Settings].
CCCC Press [Administrator Tools], and thenpress [TTTTNext].
DDDD Press [Address Book: Program / Change /Delete Group].
EEEE Select the group that you want toput into another group.
Press the group key, or enter theregistered number using the num-ber keys.
FFFF Press [Add to Group].
GGGG Select the group which you wantto add to.
DolphinC2_EN_zentai_F_pre_FM.book Page 91 Friday, February 25, 2005 7:09 PM

Registering Addresses and Users
92
5
The group key that you have se-lected becomes highlighted, andthe group is added to it.
HHHH Press [OK].
IIII Press [Exit].
JJJJ Press the {{{{User Tools/Counter}}}} key.
Displaying Names Registered in Groups
You can check the names or groupsregistered in each group.
AAAA Press the {{{{User Tools/Counter}}}} key.
BBBB Press [System Settings].
CCCC Press [Administrator Tools], and thenpress [TTTTNext].
DDDD Press [Address Book: Program / Change /Delete Group].
EEEE Select the group where the mem-bers you want to check is regis-tered.
FFFF Press [Programd. User/Group].
All the names registered will bedisplayed.
GGGG Press [OK].
HHHH Press [Exit].
IIII Press the {{{{User Tools/Counter}}}} key.
Removing a Name from a Group
AAAA Press the {{{{User Tools/Counter}}}} key.
BBBB Press [System Settings].
CCCC Press [Administrator Tools], and thenpress [TTTTNext].
DDDD Press [Address Book Management].
EEEE Select the name to remove from agroup.Press the name key, or enter theregistered number using the num-ber keys.
FFFF Press [Add to Group].
GGGG Select the group from which youwant to remove the name.
Note❒ Highlighted keys indicate groups
in which the name has been reg-istered.
The name is removed from thegroup.
HHHH Press [OK].
IIII Press [Exit].
JJJJ Press the {{{{User Tools/Counter}}}} key.
DolphinC2_EN_zentai_F_pre_FM.book Page 92 Friday, February 25, 2005 7:09 PM

Registering Names to a Group
93
5
Deleting a Group within a Group
AAAA Press the {{{{User Tools/Counter}}}} key.
BBBB Press [System Settings].
CCCC Press [Administrator Tools], and thenpress [TTTTNext].
DDDD Press [Address Book: Program / Change /Delete Group].
EEEE Within the group, select the groupsyou want to delete.
Select groups either by pressingtheir keys or entering their regis-tration numbers.
FFFF Press [Add to Group].
Keys of groups that contain thosegroups you selected in stepE ap-pear reversed and in black.
GGGG Select the groups you want to de-lete. Keys of selected groups ap-pear reversed and in white.
HHHH Press [OK].
The groups you selected in stepEare deleted from the groups thatappear reversed and in white.
Changing a Group Name
AAAA Press the {{{{User Tools/Counter}}}} key.
BBBB Press [System Settings].
CCCC Press [Administrator Tools], and thenpress [TTTTNext].
DDDD Press [Address Book: Program / Change /Delete Group].
EEEE Press the group key you want tochange.
FFFF Enter the items.
To change the group name and key display
A Press [Change] under GroupName or Key Display.
B Enter the new group name orkey display, and then press[OK].
To change the title
A Press the title key under SelectTitle.
To change the registration number
A Press [Change] under Registra-tion No..
B Enter the new registrationnumber using the numberkeys.
C Press [#].
DolphinC2_EN_zentai_F_pre_FM.book Page 93 Friday, February 25, 2005 7:09 PM

Registering Addresses and Users
94
5
GGGG Press [OK].
HHHH Press [Exit].
IIII Press the {{{{User Tools/Counter}}}} key.
Deleting a Group
AAAA Press the {{{{User Tools/Counter}}}} key.
BBBB Press [System Settings].
CCCC Press [Administrator Tools], and thenpress [TTTTNext].
DDDD Press [Address Book: Program / Change /Delete Group].
EEEE Press [Delete].
FFFF Press a group key you want to de-lete.
GGGG Press [Yes].
HHHH Press [Exit].
IIII Press the {{{{User Tools/Counter}}}} key.
DolphinC2_EN_zentai_F_pre_FM.book Page 94 Friday, February 25, 2005 7:09 PM

Registering a Protection Code
95
5
Registering a Protection Code
You can stop sender's names or fold-ers being accessed by setting a protec-tion code.You can use this function to protectthe following:• Folders
You can prevent unauthorized ac-cess to folders.
• Sender's namesYou can prevent misuse of sender'snames.
Note❒ To protect the mail sender's name,
the user code must be registered inadvance. For details, see p.76“Registering a New User Code”.
Registering a Protection Code for a Name in the Address Book
AAAA Press the {{{{User Tools/Counter}}}} key.
BBBB Press [System Settings].
CCCC Press [Administrator Tools], and thenpress [TTTTNext].
DDDD Press [Address Book Management].
EEEE Select the name whose protectioncode you want to register.
Press the name key, or enter theregistered number using the num-ber keys.
FFFF Press [Protection].
GGGG Press [Destination] or [Sender] un-der Use Name as.
Note❒ Both [Destination] and [Sender]
can be selected at the same time.
HHHH Select Protection Object.
To protect the folder
A Press [Folder Destination] underProtection Object.
Note❒ You have to select [Destina-
tion] under Use Name as inadvance.
To protect the sender
A Press [Sender] under ProtectionObject.
AHD101S
DolphinC2_EN_zentai_F_pre_FM.book Page 95 Friday, February 25, 2005 7:09 PM

Registering Addresses and Users
96
5
Note❒ You have to select [Sender]
under Use Name as in ad-vance.
IIII Press [Change] under ProtectionCode.
JJJJ Enter a protection code using thenumber keys, and then press [#].
Note❒ You can enter up to eight digits.
KKKK Press [OK].
LLLL Press [Exit].
MMMM Press the {{{{User Tools/Counter}}}} key.
Registering a Protection Code for a Group
AAAA Press the {{{{User Tools/Counter}}}} key.
BBBB Press [System Settings].
CCCC Press [Administrator Tools], and thenpress [TTTTNext].
DDDD Press [Address Book: Program / Change /Delete Group].
EEEE Press the group key you want toprotect or enter the registerednumber using the number keys.
FFFF Press [Protection].
GGGG Press [Folder Destination] under Pro-tection Object.
HHHH Press [Change] under ProtectionCode.
IIII Enter a protection code using thenumber keys, and then press [#].
Note❒ You can enter up to eight digits.
JJJJ Press [OK].
KKKK Press [Exit].
LLLL Press the {{{{User Tools/Counter}}}} key.
AHD101S
DolphinC2_EN_zentai_F_pre_FM.book Page 96 Friday, February 25, 2005 7:09 PM

Registering SMTP and LDAP Authentication
97
5
Registering SMTP and LDAP Authentication
SMTP Authentication
For each user registered in the Ad-dress Book, you can register a loginuser name and login password to beused when accessing an SMTP server.
ReferenceTo use an SMTP server, you needto program it beforehand. For de-tails, see “File Transfer”, NetworkGuide.
Note❒ When [Do not Specify] is selected for
SMTP Authentication, the UserName and Password that you havespecified in SMTP Authenticationof File Transfer settings applies.For details, see “File Transfer", Net-work Guide.
❒ If User Authentication has beenspecified, contact the administra-tor.
AAAA Press the {{{{User Tools/Counter}}}} key.
BBBB Press [System Settings].
CCCC Press [Administrator Tools], and thenpress [TTTTNext].
DDDD Press [Address Book Management].
EEEE Press the name you want to setSMTP authentication to.
You can also enter the registerednumber using the number keys.
Note❒ To register a name in the Ad-
dress Book, see p.74 “Register-ing a Name”.
FFFF Press [Auth. Info].
GGGG Press [Specify Other Auth. Info] onthe right side of SMTP Authenti-cation.
HHHH Press [Change] under Login UserName.
IIII Enter the login user name, andthen press [OK].
Note❒ You can enter up to 191 charac-
ters.❒ When using POP before SMTP
Authentication, you can enterup to 63 alphanumeric charac-ters.
Referencep.129 “Entering Text”
JJJJ Press [Change] under Login Pass-word.
AHD101S
DolphinC2_EN_zentai_F_pre_FM.book Page 97 Friday, February 25, 2005 7:09 PM

Registering Addresses and Users
98
5
KKKK Enter the password, and then press[OK].
Note❒ You can enter up to 64 charac-
ters for the password.
LLLL Enter the password again to con-firm, and then press [OK].
MMMM Press [OK].
Note❒ To change the SMTP Authenti-
cation settings, repeat steps H toM.
LDAP Authentication
For each user registered in the Ad-dress Book, you can register a loginuser name and login password to beused when accessing an LDAP server.
ReferenceTo use an LDAP server, you needto program it beforehand. For de-tails, see “LDAP Server Settings”,Network Guide.
Note❒ When [Do not Specify] is selected for
LDAP Authentication, the UserName and Password that you havespecified in Program/ChangeLDAP Server of AdministratorTools settings applies. For details,see “Program / Change / DeleteLDAP Server”, Network Guide.
AAAA Press the {{{{User Tools/Counter}}}} key.
BBBB Press [System Settings].
CCCC Press [Administrator Tools], and thenpress [TTTTNext].
DDDD Press [Address Book Management].
EEEE Press the name you want to setLDAP authentication to.
You can also enter the registerednumber using the number keys.
Note❒ To register a name in the Ad-
dress Book, see p.74 “Register-ing a Name”.
FFFF Press [Auth. Info], and then press[TTTTNext].
GGGG Press [Specify Other Auth. Info] onthe right side of LDAP Authenti-cation.
HHHH Press [Change] under Login UserName.
AHD101S
DolphinC2_EN_zentai_F_pre_FM.book Page 98 Friday, February 25, 2005 7:09 PM

Registering SMTP and LDAP Authentication
99
5
IIII Enter the login user name, andthen press [OK].
Note❒ You can enter up to 128 charac-
ters for the user name.
Referencep.129 “Entering Text”
JJJJ Press [Change] under Login Pass-word.
KKKK Enter the password, and then press[OK].
Note❒ You can enter up to 128 charac-
ters for the password.
LLLL Enter the password again to con-firm, and then press [OK].
MMMM Press [OK].
Note❒ To change the LDAP Authenti-
cation settings, repeat steps H toM.
DolphinC2_EN_zentai_F_pre_FM.book Page 99 Friday, February 25, 2005 7:09 PM

Registering Addresses and Users
100
5
DolphinC2_EN_zentai_F_pre_FM.book Page 100 Friday, February 25, 2005 7:09 PM

101
6. Troubleshooting
If Your Machine Does Not Operate As You Want
The following chart gives explanations of common problems and messages. Ifother messages appear, follow the instructions displayed.
Note❒ If you cannot make copies as you want because of paper type, paper size, or
paper capacity problems, use recommended paper. See p.137 “Copy Paper”.
General
Problem Causes Solutions
“Please wait.” ap-pears.
This message appears when you turn on the oper-ation switch.
Wait for the machine to get ready.
This message appears when you change the toner cartridge.
The display is off. The screen contrast knob is turned to the dark position.
Set the screen contrast knob to the light position so that the display panel can be seen properly.
The machine is in Energy Saver mode.
Press the {{{{Energy Saver}}}} key to can-cel Energy Saver mode.
The operation switch is turned off.
Turn on the operation switch.
Nothing happens when the operation switch is turned on.
The main power switch is turned off.
Turn on the main power switch.
The main power indicator continues blinking and does not turn off when pressed.
This occurs in the follow-ing cases:
• The machine is commu-nicating with external equipment.
• The hard disk is active.
When you turn the main power off, check if the machine is not commu-nicating with a computer.
Memory is full. The number of scanned pages exceeds the capacity of the hard disk.
Follow the instructions displayed on the control panel.
The function status indica-tor is red.
The function associated with the red indicator is in-terrupted.
Press the function key correspond-ing to the indicator. Follow the in-structions that appear on the control panel.
DolphinC2_EN_zentai_F_pre_FM.book Page 101 Friday, February 25, 2005 7:09 PM

Troubleshooting
102
6
Original images are print-ed on the reverse side of the paper.
You may have loaded the paper incorrectly.
Load paper correctly. Load paper into the cut paper tray print side down, and into the paper bypass print side up. See p.105 “Loading Paper”.
Misfeeds occur frequently. There are folds or wrinkles in the paper.
Remove any folds or wrinkles from the paper.
Jammed or torn paper is in-side the machine.
Remove the paper, as necessary. See p.110 “xClearing Misfeeds”.
The cut paper tray's side guide or back fence may not be set properly.
Check the side guide or back fence is set properly. See p.107 “Loading Cut Paper”.
You may have loaded pa-per of a size different from the paper size settings.
When using paper of a size that can-not be detected automatically, use Tray Paper Size Settings to set the paper size. See p.62 “Tray Paper Size: Tray 1, Tray 2”, p.62 “Tray Pa-per Size: Tray 3, Tray 4 (when Paper Roll Trays are installed)” and p.63 “Tray Paper Size: Tray 3, Tray 4 (when Cut Paper Trays are in-stalled)”.
Originals jam frequently. Originals are curled. Smooth out any curls and try again.
An error C message re-mains, even if misfed paper is removed.
You did not open and close the upper section of the fusing unit.
When a misfeed C message appears, it remains until you open and close the upper section of the fusing unit. Open the fusing unit cover in the back, and then the upper section of the fusing unit to check if any paper remains inside.
The user code entry dis-play appears.
Users are restricted by user management.
Enter the user code (max.eight dig-its), and then press [#].
The Authentication screen appears.
Basic Authentication, Win-dows Authentication, or LDAP Authentication is set.
Enter your login user name and user password. See p.27 “When the Au-thentication Screen is displayed”.
“You do not have the privileges to use this func-tion.” continues to be displayed even though you have entered a valid user code.
This user code is not al-lowed to use the function selected.
Contact the administrator.
Press the {{{{Energy Saver}}}} key. Con-firm that the display goes off, and then press the {{{{Energy Saver}}}} key again. The display will return to the user code entry display.
“Authentication has failed.” is dis-played.
The entered login user name or login password is not correct.
Ask the user administrator for the correct login user name and pass-word.
The machine cannot per-form authentication.
Contact your administrator.
Problem Causes Solutions
DolphinC2_EN_zentai_F_pre_FM.book Page 102 Friday, February 25, 2005 7:09 PM

If Your Machine Does Not Operate As You Want
103
6
Document Server
“Selected files contain file(s) that the user does not have access privileges to. Please note that only the files with access privi-leges will be de-leted.” is displayed.
You have tried to delete files without the authority to do so.
Files can be deleted by the file cre-ator or file administrator. To delete a file which you are not authorized to delete, contact the file creator.
Problem Action
“Scanned pages exceeded max. number. Do you want to store the scanned pages as a file? ” appears.
The number of scanned pages exceeds the ca-pacity per file of the Document Server.
If you want to store scanned originals as a file, press [Yes]. The originals are stored as a file in the Document Server.
If you don't want scanned originals to be stored, press [No]. The scanning data will be cleared.
You forgot your password. Contact the administrator.
You cannot find out what is stored in a file. Check the date or time column in the Docu-ment Server: Files display.
Check document content by printing its first page. Press the line of the document in the Document Server: Select Files to Print display, and then press [Print 1st Page] followed by the {{{{Start}}}} key.
Memory becomes full frequently. • Press [Delete File] to delete selected docu-ments to increase available memory.
• Delete documents stored using the scanner function. See Scanner Reference.
You want to check print quality before making a large print run.
First print out one set using the {{{{Sample Copy}}}} key.
You want to store a document so it will not be deleted automatically.
Select [No] for Auto Delete File, and then store the document in the Document Server. See p.70 “Auto Delete File”.
If you later switch your selection to [On], the change will apply only to documents stored after the change.
Problem Causes Solutions
DolphinC2_EN_zentai_F_pre_FM.book Page 103 Friday, February 25, 2005 7:09 PM

Troubleshooting
104
6
“Original is being scanned by another function.” appears.
The Copy function is in use. To cancel the job in process, first press [Exit], and then press the {{{{Copy}}}} key. Next press the {{{{Clear/Stop}}}} key. When the message “[Stop] key was pressed. Stop printing?” appears, press [Stop].
Problem Action
DolphinC2_EN_zentai_F_pre_FM.book Page 104 Friday, February 25, 2005 7:09 PM

Loading Paper
105
6
Loading Paper
R CAUTION:
R CAUTION:
R CAUTION:
Important❒ When removing paper rolls, lift the paper holders on either side of the paper
roll before removing. Do not lift one side only. This could damage the ma-chine.
ReferenceFor details about paper sizes and types that can be loaded, see p.137 “CopyPaper”.For details about changing the paper size, see p.115 “Changing the PaperSize”.
• Be careful when replacing the roll paper or removing misfed paper by follow-ing the operating instructions properly. Otherwise, an injury may result from the paper cutter inside.
• The fusing section of this machine might be very hot. Caution should be tak-en when removing misfed paper.
• Hold the paper rolls horizontally with both hands. When you grab the paper holder and hold the paper roll vertically, the paper roll may fall off and an in-jury may result.
DolphinC2_EN_zentai_F_pre_FM.book Page 105 Friday, February 25, 2005 7:09 PM

Troubleshooting
106
6
Loading Paper Roll
Note❒ Set the paper volume again after loading the paper roll. See p.59 “Paper Vol-
ume”.❒ When you change the paper size or paper type, make settings under System
Settings, see p.62 “Tray Paper Size: Tray 1, Tray 2”, p.62 “Tray Paper Size:Tray 3, Tray 4 (when Paper Roll Trays are installed)” and p.63 “Paper Type:Tray 1–4”.
AHD027S
DolphinC2_EN_zentai_F_pre_FM.book Page 106 Friday, February 25, 2005 7:09 PM

Loading Paper
107
6
Loading Cut Paper
Note❒ When you load paper of size that cannot be detected automatically, select the
paper size in System Settings. See p.63 “Tray Paper Size: Tray 3, Tray 4 (whenCut Paper Trays are installed)”.
----When using translucent paper
Note❒ Load the translucent paper into Tray 4.
Make sure to set the side guides before loading paper.
Note❒ After loading paper into the tray, make sure the paper is placed straightly and
the side guides are set securely onto it.
AHD028S
AGL021S
DolphinC2_EN_zentai_F_pre_FM.book Page 107 Friday, February 25, 2005 7:09 PM

Troubleshooting
108
6
DDDDAdding Toner
R WARNING:
R CAUTION:
R CAUTION:
R CAUTION:
R CAUTION:
R CAUTION:
Important❒ Faults may occur if you use non-recommended toner.❒ Replace toner while the machine is turned on. If you turn the machine off,
your settings will be lost and you will not be able to resume copying.❒ Always replace toner when the message appears.
Note❒ When the indicators blink, replace the toner as soon as possible.❒ If toner runs out, the message “DAdd toner” appears and you cannot make
copies.
ReferenceFor details about toner storage, see p.120 “Toner”.
• Do not incinerate used toner or toner containers. Toner dust might ig-nite when exposed to an open flame. Dispose of used toner containers in accordance with local regulations.
• Keep toner (used or unused) and toner containers out of reach of children.
• If toner or used toner is inhaled, gargle with plenty of water and move into a fresh air environment. Consult a doctor if necessary.
• If toner or used toner gets into your eyes, flush immediately with large amounts of water. Consult a doctor if necessary.
• If toner or used toner is swallowed, dilute by drinking a large amount of wa-ter. Consult a doctor if necessary.
• Avoid getting toner on your clothes or skin when removing a paper jam or replacing toner. If your skin comes into contact with toner, wash the affected area thoroughly with soap and water.
• If toner gets on your clothing, wash with cold water. Hot water will set the toner into the fabric and may make removing the stain impossible.
DolphinC2_EN_zentai_F_pre_FM.book Page 108 Friday, February 25, 2005 7:09 PM

DAdding Toner
109
6
DolphinC2_EN_zentai_F_pre_FM.book Page 109 Friday, February 25, 2005 7:09 PM

Troubleshooting
110
6
xxxxClearing Misfeeds
R CAUTION:
R CAUTION:
Important❒ Do not turn off the operation switch when removing jammed originals. If you
do, your settings will be lost.❒ Remove jammed originals completely, taking care not to tear them. If scraps
of paper remain inside, originals will jam again and may cause damage to themachine.
❒ If the original misfeeds again, call your service representative immediately.
Note❒ Paper jam locations may be displayed in more than one place at a time. If this
happens, check all the locations indicated.❒ Instructions for clearing paper jams in the copy output area and paper roll
tray are contained in the stickers on the machine.
• The fusing section of this machine might be very hot. Caution should be tak-en when removing misfed paper.
• Be careful when replacing the roll paper or removing misfed paper by follow-ing the operating instructions properly. Otherwise, an injury may result from the paper cutter inside.
AGL022S
DolphinC2_EN_zentai_F_pre_FM.book Page 110 Friday, February 25, 2005 7:09 PM

xClearing Misfeeds
111
6
Original Misfeeds (P)
Paper Misfeeds in the Paper Tray (A1, A2)
When you can see the edge of the paper
AHD029S
AHD030S
AHD031S
DolphinC2_EN_zentai_F_pre_FM.book Page 111 Friday, February 25, 2005 7:09 PM

Troubleshooting
112
6
When you cannot see the edge of the paper
Paper misfeeds in the cut paper trays
AHD032S
AHD033S
DolphinC2_EN_zentai_F_pre_FM.book Page 112 Friday, February 25, 2005 7:09 PM

xClearing Misfeeds
113
6
Paper Misfeeds in the Paper Bypass (A3, B)
AHD034S
DolphinC2_EN_zentai_F_pre_FM.book Page 113 Friday, February 25, 2005 7:09 PM

Troubleshooting
114
6
Paper Misfeeds in the Rear Paper Output (C)
Important❒ When clearing the paper, be careful of the auxiliary guide and other protru-
sions.
Note❒ Even if only C is displayed, check the front area first and clear any misfed pa-
per there. If you still cannot clear the paper jam, follow the procedure below.❒ If you do not open and close the fusing unit once, the error C cannot be
cleared. Make sure to follow the steps A to C below to check if any torn paperremains inside.
AHD035S
DolphinC2_EN_zentai_F_pre_FM.book Page 114 Friday, February 25, 2005 7:09 PM

Changing the Paper Size
115
6
Changing the Paper Size
PreparationWhen changing the paper size, make sure the paper size in the User Toolsmenu are correctly set. If you do not, misfeeds might occur. If you load a paper size that is not selected automatically, you need to specifythe paper size with the User Tools. See p.62 “Tray Paper Size: Tray 1, Tray 2”,and p.63 “Tray Paper Size: Tray 3, Tray 4 (when Cut Paper Trays are in-stalled)”.The following paper sizes are not selected automatically:12"×141/2"L, 11"×15"L, 11"×14"KL, 10"×14"K, 81/2"×14"KL,81/2"×13"L, 81/2"×12"KL
Changing the Paper Roll Size
Removing the roll holder
Important❒ Always follow the instructions below when adjusting the roll holder. Do not
force the roll holder by pulling or sliding it strongly. This could damage it.
AHD036S
DolphinC2_EN_zentai_F_pre_FM.book Page 115 Friday, February 25, 2005 7:09 PM

Troubleshooting
116
6
Setting the roll holder
ReferenceFor details about the procedure of loading paper, see p.106 “Loading PaperRoll”.Confirm paper width using the paper roll tray's scale.
AHD050S
DolphinC2_EN_zentai_F_pre_FM.book Page 116 Friday, February 25, 2005 7:09 PM

Changing the Paper Size
117
6
Changing the Cut Paper Size
AHD028S
DolphinC2_EN_zentai_F_pre_FM.book Page 117 Friday, February 25, 2005 7:09 PM

Troubleshooting
118
6
DolphinC2_EN_zentai_F_pre_FM.book Page 118 Friday, February 25, 2005 7:09 PM

119
7. Remarks
Dos and Don'ts
R WARNING:
R CAUTION:
Important❒ Do not turn off the main power
switch while the On indicator is litor blinking. This may cause dam-age to the hard disk or memory.
• Do not touch areas on or aroundthe fusing unit. These areas get hot.
• When you use this machine for along time in a poorly ventilatedconfined space, you may detect anodd smell. To keep the workplacecomfortable, we recommend goodventilation.
• The area around the ventilationholes might feel warm. This iscaused by exhaust air and is not amalfunction.
• Do not turn off the operationswitch while using each function.Make sure each function is fin-ished first.
• Do not open the main unit cover,the paper roll tray, or the cut papertray while copying. If you do, mis-feeds might occur.
• Do not leave the main unit openmore than 10 minutes, otherwisecopy quality may deteriorate.
• If you do not use the machine for along time, remove the paper fromthe paper roll tray, or the cut papertray and place it in its storage bag.
• Condensation can lead to imagedeterioration. To prevent this, thismachine has an anti-condensationfunction. Even when the mainpower switch is in the off position,the anti-condensation heater is ac-tive, keeping the machine bodyslightly warm.
• This machine has the anti-humidi-ty function. Even when the mainpower switch is in the off position,the anti-humidity heater is active ifit is turned on.
• Keep the machine away from flammable liquids, gases, and aerosols. A fire or an electric shock might occur.
• Unplug the power cord from the wall outlet before you move the machine. While moving the ma-chine, you should take care that the power cord will not be dam-aged under the machine.
DolphinC2_EN_zentai_F_pre_FM.book Page 119 Friday, February 25, 2005 7:09 PM

Remarks
120
7
Toner
Handling Toner
R WARNING:
R CAUTION:
Important❒ Faults may occur if you use non-recommended toner.
ReferenceTo add toner, see p.108 “DAdding Toner”.
Toner Storage
When storing toner, the following precautions should always be followed:• Store toner containers in a cool, dry place free from direct sunlight.
Important
Used Toner
Note❒ Toner cannot be re-used.
• Do not incinerate used toner or toner containers. Toner dust might ig-nite when exposed to an open flame. Dispose of used toner containers in accordance with local regulations.
• Keep toner (used or unused) and toner containers out of reach of children.
Lay toner containers on a flat surface during storage.
DolphinC2_EN_zentai_F_pre_FM.book Page 120 Friday, February 25, 2005 7:09 PM

Where to Put Your Machine
121
7
Where to Put Your Machine
Machine Environment
Choose your machine's location care-fully. Environmental conditionsgreatly affect its performance.
Optimum environmental conditions
R CAUTION:
R CAUTION:
• Temperature: 10-30 °C (50-86 °F)• Humidity: 15-90%• A strong and level base.• The machine must be level within
5 mm, 0.2 inches: both front to rearand left to right.
• To avoid possible buildup of ozone,be sure to locate this machine in alarge well ventilated room that hasan air turnover of more than 30m3/hr/person.
Environments to avoid
• Areas exposed to direct sunlight orother sources of strong light (morethan 1,500 lux).
• Areas directly exposed to cool airfrom an air conditioner or warmair from a heater. (Sudden temper-ature changes can cause condensa-tion to form inside the machine.)
• Near machines generating ammo-nia, such as a diazo copy machine.
• Places where the machine will besubject to frequent strong vibra-tion.
• Dusty areas.• Areas with corrosive gases.
Moving
R CAUTION:
Important❒ Be careful when moving the ma-
chine. Take the following precau-tions:• Turn off the main power. See
p.30 “Turning Off the MainPower”.
• Unplug the power cord fromthe wall outlet. When you pullthe plug out of the socket, gripthe plug (not the cord) to avoiddamaging the cord, thereby re-ducing the risk of fire and elec-tric shock.
• Close all covers and trays.❒ Move the machine carefully. If you
do not, it could be damaged andstored files might be lost.
❒ Protect the machine from strongshocks. Impact can damage thehard disk and cause stored files tobe lost. As a precautionary mea-sure, files should be copied to an-other computer.
• Keep the machine away from hu-midity and dust. Otherwise a fire or an electric shock might occur.
• Do not place the machine on an unstable or tilted surface. If it top-ples over, an injury might occur.
• If you use the machine in a con-fined space, make sure there is a continuous air turnover.
• Unplug the power cord from the wall outlet before you move the machine. While moving the ma-chine, you should take care that the power cord will not be dam-aged under the machine.
DolphinC2_EN_zentai_F_pre_FM.book Page 121 Friday, February 25, 2005 7:09 PM

Remarks
122
7
Power Connection
R WARNING:
R CAUTION:
R CAUTION:
• When the main power switch is inthe standby position, the optionalanti-condensation heaters are on.In an emergency, unplug the ma-chine's power cord.
• When you unplug the power cord,the anti-condensation heaters gooff.
• Make sure the plug is insertedfirmly in the wall outlet.
• Voltage must not fluctuate by morethan 10%.
• The wall outlet should be near themachine and be easily accessible.
Clearance Around the Machine
Place the machine near a powersource, and provide the clearance asshown.
Note❒ For the required space when op-
tions are installed, contact yourservice representative.
• Connect the machine only to the power source described on the inside front cover of this manual. Connect the power cord directly into a wall outlet and do not use an extension cord.
• Do not damage, break or make any modifications to the power cord. Do not place heavy ob-jects on it. Do not pull it hard nor bend it more than neces-sary. These actions could cause an electric shock or fire.
• Unplug the power cord from the wall outlet before you move the machine. While moving the ma-chine, you should take care that the power cord will not be dam-aged under the machine.
• When you disconnect the power plug from the wall outlet, always pull the plug (not the cable).
Standard setting
Front more than 100 cm (40")
Rear more than 70 cm (28")
Left more than 40 cm (16")
Right more than 45 cm (18")
Top more than 45 cm (18")
ZEDH400E
AHD038S
DolphinC2_EN_zentai_F_pre_FM.book Page 122 Friday, February 25, 2005 7:09 PM

Maintaining Your Machine
123
7
Maintaining Your Machine
If the exposure glass or feed roller aredirty, you will not be able to makeclear copies. Clean them when theybecome dirty.
❖❖❖❖ Cleaning the machineWipe the machine with a soft, drycloth. If this does not remove thedirt, wipe the machine with adamp and tightly wrung cloth. If adamp cloth still does not removethe dirt, try using a mild detergent.Wipe the machine with a dry clothto remove the moisture, after usinga damp cloth.
Important❒ Do not use chemical cleaner or or-
ganic solvent, such as thinner orbenzene. If they get into the ma-chine or melt plastic parts, a failuremight occur.
❒ Do not clean parts other than thosespecified in this manual. Suchparts should be cleaned by yourservice representative.
Cleaning inside the Original Cover
If you open the original cover, youcan access the exposure glass andoriginal feed mechanism.
AAAA Lift the release lever on the origi-nal cover, and open the originalcover while holding it on bothsides.
Cleaning the exposure glass
A Wipe the exposure glass with asoft, dry cloth.
ZEDH210E
ZEDH220E
DolphinC2_EN_zentai_F_pre_FM.book Page 123 Friday, February 25, 2005 7:09 PM

Remarks
124
7
Cleaning the feed roller
A Wipe the feed roller with a soft,dry cloth while turning the roller.
Cleaning the original feed guide
A Wipe the original feed guideswith a soft, dry cloth.
Note❒ If there is paper dust or fluff
inside, remove it.
BBBB Close the original cover gentlywhile holding it on both sides.
Cleaning the Imaging Unit
Clean off toner that may have collect-ed on the imaging area.
AAAA Lift the imaging unit opening le-vers on both sides and open theimaging unit.
Important❒ Do not leave the imaging unit
open more than 10 minutes,otherwise copy quality may de-teriorate.
Note❒ While holding down the imag-
ing unit, pull the release lever toopen it.
BBBB Wipe it with a soft, dry cloth.
CCCC Close the imaging unit cover gen-tly.
ZEDH230E
ZEDH240E
AGL055S
AGL056S
AGL057S
DolphinC2_EN_zentai_F_pre_FM.book Page 124 Friday, February 25, 2005 7:09 PM

Other Functions
125
7
Other Functions
Inquiry
The inquiry functions let you confirmthe telephone numbers to contact forrepairs or to order toner. Be sure tocontact your service engineer to veri-fy the following:
❖❖❖❖ Consumbles• Telephone No. to order• Toner
❖❖❖❖ Machine Maintenance/Repair• Telephone No.• Serial No. of Machine
❖❖❖❖ Sales Representative• Telephone No.
AAAA Press the {{{{User Tools/Counter}}}} key.
BBBB Press [Inquiry].
Inquiry information is displayed.
Printing inquiry information
A Press [Print Inquiry List].
B Press the {{{{Start}}}} key.
Inquiry information is printed.
CCCC Press [Exit].
DDDD Press [Exit].
AHD101S
DolphinC2_EN_zentai_F_pre_FM.book Page 125 Friday, February 25, 2005 7:09 PM

Remarks
126
7
Changing the Display Language
You can change the language used onthe display. English is set as defaultsetting.
AAAA Press the {{{{User Tools/Counter}}}} key.
BBBB Press [Español].
The display language is changed toSpanish.
CCCC Press [Salir].
The menu appears in Spanish.
Note❒ If you want to return the display
language to “English”, repeatstep A and press [English].
AHD101S
DolphinC2_EN_zentai_F_pre_FM.book Page 126 Friday, February 25, 2005 7:09 PM

Counter
127
7
Counter
Displaying the Total Counter
You can display the total length ofsheets used or the total area of sheetsused.You can also print the counter list.
Note❒ The total length display is set as
default. If you want to change it tothe total area display, contact yourservice representative.
AAAA Press the {{{{User Tools/Counter}}}} key.
BBBB Press [Counter].
CCCC To print a counter list, press [PrintCounter List].
DDDD Press the {{{{Start}}}} key.
A counter list is printed.
AHD101S
DolphinC2_EN_zentai_F_pre_FM.book Page 127 Friday, February 25, 2005 7:09 PM

Remarks
128
7
DolphinC2_EN_zentai_F_pre_FM.book Page 128 Friday, February 25, 2005 7:09 PM

129
8. Entering Text
Entering Text
This section describes how to enter characters. When you enter a character, it isshown at the position of the cursor. If there is a character at the cursor position,the entered character is shown before that character.
Available Characters
• Alphabetic charactersABCDEFGHIJKLMNOPQRSTUVWXYZabcdefghijklmnopqrstuvwxyz
• Symbols• Numerals
0123456789
Keys
Note❒ When entering uppercase or lowercase letters continuously, use [Shift Lock] to
lock the case.
AFU110S
DolphinC2_EN_zentai_F_pre_FM.book Page 129 Friday, February 25, 2005 7:09 PM

Entering Text
130
8
Entering Text
Entering letters
AAAA Press [Shift] to switch between uppercase and lowercase.
BBBB Press the letters you want to enter.
Deleting characters
AAAA Press [Backspace] or [Delete All] to delete characters.
DolphinC2_EN_zentai_F_pre_FM.book Page 130 Friday, February 25, 2005 7:09 PM

131
9. Specifications
Main Unit
❖❖❖❖ Configuration:Console
❖❖❖❖ Photosensitivity type:OPC drum
❖❖❖❖ Copy process:Dry electrostatic transfer system
❖❖❖❖ Development:Dry two-component magnetic brush development system
❖❖❖❖ Fusing:Heating roll pressure system
❖❖❖❖ Original scanning:Original feed image scanning over fixed contact image sensor
❖❖❖❖ Original size (W ×××× L):• Metric version:
Size that can be placed: 210 × 182 mm – 950 × 15000 mmScan size: 210 × 210 mm – 914 mm × 15000 mm
• Inch version: Size that can be placed: 8.3" × 7" – 37.5" × 590.5"Scan size: 8.3" × 8.3" – 35.9" × 590.5"
❖❖❖❖ Copy size (W ×××× L):• Metric version:
Paper roll: 210 × 210 mm – 914 × 15000 mmPaper bypass: 210 × 182 mm – 914 × 2000 mmCut paper: A4KL – A2L
• Inch version:Paper roll: 8.3" × 8.3" – 35.9" × 590.5"Paper bypass: 8.3" × 7" – 35.9" × 78"Cut paper: 8 1/2" × 11"KL – 18" × 24"L
DolphinC2_EN_zentai_F_pre_FM.book Page 131 Friday, February 25, 2005 7:09 PM

Specifications
132
9
❖❖❖❖ Reproduction ratio:• Metric version:
Full-size: 100%Reduce: 25.0%, 35.4%, 50.0%, 70.7%Enlarge: 141.4%, 200.0%, 282.8%, 400.0%Zoom: 25.0 – 400.0% (0.1% increments)
• Inch version (Engineering):Full-size: 100%Reduce: 25.0%, 32.4%, 50.0%, 64.7%Enlarge: 129.4%, 200.0%, 258.8%, 400.0%Zoom: 25.0 – 400.0% (0.1% increments)
• Inch version (Architecture):Full-size: 100%Reduce: 25.0%, 33.3%, 50.0%, 66.7%Enlarge: 133.3%, 200.0%, 266.7%, 400.0%Zoom: 25.0 – 400.0% (0.1% increments)
❖❖❖❖ Copying speed (full-size copying):4.5 copies/minute (A0(E)K), 8.0 copies/minute (A1(D)L)
❖❖❖❖ Original:Sheet
❖❖❖❖ Original weight:• Metric version: 20.9 – 157 g/m2 and 0.03 – 1 mm • Inch version: 5.6 – 41.8 lb. and 1.1 Mil – 40 Mil
❖❖❖❖ Warm-up time:Less than 2 minutes (23°C)
❖❖❖❖ First copy time:• Metric version:
Paper roll tray: A1L 18 seconds , A0K 25 seconds (Tray 1, front paper exit)Cut paper tray: A4L 16 seconds, A2L 18 seconds (Tray 3, front paper exit)Paper bypass: 31 seconds
• Inch version:Paper roll tray: DL 18 seconds , EK 25 seconds (Tray 1, front paper exit)Cut paper tray: 81/2" × 11"L 16 seconds, 18" × 24"L 18 seconds (Tray 3,front paper exit)Paper bypass: 31 seconds
❖❖❖❖ Copy paper weight:• Metric version: 52.3 – 110 g/m2
• Inch version: 13.9 – 29.3 lb
DolphinC2_EN_zentai_F_pre_FM.book Page 132 Friday, February 25, 2005 7:09 PM

Main Unit
133
9
❖❖❖❖ Non-reproduction area:• Metric version:
• Top: 8 mm• Bottom: 10 mm• Left and Right 2 ± 2 mm
• Inch version:• Top: 0.32"• Bottom: 0.40"• Left and Right 0.08" ± 0.08"
❖❖❖❖ Continuous copying count:99 copies
❖❖❖❖ Copy paper feed method:Paper bypass, paper roll × 2
❖❖❖❖ Resolution:600 dpi
❖❖❖❖ Power source:120V, 60Hz, 20A or more
❖❖❖❖ Dimensions (W××××D××××H):1250 × 748 × 1200 mm, 49.2" × 29.4" × 47.2"
❖❖❖❖ Weight:Less than 230 kg
❖❖❖❖ Power consumption:
*1 Main unit with the cut paper tray.
Full system *1
Warm-up 1.8 kw
Stand-by (Anti-humidity heater = OFF) 1.2 kw
Stand -by (Anti-humidity heater = ON) 1.3 kw
Copying 1.7 kw
Maximum less than 1.85 kw
DolphinC2_EN_zentai_F_pre_FM.book Page 133 Friday, February 25, 2005 7:09 PM

Specifications
134
9
❖❖❖❖ Noise emission *1 :Sound Power Level:
Sound Pressure Level *2 :
*1 The above measurements are in accordance with ISO 7779 and are actual values.*2 Measured at the position of the operator.
Stand-by Less than 50.6 dB (A)
Copying Less than 65.7 dB (A)
Stand-by Less than 38 dB (A)
Copying Less than 54.7 dB (A)
DolphinC2_EN_zentai_F_pre_FM.book Page 134 Friday, February 25, 2005 7:09 PM

Options
135
9
Options
Roll Feeder Type 480
❖❖❖❖ Paper sizes:width: 210 – 914 mm, length: 210 – 15000 mm (diameter: 175 mm)
❖❖❖❖ Paper widths:• Metric version210 mm, 257 mm, 297 mm, 364 mm, 420 mm, 440 mm, 490 mm, 515 mm, 594 mm,660 mm, 680 mm, 728 mm, 800 mm, 841 mm, 880 mm, 914 mm• Inch version
81/2", 9", 11", 12", 17", 18", 22", 24", 30", 34", 36"
❖❖❖❖ Power consumption88 W (supplied by the main unit)
❖❖❖❖ Dimensions (W ×××× D ×××× H):1124 × 369 × 236 mm, 44.3" × 14.6" × 9.3"
❖❖❖❖ Weight:Approx. 36 kg
Paper Cassette Type 480
❖❖❖❖ Paper weight:Metric version: 64 – 110 g/m2
Inch version: 17 – 29.3 lb.
❖❖❖❖ Paper sizes:A2L, A3K, A3L, A4K, A4L, B3 JISL, B4 JISL, B4 JISK, 18"×24"L,17"×22"L, 12"×18"K, 12"×18"L, 12"×141/2"L, 11"×17"K, 11"×17"L,11"×15"L, 11"×14"K, 11"×14"L, 10"×14"K, 9"×12"K, 9"×12"L, 81/2"×14"K,81/2"×14"L, 81/2"×13"L, 81/2"×12"K, 81/2"×12"L, 81/2"×11"K, 81/2"×11"L
❖❖❖❖ Power consumption (Max):Approx. 76 W (supplied by the main unit)
❖❖❖❖ Paper capacity:250 sheets × 2
❖❖❖❖ Dimensions (W ×××× D ×××× H):1014 × 644 × 236 mm, 40.0" × 25.4" × 9.3"
❖❖❖❖ Weight:Approx. 38 kg
DolphinC2_EN_zentai_F_pre_FM.book Page 135 Friday, February 25, 2005 7:09 PM

Specifications
136
9
Carrier Sheet
Allows you to load bent, folded, creased, thin, or pasted originals using thissheet.
Roll Holder Unit Type A
When using several types of paper roll, you can set each type of paper roll witha roll holder unit in advance.
Original Tray Type G
It is installed in the back of the machine. This can stack originals or copies thatconsist of many sheets.
DolphinC2_EN_zentai_F_pre_FM.book Page 136 Friday, February 25, 2005 7:09 PM

Copy Paper
137
9
Copy Paper
Recommended Size and Type
The following limitations apply to each paper tray.
❖❖❖❖ Metric version
Where paper is placed
Paper type Paper size Number of sheets that can be placed
Paper roll tray (Tray 3 and Tray 4 are option-al.)
Plain paper
52.3 – 110 g/m2
Paper roll
Diameter: less than 175 mm
Core: 75.7 mm – 77 mm
Width: 210 mm, 257 mm, 297 mm, 364 mm, 420 mm, 440 mm, 490 mm, 515 mm, 594 mm, 660 mm, 680 mm, 728 mm, 800 mm, 841 mm, 880 mm, 914 mm
–
Translucent paper
52.3 – 90 g/m2
Recycled paper
52.3 – 110 g/m2
Film
0.07 mm – 0.095 mm
Cut paper tray (optional)
Plain paper
64 – 110 g/m2
A2L, A3K, A3L, A4K, A4L, B3 JISL, B4 JISL, B4 JISK
250 sheets
Recycled paper
64 – 110 g/m2
Translucent paper *1
64 – 90 g/m2
100 sheets
Paper bypass Plain paper
52.3 – 110 g/m2
A0K, A1KL, A2KL
A3KL, A4KL, B1 JISK, B2 JISKL, B3 JISKL, B4 JISKL
Paper width: 210 – 914 mm
Paper length: 182 – 2000 mm
1 sheet
Translucent paper
52.3 – 90 g/m2
Film
0.07 mm – 0.095 mm
DolphinC2_EN_zentai_F_pre_FM.book Page 137 Friday, February 25, 2005 7:09 PM

Specifications
138
9
❖❖❖❖ Inch version
*1 Load in Tray 4 only.
Important❒ Damp or curled paper may cause misfeeds. See p.32 “Anti-humidity Heater
Switch”.
Note❒ When loading paper in the cut paper tray, place the copy side face down.❒ When placing paper on the paper bypass, place the copy side face up.❒ Use recommended paper.
Where paper is placed
Paper type Paper size Number of sheets that can be placed
Paper roll tray (Tray 3 and Tray 4 are option-al.)
Plain paper
13.9 – 29.3 lb
Paper roll
13.9 – 29.3 lb
Diameter: 6.7" or less
Internal diameter: 2.98" - 3.03"
Width: 81/2", 9", 11", 12", 17", 18", 22", 24", 30", 34", 36"
–
Translucent paper (vellum)
13.9 – 23.9 lb
Recycled paper
13.9 – 29.3 lb
Film
2.8 Mil – 3.7 Mil
Cut paper tray (optional)
Plain paper
17 – 29.3 lb
18"×24"L, 17"×22"L, 12"×18"K, 12"×18"L, 12"×141/2"L, 11"×17"K, 11"×17"L, 11"×15"L, 11"×14"K, 11"×14"L, 10"×14"K, 9"×12"K, 9"×12"L, 81/2"×14"K, 81/2"×14"L, 81/2"×13"L, 81/2"×12"K, 81/2"×12"L, 81/2"×11"K, 81/2"×11"L
250 sheets
Recycled paper
17 – 29.3 lb
Translucent paper *1 (vellum)
17 – 23.9 lb
100 sheets
Paper bypass Plain paper
13.9 – 29.3 lb
• EngineeringE(34"×44")K, D(22"×34")K L, C(17"×22")K LB(11"×17")K L, A(81/2"×11")KL
• ArchitectureE(36"×48")K, D(24"×36")K L, C(18"×24")K LB(12"×18")K L, A(9"×12")KL
• Other81/2" × 14"K, 30" × 42"K
Paper width: 81/2" – 37.5"
Paper length: 7.2" – 78"
1 sheet
Translucent paper (vellum)
17 – 23.9 lb
Film
2.8 Mil – 3.7 Mil
DolphinC2_EN_zentai_F_pre_FM.book Page 138 Friday, February 25, 2005 7:09 PM

Copy Paper
139
9
Paper roll
• If humidity is high, and the paper roll has expanded due to moisture, be sureto cut off approximately 1000 mm (40"), before making copies.
• Use a paper roll that has a black core.• When a paper roll of 90 g/m2 (24 lb) or 110 g/m2 (29.3 lb) paper is used and
there is little paper left on the roll, copies may be faint near the leading and/ortrailing edge, or an image may be doubled. To prevent this, set 3-5 mm (0.11"-0.19") margins from the leading and trailing edges.
Cut paper
• Straighten curled or warped paper before loading.• To prevent multiple-sheet fed simultaneously, fan the paper before loading it
in the tray.• Do not load paper over the limit mark of the paper tray.• Make sure the paper edges of the sheets are aligned to the front of the paper
tray.• Load translucent paper lengthways when possible.• If the output copies are badly curled, turn the paper loaded in the cut paper
trays upside down, or remove the copies during the copy run.
When copying translucent paper from the paper bypass
Smooth out any curls in the paper before loading it.Load translucent paper lengthways when possible.
Hemmed paper
When using hemmed paper, wrinkles and other problems may occur on copies.Use the following procedure when copying onto hemmed paper:• Copy from the paper bypass.• Make sure the paper is straight, and align the paper guides of the paper by-
pass to the paper size.• Load only one sheet at a time.• Remove each copy from the output tray and place it on a flat surface.
Note❒ Due to the thickness of hemmed paper, copies may be faint, blurred, or wrin-
kled, and paper jams may occur. You may be able to prevent this by copyingon the rear surface of the paper or feeding the bottom of the paper in first.
DolphinC2_EN_zentai_F_pre_FM.book Page 139 Friday, February 25, 2005 7:09 PM

Specifications
140
9
Unusable Paper
R CAUTION:
Important❒ To prevent faults, do not use any of the following kinds of paper:
• Thermal fax paper• Art paper• Aluminum foil• Carbon paper• Conductive paper• OHP transparencies for color copying• Paper with perforated lines
❒ Do not use copy paper that has been already copied onto, or a failure couldoccur.
Note❒ To prevent misfeeds, do not use the following kinds of paper:
• Bent, folded, or creased paper• Torn paper• Slippery paper• Perforated paper• Rough paper• Thin paper with little stiffness• Paper with a dusty surface• Adhesive labels• OHP transparencies
❒ If you copy on to rough grain paper, the copy image might be blurred.❒ When using non-recommended paper (especially chemically treated paper,
hemmed paper, film), paper jams may occur, paper wrinkle, or copy imagedeteriorate.
❒ Do not use paper that has already been copied or printed on.❒ Do not copy on both sides of paper.❒ If you use paper roll that is not marked with a black core, paper jams might
occur when the paper ends.❒ Do not use paper printed onto with an inkjet printer, as it may become entan-
gled or jammed, which may damage the machine. In the worst event, thismay cause fire, depending on paper and ink type combination.
• Do not reuse stapled paper. Do not use aluminum foil, carbon-containing paper or other conductive paper. If you do, there is a danger of fire.
DolphinC2_EN_zentai_F_pre_FM.book Page 140 Friday, February 25, 2005 7:09 PM
Copy Paper
141
9
Paper Storage
Note❒ When storing paper, the following precautions always should be followed:
• Do not store paper where it will be exposed to direct sunlight.• Avoid storing paper in humid areas (humidity: 70% or less).• Store on a flat surface.
❒ Do not store paper vertically.❒ In high temperature and humidity environments, store paper in vinyl bags.
DolphinC2_EN_zentai_F_pre_FM.book Page 141 Friday, February 25, 2005 7:09 PM

Specifications
142
9
Handling paper
Depending on the humidity of the storage environment, handle the paper as fol-lows:
Note❒ If humidity is above 60%, turn on the anti-humidity heater.
Referencep.32 “Anti-humidity Heater Switch”
AHD039S
DolphinC2_EN_zentai_F_pre_FM.book Page 142 Friday, February 25, 2005 7:09 PM

143
INDEXA
A1 is displayed, 111A2 is displayed, 111A3 is displayed, 113Accessing user tools (System Settings), 55Adding a group to another group, 91Adding toner, 108Address Book, 71
Change Order, 68Edit Title, 69Program / Change / Delete Group, 68select title, 70
Address Book Management, 67Administrator Authentication Management, 66Administrator Tools, 54, 65Anti-humidity heater switch, 21, 22, 23, 32AOF (Always On), 70Authentication screen, 27
log off, 28log on, 27
Auto Delete File, 70Auto feed button, 21, 23Auto off mode, 17, 31Auto Off Timer, 63Auto reset timer
copier/Document Server, 64scanner, 64
B
Back fence, 23B is displayed, 113Browse network, 85
C
ChangingDisplay Language, 126File Name, 43, 44Password, 44User Name, 44
Changing a group name, 93Changing a registered e-mail destination, 81Changing a registered folder, 85, 88Changing a registered name, 75Changing a user code, 77Changing default settings, 55Changing the paper size, 115
Checking Stored Documents, 45Checking the job list, 34Check Modes key, 25C is displayed, 114Cleaning inside the original cover, 123Cleaning the imaging unit, 124Clearance around the machine, 122Clearing misfeeds, 110Clearing the counters, 79Clear Modes key, 25Clear/Stop key, 26Combined function operations, 33Common key operations, 27Control panel, 25Copy Count Display, 56Copy paper, 137Counter
Displaying, 127Cut paper, 139Cut paper trays, 23Cutter knob, 21, 23
D
Delete All Files, 70Deleting a group, 94Deleting a registered e-mail destination, 82Deleting a registered folder, 86, 89Deleting a user, 75Deleting a user code, 77Deleting jobs, 35Deleting stored documents, 48Display / Clear / Print Counter per User, 67Displaying
Counter, 127Displaying names registered in groups, 92Displaying the counter for each user code, 78Display Language
Changing, 126Display panel, 25, 26Display / Print Counter, 66Document roller, 20Document Server, 39
Downloading, 49Settings, 50Using, 41Viewing, 49
Do's and don'ts, 119
DolphinC2_EN_zentai_F_pre_FM.book Page 143 Friday, February 25, 2005 7:09 PM

144
E
E-mail destination, 80Energy Saver, 64Energy Saver key, 25Energy saver mode, 31ENERGY STAR program, 17Entering Text, 129Exiting user tools, 55Extended Security, 66
F
Feed Start Method, 58File Name
Changing, 43, 44Fine ratio adjustment
copier, 60printer, 61
Firmware Version, 70Front output auxiliary tray, 19FTP, 87Function keys, 26Function Priority, 56Function reset timer, 57Function Status indicator, 26Fusing unit cover, 20
G
General Features, 51, 56Guide to components, 19
H
Handling paper, 142Hemmed paper, 139
I
If your machine does not operate as you want, 101
Imaging unit release lever, 20Indicators, 25Inquiry, 125Interleave print, 57Interrupt key, 25
J
Job List, 33Job list display time, 61Job List key, 25
K
Key Counter Management, 66
L
LDAP authentication, 97Loading
cut paper, 107paper roll, 106
Lower tray, 22Low power mode, 17, 31
M
Machine environment, 121environments to avoid, 121optimum environmental conditions, 121
Main power indicator, 25Main power switch, 19, 29Maintaining your machine, 123Main unit, 131Manuals for this machine, iMoving, 121Multi-Access, 36
N
Names of major options, 12Number keys, 26
O
On indicator, 25Operation switch, 19, 26, 29Options, 22, 135Original cover, 19Original cover release lever, 19Original feed delay 1, 57Original feed delay 2, 57Original guide, 20Original output, 58Original table, 20Original tray, 22Other options, 24
P
Panel Off Timer, 64Panel Tone, 56Paper bypass, 20Paper bypass's paper guide, 20Paper feed knob, 21, 23Paper holder, 21, 22
DolphinC2_EN_zentai_F_pre_FM.book Page 144 Friday, February 25, 2005 7:09 PM

145
Paper output exitcopier, 61Document Server, 61
Paper roll, 139Paper roll tray, 22Paper size detect method, 59Paper storage, 141Paper thickness
paper bypass, 59paper tray, 58
Paper tray prioritycopier, 62
Paper typebypass tray, 63Tray 1– 4, 63
Paper volume, 59Password
Changing, 44Setting or changing, 43
P is displayed, 111Positions of RWARNING
and RCAUTION labels, 15Power connection, 122Print Address Book
Destination List, 69Printing stored documents, 45Printing the counter for each user code, 78Printing the First Page, 48Print Priority, 56Program / Change Administrator, 66Program / Change / Delete LDAP Server, 70Protection
destination, 95Protection code, 95, 96
R
Rear original exit (straight), 20Rear output, 21Recommended size and type, 137Registering addresses and users, 71Registering a name, 74Registering an e-mail destination, 80Registering a new group, 90Registering a new user code, 76Registering a protection code, 95Registering a protection code for a group, 96Registering a protection code for a name, 95Registering folders, 83Registering names, 74Registering names to a group, 90, 91Registering or changing
User Name, 42
Registering SMTP and LDAP authentication, 97Registering user codes, 76Removing a name from a group, 92Removing the roll holder, 115
S
Safety information, 13Sample Copy, 26, 47Saving energy, 31{Scanner Stop}}}} key, 20Searching by file name, 44Searching by user name, 45Set date, 65Set time, 65Setting or changing
Password, 43Settings
Document Server, 50Settings you can change with user tools, 56Setting the roll holder, 116Sharp (#) key, 26Sleep mode, 17SMB, 83SMTP authentication, 97Start key, 26Switching between functions, 33Symbols, 11System Auto Reset, 64System reset, 33
T
Terms, 12Text
Deleting, 130Entering, 130
Timer Settings, 53, 63Toner, 120
handling toner, 120toner storage, 120used toner, 120
To register an FTP folder, 87To register an SMB folder, 83Translucent paper, 139Tray 1, 21Tray 2, 21Tray paper settings, 62Tray paper size
Tray 1, 62Tray 2, 62Tray 3, 62, 63Tray 4, 62, 63
DolphinC2_EN_zentai_F_pre_FM.book Page 145 Friday, February 25, 2005 7:09 PM

146 EN USA B188-6607
Trays, 22Turning off
the main power, 30the power, 30
Turning onthe main power, 29the power, 29
U
Unusable paper, 140Upper output stacker, 19Upper tray, 19, 21Use LDAP Server, 70User Authentication Management, 65User Name
Changing, 44Registering or changing, 42
User Tools/Counter key, 25User Tools menu (System Settings), 51Using Document Server, 41Using FTP to Connect, 87Using SMB to Connect, 83
V
Ventilation holes, 20
W
Warm Up Notice, 56Web browser, 49What you can do with this machine, iiiWhere to put your machine, 121
DolphinC2_EN_zentai_F_pre_FM.book Page 146 Friday, February 25, 2005 7:09 PM

Paper type: OK Prince Eco G100(55kg), Paper Thickness=80 µm // Pages in book=128 // Print scale=81%Gap (when printed at 81% scale) = Pages in book × Paper thickness / 2 = 5.120000 mm
Op
era
ting Instruc
tions
Sec
urity Refe
renc
e
B1887571
Op
era
ting Instruc
tions
Sec
urity Refe
renc
e
Operating Instructions
Security Reference
Read this manual carefully before you use this machine and keep it handy for future reference. For safe and correct use, be sure to read the SafetyInformation in the "General Settings Guide" before using the machine.
Getting Started
Preventing Information Leaks
Preventing Unauthorized Use of Functions and Settings
Enhanced Network Security
Management Based on Authentication and Access Control
Specifying the Administrator/Security Functions
Troubleshooting
Appendix
Printed in JapanEN USA
AE AE B188-7571

Paper type: OK Prince Eco G100(55kg), Paper Thickness=80 µm // Pages in book=128 // Print scale=81%Gap (when printed at 81% scale) = Pages in book × Paper thickness / 2 = 5.120000 mm
Introduction
This manual contains detailed instructions and notes on the operation and use of this machine. For yoursafety and benefit, read this manual carefully before using the machine. Keep this manual in a handyplace for quick reference.
Do not copy or print any item for which reproduction is prohibited by law.
Copying or printing the following items is generally prohibited by local law:
bank notes, revenue stamps, bonds, stock certificates, bank drafts, checks, passports, driver's licens-es.
The preceding list is meant as a guide only and is not inclusive. We assume no responsibility for itscompleteness or accuracy. If you have any questions concerning the legality of copying or printing cer-tain items, consult with your legal advisor.
Important
Contents of this manual are subject to change without prior notice. In no event will the company be li-able for direct, indirect, special, incidental, or consequential damages as a result of handling or oper-ating the machine.
Trademarks
Microsoft®, Windows® and Windows NT® are registered trademarks of Microsoft Corporation in theUnited States and/or other countries.
AppleTalk, EtherTalk, Rendezvous are registered trademarks of Apple Computer, Inc.
Other product names used herein are for identification purposes only and might be trademarks of theirrespective companies. We disclaim any and all rights to those marks.
The proper names of the Windows operating systems are as follows:
• The product name of Windows® 95 is Microsoft® Windows 95.
• The product name of Windows® 98 is Microsoft® Windows 98.
• The product name of Windows® Me is Microsoft® Windows Millennium Edition (Windows Me).
• The product names of Windows® 2000 are as follows:Microsoft® Windows® 2000 Advanced ServerMicrosoft® Windows® 2000 ServerMicrosoft® Windows® 2000 Professional
• The product names of Windows® XP are as follows:Microsoft® Windows® XP ProfessionalMicrosoft® Windows® XP Home Edition
• The product names of Windows Server™ 2003 are as follows:Microsoft® Windows ServerTM 2003 Standard EditionMicrosoft® Windows ServerTM 2003 Enterprise EditionMicrosoft® Windows ServerTM 2003 Web Edition
• The product names of Windows NT® 4.0 are as follows:Microsoft® Windows NT® Server 4.0Microsoft® Windows NT® Workstation 4.0
Notes
Some illustrations in this manual might be slightly different from the machine.
Certain options might not be available in some countries. For details, please contact your local dealer.
Copyright © 2005

i
Manuals for This Machine
The following manuals describe the operational procedures of this machine. Forparticular functions, see the relevant parts of the manual.
Note❒ Manuals provided are specific to machine type.❒ Adobe Acrobat Reader / Adobe Reader is necessary to view the manuals as
a PDF file❒ Two CD-ROMs are provided:
• CD-ROM 1 “Operating Instructions”• CD-ROM 2 “Scanner Driver and Utilities”
❖❖❖❖ General Settings GuideProvides an overview of the machine and describes System Settings (such asTray Paper Settings), Document Server functions, and troubleshooting.Refer to this manual for Address Book procedures such as registering e-mailaddresses and user codes.
❖❖❖❖ Security Reference (this manual)This manual is for administrators of this machine. It describes security func-tions that the administrators can use to protect data from being tampered, orprevent the machine from unauthorized use. Also refer to this manual for theprocedures for registering administrators, as well as setting user and admin-istrator authentication.
❖❖❖❖ Network Guide (PDF file - CD-ROM1)Provides information about configuring and operating the scanner (Type 480) in a network environment.For details about network settings of the scanner (RW480) and printer(RW480), see the manual that comes with the related option.
❖❖❖❖ Copy ReferenceDescribes operations, functions, and troubleshooting for the machine's copierfunction.
❖❖❖❖ Scanner Reference (Scanner Unite Type 480) (PDF file - CD-ROM1) Describes operations, functions, and troubleshooting for the machine's scan-ner function.
DolC2_EN_Sec_F_FM.book Page i Thursday, February 24, 2005 7:10 PM

ii
❖❖❖❖ Manuals for DeskTopBinder LiteDeskTopBinder Lite is a utility included on the CD-ROM labeled “ScannerDriver and Utilities”.• DeskTopBinder Lite Setup Guide (PDF file - CD-ROM2)
Describes installation of, and the operating environment for DeskTop-Binder Lite in detail. This guide can be displayed from the [Setup] displaywhen DeskTopBinder Lite is installed.
• DeskTopBinder Lite Introduction Guide (PDF file - CD-ROM2) Describes operations of DeskTopBinder Lite and provides an overview ofits functions. This guide is added to the [Start] menu when DeskTopBinderLite is installed.
• Auto Document Link Guide (PDF file - CD-ROM2) Describes operations and functions of Auto Document Link installed withDeskTopBinder Lite. This guide is added to the [Start] menu when Desk-TopBinder Lite is installed.
❖❖❖❖ Other manuals• Manuals for Printer (RW480) function• Manuals for Scanner (RW480) function
DolC2_EN_Sec_F_FM.book Page ii Thursday, February 24, 2005 7:10 PM

iii
TABLE OF CONTENTSManuals for This Machine ...................................................................................... iHow to Read This Manual .....................................................................................1
1. Getting Started
Enhanced Security.................................................................................................3Glossary .....................................................................................................................4
Security Measures Provided by this Machine.....................................................5Preventing Information Leaks ....................................................................................5Preventing Unauthorized Operation...........................................................................6Enhanced Network Security.......................................................................................7
2. Preventing Information Leaks
Specifying Access Permission for Stored Files .................................................9Assigning Users and Access Permission for Stored Files .......................................10Assigning the User and the Access Permission for the User’s Stored Files ............11Specifying Passwords for the Stored Files...............................................................14Unlocking Files.........................................................................................................15
Preventing Data Leaks Due to Unauthorized Transmission............................16Restrictions on Destinations.....................................................................................16
Protecting the Address Book .............................................................................18Address Book Access Permission ...........................................................................18Encrypting the Data in the Address Book ................................................................20
Overwriting the Data on the Hard Disk ..............................................................22“Auto Erase Memory Setting”...................................................................................22“Erase All Memory” ..................................................................................................25
3. Preventing Unauthorized Use of Functions and Settings
Preventing Modification of Machine Settings ...................................................27Limiting Available Functions ..............................................................................28
Specifying Which Functions are Available ...............................................................28
4. Enhanced Network Security
Preventing Unauthorized Access.......................................................................31Enabling/Disabling Protocols ...................................................................................31Access Control .........................................................................................................32
Encrypting Transmitted Passwords...................................................................34Driver Encryption Key ..............................................................................................34IPP Authentication Password...................................................................................36
Protection Using Encryption ..............................................................................37SSL (Secure Sockets Layer) Encryption..................................................................38User Settings for SSL (Secure Sockets Layer) ........................................................42Setting the SSL / TLS Encryption Mode...................................................................42SNMPv3 Encryption .................................................................................................44
DolC2_EN_Sec_F_FM.book Page iii Thursday, February 24, 2005 7:10 PM

iv
5. Management Based on Authentication and Access Control
The Management Function .................................................................................47Administrators and Users ...................................................................................48
Administrator ............................................................................................................48User..........................................................................................................................49
Enabling Authentication......................................................................................50Administrator Authentication ....................................................................................50User Authentication..................................................................................................51
Authentication Information Stored in the Address Book.................................59Specifying Authentication Information to Log on......................................................59
If User Authentication Has Been Specified .......................................................61User Code Authentication (Using the Control Panel) ...............................................61Login (Using the Control Panel) ...............................................................................61Log Off (Using the Control Panel) ............................................................................62Login (Using Web Image Monitor) ...........................................................................62Log Off (Using Web Image Monitor) ........................................................................62Auto Logout..............................................................................................................63
Menu Protect ........................................................................................................64Menu Protect............................................................................................................64
6. Specifying the Administrator/Security Functions
The Roles of Administrators...............................................................................67Administrator Authentication .............................................................................69
Administrator Authentication ....................................................................................70Registering the Administrator...................................................................................72Logging on Using Administrator Authentication .......................................................73Logging off Using Administrator Authentication .......................................................74Changing the Administrator......................................................................................75
Specifying the Extended Security Functions....................................................76Changing the Extended Security Functions .............................................................76Settings ....................................................................................................................77
Limiting Machine Operation to Customers Only ..............................................80Settings ....................................................................................................................80
7. Troubleshooting
Authentication Does Not Work Properly ...........................................................83A Message Appears.................................................................................................83Machine Cannot Be Operated..................................................................................85
DolC2_EN_Sec_F_FM.book Page iv Thursday, February 24, 2005 7:10 PM

v
8. Appendix
Operations by the Supervisor.............................................................................87Logging on as the Supervisor ..................................................................................87Logging off as the Supervisor ..................................................................................88Changing the Supervisor..........................................................................................88Resetting an Administrator’s Password ...................................................................89
Machine Administrator Settings.........................................................................91System Settings .......................................................................................................91Copier/Document Server Features ..........................................................................93Scanner Features.....................................................................................................93Settings via Web Image Monitor ..............................................................................94Settings via SmartDeviceMonitor for Admin.............................................................95
Network Administrator Settings .........................................................................96System Settings .......................................................................................................96Scanner Features.....................................................................................................97Settings via Web Image Monitor ..............................................................................97Settings via SmartDeviceMonitor for Admin.............................................................99
File Administrator Settings ...............................................................................100System Settings .....................................................................................................100Settings via Web Image Monitor ............................................................................100
User Administrator Settings .............................................................................101System Settings .....................................................................................................101Settings via Web Image Monitor ............................................................................101Settings via SmartDeviceMonitor for Admin...........................................................102
The Available Functions for Using the Files Stored in Document Server....103Settings That Can Be Specified In the Address Book............................................104
User Settings......................................................................................................107Copier/Document Server Features ........................................................................107Scanner Features...................................................................................................109System Settings .....................................................................................................110Web Image Monitor Setting....................................................................................114
Functions That Require Options ......................................................................120
INDEX....................................................................................................... 121
DolC2_EN_Sec_F_FM.book Page v Thursday, February 24, 2005 7:10 PM

vi
DolC2_EN_Sec_F_FM.book Page vi Thursday, February 24, 2005 7:10 PM

1
How to Read This Manual
Symbols
The following set of symbols is used in this manual.
R WARNING:This symbol indicates a potentially hazardous situation that might result indeath or serious injury when you misuse the machine without following the in-structions under this symbol. Be sure to read the instructions, all of which are de-scribed in the Safety Information section.
R CAUTION:This symbol indicates a potentially hazardous situation that might result in mi-nor or moderate injury or property damage that does not involve personal injurywhen you misuse the machine without following the instructions under thissymbol. Be sure to read the instructions, all of which are described in the SafetyInformation section.* The statements above are notes for your safety.
ImportantIf this instruction is not followed, paper might be misfed, originals might bedamaged, or data might be lost. Be sure to read this.
PreparationThis symbol indicates information or preparations required prior to operating.
NoteThis symbol indicates precautions for operation, or actions to take after abnor-mal operation.
LimitationThis symbol indicates numerical limits, functions that cannot be used together,or conditions in which a particular function cannot be used.
ReferenceThis symbol indicates a reference.
[ ]Keys that appear on the machine's display panel.
[ ]Keys and buttons that appear on the computer's display.
{ }Keys built into the machine's control panel.
{ }Keys on the computer's keyboard.
DolC2_EN_Sec_F_FM.book Page 1 Thursday, February 24, 2005 7:10 PM

2
DolC2_EN_Sec_F_FM.book Page 2 Thursday, February 24, 2005 7:10 PM

3
1. Getting Started
Enhanced Security
This machine's security function can be enhanced through the management ofthe machine and its users using the improved authentication functions.By specifying access limits on the machine’s functions and the documents anddata stored in the machine, you can prevent information leaks and unauthorizedaccess.Data encryption can prevent unauthorized data access and tampering via thenetwork.
❖❖❖❖ Authentication and Access LimitsUsing authentication, administrators manage the machine and its users. Toenable authentication, information about both administrators and users mustbe registered in order to authenticate users via their login user names andpasswords.Four types of administrator manage specific areas of machine usage, such assettings and user registration.Access limits for each user are specified by the administrator responsible foruser access to machine functions and documents and data stored in the ma-chine.
ReferenceFor details, see p.67 “The Roles of Administrators”.
❖❖❖❖ Encryption TechnologyThis machine can establish secure communication paths by encrypting trans-mitted data and passwords.
DolC2_EN_Sec_F_FM.book Page 3 Thursday, February 24, 2005 7:10 PM

Getting Started
4
1
Glossary
❖❖❖❖ AdministratorAdministrators manage a specific area of machine usage, such as settings oruser registration.There are four types of administrator: user administrator, network adminis-trator, machine administrator, and file administrator. One person can act asmore than one type of administrator.Basically, administrators make machine settings and manage the machine;they cannot perform normal operations, such as copying.
❖❖❖❖ UserA user performs normal operations on the machine, such as copying.
❖❖❖❖ File Creator (Owner)This is a user who can store files in the machine and authorize other users toview, edit, or delete those files.
❖❖❖❖ Registered UserThis is a user whose personal information is registered in the address book.The registered user is the user who knows the login user name and password.
❖❖❖❖ Administrator AuthenticationAdministrators are authenticated by means of the login user name and loginpassword supplied by the administrator when specifying the machine’s set-tings or accessing the machine over the network.
❖❖❖❖ User AuthenticationUsers are authenticated by means of the login user name and login passwordsupplied by the user when specifying the machine’s settings or accessing themachine over the network.
❖❖❖❖ LoginThis action is required for administrator authentication and user authentica-tion. Enter your login user name and login password on the machine’s controlpanel.A login user name and login password may also be supplied when accessingthe machine over the network or using such utilities as Web Image Monitorand SmartDeviceMonitor for Admin.
❖❖❖❖ LogoutThis action is required with administrator and user authentication. This ac-tion is required when you have finished using the machine or changing thesettings.
DolC2_EN_Sec_F_FM.book Page 4 Thursday, February 24, 2005 7:10 PM

Security Measures Provided by this Machine
5
1
Security Measures Provided by this Machine
Preventing Information Leaks
❖❖❖❖ Protecting Stored Files from Unauthorized AccessYou can specify who is allowed to use and access scanned files and the filesin Document Server. You can prevent activities such as the printing of storedfiles by unauthorized users.
ReferenceFor details, see p.9 “Specifying Access Permission for Stored Files”.
❖❖❖❖ Protecting Stored Files from TheftYou can specify who is allowed to use and access scanned files and the filesin Document Server. You can prevent such activities as the sending anddownloading of stored files by unauthorized users.
ReferenceFor details, see p.9 “Specifying Access Permission for Stored Files”.
❖❖❖❖ Preventing Data Leaks Due to Unauthorized TransmissionYou can specify in the address book which users are allowed to send files us-ing the scanner function.You can also limit the direct entry of destinations to prevent files from beingsent to destinations not registered in the address book.
ReferenceFor details, see p.16 “Preventing Data Leaks Due to Unauthorized Trans-mission”.
❖❖❖❖ Protecting Registered Information in the Address BookYou can specify who is allowed to access the data in the address book. Youcan prevent the data in the address book being used by unregistered users.To protect the data from unauthorized reading, you can also encrypt the datain the address book.
Note❒ To encrypt the data in the address book, the machine must have the scan-
ner function.
ReferenceFor details, see p.18 “Protecting the Address Book”.
DolC2_EN_Sec_F_FM.book Page 5 Thursday, February 24, 2005 7:10 PM

Getting Started
6
1
❖❖❖❖ Overwriting the Data on the Hard DiskYou can overwrite data on the hard disk.
ReferenceFor details, see p.22 “Overwriting the Data on the Hard Disk”.
Preventing Unauthorized Operation
❖❖❖❖ Preventing Modification or Deletion of Stored DataYou can specify who is allowed to access stored scan files and files stored inDocument Server.You can permit selected users who are allowed to access stored files to modifyor delete the files.
ReferenceFor details, see p.9 “Specifying Access Permission for Stored Files”.
❖❖❖❖ Preventing Modification of Machine SettingsThe machine settings that can be modified depend on the type of administra-tor account.Register the administrators so that users cannot change the administrator set-tings.
ReferenceFor details, see p.27 “Preventing Modification of Machine Settings”.
❖❖❖❖ Limiting Available FunctionsTo prevent unauthorized operation, you can specify who is allowed to accesseach of the machine’s functions.
ReferenceFor details, see p.28 “Limiting Available Functions”.
DolC2_EN_Sec_F_FM.book Page 6 Thursday, February 24, 2005 7:10 PM

Security Measures Provided by this Machine
7
1
Enhanced Network Security
❖❖❖❖ Preventing Unauthorized AccessYou can limit IP addresses or disable ports to prevent unauthorized accessover the network and protect the address book, stored files, and default set-tings.
ReferenceFor details, see p.31 “Preventing Unauthorized Access”.
❖❖❖❖ Encrypting Transmitted PasswordsPrevent login passwords, group passwords for PDF files, and IPP authentica-tion passwords being revealed by encrypting them for transmission.Also, encrypt the login password for administrator authentication and userauthentication.
Note❒ To encrypt transmitted passwords, the machine must have the scanner
function.
ReferenceFor details, see p.34 “Encrypting Transmitted Passwords”.
❖❖❖❖ Safer Communication Using SSLWhen you access the machine using a Web browser or IPP, you can establishencrypted communication using SSL. When you access the machine using anapplication such as SmartDeviceMonitor for Admin, you can establish en-crypted communication using SNMPv3 or SSL.To protect data from interception, analysis, and tampering, you can install aserver certificate in the machine, negotiate a secure connection, and encrypttransmitted data.
Note❒ To establish encrypted communication using SSL, the machine must have
the scanner function.
ReferenceFor details, see p.37 “Protection Using Encryption”.
DolC2_EN_Sec_F_FM.book Page 7 Thursday, February 24, 2005 7:10 PM

Getting Started
8
1
DolC2_EN_Sec_F_FM.book Page 8 Thursday, February 24, 2005 7:10 PM

9
2. Preventing Information Leaks
Specifying Access Permission for Stored Files
You can specify who is allowed to access stored scan files and files stored in theDocument Server.You can prevent activities such as the sending of stored files by unauthorized users.
❖❖❖❖ Access PermissionTo limit the use of stored files, you can specify four types of access permission.
Note❒ Files can be stored by any user who is allowed to use the Document Server
or scanner function.❒ Using Web Image Monitor, you can check the content of stored files. For
details, see the Web Image Monitor Help.❒ The default access permission for the file creator (owner) is “Read-only”.
❖❖❖❖ Password for Stored FilesPasswords for stored files can be specified by the file creator (owner) or fileadministrator.You can obtain greater protection against the unauthorized use of files.
Read-only In addition to checking the content of and in-formation about stored files, you can also send the files.
Edit You can change the print settings for stored files. This includes permission to view files.
Edit / Delete You can delete stored files.
This includes permission to view and edit files.
Full Control You can specify the user and access permis-sion.This includes permission to view, edit, and edit / delete files.
DolC2_EN_Sec_F_FM.book Page 9 Thursday, February 24, 2005 7:10 PM

Preventing Information Leaks
10
2
Assigning Users and Access Permission for Stored Files
This can be specified by the file creator (owner) or file administrator.Specify the users and their access permissions for each stored file.By making this setting, only users granted access permission can access storedfiles.
PreparationFor details about logging on with administrator authentication, see p.73“Logging on Using Administrator Authentication”.For details about logging off with administrator authentication, see p.74“Logging off Using Administrator Authentication”.
Important❒ If files become inaccessible, reset their access permission as the file creator
(owner). This can also be done by the file administrator. If you want to accessa file but do not have access permission, ask the file creator (owner).
AAAA Press the {{{{Document Server}}}} key.
BBBB Select the file.
CCCC Press [File Management].
DDDD Press [Change Acs. Priv.].
EEEE Press [Program/Change/Delete].
FFFF Press [New Program].
DolC2_EN_Sec_F_FM.book Page 10 Thursday, February 24, 2005 7:10 PM

Specifying Access Permission for Stored Files
11
2
GGGG Select the users or groups you want to assign permission to.
You can select more than one users.By pressing [All Users], you can select all the users.
HHHH Press [Exit].
IIII Select the user who you want to assign an access permission to, and thenselect the permission.
Select the access permission from [Read-only], [Edit], [Edit / Delete], or [Full Con-trol].
JJJJ Press [Exit].
KKKK Press [OK].
LLLL Press [OK].
Assigning the User and the Access Permission for the User’s Stored Files
This can be specified by the file creator (owner) or user administrator.Specify the users and their access permission to files stored by a particular user.Only those users granted access permission can access stored files.This makes the management of access permission easier than it is when permis-sion is specified for each stored file.
PreparationFor details about logging on with administrator authentication, see p.73“Logging on Using Administrator Authentication”.For details about logging off with administrator authentication, see p.74“Logging off Using Administrator Authentication”.
Important❒ If files become inaccessible, be sure to enable the user administrator, and then
reset the access permission for the files in question.
DolC2_EN_Sec_F_FM.book Page 11 Thursday, February 24, 2005 7:10 PM

Preventing Information Leaks
12
2
AAAA Press the {{{{User Tools/Counter}}}} key.
BBBB Press [System Settings].
CCCC Press [Administrator Tools].
DDDD Press [Address Book Management].
If it does not appear, press [TTTTNext].
EEEE Select the user or group.
FFFF Press [Protection].
GGGG Under "Protect File(s)", press [Program/Change/Delete] for "Permissions forUsers/Groups".
If it does not appear, press [TTTTNext].
HHHH Press [New Program].
DolC2_EN_Sec_F_FM.book Page 12 Thursday, February 24, 2005 7:10 PM

Specifying Access Permission for Stored Files
13
2
IIII Select the users or groups to register.
You can select more than one users.By pressing [All Users], you can select all the users.
JJJJ Press [Exit].
KKKK Select the user who you want to assign an access permission to, and thenselect the permission.
Select the access permission from [Read-only], [Edit], [Edit / Delete], or [Full Con-trol].
LLLL Press [Exit].
MMMM Press [OK].
NNNN Press [Exit].
OOOO Press the {{{{User Tools/Counter}}}} key.
DolC2_EN_Sec_F_FM.book Page 13 Thursday, February 24, 2005 7:10 PM

Preventing Information Leaks
14
2
Specifying Passwords for the Stored Files
This can be specified by the file creator (owner) or file administrator.Specify passwords for the stored files.Provides increased protection against unauthorized use of files.
PreparationFor details about logging on with administrator authentication, see p.73“Logging on Using Administrator Authentication”.For details about logging off with administrator authentication, see p.74“Logging off Using Administrator Authentication”.
AAAA Press the {{{{Document Server}}}} key.
BBBB Select the file.
CCCC Press [File Management].
DDDD Press [Change Password].
EEEE Enter the password using the number keys.
You can use 4 to 8 numbers as the password for the stored file.
FFFF Press [Change] at the bottom of the screen.
GGGG Confirm the password by re-entering it using the number keys.
HHHH Press [#].
IIII Press [OK].
JJJJ Press [OK].
DolC2_EN_Sec_F_FM.book Page 14 Thursday, February 24, 2005 7:10 PM

Specifying Access Permission for Stored Files
15
2
Unlocking Files
If you specify “Enhance File Protection”, the file will be locked and become in-accessible if an invalid password is entered ten times. This section explains howto unlock files.Only the file administrator can unlock files.For details about “Enhance File Protection”, see p.76 “Specifying the ExtendedSecurity Functions”.
PreparationFor details about logging on with administrator authentication, see p.73“Logging on Using Administrator Authentication”.For details about logging off with administrator authentication, see p.74“Logging off Using Administrator Authentication”.
AAAA Press the {{{{Document Server}}}} key.
BBBB Select the file.
CCCC Press [File Management].
DDDD Press [Unlock Files].
EEEE Press [Yes].
FFFF Press [OK].
DolC2_EN_Sec_F_FM.book Page 15 Thursday, February 24, 2005 7:10 PM

Preventing Information Leaks
16
2
Preventing Data Leaks Due to Unauthorized Transmission
If user authentication is specified, the user who has logged on can be designatedas the sender to prevent unauthorized access.You can also limit the direct entry of destinations to prevent files from being sentto destinations not registered in the address book.
Restrictions on Destinations
This can be specified by the user administrator.Make the setting to disable the direct entry of e-mail addresses under the scan-ner function.By making this setting, the destinations can be restricted to addresses registeredin the address book.
PreparationFor details about logging on with administrator authentication, see p.73“Logging on Using Administrator Authentication”.For details about logging off with administrator authentication, see p.74“Logging off Using Administrator Authentication”.
AAAA Press the {{{{User Tools/Counter}}}} key.
BBBB Press [System Settings].
CCCC Press [Administrator Tools].
DDDD Press [Extended Security].
DolC2_EN_Sec_F_FM.book Page 16 Thursday, February 24, 2005 7:10 PM

Preventing Data Leaks Due to Unauthorized Transmission
17
2
EEEE Press [On] for “Restrict Use of Destinations”.
Note❒ If you set “Restrict Use of Destinations” to [Off], “Permit Adding of Desti-
nations” appears.❒ If you set “Permit Adding of Destinations” to [On], the user can register
destinations by entering them directly.❒ If you set “Permit Adding of Destinations” to [Off], the user cannot register
destinations by entering them directly.❒ If you set “Permit Adding of Destinations” to [Off], you cannot make
changes to the address book.
FFFF Press [OK].
GGGG Press the {{{{User Tools/Counter}}}} key.
ReferenceThis can also be specified using Web Image Monitor. For details, see theWeb Image Monitor Help.
DolC2_EN_Sec_F_FM.book Page 17 Thursday, February 24, 2005 7:10 PM

Preventing Information Leaks
18
2
Protecting the Address Book
You can specify who is allowed to access the data in the address book. By mak-ing this setting, you can prevent the data in the address book being used by un-registered users.To protect the data from unauthorized reading, you can also encrypt the data inthe address book.
Address Book Access Permission
This can be specified by the registered user. The access permission can also bespecified by a user granted full control or the user administrator.You can specify who is allowed to access the data in the address book.By making this setting, you can prevent the data in the address book being usedby unregistered users.
PreparationFor details about logging on with administrator authentication, see p.73“Logging on Using Administrator Authentication”.For details about logging off with administrator authentication, see p.74“Logging off Using Administrator Authentication”.
AAAA Press the {{{{User Tools/Counter}}}} key.
BBBB Press [System Settings].
CCCC Press [Administrator Tools].
DDDD Press [Address Book Management].If it does not appear, press [TTTTNext].
DolC2_EN_Sec_F_FM.book Page 18 Thursday, February 24, 2005 7:10 PM

Protecting the Address Book
19
2
EEEE Select the user or group.
FFFF Press [Protection].
GGGG Under "Protect Destination", press [Program/Change/Delete] for "Permissionsfor Users/Groups".
HHHH Press [New Program].
IIII Select the users or groups to register.
You can select more than one users.By pressing [All Users], you can select all the users.
JJJJ Press [Exit].
KKKK Select the user who you want to assign an access permission to, and thenselect the permission.Select the permission, from [Read-only], [Edit], [Edit / Delete], or [Full Control].
LLLL Press [Exit].
DolC2_EN_Sec_F_FM.book Page 19 Thursday, February 24, 2005 7:10 PM

Preventing Information Leaks
20
2
MMMM Press [OK].
NNNN Press [Exit].
OOOO Press the {{{{User Tools/Counter}}}} key.
Encrypting the Data in the Address Book
This can be specified by the user administrator.Encrypt the data in the address book.
PreparationFor details about logging on with administrator authentication, see p.73“Logging on Using Administrator Authentication”.For details about logging off with administrator authentication, see p.74“Logging off Using Administrator Authentication”.
Note❒ To encrypt the data in the address book, the machine must have the scanner
function.❒ Encrypting the data in the address book may take a long time. (Up to three
minutes)❒ The time it takes to encrypt the data in the address book depends on the
number of registered users.❒ The machine cannot be used during encryption.❒ If you press [Stop] during encryption, the data is not encrypted.❒ Normally, once encryption is complete, [Exit] appears. If three minutes have
passed and [Exit] has still not appeared, contact your service representative.❒ If you press [Stop] during decryption, the data stays encrypted.❒ Do not switch the main power off during encryption, as doing so may corrupt
the data.
AAAA Press the {{{{User Tools/Counter}}}} key.
BBBB Press [System Settings].
DolC2_EN_Sec_F_FM.book Page 20 Thursday, February 24, 2005 7:10 PM

Protecting the Address Book
21
2
CCCC Press [Administrator Tools].
DDDD Press [Extended Security].
EEEE Press [On] for “Encrypt Address Book”.
FFFF Press [Change] for [Encryption Key].
GGGG Enter the encryption key, and then press [OK].
Enter the encryption key using up to 32 alphanumeric characters.
HHHH Press [Encrypt / Decrypt].
IIII Press [Yes].
JJJJ Press [Exit].
KKKK Press [OK].
LLLL Press the {{{{User Tools/Counter}}}} key.
DolC2_EN_Sec_F_FM.book Page 21 Thursday, February 24, 2005 7:10 PM

Preventing Information Leaks
22
2
Overwriting the Data on the Hard Disk
To use this function, the optional DataOverwriteSecurity unit must be installed.
You can overwrite data on the hard disk.
Note❒ Depending on the hard disk capacity and the method of erasing the data, this
action may take a few hours. The machine cannot be used during this time.
❖❖❖❖ Auto Erase Memory SettingTo erase selected data on the hard disk, specify [Auto Erase Memory Setting].
❖❖❖❖ Erase All MemoryTo erase all the data on the hard disk, using [Erase All Memory].
❖❖❖❖ Methods of Erasing the DataYou can select the method of erasing the data from the following:The default is “NSA”.
*1 National Security Agency*2 Department of Defense
ReferenceFor details, see the manual supplied with the DataOverwriteSecurity unit.
“Auto Erase Memory Setting”
This can be specified by the machine administrator.A document scanned in Copier or Scanner mode is temporarily stored on themachine's hard disk.Even after the job is completed, it remains in the hard disk as temporary data.Auto Erase Memory erases the temporary data on the hard disk by writing overit.Overwriting starts automatically once the job is completed.The Copier functions take priority over the Auto Erase Memory function. If acopy job is in progress, overwriting will only be done after the job is completed.
NSA *1 Overwrites the data on the hard disk twice with random numbers and once with zeros.
DoD *2 Overwrites the data with a number, its com-plement, and random numbers, and then checks the result.
Random Numbers Overwrites the data with random numbers the specified number of times.
You can specify between 1 and 9 as the number of times the data is overwritten with random numbers. The default is 3 times.
DolC2_EN_Sec_F_FM.book Page 22 Thursday, February 24, 2005 7:10 PM

Overwriting the Data on the Hard Disk
23
2
PreparationFor details about logging on with administrator authentication, see p.73“Logging on Using Administrator Authentication”.For details about logging off with administrator authentication, see p.74“Logging off Using Administrator Authentication”.
AAAA Press the {{{{User Tools/Counter}}}} key.
BBBB Press [System Settings].
CCCC Press [Administrator Tools].
DDDD Press [Auto Erase Memory Setting].
If it does not appear, press [TTTTNext].
EEEE Press [On], and then select the method of erasing the data.
Select the method of erasing the data from [NSA], [DoD], or [Random Numbers].
When you select “Random Numbers”
A Press [Change].
B Enter the number of times that you want to overwrite using the numberkeys, and then press [#].
FFFF Press [OK].Auto Erase Memory is set.
Important❒ When Auto Erase Memory is set to "On", temporary data that remained on
the hard disk when Auto Erase Memory was "Off" might not be overwrit-ten.
DolC2_EN_Sec_F_FM.book Page 23 Thursday, February 24, 2005 7:10 PM

Preventing Information Leaks
24
2
Note❒ Should the main power switch of the machine be turned off before over-
writing is completed, the temporary data will remain on the hard disk un-til the main power switch is next turned on and overwriting is resumed.
❒ If the overwriting method is changed while overwriting is in progress, theremainder of the temporary data will be overwritten using the method setoriginally.
Canceling Auto Erase Memory
AAAA Follow steps AAAA to DDDD in “Auto Erase Memory Setting”.
BBBB Press [Off].
CCCC Press [OK].Auto Erase Memory is disabled.
Note❒ To set Auto Erase Memory to "On" again, repeat the procedure in “Auto Erase
Memory Setting”.
Types of Data that Can or Cannot Be Overwritten
The following table shows the types of data that can or cannot be overwritten byAuto Erase Memory.
*1 Data scanned with network TWAIN scanner will not be overwritten by Auto EraseMemory.
*2 A stored document can only be overwritten after it has been printed or deleted fromthe Document Server.
*3 Data stored in the Address Book can be encrypted for security. For details, see p.20“Encrypting the Data in the Address Book”.
Data overwritten by Auto Erase Memory
Copier • Copy jobs
Scanner *1 • Scanned files sent by e-mail
• Files sent by Scan to Folder
• Documents sent using DeskTopBinder, the Scan-Router delivery software or a Web browser
Data not overwritten by Auto Erase Memory
Documents stored by the user in the Document Server using the Copier or Scanner functions *2
Information registered in the Address Book *3
Counters stored under each user code
DolC2_EN_Sec_F_FM.book Page 24 Thursday, February 24, 2005 7:10 PM

Overwriting the Data on the Hard Disk
25
2
“Erase All Memory”
This can be specified by the machine administrator.You can erase all the data on the hard disk by writing over it. This is useful if yourelocate or dispose of your machine.
PreparationFor details about logging on with administrator authentication, see p.73“Logging on Using Administrator Authentication”.For details about logging off with administrator authentication, see p.74“Logging off Using Administrator Authentication”.
Important❒ User codes and the counters under each user code, user stamps, data stored
in the Address Book, network settings, and the SSL Certificate will be over-written.
Note❒ Before erasing the hard disk, you can back up user codes, counters for each
user code, and Address Book data using SmartDeviceMonitor for Admin. Fordetails, see SmartDeviceMonitor for Admin Help.
AAAA Disconnect communication cables connected to the machine.
BBBB Press the {{{{User Tools/Counter}}}} key.
CCCC Press [System Settings].
DDDD Press [Administrator Tools].
EEEE Press [Erase All Memory].
If it does not appear, press [TTTTNext].
DolC2_EN_Sec_F_FM.book Page 25 Thursday, February 24, 2005 7:10 PM

Preventing Information Leaks
26
2
FFFF Select the method of erasing the data.
Select the method of erasing the data from [NSA], [DoD], or [Random Numbers].
When you select “Random Numbers”
A Press [Change].
B Enter the number of times that you want to overwrite using the numberkeys, and then press [#].
GGGG Press [OK].
HHHH Press [Yes].
IIII When overwriting is completed, press [Exit], and then turn off the power.
ReferenceBefore turning the power off, see "Turning On the Power", General SettingsGuide.
Important❒ Should the main power switch of the machine be turned off before Erase
All Memory is completed, overwriting is canceled.❒ Make sure the main power switch is not turned off during overwriting.
Note❒ If the main power is turned off when Erase All Memory is in progress,
overwriting will start again when you next turn on the main power.❒ If an error occurs before overwriting is completed, turn off the main pow-
er. Turn it on again, and then repeat from stepB.
Canceling Erase All Memory
AAAA Press [Cancel] while Erase All Memory is in progress.
BBBB Press [Yes].
Erase All Memory is canceled.
Note❒ If you stop this before completion, the data is not fully erased. Execute
[Erase All Memory] again to erase the data.
CCCC Turn off the main power.
Note❒ To resume overwriting after power off, turn on the main power of the ma-
chine, and then repeat the procedure in “Erase All Memory”.
DolC2_EN_Sec_F_FM.book Page 26 Thursday, February 24, 2005 7:10 PM

27
3. Preventing UnauthorizedUse of Functions and Settings
Preventing Modification of Machine Settings
The machine settings that can be modified depend on the type of administrator.Users cannot change the administrator settings.Register the administrators before using the machine.
❖❖❖❖ Type of AdministratorRegister the administrator on the machine, and then authenticate the admin-istrator using the administrator’s login user name and login password. Themachine settings that can be modified depend on the type of administrator.To manage the machine, the following types of administrator can be designat-ed:• User Administrator• Network Administrator• File Administrator• Machine Administrator
ReferenceFor details, see p.67 “The Roles of Administrators”.For details, see p.69 “Administrator Authentication”.For details, see p.91 “Machine Administrator Settings”.For details, see p.96 “Network Administrator Settings”.For details, see p.100 “File Administrator Settings”.For details, see p.101 “User Administrator Settings”.
❖❖❖❖ Menu ProtectUse this function to specify the permission level for users to change those set-tings accessible by non-administrators.You can specify Menu Protect for the following settings:• Copier / Document Server• Scanner Features
ReferenceFor details, see p.101 “User Administrator Settings”.
DolC2_EN_Sec_F_FM.book Page 27 Thursday, February 24, 2005 7:10 PM

Preventing Unauthorized Use of Functions and Settings
28
3
Limiting Available Functions
To prevent unauthorized operation, you can specify who is allowed to accesseach of the machine’s functions.
❖❖❖❖ Available FunctionsSpecify the available functions from the copier, Document Server, and scan-ner functions.
Specifying Which Functions are Available
This can be specified by the user administrator. Specify the functions availableto registered users. By making this setting, you can limit the functions availableto users.
PreparationFor details about logging on with administrator authentication, see p.73“Logging on Using Administrator Authentication”.For details about logging off with administrator authentication, see p.74“Logging off Using Administrator Authentication”.
AAAA Press the {{{{User Tools/Counter}}}} key.
BBBB Press [System Settings].
CCCC Press [Administrator Tools].
DDDD Press [Address Book Management].
If it does not appear, press [TTTTNext].
EEEE Select the user.
DolC2_EN_Sec_F_FM.book Page 28 Thursday, February 24, 2005 7:10 PM

Limiting Available Functions
29
3
FFFF Press [Auth. Info].
GGGG In [Available Functions], select the functions you want to specify.
If the setting to be specified does not appear, press [TTTTNext].
HHHH Press [OK].
IIII Press [Exit].
JJJJ Press the {{{{User Tools/Counter}}}} key.
DolC2_EN_Sec_F_FM.book Page 29 Thursday, February 24, 2005 7:10 PM

Preventing Unauthorized Use of Functions and Settings
30
3
DolC2_EN_Sec_F_FM.book Page 30 Thursday, February 24, 2005 7:10 PM

31
4. Enhanced Network Security
Preventing Unauthorized Access
You can limit IP addresses or disable ports to prevent unauthorized access overthe network and protect the address book, stored files, and default settings.
Enabling/Disabling Protocols
This can be specified by the network administrator.Specify whether to enable or disable the function for each protocol.By making this setting, you can specify which protocols are available and so pre-vent unauthorized access over the network.
PreparationFor details about logging on with administrator authentication, see p.73“Logging on Using Administrator Authentication”.For details about logging off with administrator authentication, see p.74“Logging off Using Administrator Authentication”.
AAAA Press the {{{{User Tools/Counter}}}} key.
BBBB Press [System Settings].
CCCC Press [Interface Settings].
DDDD Press [Effective Protocol].
If the setting to be specified does not appear, press [TTTTNext].
DolC2_EN_Sec_F_FM.book Page 31 Thursday, February 24, 2005 7:10 PM

Enhanced Network Security
32
4
EEEE Press [Invalid] for the protocol you want to disable.
FFFF Press [OK].
GGGG Press the {{{{User Tools/Counter}}}} key.
ReferenceAdvanced network settings can be specified using Web Image Monitor.For details, see the Web Image Monitor Help.
Access Control
This can be specified by the network administrator.The machine can control TCP/IP access.Limit the IP addresses from which access is possible by specifying the accesscontrol range.For example, if you specify the access control range as [192.168.15.16]-[192.168.15.20], the client PC addresses from which access is possible will be from192.168.15.16 to 192.168.15.20.
Limitation❒ Using access control, you can limit access involving lpd, rcp/rsh, ftp, diprint,
ipp, Web Image Monitor, SmartDeviceMonitor for Client or DeskTopBinder.You cannot limit the Monitoring of SmartDeviceMonitor for Client.
❒ You cannot limit access involving telnet, or SmartDeviceMonitor for Admin.
AAAA Open a Web browser.
BBBB Enter “http://(machine's-address)/” in the address bar to access the ma-chine.
CCCC Log onto the machine.
The network administrator can log on using the appropriate login user nameand login password.
DDDD Click [Configuration], click [Security], and then click [Access Control].The [Access Control] page appears.
EEEE In [Access Control Range], enter the IP addresses from which access to the ma-chine is permitted.
DolC2_EN_Sec_F_FM.book Page 32 Thursday, February 24, 2005 7:10 PM

Preventing Unauthorized Access
33
4
FFFF Click [Apply].
Access control is set.
GGGG Log off from the machine.
ReferenceFor details, see the Web Image Monitor Help.
DolC2_EN_Sec_F_FM.book Page 33 Thursday, February 24, 2005 7:10 PM

Enhanced Network Security
34
4
Encrypting Transmitted Passwords
Prevent login passwords, group passwords for PDF files, and IPP authenticationpasswords being revealed by encrypting them for transmission.Also, encrypt the login password for administrator authentication and user au-thentication.
❖❖❖❖ Driver Encryption KeyTo encrypt the login password, specify the driver encryption key for the driv-er used for the machine and the user’s computer.
Limitation❒ The driver encryption key cannot be used under Windows 95/98 SE/Me.
❖❖❖❖ Password for IPP AuthenticationUsing Web Image Monitor, you can encrypt the password for IPP authentica-tion.
Note❒ You can use Telnet or FTP to manage passwords for IPP authentication, al-
though it is not recommended.
Note❒ To encrypt transmitted passwords, the machine must have the scanner func-
tion.
Driver Encryption Key
This can be specified by the network administrator.Specify the driver encryption key on the machine.By making this setting, you can encrypt login passwords for transmission to pre-vent them from being analyzed.
PreparationFor details about logging on with administrator authentication, see p.73“Logging on Using Administrator Authentication”.For details about logging off with administrator authentication, see p.74“Logging off Using Administrator Authentication”.
AAAA Press the {{{{User Tools/Counter}}}} key.
BBBB Press [System Settings].
DolC2_EN_Sec_F_FM.book Page 34 Thursday, February 24, 2005 7:10 PM

Encrypting Transmitted Passwords
35
4
CCCC Press [Administrator Tools].
DDDD Press [Extended Security].
EEEE For [Driver Encryption Key], press [Change].
FFFF Enter the driver encryption key, and then press [OK].
Enter the driver encryption key using up to 32 alphanumeric characters.
Note❒ The network administrator must give users the driver encryption key
specified on the machine so they can register it on their computers. Makesure to enter the same driver encryption key as that specified on the ma-chine.
GGGG Press [OK].
HHHH Press the {{{{User Tools/Counter}}}} key.
ReferenceSee the TWAIN driver Help.
DolC2_EN_Sec_F_FM.book Page 35 Thursday, February 24, 2005 7:10 PM

Enhanced Network Security
36
4
IPP Authentication Password
This can be specified by the network administrator.Specify the IPP authentication passwords for the machine using Web ImageMonitor.By making this setting, you can encrypt IPP authentication passwords for trans-mission to prevent them from being analyzed.
AAAA Open a Web browser.
BBBB Enter “http://(machine's-address)/” in the address bar to access the ma-chine.
CCCC Log onto the machine.The network administrator can log on. Enter the login user name and loginpassword.
DDDD Click [Configuration], click [Security], and then click [IPP Authentication].
The [IPP Authentication] page appears.
EEEE Select [DIGEST] from the [Authentication] list.
Note❒ When using the IPP port under Windows XP or Windows Server 2003, you
can use the operating system’s standard IPP port.
FFFF Enter the user name in the [User Name] box.
GGGG Enter the password in the [Password] box.
HHHH Click [Apply].IPP authentication is specified.
IIII Log off from the machine.
DolC2_EN_Sec_F_FM.book Page 36 Thursday, February 24, 2005 7:10 PM

Protection Using Encryption
37
4
Protection Using Encryption
When you access the machine using a Web browser or IPP, you can establish en-crypted communication using SSL. When you access the machine using an ap-plication such as SmartDeviceMonitor for Admin, you can establish encryptedcommunication using SNMPv3 or SSL.To protect data from interception, analysis, and tampering, you can install aserver certificate in the machine, negotiate a secure connection, and encrypttransmitted data.
❖❖❖❖ SSL (Secure Sockets Layer)
A To access the machine from a user’s computer, request for the SSL servercertificate and public key.
B The server certificate and public key are sent from the machine to the us-er’s computer.
C Using the public key, encrypt the data for transmission.D The encrypted data is sent to the machine.E The encrypted data is decrypted using the private key.
Note❒ To establish encrypted communication using SSL, the machine must have
the scanner function.
AFN001S
DolC2_EN_Sec_F_FM.book Page 37 Thursday, February 24, 2005 7:10 PM

Enhanced Network Security
38
4
SSL (Secure Sockets Layer) Encryption
This can be specified by the network administrator.To protect the communication path and establish encrypted communication,create and install the server certificate.There are two ways of installing a server certificate: create and install a self-cer-tificate using the machine, or request a certificate from a certificate authority andinstall it.
❖❖❖❖ Configuration flow (self-signed certificate)A Creating and installing the server certificate
Install the server certificate using Web Image Monitor.B Enabling SSL
Enable the [SSL/TLS] setting using Web Image Monitor.
❖❖❖❖ Configuration flow (certificate issued by a certificate authority)A Creating the server certificate
Create the server certificate using Web Image Monitor.The application procedure after creating the certificate depends on the cer-tificate authority. Follow the procedure specified by the certificate authority.
B Installing the server certificateInstall the server certificate using Web Image Monitor.
C Enabling SSLEnable the [SSL/TLS] setting using Web Image Monitor.Creating and Installing the Server Certificate (Self-Signed Certificate)Create and install the server certificate using Web Image Monitor.
Note❒ To confirm whether SSL configuration is enabled, enter https://(ma-
chine’s-address) in your Web browser’s address bar to access this machine.If the “The page cannot be displayed” message appears, check the config-uration as the SSL configuration is invalid.
Creating and Installing the Self-Signed Certificate
Create and install the server certificate using Web Image Monitor.This section explains the use of a self-certificate as the server certificate.
AAAA Open a Web browser.
BBBB Enter “http://(machine's-address)/” in the address bar to access the ma-chine.
CCCC Log onto the machine.
The network administrator can log on.Enter the login user name and login password.
DolC2_EN_Sec_F_FM.book Page 38 Thursday, February 24, 2005 7:10 PM

Protection Using Encryption
39
4
DDDD Click [Configuration], click [Security], and then click [Certificates].
EEEE Click [Create].
FFFF Make the necessary settings.
ReferenceFor details about the displayed items and selectable items, see Web ImageMonitor Help.
GGGG Click [OK].
The setting is changed.
HHHH Click [OK].
A security warning dialog box appears.
IIII Check the details, and then click [OK].
[Installed] appears under [Certificate Status] to show that a server certificate forthe machine has been installed.
JJJJ Log off from the machine.
Note❒ Click [Delete] to delete the server certificate from the machine.
Creating the Server Certificate (Certificate Issued by a Certificate Authority)
Create the server certificate using Web Image Monitor.This section explains the use of a certificate issued by a certificate authority asthe server certificate.
AAAA Open a Web browser.
BBBB Enter “http://(machine's-address)/” in the address bar to access the ma-chine.
CCCC Log onto the machine.
The network administrator can log on.Enter the login user name and login password.
DDDD Click [Configuration], click [Security], and then click [Certificates].
The [Certificates] page appears.
EEEE Click [Request].
FFFF Make the necessary settings.
ReferenceFor details about the displayed items and selectable items, see Web ImageMonitor Help.
DolC2_EN_Sec_F_FM.book Page 39 Thursday, February 24, 2005 7:10 PM

Enhanced Network Security
40
4
GGGG Click [OK].
[Requesting] appears for [Certificate Status] in the [Certificates] area.Use the data in the [Certificate Request Contents:] dialog box to apply to the cer-tificate authority.
HHHH Log off from the machine.
IIII Apply to the certificate authority for the server certificate.The application procedure depends on the certificate authority. For details,contact the certificate authority.When applying, use the data created with Web Image Monitor.
Note❒ Using Web Image Monitor, you can create the contents of the server certif-
icate but you cannot send the application.❒ Click [Cancel Request] to cancel the request for the server certificate.
Installing the Server Certificate (Certificate Issued by a Certificate Authority)
Install the server certificate using Web Image Monitor.This section explains the use of a certificate issued by a certificate authority asthe server certificate.Enter the server certificate contents issued by the certificate authority.
AAAA Open a Web browser.
BBBB Enter “http://(machine's-address)/” in the address bar to access the ma-chine.
CCCC Log onto the machine.
The network administrator can log on.Enter the login user name and login password.
DDDD Click [Configuration], click [Security], and then click [Certificates].
The [Certificates] page appears.
EEEE Click [Install].
FFFF Enter the contents of the server certificate.
In the [Certificate Request] box, enter the contents of the server certificate re-ceived from the certificate authority.
ReferenceFor details about the displayed items and selectable items, see Web ImageMonitor Help.
DolC2_EN_Sec_F_FM.book Page 40 Thursday, February 24, 2005 7:10 PM

Protection Using Encryption
41
4
GGGG Click [OK].
[Installed] appears under [Certificate Status] to show that a server certificate forthe machine has been installed.
HHHH Log off from the machine.
Enabling SSL
After installing the server certificate in the machine, enable the SSL setting.This procedure is used for a self-signed certificate or a certificate issued by a cer-tificate authority.
AAAA Open a Web browser.
BBBB Enter “http://(machine's-address)/” in the address bar to access the ma-chine.
CCCC Log onto the machine.
The network administrator can log on.Enter the login user name and login password.
DDDD Click [Configuration], click [Security], and then click [SSL/TLS].
The [SSL/TLS] page appears.
EEEE Click [Enable] for [SSL/TLS].
FFFF Click [Apply].
The SSL setting is enabled.
GGGG Log off from the machine.
Note❒ If you set [Permit SSL / TLS Communication] to [Ciphertext Only], enter “ht-
tps://(machine's address)/” to access the machine.
DolC2_EN_Sec_F_FM.book Page 41 Thursday, February 24, 2005 7:10 PM

Enhanced Network Security
42
4
User Settings for SSL (Secure Sockets Layer)
If you have installed a server certificate and enabled SSL (Secure Sockets Layer),you need to install the certificate on the user’s computer.The network administrator must explain the procedure for installing the certifi-cate to users.If a warning dialog box appears while accessing the machine using the Webbrowser or IPP, start the Certificate Import Wizard and install a certificate.
AAAA When the [Security Alert] dialog box appears, click [View Certificate].
The [Certificate] dialog box appears.To be able to respond to inquiries from users about such problems as expiryof the certificate, check the contents of the certificate.
BBBB On the [General] tab, click [Install Certificate...].Certificate Import Wizard starts.
CCCC Install the certificate by following the Certificate Import Wizard instruc-tions.
Note❒ For details about how to install the certificate, see the Web browser Help.❒ If a certificate issued by a certificate authority is installed in the machine,
confirm the certificate store location with the certificate authority.
ReferenceFor details about where to store the certificate when accessing the machineusing IPP, see the SmartDeviceMonitor for Client Help.
Setting the SSL / TLS Encryption Mode
By specifying the SSL/TLS encrypted communication mode, you can change thesecurity level.
❖❖❖❖ Encrypted Communication ModeUsing the encrypted communication mode, you can specify encrypted com-munication.
Ciphertext Only Allows encrypted communication only.
If encryption is not possible, the machine does not communicate.
Ciphertext Priority Performs encrypted communication if en-cryption is possible.
If encryption is not possible, the machine communicates without it.
Ciphertext / Clear Text Communicates with or without encryption, according to the setting.
DolC2_EN_Sec_F_FM.book Page 42 Thursday, February 24, 2005 7:10 PM

Protection Using Encryption
43
4
Setting the SSL / TLS Encryption Mode
This can be specified by the network administrator or machine administrator.After installing the server certificate, specify the SSL/TLS encrypted communi-cation mode. By making this setting, you can change the security level.
PreparationFor details about logging on with administrator authentication, see p.73“Logging on Using Administrator Authentication”.For details about logging off with administrator authentication, see p.74“Logging off Using Administrator Authentication”.
AAAA Press the {{{{User Tools/Counter}}}} key.
BBBB Press [System Settings].
CCCC Press [Interface Settings].
DDDD Press [Permit SSL / TLS Communication]
If it does not appear, press [TTTTNext].
EEEE Select the encrypted communication mode.
Select [Ciphertext Only], [Ciphertext Priority], or [Ciphertext / Clear Text] as the en-crypted communication mode.
FFFF Press [OK].
GGGG Press the {{{{User Tools/Counter}}}} key.
Note❒ The SSL/TLS encrypted communication mode can also be specified using
Web Image Monitor. For details, see the Web Image Monitor Help.
DolC2_EN_Sec_F_FM.book Page 43 Thursday, February 24, 2005 7:10 PM

Enhanced Network Security
44
4
SNMPv3 Encryption
This can be specified by the network administrator.When using SmartDeviceMonitor for Admin or another application to makevarious settings, you can encrypt the data transmitted.By making this setting, you can protect data from being tampered with.
PreparationFor details about logging on with administrator authentication, see p.73“Logging on Using Administrator Authentication”.For details about logging off with administrator authentication, see p.74“Logging off Using Administrator Authentication”.
AAAA Press the {{{{User Tools/Counter}}}} key.
BBBB Press [System Settings].
CCCC Press [Interface Settings].
DDDD Press [Permit SNMP V3 Communication].
If it does not appear, press [TTTTNext].
EEEE Press [Encryption Only].
FFFF Press [OK].
GGGG Press the {{{{User Tools/Counter}}}} key.
DolC2_EN_Sec_F_FM.book Page 44 Thursday, February 24, 2005 7:10 PM

Protection Using Encryption
45
4
Note❒ To use SmartDeviceMonitor for Admin for encrypting the data for speci-
fying settings, you need to specify the network administrator’s [EncryptionPassword] setting and [Encryption Key] in [SNMP Authentication Information] inSmartDeviceMonitor for Admin, in addition to specifying [Permit SNMP V3Communication] on the machine.
❒ If the machine does not have the scanner function, or if network adminis-trator’s [Encryption Password] setting is not specified, the data for transmis-sion may not be encrypted or sent.
ReferenceFor details about specifying the network administrator’s [Encryption Pass-word] setting, see p.72 “Registering the Administrator”.For details about specifying [Encryption Key] in SmartDeviceMonitor forAdmin, see the SmartDeviceMonitor for Admin Help.
DolC2_EN_Sec_F_FM.book Page 45 Thursday, February 24, 2005 7:10 PM

Enhanced Network Security
46
4
DolC2_EN_Sec_F_FM.book Page 46 Thursday, February 24, 2005 7:10 PM

47
5. Management Based onAuthentication and Access Control
The Management Function
The machine has an authentication function requiring a login user name andlogin password. By using the authentication function, you can specify accesslimits for individual users and groups of users. Using access limits, you can notonly limit the machine’s available functions but also protect the machine settingsand files and data stored in the machine.
Important❒ If you have enabled [Administrator Authentication Management], make sure not to
forget the administrator login user name and login password. If an adminis-trator login user name or login password is forgotten, a new password mustbe specified using the supervisor’s authority.
❒ Be sure not to forget the supervisor login user name and login password. Ifyou do forget them, a service representative will to have to return the ma-chine to its default state. This will result in all data in the machine being lostand the service call may not be free of charge.
ReferenceFor details, see p.87 “Operations by the Supervisor”.
DolC2_EN_Sec_F_FM.book Page 47 Thursday, February 24, 2005 7:10 PM

Management Based on Authentication and Access Control
48
5
Administrators and Users
When controlling access using the authentication specified by an administrator,select the machine’s administrator, enable the authentication function, and thenuse the machine. The administrators manage access to the allocated functions, and users can useonly the functions they are permitted to access. To enable the authenticationfunction, the login user name and login password are required in order to usethe machine.When specifying user authentication, specify administrator authentication aswell.
Important❒ If user authentication is not possible because of a problem with the hard disk
or network, you can use the machine by accessing it using administrator au-thentication and disabling user authentication. Do this if, for instance, youneed to use the machine urgently. For details, see the Web Image MonitorHelp.
Administrator
There are four types of administrator according to the administered function:machine administrator, network administrator, file administrator, and user ad-ministrator.By sharing the administrative work among different administrators, you canspread the workload and limit unauthorized operation by a single administra-tor.Administrators are limited to managing the machine’s settings and access limits,so user authentication is required to use such function as copying.
Note❒ One person can act as more than one type of administrator.
ReferenceFor details, see p.67 “The Roles of Administrators”.For details, see p.72 “Registering the Administrator”.
DolC2_EN_Sec_F_FM.book Page 48 Thursday, February 24, 2005 7:10 PM
Administrators and Users
49
5
User
Users are managed using the personal information registered in the machine’saddress book.By enabling user authentication, you can allow only people registered in the ad-dress book to use the machine. Users can be registered in the address book bythe user administrator or registered user. In addition to registering users withthe machine’s control panel, you can register them using SmartDeviceMonitorfor Admin or Web Image Monitor.
Note❒ Users can be registered only by a user administrator, using SmartDeviceMon-
itor for Admin or Web Image Monitor.
ReferenceFor details about registering users in the address book, see General SettingsGuide, the SmartDeviceMonitor for Admin Help, or the Web Image MonitorHelp.
DolC2_EN_Sec_F_FM.book Page 49 Thursday, February 24, 2005 7:10 PM

Management Based on Authentication and Access Control
50
5
Enabling Authentication
To control administrators’ and users’ access to the machine, perform administra-tor authentication and user authentication using login user names and loginpasswords. To perform authentication, the authentication function must be en-abled.
Note❒ To specify authentication, the administrator must be registered.
ReferenceFor details, see p.72 “Registering the Administrator”.
Administrator Authentication
To use administrator authentication, enable [Administrator Authentication Manage-ment] on the control panel.
Important❒ If you have enabled [Administrator Authentication Management], make sure not to
forget the administrator login user name and login password. If an adminis-trator login user name or login password is forgotten, a new password mustbe specified using the supervisor’s authority.
ReferenceFor details, see p.87 “Operations by the Supervisor”.
Specifying Administrator Authentication Management
AAAA Press the {{{{User Tools/Counter}}}} key.
BBBB Press [System Settings].
CCCC Press [Administrator Tools].
DDDD Press [Administrator Authentication Management].
EEEE Press the [User Management], [Machine Management], [Network Management], or[File Management] key to select which settings to manage.
DolC2_EN_Sec_F_FM.book Page 50 Thursday, February 24, 2005 7:10 PM

Enabling Authentication
51
5
FFFF Set "Admin. Authentication" to [On].
[Available Settings] appears.
GGGG Select the settings to manage from "Available Settings".
Note❒ To specify administrator authentication for more than one category, repeat
steps E to G.
HHHH Press [OK].
IIII Press the {{{{User Tools/Counter}}}} key.
User Authentication
There are four types of user authentication method: user code authentication,basic authentication, Windows authentication, and LDAP authentication. To useuser authentication, select an authentication method on the control panel, andthen make the required settings for the authentication. The settings depend onthe authentication method.
Important❒ When using Windows authentication or LDAP authentication, keep in mind
that if you edit an authenticated user’s e-mail address or any of the other datathat is automatically stored after successful authentication, the edited datamay be overwritten when it is reacquired at the next authentication.
Note❒ User code authentication is used for authenticating on the basis of the user
code, and basic authentication, Windows authentication, and LDAP authen-tication are used for authenticating individual users.
❒ You cannot use more than one authentication method at the same time.❒ User authentication can also be specified via Web Image Monitor. For details
see the Web Image Monitor Help.
DolC2_EN_Sec_F_FM.book Page 51 Thursday, February 24, 2005 7:10 PM

Management Based on Authentication and Access Control
52
5
User Code Authentication
This is an authentication method for limiting access to functions according to theuser code. The same user code can be used by more than one user. For detailsabout specifying user codes, see General Settings Guide.
Limitation❒ If user code authentication is specified, files stored in the machine cannot be
delivered using DeskTopBinder. To deliver stored files using DeskTopBind-er, use basic authentication, Windows authentication, or LDAP authentica-tion.
ReferenceFor details about specifying the TWAIN driver user code, see the TWAINdriver Help.
Specifying User Code Authentication
AAAA Press the {{{{User Tools/Counter}}}} key.
BBBB Press [System Settings].
CCCC Press [Administrator Tools].
DDDD Press [User Authentication Management].
EEEE Select [User Code Authentication].
Note❒ If you do not want to use user authentication management, select [Off]
FFFF Select which of the machine’s functions you want to limit.
DolC2_EN_Sec_F_FM.book Page 52 Thursday, February 24, 2005 7:10 PM

Enabling Authentication
53
5
GGGG Press [OK].
HHHH Press the {{{{User Tools/Counter}}}} key.
Basic Authentication
Specify this authentication when using the machine’s address book to authenti-cate for each user. Using basic authentication, you can not only manage the ma-chine’s available functions but also limit access to stored files and to the personaldata in the address book.
Specifying Basic Authentication
AAAA Press the {{{{User Tools/Counter}}}} key.
BBBB Press [System Settings].
CCCC Press [Administrator Tools].
DDDD Press [User Authentication Management].
EEEE Select [Basic Authentication].
Note❒ If you do not want to use user authentication management, select [Off].
FFFF Press [OK].
GGGG Press the {{{{User Tools/Counter}}}} key.
DolC2_EN_Sec_F_FM.book Page 53 Thursday, February 24, 2005 7:10 PM

Management Based on Authentication and Access Control
54
5
Windows Authentication
Specify this authentication when using the Windows domain controller to au-thenticate users who have their accounts on the directory server. Users cannotbe authenticated if they do not have their accounts in the directory server. UnderWindows authentication, you can specify the access limit for each group regis-tered in the directory server.
❖❖❖❖ Operational Requirements for Windows Authentication• To specify Windows authentication, the following requirements must be
met:• The machine has the scanner function.• A domain controller has been set up in a designated domain.
• This function is supported by the operating systems listed below. NTLMauthentication is used for Windows authentication. To obtain user infor-mation when running Active Directory, use LDAP. For this to be possible,the version of Windows being used must support TLSv1.• Windows NT 4.0 Server• Windows 2000 Server• Windows Server 2003
Limitation❒ Users managed outside the domain are subject to user authentication, but
they cannot obtain items such as e-mail addresses.❒ With Active Directory, you can authenticate users and obtain user informa-
tion. Under Windows NT 4.0 domain controller, you can only authenticateusers.
❒ If you can obtain user information, the sender’s address (From:) is fixed toprevent unauthorized access when sending e-mails under the scanner func-tion.
Note❒ Enter the login password correctly, keeping in mind that it is case-sensitive.❒ In a network environment with a WINS server, where other networks can be
accessed via a router, you must specify WINS.❒ If you want to use Windows Authentication, you need to register the user
name that is registered in the Windows server.❒ Users who are not registered in groups and whose available functions are not
limited in the machine’s address book can use the available functions speci-fied in [Default Group].
❒ Users who are registered in multiple groups can use all the functions availa-ble to those groups.
DolC2_EN_Sec_F_FM.book Page 54 Thursday, February 24, 2005 7:10 PM

Enabling Authentication
55
5
Specifying Windows Authentication
Note❒ Under Windows authentication, the machine and domain controller commu-
nicate using SSL, so you need to create a server certificate for the domain con-troller. For details about creating the certificate, see p.56 “Creating the ServerCertificate”.
AAAA Press the {{{{User Tools/Counter}}}} key.
BBBB Press [System Settings].
CCCC Press [Administrator Tools].
DDDD Press [User Authentication Management].
EEEE Select [Windows Authentication].
Note❒ If you do not want to use user authentication management, select [Off].
FFFF Press [Change] for “Domain Name”, enter the name of the domain controllerto be authenticated, and then press [OK].
If global groups have been registered:
If global groups have been registered, you can limit the use of functions foreach global group.You need to create global groups in the Windows server in advance and reg-ister in each group the users to be authenticated.
DolC2_EN_Sec_F_FM.book Page 55 Thursday, February 24, 2005 7:10 PM

Management Based on Authentication and Access Control
56
5
You also need to register in the machine the functions available to the globalgroup members.If global groups are not specified, users can use the available functions spec-ified in [Default Group]. If global groups are specified, users not registered inglobal groups can use the available functions specified in [Default Group]. Bydefault, all functions are available to [Default Group] members. Specify the lim-itation on available functions according to user needs.A Under “Group”, press [Program / Change], and then press [*Not Programmed].
If the setting to be specified does not appear, press [TTTTNext].B Press [Change], and then enter the group name.
C Select which of the machine’s functions you want to limit.
D Press [OK].
GGGG Press [OK].
HHHH Press the {{{{User Tools/Counter}}}} key.
----Creating the Server Certificate This section explains how to create a Windows certificate for authentication. Theprocedure given uses Windows 2000 as an example.
Note❒ Before you can create a certificate, you need to install Internet Information
Service (IIS).A In [Control Panel], click [Add/Remove Programs].B Click [Add/Remove Windows Components] and install [Certificates Service].C On the [Start] menu, point to [Programs], [Administrative tools], and then click
[Internet Information Service].D Right-click [Default Web Site] and click [Properties].E Click the [Directory Security] tab.F Click [Server Certificate...] in [Secure Communication] at the bottom of the dialog
box.G Follow Web Server Certificates Wizards to create and install the server certif-
icate.
DolC2_EN_Sec_F_FM.book Page 56 Thursday, February 24, 2005 7:10 PM

Enabling Authentication
57
5
LDAP Authentication
Specify this authentication when using the LDAP server to authenticate userswho have their accounts on the LDAP server. Users cannot be authenticated ifthey do not have their accounts on the LDAP server. The address book stored inthe LDAP server can be downloaded to the machine, enabling user authentica-tion without first using the machine to register individual settings in the addressbook.
Limitation❒ To use LDAP authentication, the network configuration must allow the ma-
chine to detect the presence of the LDAP server.❒ SSL communication is used for LDAP authentication, so the machine must
have the scanner function.❒ To use LDAP authentication you need to register the LDAP server in the ma-
chine. For details about registration, see Network Guide.❒ Enter the user’s login user name using up to 32 characters and login password
using up to 128 characters.❒ Enter the administrator’s login user name and login password using up to 32
characters for each.
Note❒ If the LDAP server is Active Directory, the login user name is specified as
“username@domainname”. However, you can omit the domain name by do-ing the following: On the Windows server’s [Start] menu, select [Programs],[Administrative tools], [Active Directory Domains and Trusts]; then, on the [Action]menu, select [Properties]; and then, in [Active Directory Domains and Trusts Prop-erties], add the UPN suffix.
❒ If you want to use LDAP authentication, you need to register the user namethat is registered in the LDAP server.
Specifying LDAP Authentication
AAAA Press the {{{{User Tools/Counter}}}} key.
BBBB Press [System Settings].
CCCC Press [Administrator Tools].
DDDD Press [User Authentication Management].
DolC2_EN_Sec_F_FM.book Page 57 Thursday, February 24, 2005 7:10 PM

Management Based on Authentication and Access Control
58
5
EEEE Select [LDAP Authentication].
Note❒ If you do not want to use user authentication management, select [Off].
FFFF Select the LDAP server to be used for LDAP authentication.
GGGG Enter the login name attribute in the [Login Name Attribute] box.
If it does not appear, press [TTTTNext].
Note❒ The default login name attribute for Active Directory is “userPrincipal-
Name”.
HHHH Enter the unique attribute in the [Unique Attribute] box.
Note❒ The default unique attribute for Active Directory is “objectGUID”.
IIII Press [OK].
JJJJ Press the {{{{User Tools/Counter}}}} key
DolC2_EN_Sec_F_FM.book Page 58 Thursday, February 24, 2005 7:10 PM

Authentication Information Stored in the Address Book
59
5
Authentication Information Stored in the Address Book
In [User Authentication Management], specify the login user name and password.The login user name and password specified in [User Authentication Management]can be used as the login information for “SMTP Authentication”, “Folder Au-thentication”, and “LDAP Authentication”.If you do not want to use the login user name and password specified in [UserAuthentication Management] for “SMTP Authentication”, “Folder Authentication”,or “LDAP Authentication”, see General Settings Guide.
PreparationFor details about logging on using administrator authentication, see p.73“Logging on Using Administrator Authentication”.For details about logging off with administrator authentication, see p.74“Logging off Using Administrator Authentication”.You need to register a user in the address book. For details about the addressbook, see General Settings Guide.
Specifying Authentication Information to Log on
If you want to use [Windows Authentication] or [LDAP Authentication] in [User Authen-tication Management], take the user name registered in the server and register it inthe machine’s address book.
AAAA Press the {{{{User Tools/Counter}}}} key.
BBBB Press [System Settings].
CCCC Press [Administrator Tools].
DDDD Press [Address Book Management].If the setting to be specified does not appear, press [TTTTNext].
EEEE Select the user or group.
DolC2_EN_Sec_F_FM.book Page 59 Thursday, February 24, 2005 7:10 PM

Management Based on Authentication and Access Control
60
5
FFFF Press [Auth. Info].
GGGG Specify the login user name and password.
HHHH In “Available Functions”, select the functions available to the user.
ReferenceFor details about limiting available functions, see p.28 “Limiting AvailableFunctions”.
IIII Select [Use Auth. Info at Login] in “SMTP Authentication”.
If the setting to be specified does not appear, press [TTTTNext].
Limitation❒ When using [Use Auth. Info at Login] for “SMTP Authentication”, “Folder
Authentication”, or “LDAP Authentication”, a user name other than “oth-er” or “HIDE***” must be specified. The symbol “***” represents any char-acter.
❒ To use [Use Auth. Info at Login] for SMTP authentication, a login passwordup to 64 characters in length must be specified.
Note❒ For folder authentication, select [Use Auth. Info at Login] in “Folder Authen-
tication”.❒ For LDAP authentication, select [Use Auth. Info at Login] in “LDAP Authen-
tication”.
JJJJ Press [OK].
KKKK Press [Exit].
LLLL Press the {{{{User Tools/Counter}}}} key.
DolC2_EN_Sec_F_FM.book Page 60 Thursday, February 24, 2005 7:10 PM

If User Authentication Has Been Specified
61
5
If User Authentication Has Been Specified
When user authentication (User Code Authentication, Basic Authentication,Windows Authentication, or LDAP Authentication) is set, the authenticationscreen is displayed. Unless a valid user name and password are entered, opera-tions are not possible with the machine. Log on to operate the machine, and logoff when you are finished operations. Be sure to log off to prevent unauthorizedusers from using the machine.
Note❒ Consult the User Administrator about your login user name, password, and
user code.❒ For user code authentication, enter a number registered in the address book
as [User Code].
User Code Authentication (Using the Control Panel)
When user authentication is set, the following screen appears.
Enter a user code (eight digit), and then press [#].
Login (Using the Control Panel)
Follow the procedure below to log on when Basic Authentication, Windows Au-thentication, or LDAP Authentication is set. Follow the procedure below to logon when basic authentication, Windows authentication, or LDAP authenticationis set.
AAAA Press [Enter] for [Login User Name].
BBBB Enter a login user name, and then press [OK].
CCCC Press [Enter] for [Login Password].
DDDD Enter a login password, and then press [OK].
DolC2_EN_Sec_F_FM.book Page 61 Thursday, February 24, 2005 7:10 PM

Management Based on Authentication and Access Control
62
5
EEEE Press [Login].
When the user is authenticated, the screen for the function you are using ap-pears.
Log Off (Using the Control Panel)
Follow the procedure below to log off when Basic Authentication, Windows Au-thentication, or LDAP Authentication is set.
AAAA Press {{{{User Tools / Counter}}}}.
BBBB Press [Logout].
CCCC Press [Yes].
DDDD Press {{{{User Tools / Counter}}}}.
Login (Using Web Image Monitor)
Follow the procedure below to log on when user authentication is set.
AAAA Click [Login].
BBBB Enter a login user name and password, and then click [OK].
Note❒ For user code authentication, enter a user code in [User Name], and then
click [OK].❒ The procedure may differ depending on the Web browser used.
Log Off (Using Web Image Monitor)
AAAA Click [Logout] to log off.
Note❒ Delete the cache memory in the Web browser after logging off.
DolC2_EN_Sec_F_FM.book Page 62 Thursday, February 24, 2005 7:10 PM

If User Authentication Has Been Specified
63
5
Auto Logout
When using user authentication management, the machine automatically logsyou off if you do not use the control panel within a given time. This feature iscalled “Auto Logout”. Specify how long the machine is to wait before perform-ing Auto Logout.
AAAA Press the {{{{User Tools/Counter}}}} key.
BBBB Press [System Settings].
CCCC Press [Timer Settings].
DDDD Press [Auto Logout Timer].If the setting to be specified does not appear, press [TTTTNext].
EEEE Select [On], and then enter “10” to “999” (seconds) using the number keys.
Note❒ If you do not want to specify [Auto Logout Timer], select [Off].
FFFF Press [OK].
GGGG Press the {{{{User Tools/Counter}}}} key.
DolC2_EN_Sec_F_FM.book Page 63 Thursday, February 24, 2005 7:10 PM

Management Based on Authentication and Access Control
64
5
Menu Protect
The administrator can also limit users’ access permission to the machine’s set-tings. The machine’s System Settings menu can be locked so they cannot bechanged. This function is also effective when management is not based on userauthentication.
Note❒ To change the menu protect setting, you must first enable administrator au-
thentication.
ReferenceFor details about the menu protect level for each function, see p.101 “UserAdministrator Settings”.
Menu Protect
You can set menu protect to [Off], [Level 1], or [Level 2]. If you set it to [Off], nomenu protect limitation is applied. To limit access to the fullest extent, select[Level 2].
Copying Functions
Note❒ To specify [Menu Protect] in [Copier / Document Server Features], set [Machine Man-
agement] to [On] in [Administrator Authentication Management] in [AdministratorTools] in [System Settings].
AAAA Press the {{{{User Tools/Counter}}}} key.
BBBB Press [Copier / Document Server Features].
CCCC Press [Administrator Tools].
DDDD Press [Menu Protect].
EEEE Select the menu protect level, and then press [OK].
DolC2_EN_Sec_F_FM.book Page 64 Thursday, February 24, 2005 7:10 PM

Menu Protect
65
5
FFFF Press the {{{{User Tools/Counter}}}} key.
Scanner Functions
Note❒ To specify [Menu Protect] in [Scanner Features], set [Machine Management] to [On]
in [Administrator Authentication Management] in [Administrator Tools] in [SystemSettings].
AAAA Press the {{{{User Tools/Counter}}}} key.
BBBB Press [Scanner Features].
CCCC Press [Administrator Tools].
DDDD Press [Menu Protect].
EEEE Select the menu protect level, and then press [OK].
FFFF Press the {{{{User Tools/Counter}}}} key.
DolC2_EN_Sec_F_FM.book Page 65 Thursday, February 24, 2005 7:10 PM

Management Based on Authentication and Access Control
66
5
DolC2_EN_Sec_F_FM.book Page 66 Thursday, February 24, 2005 7:10 PM

67
6. Specifying theAdministrator/Security Functions
The Roles of Administrators
By limiting the functions available to each user, you can protect the data in themachine from leaks and from being tampered with or deleted. The administra-tors each manage the access limits to the functions they are responsible for.There are four types of administrator, as shown below. You can also specify a su-pervisor who can change each administrator’s password.• Machine Administrator• Network Administrator• File Administrator• User Administrator• SupervisorRegister the administrators and supervisor separately from the users registeredin the address book. Users registered in the address book cannot be specified asadministrators.
ReferenceFor details, see p.72 “Registering the Administrator”.
❖❖❖❖ Machine AdministratorThis is the administrator who mainly manages the machine’s default settings.You can set the machine so that the default for each function can only be spec-ified by the machine administrator. By making this setting, you can preventunauthorized people from changing the settings and allow the machine to beused securely by its many users.
❖❖❖❖ Network AdministratorThis is the administrator who manages the network settings. You can set themachine so that network settings such as the IP address and settings for send-ing and receiving e-mail can only be specified by the network administrator.By making this setting, you can prevent unauthorized users from changingthe settings and disabling the machine, and thus ensure correct network op-eration.
❖❖❖❖ File AdministratorThis is the administrator who manages permission to access stored files. Youcan specify passwords to allow only registered and permitted users to viewand edit files stored in Document Server. By making this setting, you can pre-vent data leaks and tampering due to unauthorized users viewing and usingthe registered data.
DolC2_EN_Sec_F_FM.book Page 67 Thursday, February 24, 2005 7:10 PM

Specifying the Administrator/Security Functions
68
6
❖❖❖❖ User AdministratorThis is the administrator who manages personal information in the addressbook.A user administrator can register/delete users in the address book or changeusers’ personal information.Users registered in the address book can also change and delete their own in-formation. If any of the users forget their password, the user administratorcan delete it and create a new one, allowing the user to access the machineagain.
❖❖❖❖ SupervisorThe supervisor can delete an administrator’s password and specify a newone. The supervisor cannot specify defaults or use normal functions. Howev-er, if any of the administrators forget their password and cannot access themachine, the supervisor can provide support.
ReferenceSee p.87 “Operations by the Supervisor”.
DolC2_EN_Sec_F_FM.book Page 68 Thursday, February 24, 2005 7:10 PM

Administrator Authentication
69
6
Administrator Authentication
Administrators are handled differently from the users registered in the addressbook. When registering an administrator, you cannot use a login user name andlogin password already registered in the address book. Windows Authentica-tion and LDAP Authentication are not performed for an administrator, so an ad-ministrator can log on even if the server is unreachable because of a networkproblem.Each administrator is identified by a login user name and login password. Oneperson can act as more than one type of administrator if multiple administratorauthority is granted to a single login user name and login password.You can specify the login user name, login password, and encryption passwordfor each administrator.The encryption password is a password for performing encryption when speci-fying settings using Web Image Monitor or SmartDeviceMonitor for Admin.The password registered in the machine must be entered when using applica-tions such as SmartDeviceMonitor for Admin.
Note❒ You can use up to 32 alphanumeric characters and symbols when registering
login user names and login passwords. Keep in mind that passwords arecase-sensitive.
❒ You should use at least eight characters for the login password so that otherpeople will not be able to guess it easily.
❒ You cannot include spaces, semicolons (;) or quotes (“”) in the user name, orleave the user name blank.
❒ You can register up to four sets of login user names and login passwords towhich you can grant administrator authority.
❒ Administrator authentication can also be specified via Web Image Monitor.For details see the Web Image Monitor Help.
DolC2_EN_Sec_F_FM.book Page 69 Thursday, February 24, 2005 7:10 PM

Specifying the Administrator/Security Functions
70
6
Administrator Authentication
To specify administrator authentication, set Administrator Authentication Man-agement to [On]. You can also specify whether or not to manage the items in Sys-tem Settings as an administrator.If you have not registered any administrator, you can obtain each administra-tor’s authority with the “Administrator 1” setting. To log on as an administrator,use the default login user name and login password.
PreparationFor details about logging on with administrator authentication, see p.73“Logging on Using Administrator Authentication”.For details about logging off with administrator authentication, see p.74“Logging off Using Administrator Authentication”.The “Administrator 1” defaults are “admin” for the login name and blank forthe password. If user authentication has been specified, a screen for authenti-cation appears. To specify administrator authentication, log on as an admin-istrator by entering “admin” as the login user name and leaving the loginpassword blank.
AAAA Press the {{{{User Tools/Counter}}}} key.
BBBB Press [System Settings].
CCCC Press [Administrator Tools].
DDDD Press [Administrator Authentication Management].
EEEE Specify each administrator authentication.
Specifying User Management Authentication
A Press [User Management], and then press [On].
B To specify address book management, press [Administrator Tools].
DolC2_EN_Sec_F_FM.book Page 70 Thursday, February 24, 2005 7:10 PM

Administrator Authentication
71
6
Specifying Machine Management Authentication
A Press [Machine Management], and then press [On].
B Press the item for which you want to specify management.
Specifying Network Management Authentication
A Press [Network Management], and then press [On].
B Press the item for which you want to specify management.
Specifying File Management Authentication
A Press [File Management], and then press [On].
B To specify file management, press [Administrator Tools].
FFFF Press [OK].
GGGG Press the {{{{User Tools/Counter}}}} key.
DolC2_EN_Sec_F_FM.book Page 71 Thursday, February 24, 2005 7:10 PM

Specifying the Administrator/Security Functions
72
6
Registering the Administrator
To specify the administrators separately when only “Administrator 1” has beenspecified, log on using the “Administrator 1” login user name and login pass-word. To register an administrator, you need to specify the authority of one ofthe administrators. The data for each administrator can be changed using ad-ministrator authority.Administrator authentication can also be specified via Web Image Monitor. Fordetails see the Web Image Monitor Help.
PreparationIf administrator authentication has already been specified, log on using a reg-istered administrator name and password. For details about logging on usingadministrator authentication, see p.73 “Logging on Using Administrator Au-thentication”.For details about logging off with administrator authentication, see p.74“Logging off Using Administrator Authentication”.
AAAA Press the {{{{User Tools/Counter}}}} key.
BBBB Press [System Settings].
CCCC Press [Administrator Tools].
DDDD Press [Program / Change Administrator].
EEEE In the line for the administrator whose authority you want to specify, press[Administrator 1], [Administrator 2], [Administrator 3] or [Administrator 4], and thenpress [Change].
FFFF Press [Change] for the login user name.
DolC2_EN_Sec_F_FM.book Page 72 Thursday, February 24, 2005 7:10 PM

Administrator Authentication
73
6
GGGG Enter the login user name, and then press [OK].
HHHH Press [Change] for the login password.
IIII Enter the login password, and then press [OK].
JJJJ If a password reentry screen appears, enter the login password, and thenpress [OK].
KKKK Press [Change] for the encryption password.
LLLL Enter the encryption password, and then press [OK].
MMMM If a password reentry screen appears, enter the encryption password, andthen press [OK].
NNNN Press [OK].
OOOO Press [OK].
PPPP Press the {{{{User Tools/Counter}}}} key.
Logging on Using Administrator Authentication
If administrator authentication has been specified, log on using an administra-tor’s user name and password.This section describes how to log on.
Note❒ If user authentication has already been specified, a screen for authentication appears.❒ To log on as an administrator, enter the administrator’s login user name and
login password.❒ If you log on using administrator authority, the name of the administrator
logging on appears.❒ If you log on using a login user name with the authority of more than one ad-
ministrator, “Administrator” appears.❒ If you try to log on from an operating screen, “Selected function cannot be
used.” appears. Press the {{{{User Tools/Counter}}}} key to change the default.
DolC2_EN_Sec_F_FM.book Page 73 Thursday, February 24, 2005 7:10 PM

Specifying the Administrator/Security Functions
74
6
AAAA Press the {{{{User Tools/Counter}}}} key.
BBBB Press [Login].
CCCC Press [Enter] next to “Login User Name”.
DDDD Enter the login user name, and then press [OK].
Note❒ If assigning the administrator for the first time, enter “admin”.
EEEE Press [Enter] next to “Login Password”.
Note❒ If assigning the administrator for the first time, proceed to step G without
pressing [Enter].
FFFF Enter the login password, and then press [OK].
GGGG Enter [Login].
“Authenticating... Please wait.” appears, followed by the screen forspecifying the default.
Logging off Using Administrator Authentication
If administrator authentication has been specified, be sure to log off after com-pleting settings. This section explains how to log off after completing settings.
AAAA Press [Logout].
BBBB Press [Yes].
CCCC Press the {{{{User Tools/Counter}}}} key.
DolC2_EN_Sec_F_FM.book Page 74 Thursday, February 24, 2005 7:10 PM

Administrator Authentication
75
6
Changing the Administrator
Change the administrator’s login user name and login password. You can alsoassign each administrator’s authority to the login user names “Administrator 1”to “Administrator 4” To combine the authorities of multiple administrators, as-sign multiple administrators to a single administrator.For example, to assign machine administrator authority and user administratorauthority to [Administrator 1], press [Administrator 1] in the lines for the machineadministrator and the user administrator.
PreparationFor details about logging on with administrator authentication, see p.73“Logging on Using Administrator Authentication”.For details about logging off with administrator authentication, see p.74“Logging off Using Administrator Authentication”.
AAAA Press the {{{{User Tools/Counter}}}} key.
BBBB Press [System Settings].
CCCC Press [Administrator Tools].
DDDD Press [Program / Change Administrator].
EEEE In the line for the administrator you want to change, press [Administrator 1],[Administrator 2], [Administrator 3] or [Administrator 4], and then press [Change].
FFFF Press [Change] for the setting you want to change, and re-enter the setting.
GGGG Press [OK].
HHHH Press [OK].
IIII Press the {{{{User Tools/Counter}}}} key.
DolC2_EN_Sec_F_FM.book Page 75 Thursday, February 24, 2005 7:10 PM

Specifying the Administrator/Security Functions
76
6
Specifying the Extended Security Functions
As well as providing basic security through user authentication and the machineaccess limits specified by the administrators, you can increase security by, for in-stance, encrypting transmitted data and data in the address book. If you need ex-tended security, specify the machine’s extended security functions before usingthe machine.This section outlines the extended security functions and how to specify them.For details about when to use each function, see the corresponding chapters.
Changing the Extended Security Functions
To change the extended security functions, display the extended security screenas follows:
PreparationFor details about logging on with administrator authentication, see p.73“Logging on Using Administrator Authentication”.For details about logging off with administrator authentication, see p.74“Logging off Using Administrator Authentication”.
Procedure for Changing the Extended Security Functions
AAAA Press the {{{{User Tools/Counter}}}} key.
BBBB Press [System Settings].
CCCC Press [Administrator Tools].
DDDD Press [Extended Security].
EEEE Press the setting you want to change, and change the setting.
DolC2_EN_Sec_F_FM.book Page 76 Thursday, February 24, 2005 7:10 PM

Specifying the Extended Security Functions
77
6
FFFF Press [OK].
GGGG Press the {{{{User Tools/Counter}}}} key.
Settings
❖❖❖❖ Driver Encryption KeyThis can be specified by the network administrator. Encrypt the passwordtransmitted when specifying user authentication. If you register the encryp-tion key specified with the machine in the driver, passwords are encrypted.• Driver Encryption Key
ReferenceSee the TWAIN driver Help.
❖❖❖❖ Encrypt Address BookThis can be specified by the user administrator. Encrypt the data in the ma-chine’s address book.Even if one of the machine’s internal parts is removed, the data in the addressbook is protected by encryption and cannot be read.• On• Off
Note❒ Default: Off
❖❖❖❖ Restrict Use of DestinationsThis can be specified by the user administrator.The available scanner destinations are limited to the destinations registeredin the address book.A user cannot directly enter the destinations for transmission.
Note❒ The destinations searched by “Search LDAP” can be used.• On• Off
Note❒ Default: On
DolC2_EN_Sec_F_FM.book Page 77 Thursday, February 24, 2005 7:10 PM

Specifying the Administrator/Security Functions
78
6
❖❖❖❖ Permit Adding of DestinationsThis can be specified by the user administrator.When “Restrict Use of Destinations” is set to [Off]. After directly entering ascanner destination, you can register it in the address book by pressing[ProgDest]. If this setting is set to [Off], [ProgDest] does not appear. This pre-vents the registration of destinations not managed by the administrator.• On• Off
Note❒ Default: On
❖❖❖❖ Permit Display of User InformationThis can be specified if user authentication is specified. When the job historyis checked using a network connection for which authentication is not avail-able, all personal information can be displayed as “********”. For example,when someone not authenticated as an administrator checks the job historyusing SNMP in SmartDeviceMonitor for Admin, personal information can bedisplayed as “********” so users cannot be identified. Because no informationidentifying registered users can be viewed, unauthorized users can be pre-vented from obtaining information about the registered files.• On• Off
Note❒ Default: On
❖❖❖❖ Enhance File ProtectionThis can be specified by the file administrator. By specifying a password, youcan limit operations such as deleting, and sending files, and can prevent un-authorized people from accessing the files. However, it is still possible for thepassword to be cracked.By specifying “Enhance File Protection”, files are locked and so become inac-cessible if an invalid password is entered ten times. This can protect the filesfrom unauthorized access attempts in which a password is repeatedlyguessed.The locked files can only be unlocked by the file administrator. When “En-hance File Protection” is specified, ( ) appears at the top right of the screen.
Note❒ If files are locked, you cannot select them even if the correct password is
entered.• On• Off
Note❒ Default: Off
DolC2_EN_Sec_F_FM.book Page 78 Thursday, February 24, 2005 7:10 PM

Specifying the Extended Security Functions
79
6
❖❖❖❖ Permit Settings by SNMP V1 and V2This can be specified by the network administrator. When the machine is ac-cessed using the SNMPv1, v2 protocol, authentication cannot be performed,allowing machine administrator settings such as the paper setting to bechanged. If you select [Off], the setting can be viewed but not specified withSNMPv1, v2.• On• Off
Note❒ Default: On
❖❖❖❖ Permit Simple EncryptionThis can be specified by the machine administrator.Under Windows95/98/Me, advanced encryption is not possible with theprinter driver, so simple encryption is used. If you select [Off], printing withsimple encryption is not allowed and you cannot connect using the printerdriver under Windows95/98/Me. Specify this setting when using a driverthat does not support advanced encryption.
Limitation❒ When this setting is set to [Off] and you want to edit the address book in
[User Management Tool] or [Address Management Tool] in SmartDeviceMonitorfor Admin, or you want to access the machine using DeskTopBinder or theScanRouter software, enable SSL/TLS for encrypted communication. Fordetails about specifying SSL/TLS, see p.42 “Setting the SSL / TLS Encryp-tion Mode”.
• On• Off
Note❒ Default: Off
DolC2_EN_Sec_F_FM.book Page 79 Thursday, February 24, 2005 7:10 PM
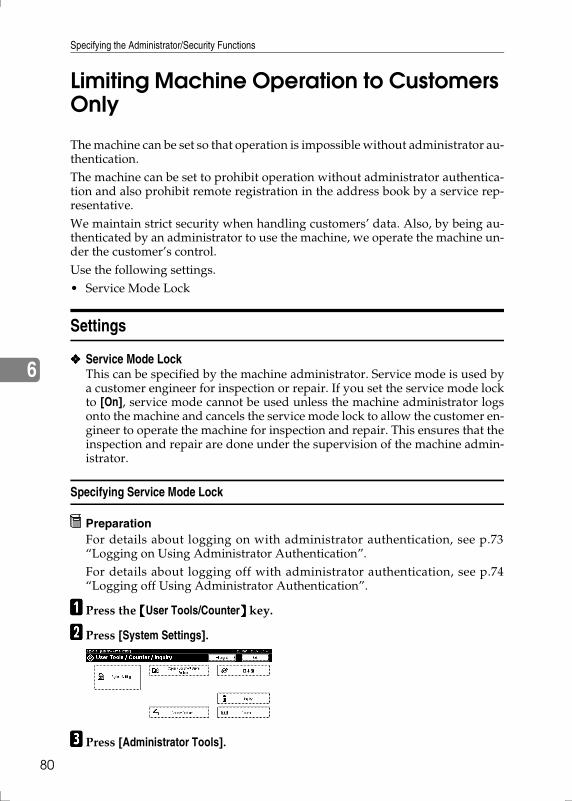
Specifying the Administrator/Security Functions
80
6
Limiting Machine Operation to Customers Only
The machine can be set so that operation is impossible without administrator au-thentication.The machine can be set to prohibit operation without administrator authentica-tion and also prohibit remote registration in the address book by a service rep-resentative. We maintain strict security when handling customers’ data. Also, by being au-thenticated by an administrator to use the machine, we operate the machine un-der the customer’s control.Use the following settings.• Service Mode Lock
Settings
❖❖❖❖ Service Mode LockThis can be specified by the machine administrator. Service mode is used bya customer engineer for inspection or repair. If you set the service mode lockto [On], service mode cannot be used unless the machine administrator logsonto the machine and cancels the service mode lock to allow the customer en-gineer to operate the machine for inspection and repair. This ensures that theinspection and repair are done under the supervision of the machine admin-istrator.
Specifying Service Mode Lock
PreparationFor details about logging on with administrator authentication, see p.73“Logging on Using Administrator Authentication”.For details about logging off with administrator authentication, see p.74“Logging off Using Administrator Authentication”.
AAAA Press the {{{{User Tools/Counter}}}} key.
BBBB Press [System Settings].
CCCC Press [Administrator Tools].
DolC2_EN_Sec_F_FM.book Page 80 Thursday, February 24, 2005 7:10 PM

Limiting Machine Operation to Customers Only
81
6
DDDD Press [Service Mode Lock].
EEEE Press [On] and then [OK].
A confirmation message appears.
FFFF Press [Yes].
GGGG Press the {{{{User Tools/Counter}}}} key.
Canceling Service Mode Lock
For a customer engineer to carry out inspection or repair in service mode, the ma-chine administrator must log onto the machine and cancel the service mode lock.
PreparationFor details about logging on with administrator authentication, see p.73“Logging on Using Administrator Authentication”.For details about logging off with administrator authentication, see p.74“Logging off Using Administrator Authentication”.
AAAA Press the {{{{User Tools/Counter}}}} key.
BBBB Press [System Settings].
CCCC Press [Administrator Tools].
DDDD Press [Service Mode Lock].
EEEE Press [Off] and then press [OK].
FFFF Press the {{{{User Tools/Counter}}}} key.
The customer engineer can switch to service mode.
DolC2_EN_Sec_F_FM.book Page 81 Thursday, February 24, 2005 7:10 PM

Specifying the Administrator/Security Functions
82
6
DolC2_EN_Sec_F_FM.book Page 82 Thursday, February 24, 2005 7:10 PM

83
7. Troubleshooting
Authentication Does Not Work Properly
This section explains what to do if a user cannot operate the machine because ofa problem related to user authentication. Refer to this section if a user comes toyou with such a problem.
A Message Appears
This section explains how to deal with problems if a message appears on thescreen during user authentication.The most common messages are explained. If some other message appears, dealwith the problem according to the information contained in the message.
Messages Causes Solutions
You do not have the privileges to use this function.
The authority to use the func-tion is not specified.
• If this appears when trying to use a function:The function is not speci-fied in the address book management setting as be-ing available. The user ad-ministrator must decide whether to authorize use of the function and then assign the authority.
• If this appears when trying to specify a default setting:The administrator differs depending on the default settings you wish to speci-fy. Using the list of set-tings, the administrator responsible must decide whether to authorize use of the function.
DolC2_EN_Sec_F_FM.book Page 83 Thursday, February 24, 2005 7:10 PM

Troubleshooting
84
7
Authentication has failed.
The entered login user name or login password is not cor-rect
Inquire the user administrator for the correct login user name and login password.
The number of users regis-tered in the address book has reached the maximum limit allowed by Windows Authen-tication or LDAP Authentica-tion, so you cannot register additional users.
Delete unnecessary user ad-dresses.
Cannot access the authentica-tion server when using Win-dows authentication or LDAP authentication.
A network or server error may have occurred. Contact to the network administrator.
Selected files con-tain file(s) that the user does not have access privi-leges to. Please note that only the files with access privileges will be deleted.
You have tried to delete files without the authority to do so.
Files can be deleted by the file creator (owner) or file admin-istrator. To delete a file which you are not authorized to de-lete, contact the file creator (owner).
Messages Causes Solutions
DolC2_EN_Sec_F_FM.book Page 84 Thursday, February 24, 2005 7:10 PM

Authentication Does Not Work Properly
85
7
Machine Cannot Be Operated
If the following conditions arise while users are operating the machine, provideinstructions on how to deal with them.
Condition Cause Solution
Cannot connect using the TWAIN driver.
The encryption key specified in the driver does not match the machine’s driver encryp-tion key.
Specify the driver encryption key registered in the machine.
See p.34 “Driver Encryption Key”.
If “Permit Simple Encryption” is set to [Off], data sent by the driver uses simple encryption.
Under Windows NT 4.0, Win-dows 2000/XP, and Windows server 2003, enable driver en-cryption.
Under Windows 95/98/Me, you can use only simple en-cryption, so you cannot print. Under Windows 95/98/Me, set “Permit Simple Encryp-tion” to [On] in the machine’s [System Settings].
Cannot authenticate using the TWAIN driver.
Another user is logging on to the machine.
Wait for the user to log off.
Authentication is taking time because of operating condi-tions.
Make sure the LDAP server setting is correct. Make sure the network settings are cor-rect.
Authentication is not possible while the machine is editing the address book data.
Wait until editing of the ad-dress book data is complete.
Cannot log on to the machine using [Document Server: Authen-tication/Encryption:] in Desk-TopBinder.
“Permit Simple Encryption” is not set correctly. Alternative-ly, [SSL/TLS] has been enabled although the required certifi-cate is not installed in the computer.
Set “Permit Simple Encryp-tion” to [On]. Alternatively, enable [SSL/TLS], install the server certificate in the ma-chine, and then install the cer-tificate in the computer.
ReferenceSee p.79 “Permit Simple Encryption”.
See p.42 “Setting the SSL / TLS Encryption Mode”.
Cannot access the machine us-ing ScanRouter EX Profes-sional V3 / ScanRouter EX Enterprise V2.
Cannot connect to the Scan-Router delivery software.
The ScanRouter delivery soft-ware may not be supported by the machine.
Update to the latest version of the ScanRouter delivery soft-ware.
Cannot log off when using the copying or scanner functions.
The original has not been scanned completely.
When the original has been scanned completely, press [#], remove the original, and then log off.
DolC2_EN_Sec_F_FM.book Page 85 Thursday, February 24, 2005 7:10 PM

Troubleshooting
86
7
Cannot access the machine us-ing ScanRouter EX Profes-sional V2.
ScanRouter EX Professional V2 does not support user authen-tication.
[ProgDest] does not appear on the scanner’s screen for speci-fying destinations.
[Permit Adding of Destinations] is set to [Off] in [Restrict Use of Destinations] in [Extended Secu-rity], so only the user adminis-trator can register destinations in the address book.
Registration must be done by the user administrator.
Stored files do not appear. User authentication may have been disabled while [All Users] is not specified.
Re-enable user authentication, and then enable [All Users] for the files that did not appear. For details about enabling [All Users], see p.9 “Specifying Ac-cess Permission for Stored Files”.
Destinations specified using the machine do not appear.
User authentication may have been disabled while [All Users] is not specified.
Re-enable user authentication, and then enable [All Users] for the destinations that did not appear.
For details about enabling [All Users], see p.18 “Protecting the Address Book”.
If you try to interrupt a job while copying or scanning, an authentication screen ap-pears.
With this machine, you can log off while copying or scan-ning. If you try to interrupt copying or scanning after log-ging off, an authentication screen appears.
Only the user who executed a copying or scanning job can interrupt it.Wait until the job has completed or consult an administrator or the user who executed the job.
Cannot register entries in [Pro-gram No.10] for program regis-tration in the copier function.
If “Change Initial Mode” is set to [Program No.10] in [General Features] in [Copier / Document Server Features], entries can be registered in [Program No.10] only by the machine adminis-trator.
The machine administrator must carry out the registra-tion.
Condition Cause Solution
DolC2_EN_Sec_F_FM.book Page 86 Thursday, February 24, 2005 7:10 PM

87
8. Appendix
Operations by the Supervisor
The supervisor can delete an administrator’s password and specify a new one.If any of the administrators forget their passwords or if any of the administratorschange, the supervisor can assign a new password. If logged on using the super-visor’s user name and password, you cannot use normal functions or specify de-faults. Log on as the supervisor only to change an administrator’s password.
Important❒ The default login user name is “supervisor” and the login password is blank.
We recommend changing the login user name and login password.❒ When registering login user names and login passwords, you can specify up
to 32 alphanumeric characters and symbols. Keep in mind that user namesand passwords are case-sensitive.
❒ Be sure not to forget the supervisor login user name and login password. Ifyou do forget them, a service representative will to have to return the ma-chine to its default state. This will result in all data in the machine being lostand the service call may not be free of charge.
Note❒ You cannot specify the same login user name for the supervisor and the ad-
ministrators.❒ Using Web Image Monitor, you can log on as the supervisor and delete an ad-
ministrator’s password.
Logging on as the Supervisor
If administrator authentication has been specified, log on using the supervisorlogin user name and login password. This section describes how to log on.
AAAA Press the {{{{User Tools/Counter}}}} key.
BBBB Press [Login].
CCCC Press [Enter] for [Login User Name].
DolC2_EN_Sec_F_FM.book Page 87 Thursday, February 24, 2005 7:10 PM

Appendix
88
8
DDDD Enter a login user name, and then press [OK].
Note❒ When you assign the administrator for the first time, enter “supervisor”.
EEEE Press [Enter] for [Login Password].
FFFF Enter a login password, and then press [OK].
Note❒ When you assign the administrator for the first time, proceed to step G
without pressing [Enter].
GGGG Press [Login].
Logging off as the Supervisor
If administrator authentication has been specified, be sure to log off after com-pleting settings. This section explains how to log off after completing settings.
AAAA Press [Logout].
BBBB Press [Yes].
CCCC Press the {{{{User Tools/Counter}}}} key.
Changing the Supervisor
AAAA Press the {{{{User Tools/Counter}}}} key.
BBBB Press [System Settings].
CCCC Press [Administrator Tools].
DDDD Press [Program / Change Administrator].
DolC2_EN_Sec_F_FM.book Page 88 Thursday, February 24, 2005 7:10 PM

Operations by the Supervisor
89
8
EEEE Under “Supervisor”, click [Change].
FFFF Press [Change] for the login user name.
GGGG Enter the login user name, and then press [OK].
HHHH Press [Change] for the login password.
IIII Enter the login password, and then press [OK].
JJJJ If a password reentry screen appears, enter the login password, and thenpress [OK].
KKKK Press [OK].
LLLL Press [OK].
MMMM Press the {{{{User Tools/Counter}}}} key.
Resetting an Administrator’s Password
AAAA Press the {{{{User Tools/Counter}}}} key.
BBBB Press [Login].
CCCC Log on as the supervisor.
You can log on in the same way as an administrator.
DDDD Press [System Settings].
EEEE Press [Administrator Tools].
FFFF Press [Program / Change Administrator].
DolC2_EN_Sec_F_FM.book Page 89 Thursday, February 24, 2005 7:10 PM

Appendix
90
8
GGGG Press [Change] for the administrator you wish to reset.
HHHH Press [Change] for the login password.
IIII Enter the login password, and then press [OK].
JJJJ If a password reentry screen appears, enter the login password, and thenpress [OK].
KKKK Press [OK].
LLLL Press [OK].
MMMM Press the {{{{User Tools/Counter}}}} key.
DolC2_EN_Sec_F_FM.book Page 90 Thursday, February 24, 2005 7:10 PM

Machine Administrator Settings
91
8
Machine Administrator Settings
The machine administrator settings that can be specified are as follows:
System Settings
The following settings can be specified.
❖❖❖❖ General FeaturesAll the settings can be specified.
❖❖❖❖ Tray Paper SettingsAll the settings can be specified.
❖❖❖❖ Timer SettingsAll the settings can be specified.
❖❖❖❖ Interface Settings• Machine Name• Panel Off Timer
❖❖❖❖ File TransferThe following settings can be specified.• Delivery Option• SMTP Authentication
SMTP AuthenticationUser NameE-mail AddressEncryptionReception Protocol
• POP before SMTP• POP3 Setting
Server NameEncryption
• Administrator's E-mail Address• Default User Name / Password (Send)
SMB User NameFTP User Name
• Program / Change / Delete E-mail Message• Program / Change / Delete Subject
DolC2_EN_Sec_F_FM.book Page 91 Thursday, February 24, 2005 7:10 PM

Appendix
92
8
❖❖❖❖ Administrator Tools• User Authentication Management
You can specify which authentication to use.You can also edit the settings for each function.
• Administrator Authentication ManagementMachine Management
• Program / Change AdministratorMachine AdministratorYou can change the user name and the full-control user’s authority.
• Key Counter Management• External Charge Unit Management• Enhanced External Charge Unit Management• Extended Security
Permit Display of User Information• Display / Print Counter
Display / Print Counter• Display / Clear / Print Counter per User
Display / Print Counter• AOF (Always On)• Program / Change / Delete LDAP Server
Server NameSearch BasePort No.AuthenticationUser NamePasswordJapanese Chara. CodeSearch ConditionsSearch Options
• Use LDAP Server• Service Mode Lock• Auto Erase Memory Setting *1
• Erase All Memory *1
*1 The DataOverwriteSecurity unit option must be installed.
DolC2_EN_Sec_F_FM.book Page 92 Thursday, February 24, 2005 7:10 PM

Machine Administrator Settings
93
8
Copier/Document Server Features
The following settings can be specified.
❖❖❖❖ General FeaturesAll the settings can be specified.
❖❖❖❖ Reproduction RatioAll the settings can be specified.
❖❖❖❖ EditAll the settings can be specified.
❖❖❖❖ StampAll the settings can be specified.
❖❖❖❖ Input / OutputAll the settings can be specified.
❖❖❖❖ Administrator ToolsAll the settings can be specified.
Scanner Features
The following settings can be specified.
❖❖❖❖ Scan SettingsAll the settings can be specified.
❖❖❖❖ Destination List SettingsAll the settings can be specified.
❖❖❖❖ Send SettingsThe following settings can be specified.• TWAIN Standby Time• File Type Priority• Compression (Black & White)• Print & Delete Scanner Journal• E-mail Information Language• Store File Priority• Delete Scanner Journal• Print Scanner Journal
❖❖❖❖ Administrator ToolsAll the settings can be specified.
DolC2_EN_Sec_F_FM.book Page 93 Thursday, February 24, 2005 7:10 PM

Appendix
94
8
Settings via Web Image Monitor
The following settings can be specified.
❖❖❖❖ Top Page• Reset Device
❖❖❖❖ Device Settings• System
Device NameOutput TrayPaper Tray Priority
• PaperAll the settings can be specified.
• Timer SettingsAll the settings can be specified.
• E-mailAll the settings can be specified.
• File TransferAll the settings can be specified.
• User Authentication ManagementAll the settings can be specified.
• Program/Change AdministratorYou can specify the following administrator settings as the machine ad-ministrator.Login User NameLogin PasswordChange Encryption Password
• Administrator Authentication ManagementMachine Administrator AuthenticationAvailable Settings for Machine Administrator
❖❖❖❖ Network• SNMPv3• Access Type (Machine Administrator)
DolC2_EN_Sec_F_FM.book Page 94 Thursday, February 24, 2005 7:10 PM

Machine Administrator Settings
95
8
Settings via SmartDeviceMonitor for Admin
The following settings can be specified.
❖❖❖❖ Device Information• Reset Device• Reset Current Job• Reset All Jobs
❖❖❖❖ User Management ToolThe following settings can be specified.• User Counter Information• Access Control List• Reset User Counters• Automatically add user codes
DolC2_EN_Sec_F_FM.book Page 95 Thursday, February 24, 2005 7:10 PM

Appendix
96
8
Network Administrator Settings
The network administrator settings that can be specified are as follows:
System Settings
The following settings can be specified.
❖❖❖❖ Interface Settings• Network
All the settings can be specified.• IEEE 1394 *1
All the settings can be specified.• IEEE 802.11b *2
All the settings can be specified.
Note❒ If [DHCP] is set to [On], the settings that are automatically obtained via
DHCP cannot be specified.*1 The IEEE1394 interface board option must be installed.*2 The IEEE802.11b interface unit option must be installed.
❖❖❖❖ File Transfer• SMTP Server
SMTP Server NamePort No.
• E-mail Communication Port• Scanner Recall Interval Time • Number of Scanner Recalls• Auto Specify Sender Name
❖❖❖❖ Administrator Tools• Administrator Authentication Management
Network Management• Program / Change Administrator
Network AdministratorYou can specify the user name and change the full-control user’s authority.
• Extended SecurityDriver Encryption KeyPermit Simple EncryptionPermit Settings by SNMP V1 and V2
DolC2_EN_Sec_F_FM.book Page 96 Thursday, February 24, 2005 7:10 PM

Network Administrator Settings
97
8
Scanner Features
The following settings can be specified.
❖❖❖❖ Send Settings• Max. E-mail Size• Divide & Send E-mail
Settings via Web Image Monitor
The following settings can be specified.
❖❖❖❖ Device Settings• System
CommentLocation
• E-mailSMTP Server NameSMTP Port No.POP Port No.
• Program/Change AdministratorYou can specify the following administrator settings for the machine ad-ministrator.Login User NameLogin PasswordChange Encryption Password
• Administrator Authentication ManagementNetwork Administrator AuthenticationAvailable Settings for Network Administrator
❖❖❖❖ Interface Settings• Change Interface• IEEE 802.11b *1
Communication ModeSSIDChannelWEP SettingAuthentication TypeWEP Key StatusKeyConfirm Key
• IEEE 1394 *2
IP over 1394SCSI print (SBP-2)Bidirectional SCSI print
DolC2_EN_Sec_F_FM.book Page 97 Thursday, February 24, 2005 7:10 PM

Appendix
98
8
*1 The IEEE802.11b interface unit option must be installed.*2 The IEEE1394 interface board option must be installed.
❖❖❖❖ Network• Protocol
All the settings can be specified.• TCP/IP
All the settings can be specified.• NetWare
All the settings can be specified.• AppleTalk
All the settings can be specified.• SMB
All the settings can be specified.• SNMP
All the settings can be specified.• SNMPv3
SNMPv3ProtocolSNMP v3 FunctionSNMPv3 Trap CommunicationAuthentication AlgorithmPermit SNMP v3 CommunicationSNMPv3 Trap Communication SettingAccount Name (User)Authentication Password (User)Encryption Password (User)Access Type (User)Access Type (Network Administrator)
• RendezvousAll the settings can be specified.
❖❖❖❖ WebpageAll the settings can be specified.
❖❖❖❖ Security• Access Control
All the settings can be specified.• IPP Authentication
All the settings can be specified.• SSL/TLS
All the settings can be specified.• Certificates
All the settings can be specified.
DolC2_EN_Sec_F_FM.book Page 98 Thursday, February 24, 2005 7:10 PM

Network Administrator Settings
99
8
Settings via SmartDeviceMonitor for Admin
The following settings can be specified.
❖❖❖❖ NIB Setup ToolAll the settings can be specified.
DolC2_EN_Sec_F_FM.book Page 99 Thursday, February 24, 2005 7:10 PM

Appendix
100
8
File Administrator Settings
The file administrator settings that can be specified are as follows:
System Settings
The following settings can be specified.
❖❖❖❖ Administrator Tools• Administrator Authentication Management
File Management• Program / Change Administrator
File Administrator• Extended Security
Enhance File Protection
Settings via Web Image Monitor
The following settings can be specified.
❖❖❖❖ Document ServerAll the settings can be specified.
❖❖❖❖ Device Settings• Program/Change Administrator
You can specify the following administrator settings for the file adminis-trator.Login User NameLogin PasswordChange Encryption Password
• Administrator Authentication ManagementFile Administrator AuthenticationAvailable Settings for File Administrator
DolC2_EN_Sec_F_FM.book Page 100 Thursday, February 24, 2005 7:10 PM

User Administrator Settings
101
8
User Administrator Settings
The user administrator settings that can be specified are as follows:
System Settings
The following settings can be specified.
❖❖❖❖ Administrator Tools• Administrator Authentication Management
User Management• Program / Change Administrator
User Administrator• Extended Security
Restrict Use of DestinationsPermit Adding of DestinationsEncrypt Address Book
• Print Address Book: Destination List• Address Book Management• Address Book: Program / Change / Delete Group• Address Book: Change Order• Address Book: Edit Title• Address Book: Select Title
Settings via Web Image Monitor
The following settings can be specified.
❖❖❖❖ Address BookAll the settings can be specified.
❖❖❖❖ Device Settings• Program/Change Administrator
The user administrator settings that can be specified are as follows:Login User NameLogin PasswordChange Encryption Password
• Administrator Authentication ManagementFile Administrator AuthenticationAvailable Settings for File Administrator
DolC2_EN_Sec_F_FM.book Page 101 Thursday, February 24, 2005 7:10 PM

Appendix
102
8
Settings via SmartDeviceMonitor for Admin
The following settings can be specified.
❖❖❖❖ Address Management ToolAll the settings can be specified.
❖❖❖❖ User Management Tool• Restrict Access To Device• Add New User• Delete User• User Properties
DolC2_EN_Sec_F_FM.book Page 102 Thursday, February 24, 2005 7:10 PM

The Available Functions for Using the Files Stored in Document Server
103
8
The Available Functions for Using the Files Stored in Document Server
The authorities for using the files stored in Document Server are as follows:The authority designations in the list indicate users with the following authori-ties.• Read-only
This is a user assigned “Read-only” authority.• Edit
This is a user assigned “Edit” authority.• Edit / Delete
This is a user assigned “Edit / Delete” authority.• Full Control
This is a user granted full control.• Owner
This is a user who can store files in the machine and authorize other users toview, edit, or delete those files.
• File AdministratorThis is the file administrator.
❍ =Granted authority to operate. - =Not granted authority to operate.
User Viewing Details about Stored Files
Viewing Thumb-nails
Print/Transmis-sion
Chang-ing In-formation about Stored Files
Deleting Files
Specify-ing File Password
Specify-ing Per-missions for Us-ers/Groups
Unlock-ing Files
Read-only
❍ ❍ ❍ - - - - -
Edit ❍ ❍ ❍ ❍ - - - -
Edit / Delete
❍ ❍ ❍ ❍ ❍ - - -
Full Control
❍ ❍ ❍ ❍ ❍ - ❍ -
Owner ❍ ❍ ❍ ❍ ❍ ❍ ❍ -
File Ad-minis-trator
❍ ❍ - - ❍ ❍ ❍ ❍
DolC2_EN_Sec_F_FM.book Page 103 Thursday, February 24, 2005 7:10 PM

Appendix
104
8
Settings That Can Be Specified In the Address Book
The authorities for using the address book are as follows:The authority designations in the list indicate users with the following authori-ties.• Read-only
This is a user assigned “Read-only” authority.• Edit
This is a user assigned “Edit” authority.• Edit / Delete
This is a user assigned “Edit / Delete” authority.• Full Control
This is a user granted full control.• Registered User
This is a user whose personal information is registered in the address book.The registered user is the user who knows the login user name and password.
• User AdministratorThis is the user administrator.
❍ =You can view and change the setting.U =You can view the setting. - =You cannot view or specify the setting.
DolC2_EN_Sec_F_FM.book Page 104 Thursday, February 24, 2005 7:10 PM

The Available Functions for Using the Files Stored in Document Server
105
8
Settings User User Ad-ministra-tor
Registered User
Full Con-trol
Read-only
Edit Edit / De-lete
Registration No. U ❍ ❍ ❍ ❍ ❍
Key Display U ❍ ❍ ❍ ❍ ❍
Name U ❍ ❍ ❍ ❍ ❍
Select Title U ❍ ❍ ❍ ❍ ❍
Auth. Info User Code - - - ❍ - -
Login User Name
- - - ❍ ❍ -
Login Password
- - - ❍ *1 ❍ *1 -
SMTP Authenti-cation
- - - ❍ *1 ❍ *1 -
Folder Authenti-cation
U ❍ ❍ ❍ ❍ -
LDAP Authenti-cation
- - - ❍ *1 ❍ *1 -
Available Functions
- - - ❍ U -
Protection Use Name as
U U U ❍ ❍ U
Protection Code - - - ❍ *1 ❍ *1 ❍ *1
Protection Object
U U U ❍ ❍ U
Protect Dest.: Per-missions for Us-ers/Groups
- - - ❍ ❍ ❍
Protect File(s): Per-missions for Us-ers/Groups
- - - ❍ ❍ ❍
E-mail Address
E-mail Address
U ❍ ❍ ❍ ❍ -
DolC2_EN_Sec_F_FM.book Page 105 Thursday, February 24, 2005 7:10 PM

Appendix
106
8
*1 You can only enter the password.
Folder Destina-tion
SMB/FTP U ❍ ❍ ❍ ❍ -
SMB: Path U ❍ ❍ ❍ ❍ -
FTP: Server Name
U ❍ ❍ ❍ ❍ -
FTP: Path U ❍ ❍ ❍ ❍ -
Japanese Chara. Code
U ❍ ❍ ❍ ❍ -
Settings User User Ad-ministra-tor
Registered User
Full Con-trol
Read-only
Edit Edit / De-lete
DolC2_EN_Sec_F_FM.book Page 106 Thursday, February 24, 2005 7:10 PM

User Settings
107
8
User Settings
If you have specified administrator authentication, the available functions andsettings depend on the menu protect setting.The following settings can be specified by someone who is not an administrator.❍ =You can view and change the setting.U =You can view the setting. - =You cannot view or specify the setting.
Note❒ Settings that are not in the list can only be viewed, regardless of the menu pro-
tect level setting.
Copier/Document Server Features
The default for [Menu Protect] is [Level 2].
Tab Names Settings Menu Protect
Off Level 1 Level 2
General Features Copy Quality ❍ ❍ U
Image Density ❍ ❍ U
Edit Erase Original Shadow in Combine ❍ ❍ U
Copy Order in Combine ❍ ❍ U
Image Repeat Separation Line ❍ ❍ U
Double Copies Separation Line ❍ ❍ U
Separation Line in Combine ❍ ❍ U
Program / Delete Format ❍ ❍ U
Partial Copy Priority ❍ ❍ U
DolC2_EN_Sec_F_FM.book Page 107 Thursday, February 24, 2005 7:10 PM

Appendix
108
8
Stamp Back-ground Num-bering
Size ❍ ❍ U
Density❍ ❍ U
Preset Stamp
Stamp Position: COPY *1 ❍ ❍ U
Stamp Position: URGENT *1 ❍ ❍ U
Stamp Position: PRIORITY *1 ❍ ❍ U
Stamp Position: For Your Info. *1 ❍ ❍ U
Stamp Position: Preliminary *1 ❍ ❍ U
Stamp Position: For internal use *1 ❍ ❍ U
Stamp Position: CONFIDENTIAL *1 ❍ ❍ U
Stamp Position: DRAFT *1 ❍ ❍ U
Stamp Language ❍ ❍ U
User Stamp
Program / Delete Stamp ❍ ❍ U
Stamp Position: 1 ❍ ❍ U
Stamp Format: 1 ❍ ❍ U
Stamp Position: 2 ❍ ❍ U
Stamp Format: 2 ❍ ❍ U
Stamp Position: 3 ❍ ❍ U
Stamp Format: 3 ❍ ❍ U
Stamp Position: 4 ❍ ❍ U
Stamp Format: 4 ❍ ❍ U
Date Stamp
Format ❍ ❍ U
Font ❍ ❍ U
Stamp Position: *1 ❍ ❍ U
Size ❍ ❍ U
Superimpose ❍ ❍ U
Tab Names Settings Menu Protect
Off Level 1 Level 2
DolC2_EN_Sec_F_FM.book Page 108 Thursday, February 24, 2005 7:10 PM

User Settings
109
8
*1 You can adjust the print position but not specify it.
Scanner Features
The default for [Menu Protect] is [Level 2].
Stamp Page Num-bering
Stamp Format ❍ ❍ U
Font ❍ ❍ U
Size ❍ ❍ U
Page Numbering in Combine ❍ ❍ U
Stamp Position: P1, P2… *1 ❍ ❍ U
Stamp Position: 1/5, 2/5… *1 ❍ ❍ U
Stamp Position: 1, 2… *1 ❍ ❍ U
Stamp Position: -1-, -2-… *1 ❍ ❍ U
Stamp Position: P.1, P.2… *1 ❍ ❍ U
Stamp Position: 1-1, 1-2… *1 ❍ ❍ U
Superimpose ❍ ❍ U
Tab Names Settings Menu Protect
Off Level 1 Level 2
Destination List Settings
Update Delivery Server Destination List❍ ❍ U
Send Settings Compression (Black & White) ❍ ❍ U
E-mail Information Language ❍ ❍ U
Tab Names Settings Menu Protect
Off Level 1 Level 2
DolC2_EN_Sec_F_FM.book Page 109 Thursday, February 24, 2005 7:10 PM

Appendix
110
8
System Settings
The settings available to the user depend on whether or not administrator au-thentication has been specified.If administrator authentication has been specified, the settings available to theuser depend on whether or not “Available Settings” has been specified.
Tab Names Settings Admin-istrator authen-tication has not been speci-fied.
Administrator au-thentication has been specified.
“Availa-ble Set-tings”
has been speci-fied.
“Availa-ble Set-tings”
has not been speci-fied.
General Features Panel Tone ❍ ❍ U
Warm Up Notice ❍ ❍ U
Copy Count Display ❍ ❍ U
Function Priority ❍ ❍ U
Print Priority ❍ ❍ U
Function Reset Timer ❍ ❍ U
Interleave Print ❍ ❍ U
Output: Copier ❍ ❍ U
Output: Document Server ❍ ❍ U
Tray Paper Settings Paper Tray Priority: Copier ❍ ❍ U
Tray Paper Size: Tray 1-4 ❍ ❍ U
Paper Type: Bypass Tray ❍ ❍ U
Paper Type: Tray 1-4 ❍ ❍ U
Timer Settings Auto Off Timer ❍ ❍ U
Panel Off Timer ❍ ❍ U
Energy Saver Timer ❍ ❍ U
System Auto Reset Timer ❍ ❍ U
Copier/ Document Server Auto Reset Timer ❍ ❍ U
Scanner Auto Reset Timer ❍ ❍ U
Auto Logout Timer ❍ ❍ U
Set Date ❍ ❍ U
Set Time ❍ ❍ U
Auto Logout Timer ❍ ❍ U
DolC2_EN_Sec_F_FM.book Page 110 Thursday, February 24, 2005 7:10 PM

User Settings
111
8
Inter-face Settings
Network IP Address *1 ❍ ❍ U
Sub-net Mask ❍ ❍ U
Gateway Address ❍ ❍ U
DNS Configuration *1 ❍ ❍ U
Domain Name *1 ❍ ❍ U
WINS Configuration *1 ❍ ❍ U
DDNS Configuration ❍ ❍ U
Effective Protocol ❍ ❍ U
NW Frame Type ❍ ❍ U
SMB Computer Name ❍ ❍ U
SMB Work Group ❍ ❍ U
Ethernet Speed ❍ ❍ U
LAN Type ❍ ❍ U
Ping Command ❍ ❍ U
Permit SNMP V3 Communication ❍ ❍ U
Permit SSL / TLS Communication ❍ ❍ U
Host Name ❍ ❍ U
IEEE 1394 *5
IP Address *1 ❍ ❍ U
DDNS Configuration ❍ ❍ U
Host Name ❍ ❍ U
Domain Name *1 ❍ ❍ U
WINS Configuration *1 ❍ ❍ U
IP over 1394 ❍ ❍ U
SCSI print (SBP-2) ❍ ❍ U
Bidirectional SCSI print ❍ ❍ U
Tab Names Settings Admin-istrator authen-tication has not been speci-fied.
Administrator au-thentication has been specified.
“Availa-ble Set-tings”
has been speci-fied.
“Availa-ble Set-tings”
has not been speci-fied.
DolC2_EN_Sec_F_FM.book Page 111 Thursday, February 24, 2005 7:10 PM

Appendix
112
8
Inter-face Settings
IEEE 802.11b *6
Communication Mode ❍ ❍ U
Transmission Speed ❍ ❍ U
SSID Setting ❍ ❍ U
Channel ❍ ❍ U
WEP (Encryp-tion) Setting
WEP (Encryption) Setting *2 ❍ ❍ U
Transmission Speed ❍ ❍ U
Return to Defaults ❍ ❍ U
Print List
❍ ❍ U
File Transfer Delivery Option *3 ❍ ❍ U
Capture Server IP Address ❍ ❍ U
SMTP Server ❍ ❍ U
SMTP Authentication *4 ❍ ❍ U
POP before SMTP ❍ ❍ U
POP3 Setting ❍ ❍ U
Administrator's E-mail Address ❍ ❍ U
E-mail Communication Port ❍ ❍ U
Default User Name / Password (Send) *4 ❍ ❍ U
Program / Change / Delete E-mail Message U U U
Program / Change / Delete Subject U U U
Scanner Recall Interval Time ❍ ❍ U
Number of Scanner Recalls ❍ ❍ U
Auto Specify Sender Name ❍ ❍ U
Tab Names Settings Admin-istrator authen-tication has not been speci-fied.
Administrator au-thentication has been specified.
“Availa-ble Set-tings”
has been speci-fied.
“Availa-ble Set-tings”
has not been speci-fied.
DolC2_EN_Sec_F_FM.book Page 112 Thursday, February 24, 2005 7:10 PM

User Settings
113
8
*1 If you select [Auto-Obtain (DHCP)], you can only view the setting.*2 You can only view the encryption setting.*3 You can only view Main Delivery Server IP Address and Sub Delivery Server IP Ad-
dress.*4 You can only specify the password.*5 The IEEE1394 interface board option must be installed.*6 The IEEE802.11b interface unit option must be installed.*7 The data overwrite security unit option must be installed.
Administrator Tools
User Authentication Management ❍ ❍ U
Administrator Authentication Management ❍ ❍ U
Key Counter Management ❍ ❍ U
External Charge Unit Management ❍ ❍ U
Enhanced External Charge Unit Management ❍ ❍ U
Display / Print Counter ❍ ❍ U
Display / Clear / Print Counter per User ❍ ❍ U
Print Address Book: Destination List U U U
Address Book Management U U U
Address Book: Program / Change / Delete Group U U U
Address Book: Change Order ❍ ❍ U
Address Book: Edit Title ❍ ❍ U
Address Book: Select Title ❍ ❍ U
Auto Delete File ❍ ❍ U
Delete All Files ❍ ❍ U
AOF (Always On) ❍ ❍ U
Program / Change / Delete LDAP Server *4 ❍ ❍ U
Use LDAP Server ❍ ❍ U
Service Mode Lock ❍ ❍ U
Firmware Version ❍ ❍ U
Auto Erase Memory Setting *7 ❍ ❍ U
Erase All Memory *7 ❍ ❍ U
Tab Names Settings Admin-istrator authen-tication has not been speci-fied.
Administrator au-thentication has been specified.
“Availa-ble Set-tings”
has been speci-fied.
“Availa-ble Set-tings”
has not been speci-fied.
DolC2_EN_Sec_F_FM.book Page 113 Thursday, February 24, 2005 7:10 PM

Appendix
114
8
Web Image Monitor Setting
❖❖❖❖ Device SettingsThe settings available to the user depend on whether or not administrator au-thentication has been specified.If administrator authentication has been specified, the settings available tothe user depend on whether or not “Available Settings” has been specified.
Category Settings Admin-istrator authen-tication has not been speci-fied.
Administrator authentication has been speci-fied.
“Available Set-
tings” has
been speci-fied.
“Available Set-
tings” has not
been speci-fied.
System Comment ❍ ❍ U
Location ❍ ❍ U
Output Tray ❍ ❍ U
Paper Tray Priority ❍ ❍ U
Paper Paper Size ❍ ❍ U
Paper Type ❍ ❍ U
Apply Auto Paper Select ❍ ❍ U
Timer Settings Auto Off Timer ❍ ❍ U
Energy Saver Timer ❍ ❍ U
Panel Off Timer ❍ ❍ U
System Auto Reset Timer ❍ ❍ U
Copier/Document ServerAuto Reset Timer
❍ ❍ U
Scanner Auto Reset Timer ❍ ❍ U
Set Date ❍ ❍ U
Set Time ❍ ❍ U
SNTP Server Address ❍ ❍ U
SNTP Polling Interval ❍ ❍ U
Time Zone ❍ ❍ U
DolC2_EN_Sec_F_FM.book Page 114 Thursday, February 24, 2005 7:10 PM

User Settings
115
8
*1 You can only specify the password.
E-mail Administrator E-mail Address ❍ ❍ U
SMTP Server Name ❍ ❍ U
SMTP Port No. ❍ ❍ U
SMTP Authentication ❍ ❍ U
SMTP Auth. E-mail Address ❍ ❍ U
SMTP Auth. Encryption ❍ ❍ U
POP before SMTP ❍ ❍ U
POP E-mail Address ❍ ❍ U
Timeout setting after POP Auth. ❍ ❍ U
POP Server Name ❍ ❍ U
POP Auth. Encryption ❍ ❍ U
POP Port No. ❍ ❍ U
E-mail Notification E-mail Address ❍ ❍ U
File Transfer SMB User Name ❍ ❍ U
SMB Password *1 ❍ ❍ U
FTP User Name ❍ ❍ U
FTP Password *1 ❍ ❍ U
User Authenti-cation Manage-ment
User Authentication Management ❍ ❍ U
User Code - Available Function ❍ ❍ U
Windows Authentication - Domain Name ❍ ❍ U
Windows Authentication - Group Settings for Windows Authentication ❍ ❍ U
LDAP Authentication - LDAP Authentica-tion
❍ ❍ U
LDAP Authentication - Login Name At-tribute
❍ ❍ U
LDAP Authentication - Unique Attribute ❍ ❍ U
Category Settings Admin-istrator authen-tication has not been speci-fied.
Administrator authentication has been speci-fied.
“Available Set-
tings” has
been speci-fied.
“Available Set-
tings” has not
been speci-fied.
DolC2_EN_Sec_F_FM.book Page 115 Thursday, February 24, 2005 7:10 PM

Appendix
116
8
❖❖❖❖ InterfaceThe settings available to the user depend on whether or not administrator au-thentication has been specified.If administrator authentication has been specified, the settings available tothe user depend on whether or not “Available Settings” has been specified.
*1 The IEEE802.11b interface unit option must be installed.*2 The IEEE1394 interface board option must be installed.
Category Settings Admin-istrator authen-tication has not been speci-fied.
Administrator authentication has been speci-fied.
“Available Set-
tings” has
been speci-fied.
“Available Set-
tings” has not
been speci-fied.
Change Interface ❍ ❍ U
IEEE 802.11b *1 Communication Mode ❍ ❍ U
Channel ❍ ❍ U
WEP Setting ❍ ❍ U
WEP Key Status ❍ ❍ U
Authentication Type ❍ ❍ U
Key ❍ ❍ U
Confirm Key ❍ ❍ U
IEEE 1394 *2 IP over 1394 ❍ ❍ U
SCSI print (SBP-2) ❍ ❍ U
Bidirectional SCSI print ❍ ❍ U
DolC2_EN_Sec_F_FM.book Page 116 Thursday, February 24, 2005 7:10 PM

User Settings
117
8
❖❖❖❖ NetworkThe settings available to the user depend on whether or not administrator au-thentication has been specified.If administrator authentication has been specified, the settings available tothe user depend on whether or not “Available Settings” has been specified.
Category Settings Admin-istrator authen-tication has not been speci-fied.
Administrator authentication has been speci-fied.
“Available Set-
tings” has
been speci-fied.
“Available Set-
tings” has not
been speci-fied.
Protocol LPR ❍ ❍ U
RSH/RCP ❍ ❍ U
DIPRINT ❍ ❍ U
FTP ❍ ❍ U
IPP ❍ ❍ U
Rendezvous ❍ ❍ U
NetWare ❍ ❍ U
AppleTalk ❍ ❍ U
SMB ❍ ❍ U
SNMP ❍ ❍ U
DolC2_EN_Sec_F_FM.book Page 117 Thursday, February 24, 2005 7:10 PM

Appendix
118
8
TCP/IP Host Name ❍ ❍ U
DHCP ❍ ❍ U
Domain Name ❍ ❍ U
IP Address ❍ ❍ U
Subnet Mask ❍ ❍ U
DDNS ❍ ❍ U
WINS ❍ ❍ U
Primary WINS Server ❍ ❍ U
Secondary WINS Server ❍ ❍ U
Scope ID ❍ ❍ U
Default Gateway Address ❍ ❍ U
DNS Server ❍ ❍ U
LPR ❍ ❍ U
RSH/RCP ❍ ❍ U
DIPRINT ❍ ❍ U
FTP ❍ ❍ U
IPP ❍ ❍ U
IPP Timeout ❍ ❍ U
Rendezvous ❍ ❍ U
Category Settings Admin-istrator authen-tication has not been speci-fied.
Administrator authentication has been speci-fied.
“Available Set-
tings” has
been speci-fied.
“Available Set-
tings” has not
been speci-fied.
DolC2_EN_Sec_F_FM.book Page 118 Thursday, February 24, 2005 7:10 PM

User Settings
119
8
NetWare NetWare ❍ ❍ U
Print Server Name ❍ ❍ U
Logon Mode ❍ ❍ U
File Server Name ❍ ❍ U
NDS Tree ❍ ❍ U
NDS Context Name ❍ ❍ U
Operation Mode ❍ ❍ U
Remote Printer No. ❍ ❍ U
Frame Type ❍ ❍ U
Print Server Protocol ❍ ❍ U
AppleTalk AppleTalk ❍ ❍ U
Printer Name ❍ ❍ U
Zone Name ❍ ❍ U
SMB SMB ❍ ❍ U
Protocol ❍ ❍ U
Workgroup Name ❍ ❍ U
Computer Name ❍ ❍ U
Comment ❍ ❍ U
Notify Print Completion ❍ ❍ U
Rendezvous Rendezvous ❍ ❍ U
Computer Name ❍ ❍ U
Location ❍ ❍ U
PRIORITY (DIPRINT) ❍ ❍ U
PRIORITY (LPR) ❍ ❍ U
PRIORITY (IPP) ❍ ❍ U
Category Settings Admin-istrator authen-tication has not been speci-fied.
Administrator authentication has been speci-fied.
“Available Set-
tings” has
been speci-fied.
“Available Set-
tings” has not
been speci-fied.
DolC2_EN_Sec_F_FM.book Page 119 Thursday, February 24, 2005 7:10 PM

Appendix
120
8
Functions That Require Options
The following functions require certain options and additional functions.• Hard Disk overwrite erases function
DataOverwriteSecurity unit• Data Encryption
Scanner option
DolC2_EN_Sec_F_FM.book Page 120 Thursday, February 24, 2005 7:10 PM

121
INDEXA
Access Control, 32Access Permission, 9Address Book, 101Address Management Tool, 102Administrator, 4Administrator Authentication, 4Administrator Tools, 92, 93, 96, 100, 101AppleTalk, 98Authentication and Access Limits, 3Auto Erase Memory Setting, 22Available Functions, 28
C
Configuration flow (certificate issued by a certificate authority), 38
Configuration flow (self-signed certificate), 38
D
Destination List Settings, 93Device Information, 95Device Settings, 94, 97, 100, 101, 114Document Server, 100Driver Encryption Key, 34, 77
E
Edit, 93, 103, 104Edit / Delete, 103, 104Encrypt Address Book, 77Encrypted Communication Mode, 42Encryption Technology, 3Enhance File Protection, 78Erase All Memory, 22
F
File Administrator, 27, 67, 103File Creator (Owner), 4File Transfer, 91, 96Full Control, 103, 104
G
General Features, 91, 93
I
Input / Output, 93Interface, 116Interface Settings, 91, 96, 97
L
Login, 4Logout, 4
M
Machine Administrator, 27, 67Menu Protect, 27, 64Methods of Erasing the Data, 22
N
NetWare, 98Network, 94, 98Network Administrator, 27, 67NIB Setup Tool, 99
O
Operational Requirements for Windows Authentication, 54
Owner, 103
P
Password for IPP Authentication, 34Password for Stored Files, 9Permit Adding of Destinations, 78Permit Display of User Information, 78Permit Settings by SNMP V1 and V2, 79Permit Simple Encryption, 79Protocol, 98
R
Read-only, 103, 104Registered User, 4, 104Rendezvous, 98Reproduction Ratio, 93Reset Device, 94Restrict Use of Destinations, 77
DolC2_EN_Sec_F_FM.book Page 121 Thursday, February 24, 2005 7:10 PM

122 EN USA AE AE B188-7571
S
Scan Settings, 93Security, 98Send Settings, 93, 97Service Mode Lock, 80SMB, 98SNMP, 98SNMPv3, 98SSL (Secure Sockets Layer), 37Stamp, 93Supervisor, 67, 68System Settings, 96
T
TCP/IP, 98Timer Settings, 91Top Page, 94Tray Paper Settings, 91Type of Administrator, 27
U
User, 4User Administrator, 27, 67, 68, 104User Authentication, 4User Management Tool, 95, 102
W
Webpage, 98
DolC2_EN_Sec_F_FM.book Page 122 Thursday, February 24, 2005 7:10 PM

Network Guide
Read this manual carefully before you use this machine and keep it handy for future reference. For safe and correct use, be sure to read the SafetyInformation in the "General Settings Guide" before using the machine.
Getting Started
Connecting and Setting Up
Monitoring and Configuring the Machine
Appendix

Introduction
This manual contains detailed instructions and notes on the operation and use of this machine. For yoursafety and benefit, read this manual carefully before using the machine. Keep this manual in a handyplace for quick reference.
Important
Contents of this manual are subject to change without prior notice. In no event will the company be liablefor direct, indirect, special, incidental, or consequential damages as a result of handling or operating themachine.
Trademarks
Microsoft®, Windows® and Windows NT® are registered trademarks of Microsoft Corporation in theUnited States and/or other countries.
Netscape and Netscape Navigator are registered trademarks of Netscape Communications Corporation.
UNIX is a registered trademark in the United States and other countries, licensed exclusively throughX/Open Company Limited.
Other product names used herein are for identification purposes only and might be trademarks of theirrespective companies. We disclaim any and all rights to those marks.
The proper names of the Windows operating systems are as follows:
• The product name of Windows® 95 is Microsoft® Windows 95.
• The product name of Windows® 98 is Microsoft® Windows 98.
• The product name of Windows® Me is Microsoft® Windows Millennium Edition (Windows Me).
• The product names of Windows® 2000 are as follows:Microsoft® Windows® 2000 ProfessionalMicrosoft® Windows® 2000 ServerMicrosoft® Windows® 2000 Advanced Server
• The product names of Windows® XP are as follows:Microsoft® Windows® XP Home EditionMicrosoft® Windows® XP Professional
• The product names of Windows Server™ 2003 are as follows:Microsoft® Windows Server™ 2003 Standard EditionMicrosoft® Windows Server™ 2003 Enterprise EditionMicrosoft® Windows Server™ 2003 Web Edition
• The product names of Windows NT® 4.0 are as follows:Microsoft® Windows NT® Workstation 4.0Microsoft® Windows NT® Server 4.0
• RSA Data Security, Inc. MD5 Message-Digest AlgorithmCopyright© 1991-2, RSA Data Security, Inc. Created 1991. All rights reserved.License to copy and use this software is granted provided that it is identified as the “RSA Data Se-curity, Inc. MD5 Message-Digest Algorithm” in all material mentioning or referencing this softwareor this function.License is also granted to make and use derivative works provided that such works are identified as“derived from the RSA Data Security, Inc. MD5 Message-Digest Algorithm” in all material mentioningor referencing the derived work.RSA Data Security, Inc. makes no representations concerning either the merchantability of this soft-ware or the suitability of this software for any particular purpose. It is provided “as is” without expressor implied warranty of any kind.These notices must be retained in any copies of any part of this documentation and/or software.

i
TABLE OF CONTENTSManuals for This Machine .....................................................................................1How to Read This Manual .....................................................................................3
1. Getting Started
Functions Available over a Network ....................................................................5E-mail .........................................................................................................................5Scan to Folder............................................................................................................5Network Delivery Scanner..........................................................................................5Network TWAIN Scanner ...........................................................................................5Document Server .......................................................................................................6
2. Connecting and Setting Up
Confirming the Connection...................................................................................7Connecting to the Ethernet Interface .........................................................................7Connecting to the IEEE 1394 Interface......................................................................8Using the IEEE 802.11b (Wireless LAN)....................................................................9
Setting Up the Machine on a Network................................................................11E-mail .......................................................................................................................11Scan to Folder..........................................................................................................13Network Delivery Scanner........................................................................................15Network TWAIN Scanner .........................................................................................16Document Server .....................................................................................................18Network Configuration..............................................................................................19Interface Settings .....................................................................................................23File Transfer .............................................................................................................27
LDAP Server Settings..........................................................................................33Before using this function.........................................................................................33Program/Change/Delete LDAP Server ....................................................................33Programming the LDAP Server................................................................................34

ii
3. Monitoring and Configuring the Machine
Using Web Image Monitor...................................................................................39Displaying Top Page ................................................................................................40When user authentication is set ...............................................................................41About Menu and Mode.............................................................................................41Access in the Administrator Mode............................................................................42Displaying Web Image Monitor Help........................................................................43
Remote Maintenance by telnet ...........................................................................44Using telnet ..............................................................................................................44access ......................................................................................................................44autonet .....................................................................................................................45devicename..............................................................................................................45dhcp .........................................................................................................................46dns ...........................................................................................................................46domainname ............................................................................................................48help ..........................................................................................................................48hostname .................................................................................................................48ifconfig......................................................................................................................49passwd .....................................................................................................................49route .........................................................................................................................50set ............................................................................................................................50show.........................................................................................................................51smb ..........................................................................................................................51snmp ........................................................................................................................52sntp ..........................................................................................................................54syslog .......................................................................................................................54web...........................................................................................................................54wiconfig ....................................................................................................................55wins ..........................................................................................................................57
SNMP.....................................................................................................................58Understanding the Displayed Information ........................................................59
Configuring the Network Interface Board .................................................................59Message List ........................................................................................................63
System Log Information ...........................................................................................63
4. Appendix
Using DHCP..........................................................................................................67Using AutoNet ..........................................................................................................68
Precautions ..........................................................................................................69Connecting a Dial-Up Router to a Network ..............................................................69When the optional IEEE 802.11b interface unit Is Installed .....................................70
Information about Installed Applications ..........................................................71RSA BSAFE® ...........................................................................................................71
Specifications.......................................................................................................72
INDEX......................................................................................................... 73

1
Manuals for This Machine
The following manuals describe the operational procedures of this machine. Forparticular functions, see the relevant parts of the manual.
Note❒ Manuals provided are specific to machine type.❒ Adobe Acrobat Reader is necessary to view the manuals as a PDF file.❒ Two CD-ROMs are provided:
• CD-ROM 1 “Operating Instructions”CD-ROM 2 “Scanner Driver & Utilities”
❖❖❖❖ General Settings GuideProvides an overview of the machine and describes System Settings (such asTray Paper Settings), Document Server functions, and troubleshooting.Refer to this manual for Address Book procedures such as registering e-mailaddresses, and user codes.
❖❖❖❖ Security ReferenceThis manual is for administrators of this machine. It describes security func-tions that the administrators can use to protect data from being tampered, orprevent the machine from unauthorized use. Also refer to this manual for theprocedures for registering administrators, as well as setting user and admin-istrator authentication.
❖❖❖❖ Network Guide (this manual)Provides information about network settings of the machine’s scanner func-tion. For details about network settings of the machine’s printer function, seethe manual that comes with the printer option.
❖❖❖❖ Copy ReferenceDescribes operations, functions, and troubleshooting for the machine’s copierfunction.
❖❖❖❖ Scanner Reference (PDF file - CD-ROM1) Describes operations, functions, and troubleshooting for the machine’s scannerfunction.

2
❖❖❖❖ Manuals for DeskTopBinderDeskTopBinder is a utility included on the CD-ROM labeled “Scanner Driver& Utilities”.• DeskTopBinder Lite Setup Guide (PDF file - CD-ROM2)
Describes installation of, and the operating environment for DeskTopBinderLite in detail. This guide can be displayed from the [Setup] dialog box whenDeskTopBinder Lite is installed.
• DeskTopBinder Introduction Guide (PDF file - CD-ROM2)Describes operations of DeskTopBinder Lite and provides an overview ofits functions. This guide is added to the [Start] menu when DeskTopBinderLite is installed.
• Auto Document Link Guide (PDF file - CD-ROM2) Describes operations and functions of Auto Document Link installed withDeskTopBinder Lite. This guide is added to the [Start] menu when Desk-TopBinder Lite is installed.

3
How to Read This Manual
Symbols
In this manual, the following symbols are used:* The statements above are notes for your safety.
ImportantIf this instruction is not followed, paper might be misfed, originals might bedamaged, or data might be lost. Be sure to read this.
PreparationThis symbol indicates prior knowledge or preparation is required before opera-tion.
NoteThis symbol indicates precautions for operation, or actions to take after mal-op-eration.
LimitationThis symbol indicates numerical limits, functions that cannot be used together,or conditions in which a particular function cannot be used.
ReferenceThis symbol indicates a reference.
[ ]Keys that appear on the machine's display panel.Keys and buttons that appear on the computer's display.
{ }
Keys built into the machine's control panel.Keys on the computer's keyboard.

4

5
1. Getting Started
Functions Available over a Network
This machine provides scanner func-tion over a network. Using the Docu-ment Server function, you can combinecopied documents and print jobs into asingle document. Not only can youprint this document straight away, butyou can also store it so it can be printedagain whenever needed.
Scan file attached to an e-mail can besent using the e-mail system througha LAN or the Internet.
ReferenceFor details about what settings tomake, see p.11 “Setting Up the Ma-chine on a Network”.For details about using this function,see "Sending Scan Files by E-mail",Scanner Reference.
Scan to Folder
You can send scan file directly toshared folders on computers runningWindows or to FTP servers.
ReferenceFor details about what settings tomake, see p.11 “Setting Up the Ma-chine on a Network”.For details about using this function,see “Sending Scan Files by Scan toFolder”, Scanner Reference.
Network Delivery Scanner
You can use the machine as a deliveryscanner for ScanRouter V2 Profes-sional.Scan file or document can be stored inthe delivery server, or delivered viathe network to specified folders onclient computers.
ReferenceFor details about what settings tomake, see p.11 “Setting Up the Ma-chine on a Network”.For details about using this function,see "Delivering Scan Files", ScannerReference.
Network TWAIN Scanner
You can use the scanning function ofthis machine from a computer con-nected via a network (Ethernet, IEEE1394 (IP over 1394), or IEEE 802.11b(wireless LAN)).You can scan documents the sameway you would if you were using ascanner connected directly to yourcomputer.
ReferenceFor details about what settings tomake, see p.11 “Setting Up the Ma-chine on a Network”.For details about using this function,see "Using the Network TWAINScanner Function", Scanner Reference.

Getting Started
6
1
Document Server
You can store copy, and scanner doc-uments on the hard disk. Using Desk-TopBinder Lite or a Web browser, youcan browse, print, delete, or copy thesedocuments over a network.
ReferenceFor details about what settings tomake, see p.11 “Setting Up the Ma-chine on a Network”.For more information about Docu-ment Server operation from thescanner, see "Using the DocumentServer", Scanner Reference.For all information about DocumentServer operation, see "Using theDocument Server", General SettingsGuide.For more information about Desk-TopBinder Lite, see the manualsfor DeskTopBinder Lite.

7
2. Connecting and Setting Up
Confirming the Connection
1. 10BASE-T/100BASE-TX portPort for connecting the 10BASE-T or100BASE-TX cable
2. IEEE 1394 ports (optional)Ports for connecting the IEEE 1394 interfacecable
3. Wireless LAN port (optional)Port for using the wireless LAN
Note❒ The optional IEEE 1394 interface board
and the IEEE 802.11b interface unitcannot be installed at the same time.
❒ The position of the port differ depend-ing on the machine type.
❒ USB Connection is not possible.
AGM054S
When the IEEE 1394 interface board (optional) is installed.
When the wireless LAN board (optional) is installed.

Connecting and Setting Up
8
2
Connecting to the Ethernet Interface
The network interface board supports10BASE-T or 100BASE-TX connections.
Important❒ Before making the connection, touch
the metallic part to ground yourself.
AAAA Turn off the main power switch.
Important❒ Make sure the main power is off.
See “Turning On the Power”,General Settings Guide.
BBBB Connect the Ethernet interface cableto the 10BASE-T/100BASE-TX port.
Note❒ The position of the port differ
depending on the machine type.
CCCC Turn on the main power switch.
1. Indicator (green)Remains green when the machine isproperly connected to the network.
2. Indicator (yellow)Turns yellow when 100BASE-TX isoperating. Turns off when 10BASE-Tis operating.
Connecting to the IEEE 1394 Interface
Important❒ Before making the connection, touch
the metallic part to ground yourself.
Note❒ Use the interface cable supplied
with the optional IEEE 1394 inter-face board.
❒ Make sure the interface cable is notlooped.
AAAA Turn off the main power switch.
Important❒ Make sure the main power is off.
See “Turning On the Power”,General Settings Guide.
BBBB Connect the IEEE 1394 interfacecable to the IEEE 1394 ports.
Note❒ Two interface ports are available
for connecting the IEEE 1394 in-terface cable. Either is suitable.
❒ If you have an interface cablewith a ferrite core, connect theend nearest to the ferrite core tothe machine.
❒ The position of the port differdepending on the machine type.
CCCC Turn on the main power switch.
AGM055S
AGM056S
AGM060S

Confirming the Connection
9
2
Using the IEEE 802.11b (Wireless LAN)
Setting IEEE 802.11b (Wireless LAN)
Note❒ Select [802.11 Ad hoc] mode when connecting Windows XP as a wireless LAN
client using Windows XP standard driver or utilities, or when not using theinfrastructure mode.

Connecting and Setting Up
10
2
Confirming the Connection
AAAA Make sure the LED of the IEEE 802.11binterface unit is lit.
❖❖❖❖ When using in infrastructure mode
1. If [LAN Type] on the [Interface Set-tings]/[Network] screen is not set to[IEEE 802.11b], it does not light, evenif the main power is on.
2. If it is connected properly to thenetwork, the LED is green when ininfrastructure mode. If the LED isblinking, the machine is searchingfor devices.
❖❖❖❖ When using in ad hoc mode/802.11ad hoc mode
1. If the IEEE 802.11b interface unitis working, it is lit in orange.
2. If it is connected properly to thenetwork, the LED is green when inad hoc mode or 802.11 ad hoc mode.If the LED is blinking, the machineis searching for devices. The LEDwill light after a few seconds.
Checking the machine's radio wave status
When using in infrastructure mode,you can check the machine's radiowave status using the control panel.
Note❒ To check the radio wave status,
press [IEEE 802.11b] under [LANType] on the [Network] screen.
AAAA Press the {{{{User Tools/Counter/Inquiry}}}}key.
BBBB Press [System Settings].
CCCC Press [Interface Settings].
DDDD Press [IEEE 802.11b].
EEEE Press [Wireless LAN Signal].
The machine's radio wave statusappears.
FFFF After checking radio wave status,press [Exit].
GGGG Press the {{{{User Tools/Counter/Inquiry}}}}key to return to the User Tools /Counter / Inquiry menu.
ZZZ024S
12
ZZZ024S
12

Setting Up the Machine on a Network
11
2
Setting Up the Machine on a Network
This section describes the network settings you can change with User Tools (Sys-tem Settings). Make settings according to functions you want to use and the in-terface to be connected.
Important❒ These settings should be made by the systems administrator, or after consulting
with the systems administrator.
ReferenceFor details about settings, see p.23 “Interface Settings”
❖❖❖❖ Viewing the Information Displayed in the List$ These items must be set to use the function. Be sure to set them before at-tempting to use the corresponding function.❍ These items must be set if required.
Interface Settings
Ethernet Interface Settings/Network
See p.23 “Network”.
IP Address $
Gateway Address $
DNS Configuration ❍
DDNS Configuration ❍
Domain Name ❍
WINS Configuration ❍
LAN Type *2 $
Ethernet Speed ❍
Effective Protocol *3 $
Permit SNMP V3 Communication ❍
Permit SSL / TLS Communication ❍
Host Name ❍
File Transfer
See p.27 “File Transfer”.
SMTP Server $
SMTP Authentication ❍
POP before SMTP ❍
POP3 Setting *4 ❍
Administrator's E-mail Address ❍
E-mail Communication Port *5 ❍
Program / Change / Delete E-mail Message
❍

Connecting and Setting Up
12
2
Ethernet File Transfer
See p.27 “File Transfer”.
Program / Change / Delete Subject ❍
Scanner Recall Interval Time ❍
Number of Scanner Recalls ❍
IEEE 1394(IP over 1394)
Interface Settings/IEEE 1394 *1
See p.25 “IEEE 1394”.
IP Address $
IP over 1394 $
DDNS Configuration ❍
WINS Configuration ❍
Host Name ❍
Domain Name ❍
Interface Settings/Network
See p.23 “Network”.
Gateway Address $
DNS Configuration ❍
Effective Protocol *3 $
File Transfer
See p.27 “File Transfer”.
SMTP Server $
SMTP Authentication ❍
POP before SMTP ❍
POP3 Setting *4 ❍
Administrator's E-mail Address ❍
E-mail Communication Port *5 ❍
Program / Change / Delete E-mail Message
❍
Program / Change / Delete Subject ❍
Scanner Recall Interval Time ❍
Number of Scanner Recalls ❍
IEEE 802.11b (wireless LAN)
Interface Settings/Network
See p.23 “Network”.
IP Address $
Gateway Address $
DNS Configuration ❍
DDNS Configuration ❍
Domain Name ❍
WINS Configuration ❍
LAN Type *2 $
Ethernet Speed ❍
Effective Protocol *3 $
Permit SNMP V3 Communication ❍
Permit SSL / TLS Communication ❍
Host Name ❍
Interface Settings

Setting Up the Machine on a Network
13
2
*1 Appears when the optional IEEE 1394 interface board is installed.*2 Appears when the optional IEEE 802.11b interface unit is installed.
If Ethernet and 802.11b (wireless LAN) are both connected to the machine, the selectedinterface has priority.
*3 Check [Effective] is selected for TCP/IP.*4 If you select [On] for [POP before SMTP], select this function as well.*5 If you select [On] for [POP before SMTP], check the port number for [POP3].
Scan to Folder
IEEE 802.11b (wireless LAN)
Interface Settings/IEEE 802.11b *2
See p.26 “IEEE 802.11b”.
Communication Mode $
SSID Setting ❍
Channel ❍
WEP (Encryption) Setting ❍
Transmission Speed ❍
File Transfer
See p.27 “File Transfer”.
SMTP Server $
SMTP Authentication ❍
POP before SMTP ❍
POP3 Setting *4 ❍
Administrator's Address ❍
E-mail Communication Port *5 ❍
Program / Change / Delete E-mail Message
❍
Program / Change / Delete Subject ❍
Scanner Recall Interval Time ❍
Number of Scanner Recalls ❍
Interface Settings
Ethernet Interface Settings/Network
See p.23 “Network”.
IP Address $
Gateway Address $
DNS Configuration ❍
DDNS Configuration ❍
Domain Name ❍
WINS Configuration ❍
LAN Type *2 $
Ethernet Speed ❍
Effective Protocol *3 $
Host Name ❍
Permit SNMP V3 Communication ❍
Interface Settings

Connecting and Setting Up
14
2
Ethernet Interface Settings/Network
See p.23 “Network”.
Permit SSL / TLS Communication ❍
File Transfer
See p.27 “File Transfer”.
Default User Name / Password (Send)
❍
Scanner Recall Interval Time ❍
Number of Scanner Recalls ❍
IEEE 1394 (IP over 1394)
Interface Settings/IEEE 1394 *1
See p.25 “IEEE 1394”.
IP Address $
IP over 1394 $
DDNS Configuration ❍
WINS Configuration ❍
Host Name ❍
Domain Name ❍
Interface Settings/Network
See p.23 “Network”.
Gateway Address $
DNS Configuration ❍
Effective Protocol *3 $
File Transfer
See p.27 “File Transfer”.
Default User Name / Password (Send)
❍
Scanner Recall Interval Time ❍
Number of Scanner Recalls ❍
IEEE 802.11b (wireless LAN)
Interface Settings/Network
See p.23 “Network”.
IP Address $
Gateway Address $
DNS Configuration ❍
DDNS Configuration ❍
Domain Name ❍
WINS Configuration ❍
LAN Type *2 $
Ethernet Speed ❍
Effective Protocol *3 $
Permit SNMP V3 Communication ❍
Permit SSL / TLS Communication ❍
Host Name ❍
Interface Settings/IEEE 802.11b *2
See p.26 “IEEE 802.11b”.
Communication Mode $
SSID Setting ❍
Channel ❍
WEP (Encryption) Setting ❍
Transmission Speed ❍
Interface Settings

Setting Up the Machine on a Network
15
2*1 Appears when the optional IEEE 1394 interface board is installed.*2 Appears when the optional IEEE 802.11b interface unit is installed.
If Ethernet and IEEE 802.11b (wireless LAN) are both connected to the machine, theselected interface has priority.
*3 Check [Effective] is selected for TCP/IP.
Network Delivery Scanner
IEEE 802.11b (wireless LAN)
File Transfer
See p.27 “File Transfer”.
Default User Name / Password (Send)
❍
Scanner Recall Interval Time ❍
Number of Scanner Recalls ❍
Interface Settings
Ethernet Interface Settings/Network
See p.23 “Network”.
IP Address $
Gateway Address ❍
DNS Configuration ❍
DDNS Configuration ❍
Domain Name ❍
WINS Configuration ❍
LAN Type *2 $
Ethernet Speed ❍
Effective Protocol *4 $
Permit SNMP V3 Communication ❍
Permit SSL / TLS Communication ❍
Host Name ❍
File Transfer
See p.27 “File Transfer”.Delivery Option *3 ❍
Scanner Recall Interval Time ❍
Number of Scanner Recalls ❍
IEEE 1394 (IP over 1394)
Interface Settings/IEEE 1394 *1
See p.25 “IEEE 1394”.
IP Address $
IP over 1394 $
DDNS Configuration ❍
WINS Configuration ❍
Host Name ❍
Domain Name ❍
Interface Settings/Network
See p.23 “Network”.
Gateway Address ❍
DNS Configuration ❍
Effective Protocol *4 $
Interface Settings

Connecting and Setting Up
16
2
*1 Appears when the optional IEEE 1394 interface board is installed.*2 Appears when the optional IEEE 802.11b interface unit is installed.
If Ethernet and IEEE 802.11b (wireless LAN) are both connected to the machine, theselected interface has priority.
*3 When delivery option is set to [On], make sure the IP address is set.*4 Check [Effective] is selected for TCP/IP.
Network TWAIN Scanner
IEEE 1394 (IP over 1394)
File Transfer
See p.27 “File Transfer”.Delivery Option *3 ❍
Scanner Recall Interval Time ❍
Number of Scanner Recalls ❍
IEEE 802.11b (wireless LAN)
Interface Settings/Network
See p.23 “Network”.
IP Address $
Gateway Address ❍
DNS Configuration ❍
DDNS Configuration ❍
Domain Name ❍
WINS Configuration ❍
LAN Type *2 $
Ethernet Speed ❍
Effective Protocol *4 $
Permit SNMP V3 Communication ❍
Permit SSL / TLS Communication ❍
Host Name ❍
Interface Settings/IEEE 802.11b *2
See p.26 “IEEE 802.11b”.
Communication Mode $
SSID Setting ❍
Channel ❍
WEP (Encryption) Setting ❍
Transmission Speed ❍
File Transfer
See p.27 “File Transfer”.Delivery Option *3 ❍
Scanner Recall Interval Time ❍
Number of Scanner Recalls ❍
Interface Settings
Ethernet Interface Settings/Network
See p.23 “Network”.
IP Address $
Gateway Address ❍
DNS Configuration ❍
DDNS Configuration ❍
Interface Settings

Setting Up the Machine on a Network
17
2
*1 Appears when the optional IEEE 1394 interface board is installed.
Ethernet Interface Settings/Network
See p.23 “Network”.
Domain Name ❍
WINS Configuration ❍
LAN Type *2 $
Ethernet Speed ❍
Effective Protocol *3 $
Permit SNMP V3 Communication ❍
Permit SSL / TLS Communication ❍
Host Name ❍
IEEE 1394 (IP over 1394)
Interface Settings/IEEE 1394 *1
See p.25 “IEEE 1394”.
IP Address $
IP over 1394 $
DDNS Configuration ❍
WINS Configuration ❍
Host Name ❍
Domain Name ❍
Interface Settings/Network
See p.23 “Network”.
Gateway Address ❍
DNS Configuration ❍
Effective Protocol *3 $
IEEE 802.11b (wireless LAN)
Interface Settings/Network
See p.23 “Network”.
IP Address $
Gateway Address ❍
DNS Configuration ❍
DDNS Configuration ❍
Domain Name ❍
WINS Configuration ❍
LAN Type *2 $
Ethernet Speed ❍
Effective Protocol *3 $
Permit SNMP V3 Communication ❍
Permit SSL / TLS Communication ❍
Host Name ❍
Interface Settings/IEEE 802.11b *2
See p.26 “IEEE 802.11b”.
Communication Mode $
SSID Setting ❍
Channel ❍
WEP (Encryption) Setting ❍
Transmission Speed ❍
Interface Settings

Connecting and Setting Up
18
2
*2 Appears when the optional IEEE 802.11b interface unit is installed.If Ethernet and 802.11b (wireless LAN) are both connected to the machine, the select-ed interface has priority.
*3 Check [Effective] is selected for TCP/IP.
Document Server
Interface Settings
Ethernet Interface Settings/Network
See p.23 “Network”.
IP Address $
Gateway Address ❍
DNS Configuration ❍
DDNS Configuration ❍
Domain Name ❍
WINS Configuration ❍
LAN Type *2 $
Ethernet Speed ❍
Effective Protocol *3 $
Permit SNMP V3 Communication ❍
Permit SSL / TLS Communication ❍
Host Name ❍
IEEE 1394 (IP over 1394)
Interface Settings/IEEE 1394 *1
See p.25 “IEEE 1394”.
IP Address $
IP over 1394 $
DDNS Configuration ❍
WINS Configuration ❍
Host Name ❍
Domain Name ❍
Interface Settings/Network
See p.23 “Network”.
Gateway Address ❍
DNS Configuration ❍
Effective Protocol *3 $
IEEE 802.11b (wireless LAN)
Interface Settings/Network
See p.23 “Network”.
IP Address $
Gateway Address ❍
DNS Configuration ❍
DDNS Configuration ❍
Domain Name ❍
WINS Configuration ❍
LAN Type *2 $
Ethernet Speed ❍
Effective Protocol *3 $

Setting Up the Machine on a Network
19
2
*1 Appears when the optional IEEE 1394 interface board is installed.*2 Appears when the optional IEEE 802.11b interface unit is installed.
If Ethernet and IEEE 802.11b (wireless LAN) are both connected to the machine, theselected interface has priority.
*3 Check [Effective] is selected for TCP/IP.
Network Configuration
Any change you make with UserTools remains in effect even if themain power switch or operationswitch is turned off, or the {{{{EnergySaver}}}} or {{{{Clear Modes}}}} key is pressed.
Configuring the network using the control panel
Note❒ Operations for System Settings are
different from normal operations.After using User Tools, press the{{{{User Tools/Counter/Inquiry}}}} key toexit.
❒ When [User Authentication Manage-ment] is set, operations are not pos-sible with the machine unless avalid user name and password isentered. For details about user au-thentication, consult administrator.
AAAA Press the {{{{User Tools/Counter/Inquiry}}}}key.
Note❒ The machine will be offline dur-
ing setting.
BBBB Press [System Settings].
CCCC Press [Interface Settings] or [FileTransfer].
DDDD Select the required menu, andthen press the desired key.
EEEE Change settings by following theinstructions on the display panel,and then press [OK].
Note❒ To cancel changes made to set-
tings and return to theSystemSettings menu, press [Cancel].
FFFF Press [Exit].
GGGG Press the {{{{User Tools/Counter/Inquiry}}}}key.
Note❒ You can also exit by pressing
[Exit] on the User Tools mainmenu.
IEEE 802.11b (wireless LAN)
Interface Settings/Network
See p.23 “Network”.
Permit SNMP V3 Communication ❍
Permit SSL / TLS Communication ❍
Host Name ❍
Interface Settings/IEEE 802.11b *2
See p.26 “IEEE 802.11b”.
Communication Mode $
SSID Setting ❍
Channel ❍
WEP (Encryption) Setting ❍
Transmission Speed ❍
Interface Settings

Connecting and Setting Up
20
2
Configuring the network using other utilities
As well as using the control panel to make network settings, utilities such as a WebImage Monitor can also be used. The following table shows available settings:
Note❒ ❍ Indicates machine settings can be changed.❒ - Indicates the setting cannot be changed from that device.
Name on the control panelWeb Image
Monitortelnet
Interface Settings
Network IP Address Auto-Obtain (DHCP) ❍ ❍
Specify IP Address ❍ ❍
Sub-net Mask
❍ ❍
Gateway Address ❍ ❍
DNS Con-figuration
Auto-Obtain (DHCP) ❍ ❍
Specify VDNS Server 1
❍ ❍
VDNS Server 2
❍ ❍
VDNS Server 3
❍ ❍
DDNS Configuration ❍ ❍
Domain Name
Auto-Obtain (DHCP) ❍ ❍
Specify V Domain Name
❍ ❍
WINS Con-figuration
On VPrimary WINS Serv-er
❍ ❍
VSecond-ary WINS Server
❍ ❍
Scope ID ❍ ❍
Off ❍ ❍
Effective Protocol
TCP/IP - ❍
SMB ❍ ❍
SMB Computer Name ❍ ❍
SMB Work Group ❍ ❍
Ethernet Speed - -
LAN Type Ethernet ❍ ❍
IEEE 802.11b ❍ ❍

Setting Up the Machine on a Network
21
2
Interface Settings
Network Ping Command - -
Permit SNMP V3 Communi-cation
Encryption Only ❍ ❍
Encryption / Clear Text ❍ -
Permit SSL / TLS Com-munication
Ciphertext Only ❍ -
Ciphertext Priority ❍ -
Ciphertext / Clear Text ❍ -
Host Name ❍ ❍
Machine Name ❍ ❍
IEEE 1394 IP Address Auto-Obtain (DHCP) ❍ ❍
Specify IP Address ❍ ❍
Sub-net Mask
❍ ❍
DDNS Configuration ❍ ❍
Host Name ❍ ❍
Domain Name
Auto-Obtain (DHCP) ❍ -
Specify Domain Name
❍ ❍
WINS Con-figuration
On Primary WINS Serv-er
❍ ❍
Secondary WINS Serv-er
❍ ❍
Scope ID ❍ ❍
Off ❍ ❍
IP over 1394
Active ❍ ❍
Inactive ❍ ❍
IEEE 802.11b
Communi-cation Mode
802.11 Ad hoc ❍ ❍
Ad hoc ❍ ❍
Infrastructure ❍ ❍
SSID Setting ❍ ❍
Channel ❍ ❍
WEP (En-cryption) Setting
WEP Active ❍ ❍
Inactive ❍ ❍
Encryption ❍ ❍
Wireless LAN Signal - -
Name on the control panelWeb Image
Monitortelnet

Connecting and Setting Up
22
2
Interface Settings
IEEE 802.11b
Transmis-sion Speed
Auto - ❍
11Mbps Fixed - ❍
5.5Mbps Fixed - ❍
2Mbps Fixed - ❍
1Mbps Fixed - ❍
Return to Defaults - -
Print List - -
File Trans-fer
Delivery Option - -
Capture Server IP Address - -
SMTP Server ❍ -
SMTP Authentication ❍ -
POP before SMTP ❍ -
Reception Protocol ❍ -
POP3 Setting ❍ -
Administrator's E-mail Address ❍ -
E-mail Communication Port ❍ -
E-mail Reception Interval ❍ -
Max. Reception E-mail Size ❍ -
E-mail Storage in Server ❍ -
Default User Name / Password (Send) ❍ -
Program / Change / Delete E-mail Message - -
Program / Change / Delete Subject - -
Scanner Recall Interval Time - -
Number of Scanner Recalls - -
E-mail Account - -
Auto Specify Sender Name - -
Name on the control panelWeb Image
Monitortelnet

Setting Up the Machine on a Network
23
2
Interface Settings
Network
❖❖❖❖ IP AddressBefore using this machine in thenetwork environment, you mustconfigure the IP address and subnetmask.• Auto-Obtain (DHCP)• Specify
When you select [Specify], enterthe [IP Address]and [Sub-net Mask]as “xxx.xxx.xxx.xxx”(“x” indi-cates a number).• IP Address: 011.022.033.044• Sub-net Mask:
000.000.000.000
Note❒ Default: Auto-Obtain (DHCP)❒ If you use the interface for Eth-
ernet and IEEE 1394 (IP over1394) at the same time, settingsmust be made carefully. Seep.67 “Using DHCP”.
❒ If you install the optional IEEE1394 interface board and use theIEEE 1394 interface, you mustset the address of the domain,different from the [IP Address] of[IEEE 1394]. If you intend to setthe address for the same do-main, set a different value forthe [Sub-net Mask].
❒ When you select [Specify], besure not to set the same [IP Ad-dress] as that of another ma-chines on the network.
❒ The physical address (MAC ad-dress) also appears.
❖❖❖❖ Gateway AddressA gateway is a connection or inter-change point between two net-works. Configure the gatewayaddress for the router or host com-puter used as a gateway.• Gateway Address:
000.000.000.000
Note❒ Default: 000.000.000.000
❖❖❖❖ DNS ConfigurationMake settings for the DNS server.• Auto-Obtain (DHCP)• Specify
When you select [Specify], enterthe [DNS Server] IP address as“xxx.xxx.xxx.xxx”(“x” indi-cates a number).• VDNS Server 1:
000.000.000.000• VDNS Server 2:
000.000.000.000• VDNS Server 3:
000.000.000.000
Note❒ Default: Auto-Obtain (DHCP)
❖❖❖❖ DDNS ConfigurationYou can specify the DDNS set-tings.• Active• Inactive
Note❒ Default: Inactive
❖❖❖❖ Domain NameYou can specify the domain name.• Auto-Obtain (DHCP)• Specify
• Domain Name
❖❖❖❖ WINS ConfigurationYou can specify the WINS server
settings.• On

Connecting and Setting Up
24
2
If [On] is selected, enter the[VVVVWINS Server] IP address as“xxx.xxx.xxx.xxx”(“x” indi-cates a number).If DHCP is in use, specify the[Scope ID].• Primary WINS Server• Secondary WINS Server• Scope ID
• Off
Limitation❒ Enter a [Scope ID] using up to 31
alphanumeric characters.
Note❒ Default: Off
❖❖❖❖ Effective ProtocolSelect the protocol to use in thenetwork.• TCP/IP:Effective/Invalid• SMB:Effective/Invalid
Note❒ Default: TCP/IP: Effective, SMB:
Invalid
❖❖❖❖ SMB Computer NameSpecify the SMB computer name.
❖❖❖❖ SMB Work GroupSpecify the SMB work group.
❖❖❖❖ Ethernet SpeedSet the access speed for networks.Select a speed that matches yournetwork environment. [Auto Select]should usually be selected.• Auto Select• 100Mbps Full Duplex• 100Mbps Half Duplex• 10Mbps Full Duplex• 10Mbps Half Duplex
Note❒ Default: Auto Select
❖❖❖❖ LAN TypeWhen you have installed the op-tional IEEE 802.11b interface unit,select interface, IEEE 802.11b(wireless LAN) or Ethernet.• Ethernet• IEEE 802.11b
Note❒ Default: Ethernet
❒ Appears when the optional IEEE802.11b interface unit is installed.
❒ If Ethernet and IEEE 802.11b(wireless LAN) are both connect-ed to the machine, the selectedinterface takes precedence.
❖❖❖❖ Ping CommandCheck the network connectionwith ping command using givenIP address.
Note❒ If you fail to connect to the net-
work, check the following, andthen retry the ping command. • Check TCP/IP of the machine
is active. • Check that the machine with
assigned IP address is con-nected to the network.
• There is a possibility thatsame IP address is used forthe specified equipment .
❖❖❖❖ Permit SNMP V3 CommunicationSet the encrypted communicationof SNMP v3.• Encryption Only• Encryption / Clear Text
Note❒ If you set to [Encryption Only],
you need to set password forthe machine.

Setting Up the Machine on a Network
25
2
❖❖❖❖ Permit SSL / TLS CommunicationSet the encrypted communicationof SSL/TLS.• Ciphertext Only• Ciphertext Priority• Ciphertext / Clear Text
Note❒ Default: Ciphertext Priority
❒ If you set to [Ciphertext Only], youneed to install the server authen-tification for the machine.
❖❖❖❖ Host NameSpecify the host name.
❖❖❖❖ Machine NameSpecify the machine name.
IEEE 1394
PreparationYou must install the optional IEEE1394 interface board in the machine.
❖❖❖❖ IP AddressWhen you connect the machine toa network using the IEEE 1394 in-terface, you must configure the IPaddress and subnet mask.• Auto-Obtain (DHCP)• Specify
When you select [Specify], enterthe [IP Address] and [Sub-netMask] as “xxx.xxx.xxx.xxx”(“x”indicates a number).• IP Address: 011.022.033.044• Sub-net Mask:
000.000.000.000
Note❒ Default: Auto-Obtain (DHCP)
❒ If you use the interface for Eth-ernet and IEEE 1394 (IP over1394) at the same time, settingsmust be made carefully. Seep.67 “Using DHCP”
❒ When you use the IEEE 1394 in-terface on a network, you can-not use the Ethernet interface inthe same domain. To use bothinterfaces in the same domain,set different values for the [Sub-net Mask].
❒ The physical address (EUI-64)also appears.
❖❖❖❖ DDNS ConfigurationYou can specify the DDNS settings.• Active• Inactive
Note❒ Default: Inactive
❖❖❖❖ Host NameSpecify the host name.
❖❖❖❖ Domain NameMake settings for the domain name.• Auto-Obtain (DHCP)• Specify
• Domain Name
❖❖❖❖ WINS ConfigurationYou can specify the WINS serversettings.• On
If [On] is selected, specify the[VVVVWINS Server] IP address as“xxx.xxx.xxx.xxx” (“xxx” indi-cates a number).If DHCP is in use, specify the[Scope ID].• Primary WINS Server• Secondary WINS Server• Scope ID
• Off

Connecting and Setting Up
26
2
Limitation❒ Enter [Scope ID] using up to 31
alphanumeric characters.
Note❒ Default: Off
❖❖❖❖ IP over 1394When you use the IP over 1394function of the IEEE 1394 interfaceto connect the machine to the net-work, or you print from computerwith the IP over 1394 driver, youmust specify [Active]for [IP over1394].• Active• Inactive
Note❒ Default: Active
IEEE 802.11b
PreparationYou must install the optional IEEE802.11b interface unit into the ma-chine.
Note❒ Be sure to make all settings simul-
taneously.
❖❖❖❖ Communication ModeSpecifies the communication modeof the wireless LAN.• 802.11 Ad hoc• Ad hoc• Infrastructure
Note❒ Default: 802.11 Ad hoc
❖❖❖❖ SSID SettingSpecifies SSID to distinguish theaccess point in infrastructuremode or 802.11 ad hoc mode.
Limitation❒ The characters that can be used
are ASCII 0x20-0x7e (32 bytes).
Note❒ Default: blank (ASSID)❒ If blank is specified in 802.11b
ad hoc mode or ad hoc mode,“ASSID” appears.
❖❖❖❖ ChannelSpecifies a channel when you se-lect 802.11b ad hoc mode or ad hocmode.
Note❒ Default: 11
❒ The following channels areavailable:• Metric version: 1-13• Inch version: 1-11
❖❖❖❖ WEP (Encryption) SettingSpecifies the encryption of theIEEE 802.11b (wireless LAN). Ifthis is set to [Active], you must en-ter the WEP key.• VWEP
• Active• Inactive
• VEncryption10 alphanumeric charactersmust be entered for 64 bit, 26characters for 128 bit.
Note❒ Default: Inactive
❖❖❖❖ Wireless LAN SignalShows the radio wave conditionsof the access point connected in in-frastructure mode.
Note❒ Radio wave status is displayed
when you press [Wireless LANSignal].
Setting Up the Machine on a Network
27
2
❖❖❖❖ Transmission SpeedSpecifies the communicationspeed of the IEEE 802.11b (wirelessLAN).• Auto• 11Mbps Fixed• 5.5Mbps Fixed• 2Mbps Fixed• 1Mbps Fixed
Note❒ Default: Auto
❖❖❖❖ Return to DefaultsYou can return the IEEE 802.11b(wireless LAN) settings to their de-faults.• No• Yes
Print List
You can check items related to thenetwork in use.
ReferenceFor details about printing, see p.27“Printing the Interface Settings”.
Printing the Interface Settings
The configuration page shows thecurrent network settings and networkinformation.
AAAA Press the {{{{User Tools/Counter/Inquiry}}}}key.
BBBB Press [System Settings].
CCCC Press [Interface Settings].
DDDD Press [Print List].
EEEE Press the {{{{Start}}}} key.
The configuration page is printed.
FFFF Press [Exit].
GGGG Press the {{{{User Tools/Counter/Inquiry}}}}key.
Note❒ You can also exit by pressing [Ex-
it] on the User Tools main menu.
File Transfer
❖❖❖❖ Delivery OptionEnables or disables sending storedor scanned documents via theScanRouter V2 Professional deliv-ery server.• On
• Main Delivery Server IP Address• Sub Delivery Server IP Address
• Off
Note❒ Default: Off
❒ Set this option when specifyingwhether or not to use ScanRouterV2 Professional. If you do, youwill have to re-register I/O devic-es in ScanRouter V2 Professional.
❖❖❖❖ SMTP ServerSpecify the SMTP server name.If DNS is in use, enter the hostname.If DNS is not in use, enter theSMTP server IP address.• Server Name• Port No.:25
Limitation❒ Enter the [Server Name] using up
to 127 alphanumeric characters.Spaces cannot be used.
Note❒ Enter [Port No.] between 1 and
65535 using the number keys,and then press the [####]key.
Connecting and Setting Up
28
2
❖❖❖❖ SMTP AuthenticationYou can configure SMTP authenti-cation (PLAIN, LOGIN, CRAM-MD5, DIGEST-MD5).Authentication prevents unau-thorized access, by making usersenter a user name and passwordwhen sending e-mail to the SMTPserver.• On
If the SMTP server requires au-thentication, set [SMTP Authenti-cation] to [On], and then specify[User Name], [Password], and[VVVVEncryption].• User Name• E-mail Address• Password• VEncryption
Auto/On/Off• Off
Limitation❒ Enter [User Name] using up to
191 alphanumeric characters.Spaces cannot be used.
❒ Depending on the SMTP servertype, "realm" must be specified.Add "@" after the user name, asin "user name@realm".
❒ Enter [Password] using up to 63alphanumeric characters. Spacescannot be used.
Note❒ Default: Off
❒ [VVVVEncryption]-[Auto]: If the au-thentication method is PLAIN,LOGIN, CRAM-MD5, or DI-GEST-MD5.
❒ [VVVVEncryption]-[On]: If the au-thentication method is CRAM-MD5 or DIGEST-MD5.
❒ [VVVVEncryption]-[Off]: If the au-thentication method is PLAIN,or LOGIN.
❖❖❖❖ POP before SMTPYou can configure POP authentica-tion (POP before SMTP).Authentication prevents unau-thorized access, by authenticatingwith the POP server before send-ing e-mail to the SMTP server.• On
To enable POP server authenti-cation before sending e-mail viathe SMTP server, set [POP beforeSMTP] to [On]. E-mail is sent to the SMTP serverafter the time specified for [VVVVWaitTime after Auth.] has elapsed.• VWait Time after Auth.: 300msec• User Name• E-mail Address• Password
• Off
Limitation❒ Enter [User Name] using up to 63
alphanumeric characters. Spacescannot be used.
❒ Enter [Password] using up to 63alphanumeric characters. Spacescannot be used.
Note❒ Default: Off❒ Using the number keys, you can
set [VVVVWait Time after Auth.] fromzero to 10,000 milliseconds, inincrements of one millisecond.
❒ If you select [On], enter [ServerName] in [POP3 Setting]. Also,check the port number for [POP3]in [E-mail Communication Port].
❖❖❖❖ Reception ProtocolSpecify Reception Protocol.• Off• POP3• SMTP
Note❒ Default: Off

Setting Up the Machine on a Network
29
2
❖❖❖❖ POP3 SettingSpecify the POP3 [Server Name].The specified POP3 server name isused for [POP before SMTP].If DNS is in use, enter the hostname.If DNS is not in use, enter the POP3or server IP address.• Server Name• VEncryption
• Auto• On• Off
Limitation❒ Enter POP3 [Server Name] using
up to 127 alphanumeric charac-ters. Spaces cannot be used.
Note❒ VEncryption-[Auto]: Password en-
cryption is automatically set ac-cording to the POP server settings.
❒ VEncryption-[On]: Encrypt pass-word.
❒ VEncryption-[Off]: Do not encryptpassword.
❖❖❖❖ Administrator's E-mail AddressOn e-mailed scanned documents,if the sender is not specified thisappears as the sender’s address.This can be used as the sender withSMTP authentication. If [On] is se-lected for [SMTP Authentication] besure to enter the administrator's e-mail address here.This can be used as the destinationfor data transmission result cc e-mails, as well as the destination fordata communication managemente-mail.
Limitation❒ Enter up to 128 alphanumeric
characters.
❖❖❖❖ E-mail Communication PortSpecify the [POP3] port numbers.The specified POP3 port number isused for [POP before SMTP].• POP3: 110
Note❒ Default: POP3/110
❒ Enter a port number between 1and 65535 using the numberkeys, and then press the [####] key.
❖❖❖❖ E-mail Reception IntervalSpecify, in minutes, the time limitfor POP3 or IMAP4 server.• On: 15 minute(s)• Off
Note❒ Default: On/15 minute(s)
❒ If [On] is selected, the number oftimes can be set from 1 to 1440 inincrements of one minute, usingthe number keys.
❖❖❖❖ Max. Reception E-mail SizeSpecify the [Max. Reception E-mail Size].
Note❒ Default: 2MB
❒ Using the number keys, enter asize from one to 50 MB in incre-ments of one megabyte.
❖❖❖❖ Default User Name / Password (Send)You can specify the user name andpassword required when sendingscan file directly to a shared folderon a computer running Windows,or to an FTP server. • SMB User Name• SMB Password• FTP User Name• FTP Password
Limitation❒ Enter up to 128 alphanumeric
characters.

Connecting and Setting Up
30
2
❖❖❖❖ Program / Change / Delete E-mail Mes-sageYou can program, change, or deletethe e-mail message used when send-ing a scan file as an attachment.• Program / Change• Delete
Note❒ Enter a name using up to 20 al-
phanumeric characters.❒ Enter up to five lines of text.
Each line can consist of up to 80alphanumeric characters.
❖❖❖❖ Program / Change / Delete SubjectYou can program, change, or de-lete the subject used when sendinga scan file as an attachment.• Program / Change• Delete
Note❒ Enter a subject using up to 20 al-
phanumeric characters.
❖❖❖❖ Scanner Recall Interval TimeSpecifies the interval the machinewaits before resending scan file, ifthey cannot be sent to the deliveryserver or mail server.
Note❒ Default: 300 seconds
❒ The interval time can be set from60 to 900 seconds in one secondincrements, using the numberkeys.
❒ This setting is for the scannerfunction.
❖❖❖❖ Number of Scanner RecallsSets a maximum number of timesscan file is resent to the deliveryserver or mail server.• On: 3 time(s)• Off
Note❒ Default: On/3 time(s)
❒ If [On] is selected, the number oftimes can be set from 1 to 99 us-ing the number keys.
❒ This setting is for the scannerfunction.
❖❖❖❖ Auto Specify Sender NameSet name of the sender when send-ing an e-mail.• On• Off
Note❒ When set to [On], the specified
e-mail address is used for the[From:] box. If the sender's e-mail address is not set , or thee-mail address is not regis-tered , e-mail cannot be sent.
❒ When set to [Off], the adminis-trator's e-mail address or themachine's e-mail address willbe used for the [From:] box.
Programming, changing, or deleting an e-mail message
Limitation❒ Enter a name using up to 20 alpha-
numeric characters.❒ Enter up to five lines of text. Each
line can consist of up to 80 alpha-numeric characters.
AAAA Press the {{{{User Tools/Counter/Inquiry}}}}key.
BBBB Press [System Settings].
CCCC Press [File Transfer].
DDDD Press [TTTT Next].The next screen appears.
EEEE Press [Program / Change / Delete E-mailMessage].

Setting Up the Machine on a Network
31
2
Programming an e-mail message
A Press [*Not programed].B Press [Change], and then enter
the name.
ReferenceFor more information aboutentering text, see “EnteringText”, General Settings Guide.
C Press [OK].
D Press [Edit], and then enter thetext.
To start a new line, press [OK] toreturn to the e-mail messagescreen, and then press [TTTT] in [Se-lect Line to Edit:].
E Press [OK].The e-mail message screen ap-pears.
F Press [Exit].
Changing an e-mail message
A Select the e-mail message tochange.
B If you want to change the name,press [Change].
C Change the name, and thenpress [OK].
D Press [UUUU] or [TTTT] to select theline to change.
E If you want to change the text,press [Edit].
F Change the text, and then press[OK].
G Press [Exit].
Deleting an e-mail message
A Press [Delete].B Select the e-mail message to
delete.The confirmation messageabout deleting appears.
C To delete the data, press [Yes].
FFFF Press [Exit].
GGGG Press [Exit].
HHHH Press the {{{{User Tools/Counter/Inquiry}}}}key.
Note❒ You can also exit by pressing
[Exit] on the User Tools mainmenu.
Programming, changing, or deleting a subject
Limitation❒ Enter a subject using up to 20 al-
phanumeric characters.
Note❒ [Urgent] and [High] are programmed
as the e-mail subjects.
AAAA Press the {{{{User Tools/Counter/Inquiry}}}}key.
BBBB Press [System Settings].
CCCC Press [File Transfer].
DDDD Press [TTTTNext]. The next screen ap-pears.
EEEE Press [Program / Change / Delete Sub-ject].
Connecting and Setting Up
32
2
Programming a subject
A Press [*Not programed], and thenenter the text.
ReferenceFor more information aboutentering text, see “EnteringText”, General Settings Guide.
B Press [OK].
Changing a subject
A Select the subject to change.
B Enter the text.C Press [OK].
Deleting a subject
A Press [Delete].B Select the subject to delete.
The confirmation messageabout deleting appears.
C To delete the subject, press [Yes].
FFFF Press [Exit].
GGGG Press [Exit].
HHHH Press the {{{{User Tools/Counter/In-quiry}}}} key.
You can also exit by pressing [Exit]on the User Tools main menu.

LDAP Server Settings
33
2
LDAP Server Settings
Program the LDAP server to find upe-mail destinations in the LDAP serv-er Address Book directly. This func-tion is possible when sending scanfiles by e-mail using the scanner func-tion.
Before using this function
To start an LDAP search, make surethat the items listed below are set. Forother items, check your environmentand make any necessary changes.• Server Name• Search Base• Port No.• Search Conditions• Authentication method selection
Note❒ For authentication method, se-
lect from [High Security], [On], or[Off].
• User Name/PasswordThe settings above differ depend-ing on server environment. Checkyour environment and make anynecessary changes.
Note❒ To use the LDAP server in Admin-
istrator Tools, select [On] under[LDAP Server].
❒ This function supports LDAP Ver-sion 2.0 and 3.0. Ver 2.0 does notsupport High Security authentica-tion.
Program/Change/Delete LDAP Server
To enter Program/Change/Delete LDAP Server
AAAA Press the {{{{User Tools/Counter/Inquiry}}}}key.
BBBB Press [System Settings].
CCCC Press [Administrator Tools], and thenpress [TTTTNext] twice.
DDDD Press [Program / Change / Delete LDAPServer].
To program/change the LDAP server
AAAA Select the LDAP server you wantto program or change. When programming the server, se-lect [*Not Programmed].
BBBB Set each item as necessary.

Connecting and Setting Up
34
2
To finish programming/changing the LDAP Server
AAAA Press [Change] after setting eachitem.
BBBB Press [Exit].
CCCC Press [Exit].
DDDD Press the {{{{User Tools/Counter/Inquiry}}}}key.
To delete the programmed LDAP server
AAAA Press [Delete].
BBBB Select the LDAP server you wantto delete.
CCCC Press [Yes].
Programming the LDAP Server
To enter an identification name
Register a name for the LDAP serverthat will appear on the server selectionscreen of the LDAP search operation.
AAAA Press [Change] under [IdentificationName].
BBBB Enter the server’s identificationname.
CCCC Press [OK].
To enter a server name
Register the LDAP server’s host nameor IP address.
AAAA Press [Change] under [Server Name].
BBBB Enter the LDAP server name.
CCCC Press [OK].
To enter the search base
Select a route folder to start the searchfrom e-mail addresses registered inthe selected folder are search targets.
AAAA Press [Change] under [Search Base].
BBBB Enter the search base.

LDAP Server Settings
35
2
Note❒ For example, if the search target
is the sales department of ABCcompany, enter “dc=sales de-partment, o=ABC”. (In this ex-ample, the description is for anactive directory. “dc” is for theorganization unit, and “o” is forthe company.)
❒ Search base registration may berequired depending on yourserver environment. When reg-istration is required, unspeci-fied searches will result in error.Check you server environmentand enter any required specifi-cations.
CCCC Press [OK].
To enter a port number
Specify the port number for commu-nicating with the LDAP server. Speci-fy a port that is compliant with yourenvironment.
AAAA Press [Change] under [Port No.].
BBBB Enter the port number using thenumber keys, and then press [#].
Note❒ When SSL is set to [On], the port
number automatically changesto “689”.
To start SSL communication
Use SSL to communicate with theLDAP server.
AAAA Press [On].
Note❒ To use SSL, the LDAP server
must support SSL.
❒ When SSL is set to [On], the portnumber automatically changesto “689”.
❒ SSL setting must be enabled onthis machine. For details, consultyour network administrator.
To set authentication
To make a search request to the LDAPserver, use the administrator accountfor authentication.For details about the administratoraccount, see “To enter the user nameand password”.
AAAA Press [TTTTNext].
BBBB Press [On] or [High Security] under[Authentication].
Note❒ Authentication settings must
comply with your server’s au-thentication settings. Checkyour server settings before set-ting this machine.
❒ [High Security] is available onlywith LDAP Version 3.0.
❒ When [High Security] is selected,the administrator password isencrypted before it is sent to thenetwork. When [On] is selected,the password is sent withoutencryption.

Connecting and Setting Up
36
2
To enter the user name and password
When [On] or [High Security] is selectedfor the authentication setting, use theadministrator account name andpassword. Do not enter the adminis-trator account name and passwordwhen using authentication for eachindividual or each search.
AAAA Press [TTTTNext].
BBBB Press [Change] under [User Name].
CCCC Enter the user name, and thenpress [OK].
Note❒ Procedures for the user name
setting differ depending onserver environment. Checkyour server environment beforemaking the setting.• Example setting procedures:
Domain Name\User NameUser Name@Domain NameCN=Name, OU=DepartmentName, DC=Server Name
DDDD Press [Change] under [Password].
EEEE Enter the password, and then press[OK].
Note❒ The user name and password
are required for administratoraccess to the LDAP server.
❒ You can set the user name andpassword in this machine’s Ad-dress Book to allow individualauthentication access to theLDAP server. Use Administra-tor Tools to select the user nameand password you want to use.For details, see General SettingsGuide.
To test the connection
Access the LDAP server to check theproper connection is established.Check authentication works accord-ing to the authentication settings.
AAAA Press [Connection Test].A connection test is carried out.
BBBB Press [Exit].
Note❒ If the connection test fails, check
your settings and try again.❒ This function does not check search
conditions or the search base.
To set search conditions
You can enter an attribute as a typicalsearch keyword. Using the entered at-tribute, the function searches theLDAP server’s Address Book.
AAAA Press [TTTTNext]twice.

LDAP Server Settings
37
2
BBBB Press [Change] for items you wantto use as search conditions fromthe following: [Name], [E-mail Ad-dress], [Company Name], and [De-partment Name].
CCCC Enter the attribute you want touse when searching for e-mail ad-dresses, and then press [OK].
Note❒ The attribute value may change
depending on the server envi-ronment. Check the attributevalue complies with your serverenvironment before setting it.
❒ You can leave items blank, butyou cannot leave attributesblank when searching for e-mailaddresses from the LDAP serv-er Address Book.
To set search options
To search the LDAP server data usinga keyword other than prepared key-words such as Name, E-mail Address,Company Name, and DepartmentName, specify the attribute for the key-word registered in your LDAP server,and the name to be displayed on thecontrol panel during the search. For ex-ample, to search e-mail addresses byemployee number, enter “employeeNo.” in the Attribute field, and “Em-ployee No.” in the key display field.
AAAA Press [TTTTNext] three times.
BBBB Press [Change] under [Attribute].
CCCC Enter the attribute you want touse when searching for e-mail ad-dresses, and then press [OK].
Note❒ The attribute value may change
depending on the server envi-ronment. Check the attributecomplies with your server envi-ronment before setting it.
DDDD Press [Change] under [Key Display].
EEEE Enter the key display, and thenpress [OK].
The registered “key display” ap-pears as a keyword for searchingLDAP.• Without key display registration
• With key display registration
Note❒ The key does not appear on the
search screen unless both “At-tribute” and “Key Display” areregistered. Make sure you regis-ter both to use the optionalsearch.

Connecting and Setting Up
38
2

39
3. Monitoring and Configuringthe Machine
Using Web Image Monitor
Using Web Image Monitor, you can check the machine status and change set-tings.
❖❖❖❖ Available operationsThe following operations can be remotely performed using Web Image Mon-itor from a client computer.• Displaying machine status or settings• Resetting the machine• Managing the Address Book • Making machine settings• Making network protocol settings• Making security settings
❖❖❖❖ Configuring the machineTo perform the operations from Web Image Monitor, TCP/IP is required. Af-ter the machine is configured to use TCP/IP, operations from Web ImageMonitor become available.
❖❖❖❖ Recommended Web browser• Internet Explorer 5.5 or higher• Netscape Navigator 7.0 or higher
Note❒ To use Netscape Navigator with Secured Sockets Layer (SSL: an encryption
protocol), use Netscape Navigator 7.0 or higher. ❒ If the previous versions of the Web browser above are used or JavaScript and
cookies are not enabled with the Web browser used, display and operationproblems may occur.
❒ If you are using a proxy server, change the Web browser settings. Contactyour network administrator for information about the settings.
❒ The previous page may not appear even after the back button of a Webbrowser is clicked. If this happens, click the refresh button of a Web browser.
❒ Updating the machine information is not automatically performed. Click [Ap-ply] in the display area to update the machine information.

Monitoring and Configuring the Machine
40
3
Displaying Top Page
This section explains the Top Page and how to display Web Image Monitor.
AAAA Start your Web browser.
BBBB Enter “http: //(machine's address)/” in the address bar of a Web browser.
Top Page of Web Image Monitor appears.
Note❒ If the machine's host name has been registered on the DNS or WINS server,
you can enter it. For details, see p.67 “Using DHCP”.❒ When setting SSL, a protocol for encrypted communication, under envi-
ronment which server authentification is issued , enter "https://(ma-chine's address)/".
Every Web Image Monitor page is divided into the following areas:
1. Header area The link to help and dialog box forkeyword search appears.
2. Menu area The dialog box for switching to theuser mode and administrator modeappears, and each mode's menu willbe displayed. If you select menu, it's content will beshown on the work area, or the sub area.
3. Display area Displays the contents of the item se-lected in the menu area.Machine information in the displayarea is not automatically updated.Click [Refresh] at the upper right in thedisplay area to update the machine in-formation. Click the Web browser's[Refresh] button to refresh the entirebrowser screen.Machine status, network interfaceboard names, and comments are dis-played.
4. HelpUse Help to view or download Helpfile contents.
1
3
44
AGM057S
2
Using Web Image Monitor
41
3
When user authentication is set
Login (using Web Image Monitor)
Follow the procedure below to log onwhen user authentication is set.
AAAA Click [Login].
BBBB Enter a login user name and pass-word, and then click [OK].
Note❒ For user code authentication, en-
ter a user code in [User Name], andthen click [OK].
❒ The procedure may differ de-pending on the Web browserused.
Log Off (using Web Image Monitor)
Click [Logout] to log off.

Monitoring and Configuring the Machine
42
3
About Menu and Mode
There are two modes available with Web Image Monitor: user mode and admin-istrator mode. Displayed Items may differ depending on the modes.
❖❖❖❖ About User ModeIn the user mode, machine status, and settings can be viewed, but the ma-chine settings cannot be changed.
1. Status Machine status, including the amountof remaining paper in paper trays andthe amount of remaining toner, is dis-played.
2. Job Allows you to display list of Docu-ment Server jobs. This also perform ordelete Document Server jobs.
3. Configuration Display current machine and networksettings, and download help files.
123
ZZZ009S

Using Web Image Monitor
43
3
❖❖❖❖ Administrator ModeIn the administrator mode, you can configure various machine settings.
1. Status Machine status, including the amountof remaining paper in paper trays andthe amount of remaining toner, is dis-played.
2. Job Allows you to display list of Docu-ment Server jobs. This also allows youto delete Document Server jobs.
3. Address Book User information can be registered,displayed, changed, and deleted.
4. Configuration Make system settings for the machine,interface settings, and security.
5. Reset Device Click to reset the machine. This buttonis located on Top Page.
1234
5
AGM059S

Monitoring and Configuring the Machine
44
3
Access in the Administrator Mode
Follow the procedure below to accessWeb Image Monitor in the adminis-trator mode.
AAAA On Top Page, click [Login].
The dialog box for entering theuser name and password appears.
BBBB Enter your user name and pass-word, and then click [OK].
To use the default account, enter"admin" as user name, and leavethe password blank.
Note❒ For user authentication, enter a
login user name and password,and then click [OK].
❒ For user code authentication,enter a user code in [User Name],and then click [OK].
Displaying Web Image Monitor Help
When using Help for the first time,clicking either [Help] in the header areaor the icon marked "?" in the displayarea makes the following screen ap-pear, in which you can view Help intwo different ways, as shown below:
❖❖❖❖ Viewing Help on our Web siteDownloading Help to your com-puter
❖❖❖❖ Downloading and Checking HelpYou can download Help to yourcomputer. As the Help URL, youcan specify the path to the local fileto view the Help without connect-ing to the Internet.
Note❒ By clicking [Help] in the header ar-
ea, the contents of Help appear.
❒ By clicking "?", the Help icon in thedisplay area, Help for the settingitems in the display area appears.
Downloading Help
AAAA In the [OS] list, select the operat-ing system.
BBBB In the [Language] list, select thelanguage.
CCCC Click [Download].
DDDD Download Help by following theinstructions on the screen.
EEEE Store the downloaded compressedfile in a location, and then decom-press the file. To view the downloaded Web Im-age Monitor Help, set the path to thelocation of the decompressed file.
Linking the URL of the Help File to the [Help] Button.
You can link the URL of the help fileon a computer or Web server to the[Help] button.
AAAA Log on to Web Image Monitor inthe administrator mode.
BBBB In the menu area, click [Configura-tion].
CCCC Click [Webpage].
DDDD In the [Help URL] box, enter theURL of the help file.
If you saved the help file to "C:\HELP\EN", enter "file://C:/HELP/". For example, if you saved the file toa Web server, and the URL of the in-dex file is "http:// a.b.c.d/HELP/EN/index.html", enter "http://a.b.c.d/HELP/".
EEEE Click [Apply].

Remote Maintenance by telnet
45
3
Remote Maintenance by telnet
Important❒ Remote Maintenance should be
password-protected so that accessis allowed to administrators only.
❒ The password is the same as theone of Web Image Monitor admin-istrator. When the password ischanged using "mshell", otherpasswords change also.
❒ Some command cannot be set de-pending on the model type.
Using telnet
Follow the procedure below to usetelnet.
Important❒ Only one user at a time can log on
to perform remote maintenance.
AAAA Use the IP address or the hostname of the machine to start telnet.% telnet IP_address
BBBB Enter your user name and password.
To use default account, enter “ad-min” as user name, and leave thepassword blank.
Note❒ For user authentication, enter a
login user name and password,and then click [OK].
❒ For user code authentication,enter a user code in [User Name],and then click [OK].
CCCC Enter a command.
DDDD Quit telnet.msh> logout
The configuration message aboutsaving the changes appears.
EEEE Enter "yes" to save the changes,and then press the {{{{Enter}}}} key.If you do not want to save the chang-es, enter "no", and then press the{{{{Enter}}}} key. To make further chang-es, enter "return" at the commandline, and then press the {{{{Enter}}}} key.
Note❒ If the message "Can not write
NVRAM information" appears,the changes are not saved. Re-peat the procedure above.
❒ When the changes are saved, thenetwork interface board is resetautomatically with that changes.
access
Use the “access” command to viewand configure access control. You canalso specify two or more access ranges.
❖❖❖❖ View settingsmsh> access
❖❖❖❖ Configurationmsh> access ✩ range “start-address end-address”
• ✩ represents a target numberbetween 1 and 5. (Up to five ac-cess ranges can be registeredand selected.)
Example: to specify accessible IPaddresses between 192.168.0.10and 192.168.0.20:msh> access 1 range 192.168.0.10 192.168.0.20
❖❖❖❖ Access control initialization msh> access flush
• Use the "flush" command to re-store the default settings so thatall access ranges become "0.0.0.0".

Monitoring and Configuring the Machine
46
3
Note❒ The access range restricts comput-
ers from use of the machine by IPaddress. If you do not need to re-strict printing, make the setting"0.0.0.0".
❒ Valid ranges must be from lower(start address) to higher (end ad-dress).
❒ Up to five access ranges can bespecified. The entry is invalid if thetarget number is omitted.
❒ You cannot access Web Image Mon-itor from a restricted IP address.
autonet
Use the “autonet” command to con-figure AutoNet parameters.
❖❖❖❖ View settingsThe following command displaysthe current AutoNet settings:msh> autonet
❖❖❖❖ ConfigurationYou can configure AutoNet set-tings.msh> autonet {on|off}
• {on} means "active" and {off}means "inactive".
❖❖❖❖ Current interface priority configura-tion displaymsh> autonet priority
❖❖❖❖ Interface priority configurationmsh> autonet priority“interface_name”
• You can give interface's Au-toNet parameter priority.
• Priority settings are availablewhen multiple interfaces are in-stalled.
• ip1394 can be specified onlywhen the IEEE 1394 interface isinstalled.
• wlan can be specified only whenthe IEEE 802.11b interface is in-stalled.
Note❒ If an interface is not selected, the
current interface connection set-tings remain in effect.
ReferenceFor details about AutoNet, refer toautonet parameters.
devicename
Use the "devicename" command todisplay and change the machinename.
❖❖❖❖ View settingsmsh> devicename
❖❖❖❖ Machine name configurationmsh> devicename name“string”
• Enter a machine name using upto 31 alphanumeric characters.
• Set single names for each ma-chine.
❖❖❖❖ Machine name initializationmsh> devicename clear name
• Reset the machine name to itsdefault.
Interface name Interface configured
ether Ethernet interface
ip1394 IEEE 1394 interface
wlan IEEE 802.11b interface

Remote Maintenance by telnet
47
3
dhcp
Use the "dhcp" command to config-ure DHCP settings.
❖❖❖❖ View settingsThe following command displaysthe current DHCP settings.msh> dhcp
❖❖❖❖ ConfigurationYou can configure DHCP.msh> dhcp “interface_name”{on|off}
• Click {on} to enable dhcp. Click{off} to disable DHCP.
• If the DNS server address anddomain name are obtained fromDHCP, be sure to click {on}.
• ip1394 can be specified onlywhen the IEEE 1394 interface isinstalled.
• wlan can be specified onlywhen the IEEE 802.11b interfaceis installed.
❖❖❖❖ Current interface priority configura-tion displaymsh> dhcp priority
❖❖❖❖ Interface priority configurationmsh> dhcp priority “inter-face_name”
• You can select which interfacehas DHCP parameter priority.
• Priority settings are availablewhen multiple interfaces are in-stalled.
❖❖❖❖ DNS server address selectionmsh> dhcp dnsaddr {dhcp |static}
• Specify whether to obtain theDNS server address from theDHCP server or use the addressset by a user.
• To obtain the DNS server addressfrom the DHCP server, specify"dhcp". To use the address set bya user, specify "static".
❖❖❖❖ Domain name selectionmsh> dhcp domainname {dhcp| static}
• Specify whether to obtain thedomain name from the DNSserver or use the domain nameset by a user.
• To obtain the domain name fromthe DHCP server, specify "dhcp".To use the domain name set by auser, specify "static".
Reference For details about DHCP functions,see p.67 “Using DHCP”. For details about setting the DNSserver address, see p.47 “dns”.For details about setting the do-main name, see p.49 “domain-name”.
dns
Use the “dns” command to configureor display DNS (Domain Name Sys-tem) settings.
❖❖❖❖ View settingsThe following command displayscurrent DNS settings:msh> dns
Interface name Interface configured
ether Ethernet interface
ip1394 IEEE 1394 interface
wlan IEEE 802.11b interface

Monitoring and Configuring the Machine
48
3
❖❖❖❖ DNS server configurationThe following command enablesor disables the DNS server ad-dress:msh> dns “number” server“server address”The following command displaysa configuration using the IP ad-dress 192.168.15.16 on a DNS 1server:msh> dns 1 server 192.168.15.16
• You can register up to threeDNS server numbers.
• You cannot use “255.255.255.255”as the DNS server address.
❖❖❖❖ Dynamic DNS function settingmsh> dns “interface_name”ddns {on|off}
• You can set the dynamic DNSfunction "active" or "inactive".
• {on} means "active" and {off}means "inactive".
• ip1394 can be specified onlywhen the IEEE 1394 interface isinstalled.
• wlan can be specified onlywhen the IEEE 802.11b interfaceis installed.
❖❖❖❖ Specifying the record overlap opera-tionmsh> dns overlap {up-date|add}
• You can specify operations per-formed when records overlap.
• updateTo delete old records and regis-ter new records.
• addTo add new records and storethe old records.
• When CNAME overlaps, it is al-ways changed, irrespective ofsettings.
❖❖❖❖ CNAME registrationmsh> dns cname {on|off}
• You can specify whether to reg-ister CNAME.
• {on} means "active" and {off}means "inactive".
• The CNAME registered is thedefault name beginning withr n p . C N A M E ca n n o t b echanged.
❖❖❖❖ A records registrationmsh> dns arecord {dhcp|own}
• {dhcp}You can specify the method ofregistering an A record whenthe dynamic DNS function isenabled and DHCP is used.
• {own}To register an A record usingthe machine as the DNS client.The DNS server address and thedomain name already designat-ed are used for the registration.
❖❖❖❖ Record updating interval settingsmsh> dns interval “time”
• You can specify the interval af-ter which records are updatedwhen using the dynamic DNSfunction.
• The updating interval is speci-fied hourly. It can be entered be-tween 1 and 255 hours.
• The default is 24 hours.
Interface name Interface configured
ether Ethernet interface
ip1394 IEEE 1394 interface
wlan IEEE 802.11b interface

Remote Maintenance by telnet
49
3
domainname
Use the "domainname" command todisplay or configure the domainname settings.You can configure the Ethernet inter-face, IEEE 1394 interface, or IEEE802.11b interface.
❖❖❖❖ View settingsThe following command displaysthe current domain name:msh> domainname
❖❖❖❖ Interface domain configurationmsh> domainname“interface_name”
❖❖❖❖ Setting the Domain Namemsh> domainname “interface_name” name “domain name”
• A domain name can be enteredusing up to 63 alphanumericcharacters.
• The Ethernet interface and IEEE802.11b interface will have thesame domain name.
• ip1394 can be specified onlywhen the IEEE 1394 interface isinstalled.
• wlan can be specified onlywhen the IEEE 802.11b interfaceis installed.
❖❖❖❖ Deleting the Domain Namemsh> domainname “inter-face_name” clear name
help
Use the "help" command to displaythe available command list and theprocedures for using those com-mands.
❖❖❖❖ Command list displaymsh> help
❖❖❖❖ Display of procedure for using com-mandsmsh> help “command_name”
hostname
Use the “hostname” command tochange the machine name.
❖❖❖❖ View settingsmsh> hostname
❖❖❖❖ Configurationmsh> hostname “interface_name ” name “machine_name”
• Enter the machine name usingup to 63 alphanumeric charac-ters.
• You cannot use a machine namestarting with "RNP" or "rnp".
• The Ethernet interface and IEEE802.11b interface will have thesame machine name.
• ip1394 can be specified onlywhen the IEEE 1394 interface isinstalled.
• wlan can be specified onlywhen the IEEE 802.11b interfaceis installed.
Interface Interface set
ether Ethernet interface
ip1394 IEEE 1394 interface
wlan IEEE 802.11b interface
Interface name Interface configured
ether Ethernet interface
ip1394 IEEE 1394 interface
wlan IEEE 802.11b interface

Monitoring and Configuring the Machine
50
3
❖❖❖❖ Initializing the machine name foreach interfacemsh> hostname “inter-face_name” clear name
ifconfig
Use the "ifconfig" command to con-figure TCP/IP (IP address, subnetmask, broadcast address, defaultgateway address) for the machine.
❖❖❖❖ View settingsmsh> ifconfig
❖❖❖❖ Configurationmsh> ifconfig “interface_name” “parameter” “address”
• If you did not enter an interfacename, it is automatically set tothe Ethernet interface.
• ip1394 can be specified onlywhen the IEEE 1394 interface isinstalled.
• wlan can be specified onlywhen the IEEE 802.11b interfaceis installed.
❖❖❖❖ Netmask configurationmsh> ifconfig “interface_name” netmask “address”
❖❖❖❖ Broadcast address configurationmsh> ifconfig “interface_name” broadcast “address”
❖❖❖❖ Changing the Interfacemsh> ifconfig “interface”up
• You can specify either the Eth-ernet interface or IEEE 802.11binterface when using the op-tional IEEE 802.11b interfaceunit.You cannot specify the IEEE1394 interface.
The following explains how toconfigure an IP address 192.168.15.16 on Ethernet interface.msh> ifconfig ether 192.168.15.16The following explains how toconfigure a subnet mask 255.255.255.0 on Ethernet interface.msh> ifconfig ether net-mask 255.255.255.0
Note❒ To get the above addresses, contact
your network administrator.❒ Use the default configuration if you
cannot obtain setting addresses.❒ The IP address, subnet mask and
broadcast address are the same asthat for the ethernet interface andIEEE 802.11b interface.
❒ When installing the optional 1394Interface board, set the IP addressand subnet mask so that it does notoverlap with the ethernet interfaceor the IEEE 1394 interface.
❒ TCP/IP configuration is the samefor both Ethernet and IEEE 802.11binterface. If interfaces are changed,the new interface inherits the con-figuration.
❒ Use "0x" as the initial two letters ofa hexadecimal address.
passwd
Use the “passwd” command tochange the remote maintenance pass-word.
Interface name Interface configured
ether Ethernet Interface
ip1394 IEEE 1394 Interface
wlan IEEE 802.11b Interface

Remote Maintenance by telnet
51
3
❖❖❖❖ Changing the Passwordmsh> passwd
• Enter the current password.• Enter the new password.• Enter the new password once
again.
Note❒ Be sure not to forget or lose the
password.❒ The password can be entered using
up to 32 alphanumeric characters.Passwords are case-sensitive. Forexample, "R" is not the same as "r".
route
Use the “route” command to controlthe routing table.
❖❖❖❖ All route information displaymsh> route
❖❖❖❖ Specified route information displaymsh> route “destination”
• Specify the IP address to desti-nation.
❖❖❖❖ Enabling/disabling Specified Destina-tionmsh> route active {host|net}“destination” {on | off}
• You can turn the specified desti-nation on or off. Host becomesthe default setting.
❖❖❖❖ Adding Routing Tablemsh> route add {host|net}“destination” “gateway”
• Adds a host or network route to“destination”, and a gateway ad-dress to “gateway” in the table.
• Specify the IP address to desti-nation and gateway.
• Host becomes the default setting.
❖❖❖❖ Setting Default Gatewaymsh> route add default“gateway”
❖❖❖❖ Deleting Specified destination fromRouting Tablemsh> route delete {host|net} “destination”
• Host becomes the default set-ting.
• IP address of destination can bespecified.
❖❖❖❖ Route Flushmsh> route flush
Note❒ The maximum number of routing
tables is 16.❒ Set a gateway address when com-
municating with devices on an ex-ternal network.
❒ The same gateway address is sharedby all interfaces.
set
Use the "set" command to set the pro-tocol information display "active" or"inactive".
❖❖❖❖ View settingsThe following command displaysprotocol information (active/inac-tive).msh> set tcpip
msh> set smb
msh> set ip1394
• ip1394 can be specified onlywhen the IEEE 1394 interface isinstalled.
msh> set protocol
• When protocol is specified, in-formation about TCP/IP, andsmb appears.

Monitoring and Configuring the Machine
52
3
msh> set ftp
msh> set rsh
msh> set web
msh> set snmp
msh> set ssl
msh> set nrs
msh> set rfu
msh> set http
❖❖❖❖ Configuration• Enter “up”to enable protocol,
and enter “down” to disableprotocol.
You can set the protocol to "active"or "inactive".msh> set tcpip {up | down}
• If you disable TCP/IP, you can-not use remote access after log-ging off. If you did this bymistake, you can use the controlpanel to enable remote accessvia TCP/IP.
• Disabling TCP/IP also disablesip1394, ftp, rsh, web, snmp, ssl,and http.
msh> set smb {up | down}
msh> set ip1394 {up | down}
• ip1394 can be specified onlywhen the IEEE 1394 interface isinstalled.
msh> set ftp {up | down}
msh> set rsh {up | down}
msh> set web {up | down}
msh> set snmp {up | down}
msh> set ssl {up | down}
• If Secured Sockets Layer (SSL,an encryption protocol) func-tion is not available for the ma-chine , you cannot use thefunction by enabling it.
msh> set nrs {up | down}
msh> set rfu {up | down}
msh> set http {up | down}
show
Use the "show" command to displaynetwork interface board configura-tion settings.
❖❖❖❖ View settingsmsh> show
• If "-p" is added, you can viewsettings one by one.
ReferenceFor details about the informationdisplayed, see p.60 “Configuringthe Network Interface Board”.
smb
Use the “smb” command to configureor delete the computer or workgroupname for SMB.
❖❖❖❖ Computer Name settings msh> smb comp
• Set computer name using up to15 characters. Names beginningwith "RNP" or "rnp" cannot beentered.
❖❖❖❖ Working Group Name settingsmsh> smb group
• Set workgroup name using upto 15 characters
❖❖❖❖ Comment settingsmsh> smb comment
• Set comment using up to 31characters
❖❖❖❖ Deleting Computer Namemsh> smb clear comp
❖❖❖❖ Deleting Group Namemsh> smb clear group

Remote Maintenance by telnet
53
3
❖❖❖❖ Deleting Commentmsh> smb clear comment
❖❖❖❖ Protocol settingsmsh> smb protocol [netbeui{up | down} | tcpip {up |down}]
• Enable or disable NetBEUI andTCP/IP. Specify “up” to enable,and “down” to disable.
snmp
Use the “snmp” command to displayand edit SNMP configuration settingssuch as the community name.
❖❖❖❖ View settingsmsh> snmp
• Default access settings 1 is asfollows:Community name:publicIP address:0.0.0.0Access type:read-only / trap off
• Default access settings 2 is asfollows:Community name:adminIP address:0.0.0.0Access type:read-write / trap off
• If "-p" is added, you can viewsettings one by one.
• To display the current commu-nity, specify its registrationnumber.
❖❖❖❖ Displaymsh> snmp ?
❖❖❖❖ Community name configurationmsh> snmp “number” name“community_name”
• You can configure ten SNMPaccess settings numbered 1-10.
• The community name can beentered using up to 15 charac-ters.
❖❖❖❖ Deleting community namemsh> snmp “number” clearname
❖❖❖❖ Access type configurationmsh> snmp “number” type“access_type”
❖❖❖❖ Protocol configurationmsh> snmp {ip | ipx} {on |off}
• Use the following command toset protocols "active" or "inac-tive": If you set a protocol "inac-tive", all access settings for thatprotocol are disabled.
• Specify "ip" for TCP/IP, or "ipx"for IPX/SPX.
• {on} means "active" and {off}means "inactive".
• IEEE 1394 interface is availablefor TCP/IP only.
❖❖❖❖ Configuration of protocol for eachregistration numbermsh> snmp “number” active{ip | ipx} {on | off}
• To change the protocol of accesssettings, use the following com-mand. However, if you havedisabled a protocol with theabove command, activating ithere has no effect.
Access type Type of access per-mission
no not accessible
read read only
write read and write
trap user is notified of trap messages

Monitoring and Configuring the Machine
54
3
❖❖❖❖ Access configurationmsh> snmp “number” {ip/addr| ipx} “address”
• You can configure a host ad-dress according to the protocolused.
• The network interface board ac-cepts requests only from hoststhat have addresses with accesstypes of "read-only" or "read-write". Enter “0” to have networkinterface board accept requestsfrom any host without requiringa specific type of access.
• Enter a host address to deliver"trap" access type information to.
• To specify TCP/IP, enter "ip"followed by a space, and thenthe IP address.
• To specify IPX/SPX, enter "ipx"followed by a space, the IPX ad-dress followed by a decimal,and then the MAC address ofthe network interface board.
❖❖❖❖ sysLocation configurationmsh> snmp location
❖❖❖❖ Deleting sysLocationmsh> snmp clear location
❖❖❖❖ sysContact settingmsh> snmp contact
❖❖❖❖ Deleting sysContactmsh> snmp clear contact
❖❖❖❖ SNMP V1V2 function configurationmsh> snmp v1v2 {on | off}
• Specify "on" to enable, and "off"to disable.
❖❖❖❖ SNMP v3 function configurationmsh> snmp v3 {on | off}
• Specify "on" to enable, and "off"to disable.
❖❖❖❖ SNMP TRAP configurationmsh> snmp trap {v1 | v2 |v3} {on | off}
• Specify "on" to enable, and "off"to disable.
❖❖❖❖ Remote Configuration Authorizationconfigurationmsh> snmp remote {on |off}
• Specify "on" to enable, and "off"to disable.
❖❖❖❖ SNMP v3 TRAP configuration displaymsh> snmp v3trap
msh> snmp v3trap {1- 5}
• If a number from 1-5 is entered,settings are displayed for thatnumber only.
❖❖❖❖ Configuring a sending address forSNMP v3 TRAPmsh> snmp v3trap {1-5}{ip| ipx} “address”
❖❖❖❖ Configuring a sending protocol forSNMP v3 TRAPmsh> snmp v3trap {1-5} ac-tive {ip/addr | ipx} {on |off}
❖❖❖❖ Configuring a user account for SNMPv3 TRAPmsh> snmp v3trap {1-5} ac-count “account_name”
• Enter an account name using upto 32 alphanumeric characters.
❖❖❖❖ Deleting an SNMP v3 TRAP user ac-countmsh> snmp v3trap {1-5}clear account

Remote Maintenance by telnet
55
3
❖❖❖❖ Configuring an SNMP v3 encryptionalgorithmmsh> snmp v3auth {md5 |sha1}
❖❖❖❖ Configuring SNMP v3 encryptionmsh> snmp v3priv {auto |on}
• Set "auto" for automatic encryp-tion configuration
• Set "on" for mandatory encryp-tion configuration.
sntp
The machine clock can be synchro-nized with a NTP server clock usingSimple Network Time Protocol(SNTP). Use the "sntp" command tochange SNTP settings.
❖❖❖❖ View settingsmsh> sntp
❖❖❖❖ NTP server address configurationYou can specify the IP address ofthe NTP server.msh> sntp server “IP_address”
❖❖❖❖ Interval configurationmsh> sntp interval“polling_time”
• You can specify the interval atwhich the machine synchroniz-es with the operator-specifiedNTP server. The default is 60minutes.
• The interval can be entered be-tween 16 and 16,384 minutes.
• If you set 0, the machine syn-chronizes with the NTP serveronly when you turn the ma-chine on. After that, the ma-chine does not synchronize withthe NTP server.
❖❖❖❖ Time-zone configurationmsh> sntp timezone “+/-hour_time”
• You can specify the time differ-ence between the machine clockand NTP server clock. Time is in24-hour format.
syslog
Use the “syslog” command to displaythe information stored in the ma-chine's system log.
❖❖❖❖ View messagemsh> syslog
ReferenceFor details about the informationdisplayed, see p.64 “System LogInformation”.
web
Use the “web” command to displayand configure parameters on WebImage Monitor.
❖❖❖❖ View Settingsmsh> web
❖❖❖❖ URL ConfigurationYou can set URLs linked by click-ing [URL] on Web Image Monitor. Specify "1" or "2" for x as thenumber corresponding to the URL.Up to two URLs can be registeredand specified.msh> web url http://”TheURL or IP address you wantto register”/
❖❖❖❖ Deleting URLs registered as link des-tinationsmsh> web x clear urlSpecify "1" or "2" for x as the corre-sponding number to the URL.

Monitoring and Configuring the Machine
56
3
❖❖❖❖ Link name configurationYou can enter the name for [URL]that appears on Web Image Moni-tor. Specify "1" or "2" for x as the corre-sponding number to the l inkname.msh> web name “Name youwant to display”
❖❖❖❖ Deleting URL names registered aslink destinationsmsh> web x clear nameSpecify "1" or "2" for x as thenumber corresponding to the linkname.
❖❖❖❖ Help URL ConfigurationYou can set URLs linked by click-ing [Help] or [?] on Web ImageMonitor.msh> web help http://”HelpURL or IP address”/help/
❖❖❖❖ Deleting Help URLmsh> web clear help
wiconfig
Use the "wiconfig" command to makesettings for IEEE 802.11b.
❖❖❖❖ View settingsmsh> wiconfig
❖❖❖❖ View IEEE 802.11b settingsmsh> wiconfig cardinfo
• If IEEE 802.11b is not workingcorrectly, its information is notdisplayed.
❖❖❖❖ Configurationmsh> wiconfig “parameter”
Parameter Value configured
mode [ap|ad-hoc|802.11adhoc]
You can set the in-frastructure mode (ap) , the 802.11 Ad hoc mode (802.11adhoc), or the ad hoc mode (adhoc).
The default is ad hoc mode.
ssid “ID value” You can make set-tings for the SSID in the infrastruc-ture mode.
Usable characters are ASCII 0x20-0x7e (32 bytes).
An SSID value is set automatically to the nearest ac-cess point if no set-ting is made.
If no setting is made for the ad hoc mode, the same value as for the infrastructure mode or an ASSID value is automati-cally set.
channel frequency “channel no.”
You can enable or disable the WEP function. To enable the WEP function, specify [on]; to dis-able it, specify [off].
To start the WEP function, enter the correct WEP key.
enc [on|off] You can enable or disable the WEP function. To enable the WEP function, specify [on]; to dis-able it, specify [off].
To start the WEP function, enter the correct WEP key.

Remote Maintenance by telnet
57
3
key [ “key value” ] val [1|2|3|4]
You can specify the WEP key when entering in hexa-decimal.
With a 64-bit WEP, you can use 10 digit hexadecimals. With a 128-bit WEP, you can use 26 digit hex-adecimals.
Up to four WEP keys can be regis-tered. Specify the number to be reg-istered with “val”.
When a WEP is specified by key, the WEP specified by key phrase is overwritten.
To use this func-tion, set the same key number and WEP key for all ports that transmit data to each other.
You can omit the numbers with “val”. The key number is set to 1 when making these omissions.
keyphrase [ “phrase” ] val [1|2|3|4]
You can specify the WEP key when entering in ASCII.
With a 64-bit WEP, you can use 10 digit hexadecimals. With a 128-bit WEP, you can use 26 digit hex-adecimals.
Up to four WEP keys can be regis-tered. Specify the number to be reg-istered with “val”.
When a WEP is specified by key phrase, the WEP specified by key is overwritten.
Parameter Value configured
keyphrase [ “phrase” ] val [1|2|3|4]
To use this func-tion, set the same key number and WEP key for all ports that transmit data to each other.
You can omit the numbers with “val”. The key number is set to 1 when making these omissions.
encval [1|2|3|4] You can specify which of the four WEP keys is used for packet encod-ing. “1” is set if a number is not specified.
auth [open|shared]
You can set an au-thorization mode when using WEP. The specified val-ue and authorized mode are as fol-lows:
open: open system authorized (de-fault)
shared: shared key authorized rate
rate [au-to|11m|5.5m|2m|1m]
You can set the IEEE 802.11b trans-mitting speed.
The speed you specify here is the speed at which data is sent. You can receive data at any speed.
auto: automatical-ly set (default)
11m: 11 Mbps fixed
5.5m: 5.5 Mbps fixed
2m: 2 Mbps fixed
1m: 1 Mbps fixed
Parameter Value configured

Monitoring and Configuring the Machine
58
3
wins
Use the "wins" command to configureWINS server settings.
❖❖❖❖ Viewing settingsmsh> wins
• If the IP address obtained fromDHCP differs from the WINS IPaddress, the DHCP address isthe valid address.
❖❖❖❖ Configurationmsh> wins “interface_name”{on | off}
• {on} means "active" and {off}means "inactive".
• Be sure to specify the interface.• ip1394 can be specified only
when the IEEE 1394 interface isinstalled.
• wlan can be specified onlywhen the IEEE 802.11b interfaceis installed.
❖❖❖❖ Address configurationUse the following command toconfigure a WINS server IP ad-dress:msh> wins “interface_name”{primary|secondary} “IPaddress”
• Use the “primary” command toconfigure a primary WINS serv-er IP address.
• Use the "secondary" commandto configure a secondary WINSserver IP address.
• Do not use “255.255.255.255” asthe IP address.
❖❖❖❖ NBT (NetBIOS over TCP/IP) Scope IDSelectionYou can specify the NBT scope ID.msh> wins “interface_name”scope “scope ID”
• The scope ID can be entered us-ing up to 31 alphanumeric char-acters.
• Be sure to specify the interface.• ip1394 can be specified only
when the IEEE 1394 interface isinstalled.
• wlan can be specified onlywhen the IEEE 802.11b interfaceis installed.
Interface name Interface configured
ether Ethernet interface
ip1394 IEEE 1394 interface
wlan IEEE 802.11b interface
Interface name Interface configured
ether Ethernet interface
ip1394 IEEE 1394 interface
wlan IEEE 802.11b interface

SNMP
59
3
SNMP
The SNMP agent operating on UDPand IPX is incorporated into the built-in Ethernet board and optional IEEE802.11b interface unit of this machine.Also, the SNMP agent operating onUDP is incorporated in the optionalIEEE 1394 interface board.Using the SNMP manager, you canget information about the machine.The default community names are[public] and [admin]. You can get MIBinformation using these communitynames.
❖❖❖❖ Supported MIBs(SNMPv1/v2)• MIB-II• PrinterMIB• HostResourceMIB• RicohPrivateMIB
❖❖❖❖ Supported MIBs(SNMPv3)• MIB-II• PrinterMIB• HostResourceMIB• RicohPrivateMIB• SNMP-FRAMEWORK-MIB• SNMP-TARGET-MIB• SNMP-NOTIFICATION-MIB• SNMP-USER-BASED-SM-MIB• SNMP-VIEW-BASED-ACM-
MIB

Monitoring and Configuring the Machine
60
3
Understanding the Displayed Information
This section explains how to read status information returned by the network in-terface board.
Configuring the Network Interface Board
Use the following command to display network interface board settings:• telnet : Use the “show” command. See p.52 “show”.
Item Description
Common
Mode
Protocol Up/Down [up] means "active" and [down] means "inactive".
TCP/IP
SMB
IP over 1394
Ethernet interface Internal version number
Syslog priority
NVRAM version Internal version number
Device name Machine name
Comment Comment
Location Location of the machine in the SNMP and Rendezvous information
Contact Administrator information for the machine and contact information in the SNMP information
Soft switch
TCP/IP
mode [up] means "active" and [down] means "inactive".
ftp
rsh
telnet
web
http
ftpc
snmp
autonet
ssl
nrs

Understanding the Displayed Information
61
3
rfu
nbt
EncapType Frame type
DHCP Dynamic Host Configuration Protocol (on/off)
Host name
Address IP address
Netmask Subnet mask
Broadcast Broadcast address
DNS Domain DNS domain type
Gateway Default gateway address
AccessRange[1]-[5] Access control range
Time server NTP server address
Time Zone NTP server time difference
Time server polling time NTP server interval
SYSLOG server
Home page URL URL of homepage.
Home page link name URL of home page
SMB
Switch
Mode (this value is fixed)
Notification Notification of print job completion
Workgroup name Name of the workgroup
Computer name Name of the computer
Comment Comment
Share name[1] Share name (model of the printer)
Protocol
IEEE 802.11b
Device Name Machine name
dhcp DHCP (on/off)
Address IP address
netmask Subnet mask
broadcast Broadcast address
DNS Domain DNS domain type
ssid SSID used
Channel range Channels available for use
Item Description

Monitoring and Configuring the Machine
62
3
Channel Channel used
Communication mode IEEE 802.11b interface transmitting mode
Authentication
TX Rate IEEE 802.11b interface speed
WEP encryption WEP enabled or disabled
Encryption key WEP key
IP over 1394
Host name
DHCP
Address IP address
netmask Subnet mask
broadcast Broadcast address
DNS Domain
DNS
Server[X]: IP address of the DNS server
Selected DNS Server Selected DNS server
Domain Name
ether Domain name on an Ethernet connection
wlan Domain name on a wireless LAN connection
ip1394
DDNS
ether Dynamic DNS function on an Ethernet connection (on/off)
wlan Dynamic DNS function on a wireless LAN connection (on/off)
ip1394 Dynamic DNS function on an IP over 1394 connection (on/off)
WINS
ether
Primary WINS IP address of the primary WINS server on an Ethernet connection
Secondary WINS IP address of the secondary WINS server on an Ethernet connection
ip1394
Primary WINS IP address of the primary WINS server on an IP over 1394 connection
Secondary WINS IP address of the secondary WINS server on an IP over 1394 connection
Item Description

Understanding the Displayed Information
63
3
SNMP
SNMPv1v2
SNMPv3
protocol
v1Trap
v2Trap
v3Trap
SNMPv1v2 Remote Setting
SNMPv3 Privacy
Shell mode Remote maintenance tool mode
Item Description

Monitoring and Configuring the Machine
64
3
Message List
This is a list of messages that appear in the machine's system log. The system logcan be viewed using the "syslog" command.
System Log Information
Use the following command to display the system log information:• UNIX: Use the "syslog" command and "rsh", "rcp", and "ftp" parameters. • telnet : Use the “syslog” command.
Message Problem and solutions
ANONYMOUS FTP LOGIN FROM <IP ad-dress>, <password>
An anonymous login has been made with a password <password> from the host <IP ad-dress>.
Change IP address from DHCP Server. The IP address changes when DHCP lease is re-newed. To always assign the same IP address, set a static IP address to the DHCP server.
child process exec error! (process name) The network service failed to start. Turn the printer off and then on. If this does not work, contact your service or sales representative.
Connected DHCP Server(<DHCP server ad-dress>).
The IP address was successfully received from the DHCP server.
connection from <IP address> Login was from the host IP address.
Current Interface Speed:xxxMbps Speed of the network (10 Mbps or 100 Mbps)
Current IP address <current IP address> The IP address <current IP address> was re-ceived from the dhcp server.
DHCP lease time expired. DHCP lease time has expired. The printer tries to discover the DHCP server again. The IP ad-dress until now becomes invalid.
DHCP server not found. The DHCP server was not found. Make sure that the DHCP is on the network.
dhcpcd start. The DHCPCD service (dhcp client service) has started.
Duplicate IP=<IP address>(from <MAC ad-dress>).
The same IP address is used. Each IP address must be unique. Check the address of the de-vice indicated in [MAC address].
httpd start. The httpd service has started.
inetd start. The inetd service has started.
LeaseTime=<lease time>(sec), Renew-Time=<renew time>(sec).
The resource lease time received from the DHCP server is displayed in [lease time] in seconds. The renewal time is displayed in [re-new time] in seconds.
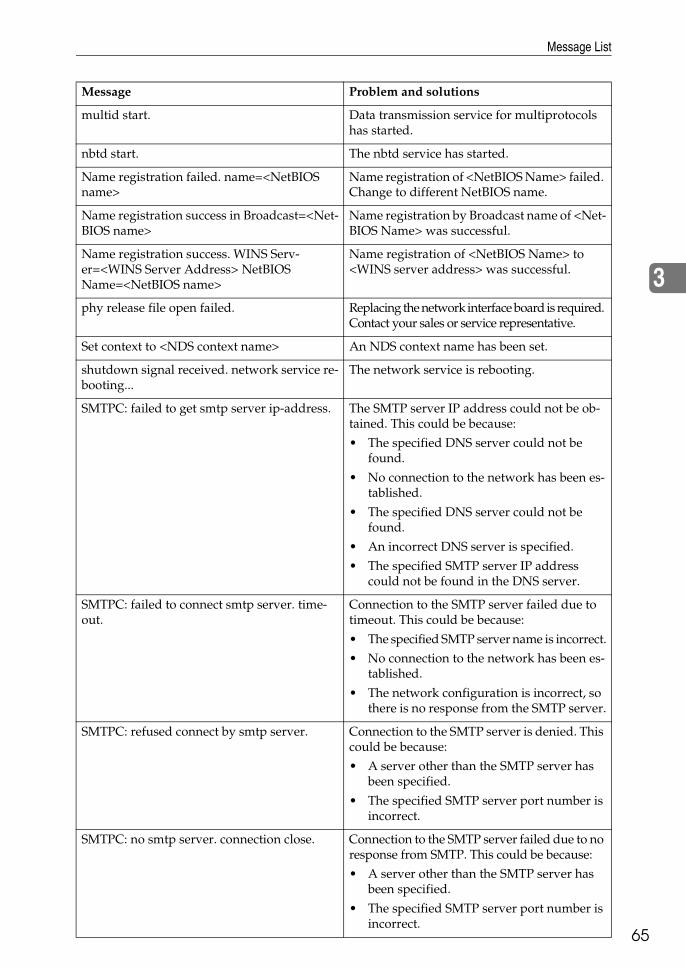
Message List
65
3
multid start. Data transmission service for multiprotocols has started.
nbtd start. The nbtd service has started.
Name registration failed. name=<NetBIOS name>
Name registration of <NetBIOS Name> failed. Change to different NetBIOS name.
Name registration success in Broadcast=<Net-BIOS name>
Name registration by Broadcast name of <Net-BIOS Name> was successful.
Name registration success. WINS Serv-er=<WINS Server Address> NetBIOS Name=<NetBIOS name>
Name registration of <NetBIOS Name> to <WINS server address> was successful.
phy release file open failed. Replacing the network interface board is required. Contact your sales or service representative.
Set context to <NDS context name> An NDS context name has been set.
shutdown signal received. network service re-booting...
The network service is rebooting.
SMTPC: failed to get smtp server ip-address. The SMTP server IP address could not be ob-tained. This could be because:
• The specified DNS server could not be found.
• No connection to the network has been es-tablished.
• The specified DNS server could not be found.
• An incorrect DNS server is specified.
• The specified SMTP server IP address could not be found in the DNS server.
SMTPC: failed to connect smtp server. time-out.
Connection to the SMTP server failed due to timeout. This could be because:
• The specified SMTP server name is incorrect.
• No connection to the network has been es-tablished.
• The network configuration is incorrect, so there is no response from the SMTP server.
SMTPC: refused connect by smtp server. Connection to the SMTP server is denied. This could be because:
• A server other than the SMTP server has been specified.
• The specified SMTP server port number is incorrect.
SMTPC: no smtp server. connection close. Connection to the SMTP server failed due to no response from SMTP. This could be because:
• A server other than the SMTP server has been specified.
• The specified SMTP server port number is incorrect.
Message Problem and solutions

Monitoring and Configuring the Machine
66
3
Note❒ For details about “syslog” command, see p.55 “syslog”.
SMTPC: failed to connect smtp server. Connection to the SMTP server failed. This could be because:
• No connection to the network has been es-tablished.
• The network configuration is incorrect, so there is no response from the SMTP server.
• The specified SMTP server name is incor-rect.
• An incorrect SMTP server is specified.
• The specified SMTP server IP address could not be found in the DNS server.
• A server other than the SMTP server has been specified.
• The specified SMTP server port number is incorrect.
SMTPC: username or password wasn’t cor-rect. [response code] (information)
Connection to the SMTP server failed. This could be because:
• The specified SMTP user name is incorrect.
• The specified SMTP password is incorrect.
Check the SMTP user name and password.
Snmp over ip is ready. Communication over TCP/IP with snmp is available.
SNMPD: account is unavailable:
Same account name be used.
User account is disabled. This could be be-cause it use the same account name as the ad-ministrator account.
SNMPD: account is unavailable:
The authentication password is not set up.
User account is disabled. This could be be-cause the authentication password is not set, and only the encryption account is set.
SNMPD: account is unavailable:
encryption is impossible.
Encryption is not possible and account is disa-bled. This could be because:
• Security option is not installed.
• Encryption password has not been speci-fied.
SNMPD: trap account is unavailable. v3Trap cannot be sent. This could be because the Trap destination account is different from the account specified by the printer.
snmpd start. The snmpd service has started.
WINS name registration: No response to serv-er<WINS server address>
There was no response from the WINS server. Check the correct WINS server address is en-tered. Alternatively, check the WINS server is functioning properly.
WINS wrong scopeID=<ScopeID> An invalid scope ID was used. Use a valid scope ID.
Message Problem and solutions

67
4. Appendix
Using DHCP
You can use the machine in a DHCPenvironment. You can also registerthe machine NetBIOS name on aWINS server when it is running.If you connect an Ethernet interfaceand IEEE 1394 (IP over 1394) interfacesimultaneously, pay attention to thefollowing:
❖❖❖❖ When a static IP address is set forboth interfaces• IP Address: If interface IP ad-
dresses overlap, the Ethernet in-terface is selected.
• Subnet Mask: If interface subnetmasks overlap, the Ethernet in-terface is selected.
• Gateway Address: The selectedvalue is applied.
Note❒ Make the gateway address set-
ting inside the subnet set in theinterface.
❒ If a value is beyond the range ofthe subnet selected by the inter-face, the machine operates us-ing "0.0.0.0".
❖❖❖❖ When obtaining addresses from theDHCP server• IP Address, Subnet Mask: you
can configure addresses as-signed by a DHCP server.
Note❒ If IP addresses overlap or the
same subnet IP addresses areselected, the effective value isassigned only to the priori-tized interface.
❒ Ethernet has default interfacepriority.
• AutoNet: A temporary IP ad-dress starting with 169.254 andnot used on the network, is as-signed to the prioritized inter-face.
Note❒ Default interface priority is
IEEE 1394 (IP over 1394).• Gateway Address, DNS Server
Address, and Domain Name:You can configure the addressesassigned by DHCP to the prior-itized interface.If the gateway address is be-yond the range of the subnet se-lected for the interface, them a ch i ne o p e r a t e s us i ng"0.0.0.0".
Note❒ Ethernet has default interface
priority.
❖❖❖❖ When there are static IP addressesand addresses assigned by DHCP• IP Address and subnet mask: if
a static IP address is the same asan address assigned by DHCP,or the static subnet mask ad-dress and the subnet mask ad-d re s s a ss i g n e d b y D H C Poverlap, the machine uses thestatic IP address interface.
Note❒ The interface with the DHCP
setting is set by default.• Gateway Address: oper-
ates using the address en-tered manually.

Appendix
68
4
Note❒ If a static address is not selected,
or is set to 0.0.0.0, the interfaceusing the address assigned byDHCP is used.
Note❒ Machines that register the machine
NetBIOS name on a WINS servermust be configured for the WINSserver. See p.58 “wins”.
❒ Supported DHCP servers are Mi-crosoft DHCP Server includedwith Windows 2000 Server, Win-dows Server 2003, and WindowsNT 4.0, and the DHCP server in-cluded with UNIX.
❒ If you do not use the WINS server,reserve the machine's IP address inthe DHCP server so the same IPaddress is assigned every time.
❒ To use the WINS server, changethe WINS server setting to “active”using the control panel.
❒ Using the WINS server, you canconfigure the host name via the re-mote network printer port.
❒ DHCP relay-agent is not support-ed. If you use DHCP relay-agenton a network via ISDN, it will re-sult in increased line charges. Thisis because your computer connectsto the ISDN line whenever a packetis transferred from the machine.
❒ If there is more than one DHCPserver, use the same setting for allservers. The machine operates us-ing data from the DHCP serverthat responds first.
Using AutoNet
If the machine IP address is not auto-matically assigned by the DHCP serv-er, a temporary IP address startingwith 169.254 and not used on the net-work can be automatically selected bythe machine.
Note❒ The IP address assigned by the
DHCP server is given priority overthat selected by AutoNet.
❒ When AutoNet is running, theNetBIOS name is not registered onthe WINS server.

Precautions
69
4
Precautions
Please pay attention to the followingwhen using the network interfaceboard. When configuration is neces-sary, follow the appropriate proce-dures below.
Connecting a Dial-Up Router to a Network
When Using Network Utility
If the machine is connected to a net-work, observe the following pointswhen setting up the machine orchanging settings:For more details, see the operating in-structions and Help for ScanRouterV2 Professional and DeskTopBinderLite/Professional.
❖❖❖❖ When a dial-up router is connected ina network environmentThe settings for the delivery serverto be connected must be made ap-propriately for the machine withScanRouter V2 Professional, AutoDocument Link, or DeskTopBind-er Lite/Professional. In addition,set up connected devices using theI/O settings of ScanRouter V2 Ad-ministration Utility.If the network environment chang-es, make the necessary changes forthe delivery server using the ma-chine, the administration utility ofclient computers, Auto DocumentL ink , and DeskTop BinderLite/Professional. Also, set the cor-rect information for the connecteddevices using the I/O settings ofScanRouter V2 AdministrationUtility.
Important❒ If the machine is set up to con-
nect to the delivery server via adial-up router, the router willdial and go online whenever aconnection to the delivery serv-er is made. Telephone chargesmay be incurred.
❖❖❖❖ When connected to a computer thatuses dial-up access• Do not install ScanRouter V2
Professional on a computerwhich uses dial-up access.
• When using ScanRouter V2 Pro-fess ional , DeskTopBinderLite/Professional, Auto Docu-ment Link, or a TWAIN driveron a computer with dial-up ac-cess, a dial-up connection maybe performed when connectingto the delivery server and otherequipment, depending on thesetup. If the computer is set upto connect to the Internet auto-matically, the confirmation dia-log box will not appear, andtelephone charges may be in-curred without your beingaware of it. To prevent unneces-sary connections, the computershould be set up so the confir-mation dialog box always ap-pears before establishing aconnection. Do not make unnec-essary connections when usingthe above listed software.

Appendix
70
4
When the optional IEEE 802.11b interface unit Is Installed
When using the wireless LAN inter-face on the network, note the follow-ing:
❖❖❖❖ When moving the machineDetach the antennas when relocat-ing the machine locally.After moving the machine, reat-tach the antennas, ensuring that: • The antennas are positioned
clear of obstacles.• There is 40 to 60 mm between
the antennas, so that they do nottouch.
• The exposure glass cover andthe Auto Document Feeder(ADF) do not knock the anten-nas.
❖❖❖❖ If the network area provides poor ra-dio environmentWhere radio wave conditions arebad, the network may not functiondue to interrupted or failed con-nections. When checking the wire-less LAN signal and the accesspoint, follow the procedure belowto improve the situation:• Position the access point nearer
to the machine.• Clear the space between access
point and machine of obstruc-tions.
• Move radio wave generatingappliances, such as micro-waves, away from the machineand access point.
ReferenceFor information about how tocheck radio wave status, see p.10“Checking the machine's radiowave status”.For more information about accesspoint radio wave conditions, referto the access point manual.

Information about Installed Applications
71
4
Information about Installed Applications
RSA BSAFE®
• This product includes RSA®
BSAFE™ cryptographic or securi-ty protocol software from RSA Se-curity Inc.
• RSA is a registered trademark andBSAFE is a registered trademark ofRSA Security Inc.in the UnitedStates and/or other countries.
• RSA Security Inc. All rights re-served.

Appendix
72
4
Specifications
*1 The optional IEEE 1394 interface board supports only TCP/IP.
Interface 100BASE-TX, 10BASE-T, IEEE 1394 (IP over 1394) *1 , IEEE 802.11b
Frame type EthernetII, IEEE 802.2, IEEE 802.3, SNAP
Protocol • Network ScannerTCP/IP
RSHFTPSMTP
POPSMB
• Document ServerTCP/IP
FTPHTTP
• Management FunctionTCP/IP
RSHRCPFTPSNMPHTTP
TELNET (mshell)NBTDHCPDNSLDAP
SNMP v1/v2 MIB-II, PrinterMIB, HostResourceMIB, RicohPrivateMIB
SNMP v3 MIB-II, PrinterMIB, HostResourceMIB, RicohPrivateMIB, SNMP-FRAMEWORK-MIB, SNMP-TARGET-MIB, SNMP-NOTIFICA-TION-MIB, SNMP-USER-BASED-SM-MIB, SNMP-VIEW-BASED-ACM-MIB

73
INDEXA
Access Control, 44Administrator's E-mail Address, 29AutoNet, 68Autonet
telnet, 45Auto Specify Sender Name, 30
C
Channel, 26Communication Mode, 26
D
DDNS Configuration, 23, 25Default User Name /
Password (Send), 29Delivery Option, 27DHCP, 46, 67dial-up router, 69DNS, 46dns
telnet, 46DNS Configuration, 23Domain Name, 23, 25, 48
E
Effective Protocol, 24E-mail Communication Port, 29E-mail Reception Interval, 29Ethernet Speed, 24
F
File Transfer, 27
G
Gateway Address, 23Going to the Top Page
Web Image Monitor, 40
H
Host Name, 25, 48
I
IEEE 802.11b, 55setting, 9
ifconfig, 49information
Network Interface Board configuration, 59
Network interface board configuration, 51
system log, 54, 63Interface Settings/IEEE 1394, 25Interface Settings/IEEE 802.11b, 26Interface Settings/Network, 23IP Address, 23, 25IP over 1394, 26
L
LAN Type, 24
M
Machine Name, 25Max. Reception E-mail Size, 29message, 63MIB, 58
N
Number of Scanner Recalls, 30
P
passwd, 49Password, 49Permit SNMP V3 Communication, 24Permit SSL / TLS, 25Ping Command, 24POP3 Setting, 29POP before SMTP, 28precautions, 69Program / Change /
Delete E-mail Message, 30Program / Change / Delete Subject, 30
R
Reception Protocol, 28Return to Defaults, 27route, 50

74 GB GB EN USA B765-8710
S
Scanner Recall Interval Time, 30set, 50show, 51smb, 51SMB Computer Name, 24SMB Work Group, 24SMTP Authentication, 28SMTP Server, 27SNMP, 58snmp, 52sntp, 54specifications, 72SSID Setting, 26
T
TCP/IP address, 49telnet, 44
Autonet, 45WINS, 57
Transmission Speed, 27Types of Menu Configuration and Mode
Web Image Monitor, 41
W
Web Image Monitor, 39WEP (Encryption) Setting, 26WINS
telnet, 57WINS Configuration, 24, 25Wireless LAN Signal, 26

Copyright © 2005

Ne
two
rk Guid
e
GB GB
EN USA B765-8710

Paper type: OK Prince Eco G100(55kg), Paper Thickness=80 µm // Pages in book=120 // Print scale=81%Gap (when printed at 81% scale) = Pages in book × Paper thickness / 2 = 4.800000 mm
B1886707
Operating Instructions
Copy Reference
Read this manual carefully before you use this machine and keep it handy for future reference. For safe and correct use, be sure to read the SafetyInformation in the "General Settings Guide" before using the machine.
Basics
Copying
Troubleshooting
User Tools (Copier / Document Server Features)
Specifications
Type for 4800WD/A080/LW411/480WPrinted in Japan
EN USA B188-6707

Paper type: OK Prince Eco G100(55kg), Paper Thickness=80 µm // Pages in book=120 // Print scale=81%Gap (when printed at 81% scale) = Pages in book × Paper thickness / 2 = 4.800000 mm
In accordance with IEC 60417, this machine uses the following symbols for the main power switch:
aaaa means POWER ON.
cccc means STAND BY.
In accordance with IEC 60417, this machine uses the following symbols for the anti- humidity heaterswitch:
aaaa means POWER ON.
bbbb means POWER OFF.
Trademark
Acrobat® is a registered trademark of Adobe Systems Incorporated.
Other product names used herein are for identification purposes only and might be trademarks of theirrespective companies. We disclaim any and all rights to those marks.
Introduction
This manual contains detailed instructions and notes on the operation and use of this machine. For yoursafety and benefit, read this manual carefully before using the machine. Keep this manual in a handyplace for quick reference.
Important
Contents of this manual are subject to change without prior notice. In no event will the company be li-able for direct, indirect, special, incidental, or consequential damages as a result of handling or oper-ating the machine.
Notes:
Some illustrations in this manual might be slightly different from the machine.
Certain options might not be available in some countries. For details, please contact your local dealer.
Notes:
Two kinds of size notation are employed in this manual. With this machine refer to the inch version.
For good copy quality, the supplier recommends that you use genuine toner from the supplier.
The supplier shall not be responsible for any damage or expense that might result from the use of partsother than genuine parts from the supplier with your office products.
Important
Do not copy or print any item for which reproduction is prohibited by law.
Copying or printing the following items is generally prohibited by local law:
bank notes, revenue stamps, bonds, stock certificates, bank drafts, checks, passports, driver's licens-es.
The preceding list is meant as a guide only and is not inclusive. We assume no responsibility for itscompleteness or accuracy. If you have any questions concerning the legality of copying or printing cer-tain items, consult with your legal advisor.
Power Source
120V, 60Hz, 20A or more
Please be sure to connect the power cord to a power source as above. For details about power source,see “Power Connection” in General Settings Guide.
Copyright © 2005

i
Manuals for This Machine
The following manuals describe the operational procedures of this machine. Forparticular functions, see the relevant parts of the manual.
Note❒ Manuals provided are specific to machine type.❒ Adobe Acrobat Reader / Adobe Reader is necessary to view the manuals as
a PDF file.❒ Two CD-ROMs are provided:
• CD-ROM 1 “Operating Instructions”• CD-ROM 2 “Scanner Driver and Utilities”
❖❖❖❖ General Settings GuideProvides an overview of the machine and describes System Settings (such asTray Paper Settings), Document Server functions, and troubleshooting. Refer to this manual for Address Book procedures such as registering e-mailaddress, and user codes.
❖❖❖❖ Security ReferenceThis manual is for administrators of this machine. It describes security func-tions that the administrators can use to protect data from being tampered, orprevent the machine from unauthorized use.Also refer to this manual for the procedures for registering administrators, aswell as setting user and administrator authentication.
❖❖❖❖ Network Guide (PDF file - CD-ROM1)Provides information about configuring and operating the scanner (Type 480)in a network environment.For details about network settings of the scanner (RW480) and printer(RW480), see the manual that comes with the related option.
❖❖❖❖ Copy Reference (this manual)Describes operations, functions, and troubleshooting for the machine's copierfunction.
❖❖❖❖ Scanner Reference(Scanner Unit Type 480) (PDF file - CD-ROM1)Describes operations, functions, and troubleshooting for the machine's scan-ner function.
DolphinC2_ENcopy_F_FM.book Page i Friday, February 25, 2005 10:46 AM

ii
❖❖❖❖ Manuals for DeskTopBinder LiteDeskTopBinder Lite is a utility included on the CD-ROM labeled “ScannerDriver and Utilities”.• DeskTopBinder Lite Setup Guide (PDF file - CD-ROM2)
Describes installation of, and the operating environment for DeskTop-Binder Lite in detail. This guide can be displayed from the [Setup] displaywhen DeskTopBinder Lite is installed.
• DeskTopBinder Introduction Guide (PDF file - CD-ROM2)Describes operations of DeskTopBinder Lite and provides an overview ofits functions. This guide is added to the [Start] menu when DeskTopBinderLite is installed.
• Auto Document Link Guide (PDF file - CD-ROM2)Describes operations and functions of Auto Document Link installed withDeskTopBinder Lite. This guide is added to the [Start] menu when Desk-TopBinder Lite is installed.
❖❖❖❖ Other manuals• Manuals for Printer (RW480) function.• Manuals for Scanner (RW480) function.
DolphinC2_ENcopy_F_FM.book Page ii Friday, February 25, 2005 10:46 AM

iii
What You Can Do with This Machine
AHD001S
DolphinC2_ENcopy_F_FM.book Page iii Friday, February 25, 2005 10:46 AM

iv
AHD002S
DolphinC2_ENcopy_F_FM.book Page iv Friday, February 25, 2005 10:46 AM

v
AHD051S
DolphinC2_ENcopy_F_FM.book Page v Friday, February 25, 2005 10:46 AM

vi
TABLE OF CONTENTSManuals for This Machine ...................................................................................... iWhat You Can Do with This Machine.................................................................. iiiHow to Read this Manual ......................................................................................1
Names of Major Options ............................................................................................2Terms .........................................................................................................................2
Control Panel..........................................................................................................3Display Panel..........................................................................................................5
1. Basics
Before Copying ......................................................................................................7Original Output Locations...........................................................................................8Adjusting the Original Tray.......................................................................................10Copy Output Locations.............................................................................................10
Originals ...............................................................................................................12Sizes and Weights of Recommended Originals.......................................................12
Placing Originals..................................................................................................15Original Orientation ..................................................................................................16Placing Custom Size Originals.................................................................................17Wide Scan................................................................................................................17Setting the Carrier Sheet..........................................................................................18
2. Copying
Basic Procedure...................................................................................................21Original Counter/Reset.............................................................................................22Auto Start .................................................................................................................23Job Preset ................................................................................................................23Interrupt Copy ..........................................................................................................24Copying from the Paper Bypass ..............................................................................25
Copier Functions .................................................................................................27Selecting Original Type Setting................................................................................27Adjusting Copy Image Density .................................................................................28Selecting Copy Paper ..............................................................................................29Setting the Length of Copy Paper Cut .....................................................................30Sort/Rotate Sort .......................................................................................................33Auto Reduce/Enlarge ...............................................................................................35User Auto Reduce/Enlarge ......................................................................................35Preset Reduce/Enlarge ............................................................................................36Zoom ........................................................................................................................37Size Magnification ....................................................................................................38Directional Magnification (%) ...................................................................................39Directional Size Magnification (inch) ........................................................................40Fine Magnification ....................................................................................................41Combine...................................................................................................................42Image Repeat...........................................................................................................43Double Copies..........................................................................................................43Positive/Negative .....................................................................................................44Partial Copy..............................................................................................................44Mirror Image.............................................................................................................45
DolphinC2_ENcopy_F_FM.book Page vi Friday, February 25, 2005 10:46 AM

vii
Format Overlay ........................................................................................................46Erase Border ............................................................................................................48Erase Inside .............................................................................................................49Erase Outside ..........................................................................................................50Margin Adjustment ...................................................................................................50Background Numbering ...........................................................................................51Preset Stamp ...........................................................................................................52User Stamp ..............................................................................................................53Date Stamp ..............................................................................................................56Page Numbering ......................................................................................................58Adjust Print Position .................................................................................................61
Storing Data in the Document Server ................................................................63Programs ..............................................................................................................65
Storing a Program ....................................................................................................65Changing a Stored Program ....................................................................................66Changing a Stored Program Name..........................................................................66Deleting a Program ..................................................................................................66Recalling a Program.................................................................................................66
3. Troubleshooting
If Your Machine Does Not Operate As You Want..............................................67When a Message Appears.......................................................................................67Screen......................................................................................................................69
If You Cannot Make Clear Copies.......................................................................70If You Cannot Make Copies As You Want .........................................................73
4. User Tools (Copier / Document Server Features)
User Tools Menu (Copier / Document Server Features) ..................................75Accessing User Tools (Copier Features)...........................................................81
Changing Default Settings .......................................................................................81Exiting User Tools ....................................................................................................82
Settings You Can Change with User Tools .......................................................83General Features .....................................................................................................83Reproduction Ratio ..................................................................................................85Edit ...........................................................................................................................87Stamp.......................................................................................................................90Input / Output ...........................................................................................................96Administrator Tools ..................................................................................................96
5. Specifications
Combination Chart...............................................................................................97Supplementary Information ................................................................................98Scan Size Limitations, by Function..................................................................104Settings Record Sheet.......................................................................................105
Magnification Ratio Chart.......................................................................................108Measure Chart .......................................................................................................109
INDEX....................................................................................................... 110
DolphinC2_ENcopy_F_FM.book Page vii Friday, February 25, 2005 10:46 AM

viii
DolphinC2_ENcopy_F_FM.book Page viii Friday, February 25, 2005 10:46 AM

1
How to Read this Manual
Symbols
The following set of symbols is used in this manual.
R WARNING:This symbol indicates a potentially hazardous situation that might result indeath or serious injury when you misuse the machine without following the in-structions under this symbol. Be sure to read the instructions, all of which are de-scribed in the Safety Information section in the General Settings Guide.
R CAUTION:This symbol indicates a potentially hazardous situation that might result in mi-nor or moderate injury or property damage that does not involve personal injurywhen you misuse the machine without following the instructions under thissymbol. Be sure to read the instructions, all of which are described in the SafetyInformation section in the General Settings Guide.* The statements above are notes for your safety.
ImportantIf this instruction is not followed, paper might be misfed, originals might bedamaged, or data might be lost. Be sure to read this.
PreparationThis symbol indicates information or preparations required prior to operating.
NoteThis symbol indicates precautions for operation, or actions to take after abnor-mal operation.
LimitationThis symbol indicates numerical limits, functions that cannot be used together,or conditions in which a particular function cannot be used.
ReferenceThis symbol indicates where further relevant information can be found.
[ ]Keys that appear on the machine's display.
{ }Keys built into the machine's control panel.
DolphinC2_ENcopy_F_FM.book Page 1 Friday, February 25, 2005 10:46 AM

2
Names of Major Options
Major options for this machine are referred to as follows:• Roll Holder Unit Type A→ Roll holder• Roll Feeder Type 480→ Lower tray• Paper Cassette Type 480 → Cut paper tray• Original Tray Type G → Original tray
Terms
• Long length original/paperOriginal/paper length longer than 1189 mm, 46.8".
DolphinC2_ENcopy_F_FM.book Page 2 Friday, February 25, 2005 10:46 AM

3
Control Panel
This illustration shows the control panel of a machine that has all options fullyinstalled.
1. Screen contrast knobAdjusts the brightness of the screen.
2. IndicatorsShow errors or machine status. For de-tails, see “Control Panel”, General SettingsGuide.m: Data In indicator L: Service Call indicatorx: Misfeed indicatorM: Open Cover indicatorD: Add Toner indicator
3. {{{{User Tools/Counter}}}} key• User Tools
Press to change the default settingsand operation conditions to matchyour requirements. See p.75 “UserTools (Copier / Document Server Fea-tures)”.
• CounterPress to check or print the counter val-ue. For details, see “Counter”, GeneralSettings Guide.
4. {{{{Job List}}}} keyShows the job list. See “Job List”, GeneralSettings Guide.
5. Display panelShows operation status, error messages,and function menus.
6. {{{{Check Modes}}}} keyPress to check the entered copying set-tings.
7. {{{{Program}}}} keyPress to store or select the programmode. See p.65 “Programs”.
8. {{{{Clear Modes}}}} keyPress to clear a setting's contents. Thenumber of copies is cleared when youpress and hold down this key for threeseconds.
9. {{{{Energy Saver}}}} keyPress to switch to and from the EnergySaver mode. For details, see “Saving En-ergy”, General Settings Guide.
10. {{{{Interrupt}}}} keyPress to make interrupt copies during acopy run. See p.24 “Interrupt Copy”.
11. Main power indicator/On indicatorWhen the main power switch is turnedon, the main power indicator lights.The On indicator lights when the opera-tion switch is on.
Important❒ Do not turn the main power off
while the On indicator is flashing.The hard disk may malfunction.
AHD100S
DolphinC2_ENcopy_F_FM.book Page 3 Friday, February 25, 2005 10:46 AM

4
12. Operation switchPress this switch to turn the power on(the On indicator goes on). To turn thepower off, press this switch again (the Onindicator goes off). See ”Turning On thePower”, General Settings Guide.
13. {{{{Sample Copy}}}} keyPress to make a single sample copy be-fore starting a long copy run. By checkingthe sample copy and making any neces-sary changes to the image quality settingsbefore you make multiple copies, you cansave time and paper. See p.34 “SampleCopy”.
14. {{{{Start}}}} keyPress to start scanning originals or copy-ing. Press to start scanning and printingin Document Server mode.
15. {{{{Clear/Stop}}}} key• Clear
Press to clear numbers entered.• Stop
Press to stop a copy job in progress.Press to stop scanning and printing inDocument Server mode.
16. {{{{#}}}} keyPress to confirm values entered.
17. Number keysPress to enter a value, such as the numberof copies.
18. Function keysPress to select the following functions:
• Copy:• Document Server:• Scanner:
19. Function Status indicatorThese show the status of the above func-tions:
• Yellow: selected• Green: active• Red: interrupted
DolphinC2_ENcopy_F_FM.book Page 4 Friday, February 25, 2005 10:46 AM

5
Display Panel
The function items displayed serve as selector keys. You can select or specify anitem by lightly pressing them.When you select or specify an item on the display panel, it is highlighted likethis: . Keys appearing as cannot be used.
❖❖❖❖ When the lower tray (paper roll tray) is installed
❖❖❖❖ When the cut paper trays are installed
DolphinC2_ENcopy_F_FM.book Page 5 Friday, February 25, 2005 10:46 AM

6
DolphinC2_ENcopy_F_FM.book Page 6 Friday, February 25, 2005 10:46 AM

7
1. Basics
Before Copying
Before you start copying, specify the original and copy paper locations.
❖❖❖❖ Paper Capacities For Each Original/Paper Output
Original output Capacities
Original Exit : Top A1 (D)L or smaller: 50 sheets (plain paper)
20 sheets (translucent paper)
• Use originals that are the same size, and of medium or high qual-ity paper.
• Do not use paper that is long length paper, thick, curled, film, folded, or translucent paper that is less than 80 g/m2 (21.3 lb) in weight.
• Do not load more than 10 sheets during very hot or humid con-ditions.
• Output thick paper (104.7 g/m2 (27.9 lb) or more) to Rear (Straight).
• Translucent paper: 80 g/m2 (21.3 lb) or less, plain paper: 52.3 g/m2 (13.9 lb) or less, and originals that are not stiff should be output to Rear (Straight).
Original Exit : Rear (Straight)
A0 (E) K or smaller: 1 sheet (plain paper)
1 sheet (translucent paper)
1 sheet (film)
• When output originals of A1 (E)K or larger, the ejected originals may interfere with the copy paper and impede its progress. If this happens, use the copy output (rear) auxiliary guide.
• When copying A0 (E) Ksize originals, remove them one by one.
Original Exit : Rear (document roller)
A1 (D)Lor larger: 1 sheet (up to 6 m (236")) (plain paper)
1 sheet (up to 3.6 m (141")) (trans-lucent paper)
1 sheet (up to 3.6 m (141")) (film)
• Use face-curl originals.
• For roll originals, use originals with a diameter of roll Φ40 mm – Φ110 mm (Φ1.6" – Φ4.3").
• Do not use the document roller when copying on originals of size longer than the maximum length for each paper type. Use both hands to roll the original.
DolphinC2_ENcopy_F_FM.book Page 7 Friday, February 25, 2005 10:46 AM

Basics
8
1
Important❒ The paper capacity indicated assumes the use of standard copier paper, and
should only be used as a guide. If the paper exceeds the upper limit, the cop-ies may become folded or cause paper jams.
Original Output Locations
The following original output loca-tions are available:
❖❖❖❖ Top Original Exit This is the basic original output lo-cation. Originals are ejected ontothe upper output stacker.
❖❖❖❖ Rear Original Exit (straight)Originals are ejected onto the orig-inal output supports. When copy-ing thick or hard originals, selectthis output location.
❖❖❖❖ Rear Original Exit (document roller)When copying rolled originalssuch as long length originals, selectthis output location so that origi-nals can be rolled and stacked bythe document roller. See p.9 “RearOriginal Exit (Document Roller)”.
Note❒ Originals of 52.3 g/m2 – 104.7
g/m2 (13.9 lb – 27.9 lb) can beused with the document roller.
❒ Do not use the document rollerwhen copying originals that arelonger than the maximumlength for each paper type. Useboth hands to roll the original.
Copy output Capacities
Copy Output: Front
Roll paper Plain paper (at normal tem-perature and humidity):
99 sheets
Plain paper (at high or low temperature and humidity):
10 sheets (A1L to A2)
99 sheets (smaller than A2)
Translucent paper(vellum): 10 sheets
Film: 1 sheet
Cut sheet paper Plain paper, and translucent paper (vellum):
10 sheets
Film: 1 sheet
• Same size copy paper
• Normal temperature = 23°CNormal humidity = 65%
Copy Output: Rear
A1 (D)K, A0 (E): 10 sheets (plain paper)
1 sheet (translucent paper)
1 sheet (film)
• Same size copy paper
• When using A0 size copy paper, attach the copy output (rear) auxiliary guide. See p.11 “Using the rear output to eject A0 (E) KPaper”.
DolphinC2_ENcopy_F_FM.book Page 8 Friday, February 25, 2005 10:46 AM

Before Copying
9
1
Important❒ When using the optional carrier
sheet, set the original output loca-tion to rear original exit. If the orig-inal output location is set to toporiginal exit, the original may bedamaged.
Top Original Exit
AAAA Press [Original Exit].
BBBB Press [Top], and then press [OK].
Rear Original Exit (Straight)
AAAA Check that the document roller israised.
BBBB Press [Original Exit].
CCCC Press [Rear ], and then press [OK].
Rear Original Exit (Document Roller)
AAAA Lower the document roller.
BBBB Press [Original Exit].
CCCC Press [Rear ], and then press [OK].
ZEDH140E
DolphinC2_ENcopy_F_FM.book Page 9 Friday, February 25, 2005 10:46 AM

Basics
10
1
DDDD After the original has been eject-ed, pull the document roller for-ward and remove the original.
Adjusting the Original Tray
When using the optional originaltray, adjust the hook position to thesize of the original.
Copy Output Locations
The following copy output locationsare available.
❖❖❖❖ Front OutputWhen [Front] is selected, copies aresent to the copy output tray at thefront of the machine. When copy-ing sizes up to A1 (D)L, selectfront output.If the output copies are badlycurled, turn the paper loaded inthe cut paper trays upside down,or remove the copies during thecopy run.
❖❖❖❖ Rear OutputWhen [Rear] is selected, copies aresent to the copy output tray at theback of the machine.When copying A1 (D)K or A0(E)K, select rear output.
Front output
AAAA Press [Front] under Copy OutputLocation.
Rear output
AAAA Press [Rear] under Copy OutputLocation.
Note❒ When copying onto thick paper,
the last sheet to be ejected mayremain in the exit area. If thishappens, remove it.
ZEDP071E
DolphinC2_ENcopy_F_FM.book Page 10 Friday, February 25, 2005 10:46 AM

Before Copying
11
1
Using the rear output to eject A0 (E) KKKKPaper
When ejecting A0 (E) Ksize paper tothe rear output, the leading edge ofthe paper may become caught in theback of the copy output tray. You canprevent this by attaching the copyoutput auxiliary guide.
AAAA Lower the copy output auxiliaryguide and adjust the position.
Note❒ You do not need to use the copy
output auxiliary guide whencopying on to A1 (D), or shorterpaper.
ZEDH410E
ZEDH420E
DolphinC2_ENcopy_F_FM.book Page 11 Friday, February 25, 2005 10:46 AM

Basics
12
1
Originals
Sizes and Weights of Recommended Originals
❖❖❖❖ Metric version
❖❖❖❖ Inch version
Where original is placed
Original size Original weight
Original table Standard sizes: A0K, A1KL, A2KL, A3KL, A4KL, B1K, B2KL, B3KL, B4KL
20.9 – 157 g/m2 and 0.03 – 1 mm thick origi-nalsCustom sizes:
Length 210 – 15000 mm
Width 210 – 950 mm
Where original is placed
Original size Original weight
Original table Standard sizes
• EngineeringE(34"×44")K, D(22"×34")K L, C(17"×22")K LB(11"×17")K L, A(81/2"×11")K L
• ArchitectureE(36"×48")K, D(24"×36")KL, C(18"×24")K LB(12"×18")K L, A(9"×12")K L
• 30"×42"K
5.6 - 41.8 lb. and 1.1 Mil - 40 Mil thick orig-inals
Custom sizes
Length: 8.3" - 590.5"
Width: 8.3" - 37.5"
DolphinC2_ENcopy_F_FM.book Page 12 Friday, February 25, 2005 10:46 AM

Originals
13
1
Originals that should be scanned using the carrier sheet
The following type of originals should be mounted on the carrier sheet. Youshould also use the carrier sheet for important originals and for originals youwill copy repeatedly.• Cut and pasted originals• Originals with fold lines• Wrinkled or torn originals• Waved originals• Punched originals• Originals with sticky tape or adhesive• Pasted originals• Originals with a damaged leading edge• Originals with surfaces that attach to glass easily such as photographs• Originals drawn in pencil
Referencep.18 “Setting the Carrier Sheet”
Non-recommended original
The following original types can cause jams, or may itself be damaged.• Originals other than those specified in p.12 “Sizes and Weights of Recom-
mended Originals”• Stapled or clipped originals• Perforated or torn originals• Bent, folded, or creased originals• Pasted originals• Originals with any kind of coating, such as thermal fax paper, art paper, alu-
minum foil, carbon paper, or conductive paper• Originals with indexes, tags, or other projecting parts• Sticky originals such as translucent paper• Bound originals such as books• Damp originals• Badly curled originals• Originals that vary in thickness• Originals with sticky tape or adhesive• Originals with thick leading edges• Originals with wet ink or correction fluid• Carbon-backed originals
DolphinC2_ENcopy_F_FM.book Page 13 Friday, February 25, 2005 10:46 AM

Basics
14
1
• Originals not made of paper (such as glass, metal)• Originals with a roll diameter smaller than φ35 mm (φ1.4")• Originals with a roll diameter larger than φ110 mm (φ4.3")Flatten curled originals so they fit within the range shown below:• Front and back curl; R 60 mm (2.4") or more, height 10 mm (0.4") or less
Originals that use more than 20% of the image area, may be faint.
Missing Image Area
As shown above, part of the original may not be copied when using paper rollor full-size copying.*1: Left and right, less than 5 mm (0.2")
60mm (2.4") 60mm (2.4")
10mm (0.4") 10mm (0.4")
AHD046S
DolphinC2_ENcopy_F_FM.book Page 14 Friday, February 25, 2005 10:46 AM

Placing Originals
15
1
Placing Originals
Note❒ Place the original after any correc-
tion fluid or ink has completelydried. Not taking this precautionwill result in a dirtied exposureglass and blemished copies.
❒ Dust and residue from pencil-drawnoriginals can result in a dirtied ex-posure glass and blemished cop-ies. We recommend using thecarrier sheet for this type of origi-nal. See p.18 “Setting the CarrierSheet”.
❒ If the original's rear edge is badlycurled, smooth it out with bothhands before scanning. If the origi-nal is inserted as is, it may be dam-aged.
❒ When copying curled originals, usethe front copy output auxiliarytray.
ReferenceFor details about precautions fororiginals, see p.12 “Originals”.
AAAA Adjust the original guides to thesize and orientation of the origi-nal width.
Note❒ Make sure the original guides
are flush against the original.
❒ Do not push the original guideside fence with force.
BBBB Using both hands, carefully insertthe original between the originalguides, copy side up.
Important❒ Once originals start to feed in,
do not push or pull them. Thismay damage them.
❒ Do not operate the documentroller while originals are beingfed through the machine. Origi-nals may be damaged.
Note❒ Do not release your hands until
the original is pulled in. Releasewhen it has gone slightly in.
❒ You can change the originalfeed delay setting if originalsare repeatedly feeding in slant-ed, or if you need to adjust thedelay for the type of originalsyou are using. See “OriginalFeed Delay 1”, General SettingsGuide.
❒ If the leading edge of the origi-nal is badly curled, smooth outthe curl, and then place the orig-inal in the insertion area.
ZEDH190E
ZEDH180E
DolphinC2_ENcopy_F_FM.book Page 15 Friday, February 25, 2005 10:46 AM

Basics
16
1
❒ When inserting long length orig-inals, there may be some move-ment to either side. If thishappens, correct the movementmanually while feeding theoriginals into the machine.
CCCC Press the {{{{#}}}} key after all origi-nals have been scanned.
----To stop originals feeding inIf the originals are feeding in slanted,or jamming, etc., press the {{{{ScannerStop}}}} key to stop them feeding in.
Note❒ When you press the {{{{Scanner Stop}}}}
key, the original stops immediate-ly, which can cause it to jam. If thishappens, see “xClearing Mis-feeds”, General Settings Guide.
❒ When you have set rear originalexit as the original output location,the rear edge of the originals areheld at the output exit. To cancelthis, press the {{{{Scanner Stop}}}} key.See p.8 “Original Output Loca-tions”.
Original Orientation
Place the original of the same orienta-tion as the copy paper on the originaltable.
1. Feeding directionWhen you cannot place the originalas the above, you may not make cop-ies as you want with particular func-tions. If this happens, change theorientation by selecting [ ] or [ ].
Note❒ It is recommended that you use
this function together with theAuto Paper Select or Preset Re-duce/Enlarge function.
AAAA Press [Orientation/Custom].
BBBB Select the original orientation,and then press [OK].
ZEDH150E
AHD005S
DolphinC2_ENcopy_F_FM.book Page 16 Friday, February 25, 2005 10:46 AM

Placing Originals
17
1
Placing Custom Size Originals
When placing custom size originals,specify the size of the originals.
Note❒ Paper with a vertical size of 210–
15000 mm (8.3"–590.5") and a hori-zontal size of 210–914 mm (8.3"–35.9") can be specified with thisfunction.
❒ If you do not specify the size, partsof the image may not be copied.
AAAA Press [Orientation/Custom].
BBBB Press [Custm Size Orig.].
CCCC Enter the horizontal size of theoriginal using the number keys,and then press [#].
Note❒ If you make a mistake, press
[Clear] or the {{{{Clear/Stop}}}} key,and then enter the value again.
DDDD Enter the vertical size of the origi-nal using the number keys, andthen press [#].
EEEE Press [OK].
FFFF Place the originals, and then pressthe {{{{Start}}}} key.
Wide Scan
The machine checks the originalwidth and then increases the scan sizeto a slightly larger standard size.
Note❒ Scan size differs depending on the
size of the original. See the follow-ing table for available scan sizes:
❖❖❖❖ Metric version
❒ The machine adjusts to a scan sizeof the same paper series as theoriginal. If you want to mix the siz-es of A and B series when scan-n in g , c o nt a c t y o ur se r v ic erepresentative.
Original width Scanning width
Over than A4K(210 mm) and less than 257 mm
A3K(297 mm)
Over than A3K(297 mm) and less than 364 mm
A2K(420 mm)
Over than A2 K(420 mm) and less than 515 mm
A1K(594 mm)
Over than A1K(594 mm) and less than 728 mm
A0K(841 mm)
Over than A0K(841 mm) and less than 914 mm
914 mm
Over than B4K(257 mm) and less than 297 mm
B3K(364 mm)
Over than B3K(364 mm) and less than 420 mm
B2K(515 mm)
Over than B2K(515 mm) and less than 594 mm
B1K(728 mm)
Over than B1K(728 mm) and less than 841 mm
914 mm
DolphinC2_ENcopy_F_FM.book Page 17 Friday, February 25, 2005 10:46 AM

Basics
18
1
❖❖❖❖ Inch version (Engineering)
❖❖❖❖ Inch version (Architecture)
❒ The machine adjusts to a scan sizeof the same paper series as theoriginal. If you want to mix the siz-es of Engineering and Architectureseries when scanning, contact yourservice representative.
❒ When copying custom size origi-nals, you can use this function withSynchro Cut to specify the copypaper to be cut to the size of theoriginal.
AAAA Press [Orientation/Custom].
BBBB Press [Wide Scan], and then press[OK].
CCCC Select the paper tray.
Note❒ When using this function, the
Auto Paper Select function doesnot work. If the paper size youselect is as the same as that ofthe original, part of the imagemay not be copied. Select aslightly larger standard size.
DDDD Place the originals, and then pressthe {{{{Start}}}} key.
Setting the Carrier Sheet
Important❒ When using the optional carrier
sheet, set the original output loca-tion to rear original exit (straight).If the original output location is setto top original exit, or rear originalexit (document roller), the originalmay be damaged.
Note❒ When using the carrier sheet with
Synchro Cut selected, the paper iscut to the size of the carrier sheet.
ReferenceFor details about using the carriersheet to make copies, see p.13“Originals that should be scannedusing the carrier sheet”.
Original width Scanning width
Over than AK(81/2") and less than 9"
BK(11")
Over than BK(11") and less than 12"
CK(17")
Over than CK(17") and less than 18"
DK(22")
Over than DK(22") and less than 24"
EK(34")
Over than 30" and less than 36"
36"
Over than EK(34") and less than 36"
36"
Original width Scanning width
Over than AK(9") and less than 11"
BK(12")
Over than BK(12") and less than 17"
CK(18")
Over than CK(18") and less than 22"
DK(24")
Over than DK(24") and less than 34"
EK(36")
Over than 30" and less than 36"
36"
DolphinC2_ENcopy_F_FM.book Page 18 Friday, February 25, 2005 10:46 AM

Placing Originals
19
1
AAAA Open the carrier sheet with thetransparent sheet face up, andthen insert the original also faceup.
Note❒ Align the original with the fold
of the carrier sheet.
BBBB Using both hands, hold the origi-nal copy side up, and carefully in-sert the folded edge of the carriersheet into the insertion area.
ZEDP020E
ZEDH180E
DolphinC2_ENcopy_F_FM.book Page 19 Friday, February 25, 2005 10:46 AM

Basics
20
1
DolphinC2_ENcopy_F_FM.book Page 20 Friday, February 25, 2005 10:46 AM

21
2. Copying
Basic Procedure
PreparationWhen User Code Authentication isset, the screen for entering a usercode will be displayed. Enter youruser code (up to eight digits) usingthe number keys, and then pressthe {{{{#}}}} key.
ReferenceFor user codes, see "RegisteringUser Codes", General SettingsGuide.When Basic Authentication, Win-dows Authentication, or LDAPAuthentication is set, the authenti-cation screen will be displayed.Enter your login user name anduser password, and then press [Lo-gin]. See "When the AuthenticationScreen is Displayed", General Set-tings Guide.
Note❒ Consult the User Administrator
about your login user name and lo-gin password.
AAAA Make sure "dddd Ready" is shownon the display.
If any other function is displayed,press the {{{{Copy}}}} key on the left ofthe control panel.
❖❖❖❖ Initial copy display
BBBB Make sure no previous settingsremain.
Note❒ To clear settings, press the
{{{{Clear Modes}}}} key.
CCCC Select the output locations fororiginals and copies, and thenprepare to use them.
Referencep.7 “Before Copying”
DDDD Make the necessary settings.
Note❒ You can press the {{{{Check Modes}}}}
key to view the settings youhave made.
ReferenceFor details, see explanations ofeach function.If you use the {{{{Program}}}} key toaccess the program function,you can store and easily recallthe settings. See p.65 “Pro-grams”.
DolphinC2_ENcopy_F_FM.book Page 21 Friday, February 25, 2005 10:46 AM

Copying
22
2
EEEE Enter the number of copies usingthe number keys.
Note❒ The copy quantity is from 1 to
99.
FFFF Place the originals.
Originals feed into the machine,which then starts copying.
Referencep.15 “Placing Originals”
Note❒ When [Press Start Key] is select-
ed in the Feed Start Method,copying starts when you pressthe {{{{Start}}}} key. See “Feed StartMethod” , Genera l Set t ingsGuide”.
❒ To stop originals feeding in,press the {{{{Scanner Stop}}}} key. Seep.16 “To stop originals feedingin”.
❒ Insert the original so that theright edge is aligned with theoriginal guide.
❒ The continuous copy speed maybe slow down to ensure the ton-er fuses to paper in the follow-ing cases:• When the machine is just
turned on• When the temperature is low• When making a lot of contin-
ues copies (more than 30sheets/A0, E)
Important❒ When Basic Authentication, Win-
dows Authentication, or LDAPAuthentication is set, alwayslog off when you have finishedusing the machine to preventunauthorized users from usingthe machine.
----To stop the machine during a multi-copy run
Press the {{{{Clear/Stop}}}} key after theoriginals have fed in. The machinestops when the current copy finishes.Press [Stop] to cancel the copy job;press [Continue] to resume the inter-rupted copy job.
Original Counter/Reset
The number of scanned originals isdisplayed in the screen's top right cor-ner. This allows you to check thenumber of originals in a job, or if anysheets have been fed together, and thenumber of copies that will be storedin the copy output tray.
Resetting the original counter
AAAA Press [Orig.] and the counter num-ber in the screen's top right cor-ner.
The number is reset to 0.
DolphinC2_ENcopy_F_FM.book Page 22 Friday, February 25, 2005 10:46 AM

Basic Procedure
23
2
Auto Start
If you make settings and scan theoriginals while the message “Scan-ning originals can be started.”and “Select copy mode and press[Start].” are displayed alternately,your copies will be made once themachine is ready.
Job Preset
Use this function to set up the nextcopy job and scan an original when acopy job is in progress. When the cur-rent copy job is finished, your copyjob will start automatically.
Reference“Job List”, General Settings Guide
AAAA Press [New Job] while ”Copying..."is displayed.
BBBB Make settings for the next copyjob.
CCCC Place the originals. The machinescans them.When the current copy job finish-es, the preset job starts automati-cally.
Note❒ Each job stored is allocated a job
number that is displayed on theReserved Job screen.
❒ To switch the display to the cur-rent copy job press [ReservedJob], followed by [Printing], andthen [Exit].
Editing Job Preset
You can check and change the con-tents of preset jobs. You also can de-lete preset jobs.
AAAA Press [Reserved Job].
BBBB Select the number of the job youwant to check or change.
CCCC Press [Check / Change Job].
The contents of the job are dis-played.
To check the job contents
AAAA Check the contents of the job.
BBBB Press [Confirmed].
The display returns to the Re-served Job screen.
To change the job contents after checking
AAAA Check the contents of the job.
BBBB Change its contents, and then press[Confirmed].
CCCC Press [Change].
The display returns to the Re-served Job screen.
DolphinC2_ENcopy_F_FM.book Page 23 Friday, February 25, 2005 10:46 AM

Copying
24
2
To delete a job after checking its contents
AAAA Check the contents of the job.
BBBB Press [Delete Job].
CCCC Press [Delete].
The display returns to the Re-served Job screen.
Deleting a Preset Job
AAAA Press [Reserved Job].
BBBB Select the number of the job youwant to delete.
CCCC Press [Delete Job].
DDDD Press [Delete].
The display returns to the Re-served Job screen.
Interrupt Copy
Use this function to interrupt a longcopy job to make urgently neededcopies.
AAAA Press the {{{{Interrupt}}}} key.
The Interrupt key indicator lights.
BBBB Make the settings for the Inter-rupt Copy job.
Limitation❒ You cannot make settings of the
Job Preset function.
CCCC Place your originals.
DDDD When copying has finished, re-move the copies output for the In-terrupt Copy job.
AHD053S
DolphinC2_ENcopy_F_FM.book Page 24 Friday, February 25, 2005 10:46 AM

Basic Procedure
25
2
EEEE Press the {{{{Interrupt}}}} key again.
The Interrupt key indicator goes off.
Resuming the previous copy job
A Place your originals, and thenpress the {{{{Start}}}} key.
Exiting interrupt copy
A Press the {{{{Clear Modes}}}} key.
Copying from the Paper Bypass
Use the paper bypass to copy onto pa-per sizes that cannot be loaded on thepaper rolls, or cut sheet paper.
PreparationWhen copying from the paper by-pass, you can make multiple cop-ies for a single original. Specify thenumber of copies using the num-ber keys.
Limitation❒ The maximum length is 2000 mm
(78").❒ The width for paper in the paper
bypass is 210 – 914 mm (81/2" – 36").❒ Do not copy on both sides of the
paper.❒ Do not use paper already copied or
printed on.
ReferenceFor details about paper type, ori-entation, and number of sheetsthat can be placed in the paper by-pass, see “Copy Paper”, GeneralSettings Guide.You can specify the paper type forthe paper bypass in advance. See“Paper Type: Bypass Tray”, Gener-al Settings Guide.
AAAA Press [Bypass].
BBBB Make the necessary settings.
ReferenceSee explanations of each func-tion.
CCCC Enter the number of copies usingthe number keys.
DDDD Place your original and scan it.
Referencep.15 “Placing Originals”
EEEE Adjust the paper bypass's paperguides to the size of the paper.
AHD054S
AGL058S
DolphinC2_ENcopy_F_FM.book Page 25 Friday, February 25, 2005 10:46 AM

Copying
26
2
FFFF Insert the paper in the paper by-pass, copy side up.The paper feeds in automaticallyand copying starts.
Important❒ Insert the paper evenly on both
sides and support it with yourhands until it feeds in.
Note❒ Insert the paper until you hear
the beep.❒ To make multiple copies, insert
an additional sheet after eachfeeds in.
AGL059S
DolphinC2_ENcopy_F_FM.book Page 26 Friday, February 25, 2005 10:46 AM

Copier Functions
27
2
Copier Functions
Selecting Original Type Setting
The following image quality modesare available, select one to match youroriginals:
❖❖❖❖ Drawing For drawings that contain finelines. Faint lines are clearly repro-duced.
❖❖❖❖ TextFor originals that contain mainlytext, or printed characters.
❖❖❖❖ Text/Photo For originals that contain both textand photographs or pictures.
❖❖❖❖ Others – Photo For photographs or pictures.
❖❖❖❖ Others – Background LinesFor images drawn on section paper(blue or green sectioned graph pa-per) without copying the lines onthe paper.Sepia lines on originals cannot beeliminated.
❖❖❖❖ Others – Patched OriginalFor originals made up of severalpieces of smaller originals whichdiffer in background density. Se-lecting this mode tones down thedark background of originals.
Limitation❒ Thick lines, text, or solid images
in the patched originals are rec-ognized as dark backgroundthat may not be copied.
❖❖❖❖ Others – GenerationFor originals that are copied. Thiswill copy the image while stoppingthe width of the characters ex-panding. It also eliminates anyspecks on the image.
ReferenceRelated default settings:p.84 “Original Type Priority”p.84 “Auto Image Density Priori-ty”p.84 “Copy Quality”p.85 “Image Density”
AAAA Press the appropriate key to selectthe original type.
Note❒ Press [Others] first if you want to
select other special originaltypes.
❒ When you select [Photo], AutoImage Density is automaticallycanceled.
DolphinC2_ENcopy_F_FM.book Page 27 Friday, February 25, 2005 10:46 AM

Copying
28
2
Adjusting Copy Image Density
PreparationYou can adjust the copy density tomatch your originals. There arethree types of density function:
❖❖❖❖ Auto Image DensityTo automatically adjust the im-age density.
❖❖❖❖ Manual Image DensityYou can adjust the density ofthe overall original in seven in-crements.
❖❖❖❖ Combined Auto and Manual DensityTo copy originals with a dirtybackground (such as newspa-pers). You can adjust the fore-ground density while leavingthe background unchanged.
ReferenceRelated default settings:p.84 “Auto Image Density Priori-ty”p.85 “Image Density”
AAAA Select the method of image densi-ty adjustment.
Auto image density
A Make sure that [Auto Image Den-sity] is selected.
Auto Image Density is high-lighted when selected.
Note❒ If Auto Image Density is not
selected, press [Auto ImageDensity].
Manual image density
A If Auto Image Density is se-lected, press [Auto Image Density]to cancel it.
B Press [Lighter] or [Darker] to ad-just the image density.
Combined auto and manual density
A Make sure that [Auto Image Den-sity] is selected.
Note❒ If Auto Image Density is not
selected, press [Auto ImageDensity].
B Press [Lighter] or [Darker] to ad-just the image density.
DolphinC2_ENcopy_F_FM.book Page 28 Friday, February 25, 2005 10:46 AM

Copier Functions
29
2
Selecting Copy Paper
PreparationThere are two ways to select copypaper:
❖❖❖❖ Auto Paper SelectThe machine detects the origi-nal's size, and then automatical-ly selects a suitable copy papersize based on the magnification.
❖❖❖❖ Manual Paper SelectSelect the paper roll tray, cut pa-per tray, or paper bypass con-taining the paper you want tocopy onto.
Note❒ In Auto Paper Select mode, insert
the proper size paper in the paperbypass or select the magnificationratio for the paper currently load-ed in the paper tray, and then setyour original again.
Referencep.25 “Copying from the Paper By-pass”Related default settings:p.83 “Auto Paper Select Priority”
Auto paper select
AAAA Make sure [Auto Paper Select] is se-lected.
Note❒ When Auto Paper Select is not
selected, press [Auto Paper Se-lect].
❖❖❖❖ When the lower tray (paper roll tray) is installed
❖❖❖❖ When the cut paper trays are installed
Note❒ Only the paper trays set to [No
Display] or [Recycled Paper] in Pa-per Type and also set to [Yes] inApply Auto Paper Select can beselected for the Auto Paper Se-lect function. See “Paper Type”in “Tray Paper Settings”, Gener-al Settings Guide.
DolphinC2_ENcopy_F_FM.book Page 29 Friday, February 25, 2005 10:46 AM

Copying
30
2
Manual paper select
AAAA Select the paper tray or paper by-pass.
The selected tray key is highlight-ed.
❖❖❖❖ When the lower tray (paper roll tray) is installed
❖❖❖❖ When the cut paper trays are installed
----Rotate CopyIf the original's width is different tothat of the paper set in the paper rolltray, or the original's orientation ( Kor L ) is different to that of the paperloaded in the cut paper trays, thisfunction rotates the original image by90 degrees, to fit it onto the copy pa-per.
Note❒ This function works when Auto
Paper Select is selected. See p.29“Selecting Copy Paper”.
❒ The default for Auto Tray Switch-ing is With image rotation. Youcannot use Rotate Copy if this set-ting is changed to Without imagerotation or Off. See p.83 “AutoTray Switching”.
Setting the Length of Copy Paper Cut
PreparationThe following paper cut methodsare available.
❖❖❖❖ Synchro CutCuts the paper at the samelength as the original.If the copy is enlarged or re-duced, the machine calculatesthe appropriate length for themagnification ratio and cuts thepaper.
GCROTA0E
DolphinC2_ENcopy_F_FM.book Page 30 Friday, February 25, 2005 10:46 AM

Copier Functions
31
2
❖❖❖❖ Preset CutCuts the paper at a preset size,regardless of the size of the orig-inal. You can use this to copydifferent sized originals to thesame size.
❖❖❖❖ Variable CutCuts the paper to the size en-tered.
Important❒ Except for Synchro Cut, the paper
is cut regardless of the size of theoriginal.
Note❒ When copying onto long paper,
the maximum length for which im-age quality can be guaranteed dif-fers according to paper type andwidth.
❖❖❖❖ Metric version
❖❖❖❖ Inch version (Engineering)
❖❖❖❖ Inch version (Architecture)
Synchro cut
Note❒ When using Synchro Cut, the pa-
per can be cut from 210 to 15000mm (8.3" to 590.5").
Limitation❒ Depending on the original length
and paper, copy paper length maybe different from the original.
AAAA Press [Synchro Cut].
BBBB Select a paper tray.
Paperwidth
728 mm or above
727 – 515 mm
514 – 364 mm
363 – 210 mmPaper
type
Plain 15000 mm
3600 mm
2000 mm
2000 mm
Translu-cent pa-per
3600 mm
3600 mm
2000 mm
2000 mm
Film
Paper width 34" 22" 17" 11"
Paper type
Plain 590.5"
142" 80" 80"
Translu-cent paper (vellum)
142" 142" 80" 80"
Film
Paper width 36" 24" 18" 12"
Paper type
Plain 590.5"
142" 80" 80"
Translu-cent paper (vellum)
142" 142" 80" 80"
Film
DolphinC2_ENcopy_F_FM.book Page 31 Friday, February 25, 2005 10:46 AM

Copying
32
2
Preset cut
AAAA Select a paper tray.
BBBB Select a preset cut size.
Note❒ The preset cut size differs de-
pending on the ro l l paperwidth. It is cut in the followingsizes or standard lengths:
❖❖❖❖ Metric version
❖❖❖❖ Inch version (Engineering)
❖❖❖❖ Inch version (Architecture)
Variable cut
Note❒ When using Variable Cut, the pa-
per can be cut from 210 to 15000mm (from 8.3" to 590.5").
AAAA Press [Variable Cut].
Roll paper width
Preset KKKK Preset LLLL
841 mm A0K A1L
594 mm A1K A2L
420 mm A2K A3L
297 mm A3K —
210 mm A4K —
728 mm B1K B2L
515 mm B2K B3L
364 mm B3K —
257 mm B4K —
914 mm 1219 mm 610 mm
880 mm 1219 mm 610 mm
800 mm 1189 mm 594 mm
660 mm 1189 mm 594 mm
440 mm 594 mm 297 mm
Roll paper width
Preset KKKK Preset LLLL
34" 44" 22"
22" 34" 17"
17" 22" 11"
11" 17" —
81/2" 11" —
Roll paper width
Preset K Preset L
36" 48" 24"
30" 42" 21"
24" 36" 18"
18" 24" 12"
12" 18" —
9" 12" —
DolphinC2_ENcopy_F_FM.book Page 32 Friday, February 25, 2005 10:46 AM

Copier Functions
33
2
BBBB Enter the length using the num-ber keys, and then press [OK] orthe {{{{#}}}} key.
Note❒ To change the value, press [Clear],
and then enter the new one.❒ If you do not want to use Vari-
able Cut, press [Cancel].The entered length size is dis-played on the screen.
CCCC Select a paper tray.
Sort/Rotate Sort
You can put copies into sequentiallyordered sets.
❖❖❖❖ SortPut copies into sequentially or-dered sets.
❖❖❖❖ Rotate sortAlternate sets are rotated (KL)and delivered to the output tray.
Note❒ When using Rotate Sort, make sure
original and paper image sizes arethe same.
ReferenceRelated default settings:p.83 “Auto Tray Switching”
AAAA Press [Sort] or [Rotate Sort].
BBBB Make the necessary settings.
CCCC Place your originals.
Note❒ Repeat the scanning procedure
until al l your originals arescanned.
❒ To cancel Sort or Rotate Sort,press the {{{{Clear/Stop}}}} key.
DDDD After the last original is scanned,press the {{{{#}}}} key.
Copying starts.
21
3 21
3 21
3 21
3
ZEDG030E
21
3 21
3 21
321
3
ZEDG040E
DolphinC2_ENcopy_F_FM.book Page 33 Friday, February 25, 2005 10:46 AM

Copying
34
2
Sample Copy
Use this function to check the copysettings before making a long copyrun.
PreparationSelect [Press Start Key] under FeedStart Method in System Settings.You cannot make sample copywhen [Auto] is selected. See “FeedStart Method”, General SettingsGuide.
Note❒ This function can be used only
when the Sort function is selected.
AAAA Select [Sort] and make any othernecessary settings, and then placethe originals.
BBBB Press the {{{{Sample Copy}}}} key.
One copy set is delivered as a sam-ple.
CCCC If the sample is acceptable, press[Print].
The specified number of copies ismade, minus one for the samplecopy.
Note❒ If you press [Suspend] after
checking the results, return tostep A to adjust the copy set-tings as necessary. Dependingon the combination of func-tions, you may not be able tochange certain settings.
Changing the number of sets
You can change the number of copysets during copying.
Note❒ This function can only be used
when the Sort function is selected.
AAAA While "Copying..." is displayed,press the {{{{Clear/Stop}}}} key.
BBBB Press [Change Quantity].
CCCC Enter the number of copy sets us-ing the number keys, and thenpress the {{{{#}}}} key.
Note❒ The number of sets you can en-
ter differs depending on whenthe {{{{Clear/Stop}}}} key is pressed.
DDDD Press [Continue].
Copying starts again.AHD104S
DolphinC2_ENcopy_F_FM.book Page 34 Friday, February 25, 2005 10:46 AM

Copier Functions
35
2
Auto Reduce/Enlarge
The machine chooses an appropriatemagnification based on the paper andoriginal sizes you select. This is usefulto copy different size originals tosame size paper.
AAAA Press [Auto Reduce / Enlarge].
BBBB Select the paper tray.
User Auto Reduce/Enlarge
Use this function to copy to a selectedsize for each original size.When the original is set, the machineautomatically enlarges or reduces theimage to fit the size of the copy paper.
PreparationYou can select the following com-binations:
❖❖❖❖ Metric version
JIS: Japanese Industrial Standard
❖❖❖❖ Inch version
Note❒ The default setting is to copy at
same size (full size). To change thecombination, use User Auto R/E.See p.86 “User Auto R/E”.
CP2F0100
Original size Copy size
A0K A0, A1, A2, A3, A4, B1 JIS, B2 JIS, B3 JIS, B4 JISA1KL
A2KL
A3KL
A4KL
B1KL
B2KL
B3KL
B4KL
Original size Copy size
Eng
inee
ring
E(34"×44")K E(34"×44"), D(22"×34"), C(17"×22"), B(11"×17"), A(81/2"×11")
D(22"×34") KL
C(17"×22") KL
B(11"×17") KL
A(81/2"×11") KL
Arc
hite
ctu
re
E(36"×48")K E(36"×48"), D(26"×36"), C(18"×24"), B(12"×18"), A(9"×12")
D(26"×36") KL
C(18"×24") KL
B(12"×18") KL
A(9"×12") KL
DolphinC2_ENcopy_F_FM.book Page 35 Friday, February 25, 2005 10:46 AM

Copying
36
2
AAAA Press [User Auto R/E].
BBBB Check that the combination se-lected for User Auto Reduce/En-large is the one you want.
Preset Reduce/Enlarge
You can select a preset copy ratio.You can store up to three enlargementor reduction ratios of your own.
❖❖❖❖ Metric version
❖❖❖❖ Inch version
You can store up to three ratios ofyour own for frequently used ratio,but are not preset. The ratios can beset in 0.1% increments. See p.85 “Cus-tom Magnification Settings 1–3”.
Note❒ Preset ratios are set by combining
original size and paper size.
ReferenceFor details about the relationshipbetween the original and papersizes for preset ratios, see p.108“Magnification Ratio Chart”.Related default settings:p.86 “Enlarge 1–4”p.86 “Reduce 1–4”p.86 “Priority Setting : Reduce /Enlarge”
AAAA Press [Reduce / Enlarge]
Enlargement ratios: 141.4%, 200.0%, 282.8%, 400.0%
Reduction ratios: 25.0%, 35.4%, 50.0%, 70.7%
Engineering Enlargement ratios: 129.4%, 200.0%, 258.8%, 400.0%
Reduction ratios: 25.0%, 32.4%, 50.0%, 64.7%
Architecture Enlargement ratios: 133.3%, 200.0%, 266.7%, 400.0%
Reduction ratios: 25.0%, 33.3%, 50.0%, 66.7%
DolphinC2_ENcopy_F_FM.book Page 36 Friday, February 25, 2005 10:46 AM

Copier Functions
37
2
BBBB Select a ratio, and then press [OK].
Zoom
You can change the magnification in0.1% (or 1%) increments.
PreparationYou can set the ratio in the follow-ing ways.• Using the number keys• Selecting a ratio close to the one
you want to set from Preset Re-duce/Enlarge, and then using[–1%], [–0.1%], [+0.1%] or [+1%] toadjust it.
Note❒ To set the magnification ratio on
the screen, use [–1%], [+1%]. Tospecify a decimal value, use [–0.1%]or [+0.1%].
AAAA Press [Reduce / Enlarge].
Using the number keys
A Press [Mag. Ratio].
B Enter the ratio using the num-ber keys.
Note❒ Use the {{{{·}}}} key to enter a dec-
imal point.❒ To change the value, press
[Clear], and then enter thenew one.
C Press the {{{{#}}}} key.
Selecting a ratio from the preset ratios, and then using [–1%], [–0.1%], [+0.1%] or [+1%] to adjust it
A Select a ratio.
B Press [–1%], [–0.1%], [+0.1%] or[+1%] to adjust the ratio.
ZEDG060E
DolphinC2_ENcopy_F_FM.book Page 37 Friday, February 25, 2005 10:46 AM

Copying
38
2
Note❒ Press [–0.1%] or [+0.1%] to ad-
just the ratio in 0.1% incre-ments.
❒ If you make a mistake, press[–1%], [–0.1%], [+0.1%] or[+1%] to readjust the ratio.
BBBB Press [OK].
CCCC Select the paper tray.
Size Magnification
This function calculates an enlarge-ment or reduction ratio based on thespecified lengths of the original andcopy.
Note❒ Measure and specify the lengths of
the original and copy by compar-ing "A" with "a".
AAAA Press [Reduce / Enlarge].
BBBB Press [Specifd. Ratio].
Make sure [Size Magnificatn] is high-lighted.
CCCC Enter the length of the originalusing the number keys, and thenpress [#].
Note❒ To change the size, press [Clear],
and then enter the new one.❒ You can enter sizes within the
following ranges:
DDDD Enter the length of the copy usingthe number keys.
Note❒ To change the size, press [Clear],
and then enter the new one.
EEEE Press [#].
Note❒ To change the length after press-
ing [#], select [Original] or [Copy],and then enter the length again.
FFFF Press [OK].
GGGG Select the paper tray.
ZEDG070E
Metric version
1–9999 mm (increments of 1 mm)
Inch version
0.1"–99.9" (increments of 0.1")
DolphinC2_ENcopy_F_FM.book Page 38 Friday, February 25, 2005 10:46 AM

Copier Functions
39
2
Directional Magnification (%)
Copies can be reduced or enlarged atdifferent magnifications, horizontallyand vertically. Use this function to al-ter the image.
a: Horizontal ratiob: Vertical ratio
PreparationYou can set the ratio in the follow-ing ways.• Using the number keys• Using [nnnn] or [oooo]
AAAA Select the paper tray.
BBBB Press [Reduce / Enlarge].
CCCC Press [Specifd. Ratio].
DDDD Press [Direct. Mag.%]
To enter the ratio using the number keys
A Press [Horizontal].
B Enter the ratio using the num-ber keys, and then press [#].
Note❒ Use the {{{{.}}}} key to enter a dec-
imal point.❒ To change the size, press
[Clear], and then enter thenew one.
C Press [Vertical].
D Enter the ratio using the num-ber keys, and then press [#].
E Press [OK].
To specify a ratio with [nnnn] and [oooo]
A Press [Withnnnnoooo].
B Press [Horizontal].
C Adjust the ratio using [nnnn] or[oooo].
CP2P01EE
DolphinC2_ENcopy_F_FM.book Page 39 Friday, February 25, 2005 10:46 AM

Copying
40
2
Note❒ Pressing [nnnn] or [oooo] changes
the ratio in increments of0.1%. Pressing and holdingdown [nnnn] or [oooo] changes itin increments of 1%.
❒ If you have incorrectly en-tered the ratio, readjust itwith [nnnn] or [oooo].
D Press [Vertical].
E Adjust the ratio using [nnnn] or[oooo].
F Press [OK].
EEEE Press [OK].
Directional Size Magnification (inch)
A suitable reproduction ratio is auto-matically selected when you enter thehorizontal and vertical lengths of theoriginal and copy image you require.Use this function to alter the image.
1. Horizontal original size
2. Vertical original size
3. Horizontal copy size
4. Vertical copy size
PreparationMeasure and specify the lengths ofthe original and copy by compar-ing “A” with “a”.
Note❒ You can enter sizes within the fol-
lowing ranges:
AAAA Press [Reduce / Enlarge].
BBBB Press [Specifd. Ratio].
CCCC Press [Dirc. Size Mag. In].
DDDD Enter the length for “Original:Horiz.” using the number keys,and then press [#].
Note❒ To change the size, press [Clear],
and then enter the new one.
EEEE Enter the length for “Copy: Horiz.”using the number keys, and thenpress [#].
FFFF Enter the length for “Original:Vertical” using the number keys,and then press [#].
CP2M01EE
Metric version
1–9999 mm (increments of 1 mm)
Inch version
0.1"–99.9" (increments of 0.1")
DolphinC2_ENcopy_F_FM.book Page 40 Friday, February 25, 2005 10:46 AM

Copier Functions
41
2
GGGG Enter the length for “Copy: Verti-cal” using the number keys, andthen press [#].
Note❒ To change a length, press the
key you want to change, andthen enter the new value.
HHHH Press [OK].
IIII Select paper tray.
Fine Magnification
For environment reasons such as hu-mid conditions, paper may expand orshrink. This can result in a mismatchbetween the size of the original andcopy. This function uses the measure-ments of the original and the copy tocalculate a ratio to produce copiesthat are close to the actual size.
PreparationMeasure the length and width ofthe original and the copy, and thencalculate the correction ratio as fol-lows:
Note❒ Fine Magnification is used for orig-
inals that have already beenscanned. If you want to apply finemagnification corrections to paperthat has stretched due to the papertype or exposure to humid condi-tions, see "Fine Ratio Adjustment:Copier", General Settings Guide.
AAAA Press [Reduce / Enlarge].
BBBB Press [Fine Magnificatn.].
CCCC Adjust the horizontal ratio using[oooo] and [nnnn].
DDDD Adjust the vertical ratio using[oooo] and [nnnn].
Note❒ To change the value, press [Clear],
and then enter the new one.
EEEE Press [OK].
ZEDG010E
Calculating the Correction Value (%)
To copy at the same size as the original
Example)CopyOriginal
Horiz. Horiz.
... For the example above:
correction value(%)
Set the correction value (horizontal) to 0.8%.
DolphinC2_ENcopy_F_FM.book Page 41 Friday, February 25, 2005 10:46 AM

Copying
42
2
Note❒ You can also make these set-
tings in "Fine Ratio Adjustment:Copier" under System Settings.If you specified the ratio in bothSystem Settings and this func-tion menu, the resulting settingswill be the sum of the set value.
Combine
Combine several pages onto one sideof a sheet.
❖❖❖❖ Combine 2 Pages Copies 2 one-sided originals ontoone side of a sheet.
❖❖❖❖ Combine 4 PagesCopies 4 one-sided originals ontoone side of a sheet.
❖❖❖❖ Combine 8 PagesCopies 8 one-sided originals ontoone side of a sheet.
❖❖❖❖ Orientation of the original and com-bine image position• Open to leftK originals
• Open to top L originals
ReferenceRelated default settings:p.87 “Erase Original Shadow inCombine”p.88 “Separation Line in Combine”p.88 “Copy Order in Combine”
AAAA Select the paper tray.
GCSHVY7E
GCSHVY8E
GCSHVY3E
GCSHUY2E
DolphinC2_ENcopy_F_FM.book Page 42 Friday, February 25, 2005 10:46 AM

Copier Functions
43
2
BBBB Press [Combine].
CCCC Select the number of originals tocombine.
DDDD Press [OK].
Image Repeat
The original image is copied repeat-edly.
PreparationThe number of repeated imagesdepends on original size, copy pa-per size, and reproduction ratio.• For example, you can copy eight
A4 (A) images onto one sheet ofA1 (D) size paper.
ReferenceRelated default settings:p.87 “Image Repeat SeparationLine”
AAAA Press [Edit / Stamp].
BBBB Press [Edit Image].
CCCC Press [Image Repeat].
DDDD Press [OK] twice.
EEEE Select the paper tray.
Double Copies
Use this function to copy an originalimage twice onto one copy, as shown.
Note❒ When using Double Copies, the
copy paper must be twice as largeas the original. When using Re-duce/Enlarge, consider the magni-fication ratio when selecting thepaper size.
ReferenceRelated default settings:p.87 “Double Copies SeparationLine”
HE2R0100
ZEDG170E
DolphinC2_ENcopy_F_FM.book Page 43 Friday, February 25, 2005 10:46 AM

Copying
44
2
AAAA Press [Edit / Stamp].
BBBB Press [Edit Image].
CCCC Press [Double Copies].
DDDD Press [OK] twice.
EEEE Select the paper tray.
Positive/Negative
Use this function to reverse black andwhite areas of the original.
Note❒ When making continuous copies,
image density may deteriorate. Seep.70 “If You Cannot Make ClearCopies”.
AAAA Press [Edit / Stamp].
BBBB Press [Edit Image].
CCCC Press [Positive/Negative].
DDDD Press [OK] twice.
EEEE Select the paper tray.
Partial Copy
Use this function to copy only a spec-ified portion of the original.
ReferenceRelated default settings:p.89 “Partial Copy Priority”
AAAA Press [Edit / Stamp].
ZEDG150E AGL040S
DolphinC2_ENcopy_F_FM.book Page 44 Friday, February 25, 2005 10:46 AM

Copier Functions
45
2
BBBB Press [Edit Image].
CCCC Press [Partial Copy].
DDDD Press [Y1], and then enter the scanstart position (the length from theleading edge of the original) us-ing the number keys.
Note❒ To change the value, press [Clear],
and then enter the new one.
EEEE Press [#].
FFFF Press [Y2], and then enter the copysize using the number keys.
Note❒ The copy size (Y2) should be at
least 210 mm (8.3").❒ The maximum length of copy
sizes is Y1 + Y2 ≤ 15000 mm(590.6").
❒ If the length specified by “Y1”and “Y2” is larger than the max-imum, the machine shortens it.The value entered second is ad-justed based on the value en-tered first.
GGGG Press [OK] three times.
Mirror Image
Copies by reversing the image fromleft to right, as reflected in a mirror.
AAAA Press [Edit / Stamp].
BBBB Press [Edit Image].
CCCC Press [Mirror Image].
DDDD Press [OK] twice.
ZEDG160E
DolphinC2_ENcopy_F_FM.book Page 45 Friday, February 25, 2005 10:46 AM

Copying
46
2
Format Overlay
Use this function to combine two im-ages (original + format) onto onecopy using the first original.You can store frequently used formatoriginal in the machine memory andrecall them for future use.
AAAA Press [Edit / Stamp].
BBBB Press [Edit Image].
CCCC Press [Format Overlay].
Using the first original as the background original
A Press [Format Overlay].
B Make the necessary settings,and then place the first origi-nal.
C Place the second original.
The machine makes a compos-ite copy of the first and secondoriginals.
D Place the third original.
The machine makes a compos-ite copy of the first and thirdoriginals.
E Place any further originals, asrequired.
Using the stored image as the background original
Note❒ To use this function, you need
to program the overlay formatin advance. See p.47 “Pro-gram/Delete Overlay Format”.
A Press [Prog. Format Overlay].
B Select a stored format number.
C Make the necessary settings,and then place the original tobe overlaid on the format orig-inal.
The machine makes a copyoverlaying the first originalonto the stored format original.
D Place any further originals, asrequired.
The machine makes a copyoverlaying the new originalonto the stored format original.
AHD006S
DolphinC2_ENcopy_F_FM.book Page 46 Friday, February 25, 2005 10:46 AM
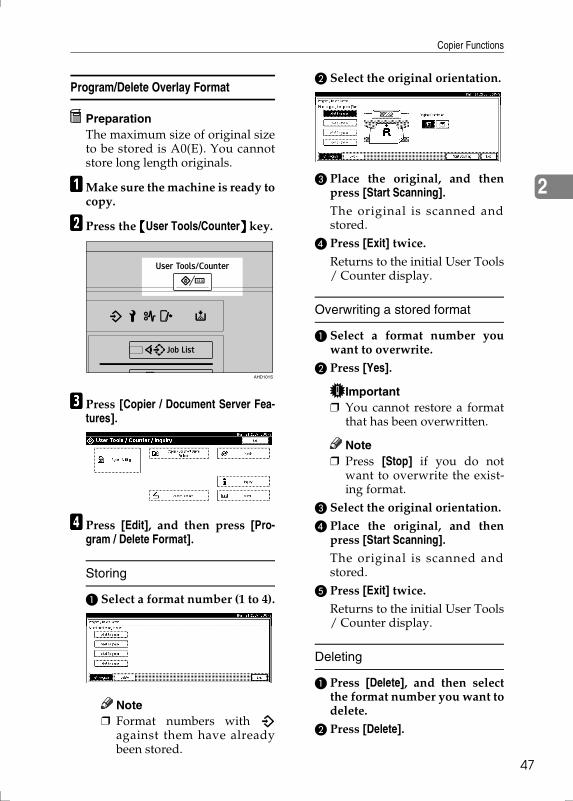
Copier Functions
47
2
Program/Delete Overlay Format
PreparationThe maximum size of original sizeto be stored is A0(E). You cannotstore long length originals.
AAAA Make sure the machine is ready tocopy.
BBBB Press the {{{{User Tools/Counter}}}} key.
CCCC Press [Copier / Document Server Fea-tures].
DDDD Press [Edit], and then press [Pro-gram / Delete Format].
Storing
A Select a format number (1 to 4).
Note❒ Format numbers with m
against them have alreadybeen stored.
B Select the original orientation.
C Place the original, and thenpress [Start Scanning].
The original is scanned andstored.
D Press [Exit] twice.
Returns to the initial User Tools/ Counter display.
Overwriting a stored format
A Select a format number youwant to overwrite.
B Press [Yes].
Important❒ You cannot restore a format
that has been overwritten.
Note❒ Press [Stop] if you do not
want to overwrite the exist-ing format.
C Select the original orientation.
D Place the original, and thenpress [Start Scanning].The original is scanned andstored.
E Press [Exit] twice.
Returns to the initial User Tools/ Counter display.
Deleting
A Press [Delete], and then selectthe format number you want todelete.
B Press [Delete].
AHD101S
DolphinC2_ENcopy_F_FM.book Page 47 Friday, February 25, 2005 10:46 AM

Copying
48
2
Important❒ You cannot restore a format
that has been deleted.
Note❒ Press [Stop] if you do not
want to delete the existingformat.
C Press [Exit] twice.
Returns to the initial User Tools/ Counter display.
EEEE Press the {{{{User Tools/Counter}}}} key.
The overlay format is stored or de-leted, and the display returns tothe initial copy display.
Erase Border
Use this function to erase the borderarea around the original image.
PreparationThe default erase border setting is10 mm (0.4").
ReferenceRelated default settings:p.87 “Erase Border Width”
AAAA Press [Edit / Stamp].
BBBB Press [Erase].
CCCC Press [Erase Border].
Selecting [Same Width]
A Press [Same Width].
B Set the erase border width us-ing [nnnn] and [oooo], and thenpress [OK].
Selecting [Diff. Width]
A Press [Diff. Width].
B Press the key for the borderyou want to change, and thenset the erase border width us-ing [nnnn] and [oooo].
C Press [OK].
ZEDX080E
DolphinC2_ENcopy_F_FM.book Page 48 Friday, February 25, 2005 10:46 AM

Copier Functions
49
2
DDDD Press [OK] twice.
Limitation❒ For details about the scan size
limitations when using theErase Border function togetherwith the other functions, seep.104 “Scan Size Limitations, byFunction”.
Erase Inside
Use this function to copy the originalwhile erasing a specified area.
Note❒ To specify the area you want to
erase, you have to define the valueof X1, Y1, X2, and Y2. Measure thearea you want to specify before en-tering the area settings.
❒ When using this function withmagnification, the actual settingwill be the specified setting multi-plied by the reproduction ratio.
❒ You can specify up to five areas.
AAAA Press [Edit / Stamp].
BBBB Press [Erase].
CCCC Select one of the areas from [EraseInside 1] to [Erase Inside 5].
DDDD Enter the length of “X1” using thenumber keys, and then press [#].
EEEE Enter the length of “X2”, “Y1”,and “Y2” in the same way, andthen press [OK].
FFFF To specify multiple areas, specifyareas 1 to 5, and then repeat stepsDDDD to EEEE.
GGGG Press [OK] twice.
Erase Inside
ABB524S
Area
AHD047S
DolphinC2_ENcopy_F_FM.book Page 49 Friday, February 25, 2005 10:46 AM

Copying
50
2
Erase Outside
Use this function to copy the originalwhile erasing outside a specified area.
Note❒ To specify the area you want to
erase, you have to define the valueof X1, Y1, X2, and Y2. Measure thearea you want to specify before en-tering the area settings.
❒ When using this function withmagnification, the actual settingwill be the specified setting multi-plied by the reproduction ratio.
AAAA Press [Edit / Stamp].
BBBB Press [Erase].
CCCC Press [Erase Outside].
DDDD Enter the length of “X1” using thenumber keys, and then press [#].
Note❒ To change the value, press [Clear],
and then enter the new one.
EEEE Enter the length of “X2”, “Y1”,and “Y2” in the same way.
FFFF Press [OK] three times.
Margin Adjustment
When Synchro Cut is selected, youcan create a margin on the copy'sleading and trailing edge.
Erase Outside
ABB526S
Area
AHD047S
AHD007S
DolphinC2_ENcopy_F_FM.book Page 50 Friday, February 25, 2005 10:46 AM

Copier Functions
51
2
PreparationYou can select the following typesof margin for this function:• Top (+): margin at the leading
edge of the original (top ofcopy).
• Bottom (+): margin at the trail-ing edge of the original (bottomof copy).
The default margin setting is 20mm (0.8").You can specified both the top andthe bottom margins at a time.The copy length is the specifiedlength plus or minus the margin.
Referencep.31 “Synchro cut”Related default settings:p.88 “Margin Adjustment Priori-ty”
AAAA Press [Edit / Stamp].
BBBB Press [Margin Adjustment].
CCCC Press [Top Margin] or [Bottom Mar-gin].
DDDD Use [-] or [+] to specify the margin,and then press [OK].
[Synchro Cut] is automatically se-lected.
EEEE Press [OK].
Background Numbering
Use this function to have numbersprinted on the background of copies.It can help you to keep track of confi-dential documents.
Note❒ You can set the number from 1 to
999.❒ You can combine this function
with up to four other stampingfunctions.
ReferenceRelated default settings:p.90 “Size”p.90 “Density”
ZEDG190E
DolphinC2_ENcopy_F_FM.book Page 51 Friday, February 25, 2005 10:46 AM

Copying
52
2
AAAA Press [Edit / Stamp].
BBBB Press [Stamp].
CCCC Press [Background Numbering].
DDDD Enter the start number using thenumber keys, and then press [OK].
Note❒ To change the number, press
[Clear] or the {{{{Clear/Stop}}}} key,and then enter the new one.
EEEE Press [OK] twice.
Preset Stamp
Use this function to print a stamp thatalready stored in the machine.
• Stamp types are as follows:
• You can change the position andorientation of the stamp.
• You can use this function with upto four other stamping functions.
❖❖❖❖ Setting Originals and Stamp Posi-tion/Orientation
Note❒ You can use only one type of
stamp at a time.
ReferenceRelated default settings:p.90 “Stamp Priority”p.90 “Stamp Language”p.90 “Stamp Position”p.91 “Stamp Format”
ABB527S
AHD008S
DolphinC2_ENcopy_F_FM.book Page 52 Friday, February 25, 2005 10:46 AM

Copier Functions
53
2
AAAA Press [Edit / Stamp].
BBBB Press [Stamp].
CCCC Press [Preset Stamp].
DDDD Select the stamp type.
EEEE Press [All Pages] or [1st Page Only] toselect the print page.
Changing the stamp position, size and density
A Press [Change].
B Select the stamp position, sizeand density, and then press[OK].
FFFF When all settings are made, press[OK].
GGGG Press [OK] twice.
User Stamp
You can store frequently used charac-ters or symbols, and then use them asa stamp.
PreparationYou must have a user stamp al-ready stored. See p .55 “Pro-gram/Delete User Stamp”.You can store up to four types ofuser stamp.
ReferenceTo delete a stored user stamp, seep.56 “Deleting a user stamp”.
ZEDG220E
DolphinC2_ENcopy_F_FM.book Page 53 Friday, February 25, 2005 10:46 AM

Copying
54
2
❖❖❖❖ Setting Originals and Stamp Posi-tion/Orientation
• You can change the stamp positionand orientation.
Note❒ You can use only one type of
stamp at a time.❒ You can use this function with up
to four other stamping functions.❒ When User Stamp is selected, it
may take longer to print the firstcopy.
ReferenceRelated default settings:p.92 “Stamp Position 1 - 4”p.92 “Stamp Format 1 - 4”
AAAA Press [Edit / Stamp].
BBBB Press [Stamp].
CCCC Press [User Stamp].
DDDD Select the number for the userstamp.
EEEE Press [All Pages] or [1st Page Only] toselect the print page.
Changing the stamp position
A Press [Change].
B Select the stamp position, andthen press [OK].
FFFF When all settings are made, press[OK].
GGGG Press [OK] twice.
AHD043S
DolphinC2_ENcopy_F_FM.book Page 54 Friday, February 25, 2005 10:46 AM

Copier Functions
55
2
Program/Delete User Stamp
Note❒ The range of stamp images for
readability is 10–432 mm high(0.4"–17") and 10–297 mm wide(0.4"–11"). However, if the valueexceeds the maximum area (5,000mm2, 7.75 inch2), it is automaticallyadjusted to range.
❒ Up to four frequently used imagescan be stored in memory.
AAAA Make sure the machine is ready tocopy.
BBBB Press the {{{{User Tools/Counter}}}} key.
CCCC Press [Copier/Document Server Fea-tures].
DDDD Press [Stamp].
EEEE Press [User Stamp].
FFFF [Program / Delete Stamp].
Storing/Overwriting a user stamp
A Press [Program], and then pressthe stamp number (1–4) youwant to program.
Note❒ Stamp numbers displayed with
m next to them already havesettings.
❒ If the stamp number is al-ready in use, the machinewill ask you if you want tooverwrite it. Press [Yes] or[No].
Important❒ You cannot restore the stamp
after it has been overwritten.B Enter the user stamp name us-
ing the letter keys on the dis-play panel. You can register upto 10 characters.
Reference“Entering Text”, General Set-tings Guide
C Press [OK].
D Enter the horizontal size of thestamp using the number keys,and then press [#].
E Press [Vertical], and then enterthe vertical size of the stampusing the number keys, andthen press [#].
AHD101S
DolphinC2_ENcopy_F_FM.book Page 55 Friday, February 25, 2005 10:46 AM

Copying
56
2
F Adjust the original guides toA3 (B)KKKK or A4 (A)LLLL, and thenplace the original for userstamp on the original table.
Note❒ The upper left corner is the
base point for scanning.
1. Base point
2. Feeding direction
G Press [Start Scanning].
The original is scanned, and thestamp is registered.
Deleting a user stamp
Important❒ You cannot restore a deleted
user stamp.A Press [Delete], and then press
the stamp number you want todelete.
B Select [Delete], and then press[Exit].
C Press [Exit].
GGGG Press the {{{{User Tools/Counter}}}} key.
The default settings are changed,and the machine is ready to makecopies.
Date Stamp
Use this function to print a datestamp on copies.
• There are five formats of DateStamp:• MM/DD/YYYY• MM.DD.YYYY• DD/MM/YYYY• DD.MM.YYYY• YYYY.MM.DD
AGL060S
AHD009S
AHD052S
DolphinC2_ENcopy_F_FM.book Page 56 Friday, February 25, 2005 10:46 AM
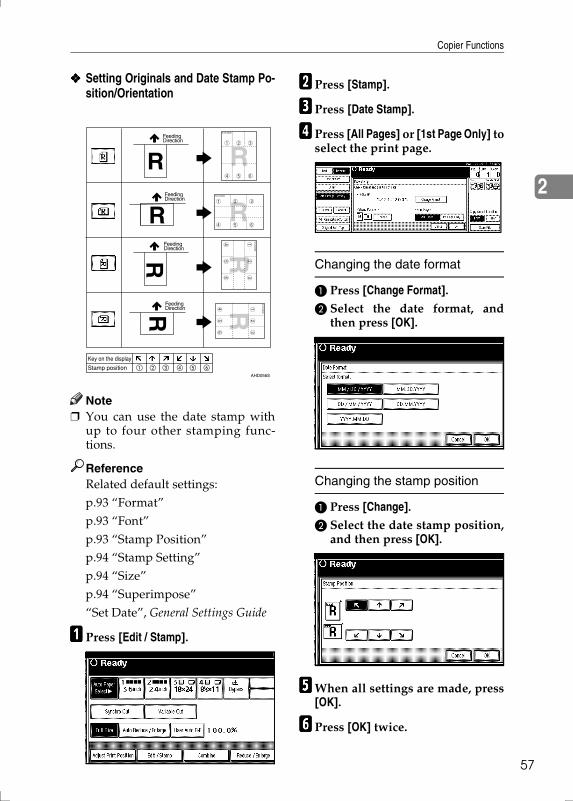
Copier Functions
57
2
❖❖❖❖ Setting Originals and Date Stamp Po-sition/Orientation
Note❒ You can use the date stamp with
up to four other stamping func-tions.
ReferenceRelated default settings:p.93 “Format”p.93 “Font”p.93 “Stamp Position”p.94 “Stamp Setting”p.94 “Size”p.94 “Superimpose”“Set Date”, General Settings Guide
AAAA Press [Edit / Stamp].
BBBB Press [Stamp].
CCCC Press [Date Stamp].
DDDD Press [All Pages] or [1st Page Only] toselect the print page.
Changing the date format
A Press [Change Format].B Select the date format, and
then press [OK].
Changing the stamp position
A Press [Change].B Select the date stamp position,
and then press [OK].
EEEE When all settings are made, press[OK].
FFFF Press [OK] twice.
AHD056S
DolphinC2_ENcopy_F_FM.book Page 57 Friday, February 25, 2005 10:46 AM

Copying
58
2
Page Numbering
Use this function to print page num-bers on your copies.This function is effective when theSort function is selected.
• There are six types of Page Num-bering (“n” is the total number ofpages in your original):• P1, P2,…Pn• 1/n, 2/n,...n/n• -1-, -2-,...-n-• P.1, P.2,...P.n• 1, 2…n• 1-1, 1-2,..1-n
❖❖❖❖ Stamp position and orientation of originals
You can use the page numberingstamp with up to four other stampingfunctions.
ReferenceRelated default settings:p.94 “Stamp Format”p.94 “Font”p.94 “Size”p.94 “Page Numbering in Com-bine”p.95 “Stamp Position”p.95 “Superimpose”
AAAA Press [Edit / Stamp].
BBBB Press [Stamp].
AHD012S
DolphinC2_ENcopy_F_FM.book Page 58 Friday, February 25, 2005 10:46 AM

Copier Functions
59
2
CCCC Press [Page Numbering].
DDDD Select the page numbering for-mat.
Note❒ You can specify the pages to be
stamped, and numbering. Seep.59 “Specifying the first print-ing page and start number”.
Setting the stamp position
A Press [Change] on the left side.
B Select the stamp position, andthen press [OK].
EEEE After all settings are complete,press [OK].
FFFF Press [OK] twice.
Specifying the first printing page and start number
If you selected (P1, P2…, -1-,-2-…, P.1, P.2…, 1, 2…, )
Note❒ The following explanation uses P1,
P2... as an example. The steps arethe same for other selections.
AAAA Press [Change] on the right side.
BBBB Press [First Printing Page], then en-ter the original page number fromwhich to start printing using thenumber keys, and then press the{{{{#}}}} key.
Note❒ To change the number entered,
press [Clear] or the {{{{Clear/Stop}}}}key, and then enter a new num-ber.
CCCC Press [Numbering from/to], enter thenumber of the page from which tostart numbering using the num-ber keys, and then press the {{{{#}}}}key.
DolphinC2_ENcopy_F_FM.book Page 59 Friday, February 25, 2005 10:46 AM

Copying
60
2
Note❒ The example below shows the
first printing page as “2”and thestart number as “3”.
DDDD Press [Last Number], enter the num-ber of the page to stop numberingusing the number keys, and thenpress the {{{{#}}}} key.
Note❒ If you want to number all pages
to the end, press [to the End].
EEEE When page designation is com-plete, press [OK].
FFFF Press [OK] three times.
If you selected (1/5, 2/5…)
AAAA Press [Change] on the right side.
BBBB Press [First Printing Page], then en-ter the original page number fromwhich to start printing using thenumber keys, and then press the{{{{#}}}} key.
Note❒ To change the number entered,
press [Clear] or the {{{{Clear/Stop}}}}key, and then enter a new num-ber.
CCCC Press [Numbering from / to], then en-ter the number of page fromwhich to start numbering usingthe number keys, and then pressthe {{{{#}}}} key.
DDDD Press [Last Number], then enter thenumber of page at which to stopnumbering using the numberkeys, and then press the {{{{#}}}} key.
Proceed to step E when not chang-ing.
Note❒ To print on the last page, press
[to the End].❒ The last number is the last page
number printed. For example, if[Total Page] is ten, and you wantto print seven pages up to page7, enter [7] as the [Last Number].
❒ Normally, you do not need toenter this number.
GCANPE2-2E
DolphinC2_ENcopy_F_FM.book Page 60 Friday, February 25, 2005 10:46 AM

Copier Functions
61
2
EEEE Press [Total Pages], enter the totalnumber of original pages usingthe number keys, and then pressthe {{{{#}}}} key.
FFFF When page designation is com-plete, press [OK].
Note❒ To change the settings after
pressing [OK], press [Change],and then enter the numbersagain.
GGGG Press [OK] three times.
If you selected (1-1, 1-2,…)
AAAA Press [Change] on the right side.
BBBB Press [First Printing Page], and thenenter the original page numberfrom which to start printing usingnumber keys, and then press the{{{{#}}}} key.
Note❒ To change the number entered,
press [Clear] or the {{{{Clear/Stop}}}}key, and then enter a new num-ber.
CCCC Press [First Chapter No.], enter thechapter number from which tostart numbering using the num-ber keys, and then press the {{{{#}}}}key.
DDDD Press [Numbering from / to], and thenenter the page number fromwhich to start numbering usingthe number keys, and then pressthe {{{{#}}}} key.
EEEE When page designation is com-plete, press [OK].
FFFF Press [OK] three times.
Adjust Print Position
Use this function to move (shift) thecopy image up, down, left, or right tocreate a margin.
ZEDG110E
DolphinC2_ENcopy_F_FM.book Page 61 Friday, February 25, 2005 10:46 AM

Copying
62
2
PreparationYou can select the following typesof margin for this function:• [↑↑↑↑] (Top): shift towards the
leading edge of the original (topof copy).
• [↓↓↓↓] (Bottom): shift towards thetrailing edge of the original(bottom of copy).
• [←←←←] (Left): shift towards the leftof the original.
• [→→→→] (Right): shift towards theright of the original.
You can also shift in a combinationof up/down and left/right.
ReferenceRelated default settings:p.87 “Adjust Position”
AAAA Press [Adjust Print Position].
BBBB Press [Adjust Print Position].
CCCC Use [←←←←] or [→→→→] to specify thelength of shift.
DDDD Use [↑↑↑↑] or [↓↓↓↓] to specify the lengthof shift.
EEEE Press [OK] twice.
DolphinC2_ENcopy_F_FM.book Page 62 Friday, February 25, 2005 10:46 AM

Storing Data in the Document Server
63
2
Storing Data in the Document Server
The Document Server enables you tostore documents in memory and printthem as you want.For details, see General Settings Guide.
Important❒ Machine failure can result in data
loss. Important data stored on thehard disk should be backed up.The manufacturer shall not be re-sponsible for any damage thatmight result from loss of data.
Note❒ Data stored in the Document Serv-
er is deleted after three days by set-ting default. You can specify aperiod after which stored data isautomatically deleted. For moreinformation about settings, see“Auto Delete File” in “Administra-tor Tools”, General Settings Guide.
AAAA Press [Store File].
BBBB Enter a user name, file name, orpassword if necessary.
ReferenceFor details about how to regis-ter the user name, file name, orpassword, see “To register orchange a user name”, and “Toset or change a password”, Gen-eral Settings Guide.
CCCC Press [OK].
DDDD Make the scanning settings forthe originals.
EEEE Place the originals.
FFFF Press the {{{{Start}}}} key.
Copies are delivered, and originalsscanned and stored in memory.
Note❒ To stop scanning, press the
{{{{Clear/Stop}}}} key. To resume apaused scanning job, press [Con-tinue] in the confirmation dis-play. To delete saved imagesand cancel the job, press [Stop].
❒ Press the {{{{#}}}} key after all theoriginals have been scanned.
❒ To check that the document hasbeen stored, press the {{{{Docu-ment Server}}}} key to display thedocument selection screen.
❒ When the machine is printing adocument stored using thecopier function, wait until print-ing has finished before youstore another copy document.
DolphinC2_ENcopy_F_FM.book Page 63 Friday, February 25, 2005 10:46 AM

Copying
64
2
----Use the Reduce/Enlarge function to print the stored documents
A Press the {{{{Document Server}}}} key.B Select the document to be printed.C Press [Print Settings].D Press [Reduce / Enlarge].E Select a ratio, and then press [OK].F Enter the number of copies using
the number keys.G Press the {{{{Start}}}} key.
ReferenceFor details about how to printstored documents, see "PrintingStored Documents", General Set-tings Guide.
DolphinC2_ENcopy_F_FM.book Page 64 Friday, February 25, 2005 10:46 AM

Programs
65
2
Programs
You can store frequently used copyjob settings in machine memory andrecall them for future use.
Note❒ You can store up to 10 programs.❒ You can select the standard mode or
Program No.10 as the default modeto be set when modes are cleared orreset, or immediately after the oper-ation switch is turned on. See p.85“Change Initial Mode”.
❒ Paper settings are stored based onpaper size. However, if you havemore than one paper tray contain-ing the same size paper, the trayprioritized with User Tools (Sys-tem Settings) is selected first. See“Paper Tray Priority” in “Tray Pa-per Settings”, General SettingsGuide.
❒ Programs are not deleted by turn-ing the power off or pressing the{{{{Clear Modes}}}} key. They are can-celed only when you delete or over-write them with another program.
Storing a Program
AAAA Edit the copy settings so all func-tions you want to store in this pro-gram are selected.
BBBB Press the {{{{Program}}}} key.
CCCC Press [Register].
DDDD Press the program number youwant to store.
Note❒ Program numbers displayed with
m next to them already havesettings.
Referencep.66 “Changing a Stored Pro-gram”
EEEE Enter the program name using theletter keys on the display panel.You can enter up to 40 characters.
ReferenceFor details about entering char-acters, see “Entering Text”, Gen-eral Settings Guide.
Note❒ If you do not want to enter a
program name, proceed to stepF.
FFFF Press [OK].
When the settings are successfullystored, the m indicator followedby the program number and pro-gram name will be displayed. Af-ter a while, the screen reverts backto the initial copy display.
AHD055S
DolphinC2_ENcopy_F_FM.book Page 65 Friday, February 25, 2005 10:46 AM

Copying
66
2
Changing a Stored Program
AAAA Check the program settings.
Note❒ To check the contents of a pro-
gram, recall it. See p.66 “Recall-ing a Program”.
BBBB Repeat steps AAAA to DDDD of “Storing aProgram”.
CCCC Press [Register].
Repeat steps E and F of “Storing aProgram”.
Note❒ When overwritten, the previous
program is deleted.
Changing a Stored Program Name
AAAA Press the {{{{Program}}}} key.
BBBB Press [Change Name].
CCCC Press the program number whosep ro gr am na me you wan t tochange.
DDDD Press [Backspace] or [Delete All],and then enter the new programname.
EEEE Press [OK].
Deleting a Program
AAAA Press the {{{{Program}}}} key.
BBBB Press [Delete].
CCCC Press the number of the programyou want to delete.
DDDD Press [Yes].
The program is deleted, and thescreen returns to the initial copydisplay.
Recalling a Program
AAAA Press the {{{{Program}}}} key.
BBBB Press [Recall].
CCCC Press the number of the programyou want to recall.
The stored settings are displayed.
Note❒ Program numbers displayed with
m next to them already havesettings.
DDDD Place the originals, and then pressthe {{{{Start}}}} key.
DolphinC2_ENcopy_F_FM.book Page 66 Friday, February 25, 2005 10:46 AM

67
3. Troubleshooting
If Your Machine Does Not Operate As You Want
When a Message Appears
The following chart contains explanations of common messages. If other mes-sages appear, follow the instructions displayed.
Message Problem/Causes Solutions
Please wait. The main power has just been turned on, paper type (plain paper/translucent pa-per/film) was changed, or the machine is otherwise getting ready.
Wait for the machine to fully warm-up.
Note❒ When “Scanning
originals can be started. ” and “Se-lect copy mode and Place original” are displayed alternately, you can make the settings for your copies and scan your originals. After the origi-nals have been scanned, the machine will automati-cally start copying after it has warmed-up. See p.23 “Auto Start”.
Check paper size An improper paper size is set. Select paper manually, do not use Auto Paper Select.
Check original ori-entation.
In User Auto Reduce/En-large, the original is set to L.
For User Auto Reduce/En-large, set the original to K.
In User Auto Reduce/En-large, the original is set to K.
For User Auto Reduce/En-large, set the original to L.
Memory is full. The machine's memory is full due to scanning originals or performing a function. The number of originals that can be stored in memory depends on the size of originals and function settings.
• When Sort is selected, press [Exit] to copy scanned originals, and then copy remaining origi-nals.
• When the Job Preset func-tion is selected, check the number of preset jobs, and then try scanning the orig-inals again.
DolphinC2_ENcopy_F_FM.book Page 67 Friday, February 25, 2005 10:46 AM

Troubleshooting
68
3
Check paper size. The size of the paper loaded is different to the size of the copy paper size.
Check the settings for Re-duce/Enlarge, etc., and then try again.
Rotate Sort is not available with this image size.
Select another paper size or cancel Ro-tate Sort mode.
The scanned original is too big to rotate.
You cannot use rotate sort with A0 (E), A1(D) originals.
An unsuitable paper size for rotate sort has been set.
Set paper of the following pa-per width:
❖❖❖❖ Metric version:• 594 mm and 420 mm (A2)
• 420 mm and 297 mm (A3)
• 297 mm and 210 mm (A4)
❖❖❖❖ Inch version (Engineering)• 81/2" and 11" (A)
• 11" and 17" (B)
• 17" and 22" (C)
❖❖❖❖ Inch version (Architecture)• 9" and 12" (A)
• 12" and 18" (B)
• 18" and 24" (C)
Maximum number of sets is NN
The number of copies exceeds maximum.
Change the maximum copy quantity you can make at a time. See p.85 “Max. Copy Quantity”.
Original was misfed at following point. Open the part as shown, then remove it.
The original has jammed (original misfeed).
Follow the on-screen instruc-tions to remove the jammed original. See “xClearing Mis-feeds”, General Settings Guide.
Paper was misfed at following point. Open the part as shown and remove it.
The copy paper has jammed. Follow the on-screen instruc-tions to remove the jammed paper. See “xClearing Mis-feeds”, General Settings Guide.
Add Toner The machine is running out of toner.
Follow the on-screen instruc-tions to change the toner car-tridge. See “DAdding Toner”, General Settings Guide.
Cover is open as shown.Close it.
The cover shown on the dis-play is open.
Close the cover as shown.
Used Toner Bottle is full.
Used Toner Bottle is full. Call your service representa-tive.
Message Problem/Causes Solutions
DolphinC2_ENcopy_F_FM.book Page 68 Friday, February 25, 2005 10:46 AM

If Your Machine Does Not Operate As You Want
69
3
Screen
You do not have the privileges to use this function.
The use of this function is re-stricted to authenticated users only.
Contact the administrator.
Authentication has failed.
The entered login user name or login password is not cor-rect.
Inquire the user administrator for the correct login user name and login password.
The machine cannot perform authentication.
Contact the administrator.
Selected files con-tain file(s) that the user does not have access privi-leges to. Please note that only the files with access privileges will be deleted.
You have tried to delete files without the authority to do so.
Files can be deleted by the file creator or file administrator. To delete a file which you are not authorized to delete, con-tact the file creator.
“Updating the desti-nation list...Please wait.Specified des-tination(s) or send-er's name has been cleared.” appears, and operations are not possible.
The destination list is being updated from the network us-ing SmartDeviceMonitor for Admin. Depending on the number of destinations to be updated, there may be some delay before you can resume operation. Operations are not possible while this message is displayed.
Wait until the message disap-pears. Do not switch off the power while this message is displayed.
Problem Cause Action
The screen is off. The screen contrast knob is turned to the dark position.
Turn the screen contrast knob until you can see the screen.
The machine is in Energy Sav-er mode.
Press the {{{{Clear Modes/Energy Saver}}}} key to cancel Energy Saver mode.
The operation switch is turned off. (The Auto Off function has turned the machine off.)
Turn on the operation switch. You can change the Auto Off time. See “Auto Off Timer”, General Settings Guide.
Cannot select the functions on the screen.
Selected functions cannot be used together.
See p.97 “Combination Chart”.
There is no paper roll dis-played in the paper roll tray.
The paper volume setting is not properly set.
Load paper into the tray prop-erly. See General Settings Guide.
The power does not come on. The main power switch is turned off.
Turn on the Main power switch. See General Settings Guide.
Message Problem/Causes Solutions
DolphinC2_ENcopy_F_FM.book Page 69 Friday, February 25, 2005 10:46 AM

Troubleshooting
70
3
If You Cannot Make Clear Copies
Problem Causes Solutions
Black or white streaks appear on copies.
Image density is too dark. Adjust image density. See p.28 “Adjusting Copy Image Den-sity”.
The exposure glass or feed roller is dirty.
Clean the exposure glass or feed roller. See “Maintaining Your Machine”, General Set-tings Guide.
The original is dusty. Clean the original and try copying again.
Be particularly careful when using the following types of original:
• Hand drawn or drawn on with other forms of pencil or pen, such as a plotter.
• Film, translucent paper, or other originals that attract static electricity.
• Very long originals.
A shadow of the reverse side of an original image appears on copies.
Image density is too dark. Adjust the image density set-ting. See p.28 “Adjusting Copy Image Density”.
The background is dirty. Image density is too dark. Adjust the image density set-ting. See p.28 “Adjusting Copy Image Density”.
The edges of pasted sections are shown.
Image density is too dark. Adjust the image density set-ting. See p.28 “Adjusting Copy Image Density”.
Change the orientation of the original.
Put mending tape on the past-ed part.
The same copy area is dirty whenever making copies.
The exposure glass or feed roller is dirty.
Clean the exposure glass or feed roller. See “Maintaining Your Machine”, General Set-tings Guide.
DolphinC2_ENcopy_F_FM.book Page 70 Friday, February 25, 2005 10:46 AM

If You Cannot Make Clear Copies
71
3
Copies are too light. Image density is too light. Adjust the image density set-ting. See p.28 “Adjusting Copy Image Density”.
Damp or rough grain paper is used.
For good copy quality, use recommended paper.
Note❒ If you use coated paper
(such as thermal fax paper, art paper, carbon paper), damp paper, or rough grain paper, copy image might be too light.
Toner fusing is poor. The paper thickness is not properly set.
Set the paper thickness again. See “Paper Thickness: Paper Tray” and “Paper Thickness: Paper Bypass”, General Set-tings Guide.
The copy paper is too thick.
A moire pattern appears on copies.
Your original has a dot pat-tern image or many lines.
Change the orientation of the original. This may prevent the moire pattern.
Copy using “Photo” mode.
Image density is uneven. The original has areas of solid color, or Positive/Negative is selected when copying multi-ple sheets.
When using Repeat Copy with originals that have areas of solid color, set the number of originals as follows:
A0 – A2 (E – C): 1 sheet, A3 (B) or smaller: 3 sheets
Halftone originals can cause this problem.
Try using “Text/Photo” or “Photo”.
Images are blurred when us-ing translucent paper.
Translucent paper is being used when copying multiple sheets.
Select a proper paper thick-ness for the copy paper. See “Paper Thickness: Paper Tray” and “Paper Thickness: Paper Bypass”, General Set-tings Guide.
Wrinkles appear when using translucent paper.
An improper paper thickness is selected.
Select a proper paper thick-ness for the copy paper. See “Paper Thickness: Paper Tray” and “Paper Thickness: Paper Bypass”, General Set-tings Guide.
The paper type has recently been changed from plain pa-per to translucent paper.
Wait about one minute.
Problem Causes Solutions
DolphinC2_ENcopy_F_FM.book Page 71 Friday, February 25, 2005 10:46 AM
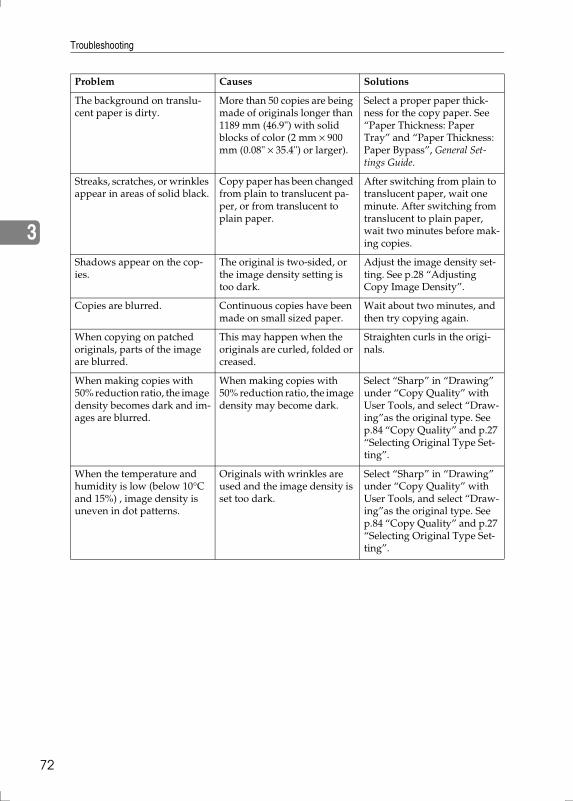
Troubleshooting
72
3
The background on translu-cent paper is dirty.
More than 50 copies are being made of originals longer than 1189 mm (46.9") with solid blocks of color (2 mm × 900 mm (0.08" × 35.4") or larger).
Select a proper paper thick-ness for the copy paper. See “Paper Thickness: Paper Tray” and “Paper Thickness: Paper Bypass”, General Set-tings Guide.
Streaks, scratches, or wrinkles appear in areas of solid black.
Copy paper has been changed from plain to translucent pa-per, or from translucent to plain paper.
After switching from plain to translucent paper, wait one minute. After switching from translucent to plain paper, wait two minutes before mak-ing copies.
Shadows appear on the cop-ies.
The original is two-sided, or the image density setting is too dark.
Adjust the image density set-ting. See p.28 “Adjusting Copy Image Density”.
Copies are blurred. Continuous copies have been made on small sized paper.
Wait about two minutes, and then try copying again.
When copying on patched originals, parts of the image are blurred.
This may happen when the originals are curled, folded or creased.
Straighten curls in the origi-nals.
When making copies with 50% reduction ratio, the image density becomes dark and im-ages are blurred.
When making copies with 50% reduction ratio, the image density may become dark.
Select “Sharp” in “Drawing” under “Copy Quality” with User Tools, and select “Draw-ing”as the original type. See p.84 “Copy Quality” and p.27 “Selecting Original Type Set-ting”.
When the temperature and humidity is low (below 10°C and 15%) , image density is uneven in dot patterns.
Originals with wrinkles are used and the image density is set too dark.
Select “Sharp” in “Drawing” under “Copy Quality” with User Tools, and select “Draw-ing”as the original type. See p.84 “Copy Quality” and p.27 “Selecting Original Type Set-ting”.
Problem Causes Solutions
DolphinC2_ENcopy_F_FM.book Page 72 Friday, February 25, 2005 10:46 AM

If You Cannot Make Copies As You Want
73
3
If You Cannot Make Copies As You Want
This section explains causes of, and solutions for, unexpected copy results.
Problem Causes Solutions
Misfeeds occur frequently. The paper is folded or creased.
Cut away the folded or creased part from the roll pa-per.
Jammed or torn paper is in-side the machine.
Remove the paper properly. See “xClearing Misfeeds”, General Settings Guide.
The paper is curled. Smooth out the curl and try again.
Images are cropped when us-ing Erase Border.
The Erase Border setting is too wide.
The margin of the original is too narrow.
Set the Erase Border setting narrower. See p.48 “Erase Bor-der”.
Parts of the image are not copied. The original is not placed cor-rectly.
Place the original correctly. See p.15 “Placing Originals”.
An improper size of paper is selected.
Select the proper paper. See “Copy Paper”, General Set-tings Guide.
Print Position Adjustment or Margin Adjustment mode is selected.
Cancel Print Position Adjust-ment or Margin Adjustment mode. See p.50 “Margin Ad-justment” and p.61 “Adjust Print Position”.
You placed a custom size orig-inal.
Enter the size of the original, or set the scanning area wider. See p.17 “Placing Custom Size Originals” and p.17 “Wide Scan”.
Copies are blank. The original is not set correct-ly.
Place the original with the sur-face to be copied on face up.
The machine does not start copying even though you have inserted paper into the paper bypass.
The number of copies has not been entered.
Enter the number of copies us-ing the number keys. See ⇒ p.25 “Copying from the Paper Bypass”.
DolphinC2_ENcopy_F_FM.book Page 73 Friday, February 25, 2005 10:46 AM

Troubleshooting
74
3
Copies shift sideways. The paper roll is not set cor-rectly.
Set the paper roll correctly, making sure it is straight and not loose. See “CLoading Pa-per Roll”, General Settings Guide.
The original does not match the size in the original table setting.
Adjust the original guides to the specified size, and then in-sert the original along the guides. See p.15 “Placing Originals”.
The paper is not set correctly in the paper bypass.
Make sure the paper size matches the paper bypass's paper guides. See p.25 “Copy-ing from the Paper Bypass”.
Copies shift in the direction of the original feed (or opposite) direction.
Print Position Adjustment or Margin Adjustment mode is selected.
Cancel Print Position Adjust-ment or Margin Adjustment mode. See p.50 “Margin Ad-justment” and p.61 “Adjust Print Position”.Copies are shorter than the se-
lected size, or cut off before the end.
Wrinkles appear on the copy. The paper is damp. Replace the paper with new paper.
Cut the paper to 1000 mm (40") just before copying.
The paper is damp. See “Anti-humidity Heater Switch”, General Settings Guide.
Turn on the anti-humidity heater. See “Anti-humidity Heater Switch”, General Set-tings Guide.
Copies are slanted. The original is not straight. Insert the original along the original guides, so it is straight.
Original and copy size does not match.
Dampness can cause paper to stretch.
Adjust the Fine Magnification setting for Additional Copy. See p.41 “Fine Magnification”.
You cannot combine several functions.
The selected functions cannot be used together.
Check the combination of set-tings, and set again. See p.97 “Combination Chart”.
Problem Causes Solutions
DolphinC2_ENcopy_F_FM.book Page 74 Friday, February 25, 2005 10:46 AM

75
4. User Tools (Copier /Document Server Features)
User Tools Menu (Copier / Document Server Features)
Note❒ Depending on the options installed, not all items listed below may be dis-
played.
❖❖❖❖ General Features (see p.83 “General Features”)
User Tools item menu Default
Auto Paper Select Priority On
Auto Tray Switching With Image Rotation
Original Type Priority Drawing
Auto Image Density Priority Text: On
Drawing: On
Text/Photo: On
Photo: Off
Background Lines: On
Patched Original: On
Generation Copy: On
Copy Quality Text: Normal
Drawing: Normal
Text/Photo: Normal
Photo: Print Photo
Background Lines: Normal
Patched Original: Pale
Image Density Text: Normal
Drawing: Normal
Text/Photo: Normal
Photo: Normal
Background Lines: Normal
Patched Original:Normal
Generation Copy: Normal
Change Initial Mode Standard
Max. Copy Quantity 99 sheets
Job End Call On
DolphinC2_ENcopy_F_FM.book Page 75 Friday, February 25, 2005 10:46 AM

User Tools (Copier / Document Server Features)
76
4
❖❖❖❖ Reproduction Ratio (see p.85 “Reproduction Ratio”)
User Tools item menu Default
Custom Magnification Settings 1–3 Metric version:
• Setting 1: 70.7%
• Setting 2: 100.0%
• Setting 3: 141.4%
Inch version (Engineering):
• Setting 1: 64.7%
• Setting 2: 100.0%
• Setting 3: 129.4%
Inch version (Architecture):
• Setting 1: 66.7%
• Setting 2: 100.0%
• Setting 3: 133.3%
Enlarge 1–4 Metric version:
• Enlarge 1: 141.4%
• Enlarge 2: 200.0%
• Enlarge 3: 282.8%
• Enlarge 4: 400.0%
Inch version (Engineering):
• Enlarge 1: 129.4%
• Enlarge 2: 200.0%
• Enlarge 3: 258.8%
• Enlarge 4: 400.0%
Inch version (Architecture):
• Enlarge 1: 133.3%
• Enlarge 2: 200.0%
• Enlarge 3: 266.7%
• Enlarge 4: 400.0%
DolphinC2_ENcopy_F_FM.book Page 76 Friday, February 25, 2005 10:46 AM

User Tools Menu (Copier / Document Server Features)
77
4
Reduce 1–4 Metric version:
• Reduce 1: 25.0%
• Reduce 2: 35.4%
• Reduce 3: 50.0%
• Reduce 4: 70.7%
Inch version (Engineering):
• Reduce 1: 25.0%
• Reduce 2: 32.4%
• Reduce 3: 50.0%
• Reduce 4: 64.7%
Inch version (Architecture):
• Reduce 1: 25.0%
• Reduce 2: 33.3%
• Reduce 3: 50.0%
• Reduce 4: 66.7%
Priority Setting: Reduce/Enlarge 100.0%
User Auto R/E Metric version
A0 : A0/ A1 : A1/ A2 : A2/ A3 : A3/A4 : A4/B1 JIS : B1 JIS / B2 JIS : B2 JIS / B3 JIS : B3 JIS / B4 JIS : B4 JIS
Inch version (Engineering)
34×44 : 34×44/22×34 : 22×34/17×22 : 17×22/11×17 : 11×17/81/2×11 : 81/2×11
Inch version (Architecture)
36×48 : 36×48/24×36 : 24×36/18×24 : 18×24/12×18 : 12×18/9×12 : 9×12
Manification Key Display Engineering
User Tools item menu Default
DolphinC2_ENcopy_F_FM.book Page 77 Friday, February 25, 2005 10:46 AM

User Tools (Copier / Document Server Features)
78
4
❖❖❖❖ Edit (see p.87 “Edit”)
❖❖❖❖ Stamp (see p.90 “Stamp”)
User Tools item menu Default
Adjust Position —
Erase Border Width Metric version
10 mm
Inch version
0.4"
Erase Original Shadow in Combine Yes
Image Repeat Separation Line None
Double Copies Separation Line None
Separation Line in Combine None
Copy Order in Combine From Left to Right
Program / Delete Format —
Margin Adjustment Priority —
Partial Copy Priority —
User Tools item menu Default
Bac
kgro
und
N
um
beri
ng
Size Normal
Density Normal
Pre
set S
tam
p
Stamp Priority COPY
Stamp Language English
Stamp Position Metric version
• Position: Top Right
• Top Margin: 24 mm
• Right Margin: 24 mm
Inch version
• Position: Top Right
• Top Margin: 1.0"
• Right Margin: 1.0"
Stamp Format Size: 1X
Density: Normal
Page to Stamp: All Pages
DolphinC2_ENcopy_F_FM.book Page 78 Friday, February 25, 2005 10:46 AM

User Tools Menu (Copier / Document Server Features)
79
4
Use
r St
amp
Program / Delete Stamp —
Stamp Position: 1–4 Metric version
• Position: Top Right
• Top Margin: 24 mm
• Right Margin: 24 mm
Inch version
• Position: Top Right
• Top Margin: 1.0"
• Right Margin: 1.0"
Stamp Format: 1–4 All Pages
Dat
e St
amp
Format Metric version:
DD/MM/YYYY
Inch version:MM/DD/YYYY
Font Font 1
Stamp Position Metric version
• Position: Top Left
• Top Margin: 8 mm
• Right Margin: 32 mm
Inch version
• Position: Top Left
• Top Margin: 0.3"
• Right Margin: 0.8"
Stamp Setting All Pages
Size Auto
Superimpose No
Pag
e N
umbe
ring
Stamp Format P1, P2...
Font Font 1
Size Auto
Page Numbering in Combine Per Original
Stamp Position Metric version
• PositionP1, 1/5, P.1, 1: Top Right-1-, 1-1: Bottom Center
Inch version
• PositionP1, 1/5, P.1, 1: Top Right-1-, 1-1: Bottom Center
Superimpose No
Page Numbering Initial Letter P1, P2.../P.1, P.2...
User Tools item menu Default
DolphinC2_ENcopy_F_FM.book Page 79 Friday, February 25, 2005 10:46 AM

User Tools (Copier / Document Server Features)
80
4
❖❖❖❖ Input / Output (see p.96 “Input / Output”)
❖❖❖❖ Administrator Tools (see “Menu Protect”, Security Reference)
User Tools item menu Default
Rotate Sort: Auto Paper Continue No
User Tools item menu Default
Menu Protect Level 2
DolphinC2_ENcopy_F_FM.book Page 80 Friday, February 25, 2005 10:46 AM

Accessing User Tools (Copier Features)
81
4
Accessing User Tools (Copier Features)
This section is for key operators incharge of this machine. You canchange or set the machine's defaultsettings.
Note❒ Be sure to exit User Tools and re-
turn to the initial copy display af-ter all settings are made. Thissection describes system settingsyou can set for the copier function.
❒ Any changes you make with UserTools remain in effect even if themain power switch or operationswitch is turned off, or the {{{{ClearModes}}}} key is pressed.
ReferenceFor details about System Settings,see “User Tools Menu (System Set-tings)”, General Settings Guide.
Changing Default Settings
AAAA Press the {{{{User Tools/Counter}}}} key.
The User Tools main menu ap-pears.
Note❒ When Basic Authentication, Win-
dows Authentication, or LDAPAuthentication is set, the au-thentication screen will be dis-played. Enter your login nameand login password, and thenpress [Login].
BBBB Press [Copier / Document Server Fea-tures].
The Copier / Document ServerFeatures menu is displayed.
CCCC Select the menu you want to makesettings.
The setting display for each menuis displayed.
Referencep.75 “User Tools Menu (Copier/ Document Server Features)”
DDDD Change settings by following theinstructions on the display panel,and then press [OK].
AHD101S
DolphinC2_ENcopy_F_FM.book Page 81 Friday, February 25, 2005 10:46 AM

User Tools (Copier / Document Server Features)
82
4
Exiting User Tools
AAAA After changing default settings,press [Exit] on the User Tools mainmenu.
Changes to User Tools are com-plete, and the machine is ready tocopy.
Note❒ You can also exit User Tools by
pressing the {{{{User Tools/Counter}}}}key.
AHD101S
DolphinC2_ENcopy_F_FM.book Page 82 Friday, February 25, 2005 10:46 AM

Settings You Can Change with User Tools
83
4
Settings You Can Change with User Tools
For details about displaying settings, see p.81 “Accessing User Tools (CopierFeatures)”.
General Features
❖❖❖❖ Auto Paper Select PriorityAuto Paper Select is the defaultsetting. You can cancel this setting.See p.29 “Selecting Copy Paper”.
Note❒ Default: On
❖❖❖❖ Auto Tray SwitchingIf you load paper of the same sizein two or more trays, the machineautomatically shifts to the otherwhen the first tray runs out of pa-per (when Auto Paper Select is se-lected.) This function is called“Auto Tray Switching”. This set-ting specifies whether to use AutoTray Switching or not.
Note❒ Default: With Image Rotation
• [With Image Rotation] Use to copywhen using the Auto TraySwitching function.
1. Original
2. Paper (Tray 1)
3. Paper (Other paper tray)
4. Paper (Other paper tray)
Limitation❒ Paper may not rotate for
some functions.• [Without Image Rotation] Only
copies with Auto Tray Switch-ing if you load paper of thesame size and in the same orien-tation in two or more trays. Ifthe paper is not the same size orin the same orientation, copyingis interrupted and the message“Load paper” is displayed.
ZGVX020E
DolphinC2_ENcopy_F_FM.book Page 83 Friday, February 25, 2005 10:46 AM

User Tools (Copier / Document Server Features)
84
41. Original
2. Paper (Tray 1)
3. Paper (Other paper tray)
4. Paper (Other paper tray)• [Off] When a paper tray runs out
of paper, copying is interruptedand the message “Load paper”is displayed.
❖❖❖❖ Original Type PriorityYou can select the type of originalseffective when the machine isturned on or reset, or when modesare cleared.
Note❒ Default: Drawing
❖❖❖❖ Auto Image Density PriorityYou can set whether Auto ImageDensity is “On” or “Off” when themachine is turned on, reset, ormodes are cleared.
Note❒ Default:
• Text: On• Drawing: On
• Text/Photo: On
• Photo: Off
• Background Lines: On• Patched Original: On
• Generation Copy: On
❖❖❖❖ Copy QualityAdjusts the finish for each originaltype (Text, Drawing, Text/Photo,Photo, Background Lines, PatchedOriginal, Generation Copy).
Note❒ [Custom Setting]: Your service
representative will set this tomeet your requirements. Fordetails, consult your servicerepresentative.
• TextAdjusts line and character out-line quality in the copy image.
Note❒ Default: Normal
❒ Character outline is less de-fined when [Soft] is selected;more defined when [Sharp] isselected.
• DrawingAdjusts the line density andlighter sections of image.
Note❒ Default: Normal
❒ Originals that have light pen-cil lines can be reproducedwith greater clarity when[Soft] is selected. When[Sharp] is selected, pencill ines can be reproducedclearly with improved clari-ty.
• Text / PhotoYou can select to prioritize thecopy image of “Text” or “Pho-to” when copying originals con-tain photographs and the text.
Note❒ Default: Normal
❒ When [Normal] is selected, anoriginal containing a mixtureof text and photographs canbe reproduced.
ZGVX030E
DolphinC2_ENcopy_F_FM.book Page 84 Friday, February 25, 2005 10:46 AM

Settings You Can Change with User Tools
85
4
• PhotoYou can configure the machineto copy originals with photo-graphs.
Note❒ Default: Print Photo
❒ Select [Print Photo] when copy-ing originals with photo-graphs such as magazines orcatalogues. A smooth finishimage can be reproduced.
❒ Select [Glossy Photo] whencopying developed photo-graphs. The text containedwithin the photographs canbe reproduced appropriate-ly.
• Background Lines
Note❒ Default: Normal
• Patched Original
Note❒ Default: Pale
❖❖❖❖ Image DensitySpecifies the copy image densityfor each original type (Text, Draw-ing, Text/Photo, Photo, Back-ground Lines, Patched Original,Generation Copy).
Note❒ Default: Normal
❖❖❖❖ Change Initial ModeYou can select standard mode orProgram No.10 as the mode effec-tive when power is turned on, ormodes are cleared.
Note❒ Default: Standard
❖❖❖❖ Max. Copy QuantitySpecifies the maximum number ofcopies that can be set.
Note❒ Default: 99 sheets
❒ The number can be set from 1 to99 sheets using the numberkeys.
❖❖❖❖ Job End CallYou can choose to have the beepersound when copying is complete.
Note❒ Default: On
❒ If Panel Tone of User Tools (Sys-tem Settings) settings is [On], themachine beeps to notify youthat it did not complete a job forreasons such as: the paper trayran out of paper, or a paper mis-feed occurred. See “PanelTone”, General Settings Guide.
Reproduction Ratio
❖❖❖❖ Custom Magnification Settings 1–3You can store up to three repro-duction ratios, and have themshown on the initial display. Youcan also change registered Reduce/ Enlarge ratios.Enter the reproduction ratio usingthe number keys.The value can be set from 25.0% to400.0%.Use the {{{{·}}}} key to enter a decimalpoint.
Note❒ Default:
• Metric version:• Settings 1: 70.7%
• Settings 2: 100%• Settings 3: 141.4%
DolphinC2_ENcopy_F_FM.book Page 85 Friday, February 25, 2005 10:46 AM

User Tools (Copier / Document Server Features)
86
4
• Inch version: (Engineering)• Settings 1: 64.7%
• Settings 2: 100%
• Settings 3: 129.4%• Inch version: (Architecture)
• Settings 1: 66.7%
• Settings 2: 100%
• Settings 3: 133.3%
❖❖❖❖ Enlarge 1–4You can customize available en-largement ratios by pressing [Re-duce / Enlarge].
Note❒ Default:
• Metric version:• Enlarge 1: 141.4%
• Enlarge 2: 200%
• Enlarge 3: 282.8%• Enlarge 4: 400%
• Inch version: (Engineering)• Enlarge 1: 129.4%
• Enlarge 2: 200%• Enlarge 3: 258.8%
• Enlarge 4: 400%
• Inch version: (Architecture)• Enlarge 1: 133.3%• Enlarge 2: 200%
• Enlarge 3: 266.7%
• Enlarge 4: 400%
❒ When selecting [User Enlrg. Ra-tio], enter a ratio using the num-ber keys (in the range of 101.0 to400.0%).
❖❖❖❖ Reduce 1–4You can customize available re-duction ratios by pressing [Reduce /Enlarge].
Note❒ Default:
• Metric version:• Reduce 1: 25.0%• Reduce 2: 35.4%
• Reduce 3: 50.0%
• Reduce 4: 70.7%
• Inch version: (Engineering)• Reduce 1: 25.0%
• Reduce 2: 32.4%
• Reduce 3: 50.0%
• Reduce 4: 64.7%• Inch version: (Architecture)
• Reduce 1: 25.0%
• Reduce 2: 33.3%
• Reduce 3: 50.0%• Reduce 4: 66.7%
❒ When selecting [User Redc.Ra-tio], enter a ratio using the num-ber keys (in the range of 25.0 to99.9%).
❖❖❖❖ Priority Setting : Reduce / EnlargeYou can set the ratio with prioritywhen [Reduce / Enlarge] is pressed.
Note❒ Default: 100%❒ The values you set in Enlarge 1–
4 and Reduce 1–4 can be select-ed here.
❖❖❖❖ User Auto R/ESpecifies original and copy sizesdisplayed when [User Auto R/E] ispressed. See p.35 “User Auto Re-duce/Enlarge”.Select the copy size to use with theoriginal size.
DolphinC2_ENcopy_F_FM.book Page 86 Friday, February 25, 2005 10:46 AM

Settings You Can Change with User Tools
87
4
❖❖❖❖ Magnification Key DisplaySpecifies which scale's reproduc-tion ratios shown on the initial dis-play.
Note❒ Default: Engineering
Edit
❖❖❖❖ Adjust PositionSpecifies the default setting forPrint Position Adjustment. Seep.61 “Adjust Print Position”.
Note❒ Default:
• Metric version: Bottom: 20 mm/Right: 20 mm
• Inch version: Bottom: 0.8"/Right: 0.8"
❒ You can adjust the position with-in the following range:• Metric version: 0– 200 mm (1
mm increments)• Inch version: 0– 7.8" (0.1" in-
crements)
❖❖❖❖ Erase Border WidthSpecifies the default setting forErase Border. See p.48 “Erase Bor-der”.
Note❒ Default:
• Metric version: 10 mm
• Inch version: 0.4"❒ The width can be set as follows:
• Metric version: 2 mm - 99 mm(1 mm increments)
• Inch version: 0.1" - 2.0" (0.1"increments)
❖❖❖❖ Erase Original Shadow in CombineIn Combine Copy mode, you canspecify whether to erase a 3 mm,0.1" bounding margin around allfour edges of each original.
Note❒ Default: Yes
❖❖❖❖ Image Repeat Separation LineSpecifies a separation line typewhen using the Image Repeatfunction. • None
• Solid
• Broken A
• Broken B
• Crop Marks
Note❒ Default: None
❖❖❖❖ Double Copies Separation LineSpecifies a separation line whenusing the Double Copies function.• None
DolphinC2_ENcopy_F_FM.book Page 87 Friday, February 25, 2005 10:46 AM
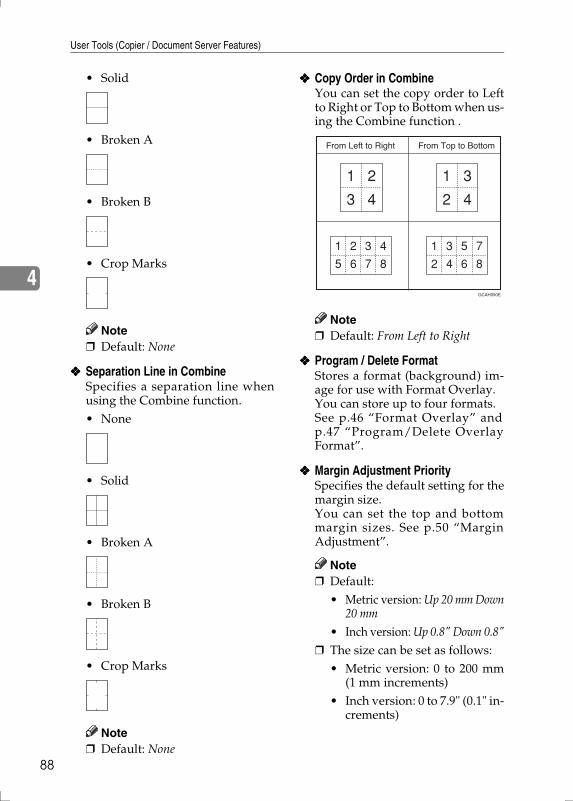
User Tools (Copier / Document Server Features)
88
4
• Solid
• Broken A
• Broken B
• Crop Marks
Note❒ Default: None
❖❖❖❖ Separation Line in CombineSpecifies a separation line whenusing the Combine function.• None
• Solid
• Broken A
• Broken B
• Crop Marks
Note❒ Default: None
❖❖❖❖ Copy Order in CombineYou can set the copy order to Leftto Right or Top to Bottom when us-ing the Combine function .
Note❒ Default: From Left to Right
❖❖❖❖ Program / Delete FormatStores a format (background) im-age for use with Format Overlay.You can store up to four formats.See p.46 “Format Overlay” andp.47 “Program/Delete OverlayFormat”.
❖❖❖❖ Margin Adjustment PrioritySpecifies the default setting for themargin size.You can set the top and bottommargin sizes. See p.50 “MarginAdjustment”.
Note❒ Default:
• Metric version: Up 20 mm Down20 mm
• Inch version: Up 0.8" Down 0.8"
❒ The size can be set as follows:• Metric version: 0 to 200 mm
(1 mm increments)• Inch version: 0 to 7.9" (0.1" in-
crements)
GCAH090E
DolphinC2_ENcopy_F_FM.book Page 88 Friday, February 25, 2005 10:46 AM

Settings You Can Change with User Tools
89
4
❖❖❖❖ Partial Copy PrioritySpecifies the default settings of thestart position (Y1) and the copysize (Y2).
Note❒ Default:
• Metric version: Y1: 0 mm, Y2:210 mmInch version: Y1: 0", Y2: 8.3"
❒ The size can be set as follows:• Metric version: Y1: 0 to 14790
mm (1 mm increments), Y2:210 mm to 15000 mm (1 mmincrements)
• Inch version: Y1: 0 to 582.3"(0.1" increments), Y2: 8.3" to590.6"
DolphinC2_ENcopy_F_FM.book Page 89 Friday, February 25, 2005 10:46 AM

User Tools (Copier / Document Server Features)
90
4
Stamp
Background Numbering
❖❖❖❖ SizeMake settings for the size of background numbers. See p.51 “BackgroundNumbering”.
Note❒ Default: Normal
❖❖❖❖ DensityMake settings for the density of background numbers. See p.51 “BackgroundNumbering”.
Note❒ Default: Normal
Preset Stamp
❖❖❖❖ Stamp PriorityYou can select the stamp type given priority when [Preset Stamp] is pressed.See p.52 “Preset Stamp”.
Note❒ Default: COPY
❖❖❖❖ Stamp LanguageYou can select the language of the stamp.
Note❒ Default: English
❖❖❖❖ Stamp PositionYou can set the position where the stamp is printed.Press the arrow keys to adjust the position.
Note❒ Default:
• Metric version:• Position: Top Right
• Top Margin: 24 mm
• Right Margin: 24 mm
DolphinC2_ENcopy_F_FM.book Page 90 Friday, February 25, 2005 10:46 AM

Settings You Can Change with User Tools
91
4
• Inch version:• Position: Top Right
• Top Margin: 1.0"
• Right Margin: 1.0"
❖❖❖❖ Stamp FormatYou can adjust the stamp's size, density, and print page.• Size
You can set the size of the stamp.
Note❒ Default: 1 X
• DensityYou can set the pattern used to print the stamp.
Note❒ Default: Normal❒ Normal: The stamp is printed on the image. You cannot check which
parts will overlap.❒ Lighter: The image can be seen through the stamp.❒ Lightest: The image appears even clearer than in the Lighter setting.
• Print PageYou can have the stamp printed on the first page or all pages.
Note❒ Default: All Pages
DolphinC2_ENcopy_F_FM.book Page 91 Friday, February 25, 2005 10:46 AM

User Tools (Copier / Document Server Features)
92
4
User Stamp
❖❖❖❖ Program / Delete StampYou can store, change, or delete a design of your choice as a user stamp.
Note❒ You can store up to four user stamps. See p.53 “User Stamp”.
ReferenceFor details about deleting user stamps, see p.55 “Program/Delete UserStamp”.
❖❖❖❖ Stamp Position 1 - 4You can set the position where the stamp is printed.Press the arrow keys to adjust the position.
Note❒ Default:
• Metric version:• Position: Top Right• Top Margin: 24 mm
• Right Margin: 24 mm
• Inch version:• Position: Top Right• Top Margin: 1.0"
• Right Margin: 1.0"
❖❖❖❖ Stamp Format 1 - 4You can adjust the print page for User Stamps 1 to 4 already registered.• Page to Stamp
Sets whether to print the stamp on all pages or only the first page.
DolphinC2_ENcopy_F_FM.book Page 92 Friday, February 25, 2005 10:46 AM

Settings You Can Change with User Tools
93
4
Note❒ Default: All Pages
Date Stamp
❖❖❖❖ Format You can specify the date stamp format.
Note❒ Default:
• Metric version: DD/MM/YYYY
• Inch version: MM/DD/YYYY
❖❖❖❖ FontYou can select the Date Stamp font.
Note❒ Default: Font 1❒ This setting is linked to the Page Numbering function.
❖❖❖❖ Stamp PositionYou can set the position where the stamp is printed.Press the arrow keys to adjust the position.
Note❒ Default:
• Metric version:• Position: Top Left
• Top Margin: 8 mm
• Left Margin: 32 mm• Inch version:
• Position: Top Left
• Top Margin: 0.3"
• Left Margin: 0.8"
DolphinC2_ENcopy_F_FM.book Page 93 Friday, February 25, 2005 10:46 AM

User Tools (Copier / Document Server Features)
94
4
❖❖❖❖ Stamp SettingYou can have the date printed on the first page or all pages.
Note❒ Default: All Pages
❖❖❖❖ SizeYou can set the Date Stamp size.
Note❒ Default: Auto
❖❖❖❖ SuperimposeYou can have the Date Stamp printed in white where it overlaps black partsof the image.
Note❒ Default: No
Page Numbering
❖❖❖❖ Stamp FormatYou can select the page number format given priority when [Page Numbering]is pressed.
Note❒ Default: P1, P2...
❖❖❖❖ FontYou can select the page number font.
Note❒ Default: Font 1
❖❖❖❖ SizeYou can set the size of the page number.
Note❒ Default: Auto
❖❖❖❖ Page Numbering in CombineYou can set page numbering when using the Combine and Page Numberingfunction together.
Note❒ Default: Per Original
DolphinC2_ENcopy_F_FM.book Page 94 Friday, February 25, 2005 10:46 AM

Settings You Can Change with User Tools
95
4
❖❖❖❖ Stamp PositionP1, P2... Stamp Position: 1/5, 2/5... Stamp Position: –1–, –2–... Stamp Position:P.1, P.2. Stamp Position: 1, 2... Stamp Position: 1–1, 1–2...You can set the position where the stamp is printed.Press the arrow keys to adjust the position.
❖❖❖❖ SuperimposeYou can have page numbers printed in white where they overlap black partsof the image.
Note❒ Default: No
❖❖❖❖ Page Numbering Initial LetterYou can select the page numbering initial letter between "P.1, P.2 ..." and "S.1,S.2...".
Note❒ Default: P.1, P.2...
DolphinC2_ENcopy_F_FM.book Page 95 Friday, February 25, 2005 10:46 AM

User Tools (Copier / Document Server Features)
96
4
Input / Output
❖❖❖❖ Rotate Sort: Auto Paper ContinueYou can continue copying whenpaper of the required orientationhas run out during rotate-sorting.See p.33 “Sort/Rotate Sort”.
Note❒ If you select [No] :
• When paper of the requiredorientation runs out, the ma-chine stops copying andprompts you to supply copypaper. When you load paper,the machine will continuecopying.
❒ If you select [Yes] : • Copying continues using copy
paper of a different orienta-tion. The copy job will finisheven if the machine is left un-attended.
❒ Default: No
Administrator Tools
❖❖❖❖ Menu ProtectYou can prevent unauthenticatedusers from changing User Toolssettings.For details, consult the administra-tor.
DolphinC2_ENcopy_F_FM.book Page 96 Friday, February 25, 2005 10:46 AM

97
5. Specifications
Combination Chart
The combination chart below shows modes that can be used together. The fol-lowing tables explains the symbols used in the chart.
*1: When there is no appropriate preset cut size paper in the selected tray, thefunction selected first has priority.
means that these functions can be used together.
× means that these functions cannot be used together. The second function selected will be the function you are working in.
$ means that these functions cannot be used together. The first func-tion selected will be the function you are working in.
AHD013S
DolphinC2_ENcopy_F_FM.book Page 97 Friday, February 25, 2005 10:46 AM

Specifications
98
5
Supplementary Information
❖❖❖❖ Auto Start• The warm-up time is longer when scanning long length originals.
❖❖❖❖ Job Preset• When the paper size in Job Preset is as the same as that of the copy job in
progress, the number of sheets that can be set is as follows:
❖❖❖❖ Metric version:
❖❖❖❖ Inch version:
*1 Depending on the settings, you may be able to preset more sheets than themaximum number.
• The maximum number of jobs that can be preset is 9.• Depending on the size of original, you may not be able to preset more jobs
even if below the maximum.
❖❖❖❖ Selecting Copy Paper• If you change the paper type, copying may take longer to start.• When Auto Paper Select is selected, copying may take slightly longer since
the machine selects the copy paper after scanning the original.
Paper size Maximum number of sheets
A0 50 sheets *1
A1 100 sheets
A2 200 sheets
A3 400 sheets
A4 400 sheets
Paper size Maximum number of sheets
E 50 sheets *1
D 100 sheets
C 200 sheets
B 400 sheets
A 400 sheets
DolphinC2_ENcopy_F_FM.book Page 98 Friday, February 25, 2005 10:46 AM

Supplementary Information
99
5
❖❖❖❖ Sort• You can use Sort for copy sizes up to A0(E).• The number of originals that can be scanned for Sort is as follows:
❖❖❖❖ Rotate Sort• You can use the following paper sizes with Rotate Sort:
• The number of originals that can be scanned for Rotate Sort is as follows:
❖❖❖❖ Preset Reduce/Enlarge• You can set the magnification ratio from 25.0 to 400.0%.• You can select one of 8 preset ratios (4 enlargement ratios, 4 reduction ratios).• The relationship between original size and paper size enlarged/reduced
by the preset ratios is as follows:
Paper size Number of sheets
A0(E) 50 sheets
A1(D) 100 sheets
A2(C) 200 sheets
A3(B) 400 sheets
A4(A) 400 sheets
Metric version 420 mm × 297 mm (A3)KL
594 mm × 420 mm (A2)KL
841 mm × 594 mm (A1)KL
515 mm × 364 mm (B3 JIS)KL
728 mm × 515 mm (B2 JIS)KL
Inch version
(Engineering)
11" × 17" (B)KL
17" × 22" (C)KL
22" × 34" (D)KL
Inch version
(Architecture)
12" × 18" (B)KL
18" × 24" (C)KL
24" × 36" (D)KL
Paper size Number of sheets
A2(C) 200 sheets
A3(B) 400 sheets
A4(A) 400 sheets
DolphinC2_ENcopy_F_FM.book Page 99 Friday, February 25, 2005 10:46 AM

Specifications
100
5
❖❖❖❖ Metric version
❖❖❖❖ Inch version (Engineering)
❖❖❖❖ Inch version (Architecture)
• You can select a ratio regardless of original size, or paper roll cut method.With certain ratios, parts of the image might not copy or margins will ap-pear.
Ratio (%) Original size →→→→ Paper size
400.0 (16 times in area ratio) A4→A0
282.8 (8 times in area ratio) A3→A0, A4→A1, B4→B1
200.0 (twice in area ratio) A2→A0, A3→A1, A4→A2, B3→B1, B4→B2
141.4 (1/2 in area ratio) A1→A0, A2→A1, A3→A2, A4→A3, B2→B1, B3→B2, B4→B3
70.7 (1/4 in area ratio) A0→A1, A1→A2, A2→A3, A3→A4, B1→B2, B2→B3, B3→B4
50.0 A0→A2, A1→A3, A2→A4, B1→B3, B2→B4
35.4 A0→A3, A1→A4, B1→B4
25.0 A0→A4
Ratio(%) Original size →→→→ Paper size
400.0 A → E
258.8 A → D, B → E
200.0 A → C, B → D, C → E
129.4 A → B, B → C, C → D, D → E
64.7 B → A, C → B, D → C, E → D
50.0 C → A, D → B, E → C
32.4 D → A, E → B
25.0 E → A
Ratio(%) Original size →→→→ Paper size
400.0 A → E
266.7 A → D, B → E
200.0 A → C, B → D, C → E
133.3 A → B, B → C, C → D, D → E
66.7 B → A, C → B, D → C, E → D
50.0 C → A, D → B, E → C
33.3 D → A, E → B
25.0 E → A
DolphinC2_ENcopy_F_FM.book Page 100 Friday, February 25, 2005 10:46 AM

Supplementary Information
101
5
❖❖❖❖ Zoom• You can set the magnification ratio from 25.0 to 400.0%.• You can select a ratio regardless of original size, or paper roll cut method.
With certain ratios, parts of the image might not copy or margins will ap-pear.
❖❖❖❖ Size Magnification• You can set the magnification ratio from 25.0 to 400.0%.• If the calculated ratio is over the maximum or under the minimum ratio, it
is automatically adjusted within the available range. With certain ratios,parts of the image might not copy or margins will appear.
• You cannot use Size Magnification if Auto Paper Select is selected.
❖❖❖❖ Directional Magnification (%)• You can set the magnification ratio from 25.0 to 400.0%.• You can enter a ratio (%) regardless of original and copy paper size. With
certain ratios, parts of the image might not copy or margins will appear.
❖❖❖❖ Directional Size Magnification• You can set the magnification ratio from 25.0 to 400.0%.• If the calculated ratio is over the maximum or under the minimum ratio, it
is automatically adjusted within the available range. With certain ratios,parts of the image might not copy or margins will appear.
• You cannot use Directional Size Magnification if Auto Paper Select is se-lected.
❖❖❖❖ Fine Magnification• When using Fine Magnification, moiré patterns may be noticeable, or the
image quality may deteriorate depending on the image patterns of theoriginals.
❖❖❖❖ Image Repeat• Depending on paper size and reproduction ratio, the repeated images may
be cropped.• You can use Image Repeat for copy sizes up to A0(E).• If you have used Image Repeat with the stamp function, you cannot delete
only the repeated image when using Additional Copy.• When using Image Repeat with the Adjust Print Position function togeth-
er, the repeated images will be shifted as a whole.• When using Image Repeat with the Format Overlay function together, the
composite image will be repeated.
❖❖❖❖ Double Copies• You can copy an image up to A2 (C) K size using Double Copies. You can
use paper sizes up to A0 (E) K.
DolphinC2_ENcopy_F_FM.book Page 101 Friday, February 25, 2005 10:46 AM

Specifications
102
5
❖❖❖❖ Format Overlay• When the sizes of the format (background original) and original to be over-
laid on the format are different, the image is created at the size of the over-laid original.
• The maximum paper size is A0 (E). However, if you create a copy usingA0(E) size paper, the composite image data is lost.
• When scanning the format (background original), the output image maybe blurred. If this happens, copy the format, and then use it as the back-ground original.
• When using the Format Overlay function, image quality may deteriorate.• You cannot change the image density of a format original. To achieve a de-
sired image density, scan an original with the image density changed be-forehand.
❖❖❖❖ Erase Border• You can specify the width of the erased border margins from 2 to 99 mm
(0.1" to 3.9") in increments of 1 mm (0.1").
❖❖❖❖ Erase Inside• By combining “Erase Inside 1”– ”Erase Inside 5”, you can erase up to 5 ar-
eas at the same time.
❖❖❖❖ Margin Adjustment• You can specify margins from 0 to 200 mm (0 to 7.9") in increments of 1 mm
(0.1").
❖❖❖❖ Preset Stamp• You can stamp onto paper sizes up to A0 (E) K.• When you change the size of the stamp, it may be cropped depending on
the paper size.
❖❖❖❖ User Stamp• You can stamp onto paper sizes up to A0 (E) K.
❖❖❖❖ Date Stamp• You can stamp onto paper sizes up to A0 (E) K.
❖❖❖❖ Page Numbering• When using page numbering with the paper bypass selected, the stamp
position is based on original size multiplied by the magnification ratio.
DolphinC2_ENcopy_F_FM.book Page 102 Friday, February 25, 2005 10:46 AM

Supplementary Information
103
5
❖❖❖❖ Adjust Print Position• You can adjust the print position from 200 mm (7.9") left to 200 mm (7.9")
right, and from 200 mm (7.9") up to 200 mm (7.9") down in increments of 1mm (0.1").
• If you set the margin too long for the original, parts of the image might notcopy.
• When using with the stamp functions, the stamp position moves accordingto the orientation and length of the print position setting.
• You can use this function for copy sizes up to A0 (E) K.
DolphinC2_ENcopy_F_FM.book Page 103 Friday, February 25, 2005 10:46 AM

Specifications
104
5
Scan Size Limitations, by Function
The following chart shows scan size limitations for the Adjust Print Position,Margin Adjustment, Edit, and Stamp functions.
Adjust Print Position A0(E) or smaller
Margin Adjustment 15 m or smaller
Format Overlay A0(E)
Erase Erase Inside A0(E) or smaller, 5 locations
Erase Outside 15 m or smaller
Erase Inside, Erase Border, and Format Overlay Combinations
A0(E)
Erase Outside and Format Over-lay Combinations
A0(E)
Positive/Negative 15 m or smaller
Mirror Image 15 m or smaller
Double Copies A0(E)
Image Re-peat
with no other modes A0(E)
with Erase Border A0(E)
with Format Overlay A0(E)
Stamp A0(E)
DolphinC2_ENcopy_F_FM.book Page 104 Friday, February 25, 2005 10:46 AM

Settings Record Sheet
105
5
Settings Record Sheet
❖❖❖❖ Program Record Sheet
Make copies of this sheet to keep a record of your program settings.AHD014S
DolphinC2_ENcopy_F_FM.book Page 105 Friday, February 25, 2005 10:46 AM

Specifications
106
5
❖❖❖❖ Stored Format Record Sheet
Make copies of this sheet to keep a record of your format settings.AHD015S
DolphinC2_ENcopy_F_FM.book Page 106 Friday, February 25, 2005 10:46 AM

Settings Record Sheet
107
5
❖❖❖❖ User Stamp Record Sheet
Make copies of this sheet to keep a record of your user stamps.
DolphinC2_ENcopy_F_FM.book Page 107 Friday, February 25, 2005 10:46 AM

Specifications
108
5
Magnification Ratio Chart
❖❖❖❖ Metric version
❖❖❖❖ Inch version (Engineering)
❖❖❖❖ Inch version (Architecture)
Copy size (mm)
% A0 A1/B1 A2/B2 A3/B3 A4/B4
Ori
gina
l siz
e
A0 100.0 70.7 50.0 35.4 25.0
A1/B1 141.4 100.0 70.7 50.0 35.4
A2/B2 200.0 141.4 100.0 70.7 50.0
A3/B3 282.8 200.0 141.4 100.0 70.7
A4/B4 400.0 282.8 200.0 141.4 100.0
Copy size (in)
% E D C B A
Ori
gina
l siz
e
E 100.0 64.7 50.0 32.4 25.0
D 129.4 100.0 64.7 50.0 32.4
C 200.0 129.4 100.0 64.7 50.0
B 258.8 200.0 129.4 100.0 64.7
A 400.0 258.8 200.0 129.4 100.0
Copy size (in)
% E D C B A
Ori
gina
l siz
e
E 100.0 66.7 50.0 33.3 25.0
D 133.3 100.0 66.7 50.0 33.3
C 200.0 133.3 100.0 66.7 50.0
B 266.7 200.0 133.3 100.0 66.7
A 400.0 266.7 200.0 133.3 100.0
DolphinC2_ENcopy_F_FM.book Page 108 Friday, February 25, 2005 10:46 AM

Settings Record Sheet
109
5
Measure Chart
❖❖❖❖ Metric version
❖❖❖❖ Inch version (Engineering)
❖❖❖❖ Inch version (Architecture)
Width × Length (mm)
A0 841 × 1189
A1 594 × 841
A2 420 × 594
A3 297 × 420
A4 210 × 297
B1 728 × 1030
B2 515 × 728
B3 364 × 515
B4 257 × 364
Width × Length (in)
E 34 × 44
D 22 × 34
C 17 × 22
B 11 × 17
A 81/2 × 11
Width × Length (in)
E 36 × 48
D 24 × 36
C 18 × 24
B 12 × 18
A 9 × 12
DolphinC2_ENcopy_F_FM.book Page 109 Friday, February 25, 2005 10:46 AM

110
INDEXA
Accessing user tools (Copier Features), 81Adjusting copy image density, 28Adjust Position, 87Adjust print position, 61, 103Administrator Tools, 96Auto image density, 28Auto image density priority, 84Auto paper select, 29Auto paper select priority, 83Auto reduce/enlarge, 35Auto start, 23, 98Auto tray switching, 83
B
Background Lines, 27Background numbering, 51, 90
density, 90size, 90
Basic procedure, 21Basics, 7Before Copying, 7
C
Change initial mode, 85Changing
number of sets, 34stored program, 66
Check Modes key, 3Clear Modes key, 3Clear/Stop key, 4Combination chart, 97Combine, 42Combined auto and manual density, 28Control panel, 3Copier functions, 27Copying, 21Copying from the paper bypass, 25Copy order in combine, 88Copy output locations, 10Copy Quality, 84Custom magnification Settings 1–3, 85Custom size originals, 17
D
Date stamp, 56, 93, 102font, 93format, 93position, 93size, 94stamp setting, 94superimpose, 94
Delete format, 88Deleting
program, 66Directional magnification (%), 39, 101Directional size magnification, 40, 101Display panel, 3, 5Document server, 63Double copies, 43, 101Double copies separation line, 87Drawing, 27
E
Edit, 87Energy Saver key, 3Enlarge 1–4, 86Erase border, 48, 102Erase border width, 87Erase inside, 49, 102Erase original shadow in combine, 87Erase outside, 50Exiting User Tools, 82
F
Fine magnification, 41, 101Format overlay, 46, 102Function keys, 4Function Status indicator, 4
G
General Features, 83Generation, 27
I
If you cannot make clear copies, 70If you cannot make copies as you want, 73If your machine does not
operate as you want, 67Image density, 85
DolphinC2_ENcopy_F_FM.book Page 110 Friday, February 25, 2005 10:46 AM

111
Image repeat, 43, 101Image repeat separation line, 87Indicators, 3Input/Output, 96
rotate sort − auto paper continue, 96Interrupt copy, 24Interrupt key, 3
J
Job end call, 85Job List key, 3Job preset, 23, 98
L
Long length original/paper, 2
M
Magnification key display, 87Magnification ratio chart, 108Main power indicator, 3Manual image density, 28Manual paper select, 30Margin adjustment, 50, 102Margin adjustment priority, 88Max. Copy Quantity, 85Measure chart, 109Menu protect, 96Mirror image, 45Missing image area, 14
N
Names of major options, 2Number keys, 4
O
On indicator, 3Operation switch, 4Original
combine, 42Original counter/reset, 22Original orientation, 16Original output locations, 8Originals, 12Original tray, 10Original type priority, 84
P
Page numbering, 58, 94, 102font, 94page numbering in combine, 94size, 94stamp format, 94stamp position, 95superimpose, 95
Partial copy, 44Partial copy priority, 89Patched Original, 27Photo, 27Placing custom size originals, 17Placing originals, 15Positive/negative, 44Preset cut, 32Preset reduce/enlarge, 36, 99Preset stamp, 52, 90, 102
stamp format, 91stamp language, 90stamp position, 90stamp priority, 90
Priority setting: reduce / enlarge, 86Program / Delete format, 88Program/Delete overlay format, 47Program/Delete user stamp, 55Program format, 88Program key, 3Programs, 65
R
Rear original exit (document roller), 9Rear original exit (straight), 9Recalling a program, 66Reduce 1–4, 86Reproduction Ratio, 85Rotate copy, 30Rotate sort, 33, 99
S
Sample copy, 34Sample Copy key, 4Scan size limitations, by function, 104Selecting copy paper, 29, 98Selecting original type setting, 27Separation line in combine, 88Setting Originals and Date Stamp
Position/Orientation, 57Settings record sheet, 105
DolphinC2_ENcopy_F_FM.book Page 111 Friday, February 25, 2005 10:46 AM

112 EN USA B188-6707
Settings you can change with user tools, 83Setting the carrier sheet, 18Setting the length of copy paper cut, 30Sharp (#) key, 4Size magnification, 38, 101Sizes and weights of recommended originals, 12Sort, 33, 99Specifications, 97Stamp, 90Start key, 4Storing
data, 63program, 65
Superimpose, 94, 95Supplementary information, 98Synchro cut, 31
T
Text, 27Text/Photo, 27Top original exit, 9Troubleshooting, 67
screen, 69
U
User Auto R/E, 86User auto reduce/enlarge, 35User stamp, 53, 92, 102
format, 92position, 92program / delete user stamp, 92
User Tools (Copier / Document Server Features), 75
User Tools/Counter key, 3
V
Variable cut, 32
W
What you can do with this machine, iiiWhen a message appears, 67Wide scan, 17
Z
Zoom, 37, 101
DolphinC2_ENcopy_F_FM.book Page 112 Friday, February 25, 2005 10:46 AM

Scanner OptionType 480
Operating Instructions
Scanner Reference
Read this manual carefully before you use this machine and keep it handy for future reference. For safe and correct use, be sure to read the SafetyInformation in the "General Settings Guide" before using the machine.
Getting Started
Sending Scan Files by E-mail
Sending Scan Files by Scan to Folder
Storing Files
Delivering Scan Files
Using the Network TWAIN Scanner Function
Configuring/Registering Scan Settings
Troubleshooting
Initial Scanner Setup
Appendix

Introduction
This manual contains detailed instructions and notes on the operation and use of this machine. For yoursafety and benefit, read this manual carefully before using the machine. Keep this manual in a handyplace for quick reference.
Two kinds of size notation are employed in this manual. With this machine refer to the inch version.
Important
Contents of this manual are subject to change without prior notice. In no event will the company be li-able for direct, indirect, special, incidental, or consequential damages as a result of handling or oper-ating the machine.
Do not copy or print any item for which reproduction is prohibited by law.
Copying or printing the following items is generally prohibited by local law:
bank notes, revenue stamps, bonds, stock certificates, bank drafts, checks, passports, driver's licens-es.
The preceding list is meant as a guide only and is not inclusive. We assume no responsibility for itscompleteness or accuracy. If you have any questions concerning the legality of copying or printing cer-tain items, consult with your legal advisor.
Trademarks
• Adobe®, PostScript®, and Acrobat® are trademarks of Adobe Systems Incorporated.
• Pentium® is a registered trademark of Intel Corporation.
• Microsoft®, Windows®, and Windows NT® are registered trademarks of Microsoft Corporation.
• Other product names used herein are for identification purposes only and might be trademarks oftheir respective companies. We disclaim any and all rights to those marks.
• The product name of Windows® 95 is Microsoft® Windows® 95.
• The product name of Windows® 98 is Microsoft® Windows® 98.
• The product name of Windows® Me is Microsoft® Windows® Millennium Edition (Windows Me).
• The product names of Windows® 2000 are as follows:Microsoft® Windows® 2000 ProfessionalMicrosoft® Windows® 2000 ServerMicrosoft® Windows® 2000 Advanced Server
• The product names of Windows® XP are as follows:Microsoft® Windows® XP Home EditionMicrosoft® Windows® XP Professional
• The product names of Windows ServerTM 2003 are as follows:Microsoft® Windows ServerTM 2003 Standard EditionMicrosoft® Windows ServerTM 2003 Enterprise EditionMicrosoft® Windows ServerTM 2003 Web Edition
• The product names of Windows NT® 4.0 are as follows:Microsoft® Windows NT® Workstation 4.0Microsoft® Windows NT® Server 4.0

i
Manuals for This Machine
The following manuals describe the operational procedures of this machine. Forparticular functions, see the relevant parts of the manual.
Note❒ The manuals provided are specific to machine type.❒ Adobe Acrobat Reader/Adobe Reader is necessary to view the manuals as a
PDF file.❒ Two CD-ROMs are provided:
• CD-ROM 1 "Operating Instructions"• CD-ROM 2 "Scanner Driver and Utilities"
❖❖❖❖ General Settings GuideProvides an overview of the machine and describes System Settings (such asTray Paper Settings), Document Server functions and troubleshooting.Refer to this manual for Address Book procedures such as registering e-mailaddresses and user codes.
❖❖❖❖ Security ReferenceThis manual is for administrators of this machine. It describes security func-tions that the administrators can use to protect data from being tampered, orprevent the machine from unauthorized use. Also refer to this manual for theprocedures for registering administrators, as well as setting user and admin-istrator authentication.
❖❖❖❖ Network Guide (PDF file - CD-ROM1)Provides information about configuring and operating the scanner (Type 480)in a network environment.For details about network settings of the scanner (RW480) and printer(RW480) , see the manual that comes with the related option.
❖❖❖❖ Copy ReferenceDescribes operations, functions, and troubleshooting for the machine's copierfunction.
❖❖❖❖ Scanner Reference (Scanner Option Type 480) (this manual) (PDF file - CD-ROM1)Describes operations, functions, and troubleshooting for the machine's scan-ner function.

ii
❖❖❖❖ Manuals for DeskTopBinder LiteDeskTopBinder Lite is a utility included on the CD-ROM labeled "ScannerDriver and Utilities".• DeskTopBinder Lite Setup Guide (PDF file - CD-ROM2)
Describes the installation of DeskTopBinder Lite, and the operating envi-ronment for DeskTopBinder Lite in detail. This guide can be displayedfrom the [Setup] dialog box when DeskTopBinder Lite is installed.
• DeskTopBinder Lite Introduction Guide (PDF file - CD-ROM2) Describes operations with DeskTopBinder Lite and provides an overviewof its functions. This guide is added to the [Start] menu when DeskTop-Binder Lite is installed.
• Auto Document Link Guide (PDF file - CD-ROM2) Describes operations and functions of Auto Document Link installed withDeskTopBinder Lite. This guide is added to the [Start] menu when Desk-TopBinder Lite is installed.
❖❖❖❖ Other manuals• Manuals for Printer (RW480) function• Manuals for Scanner (RW480) function

iii
TABLE OF CONTENTSManuals for This Machine ...................................................................................... iHow to Read This Manual .....................................................................................1
Symbols .....................................................................................................................1Names of Major Options ............................................................................................1
1. Getting Started
Control Panel..........................................................................................................3Network Scanner....................................................................................................5
E-mail .........................................................................................................................5Scan to Folder............................................................................................................6Store...........................................................................................................................7Network Delivery Scanner..........................................................................................8Network TWAIN Scanner ...........................................................................................9
Installing Software ...............................................................................................10Quick Install..............................................................................................................10TWAIN Driver ...........................................................................................................10DeskTopBinder ........................................................................................................11
User Authentication.............................................................................................12User Code Authentication (Using the Control Panel)...............................................12Login (Using the Control Panel) ...............................................................................12Log Off (Using the Control Panel) ............................................................................13
Programming E-mail Addresses and Folders ...................................................14Specifying How to Start Scanning .....................................................................15
2. Sending Scan Files by E-mail
Preparation for Sending by E-mail .....................................................................17E-mail Screen...........................................................................................................18
Sending Scan Files by E-mail .............................................................................19Procedure for Sending E-mail ..................................................................................19Simultaneous Storage and Sending by E-mail.........................................................28
Checking the E-mail Results...............................................................................30
3. Sending Scan Files by Scan to Folder
Preparation for Sending by Scan to Folder.......................................................31Scan to Folder Screen .............................................................................................32
Sending Scan Files by Scan to Folder...............................................................34Procedure for Sending by Scan to Folder ................................................................34Simultaneous Storage and Sending by Scan to Folder ...........................................41
Checking the Scan to Folder Results ................................................................42

iv
4. Storing Files
Storing Files .........................................................................................................43Storage Procedure ...................................................................................................44
Displaying the List of Stored Files .....................................................................47Viewing the List ........................................................................................................48Searching for Files ...................................................................................................49Sending Stored Files by E-mail or Scan to Folder, or Delivering .............................50Checking Stored Files from a Client Computer........................................................51
Managing Stored Files.........................................................................................53Deleting Files ...........................................................................................................53Changing File Information ........................................................................................53
5. Delivering Scan Files
Preparation for Delivering...................................................................................58Network Delivery Scanner Screen ...........................................................................59
Delivering Scan Files...........................................................................................60Delivery Procedure...................................................................................................60Simultaneous Storage and Delivery.........................................................................65
Checking the Status of Delivery .........................................................................67
6. Using the Network TWAIN Scanner Function
Preparation for Using the Network TWAIN Scanner.........................................69Scanning Originals ..............................................................................................70
7. Configuring/Registering Scan Settings
Specifying Scan Settings ....................................................................................73Specifying the Orientation and Output Tray of the Original ............................75
For E-mail, Scan to Folder, and a Network Delivery Scanner..................................75For a Network TWAIN Scanner................................................................................76
Scanning Multiple Pages into a Single File .......................................................77When a Time Limit Is Specified for Additional Originals ..........................................77When a Time Limit Is Not Specified for Additional Originals....................................78
Programs ..............................................................................................................80Registering a Program .............................................................................................80Recalling a Program.................................................................................................81Changing a Registered Program..............................................................................81Deleting a Program ..................................................................................................81Changing the Program Name ..................................................................................82

v
8. Troubleshooting
If Your Machine Does Not Operate As You Want..............................................83When Scanning Is Not Performed as Expected.......................................................83When the Delivery Function Does Not Work............................................................83When Stored Files Cannot Be Accessed .................................................................84Network Cannot Be Browsed When Sending a Scan File .......................................84The TWAIN Driver Cannot Be Started .....................................................................84Stored Files Cannot Be Edited.................................................................................84The Network Delivery Function Cannot Be Used.....................................................84Operations are not possible when messages appear ..............................................85
When a Message Is Displayed............................................................................86When an Error Message Appears on the Control Panel ..........................................86When an Error Message Appears on the Client Computer......................................92
9. Initial Scanner Setup
Scanner Features.................................................................................................95Adjusting Scanner Features ...............................................................................97Settings.................................................................................................................98
Scan Settings ...........................................................................................................98Destination List Settings.........................................................................................101Send Settings.........................................................................................................101Administrator Tools ................................................................................................103
10.Appendix
Relationship between Resolution and original size .......................................105When Using for E-mail, Scan to Folder, or Store, or as a Network Delivery Scanner ...106When Using as a Network TWAIN Scanner...........................................................108
Placing Originals................................................................................................109Software Supplied on CD-ROM ........................................................................110
Table of files...........................................................................................................110TWAIN Driver .........................................................................................................110DeskTopBinder ......................................................................................................111
Specifications for Transmission/Store/Delivery Functions ...........................112Transmission..........................................................................................................112Store.......................................................................................................................114The network delivery scanner function...................................................................114
Specifications.....................................................................................................115
INDEX....................................................................................................... 116

vi

1
How to Read This Manual
Symbols
In this manual, the following symbols are used:
ImportantIf this instruction is not followed, paper might be misfed, originals might bedamaged, or files might be lost. Be sure to read this.
PreparationThis symbol indicates the prior knowledge or preparations required before op-erating.
NoteThis symbol indicates precautions for operation or actions to take after misoper-ation.
LimitationThis symbol indicates numerical limits, functions that cannot be used together,or conditions in which a particular function cannot be used.
ReferenceThis symbol indicates a reference.
[ ]Keys that appear on the machine's display panel.
[ ]Keys and buttons that appear on the computer's display.
{ }Keys built into the machine's control panel.
{ }Keys on the computer's keyboard.
Names of Major Options
Major options of this machine are referred to as follows in this manual:• Scanner Option Type 480 → scanner optionThe following software products are referred to using a general name:• DeskTopBinder Lite and DeskTopBinder Professional* → DeskTopBinder• ScanRouter EX Professional* and ScanRouter EX Enterprise* → the ScanRout-
er delivery software* Optional

2

3
1. Getting Started
Control Panel
This illustration shows the control panel when options are installed.
1. IndicatorsDisplay errors and the machine status.See "Control Panel", General SettingsGuide.m: Data In Indicator (indicates data is be-ing received.).D: Add Toner indicatorL: Service Call indicatorM: Open Cover indicatorx: Misfeed indicator
2. {{{{User Tools/Counter}}}} keyUse to change default or operation pa-rameters according to the operating con-ditions.
3. Display panelDisplays the operation status and messages.
Note❒ Screenshots in this manual are exam-
ples and may differ from actualscreens.
4. {{{{Check Modes}}}} keyPress to check the destinations which arecurrently selected.
5. {{{{Program}}}} keyUse to register settings used frequently asa program or to recall the registered pro-gram.
6. {{{{Clear Modes}}}} keyPress to clear the current settings.
7. {{{{Energy Saver}}}} keyPress this key to begin warm-up.Pressing this key again while in warm-upmode cancels warm-up.
Note❒ This key is inactive while scanning or
setting scanner defaults.
8. {{{{Interrupt}}}} keyPress this key to interrupt the scannermode and to activate the copy mode.
9. Main power indicator and powerindicatorThe main power indicator lights up whenthe main power switch is set to on. Thepower indicator lights up when the ma-chine is on.
Important❒ Do not turn off the main power
while the power indicator is lit orblinking. Doing so may cause afailure of the hard disk.
AGH002S

Getting Started
4
1
10. Operation switchPress this switch to turn the machine on.The power indicator lights up. To turnthe machine off, press this switch again.See "Turning On the Power", General Set-tings Guide.
Note❒ This key is inactive while scanning or
setting scanner defaults.
11. Function status indicators• When lit green, the corresponding
function is active.• When lit red, the corresponding func-
tion is interrupted. Press the respec-t iv e ke y , an d th e n fo l l o w th einstructions that appear on the screen.
12. Function keysPress the {{{{Copy}}}}, {{{{Document Server}}}}, or{{{{Scanner}}}} key to activate the respectivefunction. The display content changes ac-cordingly.The indicator for the selected functionlights up.
13. Number keysUse to enter numeric values.
14. {{{{#}}}} key (Enter key)Use to confirm the entered numeric value.
15. {{{{Clear/Stop}}}} key• Clear: Clears an entered numeric value• Stop: Stops scanning
16. {{{{Start}}}} keyUse to begin scanning, file storing, or de-livery.
Note❒ Using the default setting, you can start
scanning, storing, and delivering files,simply by loading them (withoutpressing the {{{{Start}}}} key). For detailsabout how to start scanning, see “Sys-tem Settings”, General Settings Guide.

Network Scanner
5
1
Network Scanner
By installing the scanner option, the machine can be used as a network scanner.As a network scanner, the machine can send e-mail, send files to the FTP serveror the shared folders of client computers, store scan files, operate as a networkdelivery scanner, and operate as a network TWAIN scanner.
A scan file that is attached to an e-mail can be sent using the e-mail systemthrough a LAN or the Internet.
Referencep.17 “Sending Scan Files by E-mail”
1. This machineA scan file can be attached to an e-mailand sent to a mail server. In combinationwith the file storage function, scan filesfrom multiple originals that have beentemporarily stored can be sent all at once.
2. Mail serverA mail server is an SMTP server used foran e-mail system. It transfers a received e-mail to a specified destination through aLAN or the Internet.
3. Client computerAn e-mail with a scan file attached is re-ceived from the mail server.Check the content of the file using an ap-propriate application.
4. LDAP serverThe LDAP server provides a directory serv-ice for search operations or inquiries from aclient computer on the same network.You can use the LDAP server to searchfor e-mail information when the server isused as data base to manage user authen-tication and e-mail accounts.
ZZZ601S

Getting Started
6
1
Scan to Folder
A scan file can be sent to the FTP server folders or the shared Windows folderson the same network.
Referencep.31 “Sending Scan Files by Scan to Folder”
1. This machineA scan file can be sent to the FTP serverfolders using FTP or to the shared Win-dows folders using SMB. In combinationwith the file storage function, scan filesfrom multiple originals that have beentemporarily stored can be sent all at once.
2. FTP serverThe FTP server is a server that providesfile transfer services among computerson the same network. A scan file that issent to the FTP server is stored, and thestored files can be downloaded by a cli-ent computer that logs on to the FTP serv-er.
3. Client computerA scan file that is sent from the machineis received in shared Windows folders.Check the content of the file using an ap-propriate application.
ZZZ602S

Network Scanner
7
1
Store
You can store scanned documents as files on the machine’s hard disk. The storedscan files can be viewed, copied, deleted, or retrieved over the network usingDeskTopBinder from a client computer. You can also view, delete or downloadscan files over the network using Web Image Monitor from the client. A file canbe searched for using the user name or the file name. Also, others can be keptfrom viewing a file by setting a password for the file.
Referencep.43 “Storing Files”
1. This machineA scan file from the originals scanned bythe machine is stored.
2. Client computerA stored file can be viewed, copied, ordeleted by connecting to the machine us-ing DeskTopBinder.Also, a file stored in the machine can beviewed, downloaded, or deleted usingWeb Image Monitor.
ReferenceFor details about DeskTopBinder, see the DeskTopBinder manuals. See p.i“Manuals for This Machine”.For details about Web Image Monitor, see the Web Image Monitor Help.
ZZZ603S

Getting Started
8
1
Network Delivery Scanner
A scan file from the originals scanned by the machine is stored in the deliveryserver and delivered to the folders of client computers on the same network.
Referencep.57 “Delivering Scan Files”
Note❒ To use the delivery scanner function, a delivery server installed with the
ScanRouter delivery software is required.❒ When the ScanRouter delivery software is used, the machine can also deliver
scan files using e-mail, store scan files in the document management server.
1. This machineA scan file from the originals scanned bythe machine is sent to the delivery server.In combination with the file storage func-tion, scan files from multiple originalsthat have been temporarily stored can bedelivered all at once. See p.65 “Simulta-neous Storage and Delivery”.
2. Delivery serverThe ScanRouter delivery software is in-stalled in this computer which is used asa delivery server.A received file is delivered to the in-trayof the specified destination (A in the fig-ure). According to the settings of the in-tray, the file is stored in the in-tray or in aWindows folder (B in the figure).
3. Client computerThe contents of a stored file can bechecked in the following ways:
• View the file in the in-tray using Desk-TopBinder to check the contents. (Cin the figure)
• Use Auto Document Link to receivethe file stored in the in-tray, and checkthe contents with an appropriate ap-plication. (D in the figure)
• Access the Windows folder where thefile is stored via the network, andcheck the contents with an appropri-ate application. (E in the figure)
ZZZ604S

Network Scanner
9
1
ReferenceFor details about DeskTopBinder, or Auto Document Link, see the respectivemanuals. See p.i “Manuals for This Machine”.
Network TWAIN Scanner
The scanner function of this machine can be used from a client computer via anetwork using Ethernet, optional IEEE 1394 (IP over 1394), or optional IEEE802.11b (wireless LAN).
Referencep.69 “Using the Network TWAIN Scanner Function”
1. This machineThe scanner function of the machine can beused from a client computer via a network.
2. Client computerOriginals are scanned using the TWAINDriver from an application.
Note❒ When using the machine as a network TWAIN scanner, it is not necessary to
press the {{{{Scanner}}}} key on the control panel. When the TWAIN Driver be-comes active on a client computer, the display automatically switches to thefollowing screen.
❒ Press [Exit] to use functions other than the network TWAIN scanner function.
ZZZ605S

Getting Started
10
1
Installing Software
This section describes how to installthe software supplied on the “Scan-ner Driver and Utilities".
ReferenceFor details about the software onthe CD-ROM and the system re-quirements of the software, seep.110 “Software Supplied on CD-ROM”.
Quick Install
When the CD-ROM is inserted into aclient computer running Windows95/98/Me/2000/XP, Windows Serv-er 2003, or Windows NT 4.0, the in-staller starts automatically (AutoRun) to install various software.
Note❒ If Plug and Play starts, click [Can-
cel] in the [New Hardware Found],[Device Driver Wizard], or [Found NewHardware Wizard] dialog box, andthen insert the CD-ROM. The [NewHardware Found], [Device Driver Wiz-ard], or [Found New Hardware Wizard]dialog box appears depending onthe operating system used.
❒ Auto Run may not automaticallywork with certain operating sys-tem settings. If this happens,launch “SETUP.exe” on the CD-ROM root directory.
❒ To disable Auto Run, press the{{{{SHIFT}}}} key when inserting theCD-ROM into the drive and keep itpressed until the computer finish-es reading from the CD-ROM.
❒ If [Cancel] is selected during instal-lation, the installation will bestopped and all the remaining soft-ware will not be installed. If [Can-cel] has been selected, reinstall theremaining software after restartingthe client computer.
❒ For information about the softwarethat can be installed by Auto Run,see p.110 “Software Supplied onCD-ROM”.
Limitation❒ For installation under Windows
2000/XP, Windows Server 2003, orWindows NT 4.0, log on as an Ad-ministrators group member.
TWAIN Driver
To use the machine as a networkTWAIN scanner, it is essential to in-stall the TWAIN Driver on a clientcomputer.If an application that supportsTWAIN is not installed on the clientcomputer, it is also necessary to in-stall DeskTopBinder. For informationabout the installation of DeskTop-Binder, see p.11 “DeskTopBinder”.
PreparationBefore installation, check the sys-tem requirements for the TWAINDriver. For details about the sys-tem requirements, see p.110 “Soft-ware Supplied on CD-ROM”.
Note❒ Use Auto Run for installation.

Installing Software
11
1
AAAA Start Windows, and then insertthe CD-ROM labeled "ScannerDriver and Utilities" into the CD-ROM drive of the client compu-ter.
ReferenceIf the installer does not start au-tomatically, see p.10 “Quick In-stall”.
BBBB Click [TWAIN Driver].The Software Setup screen ap-pears.
CCCC The installer of the TWAIN Driv-er starts. Follow the instructions.
Note❒ When the installation is com-
plete, a message about restart-ing the client computer mayappear. In this case, restart theclient computer.
❒ After the installation is com-plete, a folder with the name ofthe machine in use is in [Pro-gram] on the [Start] menu. Helpcan be displayed from here.
❒ Notes on using the networkTWAIN scanner are provided in“Readme.txt”. Be sure to readthem before use.
DeskTopBinder
To check an in-tray or to retrieve filesusing the network delivery scannerfunction, you must install DeskTop-Binder on the client computer.
PreparationBefore installation, check the sys-tem requirements for DeskTop-Binder. See p.110 “SoftwareSupplied on CD-ROM”.
Note❒ Use Auto Run for installation.❒ To use the network delivery scan-
ner function, you need to installthe ScanRouter delivery software(optional) on the computer used asthe delivery server.
AAAA Start Windows, and then insertthe CD-ROM labeled “ScannerDriver and Document Manage-ment Utility” into the CD-ROMdrive of the client computer.The CD-ROM Launcher screen ap-pears.
BBBB Click [DeskTopBinder Lite].
The DeskTopBinder Lite Setupscreen appears.
CCCC Click [DeskTopBinder Lite]. The in-staller of the DeskTopBinderstarts. Follow the instructions onthe screen.
ReferenceFor information about the sub-sequent installation procedure,see Setup Guide that can be dis-played from the Setup screen ofDeskTopBinder.

Getting Started
12
1
User Authentication
When user authentication (User CodeAuthentication, Basic Authentication,Windows Authentication, or LDAPAuthentication) is set, the authentica-tion screen is displayed. Unless a val-id user name and password areentered, operations are not possiblewith the machine. Log on to operatethe machine, and log off when youare finished operations. Be sure to logoff to prevent unauthorized usersfrom using the machine.
Note❒ Consult the User Administrator
about your login user name, pass-word, and user code. For detailsabout the various types of user au-thentication, consult the appropri-ate administrators.
❒ For user code authentication, entera number registered in the addressbook as [User Code].
User Code Authentication (Using the Control Panel)
When user code authentication is set,the following screen appears.
Enter a User Code (eight digit), andthen press [####].
Note❒ You do not need to log off after
user code authentication.
Login (Using the Control Panel)
Follow the procedure below to log inwhen Basic Authentication, WindowsAuthentication, or LDAP Authentica-tion is set.
AAAA Press [Enter] for [Login User Name].
BBBB Enter a login user name, and thenpress [OK].
CCCC Press [Enter] for [Login Password].
DDDD Enter a login password, and thenpress [OK].
EEEE Press [Login].
When the user is authenticated, thescreen for the function you are us-ing appears.

User Authentication
13
1
Log Off (Using the Control Panel)
Follow the procedure below to log offwhen Basic Authentication, WindowsAuthentication, or LDAP Authentica-tion is set.
AAAA Press {{{{User Tools / Counter}}}}.
BBBB Press [Logout].
CCCC Press [Yes].
DDDD Press{{{{User Tools / Counter}}}}.

Getting Started
14
1
Programming E-mail Addresses and Folders
You can program e-mail addresses and folders using Address Book Manage-ment in the Administrator Tools menu under System Settings.You can also register the programmed e-mail addresses and folders in a Group.
Note❒ You can register entries in the address book using Web Image Monitor or
SmartDeviceMonitor for Admin. For details about installing SmartDevice-Monitor for Admin, see "Monitoring and Configuring the Printer", NetworkGuide. For details about registering addresses, see each application’s Help.
❒ Depending on the machine type, you may not be able to use the machinewhen it is updating the address book using CSV files (retrieved using Smart-DeviceMonitor for Admin) that contain user codes.
Reference“E-mail Destination”, General Settings Guide
“Folder Destination”, General Settings Guide
“Registering Destinations to a Group”, General Settings Guide

Specifying How to Start Scanning
15
1
Specifying How to Start Scanning
There are two ways to start scanning:• Placing originals• Pressing the {{{{Start}}}} key.Using the default setting, you can start scanning, storing, and delivering filessimply by loading them (without pressing the {{{{Start}}}} key). When you do this,the {{{{Start}}}} key does not light. However, in the following situations, press the{{{{Start}}}} key.• When you print the scanner journal• Right after you remove misfed paper• Right after you specify an entry (such as the destination) required for scan-
ning
Note❒ You can specify that the {{{{Start}}}} key must be pressed to start scanning. For de-
tails about specifying how to start scanning, see “System Settings”, GeneralSettings Guide.

Getting Started
16
1

17
2. Sending Scan Files by E-mail
Scan files can be sent from this machine to specified destinations using the e-mail system. This chapter explains the preparation for sending files by the e-mailsystem, various display screens, procedures for sending, and how to check thesending results when this function is used.
Preparation for Sending by E-mail
To send scan files by the e-mail system, the preparation described below is re-quired.
Note❒ If you establish an e-mail server on the network, set up the e-mail server on
the network in advance. For information about setting up an e-mail server,see the manuals of the mail server to be used and the software to be installed.
Connect the machine to the network with an Ethernet cable or IEEE 1394 cable, or use wireless LAN.
To connect using an IEEE 1394 cable, the IEEE 1394 interface board is required. To connect using wireless LAN, the IEEE 802.11b interface unit is required.
See Network Guide.
To send scan files by e-mail, the following [System Settings] set-tings must be specified correctly. (Certain other settings must also be specified.)
• IP address
• subnet mask
• DNS server
• SMTP server name
For details about making settings and other settings, see Net-work Guide. You also need to register destinations and other in-formation in the address book. For details, see General Settings Guide.
Make settings for sending e-mail such as file type priority and sender's default.
See p.101 “Send Settings”.

Sending Scan Files by E-mail
18
2
E-mail Screen
The e-mail is as shown.The function items displayed serve as selector keys. You can select or specify anitem by lightly pressing it. When you select or specify an item on the displaypanel, it is highlighted like . Keys that cannot be selected appear like .
1. Destination fieldDisplays the selected destination. If mul-tiple destinations are selected, the desti-nations are displayed in the order theywere selected by pressing [UUUUPrev.] or[TTTTNext].
Note❒ To check the selected destinations,
press the {{{{Check Modes}}}} key.
2. [ ] E-mail/Scan to FolderPress to switch between the e-mail func-tion and the Scan to Folder function. Youcan send a file to e-mail destinations andScan to Folder destinations at the sametime.
3. E-mail icon ( )Indicates that the e-mail screen is dis-played.
4. [Registration No.]Press to specify a destination using a fivedigit registration number.
5. [Manual Input]When specifying a destination that is notlisted, press [Manual Input], and then enterthe destination using the soft keyboard.
6. [Attach Sender's Name] [Return Re-ceipt] [Subject / Message] [Attached File]Set the sender, a reception confirmatione-mail, subject, and message of the e-mailto be sent.If necessary, specify the file type and filename of the scan file attached to the e-mail.
7. [ ] S w i tc h D e st i n at i o nList/Search/Switch TitlePress to switch a destination from the de-livery server list to the destination list ofthis machine, to search for an e-mail des-tination.
8. Destination listDisplays the destinations registered inthe delivery server or this machine.
Note❒ When the entire list does not fit on one
screen, [UUUU] or [TTTT] can be used to scrollthrough the list.
❒ Group destinations are denoted bythis symbol ( ).

Sending Scan Files by E-mail
19
2
Sending Scan Files by E-mail
Procedure for Sending E-mail
A scan file is sent after scan settingsand destinations are specified.
AAAA Press the {{{{Scanner}}}} key.
Note❒ The illustration is an example.
The actual appearance may bedifferent.
BBBB Make sure that no previous set-tings remain.
Note❒ If a previous setting remains,
press the {{{{Clear Modes}}}} key.
CCCC Make settings for the original,such as orientation and outputtray.
Referencep.75 “Specifying the Orienta-tion and Output Tray of theOriginal”
DDDD Make the scan settings.
ReferenceThere are two ways to specifyscan settings, as described be-low:• Configure each setting for
scanning. For details, seep.73 “Specifying Scan Set-tings”.
• Recall registered settings. Fordetails, see p.80 “Programs”.
EEEE If the network delivery scannerscreen appears, switch to the e-mail screen.
A Press [ ].
B Press [Switch Destination List].
C Press [E-mail].
D Press [Exit].
The e-mail screen appears.
FFFF Specify the destination.
You can specify the destination inthe following ways:• Select it from the destination list.• Specify its registration number.• Enter the e-mail address directly.• Search for it in the destination
list.• Search for it in the LDAP server.
ZZZ606S

Sending Scan Files by E-mail
20
2
Note❒ Destinations in the destination
list and registration numbersmust be registered in advancein [System Settings]. For details,see “System Settings”, GeneralSettings Guide.
❒ For details about the maximumnumber of destinations that canbe selected for each transmis-sion, see p.112 “E-mail”.
❒ Before selecting the destination,be sure to select [To]. If neces-sary, select [Cc] or [Bcc] and therespective destinations.
❒ Depending on the security set-tings, certain destinations maynot be displayed.
Selecting a destination from the list
A Select the destination.
The selected destination is high-lighted and also displayed inthe destination field at the top ofthe screen.
Note❒ If the target destination does
not appear, take one of thefollowing steps:• Display the destination by
selecting its initial letterfrom the title.
• Display the destination bypressing [UUUU] or [TTTT].
B To select more destinations, re-peat steps AAAA.
Note❒ To deselect a destination, press
the destination once more, orpress [UUUUPrev.] or [TTTTNext] todisplay the destination in thedestination field, and thenpress the {{{{Clear/Stop}}}} key.
Using a registration number to select a destination
A Press [Registration No.].
B Enter the five digit registrationnumber that has been assignedto a destination folder usingthe number keys.
If the entered number is lessthan five digits, press the {{{{#}}}}key after the last number.Example: To enter 00003Press the {{{{3}}}} key, and thenpress the {{{{#}}}} key.
C To select more destinations, re-peat steps AAAA to BBBB.
Note❒ To deselect a destination, press
[UUUUPrev.] or [TTTTNext] to displaythe destination in the desti-nation field, and then pressthe {{{{Clear/Stop}}}} key.

Sending Scan Files by E-mail
21
2
Manual entry of an e-mail address
A Press [Manual Input].
The soft keyboard appears.
Note❒ Depending on the security
settings, [Manual Input] maynot be displayed.
B Enter the e-mail address.
Note❒ For details about the maxi-
mum number of charactersthat can be entered, see p.112“E-mail”.
❒ It is possible to enter alpha-numeric characters and peri-ods. The symbols ( ) \ , ; : ”and spaces cannot be en-tered. For details, see p.112“E-mail”.
C Press [OK].
Note❒ An e-mail address entered
manually can be registered inthe list. Press [ProgDest], anda screen for registering the e-mail address appears. For in-formation, see General Set-tings Guide.
❒ To change an e-mail addressentered, press [Change] locat-ed on the left side of the des-t i n a t i o n f i e l d . T h e s o f tkeyboard appears. Make anychanges, and then press [OK].
❒ To check the selected desti-nations, press the {{{{CheckModes}}}} key.
❒ Depending on the securitysettings, [ProgDest] may notbe displayed.
D To enter more destinations, re-peat steps AAAA to CCCC.
Note❒ To deselect a destination, press
[UUUUPrev.] or [TTTTNext] to displaythe destination in the desti-nation field, and then pressthe {{{{Clear/Stop}}}} key.
Searching for a destination in the destination list
A Press [ ].
B Press [Search by Dest. Name].
The soft keyboard appears.
Note❒ To search using an e-mail ad-
dresses, press [E-mail Ad-dress].
C Enter part of the destinationname.
Note❒ Enter the first character or
characters of the destinationname.
❒ It is also possible to performa combined search using[Search by Dest. Name] and [E-mail Address].

Sending Scan Files by E-mail
22
2
❒ It is necessary to differentiatebetween uppercase and low-ercase letters.
D Press [OK].
E Select a destination.
F Press [Exit].
Searching for a destination in the LDAP server
A Press [ ].
B Press [Search LDAP].
C Press [Select Server].
D Select the LDAP server.
Note❒ The LDAP server can be reg-
istered in advance in [SystemSettings]. For details, see Net-work Guide.
❒ Make sure that the LDAPserver you want to search isselected and highlighted. If aserver is not selected, thesearch is not performed andan error message appears.
E Press [OK].
F Press [Advanced Search].
G Enter a character string relatedto the destination for a searchcondition such as [Name], [E-mailAddress], [Fax Number], [CompanyName], or [Department Name].
Note❒ Each search condition (Name,
E-mail Address, Fax Number,Company Name, and Depart-ment Name) corresponds to aitem that is registered in theLDAP server.
❒ If you press a search condi-tion item, the soft keyboardappears. Enter the first char-acter or characters for thename, address, or number.
❒ If you select [SSSSSearch Options]in [Program / Change / DeleteLDAP Server] in [AdministratorTools] in [System Settings],you can add a field for LDAPsearch. For details, see Net-work Guide.

Sending Scan Files by E-mail
23
2
❒ When the search condition[Name] is used for searching,whether the first name or sir-name is searched for de-pends on the setting made bythe administrator. For exam-ple, if you want to search for"John Doe", enter "John" or"Doe" according to the settingmade by the administrator.Consult your administratorfor which name to use.
H Press [Search Criteria] correspond-ing to each item, and then se-lect cr i ter ia f rom the l is tdisplayed.
Note❒ You can select criteria from
the following list:• [Search Beginning Word]: The
names which start withthe entered character orcharacters are targeted.For example, to search for“ABC”, enter “A”.
• [Search End Word]: The nameswhich end with the en-tered character or charac-ters are targeted.For example, to search for“ABC”, enter “C”.
• [Exact Match]: The nameswhich correspond to anentered character or char-acters are targeted.For example, to search for“ABC”, enter “ABC”.
• [Include One of Words]: Thenames which contain anentered character or char-acters are targeted.For example, to search for“ABC”, enter “A”, “B”, or“C”.
• [Exclude Words]: The nameswhich do not contain anentered character or char-acters are targeted.For example, to search for“ABC”, enter “D”.
• [Fuzzy Search]: a vague search( T h e f u n c t i o n o f t h i svague search depends onthe system supported bythe LDAP server.)
I Press [OK].
Note❒ The e-mail address searched
for in the LDAP server can-not be specified correctly if itcontains too many charac-ters. For details about themaximum number of charac-ters that can be entered, seep.112 “E-mail”.
❒ If a user name and passwordfor the LDAP server authen-tication are not set, a log-onscreen appears. Enter a username and password.
❒ Multiple e-mail addresses canbe registered for one person,but a search will only findone e-mail address per per-son. Depending on the LDAPserver, the address whichwas registered first is gener-ally found.
❒ To display details about thedestination, press [Details].
J Select a destination.
K Press [Exit].

Sending Scan Files by E-mail
24
2
Note❒ An e-mail address found in a
search can be registered inthe list. Press [ProgDest], anda screen for entering the e-mail address appears. Formore information, see Gener-al Settings Guide.
Checking selected destinations
A Use the destination field at thetop of the screen to checkwhich destinations are select-ed.
Note❒ Press [UUUUPrev.] or [TTTTNext] to
scroll through the list. Desti-nations are displayed in theorder they were selected.
❒ To check the selected desti-nations, press the {{{{CheckModes}}}} key.
GGGG Select the file type if necessary.
A Press [Attached File].B Press [File Type]
C Select the file type of the file.
D Press [OK] twice.
HHHH Specify the file name if necessary.
A Press [Attached File].
B Press [File Name].The soft keyboard appears.
C Enter a file name.
D Press [OK] twice.
IIII Specify the e-mail sender.
You can specify the sender in thefollowing ways:• Select the sender from the list.• Enter the registration number of
the sender using the numberkeys.
• Search for the sender.
Note❒ If you specify the sender, infor-
mation about the sender is in-cluded in the file being sent. Thename of the specified sender isautomatically placed in thefrom field of the e-mail so thatthe sender can be identifiedwhen the e-mail is received.
❒ Depending on system settings,the administrator's e-mail ad-dress may appear automaticallyin the e-mail header's FROMfield. To change the address,specify the sender in Step I.
❒ To prevent misuse of a sendername, we recommend you setprotection code for that sendername.See General Settings Guide.
❒ Depending on the security set-tings, [Attach Sender's Name] maybe selected as the user namewhen logging in.
Selecting a sender from the list
A Press [Attach Sender's Name].

Sending Scan Files by E-mail
25
2
B Select the sender.
Note❒ When a protection code has
been set, a screen for enteringthe protection code appearsafter selecting the sender. En-ter the protection code, andthen press [OK]. If the protec-tion code you entered is cor-rect , the sender name isdisplayed.
C Press [OK].
Using a registration number to specify a sender name
A Press [Attach Sender's Name].
B Enter the five digit registrationnumber that has been assignedto a destination folder usingthe number keys.
If the entered number is lessthan five digits, press the {{{{#}}}}key after the last number.
Example: To enter 00006Press the {{{{6}}}} key, and thenpress the {{{{#}}}} key.
Note❒ When a protection code has
been set, a screen for enteringthe protection code appearsafter selecting the sender. En-ter the protection code, andthen press [OK]. If the protec-tion code you entered is cor-rect, the sender name and[Return Receipt] are displayed.
C Press [OK].
Searching for a sender
A Press [Attach Sender's Name].
B Press [ ].

Sending Scan Files by E-mail
26
2
C Press [User (Dest.) Name].
The soft keyboard appears.
Note❒ To search for an e-mail ad-
dress, press [E-mail Address].D Enter part of the sender name.
Note❒ Enter the first character or
characters of the sender name.❒ It is also possible to perform
a combined search using [Us-er (Dest.) Name] and [E-mail Ad-dress].
❒ It is necessary to differentiatebetween uppercase and low-ercase letters.
E Press [OK].F Select the sender.
Note❒ When a protection code has
been set, a screen for enteringthe protection code appears af-ter selecting the sender. Enterthe protection code, and thenpress [OK]. If the protectioncode you entered is correct, thesender name is highlighted.
G Press [Exit].
H Press [OK].
JJJJ For a reception confirmation e-mail,press [Return Receipt].
Note❒ To use [Return Receipt] you must:
• Log on as a user• Specify the sender in Step I
❒ When [Return Receipt] is select-ed, an e-mail notifying that thee-mail has been read by the des-tination party is sent to thesender selected here. However,if the mailing software used bythe destination party does notsupport MDN (Message Dispo-sition Notification), the e-mailmay not be sent.
KKKK Specify a subject if necessary.
Note❒ To specify a subject, you can se-
lect it from the list, enter it di-rectly, or combine selecting andentering it.
❒ For details about the maximumnumber of characters that canbe entered, see p.112 “E-mail”.
❒ When a subject has been speci-fied, this information is addedto the scan file. The subject is au-tomatically placed in the subjectfield of the e-mail.
❒ The subjects that can be selectedfrom the list must be registeredin [System Settings] in advance.See Network Guide.
The procedure to specify the sub-ject “[Urgent] New product appear-ance” is explained as an examplehere.A Press [Subject / Message].

Sending Scan Files by E-mail
27
2
B Press [Attach Subject].
C Select the subject [Urgent].
D Press [Manual Input].
The soft keyboard appears.E Enter the subject “New prod-
uct appearance”.
F Press [OK].
G Press [OK] twice.
LLLL Enter a message if necessary.
Note❒ For details about the maximum
number of characters that canbe entered, see p.112 “E-mail”.
❒ When a message has been en-tered, this information is addedto the scan file.
❒ The messages that can be select-ed from the list must be regis-tered in [System Settings] inadvance. See Network Guide.
❒ A message can be selected fromthe list or entered directly.
Selecting a message from the list
A Press [Subject / Message].
B Press [E-mail Message].
C Select a message.
D Press [OK] twice.
Manual entry of a message
A Press [Subject / Message].
B Press [E-mail Message].
C Press [Manual Input].
The soft keyboard appears.

Sending Scan Files by E-mail
28
2
D Enter the message “Thank youfor what you did yesterday”.
E Press [OK] three times.
MMMM Place originals.
ReferenceThe procedure for placing origi-nals is the same as that for plac-ing originals for copying. Fordetails about placing originals,see “Placing Originals”, CopyReference.
Note❒ For details about the maximum
size of the scan file and maxi-mum number of pages that canbe sent, see p.112 “E-mail”.
❒ To interrupt scanning, press the{{{{Clear/Stop}}}} key or press [Stop]on the display panel.
❒ When scanning multiple pagesinto a single file, place the nextoriginal. For details, see p.77“Scanning Multiple Pages into aSingle File”.
Simultaneous Storage and Sending by E-mail
You can use the e-mail function andthe storage function together.The scan file is sent by e-mail and atthe same time is stored.
Note❒ This section explains mainly the
procedure for simultaneous stor-age and sending of e-mail. For de-tails, see p.19 “Procedure forSending E-mail”.
❒ The file stored when simultane-ously storing a file and sending itby e-mail cannot be resent in the e-mail screen. To resend the file, se-lect the file in the [Select Stored File]screen and send it. See p.50 “Send-ing Stored Files by E-mail or Scanto Folder, or Delivering”.
AAAA Make settings for the original, suchas orientation and output tray.
Referencep.75 “Specifying the Orienta-tion and Output Tray of theOriginal”
BBBB Make the scan settings.
Note❒ There are two ways to specify
scan settings, as described be-low:• Configure each setting for
scanning. For details, seep.73 “Specifying Scan Set-tings”.
• Recall registered settings. Fordetails, see p.80 “Programs”.
CCCC Specify the destination.
DDDD Specify the sender and a subject.

Sending Scan Files by E-mail
29
2
EEEE Press [Store File].
FFFF Make sure [Send & Store] is select-ed.
GGGG Specify file information if neces-sary.
ReferenceFor details about specifying fileinformation, see p.45 “Specify-ing file information”.
HHHH Press [OK].
IIII Place originals.
Note❒ The procedure for placing origi-
nals is the same as that for plac-ing originals for copying. Fordetails about placing originals,see “Placing Originals”, CopyReference.

Sending Scan Files by E-mail
30
2
Checking the E-mail Results
The sending results can be checked.
Note❒ For details about the maximum
number of sending operations thatcan be checked, see p.102 “Print &Delete Scanner Journal”.
❖❖❖❖ Items that can be checked• Date / Time
The date and time the e-mailwas sent or the date and time“Error” or “Cancelled” wasconfirmed is displayed.
• DestinationThe sending function (e-mail,Scan to Folder, or delivery func-tion) used is displayed with anicon.When multiple destinationswere selected, the first selecteddestination is displayed.
• Sender• File Name
The file name is displayed onlywhen a file is stored at the sametime and when a stored file issent.
• StatusOne of the following status isdisplayed: “Done” , “Send-ing...”, “Waiting...”, “Error”, or“Cancelled”.
AAAA Press [Scanned Files Status] on thee-mail screen.
BBBB Check the displayed records.
Note❒ Depending on the security set-
tings, certain records may notbe displayed.
❒ One screen shows the recordsfor five sending operations. Use[UUUUPrev.] or [TTTTNext] to scrollthrough the list.
❒ When the status of a file is“Waiting...”, the sending can becanceled by selecting that file,and then pressing [Cancel].
❒ Press [Print] to print the wholejournal.
CCCC Press [Exit].
The e-mail screen appears.

31
3. Sending Scan Files by Scanto Folder
Scan files can be sent to the folders of the FTP server or the shared folders of Win-dows. This chapter explains the preparation for sending files by Scan to Folder,various display screens, procedures for sending, and how to check the sendingresults when this function is used.
Preparation for Sending by Scan to Folder
To send scan files by Scan to Folder, the preparation described below is required.
Note❒ Under Windows Server 2003, you may not be able to send files by Scan to
Folder.❒ Sending files using SMB is available only under a NetBIOS over TCP/IP en-
vironment. Sending files using SMB is not available under a NetBEUI envi-ronment.
❒ Even when settings made with the control panel, Web Image Monitor, Telnet,or other methods do not permit the use of SMB and FTP, sending files is stillpossible.
Connect the machine to the network with an Ethernet cable or IEEE 1394 cable, or use wireless LAN.
To connect using an IEEE 1394 cable, the IEEE 1394 interface board is required. To connect using wireless LAN, the IEEE 802.11b interface unit is required.
See Network Guide.
To send scan files by Scan to Folder, the following [System Set-tings] settings must be specified correctly. (Certain other settings must also be specified.)
• IP address
• subnet mask
For details about making settings and other settings, see Net-work Guide. You also need to register destinations and other in-formation in the address book. For details, see General Settings Guide.
Make settings for sending such as compression and file type pri-ority.
See p.101 “Send Settings”.

Sending Scan Files by Scan to Folder
32
3
Scan to Folder Screen
The Scan to Folder screen is as shown.The function items displayed serve as selector keys. You can select or specify anitem by lightly pressing it. When you select or specify an item on the displaypanel, it is highlighted like . Keys that cannot be selected appear like .
1. Destination fieldDisplays the selected destination. If mul-tiple destinations are selected, the desti-nations are displayed in the order theywere selected by pressing [UUUUPrev.] or[TTTTNext].
Note❒ To check the selected destinations,
press the {{{{Check Modes}}}} key.
2. [ ] E-mail/Scan to FolderPress to switch between the Scan to Fold-er function and the e-mail function. Youcan send a file to Scan to Folder destina-tions and e-mail destinations at the sametime.
3. Scan to Folder icon ( )Shows that the Scan to Folder screen isdisplayed.
4. [Registration No.]Press to specify a destination using a fivedigit registration number.
5. [Enter Destination]When specifying a destination that is notlisted, press [Enter Destination], and thenenter the destination using the soft key-board.
6. [Attach Sender's Name] [Return Re-ceipt] [Subject / Message] [Attached File]Set the sender, a reception confirmatione-mail, file name, subject, and message ofthe scan file to be sent.If necessary, make settings for the filetype and file name of the file.
Important❒ When the scan file is sent to desti-
nations for e-mail and Scan toFolder at the same time, the send-er, subject, and message are sent tothe e-mail destinations only. [Re-turn Receipt] is also used for e-mailtransmission. For details, see p.17“Sending Scan Files by E-mail”.
7. [ ] S w i tc h D e st i n at i o nList/Search/Switch TitlePress to switch between the destinationlist of the delivery server and the destina-tion list of this machine, or to search foran e-mail destination.
8. Destination listDisplays the destinations registered inthe delivery server or this machine.

Preparation for Sending by Scan to Folder
33
3
Note❒ When the entire list does not fit on one
screen, press [UUUU] or [TTTT] to scrollthrough the list.
❒ Group destinations are denoted bythis symbol ( ).

Sending Scan Files by Scan to Folder
34
3
Sending Scan Files by Scan to Folder
Procedure for Sending by Scan to Folder
A scan file is sent after scan settingsand destinations are specified.
AAAA Press the {{{{Scanner}}}} key.
Note❒ The illustration is an example.
The actual appearance may bedifferent.
BBBB Make sure that no previous set-tings remain.
Note❒ If a previous setting remains,
press the {{{{Clear Modes}}}} key.
CCCC Make settings for the original, suchas orientation and output tray.
Referencep.75 “Specifying the Orienta-tion and Output Tray of theOriginal”
DDDD Make the scan settings.
ReferenceThere are two ways to specifyscan settings, as described be-low:• Configure each setting for
scanning. For details, seep.73 “Specifying Scan Set-tings”.
• Recall registered settings. Fordetails, see p.80 “Programs”.
EEEE If the network delivery scannerscreen appears, switch to the Scanto Folder screen.
A Press [ ].
B Press [Switch Destination List].
C Press [E-mail].
D Press [Exit].
The e-mail screen appears.E Press [ ].
The Scan to Folder screen ap-pears.
FFFF Specify the destination folder.
You can specify the destinationfolder in the following ways:• Select it from the destination list.• Specify its registration number.
ZZZ606S
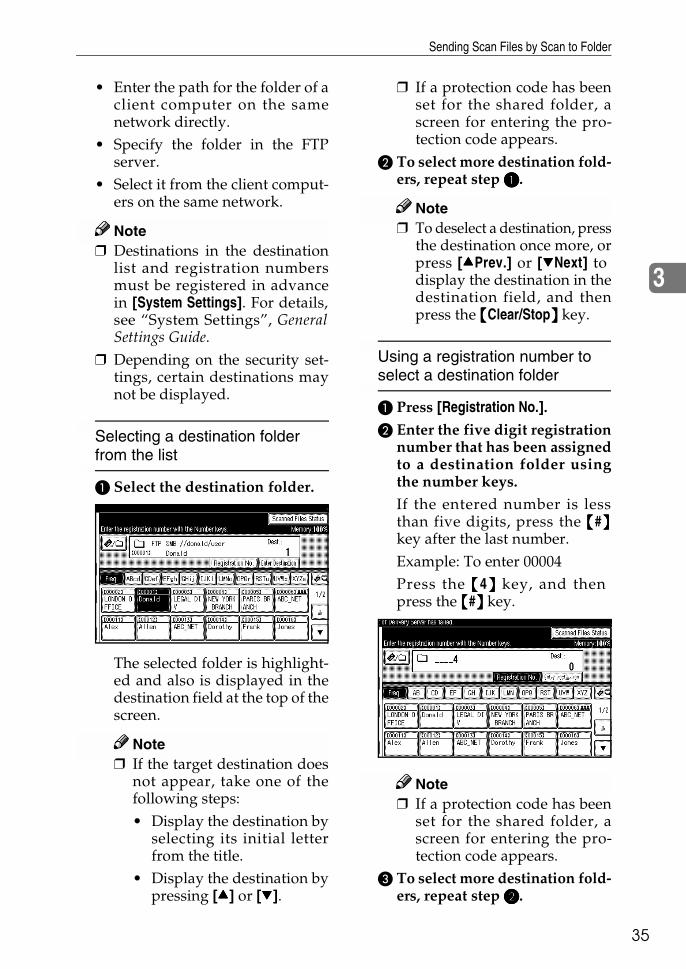
Sending Scan Files by Scan to Folder
35
3
• Enter the path for the folder of aclient computer on the samenetwork directly.
• Specify the folder in the FTPserver.
• Select it from the client comput-ers on the same network.
Note❒ Destinations in the destination
list and registration numbersmust be registered in advancein [System Settings]. For details,see “System Settings”, GeneralSettings Guide.
❒ Depending on the security set-tings, certain destinations maynot be displayed.
Selecting a destination folder from the list
A Select the destination folder.
The selected folder is highlight-ed and also is displayed in thedestination field at the top of thescreen.
Note❒ If the target destination does
not appear, take one of thefollowing steps:• Display the destination by
selecting its initial letterfrom the title.
• Display the destination bypressing [UUUU] or [TTTT].
❒ If a protection code has beenset for the shared folder, ascreen for entering the pro-tection code appears.
B To select more destination fold-ers, repeat step AAAA.
Note❒ To deselect a destination, press
the destination once more, orpress [UUUUPrev.] or [TTTTNext] todisplay the destination in thedestination field, and thenpress the {{{{Clear/Stop}}}} key.
Using a registration number to select a destination folder
A Press [Registration No.].
B Enter the five digit registrationnumber that has been assignedto a destination folder usingthe number keys.If the entered number is lessthan five digits, press the {{{{#}}}}key after the last number.Example: To enter 00004Press the {{{{4}}}} key, and thenpress the {{{{#}}}} key.
Note❒ If a protection code has been
set for the shared folder, ascreen for entering the pro-tection code appears.
C To select more destination fold-ers, repeat step BBBB.

Sending Scan Files by Scan to Folder
36
3
Note❒ To deselect a destination, press
[UUUUPrev.] or [TTTTNext] to displaythe destination in the desti-nation field, and then pressthe {{{{Clear/Stop}}}} key.
Manual entry of a path for the destination folder of the client computer on the same network
A Press [Enter Destination].B Press [SMB].
C Press [Manual Input] on the rightside of the path field.
The soft keyboard appears.D Enter the path for the folder.
Note❒ For details about the maxi-
mum number of charactersthat can be entered, see p.113“Scan to Folder”.
❒ The following is an exampleof a path where the foldername is “user” and the com-puter name is “desk01” :\\desk01\user
❒ An IP address can also be en-tered if you use one of the fol-lowing operating systems :Windows 98/Me/XP/2000or Windows NT 4.0.
❒ Computer and shared foldernames consisting of morethan 12 characters cannot bedisplayed.
E Press [OK].
F If entering a user name to logon is required, press [Manual In-put] on the right side of the username field.The soft keyboard appears.
G Enter the user name.
ReferenceFor details about the maxi-mum number of charactersthat can be entered, see p.113“Scan to Folder”.
H Press [OK].I If entering a password to log
on is required, press [Manual In-put] for [Password].
The soft keyboard appears.J Enter the password.
K Press [OK].
L Press [Connection Test].
A connection test is performedto check whether the specifiedshared folder exists.
Note❒ The connection test may take
time.❒ You may not be able to press
[Connection Test] right afterpressing [Cancel] during aconnection test.

Sending Scan Files by Scan to Folder
37
3
❒ Though the connection testwas successful, the machinemay fail to transfer the file ifwriting authority is lackingor if there is not enough freespace on the hard disk.
M Check the connection test re-sult, and then press [Exit].
N Press [OK].
O To enter more destinations, re-peat steps AAAA to NNNN.
Note❒ To deselect a destination, press
[UUUUPrev.] or [TTTTNext] to displaythe destination in the desti-nation field, and then pressthe {{{{Clear/Stop}}}} key.
❒ To change the path for thefolder that has been entered,press [Change] on the left sideof the destination field. Enterthe correct path for the fold-er, and then press [OK].
❒ To check the selected desti-nations, press the {{{{CheckModes}}}} key.
Specifying a folder in the FTP server
A Press [Enter Destination].B Press [FTP].
A confirmation message forchanging the protocol appears.
C Press [Manual Input] on the rightside of the server name field.
The soft keyboard appears.D Enter a server name.
Note❒ For details about the maxi-
mum number of charactersthat can be entered, see p.113“Scan to Folder”.
❒ An IP address also can be en-tered.
E Press [OK].
F Press [Manual Input] on the rightside of the path field.
The soft keyboard appears.G Enter the path for the folder.
Note❒ For details about the maxi-
mum number of charactersthat can be entered, see p.113“Scan to Folder”.
❒ The following is an exampleof a path where the foldername is “user” and the sub-folder name is “lib”: user\lib
H Press [OK].
I If entering a user name to logon is required, press [Manual In-put] on the right side of the username field.
The soft keyboard appears.J Enter the user name.
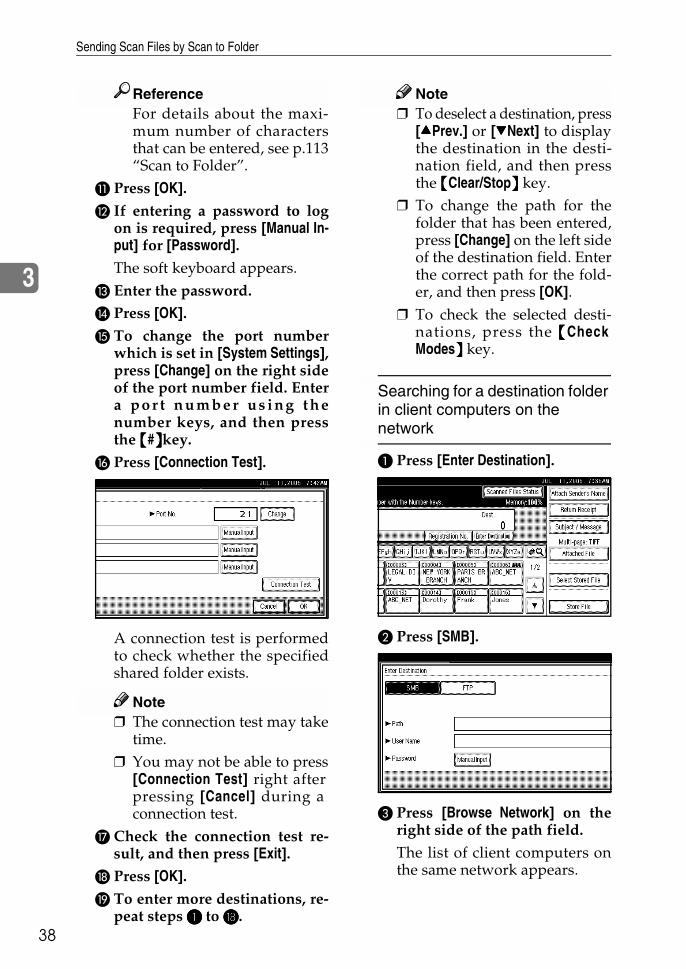
Sending Scan Files by Scan to Folder
38
3
ReferenceFor details about the maxi-mum number of charactersthat can be entered, see p.113“Scan to Folder”.
K Press [OK].
L If entering a password to logon is required, press [Manual In-put] for [Password].
The soft keyboard appears.M Enter the password.N Press [OK].
O To change the port numberwhich is set in [System Settings],press [Change] on the right sideof the port number field. Entera p o r t n u m b e r u s i n g t h enumber keys, and then pressthe {{{{#}}}}key.
P Press [Connection Test].
A connection test is performedto check whether the specifiedshared folder exists.
Note❒ The connection test may take
time.❒ You may not be able to press
[Connection Test] right afterpressing [Cancel] during aconnection test.
Q Check the connection test re-sult, and then press [Exit].
R Press [OK].
S To enter more destinations, re-peat steps AAAA to RRRR.
Note❒ To deselect a destination, press
[UUUUPrev.] or [TTTTNext] to displaythe destination in the desti-nation field, and then pressthe {{{{Clear/Stop}}}} key.
❒ To change the path for thefolder that has been entered,press [Change] on the left sideof the destination field. Enterthe correct path for the fold-er, and then press [OK].
❒ To check the selected desti-nations, press the {{{{CheckModes}}}} key.
Searching for a destination folder in client computers on the network
A Press [Enter Destination].
B Press [SMB].
C Press [Browse Network] on theright side of the path field.
The list of client computers onthe same network appears.

Sending Scan Files by Scan to Folder
39
3
Note❒ Computer and shared folder
names consisting of morethan 12 characters cannot bedisplayed.
❒ If the client computer youwant to select is not dis-played, press [Up One Level]to select another workgroup,and then search for the clientcomputer.
❒ The maximum number of cli-ent computers and sharedfolders that can be displayedis 100.
D Select the client computer thathas the destination folder.
Note❒ If authentication is required
for the selected computer, alog-on screen appears. Enterthe user name and password.
The list of folders on the select-ed computer appears.
E Select the destination folder.
Note❒ When the selected folder has
sub-folders, the sub-folderslist appears.
❒ If authentication is requiredfor the selected folder, a log-on screen appears. Enter theuser name and password.
F Press [OK].G Press [OK].
Searching for a destination folder in the destination list
A Press [ ].
B Press [Search by Dest. Name].
The soft keyboard appears.
Note❒ To search by path, press
[Search by Folder Name].C Enter part of the destination
folder name.
Note❒ Enter the first character or
characters of the destinationname.
❒ It is necessary to differentiatebetween uppercase and low-ercase letters.

Sending Scan Files by Scan to Folder
40
3
❒ It is also possible to performa combined search using[Search by Dest. Name] and[Search by Folder Name].
D Press [OK].E Select a destination folder.
F Press [Exit].
Checking selected destinations
A Use the destination field at thetop of the screen to checkwhich destinations are select-ed.
Note❒ Press [UUUUPrev.] or [TTTTNext] to
scroll through the list. Desti-nations are displayed in theorder they were selected.
❒ To check the selected desti-nations, press the {{{{CheckModes}}}} key.
GGGG Select the file type if necessary.
A Press [Attached File].
B Press [File Type].C Select the file type.
D Press [OK] twice.
HHHH Specify the file name if necessary.
A Press [Attached File].B Press [File Name].
The soft keyboard appears.C Enter a file name.
Note❒ A scan file is given a 21-digit
(excluding the extension) filename which combines thetime and date the original wasscanned with a 4-digit pagenumber. (Example : When onepage is scanned in TIFF at15.10 seconds, 3.30 p.m., 31December, 2020, the file nameis 202012311530150100001.tif)
D Press [OK].
E Press [OK].
IIII Place originals.
ReferenceThe procedure for placing origi-nals is the same as that for plac-ing originals for copying. Fordetails about placing originals,see “Placing Originals”, CopyReference.
Note❒ For details about the maximum
size of the scan file that can besent, see p.113 “Scan to Folder”.
❒ To interrupt scanning, press the{{{{Clear/Stop}}}} key or press [Stop]on the display panel.

Sending Scan Files by Scan to Folder
41
3
❒ When scanning multiple pagesinto a single file, place the nextoriginal. For details, see p.77“Scanning Multiple Pages into aSingle File”.
Simultaneous Storage and Sending by Scan to Folder
You can use the Scan to Folder func-tion and the storage function together.The scan file is sent by Scan to Folderand at the same time is stored.
Note❒ This section explains mainly the
procedure for simultaneous stor-age and sending by Scan to Folder.For details, see p.34 “Procedure forSending by Scan to Folder”.
❒ The file stored when simultane-ously storing a file and sending itby Scan to Folder cannot be resentfrom the Scan to Folder screen. Toresend the file, select the file in the[Select Stored File] screen and sendit. See p.50 “Sending Stored Filesby E-mail or Scan to Folder, or De-livering”.
AAAA Make settings for the original, suchas orientation and output tray.
Referencep.75 “Specifying the Orienta-tion and Output Tray of theOriginal”
BBBB Make the scan settings.
Note❒ There are two ways to specify
scan settings, as described be-low:• Configure each setting for
scanning. For details, seep.73 “Specifying Scan Set-tings”.
• Recall registered settings. Fordetails, see p.80 “Programs”.
CCCC Select the destination.
DDDD Specify the sender, subject, andmessage when sending e-mail isperformed at the same time.
EEEE Press [Store File].
FFFF Make sure that [Send & Store] is se-lected.
GGGG Specify file information if neces-sary.
ReferenceFor details about specifying fileinformation, see p.45 “Specify-ing file information”.
HHHH Press [OK].
IIII Place originals.
Note❒ The procedure for placing origi-
nals is the same as that for plac-ing originals for copying. Fordetails about placing originals,see “Placing Originals”, CopyReference.

Sending Scan Files by Scan to Folder
42
3
Checking the Scan to Folder Results
The sending results can be checked.
Note❒ For details about the maximum
number of sending operations thatcan be checked, see p.102 “Print &Delete Scanner Journal”.
❖❖❖❖ Items that can be checked• Date / Time
The date and time sending wasrequested or the date and time“Error” or “Cancelled” is con-firmed is displayed.
• DestinationThe sending function (e-mail,Scan to Folder, or delivery func-tion) used is displayed with anicon.When multiple destinationswere selected, the destinationsare displayed individually.
• Sender• File Name
The file name is displayed onlywhen a file is stored at the sametime and when a stored file issent.
• StatusOne of the following status isdisplayed: “Done” , “Send-ing...”, “Waiting...”, “Error”, or“Cancelled”.
AAAA Press [Scanned Files Status] on theScan to Folder screen.
BBBB Check the displayed records.
Note❒ Depending on the security set-
tings, certain records may notbe displayed.
❒ One screen shows the recordsfor five sending operations.Press [UUUUPrev.] or [TTTTNext] toscroll through the screen.
❒ When the status of a file is“Waiting...”, the sending can becanceled by selecting that file,and then pressing [Cancel].
❒ Press [Print] to print the wholejournal.
CCCC Press [Exit].
The Scan to Folder screen appears.

43
4. Storing Files
Scan files can be stored in the hard disk of the machine using the DocumentServer function, and the stored file can be used later. Using DeskTopBinder,stored files can be viewed or retrieved with a client computer.
Important❒ A password can be set for every stored file.There is a risk that stored files
without a password can be accessed by someone using DeskTopBinder on thesame LAN. We recommend you consider security measures such as settingpasswords to protect against unauthorized access.
❒ Scan file stored in the machine may be lost if some kind of failure occurs. Weadvise against using the hard disk to store important files. The supplier shallnot be responsible for any damage that may result from the loss of files. Forlong-term storage of files, we recommend the use of DeskTopBinder. For de-tails, contact your local dealer.
Note❒ When a delivery server is added to the network, stored files can be delivered.
You can store scan files and simultaneously deliver them with the networkdelivery scanner function, send it by e-mail, or send it by Scan to Folder. Seep.50 “Sending Stored Files by E-mail or Scan to Folder, or Delivering”.
Storing Files
This section explains how to store files and how to specify file information forstored files.
Note❒ For details about the maximum number of files that can be stored, see p.114
“Store”.❒ The stored files are deleted automatically after a certain number of days have
passed. For information about making settings and changing settings, seeGeneral Settings Guide.
❒ Files cannot be printed from the control panel after being stored using thescanner function. Print scan files after a client computer receives them. Seep.51 “Viewing a list of stored files using DeskTopBinder” or p.52 “Viewing alist of stored files using Web Image Monitor”.

Storing Files
44
4
Storage Procedure
You can scan and store files.
AAAA Press the {{{{Scanner}}}} key.
Note❒ The illustration is an example.
The actual appearance may bedifferent.
BBBB Make sure that no previous set-tings remain.
Note❒ If a previous setting remains,
press the {{{{Clear Modes}}}} key.
CCCC Make settings for the original, suchas orientation and output tray.
Referencep.75 “Specifying the Orienta-tion and Output Tray of theOriginal”
DDDD Make the scan settings.
ReferenceThere are two ways to specifyscan settings, as described be-low:• Configure each setting for
scanning. For details, seep.73 “Specifying Scan Set-tings”.
• Recall registered settings. Fordetails, see p.80 “Programs”.
EEEE Make the settings for storing scanfiles.
A Press [Store File].
B Press [Store Only].
Note❒ To store and deliver scan
files, press [Send & Store]. Seep.28 “Simultaneous Storageand Sending by E-mail”, p.41“Simultaneous Storage andSending by Scan to Folder”,or p.65 “Simultaneous Stor-age and Delivery”.
❒ [Store Only] cannot be pressedif a destination or sender isselected.
C Press [OK].
FFFF Specify file information.Specify a user name, file name, andpassword for the file.
ReferenceFor details about specifying fileinformation, see p.45 “Specify-ing file information”.
GGGG Place originals.
ZZZ606S

Storing Files
45
4
ReferenceThe procedure for placing origi-nals is the same as that for plac-ing originals for copying. Fordetails about placing originals,see “Placing Originals”, CopyReference.
Note❒ To interrupt scanning, press the
{{{{Clear/Stop}}}} key or press [Stop]on the display panel.
❒ When placing multiple origi-nals one-by-one, place the nextoriginal. For details, see p.77“Scanning Multiple Pages into aSingle File”.
Specifying file information
You can specify a user name, filename, and password for a stored scanfile.According to the settings made, youcan search for files by user name orfile name and you can prevent unau-thorized persons from accessing thefiles.
ReferenceFor details about the maximumnumber of characters that can beentered, see p.114 “Store”.
AAAA Press [Store File].
The File Information screen ap-pears.
BBBB Specify file information.
Specifying a user name
A Press [User Name].
B Select the user name.
Note❒ The user names shown here
are names that were regis-tered on the [AdministratorTools] tab in [System Settings].To specify a name not shownhere, press [Non-programmedName], and then enter theuser name.
C Press [OK].

Storing Files
46
4
Specifying a file name
Scan files are automatically namedSCAN0001, SCAN0002, etc. If nec-essary, you can change the filename.A Press [File Name].
The soft keyboard appears.B Enter the file name.
ReferenceFor information about howto enter characters, see Gener-al Settings Guide.
C Press [OK].
Specifying a password
When a password is specified,only a person who knows the pass-word can view the file.A Press [Password].
B Enter a four to eight digit numberusing the number keys.
C Press the {{{{#}}}} key.
Note❒ To change the password, press
[Change], and then enter anew one.
D Enter the same number as youentered in step BBBB for confirma-tion.
E Press the {{{{#}}}} key.
F Press [OK].
Important❒ Do not forget the password.
If you forget it, consult thesystem administrator of themachine.
CCCC Press [OK] to return to the previ-ous screen.

Displaying the List of Stored Files
47
4
Displaying the List of Stored Files
From the list of stored files, you candelete stored files or change file infor-mation. To show the list of storedfiles, perform the following steps:
Note❒ You can also display the list of
stored files from a client computerusing DeskTopBinder and WebImage Monitor. For details, seep.51 “Checking Stored Files from aClient Computer”.
AAAA Press the {{{{Scanner}}}} key.
Note❒ The illustration is an example.
The actual appearance may bedifferent.
BBBB Display the list of stored files.
A Press [Select Stored File].
B Press [Manage / Delete File].
ZZZ606S

Storing Files
48
4
Viewing the List
The list of stored files has the following elements.The function items displayed serve as selector keys. You can select or specify anitem by lightly pressing it. When you select or specify an item on the displaypanel, it is highlighted like . Keys that cannot be selected appear like .
Note❒ Depending on the security settings, certain files may not be displayed.
❖❖❖❖ When using the network delivery scanner, e-mail, or Scan to Folder function
❖❖❖❖ When displaying information of a selected stored file
1. Keys for searching for filesPress to switch to the screens forsearching for a file by user name or filename, or to the screen for displayingall files.
2. Keys to switch to the informationdisplay
Press to switch between the stored filelist and the detailed information of theselected file.
3. Keys for sorting filesPress to sort the files using the select-ed item. Select the same item oncemore for a reverse sort. However, thefiles cannot be sorted in reverse deliv-ery order.
4. Keys for changing file informationUse for deleting the selected file orchanging the user name, file name, orpassword.

Displaying the List of Stored Files
49
4
5. List of stored filesDisplays the list of stored files.
Note❒ The files that are stored by func-
tions other than the scanner can bedisplayed by pressing the [Docu-ment Server] key.
❒ If the file is not displayed, press[UUUUPrev.] or [TTTTNext] to scroll throughthe list.
❒ For files which are password pro-tected, a key symbol( ) is shown tothe left of the user name.
6. [Manage / Delete File]Press to perform operations such asdeleting stored files or changing fileinformation.
7. [Send]Press to send or deliver stored files.For details, see p.50 “Sending StoredFiles by E-mail or Scan to Folder, orDelivering”.
8. Information for a selected stored filePress [Detail] to display the informa-tion for a file after selecting the filefrom the file list.
Searching for Files
You can search for files from thestored files using the user name or filename.
Searching by user name
AAAA On the screen with the list of storedfiles, press [Search by User Name].
BBBB Select the user name to be usedfor the search.
Note❒ The user names shown here are
names that were registered onthe [Administrator Tools] tab in[System Settings]. To change auser name not shown here,press [Non-programmed Name],and then enter the user name.
CCCC Press [OK].The search starts, and files whoseuser name starts with the enteredstring appear.

Storing Files
50
4
Searching by file name
AAAA On the screen with the list of storedfiles, press [Search by File Name].
The soft keyboard appears.
BBBB Enter the file name.
Note❒ It is necessary to differentiate
between uppercase and lower-case letters.
ReferenceFor information about how toenter characters, see General Set-tings Guide.
CCCC Press [OK].The search starts, and files whosename starts with the entered stringappear.
Sending Stored Files by E-mail or Scan to Folder, or Delivering
Files stored can be sent by e-mail orScan to Folder, or delivered to the de-livery server.
Note❒ This section explains how to select
files you want to send or deliver.For details about sending by e-mail, see p.19 “Procedure for Send-ing E-mail”. For details aboutsending by Scan to Folder, see p.34“Procedure for Sending by Scan toFolder”. For details about deliver-ing stored files, see p.60 “Deliver-ing Scan Files”.
❒ When stored files are sent or deliv-ered, scan settings cannot bechanged. The files are sent or de-livered with the scan settings spec-ified when they were stored.
AAAA Press [Select Stored File] to displaythe list of stored files.
Referencep.47 “Displaying the List ofStored Files”
BBBB Select a file.
Note❒ When you select a password
protected file, the Password en-try screen appears. After youhave entered the correct pass-word and pressed [OK], the filewill be selected.

Displaying the List of Stored Files
51
4
CCCC To select multiple files, repeatstep BBBB.
Note❒ For details about the maximum
number of files that can be se-lected at once, see p.114 “Store”.
❒ If you select multiple files, thefiles will be sent or delivered inthe order they were selected.
❒ If you press [Display Selection],the selected files will be shownin the order of delivery.
DDDD Press [OK].
The e-mail, Scan to Folder, or net-work delivery scanner screen ap-pears.
EEEE Switch the destination list if nec-essary.
FFFF Specify a destination.
GGGG Specify the sender, subject, andmessage if necessary.
HHHH Press the {{{{Start}}}} key.
Checking Stored Files from a Client Computer
You can view the list of stored filesfrom a client computer using Desk-TopBinder and Web Image Monitor.
Note❒ You can also view the files stored
under the copy, Document Server,and printer functions.
❒ The illustration used in the follow-ing explanation is an example. Theitems that actually appear on thescreen may differ, depending onthe model in use and the environ-ment.
Viewing a list of stored files using DeskTopBinder
Stored files are shown below usingDeskTopBinder.
Note❒ The illustration is an example. The
items that actually appear may bedifferent.
❒ You can also transfer the storedfiles to the client computer.
ReferenceFor details about installingD eskTopBinde r , see p .11“DeskTopBinder”. For detailsabout the functions of DeskTop-Binder, such as transferring filesto a client computer, see themanuals related to DeskTop-Binder manuals. See p.i “Manu-als for This Machine”.

Storing Files
52
4
Viewing a list of stored files using Web Image Monitor
The stored files are displayed and canbe checked also in Web Image Moni-tor.
Note❒ When you enter http:// (machine
IP address)/ in the address bar ofthe Web browser on a client com-puter, Top Page of Web ImageMonitor is displayed.
❒ You can also download the storedfiles.
ReferenceFor details about displaying ordownloading stored files usingWeb Image Monitor, see GeneralSettings Guide.For details about making settingsfor using Web Image Monitor, seeNetwork Guide.For details about functions formanaging stored files using WebImage Monitor, click [Help] on theupper-right corner of the dis-played screen.

Managing Stored Files
53
4
Managing Stored Files
Deleting Files
You can delete files that are no longerneeded.
Limitation❒ Files waiting for delivery cannot
be deleted.
ReferenceUsing Web Image Monitor from aclient computer, you can also de-lete the stored files. See General Set-tings Guide.
AAAA Display the list of stored files.
Referencep.47 “Displaying the List ofStored Files”
BBBB Press [Manage / Delete File].
The [Manage / Delete File] screen ap-pears.
CCCC Select the file you want to delete.
Note❒ For details about the maximum
number of files that can be se-lected at once, see p.114 “Store”.
❒ When you select a passwordprotected file, the Password en-try screen appears. Enter thecorrect password, and thenpress [OK]. When multiple filesare selected, the password entryscreen appears each time a pass-word protected file is selected.
DDDD Press [Delete File].
A confirmation message about de-leting the file appears.
EEEE Press [Delete].
FFFF Press [Exit].
Changing File Information
The information for stored files (username, file name, and password) canbe changed.
Limitation❒ Information for files waiting for
delivery cannot be changed.
ReferenceUsing Web Image Monitor from aclient computer, you can changethe information of files stored. SeeGeneral Settings Guide.
AAAA Display the list of stored files.
Referencep.47 “Displaying the List ofStored Files”

Storing Files
54
4
BBBB Press [Manage / Delete File].
CCCC Select the file for which you wantto change the file information.
Note❒ When you select a password
protected file, the password en-try screen appears. Enter thecorrect password, and thenpress [OK].
DDDD Change the file information.
Changing the user name
A Press [Change User Name].
B Select the new user name.
Note❒ The user names shown here
are names that were regis-tered on the [AdministratorTools] tab in [System Settings].To change a user name notshown here, press [Non-pro-grammed Name], and then en-ter the user name.
C Press [OK].
Changing the file name
A Press [Change File Name].
B Enter the new file name.
ReferenceFor information about howto enter characters, see Gener-al Settings Guide.
C Press [OK].

Managing Stored Files
55
4
Changing the password
A Press [Change Password].
B Enter a new four to eight digitnumber as the password usingthe number keys.
C Press the {{{{#}}}} key.
Note❒ To change the password, press
[Change], and then enter anew one.
D Enter the same number as youentered in step BBBB for confirma-tion.
E Press the {{{{#}}}} key.
F Press [OK].
Important❒ Do not forget the password.
If you forget it, consult thesystem administrator of themachine.
EEEE Make sure that the file informa-tion was changed as necessary,and press [Exit].

Storing Files
56
4

57
5. Delivering Scan Files
Scan files can be sent to a specified destination using the network delivery scan-ner function. This chapter explains the preparation for delivering files, variousdisplay screens, delivery procedures, and how to check the delivery resultswhen this function is used.
Important❒ A delivery server in which the ScanRouter delivery software is installed is
necessary to use the network delivery scanner function. Information aboutdelivery destinations and senders must be registered first in the delivery serv-er. Also, connected devices should be configured in [Set I/O Device] of the Scan-Router delivery software. For details, see the ScanRouter delivery softwareHelp.

Delivering Scan Files
58
5
Preparation for Delivering
To use the machine as a network delivery scanner, the preparation described be-low is required.
Connect the machine to the network with an Ethernet cable or IEEE 1394 cable, or use wireless LAN.
To connect using an IEEE 1394 cable, the IEEE 1394 interface board is required. To connect using wireless LAN, the IEEE 802.11b interface unit is required.
See Network Guide.
To deliver scan files, the following [System Settings] settings must be specified correctly. (Certain other settings must also be specified.)
• IP address
• subnet mask
Also, [On] must be selected for [Delivery Option] under [File Trans-fer]. For details about making settings and other settings, see Network Guide.
Make settings for the network delivery scanner function, such as Destination List Settings.
See p.95 “Initial Scanner Setup”.
Install the ScanRouter delivery software required for using the network delivery scanner functions on the delivery server.
See p.11 “DeskTopBinder”.
After installing the software, make the required settings for server maintenance and delivery service.
For details, see the ScanRouter delivery software manuals.
Set the destination, sender information, and connected devices in the ScanRouter delivery software.
On the client computers, install the software required for view-ing or retrieving files by connecting to the delivery server, such as DeskTopBinder.
See p.11 “DeskTopBinder”.

Preparation for Delivering
59
5
Network Delivery Scanner Screen
The network delivery scanner screen is as shown.The function items displayed serve as selector keys. You can select or specify anitem by lightly pressing it. When you select or specify an item on the displaypanel, it is highlighted like . Keys that cannot be selected appear like .
1. Network delivery scanner icon ( )Indicates that the network delivery scan-ner screen is displayed.
2. Destination fieldThe selected destination is shown here. Ifmultiple destinations are selected, thedestinations are displayed in the orderthey were selected by pressing [UUUUPrev.] or[TTTTNext].
Note❒ To check the selected destinations,
press the {{{{Check Modes}}}} key.
3. [Registration No.]Press to specify a destination using a fivedigit registration number.
4. [Manual Input]When sending e-mail via the deliveryserver, press [Manual Input], and then enterthe destination using the soft keyboardthat is displayed. For information aboutsending e-mail via the delivery server,see the ScanRouter delivery softwaremanuals.
5. [Attach Sender's Name] [Return Re-ceipt] [Attach Subject]Specify the sender, subject, and messageof the document to be delivered. In addi-tion, specify whether or not to checkwhether the file has been opened at thedestination.
6. [ ] Switch Destination List/SearchPress to switch between the destinationlist of the delivery server and the destina-tion list of this machine, or to perform asearch such as a user name search.
7. Destination listDisplays the destinations registered inthe delivery server or this machine.
Note❒ When the entire list does not fit on one
screen, press [UUUU] or [TTTT] to scrollthrough the list.
❒ Group destinations are denoted bythis symbol ( ).

Delivering Scan Files
60
5
Delivering Scan Files
Delivery Procedure
A scan file is delivered after scan set-tings and destinations are specified. Ifnecessary, you can select a sender anda subject.
AAAA Press the {{{{Scanner}}}} key.
Note❒ The illustration is an example.
The actual appearance may bedifferent.
BBBB Make sure that no previous set-tings remain.
Note❒ If a previous setting remains,
press the {{{{Clear Modes}}}} key.
CCCC Make settings for the original, suchas orientation and output tray.
Referencep.75 “Specifying the Orienta-tion and Output Tray of theOriginal”
DDDD Make the scan settings.
ReferenceThere are two ways to specifyscan settings, as described below:• Configure each setting for
scanning. For details, seep.73 “Specifying Scan Set-tings”.
• Recall registered settings. Fordetails, see p.80 “Programs”.
EEEE If the e-mail screen appears, switchto the network delivery scannerscreen.
A Press [ ].B Press [Switch Destination List].
C Press [Delivery Server].
D Press [Exit].The network delivery scannerscreen appears.
FFFF Specify the destination.
You can specify the destination inthe following ways:• Select it from the destination list.• Specify its registration number.• Search for it.• Enter the e-mail address directly.
ZZZ606S

Delivering Scan Files
61
5
Note❒ The destination list is updated
automatically.❒ Depending on the security set-
tings, certain destinations maynot be displayed.
Selecting a destination from the list
A Select the destination.
The selected destination is high-lighted and also is displayed inthe destination field at the top ofthe screen.
Note❒ If the target destination does
not appear, take one of thefollowing steps:• Display the destination by
selecting its initial letterfrom the title.
• Display the destination bypressing [UUUU] or [TTTT].
❒ The destination titles are pro-gramed in the delivery serv-er.
❒ To deselect a destination,press the destination oncemore, or press [UUUUPrev.] or[TTTTNext] to display the desti-nation in the destinationfield, and then press the{{{{Clear/Stop}}}} key.
B To select more destinations, re-peat step AAAA.
Using a registration number to select a destination
A Press [Registration No.].
B Enter the five digit registrationnumber that has been assignedto a destination folder usingthe number keys.
If the entered number is lessthan five digits, press the {{{{#}}}}key after the last number.Example: To enter 00009Press the {{{{9}}}} key, and thenpress the {{{{#}}}} key.
Note❒ To deselect a destination, press
[UUUUPrev.] or [TTTTNext] to displaythe destination in the desti-nation field, and then pressthe {{{{Clear/Stop}}}} key.
C To select more destinations, re-peat step BBBB.
Searching for a destination
A Press [ ].

Delivering Scan Files
62
5
B Press [Search Address Book].
C Press [Search by Dest. Name].
Note❒ To search by comment, press
[Search by Comment].The soft keyboard appears.
D Enter part of the destinationname.
Note❒ Enter the first character or
characters of the destinationname.
❒ It is necessary to differentiatebetween uppercase and low-ercase letters.
E Press [OK].
F Select a destination.
G Press [Exit].
Manual entry of a destination
A Press [Manual Input].
The soft keyboard appears.B Enter the destination.
Note❒ Enter the e-mail address of
the destination when send-ing via the delivery server.
❒ For details about the maxi-mum number of charactersthat can be entered, see p.114“The network delivery scan-ner function”.
❒ Alphanumeric characters andperiods can be entered. Thesymbols ( ) \ , ; : ” and spacescannot be entered. For de-tails, see p.114 “The networkdelivery scanner function”.
C Press [OK].
Note❒ To deselect a destination, press
[UUUUPrev.] or [TTTTNext] to displaythe destination in the desti-nation field, and then pressthe {{{{Clear/Stop}}}} key.
❒ To check the selected desti-nations, press the {{{{CheckModes}}}} key.
D To enter more destinations, re-peat steps AAAA to CCCC.

Delivering Scan Files
63
5
Checking selected destinations
A Use the destination field at thetop of the screen to checkwhich destinations are select-ed.
Note❒ Press [UUUUPrev.] or [TTTTNext] to
scroll through the list. Desti-nations are displayed in theorder they were selected.
❒ To check the selected desti-nations, press the {{{{CheckModes}}}} key.
GGGG Specify the sender (sender of thefile) if necessary.
You can specify the sender in thefollowing ways:• Select it from the list.• Specify its registration number.• Search for it.
Note❒ When a sender has been speci-
fied, this information is addedto the scan file. Select a senderfrom the senders registered inthe delivery server.
❒ Depending on the security set-tings, [Attach Sender's Name] maybe selected as the user namewhen logging in.
Selecting a sender from the list
A Press [Attach Sender's Name].
B Select the sender.
The selected sender and its reg-istration number appear.
C Press [OK].
Using a registration number to specify a sender name
A Press [Attach Sender's Name].
B Enter the five digit registrationnumber that has been assignedto a destination folder usingthe number keys.
If the entered number is lessthan five digits, press the {{{{#}}}}key after the last number.Example: To enter 00006Press the {{{{6}}}} key, and thenpress the {{{{#}}}} key.
C Press [OK].

Delivering Scan Files
64
5
Searching for a sender
A Press [Attach Sender's Name].
B Press [ ].
C Press [User (Dest.) Name].
The soft keyboard appears.D Enter part of the sender name.
Note❒ Enter the first character or
characters of the sendername.
❒ It is necessary to differentiatebetween uppercase and low-ercase letters.
E Press [OK].
F Select a sender.
G Press [Exit].H Press [OK].
HHHH Specify [Return Receipt] if neces-sary.
Note❒ If you did not specify the sender
in Step G, [Return Receipt] cannotbe used even if you select it.
❒ E-mail notification that the filehas been opened at the destina-tion is sent to the sender speci-fied in [Attach Sender's Name]. Touse [Return Receipt], it is neces-sary to make settings such as thee-mail address in advance in theScanRouter delivery software.
IIII Specify a subject if necessary.
Note❒ To specify a subject, you can se-
lect it from the list, enter it di-rectly, or combine selecting andentering it.
❒ For details about the maximumnumber of characters that canbe entered, see p.114 “The net-work delivery scanner func-tion”.
❒ When a subject has been speci-fied, this information is addedto the scan file.
❒ The subjects that can be selectedfrom the list must be registeredin [System Settings] in advance.See Network Guide.

Delivering Scan Files
65
5
The procedure to specify the sub-ject name “[Urgent] New productappearance” is explained as an ex-ample here.A Press [Attach Subject].
B Press the subject [Urgent].
C Press [Manual Input].
The soft keyboard appears.D Enter the subject “New prod-
uct appearance”.E Press [OK] twice.
JJJJ Place originals.
ReferenceThe procedure for placing origi-nals is the same as that for plac-ing originals for copying. Fordetails about placing originals,see “Placing Originals”, CopyReference.
Note❒ To interrupt scanning, press the
{{{{Clear/Stop}}}} key or press [Stop]on the display panel.
❒ When scanning multiple pagesinto a single file, place the nextoriginal. For details, see p.77“Scanning Multiple Pages into aSingle File”.
Simultaneous Storage and Delivery
You can use the network deliveryscanner function and the storagefunction together.The scan file is delivered and at thesame time is stored.
Note❒ This section explains mainly the
procedure for simultaneous deliv-ery and storage. For details, seep.60 “Delivering Scan Files”.
AAAA Make settings for the original,such as orientation and outputtray.
Referencep.75 “Specifying the Orienta-tion and Output Tray of theOriginal”
BBBB Make the scan settings.
Note❒ There are two ways to specify
scan settings, as described be-low:• Configure each setting for
scanning. For details, seep.73 “Specifying Scan Set-tings”.
• Recall registered settings. Fordetails, see p.80 “Programs”.
CCCC Select the destination.
DDDD Specify the sender and a subject ifnecessary.

Delivering Scan Files
66
5
EEEE Press [Store File].
FFFF Make sure that [Send & Store] is se-lected.
GGGG Make settings for file informa-tion if necessary.
ReferenceFor details about specifying fileinformation, see p.45 “Specify-ing file information”.
HHHH Press [OK].
IIII Place originals.
Note❒ The procedure for placing origi-
nals is the same as that for plac-ing originals for copying. Fordetails about placing originals,see “Placing Originals”, CopyReference.

Checking the Status of Delivery
67
5
Checking the Status of Delivery
The sending results can be checked.
Note❒ For details about the maximum
number of sending operations thatcan be checked, see p.102 “Print &Delete Scanner Journal”.
❖❖❖❖ Items that can be checked• Date / Time
The date and time the deliverywas requested or the date andtime “Error” or “Cancelled”was confirmed is displayed.
• DestinationThe sending function (e-mail,Scan to Folder, or delivery func-tion) used is displayed with anicon.When multiple destinationswere selected, the first selecteddestination is displayed.
• Sender• File Name
The file name is displayed onlywhen a file is stored at the sametime and when a stored file issent.
• StatusOne of the following status isdisplayed: “Done” , “Send-ing...”, “Waiting...”, “Error”, or“Cancelled”.
AAAA Press [Scanned Files Status] on thenetwork delivery scanner screen.
BBBB Check the displayed records.
Note❒ Depending on the security set-
tings, certain records may notbe displayed.
❒ One screen shows the recordsfor five delivery operations.Press [UUUUPrev.] or [TTTTNext] toscroll through the screen.
❒ When the status of a file is“Waiting...”, the delivery can becanceled by selecting that file,and then pressing [Cancel].
❒ Press [Print] to print the wholejournal.
CCCC Press [Exit].
The network delivery scannerscreen appears.

Delivering Scan Files
68
5

69
6. Using the Network TWAINScanner Function
This chapter explains the procedure for scanning originals with the networkTWAIN scanner using DeskTopBinder. In addition, the preparation for usingthe network TWAIN scanner is explained.
Preparation for Using the Network TWAIN Scanner
To use the machine as a network TWAIN scanner, the preparation described be-low is required.
Connect the machine to the network with an Ethernet cable or IEEE 1394 cable, or use wireless LAN.
To connect using an IEEE 1394 cable, the IEEE 1394 interface board is required. To connect using wireless LAN, the IEEE 802.11b interface unit is required.
See Network Guide.
Check the network settings in [System Settings], and change if re-quired.
See Network Guide.
On the client computers, install the software required for using the network TWAIN scanner functions, such as a TWAIN Driv-er and DeskTopBinder.
See p.10 “TWAIN Driver”.

Using the Network TWAIN Scanner Function
70
6
Scanning Originals
This section explains how to scanoriginals using the network TWAINscanner function.
Note❒ When using the TWAIN scanner,
you can scan the original withoutentering a user code even if [WeeklyTimer Code] has been selected in[System Settings]. See "System Set-tings", General Settings Guide.
AAAA Start DeskTopBinder, and thenselect the scanner driver.A On the [Start] menu, point to
[Program], point to [DeskTop-Binder V2], and then click [Desk-TopBinder V2].
B On the [Tools] menu, click[Scanner Settings...].
If the scanner is already select-ed, no scanner settings are nec-essary. Check the settings in[File format for scanned image(s)] ,and then proceed to step E.
C Click [Select Scanner Driver...].
D Select the name of the machineyou want to use in the list, andthen click [Select].
E Click [OK].
BBBB Make the scan settings.
A On the [File] menu, point to[Add Document], and then click[Scan...].
After a short while, the dialogbox of the TWAIN Driver thatoperates the scanner appears.This dialog box is called thescanner properties dialog box.
Note❒ The name of the scanner cur-
rently being used is shownon the title bar of the dialogbox. When mult iple ma-chines are connected, makesure that the indicated ma-chine is the machine youwant to use. If it is different,click [Select Scanner] to selectthe scanner again.
❒ If the machine you want touse is not displayed in thelist, make sure that the IP ad-dress is configured and thatthe machine is correctly con-nected to the network. If themachine is still not displayedin the list after confirmingthe above, consult your net-work administrator.
B Make settings according to suchfactors as the type of original,type of scanning, and orienta-tion of the original.
Note❒ For details about the settings,
see the TWAIN Driver Help.
CCCC Click [Scan] in the scanner proper-ties dialog box.
Note❒ Depending on the security set-
tings, a dialog box requestingyour user name and passwordmay appear when you press[Scan].
DDDD A message appears on machine'scontrol panel. Specify the outputtray of the original.

Scanning Originals
71
6
EEEE Place originals.
ReferenceThe procedure for placing origi-nals is the same as that for plac-ing originals for copying. Fordetails about placing originals,see “Placing Originals”, CopyReference.
FFFF If you have further originals, re-peat Step EEEE.
GGGG After completing scanning, click[Cancel] on the computer display.
HHHH A message appears on the compu-ter display. Click [OK].
IIII A message appears on the compu-ter display. Click [Complete].
JJJJ Save the scan file in DeskTop-Binder. A On the [File] menu, click [Exit].
B Enter the file name, and thenclick [OK].The image is stored in DeskTop-Binder, and DeskTopBinderViewer closes.
----Editing and printing scan filesWith DeskTopBinder, it is possible toedit and print scan files. For detailsabout how to edit and print, see Desk-TopBinder Help.

Using the Network TWAIN Scanner Function
72
6

73
7. Configuring/RegisteringScan Settings
This section describes how to specify scan settings, the orientation of the origi-nal, and the output tray of the original. In addition, this section describes theprogramming function by which you can register frequently used settings.
Specifying Scan Settings
AAAA Press [Scan Settings].
BBBB Select items such as resolutionand or iginal s ize , and thenchange their settings.
Specify the basic scan settings(scan type, resolution, image den-sity, scan size, and edit) as follows:
❖❖❖❖ Scan TypeOriginals are scanned accordingto the selected scan type.Select the scan type from the fol-lowing:• Text (Print)
For standard originals con-taining mainly text.Pr in ter pr in t ing is bestscanned with Text (Print).
• Text (OCR)For standard originals con-taining mainly text.Text (OCR) is suitable forhigher OCR accuracy.
• DrawingFor originals containingmainly lines, such as techni-cal drawings.This setting prevents smudg-es on the original appearingon the scanned image.
• Text / PhotoFor originals containing amixture of text and photo-graphs
• PhotoFor originals containing pho-tographs and other pictures(two-value).Creates scanned images suit-able for printing.
❖❖❖❖ ResolutionSelect the resolution from 150,200, 300, 400, or 600 dpi.
❖❖❖❖ Image DensitySelect the image density in sev-en steps from iLighter (1) toDarkerj (7), or use Auto ImageDensity.

Configuring/Registering Scan Settings
74
7
❖❖❖❖ Scan SizeSelect the size of the original tobe scanned.When [Auto Detect] is selected,the auto detect function of themachine is used to set the origi-nal size.If you select [Custom Size], youcan specify the vertical and hor-izonta l d imens ions o f thescanned area in millimeters. Al-ternatively, specify the horizon-tal dimension only, and then setthe vertical dimension using[Auto Detect].
ReferenceFor details about operationsunder [Custom Size], see p.99“Selecting a custom size”.
When the size is specified, scan-ning is performed for that size,regardless of the actual size ofthe original. The following sizescan be selected:A0R, A1RS, A2RS,A3RS, A4RS,B1R,B2RS,B3RS,B4RS,36 × 48 inchR,34 × 44 inchR,30 × 42 inchR,24 × 36 inchRS,22 × 34 inchRS,18 × 24 inchRS,17 × 22 inchRS,12 × 18 inchRS,11 × 17 inchRS,81/2 × 14 inchRS,9 × 12 inchRS,81/2 × 11 inchRS
❖❖❖❖ EditMake editing settings.• Erase Border
Delete the borders of thescanned original accordingto the width specified.If you select [Same Width], youcan specify , mill imeters(inches), a uniform width fordeleting all sides (top, bot-tom, left, and right). If youselect [Diff. Width], you canspecify, millimeters (inches),a different width for deletingeach side. You can specify avalue between 2 and 99 mil-limeters (0.1 and 3.9 inches).
Limitation❒ If you set [Scan Size] to [Au-
to Detect], or select [AutoDetect] for the verticallength in [Custom Size],[Erase Border] becomes un-available (If [Erase Border]was selected beforehand,[Erase Border] is disabled).
• Positive / NegativeIf you select [Positive / Nega-tive], a black and white origi-nal will produce a negativescanned image.
Note❒ If you select [Erase Border],
the deleted margin ismade black.
• Mirror ImageIf you select [Mirror Image], thescanned image will be a mir-ror image of the original.
CCCC Press [OK].

Specifying the Orientation and Output Tray of the Original
75
7
Specifying the Orientation and Output Tray of the Original
To correctly orient a scanned imageon the computer display, you mustspecify the orientation of the original.Also, specify the original's outputtray.
For E-mail, Scan to Folder, and a Network Delivery Scanner
AAAA Select [Original Orientation] or [Origi-nal Exit].
Orientation selection
A Press the key for the same ori-entation as the actual orienta-tion of the original.
Limitation❒ If you set [Scan Size] to [Auto
Detect], or set only the verti-cal size to [Auto Detect] in[Custom Size], orientationsother than cannot be se-lected.
❒ Depending on the image size,originals with orientationsother than may not bescanned. If this happens, anerror message appears afterscanning is started. ⇒ p.105“Relationship between Reso-lution and original size”
ReferenceFor details about the orienta-tion of the original and [Origi-nal Orientation] setting, seep.109 “Placing Originals”.The default orientation set-ting can be changed in [Origi-nal Orientation Priority] in[Scanner Features]. For details,see p.98 “Scan Settings”.
Specifying the Output Tray for the Original
A Specify the output tray for theoriginal.[ ] is suitable as the outputtray for roll paper.
Note❒ The default setting for the
output tray for the originalcan be registered in [SystemSettings] . For details, see“System Settings”, GeneralSettings Guide.

Configuring/Registering Scan Settings
76
7
BBBB Press [OK].
The current settings are displayed.
For a Network TWAIN Scanner
When using the network TWAINscanner, make the setting using theTWAIN Driver.
AAAA Open the Scanner Properties dia-log box.
Referencep.70 “Scanning Originals”
BBBB Specify [Scan Mode:] according tothe type of original and scanning.• [Standard] is suitable for scan-
ning text-based standard origi-nals.
• [Diazo type] is suitable for scan-ning diazo copies.
CCCC From the [Rotate Image:] menu inthe [Quality] group, select the an-gle of rotation.
To correctly orient the scanned im-age on the computer display, spec-ify the angle of rotation accordingto the orientation of the original.
Referencep.109 “Placing Originals”
DDDD Change the settings in the [OriginalSize], [Specify output size], and [Qual-ity] groups.
ReferenceFor details about each setting,see the Help.
EEEE If you have specified the UserCode Authentication, click [Au-thentication...], enter the User Codeand encryption key in the dialogbox that appears, and then click[OK].
Note❒ Ask the administrator for the
User Code and encryption key.

Scanning Multiple Pages into a Single File
77
7
Scanning Multiple Pages into a Single File
You can scan multiple pages into asingle file.Select the standby mode for addition-al originals from the following:• Wait a specified length of time for
the next original (Time limit set)• Wait indefinitely for the next orig-
inal (No time limit set)
Note❒ The machine will not switch to en-
ergy saver mode while waiting foradditional originals.
❒ While the machine is waiting foradditional originals, you canchange scan settings and the out-put tray for the original.
When a Time Limit Is Specified for Additional Originals
In advance, specify the waiting timein seconds for placing the additionaloriginals.In [Scanner Features], [Next Original Waitat Off], specify [Set Wait Time].
Reference⇒ p.98 “Next Original Wait at Off”
AAAA Specify scan settings, the orienta-tion of the original, and the out-put tray for the original.
Referencep.73 “Specifying Scan Settings”p.75 “Specifying the Orienta-tion and Output Tray of theOriginal”
BBBB Make sure [Next Original Wait] is notselected.
CCCC Make settings for sending by e-mail,Scan to Folder, storing, or delivering.
Referencep.19 “Procedure for Sending E-mail”p.34 “Procedure for Sending byScan to Folder”p.44 “Storage Procedure”p.60 “Delivery Procedure”
DDDD Place the originals.
ReferenceThe procedure for placing theoriginals is the same as that forplacing the originals for copy-ing. For details about placingthe originals, see “Placing Orig-inals”, Copy Reference.
Note❒ Originals are scanned in order.
Place them from the first page.Scanning is started. When scanning iscompleted, the time remaining for re-ceiving additional originals appears.

Configuring/Registering Scan Settings
78
7
Note❒ The selected destination appears
while scanning the originals.
EEEE To scan additional originals, loadthem within the specified time.Repeat this step until all originalsare scanned.
Note❒ If you change settings while the
machine is waiting for addition-al originals, the countdownstops. If you load an original, itis scanned, and the countdownfor loading additional originalsstarts
FFFF When scanning of all originalsand the countdown are complet-ed, the machine automaticallys t a r t s s t o r i n g / s e n d i n g t h escanned data.
Note❒ Alternately, you can press the
{{{{#}}}} key to start storing/sendingthe scanned data.
When a Time Limit Is Not Specified for Additional Originals
AAAA Specify scan settings, orientationand output tray for the original.
Referencep.73 “Specifying Scan Settings”p.75 “Specifying the Orienta-tion and Output Tray of theOriginal”
BBBB Select [Next Original Wait].
Note❒ In [Scanner Features], if you set
[Next Original Wait at Off] to [Con-tinuous Wait], [Next Original Wait]does not appear. Proceed toStep C. In this case, the machineoperates as if [Next Original Wait]has been selected.
CCCC Make settings for sending by e-mail, or Scan to Folder, storing, ordelivering.
Referencep.19 “Procedure for Sending E-mail”p.34 “Procedure for Sending byScan to Folder”p.44 “Storage Procedure”p.60 “Delivery Procedure”
DDDD Place the originals.
Scanning starts.
ReferenceThe procedure for placing theoriginals is the same as that forplacing the originals for copy-ing. For details about placingthe originals, see “Placing Orig-inals”, Copy Reference.

Scanning Multiple Pages into a Single File
79
7
Note❒ Originals are scanned in or-
der.Place them from the firstpage.
Note❒ The selected destination appears
while scanning the originals.
EEEE To scan additional originals, loadthem.
Repeat this step until all originalsare scanned.
FFFF After all originals are scanned,press the {{{{#}}}} key.
Storing or sending starts.

Configuring/Registering Scan Settings
80
7
Programs
You can register frequently used set-tings in the machine memory and re-call them for future use.
Note❒ You can register up to 10 programs
for the scanner mode.❒ You can use the settings registered
in program No.10 as the initialmode by selecting [Program No.10]in [Change Initial Mode] of [ScannerFeatures].
❒ Programs are not deleted by turningthe power off or by pressing the{{{{Clear Modes}}}} key. They are delet-ed only when you delete them oroverwrite them with another pro-gram.
❒ Settings that can be registered as aprogram are scan settings, standbymode for additional originals,loading orientation of the original,output tray of the original, and fileformat.
Registering a Program
AAAA Make the settings you want toregister in the initial display ofthe scanner mode.
BBBB Press the {{{{Program}}}} key.
CCCC Press [mmmm Register].
DDDD Press the program number youwant to register.
Note❒ Program numbers with m al-
ready have settings in them.
EEEE Enter the program name with thesoft keyboard that appears on thedisplay panel.
Note❒ You can enter up to 40 charac-
ters.❒ If it is not necessary to enter the
program name, proceed to stepF.
FFFF Press [OK].
When the settings are successfullyregistered, m appears on the leftside of the registered programnumber and the program name ap-pears on the right side. The displayreturns to the initial display after amoment.
AGH003S

Programs
81
7
Recalling a Program
AAAA Make sure the {{{{Scanner}}}} key is se-lected, and then press the {{{{Pro-gram}}}} key.
BBBB Press [BBBB Recall].
CCCC Press the number of the programyou want to recall.
The registered settings are dis-played.
Note❒ Programs are not registered in
numbers that appear withoutm.
DDDD Place the originals.
Scanning of the original is started.
Changing a Registered Program
AAAA Make sure the {{{{Scanner}}}} key is se-lected, and then press the {{{{Pro-gram}}}} key.
BBBB Press [BBBB Recall].
CCCC Press the number of the programyou want to change.
DDDD Change settings of the program.
EEEE Press the {{{{Program}}}} key.
FFFF Press [mmmm Register].
GGGG Press the number of the programfor which you changed settings orthe number of a different pro-gram in which you want to regis-ter the changed settings.
HHHH Press [Register].
Note❒ When you want to overwrite a
program that is already regis-tered, a confirmation messageappears.
IIII Enter a program name.
JJJJ Press [OK].
Note❒ If you register a program in a
number that is already regis-tered, the old program is over-written.
Deleting a Program
AAAA Make sure the {{{{Scanner}}}} key is se-lected, and then press the {{{{Pro-gram}}}} key.
BBBB Press [Delete].
CCCC Press the number of the programyou want to delete.
DDDD Press [Yes].The program is deleted, and thedisplay returns to the initial dis-play after a moment.

Configuring/Registering Scan Settings
82
7
Changing the Program Name
AAAA Make sure the {{{{Scanner}}}} key is se-lected, and then press the {{{{Pro-gram}}}} key.
BBBB Press [Change Name].
CCCC Press the number of the programfor which you want to change thename.
DDDD Enter a new program name.
Note❒ A program name can be entered
using up to 40 characters.
EEEE Press [OK].
The new program name appearsbriefly, and then the display re-turns to the initial display.

83
8. Troubleshooting
This section contains advice on what to do if you have problems scanning anoriginal, or if the network delivery scanner or e-mail function does not work.Various messages that may appear on the control panel or client computer arelisted, along with causes and solutions.
If Your Machine Does Not Operate As You Want
When Scanning Is Not Performed as Expected
When the Delivery Function Does Not Work
Problems Causes and solutions
The scanned image is dirty.
The exposure glass or reflector is dirty. Clean these parts. See “Maintaining Your Machine”, General Settings Guide.
The image is distorted or out of position.
• The original was moved during scanning. Do not move the original during scanning.
• The original has not been loaded square. Align the original with the side guides. See “Placing Originals”, Copy Reference.
The scanned image is up-side down.
The original was placed upside down. Place the original in the cor-rect orientation.
See "Placing Originals", Copy Reference.
No image results from scanning.
The original was loaded back-to-front. Load the original with the side you want to scan facing up. See "Placing Originals", Copy Ref-erence.
The scanned image con-tains white spaces.
If you scan originals using functions other than the network TWAIN scanner function, certain paper size and resolution set-tings may produce scanned images that are larger than the speci-fied size because of margins being added to the sides. Scanning at a higher resolution may reduce the margins.
Problems Causes and solutions
The delivery scanner func-tion screen is not dis-played.
• If the network TWAIN scanner screen appears when the ma-chine is switched to scanner mode, press [Exit] to switch to the network delivery scanner screen.
• If the display does not switch from network TWAIN scanner to network delivery scanner, the delivery scanner settings are not correct. See p.95 “Initial Scanner Setup”, and then make the appropriate settings.

Troubleshooting
84
8
When Stored Files Cannot Be Accessed
Network Cannot Be Browsed When Sending a Scan File
The TWAIN Driver Cannot Be Started
Stored Files Cannot Be Edited
The Network Delivery Function Cannot Be Used
Problems Causes and solutions
The stored file is locked and is not accessible.
The file, which is password protected, is locked because the pass-word was incorrectly entered ten times. Consult the network ad-ministrator.
Problems Causes and solutions
The network cannot be browsed when specifying the destination folder.
The following machine settings may not be correct:
• IP address
• subnet mask
Check the settings.
See "Connection and Setup", Network Guide.
Problems Causes and solutions
The Scanner Properties di-alog box cannot be dis-played.
Advanced encryption has been specified in the extended security setting. For details about the extended security setting, consult an administrator.
Problems Causes and solutions
Stored files cannot be de-leted. File names and pass-words cannot be changed. Files cannot be redeliv-ered.
Limits have been imposed using the available extended security function. Consult the user administrator.
Problems Causes and solutions
The network delivery function cannot be used.
The delivery software may be an old version or a security setting may be specified. Consult the machine administrator.

If Your Machine Does Not Operate As You Want
85
8
Operations are not possible when messages appear
Problems Causes and solutions
"Updating the des-tination list...Please wait. Specified destination(s) or sender's name has been cleared.” ap-pears, and operations are not possible.
The destination list is being updated from the network using SmartDeviceMonitor for Admin. Depending on the number of destinations to be updated, there may be some delay before you can resume operation. Operations are not possible while this mes-sage is displayed.
Wait until the message disappears. Do not switch off the power while this message is displayed.

Troubleshooting
86
8
When a Message Is Displayed
When an Error Message Appears on the Control Panel
Note❒ If an error message that is not included in this section appears, turn off the
main power switch of the machine, and then turn it on again. If the messagestill appears, note the content of the message and the error number (if dis-played), and contact your service representative. For information about howto turn off the main power switch, see General Settings Guide.
Message Causes and solutions
Authentication has failed. The entered login user name or login password is incorrect. Check the login user name and login password. The machine is unable to authenti-cate. Consult an administrator.
Authentication with the destination has failed. Check settings. To check the current status, press [Scanned Files Status].
• Check that the user name and password are correct.
Note❒ A password of 64 or more
characters may not be recog-nized.
• Check that the ID and password for the destination folder are cor-rect.
Cannot cancel sending certain file(s). To confirm the result, check [Scanned Files Status].
Only files in waiting can be canceled. Files with a delivery status of suc-cessful or other result cannot be can-celed.
Cannot find the specified path. Please check the settings.
Check whether the computer name and the folder name for the destina-tion are correct.
Cannot log in with the entered user name or password.
Make settings correctly for the user name and password for authentica-tion.
Cannot send scanned data. Exceeded max. number of files. Unable to cap-ture files.
For details about the maximum number of files that can be stored, see p.114 “Store”. Reduce the number of stored files for transmis-sion or delete unnecessary stored files.
Captured file exceeded max. number of pages per file. Cannot send the scanned data.
For details about the maximum number of pages per file that can be stored, see p.114 “Store”. Reduce the number of pages in the file, and then resend it.

When a Message Is Displayed
87
8
Connection with LDAP server has failed. Check the server status.
A network error has occurred and connection has failed. Try the opera-tion once more. If the message is still shown, the network may be crowd-ed. Check the information of System Settings. See "User Tools (System Settings)", General Settings Guide.
Connection with the destination has failed. Check the status and connec-tion. To check the current status, press [Scanned Files Status].
• Check the network settings of the client computer.
• Check that components such as the LAN cable are connected properly.
• Check that the server settings are correct and the server is working properly.
Entered protection code for destina-tion is incorrect. Please re-enter.
Make sure the protection code is cor-rect, and then enter it again. See "Registering a Protection Code", General Settings Guide.
Exceeded max. data capacity. Original Orientation to , then press the Start key again.
• Reload the original in the orienta-tion of .
• If you select an original loading orientation other than , the machine may not be able to scan the original with high resolution. seep.105 “Relationship between Resolution and original size”.
Exceeded max. E-mail size. Sending E-mail has been cancelled. Check [Max. E-mail Size] in Scanner Features.
• Increase the size of [Max. E-mail Size].
• Set [Divide & Send E-mail] to [Yes (per page)] or [Yes (per max. size)]. See p.101 “Send Settings”.
Exceeded max. file capacity. Delete the unnecessary stored files.
For details about the maximum number of files that can be stored, see p.114 “Store”. Reduce the number of stored files for transmis-sion or delete unnecessary stored files.
Exceeded max. No. of search results which can be displayed.
Max.: nnn
Note❒ “nnn” in the message represents a changeable
number.
Search again after changing the search conditions.
Message Causes and solutions

Troubleshooting
88
8
Exceeded max. number of alphanumeric characters.
Make sure the maximum number of characters which can be entered, and then enter it again. See p.112 “Speci-fications for Transmis-sion/Store/Delivery Functions”.
Exceeded max. number of alphanumeric characters for the path.
The maximum number of characters which can be entered for the path is 128. Check the number of character you entered, and then enter the path again. See p.113 “Scan to Folder”.
Exceeded max. number of files which can be sent at the same time. Reduce the number of the selected files.
The number of files exceeded the maximum number possible. Reduce the number of files and send them again.
Exceeded max. number of files which can be used in Document Server at the same time.
Check the files stored by the other functions, and then delete unneeded files. See "Document Server", General Settings Guide.
Exceeded max. number of pages per file. Do you want to store the scanned pages as 1 file?
Specify whether to use the data or not. Scan the pages that were not scanned and store them as a new file. See p.43 “Storing Files”.
Exceeded max. number of standby files. Try again after the current file is sent.
There are 100 files waiting in the sending queue for e-mail, Scan to Folder, or delivery functions. Wait until files have been sent.
Exceeded max. page capacity per file. Press [Send] to send the scanned data, or press [Cancel] to delete.
Because the number of pages has reached the maximum number that can be sent, the data up to this point is sent. Scan the remaining pages af-ter transmission.
Exceeded time limit for LDAP server search. Check the server status.
A network error has occurred and connection has failed. Try the opera-tion once more. If the message is still shown, the network may be crowd-ed. Check the information of System Settings. See "User Tools (System Settings)", General Settings Guide.
LDAP server authentication has failed. Check the settings.
Make settings correctly for the user name and the password for LDAP server authentication.
Load paper of the following sizes. Re-quired: A3S B4S A4S A4R
Load paper of the sizes listed in the message.
Message Causes and solutions

When a Message Is Displayed
89
8
Memory is full. Cannot scan. The scanned data will be deleted.
Because of insufficient hard disk space, the first page could not be scanned. Try one of the following measures:
• Wait for a while, and then retry the scan operation.
• Reduce the scan area or scanning resolution. See p.95 “Scan Set-tings”.
• Delete unneeded stored files. See p.53 “Deleting Files”.
Memory is full. Do you want to store scanned file?
Because there is not enough free hard disk space in the machine for storing in the Document Server, only some of the pages could be scanned. Specify whether to use the data or not.
Memory is full. Press [Send] to send the current scanned data, or press [Cancel] to delete.
Because there is not enough free hard disk space in the machine for delivering or sending by e-mail while storing in the Document Serv-er, only some of the pages could be scanned. Specify whether to use the data or not.
Original is being scanned by another function.
The machine is using another func-tion such as copying. Retry scanning after the operation with the other function is completed.
Output buffer is full. Sending the data has been cancelled. Please try again later.
Too many files are waiting to be de-livered. Please try again after they have been delivered.
Selected file is currently in use. Cannot change file name.
You cannot change the name of a file whose status is “Waiting...” or that is being edited with DeskTopBinder. Change the file name after canceling delivery or completing editing.
Selected file is currently in use. Cannot change password.
You cannot delete the password of a file whose status is “Waiting...” or that is being edited with DeskTop-Binder. Delete the password after canceling delivery or completing ed-iting.
Selected file is currently in use. Cannot change user name.
You cannot change the user name for a file whose status is “Waiting...” or that is being edited with DeskTop-Binder. Change the user name after canceling delivery or completing ed-iting.
Message Causes and solutions

Troubleshooting
90
8
Selected file is currently in use. Cannot delete it.
You cannot delete a file whose status is “Waiting...” or that is being edited with DeskTopBinder. Delete the file after canceling delivery or complet-ing editing.
Selected files contain file(s) that the user does not have access privi-leges to. Please note that only the files with access privileges will be deleted.
You have tried to delete files without the authority to do so. The files can be deleted by the file administrator. To delete a file which you are not au-thorized to delete, contact the file ad-ministrator.
Sender's name is not selected. Please specify sender's name.
A sender's name should be specified before sending e-mail. Send e-mail after specifying the sender's name.
Sending the data has failed. The data will be resent later.
A network error has occurred and a file was not sent correctly. Wait until sending is retried automatically after the preset interval. If sending fails again, consult the network adminis-trator.
Sending the data has failed. To con-firm the result, check [Scanned Files Status].
While a file was being sent, a net-work error occurred and the file could not be sent correctly. Try the operation once more.
If the message is still shown, the net-work may be crowded. Consult the network administrator.
If multiple files were sent, use the Scanned Files Status screen to check for which file the problem occurred. See p.30 “Checking the E-mail Re-sults”, p.42 “Checking the Scan to Folder Results”, or p.67 “Checking the Status of Delivery”.
The destination list has been updated. Specified destination(s) or sender's name has been cleared.
A specified destination or sender's name was cleared when the destina-tion list in the delivery server was updated. Specify the destination or sender's name again.
The E-mail address entered is not cor-rect. Please re-enter.
Make sure the e-mail address is cor-rect, and then enter it again.
The entered path is not correct. Please re-enter.
Confirm the destination computer and the path, and then enter it again.
Message Causes and solutions

When a Message Is Displayed
91
8
The specified group contains some invalid destination(s). Do you want to select only valid destination(s)?
The specified group contains some destinations for sending by e-mail and some destinations for sending by Scan to Folder. To select destina-tions for sending by email, press [Se-lect] for the message displayed on the e-mail screen. To select destina-tion for sending by Scan to Folder, press [Select] for the message dis-played on the Scan to Folder screen.
Transmission has failed. Insufficient memory in the destination hard disk. To check the current status, press [Scanned Files Status].
Transmission has failed. There was not enough free space on the hard disk of the SMTP server, FTP server, or client computer at the destination. Allocate sufficient space.
Updating the destination list... Please wait. Specified destination(s) or sender's name has been cleared.
If a destination or sender's name was already selected, re-select it after this message disappears.
Updating the destination list has failed. Try again?
Check whether the server is connected.
You do not have the privileges to use this function.
The machine has not been set to al-low you to use the function. Consult an administrator.
No HDD is available for this function, or File Format Converter is not con-nected. Cannot use Scanner Function.
The required device for the scanner function cannot be identified cor-rectly. Contact your service repre-sentative.
Message Causes and solutions

Troubleshooting
92
8
When an Error Message Appears on the Client Computer
This section describes the main possible causes and solutions for error messagesdisplayed on the client computer when the TWAIN Driver is used.
Note❒ If an error message that is not included in this section appears, turn off the
main power switch of the machine, and then turn it on again. If the messagestill appears, note the content of the message and the error number (if dis-played), and contact your service representative. For information about howto turn off the main power switch, see General Settings Guide.
Message Causes and solutions
[Another user is already logged in.] Another user has logged on to the ma-chine. Wait for that user to log off.
[Authentication at the device side may take some time. Please wait.]
Contact the machine administrator or network administrator.
[Authentication succeeded. However, the access privileg-es for scanner function has been denied.]
Ask the machine administrator about the access privilege to use the scanner func-tion.
[Cannot find the scanner. Check the scanner main power switch..]
• Check whether the main power switch of the machine is turned off.
• Check whether the machine is con-nected to the network correctly.
[Entered value is out of range.]
[Reenter the size within the range of xxxx to xxxx.]
Check and correct the setting in the scan setting dialog box.
[Enter New Name.] In the [Save/Delete] dialog box, enter the new name.
[Error has occurred on the scanner. Scanning will be cancelled.] • If the message appears while operat-ing the TWAIN driver:
• Make sure the scanner is not switched off.
• Make sure the cables are connected properly.
• Delete or change the access mask in the network setting.
• Update the version of Winsock.
• If the message appears while scanning:
• Expand the RAM or virtual memory in the client computer.
• If you try to scan a long original at high resolution, an error may occur due to the prolonged processing time. If this happens, select [Off] in [Com-pression (Black & White)]. See p.101 “Send Settings”.

When a Message Is Displayed
93
8
[Exceeded the maximum allowable characters for a scan mode.]
[Enter within 40 characters.]
A maximum of 40 characters can be en-tered as the name of a scanning mode. Re-enter the name within this limit.
[Exceeded the maximum number of scan modes to save.]
[Reenter after deleting.]
A maximum of 48 scanning modes can be registered. Delete unnecessary scanning modes, and try registering again.
[Insufficient memory. Reduce resolution, original size, or scanning area.]
The computer does not have enough memory. Reduce the resolution or size of scanning. Alternately, try scanning again after closing any other applications in use.
[No User Code is registered. Consult your system admin-istrator.]
Access is restricted with user codes. Con-sult the system administrator of the ma-chine.
[Paper misfeed has occurred.] An original has been misfed. Remove the original.
[Please call your service representative.] An unrecoverable error has occurred in the machine. Call your service represent-ative.
[Scanner function is not available. Check the device.] Call your service representative.
[Scanner is in use by another function.] The machine is being used for functions other than the scanner function, such as the copier function. Try accessing the ma-chine a little later.
[Scanner is not ready yet.] Check the cover is not open.
[Scanning has been aborted.] Scanning has been stopped. Try scanning again.
[Standby time reached.] Load an original within the time limit specified in [Standby Time:].
[The device's authentication service cannot be per-formed.]
The machine is editing the address book. Wait a while, or contact the machine ad-ministrator.
[The login user name, login password, or driver encryp-tion key entered is invalid.]
• Check the login user name, login pass-word, and driver encryption key.
• Permission to use this function has not been granted. Contact the machine administrator.
[The scanning area does not match the original.] Check the location of the original.
[The start position of the scanning area does not match the original.]
Check the location of the original.
[This mode cannot be changed/deleted.] The standard scanning modes, [Standard], and [Diazo type], cannot be registered or deleted.
Message Causes and solutions

Troubleshooting
94
8

95
9. Initial Scanner Setup
This section explains all required settings and procedures for using the machineas a network scanner.
ReferenceFirst, see General Settings Guide to make basic settings, and then make scannersettings. For details about settings for e-mail, see "Connection and Setup",Network Guide.
Scanner Features
The settings for using the network scanner functions of the machine are listedbelow. Make the necessary settings.
Note❒ Make settings for the items marked with ❍ if necessary.
❖❖❖❖ Scan SettingsFor explanations of settings, see p.98 “Scan Settings”.
Settings Default E-mail Scan to Folder
Store Delivery TWAIN
Default Scan Settings
Scan Type Text (Print) ❍ ❍ ❍ ❍
Resolution 200 dpi ❍ ❍ ❍ ❍
Image Density Auto Image Density
(Medium)
❍ ❍ ❍ ❍
Scan Size Auto Detect ❍ ❍ ❍ ❍
Next Original Wait at Off Set Wait Time (60)
❍ ❍ ❍ ❍
Original Orientation Priority ❍ ❍ ❍ ❍
Change Initial Mode Standard ❍ ❍ ❍ ❍

Initial Scanner Setup
96
9
❖❖❖❖ Destination List SettingsFor explanations of settings, see p.101 “Destination List Settings”.
Note❒ If [Off] is selected for [Delivery Option] in [File Transfer] in [System Settings],
[Destination List Display Priority 1] and [Update Delivery Server Destination List]will not be displayed. For details see "Connection and Setup", NetworkGuide.
❖❖❖❖ Send SettingsFor explanations of settings, see p.101 “Send Settings”.
❖❖❖❖ Administrator ToolsFor explanations of settings, see p.103 “Administrator Tools”.
Settings Default E-mail Scan to Folder
Store Delivery TWAIN
Destination List Display Priority 1
Delivery Server
❍ ❍ ❍
Destination List Display Priority 2
E-mail Address
❍ ❍
Select Title Title 1 ❍ ❍ ❍
Update Delivery Server Destination List
- ❍
Settings Default E-mail Scan to Folder
Store Delivery TWAIN
TWAIN Standby Time 10 sec. ❍ ❍ ❍ ❍ ❍
File Type Priority Multi-page: TIFF
❍ ❍
Compression (Black & White) On ❍ ❍ ❍ ❍
Print & Delete Scanner Journal Delete All af-ter Printing
❍ ❍ ❍
Print Scanner Journal - ❍ ❍ ❍
Delete Scanner Journal - ❍ ❍ ❍
Max. E-mail Size 2048 KB ❍
Divide & Send E-mail Yes (per max. size)( Max. Number of
Divisions 5 )
❍
E-mail Information Language American English
❍
Store File Priority Off ❍ ❍ ❍ ❍
Settings Default E-mail Scan to Folder
Store Delivery TWAIN
Menu Protect Level 2 - - - - -

Adjusting Scanner Features
97
9
Adjusting Scanner Features
In Scanner Features, you can makesettings for basic operations when us-ing this machine as a scanner. Nor-mally, you can use the machine withits default settings. However, you canchange the settings to suit your needs.This section describes the ScannerFeatures settings. For details aboutthe settings for the whole system, seeGeneral Settings Guide.
AAAA Press the {{{{User Tools/Counter}}}} key.
BBBB Press [Scanner Features].
CCCC Press [Send Settings].
DDDD Press the item to be set.
Example: TWAIN Standby Timesetting
EEEE Change the setting.
• To select an item, touch its keyon the screen. The item is high-lighted.
• To enter numbers, use the numberkeys.
Note❒ To cancel changing a setting,
press [Cancel].
FFFF Press [OK].
GGGG Repeat steps CCCC to FFFF to make thenecessary settings, and then click[Exit].
HHHH Press [Exit].
The main menu reappears.

Initial Scanner Setup
98
9
Settings
Scan Settings
This section explains how to set thedefaults for scan settings.The scan settings consist of the fol-lowing. For the table about settingsand defaults, see p.95 “Scanner Fea-tures”.
❖❖❖❖ Default Scan SettingsVarious basic settings (scan type,resolution, image density, andscan size) can be set. You can regis-ter the scan settings in the sameway as specifying them. For de-tails, see p.73 “Specifying Scan Set-tings”.
• Scan Type• Resolution• Image Density• Scan Size
❖❖❖❖ Next Original Wait at OffWhen scanning multiple pagesinto a single file, you can select[Continuous Wait], [Off], or [Set WaitTime] as the standby mode of theadditional original. Even if you select [Continuous Wait]or [Set Wait Time], the machine op-erates as if [Continuous Wait] hasbeen selected if you select [NextOriginal Wait] on the Scan to Folderscreen.
Note❒ If [Off] is selected, sending will
start automatically after onepage of original is scanned.
❒ If [Set Wait Time] is selected, en-ter the wait time in seconds (3-999) for placing additional orig-inals with the number keys. Ifyou load additional originalswithin the specified time, scan-ning is starts. Alternatively, youcan finish scanning and startsending the scanned file bypressing the {{{{#}}}} key within thistime. Once the specified timehas elapsed, transmission startsautomatically.
❒ If [Continuous Wait] is selected,the machine waits for addition-al originals until the {{{{#}}}} key ispressed. Scanning starts whenadditional originals are loaded.You can end scanning and be-gin sending the scanned file bypressing the {{{{#}}}} key.
❒ If a paper misfeed occurs or anyof the following operations isperformed while the machine iswaiting for additional originals,the countdown stops and doesnot start again until the {{{{#}}}} keyis pressed.• Changing the settings such
as the scan settings• Pressing the {{{{Interrupt}}}} key to
activate the copy mode
❖❖❖❖ Original Orientation PrioritySelect the default original loadingorientation. If you always loadoriginals in the same orientation,select that orientation as the de-fault.
Referencep.75 “Specifying the Orienta-tion and Output Tray of theOriginal”

Settings
99
9
❖❖❖❖ Change Initial ModeSelect [Standard] to use the stand-ard settings as the initial modewhich is the mode of the machineimmediately after the operationswitch is turned on or modes arecleared or reset.Select [Program No.10] to use the set-tings stored in Program No.10 asthe initial mode.
Selecting a custom size
When selecting [Custom Size] as thescan size, follow the procedure be-low.
AAAA Press [Custom Size] on the Scan SizeSetting screen.
Specifying Vertical and Horizontal Measurements (Length and Width)
A Enter the original size with thenumber keys.Select and enter values for [X1]and [Y1], and then press the {{{{#}}}}key.
B Enter the scan starting point inrelation to the standard scanstarting point.Select and enter values for [X2]and [Y2], and then press the {{{{#}}}}key.
C Enter the scan size (area) withthe number keys.
Select and enter values for [X3]and [Y3], and then press the {{{{#}}}}key.

Initial Scanner Setup
100
9
Depending on how the originalis positioned, the scan area willbe as follows:
The range of possible originalsizes and scan sizes is as fol-lows:• Original Size
X1: 210-914 mm (8.3”-36.0”)Y1: 210-15000 mm (8.3”-11.7”)
• Scan AreaX3: 10-914 mm (0.4”-36.0”)Y3: 10-15000 mm (0.4”-590.6”)
Keep the scan area settingswithin these ranges.
D When all dimensions are en-tered, press [OK].
E Make sure that the area speci-fied in step DDDD (X3 and Y3) isshown in the [Custom Size]field, and then press [OK].
Automatically Detecting the Vertical Measurement (Length)
A Press [Auto Detect].
B Using the number keys, enterthe horizontal measurement(width) of the original.
Select [X1], enter the horizontalmeasurement, and then pressthe {{{{#}}}} key.
When you automatically detectt he v er t i ca l m e asurem ent(length) you can specify only[X1]. [X2] is set to “0”, and [X3] isset to the same value as [X1].
AGG002D

Settings
101
9
C Press [OK].
D Make sure the values of “X3”and “Auto Detect” appear nextto [Custom Size], and then press[OK].
BBBB Press [Exit] twice.
The main menu reappears.
Destination List Settings
Select the defaults for the titles andthe display priority for the destina-tion list in the machine and the deliv-ery server.
❖❖❖❖ Destination List Display Priority 1Select a destination list to be dis-played when the machine is in theinitial state. You can select either[E-mail / Folder] or [Delivery Server].
❖❖❖❖ Destination List Display Priority 2This function is available when [E-mail / Folder] is selected for [Destina-tion List Display Priority 1].Select a destination list to be dis-played when the machine is in theinitial state.You can select either [E-mail Ad-dress] or [Folder].
❖❖❖❖ Select TitleSelect the titles for destinationsand group destinations of e-mailand Scan to Folder. Selected titlesappear in the e-mail and Scan toFolder destination list to be usedfor searching for destinations. Se-lect [Title 1] (ten titles), [Title 2] (tentitles), or [Title 3] (five titles).
❖❖❖❖ Update Delivery Server DestinationListTo update the delivery server des-tination list, press [Update DeliveryServer Destination List].Normally, the delivery server des-tination list is automatically updat-ed. This function allows manualupdating at any time.
Send Settings
This section explains how to set thedefaults for settings such as the com-pression level for the scan file andswitching to and from the networkTWAIN scanner function.The settings consist of the following.For the table about settings and de-faults, see p.95 “Scanner Features”.
❖❖❖❖ TWAIN Standby TimeWhen the machine is being used tosend e-mail or a file, or functioningas Document Server or a networkdelivery scanner, a scanning re-quest to the machine as a TWAINscanner will switch the machine tothe network TWAIN scanner func-tion. This setting determines thedelay until the machine switches tothe network TWAIN scanner func-tion.• When [Off] is selected, the ma-
chine will switch to the networkTWAIN scanner function atonce.

Initial Scanner Setup
102
9
• When [On] is selected, you canenter the delay time with thenumber keys (3-30 seconds).The machine will switch to thenetwork TWAIN scanner func-tion when the time set herepasses after the last key opera-tion.
❖❖❖❖ File Type PrioritySelect whether to send the scannedoriginals as single-page files or amultiple-page file. Also, selectTIFF or PDF as the file format.
Note❒ If you send the data as a PDF
file, depending on the file size,on some computers you maynot be able to read the PDF file.
❒ Files are stored as single-pagedocuments. When sendingstored files by e-mail, you canselect to send them either as sin-gle- or multiple-page files.
❖❖❖❖ Compression (Black & White)Select whether or not to compressblack and white scan files.
Note❒ Compression reduces the time
required for transferring thescan file.
❒ The actual time required for filetransfer will vary depending onthe file size and network load.
❖❖❖❖ Print & Delete Scanner JournalUp to 250 transmission/deliveryresults can be checked on this ma-chine. If the stored transmis-sion/delivery results reach 250,select whether to print the deliveryjournal.• [Delete All after Printing]:
The transmission/deliveryjournal is printed automatically.The printed journal is deleted.
• [Do not Print: Delete Oldest]:Transmission/delivery resultsare deleted one by one as newresults are stored.
• [Do not Print: Disable Send]:Transmission/delivery cannotbe performed when the journalis full.
Note❒ When printed, all records are
deleted after printing. When notprinted, records over the limitare automatically deleted insuccession from the oldestrecord.
❒ While the journal is being print-ed, files with the status waitingcannot be sent.
❖❖❖❖ Print Scanner JournalThe scanner journal is printed anddeleted.
❖❖❖❖ Delete Scanner JournalThe scanner journal is deletedwithout being printed.
❖❖❖❖ Max. E-mail SizeSelect whether or not to limit thesize of an e-mail to which an imageis attached.When [On] is selected, enter thesize limit (128-102400 KB) with thenumber keys.
Note❒ When the SMTP limits the size,
match that setting.
❖❖❖❖ Divide & Send E-mailThis function is effective onlywhen [On] is selected for [Max. E-mail Size].Select whether or not an image ex-ceeding the size specified in [Max.E-mail Size] should be divided andsent using more than one e-mail.

Settings
103
9
Select either [No], [Yes (per Page)], or[Yes (per Max. Size)]. When [Yes (perMax. Size)] is selected, enter theMax. Number of Divisions (2-500)with the number keys.
Note❒ When [Multi-page: TIFF] or [Multi-
page: PDF] is selected for [FileType Priority], the image will notbe divided even if [Yes (perPage)] is selected.
❒ When [Yes (per Max. Size)] is se-lected, some received files maynot be able to be restored, de-pending on the type of e-mailsoftware.
❒ When [No] is selected, the e-mailis not sent if its size exceeds thelimit, and an error message ap-pears. The scan file is discarded.
❒ Set the maximum e-mail sizewithin the capacity of the SMTPserver.
❖❖❖❖ E-mail Information LanguageSelect the language in which e-mail information such as title, doc-ument name, and sender's name issent.Select one of the following 11 lan-guages: British English, AmericanEnglish, German, French, Italian,Spanish, Dutch, Portuguese, Rus-sian, Japanese, Simplified Chinese.
Note❒ The e-mail text which is a tem-
plate cannot be changed.
❖❖❖❖ Store File PrioritySelect [Send & Store], [Store Only], or[Off] as the default that is displayedwhen modes are cleared or reset,or immediately after the operationswitch is turned on.
Note❒ If you select [Send & Store],
"Send & Store" appears in [Scan-ner Features], and files are storedand sent simultaneously.
❒ If you select [Store Only], "StoreOnly" appears in [Scanner Fea-tures], and files are only stored.
❒ If you select [Off], [Scanner Fea-tures] shows that nothing hasbeen selected. If you want tostore files, specify [Store File] forscanning.
Administrator Tools
❖❖❖❖ Menu ProtectYou can prevent unauthenticatedusers from changing the user toolssettings.
Note❒ For details, consult the adminis-
trator.

Initial Scanner Setup
104
9

105
10. Appendix
Relationship between Resolution and original size
Resolution and scan area are inversely related. The higher the resolution is set,the smaller the area that can be scanned. Conversely, the larger the scan area, thelower the resolution that can be set.The relationship between the scanning resolution and the file size is shown be-low. If the file size is too large, the message “Exceeded max. data capacity.Check the scanning resolution.” appears on the control panel of the ma-chine. Specify the scan size and resolution again.
Limitation❒ Depending on the image compression level and loading orientation of the
original, the amount of the data that can be scanned may be limited.

Appendix
106
10
When Using for E-mail, Scan to Folder, or Store, or as a Network Delivery Scanner
Horizon-tal meas-urement (length) mm (inches)
Vertical measure-ment (length) mm (inches)
150dpi 200dpi 300dpi 400dpi 600dpi
Long length
914 (36.0) *1
up to 15000 (590.6)
|
up to 13400 (527.6)
| |
up to 6000 (236.3)
| | |
up to 3680 (144.9)
❍ | |
up to 3400 (133.9)
❍ | | |
up to 2760 (108.7)
❍ ❍ | |
up to 1840 (72.5)
❍ ❍ ❍ |
up to 1520 (59.9)
❍ ❍ ❍ | |
up to 1380 (54.4)
❍ ❍ ❍ ❍ |
up to 920 (36.3)
❍ ❍ ❍ ❍ ❍
A0×2 841 (33.2) 2378 (93.7)
❍ ❍ | |
A1×2 594 (23.4) 1682 (66.3)
❍ ❍ ❍ | |
A0 841 (33.2) 1189 (46.9)
❍ ❍ ❍ ❍ |
36×44 914 (36.0) 1117.6 (44.0)
❍ ❍ ❍ ❍ |
Engineer-ing E
864 (34.0) 1117.6 (44.0)
❍ ❍ ❍ ❍ |
30×42 762 (30.0) 1066.8 (42.0)
❍ ❍ ❍ ❍ |
Architec-ture E
610 (24.0) 914.4 (36.0)
❍ ❍ ❍ ❍ ❍

Relationship between Resolution and original size
107
10
❍ : You can select [ ], [ ],[ ], or [ ] as the loading orientationof the original.| : You can select [ ] or [ ] as the loading orientation of the original.Unmarked : You can only select [ ] as the loading orientation of the original.*1 If the width is less than 914 mm (36.0") , the original may be scanned at a resolution
higher than shown in the table.
Engineer-ing D
559 (22.0) 863.6 (34.0)
❍ ❍ ❍ ❍ ❍
Architec-ture C
457 (18.0) 609.6 (24.0)
❍ ❍ ❍ ❍ ❍
Engineer-ing C
432 (17.0) 558.8 (22.0)
❍ ❍ ❍ ❍ ❍
Architec-ture A
229 (9.0) 304.8 (12.0)
❍ ❍ ❍ ❍ ❍
A1,A2,A3,A4 ❍ ❍ ❍ ❍ ❍
Double letter, Legal, Letter, Half letter
❍ ❍ ❍ ❍ ❍
Horizon-tal meas-urement (length) mm (inches)
Vertical measure-ment (length) mm (inches)
150dpi 200dpi 300dpi 400dpi 600dpi

Appendix
108
10
When Using as a Network TWAIN Scanner
The maximum resolution available for scanning is determined by the original'shorizontal measurement (width). For example, the width of an A0 × 2 original is841mm (33.2"). Since this is the same as an A0 original, both A0 × 2 and A0 orig-inals can be scanned at the same maximum resolution of 600 dpi.Originals of any vertical length can be scanned at up to 1200 dpi resolution.The maximum available scanning resolution for each original size is shown be-low:
Limitation❒ Large originals require more memory. Increase available memory by closing
other applications before scanning large originals.
ReferenceTo specify the scanning area or resolution when using the machine as a net-work TWAIN scanner, see TWAIN Driver Help.
Horizontal measurements (width) mm (inches)
Maximum Resolution (dpi)
Maximum 914 (36.0) 600
A0 × 2 841 (33.2) 652
A1 × 2 594 (23.4) 923
A0 841 (33.2) 652
A1 594 (23.4) 923
A2 420 (16.6) 1200
A3 297 (11.7) 1200
36 × 44 914 (36.0) 600
Engineering E 864 (34.0) 635
30 × 42 762 (30.0) 720
Architecture E 610 (24.0) 899
Engineering D 559 (22.0) 981
Architecture C 457 (18.0) 1200
Engineering C 432 (17.0) 1200
Architecture A 229 (9.0) 1200
Double letter 280 (11.0) 1200
Legal 216 (8.5) 1200
Letter 280 (11.0) 1200
Half letter 140 (5.5) 1200

Placing Originals
109
10
Placing Originals
To correctly display the top/bottom orientation of the scanned original on a cli-ent computer, the placement of the original and the settings made on the controlpanel and scanner driver must match.There are 4 orientations for placing the original. See the table below.
Note❒ Normally, an original is or , but in the table below, a square original is
used to make original orientation easy to understand. If the actual shape ofthe original is different, the combination of original orientation and the orien-tation specified on the control panel or scanner driver does not change.
*1 When using the machine as a network TWAIN scanner, this is the standard orienta-tion for the TWAIN Driver. Normally, set the original this way.
An original to be scanned
Speci-fy the load-ing orien-tation of the origi-nal.
When scanning using the e-mail function, the Scan to Folder func-tion, the Store function, or the delivery scanner function
(Specified on the con-trol panel screen)
When scanning using the TWAIN scanner function
(Specified in the Scan-ner Control dialog box)
In the [Rotate Image:] menu in the [Quali-ty] group, se-lect [OFF]
In the [Rotate Image:] menu in the [Quali-ty] group, se-lect [Right 90 deg.]
In the [Rotate Image:] menu in the [Quali-ty] group, se-lect [Left 90 deg.]
In the [Rotate Image:] menu in the [Quali-ty] group, se-lect [180 deg.]
Place the original.
Load the original top-edge first. *1
Load the original with its top edge touching the left side of the exposure glass.
Load the original with its top edge touching the right side of the exposure glass.
Load the original bot-tom-edge first.
The original displayed on a computer

Appendix
110
10
Software Supplied on CD-ROM
Table of files
TWAIN Driver
This driver is required to scan an original on the machine.To use the machine as a network TWAIN scanner, this driver must be installed.
❖❖❖❖ File storage folderThe files are stored in the following folder on the CD-ROM provided with thismachine:\DRIVERS\TWAIN
❖❖❖❖ System requirements• Hardware
PC/AT-compatible machines that support the operating system properly
Limitation❒ Under Windows NT with RISC-based processors (MIPS R series, Alpha
AXP, or PowerPC), this driver is not supported.• Operating system
Microsoft Windows 95/98/MeMicrosoft Windows 2000/XPMicrosoft Windows NT 4.0Microsoft Windows Server 2003
• Display resolution800 × 600 pixels, 256 colors or higher
CD-ROM Wizard for the TWAIN Driver and utilities
Drivers Twain TWAIN Driver for Windows 95/98/Me, Windows XP, Windows 2000, Windows NT4.0, Windows Server 2003
Utility DeskV2 DeskTopBinder Lite

Software Supplied on CD-ROM
111
10
DeskTopBinder
DeskTopBinder is to be installed on the client computers for integration andmanagement of various kinds of files such as scan files, files created with appli-cations, and existing scan files. This software allows you to use various functionsfor stored scan files such as viewing stored files. Also, with the ScanRouter de-livery software, you can view the files stored in in-trays of the delivery server oruse other functions for stored files.
ReferenceSee DeskTopBinder Help or the manuals for DeskTopBinder.
❖❖❖❖ File storage folderThe files are stored in the following folder on the CD-ROM provided with thismachine:\UTILITY\DESKV2
❖❖❖❖ System requirements• Hardware
PC/AT-compatible machines that support the operating system properly• Operating system
Microsoft Windows 98SE/MeMicrosoft Windows 2000/XPMicrosoft Windows Server 2003
• Display resolution800 × 600 pixels, 64K colors or higher
❖❖❖❖ Software installed with DeskTopBinder• Auto Document Link
Auto Document Link on the client computer monitors in-trays of the deliv-ery server. In addition, the files delivered to in-trays can be retrieved or no-tification of the arrival of a file can be received at the client computer withthis software.
• Function PaletteFunction Palette allows you to use functions such as the network TWAINscanner, printing, printing preview, sending files by e-mail, or sending fax-es without starting DeskTopBinder. You must make settings in advance in[Extended Features...] to use Function Palette. For details, see manuals relat-ed to DeskTopBinder.
• Extended Features WizardYou can make the same settings in [Extended Features...] of the [Tools] menuwith Extended Features Wizard. For details, see manuals related to Desk-TopBinder.

Appendix
112
10
Specifications for Transmission/Store/Delivery Functions
Note❒ Depending on the type or settings of the file or document, you may not be
able to specify the destination or enter the maximum number of charactersstated below.
Transmission
*1 This is the total number of characters entered directly and from subjects selected inthe subject list.
*2 The e-mail address must meet the following requirements:A The address must be specified using one of the following formats:
• name• name@domain
B "name" and "domain" in A must only consist of the following characters: • numbers (0–9)• letters (a-z, A-Z)• symbols (! # $ % & ' * + - / = ? ^ _ ` { | } ~)• Period (.). They can be used anywhere except the beginning and end of an ad-
dress or before @. Periods cannot be used next to each other.*3 An e-mail address found using a LDAP server search cannot be specified properly if
the address exceeds 128 characters.*4 100 destinations can be entered directly(including LDAP search).
The remaining 400 destinations can be selected from the registered addresses.*5 This is the total number of e-mail destinations and file destinations.
Maximum Number of Characters That Can Be Entered for E-mail
Title 128 *1
Message 80
E-mail Address 128 *2
Maximum Number of Destinations That Can Be Specified at Once
500 *3 *4
Maximum Number of Destinations That Can Be Registered in the Destination List
2000 *5
Maximum Transmittable Sizes Files 725.3 MB per file
Pages 1000 per file

Specifications for Transmission/Store/Delivery Functions
113
10
Scan to Folder
*1 When directly entering the destinations, up to 50 destinations can be specified. *2 This is the total number of e-mail destinations and file destinations.
Simultaneous Transmission
The following table shows the maximum number of destinations when perform-ing E-mail and Scan to Folder simultaneously.
*1 An e-mail address found using a LDAP server search cannot be specified properly ifthe address exceeds 128 characters.
*2 A total of 100 e-mail destinations and file destinations can be entered directly (in-cluding destinations selected using LDAP search).
Maximum Number of Characters That Can Be Entered for Scan to Folder
SMB Destination folder path: 256 characters
User name: 128 characters
Password: 128 characters
FTP Server name: 128 characters
Destination folder path: 256 characters
User name: 128 characters
Password: 128 characters
Maximum Number of Destinations That Can Be Specified at Once
50 *1
Maximum Number of Destinations That Can Be Registered in the Destination List
2000 *2
Maximum Transmittable Size 2000 MB per file
Transmission Type
Destination Se-lection Method
Selectable Number of Des-tinations
Selectable Number of Des-tinations for Each Function
Selectable Number of Des-tinations for E-mail and Scan to Folder
E-mail Selected from the destination list
500 500 550
Direct input (in-cluding LDAP search) *1
100 *2
Scan to Folder Selected from the destination list
50 50
Direct input 50 *2

Appendix
114
10
Store
*1 On the control panel, the first 16 characters are displayed. When viewing the storedfiles from a client computer using DeskTopBinder, all the entered characters can beviewed.
*2 This is the total number of files that can be stored under the scanner, copier, store,and printer functions.
The network delivery scanner function
*1 This is the total number of characters entered directly and from subjects selected inthe subject list.
*2 The e-mail address must meet the following requirements:A The address must be specified using one of the following formats:
• name• name@domain
B "name" and "domain" in A must only consist of the following characters: • numbers (1–9)• letters (a-z, A-Z)• symbols (! # $ % & ' * + - / = ? ^ _ ` { | } ~)• Period (.). They can be used anywhere except the beginning and end of an ad-
dress or before @. Periods cannot be used next to each other.*3 The maximum number of destinations that can be selected depends on the ScanRout-
er delivery software. For details, see the manual provided with the ScanRouter de-livery software.
Maximum Number of Characters That Can Be Entered for Stored File Information
File Name 64 *1
User Name 20 *1
Password 4-8 digit number
Maximum Number of Stored Files That Can Be Selected at Once
30
Maximum number of files that can be stored 3000 *2
Maximum number of pages that can be stored 3000 *2
Maximum Number of Pages per file That Can Be Stored
1000
Maximum number of characters that can be en-tered for delivery
Title 128 *1
Delivery Destination (E-Mail Address)
128 *2
Maximum Number of Destinations That Can Be Specified at Once
500 *3
Maximum Number of Destinations That Can Be Registered in the Destination List
See the manual provided with the Scan-Router delivery software.

Specifications
115
10
Specifications
*1 When automatically detecting the size of an original, its width (horizontal length) isread as that of the closest standard-size paper. The original's vertical measurement isread exactly.
Scan method Original feed image scanning
Maximum power consumption 1,500W
Image sensor type Fixed contact image sensor
Scan type Sheet
Interface Ethernet interface (10BASE-T or 100BASE-TX), IEEE 1394 (IP over 1394) (optional), and IEEE 802.11b (Wireless LAN) (optional)
Maximum scan size 914mm (36.0") × 15000mm (590.6")
Original width that can be detect-ed automatically *1
914mm (36.0"), A0R, B1R, A1R, A1S, B2R, B2S, A2R, A2S, B3R, B3S, A3R, A3S, B4R, B4S, A4R, A4S
Resolution 600 dpi
Variable range of scan resolution • E-mail/Scan to Folder/Store/Network Delivery ScannerSetting range: 150 dpi, 200 dpi, 300 dpi, 400 dpi, and 600 dpi
• TWAIN ScannerSetting range: 150 dpi - 1200 dpi
File formats that can be sent by e-mail TIFF, PDF
Compression method TIFF (MH, MR, MMR)
Protocol Network: TCP/IP
Sending e-mail: SMTP
Scan to Folder: SMB, FTP

116
INDEXA
Adjusting Scanner Features, 97Administrator Tools, 96, 103
C
Checking the status of delivery, 67{Check Modes}}}} key, 3{Clear Modes}}}} key, 3{Clear/Stop}}}} key, 4Compression (Black & White), 102
D
Default Scan Settings, 98Delete Scanner Journal, 102Delivering Scan File, 57DeskTopBinder, 69, 111Destination List Display Priority 1, 101Destination List Display Priority 2, 101Destination List Settings, 96, 101Display panel, 3Divide & Send E-mail, 102
E
Edit, 74E-mail, 5, 17, 112E-mail Information Language, 103E-mail Screen, 18{Energy Saver}}}} key, 3{#}}}} Enter key, 4Erase Border, 74
F
File Type Priority, 102FTP server, 6, 37Function keys, 4Function status indicators, 4
I
Indicators, 3Installing software, 10{Interrupt}}}} key, 3
L
LDAP server, 5Login (Using the Control Panel), 12Log Off (Using the Control Panel), 13
M
Main power indicator and power indicator, 3Max. E-mail Size, 102Menu Protect, 103Mirror Image, 74Mode, 76
N
Network delivery scanner, 8Network Delivery Scanner Screen, 59Network TWAIN scanner, 9, 69Next Original Wait at Off, 98Number keys, 4
O
Operation switch, 4Original Orientation Priority, 98Output Tray for the Original, 75
P
Positive / Negative, 74Print & Delete Scanner Journal, 102Print Scanner Journal, 102{Program}}}} key, 3Programming E-mail Addresses and Folders, 14Programs, 80
Q
Quick Install, 10
R
Relationship between Resolution and original size, 105
Resolution, 73

117
S
Save, 71Scanner Features, 95Scanning Multiple Pages into a Single File, 77Scanning originals, 70Scan Settings, 95, 98Scan Size, 74Scan to Folder, 6, 31, 113Scan to Folder Screen, 32Scan Type, 73Selecting a custom size, 99Select Title, 101Send Settings, 96, 101Simultaneous Storage and Delivery, 65Simultaneous Storage
and Sending by E-mail, 28Simultaneous Storage
and Sending by Scan to Folder, 41SMB, 6, 36SMTP server, 5Software supplied on CD-ROM, 110Specifying How to Start Scanning, 15Specifying Scan Settings, 73Specifying the Orientation
and Output Tray of the Original, 75Specifying the Output Tray for the Original, 75{Start}}}} key, 4Store, 7, 43, 114Stored Files Cannot Be Edited, 84Store File Priority, 103Storing Files, 43
T
The Network Delivery Function Cannot Be Used, 84
The TWAIN Driver Cannot Be Started, 84Transmission, 112TWAIN Driver, 110TWAIN Standby Time, 101
U
Update Delivery Server Destination List, 101User Authentication, 12User Code Authentication
(Using the Control Panel), 12{User Tools/Counter}}}} key, 3
W
When a Time Limit Is Not Specified for Additional Originals, 78
When a Time Limit Is Specified for Additional Originals, 77

118 EN USA B765-8707

In accordance with IEC 60417, this machine uses the following symbols for the main power switch:aaaa means POWER ON.cccc means STAND BY.
In accordance with IEC 60417, this machine uses the following symbols for the anti-humidity heater switch:aaaa means POWER ON.bbbb means POWER OFF.
Note to users in the United States of America
Note:This equipment has been tested and found to comply with the limits for a Class B digital device, pursu-ant to Part 15 of the FCC Rules. These limits are designed to provide reasonable protection againstharmful interference in a residential installation. This equipment generates, uses and can radiate radiofrequency energy and, if not installed and used in accordance with the instructions, may cause harmfulinterference to radio communications. However, there is no guarantee that interference will not occurin a particular installation. If this equipment does cause harmful interference to radio or television re-ception, which can be determined by turning the equipment off and on, the user is encouraged to try tocorrect the interference by one more of the following measures:
Reorient or relocate the receiving antenna.Increase the separation between the equipment and receiver.Connect the equipment into an outlet on a circuit different from that to which the receiver isconnected.Consult the dealer or an experienced radio /TV technician for help.
Caution:Changes or modifications not expressly approved by the party responsible for compliance could voidthe user's authority to operate the equipment.
Note to users in Canada
Note:This Class B digital apparatus complies with Canadian ICES-003.
Remarque concernant les utilisateurs au Canada
Avertissement:Cet appareil numérique de la classe B est conforme à la norme NMB-003 du Canada.
Declaration of ConformityProduct Name: Scanner Option Type 480Model Number: 4800WD/LW411/A080/Aficio 480WResponsible party: Ricoh CorporationAddress: 5 Dedrick Place, West Caldwell, NJ 07006Telephone number: 973-882-2000This device complies with Part 15 of the FCC Rules.Operation is subject to the following two conditions:1. This device may not cause harmful interference, and2. this device must accept any interference received,including interference that may cause undesired operation.
Copyright © 2005

Sca
nner O
ptio
n Type
480O
pe
rating
Instructio
nsSc
anne
r Refe
renc
e
EN USA B765-8707