
FX Direct Tax User Guide - CCH Support
296
FX Direct CCH® ProSystem fx® Tax 2020 Archival Reference Guide June 2022
-
Upload
khangminh22 -
Category
Documents
-
view
0 -
download
0
Transcript of FX Direct Tax User Guide - CCH Support

FX Direct
CCH® ProSystem fx® Tax 2020 Archival Reference Guide
June 2022

© 2000-2022, CCH Incorporated and its affiliates and licensors. All rights reserved. Material in this publication may not bereproduced or transmitted, in any form or by any means, without prior written permission. Requests for that permissionshould be directed to:
CCH Incorporated
2050 West 190th Street, Suite 300
Torrance, CA 90504
The contents of this publication are believed to be accurate. However, responsibility cannot be assumed for theinformation contained herein, and the consequences resulting from the use thereof. Material in this publication is subjectto change without notice.
This User Manual and the computer software it describes are designed to provide accurate and authoritative informationin regard to the subject matter covered. They are distributed with the understanding that the publisher is not engaged inrendering accounting, legal, or other professional service. If legal advice or other expert assistance is required, theservices of a competent professional should be sought.
“CCH ProSystem fx” is a registered trademark of CCH Incorporated.
“Windows” is a registered trademark of Microsoft Corporation.
All other brand, product, or company names are trademarks or registered trademarks of their respective owners.
Welcome to FX DirectFX Direct is the professional software system that integrates and manages your tax processing andoffice administration. FX Direct combines comprehensive tax capabilities and office managementapplications with the latest Windows® and internet technology to offer you the most advanced taxcompliance software available.
In addition to this guide, the CCH ProSystem fx Tax Quick Start Guide for Worksheet and the CCHProSystem fx Tax Quick Start Guide for Interview are available to walk you through the creation andprinting of a sample tax return. You can access the Tax Quick Start Guides through our KnowledgeBase article at https://support.cch.com/kb/solution.aspx/000076329. You can also use the CCHProSystem fx Tax Help to become familiar with the features offered in CCH ProSystem fx Taxapplications.
About the FX Direct Reference GuideThis guide includes the following chapters:
Chapter 1, Installation, provides an overview of the FX Direct program and instructions forinstalling the program as an independent or integrated system. It also described the featuresfrom CCH ProSystem fx Tax that are available in FX Direct and the features that are notavailable.
Chapter 2, Office Manager, shows you how to set up firm, office group, and staff information.Office Manager helps you perform system “housekeeping tasks,” such as backing up client andreturn data and deleting files.
Chapter 3, Tax Preparation, explains the process of completing and managing your tax returns,introduces you to an extensive number of product features, and walks you through setting userpreferences and defaults.
Chapter 4, Import/Export Functions, describes the various methods of importing data to returnsin Tax Preparation and of exporting data to other applications.
Chapter 5, Production Processing, helps you complete tasks associated with productionactivities, such as processing returns for batch calculation. It provides instructions on printing,creating, and customizing returns using Pro Forma and Client Organizers.
ConventionsTo help you locate and interpret information easily, this guide uses consistent visual cues and a fewstandard text formats.
To clarify the paths to menu functions, the following convention is used in parentheses belowheading titles:
(Office Manager > Delete Client Data > All Tax Return Data > Specific Client)
Specific entries to be made by the user appear in bold lettering. For example: Enter Setup.
Italics are used for references to guide sections, dialog names, and data entry fields. Forexample: You can drag and drop returns to the Returns selected for printing box.
Note, Tip, or Warning contains important additional information about the preceding text.
• iii
Drag-and-drop functionality is available for most selection processes, allowing you to drag theselected items to the appropriate area.
To select consecutively listed client files, select the first file, press and hold the Shift key, andthen select the last client file.
To select non-consecutively listed items, hold down the Ctrl key and click each item you want toselect. Do not release the Ctrl key until you finish selecting items.
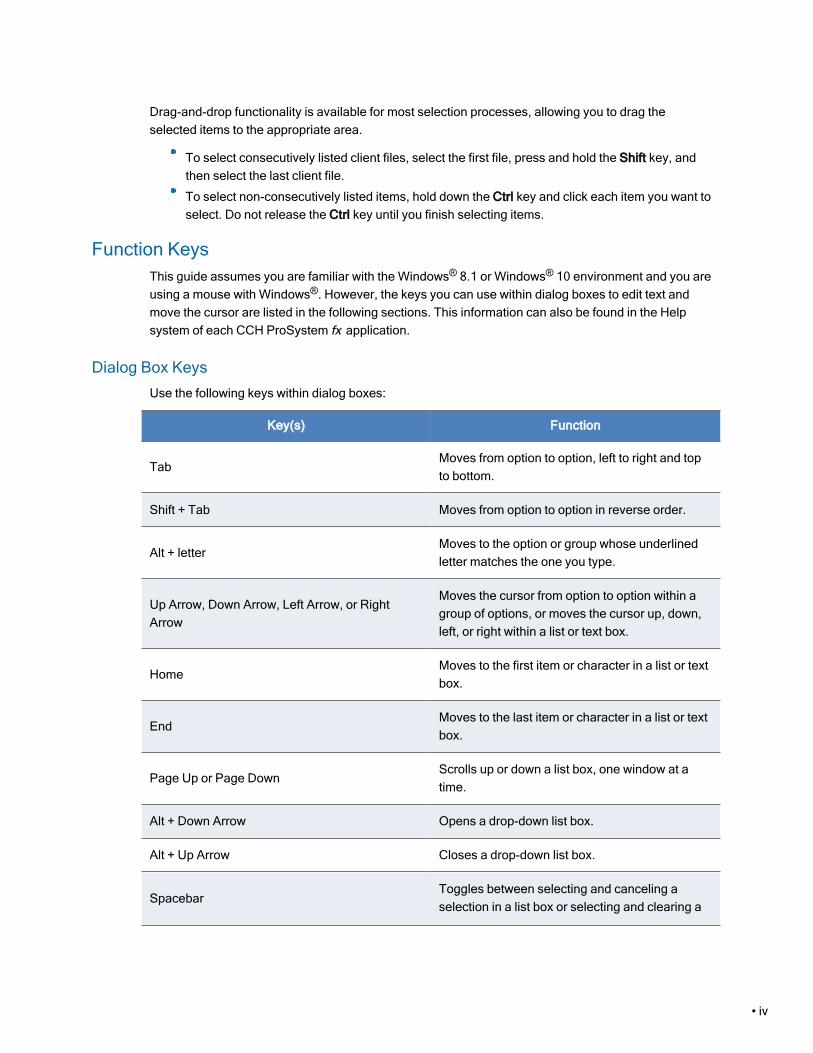
Function KeysThis guide assumes you are familiar with the Windows® 8.1 or Windows® 10 environment and you areusing a mouse with Windows®. However, the keys you can use within dialog boxes to edit text andmove the cursor are listed in the following sections. This information can also be found in the Helpsystem of each CCH ProSystem fx application.
Dialog Box KeysUse the following keys within dialog boxes:
Key(s) Function
TabMoves from option to option, left to right and topto bottom.
Shift + Tab Moves from option to option in reverse order.
Alt + letterMoves to the option or group whose underlinedletter matches the one you type.
Up Arrow, Down Arrow, Left Arrow, or RightArrow
Moves the cursor from option to option within agroup of options, or moves the cursor up, down,left, or right within a list or text box.
HomeMoves to the first item or character in a list or textbox.
EndMoves to the last item or character in a list or textbox.
Page Up or Page DownScrolls up or down a list box, one window at atime.
Alt + Down Arrow Opens a drop-down list box.
Alt + Up Arrow Closes a drop-down list box.
SpacebarToggles between selecting and canceling aselection in a list box or selecting and clearing a
• iv

Key(s) Function
check box.
Shift + Up Arrow, Down Arrow, Left Arrow, orRight Arrow
Extends the selection in a text box.
Shift + HomeExtends the selection to the first character in atext box.
Shift + EndExtends the selection to the last character in atext box.
Enter
Executes a command, or chooses the selecteditem in a list box and executes the command. InTax Preparation only, Enter moves the cursor tothe next field.
Esc or Alt + F4Closes a dialog box without completing thecommand.
F1 Accesses the Help file for the dialog box.
F2Deletes data from fields using a blinking triangleas an insertion point.
F3Loads the current date to fields using a blinkingtriangle as an insertion point.
Text Editing Keys
Key(s) Function
BackspaceDeletes the character to the left of the insertionpoint, or deletes selected text.
DeleteDeletes the character to the right of the insertionpoint, or deletes the selected text.
Ctrl + XDeletes the selected text and places it on theClipboard.
Ctrl + VInserts text from the Clipboard to the activewindow.
Ctrl + CMakes a copy of the selected text and places it onthe Clipboard.
• v

Key(s) Function
Ctrl + Z Undoes the previous editing operation.
Cursor Movement KeysUse the following keys to move the cursor or insertion point in data entry fields:
Key(s) Function
Up Arrow Moves up one line.
Down Arrow Moves down one line.
Right Arrow Moves right one character.
Left Arrow Moves left one character.
Ctrl + Right Arrow Moves right one word.
Ctrl + Left Arrow Moves left one word.
Home Moves to the beginning of the line.
End Moves to the end of the line.
Page Up Moves up one window.
Page Down Moves down one window.
Ctrl + Home Moves to the beginning of the line, list, or grid.
Ctrl + End Moves to the end of the line, list, or grid.
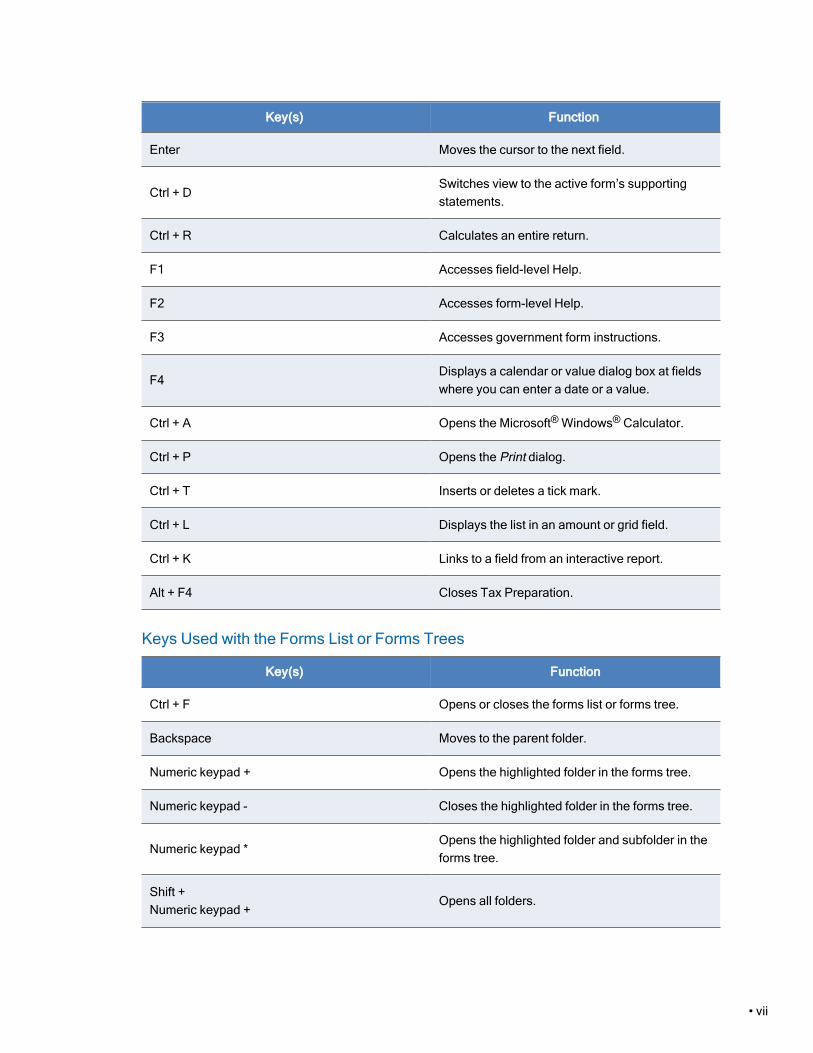
Tax Preparation KeysThere are some keys that have special functions within the Tax Preparation application.
Keys Used to Edit Data in Returns
Key(s) Function
Ctrl + N Creates a new return.
Ctrl + O Opens the Open Return dialog.
Ctrl + S Saves data entered.
• vi
Key(s) Function
Enter Moves the cursor to the next field.
Ctrl + DSwitches view to the active form’s supportingstatements.
Ctrl + R Calculates an entire return.
F1 Accesses field-level Help.
F2 Accesses form-level Help.
F3 Accesses government form instructions.
F4Displays a calendar or value dialog box at fieldswhere you can enter a date or a value.
Ctrl + A Opens the Microsoft®Windows® Calculator.
Ctrl + P Opens the Print dialog.
Ctrl + T Inserts or deletes a tick mark.
Ctrl + L Displays the list in an amount or grid field.
Ctrl + K Links to a field from an interactive report.
Alt + F4 Closes Tax Preparation.
Keys Used with the Forms List or Forms Trees
Key(s) Function
Ctrl + F Opens or closes the forms list or forms tree.
Backspace Moves to the parent folder.
Numeric keypad + Opens the highlighted folder in the forms tree.
Numeric keypad - Closes the highlighted folder in the forms tree.
Numeric keypad *Opens the highlighted folder and subfolder in theforms tree.
Shift +Numeric keypad +
Opens all folders.
• vii

Key(s) Function
Shift +Numeric keypad -
Closes all folders.
Right ArrowOpens the current folder, if not open; otherwise,moves to the first form.
Left ArrowCloses the current folder, if open; otherwise,moves to the parent folder.
Keys Used to Move between Windows
Key(s) Function
F6 Moves the focus between panes.
Ctrl + F6 Switches between windows.
Shift + Ctrl + F6 Switches between windows in reverse order.
• viii

Contents • ix
Welcome to FX Direct iii
About the FX Direct Reference Guide iii
Conventions iii
Function Keys iv
Chapter 1 - Installation 1
System Configuration 1
Printer Configuration 1
Installation Overview 1
Installing FX Direct 1
Installing Software Delivery Manager (if Needed) 3
Setting Up FX Direct as an Independent Product 4
Integrating FX Direct and CCH ProSystem fx Tax 6
Accessing the FX Direct Instruction Guide 7
CCH ProSystem fx Tax Features Available with FX Direct 8
CCH ProSystem fx Tax Features not Available with FX Direct 9
Chapter 2 - Office Manager 11
Setting Up Your Office with Office Manager 11
Accessing Office Manager for the First Time 11
Configuring Firm Information 12
Entering Firm Information 12
Setting Options 13
Configuring Tick Marks 14
Configuring Remote Setup 14
Configuring Input Methods 14
Configuring Office Groups 14
Creating a New Office Group 15
Editing Office Group Data 17
Deleting an Office Group 17
Configuring Staff 18
Adding New Users 18
Unlocking Users 22
Adding New Tax Preparers 22
Changing Staff Information 25
Deleting a User 25
Deleting a Preparer 26
Contents

Contents • x
Configuring Tax Preparation 27
Configuring Tax Preparation: Signature Block 27
Configuring Tax Preparation: Letters and Filing Instructions 31
Configuring Tax Preparation: Print Options 33
Configuring Tax Preparation: Pro Forma and Organizer 40
Configuring Tax Preparation: Client Invoice Options 44
Configuring Tax Preparation: Miscellaneous Options 48
Configuring Tax Preparation: 1040 Options 49
Configuring Tax Preparation: 1041 Options 51
Configuring Tax Preparation: 1065 Options 53
Configuring Tax Preparation: 1120/1120S Options 54
Configuring Tax Preparation: Pennsylvania Cities (1040) 56
Configuring Tax Preparation: History/Backup Options 59
Configuring Tax Preparation: Workstream Options 59
Configuring Communications 60
Configuring Transfer Options 60
Configuring CCH Research 60
Backing Up Client Data 61
Backing Up Client Data 62
Printing the Exception Report 63
Viewing the Client Backup Report 64
Restoring Client Data 64
Deleting Client Data 65
Deleting All Tax Return Data 66
Deleting All Client and Tax Return Data 67
Deleting Tax Return Components 68
Backing Up Returns for Center Pro Forma/Organizer 69
Backing Up System Data 70
Restoring System Data 70
Deleting a Tax Product 70
Using the Tools Feature of Office Manager 71
Version 71
Rebuild 71
Client Filenames List 75
Changing a Client ID 76
Contents

Contents • xi
Changing an Office Group 76
Changing a Tax Preparer 77
Viewing and Printing Office Manager Reports 78
Configuration Information Reports 78
CCH ProSystem fx on the Web 79
Chapter 3 - Tax Preparation 80
Tax Processing with Tax Preparation 80
Tax Products and Client Types 81
Monitors and Screen Resolution 82
The Open Return Dialog (Start Up Screen) 82
The Toolbar 83
The Search Panel 83
The Client/Return List 84
Using the Status Bar 84
The Tax Preparation Toolbar 85
Toolbar Buttons 85
Customizing the Toolbar 91
Setting Preferences 92
Tax Return Preferences 92
Start Up Screen Preferences 98
Multi-Monitor Preferences 98
Setting Interface Options 99
Configuring CCH Research User IDs 99
Selecting the Location for BNA Data 99
Configuring Accounting Bridges 100
Configuring the CCH ProSystem fx Engagement or CPADocumentManager Interface 101
Configuring CCH Client DataXchange 102
Setting Up ProSystem fx Portal Login Credentials 102
Practice Interface 103
Setting Up a Printer 103
Loading Fonts 104
Using Help 104
Accessing CCH Research Features 105
U.S. Master Tax Guide 106
Contents

Contents • xii
State Smart Charts 106
CCH Tax Prep Partner 106
CCH ProSystem fx on the Web 107
Accessing Form Status 108
Creating and Opening Returns 108
Creating a New Return 108
Create a New Return for an Existing Client 109
Opening a Return from the In-Box 110
Opening an In-Use Return 110
Default Returns 111
Creating a Default Return 111
Securing a Default Return 112
Saving Changes to a Return 112
Using AutoSave 112
Saving to an Alternate Drive or Removable Media 113
Save 114
Save As 114
Closing a Return 114
Selecting Interview Forms 114
Form Types 115
Form Selection Display 115
Navigating Split Window and Full Window Forms Trees 120
Viewing Only Forms with Data 121
Accessing State Forms 122
Viewing Two or More Forms with NewWindow 122
Navigating through the Forms 123
Link to Interview Forms 123
Return to Link List 124
Return to Government Form 124
Expand 124
Drill Down 125
New Entity 125
New Sheet 127
Next Sheet 127
Next Form 127
Contents

Contents • xiii
Previous Sheet 128
Previous Form 128
Delete Options in Interview View 129
Consolidated Returns 129
Data Entry Methods for Interview Forms 131
Heads Up 131
Heads Down 131
Split Screen 132
Using ProKey, QuickBox, and Key Verify 133
Worksheet View 133
Selecting Worksheet View 134
Accessing Help for Worksheets 136
Navigating Worksheets, Categories, and Sections 136
Selecting a Worksheet 143
Working with Worksheet Grids 144
Import and Export with Worksheet Grids 145
Import and Export K-1 Data to a Spreadsheet 145
Export and Import K-1 Business to Target Return 145
Field Format Guides 146
Working with Multiple Occurring Sections 146
Accessing Detail Worksheets from Summary Grids 147
Adding Entities in Worksheet View 147
Finding an Item in a List of Items 148
Displaying Only Worksheets with Data 148
Delete Options in Worksheet View 149
Data Flow Between Interview and Worksheet Views 150
Return Print Style 150
Print Order Options 151
Linking from Government to Worksheet View 152
What is Government View? 152
Color Coding in Government Form and Worksheet Fields 153
Linking from a Government Form to a Worksheet 153
Returning to a Government Form 154
Returning to the Link List 154
Edit Tools 154
Contents

Contents • xiv
Undo 154
Cut 155
Copy 155
Paste 155
Paste OLE, Insert Object, and Paste DDE Link 156
Links 156
Override 156
Clear All Overrides 156
Estimate 157
Clear All Estimates 157
Lookup Value 157
AutoText Descriptions 158
List 160
Notes 160
Global Note 161
Hash Totals 161
Changing Entity/Attachment 162
Resetting Input 162
Splitting Joint Returns 163
Embedding and Linking Spreadsheets and Documents 164
Linking Data from a Spreadsheet to a Return 164
Linking Data from a Return to a Spreadsheet 165
Linking Data from a Tax Return into a Document 166
Embedding a New Document or Spreadsheet into a Return 167
Embedding an Existing Document or Spreadsheet into a Return 168
Deleting Embedded Documents and Spreadsheets 169
Calculating a Return 169
Authorizations (PAYP, Pay-As-You-Process) 170
Return 170
Federal Only 170
Return Group 171
Recalc 171
Reviewing Calculated Returns 171
Viewing the Navigation History 171
Return Summary 172
Contents

Contents • xv
Interactive Diagnostics 173
Interactive Overrides 174
Interactive Estimates 174
Interactive Input Overrides 175
Interactive Reversed Tick Marks 175
This Form’s Statements 176
Viewing Tax Due and Refund Amounts 177
Letters 177
Tick Marks 180
Print Preview 183
Printing a Return 183
Setting Print Preferences 185
Entire Return 185
Selective Pages 189
Federal, State or City Only 190
Estimates 191
Extensions and 1st Quarter Estimate Vouchers 192
This Form 193
This Page 194
Input Data 196
Preparer Reports 197
K-1 Selection 198
Storing a PDF Return File in CCH ProSystem fx Engagement 199
Storing a PDF Return File in CPADocument Manager 201
Managing Your Returns 202
Viewing the History of a Return 202
Setting the Status of a Return 203
Linking a Return to Workstream 204
Printing a List of Returns 205
Securing a Return 205
Removing Security 206
Changing a Return Version Description 207
Forwarding a Return 207
Using the In-Box 207
Contents

Contents • xvi
Chapter 4 - Import/Export Functions 209
Introduction 209
Import Options 209
Export Options 209
Import Functions 210
Import Depletion Data Overview 210
G/L Bridge 212
G/L Bridge Processing Procedure 213
Selecting G/L Bridge or Dynalink Processing Options 213
Examples of G/L Bridge or Dynalink Processing Methods 217
Reprocessing Returns through G/L Bridge or Dynalink 220
Using the Dynalink Interface Program 223
Processing with Dynalink 224
Subsequent Dynalink Processing 225
Updating with Quiklink 225
Importing Data from CCH ProSystem fx Fixed Assets 226
Importing Depletion Data from a Spreadsheet 228
Importing K-1 Data from a Spreadsheet 230
Importing Apportionment Data from MST Spreadsheets 233
Importing Data from ViewPlan 234
Importing Data for Foreign Entities 235
Exporting Files 237
Exporting K-1 Data to a Spreadsheet 237
Exporting K-1 Business Data to Returns 239
Exporting Apportionment Data to a Spreadsheet 243
Exporting to a CCH ProSystem fx Planning File 244
Exporting of Data for Foreign Entities 244
Creating a CCH Interchange Protocol File 246
Creating a BNA File 246
Creating an IRS File 247
Chapter 5 - Production Processing 248
Introduction to Production Processing 248
Calculating Returns 249
Printing Returns, Forms and Labels 251
Contents

Contents • xvii
Setting Up a Printer 251
Printing Returns 252
Printing Return Print Files 255
Printing Blank Government Forms 257
Printing Blank Interview Forms 258
Printing Blank Client Organizer Forms 259
Printing Mailing Labels 259
Processing Pro Forma 260
Before You Create and Print Pro Forma 260
Customizing Pro Forma 261
Customizing Pro Forma Print 262
Creating Pro Forma 264
Creating Pro Forma for Default Returns 266
Printing Pro Forma 267
Creating Returns from Pro Forma 268
Creating Returns from Center Pro Forma 269
Processing Client Organizers 271
Creating Client Organizers 271
Printing Client Organizers 273
Exporting Estimate Reminder Letters 275
Transferring Clients 276
Deleting Batches 278
Accessing the Customer Support Website 278
Contents

Chapter 1
Chapter 1 - Installation
FX Direct gives you complete Federal and State tax processing capabilities for 2020 CCH ProSystemfx Tax products from one FX Direct installation. Plus, you choose how to access the tax programs.You can integrate FX Direct with your existing CCH ProSystem fx Tax system or run it as anindependent product. By integrating, you can access 2020 tax products from the CCH ProSystem fxTax system on your local or network drive.
This guide contains information and procedures that will assist you in setting up and running the FXDirect program to complete 2020 tax returns.
System ConfigurationWe recommend that you read the hardware and software requirements for your network system andreview the material pertaining to your particular network environment before installingCCH ProSystem fx Tax.
You can find current system requirement information in our System Requirements Knowledge Basearticle at https://support.cch.com/kb/solution.aspx/sw4105.
Printer ConfigurationPrinter configuration and compatibility information can be found in our Printer Compatibility KnowledgeBase article at https://support.cch.com/kb/solution.aspx/sw26398.
If your printer software and hardware are compatible, but you need further assistance, informationabout contacting Customer Support can be found on our Customer Support Contact page athttps://support.cch.com/contact.
Installation OverviewThe following section provides general information about FX Direct Tax installation that will help makethe installation process run smoothly for you.
Installing FX DirectFX Direct is the archival version of each CCH ProSystem fx Tax final yearly release.
Chapter 1 - Installation • 1
CHAPTER 1 - INSTALLATION
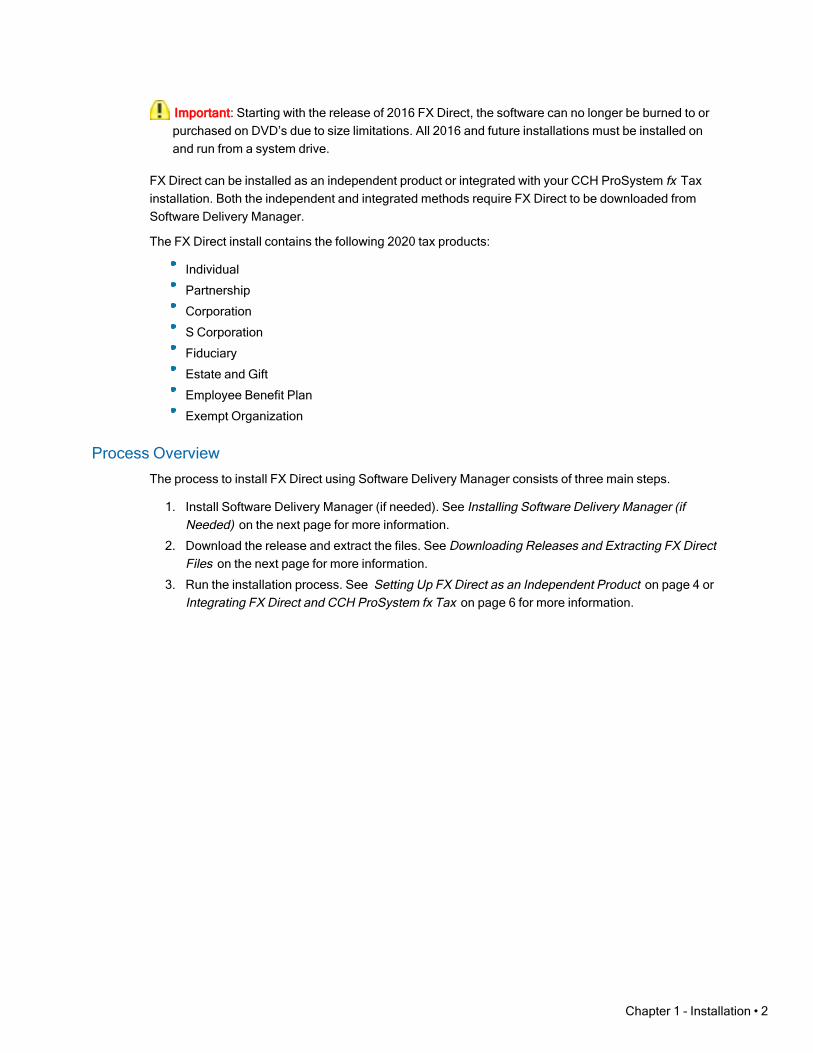
Important: Starting with the release of 2016 FX Direct, the software can no longer be burned to orpurchased on DVD’s due to size limitations. All 2016 and future installations must be installed onand run from a system drive.
FX Direct can be installed as an independent product or integrated with your CCH ProSystem fx Taxinstallation. Both the independent and integrated methods require FX Direct to be downloaded fromSoftware Delivery Manager.
The FX Direct install contains the following 2020 tax products:
Individual
Partnership
Corporation
S Corporation
Fiduciary
Estate and Gift
Employee Benefit Plan
Exempt Organization
Process OverviewThe process to install FX Direct using Software Delivery Manager consists of three main steps.
1. Install Software Delivery Manager (if needed). See Installing Software Delivery Manager (ifNeeded) on the next page for more information.
2. Download the release and extract the files. See Downloading Releases and Extracting FX DirectFiles on the next page for more information.
3. Run the installation process. See Setting Up FX Direct as an Independent Product on page 4 orIntegrating FX Direct and CCH ProSystem fx Tax on page 6 for more information.
Chapter 1 - Installation • 2
Installing Software Delivery Manager (if Needed)Software Delivery Manager (SDM) allows you to download CCH ProSystem fx software andpermission keys via the internet.
Note: An email is sent with a link to install Software Delivery Manager if you are a new customer,you have purchased additional software, or an update is available.
To install Software Delivery Manager:
1. Click the link from the e-mail sent to the Default administrator. A dialog opens to allow you todownload ClientSetup.exe. Select Run.
2. The Software Delivery Manager Installation dialog displays. Click Next.
3. Accept the default installation path or select Browse to select another location to install SoftwareDelivery Manager.
4. The Installation Progress dialog displays, indicating the progress of the installation.
5. To open Software Delivery Manager when installation is complete, select the Launch SoftwareDelivery Manager when I click Finish box and click Finish.
See Downloading Releases and Extracting FX Direct Files below to continue with the installation.
Downloading Releases and Extracting FX Direct FilesThese instructions apply to both independent and integrated installations of FX Direct.
To download and extract the FX Direct files, do the following:
1. Open Software Delivery Manager. If you have not logged in to Software Delivery Managerbefore, you will need to log in with your SSO Credentials. (The default user ID is your 6-digitProSystem fx account number).
2. Highlight the 2020 FX Direct version, and click Start Download.
3. If prompted, enter a location for your downloaded files. (This is not the actual install location ofthe program).
Note: Prior to downloading, you can click Settings to select a download location.
4. In SDM, click View downloaded file in Windows to open your Windows® and view thedownloaded fxdirect-2020.06000.exe.
5. Double-click fxdirect-2020.06000.exe to open the Unzip dialog.
6. Click Unzip to extract the files to the default location.
7. Share the download/extraction folder.
a. Right-click on the folder, click Properties.
b. Click the Sharing tab, select Advanced Sharing.
c. Select the Share this folder check box.
d. Click Permissions and give full control to everyone. Click OK.
e. Click OK on the Advanced Sharing dialog.
f. Click Close on the Properties dialog.
Chapter 1 - Installation • 3
8. Map your workstation to the download/extraction drive.
a. Open the File Explorer from the task bar or the Start menu.
b. Right-click on This PC in the left navigation panel and select Map network drive fromthe drop-down menu.
c. In the Drive list, select an available drive letter.
d. In the Folder box, select Browse to find the UNC path (example:\\Naks1106lp93jbd\2020.06000) for the computer and the folder where FX Directresides. To connect every time you log on to the PC, select the Reconnect at sign-incheck box.
e. Select Finish.
Note: If you don’t share the folder and map the drive where you plan to install from you willget an error message during the install process and when attempting to open returns usingyour install.
9. After the files are extracted, you can install FX Direct.
Setting Up FX Direct as an Independent ProductIf CCH ProSystem fx is not installed on your computer or network, configure FX Direct as anindependent product.
When you configure FX Direct as an independent product, a subdirectory is created to store the filesneeded to access the CCH ProSystem fx Tax program from the FX Direct installation.
The client data is also stored in this directory.
You can install the CCH ProSystem fx Tax program files to your hard disk. The program files willrequire 500 MB of space.
Notes:
If you set up FX Direct as an independent system, certain CCH ProSystem fx Tax features willnot be available. See CCH ProSystem fx Tax Features not Available with FX Direct on page 9for more information.
Online Help is available during installation by pressing F1.
Use these steps to install FX Direct as an independent system:
1. Select Windows + R on your keyboard.
2. Type ?:\wdirect.exe where ? is the drive letter that you extracted the FX Direct files onto andclick Enter.
Chapter 1 - Installation • 4

3. If FX Direct detects existing ProSystem files on your system, you will be prompted to select aninstall option. Choose Set up independently of existing system and click OK.
Note: When this option is selected, there will be no exchange of data between FX Directand your current installation of CCH ProSystem fx Tax. The client data will be stored inseparate directories.
4. Select a drive from the list on which to install the FX Direct files. The FX Direct subdirectoryWFX20 will be created. The CCH ProSystem fx Tax configuration and client files are located inthis directory.
Chapter 1 - Installation • 5

5. To install the FX Direct program files to the hard disk, check the Install program files box andclick OK.
Note: Remember that 500 MB of hard disk space is required for the program files.
6. A dialog prompts you to select a program group where the icons for Office Manager, TaxPreparation, Production Processing, and Workstation Setup will display. The default programgroup is 20 FX Direct. Select the Setup shortcut folder box if you wish a desktop icon createdfor you. Click OK.
7. Click OK on the next dialog to begin the installation.
8. After the installation is completed, a dialog will display informing you of the successfulinstallation. Choose from the following:
Select Yes to reboot and automatically open Office Manager.
Clear the Automatically run Office Manager after reboot box if you do not want OfficeManager to open after rebooting, and then click Yes.
Click No to close this dialog without rebooting.
Integrating FX Direct and CCH ProSystem fx TaxIf you have a current installation of CCH ProSystem fx Tax, you can integrate the prior year productsin FX Direct with the existing software. By doing this you will retain access to all current yearCCH ProSystem fx Tax features and applications, and you will be able to easily pro forma prior yearreturns and recall them to create current year returns.
During the FX Direct setup process, if the installation detects the presence of 2020 tax products, youwill be given the option to select whether to access the tax products from your hard drive or from FXDirect.
Tips:
Before integrating FX Direct with CCH ProSystem fx Tax, if 2020 tax products are currentlyinstalled, it is recommended that you access Office Manager and delete any of these that youare going to access from FX Direct. Deleting a tax product also deletes its associated laserforms. All 2020 laser forms are available in FX Direct.
Help is available during installation by pressing F1.
Note: Before you begin this installation, make sure that all CCH ProSystem fx users have closedall CCH ProSystem fx Tax applications. If the CCH ProSystem fx database is active when theinstallation process begins, you will receive a message that databases are active. Make sure allusers exit CCH ProSystem fx Tax and then retry.
Use these steps to integrate FX Direct with your existing CCH ProSystem fx Tax system:
1. Select Windows + R on your keyboard.
2. Type ?:\wdirect.exe where ? is the drive letter that you extracted the FX Direct files onto andclick Enter.
3. If FX Direct detects existing ProSystem files on your system, you will be prompted to select aninstall option. Choose Integrate with existing ProSystem fx and select OK. FX Direct will now
Chapter 1 - Installation • 6

check to see what tax products currently exist on your system. Any tax products for which youare licensed but are not currently installed will be accessed from the FX Direct installationautomatically.
4. If 2020 tax products are currently installed on your system, you will be prompted to select the taxproducts for integration in the Access Tax Products dialog displays, listing the currently installedtax products.
You can choose whether to access the tax products from the FX Direct installation or from thehard drive where ProSystem fx Tax is installed.
a. To change access from the hard disk to installation media, select one or more products.
Note: To highlight more than one product, hold the Ctrl key as you highlightselections. Do not release the Ctrl key until all the tax products you want to selectare highlighted.
b. Select Change. Select OK. The Program Group Select dialog displays.
5. Select the default program group name for your new application icons and select OK. Taxproducts installed for FX Direct will be accessed through your current installation and the defaultprogram group will be the program group for your current installation. The Start Install messagebox displays.
6. Select OK to begin the installation.
7. You will receive a confirmation message when the installation is complete. Click OK to completethe installation.
Accessing the FX Direct Instruction GuideThe FX Direct Instruction Guide can be accessed from the directory where FX Direct is installed.
Chapter 1 - Installation • 7

1. Go to the network location where FX Direct is installed.
2. In the root level folder, look for the Homepage.pdf.
3. Open the Homepage.pdf.
Note: Adobe® Reader® DC or later must be installed to use this guide. If Adobe Reader is notinstalled, it can be downloaded free of charge from the Adobe website at www.adobe.com.
CCH ProSystem fx Tax Features Available with FX DirectThis section briefly introduces the CCH ProSystem fx Tax applications and the features available withFX Direct. More detailed instructions for using these applications are included in the later chapters.
The following applications are available.
Office Manager allows you to do the following:
Control user access to applications and data.
Perform regular system maintenance or “housekeeping tasks” for your client database,including backup of client and system data.
Maintain a database of staff members.
Create one or more office groups to which you assign clients.
Establish default tax processing options and custom client invoice pricing for one or moreoffice groups.
2020 Tax Preparation provides you with full tax preparation and processing capabilities for alltax products and allows you to:
Work on and display multiple forms and sessions at one time.
Review returns with the aid of interactive diagnostics, estimates, overrides, and tickmarks.
Manage your returns by maintaining the status of each return, forwarding theresponsibility for a return to another user, and using the In-Box to open a forwardedreturn.
Production Processing provides you with a batch method of performing high volume TaxPreparation functions. With Production Processing you can:
Calculate or print one or more returns.
Transfer returns to CCH ProSystem fx Tax.
Create and print Client Organizer and Pro Forma files.
Recall CCH ProSystem fx or center-created Pro Forma files.
Chapter 1 - Installation • 8

CCH ProSystem fx Tax Features not Available with FX DirectListed below are features that are not available for prior-year processing using a non-integratedinstallation of FX Direct. These features are available with your current-year system, if installed.
BNA PlanBuilder Export
Calc Server
CCH ClientRelate
Client Manager & To Do List
Communications
Word-edited Client letters
Custom Letterhead
DataScan Plus
Electronic Filing
Engagement Plus
First and Second Batch Extension Processing
General Ledger Connection
G/L Direct
CCH Integrator
Import/Export to CCH® ProSystem fx® Planning
Interface to CCH Research Products (US Master Tax Guide®, Standard Federal Tax Reports®,Smart Tax, SmartPlanner)
Interface to CCH® ProSystem fx® Practice Management
Laptop Setup
Outsource/Outsource Status
Remote Office Processing
My1040Data Toolkit
Menu and Dialog Items not Available in Independent ModeBecause these features are not available when FX Direct is operating in independent mode, certainmenu and dialog options in the following applications are not applicable. These options may displayon the respective menus or dialogs but do not function with FX Direct.
Office Manager Menu Items
Configure Staff
Resources
Configure Applications
Client Manager, BNA, Engagement Plus
Transfer Authorizations
Delete Tax Products
Chapter 1 - Installation • 9

Firm Authorizations Report, Client Authorizations Report
Remote Office Processing Report
Tax Preparation Menu Items
File > Export
Planning Export, BNA, Electronic Filing
Manage
View Open Items, Remote Request, To Do List, Log Activity
Options
Define as Keyword
Calc
Calc Server
Tax Preparation Dialog Items
Manage
In-Box - The (To Do List) Detail button.
Secure Client Data - Returns, but not the profile or Cardex.
Options
Preferences - Prompt to create engagement for new return.
Production Processing Dialog Items
Print Returns, Forms and Labels
Select for Print/Blank Forms
Service Center/Print Returns
Service Center/Reprint Returns
Service Center/Delete Print Files
Extensions, Estimates, and Electronic Filing
Process Client Organizers
Customize Organizer - Custom forms created by CCH will not be available.
Create a Custom Letter - Templates will not be provided.
Chapter 1 - Installation • 10
Chapter 2
Chapter 2 - Office Manager
Setting Up Your Office with Office ManagerOffice Manager simplifies administrative tasks by placing everything you need to organize your firm,staff, and tax processing in one location. You can set up and maintain data for the following:
Firm. Set up office identification information, and enable client management applications.
Office Groups. Organize tax return processing into separate groups. At least one office groupmust be defined. All clients on your system must belong to an office group.
Staff. Set up identification and access information for your system users and tax preparers.
Applications. Establish tax return processing defaults for each office group.You can alsoconfigure your electronic filing declaration control number sequence and CCH® IntelliConnect®
or CCH® AnswerConnect options.
Office Manager utilities and tools include the following:
Perform the tasks associated with maintaining your system, client, and tax data.
Rebuild your system or client database.
View product version numbers.
View or print a cross-reference of client names and IDs.
Print the configurations of your office, staff, and Tax Preparation.
Accessing Office Manager for the First TimeIf you did not set up your system following installation, the Configuring Your Office dialog prompts youto do so when you first access CCH ProSystem fx Tax.
Read the information contained on the Configuring Your Office dialog and click OK. Office Managerwill guide you through Firm, Office Group, and Staff configuration. Make your entries and click OK tomove to the next dialog. For details on entering data in these dialogs, please refer to the followingsections: , Configuring Office Groups on page 14, and Configuring Staff on page 18.
You must configure at least one office group and the firm's information before using TaxPreparation.
Chapter 2 - Office Manager • 11
CHAPTER 2 - OFFICEMANAGER
You are not guided through the Configure Applications feature. Details for configuringapplications are in subsequent sections of this chapter and the chapters that follow.
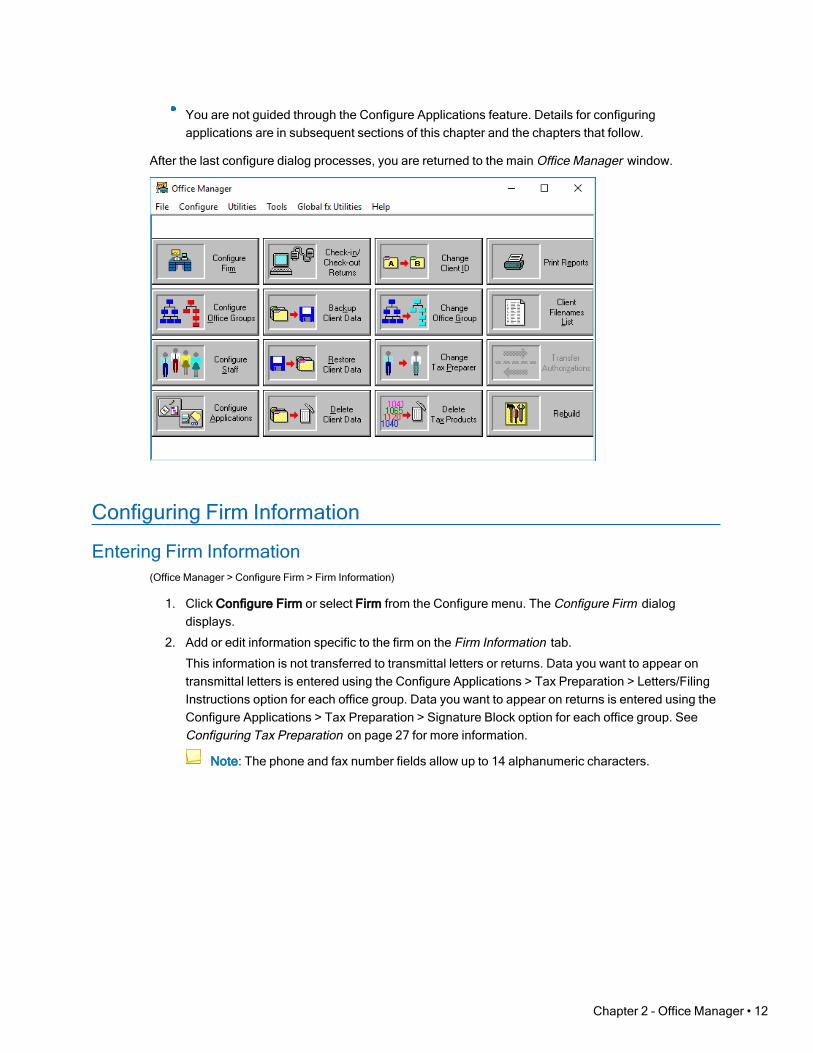
After the last configure dialog processes, you are returned to the main Office Manager window.
Configuring Firm Information
Entering Firm Information(Office Manager > Configure Firm > Firm Information)
1. Click Configure Firm or select Firm from the Configure menu. The Configure Firm dialogdisplays.
2. Add or edit information specific to the firm on the Firm Information tab.
This information is not transferred to transmittal letters or returns. Data you want to appear ontransmittal letters is entered using the Configure Applications > Tax Preparation > Letters/FilingInstructions option for each office group. Data you want to appear on returns is entered using theConfigure Applications > Tax Preparation > Signature Block option for each office group. SeeConfiguring Tax Preparation on page 27 for more information.
Note: The phone and fax number fields allow up to 14 alphanumeric characters.
Chapter 2 - Office Manager • 12

Setting Options(Office Manager > Configure Firm > Options)
1. Click the Options tab. The Configure Firm dialog displays.
2. The Invoice options section is not functional within independent FX Direct.
3. The Do not allow suppression of nonfileable message on signature forms option in the TaxPreparation section allows you to prevent users from suppressing the nonfileable message onsignature forms.
Note: Selecting this option overrides the Do not print nonfileable message on signatureform options located on the Configure Applications > Tax Preparation Electronic FilingOptions dialog and in a return on the General > Electronic Filing > General worksheet(Interview Form EF-1).
4. In the Release information section, check the box if you want release information to displayautomatically the first time Tax Preparation is opened after a new release is installed.
Note: This option can be controlled on an individual user basis by using Options >Preferences > Tax Return Preferences > Miscellaneous in Tax Preparation. SeeMiscellaneous Preferences on page 92.
Chapter 2 - Office Manager • 13
Configuring Tick Marks(Office Manager > Configure Firm > Tick Marks)
Enter the definition for each colored Tick Mark as follows:
1. Select the Tick Marks tab.
2. Enter a description for each Tick Mark you want to use.
3. Click OK to save your changes and return to Office Manager.
Configuring Remote SetupThe Remote Setup section is not functional within independent FX Direct.
Configuring Input Methods(Office Manager > Configure Firm > Input Methods)
Select an option to configure which views are available in CCH ProSystem fx Tax Preparation for allusers in the firm.
1. Select the Input Methods tab.
2. Select one of the following options:
Enable both Interview forms and Worksheets as data input methods. Choose thisoption to allow tax preparers to use both Interview forms and Worksheets when inputtingdata. This is the default.
Enable Interview forms only. Choose this option to allow tax preparers the use ofInterview forms only.
Enable Worksheets only. Choose this option to allow tax preparers the use ofWorksheets only.
3. If you enable both input methods, you must also select the Input default view: Worksheets orInterview forms.
Note: CCH ProSystem fx Tax Preparation opens with the default view selected in OfficeManager. Each preparer can select Worksheet or Interview forms by going to View >Worksheet or View > Interview in CCH ProSystem fx Tax Preparation. The return reopensin the last view saved.
4. Click OK to save your settings and return to Office Manager.
Configuring Office GroupsOffice groups allow you to organize tax processing for your firm by grouping together clients withsimilar processing requirements. If you want all return processing to be identical, set up one officegroup. Setting up multiple office groups gives you flexibility in the following areas:
Tax return formatting options for different users and preparers
Federal and State Signature Block area customization
Chapter 2 - Office Manager • 14

Separate custom client invoice settings
Unique transmittal letter/filing instructions for each group
Tip: Limit office groups to 2000 clients. The greater the number of clients in an office group, thegreater the amount of time required to display client data.
Click Configure Office Groups to add, edit, copy, or delete an office group.
The following is an example of the Configure Office Group dialog with office groups assigned.
The following buttons on the dialog are available for managing office groups. The functionality of eachbutton is described in the subsequent sections.
Setup. Edit information for an existing office group.
Add. Create a new office group.
Copy. Create an office group by copying data from an existing office group.
Delete. Delete an office group.
Creating a New Office Group(Office Manager > Configure Office Groups)
Use the Configure Office Groups Add option if you want to create an office group that has differentprocessing options from existing groups.
Use the Configure Office Groups Copy option to create an office group with Tax Preparation optionsidentical to an existing group. (See Configuring Tax Preparation on page 27, which also allows you tocopy Tax Preparation options to another office group.)
You can also use the Copy option to change an office group ID. This creates a new office group, afterwhich the old office group can be deleted.
Creating a New Office Group: Add Option(Office Manager > Configure Office Groups > Add)
1. Click Add. The Add - Office Group Information dialog displays.
2. Enter an office group ID of up to seven alphanumeric characters in the Office group field andthen enter appropriate data in the remaining fields.
Chapter 2 - Office Manager • 15

Note: The information you enter on this dialog is not imported into the signature block areaon tax returns. You must configure information for each office group using Configure TaxPreparation > Signature Block.
You can configure the Tax Preparation options here or at a later time using ConfigureApplications > Configure Tax Preparation. For information on setting up tax processing options,refer to Configuring Tax Preparation on page 27.
3. Do the following to configure tax preparation when creating a new office group:
a. Click Configure Tax Prep to display the Configure Tax Preparation dialog.
Tip: This dialog displays again after a configuration is completed, and you canchoose another option to configure.
b. Highlight a Tax Preparation option to configure.
c. Choose one of the following for each option you want to configure:
Click Setup to configure the highlighted Tax Preparation option and enter theinformation you want. Click OK to save, or click Cancel to exit the dialog withoutsaving.
Click Copy From Another Office Group. Select the source office group you wantto copy from the Select Source Office Group dialog and click OK. Thisconfiguration is saved. Repeat this step for each option you want to copy. ClickSetup to view or edit the configuration.
d. When you have configured your tax preparation options, click Close (x) to exit.
e. Click OK on the Add - Office Group Information dialog to save the added office group, orclick Cancel to exit the dialog without saving the new office group. The Configure OfficeGroup dialog displays.
4. Repeat the steps for either the add option or the copy option to configure additional officegroups, or click Close to exit the dialog.
Creating a New Office Group: Copy Option(Office Manager > Configure Office Groups > Copy)
1. Highlight an existing office group and click Copy. The Copy - Office Group Information dialogdisplays data from the group you are copying. The office group ID is blank.
2. Enter an office group ID of up to seven alphanumeric characters in the Office group field, thenenter or edit the data in the remaining fields.
Note: The information you enter on this dialog is not imported in the signature block area ontax returns. You must configure information for each office group using Configure TaxPreparation > Signature Block.
You can copy the Tax Preparation configurations here, or you can create them at a later timeusing Configure Applications > Configure Tax Preparation.
3. To copy the Tax Preparation configurations, check the Copy Tax Prep configuration to newoffice group box. This copies the configurations for all Tax Preparation options.
Chapter 2 - Office Manager • 16
4. Click OK to save the office group information or click Cancel to exit without saving. TheConfigure Office Group dialog displays.
5. Repeat the steps for either the add option or the copy option to configure additional officegroups, or click Close to exit the dialog.
Editing Office Group Data(Office Manager > Configure Office Groups > Setup)
Use Setup to edit or change information for an office group.
1. Click Configure Office Groups and highlight the office group you want to edit.
2. Click Setup and edit the applicable fields on the Setup - Office Group Information dialog.
3. Choose whether or not to edit Tax Preparation options as follows:
Click Configure Tax Prep to edit tax processing options.
Click OK to save changes to the office group without editing Tax Preparation options.
Deleting an Office Group(Office Manager > Configure Office Groups > Delete)
Use Delete to remove an office group. You cannot delete an office group until you reassign the clientsassigned to that group. This procedure prompts you to reassign the clients.
1. Highlight the office group you want to delete and click Delete.
2. If no clients are assigned to this office group, click OK at the prompt asking you to confirm thedeletion. The office group is then deleted.
3. If clients are assigned to the office group, you are prompted to reassign the clients. Click OK. Adialog displays a list of the clients assigned to the office group.
To reassign all clients to one office group, do the following:
a. Click Add All.
b. Click Assign To.
c. Highlight the office group to reassign the clients to, and then click OK.
To reassign clients to different office groups, do the following:
a. Highlight each client to be reassigned, and then drag it into the Selected box orclick Add.
Select a range of clients by holding down the Shift key and clicking the first andlast clients in the range. Select multiple clients that are not consecutive by clickingthe first client, holding down the Ctrl key and clicking the individual clients. Dragthe highlighted clients to the Selected box or click Add.
Remove a client from the Selected box by highlighting it and then dragging it intothe Clients box, or by clicking Remove.
b. Click Assign To.
c. Highlight the office group you are reassigning the clients to and click OK.
d. Repeat steps a through c until all clients are reassigned to new office groups.
Chapter 2 - Office Manager • 17
Notes:
If a return is locked, the Client In-Use dialog displays. If you are certain that no other useris currently accessing the return, click Access Anyway to reassign the client.
If the return is password-protected, you must enter the password. If you do not know thepassword, click Cancel and you are returned to the Reassign Clients to Other OfficeGroups dialog. Click Close to exit.
The office group is not deleted unless all clients are reassigned.
4. The office group is deleted once all clients are reassigned.
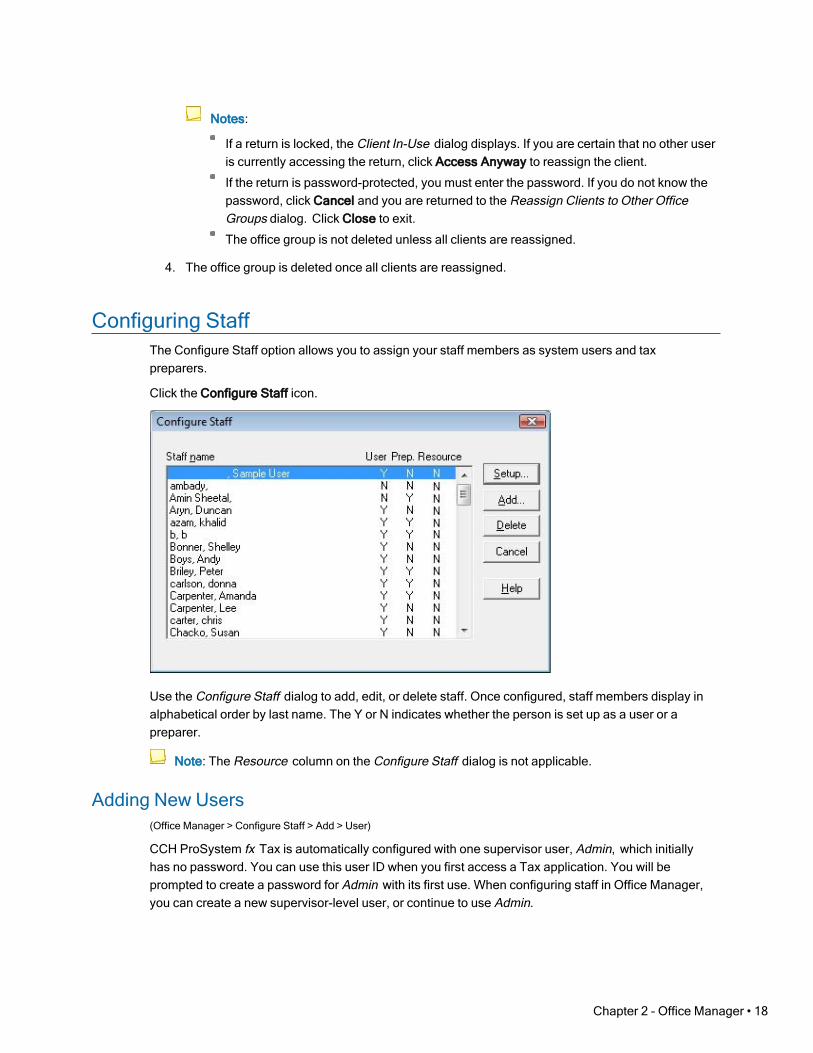
Configuring StaffThe Configure Staff option allows you to assign your staff members as system users and taxpreparers.
Click the Configure Staff icon.
Use the Configure Staff dialog to add, edit, or delete staff. Once configured, staff members display inalphabetical order by last name. The Y or N indicates whether the person is set up as a user or apreparer.
Note: The Resource column on the Configure Staff dialog is not applicable.
Adding New Users(Office Manager > Configure Staff > Add > User)
CCH ProSystem fx Tax is automatically configured with one supervisor user, Admin, which initiallyhas no password. You can use this user ID when you first access a Tax application. You will beprompted to create a password for Admin with its first use. When configuring staff in Office Manager,you can create a new supervisor-level user, or continue to use Admin.
Chapter 2 - Office Manager • 18
The three types of users and their access rights are as follows:
Supervisors can access all CCH ProSystem fx Tax applications and data, including datasecured by another user, except when secured by a password. At least one user must bedesignated as a supervisor.
Full Access Users can access all applications and data in CCH ProSystem fx Tax, except datasecured by another user. The Full Access user has access to these features in Office Manager:Backup and Restore Client Data, Print Reports, Client Filenames List, and Rebuild. Theadministrator also has the option of giving a Full Access user the ability to delete clients, deletetax products, and create new returns for new clients in Tax Preparation.
Restricted Access Users have no preselected options. Access rights to different tax productshave to be given by the administrator or a supervisor.
Chapter 2 - Office Manager • 19
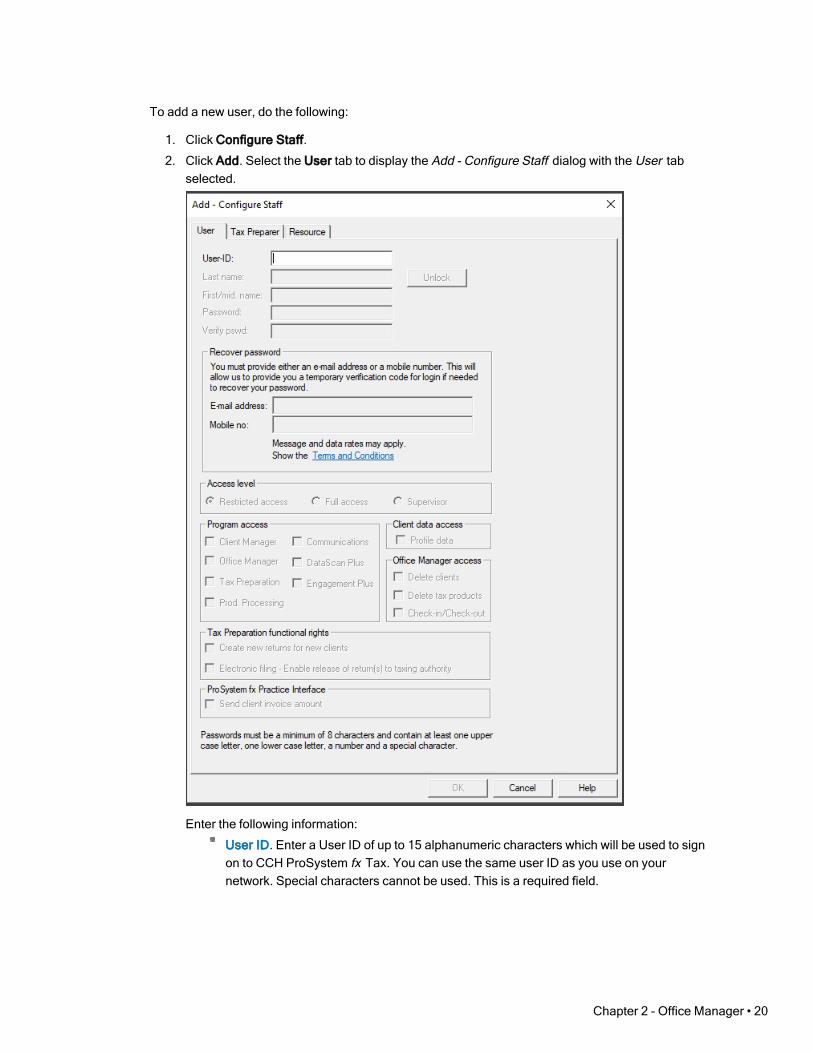
To add a new user, do the following:
1. Click Configure Staff.
2. Click Add. Select the User tab to display the Add - Configure Staff dialog with the User tabselected.
Enter the following information:
User ID. Enter a User ID of up to 15 alphanumeric characters which will be used to signon to CCH ProSystem fx Tax. You can use the same user ID as you use on yournetwork. Special characters cannot be used. This is a required field.
Chapter 2 - Office Manager • 20

Last Name and First/mid. name. The Last Name field is a required entry. These fieldsare used for description information in selection lists. You can enter the user’s full middlename or initial. The Unlock button can be used to unlock a user ID locked by five invalidpassword attempts or security question responses.
Password. Enter a password to use when signing into Tax. The password must contain 8to 63 characters with at least one upper case letter, one lower case letter, a number, anda special character. The user ID will be locked if an invalid password is entered fivetimes. The password will expire every 90 days and expiration warning messages willbegin displaying 10 days prior to the expiration date.
Note: You may be prompted a second time (password only) when launching years ofTax Preparation before the IRS timing changes were incorporated (before2015.05000).
Verify password. Enter the password again to confirm it.
Recover password. Enter a user e-mail address and/or mobile phone number. Thiscontact information allows users to receive a temporary verification code for use inunlocking their own user ID. The unlock process is initiated when the Forgot Passwordbutton is selected on the log in dialog.
Access level. Choose the level of access you want to establish for the user: Restrictedaccess, Full access, or Supervisor.
Program access. These application boxes are enabled for a Restricted user. Check theboxes accordingly to specify those applications permitted for this user. Full access usersand supervisors always have permission to access these tax programs. Some featuresare not available within independent FX Direct.
Client data access/Office Manager access. Office Manager access displays only if Fullaccess is selected as the access level. Check the appropriate boxes if you want the userto have access to deleting clients or tax products. The Profile data and Check-in/Check-out features are not available within independent FX Direct.
Tax Preparation functional rights.
Create new returns for new clients. If the user has been given access rights toCCH ProSystem fx Tax Preparation, this box is checked by default. Remove thecheck mark to deny the ability to create new returns for new clients without anassigned client ID.
Electronic filing - enable release of return(s) to taxing authority. This feature isnot available with independent FX Direct.
ProSystem fx Practice Interface or CCH ProSystem fx Practice ManagementInterface. This feature is not available with independent FX Direct.
3. Click the Tax Preparer tab to set up the staff member as a tax preparer, or click OK to return tothe Configure Staff dialog.
4. Click OK on the Configure Staff dialog to return to the Office Manager window when you havefinished setting up staff. You can add, edit, or delete staff at any time.
Chapter 2 - Office Manager • 21

Unlocking Users(Office Manager > Configure Staff > Add > User)
Supervisor level users are able to unlock users that have locked their user IDs due to too many failedlog in attempts or failed answers to security questions.
1. Click Configure Staff.
2. Click Add and click the User tab.
3. Click the Unlock button.
4. Enter a new temporary password for the user (this step is optional).
5. Click OK.
Note: Users can also unlock their own user IDs by selecting Forgot Password on the log in dialogand following the instructions provided.
Adding New Tax Preparers(Office Manager > Configure Staff > Add > Tax Preparer)
This option allows you to set up and maintain tax preparer information for the preparers who arepermitted to sign the Paid Preparer's area of the tax return.
You can also choose a configured tax preparer as the Default preparer for an office group. Thisselection is made when configuring the office group's Signature Block information. See ConfiguringTax Preparation: Signature Block on page 27.
To override these options for a specific return, see Help > Help Topics or press F1.
Chapter 2 - Office Manager • 22

Use the following procedure to add a new tax preparer:
1. Click Configure Staff and then click Add.
2. Click the Tax Preparer tab.
3. Enter the following information:
Preparer code. Enter an alphanumeric preparer code of up to five characters. Specialcharacters and leading zeroes are not allowed. Each preparer code must be unique.
Note: Once you enter a code for a preparer and save the data, you cannot changethe code. Instead, you may recreate the preparer with the new code. For information,see Changing Staff Information on page 25.
Last name and First/mid. name. Used for description information in selection lists.
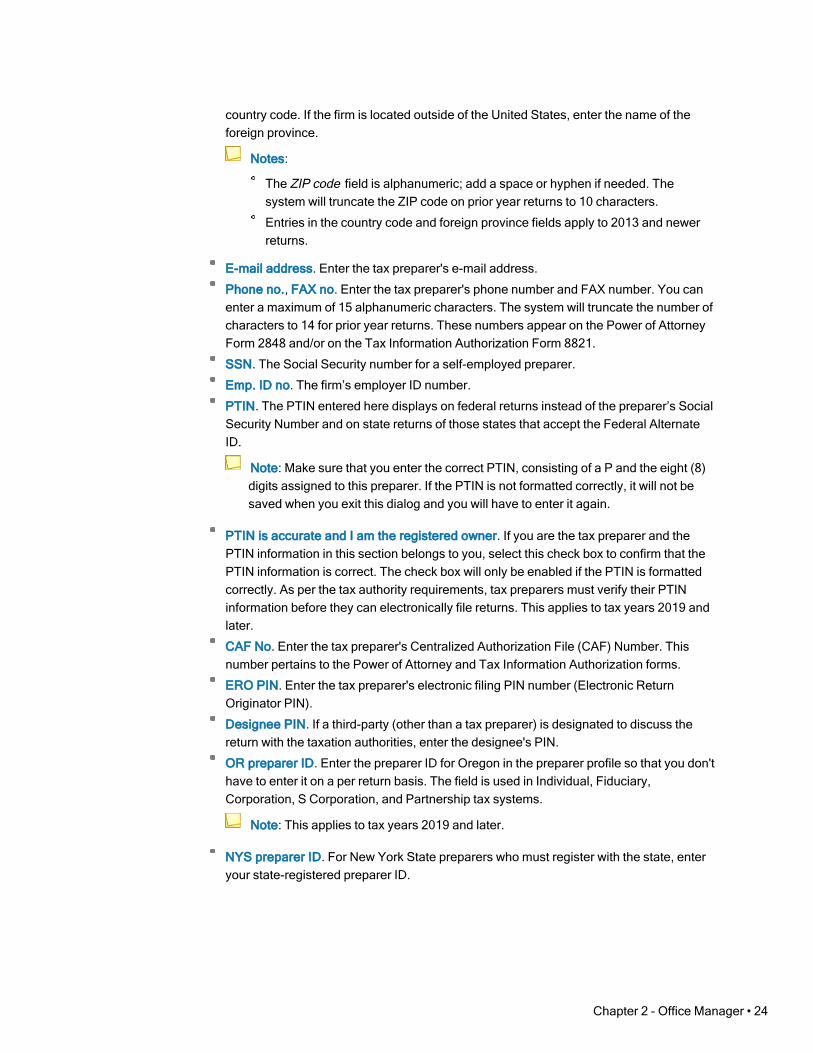
Name on return, Street, City, state, ZIP code, Country and Foreign province. Enter thepreparer’s name as it should appear on a tax return. Enter the preparer's address. Youcan enter a maximum of 16 alphanumeric characters in the Zip code field along with the
Chapter 2 - Office Manager • 23
country code. If the firm is located outside of the United States, enter the name of theforeign province.
Notes:
The ZIP code field is alphanumeric; add a space or hyphen if needed. Thesystem will truncate the ZIP code on prior year returns to 10 characters.
Entries in the country code and foreign province fields apply to 2013 and newerreturns.
E-mail address. Enter the tax preparer's e-mail address.
Phone no., FAX no. Enter the tax preparer's phone number and FAX number. You canenter a maximum of 15 alphanumeric characters. The system will truncate the number ofcharacters to 14 for prior year returns. These numbers appear on the Power of AttorneyForm 2848 and/or on the Tax Information Authorization Form 8821.
SSN. The Social Security number for a self-employed preparer.
Emp. ID no. The firm’s employer ID number.
PTIN. The PTIN entered here displays on federal returns instead of the preparer’s SocialSecurity Number and on state returns of those states that accept the Federal AlternateID.
Note: Make sure that you enter the correct PTIN, consisting of a P and the eight (8)digits assigned to this preparer. If the PTIN is not formatted correctly, it will not besaved when you exit this dialog and you will have to enter it again.
PTIN is accurate and I am the registered owner. If you are the tax preparer and thePTIN information in this section belongs to you, select this check box to confirm that thePTIN information is correct. The check box will only be enabled if the PTIN is formattedcorrectly. As per the tax authority requirements, tax preparers must verify their PTINinformation before they can electronically file returns. This applies to tax years 2019 andlater.
CAF No. Enter the tax preparer's Centralized Authorization File (CAF) Number. Thisnumber pertains to the Power of Attorney and Tax Information Authorization forms.
ERO PIN. Enter the tax preparer's electronic filing PIN number (Electronic ReturnOriginator PIN).
Designee PIN. If a third-party (other than a tax preparer) is designated to discuss thereturn with the taxation authorities, enter the designee's PIN.
OR preparer ID. Enter the preparer ID for Oregon in the preparer profile so that you don'thave to enter it on a per return basis. The field is used in Individual, Fiduciary,Corporation, S Corporation, and Partnership tax systems.
Note: This applies to tax years 2019 and later.
NYS preparer ID. For New York State preparers who must register with the state, enteryour state-registered preparer ID.
Chapter 2 - Office Manager • 24

NYS preparer ID exclusion code. Use the drop-down list to select the New York Statepreparer ID exclusion code. Default code is None. This feature is available for tax years2014 and later and the selected option prints on IT-201/IT-203.
Self-employed. Check if the preparer is a self-employed contractor.
Preparer's License Number. Enter the following information to appear on all returns inthis office group. These options are available for tax year 2012 and later.
Designation code
Jurisdiction
License number
4. Click the User tab to set up the staff member as a user, or click OK to return to the ConfigureStaff dialog.
Changing Staff Information(Office Manager > Configure Staff > Setup > User, Tax Preparer)
1. Highlight the name of the staff member whose data you want to edit and click Setup.
2. Select the appropriate tab: User or Tax Preparer.
3. Edit the fields you want to change. You cannot change the user ID or preparer code.
4. Click OK to return to the Configure Staff dialog.
Notes:
To assign a new code to an existing preparer, add the preparer with a different preparer code,changing the name slightly as the system does not allow duplicate preparer names to exist. Tocomplete the change, delete the preparer's name with the old code. You can then reassign theclients to the preparer under the new code or to another preparer.
Delete the preparer and then add the preparer with a new code.
Deleting a User(Office Manager > Configure Staff > Delete > User)
1. Click Configure Staff.
2. Highlight the user name to be deleted and click Delete.
3. Check the User box and click OK.
4. Click OK to confirm the deletion. One of the following will occur:
If the staff member does not have active returns, the person is deleted as a user. If set upas a preparer, the staff member remains in that capacity.
If the staff member has secured returns, the Reassign Security dialog display. CheckReassign access to secured returns if you want the return security reassigned toanother user.
a. Click OK and a list of the remaining users displays.
b. Click the name of the user to whom you want to reassign the secured returnaccess, if applicable.
Chapter 2 - Office Manager • 25

c. Click OK. The secured return access is reassigned to the new user and the useryou selected for deletion is deleted as a user. You are returned to the ConfigureStaff dialog.
Deleting a Preparer(Office Manager > Configure Staff > Delete > Tax Preparer)
1. Click Configure Staff.
2. Highlight the preparer to delete and click Delete.
3. Check the Tax preparer box and click OK.
4. Click OK to confirm the deletion. If no clients are assigned, the staff member is deleted as apreparer, but remains as a user, if configured as such. If the preparer has clients, you areprompted to reassign the clients before deleting the preparer.
a. Click OK on the Reassign message.
b. Do one of the following on the Reassign Clients to Other Preparer(s) dialog:
To reassign all clients to one preparer, click Add All. All clients are moved to theSelected box.
To reassign clients to different preparers, select the clients, and then drag theminto the Selected box or click Add.
You can remove a client from the Selected box by highlighting it, and then dragging itinto the Clients box or clicking Remove.
You can select a range of clients by holding down the Shift key and clicking the first andlast clients in the range. You can also select multiple clients that are not listedconsecutively by holding down the Ctrl key and clicking the individual clients. Drag thehighlighted clients to the opposite box or click the appropriate button to move them.
c. Click Assign To.
d. Select the preparer to whom you are reassigning the clients.
e. If you want the preparer reassigned on the returns, leave the Reassign preparer oncurrent returns box checked.
Notes:
Client Manager, and therefore client profiles, are not available with independentFX Direct.
If a client has a password-protected return, the Admin user can now reassign thepreparer even if the Admin user does not know the password.
f. Click OK. Repeat steps b through f as necessary to reassign all clients. The clients arereassigned to the new preparers, and the staff member is deleted as a preparer. TheConfigure Staff dialog displays.
Chapter 2 - Office Manager • 26

Configuring Tax Preparation(Office Manager > Configure Applications > Tax Preparation)
You can establish one set of tax return processing defaults that may be copied to additional officegroups or use different processing options for each office group. As your tax return processing needschange, you can change your settings.
To configure Tax Preparation, do the following:
1. Click Configure Applications.
2. Highlight Tax Preparation and click Configure.
3. Select the office group for which you are establishing return processing defaults and click OK.The Configure Tax Preparation dialog displays.
4. Highlight the tax processing option you want to configure or edit. You can also copy theconfiguration from another office group. The Configure Tax Preparation options are described inthe sections that follow.
Setup. Click Setup to configure or edit the highlighted option.
Copy From Another Office Group. To copy the configuration from another office groupto the office group you are currently configuring, click Copy From Another Office Group.The Select Source Office Group dialog displays. Highlight the office group whoseconfiguration you want to duplicate and then click OK.
Configuring Tax Preparation: Signature Block(Office Manager > Configure Applications > Tax Preparation > Signature Block)
The Tax Prep - Signature Block dialog allows you to set office group specific firm information (e.g.,name, address) and preparer information (e.g., employer ID, Social Security number, PTIN) to print onyour clients' federal and state returns. If you have multiple preparers set up in CCH ProSystem fx (seeAdding New Tax Preparers on page 22), you can designate a default office group preparer.
Chapter 2 - Office Manager • 27

To override these options for a specific return, see Help > Help Topics or press F1.
Entries on this dialog will be used if no preparer code is entered on the applicable input form forForm 2848 or if there are no entries in the specific fields on the input form.
Firm name and address
Name, Address. Contains the information to print in the federal signature block. Name can beused for the complimentary close on the transmittal letter as well.
City, State, Country. Enter the information you want printed in the federal signature block.
ZIP code. Enter up to 16 alphanumeric characters. Include a space or hyphen if needed.
Note: The system truncates the ZIP code on prior year returns to 10 characters.
Foreign province. Enter the name of the foreign province if the firm is located outside the UnitedStates. This option applies to tax year 2013 and newer returns.
Note: You can override this field in the return on the Worksheet (General > Return Options> Preparer Information - Overrides Office Manager) or Interview Form 3, Box 39.
Firm phone #. Enter up to 15 alphanumeric characters. This number prints in the PaidPreparer’s area of the tax return.
Note: The system truncates the number of characters to 14 for prior year returns.
Chapter 2 - Office Manager • 28

Preparer identificationThis information becomes the office group's default preparer information and prints in the PaidPreparer section of returns. You can either select a default preparer if you have configured taxpreparers, or enter the employer ID, Social Security Number, and PTIN.
To override these options for a specific return, see Help > Help Topics or press F1.
If you have configured tax preparers using Configure Staff, you can assign a default preparer toa specific office group. This preparer’s information displays in the Paid Preparer’s area of the taxreturns assigned to this office group.
Default preparer. Use the drop-down list to select a tax preparer.
Check the Print preparer signature, Require user to be the preparer for signature toprint, and Print date signed by preparer boxes as applicable. (See descriptions forthese fields in the following bullet.)
If no tax preparers are configured, enter the following information:
Emp. ID no. Enter the employer identification number for the preparer. The hyphen isentered for you.
Soc. sec. #. Enter the sole practitioner’s Social Security Number. Hyphens are enteredfor you.
PTIN. When entered here, the PTIN displays on all federal returns instead of the SocialSecurity Number. It is used for those states conforming to the federal provision.
Notes:
Be sure to enter the correct PTIN consisting of a P and the eight digits assigned tothis preparer. If the PTIN is not formatted correctly, it is not saved when you exitthis dialog and you have to re-enter the PTIN.
Entries from the Signature block will be used if no Preparer code is entered on theapplicable input form for the 2848 or if there are no entries in the specific fields onthe form.
If the user enters a preparer code on the input form for Form 2848, the preparerentries will be used as long as they are not overridden in the specific entry fields.
PTIN is accurate and I am the registered owner. If you are the tax preparer and thePTIN information in this section belongs to you, select this check box to confirm that thePTIN information is correct. The check box will only be enabled if the PTIN is formattedcorrectly. As per the tax authority requirements, tax preparers must verify their PTINinformation before they can electronically file returns. This applies to tax years 2019 andlater.
Note: If the PTIN information for a tax preparer has not already been confirmed here,the tax preparer is prompted to verify their information each time they navigate to thisdialog.
Chapter 2 - Office Manager • 29

OR preparer ID. Enter the preparer ID for Oregon in the preparer profile so that you don'thave to enter it on a per return basis. The field is used in Individual, Fiduciary,Corporation, S Corporation, and Partnership tax systems.
Note: This applies to tax years 2019 and later.
NYS preparer ID. For New York State preparers who must register with the state, enteryour state-registered preparer ID.
NYS preparer ID exclusion code. Use the drop-down list to select the New York Statepreparer ID exclusion code. Default code is None.
Self-employed. Check this box to force an X to print on the 1040 if the preparer is self-employed.
Print preparer signature. Check this box to print the preparer name in the signaturearea. This option is applied to all systems and extension requests on both federal andcomplying state returns.
Require user to be the preparer for signature to print. Check this box to print thepreparer name in the signature area only when the user is the preparer. This option printsonly the signature of preparers that have been matched based on preparer ID. Thisoption cannot be overridden within the tax return.
Note: To use this option, users must also select the Print preparer signature option,or enter Y on Interview Form 3, for Individual, Corporation, S Corporation,Partnership, Fiduciary, Estate & Gift, and Exempt Organization returns (General >Return Options > Preparer Information Worksheet).
Print date signed by preparer/ERO. If checked, prints the transmittal letter/filinginstructions date in the Date Prepared box on every applicable filing form.
State signature block
Note: When a state return with only two available lines in the Paid Preparer’s section defaults tothe federal signature block entries, only a portion of the address information in the federalpreparer section prints. The information varies by state.
Name/address. Enter the name and address in the associated field.
City. Enter the name of the city.
State. Use the drop-down list to select the state code.
ZIP code. Enter the ZIP code.
Designee informationIf a third-party (other than the tax preparer) is designated to discuss the return with the taxationauthorities, enter the designee's name, e-mail address, phone number, and PIN.
If the designated third-party is the tax preparer, the information will flow from the Prepareridentification information entered or selected here.
Chapter 2 - Office Manager • 30

Preparer's license numberEnter the following information to appear on all returns in this office group. These options are availablefor tax year 2012 and later.
Designation code
Jurisdiction
License number
Configuring Tax Preparation: Letters and Filing Instructions(Office Manager > Configure Applications > Tax Preparation > Letters/Filing Instructions)
You can use the Letters and Filing Instructions feature to create or edit the four lines of informationused in the transmittal letter heading. You can also set up your filing instruction options.
From the main Office Manager window, select Configure > Tax Preparation > Letters/FilingInstructions.
Preparation optionsTo override these options for a specific return, see Help > Help Topics or press F1.
Transmittal letter. Select one of the following options: Do not prepare transmittal letter,Transmittal letter, or Transmittal letter without letterhead or border.
Cover letter. Select one of the following options: Do not prepare cover letter, Cover letter, orCover letter without letterhead or border.
Filing instructions. Select one of the following options: Do not prepare filing instructions,Standard filing instructions, or Custom filing instructions.
Note: The Cover letter and Filing instructions options are not applicable in the Estate & Gift(706/709) system.
K-1 letters. Select one of the following options: Do not prepare K-1 transmittal letter, K-1transmittal letter, or K-1 transmittal letter without letterhead or border.
Extensions. Select one of the following options: Not applicable, Prepare instructions forextensions sent by preparer, or Prepare instructions for extensions sent by taxpayer.
Letter and filing instructions optionsTo override these options for a specific return, see Help > Help Topics or press F1.
Heading Line 1 through Heading Line 4. Enter the data you want to appear in the first four linesof the transmittal letter.
Due date of elec filing form code. This feature is not available with independent FX Direct.
Print letters and filing instructions in all upper case. If selected, letters and filing instructionsprint in upper case. If not selected, letters and filing instructions print with initial capital letters.
Chapter 2 - Office Manager • 31
Print letters and filing instructions in government copy. If selected, letters and filinginstructions print with the government copy of the return. If not selected, the letters and filinginstructions print only in the taxpayer's and accountant’s copies.
Print extended due date on letters and filing instructions. If selected, the extended due dateprints on letters and filing instructions for returns that are processed after the due date.
Letters reflect paper filing instructions when electronic filing is disqualified. By default, thewording in the letter and filing instructions is based on a return being selected for electronicfiling, whether or not the return qualifies for electronic filing.
Check this box to reflect paper filing instructions for this office group when electronic filing isdisqualified. When the return qualifies for electronic filing, the wording will again be based onelectronic filing. This selection is available for tax year 2012 and later.
Note: If electronic filing is not requested in Office Manager or in the return, the wording inletters and filing instructions will reference paper filing.
Use heading in "prepared by" section for custom filing instructions. If checked, the transmittalletter and filing instructions heading information will be used instead of the signature block in the"Prepared by" section of the custom filing instructions. This option applies to 2013 and newerreturns.
Include paragraph referencing IRS Revenue Procedure 2012-17 (1065 only). ForPartnership only, check this box to include the paragraph referencing IRS Revenue Procedure2012-17. This selection is available for tax year 2012 and later.
Note: This option can be overridden by return in Tax Preparation on Worksheet General> Letters and Filing Instruction > General Letter Information, or on Interview Form 9.
Suppress phone number in K-1 letter (1065 and 1120S only). Check this option if you wish tosuppress the firm phone number in the preparer section of the K-1 letter for 1065 and 1120Sreturns. This option applies to tax years 2013 and later.
Note: This option can be overridden in the return on Worksheet (Partners > Schedule K-1Transmittal Letter > Print Options > Suppress phone number below letterhead).
Letter optionsTo override these options for a specific return, see Help > Help Topics or press F1.
Complimentary close. Enter the complimentary close you want. Do not add punctuation to thecomplimentary close.
Custom letterhead laser form #. This feature is not available with independent FX Direct.
Print heading Line 1 on signature line of letters. If checked, the information entered forHeading Line 1 (e.g., the firm name) prints in the signature line of the transmittal letter. Do notcheck this box to print the federal signature block Line 1 information. This cannot be overriddenin the return.
Separate federal/state letters. If checked, separate letters are printed for the federal and eachstate return. If you do not check this box, one transmittal letter containing both federal and stateinformation prints. This is not applicable for Employee Benefit Plan.
Chapter 2 - Office Manager • 32

Prepare separate letters for certain federal forms. If checked, separate letters will print forForms 3520, 3520A, 7004 and 8802.
Notes:
This option can be overridden as follows:
Interview Form 13, Box 37
Worksheet General > Letters and Filing Instructions > Transmittal Letter >Row 8
This option applies to tax years 2016 and later.
This option applies to the following return types:
Individual
Partnership
Corporation
S Corporation
Fiduciary
Exempt Organization
Use “I” in all letters. Letters use the first-person “I” if this box is checked.
Leave date blank on letters. If checked, the date does not print on letters.
Configuring Tax Preparation: Print Options(Office Manager > Configure Applications > Tax Preparation > Print Options)
Use these options to select tax return formatting and print preferences. The Print Options dialogdisplays the Formatting and Print Options tab.
Formatting and Print OptionsTo override these options for a specific return, see Help > Help Topics or press F1.
Formatting options
Print pennies. If checked, pennies display in amount fields. If you later turn off this option andthen turn it on again, the pennies you originally entered no longer display.
Print commas. If checked, numeric boxes display and print with commas.
Print negative numbers in brackets. If checked, displays negative numbers in brackets insteadof with a minus sign.
Print in upper case only. If checked, prints and displays all correspondence, filing instructions,transmittal letters, etc., in upper case lettering.
Small font options. Select Not applicable, Convert fields to small fonts if needed, Use smallfonts on all possible forms, or Do not use small fonts.
Letter/label optionsTo override these options for a specific return, see Help > Help Topics or press F1.
Chapter 2 - Office Manager • 33

Estimate reminder letter options. Select one of the following options: Do Not Prepare (default);Prepare and Print; or Prepare, but do not print. Use this option to produce reminder letters (withthe tax return) to be sent with the appropriate vouchers and payment to the appropriate taxingauthority. The preparer’s name prints as the signature on the letter, and the complimentary closeis used.
This option is valid only for the 1040 system.
Estimate reminder labels. If checked, estimate reminder labels print for processed returns. Thisoption is not valid for Partnership, Employee Benefit Plan, Exempt Organization, or Estate & Giftsystems.
Filing labels. If checked, filing labels print in the accountant’s copy for processed returns.
Mailing sheets. If checked, mailing sheets for use with window envelopes print for processedreturns.
No. of client mailing labels. Allows you to enter the number of client mailing labels you want thesystem to print (up to 99).
Masking options
Select fields to be masked. These fields are checked by default. Deselect each field you do notwant to be masked.
Note: When printing or previewing returns, you can convert the following numbers toasterisks by selecting one or all of the following options:
Social Security numbers
Employer identification numbers
Bank account numbers
Passthrough entity EIN in K-1 copy
Note: If Passthrough entity EIN in K-1 copy has been checked, the system willproperly mask the passthrough entity EIN in the K-1 copies of the return.
Show last four digits when masking. Check this box to print the last four digits of the maskedfields. If this box is not checked, all digits of fields selected for masking are masked.
Partnership/S Corporation Multiple ActivitySelect one of these options: Print K-1 Multiple Activity Schedule (default), Print K-1 ActivityStatement, or Suppress K-1 Activity Schedule and Statement.
This selection can be overridden on Partnership Interview Form 5, Box 64, and on S CorporationInterview Form 2, Box 87.
Chapter 2 - Office Manager • 34

Print optionsTo override these options for a specific return, see Help > Help Topics or press F1.
Print order options. Select one of the following options:
Not applicable.Causes the informational (nonfileable) forms that are included in theaccountant and client copies to print in the normal sequence.
Collate informational forms before fileable forms. Rearranges accountant’s and client’scopies to group fileable forms together so they can be easily photocopied. This option isnot applicable for Estate & Gift (706/709) returns.
Print informational forms in all copies. If selected, prints informational forms for allcopies of the return. If not selected, the informational forms print only in the accountant’scopy.
Print Form 1040-ES OCR. Select one of the following options from the drop-down list:
Suppress print. Suppress printing of an estimated tax worksheet and payment vouchersfor all copies of the return.
Mandatory print version 1. Prints Version 1 of an estimated tax worksheet and paymentvouchers when mandatory.
Mandatory print version 2. Prints Version 2 of an estimated tax worksheet and paymentvouchers when mandatory.
Print one statement per page. If checked, prints each supporting statement on a separatepage.
Print federal attachments in all copies. If checked, prints selective attachments of federalforms to state and/or city returns in all three copies of the state/city return. If not checked, theattachments print only in the return’s filing copy. This option is not valid in the 5500 system.
Print mailing sheets in accountant’s copy. If checked, prints mailing sheets in the accountant’scopy of the return. This option is not available in the 5500 system.
Print IRS mailing address on federal estimate vouchers. If checked, the IRS mailing addresswill print on federal estimate vouchers for Individual and Fiduciary returns.
Print IRS mailing address on federal extension. If checked, the IRS mailing address will printon federal extensions for the following returns:
Partnership
Corporation
S Corporation
Fiduciary
Suppress print options
Suppress printing of Line 1 control information. If checked, the tax return identificationinformation does not print on the first line of the return.
Chapter 2 - Office Manager • 35

Suppress printing of Line 65 control information. If checked, the tax return identificationinformation does not print on the last line of the page.
Note: Some HP® printers do not support the printing of Lines 1 and 65 of the tax return.
Suppress input listing. Select to suppress printing of the input listing for all copies of the return.
Suppress diagnostics. Select to prevent diagnostic reports from being printed with the return.
Suppress certain supporting statements. If checked, suppresses print of specific supportingstatements from Form 1040 and Schedules A, C, E, and F, for all return copies.
Suppress automatic home state return. If checked, suppresses automatic calculation and printof the state return.
Suppress printing of Social Security numbers. If checked, suppresses the printing of SocialSecurity numbers in the following forms:
Individual. Tax Return Carryover Report, Return Summary, Two-Year Comparison, andAll Tax Projector Forms
S Corporation. Shareholder Basis Worksheets and Shareholder List
Partnership. Partner List and Expanded Capital Summary Accounts
Fiduciary. Beneficiary List, Grantor Letter, Tax Information Letter, and Resident StateLetter
Suppress print of all extensions in the client copy. If checked, suppresses the printing of allextensions in the client copy of the return.
Suppress cover sheets. If checked, suppresses any cover sheets which may print betweencopy types. This feature is available for tax years 2014 and later.
Production Processing print sequenceSelect one of the following options:
Print in entry order (Interview) (default). If selected, the return prints according to the Interviewform order.
Print in sorted order (Worksheet). If selected, a return with multiple entities (for example, Rentand FarmWorksheets) prints in alphabetical order within that entity type.
Chapter 2 - Office Manager • 36

Destinations and WatermarksUse this tab to define print file destinations and watermarks.
Default copies and print destinationsSelect the versions of the return to print, the number of printed copies for each, and the print format tobe applied. If PDF print format is selected (i.e., To PDF file or To PDF file and printer), you can specifythe watermark to use, or not to use a watermark.
Accountant, Government, Client, and K-1. Check the box next to each return version to print.
No. of copies. Enter the number of copies that should print for each version.
Destination. Select the print format to produce from the drop-down list.
Watermark (PDF files only). Select the watermark to display on the pages, or No watermark.The default is No watermark.
Edit Watermark List. Click this button to display or edit all watermarks in the Edit Watermark Listdialog. Only one user at a time can edit the watermark list.
To add a watermark, enter the watermark text in the first field (up to 15 characters) andclick Add.
To delete a watermark, select it from the list and click Delete.
Click OK when you have completed making changes, or click Cancel to close the dialogwithout saving any changes you have made.
Chapter 2 - Office Manager • 37

Mask. If checked, the system will default the Mask options on the print return dialog for returnsassociated with the office group (unless the user has enabled user level overrides).
e-file PDF Attachments. Check this box if, by default, you want PDF attachments included in areturn to print along with the return. You can overrride this option on the Print Entire Returndialog, if needed.
Additional Options
Produce separate K-1 PDF files (Partnership, Fiduciary and S-Corp only). Select this checkbox to print K-1 packages separated as follows:
By partner for Partnership
By beneficiary for Fiduciary
By shareholder for S-Corp
The original combined K-1 PDF package is retained as one file along with separate PDF files.
Warning! If a PDF file already exists with the same name as the combined K-1 PDF file, anoverwrite warning dialog displays. There is no overwrite warning for the separate K-1package PDF files when using either the default or override names. Also, if the return filename is changed, pre-existing PDF files that use the default PDF file name are notrenamed. Pre-existing K-1 PDF files using a previous client file name are not overwritten bysubsequent PDF files that are created after the return is renamed. If the return or the client isdeleted, the PDF files created from that return or client are not deleted. You must delete,rename and manage the separate K-1 package PDF files.
Tip: If your firm uses this option, many more PDF files will be created, making filemaintenance and file location more important to manage. For this reason, we recommend anaming and file location convention for PDF files. These conventions will make it easier tolocate files when they need to be purged. In addition, we recommend that you do notduplicate a PDF file name in any return. No overwrite warning will display for the separate K-1 PDF files or for combined K-1 PDF files using old client file names.
Note: CCH ProSystem fx Engagement, CCH ProSystem fx Document, and CCH Axcess™Document can all receive separate K-1 PDF files from Tax Preparation.
Create Bookmark PDFs (large returns may take longer to process). Select this check box toproduce PDFs with collapsed bookmarks, or clear it to produce PDFs with uncollapsedbookmarks.
One statement per page. Select this check box to print each return supporting statement on aseparate page.
Produce separate PDF files. Selected by default. Clear this check box if you don't want toproduce separate PDF files.
Print only open diagnostics. Select this check box if, by default, you want to only print opendiagnostics with the return.
Chapter 2 - Office Manager • 38

Override default PDF file locationTo change the default location for all PDF files created by this office group, enter the new location inthis field. You can also click Browse to browse to the location.
Portal and Document users
Print to Portal. This option is enabled when at least one copy type is set to print to PDF from theprint destination field. The PDF file will be directly transferred to Document. Click on the box toremove the check mark if you want to disable this feature.
Print to Document. If Document is installed, this option is enabled when at least one copy typeis set to print to PDF from the print destination field. The Print to Document box is checked bydefault and the PDF file will be directly transferred to Document. Click on the box to remove thecheck mark if you want to disable this feature.
Note: You may receive an account verification prompt after you enter your User ID and password.If you do, you must request and submit a 2-Step Verification code to proceed.
Mail BarcodeSelect this tab to configure the Intelligent Mail Barcode for an office group. The barcode will print onmailing sheets produced with the tax return.
These options can also be overridden on the return.
Barcode identifier. Enter the 2-digit number assigned by the USPS or select it from the drop-down list.
Service type identifier. Enter the 3-digit number that corresponds to mail class (for example,First Class Mail, Priority Mail), or select it from the drop-down list.
Mailer identifier. Enter the 6-digit or 9-digit number that is assigned by the USPS that identifiesa business entity.
Chapter 2 - Office Manager • 39

Configuring Tax Preparation: Pro Forma and Organizer(Office Manager > Configure Applications > Tax Preparation > Pro Forma and Organizer)
The Pro Forma tab of the Pro Forma and Organizer Options dialog displays.
Individual Pro Forma OptionsTo override these options for a specific return, see Help > Help Topics or press F1.
Pro Forma Schedules C, E and F Two-Year Comparison. Check to prepare the Two-YearComparison for Schedules C, E, or F, if applicable.
Depreciable assets. Use the drop-down list to select the form best suited for your depreciableassets.
The default setting is Use prior year form.
Warning! Data could be lost if the selected alternate input form does not contain fields for allpertinent data. In some situations, you may be able to run two batches of Pro Forma, onebatch for specific clients (for example, electronic filing clients) and the second batch for theremaining clients (in this case, non-electronic filing clients). Select the input and destinationforms for each batch to give you the data you need.
Chapter 2 - Office Manager • 40
Pro Forma and OrganizerTo override these options for a specific return, see Help > Help Topics or press F1.
Pro FormaTo override these options for a specific return, see Help > Help Topics or press F1.
Pro Forma Two-Year Comparison. If checked, the following are included in the Pro Forma:
Individual. Interview Forms 8 and 9 (General > Two-Year Comparison Worksheet).
Partnership, Corporation, S Corporation, and Fiduciary. The appropriate businesssystem interview or worksheet forms. For example, Interview Forms 2YR-1, 2YR- 2,2YR- 3, 2YR- 4, and 2YR-5 (General > Two-Year Comparison Worksheet) forCorporation returns.
Pro Forma input forms for 2848. If checked, the following are included in the Pro Forma:
Individual. Interview Form S-2 (Other > 2848 - Power of Attorney Worksheet)
Partnership, Corporation, and S Corporation. Interview Form O-12 (Other > 2848 -Power of Attorney Worksheet)
Fiduciary. Interview Form S-5 and S-5A (Other > 2848/8821 - Power of Attorney andTax Information Authorization Worksheet)
Employee Benefit Plan. Interview Form 10 (Other > 2848 - Power of AttorneyWorksheet)
Exempt Organization. Interview Form S-1 (Other > 2848 - Power of AttorneyWorksheet)
Estate & Gift. Interview Form 2848-1 (Other > 2848 - Power of Attorney Worksheet)
Pro Forma input forms for 8821. If checked, the following are included in the Pro Forma:
Individual. Interview Form S-5 (Other > 8821 - Tax Information Authorization Worksheet)
Partnership, Corporation, and S Corporation. Interview Form O-12A (Other > 8821 - Tax Info Authorization Worksheet)
Fiduciary. Interview Forms S-5 and S-5A (Other > 2848/8821 - Power of Attorney andTax Information Authorization Worksheet)
Pro Forma current year depr. for forced assets. If checked, prints the current year depreciationin the Pro Forma.
Pro Forma tax preparation fee. If checked, pro formas the tax preparation fee to Interview Form3 for all tax systems (General > Return Options > Invoice Options Worksheet).
Clear all electronic filing return overrides. If checked, no field will be pro formaed that overridesany Electronic Filing Options or Electronic Filing Notifications tab entries in Office Manager >Configure Applications > Tax Preparation. This applies to all products except Estate & Gift andall pro formaed returns from 2012 to 2013 and later.
Passthrough income. Make a selection from the drop-down list: Use prior year form, Interviewform K series/O series, or IRS Schedule K-1. This option applies to Individual, Partnership,Corporation, S Corporation, and Fiduciary. For tax years prior to 2012, the option applies toIndividual and Fiduciary returns only.
Chapter 2 - Office Manager • 41

Notes:
Data could be lost if the selected alternate input form does not contain fields for allpertinent data.
Moving passthrough income data to the IRS Schedule K-1 forms precludes the use of theK-1 import feature from Partnership, Corporation, S Corporation, and Fiduciary returns.The K-1 import feature should only be used in conjunction with the K Series interviewforms.
The IRS Schedule K-1 option does not apply to S Corporation passthrough forPartnership, Corporation and S Corporation return types. There are no IRS K-1S Corporation forms for Partnership, Corporation and S Corporation return types.
Default return options.
Override default return data with Pro Forma data (default). Pro Forma data overridesany data fields with default return data.
Override Pro Forma data with default return. If there is data in the field in both the ProForma and the default returns, the default return data overwrites data in the Pro Formareturn.
Merge Pro Forma data with default return. The following table shows the mergedresults, based on what data is available.
Pro Forma data Default Return data The data used is:
yes yes Pro Forma (see following note)
yes no Pro Forma
no yes Default Return
Note: If the default return has data in a repeating data field and the Pro Forma hasdata in the same repeating data field, the default return’s repeating data as well asthe Pro Forma repeating data will be used in the return. The default return’srepeating data can be viewed by selecting Options > Reset Input.
Organizer TabTo override these options for a specific return, see Help > Help Topics or press F1.
Click the Organizer tab on the Pro Forma and Organizer Options dialog (see Configuring TaxPreparation: Pro Forma and Organizer on page 40) to display the following Organizer options.
Chapter 2 - Office Manager • 42
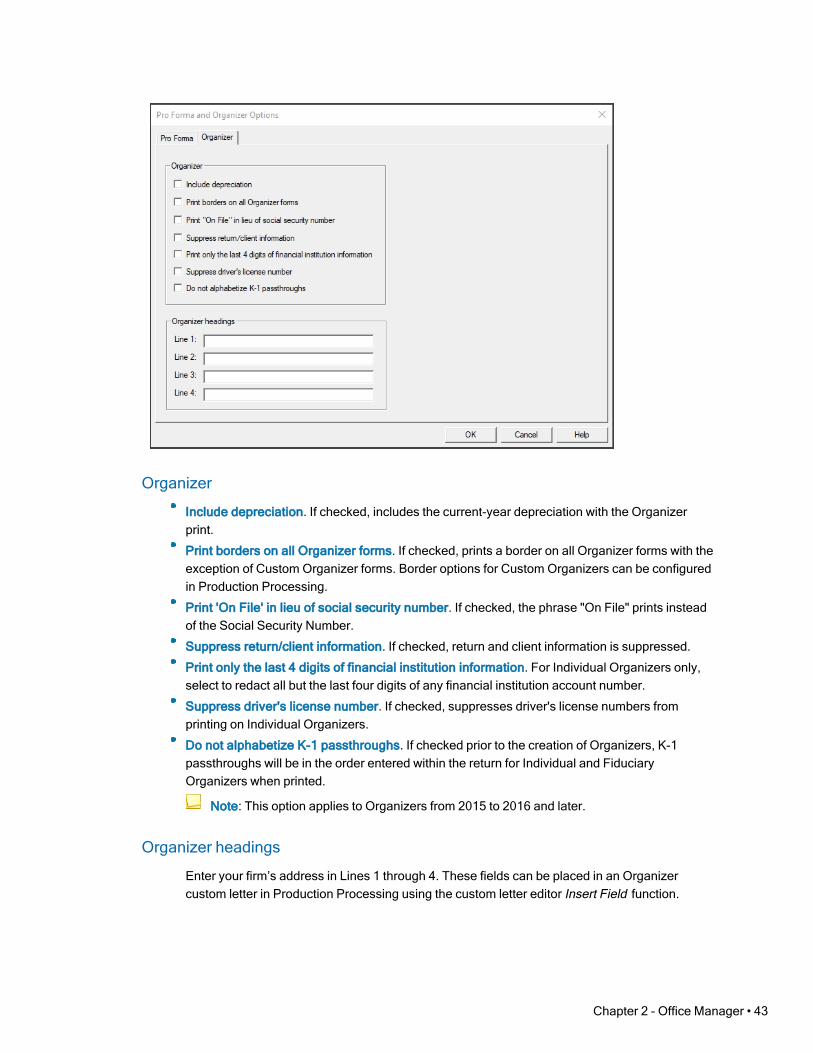
Organizer
Include depreciation. If checked, includes the current-year depreciation with the Organizerprint.
Print borders on all Organizer forms. If checked, prints a border on all Organizer forms with theexception of Custom Organizer forms. Border options for Custom Organizers can be configuredin Production Processing.
Print 'On File' in lieu of social security number. If checked, the phrase "On File" prints insteadof the Social Security Number.
Suppress return/client information. If checked, return and client information is suppressed.
Print only the last 4 digits of financial institution information. For Individual Organizers only,select to redact all but the last four digits of any financial institution account number.
Suppress driver's license number. If checked, suppresses driver's license numbers fromprinting on Individual Organizers.
Do not alphabetize K-1 passthroughs. If checked prior to the creation of Organizers, K-1passthroughs will be in the order entered within the return for Individual and FiduciaryOrganizers when printed.
Note: This option applies to Organizers from 2015 to 2016 and later.
Organizer headings
Enter your firm’s address in Lines 1 through 4. These fields can be placed in an Organizercustom letter in Production Processing using the custom letter editor Insert Field function.
Chapter 2 - Office Manager • 43

Configuring Tax Preparation: Client Invoice Options(Office Manager > Configure Applications > Tax Preparation > Client Invoice Options)
For each year installed, the Client Invoice Options allow you to create client invoices for the following:
Forms for federal, state, and city.
Schedules for Individual, Corporation, S Corporation, Partnership, Fiduciary, Employee BenefitPlan, Exempt Organization, and Estate and Gift.
Standard catalog billing for all forms and schedules is stored in the pricing table. You can override thepricing of specific items or groups of forms.
Setting Client Invoice Options
1. Select Client Invoice Options and click Setup to display the Client Invoice dialog.
Preparation option. Allows you to choose the type of statement to be prepared for thecustomer’s return activity.
To override these options for a specific return, see Help > Help Topics or press F1.
Select one of the following options:
Do not prepare client billing statement.
Detail with no amounts. Lists federal and state forms and schedules prepared forthe return.
One line total fee. A summary statement.
Custom fee schedule detail with amounts.
Custom fee schedule with total amount.
Accountant copy - Detail with no amounts.
Accountant copy - One line total fee.
Accountant copy - Custom fee schedule detail with amts.
Accountant copy - Custom fee schedule with total amt.
Processing fee multiplier. The billing statement multiplies the net or gross processingfee by the fee multiplier to arrive at the computer charge amount. If you enter a code onInterview Form 3 (for all tax systems) for Include in client fee, but no fee multiplier isincluded in the client invoice, ProSystem fx treats the fee multiplier as one (1). (This isonly applicable for the options Detail with no amounts, One line total fee, and Customfee schedule with total amount.)
Print client ID on invoice. The client ID prints above the invoice number in the upperright corner of the invoice. As the default, this option is unchecked.
Print taxpayer phone number and email on invoice. Allows you to print the taxpayerphone number and/or email address on the invoice. Select Phone number, Emailaddress, Both, or Do not print. If left blank, the default is Do not print.
2. Click Custom Invoice. Select a tax year and click OK. The Tax Preparation - Custom ClientInvoice dialog displays. Use this dialog to customize or print a pricing table, add items to an
Chapter 2 - Office Manager • 44
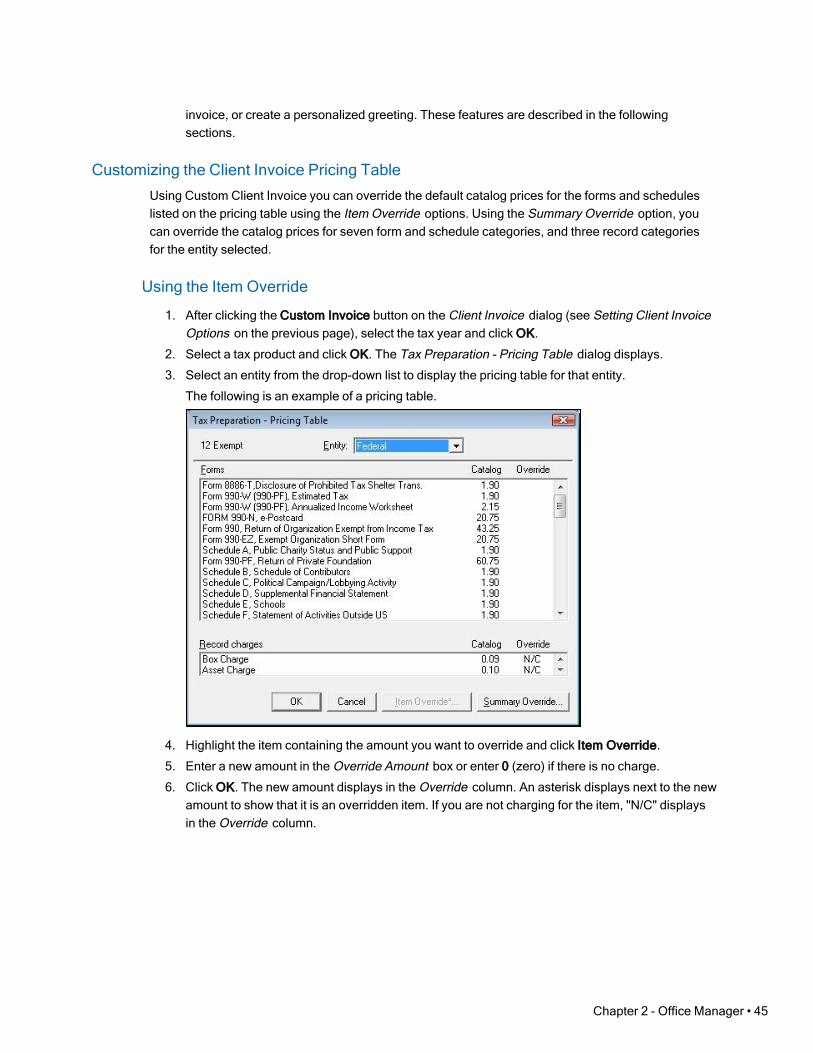
invoice, or create a personalized greeting. These features are described in the followingsections.
Customizing the Client Invoice Pricing TableUsing Custom Client Invoice you can override the default catalog prices for the forms and scheduleslisted on the pricing table using the Item Override options. Using the Summary Override option, youcan override the catalog prices for seven form and schedule categories, and three record categoriesfor the entity selected.
Using the Item Override
1. After clicking the Custom Invoice button on the Client Invoice dialog (see Setting Client InvoiceOptions on the previous page), select the tax year and click OK.
2. Select a tax product and click OK. The Tax Preparation - Pricing Table dialog displays.
3. Select an entity from the drop-down list to display the pricing table for that entity.
The following is an example of a pricing table.
4. Highlight the item containing the amount you want to override and click Item Override.
5. Enter a new amount in the Override Amount box or enter 0 (zero) if there is no charge.
6. Click OK. The new amount displays in the Override column. An asterisk displays next to the newamount to show that it is an overridden item. If you are not charging for the item, "N/C" displaysin the Override column.
Chapter 2 - Office Manager • 45
Using the Summary Override
Notes:
If you have already changed the price for an item, the Summary Override does not change thatitem’s price. You can update overridden items using Item Override.
K-1 Record charges do not apply to Individual returns. K-1 record charges only apply toPartnership, Fiduciary and S Corporation returns.
1. After clicking the Custom Invoice button on the Client Invoice dialog, select the tax year andclick OK.
2. Select a tax product and click OK. The Tax Preparation - Pricing Table dialog displays.
3. Select an entity from the drop-down list to display the pricing table for that entity.
4. Click Summary Override.
5. Enter the pricing for any of the seven form categories:
Main federal tax form. Applies to the main federal form for the tax year and tax productselected. For example, for 2020 Individual tax returns, the prices would apply toForm 1040.
Federal schedule. Applies to all the federal schedules and forms. For example, for 2020Individual tax returns, the price would apply to Schedule A, Form 2106, Form 2441, etc.
Main state tax form. Applies to all main state tax forms for the tax year and the taxproduct selected. For example, for 2020 Individual tax returns, the price would apply toCalifornia Form 540, Ohio Form IT-1040, and all other main state forms.
State estimate. Applies to all state estimates for the tax year and the tax productselected. For example, for 2020 Individual tax returns, the price would apply to CaliforniaForm 540-ES, Ohio Form IT-1040ES, and all other state estimate forms.
City return. Applies to all city returns for the tax year and the tax product selected. Forexample, for 2020 Individual tax returns, the price would apply to Cincinnati Form R, andall other main city returns.
City estimate. Applies to all city returns for the tax year and the tax product selected. Forexample, for 2020 Individual tax returns, the price would apply to Cincinnati Form D - 1,and all other city estimate forms.
State/city schedule. Applies to all state/city schedules and forms for the tax year and thetax product selected. For example, for 2020 Individual tax returns, the price would applyto California Schedule CA, New Jersey Form NJ-2210, Detroit D-1040(R), and all otherstate and city supporting schedules and forms.
Note: You can override the catalog price for specific forms and schedules on the PricingTable dialog.
6. Enter the pricing for any of the three record charges:
Box charge. Applies a charge for each data box entered on a return.
Asset charge. Applies a charge for each asset on a return.
K-1 charge. Applies a charge for each K-1 associated with a return.
Chapter 2 - Office Manager • 46

7. Enter a 0 (zero) if there is no charge for a particular item.
8. Click OK to display the override amounts in the Override column on the pricing table.
Printing a Pricing Table
1. On the Client Invoice dialog, click Custom Invoice. (See Configuring Tax Preparation: ClientInvoice Options on page 44.)
2. Select the tax year and click OK. The Tax Preparation - Custom Client Invoice dialog displays.
3. Select the Tax product from the drop-down list.
4. Click Print. The report prints immediately.
5. Click Cancel to return to the Client Invoice dialog, or OK to display the pricing table.
Note: The Print option does not print a sample invoice.
Adding Items to an InvoiceThis option allows you to specify up to ten additional forms and repeating billing adjustment items withtheir amounts to be added to the client invoice for each office group.
1. On the Tax Preparation - Custom Client Invoice dialog, select the Tax Product and click AddItems. The Tax Preparation - Additional Items dialog displays.
2. In the Forms section, you can enter up to ten form descriptions with a maximum of 53 charactersper description. Press Tab to move to the amount field and enter an amount of up to six digits, ifapplicable.
3. In the Adjustments section, you can enter up to ten adjustment items with a maximum of 42characters. These charges display on the invoice beneath Computer Charges and are added tothe total charges. Press Tab and enter an amount of up to six digits.
Note: If a form or adjustment is entered without an amount, the invoice will not total. It isassumed that an amount will be manually added to the invoice later and will need to beincluded in the invoice total at that time.
Additional items display when you print the pricing table under the categories AdditionalPreparer Form Prices and Preparer Price Adjustments.
4. When finished, click OK.
Entering a GreetingThis option allows you to enter up to 15 lines of text, with up to 59 characters per line, as apersonalized greeting. You can create one greeting per tax product.
1. On the Client Invoice dialog, click Custom Invoice. (See Configuring Tax Preparation: ClientInvoice Options on page 44.) Select the tax year and click OK. The Tax Preparation - CustomClient Invoice dialog displays.
2. Select the Tax product and click Greeting.
The Tax Preparation - Greeting dialog displays.
Chapter 2 - Office Manager • 47

3. Click anywhere on the Greeting window and enter your greeting.
4. When finished, click OK.
Configuring Tax Preparation: Miscellaneous Options(Office Manager > Configure Applications > Tax Preparation > Miscellaneous Options)
Use the Miscellaneous Options dialog to set miscellaneous data entry options that specify the type ofinformation to print in your clients’ returns.
General options
To override these options for a specific return, see Help > Help Topics or press F1.
Attach K-1 instructions. (Only Partnership, Fiduciary, and S Corporation systems) Forms 1065,1041, and 1120S instructions require each partner/shareholder be given a set of instructions forSchedule K-1.
If checked, attaches K-1 instructions for each Schedule K-1 for all returns processed.
Leave foreign bank account question blank. If checked, leaves the foreign bank accountquestion blank. This question appears on Schedule B in a 1040 return or page 2 of the Federal1041 in a 1041 return.
Use beneficiary/partner/shareholder name instead of number on Schedule K-1. If checked,you will be able to override the corresponding field on a per return basis in Worksheet view(General > Return Options > Processing Options) and Interview Form 2, Box 98 for 1120S;Interview Form 4, Box 73 for 1041; and Interview Form 2, Box 82 for 1065.
Automatically carry extension payment amount to the return. If checked, extension paymentamount will automatically carry to the return.
Notes:
This option applies to tax years 2016 and later.
Options applies to the following returns types:
Individual
Partnership
Corporation
S Corporation
Fiduciary
Exempt Organization
Taxing authority authorized to discuss return with preparer. Select from the drop-down list:Leave these boxes blank, No, or Yes.
Default for 1099-B. Select the default you want to use for this office group: 1099-B basis notreported to the IRS(Default), 1099-B basis reported to the IRS, 1099-B not received, or 1099-Bbasis reported to the IRS and reported on Sch D.
Chapter 2 - Office Manager • 48
Estimated tax
To override these options for a specific return, see Help > Help Topics or press F1.
Round estimate payments up to next $10 per voucher. If checked, eliminates odd dollaramounts by rounding estimate payments up to the next $10 per voucher.
Overpayment to estimates. Determines the method of applying an overpaymentto estimated tax. Use the drop-down list to select the appropriate method.
Form 2210/2220 preparation. Determines the processing you want for Form 2210.
The Form 2210, Underpayment of Estimated Tax, printing option can also be entered onIndividual Interview Form 4 (General > Return Options > Form Printing Options Worksheet) andFiduciary Interview Form 5. For Corporation and S Corporation, this option can also be enteredon Interview Form T-5 (Payments/Penalties/Estimates > Penalties > Federal UnderpaymentPenalty). For Exempt, this option can also be entered on Interview Form X-5(Payments/Penalties/Estimates > Penalties > Underpayment Penalty for Form 990-PF/990-T).This option is not valid for Partnership, Estate & Gift, and Employee Benefit Plan returns.
Configuring Tax Preparation: 1040 Options(Office Manager > Configure Applications > Tax Preparation > 1040 Options)
The 1040 Options dialog allows you to configure the 1040 form.
To override these options for a specific return, see Help > Help Topics or press F1.
From the main Office Manager window, select Configure Applications > Tax Preparation > 1040Options.
Print taxpayer phone #. Select an item from the drop-down list to suppress printing of ataxpayer’s phone number on the federal return, state return, or both.
Miscellaneous options.
Contribute to the Presidential Campaign Fund. If checked, enters a “Yes” to contributeto the presidential campaign fund.
Prepare tax projection. If checked, prepares a tax projection report.
This feature is not available with independent FX Direct.
Print privacy policy. If checked, prints the privacy statement in the accountant andtaxpayer copies.
Suppress Form 1040-V. If checked, Form 1040-V is not prepared for balance duereturns.
Suppress autofill of FICA and Medicare wages and taxes on Form IRS W-2. Ifchecked, autofill of FICA and Medicare wages and taxes on Form IRSW-2 issuppressed.
Suppress state K-1 print in client copy of the return. If checked, state K-1 will not printin the client copy of the return, and will be the default for existing office groups. You canoverride this feature within the state input worksheets.
Exclude federally tax-exempt interest from state Net Investment Income. If checked,federally tax-exempt interest from state Net Investment Income will be excluded.
Chapter 2 - Office Manager • 49

Suppress taxpayer and spouse email address. If checked, the taxpayer and spouseemail addresses will be suppressed when printing.
Note: This option applies to tax years 2020 and later.
Facsimile W2 Print. If checked, the facsimile W2 form will print by default for returns inthe office group.
Note: This option applies to tax years 2020 and later.
Form 6251. Dictates when Form 6251, Alternative Minimum Tax, is printed in all copies of thereturn. Select Print only when required, Suppress printing, Mandatory printing, or Print onlywhen taxpayer is liable for AMT.
Suppress printing of estimate vouchers. Select from the following: Not applicable, Suppressfederal, Suppress state, or Suppress both. The estimate vouchers always print in theaccountant's copy.
Passthrough Recap. Select Suppress Passthrough Recap, Include in all copies, Include inaccountant and taxpayer copies, or Include in accountant's copy only.
Income from passthrough statement format. Provides the firm administrator the ability to selectthe format of the income from passthrough statement at the office group level instead of on a perreturn basis. Select one of the following from the drop-down list:
Detailed
Simplified
Notes:
This option applies to tax years 2017 and later.
You can override this feature on:
Interview Form 4, Box 39
Worksheet - General > Return Options > Form Print Options > Row 47
State tax exempt interest/dividend. Select from the drop-down list:
Taxable (default)
Nontaxable
Neither
Notes:
You can override this option within the return in the Worksheet view (General > ReturnOptions > Processing Options) or Interview Form 2, Box 62.
This option applies to tax years 2013 and later.
Chapter 2 - Office Manager • 50
Interest and dividend report option. Select from the drop-down list:
Print combined report (Default)
Print separated report
Suppress report
Note: This option applies to tax years 2020 and later.
Filing status comparison/optimization.
Prepare filing status comparison. If checked, prints a filing status comparison.
Deduction option. Select from the following: Not applicable, Force standard deduction,or Force itemized deduction.
Configuring Tax Preparation: 1041 Options(Office Manager > Configure Applications > Tax Preparation > 1041 Options)
Configure the 1041 form using the 1041 Options dialog.
To override these options for a specific return, see Help > Help Topics or press F1.
From the main Office Manager window, select Configure Applications > Tax Preparation > 1041Options.
Distribution and prints options
Depreciation and depletion distribution. Select from the following choices:
Separately state on beneficiary’s schedule K-1. Distributes depreciation, amortization,and depletion to the beneficiaries based on the calculated ordinary income percentage.
Include in Total Income computation. Includes depreciation, amortization, anddepletion in the total income calculation for distribution purposes.
Print Schedule K-1 Page 2. Select one of the following:
Include in K-1 copy only (default)
Include K-1 and Accountant copies
Include in K-1 and Client copies
Include in K-1, Accountant, and Client copies
Include in ALL copies
Suppress in all copies
Interest and dividend report option. Select from the drop-down list:
Print combined report (Default)
Print separated report
Suppress report
Note: This option applies to tax years 2020 and later.
Chapter 2 - Office Manager • 51

Recap statement options
Schedule K-1. Select one of the following:
Suppress Schedule K-1 recap
Include in all copies
Include in accountant and taxpayer copies
Include in accountant's copy only
Passthrough. Select one of the following:
Suppress Passthrough Recap
Include in all copies
Include in accountant and taxpayer copies
Include in accountant's copy only
Income from passthrough statement format. Provides the firm administrator the ability to selectthe format of the income from passthrough statement at the office group level instead of on a perreturn basis. Select one of the following from the drop-down list:
Detailed
Simplified
Notes:
This option applies to tax years 2017 and later.
You can override this feature on:
Interview Form 5, Box 39
Worksheet - General > Return Options > Form Print Options > Row 14
Miscellaneous options
Exclude federally tax-exempt interest from state Net Investment Income. If checked, federallytax-exempt interest from state Net Investment Income will be excluded.
Grantor and Custodial letters
Print both federal and state information on same letter. Check this box to have both federaland state information printed in one continuous letter with state information following the federal.
Print name and address of preparer for letterhead. Check this box to have the Firm name andaddress in the letterhead on the grantor or custodial letter. Firm information must be configuredfor each office group using the Configure Tax Preparation > Signature Block option. You canoverride this information for a specific return on Interview Form 3 (General > Return Options >Preparer Information Worksheet).
Suppress letterhead entirely. Check this box to suppress the letterhead feature entirely.
Suppress references to Form 1040 on letter. Check this box to suppress printing of referencesfor each income, deduction, and credit item on the Grantor or Custodial letters.
Print net amounts of Tax-exempt interest on grantor/custodial letter. Check this box to printtax-exempt amounts reduced by indirect or specifically allocated expenses.
Chapter 2 - Office Manager • 52
Grantor print options
Print "Revocable Trust" on return. Check this box to print "Revocable Trust" on page 1 of thefederal and state return.
Suppress default answers to Other Information, Form 1041, page 2. Check this box tosuppress the default answers to Form 1041, Page 2, Other Information section.
Print Sections 671 - 678 IRC text on return. Check this box to print the following text on thefederal tax return:
"Under the terms of the trust instrument, this is a Grantor Trust. In accordance with sections 671-678 IRC, 1986, all income is taxable to the Grantor. Statements of income, deductions andcredits are attached."
Configuring Tax Preparation: 1065 Options(Office Manager > Configure Applications > Tax Preparation > 1065 Options)
Configure the 1065 form using the 1065 Options dialog. To override these options for a specificreturn, see Help > Help Topics or press F1.
Print and other options
Include all liabilities from Schedule L in the calc of other liabilities on Schedule K-1. Ifchecked, includes short-term liabilities with other liabilities on Schedule K-1.
Print Schedule K to K-1 reconciliation. Check this option to print a form showing the total for allpartners for each line on the Schedule K-1 and the corresponding Schedule K amount. A thirdamount column shows the difference between the totals of Schedules K-1 and K.
Print Schedule K-1, current year increases (decreases) reconciliation statement. If checked,prints the Schedule K-1 current year increases (decreases) reconciliation statement.
Summarize open line items from passthroughs on Schedule K/K-1 statements. Select thisoption if you want to set a default for the office group to summarize open line items frompassthroughs on Schedule K/K-1 statements.
You can override this option in the return on Interview Form 2 or the General > Return Options >Processing Options Worksheet.
Suppress printing of AMT forms. If checked, suppresses printing of alternative minimum taxversions of Schedule D, Form 4797, and Form 6252.
Complete Part 1 of Schedule M-3 and produce Schedule M-1 instead, when applicable.Select this option if you want to set a default for the office group to suppress Parts II and III ofSchedule M-3 and instead produce Schedule M-1. Part I of Schedule M-3 will still be producedwhen this option is selected.
You can override this option in a return on Interview Form L-5 or the L/M-1/M-2/M-3 > ScheduleM-3 Worksheet.
Print Schedule K-1 Page 2. Select from the following options: Include in K-1 copy only (default);Include in K-1 and Accountant's copies; Include in K-1 and Client's copies; Include in K-1,Accountant, and Client copies; Include in ALL copies; or Suppress in all copies.
Chapter 2 - Office Manager • 53

Capital Account Summary. Select from these options: Do not prepare Capital AccountSummary, Basic, or Expanded.
Basis method. Choose a response to the IRS question asking how the partner's basis wascomputed. The following options are available: Tax basis (default), Modified outside basis,Modified previous taxed capital, or Section 704(b).
You can override this option in a return on Interview Form 5, Box 66 or on Federal > Partners >General Options > Other Schedule K-1 Options > Line 23.
Note: This option applies to tax years 2020 and later.
Basis method (2019 and prior). Choose a response to the IRS question asking how thepartner's basis was computed. The following options are available: Tax basis (default), GAAP,Section 704(b) book, Leave blank, or Other.
Other basis method description. This option is available if you selected Other as the Basismethod. Enter a description of up to 78 characters.
Balance sheet options for tax input method
Adjust balance sheet for automatic sales. If checked, and if you are using the “Automatic Sale”feature, the end-of-year balances are reduced by the assets sold.
Adjust ending asset balances for current acquisitions. If checked, ending asset balances areadjusted for any acquisitions made during the tax year.
Adjust ending accumulated depreciation, depletion, and amortization. If checked, endingaccumulated balances are adjusted to include current expenses as reported on Form 1065.
Recap statement options
Schedule K-1. Choose from these options:
Suppress K-1 recap statement
Include in all copies
Include in accountant and taxpayer copies
Include in accountant's copy only
Passthrough. Choose from these options:
Suppress passthrough statement
Include in all copies
Include in accountant and taxpayer copies
Include in accountant's copy only
Configuring Tax Preparation: 1120/1120S Options(Office Manager > Configure Applications > Tax Preparation > 1120/1120S Options)
Use the 1120/1120S Options dialog to configure the 1120/1120S form.
To override these options for a specific return, see Help > Help Topics or press F1.
Chapter 2 - Office Manager • 54

Allocation and apportionment options
You can override the first two of the following features on Interview Alloc/Apport -- Form MST-O(Common State/Apportionment and Allocation Options Worksheet).
Print state detail worksheets. If checked, worksheets showing the detail entries for allocationand apportionment (per factor) are printed for each state/city with MST data.
Print summary worksheets. If checked, summary worksheets are printed for allocation andapportionment (per factor). These worksheets summarize the allocation amounts andapportionment factors for all states and cities with MST data.
Balance sheet options for tax input method
Adjust balance sheet for automatic sales. If checked and you are using the “Automatic Sale”feature, the end-of-year balances are reduced by the assets sold.
Adjust ending asset balances for current acquisitions. If checked, ending asset balances areadjusted for any acquisitions made during the tax year.
Adjust ending accumulated depreciation, depletion, and amortization. If checked, endingaccumulated balances are adjusted to include current expense as reported onForm 1120/1120S.
Print and other options
Print balance sheet regardless of applicability. Check this box to force the printing of ScheduleL regardless of applicability.
Suppress printing of AMT forms. If checked, the system suppresses all printing of alternativeminimum tax versions of Schedule D, Form 4797, and Form 6252.
Suppress printing of state estimate vouchers for EFT. Check this box to suppress printing ofstate estimate vouchers for the electronic fund transfer system.
Suppress deduction of input for state/city estimated tax payments on the return. Thiseliminates double entry for state taxes paid.
Complete Part 1 of Schedule M-3 and produce Schedule M-1 instead, when applicable.Select this option if you want to set a default for the office group to suppress Parts II and III ofSchedule M-3 and instead produce Schedule M-1. Part I of Schedule M-3 will still be producedwhen this option is selected.
You can override this option in a return on Interview Form L-5 or Sch L/M > Schedule M-3Worksheet.
Print 1120S Schedule K-1 Page 2. Select from the following options: Include in K-1 copy only(default); Include in K-1 and Accountant's copies; Include in K-1 and Client's copies; Include inK-1, Accountant, and Client copies; Include in ALL copies; or Suppress in all copies.
Print 1120 state taxable income workpaper. Select from the following options: Do not print thisschedule (default), Accountant's copy only, Client's copy only, or Both accountant's & client'scopies.
Chapter 2 - Office Manager • 55
1120S recap statement options
Schedule K-1. Choose from the following options: Suppress K-1 recap statement, Include in allcopies, Include in accountant and taxpayer copies, or Include in accountant's copy only.
Passthrough. Choose from the following options: Suppress passthrough statement, Include inall copies, Include in accountant and taxpayer copies, or Include in accountant's copy only.
1120S options
Include carryover in the net increases to restore debt-basis. Check to include losses in the netincreases to restore debt-basis on the Shareholder Basis worksheet.
Print Schedule K to K-1 reconciliation. Check this box if you want to set a default for the officegroup to print the Schedule K to K-1 reconciliation. You can override this option in the return onForm 2, box 100, and General > Return Options > Processing Options Worksheet, line 69.
Configuring Tax Preparation: Pennsylvania Cities (1040)(Office Manager > Configure Applications > Tax Preparation > Configure Pennsylvania Cities (1040))
For 2020, a standard list of the most common cities has been provided in Tax Preparation. TheConfigure Pennsylvania Cities option allows you to configure the Individual system with up to 99additional Pennsylvania tax jurisdictions. These custom jurisdictions appear as additional selectionsin Tax Preparation.
1. Select Configure Pennsylvania Cities and click Setup to display the Configure PennsylvaniaCities (1040) dialog.
2. To edit an existing custom jurisdiction, highlight the jurisdiction code and click Setup. To add anew jurisdiction, click Add. For either option, the Pennsylvania Tax Jurisdiction dialog displays.
If you are editing an existing jurisdiction, the information you entered previously displays.
Chapter 2 - Office Manager • 56
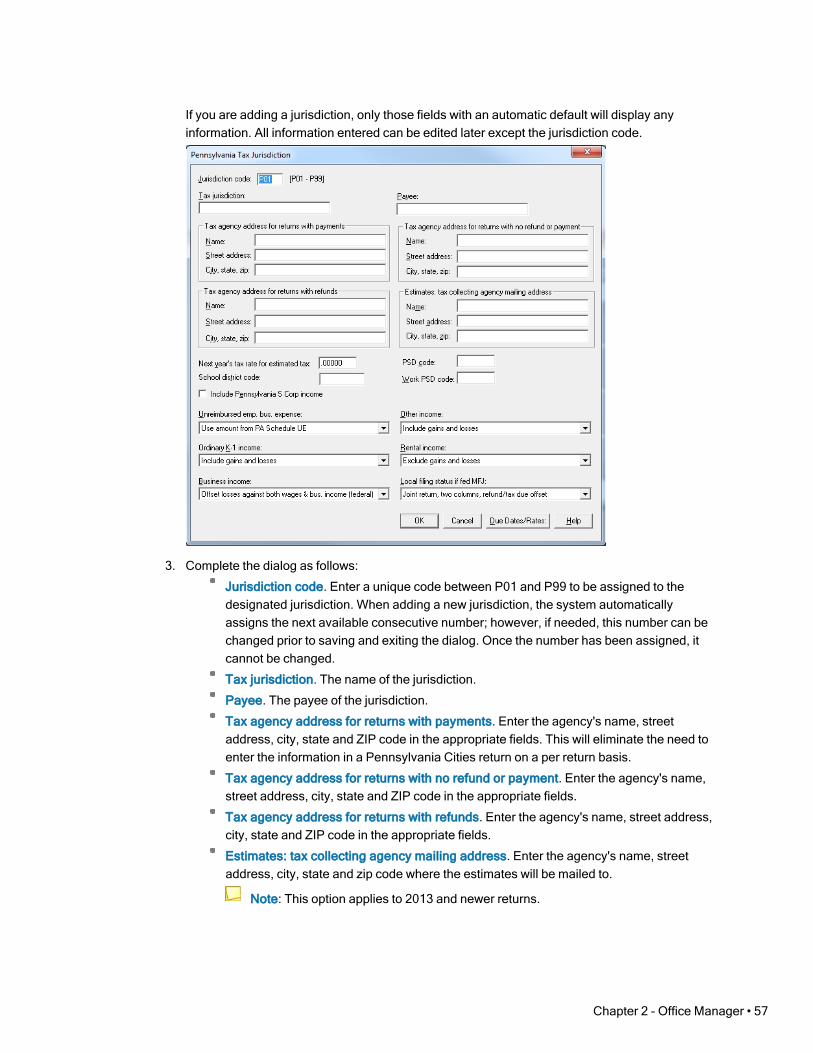
If you are adding a jurisdiction, only those fields with an automatic default will display anyinformation. All information entered can be edited later except the jurisdiction code.
3. Complete the dialog as follows:
Jurisdiction code. Enter a unique code between P01 and P99 to be assigned to thedesignated jurisdiction. When adding a new jurisdiction, the system automaticallyassigns the next available consecutive number; however, if needed, this number can bechanged prior to saving and exiting the dialog. Once the number has been assigned, itcannot be changed.
Tax jurisdiction. The name of the jurisdiction.
Payee. The payee of the jurisdiction.
Tax agency address for returns with payments. Enter the agency's name, streetaddress, city, state and ZIP code in the appropriate fields. This will eliminate the need toenter the information in a Pennsylvania Cities return on a per return basis.
Tax agency address for returns with no refund or payment. Enter the agency's name,street address, city, state and ZIP code in the appropriate fields.
Tax agency address for returns with refunds. Enter the agency's name, street address,city, state and ZIP code in the appropriate fields.
Estimates: tax collecting agency mailing address. Enter the agency's name, streetaddress, city, state and zip code where the estimates will be mailed to.
Note: This option applies to 2013 and newer returns.
Chapter 2 - Office Manager • 57

Next year’s tax rate for estimated tax. Enter the tax rate for the next year as a decimal(for example, enter 1% as 0.01).
School district code. The six-digit entry made here will be used for internal purposes,only, on the PAC Local Earned Income Tax Return and PAC Estimate form.
Note: This option applies to tax years 2014 and later.
Include Pennsylvania S Corp income. Check this box to include PennsylvaniaS Corporation income on the return.
PSD Code. If an entry is made, here, for the Political Subdivision Code (PSD), the entrywill flow to the PAC Local Earned Income Tax Return and PAC Estimate form.
Note: This option applies to tax years 2013 and later.
Work PSD Code. If an entry is made, here, for the Work Political Subdivision Code(PSD), the information will flow to the PAC Estimate forms.
Note: This option applies to tax years 2013 and later.
Unreimbursed emp. bus. expense. Select one of the following options:
Use amount from PA Schedule UE
Use amount from Federal 2106
Exclude unreimbursed employee business expenses
Other income. Select one of the following options:
Include gains and losses
Include gains only
Exclude gains and losses
Ordinary K-1 income. Select one of the following options:
Include gains and losses
Include gains only
Exclude gains and losses
Rental income. Select one of the following options:
Exclude gains and losses
Include gains and losses
Include gains only
Business income. Select one of the following options:
Offset losses against both wages & bus. income (federal)
Offset losses against business income only (federal)
Offset losses against wages only (federal)
Losses not allowed (federal)
Offset losses against both wages & bus. income (PA)
Offset losses against business income only (PA)
Offset losses against wages only (PA)
Losses not allowed (PA)
Chapter 2 - Office Manager • 58
Local filing status if fed MFJ. Select one of the following options for federal returns filedMFJ (married filing joint):
Joint return, two columns refund/tax due offset
Joint return, two columns refund/tax due not offset
Joint return, one column spousal loss offset allowed
Joint return, one column spousal loss offset not allowed
Separate returns
4. Click Due Dates > Rates to access a second dialog, which allows for the entryof year-specific data.
Tax year. For independent FX Direct, 2020 is the only choice available.
Due date. Enter the date taxes are due in the jurisdiction.
Estimated tax voucher due dates. Enter the tax voucher due dates for the designatedperiods (1st, 2nd, 3rd, and 4th) in the appropriate boxes.
Rates (enter as a decimal). Enter the tax rate, interest rate, and penalty rate in theappropriate fields. Enter these numbers as a decimal (for example, enter 1% as 0.01).
5. Click OK when finished.
Configuring Tax Preparation: History/Backup Options(Office Manager > Configure Applications > Tax Preparation > History/Backup Options)
The History/Backup options allow you to maintain a history log of return activities and status changes.You can also backup return files.
1. Select History/Backup Options and click Setup. Leave the default check in place on theMaintain status/activity history box to maintain status and activity history for your returns.
If you check the Maintain backup return files box, your files are automatically backed up as youwork on a return. You can use the backup copy should you lose the return.
Note: An automatic backup file is not generated when you are working on a new return.Once the new return is closed and saved, the initial backup file is created and the automaticbackup feature is engaged.
2. Click OK when finished.
Configuring Tax Preparation: Workstream Options(Office Manager > Configure Applications > Tax Preparation > Workstream Options)
Use this option to set a default prompt, per office group, as a reminder to update project informationwhen closing a return.
Prompt user to update project when closing return. When checked, a prompt displays every time areturn prepared using this office group is closed.
The prompt that displays when a return is closed allows you to choose whether or not you want toupdate the Workstream project for the return. If you answer Yes, the Route Sheet opens if the projectis linked. If the project is not linked, the Link to Workstream Project window opens.
Chapter 2 - Office Manager • 59
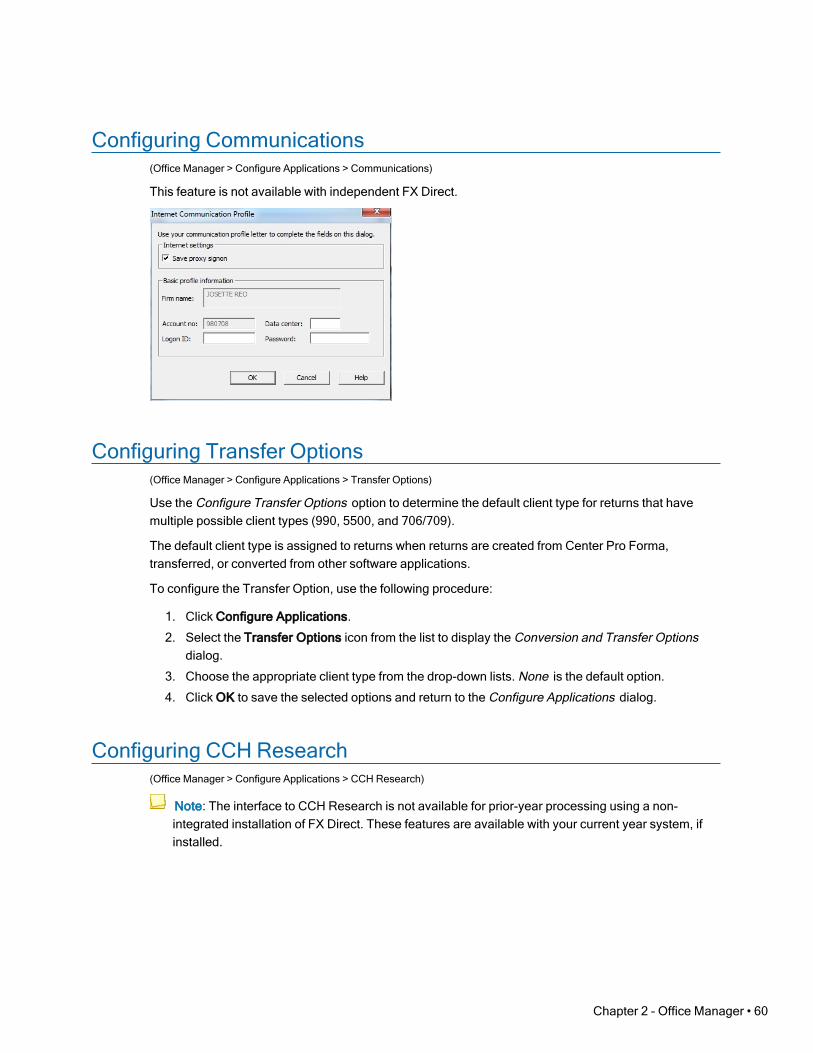
Configuring Communications(Office Manager > Configure Applications > Communications)
This feature is not available with independent FX Direct.
Configuring Transfer Options(Office Manager > Configure Applications > Transfer Options)
Use the Configure Transfer Options option to determine the default client type for returns that havemultiple possible client types (990, 5500, and 706/709).
The default client type is assigned to returns when returns are created from Center Pro Forma,transferred, or converted from other software applications.
To configure the Transfer Option, use the following procedure:
1. Click Configure Applications.
2. Select the Transfer Options icon from the list to display the Conversion and Transfer Optionsdialog.
3. Choose the appropriate client type from the drop-down lists. None is the default option.
4. Click OK to save the selected options and return to the Configure Applications dialog.
Configuring CCH Research(Office Manager > Configure Applications > CCH Research)
Note: The interface to CCH Research is not available for prior-year processing using a non-integrated installation of FX Direct. These features are available with your current year system, ifinstalled.
Chapter 2 - Office Manager • 60

The CCH Research option allows you to select the use of IP address authentication when your staffmembers open research products like CCH® IntelliConnect® or CCH® AnswerConnect from withinTax Preparation. Alternatively, you can authenticate with user IDs by leaving the IP Access boxunchecked and instructing each staff member to enter their CCH Research user ID in Tax Preparationat Options > Interface Options > CCH Research.
To authenticate using IP addresses:
1. Select Configure Applications > CCH Research and click Configure to display the CCHResearch dialog.
2. Select IP Access.
3. Click OK.
Backing Up Client Data(Office Manager > Backup Client Data)
Backing up computer files is important because your data files are susceptible to damage due topower failure, hardware failure, or operator error. This option allows you to back up client profile data,tax return data, and client history logs to floppy diskettes or hard disks (backup tapes are notsupported).
The backup process is not year specific. The utility automatically backs up all years of existing data foreach client.
Note: You can selectively restore tax return data by year. See Restoring Client Data on page 64.
When backing up client files to diskette, the following options are available:
You can back up additional files to a diskette that currently contains back up files. Select fromthese options:
Append to Diskette. If the files you are backing up already exist on the diskette, you canchoose this option to overwrite the files on the diskette with the latest files. If the files donot exist on the diskette, choose this option to add the files to those already on thediskette.
Chapter 2 - Office Manager • 61
Overwrite All Files. This option overwrites the files on the diskette with the files you haveselected to back up.
Use New Disk. This option allows you to replace a diskette with existing files with a newdiskette.
You can choose to back up one client per diskette.
If a client file exceeds the space available on the diskette, you can span the backup acrossdiskettes. You are asked to insert additional diskettes as the backup progresses.
Warning! If data is lost or damaged and you do not have a backup, you have no alternative but tore-enter the data. We offer the following backup suggestions:
Tape Backup. Network users should use a tape backup, using a third party backup utility, toprotect against potential read errors you may encounter on diskette backups.
Responsibility. Assign one person in your office the duty to ensure backups are done on aregular basis.
Frequency. Back up at least once per week. If you are entering large quantities of data, back updaily.
Number of Copies. Maintain two backup copies. One set is used for the current backup. Thesecond set contains your previous backup.
Diskettes. Label your backup set with a list of all clients backed up and the backup date. Keep acopy of the Client Backup Report with the backup set.
Backing Up Client Data(Office Manager > Backup Client Data)
Note: Only one user at a time can run the Backup/Restore process.
1. Click the Backup Client Data button or select Utilities > Backup Clients.
2. On the Create Client List dialog, select one of the following:
All clients. Select this option to selectively choose clients from a list of all clients on yoursystem or back up all clients. Click OK, and continue with step 3.
New/modified clients. Select this option for a list of new clients or clients with recentlychanged data. Click OK, and continue with step 3.
Specific client. Select this option to display a dialog in which you can enter a client’sname or ID.
Customized list. Select this option to create a list of clients filtered by client type, officegroup, and/or preparer. The list of filtered clients displays in the Select Clients for Backupdialog.
3. To select clients that you want to back up, do any of the following:
To select a single client, highlight the client in the Clients box, and then click Add or dragit into the Selected box.
To select all clients, click Add All.
Chapter 2 - Office Manager • 62

To remove a single client from the Selected box, highlight the client, and then clickRemove or drag it into the Clients box.
You can select a range of clients by holding down the Shift key and clicking the first andlast clients in the range. You can also select multiple clients that are not listedconsecutively by holding down the Ctrl key and clicking the individual clients. Drag thehighlighted clients to the Selected box or click Add.
4. If desired, select one of these options in the Options group box:
Check Delete after backup to delete all client and return data once the clients arebacked up.
Check One client per diskette to back up only one client file to each floppy diskette.You may select only drive A: or B: with this option.
Check Report per diskette to receive a Client Backup Report for each diskette used forthe backup.
5. Click Select Drive. The Select Destination Drive/Directory for Backup dialog displays. Thedefault drive is C:, and the default directory is the root. The system assigns the client file nameas *.ZIP and the backup header filename as CLNTBKUP.*.
All files pertaining to the client are zipped. The zipped client files are placed into the directoryyou specify. CCH ProSystem fx ZIP files are in a proprietary format and cannot be opened orviewed with other Zip programs.
6. Select the drive and directory to which you want to back up your client files.
If you are backing up to a floppy diskette, select drive A: or B:, insert a diskette, and clickOK.
During large backups, you are prompted to insert another diskette when a diskette hasbeen filled.
Note: If a return is less than 1.44 MB, it is backed up to the current diskette, or youare prompted for a new diskette until you insert one that has enough space for thereturn or select Skip Return. If a return is larger than 1.44 MB, you can either backup to a hard drive or a large capacity removable disk (for example, Zip drive).
If backing up to the hard disk, select a local or network drive and click OK.
Note: When using a removable disk it is recommended you back up to asubdirectory. There is a DOS limit on the number of files that can be backed up to theroot directory.
Printing the Exception ReportIf a client could not be backed up, a Backup Exception Report dialog displays. Click OK to print thereport.
Chapter 2 - Office Manager • 63
Viewing the Client Backup ReportThe Client Backup report tells you which clients were backed up and the number of disks on which thebacked up files are stored. An asterisk appears next to the client names for new, appended client files.The report is always generated when you back up, as follows:
You selected the Report per diskette option on the Select Clients for Backup dialog. Aseparate report listing all client files backed up to a diskette is generated for each diskette usedfor the backup.
You did not select the Report per diskette option. A report, sorted by client name, is generatedlisting all client files that exist on the disks used for the backup.
You have backed up client files that span diskettes. A report is generated reflecting alldiskettes used in the backup. The Spanned column lists the sequence number of the backupdiskette (e.g.,1 of 2) and the clients backed up on each diskette are separated by double bars onthe report.
Restoring Client Data(Office Manager > Restore Client Data)
Note: Only one user at a time can run the Backup/Restore process.
1. Click Restore Client Data or select Utilities > Restore Clients.
2. On the Restore Client Data dialog, choose the appropriate button.
Tax return data only. Select to restore the tax return data only. This option allows you toselectively restore a client’s tax return data by year.
All client and tax return data. Select to restore the client profile and all existing years oftax return data for each client.
Note: You are prompted for a password when restoring a password-protected returnthat already exists on your system. Returns that do not already exist on your systemare automatically restored with their password.
3. Click Select drive. The Select Source Drive/Directory for Restore dialog displays. The defaultdrive is C:, and the default directory is the root.
4. Select the drive and directory of the backed up client files that you want to restore. Click OK. TheSelect Clients for Restore dialog displays.
5. To select the client files you want to restore, you can do any of the following:
To select a single client file, highlight the file in the Clients box, and then click Add ordrag it into the Selected box.
To restore all files listed, click Add All.
To remove a single file from the Selected box, highlight the file, and then click Removeor drag it into the Clients box.
Add or remove a range of client files by holding down the Shift key and clicking the firstand last files in the range. You can also select multiple files that are not listed
Chapter 2 - Office Manager • 64
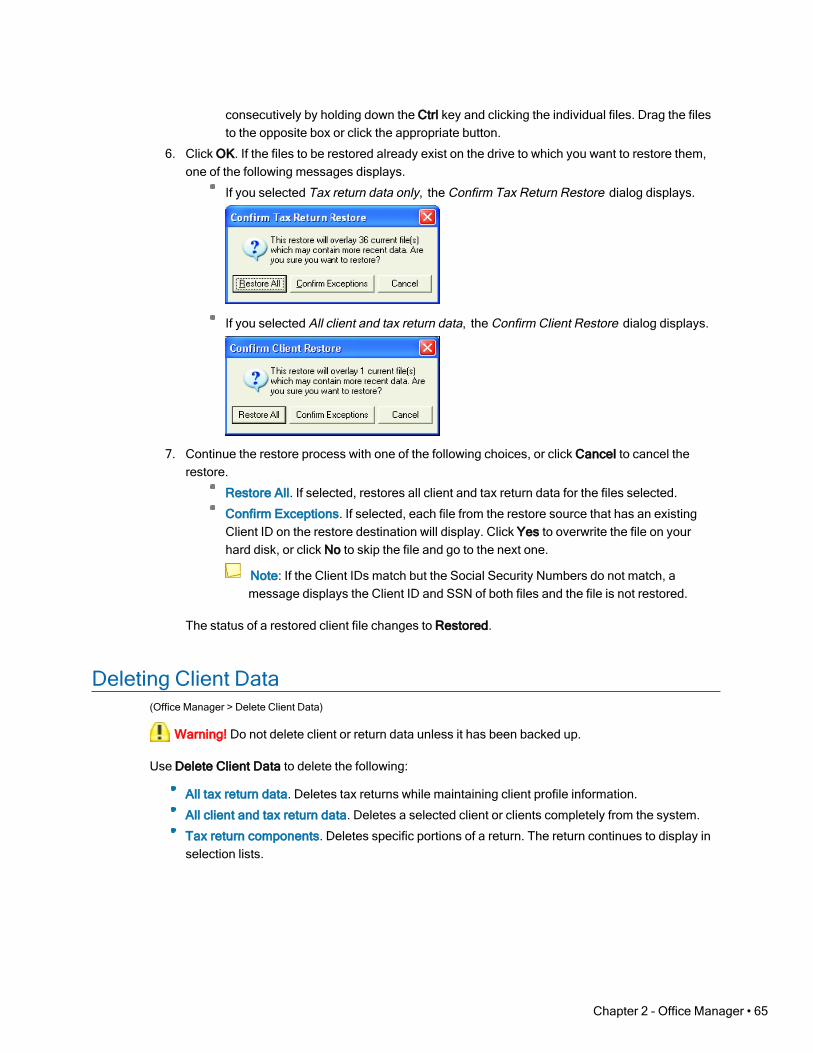
consecutively by holding down the Ctrl key and clicking the individual files. Drag the filesto the opposite box or click the appropriate button.
6. Click OK. If the files to be restored already exist on the drive to which you want to restore them,one of the following messages displays.
If you selected Tax return data only, the Confirm Tax Return Restore dialog displays.
If you selected All client and tax return data, the Confirm Client Restore dialog displays.
7. Continue the restore process with one of the following choices, or click Cancel to cancel therestore.
Restore All. If selected, restores all client and tax return data for the files selected.
Confirm Exceptions. If selected, each file from the restore source that has an existingClient ID on the restore destination will display. Click Yes to overwrite the file on yourhard disk, or click No to skip the file and go to the next one.
Note: If the Client IDs match but the Social Security Numbers do not match, amessage displays the Client ID and SSN of both files and the file is not restored.
The status of a restored client file changes to Restored.
Deleting Client Data(Office Manager > Delete Client Data)
Warning! Do not delete client or return data unless it has been backed up.
Use Delete Client Data to delete the following:
All tax return data. Deletes tax returns while maintaining client profile information.
All client and tax return data. Deletes a selected client or clients completely from the system.
Tax return components. Deletes specific portions of a return. The return continues to display inselection lists.
Chapter 2 - Office Manager • 65
The procedures for each of these options are discussed in the following sections.
Note: You are prompted to enter the password for password-protected data before you can deleteit.
Deleting All Tax Return Data(Office Manager > Delete Client Data)
Use this option to delete a return or return versions for selected clients.
1. Click Delete Client Data or select Utilities > Delete Client Data.
2. Choose All tax return data and click OK to display the Create Tax Return List dialog.
3. Enter a tax year or use the drop-down list to select the year.
4. Choose one of the following:
All tax returns. Displays a list of all returns on your system. You can then select thereturns you want to delete.
Completed tax returns. Displays a list of returns marked as Completed through the SetStatus option in Tax Preparation.
Specific client. Displays a dialog on which you enter the name or ID of the client whosereturn you want to delete.
Customized list. Displays a dialog to filter returns by client type, office group, and/orpreparer. Select returns to delete from the list created by using these filters.
5. Depending on your choice in the previous step, continue the selection process as follows:
If you select All tax returns and click OK, the Select Tax Returns for Deletion dialogdisplays all clients on your account.
If you select Completed tax returns and click OK, the Select Tax Returns for Deletiondialog displays returns marked as Completed in Tax Preparation.
If you select Specific client and click OK, specify whether you want to locate the client byname or ID, then type a name or ID and click OK. The Select Tax Returns for Deletiondialog displays the client’s return.
If you enter a partial name or ID, a list of clients displays whose names or IDs start withthe text you entered. Then select the client whose return you want to delete.
If you select Customized list and click OK, use the filter criteria to select returns basedon tax product, office group, or preparer, or leave All as the default. Click OK. The SelectTax Returns for Deletion dialog displays the returns matching your filter criteria.
6. To select clients that you want to delete, you can do any of the following:
To select a single client, highlight the client in the Clients box, and then click Add or dragit into the Selected box.
To delete all files listed, click Add All.
To remove a single client from the Selected box, highlight the client, and then clickRemove or drag it into the Clients box.
You can add or remove a range of clients by holding down the Shift key and clicking thefirst and last clients in the range. You can also select multiple clients that are not listed
Chapter 2 - Office Manager • 66

consecutively by holding down the Ctrl key and clicking the individual clients. Drag thehighlighted clients to the opposite box or click the appropriate button.
7. Click OK to delete the selected completed returns.
8. Click Yes to confirm the deletion. Click No to cancel.
Deleting All Client and Tax Return Data(Office Manager > Delete Client Data > All client and tax return data)
1. Click Delete Client Data or select Utilities > Delete Client Data.
2. Choose All client and tax return data and click OK.
3. On the Create Client List dialog, choose one of the following three options for selecting clientsfor deletion:
To display a list of all clients on your system from which you can choose those you wantto delete, select All clients and click OK.
To display a specific client, select Specific client and click OK. Then type in the client’sname or ID and click OK.
If you enter a partial name or ID, a list of clients displays whose names or IDs start withthe text you entered. Then select the client whose return you want to delete.
To display a list of clients based on client type, office group, or preparer, selectCustomized list and click OK. Select the filters and click OK. Select clients from the listcreated using these filters.
4. The Select Clients for Deletion dialog displays. To select clients you want to delete, you can doany of the following:
To select a single client, highlight the client in the Clients box, and then click Add or dragit into the Selected box.
To delete all files listed, click Add All.
To remove a single client from the Selected box, highlight the client, and then clickRemove or drag it into the Clients box.
You can add or remove a range of clients by holding down the Shift key and clicking thefirst and last clients in the range. You can also select multiple clients that are not listedconsecutively by holding down the Ctrl key and clicking the individual clients. Drag thehighlighted clients to the opposite box or click the appropriate button, Add (to move themto the Selected box) or Remove (to move them to the Clients box).
5. Click OK to delete the selected client or clients.
6. To confirm the deletion, click Yes. To cancel the deletion, click No.
Chapter 2 - Office Manager • 67

Deleting Tax Return Components(Office Manager > Delete Client Data > Tax return components)
Use this option to delete specific portions of a return. The return continues to display in selection lists.You can delete any of the following components:
Tax data. Deletes return data.
Print file. Deletes any print files created in Production Processing, Tax Preparation, or sent fromthe Service Center.
Pro Forma. Deletes Pro Forma. Do not delete the Pro Forma component of a tax return if youwant to create the next year return from the Pro Forma.
Activity history. Deletes all record of the return’s activity.
K-1 Import files. Deletes any unimported K-1 files for the selected return or returns.
To delete tax return components, do the following:
1. Click Delete Client Data.
2. Choose Tax return components.
3. Check one or more return components to delete and click OK.
4. Select the tax year of the returns, then choose one of the following to build a list of returns fromwhich to delete components and click OK.
All tax returns. The Select Tax Returns - Delete Components dialog displays all clients.
Completed tax returns. The Select Tax Returns - Delete Components dialog displaysreturns marked as Completed in Tax Preparation.
Specific client. Specify the client name or ID, or enter a partial name or ID, and click OK.The Select Tax Returns - Delete Components dialog displays the specific client, or a listof clients whose client name or ID starts with the text you entered.
Customized list. Filter returns based on tax product, office group, and/or preparer. TheSelect Tax Returns - Delete Components dialog displays the returns matching your filtercriteria.
5. To select returns to delete, you can do any of the following:
Select a single return by highlighting the return in the Returns box. Click Add or drag itinto the Selected box.
To delete all returns listed, click Add All. All returns are added to the Selected box.
To remove a single return from the Selected box, highlight the return, and then clickRemove or drag it into the Returns box.
You can add or remove a range of returns by holding down the Shift key and clicking thefirst and last returns in the range. You can also select multiple returns that are not listedconsecutively by holding down the Ctrl key and clicking the individual returns. Drag thehighlighted returns to the opposite box or click the appropriate button.
6. Click OK to delete the components for the selected returns.
7. Click Yes to confirm the deletion of the return components for the selected returns. Click No tocancel the deletion.
Chapter 2 - Office Manager • 68

Backing Up Returns for Center Pro Forma/Organizer(Office Manager > Utilities > Backup for Center Pro Forma/Organizer)
Use the following procedure to select the returns you want to send to your Service Center forPro Forma or Organizer processing.
1. Select Utilities > Backup for Center Pro Forma/Organizer.
2. Select the tax year of the returns you want to send.
3. Select one of the following four choices:
Select All tax returns and click OK to display a list of all clients on your system.
Select Completed tax returns and click OK to display a list of returns markedCompleted.
Select Specific client and click OK, enter the name or ID of the client, and click OK todisplay the client’s return.
If you enter a partial name or ID, a list of clients whose names or IDs start with the textyou entered displays. Select the client whose return you want to back up.
Select Customized list and click OK to filter the returns based on tax product, status, lastactivity, office group, and/or preparer. Once you have selected the criteria, click OK todisplay the returns matching your filter criteria.
4. To select returns that you want to back up, you can do any of the following:
Select a single return by highlighting the return in the Returns box, and then clicking Addor dragging it into the Selected for backup box.
Back up all returns listed by clicking Add All.
Remove a single return from the Selected for backup box by highlighting the return, andthen clicking Remove or dragging it into the Returns box.
Add or remove a range of returns by holding down the Shift key and clicking the first andlast returns in the range. You can also select multiple returns that are not listedconsecutively by holding down the Ctrl key and clicking the individual returns. Drag thehighlighted returns to the opposite box or click the appropriate button.
5. Click OK and then select your backup drive.
6. Enter or select the accountant number that will be used to identify the returns at the servicecenter. This number defaults to the account number listed in your communication profile. If thedirectory does not exist, a dialog box will ask if you want to create the directory in the location?:\fx\YY\ud\, where ? is the drive selected and YY is the tax year.
Chapter 2 - Office Manager • 69

Backing Up System Data(Office Manager > Utilities > Backup System)
Use Backup System Data to create a backup of your system database files. You can save to your localor network drive. Client files are not backed up with this option. For a large database, a removable disk(for example, Zip drive) or tape backup is recommended. A third party backup utility is required tocreate a tape backup.
Note: You must have exclusive access to the CCH ProSystem fx database to perform thisfunction.
Use the following procedure to backup system data.
1. Select Utilities > Backup System. The Select Destination Drive/Directory for Backup dialogdisplays.
2. Choose the drive/directory to back up the system to or specify the A:\ drive and insert a blank,formatted diskette.
3. Click OK to begin the backup. You are prompted for additional diskettes as needed until thebackup is complete.
Note: A system backup may exceed ten diskettes.
Restoring System Data(Office Manager > Utilities > Restore System)
Warning! You should restore system data only when instructed to do so by a Technical Supportrepresentative.
1. Select Utilities > Restore System to display the Select Source Drive/Directory for Restoredialog.
2. Specify the drive or insert the first Restore diskette into the A:\ drive.
3. Click OK to start the restore process. If you are restoring from the A:\ drive you are prompted forsequenced diskettes as needed until the Restore is complete.
Deleting a Tax Product(Office Manager > Delete Tax Products)
Use Delete Tax Product to delete both tax products and related laser forms from your system.
Note: This option deletes both federal and state. To selectively delete a state, perform a reinstallof the tax product, and then choose not to install that particular state.
Chapter 2 - Office Manager • 70

To delete a tax product, use the following procedure:
1. Click the Delete Tax Products button or select Utilities > Delete Tax Products to display theDelete Tax Products dialog.
2. From the Tax year drop-down list select the year of the product you want to delete.
3. Check the box of each tax product you want to delete.
4. Click OK and a message displays telling you that the interview forms, laser forms, andcalculation module for the chosen products will be deleted.
5. Click OK to confirm and delete the selected tax products, or click Cancel to end the deletionprocess and return to the Delete Tax Products dialog.
Note: Any tax products that run from FX Direct are not available for deletion on the DeleteTax Products dialog.
Using the Tools Feature of Office ManagerThe Tools feature on the menu bar provides the following options:
Version. Display the version numbers of all tax products and applications on your system.
Rebuild. Fix corrupt system files and correct database inconsistencies.
Client Filenames. Display and print a list of your clients’ names, IDs, and filenames.
Change Client ID. Change the client IDs for one or more clients.
Change Office Group. Change the office group for one or more clients.
Change Tax Preparer. Change the tax preparer for one or more clients.
Each option is explained in subsequent sections.
Version(Office Manager > Tools > Version)
Select Tools > Version to view the Version dialog. The top box of the dialog lists the version numbersof installed CCH ProSystem fx Tax applications. The bottom box lists the version numbers of taxproducts. Click OK when you are finished viewing.
Rebuild(Office Manager > Rebuild)
Rebuild lets you correct database inconsistencies and fix corrupt system files. These proceduresinitiate a rebuild of your database and should resolve most database problems. You can use File >Toolbar to toggle the Rebuild toolbar buttons on and off.
Tip: During periods of heavy return processing, you should use the System option to run a clientrebuild and user ID rebuild weekly.
Chapter 2 - Office Manager • 71

Click the Rebuild button or select Tools > Rebuild to display the Rebuild window where you canselect from the following options:
System. A system rebuild can be used to perform both high-level and low-level rebuilds and canbe used to perform a complete analysis and synchronization of your entire system.
Client. Add clients to your database that were copied directly to the client subdirectory and torepair client files.
Timed. Preset a specified time to run a high-level Selective System Rebuild.
In-Use. Used when you can no longer access a return or client file because it is left locked or In-Use.
Log. View and print a log file.
Note: Use File > Toolbar to activate and deactivate the Rebuild toolbar buttons.
Full System Rebuild(Office Manager > Rebuild > System)
A full system rebuild is recommended to correct and prevent database problems and to fix corruptsystem files. For general maintenance purposes it is recommended that you run a full system rebuildevery two weeks.
Note: The amount of time taken to run a full system rebuild depends on the size of the database.A large database can take up to an hour to run. For such a situation, a timed rebuild isrecommended. See Timed Rebuild on page 74 for details.
To run a full system rebuild, do the following:
1. Click the System button to display the Rebuild Configuration dialog.
2. Click OK. The rebuild begins.
3. When the rebuild is completed, select File > Exit to return to Office Manager.
Selective System Rebuild(Office Manager > Rebuild > System)
The Selective System Rebuild provides high-level rebuild options that focus on client, return, and userrebuilds and low-level options that focus on system-level rebuilds.
1. Click the System button. The Rebuild Configuration dialog displays.
2. Select from the available High-Level Rebuild options.
Clear database locks. Unlock a search item that was left open due to an abnormal exitfrom CCH ProSystem fx. You can also use this option if you receive the message Filexxx in use and you are sure the file is not in use.
Client rebuild. Unlock multiple “In-Use” client or return files. For example, you would usethis option if multiple users were working on returns or profiles when your system wentdown.
User ID rebuild. Use this option if users are not being recognized by the system.
Chapter 2 - Office Manager • 72

Synchronize client links. Use this option only with the assistance of a Technical Supportrepresentative.
3. Click the Low-Level Options tab and check the low-level options you want to run.
Verify/Fix Links. Checks database links. If broken links are found, the system repairsthem.
Extensive Database Integrity Check. Checks every record and field in your database forerrors.
Recycle Unused Space. Performs a function much like a disk optimization tool. Files arearranged in a single, contiguous area of available space, resulting in faster, moreefficient access to your data.
Tip: Both the Extensive Database Integrity Check and the Recycle Unused Spaceoptions should be performed after normal business hours, as the rebuild could betime consuming. The length of time required depends on the size of your database.
Rebuild All Key Files. Regenerates database index files. Use this option if you arehaving trouble accessing client files or returns or experiencing general database errors.
Synchronize Product Types. Use this option only with the assistance of a TechnicalSupport representative.
4. When finished, click OK to begin the Selective System Rebuild.
5. Select File > Exit to return to Office Manager.
Selective Client Rebuild(Office Manager > Rebuild > Client)
Note: Use Selective Client Rebuild to rebuild selected clients. If you need to do a more extensiveclient rebuild, use the Client Rebuild option in Selective System Rebuild.
1. Click the Client button. The Select Client(s) for Rebuild dialog displays.
Chapter 2 - Office Manager • 73

2. Select the client files you want to rebuild as follows:
To select a single client, highlight the client in the Clients box, and then click Add or dragit into the Selected box.
To remove a single client from the Selected box, highlight the client, and then clickRemove or drag it into the Clients box.
Add or remove a range of clients by holding down the Shift key and clicking the first andlast clients in the range. You can also select multiple clients that are not listedconsecutively by holding down the Crtl key and clicking the individual clients. Drag thehighlighted clients to the opposite box or click the appropriate button.
3. Click OK to begin rebuilding the selected clients.
Timed Rebuild(Office Manager > Rebuild > Timed)
1. Click the Timed button to display the Timed Rebuild dialog.
2. The Today’s date/time box acts as a digital clock and displays the current date. You can use theplus and minus symbols to set the month, day, hour, and minute you want the rebuild to begin.
Note the following points about setting the time on this dialog:
The default date and time settings are preset to display one minute ahead of the clock inthe Today’s date/time box.
If you are setting the hour for an afternoon or evening rebuild and it is currently morning,the PM radio button is activated when you move the hour box past 12:00. If it is currentlyafternoon or evening and you set the hour for a morning rebuild, the AM radio button isactivated.
3. Check the box to minimize the rebuild program if you want to keep it running in the background.You can maximize the program at any time to display the timed settings for the rebuild.
You can leave the appropriate boxes checked to clear database locks and perform a client anduser ID file rebuild, or remove the check next to the appropriate option if you do not want toinclude that option in the rebuild process.
Chapter 2 - Office Manager • 74

Only after you contact a Technical Support representative should you check the Synchronizeclient links box.
4. Click OK.
In-Use Rebuild(Office Manager > Rebuild > In-Use)
Use this option when you can no longer access a return or client profile because it is left locked or “inuse.”
1. Verify that no staff member is working on the return or profile.
2. Note the client ID number of the in-use return or profile.
3. Click Rebuild or select Tools > Rebuild.
4. Click the In-Use button or select Tools > Client In-Use. The Select Client(s) to Unlock dialogdisplays, listing any in-use clients.
5. Highlight the client you want to unlock. Drag the client into the Selected box or click Add.
6. Click OK.
7. When you are prompted that the return has been unlocked, click OK.
Log(Office Manager > Rebuild > Log)
Click the Log button to display the Rebuild Log dialog. This log is overwritten every time a rebuild isperformed. If you want to print a copy of the log, click Print. If errors or warnings were generatedduring the Rebuild, click Next Error to review them. Click Close when finished.
Viewing the Rebuild Toolbar and Status Bar(Office Manager > Rebuild > File)
You can toggle the Toolbar (File > Toolbar) and Status Bar (File > Status Bar) on and off by selectingthem from the File menu.
Client Filenames List(Office Manager > Client Filenames List)
Use the Client Filenames List option to display or print a list of clients on your system by ID, name,and filename. The filename is useful as a reference when rebuilding selected clients.
1. Click the Client Filenames List button or select Tools > Client Filenames.
2. Use the drop-down lists to select the clients by client type, office group and/or preparer, or leavethe default All. Click OK.
You can change the way clients are sorted by clicking one of the column headings. For example,to change the sort from Client ID to client name, click the Client Name header.
3. Click Print to print the list of filenames, or click OK to close the list after viewing.
Chapter 2 - Office Manager • 75
Changing a Client ID(Office Manager > Change Client ID)
Only a supervisor can change a client ID.
1. Click the Change Client ID button or select Tools > Change Client ID.
2. On the Customize Client List dialog, use filter criteria to select the clients you want to displayand click OK, or leave All as the default and click OK to display all clients.
3. To change the ID for one client on the Select Clients dialog, click the client and click OK.
You can select a range of clients by holding down the Shift key and clicking the first and lastclients in the range. You can also select multiple clients that are not listed consecutively byholding down the Ctrl key and clicking the individual clients. Click OK.
The Change Client ID dialog displays the name, Social Security Number or EmployerIdentification Number, and current client ID for the first client you selected.
4. For each client ID you selected to change, you have these options:
Enter the new ID for the displayed client and click OK.
If the new client ID matches an existing client ID, a message displays telling you theClient ID already exists. Click OK to return to the Change Client ID dialog and enter anew ID.
Click Skip if you decide not to change this client ID. The next client in your selectiondisplays.
Click Cancel to return to the Select Client dialog.
The client ID is updated on the client's profile and tax return. The client’s old ID is deleted. Thenext client in your selection displays.
When all client IDs have been changed, you are returned to the Select Client dialog.
5. Click Close to exit the Change Client ID program.
Changing an Office Group(Office Manager > Change Office Group)
Only a supervisor can change the office group for one or more selected clients.
1. Click the Change Office Group button or select Tools > Change Office Group.
2. On the Create Client List dialog, do one of the following:
Enter the client ID or client name of a specific client and click OK.
Use filter criteria to select the clients you want to display and click OK.
Leave All as the default and click OK to display all clients.
The Select Clients dialog displays, listing the client, or clients, you selected.
If the client listing is not what you expected, click Cancel and review the selection in the CreateClient List dialog. A name or ID entered to select a specific client takes precedence over anyfilter criteria.
Chapter 2 - Office Manager • 76
3. To select clients for whom you want to change the office group, do any of the following:
To select a single client in the Available clients box, highlight the client, and then clickAdd or drag it into the Selected clients box.
To select all clients, click Add All.
To remove a single client from the Selected clients box, highlight the client, and thenclick Remove or drag it into the Available clients box.
You can add or remove a range of clients by holding down the Shift key and clicking thefirst and last clients in the range. You can also select multiple clients that are not listedconsecutively by holding down the Ctrl key and clicking the individual clients. Drag thehighlighted clients to the opposite box or click the appropriate button.
4. Click Change. The Select Target Office Group dialog displays listing all available office groupsconfigured for CCH ProSystem fx Tax.
5. Highlight the office group to which you want to change and click OK to change the office groupsfor the selected clients. A message displays stating that the office groups have beensuccessfully changed.
Note: If a client is secured, a password dialog displays prompting you to enter the passwordbefore the client’s office group can be changed. A Change Exception Reports dialogdisplays for the client if you do not enter a password.
6. Click OK. You are returned to Office Manager.
Changing a Tax Preparer(Office Manager > Change Tax Preparer)
Changing tax preparers affects only the preparer’s name on current year tax returns, even if theselected preparer differs from the prior year preparer.
1. Select Tools > Change Tax Preparer or click the Change Tax Preparer button.
2. On the Create Client List dialog, do one of the following:
Enter the client ID or client name of a specific client and click OK.
Use filter criteria to select the clients you want to display and click OK.
Leave All as the default and click OK to display all clients.
The Select Clients dialog displays, listing the selected clients.
If the client listing is not what you expected, click Cancel and review the selection in the CreateClient List dialog. A name or ID entered to select a specific client takes precedence over anyfilter criteria.
3. To select clients for whom you want to change the Tax Preparer, do any of the following:
To select a single client in the Available clients box, highlight the client, and then clickAdd or drag it into the Selected clients box.
To select all clients, click Add All.
To remove a single client from the Selected clients box, highlight the client, and thenclick Remove or drag it into the Available clients box.
Chapter 2 - Office Manager • 77
Add or remove a range of clients by holding down the Shift key and clicking the first andlast clients in the range. You can also select multiple clients that are not listedconsecutively by holding down the Ctrl key and clicking the individual clients. Click Addor Remove, or drag the highlighted clients to the opposite box or click the appropriatebutton.
4. Click Change. The Select Target Preparer dialog displays showing all available tax preparercodes and names that have been configured for Tax.
5. Select the tax preparer that you want to change and click OK. The system checks the assignedtax preparers for all the selected clients.
Note: If a client is secured, a password dialog displays prompting you to enter the passwordbefore the client’s tax preparer can be changed. A Change Exception Reports dialogdisplays for the client if you do not enter a password.
When finished checking the clients, the system changes the tax preparer assigned to all theselected clients’ returns and profiles. A message displays stating that the tax preparers havebeen successfully changed.
6. Click OK to return to Office Manager.
Viewing and Printing Office Manager Reports
Configuration Information Reports(Office Manager > Print Reports)
This option allows supervisors to view and print the reports showing the firm and office configuration,staff (users or preparers), Tax Preparation configuration.
1. Click the Print Reports button or select File > Print.
2. Select the preferred report and click OK.
Firm/office group or Engagement Plus configuration. These reports begin printingimmediately.The Engagement Plus feature is not available in independent FX Direct.
Staff Configuration. Indicate on the next dialog if you want the report to list users and/orpreparers.
The Staff Configuration Report lists any users who are able to check returns in and out.
Tax Preparation configuration. Select one or more office groups for which you want toprint the report.
3. Click OK to begin printing the report.
Chapter 2 - Office Manager • 78

CCH ProSystem fx on the Web(Office Manager > Help > CCH Prosystem fx on the Web)
The Customer Support website can be accessed by selecting Help > CCH ProSystem fx on the Webfrom the following applications:
Tax Preparation
Office Manager
Production Processing
CCH ProSystem fx on the Web submenu options open your default web browser and take you to theCustomer Support website at https://support.cch.com. Some of the services include the following:
Account services and administration
Product and software information
Tips and answers to Frequently Asked Questions (FAQs)
Access to ordering supplies
Tax renewal
Billing data
CCH Software News publications
Electronic filing information
Training, consulting, and online seminars
Conference information
Links to federal and state tax authorities
Support contact information
Access to our Knowledge Base
Forms release and product release schedules
Program scans
Release notes
Chapter 2 - Office Manager • 79

Chapter 3
Chapter 3 - Tax Preparation
Tax Processing with Tax PreparationThis chapter describes how to create and process returns. Tax Preparation is designed to makeprocessing returns easy and efficient by allowing you to do the following:
Process returns for Individual, Corporation, S Corporation, Partnership, Fiduciary, EmployeeBenefit Plan, Exempt Organization, and Estate & Gift tax products.
Enter data using government forms, interview forms, or worksheets.
Display interview forms in laser or facsimile view.
Choose from three data entry modes for interview forms: Heads Up, Split Screen, orHeads Down.
Select forms from a Full Window Forms List, a Full Window Forms Tree, or a Split WindowForms Tree.
Review and update tax data on forms or worksheets using interactive links from diagnostic,estimate, and override reports.
Review statements for a form.
Review and edit letters and filing instructions using Microsoft®Word 2016 or a later version ofWord.
Import depletion data, including certain property information and yearly operating Oil/Gas andNon-Oil and Gas data, from a spreadsheet for tax return preparation. You can also export theexisting information entity, property data, and well numbers to a spreadsheet to use as atemplate. These functions are detailed in Chapter 4 - Import/Export Functions on page 209.
Import and export foreign entities data between Excel® spreadsheets and Corporation,S Corporation, Partnership, Exempt Organization, and Individual Tax returns. This feature isdescribed in detail in Chapter 4 - Import/Export Functions on page 209.
Export Schedule K-1 data from Partnership, S Corporation, and Fiduciary returns to an Excel®
spreadsheet, and import data from an Excel® spreadsheet to K-1 series interview forms. Thisfeature is detailed in Chapter 4 - Import/Export Functions on page 209.
Export Schedule K-1 data from Business returns to an Individual return or to another Businessreturn. This feature is detailed in Chapter 4 - Import/Export Functions on page 209.
Chapter 3 - Tax Preparation • 80
CHAPTER 3 - TAX PREPARATION
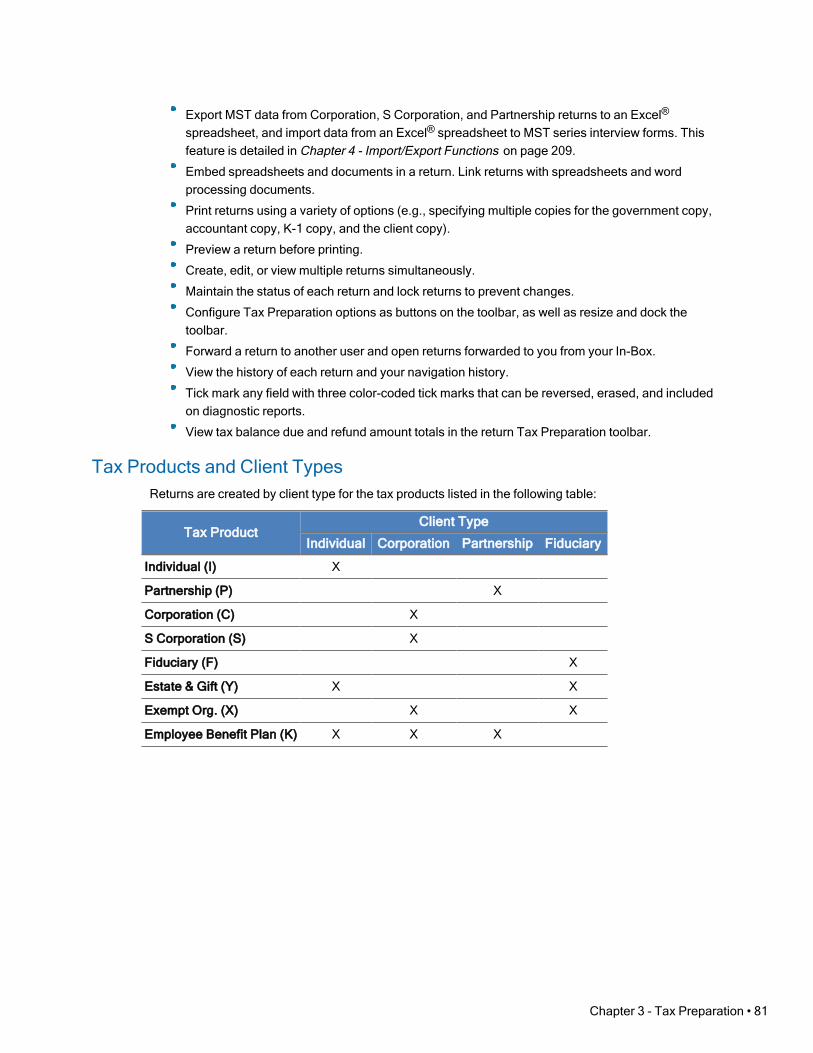
Export MST data from Corporation, S Corporation, and Partnership returns to an Excel®
spreadsheet, and import data from an Excel® spreadsheet to MST series interview forms. Thisfeature is detailed in Chapter 4 - Import/Export Functions on page 209.
Embed spreadsheets and documents in a return. Link returns with spreadsheets and wordprocessing documents.
Print returns using a variety of options (e.g., specifying multiple copies for the government copy,accountant copy, K-1 copy, and the client copy).
Preview a return before printing.
Create, edit, or view multiple returns simultaneously.
Maintain the status of each return and lock returns to prevent changes.
Configure Tax Preparation options as buttons on the toolbar, as well as resize and dock thetoolbar.
Forward a return to another user and open returns forwarded to you from your In-Box.
View the history of each return and your navigation history.
Tick mark any field with three color-coded tick marks that can be reversed, erased, and includedon diagnostic reports.
View tax balance due and refund amount totals in the return Tax Preparation toolbar.
Tax Products and Client TypesReturns are created by client type for the tax products listed in the following table:
Tax ProductClient Type
Individual Corporation Partnership Fiduciary
Individual (I) X
Partnership (P) X
Corporation (C) X
S Corporation (S) X
Fiduciary (F) X
Estate & Gift (Y) X X
Exempt Org. (X) X X
Employee Benefit Plan (K) X X X
Chapter 3 - Tax Preparation • 81

Monitors and Screen ResolutionTax Preparation supports the use of multiple monitors and pivot monitors. Multiple monitors can havethe same or differing resolutions, but they must be set side-by-side with the primary monitor in the left-most position.
For Citrix® users, a monitor configuration option is located in Tax Preparation under Options >Preferences > Multi-monitor Preferences.
Tax Preparation supports the following screen resolutions:
1024 x 768
1152 x 864
1280 x 768
1280 x 800
1280 x 960
1280 x 1024
1400 x 1050
1600 x 1200
768 x 1024 - pivot
768 x 1280 - pivot
800 x 1280 - pivot
864 x 1152 - pivot
960 x 1280 - pivot
1024 x 1280 - pivot
1680 x 1050 - wide screen
1920 x 1200 - wide screen
Dots per Inch (DPI) setting must be 96 (standard) or 120.
The Open Return Dialog (Start Up Screen)(Tax Preparation > File > Open)
The Open Return dialog is the Tax Preparation start up screen and consists of the followingcomponents:
Client/Return list. The attributes that display in the list of returns can be configured by selectingOptions > Preferences > Start Up Screen Preferences.
Search Panel. The Search Panel allows you to filter the returns that display in the Client/Returnlist.
Toolbar. The toolbar provides quick access to many of the key functions in Tax Preparation.
An existing return can be opened in a variety of ways, as described in the sections that follow. You canhave more than one return or version of a return open at a time.
A lock indicator is shown on the Open Return dialog next to returns that have been locked.
Chapter 3 - Tax Preparation • 82
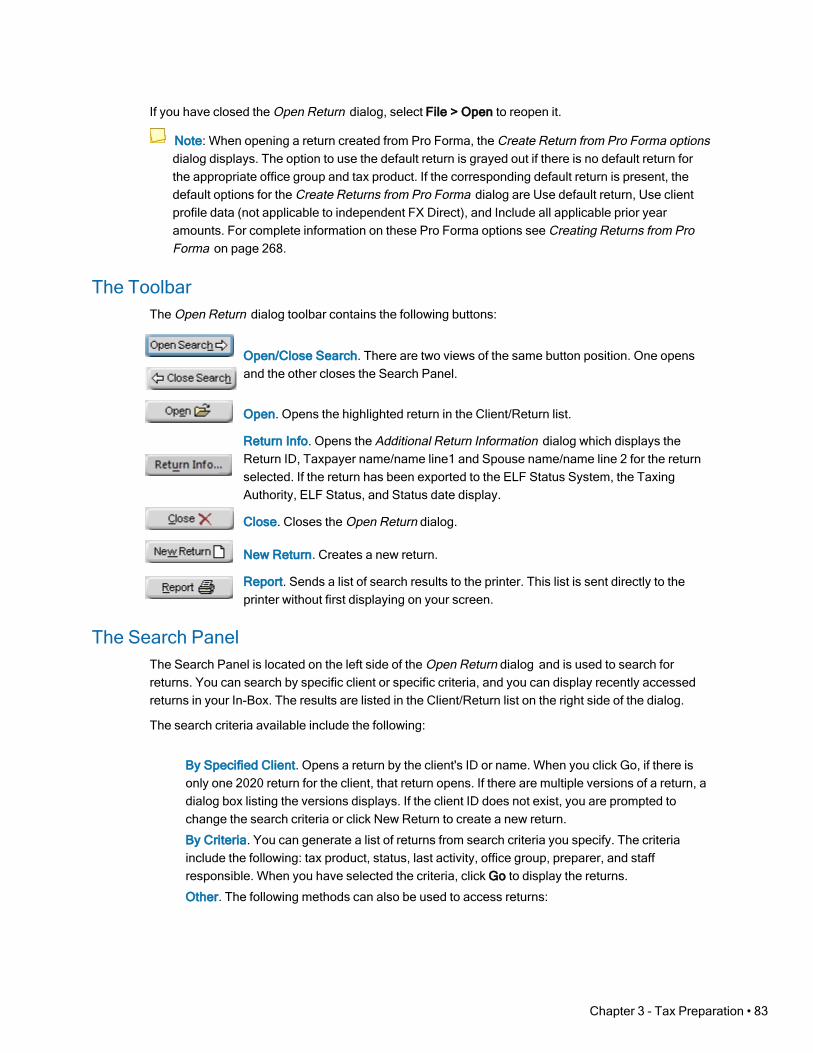
If you have closed the Open Return dialog, select File > Open to reopen it.
Note: When opening a return created from Pro Forma, the Create Return from Pro Forma optionsdialog displays. The option to use the default return is grayed out if there is no default return forthe appropriate office group and tax product. If the corresponding default return is present, thedefault options for the Create Returns from Pro Forma dialog are Use default return, Use clientprofile data (not applicable to independent FX Direct), and Include all applicable prior yearamounts. For complete information on these Pro Forma options see Creating Returns from ProForma on page 268.
The ToolbarThe Open Return dialog toolbar contains the following buttons:
Open/Close Search. There are two views of the same button position. One opensand the other closes the Search Panel.
Open. Opens the highlighted return in the Client/Return list.
Return Info. Opens the Additional Return Information dialog which displays theReturn ID, Taxpayer name/name line1 and Spouse name/name line 2 for the returnselected. If the return has been exported to the ELF Status System, the TaxingAuthority, ELF Status, and Status date display.
Close. Closes the Open Return dialog.
New Return. Creates a new return.
Report. Sends a list of search results to the printer. This list is sent directly to theprinter without first displaying on your screen.
The Search PanelThe Search Panel is located on the left side of the Open Return dialog and is used to search forreturns. You can search by specific client or specific criteria, and you can display recently accessedreturns in your In-Box. The results are listed in the Client/Return list on the right side of the dialog.
The search criteria available include the following:
By Specified Client. Opens a return by the client's ID or name. When you click Go, if there isonly one 2020 return for the client, that return opens. If there are multiple versions of a return, adialog box listing the versions displays. If the client ID does not exist, you are prompted tochange the search criteria or click New Return to create a new return.
By Criteria. You can generate a list of returns from search criteria you specify. The criteriainclude the following: tax product, status, last activity, office group, preparer, and staffresponsible. When you have selected the criteria, click Go to display the returns.
Other. The following methods can also be used to access returns:
Chapter 3 - Tax Preparation • 83
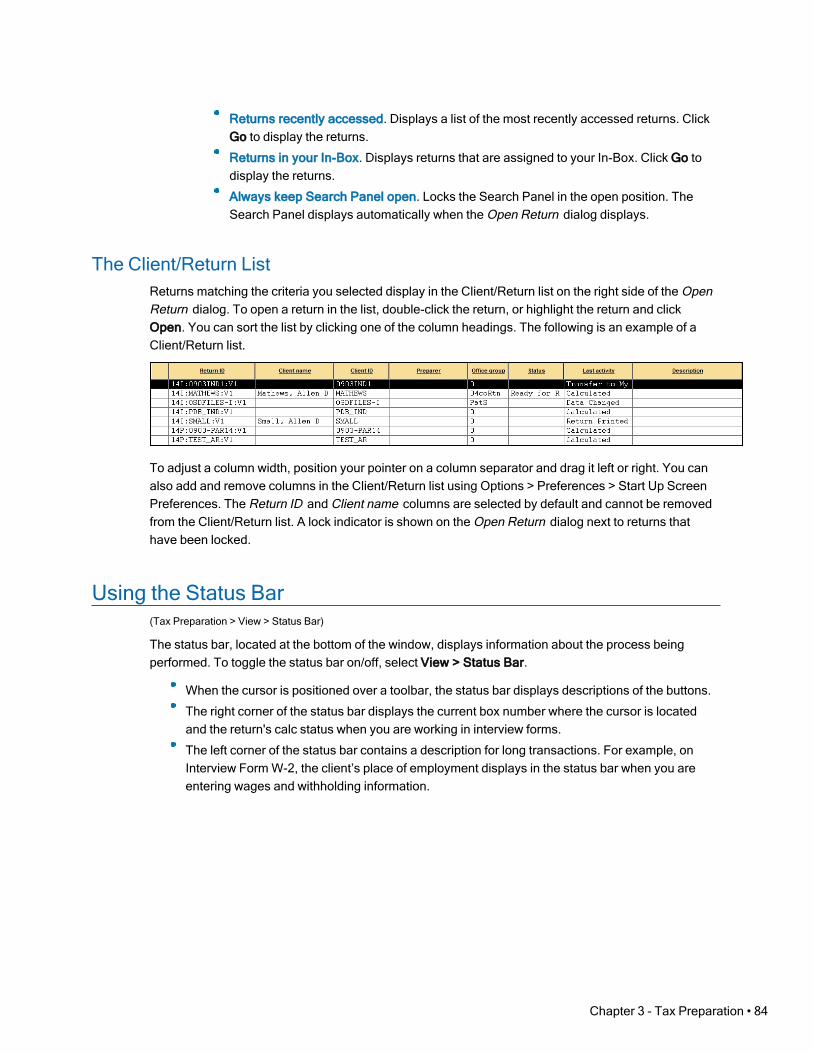
Returns recently accessed. Displays a list of the most recently accessed returns. ClickGo to display the returns.
Returns in your In-Box. Displays returns that are assigned to your In-Box. Click Go todisplay the returns.
Always keep Search Panel open. Locks the Search Panel in the open position. TheSearch Panel displays automatically when the Open Return dialog displays.
The Client/Return ListReturns matching the criteria you selected display in the Client/Return list on the right side of the OpenReturn dialog. To open a return in the list, double-click the return, or highlight the return and clickOpen. You can sort the list by clicking one of the column headings. The following is an example of aClient/Return list.
To adjust a column width, position your pointer on a column separator and drag it left or right. You canalso add and remove columns in the Client/Return list using Options > Preferences > Start Up ScreenPreferences. The Return ID and Client name columns are selected by default and cannot be removedfrom the Client/Return list. A lock indicator is shown on the Open Return dialog next to returns thathave been locked.
Using the Status Bar(Tax Preparation > View > Status Bar)
The status bar, located at the bottom of the window, displays information about the process beingperformed. To toggle the status bar on/off, select View > Status Bar.
When the cursor is positioned over a toolbar, the status bar displays descriptions of the buttons.
The right corner of the status bar displays the current box number where the cursor is locatedand the return's calc status when you are working in interview forms.
The left corner of the status bar contains a description for long transactions. For example, onInterview FormW-2, the client’s place of employment displays in the status bar when you areentering wages and withholding information.
Chapter 3 - Tax Preparation • 84
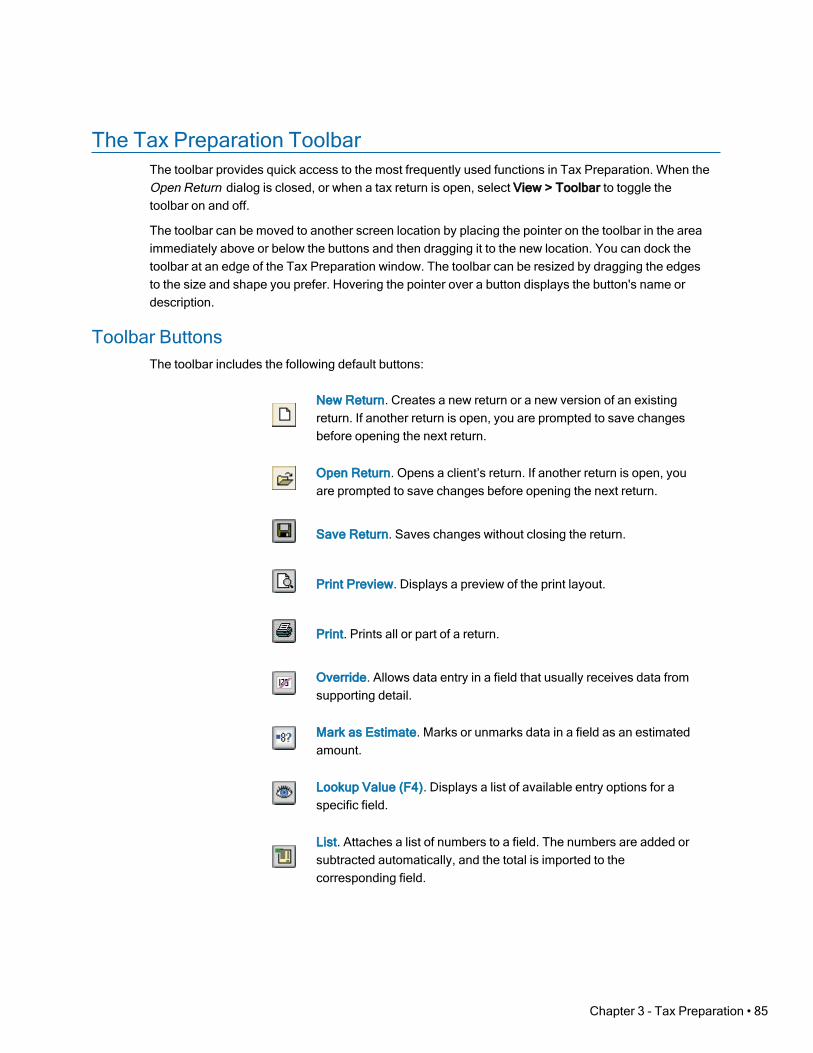
The Tax Preparation ToolbarThe toolbar provides quick access to the most frequently used functions in Tax Preparation. When theOpen Return dialog is closed, or when a tax return is open, select View > Toolbar to toggle thetoolbar on and off.
The toolbar can be moved to another screen location by placing the pointer on the toolbar in the areaimmediately above or below the buttons and then dragging it to the new location. You can dock thetoolbar at an edge of the Tax Preparation window. The toolbar can be resized by dragging the edgesto the size and shape you prefer. Hovering the pointer over a button displays the button's name ordescription.
Toolbar ButtonsThe toolbar includes the following default buttons:
New Return. Creates a new return or a new version of an existingreturn. If another return is open, you are prompted to save changesbefore opening the next return.
Open Return. Opens a client’s return. If another return is open, youare prompted to save changes before opening the next return.
Save Return. Saves changes without closing the return.
Print Preview. Displays a preview of the print layout.
Print. Prints all or part of a return.
Override. Allows data entry in a field that usually receives data fromsupporting detail.
Mark as Estimate. Marks or unmarks data in a field as an estimatedamount.
Lookup Value (F4). Displays a list of available entry options for aspecific field.
List. Attaches a list of numbers to a field. The numbers are added orsubtracted automatically, and the total is imported to thecorresponding field.
Chapter 3 - Tax Preparation • 85
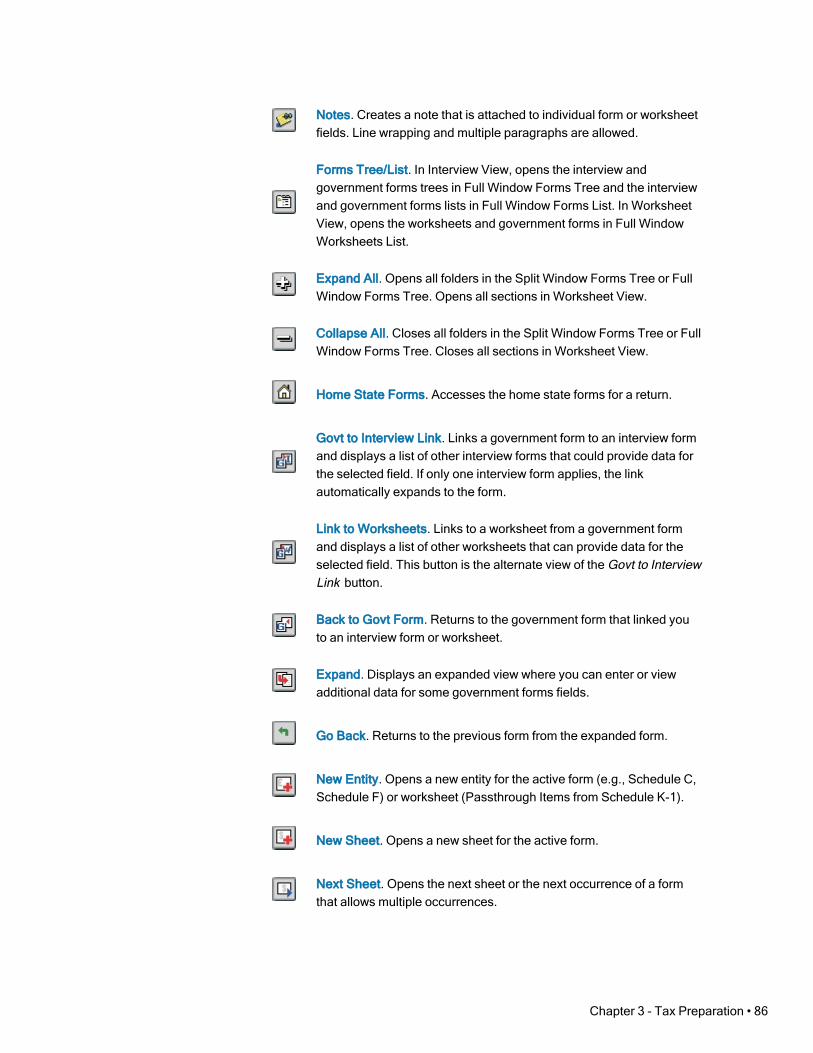
Notes. Creates a note that is attached to individual form or worksheetfields. Line wrapping and multiple paragraphs are allowed.
Forms Tree/List. In Interview View, opens the interview andgovernment forms trees in Full Window Forms Tree and the interviewand government forms lists in Full Window Forms List. In WorksheetView, opens the worksheets and government forms in Full WindowWorksheets List.
Expand All. Opens all folders in the Split Window Forms Tree or FullWindow Forms Tree. Opens all sections in Worksheet View.
Collapse All. Closes all folders in the Split Window Forms Tree or FullWindow Forms Tree. Closes all sections in Worksheet View.
Home State Forms. Accesses the home state forms for a return.
Govt to Interview Link. Links a government form to an interview formand displays a list of other interview forms that could provide data forthe selected field. If only one interview form applies, the linkautomatically expands to the form.
Link to Worksheets. Links to a worksheet from a government formand displays a list of other worksheets that can provide data for theselected field. This button is the alternate view of the Govt to InterviewLink button.
Back to Govt Form. Returns to the government form that linked youto an interview form or worksheet.
Expand. Displays an expanded view where you can enter or viewadditional data for some government forms fields.
Go Back. Returns to the previous form from the expanded form.
New Entity. Opens a new entity for the active form (e.g., Schedule C,Schedule F) or worksheet (Passthrough Items from Schedule K-1).
New Sheet. Opens a new sheet for the active form.
Next Sheet. Opens the next sheet or the next occurrence of a formthat allows multiple occurrences.
Chapter 3 - Tax Preparation • 86

Previous Sheet. Moves to the previous sheet or the previousoccurrence of a form allowing multiple occurrences.
Next Form (F9). Opens the next form that contains data.
Previous Form (F10). Moves to the previous form that contains data.
Next Worksheet (F9). Opens the next worksheet containing data.
Previous Worksheet (F10). Moves to the most recently accessedworksheet containing data.
Calc Return. Calculates the entire tax return.
This Form’s Statements. Displays the white paper supportingschedules for the current government form.
Letters. Displays a list of transmittal letters and filing instructions for areturn to view or print.
Diagnostics. Displays the diagnostics of a calculated return.
Tax Instructions Help (F1). Displays context-sensitive field-levelhelp.
Gov’t Form Instructions (F3). Launches the web browser and opensthe IRS or state form instruction site.
Insert/Delete Tick Marks. Inserts or deletes tick marks in worksheetand form fields.
Navigation History. Displays a list of the forms and worksheets youhave visited, from which you can select an item to revisit.
Forward. Proceeds to the next form or worksheet in your navigationhistory.
Back. Returns you to the previous form or worksheet in yournavigation history.
Chapter 3 - Tax Preparation • 87

Return Summary. Displays the tax summary of a calculated return.
Reversed Tick Mark Summary. Displays a list of government formscontaining amount fields with reversed tick marks.
CCH ProSystem fx on the Web. Opens the Customer Supportwebsite at https://support.cch.com.
Electronic Filing Status. This feature is not available withindependent FX Direct.
Federal Elections. Opens the Federal Elections report.
Other Tax Preparation buttons that can be displayed on the toolbar are as follows:
Close Return. Prompts you to save changes and closes the return.
Forward Return. Forwards the active return to another user.
Quiklink. Quiklink is available only with an integrated installation of FX Direct.Quiklink is not functional within independent FX Direct. Initiates a contextual jumpbetween a highlighted field in Tax Preparation and a corresponding highlightedtax line in an accounting system.
Import Fixed Assets. Initiates the data import process from CCH ProSystem fxFixed Assets.
Import Sage Fixed Assets. Initiates the data import process fromSage® Fixed Assets.
Cut. Removes selected text from a field and places it on the Clipboard.
Copy. Copies selected text to the Clipboard so it can be pasted in a field.
Paste. Inserts cut or copied text from the Clipboard into a field.
Search. Locates text in the Split Window Forms Tree in Interview View or thegovernment forms tree in Worksheet View.
Chapter 3 - Tax Preparation • 88
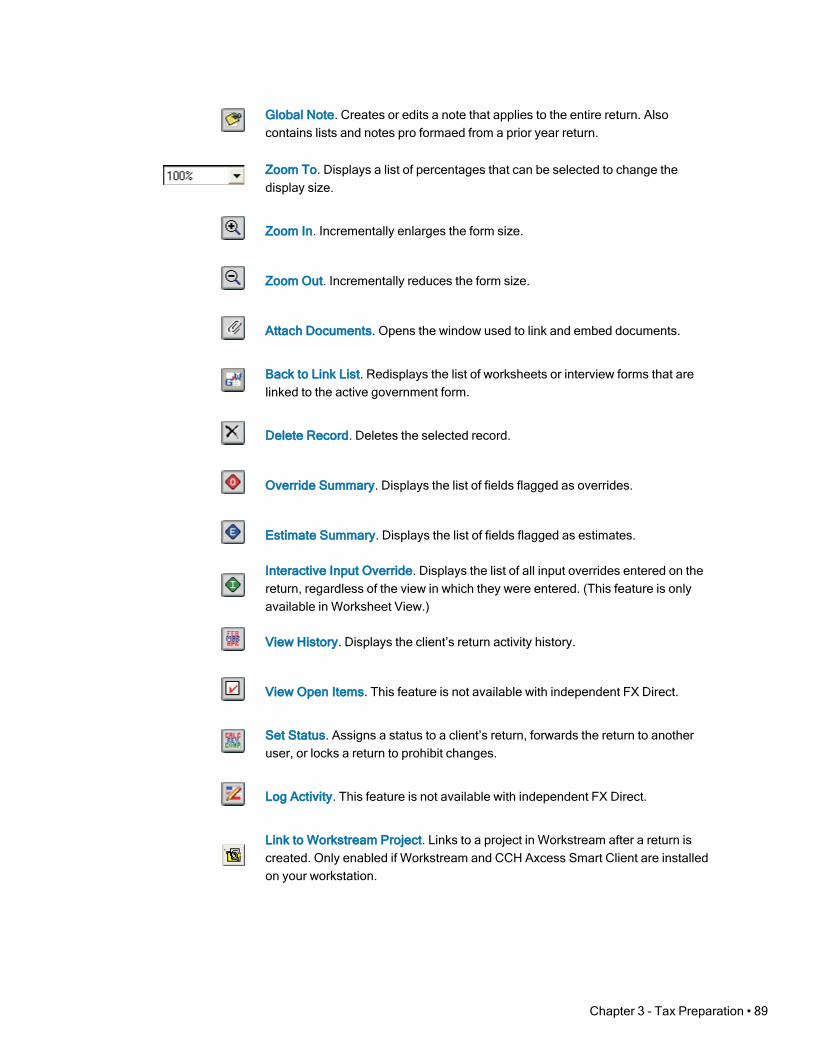
Global Note. Creates or edits a note that applies to the entire return. Alsocontains lists and notes pro formaed from a prior year return.
Zoom To. Displays a list of percentages that can be selected to change thedisplay size.
Zoom In. Incrementally enlarges the form size.
Zoom Out. Incrementally reduces the form size.
Attach Documents. Opens the window used to link and embed documents.
Back to Link List. Redisplays the list of worksheets or interview forms that arelinked to the active government form.
Delete Record. Deletes the selected record.
Override Summary. Displays the list of fields flagged as overrides.
Estimate Summary. Displays the list of fields flagged as estimates.
Interactive Input Override. Displays the list of all input overrides entered on thereturn, regardless of the view in which they were entered. (This feature is onlyavailable in Worksheet View.)
View History. Displays the client’s return activity history.
View Open Items. This feature is not available with independent FX Direct.
Set Status. Assigns a status to a client’s return, forwards the return to anotheruser, or locks a return to prohibit changes.
Log Activity. This feature is not available with independent FX Direct.
Link to Workstream Project. Links to a project in Workstream after a return iscreated. Only enabled if Workstream and CCH Axcess Smart Client are installedon your workstation.
Chapter 3 - Tax Preparation • 89
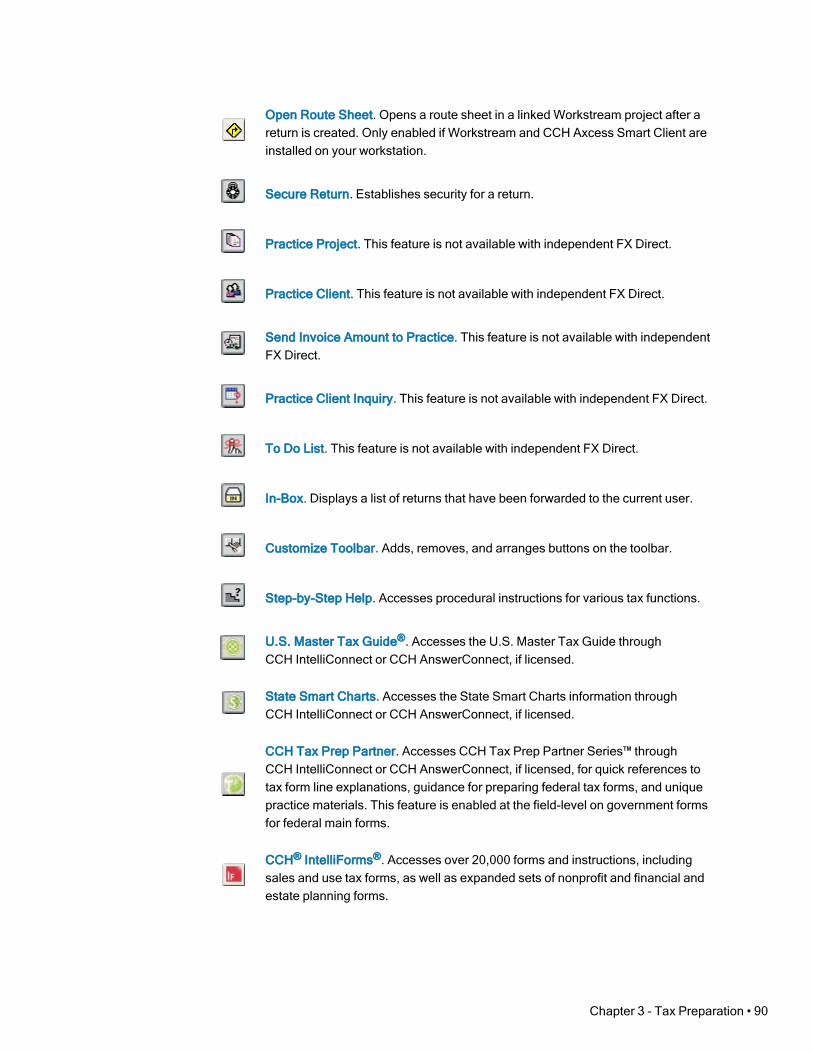
Open Route Sheet. Opens a route sheet in a linked Workstream project after areturn is created. Only enabled if Workstream and CCH Axcess Smart Client areinstalled on your workstation.
Secure Return. Establishes security for a return.
Practice Project. This feature is not available with independent FX Direct.
Practice Client. This feature is not available with independent FX Direct.
Send Invoice Amount to Practice. This feature is not available with independentFX Direct.
Practice Client Inquiry. This feature is not available with independent FX Direct.
To Do List. This feature is not available with independent FX Direct.
In-Box. Displays a list of returns that have been forwarded to the current user.
Customize Toolbar. Adds, removes, and arranges buttons on the toolbar.
Step-by-Step Help. Accesses procedural instructions for various tax functions.
U.S. Master Tax Guide®. Accesses the U.S. Master Tax Guide throughCCH IntelliConnect or CCH AnswerConnect, if licensed.
State Smart Charts. Accesses the State Smart Charts information throughCCH IntelliConnect or CCH AnswerConnect, if licensed.
CCH Tax Prep Partner. Accesses CCH Tax Prep Partner Series™ throughCCH IntelliConnect or CCH AnswerConnect, if licensed, for quick references totax form line explanations, guidance for preparing federal tax forms, and uniquepractice materials. This feature is enabled at the field-level on government formsfor federal main forms.
CCH® IntelliForms®. Accesses over 20,000 forms and instructions, includingsales and use tax forms, as well as expanded sets of nonprofit and financial andestate planning forms.
Chapter 3 - Tax Preparation • 90

Drill Down. Navigates to zero in on the source of a value to be edited.
View PDF Attachments. Displays a list of user attached PDFs that can beselected for view.
Customizing the Toolbar(Tax Preparation > Options > Customize Toolbar)
You can customize the Tax Preparation toolbar in the following ways:
Adding, removing, and reordering buttons
Inserting one or more separators to group buttons
Resetting system default toolbar setting
Instructions for customizing your toolbar are included in the sections that follow.
Adding Buttons and Separators to the Toolbar
1. Select Options > Customize Toolbar or click Customize Toolbar to display the CustomizeToolbar dialog.
2. Select a button or separator to add from the Available toolbar buttons list.
3. Click Add, or drag the button or separator to the Current toolbar buttons list. The toolbar isupdated each time a button is added to the Current toolbar buttons list.
4. If needed, reposition the button or separator by selecting it and clicking Move Up or MoveDown. Dragging a button up or down the list also moves it to a new position.
5. Do one of the following:
To exit without saving your changes, click Reset and Close. Reset restores the toolbar tothe system default settings.
Click Close to exit and save changes.
Removing Buttons from the Toolbar
1. Select Options > Customize Toolbar or click the Customize Toolbar button.
2. Select an item to remove from the Current toolbar buttons list.
3. Click Remove. You can also drag a button to the Available toolbar buttons list.
4. Do either of the following:
To exit without saving your changes, click Reset and Close. Reset restores the toolbar tothe system default settings.
Click Close to exit and save changes.
Chapter 3 - Tax Preparation • 91

Reordering Toolbar Buttons
1. Select Options > Customize Toolbar or click the Customize Toolbar button.
2. Select the item to be moved in the Current toolbar buttons list.
3. Click Move Up or Move Down to change the location of the item in the list. Dragging a button upor down the list also moves it to a new position.
4. Do either of the following:
To exit without saving your changes, click Reset and Close. Reset restores the toolbar tothe system default settings.
Click Close to exit and save changes.
Setting Preferences(Tax Preparation > Options > Preferences)
Use the Options > Preferences menu to configure user-level preferences for tax return processing, theStart Up screen display, and multi-monitor screen resolution. The preferences you set are retainedwhen you install Tax Preparation for a new year.
Tax Return Preferences(Tax Preparation > Options > Preferences > Tax Return Preferences)
Select Options > Preferences > Tax Return Preferences to display the Preferences dialog, whichincludes six tabs:
Miscellaneous
AutoSave
Grid Export
Print Entire Return
Heads Dn/Split Scrn
Worksheets
Each tab is described in the sections that follow.
Miscellaneous Preferences(Tax Preparation > Options > Preferences > Tax Return Preferences > Miscellaneous)
The Miscellaneous tab allows you to set the following preferences:
Activate AutoText descriptions. Permits you to create return and firm-level lists for fields thatallow multiple entries.
Activate AutoComplete when entering AutoText descriptions. Completes an entry when youtype in an AutoText field with the picklist item that matches the characters entered. IfAutoComplete is disabled, the system does not complete any field entries. See AutoTextDescriptions on page 158 for more details.
Chapter 3 - Tax Preparation • 92

Display In-Box when Tax Preparation is opened. Displays the In-Box automatically when TaxPreparation opens. You can also manually display the In-Box from the Open Return dialog. Formore information about the In-Box, see Opening a Return from the In-Box on page 110.
Prompt to create engagement for a new return. This feature is not available with independentFX Direct.
Automatically display Log Activity when a return is closed. This feature is not available withindependent FX Direct.
Create K-1 export files each time the return is calculated. Creates K-1 export files each time abusiness return is calculated.
Note: If you do not check this box, you can also create K-1 export files using the followingmethods:
Select File > Export > K-1 Export to Other Returns after calculating a return.
Set the option Create Schedule K-1 export files during calculation in the ExportOptions section of Form 2 or the General > Return Options Worksheet for Fiduciary,S Corporation, and Partnership returns.
Automatically display new release information. Displays access to the release information thefirst time Tax Preparation is opened after a new release is installed. Release information canalso be accessed from the Help menu.
After each calc display “Calc Complete”. Displays a "Calc Complete" message after a return iscalculated.
Disable memory/resource check when Tax Preparation opens. Verifies that your computerhas adequate memory to run the applications you have open. We recommend that you leave thememory/resource check enabled.
Sequence all CCH ProSystem fx client/return lists by. Sorts all client and return lists by ID orclient name. This preference applies to all CCH ProSystem fx applications.
Open specific return by. Allows you to choose client name or ID as the default method ofopening specific returns. This preference sets the radio button on the Open Return dialog.
AutoSave Preferences(Tax Preparation > Options > Preferences > Tax Return Preferences > AutoSave)
At preset intervals, the system creates a temporary restoration file used to recover data in the event ofa power failure or another instance of CCH ProSystem fx Tax Preparation closing abnormally. Thetemporary restoration file is deleted when a return is closed.
The AutoSave tab allows you to set the following preferences:
AutoSave using the following interval in minutes. Sets the amount of time between restorationfile updates. Click the spin buttons to select the interval. The default and minimum amount oftime for an AutoSave interval is two minutes.
Alert when preparing to save. Alerts you when the system is ready to update the restorationfile, which gives you the option of not saving.
Chapter 3 - Tax Preparation • 93
Warning! AutoSave does not replace the system Save Return function. The file created byAutoSave is used as a restoration file during the active return session. When the return is closed,the temporary file is deleted.
To retain return data so it may be recalled, you must do one of the following:
Select File > Save.
Click the Save Return button.
Press Ctrl + S.
See Using AutoSave on page 112 for more information.
Grid Export Preferences(Tax Preparation > Options > Preferences > Tax Return Preferences > Grid Export)
The Grid Export tab displays the default file locations to store data grids and blank sample grids. Thesystem default file location can be changed for one or both types of grids.
Data grids default file location. Click Browse to select a new default location for data grids. Thedata grid default file location may be different from the sample grid default.
Sample grids default file location. Click Browse to select a new default location for samplegrids. The default file location may be different from the data grid default.
Printing an Entire Return Preferences(Tax Preparation > Options > Preferences > Tax Return Preferences > Print Entire Return)
The Print Entire Return tab allows you to set the defaults for the following:
Enable user level print defaults. Select this box to override the office group print optionssettings in Office Manager and to set the print defaults for the user.
Print entire return default.
Choose one or more copy types. The options include:
Accountant
Government
Client
K-1
Choose the number of copies if the destination includes a printer.
Choose the print destination. The options that display will vary depending on whatdevices you have installed on your workstation. The possible options include:
To printer
To print file
To fax
To document imager
To PDF file
To PDF file and printer
Chapter 3 - Tax Preparation • 94

For PDF files, you can choose the watermark to display in the print background. Thesystem-defined watermarks are as follows:
Confidential
Copy
Do Not File
Draft
File Copy
Note: The watermark list can be defined by office group in Office Manager usingConfigure Applications > Tax Preparation > Print Options and can be defined forindividual returns on the print dialogs in Tax Preparation.
Select Mask for each return copy on which the bank account, SSN, and EIN should bemasked.
Select e-file PDF Attachments to print the PDFs attached to the return along with therest of the return.
Note: This option is not available for the K-1 copy or if you selected To print file asthe Destination. For the Government copy, the PDFs will only print if you selected theoption to print the entire Government copy of the return.
Additional Options.
Select Produce separate K-1 PDF files (Partnership, Fiduciary and S-Corp only) toprint K-1 packages separated as follows:
By partner for Partnership
By beneficiary for Fiduciary
By shareholder for S-Corp
The original combined K-1 PDF package is retained as one file along with the separatePDF files.
Warning! If a PDF file already exists with the same name as the combined K-1 PDFfile, an overwrite warning dialog displays. There is no overwrite warning for theseparate K-1 package PDF files when using either the default or override names.Also, if the return file name is changed, pre-existing PDF files that use the defaultPDF file name are not renamed. Pre-existing K-1 PDF files using a previous client filename are not overwritten by subsequent PDF files that are created after the return isrenamed. If the return or the client is deleted, the PDF files created from that return orclient are not deleted. You must delete, rename and manage the separate K-1package PDF files.
Chapter 3 - Tax Preparation • 95

Tip: If your firm uses this option, many more PDF files will be created, making filemaintenance and file location more important to manage. For this reason, werecommend a naming and file location convention for PDF files. These conventionswill make it easier to locate files when they need to be purged. In addition, werecommend that you do not duplicate a PDF file name in any return. No overwritewarning will display for the separate K-1 PDF files or for combined K-1 PDF filesusing old client file names.
Note: CCH ProSystem fx Engagement, CCH ProSystem fx Document, and CCHAxcess™ Document can all receive separate K-1 PDF files from Tax Preparation.
Select Create Bookmark PDFs (large returns may take longer to process) to producePDFs with collapsed bookmarks, or clear it to produce PDFs with uncollapsedbookmarks.
Select One statement per page to start each supporting statement on a new page. Thishas no effect on printing if no statements are included in a return.
Select Produce separate PDF files to produce separate PDF files.
Select Print only open diagnostics to only print open diagnostics with the return.
Select one of the following if you want to transfer your PDF file to Portal or Document. Youcannot select more than one. You may receive an account verification prompt after you enteryour User ID and password. If you do, you must request and submit a 2-Step Verification code toproceed.
Print to Portal. Select to transfer the file directly to Portal. This option is enabled only ifyour firm is licensed to use Portal, you have been granted access to use this option, anda PDF print option is selected.
Print to Document. Select to transfer the file directly to Document. This option is enabledonly if Document Smart Client is installed, you have been granted access to use thisoption, and a PDF print option is selected.
Print options can also be set in Office Manager and in the tax return. The following list summarizes thehierarchy of print preferences and how they are used:
For an office group. Use Configure Applications > Tax Preparation > Print Options in OfficeManager.
For a user. Use Options > Preferences > Tax Return Preferences > Print Entire Return in TaxPreparation. If enabled, this overrides the Office Manager option. In Tax Preparation, the PrintEntire Return user preferences apply to printing the entire return and the print preview only.
For a tax return. Use File > Print > Entire Return in the tax return. This overrides both the OfficeManager and the Preferences options. Selections made here will be used until you close yourTax Preparation session. The next time you open Tax Preparation, the choices selected usingthe Preferences options will be in use.
For more information on print types and destinations, see Entire Return on page 185.
Chapter 3 - Tax Preparation • 96
Heads Down and Split Screen Preferences(Tax Preparation > Options > Preferences > Tax Return Preferences > Heads Dn/Split Scrn)
The Heads Dn/Split Scrn tab allows you to set the following preferences to assist your data entrywhen using the Heads Down or Split Screen view:
ProKey. The ProKey feature is used to change forms quickly.
Use ++ to change form. Press + twice to change forms.
Use Enter key to change form. Press Enter to change forms.
QuickBox. The QuickBox feature moves the focus quickly to a specific box number.
Automatically move the cursor. Moves the cursor automatically to the data section assoon as you enter the box number.
Use Enter key to exit box #. After entering the box number, press Enter to move to thedescription field.
Key Verify. When entering amounts on a form in Split Screen or Heads Down display, KeyVerify displays a dialog if an amount you enter is different from an amount previously entered.When you leave the field, a dialog displays the previous amount and the current amount,allowing you to select the entry you want in the field.
See Using ProKey, QuickBox, and Key Verify on page 133 for more information.
Worksheet Preferences(Tax Preparation > Options > Preferences > Tax Return Preferences > Worksheets)
The following options can be used to customize how you display and navigate worksheets:
Worksheet. Specify how sections display when you open a worksheet.
Open worksheets with first section expanded (Default).
Open worksheets with sections containing data expanded.
Open worksheets with all sections expanded. Selecting this option may lengthen theamount of time needed to display worksheets.
Open worksheets with all sections collapsed.
End of section tab key movement. Select an action to occur when the cursor is positioned inthe last field of a worksheet section and Tab is pressed.
Move to next expanded section (Default).
Move to next section and expand if collapsed.
Highlight bar. Check the Disable data entry row highlight bar box to disable the highlight barthat displays over the field where the cursor is located.
Grids. Select Enter key moves cursor to the next field same record to use the Enter keyinstead of the Tab key, which is the default, to move to the next field in the grid.
Chapter 3 - Tax Preparation • 97

Start Up Screen Preferences(Tax Preparation > Options > Preferences > Start Up Screen Preferences)
The Open Return dialog displays as the start up screen when Tax Preparation opens. If you close theOpen Return dialog, you can reopen it by selecting File > Open. To set start up screen preferences,select Options > Preferences > Start Up Screen Preferences. The Preferences dialog displays.
The start up screen preferences are the default settings for the Open Return dialog, regardless of howit was opened. The preferences you can set are as follows:
Include the following attributes in client/return selection lists. Check or clear the box to add orremove a column of return detail in the Client/Return list. Return ID and Client name arepreselected and cannot be cleared.
Open list of returns with. Check Display list of returns when Tax Prep opens to launch asearch when the Open Return dialog opens. The length of time the system requires to searchvaries widely depending on the type of search selected, so consider your available time whenmaking this selection.
The search options you can select from include the following:
The most recently used returns: number of entries. Displays the most recently openedor saved returns. Choose how many clients and/or returns display. A smaller numberresults in a shorter system response time.
The results list created by the most recent client/return search. Displays the results ofyour last search. This means the search itself is not repeated; only the results areredisplayed, which takes less time than a new search.
Client/returns filtered by. Displays a list of returns that match criteria you select for thefollowing categories: Tax product, Status, Last activity, Office group, Preparer, andStaff responsible. Each filter has a drop-down list, allowing you to narrow your search toa target group, category, or name within the filter.
Returns in your In-Box. Displays returns that have been forwarded to your In-Box.
Multi-Monitor Preferences(Tax Preparation > Options > Preferences > Multi-Monitor Preferences)
If you are using multiple monitors with different screen resolutions in a Citrix® environment, you mustspecify the resolution for the monitor where Tax Preparation is displayed; otherwise, the laser formsdo not display properly. Use the Multi-Monitor Preferences dialog to configure screen resolution forthe monitor that is running Tax Preparation.
1. Select Options > Preferences > Multi-Monitor Preferences to display the Multi-MonitorPreferences dialog.
2. In the Configuration option section, select the resolution for the monitor that displays TaxPreparation.
3. Click OK.
Chapter 3 - Tax Preparation • 98
Setting Interface OptionsThe interface options in Tax Preparation allow you to enter workstation and user-level settings for thefeatures discussed in the sections that follow. Some of the Tax Preparation settings override thedefault settings from Office Manager.
Configuring CCH Research User IDs(Tax Preparation > Options > Interface Options > CCH Research)
Note: The interface to CCH Research is not available for prior-year processing using a non-integrated installation of FX Direct. These features are available with your current year system, ifinstalled.
If you subscribe to a CCH research product, CCH® IntelliConnect® or CCH® AnswerConnect, yourweb browser launches to access the U.S. Master Tax Guide, State Smart Charts, or Tax Prep Partnerthrough your IntelliConnect or AnswerConnect website.
If your firm assigns user IDs to access IntelliConnect or AnswerConnect, enter your User ID by doingthe following:
1. Select Options > Interface Options > CCH Research. The CCH Research dialog displays.
2. Enter your IntelliConnect or AnswerConnect user ID.
3. Click Save.
The CCH Research user ID is retained when you install Tax Preparation for a new year.
Notes:
If you have previously configured your user ID, it is retained.
Tax Preparation does not validate the accuracy of the CCH Research user ID.
For tax years 2011 to 2016, configure your user ID at Options > Interface Options >IntelliConnect in Tax Preparation.
For tax years prior to 2011, configure your user ID and password at Options > InterfaceOptions > Researchin Tax Preparation.
Selecting the Location for BNA Data(Tax Preparation > Options > Interface Options > BNA)
Note: The BNA interface is available only with an integrated installation of FX Direct. It is notfunctional with independent FX Direct.
To configure user-specific settings to override firm-wide BNA configurations, do the following:
1. Select Options > Interface Options > BNA. The Configure BNA dialog displays.
2. Enter the path where the BNA program is installed. The default location is C:\ProgramFiles\Bloomberg BNA\BNA Income Tax Planner.
Chapter 3 - Tax Preparation • 99

3. Enter the location to store a specific BNA planning file. The default location is C:\Users\<userprofile>\Documents\Bloomberg BNA\BNA Income Tax Planner.
4. Click OK.
Configuring Accounting Bridges(Tax Preparation > Options > Interface Options > Accounting Bridges)
Note: Quiklink functions mentioned in this procedure are only available with an integratedinstallation of FX Direct. Quiklink is not available in independent FX Direct.
Before tax data can be imported from an accounting system, you must use the Accounting Bridgesdialog to link to the accounting systems you use and then create a client list.
The configuration you set up is retained when you install Tax Preparation for a new year.
To link to the accounting system and create a client list, do the following:
1. In Tax Preparation, select Options > Interface Options > Accounting Bridges. The AccountingBridges dialog displays. All of the accounting systems that are used with Dynalink and Quiklinkprocessing are listed. If an accounting system has been configured, the Configured columnshows a Y; otherwise, it is blank.
Note: To reconfigure accounting bridges for an accounting system, you must first removethe existing configuration. See Removing an Existing Configuration of Accounting Bridgeson the next page for more information.
In the List Created column, the date the client list was created displays; otherwise, the column isblank. For Tax Preparation, only one list, which corresponds to the current tax year, can becreated per accounting system.
Note: Accounting systems for Dynalink and Quiklink processing can be configured in OfficeManager using Configure Applications.
2. Select your accounting system, and then click Configure. The Configure Accounting Systemdialog displays.
3. Enter the drive and directory location of the processor in the Accounting system path field, orclick Browse and select the drive and directory. (This is the location of the DYNALINK.exe file.)
The typical file paths, where ? represents the drive letter, are as follows:
?:\Avision\Av32 for CCH ProSystem fx Trial Balance
?:\Pfx Engagement\Wm for CCH ProSystem fx Engagement
4. When you configure a file path for an accounting system that uses Quiklink processing, theQuiklink option group box is enabled. Choose a Quiklink option and click OK.
The Quiklink option selection determines which worksheet or form location the accountingsystem will link to in the client’s Tax Preparation return.
5. Highlight the accounting system you are configuring and click Create Client List to create a listof the clients available for processing.
Chapter 3 - Tax Preparation • 100
This list must be updated only when changes are made to the client information in youraccounting system. When the list is created and no changes or additions have been made to theclient information, the button option is Refresh Client List.
6. Click Close.
See Processing with Dynalink on page 224 for instructions on importing client information from youraccounting system into a return.
See Updating with Quiklink on page 225 for more information on using Quiklink.
Removing an Existing Configuration of Accounting BridgesTo reconfigure accounting bridges for an accounting system, you must first remove the existingconfiguration.
1. On the Accounting Bridges dialog, highlight an accounting system displaying a Y in theConfigured column.
2. Click Remove Configuration. A message displays asking if you want to remove theconfiguration and client list for the accounting system you selected.
3. Do either of the following:
Click Yes. The system removes the configuration and client list for the selectedaccounting system. The Accounting Bridges dialog displays, still listing the accountingsystem, but the Configured and List created columns are blank.
Click No. The Accounting Bridges dialog displays, showing the configuration of theaccounting system is unchanged.
Your configuration settings are retained when you install Tax Preparation for a new year.
Configuring the CCH ProSystem fx Engagement or CPADocument ManagerInterface
(Tax Preparation > Options > Interface Options > PFX Engagement/CPADocument Manager)
Return copies saved as PDF files can be stored in CCH ProSystem fx Engagement binders orCPADocument Manager. You must have one or both of these programs installed to configure the PDFstorage options. CCH ProSystem fx Engagement must be version 2.5 or later.
To configure the Engagement or CPADocument Manager Interface, do the following:
1. Select Options > Interface Options > PFX Engagement/CPADocument Manager. ThePfx Engagement/CPADocument Manager dialog displays.
2. Select Save PDF to, and then select ProSystem fx Engagement or CPADocument Managerfrom the drop-down list (only the installed software appears).
3. Under Options, choose whether to be prompted before saving each PDF file.
Always save. Means your PDF file can always be found in the same location.
Prompt me. Allows you to save the return copies to a different location, such as a folderon your system, an Engagement binder, or a CPADocument Manager binder, on a case-by-case basis.
Chapter 3 - Tax Preparation • 101
4. If you selected Engagement, enter your CCH ProSystem fx Engagement user name andpassword. If you selected CPADocument Manager, no user name or password is required.
Note: Tax Preparation does not validate the user name or password. If there is an error ineither field, Engagement displays an error when the system attempts to save a PDF file toan Engagement binder.
5. Click OK. The Engagement Wizard launches when you create a PDF file. The wizard walks youthrough the process of selecting the binder and the workpaper tab where the file will be stored.CPADocument Manager does not have a wizard.
The options set using this procedure are retained when you install Tax Preparation for a new year.
Note: When the Save PDF to option is checked, the buttons for sending more than one returncopy to PDF files are disabled. The Engagement binder interface always sends only one PDF filethat contains all copies. For more information regarding this print option, see Entire Return onpage 185.
Configuring CCH Client DataXchange(Tax Preparation > Options > Interface Options > CCH Client DataXchange)
Note: The CCH Client DataXchange interface is available only with an integrated installation ofFX Direct. It is not functional with independent FX Direct.
You can configure the system to prompt you to create a CCH Client DataXchange export file everytime an Estate return is closed. The export file can be used with ViewPlan, an estate planning product.When you close the return, you can specify a file name with the extension CIP and the drive anddirectory where the file will be stored.
To configure CCH Client DataXchange, do the following:
1. Select Options > Interface Options > CCH Client DataXchange.
2. Check the Automatically prompt to create a CCH Client DataXchange export file when a 706return is closed box.
3. Click OK to save your changes.
Setting Up ProSystem fx Portal Login Credentials(Tax Preparation > Options > Interface Options > ProSystem fx Portal)
ProSystem fx Portal allows you to collaborate on files with your clients. You and your clients canupload, download, store, and share documents in a safe and secure environment. One user at a timecan check out a file from a network server and make edits. When that user uploads the revised fileback to the server, it becomes available for the next reviewer. This process ensures that there isalways just a single authoritative version of a file. Users access their documents via the internet usinga web-based interface called a portal.
Chapter 3 - Tax Preparation • 102

To set up your login credentials for ProSystem fx Portal, do the following:
1. Select Options > Interface Options > ProSystem fx Portal.
2. Enter your login information.
3. Click OK.
You can transfer a return from Tax Preparation to ProSystem fx Portal. Select To PDF file as thedestination on any print dialog, and then select Print to Portal. You may receive an accountverification prompt after you enter your User ID and password. If you do, you must request and submita 2-Step Verification code to proceed.
If you have been granted the option to transfer a return from Tax Preparation to ProSystem fx Portal,you can set preferences for printing an entire return by selecting Options > Preferences > PrintEntire Return.
Practice InterfaceThe Practice interface menu options and toolbar features are available only if you have licensed andinstalled Practice software and you have an integrated installation of FX Direct. This feature is notavailable with independent FX Direct. Before using the Practice interface, settings must be configuredin Office Manager.
The configuration options in Office Manager for ProSystem fx Practice software include the following:
ProSystem fx Practice. Enables client profile link, time clock management, and sending invoiceamounts.
ProSystem fx Practice with Project. Enables client profile link, project link, time clockmanagement, and sending invoice amounts.
ProSystem fx Project. Enables client profile link and project link.
Practice interface features are accessed from the Manage menu and are available only when a taxreturn is open. See Chapter 2 - Office Manager on page 11, Chapter 3 - Tax Preparation on page 80,and Chapter 12, ProSystem fx Practice or Project Interface of CCH ProSystem fx Tax User Guide fordetailed information, including establishing client links and enabling the Sending Invoice Amount toPractice and Time Clock features.
Setting Up a Printer(Tax Preparation > File > Printer Setup)
The Printer Setup you establish in Tax Preparation applies to all CCH ProSystem fx Tax applicationsand remains in effect for the workstation until it is changed. If the setup is changed, the change appliesto all open sessions of Tax Preparation.
1. Select File > Printer Setup.
2. Choose either the Windows® default printer or an alternate printer from the ProSystem fx printerdrop-down list.
Chapter 3 - Tax Preparation • 103
3. Check the Utilize True Type fonts for print processing box to use Windows® fonts and not theCCH ProSystem fx fonts. When this option is selected, you do not have to download fontsbefore printing.
4. Select to use a large capacity tray, if available.
For CCH ProSystem fx fonts. Check the Use large capacity add-on tray when printingbox if your printer is configured to use a large capacity tray and you want to use it whenprinting returns and reports.
For TrueType fonts. The tray option is not available from the Printer Setup dialog. If yourprinter has this capacity, select the tray on the Printing Preferences > Paper tab fromyour printer Properties dialog.
5. To print to an installed fax, select the fax from the list in the Print to fax section.
6. If you want to print to installed document imaging software, select the imager from the Print todocument imager section.
Check the Installed document imager can process landscape forms box if your documentimaging software is capable of processing landscape forms. If it is unable to process forms in alandscape layout, the forms are compressed and printed in portrait layout.
7. Choose the default Windows® printer or a specific printer to print labels.
8. Click OK to save your changes.
Loading Fonts(Tax Preparation > File > Load Fonts)
If you are not using TrueType fonts, select File > Load Fonts to download fonts to your default printer,or click Load Fonts on print dialogs prior to printing. If a printer has not been selected for printingreturns and reports, the Select Printer dialog displays enabling you to select the preferred printer.
Note: Load Fonts is not available if you selected the TrueType fonts option during Printer Setup.
Using Help(Tax Preparation > Help)
Tax Preparation offers a variety of Help references for return processing instruction and productinformation. They include the following:
Select Help from the menu bar or press Alt + H to access Help options.
Select Help > Help Topics to open the online Help for Tax Preparation. You can browse fortopics in the table of contents or index, search for keywords, and create a list of favorite topics.
Select Help > Message Center to open the Message Center and view recent messages fromCCH.
Select Help > Release Information to access information about the updates included in thecurrently installed release.
Chapter 3 - Tax Preparation • 104

When your cursor is located in a worksheet field or an interview form field, do one of thefollowing to access field-level tax help:
Select Help > This Field’s Instructions.
Press F1.
Click Tax Instructions Help on the toolbar.
Right-click and select This Field’s Instructions from any field on an interview form orworksheet.
When working with Federal and most state government forms, do one of the following to accessa cross-reference list correlating government forms with the corresponding interview forms andworksheets:
Select Help > Cross-Reference.
Press F1 from any field.
Click Tax Instructions Help on the toolbar.
In Worksheet or Interview View, do one of the following to access form-level tax help:
Select Help > This Worksheet's Instructions when using Worksheet View.
Select Help > This Form’s Instructions when using Interview View.
Press F2 from any field.
Right-click a white area of a worksheet or form and select This Worksheet's/Form’sInstructions from the menu.
When working on government forms, do one of the following to open your web browser and go tothe IRS or state form instruction website:
Select Help > Gov’t Form Instructions.
Press F3.
Click the Gov’t Form Instructions button.
Right-click and select Gov’t Form Instructions from the menu.
Select Help > Step-by-Step > Help or click the Step-by-Step Help button to access instructiontopics for specific tax functions.
Help runs as a separate application within Windows®. You can leave Help running and return to TaxPreparation or exit Help by clicking Close (X).
Accessing CCH Research FeaturesCCH research products, CCH® IntelliConnect® and CCH® AnswerConnect, combine up-to-datefederal, state, and international tax information with powerful search functionalities. Researchdocuments are well-organized and include tools to help you efficiently locate related news, full-textsource documents, and analysis.
Note: The interface to CCH Research is not available for prior-year processing using a non-integrated installation of FX Direct. These features are available with your current year system, ifinstalled.
Chapter 3 - Tax Preparation • 105
U.S. Master Tax Guide(Tax Preparation > Help > U.S. Master Tax Guide)
Select the U.S. Master Tax Guide button on your toolbar, select Help > U.S. Master Tax Guide, orselect U.S. Master Tax Guide from the right-click menu within any return field that is supported by alink.
The U.S. Master Tax Guide is displayed in your internet browser on the CCH IntelliConnect or CCHAnswerConnect research website that you are licensed for.
Note: If your firm is authenticating in CCH Research with user IDs and you have not set up youruser ID in Options > Interface Options > CCH Research, you are prompted to do so now. Fordetails, see Setting Interface Options on page 99.
State Smart Charts(Tax Preparation > Help > State Smart Charts)
Select State Smart Charts from the Help menu or the right-click option. Select from the following forinformation about supporting laws and regulations for the selected state in the return.
Business Income Tax
Personal Income Tax
Franchise Tax
Sales and Use Taxes
Property Tax
Other Taxes
Unclaimed Property
CCH Tax Prep Partner(Tax Preparation > Help > CCH Tax Prep Partner)
The CCH Tax Prep Partner Series™ provides quick references to tax form line explanations, guidancefor preparing the main federal tax forms, and unique practice materials such as client letters andready-to-use worksheets.
You can configure the toolbar to include the CCH Tax Prep Partner button.
To access CCH Tax Prep Partner from a field on a government form:
Right-click in the field and select CCH Tax Prep Partner from the menu.
Select the CCH Tax Prep Partner button on the toolbar.
Select Help > CCH Tax Prep Partner.
Chapter 3 - Tax Preparation • 106

Notes:
Tax provides links to the CCH Tax Prep Partner Series research products for the following returntypes: 1040, 1041, 1065, 1120, 1120S, 990 (main forms only).
The menu command and toolbar button are enabled at the field-level when the selected field hasa link to Tax Prep Partner.
If your firm has user-specific credentials for CCH Research (IntelliConnect/AnswerConnect) andyou have not set up your User ID in Options > Interface Options > CCH Research, you areprompted to do so now.
If you do not have the appropriate licensing when trying to link from Tax, an Unable to FindCitation message displays.
CCH ProSystem fx on the Web(Tax Preparation > Help > CCH ProSystem fx on the Web)
The Customer Support website can be accessed by selecting Help > CCH ProSystem fx on the Webfrom the following applications:
Tax Preparation
Office Manager
Production Processing
CCH ProSystem fx on the Web submenu options open your default web browser and take you to theCustomer Support website at https://support.cch.com. Some of the services include the following:
Account services and administration
Product and software information
Tips and answers to Frequently Asked Questions (FAQs)
Access to ordering supplies
Tax renewal
Billing data
CCH Software News publications
Electronic filing information
Training, consulting, and online seminars
Conference information
Links to federal and state tax authorities
Support contact information
Access to our Knowledge Base
Forms release and product release schedules
Program scans
Release notes
Chapter 3 - Tax Preparation • 107

Accessing Form Status(Tax Preparation > Form Status
The Forms Release Status page on the Customer Support website provides release statusinformation for paper and e-file forms. You can search by product, taxing authority, and form status.
You can access the Forms Release Status page from within Tax Preparation by:
Selecting Form Status from the return main menu bar.
Selecting Help > CCH ProSystem fx on the Web > Forms Release Status.
You will be prompted to log in to the Customer Support site (support.cch.com).
Creating and Opening ReturnsThis section explains how to create a return for a new or existing client. Multiple returns or versionscan be open simultaneously. The number that can be open is limited by the view that is currentlyenabled, and available system memory. Up to eight sessions can be open simultaneously in InterviewView, and up to four sessions in Worksheet View.
Creating a New Return(Tax Preparation > File > New)
Use the following procedure to create a new return for a new or an existing client who does not have areturn for the same tax year and tax product.
1. Do one of the following:
Select File > New.
Click the New Return button on the toolbar.
Click New Return on the Open Return dialog.
Press Alt + W from the Open Return dialog.
2. Enter a unique client ID of 1 to 12 alphanumeric characters and click OK.
3. If you are creating a return for a new client, use the drop-down list to select a client type. Onlythose entities that are installed will appear in the list.
4. Select the tax product. The options available depend on what you have installed and the clienttype.
5. Select the office groups for the client.
6. If a default return has been created for the tax product and tax year, you can select Use defaultreturn to copy default information to the return. If you do not want to use the default return, clearthis option. For more information, see Default Returns on page 111.
7. Click OK.
Chapter 3 - Tax Preparation • 108

Note: The available worksheets or government forms depend on the client type and taxproduct selected. The view defaults to the preceding view selected.
8. Enter name and optionally an SSN/FEIN number and click OK.
Create a New Return for an Existing Client(Tax Preparation > File > New)
You can create a return for one of the following:
An existing client with no existing returns for the current year.
Another version of a return belonging to an existing client.
To create a new return for an existing client, do the following:
1. Select File > New or click the New Return button.
2. Enter the client ID and click OK.
3. Do one of the following:
To create a return for a client with no existing returns, choose a client type, tax product,and office group. Only those entities installed appear in the list.
To create a new version of a return for an existing client, select a tax product.
4. If a default return has been created for the tax product and tax year, the Use default return box isenabled to copy default information to the return. If you do not want to use the default return,clear this option.
5. Click OK. If you are creating a return for a client with no existing returns, the return opens. If youare creating a new version of a return for an existing client with one or more returns within thesame tax year, the existing return versions display by tax year, tax product, version number, anddescription.
6. Click New Version.
7. Enter a description (optional) for the new version and click OK to open the return.
Note: The view (for example, Worksheet, Interview, Split Window Forms Tree) defaults tothe most recent view selected. The available worksheets or government forms depend onthe client type and tax product selected.
When you create a return version using this method, only information entered in a default return andprofile data are copied into the new return. To create another return version containing all return datafrom an original version (i.e., entities, depreciation, etc.), open the original return and select File >Save As.
The Return ID is incrementally numbered as YY?:Client ID:V2 where YY represents the tax year,? represents the tax product, and 2 is the version number. For example, the third version created foran Individual 2020 return for the client Mathews is 20I:Mathews:V3.
The system letter that defines each tax product is as follows:
(I) Individual
(P) Partnership
Chapter 3 - Tax Preparation • 109

(C) Corporation
(S) S Corporation
(F) Fiduciary
(Y) Estate & Gift
(K) Employee Benefit Plan
(X) Exempt Organization
Opening a Return from the In-Box(Tax Preparation > Manage > In-Box)
There are several methods of accessing returns from the In-Box.
To open the In-Box with a direct command, use the following procedure:
1. Select Manage > In-Box or click In-Box. The In-Box displays a list of forwarded returns. If the In-Box button does not display, add it to your toolbar using Options > Customize Toolbar. SeeCustomizing the Toolbar on page 91 for information.
2. Highlight a return and click Open. For more information on using the In-Box, see Using the In-Box on page 207.
To display the In-Box when Tax Preparation opens, set the following preferences:
1. Select Options > Preferences > Tax Return Preferences > Miscellaneous.
2. Check the Display In-Box when Tax Preparation is opened box.
To display the list of returns from your In-Box (but not the In-Box itself) in the Client/Return list whenTax Preparation opens, do the following:
1. Select Options > Preferences > Start Up Screen Preferences.
2. Check the Display list of returns when Tax Prep opens box.
3. Choose Returns in your In-Box.
To display the list of returns from your In-Box in the Client/Return list when Tax Preparation opens, dothe following:
1. In the Other section located at the bottom of the Search Panel, select Returns in your In-Box.
2. Click Go.
Opening an In-Use ReturnIf you attempt to open a return and you receive an “in-use” message, the return is being accessed byanother user or, if your system shuts down unexpectedly, the return is locked.
You have the following options:
Select Retry to attempt accessing the return when the client is no longer in use, or click Cancelto exit the warning dialog.
Chapter 3 - Tax Preparation • 110
Note: Check with the user whose name displays on the Client In-Use dialog to see if thatuser is still working on the return you are trying to access.
Select Access Anyway if you believe the return is locked because it closed unexpectedly (e.g.,your computer crashed while the return was open).
Note: If you select Access Anyway for a return that someone is working on, you will receivea message stating the return cannot be opened.
Perform an In-Use Rebuild to unlock any clients that are currently locked. See In-Use Rebuildon page 75 for details.
Default ReturnsA default return allows you to create a master return for the tax year accessed. A default return cancontain recurring information that can be applied to new and pro formaed returns for an office group.
Users with any access level can create default returns for each tax product, provided functional rightshave been granted to create new returns for new clients using Configure Staff in Office Manager. Adifferent set of default returns can be created for each office group. Since there are no mandatoryfields in a default return, you can enter data in any field on any form.
Points to Remember
If you change a default return, the change applies only to new returns created after the change.Returns created with the previous default return version are not updated.
If you use default return data when recalling client Pro Forma, any conflicting default return datais overridden by the client Pro Forma data, unless otherwise indicated for your office group inOffice Manager. For more information, see Configuring Tax Preparation: Pro Forma andOrganizer on page 40.
Creating a Default Return(Tax Preparation > Options > Default Returns)
Do the following to create a default return:
1. Select Options > Default Returns.
2. On the Default Return dialog, select a tax product and office group.
3. Click OK. The default return opens and can be edited like any other return.
Chapter 3 - Tax Preparation • 111
Securing a Default Return(Tax Preparation > Manage > Secure Return)
You can enable password security by office group for each product’s default return, making apassword required to open the default return for editing.
Warning! If you forget the password, you must request assistance from Technical Support. It isrecommended that you designate someone in your office to maintain a list of passwords assignedto default and regular returns.
To secure a default return, do the following:
1. Open the default return you want to secure.
2. Select Manage > Secure Return or click the Secure Return button. The Secure Default Returndialog is displayed.
3. Check the Secure default return box to enable the Password field.
4. Enter a password of up to eight alphanumeric characters. Do not use spaces or specialcharacters.
5. Press Tab to move to the Verify pswd field and re-enter the password.
6. Click OK.
Notes:
If you forget the password when opening a default return, the View Only option displays thecontents of the default return. In this mode, changes cannot be made to the security setting ofthe return.
Client returns created from password-protected default returns do not inherit the securitysettings of the default return.
Saving Changes to a ReturnUse the options discussed in the sections that follow to save changes to a return.
Using AutoSave(Tax Preparation > Options > Preferences > Tax Return Preferences > AutoSave)
The AutoSave feature allows you to set a specific time interval for the system to automatically savereturn data as a temporary file.
1. Select Options > Preferences > Tax Return Preferences > AutoSave.
2. Select AutoSave using the following interval in minutes and click the arrow buttons to select anumber of minutes. The minimum is two minutes.
3. Check the Alert when preparing to save box to be prompted before each AutoSave, giving youthe option of not saving.
4. Click OK to activate AutoSave.
Chapter 3 - Tax Preparation • 112
Warning! AutoSave does not replace the system Save Return function. The file created byAutoSave is used as a restoration file during the active return session. When the return is closed,the temporary file is deleted. To retain return data so it can be recalled, you must select File >Save, click the Save Return button, or press Ctrl + S.
Saving to an Alternate Drive or Removable MediaYou can save new returns and move existing returns to your local drive or a removable storagedevice, such as a CD, DVD, or flash drive.
The procedures for saving a new or existing return vary slightly.
1. Insert the storage device if you are saving or moving a return to a removable media.
2. Select one of the following:
Create a new return and select File > Save To.
Open an existing return and select File > Move To.
3. Select your local drive or the media drive where you want to store the return.
4. Click OK.
Note: If there is not enough space for the return on the drive you selected, an "insufficientspace" message displays. Do the following to continue the storing process:
a. Click OK.
b. Insert another storage device (e.g., CD or DVD) or select another drive.
c. Click OK to continue the storing process.
When you move an existing return, the system determines if the return exists on the drive selected. If itdoes, you are given the option to overwrite it. If it does not already exist, a Wfx32\Client\YYP directoryis created, where YY represents the tax year and P represents the tax product.
Notes:
All batch functions in Production Processing, including creating and printing Organizers and ProForma, can be performed for returns on a storage device or an alternate drive. All TaxPreparation features, including electronic filing and history are available with the exception ofthe ability to forward a return.
If you are storing a return that has been forwarded to another user, the forwarded status of thereturn is canceled. The return cannot be forwarded again until it is moved back to theCCH ProSystem fx system drive.
When a return has been moved, an activity entry of Moved to Alternate Drive is posted to thereturn history log. If you have licensed Client Manager, you can view a client’s return and profileactivity using the Options > View Client History option in Client Manager.
Returns can be filtered in the Client/Return List by entering Moved to Alternate Drive as the lastactivity.
Returns stored on removable media are not available for backup.
Chapter 3 - Tax Preparation • 113
Save(Tax Preparation > File > Save)
To save changes to the return on which you are currently working, press Ctrl + S, select File > Save,or click the Save Return button.
Save As(Tax Preparation > File > Save As)
Save As allows you to create a copy of a return with a new version number. A maximum of nineversions can be created.
Note: Changes made to the return since the last time it was saved are applied to the new versiononly. The original version of the return remains unchanged.
1. Select File > Save As. The New Version of Return dialog displays with the version numberautomatically incremented by one.
2. Enter up to 20 characters as a description for the new version.
3. Click OK. All data in the current return is copied to the new version of the return.
Save As creates a new return on the same drive location from which it was opened. The Return ID isincrementally numbered as YY?:Client ID:V2 where YY represents the tax year, ? represents the taxproduct, and 2 is the version number. For example, the third version created for an Individual 2020return for the client Mathews is 20I:Mathews:V3.
Closing a Return(Tax Preparation > File > Close Return)
1. Select File > Close Return, or click the Close Return button if configured on your toolbar.
2. If you made changes to the return, you are asked if you want to save the changes. Click Yes tosave changes.
Selecting Interview Forms(Tax Preparation > View)
The availability of interview forms depends on the setting selected in Office Manager > Configure Firm> Input Methods. See for more information.
Chapter 3 - Tax Preparation • 114
Form TypesYou can enter tax return data on two types of forms.
Government. Government forms resemble their associated tax forms. Using Forms 1040, 1041,1065, 1120, 1120S, 706/709, 990, or 5500 as your starting point, you can expand or link to anysupporting form or schedule in the return.
Use the Expand feature to enter supplemental data in a government form.
The Govt to Interview Link function links a federal government form to its correspondinginterview form. The link must be initiated from the government form. See Navigatingthrough the Forms on page 123 for more detail.
Interview. Interview forms are replicas of the hard copy CCH ProSystem fx Tax interview forms.You have the option of using Heads Up, Heads Down, or Split Screen data entry. See Data EntryMethods for Interview Forms on page 131 for more detail.
Form Selection DisplayThere are three window displays from which forms are selected.
Split Window Forms Tree
Full Window Forms Tree
Full Window Forms List
When working with consolidated returns, there is an additional tab and tree available to move betweenthe returns within the consolidated unit. See Navigating Consolidated Returns on page 130 fordetailed information.
Split Window Forms TreeIn this view, the open form displays in the right pane and a list of forms displays in the left pane. Whenyou initially select View > Split Window Forms Tree, only the Federal and State folders display.
Chapter 3 - Tax Preparation • 115

Use the vertical border that separates the two panes to resize the forms window and display full formnames. You can also display an entire form name by positioning the pointer on the form.
Select an entity by opening the folder containing the entity (e.g., the Business Income and Expensesfolder). Entity refers to a discreet taxable unit, such as a single rental property, a farm, or a quantity ofstock in a company. All pertinent forms for the entity are in the folder.
To quickly locate a form, click the Search button, select Edit > Search from the menu, or right-click inthe tree pane and select Search from the menu. The Search dialog displays. Enter a keyword in theSearch Text field and click Find Next.
Use the View > Zoom To option to increase or reduce the form size. Use the Zoom To > Split Zoomoption to return the form to its original size.
To change the form selection list, click the Interview or Government tabs in the lower-left corner of thetree pane. The forms tree contains the interview and government forms respective to each display.
To display or hide the tree pane of the Split Window Forms Tree, select Forms > Open (Close) FormsTree or click the Open (Close) Forms Tree button. The button description and menu commandalternate between Open and Close, depending on the display.
Use one of the following to open all folders in the forms tree:
Select View > Expand All.
Click the Expand All button.
Press Shift and + to expand all folders.
Chapter 3 - Tax Preparation • 116

Use one of the following to close all folders in the forms tree:
Select View > Collapse All.
Click the Collapse All button.
Press Shift and - to collapse all folders.
Full Window Forms TreeSelect View > Full Window Forms Tree to display the Federal and State folders for the forms type,either Interview or Government. To change from one forms list to another, click the appropriate tab atthe top of the screen for Interview or Government.
To select a new form when another is open, you first must display the forms tree by doing one of thefollowing:
Select Forms > Forms Tree.
Click the Forms Tree button.
Right-click and select Forms Tree from the menu.
Press Ctrl + F6.
The focus returns to the last form you selected.
To select an entity, open the folder containing the entity (e.g., the Business Income and Expensesfolder). All pertinent forms for the entity are contained in the folder.
Chapter 3 - Tax Preparation • 117
To keep the Full Window Forms Tree tabs visible (i.e., Fed Interview, Fed Government, etc.)regardless of the number of open forms, select Show Form Tabs on the View menu.
To display hidden forms tabs, click Forms Tree on the toolbar.
To quickly locate a form or folder, enter keywords in the Search Text field at the top of the forms tabsand click Find Next.
Use View > Zoom To to increase or reduce the form size.
Use one of the following to open all folders in the forms tree:
Select View > Expand All.
Click the Expand All button.
Press Shift and + to expand all folders.
Use one of the following to close all folders in the forms tree:
Select View > Collapse All.
Click the Collapse All button.
Press Shift and - to collapse all folders.
Chapter 3 - Tax Preparation • 118
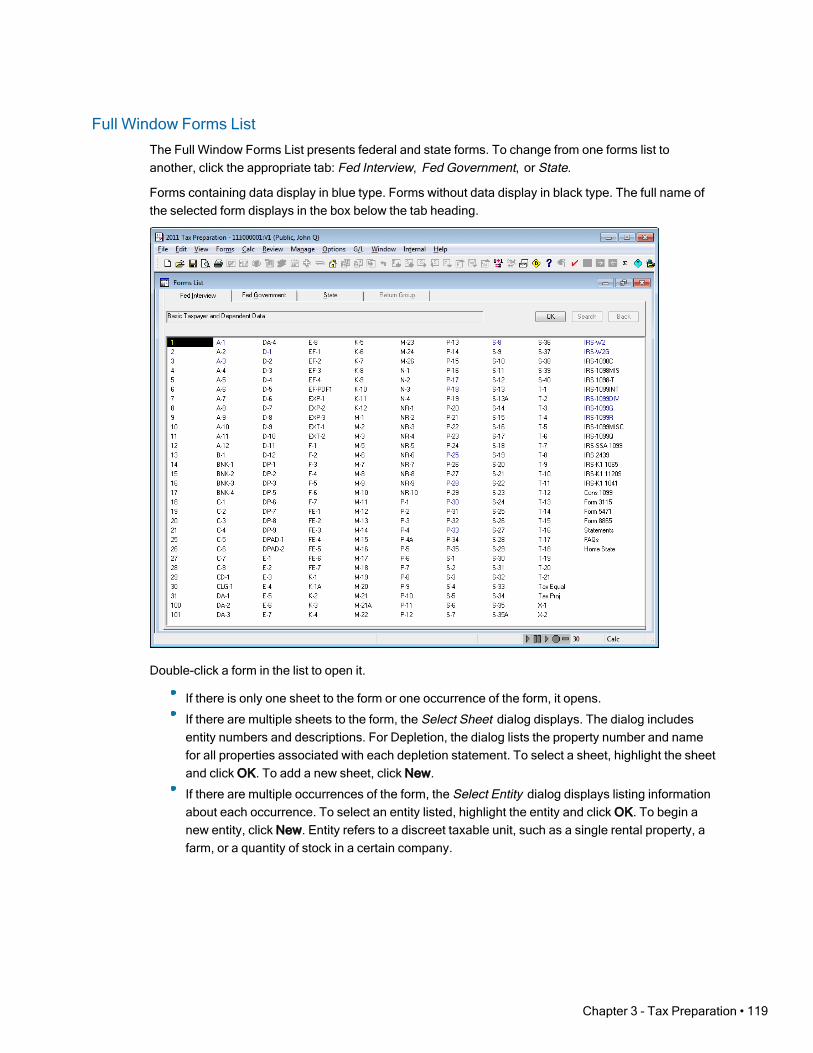
Full Window Forms ListThe Full Window Forms List presents federal and state forms. To change from one forms list toanother, click the appropriate tab: Fed Interview, Fed Government, or State.
Forms containing data display in blue type. Forms without data display in black type. The full name ofthe selected form displays in the box below the tab heading.
Double-click a form in the list to open it.
If there is only one sheet to the form or one occurrence of the form, it opens.
If there are multiple sheets to the form, the Select Sheet dialog displays. The dialog includesentity numbers and descriptions. For Depletion, the dialog lists the property number and namefor all properties associated with each depletion statement. To select a sheet, highlight the sheetand click OK. To add a new sheet, click New.
If there are multiple occurrences of the form, the Select Entity dialog displays listing informationabout each occurrence. To select an entity listed, highlight the entity and click OK. To begin anew entity, click New. Entity refers to a discreet taxable unit, such as a single rental property, afarm, or a quantity of stock in a certain company.
Chapter 3 - Tax Preparation • 119

Do one of the following to return to the Forms List. The focus will be on the form you last opened.
Click the Forms List button.
Press Ctrl + F6.
Right-click and select Forms List from the menu.
Select Forms > Forms List.
To keep the Full Window Forms List tabs visible (e.g., Fed Interview, Fed Government) regardless ofthe number of open forms, select Show Form Tabs on the View menu.
Navigating Split Window and Full Window Forms TreesUse the following keyboard and menu options to navigate the forms trees:
Keyboard and Menu Options to Navigate Form Trees
(For a complete table of shortcuts, see Help or the beginning of this User Guide)
Function Keyboard Menu
Open FolderRight Arrow or + (on numerickeypad)
View > Open Folder
Open Sub Folders * (on numeric keypad)View > Open Folder & Sub-Folder
Open All FoldersShift and + (on numerickeypad)
View > Expand All
Close FolderLeft Arrow or - (on numerickeypad)
View > Close Folder
Close All FoldersShift and - (on numerickeypad)
View > Collapse All
Open a Form Enter or double-click form
Toggle between Form and Tree (Splitview only)
F6
Moving between Multiple Windows Shift + F6 or Ctrl + Shift + F6
Related forms are grouped in folders. Expand or open a folder to display its contents.
To open a form, do any of the following:
Double-click the form.
Highlight the form and press Enter.
Right-click the form and select Open Form from the menu.
If there is only one sheet to the form, the form opens. If there are multiple sheets, the Select Sheetdialog displays. The dialog shows entity numbers and descriptions. For Depletion, the dialog lists the
Chapter 3 - Tax Preparation • 120

property number and name for all properties associated with each depletion statement. To select anexisting sheet, select the sheet and click OK. To add a new sheet, click New.
To work on a new entity, double-click the red cross in the primary folder. CCH ProSystem fx Taxautomatically increases the entity number by one and assigns a new sheet number.
Note: Forms and folders containing data are blue. Folders without data are yellow, and formswithout data are gray.
Viewing Only Forms with Data(Tax Preparation > View > Show Forms in Return)
In the Split or Full Window Forms Tree views, you can choose to display only forms containing data.When this option is selected, the forms tree includes only the following:
Government forms. All forms that print in the accountant copy.
Interview forms. All forms containing data.
Note: Blue indicates folders or forms that contain data, yellow indicates folders without data, andgray text indicates forms without data.
Split Window Forms TreeDo any of the following:
Click Show Forms in Return at the lower-right corner of the forms tree pane. To return to thecomplete forms list, click the button again. The button description alternates between ShowForms in Return and Show All Forms.
Right-click a form, folder, or open space in the tree, and select Show Forms in Return. To returnto the complete list, right-click and clear Show Forms in Return.
From the View menu, select Show Forms in Return.
Full Window Forms TreeDo any of the following:
Click Forms in Return located below the tab heading. The button changes to Show All Forms.To return to the full list, click Show All Forms.
Right-click a form, folder, or open space in the tree and select Show Forms in Return from themenu. To return to the full list, right-click and clear the option.
From the View menu, select Show Forms in Return.
Chapter 3 - Tax Preparation • 121

Accessing State Forms(Tax Preparation > Forms > Home State Forms)
Do the following in Split Window Forms Tree or Full Window Forms Tree view:
To access state forms, open the States folder.
To access home state forms, select Forms > Home State Forms or click the Home StateForms button.
If you are using Full Window Forms List view, do the following:
To access state forms, click the State tab.
To access home state forms, select Forms > Home State Forms, select Home State from theFed Interview or Fed Government tab, or click the Home State Forms button.
Viewing Two or More Forms with NewWindow(Tax Preparation > Window > NewWindow)
Along with interactive reports (i.e., diagnostics, overrides, estimates, etc.), up to four forms can beopen at the same time. Select Window > New Window to open a new window for the same return,enabling you to view or work on two, three, or four forms simultaneously.
Use NewWindow to display multiple forms of the same type, such as government Form 1040 andSchedule A, or multiple forms of different types, such as the 1040 and Interview Form C-1.
Each window can have a different method of data entry, such as displaying Interview Form 1 in HeadsUp mode while displaying Interview Form A-1 in Heads Down mode. For more information, see DataEntry Methods for Interview Forms on page 131.
Note: Unlike government or interview forms, multiple worksheets cannot be opened in separatewindows.
Viewing Two or More Forms Simultaneously(Tax Preparation > Window > Arrange All)
1. With a form displayed, select Window > New Window. A second window opens containing thesame form as the first window.
2. Select Window > Arrange All to split the screen to display both windows.
3. To open a different form in the new window, position the cursor anywhere in the new window. Ifyou are using Full Window Forms List, the forms list also displays as a window. Double-click theform you want to open in the new window.
In the Full Window Forms Tree, click the Forms Tree button, select the form you want toopen, and select Arrange All. The Full Window Forms Tree displays as a third window.
In the Split Window Forms Tree, double-click the form to open it in a new window.
4. Repeat steps 1 through 3 as needed to change the form in a window or to open subsequentwindows.
Chapter 3 - Tax Preparation • 122
Moving Between Multiple FormsTo move between multiple forms, do any of the following:
Click anywhere on a form to make it active.
Press Ctrl + F6 or Ctrl + Shift + F6.
Select an open form from the Window menu.
If the windows are set to cascade Window > Cascade, click any area on a background form to bring itto the foreground.
To close a form, click Close (X) at the far right of the form's title bar, or click the form button at the farleft of the form's title bar and select Close. To close all forms, select Window > Close All.
Navigating through the FormsThe sections that follow describe functions to help you move through forms. As a navigation aid, formfields are color-coded when the cursor is positioned in them.
Regular entry fields are blue.
Fields that can be overridden are yellow.
Fields that do not allow direct data entry (e.g., Expand fields) are red.
Link to Interview Forms(Tax Preparation > Forms > Govt To Interview Link)
Select this feature to link (move) from a federal, state, or city government form to its correspondinginterview form. You must initiate the link from the government form, not the interview form.
Note: This feature does not work for forms in consolidated returns.
To link to an interview form, open a government form, position the cursor in a field that can be linked,and do any of the following:
Select Forms > Govt To Interview Link.
Click the Govt To Interview Link button.
With the cursor in a field, right-click and select Govt To Interview Link from the menu.
Linking to the interview form can occur as follows:
If there is only one interview form and only one occurrence of that form in the return, you can linkdirectly from the open government form to the open interview form.
If there are multiple interview forms that a particular field could link to, the Select Interview Formlist displays. Select an interview form from the list and click OK to display the form.
Note: The forms on the list that contain data are indicated by an asterisk.
Chapter 3 - Tax Preparation • 123

If there are multiple entities in the return, the Select Interview Form list displays. Select aninterview form and then the sheet and entity from the Select Sheet dialog. (Entity refers to adiscreet taxable unit, such as a single rental property, a farm, or a quantity of stock in a certaincompany.)
If you select an existing sheet, that sheet displays directly; if you select a new sheet, the SelectEntity dialog displays, allowing you to choose an entity. Click OK to display the form.
Return to Link List(Tax Preparation > Forms > Return to Link List)
If you have used the Select Interview Form list to link to the active interview form, position the cursorin a field that can be linked and do any of the following to bring back the last list. You can then selectanother interview form to link to.
Select Forms > Return to Link List.
Click the Back to Link List button.
Right-click outside of a data field and select Return to Link List from the menu.
Return to Government Form(Tax Preparation > Forms > Return to Government Form)
Do any of the following to return to the government form from which the last link was established:
Select Forms > Return to Government Form.
Click the Back to Govt Form button.
Right-click outside of a data field and select Return to Government Form from the menu.
Expand(Tax Preparation > Forms > Expand)
The Expand option, available in some government and interview form fields, allows you to enterdetailed information by expanding the display for detailed input. If a field can accommodate detailedinput, the Expand button is available.
To use Expand, perform the following procedure:
1. Position the cursor in a field that can be expanded and do one of the following:
Click the Expand button.
Double-click the field.
Select Forms > Expand.
Right-click and select Expand from the menu.
2. When the form expands, you are able to add, edit, or view information as needed. If there aremultiple occurrences of forms, a summary displays. Highlight the form you want displayed andclick Expand again.
Chapter 3 - Tax Preparation • 124

3. Do one of the following to return to the original form:
Click the Go Back button.
Select Forms > Go Back.
Right-click and select Go Back from the menu.
Drill Down(Tax Preparation > Forms > Drill Down)
The Drill Down option allows you to navigate down the calculation path to see where values cometogether to form the value in the government field. It is available for some government view form fieldsidentified by blue down arrows, Each time you drill down, it will take you to the value from anothergovernment form, or open a new Drill Down pop-up form which shows how values combine at thatlevel of the calculation. Other than the totals, all values here should provide further Drill Downs, untilreaching another government form the value comes from, or the input form/worksheet where the datawas entered.
To use Drill Down, perform the following:
1. Position the cursor in a field indicated by a drill down icon (blue down arrow) and do one of thefollowing:
Click the Drill Down button.
Double-click the field.
Select Forms > Drill Down.
Right-click the field and select Drill Down from the menu.
2. If you are taken to another government form, the field containing the value leading to the originalvalue is highlighted.
3. If instead, a drill down form opens, any fields marked with drill down icons may be double-clickedto drill down closer to the source data.
4. If you end at an input form/worksheet, you may change data as normal.
5. To return, do any of the following:
Click the Go Back button.
Select Forms > Go Back.
If in a drill down form, a Go Back button is provided on the form.
New Entity(Tax Preparation > Forms > New Entity)
New Entity allows you to create or access another entity of the same form type (e.g., Schedule C orSchedule F). Entity refers to a discreet taxable unit, such as a single rental property, a farm, or aquantity of stock in a certain company.
Chapter 3 - Tax Preparation • 125

Interview FormsTo select or add an entity, use the following procedure:
1. Select Forms > New Entity, click the New Entity button, or right-click in a white area of the formand select New Entity from the menu.
The Select Sheet dialog displays. The dialog includes entity numbers and descriptions. ForDepletion, the dialog lists the property number and name for all properties associated with eachdepletion statement.
2. Do one of the following:
To select a listed entity, highlight the associated sheet and click OK.
To add an entity, do the following:
a. Click New on the Select Sheet dialog. You can change the sheet by entering adifferent number in the New sheet number field before clicking New.
b. The Select Entity dialog displays the entity number automatically incremented byone. If needed, enter a different entity number and click New to add a form for thenew entity.
Government FormsTo select or add an entity, do the following:
1. Select Forms > New Entity, click the New Entity button, or right-click in a white area of the formand select New Entity from the menu. The Select Entity dialog displays.
2. Do one of the following:
To select a listed entity, highlight the entity and click OK.
To add an entity, click New. You can change the entity number by entering a differentnumber in the New entity number field before clicking New.
WorksheetsTo select or add an entity, do the following:
1. Select Forms > New Entity, click the New Entity button, or right-click in a white area of theworksheet and select New Entity from the menu.
2. In the Entity (Business) section of the Navigation Panel, click Add. A new worksheet displays.Notice a new entity now displays in the Entity section of the Navigation Panel.
3. Do one of the following:
To select a listed entity, highlight the entity in the Navigation panel. The worksheetdisplays the entity information selected.
To add an entity, click New entity. You can change the entity number by entering adifferent number in the Entity number field.
Chapter 3 - Tax Preparation • 126
New Sheet(Tax Preparation > Forms > New Sheet)
Do any of the following to access a new sheet:
Click the New Sheet button.
Select Forms > New Sheet.
Right-click in a white area of the form and select New Sheet from the menu.
If you are working on interview forms and the sheet is not attached to an entity, the Select Sheetdialog displays. Click New and the new sheet displays with the sheet number automaticallyincremented by one. You can change the sheet by entering a different number in the New sheetnumber field before clicking New.
If you are adding a sheet to a form and multiple occurrences of the form exist, the Select Sheet dialogdisplays information about each occurrence. The dialog includes entity numbers and descriptions. ForDepletion, the dialog lists the property number and name for all properties associated with eachdepletion statement.
When you click New, the Select Entity dialog displays, allowing you to add a new entity or add a newsheet. Entity refers to a discreet taxable unit, such as a single rental property, a farm, or a quantity ofstock in a certain company.
If you are working on government forms, the New Sheet option allows you to access additional datafields that are identical to those you are working on. It displays the Select Entity dialog, if applicable,when you are working on certain government forms (e.g., Schedule C).
Next Sheet(Tax Preparation > Forms > Next Sheet)
Use Next Sheet to display the next sheet when working on interview forms or to move to the nextsection in government forms that have multiple occurrences.
Do any of the following to move to the next sheet:
Click the Next Sheet button.
Select Forms > Next Sheet.
Right-click a white area of the form and select Next Sheet from the menu.
If you are currently viewing interview Form C-1, sheet 1, and Form C-1 has more than one sheet,using Next Sheet opens Form C-1, sheet 2. If you have more than one C-1 entity, Next Sheet wouldmove from C-1, sheet 1, entity 1 to C-1, sheet 2, entity 2.
Next Form(Tax Preparation > Forms > Next Form)
Next Form displays the next form containing data in a forms list or tree. For example, if you arecurrently entering data on Schedule A-1, there is no data in any other A series form, and data isentered in Schedule B-1, then selecting Next Form will open Schedule B-1.
Chapter 3 - Tax Preparation • 127

Do any of the following to move to the next form:
Click the Next Form button.
Select Forms > Next Form.
Right-click a white area of the form and select Next Form from the menu.
Press F9.
Next Form accesses all entities in order and in sequence for each entity. For example:
Form C-1, sheet 1, entity 1
Form C-2, sheet 1, entity 1
Form C-3, sheet 1, entity 1
Form C-1, sheet 2, entity 2
Form C-2, sheet 2, entity 2
Form C-3, sheet 2, entity 2
Previous Sheet(Tax Preparation > Forms > Previous Sheet)
Use Previous Sheet to display the previous sheet when working on interview forms or the previoussection when working on government forms.
Do any of the following to move to the previous sheet:
Click the Previous Sheet button.
Select Forms > Previous Sheet.
Right-click in a white area of the form and select Previous Sheet from the menu.
Example: If you are currently viewing Interview Form E-1, sheet 2, entity 1, and Form E-1 hasmore than one sheet, using Previous Sheet would access E-1, sheet 1, entity 1.
Previous Form(Tax Preparation > Forms > Previous Form)
Previous Form is used to display the previous form containing data in the current view. For example, ifyou are currently viewing Schedule B-3 and there is no data entered on Schedule B-2, but data isentered on Schedule B-1, Previous Form accesses Schedule B-1.
Do any of the following to move to the previous form:
Click the Previous Form button.
Select Forms > Previous Form.
Right-click in a white area of the form and select Previous Form from the menu.
Press F10.
Chapter 3 - Tax Preparation • 128
Delete Options in Interview View(Tax Preparation > Edit > Delete)
Delete a field, record, sheet, entity, or state using the Delete menu options that are described in thissection. To access the Delete functions, select Edit > Delete, or position the pointer on a white area ofa form or in a form field, right-click, and select Delete from the menu.
Delete Field(Tax Preparation > Edit > Delete > Delete Field)
Select Edit > Delete > Delete Field, or right-click and select Delete > Delete Field from the menu toremove data from a highlighted box on a form.
Delete Record(Tax Preparation > Edit > Delete > Delete Record)
Select Edit > Delete > Delete Record, or right-click and select Delete > Delete Record from themenu to remove data from the highlighted box and any boxes associated with that entry. You can alsoadd the Delete Record button to your toolbar to delete a record. See Customizing the Toolbar onpage 91 for more details.
Delete Sheet(Tax Preparation > Edit > Delete > Delete Sheet)
Select Edit > Delete > Delete Sheet, or right-click and select Delete > Delete Sheet from the menuto delete the active interview form.
Delete Entity(Tax Preparation > Edit > Delete > Delete Entity)
Select Edit > Delete Entity, or right-click and select Delete > Delete Entity from the menu to removethe active entity and its attachments.
Delete State(Tax Preparation > Edit > Delete > Delete State)
Delete State deletes all forms associated with a state.
1. Open a return and select Edit > Delete > Delete State.
2. Select the state to be deleted and click OK.
3. Click Yes to confirm the deletion.
Consolidated ReturnsYou can make consolidated returns for these tax products:
Corporation
S Corporation
Chapter 3 - Tax Preparation • 129

Partnership
When working on a consolidated return, use the Return Group tab to easily access all the returns thatare part of the consolidated unit.
Adding Returns to a Consolidated GroupYou can choose the subsidiary returns to add to a consolidated return from a picklist of all returns forthat tax product. To use the picklist, open the consolidating unit’s return and accessInterview Form CC - 1.
Position the cursor in the Name, Employer ID, or Client ID field and do one of the following to displaythe Select Returns dialog:
Click the Lookup Value button.
Press F4.
Right-click and select Lookup Value from the menu.
Returns are listed by return ID, return name, office group, and preparer ID. Select a return byhighlighting it and clicking OK. The return name, Employer ID number, and client ID fields are filled onInterview Form CC - 1 with the corresponding information from the return.
Note: For complete instructions on designating returns as part of a consolidated return press F2on the consolidating unit’s main form.
Calculating a Consolidated Return and SubsidiariesOnce you have made changes to any subsidiary return in the consolidated return, select Calc >Return Group to calculate and save all subsidiaries/parents and the consolidating unit.
Note: If one of the subsidiary returns is password-protected, you will be asked to enter thereturn’s password before the calculation continues. If you do not enter a password, the calculationwill be stopped.
Navigating Consolidated ReturnsIn Full Window Forms Tree and Full Window Forms List, the Return Group tab is enabled when youare working on a consolidated return and at least one subsidiary return has been entered on InterviewForm CC-1 of the consolidating unit. Access a return in the consolidated group by double-clicking thereturn. When the return opens, click the Interview and Government tabs to access the forms in thereturn.
In Split Window Forms Tree, you can access the consolidated group by clicking Return Group at thebottom of the tree pane. The consolidated returns tree displays in the left pane and can be expandedto display the parent and subsidiary units.
To locate a particular return in the tree, right-click in the left pane, select Search, and enter the return’sname in the Search dialog.
Chapter 3 - Tax Preparation • 130

In all trees, a return that needs to be calculated is represented with a calculator icon, a return that doesnot need to be calculated is represented with a page icon, and a return that does not exist isrepresented with a circled X.
Data Entry Methods for Interview Forms(Tax Preparation > View > Data Entry Method)
To select a data entry method for interview forms, do the following:
1. Select View > Data Entry Method.
2. Select the data entry method.
Heads Up. Use Heads Up to enter data directly onto the interview form, just as you wouldwrite in on a paper form. Heads Up lets you see both the data entry boxes and thecorresponding text together.
Heads Down. Use Heads Down to enter data using interview form box numbers as yourpoints of reference.
Split Screen. Use Split Screen, a combination of the Heads Up and Heads Down modes,to enter data quickly by entering the data box number and all necessary data for the box.
If you are working on an interview form, the data entry method changes immediately. If you areworking on government forms, the data entry method changes when you switch to interviewforms.
Note: Set ProKey, QuickBox, and Key Verify options using the Preferences dialog to assistyour data entry in Heads Down or Split Screen mode. See Using ProKey, QuickBox, andKey Verify on page 133 for more information on these options.
Heads Up(Tax Preparation > View > Data Entry Method > Heads Up)
Heads Up, available in all form views, allows you to enter data directly onto a form, just as you wouldwrite it on paper.
Data entry fields have corresponding box numbers. The box number displays next to each field as itdoes on a printed form.
You can use the keyboard or the mouse to move the cursor from field to field.
Heads Down(Tax Preparation > View > Data Entry Method > Heads Down)
Heads Down, available when working with interview forms, allows you to enter data quickly anddirectly using interview form box numbers as your points of reference. Data entry is done on one partof the display. Entering a box number replaces moving the cursor from field to field. An audit traildisplays as data is entered in fields on the interview form. Once you have selected Heads Down, youcan begin entering data.
Chapter 3 - Tax Preparation • 131
To enter data in Heads Down view, do the following:
1. Enter the interview form box number in the Box field. Unless you selected Use Enter key to exitbox # as your QuickBox setting, the cursor automatically moves to the Data field. If you havechanged the QuickBox setting, press Enter to move to the Data field. See Using ProKey,QuickBox, and Key Verify on the next page for more information on the QuickBox option.
2. Enter the appropriate data into the Data field.
3. Press Enter and the data displays as the next line of the Direct Data Entry window.
Note: If you are updating information, both the old and new information display in the audittrail. When you exit the form, the information is updated.
4. To select another form without exiting the current form, press Enter or + + in the Box field. TheSelect Form dialog displays. Whether you need to press Enter or + + depends on the ProKeysetting. See Using ProKey, QuickBox, and Key Verify on the next page for more information onthe ProKey option.
5. Enter the form and sheet number and, if applicable, the entity number and attachment code inthe appropriate boxes, pressing Enter or Tab after each entry. The form you selected displays.
For example, to change to an existing sheet 1 of FormW-2, enter 0352 in the Form number fieldand 1 in the Sheet number field, or to add a new sheet to FormW-2, enter 2 in the Sheet numberfield.
Notes:
If you are changing to a form that needs to be attached to an entity, you must first enterdata for the entity before attaching the form.
For example, before entering depreciation data for a Schedule E, you need to create theSchedule E by making at least one entry on the E-1.
The form number is in the upper-right corner of the interview form. Attachment codes forattachable forms also are shown.
6. Press Enter to display the data entry screen for the new form.
Split Screen(Tax Preparation > View > Data Entry Method > Split Screen)
Split Screen displays a Direct Data Entry window at the bottom of the screen and the interview form atthe top of the screen. It allows you to key data by entering the data box number and all necessaryinformation for the box. The interview form serves as a backdrop, giving you both the form and the boxnumber as points of reference. The box number of the cursor position displays in the lower-rightcorner of the status bar. Data entered in the Direct Data Entry window displays in the correspondingform field.
To perform data entry in Split Screen view, do the following:
1. Enter the interview form box number. Unless you have selected Use Enter key to exit box # asyour QuickBox setting, the cursor automatically moves to the Data field. If you have changed theQuickBox setting, press Enter to move to the Data field. See the next section for more
Chapter 3 - Tax Preparation • 132
information on the QuickBox option.
2. Enter the appropriate data in the Data field.
3. Press Enter and the data displays in the appropriate box.
4. To select another form without exiting the current form, press Enter or + + in the Box field. TheSelect Form dialog displays.
Note: Whether you press Enter or + + depends on the ProKey setting. See the next sectionfor more information on the ProKey option.
5. Enter the form and sheet number and, if applicable, the entity number and attachment code inthe appropriate boxes, pressing Enter or Tab after each entry. The form you have selecteddisplays.
6. Press Enter to display the form.
Using ProKey, QuickBox, and Key Verify(Tax Preparation > Options > Preferences > Tax Return Preferences > Heads Dn/Split Scrn)
When using the Heads Down or Split Screen data entry method, you can set the ProKey, QuickBox, orKey Verify options to assist your data entry. Select Options > Preferences > Tax Return Preferences> Heads Dn/Split Scrn to set the following options:
ProKey. ProKey controls how you access the Select Form dialog to open another interviewform. In the default setting, pressing + + displays the Select Form dialog. The other option is touse the Enter key to display the Select Form dialog.
QuickBox. QuickBox controls the cursor movement from the box number to the data section.The default setting is to move the cursor automatically after an entry is made in the box number.
The system validates the entry of the box number by checking if the number is between 30 and299. This eliminates the need to press Enter after a complete box number entry; however, if youprefer to press Enter after the box number entry, your QuickBox preference should be set to UseEnter key to exit box #.
Key Verify. Select the Key verify mode option to confirm the accuracy of entered data beforeadding it to a form in Heads Down or Split Screen mode.
When you press Enter, a dialog displays comparing the information just entered with previouslyentered data. You must choose the entry that should be applied, and click OK. This dialog doesnot display if there is no discrepancy in data.
Worksheet ViewWorksheet View is an additional data entry method to the interview forms. Data can be entered onworksheets to complete a government form or a coordinated group of forms.
Worksheets are organized into categories and are accessed through the Worksheet Menu locatedbelow the Tax Preparation toolbar, or by selecting View > Full WindowWorksheets List.
Worksheet Menu/Tree. Selecting a category title from this menu produces a menu of relatedworksheets. For example, selecting Income or Deductions in an Individual return displays a list
Chapter 3 - Tax Preparation • 133

containing worksheets that pertain to Income or Deductions, such as wages, interest, dividends,itemized deductions, and expenses.
Worksheets List. Selecting View > Full Window Worksheets List or clicking the FormsList button displays a list of worksheets available depending on the return type selected.Double-click a worksheet to open it.
Each worksheet is divided into numbered sections. The fields in each section are grouped by topic.For example, selecting the Itemized Deductions worksheet contains sections such as Medical andDental Expenses, Taxes Paid, and Business Use of Home. The section numbers appear in both theNavigation Panel and the Worksheet pane.
Sections can be expanded or collapsed as needed. Collapsing sections reduces the amount ofscrolling required for a worksheet. By default, the first section of a worksheet is expanded.
Notes:
Section numbering begins with the first section numbered "1" and increases in order for alltabbed sections contained in the worksheet. There may be instances where the numberingsequence has dropped sections. This occurs when there are products not installed (that is,state-specific information).
If you open a worksheet from the Worksheets List, the Worksheets List tabs (Worksheet, FedGovernment, State, etc.) replace the Worksheet Menu. Use the tabs to select additionalworksheets for the return type selected. To display the Worksheet Menu, select View >Worksheet Menu/Tree.
Selecting Worksheet View(Tax Preparation > View >Worksheet)
To move from Interview to Worksheet View, select View > Worksheet. The default worksheet orgovernment form for the tax product displays, depending on which one was used in the previousWorksheet View session.
The availability of Worksheet View depends on the setting selected in Office Manager using ConfigureFirm > Input Methods. A firm can be set up to use only interview forms, only worksheets, or bothinterview forms and worksheets. See for more information.
Note: The amount of time needed to display worksheets may increase when the Openworksheets with all sections expanded option is enabled on the Worksheets tab in Options >Preferences > Tax Return Preferences. See Worksheet Preferences on page 97 for information.
Form Selection DisplayThere are two window displays from which forms are selected.
Worksheet Menu/Tree
Worksheets List
Chapter 3 - Tax Preparation • 134

When working with consolidated returns, there is an additional tab and tree available to move betweenthe returns within the consolidated unit. See Navigating Consolidated Returns on page 130 fordetailed information.
Worksheets ListThe Worksheets List presents worksheets and state worksheets. To change from one worksheet list toanother, click the appropriate tab: Worksheet, Fed Government, or State.
Worksheets containing data display in blue type. Worksheets without data display in black type. Thefull name of the selected Worksheet displays in the box below the tab heading.
Do one of the following to open a worksheet:
Highlight a worksheet and select OK.
Double-click a worksheet in the list.
Select a worksheet and press Enter.
Do one of the following to return to the Worksheets List. The focus will be on the form you last opened.
Click the Forms List button.
Press Ctrl + F6.
Select one of the tabs on the Worksheets List (Worksheet, Fed Government, etc.)
Select View > Full Window Worksheets List.
If you open a worksheet from the Worksheets List, the Worksheets List tabs (Worksheet, FedGovernment, State, etc.) replace the Worksheet Menu. Use the tabs to select additional worksheetsfor the return type selected. To display the Worksheet Menu, select View > Worksheet Menu/Tree.
Chapter 3 - Tax Preparation • 135

Accessing Help for Worksheets(Tax Preparation > Help)
Do any of the following to display worksheet-level Help:
Select Help > This Worksheet's Instructions.
Press F2.
Right-click outside a field and select This Worksheet's Instructions from the menu.
Do any of the following to display field-level Help:
Select Help > This Field's Instructions.
Press F1.
Click the Tax Instructions Help button.
Right-click a field and select This Field's Instructions from the menu.
Navigating Worksheets, Categories, and Sections
Chapter 3 - Tax Preparation • 136
This section provides navigation and data input information for worksheets.
1. Navigation Panel. Provides the option to select federal and state tax authorities as well asselect sections and entities for the active worksheet.
2. Worksheet Window. Displays the active worksheet and its sub-sections.
3. Worksheet Menu. Displays the categories that are available for the current tax product. Eachcategory lists a selection of related worksheets. The Worksheet Menu displays when you areusing Worksheet View, and is located below the toolbar. To view the Worksheet Menu, selectView > Worksheet Menu/Tree.
4. Worksheets List. Displays a list of worksheets organized by category that are available for theselected tax product. To view the Worksheets List, click the Forms List button or select View >Full Window Worksheets List. Use the tabs to select additional worksheets for the return typeselected.
5. Tax Authority. Presents a drop-down list of federal and state tax authorities. Options on theWorksheet Menu change according to the selected tax authority.
6. Pin Button. Locks and unlocks the panel in an open position. When the panel is pinned open,clicking this button causes the window to retract.
7. Sections. Displays a list of numbered sub-units contained within a worksheet. If the worksheetcontains only one section, the section title and number are not listed. Click a section title toexpand and display it in the Worksheet window.
8. Entities. Lists the entities that exist in the open worksheet. Click a listed entity to open itsassociated worksheet section.
9. Worksheet and Government Tabs. Moves between the government forms tree and worksheetcategories.
10. Expanded Section. Displays the numbered data entry fields.
11. Section Header. Expands and collapses sections.
Worksheet Section ShortcutsThe following keyboard shortcuts can be used to navigate worksheets:
Keyboard Shortcuts to Navigate Worksheet Sections
Function Shortcut
Expands sections, in descending order. Ctrl + Tab
Expands sections, in ascending order. Shift + Ctrl + Tab
Expands all sections in a worksheet.Shift and + (on thekeypad)
Collapses all sections in a worksheet.Shift and - (on thekeypad)
Moves from the last field of a section to the first field of the next expandedsection.
Tab
Chapter 3 - Tax Preparation • 137

Keyboard Shortcuts to Navigate Worksheet Sections
Function Shortcut
Moves from the first field of a section to the last field of the previous expandedsection.
Shift + Tab
Adds another item in a grid or Detail worksheet. Alt and +
Deletes the selected item in a grid or Detail worksheet. Alt + Delete
Moves to the first item in a group of multiple occurring items in a grid or Detailworksheet.
Alt + Shift + <
Moves to the last item in a group of multiple occurring items in a grid or Detailworksheet.
Alt + Shift + >
Moves to the previous item in a group of multiple occurring items in a grid orDetail worksheet.
Alt + <
Moves to the next item in a group of multiple occurring items in a grid or Detailworksheet.
Alt + >
Display and select items (i.e., sections, worksheets, entities) that are not visiblein a grid or Detail worksheet.
Alt + L
Displays the List in an amount field or grid cell. Ctrl + L
Moves from an item in an interactive report to an entry on a tax form to which it islinked.
Ctrl + K
Notes:
Sections with blue titles contain data. Sections with black titles do not contain data.
See Setting Preferences on page 92 for details on setting end-of-section tab key movementoptions.
Chapter 3 - Tax Preparation • 138
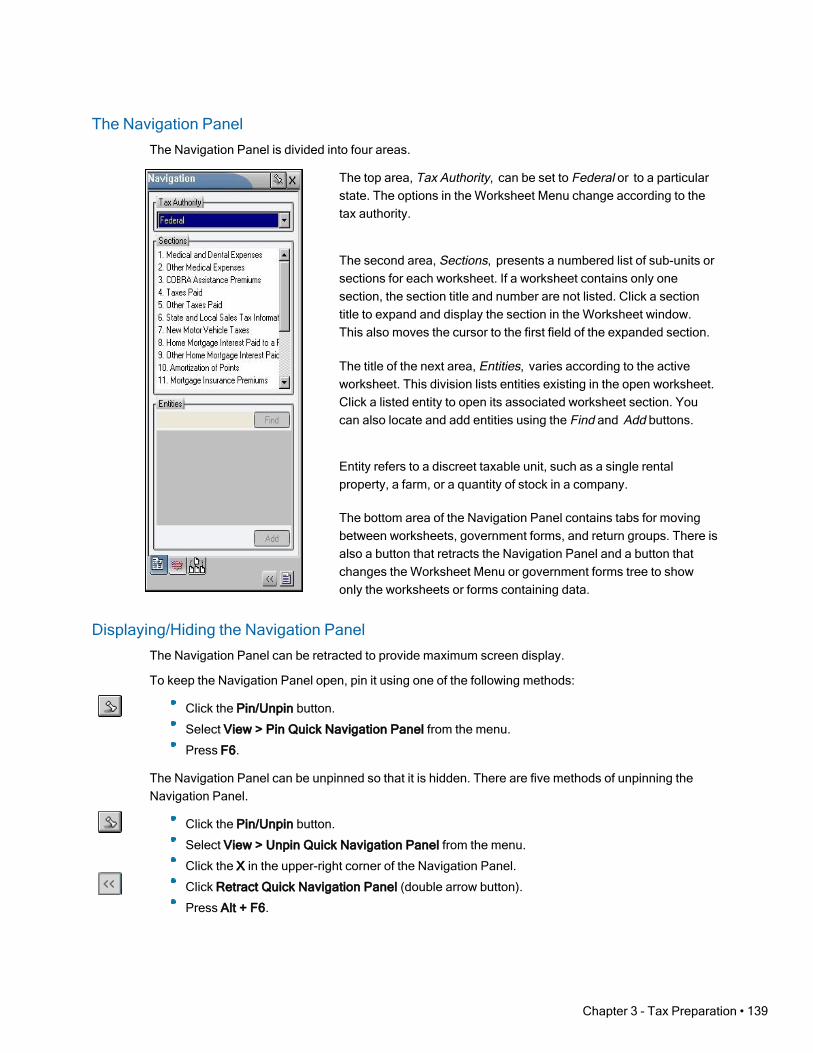
The Navigation PanelThe Navigation Panel is divided into four areas.
The top area, Tax Authority, can be set to Federal or to a particularstate. The options in the Worksheet Menu change according to thetax authority.
The second area, Sections, presents a numbered list of sub-units orsections for each worksheet. If a worksheet contains only onesection, the section title and number are not listed. Click a sectiontitle to expand and display the section in the Worksheet window.This also moves the cursor to the first field of the expanded section.
The title of the next area, Entities, varies according to the activeworksheet. This division lists entities existing in the open worksheet.Click a listed entity to open its associated worksheet section. Youcan also locate and add entities using the Find and Add buttons.
Entity refers to a discreet taxable unit, such as a single rentalproperty, a farm, or a quantity of stock in a company.
The bottom area of the Navigation Panel contains tabs for movingbetween worksheets, government forms, and return groups. There isalso a button that retracts the Navigation Panel and a button thatchanges the Worksheet Menu or government forms tree to showonly the worksheets or forms containing data.
Displaying/Hiding the Navigation PanelThe Navigation Panel can be retracted to provide maximum screen display.
To keep the Navigation Panel open, pin it using one of the following methods:
Click the Pin/Unpin button.
Select View > Pin Quick Navigation Panel from the menu.
Press F6.
The Navigation Panel can be unpinned so that it is hidden. There are five methods of unpinning theNavigation Panel.
Click the Pin/Unpin button.
Select View > Unpin Quick Navigation Panel from the menu.
Click the X in the upper-right corner of the Navigation Panel.
Click Retract Quick Navigation Panel (double arrow button).
Press Alt + F6.
Chapter 3 - Tax Preparation • 139

When Unpin Quick Navigation Panel is activated, you can display or hide the Navigation Panel usingthe mouse.
Move the pointer over the Navigation Panel tab on the left side of the screen to display theNavigation Panel.
Move the pointer away from the Navigation Panel to retract it.
The Unpin Quick Navigation Panel option gives the Navigation Panel the appearance of floating overthe worksheet. The Navigation Panel tab is visible until the Navigation Panel is pinned open.
Navigation Panel ShortcutsUse the following options to access the Navigation Panel, worksheet sections, and entities:
Keyboard and Menu Options for the Quick Navigation Panel
Function Shortcut Menu
Open and pin (i.e., lock) the Navigation Panel intoposition.
F6View > Pin Quick NavigationPanel
Retract the Navigation Panel. Alt + F6View > Unpin QuickNavigation Panel
Chapter 3 - Tax Preparation • 140
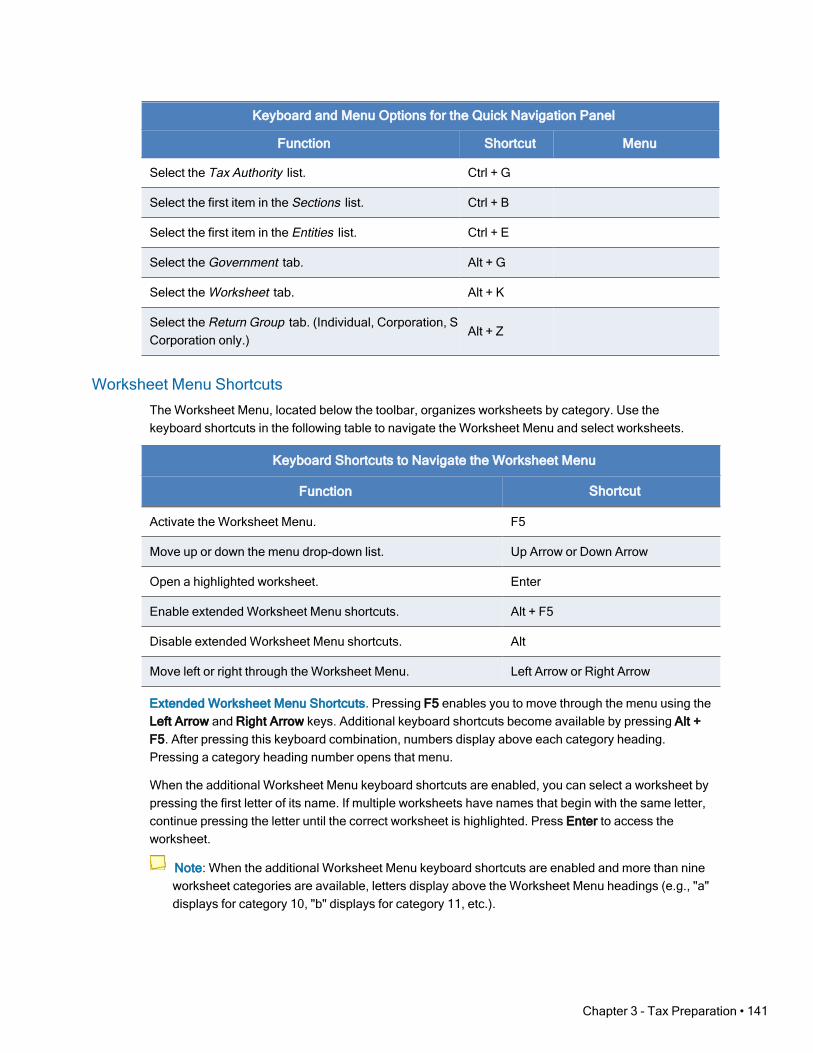
Keyboard and Menu Options for the Quick Navigation Panel
Function Shortcut Menu
Select the Tax Authority list. Ctrl + G
Select the first item in the Sections list. Ctrl + B
Select the first item in the Entities list. Ctrl + E
Select the Government tab. Alt + G
Select the Worksheet tab. Alt + K
Select the Return Group tab. (Individual, Corporation, SCorporation only.)
Alt + Z
Worksheet Menu ShortcutsThe Worksheet Menu, located below the toolbar, organizes worksheets by category. Use thekeyboard shortcuts in the following table to navigate the Worksheet Menu and select worksheets.
Keyboard Shortcuts to Navigate the Worksheet Menu
Function Shortcut
Activate the Worksheet Menu. F5
Move up or down the menu drop-down list. Up Arrow or Down Arrow
Open a highlighted worksheet. Enter
Enable extended Worksheet Menu shortcuts. Alt + F5
Disable extended Worksheet Menu shortcuts. Alt
Move left or right through the Worksheet Menu. Left Arrow or Right Arrow
Extended Worksheet Menu Shortcuts. Pressing F5 enables you to move through the menu using theLeft Arrow and Right Arrow keys. Additional keyboard shortcuts become available by pressing Alt +F5. After pressing this keyboard combination, numbers display above each category heading.Pressing a category heading number opens that menu.
When the additional Worksheet Menu keyboard shortcuts are enabled, you can select a worksheet bypressing the first letter of its name. If multiple worksheets have names that begin with the same letter,continue pressing the letter until the correct worksheet is highlighted. Press Enter to access theworksheet.
Note: When the additional Worksheet Menu keyboard shortcuts are enabled and more than nineworksheet categories are available, letters display above the Worksheet Menu headings (e.g., "a"displays for category 10, "b" displays for category 11, etc.).
Chapter 3 - Tax Preparation • 141
Expanding/Collapsing Worksheets(Tax Preparation > View)
Most worksheets contain more than one section. For example, in the worksheet categoryGeneral > Basic Data of an Individual return, there are five sections: General, Dependents, Designee,Direct Deposit/Electronic Funds Withdrawal, and U.S. Series | Savings Bond Purchases. The sectionsare displayed in the section tabs in the Worksheet pane.
The section tabs are expandable and collapsible, using any of the following methods:
Click the arrow to the left of any section header. A right arrow indicates that the section containssub-sections that can be expanded. Click the right arrow to expand the section. A down arrowindicates that the section is already expanded. Click the down arrow to collapse the section.
Select View > Expand Section or View > Collapse Section to expand or collapse a section.
Select View > Expand All or View > Collapse All to expand or collapse all sections in acategory.
Use the keyboard function for Expand Section, Ctrl and +, on the numeric keypad and thekeyboard function for Collapse Section, Ctrl and -, on the numeric keypad.
Use the keyboard function for Expand All, Shift and +, on the numeric keypad and the keyboardfunction for Collapse All, Shift and -, on the numeric keypad.
Select Options > Preferences > Tax Return Preferences to set worksheet display options inthe Preferences dialog, as described in the next section, Setting Worksheet Preferences.
Setting Worksheet Preferences(Tax Preparation > Options > Preferences > Tax Return Preferences > Worksheets)
To configure Worksheet View display preferences and tab key movement, do the following:
1. Select Options > Preferences > Tax Return Preferences from the menu.
2. Click the Worksheets tab.
3. To specify whether worksheet sections are expanded or collapsed when you open a worksheet,choose one of the following options:
First section expanded. This is the default.
Sections containing data expanded. Sections without data are collapsed by default.
All sections expanded.
All sections collapsed.
4. To dictate how the Tab key moves between sections, choose an option listed under the End ofsection tab key movement. The Tab key works as specified only when you tab from the last fieldof a section.
Move to next expanded section. This is the default) Tab moves the cursor to the firstfield of the next expanded section.
Move to next section and expand if collapsed. Tab moves the cursor to the first field ofthe next section and expands the section if collapsed.
Chapter 3 - Tax Preparation • 142

5. If you prefer not to highlight items when selecting them, turn off the highlight bar by selectingDisable data entry row highlight bar.
6. Alter the action of the Enter key within a grid by selecting or clearing the option Enter key movescursor to the next field same record in the Grids section.
Selecting this option enables you to use the Enter key to move to the next field in a grid.(This is the default.)
Leaving the option cleared makes the Enter key behave like another Tab key. The tabaction will depend on how you set the Tab key in step 4.
7. Press OK to save your preferences.
Selecting a WorksheetUse the following steps to select a worksheet for data entry:
1. Choose Federal or a specific state from the Tax Authority drop-down list of the NavigationPanel. If the Navigation Panel is retracted, display it with one of these methods:
Point to the Navigation Panel tab located in the upper-left corner of the window. TheNavigation Panel retracts when the pointer is moved away from the window. ClickPin/Unpin to keep the panel in view.
Select View > Pin Quick Navigation Panel.
2. Do one of the following:
Select a worksheet from the Worksheet Menu located below the toolbar.
Select the Forms List button on the toolbar. On the Worksheets List, highlight aworksheet and select OK or double-click a worksheet to open it.
For most worksheets, a numbered list of headings displays in the Sections list in the NavigationPanel. The sections also display in the Worksheet window. The first section of the worksheet isexpanded by default.
Notes:
If you enter partial information in the Tax Authority field, it fills with the name of the firsttax authority in the list that begins with the characters entered.
Changing tax authorities causes the Worksheet Menu selections to change.
Titles of worksheet categories containing data display with blue titles. Titles of categoriescontaining only empty worksheets display as black.
If you open a worksheet from the Worksheets List, the Worksheets List tabs (Worksheet,Fed Government, State, etc.) replace the Worksheet Menu. Use the tabs to selectadditional worksheets for the return type selected.
3. To access a specific section of a worksheet, click the name of the section in the NavigationPanel, or click a section heading or blue arrow in the Worksheet window.
Notes:
The active section is highlighted in the Sections list.
Unlike government and interview forms, multiple worksheets cannot be opened byselecting Window > New from the menu. In Worksheet View, you can open only one
Chapter 3 - Tax Preparation • 143

worksheet plus any interactive report (overrides, estimates, etc.) at a time.
To move to government forms, click the Government tab located at the bottom of theNavigation Panel.
See Setting Worksheet Preferences on page 142 for details on changing the default options foropening worksheets.
Working with Worksheet GridsMany worksheet sections use grids for data entry. There are two types of grids. Summary grids, asshown in Accessing Detail Worksheets from Summary Grids on page 147, have a vertical orientationand store data in rows. Grids that have a horizontal orientation, as shown in the following example,store data in columns.
The following information outlines the editing features in the grid navigation bar and the sorting featurein the grid header.
To add a row or column after the last item in a grid, click Add on the grid navigation bar.
Note: Whether a row or column displays depends on the structure of the grid.
To delete a grid row or column, click Delete on the grid navigation bar.
To insert a row or column before a selected row or column, click Insert.
To sort by column, double-click an underlined column header.
To locate a row or column that is not currently visible, click Select.
Chapter 3 - Tax Preparation • 144

Import and Export with Worksheet GridsThe Import into Worksheet Grid wizard will assist you with importing data from a Microsoft® Excel®
spreadsheet to a worksheet grid. To launch the wizard, click Import in the navigation bar located at thetop of the designated grid. You can also launch the wizard by pressing Alt + I while your cursor ispositioned inside the grid. The wizard allows you to select the spreadsheet you want to import, and tochoose a default template or customize a template of your own. Templates you create can be savedfor future use. The data is validated prior to being imported, giving you the opportunity to review thestatus and make corrections, if needed. For detailed import instructions, click Help on any of thewizard dialogs.
The export function provides you the option to export data from a grid to an Excel® spreadsheet or tocreate a blank sample of a grid as a spreadsheet. To make this selection, click Export in thenavigation bar that is located at the top of the designated grid. You can also press Alt + X while yourcursor is positioned inside the grid.
Import and Export K-1 Data to a SpreadsheetThe import and export process between Schedule K-1 data and Microsoft® Excel® spreadsheets hasbeen expanded to include general K-1 data, ratios, amount allocations, Schedule K overrides, and K-1footnotes.
Templates are available to streamline the export process. Separate sheets are created in the Excel®
spreadsheet that are named for each data type (e.g., "Ratios," "Amount allocations"). To see thetemplates that are available and what they consist of, select Import/Export to a Spreadsheet >Spreadsheet Templates from the Contents tab in the system Help.
Export and Import K-1 Business to Target ReturnExport Schedule K-1 data from business returns, and then import the data into other returns.
The transfer of K-1 data can be performed for the following returns:
Fiduciary to Individual, Corporation, S Corporation, Partnership, and Fiduciary.
Partnership to Individual, Corporation, S Corporation, Partnership, and Fiduciary.
S Corporation to Individual and Fiduciary.
For information on creating K-1 export files each time a return is calculated, see MiscellaneousPreferences on page 92.
Chapter 3 - Tax Preparation • 145
Field Format GuidesWorksheet View gives you cues, called format guides, to help you fill out fields. Format guides consistof text that models the appropriate way to fill out a field. Other format guides explain how the softwareuses the data in the calculation of a return. The table below provides interpretation of field formatguides that are not obvious.
FormatGuide Interpretation
DatesEnter the date in the format given, M = month, D = day, Y = year. Use the punctuationspecified.
. Indicates where the decimal must occur in a percentage field.
INFO Indicates an optional information-only field. The value is not used in any calculation.
:Indicates where dashes would normally go in number sequences such as SocialSecurity Number or Employer Identification Number.
Required Mandatory field.
Working with Multiple Occurring SectionsSome worksheets contain sections with multiple occurrences called repeaters. For example, theOther Home Mortgage Interest Paid section on the Itemized Deduction worksheet could be repeatedmultiple times for Individual clients with multiple mortgages.
Each repeater section has a navigation bar positioned at the top of the grid with options for adding,deleting, inserting, and finding sections.
To add an occurrence in a repeater section, click Add.
To delete an occurrence in a section, click Delete.
To locate a specific occurrence, click Select to display the Select dialog. Enter a keyword andclick Find, or double-click the occurrence from the list.
Click the single left or right arrow to move to the previous or next section.
Click the double-arrow left or right buttons to move to the first or last section.
The navigation bar shows the total number of occurrences of a repeated section and the numberof the selected section.
Chapter 3 - Tax Preparation • 146
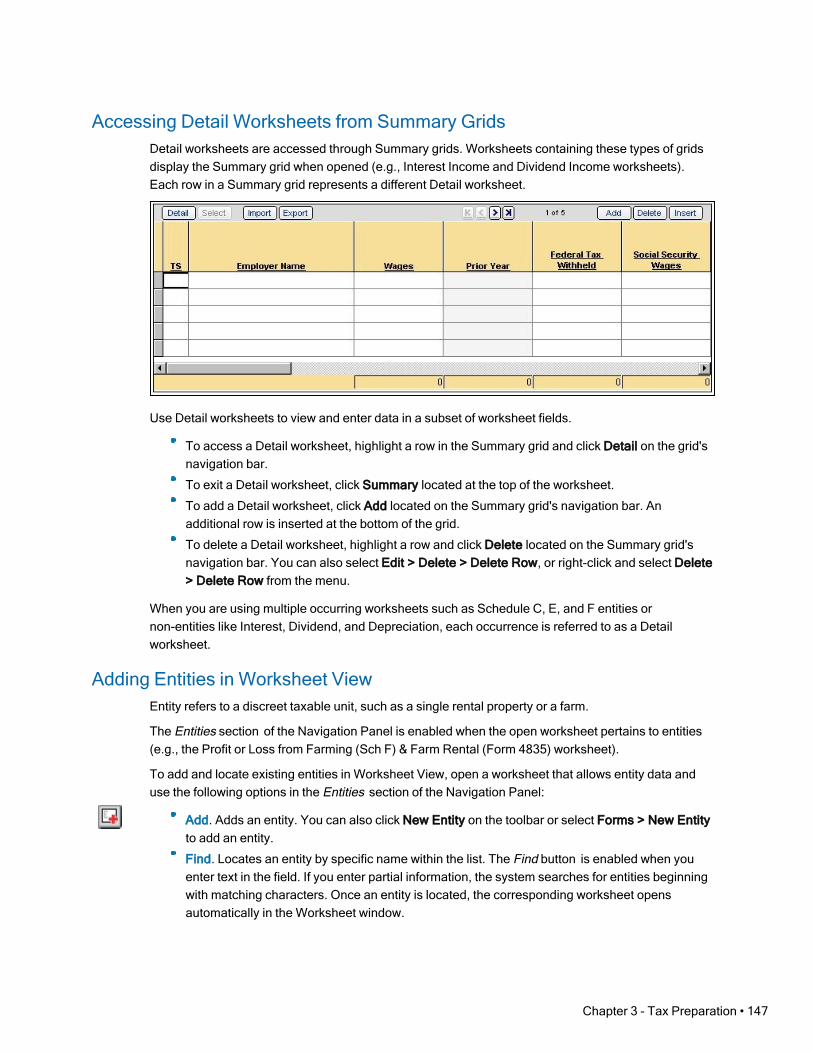
Accessing Detail Worksheets from Summary GridsDetail worksheets are accessed through Summary grids. Worksheets containing these types of gridsdisplay the Summary grid when opened (e.g., Interest Income and Dividend Income worksheets).Each row in a Summary grid represents a different Detail worksheet.
Use Detail worksheets to view and enter data in a subset of worksheet fields.
To access a Detail worksheet, highlight a row in the Summary grid and click Detail on the grid'snavigation bar.
To exit a Detail worksheet, click Summary located at the top of the worksheet.
To add a Detail worksheet, click Add located on the Summary grid's navigation bar. Anadditional row is inserted at the bottom of the grid.
To delete a Detail worksheet, highlight a row and click Delete located on the Summary grid'snavigation bar. You can also select Edit > Delete > Delete Row, or right-click and select Delete> Delete Row from the menu.
When you are using multiple occurring worksheets such as Schedule C, E, and F entities ornon-entities like Interest, Dividend, and Depreciation, each occurrence is referred to as a Detailworksheet.
Adding Entities in Worksheet ViewEntity refers to a discreet taxable unit, such as a single rental property or a farm.
The Entities section of the Navigation Panel is enabled when the open worksheet pertains to entities(e.g., the Profit or Loss from Farming (Sch F) & Farm Rental (Form 4835) worksheet).
To add and locate existing entities in Worksheet View, open a worksheet that allows entity data anduse the following options in the Entities section of the Navigation Panel:
Add. Adds an entity. You can also click New Entity on the toolbar or select Forms > New Entityto add an entity.
Find. Locates an entity by specific name within the list. The Find button is enabled when youenter text in the field. If you enter partial information, the system searches for entities beginningwith matching characters. Once an entity is located, the corresponding worksheet opensautomatically in the Worksheet window.
Chapter 3 - Tax Preparation • 147
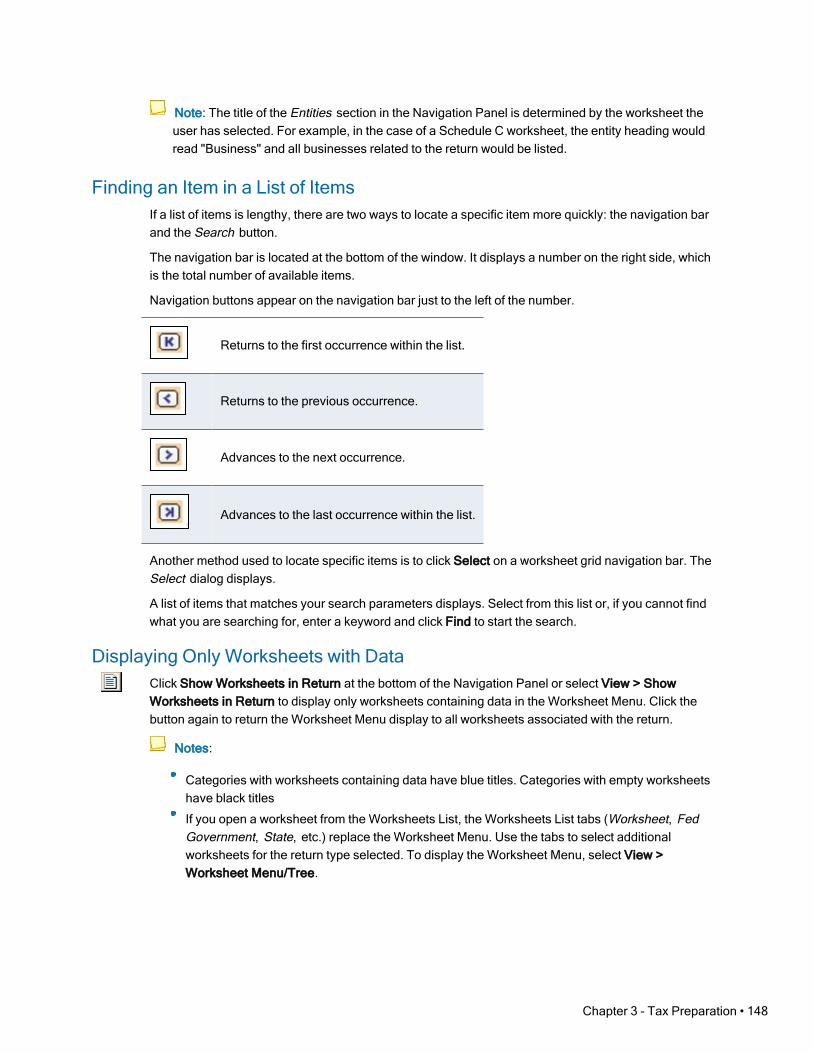
Note: The title of the Entities section in the Navigation Panel is determined by the worksheet theuser has selected. For example, in the case of a Schedule C worksheet, the entity heading wouldread "Business" and all businesses related to the return would be listed.
Finding an Item in a List of ItemsIf a list of items is lengthy, there are two ways to locate a specific item more quickly: the navigation barand the Search button.
The navigation bar is located at the bottom of the window. It displays a number on the right side, whichis the total number of available items.
Navigation buttons appear on the navigation bar just to the left of the number.
Returns to the first occurrence within the list.
Returns to the previous occurrence.
Advances to the next occurrence.
Advances to the last occurrence within the list.
Another method used to locate specific items is to click Select on a worksheet grid navigation bar. TheSelect dialog displays.
A list of items that matches your search parameters displays. Select from this list or, if you cannot findwhat you are searching for, enter a keyword and click Find to start the search.
Displaying Only Worksheets with DataClick Show Worksheets in Return at the bottom of the Navigation Panel or select View > ShowWorksheets in Return to display only worksheets containing data in the Worksheet Menu. Click thebutton again to return the Worksheet Menu display to all worksheets associated with the return.
Notes:
Categories with worksheets containing data have blue titles. Categories with empty worksheetshave black titles
If you open a worksheet from the Worksheets List, the Worksheets List tabs (Worksheet, FedGovernment, State, etc.) replace the Worksheet Menu. Use the tabs to select additionalworksheets for the return type selected. To display the Worksheet Menu, select View >Worksheet Menu/Tree.
Chapter 3 - Tax Preparation • 148
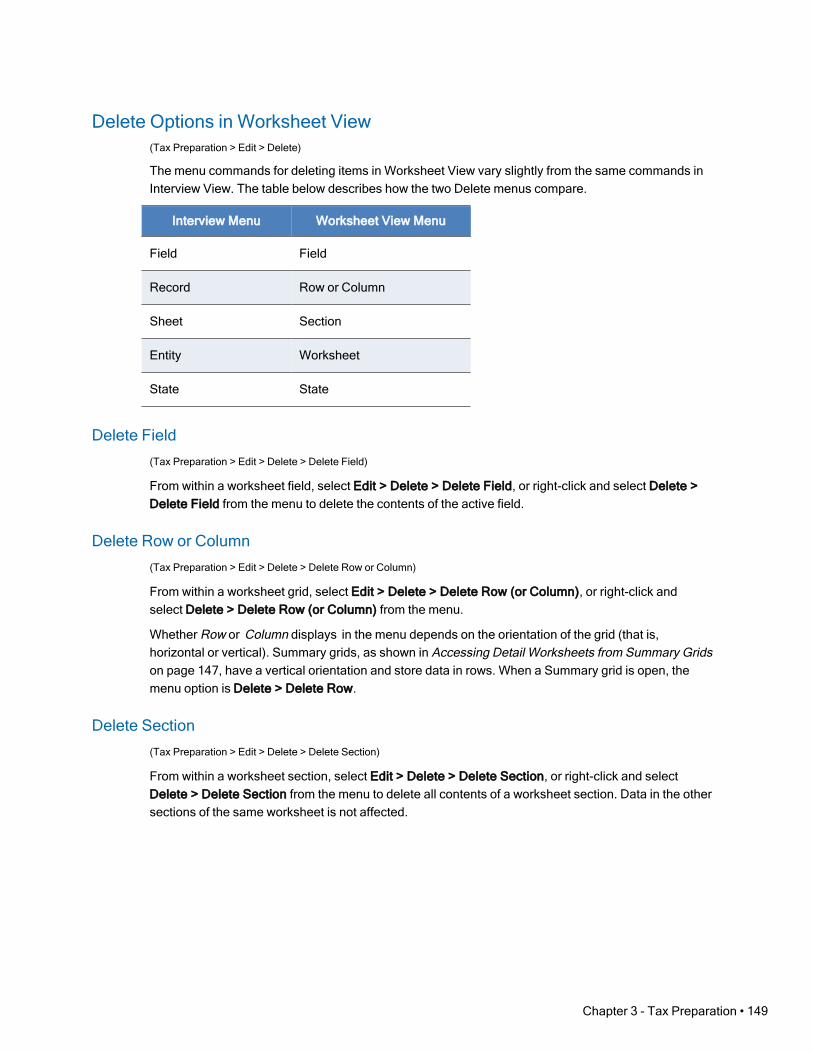
Delete Options in Worksheet View(Tax Preparation > Edit > Delete)
The menu commands for deleting items in Worksheet View vary slightly from the same commands inInterview View. The table below describes how the two Delete menus compare.
Interview Menu Worksheet View Menu
Field Field
Record Row or Column
Sheet Section
Entity Worksheet
State State
Delete Field(Tax Preparation > Edit > Delete > Delete Field)
From within a worksheet field, select Edit > Delete > Delete Field, or right-click and select Delete >Delete Field from the menu to delete the contents of the active field.
Delete Row or Column(Tax Preparation > Edit > Delete > Delete Row or Column)
From within a worksheet grid, select Edit > Delete > Delete Row (or Column), or right-click andselect Delete > Delete Row (or Column) from the menu.
Whether Row or Column displays in the menu depends on the orientation of the grid (that is,horizontal or vertical). Summary grids, as shown in Accessing Detail Worksheets from Summary Gridson page 147, have a vertical orientation and store data in rows. When a Summary grid is open, themenu option is Delete > Delete Row.
Delete Section(Tax Preparation > Edit > Delete > Delete Section)
From within a worksheet section, select Edit > Delete > Delete Section, or right-click and selectDelete > Delete Section from the menu to delete all contents of a worksheet section. Data in the othersections of the same worksheet is not affected.
Chapter 3 - Tax Preparation • 149
Delete Worksheet or Entity(Tax Preparation > Edit > Delete > Delete Worksheet)
Do one of the following to delete a worksheet or entity:
From within a worksheet, select Edit > Delete > Delete Worksheet, or right-click and selectDelete > Delete Worksheet from the menu to delete an entire single occurrence of a worksheet(e.g., Schedule A) and all data contained in it.
From within a Detail or Summary grid, click Delete in the grid's navigation bar.
Delete State(Tax Preparation > Edit > Delete > Delete State)
Delete State removes data entered in the state tax authority worksheets for a specified state. Data inthe federal worksheets of the same return is not affected.
From within a worksheet select Edit > Delete > Delete State, or right-click and select Delete > DeleteState from the menu. The states associated with the active return display in the Units dialog. Selectthe preferred state and click OK.
Data Flow Between Interview and Worksheet ViewsData entered in one view displays in other views based on these standards:
When you enter data in Worksheet View, the interview forms are automatically populated withthe same data.
When you enter data in Interview View, the worksheet forms are automatically populated withthe same data.
When you override existing data in one view, it is also overridden in the other view.
Return Print StyleThe print style of a return differs based on whether it is printed fromWorksheet View or Interview View.If the return is printed fromWorksheet View, multiple entities (e.g., Schedules C, E, F) print inalphabetical order within that entity type. If the return is printed from Interview View, entities print innumerical order within each entity type.
You can print according to the view you are in or you can set a default print style. To select a return'sprint style, open the Processing Options section of the General > Return Options category.
Chapter 3 - Tax Preparation • 150

Position the cursor in the Return print style field to select from the drop-down list.
Your print options are as follows:
Based on current view (Default). Forms print in sorted order if you are in Worksheet View andin entry order if you are in Interview View.
Print in sorted order (Worksheet). If you are in Interview View but want to print in sorted orderas if you were in Worksheet View, select this option.
Print in entry order (Interview). If you are in Worksheet View but want to print in entry order as ifyou were in Interview View, select this option.
Print Order OptionsThe informational or nonfileable forms, included in the accountant and client copies, are for audit orinformation purposes only and are not required to be filed with the return (for example, depreciationdetail forms and the AMT depreciation report).
You can configure the default order in which informational forms print for an office group usingConfigure Applications > Tax Preparation > Print Options in Office Manager.
A default can be overridden on a single return basis in Tax Preparation using General > ReturnOptions > Processing Options (see this screen at Return Print Style on the previous page). To accessthe options, click in the Print order options field and select the arrow to display the drop-down list.
Chapter 3 - Tax Preparation • 151

The print order options are as follows:
Collate informational forms before fileable forms. Collates all informational (nonfileable) formsin front of the federal return. This option affects only the accountant and client copies. Theprinting sequence of the government copy is unaffected.
Print informational forms in all copies. Causes all the informational (nonfileable) forms to beincluded in the government copy of the return in addition to the accountant and client copies.Each copy will be identical beginning with page one of the actual forms.
None. Causes the informational (nonfileable) forms that are included in the accountant andclient copies to print in the normal sequence.
Linking from Government to Worksheet View
What is Government View?Government View contains the official IRS forms that have been approved by the US Government.
Data entered in interview forms or worksheets is transferred to the appropriate government formsupon calculation of the return. Data can also be entered directly in government form fields or afterselecting the Override feature, which allows the user to enter information in a field that populates as aresult of calculating the return. For more information, see Override on page 156.
Chapter 3 - Tax Preparation • 152
Color Coding in Government Form and Worksheet FieldsFields are color-coded when the cursor is positioned in them.
Regular entry fields are blue.
Fields that can be overridden are yellow.
Fields disabled for data entry are red (e.g., fields that can be expanded).
Linking from a Government Form to a Worksheet(Tax Preparation > Forms > Link to Worksheets)
Select this feature to link (move) from a federal, state, or city government form to its correspondingworksheet. This feature displays a list of the applicable worksheets that can provide data for theselected field. It is not available for worksheets in consolidated returns.
Note: You must initiate the link from the government form, not the worksheet.
To link to a worksheet, do any of the following from an open government form:
Select Forms > Link to Worksheets.
Click the Link to Worksheets button.
Right-click in a government field and select Link to Worksheets from the menu.
There are three possible responses when you link to a worksheet. The response depends on the typeof field the cursor is in when executing the link command.
If the source data is from only one worksheet in the return, you can link directly from thegovernment form to the worksheet.
If the field is a summary field (i.e., the field summarizes information from multiple sources), theSelect Worksheet/Section dialog displays. This is also known as the Link List dialog. Double-click the preferred worksheet or section, or select an item in the list and click OK.
Note: The worksheets on the picklist that contain data are shown as blue text. Onlyworksheets display in blue, not the sections within worksheets.
If the field represents multiple entities or entity sources within a single worksheet, a list of entitiesdisplays. Once an entity is selected from this picklist, the Select Worksheet/Section (Link List)dialog displays. The worksheet or section can then be selected.
Chapter 3 - Tax Preparation • 153

Returning to a Government Form(Tax Preparation > Forms > Return to Government Form)
You can move from a worksheet to the government form from which a link was established.
1. Place the cursor anywhere in the worksheet.
2. Do one of the following:
Select Forms > Return to Government Form.
Click the Back to Govt Form button.
Right-click and select Return to Government Form from the menu.
Returning to the Link List(Tax Preparation > Forms > Return to Link List)
Once you have linked to a worksheet using the Select Worksheet/Section (Link List) dialog, you canreturn to the dialog to select another worksheet or section.
To return to the Select Worksheet/Section (Link List) dialog, do one of the following:
Select Forms > Return to Link List.
Click the Back to Link List button.
Right-click and select Return to Link List from the menu.
You can then select another worksheet or section to link to.
To add the Back to Link List button to your toolbar, see Customizing the Toolbar on page 91.
Edit ToolsUse the following features and shortcut keys to assist you with editing returns.
UndoProvided you have not exited the field, you can restore it to the previous state. Press Ctrl + Z,Alt + Backspace, or Esc to undo changes and restore the original data.
Note: Esc does not function in Split Screen or Heads Down data entry mode.
Chapter 3 - Tax Preparation • 154
Cut(Tax Preparation > Edit > Cut)
Use Cut to move or delete data from a field and copy it to the Clipboard.
1. Select the portion of the text you want to remove.
2. Choose one of the following:
Select Edit > Cut.
Click Cut, if it has been added to your toolbar.
Right-click and select Cut from the menu.
Press Ctrl + X.
Copy(Tax Preparation > Edit > Copy)
Use Copy to copy data from one field to another.
1. Select the portion of the text you want to copy.
2. Choose one of the following:
Select Edit > Copy.
Click Copy, if you have added it to your toolbar.
Right-click and select Copy from the menu.
Press Ctrl + C.
The data remains in the field and is copied to the Clipboard.
Paste(Tax Preparation > Edit > Paste)
Use Paste to move the copied data from the Clipboard to another data field.
1. Select the field where text is to be inserted.
2. Choose one of the following:
Select Edit > Paste.
Click the Paste button.
Right-click and select Paste from the menu.
Press Ctrl + V.
The copied text displays in the field you selected.
Chapter 3 - Tax Preparation • 155

Paste OLE, Insert Object, and Paste DDE Link(Tax Preparation > Edit > Paste OLE > Insert Object > Paste DDE Link)
While in an interview or government form, you can use the Object Linking and Embedding (OLE),Insert Object, and Dynamic Data Exchange (DDE) functions to link and embed data betweenTax Preparation and other applications.
For more information and instructions on these features, see Embedding and Linking Spreadsheetsand Documents on page 164.
Links(Tax Preparation > Edit > Links)
Select Edit > Links to change, remove, or view links you have established between fields on a formand a spreadsheet.
Override(Tax Preparation > Edit > Override)
The Override option allows you to enter data directly into a government form field that normallyreceives data from a calculation done in another part of the return. Overrides are identified by a yellowbackground color, with override amounts in magenta.
1. Place the cursor in an override field and do one of the following:
Right-click and select Override from the menu.
Click the Override button.
Select Edit > Override.
2. Click OK to accept the caption, or enter your own, and then click OK. Click Clear Override toclear an override previously entered in the field.
3. Enter the override amount. When you exit the field, the amount displays as magenta to mark itas an override.
Note: Select File > Print > Preparer Reports > Override Report > View Report to view or printan Override report.
Clear All Overrides(Tax Preparation > Options > Clear All Overrides)
Clear All Overrides clears the override markers for a return. The amounts are no longer consideredoverrides. The fields will change, if appropriate, following the next calculation to displaysystem-calculated amounts.
Warning! Overrides that are removed cannot be recovered.
Chapter 3 - Tax Preparation • 156
Clear all overrides in a return by following these instructions:
1. Open a return containing overrides you want to remove.
2. Select Option > Clear All Overrides.
3. Click Yes to confirm.
Estimate(Tax Preparation > Edit > Estimate)
The Estimate option enables you to flag an amount field as an estimate and not a confirmed value.Any amount field in a worksheet, an interview, or government form may be flagged as an estimateexcept protected fields. Estimate amounts display in green type.
1. Choose one of the following:
Select Edit > Estimate.
Click the Estimate button.
Right-click and select Estimate from the menu.
Note: In an override field on a government form, you must first select Override, click OK onthe Override caption, and then select Estimate.
2. Click OK to accept the caption or enter one of your own.
3. Enter the estimated amount. When you exit the field, the amount displays in green type.
Clear All Estimates(Tax Preparation > Options > Clear All Estimates)
The Clear All Estimates option removes all estimate flags entered for a return. The amounts are nolonger treated as estimates.
Warning! Estimate flags that are removed cannot be recovered.
1. Open a return containing estimate flags you want to remove.
2. Select Options > Clear All Estimates. A message asking you to confirm that estimate flagsshould be removed displays.
3. Click Yes. All estimate flags on the return are removed.
Lookup Value(Tax Preparation > Edit > Lookup Value)
Some fields require specific entries. A list of the valid entries for these fields is displayed using theLookup Value feature.
1. From a field where specific entries are required or a list was created, do one of the following:
Select Edit > Lookup Value.
Press F4.
Chapter 3 - Tax Preparation • 157
Click the Lookup Value button.
Right-click and select Lookup Value from the menu.
Double-click the field.
2. To search for an entry in a long list of possible entries, click the Search button.
3. Type the text to search for, and then click Find Next.
4. Select the correct item, and then click OK.
AutoText Descriptions(Tax Preparation > Edit > AutoText Descriptions)
The AutoText Descriptions feature allows you to create lists of entries for repeating description lineswithin each type of return. The picklist will be available for all applicable forms within the return.
Examples of repeating description fields are the Other accounting method fields on the IndividualInterview Form C-1, the Additional Section 163A Costs on Partnership Interview Form A-2, and theFiduciary Fees - Direct section on Fiduciary Interview Form A-1.
Use this feature to create firm-wide lists that are available for all returns for each tax product. A returnof the tax product you want to create the descriptions for must be open for this feature to be available.
Notes:
To enable the AutoText Descriptions feature, check the Activate AutoText descriptions boxusing Options > Preferences > Tax Return Preferences > Miscellaneous.
Lists will be carried to the next year’s return.
Firm-level picklists can be accessed by multiple sessions of Tax Preparation.
Creating Return-Level DescriptionsTo enter a description directly in a repeating description line, position the cursor on the line and enterthe description. To use the entry in another field within that section, click the down arrow at the rightend of the field, highlight the item, and click to insert it.
If you have enabled the AutoComplete feature on the Options > Preferences > Tax ReturnPreferences > Miscellaneous tab, enter the first letter of the description to insert in the field.
If multiple descriptions begin with the same letter, the first match populates the field. As you type, thetext changes if another description matches what is being entered.
Creating Firm-Level AutoText DescriptionsTo create AutoText items in a repeating description field, do the following:
1. Open the form or worksheet containing the description field you want to create a list for.
2. Place the cursor in the field you want to create a picklist for.
Chapter 3 - Tax Preparation • 158
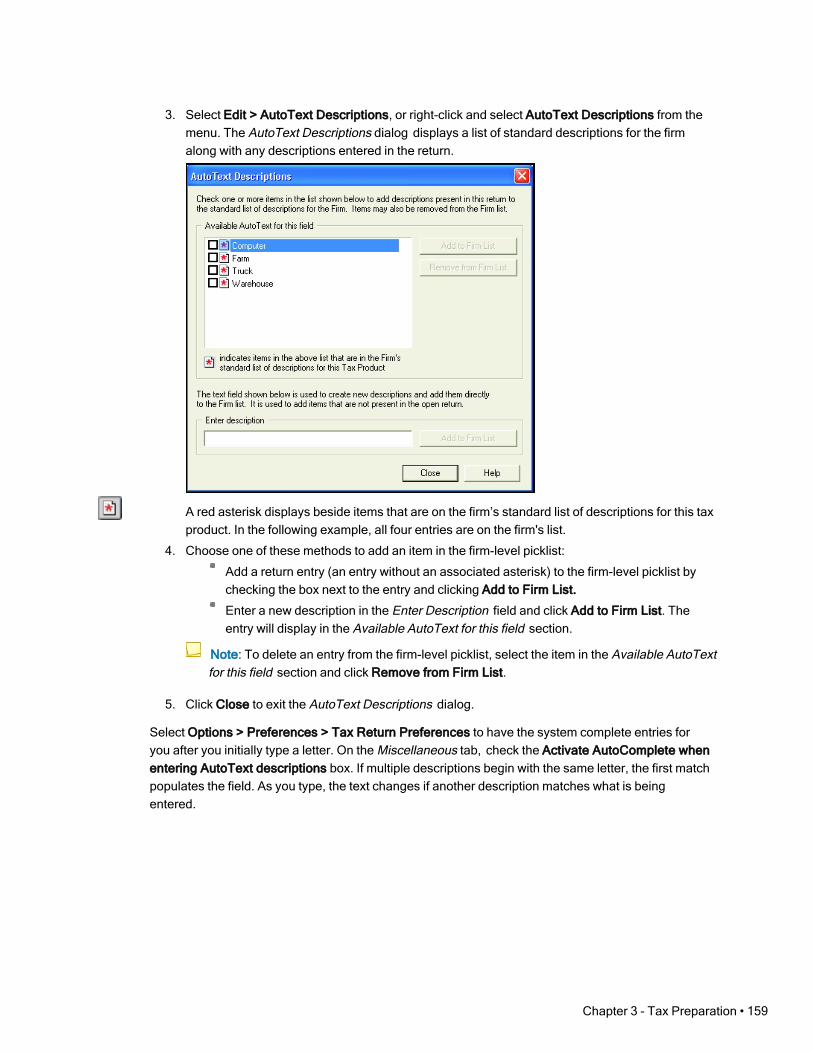
3. Select Edit > AutoText Descriptions, or right-click and select AutoText Descriptions from themenu. The AutoText Descriptions dialog displays a list of standard descriptions for the firmalong with any descriptions entered in the return.
A red asterisk displays beside items that are on the firm’s standard list of descriptions for this taxproduct. In the following example, all four entries are on the firm's list.
4. Choose one of these methods to add an item in the firm-level picklist:
Add a return entry (an entry without an associated asterisk) to the firm-level picklist bychecking the box next to the entry and clicking Add to Firm List.
Enter a new description in the Enter Description field and click Add to Firm List. Theentry will display in the Available AutoText for this field section.
Note: To delete an entry from the firm-level picklist, select the item in the Available AutoTextfor this field section and click Remove from Firm List.
5. Click Close to exit the AutoText Descriptions dialog.
Select Options > Preferences > Tax Return Preferences to have the system complete entries foryou after you initially type a letter. On the Miscellaneous tab, check the Activate AutoComplete whenentering AutoText descriptions box. If multiple descriptions begin with the same letter, the first matchpopulates the field. As you type, the text changes if another description matches what is beingentered.
Chapter 3 - Tax Preparation • 159
List(Tax Preparation > Edit > List)
Select Edit > List to add multiple amounts and place them in one field. The list keeps a running total ofthe amounts and inserts the total amount in the corresponding field.
A light green marker displays in the upper-left corner of a data field when a list is attached. If the cursoris in a field with an associated list, a check mark appears next to List on the Edit menu and the Listbutton displays with a light background.
When you print a return, list entries, descriptions, and amounts appear in the accountant copy. SelectFile > Print > Preparer Reports and choose List and Notes to print or review lists.
To create a list, use the following procedure:
1. Click the amount field where you are attaching a list, then do one of the following:
Select Edit > List.
Click the List button.
Right-click and select List from the menu.
Press Ctrl + L.
2. The default caption shows the user ID, date, time, input form ID, and displays in the audit trailfound in the accountant copy of the return. You can change the caption, if needed.
3. Enter a description. Press Tab to move to the amount field and enter an amount. Continueentering descriptions and amounts. The system keeps a running total of amounts entered.
4. When finished, click OK. The total amount is entered in the field. When you leave the field, alight green marker displays in the field.
The List dialog also includes the following commands to edit a list:
Del List. Deletes all descriptions and amounts in a list.
Del Line. Deletes a line where the cursor is positioned.
Ins Line. Inserts a blank line above the line where the cursor is positioned.
Notes(Tax Preparation > Edit > Notes)
Notes allows you to attach alphanumeric data to any data field. A blue marker displays in the leftcorner of a data box if a note is attached. When you position the cursor in a field with a note, a checkmark displays next to Notes on the Edit menu, and the Notes button displays with a light background.
To attach a note to a field, use the following procedure:
1. Position the cursor in the data field where you are attaching a note and choose one of thefollowing to display the Notes dialog:
Select Edit > Notes.
Click the Notes button.
Right-click and select Notes from the menu.
Chapter 3 - Tax Preparation • 160

2. Modify the caption if you want to add a description to identify the note in the audit trail found inthe accountant copy of the return.
3. Enter up to 750 lines for your note. If you need a blank line, press Enter.
4. To return to the form, click OK.
To move forward to the next sequential note in the form, click Next.
To return to the preceding note in the form, click Previous.
To access the global note for the return, click Global Note.
To delete the note, click Delete Note.
Global Note(Tax Preparation > Edit > Global Note)
Unlike notes that are attached to single fields, global notes can be accessed from any field within areturn. Global notes are carried forward to the next year’s return.
1. To enter or edit global notes, choose one of the following options to select the Notes dialog:
Select Edit > Global Note.
Click Global Note on the toolbar.
Click Global Note from any Notes dialog.
2. The default text in the caption begins with the user ID, followed by the date and time the globalnote was created. The text, Global Note, is added to the end of the caption. You can change thecaption, if needed.
The global note references that are used to detail the pro formaed lists and notes show the userID, date, time, interview form, field name, and the list or note detail.
3. Click in the Notes box and begin typing the note. If you need a blank line, press Enter.
4. To save and close the Notes dialog, click OK.
Notes:
There can be only one global note for a return.
Click Delete Note to delete the entire global note and close the Notes dialog.
Hash Totals(Tax Preparation > Forms > Hash Totals)
When you are working on interview forms, hash totals compare the sum total dollar amount you entermanually for a sheet with the sum total calculated by the system.
Warnings!
Hash totals are removed from the return when the Reset Input option is used.
Hash totals are not available in Worksheet View. Switching to Worksheet View clears all hashtotals from interview forms.
Chapter 3 - Tax Preparation • 161

To enter a hash total amount, do the following:
1. Select Forms > Hash Totals.
2. Enter the estimated total for the sheet.
3. Click OK. The system displays the hash total entered, the system computed total, and anydifference in the amounts.
4. Click OK to return to the sheet. Hash total amounts display in red at the bottom of the form.
Changing Entity/Attachment(Tax Preparation > Forms > Change Entity/Attachment)
Available when using interview forms, the Change Entity/Attachment option allows you to reassignassets or other selected detail items on a one-by-one or sheet basis.
For example, to reassign an asset from one Schedule C to another Schedule C, do the following:
1. Open the DP-1 for the first Schedule C.
2. Place the cursor in the box containing the asset you want to reassign.
3. Select Forms > Change Entity/Attachment > This Record. A list of existing schedules displaysin the Select Entity dialog.
4. Highlight the schedule selected to contain the asset and click OK. The asset description andnumber no longer displays on the DP-1 for the Schedule C.
When you open the DP-1 for the second Schedule C, the new asset displays.
Note: Select Options > Reset Input to consolidate all assets in the fewest sheets possible.
To reassign all assets on a sheet to a new sheet, do the following:
1. Open the DP-1 containing the assets you want to reassign.
2. Right-click and select Change Entity/Attachment > This Sheet from the menu. TheSelect Entity dialog displays a list of existing schedules.
3. Highlight the entity selected to contain the assets and click OK.
Note: The Change Entity/Attachment feature is not available in Worksheet View.
Resetting Input(Tax Preparation > Options > Reset Input)
Use Reset Input to carry over data entered on government forms to corresponding interview forms.This option ensures that the information is carried to the correct interview box number and form sheet.
To reset government form input, do the following:
1. Select Options > Reset Input.
2. Click OK to reset your data. Once the procedure is complete, interview forms are updated withthe changes you made on the government forms.
Chapter 3 - Tax Preparation • 162

Notes:
When you use Reset Input, interview form sheets are renumbered with each form starting withsheet 1, and hash totals are removed from the return.
The Reset Input function is not available in Worksheet View.
Splitting Joint Returns(Tax Preparation > File > Split Joint Return)
The Filing Status Optimization feature, identified in Tax Preparation as the Split Joint Returns option,allows you to split Individual returns with a status of Married Filing Jointly into two new separatereturns for the taxpayer and spouse.
The taxpayer’s return is created as a new version of the existing joint return and the spouse’s returnwill be created as a new return. The joint return, however, is not changed.
You can re-enter the joint return and split it again, if needed. Each time you do, you can overwrite thepreviously split returns or create different versions of the returns.
Note: You cannot split a return that has been created as the result of a split.
For PAYP (Pay-As-You-Process) customers, the Married Filing Jointly return must be authorizedbefore it can be split. No additional authorizations are required for the returns created by the split.
The Filing Status Optimization feature complements the Filing Status Comparison worksheet, whichcan help determine whether it is better to file a joint or separate return.
Once the split is complete, you must process each return separately.
To split a joint return, do the following:
Note: The spouse’s Social Security Number must be entered in the return and the return must becalculated. If not, you are prompted to do so before the splitting process can begin.
1. Open the joint return you want to split.
2. Select File > Split Joint Return.
3. At the confirmation prompt, click Yes to split the return.
4. The system does either of the following:
If this is the first time this return is being split, you must enter a client ID for the spouse’stax return (the taxpayer’s return will be a new version of the joint return). After entering aclient ID, click OK to complete the split process.
When the split is complete, a summary dialog shows the return versions resulting fromthe split. Click Print Report to print a hard copy listing the joint return and the returnscreated from it.
If you previously split the joint return, a dialog asks if you want to overwrite the returnspreviously created, or create new return versions. Make your selection and click OK tocomplete the split process.
Chapter 3 - Tax Preparation • 163

Note: If you chose to create new return versions, you can print a report listing thenew versions created by the split process.
CCH ProSystem fx Tax automatically resets input for the two new returns to ensure that the correcttaxpayer and spouse information is placed in the split returns. Some of the information found in thejoint return might not be carried to the taxpayer or spouse return, depending on the results of the split.
If information entered on a government form does not seem to flow correctly to the correspondinginterview form, it may be necessary to use the Reset Input option if you are in Interview View. SeeResetting Input on page 162 for details.
Embedding and Linking Spreadsheets and DocumentsNote: The Embedding and Linking Spreadsheets and Documents features are used withgovernment and interview forms only.
Tax Preparation utilizes both Dynamic Data Exchange (DDE) and Object Linking and Embedding(OLE) to link and embed data between Tax Preparation and other applications.
OLE and DDE allow you to do the following:
Link data from a spreadsheet to tax form data fields
Link data from a return data field to a spreadsheet
Link data from a tax return into a word processing document
Embed a spreadsheet into a return
Embed a document into a return
The sections that follow discuss the procedures for linking and embedding return data, documents,and spreadsheets.
Linking Data from a Spreadsheet to a ReturnNote: When linking from a spreadsheet to a return, the spreadsheet data can only be linked tofields on interview and government forms.
1. Open the spreadsheet containing the data you want to link.
2. Highlight the field or cell to be linked.
3. Select Edit > Copy in the spreadsheet application.
4. Open the return in Tax Preparation.
5. Locate the form and field to contain the linked data, and then place the cursor in the preferredfield.
6. Select Edit > Paste DDE Link. When you exit the field, the data displays in the return field and ared marker displays to the left of the data to show the field has been linked.
If you make changes to a spreadsheet with the tax return open, the changes display automatically inthe return.
Chapter 3 - Tax Preparation • 164
If the return is closed when you are updating the spreadsheet, the changes are not made to the returndata. Open the return you want updated. When prompted to re-establish the remote DDE links,answer Yes to update the fields in the return.
Editing Links from SpreadsheetsThe Links function allows you to manually update data linked from a spreadsheet into a return. Whenyou open a return containing data linked from a spreadsheet, you are prompted to re-establish links. Ifyou select Yes, all links are automatically updated. If you select No, select Edit > Links to manuallyupdate them. This feature allows you to view, change, deactivate, or remove links between aspreadsheet and a return.
Note: This process does not affect links that carry information from Tax Preparation to otherapplications. To edit those links, you must access the “destination” application’s edit linksfunction.
To manually update links from a spreadsheet to a return, use the following procedure:
1. Select Edit > Links. The Edit Links dialog displays.
2. Select the first link you want to edit.
3. Click the appropriate option.
Update all. Allows you to manually update all links with the changes you have made to alinked document.
Update. Allows you to manually update a single link with changes made to a linkeddocument.
Edit. Allows you to change the source of existing linked data: the application name, filename, and item name of the data.
Unlink. Removes the link.
Deactivate/Activate. Deactivate disables the link, but maintains the link in the list.Activate enables the link.
4. Click Close when finished.
Linking Data from a Return to a SpreadsheetNote: Return data on any government or interview form can be linked to a spreadsheet.
1. Open a return.
2. Select data in the field that is to be linked to the spreadsheet.
3. Select Edit > Copy in Tax Preparation.
4. Open the target spreadsheet.
5. Place the cursor in the cell in which to link data.
6. Select the application’s Paste Link option to apply the link.
To link data to a Microsoft® Excel® 2016 or later spreadsheet, select Paste from the ribbon andselect Paste Link.
Chapter 3 - Tax Preparation • 165

To link data to an earlier version of a Microsoft® Excel® spreadsheet, you would do thefollowing:
a. Select Edit > Paste Special in Excel®.
b. Select the Paste link radio button.
c. Select Text from the As list box.
d. Click OK.
Repeat steps 2 through 6 for each data field you want to link.
Linking Data from a Tax Return into a DocumentTax provides several methods for incorporating data into your documents. The method you usedepends on the types of data you transfer and how often the documents need updating.
Select Configure Applications > Tax Preparation > Letters and Filing Instructions in OfficeManager to make changes that affect all CCH ProSystem fx Tax letters produced for a specificoffice group. See Configuring Tax Preparation: Letters and Filing Instructions on page 31 forfurther information.
Select Review > Letters in Tax Preparation to make changes to a specific return’s letters. SeeLetters on page 177 for more information.
If you routinely create your own correspondence and prefer to have return-specific informationdynamically linked to your own documents, you can link return data to the documents youcreate.
Note: Return data on any government or interview form can be linked to a document.
Using Fields on Tax Forms
1. Open a return.
2. Select data in the field you are linking to the document and select Edit > Copy.
3. Open the target document.
4. Place the cursor in the position in which to link data and select the application’s Paste Linkoption to apply the link.
To link data to a Microsoft®Word document you would do the following:
a. Select Edit > Paste Special.
b. Select the Paste link radio button.
c. Select Text from the As list box.
d. Click OK.
5. Repeat steps 2 through 4 for each data field you want to link.
Chapter 3 - Tax Preparation • 166

Using the Federal and State Link WorksheetsThe Federal and State Link Worksheets provide a single location for data that is commonly used inclient correspondence. This allows you to gather much of the information that is to be linked to yourdocuments without going from form to form to locate each piece of data.
The Federal and State Link Worksheets are available for each tax product and containproduct-specific data fields. These worksheets are located on the Government tab in Full WindowForms Tree and Split Window Forms Tree, on the Fed. Government tab in Full Window Forms List orFull WindowWorksheets List, and on the government forms tree in Worksheet View.
Note: Data from the Federal and State Link Worksheet can be linked to spreadsheets anddocuments.
To locate the Federal and State Worksheets in Full Window Forms List or Worksheets List, do thefollowing:
1. Click Forms List or in Interview View, select Forms > Forms List. In Worksheet View, selectView > Full Window Worksheets List.
2. Select the Fed Government tab.
3. You can find the worksheets by selecting Search and entering Fed Link as a search term ornavigate to the worksheets located near the end of the list.
To locate the Federal and State Link Worksheets in Full Window Forms Tree, do the following:
1. Click Forms Tree or select Forms > Forms Tree.
2. Select the Government tab.
3. Enter Link as a search term in the Search Text box and click Find Next or press Enter.
To locate the Federal and State Link Worksheets in Split Window Forms Tree, do the following:
1. Click Search or select Edit > Search.
2. Select the Government tab.
3. Enter Link as a search term in the Search text box and click Find Next.
Embedding a New Document or Spreadsheet into a ReturnWhen embedding documents and spreadsheets, you can create the document or spreadsheet in thetax return. Once you save the new document or spreadsheet, it automatically displays in the taxreturn’s Attach Documents window. The data can only been seen in the Attach Documents window orwhen printed to the printer. The information prints near the beginning of the Accountant copy of thereturn.
You can embed a document or spreadsheet in a default return for a specific product type. Thedocument or spreadsheet will be available for all returns created or recalled using the default return.
Chapter 3 - Tax Preparation • 167

To embed a new document or spreadsheet into a return, use the following procedure:
1. Open the tax return in which you want to embed the object.
2. Select Forms > Attach Documents or click the Attach Documents button to display the AttachDocuments window.
3. Select Edit > Insert Object. The Insert Object dialog allows you to select the application used tocreate charts, graphs, spreadsheets, etc.
4. Select the object type and click OK to open the associated application.
5. Create the spreadsheet or document.
6. Save your work when it is complete.
7. Return to Tax Preparation and the file you created automatically displays in the AttachDocuments window.
Embedding an Existing Document or Spreadsheet into a ReturnAn entire document or spreadsheet, or only a selected portion of information, can be embedded in aclient’s return.
Document or spreadsheet data can also be embedded in a default return for a specific product type.The data will be available for all returns created or recalled using the default return. The data can onlybeen seen in the Attach Documents window or when printed to the printer. The information prints nearthe beginning of the Accountant copy of the return.
To embed an entire document or spreadsheet into a return, drag the file from Explorer to the AttachDocuments window.
To embed a portion of a document or spreadsheet, do the following:
1. Open the tax return.
2. Select Forms > Attach Documents or click the Attach Documents button to display the AttachDocuments window. Previously embedded documents and spreadsheets display in the window;otherwise, the window is empty.
3. Open the document or spreadsheet.
4. Highlight the portions of the document or spreadsheet you want to embed in the return.
5. Select Edit > Copy in the document or spreadsheet application.
Chapter 3 - Tax Preparation • 168
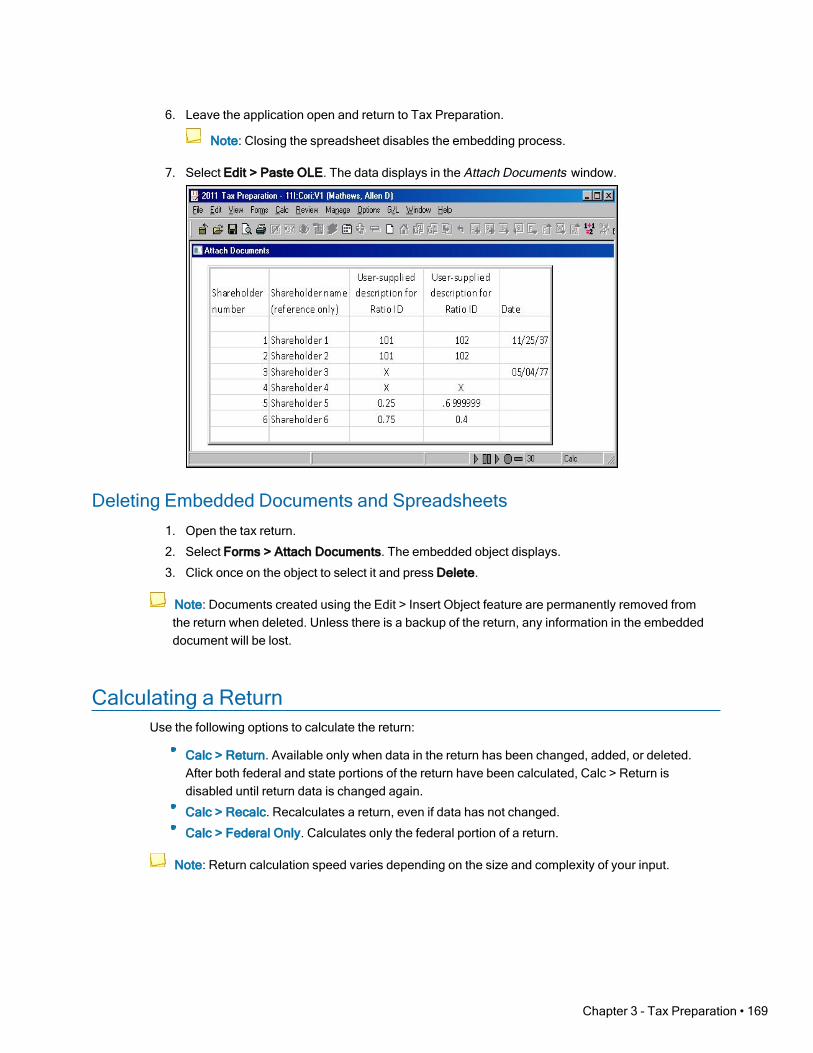
6. Leave the application open and return to Tax Preparation.
Note: Closing the spreadsheet disables the embedding process.
7. Select Edit > Paste OLE. The data displays in the Attach Documents window.
Deleting Embedded Documents and Spreadsheets1. Open the tax return.
2. Select Forms > Attach Documents. The embedded object displays.
3. Click once on the object to select it and press Delete.
Note: Documents created using the Edit > Insert Object feature are permanently removed fromthe return when deleted. Unless there is a backup of the return, any information in the embeddeddocument will be lost.
Calculating a ReturnUse the following options to calculate the return:
Calc > Return. Available only when data in the return has been changed, added, or deleted.After both federal and state portions of the return have been calculated, Calc > Return isdisabled until return data is changed again.
Calc > Recalc. Recalculates a return, even if data has not changed.
Calc > Federal Only. Calculates only the federal portion of a return.
Note: Return calculation speed varies depending on the size and complexity of your input.
Chapter 3 - Tax Preparation • 169
Consider the possible effects of a calculation.
All open form windows and the tax due and refund amounts displayed on the open return toolbarare automatically refreshed with the results of the calculation.
If the data in a field containing a tick mark has been changed, the tick mark will be reversed,indicated by a white check mark in a red, blue, or green background.
If there are embedded objects in the return, you must open the objects to update them.
Authorizations (PAYP, Pay-As-You-Process)If you have licensed CCH ProSystem fx Tax with PAYP (a per-return charge program), you mustauthorize the return before it can be calculated.
Select Calc on the menu bar and specify whether to calculate the entire return or the federal portiononly. Answer Yes to the prompt telling you a return is not yet authorized. One authorization for federaland one authorization for each state are deducted from the total number of authorizations purchasedand available on your system.
Note: If you change the Social Security Number or the Federal Employer Identification Number(FEIN), you must re-authorize the return.
Return(Tax Preparation > Calc > Return)
To calculate the entire return, do any of the following:
Select Calc > Return.
Click the Calc Return button.
Right-click and select Calc Return from the menu.
Press Ctrl + R.
A calc status dialog displays. The results of the calculation display on the government forms.
Note: To display a message notifying you when calculation is complete, select Options >Preferences > Tax Return Preferences > Miscellaneous and check the After each calc. display“Calc complete” box.
Federal Only(Tax Preparation > Calc > Federal Only)
Select Calc > Federal Only. A dialog displays a series of messages indicating the return is beingcalculated. The results of the calculation display on the government forms.
Note: The Calc Return button remains enabled until the entire return has been calculated.
Chapter 3 - Tax Preparation • 170
Return Group(Tax Preparation > Calc > Return Group)
The Return Group option allows you to calculate a subsidiary return in a consolidated group if thechanges you make to the subsidiary return means a calculation is necessary. When you calculate theconsolidated return, all subsidiary returns that require calculation are calculated first.
Note: If any of the returns in the consolidated group is password-protected, you must enter thepassword before calculating.
Recalc(Tax Preparation > Calc > Recalc)
Recalc allows you to recalculate a return regardless of whether a change has been made to the returndata. Recalculation would be necessary if external changes occur (e.g., if Tax Preparation options foran office group are changed through Office Manager, or if a new release of the tax system is installed).
To recalculate an entire return, including federal and state, select Calc > Recalc or press Ctrl + R. Astatus dialog displays during the calculation process.
Reviewing Calculated ReturnsUse the features on the Review menu to assist you in reviewing the return after it has been calculated.These options allow you to do the following:
View and print reports: Federal Elections, Lists and Notes, and Extra Report.
View Tax Preparation navigation history
View and print return summaries, diagnostics, estimates, overrides, transmittal letters, and formstatements
Link from review reports to fields in the return
Mark fields that have been reviewed
Each of these features is discussed in the sections that follow.
Viewing the Navigation History(Tax Preparation > Review > Navigation History)
Tax Preparation maintains a trail of the worksheets or forms that were viewed during a single sessionin either Worksheet View or Interview View. Every time you open and close a form or worksheet, arecord is added to the history file.
When you switch between Interview and Worksheet Views or exit Tax Preparation, the records areremoved from history. The history file maintains a maximum of 1000 records. When the maximum isreached, the oldest records drop off as new forms are opened and new records are added.
Chapter 3 - Tax Preparation • 171
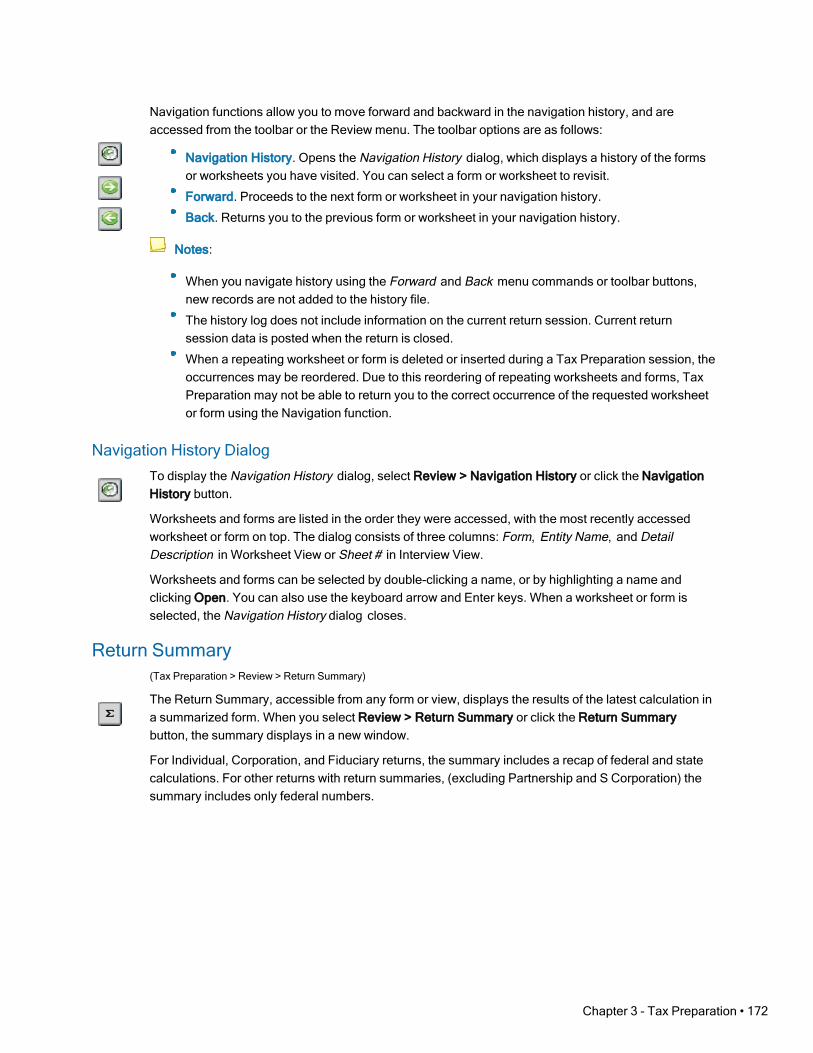
Navigation functions allow you to move forward and backward in the navigation history, and areaccessed from the toolbar or the Review menu. The toolbar options are as follows:
Navigation History. Opens the Navigation History dialog, which displays a history of the formsor worksheets you have visited. You can select a form or worksheet to revisit.
Forward. Proceeds to the next form or worksheet in your navigation history.
Back. Returns you to the previous form or worksheet in your navigation history.
Notes:
When you navigate history using the Forward and Back menu commands or toolbar buttons,new records are not added to the history file.
The history log does not include information on the current return session. Current returnsession data is posted when the return is closed.
When a repeating worksheet or form is deleted or inserted during a Tax Preparation session, theoccurrences may be reordered. Due to this reordering of repeating worksheets and forms, TaxPreparation may not be able to return you to the correct occurrence of the requested worksheetor form using the Navigation function.
Navigation History DialogTo display the Navigation History dialog, select Review > Navigation History or click the NavigationHistory button.
Worksheets and forms are listed in the order they were accessed, with the most recently accessedworksheet or form on top. The dialog consists of three columns: Form, Entity Name, and DetailDescription in Worksheet View or Sheet # in Interview View.
Worksheets and forms can be selected by double-clicking a name, or by highlighting a name andclicking Open. You can also use the keyboard arrow and Enter keys. When a worksheet or form isselected, the Navigation History dialog closes.
Return Summary(Tax Preparation > Review > Return Summary)
The Return Summary, accessible from any form or view, displays the results of the latest calculation ina summarized form. When you select Review > Return Summary or click the Return Summarybutton, the summary displays in a new window.
For Individual, Corporation, and Fiduciary returns, the summary includes a recap of federal and statecalculations. For other returns with return summaries, (excluding Partnership and S Corporation) thesummary includes only federal numbers.
Chapter 3 - Tax Preparation • 172
Interactive Diagnostics(Tax Preparation > Review > Interactive Diagnostics)
Interactive Diagnostics alert you to issues that can affect the outcome of a return. Diagnostics aregrouped in categories: Electronic Filing, Warning, Caution, and Informational.
Diagnostics display in a new window and can be viewed while you work on a worksheet or a form.Diagnostics allows you to move between an item in the report and the relevant field in the tax return.Once you have reviewed or resolved the errors, you can sign-off on them. The system will display theuser ID and the date and time of sign-off. Cleared diagnostics are displayed on the Signed-Off tab.You can review the remaining messages on the Open tab. The All tab displays all of the diagnostics.
Note: Only diagnostics in the Caution and Informational categories are available to be signed off.
To use the Interactive Diagnostics feature, do the following:
1. Select Calc > Return or click Calc Return if the return has not been calculated or must berecalculated.
2. Select Review > Interactive Diagnostics or click the Diagnostics button to display diagnostics.Diagnostics refer to forms and also provide worksheet and field descriptions.Diagnostics that link to field entries are indicated by a Diagnostic link icon to the left of thediagnostic item.
3. To display a split screen with the Diagnostics report in the top portion of the window, use one ofthe following methods:
Click the Diagnostic link icon to the left of the diagnostic item.
Double-click the diagnostic item.
Highlight a diagnostic item and press Enter.
If you are working on a form, the form field containing the incorrect entry is highlighted in thebottom window. From a worksheet, the section field containing the incorrect entry is highlightedin the bottom window.
4. Enter the correct data in the field on the form or worksheet.
5. Repeat steps 3 and 4 to correct other diagnostic items.
6. If you would like to sign-off a diagnostic, select the Sign-off check box under the diagnostic, orpress the space bar when the diagnostic item is highlighted. The system will display the user IDof who signed off on the diagnostic and record the date and time of the sign-off. The signed offdiagnostic is displayed on the Signed-Off tab.
If there are multiple instances of the same diagnostic, a message will display asking ifyou want to sign-off on all or just the current one. Select All if you want to sign-off on allof them, or select Current to only sign-off on the current diagnostic.
If you would like to remove the sign-off, clear the Signed-off check box.
If there are multiple instances of the same diagnostic, a message will displayasking if you want to clear the sign-off for all or just the current one. Select All ifyou want to clear the sign-off on all of them, or select Current to only clear thesign-off on the current diagnostic.
7. When finished, click Close (X) to close the Diagnostics window.
Chapter 3 - Tax Preparation • 173

Interactive Overrides(Tax Preparation > Review > Interactive Overrides)
Interactive Overrides provides a list of the overrides within a government form; however, you can viewthe Override Summary while working in interview forms, government forms, or worksheets. You canmove between an item in the Override Summary and the relevant field in the tax return.
Note: The items in the Override Summary window link to government form fields only.
To use the Interactive Overrides feature, do the following:
1. Select Calc > Return or click Calc Return if the return has not been calculated or must berecalculated.
2. Select Review > Interactive Overrides, or click the Override Summary button.
3. Select a summary item and select Review > Link to Field, or double-click the item. The windowdisplays a split screen. The top window shows the highlighted item in the Field Override Report.The field containing the override entry is highlighted in the bottom window.
Note: You must activate the override before you can edit this field; otherwise, the change isnot applied to the correct entity of the form where the override is located.
4. Enter new data in the field on the government form.
5. Repeat steps 3 and 4 to change other override entries.
6. When finished, click Close (X) to close the Override Summary window.
Interactive Estimates(Tax Preparation > Review > Interactive Estimates)
Interactive Estimates displays a list of the estimates within a return. The estimates display in a newwindow and can be viewed while you work on a form or worksheet, allowing you to move between theEstimate Summary and the relevant field in the return.
To use the Interactive Estimates feature, do the following:
1. Select Calc > Return or click Calc Return if the return has not been calculated or must berecalculated.
2. Select Review > Interactive Estimates or click the Estimate Summary button. The returnestimates display.
3. Highlight a summary item and select Review > Link to Field, or double-click the estimate item.The window displays a split screen. The top window shows the highlighted item in the FieldEstimate Report.
The bottom window displays the form or worksheet with the estimate field.
4. Enter new data in the field or remove the flag from the estimate.
5. Repeat steps 3 and 4 to change other estimate entries.
6. When finished, click Close (X) to close the Estimate Summary windows.
Chapter 3 - Tax Preparation • 174

Interactive Input Overrides(Tax Preparation > Review > Interactive Input Overrides)
Interactive Input Overrides lists the overrides within a return. You can view the overrides while workingon a worksheet, allowing you to move between the Input Override Summary and the relevant field inthe tax return.
Note: This feature is available only in Worksheet View.
To use the Interactive Input Overrides feature, do the following:
1. Select Calc > Return or click Calc Return if the return has not been calculated or must berecalculated.
2. Select Review > Interactive Input Overrides or click the Interactive Input Override button. TheInput Override Summary displays.
3. Highlight the summary item and select Review > Link to Field, or double-click the override item.The window displays a split screen.
The bottom window displays the worksheet with the field containing the input override. The topwindow shows the highlighted item in the Input Override Report.
4. Enter data in the field on the worksheet.
5. Repeat steps 3 and 4 to change other input override entries.
6. When finished, click Close (X) to close the Interactive Override window.
Interactive Reversed Tick Marks(Tax Preparation > Review > Interactive Reversed Tick Marks)
Interactive Reversed Tick Marks lists the government forms with reversed tick marks in a return. TheReversed Tick Marks Summary displays in a new window and can be viewed while you work on a formor a worksheet, allowing you to move between the tick mark and the relevant field in the tax return.
To use the Interactive Reversed Tick Marks feature, do the following:
1. Select Calc > Return or click Calc Return if the return has not been calculated or must berecalculated.
2. Select Review > Interactive Reversed Tick Marks or click the Reversed Tick Mark Summarybutton.
3. Highlight a summary item and select Review > Link to Field, or double-click the reversed tickmark item. The window displays a split screen. The top window shows the highlighted item in theReversed Tick Mark Report.
The bottom window displays the form field containing the reversed tick mark.
4. Enter new data in the form or worksheet field.
5. Repeat steps 3 and 4 to change other reversed tick marks.
6. When finished, click Close (X) to close the Reversed Tick Mark Summary window.
Chapter 3 - Tax Preparation • 175

This Form’s Statements(Tax Preparation > Review > This Form’s Statements)
The This Form's Statements option allows you to view, print, or copy supporting statements for agovernment form.
Calculate the return and use the following procedure to display the supporting statements for theactive form.
1. Select Review > This Form’s Statements, click the This Form’s Statements button, or pressCtrl + D.
2. Click Copy to Clipboard to place the report on the Clipboard for transfer to a word processingapplication.
3. Click Print to print the statements.
Link to Statements
Link to statements buttons allow you to navigate from a specific line in a government form to thestatement associated with that line. The buttons appear in a line when additional detail is availablerelated to the input data, or when the input data has exceeded the available input space on theform. If any of the following buttons are present in a government form, they can be clicked to openthe View Statement window displaying the statement:
The return must be calculated to initially display the link to statements buttons and also to generateupdated statement results.
Note: From the View Statement window, you can select Print to print the statement.
Chapter 3 - Tax Preparation • 176

Viewing Tax Due and Refund AmountsThe Tax Due and Refund feature displays the federal and state tax due and refund amounts for openreturns on the right end of the return toolbar. Tax due amounts are displayed in black font and taxrefund amounts are displayed in green font. The amount totals are refreshed when the return iscalculated. The totals display in gray if the return needs to be recalculated.
Currently, the feature is functional for the following return types:
Individual
Corporation
Fiduciary
Estate and Gift
Exempt Organization
Letters(Tax Preparation > Review > Letters)
The Letters option allows you to view, print, or copy all correspondence associated with a return. IfMicrosoft®Office 2016 or a later version is installed, you can also edit letters in Word.
Keep the following in mind when creating and editing letters in Word:
To print edited letters, the workstation you are printing from must be configured to run Word.
Workstation Setup must be run on a computer before any letters can be created or edited inWord.
Letters created in Word for joint returns that are subsequently split remain with the originalreturn, not with the split return.
Do not attempt to load two new letters simultaneously.
Viewing a Letter
1. Select Review > Letters or click the Letters button to display the Select Letter dialog.
The letters are listed in the order they will be printed with the return: Transmittal letters,Cover letters, Standard Filing Instructions, and, if applicable for a Partnership,S Corporation, or Fiduciary return, K-1 letters.
The Version column indicates if the letter is a system-generated original or a versionedited in Word.
The Modified column indicates the date and time the return was calculated for an originalversion, and the date and time a Word version was last saved.
Note: If the original system letter has a more recent date/time stamp, the Wordversion may need to be edited or deleted, and then recreated from the original toacquire the latest variable data values.
The Search feature aids in locating letters when a list exceeds the available viewingarea.
Chapter 3 - Tax Preparation • 177

If a Word version is highlighted, the Delete MSWord Version button becomes availableto allow its removal.
2. Select a letter and click OK, or press Enter.
3. Do one of the following:
Click Print to print the letter with letterhead on a laser form, if applicable.
Select Copy to Clipboard to copy the letter, including page separators and inserted formtext, to the Clipboard for use in a word processing application.
Note: Copying the edited letter to the Clipboard will not attach the letter to the return.
4. Click Close to return to the Select Letter dialog.
5. Click Close to exit the Select Letter dialog.
Printing All Return Letters(Tax Preparation > File > Print > Preparer Reports)
1. Select File > Print > Preparer Reports. The Print Preparer Reports dialog displays.
2. Click the Letters radio button.
3. Click OK.
Note: The letter version with the most recent date or time will print with the return. If the systemversion of a letter has a more recent date or time than a Word version of the same letter, you aregiven three options: print all system-generated letters; print all Word document letters; or print themost recent dates, regardless of type.
Printing Letters with the Return(Tax Preparation > File > Print > Entire Return)
Select File > Print > Entire Return.
Note: The letter’s font type and print position within the return depend on the font selection andprint destination chosen in Printer Setup.
If TrueType fonts are not used and the job is sent to a printer, the letters print using the Tax fontsand the letters are placed in the proper sequence in the return.
If TrueType fonts are not used and the job is sent to a fax or document imager, the systemswitches to Windows® Print and TrueType fonts, and produces a separate print job for eachdocument.
These print jobs follow the print job of the associated return. To facilitate collation, a pagereferring the user to the associated Word letter being printed at the end of the return is placed inthe position where the system-generated letter would have printed. Once the print jobs arecreated, the system switches the Printer Setup back to CCH ProSystem fx Tax fonts.
If Windows® print with TrueType fonts is chosen, the letters print as a separate print jobimmediately following the return.
Chapter 3 - Tax Preparation • 178

A page referring the user to the associated Word letter being printed at the end of the return isplaced in the position where the system-generated letter would have printed to facilitatecollation. A message at the end of the diagnostics informs you that an edited Word letter hasbeen printed in place of a system letter.
Note: Word letters are not printed as part of a PDF file, regardless of the fonts used.
Editing a Letter in WordTax Preparation must remain open while you edit and save changes to the Word version of the letter.
Edited letters are saved in X:\Wfx32\client\YYP\letters in the format cccccccv.dxx where X is the driveon which CCH ProSystem fx Tax is installed, YY is the tax year, P is the tax product, ccccccc is thefirst seven characters of the client ID, v is the version number, and dxx is a unique extension assignedto each letter by the system.
1. Follow the steps for selecting a letter outlined in Viewing a Letter on page 177.
2. If you selected a Word version, it is opened in Microsoft®Word. Wait for the letter to loadcompletely before editing.
If the letter is an original version, select Edit in MS®Word to display the letter in Word. Thisbutton is disabled if the system does not detect a correct version of Word or the return for whichthe letters are listed is checked out.
3. Edit the letter using standard Word commands. There are some items to be aware of whenediting letters.
If you have problems with characters not appearing as they should, highlight them andchange them to a different font. We suggest using Courier font. Some circumstances thatcan occur are as follows:
Entering three periods in a row changes the periods to a box.
The tilde (~), the pipe (|), and the curly brackets ({}) do not print.
Symbols created by multiple keystrokes such as the yen symbol (¥) or the sectionsymbol (§) do not print.
Press Ctrl + Home to move to the top of the first page.
The template used by the system for Word letters contains embedded lines and spaces;if you add or delete lines and spaces, you may find that the word wrap is incorrect. Toadjust for this, use the Show/Hide button to reveal the embedded characters and thenuse the spacebar as appropriate to correct the spacing.
Bold-faced type is not supported if the document is printed from Tax Preparation. To printbold-faced type, print the document fromWord.
4. When you are finished editing the letter, do any of the following:
Tax Preparation Commands. Access the following two functions from the Word Filemenu, the custom dockable toolbar, or if you use Office with the ribbon.
Select Save With Return so the letter can be printed with the return. This alsoupdates any changes. Only one Word version is allowed per letter.
Chapter 3 - Tax Preparation • 179

Select Close - Return to Tax Prep to return to the Tax Preparation applicationwithout saving any modifications. A message box displays allowing you to savethe changes to the return.
Word Commands. These commands function in the Word application and do not interactwith Tax Preparation.
Note: Do not use the Save or Save As options if you want the letter available in thelist of letters or printed with the return. Use the Tax Preparation command Save withReturn for this purpose.
Select File > Save to save a letter previously saved in Word.
Select File > Save As to save a letter not previously saved in Word or to make acopy of a letter using a new name.
Select File > Print to print a letter fromWord. You are returned to Word uponcompletion of the print process.
Select File > Close to close the open document and remain in Word. If thedocument must be saved, the system prompts you.
Select File > Exit to exit Word and return to Tax Preparation. If a document isopen, you are prompted to save it.
5. Select Close on the Select Letter dialog when finished editing.
Tick MarksTick marks provide the following features and functions:
Tick mark any type of worksheet or form field, including descriptions, dates, codes, check boxes,and amount fields.
Tick marks can be color-coded for first, second, and third reviews.
Simultaneously show the tick marks for all reviews.
Tick marks can be reversed to indicate a calculation caused the tick-marked field to change. Areversed tick mark is indicated by a white check mark in a red, blue, or green background.
Tick marks are automatically erased when you change the data in a tick-marked field.
Tick marks are available in Interview and Worksheet Views.
Print or review the Reversed Tick Mark Summary report, which lists government formscontaining amount fields with reversed tick marks.
Setting Up Tick MarksUse tick marks for whatever purpose you choose. The default tick mark colors and descriptions are asfollows:
Red. First Review
Blue. Second Review
Green. Third Review
Chapter 3 - Tax Preparation • 180

You cannot alter the tick mark colors, but you can change the tick mark descriptions to suit your firm.For instructions, see .
Applying Tick Marks(Tax Preparation > Review > Insert/Delete Tick Mark)
Place the cursor in a field and use one of the following methods to apply a tick mark:
Select Review > Insert/Delete Tick Mark.
Press Ctrl + T.
Right-click and select Insert/Delete Tick Mark from the menu.
Double-click the right mouse button.
Click the Insert/Delete Tick Mark button.
Notes:
The Insert/Delete Tick Mark button changes color according to which tick mark is active. Tochange the active tick mark, see the following section.
If you do not have an Insert/Delete Tick Mark button on your toolbar, you can add one. SeeCustomizing the Toolbar on page 91.
Changing the Active Tick Mark(Tax Preparation > Review > Change Active Tick Mark)
To change to a different tick mark color and description, use the following procedure:
1. Select Review > Change Active Tick Mark. The Change Active Tick Mark dialog displays.
2. Choose the new color and/or description.
3. Click OK to finalize your choice.
The descriptions displayed in this dialog can be changed in Office Manager.
Viewing the Active Tick Marks(Tax Preparation > View > Tick Marks > Active Tick Mark)
Select View > Tick Marks > Active Tick Mark to view the active tick mark color only.
Showing All Tick Marks(Tax Preparation > View > Tick Marks > All)
Select View > Tick Marks > All to view all tick mark colors.
Chapter 3 - Tax Preparation • 181

Clearing Individual Tick Marks(Tax Preparation > Review > Insert/Delete Tick Mark)
Place the cursor in a tick-marked field and use any of the following methods to clear an individual tickmark:
Select Review > Insert/Delete Tick Mark.
Press Ctrl + T.
Right-click and select Insert/Delete Tick Mark from the menu.
Double-click the right mouse button.
Click the Insert/Delete Tick Mark button.
Note: If you do not have an Insert/Delete Tick Mark button on your toolbar, see Customizing theToolbar on page 91 for more details.
Hiding/Clearing All Tick Marks(Tax Preparation > View > Tick Marks > None)
Select View > Tick Marks > None to hide tick marks without erasing or clearing them.
To permanently erase tick marks, use the following procedure:
1. Select Options > Clear Tick Marks. The Clear Tick Marks dialog displays.
2. Clear all tick marks, or designate which colors to clear.
3. Click OK to finalize your choice.
The descriptions displayed in this dialog can be changed in Office Manager.
Reversing Tick MarksThe system generates a reverse tick mark whenever a calculation causes the data in a previously tick-marked field to change. The reverse tick mark is indicated by a white check mark in a red, blue, orgreen color background.
Displaying the Reversed Tick Mark Summary(Tax Preparation > Review > Interactive Reversed Tick Marks)
The Reversed Tick Mark Summary lists the government forms containing amount fields with reversedtick marks. To display the summary, select Review > Interactive Reversed Tick Marks or click theReversed Tick Mark Summary button.
For more information, see Interactive Reversed Tick Marks on page 175.
Chapter 3 - Tax Preparation • 182

Print Preview(Tax Preparation > File > Print Preview)
You can preview the print layout prior to printing a return in PDF format. We recommend usingAdobe® Acrobat® products (Adobe® Reader®, Adobe® Acrobat® Standard, and Adobe® Acrobat®
Professional), version DC or later, for all CCH ProSystem fx Office products.
To preview the print layout, do the following:
1. Select File > Print Preview or click the Print Preview button.
2. Select the box next to the return copies you want to preview:
Accountant
Government
Client
K-1
3. Select Mask for each return copy on which the bank account, SSN, and EIN should be masked.
4. Select e-file PDF Attachments to preview the PDFs attached to the return with the rest of thereturn information.
Note: This option is not available for the K-1 copy or if you selected To print file as theDestination. For the Government copy, the PDFs will only print if you selected the option toprint the entire Government copy of the return.
5. Select Create Bookmark PDFs (large returns may take longer to process) to produce PDFs withcollapsed bookmarks, or clear it to produce PDFs with uncollapsed bookmarks.
6. Select One statement per page to have each return statement printed on a separate page. If youhave no statements, printing is not affected by this check box.
7. Select Print only open diagnostics to only print open diagnostics with the return.
8. Click OK. The return opens in Adobe® Reader®. To print from Adobe®, select File > Print.
Note: If a PDF file is created for a return secured with a password, the PDF file is also securedwith that password The password is case-sensitive in Adobe®.
Printing a Return(Tax Preparation > File > Print)
You have the option of printing with Windows® Print or CCH ProSystem fx Tax font loading. Youspecify the print system you want to use when you set up a printer using File > Printer Setup. To useWindows® Print, check the Utilize TrueType fonts for print processing box. See PrinterConfiguration on page 1 for details on the two types of print.
When printing returns, forms, etc., you can choose the print destination: a printer, a print file, a fax (ifinstalled and set up in Printer Setup), a document imager (if installed and set up in Printer Setup), aPortable Document Format (PDF) file, or both a PDF file and a printer.
Chapter 3 - Tax Preparation • 183

Consider the following information concerning PDF files:
We recommend using Adobe® Acrobat® products (Adobe® Reader®, Adobe® Acrobat®
Standard, and Adobe® Acrobat® Professional), version DC or later, for all CCH ProSystem fxOffice products. You can download Adobe® Reader® for no charge from the Adobe® website athttp://www.adobe.com. Click Get Adobe® Reader® icon to proceed to the download page.
PDF files are stored in the X:\Wfx32\CLIENT\PDF\YYP directory, where X represents the drive,YY represents the tax year, and P represents the tax product. The files can be opened bydouble-clicking the file fromWindows® Explorer, or by using the File > Open command inAdobe® Reader®. When saving the files, use the Save in drop-down list to save the files toanother location.
Note: The default PDF file location can be customized for an office group using ConfigureApplications > Tax Preparation > Print Options > Destinations and Watermarks in OfficeManager.
If Engagement is licensed and installed on the computer creating the PDF files, the files can bestored in a workpaper tab in an Engagement binder. You first configure the interface usingOptions > Interface Options > PFX Engagement/CPADocument Manager. After you create aPDF file, an Engagement wizard is launched to walk you through choosing the binder andworkpaper tab that will store the file. See Storing a PDF Return File in CCH ProSystem fxEngagement on page 199.
If a PDF file is created for a return secured with a password, the PDF file is also secured withthat password, provided Microsoft® 128-bit encryption is installed on your system. If it is notinstalled, the PDF file is not protected. You can download 128-bit encryption from the Microsoft®
internet site. The password is case-sensitive in Adobe®.
Note: Select None from the Page Scaling list on the Print dialog so that a return printed toPDF meets IRS or state taxing agency specifications and is not rejected.
To access the print functions, do one of the following:
Select File > Print.
Click the Print button.
Right-click in a white area of a form and select Print from the menu.
The print options are as follows:
Entire Return. Prints the number of copies you specify of all units (federal, state, etc.).
Selective Pages. Prints the number of copies you specify of the forms and schedules within aclient’s return.
Federal, State or City Only. Prints the number of copies you specify of the federal, state, or cityunits of the client’s return.
Estimates. Prints the number of copies you specify of estimates associated with the paymentquarter selected.
Extensions and 1st Quarter Estimate Vouchers. Prints the number of copies you specify ofextensions associated with the units selected (federal, state, etc.).
Chapter 3 - Tax Preparation • 184

This Form. Prints the number of copies you specify for all pages of the active form. Also allowsyou to view and print supporting statements. The print option, This Form, is not available forworksheets.
This Page. Prints the number of copies you specify of the current page of the open form. Alsoprints displayed interactive diagnostics, overrides, and estimates. The print option This Page isnot available for worksheets.
Input Data. View and print an input listing of all forms with data in a tax return.
Preparer Reports. Allows you to view and print various reports and return attachments.
K-1 Selection. Allows you to select one or multiple partners for printing in Corporation, SCorporation, Fiduciary, and Partnership returns.
Setting Print PreferencesDefaults for formatting and printing the entire return can be configured for an office group in OfficeManager using Configure Applications > Tax Preparation > Print Options > Destinations andWatermarks. Each type of return copy (i.e., accountant, government, client, and K-1) can beconfigured independently with the number of print copies, print destination, watermarks (for PDF filesonly), and the path or location to store PDF files. The system provides several watermarks that youcan choose for the print background, and you can create a customized watermark list.
User-level print defaults can be configured in Tax Preparation using Options > Preferences > TaxReturn Preferences > Print Entire Return. The same options can be set for each type of return copywith the exception of defining the PDF file location and customizing the watermark list.
Print options can also be set in the tax return and on print dialogs. The following list summarizes thehierarchy of print preferences and how they are used:
For an office group. Use Configure Applications > Tax Preparation > Print Options in OfficeManager.
For a tax return. Use the Processing Options worksheet or Interview Form 2 (Form 4 forEmployee Benefit Plan) in the tax return. This overrides the Office Manager option.
For a user. Use Options > Preferences > Tax Return Preferences > Print Entire Return in TaxPreparation. If enabled, this overrides the tax return and Office Manager options. In TaxPreparation, the Print Entire Return user preferences apply to printing the entire return and theprint preview only.
Entire Return(Tax Preparation > File > Print > Entire Return)
1. Select File > Print > Entire Return, or click the Print button and select Entire Return. The PrintEntire Return dialog displays.
2. Choose the type and number of copies. You can print up to nine copies for each category if youare printing to a printer or the To PDF file and printer option.
Accountant. Prints the federal, state and city copies, diagnostics, all lists and notes in thereturn, invoices, input listings, forms and schedules, supporting statements, reports,hash totals, and labels. Hash totals are not printed in Worksheet View.
Chapter 3 - Tax Preparation • 185

Government. Prints the federal, state, and city copies only.
Client. Prints the taxpayer copy.
K-1. Prints only the K-1 forms, including the K-1 transmittal letters, states, and anyattachments for Partnership, Corporation, Fiduciary, and S Corporation returns only.
3. Choose the print destination for each copy that you are printing. The options are:
To printer. Prints returns to the printer configured in Printer Setup. You can print up tonine copies.
To print file. Creates one print file. Only one print file will be written to disk. The print filedoes not print when it is created. You can print the file in batch mode in ProductionProcessing using Print Returns, Forms and Labels > Return print files.
To fax. Choose this option to print one copy to a fax if a fax driver has been configured inPrinter Setup.
To document imager. Prints one copy to a document imager if document imagingsoftware has been configured in Printer Setup.
To PDF file. Prints one copy of the return to a PDF file. You are required to choose thedirectory where you want the file printed. Word letters, labels, and OLE objects will not beprinted.
To PDF file and printer. Prints to a PDF file and a printer simultaneously. The sameconditions apply to the PDF file as those stated in the previous bullet. However, you canprint multiple return copies to the printer.
Note: Some HP® printers do not support printing of Lines 1 and 65 of the returnwhen printing to a PDF file and printer.
4. For PDF files only, you can choose the watermark to display in the print background. Thesystem-defined watermarks are Confidential, Copy, Do Not File, Draft, and File Copy.Watermarks can be added or deleted in Office Manager.
5. You can mask the taxpayer SSN, EIN, and bank account information. Select Mask for the copyor copies on which you wish to mask these fields.
Note: If you are printing a Client copy and masking is selected, a "For Your Records - DoNot File" watermark will be displayed unless you have selected to display a specificwatermark.
6. Select the e-file PDF Attachments check box to print the PDFs attached to the return along withthe rest of the return.
Note: This option is not available if you selected To print file as the Destination.
7. If you are printing a Partnership, Fiduciary, or S Corporation return to PDF or to a PDF andprinter, you can select Produce separate Partner K-1 PDF Files to print individual K-1packages separated by partner.
Warning! When printing PDF files, if a file already exists with the same name as thecombined K-1 PDF file, an overwrite warning dialog is given. There is no overwrite warningfor the separate K-1 package PDF files (when using either the default or override names).
Chapter 3 - Tax Preparation • 186

If the return file name is changed, pre-existing PDF files for the return that were created usingthe default PDF file name (for both the combined K-1 PDF file and the separate K-1 packagePDF files) will not be renamed. Pre-existing K-1 PDF files (both the combined and separate K-1package PDF files) using a previous client file name will not be overwritten by subsequent PDFfiles that are created after the return is renamed. If the return or the client is deleted, the PDFfiles created from that return or client are not deleted. You are responsible for deleting, renamingand managing the separate K-1 package PDF files.
Tip: If your firm uses this option, a much larger number of PDF files will be created, makingfile maintenance and file location more important for you to manage. For this reason, werecommend a naming and file location convention for PDF files. This will help you locatefiles when they need to be purged. In addition, we recommend that you do not duplicate aPDF file name in any return because no overwrite warning will display for the individual K-1PDF files or for combined K-1 PDF files using old client file names.
Note: CCH ProSystem fx Engagement, CCH ProSystem fx Document, andCCH Axcess Document can all receive separate K-1 PDF files from Tax Preparation.
8. Select the Create Bookmark PDFs (large returns may take longer to process) box to producePDFs with collapsed bookmarks, or clear it to produce PDFs with uncollapsed bookmarks.
9. Select the One statement per page box to start each supporting statement for a return on a newpage.
Note: The print function to print One statement per page selection is made available fromTax > Print > Print Entire Return and Production Processing > Print Returns, Forms andLabels > Returns. A default selection can be made at the office group level in OfficeManager > Configure Applications > Tax Preparation > Print Options or at the user level inTax > Preferences > Tax Return Preferences. This option is also available for the returnusing Form 2 in Tax Preparation (Form 4 for Employee Benefit Plan returns). The selectionin the return form overrides the option set in Office Manager.
10. When sending more than one return copy to PDF files, you can select Produce a separate PDFfile for each copy or Produce one PDF file for all copies.
11. Select the Print only open diagnostics box to only print open diagnostics with the return.
12. Select Print to Portal to transfer the file directly to ProSystem fx Portal. This option is enabledonly if your firm is licensed to use Portal, you have been granted access to use this option, and aPDF print option is selected.
Note: You can select to print to Portal or print to Document, but not to both.
13. Select Print to Document to transfer the file directly to Document. This option is enabled only ifDocument Smart Client is installed, you have been granted access to use this option, and a PDFprint option is selected. You may receive an account verification prompt after you enter yourUser ID and password. If you do, you must request and submit a 2-Step Verification code toproceed.
Note: You can select to print to Portal or print to Document, but not to both.
Chapter 3 - Tax Preparation • 187

14. If you are not using TrueType fonts and you have not downloaded fonts, click Load Fonts. Thisoption is available if you print to a printer or to a PDF file and printer.
15. Click OK. If you choose the first print option, printing begins. If you choose to print to a PDF file,the Save PDF Files As dialog displays.
Note: The Save PDF Files As dialog displays if you select to produce one PDF for allcopies.
Saving the Entire Return to PDFPDF files are stored in the X:\Wfx32\Client\PDF\YYP directory, where X represents the drive, YYrepresents the tax year, and P represents the tax product. The default name that the system assignsto a PDF file depends on the following criteria.
If you selected Produce one PDF file for all copies, the default file name is the client ID followed by theversion number and a PDF file extension.
The default names for separate Partner K-1 PDF files are as follows:
When the first and last names have been entered on Interview Form K-1: YYP_ClientIDK1_V2 3LastName (and suffix, if present), FirstName (and middle initial, if present).PDF
YY = year, P = tax product, K1 = copy type, V2 = version number, 3 = Partner number.
Example using 122 as the Partner number, Public III as the last name and suffix, and John Q asthe first name and middle initial: 20P_ABCPartnersK1_V2 122 Public III, John Q.PDF
When the entity name and entity continuation fields have been entered: YYP_ClientIDK1_V2100 EntityName ContinuationName.PDF
YY = year, P = tax product, K1 = copy type, V2 = version number, 100 = Partner number.
Example using 1008 as the Partner number, Smith Family Trust as the entity name, and QTIPTrust as the continuation name: 20P_ABCPartnersK1_V1 1008 Smith Family Trust QTIPTrust.PDF
When the PDF file name is overridden: YYP_ClientIDK1_V2 OverrideName.PDF
YY = year, P = tax product, K1 = copy type, V2 = version number.
Example using Jims K-1 as the override name: 20P_ABCPartnersK1_V4 Jims K-1 .PDF
In all other cases, the default file name is YYP_ClientIDXXXX_V1.PDF where YY represents the year,P represents the tax product, XXXX represents the type of copy, and 1 represents the version number.
You can change the default file name. Use the Browse button to select a different file location. ClickSave to create the PDF file.
Chapter 3 - Tax Preparation • 188

Notes:
The following table lists special characters that are not allowed in the file name overrides. Whenone of these characters is encountered, it is changed to a hyphen (-):
\ back slash % percent sign
/ forward slash & ampersand
: colon ' single quote
* asterisk " double quote
? question mark < less than sign
> greater than sign | pipe sign
More than two consecutive hyphens are not supported in the file name.
If you print to PDF a second time without changing the file name, you will be asked if you want tooverwrite the existing file. You can overwrite the file or enter a new file name.
See Create a New Return for an Existing Client on page 109 for a list of the letters the systemuses to represent each tax product.
Selective Pages(Tax Preparation > File > Print > Selective Pages)
The Selective Pages print option allows you to specify the forms, schedules, and reports to be printed;the number of copies (up to nine) of each selected; and a print destination - to a printer, a fax, adocument imager, a PDF file, or a PDF file and a printer.
Use the following procedure to selectively print pages:
1. Select File > Print > Selective Pages, or click the Print button and select Selective Pages.
2. Select from the following fields on the Print Options dialog:
Destination. Choose To printer, To fax, To document imager, To PDF file, or To PDFfile and printer. The fax and document imager are only enabled if installed and set up inPrinter Setup.
Watermark (PDF files only). For PDF files, you can choose the watermark to display inthe print background. The system-defined watermarks are Confidential, Copy, Do NotFile, Draft, and File Copy. A customized watermark list can be created in OfficeManager.
No. of copies. If you are printing to a printer or to the printer portion of the To PDF fileand printer option, you can specify the number of copies (up to nine).
Mask. Select if the Bank Account, SSN, and EIN should be masked.
One statement per page. Starts each supporting statement for a return on a new page.
Select one of the following if you want to transfer your PDF file to Portal or Document.You cannot select more than one. You may receive an account verification prompt after
Chapter 3 - Tax Preparation • 189

you enter your User ID and password. If you do, you must request and submit a 2-StepVerification code to proceed.
Print to Portal. Select to transfer the file directly to Portal. This option is enabledonly if your firm is licensed to use Portal, you have been granted access to usethis option, and a PDF print option is selected.
Print to Document. Select to transfer the file directly to Document. This option isenabled only if Document Smart Client is installed, you have been granted accessto use this option, and a PDF print option is selected.
Load Fonts. If you are not using TrueType fonts and fonts have not been downloaded,click Load Fonts. This option is enabled if you print to a printer or to a PDF file andprinter.
3. Click OK. The system prepares the pages in the return and displays the Selective Print dialog.
4. You can either select individual forms by using the arrow keys and the space bar, or by using themouse, click Select All to choose all forms, or click Clear Selected to cancel your choices.
5. Do one of the following:
Click OK to start the printing to a printer, fax, or document imager.
If you select to print to a PDF file, the Save As dialog displays. Accept the file name thesystem provides, or enter a different name. Save the file in the directory specified, orselect another drive and/or directory from the Save in drop-down list and click Save.
Federal, State or City Only(Tax Preparation > File > Print > Federal, State or City Only)
This print option allows you to select the federal, state, or city units and to specify the number ofcopies of each unit to print.
Use the following procedure to select units to print:
1. Select File > Print > Federal, State or City Only, or click the Print button and select Federal,State or City Only > OK.
2. On the Multiple Units Selection dialog, select the units to print and click OK.
3. Select from the following fields on the Print Options for Print Fed, State or City Return dialog:
Destination. Choose To printer, To fax, To document imager, To PDF file, or To PDFfile and printer. The fax and document imager are only enabled if installed and set up inPrinter Setup.
Watermark (PDF files only). For PDF files, you can choose the watermark to display inthe print background. The system-defined watermarks are Confidential, Copy, Do NotFile, Draft, and File Copy. A customized watermark list can be created in OfficeManager.
No. of copies. If you are printing to a printer or to the printer portion of the To PDF fileand printer option, you can specify the number of copies (up to nine).
Mask. Select if the Bank Account, SSN, and EIN should be masked.
e-file PDF Attachments. Check this box to print the PDFs attached to the return alongwith the rest of the return.
Chapter 3 - Tax Preparation • 190

One statement per page. Starts each supporting statement on a new page.
Select one of the following if you wish to transfer your PDF file to Portal or Document.You cannot select more than one. You may receive an account verification prompt afteryou enter your User ID and password. If you do, you must request and submit a 2-StepVerification code to proceed.
Print to Portal. Select to transfer the file directly to Portal. This option is enabledonly if your firm is licensed to use Portal, you have been granted access to usethis option, and a PDF print option is selected.
Print to Document. Select to transfer the file directly to Document. This option isenabled only if Document Smart Client is installed, you have been granted accessto use this option, and a PDF print option is selected.
Load Fonts. If you are not using TrueType fonts and fonts have not been downloaded,click Load Fonts. This option is enabled if you print to a printer or to a PDF file andprinter.
4. Click OK to start printing to a printer, fax, or document imager.
5. If you select to print to a PDF file, the Save As dialog displays. Accept the file name the systemprovides, or enter a new name. Save the file in the directory specified, or select another locationfrom the Save in drop-down list, and then click Save.
Estimates(Tax Preparation > File > Print > Estimates)
This print option allows you to print estimates associated with payment quarters selected and estimatereminder letters, if prepared.
Use the following procedure to print estimates:
1. Select File > Print > Estimates, or click Print and select Estimates.
2. Choose one or more payment quarters, or select All quarters.
3. Select from the following fields on the Print Options dialog:
Destination. Choose To printer, To fax, To document imager, To PDF file, or To PDFfile and printer. The fax and document imager are only enabled if installed and set up inPrinter Setup.
Watermark (PDF files only). For PDF files, you can choose the watermark to display inthe print background. The system-defined watermarks are Confidential, Copy, Do NotFile, Draft, and File Copy. A customized watermark list can be created in OfficeManager.
No. of copies. If you are printing to a printer or to the printer portion of the To PDF fileand printer option, you can specify the number of copies (up to nine).
Print estimate reminder letter. If estimate reminder letters have been prepared, selectPrint estimate reminder letter to print the estimate reminder along with the estimates.The estimate reminder letter will print immediately before its corresponding estimates.
Note: This option is not available for Partnership returns.
Chapter 3 - Tax Preparation • 191

Select one of the following if you wish to transfer your PDF file to Portal or Document.You cannot select more than one. You may receive an account verification prompt afteryou enter your User ID and password. If you do, you must request and submit a 2-StepVerification code to proceed.
Print to Portal. Select to transfer the file directly to Portal. This option is enabledonly if your firm is licensed to use Portal, you have been granted access to usethis option, and a PDF print option is selected.
Print to Document. Select to transfer the file directly to Document. This option isenabled only if Document Smart Client is installed, you have been granted accessto use this option, and a PDF print option is selected.
Load Fonts. If you are not using TrueType fonts and fonts have not been downloaded,click Load Fonts. This option is enabled if you print to a printer or to a PDF file andprinter.
4. Do one of the following:
Click OK to start the printing if you are printing to a printer, fax, or document imager.
If you select to print to a PDF file, the Save As dialog displays. Accept the file name thesystem provides, or enter a different name. Save the file in the directory specified, orselect another drive and/or directory from the Save in drop-down list and click Save.
Extensions and 1st Quarter Estimate Vouchers(Tax Preparation > File > Print > Extensions and 1st Quarter Estimate Vouchers)
This print option allows you to print extensions for the units selected (e.g., federal, states, cities) andassociated extension letters, if prepared.
Use the following procedure to print extensions:
1. Select File > Print > Extensions and 1st Quarter Estimate Vouchers, or click Print and selectExtensions and 1st Quarter Estimate Vouchers.
2. Select from the following fields on the Print Options dialog:
Destination. Choose To printer, To PDF file, or To PDF file and printer.
Watermark (PDF files only). For PDF files, you can choose the watermark to display inthe print background. The system-defined watermarks are Confidential, Copy, Do NotFile, Draft, and File Copy. A customized watermark list can be created in OfficeManager.
No. of copies. If you are printing to a printer or to the printer portion of the To PDF fileand printer option, you can specify the number of copies (up to nine).
Print extension letter. If extension letters have been prepared, select Print extensionletter to print the extension letter along with the extensions. The extension letter will printimmediately before its corresponding extensions.
Note: This option is not available for Estate & Gift returns.
Select one of the following if you wish to transfer your PDF file to Portal or Document.You cannot select more than one. You may receive an account verification prompt after
Chapter 3 - Tax Preparation • 192

you enter your User ID and password. If you do, you must request and submit a 2-StepVerification code to proceed.
Print to Portal. Select to transfer the file directly to Portal. This option is enabledonly if your firm is licensed to use Portal, you have been granted access to usethis option, and a PDF print option is selected.
Print to Document. Select to transfer the file directly to Document. This option isenabled only if Document Smart Client is installed, you have been granted accessto use this option, and a PDF print option is selected.
Load Fonts. If you are not using TrueType fonts and fonts have not been downloaded,click Load Fonts. This option is enabled if you print to a printer or to a PDF file andprinter.
3. Do one of the following:
Click OK to start the printing if you are printing to a printer.
If you select to print to a PDF file, the Save As dialog displays. Accept the file name thesystem provides, or enter a different name. Save the file in the directory specified, orselect another drive and/or directory from the Save in drop-down list and click Save.
This Form(Tax Preparation > File > Print > This Form)
Use the following procedure to print forms:
1. Select File > Print > This Form, or click the Print button and select This Form.
Note: When a summary report (e.g., Diagnostics, Estimates) is displayed, this commandprints the report automatically. Using the This Form command, you do not have the option toselect the print destination for summary reports. To select the print destination for asummary report, use File > Print > Preparer Reports.
2. Choose from the Print selection list.
Print form and supporting statements. Prints the current form along with all associatedsupporting statements.
Print form all occurrences with statements. Prints all occurrences of the active formalong with all associated supporting statements. For example, if Schedule C is displayedand there are three Schedule C forms within the return, all Schedule C forms with theirsupporting statements will print.
Print supporting statements only. Prints only the supporting statements.
View supporting statements. Displays supporting statements. You can print thestatements while viewing them.
View one statement per page. Starts each supporting statement for a return ona new page.
3. Click OK.
Chapter 3 - Tax Preparation • 193
4. Select from the following fields on the Print Options dialog:
Destination. Choose To printer, To fax, To document imager, To PDF file, or To PDFfile and printer. The fax and document imager are only enabled if installed and set up inPrinter Setup.
Watermark (PDF files only). For PDF files, you can choose the watermark to display inthe print background. The system-defined watermarks are Confidential, Copy,Do Not File, Draft, and File Copy. A customized watermark list can be created in OfficeManager.
No. of copies. If you are printing to a printer or to the printer portion of the To PDF fileand printer option, you can specify the number of copies (up to nine).
Mask. Select if the Bank Account, SSN, and EIN should be masked.
Select one of the following if you want to transfer your PDF file to Portal or Document.You cannot select more than one. You may receive an account verification prompt afteryou enter your User ID and password. If you do, you must request and submit a 2-StepVerification code to proceed.
Print to Portal. Select to transfer the file directly to Portal. This option is enabledonly if your firm is licensed to use Portal, you have been granted access to usethis option, and a PDF print option is selected.
Print to Document. Select to transfer the file directly to Document. This option isenabled only if Document Smart Client is installed, you have been granted accessto use this option, and a PDF print option is selected.
Load Fonts. If you are not using TrueType fonts and fonts have not been downloaded,click Load Fonts. This option is enabled if you print to a printer or to a PDF file andprinter.
5. Do one of the following:
Click OK to start the printing if you are printing to a printer, fax, or document imager.
If you select to print to a PDF file, the Save As dialog displays. Accept the file name thesystem provides, or enter a different name. Save the file in the directory specified, orselect another drive and/or directory from the Save in drop- down list and click Save.
This Page(Tax Preparation > File > Print > This Page)
This Page allows you to print only the current page or screen of a displayed return. It also printsinteractive diagnostics, estimates, and summaries currently displayed.
Depending on what shows on the form, this option may or may not print pages connected throughmulti-page forms, next forms, or previous forms (e.g., pages 1 and 2 of Form 1040 print, but not pages1 through 4 of Form 1120).
Use the following procedure to print the current page:
1. Select File > Print > This Page, or click the Print button and select This Page.
Chapter 3 - Tax Preparation • 194

Note: When a summary report (e.g., Diagnostics, Estimates) is displayed, this commandprints the report automatically. Using the This Page command, you do not have the option toselect the print destination for summary reports. To select the print destination for asummary report, use File > Print > Preparer Reports.
2. Select from the following fields on the Print Options dialog:
Destination. Choose To printer, To fax, To document imager, To PDF file, or To PDFfile and printer. The fax and document imager are only enabled if installed and set up inPrinter Setup.
Watermark (PDF files only). For PDF files, you can choose the watermark to display inthe print background. The system-defined watermarks are Confidential, Copy, Do NotFile, Draft, and File Copy. A customized watermark list can be created in OfficeManager.
No. of copies. If you are printing to a printer or to the printer portion of the To PDF fileand printer option, you can specify the number of copies (up to nine).
Mask. Select if the Bank Account, SSN, and EIN should be masked.
Select one of the following if you wish to transfer your PDF file to Portal or Document.You cannot select more than one. You may receive an account verification prompt afteryou enter your User ID and password. If you do, you must request and submit a 2-StepVerification code to proceed.
Print to Portal. Select to transfer the file directly to Portal. This option is enabledonly if your firm is licensed to use Portal, you have been granted access to usethis option, and a PDF print option is selected.
Print to Document. Select to transfer the file directly to Document. This option isenabled only if Document Smart Client is installed, you have been granted accessto use this option, and a PDF print option is selected.
Load Fonts. If you are not using TrueType fonts and fonts have not been downloaded,click Load Fonts. This option is enabled if you print to a printer or to a PDF file andprinter.
3. Do one of the following:
Click OK to start the printing if you are printing to a printer, fax, or document imager.
If you select to print to a PDF file, the Save As dialog displays. Accept the file name thesystem provides, or enter a new name. Save the file in the directory specified, or selectanother location from the Save in list and click Save.
Chapter 3 - Tax Preparation • 195

Input Data(Tax Preparation > File > Print > Input Data)
You can print or view an input list or print all interview forms with data.
1. Select File > Print > Input Data, or click the Print button and select Input Data.
2. The print options depend on whether your active view is Worksheet or Interview.
In interview forms, select from the Format section of the Print Input Data dialog:
Print data list. Prints a return's government and interview forms data input.
View data list. Displays a return's government and interview forms data input.
Print interview forms. Prints all interview forms that contain data.
In the Options section, check Reset input to reset data entry. You may need to selectthis option before printing interview forms if you changed data on government forms.Resetting input ensures that data flows to the correct interview forms.
In Worksheet View, select from the Print Selection box on the Print Data dialog:
Worksheet data list. Prints a return's data input, categorized by worksheet andsection.
View Worksheet data list. Displays a return's data input, categorized byworksheet and section.
Note: When printing fromWorksheet View, input data prints in sections with headings. Fordetails, refer to system Help.
3. Select from the following fields on the Print Options dialog:
Destination. Choose To printer, To fax, To document imager, To PDF file, or To PDFfile and printer. The fax and document imager are only enabled if installed and set up inPrinter Setup.
Watermark (PDF files only). For PDF files, you can choose the watermark to display inthe print background. The system-defined watermarks are Confidential, Copy, Do NotFile, Draft, and File Copy. A customized watermark list can be created in OfficeManager.
No. of copies. If you are printing to a printer or to the printer portion of the To PDF fileand printer option, you can specify the number of copies (up to nine).
Mask. Select if the Bank Account, SSN, and EIN should be masked.
Select one of the following if you wish to transfer your PDF file to Portal or Document.You cannot select more than one. You may receive an account verification prompt afteryou enter your User ID and password. If you do, you must request and submit a 2-StepVerification code to proceed.
Print to Portal. Select to transfer the file directly to Portal. This option is enabledonly if your firm is licensed to use Portal, you have been granted access to usethis option, and a PDF print option is selected.
Chapter 3 - Tax Preparation • 196

Print to Document. Select to transfer the file directly to Document. This option isenabled only if Document Smart Client is installed, you have been granted accessto use this option, and a PDF print option is selected.
Load Fonts. If you are not using TrueType fonts and fonts have not been downloaded,click Load Fonts. This option is enabled if you print to a printer or to a PDF file andprinter.
4. Do one of the following:
Click OK to start the printing if you are printing to a printer, fax, or document imager.
If you select to print to a PDF file, the Save As dialog displays. Accept the file name thesystem provides, or enter a different name. Save the file in the directory specified, orselect another drive and/or directory from the Save in drop-down list and click Save.
Preparer Reports(Tax Preparation > File > Print > Preparer Reports)
The Preparer Reports option allows you to print or view various reports. When you choose to view areport, you have the option of copying the contents of a report to a word processing file for editing.
1. Select File > Print > Preparer Reports, or click the Print button and select Preparer Reports.
2. Choose from the Report Selection section.
Diagnostics. Prints the Diagnostics report.
Override Report. Prints a summary of overrides in a return.
Estimate Report. Prints a summary of estimates in a return.
Input Override Report. Lists the overrides in a return. You can view overrides, movebetween the Override Summary and the field where the override is entered, and changethe entry, if applicable. (Not available in Interview View.)
Reversed Tick Mark Report. Prints a list of government forms containing at least onereversed tick marked field.
Hash Total Report. Prints the Hash Total report. (Not available in Worksheet View.)
List and Notes. Print lists and notes attached to the return.
Client Invoice. Prints the invoice for a return.
Letters. Displays a list of the letters associated with the return from which a letter can beselected for printing or copying to the Clipboard.
Extra Report. Prints extra reports for an Individual return.
Federal Elections. Prints the federal election interview forms you select for an Individual,Corporation, S Corporation, Partnership, Fiduciary or Tax Exempt return, or click theFederal Elections icon in the Toolbar.
Note: The Federal Elections icon can be added to the Toolbar by selection Optionsfrom above the Toolbar, then Customize Toolbar, Add Federal Elections from theAvailable toolbar buttons to the Current toolbar buttons list and Close the window.
3. Check View report in the Options section to display instead of printing a report. The report canbe printed from the review screen or be copied to the Clipboard. If you choose to view Letters,you can also edit the letter in Microsoft®Word.
Chapter 3 - Tax Preparation • 197
4. Select from the following fields on the Print Options dialog:
Destination. Choose To printer, To fax, To document imager, To PDF file, or To PDFfile and printer. The fax and document imager are only enabled if installed and set up inPrinter Setup.
Watermark (PDF files only). For PDF files, you can choose the watermark to display inthe print background. The system-defined watermarks are Confidential, Copy, Do NotFile, Draft, and File Copy. A customized watermark list can be created in OfficeManager.
No. of copies. If you are printing to a printer or to the printer portion of the To PDF fileand printer option, you can specify the number of copies (up to nine).
Mask. Select if the Bank Account, SSN, and EIN should be masked.
Print only open diagnostics. When printing the Diagnostics report, select this option toonly print open diagnostics with the return.
Select one of the following if you want to transfer your PDF file to Portal or Document.You cannot select more than one. You may receive an account verification prompt afteryou enter your User ID and password. If you do, you must request and submit a 2-StepVerification code to proceed.
Print to Portal. Select to transfer the file directly to Portal. This option is enabledonly if your firm is licensed to use Portal, you have been granted access to usethis option, and a PDF print option is selected.
Print to Document. Select to transfer the file directly to Document. This option isenabled only if Document Smart Client is installed, you have been granted accessto use this option, and a PDF print option is selected.
Load Fonts. If you are not using TrueType fonts and fonts have not been downloaded,click Load Fonts. This option is enabled if you print to a printer or to a PDF file andprinter.
5. Do one of the following:
Click OK to start printing if printing to a printer, fax, or document imager.
If you select to print to a PDF file, the Save As dialog displays. Accept the file name thesystem provides, or enter a different name. Save the file in the directory specified, orselect another drive and/or directory from the Save in drop-down list and click Save.
K-1 Selection(Tax Preparation > File > Print > K-1 Selection)
The K-1 Selection print option allows you to select one or more partners for printing to PDF or printer.All partners are selected as the default.
Note: This option is only available for Corporation, S Corporation, Fiduciary, and Partnershipreturns.
1. Select File > Print > K-1 Selection, or click the Print button and select K-1 Selection.
Chapter 3 - Tax Preparation • 198
2. On the Multiple K-1 Partner Selection dialog, deselect the Partner box in the header to clear allselected names.
3. Select the box beside each Partner Name that you want to print.
4. Click OK.
5. Select from the following fields on the Print Options for Print K-1 Selection dialog:
Destination. Choose To printer, To fax, To document imager, To PDF file, or To PDFfile and printer. The fax and document imager are only enabled if installed and set up inPrinter Setup.
Watermark (PDF files only). For PDF files, you can choose the watermark to display inthe print background. The system-defined watermarks are Confidential, Copy, Do NotFile, Draft, and File Copy. A customized watermark list can be created in OfficeManager.
No. of copies. If you are printing to a printer or to the printer portion of the To PDF fileand printer option, you can specify the number of copies (up to nine).
Mask. Select if the Bank Account, SSN, and EIN should be masked.
Select one of the following if you want to transfer your PDF file to Portal or Document.You cannot select more than one. You may receive an account verification prompt afteryou enter your User ID and password. If you do, you must request and submit a 2-StepVerification code to proceed.
Print to Portal. Select to transfer the file directly to Portal. This option is enabledonly if your firm is licensed to use Portal, you have been granted access to usethis option, and a PDF print option is selected.
Print to Document. Select to transfer the file directly to Document. This option isenabled only if Document Smart Client is installed, you have been granted accessto use this option, and a PDF print option is selected.
Load Fonts. If you are not using TrueType fonts and fonts have not been downloaded,click Load Fonts. This option is enabled if you print to a printer or to a PDF file andprinter.
6. Do one of the following:
Click OK to start printing if printing to a printer, fax, or document imager.
If you select to print to a PDF file, the Save As dialog displays. Accept the file name thesystem provides, or enter a different name. Save the file in the directory specified, orselect another drive and/or directory from the Save in drop-down list and click Save.
Storing a PDF Return File in CCH ProSystem fx Engagement(Tax Preparation > Options > Interface Options > Pfx Engagement/CPADocument Manager)
PDF files can be created from returns in Tax Preparation and stored in an Engagement binder ifCCH ProSystem fx Engagement is licensed and installed on the computer creating the PDF files.
To store the files, you first configure the interface using Options > Interface Options >Pfx Engagement > CPADocument Manager. CCH ProSystem fx Engagement does not have to beopen while you are creating and storing the return file.
Chapter 3 - Tax Preparation • 199
The following criteria must be met in Engagement before storing Tax Preparation PDF files:
Valid Engagement user name and password
Assigned as a team member to the binder where the files will be stored
Rights to create a new workpaper for the target binder
Target binder must be closed
Follow these steps to store a PDF in Engagement:
1. Select File > Print.
2. Select the return print option.
Entire Return. Prints one copy of the unit (accountant, government, client, K-1) specifiedfor the active return.
Selective Pages. Prints one copy of the forms and schedules you specify.
Federal, State or City Only. Prints one copy of the federal, state, or city units youspecify.
Estimates. Prints one copy of estimates associated with the payment quarter selected.
Extensions and 1st Quarter Estimate Vouchers. Prints one copy of extensionsassociated with the units selected (federal, state, etc.).
This Form. Prints one copy of all the pages and supporting statements of the active form.Also allows you to view and print supporting statements.
This Page. Prints one copy of the current page of the displayed form. Also printsdisplayed interactive diagnostics, overrides, and estimates.
Input Data. Allows you to view and print an input listing or all interview forms containingdata in a tax return.
Preparer Reports. Allows you to view and print one copy of the various reports andreturn attachments.
K-1 Selection. Allows you to select one or multiple partners for printing in Corporation, SCorporation, Fiduciary, and Partnership returns.
For additional information, refer to the sections pertaining to each print option.
3. Select To PDF file or To PDF file and to printer as the print destination.
4. If you specified that PDF files should be stored in Engagement, the Insert Workpaper WizardWelcome dialog displays. Click Next.
If you asked to be prompted when creating a PDF file, answer Yes to the prompt to display theInsert Workpaper Wizard Welcome dialog. Click Next.
5. If your Engagement user name and password do not display in the next dialog, enter both andclick Next.
6. In the Local File Room, select the Client folder and then the binder to place the PDF file.
7. Click Next.
8. Select the workpaper tab in which to insert the PDF workpaper and click Next.
9. Enter an index number and name for the workpaper. The name is a mandatory field and shouldimport from Tax Preparation. The index number is optional.
Chapter 3 - Tax Preparation • 200
10. Click Next to display a summary dialog listing the client, binder, workpaper tab, and workpaperindex number and name.
11. Click Finish if the information is correct. Click Back to change any of your selections.
Warning! Do not print to Engagement using the Engagement PDF converter. This method ofprinting files to Engagement from Tax Preparation is not supported.
Notes:
Separate PDF files can be selected on the Print Entire Return dialog when the Save PDF tooption is checked using Options > Interface Options > PFX Engagement/CPADocumentManager.
When storing PDF files in Engagement, Tax Preparation allows invalid characters to be enteredin the User name and Password fields and does not display error messages for invalidcharacters. Engagement validates the name and password, and posts error messages, ifapplicable, when the data is transferred from Tax Preparation.
Documents and spreadsheets attached to the return are carried to Engagement.
For complete details on the Insert Workpaper Wizard, please refer to yourCCH ProSystem fx Engagement User Guide.
Storing a PDF Return File in CPADocument Manager(Tax Preparation > Options > Interface Options > PFX Engagement/CPADocument Manager)
PDF files can be created from returns in Tax Preparation and stored in CPADocument Manager FileCabinet if CPADocument Manager is licensed and installed on the computer creating the PDF files. Tostore the files, you first configure the interface using Options > Interface Options >PFX Engagement/CPADocument Manager. CPADocument Manager does not have to be openwhile you are creating and storing the return file.
Only one copy of the selected return or return unit can be printed to PDF for storage in CPADocumentManager. However, any tax product return can be stored. Word documents or Excel® spreadsheetsattached to the return are carried to CPADocument Manager.
Note: This option is available with CPADocument Manager version 2004.02.03 or later.
Follow these steps to store a PDF file in CPADocument Manager:
1. Select File > Print.
2. Select the return print option to use:
Entire Return. Prints one copy of the unit (accountant, government, client, K-1) specifiedfor the displayed return.
Selective Pages. Prints one copy of the forms and schedules you specify.
Federal, State or City Only. Prints one copy of the federal, state, or city units youspecify.
Estimates. Prints one copy of estimates associated with the payment quarter selected.
Chapter 3 - Tax Preparation • 201

Extensions and 1st Quarter Estimate Vouchers. Prints one copy of extensionsassociated with the units selected (federal, state, etc.).
This Form. Prints one copy of all pages and supporting statements of the active form.Allows you to view and print supporting statements.
This Page. Prints one copy of the current page of the displayed form. Also printsdisplayed interactive diagnostics, overrides, and estimates.
Input Data. Allows you to view and print an input listing or all interview forms containingdata in a tax return.
Preparer Reports. Allows you to view and print one copy of the various reports andreturn attachments.
K-1 Selection. Allows you to select one or multiple partners for printing in Corporation, SCorporation, Fiduciary, and Partnership returns.
For additional information, see the section pertaining to each of these options.
3. On the appropriate print dialog, select To PDF file or To PDF file and to printer.
4. If you previously specified that you always want PDF files stored in CPADocument Manager, thePDF file is sent directly to CPADocument Manager. If you previously asked to be promptedwhen creating a PDF file, answering Yes to the prompt sends the PDF file to CPADocumentManager.
Managing Your ReturnsUse the Manage menu to organize the work performed for your returns. The Manage menu featuresallow you to do the following:
View a history log of all return activity
Update the status of your returns
Access returns in your In-Box
Print a report containing a filtered list of returns
Assign security to your returns
Change the version description for your returns
Designate returns for service center processing
Viewing the History of a Return(Tax Preparation > Manage > View History)
To view a return’s history, select Manage > View History or click the View History button. The historylog contains all status changes and activities for a return, including the following:
Session date
Status/Activity description
User name
Time session started
Time session finished
Chapter 3 - Tax Preparation • 202

Duration of session
History of each session
Current status of the return
User to whom the return was forwarded
Status and activity information is listed by session, including a reverse chronological sequence withthe most recent session at the top of the list.
Notes:
The history log does not include information on the current session. Current session data isposted when the return is closed.
The option to maintain client history is activated by the History/Backup option on the ConfigureTax Preparation dialog in Office Manager. See Configuring Tax Preparation: History/BackupOptions on page 59 for more information.
Setting the Status of a Return(Tax Preparation > Manage > Set Status)
The Set Status option allows you to set or change the status of the return that is currently open. Thisoption helps you track the progress of the return. Status changes are automatically recorded in thereturn history log.
1. Select Manage > Set Status, or click the Set Status button. The Set Status dialog displays.
2. If you are a network user, you can forward a return to another user by highlighting the user’s IDand clicking OK. All users can forward returns an unlimited number of times.
3. Select Lock return to prohibit changes to lock a return. If the box is selected, you can clear it tounlock the return. Only the user who locked the return or a supervisory user is able to unlock it. Alocked return can be printed or reviewed, but not edited or calculated. A lock indicator is shownon the Open Return dialog next to returns that have been locked.
Note: If a return is locked, it cannot be calculated or printed from Production Processing.
Chapter 3 - Tax Preparation • 203
Linking a Return to WorkstreamTo link a return to a project in Workstream:
You must have a license for CCH Axcess™Workstream.
You will be prompted to log in to Workstream the first time you access it in each Tax session.
Workstream and CCH Axcess Smart Client must be installed on your workstation.
You can:
Select an existing Workstream project for the client
Create a new project in Workstream for the client
Create a new client if the client does not exist in Workstream
Link to Workstream Project(Tax Preparation > Manage > Link to Workstream Project)
Do the following to link to a project in Workstream:
1. In an open return, select Manage > Link to Workstream Project or click the Link toWorkstream Project button. The Workstream window, Link work object, displays.
Note: If this is the first time you have accessed Workstream for this client, the Client toClient Link window will display.
2. For information on completing these window entries, select the Help button.
Open Route Sheet(Tax Preparation > Manage > Open Route Sheet)
Do the following to open a route sheet in Workstream:
1. In an open return, select Manage > Open Route Sheet or click Open Route Sheet.
Note: If this is the first time you have accessed Workstream for this client, the Client toClient Link window will display.
2. For information on completing these window entries, select the Help button.
Notes:
You can also set up the link when selecting Print to Document when printing a return. Once thelink is setup, you will not have to do any further setup to use these features.
You can set up a default prompt, by office group, in Office Manager to remind users to updatethe Workstream project information. This prompt appears when a return is closed, and give theuser the choice of whether or not they want to update the Workstream project. If the useranswers Yes, the Route Sheet is opened. Set this option in Office Manager using Configure TaxPreparation > Workstream Options.
Chapter 3 - Tax Preparation • 204

Printing a List of Returns(Tax Preparation > Manage > Print List of Returns)
The List of Returns report provides client status and detailed return information for clients based onselected criteria. Possible criteria can include the following:
Tax Product
Status
Last Activity
Office Group
Preparer
Staff Responsible
Returns listed on the report can be sorted by up to three categories. The fields include:
Return ID
Client Name
Client ID
Office Group
Preparer Code
Status
Last Activity
Last Activity Date
To print a list of returns, do the following:
1. Select Manage > Print List of Returns. The Print List of Returns dialog displays.
2. In the Select returns by box, choose filter criteria to customize the list of returns that print on thereport. The categories and criteria you choose are the same as those available on the Start UpScreen, also known as the Open Return dialog.
3. In the Print options group box, select the sort keys that determine the order in which thecolumns and returns print. This group box contains the same categories and sort criteria asthose on the List of Returns Print Options dialog.
4. Enter the number of copies (up to 99) to be printed.
5. Click Print to print the List of Returns report.
Securing a Return(Tax Preparation > Manage > Secure Return)
The ways to secure a return in Tax are as follows:
User list method. Only the user who secures the client, users granted access by the personsecuring the data, and supervisors can access the secured client data.
Password method. Any user who has access to the application and knows the password canaccess the secured data.
Chapter 3 - Tax Preparation • 205
Information about each of these methods is described in the sections that follow.
Assigning User List SecurityTo assign user list security to a return, do the following:
1. Open a return.
2. Select Manage > Secure Return or click the Secure Return button. The Secure Client Datadialog displays.
3. In the Security level section, assign security to the client’s return.
4. In the Security method section, choose User List.
5. In the User list section, select the users to allow access rights.
6. Click OK to activate security.
Note: If a restricted user attempts to open a secured return or profile, a dialog stating theclient is secured and by whom is displayed.
Assigning Password SecurityThis method of security requires users to enter a password to view, modify, or print data.
Returns that are password-protected in Tax Preparation require a password to be entered inProduction Processing prior to performing specific functions such as calculation, printing returns orextensions, and creating Pro Forma. A prompt will ask you for the password.
To assign password security to a return, do the following:
1. Open a return.
2. Select Manage > Secure Return to display the Secure Client Data dialog.
3. In the Security level box, choose Secure Return Data.
4. In the Security method box, choose Password.
5. Enter any combination of up to eight alphanumeric characters for the password. Blank spacescannot be used in the password.
6. Click OK.
7. Re-enter the password in the Confirm Password dialog.
8. Click OK. The Enter Password dialog displays when users attempt to access password- protected returns.
Warning! If you forget the assigned password, you must send the return or a client backupto Technical Support for assistance. We recommend that each office designates someoneto maintain the list of passwords.
Removing SecurityTo remove security for a client, do the following:
1. Open a secured return.
2. Select Manage > Secure Return.
Chapter 3 - Tax Preparation • 206

3. In the Security level box, choose No security for client.
4. Click OK to deactivate security.
5. When you close the return, click Yes when prompted to save changes.
Changing a Return Version Description(Tax Preparation > Manage > Version Description)
Use Version Description to change the description of an open return. To create a new version of areturn, use the File > Save As option or the File > New option.
To edit the version description of a return, do the following:
1. Select Manage > Version Description.
2. Enter the new description.
3. Click OK when finished.
The description of the return displays with the return information in the Client/Return List and theApplicable Returns dialog.
Forwarding a Return(Tax Preparation > File > Forward Return)
Your In-Box is activated only when returns have been forwarded to you.
The responsibility for a return can be forwarded to a specified user by using the File > Forward Returncommand or Set Status.
To forward a return to another user, do the following:
1. Open the return that you want to forward.
2. Select File > Forward Return to display the Forward To dialog.
3. In the Return Status section, enter or select a status for the return.
4. In the Forward To section, enter or select a user name.
5. If you do not want changes made to the return, select Lock returns to prohibit changes.
6. Click OK. If you made changes to the return, you are prompted to save the changes. The returnis closed and is forwarded to the named user’s In-Box.
Note: If you try to open a return you forwarded to another user, a message displays to remind youthat the return has been forwarded. The Forward Return selection on the File menu remainsenabled because you can still forward that return to another user.
Using the In-Box(Tax Preparation > Manage > In-Box)
The In-Box option displays a list of returns forwarded to you and allows you to do the following:
Open a return.
Complete a forwarded item.
Chapter 3 - Tax Preparation • 207
Update the detail information of a forwarded item.
Set the status of a return and/or forward a return.
Note: All users can forward returns an unlimited number of times.
To access your In-Box, do the following:
1. Select Manage > In-Box or click the In-Box button. The In-Box dialog displays.
2. Select a return and choose one of the following actions:
Complete. Marks the return as completed in the history log and removes the return fromthe list.
Detail. To view or change detailed information (e.g., priority or description).
Open. To work on the return.
Set Status. To change the status of a return and/or forward the return.
Chapter 3 - Tax Preparation • 208
Chapter 4
Chapter 4 - Import/Export Functions
IntroductionThis chapter provides instructions for using the import and export functions in Tax Preparation.
Import OptionsYou can import data from the following applications to a tax return:
G/L Bridge
Dynalink
Quiklink
CCH ProSystem fx Fixed Assets
CCH Client DataXchange
You can also import the following data into a tax return:
K-1 spreadsheet data
Depletion spreadsheet data
Apportionment data
GainsKeeper Pro Schedule D data
BasisPro Schedule D Data
Foreign entity spreadsheet data
Export OptionsYou can export tax return data to the following applications when FX Direct is integrated with CCHProSystem fx Tax:
CCH ProSystem fx Planning
BNA
CCH Client DataXchange
Chapter 4 - Import/Export Functions • 209
CHAPTER 4 - IMPORT/EXPORT FUNCTIONS
You can also export the following data:
K-1 data from:
S Corporation returns to an existing Individual or Fiduciary return or to a spreadsheet.
Partnership and Fiduciary returns to an existing, Individual, Partnership, Corporation,S Corporation return or spreadsheet.
Depletion data to create a template layout that includes the return's existing information forentity, property data, and well numbers.
Apportionment data from a Corporation, S Corporation, or Partnership return to a spreadsheet.
Import Functions(Tax Preparation > File > Import)
This section describes the Tax Preparation import functions, including the direct tax interfaces thatallow you to convert tax interface data from a third-party accounting system into tax return data. Thedirect tax interfaces are as follows:
G/L Bridge
Dynalink
Quiklink
In addition, this section describes how to import data from the following applications:
Depletion data spreadsheets
Fixed Assets
K-1 and MST spreadsheets
ViewPlan
CCH Client DataXchange
Import Depletion Data OverviewThe depletion import and export features are available for Individual, Partnership, Corporation,S Corporation, and Fiduciary systems. This process allows you to import certain property informationand yearly operating Oil/Gas and Non-Oil and Gas data into an open return. To access this featurefrom an open return, select File > Import > Depletion Data from Spreadsheet.
Well NumberThe Well Number is a unique number that identifies a specific well when there are multiple wellsassociated with a property.
Interview View. The Well Number is on the production data section of the following forms:
Individual. Interview Form E-8
Partnership, Corporation, S Corporation. Interview Form E-2
Fiduciary. Interview Form E-4
Chapter 4 - Import/Export Functions • 210

Worksheet View. The Well Number field is located on the Worksheet View as follows:
Individual and Fiduciary. Property Production Income and Expenses section of theapplicable worksheet of the Income menu
Partnership, Corporation, S Corporation. Income/Deductions > Depletion > PropertyProduction Income and Expenses section
Use Spreadsheet Template or Create Spreadsheet Template
A template layout is provided for each system. This allows you to enter property and productiondata on a single Excel® spreadsheet for import.
You can create a template layout using the export feature. The existing information entity,property data, and well numbers are exported so you can properly enter the depletion data to beimported.
Update Existing or Create New Entity, Property, and/or WellImported data matches to the depletion data in the return on Entity, Property, and Well.
If the import data matches the Entity, Property, and Well of the depletion data in the return, thereturn data is updated in the correct depletion interview form and fields.
If the import data does not match an Entity, Property, and Well of the depletion data in the return,a new Entity, Property, and/or Well will be created.
Select Option for Processing Depletion DataWithin the Depletion Import Wizard, you will select how to process the imported data.
Match and update existing input
Delete applicable input, replacing with import data
Warning! Deleting the existing depletion data in the return will also delete any attacheddepreciation entries.
Data Validation Log and Import LogThe import process starts by validating the data. Messages that are generated from the importvalidation process will display on the Spreadsheet Data Validation Log where you have the choice toaccept the results and continue the import, or cancel the import. You can print this log.
If you continue the import, the Spreadsheet Import Log displays, providing messages related to theimport process. You can print this log.
Chapter 4 - Import/Export Functions • 211

G/L Bridge(Tax Preparation > File > Import > G/L Bridge)
This section describes G/L Bridge processing for customers who will be bridging tax line data directlyfrom an accounting system. See the Process with Dynalink or G/L Bridge topic in the Tax Preparationonline Help file for information on supported accounting systems.
Warning! Importing via either G/L Bridge or Dynalink will REMOVE data placed on Partnership A-series entities numbered higher than 1. After importing you must review entities 2 and greater andre-enter any data removed by the import process.
When you run the tax service export function in your system (for example, the Create Tax InterfaceFile feature in CCH ProSystem fx Trial Balance), it creates an interface file that contains an extract ofaccounting data, coded by tax lines, for processing an Individual, C Corporation, S Corporation,Partnership, or Exempt Organization tax return.
Note: The Individual tax product is only processed by certain accounting systems through G/LBridge. See the Process with Dynalink or G/L Bridge topic in the Tax Preparation help file.
G/L Bridge uses the interface file as input and merges it into a CCH ProSystem fx Tax return usingone of these processing methods:
Pro Forma Merge. Merges the interface file with Pro Forma data to create a current year return.
Existing Return Merge. Merges the interface file with an existing return.
New Return Merge. Merges the interface file with a new return that has been createdautomatically by G/L Bridge.
Center Pro Forma Merge. Merges the interface file with Pro Forma created by the ProcessingCenter. G/L Bridge or Dynalink automatically removes from the Pro Forma data any open linedescriptions in repeater data that do not have corresponding amounts (for example, OtherDeductions). To use the Pro Forma Merge method, you must run G/L Bridge or Dynalink beforerecalling your Pro Forma data.
During the merging process, G/L Bridge maps the tax line data in the interface file to the appropriateCCH ProSystem fx Tax interview form and box number locations.
Use the Tax Line Conversion Charts available in the Tax Preparation online help (select Help > HelpTopics) to match tax lines with their corresponding CCH ProSystem fx Tax interview form and boxnumber locations.
When G/L Bridge processing is complete, your Individual, Corporation, S Corporation, Partnership, orExempt Organization tax return is ready for final processing. Use the standard functions in TaxPreparation to make any required changes, additions, or deletions.
Note: To view the converted data on government forms, you must first calculate the return.
Chapter 4 - Import/Export Functions • 212
G/L Bridge Processing Procedure1. Open Tax Preparation. If you are already in Tax Preparation and a return is open, you must
close the return before you continue.
2. Select File > Import > G/L Bridge. The G/L Bridge dialog displays.
3. Select an accounting system from the drop-down list.
Note: It is very important that you select the accounting system that was used to generateyour client’s tax interface file. G/L Bridge performs different functions for certain accountingsystems. Your selection of the accounting system determines whether or not the correctfunctions are executed.
4. Click Select Import File to select an interface file.
5. Use the Look in box to select the drive and directory where the import file is located. Then selectthe file extension from the Files of type list. The file name will always be Compfile. The fileextension varies depending on the accounting system you are using.
For tax interface files generated by CCH ProSystem fx Trial Balance or CBEAM for Windows®,the default file extension is .txt. You may override this with your own extension. In most otheraccounting systems, such as CaseWare®, the default file extension, which you may alsooverride, is based on the letters in the client code.
6. Select the import file and click Open. The import file information displays in the top box of theG/L Bridge dialog.
7. Select the return corresponding to the import file. Click Select Return. The Select Return dialogdisplays with the following options: Open, New, Pro Forma, and Center Pro Forma. Dependingon which category you select, you will see varying filter criteria for selecting the return.
8. After choosing the return category, use the drop-down lists to filter the returns you want todisplay. If more than one return fits the criteria, a dialog displays listing the applicable returns.
9. Highlight the return you want and click OK.
10. Compare the data in the Import File Information box with the data in the Return Information boxto make sure it is consistent.
11. Click Options. At the G/L Bridge and Dynalink – Options dialog, choose from among theprocessing options provided. See the next section, Selecting G/L Bridge or Dynalink ProcessingOptions, for details about these options.
12. Click Process. The system converts the G/L Bridge data and then merges the import file with theCCH ProSystem fx Tax return.
13. When processing is complete, the interview forms list for the selected return type displays. Thehighlighted forms contain data processed by G/L Bridge. You can double-click any form tocontinue working on the return.
Selecting G/L Bridge or Dynalink Processing OptionsWhen you click Options on the G/L Bridge or Dynalink dialogs, the G/L Bridge and Dynalink - Optionsdialog with two tabs, General and Existing Returns, displays.
The G/L Bridge and Dynalink - Options dialog allows you to control the import of specific import itemsinto Pro Forma or into new or existing returns. To set chosen options as defaults, click Save as
Chapter 4 - Import/Export Functions • 213

Default and respond Yes to the prompt. The options then remain in place for each return you process,unless you change them for a specific return.
The options available on the General tab are as follows:
Import options
Import identification information (name, address, etc). Check this box to import name,address, city, state, ZIP code, EIN (if present), Beginning Fiscal Yr Date, and Ending Fiscal YrDate. Existing return or Pro Forma data is overwritten.
Note: The first name line is always available on the tax interface file; the availability of theother identification items varies among the systems.
Import beginning balance sheet data. If checked, G/L Bridge or Dynalink processes beginningbalance sheet data from the tax interface file. Ending balances are always processed. Anybeginning balance sheet data is deleted.
If blank, only ending balance sheet data is processed. The system uses Pro Forma data forbeginning balance sheet data and performs matching routines on the balance sheet repeaterdata (i.e., open line descriptions such as Other Current Assets) in order to match up both theprior-year and the current-year amounts with the same description.
Import state and city taxes data (Corporation, S Corporation). The state and city taxes dataavailable from the tax interface file does not have state codes. However, the input on commonInterview Form A-3, Deductions (Taxes and Licenses section of the Business Worksheet underthe Income/Deductions category), does allow state codes. Check this option if you want toimport these amounts. If you leave this box unchecked, the system suppresses the import ofdata from these tax codes.
Click the Existing Returns tab to display the following options.
Options for ProSystem fx accounting systems.
The CCH ProSystem fx accounting systems are Engagement and Trial Balance.
The following options apply only to the processing of existing returns. If you are processing withDynalink or G/L Bridge, these options apply only if you select a CCH ProSystem fx accountingsystem.
The internally stored tax code identifiers are only generated by G/L Bridge or Dynalinkprocessing. Repeater data records that were keyed in manually or transferred in from Pro Formaand then recalled do not have identifiers. This uncoded class of data is referred to as existingdata.
Chapter 4 - Import/Export Functions • 214

The options below apply only to the processing of existing returns.
Note: Existing data applies only to data items processed by G/L Bridge or Dynalink. It doesnot include other groups of data in your return such as depreciation detail, installment sales,carryovers, state data, etc.
Keep existing data (default). Any repeater data records in the sections of the interviewforms processed for G/L Bridge or Dynalink that have either been keyed in or transferredfrom Pro Forma are kept.
Remove existing data. Any repeater data records in the sections of the interview formsprocessed for G/L Bridge or Dynalink that have either been keyed in or transferred fromPro Forma are removed, unless certain exceptions apply as explained below.
Do not remove interest income detail data. Interview Form B-1, Interest Income(Interest Worksheet under the Income category), retains amounts in either or bothof the state columns and the Federal Tax Withheld column. All amount
These valid data records can be present in the return but have no data in theamount fields processed by G/L Bridge or Dynalink. This option allows you toexclude these repeater ranges from import processing.
Processing Detail Items for Interview Forms L-1 and L-2The following tables show the possible combinations of the CCH ProSystem fx accounting systemsoptions and the Import beginning balance sheet data on the General tab.
A. Keep existing data option selected.
1. Import beginning balance sheet data option selected.
RecordType
DescriptionBeg. of Taxable YearAmount
End of Taxable YearAmount
RecordProcessing
CodedMatch &Replace
Match & Replace Match & ReplaceCompareIdentifiers
Uncoded Keep Keep Keep Keep Records
2. Import beginning balance sheet data option not selected.
RecordType
DescriptionBeg. of Taxable YearAmount
End of Taxable YearAmount
RecordProcessing
CodedMatch &Replace
Keep (1) Match & Replace Compare (1)
Uncoded Keep Keep Keep Keep Records
Chapter 4 - Import/Export Functions • 215

B. Remove existing data option selected.
1. Import beginning balance sheet data option selected.
RecordType
DescriptionBeg. of Taxable YearAmount
End of Taxable YearAmount
RecordProcessing
CodedMatch &Replace
Match & Replace Match & ReplaceCompareIdentifiers
Uncoded Delete Delete Delete Delete Records
2. Import beginning balance sheet data option not selected.
RecordType
DescriptionBeg. of Taxable YearAmount
End of Taxable YearAmount
RecordProcessing
CodedMatch &Replace
Keep (1) Match & Replace Compare (1)
Uncoded Keep (2) Keep (2) Initialize to zero Keep (2)
(1) Only delete record if the tax code identifier is not matched on the tax interface file and thebeginning of year amount is zero.
(2) Only delete record if the beginning of year amount is zero.
Options for other accounting systemsThese options do not apply to Engagement and Trial Balance.
Interest income detail data reprocessing options. Choose whether to use imported data tooverride existing interest income data, or blend imported data with existing data.
This data is overridden only by consent of the user, since interest income data can have anextensive number of input fields and Pro Forma data items associated with it.
Imported data should override existing data. Click to automatically remove the existingrepeater data for interest income and replace it with the data from the tax interface file.
Imported data should match description with existing data. Click to compare the description ofeach item on the tax interface file for interest income with the descriptions of the items of existingdata (this is not case-sensitive). If a match is found, the amount from the tax interface file itemoverrides the corresponding amount for the existing data item. If no match is found, a newrepeater item is created for the data from the tax interface file.
Chapter 4 - Import/Export Functions • 216

Examples of G/L Bridge or Dynalink Processing MethodsThe methods of processing data with G/L Bridge or Dynalink are the same for each system.
Pro Forma Merge. Merges the interface file with Pro Forma data. G/L Bridge or Dynalinkautomatically removes from the Pro Forma data any open line descriptions in repeater data thatdo not have corresponding amounts (for example, Other Deductions). To use the Pro FormaMerge method, you must run G/L Bridge or Dynalink before recalling your Pro Forma data.
Center Pro Forma Merge. Merges the interface file with Pro Forma created by the ProcessingCenter. G/L Bridge or Dynalink automatically removes from the Pro Forma data any open linedescriptions in repeater data that do not have corresponding amounts (for example, OtherDeductions). To use the Pro Forma Merge method, you must run G/L Bridge or Dynalink beforerecalling your Pro Forma data.
Existing Return Merge. Merges the interface file with an existing return.
New Return Merge. G/L Bridge or Dynalink automatically creates a new return and merges theinterface file data into it.
Each processing method is discussed in the sections that follow.
Pro Forma MergeTo merge Pro Forma with an interface file, do the following:
1. Select File > Import > G/L Bridge or Dynalink.
2. If using G/L Bridge, do the following:
a. Click Select Import File.
b. Browse to the Compfile.
c. Select Open.
3. If using Dynalink, do the following:
a. Click Select Client.
b. Select a tax product and accounting system and click OK.
c. In the Select Client dialog, highlight a client and click OK.
4. Click Select Return and choose the Pro Forma option.
5. Select the office group, preparer, and staff responsible, or leave All as the default.
6. Click OK. If more than one return fits the filter criteria, the Applicable Returns dialog displays.
7. Select a return, and then click OK. The return data displays with the client information. You cancompare the import file or client information and return data information.
8. Click Options to display the G/L Bridge and Dynalink – Options dialog.
9. Check the Import beginning balance sheet data box. This causes G/L Bridge or Dynalink toprocess both beginning and ending balance sheet data from the tax interface file, and removeany beginning balance sheet data that exists in the Pro Forma.
10. Select additional processing options.
Chapter 4 - Import/Export Functions • 217
11. For G/L Bridge, click Process; for Dynalink, click Import to begin processing. When the import iscomplete, the interview forms list for the selected return type displays. The highlighted formscontain previously existing data or data that was processed by G/L Bridge or Dynalink.
12. Double-click a form to continue working on the return.
Center Pro Forma MergeTo merge Center Pro Forma with an interface file or client information, do the following:
1. Select File > Import > G/L Bridge or Dynalink.
2. If using G/L Bridge, do the following:
a. Click Select Import File.
b. Browse to the Compfile.
c. Select Open.
3. If using Dynalink, do the following:
a. Click Select Client.
b. Select a tax product and accounting system and click OK.
c. In the Select Client dialog, highlight a client and click OK.
4. Click Select Return and choose Center Pro Forma. The dialog changes its display with the taxyear and tax product already selected.
5. Select the drive where the Pro Forma is located. The system displays the fx\yy\UD\xxxxxxsubdirectory (where yy = the tax year, for example, 08, and xxxxxx = the account number, forexample, 123456). If more than one subdirectory exists, select the correct one. You can thenselect the Pro Forma by return number.
6. If a client ID already exists in the Center Pro Forma, it displays. If not, enter a client ID.
7. Select an office group to which the return should be assigned once it is processed. You may alsoassign a preparer.
8. Click OK. The return data displays on the G/L Bridge or Dynalink dialog with the import file orclient information.
9. Click Options.
10. Check the Import beginning balance sheet data box. This causes G/L Bridge or Dynalink toprocess both beginning and ending balance sheet data from the tax interface file or clientinformation, and remove any beginning balance sheet data that exists in the Pro Forma. Selectadditional processing options as needed.
11. For G/L Bridge, click Process; for Dynalink, click Import to begin processing. When processingis complete, the interview forms list for the selected return type displays in Tax Preparation. Thehighlighted forms contain data that was processed by G/L Bridge, Dynalink, or previouslyexisting data.
12. Double-click a form to continue working on the return.
Chapter 4 - Import/Export Functions • 218

Existing Return Merge
1. Select File > Import > G/L Bridge or File > Import > Dynalink.
2. If using G/L Bridge, do the following:
a. Click Select Import File.
b. Browse to the Compfile.
c. Select Open.
3. If using Dynalink, do the following:
a. Click Select Client.
b. Select a tax product and accounting system and click OK.
c. In the Select Client dialog, highlight a client and click OK.
4. Click Select Return and choose Open. The dialog changes its display with the tax year and taxproduct already selected.
5. You can select a specific client by entering the client’s ID or by choosing Name and entering theclient’s name.
If you prefer to use filter criteria, use the drop-down lists to select the return status, last activity ofthe return, office group, preparer, or staff responsible.
6. Click OK. If multiple returns fit the filter criteria, the Applicable Returns dialog displays (the titleof this dialog changes depending on whether you are processing G/L Bridge or Dynalink).
7. Highlight the return you want and click OK. The return data displays on the G/L Bridge orDynalink dialog with the import file or client information. You can compare the import file or clientinformation and return data.
8. If your default selection for the Import beginning balance sheet data box is unchecked, you donot need to click Options unless you want to change other default settings for this return. If yourdefault setting for this box is checked, click Options to uncheck the box and then click OK. Thisaction unchecks the box only for the current return. When you process the next return, thedefault is in effect again.
This allows G/L Bridge or Dynalink to process the ending balance sheet data from the interfacefile, keeping any beginning balance sheet data that exists in the return.
Select additional options as needed.
9. For G/L Bridge, click Process; for Dynalink, click Import to begin processing. When processingis complete, the interview forms list for the selected return type displays in Tax Preparation. Theselected forms contain data processed by G/L Bridge or Dynalink or previously existing data.Double-click any form to continue working on the return.
Chapter 4 - Import/Export Functions • 219
New Return MergeIn this example, the interface file is merged with a new return and both beginning and ending balancesheet data from the interface file or client information are used.
To merge a new return with an interface file:
1. Select File > Import > G/L Bridge or Dynalink.
2. If using G/L Bridge, do the following:
a. Click Select Import File.
b. Browse to the Compfile.
c. Select Open.
3. If using Dynalink, do the following:
a. Click Select Client.
b. Select a tax product and accounting system and click OK.
c. In the Select Client dialog, highlight a client and click OK.
4. When the Select Return dialog displays, choose New. The dialog changes to display the taxyear, client type, and tax product as preselected.
5. Enter a client ID.
6. Use the drop-down list to assign an office group to the return.
7. Check Use Default Return to use a default return for this return. This option is available only ifthere is a default return for the tax product in this specific office group.
8. Click OK. The return data displays on the G/L Bridge or Dynalink dialog with the import fileinformation. You can compare the import file or client information and return data.
9. For either system, click Options. On the G/L Bridge and Dynalink – Options dialog, check theImport beginning balance sheet data box. Both the beginning and ending balance sheet data inthe new return are included in the new return.
Select additional processing options as needed.
10. For G/L Bridge, click Process; for Dynalink, click Import to begin processing. When processingis complete, the interview forms list for the selected return type displays in Tax Preparation. Thehighlighted forms contain data that was processed by G/L Bridge or Dynalink. Double-click anyform to continue working on the return.
Reprocessing Returns through G/L Bridge or DynalinkIf you have processed your return with Dynalink and your accounting system supports it, you can useQuiklink to process non-extensive accounting system changes to your client’s data. For details, seeUpdating with Quiklink on page 225. However, if the changes are extensive or your accountingsystem does not support Quiklink, you have to reprocess the return through Dynalink.
Note: Quiklink is not available if you processed your return through G/L Bridge.
Reprocessing is an application of the Existing Return Merge method. It merges your revised taxinterface file with the return that you created previously. See the following sections on reprocessingwith tax code identifiers available and not available.
Chapter 4 - Import/Export Functions • 220
Warning! Importing via either G/L Bridge or Dynalink will REMOVE data placed on Partnership A-series Entities higher than 1. After importing you must review Entities 2 and greater and re-enterany data removed by the import process.
Tax Code Identifiers Are Available in the Tax Interface FilePlease refer to the Reprocessing Returns through G/L Bridge or Dynalink topic in the Tax PreparationHelp file for more information.
Some accounting systems include tax code identifiers as part of the tax interface file data. When youreprocess your return through G/L Bridge or Dynalink, the exact tax code used for each repeater item(for example, open line description items such as Other Deductions, Other Current Assets) is stored inthe tax return. During reprocessing, the system matches tax codes for repeater data. Listed below is asummary of the processing that occurs during the matching process.
Tax code of a repeater item in the interface file is matched with an existing repeater item inthe return. The system overrides the existing description and applicable amount data with thenew data from the tax interface file.
If there are additional fields on the repeater record other than description and amounts (forexample, code boxes, option boxes), they are not affected by the reprocessing.
Tax code of a repeater item in the interface file is not matched with an existing repeater itemin the return. If no match is found for the tax code of a repeater item on the interface file, thesystem creates a new repeater item and transfers the description and amount to the new record.
Tax code of an existing repeater item is not matched on the tax interface file. If an existingrepeater data item has a stored tax code and is not matched by any data coming in from the taxinterface file, then it is deleted from the return.
Data that has been entered through data entry in Tax Preparation. If you enter repeater datathrough regular data entry methods after you process your return through either G/L Bridge orDynalink the repeater items will not have stored tax codes.
Stored tax codes in repeater data can only be supplied from processing with G/L Bridge orDynalink. During reprocessing, these records, which are considered existing data, will beprocessed according to your selection of the existing data options. See Options for ProSystem fxaccounting systems. on page 214.
Note: You must always calculate the return to view data on government forms.
Tax Code Identifiers Are Not Available in the Tax Interface FileIf tax code identifiers are not available in the interface file, special processing is provided for thespecific groups of repeater data supplied from the interface file (for example, Other Income, OtherTaxes).
For these groups, existing repeater data is removed from the return, and the revised data from theinterface file is added to the return.
Data covered by specific processing options is an exception (for example, balance sheet data andinterest income). See Selecting G/L Bridge or Dynalink Processing Options on page 213 for details onthe items available for reprocessing. All data not brought in from the interface file is left intact.
Chapter 4 - Import/Export Functions • 221
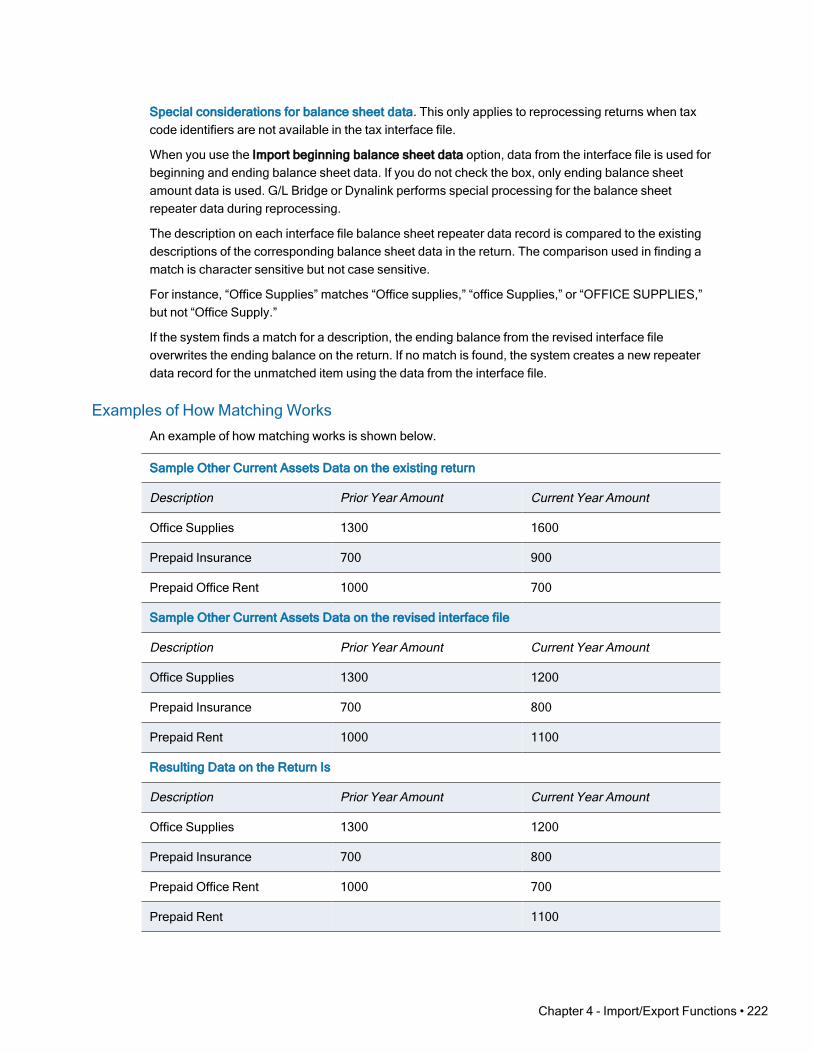
Special considerations for balance sheet data. This only applies to reprocessing returns when taxcode identifiers are not available in the tax interface file.
When you use the Import beginning balance sheet data option, data from the interface file is used forbeginning and ending balance sheet data. If you do not check the box, only ending balance sheetamount data is used. G/L Bridge or Dynalink performs special processing for the balance sheetrepeater data during reprocessing.
The description on each interface file balance sheet repeater data record is compared to the existingdescriptions of the corresponding balance sheet data in the return. The comparison used in finding amatch is character sensitive but not case sensitive.
For instance, “Office Supplies” matches “Office supplies,” “office Supplies,” or “OFFICE SUPPLIES,”but not “Office Supply.”
If the system finds a match for a description, the ending balance from the revised interface fileoverwrites the ending balance on the return. If no match is found, the system creates a new repeaterdata record for the unmatched item using the data from the interface file.
Examples of How Matching WorksAn example of how matching works is shown below.
Sample Other Current Assets Data on the existing return
Description Prior Year Amount Current Year Amount
Office Supplies 1300 1600
Prepaid Insurance 700 900
Prepaid Office Rent 1000 700
Sample Other Current Assets Data on the revised interface file
Description Prior Year Amount Current Year Amount
Office Supplies 1300 1200
Prepaid Insurance 700 800
Prepaid Rent 1000 1100
Resulting Data on the Return Is
Description Prior Year Amount Current Year Amount
Office Supplies 1300 1200
Prepaid Insurance 700 800
Prepaid Office Rent 1000 700
Prepaid Rent 1100
Chapter 4 - Import/Export Functions • 222

Since no match is found for the description, “Prepaid Rent,” a new repeater data item is created withjust the current year amount.
Note: After reprocessing a return through G/L Bridge or Dynalink when the Import beginningbalance sheet data box was not checked, double-check your balance sheet repeater data tomake sure there are no duplicate repeater data items resulting from data descriptions beingslightly different between the return and the revised interface file.
Using the Dynalink Interface ProgramThis section provides information on the features and methods of Dynalink processing for customerswho will be transferring tax line data from an accounting system using Dynalink. Refer to the currentrelease notes for a list of applicable accounting system vendors and their products.
The Import > Dynalink option allows you to easily transfer data to Tax Preparation from youraccounting software package for Individual, Corporation, S Corporation, Partnership, and ExemptOrganization returns. Dynalink creates interface data and processes it all in one step. The interfacedata from your accounting system is transferred automatically to CCH ProSystem fx Tax for a newclient, existing client, Pro Forma, or Center Pro Forma.
The first time you perform Dynalink processing, you will need to configure the path of the accountingsystems (bridges) you use and create a list of the clients available for Dynalink processing (seeConfiguring Accounting Bridges on page 100). For subsequent processing, the accounting bridges donot have to be reconfigured unless you change the location of the Dynalink software, or theaccounting software vendor changes the subdirectory name. The client list may need to be refreshedwhen clients are created or deleted.
Dynalink uses the interface file as input and merges it into a tax return using one of the processingmethods listed below.
Center Pro Forma Merge. Merges the interface file with Center Pro Forma to create a currentyear return.
Pro Forma Merge. Merges the interface file with Pro Forma to create a current year return.
Existing Return Merge. Merges the interface file with an existing return.
New Return Merge. Merges the interface file with a new return that has been createdautomatically by Dynalink.
During the merging process, Dynalink converts the tax line data in the interface file by mapping it tothe appropriate CCH ProSystem fx Tax interview form and box number locations. Use the Tax LineConversion Charts available in the Tax Preparation online help to match tax lines with theircorresponding interview form and box number locations.
When Dynalink processing is completed, the sheet numbers of the Dynalink-created interview formsare converted to the regular sheet numbers used in the rest of your return file. Your tax return is readyfor final processing. Use the standard Tax Preparation functions to make any required changes.
Warning! Importing via either G/L Bridge or Dynalink will REMOVE data placed on Partnership A-series Entities numbers higher than 1. After importing you must review Entities 2 and greater andre-enter any data removed by the import process.
Chapter 4 - Import/Export Functions • 223
Note: To view the converted data on government view forms, you must calculate the return.
Processing with DynalinkNote: Before processing, configure the accounting systems (bridges) you use and create a clientlist. See Configuring Accounting Bridges on page 100 for details.
1. Open Tax Preparation.
2. Select File > Import > Dynalink. The main Dynalink dialog displays.
This dialog displays the information for the client and tax return you select for processing, andallows you to verify that the information for both is correct.
3. Click Select Client. The Select Accounting System Client List dialog displays.
4. Select the tax product (Individual, Corporation, S Corporation, Partnership, or ExemptOrganization) for the client you want to process.
5. Select the accounting system you want. The client lists created in Tax Preparation display "(userconfigured)" at the end of the description. Lists created in Office Manager display only the nameof the accounting system. Click OK. The Select Client dialog displays the clients in client codeorder for the product selected.
6. Highlight a client and click OK. The Dynalink request to the accounting system is initiated toprovide the tax interface data for your selected client. When this process is complete, the mainDynalink dialog displays, showing the information from the client data list in the Clientinformation (accounting system) box.
7. Click Select Return. The tax year and product are already displayed.
8. Select one of the following:
Open. Transfers data to an existing return.
New. Creates a new return and transfers data into it.
Pro Forma. Transfers data into Pro Forma.
Center Pro Forma. Transfers data into Center Pro Forma.
9. Select a client by ID or name, or use the lists to select a client using the displayed filter criteriaselections:
Status. Current status of the return.
Last activity. Most recent task performed for the return.
Office group. The office group associated with the return.
Preparer. Any of the preparers assigned to the return.
Staff responsible. Staff member responsible for the return.
10. Once you have made your selections, click OK. The return information displays in the Returninformation box on the main Dynalink dialog with the client list data.
You can compare the data in the Client information and Return information boxes to ensure thedata is consistent. When comparing this information, remember the following:
In the Client information (accounting system) box, the value in the Client code fieldcomes from the accounting system client number.
The Empl. ID no. field is completed only if it is available from the accounting system.
Chapter 4 - Import/Export Functions • 224
In the Return information box, the Client ID field is the CCH ProSystem fx Tax systemidentifier.
The Client name and Empl. ID no. fields are blank if you are processing with a newCCH ProSystem fx Tax return.
11. Click Options. At the G/L Bridge and Dynalink – Options dialog, choose from among theprocessing options provided. See Selecting G/L Bridge or Dynalink Processing Options onpage 213 for more information on the processing options.
12. Select Import to process the return. When the processing is complete, the Interview Forms listfor the return type selected displays in Tax Preparation.
Subsequent Dynalink ProcessingAfter you have processed returns through Dynalink the first time, you do not need to configureaccounting systems before you start processing. Simply follow the steps in Processing with Dynalinkon the previous page to process a return.
Updating with QuiklinkQuiklink allows you to make changes to a client’s tax interface data in the accounting system. The taxinterface data must have been processed through Dynalink, and a return created for the client. Thechanges you make to the tax interface data are automatically transferred into the appropriate place inthe client’s tax return without reprocessing the entire return through Dynalink.
If you have made extensive changes to the tax interface data in your accounting system, you need toreprocess the data through Dynalink.
Notes:
Before you can use Quiklink, you must have a return processed with Dynalink and configure theaccounting systems you use. See Configuring Accounting Bridges on page 100.
You may have only one client open at a time. If another client is currently open in TaxPreparation, you are prompted to either cancel your request for processing or save and closethe currently open client.
The following procedure starts the Quiklink processing from Tax Preparation. Alternatively, you maystart Quiklink processing from the accounting system by opening a client that has been processedthrough Dynalink. However, to do so you must first open the corresponding Tax Preparation return tocomplete the Quiklink process when starting from the accounting system.
To update a return with changes made in the tax interface data, do the following:
1. In Tax Preparation, open a client’s return that was previously processed in Dynalink.
2. Do one of the following to switch to the accounting system:
Select File > Import > Quiklink.
Click Quiklink from the toolbar.
If an interview form box relevant to the tax interface is highlighted at the time you initiatedQuiklink processing, the tax line corresponding to the interview form box is highlighted in theaccounting system.
Chapter 4 - Import/Export Functions • 225
Note: When you first select Quiklink processing for the current Tax Preparation session, ifyou have set up two system paths (one in Office Manager and one in Tax Preparation) forthe accounting system, you are prompted to choose which system path to use.
3. From the highlighted tax line in the accounting system, “drill down” to the account and journalentry detail data which makes up the tax line balance.
4. Modify the account and journal entry detail data. If the changes relate to the tax interface data,the accounting system automatically recalculates the tax line balance and transfers thechanges, as you make them, to the client’s tax return in Tax Preparation.
5. Return to the summary tax line display to see the changes reflected there.
6. From the highlighted tax line in the accounting system, switch back to Tax Preparation using theQuiklink button or menu selection.
If the tax line is highlighted when you switch back to Tax Preparation, the accounting systemopens the client’s tax return and highlights the corresponding interview form box that containsthe changed value for the tax line.
If the highlight was anywhere else in the accounting system, the client’s tax return opens and aforms selection list displays for the currently selected view.
Importing Data from CCH ProSystem fx Fixed Assets(Tax Preparation > File > Import > Fixed Assets)
The Import function in Tax Preparation is used to bring data from CCH ProSystem fx Fixed Assets intoa return.
Note: Before importing, be sure the client’s Fixed Assets file is closed and the Tax return is open.
During the import of Fixed Asset data to Tax, you are given the choice of importing asset data as:
Asset detail to be imported to Interview Forms DP-1, DP-2, DP-3, or DP-4.
Importing current year acquisitions only
Importing current year dispositions only
Both Current Year Acquisitions and Current Year Dispositions
Appending and Updating all Assets
Full Import
Totals only to be imported to Interview Forms DP-5 and DP-6.
When a full import is implemented, Tax deletes assets in the return associated with the entities beingimported and replaces the existing asset data with the Fixed Assets data.
If there is a difference between asset data from Fixed Assets and the return data regarding the use oftotals only and asset detail, Tax gives you the choice of stopping the import and changing the methodof import or continuing.
Future assets are imported with zero depreciation.
Chapter 4 - Import/Export Functions • 226

The following assets are not imported from Fixed Assets:
Assets marked as inactive on the Fixed Assets Detail tab.
Previously disposed assets if the asset’s disposed date is prior to the tax year of the return.
Notes:
We recommend that you use the Save option on the first screen of the Import Wizard beforebeginning the import process.
If you have turned on the Tax Preparation AutoSave feature, you should turn it off beforeimporting. Select Options > Preferences > Tax Return Preferences > AutoSave and removethe check next to the AutoSave option.
To import Fixed Assets data to Tax Preparation, do the following:
1. In Tax Preparation, open the return to which you will import Fixed Assets data. The Fixed Assetsmenu command is unavailable until a return is open.
2. Select File > Import > Fixed Assets or click Import Fixed Assets on the toolbar.
3. If you have not yet saved the return, we recommend you click Save and then Next to continue tothe next screen.
Note: If AutoSave has been turned on, a message states that AutoSave is active and thatyou should turn it off to avoid automatically saving the imported data with the return. To doso, click No and select Options > Preferences > Tax Return Preferences > AutoSave.
4. Highlight the Fixed Assets clients whose data you want to import and click Next. Use ChangeLocation if there are Fixed Assets clients in alternate locations.
If only one client is selected, skip to step 6.
If multiple clients are selected, continue to the next step.
Notes:
Only Fixed Assets clients who match the return type of the open return are listed. Forexample, if the return is an Individual return, only Individual Fixed Assets clients arelisted.
If the Fixed Assets client is password protected, enter the password to allow the import tocontinue.
5. If multiple Fixed Assets clients are selected, they are listed in the next dialog. If you hadpreviously imported a client into this return and it is listed, select that client, and then click Next.
Existing entities for the selected client are updated or replaced.
New entities are created in the return for clients that have not been previously imported.
6. Choose one of the following import options:
Select Totals only to import current depreciation total figures for each entity intoInterview Forms DP-5 and DP-6 and click Next.
Note: All totals on these forms will be deleted and replaced with the Fixed Assetsdata.
Chapter 4 - Import/Export Functions • 227

Select Asset detail to import current depreciation detail figures for each asset toInterview Forms DP-1, DP-2, DP-3, and DP-4 and click Next.
7. Choose one of the following import options and click Next.
Import Current Year Acquisitions Only
Import Current Year Dispositions Only
Import Current Year Acquisitions and Current Year Dispositions Only
Append and Update all Assets
Full Import
Notes:
If Full Import is selected, all asset detail will be overwritten.
A Full Import must take place before the Import Current Year Dispositions Only, ImportCurrent Year Acquisitions and Current Year Dispositions Only, and Append and Updateall Assets options will be available.
8. Choose how the import process should react if an entity in the Fixed Assets system has nocorresponding entity in the tax return.
Add Entity. Creates an entity in the return and imports the fixed asset data to the newentity.
Bypass Entity. Does not create an entity in the return and bypasses the assets in theFixed Assets system that belong to the entity.
9. Click Next to display the options you have chosen.
The dialog lists the return ID, client’s name, tax year, and method of import, allowing you toconfirm that the import is correct.
Click Finish to import asset data into the return.
Click Back to return to the previous step in the import process.
10. When import has finished, a successful import message displays. Click OK.
Importing Depletion Data from a SpreadsheetYou can use the provided template or create a template from a return using the export feature.
Creating a Depletion Data Spreadsheet from the Template
You can use the spreadsheet template which is provided for each system. The templates arenamed yyxOILGS.xls, where yy is the two-digit tax year and x is the system.
Warning! Do not make changes to the template. Copy or save the template to anotherlocation. You can find details of the template content in the Tax Preparation online Help.
Creating a Depletion Data Spreadsheet using Export
You can create a template layout using the export feature. The existing information entity,property data, and well numbers are exported so you can properly enter the depletion data to beimported.
Chapter 4 - Import/Export Functions • 228

Importing the SpreadsheetIf AutoSave is enabled, a message displays stating that it is active. You should disable AutoSave toavoid automatically saving the imported data with the return.
If the import process encounters any errors or exceptions, a dialog displays detailing where theexceptions occurred.
To import depletion data from a spreadsheet, open the return into which you want to import the data,and do the following:
1. Select File > Import > Depletion Data from Spreadsheet. The Select Import File wizard screendisplays.
2. Enter the path and file name for the Excel® spreadsheet input file, or click Browse to locate it.
3. Click Next. The Select Option wizard screen displays.
The import data matches to the depletion data in the return on Entity, Property, and Well.
If the import data matches the Entity, Property, and Well of the depletion data in thereturn, the return data is updated.
If the import data does not match an Entity, Property, and Well of the depletion data in thereturn, a new entity will be created.
This wizard screen requires you to select an option for the way the import data will beprocessed. See the online Help for additional information.
Warning! If you select the option to delete the existing depletion data in the return, anyattached depreciation entries will also be deleted.
4. When selections are completed, click Finish. The Spreadsheet Data Validation Log displays.
5. Click Print, if needed. The log prints after you select Continue Import or Cancel Import.
6. Click Continue Import. The Spreadsheet Import Log displays.
Chapter 4 - Import/Export Functions • 229
7. Click Print to close the wizard and printed the log, or click Close to exit the wizard withoutprinting. The Import Completed message displays.
8. Click OK.
Importing K-1 Data from a Spreadsheet(Tax Preparation > File > Import > K-1 Data from Spreadsheet)
User information that is stored in a spreadsheet but not intended for import should be maintained inseparate user-named sheets. User information intended for import should be stored using the sheetnames specified in our sample templates. Overflow sheets for each type of data should follow theExcel® numbering convention. For example, the first sheet of “K-1 data” is not numbered. The secondsheet would be named “K-1 data (2).” This ensures that information from a multiple sheet workbook isimported correctly.
Tip: Begin by exporting data from a 2020 return in Tax Preparation to create a spreadsheet,modify the data in Excel®, and then import the data into the return.
You may also create a spreadsheet from a template in Excel®, save the spreadsheet under a newname, and then import the data into a return. Standard templates are found in theX:\wfx32\SAMPLES\yy directory (where X represents the drive and yy represents the year of the taxreturn).
Note: To view examples of the spreadsheet templates, select Help > Help topics inCCH ProSystem fx Tax. Click the Contents tab and select Import/Export to Spreadsheet >Spreadsheet Templates.
When adding data to a spreadsheet, use Insert > Row in Excel® to add rows to ensure that the propercell and print format is maintained and the data imports into the return correctly.
If data is entered on a spreadsheet and it exceeds the allowable field length, it is truncated on import.
To import K-1 data from a spreadsheet, do the following:
1. Open the return to which you want the spreadsheet imported. The K-1 Data from Spreadsheetoption is not available until a Partnership, S Corporation, or Fiduciary return is opened.
2. Select File > Import.
3. Select K-1 Data from Spreadsheet to start the K-1 Import Wizard.
4. Enter the path and filename of the template, or use Browse to locate the import file. The file musthave the Excel® .xls or .xlsx extension.
5. Click Next. The Select Type of Data dialog displays.
6. Select the type of data to be imported. The options include:
K-1 data. Imports Schedule K-1 data without rounding for Partnership, S Corporation,and Fiduciary (Interview Forms K-1 and K-2).
Ratios. Imports Schedule K-1 data without rounding for Partnership and S Corporation(Interview Form K-5).
Amount allocations. Imports Schedule K-1 data without rounding for Partnership andS Corporation (Interview Form K-4).
Chapter 4 - Import/Export Functions • 230

Schedule K overrides. Imports Schedule K Totals Overrides without rounding consistingof Interview Forms K-9 through K-11A for Partnership and Forms K-8 through K-10 forS Corporation.
K-1 footnotes. Imports Schedule K-1 footnotes for Partnership, S Corporation, andFiduciary (the Interview Form 12 for Partnership and S Corporation, Form 15 forFiduciary).
The import application checks the sheet names against the items with check boxes, disablingthose not present or with no data. For Fiduciary returns, the middle three options are alwaysdisabled. You can change the selections for any items that are valid for the tax product type.
7. Your selection on this dialog determines whether you click Finish to begin the import process orclick Next to select an additional option.
If either K-1 data or Ratios is checked, you will be prompted to specify how the data is tobe processed with existing data in the return. Click Next to display the Select Optionsdialog.
If the only items selected are some combination of the last three boxes, click Finish tobegin the data import.
8. For K-1 data or Ratios only, select whether the data being imported should match and updateexisting return data or delete and replace the return data. Click Finish to begin the data import.
9. A validation log of the import advises the status of the import. If there are no errors and you wishto proceed, click Continue Import. You can also print the summary or copy it to the Clipboard.
10. After the import is complete, a spreadsheet import log advises the results of the import. You canprint the import log or copy it to the Clipboard. Click Close to exit the validation log.
Notes:
The template layouts are streamlined and provide for all possible items for the applicable taxproduct within a single Excel® spreadsheet. A separate sheet is named by the tax product.
For the most efficient usage of the templates, we recommend beginning in Tax Preparation witha tax return file containing the K-1 data, but even without K-1 data, exporting will produce a blanktemplate with only the formatting and headers.These templates will be placed in the folderwfx32\client\K-1 Export.
Although it is not necessary, it is generally better to use the Delete and Replace option whenimporting any K-5 data.
When new partners or shareholders are added to the K-5 in Excel®, use the appropriate(Partnership or S Corporation) K-1 and Ratio ID Data template as opposed to the K-1 Data Onlyor Ratio ID Data Only template.
A ratio ID number must be entered within row 2 of the spreadsheet in order for that particularcolumn of Ratio ID data to be imported.
To see what templates are available, select Help > Help Topics > Contents > Import/Export toSpreadsheet > Spreadsheet Templates or Help > Help Topics > Index > Template.
Chapter 4 - Import/Export Functions • 231

Transferring K-1 Data to a SpreadsheetThe K-1 data sheet changes for tax year 19 to tax year 20, specific to each Tax product, are as follows:
S Corporation. S Corporation had changes to Interview Forms K-1 and K-2. To convert the K-1data sheet, do the following:
a. Use the K-1 data sheet.
b. Rename AE (Reserved) to K-1 Print Suppress.
c. Rename AQ to Form 2553 Information - Date Acquired (MMDD/YY)
d. Rename AR to Form 2553 Information - Tax Year End (MM/YY).
e. Your spreadsheet is now in the current year format.
Partnership. Partnership had changes to Interview Form K-1. To convert the K-1 data sheet, dothe following:
a. Use the K-1 data sheet.
b. Rename R (Reserved) to K-1 Print Suppress.
c. Your spreadsheet is now in the current year format.
Fiduciary. Fiduciary had no changes to Interview Form K-1.
Transferring MST Data to a SpreadsheetThe MST data sheet changes for tax year 19 to tax year 20, specific to each Tax product, are asfollows:
Corporation/S Corporation MST. There were updates for Sales and Transportation.
Import your 2019 data into a 2020 tax return. When you export, the new columns will beincluded.
Transferring Foreign Entities Data to a SpreadsheetFor tax year 19 to tax year 20, there were no changes to the Foreign Entities spreadsheets. Yourspreadsheet is now in the current year format.
Form 5471. There are no input changes to Form 5471. Your template is now in current yearformat.
Form 5472. There are no input changes to Form 5472. Your template is now in current yearformat.
Form 8865. There are no input changes to Form 8865. Your template is now in current yearformat.
Transferring Oil and Gas Data to a SpreadsheetOil and Gas do not have any changes. Your templates are now in the current year format.
Working with Fields New to 2020 FormsOnce you have completed the steps for your template, the file should be saved and imported directlyinto the 2020 return. To enter data into fields that are new to the 2020 forms, it is recommended that
Chapter 4 - Import/Export Functions • 232

you reformat the newly added columns to the appropriate data type for that field (for example,currency, decimal, date). If you export the information that you have just imported, the program insertsthe proper headings and column formats for you.
Importing Apportionment Data from MST SpreadsheetsData for Corporation, S Corporation, and Partnership returns can be imported from pre-defined CCHExcel®MST spreadsheets to the following interview forms:
MST-A and MST-A1, property factor
MST-B and MST-B1, payroll factor
MST-C and MST-C1, sales factor
MST-D, non-business income (Corporation and S Corporation)
MST-H, transportation (Corporation and S Corporation)
MST-I, insurance (Corporation and S Corporation)
Data will not be imported to the following interview forms: MST-E, MST-F, MST-G, MST-O, MST-P,MST-T, MST-T1, MST-TA, MST-TB, MST-TC, MST-TD, MST-1, MST-2, MST-3, MST-4, and MST-5.
The standard apportionment data spreadsheet templates, 20MSTC.XLS, 20MSTP.XLS, and20MSTS.XLS are located in the wfx32/SAMPLES/20 folder; the format of the spreadsheet can bereviewed there.
Forms MST-A and MST-A1 are represented by one sheet, with two columns of data per code: one forbeginning property and one for ending property. Forms MST-B and MST-B1, and MST-C and MST-C1are each represented by one sheet, with one column of data per code. Form MST-D is represented byone sheet but has two columns of data per code, one for gross amount and one for related expenses.MST-H and MST-I are each represented by one sheet, with one column of data per code.
State and city codes can be entered in any order on the spreadsheet; however, invalid state or citycodes are not imported and are listed on a Data Validation log.
MST data can be imported as often as necessary. With each import, data on existing forms is deletedand replaced by the data being imported.
The system displays a Data Validation Log when the import has been checked. If no errors exist, asummary of data checked is displayed. If errors exist, the report lists the error data type, row, andcolumn location. Data that is in error is not imported.
To import MST data from a spreadsheet:
1. Open the Corporation, S Corporation, or Partnership return to which the data will be imported.
2. Select File > Import > Apportionment Data from Spreadsheet.
3. Enter the path to the Excel® spreadsheet, or click Browse to locate the spreadsheet.
4. Click OK to begin the import. Any data on an existing MST form A, B, C, A1, B1, C1, D, H, or I, isdeleted and replaced with the information in the spreadsheet.
During import, the system also checks the spreadsheet data and displays the Spreadsheet DataValidation Log. If no errors exist, a summary of the rows of data checked is displayed. If there are
Chapter 4 - Import/Export Functions • 233
errors, the report lists the error data type, row, and column location. Data that is in error is notimported.
Select Print to print the validation log or Copy to Clipboard to copy the log to the clipboard. Tocontinue, click Continue Import or Cancel Import.
When the import process is complete, the Spreadsheet Import Log displays, listing a summary of allrows that were successfully imported from each sheet. You can select Print to print the import log,Copy to Clipboard to copy the log to the clipboard, or Close to exit the log.
Importing Data from ViewPlanUsing the CCH Client DataXchange option on the File > Import menu, you can import data fromViewPlan to an Estate (706). You can choose to do a full import of all relevant data or a partial importwhere you specify the type of data you wish to import.
You do not need to have ViewPlan installed on your computer to import files created by thoseapplications. You do need to be able to access the export file created in those programs.
Notes:
This feature requires that Microsoft® XML Parser 4.0 RTM be installed on each workstationusing this option. If the XML Parser is not installed, a message displays when you access theimport function with an option to install the Parser.
Once the import is complete, be sure to examine the data to verify that it is correct before savingthe return.
You can import as often as necessary from the same file.
To import a ViewPlan file, do the following:
1. Open the return to which you are importing data.
2. Select File > Import > CCH Client DataXchange. The Import a CCH Client DataXchange Filedialog displays.
3. Select the file you want to import and click Open. (The file type defaults to .cip, which is the onlyfile type you can import.)
The system checks the file for errors and displays the CCH Client DataXchange ImportValidation log.
4. You can do one or more of the following:
Click Continue Import.
Check the Print or Copy to Clipboard boxes to create a copy of the errors and then clickContinue Import or Cancel Import.
Click Cancel Import and review the file in ViewPlan.
Chapter 4 - Import/Export Functions • 234
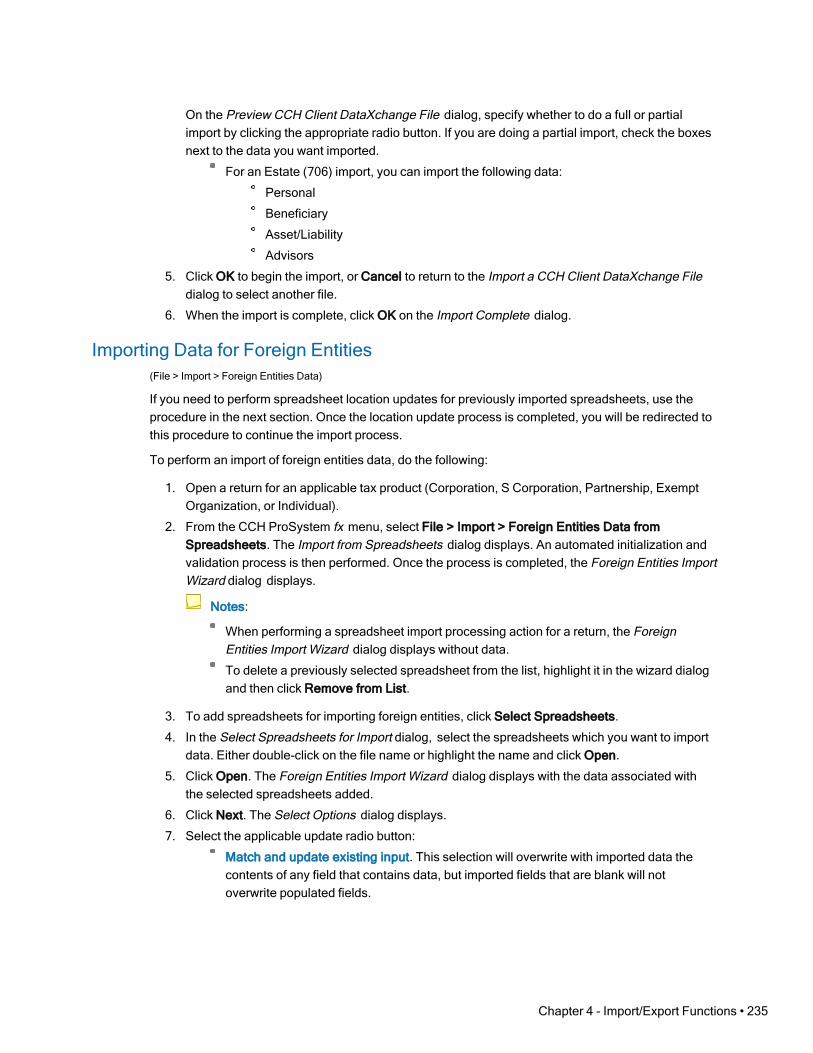
On the Preview CCH Client DataXchange File dialog, specify whether to do a full or partialimport by clicking the appropriate radio button. If you are doing a partial import, check the boxesnext to the data you want imported.
For an Estate (706) import, you can import the following data:
Personal
Beneficiary
Asset/Liability
Advisors
5. Click OK to begin the import, or Cancel to return to the Import a CCH Client DataXchange Filedialog to select another file.
6. When the import is complete, click OK on the Import Complete dialog.
Importing Data for Foreign Entities(File > Import > Foreign Entities Data)
If you need to perform spreadsheet location updates for previously imported spreadsheets, use theprocedure in the next section. Once the location update process is completed, you will be redirected tothis procedure to continue the import process.
To perform an import of foreign entities data, do the following:
1. Open a return for an applicable tax product (Corporation, S Corporation, Partnership, ExemptOrganization, or Individual).
2. From the CCH ProSystem fx menu, select File > Import > Foreign Entities Data fromSpreadsheets. The Import from Spreadsheets dialog displays. An automated initialization andvalidation process is then performed. Once the process is completed, the Foreign Entities ImportWizard dialog displays.
Notes:
When performing a spreadsheet import processing action for a return, the ForeignEntities Import Wizard dialog displays without data.
To delete a previously selected spreadsheet from the list, highlight it in the wizard dialogand then click Remove from List.
3. To add spreadsheets for importing foreign entities, click Select Spreadsheets.
4. In the Select Spreadsheets for Import dialog, select the spreadsheets which you want to importdata. Either double-click on the file name or highlight the name and click Open.
5. Click Open. The Foreign Entities Import Wizard dialog displays with the data associated withthe selected spreadsheets added.
6. Click Next. The Select Options dialog displays.
7. Select the applicable update radio button:
Match and update existing input. This selection will overwrite with imported data thecontents of any field that contains data, but imported fields that are blank will notoverwrite populated fields.
Chapter 4 - Import/Export Functions • 235

Delete applicable input, replacing with imported data. This selection overwrites allfields with imported data regardless of whether the imported field, or recipient field, isblank. Use caution when selecting this option.
Warning! The Delete applicable input, replace with imported data option will delete ALLforeign entities data previously imported into the return and will replace ALL data with theimported data.
8. Click Finish. The Spreadsheet Data Validation Log dialog displays. The messages displayed onthe dialog will help you determine whether to complete the import process. If no significantproblems are reported, then you can proceed with the import.
9. Click Continue Import. Once the import process is completed, the Spreadsheet Import Logdialog displays with the final processing result for each spreadsheet being imported.
Note: Select the Print check box to print the dialog contents. Select the Copy to Clipboardcheck box to copy the dialog contents to the clipboard.
10. Click Close.
Updating Import Spreadsheet LocationsTo update a spreadsheet’s location from which its data is to be imported, do the following:
1. With the return open in CCH ProSystem fx Tax, select File > Import > Foreign Entities Datafrom Spreadsheets from the menu. The Foreign Entities Import Wizard dialog displays.
Note: A return must have had at least one spreadsheet previously imported for the locationupdate functionality to be available for that return (the Update Spreadsheet Locationsbutton will be disabled if it is unavailable).
2. To update a spreadsheet location, click Update Spreadsheet Locations. The UpdateSpreadsheet Locations dialog displays.
Note: To remove an import spreadsheet from the list, select it and then click RemoveSelected Rows. This action can be performed at any time prior to clicking OK.
3. To change import spreadsheet drive designations, make the appropriate entries in the Old driveand New drive fields or enter the Old drive designation and then click Browse to select a Newdrive.
Notes:
The New drive field is disabled until an entry is made in the Old drive field.
Steps 3 and 4 must be repeated for each Old drive value that you want to change.
Invalid entries in either the old or new field will generate \an error message.
Chapter 4 - Import/Export Functions • 236
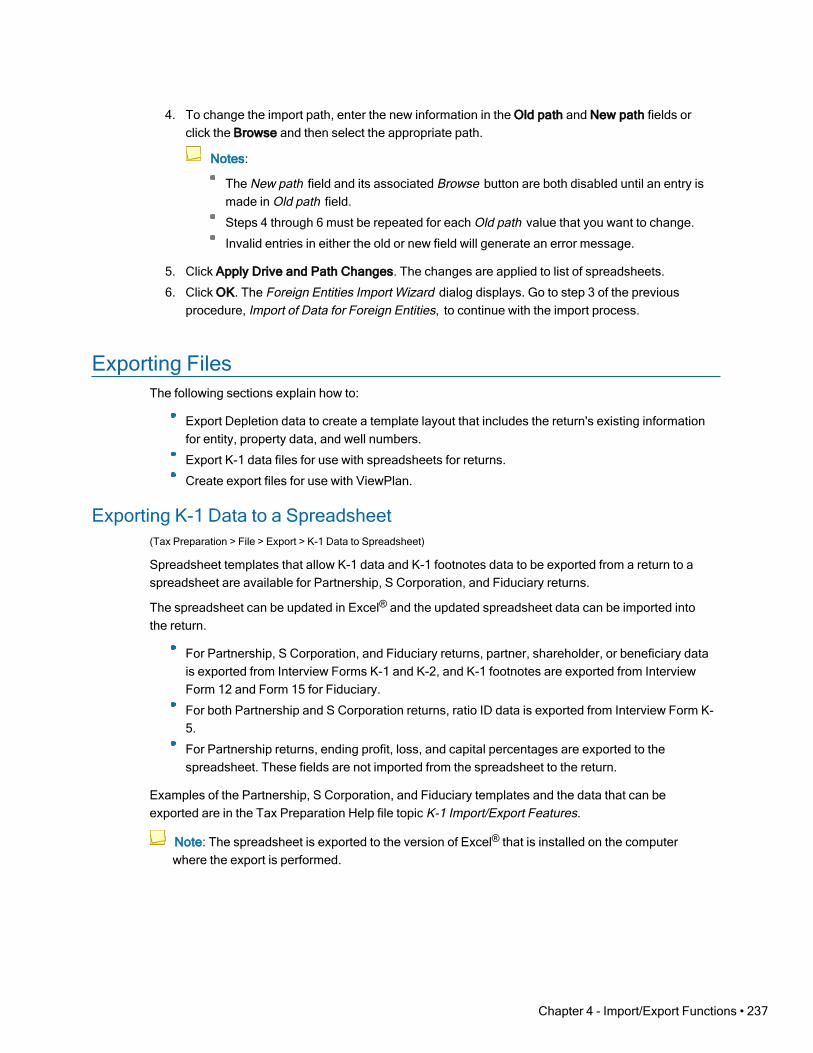
4. To change the import path, enter the new information in the Old path and New path fields orclick the Browse and then select the appropriate path.
Notes:
The New path field and its associated Browse button are both disabled until an entry ismade in Old path field.
Steps 4 through 6 must be repeated for each Old path value that you want to change.
Invalid entries in either the old or new field will generate an error message.
5. Click Apply Drive and Path Changes. The changes are applied to list of spreadsheets.
6. Click OK. The Foreign Entities Import Wizard dialog displays. Go to step 3 of the previousprocedure, Import of Data for Foreign Entities, to continue with the import process.
Exporting FilesThe following sections explain how to:
Export Depletion data to create a template layout that includes the return's existing informationfor entity, property data, and well numbers.
Export K-1 data files for use with spreadsheets for returns.
Create export files for use with ViewPlan.
Exporting K-1 Data to a Spreadsheet(Tax Preparation > File > Export > K-1 Data to Spreadsheet)
Spreadsheet templates that allow K-1 data and K-1 footnotes data to be exported from a return to aspreadsheet are available for Partnership, S Corporation, and Fiduciary returns.
The spreadsheet can be updated in Excel® and the updated spreadsheet data can be imported intothe return.
For Partnership, S Corporation, and Fiduciary returns, partner, shareholder, or beneficiary datais exported from Interview Forms K-1 and K-2, and K-1 footnotes are exported from InterviewForm 12 and Form 15 for Fiduciary.
For both Partnership and S Corporation returns, ratio ID data is exported from Interview Form K-5.
For Partnership returns, ending profit, loss, and capital percentages are exported to thespreadsheet. These fields are not imported from the spreadsheet to the return.
Examples of the Partnership, S Corporation, and Fiduciary templates and the data that can beexported are in the Tax Preparation Help file topic K-1 Import/Export Features.
Note: The spreadsheet is exported to the version of Excel® that is installed on the computerwhere the export is performed.
Chapter 4 - Import/Export Functions • 237

To export K-1 data to a spreadsheet, do the following:
1. With the return open, select File > Export.
2. Select K-1 Data to Spreadsheet.
3. Enter a file name for the spreadsheet and the path to the directory where you want to store it. Forexample, c:\partnership1.xls. (The default is c:\untitled.xls.) You can click Browse to locate adirectory and file.
4. Click Next. The Select Type of Data dialog displays.
5. Select the types of data to export.
K-1 data. Exports Schedule K-1 data without rounding for Partnership and S Corporation(Interview Forms K-1 and K-2.)
Ratios. Exports Schedule K-1 data without rounding for Partnership and S Corporation(Interview Form K-5.)
Amount allocations. Exports Schedule K-1 data without rounding for Partnership andS Corporation (Interview Form K-4.)
Schedule K overrides. Exports Schedule K Totals Overrides without rounding consistingof Interview Forms K-9 through K-11A for Partnership and Form K-8 through Form K-10for S Corporation.
K-1 footnotes. Exports Schedule K-1 footnotes for Partnership, S Corporation, andFiduciary (Interview Form 15 for Fiduciary, Form 12 for the other systems.)
The export application checks the tax product type and defaults the check box selectionsto those that are found in the return. Items not found are disabled.
For Partnership and S Corporation, all check boxes are selected.
For Fiduciary returns, the middle three options are always disabled.
You can change the selections for any items that are valid for the tax product type.
Note: The options available depend upon the type of return currently open.
6. Click Finish to confirm the export.
Notes:
Spreadsheets are exported to the version of Excel® installed on the computer where theexport is taking place. If the XLS file is exported to versions of Excel® newer thanExcel® 2003 and needs to be shared among users with Excel® 2003 installed, orimported on a computer with Excel® 2007 installed, it should be saved in the olderformat.
If rows need to be added to the spreadsheet once exported to Excel®, use the Insert >Row option. Using this option, rather than adding data to unused cells, maintains propercell and print formatting. Inserting new rows also prevents potential problems within thereturn once the data has been imported.
To see which templates are available and what they consist of, select Help > HelpTopics > Contents > Import/Export to Spreadsheet > Spreadsheet Templates or Help> Help Topics > Index > Template.
Chapter 4 - Import/Export Functions • 238

For most efficient use of the templates, we recommend beginning in Tax Preparation withthe tax return file containing the K-1 data and exporting K-1 information to the appropriatetemplate. Though more labor intensive, you can begin in Excel®, open the appropriatetemplate, enter K-1 information, save the file with a new name, and then import that newfile into a tax return. The standard template files reside in the wfx32\SAMPLES\20subdirectory.
Exporting K-1 Business Data to Returns(Tax Preparation > File > Export > K-1 Export to Other Returns)
You can export K-1 business data from the government Form K-1 to an existing return. The types ofreturns that you can export K-1 data from are as follows:
Export data fromthese types of
returns
To these types of returns
Individual Fiduciary Partnership Corporation S Corporation
S Corporation X X
Partnership X X X X X
Fiduciary X X X X X
The multiple activities of a passthrough entity can be imported as separate activities from Partnershipand S Corporation returns based on entries on Interview Form Q-3.
Warning! Some information in the actual return may not be included when you use this feature.You may need to enter some supporting statement information manually. A complete list of itemsnot included in the export is provided in the online Help system in the book K-1 Export to OtherReturns/Data not Included in K-1 Import File.
Overview of steps to transfer K-1 data
1. Select the Tax Preparation option to create export files each time the source return is calculated.Use the Preferences > Tax Return Preferences > Miscellaneous tab on the Options menu.
2. Prepare a Partnership, S Corporation, or Fiduciary tax return and enter the corresponding returnClient ID for each export file requested.
Note: Enter Client ID on Form K-1 for S Corporation, K-2 for Partnership and Fiduciary.
3. If you have not chosen to create the export file each time the source return is calculated, selectFile > Export > K-1 Export to Other Returns to create the files.
4. Open the corresponding return and import the files created for that return.
Details for each of these steps are outlined in the following section.
Chapter 4 - Import/Export Functions • 239

Before You Create K-1 Export FilesBefore attempting to create export files, verify that none of the following circumstances exists. Eachone prevents export files from being created.
Return is on Laptop. Export files are not created when the target return is checked out. Themessage Return Checked Out appears on the dialog.
No corresponding Client ID exists. Either the client has not been created or the Client ID isincorrect. The message No Related Client ID displays on the dialog.
Maximum target of 36 files per return exceeded. When 36 export files for a particular targetreturn have been created, no additional export files can be created. Import the existing files andsave the return. After you import and save the return, it is available to receive more export files.
Returns on Laptop/Center Processing. No export files are created from a source return that ischecked out on the Laptop or from a source return that has been sent to the center forprocessing.
Fiscal year P, S or F returns. No export files are created from fiscal year Partnership,S Corporation, or Fiduciary returns since the box numbers may not be the same in the targetreturn for the subsequent year.
Creating K-1 Export Files Automatically at Each CalculationA maximum of 36 export files can be created for each return. The return to which you import the filesmust not be in use. This option can be set at the user level or on a return-by-return basis.
To create the K-1 export files each time you calculate the source return, do the following:
1. In Tax Preparation, select Options > Preferences > Tax Return Preferences.
2. On the Miscellaneous Tab, check the box titled Create K-1 export files each time return iscalculated.
3. Click OK.
The export files are created automatically each time you calculate the return.
Note: To enable this option at the return level, select Create Schedule K-1 export files duringcalculation in the Export Options sections at the bottom of Interview Form 2 for each businessreturn.
Creating the K-1 Export Files by Selecting the Menu OptionTo create K-1 export files as the final step after the return has been calculated, select File > Export >K-1 Export to Other Returns before you exit the business return.
Warning! If you decide to create the export files with this method, the hard copy output of the K-1interview forms change with each calculation, but the electronic files do not change until youselect the menu option.
Chapter 4 - Import/Export Functions • 240
Preparing the Source ReturnWhile working on interview forms for the source return from which K-1 data is exported remember thefollowing:
Enter the Client ID exactly as it was entered in the target system for each export file.
Enter this ID in the Client ID field under the Export File (CCH ProSystem fx Tax Only) headingon the following forms:
Form K-2 for Partnership and Fiduciary
Form K-1 for S Corporation
You can enter data in the K-1 Activity Number and TSJ fields. These entries are required underlimited circumstances (for example, if the target return has multiple K-1s coming from thisbusiness return). The K-1 Activity Number is also required when the target return contains bothInterview Forms K-1 and K-10 relating to the same activity.
You must enter a code to request K-1 interview form output. Selections 1 through 3 apply onlywhen exporting to Individual returns. Export to Business returns always produces an export fileunless suppressed by option 4. Hard copies are not produced for export to Business returns.
Enter 1 to print a hard copy only (1040 only)
Enter 2 for an export file only (1040 only)
Enter 3 to get both a hard copy and an export file (1040 only)
Enter 4 to suppress (all systems)
To set the codes for all members, use:
Partnership Interview Form 2A, Box 60
S Corporation Interview Form 2, Box 130
Fiduciary Interview Form K-2, Box 151
To set the codes on a member-by-member basis, use the following fields:
Partnership and Fiduciary Interview Form K-2 > Export Options
S Corporation Interview Form K-1 > Export Options
For Partnerships and S Corporations passing multiple activity information, use Interview FormQ-3 to maintain the multiple activity status in the export file. This form provides for enteringmultiple activity input on an activity-by-activity and member-by-member basis.
To successfully export this information, you must enter the business return activity number, thepartner/shareholder number, and the partner/shareholder 1040 activity number.
Chapter 4 - Import/Export Functions • 241

Importing a K-1 File into a Target ReturnAfter the K-1 files are created, you can select the files to be imported into a specific tax return. Followthese steps:
1. Open the target return having the same Client ID you entered in the business return. If K-1import files exist for the return, the Import K-1 Files into the Return dialog lists the files.
Note: If there are multiple versions of the target return, the first version that opens the filereceives the import. To bring the K-1 file into another version, export the file again from thesource return. To do so, exit the return, open the source return, and select File > K-1 Exportto Other Returns. You do not have to calculate the return again.
2. Select the K-1 files to import and click Add. The files are moved to the Files selected for importbox. You can also click Add All to add all files. Click Remove to remove one or more files fromthe Files selected for import box.
3. Click OK to import the K-1 files into the open target return.
Note: If you click Cancel, no files are imported and they will be left intact.
4. After the import, the K-1 Import File Log dialog displays, listing the K-1 interview forms that wereautomatically added to the target return.
Do any or all of the following:
Click Close to exit the log.
Click Print to print the log for review.
Click Copy to Clipboard to copy the log to the clipboard for use in a word processorapplication.
If all the K-1 import file identifiers match the corresponding K-1 data in the target return, the datais merged into the existing input data for that K-1.
If the imported data items do not match the existing K-1 data, you can either let the K-1 inputforms remain as added, or print the import log to review and mark any changes to be made tothe source return from which the data had been exported.
5. Save the target return. Following a successful save, the K-1 files are deleted.
Automatic Deletion of Unimported Export FilesEach time a new export file is created from a source return, any previous export files from thatparticular return are deleted.
Chapter 4 - Import/Export Functions • 242

Exporting Apportionment Data to a Spreadsheet(Tax Preparation > File > Export > Apportionment Data to Spreadsheet)
You can export the following apportionment data to an Excel® spreadsheet for Corporation,S Corporation, and Partnership returns:
MST-A and MST-A1 MST-D
MST-B and MST-B1 MST-H
MST-C and MST-C1 MST-I
The standard spreadsheet templates, 20MSTC.XLS, 20MSTP.XLS, and 20MSTS.XLS are located inthe wfx32/SAMPLES/20 folder and their format can be reviewed there.
If the Excel® spreadsheet already exists, make sure it is closed before attempting the export.
To export apportionment data to an Excel® spreadsheet, do the following:
1. Open the return containing the data you want to export.
2. Select File > Export > Apportionment Data to Spreadsheet.
3. In the Select export file field, enter a name for the spreadsheet and a path. The default isc:\untitled.xls. You must use the Excel® .xls extension. You can use any file name and locationto store the file.
4. Click OK. If the export file already exists, you are prompted whether to overwrite the file. If youoverwrite the file, information in the file is deleted and replaced with the new data from thereturn.
Excel® export spreadsheets are created with the following sheets, depending upon the tax product:
Corporation. Beginning Property, Ending Property, Payroll, Sales, Nonbusiness,Transportation, and Insurance
S Corporation. Beginning Property, Ending Property, Payroll, Sales, Nonbusiness, andTransportation
Partnership. Beginning Property, Ending Property, Payroll, and Sales
Note: The spreadsheet is exported to the version of Excel® installed on the computer where theexport is taking place. If the spreadsheet is exported to Excel® 2007 or Excel® 2010 and must beused with Excel® 2003 installed, it should be saved in the older format.
Chapter 4 - Import/Export Functions • 243

Exporting to a CCH ProSystem fx Planning File(Tax Preparation > File > Export > Planning Export)
The type of data exported to CCH ProSystem fx Planning is controlled by entries on Interview Form 2,Box 33. Choose one of the two options listed:
1 - Plan begins with current tax year. (Default option.) Use this option when input in Tax iscompatible with CCH ProSystem fx Planning for export purposes. Option 1 exports all current-year data to the current-year column in Planning. Planning automatically carries all resultingcarryover items from the current-year column to the next-year column.
2 - Plan begins with following tax year (recurring items and carryover amounts). Use thisoption when Tax data is not compatible with CCH ProSystem fx Planning. The following itemscould be incompatible:
Most government form line overrides
Self-employment income overrides
Non-aggregated real estate professional activities
When exporting returns with this type of data to the current-year column in Planning, the current-year calculation results and corresponding carryover items to the next year will be inconsistentwith current-year results.
Tip: We recommend eliminating the current-year column in Planning and exporting directlyto the next year column.
To export to CCH ProSystem fx Planning file, do the following:
1. Choose an option on Interview Form 2 and calculate the return.
2. Select File > Export.
3. Select Planning Export.
CCH ProSystem fx Planning opens, displaying the summary grid for the new tax plan. The defaultplan configuration is used to define cases, years, column names, states, etc.
Exporting of Data for Foreign Entities(Tax Preparation > File > Export > Foreign Entities)
To perform spreadsheet location updates for data previously exported to spreadsheets, use theprocedure that follows this one. Once the location update is completed, you will be redirected to thisprocedure to continue the export process.
To perform an export of foreign entities data, do the following:
1. Open a return for an applicable tax product (Corporation, S Corporation, Partnership, ExemptOrganization, or Individual).
2. From the CCH ProSystem fx toolbar menu, select File > Export > Foreign Entities Data toSpreadsheets. The Export to Spreadsheets dialog displays. An automated initialization andvalidation process is then performed. Once the process is completed, the Foreign EntitiesExport Wizard dialog displays.
Chapter 4 - Import/Export Functions • 244

3. To change a spreadsheet on the wizard dialog, click Browse Spreadsheet. A standard browsedialog displays. If no other spreadsheets need to be changed, proceed to step 5.
4. Select the spreadsheet to which you want to export entity data. You can do this either by double-clicking on the file name or by highlighting the name and then clicking Open.
5. Clear the foreign entities for which you do not want to export data by clicking the check box tothe left of the foreign entity. Clicking Deselect All and Select All toggles adding and removing allcheck marks within the Export check box column for the entire list of entities.
6. Click Finish. The Spreadsheet Export Log dialog displays.
Note: Select the Print box to print the dialog contents.
7. Click Close.
Updating Export Spreadsheet LocationsTo update a spreadsheet’s location to which data is to be exported, do the following:
1. With the return open in CCH ProSystem fx Tax, select File > Export > Foreign Entities Data toSpreadsheets. The Foreign Entities Export Wizard dialog displays.
Note: A return must have had at least one previous export action for the location updatefunctionality to be available for that return (the Update Export Locations button will bedisabled if it is unavailable).
2. There are two methods for altering an export location:
Click Update Export Locations. The Update Export Locations dialog displays. Continuethe procedure with the next step.
Manually enter the changes for that entity in the field beneath the Export spreadsheetpath & file name column. Repeat this process for each entity requiring a spreadsheetlocation change, then go to step 7 after you complete all edits.
Note: This process occurs on the wizard grid, not on the Update Export Locations dialog.
3. To delete a row from the list of previously exported entities, highlight the row and click RemoveSelected Rows.
4. To change the export spreadsheet drive designation, make the appropriate entries in the Olddrive and New drive fields or enter the old drive designation and the click Browse to select anew drive.
Notes:
The New drive field is disabled until an entry is made in the Old drive field.
Repeat steps 3 through 6 for each Old drive value that you change.
Invalid entries in the old or new field will generate an error message.
Chapter 4 - Import/Export Functions • 245
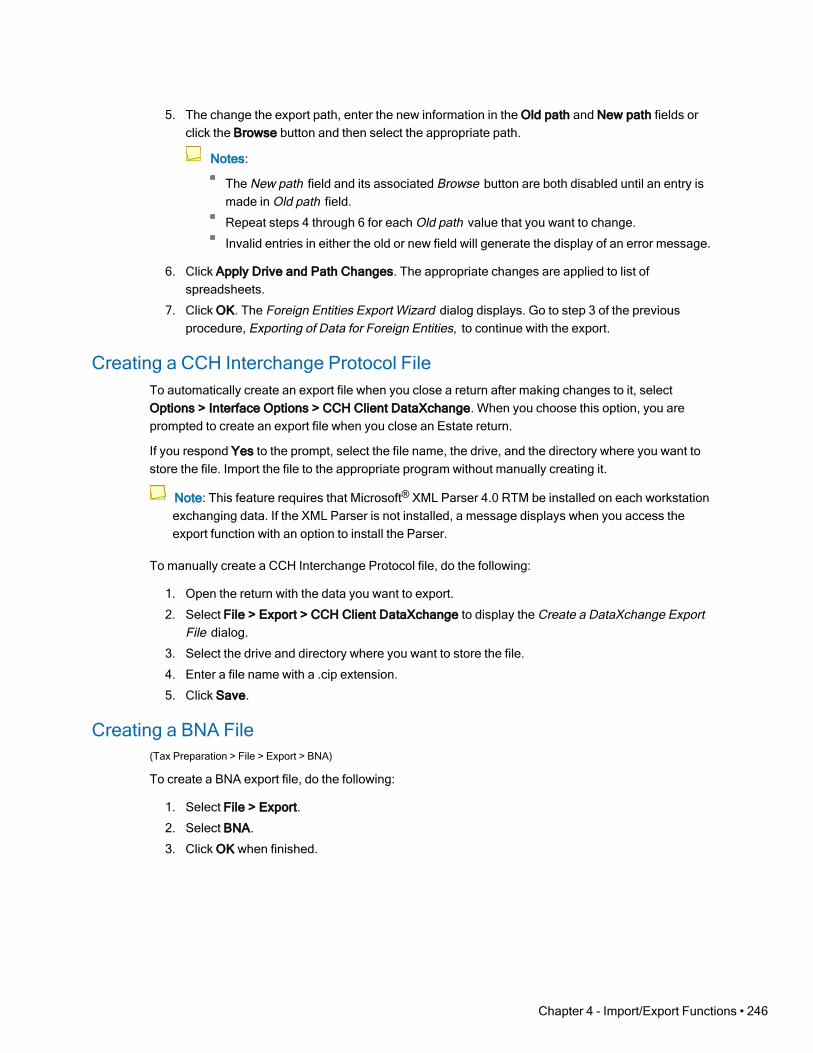
5. The change the export path, enter the new information in the Old path and New path fields orclick the Browse button and then select the appropriate path.
Notes:
The New path field and its associated Browse button are both disabled until an entry ismade in Old path field.
Repeat steps 4 through 6 for each Old path value that you want to change.
Invalid entries in either the old or new field will generate the display of an error message.
6. Click Apply Drive and Path Changes. The appropriate changes are applied to list ofspreadsheets.
7. Click OK. The Foreign Entities Export Wizard dialog displays. Go to step 3 of the previousprocedure, Exporting of Data for Foreign Entities, to continue with the export.
Creating a CCH Interchange Protocol FileTo automatically create an export file when you close a return after making changes to it, selectOptions > Interface Options > CCH Client DataXchange. When you choose this option, you areprompted to create an export file when you close an Estate return.
If you respond Yes to the prompt, select the file name, the drive, and the directory where you want tostore the file. Import the file to the appropriate program without manually creating it.
Note: This feature requires that Microsoft® XML Parser 4.0 RTM be installed on each workstationexchanging data. If the XML Parser is not installed, a message displays when you access theexport function with an option to install the Parser.
To manually create a CCH Interchange Protocol file, do the following:
1. Open the return with the data you want to export.
2. Select File > Export > CCH Client DataXchange to display the Create a DataXchange ExportFile dialog.
3. Select the drive and directory where you want to store the file.
4. Enter a file name with a .cip extension.
5. Click Save.
Creating a BNA File(Tax Preparation > File > Export > BNA)
To create a BNA export file, do the following:
1. Select File > Export.
2. Select BNA.
3. Click OK when finished.
Chapter 4 - Import/Export Functions • 246

Creating an IRS File(Tax Preparation > File > Export > Electronic Filing)
Use the File > Export > Electronic Filing menu option to create the IRS or DOL format file. If thereturn qualifies, it is ready to be authorized for release to the IRS or DOL. If a return does not qualify,the reason for disqualification appears in a diagnostic report you can display or print.
Before you create an IRS file, you must enter your electronic filing information in the CommunicationProfile of Office Manager
Creating the FileIndividual, Partnership, Corporation, S Corporation, Fiduciary, and Exempt Organization returns useInterview Forms EF-1 and EF-2 to designate a return for electronic filing. Employee Benefit Plan usesInterview Form EF-1. (If the alternative filing options have been established for the office group inOffice Manager, this is not required.)
1. Make any necessary entries on the EF series Interview Forms.
2. Calculate the return.
3. Select File > Export > Electronic Filing.
4. Select Return, Extension, New York IT-204-LL, or Report of Foreign Bank and FinancialAccounts.
Checking Return Qualification
1. Select File > Print > Preparer Reports.
2. Click Diagnostics and check View Report to view return diagnostics.
3. Click Print to print the diagnostics or click OK to close the dialog. Make changes to the return asnecessary to qualify the return. If the return qualified, the IRS file is created.
After an IRS file is created, authorize its release to the service center using the Electronic Filingapplication.
If you are using the internet to communicate, you can transmit the returns to the service center in theElectronic Filing application.
Chapter 4 - Import/Export Functions • 247

Chapter 5
Chapter 5 - Production Processing
Introduction to Production ProcessingProduction Processing provides batch production features for numerous high-volume tasks of TaxPreparation. The functions of Production Processing are as follows:
Calculate Returns. Calculate one or more returns.
Process Pro Forma. Create and print Pro Forma and create returns using Pro Forma andCenter Pro Forma.
Process Client Organizers. Create Organizer forms to be sent to clients for their use ingathering and documenting their 2021 tax facts and circumstances.
Export Estimate Reminder Letters for Email or Print. Create and send batch estimatereminder letters for all returns with vouchers due in the processing month.
Transfer Clients. Transfer Service Center Conversion returns to CCH ProSystem fx Tax.
Delete Batches. Delete batches once your processing is complete.
Returns and default returns may be password-protected. If you are required to enter the password fora specific feature, a prompt will ask you for the password.
Chapter 5 - Production Processing • 248
CHAPTER 5 - PRODUCTION PROCESSING

When you open Production Processing, the Production Processing main window displays.
Calculating Returns(Production Processing > Calculate Returns)
After you have selected the returns you want to calculate, and before calculation begins, ProductionProcessing checks for the following:
Returns currently accessed by other users or with a status of locked. The return cannot beprocessed if it is locked, or currently accessed by other users.
Password-protected. If the return is password-protected, Full and Restricted users areprompted to enter a password.
Returns requiring authorizations. If you are using an integrated installation of FX Direct andhave licensed CCH ProSystem fx Tax with PAYP (a per-return charge program), you mustauthorize the return before it can be calculated. Authorizations are not required when runningFX Direct as an independent system.
Do the following to calculate returns:
1. Click Calculate Returns to open the Calculate Returns dialog.
2. Use the drop-down lists to select a list of returns:
Tax year. The tax year defaults to 2020.
Tax product. All or a specific tax product.
Status. All or any status listed.
Last activity. All or any activity listed.
Chapter 5 - Production Processing • 249
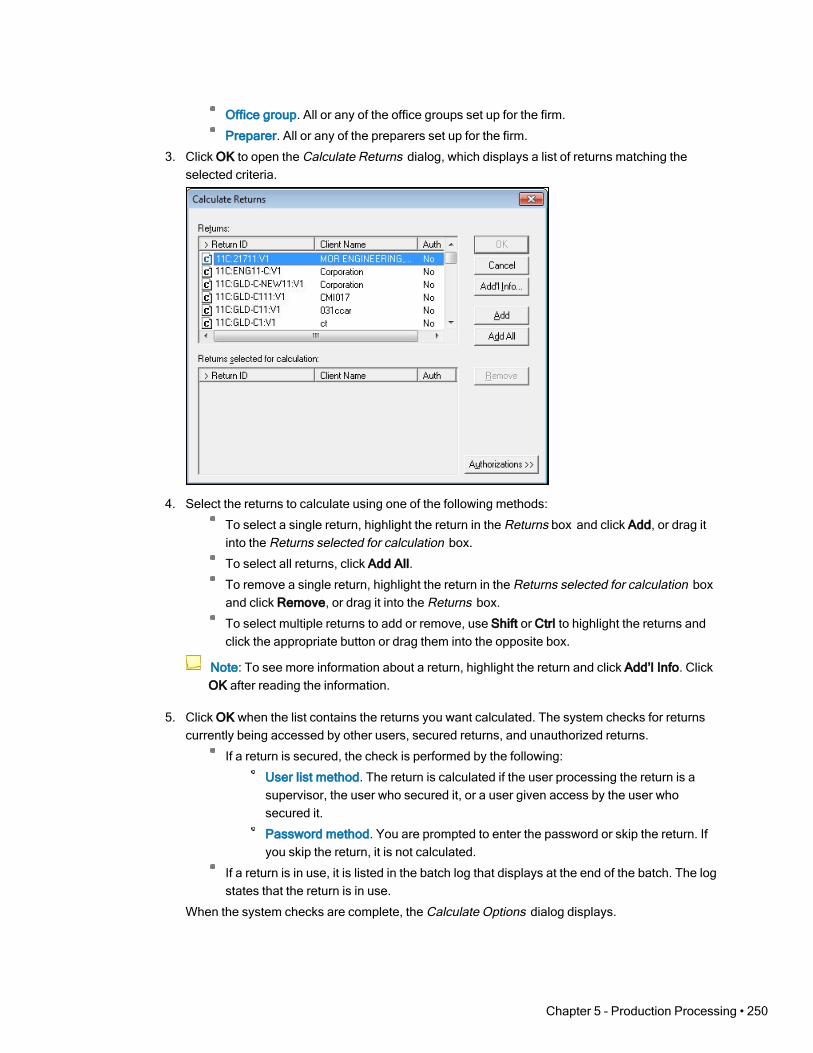
Office group. All or any of the office groups set up for the firm.
Preparer. All or any of the preparers set up for the firm.
3. Click OK to open the Calculate Returns dialog, which displays a list of returns matching theselected criteria.
4. Select the returns to calculate using one of the following methods:
To select a single return, highlight the return in the Returns box and click Add, or drag itinto the Returns selected for calculation box.
To select all returns, click Add All.
To remove a single return, highlight the return in the Returns selected for calculation boxand click Remove, or drag it into the Returns box.
To select multiple returns to add or remove, use Shift or Ctrl to highlight the returns andclick the appropriate button or drag them into the opposite box.
Note: To see more information about a return, highlight the return and click Add’l Info. ClickOK after reading the information.
5. Click OK when the list contains the returns you want calculated. The system checks for returnscurrently being accessed by other users, secured returns, and unauthorized returns.
If a return is secured, the check is performed by the following:
User list method. The return is calculated if the user processing the return is asupervisor, the user who secured it, or a user given access by the user whosecured it.
Password method. You are prompted to enter the password or skip the return. Ifyou skip the return, it is not calculated.
If a return is in use, it is listed in the batch log that displays at the end of the batch. The logstates that the return is in use.
When the system checks are complete, the Calculate Options dialog displays.
Chapter 5 - Production Processing • 250

6. Choose Local PC.
Check Save list to batch name and enter a name for the batch to save the list for additionalprocessing. For example, you may want to print the batch after you calculate it.
7. Click Calc to begin calculating. After a few seconds, the Batch Calculation dialog displays theclient and status information of the return being processed.
8. When the batch finishes or when you click Cancel, a batch log displays. You can choose fromthe following options:
Close. Closes the window without saving or printing.
Print. Prints one copy of the log and closes the open window without saving.
Copy to Clipboard. Places a copy of the log on the clipboard for later use.
Printing Returns, Forms and Labels(Production Processing > Print Returns, Forms and Labels)
Use Print Returns, Forms and Labels to batch print returns, blank forms, and labels processed inyour office or print files processed by the Service Center.
Tip: Print returns grouped together by copy type requested. For example, all returns requiring K-1transmittal letters would be one batch; all returns requiring the Accountant’s copy would beanother batch.
The following batch printing options are available:
Returns. Print one or more tax returns or prepare print files for one or more returns for any yearinstalled.
Return print files. Print one or more return print files for any year installed.
Blank forms. Print blank Government, Client Organizer, and Interview forms. Blank Organizerforms print for Individual and Fiduciary returns. The printer is the only option for the printdestination for blank forms, that is, you cannot print to a PDF.
Mailing labels. Print a batch of mailing labels.
Print returns. Not available.
Reprint returns. Not available.
Delete print files. Not available.
Setting Up a Printer(Production Processing > File > Printer Setup)
The printer setup you establish here applies to all CCH ProSystem fx applications and remains ineffect for this workstation until the setup is changed.
1. Select File > Printer Setup.
2. Choose the default Windows® printer or a specific printer to print returns, blank forms, andreports.
Chapter 5 - Production Processing • 251
3. Check Utilize True Type fonts for print processing to use Windows® fonts and not the genericCCH ProSystem fx Tax fonts. You do not have to download TrueType fonts before printing.
4. Check Use large capacity add-on printer tray when printing returns if your printer has beenconfigured to use a large capacity tray and you want to use it when printing returns. If you areusing TrueType fonts, set the tray option using the Paper tab of the Properties option.
5. To print to an installed fax, select the fax from the drop-down list in the Print to fax section.
Note: Although it is possible to configure printing to a fax, it is not a valid destination forProduction Processing.
6. To print to installed document imaging software, select the document imager from the Print todocument imager section.
Check the Installed document imager can process landscape forms box if your documentimaging software is capable of processing landscape forms. If it is not, landscape forms printedto the document imager are compressed and printed in portrait format.
7. Choose the default Windows® printer or a specific printer to print labels.
Tip: To print labels as a batch after the Accountant’s copy of the returns have finished printing,select the same printer for both documents and labels.
Printing Returns(Production Processing > Print Returns, Forms and Labels > Returns)
Use this function to print one or more tax returns processed in your office. You can batch print labelswhen printing the Accountant’s copy of tax returns or save them to a file to print at a later date. If any ofthe returns you select for printing need to be calculated, they are calculated automatically beforeprinting.
Notes:
To print labels to a separate printer, select the second printer in Printer Setup before printing.When you print returns and labels to the same printer, you are prompted to print labels when thereturns are done printing.
If you are printing returns with letters (for example, transmittal or cover letters) edited inMicrosoft®Word, the version of Word used to edit the letters must be installed on the computerfrom which you are printing.
1. Click Print Returns, Forms and Labels.
2. Choose Returns and click OK. The Print Returns dialog displays.
3. Choose the tax year of the returns.
4. Use the Batch list drop-down list to select a batch previously created during calculation, or usethe Select returns by drop-down lists to create a filtered list of returns.
5. Click OK. The Print Returns (List) dialog displays a list of returns.
Chapter 5 - Production Processing • 252
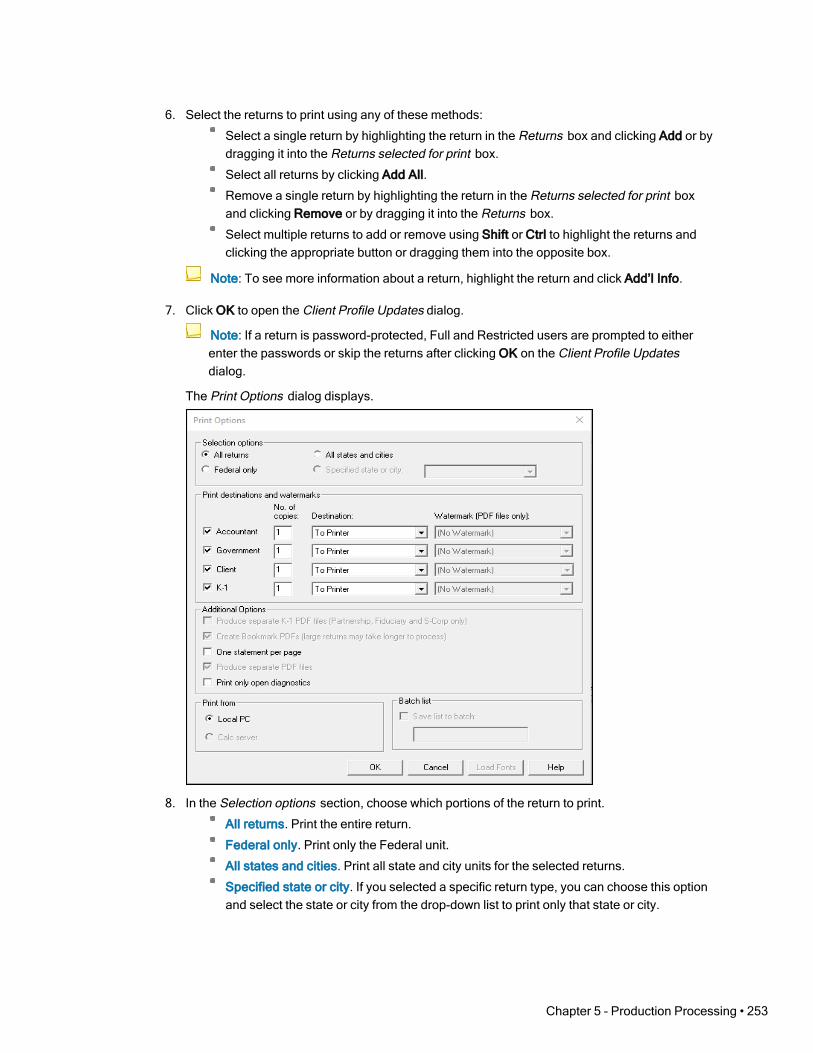
6. Select the returns to print using any of these methods:
Select a single return by highlighting the return in the Returns box and clicking Add or bydragging it into the Returns selected for print box.
Select all returns by clicking Add All.
Remove a single return by highlighting the return in the Returns selected for print boxand clicking Remove or by dragging it into the Returns box.
Select multiple returns to add or remove using Shift or Ctrl to highlight the returns andclicking the appropriate button or dragging them into the opposite box.
Note: To see more information about a return, highlight the return and click Add’l Info.
7. Click OK to open the Client Profile Updates dialog.
Note: If a return is password-protected, Full and Restricted users are prompted to eitherenter the passwords or skip the returns after clicking OK on the Client Profile Updatesdialog.
The Print Options dialog displays.
8. In the Selection options section, choose which portions of the return to print.
All returns. Print the entire return.
Federal only. Print only the Federal unit.
All states and cities. Print all state and city units for the selected returns.
Specified state or city. If you selected a specific return type, you can choose this optionand select the state or city from the drop-down list to print only that state or city.
Chapter 5 - Production Processing • 253
9. Select the type and number of copies you want to print in the Print destinations and watermarkssection.
Accountant. Includes Federal, state and city copies, diagnostics, all return lists andnotes, invoices, input listings, forms, schedules, supporting statements, reports, andlabels, if requested.
Government. Includes the Federal, state, and city copies.
Client. Includes the taxpayer copy.
K-1. Includes only the K-1 forms for S Corporation, Partnership, and Fiduciary returns.
10. Choose the print destination from the following options:
To printer. Sends returns to the designated printer for immediate printing.
To print file. Creates a print file. The Save list to batch option becomes available.
To document imager. Prints the returns to the document imager you set up in PrinterSetup.
To PDF file. Creates a PDF file.
To PDF file and to printer. Creates a PDF file and simultaneously sends the return to aprinter.
Notes:
PDF files are placed in the X:\wfx32\client\PDF\YYP directory, where Xrepresents the drive, YY equals the tax year of the returns and P equals the taxproduct. Use Windows® Explorer to copy the PDF files to a different directory forstorage purposes.
You can print only one copy of a return if you print to a document imager, PDF fileor print file. You can print multiple copies if you are printing to a printer, or PDF fileand printer.
If you select to print to PDF file, you have the option of adding a watermark.Choose a watermark from the drop-down list and click OK.
If you have already created PDF files for any of the returns you are printing, thenew files overwrite the existing files with no warning.
PDF files do not include labels, Word letters, or OLE objects.
Some printers do not support the printing of Lines 1 and 65.
If you intend to file your return via mail, do not use the Fit to Printable Area optionin the Print dialog when printing your file in Adobe® Acrobat®. Forms printedusing this option can be rejected by the IRS or state taxing authority.
When To PDF file or To PDF file and printer is selected, you have the following options:
Produce a separate PDF file for each copy (default)
Produce one PDF file for all copies
11. Choose Additional Options from the following:
Produce separate K-1 PDF files (Partnership, Fiduciary and S-Corp only). This optionprints separate K-1 packages grouped as follows: by partner for Partnership, bybeneficiary for Fiduciary, by shareholder for S Corporation.
Chapter 5 - Production Processing • 254

Create Bookmark PDFs (large returns may take longer to process).This option createsPDFs with collapsed bookmarks.
One statement per page. This option prints the return statements on separate pages.
Produce separate PDF files. When printing more than one return copy to PDF, thisoption generates separate PDF files.
Print only open diagnostics. This option only prints open diagnostics with the return.
12. When printing to a file, check the Save list to batch box to save the selected returns to a batchfile. Enter a batch name of up to eight alphanumeric characters. This batch name identifies thebatch when you are ready to process the returns.
13. In the Print from section, select Local PC to print the return from your computer. Select Calcserver to send the return to the Calc sever to be calculated then printed. This option is notavailable if you have selected to print to a document imager.
14. Click Load Fonts if necessary. This option is unavailable if using TrueType fonts.
15. Click OK. After a few seconds, the Batch Prepare/Print dialog displays the client and statusinformation. The returns selected are printed and print files are prepared and sent to a documentimager or prepared as PDF files.
If you are printing the Accountant’s copy of returns, and the same printer is selected for returnsand labels in Printer Setup, you are prompted to print a batch of labels for the returns.
16. When the batch is finished or you click Cancel, a batch log displays. Choose from the followingoptions:
Close. Closes the window without saving or printing.
Print. Prints one copy of the log and closes the open window without saving.
Copy to Clipboard. Places a copy of the log on the clipboard for later use.
Printing Return Print Files(Production Processing > Print Returns, Forms and Labels > Return print files)
Use the Return Print Files function to print one or more previously created return print files.
1. Click Print Returns, Forms and Labels.
2. Choose Return print files and click OK.
3. Choose the tax year of the returns.
4. Enter a batch list name or use the drop-down lists to select a criteria-filtered list of return printfiles.
5. Click OK to display the print files matching the criteria.
6. Select the print files to print using any of these methods:
To select a single return, highlight the return in the Returns box and click Add or drag itinto the Returns selected for print box.
To select all returns, click Add All.
To remove a single return, highlight the return in the Returns selected for print box andclick Remove or drag into the Returns box.
Chapter 5 - Production Processing • 255
To select multiple returns to add or remove, use Shift or Ctrl to highlight the returns andclick the appropriate button or drag them into the opposite box.
Note: To see more information about a return, highlight the return and click Add’l Info. ClickOK after reading the information.
7. Click OK to display the Print Options dialog.
8. Choose the print destination from the following options:
To printer. Sends return print files to the printer. The files are printed immediately andautomatically deleted. You can print multiple copies.
To document imager. Sends the print files to a document imager (if a document imageris installed and this option was selected on the Printer Setup dialog).
To PDF file. Creates a PDF file.
To PDF file and to printer. Creates a PDF file and simultaneously sends the return to aprinter.
Notes:
Printing to a PDF file is available only for tax year 2000 and later.
PDF files are placed in the wfx32\client\PDF\YYP directory, where YY equals the taxyear of the returns and P equals the tax product. You can use Windows® Explorer tocopy the PDF files to a different directory for storage purposes.
PDF files do not include labels, Word letters, or OLE objects. Some HP® printers cannotprint Lines 1 and 65.
If you have already created files for any of the returns you are printing, the new filesoverwrite existing files without warning.
If you intend to file your return via mail, do not use the Fit to Printable Area option in thePrint dialog when printing your file in Adobe® Acrobat®. Forms printed using this optioncan be rejected by the IRS or state taxing authority.
9. If you are printing to a printer, enter the number of return copies to be printed in the Number ofcopies box.
10. Click Load Fonts, if necessary. The Load Fonts option is not available if you are printing withTrueType fonts.
11. Click OK to start printing. If you click Cancel, you are returned to the Print Files (List) dialog. Thereturns you previously selected remain selected.
Note: If a return is password-protected, Full and Restricted users are prompted to eitherenter the password or skip the return after clicking OK on the Print Options dialog.
12. When the batch finishes or when you click Cancel during the batch print process, a batch logdisplays. You can choose from the following options:
Close. Closes the window without saving or printing.
Print. Prints one copy of the log and closes the open window without saving.
Copy to Clipboard. Places a copy of the log on the clipboard for later use.
Chapter 5 - Production Processing • 256

Printing Blank Government Forms(Production Processing > Print Returns, Forms and Labels > Blank forms > Government forms)
1. Click Print Returns, Forms and Labels.
2. Select Blank forms and click OK.
3. Select Government forms and click OK.
4. Select a tax year and tax product. Click OK. The Print Blank Government Forms dialog displays.
5. Select an entity (Federal or state). Only installed tax years and tax products are available forprinting. The forms available for the selected entity display in the Forms list.
6. Select the forms to print using any of these methods:
To select a single form, highlight the form in the Forms box and click Add.
To select all forms, click Add All.
To remove a single form, highlight the form in the Forms selected for print box and clickRemove.
To select multiple forms to add or remove, use Shift or Ctrl to highlight the forms andclick the appropriate button.
7. Click OK to open the Print Options dialog.
8. Choose the print destination from the following options:
To printer. Sends the selected forms to the printer.
To document imager. Send the selected forms to a document imager (if a documentimager is installed and this option was selected on the Printer Setup dialog).
9. Enter the number of copies to be printed.
10. Click Load Fonts, if necessary. The Load Fonts option is not available if you are printing withTrueType fonts.
Chapter 5 - Production Processing • 257
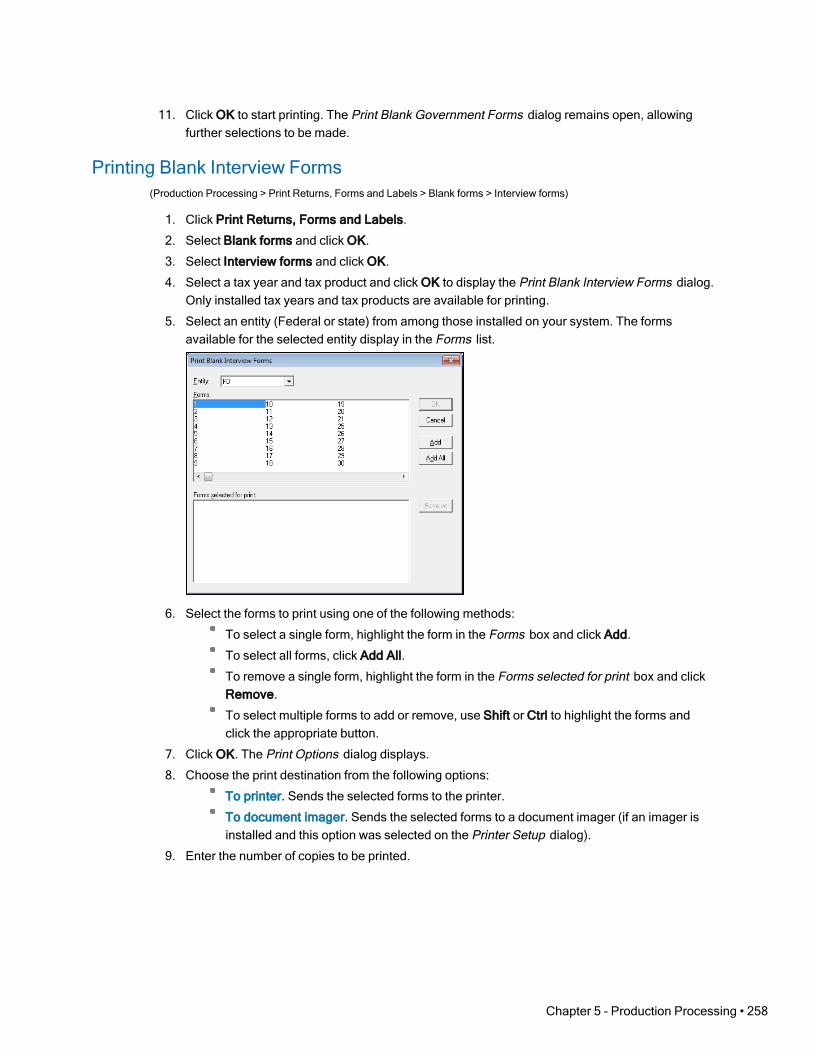
11. Click OK to start printing. The Print Blank Government Forms dialog remains open, allowingfurther selections to be made.
Printing Blank Interview Forms(Production Processing > Print Returns, Forms and Labels > Blank forms > Interview forms)
1. Click Print Returns, Forms and Labels.
2. Select Blank forms and click OK.
3. Select Interview forms and click OK.
4. Select a tax year and tax product and click OK to display the Print Blank Interview Forms dialog.Only installed tax years and tax products are available for printing.
5. Select an entity (Federal or state) from among those installed on your system. The formsavailable for the selected entity display in the Forms list.
6. Select the forms to print using one of the following methods:
To select a single form, highlight the form in the Forms box and click Add.
To select all forms, click Add All.
To remove a single form, highlight the form in the Forms selected for print box and clickRemove.
To select multiple forms to add or remove, use Shift or Ctrl to highlight the forms andclick the appropriate button.
7. Click OK. The Print Options dialog displays.
8. Choose the print destination from the following options:
To printer. Sends the selected forms to the printer.
To document imager. Sends the selected forms to a document imager (if an imager isinstalled and this option was selected on the Printer Setup dialog).
9. Enter the number of copies to be printed.
Chapter 5 - Production Processing • 258
10. Click Load Fonts, if necessary. The Load Fonts option is not available if you are printing withTrueType fonts.
11. Click OK to start printing. The Print Blank Interview Forms dialog remains open, allowing furtherselections to be made.
Printing Blank Client Organizer Forms(Production Processing > Print Returns, Forms and Labels > Blank forms > Client Organizers)
Use the following procedure to print blank Organizer forms:
1. Click Print Returns, Forms and Labels.
2. Choose Blank forms and click OK.
3. Choose Client Organizers and click OK.
4. Select the tax year.
5. Select a tax product.
6. Select the forms to print using one of the following methods:
To select a single form, highlight the form in the Client Organizers box and click Add.
To select all forms, click Add All.
To remove a single form, highlight the form in the Forms selected for print box and clickRemove.
To select multiple forms to add or remove, use Shift or Ctrl to highlight the forms andclick the appropriate button.
7. Click OK. The Print Options dialog displays.
8. Choose the print destination from the following options:
To printer. Sends the selected forms to the printer.
To document imager. Sends the selected forms to a document imager (if a documentimager is installed and this option was selected on the Printer Setup dialog).
9. Enter the number of copies to be printed.
10. Click Load Fonts if necessary. This option is unavailable if using TrueType fonts.
11. Click OK to start printing. The Print Blank Client Organizer Forms dialog remains open, allowingfurther selections to be made.
Printing Mailing Labels(Production Processing > Print Returns, Forms and Labels > Mailing labels)
Use this function to print a batch of mailing labels. You should use 8½ x 11-in., two-column 4 x 1-in.labels.
1. Click Print Returns, Forms and Labels.
2. Choose Mailing labels and click OK.
3. Select a tax year and then use the drop-down lists to select a criteria-filtered list of clients.
4. Click OK. The Print Mailing Labels (list) dialog displays the returns matching the selectedcriteria.
Chapter 5 - Production Processing • 259
5. Select the returns for which you want to print labels using any of these methods:
To select a single return, highlight the return in the Returns box and click Add or drag itinto the Returns selected for print box.
To select all returns, click Add All.
To remove a single return, highlight the return in the Returns selected for print box andclick Remove or drag it into the Returns box.
To select multiple returns to add or remove, use Shift or Ctrl to highlight the returns andclick the appropriate button or drag them into the opposite box.
Note: To see more information about a return, highlight the return and click Add’l Info. ClickOK after reading the information.
6. Click OK to open the Print Mailing Labels dialog.
7. Select whether to sequence the order of the label printing by client name or client ID.
8. Enter the number of copies, up to 99, you want of each label. Click OK to print the labels.
Processing Pro Forma(Production Processing > Process Pro Forma)
For the purposes of this section, the terms "current year" and "next year" are defined as follows:
Current year. The tax year of the return from which you are generating the Pro Forma.
Next year. The tax year for which the Pro Forma is being produced.
The Process Pro Forma function allows you to complete the following tasks:
Customize Pro Forma print options.
Create and print CCH ProSystem fx Pro Forma in your office.
Create Pro Forma for default returns.
Create returns from Pro Forma.
Before You Create and Print Pro FormaObserve the following points before you create and print Pro Forma:
To apply default return data to the returns created from Pro Forma, make sure you update yourdefault returns before recalling the Pro Forma. See Creating Pro Forma for Default Returns onpage 266 for more information.
You can set Pro Forma options for an office group in Office Manager > Configure Applications >Tax Preparation > Pro Forma Options. Review and set your Pro Forma options before creatingany Pro Forma. For complete information on Pro Forma options available in Office Manager,see Configuring Tax Preparation: Pro Forma and Organizer on page 40.
Pro Forma cannot be created for clients whose returns are in use by another user or whoseprofiles are open.
Chapter 5 - Production Processing • 260

You can convert S Corporation returns to C Corporation Pro Forma, or C Corporation returns toS Corporation Pro Forma when choosing Corporation or S Corporation returns to Pro Forma.This program is available only to licensed C Corporation and S Corporation customers.
An exception log may display at the end of your Pro Forma. This log lists any returns for whichPro Forma could not be created, as well as error information.
Customizing Pro Forma(Production Processing > Process Pro Forma > Customize Pro Forma)
The Customize Pro Forma feature lets you determine which Pro Forma forms you want to includewhen printing Pro Forma. This feature is available for all tax systems.
Note: Be sure to customize your Pro Forma before you create it; otherwise, you must recreate thePro Forma.
Use the following procedure to customize Pro Forma:
1. Select Process Pro Forma to open the Pro Forma Returns dialog.
2. Select Customize Pro Forma and click OK.
3. Select the tax year and tax product and click OK. The Customize Pro Forma dialog for the taxproduct displays.
The Entity defaults to Federal, but you can select another entity from the drop-down list of state or cityproducts installed on your system.
The center portion of the dialog shows the forms according to the Pro Forma product selected. Formost forms, the Form name column shows the Pro Forma form identification that prints in the upperleft corner of standard Pro Forma forms. The Form description is the Pro Forma form title.
The Print option column displays one of five print options for the various forms.
Chapter 5 - Production Processing • 261
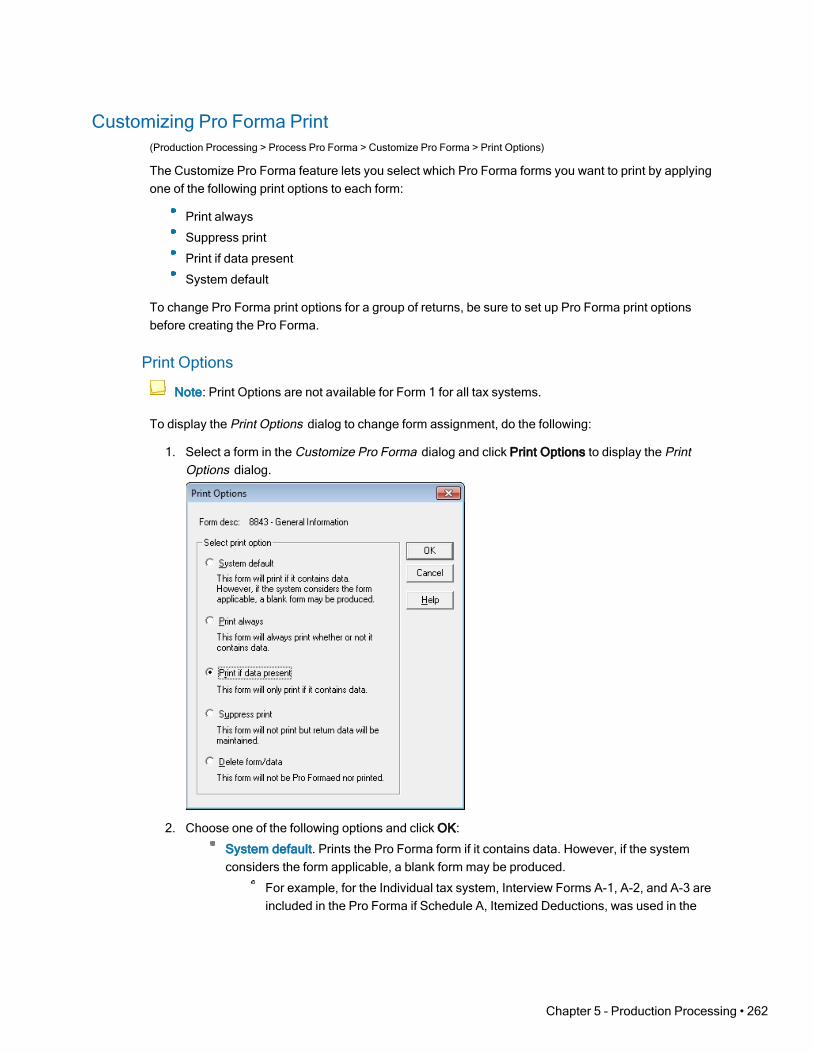
Customizing Pro Forma Print(Production Processing > Process Pro Forma > Customize Pro Forma > Print Options)
The Customize Pro Forma feature lets you select which Pro Forma forms you want to print by applyingone of the following print options to each form:
Print always
Suppress print
Print if data present
System default
To change Pro Forma print options for a group of returns, be sure to set up Pro Forma print optionsbefore creating the Pro Forma.
Print Options
Note: Print Options are not available for Form 1 for all tax systems.
To display the Print Options dialog to change form assignment, do the following:
1. Select a form in the Customize Pro Forma dialog and click Print Options to display the PrintOptions dialog.
2. Choose one of the following options and click OK:
System default. Prints the Pro Forma form if it contains data. However, if the systemconsiders the form applicable, a blank form may be produced.
For example, for the Individual tax system, Interview Forms A-1, A-2, and A-3 areincluded in the Pro Forma if Schedule A, Itemized Deductions, was used in the
Chapter 5 - Production Processing • 262
current year. These forms are also included if Schedule A was not advantageousin the current year, but there were entries on Interview Forms A-1, A-2, A-3, A-4,A-5, or A-7 or unreimbursed employee expenses from Form 2106 were includedon Schedule A.
Also, as an example, if the New York Fiduciary Interview Form NY2 was used inthe current year return, the form will be produced in next year’s Pro Forma. Itprints with applicable Pro Forma data derived from data entry or computations. Ablank NY2 prints even if no Pro Forma data is present.
Print always. Forces a Pro Forma form to print whether or not it contains data.
Print if data present. Prints the form only if there is data on the form.
Suppress print. Suppresses the printing of a Pro Forma form. The data is in thePro Forma file and can be recalled, but does not print.
Delete form/data. Prevents the form and the data in the form from being included in thePro Forma file. This option does not delete the data from the original tax return file.
Selecting Delete form/data displays one of the following messages:
For standalone forms. Gives the option to cancel your selection. If you want thedata to be recalled but not printed, use the Suppress print option instead of theDelete form/data option.
For forms with attachments. Informs you that if you confirm the delete option, allforms attached to that form are deleted as well. You cannot Pro Forma a form thatis attached to another form without its “parent” form.
For example, if you code C-1 (Sch C - Income form in the Individual tax system)as Delete form/data, all attached forms (those indented on the Pro Forma formslist after this form) are automatically coded as Delete form/data also.
For an attachment that has been marked for deletion. Explains that you mustfirst change the print code of the main form prior to changing print options ofattached forms, if the form has been attached to a form that has been marked fordeletion.
For example, if you mark Form C-1 for deletion, all forms attached to the C-1 areautomatically marked for deletion. If you later decide to print one of the attached forms, amessage informs you that you must first change the print option of the C-1.
Note: Changing the print option of the main form to something other than Deleteform/data does not automatically change the print option of the attached forms.
3. Click OK to confirm or Cancel to exit the dialog without making any changes.
Print FormPrints one copy of the form currently highlighted if Pro Forma print has been installed. You areprompted to confirm the printing.
Print TablePrints a hard copy of the custom print options for all Pro Forma forms displayed for the entity selected.You are prompted to confirm the printing.
Chapter 5 - Production Processing • 263

ResetRemoves all customized print options from the displayed list of forms and restores the default list ofprint options. You are prompted to confirm the resetting of the forms and then you are returned to theProduction Processing main window.
Creating Pro Forma(Production Processing > Process Pro Forma > Create Pro Forma)
When you create Pro Forma, you can convert current-year C Corporation returns to next-yearS Corporation returns or current-year S Corporation to next-year C Corporation returns if you haveinstalled the Corporation and S Corporation tax systems. The program converts Federal informationonly. It does not convert state information.
Warning! Customize the Pro Forma before you create it, or you will have to recreate the ProForma.
To create Pro Forma, do the following:
1. Click Process Pro Forma to open the Pro Forma Returns dialog.
2. Choose Create Pro Forma and click OK.
3. In the Pro Forma dialog, use the drop-down lists to select the filter criteria to display returns:
Tax year. Select a tax year from the drop-down list or accept the default year.
Client ID. If you are creating Pro Forma for a specific client you must enter a completeclient ID. Select a product from the Tax product drop-down list.
Tax product. Select a product from the Tax product drop-down list: Individual,Corporation, S Corporation, Partnership, Fiduciary, Employee Benefit Plan, Estate &Gift, or Exempt Organization.
Status. All, Created, or Not Created.
Office group. All or any of the office groups set up for the firm.
Preparer. All or any of the preparers set up for the firm.
4. Click OK to display a list box containing a list of returns matching the selected criteria.
Chapter 5 - Production Processing • 264

5. Select the returns for which you want to create Pro Forma using any of these methods:
To select a single return in the Returns box, highlight the return and click Add, or dragthe return into the Returns selected for Pro Forma box.
To create Pro Forma for all returns, click Add All.
To remove a single return from the Returns selected for Pro Forma box, highlight thereturn and click Remove, or drag it into the Returns box.
To select multiple returns to add or remove, use Shift or Ctrl to highlight the returns andclick the appropriate button or drag them into the opposite box.
Note: To see more information about a return, highlight it and click Add’l Info. Click OKwhen finished.
6. Click OK to open the Create Pro Forma dialog.
You can select from the following Pro Forma options:
Save list to batch. Check this box and enter up to an eight-character name to save thelist of returns to a batch file. You can select this batch when printing Pro Forma.
Use client profile data. This feature is not available with independent FX Direct.
Create all specified Pro Forma, including those suppressed on return. Causes allreturns to be pro formaed even if you have checked the box on the return to suppress ProForma creation.
Pro Forma Lists and Notes. Carries lists and notes to the next year’s return. Lists andnotes are in the same location as they were in the current year.
If you have chosen C Corporation or S Corporation returns, the following option is available:
Create S Corp Pro Forma from the selected C Corp returns. Check this box to convertall selected C Corporation returns to S Corporation Pro Forma. (If you have selectedS Corporation returns to pro forma, the box will read Create C Corp Pro Forma from theselected S Corp returns and choosing this option converts all selected returns to CCorporation Pro Forma).
7. Click Create to begin creating the Pro Forma.
Chapter 5 - Production Processing • 265

Notes:
Full and Restricted users are prompted to enter the password of any password-protected returns before any Pro Forma are created. After you enter all requestedpasswords, Pro Forma are created for the selected returns.
If any errors occur during the process, an error log lists the problem return and cause ofthe error. Click Print to send the report to your printer; Copy to Clipboard to save a copyof the log on the clipboard for later use; or Close.
Creating Pro Forma for Default Returns(Production Processing > Process Pro Forma > Pro Forma default returns)
The Pro Forma default returns function allows you to move default tax return data from one year to thenext. It is important that you perform this procedure prior to recalling your client Pro Forma files.
1. Click Process Pro Forma. The Pro Forma Returns dialog displays.
2. Choose Pro Forma default returns and click OK.
3. In the Pro Forma Default Returns dialog, use the drop-down lists to select the filter criteria, suchas Tax year or Office group, to produce a list of default returns.
4. Click OK to open the Pro Forma Default Returns (list) dialog, which lists selected default returnsin order by office group.
5. Select the default returns for Pro Forma processing using any of these methods:
To select a single default return in the Default returns box, highlight the return and clickAdd or drag the return into the Default returns selected for Pro Forma box.
To create Pro Forma for all default returns, click Add All.
To remove a single default return from the Default returns selected for Pro Forma box,highlight the return and click Remove or drag it into the Default returns box.
To select multiple default returns to add or remove, use Shift or Ctrl to highlight thereturns and click the appropriate button or drag them into the opposite box.
6. Click OK once the default returns are selected to begin the Pro Forma process.
Note: If any password-protected default returns were selected, Full and Restricted usersare prompted to enter a password for each return before any Pro Forma is created. After youenter all the passwords, the Pro Forma process continues.
Pro formaed default returns are recalled in certain situations:
You select a default return for editing in Tax Preparation.
You create a new client return in Tax Preparation and use the default return.
You select to create client returns from Pro Forma in Production Processing or TaxPreparation, and select to use the default return.
Note: You cannot print a default return Pro Forma.
Chapter 5 - Production Processing • 266

Printing Pro Forma(Production Processing > Process Pro Forma > Print Pro Forma)
Printing Pro Forma In Your OfficeRemember the following facts about printing Pro Forma in your office:
Current-year returns must be present on your system to perform Pro Forma print.
The Pro Forma Print program must be installed.
If you are not using TrueType fonts, make sure you have loaded fonts before printing Pro Forma.You can load fonts during the print process or use File > Load Fonts on the ProductionProcessing menu bar.
For printing Pro Forma, your printer must be set to 60 lines per page. The printing of Pro Formashould be considered a supervised activity to ensure the printer does not run out of paper.
Full and Restricted users must enter the passwords of any password-protected returns beforeyou can print Pro Forma for those returns.
If you are using an HP® 6P or HP® 6MP printer with the “enhanced” driver and are experiencingproblems, try using the “standard” driver. If you are using an HP® 5000 with the PCL6 driversand are experiencing problems, try using the PCL5E drivers instead. If you need assistance,visit the Customer Support Contact page at https://support.cch.com/contact.
Use the following procedure to print Pro Forma:
1. Click Process Pro Forma.
2. Choose Print Pro Forma and click OK.
3. You can use the Batch list drop-down to select a batch previously created during Pro Formacreation or use the Select returns by drop-down lists to select the criteria for a filtered list ofreturns:
Tax year. Select a tax year from the list or accept the default year.
Client ID. If you are printing Pro Forma for a specific client you must enter a complete IDand select a product from the Tax product drop-down list.
Tax product. Individual, Corporation, S Corporation, Partnership, Fiduciary, EmployeeBenefit Plan, Estate & Gift, or Exempt Organization.
Status. All, Printed, Not Printed.
Office group. All or any of the office groups set up for the firm.
Preparer. All or any of the preparers set up for the firm.
4. Click OK.
5. Select which Pro Forma to print using any of these methods:
To select a single Pro Forma in the Returns box, highlight the Pro Forma and click Addor drag it into the Returns selected for Pro Forma box.
To print all Pro Forma, click Add All.
To remove a single Pro Forma from the Returns selected for Pro Forma box, highlightthe Pro Forma and click Remove or drag it into the Returns box.
Chapter 5 - Production Processing • 267
To select multiple Pro Forma to add or remove, use Shift or Ctrl to highlight thePro Forma and click the appropriate button or drag them into the opposite box.
To view information about a Pro Forma, highlight it and click Add’l Info. Click OK whendone.
6. Click OK once you have selected your Pro Forma to print.
Note: If any password-protected returns were selected, Full and Restricted users areprompted to enter a password for each before any Pro Forma is printed. After you enter allpasswords, Pro Forma are printed for the selected returns.
7. Select to sort the printed Pro Forma by Client ID or Client name.
8. If necessary, click Load Fonts and the fonts immediately begin loading.
9. Click Print to begin printing. A processing log lists printed Pro Forma files.
10. You can copy, print, or close the processing log:
Click Close to return to Production Processing.
Click Print to print the log.
Click Copy to Clipboard to place a copy of the log onto the clipboard for later use.
Creating Returns from Pro Forma(Production Processing > Process Pro Forma > Create returns from Pro Forma)
Use the following procedure to recall data from the Pro Forma into a tax return.
Note: If any password-protected Pro Forma are selected, Full and Restricted users are promptedto enter the password for each before any returns are created.
1. Click Process Pro Forma.
2. Click Create returns from Pro Forma and click OK.
3. Select the filter criteria to display the Pro Forma from which you want to create returns. Use thedrop-down lists to select a batch list or returns:
Tax year. Select a tax year from the drop-down list or accept the default year.
Client ID. Display a specific client’s return.
Tax product. All, Individual, Corporation, S Corporation, Partnership, Fiduciary,Employee Benefit Plan, Estate & Gift, or Exempt Organization.
Office group. All or any of the office groups set up for the firm.
Preparer. All or any of the preparers set up for the firm.
4. Click OK to open the Create Returns from Pro Forma dialog, which lists those Pro Formamatching the selected criteria.
5. Select the Pro Forma from which you want to create returns using one of the following methods:
To select a single return in the Returns box, highlight the return and click Add, or dragthe return into the Returns selected for retrieval box.
To create all returns, click Add All.
Chapter 5 - Production Processing • 268
To remove a single return from the Returns selected for retrieval box, highlight the returnand click Remove, or drag it into the Returns box.
To select multiple returns to add or remove, use Shift or Ctrl to highlight the returns andclick the appropriate button or drag them into the opposite group box.
6. Once all Pro Forma have been selected, click OK to open the Create Returns Options dialog.
Check the Use default return box to apply default return data to the CCH ProSystem fxreturns to be created. If the default return and the Pro Forma both contain data for a field,the Pro Forma data is used unless otherwise indicated for your office group in OfficeManager. (See Configuring Tax Preparation: Pro Forma and Organizer on page 40 formore information.)
Note: Make sure you have updated your default returns for the year prior to creatingnew returns. See Creating Pro Forma for Default Returns on page 266 for moreinformation.
You can set Pro Forma options for an office group in Office Manager > ConfigureApplications > Tax Preparation > Pro Forma and Organizer. Review and set yourPro Forma options before creating any Pro Forma. For complete information onPro Forma options available in Office Manager, see Configuring Tax Preparation: ProForma and Organizer on page 40.
Use client profile data is not applicable to independent FX Direct.
Check the Include all applicable prior year display amounts box if you want applicableprior year amounts to display when viewing interview forms in Tax Preparation. Prior yearamounts display in interview forms that contain Prior Year columns.
7. Click Create to create the returns. The Batch Recall dialog displays processing and statusinformation. When processing is completed, the returns are available as next-year returns forediting.
Creating Returns from Center Pro Forma(Production Processing > File > Create returns from Pfx/Center Pro Forma)
Note: If password-protected Pro Forma are selected, Full and Restricted users must enter thepassword for each before any of the returns are created.
Use the following procedure to create returns from Center Pro Forma:
1. Select File > Create returns from Pfx/Center Pro Forma.
2. Use the drop-down lists to select Pro Forma:
Tax year. Select a tax year from the drop-down list or accept the default year.
Tax product. Individual, Corporation, S Corporation, Partnership, Fiduciary, EmployeeBenefit Plan, Estate & Gift, and Exempt Organization.
Data drive. The resident drive of the Center Pro Forma files.
Directory. The directory where the Pro Forma files are located displays once the drive isspecified.
3. Click OK.
Chapter 5 - Production Processing • 269

4. Select the Pro Forma you want to create returns for using one of the following methods:
To select a single Pro Forma in the Returns box, highlight the Pro Forma and click Add,or drag the return into the Returns selected for retrieval box.
To select all Pro Forma, click Add All.
To remove a single Pro Forma from the Returns selected for retrieval box, highlight thePro Forma and click Remove, or drag it into the Returns box.
To select multiple Pro Forma to add or remove, use Shift or Ctrl to highlight thePro Forma and click the appropriate button or drag them into the opposite box.
5. Use the Office group drop-down list to select an office group to assign to all of the returns youare creating.
6. To assign a preparer, use the Preparer drop- down list.
7. To assign a client ID to a return, or change the existing ID, select the return and click Client ID.
8. Click OK when the list contains the returns you want to be recalled.
9. On the Create Returns Options dialog, specify what to include by checking the boxes:
Use default return. Applies default return data to the returns. If the default return and thePro Forma both contain data for a field, the Pro Forma data is used unless otherwiseindicated for your office group in Office Manager.
Include all applicable prior year display amounts. Displays applicable prior year whenviewing interview forms in Tax Preparation. Prior year amounts display in interview formsthat contain Prior Year columns.
10. Click Create to create the returns from the Pro Forma.
Note: The system checks the Pro Forma for duplicate or missing client IDs. If duplicate IDsor returns exist in CCH ProSystem fx Tax, an Exceptions dialog displays.
The CCH ProSystem fx Tax client ID replaces the center control number as a system identifier.Therefore, when creating returns from current year center Pro Forma, the system prompts youto assign a client ID for any return which does not already have one.
Review the warning message, and then follow the Options box suggestion to resolve theexception.
Enter a unique alphanumeric client ID of up to twelve characters, or use the drop-downlists to edit the client type, or change the office group, preparer code, or return version.
Click Retry to recall the Pro Forma and create the return. If the return still cannot becreated, the Exceptions dialog displays again.
Click Skip Return to ignore the exceptions and skip the return.
Click Cancel to cancel the recall/create process and return to the Create Returns fromPfx/Center Pro Forma dialog.
Once exceptions have been resolved, or if none are found, the Batch Recall dialog displaysshowing processing and status information. Recall data is then merged for each Pro Formabeing processed. A batch log displays when processing is complete. The returns are availableas next-year returns for editing in Tax Preparation.
Chapter 5 - Production Processing • 270
Processing Client Organizers(Production Processing > Process Client Organizers)
With the Client Organizer program, licensed separately, you can complete these tasks:
Create Organizers.
Print Organizers.
For the purposes of this section the terms “current year” and “next year” are defined as follows:
Current year. The tax year of the return from which you are generating the Organizer.
Next year. The tax year of the return produced from the Organizer.
Creating Client Organizers(Production Processing > Process Client Organizers > Create Organizers)
Before You Create Client OrganizersNote these important points before creating your Organizers:
Clients whose returns have the Suppress Organizer Processing option selected in the returncan only have Organizers created if you choose to override the option on the Create ClientOrganizers dialog (see step 6 below).
Complete all Client Organizer processing before you delete current-year tax returns. Thecurrent-year tax return must be present in the system when creating and printing next year’sClient Organizers.
An exception log may display at the end of the Organizer process if errors are encountered. Thislog lists any returns for which Organizers could not be created and the reason why.
The Firm Name and Address that print on the Client Organizer (Mail/Presentation Sheet,Mail/Presentation Sheet - to preparer, and Engagement Letter) are taken from the Pro Formaand Organizer setup in Office Manager > Configure Tax Preparation. If the Organizer setup isnot available for Individual Organizers, the system looks for the Firm Name and Address onInterview Forms 13, 12, and then 3, in that order. If the Organizer setup is not available forFiduciary Organizers, the system looks for the Firm Name and Address on Interview Forms 10,9, and then 3, in that order. If no information is found on the Interview Forms, the Firm Address istaken from the Letters/Filing Instructions section of the Tax Preparation configuration for thatoffice group. If no information is found in the Letters/Filing Instruction section, the Firm Addressis taken from the Signature Block configuration for the office group. Make sure your TaxPreparation setup in Office Manager is properly configured prior to preparing next year’sOrganizers.
To create Client Organizers, do the following:
1. Click Process Client Organizers.
2. Choose Create Organizers and click OK.
Chapter 5 - Production Processing • 271
3. Select returns from which you want to create Organizers:
Tax year. Select a tax year from the list or accept the default year.
Client ID. Enter a Client ID to select a specific return.
Tax product. Select the tax product by which to filter.
Organizer status. All, Created, Not Created, Printed.
Office group. Display returns for all or a specific office group.
Preparer. Display returns for all or a specific preparer.
4. Click OK. The Create Client Organizers dialog displays returns that meet the selected criteria.
5. Select the returns for which you want to create Organizers using any of these methods:
To select an individual return, highlight the return in the Returns box and click Add ordrag it into the Returns selected for Organizer box.
To create Organizers from all returns listed, click Add All.
To remove a return from the Returns selected for Organizer list, highlight the return andclick Remove or drag it into the Returns box.
To select multiple returns to add or remove, use Shift or Ctrl to highlight the returns andclick the appropriate button or drag them into the opposite box.
Note: To see more information about a return, highlight the return and click Add’l Info. ClickOK after reading the information.
6. To include all returns whose Organizer creation was suppressed in the return, check Create allspecified Organizers, including those suppressed in the return.
7. Click OK to open the Organizer Options dialog.
Note: If any password-protected returns were selected, Full and Restricted users areprompted to enter a password for each before any Organizers are created. After you haveentered all passwords, Organizers are created for the selected returns.
8. Choose how you want to process the Organizers, and then click OK:
To save the Organizers for printing at a later time, or maintain separate Organizers fordifferent office groups or preparers, check the Save list to batch box and enter a batchname.
9. Click OK on the Organizer Processing Complete message box.
Note: If exceptions occurred during the process an error log lists the returns and errorinformation. You can close, print, or copy the error log:
Click Close to return to Production Processing.
Click Print to print the log.
Click Copy to Clipboard to place a copy of the log onto the clipboard for later use.
Chapter 5 - Production Processing • 272

Printing Client Organizers(Production Processing > Process Client Organizers > Print Organizers)
Consider the following before printing Organizers:
The current year tax return must be loaded on the system when printing next year’s ClientOrganizers.
If you are not using TrueType fonts, you must download fonts before printing Organizers. Thiscan be done during the print process itself or before printing by selecting File > Load Fonts.
If you are using an integrated installation of FX Direct and have licensed CCH ProSystem fx Taxwith PAYP (a per-return charge program), you must authorize the return before it can becalculated. Authorizations are not required when running FX Direct as an independent system.
To print Organizers, your HP® printer must be set to 60 lines per page. The printing ofOrganizers should be considered a supervised activity to ensure the printer does not run out ofpaper.
If your custom forms contain bitmaps, the resolution (dpi) of your physical printer must matchthat of the Windows® printer’s resolution. You can change your printer resolution within theProperties of your printer driver.
If you are using an HP® 6P or HP® 6MP printer with the enhanced driver and are experiencingproblems, try using the standard driver. If you are using an HP® 5000 with the PCL6 drivers andare experiencing problems, try using the PCL5E drivers instead. If you need assistance, visit theCustomer Support Contact page at https://support.cch.com/contact.
Use the following procedure to print Client Organizers:
1. Click Process Client Organizers.
2. Choose Print Organizers and click OK.
3. Select returns from the Print Organizers filter dialog:
Tax year. Select a tax year from the drop-down list or accept the default.
Client ID. Enter a complete client ID to print the Organizer for a specific client.
Tax product. Select a tax product from the drop-down list.
Office group. Select Organizers from all or a specific office group.
Preparer. Select Organizers for all or a specific preparer.
Batch list. Select a previously created batch of Organizers.
4. Click OK.
5. Select Organizers for printing using any of these methods:
To select a single Organizer from the Returns box, highlight the Organizer and click Addor drag it into the Organizers selected for print box.
To print all Organizers, click Add All.
To remove a single Organizer from the Organizers selected for print box, highlight theOrganizer and click Remove or drag it into the Returns box.
To select multiple Organizers to add or remove, use Shift or Ctrl to highlight them andclick the appropriate button or drag them into the opposite box.
Chapter 5 - Production Processing • 273

Notes:
To view more information about an Organizer, highlight the Organizer and click Add’lInfo. Click OK once you have read the information.
When selecting returns for batch printing and publishing to Portal, you are limited to1,000 returns per batch.
6. Click OK once you have selected Organizers to print.
Note: If any password-protected returns are selected, Full and Restricted users areprompted to enter a password for each before any Organizers are printed. After you enter allthe passwords, Organizers are printed for the selected returns.
7. Choose whether to sort the printed Organizers by Client ID or Client name.
8. Choose one of the following print options.
To printer. Sends the Organizers to your default printer and the files are printedimmediately.
To PDF file. Creates a PDF file. If selected, the option to print to Portal becomesavailable.
To PDF file and to printer. Creates a PDF file and simultaneously sends the Organizersto your default printer. If selected, the option to print to Portal becomes available.
Notes:
If you are licensed for Portal, you are prompted to log in with your Portalcredentials. To bypass this step, follow the instructions for Setting Up ProSystemfx Portal Login Credentials on page 102.
PDF files are created in the default path x:\wfx32\client\pdf\YY{F/I} (where x isyour local drive, YY is the tax year, and {F/I} represents Fiduciary or Individual),unless a different path has been configured in Office Manager under ConfigureApplications > Tax Preparation > Configure > Print Options > Setup >Destinations and Watermarks. See Configuring Tax Preparation: Print Options onpage 33 for more information.
To fax. The fax option is available only if a fax is installed and set up on the Printer Setupdialog.
9. If fonts have not been loaded and you are not using TrueType fonts, click Load Fonts.
10. Click OK to begin printing. When printing is finished, a processing log displays, listing returnsprocessed. Do one of the following:
Click Close to return to Production Processing.
Click Print to print the log.
Click Copy to Clipboard to place a copy of the log onto the clipboard for later use.
Chapter 5 - Production Processing • 274

Exporting Estimate Reminder Letters(Production Processing > Export Estimate Reminder Letters for Email or Print)
The exporting of estimate reminder letters is available for Individual, Corporation, S Corporation, andFiduciary returns. The letters can be batch emailed and/or printed using Microsoft®Word andMicrosoft®Outlook® or Outlook® Express. Reminder letters must first be created in Tax Preparation.
1. Click Export Estimate Reminder Letters for Email or Print on the Production Processing mainwindow. The Export Estimate Reminder Letters dialog displays.
2. Create a list of returns by selecting criteria from the following drop-down lists:
Tax year. The tax year defaults to 2020.
Tax product. Select All, Individual, Corporation, S Corporation, or Fiduciary.
Office group. Select All or any of the office groups set up for your firm.
Preparer. Select All or any of the preparers set up for your firm.
Processing Period. Select the month and year due. Only one year at a time can beprocessed.
Returns with email addresses only. If this box is checked, only returns with emailaddresses are added to the list.
3. Click OK. All returns matching the criteria display in the Export Estimate Reminder Letters (list)dialog.
Note: If no returns satisfy the criteria, a message displays “No returns found for selection.”
4. Select the returns for which you want to export estimate reminder letters using any of thesemethods:
To select a single return from the Returns box, highlight the return and click Add or dragit into the Returns selected for Export box.
To select all the returns, click Add All.
To remove a single return, highlight the return in the Returns selected for Export box andclick Remove or drag it into the Returns box.
To select multiple returns to add or remove, use Shift or Ctrl to select the returns andclick the appropriate button or drag them into the opposite box.
5. Click OK to display the Save As dialog. The file name for the batched letters defaults tommESRem.txt (where mm equals the month of the processing period for which the letters werecreated). You can change the file name if desired. The file is saved in the X:\Wfx32\Exportdirectory, where X is the drive where CCH ProSystem fx Tax is installed. You can select anotherdirectory.
6. Personalize the estimate reminder letters using Microsoft®Word.
7. Use Microsoft®Word to send printed letters or deliver reminders via email.
Use Microsoft®Word to mail merge the letters and then Microsoft®Outlook® or Outlook®
Express to transmit the letters by email.
Use Microsoft®Word to print the letters for mailing.
Chapter 5 - Production Processing • 275
Note: Refer to your respective Microsoft® user guide for details on how to perform theseoperations.
8. Click OK. After a few seconds, the Batch Email Estimate Reminder dialog displays the clientand status information of the return being processed.
9. When the batch finishes or when you click Cancel, a batch log displays. You can choose fromthe following options:
Close. Closes the window without saving or printing.
Print. Prints one copy of the log and close the open window without saving.
Copy to Clipboard. Places a copy of the log on the clipboard for later use.
Transferring Clients(Production Processing > File > Transfer Clients)
Use Transfer Clients to copy returns created through Service Center Conversion CCH ProSystem fxTax.
Tax employs client IDs having a maximum length of 12 alphanumeric characters.
The transfer process can be time consuming. During the transfer, the system completes the followingtasks:
Checks the client ID to make sure it is not a duplicate ID
Checks for data inconsistencies
Enters client information in the Tax client database
Reformats return data to CCH ProSystem fx Tax format
Transfers the security attached to a return
A password-protected return retains the same password once it is transferred into Tax. The client’sprofile and tax data are accessible only to users who know the password.
Notes on Transferring Consolidated Returns
For consolidated returns, you must enter the Tax client ID for each subsidiary return onForm CC - 1 of the consolidated return, and recalculate the return in Tax.
Do not enter a client ID for the consolidating unit.
If no version number is entered with the client ID, the first version of the return is used.
To transfer clients, do the following:
1. Select File > Transfer Clients.
2. Specify the tax year, tax product, data drive, and account number (if there is only one accountnumber, it displays) where the client files are located.
3. Click OK. A dialog containing the list of client files found in the account directory displays. TheCCH ProSystem fx return number, client ID, client name, and preparer code display.
Chapter 5 - Production Processing • 276
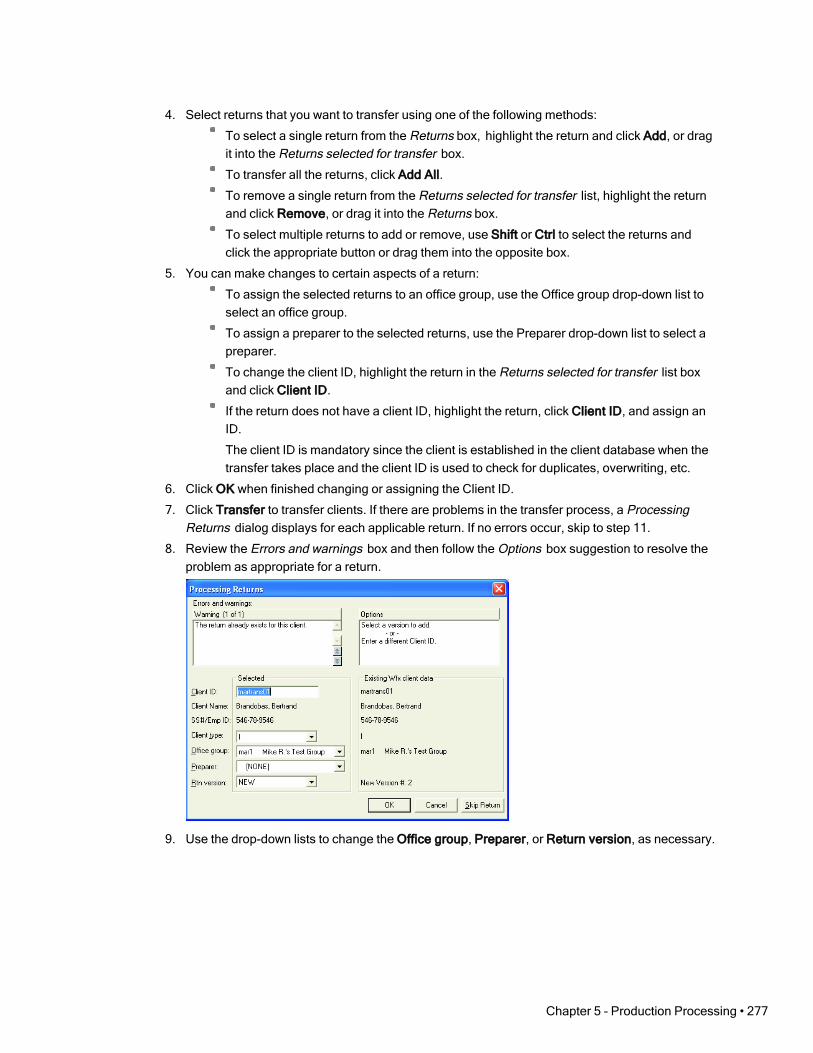
4. Select returns that you want to transfer using one of the following methods:
To select a single return from the Returns box, highlight the return and click Add, or dragit into the Returns selected for transfer box.
To transfer all the returns, click Add All.
To remove a single return from the Returns selected for transfer list, highlight the returnand click Remove, or drag it into the Returns box.
To select multiple returns to add or remove, use Shift or Ctrl to select the returns andclick the appropriate button or drag them into the opposite box.
5. You can make changes to certain aspects of a return:
To assign the selected returns to an office group, use the Office group drop-down list toselect an office group.
To assign a preparer to the selected returns, use the Preparer drop-down list to select apreparer.
To change the client ID, highlight the return in the Returns selected for transfer list boxand click Client ID.
If the return does not have a client ID, highlight the return, click Client ID, and assign anID.
The client ID is mandatory since the client is established in the client database when thetransfer takes place and the client ID is used to check for duplicates, overwriting, etc.
6. Click OK when finished changing or assigning the Client ID.
7. Click Transfer to transfer clients. If there are problems in the transfer process, a ProcessingReturns dialog displays for each applicable return. If no errors occur, skip to step 11.
8. Review the Errors and warnings box and then follow the Options box suggestion to resolve theproblem as appropriate for a return.
9. Use the drop-down lists to change the Office group, Preparer, or Return version, as necessary.
Chapter 5 - Production Processing • 277

10. To transfer the return, click OK. To go to the next return, click Skip Return. To return to theTransfer dialog, click Cancel.
11. When the batch finishes or when you click Cancel, a batch log displays. You can choose fromthe following options:
Close. Closes the window without saving or printing.
Print. Prints one copy of the log and close the open window without saving.
Copy to Clipboard. Places a copy of the log on the clipboard for later use.
Deleting Batches(Production Processing > File > Delete Batches)
To delete a batch you created for processing, do the following:
1. Select File > Delete Batches from the Production Processing main menu. The Delete Batchesdialog displays the batch type that describes the task for which the batch was created (forexample, calculating returns), the batch name, its creation date, and whether the batch hasalready been processed.
2. Select batches to delete using one of the following methods:
To select one batch, highlight the batch and click Add, or drag the selected batch into theBatches selected for delete box.
To delete all the batches, click Add All.
To remove a single batch from the Batches selected for delete list, select the batch andclick Remove, or drag it into the Batches box.
To select multiple batches to add or remove, use Shift or Ctrl to select the batches andclick the appropriate button or drag them into the opposite box.
3. Click OK to delete the selected batches immediately. You cannot cancel the deletion.
Accessing the Customer Support WebsiteThe Customer Support website can be accessed by selecting Help > CCH ProSystem fx on the Webfrom the following applications:
Tax Preparation
Office Manager
Production Processing
CCH ProSystem fx on the Web submenu options open your default web browser and take you to theCustomer Support website at https://support.cch.com. Some of the services include the following:
Account services and administration
Product and software information
Tips and answers to Frequently Asked Questions (FAQs)
Access to ordering supplies
Chapter 5 - Production Processing • 278

Tax renewal
Billing data
CCH Software News publications
Electronic filing information
Training, consulting, and online seminars
Conference information
Links to federal and state tax authorities
Support contact information
Access to our Knowledge Base
Forms release and product release schedules
Program scans
Release notes
Chapter 5 - Production Processing • 279