Enabling Approvals Management for Absence Management ...
25
Oracle HRMS Applications Enabling Approvals Management for Absence Management within Release 12 An Oracle White Paper March 2009 Author: Sid Bains
-
Upload
khangminh22 -
Category
Documents
-
view
3 -
download
0
Transcript of Enabling Approvals Management for Absence Management ...

Oracle HRMS Applications
Enabling Approvals Management for Absence Management within Release 12
An Oracle White Paper March 2009
Author: Sid Bains

Table of Contents:
Document Overview .......................................................................................................... 3 Audience.............................................................................................................................. 4 Assumptions........................................................................................................................ 5 Overview.............................................................................................................................. 6 AME Setup.......................................................................................................................... 8 AME Test Case ................................................................................................................ 17 Absence Management Function ..................................................................................... 20 Running a Real Transaction within SSHR.................................................................... 23

Document Overview The purpose of this White Paper is to illustrate how to enable Approval Management (AME) for the Absence Management (LOA) function within Self Service Human Resources (SSHR) Note: Perform the suggested changes within a test environment, only after successful testing should you promote the changes into production.
Audience This document is intended for the functional and technical person implementing the LOA functionality within SSHR for R12.

Assumptions
1. The LOA function requires uses of AME for approval. 2. The Approval is up to the first supervisor of the transaction initiator 3. The Audience understands and are aware of AME functionality 4. The Audience understands and are aware of LOA functionality.

Overview The Absences functionality enables employees or managers to enter absence-related information using a self-service interface. Users can submit and update their absence requests. In R12, by default Oracle Approvals Management (AME) is used for the LOA approval process. AME is a self-service web based application that enables users to define business rules governing the process for approving transactions. By default the AME approval level for the LOA transaction is set for the top most approver. This paper discuss a simple case of creating one level of approval using AME for the LOA transaction and testing the changes.

Key Parameters
Item Value
AME Responsibility Approvals Management Business Analyst SSHR Responsibility Employee Self-Service
AME Transaction Type Oracle Self Service Human Resources AME Condition HR_IS_LEAVE_OF_ABSENCE_SS Approval Action Requires approvals up to the first supervisor SSHR Function Leave Of Absence

AME Setup 1. Log in to the application with an apps user who has the AME responsibilities. 2. Select Approval Management Business Analyst responsibility from the Navigator.
Fig 1: Responsibility Menu 3. In the Business Analyst Dashboard page, under the Approval Process Setup select Oracle Self Service Human Resources as the transaction type from the LOV.
Fig 2: Approval Process Setup in Dashboard

4. Click on Condition Link.
Fig 3: Approval Process Setup in Dashboard 5. In the Conditions page click on ‘Create’ button.
Fig 4: Conditions Page

6. In the Setup: Conditions page, enter the following values a. Condition Type : Ordinary b. Attribute: HR_IS_LEAVE_OF_ABSENCE_SS c. Expression : is true (Note: The Value field will be rendered only when the Attribute is selected)
Fig 5: Create Condition Page 7. Once the values are entered, click on Apply. (Note if a condition with the same attribute and string value exists, then the application will throw an error to create a unique condition.)
8. Once the condition is successfully created you will get a confirmation message.
Fig 6: Condition Creation Confirmation 9. With new condition for LOA in place, make sure to remove the LOA process from the seeded AME condition and from other custom AME conditions. 10. In the Conditions Page search with Attribute as ‘Workflow’.
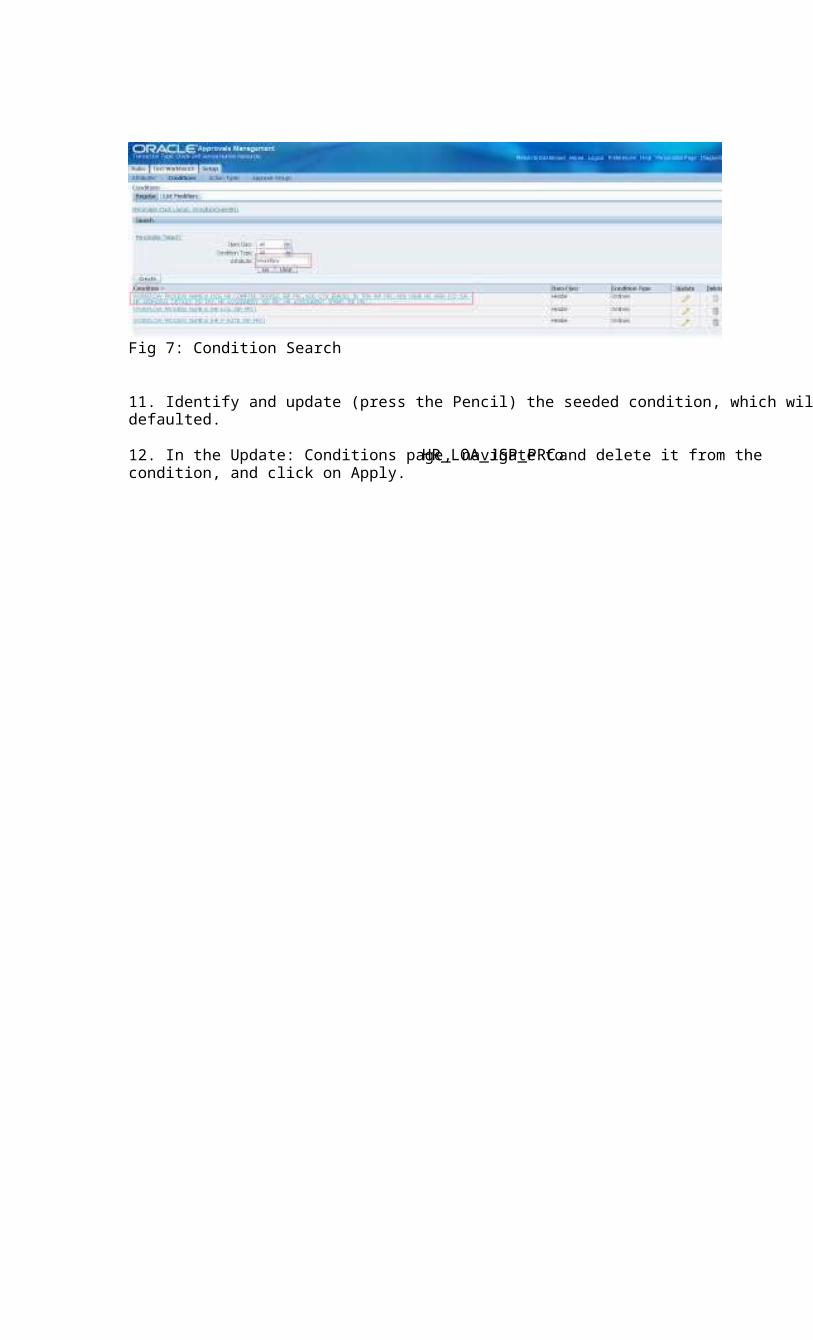
Fig 7: Condition Search 11. Identify and update (press the Pencil) the seeded condition, which will have all the process defaulted. 12. In the Update: Conditions page, navigate to HR_LOA_JSP_PRC and delete it from the condition, and click on Apply.

Fig 8: Condition Update Page Once deleted something similar will be displayed:
Fig 9: Condition Deletion Confirmation 13. Now the condition is created, the Rule has to be defined. Navigate to Rules tab or from the dashboard, after selecting the transaction type click the rules link.

Fig 10: Approval Process Setup in Dashboard 14. In the Rules page click on Create button.
Fig 11: Rules Page

15. Enter the following values and click Next in the Create New Rule page: a. Name: XX LOA HR_IS_LEAVE_OF_ABSENCE_SS b. Rule Type: List Creation c. Start Date: 06-Mar-2009 (Note, the system accepts sysdate or future date only.)
Fig 12: New Rules Detail 16. Press Next and Navigate to Add Conditions page and click on ‘Add Condition button’. 17. Search for ‘Workflow’ Attribute and select the newly created LOA condition.
Fig 13: Add Condition to Rule

18. With the respective condition selected, press Continue and proceed to Add Actions page.
Fig 14 : Add Conditions page 19. The required level of Approval can be selected here. In this example, a seeded action of ‘Require approvals up to the first superior’ is selected, for the ‘Supervisor Level’ action type.
Fig 14: Add Actions page 20. Proceed to the review page, verify the condition and the actions attached before submitting.
Fig 15: Rules Review page.

21. Once the Rule is successfully created, a confirmation will be displayed.
Fig 16: Confirmation Note, at this stage the basic requirement for changing the approval level for the LOA process is done. The following section illustrates how to test the new changes for the LOA process.

AME Test Case 1. In the Business Analyst Dashboard, select the transaction type as ‘Oracle Self Service Human Resources’ and click on the ‘Test Workbench’ link.
Fig 17: Approval Process Setup in Dashboard 2. In the Test Workbench. ‘Create’ new test case.

Fig 18 : Test Workbench page 3. In the ‘Create Test Case’ page, enter a name for the test case. 4. Navigate to ‘TRANSACTION_REQUESTOR_PERSON_ID’ field and select a person who has required level of supervisors above him. 5. Under the ‘WORKFLOW_PROCESS_NAME’ field enter the absence process name (HR_LOA_JSP_PRC).
Fig 19: New Test case page 6. Once appropriate vales are entered, select ‘Run Test Case’ button. 7. In the results page, the final processed Approver List will be provided for the selected person and process. 8. The page will also display the applicable rules for the selected combination.

Fig 20: Test Case results page

Absence Management Function 1. Using the System Administrators responsibility; Navigate to Application > Function. 2. Query the User Function Name: Absence Management
Fig 21: Form Functions, Description Tab 3. Check the Parameters under the Form tab to read: OAFunc=HR_LOA_SS&pAMETranType=SSHRMS&pAMEAppId=800&pProcessName=HR_GENERIC_APPROVAL_PRC&pItemType=HRSSA&pCalledFrom=HR_LOA_SS&pApprovalReqd=Y&pNtfSubMsg=HR_ABS_NTF_SUB_MSG&pConcAction=N

Fig 22: Form Functions, Form Tab 4. Check the HTML Call under the Web HTML Tab to read OA.jsp?page=/oracle/apps/per/selfservice/absence/webui/AbsenceHomePagePG&akRegionApplicationId=800

Fig 23: Form Functions, Web HTML Tab

Running a Real Transaction within SSHR 1. Using the responsibility Employee Self-Service; Navigate to Absence Management.
Fig 24: Responsibility Employee Self-Service 2. Press the Create Absence button to initiate a new transaction

Fig 24: Absence Management: Summary Page 3. Fill in the Absence Status, Absence Type and Duration; then press the Next Button
Fig 24: Create Absence: Enter Absence Details Page 4. On the Review Page, you can see the supervisor of the employee as the approver of the LOA transaction

Fig 25: Create Absence: Review Page