EMERGENCY CARE for Professional Responders
456
EMERGENCY CARE for Professional Responders
-
Upload
khangminh22 -
Category
Documents
-
view
2 -
download
0
Transcript of EMERGENCY CARE for Professional Responders

EMERGENCY CARE for Professional
Responders
redcross.ca/firstaid | 1-877-356-3226
shop.redcross.caShop for first aid kits, merchandise, and many safety items—for work, home, travel, or as meaningful gifts.
redcross.ca/appsDownload our Free First Aid App and have instant access to videos, interactive quizzes, and simple step-by-step advice.
redcross.ca/firstaidBecome a First Aid Instructor. Teach others invaluable skills that can help save lives.
redcross.ca/firstaidfeedbackLet us know what you think about the Red Cross course you just completed.
redcross.ca/findacourseAs well as traditional courses, Red Cross offers a variety of online health and safety courses including WHMIS, Transportation of Dangerous Goods (TDG), and more.
Red Cross First Aid. The Experience to Make a Difference.
Free Red Cross First Aid AppDownload it today!redcross.ca/apps .CA
CA
NA
DIA
N R
ED C
RO
SSEM
ERG
ENC
Y C
AR
E FOR
PRO
FESSION
AL R
ESPON
DER
S


Emergency Care for
Professional Responders

2
Copyright © 2018 The Canadian Red Cross Society
All rights reserved. No part of this publication may be reproduced, stored in a retrieval system, or transmitted, in any form or by any means—electronic, mechanical, photocopying, recording, or otherwise—without prior written permission from The Canadian Red Cross Society.
The Canadian Red Cross Society (CRCS) has made reasonable efforts to ensure the contents of this publication are accurate and reflect the latest scientific research available on the topic as of the date published. The information contained in this publication may change as new scientific research becomes available. Certain techniques described in this publication are designed for use in lifesaving situations. However, the CRCS cannot guarantee that the use of such techniques will prevent personal injury or loss of life.
Unique aspects of individual clinical situations, and the possibility of human error in preparing this text require that the reader exercise individual judgment when making a clinical decision and, if necessary, consult and compare information from other sources. The CRCS shall not be held liable for any damage arising out of human error or possible omission or inaccuracy of the information contained in this text.
All the content is provided for informational purposes only; it is meant to be used in the context of the CRCS training course on the subject, and it is not to be relied upon for any other purpose. It is the responsibility of the responder authorized to provide medical assistance to ascertain the status of each drug and/or piece of equipment, to check the product information provided by the manufacturer for any changes, and to perform skills to the level specified in his or her particular jurisdiction or scope of practice.
This publication is available in English and French.
ISBN: 978-1-58480-698-1
21 22 / 8 7 6 5
All brand names are provided (shown) as examples only. The Canadian Red Cross Society does not endorse or recommend any specific brand or company.

3
TABLE OF CONTENTS
1 The Professional Responder ............................................... 7
2 Responding to the Call ....................................................... 27
3 Infection Prevention and Control ...................................... 37
4 Anatomy and Physiology .................................................... 53
5 Assessment ........................................................................... 79
6 Airway Management and Respiratory Emergencies ......... 105
7 Circulatory Emergencies ..................................................... 141
8 Shock .................................................................................... 163
9 Hemorrhage and Soft Tissue Trauma ................................. 169
10 Musculoskeletal Injuries ...................................................... 195
11 Chest, Abdominal, and Pelvic Injuries ................................ 215
12 Head and Spinal Injuries ..................................................... 227
13 Acute and Chronic Illnesses ................................................ 247
14 Poisoning ............................................................................. 259
15 Environmental Illnesses ....................................................... 277
16 Pregnancy, Labour, and Delivery ........................................ 301
17 Special Populations ............................................................. 315
18 Crisis Intervention ............................................................... 331
19 Reaching, Lifting, and Extricating Patients ........................ 337
20 Transportation ..................................................................... 349
21 Multiple-Casualty Incidents ................................................ 357
22 Pharmacology ...................................................................... 369
23 Marine Environment ........................................................... 383
24 Workplace ............................................................................ 401
Appendix A: Abbreviations for Documentation ....................... 414
Appendix B: Sample Ambulance Equipment List ..................... 416
Appendix C: The Phonetic Alphabet ......................................... 419
Appendix D: Medical Terminology ............................................ 421
Glossary ....................................................................................... 426
Sources ........................................................................................ 446
Index ........................................................................................... 448
TAB
LE O
F C
ON
TEN
TS
3

AC
KN
OW
LED
GEM
ENTS
4
ACKNOWLEDGEMENTS
Each time a program is revised, it is built on the great work completed in the previous revisions. The Canadian Red Cross would like to recognize everyone who worked on developing these programs in the past; their work set the foundation for our success.
The Canadian Red Cross (CRC) would like to thank our Training Partners, Master Instructor Trainers, Instructor Trainers, and Instructors who provided the feedback that helped guide this revision and shape our new programs. The CRC would like to also acknowledge the Canadian Fire Service for its continued support in the development of our programs.
This revision required the hard work and dedication of many teams, who put in countless hours to contribute to its success. The CRC extends its thanks to the Canadian Council for First Aid Education (CCFAE) for its overall leadership, dedication, and direction. CCFAE members include:
Dr. Gordon Giesbrecht Dr. Morgan HillierDr. Loriann HynesDr. Andrew MacPherson Jason BrinsonRichard CzechJason DurhamDomenic Filippelli
Carolyn HoekstraLyle Karasiuk (Chair) Siobán KennedyShelly LongmoreJodie MarshallRoger MayoKyle MohlerMichael Nemeth
Tyrone PowerBob ResideMichael SkinnerDiane StoryHugo SurprenantKristopher TharrisDebbie Van’t KruisCharna Young
The Canadian Athletic Therapists Association (CATA) is pleased to endorse the
Emergency Care for Professional Responders text overall.
Parachute is pleased to endorse Chapter 12: Head and Spinal Injuries of the Emergency
Care for Professional Responders text.

THE
RED
CR
OSS
5
The Red Cross—The Fundamental PrinciplesThere are Red Cross or Red Crescent Societies in more than 190 countries around the world. In every country, our programs and activities are guided by seven Fundamental Principles. The Tanzanian Red Cross has created a short, simple version of these principles:
Humanity: We serve people, but not systems.
Impartiality: We care for the victims and the aggressors alike.
Neutrality: We take initiatives, but never take sides.
Independence: We bow to needs, but not rulers.
Voluntary Service: We work around the clock, but never for personal gain.
Unity: We have many talents, but a single idea.
Universality: We respect nations, but our work knows no bounds.
Essentially, we provide help to people in need, whatever their race, political beliefs, religion, social status, or culture.
Who We Are—The Canadian Red Cross
OUR MISSIONThe mission of the Canadian Red Cross is to improve the lives of vulnerable people by mobilizing the power of humanity in Canada and around the world.
OUR VISIONThe Canadian Red Cross is the leading humanitarian organization through which people voluntarily demonstrate their caring for others in need.
OUR VALUESOur actions and decisions are based on: • Humanitarian values. • Respect, dignity, and care for one another within and outside the Canadian Red Cross. • Integrity, accountability, effectiveness, and transparency.
OUR VOLUNTEERSVolunteers are the heart of the Canadian Red Cross. More than 25,000 Red Cross volunteers give their time and energy to help others every day.
How We Help
DISASTER MANAGEMENTThe Canadian Red Cross works with governments and with other humanitarian organizations to meet the basic needs of people affected by emergencies and disasters. We provide food, clothing, shelter, first aid, and emotional support. When families have been separated by disasters, we help bring them back together.
The Red Cross

THE
RED
CR
OSS
6
INTERNATIONAL OPERATIONSThe Canadian Red Cross works in other countries to help people who have been affected by wars and natural disasters. We bring urgently needed supplies, reunite families, and help rebuild communities. Each year, we send about 100 professional relief workers on overseas missions.
FIRST AID PROGRAMSCanadian Red Cross First Aid Programs have been training Canadians in first aid for the past 70 years. Our courses give people the knowledge and skills to deal with emergency situations and prevent injuries from happening.
SWIMMING & WATER SAFETY PROGRAMSince 1946, more than 50 million Canadians have learned how to swim and safely enjoy water activities with the Canadian Red Cross. Our Red Cross Swim programs consider each swimmer’s individual needs and offer participants of all abilities and ages (preschoolers, kids, teens, and adults) opportunities to learn swimming and water-safety skills. Teens and adults can also enjoy aquatic sports and enroll in lifeguarding courses.
RESPECT EDUCATIONSince 1984, the Canadian Red Cross has been promoting respect and preventing violence in communities across Canada and internationally. Respect Education programs promote healthier relationships and safer communities through education and partnerships.
COMMUNITY HEALTH AND WELLNESSFor more than a century, the Canadian Red Cross has provided health and wellness programming in Canadian communities. We provide in-home community services to help individuals live as independently as possible. These services enhance people’s well-being and dignity. As the Canadian population ages, there will continue to be a significant role for the Red Cross in the areas of community health and wellness. Our employees and volunteers offer important community support services that include nutrition, transportation, hospital-to-home transitions, and more.

THE
PRO
FESS
ION
AL
RES
PON
DER
1 The Professional Responder
7
Key ContentProfessional Responder Training Levels .................... 10 Preceptorship ......................... 10Medical Oversight .................. 11 Communicating with the
Medical Director .............. 11 The Professional Responder .. 12 Responsibilities .................... 13 Interpersonal Communication ................... 14Self-Care ................................. 15 Critical Incident Stress and Post-Traumatic Stress Disorder ............................ 16 Legal and Ethical Issues ......... 17 Duty to Act .......................... 17 Scope of Practice ................. 17 Abuse and Neglect .............. 18 Consent ................................ 19 Refusal of Care .................... 21 Transfer of Care ................... 21 Documentation ................... 22Communication ..................... 23Medical Terminology ............. 24
IntroductionAs a responder, you are a key part of the pre-hospital care system, also known as the emergency medical system. The pre-hospital care system is a network of professional responders with an integrated approach to providing care in an emergency situation. Your level of expertise may provide a link between the first actions of bystanders and more advanced medical care. A professional responder is a person who, in a paid or volunteer capacity, is often summoned to provide initial care during an emergency. As the first trained professional on the scene, you perform critical actions and may have a significant effect on the patient’s outcome.
Emergency Medical Responders (EMRs)According to the Paramedic Association of Canada (PAC), first responders may be included within the emergency medical responder (EMR) level, although in many settings, first responders do not transport patients.

THE
PRO
FESS
ION
AL
RES
PON
DER
8
According to PAC, the EMR “has successfully completed a recognized training program in emergency patient care and transportation.” As part of the foundation of the Canadian emergency systems, EMRs are often linked with volunteer emergency services organizations in rural and remote areas and, in some communities, they may be the sole provider of emergency services.
Responders across the country have different roles to perform, including primary and secondary assessments, the provision of safe and prudent care, effective oral and written communication, and the transport of a patient to the most appropriate healthcare facility. Responders must also learn to recognize the signs of high levels of stress in themselves and their co-workers.
Throughout your course, you will gain the knowledge, skills, and confidence to provide appropriate care and assistance when you are called to help someone who has become injured or suddenly ill. You will learn how to assess a patient’s condition and how to recognize and care for life-threatening emergencies. You will also learn how to minimize a patient’s discomfort and prevent further complications until you can obtain more advanced medical care. Finally, you will learn the importance of understanding how stress can affect you as a professional responder and learn some techniques to manage stress.
Components of a Pre-Hospital Care SystemThe pre-hospital care system, which contains Emergency Medical Services (EMS), is a network of community resources and medical personnel that provides emergency care to patients with injuries or sudden illnesses (Figure 1–1). When people recognize an emergency and take action, they activate this system. Care is provided by more highly trained professionals in succession until a patient receives the level of care required. An effective pre-hospital care system includes the following components: • Communications • Transportation • Facilities • Medical control • Trauma systems • Public information and education • Human resources, training, and continuing
education • Resource management • Regulation and policy • Evaluation
Paramedicine in CanadaPARAMEDIC ASSOCIATION OF CANADA (PAC)EMS systems throughout Canada vary by region and, in many cases, by city. In 2001, with the support of Human Resources Development Canada (now Human Resources and Skills Development Canada) and the Canadian Medical Association,
EMS Activation
Advanced Pre-Hospital
Care
Public Response
Responder Care
RehabilitationPatient(Injury/Illness)
Figure 1–1: The components of an emergency response.

THE
PRO
FESS
ION
AL
RES
PON
DER
9
PAC established the National Occupational Competency Profile (NOCP) to promote national consistency in paramedic training and practice.
Since 1988, PAC (originally The Canadian Society of Ambulance Personnel) has been the national association for paramedics. Its mandate includes the following: • Promotion of paramedic self-regulation • Promotion of a national examination • Promotion of a national registry for paramedics • Advocacy for paramedics to be included in the
Canada Health Act • Support for paramedic research through the
Canadian Emergency Health Services Research Consortium
• Stewardship of the National Occupational Competency Profile for paramedics
Though PAC was the first, other national paramedic stakeholder groups have arisen that also share several aspects of PAC’s mandate.
PARAMEDIC CHIEFS OF CANADAThe Paramedic Chiefs of Canada is a national forum for information gathering, policy development, and coordinated action by the leadership of Canada’s EMS systems. This group works under the operating mission “To advance and align EMS leadership in Canada.”1
CANADIAN ORGANIZATION OF PARAMEDIC REGULATORS (COPR)Established in 2009, COPR represents a national viewpoint on: • Education. • Operations. • Regulation. • Professional practice in paramedicine.
In 2008, paramedic regulators from across Canada began working together informally “to discuss ways to ensure compliance with the new labour mobility requirements of the Agreement on Internal Trade (AIT) that came in to effect on April 1, 2009.”2 These regulators agreed on a statement of intent that identified a strategy to achieve AIT compliance in the short term. When it was formed, the Canadian Organization of
Paramedic Regulators (COPR) received letters of support from all provincial jurisdictions, and these authorities provide the funding for COPR.
The regulators’ initial success with meeting the AIT labour mobility requirements resulted in the acknowledgement that a national organization would benefit a number of initiatives, including, but not limited to, labour mobility.
AGREEMENT ON INTERNAL TRADE (AIT)The Agreement on Internal Trade is an intergovernmental trade agreement, signed by Canadian first ministers, that came into force in 1995. Its purpose is to reduce and eliminate, to the extent possible, barriers to free movement of persons, goods, services, and investment within Canada and to establish an open, efficient, and stable domestic market.
In early 2010, regulators established COPR as a formal organization. “In addition, federal government and provincial labour mobility coordinators recognized the group’s innovation and willingness to adapt practices to succeed with labour mobility.”3
This support—coupled with the group’s desire to build upon its initial successes—led regulators to successfully apply for federal government funding to further their labour mobility work. Also, COPR submitted a set of bylaws to the federal government as part of the process for incorporation.
SOCIETY FOR PREHOSPITAL EDUCATORS IN CANADA (SPEC)The Society for Prehospital Educators in Canada (SPEC; rebranded in 2006 from the former Canadian Society of Prehospital Care Educators) is a national group of paramedic educators that “has demonstrated a keen desire to represent paramedic education on a national basis.”4
The concept of labour mobility is the freedom of workers to practise their occupation wherever opportunities exist. In 2008, with the help of Human Resources and Skills Development Canada, several provincial regulators established a national

THE
PRO
FESS
ION
AL
RES
PON
DER
10
body of paramedic regulators, whose purpose is “to address national standards within the context of labour mobility.”5
In 2009, the Canadian Organization of Paramedic Regulators was established. As a result, there is now a national perspective on education, regulation, operations, and professional practice.
PROFESSIONAL RESPONDER TRAINING LEVELS
A pre-hospital care system may utilize emergency care providers with many different levels of training.
A first responder may or may not be trained as an emergency medical responder (EMR). EMRs are often considered first responders, but other groups may be considered first responders as well.
PAC has developed occupational competency profiles at four levels of pre-hospital care training:
• Emergency Medical Responder (EMR) The EMR has successfully completed a
recognized training program in emergency patient care and transportation. Historically, EMRs have been the medical first responder in rural and remote communities. They are often associated with volunteer emergency services organizations, and may be the sole provider of emergency medical services in some communities. EMRs may be responsible for initial assessments, the provision of safe and prudent care, and the transport of a patient to the most appropriate healthcare facility.
• Primary Care Paramedic (PCP) The PCP has successfully completed
a recognized education program in paramedicine at the primary care paramedic level. PCPs may be volunteer or career paramedics associated with remote, rural, suburban, urban, industrial, air ambulance, and military services. PCPs constitute the largest group of paramedics in Canada. Controlled or delegated medical acts in the
PCP competency profile include intravenous cannulation and the administration of certain medications.
• Advanced Care Paramedic (ACP) The ACP has successfully completed
a recognized education program in paramedicine at the advanced care paramedic level. ACP education builds upon the PCP competencies, and ACPs apply their added knowledge and skills to provide enhanced levels of assessment and care. ACPs are often employed in rural, suburban, urban, industrial, and air ambulance services. Controlled or delegated medical acts in the ACP competency profile include advanced techniques to manage life-threatening problems affecting patient airway, breathing, and circulation. ACPs may implement treatment measures that are invasive and/or pharmacological in nature.
• Critical Care Paramedic (CCP) The CCP has successfully completed
a recognized education program in paramedicine at the critical care paramedic level. This is currently the highest level of paramedic certification available. CCPs are often employed in suburban, urban, and air ambulance services. CCP education builds upon the ACP competencies, and CCPs apply their added knowledge and skills to provide enhanced levels of assessment and care. Controlled or delegated medical acts in the CCP competency profile include advanced techniques, such as using invasive hemodynamic monitoring devices to manage life-threatening problems. CCPs may implement treatment measures that are invasive and/or pharmacological in nature.
PRECEPTORSHIP
Preceptorship is a relationship between an experienced responder (the preceptor) and a new responder. The preceptor serves as a coach and mentor, providing support, guidance, and assessment in the field. Preceptorship is a teaching method that is widely used by a number of

THE
PRO
FESS
ION
AL
RES
PON
DER
11
healthcare professionals within the EMS system. In some cases, the preceptor evaluates the new responder’s individual skills, confirming that he or she is demonstrating the required competencies.
By ensuring that new responders are meeting standardized minimum competency profiles, EMS providers can create consistency throughout the country, which in turn allows for portability and an appropriate standard of professional care for every patient.
WORKPLACE RESPONSE TEAMS
The pre-hospital care system is continuing to evolve as the needs of workplaces, communities, and medical systems change. For example, many businesses are seeing the benefits of establishing workplace response teams. These response teams are composed of specially trained workplace advanced first aid attendants who are responsible for attending to injuries or illnesses of employees.
COMMUNITY PARAMEDICINE
The increased demand on the medical system has also highlighted the benefits of Community Paramedics (CPs).
Community paramedicine is the delivery of healthcare services by paramedics in community-based, non-emergency-care roles. Community Paramedic programs have been successfully implemented across Canada and in countries such as the United States, the United Kingdom, New Zealand, and Australia.
CP programs provide targeted solutions for many communities, including:
• Helping to relieve overuse of the EMS systemfor social or psychological problems.
• Providing alternative means to managepatients who do not require transport toa general acute care hospital emergencydepartment.
• Helping to alleviate repetitive emergencydepartment visits and hospital readmissionsdue to gaps in care between hospitaland outpatient primary care or specialtymanagement.
• Creating the capacity for short-notice homevisits, especially during off hours.
• Alleviating primary care shortages inunderserved areas.
MEDICAL OVERSIGHT
Medical oversight may present in various forms depending on an organization’s operational, administrative, or training requirements. Physicians are the primary body providing oversight.
Medical DirectorMedical direction is a formal relationship between pre-hospital care (EMS) providers and a physician who is responsible for out-of-hospital emergency medical care. This physician is known as the medical director, and is legally responsible for the clinical and patient-care aspects of the pre-hospital (EMS) system.
The medical director provides guidance and medical oversight for all emergency care provided by EMS personnel. The medical director can also be responsible for reviewing and determining the scope of practice in a pre-hospital care (EMS) system, though in some cases this is determined by regulations or legislation. The medical director may oversee the organization’s training and quality assurance, and the development of standing orders or protocols.
COMMUNICATING WITH THE MEDICAL DIRECTORIn some systems, there is a physician on call at all times who can be consulted when additional treatment is required or a patient refuses treatment and/or transport. Contact him or her whenever you have questions about a patient’s condition that cannot be resolved by protocols.
Since the physician may not be at the emergency scene, it is up to you to present all the relevant

THE
PRO
FESS
ION
AL
RES
PON
DER
12
information clearly and concisely. Prepare yourself ahead of the call so that you are ready to provide the following information during your conversation: • Your name, unit identifier, the fact that you
are a responder, and the level of your training • The patient’s age, sex, and chief complaint • A brief, pertinent history of the events leading
to the injury or illness • Results of the patient’s assessments, including
vital signs • Any care provided to the patient and his or her
response to that care • The reason you are calling
This information is what you would relay to any other healthcare provider when giving a verbal report.
If the physician gives you orders for patient care, repeat the orders back to verify them. Make sure that you understand all of the orders and advice that the physician provides. If you have any questions, ask the physician for clarification.
Professional responders should be aware that it is possible to contact a physician from an airplane at any time, regardless of the location.
Direct or Online Medical ControlA professional pre-hospital care provider may be required to perform some skills that can only be delegated by a physician. Physicians provide medical direction within a pre-hospital care (EMS) system through a process called direct medical control. Usually, a medical director, who assumes responsibility for the care given through delegated medical acts, does this monitoring. This process allows a physician to direct the care given to patients by pre-hospital care professionals and may include direct communication with crews at the scene of a medical incident. Procedures that are not covered by standing orders require the responder to speak directly with the physician (via mobile or landline telephone or radio).
Indirect or Offline Medical ControlSince it is impossible for the medical director to be present at every medical incident outside the hospital, he or she can direct care through
predetermined standing orders or medical control protocols (MCPs). Standing orders or MCPs allow responders to provide certain types of care and treatments without consulting with the physician. This type of medical control is called indirect or offline and includes education, protocol review, and continuous improvement in the quality of care and treatments.
For a first responder or emergency medical responder, certification is not a licence to perform all the skills in the Emergency Care for Professional Responders text. Some skills should be performed only by a responder who has been delegated these responsibilities by a physician.
EMERGENCY RESPONSE SUPPORTING THE PRE-HOSPITAL CARE SYSTEM
The efficiency of the pre-hospital care system depends on the people involved performing their roles correctly and promptly. When each component of the system works effectively, this enhances the patient’s chances for a positive prognosis and recovery.
In a serious injury or illness, survival and recovery are not a matter of chance. Survival is the result of a carefully orchestrated series of procedures in which all participants fulfill their roles. The EMS system can make the difference between life and death or a positive and negative recovery. As a professional responder, you play a critical role in this system and the outcomes of patients.
THE PROFESSIONAL RESPONDER
Professional responders are made up of a wide variety of individuals who are tasked with providing medical interventions in the course of their duties. They respond to emergencies on a professional basis and have an obligation to respond to emergencies while they are on duty or when called upon.

THE
PRO
FESS
ION
AL
RES
PON
DER
13
When a person dials 9-1-1 or the local EMS number, he or she will request public safety personnel (i.e., police, fire, or ambulance personnel). However, responders do not necessarily work in public safety agencies. Any of the following may be considered professional responders if they are called to help in the event of a medical emergency: • Industrial rescue or safety personnel • Workplace first aid attendants • Disaster response team members • Emergency management personnel • Ski patrol members • Athletic therapists • Lifeguards
As a professional responder, you have a duty to respond quickly and safely to the scene of an emergency incident. Your duties include: • Assessing the patient’s condition and providing
necessary care within your professional practice designation.
• Acting as the patient’s advocate. • Ensuring that additional assistance has been
summoned. • Assisting any additional medical personnel at
the scene. • Documenting your actions.
ResponsibilitiesAs a Professional Responder who interacts with the public, you must be willing to take on additional responsibilities beyond providing care. These responsibilities require you to demonstrate certain additional characteristics.
MAINTAIN A CARING AND PROFESSIONAL ATTITUDEBe compassionate to your patients; try to understand their concerns and fears. Realize that any anger a patient may show is often the result of fear. Someone who helps at the emergency may also be afraid. Try to be reassuring. Even though a bystander may not have done everything perfectly, be sure to thank him or her for taking action and providing assistance. Recognition and praise can help affirm a person’s willingness to act. Also, be careful about what you say. Do not give distressing news about the emergency to the patient or the patient’s family or friends.
WORK COLLABORATIVELY WITH OTHER PROFESSIONALSAs a professional responder, you are part of a network of professionals working towards a common goal. You have a responsibility to work collaboratively and professionally with your colleagues, whether they are team members or staff of other agencies. Without effective communication and mutual respect between responders, patient care can be negatively impacted and your professionalism can be compromised in the eyes of those around you.
MANAGE YOUR FEARSTry not to reveal your anxieties to patients or bystanders. The presence of blood, vomit, unpleasant odours, or torn or burned skin is disturbing to most people. In some cases, you may need to take a moment to compose yourself. Focus on the patient’s needs and remember that your role is to provide professional care.
PRESENT A CLEAN AND PROFESSIONAL APPEARANCEA clean and professional appearance can help to instill confidence in patients. Representing yourself as part of a professional system will reinforce to patients that you are competent and ready to help.
KEEP YOUR SKILLS AND KNOWLEDGE UP TO DATETake part in continuing education such as reading professional journals and completing refresher training.
PARTICIPATE IN QUALITY ASSURANCE AND ENHANCEMENT PROGRAMSEach organization will participate in quality assurance and enhancement programs such as internal audits, independent reviews, ongoing professional development programs, and post-call analysis. Ensure that you are aware of your role in these important processes, as they support the effective functioning of your organization. These processes ensure that the required standards of care are achieved or surpassed, and also help to support crucial considerations such as patient confidentiality and legislative compliance.

THE
PRO
FESS
ION
AL
RES
PON
DER
14
Primary ResponsibilitiesSince you will often be the first trained professional responder to arrive on scene at emergency incidents, your primary responsibilities focus on safety and early emergency care. Your seven major responsibilities are to:
1. ENSURE YOUR OWN SAFETY. Your first responsibility is to not make the
situation worse by getting hurt yourself. By making sure the scene is safe as you approach it, you can avoid unnecessary injuries.
2. ENSURE SAFETY FOR ANY BYSTANDERS.
So long as it does not put your safety at risk, you should also prevent any harm from coming to bystanders at the scene. Keep people away from hazards, and encourage them to stay at a safe distance from the scene.
3. GAIN ACCESS TO THE PATIENT. Carefully approach the patient unless the
scene is too dangerous to handle without help. Electrical hazards, unsafe structures, and other dangers may make it difficult to reach the patient. Recognize when a rescue requires additional specially trained emergency personnel and know how to activate this response.
4. DETERMINE ANY THREATS TO THE PATIENT’S LIFE.
Assess the patient for life-threatening injuries or conditions, such as airway, breathing, or circulation emergencies.
5. REQUEST MORE ADVANCED MEDICAL CARE AS NEEDED.
Your assessment of the patient may reveal the need for more advanced medical care. Request additional support as required. You may also need to transport the patient to a medical facility (if you have the training and resources to do so).
6. PROVIDE THE NECESSARY CARE FOR THE PATIENT.
Provide appropriate care for the patient within the scope of your licence and training until you are relieved or transfer care to another person with the same or a higher level of qualification.
7. ASSIST MORE ADVANCED MEDICAL PERSONNEL.
Transfer your information about the patient and the emergency to more advanced personnel. Tell them how you found the patient, any problems or conditions you found, and the care you provided. Assist them as needed and help provide care for any other patients at the scene. When possible, try to anticipate the needs of those who are providing care.
In addition to these primary responsibilities, you have secondary responsibilities that include: • Directing bystanders. • Documenting in detail what you saw, heard,
and did at the scene. • Maintaining the confidentiality of information
about the incident, the patient(s) and bystanders, and any responders at the scene.
• Reassuring the patient’s family or friends without disclosing confidential information.
Interpersonal CommunicationMedical emergencies can be frightening to people. Be sure to speak slowly and clearly when communicating with the patient and family. Avoid technical terms that will confuse and possibly frighten them. Use language they can understand. Communicating effectively means providing information, listening actively, establishing trust, and helping the patient feel as comfortable as possible. One way to put patients at ease is to address them by name whenever possible, but you should not address an older adult by his or her first name unless invited to do so.
NONVERBAL COMMUNICATIONWhen speaking to patients, think about the message your body language sends. Try to put yourself at patients’ eye level rather than standing over them. Make eye contact.

THE
PRO
FESS
ION
AL
RES
PON
DER
15
Observe the patient when he or she speaks. Use body language that shows you are listening and open to what people are saying. For example, avoid crossing your arms or putting your hands in your pockets.
LISTENINGListen carefully to what the patient tells you. Provide reassurance if someone appears reluctant to speak about a topic. Tell the patient that any information he or she may have about the problem is important, even if it is upsetting to talk about, and remind him or her that you will keep everything you hear confidential.
Listen to what bystanders tell you. They may have seen or heard something that will help you determine how you will treat the patient. Many times, people will want to stay with the patient or watch to see what is going on. Be firm but reasonable with bystanders. Ask them to move away for the safety and comfort of everyone involved. Consider allowing a parent of a child or an immediate family member to stay, although this is not always possible.
You can also learn a lot about physical problems just by observing the patient while he or she talks. Be observant. Nonverbal communication (or body language) can convey a great deal of information. For example, if the patient can only speak a few words before needing to take a breath, he or she may be having a breathing emergency. If the patient is holding his or her stomach or clutching the chest without being aware of it, this might give an indication about the patient’s condition. A person who winces should be questioned about any pain.
From the patient’s perspective, nothing is more annoying than being ignored or not having focus on their complaint. Consider the last time you had to repeat information to someone several times; it is not a pleasant experience. Listening to patients allows them to realize that they are important. If you ask someone a question, listen for the answer. If necessary, make notes so you do not forget what the patient said. Sometimes, the patient may stop answering your questions altogether if he or she feels ignored.
LANGUAGE BARRIERSIf you are called to care for someone who does not speak a language that you understand, call for someone who can translate. For example, a family member or neighbour may be able to speak both your language and the patient’s language. This is true for sign language as well. There may also be translation resources available through dispatch centres to assist you.
CULTURAL AND RELIGIOUS CONSIDERATIONS Be respectful and sensitive of cultural and religious traditions specific to each patient. In some cultures or religions, for example, it may be inappropriate to make eye contact or for someone of a different gender to help the patient. Respect your patient’s wishes and do what you can to help. Ask for help with cultural translation if necessary when providing care for patients with obviously different cultural backgrounds.
Some communities have specialized response groups that provide emergency care for particular ethnic, cultural, or religious groups. These response groups may be separate from the EMS system, or they may be fully integrated. Be familiar with specialized response groups in the community, and do your best to accommodate their participation.
SELF-CARE
Given the nature of the work that responders do, they are exposed to vicarious and traumatic stress. Self-care is an important part of staying healthy—both physically and mentally. The Canadian Red Cross offers programs that help professional responders develop self-care plans in support of their psychosocial health.
Elements of self-care include: • Maintaining a healthy diet by eating sensibly
and regularly.• Getting adequate sleep.• Engaging in regular exercise.• Participating in activities outside of work
(hobbies).

THE
PRO
FESS
ION
AL
RES
PON
DER
16
• Paying attention to your stress level, and taking precautions against exceeding your own limits.
• Understanding how you react to stressful situations and having a self-care plan outlining protective systems that you can rely on when in distress.
If you can, try to diversify your own tasks at work. A change can make a difference in both personal engagement and stress management. Some general things you can do to maintain self-care at work include: • Taking breaks during your workday. • Taking vacation days. • Using relaxation techniques (e.g., deep
breathing). • Talking with colleagues about how your work
affects you. • Seeking or establishing a professional support
group. • Setting limits with patients and colleagues.
Job stresses can adversely affect your health. Exercise and diet can help you manage physical, mental, and emotional stress. Developing a fitness plan and having regular checkups with your physician will help you maintain the physical and mental capabilities necessary for your duties. You should also identify the risk factors in your life so that you can take steps to mitigate them.
Self-care is important at all stages of your career as a professional responder. Ignoring self-care can put you at greater risk of developing a serious occupational stress injury such as post-traumatic stress disorder (PTSD). Self-care is specific to each individual. What works for another person may not work for you.
Death and DyingYou may be summoned to an emergency in which one or more people have died or are dying. Although your responses will vary according to the situation, you must recognize that death will have an emotional impact on you, as well as on others who are involved. Be prepared to interpret your feelings responsibly and be considerate of
the feelings of others. Remember that reactions to death and dying can be dramatically different from person to person and from situation to situation.
Critical Incident Stress and Post-Traumatic Stress DisorderFor years, researchers have recognized that individuals who provide emergency care can experience high levels of stress. Incidents involving multiple patients, rescues, children, failed resuscitation attempts, serious injury to co-workers, or death may cause more stress than most other incidents.
Any emergency response, regardless of the circumstances, can cause an adverse stress reaction such as critical incident stress (CIS). Occupational stress injuries can happen to anyone involved in responding to an emergency (Figure 1–2). They could be characterized as acute and chronic versions of a similar condition: Signs and symptoms of CIS usually appear soon after the event, but may not last long. PTSD usually occurs later and can be much more long-lasting.
From the time you begin to establish a rapport with a patient, you become involved in that person’s pain and stress. To some degree, you share the thoughts and emotions of that person. As a result, the emotional impact of a situation may be too great for you to handle alone. You may need the help of professional mental health services in order to deal with the stress.
Figure 1–2: Watch for the signs of CIS and PTSD.

THE
PRO
FESS
ION
AL
RES
PON
DER
17
CIS can cause a number of signs and symptoms, including the following:
• Confusion• Lowered attention span• Poor concentration• Denial• Guilt• Depression• Anger• Change in interactions with others• Increased or decreased appetite• Uncharacteristic, excessive humour or silence• Unusual behaviour
PTSD is a serious anxiety disorder. Trauma is a natural emotional reaction to disturbing experiences that involve actual or threatened serious harm to oneself or others. However, for some people, the thoughts or memories of these events seriously affect their lives long after any real danger has passed.
PTSD usually appears within 3 months of the event, but sometimes symptoms may not appear for years. Common symptoms include reliving the event, avoiding reminders of the event, and a constant feeling of dread. PTSD can also present with physical symptoms such as difficulties concentrating and/or sleeping, sudden attacks of dizziness, rapid heartbeat, and shortness of breath.
In addition to being alert to your own mental and emotional states, you should watch for the signs and symptoms of distress in your colleagues.
People can recover from PTSD, but the recovery time varies greatly from person to person. All treatment approaches should follow the stages of the trauma therapy model and can include a combination of counselling, therapy, and medication.
Some people think that participating in counselling is an admission of weakness, but it takes more strength to face something than to hide from it. The most important thing you can do to minimize the effect that an emergency will have on you is to know your protective factors and have a self-care plan. Ensure that you are aware of the resources that are available through your organization.
LEGAL AND ETHICAL ISSUES
Many people are concerned about lawsuits. However, lawsuits against those who give care at the scene of an emergency are highly unusual and rarely successful. By being aware of some basic legal principles, you can protect yourself against litigation.
In general terms, the following sections address the legal principles that concern emergency care. Laws and regulations can vary from region to region or from role to role: You must ensure that you are aware of the legislation and regulations that apply to you.
Legal issues are constantly evolving. The information presented here is intended as an overview of the important concepts, but you must always confirm the specific laws that apply to your situation.
Duty to ActEither by case law, statute, or job description, most responders have a duty to act at the scene of an emergency. This duty applies to public safety officers, government employees, licensed and certified professionals, and paraprofessionals while on duty. For instance, members of a volunteer fire department have a duty to act based on their agreement to participate in the fire department. An athletic therapist has a duty to give care to an injured athlete. Failure to adhere to these agreements could result in legal action.
Scope of PracticeA responder’s scope of practice is the range of duties and skills he or she is allowed and expected to perform. Using reasonable care and skill, a responder performs these duties according to his or her level of training.
The responder is governed by legal, ethical, regulatory, and medical standards. These standards establish the scope and limits of care that the responder provides and ensure that all patients receive appropriate care from qualified personnel.

THE
PRO
FESS
ION
AL
RES
PON
DER
18
Since standards may differ by region, responders must be aware of the variations existing for their level of training and licensing in their region. Be aware that when you practise a medical act, you may be doing so as an extension of your medical director.
Ethical ResponsibilitiesAs a responder, you have an ethical obligation to carry out your duties and responsibilities in a professional manner. This includes showing compassion when dealing with a patient’s physical and mental needs, and communicating sensitively and willingly at all times. You should never become satisfied with meeting minimum training requirements but rather strive to develop your professional skills to surpass the standards for your region. Doing so includes not only practising and mastering the skills you acquired in your initial training but also seeking further training and information through workshops, continuing medical education, conferences, and supplemental or advanced educational programs.
In addition, be honest in reporting your actions and the events that occurred at a scene or when you responded to an emergency. You have a legal and ethical responsibility to document events accurately. Make it a personal goal to be a person whom others trust and can depend on to provide accurate reports as well as effective care. You should address your responsibilities to the patient at each and every emergency. Periodically, you must reflect on your professional practice. This may help you improve any weaknesses and skills (e.g., providing care to the patient, communication with the patient, and documentation).
Patient AdvocacyPatient advocacy refers to the practice of hearing and representing a patient’s concerns, respecting his or her rights, and making every effort to ensure that your patient receives effective care that is in accordance with his or her wishes.
Patient advocacy includes basic practices such as treating each patient with dignity and getting consent before providing care, but it can also include elements such as expressing a patient’s wishes to other healthcare practitioners (if you
know what those wishes are and the patient is unable to express them).
Abuse and NeglectProfessional responders may respond to a situation where they suspect abuse or neglect. Abuse is any behaviour or action that is used to scare, harm, threaten, control, exploit, or intimidate another person. It can come in different forms: physical, emotional, verbal, sexual, or financial. Neglect is a failure to provide the necessary care, aid, or guidance to dependent adults or children by those responsible for their care. Abuse and neglect can happen to anyone, so be mindful of any stereotypes that you might already have.
A professional responder’s responsibility is not to judge but to provide appropriate care, document the situation, and notify the authorities when necessary. As a professional responder, you not only have a duty to act, you also have a duty to report. In the case of children, this ethical duty is also a legal responsibility. You must be aware of the referral and reporting systems used by your organization and understand how and when to use them. Because of the potential for criminal investigation in these cases, it is important to document everything you observe that could be relevant to investigators. Follow your local protocols.
CHILD ABUSEChild abuse refers to the physical, psychological, or sexual assault of a child, resulting in injuries and/or emotional trauma. Children of all ages and backgrounds can be victimized.
The child abuser can come from any geographic, ethnic, religious, occupational, or socio-economic background. The abuser is often a person that the child or family knows and trusts. The signs of child abuse include: • Unexplained physical trauma in a child less
than 2 years of age (e.g., fractures). • Signs of shaken baby syndrome. • Injuries in various stages of healing, especially
bruises and burns. • Unusual extent or number of injuries. • Injuries located in suspect parts of the body. • An injury that does not fit the description of
what caused it.

THE
PRO
FESS
ION
AL
RES
PON
DER
19
An abused child may be frightened, hysterical, or withdrawn. He or she may be unwilling to talk about the incident in an attempt to protect the abuser. As you provide care for any injuries, attempt to reassure the child and listen calmly and openly to what he or she tells you. Do not interrogate the child or make any accusations. Instead, explain your concerns to responding law enforcement or EMS personnel and follow organizational policies regarding making a report of child abuse.
In all provinces and most territories in Canada, suspected child abuse must be reported to the appropriate provincial/territorial child protection agency. Protocols may require you to make a report to law enforcement personnel as well. When in doubt, ask your local police department or child protection agency for advice. As a follow-up, accurately complete an incident report, noting in detail anything you were told and any injuries you noted when you first examined the child. Also ensure that you record any instructions provided by the police or child protection agency.
ELDER ABUSEElder abuse is a growing problem in our society. Elder abuse involves any of four types of abuse: the infliction of pain or injury (physical abuse), mental anguish or suffering (psychological abuse), financial or material abuse, or unnecessary confinement or willful deprivation (neglect) by an older adult’s caretaker. Typically, but not always, the abuser is a relative and lives with the abused elder.
The signs and symptoms of elder abuse generally include any unexplained injury or any physical situation in which older adults seem to be neglected. Provincial/territorial laws may require the reporting of such abuse if suspected, so follow your local protocol.
ConsentAn individual has a basic right to decide what can and cannot be done with his or her body. Therefore, to provide care for a patient, you must first obtain that person’s consent. Usually, the person needs to tell you clearly that you have permission to provide care.
To obtain consent, you must:1. Identify yourself to the person.2. State your level of training.3. Explain what you think may be wrong.4. Explain what you plan to do.
After you have provided this information, the person can decide whether to grant his or her informed (or actual) consent. Gaining consent is not limited to getting permission just once. A person can withdraw consent for care at any time or for any part of treatment. To ensure that the patient is giving informed consent, it is important for the professional responder to tell the patient what he or she plans to do, the intended outcome or purpose, and the possible risks and consequences.
There is no specific age at which one is old enough to either consent to or reject first aid treatment. You must judge for yourself whether the patient is capable of giving or refusing informed consent. In general, the person receiving the treatment must be mature enough to understand the circumstances that he or she is in, the nature of the treatment to be provided, and the consequences of refusal.
A person who is unresponsive, confused, seriously ill, or injured may not be able to grant informed consent. In these cases, the law assumes that the person would grant consent for care if he or she were able to do so. This is called implied consent.
The legal issues regarding consent are complex and constantly evolving. It is critical that you remain aware of specific legislation that pertains to you and remain informed of any changes that could affect the care that you provide.
PEDIATRIC PATIENTSIf you encounter a young child who requires care, you must get consent from his or her parent or guardian before care can be given. If a child requires urgent care and his or her parent or guardian is not available, provide the care that is necessary.
If a child’s parent or guardian refuses to let you provide care, try to explain the consequences that may occur if care is not given to the ill or injured child. Use terms that the parent or guardian will

THE
PRO
FESS
ION
AL
RES
PON
DER
20
understand. Do not argue with the patient’s parent or guardian. If necessary, you can request a law enforcement officer for assistance in establishing the legal authority to provide care.
If the person is an adult who is under a legal guardian’s care, you must also get the guardian’s consent to provide care.
COMPETENCECompetence refers to a person’s ability to understand the responder’s questions and understand the implications of decisions. Before providing any care to a competent person, you must obtain the person’s consent. Before receiving consent or refusal of care, the responder should determine whether the patient is competent. A person may not be competent to make rational decisions if he or she is intoxicated or on drugs, has a serious injury that might affect his or her judgment, or has a mental illness or disability. In such cases, call appropriate personnel to evaluate the person. A law enforcement officer may need to be present to obtain the necessary legal authority so that care can be provided.
Advance DirectivesAdvance directives are documented instructions from a competent person, signed by a medical authority, which capture the person’s wishes concerning healthcare decisions that could arise in the future (either what those decisions should be or who should make them on the person’s behalf). If the person becomes incompetent with regard to these decisions, advance directives may specify what his or her wishes are. For example, an advance directive may specify that the patient refuses specific interventions, such as CPR, if the patient is not able to express these wishes. Advance directives are legal documents.
There are two distinct types of advance directive: instructional directives and proxy directives.
Instructional directives specify the healthcare decisions that a patient wishes to be made if he or she becomes unable to express those wishes.
Proxy directives specify a person or persons who will make decisions on the patient’s behalf if the patient is unable to make the decisions. Proxy
directives are sometimes called durable powers of attorney for healthcare.
Advance directives may differ by province, territory, and region. You must be aware of the proper legislation and protocols in relation to these orders. In any emergency medical incident, professional responders are to follow their governing protocols with respect to any advance directive(s) that may be in place.
NegligenceNegligence is the failure to follow a reasonable standard of care, thereby causing injury or damage to another. A person could be negligent by either acting incorrectly or failing to act at all.
Acting reasonably means performing to the standard of care expected of a person with your training and working in your position. If a responder fails to act or to live up to the established standard of care, and this failure causes damage to another person, the responder could be vulnerable to legal action. To help avoid lawsuits, responders must do only what they have been trained and authorized to do and stay within their standard of care. Responders are governed and regulated by legal, ethical, and medical standards. These standards establish the scope of practice for the responder.
Four components must be present for a negligence lawsuit to be successful:1. The responder had a duty of care.2. That duty was breached.3. Damage was caused.4. This damage resulted from something the
responder did or failed to do.
Good Samaritan LawsMost provinces and territories have enacted laws to protect people who provide emergency care voluntarily. When you have a duty to respond, these laws are usually not applicable. These laws, which differ across Canada, are often called Good Samaritan laws. They will generally protect you from legal liability as a responder as long as you: 1. Act in good faith. 2. Are not negligent. 3. Act with reasonable care and skill.4. Act within the scope of your training.

THE
PRO
FESS
ION
AL
RES
PON
DER
21
Refusal of CareSome people, even those who desperately need care, may refuse the care you offer. Even though the person may be seriously injured, you should honour a refusal of care. Emphasize the need for care but do not argue with him or her. Repeat your offer of help at least once.
If a patient is not competent or has an altered mental state, or if you believe that the patient poses a threat to him- or herself or to others, he or she cannot legally refuse care. You may need to request law enforcement personnel to assist you.
If you have exhausted the options available to you through your response organization or regulatory body to encourage the patient to co-operate with your request for assessment or an assessment by a physician, you must make it clear that you did not abandon the person.
Many EMS systems have a Refusal of Care or release from responsibility form that you can use in these situations. This is a legal document, so ensure that it is filled out carefully and completely, including any necessary signatures. You will often have to read the required legal documentation to the competent patient. Completely explain the patient refusal process and ensure the required number of legal witnesses are present. All parties, including the patient and witnesses, must sign the applicable document. As always, refer to your organization’s legal guidance and follow local protocol.
HOSTILE PATIENTSIf a patient who requires care is hostile toward you, try to explain calmly who you are and that you are there to help. A patient’s anger or hostility may be caused by the injury or illness, or by fear. Remember that you cannot give care without the patient’s consent. If the patient accepts your offer to help, keep talking to him or her as you assess the condition. When the patient realizes that you are not a threat, the hostility will usually disappear.
If the patient refuses your care or threatens you, withdraw from the scene. Never try to restrain or argue with a patient, or to provide care without consent. If a patient does not let you provide care,
call for additional help. Sometimes a friend or a family member will be able to calm a hostile patient and convince him or her to accept your care.
AbandonmentOnce you have started providing care, you are legally obligated to continue until either you transfer the patient to someone with equal or higher qualification or the patient formally refuses additional care. Usually, your obligation ends when you transfer the patient’s care to more advanced personnel.
Cessation of patient care prior to this transfer can leave you legally responsible for the abandonment of a patient in need and subject to applicable laws and professional discipline by a regulatory body.
If a person’s condition improves and additional care is unnecessary, you must have the patient sign a legal document indicating that he or she is refusing additional care.
ConfidentialityWhile providing patient care, you may acquire information about the patient that is private and/or confidential. Information such as a patient’s previous medical problems, physical problems, and medications is personal to the individual. Respect the patient’s privacy by maintaining confidentiality, including any documentation you may create.
Do not discuss confidential or private information with anyone, including lawyers or members of the media who approach you. Never discuss the patient or the care you provided with anyone except law enforcement personnel with a direct interest in the patient, or other personnel caring for the individual. Once transfer of care has taken place, your responsibilities for data gathering are terminated unless you are asked to act further. Any information gathered up to that point must be documented.
Transfer of CareAt some point during the response, professional responders may need to transfer a patient’s care to another medical professional. This transfer of care may become necessary at the scene, during transport, or at the receiving medical care facility.

THE
PRO
FESS
ION
AL
RES
PON
DER
22
This involves transferring care to another practising medical professional (e.g., a paramedic, nurse, or physician). The receiving medical professional will need a brief, concise report detailing what you observed while the patient was in your care, what treatment has been provided, and any changes in the patient’s condition that you are aware of (Figure 1–3). Your Patient Care Report should include: • Patient information (e.g., name, age). • The patient’s chief complaint. • A brief history of what happened. • Relevant patient history (e.g., past medical
history, medications, allergies). • The treatment provided. • Any changes in patient condition as a result
of that treatment. • Patient vitals, including relevant changes in
vital signs.
DocumentationDocumenting the care that you provide is as important as the care itself. Your documentation will help healthcare professionals assess and continue to care for the patient. As a patient’s condition may change before he or she arrives at the hospital, delivering a record of the condition immediately after the emergency will provide useful information for healthcare providers (Figure 1-4). They can compare the current condition with information you documented earlier.
As a legal document, your record will be important if legal action occurs. Should you be called to court for any reason, your record will support what you saw, heard, and did at the scene of the emergency. It is important to write the record as soon as possible after the emergency, while all the facts are fresh in your memory. Many systems have electronic forms for responders to use, while others use printed forms.
REASONS FOR DOCUMENTATIONThere are four main reasons for documentation:1. Medical: To document the care that you
provided2. Legal: To defend against lawsuits, as well as
possibly serve as evidence in court proceedings (e.g., if an act of violence was involved)
3. Administrative: To transfer information about the individual from one person to another
4. Research: To improve your EMS system
PAC lists several competencies for paramedics under the area of professional responsibilities. Those that pertain to written reports can be summarized as follows: • Record organized, accurate, and relevant
patient information. ◆ Organize patient information for the
purposes of a written report. ◆ Communicate accurate, organized, and
relevant documentation.6
Figure 1–3: Provide a Patient Care Report when transferring care of a patient.
Figure 1–4: Provide a brief, concise report when transferring care of a patient.

THE
PRO
FESS
ION
AL
RES
PON
DER
23
• Include all pertinent and required informationon reports and medical records.
◆ Organize information for documentation.◆ Apply principles of correct documentation.◆ Acknowledge the importance of
appropriate documentation.◆ Demonstrate proper documentation.7
ELEMENTS OF GOOD DOCUMENTATIONEach EMS system has a different Patient Care Report that is filled out for every emergency call. Responders should keep in mind the following record-keeping characteristics:
• Completeness and accuracy• Objectivity• Absence of alterations (If an error is made,
never use liquid paper. Cross out the error witha straight line through the word or commentand initial the change.)
• Legibility (see Appendix A: Abbreviationsfor Documentation)
• Timeliness
If the form you are using is multi-layered, press firmly to ensure transfer. Note that when using multi-layered forms, you need to ensure that you are not transferring ink (and confidential information) to the wrong paper/surface.
Documentation should include the following:• Administrative information: names of
responders, unit number, call number, andaddress to which the responders were sent
• Patient’s information: name, age, sex, birthdate, address, and any care given prior to theresponder’s arrival
• Patient’s vital signs• Patient’s chief complaint• History and assessment findings (see Chapter 5)• Care provided
Local protocols often dictate the specific details that are to be included in a report, as well as the format that the information is to be documented in.
There are some situations when other documentation, or variances in the usual
documentation, may be required. Such situations may include:
• Caring for injuries to responders.• Multiple-casualty incidents.• Infectious disease exposure.
It may be necessary to provide a verbal report about the patient to another healthcare provider. Report the facts about what you found and what you have done up to that point.
ELECTRONIC PATIENT CARE REPORT (E-PCR)Electronic Patient Care Reports (e-PCRs) are becoming more popular in Canada. They are tablet-style devices that allow data to be rapidly entered, collected, and analyzed. Confidential information entered into an e-PCR is kept secure but can be transmitted electronically to predetermined receiving agencies, such as hospitals, or between crews when care is transferred (maintaining the continuity of patient care information). E-PCRs may also be integrated with computer-aided dispatching systems, helping to centralize information gathered by responders.
E-PCRs also increase the legibility ofdocumentation and allow for data managementand analysis. They may allow access to specificprotocols. Specific training is required forresponders to become proficient in using e-PCRs.
COMMUNICATION
You must make every reasonable attempt through interviewing and assessing the patient to determine the patient’s chief complaint, obtain his or her past and present medical history, and properly reassure and comfort the patient. These responsibilities are just as important as updating incoming EMS units on the patient’s status or requesting help from dispatch. Both types of communication require training and experience, and they depend on your skills as a good communicator.
You may communicate with other EMS personnel by radio or telephone, or in person. It is important

THE
PRO
FESS
ION
AL
RES
PON
DER
24
for you to speak slowly, accurately, and clearly. Clear communication is crucial for providing accurate, complete information. Ineffective communication could result in harm to the patient in your care.
Radio CommunicationRadios operate on specific frequencies that are regulated and licensed by Industry Canada’s Spectrum Management and Telecommunications. Unauthorized people do not have access to these frequencies, so they cannot disrupt emergency radio traffic.
A radio system is made up of several components (Figure 1–5) that usually include: • A base station: The base system is the
stationary radio located in a dispatch centre, station, or hospital.
• Mobile radios: These radios are mounted inside vehicles.
• Portable radios: These are hand-held radios that may be carried on your belt or in your pocket.
• Repeaters: Repeaters are devices that receive a low-power radio transmission and rebroadcast it with increased power.
• Mobile phones: Mobile phones are useful for contacting the medical director or the dispatcher where radio coverage is unavailable.
• Satellite phones: These are mobile phones that connect to orbiting satellites and are found in many remote communities or environments.
During an emergency call, you will need to keep the dispatcher aware of your activities, assuming that your EMS system has a dispatch centre and radios. You should inform dispatch whenever you: • Are en route to a call. • Arrive at the scene of a call. • Require additional assistance or specialized
personnel. • Are transporting a patient. • Return to service and are available for the
next call.
You will also use the radio to update incoming responder units or to speak with the medical director. During training, it is important for the
professional responder to become familiar with the use of a radio so that he or she understands how to use it during an emergency.
The professional responder needs to be familiar with the different types of communication used in their EMS system. There are many different types of radios, including portable and permanently mounted, or base, units. Follow the manufacturer’s recommendations for the unit you are using.
When using the radio, keep your transmissions brief; others may be waiting to use the frequency. Listen before you transmit so that you don’t disrupt another conversation. Remember to speak slowly and clearly.
Assume that anything you say over the radio can be overheard by others, even outside your organization. People with scanners can listen to emergency frequencies. Never say anything personal or confidential, even a patient’s name, on the radio. The public nature of radio transmission also means you should always be aware of your language and maintain a professional tone of voice.
MEDICAL TERMINOLOGY
In order to communicate accurately about patients with other professionals, you must have a common language that is clear and universally understood. Using this language requires a basic understanding of medical terminology. One of the key elements
Figure 1–5: A radio communication system in an emergency vehicle.

THE
PRO
FESS
ION
AL
RES
PON
DER
25
to understanding medical terminology is the ability to break down the terms into their parts.
Medical terms are often made up of a combining form (a root word plus a combining vowel; Table 1–1) that contains the core meaning of the term, along with a suffix (a word ending) and/or a prefix (a word beginning) that qualifies the combining form (Table 1–2).
For example, the medical term endotracheal is made up of the following language elements: • The combining form trache-, which means
trachea • The prefix endo-, which means within • The suffix -al, which means pertaining to
By understanding the parts of the word, you can deduce that the term endotracheal means pertaining to something within the trachea. You can then also guess that an endotracheal tube describes a type of tube used within the trachea.
The easiest way to learn medical combining forms, their prefixes, and their suffixes is to memorize them. A few of the more common suffixes are -emic (pertaining to the blood), -emia (condition of the blood), and -a or -ia (condition).
A list of common medical word elements can be found in Appendix D: Medical Terminology.
TABLE 1–1: COMMON COMBINING FORMS
TABLE 1–2: COMMON PREFIXES
COMBINING FORM MEANING
COMBINING FORM MEANING
Cardi/o- Heart, cardiac
Neur/o- Nerve, neural
Oro- Mouth
Arteri/o- Artery, arterial
Hem/o- Blood
Therm/o- Heat
Vas/o- Duct, vessel, vascular
A- Without, no
Hyper- Excessive, above, over, beyond
Hypo- Less than normal, under
Tachy- Fast, swift, rapid, accelerated
Brady- Slow, dull

Professional Responsibilities
As a professional responder, you must: • Maintain a caring and professional attitude. • Have an up-to-date self-care plan to help manage distress. • Present a clean and professional appearance. • Keep your skills and knowledge up to date. • Maintain a safe and healthy lifestyle.
Primary Responsibilities
1. Ensure your own safety.2. Ensure safety for any bystanders.3. Gain access to the patient.4. Determine any threats to the patient’s life.5. Request more advanced medical care as needed.6. Provide the necessary care for the patient.7. Assist more advanced medical personnel.
Elements of Good Documentation
• Administrative information: names of responders, unit number, call number, and address
• Patient’s information: name, age, sex, birth date, address, and any care given prior to responder’s arrival
• Patient’s vital signs • Patient’s chief complaint • History and assessment findings • Care provided
SUMMARY
26
THE
PRO
FESS
ION
AL
RES
PON
DER
26

RES
PON
DIN
G T
O T
HE
CA
LL
2 Responding to the Call
27
Key ContentPreparing for the Emergency Response ............................. 28 Equipment ........................... 28 Plan of Action...................... 28 Communications ................. 29 Training ................................ 29 Psychological Preparation .. 29Managing Hazards at the Emergency Scene ................ 29 Personal Safety .................... 30 Safety of Others .................. 30 Special Emergency Scenes .. 30 Specific Scene Hazards ........ 32
IntroductionAs a professional responder, you have a duty to respond to an emergency when called upon, but you also have a responsibility to prepare yourself and your equipment so that you can deliver prompt, effective care. You must also take all reasonable steps to protect yourself and others from harm once you reach the scene.
This chapter describes the responsibilities for preparing for an emergency response and for identifying and managing hazards at an emergency scene.

RES
PON
DIN
G T
O T
HE
CA
LL
28
PREPARING FOR THE EMERGENCY RESPONSE
EquipmentThe emergency response is supported by careful preparation of the vehicle and equipment before an emergency occurs. The three most common types of equipment used by the professional responder are a trauma response kit, an automated external defibrillator (AED), and a portable oxygen unit.
A trauma response kit may also be called a trauma kit, jump bag, first aid kit, or responder kit. It should be checked on a regular schedule to ensure that it is properly stocked at all times. You should be familiar with the location of all equipment within the kit. Emergency equipment must always be clean and in good condition. Dressings, bandages, and other supplies kept in kits should be restocked as soon as possible following their use. The quantity of specific items should be determined by individual needs, local protocols, and legislation/regulations. AEDs must be properly maintained as per their manufacturers’ guidelines, and their batteries should always be charged. Oxygen cylinders should be kept full.
Plan of ActionHaving a plan of action allows you to respond more effectively and facilitates coordination between responders in an emergency. Emergencies generally happen suddenly, so there is often not time to discuss logistics and determine the best plan of action in the moment. Creating a plan lets these decisions take place before the emergency occurs, when there is time to weigh all of the factors involved.
Any emergency plan should be established based on the anticipated needs and available resources in a given situation. As a professional responder, you should engage in a preplanning process regarding the real or potential hazards in your area and familiarize yourself with existing emergency response plans. Ensure that you are aware of the resources in your community for
handling situations that require specially trained personnel and special equipment (e.g., hazardous materials spills).
As a responder, you may encounter several different types of plans:
Workplace emergency response plans are developed for specific workplaces. They typically identify trained personnel on site, the locations of emergency supplies and equipment, the communication system that is used in emergencies (including how to call for external emergency assistance, such as an ambulance), and the evacuation routes for the building (Figure 2–1). All personnel in a workplace with a response plan must familiarize themselves with it so that they will know what to do in an emergency.
Emergency response plans are developed to respond to an emergency in a specific building. They may be created by EMS personnel (often
Figure 2–1: Posted evacuation routes may be a part of an emergency plan.

RES
PON
DIN
G T
O T
HE
CA
LL
29
fire departments) or by private companies that administer the building in question, usually in collaboration with EMS personnel. Emergency response plans are typically created in cases where a building has unique challenges for responders or requires special resources. For example, a hotel may require a key card to access each floor, or a factory may contain large quantities of hazardous materials. Developing the plan involves inspecting the site, noting potential hazards, and identifying the types of equipment and personnel that could be required to respond effectively in that particular environment. Emergency response plans must be practised, evaluated, and updated periodically.
Disaster response plans are developed to respond to specific large-scale emergencies, such as natural disasters, plane crashes, or mass-exposure incidents. These plans often involve multiple agencies and should be practised regularly with all personnel involved.
CommunicationsEmergency response depends on a reliable and efficient communication system. Ensure that you are always able to contact any specialized or more advanced personnel that may be required. Communication devices used by professional responders include pagers, computers, two-way radios, mobile phones, satellite phones, and CB radios.
You should always have a backup communication system in place. Check communications equipment often to ensure that it is working. Become familiar with your communication networks and develop alternative plans in case regular communications fail.
TrainingAs a professional responder, your training is based on scientific evidence and best practices. This means that the guidelines for care will continue to evolve as new research is conducted and new evidence becomes available. It is crucial that you make every effort to remain aware of developments in your field and to keep your training current. In many jurisdictions, legislation
and regulations require responders to engage in ongoing education in order to maintain their registration or licences.
Practise all of your skills, including the ones you use infrequently. Pursue activities that will help you continue to improve in your professional role, including reading industry articles and publications and participating in workshops, emergency response exercises, and seminars. Professional responders have the opportunity and potential to advance their career qualifications through continuing medical education. Setting goals for career advancement and the acquisition of new skills can help you to practise ongoing professional development.
Psychological PreparationJust as it is important to keep equipment ready for emergencies, it is also important to keep yourself prepared psychologically. Even experienced responders can have emotional reactions to disturbing injuries or situations, and it can be difficult to predict what will or will not have an effect. Thinking about your own mental health before you respond can help you prepare for whatever you might encounter. Recognize your own limitations, and make plans to address them so that they don’t become barriers to action in an emergency.
You may never get used to some of the things that responders encounter on a regular basis. However, with preparation and experience, you can learn to control your reactions.
MANAGING HAZARDS AT THE EMERGENCY SCENE
Some emergency scenes are inherently dangerous, while others may become dangerous while you are providing care. Sometimes the dangers may be obvious (e.g., fire, hostile patients or bystanders). Other dangers may be less obvious (e.g., hazardous materials, confined spaces). Table 2–1 lists a number of hazards you may find at an emergency scene.

RES
PON
DIN
G T
O T
HE
CA
LL
30
Personal SafetyAmong the seven primary responsibilities of the responder, your personal safety is always your first concern. You cannot overlook the importance of ensuring your own safety. If you are injured, you become a patient yourself. It may only require simple steps to make an emergency scene safe. Approach all emergency scenes cautiously until you can assess the situation.
Pay particular attention to the: • Environment (e.g., residence, construction site,
highway). • Extent of the emergency. • Potential hazards. • Behaviour of the patient(s) and any bystanders.
Dispatch may tell you to stage near the scene in the case of a scene with known or potential hazards (e.g., an assault). Be ready to respond immediately when police or other specialized personnel notify you that the scene is safe.
At any time, if the scene appears or becomes unsafe, retreat to a safe distance. Never enter a dangerous scene unless you have the training and equipment to do so safely. Responders have been injured or killed because they forgot to look for scene hazards. If your training has not prepared you for a specific emergency, such as a fire or an incident involving hazardous materials, request appropriately trained personnel.
When arriving on an emergency scene, always follow these four guidelines to ensure your personal safety and that of others:1. Take time to assess (size up) the scene. This will
enable you to recognize existing and potential dangers.
2. Wear appropriate personal protective equipment (PPE).
3. Perform only the skills that you are trained in. 4. Get any assistance you need by requesting
additional personnel. Be ready to describe the scene and the type of additional help required.
Safety of OthersYou have a responsibility for the safety of others at the scene, as well as your own personal safety. Discourage bystanders and family members from entering any area that appears unsafe. You can ask these individuals to help you keep people away from unsafe areas or to call for additional help that might be required, such as police officers. Some dangers may require you to take special measures to protect people at the scene, such as placing physical barriers to prevent bystanders from getting too close.
You may also encounter situations that require you to free a patient who is trapped or physically move a patient away from a hazard. So long as you do not put yourself at risk, you should do everything possible to protect everyone at the scene from harm.
Special Emergency ScenesSome emergency situations, such as crime scenes, drug labs, and scenes with multiple patients, present a special set of problems and considerations.
CRIME SCENEIf you arrive at the scene of a crime, your own safety is paramount. If a crime scene is suspected, retreat and wait until police arrive and indicate it is safe to enter the area. If police have not been dispatched, notify them immediately.
• People (aggressive patients, hostile bystanders) • Debris • Water
• Animals (domestic or wild) • Confined spaces • Uneven terrain
• Weapons • Low lighting • Hazardous materials
• Pathogens • Unstable/unsafe structures • Downed electrical lines
• Sharp glass or metal • Obstructed exits • Oxygen-deficiency
• Loud noise • Extreme temperature
• Traffic • Ice
TABLE 2–1: POTENTIAL HAZARDS AT AN EMERGENCY SCENE

RES
PON
DIN
G T
O T
HE
CA
LL
31
Once the scene is safe, your priority is patient care. A victim of an assault may have severe injuries, but there is very little that you can do to provide care until the scene is safe. Yield to the primary investigative agency on the scene and follow any instructions they give.
Police usually gather evidence at a crime scene. You must be careful not to compromise the continuity of evidence. Do not touch anything except what you must to give care. Use one path to enter and exit. Once you enter a crime scene to give care, make sure that police are aware of your presence and actions. Document anything that you interact with (e.g., if you must move something to access a patient). As always, remember that your notes could become legal evidence in a courtroom: They must be complete, accurate, and objective.
To avoid interfering with forensic evidence-gathering, follow these guidelines: • When removing clothing following gunshot
wounds, stabbings, or other assaults, if at all possible, do not cut clothing through or near the bullet or stab wound holes.
• Avoid allowing blood or debris to contaminate another area or other objects, such as clothing.
• Handle patient clothing as little and as carefully as possible.
• Minimize the introduction of foreign objects into the crime scene. Communicate with law enforcement concerning any items you leave behind (e.g., medical supplies).
• In situations where sexual assault is suspected, discourage the patient from washing, showering, or changing clothing.
If an unarmed person threatens suicide, try to reassure and calm the person. Ensure that appropriate personnel have been notified. You cannot physically restrain a suicidal person without medical or legal authorization. Listen to the patient and try to keep him or her talking until help arrives. Try to be understanding. Do not dare the person to act or trivialize his or her feelings. Unless your personal safety is threatened, never leave a suicidal person alone.
DRUG LABSDrug labs are places where people illegally manufacture or process drugs. Clues that may indicate the presence of a drug lab include chemical glassware, strange odours, and unusual chemicals.
Specific hazards in illegal drug labs include: • Booby traps. • Electrical hazards. • Fire and explosion hazards. • Poor air quality due to mould or chemical
reactions. • Biohazards. • Hazardous chemicals.
Illegal drug labs are unsafe environments. Do not enter the scene until trained personnel arrive.
HOSTILE BYSTANDERSYou may encounter hostile bystanders at any emergency scene. Hostile behaviour may result from the use of alcohol or other drugs, or from an underlying medical condition. If you encounter hostile bystanders at a scene, request law enforcement personnel and wait at a safe distance until they arrive. Approach the scene only after police officers have declared it safe and have asked you to help.
HOSTAGE SITUATIONSIf you encounter a hostage situation, your first priority is to not become a hostage yourself. Assess the scene, request law enforcement personnel, and wait at a safe distance. A police officer trained in hostage negotiations should take charge.
Remain at a safe distance until you are summoned by law enforcement personnel. Try to get any information from bystanders that may help law enforcement personnel. Ask about the number of hostages, any weapons they have seen, and other possible hazards. Report any information to the first law enforcement official on the scene.
NATURAL DISASTERSNatural disasters include tornadoes, hurricanes, earthquakes, forest fires, ice storms, and floods (Figure 2–2). The consequences of a natural disaster can be very complex. A large number of

RES
PON
DIN
G T
O T
HE
CA
LL
32
injuries and deaths can result from electricity, hazardous materials, rising water, and other dangers that accompany or follow the disaster itself. When responding to a natural disaster, be sure to carefully assess the scene, avoid obvious hazards, and use caution when operating rescue equipment. In confined spaces, never use gasoline-powered equipment such as chainsaws, generators, or pumps.
Specific Scene HazardsHAZARDOUS MATERIALSHazardous materials pose a special risk for responding personnel. When you approach an emergency scene, look for clues that indicate the presence of hazardous materials, including: • Signs (placards) on vehicles, storage facilities,
or railroad cars. • Clouds of vapour. • Spilled liquids or solids. • Unusual odours. • Leaking containers, bottles, or gas cylinders. • Chemical transport tanks or containers.
Those who transport or store hazardous materials in specific quantities are required to post placards identifying the specific hazardous material, by name or by number, and the specific risks it poses (Figure 2–3). This information is available from various sources, such as shipping documents and Safety Data Sheets (SDSs). If you do not see a
placard but suspect that a hazardous material is present, request that the appropriate agency respond to the scene (e.g., a fire department or hazmat response team).
Safety Data Sheets (SDSs)Safety Data Sheets (SDSs) are documents containing important technical information for workers on a work site. An SDS must be available for every hazardous material at the work site.
An SDS contains important information about the specific hazardous material, including: • Toxicological properties: information on how
a material enters the body and its short- and long-term health effects.
• Preventive measures: information on how to protect yourself when you’re working with the material, including ventilation, PPE, and work procedures.
• First aid measures: information on what to do if the material causes illness or injury.
Each SDS contains large amounts of specific information for a given substance, broken down into 16 categories:1. Identification2. Hazard identification3. Composition/Information of ingredients4. First aid measures5. Fire-fighting measures
Figure 2–2: A natural disaster. Figure 2–3: Hazardous material placard.

RES
PON
DIN
G T
O T
HE
CA
LL
33
6. Accidental release measures7. Handling and storage8. Exposure controls/Personal protection9. Physical and chemical properties10. Stability and reactivity11. Toxicological information12. Ecological information13. Disposal considerations14. Transport information15. Regulatory information16. Other information
WATER AND ICEWater and ice can also be serious hazards. If a PFD or lifejacket is available, a responder should wear it in or around water.
If you cannot reach a responsive person in the water, try to throw him or her something that floats and is nearby. Never enter a body of water to rescue someone unless you have been trained in water rescue. Even then, enter the water only as a last resort.
To help a responsive person in the water, reach out to him or her with a branch, a pole, or even your hand, being careful not to be pulled into the water. When the person grasps the object, pull him or her to safety.
Fast-moving water is extremely dangerous and often occurs in floods and hurricanes, and at low-head dams. Ice is also treacherous. It can break under your weight, and the cold water beneath can quickly overcome even the strongest swimmer. Never enter fast-moving water or venture out onto ice unless you are specifically trained in this type of rescue. Water rescues require careful planning and proper equipment, so they must only be attempted by personnel with special training.
DOWNED ELECTRICAL LINES Downed electrical lines also present a major hazard for responders. Look for downed wires at a scene and always assume that they are live and dangerous. Even if the line is not live initially, power could be restored without warning. Note that the outer covering on power lines does not provide insulation against the electrical current; it will not protect you from electrocution.
Do not touch any vehicle that is in contact with downed wires, and do not let others touch it. Tell anyone in the vehicle to remain calm and stay inside the vehicle. Vehicle occupants should keep still and avoid touching one another. Never attempt to remove people from a vehicle with downed wires touching it, no matter how seriously injured they may seem.
If you find downed wires, follow these guidelines: • Electricity can travel through the ground, so
stay at least 15 metres (50 feet) from downed power lines and ensure that bystanders do the same.
• Do not attempt to move downed wires. • Notify the fire department immediately. • Do not touch any metal fences, metal
structures, or bodies of water in contact with a downed wire. Wait for the power company to shut off the power source.
FIREAny fire can be dangerous. Only firefighters should approach a fire, as they are highly trained and use equipment that protects against fire and smoke. Make sure that the local fire department has been dispatched and warn others not to approach the fire. If you arrive at the scene before any responding firefighters, gather any information you can from bystanders about people or hazards inside the building and provide this information to the fire department personnel when they arrive.
TRAFFICTraffic is the most common danger emergency personnel will encounter when responding to a motor vehicle collision (MVC).
When you arrive, position the vehicle you are operating in a safe manner in accordance with the law and operational guidelines of your organization. Your vehicle placement should create a safe zone by preventing regular traffic from entering the scene, while allowing other incoming emergency vehicles direct routes to the incident. Applicable warning devices (such as reflectors or lights) must be activated and all applicable laws and organizational guidelines complied with.

RES
PON
DIN
G T
O T
HE
CA
LL
34
Professional responders have been killed by traffic at emergency scenes. If dangerous traffic makes the scene unsafe, do not put yourself at risk. Always ensure that the proper steps are taken to create a safe area for yourself and others before providing care.
UNSAFE STRUCTURESBuildings and other structures such as mines, wells, and unreinforced trenches can become unsafe because of fire, explosions, natural disasters, deterioration, or other causes. An unsafe building or structure is one in which: • The air may contain debris or hazardous gases. • There is a possibility of being trapped or
injured by collapsed walls, weakened floors, and other debris.
Gather as much information as you can to determine the exact or probable location of anyone in the structure, call for appropriate help, and wait for the arrival of properly trained and equipped personnel.
CONFINED SPACESFeatures of confined spaces (Figure 2–4) include: • Restricted openings for entry and exit. • Poor ventilation with possible air
contaminants. • Physical hazards related to engulfment or
collapse (being surrounded and overwhelmed by a substance such as soil or grain).
Such spaces might include pits, tunnels, storage tanks, sewers, ventilation and exhaust ducts, underground utility vaults, and pipelines.
Confined spaces are particularly challenging because they are not designed or intended to have people in them. They can present a risk to the health and safety of anyone who enters (including responders) due to one or more of the following factors: • Their design, construction, location, or
atmosphere • The materials or substances inside • Work activities being carried out inside
There are specific processes for dealing with confined spaces (e.g., a grain silo, vat, or pipe). Without appropriate training, you are putting yourself at risk. If dealing with confined spaces is not within your training, request specialized personnel and manage the scene until they arrive.
WRECKAGEThe wreckage of automobiles, aircraft, or machinery may contain hazards such as sharp pieces of metal or glass, fuel, and moving parts. Do not try to rescue someone from wreckage unless you have the proper equipment and training and the wreckage has been stabilized.
Figure 2–4: A confined space has restricted openings for entry
and exit.

Elements of Preparing for an Emergency Response
EQUIPMENT
Ensure that all equipment is stocked, maintained, and inspected properly.
COMMUNICATIONS
Ensure that you are able to contact specialized and advanced personnel, that communications systems are working properly, and that backup communications systems are in place.
TRAINING
Ensure that your skills and knowledge remain up to date through skill practice and professional development activities.
PLAN OF ACTION
Develop plans for responding in specific situations or locations.
PSYCHOLOGICAL PREPARATION
Prepare yourself mentally for the emergency scene so you will be able to remain professional and effective.
Scene Safety Guidelines
• Take time to assess (size up) the scene. • Wear appropriate personal protective equipment (PPE). • Perform only the skills that you are trained in. • Get any assistance you need by requesting additional personnel.
Special Emergency Scenes
• Crime scene • Hostile bystanders • Natural disasters • Hostage situations • Drug labs
• Specific scene hazards ◆ Hazardous materials ◆ Confined spaces ◆ Wreckage ◆ Downed electrical wires ◆ Unsafe structures ◆ Fire ◆ Traffic ◆ Water and ice
SUMMARY
RES
PON
DIN
G T
O T
HE
CA
LL
35


INFE
CTI
ON
PR
EVEN
TIO
N A
ND
CO
NTR
OL
3 Infection Prevention and Control
37
Key ContentHow Infections Occur ............ 38 Disease-Causing Pathogens ........................ 38 How Diseases Are Transmitted ...................... 39 Epidemics and Pandemics ... 41 Diseases That Cause Concern ............................ 41 Immunization ...................... 45Preventing Disease Transmission ........................ 45 Personal Hygiene ................ 46 Personal Protective Equipment (PPE) .............. 47 Engineering and Work Practice Controls .............. 48 Cleaning and Disinfecting Equipment ........................ 49 Spill Management ............... 49 Exposure Control Plans ....... 49 If an Exposure Occurs ............ 50
IntroductionProfessional responders typically interact with ill patients on a regular basis and may also be exposed to blood and other potentially infectious fluids while treating injuries. It is important to understand how infections occur, how they are passed from one person to another, and what you can do to protect yourself and others from pathogens.
Diseases that can be contracted from other people, objects, animals, or insects are referred to as infectious diseases. In this chapter, you will learn how to recognize situations with the potential for infection and how to protect yourself and others.

INFE
CTI
ON
PR
EVEN
TIO
N A
ND
CO
NTR
OL
38
HOW INFECTIONS OCCUR
Disease-Causing PathogensThe disease process begins when a pathogen enters the body. When this happens, it can sometimes overpower the body’s defense systems and cause an infection. Most infectious diseases are caused by one of six types of pathogens. The most common pathogens are bacteria and viruses.
BACTERIAThese are single-celled micro-organisms that may cause infection. Bacteria are everywhere. They do not depend on other organisms for life and can live outside the human body. Most bacteria do not infect humans; however, those that do can cause serious illness. Examples of bacterial-caused conditions include the following:
• Tetanus• Meningitis• Scarlet fever• Strep throat• Tuberculosis• Gonorrhea• Methicillin-resistant Staphylococcus aureus
(MRSA)• Vancomycin-resistant Enterococci (VRE)• Syphilis• Chlamydia• Legionnaires’ disease• Diphtheria• Food poisoning
The body has difficulty fighting infections caused by bacteria. Physicians may prescribe antibiotic medications that either kill the bacteria or weaken them enough for the body to eliminate them.
VIRUSESUnlike bacteria, viruses depend on other organisms to live and reproduce. Viruses cause many diseases, including the following:
• The common cold• Hepatitis• Measles• Mumps• Chickenpox
• Meningitis• Rubella• Influenza• Warts• Shingles• Human immunodeficiency virus (HIV)• Acquired immune deficiency syndrome (AIDS)
Once viruses become established within the body, they are difficult to eliminate because very few medications are effective for defeating them. Antibiotics do not kill or weaken viruses. The body’s immune system is the main defence against them.
FUNGIA fungus is a single-celled or multicellular organism. Some can cause conditions that are detrimental to human health. Athlete’s foot and ringworm are conditions caused by fungi.
PROTOZOAProtozoa are single-celled organisms that can only divide within a host organism. Malaria and dysentery are examples of conditions caused by protozoa.
RICKETTSIARickettsia are a group of micro-organisms that are similar to viruses in that they require other living cells for growth, but are also similar to bacteria in that they use oxygen, have metabolic enzymes and cell walls, and are susceptible to antibiotics. Some conditions that are caused by rickettsia include typhus and Rocky Mountain spotted fever.
PARASITIC WORMSSome worms can be classified as parasites, which are disease-causing organisms that live on or inside a human or other animal and derive their nourishment from their hosts. Parasitic worms can cause the following complications:
• Abdominal pain• Anemia• Lymphatic vessel blockage• Lowered antibody response• Respiratory and circulatory complications

INFE
CTI
ON
PR
EVEN
TIO
N A
ND
CO
NTR
OL
39
The Body’s Natural DefencesThe body has a series of natural defences that prevent germs from entering. The body depends on intact skin and mucous membranes in the mouth, nose, and eyes to keep germs out. When the skin is damaged, germs can enter through openings such as cuts and sores. Mucous membranes protect the body from intruding germs by trapping them so that they can then be killed or forced out (e.g., by a cough or sneeze). However, mucous membranes are less effective than skin for keeping blood-borne pathogens out of the body.
If these natural barriers fail and a pathogen enters the body, the body’s immune system begins working to fight the disease. The immune system’s basic tools are white blood cells and antibodies. Special white blood cells travel around the body and identify invading pathogens. Once they detect a pathogen, white blood cells gather around it and release antibodies that attack the pathogens to weaken or destroy them. Antibodies can usually rid the body of pathogens.
The combination of preventing pathogens from entering the body and destroying them after they have entered is necessary for good health (homeostasis). Sometimes, however, a pathogen enters the body and the body cannot fight it off. When this occurs, an invading pathogen can thrive inside the body and, under ideal conditions,
multiply and overwhelm the immune system, causing an infection which may range from mild to serious and from brief (acute) to long-lasting (chronic).
Common signs and symptoms that signal that the body is fighting off an infection include the following: • Headaches • Fever • Exhaustion • Nausea • Vomiting
How Diseases Are TransmittedFour factors must coincide for an infection to occur: 1. A pathogen is present.2. There is enough of the pathogen to cause
disease.3. A person is susceptible to the pathogen.4. There is a route of entry (Table 3–1).
If any one of these conditions is missing, an infection cannot occur (Figure 3–1).
Pathogens enter the body in four ways:
1. DIRECT CONTACTDirect contact transmission (Figure 3–2) occurs when a person touches bodily fluids from an infected person.
Figure 3–1: For an infection to occur, all four conditions must be present.
Figure 3–2: Direct contact transmission.
Pathogen Susceptibility
Quantity Entry Site

INFE
CTI
ON
PR
EVEN
TIO
N A
ND
CO
NTR
OL
40
Figure 3–3: Indirect contact transmission.
DISEASE MODE OF DESCRIPTION ROUTE OF ENTRY SIGNS AND SYMPTOMS TRANSMISSION
Herpes Direct contact Family of viruses; infection with one of the human herpes viruses, especially herpes simplex types 1 and 2
Broken skin, mucous membranes
Lesions, general ill feeling, sore throat
Meningitis Airborne, direct and indirect contact
Inflammation of the membranes that envelop the central nervous system (meninges), usually due to a bacterial infection but sometimes from viral, protozoan, or other causes
Food and water, mucus
Respiratory illness, sore throat, nausea, vomiting
Tuberculosis Airborne, direct and indirect contact
A highly contagious infection caused by the bacterium Mycobacterium tuberculosis
Mucus, broken skin
Weight loss, night sweats, occasional fever, general ill feeling
Hepatitis Direct and indirect contact
Inflammation of the liver from any cause; most often viral due to infection with one of the hepatitis viruses (A, B, C, D, and E) or another virus
Blood, saliva, semen, feces, food, water, other products
Flu-like, jaundice
HIV/AIDS Direct and indirect contact
Disease due to infection with the HIV virus
Blood, semen, vaginal fluid
Fever, night sweats, weight loss, chronic diarrhea, severe fatigue, shortness of breath, swollen lymph nodes, lesions
TABLE 3–1: EXAMPLES OF INFECTIOUS DISEASES
2. INDIRECT CONTACTIndirect contact transmission (Figure 3–3) occurs when a person touches objects that have touched the bodily fluids of an infected person. These objects could be soiled dressings, equipment, or work surfaces that an infected person came into contact with. Sharp objects, such as needles, present a particular risk. If sharp objects have contacted the blood or bodily fluids of an infected person and are handled carelessly, they can pierce the skin and transmit infection.

INFE
CTI
ON
PR
EVEN
TIO
N A
ND
CO
NTR
OL
41
3. AIRBORNEAirborne transmission (Figure 3–4) occurs when a person breathes in droplets that become airborne when an infected person coughs or sneezes. Generally, an exposure to these droplets will be too brief for transmission to take place; however, a transmission may occur if a person is coughing heavily.
4. VECTOR-BORNEVector-borne transmission (Figure 3–5) occurs when an animal or an insect transmits a pathogen into the body through a bite. A bite from an infected human can also result in vector-borne transmission. The carrier is the vector and passes the infection to another animal or person. Rabies and Lyme disease are transmitted this way.
Epidemics and Pandemics Occasionally an illness will spread quickly among a population and across geographical boundaries, affecting large numbers of people simultaneously. This may be referred to as an epidemic or a pandemic, depending on the scope of the area affected.
An epidemic occurs when there is an increase, especially a sudden increase, in the number of cases of a disease in a given group of people or geographical area, above what is normally expected for that population or area.
A pandemic is an epidemic that involves multiple countries, usually affecting a large number of people.
Diseases That Cause ConcernHEPATITISHepatitis is an infection of the liver. There are five types of hepatitis, each caused by a different virus.
Hepatitis AHepatitis A is caused by the hepatitis A virus (HAV). This disease is spread primarily through food or water that has been contaminated by feces from an infected person.
HAV causes inflammation and swelling of the liver. The patient may feel ill, with flu-like symptoms, or may experience no symptoms at all. Symptoms of HAV usually disappear after several weeks. This disease rarely causes permanent damage or chronic illness.
HAV can be prevented with the hepatitis A vaccine, which is a series of two injections administered at least 6 months apart. The most effective prevention, however, is maintaining healthy habits. Always wash your hands thoroughly before preparing food, after using the toilet, and after changing a diaper. International travellers should be careful about drinking tap water.
Figure 3–5: Vector-borne transmission.Figure 3–4: Airborne transmission.
© iS
tock
pho
to.c
om/M
icha
el P
ettig
rew

INFE
CTI
ON
PR
EVEN
TIO
N A
ND
CO
NTR
OL
42
Hepatitis BHepatitis B is caused by the hepatitis B virus (HBV). Hepatitis B may be severe or even fatal. Signs and symptoms may include flu-like symptoms such as fever, fatigue, abdominal pain, loss of appetite, nausea, vomiting, and joint pain, as well as dark urine and pale bowel movements. Later-stage symptoms include jaundice, which causes a yellowing of the skin and eyes.
Medications are available to treat chronic hepatitis B infection, but they do not work for everyone: Some people remain chronically infected, though they may not always experience symptoms.
The most effective means of prevention is the hepatitis B vaccine. Given in a series of three doses, this vaccine provides immunity to the disease. Organizations should make hepatitis B vaccinations available to all employees whose responsibilities could expose them to hepatitis B, in accordance with local regulations and legislation.
Hepatitis CHepatitis C is a liver disease caused by the hepatitis C virus (HCV). Symptoms are similar to those of hepatitis B infection, including fever, fatigue, abdominal pain, loss of appetite, nausea, vomiting, dark urine, clay-coloured stool, joint pain, and jaundice.
Hepatitis C has an acute phase, lasting approximately 6 months, followed by a chronic infection. Since the symptoms vary widely (and may not be present at all), people may be infected without their knowledge.
There is no vaccine against hepatitis C. For these reasons, hepatitis C is more serious than hepatitis B. Hepatitis C is the leading cause of liver transplants.
Hepatitis DHepatitis D is a serious liver disease caused by the hepatitis D virus (HDV). HDV relies on HBV to replicate, so hepatitis D only occurs in people who are already infected with hepatitis B. It is uncommon in Canada. It is transmitted through
contact with infectious blood, similar to how HBV is spread. There is no vaccine for hepatitis D, but the hepatitis B vaccine provides indirect protection.
Hepatitis EHepatitis E is caused by the hepatitis E virus (HEV). It is commonly transmitted via the fecal-oral route and is associated with ingestion of drinking water contaminated with fecal material in countries with poor sanitation. It occurs primarily in adults. There is no evidence of transmission by percutaneous (through the skin) or sexual exposures.
HIV/AIDSHIV is the virus that causes AIDS. HIV attacks white blood cells and destroys the body’s ability to fight infection. Infections that strike people with weakened immune systems are called opportunistic infections. Some opportunistic infections that occur in people with AIDS include severe pneumonia, tuberculosis (TB), and unusual cancers such as Kaposi’s sarcoma.
People infected with HIV may not feel or appear sick. A blood test, however, can detect the HIV antibody. When an infected person has a significant drop in a certain type of white blood cell or shows signs of having certain infections or cancers, the person may be diagnosed as having AIDS. Common effects of infections associated with AIDS include fever, fatigue, diarrhea, skin rashes, night sweats, loss of appetite, swollen lymph glands, and significant weight loss. In the advanced stages, AIDS is a very serious condition. Most people with AIDS eventually develop life-threatening infections. Currently, there is no vaccine against HIV.
TUBERCULOSISTuberculosis (TB) is an infection caused by a bacterium called Mycobacterium tuberculosis. The bacteria usually attack the lungs, but they may also damage other parts of the body, such as the brain, kidneys, or spine. TB is spread through the air when an infected person coughs, sneezes, or talks. Anyone who may have been exposed to TB should be tested. People with weakened immune systems are more likely to contract TB.

INFE
CTI
ON
PR
EVEN
TIO
N A
ND
CO
NTR
OL
43
Symptoms of TB in the lungs may include: • Significant coughing lasting 3 weeks or longer. • Pain in the chest. • Weight loss. • Loss of appetite. • Coughing up blood or bloody sputum (phlegm
from inside the lungs). • Weakness and/or fatigue. • Fever and chills. • Night sweats.
TB must be treated with medication or it can be fatal. It can usually be cured with several medications over a long period of time. People with latent (asymptomatic) TB can take medicine to prevent the development of active TB.
Multidrug-Resistant TuberculosisMultidrug-resistant tuberculosis (MDR TB) is TB that is resistant to at least two of the most effective anti-TB drugs, isoniazid and rifampin. These drugs are the most widely used to treat TB. MDR TB is more likely to occur in people who: • Do not take their TB medicine regularly or who
do not take all of the prescribed medication. • Develop active TB after having taken
medication to treat it in the past. • Come from areas of the world where MDR
TB is prevalent. • Spend time with someone known to have
MDR TB.
MENINGITISMeningitis is a contagious meningococcal infection that attacks the meninges, which are the protective coverings that surround the brain and spinal cord. Several different bacteria can cause meningitis, but it can also be caused by a virus. The bacteria is transmitted from person to person through droplets. Close and prolonged contact and living in close quarters or dormitories facilitate the spread of the disease. Meningitis can infect anyone but is more commonly found in those who have compromised immune systems and have trouble fighting infections.
The most common symptoms are a stiff neck, high fever, confusion, headache, nausea, sleepiness, vomiting, and sensitivity to light. Bacterial meningitis is a serious infection; even when diagnosed early and properly treated, 5 to 10% of people die, typically
within 24 to 48 hours of the onset of symptoms. Bacterial meningitis results in brain damage, hearing loss, or other permanent disabilities in 10 to 20% of people. Viral meningitis is less severe and usually resolves without specific treatment. Bacterial meningitis is potentially fatal and is a medical emergency. Admission to a hospital or health centre is necessary. There are vaccines available to prevent meningitis and antibiotics available to treat it.
MRSA AND COMMUNITY-ASSOCIATED MRSAMethicillin-resistant Staphylococcus aureus (MRSA) is a bacterium. As with other kinds of staph bacteria, it often lives on the skin and in the nose without causing any adverse health effects, but if it enters the body it can become a source of infection. These bacteria can be spread from one person to another through casual contact or contaminated objects. MRSA infections are more difficult to treat than ordinary staph infections because they are resistant to many types of antibiotics. Infections can occur in wounds, burns, and sites where tubes have been inserted into the body.
When MRSA occurs in groups of people who have not been recently hospitalized or have not had a medical procedure, it is referred to as community-associated MRSA (CA-MRSA). For example, MRSA can occur among young people who have cuts or wounds and who are in close contact with one another, such as members of a sports team.
VANCOMYCIN-RESISTANT ENTEROCOCCI (VRE)Enterococci are bacteria that live in the human intestine and urinary tract and are often found in the environment. Generally, these bacteria do not cause illness, and when illness does occur, it can usually be treated with antibiotics.
Vancomycin is an antibiotic generally prescribed to treat serious infections caused by organisms that are resistant to other antibiotics such as penicillin. Vancomycin-resistant Enterococci (VRE) are strains of enterococci bacteria that are resistant to the antibiotic vancomycin. Vancomycin is not effective in treating a VRE infection.

INFE
CTI
ON
PR
EVEN
TIO
N A
ND
CO
NTR
OL
44
A person can have VRE present in his or her body without being infected. A person with VRE who does not have symptoms is merely colonized with VRE. A person is considered to be infected with VRE when symptoms are present (e.g., an infection of the urinary tract or bloodstream).
Often, VRE spreads within healthcare facilities. It can spread from patient to patient when bacteria are carried on the hands of healthcare workers and, occasionally, through contact with contaminated equipment or other surfaces (e.g., toilet seats, bedrails, door handles, soiled linens, or stethoscopes).
CORONAVIRUSCoronaviruses are a group of six viruses that typically cause upper respiratory-tract illnesses. They are quite common, with most people becoming infected at some point in their lives without serious consequences. However, because coronaviruses are constantly evolving and poorly understood, they can pose serious health risks, even to healthy individuals, and in some cases they can be fatal. Severe Acute Respiratory Syndrome (SARS) and Middle East Respiratory Syndrome (MERS) are both caused by coronavirus infections.
The method of transmission is not fully known, but it is believed that the viruses are transmitted through the air when an infected person coughs or sneezes and through physical contact (e.g., shaking hands). The viruses may also be contracted when a person touches a contaminated surface and then touches his or her mouth, nose, or eyes. There are no specific treatments for coronaviruses, so prevention in the form of proper handwashing and use of personal protective equipment is the only defence.
Severe Acute Respiratory Syndrome (SARS)Severe acute respiratory syndrome (SARS) is a viral respiratory illness caused by the SARS-associated Coronavirus (SARS-CoV). It was first reported in Asia in February 2003. Over the following months, it spread to more than two dozen countries in North America, South America, Europe, and Asia before the outbreak was contained.
SARS usually begins with a high fever—a temperature greater than 38°C (100.4°F). Patients may also experience a headache, an overall feeling of discomfort, and body aches. They may have mild respiratory symptoms at the outset. After 2 to 7 days, SARS patients may develop a dry cough, and most develop pneumonia.
SARS spreads mainly through close person-to-person contact. The virus that causes SARS is thought to be transmitted most easily by respiratory droplets produced when an infected person coughs or sneezes and the droplets are deposited on the mucous membranes of the mouth, nose, or eyes of people nearby. It can also spread when a person touches a surface or an object contaminated with infectious droplets and then touches the mouth, nose, or eyes.
MIDDLE EAST RESPIRATORY SYNDROME CORONAVIRUS (MERS-CoV)Since April 2012, cases of Middle East Respiratory Syndrome Coronavirus (MERS-CoV) have been identified in a number of countries in the Middle East. Several other countries have also reported MERS-CoV cases in individuals who have travelled to the Middle East. These individuals acquired the disease through limited local transmission among close contacts, including healthcare workers. No cases have been confirmed in Canada.
The symptoms of MERS-CoV are similar to severe pneumonia and include fever, cough, shortness of breath, and other breathing difficulties. Since MERS-CoV was first identified, serious illness and death have been associated with patients having underlying medical conditions as well as older individuals. The illness can be less severe in younger, healthy people.
INFLUENZASeasonal influenza is a respiratory illness caused by both human influenza A and human influenza B viruses, which can be transmitted from person to person. Most people have some immunity to influenza, and there is a vaccine available.
Seasonal influenza usually has a sudden onset, with symptoms of fever (usually high), headache, extreme tiredness, dry cough, sore throat, runny or stuffy nose, and muscle aches. Abdominal

INFE
CTI
ON
PR
EVEN
TIO
N A
ND
CO
NTR
OL
45
symptoms such as nausea, vomiting, and diarrhea may also be present, but these symptoms occur more often in children than in adults.
Influenza is transmitted from person to person via large, virus-laden droplets projected by coughing or sneezing. These large droplets can settle on the mucosal surfaces of the upper respiratory tracts of a susceptible person. Transmission can also occur through direct or indirect contact with respiratory secretions—for example, when touching surfaces contaminated with influenza virus and then touching the mouth, nose, or eyes.
ImmunizationMost people receive immunization as infants in the form of vaccinations against common childhood diseases (e.g., measles and mumps). Immunization is the introduction of a substance that contains specific weakened or killed pathogens into the body. The body’s immune system then builds resistance to the specific type of infection that was injected.
The most common vaccinations include the following:
• DPT (diphtheria, pertussis, tetanus)• Polio• Hepatitis B• MMR (measles, mumps, rubella)• Influenza• Chickenpox
You may not have been immunized against all of these diseases as a child. If you are uncertain which immunizations you have received or may need to update, contact your physician or local community health nurse.
PREVENTING DISEASE TRANSMISSION
It is easy to make assumptions about the risks that are posed by a given patient or environment. You might unconsciously expect a person with dirty clothes to pose a greater risk of infection, for example, or assume that a tidy home does not contain many pathogens. Often you will not know the health status of the people you work with or care for. Even situations that seem clean could contain deadly viruses or bacteria, and the one time you stop being careful may be the very time that you become infected.
Each time you provide care, you must follow basic infection-control precautions, including:
• Wearing personal protective equipment (PPE)(Figure 3–6).
• Practising good personal hygiene.• Cleaning and disinfecting equipment.• Following other occupational or workplace
procedures.
Figure 3–6: There are many ways to protect yourself from disease transmission.

46
INFE
CTI
ON
PR
EVEN
TIO
N A
ND
CO
NTR
OL
Personal HygieneGood personal hygiene habits (e.g., frequent handwashing) (Figure 3–7, a-f) are as important for preventing infection as any equipment you might use. These practices can prevent infectious materials from staying in contact with your body long enough to cause an infection.
When it is not possible to wash your hands, use a gel disinfectant with a minimum alcohol content of 70%. Gel disinfectants are not a substitute for proper handwashing; even if they are used, you should still wash your hands at the earliest opportunity.
Figure 3–7, a-f: Washing your hands properly helps protect you against disease transmission.
a
c
e f
d
b

INFE
CTI
ON
PR
EVEN
TIO
N A
ND
CO
NTR
OL
47
Personal Protective Equipment (PPE)PPE should be used to prevent skin and mucous-membrane exposure (Table 3–2). PPE protects you from direct contact with infected materials. Examples include disposable medical examination gloves, gowns, masks, protective eyewear, and resuscitation devices. To minimize your risk of contracting or transmitting an infectious disease, follow these universal precautions: • Handle all blood and other bodily fluids as if
they are infectious. • Handle all patients in a way that minimizes
exposure to blood and other bodily fluids. • Wear disposable medical examination gloves
whenever you are interacting with a patient: ◆ Do not clean or reuse disposable gloves. ◆ Avoid handling items such as pens, combs,
or radios while wearing soiled gloves. ◆ Use fresh gloves for each patient. • Use protective coverings (e.g., mask, eyewear,
and gown) whenever you are likely to contact
blood or other bodily fluids that may splash (Figure 3–8).
• Cover any cuts, scrapes, or skin irritations you may have with clothing or bandages.
• Use breathing devices, such as resuscitation masks, with one-way valves.
TASK OR ACTIVITY DISPOSABLE GOWN MASK PROTECTIVE EYEWEAR GLOVES (ALWAYS WORN)
Hemorrhaging control with spurting blood
Yes Yes Yes Yes
Bleeding control with minimal bleeding
Yes No No Yes
Childbirth Yes Yes Yes Yes
Helping with an intravenous (IV) line
Yes No No Yes
Oral/nasal suctioning, manually clearing airway
Yes No Yes Yes
Handling and cleaning contaminated equipment and clothing if bodily fluids are present
Yes No, unless soiling is likely
No, unless cleaning after transporting
a patient with transmissible
respiratory illness
Yes
Transporting or caring for a patient with signs of transmissible respiratory illness
Yes No Yes Yes
TABLE 3–2: RECOMMENDED PERSONAL PROTECTIVE EQUIPMENT FOR PRE-HOSPITAL SETTINGS
Figure 3–8: Wear appropriate protective coverings whenever you may come into contact with bodily fluids.

INFE
CTI
ON
PR
EVEN
TIO
N A
ND
CO
NTR
OL
48
Donning and Doffing PPEWhen donning and doffing PPE, follow a specific order to avoid indirect contact with pathogens. To put on the appropriate PPE (see Table 3–2), follow this process:1. Wash your hands.2. Put on your gown.3. Put on your mask.4. Put on protective eyewear.5. Put on disposable gloves.
When removing PPE, follow this process:1. Remove your disposable gloves.2. Remove your gown.3. Wash your hands.4. Remove protective eyewear.5. Remove your mask.6. Wash your hands.
Remove gloves by turning them inside out, beginning at the wrist and peeling them off. When removing the second glove, do not touch the soiled surfaces with your bare hand. Hook the inside of the second glove at the wrist and peel the glove off (Figure 3–9, a-c). Always wash your hands with soap and water after removing gloves.
Engineering and Work Practice ControlsEngineering controls isolate or remove a hazard from the workplace. Examples include puncture-resistant containers for sharp equipment and mechanical needle-recapping devices. Engineering controls should be examined and maintained or replaced on a regular basis.
Work practice controls reduce the likelihood of exposure by specifying how a task is to be carried out. The protection provided by work practice controls is based on the way people behave rather than on physical devices or structures.
Engineering controls and work practice controls are established to ensure good occupational hygiene. Everyone in the workplace should be trained in these practices.
Following certain guidelines for engineering controls and work practice controls can greatly reduce your risk of contracting or transmitting an infectious disease: • Check response kits regularly to ensure that
they are fully stocked. • Keep all PPE in good working order.
Immediately dispose of any PPE that is peeling, discoloured, torn, or punctured.
• Use dressings and bandages to minimize direct contact with blood, other bodily fluids, and wounds. If possible, have the patient wash the wound first and assist you with holding a dressing in place or applying pressure if necessary.
• Avoid needle-stick injuries by not trying to bend or recap any needles.
• If a procedure requires the recapping of a needle, use mechanical devices or one-handed techniques to recap. Never recap contaminated needles.
• Place sharp items (e.g., needles, scalpel blades) in puncture-resistant, leak-proof, labelled containers.
Figure 3–9, a-c: Glove removal.
a b c

INFE
CTI
ON
PR
EVEN
TIO
N A
ND
CO
NTR
OL
49
• Perform all procedures in a way that cuts down on splashing, spraying, splattering, and producing droplets of blood or other potentially infectious materials.
• Remove soiled protective clothing as soon as possible.
• Avoid eating, drinking, smoking, applying cosmetics or lip balm, handling contact lenses, and touching your mouth, nose, or eyes in work areas where exposure to infectious materials may occur.
• Handle all soiled equipment, supplies, and other materials with great care until they are properly cleaned and disinfected. Place all contaminated disposable items in labelled containers. Place all soiled clothing in properly marked plastic bags for disposal or disinfection.
• Wash your hands thoroughly with soap and water immediately after providing care. Use a utility or restroom sink, not one in a food preparation area.
• Disposable waste or soiled laundry should be stored in appropriate containers with warning labels such as biohazard until they are disposed of or disinfected.
Cleaning and Disinfecting EquipmentClean and disinfect equipment and work surfaces promptly if they are (or could be) soiled by blood or other bodily fluids. Always wear proper PPE when cleaning equipment and surfaces.
Surfaces such as floors, woodwork, vehicle seats, and countertops must be cleaned with soap and water first, using disposable towels, and then disinfected. To disinfect equipment soiled with blood or bodily fluids, wash thoroughly with a solution of chlorine bleach and water. Each EMS system may have protocols and solution ratios for various decontamination techniques. Many commercial decontamination solutions are available. Follow the manufacturer’s directions when using these.
Wash and dry protective clothing and work uniforms according to the manufacturer’s directions. Scrub soiled boots, leather shoes, and other leather goods, such as belts, with soap, a brush, and hot water.
Work areas should be kept in a clean and sanitary condition based on a written schedule for cleaning and decontamination. The schedule must meet all applicable legislation, regulations, and protocols for the region and type of workplace.
Spill ManagementAny spill should be cleaned up as soon as possible. There should be a plan in place to deal with any spill that might occur. The plan should specify the system for reporting a spill and the actions taken to resolve it. It should also include a list of people responsible for containment and instructions for cleanup and disposal (including any required equipment) of the spilled material.
The first step in dealing with a spill is containment. Spill containment units for hazardous materials are commercially available. Follow your spill management plan, along with the following guidelines: • Put on applicable PPE for the type of spill. • If the spill is mixed with sharp objects, such
as broken glass and needles, use equipment such as tongs or a broom and dustpan to clean them up.
• Dispose of the absorbent material used to collect the spill in a labelled biohazard container.
• Flood the area with disinfectant solution and allow it to stand for at least 20 minutes.
• Use paper towels to absorb the solution and put the towels in the biohazard container.
Exposure Control PlansPreventing infectious disease transmission begins with preparation and planning. An exposure control plan is an important step for eliminating or reducing exposure to blood and other possibly infectious materials.
The exposure control plan should be developed for a particular workplace. It should be kept where it can easily be accessed and be made available to all workers. The plan should be updated regularly (at least annually) in accordance with applicable regulations.

INFE
CTI
ON
PR
EVEN
TIO
N A
ND
CO
NTR
OL
50
The plan must identify the individual or individuals who will receive exposure control training, PPE, and vaccinations.
Exposure determination is one of the key elements of an exposure control plan. It includes identifying and making a written record of tasks in which exposure to blood or other bodily fluids can occur. The plan should also specify how a possible exposure incident will be evaluated and describe the system whereby soiled materials can be easily identified and disposed of.
The exposure control plan should specify the reporting procedures for any first aid incidents. The procedures must ensure that incidents are reported before the end of the shift in which they occur. Reports of first aid incidents should include the names of all responders involved and the details of the incident (including the date and time). Exposure reports should be included on lists of first aid incidents. Professional responders must always follow their organization’s reporting procedures.
Health Canada’s recommendations for healthcare providers can be applied to individuals at risk in any environment. These include the following: • There should be initial orientation and
continuing education provided for all workers regarding modes of transmission and prevention of infections, and the need for routine use of PPE.
• Equipment and supplies that are required to minimize the risk of infection should be provided.
• Adherence to recommended protective measures should be monitored. When monitoring reveals a failure to follow recommended precautions, counselling, education, or retraining should be provided.
• Specific relevant vaccinations (e.g., hepatitis B) should be offered to all susceptible healthcare providers, particularly those who work in high-risk areas.
IF AN EXPOSURE OCCURS
If you suspect that you have been exposed to an infectious disease, wash any area of contact as
quickly as possible and record the circumstances of your exposure. Exposures usually involve contact with potentially infectious blood or other fluids through a needle stick, broken or scraped skin, or the mucous membranes of the eyes, nose, or mouth. An exposure may also consist of inhaling potentially infected airborne droplets.
Most organizations have protocols for reporting infectious disease exposure. Be aware of provincial/territorial Occupational Health and Safety guidelines and Workers’ Compensation guidelines that apply to you.
Reporting procedures should be easy to access and user-friendly. They should ensure confidentiality and instill confidence in the exposed worker.
As a minimum, reporting procedures should include: • A list of events covered by the procedure. • A list of immediate actions to be taken by the
exposed individual to reduce the chances of infection.
• Direction as to when or how quickly the individual should report the exposure incident.
• Direction as to where and to whom the individual should report the exposure incident.
• An indication of which forms the individual should complete.
• Directions for investigating the incident. • Information required from healthcare
providers. • An outline of the required medical follow-up,
including post-exposure vaccination.
If you think you have been exposed to an infectious disease, you should report the exposure immediately. A test may be done to see if the infection is present. Even before a disease is confirmed, you should receive medical evaluation, counselling, and post-exposure care. Your medical personnel or supervisor is responsible for notifying any other personnel who might have been exposed. If your system does not have a designated physician or nurse at a local hospital for follow-up care, see your personal physician.

Bacteria Single-celled micro-organisms that do not depend on other organisms for life
DISEASE-CAUSING PATHOGENS
Non-cellular organisms that depend on other organisms to live and reproduce
Single-celled or multicellular organisms
Single-celled organisms that can only divide within a host organism
Macroscopic parasites that can live inside the body and derive nourishment from the host
Micro-organisms that require other living cells for growth but use oxygen, have metabolic enzymes and cell walls, and are susceptible to antibiotics
Viruses
Fungi
Protozoa
Rickettsia
Parasitic Worms
Direct Contact A person touches bodily fluids from an infected person.
MODES OF DISEASE TRANSMISSION
A person touches an object that has touched the bodily fluids of an infected person.
A person inhales droplets that become airborne when an infected person coughs or sneezes.
An animal or insect transmits pathogens through a bite.
Indirect Contact
Airborne
Vector-borne
Four Factors Necessary for Infection to Occur
1. A pathogen is present.2. There is enough of the pathogen to cause disease.3. A person is susceptible to the pathogen.4. There is a route of entry.
Precautions to Prevent Disease Transmission
• Practise good personal hygiene. • Wear personal protective equipment (PPE). • Follow other occupational/workplace procedures. • Clean and disinfect equipment.
SUMMARY
INFE
CTI
ON
PR
EVEN
TIO
N A
ND
CO
NTR
OL
5151

Hemorrhaging control with spurting blood
Yes YesYes Yes
Yes YesNo No
Yes YesYes Yes
Yes YesNo No
Yes YesNo Yes
Yes YesNo, unless soiling is likely
No, unless cleaning after transporting
a patient with transmissible
respiratory illness
Yes YesNo Yes
RECOMMENDED PERSONAL PROTECTIVE EQUIPMENT FOR PRE-HOSPITAL SETTINGS
Bleeding control with minimal bleeding
Childbirth
Helping with an intravenous (IV) line
Oral/nasal suctioning, manually clearing airway
Transporting or caring for a patient with signs of transmissible respiratory illness
Handling and cleaning contaminated equipment and clothing if bodily fluids are present
Task or ActivityDisposable
Gloves
ProtectiveEyewear
(always worn)Gown Mask
Donning PPE
1. Wash your hands.2. Put on your gown.3. Put on your mask.4. Put on protective eyewear.5. Put on disposable gloves.
DONNING AND DOFFING PPE
Doffing PPE
1. Remove your disposable gloves.2. Remove your gown.3. Wash your hands.4. Remove protective eyewear.5. Remove your mask.6. Wash your hands.
52
SUMMARYIN
FEC
TIO
N P
REV
ENTI
ON
AN
D C
ON
TRO
L
52

AN
ATO
MY
AN
D P
HY
SIO
LOG
Y
4 Anatomy and Physiology
53
Key ContentAnatomical Terminology ....... 54 Body Cavities .......................... 56 Body Systems ......................... 56 The Cell ................................ 57 Respiratory System .............. 57 Circulatory System............... 59 Lymphatic System ................ 62 Immunological System ........ 62 Nervous System ................... 64 Musculoskeletal System ...... 66 Integumentary System ........ 71 Endocrine System ................ 72 Digestive System ................. 73 Genitourinary System ......... 73 Interrelationships of Body Systems ............................. 74How Injuries Occur ................. 75
IntroductionAs a professional responder, you need a basic understanding of normal human body structure and function. This information will help you to recognize and understand illnesses and injuries. Body systems do not operate independently; they depend upon one another to function properly. When your body is healthy, your body systems are working well together, but an injury or illness in one body part or system can have effects in others. Knowing the location and function of the major organs and structures within each body system will help you to more accurately assess a patient’s condition and provide the best care.
To remember the location of body structures, it helps to learn to visualize the structures beneath the skin. The structures you can see or feel are reference points for locating the others. For example, to locate the carotid pulse on either side of the

AN
ATO
MY
AN
D P
HY
SIO
LOG
Y
54
neck, you can use the Adam’s apple as a reference point. Using reference points will also help you to describe the location of injuries and irregularities that you find. This chapter provides you with an overview of important reference points, anatomical terminology, and the functions of the major body systems.
ANATOMICAL TERMINOLOGY
Knowing about key body structures will help you to identify serious illnesses and injuries and accurately communicate with other emergency care personnel about a patient’s condition.
To use terms that refer to the body, you must first understand anatomical position. All medical terms that refer to the body are based on the position shown in Figure 4–1, a-b.
The simplest anatomical terms are based on an imaginary line running down the middle of the body, dividing it into equal right and left halves. This line is called the midline. In medical terms, right and left always refer to the patient’s right and left, not the responder’s.
Other terms related to the midline include lateral and medial. Anything located away from the midline is called lateral. Anything located toward the midline is called medial.
Another reference line can be drawn through the side of the body, dividing it into front and back halves. Anything located toward the front of the body is called anterior (ventral); anything toward the back is called posterior (dorsal).
When comparing any two structures, such as two body parts, any part toward the patient’s head is described as superior (cephalic). Any part toward the patient’s feet is described as inferior (caudal).
Figure 4–1, a-b a: The anatomical position and medical use of the terms right and left refers to the patient’s right and left. Medial refers to anything toward the midline; lateral refers to anything away from the midline. Proximal and distal are usually used to refer to extremities. b: Anterior refers to the front of the body; posterior refers to the back of the body; superior refers to anything toward the head; inferior refers to anything toward the feet.
ba
Proximal
Distal
Right Left
Lateral
Medial
Midline
Superior (Cephalic)
Anterior
(Ventral)
Inferior (Caudal)
Posterior
(Dorsal)

AN
ATO
MY
AN
D P
HY
SIO
LOG
Y
55
Two other terms are generally used when referring to the arms and legs. These terms are proximal and distal. To understand these terms, you must think of the chest, abdomen, and pelvis as the areas that make up the trunk of the body. Points on a limb that are closer to the trunk are described as proximal, and points farther from the trunk are described as distal.
Figure 4–2 shows other basic terms used for body regions and their specific parts. These terms will be used throughout this text.
Special anatomical terms are used for the abdomen, which is the part of the trunk below the ribs and above the pelvis. By drawing two imaginary lines, one from the sternum down through the navel to the lowest point in the pelvis and another horizontally through the navel, you divide the abdomen into four areas called quadrants (Figure 4–3). Referring to the affected quadrant(s) is important when describing injuries to the abdomen because it helps to determine which organs could be affected. Figure 4–2: It is important to refer correctly to the parts of the body.
Head
Right Left
Chest
Trunk
Lower extremity
Abdomen
Neck
Upper extremity
Shoulder
Arm
Elbow
Forearm
Wrist
Hand
Thigh
Hip
Knee
Lower leg
Ankle
Foot
Pelvis
Figure 4–3: The abdominal quadrants.
FRONT VIEWSpine
Spleen
Pancreas
Kidneys
Liver
Stomach
Gallbladder
Large intestine
Small intestine
Abdominal cavity
BACK VIEW

AN
ATO
MY
AN
D P
HY
SIO
LOG
Y
56
BODY CAVITIES
A body cavity is a hollow place in the body that contains organs such as the heart, lungs, and liver. The five major cavities that are illustrated in Figure 4–4 are: • Cranial cavity: Located in the head, protected
by the skull. • Spinal cavity: Extending from the bottom of
the skull to the lower back, protected by the bones of the spine.
• Thoracic cavity (also called chest cavity): Located in the trunk between the diaphragm and the neck, protected by the rib cage and the upper portion of the spine.
• Abdominal cavity: Located in the trunk between the diaphragm and the pelvis.
• Pelvic cavity: Located in the pelvis, which is the lowest part of the trunk, protected by the pelvic bones and the lower portion of the spine.
BODY SYSTEMS
The human body is a remarkable machine that performs many complex functions. Vital organs are organs such as the brain, heart, and lungs whose functions are essential for life.
Organs can be either hollow or solid. Hollow organs, such as the stomach and colon, have large spaces within them to allow solids to pass through. Solid organs, such as the liver and kidneys, do not.
A body system is a group of organs and other structures that are especially adapted to perform specific body functions (described in this chapter). They work together to carry out a function necessary for life. For example, the heart, blood, and blood vessels make up the circulatory system, which keeps all parts of the body supplied with oxygen-rich blood.
Human health depends on these systems working properly and coordinating properly with one another. When any one of them is damaged or impaired, the person’s health will be affected. Pathophysiology is the study of abnormal changes in mechanical, physical, and biochemical functions of body systems or cells caused by injury or illness. Figure 4–5: The basic human cell.
Figure 4–4: The five major cavities of the body.
Cranial cavity
Spinal cavity
Thoracic cavity
Abdominal cavity
Pelvic cavity
Diaphragm
Plasma cell membrane—regulates what exits and enters the cell
Golgi—processes and packages proteins and fats
Endoplasmic reticulum— creates, modifies, and transports proteins
Lysosome— houses destructive enzymes
Ribosome—produces proteins
Nucleus—contains genetic material
Mitochondria—generate energy

AN
ATO
MY
AN
D P
HY
SIO
LOG
Y
57
The CellThe cell is the basic unit of life (Figure 4–5). Among other things, energy, DNA, and enzymes are created within a human cell. Cells combine to form tissues, which in turn make up organs.
Respiratory SystemThe respiratory system supplies the body with oxygen through breathing. The body must have a constant supply of oxygen in order to stay alive. When you inhale, air fills your lungs, and the oxygen in the air is transferred to your blood and carried to the cells of the body. This same system removes carbon dioxide, which is transferred from the blood to the lungs. When you exhale, air is forced from the lungs, expelling carbon dioxide and other waste gases. This breathing process is called respiration.
The airway, which is the passage through which air travels to the lungs, begins at the nose and mouth, which form the upper airway. Air passes through the nose and mouth and through the pharynx (the throat), larynx (the voice box), and trachea (the windpipe) on its way to the lungs (Figure 4–6). The pharynx divides into two passageways: the esophagus (which leads to the stomach), and the trachea (which leads to the lungs). When a person swallows, a flap of tissue called the epiglottis protects the opening of the trachea so that food and liquid do not enter the lungs. The epiglottis divides the airway into two sections: the upper airway and the lower airway.
Air reaches the lungs through two tubes called bronchi. The bronchi branch into increasingly smaller tubes (called bronchioles), eventually terminating in millions of tiny air sacs called alveoli (Figure 4–7). Oxygen and carbon dioxide are exchanged with the blood through the thin cell walls of the alveoli and through tiny blood vessels called capillaries.
The lungs are protected by the chest. It is formed by 12 pairs of ribs, 10 of which attach to the sternum (breastbone) on the anterior side of the chest and the spine on the posterior side. The other two pairs attach only to the spine in the back and so are sometimes called floating ribs. The rib cage is the cage of bones formed by the 12 pairs of ribs, the sternum, and the spine, and protects the vital organs within (Figure 4–8).
When you inhale, the chest muscles and diaphragm contract, expanding the chest and drawing air into the lungs. When you exhale, the chest muscles and diaphragm relax, allowing air to exit the lungs (Figure 4–9, a-b). This ongoing breathing process is involuntary and is controlled by the medulla oblongata at the base of the brain. The intercostal muscles, between the ribs, are referred to as accessory muscles of respiration because they provide assistance to the diaphragm during the respiration process.
Figure 4–6: The respiratory system includes the pharynx, larynx, and trachea.
Figure 4–7: The bronchi branch into smaller tubes and end in air sacs called alveoli.
Trachea
Nose
MouthTongue
JawLungs
Bronchi
Bronchioles
NasopharynxOropharynxEpiglottisLarynx
Pharynx
Alveoli
Bronchiole
Alveolar sacs

Air flows in
Trachea
Lung expands
Diaphragm contracts
Air flows out
Lung relaxes
Diaphragm relaxes
AN
ATO
MY
AN
D P
HY
SIO
LOG
Y
58
Some examples of injuries, disorders, and diseases that affect the respiratory system include: • Asthma • Bronchitis • Pneumonia • Pulmonary edema • Airway obstruction • Hemothorax • Chronic obstructive pulmonary disease (COPD)
RESPIRATION PROCESSThe body requires a constant supply of oxygen, which varies depending on the needs of the body. These are affected by variables such as activity level. A body that is fighting off an illness, even the common cold, uses more energy and oxygen than a body in its healthy state. When a person is ill, the body must carry out all regular functions and also fight the illness. Some tissues, such as brain tissue, are very sensitive to oxygen starvation. Without oxygen, brain cells soon begin to die. Unless oxygen supplies can be restored, other vital organs will also be affected.
The brain is the control centre for respiration. It adjusts the rate and depth of breaths according to the oxygen and carbon dioxide levels in the body. Breathing requires the respiratory, circulatory, nervous, and musculoskeletal systems to work together. Injuries or illnesses that affect any of these systems may cause respiratory emergencies. For example, if the body suffers an injury, the body will require more oxygen to respond, therefore increasing the respiration rate.
Respiratory emergencies can be caused by: • Choking. • Illness (e.g., pneumonia). • Respiratory conditions (e.g., emphysema
and asthma). • Electrocution. • Shock.
Figure 4–9, a-b: The chest muscles and the diaphragm a, contract as you inhale and b, relax as you exhale.
a b
Figure 4–8: The rib cage surrounds and protects several vital organs.
Spine
Ribs
ClavicleTrachea
Lungs
Sternum (Breastbone)
Liver
Stomach Pancreas
Heart

AN
ATO
MY
AN
D P
HY
SIO
LOG
Y
59
• Drowning. • Heart attack or heart disease. • Injury to the chest or lungs. • Allergic reactions. • Drugs. • Poisoning (e.g., inhaling or ingesting
toxic substances).
AGONAL RESPIRATIONSAgonal respirations are an inadequate pattern of breathing associated with cardiac arrest states. Agonal respirations are not always seen during cardiac arrest. Because they can be confused with ordinary respiration, it is important that professional responders recognize agonal respirations.
Agonal respirations originate from lower brainstem neurons as higher brain centres become increasingly hypoxic (oxygen-deprived) during cardiac arrest. In agonal respirations, the diaphragm is still receiving intermittent residual impulses from the brain, resulting in sporadic gasping breaths.
Agonal respirations can present as a snorting, gurgling, moaning, or gasping sound, a gaping mouth, or laboured breathing. The duration differs from person to person, from a few minutes to several hours. While normal respirations follow a regular pattern, agonal respirations are irregular and sporadic. It is important to remember that agonal respirations are not sufficient for delivering oxygen to the body. A person experiencing agonal respirations is not breathing and requires immediate interventions.
Circulatory SystemThe circulatory system works with the respiratory system to carry oxygen to cells throughout the body and to carry carbon dioxide back to the lungs. It also carries other nutrients throughout the body and removes waste from cells.
The circulatory system includes the heart, blood, and blood vessels. Figure 4–10 shows the major structures of the circulatory system. The heart is a muscular fist-sized organ behind the lower half of the sternum. The heart is protected by the ribs and sternum in the front and by the spine in the back (Figure 4–11).
The heart is actually a double pump: One half pumps blood to the lungs while the other half pumps blood to the body. The heart has four chambers, and is separated into right and left halves. The two upper chambers, called atria, have thinner walls and receive blood, which is then passed down to the muscular pumping chambers called ventricles.
Figure 4–10: The circulatory system.
Figure 4–11: The heart is located in the middle of the chest, behind the lower half of the sternum.
Superior vena cava
Pulmonary veins
VeinsArteries
Inferior vena cava
Aorta
Pulmonary arteries
Heart
please supply:Figure 8-2 from page 129 of the previous edition.
Ribs
Lungs
Sternum (Breastbone)
Heart

AN
ATO
MY
AN
D P
HY
SIO
LOG
Y
60
Oxygen-poor blood from the body enters the right atrium and passes into the right ventricle. From there it is pumped to the pulmonary vessels and into the small capillaries surrounding the alveoli at the base of the lungs, where gas exchange occurs. Once oxygenated by the respiratory system, the blood returns to the heart through the pulmonary vessels and enters the left atrium. It then passes into the left ventricle, which pumps it into the large aorta, and from there through the arterial system to the rest of the body. One-way valves direct the flow of blood as it moves through the heart’s chambers.
After the oxygen in the blood is transferred to the cells, veins carry the oxygen-poor blood back to the heart through veins. The heart pumps this blood to the lungs to pick up more oxygen before pumping it to other parts of the body. This process is called the circulatory cycle. The cross-section of the heart in Figure 4–12 shows how blood moves through the heart to complete the circulatory cycle.
The system of blood vessels that carries blood through the body is referred to as the vascular system. It consists of the following key components: • Arteries: Large high-pressure tubes that carry
oxygenated blood from the heart and lungs to the body.
• Veins: Large lower-pressure tubes that carry oxygen-poor blood back to the heart and lungs.
• Capillaries: Small tubes that allow the transfer of gases, nutrients, and waste between the vascular system and the body’s cells. They are the link between arteries and veins.
Two exceptions to the points above exist: The pulmonary arteries carry oxygen-poor blood from the heart to the lungs, and the pulmonary veins carry oxygenated blood from the lungs to the heart.
Blood in the arteries travels quickly and is under greater pressure than blood in the capillaries and veins. Blood in the arteries moves in pulses as the heart beats; blood in the veins flows more slowly and evenly.
THE HEART’S ELECTRICAL SYSTEMThe pumping action of the heart is called a contraction. Contractions are controlled by the heart’s electrical system, which makes the heart beat regularly. You can feel the heart’s contractions in the arteries that are close to the skin such as the ones at the neck or the wrist. The beat you feel with each contraction is called the pulse. The heart must beat regularly to deliver oxygen to the body’s cells to keep the body functioning properly.
To better understand both the limitations of CPR and how defibrillators work, it is helpful to understand how the heart’s electrical system functions. Under normal conditions, specialized cells in the heart produce electrical activity. These electrical impulses are the stimuli that cause the heart muscle to contract and pump the blood out of its chambers and throughout the body (Figure 4–13).
The normal point of origin of the electrical impulse is the sinoatrial (SA) node, which is situated in the upper part of the heart’s right atrium. When
Figure 4–12: The right side of the heart receives blood from the body and sends it to the lungs. The left side of the heart receives blood from the lungs and pumps it out through the body. One-way valves direct the flow of blood through the heart.
To upper body
Aorta
To lungTo lung
From lung From lung
Left atrium
Left ventricle
Right ventricle
Right atrium
From upper body
From lower body (inferior vena cava)
To lower body (descending aorta)
n = Oxygen-poor blood pumped from the body to the lungsn = Oxygen-rich blood pumped from the lungs to the body

AN
ATO
MY
AN
D P
HY
SIO
LOG
Y
61
it fires, the atria contract. The electrical impulse moves to the atrioventricular (AV) node, which is situated between the atria and ventricles, through conduction pathways within the heart muscle.
From the AV node, the electrical signal is sent to the ventricles through other pathways. When the ventricles receive the impulse, they contract to expel the blood throughout the body’s blood vessels. This process normally occurs 60 to 100 times per minute.
Cardiac monitors are used to read the electrical impulses in the heart and produce an electrocardiogram (ECG), which is a reading of the conduction of the electrical current through the pathways of the heart. The normal conduction of electrical impulses without any disturbances is called sinus rhythm (SR) (Figure 4–14).
BLOOD COMPONENTSBlood consists of liquid and solid components and comprises approximately 8% of the body’s total weight, with a volume of approximately 5 litres (5 quarts). Blood has three major functions:1. Transporting oxygen, nutrients, and waste
2. Protecting against disease by producing antibodies and defending against pathogens
3. Helping to regulate body temperature by transferring heat to different parts of the body
Blood appears as a uniform red liquid, but it contains the following major components: • Plasma: A clear yellowish fluid; carries blood
cells as well as many proteins, minerals, and waste products
• Red blood cells: Bond with oxygen molecules so that they can be carried to cells
• White blood cells: Fight infection • Platelets: Repair leaks in blood vessels by
promoting clotting
Plasma makes up just over half of the volume of blood circulating within the body. Composed mostly of water, plasma carries the other blood components through the circulatory system and maintains the blood volume that the circulatory system requires to function effectively. Plasma also contains nutrients essential for energy production and cell maintenance, and carries waste products away from cells.
Red blood cells (erythrocytes) make up the majority of the blood’s solid components. They contain hemoglobin, which bonds to oxygen so that it can be carried to the cells that need it. Red blood cells also carry carbon dioxide away from the cells so that it can be exhaled. Red blood cells are produced in the marrow in the hollow centre of large bones, such as the humerus and femur. When blood is rich in oxygen, it appears bright red. Low-oxygen blood appears dark red or purple. This is why arterial blood can usually be quickly identified by its bright colour.
White blood cells (leukocytes) are a component of the body’s immune system, defending against invading micro-organisms. They also aid in producing antibodies that help the body resist infection.
Platelets (thrombocytes) are disc-shaped cell fragments in the blood. They are a crucial component of blood clotting: When the vascular system is ruptured (e.g., a vein is cut by a knife), platelets bind together on the inside of the damaged vessel to form a clot. This blocks the
Figure 4–13: The conduction system of the heart.
Figure 4–14: Sinus rhythm.
Purkinje fibres
Atria
SA node
AV node
Bundle of His
Bundle branches
Ventricles

AN
ATO
MY
AN
D P
HY
SIO
LOG
Y
62
hole in the blood vessel and prevents blood from escaping until the wound can heal.
Some examples of injuries, disorders, and diseases that affect the cardiovascular system include: • Myocardial infarction (heart attack). • Angina (chest pain caused by reduced blood
flow to the heart). • Ischemia (a restriction in blood supply to
tissues). • Aneurysm (dilation or swelling of a blood
vessel’s wall, which makes it more likely to rupture).
• Atherosclerosis (fatty deposits and fibrosis on artery walls).
• External or internal bleeding. • Hypertension (elevated blood pressure). • Congestive heart failure (CHF) (inefficient
heart contractions, which can cause a backup of blood in the systemic and/or pulmonary circuit).
Lymphatic SystemThe lymphatic system performs three interrelated functions: 1. Removal of excess fluids (lymph) from body
tissues2. Absorption of fatty acids and subsequent
transport of fat to the circulatory system 3. Formation of white blood cells (WBCs) and
initiation of immunity through the formation of antibodies, creating specific resistance to pathogens
The lymphatic system acts as a secondary circulatory system, transporting lymph throughout the body as the circulatory system transports blood. It collaborates with white blood cells in lymph nodes to protect the body from being infected by cancer cells, fungi, viruses, or bacteria.
Unlike the circulatory system, the lymphatic system is not closed and has no central pump. The lymph moves slowly and under low pressure due to peristalsis, which is the operation of semilunar valves in the lymph veins, and the milking action of skeletal muscles. Like veins, lymph vessels have one-way semilunar valves and depend mainly on the movement of skeletal muscles to squeeze fluid through them.
Rhythmic contraction of the vessel walls can also help draw fluid into the lymphatic capillaries. This fluid is then transported to progressively larger lymphatic vessels culminating in the right lymphatic duct (for lymph from the right upper body) and the thoracic duct (for the rest of the body). These ducts drain into the circulatory system at the right and left subclavian veins.
LYMPHLymph originates as blood plasma that leaks out of the capillaries of the circulatory system and becomes interstitial fluid (fluid in the space between individual cells of tissue). Plasma is forced out of the capillaries by hydrostatic pressure, and as it mixes into the interstitial fluid, the volume of fluid increases slowly.
Approximately 90% of this plasma is reabsorbed into the capillaries through osmosis, but the remaining 10% accumulates as overfill. The excess interstitial fluid is collected by the lymphatic system by diffusion into lymph capillaries and is processed by lymph nodes prior to being returned to the circulatory system. Once within the lymphatic system, the fluid is called lymph and has almost the same composition as the original interstitial fluid.
Immunological SystemThe immune system is a network of organs, cells, and proteins that identify and destroy harmful foreign substances in the body. These can be grouped into three types of defense: innate defence, non-specific responses to infection, and specific defence. It is only when all three lines are breached that infection and disease can occur.
Protecting the body is a difficult task, since pathogens range from viruses to parasitic worms and must be detected with absolute specificity as they are hidden amongst normal cells and tissues. It is important that the body identify pathogens correctly so that it destroys as many as possible without attacking its own cells. This is further complicated by the fact that most pathogens are constantly evolving and mutating, increasing their chance of avoiding detection and successfully infecting their hosts.

AN
ATO
MY
AN
D P
HY
SIO
LOG
Y
63
INNATE DEFENCEThe body’s innate defences include physical and chemical barriers that prevent pathogens from entering or establishing themselves in the body. One of the primary barriers against bacteria and other harmful organisms is the skin, which keeps pathogens from entering the body. In addition to the physical barrier, skin creates a chemical barrier: Sebaceous glands in the skin produce sweat and sebum, which contain antiseptic molecules (primarily lysozyme) that break down bacterial cell walls.
The body’s mucous membranes form a second physical barrier. Mucous membranes line various body cavities that are exposed to the external environment and also line internal organs. Major mucous membranes can be found in the nose, mouth, ears, genital area, and anus. Mucous membranes function by secreting mucus that traps bacteria and other foreign debris. Some mucous membranes are ciliated, meaning that they are covered with cilia, thin tail-like projections extending approximately 5 to 10 micrometers from the surface. The main function of cilia is to move things across the surface of the membrane. Cilia move potentially harmful substances towards the outside of the body where they can be harmlessly expelled.
Innate defence includes other chemical defenders as well. Tears and saliva also contain lysozyme, and glands in the stomach lining produce hydrochloric acid (HCl), which kills most pathogens that are ingested.
NON-SPECIFIC RESPONSES TO INFECTIONNon-specific immune responses are generalized responses initiated by the body when infection is detected. They include inflammation and fevers. This line of defence also includes the deployment of white blood cells (WBCs).
Any break in the skin can allow bacteria to enter the body. When an injury occurs, cells rupture, releasing histamine. This causes the capillaries to dilate, becoming more permeable and leaking fluid into these tissues. This reaction by the body is
called an inflammatory response. Inflammation is characterized by swelling, redness, heat, pain, and dysfunction of any organs involved.
During an infection, white blood cells may release a chemical that changes the thermostat setting in the hypothalamus. When the thermostat is set to a higher temperature, the current body temperature registers as too cold. To increase the temperature to the new level, the body shivers to generate heat. This can result in a fever. The increased temperature makes the body less hospitable to pathogens. The hypothalamus may subsequently lower the thermostat, in which case the person will suddenly feel overheated and start to sweat as the body attempts to cool off. A person may alternate between these heating and cooling responses during the course of an infection.
When the skin is broken, WBCs arrive and attempt to engulf and destroy invading pathogens. Chemicals produced by the WBCs are carried by the blood to bone marrow, where they stimulate the production and release of additional WBCs to support the immune response. During the response, some WBCs die and become mixed with other cells such as dead tissue, bacteria, and living WBCs. This forms a thick, yellow-white fluid called pus.
SPECIFIC DEFENCESpecific defences directly target invading pathogens by responding to antigens. Antigens are proteins found on the membranes of cells that the body recognizes as non-self (e.g., microbes, foreign cells, and cancer cells). Normally, the body’s immune system does not respond to its own antigens; however, if it does, this is referred to as autoimmune disease. Sometimes a person will develop an immune response to a harmless antigen, such as pollen or cat dander; this is an allergic response.
LymphocytesSpecific immunity is dependent upon two special types of WBCs called lymphocytes: B cells and T cells. Their names are based on where in the body they mature. B cells mature in the bone marrow, and T cells mature in the thymus gland. B- and T-cell lymphocytes are capable of

AN
ATO
MY
AN
D P
HY
SIO
LOG
Y
64
recognizing an antigen because they have specific receptor molecules on their surface that exactly fit individual antigens as a key fits into a lock.
B CellsB-cell lymphocytes are responsible for antibody-mediated immunity (also called humoral immunity). They produce antibodies that bind with and neutralize specific antigens. Antibodies do not directly kill bacteria but mark them for destruction. When antibodies bind to viruses, they can prevent the viruses from infecting cells. When antibodies bind to toxins, they can neutralize them. This allows people to be immunized against specific toxins, such as tetanus.
As B cells mature, they develop surface receptors that allow them to recognize specific antigens. They then travel through the bloodstream, distributing throughout the lymph nodes, spleen, and tonsils. Once B cells reach their destination, they remain inactive until they encounter a foreign cell with an antigen that matches their particular receptor site. When such an encounter occurs, the B cell’s receptors will attach it to the antigen. The B cell is then turned on and actively secretes antibodies that will bind with the invading antigen. Although these cells only live a few days, their antibodies remain and circulate in the blood and lymph, gradually decreasing in number.
At the time of activation, some of the cells become memory B cells, which have a longer lifespan. Memory B cells record the information about the foreign antigen so that antibodies can be made more quickly, and in greater quantities, if a second exposure occurs. This is the principle behind vaccination: By creating cells in the body that are keyed to detect a specific pathogen, the vaccination gives the body the tools to quickly attack and destroy that pathogen if it is introduced again.
T CellsDefending the body against intracellular pathogens is the role of T cells. Macrophages, a type of white blood cell, seek out and ingest invading microbes. Antigens from the microbe turn on, or stimulate, the T cell.
The activated T cell rapidly multiplies into a large group of cytotoxic T cells. These cytotoxic T cells migrate to the site of the infection or disease and produce chemicals that directly kill the pathogens. A portion of these activated T cells also become memory T cells, recording information about the foreign antigen so that T cells can respond more quickly and with greater power if a second exposure occurs.
ALLERGIC AND INFLAMMATORY RESPONSESAn allergy is an inflammatory immune response to a foreign antigen. On its own, the antigen is not harmful to the body, but in a person who is sensitive to the antigen, the body produces an inflammatory response designed to get rid of it. This inflammatory response also creates antibodies to respond to future exposures to the antigen. Allergic inflammatory responses can have effects ranging from mild to fatal. The immune response to an allergen is classified as either a sensitivity or a hypersensitivity.
During a hypersensitivity reaction, the inflammatory response is more intense. When the allergen enters the body, it binds to the antibodies that are already present. These antibodies sit on mast cells (specialized WBCs) located in connective tissues throughout the body. When an allergen binds with the antibody, the mast cell triggers the immediate release of histamine and other mediators that cause allergy symptoms. The severity of the reaction varies, ranging from localized reactions near the site where the allergen entered the body (e.g., a rash) to life-threatening allergic reactions called anaphylaxis.
In an anaphylactic reaction, a massive release of histamine causes widespread vasodilation, circulatory collapse, and severe bronchoconstriction. Unless treated promptly, anaphylaxis can result in death.
Nervous SystemThe nervous system is the most complex and delicate of all body systems. The brain and spinal cord form the central nervous system.

AN
ATO
MY
AN
D P
HY
SIO
LOG
Y
65
The brain regulates all body functions, including the respiratory and circulatory systems. The primary functions of the brain can be divided into three categories: 1. Sensory functions2. Motor functions3. Integrated functions such as responsiveness,
memory, emotion, and use of language
The brain transmits and receives information through a network of nerves. Figure 4–15 shows the nervous system. The spinal cord, a large bundle of nerves, extends from the brain through a canal in the spine. Nerve branches extend to various parts of the body through openings on the sides of the vertebrae.
Nerves transmit information as electrical impulses from one area of the body to another. Some nerves conduct impulses from the body to the brain, allowing you to see, hear, smell, taste, and
feel. These are the sensory functions. Other nerves conduct impulses from the brain to the muscles to control motor functions.
Illness or injury to the brain may change a person’s level of responsiveness (LOR) and/or affect specific psychological functions such as memory, emotion, and language. Injuries to the nervous system can also affect sensation and the ability to move (motor function).
Nerve cells cannot regenerate or grow back. Once brain cells are damaged or killed, they are not replaced. Nerve cells may die due to disease or injury. When a particular part of the brain is diseased or injured, a person may permanently lose the body functions controlled by that area of the brain. For example, if motor control centres are damaged, the person may experience permanent paralysis.
One of the functions of the brain, particularly of the brain stem, is maintaining responsiveness. When the brain stem is fully functioning and oxygenated, the person is responsive. Decreased oxygen supply results in a decreased level of responsiveness, where the person may only respond to tactile or painful stimuli. The level of responsiveness may further degrade to a point of unresponsiveness, where there is no response to any stimulus.
The spinal column is a strong, flexible column that supports the head and the trunk, and it encases and protects the spinal cord. The spinal column, which extends from the base of the skull to the tip of the coccyx, consists of a series of small articulated bones called vertebrae. The vertebrae are separated from one other by cushions of cartilage called intervertebral discs (Figure 4–16, a). This cartilage is an elastic tissue that acts as a shock absorber, cushioning against the effects of everyday movement.
The spinal column is divided into five regions (Figure 4–16, b): 1. The cervical or neck region2. The thoracic or mid-back region3. The lumbar or lower back region4. The sacrum5. The coccyx, which consists of three to four
small fused vertebrae at the lower end of the spinal column
Figure 4–15: The nervous system.
Central nervous system
Peripheral nervous system
Brain
Spinal cord
Nerves to and from
the spinal cord

b
C1
C2
C3
C4
C5
C6
C7
T1
T2
T3
T4
T5
T6
T7
T10
T11
T12
L1
L2
L3
L4
L5
S1S2
S3S4
S5
AN
ATO
MY
AN
D P
HY
SIO
LOG
Y
66
Injuries to the spinal column may include fractures and dislocations of the vertebrae, sprained ligaments, strained muscles, and compression or displacement of the discs between the vertebrae.
Some examples of injuries, disorders, and diseases that affect the nervous system include: • Parkinson’s disease. • Multiple sclerosis (MS). • Amyotrophic lateral sclerosis (ALS). • Spinal cord injury (This can be related to
trauma to the musculoskeletal system.) • Brain tumors. • Concussion. • Stroke/transient ischemic attack (TIA).
Musculoskeletal SystemThe musculoskeletal system is made up of the body’s muscles, the bones that form the skeleton, and connective tissues such as tendons and ligaments. Together, these structures support the body, protect internal organs, allow movement, store minerals, produce blood cells, and generate heat.
MUSCLESThe body has more than 600 muscles. Most are skeletal muscles that attach to bones. Skeletal muscles account for most of a person’s lean body weight (body weight without excess fat).
Figure 4–16, a-b: a, Vertebrae are separated by cushions of cartilage called intervertebral discs; b, the spine is divided into 5 regions.
a
b
Vertebra
Spinal cord
Intervertebral disc
Cervical
Thoracic
Lumbar
Sacrum5 fused vertebrae
Coccyx4 fused vertebrae

AN
ATO
MY
AN
D P
HY
SIO
LOG
Y
67
Body movements result from skeletal muscles contracting and relaxing. Figure 4–17 shows the major muscles of the body. Because skeletal muscle actions are under your conscious control, skeletal muscles are also called voluntary muscles. Skeletal muscles protect underlying structures such as bones, nerves, and blood vessels.
Most skeletal muscles are anchored to a bone at each end by tendons, which are strong cord-like tissues. Muscles and their adjoining tendons extend across joints. When the brain sends a command to move, electrical impulses travel from the brain down through the spinal cord and nerve pathways to the individual muscles and stimulate the muscle fibres to contract. This shortens (contracts) the muscle, pulling the ends of the muscle closer together, which in turn pulls the attached bones, causing motion at the joint the muscle crosses. The contraction and relaxation of muscles also produces heat.
Most movement is caused by muscle groups working together (Figure 4–18). For instance, the hamstring muscles are a group of muscles at the back of the thigh, and the quadriceps are a group of muscles at the front of the thigh. When the hamstring muscles contract, the knee bends (flexion). When the quadriceps contract, the knee straightens (extension). Generally, when one group of muscles contracts, another group of muscles relaxes (Figure 4–19). Even simple tasks, such as tossing a ball, involve a complex series of movements in which different muscle groups contract and relax.
Muscle actions can be voluntary or involuntary. Involuntary muscles, such as the heart and diaphragm, are automatically controlled by the brain. You don’t have to think about them to make them work. Voluntary muscles, such as leg and arm muscles, are most often under your conscious control. You are aware of telling them
Figure 4–17: Major muscles of the body.
FRONT VIEW BACK VIEW
Face muscles
Neck muscles
Gluteus maximus
Hamstring muscles
Calf muscles
Achilles tendon
Back muscles
Deltoid
Triceps
Flexors and extensors of wrist and fingers
Neck muscles
Deltoid
Biceps
Flexors and extensors
of wrist and fingers
Quadriceps
Flexors and extensors of
foot and toes
Chest muscles
Abdominal muscles
Groin muscles

AN
ATO
MY
AN
D P
HY
SIO
LOG
Y
68
to move, and they usually don’t move unless you want them to.
Injuries to the nervous system, brain, spinal cord, or peripheral nerves can affect muscle control. A complete loss of muscle control is called paralysis. When an isolated injury to a muscle occurs, the adjacent muscles can sometimes assume some of the function of the injured muscle (Figure 4–20).
SkeletonAn adult skeleton is comprised of over 200 bones of various sizes and shapes (Figure 4–21). These bones shape the skeleton, giving each body part a unique form. Prominent bones that can be seen or felt beneath the skin provide landmarks for locating less visible internal structures.
The skeleton protects vital organs and other soft tissues (Figure 4–22, a-c). The point where two or more bones come together is a joint. Ligaments, which are fibrous bands that hold bones together at joints, give the skeleton stability and, with the muscles, help maintain posture.
BonesBones are hard, dense tissues. Their strong, rigid structure helps them to support the body and withstand stresses that cause injuries. The shape of each bone depends on its function and the stresses imposed on it. For example, although they are similar in appearance to the bones of the arm, the bones of the leg are much larger and stronger because they support the body’s weight.
In addition to supporting and protecting the body, bones aid movement. The bones of the arms and legs work like a system of levers and pulleys to position the hands and feet. Bones of the wrist, hand, and fingers are progressively smaller to allow for fine movements, such as writing. The small bones of the feet enable the body to walk smoothly, and together they work as shock absorbers while walking, running, or jumping. Bones have many blood vessels and nerves.
Figure 4–20: Adjacent muscles can often assume the function of an injured muscle.
Figure 4–19: Movement occurs when one group of muscles contracts and an opposing group of muscles relaxes.
Injured muscle
Adjacent muscle
Figure 4–18: Muscles work together to produce movement.
Relax
Relax
Contract
Contract

AN
ATO
MY
AN
D P
HY
SIO
LOG
Y
69
Figure 4–22, a-c a: The immovable bones of the skull protect the brain; b, the rib cage protects the heart and lungs; and, c, the vertebrae protect the spinal cord.
a b c
Cranium
Thorax
Spinal column
Face
Thorax
Patella
Spinal column
Skull
Clavicle
Scapula
Humerus
Radius
Ulna
Pelvis
Coccyx
Femur
Tibia
Fibula
Ribs
Sternum
FRONT VIEW BACK VIEW
Figure 4–21 The skeleton.

AN
ATO
MY
AN
D P
HY
SIO
LOG
Y
70
Bones are filled with a spongey tissue called marrow, which produces blood cells and supplies them to the circulatory system.
Bones are classified as long, short, flat, or irregular: • Long bones are longer than they are wide.
These include the bones of the upper arm (humerus), the forearm (radius and ulna), the thigh (femur), and the lower leg (tibia and fibula).
• Short bones are about as wide as they are long. Short bones include the small bones of the hands (carpals) and feet (tarsals).
• Flat bones have a relatively thin, flat shape. They include the sternum, the ribs, the shoulder blades (scapula), and some of the bones that form the skull.
• Irregular bones are those that do not fit into one of the other three categories. They include the vertebrae, bones of the face, and the sesamoid bones (tiny bones embedded in other tissues).
Bone injuries are usually very painful and can bleed excessively. The bleeding can become life-threatening if not properly cared for. Bones heal by forming new bone cells.
Bones become more brittle with age. Bones in young children are more flexible than in adults, so they are less likely to break. An older adult’s bones are less dense and more likely to give way under everyday stresses.
Osteoporosis is a degenerative bone disorder that occurs when the amount of calcium in the bones decreases, causing low bone mass (in addition to the natural deterioration of bone tissue).
Bone-building cells constantly repair damage that occurs as a result of everyday wear and tear, keeping bones strong. When the calcium content of bones decreases, the bones become frail, less dense, and less able to repair themselves after incurring stress and damage.
The loss of density and strength leaves bones more susceptible to fractures (especially of the hips, vertebrae, and wrists). Instead of being caused by tremendous force, fractures may now occur
spontaneously, with little or no aggravation, trauma, or force. For example, the person may be taking a walk or washing dishes when the fracture occurs. Some hip fractures thought to be caused by falls are actually spontaneous fractures that cause the person’s fall. Repeated fractures are also a sign of osteoporosis. Osteoporosis is a leading cause of bone and joint injuries in older people. It is much more common in women.
JointsA joint is a structure formed by the ends of two or more bones coming together. Figure 4–23 shows a typical joint. Most joints allow motion. However, the bones at some joints are fused together, which restricts motion. Fused bones, such as the bones of the skull, form solid structures that protect their contents (Figure 4–24).
Joints are held together by tough, fibrous connective tissues called ligaments. Ligaments resist joint movement, so joints surrounded by ligaments have restricted movement, while joints that have fewer ligaments move more freely. For instance, the shoulder joint, which has fewer ligaments, has a greater range of motion than the hip joint, although their structures are similar. Each joint is surrounded by a capsule that secretes synovial fluid to lubricate the joint.
Figure 4–23: A typical joint consists of at least two bones that are held together by ligaments.
Femur
Fibula
Tendon
LigamentsLigaments
Tibia
Patella

AN
ATO
MY
AN
D P
HY
SIO
LOG
Y
71
Joint motion also depends on the bone structure. Joints that move more freely have less natural support and are therefore more prone to injury. However, there is a normal range of movement for each joint. When a joint is forced beyond its normal range, ligaments stretch and tear. Stretched and torn ligaments permit too much motion, making the joint unstable. Unstable joints can be disabling, particularly when they are weight-bearing joints (e.g., the knee or ankle). Unstable joints are also more prone to injury and often develop osteoarthritis, which is an inflammatory condition of the joints that generally occurs in older adults.
Some examples of injuries, disorders, and diseases that affect the musculoskeletal system include the following: • Sprains • Strains • Dislocations • Fractures • Carpal tunnel syndrome • Osteoporosis
Integumentary SystemThe integumentary system consists of the skin, hair, and nails (Figure 4–25). Most important among these is the skin because it protects the body. The skin is the largest single organ, and without it the human body could not function. It helps keep fluids inside and prevents infection by keeping pathogens from entering the body. The skin also helps make vitamin D and stores minerals. The skin is made of tough, elastic fibres that can stretch without tearing, protecting it from injury.
The skin has two layers. The outer layer of skin, the epidermis, provides the barrier to bacteria and other organisms that can cause infection. The deeper layer, called the dermis, contains the important structures of the nerves, glands, and blood vessels.
Figure 4–24: Fused bones, such as those of the skull, form solid structures that protect their contents.
Figure 4–25: The integumentary system.
Epidermis
Nerves
Skin
Hair
Glands
Fatty tissue
Dermis
Subcutaneous layer

AN
ATO
MY
AN
D P
HY
SIO
LOG
Y
72
The outer surface of the skin consists of dead cells that are continually rubbed away and replaced. The skin contains the hair roots, oil glands, and sweat glands. Oil glands help keep the skin soft, supple, and waterproof. Sweat glands and pores help regulate body temperature by releasing sweat. The nervous system monitors blood temperature and causes the body to sweat if blood temperature rises even slightly. Small amounts of sweat are often released to the skin’s surface without the person’s awareness.
Blood supplies the skin with nutrients and helps provide its colour. When blood vessels dilate (become wider), the blood circulates close to the skin’s surface. This increases heat loss, cooling the blood, and makes the skin feel warm. It also makes some people’s skin appear flushed and red. The reddening may not appear on darker skin. When blood vessels constrict (become narrower), less blood is close to the skin’s surface. This causes the skin to feel cool and appear pale, and reduces heat loss.
Nerves in the skin also absorb information about the environment. Nerves make the skin very sensitive to touch, pain, and temperature, so the skin is also an important part of the body’s sensory communication network.
Beneath the skin lies a layer of fat, which helps to insulate the body, aiding in thermoregulation. The fat layer also stores energy. The amount of fat in this layer varies from person to person and between different areas of the body.
Some examples of injuries, disorders, and diseases affecting the integumentary system include the following: • Skin cancer • Eczema • Psoriasis • Burns • Lacerations, contusions, and abrasions
Endocrine SystemThe endocrine system is one of the body’s two regulatory systems. Together with the nervous system, it coordinates the activities of other systems. The endocrine system consists of several glands (Figure 4–26). Glands are organs that release fluid and other substances into the blood or onto the skin. Some produce hormones, chemical messengers that enter the bloodstream and influence tissue activity in various parts of the body. For example, the thyroid gland makes a hormone that controls metabolism, the process by which all cells convert nutrients into energy.
Figure 4–26: The endocrine system.
Pineal gland
Hypothalamus
Pituitary gland
Thyroid
Adrenal glands
Ovaries
Testes

AN
ATO
MY
AN
D P
HY
SIO
LOG
Y
73
Some examples of injuries, disorders, and diseases that affect the endocrine system include: • Traumatic brain injuries (TBIs), which can
damage the pituitary gland or hypothalamus. • Thyroid cancer. • Type 1 and 2 diabetes.
Digestive SystemThe digestive system, also called the gastrointestinal (GI) system, consists of organs that work together to break down food and eliminate waste from the body. Figure 4–27 shows the major organs of the digestive system. Food enters the system and is broken down into smaller components that the body can use. This occurs both mechanically (e.g. when food is chewed) and chemically (e.g. when food is broken down molecularly by stomach acid). As food passes through the system, the body absorbs nutrients that can be converted for use by the cells. The unabsorbed portion continues through the system and is eliminated as waste.
Since most digestive system organs are in the unprotected abdominal cavity, they are very vulnerable to injury. Damaged organs may hemorrhage internally, causing severe loss of blood, or spill waste products into the abdominal cavity, causing infection.
Examples of injuries, disorders, and diseases that affect the digestive system include the following: • Bowel obstruction • Gastrointestinal bleed • Appendicitis • Abdominal injuries
Genitourinary SystemThe genitourinary system is made up of two organ systems: the urinary system and the reproductive system. The urinary system consists of organs that eliminate waste products filtered from the blood (Figure 4–28). The primary organs are the kidneys and the bladder. The kidneys are located behind the abdominal cavity just beneath the chest, one on each side. They filter waste from the circulating blood and form urine. Urine is then stored in the bladder, which is a small muscular sac. The bladder expands as it fills and then contracts when the urine is released.
Figure 4–27: The digestive system.
Mouth
Liver
Gallbladder
Large intestine
(colon)
Esophagus
Stomach
Pancreas
Small intestine
Rectum
Anus
Figure 4–28: The urinary system.
Ureters
Urethra
Kidneys
Urinary bladder

AN
ATO
MY
AN
D P
HY
SIO
LOG
Y
74
The kidneys are partially protected by the lower ribs. However, the kidneys may be damaged by a significant blow to the back just below the rib cage or a penetrating wound such as a stab or gunshot wound. Because of the kidney’s rich blood supply, such an injury may cause severe hemorrhaging.
The bladder is injured less frequently than the kidneys, but injuries to the abdomen can rupture the bladder, particularly when it is full. Bone fragments from a fracture of the pelvis can also pierce or rupture the bladder.
The male and female reproductive systems include the organs for sexual reproduction (Figure 4–29, a-b). Because these organs are close to the urinary system, injuries to the abdominal or pelvic area can injure organs in either system.
The female reproductive organs are smaller than many major organs and are protected by the pelvic bones. The soft tissue of the external structures are more susceptible to injury, although such injury is uncommon. The male reproductive organs are located outside the pelvis and are more vulnerable to injury.
The external reproductive organs, called genitalia, have a rich supply of blood and nerves. Injuries to these organs may cause a hemorrhage but are rarely life-threatening. Injuries to the genitalia are usually caused by a blow to the pelvic area or by sexual assault.
Some examples of injuries, disorders, and diseases that affect the genitourinary system include the following: • Urinary tract infection (UTI) • Pelvic inflammatory disease (PID) • Ectopic pregnancy • Breech birth • Post-partum bleeding
Interrelationships of Body SystemsEach body system plays a vital role in survival. Body systems work together to help the body maintain a constant healthy state. When conditions change, the body’s systems adapt to the new conditions. For example, because the musculoskeletal system works harder during exercise, the respiratory and circulatory systems must also work harder to meet the body’s increased oxygen demands. The body’s systems also react to the stresses caused by illness or injury and to environmental factors such as the ambient temperature.
Body systems do not work independently of each other. The impact of an injury or a disease is rarely restricted to one body system. For example, a broken bone may result in nerve damage that may impair movement and feeling. Injuries to the ribs can make breathing difficult. If the heart stops beating for any reason, breathing will also stop.In any significant illness or injury, multiple body systems may be affected. Generally, the more body systems that are involved in an emergency, the more serious the emergency.
Figure 4–29, a-b: The reproductive systems: a, male; b, female.
a b
Vagina
Duct system
Ovaries
Fallopian tubes
Uterus
Urethra
Penis
Testicles

AN
ATO
MY
AN
D P
HY
SIO
LOG
Y
75
HOW INJURIES OCCUR
The body has a natural resistance to injury. However, injuries occur when external forms of energy produce forces that the body cannot tolerate. Mechanical forms of energy and the energy from heat, electricity, chemicals, and radiation can damage body tissues and disrupt normal body function.
Some tissues, such as the soft tissues of the skin, have less resistance and are at a greater risk of injury when exposed to trauma than the deeper, stronger tissues of muscle and bone. Some organs, such as the brain, heart, and lungs, are better protected by bones than other organs, such as those in the abdominal cavity. Understanding the forces that cause injury and the kinds of injury that each force can cause will help you recognize certain injuries that a patient may have.
Mechanical EnergyMechanical energy produces the following forces: direct, indirect, twisting, and contracting. Figure 4–30 shows how these forces can result in injuries.
A direct force is the force of an object striking the body and causing injury at the point of impact. Direct forces can be either blunt or penetrating. For example, a fist striking the chin (blunt force) can break the jaw, or a bullet (penetrating force) can injure structures beneath the skin. Direct force can cause internal and external bleeding, head and spinal injuries, fractures, and other problems, such as crushing injuries.
An indirect force is the force of a blunt object striking one part of the body and causing injury to another. For example, falling onto an outstretched hand may result in an injury to the arm, shoulder, or collarbone.
Figure 4–30: Four forces—direct, indirect, twisting, and contracting—cause the majority of all injuries.

AN
ATO
MY
AN
D P
HY
SIO
LOG
Y
76
In a twisting injury, one part of the body remains stationary while another part of the body turns. A sudden or severe twisting action can force body parts beyond their normal range of motion, causing injury to bones, tendons, ligaments, and muscles. For example, if a ski and its binding keep the lower leg in one position while the body falls in another position, the knee may be forced beyond its normal range of motion. Twisting injuries are not always this complex. They more often occur as a result of simple actions, such as stepping off a curb or turning to reach for an object.
Sudden or powerful muscle contractions often result in injuries to muscles and tendons. These commonly occur in sports activities—for example, when someone throws a ball without properly warming up or preparing his or her muscles. Occasionally, powerful muscle contractions can suddenly pull a piece of bone away from the point at which it is normally attached.
These four forces, products of mechanical energy, cause the majority of injuries. Soft tissue injuries and injuries to muscle and bone (musculoskeletal injuries) are most often the result.

SUMMARY
77
AN
ATO
MY
AN
D P
HY
SIO
LOG
Y
Midline
Head
Chest
Trunk
Abdomen
Pelvis
HipHand
Wrist
Elbow
Arm
Shoulder
Neck
Forearm
Thigh
Knee
Ankle
Foot
RightLower extremity Left
Lower leg
Upper extremity
Medial
Lateral
Proximal
Distal
Right Left
Cranial cavity
Spinal cavity
Thoracic cavity
Abdominal cavity
Pelvic cavity
Diaphragm
Cranial Cavity Located in the head,protected by the skull
Located in the trunk between the diaphragm and the pelvis
Extending from the bottom of the skull to the lower back, protected by the bones of the spine
Located in the pelvis, protected by the pelvic bones and the lower portion of the spine
Located in the trunk between the diaphragm and the neck, protected by the rib cage and the upper portion of the spine
MAJOR BODY CAVITIES
Pelvic Cavity
Abdominal Cavity
Spinal Cavity
Thoracic (Chest) Cavity

Respiratory system
System Major Structures Primary Functions
Airway and lungs Supplies the body with oxygen through breathing
Transports nutrients and oxygen to body cells and removes waste products
Transmits messages to and from the brain
Secretes hormones and other substances into blood and onto skin
Breaks down food into a usable form to supply the rest of the body with energy
Performs the processes of reproduction
Removes wastes from the circulatory system and regulates water balance
Removes excess fluid (lymph) from body tissues; absorbs fatty acids and transports fat to the circulatory system; aids in formation of white blood cells (WBCs); initiates immunity through the formation of antibodies
Circulatory system
Lymphatic system
Nervous system
Endocrine system
Digestive system
Genitourinary system
Musculoskeletal system
Integumentary system
Heart, blood, and blood vessels
Lymph, lymph nodes
Brain, spinal cord, and nerves
Glands
Mouth, esophagus, stomach, intestines
Uterus and genitalia
Kidneys, bladder
Bones, ligaments, muscles, and tendons
Skin, hair, and nails
Provides the body’s framework; protects internal organs and other underlying structures; allows movement; produces heat; manufactures blood
An important part of the body’s communication network; helps prevent infection and dehydration; assists with temperature regulation; aids in production of certain vitamins
BODY SYSTEMS
Type of Energy Description
An object strikes or is struck by the body. It can be blunt or penetrating.
Part of the body remains stationary while another part turns.
Blunt force on one part of the body causes injury to another part.
Direct force
Indirect force
Twisting force
Contracting force A sudden or powerful muscle contraction injures muscles and/or tendons.
MECHANICAL ENERGY CAUSING INJURY
78
AN
ATO
MY
AN
D P
HY
SIO
LOG
Y
78
SUMMARY

ASS
ESSM
ENT
5 Assessment
79
Key ContentScene Assessment .................. 80 Primary Assessment ............... 82 Reassessment ......................... 90 Secondary Assessment .......... 91 Treatment/Interventions ....... 103Documentation of Findings ... 103 Ongoing Assessment ............. 103
IntroductionWhen you arrive at the scene of an emergency, after ensuring the safety of yourself and others, you must quickly determine whether the patient has any life-threatening injuries or conditions by conducting a primary assessment. This includes assessing the patient’s level of responsiveness and his or her airway, breathing, and circulation. Once the primary assessment is complete, you can begin your secondary assessment, which includes interviewing the patient (or bystanders), assessing and documenting vital signs, and conducting a thorough physical exam.
Having a clear plan of action will help you to respond effectively in any emergency situation. The important questions are “What are my priorities?” and “What interventions may be necessary?” The general steps in this section will provide answers to these questions (Figure 5–1).

ASS
ESSM
ENT
80
These steps, conducted in this order, help to ensure your safety and that of the patient and bystanders. They will also increase the patient’s chance of a positive outcome.
This assessment model may be modified depending on the situation. For example, a responsive patient may complain of an ankle injury. In this case, a full head-to-toe assessment is probably unnecessary, unless you have reason to suspect that additional injuries or conditions may be present.
SCENE ASSESSMENT
Whenever you respond to an emergency, you must make sure the emergency scene is safe for you, the patient(s), and any bystanders. It is important not to make assumptions that could put you or others at risk. Take time to assess the scene and answer these questions:
Hazards and EnvironmentWhat are the potential hazards at the scene? Does
anything about the environment create a risk?
Are there any specific processes to mitigate hazards (e.g., workplace lock-out-tag-out procedures)?
Mechanism of Injury (MOI) and Chief ComplaintWhat happened? What is the problem?
Number of PatientsHow many people are ill or injured?
Additional Resources RequiredWhat other resources are required (e.g., law
enforcement, utilities)?
Forming a General ImpressionWhat is your initial overall impression of the scene
and the patient?
Donning PPEAre you wearing appropriate PPE for the situation?
Figure 5–1: Look for indicators of what may have happened.
Scene AssessmentHazards and Environment
Mechanism of Injury (MOI) and Chief ComplaintNumber of Patients
Additional Resources RequiredForming a General Impression
Donning PPE (if not already done)
Primary AssessmentChief Complaint
Level of Responsiveness Spinal Motion Restriction
Airway, Breathing, and Circulation (ABCs)Pulse Oximetry (SpO2)
Rapid Body SurveyTransport DecisionPatient Positioning
Secondary AssessmentInterview with Patient and Bystanders
Vital SignsHead-to-Toe Physical Examination
Reassessment
Treatment/Interventions
Documentation of Findings
Ongoing Assessment

ASS
ESSM
ENT
81
Before You Approach the PatientWhen you assess the scene, look for anything that may threaten your safety or that of bystanders or the patient. Examples of hazards and strategies to mitigate them are given in Chapter 2. If you do not have the necessary qualifications or equipment to manage hazards at the scene, do not approach the patient. Request the necessary personnel, and ensure that the scene is safe before you enter.
Do not put your personal safety at risk. An emergency that begins with one injured person could end up with two if you are hurt. While waiting for additional personnel, monitor the scene from a safe distance. If conditions change, you may be able to approach the patient safely.
As You Approach the PatientConsider the mechanism of injury (MOI) as you approach the patient by looking around the scene for clues as to what caused the emergency. This will help you to determine the possible type and extent of the patient’s injuries or illness.
As you approach the patient, take in the whole picture and act appropriately. For example, if the mechanism of injury indicates a potential spinal injury, you should approach the patient from an angle that allows him or her to see you without turning his or her head. This simple choice could prevent further harm to the spine.
Clues at the scene such as a fallen ladder, a damaged helmet, or drug paraphernalia may suggest the MOI. If the patient is unresponsive, assessing the scene may be the only way you can determine what has happened. This may involve some detective work on your part.
When you assess the scene, always look carefully for more than one patient. You may not see everyone at first. For example, in a vehicle collision, an open door may be a clue that an injured person has left the vehicle. If one person is hemorrhaging blood or screaming, you may overlook another person who is unresponsive. It is also easy in any emergency situation to overlook an infant or a small child. Ask anyone present how many people may be involved.
Bystanders may be able to tell you what happened or to help in other ways. A bystander who knows the patient may know whether the patient has any medical conditions or allergies. Bystanders can meet and direct further personnel to your location, help keep the area free of unnecessary traffic, and help you provide care, especially if there is more than one patient at the scene.
Once You Reach the PatientOnce you reach the patient, quickly assess the scene again to see if it is still safe. At this point, you may see other hazards, clues to what happened, or other injured people or bystanders that you did not notice before. Ensure that you are wearing the appropriate PPE for the situation. You may also decide that it is necessary to relocate a patient prior to your primary assessment.
Moving a patient always involves a level of risk, so you should avoid moving a patient unless the situation makes an urgent relocation necessary. Situations that may require an emergency move include: • Moving a patient away from dangerous
materials or situations. • Moving a patient with minor injuries to reach
someone who may have a life-threatening condition.
• Moving a patient to provide appropriate care. Chapter 19 provides more detailed information about how to move patients safely.
If the scene is unsafe to enter and the patient is able to do so, ask the patient to move to a safe location where you can provide care without putting yourself at risk. If the situation becomes dangerous once you have started to provide care and you cannot move the person, cease care and retreat to safety.
Forming a General ImpressionOnce you reach the patient and begin your assessment, you will be able to form a general impression of the patient’s condition. This includes determining the following details: • The patient’s chief complaint or problem • If the patient is injured or ill • The patient’s sex and approximate age

ASS
ESSM
ENT
82
Donning PPE Before beginning the primary assessment, ensure that you are wearing appropriate PPE for the situation (Figure 5–2). Depending on your role and the demands of the scene, you may already be wearing PPE at this point, but before you begin your primary assessment you should ensure that the PPE you have donned is appropriate based on all the information you have collected during your scene assessment. For example, you might be wearing gloves and eye protection, but may realize that a gown is also necessary once you see that the patient is hemorrhaging.
PRIMARY ASSESSMENT
The primary assessment is a rapid systematic check of the patient to identify conditions that pose an immediate threat to the patient’s life. It is ordered so that it will typically identify the highest priority conditions first. The primary assessment has several components: • Introducing yourself • Assessing level of responsiveness (LOR) • Assessing cervical spine (C-Spine) • Simultaneously assessing airway, breathing,
and circulation (including pulse check) • Performing a rapid body survey (RBS),
including skin check
Chief ComplaintThe chief complaint is the injury or condition that the patient verbally identifies as the most serious. If the patient does not do this spontaneously as you approach, ask the patient a question such as “What seems to be the problem?” (Figure 5–3). The patient’s answer is the chief complaint. The chief complaint is always an injury or condition: It is not the mechanism of injury.
If a patient is unresponsive, the chief complaint is unresponsiveness.
Level of ResponsivenessTo determine whether a patient is responsive, gently tap the patient on the shoulder and ask, “Are you okay?” (Figure 5–4). Do not jostle or
Figure 5–2: Ensure that you are wearing appropriate PPE before you begin the primary assessment.
Figure 5–3: Ask the patient what the chief complaint is with a question such as “What seems to be the problem?”
Figure 5–4: Determine the patient’s level of responsiveness.
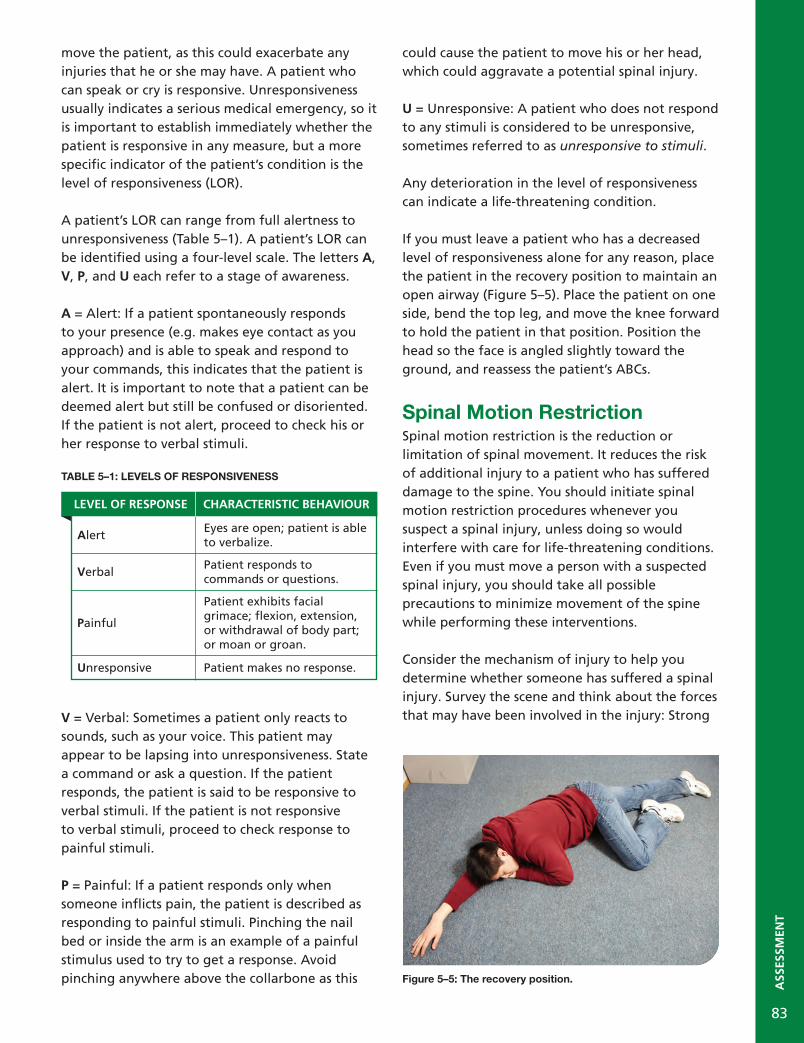
ASS
ESSM
ENT
83
move the patient, as this could exacerbate any injuries that he or she may have. A patient who can speak or cry is responsive. Unresponsiveness usually indicates a serious medical emergency, so it is important to establish immediately whether the patient is responsive in any measure, but a more specific indicator of the patient’s condition is the level of responsiveness (LOR). A patient’s LOR can range from full alertness to unresponsiveness (Table 5–1). A patient’s LOR can be identified using a four-level scale. The letters A, V, P, and U each refer to a stage of awareness.
A = Alert: If a patient spontaneously responds to your presence (e.g. makes eye contact as you approach) and is able to speak and respond to your commands, this indicates that the patient is alert. It is important to note that a patient can be deemed alert but still be confused or disoriented. If the patient is not alert, proceed to check his or her response to verbal stimuli.
TABLE 5–1: LEVELS OF RESPONSIVENESS
V = Verbal: Sometimes a patient only reacts to sounds, such as your voice. This patient may appear to be lapsing into unresponsiveness. State a command or ask a question. If the patient responds, the patient is said to be responsive to verbal stimuli. If the patient is not responsive to verbal stimuli, proceed to check response to painful stimuli.
P = Painful: If a patient responds only when someone inflicts pain, the patient is described as responding to painful stimuli. Pinching the nail bed or inside the arm is an example of a painful stimulus used to try to get a response. Avoid pinching anywhere above the collarbone as this
could cause the patient to move his or her head, which could aggravate a potential spinal injury.
U = Unresponsive: A patient who does not respond to any stimuli is considered to be unresponsive, sometimes referred to as unresponsive to stimuli.
Any deterioration in the level of responsiveness can indicate a life-threatening condition.
If you must leave a patient who has a decreased level of responsiveness alone for any reason, place the patient in the recovery position to maintain an open airway (Figure 5–5). Place the patient on one side, bend the top leg, and move the knee forward to hold the patient in that position. Position the head so the face is angled slightly toward the ground, and reassess the patient’s ABCs.
Spinal Motion RestrictionSpinal motion restriction is the reduction or limitation of spinal movement. It reduces the risk of additional injury to a patient who has suffered damage to the spine. You should initiate spinal motion restriction procedures whenever you suspect a spinal injury, unless doing so would interfere with care for life-threatening conditions. Even if you must move a person with a suspected spinal injury, you should take all possible precautions to minimize movement of the spine while performing these interventions.
Consider the mechanism of injury to help you determine whether someone has suffered a spinal injury. Survey the scene and think about the forces that may have been involved in the injury: Strong
Figure 5–5: The recovery position.
LEVEL OF RESPONSE CHARACTERISTIC BEHAVIOUR
AlertEyes are open; patient is able to verbalize.
VerbalPatient responds to commands or questions.
Painful
Patient exhibits facial grimace; flexion, extension, or withdrawal of body part; or moan or groan.
Unresponsive Patient makes no response.

ASS
ESSM
ENT
84
forces are likely to cause severe injury to the head and spine. For example, a diver who hits his or her head on the bottom of a swimming pool may have a serious head and/or spinal injury.
Examples of situations in which you should suspect a spinal injury include (but are not limited to): • Unresponsiveness in the patient or an
unknown cause of injury. • A fall from a height greater than 1 metre
(3.3 feet) or 5 stairs. • Any motor vehicle collision or ejection from a
motor vehicle. • Any injury in which a patient’s helmet is
broken. • Any injury involving a severe blunt force to the
head or trunk. • Any injury, such as a gunshot wound, that
penetrates the head or trunk. • Any diving mishap.
Techniques for spinal motion restriction are described in Chapter 12.
Airway, Breathing, and Circulation (ABCs)The next step is to evaluate the patient’s airway, breathing, and circulation (ABCs). Try to move the patient as little as possible when checking the ABCs, especially if you suspect that the patient has a head and/or spinal injury. If the patient’s position prevents you from checking the ABCs effectively, roll the patient gently onto his or her back, keeping the head and spine in as straight a line as possible.
CHECK A: AIRWAYCheck whether the patient’s airway is open. If a patient is speaking, moaning, or crying, the patient has an open airway. If a patient is unresponsive, it may be difficult to determine whether there is an open airway. Open an unresponsive patient’s airway by tilting the head back and lifting the chin. These two complementary motions, called the head-tilt/chin-lift, reposition the tongue and epiglottis so that they do not block the airway.
If you suspect a head and/or spinal injury, attempt to open the airway using the jaw thrust technique (Figure 5–6). This opens the airway without repositioning the patient’s neck. If the jaw thrust is unsuccessful, use the head-tilt/chin-lift, keeping the neck in line with the body.
Sometimes a head-tilt/chin-lift or jaw thrust will not open the airway. This may occur when a patient’s airway is blocked by a foreign object, such as a piece of food, or by something anatomical, such as swelling in the throat. Chapter 6 describes how to care for an obstructed airway.
CHECK B: BREATHINGPosition yourself so that you can hear and feel air from the patient’s nose and mouth on your cheek. At the same time, watch for the patient’s chest to rise (Figure 5–7). If the patient is breathing normally, you will observe the rise and fall of the chest and be able to assess ease of breathing and approximate respiratory rate.
Figure 5–6: The jaw thrust. Figure 5–7: Look, listen, and feel for breathing for no more than 10 seconds.

ASS
ESSM
ENT
85
A patient who is experiencing dyspnea (difficulty breathing) may have the following signs and symptoms: • Inadequate rise and fall of the chest • Increased effort on respiration • Very slow or very fast respiratory rates
Assess the patient’s breathing for a maximum of 10 seconds. Assessing the quality of the patient’s respiration (along with determining the mechanism of injury) will help you to determine whether interventions such as assisted ventilations or supplemental oxygen are necessary.
Agonal RespirationsAgonal respirations are an inadequate pattern of breathing sometimes associated with cardiac arrest states. Because they can be confused with ordinary respiration, it is important that professional responders recognize the differences between the two.
Agonal respirations originate from lower brainstem neurons as higher brain centers become increasingly hypoxic (oxygen-deprived) during cardiac arrest. In agonal respirations, the diaphragm is receiving intermittent residual impulses from the brain, resulting in sporadic, gasping breaths.
Agonal respirations can present as a snorting, gurgling, moaning, or gasping sound, a gaping mouth, or laboured breathing. The duration differs from person to person, from a few minutes to several hours. While normal respirations follow a regular pattern, agonal respirations are irregular and sporadic. It is important to remember that agonal respirations are not sufficient for delivering oxygen to the body. A person experiencing agonal respirations is not breathing and requires immediate interventions.
CHECK C: CIRCULATIONWhen checking the patient’s ABCs, circulation refers to the patient’s pulse. You must determine whether the patient’s heart is beating. The method of assessing circulation is different for infants than for adults and children. If an adult or child is responsive, check his or her pulse using the
radial artery (Figure 5–8). If the adult or child is unresponsive, check the pulse at one of the carotid arteries in the neck.
Checking a pulse is a simple procedure. It involves placing either two or three fingers on a major artery where it is located close to the skin’s surface. Do not use your thumb to take a patient’s pulse.
To find the carotid pulse, feel for the Adam’s apple at the front of the neck and then slide your fingers into the groove at the side of the neck closest to you (Figure 5–9). Sometimes the pulse may be difficult to find, especially if it is slow or weak. If at first you do not find a pulse, relocate the Adam’s apple and slide your fingers into place.
To find an infant’s pulse, place one or two fingers over the brachial artery, located on the underside of the infant’s arm, halfway between the elbow and the shoulder (Figure 5–10).
Figure 5–8: The location of the radial artery.
Figure 5–9: The location of the carotid artery.

ASS
ESSM
ENT
86
If no pulse is detected after a maximum of 10 seconds, initiate the applicable CPR/AED protocol (described in Chapter 7).
You should also quickly check the patient’s skin for signs of a circulation emergency. Any abnormalities in the colour, temperature, or moisture of the skin can indicate an underlying problem with circulation. Touch the back of your hand (with appropriate PPE) to the patient’s forehead. If the patient’s skin is cold, pale, or clammy, for example, this may indicate that the patient is in shock, which is a life-threatening condition.
You must check to ensure that the ABCs are present at least every 5 minutes for an unstable patient (a patient with a life-threatening condition) and every 10 minutes for a stable patient. This check is just to confirm that the ABCs haven’t changed: These findings are not recorded.
Pulse Oximetry (SpO2) PURPOSEPulse oximetry is a simple, rapid, safe, and non-invasive method used to measure the percentage of oxygen saturation in the blood. The reading is taken by a pulse oximeter, which is a device that measures the percentage of hemoglobin that is saturated with oxygen. To ensure that the instrument measures arterial and not venous oxygenation, pulse oximeters assess only pulsating blood vessels. Pulse oximeters also measure the patient’s pulse.
Pulse oximetry should be applied whenever a patient’s oxygenation is a concern, and also for: • All patients with neurologic, respiratory, or
cardiovascular complaints. • All patients with abnormal vital signs. • All patients under the effect of respiratory
depressants (morphine, diazepam, midazolam). • Multi-system trauma patients.
Each hemoglobin molecule has the capacity to hold oxygen molecules. How much of that capacity is filled with oxygen is known as the oxygen saturation. This is written as a percentage of the amount of oxygen actually bound to the hemoglobin compared with the total oxygen-carrying capacity of the hemoglobin. If a given volume of blood is carrying 97% of the total oxygen that it could carry, its oxygen saturation is 97%.
The capacity depends on the amount of hemoglobin in the blood, and the amount of bound oxygen depends on the partial pressure of the oxygen. Higher pressure causes oxygen to bond more readily with hemoglobin. The partial pressure of oxygen in the lungs is high, so oxygen bonds well with hemoglobin there. When hemoglobin travels through the body’s tissues, the partial pressure is lower, so the bond between the oxygen and the hemoglobin weakens and the oxygen is released into the cells of the body.
This binding can be affected by several factors, including blood pH, temperature, the presence of carbon monoxide, and hemoglobin disorders.
The reading from the oximeter appears as a percentage of hemoglobin saturated with oxygen. Normal saturation is approximately 95 to 100%. The saturation reading is documented as SpO2
(e.g., 97% SpO2).
A 100% saturation measurement means all the hemoglobin molecules are carrying oxygen; 80% saturation means only 80% of these molecules are carrying oxygen. Oxygen saturation below 80% is considered insufficient to support life.
Figure 5–10: The location of the brachial artery.

ASS
ESSM
ENT
87
A healthy, non-smoking adult who is breathing room air should have oxygen saturation of around 95 to 100%. Smokers who are breathing room air can have oxygen saturation around 94 to 96%. People with chronic lung disease may have oxygen saturations as low as 90% on room air, even when they are not otherwise ill. See Table 5–2. When possible, the responder should attempt to get an SpO2 reading before administering supplemental oxygen to a patient. This initial reading is referred to as room air saturation. This reading gives the responder an idea of the patient’s respiratory function before treatment is started (i.e., when the person has been breathing the normal air in the room, as opposed to supplemental oxygen). Once treatment is initiated, pulse oximetry is also used to assess the adequacy of oxygen delivery.
A pulse oximeter is a tool that supports patient assessment. Pulse oximetry data should be one component of your assessment: You must always consider the clinical presentation of the patient in addition to the SpO2 reading. For example, if a patient appears to be in respiratory distress but has an SpO2 percentage of 95%, you should not withhold supplemental oxygen based on the pulse oximetry reading alone.
Like any electronic device, pulse oximeters can malfunction, run out of power, etc. You should not rely on it exclusively to guide your patient assessment.
When treating the patient, all symptoms should be assessed along with the data provided by the device. Treat the patient, not the pulse oximeter.
PROCEDUREApply the pulse oximeter. Usually, the patient’s fingertip is the most convenient site; otherwise, use an earlobe or a toe (if a proper probe is available). Refer to the manufacturer’s directions to ensure that you are using it properly.
Once the device registers the oxygen saturation level, record the time and the saturation percentage. Assess the patient’s pulse manually and compare this number with the pulse oximeter’s reading.
If you are recording a one-time reading, be sure to monitor the patient for a few minutes, as oxygen saturation can vary.
Pulse oximetry should be taken and recorded with vital signs at least every 15 minutes for stable patients, and reassessed and recorded every 5 minutes for unstable patients.
LIMITATIONSSome factors may reduce the reliability of the pulse oximetry reading, including: • Hypoperfusion (i.e., poor perfusion) or shock
(fewer circulating red blood cells to carry oxygen).
• Hypotension. • Decreased circulation to the extremities
(insufficient blood flow to obtain an accurate reading).
• Cardiac arrest (absent perfusion to fingers). • Excessive motion of the patient during the
reading. • Fingernail polish. • Carbon monoxide poisoning (carbon monoxide
binds to hemoglobin more easily than oxygen and saturates the hemoglobin).
• Hypothermia or other cold-related illness. • Sickle cell disease or anemia (because there are
fewer red blood cells present to carry oxygen). • Smoking cigarettes (due to carbon monoxide). • Edema (swelling). • A delay in detecting respiratory insufficiency.
The pulse oximeter could warn too late of a decrease in respiratory function based on the amount of oxygen in circulation.
RANGE VALUE TREATMENT
Normal 95 to 100% None
Mild hypoxia
91 to 94%
Administer emergency oxygen using a nasal cannula or standard oxygen mask.
Moderate hypoxia
86 to 90%
Administer emergency oxygen using a non-rebreather mask or bag-valve-mask with oxygen reservoir.
Severe hypoxia
85% or lower
Administer emergency oxygen using a non-rebreather mask or bag-valve-mask with oxygen reservoir.
TABLE 5–2: PULSE OXIMETRY

ASS
ESSM
ENT
88
• Ambient light, which can affect your ability to read the equipment.
• False positives from CPR.
Continue administering high-concentration oxygen to all patients with suspected carbon monoxide (CO) poisoning, regardless of the saturation readings.
OXYGEN DECISIONBased on all of the information you have gathered about the patient—including signs, symptoms, chief complaint, and SpO2—decide whether the patient requires supplemental oxygen. If oxygen is indicated, set the flow rate and then apply the appropriate oxygen delivery device.
When monitoring a conscious patient’s oxygen saturation, you may reduce the flow of oxygen and change to a lower-flowing delivery device if the patient’s oxygen level reaches 100%. Consider discontinuing supplemental oxygen if the patient is not distressed and the saturation is greater than 95% on room air. A patient who uses low-flow oxygen regularly for a chronic condition (such as COPD) should usually be kept on low-flow maintenance oxygen unless higher-concentration oxygen is necessary to increase the patient’s SpO2 levels.
Rapid Body SurveyThe rapid body survey (RBS) is a hands-on check that allows you to quickly identify life-threatening injuries and conditions. If you discover the need for a critical intervention, pause the RBS and perform the intervention before continuing the survey.
The RBS is a systematic check of the patient’s body, starting with the highest-priority areas. An RBS should check the patient in the following order: head, neck, chest, abdomen, pelvis, lower extremities, upper extremities, and back.
Palpate each of these areas, checking for abnormalities such as inflammation, deformities, and fractures. You should look, listen, and feel as you conduct this check. For example, you may hear crepitus (bones scraping) if the patient has a fracture, feel deformities at the site of a dislocation, or see contusions that indicate internal bleeding. If you discover any abnormalities under the patient’s
clothing, you should expose and examine the area to determine the extent of the injury.
Because fractures of the pelvis can cause other serious internal injuries, use caution and handle the area gently. Do not push down on the iliac crests.
The RBS also includes checking for external hemorrhaging. External bleeding is life-threatening when blood spurts from the wound or cannot be easily controlled. As you palpate each section of the patient’s body, check your gloves for blood or other bodily fluids. If you see any bodily fluids on your gloves, expose and examine the area of origin before proceeding.
Be aware of any risks to your own safety. Watch for sharp objects such as broken glass or syringes. Do not put your hands anywhere you cannot see. To avoid aggravating any injuries, avoid moving the patient unless it is absolutely necessary to provide care for life-threatening conditions.
Transport DecisionYou must now decide whether the patient requires immediate transport. If so, the patient is considered to be in the rapid transport category (RTC). A patient with a life-threatening condition will fall into the rapid transport category.
This decision is made quickly based on whether you have found any life-threatening conditions in your assessment thus far. If at any point the patient’s condition deteriorates, you must re-evaluate whether rapid transport is necessary. This decision can occur at any point in your assessment or during care for the patient, even before you have completed your primary assessment (though the assessment should still be completed once any necessary interventions are performed). If you arrive on scene, for example, and immediately see a patient with an amputated leg, you know that he or she will be in the rapid transport category regardless of the results of your assessment. If you are working in a team, one responder can prepare the stretcher and make other preparations for transport while the other begins the assessment and cares for the patient.

ASS
ESSM
ENT
89
Seriously injured patients have the best chance of survival when emergency care is provided as soon as possible after the injury. The first hour after the injury is sometimes referred to as the Golden Hour because patients who receive hospital care within this time are considered significantly more likely to survive.
If delaying transport could have a negative effect on the patient’s condition, transport the patient immediately. Do not delay transport at any time to perform additional assessments or treatment, aside from immediate life-saving interventions. You may be able to perform other steps en route.
IMMEDIATE TRANSPORT EMERGENCIESIf a life-threatening condition is found, this requires an immediate transport response. Transporting the patient is high priority.
Examples of immediate transport emergencies can include: • Severe or multi-system trauma. • Instability or absence of the ABCs. • Internal or external hemorrhage. • Neurological deficits. • Decreased level of responsiveness (LOR) or
unresponsiveness. • Ongoing seizures. • Chest pain (if disorder or heart attack is
suspected). • Burns with signs of inhalation injury. • Extensive burns. • Abdominal distension and tenderness. • Unstable pelvic injury. • Fractured femur. • Amputation. • Childbirth complications. • Severe hypothermia. • Electrocution. • Decompression illness.
When possible, transport any of the patient’s medications with the patient.
Patient PositioningMost injured patients will find the most comfortable position for themselves. For example, a patient with a chest injury who is having trouble breathing may be sitting up and supporting the injured area.
In general, it is best to keep a patient in the position you find him or her. However, there are several cases where moving a person can be beneficial: • The patient’s position prevents you from
performing a proper assessment or from providing critical interventions.
• A different position could improve the patient’s condition or reduce pain.
• The patient’s position could aggravate an existing injury or condition.
Whenever possible, you should assist the patient in changing positions to reduce the risk of injury.
Some positions are better suited to certain situations than others. For example, a patient in respiratory distress will usually find it easier to breathe if he or she is in the Fowler or Semi-Fowler position than if he or she is supine. Common positions include: • Lateral: The patient is lying on his or her side. • Supine: The patient is lying on his or her back. • Lateral recumbent (recovery): The patient
is lying in a semi-prone position, half-way between prone (lying on his or her stomach) and lateral.
• Fowler: The patient is lying on his or her back with the body elevated at a 45-degree to 60-degree angle.
• Semi-Fowler: The patient is lying on his or her back with the body elevated at an angle less than 45 degrees.
• Trendelenburg: The patient is lying on his or her back with legs elevated higher than the head and the body on an inclined plane.

ASS
ESSM
ENT
90
REASSESSMENT
Reassessment is an ongoing process. It is included here as a step to ensure that it is consciously considered, but you should get into the habit of monitoring the condition of any patient you are providing care for, thinking about whether additional resources are required to deal with changes on the scene or with the patient, and considering whether your transport decision is still appropriate for the situation.
For example, if your assessment of the patient changes as a result of your RBS findings, you may decide that the patient is in the rapid transport
Lateral
Supine
Lateral recumbent
Fowler
Semi-Fowler
Trendelenburg

ASS
ESSM
ENT
91
category. If this is the case, prepare the patient for immediate transport, and begin the secondary assessment once you are en route or while awaiting transport. Notify or update the hospital and any personnel who are on their way to the incident of your updated transport decision.
Reassessing a patient’s ABCs should occur frequently throughout the assessment and care process. Performing a rapid body survey, for example, requires you to move away from the patient’s airway to check his or her extremities. Once this survey is complete you should immediately reassess the patient’s airway, breathing, and circulation to ensure that there has been no change in the patient’s presentation.
SECONDARY ASSESSMENT
Once you have made a decision about transport, you can begin gathering more information through a secondary assessment. This assessment may take place at the scene (if the patient does not require immediate transport) or en route to a hospital or other emergency medical facility.
The secondary assessment is more thorough than the primary assessment and focuses on gathering detailed information about the patient’s history and condition. Immediately life-threatening conditions are usually identified during the primary assessment, but the secondary assessment can reveal injuries or conditions that may become life-threatening without immediate care. For example, you might find broken bones, minor bleeding, or a specific medical condition, such as diabetes.
The secondary assessment is made up of the following three steps:1. Interview the patient and bystanders to
get information about the MOI and chief complaint.
2. Check the patient’s vital signs.3. Do a head-to-toe physical examination.
As you perform the secondary assessment, try not to move the patient.
Interview with Patient and BystandersBegin by asking the patient and bystanders simple questions to learn more about what happened and the patient’s condition. Asking about any existing conditions the patient has, the circumstances of the incident, and the chief complaint are collectively known as obtaining a patient’s history. While the patient is answering your questions, you should listen carefully but also watch for signs of injury or illness, such as an unusually pale skin colour or a rasping sound during inhalation.
Begin the interview by asking the patient’s name. Using a patient’s name will make the patient more comfortable. Using the acronym SAMPLE will help you gather information on all of the necessary topics:
If the patient is experiencing pain of any kind, use the mnemonic OPQRST to ask all the relevant questions about the pain (Table 5–3). Be careful not to lead the patient with your questions: For example, asking “What does the pain feel like?” lets the patient choose how to characterize it, but “Is the pain sharp?” will only provoke a yes or no response.
S Signs and symptoms (e.g., “What’s bothering you?”)
A Allergies (e.g., “What allergies do you have?”)
MMedications (e.g., “What medications are you currently taking? Have there been any recent changes?”)
PPast/present medical history (e.g., “What medical conditions do you have?”)
LLast oral intake (e.g., “When did you last eat or drink? What did you last eat or drink?)
E Events before the incident (e.g., “What happened to cause the problem?”)

ASS
ESSM
ENT
92
TABLE 5–3: QUESTIONS ABOUT PAIN: OPQRST
Sometimes the patient will be unable to give you this information. This can be the case with children (who may be shy or intimidated by your presence) or with adults who have altered levels of responsiveness. Be calm and patient. Speak normally, in simple terms, and offer reassurance.
You can also ask family members, friends, or bystanders what happened. They may be able to give you helpful information, such as telling you if the patient has a medical condition that you should be aware of or describing the circumstances of an injury. They may also be able to help calm the patient if necessary.
Vital SignsThe next step is to gather more detailed physiological information about the patient by taking clinical measurements of the patient’s vital signs. These are indicators of the body’s overall function and can be used to guide your assessment and treatment.
The vital signs that you document can vary based on your qualifications and scope of practice. They may include: • Level of responsiveness (AVPU/Glasgow
Coma Scale). • Respiration. • Pulse. • Skin characteristics. • Pupils. • Blood pressure. • SpO2. • Body temperature. • Blood glucose level (BGL).
The first set of vital signs taken from the patient is considered to be the baseline vital signs. You must always record the time when taking vital signs. If the patient’s vital signs vary from the baseline, you can evaluate the effectiveness of your treatment. For example, if a patient’s skin is initially pale but presents normally after a period of time on supplemental oxygen, this suggests that the patient is responding positively to the oxygen.
Vital signs should be reassessed and recorded every 5 minutes for unstable patients and every 15 minutes for stable patients.
ASSESSING A RESPONSIVE CHILD OR INFANTIf possible, assess an infant or a child in a parent or guardian’s arms or lap. When assessing an infant or child: • Approach the patient slowly. • Kneel so that you are at eye level with the
patient. • Give the patient a few minutes to get used to
you if possible. • Use the patient’s name. • Tell the patient what you are going to do
and why you need to do it. Demonstrate on a stuffed animal or doll if possible.
• Allow the patient to inspect safe and non-sterile items such as bandages.
• If the patient is not responding to your questions, ask the parent or guardian to relay your questions to the child.
LEVEL OF RESPONSIVENESS You learned how to assess a patient’s LOR earlier in the chapter using the AVPU scale. Another evaluation, typically used for assessing patients with head trauma, is the Glasgow Coma Scale.
Glasgow Coma ScaleThe Glasgow Coma Scale (GCS) is a standardized system used to determine a patient’s level of responsiveness and is considered a good indicator of eventual clinical outcome for head trauma. The scale is often used to assess patients with neurological damage. The assessment process involves assigning a numerical score to the patient’s responses in three areas: the patient’s eye-opening responses, verbal responses, and
MNEMONIC EXAMPLES OF QUESTIONS
OnsetDid it start suddenly or develop over days, hours, etc.?
ProvocationWhat provokes the pain or causes it to get worse?
QualityWhat does the pain feel like (sharp, dull, stabbing, moving, etc.)?
Region and Radiation
Where exactly is the pain located? Does it radiate to other areas?
SeverityOn a scale of 0 to 10, how bad is the pain?
Time When did the pain start?

ASS
ESSM
ENT
93
TABLE 5–4: GLASGOW COMA SCALE
motor responses (E,V,M). These three sections are scored individually, with the values then added together to produce the overall score (Table 5–4).
Eye OpeningIf a patient spontaneously opens his or her eyes, he or she receives a score of 4. If the patient does not spontaneously open his or her eyes, give a verbal command, such as “Open your eyes.” If the patient complies, he or she receives a score of 3. If the patient still does not open his or her eyes, apply a painful stimulus, as with the AVPU assessment. If the patient responds, he or she receives a score of 2. If there is no response to the painful stimulus, the patient receives a score of 1.
Best Verbal ResponseAsk a question. If the patient responds coherently, he or she receives a score of 5. If the answer is confused but still comprehensible and appropriate,
the patient receives a score of 4. If the patient’s response consists of comprehensible but inappropriate words, the patient receives a score of 3. If the patient’s response is incomprehensible (e.g., moaning), the patient receives a score of 2. If the patient does not reply at all or is unresponsive, he or she receives a score of 1.
Best Motor ResponseGive the patient a command, such as “Wiggle your fingers.” If the patient responds to your command, he or she receives a score of 6. If the patient does not follow your command, apply a painful stimulus, as described earlier, and score the response accordingly. If the patient pushes away the stimulus or (correctly) says something like “Stop pinching my finger,” this is considered localizing the pain, and the patient receives a score of 5. A patient who withdraws from the painful stimuli receives a score of 4. Responses lower than 4 indicate that the patient is responding at the reflex level only: A patient who demonstrates flexion receives a score of 3, and a patient who demonstrates extension receives a score of 2. A patient who does not manifest a motor response of any kind receives a score of 1.
A score of 15 indicates a perfect score in each category: Neurological damage is unlikely. A score of 14 can indicate minor damage, especially if this assessment is supported by other indicators that you have observed. A score of 13 or lower indicates neurological damage. Any patient with a score of 13 or lower requires rapid transport.
Use judgment when assessing children and infants, as they might not be able to respond to methods used to assess the level of responsiveness in adults. When possible, have someone who knows the child remain present to confirm whether the child is responding normally. A child who does not reply to your question may simply be shy, for example, and not suffering from an underlying medical condition.
When assessing any patient, try to evaluate the person’s responses as compared against the normal behaviour of that person. Family members, friends, or colleagues of the patient who are at the scene may be able to help you establish what is outside of the normal parameters.
EYE OPENING E
BEST VERBAL RESPONSE V
BEST MOTOR RESPONSE M
Spontaneous 4
To voice 3
To pain 2
No response 1
Oriented and converses 5
Disoriented and converses
4
Inappropriate words 3
Incomprehensible sounds
2
No response 1
To verbal command:
Obeys command 6
To painful stimulus:
Localizes pain 5
Withdrawal 4
Abnormal flexion 3
Abnormal extension 2
No response 1
E + V+ M = 3 to 15

ASS
ESSM
ENT
94
RESPIRATIONA healthy person breathes regularly, quietly, and effortlessly. The normal respiratory rate for an adult is between 12 and 20 breaths per minute. However, some people breathe slightly slower or faster. Excitement, fear, and exercise cause breathing to become faster and deeper. Certain injuries or illnesses can also cause the respiratory rate and quality to change.
During the primary assessment, you are concerned with whether a patient is breathing at all, whereas in the secondary assessment, you are concerned with the rate, rhythm, and volume of breathing. Look, listen, and feel again for breathing. Look for the rise and fall of the patient’s chest or abdomen. Listen for sounds as the patient inhales and exhales. Count the number of times a patient breathes (inhales or exhales) in 15 seconds and multiply that number by four. This is the number of breaths per minute.
Try to assess breathing without the patient’s knowledge. If a patient realizes that you are checking breathing, he or she may change his or her breathing pattern without being aware of doing so. Assume the same position you will be in when you are checking the pulse.
Watch and listen for any changes in breathing. Abnormal breathing may indicate a potential respiratory or airway problem. Signs and symptoms of abnormal breathing include: • Gasping for air. • Noisy breathing, including whistling sounds,
crowing, gurgling, or snoring. • Excessively fast or slow breathing. • Painful breathing.
PULSEWith every heartbeat, a pressure wave of blood moves through the blood vessels. This creates the patient’s pulse. You can feel it with your fingertips in arteries near the surface of the skin. In the primary assessment, you are concerned only with whether or not a pulse is present. In the secondary assessment, you are trying to determine pulse rate, rhythm, and quality. This is most often done by checking the radial pulse located on the thumb side of the patient’s wrist.
A normal pulse for an adult is between 60 and 100 beats per minute. A well-conditioned athlete may have a pulse of 50 beats per minute or lower. Table 5–5 lists average pulses at different ages. If the heartbeat changes, so does the pulse. An abnormal pulse may be a sign of a potential problem. These signs include: • Irregular pulse. • Weak and hard-to-find pulse. • Excessively fast or slow pulse.
When the body is injured or unhealthy, the heart may beat irregularly. The rate at which the heart beats can also vary. The pulse speeds up when a person is excited, anxious, in pain, losing blood, or under stress. It slows down when a person is relaxed. Some heart conditions can also speed up or slow down the pulse rate. Sometimes changes may be difficult to detect, so be careful and attentive in your assessment to ensure that you note even subtle variations in the patient’s pulse.
The most important change to note is a pulse that changes from being present to absent.
AGE PULSE RESPIRATIONS BLOOD PRESSURE
Up to 28 days 120−160 40−60 80/40
1−12 months 100−120 30−40 80/40
1−8 years 80−120 16−24 90/50
Over age 8 60−100 12−20 120/80
*These values vary among individuals and should not be considered normal values. They are averages for each age group.
TABLE 5–5: AVERAGE* VITAL SIGNS BY AGE

ASS
ESSM
ENT
95
Pulse sites that are easy to locate are the carotid arteries in the neck, the radial artery in the wrist, and, for babies, the brachial artery in the upper arm (Figure 5–11, a-c). There are other pulse sites you may use (Figure 5–12). To check the pulse rate, count the number of beats in 15 seconds and multiply that number by four. The number you get is the number of heartbeats per minute. If you find that the pulse is irregular, you may need to check it for more than 15 seconds to determine the average rate accurately. A patient with severe hypothermia, for example, may have a severely depressed heart rate, so you may need to check for 45 to 60 seconds.
A patient’s pulse may be hard to find. Take your time. Remember that if a patient is breathing, his or her heart is also beating. However, there may be a loss in circulation to an injured area, causing a loss of pulse. If you cannot find the pulse in one location, check it in another major artery.
SKIN CHARACTERISTICSThe colour, temperature, and condition of the skin often indicate something about the patient’s condition. For example, a patient with a breathing problem may have a flushed or pale face.
The skin looks red when the body is forced to work harder. The heart pumps faster to get more blood to the tissues. This increased blood flow causes reddened skin and makes the skin feel warm. In contrast, if the blood flow is directed away from the skin’s surface, the skin may lose its underlying red tones, becoming pale or bluish, and feel cool and moist. When the blood below the skin is oxygen-deficient, it can give the skin a bluish tint. This is referred to as cyanosis.
In patients with darker skin, cyanosis may be harder to recognize: Skin may appear ashen-grey, yellow-brown, or greyish-green. Changes may be most easily visible on the inside of the lips, the nail beds, or the skin around the mouth. The important thing is to note any changes from the patient’s normal skin tone, if possible.
Figure 5–11, a-c: Checking for: a, the carotid pulse; b, the radial pulse; and c, the brachial pulse.
a b c
Figure 5–12: Easily located pulse sites.
Arm (Brachial)
Leg (Femoral)
Foot (Posterior tibial)
(Dorsalis pedis)
Neck (Carotid)
Wrist (Radial)

ASS
ESSM
ENT
96
Illness and/or injury may also cause the skin to become dry, moist, or clammy, for example. Any changes in these skin characteristics may indicate a problem.
CAPILLARY REFILLCapillary refill is a method of estimating the amount of blood flowing through the capillary beds, such as those in the fingertips. The capillary beds in the fingertips are normally rich with blood, which causes the pink colour under the fingernails. Capillaries in the extremities are among the first blood vessels to constrict. When an injury or condition (such as shock) reduces blood flow to an extremity, this will be evident as reduced blood flow through the capillaries, reducing the speed at which they refill when emptied by external pressure.
To check capillary refill, squeeze the patient’s nail bed and then release (Figure 5–13, a-b). In a healthy person, the area beneath the nail will turn pale as you press it and turn pink again as you release and it refills with blood. If the area does not return to pink within 2 seconds, this indicates that circulation to the fingertip is impaired.
PUPILSLook closely at the size of the pupils, as well as whether they react to light and are of equal size. You can check the reaction to light by shading each eye and then allowing light to enter, or by
shining a light into each eye and then removing it. Pupils should be equal, round, and reactive to light.
Pupils that are unequal, fully dilated, fully constricted, or unresponsive to light may indicate a serious head injury or illness (Figure 5–14).
BLOOD PRESSUREBlood pressure (BP) is the force exerted by the blood against the blood vessel walls as it travels throughout the body. Blood pressure is necessary to move blood through the circulatory system. Blood pressure is a good indicator of how the circulatory system is functioning.
Blood pressure is created by the pumping action of the heart. The pumping action involves two phases: the contracting (working) phase and the refilling (resting) phase. During the contraction phase, the ventricles of the heart contract, pumping blood through the arteries to all parts of the body. During the refilling phase, the ventricles relax and the heart refills with blood before the next contraction.
Stress, excitement, illness, and injury often affect blood pressure. When a patient is ill or injured, a single blood pressure measurement is often of little value. Immediately following an injury or the onset of an illness, a more accurate indicator of a patient’s condition is whether his or her
Figure 5–13, a-b: To check capillary refill: a, squeeze the patient’s nail bed and then release; b, assess how quickly colour returns to the area beneath the nail.
a b

ASS
ESSM
ENT
97
blood pressure changes over time. For example, a patient’s initial blood pressure reading could be uncommonly high due to the stress of the emergency. Providing care, however, usually relieves stress and anxiety, and blood pressure may return to a normal range. At other times,
blood pressure will remain unusually high or low, depending on the nature of the injury or illness. Changes in a patient’s blood pressure can indicate a change in the patient’s condition, and may indicate a need for interventions to return the blood pressure to the normal range.
Before taking a patient’s blood pressure, check his or her arm for abnormalities, such as swollen lymph nodes (e.g., in a cancer patient), a dialysis fistula (a dialysis port in the lower arm), or trauma.
To accurately assess a patient’s blood pressure, you need a blood pressure cuff. Cuffs come in sizes for small, average, and large arms. Inside the cuff is a rubber bladder, similar to an inner tube that can be inflated. A pressure gauge, inflation bulb, and regulating valve are connected to the bladder by rubber tubing.
Blood pressure is measured in units called millimetres of mercury (mmHg). These units, written on the blood pressure gauge, range from 20 mmHg to 300 mmHg. In measuring blood pressure, two different numbers are usually recorded. The first number reflects the pressure in the arteries when the heart is contracting. This pressure is called the systolic blood pressure. The second number reflects the pressure in the arteries when the ventricles are relaxed and the heart is refilling. This is called the diastolic blood pressure.
You report blood pressure by giving the systolic number first and the diastolic second (S/D). For example, BP 120/80 means the patient has a systolic pressure of 120 mmHG and a diastolic pressure of 80 mmHG.
There are two methods used to assess a patient’s blood pressure: palpation and auscultation.
Palpation uses a blood pressure cuff and involves feeling the patient’s radial pulse. It is used only to assess the systolic pressure.
Auscultation uses both a blood pressure cuff and a stethoscope and involves listening for the patient’s pulse. It is used to assess both systolic and diastolic pressure.
Figure 5–14: Pupils that are unequal, fully dilated, fully constricted, or unresponsive to light may indicate a serious head injury or illness.

ASS
ESSM
ENT
98
PalpationTo determine blood pressure using palpation, begin by having the patient sit or lie down. Wrap the blood pressure cuff around the patient’s arm so that the lower edge is about 2.5 cm (1 in.) above the crease of the elbow. The centre of the cuff should be over the brachial artery, the major artery of the arm (Figure 5–15). The cuff should be directly against the skin. Next, locate the radial pulse (Figure 5–16). Close the regulating valve on the blood pressure cuff, and inflate the cuff until you can no longer feel the radial pulse. Note the number displayed on the gauge.
Continue to inflate the cuff for another 20 mmHg beyond this point. Slowly reduce the pressure in the cuff by releasing the valve slowly (referred to as bleeding it down). Allow the cuff to deflate at a rate of about 2 mmHg per second. Continue to feel for the radial pulse as the cuff deflates. The point at which the pulse returns is the approximate systolic blood pressure by palpation. Using this method, the systolic pressure found is (on average) about 10 to 20 mmHg less than the systolic pressure found by auscultation. This blood pressure reading is expressed as one number only, such as 130/P. In this example, the systolic pressure is 130, and P refers to palpation. Once you know the approximate systolic pressure, quickly deflate the cuff. Record the systolic pressure and whether the patient was sitting or lying down when the blood pressure was taken.
AuscultationBefore auscultation, it is best to begin by determining the systolic pressure using the palpation method. This will rapidly provide a baseline against which you can compare the results of auscultation, as well as a starting pressure for the blood pressure cuff.
Next, locate the brachial pulse. Place the earpieces of the stethoscope in your ears and the other end, the diaphragm, over the brachial pulse (Figure 5–17). Apply the cuff as for palpation (or leave it in place after performing palpation) and begin to inflate the cuff. Inflate the cuff to 20 mmHg above the approximate systolic blood pressure (as determined during palpation).
Slowly deflate the cuff at a rate of about 2 mmHg per second. As you deflate the cuff, listen carefully for the pulse (it will make a tapping sound). The point at which the pulse is first heard is the systolic pressure.
As the cuff deflates, the sound of the pulse will fade. The point at which the sound disappears is the diastolic pressure. Release the remaining air quickly. Record the blood pressure as two numbers, for example: 130/80. Also, be sure to record whether the patient was sitting or lying down.
Figure 5–15: The centre of the cuff should be placed over the brachial artery, about 2.5 cm (1 in.) above the crease of the elbow.
Figure 5–16: Assessing systolic blood pressure requires you to feel for a radial pulse.

ASS
ESSM
ENT
99
To determine both the systolic and the diastolic pressure, you must use auscultation, which requires a stethoscope. The stethoscope enables you to hear the pulsating sounds of blood moving through the arteries with each contraction of the heart. Sometimes you may not have a stethoscope or, because of background noise, find it very difficult to use effectively. You can still determine the systolic blood pressure through palpation.
In many situations, blood pressure can be taken using an automatic blood pressure cuff. Nevertheless, it is important that you are able to take blood pressure manually in case the automated equipment fails or is unavailable.
BLOOD GLUCOSE LEVEL (BGL)Glucose is a form of sugar that is naturally present in the bloodstream. A patient’s blood sugar refers to the glucose that is carried in his or her blood. Glucose can move from the bloodstream to the body’s cells, where it is used for energy. This transfer is carried out with the aid of insulin, a hormone produced in the pancreas.
Quantifying a patient’s blood glucose level can provide important information about a patient’s condition. This is especially true in patients suffering from diabetes.
Testing BGL with a GlucometerPeople with diabetes check their BGL regularly, often using a portable device called a glucometer
(Figure 5–18). The test requires obtaining a drop of blood by piercing the skin of a finger pad with a sterile lancet. The drop of blood is then placed on a test strip, which is then inserted into the glucometer.
Because this procedure requires you to break the patient’s skin to obtain the blood sample, it is considered an invasive diagnostic technique.
Using a GlucometerWhen using a glucometer, follow the manufacturer’s directions in conjunction with these general steps:1. Ensure that you are wearing proper PPE,
you have a sharps container ready, and your glucometer is ready for use.
2. Prepare the lancet and lancet device.3. Insert the test strip into the glucometer. Some
are self-calibrating, and others require you to match a code on the screen to the test strip vial for calibration.
4. Wipe the pad of the patient’s finger with an alcohol swab, or clean the finger with soap and water. Allow the skin to dry completely. Force blood into the finger by squeezing.
5. Using a sterile lancet, prick the side of the fingertip and wait for a drop of blood to appear.
6. Bring the glucometer to the patient’s finger and touch the tip of the test strip to the drop of blood.
Figure 5–17: To auscultate blood pressure, position the cuff, find the brachial pulse, and position the stethoscope over it.
Figure 5–18: An example of a glucometer kit.

ASS
ESSM
ENT
100
7. Most glucometers will alert you that the sample has been received with either an audible sound or a change in the display.
8. Document the results when they are displayed.9. Bandage the patient’s finger.10. Remove the test strip. Place the lancet in the
sharps container and dispose of the test strip and any other contaminated materials in a biological waste container.
11. Ensure that your glucometer is ready for its next use.
What the Numbers MeanBlood glucose is measured in millimoles per litre (mmol/L), and a normal BGL ranges from 4 mmol/L to 8 mmol/L. Hypoglycemia (low blood sugar) is most often defined as a BGL of less than 4 mmol/L, whereas hyperglycemia (high blood sugar) is defined as a BGL of greater than 8 mmol/L.
Although the result may vary depending upon the patient and the testing device used, it is generally accepted that the normal range before meals is 4 to 6 mmol/L, and for the 2 hours after meals it is 5 to 8 mmol/L. Professional responders should remember that a glucometer is just one assessment tool. Responders should use this reading, along with the patient’s history and other information gathered during the assessment, to determine whether to treat the situation as a diabetic emergency.
Head-to-Toe Physical ExaminationOnce you have assessed and recorded the patient’s vital signs, you must complete a head-to-toe physical examination to gather additional information about injuries or conditions that may require care. These injuries or conditions may not be immediately life-threatening, but they could become so if not cared for. For example, you might find minor bleeding or possible broken bones as you conduct your examination of the patient.
The physical exam process involves inspection (exposing and examining), auscultation (listening), and palpation (feeling). You may even smell something that provides additional information, such as the smell of bleach on the breath, which may indicate poisoning.
Begin the physical exam by explaining to the patient what you are going to do and confirming that you have consent. Next, direct the patient to keep still while you systematically inspect and palpate each part of the body, starting with the head. Handle the patient gently to avoid aggravating any existing injuries, and avoid moving the patient unless it is necessary to complete the examination. At the same time, a balance is necessary: You must always ensure that you are palpating effectively. Always maintain the patient’s dignity and privacy while conducting the exam.
Ask the patient to tell you if he or she experiences any pain or discomfort during the examination. Avoid touching any painful areas or having the patient move any area in which there is discomfort. Watch the patient’s facial expressions and listen for a tone of voice that may reveal pain. If you encounter a painful area, have the patient characterize the pain by asking the OPQRST questions outlined in Table 5–3. If you find that palpating a specific point (one or two finger-widths) on the patient’s body is especially painful for the patient, this is referred to as point tenderness and can indicate the presence of an injury, often a fracture.
Look for a medical identification product such as a necklace or bracelet that the patient might be wearing. (Figure 5–19). This tag may help you determine what is wrong, who to call for help, and the level of care that may be required.
Figure 5–19: There are many forms of medical identification products.

ASS
ESSM
ENT
101
As you examine each part of the body, be alert for any sign of injuries—anything that looks or feels unusual. You are looking especially for discolouration, deformity, and bleeding. Abnormalities often cause the body to be asymmetrical: If you are uncertain as to whether something is unusual, compare it to the other side of the patient’s body.
Begin by checking the head (Figure 5–20, a). Look for blood or clear fluid in or around the ears, nose, and mouth. Blood or clear fluid can indicate a serious head injury. Check the level of responsiveness again and note any change. Check the pupils again and note any changes.
To check the neck, look and feel for any abnormalities. If the patient has not suffered an injury involving the head or trunk and does not have any pain or discomfort in the head, neck, or back, there is little likelihood of a spinal injury. You should proceed to check other body parts. However, if you suspect a possible head and/or spinal injury because of the mechanism of injury (e.g., a motor vehicle collision or a fall from a height), minimize movement of the patient’s head and spine. If you suspect head and/or spinal injuries, you must address these concerns before continuing with the secondary assessment. You will learn techniques for stabilizing and immobilizing the head and spine in Chapter 12.
Check the clavicles (collarbones) and shoulders, including scapulas and associated muscles. If you find no abnormalities, direct the patient to shrug his or her shoulders and note whether the movement seems impaired.
Place your hands gently on the lower anterior portion of the patient’s ribs, one on each side. Check the chest by having the patient inhale and exhale, feeling for equal expansion of the lungs. Ensure that there are no injuries or abnormalities in the chest, and ask whether the patient experiences any pain. If your findings suggest an injury or illness, expose and examine the affected area.
Expose the patient’s back and palpate both sides of the spine from the neck downward with your fingertips. It may be necessary to expose the
patient’s entire torso, but balance this against the need to protect the patient’s privacy. As always, expose only as much of the patient’s body as is necessary to perform the assessment. Check the entire posterior side of the patient’s torso, including the scapulas, ribs, and upper pelvis (Figure 5–20, b).
Expose the abdomen: In addition to looking for discolouration, deformity, and bleeding, check the area for distension. A pulsating mass beneath the skin can indicate a life-threatening internal hemorrhage, which is an urgent medical emergency. Otherwise, apply light pressure to each of the abdominal quadrants, avoiding any areas where the patient has indicated pain. The abdomen should be soft. Abdominal muscles clench in response to trauma to protect
CHEST AUSCULTATIONIf your scope of practice includes chest auscultation, expose the chest and perform the following steps:1. Place the stethoscope below the clavicle at
the mid-clavicular line (the imaginary line running parallel to the body’s midline and passing through the midpoint of the clavicle). Listen to one full inhalation and exhalation on each side of the chest by asking the patient to take a deep breath in and out through the mouth.
2. Place the stethoscope at the fourth or fifth intercostal space (the space between the ribs) on the mid-axillary line (below the axilla, or armpit). Listen to one full inhalation and exhalation on each side of the chest.
When auscultating, listen for equal breath sounds in both lungs, at the top and bottom. You should hear equally good air entry in each lung. Absent, diminished, or abnormal breath sounds may indicate a respiratory condition.

ASS
ESSM
ENT
102
underlying structures: If any of the abdominal quadrants are rigid, this can indicate an underlying injury or condition. This can be a clue to an unknown MOI or the resulting condition.
Check the hips, asking the patient if he or she is experiencing any pain there. Place your hands on the sides of the hips (lateral) and gently rock the pelvis, listening for crepitus and watching for any sign of pain or discomfort. Assess joint rotation and check for shortening of limbs. Because fractures of the pelvis can cause other serious internal injuries, use caution and handle the area gently.
Palpate each leg individually (Figure 5–20, c). Assess the continuity of the bones to ensure there are no fractures, and check the knee and ankle joints for signs of injury. If any abnormalities are found, expose and examine the area. Assess circulation in the lower extremities by checking the dorsalis pedis pulse on the anterior side of the patient’s foot or the posterior tibialis pulse on the back of the ankle (see Figure 5–12). The pulse should be the same on each side: Any inequalities can indicate circulatory impairment. Check the capillary refill on the toes. If there is no apparent sign of injury, perform a motor-sensory assessment by instructing the patient to move his or her toes, foot, and leg and watching for any signs of impaired function. As the patient moves each part, ensure that each joint has a normal range of motion (ROM).
Finally, physically assess each arm individually, beginning at the shoulder and working towards the tips of the fingers. This assessment mirrors the assessment of the lower extremities (above). Check circulation by assessing the radial pulse and capillary refill in the fingers. Compare both sides (as for the legs). Perform a motor-sensory assessment and range of motion assessment as above.
When you complete the head-to-toe physical examination, reassess the patient’s ABCs.
Figure 5–20, a-c: To do a physical exam: a, check the neck, then the shoulders and collarbones; b, examine the chest and abdominal areas (checking the four quadrants), then check the pelvis and hips (do not push down on the iliac crests); c, check the legs, feet, and toes, and finish with checking the arms, hands, and fingers.
a
b
c

ASS
ESSM
ENT
Document the information you find during the physical examination. This information will help you provide a complete and accurate written and verbal report, which helps to preserve the continuity of care for the patient after care is transferred.
TREATMENT/INTERVENTIONS
If the patient is stable, perform the appropriate treatment/interventions, beginning with the most pressing injury or condition (e.g., splinting a limb, cleaning and dressing a wound).
DOCUMENTATION OF FINDINGS
It is essential on every call that you take the time to document your findings thoroughly, as described in Chapter 1 on page 22. Documentation should be completed immediately or as soon as possible after the call, based on the specific incident and the patient’s needs. As important as documentation is, patient care cannot be delayed to fill out paperwork.
The documentation you create can simplify the transfer of care by ensuring that all relevant information is available for the receiving personnel. It may also protect you from legal action by showing that you acted appropriately in the situation.
ONGOING ASSESSMENT
Once you have completed the secondary assessment and provided care for any injuries and conditions, monitor the patient (ABCs, vital signs) and keep the patient calm and comfortable until the transfer of care takes place, you determine that the patient does not require medical care, or the patient refuses additional treatment. Re-inspect any injuries, bandages, etc. periodically.
A patient’s condition can change unexpectedly. A life-threatening condition, such as a respiratory or cardiac arrest, can occur suddenly, even in a patient whose ABCs and vital signs were initially normal.
The physical exam and patient history do not need to be repeated unless there has been a relevant change (e.g. if an unresponsive person becomes responsive). If any life-threatening emergencies develop, stop whatever you are doing and provide appropriate interventions immediately. Continue to document all pertinent information.
103

SCENE ASSESSMENT
Hazards and Environment Mechanism of Injury (MOI) and Chief Complaint Number of PatientsAdditional Resources Required Forming a General Impression Donning PPE (if not already done)
PRIMARY ASSESSMENT
Chief ComplaintLevel of ResponsivenessSpinal Motion RestrictionAirway, Breathing, and Circulation (ABCs) Pulse Oximetry (SpO2)Rapid Body Survey
Transport DecisionPatient Positioning
SECONDARY ASSESSMENT
TREATMENT/INTERVENTIONS
DOCUMENT FINDINGS
ONGOING ASSESSMENT
Interview with Patient and BystandersVital SignsHead-to-Toe Physical Examination
CHANGING PATIENTCHANGING CONDITIONS
TRANSPORT DECISIONTREATMENT
PATIENTASSESSMENT
SCENEASSESSMENT
104
SUMMARYA
SSES
SMEN
T

AIR
WA
Y M
AN
AG
EMEN
T A
ND
RES
PIR
ATO
RY E
MER
GEN
CIE
S
6 Airway Management and Respiratory Emergencies
105
Key ContentRespiratory Pathophysiology ................. 106 Airway Obstruction ............... 107 Respiratory Conditions .......... 115 Assisted Ventilation ............... 119 Resuscitation Devices ............ 121 Resuscitation Masks ............ 121 Bag-Valve-Mask (BVM) Resuscitators .................... 123 Supplemental Oxygen ........... 124 Airway Adjuncts ..................... 131 Oropharyngeal Airways ...... 131 Nasopharyngeal Airways .... 134 Supraglottic Airways ........... 135 Suction .................................... 136 Care for Respiratory Distress ................................ 138Care for Respiratory Arrest ... 138
IntroductionIn this chapter, you will learn how to manage a patient’s airway and how to care for respiratory emergencies. Because oxygen is vital to life, you must always ensure that the patient has an open airway and is breathing effectively. Airway and respiratory problems should be apparent when you check the patient’s ABCs during your primary assessment.
A respiratory emergency can occur in two ways: Respiration becomes difficult or ineffective, or respiration stops entirely. A patient who is having difficulty breathing (dyspnea) is in respiratory distress. A patient who has stopped breathing is in respiratory arrest.
Airway management and ventilation can contribute significantly to the survival and recovery of a seriously ill or injured patient. A number of devices can help you maintain

AIR
WA
Y M
AN
AG
EMEN
T A
ND
RES
PIR
ATO
RY E
MER
GEN
CIE
S
106
an open airway, perform ventilations, and/or increase the oxygen concentration in a patient’s bloodstream. In addition, some of these devices limit the potential for infection.
RESPIRATORY PATHOPHYSIOLOGY
Normal respiration uses ambient (surrounding) air, which usually contains all the necessary gases for normal respiration.
For respiration to occur, there must be an open passage to the lungs, the lungs must be provided with sufficient oxygen, gas exchange must occur (providing oxygen to the circulatory system), and the lungs must inflate and deflate with an effective rhythm.
Respiratory emergencies can have many causes: Damage to the respiratory system can be caused by trauma or inhaled toxins, a low-oxygen environment can deprive the body’s system of oxygen, an airway obstruction can physically prevent inhalation and exhalation, and neurological injuries or conditions can prevent the lungs from functioning properly.
Other causes of respiratory emergencies include poor circulation, infection of the lungs, and excess fluid in the lungs or between the lungs and the blood vessels. In addition, illnesses like asthma can narrow the airway and cause wheezing.
Breathing difficulties may also develop due to upper-airway problems caused by swelling, foreign bodies, or trauma. Swelling of the upper airway can occur due to anaphylaxis (a severe allergic reaction), asthma, or inhalation of hot gases (e.g., in a fire).
An airway obstruction (choking) is one of the most common causes of respiratory emergencies. Trauma can occur due to a blow to the upper chest, a puncture, or a crush injury.
Breathing problems may also develop because of ineffective circulation. This can be the result of shock, an acute condition in which the circulatory
system fails to adequately circulate oxygen-rich blood to all cells of the body. It can also be the result of cardiac arrest (often the result of a heart attack), which occurs when the heart stops functioning as a pump.
Sometimes the rate or depth of respiration is inadequate, leading to an insufficient volume of air moving into and out of the lungs. Respiration may be ineffective due to unresponsiveness, an altered level of responsiveness, an injury to the chest, an overdose, poisoning, or diseases such as chronic obstructive pulmonary disease (COPD) or emphysema.
If an insufficient amount of oxygen is delivered to the cells, this is referred to as hypoxia, and it may result from an obstructed airway, shock, inadequate breathing, drowning, strangulation, choking, suffocation, cardiac arrest, head trauma, carbon monoxide poisoning, or complications of general anesthesia.
Signs and Symptoms of Respiratory EmergenciesThe signs and symptoms of respiratory emergencies are usually obvious. Patients who are experiencing dyspnea may appear as if they cannot catch their breath, or they may gasp for air (Figure 6–1). Their respiration may be unusually fast, slow, deep, or shallow. They may make unusual noises, such as wheezing, gurgling, or shrill high-pitched sounds.
Figure 6–1: Patients with respiratory emergencies may look as if they cannot catch their breath, or they may gasp for air.

AIR
WA
Y M
AN
AG
EMEN
T A
ND
RES
PIR
ATO
RY E
MER
GEN
CIE
S
107
Because the circulatory system and respiratory system are interconnected, signs of circulatory impairment can indicate a respiratory emergency as well. For example, the patient may feel dizzy or lightheaded, or experience chest pain or tingling in the hands and feet. The patient may also be apprehensive or fearful. Any of these symptoms can indicate a respiratory emergency (Figure 6–2). Table 6–1 lists the signs and symptoms of respiratory emergencies.
TABLE 6–1: SIGNS AND SYMPTOMS OF RESPIRATORY EMERGENCIES
If you determine that an unresponsive patient has a pulse but is not breathing, this could indicate one of two situations: Either the patient’s airway is completely obstructed, or the patient’s airway is clear but he or she is in respiratory arrest. To determine whether the airway is obstructed, open the airway and attempt to ventilate. If your ventilation goes in, the patient’s airway is clear. Give a second ventilation and begin care for respiratory arrest.
If the patient’s chest does not rise after the first ventilation, tilt the head back farther to ensure that the airway is not occluded, and attempt to give another ventilation. If the second ventilation does not enter the lungs, this indicates that the airway is completely obstructed.
AIRWAY OBSTRUCTION
There are two types of airway obstruction:1. Anatomical airway obstruction2. Foreign-body airway obstruction
Anatomical obstructions occur when the airway is blocked by an anatomical structure, such as the tongue or swollen tissues of the mouth and throat. This type of obstruction may result from injury to the neck or a medical emergency such as anaphylaxis. The most common obstruction in an unresponsive patient is the tongue, which may drop to the back of the throat and block the airway. This occurs because muscles, including the tongue, relax when deprived of oxygen.
Foreign-body airway obstructions (FBAO) occur when the airway is blocked by a foreign object, such as a piece of food or small toy, or by fluids such as vomit, blood, mucus, or saliva. This may also be referred to as a mechanical obstruction.
Figure 6–2: There are many signs and symptoms of respiratory emergencies.
TYPE EXAMPLE
Dyspnea Patient has laboured breathing, struggles to breathe, or gasps for breath
Abnormal breathing sounds
Patient is wheezing, gurgling, or making high-pitched noises
Abnormal respiratory rate
Patient’s respiration is too fast or too slow
Abnormal skin characteristics
Skin is unusually moist and/or has an unusual tone
Emotional effects Patient is restless or anxious
Neurological effects
Patient is dizzy or lightheaded and/or experiences pain or tingling in the extremities
Patient position Patient is in an unusual position (e.g., tripod position)

AIR
WA
Y M
AN
AG
EMEN
T A
ND
RES
PIR
ATO
RY E
MER
GEN
CIE
S
108
Common causes of FBAO include: • Trying to swallow large pieces of poorly
chewed food. • Drinking alcohol before or during meals
(alcohol dulls the nerves that aid swallowing, making choking on food more likely).
• Wearing dentures (dentures make it difficult to sense whether food has been fully chewed before swallowing).
• Laughing or talking while eating. • Eating too quickly. • Walking, playing, or running with food or
objects in the mouth.
An airway obstruction can be either partial or complete.
As a natural reaction to choking, the patient may clutch at the throat with one or both hands.
Partial Airway ObstructionA patient with a partial airway obstruction can still have good air entry. The amount of air entering the lungs depends on the severity of the obstruction. This air allows the patient to cough in an attempt to dislodge the object. The narrowed airway may cause a wheezing sound as air moves in and out of the lungs.
Have the patient cough forcefully. Usually the patient’s coughing will clear the object without the need for interventions. Coughing is usually more effective when the patient is in a seated position and leaning forward slightly. Sitting down also reduces the risk of injury if the patient becomes unresponsive.
Partial choking can cause a great deal of anxiety, which can aggravate an underlying condition such as angina or asthma. Monitor the patient closely.
Complete Airway ObstructionA partial airway obstruction can quickly progress to a complete airway obstruction. A patient with a completely obstructed airway is unable to speak, breathe, or cough effectively, though he or she
may cough weakly or make high-pitched noises. A complete airway obstruction essentially prevents respiration. The patient will not be able to breathe, cough, or speak, and will quickly lose responsiveness and asphyxiate without intervention. You must be able to recognize that the airway is obstructed and provide immediate interventions. This is why checking the airway comes first in the ABCs of the primary assessment.
Although a complete airway obstruction may be caused by either a foreign body or the patient’s own anatomy, this can be difficult to determine. The interventions for both responsive and unresponsive patients with airway obstructions are primarily effective for FBAO, but these interventions should be attempted even if you are unsure whether the obstruction is anatomical or FBAO.
There are fewer interventions available for anatomical obstructions. In some cases, tilting the patient’s head back farther can be sufficient to clear the occlusion from the airway (e.g., the tongue). Other anatomical obstructions (such as swelling in the airway) typically require you to request additional resources, such as personnel trained in advanced life-support.
Foreign Body Airway Obstruction InterventionIf the patient has a complete FBAO, you must try to open the airway as quickly as possible. This is done by creating pressure in the thoracic cavity to push the obstruction up and out of the airway.
The specific interventions you use depend on whether the patient is responsive or unresponsive and can also be affected by other factors (if the patient is pregnant, for example). There are also some variations necessary when you are providing care for an infant.
CARE FOR A FOREIGN-BODY AIRWAY OBSTRUCTION—RESPONSIVE ADULT OR CHILDThere are three interventions appropriate for removing a foreign body airway obstruction in a

AIR
WA
Y M
AN
AG
EMEN
T A
ND
RES
PIR
ATO
RY E
MER
GEN
CIE
S
109
responsive adult or child: back blows, abdominal thrusts, and chest thrusts. More than one of these methods is usually necessary, and all three have proven to be effective. You should alternate between at least two of these options, choosing the methods that seem most suitable for the situation (Figure 6–3, a-b).
Regardless of the methods you choose, you should perform the first method up to five times, checking after each one to see whether the object has been dislodged. If the obstruction is not cleared after five attempts, switch to the other selected method and try it up to five times, checking after each attempt. Continue to alternate until either the foreign body is dislodged and the patient begins to cough or breathe or the patient becomes unresponsive. For example, you might perform five back blows, then five chest thrusts, then five back blows, and so on.
If the patient becomes unresponsive, he or she will collapse to the ground. Attempting to support the patient’s full weight unexpectedly can result in injury to you, so focus instead on protecting the head and neck as much as possible as the patient collapses. Begin care for an unresponsive patient.
If the patient is in a wheelchair, lock the wheels before providing care.
Back BlowsGiving back blows creates pressure in the thoracic cavity that can help to dislodge an obstruction.
To perform a back blow, stand behind the patient and ensure that your stance is stable. Standing slightly to one side can make your blows more effective. Wrap one arm around the patient’s chest and bend the patient forward at the waist until the upper airway is at least parallel to the ground. If the patient is a small child, it can be more effective to kneel on the floor with one knee raised and bend the child across your raised knee. With the heel of your other hand, deliver 5 firm blows between the shoulder blades, checking after each one to see if the obstruction has cleared.
Abdominal ThrustsAbdominal thrusts compress the patient’s abdomen, increasing pressure in the lungs and airway. This simulates a cough, forcing trapped air in the lungs to dislodge the object from the airway. Abdominal thrusts are a good default choice for most patients, but they may be difficult with bariatric (obese) patients. They are not suitable for pregnant women.
Figure 6–3, a-b: To care for a responsive choking adult, alternate between two methods—for example: a, abdominal thrusts; and b, back blows—until the obstruction has cleared.
a
b

AIR
WA
Y M
AN
AG
EMEN
T A
ND
RES
PIR
ATO
RY E
MER
GEN
CIE
S
110
To perform an abdominal thrust, stand behind the patient and ensure that your stance is stable. If the patient is significantly shorter than you are, it may be more effective to kneel. Make a fist and place it thumb-side-in against the patient’s abdomen, just above the navel and well below the lower tip of the sternum. Grasp your fist with your other hand and give up to 5 quick upward thrusts into the abdomen, checking after each one to see if the obstruction has been cleared.
Chest ThrustsChest thrusts are similar to abdominal thrusts except that they compress the chest rather than the abdomen to create pressure in the lungs and airway. They are recommended for pregnant women. They can also be useful in situations where you cannot effectively reach around a patient’s abdomen.
To perform a chest thrust, stand behind the patient and ensure that your stance is stable. Make a fist and place it thumb-side-in against the patient’s sternum. Grasp your fist with your other hand and perform up to 5 quick thrusts, pulling directly back towards you with each one and checking after each thrust to see if the object has been dislodged. If your initial thrusts are ineffective, pull more sharply and deeply.
CARE FOR A FOREIGN-BODY AIRWAY OBSTRUCTION—UNRESPONSIVE ADULT OR CHILDThe methods used to remove a foreign-body airway obstruction from a responsive patient are not effective for an unresponsive patient. Instead, you must perform sets of 30 chest compressions as in the CPR procedure (Figure 6–4).
After performing each set of 30 chest compressions, look inside the patient’s mouth. If you see an object, carefully remove it. To do so, grasp the tongue and lower jaw and lift, then sweep the object out using a finger sweep (Figure 6–5). Place your finger only as far into the patient’s airway as you can see.
After looking in the mouth, or after removing an object, open the airway and attempt to ventilate. If your breath goes in, give a second breath. If
your first breath does not go in, reposition the head and attempt to give a second breath. If it does not go in, resume the CPR sequence, starting with 30 chest compressions. Tilting the patient’s head back farther is only necessary on your initial attempt: On consecutive cycles, simply attempt one breath and then resume compressions if it does not go in. Repeat this sequence until either the airway is clear or you transfer care of the patient to appropriately qualified personnel.
If your ventilations cause the chest to rise, the obstruction is clear. The patient may still be in respiratory distress or arrest, so reassess and provide care according to what you find.
Figure 6–4: Chest compressions for an unresponsive choking adult or child are done just as they are in CPR.
Figure 6–5: To do a finger sweep, grasp the tongue and lower jaw and lift, then sweep the object out.

Figure 6–6: Care for a foreign-body airway obstruction—unresponsive adult or child.
AIR
WA
Y M
AN
AG
EMEN
T A
ND
RES
PIR
ATO
RY E
MER
GEN
CIE
S
111
The procedure for caring for an unresponsive patient with absent breathing is represented in Figure 6–6.
CARE FOR A FOREIGN-BODY AIRWAY OBSTRUCTION—RESPONSIVE INFANTCare for a responsive infant with a foreign-body airway obstruction consists of alternating sets of back blows and modified chest thrusts. It is preferable to sit or kneel with the infant while performing these interventions, but the technique presented here can be performed while standing if necessary.
Position the infant’s body supine on your forearm with the head supported in your hand. Place your other forearm over the infant’s midline, sandwiching the infant between your forearms.
Place the thumb of your top hand at the angle of the infant’s lower jaw, and one or two fingers from the same hand at the same point on the opposite side of the infant’s jaw. Be careful not to compress the soft tissues under the chin.Next, turn the infant over so that he or she is prone, and position the infant across your thigh so that the head is lower than the chest (Figure 6–7, a). This allows gravity to assist in dislodging the foreign body. Give up to 5 firm back blows with the heel of your hand (Figure 6–7, b). The blows should be delivered directly between the shoulder blades and should not glance off. Check after each blow whether the foreign body has been dislodged: Your goal is to dislodge the object with the smallest number of blows. Continue to support the head and neck as you deliver the blows by holding the infant’s jaw firmly between your thumb and forefinger.
Unresponsive Patient with Absent Breathing
Primary Assessment (ABCs)
Respiration absentPulse present
Attempt 2 ventilations (If 1st doesn’t enter, reposition the head)
Reassess patient’s ABCs (simultaneously)
Pulse absent
Consider causes of unresponsiveness
RESPIRATORY ARRESTBegin care (continue airway
management and monitor pulse)
Respiration absent
Ventilation successful Ventilation unsuccessful
Give 2nd ventilation
AIRWAY OBSTRUCTIONPerform one set of CPR chest compressions,
then check for object in mouth. If object is found, carefully remove, and visually
confirm that mouth is clear.
Respiration absentPulse absent
CARDIAC ARREST
Begin CPR/AEDprotocol, starting with compressions
Respiration present
Ventilation successful
Attempt 1 ventilation
UNRESPONSIVENESSContinuously monitor patient
and provide ongoing patient care

AIR
WA
Y M
AN
AG
EMEN
T A
ND
RES
PIR
ATO
RY E
MER
GEN
CIE
S
112
If you have given five back blows and the airway is still obstructed, you will need to turn the infant supine and deliver up to 5 chest thrusts. Sandwich the infant between your hands and forearms as before. Continue to support the head between your thumb and fingers from the front while you cradle the back of the head with your other hand.
Turn the infant supine. The head should be lower than the chest. Locate the correct place to give chest thrusts by placing two fingers on the sternum just below the nipple line.
Use the pads of these two fingers to compress the sternum to approximately one-third the depth of the chest, and then let it return to its normal position. Keep your fingers in contact with the infant’s sternum (allowing full recoil after each compression). Compress up to 5 times, checking after each compression whether the foreign body has been removed (Figure 6–8).
Keep alternating between back blows and chest thrusts until either the object is dislodged and the infant begins to breathe, cough, or cry, or the infant becomes unresponsive. Even if the infant seems to be breathing well, he or she should be examined by more advanced medical personnel.
CARE FOR A FOREIGN-BODY AIRWAY OBSTRUCTION—UNRESPONSIVE INFANTBegin by performing 30 chest compressions, as in the CPR protocol. Next, visually inspect the mouth: Open the infant’s mouth using the hand that is nearer to the infant’s feet (Figure 6–9). Place your thumb on the lower teeth and gently open the mouth. If you can see an object, try to remove it by picking it out with your little finger and thumb (Figure 6–10). Because infants’ soft palates are very susceptible to injury, you must use caution to avoid causing damage. Do not use a finger sweep to remove an object from an infant’s mouth.
Open the airway and attempt to ventilate. If your breath goes in, give a second breath. If the infant’s chest does not rise after the first breath, reposition the head to adjust the airway and attempt to give another breath. If you still cannot breathe air into the infant’s lungs, repeat the set of compressions, then look inside the infant’s mouth for a foreign object.
Repeat this sequence until either the airway is clear or you transfer care of the patient to appropriately qualified personnel.
Figure 6–8: After giving 5 back blows, turn the infant supine, lower your arm onto your thigh, and give up to 5 chest thrusts.
Figure 6–7, a-b: To care for a responsive choking infant: Sandwich the infant between your forearms; a, turn the infant prone along your forearm on your lap; and b, give up to 5 firm back blows with the heel of your hand between the shoulder blades.
b
a

AIR
WA
Y M
AN
AG
EMEN
T A
ND
RES
PIR
ATO
RY E
MER
GEN
CIE
S
113
After you have repositioned the head and attempted to give a second breath once, you do not need to repeat the repositioning step between chest-compression cycles.
OBSTRUCTED AIRWAY SELF-RESCUEIf you are alone and you are choking, dial EMS/9-1-1 and leave the phone off the hook. This will tell the dispatcher to send help. If there are people nearby, move to a place where they will notice you. Try to dislodge the obstruction by performing abdominal thrusts on a safe object with no sharp edges or corners, such as the back of a chair (Figure 6–11).
WHEN THE OBSTRUCTION IS CLEAREDOnce the airway is clear, reassess the patient’s ABCs. The patient may require additional interventions for conditions such as respiratory distress or cardiac arrest. In addition to injuries caused by the foreign body itself, interventions that clear the airway, such as back blows and chest thrusts, can result in trauma. Therefore, any patient who has received interventions for an obstructed airway should be referred to a physician for examination as soon as possible.
AnaphylaxisAnaphylaxis, also known as anaphylactic shock, is a life-threatening allergic reaction that causes the air passages to constrict. Anaphylaxis is caused by an extreme allergy to a substance such as a particular food, medication, or insect venom. A person may have an anaphylactic reaction to a substance on one occasion and a mild allergic reaction on another.
Anaphylaxis usually occurs suddenly, within seconds or minutes of contact with the substance, though it may occur 30 minutes or more after exposure. Parts of the body that come into contact with the substance usually swell and redden (Figure 6–12). The patient may also feel dizzy, confused, distressed, or faint. Other signs and symptoms include hives, itching, rash, weakness,
Figure 6–11: To give yourself abdominal thrusts, press your abdomen onto a firm object, such as the back of a chair.
Figure 6–9: Place your thumb on the lower teeth and gently open the infant’s mouth.
Figure 6–10: If you see an object, carefully pick it out with your thumb and little finger.

AIR
WA
Y M
AN
AG
EMEN
T A
ND
RES
PIR
ATO
RY E
MER
GEN
CIE
S
114
nausea, vomiting, and respiratory difficulties, such as coughing, wheezing, and tightness in the chest and throat. These respiratory issues can progress to an obstructed airway as the tongue and throat swell.
If an unusual inflammation or rash is noticeable after contact with a possible allergen, it could be an allergic reaction. Assess the patient’s airway and breathing. If the patient is experiencing respiratory distress or complains that his or her throat is closing, you should suspect anaphylaxis. Help the patient into the most comfortable position for breathing. Monitor the ABCs and try to keep the patient calm.
Patients who know they are extremely allergic to certain substances usually try to avoid them, although this is sometimes impossible. Some patients may carry an epinephrine auto-injector in case they have a severe allergic reaction (Figure 6–13). The injector contains the drug epinephrine hydrochloride, which slows the harmful effects of anaphylactic reactions by constricting blood vessels (reducing swelling) and increasing heart rate (reducing the risk of cardiovascular collapse). It can also prevent the release of additional histamines, reducing the effects of the allergen on the body.
If the patient has an epinephrine auto-injector, assist him or her in using it. If it is within your scope of practice, or covered by medical direction, you may be able to administer the epinephrine yourself after checking the Six Rights of Medication as described in Chapter 22.
Because epinephrine does not correct the underlying condition, any patient experiencing anaphylaxis requires immediate transport to a medical facility, even if he or she injects epinephrine.
HOW TO USE AN EPINEPHRINE AUTO-INJECTORAfter checking the Six Rights of Medications (Chapter 22), remove the safety cap from the injector (being careful to avoid needle injuries). Position the injection tip against the patient’s quadriceps muscle in the centre of the outer thigh, and push it firmly against the thigh with a quick motion. You should hear a click. Hold the auto-injector in place as directed, usually for approximately 10 seconds, to allow the complete dose to be administered. Remove the auto-injector and rub the injection site for approximately 30 seconds to help with medication absorption. Ensure that the used epinephrine auto-injector is transported with the patient to the hospital in a rigid sharps container.
If a patient does not improve within 5 minutes of the initial dose of epinephrine, a second dose may be indicated.
Remember that epinephrine auto-injectors are needles: Follow your sharps protocol to avoid injury or infection.
Oral antihistamines can also help to counteract the effects of the reaction, especially if taken soon after the onset of symptoms.
Figure 6–13: An epinephrine auto-injector.
Figure 6–12: A patient in anaphylaxis may have many signs and symptoms, including swelling of the face.

AIR
WA
Y M
AN
AG
EMEN
T A
ND
RES
PIR
ATO
RY E
MER
GEN
CIE
S
115
RESPIRATORY CONDITIONS
Chronic Obstructive Pulmonary DiseaseChronic obstructive pulmonary disease (COPD) is a condition of the airways that is characterized by a loss of lung function. This disease affects both men and women. The average Canadian with COPD is 65 years old and has a long history of smoking. However, the disease has also been diagnosed in individuals as young as 40 years of age.
The general term COPD encompasses three clinical conditions:
• Emphysema• Chronic bronchitis• Bronchospasm
A person with COPD may have all of these conditions, but in each particular patient, one of the three is usually most evident.
Patients diagnosed with COPD may get colds or the flu more frequently, and they also experience shortness of breath under conditions that do not tax most healthy people.
Signs and symptoms of COPD include:• Shortness of breath, gasping for air with
sudden onset.• Sitting upright, leaning forward.• A barrel-chested appearance.• Coarse rattling sounds in the lungs.• Distended neck veins.• Cyanosis.• Prolonged exhalation through pursed lips.• The presence of an oxygen system in a
patient’s residence.
EMPHYSEMAEmphysema is a disease in which the alveoli lose their elasticity and become distended with trapped air. This results in the lungs losing their ability to efficiently exchange carbon dioxide and oxygen. Emphysema is often caused by smoking and usually develops over many years. Emphysema can worsen over time.
Patients with emphysema suffer from shortness of breath. As the total number of functional alveoli decreases, breathing becomes more difficult. Exhalations are often more difficult than inhalations. Patients may cough and may have cyanosis or fever. In advanced cases, patients may become restless, confused, and weak, and can go into respiratory or cardiac arrest.
CHRONIC BRONCHITISBronchitis is the general term for inflammation of the bronchial tubes. The inflammation results in excessive mucous secretions in the bronchial tubes, constricting smaller air passageways and making respiration more difficult. Patients with bronchitis suffer from shortness of breath and the presence of a cough with sputum.
Bronchitis can be either acute or chronic. Acute bronchitis is most often the result of infection and usually improves in a few days without any chronic effects. Chronic bronchitis is often caused by prolonged exposure to irritants (most commonly, cigarette smoke).
Chronic bronchitis is characterized by a productive cough that has persisted for at least 3 months per year over 2 consecutive years. There may also be narrowing of bronchi and bronchioles, making it more difficult for air to move in and out of the lungs.
BRONCHOSPASMBronchospasm is a condition that affects the terminal bronchioles, the portion immediately before the alveoli. In a patient with chronic bronchospasm, these small airways can swell and become filled with fluid, and the muscles surrounding the tubes can contract, further narrowing the respiratory passages. Patients with bronchospasm present primarily with shortness of breath and wheezing.
Patients with COPD may eventually develop a hypoxic drive to breathe. In healthy individuals, the drive to breathe is determined by the amount of carbon dioxide in the blood: When carbon dioxide levels rise, the brain tells the body to take in more oxygen to compensate. Patients with

AIR
WA
Y M
AN
AG
EMEN
T A
ND
RES
PIR
ATO
RY E
MER
GEN
CIE
S
116
COPD can maintain high levels of carbon dioxide in the blood for extended periods of time. Due to these consistently high levels, the body looks to the oxygen levels instead to determine the need to breathe. If oxygen levels are low, the respiratory rate increases. Patients with COPD who are not acutely short of breath are usually receiving low concentrations of oxygen from a home oxygen unit.
In a patient with COPD who has a true hypoxic drive, increased levels of oxygen could signal the body to slow down or stop breathing entirely. However, this is rarely encountered in the field because EMS is usually called for a patient who is acutely short of breath. If you do encounter this, you should administer high-flow oxygen to the patient.
Acute Respiratory Distress SyndromeAcute respiratory distress syndrome (ARDS) is a serious lung disease caused by a variety of direct and indirect conditions. It often occurs in patients with other serious illnesses of the lungs or who have suffered significant chest trauma.
ARDS occurs when the quantity of fluid between the alveolar membrane and the surrounding pulmonary capillaries increases, causing a decrease in the amount of oxygen that the red blood cells can absorb. Patients with a history of injury or illness involving the lungs are at a higher risk of ARDS. When caused by trauma, ARDS can develop within hours or days of the injury.
Signs and symptoms of ARDS include: • Rapid breathing (tachypnea). • Shortness of breath. • Cyanosis (mottled, bluish skin). • Possible pulmonary edema.
AsthmaAsthma is a condition that narrows the air passages and makes breathing difficult. During an asthma attack, the air passages become constricted or narrowed by a spasm of the muscles lining the bronchi or by a swelling of the bronchi themselves. People may become anxious or frightened because breathing is difficult.
Asthma is most common in children and young adults. It may be triggered by an allergic reaction to food, pollen, a drug, or an insect sting. It may also be triggered by emotional distress, cold weather, or physical activity. Normally, patients with asthma are able to easily control their attacks with medication. These medications stop the muscles from spasming, opening the airway and making respiration easier.
A characteristic sign of asthma is wheezing during exhalations. This is due to the constriction of the air passages, which also traps air in the lungs. This trapped air may also make the patient’s chest appear larger than normal, particularly in small children.
If the patient has a prescription for a metered-dose inhaler (puffer), you can provide assistance. A metered-dose inhaler may or may not be used with a spacer and/or a mask (Figure 6–14).
HOW TO HELP SOMEONE USE A METERED-DOSE INHALERWhen assisting a patient, follow these steps:1. Check the Six Rights of Medication before
proceeding.2. Tell the patient to shake the inhaler three or
four times.3. Help the patient remove the cap from the
inhaler. 4. Tell the patient to breathe out, away from the
inhaler.5. Have the person bring the inhaler to the
mouth. Help to put the mouthpiece between the patient’s teeth and then tell patient to close his or her lips around it.
6. Tell the patient to press the top of the inhaler once while taking one slow, full breath in. If the patient is unable to press the top, you may do it instead if the patient asks you to.
7. Have the patient hold the breath for as long as comfortable (up to 10 seconds) and then exhale.
HOW TO HELP SOMEONE USE A METERED-DOSE INHALER WITH A SPACERWhen assisting a patient, follow these steps:1. Check the Six Rights of Medication before
proceeding.

AIR
WA
Y M
AN
AG
EMEN
T A
ND
RES
PIR
ATO
RY E
MER
GEN
CIE
S
117
2. Tell the patient to shake the inhaler three or four times.
3. Have the patient remove the cap from the inhaler (and spacer, if applicable).
4. Have the patient put the inhaler into the spacer.
5. Tell the patient to breathe out, away from the spacer.
6. Have the patient bring the spacer to the mouth.7. Tell the patient to press the top of the inhaler
once while taking one slow, full breath in (Figure 6–15). If the patient is unable to press the top, you may do it instead if the patient asks you to.
8. Have the patient hold the breath for as long as comfortable (up to 10 seconds) and then exhale.
NEBULIZATION A small-volume nebulizer is a special mask designed to administer aerosolized (mist) medication. It allows medication to be delivered to the smaller airways by converting it from a liquid form to an aerosol by forcing oxygen through it at a high velocity. Smaller particles penetrate deeper into the lungs to reach target sites in the smaller airways. Nebulization increases the efficacy of drug delivery even if the patient is not breathing effectively. Nebulizers are common for children under the age of 5, those who have difficulty using inhalers, and those with severe asthma (Figure 6–16).
Because aerosolized medication can travel through the air, additional PPE is required to protect responders from being exposed. In addition to gloves and eye protection, the responder should wear an N95 mask throughout the entire nebulization procedure.
Typically, bronchodilators are indicated for patients with acute shortness of breath. Bronchodilators relax the bronchial muscles, making them smooth, which improves airflow during inhalation and exhalation.
Figure 6–14: Examples of metered-dose inhalers, spacer, and masks.
Figure 6–15: An inhaler with a spacer.
Figure 6–16: Nebulizers are common for children under the age of 5.
© iS
tock
pho
to.c
om/G
ord
ana
Joan
ovic

AIR
WA
Y M
AN
AG
EMEN
T A
ND
RES
PIR
ATO
RY E
MER
GEN
CIE
S
118
PneumoniaPneumonia is a term used to describe a group of illnesses characterized by lung infection and fluid- or pus-filled alveoli that results in hypoxia. Pneumonia is usually caused by bacteria or a virus, but it can also be caused by irritants, such as smoke, or aspirated materials, such as vomit. Patients with pneumonia may complain of fever and chills.
Signs and symptoms of pneumonia include: • Difficulty breathing (dyspnea). • Rapid breathing (tachypnea). • Pleuritic chest pain, which usually worsens
while breathing. • Productive cough with pus in the sputum or
mucus. • Fever, usually exceeding 38°C (100°F). • Chills.
Patients suffering from pneumonia may also display other symptoms, such as: • Nausea. • Tiredness. • Vomiting. • Muscle aches. • Headache.
Acute Pulmonary EdemaPulmonary edema can be caused by heart or lung damage. For example, a number of heart disorders (e.g., heart attack, left-sided heart failure, dysrhythmias) can cause fluid to back up in the blood vessels that carry blood away from the lungs to the heart (pulmonary veins). As a result of a buildup of pressure in these veins, excess fluid leaks out into the alveoli. As the fluid builds up in the lungs, the amount of oxygen entering the blood also decreases (Figure 6–17).
Congestive heart failure (CHF) is the most common condition to cause pulmonary edema. However, other causes include pneumonia, smoke or toxin inhalation, narcotic overdose, drowning, and high-altitude illness. You may find patients with pulmonary edema sitting upright and leaning forward. If you find a patient lying down, instruct him or her to sit up and dangle his or her legs to encourage fluid to pool in the legs. In some cases, you may need to assist the patient’s ventilations.
Signs and symptoms of pulmonary edema are: • Shortness of breath with sudden onset. • Rapid, laboured breathing. • Cyanosis. • Restlessness. • Anxiety. • Exhaustion. • Rapid pulse (tachycardia). • Cool, clammy skin. • Frothy sputum (in the later stages).
Pulmonary EmbolismPulmonary embolism is caused by a blockage (embolus) of a pulmonary artery by a clot or other foreign material that has travelled from another part of the circulatory system (Figure 6–18). It is a common disorder that usually begins as a venous disease. It is most often caused by a blood clot (thrombus) breaking free in the large veins of the lower extremities, but it can also be caused by fat, air, amniotic fluid, or tumour tissue. The embolus flows through the right side of the heart and into a pulmonary artery, obstructing the blood supply to the part of the lung served by the artery.
An embolus may range in size from small to massive; therefore, the signs and symptoms vary and depend on the location and size of the blockage. The signs and symptoms of a pulmonary embolism may include: • Shortness of breath. • Coughing. • Pain.
Figure 6–17: Pulmonary edema is a buildup of fluid in the lungs.
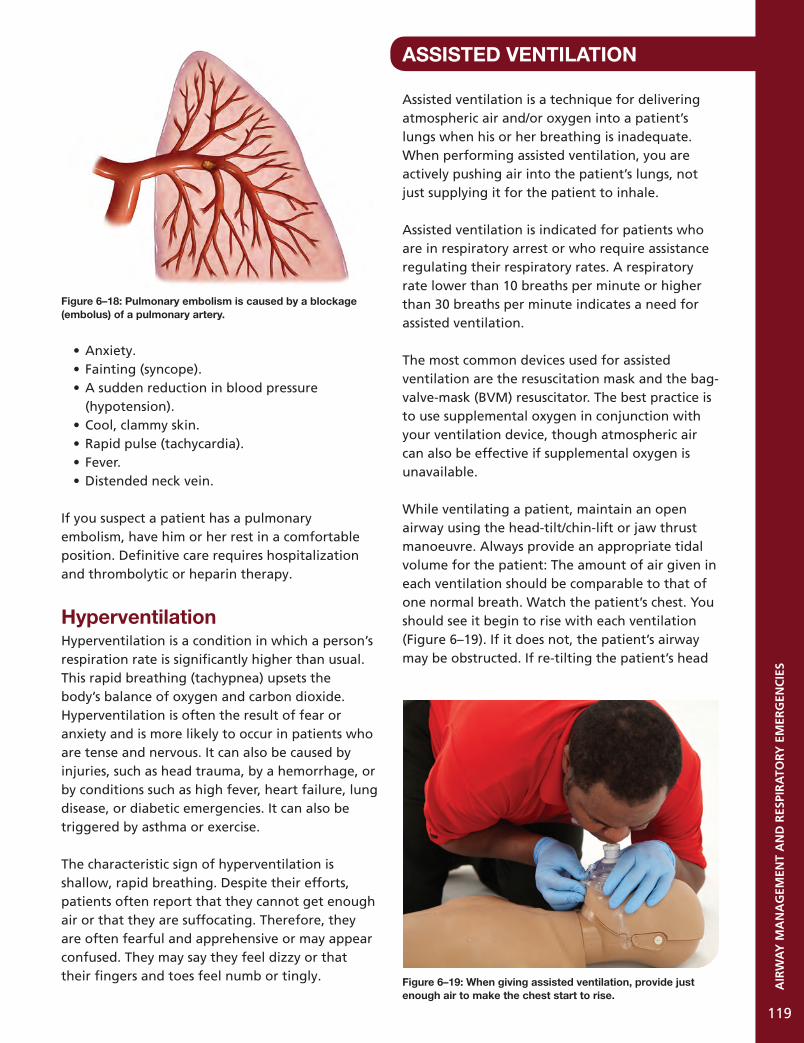
AIR
WA
Y M
AN
AG
EMEN
T A
ND
RES
PIR
ATO
RY E
MER
GEN
CIE
S
119
• Anxiety.• Fainting (syncope).• A sudden reduction in blood pressure
(hypotension).• Cool, clammy skin.• Rapid pulse (tachycardia).• Fever.• Distended neck vein.
If you suspect a patient has a pulmonary embolism, have him or her rest in a comfortable position. Definitive care requires hospitalization and thrombolytic or heparin therapy.
HyperventilationHyperventilation is a condition in which a person’s respiration rate is significantly higher than usual. This rapid breathing (tachypnea) upsets the body’s balance of oxygen and carbon dioxide. Hyperventilation is often the result of fear or anxiety and is more likely to occur in patients who are tense and nervous. It can also be caused by injuries, such as head trauma, by a hemorrhage, or by conditions such as high fever, heart failure, lung disease, or diabetic emergencies. It can also be triggered by asthma or exercise.
The characteristic sign of hyperventilation is shallow, rapid breathing. Despite their efforts, patients often report that they cannot get enough air or that they are suffocating. Therefore, they are often fearful and apprehensive or may appear confused. They may say they feel dizzy or that their fingers and toes feel numb or tingly.
ASSISTED VENTILATION
Assisted ventilation is a technique for delivering atmospheric air and/or oxygen into a patient’s lungs when his or her breathing is inadequate. When performing assisted ventilation, you are actively pushing air into the patient’s lungs, not just supplying it for the patient to inhale.
Assisted ventilation is indicated for patients who are in respiratory arrest or who require assistance regulating their respiratory rates. A respiratory rate lower than 10 breaths per minute or higher than 30 breaths per minute indicates a need for assisted ventilation.
The most common devices used for assisted ventilation are the resuscitation mask and the bag-valve-mask (BVM) resuscitator. The best practice is to use supplemental oxygen in conjunction with your ventilation device, though atmospheric air can also be effective if supplemental oxygen is unavailable.
While ventilating a patient, maintain an open airway using the head-tilt/chin-lift or jaw thrust manoeuvre. Always provide an appropriate tidal volume for the patient: The amount of air given in each ventilation should be comparable to that of one normal breath. Watch the patient’s chest. You should see it begin to rise with each ventilation (Figure 6–19). If it does not, the patient’s airway may be obstructed. If re-tilting the patient’s head
Figure 6–18: Pulmonary embolism is caused by a blockage (embolus) of a pulmonary artery.
Figure 6–19: When giving assisted ventilation, provide just enough air to make the chest start to rise.

AIR
WA
Y M
AN
AG
EMEN
T A
ND
RES
PIR
ATO
RY E
MER
GEN
CIE
S
120
does not open the airway, obstructed airway interventions will be necessary before ventilations can be effective.
Your goal is to reproduce the natural respiratory rate of the patient. Provide 1 ventilation every 5 to 6 seconds for an adult and every 3 to 5 seconds for a child or an infant. If the patient is breathing too slowly (bradypnea), provide one ventilation as the patient inhales and a second ventilation in between the patient’s breaths, maintaining the natural respiratory rate (every 5 to 6 seconds for an adult and every 3 to 5 seconds for a child or an infant). If the patient is breathing too quickly (tachypnea), provide one ventilation on every second inhalation, trying again to maintain a steady rate that mirrors the patient’s natural respiratory rate.
If the patient is responsive, he or she may resist the ventilations or even begin to panic. Try to calm and reassure the person and explain what you are doing. Providing supplemental oxygen can help to reduce anxiety caused by hypoxia.
Because ventilations are given through a mask that covers the patient’s mouth and nose, the procedure is the same even if the patient’s mouth is compromised. Your ventilations will enter the lungs through the nasal passages.
In some cases, assisted ventilation will cause a patient to spontaneously resume a normal respiratory rate, even if that patient was initially in respiratory arrest. Otherwise, the ventilations will maintain a steady supply of oxygen to the patient’s lungs until additional interventions can be performed.
Special Considerations for Assisted VentilationAIR IN THE STOMACHWhen you perform assisted ventilation, air normally enters the patient’s lungs, but sometimes air may enter the patient’s stomach instead. Air in the stomach is called gastric distension. Gastric distension can be a serious problem because it can cause a patient to vomit. When an unresponsive patient vomits, the stomach contents can be
aspirated (inhaled), impairing breathing and creating the risk of an airway obstruction. If the patient vomits, you must clear the airway immediately (see Suction on page 136).
There are several reasons why gastric distension may occur. First, overinflating the lungs by providing too much air in a ventilation may cause the extra air to enter the stomach. Second, ventilations that are given with too much force (aggressive ventilations) can also force air into the stomach. If the patient’s head is not tilted back adequately, the airway will not open completely and the chest may only rise slightly when you ventilate normally. This can lead you to provide ventilations with more force. Third, if your ventilation rate is too high, pressure can build up in the airway and cause air to enter the stomach.
To avoid forcing air into the stomach, be sure to keep the patient’s head tilted to an appropriate angle. Give ventilations with just enough volume to make the chest start to rise and maintain a steady rhythm of 1 breath every 5 to 6 seconds (every 3 to 5 seconds for infants and children).
MOUTH-TO-STOMA BREATHINGSome patients have had an operation to remove all or part of the larynx. They breathe through an opening in the front of the neck called a stoma (Figure 6–20). Air passes directly into the trachea through the stoma instead of through the mouth and nose.
Figure 6–20: A stoma is an opening in the front of the neck that someone breathes through.

AIR
WA
Y M
AN
AG
EMEN
T A
ND
RES
PIR
ATO
RY E
MER
GEN
CIE
S
121
When assessing the patient’s breathing, put the side of your face over the stoma rather than the mouth and nose. For ventilations, place the mask directly over the stoma and ensure that there is a good seal on the neck. It may be easier to create the seal if you use an infant- or child-sized mask. Otherwise, provide ventilations as usual (Figure 6–21).
If the chest does not rise when you give ventilations, this may indicate that the patient has had only part of the larynx removed. This means that some air continues to flow through the larynx to the lungs during normal breathing. When providing ventilations into the stoma, air may leak through the nose and mouth, diminishing the amount that reaches the lungs. If this occurs, seal the nose and mouth with your hand to prevent air from escaping.
PATIENTS WITH DENTURESDentures help with assisted ventilation by supporting the patient’s mouth and cheeks. If the dentures are loose, the head-tilt/chin-lift may help keep them in place. Remove the dentures only if they become so loose that they obstruct the airway or make it difficult to provide ventilations.
RESUSCITATION DEVICES
Resuscitation devices are used when providing assisted ventilation for a patient in respiratory distress or arrest. They are also a form of barrier protection, reducing the risk of direct contact between the patient and the responder.
Resuscitation MasksOne of the simplest and most readily available ventilation devices is the resuscitation mask. Resuscitation masks are pliable, dome-shaped devices that fit over a patient’s mouth and nose to aid in ventilation. Several types of resuscitation masks are available, varying in size, shape, and features. Resuscitation masks can also be referred to as pocket masks.
Resuscitation masks provide a barrier between you and the patient, reducing the risk of infection.
They are easy to use, especially compared to using a BVM without a partner, and are small enough to be carried on your person.
Resuscitation masks can be susceptible to damage: Small parts such as the valves can detach and become lost. If stored for long periods in a collapsed state, the mask can crack or split.
SELECTING A RESUSCITATION MASKAn effective resuscitation mask should meet the following criteria (Figure 6–22):
• It should be made of a transparent, pliablematerial that allows you to form a tight sealon the patient’s face.
• It should have a one-way valve for redirectinga patient’s exhaled air.
Figure 6–22: A resuscitation mask should meet specific criteria.
Figure 6–21: When giving rescue breaths to a patient with a stoma, breathe directly into the stoma.

AIR
WA
Y M
AN
AG
EMEN
T A
ND
RES
PIR
ATO
RY E
MER
GEN
CIE
S
122
• It should contain a biofilter to keep fluids from entering the valve.
• It should have an inlet for the delivery of supplemental oxygen.
• It should work well under a variety of environmental conditions.
• It should be easy to assemble and use.
USING A RESUSCITATION MASKTo use a resuscitation mask, begin by expanding the mask and attaching the one-way valve. Next, place the mask so that it covers the patient’s mouth and nose. Position the lower rim of the mask between the patient’s lower lip and chin. The upper end of the mask should cover the nose. Figure 6–23 shows how to position the resuscitation mask.
When using the mask, you must maintain a good seal to prevent air from leaking at the edges of the mask. Use both hands to hold the mask in place, and maintain an open airway by tilting the patient’s head back and lifting the jaw upward into the mask.
Figure 6–24, a-b, shows two methods for using a resuscitation mask.
If you suspect that a patient has a head and/or spinal injury, use the jaw thrust technique to maintain an open airway while holding the mask in position (Figure 6–25).
Figure 6–23: A resuscitation mask should be positioned over the mouth and nose, with the lower rim placed between the patient’s lower lip and chin.
Figure 6–24, a-b: To use a resuscitation mask: a, position yourself behind the patient’s head and hold the two sides tightly against the face; or b, position yourself beside the patient and hold the mask in place.
Figure 6–25: If you suspect a head and/or spinal injury, use the jaw thrust technique and hold the mask to the face without tilting the head.
a
b
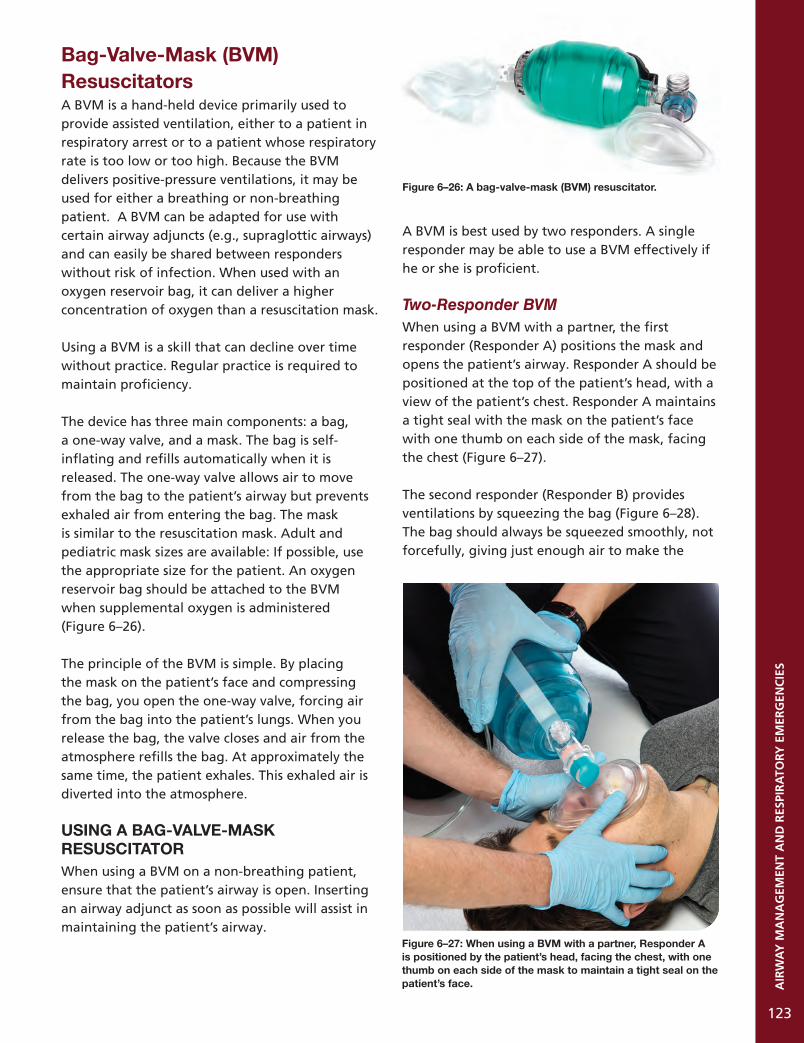
AIR
WA
Y M
AN
AG
EMEN
T A
ND
RES
PIR
ATO
RY E
MER
GEN
CIE
S
123
Bag-Valve-Mask (BVM) ResuscitatorsA BVM is a hand-held device primarily used to provide assisted ventilation, either to a patient in respiratory arrest or to a patient whose respiratory rate is too low or too high. Because the BVM delivers positive-pressure ventilations, it may be used for either a breathing or non-breathing patient. A BVM can be adapted for use with certain airway adjuncts (e.g., supraglottic airways) and can easily be shared between responders without risk of infection. When used with an oxygen reservoir bag, it can deliver a higher concentration of oxygen than a resuscitation mask.
Using a BVM is a skill that can decline over time without practice. Regular practice is required to maintain proficiency.
The device has three main components: a bag, a one-way valve, and a mask. The bag is self-inflating and refills automatically when it is released. The one-way valve allows air to move from the bag to the patient’s airway but prevents exhaled air from entering the bag. The mask is similar to the resuscitation mask. Adult and pediatric mask sizes are available: If possible, use the appropriate size for the patient. An oxygen reservoir bag should be attached to the BVM when supplemental oxygen is administered (Figure 6–26).
The principle of the BVM is simple. By placing the mask on the patient’s face and compressing the bag, you open the one-way valve, forcing air from the bag into the patient’s lungs. When you release the bag, the valve closes and air from the atmosphere refills the bag. At approximately the same time, the patient exhales. This exhaled air is diverted into the atmosphere.
USING A BAG-VALVE-MASK RESUSCITATORWhen using a BVM on a non-breathing patient, ensure that the patient’s airway is open. Inserting an airway adjunct as soon as possible will assist in maintaining the patient’s airway.
A BVM is best used by two responders. A single responder may be able to use a BVM effectively if he or she is proficient.
Two-Responder BVMWhen using a BVM with a partner, the first responder (Responder A) positions the mask and opens the patient’s airway. Responder A should be positioned at the top of the patient’s head, with a view of the patient’s chest. Responder A maintains a tight seal with the mask on the patient’s face with one thumb on each side of the mask, facing the chest (Figure 6–27).
The second responder (Responder B) provides ventilations by squeezing the bag (Figure 6–28). The bag should always be squeezed smoothly, not forcefully, giving just enough air to make the
Figure 6–27: When using a BVM with a partner, Responder A is positioned by the patient’s head, facing the chest, with one thumb on each side of the mask to maintain a tight seal on the patient’s face.
Figure 6–26: A bag-valve-mask (BVM) resuscitator.

AIR
WA
Y M
AN
AG
EMEN
T A
ND
RES
PIR
ATO
RY E
MER
GEN
CIE
S
124
patient’s chest start to rise: This is generally about one-third of the bag’s capacity. This two-person technique allows one responder to maintain an open airway and a tight mask seal while the second responder provides ventilations.
Single-Responder BVMIf you are using a BVM without a partner, you must maintain the mask seal, monitor the airway, and provide ventilations simultaneously.
Position yourself above the patient’s head, facing the chest. Make a “C” with the thumb and index finger of one hand and place it around the mask seal, with the index finger on the chin side. Maintain pressure on the mask to form a tight seal. Place the other three fingers of the same hand along the patient’s cheek, with your fingertips hooked under the patient’s mandible to maintain the angle of the head, protecting the airway (Figure 6–29).
With your other hand, provide ventilations by squeezing the bag. The bag should always be squeezed smoothly, not forcefully, giving just enough air to make the patient’s chest start to rise: This is generally about one-third of the bag’s capacity.
BVMs FOR CHILDREN AND INFANTSSome BVMs are designed specifically for children and infants. These devices have a smaller mask for a better fit on the face. The bag is designed to hold a smaller volume of air and limit the amount of air that is squeezed into the lungs. A number of these BVMs also include a valve that stops the forced entrance of air once a certain pressure has been reached, avoiding overinflation of the lungs. As always, ventilate until the chest just starts to rise.
SUPPLEMENTAL OXYGEN
The normal concentration of oxygen in the air is approximately 21%, which is more than enough to sustain life under normal conditions. However, when serious injury or illness occurs, the body’s tissues may not receive sufficient oxygen from atmospheric air, resulting in hypoxia (a condition in which the body’s cells receive insufficient oxygen). Hypoxia can cause an increase in respiration and heart rate, restlessness, cyanosis, chest pain, and changes in responsiveness.
Figure 6–29: Hand placement for single-responder BVM use.
Figure 6–28: When using a BVM, one responder maintains a tight seal of the mask on the patient’s face, and a second responder provides ventilations.

AIR
WA
Y M
AN
AG
EMEN
T A
ND
RES
PIR
ATO
RY E
MER
GEN
CIE
S
125
If a patient is not receiving sufficient oxygen through normal respiration, you must provide additional oxygen to the patient to increase the oxygen saturation in the blood (Figure 6–30). This may be as simple as breathing air into the patient’s lungs or as complex as providing specific quantities of supplemental oxygen from a cylinder.
Oxygen cylinders may be portable or fixed. An ambulance, for example, typically carries a cylinder with a large supply of oxygen in a secure onboard location. This is connected to an internal system that can interface with multiple devices to provide oxygen when transporting patients. Portable oxygen units are more compact and lightweight. They can be carried to a patient’s location to provide oxygen during care or extrication. If a patient is loaded into an ambulance, the oxygen delivery system you are using can be transferred to draw oxygen from the onboard system instead.
PrecautionsDepending on the environment, supplemental oxygen is not always safe to use. Oxygen supports combustion; therefore, it cannot be used in environments where there is a risk of fire or explosion, or around sparks or flames. You may need to caution bystanders against smoking. The responder needs to remain vigilant of the environment any time oxygen is being administered. When using supplemental oxygen, safety is a primary concern. Remember the following precautions:
• Do not operate oxygen equipment around an open flame or sparks or in close proximity to an AED. Oxygen causes fire to burn more rapidly.
• Do not stand oxygen cylinders upright unless they can be well secured. If the cylinder falls, it could damage the regulator or possibly loosen the cylinder valve.
• Handle oxygen cylinders carefully: Do not drop a cylinder, and never drag or roll a cylinder.
• Do not use grease, oil, tape, or petroleum products to lubricate any pressure regulator parts. Oxygen does not mix with these products, and a severe chemical reaction could cause an explosion.
• When disinfecting an oxygen regulator, take care to prevent any material from entering the inlet port (as per the manufacturer’s instructions).
Indications for Supplemental OxygenSupplemental high-flow oxygen is indicated in the following situations:1. The patient has been exposed to carbon
monoxide.2. The patient is experiencing decompression
sickness and/or injury (e.g. SCUBA incidents).3. The patient is suffering from asphyxiation.4. The patient is suffering from dyspnea.5. The patient is hypoxic.6. The patient’s SpO2 is lower than 95%
(hypoxemia).
Figure 6–30: Administering supplemental oxygen allows a substantially higher oxygen concentration to be delivered to the patient.
Rescue Breathing
Resuscitation Mask
Bag-Valve-Mask
16%
50%w/O2
100%O2w/
reservoir
16% 21%

AIR
WA
Y M
AN
AG
EMEN
T A
ND
RES
PIR
ATO
RY E
MER
GEN
CIE
S
126
Calculating How Long an Oxygen Cylinder Will LastThe size of an oxygen cylinder is designated by a letter. If you know the size of your oxygen cylinder and the reading on the pressure gauge, you can calculate how long the supply will last. There are various protocols as to when to change your tank; however, in all cases, 200 psi is known as the safe residual pressure, and the tank should always be changed around this point. Note that this is the oxygen remaining under ideal conditions: The general best practice is to monitor the oxygen supply while it is being administered to ensure that it does not run out unexpectedly.
If a patient who is receiving supplemental oxygen is being transported, you must include the extrication and transportation time when calculating how much oxygen will be required and ensure that you are prepared to meet the demands. It is better to have more oxygen than you need than to run out while providing care.
The calculation is as follows:
Duration of flow = (gauge pressure – 200 psi) x C
flow rate (litres per minute (LPM))
Where C = the cylinder constant
The constants for each size of cylinder are:
D cylinder = 0.16 L/psiE cylinder = 0.28 L/psiM cylinder = 1.56 L/psi
Example 1:Duration of a full D cylinder at 2,000 psi, at a flow rate of 10 LPM.
Duration of flow = (2000 – 200) x 0.16 10
Duration of flow = approximately 28.8 minutes of flow remaining
Example 2:Duration of a full D cylinder at 2,000 psi, at a flow rate of 15 LPM.
Duration of flow = (2000 – 200) x 0.16 15
Duration of flow = approximately 19.2 minutes of flow remaining
If the patient is already receiving low-flow oxygen (e.g., for COPD), it is usually best to keep the patient on low-flow oxygen unless the patient is suffering from respiratory distress.
In order to deliver supplemental oxygen, a responder must have the following equipment: • An oxygen cylinder • An oxygen regulator • A delivery device
Figure 6–31 shows an oxygen cylinder, regulator, and flowmeter.
Figure 6–31: An oxygen cylinder, regulator, and flowmeter.

AIR
WA
Y M
AN
AG
EMEN
T A
ND
RES
PIR
ATO
RY E
MER
GEN
CIE
S
127
Oxygen CylindersOxygen cylinders have a distinctive green or white colour and a yellow diamond marking that says “oxidizer.” These cylinders are made of steel, aluminum, or another metal. Depending on their size, those used in the pre-hospital setting typically hold between 350 and 625 litres of oxygen. These cylinders have internal pressures of approximately 2,000 pounds per square inch (psi) (13,790 kPa).
Oxygen Regulator The oxygen inside an oxygen cylinder is under tremendous pressure. To safely administer oxygen from the cylinder to a patient, this pressure must be reduced significantly. This is done by attaching an oxygen regulator to the cylinder to reduce the pressure of the oxygen to a safe level. The regulator reduces the pressure from approximately 2,000 psi inside the cylinder to a safe range of 30 to 70 psi. Some oxygen cylinders have an integrated regulator, but these are used in the same way as an independent regulator (Figure 6–32).
An oxygen regulator has a gauge that indicates how much pressure is in the cylinder. By checking the gauge, you can determine if a cylinder is full (2,000 psi), nearly empty (200 psi), or somewhere in between.
An oxygen regulator has two metal prongs that fit into a valve at the top of the oxygen cylinder. Regulators and cylinders are pin indexed, meaning that a regulator will only fit into a cylinder that it was designed for. To ensure a tight seal between
the regulator and the cylinder, a gasket (commonly referred to as an O-ring) must be used. These come in both single-use and multi-use forms.
A regulator controls the rate at which oxygen flows through the oxygen delivery device, which is measured in litres per minute (LPM). Regulators normally deliver between 1 and 25 LPM.
When working with oxygen cylinders, always: • Use pressure gauges and regulators designed
for use with oxygen. • Ensure that all hardware is in good condition. • Use medical-grade (USP) oxygen. • Store oxygen in a cool, ventilated room when
not in use. • Have cylinders hydrostatically tested every
5 years (or per manufacturer’s specifications).
Using Oxygen Delivery DevicesTo deliver oxygen from the cylinder to the patient requires a delivery device. There are a variety of delivery devices available, applicable in different situations. A section of tubing is attached to the device at one end and to the oxygen regulator at the other.
NASAL CANNULAA nasal cannula is a plastic tube with two small prongs that are inserted into the patient’s nostrils to deliver oxygen (Figure 6–33). It is commonly used to manage patients with minor respiratory difficulties who do not require high-flow oxygen. It is especially useful in non-trauma situations.
Figure 6–33: A nasal cannula.Figure 6–32: An oxygen cylinder with an integrated regulator.

AIR
WA
Y M
AN
AG
EMEN
T A
ND
RES
PIR
ATO
RY E
MER
GEN
CIE
S
128
Because it leaves the mouth clear, it also facilitates communication with the patient. A nasal cannula is only suitable for a breathing patient.
The use of a nasal cannula is limited since it is normally used at a flow rate of 1 to 4 LPM. Under these conditions, it delivers a peak oxygen concentration of approximately 36%. Flow rates above 4 LPM are not commonly used because of their tendency to quickly dry out mucous membranes. This can cause epistaxis (nosebleeds) and headaches. After longer periods of use, patients can experience irritation around the nostrils.
To use a nasal cannula, connect the cannula to an oxygen source and start the oxygen flow. Place the cannula’s prongs into the patient’s nostrils. Hold the prongs in place (or have the patient hold them) while you loop the cannula tubing over the patient’s ears with the excess hanging in front of the patient’s chest. Adjust the collar on the tubing to gather it in front of the patient’s chest and hold the cannula in place.
Adding moisture to oxygen by attaching an oxygen humidifier to the regulator can help decrease irritation of the respiratory tract, which can result when a patient receives supplemental oxygen over a long period of time. The humidifier forces oxygen through sterile water, which allows it to pick up moisture before being delivered to the patient. Generally, a humidifier is not used in a pre-hospital setting, although it may be used during a long transfer.
A nasal cannula is not appropriate for patients experiencing serious respiratory emergencies, since they need a device that can supply a greater concentration of oxygen. In addition, the nasal cannula can be ineffective if the patient has a nasal airway obstruction, nasal injury, or illness (e.g., a bad cold) causing blocked sinus passages. However, it could be considered if the patient requires low-flow oxygen and cannot tolerate having a mask over his or her face.
RESUSCITATION MASKResuscitation masks may have a port that can be connected to supplemental oxygen. If a breathing patient requires supplemental oxygen and no other delivery device is available, you can connect oxygen directly to the mask and use it as you would use a standard oxygen mask. The oxygen flow rate is 6–10 LPM and can supply an oxygen concentration of approximately 35 to 55%. Some resuscitation masks have elastic straps that can be placed over the patient’s head and tightened to secure the mask in place. If the mask does not have a strap, either you or the patient can hold it in place.
STANDARD MASKA standard oxygen mask (also referred to as a simple face mask or standard mask) is an oxygen mask that fits over a patient’s mouth and nose to supply oxygen. It is usually made of a pliable material to increase patient comfort. Oxygen tubing is often an integral part of the mask, so it may not require assembly.
Medium-concentration masks are available in both adult and pediatric sizes. The flow rate for a medium-concentration mask is usually 6 to 10 LPM, delivering an oxygen concentration of 40 to 60%.
NON-REBREATHER MASKA non-rebreather mask (or partial non-rebreather mask), sometimes referred to as a high-concentration mask, is an oxygen face mask with low-resistance check valves along its sides. It is used with an oxygen cylinder and reservoir bag (usually 750 ml) to provide supplemental oxygen.
A non-rebreather mask needs to have a flow rate of 10 LPM or more to ensure the proper reservoir bag inflation. This device allows the patient to inhale air from the reservoir bag and exhale through the check valves (Figure 6–34, a). The non-rebreather mask, when used in conjunction with a pulse oximeter, can be utilized on a patient with SpO2 levels under 95%, with flow rates from 10 to 15 LPM. Monitor the oxygen reservoir bag, and increase the oxygen flow rate as necessary (titrate) to ensure that the bag remains full.

AIR
WA
Y M
AN
AG
EMEN
T A
ND
RES
PIR
ATO
RY E
MER
GEN
CIE
S
129
Figure 6–34, a-b: Common oxygen delivery devices include a, a non-rebreather mask; and b, a BVM.
ba
TABLE 6–2: OXYGEN DELIVERY DEVICES
DEVICE COMMON FLOW RATE OXYGEN FUNCTION CONCENTRATION
Nasal cannula 1–4 LPM 24–36% Breathing patients only
Resuscitation mask 6+ LPM 35–55%Breathing and non-breathing patients
Standard mask 6–10 LPM 40–60% Breathing patients only
Non-rebreather mask (w/O2 res.) 10+ LPM 90+% Breathing patients only
Bag-valve-mask resuscitator (w/O2 res.) 15 LPM 90+%Breathing and non-breathing patients
BAG-VALVE-MASKThe BVM resuscitator with an oxygen reservoir is capable of supplying an oxygen concentration of 90 to 100%. A flow rate of 15 LPM is sufficient to keep the reservoir full.
To deliver oxygen through a BVM, you must first attach an oxygen reservoir bag to the back of the BVM bag (Figure 6–34, b). Next, connect the oxygen cylinder tubing to the BVM through the oxygen port. After setting the oxygen flow rate and opening the cylinder, block the outlet port on the resuscitation mask with your finger or thumb. This will fill the oxygen reservoir. When you compress the BVM bag, the patient will receive close to 100% oxygen. When you release the BVM bag, it will refill with oxygen from the reservoir.
Table 6–2 provides an overview of each of the delivery devices.
Administering OxygenBegin by checking the cylinder to confirm that it contains medical oxygen (Figure 6–35, a). Next, check the oxygen gauge to ensure that the quantity of oxygen in the cylinder is sufficient. A full cylinder will come with a protective covering over the tank opening. Remove this covering and save the O-ring. While pointing the cylinder’s valve away from yourself and others, and wearing proper ear and eye protection, quickly open the cylinder’s valve (for a maximum of one second) (Figure 6–35, b). This will remove any dirt or debris from the cylinder valve.
Next, examine the pressure regulator. Ensure that the gasket is positioned properly within the regulator inlet port (Figure 6–36, a). Confirm that the pin index on the regulator corresponds to the oxygen cylinder you are using (Figure 6–36, b). Attach the pressure regulator to the cylinder, seating the prongs inside the holes in the valve

AIR
WA
Y M
AN
AG
EMEN
T A
ND
RES
PIR
ATO
RY E
MER
GEN
CIE
S
130
Figure 6–35, a-b: a, An oxygen cylinder is usually green or white, with a yellow diamond indicating oxygen; b, open the cylinder for one second, pointing it away from you.
Figure 6–36, a-d: To attach the pressure regulator to the cylinder: a, insert the gasket into the pressure regulator; b, check to see that the pin index corresponds to the oxygen tank; c, seat the prongs of the regulator inside the cylinder and hand-tighten the screw until the regulator is snug; and d, turn on the oxygen and check how much pressure is in the cylinder.
a
a
b
b
c d

stem (Figure 6–36, c). Hand-tighten the screw until the regulator is snug. To avoid damaging the assembly, do not use a wrench or other tool to tighten the regulator. Using an appropriate oxygen wrench, open the cylinder by giving the valve one full turn, and listen for leaks.
Check the gauge to determine how much pressure is in the cylinder (Figure 6–36, d). A full cylinder should have approximately 2,000 psi. Attach the chosen delivery device to the oxygen port on the regulator using the appropriate tubing. Set the regulator to the appropriate flow rate. Listen and feel to make sure that oxygen is flowing into the delivery device. If using a delivery device with a reservoir bag, ensure that it is full (Figure 6–37), and then place the delivery device on the patient.
AIRWAY ADJUNCTS
An airway adjunct is a tube that is inserted into a patient’s upper airway to assist in keeping it patent (open). It can also facilitate assisted ventilations. Airway adjuncts are especially useful for patients with decreased levels of responsiveness, whose tongues can otherwise become anatomical obstructions. The most common adjuncts are oropharyngeal airways (OPAs) and nasopharyngeal airways (NPAs). A foreign-body airway obstruction must be cleared before any airway adjunct can be inserted.
Note that an airway adjunct may not be sufficient to maintain an open airway on its own. Even after inserting an adjunct, you must continue to monitor the patient’s respiration and use manual techniques such as the head-tilt/chin-lift to maintain airway patency. After inserting an airway adjunct for an unresponsive breathing patient, check the patient’s breathing to confirm that the airway has not been obstructed.
Oropharyngeal AirwaysAn oropharyngeal airway (OPA) is a device that is inserted into the mouth of an unresponsive patient. OPAs come in a variety of sizes (Figure 6–38). The curved design fits the natural contour of the mouth and throat. A properly sized and inserted OPA will not interfere with assisted ventilations or oxygen delivery.
PROPER SIZING AND INSERTION OF AN OPAMeasure the device against the side of the patient’s face to ensure that it extends from the earlobe to the corner of the mouth (Figure 6–39). Open the patient’s mouth using the crossed-finger technique (see below), and then insert the OPA by gently sliding the tip along the roof of the mouth (Figure 6–40). When the device is approximately one-half to three-quarters of the way into the patient’s mouth (as the tip approaches the back of the throat), rotate it a half-turn (Figure 6–41). The OPA should drop into the throat without resistance. The flange end should rest on the patient’s lips (Figure 6–42).
AIR
WA
Y M
AN
AG
EMEN
T A
ND
RES
PIR
ATO
RY E
MER
GEN
CIE
S
131
c
Figure 6–37: Ensure that the reservoir bag is full before placing the delivery device on a patient.
Figure 6–38: Oropharyngeal airways (OPAs) come in a variety of sizes.

AIR
WA
Y M
AN
AG
EMEN
T A
ND
RES
PIR
ATO
RY E
MER
GEN
CIE
S
132
If the patient appears unresponsive but gags when you attempt to insert the device, he or she may be partially responsive. If so, stop your attempt. Maintain an open airway using other methods and continue your assessment of the patient. The patient’s LOR can rapidly decline. Reattempt to insert the OPA frequently: A small change in the patient’s responsiveness may allow you to insert it without triggering the gag reflex.
OPAs IN CHILDREN AND INFANTS Younger children and infants have delicate airways, so extra caution must be taken to avoid causing injury when inserting an OPA. Also, you must be careful not to hyperextend the patient’s neck, which could close or even damage the airway. When inserting an OPA into a child’s mouth, you should gently slide the tip along the inside of the cheek, and then rotate it 90 degrees to place it into the throat (Figure 6–43).
When inserting an OPA for an infant, place some padding (e.g., a towel) under the infant’s shoulders to help maintain the neutral position of the head without hyperextending the neck. Hold the tongue against the bottom of the mouth with a tongue depressor. Place the OPA against the lower lip with the concave side facing down, and slide the OPA smoothly into place without rotating it, following the natural curvature of the mouth and throat.
Figure 6–40: To insert the OPA, open the patient’s mouth using the crossed-finger technique. Insert the OPA with the tip along the roof of the mouth.
Figure 6–41: As the tip of the device approaches the back of the throat, rotate it a half-turn.
Figure 6–42: The flange end of the OPA should rest on the patient’s lips.
Figure 6–39: A properly sized OPA extends from the earlobe to the corner of the mouth.

AIR
WA
Y M
AN
AG
EMEN
T A
ND
RES
PIR
ATO
RY E
MER
GEN
CIE
S
133
REMOVING AN OPATo remove an OPA from a patient of any age, grasp the flange between your thumb and index finger and pull gently outwards and downwards (towards the chin). The OPA will slide out smoothly.
Techniques for Opening the MouthThere are two common methods of opening a patient’s mouth to assess the upper airway, insert an OPA, or provide suction. If the patient
has experienced facial trauma, use caution when inserting your fingers to avoid injury from sharp edges of broken teeth or dental appliances.
THE CROSSED-FINGER TECHNIQUEThe crossed-finger technique (Figure 6–44) is the preferred method in most situations:1. Cross the thumb and index finger of one hand.2. Place the thumb on the patient’s lower front
teeth and the index finger on the upper front teeth.
3. Open the mouth using a scissor motion (sometimes described as a slow-motion snapping motion).
THE TONGUE-JAW LIFT TECHNIQUEThe tongue-jaw lift (Figure 6–45) can provide a better view of the oral cavity and upper airway than the crossed-finger technique. However, it requires you to place your thumb between the patient’s teeth, so it exposes you to the risk of being bitten. If the patient is fully unresponsive, this risk is mitigated, so this technique may be used interchangeably with the crossed-finger technique.
To perform the tongue-jaw lift:1. Place your index finger beneath the patient’s
chin.2. Insert the thumb of the same hand into the
patient’s mouth and grasp the tongue, pinning it between your thumb and finger.
3. Gently lift the mandible to open the patient’s mouth.
Figure 6–43: You may attempt to insert the OPA by gently sliding the tip along the inside of the cheek, and then rotating it 90 degrees to place it into the throat.
Figure 6–44: The crossed-finger technique for opening the mouth.
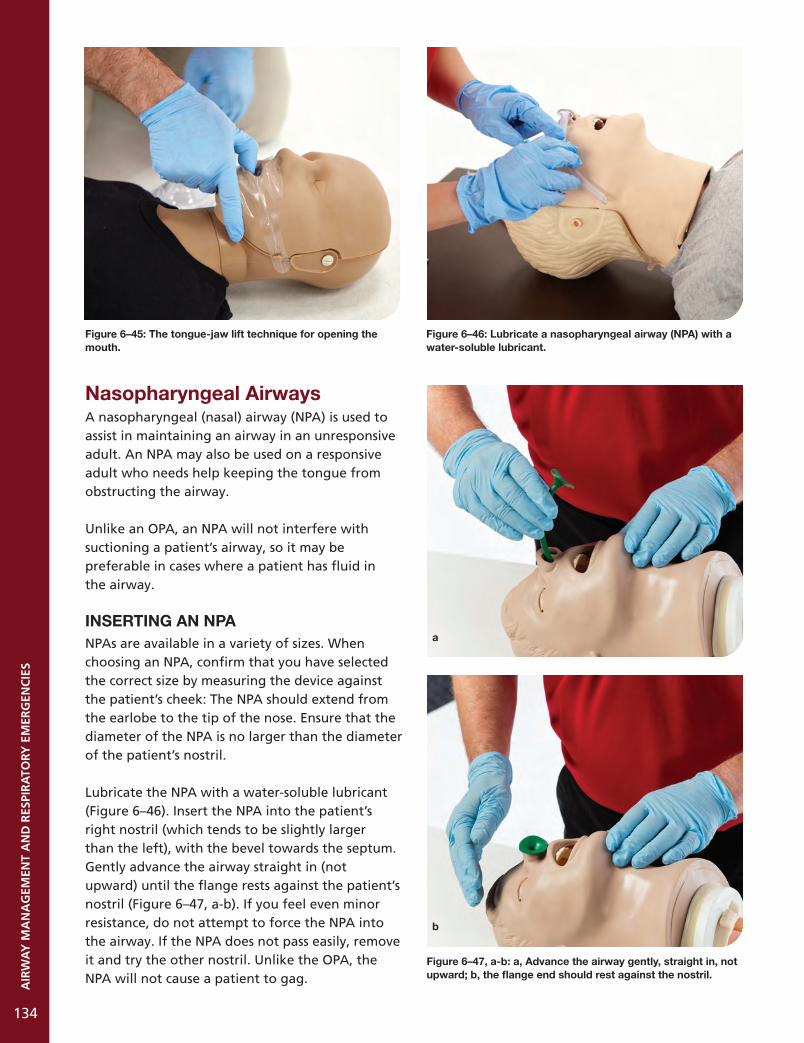
AIR
WA
Y M
AN
AG
EMEN
T A
ND
RES
PIR
ATO
RY E
MER
GEN
CIE
S
134
Nasopharyngeal AirwaysA nasopharyngeal (nasal) airway (NPA) is used to assist in maintaining an airway in an unresponsive adult. An NPA may also be used on a responsive adult who needs help keeping the tongue from obstructing the airway.
Unlike an OPA, an NPA will not interfere with suctioning a patient’s airway, so it may be preferable in cases where a patient has fluid in the airway.
INSERTING AN NPANPAs are available in a variety of sizes. When choosing an NPA, confirm that you have selected the correct size by measuring the device against the patient’s cheek: The NPA should extend from the earlobe to the tip of the nose. Ensure that the diameter of the NPA is no larger than the diameter of the patient’s nostril.
Lubricate the NPA with a water-soluble lubricant (Figure 6–46). Insert the NPA into the patient’s right nostril (which tends to be slightly larger than the left), with the bevel towards the septum. Gently advance the airway straight in (not upward) until the flange rests against the patient’s nostril (Figure 6–47, a-b). If you feel even minor resistance, do not attempt to force the NPA into the airway. If the NPA does not pass easily, remove it and try the other nostril. Unlike the OPA, the NPA will not cause a patient to gag.
Figure 6–46: Lubricate a nasopharyngeal airway (NPA) with a water-soluble lubricant.
Figure 6–47, a-b: a, Advance the airway gently, straight in, not upward; b, the flange end should rest against the nostril.
a
b
Figure 6–45: The tongue-jaw lift technique for opening the mouth.

AIR
WA
Y M
AN
AG
EMEN
T A
ND
RES
PIR
ATO
RY E
MER
GEN
CIE
S
135
An NPA is not indicated for a patient with a suspected skull fracture, active bleeding from the nose, or facial trauma. Insertion of an NPA may cause nosebleeds (epistaxis), which can cause blood to enter the airway. Monitor the patient and provide interventions as necessary.
REMOVING AN NPATo remove an NPA, grasp the flange gently between your thumb and index finger and draw it gently out of the patient’s nose.
Supraglottic AirwaysA supraglottic airway (SGA) is used to keep the upper airway open (create a protected airway) and/or to provide unobstructed ventilation. It is used when other airway management is ineffective. A variety of supraglottic airways are commercially available (Figure 6–48), but they all consist of a rigid tube with inflatable cuffs that expand to seal the patient’s airway and hold the SGA in place.
Aspiration is a risk with supraglottic airways, especially if the patient has gastric inflation or high airway pressure, and these airways are not suitable for patients with active vomiting. Monitor the patient closely after inserting the airway. Supraglottic airways are not indicated for patients with airway edema or stridor, or in cases where you suspect that the patient has ingested a caustic substance.
INSERTING AN SGAAn SGA has a small port that is used to inflate and deflate the cuffs. Before inserting the SGA, deflate the cuffs using a 20 to 30 ml syringe. Lubricate the outer cuff with water-soluble lubricating gel.
Position yourself behind the supine patient, standing, sitting, or kneeling behind the patient’s head. Tilt the patient’s head back approximately 15 degrees, ensuring that the head is extended on the neck and that the chin is centred on the midline of the body (without lateral deviation).
Still standing or kneeling behind the patient, hold the SGA as you would hold a pen and insert it into the patient’s mouth. Apply enough pressure to direct it back and downwards until it reaches the back of the hypopharynx. Using the syringe, inflate the cuffs (Figure 6–49). The volume of air required depends on the specific model that you are using: Consult the manufacturer’s guidelines to determine the appropriate amount. If necessary, attach the BVM to the tube.
Next, confirm that the SGA is in the correct position by observing the chest expansion and auscultating both sides of the chest. You should see and hear good air entry on both sides of the chest. If your level of training and local protocol allow it, consider applying a CO2 detector or end-tidal CO2 monitor to confirm that the placement is correct.
Figure 6–48: A variety of supraglottic airways are available. Figure 6–49: An SGA and a syringe.

AIR
WA
Y M
AN
AG
EMEN
T A
ND
RES
PIR
ATO
RY E
MER
GEN
CIE
S
136
Secure the SGA’s end with tape or a commercially manufactured device. Most SGAs have an attached string or strap: Attach this at the back of the patient’s neck to further support the SGA.
You should not make more than two attempts to insert a supraglottic airway (with an attempt defined as an insertion of the airway into the mouth).
REMOVING AN SGATo remove an SGA, simply reverse the steps for insertion: Detach the tape, string, and/or strap, deflate the cuffs with the syringe, and draw the SGA out of the patient’s airway. Be prepared to support the patient’s airway as you remove the SGA. For example, have a suction device ready in case it is needed. The patient may require an OPA to manage his or her airway once the SGA is removed.
SUCTION
Injury or illness can cause materials such as mucus, vomitus, water, or blood to collect in a patient’s airway. In many cases, these materials can be removed by simply rolling the patient onto his or her side and sweeping the mouth clean with your finger. Because this technique involves moving the patient, it can aggravate existing injuries and therefore may not be appropriate for a person with a suspected spinal injury, for example. It may also not allow you to remove material that is farther back in the airway.
A safer and more effective method is to suction the airway clear. Suctioning is the process of removing foreign matter by means of a vacuum. Whenever you are providing assisted ventilations to an unresponsive patient, it is good practice to have the suction unit on standby so you can use it immediately if the patient vomits.
A variety of manual and mechanical vacuums are available. Manual suction devices are lightweight and compact (Figure 6–50, a-b). Mechanical suction devices use either battery-powered pumps or oxygen-powered aspirators. These devices are normally found on ambulances.
Attached to the end of any suction device is a suction tip, also referred to as a catheter. These come in various sizes and shapes. Some are rigid and others are flexible. The two most common arethe tonsil tip catheter and the French catheter. The tonsil tip catheter is used for clearing the mouth and throat, whereas a French catheter is used to clear the nose.
A bulb syringe is used to provide suction for an infant. Ensure that you deflate the bulb syringe before inserting it into the infant’s airway.
Some catheters are disposable and can be attached to a reusable handle or trigger assembly. Suction devices may also have a canister that captures any material that is drawn through the catheter. These canisters may be disposable or reusable. Disposable components should be discarded safely after use, and reusable portions should be disinfected between patients according to the manufacturer’s instructions.
Figure 6–50, a-b: Manual suction devices are lightweight and compact.
a
b

AIR
WA
Y M
AN
AG
EMEN
T A
ND
RES
PIR
ATO
RY E
MER
GEN
CIE
S
137
Suctioning devices are most effective when removing fluids: The catheter can be clogged by large pieces of material (e.g., pieces of food). If this happens, quickly pull a quantity of sterile water or saline through the device to clear the catheter. If this is not immediately effective, roll the patient carefully and attempt to clear the airway with a finger sweep.
If the patient vomits up a large quantity of material, it may exceed the capacity of the unit. If this happens, roll the patient immediately and clear the airway with a finger sweep.
If the patient has an OPA inserted that will interfere with suctioning the oral cavity (see Oropharyngeal Airways on page 131), remove the OPA prior to suctioning. If necessary, reinsert the OPA once the airway is clear.
Whether you are using a manual or mechanical suction device, the basic steps are the same. First, measure the distance of insertion, which is the distance from the patient’s earlobe to the corner of the mouth (Figure 6–51). This indicates how far into the airway the vacuum can be safely inserted.
Open the patient’s mouth using the crossed-finger technique or tongue-jaw lift (see page 133). Insert the catheter into the upper airway (Figure 6–52) to the maximum depth measured earlier. Provide rapid suction until the airway is clear.
Using suction will draw air from the patient’s airway. After providing suction, give the patient supplemental oxygen to ensure that he or she does not become hypoxic.
If a mechanical suction device malfunctions or does not adequately clear the airway, roll the patient onto his or her side immediately and sweep the airway clear.
If a patient has a tracheostomy or stoma, suction through the tube or hole, as this is where the patient’s air passes. Do not insert the suction tip more than 5 cm (2 in.) beyond the lower edge of the opening.
Figure 6–51: Measure the distance from the patient’s earlobe to the corner of their mouth to determine the depth of insertion.
Figure 6–52: Insert the suction tip into the back of the mouth.

AIR
WA
Y M
AN
AG
EMEN
T A
ND
RES
PIR
ATO
RY E
MER
GEN
CIE
S
138
CARE FOR RESPIRATORY DISTRESS
Respiratory distress can be life-threatening and can also progress to other serious conditions. For example, respiratory distress could lead to respiratory arrest. It may also aggravate underlying conditions such as asthma.
For this reason, it is crucial that you are able to recognize the signs and symptoms of respiratory distress and provide appropriate interventions immediately. Many different respiratory emergencies have similar signs and symptoms, and particular conditions may require specific interventions, but certain general principles can be helpful for most patients with respiratory distress.
Have the patient rest in a comfortable position. Sitting upright usually makes respiration easier. Loosen restrictive clothing and help to keep the patient calm: Anxiety can contribute to the patient’s breathing difficulty. If the environment is enclosed or uncomfortable (e.g. too hot or too cold), consider moving the patient to a more suitable location.
Assist the patient in taking any prescribed medication for the condition, if it is available. For example, a patient experiencing asthma-related dyspnea may require his or her inhaler.
If the patient’s breathing is rapid (tachypnea) and you suspect that it is caused by emotion, such as excitement or anxiety, try to calm the patient to slow his or her breathing. Reassurance is often enough to correct hyperventilation, but you can also ask the patient to breathe along with you. Breathe at a normal rate, emphasizing each inhalation and exhalation.
CARE FOR RESPIRATORY ARREST
Respiratory arrest is a life-threatening condition in which respiration ceases. It may be caused by illness, injury, or an obstructed airway. During respiratory arrest, the patient’s body is not independently acquiring oxygen. Without oxygen, the heart will quickly stop functioning, which causes the circulatory system to fail. However, you can simulate the function of the patient’s respiratory system with assisted ventilation (page 119).
If possible, monitor the patient’s pulse as you provide ventilations. After every 2 minutes of assisted ventilation, check whether the patient has begun to breathe spontaneously. You should also recheck the patient’s carotid pulse (for adults and children) or brachial pulse (for infants) to confirm that the heart is still beating. If the patient still has a pulse but is not breathing, continue to provide ventilations.
Continue to provide assisted ventilation until one of the following occurs:
• The patient begins to breathe.• The patient’s pulse is absent. In this case, begin
CPR (described in Chapter 7).• You transfer care to another person with the
same or a higher level of qualification.• You are too exhausted to continue.• The scene becomes unsafe.

Unresponsive Patient with Absent Breathing
Primary Assessment (ABCs)
Respiration absentPulse present
Attempt 2 ventilations (If 1st doesn’t enter, reposition the head)
Reassess patient’s ABCs (simultaneously)
Pulse absent
Consider causes of unresponsiveness
RESPIRATORY ARRESTBegin care (continue airway
management and monitor pulse)
Respiration absent
Ventilation successful Ventilation unsuccessful
Give 2nd ventilation
AIRWAY OBSTRUCTIONPerform one set of CPR chest compressions,
then check for object in mouth. If object is found, carefully remove, and visually
confirm that mouth is clear.
Respiration absentPulse absent
CARDIAC ARREST
Begin CPR/AEDprotocol, starting with compressions
Respiration present
Ventilation successful
Attempt 1 ventilation
UNRESPONSIVENESSContinuously monitor patient
and provide ongoing patient care
SUMMARY
AIR
WA
Y M
AN
AG
EMEN
T A
ND
RES
PIR
ATO
RY E
MER
GEN
CIE
S
139
SIGNS AND SYMPTOMS OF RESPIRATORY EMERGENCIES
Type Example
Dyspnea Patient has laboured breathing, struggles to breathe, or gasps for breath
Abnormal breathing sounds Patient is wheezing, gurgling, or making high-pitched noises
Abnormal respiratory rate Patient’s respiration is too fast or too slow
Abnormal skin characteristics Skin is unusually moist and/or has an unusual tone
Emotional effects Patient is restless or anxious
Neurological effects Patient is dizzy or lightheaded, and/or experiences pain or tingling in extremities
Patient position Patient is in an unusual position (e.g., tripod position)

Situations in Which High- Flow Supplemental Oxygen Is Indicated
1. Carbon monoxide exposure2. Decompression sickness/injury3. Asphyxiation4. Dyspnea5. Hypoxia6. SpO2 < 95%
Calculating How Long an O2 Cylinder Will Last
Duration of flow = ( gauge pressure - 200 psi) x C flow rate (litres per minute)Where C = the cylinder constant:D cylinder constant = 0.16 L/psi E cylinder constant = 0.28 L/psi M cylinder constant = 1.56 L/psi
1. Confirm that cylinder contains medical oxygen.2. Ensure cylinder contains sufficient oxygen.3. Remove protective covering (for new
cylinders). Save the O-ring.4. Briefly open valve (maximum one second).5. Ensure gasket is positioned properly.6. Confirm that regulator’s index pin corresponds
to oxygen cylinder.
7. Attach regulator to cylinder.8. Hand-tighten screw until regulator is snug.9. Check cylinder pressure.10. Attach delivery device to regulator.11. Set regulator to appropriate flow rate.12. Confirm that oxygen is flowing.
The Crossed-Finger Technique
1. Cross the thumb and index finger of one hand.
2. Place the thumb on the patient’s lower front teeth and the index finger on the upper front teeth.
3. Open the mouth using a scissor motion.
The Tongue-Jaw Lift Technique
1. Place your index finger beneath the patient’s chin.
2. Insert the thumb of the same hand into the patient’s mouth and grasp the tongue, pinning it between your thumb and finger.
3. Gently lift the mandible to open the patient’s mouth.
TECHNIQUES FOR OPENING THE MOUTH
Administering Oxygen
140
SUMMARYA
IRW
AY
MA
NA
GEM
ENT
AN
D R
ESPI
RA
TORY
EM
ERG
ENC
IES
OXYGEN DELIVERY DEVICES
Device Common Flow Rate Oxygen Concentration Patient
Nasal cannula 1–4 LPM 24–36% Breathing
Resuscitation mask 6+ LPM 35–55% Breathing and non-breathing
Standard mask 6–10 LPM 40–60% Breathing
Non-rebreather mask (w/O2 res.) 10+ LPM 90+% Breathing
Bag-valve-mask resuscitator (w/O2 res.) 15 LPM 90+% Breathing and non-breathing

CIR
CU
LATO
RY E
MER
GEN
CIE
S
7 Circulatory Emergencies
141
Key ContentCardiovascular Disease .......... 142Angina .................................... 142 Myocardial Infarction (MI) ..... 143 Congestive Heart Failure ....... 146 Cardiac Arrest ......................... 147 Cardiopulmonary Resuscitation ....................... 149 Compressions....................... 149 Team Approach ................... 152 Using a Defibrillator ........... 154 Special Resuscitation Situations ......................... 156 Post-Cardiac Arrest Care ..... 157Cerebrovascular Accident (Stroke) ................................ 157 Transient Ischemic Attack (TIA) ................................. 157 CVA Assessment Scales ....... 157
IntroductionCirculatory emergencies are those that affect the heart or vascular system. While a circulatory emergency can often appear as a sudden, dramatic emergency, the underlying cause may be a condition that has been developing over a period of years or even decades. Because circulatory emergencies can deprive vital organs of oxygen, they are often immediately life-threatening.

CH
APT
ER 5
142
CIR
CU
LATO
RY E
MER
GEN
CIE
S
142
CARDIOVASCULAR DISEASE
Cardiovascular disease (CVD) is a term used to refer to a broad range of abnormal conditions affecting the heart and blood vessels. Many specific diseases and conditions are grouped under this umbrella term, including diseases of the heart itself (such as congenital heart disease) and of the vascular system (such as peripheral arterial disease). CVD is one of the leading causes of death both in Canada and worldwide.
Examples of cardiovascular diseases include:• Coronary heart disease (CHD) (also called
coronary artery disease, a disease of the bloodvessels supplying the heart muscle itself).
• Cerebrovascular disease (disease of the bloodvessels supplying the brain).
• Congenital heart disease (genetic defects inthe heart that are present at birth).
• Deep vein thrombosis and pulmonaryembolism (blood clots in the legs, which canmove to the heart and lungs).
• Peripheral arterial disease (disease of bloodvessels that reduces circulation to extremities,especially the legs).
CVD also significantly increases the risk of acute circulatory emergencies such as cerebrovascular accident (CVA), also referred to as stroke, and myocardial infarction (MI), also referred to as heart attack. Both of these emergencies are immediately life-threatening.
Arteriosclerosis (also called atherosclerosis) occurs when arteries become hardened, narrowed, and less elastic. This occurs gradually, as cholesterol and plaque (fatty deposits) build up on the interior walls of the arteries (Figure 7–1, a). As plaque accumulates, the arteries become narrower, reducing the volume of blood that can flow through them and thereby reducing the supply of oxygen to the affected tissues. When arteriosclerosis occurs in the coronary arteries (supplying blood to the heart), this results in coronary heart disease (CHD).
When coronary heart disease (or another condition) significantly reduces blood flow to the myocardium (heart muscle), this is referred
to as acute myocardial ischemia. This may result in angina pectoris (chest pain) or myocardial infarction (heart attack).
Because arteriosclerosis develops gradually, it can go undetected for many years. Even with significantly reduced blood flow to the myocardium, there may be no signs and symptoms. Most people with arteriosclerosis are unaware of it. Some may suffer a myocardial infarction or even cardiac arrest without any previous warning.
ANGINA
Some patients with coronary heart disease may experience intermittent chest pain or pressure that is exacerbated by exertion and stress and reduced when these factors are removed.
This type of pain is called angina pectoris, commonly referred to as angina. It occurs when the oxygen demands of the heart exceed the available supply of oxygen-rich blood, such as during periods of physical activity or emotional stress. This lack of oxygen can cause a constricting chest pain that may spread to the neck, jaw, and arms.Pain associated with angina usually lasts less than 10 minutes. A patient who is diagnosed with
Figure 7–1, a-b: a, Buildup of material on the inner walls of coronary arteries reduces blood flow to the heart muscle and may cause a myocardial infarction; b, the coronary arteries supply the heart muscle with blood.
Coronary arteries
Unblocked Partially Completelyblocked blocked
a
b

CIR
CU
LATO
RY E
MER
GEN
CIE
S
143
angina will often have a prescribed medication (typically sublingual nitroglycerin in a spray or pill form). Nitroglycerin is a vasodilator, which means that it causes blood vessels to dilate (expand). This allows blood to pass more easily through narrowed vessels, increasing the flow of oxygenated blood to the myocardium and reducing the workload of the heart.
Stable angina usually occurs while a patient is exercising or under emotional stress and follows a predictable pattern. Usually, the pain can be relieved with a combination of rest and medication: A patient experiencing stable angina should cease any physical activity that could increase the body’s oxygen demands and rest in a position of comfort. Recognizing the difference between stable angina (which is usually not life-threatening) and the symptoms of a myocardial infarction (MI) is crucial. The patient should track how long his or her angina typically lasts and which factors are effective in reducing it so that this baseline can be used to evaluate any future cases.
Unstable angina is angina that is not typical for the patient. It may occur when the patient is at rest, last longer than 10 minutes, or not respond to medication. Unstable angina may also be more painful or last longer each time it occurs, or may happen with increasing frequency. Unstable angina occurs when the myocardium (heart muscle) is receiving insufficient oxygenated blood. It is similar to an MI, except that the effects are usually temporary and do not result in permanent damage. Unstable angina is a warning sign that an MI may be imminent. Because the signs and symptoms of unstable angina and of an MI are difficult to distinguish in the field, you should provide essentially the same care for the two conditions.
If you are unsure whether the patient is experiencing angina or an MI, treat the patient for an MI.
MYOCARDIAL INFARCTION (MI)
The coronary arteries supply the myocardium with oxygen-rich blood (Figure 7–1, b). If one or more of these arteries is blocked by arteriosclerosis or a blood clot, the oxygen supply to the myocardium will be interrupted and the heart muscle will become hypoxic. When the hypoxic myocardium cells begin to die (myocardial necrosis), this is called a myocardial infarction (MI) or heart attack. An MI may interrupt the heart’s electrical system, resulting in arrhythmias that can prevent blood from circulating effectively. An MI can also lead to cardiac arrest if the heart is so damaged that it cannot continue to beat.
Signs and Symptoms of a Myocardial InfarctionThe most prominent symptom of a myocardial infarction is persistent chest pain or discomfort (Figure 7–2). However, it may not always be easy to distinguish between the pain of an MI and chest pain caused by indigestion, muscle spasms, or other conditions. Brief, stabbing chest pain or pain that feels more intense when the patient bends or breathes deeply is usually not caused by an MI.
Figure 7–2: The most prominent symptom of a myocardial infarction is persistent chest pain.

CIR
CU
LATO
RY E
MER
GEN
CIE
S
144
As a blockage or reduction of blood flow to the heart progresses, some patients experience symptoms such as chest pain, pressure, or discomfort, which are early warning signs that the heart is not receiving enough oxygen-rich blood. Others may suffer heart attacks or even cardiac arrest without any warning signs or symptoms. If a blockage in an artery of the heart is not treated quickly, the affected heart muscle tissue will die.
The pain of a myocardial infarction can range from mild discomfort to an unbearable crushing sensation in the chest. The patient may describe it as pressure, squeezing, tightness, aching, or a heavy sensation in the chest. Often the patient feels pain in the centre of the chest behind the sternum. It may spread to the shoulder, arm, neck, or jaw (Figure 7–3). The pain is constant and usually not relieved by resting, changing position, or taking medication. When assessing a patient who complains of chest pain or pressure, ask the OPQRST questions (see page 92) to determine whether the qualities of the pain suggest an MI.
Although the signs and symptoms of a myocardial infarction are often obvious, someone experiencing an MI can also have relatively mild symptoms. The patient may feel little or no chest pain, and may have other signs and symptoms such as fatigue, nausea, and vomiting. Other signs include a mild, unfocused chest discomfort that gets continually stronger, gets better with rest, and gets worse with activity. These soft signs are more common among women, older adults, and patients with diabetes.
Another sign of an MI is dyspnea. The patient may be experiencing tachypnea because the body is trying to get more oxygen to the heart. Depending on the patient’s general condition, his or her pulse may be faster or slower than normal, or its rhythm may be irregular. The patient’s skin may be pale or bluish, particularly around the face. Some patients will sweat profusely during a myocardial infarction. These signs and symptoms result from the stress that the body experiences when the heart is not working effectively.
Since any myocardial infarction may lead to cardiac arrest without immediate interventions, it is important to recognize and act on these signs and symptoms. Most patients die within one to two hours after the first appearance of MI signs and symptoms. Many patients who have MIs delay seeking care: Denial is a common reaction. Nearly half of patients wait two or more hours before going to the hospital. They may dismiss the symptoms as indigestion or muscle soreness.
While not every MI is accompanied by chest pain, the presence of severe chest pain or discomfort that lasts longer than 10 minutes is a key indicator that should not be ignored.
Any patient experiencing severe chest pain, chest pain that lasts longer than 10 minutes, or chest pain that is accompanied by other myocardial infarction signs and symptoms should be treated for MI.
Figure 7–3: Signs and symptoms of a myocardial infarction may be different for each individual.
Persistent chest pain
Pain radiating to arm, shoulders, neck, or jaw
Tiredness
Moist or sweaty skin
Pale or bluish skin
Change in pulse
Pale or bluish skin
General malaise
Mild, unfocused chest discomfort
Gastric discomfort or indigestion
Flu-like symptoms
Breathing difficulty

CIR
CU
LATO
RY E
MER
GEN
CIE
S
145
A silent MI occurs when a myocardial infarction is not recognized and, therefore, advanced medical care is not obtained. This can happen to anyone but occurs most often in those who experience soft signs—typically women, patients with diabetes, and older adults.
Care for Myocardial InfarctionsThe most important step in providing care for an MI is the early recognition of the signs and symptoms. During your assessment, it’s important to remember that all MI signs and symptoms may not be present: Your care will be based on an overall picture of the patient. Don’t withhold care because some signs and symptoms are absent.
Keep the patient in a comfortable position throughout assessment and care (Figure 7–4).
Because most MIs result from blood clots in the coronary arteries, reducing clot formation can reduce damage to the heart during an MI. Any patient experiencing chest pain should chew 160 to 325 mg of acetylsalicylic acid (ASA), depending on what is available (Figure 7–5). Do not repeat the dosage. ASA, commonly sold under the brand name Aspirin®, thins the blood and reduces the formation of clots, possibly minimizing the damage to the heart muscle.
Acetaminophen (e.g., Tylenol®) and ibuprofen (e.g., Advil®) do not have the same effect as ASA in reducing damage due to myocardial infarctions. Do not substitute. ASA is contraindicated for patients with asthma or for patients with bleeding conditions (e.g., ulcers).
If necessary, you may assist the patient in taking prescribed nitroglycerin after checking the Six Rights of Medication. If your scope of practice includes the administration of nitroglycerin, you may provide it to the patient (with appropriate medical oversight).
For further information about assisting with medication, refer to Chapter 22.
Nitroglycerin is a vasodilator medication often prescribed for angina. It may come in the form of a pill or a sublingual spray (Figure 7–6). The patient should be resting in a comfortable position, or in the position found, when taking nitroglycerin. Once absorbed into the body, nitroglycerin enlarges the blood vessels to improve the flow of blood to the myocardium. This increases the quantity of oxygen reaching the heart, which can help to reduce the patient’s chest pain.
Figure 7–4: When assessing and caring for a patient suffering an MI, ensure you keep them in a position of comfort. Patients may find it easier to breathe when they are seated upright (High Fowler’s position) or semi-seated (Fowler’s position).
Figure 7–5: Low-dose ASA.

CIR
CU
LATO
RY E
MER
GEN
CIE
S
146
A patient will often know when to take his or her prescribed nitroglycerin. Ask the patient, “Would you normally take your medication at this time?” If the patient answers “yes” (taking into consideration the signs and symptoms), this is a good indication that the circumstance warrants the use of nitroglycerin.
Nitroglycerin reduces blood pressure, so low blood pressure is a contraindication. It is important to check the patient’s blood pressure before and after the patient takes nitroglycerin. Specific BP values will vary based on local protocols, etc., but in general, systolic pressure lower than 90 mmHg is a contraindication for nitroglycerin.
Before suggesting that the patient take nitroglycerin, ask if he or she has recently taken erectile dysfunction medication for any reason. If the patient has taken sildenafil (e.g., Viagra®) or vardenafil (e.g., Levitra®) in the previous 24 hours, or tadalafil (e.g., Cialis®) in the previous 48 hours, advise him or her not to take the nitroglycerin because the combination can cause a fatal lowering of blood pressure. Other contraindications include an allergy or known hypersensitivity to nitroglycerin or other nitrates, uncorrected hypovolemia, and severe anemia.
The nitroglycerin dose may be repeated every 3 to 5 minutes until the pain is relieved or until 3 doses have been administered. Blood pressure must be reassessed prior to each dose.
Be calm and reassuring when caring for someone experiencing a myocardial infarction. Comforting the patient helps reduce anxiety and eases some of the discomfort.
Observe any changes in appearance or behaviour. Since a myocardial infarction may lead to cardiac arrest, be prepared to perform CPR. Any patient you suspect of having an MI should be placed in the rapid transport category, though typically the first dose of indicated medications will be taken at the scene.
CONGESTIVE HEART FAILURE
Congestive heart failure (CHF) is an abnormal condition in which the heart’s pumping ability is diminished. This may be the result of an MI, valvular disease, ischemic heart disease, or any other disease that affects the myocardium. The result is that fluids and blood back up into the lungs or body tissues. CHF may affect the left side of the heart, the right side of the heart, or both sides.
The left side of the heart receives blood from the lungs, so left-sided heart failure causes blood to back up into the alveoli. The right side of the heart receives blood from the body’s veins, so right-sided heart failure causes blood to back up and collect in the body’s tissues, especially in the extremities.
Left-Sided Heart FailureIn an MI, it is often the left ventricle that is damaged. Also, in chronic hypertension, the left ventricle suffers the long-term effects of having to pump against restricted arteries in the extremities (peripheral arteries). Whatever the cause, the left ventricle can lose the ability to effectively pump blood through the body. Blood coming into the left ventricle from the lungs backs up, causing fluid to leak into the lungs (pulmonary edema).
Signs and symptoms of left-sided heart failure may include: • Shortness of breath. • Increased respiratory rate.
Figure 7–6: Nitroglycerin spray is one of the common forms that this medication comes in.

CIR
CU
LATO
RY E
MER
GEN
CIE
S
147
• History of severe shortness of breath when the patient is lying down, which gets better when standing.
• Cyanosis. • Coughing up foamy sputum (sometimes blood-
tinged). • Increased heart rate. • Wheezing. • Pale, cool, clammy skin. • Panic, restlessness, agitation. • Normal to high blood pressure. • Confusion and disorientation.
Right-Sided Heart FailureRight-sided heart failure usually occurs due to left-sided heart failure. When the left ventricle fails, increased fluid pressure is transferred back through the lungs. Eventually, the right side is unable to keep up with the increased workload, damage occurs, and heart failure results.
Right-sided heart failure may also occur as a result of a pulmonary embolism, long-standing COPD, or an MI. When the right side loses its pumping power, blood backs up in the body’s veins. This usually causes pooling of fluid in the tissues, resulting in swelling of the extremities (peripheral edema). This will be most noticeable in the feet and lower legs. Bedridden patients may also experience swelling of the lower back.
Signs and symptoms of right-sided heart failure may include: • Shortness of breath. • Swelling of the lower extremities and/or lower
back. • Urinating more frequently at night. • Jugular venous distension (JVD). • Tachycardia or cardiac arrhythmia. • Weakness and fatigue. • Fainting.
Right-sided heart failure by itself is seldom a life-threatening emergency. A change in lifestyle and possibly medications are the definitive treatments for this condition.
Jugular Venous Distention (JVD)Jugular venous distension (JVD) refers to a visible swelling of the jugular vein in the neck. It is
an indication of increased blood volume in the patient’s circulatory system, or anything that interferes with the flow of blood into the right atrium or the right ventricle. Essentially, JVD increases whenever the venous return of blood to the heart overwhelms the heart’s ability to pump it back out to the body. It is primarily seen in patients with right-sided heart failure.
JVD is most easily assessed when a patient is in the Semi-Fowler’s position (inclined 30 to 45 degrees). It should be visible in a supine patient as well.
CARDIAC ARREST
Cardiac arrest occurs when the heart stops circulating blood: A patient who goes into cardiac arrest will not have a pulse, and respiration will soon cease (if it has not already).
The cessation of both circulation and respiration is referred to as clinical death. Clinical death may be reversible through immediate interventions.
Cardiac arrest is a life-threatening emergency because the body’s vital organs, including the brain, stop receiving oxygen-rich blood, causing their cells to begin dying in a matter of minutes. The irreversible damage caused by the death of brain cells is known as biological death, which is irreversible.
Any patient in cardiac arrest requires immediate interventions in the form of CPR, defibrillation, and advanced cardiac life support (ACLS).
Common Causes of Cardiac ArrestCardiovascular disease is the most common cause of cardiac arrest in adults: Many cardiac arrests are the result of damage caused by MIs. Other causes include asphyxiation, exposure to certain drugs, severe chest trauma, severe blood loss, and electrocution. Strokes and other injuries to the brain can also cause the heart to stop.
A child or infant’s heart is usually healthy, unless it has a genetic abnormality. In children and infants, cardiac emergencies usually result from

CIR
CU
LATO
RY E
MER
GEN
CIE
S
148
non-cardiac causes, typically respiratory arrest. Common causes of cardiac emergencies in infants and children include drowning, smoke inhalation, burns, poisoning, airway obstructions, and traumatic injuries.
Signs of Cardiac ArrestSomeone in cardiac arrest will be unresponsive, have no palpable pulse, and not be breathing effectively (though agonal respirations may be present). The patient’s heart has either stopped beating or is beating so weakly or irregularly that it does not produce a pulse.
Cardiac arrest can happen suddenly, without prior indication. This is referred to as sudden cardiac arrest (SCA). A patient who appears to be unresponsive and breathing may in fact be in cardiac arrest. Ensure that you assess the patient’s respiration thoroughly and confirm whether the carotid pulse is present (or the brachial pulse, in the case of infants). The surest sign of cardiac arrest is the absence of a pulse.
Cardiac Arrhythmias and DefibrillationWhen a patient is in cardiac arrest, his or her heart will either be stopped completely or have an arrhythmia that essentially prevents it from circulating blood. An extreme arrhythmia in which the heart is simply quivering (rather than truly contracting) is referred to as fibrillation. In some cases, stopping the fibrillating heart momentarily can allow it to spontaneously resume an effective rhythm.
A defibrillator is a device used to analyze the heart’s rhythm and deliver an electric shock, causing the myocardium to contract forcefully. It consists of a defibrillator unit connected to two electrodes contained in adhesive pads. When the pads are placed on a patient and the shock button is pressed, a powerful electrical current travels between the pads, through the patient’s heart, delivering a shock. Defibrillators are only effective for patients with certain heart rhythms, often referred to as shockable rhythms: Defibrillators can analyze the patient’s heart rhythm to determine whether a shock is advised. The most commonly
encountered defibrillator is the automated external defibrillator (AED).
The healthy adult heart usually displays sinus rhythm (SR), the normal conduction of electrical impulses without any disturbances. Disturbances or variations in the conduction of electrical impulses within the heart are called arrhythmias (used interchangeably with dysrhythmias). Arrhythmias range from benign to life-threatening. There are four major arrhythmias that are immediately life-threatening: asystole, pulseless electrical activity (PEA), ventricular tachycardia (VT), and ventricular fibrillation (VF).
ASYSTOLEAsystole is the total absence of electrical activity in the heart: The heart is not pumping and the patient has no pulse. Defibrillation will not be effective for this rhythm (Figure 7–7).
PULSELESS ELECTRICAL ACTIVITY (PEA)Pulseless electrical activity occurs when there is electric activity in the heart, but it is insufficient to produce a pulse. The heart may either contract ineffectively or not contract at all. Defibrillation will not be effective for this rhythm (Figure 7–8).
VENTRICULAR TACHYCARDIAVentricular tachycardia (VT) occurs when the heart’s ventricles are contracting too rapidly to fill with blood between contractions. In some cases, a patient with a VT rhythm will have a rapid, ineffective pulse. In others, the heart will be beating so rapidly and ineffectively that there will be no palpable pulse (pulseless VT). Defibrillation is indicated for pulseless VT (Figure 7–9).
VENTRICULAR FIBRILLATION Ventricular fibrillation (VF) is a chaotic discharge of electrical activity that causes the heart muscle to quiver. Patients with this arrhythmia have no pulse. VF is a life-threatening condition that will quickly deteriorate to asystole within a few minutes. Defibrillation can be effective for this rhythm (Figure 7–10).
Because not all rhythms are shockable, defibrillators are able to analyze a patient’s heart rhythm and indicate whether a shock is advised.

CIR
CU
LATO
RY E
MER
GEN
CIE
S
149
Some devices begin to analyze automatically when the defibrillator’s pads are applied, and others have an analyze button that must be manually activated by the operator (usually referred to as semi-automated defibrillators). Advanced cardiac life support personnel use defibrillators that can be toggled between automatic, semi-automatic, and fully manual operation.
Early defibrillation increases the chance of surviving cardiac arrest for patients with shockable rhythms.
CARDIOPULMONARY RESUSCITATION
A patient in cardiac arrest needs cardiopulmonary resuscitation (CPR). CPR consists of a combination of assisted ventilations and chest compressions, which artificially replicate the functions of the lungs and heart. For a patient in cardiac arrest, CPR increases the chance of survival by keeping the brain supplied with oxygen until the patient can receive advanced medical care.
CPR consists of cycles, which are sets of compressions and ventilations given in a fixed ratio. These can be performed by one responder alternating between compressions and ventilations, but a team approach is both easier and more strongly associated with positive patient outcomes. The basic ratio for adults is 30 compressions for every 2 ventilations, but this ratio can vary based on the age of the patient and whether CPR is being performed alone or with another responder (see Table 7–1 on page 152).
Once started, CPR should be interrupted only to perform critical interventions (such as clearing the airway) or when there are obvious changes in the patient’s condition (such as a return of spontaneous circulation, or ROSC).
CompressionsChest compressions move blood through the circulatory system by creating pressure within the chest cavity (intrathoracic pressure) and by directly compressing the heart. For compressions to be most effective, the patient should be flat on his or her back on a firm surface. Give compressions smoothly, and maintain a steady rhythm. Compressions should be given at a rate of approximately 100 to 120 per minute: This works out to 30 compressions in the space of 15 to 18 seconds.
COMPRESSION FRACTION/OFF-CHEST TIMEWhen compressions are interrupted, the pressure in the circulatory system begins to drop almost immediately. When you resume compressions after a break of even a few seconds, the first compressions you perform will be rebuilding the patient’s blood pressure, not circulating blood effectively. For this reason, it is crucial that interruptions to compressions be kept to a minimum. This is another reason why two-responder CPR is recommended whenever possible: Because one responder is maintaining the airway and keeping the ventilation device in the correct position, there is no need to readjust these when switching between compressions and ventilations, saving crucial seconds.
Figure 7–7: Asystole (non-shockable rhythm). Figure 7–9: Pulseless VT (shockable rhythm).
Figure 7–8: Pulseless electrical activity (non-shockable rhythm). Figure 7–10: VF (shockable rhythm).

CIR
CU
LATO
RY E
MER
GEN
CIE
S
150
The percentage of total CPR time in which the patient is receiving compressions is referred to as the compression fraction, and the remaining time (spent applying defibrillator pads, checking vitals, etc.) is referred to as off-chest time. By minimizing interruptions to compressions, you can maximize the compression fraction and perform the most effective CPR.
HAND POSITIONPressing on the centre of the chest (on the lower half of the sternum) allows you to give the most effective compressions, regardless of the patient’s age.
For an adult or child, place the heel of one hand over the patient’s sternum, then place your other hand on top and grip the lower hand with your fingers.
This standard hand position must be modified for the smaller bodies of infants. There are two appropriate compression methods for infants: Using two fingers, and encircling the infant’s torso with your hands to give compressions with your thumbs. The technique you select depends on the infant’s size and whether you are alone (Figure 7–11).
You must use the two-finger method if the infant’s torso is too large to encircle. If you cannot make a complete ring around the infant’s chest with your thumb and fingers, use the two-finger method. The two-finger method is also recommended if you are performing CPR alone: It is very difficult to maintain an open airway and give ventilations effectively while encircling the infant’s chest with your hands.
The two-finger method is similar to the method used for adults and children, but compressions are given with the tips of your index and middle fingers rather than the entire hands. Place your fingers in the centre of the sternum, just below the nipple line, and give compressions with the pads of your fingers (Figure 7–12). Keep your fingers at a right angle to the chest so that your compressions press directly downwards.
If you are performing two-responder CPR and the infant’s torso is small enough to encircle with your hands, the encircling method is the recommended approach. One responder holds the infant’s chest with his or her hands, spreading the fingers around the infant’s back and placing both thumbs on the lower half of the infant’s sternum (Figure 7–13). The first responder gives compressions by pressing on the sternum with his or her thumbs, and the second responder monitors the infant’s pulse, manages the airway, and gives ventilations.
RESPONDER POSITIONCorrect body position makes CPR more effective and also reduces responder fatigue. Body position is mainly relevant for adults and children: Infants are small enough that CPR can be performed in any comfortable and effective position.
Kneel beside the patient (or stand beside a patient who is on a multi-level stretcher), facing the chest. You should be close enough that your arms form a right angle to the chest when you begin compressions. Lean forward and straighten your arms so that your shoulders are directly above your hands (Figure 7–14). Lock your elbows and press straight down onto the patient’s sternum.
Encircling chest method
Infant requires CPR
Hands can encircle chest
Performing CPR with partner
Performing CPR alone
Hands cannot encircle chest
Two-fi ngercompression method
Figure 7–11: Decision tree for two-finger compressions versus encircling method for infant CPR.

CIR
CU
LATO
RY E
MER
GEN
CIE
S
151
Compressing the chest requires less effort in this position. If you are on your knees, avoid resting on your legs: The weight of your upper body creates the force needed to compress the chest. Push with the weight of your upper body, not with the muscles of your arms. Push straight down and avoid rocking back and forth, as rocking results in less effective compressions and uses unnecessary energy.
CHEST RECOILWhen you complete each compression, allow the chest to recoil completely. Do not rest or lean on the patient’s chest between compressions. When the chest recoils completely, it allows the heart to expand and fill with blood, which is then forced into the circulatory system with the next compression. This is also when the heart’s own tissues receive oxygen.
CHEST COMPRESSION DEPTHThe recommended depth for chest compressions varies based on the age of the patient. For adults, the chest should be compressed at least 5 cm (about 2 in.). Avoid pressing to a depth greater than 6 cm (2.4 in.).
In children and infants, the compression depth is more usefully represented as a fraction of the chest’s total depth. When performing compressions on a child, infant, or neonate, compress to a depth of at least one-third of the anteroposterior (front-to-back) diameter of the chest.
If you find that you are pushing too deeply, consider performing compressions with one hand only. This is especially useful for smaller patients. If you are alone, you can use your free hand to help keep the patient’s airway open.
CPR ventilations may be given with resuscitation mask or a BVM using the techniques described in Chapter 6.
Performing high-quality CPR has the following key components: • Ensuring an appropriate rate of chest
compressions • Ensuring an appropriate depth of chest
compressions
Figure 7–12: The two-finger compressions method for infant CPR.
Figure 7–13: The encircling method for infant CPR.
Figure 7–14: Kneel next to the patient so that your arms form a right angle to the chest. Lean forward, straighten your arms, and press straight down onto the patient’s sternum.

CIR
CU
LATO
RY E
MER
GEN
CIE
S
152
• Allowing full chest recoil between compressions • Maximizing compression fraction (minimizing
off-chest time) • Avoiding excessive ventilation
These components combine to create the most effective CPR possible, increasing the chance of a positive patient outcome. Using a choreographed team approach to CPR can help ensure that these key components are present, so it is preferable whenever possible.
Team ApproachWhen a patient is in cardiac arrest, time is a crucial factor. Interventions must be performed immediately, and unnecessary delays can reduce the patient’s chance of survival. For this reason, effective co-operation and communication between responders is crucial to patient outcomes.When a patient is in cardiac arrest and two responders are present, the first (Responder A)
should begin CPR while the second (Responder B) deploys the defibrillator and requests any additional resources that may be required.
When Responder B is available, he or she moves to the patient’s head to maintain an open airway and hold the BVM in place (Figure 7–15). Responder A continues to give chest compressions and squeezes the BVM to provide ventilations.
The ratio of compressions to ventilations can be different when you are working as a team (see Table 7–1 below).
Responder B checks the effectiveness of the compressions by feeling for the carotid pulse (or the brachial pulse in infants) while Responder A is giving compressions. Responder B should provide feedback to Responder A about the effectiveness of the compressions, as determined by the strength of the pulse they produce. Note that a
ADULT CHILD INFANT NEONATE
Hand Position: Two hands on sternum
One or two hands on sternum
Two fingers on sternum (just below nipple line) OR Encircling method
Two fingers on sternum (just below nipple line)OREncircling method
Compression Depth:
5 cm (about 2 in.) 1/3 of the chest depth
1/3 of the chest depth
1/3 of the chest depth
One-Responder Cycle:
30 compressions 2 ventilations
30 compressions 2 ventilations
30 compressions 2 ventilations
3 compressions 1 ventilation
Two-Responder Cycle:
30 compressions 2 ventilations
15 compressions 2 ventilations
15 compressions 2 ventilations
3 compressions 1 ventilation
Compresion Rate: 100–120 per minute (30 compressions in 15–18 seconds)
100–120 per minute (30 compressions in 15–18 seconds)
100–120 per minute (30 compressions in 15–18 seconds)
100–120 per minute (30 compressions in 15–18 seconds)
ADULT CHILD INFANT
TABLE 7–1: CPR SUMMARY

CIR
CU
LATO
RY E
MER
GEN
CIE
S
153
patient who has lost a significant amount of blood may not have a strong pulse even if compressions are effective.
To avoid fatigue and maintain a high quality of compressions, the two responders should switch roles after approximately 2 minutes (5 cycles for most patients) of continuous CPR. When Responder A completes the last ventilation, Responder B moves immediately into position beside the patient’s chest while Responder A moves to the head. There is no need to move to the other side of the patient. Responder B begins compressions immediately to reduce off-chest time.
If more than two responders are available, one responder should assume the role of team leader. In some situations, this role will be clear: In a fire department, for example, the officer will usually be the team leader. The team leader’s role is to coordinate the actions of the other responders, record patient information, and communicate with other incoming personnel.
If more advanced personnel arrive on the scene, such as an advanced life support team or code team (in a hospital setting), it is the team leader who communicates with the advanced personnel, providing them with a report of the situation and the patient’s status. When transferring care of a patient in cardiac arrest, try to minimize off-chest time. The goal is to achieve a near-seamless continuation of CPR.
Dynamic CPRDynamic CPR is performed while a patient is being moved (Figure 7–16). The keys to making it work are planning and adaptability. The responder’s goal is to maintain the highest-quality CPR, with the fewest interruptions possible, while quickly and efficiently moving with the patient.
The exit route should be planned while you are entering the scene: This should become a habit whenever you arrive at a scene. Moves can be communicated ahead of time with clear, concise commands to other responders involved. Lifting and turning can cause a patient to vomit, so it is important to have suction and extra airways
available if possible. Whenever CPR is interrupted to move or reposition a patient, the patient should be quickly reassessed.
The patient and equipment must be firmly secured before moving. It is often best to leave the stretcher partially elevated, midway between the lowest and highest position. This lets the responder walk in a slightly bent position, allowing for more
Figure 7–15: When responders are working as a team, one responder maintains the airway and holds the BVM.
Figure 7–16: Dynamic CPR.

CIR
CU
LATO
RY E
MER
GEN
CIE
S
154
effective compressions. If the stretcher is too low or too high relative to the responder, compressions will be less effective and more tiring.
A resuscitation mask can be used to give ventilations during dynamic CPR. After being secured to the patient’s head with a strap, this allows the option of performing mouth-to-mask ventilations or using a BVM. When the mask is secured over the patient’s mouth, the airway should be monitored closely: If the patient vomits, it may be concealed by the mask.
For an infant, you may be able to perform dynamic CPR while carrying the patient.
Using a DefibrillatorThe large majority of sudden cardiac arrests involve a shockable heart rhythm (VT or VF), so a defibrillator should always be used when a patient is in cardiac arrest. As soon as you determine that the patient is in cardiac arrest, deploy the defibrillator: If two responders are present, one responder should begin CPR while the second prepares the defibrillator and applies the pads to the patient. The unit will need to be activated, and the pads may need to be connected to the unit with electrical leads (if they are not pre-connected).
If available, select the most suitable pads for the patient (e.g., pediatric pads for a child). Pediatric pads are typically smaller (to accommodate the smaller chest size) and deliver a lower-intensity shock. If age-appropriate pads are not available, adult pads are acceptable. Defibrillation is not indicated for neonates (0 to 28 days old). Some defibrillators will detect the size of the patient and adjust the shock level automatically: Ensure that you are familiar with all the details of how your defibrillator works.
Activating the defibrillator as soon as cardiac arrest is confirmed allows the defibrillator to begin analyzing the patient immediately, and most defibrillators will also record the actions taken by responders and the times that they occur, creating a record of the treatment provided.
First, expose and prepare the patient’s chest. If it is wet, dry it quickly. If the patient has a large quantity of chest hair (enough that it interferes with the adhesion of the pads), quickly shave the areas where the pads will be affixed.
Attach the pads to the patient’s chest as directed by the defibrillator’s manufacturer. Most pads have illustrations showing the correct placement. Typically, one pad is placed on the upper-right side of the chest and the other on the lower-left side (Figure 7–17). If the patient’s chest is too small to allow at least 2.5 cm (1 in.) of space between the pads, place one pad on the front of the patient’s chest (anterior) and one on the back (posterior).
The defibrillator may be used with standard defibrillation pads only on adults and children who are 8 years old or more or who weigh more than 25 kg (55 lb.). For children who are less than 8 years old or weigh less than 25 kg (55 lb.), use infant/child reduced-energy defibrillation electrodes.
Pause CPR to allow the defibrillator to analyze the patient’s heart rhythm. Some devices do this automatically, and some (semi-automated defibrillators) require you to press an analyze button. To avoid interfering with the analysis, do not touch the patient or the defibrillator while this analysis is performed (Figure 7–18). The defibrillator will notify you when the analysis is complete.
Figure 7–17: Typical defibrillator pad placement.

CIR
CU
LATO
RY E
MER
GEN
CIE
S
155
If the defibrillator detects a rhythm that indicates the need for a shock, ensure that no one is touching the patient and press the shock button. Compressions should be continued while the AED charges. The necessary interruption of CPR for the administration of a shock is referred to as the peri-shock pause. While it is crucial that no one touch the patient while the shock is administered, CPR compressions should be resumed immediately after the shock is complete. Continue CPR, listening for the defibrillator’s prompts.
If the defibrillator determines that no shock is advised, resume CPR and follow the defibrillator’s prompts, reanalyzing after 5 CPR cycles. If the defibrillator advises a shock and then later advises against a shock, this indicates that the patient’s condition has changed: Quickly reassess the patient before proceeding.
Defibrillator Care and MaintenanceYou must ensure that your defibrillator is ready for use at all times. To arrive at the scene of a cardiac arrest with a defibrillator that is not functioning properly could result in the death of the patient.
At the beginning of each shift: • Ensure that the battery is fully charged. If
possible, have a backup battery with you. • Ensure that all necessary components are with
the unit. • Ensure that you have several sets of pads
with you, including pediatric and infant pads (if available), and that they are within their expiration date.
Modern defibrillators require minimal maintenance and include various self-diagnostic features. You should familiarize yourself with the visual and/or audio warnings that indicate a low battery or a malfunction. Read the manufacturer’s documentation thoroughly, and contact the manufacturer for more information if necessary.
The manufacturer’s documentation will indicate how to maintain and care for the particular defibrillator you are using. It should be disinfected after each use. Always handle the defibrillator carefully: Avoid jostling or dropping it.
Defibrillation PrecautionsThe following precautions must be taken when using a defibrillator:
DO NOT USE A DEFIBRILLATOR IN A MOVING VEHICLEThe motion of the vehicle can interfere with the defibrillator’s analysis of the patient’s heart rate, resulting in a shock being advised when it is not needed (or vice versa). Some modern defibrillators are able to filter out external movement: Consult the manufacturer’s guidelines. In most cases, it is advisable to pull over and stop the vehicle while the defibrillator analyzes the patient’s rhythm.
DO NOT DEFIBRILLATE A PATIENT IN THE PRESENCE OF FLAMMABLE MATERIALSDo not use a defibrillator if materials such as gasoline are present. A defibrillator may produce a spark when the shock is delivered, which could ignite flammable materials. For the same reason, avoid using alcohol to clean the patient’s chest before applying the pads. You should also keep free-flowing oxygen away from the patient during defibrillation. Remove any oxygen-delivery devices while the shock is delivered, and use caution around oxygen in general.
Figure 7–18: Ensure that no one touches the patient or the defibrillator while the defibrillator analyzes the patient’s heart rhythm.

CIR
CU
LATO
RY E
MER
GEN
CIE
S
156
DO NOT TOUCH A PATIENT WHILE THE SHOCK IS DELIVEREDA defibrillator necessarily delivers a shock powerful enough to stop the human heart, so ensure that the electrical current travels through the patient only. Make sure that no one is touching the patient when a shock is delivered, and if the patient is touching a conductive surface (e.g., the metal frame of a stretcher), ensure that no one is touching that surface, either.
Special Resuscitation SituationsPREGNANT WOMENWhen performing CPR on a visibly pregnant woman, putting a blanket or cushion under her right hip will help blood return to the heart. However, do not interrupt CPR to find an object. It is safe to use a defibrillator normally on a pregnant woman.
TRANSDERMAL MEDICATION PATCHESA defibrillator pad should not be placed over a transdermal medication patch (e.g., nitroglycerin or nicotine), as the patch may block the transfer of the energy to the heart and may cause small burns on the skin. Remove any patches from the chest and wipe the area clean before attaching the electrode pads. Ensure that you are wearing gloves, as the medication in these patches is designed to be absorbed through the skin.
IMPLANTED PACEMAKERS AND IMPLANTED CARDIOVERTER-DEFIBRILLATORSA patient may have a pacemaker or cardioverter-defibrillator (ICD) implanted in his or her chest. If you see a small scar and a matchbox-sized lump on the chest, ensure that the electrodes are positioned at least 2.5 cm (1 in.) away. If an ICD is already in shock sequence (e.g., the patient’s muscles contract in a manner similar to that observed during external defibrillation), allow 30 to 60 seconds for the ICD to complete the treatment cycle before delivering a shock from the external defibrillator.
In most situations, a patient is considered a child if he or she is over the age of 1 year but has not reached the onset of puberty. For the purposes of using a defibrillator, however, a patient is considered a child if he or she is between the ages of 1 and 8 years. Both infants and children can be defibrillated, but neonates cannot.
BODY JEWELLERYIf a piece of jewellery (e.g., a necklace or body piercing) is within 2.5 cm (1 in.) of the defibrillator pad placement, remove the jewellery before applying the pad.
TRAUMA TO THE TORSOIt is safe to perform CPR and place defibrillator pads on the chest as usual if the trauma does not interfere with their placement.
PATIENTS IN WATERIf the patient is in the water, remove the patient before defibrillation. A shock delivered in water could be conducted to responders or bystanders. Quickly wipe the patient’s chest dry and attach the defibrillator pads normally.
RAIN OR SNOWIf it is raining or snowing, ensure that the patient is as dry as possible and sheltered from the weather. This should be done as quickly as possible: Throwing a tarp (or other improvised cover) over yourself and the patient can provide the necessary shelter. If there is a safe, dry area in very close proximity, consider moving the patient (so long as this causes only a minimal delay). Wipe the patient’s chest dry. As always, follow all of the manufacturer’s precautions and operating instructions.
NEONATAL RESUSCITATIONRescucitation is indicated for any neonate with a heart rate less than 60 bpm. Resuscitation methods must be adjusted when the patient is a neonate (from birth to 28 days old). Because the cause of cardiac arrest in neonates is almost always respiratory in origin (not cardiac), there is more of a focus on ventilations: The ratio of compressions

CIR
CU
LATO
RY E
MER
GEN
CIE
S
157
to ventilations is 3:1. Defibrillation is not indicated for neonatal patients.
Post-Cardiac Arrest CareIn some cases, a patient receiving CPR will regain a pulse, especially when a defibrillator is incorporated. This is called return of spontaneous circulation (ROSC). Such a patient must be monitored very closely. Check the pulse regularly, and be prepared to resume CPR if the heart stops again. Keep the defibrillator pads attached to the patient’s chest.
The return of the patient’s pulse may or may not be accompanied by the resumption of respiration. Either ventilate the patient or provide assisted ventilations as necessary. A patient who has experienced cardiac arrest is likely to be at least moderately hypoxic, so high-flow supplemental oxygen is indicated. Monitor the patient’s airway and be prepared to provide suction or other interventions if necessary. Any patient who has experienced cardiac arrest must receive advanced medical care as soon as possible, even if normal circulation and respiration have resumed.
CEREBROVASCULAR ACCIDENT (STROKE)
A cerebrovascular accident (CVA), also called a stroke, is a disruption of blood flow to a part of the brain. The affected brain tissue quickly becomes hypoxic and suffers damage. The effects of a stroke vary based on which part of the brain is affected: The patient will experience deficits in the areas that are controlled by the damaged tissue (speech, motor skills, memory, etc.). Effects can range from minor to catastrophic, depending on the location and extent of the damage.
A transient ischemic attack (TIA) is similar to a stroke in its signs and symptoms, but usually resolves quickly without permanent tissue damage. It is caused by a temporary restriction in blood flow to part of the brain and resolves when the blockage clears. A patient will usually survive a TIA without any lasting effects, though some
patients may experience permanent deficits if tissue damage occurs.
Transient Ischemic Attack (TIA)TIAs are sometimes called mini-strokes. Like a stroke, a TIA is caused by reduced blood flow to part of the brain, most commonly as a result of a blood clot. Unlike a stroke, the signs and symptoms of a TIA disappear within a few minutes or hours as the patient’s body clears the blockage and blood flow returns to normal.
Even if stroke signs and symptoms disappear, the patient is not out of danger. A TIA is sometimes referred to as a warning stroke, as someone who has experienced a TIA is at a significantly increased risk of having a CVA. Aside from the duration of signs and symptoms, a TIA is essentially identical to a CVA. TIA patients require immediate medical care as well: Don’t delay transport to see whether a patient’s condition changes.
Recognizing a TIA and getting prompt medical treatment can help to identify why the TIA occurred and allow the patient to receive appropriate treatment (medication or surgery). Ultimately, this may prevent a stroke from occurring in the future.
Causes of Cerebrovascular Accidents (CVA) There are two main causes of CVAs: Either an artery in the brain is blocked (ischemic stroke), or an artery in the brain ruptures (hemorrhagic stroke), spilling blood into the surrounding tissues (Figure 7–19).
ISCHEMIC STROKES Ischemic strokes occur when a cerebral artery becomes blocked or narrowed, resulting in severely restricted blood flow (ischemia) to brain tissues. The blockage may develop in a cerebral artery over time (thrombotic stroke) or may be caused by a piece of material that is carried to the brain from elsewhere in the body (embolic stroke). More than 4 out of 5 CVAs are ischemic strokes.

CIR
CU
LATO
RY E
MER
GEN
CIE
S
158
Thrombotic strokes occur when a blood clot (thrombus) develops in a cerebral artery. They are often caused by the build-up of plaque associated with cardiovascular disease.
Embolic strokes occur when a piece of material (embolus) forms outside of the brain and is carried to the cerebral arteries by the circulatory system. The embolus may be solid, liquid, or gas. The most common type of embolus is a clot that forms in diseased carotid blood vessels or from abnormally contracting chambers in the heart and then becomes detached and carried to the brain.
HEMORRHAGIC STROKESHemorrhagic strokes occur when there is a break in one of the brain’s blood vessels. This causes blood to spill (hemorrhage) into either the brain’s tissue (intracerebral hemorrhage) or the space between the brain and the skull (subarachnoid hemorrhage). Hemorrhagic strokes can result from head injuries, hypertension, or a ruptured aneurysm (a weakened section of an artery wall).
Intracerebral hemorrhage occurs when a blood vessel within the brain tissue bursts and spills blood into the surrounding tissues. In addition to damaging the brain cells at the site of the rupture,
the tissues that are normally supplied by the ruptured artery may also become hypoxic and suffer damage as a result of the reduced blood flow.
Subarachnoid hemorrhage occurs when an artery on the surface of the brain bursts, spilling blood into the subarachnoid space between the brain and the skull. This often manifests as a sudden and severe headache, reaching peak intensity within a few seconds.
Signs and Symptoms of CVA and TIAThe signs and symptoms of a CVA or TIA vary based on which brain tissues are affected: The person will have deficits in the areas controlled by that tissue. If the language centre is affected, for example, the person may have difficulty communicating. A person may experience weakness (hemiparesis) or paralysis (hemiplegia) on one side of the body (Figure 7–20). More than one area of the brain can be affected.
A person experiencing a CVA or TIA may experience any of the following signs and symptoms: • Sudden weakness and/or numbness of the
face, arm, or leg, usually only on one side of the body
• Difficulty speaking or understanding speech • Blurred or dimmed vision
Figure 7–19: A CVA can be caused by a clot or rupture.
Figure 7–20: Weakness or numbness, often on one side of the face, is a sign of stroke.
Clot
Rupture

CIR
CU
LATO
RY E
MER
GEN
CIE
S
159
• Pupils of unequal size • Sudden, severe headache • Dizziness • Confusion • Changes in mood • Ringing in the ears • Unresponsiveness or changes in responsiveness • Loss of bowel or bladder control
Care for CVA and TIAA patient experiencing a CVA or TIA is in a life-threatening situation and requires advanced medical care immediately. Time is a crucial factor in the treatment of patients experiencing CVAs, so these patients are always in the rapid transport category. You should not delay transport unless it is absolutely necessary. Ideally, the patient will be transported to a stroke centre where thrombolytic therapy is available. When notifying the hospital of the patient’s condition, it is important to include the time of symptom onset so that treatment can be planned accordingly.
A patient experiencing a CVA or TIA may have difficulty managing his or her airway. Do not give a patient with a suspected CVA anything to eat or drink (NPO, or no products orally). Position the patient so that you can either manually clear the airway (recovery position) or easily provide suction. If a patient must be rolled into the recovery position and is experiencing weakness or paralysis on one side, position the patient with the affected side of the body downwards.
A stroke can make the patient fearful and anxious; therefore, it is important to comfort and reassure the patient. Often, the patient is confused and does not understand what has happened.

CIR
CU
LATO
RY E
MER
GEN
CIE
S
160
CVA Assessment ScalesThe following two scales are commonly used to assess a patient who has had a suspected CVA.
FASTWhen assessing a patient with a suspected CVA, the acronym FAST will focus your questions on the most relevant areas:
F ACE—facial numbness and/or weakness, especially on one side
A RM—arm numbness and/or weakness, especially on one side
SPEECH—slurred speech or difficulty speaking or understanding
TIME—when did signs and symptoms first appear (or when was the person last known to be well)?
Time also refers to the urgency of care: A person with a suspected CVA must receive advanced medical care as soon as possible, as the thrombolytic drugs used to treat many CVAs are only effective in a short window of time following the onset of signs and symptoms.
CINCINNATI PRE-HOSPITAL STROKE SCALE (CPSS)The Cincinnati Pre-hospital Stroke Scale (CPSS) is a set of simple tests that can be used to assess facial droop, arm weakness, and speech abnormalities in a patient suspected of having a CVA. If the patient has abnormal results in any of these areas, you should suspect a CVA.
Facial droop: Have the patient show his or her teeth or smile. • Normal: Both sides of the face move equally. • Abnormal: One side of the face does not
move as well as the other side.
Arm weakness: Have the patient close both eyes and hold his or her arms out straight for 10 seconds. • Normal: Both arms move equally or neither
arm moves at all. • Abnormal: One arm does not move or arms
drift unequally.
Speech abnormalities: Have the patient repeat a well-known saying (e.g., “The early bird gets the worm.”) • Normal: The patient uses the correct words
and does not slur. • Abnormal: The patient uses the incorrect
words, slurs the words, or does not speak at all.

Key Components of High-Quality CPR
• Ensuring an appropriate rate of chest compressions
• Ensuring an appropriate depth of chest compressions
• Allowing full chest recoil between compressions
• Maximizing compression fraction (minimizing off-chest time)
• Avoiding excessive ventilation
Asystole
Name Description Defibrillation Indicated?
Electrical activity is totally absent: no pulse.
Electrical activity is present, but insufficient to produce a pulse.
Ventricles contract too rapidly for the heart to refill with blood between contractions. Pulse will be rapid and ineffective or undetectable entirely.
Chaotic discharge of electrical activity causes the heart muscle to quiver: no pulse.
Pulseless electrical activity (PEA)
Ventricular tachycardia (VT)
Ventricular fibrillation (VF)
LIFE-THREATENING ARRHYTHMIAS
No
No
Yes
Yes
Hand Position
Compression Depth
Two-Responder Cycle
One-Responder Cycle
Compression Rate
ADULT CHILD INFANT NEONATE
Two hands on sternum
5 cm (about 2 in.)
30 compressions 2 ventilations
30 compressions 2 ventilations
100–120 per minute (30 compressions in 15–18 seconds)
One or two hands on sternum
1/3 of the chest depth
30 compressions 2 ventilations
15 compressions 2 ventilations
100–120 per minute (30 compressions in 15–18 seconds)
1/3 of the chest depth
30 compressions 2 ventilations
15 compressions 2 ventilations
100–120 per minute (30 compressions in 15–18 seconds)
1/3 of the chest depth
3 compressions 1 ventilation
3 compressions 1 ventilation
100–120 per minute (30 compressions in 15–18 seconds)
Two fingers on sternum (just below nipple line) OREncircling method
Two fingers on sternum (just below nipple line) OREncircling method
CARDIOPULMONARY RESUSCITATION (CPR) SUMMARY
Signs and Symptoms of Myocardial Infarction (MI)
• Tiredness• General malaise• Moist or sweaty skin• Pale or bluish skin• Change in pulse• Flu-like symptoms
• Mild, unfocused chest discomfort• Gastric discomfort or indigestion• Breathing difficulty• Persistent chest pain• Pain radiating to arm, shoulders,
neck, or jaw
SUMMARY
CIR
CU
LATO
RY E
MER
GEN
CIE
S
161

1. Begin CPR.
4. Continue CPR.
2. Perform chest compressions and squeeze BVM to provide ventilations.
3. After 2 minutes (5 cycles for most patients), switch places with Responder B.
1. Deploy defibrillator and request additional resources if necessary.
5. Continue CPR.
2. Move to patient’s head to maintain airway and hold BVM in position.
3. Check effectiveness of compressions by feeling carotid pulse (or brachial pulse in infants) and provide feedback.
4. After 2 minutes (5 cycles for most patients), switch places with Responder A.
Responder A Responder B
TEAM APPROACH TO CPR
1. Select the most suitable pads for the patient.
Shockable Rhythm Unshockable Rhythm
2. Expose the patient’s chest and ensure it’s dry.
3. Attach the defibrillator pads; typically, in the upper-right- and lower-left side of the chest, at least 2.5 cm (1 in.) apart.
4. Pause CPR to let defibrillator analyze patient’s heart rhythm.
5. Ensure no one is touching the patient and press the shock button. After the shock, resume compressions.
6. Continue CPR and follow defibrillator’s prompts.
5. Resume CPR.
6. Reanalyze after 5 cycles.
USING A DEFIBRILLATOR
Face—facial numbness and/or weakness, especially on one side
Arm—arm numbness and/or weakness, especially on one side
Speech—slurred speech or difficulty speaking or understanding
Time—when did signs and symptoms first appear (or when was the person last known to be well)?
F
A
S
T
FAST CVA (STROKE) ASSESSMENT MODEL
Facial droop
Arm weakness
Speech abnormalities
Normal: Both sides of the face move equally.
Normal: Both arms move equally or neither arm moves at all.
Normal: The patient uses the correct words and does not slur.
Abnormal: One side of the face shows impaired movement.
Abnormal: One arm does not move or arms drift unequally.
Abnormal: The patient uses the incorrect words, slurs the words, or does not speak at all.
Have the patient show his or her teeth or smile.
Have the patient close both eyes and hold arms out straight for 10 seconds.
Have the patient repeat a well-known saying (e.g., “The early bird gets the worm.”)
Factor Interpretation
CINCINNATI PRE-HOSPITAL STROKE SCALE (CPSS)
Method
162
SUMMARYC
IRC
ULA
TORY
EM
ERG
ENC
IES
162

SHO
CK
8 Shock
163
Key ContentPathophysiology of Shock ..... 164 Types of Shock ..................... 165Stages of Shock ...................... 165 Care for Shock ........................ 166
IntroductionAll cells of the body require oxygen. Under normal circumstances, the circulatory system carries this oxygen to the body’s tissues. The supply of oxygen to the cells is called perfusion: If a patient has good perfusion, the patient’s tissues are receiving the oxygen they need.
Three conditions are necessary for maintaining perfusion:1. The heart must be functioning effectively.2. An adequate quantity of blood must be circulating in the
body.3. The blood vessels must be able to control blood flow by
dilating and constricting.
An injury or sudden illness can interrupt normal body functions. In cases of minor injury or illness, this interruption is brief and the body is able to quickly compensate and resume normal operation. With more severe injuries or illnesses,

SHO
CK
164
however, the body may be unable to adjust, and the body’s tissues may stop receiving the oxygen they require.
When vital organs such as the heart, lungs, brain, and kidneys do not receive oxygen-rich blood, their ability to function effectively is compromised. This triggers a series of responses that results in a combination of signs and symptoms known as shock. These responses are the body’s attempts to maintain adequate blood flow to the vital organs and prevent them from shutting down.
PATHOPHYSIOLOGY OF SHOCK
Shock is a condition defined by its effects. There are many causes of shock, ranging from emotional distress to anaphylaxis, but the outcome is the same: Blood does not circulate effectively to the body’s tissues. The causes of shock can be categorized differently for different purposes, but at the foundation, shock is caused by one or more of the following problems:
1. The heart is not functioning effectively. When the heart is not functioning effectively,
blood will not circulate properly even if the rest of the circulatory system is working normally. A patient in cardiac arrest, for example, will rapidly go into shock. This is often referred to as cardiogenic shock.
2. The quantity of blood circulating in the body is too low.
A healthy body that is not stressed can compensate for some decrease in blood volume. When a person donates blood, for example, he or she can lose 500 mL (17 oz.) of blood in 10 or 15 minutes without causing any stress to the body. To compensate for the lost volume, the body reabsorbs fluid from the kidneys, lungs, and intestines and immediately begins to manufacture new blood cells. When blood is lost due to a severe injury, however, the blood loss may be greater or more rapid, and the body’s ability to compensate may be overwhelmed. This is often referred to as hypovolemic shock.
3. The blood vessels are unable to constrict effectively.
Normally, blood vessels control the flow of blood to different areas of the body by constricting and dilating to change the pressure of the blood. This process ensures that blood reaches the areas of the body that need it most. Injury, illness, toxins, and infection can all cause blood vessels to lose their ability to constrict, causing a drop in blood pressure (Figure 8–1). Although the actual volume of blood in the body does not change, the capacity of the vascular system itself increases as the vessels dilate, so the same volume of blood is under lower pressure. This is often referred to as distributive shock. It may also be
Figure 8–1: Injury or illness can cause blood vessels to lose their ability to change size, causing a drop in blood volume.
DILATED NORMAL

SHO
CK
165
called relative hypovolemic shock because the volume of blood is low relative to the dilation of the vascular system.
Types of ShockThere are many types of shock, all of which create one or more of the three conditions described above. The following examples are most common, but any condition that causes a sudden drop in blood pressure can result in shock.
CARDIOGENIC SHOCKCardiogenic shock is the result of a problem with the heart itself. A patient experiencing cardiac arrest, for example, will typically be in cardiogenic shock because the heart is not pumping blood through the circulatory system.
OBSTRUCTIVE SHOCKObstructive shock occurs when something physically prevents the heart from filling or emptying effectively, even if it is otherwise pumping normally. This may be caused by a pulmonary embolism, for example, or a tension pneumothorax.
HYPOVOLEMIC SHOCKHypovolemic shock is the general term for shock that results from an insufficient volume of blood circulating in the body. This is often subdivided into true hypovolemic shock, in which the body’s total blood volume is actually reduced, and relative hypovolemic shock, in which dilated blood vessels cause blood to pool in extremities rather than circulating effectively (also called distributive shock).
Hemorrhagic ShockHemorrhagic shock is the most common type of true hypovolemic shock, occurring when the vascular system rapidly loses a large quantity of blood due to hemorrhaging.
Neurogenic ShockNeurogenic shock is a form of relative hypovolemic shock (distributive shock) that occurs when the nervous system loses its ability to control the constriction of the body’s blood vessels, causing them to dilate. The cause is usually an injury to the brain or spine.
Psychogenic ShockPsychogenic shock is a form of relative hypovolemic shock (distributive shock) that results from emotional stress. When a person receives upsetting news, for example, the body’s blood vessels can dilate, allowing blood to pool in the extremities rather than circulating throughout the body. The effect is similar to that of neurogenic shock, but the cause is psychological rather than neurological in origin.
Septic ShockSeptic shock is a form of relative hypovolemic shock (distributive shock) that occurs as the result of a severe infection. As the infection progresses, it releases toxins into the blood that cause the blood vessels to dilate, allowing blood to pool in the lowest parts of the body.
Anaphylactic ShockAnaphylactic is a form of true hypovolemic shock that occurs as the result of an extreme allergic reaction (anaphylaxis). It increases the permeability of the body’s blood vessels, allowing fluid to leech out of the circulatory system, thereby reducing the volume of circulating blood in the vascular system.
STAGES OF SHOCK
A patient in shock will go through three distinct stages: compensated, decompensated, and irreversible (see Figure 8–2).
Compensated ShockWhen the body initially detects that perfusion is low, it attempts to restore normal circulation through a series of compensatory mechanisms. The blood vessels constrict, focusing blood towards vital organs and helping to sustain blood pressure. This reduces the amount of blood circulating to the less critical tissues in the extremities and skin, which causes the skin to become pale and cool. A patient’s capillary refill will slow during this stage of shock as less blood travels to the extremities. The heart beats more rapidly to increase blood flow. As a result, respiration must also increase so that the level of oxygen in the blood is not reduced. These changes in pulse and respiration

SHO
CK
166
can often be detected during the primary assessment, but there tends to be little change in blood pressure during the compensated stage. A patient in compensated shock may or may not be sweating, depending on the cause of shock and the individual patient’s reaction to it. The patient may be apprehensive or anxious.
Decompensated ShockIf the body’s compensatory mechanisms are unsuccessful, the body’s tissues begin to become hypoxic. At this stage, shock becomes life-threatening, though immediate interventions may reverse the effects. Decreased oxygen flow to the brain can cause the patient to become confused, listless, or unresponsive, and the heart and other organs begin to work less effectively. Respiration will become slow, shallow, and irregular, and the pulse will become weak and rapid. Blood pressure will drop, and the body’s temperature will decrease. Cyanosis may occur around the lips and eyes due to the prolonged lack of oxygen, and the patient’s pupils will dilate. Diaphoresis (excessive sweating) and extreme thirst are common.
Irreversible ShockWithout intervention, decompensated shock progresses to irreversible shock. The body’s vascular system becomes unable to maintain its internal pressure, so blood pools in the extremities, away from the vital organs. At this
stage, the damage to the brain, heart, and other tissues is so extensive that the patient will not survive regardless of any interventions performed.
CARE FOR SHOCK
Early recognition and care for serious injuries and conditions (e.g., controlling a hemorrhage) will minimize the effects of shock (Figure 8–3). Help the patient rest comfortably in the recovery or supine position. A supine position will help increase blood flow to the patient’s vital organs, especially the brain. Elevating the patient’s feet 20 to 30 cm (8 to 12 in.) can help improve blood flow to the head and torso. The supine position with feet elevated is sometimes referred to as the Trendelenburg position or shock position. This is not indicated if the patient has experienced trauma that is putting stress on the cardiovascular system or if the patient’s systolic blood pressure is over 100 mmHg.
Help the patient maintain a normal body temperature (Figure 8–4). This may involve controlling environmental factors, such as turning off air conditioning.
Avoid giving the patient anything to eat or drink, even if he or she is thirsty. The patient’s condition may be severe enough to require surgery, in which case it is better to have an empty stomach.
PROGRESSION OF SHOCK
Normal Function Compensated Shock Decompensated Shock Irreversible Shock
Heart Rate
Blood Pressure (BP)
Respiration Rate
Level of Responsivness (LOR)
Hem
od
ynam
ic S
tate
Figure 8–2: The effects of shock over time.
Hem
od
ynam
ic S
tate
Normal Function Compensated Shock Decompensated Shock Irreversible Shock
Heart Rate
Blood Pressure (BP)
Respiration Rate
Level of Responsiveness (LOR)

SHO
CK
167
Initial Cause 1. An injury causes a hemorrhage (severe bleeding).
Compensated shock
2. The heart attempts to compensate by beating faster, resulting in a rapid pulse(tachycardia). This causes more blood loss. As the body’s blood volume continues to drop,the pulse becomes weaker.
3. The increased workload on the heart results in an increased oxygen demand. Therefore,respiration becomes faster (tachypnea).
4. To maintain circulation of blood to the vital organs, blood vessels in the arms and legsconstrict, causing the skin to become pale and cool. In response to the stress, the bodyperspires heavily.
Decompensated shock
5. Since tissues in the extremities are now without oxygen, their cells start to die. The brainresponds by restoring blood flow to the arms and legs in an attempt to balance theoxygen needs of the extremities with those of the vital organs.
6. The vital organs are now lacking adequate oxygen. The heart tries to compensate bybeating even faster, increasing blood loss.
Irreversible shock
7. Without oxygen, the vital organs stop functioning effectively. As the brain tissues becomehypoxic, the person becomes restless and drowsy and eventually loses responsiveness. Thepulse becomes chaotic, and soon the patient enters cardiac arrest. When the heart stops,respiration stops as well.
8. The body’s continuous attempt to compensate for severe blood loss eventually results indeath.
The general care you provide in any emergency will help the patient’s body adjust to the stresses imposed by the injury or illness, preventing or slowing the progression of shock.
A patient presenting the signs and symptoms of shock should be rapidly transported to an advanced care facility, regardless of the cause. Because hypoxia is the underlying condition caused by shock, high-flow supplemental oxygen is indicated.
SHOCK: THE DOMINO EFFECT
Although shock can have many causes, the following example shows how it can progress through a chain of cause and effect from an initial injury to the ultimate death of the patient. This is an example of hemorrhagic shock.
Figure 8–3: Care for shock includes providing care for the ABCs.
Figure 8–4: Help the patient maintain a normal body temperature.

Three Underlying Causes of Shock
1. The heart is not functioning effectively.2. The quantity of blood circulating in the body is too low.3. The blood vessels are unable to constrict effectively.
Compensatedshock
Irreversibleshock
Decompensated shock
Stage Description Effects
The body detects low perfusion and activates compensatory mechanisms.
The body is unable to maintain blood pressure: Blood pools in extremities, away from vital organs. The brain and heart are irreversibly damaged: Death is imminent.
Compensatory mechanisms are unsuccessful: Body tissues begin to become hypoxic.
• Constricted blood vessels• Pale and cool skin• Tachycardia• Tachypnea• Possible sweating
• Unresponsiveness• Chaotic pulse progressing to cardiac arrest• Respiratory arrest
• Confusion, listlessness, unresponsiveness• Slow, shallow, irregular respiration• Rapid, weak pulse• Lowered blood pressure• Lowered body temperature• Dilated pupils• Diaphoresis (excessive sweating) and thirst• Possible cyanosis
STAGES OF SHOCK
Septic
Obstructive
Cardiogenic
Anaphylactic
Hypovolemic Relative
True
Psychogenic
Neurogenic
Hemorrhagic
Severe infections create poisons in the body that cause blood vessels to dilate, reducing blood pressure and causing blood to pool in extremities.
Obstruction of blood flow outside of the heart prevents it from filling or emptying effectively.
Failure of the heart to effectively pump blood to all parts of the body; occurs with heart attack or cardiac arrest.
Life-threatening allergic reaction to a substance increases blood vessel permeability, allowing fluid to move out of the circulatory system and thereby decreasing blood volume.
Factors such as emotional stress cause blood vessels to dilate, reducing blood pressure and causing blood to pool in extremities.
Failure of the nervous system to control the size of blood vessels causes them to dilate; this occurs with brain or nerve injuries.
Loss of blood due to internal or external hemorrhage results in reduced blood volume.
Type Description
TYPES OF SHOCK
SHO
CK
168
SUMMARY

HEM
OR
RH
AG
E A
ND
SO
FT T
ISSU
E TR
AU
MA
9 Hemorrhage and Soft Tissue Trauma
169
Key ContentInfection .................................. 170 Dressings and Bandages ........ 172 Stitches and Sutures .............. 173 Tourniquets ............................ 174External Bleeding ................... 174 Internal Bleeding ................... 177 Open Wounds ........................ 178 Closed Wounds ...................... 182 Burns ....................................... 182Major Soft Tissue Trauma ...... 191
IntroductionMost of the human body is made of soft tissues, which is a general category that includes skin, fat, muscle, vital organs, and blood vessels, among others. Soft tissues are generally defined by what they are not: Essentially, soft tissues are all tissues other than bones. These tissues are more susceptible to injury than the denser tissue in the skeleton. Injuries to the soft tissues range from extremely minor (such as a scrape or bruise) to life-threatening (such as an impaled object or gunshot wound).
Damage to blood vessels, especially arteries, can be immediately life-threatening. Most soft tissue injuries are not addressed during your primary assessment, as they are typically not as serious as issues affecting the airway, respiration, or circulation, but a hemorrhage must be recognized and cared for as quickly as possible.

HEM
OR
RH
AG
E A
ND
SO
FT T
ISSU
E TR
AU
MA
170
Soft tissue injuries can be divided into two general categories: open wounds, in which the skin is broken, and closed wounds, in which trauma occurs beneath the skin. Some types of soft tissue injuries, such as crush injuries, may be open, closed, or both, depending on the nature of the specific injury. Others, such as burns, do not fall naturally into either category, so this distinction is more of a guide than a rule.
STAGES OF WOUND HEALING
Healing is the general term used to describe the body’s process of repairing damaged tissues. In the case of wounds, this occurs primarily through the formation of scar tissue.
First, the edges of a wound are brought together, and a thin layer of blood or plasma forms a clot between them. New tissue cells then grow through the clot, followed by new blood vessels. A new layer of skin then grows over the restored tissues. This process takes 5 or 6 days on average, depending on the size and location of the wound: Areas with good blood supply (such as the face) heal more rapidly than those without (such as the knees). The scar reaches full strength in approximately 17 days but will continue to contract and solidify for about a year.
If the edges of the wound are not brought together, healing takes longer, and a larger scar is likely to result. When the gap between the wound’s edges is so large that the wound cannot be closed, healing occurs through granulation, where new tissue grows from the bottom of the wound towards the surface, displaying a rough texture as it develops. Skin then grows slowly over this rough tissue. This is a much slower process, reinforcing the value of closing wounds whenever possible.
INFECTION
Any open wound is at risk of infection and should be protected from harmful pathogens. The best initial defence against infection is cleansing the
area thoroughly to remove any bacteria that might already be present. Minor wounds that are not hemorrhaging should be washed with water, preferably running water under gentle pressure (as from a tap or hose). If possible, rinse any minor wound for 5 minutes. Because chemicals such as soap and alcohol can cause damage to sensitive tissues under the skin, water alone is recommended for cleaning wounds.
For wounds that are hemorrhaging or that involve extensive tissue damage, bleeding control and rapid transport are higher priorities than cleaning. These wounds will be cleaned thoroughly in the medical facility as a routine part of the care provided. Do not delay transport to clean a major wound.
When caring for any open wound, you can reduce the risk of infection by using sterile technique. Avoid touching open wounds, and use clean gloves if touching the wound is unavoidable. Take care to keep dirt and debris out of the wound, and avoid letting non-sterile material come into contact with it. When cleaning the area around a wound, always wipe away from the wound, not towards it.
Signs of InfectionWhen a wound becomes infected, the surrounding area becomes swollen and red, and the area may feel warm or throb with pain. Some infected wounds have a pus discharge (Figure 9–1, a-b). An infection begins in the wound itself but may spread into the surrounding tissues if untreated.
In some cases, the infection can enter the patient’s circulatory system and move throughout the body, resulting in a life-threatening condition called systemic infection. Red streaks on the skin moving away from the wound and towards the heart are one sign that an infection is progressing to the systemic level. Systemic infection can also cause a patient to present with flu-like symptoms (e.g., fever, nausea, and general malaise). Systemic infections are usually treated with antibiotics, so a patient with these signs and symptoms should be examined by a physician as soon as possible.

HEM
OR
RH
AG
E A
ND
SO
FT T
ISSU
E TR
AU
MA
171
TetanusTetanus is a serious infection caused by the micro-organism Clostridium tetani. The spores of this bacterium are commonly found in soil, dust, and the feces of certain animals. Tetanus can cause severe medical problems and can be fatal.
Tetanus spores are introduced into the body through a wound caused by a contaminated object. The spores then grow into bacteria inside the body. Because the organism multiplies in an environment that is low in oxygen, puncture wounds and other deep wounds are at the greatest risk for tetanus infection.
Tetanus produces a powerful toxin that affects the body’s central nervous system and specific muscles. Because it can often cause the jaw and neck muscles to contract, tetanus is sometimes referred to as lockjaw. As a tetanus infection progresses, it can affect other muscles as well. Once the tetanus infection enters the nervous system, its effects are irreversible, so any patient suspected of having a tetanus infection should see a physician as soon as possible.
Signs and symptoms of tetanus include: • Difficulty swallowing. • Irritability. • Headache. • Fever. • Muscle spasms near the infected area.
The best way to prevent tetanus is to be immunized against it. This involves an initial vaccination and periodic booster shots, which help to maintain the antibodies that protect against tetanus. Booster shots are recommended every 5 to 10 years. They are also recommended if a wound has been contaminated by dirt, or whenever a potentially contaminated object, such as a nail in a barn, causes a puncture wound. Most children in Canada receive an immunization known as DPT vaccine (short for diphtheria, pertussis, and tetanus. Consult a physician if you are unsure whether your tetanus immunization or booster is up to date.
Infected wounds of the face, neck, and head should receive immediate medical care since the tetanus toxin can travel rapidly to the brain.
GangreneLike tetanus, gangrene is caused by bacteria that thrive in the absence of oxygen. It may also be caused by a loss of blood supply to the affected tissue. Gangrene causes a sudden onset of pain and swelling, with local tissue discoloration and a brownish, foul-smelling watery discharge that is highly infectious (Figure 9–2). A patient may also have a low-grade fever and present with signs of shock.
Figure 9–1, a-b: An infected wound.
b
a

HEM
OR
RH
AG
E A
ND
SO
FT T
ISSU
E TR
AU
MA
172
While rare, gangrene may lead to necrotizing fasciitis, which is a rapidly progressive and very painful infection sometimes referred to as flesh-eating disease. The most definitive characteristic is the presence of crackling (crepitus) beneath the skin due to tiny air bubbles.
Any patient with gangrene should be seen by a medical professional and may require urgent transportation to do so. Monitor the patient for signs of shock during transport.
DRESSINGS AND BANDAGES
Once an open wound has been cleaned, it must be protected against the intrusion of additional pathogens. This is done by covering the wound with a dressing, which is the general term for any material that is placed over a wound to cover and protect it. A dressing can also help to absorb blood and other fluids. A bandage is a piece of material (usually cloth or elastic) used to hold a dressing in place. Bandages can also be used to support an injured body part. Wrapping a bandage snugly can create pressure on a wound, helping to control bleeding. This is referred to as a pressure bandage.
A wide variety of dressings and bandages are commercially available (Figure 9–3, a-b). Sometimes, a dressing and a bandage will be combined into a single product. When possible, choose the option that is best suited to the wound, taking into account the size, type, and location of the injury (see Table 9–1).
Applying a Roller BandageTo apply a roller bandage, follow these general guidelines:
First, secure one end of the bandage in place (Figure 9–4, a). Wrap the bandage around the body part until the dressing is completely covered and the bandage extends several centimetres beyond the dressing (Figure 9–4, b). Tie or tape the bandage in place (Figure 9–4, c). If applying roller gauze to an extremity, apply it distally-to-proximally to facilitate venous return. If blood soaks through the bandage, leave the bandage and dressings in place and apply additional dressings and another bandage on top.
Figure 9–3, a-b: a, Dressings come in various sizes; b, different types of bandages are used to hold dressings in place, apply pressure to control bleeding, help protect a wound from dirt and infection, and provide support to an injured body part.
a
b
Figure 9–2: Gangrene causes a sudden onset of pain and swelling, with local tissue discoloration and a brownish, foul-smelling watery discharge that is highly infectious.
© 2012 M
ICH
AE
L EN
GLIS
H, M
.D. - C
ustom M
edical S
tock Photo. A
ll Rights
Reserved
.

HEM
OR
RH
AG
E A
ND
SO
FT T
ISSU
E TR
AU
MA
173
TABLE 9–1: COMMON TYPES OF BANDAGES AND DRESSINGS
TYPE DESCRIPTION EXAMPLES OF USE
Occlusive dressings • Air- and water-tight dressings thatcompletely block a wound
Covering an intravenous (IV) site
Gauze • Can be sterile or non-sterile• Some types are non-stick
Open wounds; non-stick variety is commonly used for burns
Burn dressings • Sterile, non-stick sheets or packs• Some have non-stick material on one
surface and sterile gauze on the reverse,others may have a gel or other substanceincorporated to speed burn cooling
Burn care
Trauma dressings • Large sheets of sterile, absorbent material• Usually placed over a layer or more of
gauze
Large open wounds
Abdominal dressings • Similar to trauma dressings, but smallerin size
Abdominal wounds, other large open wounds
Pressure dressings (field dressings)
• Layers of gauze and other absorbentmaterial attached to a roller bandage
• Allows a dressing and bandage to beapplied simultaneously
Hemorrhage control, especially on extremities
Skin closures (butterfly closures)
• Small adhesive strips used to hold togetheredges of an open wound
Lacerations
Small adhesive dressings
• Small, adhesive pad or strip with anattached sterile pad
• Available in a variety of sizes and shapesfor different applications
Small minor wounds
Eye dressings • Small, sterile oval of thick absorbentmaterial placed over the eye socket
Protecting an injured eye from additional damage or foreign material, and absorbing fluid
Triangular bandages • Triangular sheet of soft material, typicallycotton
Supporting injured extremities, holding dressings in place, securing splints
Elastic roller bandage (tensor bandage)
• Long strip of elastic material that canbe wrapped around an injury to providecontinuous pressure, supporting the areaand reducing swelling
Supporting injured extremities, caring for sprains and sprains
Gauze roller bandage • Long strip of absorbent material. May beself-adhesive. Can be folded for use as adressing or compress
Holding dressings in place, stabilizing impaled objects, holding cold packs in place
Leave the fingers or toes uncovered if possible: This can help you assess sensation and circulation to ensure that the bandage’s pressure is appropriate (Figure 9–4, d). Check sensation and circulation before and after applying the bandage. If the fingers or toes show signs of impaired circulation or sensation after applying the bandage, loosen the bandage slightly and reassess. Comparing the injured extremity to the corresponding one on the other side of the body can help you determine the patient’s normal levels of sensation and circulation.
STITCHES AND SUTURES
Stitches or sutures are needed when a wound might not otherwise heal cleanly. Stitches and sutures speed the healing process, help to prevent infection, and reduce the appearance of scars. A wound should be stitched or sutured within the first few hours after the injury. The following may require stitches or sutures:
• A hemorrhaging wound• A wound with jagged edges• A wound more than 2.5 cm (1 in.) long• A wound on the face or head

HEM
OR
RH
AG
E A
ND
SO
FT T
ISSU
E TR
AU
MA
174
• A wound that gapes widely or shows themuscle or bone
• A wound on a joint or on the hands or feet• A large or deep puncture• A large or deeply embedded object• A human or animal bite
TOURNIQUETS
A tourniquet is a tight band placed around an extremity to constrict blood vessels and stop blood flow. It is used to treat a hemorrhage when all other interventions are impossible or have been ineffective (Figure 9–5, a). Because the tourniquet completely blocks blood flow to the extremity for the entire time that it is in place, it can have serious complications for the patient and should only be used if it is absolutely necessary. A bandage and dressing should be used in addition to a tourniquet whenever possible to assist with blood clotting. A variety of commercially manufactured tourniquets are available.
You should consider applying a tourniquet for initial care during situations when you are unable to use standard hemorrhage control. Such situations may include a mass casualty incident, an injury in an environment that becomes unsafe, or a patient hemorrhaging blood from a wound that cannot be accessed.
Apply the tourniquet 5 to 10 cm (2 to 4 in.) above the injury and just above any joint in this range (Figure 9–5, b). Tighten the tourniquet until the bleeding stops, and secure it in place (Figure 9–5, c). Continue to apply direct pressure to the wound if possible. Document the time that the tourniquet was applied. A patient with a tourniquet applied should always be in the rapid transport category.
EXTERNAL BLEEDING
Most open wounds will have some bleeding, but the body’s clotting response will usually stop minor bleeding within 10 minutes, especially if pressure is applied. A hemorrhage, however, will overwhelm
Figure 9–4, a-d: When applying a bandage: a, secure the end of the bandage in place; b, wrap the bandage around the body part until the dressing is completely covered; c, tie or tape the bandage in place; and d, ensure the bandage is not too tight by checking distal circulation.
a
b
c
d

HEM
OR
RH
AG
E A
ND
SO
FT T
ISSU
E TR
AU
MA
175
the body’s responses and can rapidly cause a patient to go into hemorrhagic shock. For this reason, it is crucial that you learn to differentiate minor bleeding from hemorrhaging. You should check for external hemorrhaging during the rapid body survey in your primary assessment and provide care for it immediately if it is found.
Each type of blood vessel bleeds differently. Bleeding from arteries is often hemorrhagic (rapid, profuse, and life-threatening). This is because arterial blood is under direct pressure from the heart, so it usually spurts from the wound, making it difficult for clots to form. For this reason, arterial bleeding is harder to control than bleeding from veins and capillaries. Arterial blood has a bright red colour due to its high concentration of oxygen.
Veins are damaged more often than arteries because they are closer to the skin’s surface. Venous blood is under less pressure than arterial blood, and flows from the wound at a steady rate without spurting. Due to the lower pressure, venous bleeding is easier to control than arterial bleeding. Only damage to veins deep in the body, such as those inside the trunk or thighs, produces hemorrhages that are hard to control. Because it is oxygen-poor, venous blood is a dark red or maroon colour.
Capillary bleeding is usually slow because the vessels are small and the blood is under low pressure. It is often described as oozing from the wound. Clotting occurs easily with capillary bleeding. The blood from capillaries is usually dark red in colour.
External bleeding is life-threatening when significant quantities of blood are spurting or flowing freely (hemorrhaging) from a wound.
Care for External BleedingTo control minor to moderate amounts of bleeding, apply pressure with your gloved hand directly on the wound. This is called applying direct pressure. Pressure on the wound compresses the blood vessels, restricting the blood flow, and allows clotting to occur. You can maintain pressure on a wound by applying a dressing and pressure bandage to the injured area. If the patient is responsive, he or she may be able to maintain direct pressure on the dressing while you apply the bandage.
Figure 9–5, a-c: a, If a hemorrhage cannot be controlled through other interventions: b, apply a tourniquet 5 to 10 cm (2 to 4 in.) above the injury; and c, tighten the tourniquet until bleeding stops, and secure it in place.
a
b
c

HEM
OR
RH
AG
E A
ND
SO
FT T
ISSU
E TR
AU
MA
176
Direct pressure alone may not be enough to control a hemorrhage, or it may be impossible (for example, if a patient’s leg is inaccessible but is hemorrhaging). If so, apply a tourniquet to control the bleeding.
To control external bleeding, follow these general steps:1. Place the patient in a seated or recumbent
position.2. Place direct pressure on the wound with a
gloved hand. 3. Apply a sterile dressing. Place your gloved
hand over the dressing and apply firm pressure (Figure 9–6, a).
4. Apply a bandage over the dressing to maintain direct pressure (Figure 9–6, b) and hold the dressing in place. If blood soaks through, add additional dressings and bandages. Do not remove any blood-soaked dressings or bandages.
5. If bleeding continues, and the wound is on a limb, apply a tourniquet above the injury (Figure 9–6, c). While painful, this is necessary to save the patient’s life.
EPISTAXIS (NOSEBLEED)Epistaxis (usually referred to as a nosebleed) is often caused by blunt force trauma to the nose. High blood pressure or changes in altitude can also cause epistaxis. If the MOI suggests more severe injuries, ensure that those are identified and cared for. Initiate spinal motion restriction protocols if indicated.
In most cases, you can control the bleeding by having the patient sit with the head slightly forward while pinching the nostrils together (Figure 9–7). Applying an ice pack or cold compress to the bridge of the nose can also help slow blood flow and assist in the clotting process.
Once you have controlled the bleeding, instruct the patient to avoid rubbing, blowing, or picking his or her nose since this could restart the bleeding.
If you suspect that the nosebleed is caused by a foreign body lodged in the nostril or nasal passage, refer the patient to a physician (unless it can be easily removed without the risk of
Figure 9–6, a-c: To control external bleeding: a, place direct pressure on the wound; b, apply a pressure bandage; and c, apply a tourniquet if bleeding continues and the wound is on a limb.
a
b
c

HEM
OR
RH
AG
E A
ND
SO
FT T
ISSU
E TR
AU
MA
177
further injury). If the patient’s history includes hypertension or blood-thinning medication, epistaxis can become life-threatening: If the bleeding cannot be quickly controlled, these patients may require rapid transport.
If the bleeding cannot be controlled within 10 to 15 minutes or repeatedly stops and recurs in a short period, this is an example of uncontrollable bleeding: The patient should be transported to a medical facility.
If the patient loses responsiveness, place him or her in the recovery position to allow blood to drain from the nose.
INTERNAL BLEEDING
Internal bleeding is the escape of blood from arteries, veins, or capillaries into spaces inside the body. Capillary bleeding is just beneath the skin and is usually not serious; it is usually indicated by mild bruising. Internal bleeding involving arteries and veins, however, can result in severe blood loss and can be life-threatening.
Internal hemorrhaging usually occurs in injuries caused by a violent blunt force, such as when a driver is thrown against the steering wheel in a motor vehicle collision. An internal hemorrhage may also occur when a sharp object, such as a knife, penetrates the skin and damages internal structures, or when a fractured bone ruptures an organ or blood vessels.
Because internal bleeding is more difficult to recognize than external bleeding, you should always suspect internal bleeding when the MOI indicates the potential for a serious injury. For example, if you find a motorcycle rider who has been thrown from a bike, you may not see any external hemorrhaging, but the violent forces involved indicate that serious internal injuries are likely.
Major fractures, such as those involving the pelvis, femur, or lower ribs, can puncture organs or arteries and cause significant internal bleeding.
The signs and symptoms of possible internal bleeding are not always obvious and may take time to appear. They include: • Discoloration of the skin (bruising) in the
injured area. • Soft tissues that are tender, swollen, or firm. • Anxiety or restlessness. • Rapid breathing (tachypnea). • Skin that feels cool or moist or looks pale or
bluish. • Nausea and vomiting. • Excessive thirst. • Declining level of responsiveness. • A rapid, weak pulse. • A drop in blood pressure.
The body’s inability to adjust to internal hemorrhaging will eventually result in shock. Shock is discussed in Chapter 8.
Figure 9–7: To control epistaxis, have the patient lean forward while pinching the nostrils together.

HEM
OR
RH
AG
E A
ND
SO
FT T
ISSU
E TR
AU
MA
178
Care for Internal BleedingThe care for internal bleeding depends on the severity and site of the bleeding. For minor internal bleeding, such as a contusion (bruise) on an arm, apply ice or a chemical cold pack to the injured area to help reduce pain and swelling. Place something such as a gauze pad or towel between the cold source and the skin to avoid freezing the tissues.
If you suspect internal hemorrhaging, you must obtain advanced medical care for the patient immediately. There is little you can do to control internal hemorrhaging effectively: The patient must be transported to the hospital as soon as possible. Monitor the patient for signs and symptoms of shock. The patient will often require immediate surgery to correct the problem.
OPEN WOUNDS
There are four main types of open wounds:1. Abrasions2. Lacerations3. Avulsions4. Punctures
The care for all of them is generally the same: Control any external bleeding, protect against infection, and check for internal injuries.
AbrasionsAn abrasion is the most common type of open wound. It occurs when skin is rubbed or scraped away (Figure 9–8, a-b). Rug burn and road rash are common terms for types of abrasions. Because the removal of the outer skin layers exposes sensitive nerve endings, an abrasion is often painful.
Because abrasions are usually superficial, the capillaries are the only blood vessels affected. Bleeding is typically not severe. Infection is a serious concern with abrasions, as dirt and other matter can easily become embedded in the skin during the injury. Cleaning the wound and monitoring for signs of infection are important steps.
Lacerations A laceration is a cut, usually caused by a sharp object (e.g., a knife or broken glass). The cut may have either jagged or smooth edges (Figure 9–9, a-b). A laceration can also result when a blunt force splits the skin. This often occurs in areas where bone lies directly under the skin’s surface (e.g., the eyebrow). Deep lacerations can affect the layers of fat and muscle, damaging both nerves and blood vessels. Lacerations usually bleed freely and, depending on the structures involved, can hemorrhage. Because the nerves may also be injured, lacerations may or may not be immediately painful.
Figure 9–8, a-b: An abrasion.
a
b

HEM
OR
RH
AG
E A
ND
SO
FT T
ISSU
E TR
AU
MA
179
Bleeding control is usually your primary concern with a laceration, though infection is also a risk. If the wound is deep, damage to underlying tissues can cause internal bleeding: Monitor the patient’s condition closely and watch for signs of shock, especially if the laceration is on the torso.
AvulsionsAn avulsion is a type of injury in which a portion of the skin and other soft tissue is partially or
completely torn away (Figure 9–10, a-b). A partially avulsed piece of skin may remain attached but hang like a flap. Because avulsions often involve deeper layers of soft tissue, bleeding is usually significant.
Bleeding and infection control are usually your priorities when caring for an avulsion.
Figure 9–9, a-b: A laceration. Figure 9–10, a-b: An avulsion.
a a
b b

HEM
OR
RH
AG
E A
ND
SO
FT T
ISSU
E TR
AU
MA
180
PuncturesA puncture wound results when the skin is pierced with a pointed object such as a nail, a splinter, or a knife (Figure 9–11, a-b). A bullet wound is also classified as a puncture wound. Because the skin usually closes around the penetrating object, external bleeding is generally not severe. However, internal hemorrhages can occur if the penetrating object damages major blood vessels or internal organs. An object that remains in the open wound is called an impaled object (Figure 9–12, a-b). An object may also pass completely through a body part, making two open wounds: one at the entry point and one at the exit point.
Although puncture wounds generally do not hemorrhage, they are still potentially dangerous as they have a high risk of infection. Objects penetrating the soft tissues carry micro-organisms that cause infections (e.g., tetanus), and these micro-organisms often prefer low-oxygen environments, such as those found deeper within the body. To combat the risk of infection, both major and minor puncture wounds should be cleaned thoroughly.
Figure 9–11, a-b: A puncture wound. Figure 9–12, a-b: An impaled object.
a
a
b b

HEM
OR
RH
AG
E A
ND
SO
FT T
ISSU
E TR
AU
MA
181
BALLISTICS INJURIESInjuries caused by firearms are considered puncture (or penetrating) wounds, and the care is generally the same as for any other open wound. If you encounter a patient who has been injured by a firearm, look for both an entry and an exit point for the bullet. If no exit point is found, the bullet may still be inside the patient’s body. You may also find burns on the skin caused by gunpowder, especially if the bullet was fired at close range.
The location of the entry point (and exit point, if present) can give an indication of the internal injuries that may have occurred based on which structures or organs the bullet may have damaged after penetrating the skin. It is not always possible to assess the patient’s internal injuries merely by examining the entry (and/or exit) point, however.
The scene of a firearms injury is often a crime scene. Ensure that the scene is safe and that law enforcement personnel have been contacted, and follow the protocol for responding to a crime scene.
Impaled ObjectsIf the object that caused an injury is still in the wound, it is referred to as an impaled object. Small objects (such as slivers and fish hooks) can usually be removed without any risk for the patient (see below), but larger impaled objects (such as a shard of glass or metal rebar) should be left in place unless they interfere with the patient’s airway or respiration. Moving an impaled object can damage internal structures and cause or exacerbate bleeding.
Stabilize the object with bulky dressings (Figure 9–13, a), then bandage the dressings in place around the object to limit movement and control bleeding (Figure 9–13, b).
REMOVING SLIVERSA sliver is a thin piece of material that has penetrated the skin. There are three common types of sliver:1. Wood: These are often difficult to see against
the patient’s skin. To find a wood sliver, wet the area with a coloured antiseptic solution
(e.g., iodine) for 30 seconds. Gently wipe away the remaining liquid; the sliver will have likely soaked up some of the liquid, making it easier to see.
2. Metal: These are generally easy to see and remove.
3. Glass: These are usually invisible and difficult to remove. Soak in warm, diluted antibacterial detergent for 20 minutes.
Figure 9–13, a-b: a, Use bulky dressings to support an impaled object; b, control bleeding and hold the dressing in place by applying a bandage.
b
a

HEM
OR
RH
AG
E A
ND
SO
FT T
ISSU
E TR
AU
MA
182
To remove a sliver:1. Determine the angle at which the sliver
entered the skin (Figure 9–14, a).2. Grasp the sliver with disinfected forceps
(tweezers) and draw it out at the same angle(Figure 9–14, b).
3. Treat the wound as a puncture or laceration.
REMOVING FISH HOOKSDo not remove an impaled fish hook if there is a chance that removing it might injure vital structures (e.g., muscles or nerves around the eye). In these cases, immobilize the fish hook until it can be removed at a medical facility. If the fish hook can be removed without risk to underlying tissues, take it out using one of the following methods, and then treat the resulting puncture wound.
Method 11. With one hand, press down on the back of the
hook shank (by the eye of the hook) to pushthe barb away from any tissue.
2. With the other hand, quickly jerk out thehook.
Method 21. Move the hook in a curve so that the barbed
tip exits through the skin.2. Clip off the barbed tip and remove the
remainder of the hook by pulling it back theway it entered. This avoids forcing the eye ofthe hook through tissue.
CLOSED WOUNDS
A closed wound is generally defined as any wound that occurs without breaking the skin. While infection is less of a concern with closed wounds, they often involve damage to internal structures and the risk of internal bleeding. Like open wounds, closed wounds range from extremely minor to life-threatening.
AbscessesAn abscess is a significant localized collection of pus within tissues, usually in hair-bearing areas (Figure 9–15). It is also referred to as a boil.
If the abscess involves the face, neck, groin, or buttocks, or if it is very painful, the boil should preferably be treated by a physician.
The abscess may drain naturally if left alone. Draining can be hastened by applying hot and warm compresses alternately until the pus begins
Figure 9–14, a-b: To remove a sliver: a, determine the angle at which it entered the skin; and b, with disinfected forceps, grasp and withdraw it at the same angle.
b
a

HEM
OR
RH
AG
E A
ND
SO
FT T
ISSU
E TR
AU
MA
183
to discharge. Avoid squeezing the abscess, as this is likely to spread the infection. Clean the area and apply dry dressings once the abscess has begun to reduce in size. The dressings will continue to absorb the remaining fluid from the wound. Change the dressings if they become saturated with fluid. Continue to cleanse the area periodically, watching for signs of infection.
Subungual HematomasA subungual hematoma is a collection of blood or fluid between the nail bed and the fingernail. Subungual hematomas result from direct trauma to the fingernail, most commonly after a crush-type injury. The pressure of the fluid causes the fingernail to throb, often resulting in intense pain. If the blood is released, the patient will feel some relief. To care for a subungual hematoma, begin by cleaning the area. Ensure that the patient’s hand is on a firm surface. Use a nail drill to create a small hole in the nail above the fluid pocket. If there is no nail drill available, heat the end of a paperclip until it is red-hot and use it to create the hole. Because there are no nerve endings in this area, the procedure should be painless. Clean the area and apply a dressing.
If pressure builds over time, the hole may need to be reopened. If releasing the fluid does not stop the pain, perform a focused exam on the affected digit to check for a possible fracture or other damage to internal structures.
Myocardial ContusionsMyocardial contusion (also referred to as cardiac contusion) is a bruising of the heart’s muscle tissue. It is usually caused by blunt chest trauma and therefore is frequently suspected in patients involved in a motor vehicle collision or a fall. Cardiac contusion can cause life-threatening arrhythmias and cardiac failure. Because of non-specific symptoms, myocardial contusion is difficult to identify. Common symptoms include pain in the chest (from the blunt force) and the feeling that the heart is racing. Any patient with serious chest trauma should be rapidly transported to a medical facility for assessment.
DermatitisDermatitis is a general term for an inflammation of the skin. Most cases of dermatitis result either from direct contact with a chemical irritant or from an allergy. Dermatitis is not contagious, but it can spread if left untreated. If you encounter a patient with dermatitis, ask whether he or she has had a reaction to a skin irritant in the past.
Signs and symptoms of dermatitis include: • Redness, irritation, or swelling (Figure 9–16). • Itchiness or pain. • Possible thickening and cracking of the skin. • Possible blisters.
To care for dermatitis: • Avoid further contact with the irritant. • Protect the skin with a suitably sized dressing. • Advise the patient to seek additional medical
attention if the irritation persists for more than 3 days.
Figure 9–15: An abscess.
© 2
012
Sci
ence
Pho
to L
ibra
ry -
Cus
tom
Med
ical
Sto
ck
Pho
to. A
ll R
ight
s R
eser
ved
.
Figure 9–16: Dermatitis.

HEM
OR
RH
AG
E A
ND
SO
FT T
ISSU
E TR
AU
MA
184
BURNS
A burn is a soft tissue injury caused by heat, chemicals, electricity, or radiation (see Table 9–2). While all types of burns have similar characteristics, the care that is indicated for a patient can vary based on how the burn occurred. Interventions indicated for a thermal burn may not be indicated for a chemical burn, and so on.
When burns occur, they affect the epidermis (outer layer of skin) first. If a burn progresses, it can also damage the dermis and other underlying tissues (including muscle and bone). Burns that break the skin can cause infection, fluid loss, and loss of temperature control.
The severity of a burn depends on the following factors:
• Intensity of the source (e.g., the temperatureof steam or concentration of a chemical)
• Length of exposure to the source• Location of the burn• Extent of the burn• Patient’s age• Patient’s underlying medical conditions
In general, patients under the age of 5 and over the age of 60 have thinner skin and burn more severely. Patients with acute trauma (e.g., fractures) or chronic medical problems (e.g., heart or kidney conditions, diabetes) tend to have more complications resulting from burns; burns are often more severe in these patients, and they are more vulnerable to dehydration as a result of burn injuries (increasing the risk of shock).
TABLE 9–2: CAUSES OF BURNS
Severity of BurnsIn addition to being broken down by their causes (heat, chemicals, electricity, or radiation), burns are classified by their depths. The deeper the burn, the more types of tissue are affected, and the more severe the burn is.
Generally, three depth classifications of burns are used: 1. Superficial2. Partial-thickness3. Full-thickness
SUPERFICIAL BURNSA superficial burn (sometimes referred to as a first-degree burn) involves only the top layer of skin (Figure 9–17, a-b). The burnt skin is red and dry, the burn is usually painful, and the affected area may swell. Superficial burns generally heal in 5 to 6 days without permanent scarring.
Figure 9–17, a-b: A superficial burn.
CAUSE DESCRIPTIONEXAMPLES
OF SOURCES
Thermal Caused by exposure to heat
Steam, fire, boiling water
Chemical Caused by exposure to caustic chemicals
Battery acid, drain cleaner
Electrical Caused by exposure to powerful electrical currents
Charged electrical wires, lightning
Radiation Caused by exposure to radiation
Sunlight, nuclear radiation
a
b

HEM
OR
RH
AG
E A
ND
SO
FT T
ISSU
E TR
AU
MA
185
PARTIAL-THICKNESS BURNSA partial-thickness burn (sometimes referred to as a second-degree burn) involves both the epidermis and the dermis (Figure 9–18, a-b). These burns appear red and have blisters that may open and weep clear fluid, making the skin appear wet. The skin may also appear blotchy in the area around the burn. These burns are usually very painful. Minor partial-thickness burns may heal in a few weeks without in-hospital burn care, but more severe partial-thickness burns can be life-threatening. Scarring can occur from partial-thickness burns.
FULL-THICKNESS BURNSA full-thickness burn (sometimes referred to as a third-degree burn) destroys the epidermis, the dermis, and any or all of the underlying structures—fat, muscles, bones, and nerves (Figure 9–19, a-b). They may look brown or charred, and the tissues underneath sometimes appear white. They can be either extremely painful or relatively painless, depending on how much damage is caused to the nerve endings in the skin. Full-thickness burns are often surrounded by painful partial-thickness and superficial burns. Full-thickness burns can be life-threatening: Because the burns are open wounds, the body loses fluid (reducing blood volume), so hypovolemic shock is a serious risk. Full-thickness burns are also large open wounds, so they make the body highly vulnerable to infection. Severe scarring may occur, and skin grafts are usually required.
Figure 9–18, a-b: A partial-thickness burn. Figure 9–19, a-b: A full-thickness burn.
a
b b
a

HEM
OR
RH
AG
E A
ND
SO
FT T
ISSU
E TR
AU
MA
186
Identifying Critical BurnsA critical burn is a burn that is likely to be life-threatening, disfiguring, or disabling and requires immediate, advanced burn care. A patient with a critical burn requires rapid transport. Determining whether a burn is critical is not simply a question of determining its depth or cause: A superficial burn that covers large areas of the body or damages certain body parts can be critical.
The following are examples of critical burns: • A full-thickness burn of any size • A partial-thickness burn that covers more than
10% of the body • Any partial- or full-thickness burns on a child
or an older adult • Inhalation injuries causing respiratory difficulty • Burns around the mouth or nose, or signs of
smoke inhalation • Significant burns on the head, neck, hands,
feet, or genitals • Burns resulting from chemicals, explosions, or
elec tricity • Burns that cause a great deal of pain • Burns that result in unresponsiveness
Estimating the Extent of BurnsWhen communicating with medical personnel about a burned patient, you may be asked how much of the body is burned. The Rule of Nines is a common method for estimating the percentage of the body affected by burns (Figure 9–20 and Table 9–3). It is most useful when assessing large burns that cover multiple areas of the body.
In an adult, the head equals 9% of the body’s total surface. The anterior and posterior sides of each arm are considered 4.5% each, for a total of 9% per arm. Each leg equals 18%, as does the anterior and posterior side of the trunk. The groin equals 1%. If the front of the trunk (18%) and one entire arm (9%) are burned, you would estimate that 27% of the body’s surface area had been burned.
The Rule of Nines is modified when assessing an infant. For an infant, the head equals 18% of the total body surface. As for adults, the anterior and posterior sides of each arm are considered
4.5% each, for a total of 9% per arm. Each lower extremity equals 14%, and each side of the trunk (anterior and posterior) equals 18% (Figure 9–21). For an infant with burns to one leg (14%) and the front of one arm (4.5%), you would estimate that 18.5% of the body’s surface area had been burned.
TABLE 9–3: RULE OF NINES
Figure 9–20: The Rule of Nines is one method to help determine how much of the body is burned.
AREA PERCENTAGE PERCENTAGE
(ADULT AND (INFANT) CHILD)
Head and neck 9 18
Left arm (anterior) 4.5 4.5
Left arm (posterior) 4.5 4.5
Right arm (anterior) 4.5 4.5
Right arm (posterior) 4.5 4.5
Torso (anterior) 18 18
Torso (posterior) 18 18
Groin 1 0
Left leg 18 14
Right leg 18 14

HEM
OR
RH
AG
E A
ND
SO
FT T
ISSU
E TR
AU
MA
187
In simpler cases, or if the Rule of Nines is not practical, communicate how the burn occurred, the body parts involved, and the severity of the burn. For example, “The patient was injured when an overheated car radiator exploded. The patient has partial-thickness burns on his or her face, neck, chest, and arms.”
The Rule of Palms is another method used to estimate the percentage of a patient’s body that has been burned. It is generally used when burns are less extensive. The palm of the patient’s hand is roughly equivalent to 1% of his or her body’s surface area, so if the burns cover an area equal to about 4 of the patient’s palms, the burns cover approximately 4% of the patient’s body.
Care for BurnsGenerally speaking, burns are caused by something in a patient’s environment. You should always use caution when responding to a patient with burns to avoid being injured by the same source. Look for fire, smoke, downed electrical wires, and warning signs for chemicals or radiation. If the scene is unsafe and you have not been trained to manage the specific hazards you encounter, request qualified personnel immediately.
Interventions and additional care may not be necessary if a burn is superficial: These injuries generally heal on their own in a matter of days with a low risk of complications.
Pay special attention to the patient’s airway during the primary assessment to ensure that it has not been affected by inhalation injuries. Regardless of the burn type, you should perform these three basic care steps:1. Prevent additional damage to tissue.2. Cover the burned area with dry dressings.3. Take steps to manage shock.
Additional steps may be necessary, depending on how the burn was caused.
PREVENT ADDITIONAL DAMAGE TO TISSUESBurns can continue to worsen over time if steps are not taken to mitigate their effects. A patient who has been burned by boiling water, for example, will continue to experience tissue damage until the area is cooled. A caustic chemical can continue to burn a patient until it is flushed from his or her skin. When caring for a burn, your first priority is to minimize additional damage.
If a patient’s eyes have been flash burned, rinse them with saline or water. Have the patient close his or her eyes, and cover them with moist, sterile dressings.
COVER THE BURNED AREACover the burned area to protect against pathogens and help reduce pain (Figure 9–22), leaving any blisters intact to further reduce the risk of infection. Use dry, non-stick, sterile dressings and loosely bandage them in place. The bandage should not put pressure on the burned area. If the burn covers a large area of the body, cover it with clean, dry sheets (or other large
Figure 9–21: The Rule of Nines is modified when it is used for an infant.

HEM
OR
RH
AG
E A
ND
SO
FT T
ISSU
E TR
AU
MA
188
pieces of clean, dry cloth). Unlike most burns, small burns (covering less than 10% of the body) may be covered with a moist dressing if this reduces pain for the patient. Do not put ointments or other oils (e.g., butter, cooking oil, commercial salves) on a burn. Instead of relieving pain, these substances tend to seal in heat and cause infections by contaminating open skin areas.
TAKE STEPS TO MANAGE SHOCK Pain and fluid loss from full-thickness and large partial-thickness burns can cause shock. Monitor the patient closely and provide care for shock (see Chapter 8). Patients with burns tend to lose body heat easily, so it is important to manage the temperature of the environment as much as possible to help the patient maintain a normal body temperature.
ADDITIONAL CONSIDERATIONS BY CAUSEThermal BurnsThermal burns are caused by exposure to heat. This may be direct (e.g., touching steam or a hot stove) or radiant (e.g., being exposed to the heat from a forest fire).
When caring for a thermal burn, it is essential to cool the affected areas immediately. Even after the source of heat has been removed, soft tissue will continue to burn for several minutes, causing further damage.
Hot grease poses a high risk of critical burns because it is slow to cool and difficult to remove from the skin. Burns that involve hot liquid or flames contacting clothing will also be serious since the clothing keeps the heat in contact with the skin. Some synthetic fabrics can melt and stick to the skin when exposed to heat and may take longer to cool than the body’s soft tissues. Although the severity of thermal burns may seem low at first, they can continue to worsen over time if they are not cooled thoroughly.
Cool thermal burns with cool or cold potable water (Figure 9–23). Flush or immerse the area using whatever clean sources of water are available (e.g., a tub, shower, or garden hose).
If possible, immerse the burn in water (instead of using running water) to reduce the risk of tissue damage. Ensure that any water used stays cool: You may need to add more cool water to maintain an appropriate temperature.
You can apply soaked cloth compresses to areas that cannot be immersed or are too painful to immerse. Continue adding water regularly to keep these compresses cool until the burn site has been cooled completely. Allow adequate time for the burned area to cool, usually at least 10 minutes. If pain continues after 10 minutes, additional cooling may help to relieve it.
If a partial- or full-thickness burn covers more than 10% of the body, cool only a small area at a time. Cooling a large area increases the risk of cold stress and hypothermia. Do not use ice or ice water because they can cause critical body-heat loss. Care should be taken to monitor for hypothermia when cooling large burns. This is particularly important in children, who have a higher susceptibility to
Figure 9–22: Cover a burned area to protect against pathogens and help reduce pain.

HEM
OR
RH
AG
E A
ND
SO
FT T
ISSU
E TR
AU
MA
189
hypothermia. If the patient starts to shiver, stop cooling his or her burns immediately and monitor for additional signs of hypothermia and shock.
If possible, remove any jewellery early in the cooling process. When the burn is cool, remove any remaining clothing from the affected area by carefully peeling or cutting the material away. Do not remove any clothing that sticks to the burn.
Inhalation InjuriesThe presence of soot, thermal burns around the mouth or nose, singed hair, and/or singed eyebrows may signal that a patient’s air passages or lungs have been burned (Figure 9–24). Burns that result from a fire in an enclosed, confined space are likely to involve inhalation injuries of the airway and lungs. Usually, only the upper airway is vulnerable to inhalation injuries.
If possible, move the patient to a well-ventilated area. If you suspect a burned airway or burned lungs, place the patient in the rapid transport category. Airway management, assisted ventilations, and supplemental oxygen may be indicated.
Chemical BurnsChemical burns are caused by exposure to caustic chemicals. These substances are more common in industrial settings but also occur in the home. Cleaning solutions (such as household bleach), oven or drain cleaners, toilet bowl cleaners, paint strippers, and lawn or garden treatments are common sources of caustic chemicals. Typically, burns result from chemicals that are strong acids or alkalis (bases).
The severity of a chemical burn depends on the strength of the chemical and the duration of the chemical’s contact with the body. The chemical will continue to burn as long as it is on the skin. You must remove the chemical from the skin as quickly as possible and then place the patient in the rapid transport category.
Before providing care for a chemical burn, ensure that you have taken the proper steps to protect yourself from any possible hazardous chemicals by donning the appropriate personal protective equipment. Ask the patient whether he or she
Figure 9–23: It is important to cool a thermal burn with large amounts of cool water.
Figure 9–24: Burns to the face may indicate an inhalation injury.

HEM
OR
RH
AG
E A
ND
SO
FT T
ISSU
E TR
AU
MA
190
touched any tools, equipment, etc. after being contaminated by the chemical (as this could contaminate others as well). You should also ask whether anyone else may have been exposed in the same incident.
Flush the burn continuously with large amounts of cool, running water. If the chemical is in the form of a powder or granules, brush the chemical from the skin before flushing the area. Continue flushing for at least 20 minutes. Have the patient remove contaminated clothing, including clothing that became wet during flushing.
Chemical Burns to the EyeChemical burns to the eyes can be extremely traumatic. Flush the affected eye for at least 20 minutes (Figure 9–25). Take care to avoid contaminating any unaffected areas of the patient: Flush the affected eye from the nose outward, and angle the patient’s head to avoid washing the chemical into the other eye or onto unaffected skin.
Electrical BurnsThe human body is an effective conductor of electricity. When a person makes contact with an electrical source, the electricity is conducted through his or her body. Some body parts, such as the skin, resist the electrical current. Resistance produces heat, which can cause electrical burns along the path of the current (Figure 9–26). The severity of an electrical burn depends on the circumstances of the contact with the source, the current’s path through the body, and the duration of the contact with the electrical current. Ensure that any electrical current is turned off before approaching a patient with suspected electrical burns. Some areas have specific lock-out procedures for de-energizing electrical systems.
Although electrical burns may look superficial, the underlying tissues may be severely damaged. Some electrical injuries will be marked by characteristic entry and exit burns that indicate where the current has entered and left the body (Figure 9–27). Look for two burn sites during the secondary assessment.
If a patient has been electrocuted (especially by a lightning strike), you should suspect life-threatening conditions such as respiratory or cardiac arrest. Because of the powerful forces involved, you should also suspect spinal injuries and other fractures.
Figure 9–25: Flush a chemical burn to the eye for at least 20 minutes.
Figure 9–26: An electrical burn.
Figure 9–27: An electrical exit wound.

HEM
OR
RH
AG
E A
ND
SO
FT T
ISSU
E TR
AU
MA
191
Radiation BurnsRadiation from the sun and other sources can cause radiation burns, which are similar to thermal burns. The most common radiation burn is a sunburn, which is caused by exposure to the natural ultraviolet radiation of the sun. These burns are usually mild, but they can be painful (Figure 9–28). Occasionally, radiation burns may be partial-thickness and blister. Care for a sunburn as you would a thermal burn: Cool the burn and protect the area from further damage by avoiding exposure to sunlight.
People who work in special settings, such as certain medical, industrial, or research sites, may be exposed to other types of radiation. These facilities will have systems for responding to this type of incident, so you will be working with internal response teams. Treat radiation burns as you would thermal burns and place the patient in the rapid transport category.
MAJOR SOFT TISSUE TRAUMA
AmputationsAn amputation occurs when a body part is completely or partially severed from the rest of the body (Figure 9–29). This can cause damage to many types of soft tissue simultaneously (e.g., skin, fat, muscle, and blood vessels), as well as to bones and other tissues.
Although damage to the tissues is severe, bleeding is often less than would be expected from such a major injury. Initial bleeding is often heavy, but blood vessels usually constrict and retract from the site of the amputation, slowing bleeding and making it easier to control with direct pressure.
An amputated body part can often be surgically reattached if it is cared for properly. To increase the chance of successful reattachment, rinse the body part quickly with saline, then wrap the body part in sterile gauze and place it inside a plastic bag. Place this bag inside a larger bag and cool it with ice or chemical cold packs. Label the bag clearly with the patient’s name, the date, and the time. Patients with amputations are usually in the rapid transport category.
Crush InjuriesCrush injuries occur when the body is subjected to intense blunt force. If a patient is trapped under a heavy object or between two objects, then it is likely that crush injuries have occurred. These injuries can be internal or external and affect a variety of tissues. Internal hemorrhaging and the buildup of toxins in the body are likely.
If necessary, request specially qualified personnel to assist with extricating the patient. Because of the extensive damage that typically results, patients with crush injuries almost always require rapid transport.
Figure 9–28: A radiation burn.
Figure 9–29: An amputation.

HEM
OR
RH
AG
E A
ND
SO
FT T
ISSU
E TR
AU
MA
192
CRUSH SYNDROMECrushing forces can impair or eliminate circulation in the affected tissues. If a patient has been subjected to crushing forces for a longer period of time (typically more than 1 hour), the hypoxic tissues begin to function anaerobically (without oxygen), producing a buildup of toxins (e.g., lactic acid). When the crushing object is removed, these toxins are carried through the body, affecting multiple body systems and causing a condition referred to as crush syndrome. Impaired heart function and renal (kidney) failure often result. As with any patient suffering crush injuries, a patient with crush syndrome should receive interventions for life-threatening conditions and be placed in the rapid transport category.
Compartment SyndromeCompartment syndrome occurs when pressure within the muscle compartment builds up to dangerous levels and blocks circulation to the cells. Within the muscle compartment, swelling and/or bleeding creates pressure on capillaries and nerves. The capillaries collapse when the pressure in the compartment becomes greater than the blood pressure within the capillaries, and this disrupts blood flow to muscle and nerve cells in the area. Without a steady supply of oxygen and nutrients, nerve and muscle cells begin to die within hours. Unless the pressure is relieved quickly, compartment syndrome can cause permanent disability or death.
Compartment syndrome can be caused by a traumatic injury, such as a fracture of one of the long bones in the body. It can also have other causes, such as a badly bruised muscle, complications after surgery, a crush injury, or anabolic steroid use. Compartment syndrome can affect muscle groups in the arms, hands, legs, feet, and buttocks because they are covered by fibrous membranes that do not readily expand.
The classic sign of compartment syndrome is pain, especially when the muscle is stretched. Other signs and symptoms of compartment syndrome may include: • Pain that is intensely out of proportion with
the injury, especially if no bones are broken. • A tingling or burning sensation in the muscle.
• A feeling of tightness or fullness in the muscle. • A numbness or paralysis in the area. This
means that cell death has begun, and efforts to lower the pressure in the compartment may not be successful in restoring function to the muscle.
Acute compartment syndrome is a medical emergency. Place the patient in the rapid transport category.
Blast InjuriesBlast injuries occur when heat and pressure waves generated by an explosion strike and pass through the body’s surfaces. These waves can also throw debris (shrapnel) against a patient, or throw the patient’s body against other objects (causing injuries similar to those sustained in a fall from a height). Blasts release large amounts of energy in the form of pressure and heat. Injuries can include thermal burns (including inhalation burns), loss of hearing, pneumothorax, internal bleeding, and organ damage. Pressure waves are especially likely to damage hollow structures in the body, such as the lungs, sinuses, and GI tract.
The extent of blast injuries may be difficult to identify because sometimes there are no visible external injuries, and indicators of internal injuries may not be apparent. Any patient with suspected blast injuries should be placed in the rapid transport category.
High-Pressure Injection (HPI) InjuriesHigh-pressure injection (HPI) injuries occur when a substance is injected into the body under high pressure. This usually occurs in workplace settings and involves a tool such as a grease gun or pressure washer. The injected substance may be paint, oil, water, grease, or even air.
The only visible sign of injury may be a small puncture wound on the hand, which may be overlooked, but the damage to internal tissues can be significant. If the mechanism of injury suggests an HPI (for example, if the patient was injured while using a paint gun), you should suspect additional internal injuries. Immediate surgical interventions are often necessary.

Applying a Tourniquet
1. Confirm that other hemorrhage control techniques are ineffective for the situation.
2. Apply the tourniquet 5 to 10 cm (2 to 4 in.) above the injury and just above any joint in this range.
3. Tighten the tourniquet until the bleeding stops.4. Secure the tourniquet in place.5. Continue to apply direct pressure to the wound,
if possible.6. Document the time that the tourniquet was
applied.7. Ensure that the patient is in the rapid transport
category.
Superficial burns
Full-thickness burns
Partial-thickness burns
Name Tissues Affected Signs and Symptoms
Top layer of skin (epidermis)
Both layers of skin and underlying tissues (fat, muscle, bone, nerves)
Both layers of skin (epidermis and dermis)
• Red, dry affected area• Swelling• Pain
• Brown, charred area, underlying tissues may appear white• Pain may or may not be present
• Red affected area• Blotchy skin around the burn• Blisters which may weep clear fluid• Pain
TYPES OF BURNS
Care for External Bleeding on a Limb
Immediately apply direct pressure with a gloved hand
Reassess patient
Apply a sterile dressing and maintain firm pressure
Apply a bandageIf blood soaks through, apply another bandage on top
Apply a tourniquet and tighten until bleeding stops
Bleeding continuesBleeding stops
Controlling External Bleeding
1. Place the patient in a seated or recumbent position.
2. Place direct pressure on the wound with a gloved hand.
3. Apply a sterile dressing. Place your gloved hand over the dressing and apply firm pressure.
4. Apply a bandage over the dressing to maintain direct pressure and hold the dressing in place. If blood soaks through, add additional dressings and bandages on top.
5. If bleeding continues, apply a tourniquet.
SUMMARY
HEM
OR
RH
AG
E A
ND
SO
FT T
ISSU
E TR
AU
MA
193

194

MU
SCU
LOSK
ELET
AL
INJU
RIE
S
10 Musculoskeletal Injuries
195
Key ContentTypes of Musculoskeletal Injuries ................................. 196 Splints ..................................... 198 Slings ....................................... 201 Signs and Symptoms of Musculoskeletal Injuries ..... 201Care for Musculoskeletal Injuries ................................. 203Upper Extremity Injuries ....... 204 Lower Extremity Injuries ....... 208
IntroductionInjuries to the musculoskeletal system occur in a variety of ways. They are most commonly caused by forces generated by mechanical energy, but they can also result from exposure to excessive heat, chemicals, or electricity. Injuries to muscles and related tissues such as tendons and ligaments are technically soft tissue injuries, but the close relationship between these tissues and the skeleton make it more useful to consider musculoskeletal injuries separately.
Although musculoskeletal injuries are typically painful, they are rarely life-threatening. However, when not recognized and treated promptly, they can result in permanent disability or death. Musculoskeletal injuries are especially dangerous when a bone breaks and the fractured ends cause damage to other internal structures such as vital organs or blood vessels. They are also dangerous when a displaced part of the bone puts pressure on blood vessels, resulting in vascular compromise and

MU
SCU
LOSK
ELET
AL
INJU
RIE
S
196
tissue death. In these cases, the soft tissue injury is the life-threatening condition, but the cause is the fracture.
TYPES OF MUSCULOSKELETAL INJURIES
Injuries to the musculoskeletal system can be classified according to the type of structure that is damaged. Injuries are also classified by the nature and extent of the trauma caused to the body. The four basic types of musculoskeletal injuries are fractures, dislocations, sprains, and strains. Some injuries may involve more than one type of injury: For example, a direct blow to the knee may injure both ligaments and bones.
FractureA fracture is a partial or complete break in bone tissue. Fractures include chipped or cracked bones, as well as bones that are broken completely into separate pieces (Figure 10–1). Because bones are made of hard, rigid tissues, any force that causes a bone to bend is likely to result in a fracture. This force could be from a blunt impact, or it could be caused by a movement of the body (e.g., a strong twisting motion). Even a powerful muscular contraction can result in a fracture.
Fractures can be classified as open or closed.
Open fractures involve open wounds. They often occur when an extremity is severely angulated or bent, causing a bone to break and then forcing the tip through the skin and other local soft tissues. Open fractures can also occur when an object, such as a bullet, penetrates the skin and breaks a bone.
Closed fractures leave the skin unbroken. They are more common than open fractures and can be displaced or simple.
Open fractures are more serious than closed fractures because of the risks of infection and hemorrhage (although closed fractures may cause internal hemorrhaging). Although fractures are rarely an immediate threat to life, any fracture involving a large bone can cause hypovolemic shock because of the hemorrhaging that can result.
Fractures are not always easy to recognize without a telltale sign, such as an open wound with protruding bone ends or a severely deformed body part. The mechanism of injury is often the best indicator of whether you should suspect a fracture.
DislocationA dislocation is a displacement or separation of a bone from its normal position at a joint (Figure 10–2). Dislocations are usually caused by powerful forces that push the joint beyond its normal range of motion, such as twisting the joint or falling in an awkward position. Some joints, such as the shoulder, are more prone to dislocation because they are less protected from injury or are exposed to strong forces more often. Others, such as the joints of the spine, are well protected and therefore dislocate less often.
When the ends of a bone that meet at a joint are forced far enough beyond their normal position, the ligaments stretch and tear. Once this has happened, subsequent dislocations of the same joint are more likely to occur.
Figure 10–1: Fractures include chipped, cracked, or completely broken bones.
Cracked bone
Broken bone
Chipped bone

MU
SCU
LOSK
ELET
AL
INJU
RIE
S
197
Dislocations are generally more obvious than fractures because the joint will be visibly deformed. Often the end of the displaced bone causes an abnormal lump, ridge, or depression beneath the skin. An injured patient will generally be unable to move a joint that is dislocated. A force violent enough to cause a dislocation can also cause a fracture and can damage nearby nerves and blood vessels.
Do not attempt to reinsert a dislocated joint, as this can cause additional damage unless your scope of practice or medical director specifies that this is the appropriate intervention.
SprainA sprain is the partial or complete stretching or tearing of ligaments at a joint. A sprain usually results when the bones that form a joint are forced beyond their normal range of motion (Figure 10–3).
Mild sprains, which only stretch ligament fibres, generally heal quickly. The patient may have only a brief period of pain or discomfort (7 to 10 days) and quickly return to activity with little or no lingering effects. Severe sprains usually cause pain when the joint is moved. A force that results in a severe sprain can also involve a fracture of the bones that form the joint.
Often, a sprain is more disabling than a fracture. When fractures heal, they usually leave the bone as strong as it was before; it is unlikely that a repeat break will occur at the same location. Once ligaments have been stretched or torn, however, the joint may become unstable and more vulnerable to reinjury, especially if the initial sprain is not cared for properly. It is important that patients have even minor sprains examined to reduce the risk of lifelong complications.
StrainA strain is the stretching and tearing of muscle or tendon fibres. Because tendons are tougher and stronger than muscles, tears usually occur in the muscle itself or where the muscle attaches to the tendon. Strains are often the result of overexertion, such as lifting an object that is too heavy or stretching a muscle beyond its normal
range when exercising. They can also result from sudden or uncoordinated movements, such as twisting to avoid falling on a patch of ice. Strains commonly involve the muscles in the neck or back, the thigh, or the back of the lower legs. Strains of the neck and lower back can be particularly painful and disabling.
Like sprains, strains are often neglected, which makes them very susceptible to reinjury. Strains sometimes recur chronically, especially those involving the muscles of the neck, lower back, and back of the thigh. These injuries can often be prevented by using proper body mechanics and ergonomics (e.g., proper lifting procedure) for repeated or high-risk tasks.
Figure 10–2: A dislocation is a displacement or separation of a bone from its normal position at a joint.
Figure 10–3: A sprain usually results when the bones that form a joint are forced beyond their normal range of motion.

MU
SCU
LOSK
ELET
AL
INJU
RIE
S
198
SPLINTS
A splint is used to immobilize an injured extremity to reduce the risk of additional injury and help reduce pain for the patient.
Types of SplintThere are four general types of splints: 1. Soft2. Rigid3. Anatomical4. Traction
As a professional responder, you are likely to have a variety of commercially made splints available. These include padded board splints, air splints, specially designed flexible splints, and vacuum splints (Figure 10–4). You should familiarize yourself with each of the commercial splinting devices at your disposal before using it in the field.
SOFT SPLINTSSoft splints include folded blankets, towels, pillows, slings, and triangular bandages (Figure 10–5). A blanket can be used to splint an injured ankle (Figure 10–6). A folded triangular bandage is used to secure dressings or splints in place.
RIGID SPLINTSRigid splints are made of hard, inflexible materials that hold the extremity firmly in one position. Commercial rigid splints include a range of sizes, including longer models for leg injuries and shorter models for injuries to the arms. Some have a moldable aluminum core surrounded by padding: These can be shaped to the affected area to increase support and comfort (Figure 10–7).
ANATOMICAL SPLINTSAnatomical splints use the patient’s own body to support an injured part. For example, an arm can be immobilized against the chest, or an injured leg
Figure 10–4: Commercial splints.
Figure 10–5: Soft splints include folded blankets, towels, and triangular bandages.
Figure 10–6: A blanket can be used to splint an injured ankle.

MU
SCU
LOSK
ELET
AL
INJU
RIE
S
199
can be immobilized using the uninjured leg for support (Figure 10–8).
TRACTION SPLINTSA traction splint is a special type of splint used primarily to immobilize fractures of the femur. One end attaches to the patient’s hip and the other to the patient’s ankle. When traction is engaged, a constant, steady pull is applied to opposite ends of the leg, stabilizing the fractured bone’s ends and keeping them from causing any further damage to soft tissues in the thigh (Figure 10–9). Each commercial brand of traction splint has its own unique method of application. Refer to the manufacturer’s directions, and only apply traction splints that you are proficient with.
Rule of ThirdsSome specific injuries require special splinting considerations. To determine which type of splint is most appropriate for an injury, you should determine whether the injury is a joint injury or mid-shaft injury. This can be difficult with long-bone fractures.
To determine if an injury is a joint or mid-shaft injury, use the Rule of Thirds. Each long bone (see the section on Bones in Chapter 4) can be divided into thirds. If the injury is located in the upper or lower third of the bone, treat the injury as a joint injury. If the injury is in the middle third of the bone, treat it as a mid-shaft injury.
How to SplintWhen using a splint, follow these basic principles: • Use appropriate equipment. • Splint only if it can be done without causing
further injury. • Immobilize the joints above and below the
injury site in the splint. • Check for normal circulation and sensation
before and after splinting. • Familiarize yourself with the manufacturer’s
directions before using a commercial splint.
Before splinting, cover any open wounds with dressings and bandages to help control bleeding and prevent infection.
Figure 10–7: A rigid splint can be used to support an injured arm.
Figure 10–8: An injured leg can be splinted to the uninjured leg.
Figure 10–9: A traction splint is primarily used to immobilize femur fractures.

MU
SCU
LOSK
ELET
AL
INJU
RIE
S
200
While applying a splint, support the injured body part to reduce pain and mitigate the risk of additional injuries.
If the injury involves an extremity, check for normal sensation in the digits distal to the injury. You should also check distal circulation: Check the patient’s pulse, as well as the colour, temperature, and capillary refill in the digits below the injury. Abnormalities can be identified more easily by comparing the injured extremity against the uninjured one.
If you are using a rigid or anatomical splint, pad the splint so that it is shaped to the injured part. Using the uninjured limb as a guide to normal positioning will help prevent further injury and increase comfort for the patient. If using a moldable splint, shape the splint to the uninjured extremity, then transfer it to the injured side.
To effectively immobilize an injured part, a splint must extend above and below the injury site (Figure 10–10) and include the joints above and below the injury.
Secure the splint in place with an elastic roller bandage or the straps provided with the splint. Always move from stable to unstable when attaching a splint: This means first anchoring the splint to strong, uninjured areas, and then wrapping towards the injured part. For example, if a patient has a broken elbow, begin securing the splint at the axilla (armpit) and work distally towards the elbow, stopping short of the injury site. Next, secure the splint from below the wrist, working proximally towards the elbow and again stopping short of the injury. Finally, carefully wrap the injured area with a separate elastic roller bandage. This last bandage can then be removed to allow an examination of the injury without compromising the stability of the splint.
Recheck circulation and sensation below the injury to ensure that they have not been restricted due to the pressure from the splint. If either circulation or sensation has changed, loosen the splint slightly and reassess. You should also loosen the splint if the patient complains of numbness or if the fingers or toes turn blue or become cold. If there are signs of pooling fluids, loosen the bandages.
Figure 10–10: To effectively immobilize an injured part, a splint must extend above and below the injury site.

MU
SCU
LOSK
ELET
AL
INJU
RIE
S
201
After a musculoskeletal injury has been immobilized, recheck the patient’s ABCs and vital signs, and take steps to care for shock. Shock is likely to develop as a result of a serious musculoskeletal injury. Help the patient rest in the most comfortable position, apply ice or a cold pack to the injured area, maintain normal body temperature, and offer reassurance to the patient.
With the patient’s willingness, a single attempt may be made to straighten a fractured limb if more advanced medical care is not available within 30 minutes and the patient is exhibiting signs of the following: • A decrease or absence of distal circulation,
sensation, and/or mobility • Gross angulation of the limb • Tenting of the skin • Severe pain
Using gentle traction, straighten the limb into anatomical position. Grasp the limb above and below the site of injury and pull gently. Reassess circulation and sensation below the injury once you have realigned the limb. If either is still impaired, the patient should be in the rapid transport category.
Do not attempt this if you suspect a joint injury, such as a dislocation, or if you observe firm resistance to movement, a significant increase in pain, or the sound or feeling of bone fragments grating.
SLINGS
A sling is used to support an upper extremity if a musculoskeletal injury damages the usual support structures. For example, a patient with a dislocated right shoulder will require a sling to support his or her right arm. Commercial slings are available, and slings may also be improvised using a triangular bandage (Figure 10–11). A sling may also be applied to a splinted arm to provide additional support.
SIGNS AND SYMPTOMS OF MUSCULOSKELETAL INJURIES
Five common signs and symptoms of musculoskeletal injuries are:1. Pain.2. Swelling.3. Deformity.4. Discoloration of the skin.5. Inability to use the affected part normally.
Irritation and damage to nerve endings in the injured area cause pain. The injured area may be painful when touched, when moved, or both.
Swelling is often caused by bleeding from damaged blood vessels in the injured area. Swelling may also occur due to excessive fluid production by the synovial capsule surrounding the joint. This swelling may appear rapidly at the
Figure 10–11: A triangular bandage can be used to create a sling.

MU
SCU
LOSK
ELET
AL
INJU
RIE
S
202
site of injury, develop gradually, or not appear at all. Therefore, swelling alone may not be a reliable indicator of which structures are involved or of the severity of an injury.
Internal bleeding may discolour the skin in surrounding tissues, but it may take hours or days to appear. At first, the skin may only look red. As blood seeps to the skin’s surface, however, contusions will usually appear.
Deformity may also be a significant sign of injury (Figure 10–12). Abnormal lumps, ridges, depressions, or unusual bends or angles in body parts are examples of deformities that can indicate a musculoskeletal injury. Comparing the injured part with the corresponding part on the uninjured side can help you identify abnormalities.
An injured patient’s inability or unwillingness to move or use an injured part may also indicate a significant injury. The patient may tell you that he or she is unable to move it or that it is simply too painful to move. Moving or using injured parts can disturb tissues and further irritate nerve endings, which causes or increases pain. Often, the muscles of an affected area will spasm in an attempt to keep the injured part from moving.
An injured patient will usually support an injured part in the most comfortable position. To care for musculoskeletal injuries, try to avoid causing patients additional pain: Don’t move an injured part unless it is necessary for assessment or interventions.
Sprains and strains are fairly easy to differentiate based on where the signs of injury are located. Because a sprain involves the soft tissues at a joint, any pain, swelling, and deformity are usually confined to the joint area. Strains involve the soft tissue structures that, for the most part, lie between joints (Figure 10–13).
The most serious musculoskeletal injuries are fractures, as they are most likely to cause additional damage to internal structures or result in permanent impairment without prompt treatment. If a bone is fractured, you may detect crepitus, which is a grating, popping, or crackling sound or sensation beneath the skin in the injured area. It can have multiple causes but is commonly caused by fractured pieces of bone rubbing against one another.
Other signs and symptoms that suggest a fracture include: • A significant deformity. • A snapping or popping sound at the moment
of injury. • A mechanism of injury that suggests the
trauma may be severe. • Crepitus. • Moderate to severe swelling and/or
discoloration. • An inability to move or use the affected body
part. • Visible broken bones protruding from the skin. • Loss of circulation or sensation in an extremity.
Figure 10–12: Deformity may be a sign of significant injury.
Figure 10–13: Strains generally involve an area between the joints.

MU
SCU
LOSK
ELET
AL
INJU
RIE
S
203
CARE FOR MUSCULOSKELETAL INJURIES
Musculoskeletal injuries are rarely life-threatening, unless other tissues are damaged as well, but the patient should be examined by a physician to reduce the risk of complications.
However, a patient in the following situations requires rapid transport:
• The injury involves a hemorrhage.• The injury involves trauma to the skull or
spine.• The injury impairs the patient’s respiration.• There is severe angulation with reduction in or
loss of sensation and/or circulation.• There are multiple major musculoskeletal
injuries suspected (e.g., two long-bonefractures).
General CareWhile it can be difficult to identify the exact nature of a musculoskeletal injury in the field, the general care for all musculoskeletal injuries is similar (Figure 10–14). Performing a focused assessment on the injured area will help you to determine the nature of the injury. If the injury involves more than minor bleeding, apply direct pressure until the bleeding stops (as described in Chapter 9). Movement of a fractured bone can cause additional tissue damage: Avoid putting more pressure on the injured area than is necessary to control the bleeding.
Remember the acronym RICE:R — Rest I — ImmobilizeC — ColdE — Elevate
RESTAvoid any unnecessary actions that cause the patient pain. Help the patient find the most comfortable position. If you suspect a head and/or spinal injury, leave the patient lying flat. Do not move the patient unless it is absolutely necessary.
IMMOBILIZEIf you suspect a serious musculoskeletal injury, you must immobilize the injured part before giving additional care, such as applying ice or elevating the injury. To immobilize, apply a splint, sling, or bandages (or use another appropriate method) to reduce movement of the injured part.
The purpose of immobilizing an injury is to:• Reduce pain.• Reduce the risk of a hemorrhage.• Reduce potential loss of circulation to the
injured part.• Prevent further damage to soft tissues.• Prevent closed fractures from becoming open
fractures.
If possible, always splint a musculoskeletal injury before moving the patient. Fractures of large bones especially can cause internal hemorrhaging, which may lead to shock.
COLDIf the injury is not an open wound (i.e., if it is a closed fracture, dislocation, sprain, or strain), apply ice or a cold pack. Cold helps ease pain and discomfort. Place a thin layer of gauze or cloth between the source of cold and the skin to prevent skin damage. Do not apply an ice or cold pack directly over a fracture because the pressure could cause discomfort to the patient. Instead, place cold packs around the site of injury. In general, cold should be applied for 15 to 20 minutes every hour for the first 24 to 48 hours (as needed) after an injury.
Figure 10–14: General care for all musculoskeletal injuries is similar—rest, immobilize, cold, elevate (RICE).

MU
SCU
LOSK
ELET
AL
INJU
RIE
S
204
ELEVATEElevating the injured area above the level of the heart helps to reduce swelling. Always immobilize a seriously injured limb before elevating. Do not elevate an injured area if doing so causes the patient additional pain, as this may aggravate the injury.
UPPER EXTREMITY INJURIES
The upper extremities are the arms and hands. Upper extremity bones include the clavicle, scapula, humerus, radius and ulna, carpals and metacarpals, and phalanges. Figure 10–15 shows the major structures of the upper extremities.
The upper extremities are the most commonly injured area of the body. Injuries to the upper extremities occur in many different ways. The most frequent cause is falling on the hand of an outstretched arm. Since the hands are rarely protected, abrasions occur easily. A falling person instinctively tries to break the fall by extending the arms and hands, so these areas receive the force of the body’s weight. This can cause a severe sprain, fracture, or dislocation to the hand, forearm, upper arm, or shoulder (Figure 10–16).
When caring for serious upper extremity injuries, minimize any movement of the injured area. If a patient is holding the arm securely against the chest, do not attempt to change the position. Holding the arm against the chest is an effective method of immobilization because it keeps an injured body part from moving. Allow the patient to continue to support the arm in this manner. You can further assist the patient by binding the injured arm to the chest. This eliminates the need for special splinting equipment and still provides an effective method of immobilization.
Injuries to the upper extremities may also damage blood vessels, nerves, and several soft tissues. It is particularly important to ensure that blood flow and nerve function have not been impaired. Always check the peripheral pulse and ensure that sensation below the injury site is normal both before and after splinting. Sometimes, when a splint is applied too tightly, circulation may be
Figure 10–15: The major structures of the upper extremities.
FRONT VIEWClavicle
Humerus
Ulna
Radius
Carpals
Metacarpals
Phalanges
BACK VIEW
Humerus
Scapula
Ulna
Radius
Carpals
Metacarpals
Phalanges
Median nerve
Brachial artery
Ulnar nerve
Radial nerve
Radial artery
FRONT VIEW

MU
SCU
LOSK
ELET
AL
INJU
RIE
S
205
impaired. If this occurs, loosen the splint. If you suspect that either the blood vessels or the nerves have been damaged, minimize movement of the area and obtain more advanced medical care immediately.
Shoulder InjuriesThe shoulder consists of three bones that meet to form the shoulder joint: the clavicle, the scapula, and the humerus. The most common shoulder injuries are sprains. However, injuries of the shoulder may also involve a fracture of one or more of these bones or a dislocation of the shoulder joint.
The most frequently injured bone of the shoulder is the clavicle, though this is more common in children than adults. Typically, the clavicle is fractured as a result of a fall. The patient usually reports pain in the shoulder area that may radiate down the arm. A patient with a fractured clavicle usually attempts to ease the pain by holding the arm against the chest. Since the clavicle lies directly over major blood vessels and nerves, it is important to immobilize the injured area to prevent injury to these structures.
Scapular fractures are not common. You are less likely to see deformity of the scapula: The most significant signs and symptoms are extreme pain and the inability to move the arm. It takes a great deal of force to break the scapula, so an MOI that results in a fractured scapula is likely to injure the ribs or internal organs in the chest as well. This is often indicated by dyspnea.
A dislocation is another common type of shoulder injury. Like fractures, dislocations often result from falls. This happens frequently in contact sports, such as football and rugby. A player may attempt to break a fall with an outstretched arm or may land on the tip of the shoulder, forcing the arm against the joint formed by the scapula and clavicle (this is commonly referred to as a separation). This can result in ligaments tearing, causing the end of the clavicle to displace. Dislocations also occur at the joint where the humerus meets the socket formed by the scapula. For example, when a patient’s arm is struck while raised in the throwing position, the arm is forced to rotate backward, tearing ligaments and causing the upper end of the arm to dislocate from its normal position in the shoulder socket. Shoulder dislocations are painful and can often be identified by the deformity present. As with other shoulder injuries, the person often tries to minimize the pain by holding the arm in the most comfortable position.
SPECIFIC CARE FOR SHOULDER INJURIESFollow the general care steps for musculoskeletal injuries. Support the joint by applying an elastic roller bandage in a figure-eight pattern around the shoulder.
Help the patient to keep the injured arm in the position that he or she is naturally holding it in. If the patient is holding the arm away from the body, for example, place a soft object such as a pillow or folded blanket between the arm and the torso to provide support. Immobilize the injured arm by binding it to the chest or by placing the arm in a sling and then binding it to the chest with a triangular bandage folded into a broad bandage (Figure 10–17, a-c).
Figure 10–16: A fall can cause a serious injury to the hand, arm, or shoulder.

MU
SCU
LOSK
ELET
AL
INJU
RIE
S
206
Upper Arm InjuriesThe humerus is a long bone that can be fractured at any point, although fractures most often occur near the shoulder or in the middle of the bone. The upper third of the humerus fractures more often in older adults and young children, often as a result of falls. Fractures in the middle third occur mostly in young adults.
A fractured humerus can cause damage to the blood vessels and nerves supplying the entire arm. Most humerus fractures are very painful and prevent the person from using the arm. These fractures can cause considerable deformity.
SPECIFIC CARE FOR UPPER ARM INJURIESFollow the general care steps for musculoskeletal injuries. If you suspect a fracture, apply a moldable long splint from the axilla to the wrist to prevent movement of the elbow, immobilizing the upper arm in the position found. If a fracture is not suspected (or if the position of the splinted arm allows it), place the arm in a sling. If necessary, provide additional support by binding the forearm to the chest with triangular bandages (so long as this doesn’t cause discomfort or risk aggravating the injury).
Elbow InjuriesLike other joints, the elbow can be sprained, fractured, or dislocated. Since all the nerves
and blood vessels of the forearm and hand pass through the elbow, injuries to the elbow can cause permanent disability. Like all joint injuries, elbow injuries can be made worse by movement. Use caution when assessing an injured elbow to reduce the risk of causing further damage.
SPECIFIC CARE FOR ELBOW INJURIESFollow the general care steps for musculoskeletal injuries. If the patient indicates an inability to move the elbow, do not try to move it. Support the arm and immobilize it in the position found with a long moldable splint from the axilla to the hand (including the fingers) (Figure 10–18). Once the arm is immobilized, and if the angle of the elbow allows it, place the arm in a sling and secure it to the chest.
Figure 10–17, a-c: Splint the arm against the chest in the position the patient was holding it.
Figure 10–18: Immobilize the arm from shoulder to wrist, keeping the elbow in the position found.
a b c

MU
SCU
LOSK
ELET
AL
INJU
RIE
S
207
Forearm, Wrist, and Hand InjuriesThe forearm is the part of the upper extremity extending from the elbow to the wrist. Fractures of the two forearm bones, the radius and ulna, are most common in children and older adults. If a person falls on the palmar surface of an outstretched arm, both bones of the lower arm may break, but not always in the same place. A fracture of both bones can cause the arm to appear S-shaped (Figure 10–19). Because the radial artery and nerve are near these bones, a fracture may cause a hemorrhage or a loss of movement in the wrist and hand. Sprains of the wrist are also common.
The hands are very susceptible to injury because they are used so often in daily activities.
SPECIFIC CARE FOR FOREARM, WRIST, AND HAND INJURIES Follow the general care for musculoskeletal injuries. If a single finger is damaged, it can be immobilized by taping it to the adjacent finger (Figure 10–20). You can also place a tongue depressor (padded with gauze) along the underside of the finger and immobilize it with tape.
If multiple fingers or the hand itself are damaged, you should attempt to immobilize them in a position of function. This is the natural, gentle curve of the fingers and palm when at rest. If the fingers are bleeding, place gauze between them. If the hand is bleeding, wrap it in gauze. Next, splint the patient’s forearm from the elbow to just beyond the fingertips. Beginning at the elbow, attach the splint firmly to the forearm with a roller bandage, avoiding excessive pressure. A moldable splint is best suited. Leave a gap in the bandage that will allow you to assess the radial pulse. When you reach the hand, place a roll of non-sterile gauze in the patient’s palm to increase comfort and maintain the position of function (Figure 10–21, a-b), then wrap the hand with a roller bandage. Once it is immobilized, support the injured hand with a sling and secure it to the patient’s chest.
Care for an injured forearm or wrist by immobilizing the injured area. Place a splint underneath the forearm. When using a rigid splint, extend the splint beyond the hand, and immobilize the elbow by splinting to the shoulder. Place a roll of gauze or a similar object in the palm to keep the palm and fingers in a position of function. Place the arm in a sling and secure it to the patient’s chest (Figure 10–22).
Figure 10–19: Fractures of both bones of the forearm may lead to an S-shaped deformity.
Figure 10–20: An injured finger can be splinted to an adjacent finger.

MU
SCU
LOSK
ELET
AL
INJU
RIE
S
208
LOWER EXTREMITY INJURIES
Injuries to lower extremities can involve both soft tissue and musculoskeletal trauma. The major bones of the thigh and lower leg are large and strong because they carry the body’s weight.
Bones of the leg include the femur, patella, tibia, and fibula, as well as the tarsals, metatarsals, and phalanges. Because of the size and strength of the bones in the thigh and lower leg, a significant amount of force is required to cause a fracture. Serious injuries to the lower extremities can result in their inability to bear weight.
Figure 10–21, a-b: A roll of gauze can be used to immobilize a hand: a, start wrapping at the wrist; b, cover the hand with a roller bandage.
Figure 10–22: If the forearm is fractured, place a splint under the forearm and secure it.
ba

MU
SCU
LOSK
ELET
AL
INJU
RIE
S
209
Thigh InjuriesThe femurs are the largest bones in the body and are the most important for walking and running. The upper end of the femur meets the pelvis at the hip joint (Figure 10–23). Most femur fractures involve the upper end of the bone. Even though the hip joint itself is not usually involved, these injuries are often referred to as hip fractures.
A fracture of the femur usually produces a characteristic deformity. When a fracture occurs, the thigh muscles begin to contract. The thigh muscles are so strong that they can pull the broken
bone ends together, causing them to overlap. This may cause the injured leg to be noticeably shorter than the other leg. The injured leg may also be turned outward (Figure 10–24). Other signs and symptoms of a fractured femur may include severe pain and swelling and the inability to move the leg.
The femoral artery is the major supplier of blood to the legs and feet. If it is damaged, as may happen with a fracture of the femur, the blood loss can be rapidly life-threatening. A weak or absent pulse distal to the injury is a sign of damage to the femoral artery.
SPECIFIC CARE FOR THIGH INJURIESFollow the general care for musculoskeletal injuries. If the upper or lower third of the femur is fractured, treat the injury as a joint injury (hip or knee). Because of the risk of an internal hemorrhage, a patient with a fractured femur should always be placed in the rapid transport category.
Control any external bleeding before immobilizing the injured area (Figure 10–25). Keep the patient in the most comfortable position.
If a patient’s femur is broken, apply a long rigid splint from the axilla (armpit) to the foot on the lateral side, and a second rigid splint on the medial side from the groin to the bottom of the foot (or just beyond). Traction splints may be indicated for fractures of the femur (as dictated by your scope of practice and local protocols). Figure 10–26, a-b, shows two types of traction splints.
Figure 10–23: The upper end of the femur meets the pelvis at the hip joint.
Figure 10–24: A fractured femur often produces a characteristic deformity. The injured leg is shorter than the uninjured leg and may be turned outward.
Pelvis
Hip
Femur

MU
SCU
LOSK
ELET
AL
INJU
RIE
S
210
Another method involves securing the injured leg to the uninjured leg (i.e., creating an anatomical splint). This should only be used if the patient is in a rapid transport situation, when speed is crucial. Roll a blanket so that it fills the space from groin to ankle without putting unnecessary pressure on the injured area. Measure the blanket against the outside of the uninjured leg before placing it between the legs. Bring the uninjured leg to the injured leg, and bind the legs together in several places above and below the site of the injury using wide elastic straps or broad bandages (Figure 10–27). Ensure that there is sufficient padding between the legs to maximize comfort for the patient and reduce the risk of injury. If the patient is not on a rigid device such as a backboard, ensure that the knees are supported from behind so they will not bend when the patient is moved.
Lower Leg InjuriesA fracture in the lower leg may involve one or both bones (fibula and tibia). Like the bones in the forearm, they are often fractured simultaneously. However, a blow to the outside of the lower leg can cause an isolated fracture of the fibula. Open fractures are common because the fibula and tibia lie just beneath the skin. A lower leg fracture may cause a severe deformity in which the lower leg is bent at an unusual angle (angulated). These injuries are painful and result in an inability to move the leg. However, fractures of the fibula, and small fractures of the tibia, may not cause any deformity, and the patient may even be able to use the leg.
Figure 10–27: To splint an injured leg, secure the injured leg to the uninjured leg with triangular bandages. A rolled blanket between the legs provides support and comfort.Figure 10–26, a-b: Two types of traction splints.
Figure 10–25: It is important to stop any external bleeding before immobilizing the injured area.
b
a

MU
SCU
LOSK
ELET
AL
INJU
RIE
S
211
SPECIFIC CARE FOR LOWER LEG INJURIESFollow the general care for musculoskeletal injuries. If the upper or lower third of the tibia or fibula is fractured, treat the injury as a joint injury (knee or ankle).
If the tibia or fibula is fractured, apply a rigid long splint to the lateral side of the injured leg, extending from just below the hip to below the foot. Place a shorter padded splint on the medial side of the leg, extending from the groin to the foot (Figure 10–28). Specific commercial splints, such as air splints and vacuum splints, are available for these applications.
Knee InjuriesThe knee joint includes the lower end of the femur, the upper ends of the tibia and fibula, and the patella (kneecap). This joint is very vulnerable to injury. The patella is a bone that moves on the lower front surface of the thigh bone. Sprains, fractures, and dislocations of the knee are common in athletic activities that involve quick movements or exert unusual force on the knees.
The knee joins the two longest bones of the body, the femur and the tibia. Four ligaments attach to the bones and hold the knee together. Two cartilage discs serve to increase joint stability, facilitate joint lubrication, and absorb shock. This cartilage can be torn due to a torsion injury. Repeated and excessive shocks to the knee can also splinter the cartilage pads and stretch or fray the ligaments.
The kneecap is unprotected in that it lies directly beneath the skin. This part of the knee is very vulnerable to bruises and lacerations, as well as dislocations. Any violent trauma to the front of the knee can cause fractures of the patella.
SPECIFIC CARE FOR KNEE INJURIESFollow the general care for musculoskeletal injuries. For a soft tissue injury, such as a sprain, apply an elastic roller bandage using a figure-eight pattern. In the case of a fracture, splint the knee in the position found. If the knee is bent, support it in the bent position (Figure 10–29). If the knee is straight, splint the leg from the foot to the axilla
on the lateral side, and from the foot to the groin on the medial side (as you would for an injury of the thigh).
Ankle and Foot InjuriesAnkle and foot injuries are commonly caused by twisting forces. Injuries range from minor sprains with little swelling and pain to fractures and dislocations. As with other joint injuries, you cannot always distinguish between minor and severe injuries. You should initially care for any ankle or foot injury as if it is serious. As with other lower extremity injuries, a physician should evaluate an ankle or foot injury if it appears swollen, is unable to bear weight, or causes pain when moved.
Fractures are possible when any great force is applied, such as falling from a height and landing on the feet. The force of the impact may also be
Figure 10–28: Rigid splints can also be used to splint an injured leg.
Figure 10–29: Support a knee injury in the bent position if the patient cannot straighten the knee.

MU
SCU
LOSK
ELET
AL
INJU
RIE
S
212
transmitted up the legs. This can result in an injury elsewhere in the body, such as the thigh, pelvis, or spine. If the MOI suggests that these serious injuries may be present, take necessary precautions (e.g., spinal motion restriction). Foot injuries may also involve the toes. Although these injuries are painful, they are rarely serious.
SPECIFIC CARE FOR ANKLE AND FOOT INJURIESFollow the general care for musculoskeletal injuries. If the ankle is injured, immobilize it in the position found. This can be done with a commercial splint or a pillow splint. The improvised splint is made by placing the ankle in the centre of a pillow and folding the sides of
the pillow around the ankle. Secure the pillow to the ankle with elastic straps or broad bandages. You may also immobilize an injured ankle with two well-padded rigid splints, one lateral and one medial, extending from above the knee to the foot.
A pillow splint (described above) is generally effective for most foot injuries as well. If the injury was caused by crushing forces to the toes (tarsals), place gauze between the toes before splinting to absorb fluid and prevent the toes from adhering to one another.

• A partial or complete break in bone tissue
• Open fractures: damaged bone breaks through the skin
• Closed fractures: bone is damaged but it does not break through the skin
• Displacement or separation of a bone from its normal position at a joint
• Can cause torn or stretched ligaments
• Stretching and tearing of muscle or tendon fibres
• Susceptible to reinjury
• Partial or complete stretching or tearing of ligaments and other tissues at a joint
• Mild sprains: only ligament fibres stretch; heal quickly; minor pain
• Severe sprains: cause pain when injury occurs; more likely to involve a fracture
• Susceptible to reinjury
Fracture
Dislocation
Strain
Sprain
TYPES OF MUSCULOSKELETAL INJURIES
• Found materials that are soft and flexible (e.g., blankets, slings, pillows)
• Improvised or commercial splints made of hard, inflexible materials
• Use the patient’s own body to support an injured part
• Used to immobilize femur fractures
Soft
Rigid
Anatomical
Traction
TYPES OF SPLINTS
Basic Splinting Principles
• Use appropriate equipment. • Do not cause further injury. • Ensure splint includes joints
above and below the injury site. • Check for normal circulation
and sensation before and after splinting.
• Follow the manufacturer’s directions for commercial splints.
General Care for Musculoskeletal Injuries
Common Signs and Symptoms of Musculoskeletal Injuries
• Pain • Swelling • Deformity • Discolouration of the skin • Inability to use the affected part normally
R – Rest I – Immobilize C – Cold E – Elevate
SUMMARY
MU
SCU
LOSK
ELET
AL
INJU
RIE
S
213


CH
EST,
AB
DO
MIN
AL,
AN
D P
ELV
IC IN
JUR
IES
11 Chest, Abdominal, and Pelvic Injuries
215
Key ContentChest Injuries .......................... 216 Rib Fractures ........................ 216 Hemothorax ........................ 218 Pneumothorax..................... 218 Subcutaneous Emphysema (SCE) .................................. 219 Penetrating Chest Injuries ... 219Abdominal Injuries ................. 220 Evisceration ......................... 222 Abdominal Aortic Aneurysm (AAA) ............................... 222Pelvic Injuries .......................... 223 Pelvic Binding ...................... 224 Genital Injuries .................... 225
IntroductionInjuries to the chest, abdomen, and pelvis include both soft tissue injuries (e.g., internal organ damage) and fractures (e.g., of the ribs or pelvic bones). While ribs are thin and more susceptible to fractures, a powerful force (e.g., from a fall or motor vehicle collision) is required to cause serious injury to the pelvic bones.
Because the chest, abdomen, and pelvis contain many of the body’s vital organs, injuries to these areas can be immediately life-threatening. A force that causes a severe injury in these areas may also cause injury to the spine. All injuries described in this chapter should cause serious concern: Any patient with a serious chest, abdomen, or pelvic injury should be placed in the rapid transport category.

CH
EST,
AB
DO
MIN
AL,
AN
D P
ELV
IC IN
JUR
IES
216
General care for chest, abdomen, and pelvic injuries includes controlling any external bleeding, limiting movement of any injured areas as much as possible (especially if fractures are suspected), and taking steps to mitigate the effects of shock (which is common when internal organs are damaged).
CHEST INJURIES
Chest injuries can occur when either a blunt or penetrating force is applied to the chest. Motor vehicle collisions, industrial accidents, falls, and intentional violence (e.g., knife injuries) are common causes (Figure 11–1).
Chest wounds are categorized as either open or closed. Open chest wounds occur when an object (e.g., a knife or bullet) penetrates the chest wall. An open chest wound can also occur when fractured ribs break through the skin. A chest wound is closed if the skin is not broken. Closed chest wounds are generally caused by blunt force (e.g., a fall).
Signs and Symptoms of Chest InjuriesThe signs and symptoms of a serious chest injury include:
• Respiratory distress or arrest.• Pain at the site of the injury that increases with
deep respirations or movement.• Obvious deformity (as with other fractures).• Unequal or paradoxical movement of the chest
wall.• Flushed, pale, or bluish skin.• Coughing up blood.
These signs and symptoms of a serious chest injury can occur in both open and closed wounds. A patient with a serious chest injury is at risk of respiratory arrest (see Chapter 6).
If a patient has sustained a chest injury or is complaining of chest pain, the chest must be exposed for proper assessment.
Types of Chest InjuryRIB FRACTURESRib fractures are usually caused by an external blunt-force impact to the chest (Figure 11–2). Although painful, a simple rib fracture is rarely life-threatening unless the fractured bone causes damage to organs (e.g., the lungs) or major blood vessels.
You should suspect a rib fracture in the following situations:
• The patient’s respiration presents as painfuland shallow or laboured.
• The patient attempts to ease the pain byleaning toward the side of the fracture.
Figure 11–1: Injuries to the chest may result from blunt or penetrating forces.

CH
EST,
AB
DO
MIN
AL,
AN
D P
ELV
IC IN
JUR
IES
217
• The patient tries to stabilize the fracture by putting pressure on the injured area.
Chest injuries involving multiple rib fractures are more serious and can be life-threatening. Multiple rib fractures should be suspected if the MOI involves a severe blunt-force impact or crush injury to the chest. Multiple rib fractures often cause internal hemorrhaging and difficulty breathing (dyspnea), creating the risk of shock.
Care for Rib FracturesIf you suspect a rib fracture, perform the following steps:1. Position the patient to facilitate respiration
(a Semi-Fowler’s position is often most comfortable).
2. Support and immobilize the injured area using a soft, bulky object, such as a pillow or rolled blanket.
3. Provide interventions for respiratory distress or arrest if indicated (e.g., supplemental oxygen, assisted ventilations).
Flail ChestMultiple rib fractures can result in a section of the rib cage breaking free from the surrounding tissues, a condition referred to as flail chest (see Figure 11–3). The loose section of the chest wall will not move normally during respiration. Usually, this loose section (commonly referred to as a flail segment) will move in the opposite direction from the rest of the chest (i.e., will move inwards during inhalation and outwards on exhalation); this is called paradoxical movement.
If enough force is applied, a flail chest may also involve the sternum. A flail sternum occurs when the sternum is separated from the rest of the ribs.
Care for Flail ChestIf you suspect a flail chest injury, perform a focused exam of the ribs, gently palpating the area to locate the flail segment. Stabilize the flail segment by placing bulky dressings—at least 1.3 cm (½ in.) thick—over the entire injured area, ensuring that the dressing extends beyond the edges of the segment on all sides. This will allow sufficient pressure to be applied without
Figure 11–3: Multiple rib fractures can result in flail chest, where a flail segment becomes disconnected from the rib cage.
Figure 11–2: An external blunt-force impact to the chest can cause a fracture of the ribs or sternum.

CH
EST,
AB
DO
MIN
AL,
AN
D P
ELV
IC IN
JUR
IES
218
causing unnecessary damage to the injured area. Secure the dressings in place with long strips of tape, taking care to avoid aggravating the injury or impairing the patient’s respiration.
HEMOTHORAXHemothorax is bleeding into the pleural space around the lungs (Figure 11–4). This can be caused by blunt or penetrating trauma to the chest that results in a lacerated lung or laceration of a blood vessel in the chest. Hemothorax can occur with closed or open chest wounds. The severity of the hemothorax depends on the amount of bleeding into the pleural space.
As the chest fills with blood, the lung on the affected side will become increasingly unable to expand and may collapse. The patient will present with dyspnea, and the onset of shock will occur if bleeding continues. Blood in the pleural space will also create pressure on the heart and lungs, resulting in further complications.
Interventions for HemothoraxProvide care for respiratory distress or arrest (e.g., if the patient is hypoxic, provide high-concentration supplemental oxygen). Assisted ventilations are usually indicated for a patient with shallow or inadequate respirations. If the hemothorax is a result of a penetrating chest injury, the patient may require interventions for an open pneumothorax as well. A patient with a hemothorax will often require emergency surgery and should be placed in the rapid transport category.
PNEUMOTHORAXPneumothorax is a condition caused by air entering the pleural space around the lung (Figure 11–5). It may occur as a result of blunt or penetrating trauma, or it may be spontaneous (spontaneous pneumothorax). A one-time escape of air into the pleural space is referred to as a simple pneumothorax. The patient’s presentation will vary depending on how much air has entered the pleural space: The lung may be partially or totally collapsed, and this will be reflected in the patient’s signs and symptoms.
Signs and symptoms of pneumothorax may include: • Pleuritic chest pain (pain increased by
coughing or inhaling deeply). • Dyspnea and/or tachypnea. • Decreased or absent breath sounds on the
affected side. • Subcutaneous emphysema (page 219).
Figure 11–4: A hemothorax is bleeding into the pleural space.
Figure 11–5: A pneumothorax is a condition caused by air entering the pleural space.

CH
EST,
AB
DO
MIN
AL,
AN
D P
ELV
IC IN
JUR
IES
219
Spontaneous PneumothoraxPneumothorax can occur in otherwise perfectly healthy people without any associated trauma. This is referred to as spontaneous pneumothorax and is most frequently seen in young, thin, tall males. Typically, the patient complains of a sudden, sharp chest pain and sudden shortness of breath following strenuous exertion, coughing, or air travel.
Tension PneumothoraxIn some cases, a pneumothorax can progress to a tension pneumothorax. While pneumothorax is caused by a single entry of air into the pleural space, tension pneumothorax occurs when lung tissue is torn, causing a continual flow of air into the pleural space and a steady increase in pressure (Figure 11–6). The mounting pressure of the air in the pleural space causes the lung to eventually collapse, diminishing the volume of air that can be inhaled and exhaled with each respiration.
As the air continues to mount in the pleural space, pressure is placed on the unaffected lung, heart, and major blood vessels as well. Accompanying signs may include tachycardia, hypotension, tracheal deviation, and jugular venous distension (JVD). As the condition worsens, signs of hypoxia and a severe respiratory emergency will be evident. Provide any necessary interventions, such as supplemental oxygen or assisted ventilations, based on the patient’s presentation. A patient with a suspected tension pneumothorax should be placed in the rapid transport category.
SUBCUTANEOUS EMPHYSEMA (SCE)Subcutaneous emphysema (SCE) is a rare condition that occurs when air becomes trapped in tissues beneath the skin. Damage to the respiratory system (especially penetrating trauma to the lungs and bronchial tube) can allow air to escape into the body. Affected areas often appear swollen. SCE produces an unusual crackling sensation when the affected area is touched.
While usually not a serious condition in itself, SCE can be an indicator of serious internal trauma such as tension pneumothorax.
PENETRATING CHEST INJURIESA penetrating object can injure any structure within the chest, including the lungs, heart, and major arteries or veins, causing complications that range in severity from minor to life-threatening. A hole in the chest wall disrupts the intrathoracic pressure, which can prevent the lungs from functioning properly and cause respiratory distress. Puncture wounds may also allow air or blood to enter the chest cavity, causing pneumothorax or hemothorax.
Care for Penetrating Chest InjuriesPuncture wounds can cause varying degrees of internal and/or external bleeding. If the injury penetrates the rib cage and punctures the lungs, air will be able to pass freely in and out of the chest cavity, significantly impacting the patient’s respiration. With a penetrating chest wound, you may hear a sucking sound coming from the wound with each inhalation. This is referred to as a sucking chest wound, and is the primary sign of a penetrating chest injury.
When providing treatment for a penetrating chest injury, your goal is to control any external hemorrhaging without increasing the pressure in the chest.
Figure 11–6: A tension pneumothorax is caused by the continual flow of air into the pleural space, which is unable to escape.

CH
EST,
AB
DO
MIN
AL,
AN
D P
ELV
IC IN
JUR
IES
220
The concern with a penetrating chest wound is that the wound will become occluded, meaning that the wound no longer allows air to enter or exit. Occlusion significantly increases the risk of a tension pneumothorax, so it must be prevented. If bleeding is minor, leave the wound exposed to the air or use a non-occlusive dressing. If an external hemorrhage is present, it must be quickly controlled: Apply direct pressure to the chest wound with your gloved hand and/or a non-occlusive dressing (Figure 11–7, a). If the dressing becomes saturated with blood, it will become occluded: Monitor the dressing closely and replace saturated dressings immediately (Figure 11–7, b).
If the patient is hypoxic, administer oxygen (if available), and take steps to minimize the onset of shock. Assisted ventilations may also be necessary. Place the patient in a position of comfort that allows for ease of breathing. If you roll the patient into the recovery position, make sure the injured side is towards the ground.
ABDOMINAL INJURIES
Unlike the chest, the abdomen is not surrounded by a cage of bone, so it is more susceptible to injury. Because it contains many vital organs (and these organs tend to bleed profusely), injuries to the abdomen are often life-threatening (see Figure 11–8).
The liver is located in the upper right quadrant of the abdomen, partially protected by the lower ribs. The liver is rich in blood and can be damaged by blunt trauma or penetrated by a fractured rib. The resulting bleeding may be severe and can become fatal. When injured, the liver can also leak bile into the abdomen, which can cause severe infection.
The spleen is located in the upper left quadrant of the abdomen, behind the stomach, and is protected somewhat by the lower left ribs. The spleen is easily damaged, as it may rupture when the abdomen is struck forcefully by a blunt object. Since the spleen stores blood, an injury can quickly lead to a severe loss of blood and become life-threatening.
The stomach is one of the main digestive organs. It changes shape depending on its contents, the stage of digestion, and the size and strength of the stomach muscles. Because the stomach is lined with many blood vessels and nerves, it can hemorrhage internally when injured, and food contents may empty into the abdomen, causing infection.
Damage to the GI tract can cause internal hemorrhaging as well. If the contents of the intestines are spilled into the abdominal cavity, the risk of infection is very high.
Figure 11–7, a-b: a, Control an external hemorrhage by applying direct pressure to the wound with a gloved hand and/or a non-occlusive dressing; b, change saturated dressings immediately.

CH
EST,
AB
DO
MIN
AL,
AN
D P
ELV
IC IN
JUR
IES
221
Signs and Symptoms of Abdominal InjuryThe signs and symptoms of serious abdominal injury include: • Severe pain. • Bruising. • External bleeding. • Nausea and vomiting (sometimes vomit
containing blood). • Pale, moist skin. • Thirst. • Pain, tenderness, or a tight feeling in the
abdomen. • Distension in the abdomen. • Organs possibly protruding from the abdomen. • Signs and symptoms of shock.
Blunt trauma to the abdomen may not cause external signs of injury and may even be painless, even when serious injuries have occurred. You should suspect serious abdominal injuries if the MOI suggests that they are likely, even if the patient’s presentation does not suggest serious injuries. Penetrating wounds to the abdomen may cause internal hemorrhaging. The patient may also develop peritonitis (an infection of the abdominal lining) in the hours or days following the event.
A patient who has experienced serious trauma to the abdomen should be in the rapid transport category, even if signs and symptoms of serious injury are absent.
Care for Abdominal InjuriesAn injury to the abdomen may be either open or closed. Even with a closed wound, the rupture of an organ can cause internal hemorrhaging. This can be extremely painful and may result in shock. Serious complications can occur if organs leak blood or other contents into the abdomen.
When caring for an abdominal injury, place the patient in a supine position. Bend the patient’s knees slightly, allowing the muscles of the abdomen to relax. Place rolled-up blankets or pillows under the patient’s knees. If moving the patient’s legs causes pain, leave them straight.
If external bleeding is present, attempt to control it by applying trauma dressings and gentle pressure: Avoid applying firm pressure to the abdomen, as this can exacerbate internal injuries. If gentle pressure is not sufficient to control the bleeding, place the patient in the rapid transport category immediately.
Figure 11–8: The abdomen can be divided into four quadrants, each containing different vital organs.
Spine
Spleen
Pancreas
Kidneys
Liver
Stomach
Gallbladder
Large intestine
Small intestine
Liver
Spleen
GI tract
Stomach

CH
EST,
AB
DO
MIN
AL,
AN
D P
ELV
IC IN
JUR
IES
222
EVISCERATIONWhen a major open wound occurs to the abdomen, abdominal organs may begin to protrude through the wound (Figure 11–9, a). Interventions you perform focus on protecting the organs from damage and mitigating the effects of shock until the patient can be transported to an emergency medical facility for advanced care.
Internal organs are usually protected by the body and so are very susceptible to environmental conditions. You should protect the organs from extremes of heat and cold, dust, etc. Avoid touching the exposed organs, and do not attempt to force protruding organs back into place.
Remove clothing from around the wound (Figure 11–9, b) and cover the area lightly with moist, sterile dressings placed loosely over the wound. (Figure 11–9, c). Saline or warm tap water can be used to moisten the dressings. Cover the dressings loosely with plastic wrap, if available. Place a
folded towel or blanket over the area to maintain warmth (Figure 11–9, d). If necessary, gently secure the towel or blanket in place with large bandages, but avoid putting pressure on the injured area.
ABDOMINAL AORTIC ANEURYSM (AAA)An abdominal aortic aneurysm (AAA) occurs when the wall of the abdominal aorta weakens and bulges, creating a localized enlarged area (Figure 11–10). Initially, an abdominal aortic aneurysm may present few or no signs or symptoms (i.e., it may be asymptomatic).
As the AAA expands, it may reach a stage at which it becomes very painful, accompanied by pulsating sensations in the abdomen or pain in the chest, lower back, or scrotum. As the aneurysm grows, the vessel walls become thinner and the risk of the aneurysm rupturing increases.
A patient with an (AAA) may have absent or decreased femoral or pedal pulses on both sides
Figure 11–9, a-d: a, Severe injuries to the abdominal cavity can result in protruding organs; b, remove clothing from around the wound; c, apply moist, sterile dressings loosely over the wound; and d, cover dressings lightly with a folded towel to maintain warmth.
a
c
b
d

CH
EST,
AB
DO
MIN
AL,
AN
D P
ELV
IC IN
JUR
IES
223
of the body. If you suspect an AAA, do not put pressure on the abdomen. Many older adults mistake AAA for renal colic, as the pain pattern is quite similar.
Signs and symptoms of advanced AAA may include:
• Abdominal pain.• Abdominal rigidity.• Back pain.• Nausea and vomiting.• Pulsating mass in the abdomen.• Diminished or absent femoral or pedal pulses.• Tingling or numbness in the lower extremities.
A patient with a ruptured AAA will present with signs and symptoms of internal bleeding, and will likely be in shock. Any patient with a suspected AAA should be in the rapid transport category.
PELVIC INJURIES
The pelvis is a ring-shaped bony structure consisting of the sacrum, the coccyx, and the three innominate bones: the ilium, the ischium, and the pubis. The pelvis is the lower part of
the trunk and contains the bladder, the female reproductive organs, and the lower portion of the large intestine (including the rectum). An array of arteries and nerves passes through the pelvis.
The organs within the pelvis are well protected at the sides and rear, but not in the front (Figure 11–11). Forceful blows from blunt or penetrating objects are the most common cause of pelvic injuries. Fractured bones in the pelvis can puncture or lacerate internal organs and major blood vessels, causing severe internal hemorrhage. Injury to the nerves that travel through the pelvis can result in bowel, bladder, and sexual dysfunction. When assessing or treating a suspected pelvic injury, minimize movement of the pelvis, as any motion increases the risk of damage to internal structures.
Signs and Symptoms of Pelvic InjurySigns and symptoms of pelvic injuries are very similar to those of abdominal injuries. Pain, pelvic instability, and crepitus are key indicators of a pelvic fracture. Certain pelvic injuries may also cause loss of sensation in the legs, decreased range of motion, or paralysis. This may indicate an injury to the lower spine or to the nerves of the pelvis. If there are internal injuries to pelvic organs, there may be visible bleeding (rectal, urethral, or vaginal). Depending on the MOI, there may also be soft tissue injuries to the genitals, including pain and hematoma.
Care for Pelvic InjuriesThe care for pelvic injuries is similar to the care for abdominal injuries. Your priorities are to minimize additional damage, control external bleeding, and mitigate the effects of shock until the patient can be rapidly transported for advanced emergency interventions.
If you suspect a fracture of one of the pelvic bones, perform a three-plane assessment to assess its stability. Apply gentle pressure to the pelvis, first inwards, then upwards, and finally downwards. This allows you to assess the pelvic girdle as a whole, followed by the pubis, and finally the sacral
Figure 11–10: An abdominal aortic aneurysm (AAA).
Abdominal aorta
Abdominal aortic aneurysm
Inferior vena cava

CH
EST,
AB
DO
MIN
AL,
AN
D P
ELV
IC IN
JUR
IES
224
coccygeal spine. If the pressure causes the patient any pain, stop the assessment and initiate pelvic binding (described below).
Keep the patient supine and as still as possible. If necessary (and within your scope of practice), immobilize the patient on a backboard. Avoid any unnecessary movement of the patient, and avoid putting pressure on the pelvis. If any organs are visibly protruding, provide care for evisceration (see page 222).
PELVIC BINDINGPelvic binding is a technique that creates even pressure on a fractured pelvis from all sides, supporting the bones and reducing the risk of additional damage to internal structures. It may be used when fractures of the pelvic bones make the pelvis unstable (and if indicated by your scope of practice and local protocols).
Patients with an unstable pelvic injury may benefit from pelvic binding because it provides the following benefits: • Assists in controlling an internal hemorrhage
by stabilizing the pelvic ring to encourage clot formation
• Maintains circumferential immobilization and stability
• Reduces the volume within the pelvic cavity • Allows for easy access to the abdomen,
femoral vessels, and perineum
Pelvic bindings are not recommended for patients who sustain fractures from low-energy or lateral impacts.
There are various methods and commercial tools available for pelvic binding. Follow the manufacturer’s instructions for correct application when using a commercial pelvic binder.
Figure 11–11: Unlike the organs of the chest or pelvis, organs within the abdominal cavity and front of the pelvic cavity are not well protected.
Liver
Stomach
GI tract
Spleen

CH
EST,
AB
DO
MIN
AL,
AN
D P
ELV
IC IN
JUR
IES
225
If a commercial binding device is unavailable, you may use a modified method, securing a flannel blanket or bed sheet in place with clamps. To do so, perform the following steps:1. Remove outer clothing and bring the legs
together.2. Place a narrow, folded sheet—20 to 30 cm
(8 to 12 in.) wide—across a multi-level stretcher. The width of the sheet should correlate with the distance between the patient’s iliac crest and pubis symphysis.
3. Pad the spaces between the knees and ankles, and secure the legs together.
4. Lift the patient with a scoop stretcher (clamshell stretcher) onto the prepared folded sheet on the multi-level stretcher. If a multi-level stretcher is not readily accessible, insert the folded sheet from under the knees, and slide it up and under the pelvis.
5. Ensure that the top of the sheet is level with the iliac crest.
6. Cross the ends of the sheet on the anterior side of the pelvis and apply gentle tension or twist the sheet’s end until the desired tension is reached. Synchronize the movements of each side of the sheet to ensure even pressure is applied. Avoid any movement of the patient.
7. Secure the binding with clamps (or by knotting the ends) to prevent loss of tension. Position clamps laterally to avoid obstructing X-ray views.
8. Carefully tuck any loose ends of the sheet away so they will not interfere with the transporting of the patient.
9. Reassess sensation and distal circulation in the lower extremities to ensure that they have not been affected.
10. Reassess the binding periodically to ensure the tension is maintained.
During pelvic binding, patient safety is paramount. Pelvic binding needs to be performed early in the course of treatment. Once the binding is applied, it should not be removed until the patient reaches the hospital. Gentle application is recommended because manipulation and movement of an injured pelvis can cause severe damage. A scoop or clamshell stretcher is ideal. A log roll should not be used if there is a suspected pelvic injury.
Genital InjuriesPelvic injuries may involve the genitals. Genital injuries are soft tissue injuries and may be either closed wounds (e.g., contusions) or open wounds (e.g., lacerations). Due to the large number of vascular structures, genital wounds often hemorrhage. Care for injuries to the genitals is the same as care for any other soft tissue injuries (see Chapter 9).
Injuries to the genital area can be embarrassing for the patient. Act in a confident and professional manner, and briefly explain the interventions you intend to provide to the patient before proceeding. Attempt to maintain the patient’s privacy as much as possible while providing care.

Signs and Symptoms Notes
Types of Chest Injuries
CHEST INJURIES
• Respiratory distress or arrest• Pain at site of the injury that increases with
deep respirations or movement• Obvious deformity• Unequal or paradoxical chest wall
movement• Flushed, pale, or bluish discolouration of the
skin• Coughing up blood
• Open chest wound: The chest wall has been penetrated.• Closed chest wound: The skin has not broken. • Treatment varies depending on the type of chest injury.
• Rib fractures• Flail chest • Hemothorax• Pneumothorax• Subcutaneous emphysema (SCE)• Penetrating chest injuries
Signs and Symptoms General Treatment
Factors that Vary Treatment
ABDOMINAL INJURIES
• Severe pain• Bruising• External bleeding• Nausea and vomiting• Pale, moist skin• Thirst• Pain, tenderness, or tight feeling in the
abdomen• Distension in the abdomen• Pale, moist skin• Evisceration• Signs and symptoms of shock
1. Place patient in a supine position.2. Bend the knees if it does not cause pain and place a rolled
blanket or pillow under them.3. If external bleeding is present, apply trauma dressings and
gentle pressure; if gentle pressure is insufficient, place patient in the rapid transport category.
• Evisceration• Abdominal aortic aneurysm (AAA)
Signs and Symptoms General Treatment
Factors that Vary Treatment
PELVIC INJURIES
• Signs and symptoms of abdominal injuries• Pain• Pelvic instability• Crepitus• Numbness in legs• Decreased range of motion• Paralysis• Rectal, urethral, or vaginal bleeding• Hematoma
1. Keep patient supine and avoid movement if possible.2. If it’s within your training, immobilize patient.3. Avoid putting pressure on the pelvis.4. Ensure patient is in the rapid transport category.
• Suspected pelvic fracture• Pain during three-plane assessment • Evisceration
226
SUMMARYC
HES
T, A
BD
OM
INA
L, A
ND
PEL
VIC
INJU
RIE
S
226

HEA
D A
ND
SPI
NA
L IN
JUR
IES
12 Head and Spinal Injuries
227
Key ContentMechanism of Injury for Head and Spinal Injuries .............. 228 Head Injuries .......................... 228 Skull Fracture....................... 228 Objects Impaled in the Skull .................................. 230 Injuries to the Brain ............ 230 Cerebral Hematoma............ 232Spinal Injuries ......................... 233 Spinal Motion Restriction (SMR) ................................ 233 Care for Serious Head and Spinal Injuries...................... 242Rapid Extrication .................... 242 Removing Helmets and Other Equipment ................ 242
IntroductionInjuries to the head and spine can cause damage to the central nervous system (the brain and spinal cord), and this can result in paralysis, impaired mental function (e.g., behavioural disorders, speech or memory issues), or death.
Fortunately, prompt care can help minimize the damage from most head and spinal injuries. For this reason, it is important to learn to recognize situations that should make you suspect a serious head and/or spinal injury.
Injuries to the head and spine can damage both bone and soft tissue, including brain tissue and the spinal cord. It is difficult to determine the extent of damage in head and spinal injuries. Signs and symptoms of a serious head and/or spine injury may be slow to develop, especially in the case of trauma to the brain. In most cases, the only way to assess the

HEA
D A
ND
SPI
NA
L IN
JUR
IES
228
full extent of the damage is by having an X-ray or scan conducted. Since you cannot know exactly how severe an injury is in the field, always provide initial care as if the injury is serious. Remember to treat head and/or spinal injuries before minor injuries such as lacerations.
Head and spinal injuries can cause challenges when you are prioritizing care. A patient with a suspected spinal injury should have his or her spine protected from further injury, but if protecting the spine interferes with life-saving interventions, protecting the patient’s life must be the highest priority. Similarly, if you have the choice between saving a patient’s limb and protecting the patient’s spine, the spine should be your priority.
MECHANISM OF INJURY FOR HEAD AND SPINAL INJURIES
The mechanism of injury is often the best guide to determining whether someone has suffered a head and/or spinal injury (Figure 12–1). Survey the scene and think about the forces that may have been involved in the injury: Powerful blunt forces are likely to cause severe injury to the head and spine. For example, a driver whose head breaks a car windshield in a crash or a diver who hits his or her head on the bottom of a swimming pool is likely to have suffered a serious head and/or spinal injury. When evaluating the scene and talking to patients and bystanders, watch for clues that could indicate that a serious head and/or spinal injury has occurred. If the patient is found in a position that makes his or her back visible, check for signs of trauma such as bleeding, deformity, discoloration, or muscle spasms.
You should consider the possibility of a head and/or spinal injury whenever the body is subjected to powerful blunt forces (or when the cause of trauma is unknown). These situations include:
• A patient found unresponsive with anunknown cause.
• Any fall from a height greater thanapproximately 1 metre (3.3 feet).
• Any motor vehicle collision.• Any injury in which a patient’s helmet is badly
damaged or broken.
• Any injury involving a severe blunt force to thehead or trunk.
• Any penetrating injury to the head, neck, ortrunk.
• Any head injury that occurs when a patient isdiving.
• Any incident involving electrocution (includinglightning strikes).
HEAD INJURIES
There is a significant difference between a head injury and an injury to the head. An injury to the head is often a superficial injury (e.g., a cut to the face or scalp), whereas a head injury often involves brain trauma. Some trauma will result in both a head injury and an injury to the head: For example, a forceful blow could cause both contusions (injury to the head) and a concussion (head injury). Soft tissue injuries to the head are discussed in Chapter 9.
Skull FractureBecause of the risk of brain trauma, skull fractures are very serious. The signs and symptoms of a skull fracture include:
• Visible damage to the scalp.• Deformity of the skull or face.• Pain.• Swelling.• Fluid (clear or pinkish) coming from the nose,
ears, mouth, or a head wound.• Unusual pupil size.• Bruising around the eyes (raccoon eyes).• Bruising behind the ears (Battle’s sign).
With a skull fracture, spinal precautions are indicated.
ORBIT FRACTURESTrauma to the face may result in a fracture of the bones that form the orbits, or eye sockets (Figure 12–2). A patient with an orbit injury may complain of double or decreased vision. He or she may also experience numbness above the eyebrow or over the cheek, or massive discharge of fluid from the nose.

HEA
D A
ND
SPI
NA
L IN
JUR
IES
229
Figure 12–1: The mechanism of injury may help you to determine if the patient has suffered a head and/or spine injury.
Compression
Flexion
Hyperextension
Distraction
Rotation
Penetration

HEA
D A
ND
SPI
NA
L IN
JUR
IES
230
Fractures of the lower part of the orbit are most common. They can cause paralysis of the upward gaze: the patient’s eyes will not be able to follow your finger upward.
Place cold packs around the injured orbit to help reduce the swelling, without putting any pressure on the fracture site. A patient with an orbit fracture should be rapidly transported in a supine position, as surgery is usually necessary and permanent visual impairment is possible. Injuries that cause orbit fractures are often associated with concussions.
Objects Impaled in the SkullIf an object is impaled in the skull, leave it in place and stabilize it with bulky dressings. Dress the area around the wound with sterile gauze, but allow blood to drain. Avoid putting direct pressure on the head if you suspect a skull fracture.
If an object has penetrated the skull but is not visibly protruding (e.g., a bullet), cover the wound lightly with sterile dressings.
Injuries to the BrainBrain damage can occur with an open or closed wound. The severity of the injury often depends on the mechanism of injury and the force involved. All head injuries should be considered serious. The signs and symptoms vary depending on the location and severity of the injury, but they may include:
• Changes in level of responsiveness. • Paralysis or flaccidity of muscles (i.e., limp,
lacking tone), usually on one side of the body. • Unequal facial movements and/or disturbances
in vision or pupils. • Ringing in the ears or other disturbances in
hearing. • Limb rigidity. • Loss of balance. • Rapid, weak pulse. • High blood pressure with slow pulse. • Breathing problems. • Vomiting. • Incontinence.
Cushing’s reflex (or Cushing’s response) is the body’s natural response to an increase in intracranial pressure (for example, as a result of cerebral hematoma) and often indicates a serious head injury. The three characteristic signs of this response are often referred to collectively as Cushing’s triad (Figure 12–3). These signs are:1. A change in respiration (irregular and often
deep).2. An increase in blood pressure (especially a
widening of the gap between systolic and diastolic pressure).
3. Bradycardia.
If the patient has a serious head injury, blood or cerebrospinal fluid (CSF) may drain from the ear. Cover the ear lightly with a sterile dressing without applying direct pressure. If CSF drains into the nose or mouth, airway management will be necessary.
Figure 12–2: Facial trauma may result in a fracture of the eye sockets.

HEA
D A
ND
SPI
NA
L IN
JUR
IES
231
TABLE 12–1: SIGNS AND SYMPTOMS OF A CONCUSSION
THINKING AND REMEMBERING PHYSICAL EMOTIONAL SLEEP
• Confusion• Clouded or foggy mindset• Stunned or dazed
appearance• Temporary memory loss
regarding the event of the injury
• Difficulty concentrating• Difficulty remembering or
recalling events• Slowed reaction times
• Neck pain, headache, or pressure within the head
• Fatigue or low energy• Short-term loss of
responsiveness• Dizziness or loss of
balance• Double or blurred
vision, or “seeing stars”
• Ringing in the ears• Nausea or vomiting• Mumbled or indistinct
speech• Sensitivity to light
and/or noise • Not feeling “right”• Seizure or convulsion
• Irritability• Sadness or depression• Heightened emotions• Nervousness or anxiety• Personality changes
• Drowsiness• Sleeping more or less
than usual• Difficulty sleeping
CONCUSSIONA concussion is one of a subset of traumatic brain injuries (TBI) that involves a temporary alteration in brain function. An impact to the head or upper body can create forces that cause the brain to shake inside the skull. This shaking can cause the brain to collide with the bony structures that make up the skull’s inner shell, which sometimes causes swelling and/or bleeding, or to rotate within the skull, which can shear or tear the brain nerve fibres and sometimes stretch and damage the brain cells.
When the brain sustains an acceleration (or moving) injury, there is usually (but not always) damage at two points. The brain initially strikes the skull, called the coup effect, and then there is a second point of damage when the brain strikes the skull on the opposite side (the contrecoup effect).
A concussion can result from even a seemingly minor injury, and the signs and symptoms may not be immediately obvious (see Table 12–1). Concussions are evolving injuries, with the effects intensifying, dissipating, or changing unexpectedly in the days and weeks following the initial injury. Depending on the severity of the concussion, signs and symptoms can last for days, weeks, or even months. The majority of concussions,
however, resolve in a short period of time. A patient does not have to have lost consciousness to have incurred a concussion. A patient who has had one concussion is at increased risk for future concussions.
Identifying signs and symptoms of a concussion in a child is more difficult than in an adult. It is particularly difficult for a young child or infant, since these patients may not be able to describe the symptoms. In addition to the standard signs of a concussion, a child or infant may exhibit the following signs: • Disturbed sleeping and eating patterns • Excessive crying • Disinterest in activities or favourite toys
Respiration changes
Cushing’s Triad
Bradycardia Increased blood pressure
Figure 12–3: Cushing’s triad consists of three signs characteristic of increased intracranial pressure.

HEA
D A
ND
SPI
NA
L IN
JUR
IES
232
Children may also express simply “feeling off” or “not feeling right” following a physical impact. This is also a possible symptom of a concussion.
Anyone suspected of having a concussion should be examined by a physician as soon as possible. If a patient sustains a suspected concussion during an activity, he or she should cease all activity immediately and be monitored closely until he or she can be examined and evaluated by a physician. For example, athletes who have sustained a significant blow to the head should be removed from the activity immediately and not be allowed to return to the current game or practice regardless of whether they have signs and symptoms of a concussion. The player should not be left alone and should be monitored closely. The player should be medically evaluated and follow a supervised return-to-sport process. A player should complete any prescribed return-to-school process before beginning the return-to-sport process.
Cerebral HematomaThe brain requires large amounts of oxygen and so contains many arteries and veins. When the brain is injured, there is a significant risk of internal bleeding from these blood vessels. Blood from a ruptured vessel in the brain can accumulate in the skull (Figure 12–4). Because there is very little empty space in the skull, the buildup of blood creates intracranial pressure (ICP), which can
cause further damage to brain tissue. Depending on whether the damage is to an artery or a vein, bleeding in the skull can occur rapidly or slowly, sometimes even over a period of days. This bleeding will affect the brain, causing neurological effects such as changes in responsiveness. An altered level of responsiveness is often the first and most important sign of a serious head injury. This can be assessed using the Glasgow Coma Scale (described on page 93).
There are four types of bleeding that can occur in the skull (Figure 12–5): 1. Epidural Hematoma2. Subdural Hematoma3. Subarachnoid Hematoma4. Intracerebral Hematoma
EPIDURAL HEMATOMAAn epidural hematoma is arterial bleeding that occurs between the skull and the dura mater. It usually results from a low-velocity blow to the head (Figure 12–6). The signs and symptoms appear quickly, and the patient usually presents with a brief loss of responsiveness, followed by regained responsiveness and then a rapid decline in responsiveness. As this decline occurs, the patient’s pupils may become sluggish, dilated, or non-reactive. Motor function may also be impaired on one side of the body, which will be the side opposite the injury.
SUBDURAL HEMATOMAA subdural hematoma is venous bleeding in the subdural space resulting from a violent blow to the head (Figure 12–7). Neurological deficits may be obvious immediately after the blow, or they may develop up to days later. While the signs and symptoms of subdural hematoma may not appear immediately after the impact, other signs of trauma may be visible. As the pressure resulting from the bleeding increases, signs and symptoms will begin to appear. Possible symptoms include headaches, visual disturbances, personality changes, difficulty speaking, and deficits in motor function.
SUBARACHNOID HEMATOMAA subarachnoid hematoma is arterial bleeding into the subarachnoid space—the area between the arachnoid membrane and the pia mater
Figure 12–4: Blood from a ruptured vessel in the brain can accumulate in the skull.

HEA
D A
ND
SPI
NA
L IN
JUR
IES
233
surrounding the brain. The subarachnoid space is the path through which the cerebrospinal fluid circulates, and it is responsible for protecting the brain from serious injuries. Subarachnoid hematomas may occur spontaneously from a ruptured cerebral aneurysm, or they may result from a head injury. Possible signs and symptoms include a severe headache with rapid onset, vomiting, seizures, confusion, and a lowered level of responsiveness.
INTRACEREBRAL HEMATOMAAn intracerebral hematoma is caused by blunt or penetrating trauma that damages blood vessels in the brain itself. Often, there is more than one contusion, and they can enlarge over time. Specific neurological consequences depend on the location and size of the hematoma.
SPINAL INJURIES
Injuries to the spine can fracture the vertebrae and sprain the ligaments; however, these injuries usually heal without complications. The greater concern with serious spinal injuries is that the vertebrae may shift, compressing, lacerating, or severing the spinal cord. This can cause temporary
or permanent paralysis, or even death. The extent of the neural damage can depend on which area of the spinal cord is damaged.
Signs and symptoms that indicate a spinal injury may be immediately obvious or may have a delayed onset.
Signs and symptoms of spinal injuries include the following: • Changes in the level of responsiveness • Severe pain or pressure in the neck or back • Swelling in the injured area • Tingling or loss of sensation in the extremities • Partial or complete loss of movement of any
body part • Unusual bumps or depressions on the neck
or back • External hemorrhaging from the neck or back • Irregular or impaired breathing • Nausea or vomiting • Loss of balance • Incontinence • Specific changes in blood pressure and pulse
While signs and symptoms alone do not always suggest a spinal injury, they may do so in combination with the MOI. Regardless of the situation, spinal motion restriction (SMR) should be initiated for any patient with a suspected spinal injury. These patients should be in the rapid transport category.
Spinal Motion Restriction (SMR)When a head and/or spinal injury is suspected, spinal motion restriction (SMR) should be considered before extricating or transporting a patient. Moving a patient with a suspected spinal injury may cause additional damage to the spine. SMR refers to any technique for limiting movement of the patient’s neck and/or spine. It may be done manually or with special equipment (e.g., a cervical collar or backboard).
Protocols around SMR vary widely between jurisdictions, so these techniques are presented as general guidelines only: Ensure that you are familiar with the protocols that apply to you within your scope of practice.
Figure 12–5: The four main types of cerebral hematomas.
Intracerebral hematoma
Skull
Subdural hematoma
Subarachnoid hematoma
Epidural hematoma
Dura mater

HEA
D A
ND
SPI
NA
L IN
JUR
IES
234
When determining whether to initiate SMR protocols, consider as many factors as possible, including the patient’s signs and symptoms, MOI, age, and medical history. If you have good reason to suspect a spinal injury based on these factors and the patient’s overall condition, consider initiating SMR protocols.
CANADIAN C-SPINE RULEThe Canadian C-Spine Rule is a process that was developed to simplify and standardize the assessment of patients with suspected spinal injuries. It is used by both pre- and in-hospital providers of emergency care. In a hospital setting, it is used to determine whether there is sufficient risk of spinal injury to warrant radiography (i.e., X-rays and other scans). While individual protocols vary, many responders use the Canadian C-Spine Rule as the protocol for determining whether spinal motion restriction (SMR) is necessary and, if so, to what degree: In general, any patient for whom radiography is indicated should be rapidly transported with some form of SMR.
This rule is not a definitive diagnostic tool. Rather, it provides a useful system for ruling out major risk factors and assessing whether spinal motion restriction is necessary. In the past, spinal motion restriction was used for a large percentage of trauma patients, even those with almost no risk of spinal injuries: In addition to being uncomfortable for patients, this practice had the potential to aggravate existing injuries. The Canadian C-Spine Rule allows responders to determine whether there is a reasonable justification for spinal motion restriction, and to use it only in those cases. Figure 12–8 shows the steps of the assessment process.
The Canadian C-Spine Rule can be used with most patients. The rule should be applied if all of the following are true: • The patient experienced trauma. • The patient is alert (Glasgow Coma Scale score
of 15—see page 93). • The patient’s vital signs are stable. • The patient is 16 years old or older. • The patient has no acute paralysis.
Yes
CANADIAN C-SPINE RULE
1.HIGH-RISK FACTOR
PRESENT?
Age ≥ 65 years
Paresthesia in extremities
Dangerous MOI
3.ABLE TO ACTIVELY
ROTATE HEAD?
Rotates head 45 degreesleft and right
SMR not indicated
Spinal motion restriction(SMR) indicated.
2.SAFE TO ASSESS RANGE
OF MOTION?
MOI = Simple rear-end MVC
Position = Sitting
Ambulatory at any pointpost injury
Deferred onset of neckpain post injury
No midline C-spinetenderness
WHEN TO APPLY RULE:
• Trauma indicated
• The patient is alert
• Stable vital signs
• Age ≥ 16 years
• No acute paralysis
• No vertebral disease
• No previous C-spine surgeryNo
Yes
Yes
No
No
Figure 12–8: The assessment process for the Canadian C-Spine Rule.

HEA
D A
ND
SPI
NA
L IN
JUR
IES
235
• The patient has no known vertebral disease. • The patient has had no previous C-spine
surgery.
First, determine whether the patient has any high-risk factors. If any of the following are true, spinal immobilization may be indicated for the patient: • The patient is 65 years old or older. • The patient has paresthesia (a tingling,
burning, or prickling sensation) in the extremities.
• There was a dangerous MOI (defined as one of the following):
◆ Fall from a height greater than 1 metre (3.3 feet) or 5 stairs
◆ An axial load injury to the head (struck on the top of the head—e.g., while diving)
◆ A high-speed motor vehicle collision (greater than 100 km/h or 60 mph), vehicle rollover, or vehicle ejection
◆ A motorized recreational vehicle collision ◆ A motor vehicle–bicycle collision
If the patient has no high-risk factors, determine whether it is safe to assess his or her range of motion. If any of the following are true, the patient is unlikely to require spinal motion restriction: • MOI was a simple rear-end motor vehicle
collision. • The patient is in a sitting position.
• The patient has been ambulatory (walking) at any point since the injury.
• The patient has no immediate onset of neck pain after the injury.
• The patient has no midline C-spine tenderness.
If any of these factors apply to the patient, assess the patient’s range of motion by having the patient gently rotate his or her head 45 degrees left and right. If he or she is able to do so, spinal motion restriction may not be indicated. If the patient cannot rotate his or her head, at least partial spinal motion restriction may be indicated.
IN-LINE STABILIZATIONTo bring a patient’s head into neutral alignment, use a technique called in-line stabilization. The head is in neutral alignment when the chin is in line with the neck and the spine is straight. In-line stabilization can be performed on a patient in several positions, including supine, sitting, standing, and in the recovery position.
To perform in-line stabilization:1. Direct the patient to remain still.2. Ensure that your arms or elbows are
completely stable.3. Simultaneously place one hand on each side of
the patient’s head.4. Slowly and gently rotate the head until the
patient’s chin is in line with his or her body’s midline (the middle of the chest).
Figure 12–6: An epidural hematoma is an arterial bleed between the skull and the dura mater.
Figure 12–7: A subdural hematoma is a venous bleed in the subdural space.
Dura mater Dura materSkull Skull

HEA
D A
ND
SPI
NA
L IN
JUR
IES
236
5. Slowly and gently tilt the head into the neutral position.
6. Maintain manual stabilization.
If you encounter any resistance, or if the patient complains of any neck pain, stop moving the head and maintain manual stabilization in the current position.
Maintaining the head in this neutral, anatomically correct position helps prevent further damage to the spinal column (Figure 12–9, a-b). If a second responder is available, he or she can complete assessments and interventions for any other conditions while the first responder keeps the head and neck stable. If you are alone, place a safe object such as a sandbag, an IV bag, or a rolled-up towel on each side of the head.
While in-line stabilization is recommended for most cases of suspected head and/or spinal injuries, it should not be used under the following circumstances: • The patient’s head is severely angulated to one
side. • The patient complains of pain, pressure, or
muscle spasms in the neck when you begin to align the head with the body.
• You feel resistance when attempting to align the head with the body.
In these circumstances, support the patient’s head in the position in which you found it, unless this position negatively affects the patient’s airway.
Rotate the head along only one axis at a time (i.e., up and down or left and right, not both at once).
Once you have manually stabilized the head and neck, do not remove your hands until the patient has been fully secured to a spinal motion restriction device or (if permitted by your scope of practice) it is determined that there is no longer a need for SMR.
MANUAL SPINAL MOTION RESTRICTIONThere are a number of effective methods for manually stabilizing a patient’s head. You should choose the method that is most appropriate for the patient’s position and/or the procedure you are performing.
Head GripThis is a basic manoeuvre that is suitable for patients in a supine position (Figure 12–10). It is the preferred method for supporting a patient while a cervical collar is applied.
To perform a head grip:1. Kneel behind the patient’s head, facing the
patient’s chest.2. Place your elbows on the ground and then
place your hands on either side of the patient’s head. Your fingers should not extend past the patient’s ears.
3. Place your thumbs on the patient’s forehead, your index and middle fingers on the cheekbone, and your ring and little fingers below the patient’s ears.
Figure 12–9, a-b: Support the patient’s head in line with the body using in-line stabilization.
a
b

HEA
D A
ND
SPI
NA
L IN
JUR
IES
237
4. If you need to manipulate the patient’s airway, move your index and middle fingers to the angle of the jaw and displace the mandible (the lower jaw) upwards (away from you) while maintaining head support in the neutral position.
Trapezius Squeeze (Trap Stabilization)The trapezius squeeze, or trap stabilization, is used when manual stabilization will be necessary for a longer period, as it causes less fatigue for the responder (Figure 12–11). It can also be used when rolling a patient from a supine to a lateral position (if a patient vomits, for example).
To perform a trapezius squeeze:1. Kneel behind the patient’s head, maintaining
alignment with the patient’s body. 2. Place your elbows on the ground or on your
knees and then extend your arms along either side of the patient’s head.
3. Slide your hands under the patient’s trapezius muscles, with your thumbs pointing downward on the front of the patient’s trapezius muscles and your fingers pointing along the long axis of the body (parallel to the spine). Do not turn your hands to cradle the patient’s neck.
4. Move your forearms inwards to support the patient’s head (without lifting).
5. Apply firm pressure to maintain support of the patient’s head in a neutral position.
Modified Trapezius StabilizationThe modified trapezius stabilization is used when rolling a patient to a lateral position from either a supine or a prone position (Figure 12–12). It may also be used in place of the trapezius squeeze when the patient is supine.
To perform a modified trapezius stabilization:1. Kneel behind the patient’s head, keeping
yourself aligned with the patient’s body.2. Support your elbow on the ground or against
your knee and then grip the patient’s trapezius muscle with one hand while simultaneously placing the palm of your other hand against the side of the patient’s head. Your fingertips should not extend beyond the patient’s earlobe.
3. Apply firm pressure to stabilize the head between your palm and forearm.
Figure 12–11: The trapezius squeeze.
Figure 12–10: The head grip.
Figure 12–12: The modified trapezius stabilization.

HEA
D A
ND
SPI
NA
L IN
JUR
IES
238
Sternal Forehead GripThe sternal forehead grip is typically used for transferring manual spinal restriction of a patient from one responder to another (Figure 12–13). It is used if the responder maintaining the manual stabilization must release the patient.
To perform the sternal forehead grip:1. Kneel with one leg beside the patient’s chest
or shoulders and the other leg by the patient’s head.
2. Place your elbow and forearm along the patient’s sternum.
3. Place your hand on the patient’s face, with your thumb on one cheekbone and your index and middle fingers on the other cheekbone. Arch your hand to stay clear of the patient’s nose and mouth. At the same time, place your other elbow on your knee and your other hand on the patient’s forehead.
4. Apply firm pressure to hold the head and neck in position. Avoid rotating the head or compressing the head and neck toward the body.
5. Arching your hand raises your forearm, creating room for sandbags or other devices to be placed or removed from each side of the patient’s neck, or for your partner to adjust his or her grip.
Sternal/Spinal GripThis grip is used when a patient is in a seated position (e.g., on the floor or in a vehicle) (Figure 12–14).
To perform a sternal/spinal grip:1. Kneel at a right angle to the patient, at his or
her side. 2. Place your elbow and forearm along the
patient’s sternum.3. Place the hand of the same arm on the
patient’s face, with your thumb on one cheekbone or mandible and your index and middle fingers on the other cheekbone or mandible.
4. At the same time, position your other arm along the patient’s spine and grip the occiput (the back of the head).
HARD CERVICAL COLLARSOnce the head is manually stabilized in an anatomical position, a rigid cervical collar should be applied (Figure 12–15). This collar helps minimize movement of the head and neck and keeps the head in line with the body. It is important to note that although cervical collars reduce movement and some range of motion, these devices alone do not provide adequate SMR. The collar must always be used in conjunction with manual in-line stabilization or a mechanical motion restriction device.
Figure 12–14: The sternal/spinal grip.
Figure 12–13: The sternal forehead grip.

HEA
D A
ND
SPI
NA
L IN
JUR
IES
239
Proper sizing of a hard cervical collar is very important, and there are a wide variety of collars available. If the collar is too short, it will not provide enough support, whereas if it is too tall, it may hyperextend the neck. Hard collars come in a variety of sizes. Some collars are adjustable to accommodate different sizes of patients. Accurate measurement is crucial to support and restrict the area properly without aggravating any injuries. Applying a hard cervical collar requires two responders: Responder A maintains the alignment of the head while Responder B sizes and attaches the collar. To size and apply a hard collar, perform the following steps:1. Ensure that the patient’s head is in the neutral
position. If this is not safe or possible, use manual stabilization instead of a cervical collar. If the patient is supine, the head and shoulders should both be resting on the same surface.
2. Responder A applies manual in-line stabilization from behind the patient and maintains it throughout the procedure. Responder A’s fingertips should not extend beyond the patient’s earlobe, as this makes applying the collar difficult.
3. Responder B removes or cuts away any jewellery or clothing that could interfere with the placement of the collar (e.g., necklaces, collared shirts, jackets) and draws the patient’s
arms gently down towards the waist (so long as this does not aggravate any injuries).
4. Responder B measures the distance between the top of the patient’s trapezius and the bottom of the patient’s chin using his or her fingers (Figure 12–16). This measurement indicates the appropriate size of the collar. Familiarize yourself with the brand of hard collar you are using and the manufacturer’s measurement marks.
5. Responder B prepares the collar for application. As always, refer to the manufacturer’s directions.
6. Responder B properly angles the collar for placement and slides the end with the attached strap towards the back of the neck.
7. Responder B positions the front of the collar beneath the patient’s chin while Responder A maintains the patient’s head in the neutral position. The chin piece should rest snugly beneath the patient’s chin, supporting it gently. The lower portion of the collar should be centred and resting on the patient’s sternum.
8. Responder B reaches carefully behind the neck to grasp the end of the strap and draw it around the back of the neck.
9. Responder B secures the collar with the attached strap.
10. After the collar is applied, Responder B visually checks to make sure it is correctly placed and fitted properly, and Responder A confirms this assessment.
Figure 12–15: A rigid cervical collar.
Figure 12–16: To select the correct size of cervical collar, measure the distance from the top of the trapezius to the bottom of the chin.

HEA
D A
ND
SPI
NA
L IN
JUR
IES
240
11. Gently tug the collar where it meets the sternum, then check the collar at the sternum, at each shoulder, and at the chin to ensure that the collar is positioned correctly at each point. If the patient is responsive, ensure that he or she is comfortable and can breathe normally.
12. Responder A maintains in-line stabilization until the patient is fully secured to a spinal restriction device.
SPINAL IMMOBILIZATIONOnce the cervical collar has been applied, the patient’s entire body should be immobilized. Manual SMR should be maintained throughout this process. Spinal immobilization may be accomplished with a long backboard, though local protocol may dictate other procedures.
Long backboards and scoop stretchers (clamshell stretchers) may also be used for extrication: In some cases, the patient may then be transferred to a multi-level stretcher with a soft pad for transportation.
Once the cervical collar is in place, the patient can be positioned on the backboard. This is done by log-rolling the patient onto the board. Log-rolling helps to keep the head in line with the body. It requires a minimum of two responders: one to maintain in-line stabilization and another to position the backboard and roll the patient’s body onto it while keeping the spine in a straight line. However, if possible, it is preferable to perform this technique with at least three responders. With three responders, one can provide in-line stabilization while the second and third log-roll the patient and position the backboard (Figure 12–17).
If a patient is prone, he or she must be rolled into a supine position. This requires a minimum of two responders. When rolling the patient into the supine position, consider rolling him or her directly onto the backboard in order to limit further movement. The head should be kept in the position found during this roll. It may be moved into the neutral position using in-line stabilization once the roll is complete (if indicated).
Babies and children have large heads and may require padding under the body when being placed on a board. Collars and other equipment specifically designed for children should be used when possible.
Before applying the straps, ensure that the patient is in the correct position on the backboard: The top of the patient’s head should not go beyond the end of the board. Otherwise, you must adjust the patient’s position (using the appropriate technique to maintain spinal motion restriction).
Once the patient’s body is positioned on the backboard, ensure that the head is in the proper neutral position. If necessary, place padding under or around the head to maintain this neutral position.
Next, secure the chest to the backboard, followed by the pelvis and legs (Figure 12–18). Padding any cavities between the body and the board (e.g., behind the knees) helps reduce the risk of injury and increases the patient’s comfort. The straps should be snug, but not so tight that they cause discomfort or restrict the patient’s respiration.
Always secure the head last. Use tape or a commercial head restriction device. It is important to maintain manual in-line stabilization until the patient’s head is fully secured. To reduce the risk of injury, you may also secure the patient’s hands over the abdomen before moving him or her.
Figure 12–17: Log-roll a patient onto a backboard while keeping the spine in as straight a line as possible.

HEA
D A
ND
SPI
NA
L IN
JUR
IES
241
You may have a commercially made head restriction device available (Figure 12–19). Many of these devices use Velcro® straps to secure the head. Follow the manufacturer’s directions when using these devices.
There may be instances in which SMR must be performed for a patient in a prone or lateral position. In these cases, follow local protocols.
In some cases, it may be sufficient to apply a hard cervical collar and place the patient supine on a soft mattress (Figure 12–20).
UPPER BODY MOTION RESTRICTION DEVICESAn upper body motion restriction device is a board approximately 1 metre (about 3 feet) long that can be used to restrict motion in the upper body of a patient (Figure 12–21). Multiple types are available, including rigid models (often referred
to as short boards) and flexible models that can be wrapped around a patient’s sides. These devices can be used to restrict movement of a patient’s cervical spine when long backboards are not practical (for example, in a confined space or inside a motor vehicle). A short board can also be used as a long backboard for an injured child.
While manufacturer recommendations vary and should be followed, the following general steps are used to secure a patient to an upper body motion restriction device: 1. Place the device behind the patient. This can
be performed after manual in-line stabilization and the application of a rigid cervical collar.
2. Secure the middle torso by fastening the middle and lower chest straps. The straps should be snug so that fingers cannot be slipped beneath them.
Figure 12–21: Attaching the head straps on an upper body motion restriction device (e.g., Kendrick Extrication Device, or K.E.D.®, shown here).
Figure 12–20: A patient with a hard cervical collar on a soft mattress.
Figure 12–18: Use several straps and/or triangular bandages to secure the patient to the backboard.
Figure 12–19: There are commercially available head restriction devices.

HEA
D A
ND
SPI
NA
L IN
JUR
IES
242
3. Position and fasten each groin/leg strapseparately, forming a loop. These strapsprevent the device from moving up and thelower end from moving laterally.
4. Pad the head and secure it to the device.5. Secure the upper torso by fastening the upper
chest strap.6. Move the patient carefully as a unit to a long
backboard by rotating the person and upperbody motion restriction device onto the board.The legs are held proximal to the knees andlifted during the transition.
7. Centre the patient on the backboard. Loosenany groin straps, and lower the legs slowly toan in-line position.
8. Secure the patient to the backboard, keepingthe upper body motion restriction device inplace.
CARE FOR SERIOUS HEAD AND SPINAL INJURIES
In addition to the risk of permanent paralysis, head and spinal injuries can become life-threatening emergencies if the nerve signals for crucial body processes are impaired. An injury to the brain can stop a patient’s respiration or heart, for example, so caring for serious head and spinal injuries includes supporting the respiratory and circulatory systems as necessary. When providing treatment for a patient with a suspected head or spinal injury:
• Place the patient in the rapid transportcategory.
• Initiate spinal motion restriction (SMR)protocols.
• Control any external bleeding.• Monitor responsiveness and be prepared to
provide interventions for respiratory or cardiaccomplications.
Caring for a head and/or spinal injury is similar to caring for any other serious soft tissue or musculoskeletal injury. Because movement of an injured head and/or spine can cause irreversible damage to the spinal cord, keep the patient as still as possible until he or she can be transported.
RAPID EXTRICATION
In some cases, it may be necessary to move a patient quickly using only manual in-line stabilization. Rapid extrication may be required when:• The scene becomes unsafe.• Life-saving interventions cannot be performed
due to the location or position of the patient.• It is necessary to move the patient to gain access
to another patient who requires life-savinginterventions.
If the situation requires immediate extrication due to dangers at the scene, pull the patient out of the situation, while taking precautions to stabilize the head and neck in the safest manner possible.
REMOVING HELMETS AND OTHER EQUIPMENT
If a patient is wearing a helmet that interferes with necessary assessments or interventions, you must remove it correctly and safely to avoid causing further harm to the patient.
Helmets fall into multiple categories, including sports helmets and motorcycle helmets (Figure 12–22). While many sports helmets have detachable face masks, it may be safer and easier to remove the entire helmet depending on the type of equipment. Removing any chest or shoulder pads is also advisable, as these can interfere with necessary assessments and interventions.
To remove an athletic helmet and shoulder pads, follow these steps:1. Responder A provides manual stabilization
while Responder B cuts away the chinstrap,shoulder pad straps (sides and front), andjersey.
2. Responder B then removes the internal cheekpads (using 2–3 tongue depressors tapedtogether) and/or deflates the helmet’s airbladder system (using a syringe or air pump).These are most common in football helmets,though individual models vary.

HEA
D A
ND
SPI
NA
L IN
JUR
IES
243
3. Responder B then grasps the patient’s mandible with the web space of his or her hand, so the thumb is on one side and the middle and index fingers on the other, while resting his or her forearm on the patient’s sternum for stability. Responder B then slides the other hand between the top of the athlete’s shoulder and the inside of the shoulder pad, underneath the deltoid cup. From here, Responder B continues to slide his or her hand up towards the back of the patient’s neck, through the opening of the shoulder pads, terminating at the back of the patient’s head (occipital region), thus grasping the head without lifting it off of the ground.
4. Responder A carefully slides the helmet gently up until it just clears the patient’s ears, then pauses while Responder B readjusts his or her hand position under the patient’s head.
5. Responder A then removes the helmet the rest of the way, making sure to tilt it backwards to avoid hitting the patient’s nose. This may require a gentle forward and backward motion, but care should be taken to avoid motion of the head. Responder B maintains manual stabilization from below to prevent the head from tilting during the helmet removal.
6. From the top of the patient’s head, Responder A then places both hands on the sides of the neck opening of the shoulder pads and pulls straight back along the ground, bringing the shoulder pads up over the patient’s head. Care should be taken to help clear the shoulder pads over the patient’s nose to avoid causing excessive cervical extension.
7. Once the shoulder pads have been removed, Responder A takes over manual stabilization (page 235) of the patient’s head from Responder B and lowers it to the ground.
Removing protective equipment (e.g., a football helmet and shoulder pads) is a skilled technique that requires hours of practice, and often requires several responders trained in this skill. If you encounter this type of situation during an athletic event, look to the certified athletic therapist or trainer to assist in the removal of the face mask, helmet, and shoulder pads, as the necessary tools will be included in their emergency kits.
Prior planning and interdisciplinary practice involving the responder, certified athletic therapist or trainer, and emergency department personnel is recommended prior to the beginning of the athletic season, particularly for sports involving helmets and shoulder pads. If you are likely to be responding to injuries sustained during athletic activities, familiarize yourself with the specific types of protective equipment used (especially helmets) to facilitate care.
Removing a motorcycle helmet is comparatively simple because the helmet design is less complex and the patient will usually not be wearing shoulder or chest pads as well.
The steps for removing motorcycle helmets with two responders are as follows:1. If the patient is wearing glasses, remove them
before attempting to remove the helmet. Ensure that the patient is supine.
2. Responder A holds both sides of the helmet (head grip).
3. Responder B loosens the strap at the D-rings while Responder A maintains stabilization of the patient’s head (Figure 12–23, a).
4. Responder B then places one hand on the patient’s mandible at an angle, with the thumb on one side and the middle and index fingers on the other. With the other hand, Responder B holds the back of the patient’s head (occipital region) (Figure 12–23, b) as high up as possible without lifting the head off of the ground.
5. Responder A carefully slides the helmet gently up until it just clears the patient’s ears, then pauses while Responder B readjusts his or her hand position under the patient’s head.
Figure 12–22: Helmets fall into multiple categories.

6. Responder A then removes the helmet the rest of the way, making sure to tilt it backwards to avoid hitting the patient’s nose (Figure 12–23, c). This may require a gentle forward and backward motion, but care should be taken to avoid causing any motion of the head.
7. Responder B maintains manual stabilization from below to prevent the head from tilting during the helmet removal. After the helmet has been removed, Responder A lowers the head to the ground while maintaining manual stabilization (page 235).
HEA
D A
ND
SPI
NA
L IN
JUR
IES
244
Figure 12–23, a-c: a, One responder restricts motion of the head by holding both sides of the helmet while the second responder loosens the strap; b, the second responder holds the patient’s mandible and base of the skull; and c, the first responder removes the helmet while the second responder maintains manual stabilization.
a
b
c

Skull Fracture
Epidural Hematoma
Brain Injury
Orbit Fracture
Concussions
Subarachnoid Hematoma
Intracerebral Hematoma
Visible damage to scalp; deformity of skull or face; pain; swelling; fluid from the nose, ears, mouth, or head wound; unusual pupil size; bruising around the eyes; bruising behind the ears
Changing responsiveness (in and out) that results in rapid decline in responsiveness; slowed pupil response or non-reactive pupils; dilated pupils; impaired motor function on the side opposite the injury
Changes in LOR; paralysis or flaccidity of muscles; unequal facial movements; vision or pupil disturbances; hearing disturbances; limb rigidity; loss of balance; rapid or weak pulse; high blood pressure with slow pulse; respiratory problems; vomiting; incontinence
Double or decreased vision; numbness of the cheek or above the eyebrow; massive fluid discharge from the nose; paralysis of upward gaze
Physical and emotional changes; disturbances in sleep pattern and drowsiness; memory and mental difficulties (see Signs and Symptoms of a Concussion table below)
Severe headache with rapid onset; vomiting; seizures; confusion; lowered level of responsiveness
More than one contusion; contusions that enlarge over time; specific signs and symptoms depend on location and size of hematoma
SIGNS AND SYMPTOMS OF DIFFERENT HEAD INJURIES
When to Suspect Head and/or Spinal Injuries
• A patient found unresponsive with an unknown cause • Any fall from a height greater than approximately 1 m (3.3 feet) • Any motor vehicle collision • Any injury in which a patient’s helmet is badly damaged or broken • Any injury involving a severe blunt force to the head or trunk • Any penetrating injury to the head, neck, or trunk • Any head injury that occurs when a patient is diving • Any incident involving electrocution (including lightning strikes)
HEA
D A
ND
SPI
NA
L IN
JUR
IES
SUMMARY
245
Thinking and Remembering Physical Emotional Sleep
SIGNS AND SYMPTOMS OF A CONCUSSION
• Confusion• Clouded or foggy mindset• Seeming stunned or
dazed• Temporary memory loss
regarding the event of the injury
• Difficulty concentrating• Difficulty remembering
or recalling events• Slowed reaction times
• Irritability• Sadness or
depression• Heightened
emotions• Nervousness or
anxiety• Personality changes
• Drowsiness• Sleeping more or
less than usual• Difficulty sleeping
• Neck pain, headache, or pressure within the head
• Fatigue or low energy• Short-term loss of responsiveness• Dizziness or loss of balance• Double or blurred vision, or
“seeing stars”• Ringing in the ears• Nausea or vomiting• Mumbled or indistinct speech• Sensitivity to light and/or noise• Not feeling “right”• Seizure or convulsion
HEA
D A
ND
SPI
NA
L IN
JUR
IES

Signs and Symptoms of Spinal Injuries
• Changes in the level of responsiveness • Severe pain or pressure in the neck or back • Swelling in the injured area • Tingling or loss of sensation in the extremities • Partial or complete loss of movement of any body part • Unusual bumps or depressions on the neck or back • External hemorrhaging of the neck or back • Irregular or impaired breathing • Nausea or vomiting • Loss of balance • Incontinence • Specific changes in blood pressure and pulse
How to Perform In-Line Stabilization
1. Direct the patient to remain still.2. Place one hand on each side of the head.3. Slowly rotate the head until the chin is in line with the body’s midline.4. Slowly tilt the head into the neutral position.5. Maintain manual stabilization.
Methods for Manual Spinal Motion Restriction (SMR)
• Head grip • Trapezius squeeze • Modified trapezius stabilization • Sternal forehead grip • Sternal/spinal grip
General Guidelines for Serious Head or Spinal Injuries
• Place the patient in the rapid transport category.
• Initiate SMR protocols. • Control any external
bleeding. • Monitor responsiveness
and prepare to provide interventions for respiratory or cardiac issues.
When Rapid Extrication Is Needed
• The scene becomes unsafe. • Location or patient position makes life-saving interventions impossible. • The patient is blocking access to another patient with life-threatening injuries.
246
SUMMARYH
EAD
AN
D S
PIN
AL
INJU
RIE
S
246

AC
UTE
AN
D C
HR
ON
IC IL
LNES
SES
13 Acute and Chronic Illnesses
247
Key ContentAltered Mental Status ........... 248 Syncope................................ 248Diabetic Emergencies ............. 249 Seizures ................................... 251 Types of Seizures ................. 251 Epilepsy ................................ 252Peritonitis ............................... 253 Appendicitis ............................ 253 Bowel Obstruction ................. 254 Gastroenteritis ....................... 254 Kidney Stones ........................ 255 Peptic Ulcers ........................... 255 Gastrointestinal (GI) Bleeding............................... 255 Urinary Tract Infection (UTI) ... 256
IntroductionAn illness can be categorized as either acute (with a sudden onset) or chronic (persisting over time). Both acute and chronic illnesses can develop into sudden medical emergencies either rapidly or gradually.
Sometimes, there are no warning signs or symptoms to indicate a medical emergency caused by an acute or a chronic illness. Other times, a patient may only be able to communicate that he or she is feeling ill or that something is wrong. Symptoms may also be atypical; for example, older adults or those with diabetes may have a heart attack without experiencing chest pain.
Conditions such as diabetes, epilepsy, and high-altitude illness can cause a variety of signs and symptoms, including sudden, unexplained altered mental status. A patient may complain of

AC
UTE
AN
D C
HR
ON
IC IL
LNES
SES
248
feeling light-headed, dizzy, or weak. The patient may also feel nauseated or may vomit. Respiration, pulse, and skin characteristics may change. Ultimately, if a patient looks and feels ill without having experienced trauma, this could indicate a medical emergency that requires immediate care.
When helping a patient with a general medical complaint, perform the standard assessment and care processes, such as conducting primary and secondary assessments and providing any indicated interventions.
ALTERED MENTAL STATUS
Altered mental status is often characterized by a sudden or gradual change in a patient’s level of responsiveness, including drowsiness, confusion, and partial or complete loss of responsiveness. Altered mental status is sometimes caused by a temporary reduction of blood flow to the brain, such as when blood collects or pools in the legs and lower body.
SyncopeSyncope (fainting) occurs when the brain is suddenly deprived of its normal blood flow and momentarily shuts down.
Syncope may occur when blood flow to the brain is momentarily reduced. It can be triggered or caused by the following:
• Pain• Emotional shock• A drop in blood pressure• A pinched blood vessel in the neck• A drop in blood sugar• Certain medications• Standing for a long time• Exposure to heat• Overexertion• Medical conditions (e.g., heart disease)
Pregnant women and older adults may be more likely than other patients to experience syncope while suddenly changing positions (e.g., moving from lying down to standing up).
A patient may faint with or without warning. Often, the patient may first feel light-headed or dizzy. There may be signs of shock, such as cool, moist, pale or ashen skin. The patient may feel nauseated and complain of numbness or tingling in the fingers and toes. The patient’s respiration and pulse may become faster.
CARE FOR SYNCOPEMake sure the patient’s airway is open, and place an unresponsive patient in the supine position. Have suction equipment ready for use. Do not allow the patient to eat or drink, as this can increase the chance of vomiting. Since a patient’s condition may deteriorate and make communication impossible, attempt to gain information quickly from the patient, family members, or bystanders. Any information you can obtain may assist with the patient’s treatment, both at the scene and after care is transferred.
Sometimes, a patient may briefly faint and slowly begin to regain responsiveness. Syncope often resolves itself when the patient moves from a standing or sitting position to a reclining position. When normal circulation to the brain resumes, the patient usually regains responsiveness within minutes.
Syncope itself does not usually harm the patient, but a fall may lead to an injury. Take SMR precautions if necessary. If you can reach a patient who is starting to collapse, gently lower the patient to the ground or another flat surface (without risking injury to yourself). Place the patient in a supine position. Assess the patient’s respiration and pulse, and loosen any restrictive clothing.
Although the patient usually recovers quickly, the underlying cause may not be clear. Any altered mental status can be an indicator of a serious underlying condition. Always conduct a thorough assessment of any patient who has experienced a loss of responsiveness.

AC
UTE
AN
D C
HR
ON
IC IL
LNES
SES
249
DIABETIC EMERGENCIES
The body’s cells need glucose (sugar) as a source of energy to function normally. Through the digestive process, the body extracts glucose from food, which is then absorbed into the bloodstream. Insulin (a hormone produced in the pancreas) is required for the transfer of glucose from the bloodstream to the body’s cells. Without a proper balance of glucose and insulin, the cells will starve and the body will not function properly.
Diabetes mellitus is a condition in which the body either fails to produce enough insulin or does not effectively use the insulin it does produce. There are two major types of diabetes.
Type 1 diabetes (insulin-dependent diabetes) occurs when the body does not produce enough insulin for its needs. Most people with insulin-dependent diabetes have to inject insulin into their bodies daily. This type of diabetes often begins in childhood and so can be referred to as juvenile diabetes.
Type 2 diabetes can be insulin-dependent or non-insulin-dependent diabetes. It occurs when the body does not produce enough insulin for its needs, or when the body does not properly use the insulin it produces.
A patient with diabetes may use an insulin pump, which is a small portable device consisting of an external pump and a small tube that fits under the patient’s skin. This device provides continuous doses of insulin throughout the day and can be adjusted to meet the patient’s insulin requirements. If you encounter an insulin pump during your patient assessment, this may be a clue that the patient’s condition could be a diabetic emergency.
Some pregnant women develop diabetes as an effect of pregnancy: This is referred to as gestational diabetes. Healthy diet and exercise can help to reduce the risk, but medication may be necessary as well. Gestational diabetes usually disappears after a woman gives birth, but ongoing monitoring may be necessary.
A person with diabetes must carefully monitor his or her diet and exercise. People with insulin-dependent diabetes must also regulate their use of insulin (Figure 13–1). When a person with diabetes fails to control these factors, it leads to an excessive or insufficient glucose level, causing an imbalance in the body. The level of glucose may become too high (hyperglycemia) or too low (hypoglycemia). Either imbalance causes illness, which can become a diabetic emergency.
HyperglycemiaHyperglycemia is a condition in which a patient’s blood glucose level (BGL) is too high. In patients with diabetes, this usually occurs when the insulin level in the body is too low: Because this prevents glucose from transferring to the body’s cells, it results in a buildup of glucose in the blood. The body’s cells do not receive sufficient glucose from the bloodstream even though it is abundant.
The body attempts to meet its need for energy by using other stored food and energy sources (e.g., fats). Converting fat into energy produces waste products and increases the acidity level in the blood, causing a condition called acidosis. As this occurs, the patient becomes ill. If it continues, the hyperglycemic condition deteriorates into a diabetic coma.
Figure 13–1: People with insulin-dependent diabetes must regulate their use of insulin. They may need to check their blood glucose level frequently.

AC
UTE
AN
D C
HR
ON
IC IL
LNES
SES
250
HypoglycemiaHypoglycemia occurs when the BGL in the blood is too low. In patients with diabetes, this often occurs when the insulin level in the body is too high (but it may have other causes as well). A patient’s BGL can become too low if a patient with diabetes: • Takes too much insulin. • Fails to eat adequately. • Over-exercises and uses glucose more quickly
than it is replaced.
In this situation, the small amount of glucose in the blood is used up rapidly, and there is not enough for the brain to function properly. This can result in an acute condition called insulin reaction, which can be life-threatening.
Many people with diabetes carry a glucometer, a device with which they can test their blood glucose level (BGL).
Signs and Symptoms of Diabetic EmergenciesThe signs and symptoms of hyperglycemia and hypoglycemia are somewhat different, but common signs and symptoms include: • Changes in the level of responsiveness,
including dizziness, drowsiness, and confusion. • Tachypnea (rapid breathing). • Tachycardia (rapid pulse). • Feeling and looking ill.
It is not important for you to differentiate between hyperglycemia and hypoglycemia: The standard treatment for both conditions is the same. Giving glucose to a hyperglycemic patient will not cause additional harm.
Treatment for Diabetic EmergenciesIf the patient is known to have diabetes (as identified in your secondary assessment) and exhibits the signs and symptoms previously stated, you should suspect a diabetic emergency.
Test the patient’s blood glucose level (BGL). If possible, find out what the patient’s average reading is. A normal BGL is usually between 4 and 7 mmol/L. After assessing the reading, determine whether you will use oral glucose. Local protocols often govern the treatment of diabetic emergencies, but the following guidelines may be followed.
If the patient is able to follow directions and swallow safely, he or she should chew 2 to 5 glucose tablets (Figure 13–2). Other oral glucose products are available (e.g., glucose gel): Follow the manufacturer’s recommendation for their use.
If signs and symptoms persist 5 to 10 minutes after the first dose of glucose, the patient should be placed in the rapid transport category. Provide a second dose of glucose. Supplemental oxygen is also indicated. When transferring care, ensure that you communicate about any glucose the patient has received.
Never give any patient insulin.
Figure 13–2: If a patient having a diabetic emergency can safely swallow and follow directions, have him or her chew 2 to 5 glucose tablets or provide oral glucose gel.

AC
UTE
AN
D C
HR
ON
IC IL
LNES
SES
251
GLUCOSE GELGlucose gel is a concentrated form of glucose designed for rapid absorption. If glucose gel is included in your local protocol and scope of practice, it may be used for an unresponsive patient with suspected hypoglycemia.
To administer glucose gel:1. Ensure that the patient is in the semi-
prone position.2. Ensure that suction devices are ready to
use.3. Remove any airway adjuncts that could
interfere with the administration of oralglucose.
4. Place approximately 12 grams (halfa tube) of gel on the inside of thepatient’s lower cheek. You may usea tongue depressor for this step. Themore thoroughly you spread theglucose on the patient’s cheek, themore quickly it will be absorbed.
GLUCAGONGlucagon is a substance that can be injected (intramuscularly or subcutaneously) into a hypoglycemic patient to increase his or her BGL by accelerating the breakdown of glycogen into glucose. It should be used when the patient has signs and symptoms of hypoglycemia and is unable to protect his or her airway (i.e., when oral glucose is not indicated). Glucagon should only be given to an adult with a BGL lower than 4 mmol/L or a child with a BGL lower than 3 mmol/L.
Glucagon is a fast-acting medication with a short half-life: It will be largely metabolized within 30 minutes. A patient who receives glucagon should also ingest additional sugar and/or complex carbohydrates.
Glucagon also stimulates the release of catecholamines. In the presence of pheochromocytoma, glucagon can cause the tumor to release catecholamines, which may result in a dangerous sudden and marked increase in blood pressure. Because glucagon is derived from animal products, it is contraindicated if a patient has a hypersensitivity to pork or beef proteins.
SEIZURES
A seizure is the result of abnormal electrical activity in the brain. It can cause temporary changes in movement, function, sensation, awareness, or behaviour. Seizures can occur when the normal functions of the brain are disrupted by injury, disease, fever, infection, metabolic disturbances, or conditions causing a decreased oxygen level.
Types of SeizuresGENERALIZED SEIZURESGeneralized tonic-clonic seizures, also called grand mal seizures, are the most well-known type of seizure. They involve both hemispheres of the brain and usually result in loss of responsiveness. This type of seizure rarely lasts for more than a few minutes.
Before a generalized seizure occurs, the patient may experience an unusual sensation or feeling called an aura. An aura in this context can include a strange sound, taste, or smell, or an urgent need to get to safety. If the patient recognizes the aura, he or she may have time to sit or lie down and warn bystanders before the seizure occurs.
Generalized seizures usually last 1 to 3 minutes and can produce a wide range of signs and symptoms. When a seizure occurs, the patient loses responsiveness and can fall, causing injury. The patient may become rigid and then experience sudden, uncontrollable muscular contractions that can last several minutes. Breathing may become irregular and even stop temporarily. The patient may drool, and the eyes may roll upward. As the seizure subsides and the muscles relax, the patient may lose bladder or bowel control.
The four stages of generalized seizures are:1. Aura phase: The patient may sense something
unusual (not all patients will experience an aura).2. Tonic phase: The patient appears unresponsive
and experiences muscle rigidity.3. Clonic phase: The patient experiences
uncontrollable muscular contractions(convulsions).
4. Postictal phase: The patient displaysdiminished responsiveness with gradualrecovery and confusion (he or she may feelconfused and want to sleep).

AC
UTE
AN
D C
HR
ON
IC IL
LNES
SES
252
PARTIAL SEIZURESPartial seizures can be simple or complex, and they are the most common type of seizure experienced by patients with epilepsy. They usually involve a small area of one hemisphere of the brain. A partial seizure can spread and become a generalized seizure. In simple partial seizures, the patient usually remains aware of his or her surroundings. Complex partial seizures usually last for 1 to 2 minutes, though they may last longer, and awareness is either impaired or lost while the patient remains responsive.
In simple partial seizures, there may be involuntary muscular contractions in one area of the body (e.g., the arm, leg, or face). Some patients cannot speak or move during a simple partial seizure, although they may remember everything that occurred. Simple partial seizures may produce a feeling of fear. They can also produce odd sensations such as strange smells or hearing voices. In rare occurrences, strong emotions such as anger or joy can be brought on by a seizure.
Complex partial seizures often begin with a blank stare followed by random facial movements (e.g., smacking the lips or chewing). The patient may appear dazed or be clumsy. The patient’s activities may be lacking in direction, and he or she may be unable to follow directions or answer questions. This type of seizure usually lasts for a few minutes but may last longer. The patient generally cannot remember what happened and may be very confused. Provide reassurance and calmly explain what happened.
ABSENCE (PETIT MAL) SEIZURESIndividuals may also experience an absence seizure, also known as a petit mal seizure. These are most common in children. During an absence seizure, there is brief, sudden loss of awareness that may be mistaken for daydreaming. There may be little to no movement, and the patient may appear to have a blank stare (though eye fluttering and chewing movements may also appear). This type of seizure is also referred to as a non-convulsive seizure, since the body remains relatively still during the episode. Most often, these seizures last for only a few seconds.
FEBRILE SEIZURESYoung children and infants may be at risk of febrile seizures, which are seizures brought on by a rapid increase in body temperature. They are most common in children under the age of 5 years.
Febrile seizures are often caused by ear, throat, or digestive system infections and are most likely to occur when a child or an infant runs a rectal temperature of over 39°C (102°F). A patient experiencing a febrile seizure may experience some or all of the following signs and symptoms: • Sudden rise in body temperature • Change in level of responsiveness • Rhythmic jerking of the head and limbs • Loss of bladder or bowel control • Confusion • Drowsiness • Rigidity • Holding the breath • Rolling the eyes upward
STATUS EPILEPTICUSStatus epilepticus is a seizure that lasts longer than 5 minutes or a series of repeated seizures lasting longer than 5 minutes without a return to normal responsiveness between them. If you suspect that a patient is experiencing this type of seizure, the patient is in the rapid transport category, as this a serious medical emergency and can be fatal. If the seizure passes, place the patient on his or her side and suction the patient’s airway.
EpilepsyEpilepsy is a term used to describe a group of neurological disorders in which the individual experiences recurrent seizures as the main symptom.
Most epileptic seizures last only a few seconds. People living with epilepsy can often control seizures with medication, and sometimes epilepsy can resolve with age. In more severe cases, the frequency of seizures may be reduced through curative surgical re-sectioning or implanted devices (e.g., a vagus-nerve stimulator). While some patients require lifelong medical therapy, sometimes medication may be reduced or even eliminated over time.

AC
UTE
AN
D C
HR
ON
IC IL
LNES
SES
253
Care for SeizuresWhen treating a patient who is having a seizure, there are two main priorities: preventing injury and managing the airway.
To protect the patient from injury, move nearby objects (e.g., furniture, wires, and electronic devices) away from the patient. Do not place anything in the patient’s mouth to prevent the patient from biting his or her tongue or cheek. It is rare that an actively seizing patient bites hard enough to cause significant bleeding, and this intended precaution may act as an airway obstruction instead.
Manage the patient’s airway by positioning the patient on his or her side, if possible; doing so will allow fluids (saliva, blood, vomit) to drain away from the mouth. Never put your fingers into the mouth of an actively seizing patient to clear the airway.
In some cases, the patient may be in the post-ictal phase by the time you arrive. Check to see if the patient was injured during the seizure. Offer comfort and reassurance, especially if the seizure occurred in public, as the patient may feel embarrassed or self-conscious. Keep bystanders well back to provide maximum privacy, and stay with the patient until he or she is fully responsive.
Transport Decision for SeizuresThe patient will usually recover from a seizure in a few minutes. If you discover the patient has a history of seizures that are medically controlled, you may not need to escalate the patient to the rapid transport category.
However, the following cases indicate the patient is in the rapid transport category: • It is the patient’s first seizure. • You are uncertain about the cause of the
seizure. • The patient presents with status epilepticus. • The seizure takes place in water. • The seizure is the result of trauma. • The patient is pregnant. • The patient is known to have diabetes. • The patient is a child or an infant.
• The patient fails to regain responsiveness after the seizure.
• The patient is an older adult who may have suffered a stroke.
MIGRAINES
A migraine is more than just a bad headache: It is a debilitating condition that can include a severe headache, visual disturbances, confusion, and other neurological effects. Migraines usually subside within 4 hours but may persist for up to 3 days. If a migraine occurs, pain-relieving medication can reduce the symptoms. A patient who experiences chronic migraines should consult a physician for assessment, especially if there is an increase in the frequency or intensity of attacks. Preventive medications may be prescribed for patients with chronic migraines.
PERITONITIS
Peritonitis is an inflammation of the peritoneum (abdominal cavity lining) that presents with acute abdominal pain and tenderness. Coughing, flexing the hips, and releasing manual pressure from the abdomen all tend to elicit more pain.
A common cause of peritonitis is blunt trauma to the abdominal or pelvic region, as internal damage can cause fluid or infectious material to enter the peritoneum from other parts of the body. Treatment includes IV therapy, as well as possible antibiotics or surgery. Patients with peritonitis should be placed in the rapid transport category.
APPENDICITIS
Appendicitis is an acute inflammation of the appendix. Appendicitis occurs as a result of a viral or bacterial infection in the digestive tract, or when the channel in the appendix becomes blocked. If it is untreated, the appendix may become gangrenous and rupture, causing inflammation of the membrane that covers the peritoneum.

AC
UTE
AN
D C
HR
ON
IC IL
LNES
SES
254
The signs and symptoms of appendicitis include:• Abdominal pain or cramping.• Nausea or vomiting.• Constipation.• Diarrhea.• Low-grade fever.• Abdominal swelling.
The pain usually begins near the umbilical area and diffuses, later becoming intense and localized in the lower right quadrant. The pain becomes worse for the patient when he or she moves, takes deep breaths, coughs, sneezes, or is touched in the abdomen.
The definitive care for appendicitis is surgical removal of the appendix. While caring for a patient with appendicitis, place the patient in a comfortable position and transport him or her for emergency surgery immediately.
BOWEL OBSTRUCTION
A bowel obstruction occurs when the intestinal tract becomes occluded, preventing the normal flow of intestinal contents. This condition may be caused by a number of factors, including adhesions, hernias, fecal blockage, and tumours. Bowel obstruction in the small intestine is usually caused by adhesions or hernias. Bowel obstruction in the large intestine is usually caused by tumours or fecal obstruction. The signs and symptoms of a bowel obstruction include:
• Abdominal pain.• Constipation.• Abdominal distension.
An obstructed bowel may result in perforation with generalized inflammation of the peritoneum, resulting in infection.
Any patient with a bowel obstruction should be placed in the rapid transit category. The patient should not eat or drink anything. Treatment includes fluid replacement and antibiotics. Sometimes, surgery is necessary to correct the obstruction.
GASTROENTERITIS
Gastroenteritis refers to inflammation of the GI tract, often as a result of a viral infection. This may be caused by poor hygiene, improper food preparation, or improper water disinfection.
Signs and symptoms of gastroenteritis generally have a rapid onset and short duration. They may include:
• Nausea and vomiting.• Diarrhea.• Headache (due to dehydration).• Abdominal cramps.• Fever.
Gastroenteritis may resolve without treatment, but a patient should be assessed by a physician if any of the following signs or symptoms appear:
• Dehydration• Blood in the vomit or stool• Inability to keep liquids down for more than
24 hours• Vomiting for more than 2 days (or several
hours for infants)• Fever of 40°C (104°F) for adults or 39°C (102°F)
for infants and children• Lethargy and irritability (especially in children
and infants)
Other conditions may have similar signs and symptoms to gastroenteritis, but they are typically much more serious. A patient with any of the following signs and symptoms is not suffering from gastroenteritis:
• Localized, constant pain• Slow pain onset• Rebound tenderness• Abdominal rigidity• Signs of internal bleeding or shock
If these signs and symptoms are evident, the patient should be placed in the rapid transport category.
Find out what the patient last ingested and if anyone else is experiencing similar symptoms; this could provide clues as to the cause.

AC
UTE
AN
D C
HR
ON
IC IL
LNES
SES
255
KIDNEY STONES
Kidney stones are solid concentrations of dissolved minerals found in the kidneys or ureters that usually pass during urination. However, if kidney stones cause a blockage that obstructs the flow of urine, the patient can present with the following signs or symptoms:
• Pain in the side, lower abdomen, or groin(usually radiating from the back to the front)
• Nausea or vomiting• Restlessness• Possible blood in the urine
Kidney stones cause severe pain, commonly referred to as renal colic. Depending on the level of pain or severity of the signs and symptoms, the patient may wait for the stones to pass, or he or she may be in the rapid transport category.
PEPTIC ULCERS
A peptic ulcer is a small erosion inside the GI tract. Peptic ulcers can be caused by gastric destruction or by hydrochloric acid in the intestinal mucosal lining. Helicobacter pylori infection and ulcers treated with some prescribed medications may also play a role in causing peptic ulcers. Other major causes of peptic ulcers include the chronic use of medications (e.g., ASA) and cigarette smoking.
The major symptom of a peptic ulcer is a burning or gnawing feeling in the stomach area that can last anywhere from 30 minutes to 3 hours. This pain is often misinterpreted as heartburn, indigestion, or hunger, and it usually occurs in the upper abdomen or below the sternum. In some individuals, the pain occurs immediately after eating; in others, it may not occur until hours after eating. Some symptoms include loss of appetite and weight loss. The pain frequently awakens the patient at night, and he or she may experience weeks of pain, followed by weeks without any pain. Pain can be relieved by drinking milk, eating, resting, or taking antacids.
Peptic ulcers can also occur in the duodenum (the first part of the intestine). Other symptoms include recurrent vomiting, blood in the stool, and anemia.
Prescription medication is needed to treat peptic ulcers and/or relieve their symptoms. As such, the patient should be assessed and treated by a physician. If the patient is in extreme pain or has concerning symptoms (e.g., respiratory distress), he or she may be placed in the rapid transport category.
GASTROINTESTINAL (GI) BLEEDING
There are multiple causes of GI bleeding. The causes vary based on the location of the bleeding within the gastrointestinal tract.
Bleeding in the upper GI tract originates in the esophagus, stomach, or duodenum. This condition may be caused by peptic ulcers, gastritis, stomach cancer, or the ingestion of caustic poisons.
Bleeding in the lower GI tract originates in the small intestine, large intestine, rectum, or anus. This condition may be caused by diverticular disease, polyps, hemorrhoids, anal fissures, cancer, or inflammatory bowel disease.
A patient with GI bleeding may experience vomiting of blood, bloody bowel movements, or black, tarry stools. Symptoms that may accompany GI bleeding include fatigue, weakness, abdominal pain, pale skin, and shortness of breath.
Serious GI bleeding can have a significant impact on vital signs; for instance, it can cause blood pressure to drop sharply and pulse to increase. The patient is in the rapid transport category, as he or she may require a blood transfusion or surgery.

AC
UTE
AN
D C
HR
ON
IC IL
LNES
SES
256
URINARY TRACT INFECTION (UTI)
A urinary tract infection (UTI) is usually a bacterial infection found within the urinary tract. It can affect the urethra, bladder, or kidney, as well as the prostate gland in males. These infections are very common. The signs and symptoms of a UTI include: • An urgent need to urinate often. • Burning during urination. • Cloudy or foul-smelling urine. • Pain in the lower abdomen.
Females are at a greater risk of urinary tract infection because of their shorter urethra. Other groups that are at higher risk for UTIs include paraplegics and people with nerve disruption to the bladder (e.g., people with diabetes). People with urinary stasis (incomplete emptying of the bladder, which may provide nutrition to pathogens) are also predisposed to the infection. This latter group includes pregnant women and people with neurological impairment. Prescription medication is often needed to treat a UTI or relieve UTI symptoms.

Generalized
Simple Partial Seizures
Complete Partial Seizures
Febrile
Status Epilepticus
Absence
Other names: generalized tonic-clonic; grand malHas four stages:1. Aura phase: senses something unusual; not all patients will have this2. Tonic phase: appears unresponsive and experiences muscle rigidity3. Clonic phase: experiences convulsions4. Postictal phase: shows reduced responsiveness with gradual recovery and
confusion
Aware of surroundings; convulsions on one part of body; may not speak or move but can remember the event; feelings of fear and odd sensations
Blank stare followed by random facial movements; may seem lost or confused; difficulty following directions or answering questions; no memory of event
Most common in children under 5 years oldUsually occur if child has a rectal temperature over 39°C (102°F)
Lasts longer than 5 minutes or occurs repeatedly for more than 5 minutesPatient in rapid transport category
Other names: petit mal; non-convulsive seizureMost common in childrenPatient may experience: brief, sudden loss of awareness; little to no convulsionsPatient may have: blank stare, very subtle, random facial movements
TYPES OF SEIZURES
Cause
General Treatment
A temporary reduction of blood flow to the brain
1. Ensure patient is in the supine position.2. Do not allow the patient to eat or drink.3. Have suction equipment ready.4. Conduct patient assessment.
ALTERED MENTAL STATUS: SYNCOPEWhen to Transport a Seizing Patient
• It is the patient’s first seizure.
• You are uncertain about the cause of the seizure.
• The patient presents with status epilepticus.
• The seizure takes place in water.
• The seizure is the result of trauma.
• The patient is pregnant. • The patient is known to
have diabetes. • The patient is a child or
an infant. • The patient fails to regain
responsiveness after the seizure.
• The patient is an older adult who may have suffered a stroke.
Type 1 Diabetes
Hyperglycemia
Hypoglycemia
General Signsand Symptoms
General Treatment
Type 2 Diabetes
Insulin-dependent: The body does not produce enough insulin for its needs.
Blood glucose level (BGL) is too high; usually occurs when the body’s insulin level is too low.
BGL is too low; usually occurs when the body’s insulin level is too high.
Changes in LOR; tachypnea; tachycardia; feeling and looking ill.
1. Test the patient’s BGL and determine an average reading if possible.
2. If patient can follow directions and swallow safely, administer 2 to 5 glucose tablets or other oral glucose products.
3. If signs and symptoms persist 5 to 10 minutes after first dose of glucose, put patient in the rapid transport category and provide a second dose of glucose and supplemental oxygen.
Insulin-dependent or non-insulin-dependent: The body does not produce enough insulin for its needs, or it does not properly use the insulin it produces.
DIABETES
257
SUMMARY
AC
UTE
AN
D C
HR
ON
IC IL
LNES
SES
257

258
SUMMARY

POIS
ON
ING
14 Poisoning
259
Key ContentPoison Control Centres .......... 261 Recognizing Poisoning .......... 261 General Care for Poisoning Emergencies ........................ 261 Ingested Poisons.................. 262 Inhaled Poisons ................... 262 Absorbed Poisons ................ 263 Injected Poisons................... 265Substance Misuse and Abuse ........................... 270 Crowd Management Agents ................................. 274
IntroductionA poison is a substance that causes injury, death, or impairment of an organism through chemical action (as opposed to the biological action of a bacteria or virus). The effects range from mild irritation to death. A poisonous substance could be a solid, liquid, or fume (gas or vapour).
There are four routes through which a poison can enter the body (Figure 14–1, a-d): • Ingestion • Inhalation • Absorption • Injection

POIS
ON
ING
260
Ingested poisons are swallowed and enter the body through the digestive system. Examples include foods (e.g., toxic mushrooms, contaminated shellfish), many drugs and medications (e.g., alcohol, ASA), and household substances that could be accidentally ingested, especially by children (e.g., cleaning products, pesticides).
Poisoning by inhalation occurs when a person breathes in toxic gas or fumes. Inhaled poisons include carbon monoxide (a by-product of combustion), chlorine (found in commercial swimming facilities), and fumes from household products such as glue and paint. Hydrogen sulfide
(H2S) is a common inhaled poison found in many spray chemicals, which also occurs naturally as a result of organic decomposition in closed environments.
Absorbed poisons enter the body through the skin or other membranes (e.g., mucous membrane in the mouth or nose). Sources of absorbed poisons include plants (e.g., poison ivy, giant hogweed), fertilizers and pesticides, and drugs that are absorbed through the mucous membranes (e.g., cocaine).
Figure 14–1, a-d: A poison can enter the body by a, ingestion; b, inhalation; c, absorption; and d, injection.
© iS
tock
pho
to.c
om
/to
dd
med
ia
© iS
tock
pho
to.c
om
/sav
ageu
ltra
light
© iS
tock
pho
to.c
om
/Mic
hael
Pet
tig
rew
a
c
b
d

POIS
ON
ING
261
Injected poisons enter the body through bites or stings of insects, spiders, ticks, snakes, and other animals. They can also be drugs or medications that are injected into the body with a hypodermic syringe.
POISON CONTROL CENTRES
Poison Control Centres exist throughout Canada to help responders of all levels (and the general public) deal with suspected poisonings. Medical professionals in these centres have access to information about virtually all poisonous substances, and they can direct you on how to proceed. You should know the number of your closest Poison Control Centre.
Dispatchers may be able to connect to the Poison Control Centre directly. A dispatcher may also monitor discussion with the Poison Control Centre and provide additional information to responders. In some instances, this eliminates the need for a second call and saves time.
RECOGNIZING POISONING
The severity and presentation of the poisoning depends on the type and amount of the substance, how it entered the body, and the patient’s height, weight, and age. Many substances may be harmless (or even beneficial) in small quantities but poisonous in larger amounts. While some poisons act quickly and display characteristic signs and symptoms in patients, others act slowly and cannot easily be identified. Sometimes, identifying a specific poison based on the signs and symptoms may be difficult.
It may not be obvious that a patient has been poisoned. As always, look for clues at the scene that could indicate the MOI. As you approach the patient, watch for any unusual odours, flames, smoke, open or spilled containers, open medicine cabinets, overturned or damaged plants, or other signs that could suggest poisoning. You may also see drug paraphernalia at the scene (e.g., rolling papers, pipes, syringes).
The signs and symptoms of poisoning vary greatly depending on the substance that entered the body and the route by which it entered: A person who has inhaled carbon monoxide will have a very different presentation when compared with a person who has touched poison ivy.
In general, a patient who has been poisoned will often display signs and symptoms common to other sudden illnesses, including:
• Sweating.• Nausea.• Vomiting.• Diarrhea.• Chest or abdominal pain.• Dyspnea.• Altered level of responsiveness.• Seizures.
If you suspect that a patient has been poisoned, try to get answers to the following questions:1. What type of poison was it?2. How did the contamination occur (inhalation,
ingestion, etc.)?3. When did it occur?4. What was the quantity of poison (if known)?
This information will ensure that the patient receives the most appropriate initial treatment, as well as any additional treatment that is necessary.
GENERAL CARE FOR POISONING EMERGENCIES
The specific interventions required for poisoning vary based on a number of factors, including the specific poison involved, the route through which it entered the body, and the amount of poison. In addition to providing the care described for each type of poison, there are general guidelines that should be followed for most patients with suspected poisoning.
If you have the proper equipment and qualifications, limit further exposure to the poison. Never put yourself at risk: If necessary (or if you are unsure of the nature of the hazard), request properly qualified personnel.

POIS
ON
ING
262
Contact the Poison Control Centre and follow the directions provided. If the poison is a commercial product, it should have a clear label or corresponding Safety Data Sheet (SDS). These will detail first aid procedures for the substance: Follow any directions, and contact the Poison Control Centre for additional information.
Avoid giving the patient anything by mouth unless advised to do so by Poison Control Centre staff. Your scope of practice may indicate a specific oral intake as an intervention for a particular type of poison: This may be provided so long as you are certain of the type of poison involved.
If the poison is unknown and the patient vomits, save some of the vomitus, as it may be analyzed later to identify the poison. Ensure that the container used is labelled with the patient’s name, the date, the time, and any other identifying details available. Ensure that it stays with the patient when care is transferred.
It is also important to manage concurrent problems and monitor the patient closely. Administer oxygen if indicated.
Ingested PoisonsSigns and symptoms of ingested poisons, like those of all poison types, vary considerably, but the following are often present:
• An open container of poison nearby• Burns around the mouth• Unusual odour on the breath• Increased production of saliva or saliva that is
an abnormal colour• Abdominal cramps, vomiting, or diarrhea• Seizures• Dizziness or drowsiness• Unresponsiveness• A burning sensation in the mouth, throat, or
stomach
Food poisoning is one example of ingested poisoning. It occurs when a person ingests food that has been contaminated by infectious organisms or their toxins. If multiple people who have shared the same food become ill with signs and symptoms of ingested poisoning, you may suspect food poisoning as the cause.
Sometimes the Poison Control Centre will advise you to induce vomiting. To do so, follow the Poison Control Centre’s instructions as well as local protocols. In addition, before you induce vomiting, ensure that the patient meets all of the following criteria:
• The patient is fully responsive and understandsinstructions.
• The patient is co-operative.• The patient has not had a seizure or vomited
spontaneously.• The patient is not exhibiting periods of
instability with respect to pulse, respiration, orlevel of responsiveness.
The Poison Control Centre may direct you to neutralize the remaining poison in the patient’s stomach with activated charcoal. Activated charcoal is available in both liquid and powder forms and may be part of your response equipment. Use activated charcoal as directed by the Poison Control Centre and local protocol.
If directed to do so by the Poison Control Centre, you can dilute some ingested poisons by giving the patient water to drink. Diluting the substance decreases the potential for damaging tissues.
Inhaled PoisonsGeneral signs and symptoms of inhaled poisoning include:
• Respiratory distress or dyspnea.• Respiratory arrest.• Irritated eyes, nose, or throat.• Dizziness.• Vomiting.• Seizures.• A bluish colour (cyanosis) around the mouth.• Unresponsiveness.• An unusual smell in the air or on the patient’s
breath.
If you suspect that a patient has been poisoned by an inhaled substance, take steps to ensure that you are not exposed yourself. If you know or suspect that the substance is still in the air, the scene may not be safe for you to enter. Unless you have specialized training or equipment, request specially qualified and equipped personnel to make the scene safe or move the patient to a safe

POIS
ON
ING
263
area. In other cases, a simple step such as opening a garage door can allow fumes to escape and render the scene safe.
Any patient with suspected inhaled poisoning should be in the rapid transport category, as respiration is often impaired. Perform any indicated interventions for respiratory distress or arrest, as well as any specific interventions described by the Poison Control Centre.
CARBON MONOXIDE POISONINGA common inhaled poison is carbon monoxide (CO). CO is an odourless, colourless, tasteless gas. Because it is not detectable to the senses and is quite common, it is a frequent cause of accidental poisoning deaths. CO is found in fumes that are produced when fuel is burned in cars or trucks, small engines, stoves, lanterns, grills, fireplaces, gas ranges, and furnaces.
CO replaces the oxygen (O2) bonded to a patient’s red blood cells, slowly depriving the body of oxygen. As a result, most signs and symptoms of CO poisoning are essentially signs and symptoms of hypoxia. CO poisoning mainly affects the central nervous system and the heart.
CO poisoning may be either acute (e.g., a patient is in a closed garage with an engine running) or chronic (e.g., a patient’s furnace exhaust has a leak). Chronic CO poisoning may last months.
The most common signs and symptoms of carbon monoxide poisoning include:
• Headaches.• Dizziness.• Weakness or fatigue.• Pale or bluish skin colour.• Nausea or vomiting.• Chest pain.• Confusion.• Seizures.• Impaired hearing and vision.• Altered level of responsiveness.• Tachycardia or arrhythmia.• Low blood pressure.• Dyspnea (especially shortness of breath).• Respiratory arrest.
However, some of these symptoms can be vague and non-specific, and diagnosis of CO poisoning can easily be missed. Mild CO poisoning is often mistaken for food poisoning or gastroenteritis. Pay attention to headaches and similar flu-like symptoms reported by multiple people living in the same dwelling, particularly in colder times of the year when homes are being actively heated.
CO poisoning symptoms usually resolve themselves when a patient is removed from exposure, unless there has been an episode of acute poisoning.
Absorbed PoisonsPeople often come into contact with poisonous substances that can be absorbed through the skin. Many of these cause only minor irritation—for example, poison ivy (Figure 14–2, a), poison sumac (Figure 14–2, b), and poison oak (Figure 14–2, c). Other common poisons absorbed through the skin include dry and wet chemicals, such as those found in insecticides and toxic industrial chemicals.
To treat general absorbed poisoning:1. Wash the affected area with cool water
immediately and pat dry.2. Keep the area clean and dry.3. Instruct the patient to see a physician if the
condition worsens.
If exposure to a wet or dry chemical immediately causes burns to the patient’s skin, refer to the care for chemical burns (page 189).
RASH-CAUSING PLANTSSome plants produce chemicals that can cause absorbed poisoning on contact. These plants vary in appearance depending on the location, species of plant, and time of year. As prevention is the best strategy, it is a good idea to become familiar with the appearance of rash-causing plants in your area.
Poison Ivy, Sumac, and OakPlants such as poison ivy, poison sumac, and poison oak produce urushiol, an oil that causes skin irritation in most people.
If a patient has come into contact with urushiol, he or she may have the following signs and symptoms in the exposed areas:

POIS
ON
ING
264
• Itching• Red rash• Swelling• Bumps, streaking, and weeping blisters
The severity of the rash can range from mildly irritating to unbearable, depending on the patient’s sensitivity, the amount of skin exposed, and the rash’s location.
Plants containing urushiol should never be burned. The oil is carried in the smoke, and inhalation can cause inflammation of the throat and irritation of the lungs.
Treatment for Poison Ivy, Sumac, or Oak PoisoningIf a patient has absorbed poisoning caused by poison ivy, poison sumac, or poison oak, encourage the patient to apply a cream or ointment designed to reduce itching or blistering (e.g., calamine). Suggest the patient take an oral antihistamine to relieve itching. If the rash is severe or on a sensitive part of the body (e.g., the face or groin), the patient should be assessed by a physician.
Giant Hogweed and Wild ParsnipThe sap of giant hogweed and wild parsnip contains furanocoumarins (toxic photosensitizing compounds). Contact with either of these plants transfers these compounds to the skin. While they do not have an immediately visible effect, they cause the skin to react when exposed to the sun’s UV radiation, producing severe inflammation, intense burning, and weeping blisters. If any of these plants are found, their location should be reported to the local environmental or municipal authorities.
The specific signs and symptoms depend on the time since exposure to sunlight:
• 24 hours after exposure:◆ Swelling of the skin◆ Reddening of the skin
• 48 hours after exposure:◆ Painful blistering◆ Purplish scarring of the skin
Figure 14–2, a-c: a, Poison ivy; b, poison sumac; and c, poison oak.
© iS
tock
pho
to.c
om
/No
Der
og
© iS
tock
pho
to.c
om
/Alp
amay
oP
hoto
© iS
tock
pho
to.c
om
/dev
do
gg
a
b
c

POIS
ON
ING
265
The affected area may be sensitive to sunlight for months or even years following the incident. Ensure the patient is aware of this and knows to protect the area by keeping it covered, wearing sunglasses (if the affected area is the eye), and applying sunscreen.
Treatment for Giant Hogweed or Wild Parsnip PoisoningIf the patient’s skin has come in contact with the sap of giant hogweed or wild parsnip, protect the area from sunlight. Encourage the patient to see a physician following the incident.
If sap gets into the patient’s eyes, the patient is in the rapid transport category: Rinse the eyes thoroughly with water for at least 15 minutes and ensure the patient receives prompt transportation to a medical facility.
Injected PoisonsInsect and animal stings and bites are among the most common sources of injected poisons. Care varies based on the species causing the sting or bite, as different creatures carry different toxins and deliver it in different ways.
If the animal is still present, do not attempt to capture it, as this can put you at risk. Instead, make a note of any memorable features, such as distinctive patterns or colouration. This will help to determine the appropriate treatment. Antivenins are available for many particular types of venom. Identifying the species makes it possible to determine whether an antivenin is available.
The following sections describe the care for common stings and bites of insects, spiders, marine life, snakes, mammals, and ticks.
INSECTSAlthough insect stings are painful, they are rarely fatal. However, some people have anaphylactic reactions to insect stings, creating immediately life-threatening situations.
To provide treatment for an insect sting, examine the affected area to see if the stinger is embedded in the skin. Some insects, such as bees, leave their stingers in the patient’s skin. Others, such as wasps, do not. If the stinger is embedded, prevent any further poisoning by scraping the stinger away from the skin with a plastic card (e.g., driver’s licence or credit card) to remove it. Often, the venom sac will still be attached to the stinger. Do not remove the stinger with forceps since putting pressure on the venom sac can inject additional toxins into the patient.
Next, wash the site with water and cover it with a dressing. Apply a cold pack wrapped in a thin, dry towel to the area to reduce the pain and swelling. Monitor the patient for signs and symptoms of an allergic reaction, and provide care for anaphylaxis if any are present.
Cimex lectularius (or bedbugs) are insects that trouble many Canadian homes. Their bites can cause skin irritation that can be intensely uncomfortable and creates the risk of infection. Following proper decontamination procedures for your clothing and equipment reduces the risk of carrying infestation from a patient’s home.
SPIDERSWhile few spiders in North America produce venom that causes dangerous reactions, bites from black widow and brown recluse spiders can (in rare cases) be fatal. You can identify these spiders by the unique designs on their bodies.
The black widow spider is black with a reddish hourglass shape on its underbody (Figure 14–3). The bite usually causes an immediate sharp pain, followed by dull pain in the area of the bite. However, a patient often does not know that he or she has been bitten until he or she starts to feel ill or notices a bite mark or swelling.
Signs and symptoms of a black widow spider bite include:
• A raised, round, red mark.• Cramping pain in the thighs, shoulders, back,
and abdominal muscles.

POIS
ON
ING
266
• Restlessness and anxiety.• Dizziness.• Headache.• Excessive sweating.• Weakness.
The brown recluse spider is light brown with a darker brown violin-shaped marking on the top of its body (Figure 14–4). Its bite may initially produce little or no pain, with pain developing in the area of the bite an hour or more after it occurs. A blood-filled blister forms under the surface of the skin, sometimes in a target or bull’s-eye pattern. Over several hours, the blister increases in size. Eventually it ruptures, leading to tissue destruction and a black scab.
Signs and symptoms of a brown recluse spider bite include:
• A slight stinging sensation (though bitesmay not be initially felt).
• A blood-filled blister that appears within2 to 8 hours.
• A bull’s-eye pattern around the bite.
Signs and symptoms of a severe reaction to a brown recluse spider bite occur within 72 hours of the bite and include nausea, vomiting, and joint pain.
Both spiders prefer dark, secluded places where they are seldom disturbed. Bites usually occur when a patient reaches into a wood, rock, or
brush pile, or is rummaging in a dark storage area. Often, the patient will not know that he or she has been bitten until signs or symptoms develop.
To treat a bite from a non-venomous spider, wash the wound and apply a wrapped cold pack to the site.
If the spider is identified as either a black widow or a brown recluse, the patient should be in the rapid transport category. Keep the bitten area elevated and as still as possible, and apply ice or a chemical cold pack. Place something such as a gauze pad or towel between the cold source and the skin to avoid freezing the tissues. The wound should be cleaned by medical personnel, and medication will usually be provided to reduce the pain and inflammation.
MARINE LIFESting rays (Figure 14–5), sea anemones, certain fish, jellyfish, and other marine animals can give painful stings that may cause allergic reactions, paralysis, and even cardiac or respiratory arrest. A patient who has been stung in the water should be removed as soon as possible. If any of the following statements is true, place the patient in the rapid transport category:
• The patient has a history of allergic reactionsto marine-life stings.
• The patient has been stung on the face or neck.• The patient develops severe problems, such as
dyspnea.
Figure 14–3: A black widow spider. Figure 14–4: A brown recluse spider.
© iS
tock
pho
to.c
om
/Mar
k K
ost
ich
© iS
tock
pho
to.c
om
/Clin
t S
pen
cer

POIS
ON
ING
267
The specific interventions that are indicated depend on the type of marine creature responsible for the wound.
Jellyfish, Man-of-War, or Sea AnemoneTo treat a sting from a jellyfish, man-of-war, or sea anemone, soak the affected area in vinegar to deactivate the toxin. Rubbing alcohol or baking soda may also be used. Do not rub the wound or apply fresh water or ammonia, as this will increase pain.
If pieces of the marine creature (e.g., tentacles) are still attached to the patient, deactivate the toxin before attempting to remove them. Otherwise, additional toxins may be released into the patient’s body when the pieces are disturbed.
Stingray, Sea Urchin, or Spiny FishFor stings from a stingray, sea urchin, or spiny fish, flush the wound thoroughly: Sterile saline is preferred, but tap water or even ocean water may be used if other options are not available. Immobilize the injured part (often the foot), and soak the affected area in water that is as hot as the patient can tolerate for approximately 30 minutes or until the pain subsides. Then, carefully clean the wound and apply a bandage. Remind the patient to watch for signs of infection and check with a healthcare provider to determine whether a tetanus shot is required.
SNAKESRattlesnakes account for most snakebites and nearly all snakebite fatalities in Canada. However, most snakes in Canada are not venomous, so a patient with a snakebite has not necessarily been poisoned. However, if the species of snake is unknown and venomous snakes are present in the region, treat the patient as if he or she was bitten by a venomous snake.
There are three venomous snakes currently native to Canada (Figure 14–6, a-c). All three are rattlesnakes: 1. Northern Pacific Rattlesnake2. Massasauga Rattlesnake3. Prairie Rattlesnake
If the patient has been bitten by a venomous or unidentified snake, place the patient in the rapid transport category and follow these guidelines:1. Keep the injured site still. Position the patient
so that the bite is at or below the level of theheart, if possible.
2. If the bite is on a limb, remove any jewelleryor tight clothing from the limb and watch forinflammation.
3. Wash the wound with water.4. Cover the bite with a clean (ideally sterile), dry
dressing.
Very few people die of snakebites. Most snakebite deaths occur because a patient has an allergic reaction to the venom or has a weakened body system, or because significant time passes before the patient receives medical care. Because time is a crucial factor, a patient who has been bitten by a venomous snake should be transported as rapidly as possible. If ground transportation will be delayed, or if you are in a remote area, consider requesting air evacuation (if local protocol allows).
Avoid the following when treating a snakebite:• Applying ice. Cooling the bite can cause
further harm.• Cutting the wound. Cutting the wound can
further injure the patient and has not beenshown to remove any significant quantity ofvenom.
• Applying a tourniquet. A tourniquet severelyrestricts blood flow to the extremity, whichcould result in the loss of the extremity.
Figure 14–5: A stingray.©
iSto
ckp
hoto
.co
m/N
iko
Gui
do

POIS
ON
ING
268
MAMMALSThe bite of a domestic or wild animal carries the risk of infection, as well as soft tissue injury. One serious risk with mammal bites is rabies, which is a viral disease that is transmitted through the saliva of infected mammals. Wild mammals (e.g., raccoons, bats, and skunks) are most frequently affected, but domestic mammals (e.g., dogs, cats, and cattle) are also at risk.
Animals with rabies may act in unusual ways. For example, nocturnal animals such as raccoons may be active in the daytime. A wild animal that usually tries to avoid humans may not run away when approached. Rabid animals may salivate, appear partially paralyzed, or act irritable, aggressive, or strangely quiet.
If not treated, rabies can be fatal. Anyone bitten by an animal suspected of having rabies must seek medical attention. To prevent rabies from developing, the patient receives a series of injections to build up immunity. In the past, caring for rabies meant a lengthy series of painful injections that had many unpleasant side effects. However, modern vaccines usually require fewer injections and have less severe side effects.
If a patient has been bitten by a mammal, follow these guidelines:
• Attempt to get the patient away from theanimal without causing further harm to thepatient or endangering yourself.
• If the animal is not present, try to get a gooddescription of the animal and the area inwhich it was last seen.
• Treat any open wounds.
Any person who has been bitten by an animal must see his or her physician. Local laws or protocols may require you to report the bite to the proper authorities, such as animal control.
TICKSTicks are arachnids that can carry and transmit disease to humans.
If you find a tick, remove it by firmly grasping the tick with fine-tipped forceps (or a hook designed for tick removal), as close to the skin as possible, and pulling slowly and steadily (Figure 14–7).
Figure 14–6, a-c: Venomous snakes native to Canada are a, the Northern Pacific Rattlesnake; b, the Massasauga Rattlesnake; and c, the Prairie Rattlesnake.
© iS
tock
pho
to.c
om
/Dav
e R
od
rig
uez
© R
epti
lia Z
oo
and
Ed
ucat
ion
Cen
tre
© R
epti
lia Z
oo
and
Ed
ucat
ion
Cen
tre
a
b
c

POIS
ON
ING
269
Once the tick is removed, treat the resulting minor wound and remind the patient to watch for signs of infection.
If you are unable to remove the tick, or if any of its mouthparts stay in the skin, the patient should see a physician.
Lyme DiseaseWhile tick bites can become infected, the more serious concern is the risk of disease transmission. In particular, some ticks carry Lyme disease, a potentially fatal bacterial illness. The longer the tick is attached, the greater the risk of disease transmission: Ticks must remain attached for more than 24 hours to transmit Lyme disease.
Not all ticks carry Lyme disease. Lyme disease is spread primarily by the black-legged tick (also referred to as deer tick), which commonly attaches itself to field mice and deer. The black-legged tick is found near beaches and in wooded or grassy areas. When in contact with any warm-blooded animal—including humans—the black-legged tick will attach itself to the host’s skin.
Black-legged ticks are very tiny and difficult to see. They are much smaller than the common dog tick or wood tick. They can be as small as a poppy seed or the head of a pin (Figure 14–8). Even in the adult stage, they are only as large as a grape seed. A black-legged tick can attach itself to a patient without his or her knowledge. People who develop Lyme disease may not be aware of having been bitten.
The first sign of Lyme disease typically appears a few days or a few weeks after being bitten by an infected tick. A rash usually forms as a small red area, centred on the site of the bite, that may spread to up to 13 to 18 cm (5 to 7 in.) across. In fair-skinned people, the centre is lighter in colour and the outer edges are red and raised, sometimes resembling a bull’s-eye (Figure 14–9). In darker-skinned people, the area may look black and blue, like a contusion.
Further signs and symptoms of Lyme disease include:
• Fever.• Headache.• Weakness.• Joint and muscle pain similar to that of a flu.
Figure 14–7: Remove a tick by grabbing it with tweezers as close to the skin as possible.
Figure 14–8: Ticks can be as small as the head of a pin.
Figure 14–9: A rash in a bull’s-eye pattern is a common sign of Lyme disease infection in fair-skinned patients.

POIS
ON
ING
270
These signs and symptoms may develop slowly and may not occur at the same time as a rash. A patient can have Lyme disease without developing a rash.
In its advanced stages, Lyme disease may cause neurological conditions, including cognitive impairments, impaired sensory function, and impaired muscle movement. Irregular or rapid heartbeats can also develop.
If a rash or flu-like symptoms develop after a patient has been bitten by a tick, he or she should consult a physician (even if signs and symptoms disappear). A physician will usually use antibiotics to treat Lyme disease. Antibiotics work most effectively when taken early: Treatment is less effective once the disease is in its advanced stages. If untreated, Lyme disease can continue to spread through the body over months or years, and it can ultimately be fatal.
SUBSTANCE MISUSE AND ABUSE
Alcohol and over-the-counter medications (such as ASA, cough syrup, and sleeping pills), are among the most frequently misused and abused substances (Figure 14–10). The misuse or abuse of a substance results in poisoning.
Substance misuse is the use of a substance for purposes other than those intended by the manufacturer, or exceeding the recommended dosage. An example of substance misuse is taking a sleeping pill, and then taking an additional dose an hour later because the initial dose did not work. Substance misuse may be accidental or intentional.
Substance abuse is the deliberate, persistent, and/or excessive use of a substance without regard to health concerns or accepted medical practices. An example of substance abuse is taking a prescription drug, such as a painkiller, in order to gain a pleasant or euphoric feeling. Many substances that are abused or misused are legal when prescribed by a physician.
A drug is any substance that is taken to affect the function of the body. A drug used to prevent or treat a disease or condition is called a medication.
An overdose occurs when a person takes too much of a substance, producing toxic (poisonous) or fatal effects in the body. An overdose may occur after a person takes more of a drug than is needed for medical purposes. It may occur unintentionally when someone takes too much medication at one time—for example, if an older adult forgets that he or she has already taken the medication and takes another dose.
An overdose may also be intentional, such as in a suicide attempt (i.e., a person may intentionally take a fatal amount of a certain substance).
Withdrawal describes a condition that a person who is addicted to a substance may experience after refraining from using or abusing that substance. Withdrawal may occur because of a person’s deliberate decision to stop or because he or she is unable to obtain the specific drug. Withdrawal from certain substances, such as alcohol, can cause severe mental and physical discomfort and can become a serious medical condition.
Figure 14–10: Commonly misused and abused legal substances.

POIS
ON
ING
271
Commonly Misused and Abused SubstancesCommonly misused and abused substances are categorized according to their effects on the body. The three basic categories are: • Stimulants. • Depressants. • Hallucinogens.
The category to which a substance belongs depends on the effects it has on the central nervous system (Figure 14–11). Some substances depress the nervous system whereas others hasten its activity. Some are not easily categorized because they have multiple effects.
Designer drugs are generally chemical variations on other drugs. They are often designed to circumvent drug laws by altering a drug’s composition so that it is no longer technically illegal or is more difficult to detect in drug tests. Designer drugs may fit into any of the three categories listed above. They may also be more potent than their parent drugs or have additional effects on the user’s mind or body. When the chemical makeup of a drug is altered, the user may experience a variety of unpredictable and dangerous effects.
STIMULANTSStimulants affect the central nervous system by speeding up physical and mental activity. They can produce temporary feelings of alertness, improve task performance, and prevent sleepiness. Some stimulants are used for medical purposes (e.g., to treat asthma). They are sometimes used for weight reduction because they suppress appetite.
Many stimulants are ingested as pills, but some can be absorbed or inhaled. Amphetamine, dextroamphetamine, and methamphetamine are stimulants. There are many street names or slang terms for stimulants, (e.g., speed).
Cocaine is one of the most publicized and powerful stimulants. It can be taken into the body in different ways, including injecting it into the blood or sniffing it in powder form, in which case it is then absorbed into the blood through
the capillaries in the nose. A purer and more potent form of cocaine is crack, which is inhaled through smoking. The vapours that are inhaled into the lungs reach the brain within 10 seconds. Crack poses a serious threat because it is highly addictive.
The most common stimulants are legal. Leading the list is caffeine, which is present in coffee, tea, sodas, chocolate, diet pills, and pills used to combat fatigue. Next is nicotine, which is found in tobacco products.
The misuse or abuse of stimulants can have many unhealthy effects on the body, including the following: • Moist or flushed skin • Sweating • Chills • Nausea • Vomiting • Fever • Headache • Dizziness • Tachycardia (rapid pulse) • Tachypnea (rapid breathing) • High blood pressure • Chest pain
In some instances, misuse or abuse can disrupt normal heart rhythms, cause respiratory emergencies, or even be fatal. The person may appear very excited, restless, talkative, irritable, or combative, or may suddenly lose responsiveness.
Figure 14–11: Misused and abused substances.

POIS
ON
ING
272
DEPRESSANTSDepressants affect the central nervous system and slow down physical and mental activity. Depressants are commonly used for medical purposes. Common depressants are alcohol, barbiturates, benzodiazepines, narcotics, and inhalants. Most depressants are ingested or injected.
All depressants alter a patient’s level of awareness to some degree. They can relieve anxiety and pain, and they also promote sleep and relax muscles. However, these drugs can also depress respiration and impair coordination and judgment. Like other substances, the larger the dose or the stronger the substance, the greater its effects.
When taken in small amounts, alcohol’s effects are fairly mild; in higher doses, its effects can be toxic. Alcohol can have the same negative effects on the body and pose the same risks for overdose as other depressants. Frequent drinkers may become dependent on the effects of alcohol and become increasingly tolerant of them.
If alcohol is used frequently in large amounts, alcohol consumption can lead to unhealthy consequences and may become life threatening. For example, alcohol can cause the esophagus to rupture or the digestive system to become irritated. It can even injure the stomach lining, causing a patient to vomit blood.
Chronic drinking can affect the brain and cause a lack of coordination, memory loss, and apathy. Other problems include liver diseases, such as cirrhosis. In addition, many psychological, family, social, and professional problems are related to chronic drinking.
Narcotics have similar effects to other depressants. They are powerful and are used to relieve anxiety and pain. All narcotics are illegal without a prescription, and some are not medically prescribed at all. Common narcotics include morphine, codeine, and heroin.
Inhalants are substances, usually common commercial products, that produce chemical vapours with mind-altering effects. Inhalants include certain solvents, such as acetone, toluene,
butane, gasoline, kerosene, lighter fluid, paints, nail polish and nail polish remover, and aerosol sprays. Inhalants have a depressing effect on the central nervous system and can damage the heart, lungs, brain, and liver. The effects of inhaled substances are similar to those of alcohol (i.e., the user appears to be drunk).
Opioid Overdose and NaloxoneOpioids are a class of depressants that includes morphine, heroin, and fentanyl. They pose a high risk of fatal overdoses because, in higher quantities, they bind to receptors in the brain that control respiration, rapidly causing respiratory arrest.
Signs and symptoms of opioid overdose include: • Severely reduced level of responsiveness,
or unresponsiveness • Severely constricted pupils or rolled-back
eyes. • Limp muscles. • Slow or absent pulse. • Slow or absent respiration (< 8 breaths
per minute), possibly with gurgling or snoring sounds.
• Low SpO2 (< 92% on room air). • Cold and pale or blue skin, especially on
nail beds and lips. • Vomiting.
Naloxone is a drug that rapidly counteracts the effects of opioid overdose by binding to the same receptors in the brain, displacing the opioid and preventing respiratory arrest. It can be administered intranasally (as a spray), intramuscularly, or subcutaneously.
If your scope of practice and protocols allow, administering naloxone is indicated for most cases of suspected opioid overdose. Because naloxone has no effect on a person who is not suffering from an opioid overdose, it is safe to use even if an overdose cannot be confirmed.

POIS
ON
ING
273
Specific signs and symptoms of depressant misuse or abuse may include: • Drowsiness. • Brachycardia. • Confusion. • Brachypnea. • Slurred speech. • Poor coordination.
An alcohol abuser may smell of alcohol, may be unresponsive or difficult to arouse, or may vomit violently. A patient suffering alcohol withdrawal can be confused and restless. He or she may also tremble and experience hallucinations.
HALLUCINOGENSHallucinogens do not have medical uses, but they can cause changes in mood, sensation, thought, emotion, and self-awareness. They can alter a person’s perception of time and space and produce delusions.
Among the most widely abused hallucinogens are lysergic acid diethylamide (LSD, also known as acid), psilocybin (also known as mushrooms), and phencyclidine (PCP, also known as angel dust). These substances are usually ingested, but PCP is also often inhaled.
Hallucinogens often have physical effects similar to those of stimulants but are classified differently because of their potential to produce additional effects. Specific signs and symptoms of hallucinogen use may include sudden mood changes and a flushed face. The patient may report seeing or hearing something that is not present and may be anxious and frightened. Hallucinogens can sometimes cause intense fear, panic, paranoid delusions, vivid hallucinations, profound depression, tension, and anxiety. The person may be irrational and feel threatened by any attempt others make to help.
General Signs and Symptoms of Substance Misuse or AbuseLike other poisons, the general signs and symptoms of substance misuse and abuse are similar to other medical emergencies. To treat the patient, you need only recognize abnormalities in the patient’s respiration, pulse, pupils, temperature, bowel sounds, perspiration, and behaviour that may indicate a condition requiring professional help (Figure 14–12).
HR & BP RR TEMP PUPILS BOWEL SOUNDS DIAPHORESIS
HR & BP RR TEMP PUPILS BOWEL SOUNDS DIAPHORESIS
HR & BP RR TEMP PUPILS BOWEL SOUNDS DIAPHORESIS
HR & BP RR TEMP PUPILS BOWEL SOUNDS DIAPHORESIS
HR & BP RR TEMP PUPILS BOWEL SOUNDS DIAPHORESIS
AnticholinergicLow potency antipsychoticsOxybutynin, IpratropiumACh receptor antagonists
CholinergicACh receptor agonistsAChEIs (e.g., Donepezil)
OpioidMorphineHeroinHydromorphone
Sedative-HypnoticBenzos and “barbiturates” “Z-drugs” (e.g., zopiclone)Antihistamines
SympathomimeticEpinephrineCocaineAmphetamine and methylphenidate
Figure 14–12: General signs and symptoms of substance abuse and misuse.

POIS
ON
ING
274
Treatment for Substance Misuse or AbuseInitial intervention for substance misuse or abuse does not require you to know the specific substance taken. Since substance misuse or abuse is a form of poisoning, treatment follows the same general steps as for other types of poisoning (outlined on page 261).
Question the patient or bystanders during your secondary assessment to attempt to find out what substance was taken, how much was taken, and when it was taken.
Contact the Poison Control Centre and follow their directions. A patient who is under the effects of a drug may be irrational, aggressive, or violent. Withdraw from the area if the patient becomes violent or threatening.
If you suspect that a patient may have overdosed on a designer drug, be sure to include this information in the patient history when you are transferring the patient’s care. A patient who has overdosed on a designer drug may not respond to traditional medical treatment.
CROWD MANAGEMENT AGENTS
Crowd management agents, also referred to as riot control agents, are a group of substances used by law enforcement personnel to temporarily incapacitate groups of people. Because they cause
tearing of the eyes and are dispersed in the form of particles or droplets, they are often referred to as tear gas. Similar compounds are also used for personal protection (usually referred to as pepper spray). Crowd management agents may be inhaled, or they may be absorbed through the skin and/or eyes.
Crowd management agents can have the following effects:
• Excessive tearing and blurred vision• Eye pain and redness• Swelling and irritation of the respiratory tract• Rash or burning skin• Nausea and vomiting• Runny nose• Chest tightness, dyspnea, and coughing
These signs and symptoms generally diminish in intensity when the patient moves away from the crowd management area.
To care for a patient who has been exposed to a crowd management agent:1. Take full PPE precautions against both inhaled
and absorbed poisons.2. Remove any clothing that may have come into
contact with the agent and seal it in a plasticbag. If the patient wears contacts, these shouldbe removed and placed in the bag as well.
3. Wash the patient’s skin with soap and water. Ifthe patient’s eyes are burning, rinse them withwater for 10 to 15 minutes.

Ingested
Inhaled
Absorbed
Injected
Enter the body through the digestive system after being swallowed by the patient Examples: eating contaminated shellfish; consuming too much alcohol (substance abuse)
Enter the body after the patient breathes in toxic gas or fumesExamples: using chemical cleaning products in a poorly ventilated area; breathing carbon monoxide
Enter the body through the skin or other membranesExamples: touching poison ivy, sumac, or oak, or giant hogweed or wild parsnip
Enter the body through bites or stings, or through a hypodermic syringeExamples: getting stung by an insect or marine life (jellyfish), or bitten by a spider or tick; using intravenous drugs (substance abuse)
FOUR TYPES OF POISONS
Common Substances
General Treatment
General Signs and Symptoms
Stimulants, depressants, and hallucinogens
Provide general treatment for poisoning
Similar to that of other poisons and medical emergencies; note abnormalities in respiration, pulse, skin’s appearance and moisture, temperature, and patient’s behaviour
SUBSTANCE MISUSE AND ABUSE
General Treatment for Poisoning
1. Act within your scope of training.2. Don appropriate PPE.3. Contact the Poison Control Centre and follow
the staff’s instructions.4. Avoid giving the patient anything orally, unless
your scope of training or the Poison Control Centre staff indicates otherwise.
5. Save a sample of vomitus in a clearly labelled container (if poison is unknown).
6. Administer oxygen if indicated.
Treatment for Exposure to Crowd Management Agents
1. Take full PPE precautions against both inhaled and absorbed poisons.
2. Remove any clothing that may have come into contact with the agent and seal it in a plastic bag. If the patient wears contacts, these should be removed and placed in the bag as well.
3. Wash the patient’s skin with soap and water. If the patient’s eyes are burning, rinse them with water for 10 to 15 minutes.
General Signs and Symptoms of Poisoning
• Sweating • Nausea • Vomiting • Diarrhea • Chest or abdominal pain • Dyspnea • Altered level of responsiveness • Seizures
Questions to Ask If Poisoning Is Suspected
• What type of poison was it? • How did the contamination
occur? • When was it taken? • How much was taken
(if known)?
275
SUMMARY
POIS
ON
ING
275


ENV
IRO
NM
ENTA
L IL
LNES
SES
15 Environmental Illnesses
277
Key ContentTemperature Homeostasis ..... 278 Heat-Related Illness ............... 281 Heat Cramps ........................ 281 Heat Exhaustion .................. 281 Heat Stroke.......................... 281Cold-Related Illness ................ 284 Hypothermia ....................... 284 Frost Nip .............................. 286 Frostbite............................... 286Drowning ................................ 288 Cold-Water Immersion and Drowning ......................... 290High-Altitude Illness .............. 292 SCUBA-Related Illness ............ 293 Physiology............................ 293 Barotrauma of Descent....... 294 Barotrauma of Ascent......... 294
IntroductionWhile the human body is equipped with mechanisms for regulating body temperature, emergencies still occur when the body is overwhelmed by extremes of heat and cold.
Illnesses caused by exposure to extreme temperature occur in stages but can rapidly become life threatening. If a patient shows any signs or symptoms of a heat- or cold-related illness, note the weather conditions and the patient’s activities to determine whether they might be related. Immediate intervention can prevent the condition from worsening and becoming life threatening.
A patient in the water poses special challenges for the responder, as the patient must be safely extricated before assessment and interventions can be performed.

ENV
IRO
NM
ENTA
L IL
LNES
SES
278
Other environmental stressors like low barometric pressure (e.g., hiking at a high altitude) and high barometric pressure (e.g., scuba diving) also cause various illnesses. In this chapter, you will learn how environmental extremes affect the body, how to recognize environment-related illnesses, and how to provide treatment.
TEMPERATURE HOMEOSTASIS
The human body’s core temperature is normally around 37°C (98.6°F) and is maintained by balancing heat loss with heat gain.
Under normal conditions, the body generates heat primarily by converting food into energy. Heat is also produced by contracting the muscles, which is either voluntary (e.g., exercising) or involuntary (e.g., shivering). The heat produced during routine activities is usually enough to balance normal heat loss.
The hypothalamus is the part of the brain that controls thermoregulation, which is the body’s ability to maintain a constant core temperature.
The hypothalamus receives temperature information from skin and central receptors. If the body is too warm, thermoregulatory heat loss responses include vasodilation (increasing blood flow to the skin) and/or sweating to facilitate evaporation. If the body is too cold, thermoregulatory responses include vasoconstriction (decreasing blood flow to the skin) and/or shivering, which produces heat by rapidly contracting and relaxing muscles (Figure 15–1) .
Heat moves from warm areas to cooler ones through four mechanisms (Figure 15–2): 1. Conduction
(Warming or Cooling) Occurs through direct contact with a solid orliquid. Heat loss due to direct contact withcold snow could be decreased by minimizingcontact or increasing insulation (e.g., sitting onan insulator pad on the snow).
2. Convection (Warming or Cooling) Occurs when air or liquid moves across theskin. In cold air, this creates the wind chillfactor. Convective heating can also occur ifwarm air is blown across the skin.
Sweating
HUMAN THERMOREGULATION RESPONSES
Vasodilation Vasoconstriction
Shivering
Heat Loss (vasodilation)Heat Loss (sweating)
Warm / Hot EnvironmentHeat Conserving (vasoconstriction)
Heat Production (shivering)
Cool / Cold Environment
CORE
CORE
PADROCK
GROUND
Convection
WATER
Convection
Radiation
Evaporation(from expired air)
Evaporation(from wet clothing)
Conduction
Conduction
Conduction
Radiation: Through space (air) by infrared radiation.
Convection: Flowing water or air removes heat.
Conduction: Through direct contact with a solid or liquid.
Evaporation: Change from liquid to gas requires energy.
FOUR MECHANISMS OF HEAT LOSS
Figure 15–1: Human thermoregulation responses in hot and cold environments.
Figure 15–2: Heating and cooling mechanisms.

ENV
IRO
NM
ENTA
L IL
LNES
SES
279
3. Radiation (Warming or Cooling) Involves the direct loss or absorption of heat
energy through electromagnetic waves.4. Evaporation (Cooling Only) Occurs when a liquid changes to a vapour.
This process requires heat, which means the evaporation of sweat takes heat from the body’s surface. When sweat or water evaporates (either on the skin or in clothing that is in contact with the skin), the skin is cooled.
Sweating occurs when the temperature of either the skin or the body’s core increases. In a cold environment, sweating should be minimized (e.g., clothing layers should be removed prior to hard work to minimize sweating). In a hot environment, evaporative heat loss is beneficial; however, any sweat that does not evaporate will not cause cooling. For example, when humidity is high, sweat does not evaporate as efficiently and may simply drip off the body.
The body’s ability to maintain normal core temperature is primarily affected by the following factors: • Temperature of the surrounding air or water • Air humidity • Wind speed • Physiological factors, including heat
production • Clothing properties (e.g., insulation,
permeability, and moisture-transfer capacity) • Total insulation (e.g., how many layers are worn) • Skin moisture
In a cold environment, low ambient temperature and wind combine to increase heat loss through convection. The combination of temperature and wind speed results in wind chill, which is the apparent temperature in relation to the ambient temperature (Figure 15–3). For example, if the wind speed is 65 km/h and the ambient temperature is -25°C (-13°F), the temperature feels like -44°C (-47.2°F), and there is a high risk of frostbite to exposed skin within 2 to 5 minutes.
In a hot environment, heat and humidity combine to increase heat stress. An increase in humidity produces a corresponding increase in the apparent
Figure 15–3: The Wind Chill Index.
WIND CHILL INDEXACTUAL AIR TEMPERATURE (°C)
WIND SPEED(km/h) 5 0 -5 -10 -15 -20 -25 -30 -35 -40 -45 -50
5 4 -2 -7 -13 -19 -24 -30 -36 -41 -47 -53 -58
10 3 -3 -9 -15 -21 -27 -33 -39 -45 -51 -57 -63
15 2 4 -11 -17 -23 -29 -35 -41 -48 -54 -60 -66
20 1 -5 -12 -18 -24 -30 -37 -43 -49 -56 -62 -68
25 1 -6 -12 -19 -25 -32 -38 -44 -51 -57 -64 -70
30 0 -6 -13 -20 -26 -33 -39 -46 -52 -59 -65 -72
35 0 -7 -14 -20 -27 -33 -40 -47 -53 -60 -66 -73
40 -1 -7 -14 -21 -27 -34 -41 -48 -54 -61 -68 -74
45 -1 -8 -15 -21 -28 -35 -42 -48 -55 -62 -69 -75
50 -1 -8 -15 -22 -29 -35 -42 -49 -56 -63 -70 -76
55 -2 -8 -15 -22 -29 -36 -43 -50 -57 -63 -71 -77
60 -2 -9 -16 -23 -30 -36 -43 -50 -57 -64 -72 -78
65 -2 -9 -16 -23 -30 -37 -44 -51 -58 -65 -72 -79
70 -2 -9 -16 -23 -30 -37 -44 -51 -58 -65 -72 -80
75 -3 -10 -17 -24 -31 -38 -45 -52 -59 -66 -73 -80
80 -3 -10 -17 -24 -31 -38 -45 -52 -60 -67 -74 -81

ENV
IRO
NM
ENTA
L IL
LNES
SES
280
temperature, which increases the heat stress on the body, even if the actual temperature of the air remains the same. For example, if the relative humidity is 65% and the ambient temperature is 37°C (98.6°F), it actually feels like 54°C (129.2°F), and there is serious risk of heat stress. The Heat and Discomfort Index (Figure 15–4) provides a guide for determining how the combination of humidity and temperature will affect a patient’s heat stress and comfort level.
CAUSES AND RISK FACTORS FOR HEAT- OR COLD-RELATED ILLNESS
Some causes of heat- or cold-related illness include: • Strenuous work or exercise in extreme
temperatures with an inappropriate amount of insulation.
• Working and/or exercising in protective clothing or gear that inhibits heat exchange (e.g., football equipment, firefighter turnout gear, or chemical/biological protective suits).
• Working indoors in hot, humid, or poorly ventilated areas.
• Exposure to cold temperatures, exaggerated by wet and windy conditions.
• Boots or other footwear that is too tight. • Poorly heated homes. • Recreation in cold, wet, or windy conditions.
Some risk factors that may make a patient more prone to heat- or cold-related emergencies include: • Age—particularly the elderly (especially those
with dementia) and young children. • Previous history of a heat- or cold-related
illness. • Respiratory or cardiovascular disease. • Diabetes or other conditions that cause poor
circulation. • Taking medications to eliminate water from
the body (diuretics).
HEAT AND DISCOMFORT INDEXHUMIDEX INDEX OF APPARENT TEMPERATURE (°C)
25% 30% 35% 40% 45% 50% 55% 60% 65% 70% 75% 80% 85% 90% 95% 100%
42° 48 50 52 55 57 59 62 64 66 68 71 73 75 77 80 82
41° 46 48 51 53 55 57 59 61 64 66 68 70 72 74 76 79
40° 45 47 49 51 53 55 57 59 61 63 65 67 69 71 73 75
39° 43 45 47 49 51 53 55 57 59 61 63 65 66 68 70 72
38° 42 44 45 47 49 51 53 55 56 58 60 62 64 66 67 69
37° 40 42 44 45 47 49 51 52 54 56 58 59 61 63 65 66
36° 39 40 42 44 45 47 49 50 52 54 55 57 59 60 62 63
35° 37 39 40 42 44 45 47 48 50 51 53 54 56 58 59 61
34° 36 37 39 40 42 43 45 46 48 49 51 52 54 55 57 58
33° 34 36 37 39 40 41 43 44 46 47 48 50 51 53 54 55
32° 33 34 36 37 38 40 41 42 44 45 46 48 49 50 52 53
31° 32 33 34 35 37 38 39 40 42 43 44 45 47 48 49 50
30° 30 32 33 34 35 36 37 39 40 41 42 43 45 46 47 48
29° 29 30 31 32 33 35 36 37 38 39 40 41 42 43 45 46
28° 28 29 30 31 32 33 34 35 36 37 38 39 40 41 42 43
27° 27 27 28 29 30 31 32 33 34 35 36 37 38 39 40 41
26° 26 26 27 28 29 30 31 32 33 34 34 35 36 37 38 39
25° 25 25 26 27 27 28 29 30 31 32 33 34 34 35 36 37
24° 24 24 24 25 26 27 28 28 29 30 31 32 33 33 34 35
23° 23 23 23 24 25 25 26 27 28 28 29 30 31 32 32 33
22° 22 22 22 22 23 24 25 25 26 27 27 28 29 30 30 31
Figure 15–4: The Heat and Discomfort Index.

ENV
IRO
NM
ENTA
L IL
LNES
SES
281
HEAT-RELATED ILLNESS
Heat cramps, heat exhaustion, and heat stroke are conditions caused by overexposure to heat. Cramps are the least severe indicator but are often the first sign of overexposure to heat. Heat exhaustion and heat stroke are more serious emergencies.
Heat CrampsHeat cramps are painful spasms of skeletal muscles. Heat cramps develop fairly rapidly and usually occur after periods of physical exertion in warm or even moderate temperatures.
Heat ExhaustionHeat exhaustion occurs when the body’s temperature rises and thermoregulatory responses are activated to compensate. Sweating is usually profuse, allowing heat loss through evaporation.
Heat exhaustion is an early sign that the body’s temperature-regulating mechanisms are becoming overwhelmed. Heat exhaustion is not always preceded by heat cramps. The patient’s temperature will be normal or slightly elevated.
Over time, the patient loses fluid through sweating, which decreases blood volume. Blood flow to the skin increases in an effort to increase heat loss, thus reducing blood flow to the vital organs. Because less blood is available for the vital organs, the patient may begin to experience sign and symptoms of shock.
Without interventions, the patient’s condition will deteriorate for as long as the heat stress continues, and the body’s core temperature will continue to rise. The patient may vomit and begin to show changes in level of responsiveness. Without prompt intervention, heat exhaustion can quickly advance to heat stroke.
Heat StrokeHeat stroke is the least common but most severe heat-related illness. Often, it occurs when signs and symptoms of heat exhaustion are
ignored. Heat stroke begins when the body’s thermoregulatory mechanisms are overwhelmed by heat stress and begin to stop functioning.
Sweating stops because the body’s fluid levels are low. When sweating stops, the body cannot actively cool itself effectively, and the body’s core temperature rises, usually above 40°C (104°F). It soon reaches a level at which the brain and other vital organs (i.e., the heart and kidneys) begin to fail. If the body is not cooled, heat stress can lead to seizures, coma, and death. Heat stroke is a serious medical emergency. You must recognize the signs and symptoms and provide treatment immediately.
Signs and Symptoms of Heat-Related IllnessFigure 15–5 shows the signs and symptoms of heat stress.
Treatment for Heat-Related IllnessIf recognized in its early stages, a heat-related illness can usually be reversed. Follow these general treatment steps immediately (Figure 15–6):
Pouring water on a patient’s torso is more effective if there is a layer of cloth to keep the water in contact with the skin until it evaporates. Pour the water onto clothing, a towel, or another layer of cloth rather than directly onto the patient’s skin. Fanning the patient after pouring the water encourages evaporation (in addition to creating or increasing convective cooling). Note that other liquids may be used if water is not available: Beverages are often cool and available, for example. Even IV fluid can be used, so long as it is not necessary for rehydrating the patient.
Patients with heat-related illness should be given an electrolyte-replacement beverage or water. Electrolyte replacement is especially important for patients with heat cramps.

ENV
IRO
NM
ENTA
L IL
LNES
SES
282
When caring for heat stroke, immerse as much of the patient’s body in cold water as possible with the resources available. If using a bucket, for example, the patient should immerse his or her hands and as much of the forearms as possible.
When treating a patient with heat cramps, the patient can usually resume activity once the cramps stop and there are no other signs or symptoms of illness. A patient with heat exhaustion or heat stroke should not resume normal activities on the same day.
When treating an unresponsive patient for heat exhaustion or heat stroke, hydrate the patient intravenously with isotonic or hypertonic fluid if your scope of practice and protocols permit.
A patient should be in the rapid transport category if he or she has heat stroke or any of the signs or symptoms listed in red above. If transportation is not yet on scene, cool the patient aggressively until it arrives. When transporting a patient with a heat-related illness, provide cooling en route as well. As a minimum, poor cool liquid onto the patient’s chest (with clothing or a towel over the skin as usual) and fan the patient to encourage evaporation. Keep the vehicle’s interior as cool as possible (e.g., turn up air conditioning).
Refusing water, vomiting, and a changing level of responsiveness are signs that the patient’s condition may be deteriorating. Such a patient should in the rapid transport category. If the patient vomits, stop giving oral fluids and position the patient in the recovery position. Ensure that the patient has a protected, patent airway. Keep the patient lying down and continue to cool the body as quickly as possible. Monitor the patient closely, and be prepared to perform assisted ventilations and/or CPR if required.
ASSESSMENT OF A HEAT-STRESSED PATIENTSKIN PHYSICAL MENTAL PULSE RESPIRATION
HEAT CRAMPSmoist
warm
muscle contractions
(mild to severe)normal normal normal
HEAT EXHAUSTION
moist
warm
headache
weakness/exhaustion
nausea, vomiting
fainting
anxiety
dizzinessnormal normal
HEAT STROKE
dry
hot
seizures
coma
severe headache
altered behaviour:
irritableaggressive
bizarre
rapid
weak
rapid
shallow
CAUTION RAPID TRANSPORT
Figure 15–5: Signs and symptoms of heat stress.

ENV
IRO
NM
ENTA
L IL
LNES
SES
283
Heat Cramps Heat Exhaustion
Pour water on torso
AGGRESSIVE COOLING(ORDER OF PREFERENCE)
Immerse body in cool water
Immerseforearms incool water
Pour water on torso
Fan skin
Heat Stroke
If patient is alert, provide cool drink
Gentle stretching
Fan skin
Remove from heat
Loosen tight clothing,remove padding fromtorso
Remove from heat
Loosen tight clothing,remove padding fromtorso
Remove from heat
Loosen tight clothing,remove padding fromtorso
If patient is alert, provide cool drink
If patient is alert, provide cool drink
ACTIVE COOLING
Do not dry skin
Do not dry skin
Figure 15–6: General treatment for heat stress.

ENV
IRO
NM
ENTA
L IL
LNES
SES
284
COLD-RELATED ILLNESS
Cold-related illness may occur when the body’s heating mechanisms are overwhelmed by prolonged or extreme cold temperatures. They may also occur as localized superficial injuries (as when patches of skin are frozen by frostbite).
HypothermiaHypothermia occurs when the body core temperature decreases from a normal 37°C (98.6°F) to 35°C (95°F) or below. Hypothermia can be life threatening, especially when the core temperature drops below 28°C (82°F).
There are four distinct stages of cold stress. The signs and symptoms of each stage build upon the signs and symptoms of the previous stage (Figure 15–7).
Cold Stressed—Not Hypothermic• Shivering• Normal mental status• Normal or near-normal motor functions
Mild Hypothermia• Vigorous shivering; complaining of the cold• Decreased motor and sensory function• Difficulty taking care of self
Moderate Hypothermia• Weak and intermittent shivering, or shivering
that later stops• Complaints about the cold• Lack of coordination or speech; confused or
unusual behaviour• Impaired judgment• Apathy or a decreasing level of responsiveness• Unresponsiveness
Severe Hypothermia• Cessation of shivering• Unresponsiveness• Stiffening of body tissues• Shallow or absent respirations• Weak or absent pulse
TREATMENT FOR HYPOTHERMIAA patient with hypothermia (mild, moderate, or severe) is in the rapid transport category. Handle the patient gently and keep him or her in a horizontal position.
Place the patient in a hypothermia wrap immediately if his or her clothing is dry or damp, or if shelter or transport is less than 30 minutes way. If clothing is very wet and shelter or transport is less than 30 minutes away, wrap the patient without removing clothing.
If shelter or transport is more than 30 minutes away, seek protection from the wind and wet weather (create shelter if necessary) and then remove any wet clothing. Dry the patient by blotting (not rubbing) the skin, and then apply a hypothermia wrap. If the patient is responsive, allow him or her to sit up, and provide a warm, sugary, non-alcoholic beverage to drink, taking care to ensure that the patient does not choke and that the drink is not too hot.
Severe hypothermia can cause bradycardia and bradypnea. If vital signs seem absent and you suspect hypothermia, check for signs of pulse and respiration for 60 seconds. If neither are detected, start CPR.

ENV
IRO
NM
ENTA
L IL
LNES
SES
285
Figure 15–7: Assessment and care of a cold-stressed patient.
1. Starting with the outside ring, assess the patient's responsiveness, movement, shivering, and alertness. Decide whether each one is normal or impaired/absent.
2. Provide the care described in the quadrant that matches the patient's condition.
SHIVERING
ALERT
SHIVERIN
GNOT
IF COLD &UNRESPONSIVE
ASSUME SEVEREHYPOTHERMIA
Cold Stressed,Not Hypothermic
Mild Hypothermia
1. Reduce heat loss (e.g., add dry clothing)2. Provide high-calorie food or drink3. Increase heat production (e.g., exercise)
ModerateHypothermia
SevereHypothermia
ALERTNOT
MO
VEM
ENT
NO
RMAL IM
PAIRED
MO
VEMEN
T
RESPONSIVE
RESP
ONSIVE RESPONSIVE
1. Handle gently2. Keep horizontal3. No standing/walking for at least 30 min.4. Insulate/vapour barrier5. Apply heat to upper trunk6. Provide high-calorie food/drink7. Monitor until improvement (at least 30 min.)8. Rapid transport if no improvement
1. Handle gently2. Keep horizontal3. No standing/walking4. No drink or food5. Insulate/vapour barrier6. Apply heat to upper trunk7. Rapid transport
1. Treat as moderate hypothermia, and a) IF no obvious vital signs, THEN 60-second breathing check b) IF no breathing, THEN start CPR
2. Rapid transport

Apply a hypothermia wrap by performing the following steps (Figure 15–8):1. Place a tarp or large piece of plastic (external
vapour barrier) on the ground.2. Place an insulation pad (or pads) on the tarp or
plastic.3. Place as much additional insulation as possible
on the pad (e.g., blankets or sleeping bags).4. Place a piece of plastic or foil sheet (internal
vapour barrier) on the insulation.5. Gently place the patient in the wrap, apply
warm water bottles or heating pads to the patient’s upper torso (if available), and close each layer.
6. Cover the patient’s head and neck with whatever appropriate material is available (e.g., toque, heavy hat, hood, scarf, or small blanket).
If heat sources are not immediately available (e.g., if water must be heated before it can be poured into a hot-water bottle), you can open the wrap once the heat source is ready, place it on the patient’s upper torso, and close the wrap again.
Frost NipFrost nip is a local, superficial condition that occurs when skin, usually on the face, is exposed to cold temperatures and begins to freeze. It is essentially a minor form of frostbite. If the tissues below the skin begin to freeze as well, frost nip will escalate to frostbite.
If a patient has frost nip, his or her skin may appear pale, and there may be pain or stinging in the area. Treat frost nip by warming the area against warm skin or in warm water (38–40°C or 100.4–104°F).
FrostbiteExtremities (i.e., toes, feet, fingers, hands, ears, and nose) are particularly prone to frostbite. When frostbite occurs, the water inside and between the body’s cells begins to freeze and swell. Inside the body, the ice crystals and swelling begin to damage or destroy the body’s cells, blood vessels, and nerves.
Signs and symptoms of frostbite include: • Skin that appears white or waxy. • Skin that is cold and hard to the touch. • A lack of feeling in the affected area.
After the area is thawed, the patient may experience a burning sensation, redness, pain or tenderness, and blisters.
Frostbite may be classified as either superficial or deep. A patient with superficial frostbite may develop clear blisters after the affected area has thawed. Superficial frostbite may result in small amounts of tissue loss or no tissue loss at all. A patient with deep frostbite may develop dark, hemorrhagic blisters after the affected area has thawed. Deep frostbite is likely to result in tissue loss.
TREATMENT FOR FROSTBITEWhen treating a patient for frostbite, handle the affected area gently. Do no rub the affected area or apply snow or ice (rubbing causes further damage to the frozen tissue).
Thaw the area only if you are certain that it will not freeze again: You may need to transport the patient to a warmer environment before providing care. Warm the affected area, preferably by submerging it in a container of warm water (38–40°C or 100.4–104°F). Use a thermometer to check the temperature of the water if possible. If a thermometer is unavailable, carefully use your own hand to test the water; the water should feel warm but not uncomfortable. Keep the affected body part away from the bottom or sides of the container, and leave it in the water until it starts to turn red and feels warm.
If a container of warm water is unavailable, frozen tissue may also be warmed through direct contact with warm skin from either the patient (e.g., arm pits) or responder (e.g., stomach).
286
ENV
IRO
NM
ENTA
L IL
LNES
SES

ENV
IRO
NM
ENTA
L IL
LNES
SES
287
Figure 15–8: Applying a hypothermia wrap.

ENV
IRO
NM
ENTA
L IL
LNES
SES
288
If the patient is responsive and does not have gastrointestinal symptoms, rehydrate the patient (preferably with sugary, warm, non-alcoholic beverages). To treat the pain that thawing may cause, advise the patient to take an over-the-counter nonsteroidal anti-inflammatory drug (NSAID), such as ibuprofen.
Once the frozen area is thawed, refrain from breaking any blisters. Protect them with dry, sterile, non-adherent dressings. Place these dressings between the fingers or toes as well if they are affected. If possible, elevate the thawed area above the level of the patient’s heart. The patient should be assessed by a physician.
DROWNING
Drowning is a form of suffocation caused by immersion in water or other liquid. Drowning begins as a person gasps for air, either while struggling to stay afloat or underwater once the patient can no longer hold his or her breath.
As some water is inhaled, it can stimulate laryngospasm and the closing of the vocal cords. This is the body’s natural response to prevent water from entering the lungs, but it also prevents the inspiration of air. As suffocation continues, hypoxia worsens. The patient will become unresponsive and die. Laryngospasm may relax after unresponsiveness, and it will always cease with death (if not before). If the patient is face down, the lungs may remain dry and the patient may float. If the patient is face up, water can passively fill the lungs and the patient will sink.
Responsive Drowning PatientA responsive drowning patient will be struggling in the water. Submersion below the surface will occur repeatedly, and vocalization will be minimal to non-existent. Other signs that indicate a drowning patient include: • The patient is not using his or her legs to move
forward and tread water. • The patient is vertical in the water, usually
trying to rise out of the water to breathe rather than trying to swim forward.
• The patient has limited forward motion, usually struggling for only 20 to 60 seconds before submerging.
• The patient has an expression of fear. • The patient will usually be flailing his or her
arms at the sides, alternately moving up and pressing down.
ASSISTING A RESPONSIVE DROWNING PATIENTWater rescues should be performed by individuals who have been specifically trained for such situations. Additionally, all responders in and around water should be wearing lifejackets/PFDs if they are available.
A responsive drowning patient is in the rapid transport category. Perform a scene assessment. If the scene is safe to enter, or if you are equipped to safely enter the scene, rescue the patient from land by following this order of steps to ensure your own safety:1. Talk: Instruct and encourage the patient to
perform a self-rescue.2. Throw: Throw a rope or buoyant object, with
or without an attached line, to the patient.3. Reach: Reach out to the patient with a rigid
object (e.g., a ladder, paddle, tree branch, rescue tube, water noodle).
You must always remember not to endanger yourself. Rescues that involve entering the water and swimming to the patient require special training, (e.g., Red Cross Lifeguard training). Do not enter the water and swim to a drowning patient without this training; you are not likely to save the person, and you will be putting your life danger in addition to the patient’s life. Likewise, leaping into water, even shallow water, to help someone may seem courageous, but choosing a less dramatic method is safer and usually more effective. You can help a person only if you maintain your personal safety and stay in control of the situation. The talking (instructing), throwing, and reaching methods presented here help you do both.

ENV
IRO
NM
ENTA
L IL
LNES
SES
289
Talking (Instructing)If the patient has some swimming ability, instruct and encourage the patient to swim for safety if the distance is appropriate for the patient’s swimming skills and energy level, and the conditions of the water.
If the person has limited or no swimming skills, or if he or she is unable to swim normally due to exhaustion, injury, or cold exposure, encourage the patient to tread water or float on his or her back. Treading water to stay at the surface takes more energy than floating (but less energy than swimming).
Motionless floating is useful for conserving energy. This is an effective survival skill in calm, warm water, but may be very difficult in cold water.
Throwing AssistsThrow an object that the patient can grab to stay afloat, such as a PFD/lifejacket or ring buoy (Figure 15–9). If a line is attached, you can pull the patient to safety. When throwing a device, follow these steps:1. Speak clearly to the distressed swimmer while
maintaining eye contact.2. Face the patient and throw the assist, trying to
throw it beyond him or her.3. Get into stable position (e.g., lying down)
before the patient grabs the assist.4. Smoothly pull the patient to the nearest point
of safety.
Reaching AssistsA reaching assist may be used if a throwing assist is unavailable or the circumstances make throwing an object ineffective. Extend your reach with any object that will reach the patient, such as a pole, oar, tree branch, shirt, belt, towel, or rescue tube (Figure 15–10). If there are no objects available to extend your reach, try to extend your arm and grasp the patient, or extend your leg so that the patient can grab onto your foot. As always, protecting yourself is your top priority: Always ensure that you are in a stable position and are not at risk of being pulled into the water yourself. If possible, lie down on a pool deck, dock, or pier.
To perform a reaching assist:1. Get into a stable position, such as lying prone. 2. Extend the object to the patient.3. When the patient grabs the object, slowly and
carefully pull the patient to safety.4. Keep your body low, and lean back to avoid
being pulled into the water.
ONCE THE PATIENT IS RESCUEDIf you suspect that the patient may have a head and/or spinal injury, you must support his or her head and neck, keeping it aligned with the body, before pulling the patient from the water. It may be necessary to turn the patient onto his or her back; if so, the patient’s head, neck, chest, and body must be aligned, supported, and turned as one unit. The patient should be floated, on his or her back, onto a firm support, such as a backboard, before being removed from the water.
Figure 15–9: Ensure your safety while using a throwing assist. Figure 15–10: You can use many things for a reaching assist (e.g., a paddle, tree branch, belt, towel, or even a ladder).

ENV
IRO
NM
ENTA
L IL
LNES
SES
290
Once the patient is out of the water, perform a primary assessment and provide care for any conditions found. The patient should be placed in the rapid transport category. All survivors of drowning incidents must be assessed by a physician immediately, regardless of how rapid the recovery may seem.
You should attempt to resuscitate the patient even if he or she has been submerged for a prolonged period. Patients have been successfully resuscitated even after being submerged in cold water for longer than 30 minutes.
SELF-RESCUEIf you unexpectedly fall into the water without a PFD/lifejacket, you may need to remove clothing in order to swim or float; however, some clothing, such as a long-sleeved shirt that buttons, will actually help you float and protect you from cold. If your shoes are light enough for you to swim in comfortably, leave them on. If they are too heavy, remove them.
Tread water to stay in an upright position while you signal for help or wait for rescue. To tread water, stay vertical, move your hands back and forth, and use a kick that you can do effectively and comfortably, using the least amount of energy.
If you are wearing a PFD/lifejacket, you should await rescue and adopt the Heat Escape Lessening Position (HELP) (Figure 15–11): 1. Press your arms against your armpits.2. Squeeze your thighs together and adjust the
bend of your hips and knees as needed to keep stable in the water.
3. Place your forearms across your chest or use your hands to pull your knees towards your chest.
Unresponsive Drowning PatientRescuing an unresponsive drowning patient requires specific qualifications and training. If you are not qualified, request specialized personnel to extricate the patient from the water.
Cold-Water Immersion and DrowningHypothermia caused by cold-water immersion occurs faster than hypothermia caused by cold-air exposure; however, diagnosis and treatment remain the same, regardless of the cause.
It is important to understand the four phases of cold-water immersion: 1. Cold Shock Response: A rapid cooling of the
skin, causing the patient to gasp, followed by hyperventilation. This can last for 1 to 2 minutes.
2. Cold Incapacitation: A further cooling of deeper nerve and muscle fibres, which causes loss of coordination and weakness, leading to incapacitation within approximately 15 minutes.
3. Hypothermia: Requires 30 minutes or more for an appropriately dressed adult to become mildly hypothermic.
4. Circum-rescue Collapse (also referred to as post-rescue collapse): Can occur just prior to, during, or after a rescue. Symptoms range from syncope to cardiac arrest.
Most deaths in cold water result from the Cold Shock Response (i.e., when the head is under water) or drowning due to Cold Incapacitation. Normally, a personal flotation device (PFD) must be worn to remain afloat long enough for a person to die from hypothermia.
Figure 15–11: The Heat Escape Lessening Position (HELP).

ENV
IRO
NM
ENTA
L IL
LNES
SES
291
Cold-water immersion can occur in open water (e.g., when a boat capsizes) or after breaking through the ice.
COLD-WATER RESCUESelf-RescueShould you find yourself in cold open water and at risk of cold-water immersion, attempt to rescue yourself by climbing out of the water and into a boat, raft, or other mode of marine transportation, if available.
If you have fallen through the ice, place your arms on the surface of the ice and control your breathing by taking some slow deep breaths. Kick your legs until your body is horizontal to the water’s surface, and then kick and pull forward until you are on top of the ice. Roll or crawl a safe distance away from the hole before standing up.
Surviving to Await RescueIf self-rescue is not possible in cold open water, you may be able to increase your survival time by climbing out of the water as much as possible onto a capsized boat or other floating object. If you are wearing a PFD/lifejacket and there is nothing to climb up on, you may adopt the HELP position.
If several people are together, adopt the Huddle position (Figure 15–12):1. Face each other.2. Have each person squeeze his or her thighs
together. 3. Form a circle and hug each other. Each person
should place one arm above and one arm below the arms of those adjacent and pull the sides of their chests together.
4. Sandwich any children or people without PFDs inside the Huddle.
The Huddle position is most effective for groups of three to five.
If you have fallen through ice and you are unable to climb out of the water on your own, stop struggling. Place your arms onto the ice and allow them to freeze in place; this will prevent drowning if moderate hypothermia causes incapacitation or unresponsiveness.
COLD-WATER DROWNINGIf a patient has drowned in cold water, he or she is in the rapid transport category. If the scene is safe to enter, perform the steps for rescuing an unresponsive drowning patient (see page 290).
Depending on the situation, there may or may not be a chance of successfully resuscitating the patient. The relevant factors are the temperature of the water and the length of the time the patient was underwater (submersion time), if known. Colder water reduces the rate at which brain cells die when they become hypoxic, so drowning in colder water can increase a patient’s chances of resuscitation.
You should attempt resuscitation in either of the following situations: • The water temperature is less than 6°C (42.8°F)
and the known submersion time is less than 90 minutes.
• The water temperature is 6 to 10°C (42.8 to 50°F) and the known submersion time is less than 30 minutes.
Once you begin CPR, you should continue for 25 minutes. If the patient shows no signs of improvement after this period, or if your safety is threatened, you may cease CPR.
Like water rescues, ice rescues require special training and equipment.
Figure 15–12: The Huddle position.

ENV
IRO
NM
ENTA
L IL
LNES
SES
292
HIGH-ALTITUDE ILLNESS
At higher altitudes, the lower atmospheric pressure results in less available oxygen in the air, resulting in hypoxemia (decreased oxygen saturation of the arterial blood). The risk increases as the patient moves higher, but high-altitude illness may occur at elevations as low as 2,500 metres (8,202 feet) above sea level.
The body gradually adapts physiologically to changes in altitude. Within the first 10 days, the body compensates by increasing its respiration and pulse rates.
Other adaptations may take place anywhere from 10 days to 6 weeks and include increased red-blood-cell production, increased capillarization (development of capillary networks), and a gradually decreasing resting heart rate.
Edema (accumulation of fluid in extravascular space) is a major factor contributing to high-altitude illness. Edema formation usually occurs in two places:
• In the brain (interstitial space): Primarilyinvolved in acute mountain sickness (AMS)and high-altitude cerebral edema (HACE)
• In the lungs (alveoli): Primarily involved inhigh-altitude pulmonary edema (HAPE)
The most common cause of death related to high altitude is HAPE. With all high-altitude illnesses, rapid recognition and treatment are crucial, as they can significantly reduce mortality.
Signs, Symptoms, and Care for High-Altitude IllnessTable 15–1 summarizes the signs, symptoms, and care for illnesses that result from high altitude.
TABLE 15–1: SUMMARY OF ALTITUDE ILLNESSES
CONDITION SIGNS AND SYMPTOMS CARE
Acute mountain sickness (AMS)
Headache, and one or more of the following:• Nausea/vomiting• Fatigue• Lethargy• Dizziness• Difficulty sleeping
Other signs and symptoms include:• Loss of appetite• Coughing and/or chest tightness• Irregular breathing or shortness of
breath• Reduced urine output• Peripheral edema (e.g., swellingaround the eyes and face)
• Cyanosis at nail beds and around themouth
Mild AMS:Stop ascent, rest and acclimatize
Treat symptoms (e.g., provide analgesics and/or anti-emetics)
If signs and symptoms persist, descend at least 500 metres (1,640 feet)
Moderate to severe AMS:Provide supplemental oxygen (low flow)
Apply hyperbaric therapy in a portable hyperbaric pressure bag (Figure 15–13)
Give acetazolamide with or without dexamethasoneORDescend at least 500 metres (1,640 feet)
Also:Hydrate regularly, with 4 to 6 L (16–24 cups) of fluids per day
Figure 15–13: A hyperbaric pressure bag. Two psi pressure is equivalent to an altitude decrease of about 1,600 m (5,249 ft).
Eri
c Jo
hnso
n

ENV
IRO
NM
ENTA
L IL
LNES
SES
293
SCUBA-RELATED ILLNESS
PhysiologyThe human body is always under pressure as a result of the weight of the atmosphere pressing in and down on it. The standard level of pressure at sea level is referred to as one atmosphere (1 ATM). Pressure increases dramatically underwater because of the weight of the water itself. Descending to a depth of just 10 metres (33 feet) results in pressure two times higher than at sea level (2 ATM). At a depth of 50 metres (165 feet), the pressure is 6 ATM, or 6 times higher than at the surface.
Divers Alert NetworkThe Divers Alert Network (DAN) is a network of recreational divers. Membership is required. DAN’s mission is to provide emergency medical assistance to divers and to support diving safety.
DAN has a diving medicine physician who is on-call 24/7 to help with diagnosis and treatment of suspected SCUBA-related illnesses. The DAN hotline number is 1-919-684-9111. If you have a membership available, contacting DAN can provide valuable information for assessment and treatment of a patient with a known or suspected diving injury.
CONDITION SIGNS AND SYMPTOMS CARE
High-altitude cerebral edema (HACE)
Worsening of all symptoms seen in moderate to severe AMS as well as one or more of the following:• Ataxia (difficulty maintaining balance)• Severe lethargy• Altered level of responsiveness
Other symptoms may include:• Convulsions, stupor• Unresponsiveness• Vision disturbances• Paralysis• Seizures• Hallucinations• Cyanosis• Increased blood pressure• Decreasing heart rate
Descend or evacuate immediately
Provide supplemental oxygen (2 to 4 LPM)
Apply hyperbaric therapy in a portable hyperbaric pressure bag
Administer dexamethasone
High-altitude pulmonary edema (HAPE)
Signs and symptoms include the following:• Headache• Dyspnea at rest• Wheezing• Insomnia• Coughing spasms (may have gurgling
sound)• Rales (crackling or clicking sounds) on
auscultation• Poor appetite• General ache in the chest• Continuous fast pulse• Cyanosis
In more severe cases: • Extreme weakness• Ataxia (loss of control of muscle
movements)• Frothy, blood-tinged sputum• Mental confusion, delirium, and
irrational behaviour
Minimize exertion and keep warm
Start descent immediately or apply hyperbaric therapy in a portable hyperbaric pressure bag
Provide supplemental oxygen (4 to 6 LPM until improving, then 2 to 4 LPM)
If above unavailable or not possible, consider administering one of the following:• Nifedipine• Sildenafil• Tadalafil

ENV
IRO
NM
ENTA
L IL
LNES
SES
294
Barotrauma of DescentNormally, gas-filled spaces are in equilibrium with the pressure of the outside environment. For example, air in the middle ear remains equalized in pressure with the atmosphere via the Eustachian tube (which runs from the middle ear to the pharynx). Similarly, equalization occurs in the sinuses through connections to the nasal cavity, and this even occurs in a dive mask.
Barotrauma of descent (sometimes referred to as a squeeze) results when something blocks the opening between the internal space and the environment, trapping gas within the space. As the diver descends and the external pressure increases, there is a relative decrease, or negative, pressure within the blocked space, causing pain and other symptoms, such as tympanic membrane rupture (middle ear); congestion, edema and hematoma (sinuses); and capillary rupture and edema in and around the eyes (mask).
Barotrauma of AscentAs the pressure decreases during a diver’s ascent, gas in body spaces will expand. Normally this gas will escape, maintaining equilibrium with the external environment. However, if this venting is prevented due to obstruction, the expanding gases will distort the tissues within the body space and cause tissue damage and bleeding. This typically occurs in teeth and also in the gut (in those who swallow air or chew gum while diving). These patients typically present with local pain on ascent.
Some patients experience a more severe disorder called pulmonary barotrauma. This occurs when a diver ascends while holding his or her breath (breath holding). As external pressure decreases during ascent, the trapped air in the lungs expands against the closed glottis, causing the alveoli to rupture. Signs and symptoms include local capillary bleeding, pneumomediastinum, arterial gas embolism (AGE), chest pain, cough, and even froth in the mouth.
ARTERIAL GAS EMBOLISM (AGE)As depth increases, air is compressed, but this process will reverse on ascent. If the compressed air in a diver’s lungs cannot freely escape during an ascent (particularly a rapid one), then rapid gas
expansion within the lung may rupture lung tissue. Air entering the arterial blood through ruptured pulmonary vessels can distribute bubbles into body tissues (including the heart and brain), where they disrupt circulation. This is referred to as an arterial gas embolism (AGE). An AGE may cause minimal neurologic symptoms, dramatic symptoms requiring medical attention, or death.
Common signs and symptoms of AGE include: • Headaches. • Seizures. • Unresponsiveness. • Confusion. • Visual disturbances. • Bloody froth from the airway (rare). • Paralysis or weakness.
Treatment of AGE includes the following: provide supplemental high-concentration oxygen and ensure rapid transportation to a medical facility (preferably one capable of dealing with diving injuries). The patient should remain in a supine position. If air transportation is used, the pilot should fly at an altitude of 305 metres (1,000 feet) or less, or use an aircraft that can be pressurized to 1 ATM.
The best prevention for AGE is avoiding ascent with a closed glottis and remembering to exhale bubbles. In general, it should be assumed that a diver has suffered from AGE when he or she is unresponsive upon surfacing or loses responsiveness within 10 minutes after surfacing.
DECOMPRESSION SICKNESS (DCS)Breathing air under pressure causes excess inert gas (nitrogen) to dissolve in the blood and body tissues. The amount dissolved is proportional to, and increases with, depth and time. As the diver ascends to the surface, the excess dissolved nitrogen comes out of solution. If the return to the surface is slow and controlled, the nitrogen is released from the blood through the alveoli and exhaled. If the ascent is too rapid, some of the gas can supersaturate within the tissues, coming out of solution to form bubbles in the surrounding tissues. This condition is known as decompression sickness. It is sometimes referred to as the bends. Symptoms of DCS typically occur 15 minutes to 24 hours after ascent.

ENV
IRO
NM
ENTA
L IL
LNES
SES
295
Signs and symptoms can include any of the following, depending on where in the body nitrogen bubbles appear: • Itchiness, swelling • Blotchy, mottled, or marbled skin rash • Severe joint pain • Fatigue or dizziness • Personality changes • Chest pain, cough, shortness of breath • Numbness or tingling • Weakness or paralysis • Loss of bowel or bladder function • Shock • Unresponsiveness
Treatment of DCS mirrors the treatment for AGE and involves providing supplemental high-concentration oxygen and rapid transportation to a medical facility (preferably one capable of dealing with diving injuries). The patient should remain in a supine position. If air transportation is used, the pilot should fly at an altitude less than 305 metres (1,000 feet) or use an aircraft that can be pressurized to 1 ATM.
NITROGEN NARCOSISBreathing pressurized air while diving can cause excess inert gas (usually nitrogen) to dissolve into the body’s tissues. The amount dissolved is proportional to, and increases with, the depth and duration of the dive.
Nitrogen narcosis is caused when the dissolved nitrogen in the body increases to the point that it begins to impair the nervous system. This can alter a diver’s thought processes and decrease his or her ability to make judgments and calculations. It can also decrease motor skills, worsening performance in tasks requiring manual dexterity. Pressure increases with depth, and so does the severity of the narcosis. The effects vary widely from individual to individual, and even from day to day for the same diver.
Nitrogen narcosis can have any of the following signs or symptoms: • Euphoria • Light-headedness • Impaired judgment • Confusion • Hallucinations • Delayed response to signals, instructions,
and other stimuli • Hysteria
Because of the perception-altering effects of narcosis, a diver may not be aware of the changes in his or her mental state. The best prevention for nitrogen narcosis is vigilant monitoring of diving partners and helping a diver ascend safely if he or she shows any of the signs or symptoms. Some symptoms may become resolved with ascent to shallower depths (usually less than 20 metres or 65 feet).

Assessment of a Heat-Stressed Patient
Radiation
Conduction
Convection
Evaporation
Effects: warming or coolingOccurs through direct loss or absorption of heat energy through electromagnetic waves
Effects: warming or coolingOccurs through direct contact with a solid or liquid
Effects: warming or coolingOccurs when air or liquid moves across the skin
Effects: cooling onlyOccurs when a liquid changes to a vapour
FOUR MECHANISMS OF HEATING AND COOLING
SKIN PHYSICAL MENTAL PULSE RESPIRATION
HEAT CRAMPSmoistwarm
muscle contractions (mild
to severe)normal normal normal
HEAT EXHAUSTION
moistwarm
headacheweakness/exhaustion
nausea, vomitingfainting
anxietydizziness
normal normal
HEAT STROKEdryhot
seizurescoma
severe headache
altered behaviour:
irritable aggressive
bizarre
rapidweak
rapidshallow
CAUTION RAPID TRANSPORT
SUMMARY
296
ENV
IRO
NM
ENTA
L IL
LNES
SES

Care for a Heat-Stressed Patient
Heat Cramps Heat Exhaustion
Pour water on torso
AGGRESSIVE COOLING(ORDER OF PREFERENCE)
Immerse body in cool water
Immerseforearms incool water
Pour water on torso
Fan skin
Heat Stroke
If patient is alert, provide cool drink
Gentle stretching
Fan skin
Remove from heat
Loosen tight clothing,remove padding fromtorso
Remove from heat
Loosen tight clothing,remove padding fromtorso
Remove from heat
Loosen tight clothing,remove padding fromtorso
If patient is alert, provide cool drink
If patient is alert, provide cool drink
ACTIVE COOLING
Do not dry skin
Do not dry skin
297
SUMMARY
ENV
IRO
NM
ENTA
L IL
LNES
SES

1. Starting with the outside ring, assess the patient's responsiveness, movement, shivering, and alertness. Decide whether each one is normal or impaired/absent.
2. Provide the care described in the quadrant that matches the patient's condition.
SHIVERING
ALERT
SHIVERIN
GNOT
IF COLD &UNRESPONSIVE
ASSUME SEVEREHYPOTHERMIA
Cold Stressed,Not Hypothermic
Mild Hypothermia
1. Reduce heat loss (e.g., add dry clothing)2. Provide high-calorie food or drink3. Increase heat production (e.g., exercise)
ModerateHypothermia
SevereHypothermia
ALERTNOT
MO
VEM
ENT
NO
RMAL IM
PAIRED
MO
VEMEN
T
RESPONSIVE
RESP
ONSIVE RESPONSIVE
1. Handle gently2. Keep horizontal3. No standing/walking for at least 30 min.4. Insulate/vapour barrier5. Apply heat to upper trunk6. Provide high-calorie food/drink7. Monitor until improvement (at least 30 min.)8. Rapid transport if no improvement
1. Handle gently2. Keep horizontal3. No standing/walking4. No drink or food5. Insulate/vapour barrier6. Apply heat to upper trunk7. Rapid transport
1. Treat as moderate hypothermia, and a) IF no obvious vital signs, THEN 60-second breathing check b) IF no breathing, THEN start CPR
2. Rapid transport
Four Stages of Hypothermia
298
SUMMARYEN
VIR
ON
MEN
TAL
ILLN
ESSE
S

299
ENV
IRO
NM
ENTA
L IL
LNES
SES
299
Hypothermia Treatment
• Do not remove clothing• Apply hypothermia wrap
• Seek/create shelter• Remove any wet clothing• Dry patient (blot, don’t rub)• Apply hypothermia wrap
Assess patient’s clothing
Patient’s clothing dry or damp
• Do not remove clothing• Apply hypothermia wrap
Patient’s clothing very wet
Assess proximity of shelter/transport
Shelter/transport < 30 minutes away
Shelter/transport >_ 30 minutes away
Approach to Rescuing a Responsive Drowning Patient
1. Talk: Instruct the patient to perform a self-rescue.
2. Throw: Throw a rope or buoyant object to the patient.
3. Reach: Reach out to the patient with a rigid object.
Huddle Position (for Groups)
1. Face each other.2. Have each person squeeze his or
her thighs together.3. Form a circle and hug each other.4. Sandwich any children or people
without personal flotation devices (PFDs) inside the Huddle.
Heat Escape Lessening Position (HELP)
1. Press your arms against your armpits.2. Squeeze your thighs together.3. Place your forearms across your chest or pull your knees towards your chest.
299
ENV
IRO
NM
ENTA
L IL
LNES
SES
SUMMARY


PREG
NA
NC
Y, L
AB
OU
R, A
ND
DEL
IVER
Y
16 Pregnancy, Labour, and Delivery
301
Key ContentPregnancy ............................... 302 The Birth Process .................... 302 Assessing Labour ................. 302 The Labour Process ............. 303Preparing for Delivery ........... 304 Assisting with Delivery .......... 304 Caring for the Neonate and Mother ................................ 306 Care and Assessment for the Neonate ............................ 306 Caring for the Mother ........ 308Midwives and Home Births ... 309 Complications During Pregnancy ............................ 309 Spontaneous Abortion ....... 310 Premature Labour ............... 310 Ectopic Pregnancy ............... 310 Third Trimester Bleeding .... 311Complications During Childbirth............................. 311 Prolapsed Cord .................... 311 Breech Birth ......................... 312 Limb Presentation ............... 312 Multiple Births..................... 313
IntroductionYou may be faced with a situation that requires you to assist with emergency labour and/or delivery. Take comfort in knowing that things rarely go wrong. Childbirth is a natural process. Thousands of children are born all over the world each day, without complications, in areas where no medical assistance is available during labour and delivery. By following a few simple steps, you can effectively assist in the labour and delivery process.

PREG
NA
NC
Y, L
AB
OU
R, A
ND
DEL
IVER
Y
302
PREGNANCY
Pregnancy begins when an egg (ovum) is fertilized by a sperm, forming an embryo. The embryo implants itself within the mother’s uterus, a pear-shaped organ that lies at the top of the pelvis. The embryo is surrounded by the amniotic sac. This is a fluid-filled sac also called the bag of waters. The fluid within the amniotic sac is constantly renewed and helps to protect the embryo from injury and infection.
As the embryo grows, its organs and body parts develop. After approximately 8 weeks, the embryo is called a fetus. In order to continue developing properly, the fetus must receive nutrients. The fetus receives these nutrients from the mother through a specialized organ attached to the uterus called the placenta. The placenta is attached to the fetus by a flexible structure called the umbilical cord. The fetus develops for approximately 40 weeks (about 9 months), at which time the birth process begins (Figure 16–1).
THE BIRTH PROCESS
The birth process begins with the onset of labour, which is the final phase of pregnancy. Labour begins with a rhythmic contraction of the uterus. As these contractions continue, they cause the cervix to dilate. The cervix is a short tube of muscle at the upper end of the birth canal that serves as the passageway from the uterus to the vaginal opening. When the cervix is sufficiently dilated (approximately 10 cm), it allows the baby to travel from the uterus through the birth canal. The baby passes through the birth canal and emerges from the vagina, at which point it is referred to as a neonate.
Assessing LabourIf you are called to assist a pregnant woman, you will want to determine early in your assessment whether she is in labour. If she is in labour, you should determine how far along she is in the birth process and whether she expects any complications. The following questions and some quick observations can help you to determine these factors:
• Is this your first pregnancy? The first stageof labour often takes longer with firstpregnancies than with subsequent ones.
• Are you under a physician’s care for any factorsthat make this as a high-risk pregnancy?
• Has the amniotic sac ruptured? When thishappens, fluid flows from the vagina ina sudden gush or a trickle, which may beconfused with loss of bladder control. Peopleoften describe the rupture of the sac as thewater breaking. Note that labour often beginswithout the amniotic sac rupturing.
• What are the contractions like? Are they veryclose together? Are they strong? The lengthand intensity of the contractions will giveyou valuable information about the progressof labour. As labour progresses, contractionsbecome stronger, last longer, and are closertogether.
• Is there a bloody discharge? This thick, pinkor light red discharge from the vagina is themucous plug that falls from the cervix as itbegins to dilate, signalling the onset of labour.This sign is often referred to as bloody show.
• Do you have an urge to push? If the expectantmother expresses a strong urge to push, thissignals that delivery is imminent.
• Is the baby crowning? If the baby’s head isvisible, the baby is about to be born.
Note that these are general guidelines only: Every patient (and every birth) can be different. A patient may have contractions for hours without her amniotic sac rupturing, for example, or may have a much longer second birth than her first.
Figure 16–1: Mother and fetus at 40 weeks.
Placenta
Umbilical cord
Fetus
Uterus
Cervix
Vagina

PREG
NA
NC
Y, L
AB
OU
R, A
ND
DEL
IVER
Y
303
The Labour ProcessThe labour process has four distinct stages. The length and intensity of each stage varies from patient to patient and from birth to birth. The duration of the entire process ranges from just a few hours to several days, but generally the process takes between 12 and 24 hours. First-time mothers typically have longer labours. Second and subsequent births are often shorter, but this is a guideline, not a rule.
While not impossible, it is extremely rare for a woman to go into labour and give birth so quickly that it creates an emergency situation. This is a popular plot device in television and movies, but in reality, the onset of labour is usually gradual and steady.
STAGE ONE—PREPARATIONIn the first stage, the mother’s body prepares for the birth. This stage covers the period of time from the first contraction until the cervix is fully dilated. A contraction is a rhythmic tightening of the muscles in the uterus. It is like a wave: It begins gently, rises to a peak of intensity, and then drops off and subsides. The muscles then relax, and there is a break before the next contraction starts.
As the time for delivery approaches, the contractions become closer together, last longer, and feel stronger. Normally, contractions that are less than 3 minutes apart signal that childbirth is near. When timing the space between contractions, time from the beginning of a wave to the beginning of the next wave, not just the time between the contractions.
To prepare for delivery, create a comfortable, clean (preferably sterile) area for the mother. Help her into a position of comfort, and respect her privacy as much as possible. Keep unnecessary bystanders away unless the mother requests their presence. Ensure that necessary equipment is ready for use and close by. If you have an obstetrics kit, it will contain the necessary equipment.
Note the spacing of the contractions: When contractions are less than 3 minutes apart, childbirth is imminent. Watch for any signs of complications, and allow the woman’s body to progress naturally.
The woman’s emotional state and stress levels have a direct impact on the ease of the labour process. Create a calm, supportive, and professional atmosphere, and respect the woman’s requests as much as possible (e.g., she may want to turn off bright lights) as long as they do not interfere with care.
STAGE TWO—DELIVERY OF THE BABYThe second stage of labour involves the actual delivery of the baby. It begins once the cervix is completely dilated and ends with the birth of a neonate. The baby’s head will become visible as it emerges from the vagina. When the top of the head begins to emerge, it is called crowning (Figure 16–2). When crowning occurs, birth is imminent, and you must be prepared to receive the baby.
STAGE THREE—DELIVERY OF THE PLACENTAOnce the neonate has fully emerged from the birth canal, the third stage of labour begins. During this stage, the placenta usually separates from the wall of the uterus and exits through the birth canal. This process normally occurs within 20 minutes of the delivery of the baby.
If the placenta does not emerge fully, or if pieces are torn loose during delivery, this is a serious complication that requires rapid transport.
STAGE FOUR—STABILIZATIONThe final stage of labour involves the initial recovery and stabilization of the mother
Figure 16–2: When crowning begins, birth is imminent.

PREG
NA
NC
Y, L
AB
OU
R, A
ND
DEL
IVER
Y
304
after childbirth. Normally, this stage lasts for approximately 1 hour. During this time, the uterus contracts to control bleeding, and the mother begins to recover from the physical and emotional stress of childbirth.
PREPARING FOR DELIVERY
Preparing YourselfAssisting with delivery can be a daunting task. Responders may alternate between feelings of excitement and fear. Childbirth is also messy, involving a discharge of watery, sometimes bloody fluid during stages one and two of labour and what appears to be a rather large loss of blood after stage two. Try not to be alarmed by the loss of blood; it is a normal part of the birth process. Only bleeding that cannot be controlled after the neonate is born is a problem. Take a deep breath and try to relax. Remember that you are only supporting the process; the expectant mother is doing all the work.
Supporting a Patient in Labour Make sure the expectant mother understands that the baby is about to be born. Expectant mothers can display a wide range of emotions during the birthing process, from being completely calm and collected to being quite fearful or apprehensive. Common concerns include the pain, birth complications, and the condition of the baby. Labour pain ranges from discomfort similar to menstrual cramps to intense pressure or pain. Many women experience something in between. Factors that can increase pain and discomfort during the first stage of labour include:
• Irregular breathing.• Tensing up because of fear.• Not knowing what to expect.• Feelings of loneliness and lack of support.
To help the expectant mother cope with the discomfort and labour pain:
• Reassure her that you are there to help.• Explain what to expect as labour progresses.• Suggest specific physical activities that she can
do to relax (e.g., regulating her breathing).
• Ask her to focus on one object in the roomwhile regulating her breathing.
• Remain calm, firm, confident, andencouraging. This can help reduce fear,apprehension, pain, and discomfort.
The use of slow, deep breathing during labour can help by:
• Aiding in muscle relaxation.• Providing distraction from the pain of strong
contractions as labour progresses.• Ensuring adequate oxygen to both the mother
and the baby during labour.
Attending a childbirth course is a common practice for expectant mothers. Course topics include expectations during labour and labouring techniques that include breathing and building a birth plan. The expectant mother may provide suggestions or make requests regarding comfort, cultural expectations, and personal needs. Wherever possible, try to fulfill as many of the mother’s and/or family members’ requests as possible, as long as they are safe for you, the mother, and the child.
ASSISTING WITH DELIVERY
It is difficult to predict how much time you will have before the baby is delivered. Time the expectant mother’s contractions from the beginning of one contraction to the beginning of the next. You will recognize that delivery is near if contractions are less than 3 minutes apart. The expectant mother might say that she feels the need to push, or that she feels as if she has to have a bowel movement. You may also see that the baby is starting to crown. Any of these signs indicates that delivery is imminent.
Assisting with the delivery of the baby can be a simple process. The expectant mother is doing all the work. Your job is to create a clean environment, help guide the baby from the birth canal, and minimize the possibility of injury to the mother and baby.

PREG
NA
NC
Y, L
AB
OU
R, A
ND
DEL
IVER
Y
305
Establish a clean environment for delivery. Use items such as clean sheets, blankets, or towels. To make the area around the mother as sanitary as possible, place these items over the mother’s abdomen and under her buttocks and legs (Figure 16–3). To add a level of privacy, you can also drape a clean sheet over the mother’s legs. Keep a clean, warm towel or blanket handy to wrap the neonate. Other items that can be helpful include a bulb syringe to suction secretions from the baby’s mouth and nose, gauze or sanitary pads to help absorb secretions and vaginal bleeding, a large plastic bag or towel to hold the placenta after delivery, and supplemental oxygen.
Help the mother into a position of comfort: She will usually tell you which position is most comfortable for her.
As crowning occurs, place a hand on the top of the baby’s head and apply gentle, light counter-pressure (Figure 16–4). This allows the baby’s head to emerge slowly, not forcefully, and helps prevent tearing of the perineum and injury to the baby.
At this point, the expectant mother should be directed to stop pushing to allow for a controlled delivery of the head. Instruct the mother to concentrate on her breathing and try to avoid pushing. Panting and/or exhaling in slow, short breaths are two breathing techniques that may help her stop pushing: This helps to prevent a forceful birth.
As the head emerges, the baby will turn to one side (Figure 16–5). This will enable the shoulders and the rest of the body to pass through the birth canal. Support the baby’s head and check to see if the umbilical cord is looped around the baby’s neck (a life-threatening condition referred to as a nuchal cord). If it is, gently slip it over the baby’s head. If this cannot be done, slip it over the baby’s shoulders as they emerge. The baby can slide through the loop. Wipe the baby’s mouth and nose when they become visible.
Guide one shoulder out at a time. Do not pull the baby. As the baby emerges, he or she will be wet and slippery. If possible, use a clean towel to support the neonate and reduce the risk of accidentally dropping him or her.
Figure 16–3: Place clean sheets, blankets, towels, or even clothes under the mother.
Figure 16–4: Place your hand on top of the baby’s head and apply light pressure.
Figure 16–5: As the baby emerges, support the head.

PREG
NA
NC
Y, L
AB
OU
R, A
ND
DEL
IVER
Y
306
Place the neonate on its side, between the mother and you. This allows you to safely perform a primary assessment. Document the time the neonate was born. Leave the cord in place and do not pull on or cut it. Clamp or tie the cord while waiting for the placenta to be delivered. Use clamps or sterile ties at two locations, 10 and 15 cm (4 and 6 in.) away from the neonate.
Stillbirth is the birth of an infant after 20 weeks of pregnancy that died at some point during pregnancy or labour. The woman and the baby should be transported to a medical facility. If the baby dies during the delivery, he or she is not considered stillborn, and resuscitation may be effective.
CARING FOR THE NEONATE AND MOTHER
Care and Assessment for the NeonateCARING FOR THE NEONATEThe first few minutes of the neonate’s life are a difficult transition from life inside the mother’s uterus to life outside. Your first priority is to see that the neonate’s airway is open and clear. Note that neonates breathe primarily through their noses. It is important to immediately clear the mouth and nasal passages.
You can do this by using your finger or a gauze pad to wipe around the nose and mouth. If the neonate is not actively crying or has evidence of meconium aspiration and respiratory distress, active suctioning with a bulb syringe is indicated (Figure 16–6). Squeeze the bulb, insert it into the nose or mouth, and then release the bulb to clean out the fluids. Squeeze the fluids out of the bulb syringe before attempting to suction up any other fluids.
Most neonates begin crying and breathing spontaneously. Crying helps clear the neonate’s airway of fluids and promotes respiration. If the neonate has not made any sounds, stimulate him or her to elicit the crying response by flicking your
fingers on the soles of the neonate’s feet and drying the neonate vigorously for 30 seconds. This is important, as the neonate requires stimulation in order to begin respiration. After your initial 30 seconds of care, assess the neonate’s respiration for 10 seconds. If respirations are absent or ineffective, begin assisted ventilations at a rate of 1 breath every 3 seconds (Figure 16–7).
Using a neonate or pediatric BVM with room air, ventilate for 30 seconds, and then assess the neonate’s pulse. If the neonate’s heart rate is between 60 and 100 bpm, continue to ventilate for an additional 30 seconds with room air or supplemental oxygen. Continue to provide 30-second periods of ventilation followed by10-second pulse assessments. If the neonate’sheart rate ranges from 0 to 60 bpm, perform chestcompressions with ventilations at a rate of 3:1. Ifthe heart rate increases to between 60 and 100bpm, continue ventilations at a rate of 1 breathevery 3 seconds. If the heart rate is greater than100 bpm, continue with your primary assessmentand routine care.
Optimally, a neonate’s heart rate should be between 140 and 160 beats per minute (normal heart rate is 100 to 180 bpm). Begin CPR if the
Figure 16–6: A bulb syringe can be used to clear the neonate’s mouth and nose of any obvious secretions.

PREG
NA
NC
Y, L
AB
OU
R, A
ND
DEL
IVER
Y
307
neonate’s pulse rate is less than 60 bpm and the neonate is not responding to ventilations (see page 149). If the neonate’s heart rate is in the normal range but the neonate is showing cyanosis or signs of laboured breathing, blow by supplemental oxygen is indicated: Attach a section of tubing to the regulator and deliver oxygen at 4 litres per minute by holding the open end of the tubing near the neonate’s face.
Once you have stabilized the neonate’s heart and respiration rate, your second priority is to maintain a normal body temperature. Because neonates can lose heat quickly, it is important to keep them warm. Dry the neonate gently but vigorously, and wrap him or her in a clean, warm towel or blanket. If possible, record an initial set of vital signs. Most important are breathing, heart rate, and skin colour. You can review vital signs in Chapter 5.
ASSESSING THE NEONATEThe APGAR score is a numerical system used to assess the condition of a neonate (Table 16–1). It evaluates the neonate’s heart rate, respiratory rate, muscle tone, reflex irritability, and colour. Each of these five categories is given a score of 0, 1, or 2, resulting in a total score between 0 and 10. The assessment is performed twice: first at 1 minute after birth, and again at 5 minutes after birth.
The name APGAR is often used as an acronym to aid in remembering the five areas to be evaluated (Appearance, Pulse, Grimace, Activity, and Respiration). Assess each area as follows:
Figure 16–7: Neonatal resuscitation.
Stimulate to elicit crying response
Assess respiration
Continue with primary assessment and routine care
Ventilate (BVM) for 30 seconds
Active crying with stimulation
> 100 bpm < 60 bpm
Assess heart rate
> 60 bpm and < 100 bpm
Ventilate (room air) for 30 seconds
Perform CPR at a ratio of 3:1 for 30 seconds
Ineffective gasping/apnea

PREG
NA
NC
Y, L
AB
OU
R, A
ND
DEL
IVER
Y
308
Appearance (skin colour): Assess the infant’s skin colour, looking at both the torso and the extremities: • Torso and extremities are pale and blue: 0 • Torso is pink, extremities are blue: 1 • Torso and extremities are pink: 2
Pulse: Assess the infant’s pulse using a stethoscope: • No detectable pulse: 0 • Pulse lower than 100 bpm: 1 • Pulse of 100 bpm or higher: 2
Grimace (reflex irritability): Assess the infant’s response to stimulation, such as a gentle pinch: • No response: 0 • Some facial grimacing: 1 • Grimacing and a cough, sneeze, or cry: 2
Activity (muscle tone): Manipulate the infant’s extremities and evaluate the tone of the muscles: • Muscles are floppy, loose, and without tone: 0 • Muscles have some tone, extremities show
some flexion: 1 • Muscles show active motion: 2
Respiration: Assess the infant’s respiration: • No respiration: 0 • Slow or irregular respiration: 1 • Strong respiration, crying: 2
A score between 7 and 10 is considered normal, 4 to 6 is fairly low, and 0 to 3 is critically low. Note that scores of less than 2 in some areas are normal. A score of 10 is fairly uncommon, and a perfectly healthy neonate may have a score of 7 or 8.
TABLE 16–1: THE APGAR SCORE
TRANSPORTING A NEONATETransporting a neonate safely requires skilled personnel and specialized equipment. Ideally, a neonatal transport team should be requested, but this may not be readily available. If you must transport a neonate, he or she must be placed on monitoring, and if any issues arise with the neonate’s heart rate, respirations, or temperature, interventions must be performed immediately.
Caring for the MotherBalancing the needs of the neonate and the mother may be a challenge for the first few minutes after birth. If you are working in a team, one responder should address the needs of the neonate while another cares for the mother. If working alone, continue to check the mother’s condition frequently while you provide the initial care for the neonate. Once the neonate’s vitals are stable, encourage the mother to begin breastfeeding the neonate. Breastfeeding helps stimulate the uterus to contract, which helps slow bleeding, and provides a wide range of benefits for both the infant and the mother.
After the delivery of the neonate, the placenta will still be in the uterus and attached to the neonate by the umbilical cord. Contractions of the uterus will usually expel the placenta within 20 minutes of delivery. Catch the placenta in a clean towel or container.
Unless specifically directed to do so by local protocols or your medical director, do not separate the placenta from the neonate or cut the clamped/tied umbilical cord. Instead, leave the placenta attached to the neonate and place it in a plastic bag or wrap it in a towel for transport to the hospital.
ELEMENT 0 1 2 SCORE
Appearance (skin colour)
Body and extremities blue and pale
Body pink, extremities blue
Completely pink
Pulse Absent Below 100 bpm 100 bpm or above
Grimace (irritability) No response Grimace Cough, sneeze, cry
Activity (muscle tone)
Limp Some flexion of extremities
Active movement, flexed arms and legs
Respiration Absent Slow and irregular Strong, crying
Total Score =

PREG
NA
NC
Y, L
AB
OU
R, A
ND
DEL
IVER
Y
309
Expect some additional vaginal bleeding when the placenta is delivered. Gently clean the mother using gauze pads or clean towels. Place a sanitary pad or towel over the vagina. Have the mother place her legs together. Do not insert anything into the vagina for any reason. Gently massage the lower portion of the abdomen, as this will stimulate the uterus to contract, helping to eliminate large blood clots and slowing bleeding. This may be done by the mother or her support person, or by a responder.
After childbirth, many new mothers experience shock-like signs or symptoms, such as shivering, slight dizziness, and cool, pale, moist skin. A supine position will help to compensate for these effects. Maintain normal body temperature and monitor her vital signs.
POSTPARTUM BLEEDINGWhile minor bleeding after birth is normal, postpartum bleeding is excessive bleeding after the birth (more than 500 mL or 17 oz.). It may be caused by the uterine muscles not contracting fully, pieces of placenta or membranes remaining in the uterus, or vaginal or cervical tears during delivery. Postpartum bleeding frequently occurs within the first few hours after delivery, but it can be delayed for up to 24 hours after delivery.
If a woman experiences postpartum bleeding, care for any external bleeding from perineal tears as open wounds. Do not attempt vaginal packing to control internal bleeding. You can encourage the mother to breastfeed the neonate, as this also stimulates the uterus to contract. Position the patient for shock and monitor her condition. Do not let the patient eat or drink anything. As always, a patient presenting with signs of shock should be in the rapid transport category (if she is not already).
MIDWIVES AND HOME BIRTHS
Registered midwives are health professionals who provide primary care to women and their babies during pregnancy, labour, birth, and the postpartum period. Midwives practise across Canada and are governed by provincial legislation.
As primary care providers, midwives may be the first point of entry to maternity services, and they are fully responsible for clinical decisions and the management of care within their scope of practice. Midwives provide the complete course of low-risk prenatal, intrapartum, and postnatal care, including physical examinations, screening and diagnostic tests, risk and abnormal condition assessments, and normal vaginal deliveries. Midwives work in collaboration with other health professionals and consult with or refer to medical specialists as appropriate. Midwives attend births in hospitals, birth centres, and patients’ homes.
Women expecting a normal vaginal delivery have the option of a home birth if they are under the care of a midwife. Women choose home births for a variety of reasons.
Midwives regularly deliver babies at home. However, if a professional responder is called, there has likely been an unexpected complication that creates a medical emergency. Care for a woman or neonate should be a collaborative effort. The scope of practice for a midwife will be very different than yours as a responder. Provide support and interventions as per your scope of practice. Always follow your local protocols.
COMPLICATIONS DURING PREGNANCY
Many complications that can arise during pregnancy are difficult to differentiate. Because of the vulnerable state of a fetus in utero, it is important to err on the side of caution and place any pregnant patient with concerning signs or symptoms in the rapid transport category. Always provide reassurance and support to the patient. For a pregnant patient, you should be concerned with two important signs and symptoms: abdominal pain and vaginal bleeding.
Any abdominal pain, persistent or profuse vaginal bleeding, or bleeding in which tissue passes through the vagina should be assessed by a physician as soon as possible to determine the cause. A pregnant patient exhibiting these signs and symptoms should be in the rapid transport

PREG
NA
NC
Y, L
AB
OU
R, A
ND
DEL
IVER
Y
310
category. You should also monitor the patient closely and take steps to minimize shock. When transporting a woman in the third trimester of pregnancy, position her on her left side.
Spontaneous AbortionSpontaneous abortion, often referred to as miscarriage, is the spontaneous termination of pregnancy from any cause before 20 weeks of gestation. Spontaneous abortion is relatively common, occurring in about 1 in 10 pregnancies. It is a common cause of vaginal bleeding in the first trimester of pregnancy.
Signs and symptoms of spontaneous abortion include: • Anxiety and apprehensiveness. • Vaginal bleeding, which may be minor or
profuse, and which may contain tissue. • Cramp-like abdominal pain that is similar to
the pain of labour or menstruation.
During your patient interview, you should attempt to determine: • The time of onset of the pain and bleeding. • The approximate amount of blood lost. • Whether any tissue was passed along with the
blood.
Should the woman feel an urge to go to the bathroom, ask her to call you in if she sees any tissue or clot-like matter after urinating. Collect and transport any tissue found to the hospital for analysis.
Spontaneous abortions are typically upsetting for a patient but are rarely medical emergencies. Any woman who experiences a suspected spontaneous abortion should be examined by a physician to ensure that all tissue has passed out of the uterus: Otherwise, interventions may be necessary.
Premature LabourLabour that begins between the 20th and 37th week of gestation is called premature or preterm labour and is a medical emergency. Many factors increase the chance of having a preterm birth, including a history of preterm births or
spontaneous abortions, carrying multiple babies, and poor nutrition, as well as certain diseases and abnormalities.
Any woman who goes into labour between the 20th and 37th week of pregnancy is experiencing premature labour. Assess the patient to determine whether rapid transport is necessary. A physician will determine whether labour has truly begun and whether any interventions are necessary. If necessary, assist with labour as usual.
Infants born prematurely, especially before 34 weeks, have not fully developed and are at high risk of infection, injury, and complications.
BRAXTON HICKS CONTRACTIONSMany women experience Braxton Hicks contractions towards the end of pregnancy. These are also referred to as practice contractions or false labour, as they mimic many effects of labour contractions but do not result in true labour and delivery. Unlike labour contractions, Braxton Hicks contractions do not increase in intensity or become closer together over time. Other signs and symptoms of labour are not present.
Ectopic PregnancyAn ectopic pregnancy occurs when a fertilized ovum implants outside of the uterus (e.g., in the fallopian tubes) (Figure 16–8).
There are numerous causes of ectopic pregnancy; however, most involve factors that delay or prevent passage of the fertilized ovum through the fallopian tube and into the uterus. Predisposing factors include previous surgery, previous ectopic pregnancy, and intentionally blocked tubes (i.e., tubal ligation as birth control). Ask questions about these factors when interviewing a pregnant patient.
Because the ovum is not in the uterus, there is little space for it to expand. As it grows, it puts pressure on the surrounding tissues and can ultimately rupture. A ruptured ectopic pregnancy

usually causes a severe hemorrhage and is the leading cause of maternal death in the first trimester. Most ruptures occur between 2 and 12 weeks of gestation. The signs and symptoms of ectopic pregnancy include: • Abdominal pain (especially sharp pain on one
side). • Referred pain to the shoulder. • Vaginal spotting or bleeding (may be minimal
or severe). • Nausea or vomiting. • Missed menstrual periods. • Syncope. • Signs of shock.
Because an ectopic pregnancy can be immediately life threatening, any woman experiencing severe abdominal pain and who could even possibly be pregnant should be placed in the rapid transport category. Because emergency surgery is often indicated for ectopic pregnancies, the patient should not eat or drink anything.
Third Trimester BleedingThird trimester bleeding occurs in a very small percentage of pregnancies and is not considered normal. The causes of third trimester bleeding include: • Abruptio placentae: a partial or complete
detachment of a normally implanted placenta after 20 weeks’ gestation.
• Placenta previa: a condition in which the placenta is attached in the lower uterus, encroaching on the opening of the cervix.
• Uterine rupture: a spontaneous or traumatic rupture of the uterine wall. This may be a result of prolonged or obstructed labour, a previous scar from a Caesarean birth, or trauma.
The signs and symptoms of third trimester bleeding may include: • Vaginal bleeding (may be sudden and/or
painless). • Uterine cramping. • Back pain.
A woman with third trimester bleeding should be in the rapid transport category, as she should be
assessed by a physician immediately to determine whether emergency interventions are necessary. Depending on the cause of the bleeding, emergency surgery may be required, so she should not eat or drink anything.
COMPLICATIONS DURING CHILDBIRTH
The vast majority of births occur without complication. For the few that do have complications, delivery can be stressful and even life threatening for the expectant mother, the baby, or both. A patient presenting with any of the conditions listed here should be in the rapid transport category.
The most common complication of childbirth is persistent vaginal bleeding. Other childbirth complications include: • Prolapsed cord. • Breech birth. • Limb presentation. • Multiple births.
Prolapsed CordA prolapsed cord occurs when a loop of the umbilical cord protrudes from the vagina while the PR
EGN
AN
CY,
LA
BO
UR
, AN
D D
ELIV
ERY
311
16–8: An ectopic pregnancy.
Fallopian tube
Uterus
Cervix
Ovary
Vagina
Embryo

PREG
NA
NC
Y, L
AB
OU
R, A
ND
DEL
IVER
Y
312
baby is still in the birth canal (Figure 16–9). As the baby moves through the birth canal, the cord will be compressed between the baby’s head and the birth canal, and blood flow to the baby will stop. Without this blood flow, the baby will die within a few minutes from lack of oxygen.
If you notice a prolapsed cord, have the expectant mother assume a knee-chest position, leaning to the left side (Figure 16–10). This will help take the pressure off the cord. Initiate rapid transport and administer oxygen to the mother if it is available.
Breech BirthMost babies are born headfirst. However, on rare occasions, the baby is delivered feet- or buttocks-first. This is commonly referred to as breech birth. If the patient has a known or presented breech birth and is in labour, she should be in the rapid transport category.
If you are supporting a woman during a breech delivery, support the baby’s body as he or she exits the birth canal while you are waiting for the head to emerge. Do not pull on the baby’s body. This will not help to deliver the head and can cause serious injury to the baby.
After about 3 minutes, if the head has not delivered, you will need to help create an airway so the baby can breathe. Because the weight of the baby’s head lodged in the birth canal will reduce or stop blood flow by compressing the cord, the baby will be unable to receive any oxygen. Should the baby try to take a spontaneous
breath, he or she will also be unable to breathe because his or her face will be pressed against the wall of the birth canal.
To help with a breech delivery, place the index and middle fingers of your gloved hand into the vagina next to the baby’s mouth and nose. Spread your fingers to form a “V” (Figure 16–11), and maintain this position until the baby’s head is delivered. Although this will not lessen the compression on the umbilical cord, it may allow air to enter the baby’s mouth and nose. Supplemental oxygen is indicated for the mother.
Limb PresentationIn most births, the baby’s head presents first and the rest of the body follows. Less frequently, the
Figure 16–10: The knee-chest position will take pressure off the cord.
Figure 16–11: During a breech birth, position your index and middle fingers to allow air to enter the baby’s mouth and nose.
Figure 16–9: A prolapsed cord.

PREG
NA
NC
Y, L
AB
OU
R, A
ND
DEL
IVER
Y
313
baby’s arms or legs may present first, preventing the possibility of a normal delivery (Figure 16–12). This kind of delivery can be fatal, and the patient requires rapid transport. Never pull on the baby’s arms or legs.
Multiple BirthsSome births involve delivery of more than one baby (e.g., twins or triplets). If the mother has had prenatal care, she should be aware that she is going to deliver more than one baby. Multiple births should be handled in the same manner as single births. There may also be a separate placenta for each child, although depending on the type of pregnancy, this is not always the case. Multiple births increase the chance of breech presentation.
Clamp or tie the cord after the first neonate is born. Labour contractions should resume within 5 to 10 minutes of the first neonate’s birth. The second neonate should be born shortly after the first.
Twins have a higher risk of premature birth, and even when born full-term, they may be small enough to be considered premature. Take extra precautions to guard against heat loss until they can be transported to the hospital.
Figure 16–12: Limb presentation prevents the possibility of a normal birth and could be fatal.

Stage 1—Preparation
Stage 4—Stabilization
Stage 2—Delivery of the Baby
Stage 3—Delivery of the Placenta
Ensure the mother’s comfort and privacy. Create a comfortable, clean/sterile space. Have necessary equipment ready.
Ensure the initial recovery and stabilization of the mother post childbirth.
As crowning occurs, place a hand on the top of the baby’s head and apply gentle, light pressure. Direct the mother to stop pushing and support the baby’s head and neck as they emerge. Assess the neonate.
Put the patient in the rapid transport category if: • The placenta does not fully emerge. • The placenta is damaged during delivery.
THE LABOUR AND DELIVERY PROCESS
Assessing the Neonate
Neonatal Resuscitation Flowchart
Stimulate to elicit crying response
Assess respiration
Continue with primary assessment and routine care
Ventilate (BVM) for 30 seconds
Active crying with stimulation
> 100 bpm < 60 bpm
Assess heart rate
> 60 bpm and < 100 bpm
Ventilate (room air) for 30 seconds
Perform CPR at a ratio of 3:1 for 30 seconds
Ineffective gasping/apnea
Activity (muscle tone)
Appearance (skin colour)
Pulse
Grimace (irritability)
Respiration
Limp
Body and extremities blue and pale
Absent
No response
Absent
Some flexion of extremities
Body pink, extremities blue
Below 100 bpm
Grimace
Slow and irregular
Active movement, fixed arms and legs
Completely pink
100 bpm or above
Cough, sneeze, cry
Strong, crying
Element
THE APGAR SCORE
0 1 2
314
SUMMARYPR
EGN
AN
CY,
LA
BO
UR
, AN
D D
ELIV
ERY
314

SPEC
IAL
POPU
LATI
ON
S
17 Special Populations
315
Key ContentPediatric Patients ................... 316 Stages of Development ...... 316 Anatomical and Physiological Differences ....................... 317 Assessing the Pediatric Patient .............................. 318 Pediatric Illnesses ................ 318 Other Pediatric Conditions ........................ 321Geriatric Patients .................... 323 Dementia and Alzheimer’s Disease .............................. 323 Osteoporosis ........................ 324Bariatric Patients .................... 324 Palliative Patients ................... 324 Patients with Disabilities ....... 325
IntroductionAs a responder, you are likely to encounter individuals who fit the description of special populations. What makes these people special are their needs and considerations. This chapter focuses on children, geriatric patients (older adults), bariatric (obese) patients, terminally ill patients, and patients with mental or physical impairments. Understanding the special needs of a patient can make communication and interaction easier, allowing you to provide more effective care.
Patients in special populations may require special consideration around assessment, communication, treatment, and/or transportation, or they may require no changes to any of these. Depending on the situation, patients in special populations may be at higher risk of abuse and neglect. If you suspect that abuse or neglect have occurred, provide care as usual and report your concerns to the proper authorities.

SPEC
IAL
POPU
LATI
ON
S
316
Some patients are at risk because of their unique situations, and these risks are often obvious. Homeless patients, for example, are at a higher risk of environmental illnesses because of their greater exposure to the environment. When providing care for a patient, always try to consider any unique factors that could be relevant. Every patient is different.
PEDIATRIC PATIENTS
Pediatric patients have unique needs and often require modified assessment and care. Children often do not readily accept strangers, making it more challenging to accurately assess them. Young children can be especially difficult to assess since they are often unable to communicate what is wrong.
It is often difficult for adults to imagine how a young child with a serious illness or injury feels. Children often experience uncertainty and fear very strongly. Fear of the unknown, of being ill or hurt, of being touched by strangers, or of being separated from parents or guardians can compound an already complex situation. Being aware of the child’s fears and knowing how to manage them will help you to provide more effective care.
If you have any reason to suspect abuse or neglect (e.g., if you see physical evidence or a patient makes a disclosure), you have a moral and legal obligation to report your suspicions.
Stages of DevelopmentA pediatric patient is one in the age range of birth to 18 years old. Pediatric patients can be broken into five stages of development, each with distinctive physical and cognitive milestones. Some of these stages are defined more by developmental characteristics than by strict age ranges, so the ages presented here should be considered a rough guideline. A 2-year-old patient would be considered a toddler based on his or her age but may be more like a preschooler in terms of his or her developmental characteristics.
NEONATES (0 TO 28 DAYS)Neonates, also called newborns, are patients between birth and 28 days old. They are extremely vulnerable to injury and infection and must be handled with great care at all times.
INFANTS (29 DAYS TO 1 YEAR OF AGE)Children up to 1 year of age are commonly referred to as infants. Infants younger than 6 months old are relatively easy to examine. Generally, your presence will not bother this age group. Older infants, however, will often exhibit stranger anxiety. They are uncomfortable around strangers and may cry and cling to a parent or guardian.
TODDLERS (1 TO 2 YEARS OF AGE)Children 1 or 2 years of age are sometimes called toddlers. These children are frequently uncooperative. As a result, they are often best examined in a parent or guardian’s lap. A toddler may be concerned that he or she will be separated from a parent or guardian. Reassurance that this will not happen may comfort a concerned child of this age.
PRESCHOOLERS (3 TO 5 YEARS OF AGE)Children aged 3 to 5 are generally referred to as preschoolers. Children in this age group are usually easy to examine if approached properly. Pay attention to their natural curiosity. Allow them to inspect equipment or supplies, such as oxygen tubing or bandages. This can put to rest many fears and distract them during your assessment.
SCHOOL-AGED CHILDREN (6 TO 12 YEARS OF AGE)School-aged children are those between 6 and 12 years of age. They are usually co-operative and can usually communicate effectively about the injury or condition you are examining. You should be readily able to converse with them, but avoid technical medical terminology. Children in this age group are becoming conscious of their bodies and often do not like exposure. Respect the child’s modesty as much as possible.

SPEC
IAL
POPU
LATI
ON
S
317
ADOLESCENTS (13 TO 18 YEARS OF AGE)Adolescents are between 13 and 18 years of age. They are typically more like adults than children in most respects. Direct your questions to the adolescent patient, allowing input from a parent or guardian as required. Occasionally, an adolescent may be hesitant to provide a complete and accurate history in the presence of a parent or guardian, especially if it includes elements that the parent or guardian may disapprove of (e.g., alcohol use or sexual activity). If you notice hesitation or conflicting information, tactfully try to create a safe and private environment for the adolescent patient. Adolescents are generally going through puberty: Changes to body image may increase anxiety and stress, especially if the patient’s body must be exposed for assessment or interventions. Adolescents often respond better to a responder of the same gender. Respect the adolescent’s modesty as much as possible.
Anatomical and Physiological DifferencesWhen assessing a child or an infant, note that they have many anatomical and physiological differences when compared with adults. These differences are summarized in Table 17–1. This is an overview, generalized across the age range of pediatric patients: Use judgment and consider the developmental stage of the individual patient when applying these principles. For the most part, differences between adults and children are less extreme as children get older: A 17-year-old is technically a pediatric patient, for example, but his or her anatomy and physiology will have much more in common with a 19-year-old’s than with a 2-year-old’s.
For adults, a normal resting heart rate ranges from 60 to 100 beats per minute. Infants and toddlers, on the other hand, have normal resting heart rates
TABLE 17–1: ANATOMICAL AND PHYSIOLOGICAL DIFFERENCES IN PEDIATRIC PATIENTS
BODY SYSTEM DIFFERENCE CLINICAL SIGNIFICANCE
Respiratory Tongue is larger Can block airway more readily
Airway is narrower Can become obstructed more readily
Nose and face are flatter Obtaining a good mask seal can be difficult
Trachea is smaller with less cartilage development
Neck is more easily hyperextended, can close off airway
Respiratory rate is higher Muscles become more easily fatigued
Respiration primarily occurs nasally (in neonates)
Airway management is more difficult
Abdominal muscles are used for respiration Evaluating respiration is more difficult
Ribs are more flexible Lungs and other organs in the chest are less protected; significant internal injuries may occur without external signs
Circulatory A faster heart rate can be sustained for a longer period
Can compensate longer before signs of shock are evident; decompensating phase occurs more quickly and suddenly
Nervous Brain tissue is thinner and softer Head injury is often more serious
Thermoregulatory Larger relative surface area More vulnerable to effects of cold stress
Integumentary Skin is thinner Burns are often more severe
Musculoskeletal Head is proportionally larger Neck flexion or anterior head displacement occurs when supine
Neck is shorter SMR can be more difficult
Bones are softer Bones fracture more readily

SPEC
IAL
POPU
LATI
ON
S
318
from approximately 100 to 160 beats per minute. As the child ages, his or her resting heart rate will become slower. An adolescent’s resting heart rate will be approximately the same as an adult’s. Pediatric patients also have higher respiratory rates. Average resting respiration rates for preadolescent children are 20 to 40 breaths per minute; adolescent patients’ respiratory rates are similar to those of adults.
Assessing the Pediatric PatientWhen assessing a child, follow the same general steps as those for assessing an adult. Where possible, take time to explain to the child and the parent or guardian what you plan to do. Knowing what is happening can help alleviate anxiety and fear for both the child and the adult involved. During the secondary assessment, interview the child and any bystanders (e.g., the child’s parent or guardian). The manner in which you interact with the child and the parent or guardian is very important. Establishing a good rapport will help to reduce anxiety and panic in both the child and the parent or guardian. There are a few basic guidelines that will help you assess an injured or ill child: • Observe the child before touching him or her.
Look for signs that indicate changes in the child’s level of responsiveness, any breathing difficulty, or apparent injuries or conditions. Getting a good and thorough first impression is important, as signs and symptoms may become masked as soon as the child becomes anxious or upset.
• When speaking to the child, lower yourself to eye level.
• Communicate clearly with the parent or guardian and the child. Explain what you wish to do. Talk slowly and use simple words when speaking with the child. Ask questions that can be easily answered.
• Remain calm. Caring for seriously ill or injured children can be very stressful. Your own calmness will show confidence and help keep the child and parent/guardian calm.
• Keep the child with loved ones unless it is necessary to separate them. This is especially true for younger children (under age 7 or 8). Often, a parent or guardian will be holding
a crying child. In this case, you can assess the child’s condition while the parent or guardian continues to hold the child.
• Gain trust through your actions. If the family is excited or agitated, the child is likely to be excited or agitated, too. If you are able to calm the family, the child will often calm down as well.
While performing the secondary assessment, it may be easier to do the head-to-toe examination before you check vital signs. Sometimes, the head-to-toe examination is best performed in reverse order, as a toe-to-head examination, on a responsive child (Figure 17–1). The child is more likely to accept you first touching the feet and progressing to the head. The assessment should be otherwise the same.
Sometimes, it can be more difficult to assess a child than an adult. When doing so, you can ask yourself, the child, and the parents or guardians the questions in Table 17–2.
Pediatric IllnessesWhile many illnesses and injuries affect children and adults alike, others are more prevalent among (or exclusive to) children. Some conditions occur in adults as well, but are much more serious or have
Figure 17–1: Sometimes, the head-to-toe examination is best performed in reverse order, as a toe-to-head examination, on a responsive child.

SPEC
IAL
POPU
LATI
ON
S
319
TABLE 17–2: QUESTIONS TO ASK WHEN ASSESSING A CHILD
AREA TO WATCH QUESTIONS AREA TO WATCH QUESTIONS
Behaviour Is the child: • Confused? • Unusually sleepy? • Unusually irritable or fussy? • More active or more subdued
than normal? • Not interested in other
children or play? • Crying nonstop, even when
cuddled?
Face Does the child: • Appear pale or flushed? • Show signs of pain or anxiety? • Have bluish lips? • Have any swelling?
Skin Does the child have: • Hot and dry skin or cold and
moist skin? • A rash or spots? • An unusual skin colour? • Itchy skin? • Any bruising or swelling?
Eyes Does the child: • Rub and scratch his or her
eyes? • Have red and inflamed eyes? • Have discharge in his or her
eyes? • Have dull or unusually bright
eyes? • Have swollen or puffy eyes? • Have yellow eyes? • Complain of seeing spots?
Ears Does the child have: • Trouble hearing? • Swelling in or around the ears? • Ringing in the ears? • An earache? • Any discharge? • Loss of balance? • A tendency to pull, cup, or
poke his or her ears?
Tongue Does the child have a: • Dry and cracked tongue? • Red and raw tongue? • White or yellow coating on his
or her tongue?
Respiration Does the child have: • Rapid, shallow respiration? • Painful respiration? • A strange odour on his or her
breath?
Throat Does the child have: • A sore throat? • Difficulty swallowing? • Unusual drooling? • A red and inflamed throat? • A voice that sounds different?
Cough Does the cough: • Occur frequently, and is it dry? • Bring up sputum? • Sound unusual?
Appetite Does the child have: • Little or no appetite? • An unusual level of thirst?
Vomiting Is the child: • Unable to keep food or water
down? • Nauseated? • Frequently vomiting? • Projectile vomiting?
Temperature Does the child: • Complain about feeling very
cold? • Complain about feeling very
hot? • Shiver uncontrollably?
Bowel movements
Are the child’s bowel movements: • Abnormally frequent and
liquid? • Abnormally infrequent, dry,
and hard? • Abnormal in content, such as
undigested food, mucus, or blood?
• An unusual colour or odour?
unique risks in children. Some conditions cause irritation and discomfort, while others can cause lifelong complications or death. Some childhood illnesses and conditions are contagious.
Vaccination is a fundamental prevention strategy. Vaccines have been incredibly effective in preventing childhood diseases and improving child mortality rates. Common childhood vaccines include diphtheria, tetanus, pertussis, measles, mumps, and rubella. Infants who are 6 months or older are the most vulnerable to these diseases.
CHICKENPOX Chickenpox (varicella) is a viral infection that is most contagious 1 to 2 days before the onset of the rash, and for approximately 5 days after onset, or until the chickenpox lesions have become crusted. The contagious period may be prolonged in an immune compromised person. Signs and symptoms of chickenpox include fever and an itchy rash. The rash initially presents as smooth red

SPEC
IAL
POPU
LATI
ON
S
320
spots, which develop into blisters 3 or 4 days after appearing.
MEASLESMeasles is a highly contagious viral infection that is transmitted both through direct contact and airborne transmission. The virus infects the mucous membranes before spreading throughout the body. Measles can be prevented by immunization.
The signs and symptoms of measles usually occur as follows: • 10 to 12 days after exposure: ◆ High fever (usually lasts 4 to 7 days) ◆ Runny nose ◆ Cough ◆ Red, watery eyes ◆ Small white spots inside the cheeks • 14 days after exposure: ◆ Rash (usually appears on the face and
upper neck) • About 3 days after rash appears: ◆ Rash usually spreads to the hands and feet
The measles rash usually lasts for 5 to 6 days and then fades. Patients are considered contagious from 4 days before until 4 days after the rash first appears.
Most measles-related deaths are caused by complications associated with the disease. Complications are more common in children under the age of 5 or adults over the age of 20. The most serious complications associated with measles include: • Blindness. • Ear infections. • Encephalitis (an infection that causes brain
swelling). • Severe diarrhea and dehydration. • Severe respiratory infections, (e.g., pneumonia).
MUMPSMumps is a contagious disease caused by a viral infection. The virus is transmitted through direct contact and airborne transmission from infected people. Initial symptoms usually appear 2 to 3 weeks after infection. Typically, mumps starts with a few days of fever, headache, muscle aches, tiredness, and loss of appetite, followed by swollen salivary glands.
There is no specific treatment for mumps. The virus usually causes mild disease in children, but in adults can lead to further complications such as meningitis. Mumps can be prevented by immunization.
ECZEMAEczema is not contagious. A child with eczema may have the following signs and symptoms: • Pimples • Scaly skin • Scabs • Inflamed skin and one or a combination of
rashes • Dry skin or a watery discharge from the skin • Burning or itching skin
IMPETIGOA child infected with impetigo will have inflamed skin and crusted, broken clusters of pimples around the mouth and nose that may be flat and pitted (filled with straw-coloured fluid). Impetigo is contagious and can spread to anyone who comes into contact with the infected skin or other items that have been touched by the infected skin (e.g., clothing, towels, and bed linens).
RINGWORMRingworm is a contagious fungal infection that is characterized by red, scaling rings on the skin. A child with ringworm is contagious until 48 hours after treatment begins.
SCABIESScabies is a highly contagious skin parasite. Scabies is caused by an infestation of the skin by the human itch mite (Sarcoptes scabiei var. hominis). The adult female scabies mites burrow into the epidermis, where they live and deposit their eggs. A child with scabies will have many tiny blisters, scratch marks, and scaly crusts (found mainly in skin folds), as well as extreme itchiness. The microscopic scabies mite is almost always passed by direct, prolonged, skin-to-skin contact with an infected person. An infected person can spread scabies even if he or she has no symptoms. Humans are the source of infestation; animals do not spread human scabies.

SPEC
IAL
POPU
LATI
ON
S
321
PRICKLY HEAT RASHA heat rash may present as a rash of tiny, pinpoint blisters surrounded by blotches of pink skin. It may appear on the face or on the parts of the body that are usually heavily clothed. Heat rashes occur in hot weather, or whenever an infant or child is overdressed.
CONJUNCTIVITIS (PINK EYE)Bacterial and viral conjunctivitis are highly contagious and are transmitted through direct contact. Pink eye is contagious until 24 hours after treatment is started. Signs and symptoms of pink eye include: • Pink colour around the white of the eye. • Swollen eyelids. • Pus in or around the eyes • Itchy or sensitive eyes.
PINWORMSPinworm is an intestinal infection caused by tiny parasitic worms. Pinworms are contagious. Tiny eggs deposited around the anus by a female worm spread the infection. When a child has pinworms, he or she will be constantly scratching around the anus and will be unusually irritable.
CROUP AND EPIGLOTTITISInfections of the respiratory system are more common in children than in adults. These can range from minor infections, such as the common cold, to life-threatening infections that block the airway. Signs and symptoms of a breathing emergency in children include: • Unusually fast or slow breathing. • Noisy breathing. • Pale, grey, cyanotic skin. • Intercostal in-drawing (a retraction of the
spaces between the ribs during breathing). • Decreasing level of responsiveness.
Croup and epiglottitis are infections of the respiratory system that may be superficially similar, but because epiglottitis is generally much more serious, it is important that you be able to distinguish between the two conditions.
Croup is usually triggered by an acute viral infection of the upper airways. It is generally not life threatening. The infection causes swelling
of the throat and tissues below the vocal cords. Croup is generally not life threatening in itself, but it can lead to severe shortness of breath and hypoxia. Croup is commonly identified by its distinctive harsh, barking cough, often described as being like the bark of a seal. Croup is often preceded by 1 or 2 days of illness, sometimes with a fever. Croup occurs more often in the winter months, and the signs and symptoms of croup are often more evident in the evening. The child may show improvement when exposed to cool air (e.g., outdoor air or cool steam from a vaporizer). To care for a child experiencing croup, allow him or her to remain in the position that makes respiration easiest. A child with croup should be examined by a physician.
Epiglottitis is a potentially life-threatening bacterial infection that causes severe inflammation of the epiglottis, which is the flap of tissue above the vocal cords that protects the airway during swallowing. When the epiglottis becomes infected, it can swell to the point of completely obstructing the airway. A child with epiglottitis may: • Appear severely ill (with high fever). • Need to be sitting up. • Strain to breathe. • Appear very frightened. • Drool (swelling of the epiglottis prevents the
child from swallowing).
Although superficially similar to croup in some respects, epiglottitis is a much more serious condition than croup because it can quickly cause a life-threatening airway obstruction. A child with epiglottitis should be placed in the rapid transport category.
For either condition, do not attempt to place any objects in the child’s mouth or examine the mouth. Supplemental oxygen may be indicated.
Other Pediatric ConditionsDEHYDRATION Dehydration in children is most commonly caused by prolonged vomiting and diarrhea, which may itself be caused by a contagious illness, but dehydration is a sign of an underlying condition, not an illness in itself.

SPEC
IAL
POPU
LATI
ON
S
322
You may suspect dehydration if a child: • Has a dry mouth and tongue. • Has sunken eyes. • Does not have tears when crying. • Is listless or irritable.
In infants, the fontanel (soft spot) on the top of the head may be sunken. An infant will also produce fewer wet diapers than usual.
A dehydrated child who is also experiencing persistent vomiting or diarrhea will be difficult to rehydrate, as fluids will not be adequately absorbed by the body. This is a life-threatening emergency: Any dehydrated pediatric patient with diarrhea or persistent vomiting should be in the rapid transport category.
PERSISTENT VOMITINGA child who experiences persistent vomiting will have nausea and stomach pain, and may become dehydrated. The underlying condition that causes persistent vomiting may be contagious.
DIARRHEADiarrhea itself is not contagious, though the underlying condition causing it may be. A pediatric patient with diarrhea is at an increased risk of dehydration, which can become a medical emergency that requires rapid transport.
EARACHESEaraches are not contagious but can be very painful. A child with an earache may exhibit the following signs and symptoms: • A worried appearance • Pulling at the ear or covering it with a hand • Sore ears or fluid discharging from the ear • Fever • Chills • Dizziness and/or nausea • Deafness
HIGH FEVERA high fever is defined as a core body temperature above 39°C (102°F). It most commonly indicates some type of infection. Because a young child’s temperature-regulating mechanisms have not fully developed, even a minor infection can result in a high fever. A case of prolonged or excessively high fever can result in febrile seizures (see page 252).
SHAKEN BABY SYNDROMEShaken Baby Syndrome (SBS) refers to a variety of injuries that may result when an infant or a young child is violently shaken. Shaking causes the child’s brain to move within the skull, forcing blood vessels to stretch and tear. This brain injury may result in death, permanent brain damage, or long-term disability. SBS can also cause fractures, contusions, and internal bleeding.
Permanent damage can occur after a single event, and physical signs of injury may not be present. Often, there is no intent to harm the child, but SBS is a common cause of infant mortality and long-term disability.
Inconsolable crying is the most common trigger. Other common triggers are feeding problems and difficulties with toilet training. Indicators of SBS range from extensive retinal damage in one or both eyes (which may result in blindness) to minor neurological problems (e.g., irritability, lethargy, tremors, and vomiting) to major problems (e.g., seizures, coma, and death). Treat the infant for the injuries found and place him or her in the rapid transport category. Treat the situation as a case of suspected child abuse.
SUDDEN INFANT DEATH SYNDROME (SIDS)Sudden infant death syndrome (SIDS) is defined as the sudden death of a seemingly healthy infant during sleep, without evidence of disease. You will not be able to diagnose SIDS, as its causes are not clear. SIDS is loosely connected to a prone sleeping position, asphyxiation from bedding, overheated sleeping environments, and air quality; however there are no scientific links to indicate these are direct causes. Treatment for SIDS is purely preventive. SIDS may sometimes be mistaken for child abuse; however, the two are unrelated. SIDS is not believed to have a hereditary link, but it can recur in families. Treatment for SIDS is the same as for any patient in cardiac arrest.
SIDS can be an especially traumatic event for both the child’s caregivers and the responder, regardless of the outcome. Proper psychological support is critical for everyone involved.

SPEC
IAL
POPU
LATI
ON
S
323
GERIATRIC PATIENTS
Geriatric patients are generally considered those 65 years of age and over.
Many changes occur as the body ages (Figure 17–2). Overall, there is a general decline in body function. One of the first body systems affected by age is the respiratory system. Respiratory capacity typically begins to decrease around age 30. By the time a person reaches age 65, the respiratory system may be only half as effective as it was during youth. The heart also suffers the effects of aging. The amount of blood pumped by the heart with each beat decreases, and the heart rate slows. Blood vessels harden, causing increased work for the heart. The number of functioning brain cells also decreases with age. Hearing and vision usually decline. Reflexes become slower, and arthritis may affect joints, causing movement to become painful.
Burns are a special concern to older adults because their skin is thinner and more fragile. Their immune systems are less effective, so infections become more frequent, and the risk of localized infection increases. Bowel obstructions are common due to the weaker muscles of the bowel. Older people are susceptible to problems involving the thermoregulatory system, so they are more at risk of heat and cold-related illness.
Older adults are at increased risk of injury, with a common cause of injury being falls. Bones increasingly become weaker and more brittle, so falls are more likely to result in fractures.
As a person ages, the size of the brain decreases, which results in increased space between the brain and the skull (Figure 17–2). This allows more movement of the brain within the skull, which can increase the likelihood of brain injury (e.g., concussion).
Because geriatric patients may present with confusion or decreased mental acuity as a result of a chronic condition, it may be difficult to determine whether acute illness or trauma is the cause of unusual behaviour, or whether the behaviour is actually normal for the patient. Interviewing friends and family can help you
establish a baseline for the particular patient, against which you can compare his or her signs and symptoms. A geriatric patient who suffers a head injury may not exhibit signs and symptoms immediately: You may suspect a head injury as the cause of altered behaviour even if several days have passed since the event.
Dementia and Alzheimer’s DiseaseGeriatric patients are at increased risk of confusion and a decline in cognitive ability. While some deterioration in mental function is normal as a patient ages, Alzheimer’s disease is not a normal part of aging. It is a progressive, degenerative disease that destroys brain cells and causes deterioration of memory and cognitive ability. Alzheimer’s is the most common form of dementia, accounting for 60 to 80% of dementia cases. Usually, symptoms develop slowly and worsen over time, ultimately becoming severe enough to interfere with daily tasks.
Each patient is affected differently by Alzheimer’s disease. It is difficult to predict the order and progression of symptoms, or the speed of their onset. Alzheimer’s disease will eventually affect all aspects of a patient’s life and is ultimately fatal. There is currently no cure, though medication can help reduce signs and symptoms.
Figure 17–2: The size of the brain decreases with age.

SPEC
IAL
POPU
LATI
ON
S
324
If you are providing care for a patient with dementia, try to determine whether the confusion is the result of the acute injury or illness or of a pre-existing condition. Sometimes, confusion is actually the result of decreased vision or hearing. Speaking with the patient’s family or caregivers can help you compare his or her psychological state to daily norms and determine whether the injury or illness has resulted in a change.
Be thorough in your assessment. Geriatric patients may describe one chief complaint, but other potentially serious conditions may be present as well. Avoid assumptions, and do not downplay signs or symptoms that seem insignificant, as they may indicate a serious underlying condition. Some geriatric patients may intentionally minimize their symptoms for fear of losing their independence (e.g., being placed in a nursing home).
OsteoporosisOsteoporosis is a degenerative bone disorder, characterized by low bone mass and deterioration of bone tissue. Osteoporosis can begin at any age but is most common in older adults. Osteoporosis affects women more commonly than men.
Normally, bone-building cells constantly repair damage that occurs as a result of everyday stresses, keeping bones strong. When the calcium content of bones decreases, the bones become frail, less dense, and less able to repair themselves.
This loss of density and strength leaves bones more susceptible to fractures (especially of the hips, vertebrae, and wrists). Instead of being caused by significant force, fractures may now occur spontaneously, with minimal aggravation, trauma, or force (e.g., the patient may be taking a walk or washing dishes when the fracture occurs). Some hip fractures thought to be caused by falls are actually spontaneous fractures that cause the patient’s fall.
BARIATRIC PATIENTS
Bariatrics is the science of providing healthcare for those who have obesity. The most accepted and consistent measurement for identifying and
defining bariatric patients is the Body Mass Index (BMI). This is defined as the person’s weight in kilograms divided by the person’s height in metres squared. It is the ratio of weight per square metre, (e.g., 24 kg/m2), though the units are often omitted. The World Health Organization (WHO) defines an obese patient as one with a BMI greater than 30.
It has been well established that obesity is a major risk factor for numerous diseases and is associated with multiple adverse health conditions. The most common health concerns seen in bariatric populations are diabetes mellitus, hypertension, and hyperlipidemia (too much fat in the blood). All of these are associated with an increased risk of vascular disease. Depending on which blood vessels are affected, there can be an increase in strokes, cardiac disease, congestive heart failure, and peripheral edema and ulceration. In addition, elevated intra-abdominal pressure, and restricted lung volumes may compromise respiration. Overall, obesity has the potential to negatively impact every organ system.
Evaluation of bariatric patients presents many challenges. It can be more difficult to determine the cause of complaints. Excess body mass can also make it difficult to determine which organ system is affected. Chronic medical problems are frequently present and create the challenge of an unknown baseline of illness, which makes determining the current state of an acute illness problematic. These patients may have complex medical histories involving multiple conditions, surgeries, and medications. When assessing a bariatric patient, the information needed is the same as for any other patient: signs/symptoms, allergies, medications, past medical and surgical history, last oral intake, and events leading to present illness. Responders should be aware of equipment requirements, limitations, and challenges (e.g., a larger adult BP cuff or a specialized bariatric stretcher).
PALLIATIVE PATIENTS
Palliative patients are those with terminal illnesses. Treatment consists of improving quality of life and making patients as comfortable as possible.

SPEC
IAL
POPU
LATI
ON
S
325
Terminal illnesses are those that will ultimately be fatal regardless of interventions or treatment.
Many illnesses can be terminal, and a patient of any age can be affected. Often, palliative care situations are emotionally charged and require empathy and compassion toward the patient and his or her family and friends. Many palliative patients prefer to remain at home, regardless of the nature of the medical emergency you are responding to. You must recognize that palliative patients are in a different situation than most other patients.
Some terminally ill patients will have advance directives specifying the level or type of interventions they consent to. A well-known example is a do not resuscitate order (or DNR). These may also be referred to as living wills. Be sure that you are aware of any special instructions for the patient, and be respectful of his or her wishes.
In some cases, a responder may have to take control to calm the people at the scene. Care for a patient with a terminal illness will usually be based on support, calming, and comfort measures. Sometimes, the terminally ill patient and family will have received counselling to deal with death or dying.
PATIENTS WITH DISABILITIES
Special populations also include those with physical, intellectual, or developmental impairments.
The loss or absence of a limb, either from birth or as a result of trauma, is considered a physical impairment. Likewise, the paralyzing effects of a stroke are a physical impairment.
An intellectual or developmental impairment affects mental functioning and cognitive processes.
Any impairment, physical or mental, may interfere with normal activity and participation in life. However, you should never make assumptions about what a person with a disability can or cannot do.
Service AnimalsPatients with disabilities may be assisted by service animals, often (but not always) dogs. Service animals undergo extensive training and assist with a wide variety of tasks (depending on the animal and the patient). Remember that when a service animal is in its harness, it is working. Avoid interacting with the animal, including talking to it and petting it.
During care, try to keep the service animal as close to the patient as possible. Keeping the animal close may provide comfort and reassurance to the patient. If possible, keep the service animal with the patient if he or she is transported to a medical facility.
Assistive DevicesSome people require special equipment to assist them with regular functions, such as seeing, hearing, communicating, or moving. Patients may be reliant on these devices, so be mindful not to limit their use during assessment or treatment unless it is absolutely necessary to do so.
Ensure that the patient’s assistive devices stay with him or her during transport.
Assistive devices you may encounter include white canes (used by patients with visual impairments for orientation and mobility), communication boards (used by patients with language difficulties to communicate), and hearing aids (which amplify sound for patients with hearing impairments).
Examples of mobility aids include wheelchairs, walkers, canes, crutches, and prosthetic devices (Figure 17–3). Patients with physical disabilities may also live in homes that include ramps, automatic door openers, grab bars, and specially designed bedrooms and/or washrooms.
Visual ImpairmentPeople who have a visual impairment are either unable to see effectively or unable to see at all (blindness). Some people are born blind. Others lose their sight due to injury or illness. Visual impairment can occur because of problems in the visual centres of the brain or in the optic nerves: The causes are not restricted to problems with the eyes themselves.

SPEC
IAL
POPU
LATI
ON
S
326
People with visual impairments usually adapt well to their condition. It should be no more difficult to communicate with a patient who has a visual impairment than with a patient who has full sight. It is not necessary to speak loudly or in overly simple terms for a visually impaired patient to understand you. Your assessment of a visually impaired patient should be largely identical to your assessment of any other patient.
If you are called to assist someone who has a visual impairment, explain what is happening and what you are doing. This will help alleviate anxiety. If you must move a patient with a visual impairment who can walk, stand beside the patient and have him or her hold onto your arm (Figure 17–4). Walk at a normal pace and alert the patient to any potential hazards (e.g., stairs).
Hearing ImpairmentHearing impairment can occur as a result of injury or illness affecting the ear, the nerves leading from the ear to the brain, or the brain itself. As with visual impairment, hearing impairment may also be genetic and present from birth.
Some responders become anxious when called to treat a patient with a hearing impairment. Patients with a hearing impairment can be cared for in basically the same manner as other patients,
though communication can present unique challenges.
At first, you may not be aware that a patient has a hearing impairment. Often, the patient will tell you. Others may point at their ear and shake their head “no.” A child may carry a card stating that he or she has a hearing impairment. You may also see a hearing aid in a patient’s ear.
The biggest obstacle you must overcome when caring for a patient with a hearing impairment is communication. Most people have adapted to their hearing loss by learning to speak, lip read, sign, or any combination of these. Many people with a hearing impairment are able to speak. If you do not understand what a patient is saying, ask him or her to repeat it. Do not pretend to understand if it is not clear.
If the patient is able to read lips, communication will often be easier. Position yourself where the patient can see you, look at the patient when you speak, speak slowly, and enunciate your words carefully (Figure 17–5, a). If both you and the patient know sign language, communicate in this way if you are able to (Figure 17–5, b). If the patient knows sign language and has a friend or family member present, he or she may be able to translate for you. Address your questions to the patient.
Figure 17–4: You can help a patient with a visual impairment walk by having him or her hold onto your arm.
Figure 17–3: A patient using a mobility device.

SPEC
IAL
POPU
LATI
ON
S
327
If the patient cannot speak, read lips, or communicate with you through sign language, you can write messages on paper or a digital device (e.g., a smartphone or tablet) and have the patient respond (Figure 17–5, c).
DeafblindA person who is deafblind has both a visual and a hearing impairment. This often results in difficulties in communicating and managing daily activities. Many people who are deafblind will be accompanied by an intervenor who helps with communication.
The following are some general guidelines for caring for a deafblind patient: • Remember that people who are deafblind may
have some sight or hearing capabilities, while others may have neither.
• A person who is deafblind is likely to explain to you how to communicate with him or her. He or she may give you an assistance card or a note explaining how to communicate.
• Identify yourself to the intervenor when you approach the person who is deafblind, but then speak directly to the person as you normally would, not to the intervenor.
• Avoid touching a patient who is deafblind suddenly or without permission.
Speech or Language Impairments Some people have problems communicating because of a disability. Cerebral palsy, post-stroke impairments, hearing loss, and other conditions may make it difficult to pronounce words or may cause slurring or stuttering during speech. These conditions may also prevent the person from expressing him- or herself, or from understanding written or spoken language. Some people who have severe difficulties may use communication boards or other assistive devices. The following are some general guidelines for caring for a patient with a speech or language impairment: • Do not assume that because a patient has one
impairment, he or she also has another. For example, if a patient has difficulty speaking, it doesn’t mean he or she has an intellectual or developmental impairment as well.
Figure 17–5, a-c: There are many ways you can communicate with someone who has a hearing impairment: a, allow him or her to read your lips; b, use sign language; and c, write down what you want to say.
a
b
c

SPEC
IAL
POPU
LATI
ON
S
328
• Ask the patient to repeat information if you don’t understand.
• Ask questions that can be answered “yes” or “no” if possible.
• Try to allow enough time to communicate with the patient, as he or she may speak more slowly.
• Do not interrupt or finish the patient’s sentences. Wait for him or her to finish.
Physical ImpairmentPhysical impairments are generally the result of problems with either the muscles or bones or the nerves that control them. Causes include stroke, cerebral palsy, multiple sclerosis, muscular dystrophy, and brain and spinal cord injuries. Depending on the nature and severity of the problem, you may care for the patient in much the same way you would care for any other patient. In some cases, extra patience and compassion may be required.
A patient with a physical impairment may present with reduced range of motion. Try to determine the exact extent of the patient’s chronic impairment so you can determine which signs and symptoms are the result of the acute injury or illness you are assessing. If you are unable to determine whether a condition is new or pre-existing (e.g., if the patient is unresponsive), care for the condition as if it is new.
Mental ImpairmentA person with a cognitive impairment may be referred to as having an intellectual or developmental disability. As with physical impairments, mental impairments can be diverse. Some types of cognitive impairment, such as Down’s syndrome, are genetic. Others result from injuries or illnesses that occur during pregnancy, after birth, or later in life. Some occur from undetermined causes.
You may be able to determine quickly that a patient has a mental impairment. However, in some situations, it may not be evident. Always approach the patient as you would any other patient in his or her age group. When you speak, try to assess the patient’s level of understanding. If the patient is confused, rephrase your statement or question in simpler terms. Listen carefully to what the patient is saying. If a guardian or caregiver is present, he or she may be able to help with communication, and can also help you determine the normal mental state of the person (as a baseline for assessing the effects of the acute injury or illness you are evaluating).
A sudden illness or injury can interrupt the normal routine of the patient’s life and cause a great deal of anxiety and fear. Anticipate this risk and offer as much reassurance and empathy as possible. Take time to explain to the patient who you are and what you are going to do. Try to gain the patient’s trust.

Service Animals
Assistive Devices
Deafblind
Speech or Language Impairment
Mental Impairment
Physical Impairment
Visual Impairment
Hearing Impairment
Avoid interacting with the animal.Keep animal close to the patient during treatment, if possible.
Keep device with patient during assessment and treatment unless it creates a barrier to action.Keep device with patient during transport.
Identify yourself to the intervenor if the patient has one.Refer to the patient’s assistance card if available.Avoid touching the patient suddenly or without permission.
Ask the patient to repeat anything you don’t understand.Ask closed-ended questions.Don’t interrupt or finish the patient’s sentences.
Try to assess the patient’s level of understanding when you speak, and rephrase your statements if necessary. Speak to his or her guardian or caregiver if present.
Practise patience and compassion; act according to the patient’s range of motion.
Assess and treat the patient as you would treat a patient without a visual impairment.Explain what is happening and what you’re doing.To move the patient if necessary: Stand beside the patient and have him or her hold onto your arm; walk at a normal pace; alert the patient to any potential hazards en route.
If the patient cannot speak, read lips, or communicate with you through sign language: Write messages on paper or a digital device.If the patient can speak: Ask the patient to repeat anything you don’t understand.If the patient can read lips: Position yourself so that he or she can clearly see your mouth, speak slowly, and enunciate.
PATIENTS WITH DISABILITIES
Sudden Infant Death Syndrome (SIDS)
• Special population: infants • Treatment: follow treatment for cardiac arrest • Treat case as suspected child abuse? No
Shaken Baby Syndrome
• Special population: infants or young children • Treatment: treat according to injuries found • Treat case as suspected child abuse? Yes
SUMMARY
SPEC
IAL
POPU
LATI
ON
S
329

330

CR
ISIS
INTE
RV
ENTI
ON
18 Crisis Intervention
331
Key ContentPsychological Crisis ................ 332 Suicide.................................. 332 Assault ................................. 332 Death and Dying ................. 333Mental Health Crises .............. 333 Anxiety................................. 334 Depression ........................... 334 Psychosis .............................. 335
IntroductionAs a responder, you will frequently encounter people in crisis. Serious injuries, sudden illnesses, and deaths have an emotional impact on everyone involved. The degree of impact varies from person to person. In some cases, the impact is minimal, and a person can accept and handle an injury or illness that results in hospitalization, disability, or even death. In other cases, even a minor injury can create an extreme emotional crisis.
When responding to a stressful situation, minor variations in the way you provide care can help you to address the emotional needs of a patient or other person at the scene. While you should always follow your protocols and training, you might, for example, delay performing a non-critical intervention until the patient has been moved away from any bystanders. Empathy, professionalism, and creativity can help lessen the impact of a crisis on the people involved.

CR
ISIS
INTE
RV
ENTI
ON
332
The circumstances of the event (such as a sexual assault) can cause great emotional turmoil even if medical interventions are not necessary. Events such as an attempted suicide or self-inflicted injury can also cause great stress to a patient’s family and friends.
Besides providing care for any specific injury or illness, you may also need to provide emotional support to a patient experiencing an emotional or psychological crisis. Being able to understand some of what the patient is feeling can help you cope with the situation. You should also be prepared to refer patients to emergency psychological counselling resources, such as a hotline that specializes in helping those in the patient’s situation. This can be as simple as finding an appropriate service ahead of time and keeping the telephone number with you.
PSYCHOLOGICAL CRISIS
Many different situations can result in a psychological crisis for a person. Emergency personnel often encounter incidents of attempted suicide, sexual or physical assault, or the sudden death of a loved one.
SuicideSuicide is one of the leading causes of death among people aged 15 to 19, although it is also common among adults of all ages. Responding to suicide or attempted suicide can be especially disturbing for responders. If family or friends of the patient are present, they are likely to also be experiencing an emotional crisis.
AssaultAssault can be physical, sexual, or both. It results in injury and, often, emotional distress to the person. Assault is a crime and should be reported to the police. If the victim is a child, the crime must also be reported to your provincial or territorial child protection service.
SEXUAL ASSAULTSexual assault occurs when someone is forced into any form of sexual activity without his or
her consent. A sexual assault is a devastating experience for the patient. Patients often feel degraded, extremely frightened, and at further risk of attack. They require significant emotional support and should be referred to appropriate psychological counselling. Try to control your own reaction and focus on the emotional state and needs of the patient. Emphasizing the steps that should be followed can help reduce feelings of helplessness in the patient.
Besides providing emotional support, you must care for any injuries the patient may have received. When caring for a patient who has experienced sexual assault: • Cover the patient and protect him or her from
unnecessary exposure. • Have the patient interact with a responder of
the same gender if possible. • Clear the area of any bystanders, except
friends or family who are able to provide emotional support (if the patient prefers their presence).
• Remove articles of clothing only if absolutely necessary to provide care for injuries.
• Discourage the patient from bathing, showering, or douching before a medical examination can be performed.
• Treat the area as a crime scene. • Do not question the patient about the specifics
of the assault beyond what is absolutely necessary for providing care.
PHYSICAL ASSAULTPhysical assault on a child, spouse or partner, or older adult occurs more frequently than reported. Unfortunately, when you are summoned, the assault has often resulted in more serious injuries. The emergency scene where a physical assault has occurred is not always safe. The attacker may still be present or nearby. If the scene involves domestic violence, it may not be clear what has happened.
Remember that your first concern is your own safety. If you are not a law enforcement officer, do not approach the scene until it is determined to be safe. The scene is a crime scene, so do not handle items unrelated to the patient’s care. Reassure and comfort the patient while providing care.

CR
ISIS
INTE
RV
ENTI
ON
333
Death and DyingYou may be summoned to an emergency in which one or more people have died or are dying. Although your responses will vary according to the situation, you must recognize that death will have an emotional impact on you, as well as on others who are involved. Be prepared to handle your feelings and be considerate of the feelings of others. Remember that reactions to death and dying vary greatly from person to person: The manner in which a person handles a situation will depend on both personal feelings about death and the nature of the incident. You must be professional while remaining empathetic and tactful. Respect that the people at the scene may have just experienced a life-changing event.
Be cautious about what you say in situations in which the death of a patient seems probable. Avoid making statements about the patient’s condition to the patient or to family, friends, and bystanders. You can provide comfort by using positive statements such as: “We are doing everything we can.”
MENTAL HEALTH CRISES
Mental health crises are those in which the patient’s chief complaint is some disorder of mood, thought, or behaviour that is dangerous or disturbing to the patient or those nearby.
Responding to an emergency involving a behavioural or psychiatric condition creates unique challenges. As a responder, it is not your responsibility to diagnose a psychiatric condition, just as you do not diagnose physical illnesses. After determining that the scene is safe, your most important responsibility is to identify and care for any injuries or illnesses the patient may have, and to reduce the risk of harm to the patient and others.
The role of the responder is not to be a therapist but to provide support and to refer the patient to appropriate treatment and/or care. Use active listening and do not pass judgment. People who are upset or angry may express themselves in ways that might seem rude or antagonistic. Remember
that what the patient says is not directed at you and should not be taken personally. Be respectful, listen to the patient, and ensure that your nonverbal communication is positive (Figure 18–1).
In any behavioural emergency, ensure the safety of responders and the scene first. You may need to take special precautions for concerns that pose a threat to you or other responders: Request additional resources as required by the situation. These could include law enforcement or local mental health or crisis centre personnel. While waiting for others to arrive, continue to talk with the patient. Never leave the patient alone unless there is a threat to your safety.
Next, identify and care for the patient’s potentially life-threatening medical conditions. If the patient has no obvious life-threatening conditions, take extra time to calm the patient and develop a rapport before proceeding with the rest of your assessment. Avoid making judgments or subjective interpretations of the patient’s behaviour. You may need to look beyond the obvious to determine the true nature of the problem.
A proper secondary assessment will help you determine whether an underlying medical emergency exists and how to proceed. Transport decisions should be made in accordance with local
Figure 18–1: Assuming a non-threatening posture and getting at eye level are examples of positive nonverbal communication.

CR
ISIS
INTE
RV
ENTI
ON
334
protocols and any instructions from the medical director: Specialized protocols may exist for the transportation of patients with certain mental health conditions. Throughout management and transport, reassess the patient’s ABCs and mental status at frequent intervals. Continual reassessment of your patient’s mental state is critical, as rapid changes can occur that could put you or others at risk.
Mental health conditions can cause physical signs and symptoms. For example, a person with an anxiety disorder may experience a panic attack, with signs and symptoms including hyperventilation, a rapid heart rate, and chest pain. Remember that a patient with a history of mental health conditions may experience injuries or illnesses unrelated to his or her psychiatric history.
If care is required for a minor injury, try to get the patient to help you (Figure 18–2). By encouraging the patient to participate, you may help him or her regain a sense of control.
Three common mental health conditions resulting in crises are anxiety, depression, and psychosis.
AnxietyAnxiety is a term for mental disorders in which the dominant mood is fear and apprehension. A patient with an anxiety disorder may experience persistent, incapacitating anxiety in the absence of an external cause. There are several types of anxiety disorders, but panic disorders are most commonly encountered.
A patient with a panic disorder experiences panic attacks, which are unpredictable feelings of terror that strike suddenly and repeatedly. They can occur at any time, even during sleep. Signs and symptoms of panic attacks may include: • Hyperventilation. • Feelings of weakness or faintness. • Chest discomfort. • Dizziness. • Rapid heart rate. • Sweating. • Nausea. • Smothering sensations. • Fear of losing control.
Calming and reassuring the patient may be the only treatment necessary for a panic attack. Help the patient to take deep, controlled breaths, and listen to what he or she tells you. A complete medical history may be necessary to rule out the possibility of an underlying disease. For example, the rapid heart rate often associated with panic attacks or phobias may indicate a pulmonary embolism.
DepressionMajor depression, also referred to as clinical depression, is a mood disorder. The patient may express feelings of worthlessness, hopelessness, guilt, and/or pessimism. Individuals with depression may also experience fatigue, a change in appetite with weight gain or loss, disruption of sleep patterns, and recurring thoughts of death or suicide. The patient may have difficulty concentrating or making decisions and may become restless or irritable. Depression can also be a response to a stressful event, such as the loss of a close friend or relative.
Care for a patient with depression includes calmly talking to him or her. It may be possible to temporarily direct the patient’s thoughts away from topics that cause distress—for example, by asking about his or her interests or discussing topics of general interest (e.g., sports, weather). Individuals experiencing depression are at risk for suicide. Any statements about suicide
Figure 18–2: Having a patient help care for his or her own injury may help provide a sense of regained control.

CR
ISIS
INTE
RV
ENTI
ON
335
attempts or suicidal ideation should be taken seriously, documented, and reported when care is transferred. If the patient is not being transported for additional assessment or treatments, offer to refer him or her for psychological counselling in the area.
PsychosisPsychosis is a serious medical condition that reflects a disturbance in brain function. A person with psychosis experiences some loss of contact with reality, characterized by changes in his or her thinking, beliefs, perception, and/or behaviour. When a person can’t tell the difference between what is real and what is not, he or she is said to be experiencing a psychotic episode. For the person experiencing psychosis, the condition can be very disorienting and distressing.
Signs and symptoms of psychosis may include: • Loss of touch with reality. • False beliefs. • Hallucinations. • Mania. • Confusion or disconnected thoughts. • Suicidal ideation.
Aggressive behaviour can also arise from psychotic episodes. Before approaching the patient, assess the potential for violence. Request law enforcement personnel if necessary.
Assessing a patient during a psychotic episode may be challenging. You may find that responses to your questions reveal bizarre or disorganized thought processes, memory disturbance, and an inability to concentrate. It may be difficult to reason with the patient or have him or her focus on your questions.
One example of chronic psychosis is schizophrenia, which is a group of mental disorders that may present with distortions in language and thought. A patient with schizophrenia may also experience delusions, hallucinations, and social withdrawal.

Responding to Mental Health Crises
• Care for any life-threatening and minor injuries accordingly. • Try to have the patient assist you when caring for minor injuries. • Reduce the risk of harm to the patient, others, and yourself. • Be respectful and practise active listening. • Ensure positive nonverbal communication. • Request additional resources as required by the situation. • Never leave the patient alone unless your safety is at risk. • Continually reassess the patient.
Responding to Physical Assault
• If you are not a law enforcement officer, do not approach the scene until it is determined to be safe.
• Treat the area as a crime scene. • Ensure your own safety as well as that of the patient and others. • Reassure and comfort the patient while providing care.
Professional Responsibilities
• Provide emotional support. • Cover the patient and protect him or her from unnecessary exposure. • Have the patient interact with a responder of the same gender if possible. • Clear the area of any bystanders, except friends or family who are able to help
provide emotional support (if the patient prefers their presence). • Remove articles of clothing only if absolutely necessary to provide care for injuries. • Discourage the patient from bathing, showering, or douching before a medical
examination can be performed. • Treat the area as a crime scene. • Do not question the patient about the specifics of the assault beyond what is
absolutely necessary for providing care.
336
SUMMARYC
RIS
IS IN
TER
VEN
TIO
N
336

REA
CH
ING
, LIF
TIN
G, A
ND
EX
TRIC
ATI
NG
PA
TIEN
TS
19 Reaching, Lifting, and Extricating Patients
337
Key ContentGaining Entry to Buildings .... 338 Motor Vehicles ....................... 338 Stabilizing Vehicles ............. 339 Accessing the Patient .......... 339Moving Patients ..................... 340 Body Mechanics................... 341 Stretchers and Lifting Devices .............................. 344 Lifting and Moving a Stretcher ........................... 346 Bariatric Patients ................. 346
IntroductionAs a responder, you may encounter emergencies where you are unable to treat the patient because he or she is inaccessible. A patient may be unresponsive inside a locked vehicle, or may be able to call EMS from a residence but unable to unlock the door for responders. In these cases, you must gain access quickly and safely so that care can be provided.

REA
CH
ING
, LIF
TIN
G, A
ND
EX
TRIC
ATI
NG
PA
TIEN
TS
338
GAINING ENTRY TO BUILDINGS
If the patient is in a building, the door may be locked. Larger buildings such as office or apartment buildings may have multiple stages of entry: You may have to first enter the lobby with an electronic pass card, and then enter the patient’s apartment with a key. Some buildings may require a pass for the elevator or stairwells as well.
If you respond to a call at a building, you will have to gain access to the patient before you can perform any assessments or interventions. Because of the legal implications of breaking into a building, the procedure you must follow is often very specific but may vary widely between responders or locations. In many cases, responders will contact their dispatcher, who will attempt to contact the person who placed the emergency call to see if he or she can open the door or consent to forcible entry. In some cases, law enforcement personnel should be requested, as they may have legal authority to perform forcible entry in emergencies. In other cases, responders may be authorized to perform forcible entry as well, especially in life-threatening situations. Always confirm that a door is actually locked before initiating forcible entry procedures: This simple step can often be overlooked.
MOTOR VEHICLES
Patients involved in motor vehicle collisions may be inaccessible inside their vehicles. Doors may be locked or crushed, and the windows may all be rolled up. A vehicle that has been involved in a collision may also be in an unstable position, meaning that it could move or shift during extrication, putting occupants and responders at risk. In other instances, fire, downed power lines, or other factors may prevent you from accessing the patient. When a patient is unable to exit the vehicle, this is sometimes referred to as patient entrapment.
Extricating patients from vehicles often requires specialized qualifications and equipment. If your training does not cover an extrication situation you encounter, request specialized personnel.
Do not put yourself and the patient at risk by attempting an extrication you are not trained or equipped for.
In cases of patient entrapment, you must immediately strategize how to safely gain access to the patient before you can begin providing care. During any extrication, or while attempting to gain access to a patient, it is important that all team members communicate clearly. Develop a plan so that each team member knows what role he or she will play. Multiple agencies may respond to an MVC. For example, fire and police personnel may both be on scene. It is important to establish Emergency Scene Management (ESM) or Incident Scene Management (ISM) protocols to ensure that all personnel on the scene can coordinate their efforts effectively.
Consider your own safety (often referred to as rescuer safety) when attempting to reach a patient; act only within your training and use the appropriate equipment and PPE. Remember to practise precautions that prevent further injury to the patient.
When assessing the scene of an MVC, ensure that you have walked around the vehicle(s) involved. Look carefully for hazards, such as leaking fuel, and for patients who are not in the vehicles (e.g., pedestrians who may have been struck, or occupants who were ejected in the collision). One technique is to have two responders circle the vehicle in opposite directions, one looking inwards to the vehicle and the other looking outwards at the area around it. This helps to ensure that the area is clear of hazards and that all patients have been identified.
Equipment that will help you safely navigate the scene and keep it under control may include markers, flares, or flashlights. Perform a full scene assessment and check for flammable materials (e.g., leaking fuel) before lighting equipment such as flares. If available, use electric lights instead (as they do not create the risk of a fire).
Gaining access may be a lengthy and unnerving process for the patient. Stay with the patient and try to keep him or her calm by explaining what is happening.

REA
CH
ING
, LIF
TIN
G, A
ND
EX
TRIC
ATI
NG
PA
TIEN
TS
339
Gaining access to a vehicle can be a stressful process, especially if patients inside have life-threatening injuries: You may be tempted to rush the process. Always follow the proper procedures, taking all necessary safety precautions. Attempting to perform an uncontrolled extrication creates major risks for both the patient and the responder.
Stabilizing VehiclesStabilizing a vehicle helps to ensure that the vehicle does not slide, shift, or roll into a position that could injure the responders or patient(s). All vehicles should be stabilized before any attempt is made to access occupants.
Depending on a vehicle’s position, environmental factors, and other elements, stabilizing a vehicle can be either a simple or a highly technical task. Environmental factors influencing the stability of a vehicle include ice, water, snow, or inclined surfaces or embankments.
The simplest stabilization technique is called chocking. Any vehicle that has any chance of rolling (i.e., any vehicle that has its tires on the ground) must be chocked. Chocking involves placing blocks or wedges against the wheels of a vehicle to reduce the chance of it rolling backwards or forwards. MVCs that involve overturned vehicles or multiple vehicles may require more technical stabilization techniques and tools. To reduce the risk of injury, avoid the path of any vehicle that could move (i.e., do not stand in front of it or behind it). To further stabilize the vehicle, have a responsive occupant place the vehicle’s gearshift in park, turn off the ignition, and activate the emergency brake, if possible. A vehicle with a manual transmission should be placed in neutral gear, rather than park, with the emergency brake on. Once the vehicle’s ignition is off, the keys should be placed on the dashboard or, if possible, handed to the officer in charge of the extrication.
If the vehicle has no responsive occupants, or if none is able to perform the steps above, chock the vehicle thoroughly and access the interior as described below. Once you have access, put the gearshift in park, turn off the ignition, and activate the emergency brake.
Use extra caution around vehicles equipped with proximity keys. The ignition in these vehicles can be activated by pressing a button in the vehicle so long as the keys are within a certain range.
Accessing the PatientOnce you are certain that the vehicle is stable, check the doors to see if any are unlocked—it is easy to forget this simple, time-saving step. If the doors are locked, the patient(s) inside (if responsive) may be able to unlock at least one door for you. If the windows are open, you may be able to unlock the door yourself.
If glass needs to be broken in order to access the patient, choose a window as far from the occupant(s) as possible. In addition to the hazard created by shards of glass, glass dust created when the window breaks can be inhaled and cause respiratory issues. Instruct any responsive patients to cover their faces before you break the window. Wear appropriate PPE (e.g., respiratory mask, eye protection, and thick leather gloves—ideally extrication gloves). In non-emergency situations, consider alternative options such as calling a towing company or auto association.
Sometimes, locked or jammed doors require you to enter the vehicle through a window. If the window is open or can be rolled down by someone inside the car, this can provide an entry point. In some cases, gaining access to the patient is more challenging and requires specific extrication equipment and knowledge. Each jurisdiction will have specific protocols outlining patient extrication.
AirbagsAirbags can pose serious risks for responders. Airbags must deploy in the fraction of a second between when a collision occurs and when the force causes occupants to strike the vehicle’s interior. Their deployment is carefully controlled to reduce the risk of injury to occupants who are seated properly and wearing seatbelts. If they deploy during patient extrication, they can strike a patient or responder with enough force to cause serious injury or even death.

REA
CH
ING
, LIF
TIN
G, A
ND
EX
TRIC
ATI
NG
PA
TIEN
TS
340
Never place a hard object between the patient and an airbag deployment zone. Avoid placing yourself or a patient where you could be struck by a deploying airbag.
Even once the vehicle is turned off and the battery is disconnected, responders should assume that any airbags are live and could deploy at any moment. Some modern airbags have more complex deployment systems: Even an airbag that has deployed in the collision could still redeploy during extrication using a secondary charge.
The number and location of airbags varies between vehicle models, ranging from two airbags (one each for the driver and passenger) to complex systems with 10 or more deployment zones throughout the vehicle.
Look for any electronic devices (e.g., mobile phones, GPS, computers) that are plugged into the vehicle’s electrical system. These should be disconnected as soon as possible, as these devices can cause power feedback (i.e., reverse power to the vehicle’s safety devices, including the airbags), leading airbags to deploy unexpectedly.
There are many other supplemental restraint systems (SRS) used in modern vehicles: Convertibles, for example, may have pop-up style roll bars that deploy rapidly when the vehicle reaches a certain angle or is in a certain type of collision. Any responder performing vehicle extrications should remain aware of innovations in vehicle safely technology and understand how they can be accommodated with safe extrication practices.
Hybrid and Electric VehiclesHybrid and electric vehicles pose an additional risk for professional responders because of their unique electrical systems. They may have high-voltage power cables running through their bodies: These are usually orange. Damage to these cables from the collision, or subsequent damage caused by the extrication process, can result in electrocution.
Some hybrid and electric vehicles produce little or no noise, so it may not be obvious whether the ignition is on. Damaged electric or hybrid vehicles may restart independently.
Keep in mind that some hybrid vehicles do not have an ignition key and instead have an on-off switch that must be pressed. Therefore, some models may remain live for up to 10 minutes after the vehicle is shut off or disabled. Always follow the manufacturer’s emergency response guidelines for the specific make and model of vehicle.
MOVING PATIENTS
Moving a patient involves certain risks. For example, moving someone with a closed fracture of the leg without taking the time to splint it first could result in an open fracture, which could then lead to soft tissue damage, nerve damage, blood loss, and infection. That said, there are situations in which a patient must be moved, but this decision must always be balanced against the risks involved.
Three general situations require you to move a patient in an emergency:1. The scene becomes unsafe: If changing
conditions make the scene unsafe, you willneed to extricate the patient quickly.
2. You must gain access to other patients: Apatient with minor injuries may need to bemoved quickly so that you can reach otherpatients with life-threatening conditions.
3. You cannot provide proper treatment: Apatient with a medical emergency, such ascardiac arrest or heat stroke, may need tobe moved to provide proper treatment. Forexample, a person in cardiac arrest requiresCPR, which should be performed on a firm, flatsurface. If the patient collapses on a bed or ina small bathroom, the surface or space maynot be adequate to provide appropriate care;you may have to move the patient in orderto properly treat him or her. A patient in therapid transport category will also need to bemoved quickly.

REA
CH
ING
, LIF
TIN
G, A
ND
EX
TRIC
ATI
NG
PA
TIEN
TS
341
Some extrications will present unique challenges or require special training and equipment—for example, when the patient is in a confined space. In these situations, specialized personnel are required.
Before you move a patient, you must consider the nature of the situation. Consider the following factors: • Dangerous conditions at the scene • The size of the patient • Your own physical ability • Whether others can assist you • The patient’s condition
Follow these general guidelines when moving a patient: • Attempt to move a patient only when you are
sure you can comfortably handle the rescue. • Walk carefully, using short steps. • Walk forwards (rather than backwards) to
safety with the patient wherever possible. • Always take the shortest, most direct route
to safety, unless there are hazards along that path.
• Before moving, scan the extrication pathway to identify potential hazards (e.g., uneven terrain, slip hazards, poor lighting).
Body MechanicsUsing proper technique when lifting or moving a patient will reduce the risk of injury both to the patient and to yourself. If you become injured during an extrication, you may be unable to move the patient and risk making the situation worse. Musculoskeletal injuries can occur as a result of lifting and carrying a great deal of weight during an emergency. If this happens at a scene, you have become part of the problem that other responders will have to address. The situation will have become more complicated because you have become another patient who requires treatment.
To reduce the risk of personal injury, as well as injury to another team member, everyone involved in a lift or carry should use proper body mechanics. The basic principles of body mechanics that can be used for all lifts and moves include the following:
• Use your legs, not your back, to lift: Use the muscles of your legs, hips, and buttocks, as well as your abdomen. Never use the muscles of your back to move or lift a heavy object.
• Keep the weight as close to you as possible: Reduce the distance you have to reach.
• Keep your body aligned: Imagine a straight line from your shoulders through your hips and down to your feet, and always move them as a unit. This will reduce twisting forces.
• Reduce the height or distance you need to move: Lift in stages, if necessary.
• Use as many personnel as necessary: The more people lifting, the lighter the load will be for each responder. The person at the patient’s head directs the actions of the team.
If performed incorrectly, reaching can also lead to back injuries. When reaching, keep your back locked (i.e., avoid hyperextending it) and never twist it. You should avoid reaching more than 15 to 20 cm (6 to 8 in.) in front of you, as the muscles in the upper back and shoulders can stay stretched in that position for only a few seconds before they become fatigued and the risk of injury increases.
There are many different ways to move a patient to safety. Some are more suitable for some situations than others, but as long as you can move the patient to safety without injuring yourself or the patient, the move is successful.
Moves used by responders include assists, carries, and drags. The most common of these moves include the following: • Walking assist • Two-person seat carry • Clothes drag • Blanket drag • Extremity lift
All of these moves can be performed by one or two people and without equipment. This is important because, with most moves, equipment is often not immediately available and time is critical. It is often easier for a responder to assist a patient of approximately the same height, so if more than one responder is available, consider who might be best suited.

REA
CH
ING
, LIF
TIN
G, A
ND
EX
TRIC
ATI
NG
PA
TIEN
TS
342
WALKING ASSISTThe walking assist is a simple manoeuvre suitable for moving a responsive patient. The move may be performed by either one or two responders and is usually used to help patients who require simple assistance with walking.
To perform a walking assist:1. Ensure the patient is standing up and position
yourself on the patient’s injured or weaker side.2. Place the patient’s arm across your shoulders
and hold it in place with one hand. 3. Support the patient with your other hand
around the patient’s waist (Figure 19–1). Your body acts as a crutch, supporting the patient’s weight while you both walk.
If present, a second responder can support the patient in the same way from the other side (Figure 19–2).
TWO-PERSON SEAT CARRYThe two-person seat carry requires two responders. It is suitable for a responsive patient who may be unable to walk.
To perform a two-person seat carry:1. Position yourself so that you and the second
responder are standing on either side of the patient.
2. Put one arm under the patient’s thighs and the other across the patient’s back.
3. Interlock your arms with those of the second responder under the patient’s legs and across the patient’s back (hold on to the second responder’s wrists or forearms).
4. Lift the patient in the seat formed by your joined arms (Figure 19–3).
CLOTHES DRAGThe clothes drag is an emergency move that is appropriate for someone suspected of having a head and/or spinal injury, as it helps maintain basic manual SMR during the move. It may be used for a responsive or an unresponsive patient.
To perform a clothes drag:1. Gather the patient’s clothing, such as a jacket
or shirt, behind the patient’s neck. 2. Cradle the patient’s head using both the
clothing and your hands, and keep the
Figure 19–1: A walking assist with one responder.
Figure 19–2: A walking assist with two responders.

REA
CH
ING
, LIF
TIN
G, A
ND
EX
TRIC
ATI
NG
PA
TIEN
TS
343
patient’s head, neck, and back as straight as possible (Figure 19–4).
3. Pull the patient to safety, ensuring that the clothing does not compromise the patient’s airway.
BLANKET DRAGThe blanket drag is an appropriate emergency move if a stretcher is not available. It can be used on a responsive or an unresponsive patient. It works best on a smooth surface.
To perform a blanket drag:1. Gather half a blanket and place the gathered
side alongside the patient. 2. Roll the patient toward you (away from the
blanket), moving the patient’s body as one unit.3. Tuck the gathered half of the blanket under
the patient as far as you can, and then roll the patient back onto the blanket.
4. Wrap the blanket around the patient and then drag the patient by pulling the part of the blanket at the patient’s head (Figure 19–5).
EXTREMITY LIFT (FORE-AND-AFT LIFT)The extremity lift (also called a fore-and-aft lift) is performed with a partner. The extremity lift is not appropriate when the patient has a suspected head and/or spinal injury, or injuries to the pelvis, arms or legs (Figure 19–6). This move can be used to lift an unresponsive patient from the floor to a chair or stretcher. This move requires a measure of physical strength, so it is not suitable for patients larger than the responders.
To perform an extremity lift:1. Carefully move the patient into a seated
position.2. Crouch at the patient’s head and support the
patient in the seated position. Have the second responder kneel either beside or between the patient’s knees.
3. Place one hand below each of the patient’s underarms and reach through to grab the patient’s opposite wrist. Ensure that the patient’s back is close to your chest and fold your arms across the patient’s chest.
4. Have the second responder place his or her hands under the patient’s knees.
5. Signal the second responder and lift in unison, using proper body mechanics.
Figure 19–3: A two-person seat carry.
Figure 19–4: A clothes drag.
Figure 19–5: A blanket drag.

REA
CH
ING
, LIF
TIN
G, A
ND
EX
TRIC
ATI
NG
PA
TIEN
TS
344
Stretchers and Lifting DevicesToday, there are many kinds of stretchers and lifting devices used by professional responder agencies. The more common types are: • Scoop stretcher (clamshell) • Backboard (longboard) • Basket stretcher • Multi-level stretcher (wheeled ambulance-type
cot) • Stair chair
All of these stretchers will carry the patient’s entire body.
To ensure stability, every organization should have regular inspection and maintenance programs in place for all stretchers and lifting devices. Rust, cracks, severe discoloration, and bent frames are all signs of damage. Plastic stretchers can be damaged by exposure to prolonged sunlight and corrosive material.
Many variations on these general types of stretchers and lifting devices exist: Always follow the manufacturer’s recommen-dations, along with your local protocols for moving patients.
SCOOP STRETCHERThe scoop stretcher (also called a clamshell) is a rigid stretcher that can be separated into two pieces (Figure 19–7). These pieces can then be placed on either side of a patient and reconnected underneath the body: This allows you to scoop a patient off of the ground without rolling him or her (ideal for suspected spinal injuries). A scoop stretcher is suitable for lifting a patient from the ground to another kind of stretcher or backboard. The length of a scoop stretcher can be adjusted quickly to match the height of the patient: This should be done before the patient is on the stretcher.
BACKBOARDThe backboard (also referred to as the spine board or long board) is a long, rigid board used primarily for extrication purposes. Many types are available, including floating models for water extrications. Backboards are either rectangular or tapered at one end. The board has slots along the sides through which straps may be placed to secure the patient’s body to the board. Most boards are approximately 1.8 metres (6 feet) long. If a backboard is used with a basket stretcher, the board must fit inside the stretcher.
BASKET STRETCHERThe basket stretcher, also called the Stokes basket, is a long, rectangular metal or plastic frame with a wire mesh or plastic liner. It has slightly raised sides, so a patient on another stretcher (such as a scoop stretcher or backboard) can be placed directly into the basket stretcher for transportation. Basket stretchers are commonly
Figure 19–6: An extremity lift (fore-and-aft lift).
Figure 19–7: A scoop stretcher (clamshell).

REA
CH
ING
, LIF
TIN
G, A
ND
EX
TRIC
ATI
NG
PA
TIEN
TS
345
used for rescues and as lifting devices. The patient can be secured to the stretcher if it is to be carried over a long distance or if the patient is to be lowered or raised off the ground, as in a low- or high-angle rescue.
MULTI-LEVEL STRETCHERThis type of stretcher can be lowered or raised manually using release handles found at the end or side (Figure 19–8). Some may be powered electrically as well. This device is equipped with wheels. It has adjustable upper-body and leg sections. Each side of the stretcher has a safety rail. The stretcher should not be lifted using these rails. This stretcher is commonly used in transportation vehicles, such as ambulances. Some are designed for larger or bariatric patients. Multi-level stretchers also have features that allow them to be secured inside an ambulance.
STAIR CHAIRA stair chair is used for transporting a patient in a seated position (Figure 19–9). It is used to extricate a patient from a location that is not accessible to a multi-level stretcher. Once you reach a multi-level stretcher, the patient will usually be transferred from the stair chair to the multi-level stretcher.
Stair chairs are especially useful when there is a small elevator or staircase in which a longer stretcher will not fit. The wheels swivel to manoeuvre around tight corners and landings. Some stair chairs have caterpillar-style treads that make navigating stairs or steep terrain easier.
FLEXIBLE LITTERA flexible litter has no rigid structure of its own. These devices are made of synthetic materials that require some type of spinal immobilization device to provide rigidity. Because they are flexible, they work well when moving patients through narrow passageways. They wrap around the patient, so the litter is little more than the circumference of the patient’s body. Flexible litters also have the advantage of being useable with patients of various sizes, including those for whom a basket stretcher may be restrictive.
HELICOPTER STRETCHERA helicopter stretcher is a flat backboard. Helicopters are usually equipped with one of these stretchers. The helicopter stretcher is hinged in the middle and folds in half for ease of storage. The responder must ensure that the stretcher is open with the correct surface up so that it will not accidentally fold in half during use. A backboard may be secured on top of the helicopter stretcher. Make sure you are aware of the air flight regulations for the service you are working with: You may need to select a backboard that will fit the helicopter stretcher, for example.
Figure 19–8: A multi-level stretcher.
Figure 19–9: A stair chair.

REA
CH
ING
, LIF
TIN
G, A
ND
EX
TRIC
ATI
NG
PA
TIEN
TS
346
ARMY-TYPE STRETCHERThese stretchers consist of two wooden poles with canvas or plastic stretched between. The canvas must be checked regularly for wear (e.g., tears, rot). The stretcher is usually stored collapsed. To open, undo the straps and open the stretcher. Once open, the spreader bars should be locked into place. The centre part of the hinge can be further secured using a triangular bandage or tape. The stretcher should be tested before being used with a patient.
Lifting and Moving a StretcherAs with all lifts and carries, proper body mechanics are important when lifting a patient onto a stretcher or when loading or unloading a stretcher from a vehicle. When lifting or moving a stretcher, follow these guidelines: • Use enough responders to help with lifting. • Ensure that the appropriate securing devices
are in place and are always used. • Carry the patient feet first on a level slope,
down stairs, or down inclines, as this keeps the abdominal organs away from the diaphragm. When going uphill or up stairs, move the patient headfirst.
• Move the stretcher based on the area’s terrain, the patient’s condition, and relevant safety factors.
• Never run with a stretcher. • Load the patient headfirst into the ambulance.
• Use padding if the patient is going to be on the carrying device for a long period of time, or if the travelling surface is going to be rough.
• Secure the stretcher to the transport vehicle to ensure that it doesn’t move during transport.
There are many ways to position a patient onto a stretcher. Always follow local protocol.
It can be difficult to transfer a patient from a bed to a multi-level stretcher (or vice versa). One piece of equipment that can make this easier is a transfer board. Transfer boards are sheets of strong, semi-rigid plastic. They can slide beneath a patient (and beneath the sheet below the patient if he or she is on a bed), allowing you to easily transfer the patient without rolling him or her.
Bariatric PatientsDue to a bariatric patient’s size and weight, responders need to take extra precautions to avoid the risk of injury (both to the patient and to themselves). Moving, lifting, and transporting a bariatric patient requires appropriate personnel and equipment. Standard equipment, such as a stretcher, may not be rated to accommodate the patient’s size and weight.
Bariatric patients should be moved utilizing additional help and resources. At no time should a patient who weighs more than 135 kg (298 lb.) be
Figure 19–10: Examples of bariatric stretchers.

REA
CH
ING
, LIF
TIN
G, A
ND
EX
TRIC
ATI
NG
PA
TIEN
TS
347
moved without at least four individuals to assist. Other trained staff or safety personnel may be able to assist if necessary. A good guideline is that for every 20 to 45 kg (44 to 99 lb.) by which a patient’s weight exceeds 135 kg (298 lb.), an additional person should assist with moving the patient.
The responder may need to employ a bariatric multi-level stretcher (Figure 19–10), which has a wider patient surface and wheelbase, providing increased stability during transport, and is rated for a higher weight load. Many also have additional hand-holds so that more responders
can assist in lifting the stretcher. Often, bariatric stretchers are battery-powered and can be raised or lowered electronically, decreasing the amount of manual lifting required. Responders should also be aware of other procedures and equipment available to them.
When moving a bariatric patient on a stretcher, choose a route that is level and easy to navigate. If you must move the stretcher across uneven terrain, lowering the stretcher will create a lower centre of gravity, reducing the risk of tipping the patient.

The Scene Becomes Unsafe
Gaining Access to Other Patients
Providing Proper Treatment
If changing conditions make the scene unsafe, you will need to extricate the patient quickly.
A patient with minor injuries may need to be moved quickly so that you can reach other patients with life-threatening conditions.
A patient with a medical emergency may need to be moved to provide proper treatment. A patient in the rapid transport category will also need to be moved quickly.
WHEN IT’S REQUIRED TO MOVE A PATIENT
Stabilizing Vehicles—Chocking Technique
• When to use technique: if the vehicle has any chance of rolling • How to use technique: ◆ Place blocks or wedges against the wheels. ◆ If possible, ensure the gearshift is in park or neutral, the ignitions is off, and the
emergency brake is activated. ◆ Have the car keys placed on the dashboard or handed to the officer in charge of
extrication. ◆ Avoid the path of any vehicle. ◆ Follow your jurisdiction’s protocol for extricating a patient.
Considerations Before Moving
• Dangerous conditions at the scene • The size of the patient • Your own physical ability • Whether others can assist you • The patient’s condition
General Guidelines For Moving
• Attempt to move a patient only when you are sure you can comfortably handle the rescue.
• Walk carefully, using short steps. • Walk forward to safety with the patient,
instead of walking backwards wherever possible.
• Always take the shortest, most direct route to safety, unless there are hazards along the path.
• Before moving, scan the extrication pathway to identify potential hazards.
General Body Mechanics
• Use your legs, not your back, to lift. • Keep the weight as close to you as possible. • Keep your body aligned. • Reduce the height or distance you need to
move as much as possible. • Use as many personnel as necessary.
Lifting and Moving a Stretcher
• Use enough responders to help with lifting. • Ensure that the appropriate securing devices are
in place and are always used. • Carry the patient feet-first on a level slope, down
stairs, or down inclines; when going uphill or up stairs, move the patient head-first.
• Move the stretcher based on the area’s terrain, the patient’s condition, and relevant safety factors.
• Never run with a stretcher. • Load the patient headfirst into the ambulance. • Use padding if the terrain is rough or if the
patient will be on the device for a long period. • Secure the stretcher to the transport vehicle.
MOVING A PATIENT
348
SUMMARYR
EAC
HIN
G, L
IFTI
NG
, AN
D E
XTR
ICA
TIN
G P
ATI
ENTS
348

TRA
NSP
OR
TATI
ON
20 Transportation
349
Key ContentEmergency Vehicle Maintenance and Safety Check ................ 350 Removing a Vehicle from Service .............................. 351 Beginning and Ending a Shift .................................. 351Safe Vehicle Operation .......... 351 Air Medical Transportation ... 353 Patient Considerations........ 353 Landing Site Preparation .... 353 Ground Safety Precautions ....................... 353Medical Evacuation from a Ship ...................................... 355 Preparing the Patient for Transfer............................. 355
IntroductionIf your scope of practice includes the transportation of patients, you must be prepared to transport them safely and effectively. This means driving in a safe manner and ensuring that both the vehicle and its onboard equipment are inspected and maintained regularly. Most often, the vehicle used by responders to transport patients is an ambulance, though other vehicles are sometimes also used (e.g., helicopters).

TRA
NSP
OR
TATI
ON
350
EMERGENCY VEHICLE MAINTENANCE AND SAFETY CHECK
Completing an ambulance equipment and supply checklist at the beginning of every work shift is important for safety, patient care, and risk management. Daily checks help ensure that the vehicle is functioning properly and prepared for use in both emergency and non-emergency responses. Some equipment on the ambulance (e.g., defibrillators) requires specific routine maintenance and testing to ensure safe and effective operation when needed. All supplies must be fully stocked and easily accessible (Figure 20–1). For a list of equipment commonly found on an ambulance, see Appendix B: Sample Ambulance Equipment List.
The vehicle and equipment must be disinfected and cleaned regularly, both inside and out, to ensure that pathogens have been removed and that the vehicle maintains a professional appearance. Most organizations have specific protocols for vehicle maintenance and routine care. The procedure for vehicle checks is often legislated by a government body. Specific services may develop their own equipment checklists as well. All checks need to be documented and all
problems or deficiencies brought to the attention of the responsible individual: Your organization should have clear procedures for reporting vehicle problems.
You should check the components listed in Table 20–1 as part of your daily vehicle safety check (pre-trip inspection).
Figure 20–1: Supplies in an ambulance are in easily accessible cabinets and must be fully checked and stocked at the beginning of each shift.
UNDER HOOD EXTERIOR INTERIOR EMERGENCY EQUIPMENT DOCUMENTATION
• Engine oil/leaks• Coolant levels/
leaks• Power-steering
fluid• Drive belts• Windshield-
washer fluid• Battery clean/
secure• Leaks, hoses
• Lights• Mud flaps• Body damage/rust
perforation• Fluid leaks under
vehicle• Wheels, hubs,
lugs, nuts• Tire condition/
pressure (psi)• Suspension,
springs, shocks• Exhaust system• Licence plate—
clean/valid sticker• Exterior vehicle
clean
• Steering—excessive play/looseness
• Brake boosteroperation
• Brake pedal reserveand fade
• All gauges• Fuel level• Windshield wipers
and washers• Clean windows and
mirrors• Heater and defroster• Horn• Seatbelt operation• Parking brake
operation• Clean inside cab/no
damage• Mirror adjustment
and condition• Patient compartment
clean and sanitary
• Emergency warninglights
• Side floodlights• Rear floodlight• Interior lights• Siren and PA system• Backup alarm• Flares• Fire extinguisher• Radio• 2 helmets, 2 traffic
safety vests, and2 level C haz-mat suits
• Ownership• Insurance• Collision report
booklet• Annual
inspectionsticker and/orcertificate
TABLE 20–1: VEHICLE SAFETY CHECK COMPONENTS

TRA
NSP
OR
TATI
ON
351
Removing a Vehicle from ServiceWhen checking vehicles, equipment, and supplies, it is important to note and record any problems or deficiencies found. If any vehicle or piece of onboard equipment is damaged or malfunctioning in such a way that it could pose a safety hazard, the vehicle must be removed from service or the equipment repaired/replaced prior to use. If a vehicle is out of service, affix a sign to the steering wheel to prevent another responder from using it without knowing. Organizations should specify how and when to remove a vehicle from service.
Beginning and Ending a ShiftAt the beginning of a shift, your duties include:1. Checking in with your partner and discussing
expectations and roles for the shift.2. Checking with the outgoing crew for the
status of emergency vehicle and equipment.3. Performing a thorough vehicle safety check.
At the end of each shift, your duties include:1. Refueling the vehicle, if required.2. Restocking all kits as required.3. Replenishing and replacing used supplies.4. Cleaning the interior and exterior of the
vehicle.5. Decontaminating or replacing any soiled
equipment.6. Completing all documentation.7. Debriefing and discussing all calls with your
partner:• What went well?• What could have gone better?
SAFE VEHICLE OPERATION
Safe vehicle operation is important for the safety of patients, responders, and the public. Any responder who is required to transport patients is strongly advised to complete an Emergency Vehicle Operator (EVO) course and maintain that certification throughout his or her career.
Never drive a private vehicle as if it were an emergency vehicle. Even if you have lights and sirens, people do not always see you, hear you, or yield the right-of-way. Professional responders who are travelling to an emergency or a hospital
sometimes cause collisions because they fail to drive safely. Defensive driving skills are taught as a component of EVO courses for professional responders. Always pay attention to your driving, and take extra precautions to ensure that there are no hazards in your path. When backing up your vehicle, remember to use your backup signals, as backing up can sometimes be dangerous. Wherever possible, use a spotter to decrease the risks.
When operating an emergency vehicle, follow these guidelines:
• Follow all laws and acts with respect to theoperation of an emergency vehicle in yourprovince or territory.
• Follow all operational guidelines for yourjurisdiction.
• Be observant and aware of other motoristsand pedestrians.
• Always wear your seatbelt.• Be familiar with the characteristics of the
emergency vehicle.• Be alert to changes in weather and road
conditions.• Exercise caution in the use of audible and
visible warning devices.• Drive within the speed limit, except in
circumstances allowed by law.• Maintain a safe following distance.• Drive defensively, with due regard for the
safety of others.• Adjust your driving to balance the needs of
timely transportation, patient comfort, androad safety.
AttitudeAttitude is the mental framework that structures your day-to-day driving performance. It is the way you see yourself as a driver and how you view other drivers. Attitudes are influenced by experiences, emotions, values, feelings, prejudices, and personality. Being a safe driver requires an open mind, a willingness to learn, and a desire to improve.
Safe drivers are courteous and considerate. They are willing to yield the right-of-way, they monitor traffic, and they adapt to changing conditions. A positive attitude will help you drive amicably with others and maintain the safe operation of your vehicle.

TRA
NSP
OR
TATI
ON
352
Environmental Conditions Environmental conditions can pose significant dangers to drivers. Factors that can affect safe vehicle operation include decreased visibility from fog or heavy rain and slippery conditions caused by snow, ice, or water. When hazardous environmental conditions are present, the driver should maintain a speed and following distance that is appropriate to the conditions.
Appropriate Use of Warning DevicesWhen responding to an emergency incident, the driver must use audible and visual warning devices according to local protocols and based on provincial/territorial motor vehicle laws. During patient transportation, the use of warning devices should be based on patient assessment and appropriate protocol for treatment and transportation.
When using warning devices, keep in mind that motorists who drive with car windows rolled up or who are using a radio, air conditioning, or heating system may not be able to hear the warning devices. It is important that you proceed with caution and never assume that the warning devices provide an absolute right-of-way to proceed.
Proceeding Safely Through IntersectionsMost provinces and territories require all emergency vehicles to come to a complete stop at all controlled intersections (i.e., red light, stop sign) and proceed through the intersection when safe to do so. Even with lights and sirens, you cannot trust that all motorists will stop and yield the right-of-way. Take precautions when proceeding through controlled intersections to gain the attention of surrounding motorists—for example, change the mode of the siren or use your air horn.
Parking at the Emergency SceneBefore parking and securing the emergency vehicle at the scene, consider potential hazards, such as leaking fuel or gas, or hazardous materials. If any of these conditions are present, position the vehicle uphill, upwind, and at a safe distance. In
addition, position the vehicle so that it protects you and the patient from other motorists and hazards. When parking or positioning your vehicle, keep the following potential hazards in mind: • Vehicle exhaust fumes • Downed electrical wires • Poor lighting • Blocking extrication vehicles and equipment • The possibility of collapse of surrounding
buildings due to fire or explosion
When you are positioning the emergency vehicle, another responder should act as a spotter, especially when you are reversing (Figure 20–2).
Operating With Due Regard for the Safety of All OthersMost provinces and territories allow special privileges for drivers of emergency vehicles that include driving slightly above the speed limit and proceeding through controlled intersections (after a complete stop) during an emergency response.
These exceptions to the rule are privileges, not rights. Due regard for the safety of all others carries legal responsibility. If you operate a vehicle without this due diligence, it can result in liability for you and the agency you represent if damage, injury, or death results. As a responder, you must be familiar with all applicable laws and regulations pertaining to the operation of an emergency vehicle.
Figure 20–2: Have another responder act as a spotter when you are positioning the vehicle.

TRA
NSP
OR
TATI
ON
353
AIR MEDICAL TRANSPORTATION
In certain situations, it is sometimes best for a patient to be transported to a medical facility by a helicopter or a fixed-wing aircraft. This type of transport enables severely injured or ill patients to be transported quickly to specialized medical centres or larger (but more distant) treatment facilities. Geography and other circumstances can play an integral role in this type of transport decision, and specific protocols must be followed by emergency personnel.
Air ambulance services throughout the country typically use fixed-wing and/or rotary-wing (helicopter) aircraft. Fixed-wing aircraft are particularly useful for long-distance (i.e., greater than 200 km [124 mi.]) and inter-hospital transfers of patients or vital organs. Fixed-wing aircraft can also operate in weather conditions that may restrict rotary-wing aircraft.
When coordinating with air medical transportation organizations, be aware that their protocols may vary: Follow the directions of the pilot and crew.
Patient ConsiderationsWhen preparing a patient for air medical transport, consider the requirements of the aircraft. While most modern aircraft used for medical evacuation allow full monitoring of patients during flight, some may offer fewer options, so the patient should be positioned in the safest manner for his or her condition. If the patient’s airway is compromised, this is often a lateral position, as this helps to keep the airway clear. Other positions may be better suited, depending on the nature of the injury or illness.
Landing Site PreparationIf a patient is to be transported by helicopter, a safe landing zone must be established at or near the scene.
A helicopter landing zone should be approximately 46 by 46 metres (151 by 151 feet). It should have no vertical structures that can impair landing or takeoff and should be relatively flat and free of high grass, crops, or other factors that can conceal
uneven terrain or hinder access. The landing site should also be free of debris that could injure people or damage the aircraft. Personnel close to the landing site should wear protective eyewear and helmets.
Given the time of day, the landing site may need lighting (e.g., portable lights and traffic cones with reflectors). In some cases, this may be accomplished by positioning emergency vehicles around the perimeter of the landing zone with their warning lights on. If white lights are used, point them toward the centre of the landing zone and not directly at the aircraft. Flares should not be used to illuminate the landing site. If conditions are very dry, you may need to wet the landing zone to prevent the pilot and drivers on the ground from being blinded by clouds of dust. It may also be helpful to use radio communications with the pilot to advise him or her of conditions such as wind direction or any hazards or obstructions that may be relevant. In some cases, such as when the helicopter is landing, it may be appropriate for you to use hand signals to guide the pilot.
Ground Safety PrecautionsKeep the landing zone clear during takeoffs and landings. Maintain a distance of at least 60 metres (200 feet). In addition, adhere to the following guidelines:
• Never allow ground personnel to approachthe helicopter unless requested to do so by thepilot or flight crew.
• Stay in view of the flight crew at all times.• Stay away from propellers.• Allow only necessary personnel to help load or
unload patients.• Secure any loose objects or clothing that could
be blown by rotors (e.g., stretcher, sheets, orblankets).
• After the aircraft is parked, wait for a signalfrom the pilot to approach.
• Approach the helicopter in a crouchedposition, staying within view of the pilot orother crew members (Figure 20–3).
• Never approach the aircraft (rotary- or fixed-wing) from the rear (Figure 20–4). The tailrotors on most aircraft are near the groundand spin at a high rotation per minute, whichmakes them virtually invisible.

TRA
NSP
OR
TATI
ON
354
Figure 20–4: Never approach a helicopter from the rear.
Acceptable area
Prohibited area
DANGERZONE
Approach area
Main rotor
Tail rotor
Figure 20–3: Approach a helicopter in a crouched position.
Main rotor
DANGER AREADo NOT approach
Ground
Approach from
this side

TRA
NSP
OR
TATI
ON
355
• Carry long objects horizontally and no higher than waist height.
• Approach or depart the helicopter from the downhill side if it has landed on an incline.
MEDICAL EVACUATION FROM A SHIP
A helicopter should not be requested for evacuation from a ship unless the patient is in serious condition. In many cases, the decision to use aeromedical evacuation is made in consultation with the medical advisor, based on the medical information provided by the attendant.
Preparing the Patient for TransferTo prepare a patient for transfer, follow these steps: • Ensure that the patient’s airway, respiration,
and circulation are under control. If indicated, strap the patient into the stretcher to prevent him or her from slipping or falling out.
• Place the patient’s medical records (if any) with all necessary papers (including passport, if available, and notes of any treatment given) in a plastic envelope to be sent along with him or her.
• If possible, ensure that the patient is wearing a PFD/lifejacket before moving him or her to the stretcher.
• Relay all pertinent information directly to one of the flight crew members: Describe any bandaged or covered injury, along with any other information about the patient’s condition and a concise history of the event.
Ship-to-Ship TransferShip-to-ship transfer involves difficult manoeuvring for two vessels. It is a seamanship problem demanding high standards of competence for its safe and efficient performance. Light (unloaded) ships must be approached slowly and with caution. Ships with the higher freeboard should provide the illumination and boarding facilities. The transfer should be performed quickly, and ships should not linger alongside each other for any reason.

Guidelines to Safely Operate an Emergency Vehicle • Follow all laws and acts with respect to the operation of an emergency vehicle in
your province or territory. • Follow all operational guidelines for your jurisdiction. • Be observant and aware of other motorists and pedestrians. • Always wear your seatbelt. • Be familiar with the characteristics of the emergency vehicle. • Be alert to changes in weather and road conditions. • Exercise caution in the use of audible and visible warning devices. • Drive within the speed limit except in circumstances allowed by law. • Maintain a safe following distance. • Drive with due regard for the safety of others. • Adjust your driving to balance the needs of timely transportation, patient comfort,
and road safety.
Air Medical Transportation— Guidelines for Grounding Safely • Never allow ground personnel to approach until the pilot or flight crew says so. • Stay in view of the flight crew at all times. • Stay away from propellers. • Allow only necessary personnel to help load or unload patients. • Secure any loose objects or clothing that could be blown by rotors. • After the aircraft is parked, wait for a signal from the pilot to approach. • Approach the helicopter in a crouched position, staying within view of the pilot or
other crew members. • Never approach the aircraft from the rear. • Carry long objects horizontally and no higher than waist height. • Approach or depart the helicopter from the downhill side if it has landed on an incline.
Medical Evacuation from a Ship—Preparing the Patient • Ensure that the patient’s airway, respiration, and circulation are under control. • If indicated, strap the patient in a stretcher. • Place any patient medical records and all necessary papers (e.g. passport) in a plastic
envelope to be sent with the patient. • If possible, ensure that the patient is wearing a PFD/lifejacket before moving him or
her to the stretcher. • Relay all pertinent information directly to one of the flight crew members.
1. Check in with your partner and discuss expectations and roles for the shift.
2. Check with the outgoing crew for the status of the emergency vehicle and equipment.
3. Perform a thorough vehicle safety check.
1. Refuel the vehicle if required.2. Restock all kits as required.3. Replenish and replace used supplies.4. Clean the interior and exterior of the vehicle.5. Decontaminate or replace any soiled equipment.6. Complete all documentation.7. Debrief and discuss all calls with your partner.
At the beginning of a shift
BEGINNING AND ENDING A SHIFT
At the end of a shift
356
SUMMARYTR
AN
SPO
RTA
TIO
N
356

MU
LTIP
LE-C
ASU
ALT
Y IN
CID
ENTS
21 Multiple-Casualty Incidents
357
Key ContentOrganizing Resources ............ 358Caring for the Ill or Injured ... 359 Triage ................................... 359CBRNE Emergencies ............... 361 Types of Agents ................... 362 Methods of Dissemination .................. 363 Scene Assessment ................ 364 Establishing Perimeters....... 364 Triage in a CBRNE Incident ............................ 364 Control of Contaminated Casualties ......................... 364 Transporting CBRNE Patients ............................. 365 Psychological Impact of CBRNE Events ................... 365
IntroductionAs the term implies, a multiple-casualty incident (MCI) refers to a situation involving two or more patients. You are most likely to encounter MCIs involving only a few patients, such as a motor vehicle crash involving a driver and a passenger. MCIs can also be large-scale events, involving dozens or even hundreds of patients. Examples of MCIs include: • Floods • Fires • Earthquakes • Tornadoes • Hurricanes • Explosions • Structural collapses • Train derailments • Airline crashes • Hazardous material incidents

MU
LTIP
LE-C
ASU
ALT
Y IN
CID
ENTS
358
Incidents of this magnitude can strain the emergency response resources of local communities. Coping effectively with an MCI requires a plan that enables you to acquire and manage the necessary personnel, equipment, and supplies.
Organizing ResourcesINCIDENT COMMAND SYSTEM (ICS)Because incidents vary in complexity, providing appropriate assistance to multiple patients in an emergency involves organization. MCIs can strain the resources of the responding personnel and require additional resources. The incident command system (ICS) was developed to ensure that the various resources operate in an orderly, cohesive fashion. ICS is a component of the Incident Management System (IMS).
The key components of an ICS are: 1. Incident Command. 2. Operations.3. Planning. 4. Logistics. 5. Finance/Administration.
There are a number of sectors within the ICS, each with individual areas and responsibilities. Each sector has a supervising officer. As designated by command, the officers may include the following (Figure 21–1): • Triage officer: Supervises assessment, tagging,
and transportation of patients to designated treatment areas.
• Treatment officer: Sets up a treatment area and supervises treatment, making sure the most seriously injured are treated and/or transported first.
• Transportation officer: Arranges for patient transport while also tracking the priority, identity, and destination of all patients leaving the scene.
• Staging officer: Releases and distributes resources as needed and ensures that there is no transportation gridlock.
• Safety officer: Maintains scene safety by identifying potential hazards and taking actions to prevent them from causing injury. This officer has the authority to suspend, alter, or terminate any actions that are deemed unsafe.
The ICS is designed to apply in a wide variety of emergencies. It is a common system that can be easily understood by different agencies working together at the scene of an emergency. Originally developed in California to manage the large numbers of firefighters necessary for major brush and forest fires, the ICS has subsequently been modified for use in a variety of MCIs.
An ICS is similar to an organization: a group of people working together to achieve a common goal. The organization must clearly define who is in charge, the scope of authority and responsibility, the goal, and the objectives to accomplish the goal. The advantages of using the ICS include: • Establishing a common vocabulary for all
parties involved. • Creating an integrated communications
system. • Establishing one commander who can make
rapid, informed decisions. • Creating a unified command structure with
well-established divisions. • Creating easily managed units, normally
consisting of no more than four people.
Using the Incident Command SystemA police officer is dispatched to a single motor vehicle collision. Since she is the first responder to arrive at the scene, she assumes the role of incident commander. She assesses the scene to determine the magnitude of the incident. She makes the scene safe for herself, bystanders, and any patients. Once the scene is safe, she approaches the vehicle. The driver has already left the vehicle and is seated on the curb next to the vehicle. The officer determines that the driver is the only injured person and approximates the type of injuries. She then notifies the dispatcher of the situation, requesting only one ambulance as an additional resource. She gathers information from the patient while providing care until more advanced medical personnel arrive. Once the patient is turned over to the arriving paramedics, the officer reassesses scene safety, checks to make sure nothing else is needed, finishes gathering information, and completes any paperwork.
In this situation, the required resources were minimal. But what if the car had struck a utility

MU
LTIP
LE-C
ASU
ALT
Y IN
CID
ENTS
359
Figure 21–1: Basic structure of an incident command system.
TRIAGE
TREATMENT
TRANSPORTATION
INCIDENTCOMMAND
STAGING
SAFETY
pole and knocked down an electrical wire, the injured person had been trapped in a crushed vehicle, or multiple people had been injured? As the incident commander, the police officer would have notified the dispatcher of the situation and requested additional resources. She would have summoned the power company for the downed wire. If a person was trapped in the vehicle, resources such as the fire department or specialized rescue squad personnel would have been sent to the scene.
As these personnel arrive, the police officer could continue to act as the incident commander, or command could be turned over to other, more experienced personnel. These decisions are often based on the type of emergency and on local protocols. If the incident is beyond your scope of practice, you should act as incident commander only until more experienced personnel arrive. At this point, command will usually be transferred to the most experienced officer.
At other times, you may be responding to a large-scale MCI because it requires additional personnel. Where you are placed and how your
services are used will be based on your expertise and the needs at the time. Your role could include assisting medical personnel, aiding in crowd or traffic control, helping to maintain scene security, or helping to establish temporary shelter. By using the ICS in numerous emergencies, the tasks of reaching, caring for, and transporting patients are performed more effectively, thereby saving more lives. Since there are variations in the ICS throughout the country, you should become familiar with the ICS for your local community.
Caring for the Ill or Injured TRIAGEIn previous chapters, you learned how to conduct a systematic assessment of a patient. This enabled you to identify and care for life-threatening emergencies before minor injuries.
Although this approach is appropriate for one patient, it is not effective when there are fewer responders than there are patients. If you took the time to conduct a full primary and secondary assessment, providing care for all problems that you found, your entire time could be spent with

MU
LTIP
LE-C
ASU
ALT
Y IN
CID
ENTS
360
just one patient. A patient who is unresponsive and not breathing because the tongue is blocking the airway could be overlooked and die while your attention is given to someone with a minor injury.
Pediatric triage may differ in some jurisdictions according to local protocol.
In an MCI, you must modify your patient assessment model. This requires you to understand your priorities. It also requires you to accept death and dying: Some patients, such as those who would normally receive CPR and be high priority, may be beyond your ability to help in an MCI.
To identify which patients require urgent care in an MCI, you use a process known as triage. Triage is a French term that was first used to refer to the sorting and treatment of those injured in battle. Today, the triage process is used any time there are more patients than responders. It is a system for sorting patients into categories according to the severity of their injuries or illnesses.
There are many different triage models in existence. Make sure you are familiar with the system used within your local jurisdiction.
The START SystemOver the years, a number of systems have been used to triage patients. Most, however, required you to diagnose the exact extent of the injury or illness. This was often time-consuming and resulted in delays in assessment and care for people in MCIs. As a result, the START system was created. START stands for Simple Triage And Rapid Treatment. It is a simple system used to quickly assess and prioritize patients. The START system requires you to assess only three factors: respiration, circulation, and level of responsiveness. Based on this assessment, you will classify patients into one of four levels that reflect the severity of injury or illness and need for care. These levels are minor, immediate, delayed, and dead/non-salvageable.
Using the START system requires the first responders on the scene to clear the area of all those patients in the minor category, which
consists of patients with only minor illnesses or injuries. These patients are sometimes referred to as walking wounded. If a patient is able to walk from the site of the incident without assistance, allow him or her to do so. Have these patients walk to a designated area for evaluation by arriving medical personnel.
Next, quickly assess the remaining patients. As you do so, you are attempting to classify each patient into one of the three remaining categories.
The second category is delayed care. Patients assigned to this category have respiration, circulation, and a level of responsiveness within normal limits (and so do not require immediate interventions), but are not able to move (e.g., because of a broken leg)
The third category is immediate care, meaning that the patient needs to be immediately transported to a medical facility. An example of an immediate patient is one who requires emergency surgery for internal hemorrhaging.
The final category is dead/non-salvageable. This category is assigned to those individuals who are obviously deceased. Patients who are initially found not breathing and who fail to breathe after attempts are made to open and clear the airway are classified as dead/non-salvageable. This is also true for obvious mortal injury, such as decapitation.
As you classify each patient into one of these four categories, you need to mark the patient in some distinguishing manner so that other responders will be able to easily identify the most critical patients first. This process of labeling patients is easily done with commercial triage markers or multi-coloured tape, which should be fastened to the patient in an easily noticeable area, such as around the wrist (Figure 21–2). Colour codes are as follows: • Minor = green • Delayed = yellow • Immediate = red • Dead/non-salvageable = black or grey

MU
LTIP
LE-C
ASU
ALT
Y IN
CID
ENTS
361
Check RespirationWhen you locate a patient, begin by assessing his or her respiration. If the patient is not breathing, clear the mouth of any foreign objects and make sure the airway is open. If respiration is still not present, the patient is classified as dead/non-salvageable. There is no need to check the pulse. Place a black or grey marker on the patient and move on.
If the patient does begin to breathe on his or her own when you open the airway, this patient should be classified as needing immediate care. Any individual who needs help maintaining an open airway is a high priority. Position the patient in a way that will maintain an open airway, place a red tag on the patient, and move on to the next patient. Once triage of all patients is complete, you may be able to come back and assist with care for patients in the immediate category.
If the patient’s respiration is present, you must check the rate. A patient with a respiration rate of more than 30 breaths per minute should be classified as immediate. A patient with a rate of less than 30 breaths per minute should be further evaluated. This requires you to move to the next check—circulation.
Check Circulation The next step is to evaluate the circulation. You do this by checking the radial pulse. You are only assessing the presence or absence of the radial pulse, not its quality. If you cannot find the radial pulse in either arm, then the patient’s blood pressure is very low. Control any external hemorrhaging by using direct pressure and applying a pressure bandage. Place the patient in the immediate category and move on to the next patient. If the pulse is present and no hemorrhaging is evident, conduct the final check—level of responsiveness.
Check Level of Responsiveness At this point, you have determined the following about the patient: • Respiration is normal (fewer than 30 breaths
per minute). • Radial pulse is present. (A hemorrhage may or
may not be present.)
This final check will serve to classify this patient. You determine the patient’s level of responsiveness by using the AVPU scale (see page 83). A patient who is alert and responds appropriately to verbal stimuli should be put into the delayed category. Someone who remains unresponsive, responds only to painful stimuli, or responds inappropriately to verbal stimuli is classified as immediate.
By using the START system, you will be able to move quickly among patients, assessing and classifying them. Remember, your role is not to provide extensive care for the patient. Instead, you are expected to assess as many patients as possible. You should not pause the triage process to perform CPR: A patient in cardiac arrest is in the dead/non-salvageable category. Table 21–1 provides a simple overview of the START classification system.
CBRNE EMERGENCIES
CBRNE stands for Chemical, Biological, Radiological, Nuclear, Explosive. It is the general term used in Canada to refer to weapons of mass destruction (WMDs). CBRNE events involve the intentional use of chemical, biological,
Figure 21–2: Example of a multiple-casualty incident tag.

MU
LTIP
LE-C
ASU
ALT
Y IN
CID
ENTS
362
radiological, nuclear, or explosive materials to cause harm. These are criminal acts and, depending on the context, are often considered acts of terrorism.
CBRNE events often involve agents or materials that can cause damage or harm over a wide area. Chemicals may be dispersed by wind, biological agents may be passed from one person to another through infection, and nuclear radiation can affect every organism within a given radius. This means that the emergency scene may be large, and there are typically multiple casualties.
Types of AgentsCHEMICAL AGENTSChemical agents are substances that adversely affect the body through chemical action. They are grouped into five general categories (Table 21–2).
BIOLOGICAL AGENTSBiological agents affect the body through biological action. They can be broken down into three general categories (Table 21–3).
TABLE 21–1: START CLASSIFICATION SYSTEM
MINOR (GREEN) DELAYED (YELLOW) IMMEDIATE (RED)
DEAD/NON-SALVAGEABLE (BLACK/GREY)
• Walking without assistance
• Respiration normal, radial pulse present, and level of responsiveness normal
• Breathing more than 30 times per minute
• Breathing normal, but radial pulse absent
• Breathing normal, radial pulse present, but level of responsiveness abnormal
• No respiration
TABLE 21–2: CATEGORIES OF CHEMICAL AGENTS
CATEGORY DESCRIPTION EXAMPLES
Nerve agents (organophosphates)
• Most toxic of all chemical agents: Can cause death within minutes of exposure
• Disrupt nervous system, resulting in loss of cardiac and respiratory function
• Deployed as liquid or vapour
• Sarin• Tabun
Blood agents • Cause asphyxiation by interfering with the body’s use of oxygen
• Deployed as solid or gas
• Cyanide
Blister agents (vesicants)
• Cause blisters on affected skin and mucous membranes• If inhaled, cause serious respiratory tract injuries• Deployed as vapour or liquid
• Mustard gas
Choking agents (pulmonary agents)
• Cause pulmonary edema, which can lead to asphyxiation• Often used in industrial applications• Deployed as liquid or vapour
• Chlorine• Phosgene
Riot control agents (crowd management agents)
• Temporarily impairs the performance and normal function of the target
• Causes localized irritation of affected areas• Considered non-lethal• Deployed as droplets or powder (for more information,
see Crowd Management Agents on page 274)
• Pepper spray• Chloroacetophenone

MU
LTIP
LE-C
ASU
ALT
Y IN
CID
ENTS
363
Methods of DisseminationThe goal of a CBRNE event is often to cause mass casualties or wide-scale destruction. Therefore, the harmful agent used in the attack is often disseminated over a wide area. Dissemination methods fall into four categories:1. Mechanical action2. Chemical reaction3. Pneumatic devices4. Explosive devices
MECHANICAL ACTIONMechanical action uses simple physical processes to disseminate a substance. This may involve breaking a glass vial, for example, or simply placing a substance in an open container where it will naturally disperse (e.g., in an office building’s stairwell).
CHEMICAL REACTIONA chemical reaction occurs when two or more substances are mixed to produce a more hazardous compound. This may be done manually (i.e., by stirring them together) or using another device (e.g., a timer could activate a switch that allows the chemicals to mix).
PNEUMATIC DEVICESPneumatic devices use pressurized gas to disseminate a harmful substance. This may be an improvised or repurposed device, or it may be purpose-built.
EXPLOSIVE DEVICESOn their own, explosive devices can cause property damage and blast injuries to people nearby. They may also be used effectively as dispersal devices for other agents.
Personal Protective EquipmentPersonal protective equipment, or PPE, is designed to provide protection from serious illnesses or injuries as a result of exposure to hazards that may be chemical, radiological, physical, electrical, or mechanical. PPE should be used in conjunction with exposure-control procedures and equipment. Examples of PPE include respirators, protective clothing, eye and hearing protection. Based on the hazard, the level of PPE required will vary: No single combination of protective equipment and clothing will meet the need of all CBRNE incidents (Figure 21–3).
TABLE 21–3: CATEGORIES OF BIOLOGICAL AGENTS
CATEGORY DESCRIPTION EXAMPLES
Viral agents • Non-cellular organisms that depend on a host organism for survival
• Smallpox• Viral hemorrhagic fevers
(VHF)
Bacterial agents • Single-celled organisms that invade host tissues and/or release toxins in the body
• Anthrax• Tularemia
Toxins • Poisons produced by living organisms (plants, animals, or microbes)
• Exposed patients are not infectious
• Ricin• Botulism
Figure 21–3: The risk of contamination depends on the nature of the incident and dictates the level of PPE worn by responders.

MU
LTIP
LE-C
ASU
ALT
Y IN
CID
ENTS
364
Scene AssessmentWhen confronted with a CBRNE incident, follow your usual scene assessment procedure, paying special attention to the following guidelines: • Identify an escape route in case the situation
suddenly deteriorates. • Pay particular attention to casualties (number,
location, and severity of signs and symptoms). • Warn other responders of potential hazards at
the scene. • Be aware of secondary devices and the possible
presence of a perpetrator.
Approach the scene from an uphill and/or upwind direction. This allows toxic materials to flow or be blown away from you rather than towards you. Elevation prevents the formation of pockets of toxic vapours and gases that are heavier than air.
Establishing PerimetersInner and outer perimeters should be quickly established around the affected area (Figure 21–4). This can be done by the first responders on scene and will reduce the risk of contaminating additional persons.
The inner perimeter or safety perimeter should be at least 100 metres (328 feet) from the source of contamination (in an enclosed environment) or 900 metres (2,953 feet) from the source if it is outdoors. These are minimum values and may be adjusted if necessary (e.g., if strong winds are visibly dispersing an agent beyond the perimeter, the perimeter should be extended).
The outer perimeter or security perimeter is established beyond the inner perimeter to create a secure working area for responders and prevent unauthorized access to the contaminated area.
Triage in a CBRNE IncidentBecause patients in a CBRNE incident may be contaminated, their initial assessment should be performed by specialized personnel equipped with appropriate PPE. Without PPE appropriate to the situation, assessment and care should only be attempted once the patient has been decontaminated.
Control of Contaminated CasualtiesContaminated casualties must be controlled and contained to prevent the spread of the contamination. Any patient in a contaminated area should be considered contaminated until they can be proven otherwise. Do not approach or touch a potentially contaminated patient without wearing appropriate PPE.
Casualties with minor injuries should receive clear and specific directions on where to go and what to do. They should be directed to move to a designated gathering point (e.g., the entrance to the decontamination area). Casualties should keep a distance of approximately 5 metres (16 feet) between themselves and others to further reduce the risk of contamination.
DIRECTED FIRST AIDDirected first aid is the care a patient provides to him- or herself while being directed by another (more qualified) person. This is useful in situations where patients cannot be reached by responders, or are contaminated to an extent that makes it unsafe for responders to provide care. Many life-saving interventions, such as applying pressure to an external hemorrhage, are easy to describe in simple terms. Directed first aid may also be performed by one patient on another.
Contaminatedzone
Inne
r perim
eter 100 m (328 ft.)
Outer perimeter 900 m (2,953 ft.)
Figure 21–4: Establish an inner and outer perimeter around the affected area as soon as possible.

MU
LTIP
LE-C
ASU
ALT
Y IN
CID
ENTS
365
DECONTAMINATION PROCEDURESA patient contaminated during a CBRNE event must be decontaminated to prevent further harm to the patient and to reduce the risk of contaminating others. A patient should not leave the CBRNE scene without being decontaminated.
Emergency Wash-Down (EW)Emergency wash-down procedures allow responders to perform a rapid preliminary decontamination of a patient with resources that are readily available. While EW can significantly reduce the signs and symptoms of exposure to CBRNE agents and may save the lives of the patients involved, it is not an alternative to proper decontamination. Patients should still be formally decontaminated once the facilities to do so are available.
Patients can be instructed on the EW technique from a distance if responders lack the appropriate PPE or the scene is not safe to approach. EW basically consists of carefully removing all clothing and washing skin thoroughly with soap and water (if available).
One simple method is to spray water over patients with a fire hose equipped with a fog nozzle. Direct patients to follow these general steps:1. Carefully remove clothing and personal items,
being mindful to avoid contaminating the skin beneath. Casualties may be able to assist one another.
2. Place removed items in double plastic bags, if possible. These should be collected by qualified personnel.
3. Walk through the spray of water with head back and legs and arms spread.
4. Wash from the top down, using soap if it is available. Patients should avoid swallowing water or touching their faces with their contaminated hands.
5. Proceed to the designated holding area to await decontamination.
Transporting CBRNE PatientsA CBRNE event poses special challenges for patient transportation. In some cases, the risk of contamination makes transportation impossible until the patient has been thoroughly disinfected. In other cases, the threat of contamination may be low and should be balanced against the serious risks of delaying transportation for a patient in critical condition.
Another challenge when transporting patients from a CBRNE event is the number of patients: In a large-scale emergency with dozens or even hundreds of patients, the number of patient transportation vehicles may be insufficient for the scale of event. In some cases, it may be possible to use public transit buses or school buses to transport patients, especially those with minor injuries, reserving ambulances for patients with more urgent complaints.
In many jurisdictions, decisions about transporting patients from a CBRNE event will be directed by the public health authority.
Psychological Impact of CBRNE EventsA CBRNE event can have devastating psychological effects on responders. In addition to witnessing the suffering, death, and damage that can result, there is the further complication of knowing that they are the result of the deliberate actions of a human being. For this reason, CBRNE events can be especially traumatic, even when compared with other mass-casualty incidents such as natural disasters.
As with any mass-casualty incident, a responder must do everything possible to help while realizing that even a perfectly coordinated and executed response may not be able to save every patient. CBRNE events are also unfamiliar to most responders, leading to fear and self-doubt both during and after the event. When this is combined with the pressure to act rapidly to save lives, the psychological pressure becomes very high.

MU
LTIP
LE-C
ASU
ALT
Y IN
CID
ENTS
366
Any responder involved in a CBRNE response should receive counselling and support once the incident is resolved, as the risk of critical incident stress (CIS) is very high.
Consider the following guidelines when responding to a CBRNE event: • If you begin to feel overwhelmed, control your
reactions by breathing slowly and regularly.
• Focus on the task that you are performing (while monitoring the scene for hazards).
• Take breaks during a prolonged response. If possible, move away from the scene. Eat regularly and stay hydrated.
• Support your fellow responders. Watch for signs of stress, and ensure that those around you follow proper protocols and procedures to keep themselves and others safe.

Minor
Dead/ Non-Salvageable
Immediate Care
Delayed Care
Colour code: green• Patients with minor illness or injuries• Have patients move to designated
area for evaluation by arriving medical personnel
Colour code: red• Patients with illness or injuries that
put them in the rapid transport category
Colour code: yellow• Respiration, circulation, and LOR
present as normal in these patients; however, they cannot move
Colour code: black or grey• Patients who are found obviously
deceased or who are initially without respiration but attempts to open and clear airway are unsuccessful
THE START SYSTEM
IV
0 0I I
II IIIII III
IM
Emergency Wash-Down (EW)
Instruct contaminated patients to:1. Carefully remove clothing and
personal items; patients may be able to assist one another.
2. Place removed items in double plastic bags, if possible, to be collected by qualified personnel.
3. Walk through the spray of water with their heads back and their legs and arms spread.
4. Wash themselves from the top down, using soap if it is available, and avoid swallowing water or touching their faces with contaminated hands.
5. Proceed to the designated holding area to await decontamination.
CBRNE Events
• If you begin to feel overwhelmed, control your reactions by breathing slowly and regularly.
• Focus on the task that you are performing (while monitoring the scene for hazards).
• Take breaks during a prolonged response; eat regularly and stay hydrated.
• Support your fellow responders.
Chemical, Biological, Radiological, Nuclear, Explosive (CBRNE)
SUMMARY
367
MU
LTIP
LE-C
ASU
ALT
Y IN
CID
ENTS

368

PHA
RM
AC
OLO
GY
22 Pharmacology
369
Key ContentAssisting with Medication vs Administering Medication .......................... 370Six Rights of Medication ....... 371 Pharmacological Terminology ........................ 371 Routes of Drug Administration .................... 372 Pharmacokinetics ................... 373 Pharmacodynamics ................ 373 Intravenous (IV) Therapy Maintenance ....................... 374 Preparing a Drip Set and Solution ..................... 374 Calculating IV Flow Rates ... 375 Changing an IV Bag ............ 375 Complications ...................... 376 Discontinuing an IV............. 377How to Administer Medication Intranasally...... 378Guidelines for Injections ........ 378 Disinfection ............................ 380 Introduction
Pharmacology is the study of drugs and how they interact with the body. Drugs do not confer any new properties on cells. They can be given locally or systemically. They tend to have actions at multiple sites, so they need to be thought of systemically even if administered locally.
The administration of drugs is not part of the scope of practice for many responders. This section provides an overview of pharmacology and drug administration but must be read alongside all applicable legislation, regulations, and protocols for your particular jurisdiction. If you are under medical direction, your director may specify procedures other than those set out here. As always, follow local protocols and medical direction where applicable.

PHA
RM
AC
OLO
GY
370
Generally, all medications have indications, contraindications, and side effects to their administration: • Indications are conditions that make
administration of the drug appropriate. • Contraindications are conditions that make
administration of the drug inappropriate due to potential harmful effects.
• Side effects are any reactions to the drug other than its intended effects. For example, a drug intended to reduce pain may also cause nausea.
If a drug is indicated, this does not mean it will have no negative side effects. The benefits of the desired effects are weighed against the risks of complications: A lifesaving drug may be indicated even if there are potential serious negative side effects.
This set of assessment models, treatment principles, and protocols reflects the accepted medical practice for responders. Each protocol follows the current direction of the medical community, taking into consideration the limitations and special circumstances that may exist in pre-hospital care environments.
Protocols allow the responder to perform medical procedures that are normally in the domain of a physician. This allows responders to initiate care that patients would otherwise not receive until they arrived at a medical facility.
Medications can be extremely beneficial, but they can also be dangerous if used incorrectly. Before administering a drug to a patient, ensure that you are aware of the patient’s drug history (any drugs that he or she is currently taking or has recently taken), as this may inform how you proceed. This information is usually gathered in the secondary assessment. For example, a patient taking erectile dysfunction (ED) drugs should never take nitroglycerin, as the two can combine to cause a fatal lowering of blood pressure. In other words, ED drugs are a contraindication for nitroglycerin.
Under certain circumstances and under medical direction, you may be able to provide medication to a patient or to assist a patient with his or her own medication.
ASSISTING WITH MEDICATION VS ADMINISTERING MEDICATION
Assisting with medication and administering medication refer to different things. Administration means making the decision to give a medication to a patient and then actually introducing the drug into the patient’s body. Assisting with medication means following a patient’s specific direction to help with medication. Assisting can refer to a variety of activities, including locating the drug, helping the patient prepare it, guiding the patient in taking it, and reading the medication’s packaging to the patient. In many cases, a responder will be qualified to assist with medication but not to actually administer it.
Administering medication is a controlled act that is governed by a specific set of standards and requires special training. Anyone can be directed by a patient to assist with medication, provided they do not cross over into administering the medication, but only very specific groups of medical professionals are legally allowed to administer medication. In the workplace, first aid attendants are required to know the provincial or territorial regulations specific to their workplaces regarding assisting a patient with medications. Examples of assisting with medication and administering medication are shown in Table 22–1.
ASSISTING ADMINISTERING
• Opening the lid of a pill bottle
• Placing pills in a patient’s hand
• Opening an epinephrine auto-injector
• Unwrapping a transdermal patch
• Reading a medication’s label aloud
• Pushing pills out of a blister pack
• Injecting a medication
• Placing medication in a patient’s mouth
• Placing a transdermal patch on a patient’s skin
• Spraying medication into the patient’s nose
TABLE 22–1: EXAMPLES OF ASSISTING WITH MEDICATION AND ADMINISTERING MEDICATION

PHA
RM
AC
OLO
GY
371
In some cases, a physician (who is allowed to administer medication) can authorize a responder to administer medication through medical direction or standing protocols. In these cases, the physician is essentially authorizing the responder to administer the drug on his or her behalf.
SIX RIGHTS OF MEDICATION
When administering or assisting a patient with medication, the responder has a responsibility to know the medication’s therapeutic benefits, side effects, indications, and contraindications. The responder should use proper technique and monitor the drug’s effects (and side effects).
Prior to having the patient take any medication, it is the responder’s responsibility to ensure that the Six Rights of Medication have been met:1. Right person: Make sure the patient receiving
the medication is the one whose name is on the label of the medicine container.
2. Right medication: Read the label and confirm the name of the medication.
3. Right dosage: Accurately measure the indicated quantity of medication.
4. Right time: Give the medication at the right time.
5. Right route: Read the directions carefully and administer with the correct method.
6. Right documentation: Completely document your actions and findings, including:
• Time • Dose • Route • Effect
Also check the medication’s colour, clarity (no particles), concentration, and expiration date. Document all of the circumstances around the medication, including the patient’s initial presentation and any changes in the patient’s condition after taking the medication.
PHARMACOLOGICAL TERMINOLOGY
Addiction: A strong dependence on a drug; it may be physiological, psychological, or both, and it may be due to a decreased response to a drug with repeated use.
Agonists: Drugs that bind with a receptor in the body to produce a biological response. Antagonists: Drugs that combine with a receptor to prevent a biological response.
Contraindication: A medical or physiological factor that makes it harmful to administer a medication that would otherwise have therapeutic value.
Depressant: A substance that decreases a body function or activity.
Drug allergy: A reaction to a drug resulting from previous sensitizing exposure and the development of an immunological mechanism.
Drug interaction: A modification, which can be beneficial or detrimental, of the effects of one drug by the administration of another drug.
Indications: The conditions that make the administration of a drug appropriate.
Potentiation: An increase in the effect of a drug due to the administration of a second drug.
Side effect: An often unavoidable effect of a drug; an effect other than those for which the drug was originally given.
Synergism: The combined effects of two drugs such that the total effect exceeds the sum of the individual effects of each agent (sometimes expressed as “1 + 1 = 3”).
Therapeutic action: The desired, intended effect(s) of a drug.

PHA
RM
AC
OLO
GY
372
Drug NamesEach drug has several names. The two most important are the generic name and the trade name.
Chemical name: The scientific name for the drug’s atomic or molecular composition (e.g., the chemical name for Aspirin® is acetylsalicylic acid).
Generic name (also known as a non-proprietary name): An abbreviated form of the chemical name of the drug. Generic medications usually have the same therapeutic efficacy as the non-generic medication and are generally less expensive.
Trade name (also known as a brand name or proprietary name): A copyrighted name designated by the drug company that develops and requests approval for the medication. Trade names of drugs are considered to be proper nouns and, therefore, the first letter is capitalized (e.g., Demerol).
Official name: Followed by the initials “USP” or “NF,” this name denotes the medication’s listing in one of the official publications; it is usually the same as the generic name (e.g., meperidine hydrochloride USP).
ROUTES OF DRUG ADMINISTRATION
Drugs can be introduced into a patient’s body through a number of routes. These are broadly categorized as enteral (through the digestive system) or parenteral (not through the digestive system). Regardless of the route selected, a patient should be monitored closely for complications and side effects after taking any medication.
Enteral administration of drugs includes the following routes: • Oral: ◆ Drugs are swallowed and absorbed
through the digestive system. ◆ Solid drugs must first dissolve before
absorption: The slower absorption rate means the patient must be monitored for a longer period after taking the medication.
◆ The patient must be responsive and able to control his or her own airway.
• Sublingual: ◆ Medications are delivered under the
tongue and are rapidly absorbed into the blood.
◆ Sublingual drugs are not to be swallowed or inhaled.
◆ The patient should not take anything else by mouth until the drug is completely absorbed.
• Buccal: ◆ The drug is placed between the cheek and
the gum and is absorbed across mucous membranes.
◆ This route is not common in a pre-hospital setting.
• Rectal: ◆ Suppositories are solid at room temperature
and dissolve with body heat when placed in the rectum.
◆ Liquids can be instilled with a syringe. ◆ This route is not common in a pre-hospital
setting.
Parenteral administration of drugs includes the following routes: • Intravenous: ◆ The drug is administered directly into the
vein. ◆ This route requires an IV line to be started
(aseptic technique). • Endotracheal: ◆ This route is common in a pre-hospital
setting for specific medications. ◆ This route is restricted to advanced life
support (ALS) practitioners. • Subcutaneous: ◆ The drug is administered into the layer of
fat between the patient’s muscle and skin. ◆ This route involves smaller volumes and
slower onset than intramuscular (IM) administration.
• Intradermal ◆ The drug is administered into the dermis,
just below the epidermis. • Intramuscular: ◆ The drug is administered directly into a
large muscle. ◆ The drug absorbs well due to the rich
blood supply of muscle tissue.

PHA
RM
AC
OLO
GY
373
◆ The volume given must be carefullyassessed based on the patient’s size andthe site of administration.
• Inhalation:◆ This route produces rapid onset of the
effects if the drug reaches the lowerairways and passes into general circulation.
• Intranasal:◆ The drug is administered into the patient’s
nostril in mist form.◆ This route allows rapid absorption of
medication into the bloodstream throughthe mucous membrane.
PHARMACOKINETICS
Pharmacokinetics is the study of how the body handles a drug over a period of time, including:
• Drug absorption.• Drug distribution.• Biotransformation.• Excretion.
Drug AbsorptionAbsorption involves the movement of drug molecules from the site of entry into general circulation. Variables that affect drug absorption include:
• Blood flow to the site of administration.• Solubility of the drug.• pH of the body.• Concentration of the drug.• Route of drug administration.
Drug DistributionDistribution is the transport of a drug through the bloodstream to various tissues of the body and, ultimately, to its site of action. The rate of distribution depends on the permeability of the capillaries to the drug molecules. Cardiac output and regional blood flow also affect the rate and extent of distribution.
BiotransformationBiotransformation is the process by which a drug is chemically converted to a metabolite. This detoxifies a drug and renders it less active. The
liver is the primary site of drug metabolism. If drug metabolism is delayed, drug accumulation and cumulative drug effects may occur.
ExcretionExcretion is the elimination of toxic or inactive metabolites from the body. The organs of excretion include the kidneys, intestines, lungs, sweat glands, salivary glands, and mammary glands.
PHARMACODYNAMICS
Factors That Influence the Actions of DrugsThe following factors can influence the actions of drugs:
• Age of patient• Body mass• Gender• Environment• Time of administration• Pathological state• Genetic factors• Psychological factors
Drug–Receptor InteractionMost drug actions result from a chemical interaction between the drug and various receptors throughout the body. Drugs bind to drug receptors to produce their desired effect.
Many drugs used in the pre-hospital setting directly or indirectly affect the nervous system, often the autonomic nervous system (ANS). The sympathetic nervous system (a component of the ANS) prepares the body for stress and emergencies. Epinephrine is one of the chemical messengers released by the sympathetic nervous system (also referred to as the sympathetic division of the ANS). It can act on three different receptor types:1. Alpha1 receptors: When stimulated, they cause
peripheral vasoconstriction.2. Beta1 receptors: When stimulated, they cause
increased heart rate and increased force ofcardiac contraction.

PHA
RM
AC
OLO
GY
374
3. Beta2 receptors: When stimulated, they cause bronchodilation.
The parasympathetic division of the ANS restores the body to normal conditions. Parasympathetic receptors are called cholinergic receptors; when stimulated, they cause bronchodilation and a decreased heart rate.
INTRAVENOUS (IV) THERAPY MAINTENANCE
Maintaining intravenous (IV) administration is an advanced skill that may or may not be part of your scope of practice. You may be expected to maintain IV therapy in specific cases, such as during patient transport. At times, you may be asked to set up a peripheral IV line, replace a solution bag, or prepare an IV line (Figure 22–1).
A peripheral intravenous (IV) line allows the administration of fluids, including saline and blood, and solutions containing substances such as medications. Once established, an IV line can be used to introduce medication directly into a patient’s circulatory system.
You should wear gloves, eye protection, and other appropriate PPE whenever you are working with an IV line.
A drip set consists of tubing that can connect to the catheter in the patient’s arm on one side and the drip bag on the other. It includes the drip chamber, which is where you can monitor the rate at which fluid drips into the line, and a medication port that allows other medication to be introduced into the line with a syringe. The drip set also includes a line lock that allows you to adjust the drip rate or suspend the flow entirely. Finally, there is a check or back-flow valve that prevents fluid from moving up the line.
Crystalloid solutions that are commonly used with an IV line include the following: • Normal saline: a 0.9% sodium chloride
solution; an isotonic volume expander • Dextrose: 3.3% dextrose and 0.3% sodium
chloride (2/3 and 1/3)
• Ringer’s lactate: a solution containing sodium chloride, potassium chloride, calcium chloride, and sodium lactate in distilled water
• D5W: 5% dextrose in water
Preparing a Drip Set and SolutionTo prepare a drip set and solution for use:1. Inspect the solution and packaging prior to
assembling the drip set. Confirm that the solution is the one that was requested, that it has not expired, and that the fluid is clear and uncontaminated. Ensure that you are using the correct drip set.
2. Assemble the drip set and use the line lock to close off the line.
3. Hold the solution bag upside down and remove the protective cap on the port using aseptic technique.
4. Support the inverted solution bag and insert the spiked end of the IV drip chamber into the port with a straight push.
5. Place the solution bag in the proper vertical position, and squeeze the drip chamber until it is half to two-thirds full.
6. Release the line lock and purge all air from the line.
Figure 22–1: Intravenous therapy.

PHA
RM
AC
OLO
GY
375
7. Confirm that the solution is flowing, then lock off the line.
8. Once IV therapy has been initiated, adjust the drip rate until the correct flow rate is achieved.
Calculating IV Flow RatesIV flow rates are measured in drops per minute, written as gtt/min (gtt stands for the Latin guttae, meaning drops). By watching the drops in the drip chamber, you can calculate the number of drops per minute (similar to taking a pulse).
There are three factors used to calculate gtt/min:1. Volume to be infused: This represents the total
volume of fluid or solution required for the patient.
2. gtt/mL of administration set: This refers to the size of the drops created by different drip sets. Drip sets can be grouped into micro-drip (with drops of 60 gtt/mL) and macro-drip (with drops of 20, 15, or 10 gtt/mL).
3. Total time of infusion: This is the total time over which the fluid or solution should be administered to the patient.
When you are asked to set up a drip set and solution by an authorized person, you will be given most or all of this information. For example, you may be asked to infuse 1,000 mL over 120 minutes.
METHOD FOR CALCULATING FLOW RATESTo calculate flow rates for infusion of IV fluids, use the following formula:
gtt/min = volume to be infused x gtt/mL of administration set
total time of infusion (in minutes)
Example 1:
gtt/min = 500 mL x 10 gtt/mL
60 min
gtt/min = 83.3
This works out to just under 1.5 drops per second.
Example 2:
gtt/min = 250 mL x 60 gtt/mL
90 min
gtt/min = 166.6
This works out to just under 3 drops per second.
Changing an IV BagChanging an IV bag is indicated in the following circumstances: • The bag is empty or has less than
approximately 50 mL remaining inside it. • You are given instructions from the medical
staff that the IV is to be changed en route during a transfer. In this circumstance, you can request that the nursing staff change the bag prior to the transfer or obtain a replacement bag from the hospital so that you can change the bag en route.
Follow this procedure when changing an IV bag:1. Ensure aseptic technique.2. Remove a new bag of solution from the
outer wrappings and inspect it for leaks and discoloration. Ensure that it has the correct contents and concentration and that it has not expired.
3. Close the line lock on the tubing.4. Note how much solution remains in the old
bag and invert it.5. Remove the spike on the administration
set from the old bag. Taking care not to contaminate the spike, remove the protective cap from the IV port on the new bag. Insert the spike into the IV port on the new bag.
6. Invert the new bag, unlock the line, and confirm the flow rate. Adjust the flow rate if necessary.
7. Document the procedure by noting the time you changed the IV bag and the amount and type of solution hung, as well as the amount of solution that was discarded with the old bag. Example: 0930 (time) to 1,000 mL N/S started at 500 mL/hr/50 mL solution discarded [your signature].

PHA
RM
AC
OLO
GY
376
ComplicationsIn the course of monitoring an IV, complications may arise that require intervention. If any of these complications occur, contact the appropriate medical personnel for instructions on how to proceed. If you are qualified under medical direction or your scope of practice to decide that an IV should be discontinued, you may do so as a result of some of these complications (see Discontinuing an IV on page 377). If discontinuing an IV is not part of your scope of practice, contact the appropriate medical personnel for direction.
INTERSTITIAL IVIf an IV is interstitial, this means that the IV fluid is flowing into the surrounding tissues instead of into the vein due to complete or partial perforation of the vein through the opposite wall. This is identified by swelling around the injection site, and the skin will be cool to the touch. Flow rate may be diminished, and pain may or may not be present.
Once you have identified that the IV is interstitial, perform the following interventions:1. Discontinue the IV.2. Record the time at which the IV was
discontinued and the amount infused.3. If the swollen area is small, apply a cold pack.4. If the swollen area is large, apply warm, wet
compresses to promote reabsorption of the fluid.
CIRCULATORY OVERLOADCirculatory overload occurs when the patient’s system is unable to manage the extra fluids administered, leading to cardiac and pulmonary complications similar to congestive heart failure or pulmonary edema. This can be caused by excessive fluid administration or rapid fluid delivery. Monitor the patient’s vital signs and IV drip rate and watch for any changes.
Should the patient develop signs of fluid overload, perform the following interventions:1. Immediately slow the IV rate to keep the vein
open (abbreviated to TKVO).2. Place the patient in a semi-sitting position and
apply oxygen if indicated.
3. Transport the patient as quickly as possible and notify the hospital of your arrival.
4. Closely monitor the patient’s vital signs while en route, and make sure you keep the patient warm to promote peripheral circulation.
5. Document your findings and actions, including slowing the IV rate. Someone with circulatory overload should be treated as a patient with congestive heart failure.
THROMBOSIS AND THROMBOPHLEBITISThrombosis is the formation of a clot and usually occurs at the tip of the catheter. Thrombophlebitis is inflammation of a vein due to the formation of a blood clot (thrombus means blood clot and phlebitis means inflammation of a vein).
A clot may form if: • The IV is running too slowly. • There is injury to the vein wall, either from the
insertion or from mechanical irritation (e.g., excessive movement of the patient).
• The catheter is too large for the lumen (hollow) of the vein.
• The vein is too small to handle the amount or type of solution being administered.
• There is irritation to the vein by medications (e.g., drug infusions).
Keeping the infusion flowing at the established rate helps prevent the formation of a thrombus at the end of the needle. Stabilizing the IV site with an arm board or splint will prevent mechanical irritation.
If thrombophlebitis develops, perform the following steps:1. Discontinue the IV.2. Record the time at which the IV was
discontinued and the amount of fluid infused.3. Apply warm, wet compresses to decrease
the pain and promote healing. Refrain from massaging or rubbing the affected arm, as this may dislodge the clot that has formed.
CATHETER EMBOLISMA catheter embolism occurs when the catheter or a portion of it breaks off and is carried away in the bloodstream. This rare complication occurs when the IV is initiated.

PHA
RM
AC
OLO
GY
377
If a catheter embolism occurs, perform the following interventions:1. Discontinue the IV but do not discard the
catheter. Give the catheter to hospital personnel for examination and follow-up.
2. Record the time at which the IV was discontinued and the amount of fluid infused.
3. Be careful not to obstruct the arterial flow; check the distal pulse to ensure its presence.
4. Administer high-flow oxygen to the patient if indicated.
5. Notify the hospital and ensure that the patient is in the rapid transport category.
SITE INFECTIONYou are most likely to encounter a site infection when transporting a patient who already has an IV in place. The majority of infections are due to skin flora (micro-organisms such as bacteria) entering the wound when the IV is initiated because of non-aseptic techniques. Infection is usually recognized by redness in the area around the catheter, swelling of the site, or possible discharge.
If you are transferring a patient and have not departed, inform hospital staff immediately. They will address the infection.
When infection of a site occurs while you are en route with a patient, perform the following steps:1. Contact the hospital and request direction.2. Discontinue the IV and record the time.3. Document the amount of solution infused.4. Dispose of the catheter in a sterile container
and give it to hospital personnel for testing.5. Dress the site with a sterile dressing and apply
a warm pack.
ALLERGIC REACTIONAn allergic reaction to an IV can be caused by a hypersensitivity to an IV solution or an additive and may result in a generalized rash, shortness of breath, rapid heart rate, and a drop in blood pressure.
If the patient has an allergic reaction, perform the following interventions: 1. Decrease the IV rate to keep the vein open or
discontinue the IV (see note).2. Record the time the IV rate was changed.
3. Notify the hospital.4. Administer oxygen if indicated.
Search for other substances that may have caused the reaction. If unable to find another cause for the reaction, discontinue the IV.
AIR EMBOLISMAn air embolism can be caused by allowing an IV bag to run dry or attaching a line that has not been fully purged of air, or by loose connections between the IV tubing and the catheter or at any other connection point. When setting up an IV, make sure you thoroughly clear all tubing of air bubbles. Change the IV bags before they are empty, and make sure all connections are secure.
If an air embolism has occurred, perform the following interventions:1. Turn the patient on his or her left side. Angle
the patient’s body 30 degrees to keep the head lower than the rest of the body. If air has entered the heart’s chambers, this position may keep the air bubbles on the right side of the heart, where they can then enter the pulmonary circulation and be absorbed.
2. Check the IV system for leaks.3. Administer oxygen if indicated.4. Notify the hospital and transport immediately.
Discontinuing an IV If you are qualified under medical direction or your scope of practice to discontinue an IV, you may need to do so in the following situations: • Interstitial IV • Thrombophlebitis • Catheter embolism • Site infection (do not remove an IV catheter if
a “do not remove” order has been given)
The procedure for discontinuing an IV is as follows:1. Ensure aseptic technique.2. Gather and prepare your supplies (gauze, tape,
disposable biohazard bag).3. Stop the flow using the line lock.4. Remove the transparent dressing and the tape
from the site while minimizing movement of the IV and catheter. This is simplest if you

PHA
RM
AC
OLO
GY
378
stabilize the hub of the catheter with one hand while removing the tape with the other.
5. Hold sterile gauze over the puncture site.Grasping the catheter by the hub, pull straightback. Do not use an alcohol swab for thisprocedure, as this may interfere with bloodclotting and be painful for the patient.
6. Place gauze over the site and immediatelyapply firm pressure until bleeding stops (3 to5 minutes).
7. Cover the puncture site with an adhesivebandage.
8. Inspect the catheter (to ensure there has notbeen a catheter embolism).
9. Document the time the IV was discontinued,the amount of solution infused, and thecondition of the catheter.
HOW TO ADMINISTER MEDICATION INTRANASALLY
The following steps represent an overview of one method for the intranasal administration of medication. As there are several types of devices available, familiarize yourself with the device you are using and any local protocols or instructions from your medical director.
To administer medication through intranasal injection (IN), first remove the nasal spray device from the packaging. Place your thumb on the plunger and hold the nasal spray tip between your middle and index fingers. If the device is too large, use one hand to operate the plunger and your other hand to hold the spray tip.
Gently tilt the patient’s head back slightly and support it in this position. If using both hands for administration, have another responder support the head. Insert the tip of the device into one of the patient’s nostrils until your fingers come into contact with the bottom of the patient’s nose. Administer the entire dose of medication by pressing firmly on the plunger, and then remove the device from the patient’s nostril immediately (Figure 22–2).
GUIDELINES FOR INJECTIONS
Injecting medication safely requires adherence to specific procedures before, during, and after administration of the medication.
Place the needle and syringe directly into a proper sharps disposal bin as soon as they have been used. Never, under any circumstances, replace the needle guard on the needle or attempt to break the needle and syringe.
Medicines for injection are supplied either in rubber-capped vials or in glass ampoules. The use of multi-dose vials carries a risk of contamination; a new needle and syringe must always be used when drawing medicines from a multi-dose vial. Glass ampoules may have a coloured band around the neck, indicating the level at which the top of the ampoule will break off cleanly. The rubber cap of a vial is held on by a metal cap with a small tear-off seal; do not remove this seal until the drug is required.
How to Prepare Medication for InjectionCheck that the name and strength of the medication are marked on the vial or ampoule. If you cannot see or decipher the name of the medication, discard the vial or ampoule.
Figure 22–2: Intranasal administration of medication.

PHA
RM
AC
OLO
GY
379
If the medication is in a multiple-dose vial, clean the rubber diaphragm on the vial with alcohol. If the medicine is in an ampoule, tap the ampoule gently with a finger to ensure that all the liquid is below the neck of the ampoule; then break off the top with a sharp snap. If you are not experienced in this procedure, hold the top of the ampoule with a cloth or swab to avoid being cut by the edge of the glass.
Remove the guard from the needle without touching the needle. If the medication is in a vial, inject an amount of air into the vial that is equal to the amount of medication to be withdrawn. This will make it easier to withdraw the medication. Withdraw the correct amount of medication.
How to Administer a Subcutaneous InjectionA subcutaneous injection is given into the layer of fat just below a patient’s skin. To administer a subcutaneous injection, begin by assembling the following items: • A disposable syringe • A 19- or 21-gauge needle for drawing the
medication into the syringe • A disposable 23- or 25-gauge needle for
injecting the medicine • Alcohol swabs • The medication
Draw the correct amount of medication into the syringe with the 19- or 21-gauge needle (as described above). Change the needle to the appropriate gauge for the injection. Point the needle upward and push the plunger to expel any air in the syringe. Select a site for the injection and disinfect the skin with an alcohol swab.
Between your thumb and forefinger, grasp a fold of skin large enough to offer plenty of space between the site of injection and your fingers. Insert the needle firmly and quickly at a 30- to 45-degree angle to a depth of about 2 cm (3/4 in.). Once the needle is under the skin, draw back the syringe plunger (Figure 22–3). If no blood appears in the syringe, inject the medicine and withdraw
the needle. If blood appears, repeat the procedure at a new site, using new sterile equipment. Place the needle, together with the syringe, directly into a proper sharps disposal bin.
How to Give an Intradermal InjectionThis type of injection delivers medication into the dermis, the layer of skin just below the epidermis. It is usually performed on the inside of the forearm.
To begin, assemble the following items: • A disposable syringe • A 19- or 21-gauge needle for drawing the
medicine into the syringe • A disposable 25- or 27-gauge needle, only
1 to 1.6 cm (3/8 to 5/8 in.), for injecting the medicine
• Alcohol swabs • The medication
Draw the correct amount of medication into the syringe with the 19- or 21-gauge needle (as described above). Change the needle to one that is the appropriate gauge for the injection. Point the needle upward and push the plunger to expel any air in the syringe. Select a site for the injection and disinfect the skin with an alcohol swab.
Figure 22–3: Administering a subcutaneous injection.

PHA
RM
AC
OLO
GY
380
Grasp the forearm firmly in one hand, with the syringe in the other hand. With the bevel of the needle facing away from the skin, insert the needle into the skin, almost parallel with the arm (at an approximately 5- to 7-degree angle). Once the needle is inserted, inject the medicine and withdraw the needle. Place the needle, together with the syringe, directly into a proper sharps disposal bin.
How to Give an Intramuscular InjectionAssemble the following items:
• A disposable syringe• A disposable 19- or 21-gauge needle• Alcohol swabs• The medicine
Draw the correct amount of medication into the syringe (as described above). Expel any air from the syringe.
Select a site for the injection: The preferred sites are the outer upper quadrant of either buttock or the outer thigh muscle; do not use other parts of the buttock. In babies, use only the outer thigh muscle. Swab the skin at the injection site with alcohol swabs.
Stretch the skin with your thumb and forefinger and, after finding the landmark, insert the needle at a right angle to the skin to a depth of about 2 cm (3/4 in.) so as to penetrate the subcutaneous fat and enter the muscle (Figure 22–4).
Draw back the syringe plunger. If no blood appears, inject the medicine and withdraw the needle. If blood appears, repeat the procedure at another site, using new sterile equipment. Place the needle, together with the syringe, directly into a proper sharps disposal bin.
DISINFECTION
Used instruments that have passed through the skin of a patient pose an increased risk of infection for the patient. For this reason, there are certain
standards to follow when disinfecting surgical instruments.
Disinfectants are solutions used to inactivate any infectious agents that may be present in blood or other bodily fluids. This will decrease the number of bacteria and viruses on an object, but will not sterilize it. Disinfectants may reduce the risk of infection for people who will be handling the objects during further cleaning and sterilization. There are various types of disinfectant solutions, which also have varying degrees of effectiveness. Sodium hypochlorite, or bleach, is one of the most common worldwide disinfectant solutions.
Disinfectant solutions must always be available for:• Disinfecting working surfaces.• Disinfecting equipment that cannot be
sterilized further (e.g., in an autoclave).• Dealing with any spills involving bodily fluids
or other known infectious material.
All instruments should be soaked in a disinfectant solution for 30 minutes before cleaning.
Gloves should always be used when disinfecting equipment. Thick gloves should be worn when needles and sharp instruments are being cleaned. Soiled linen should be placed in leak-proof bags
Figure 22–4: Giving an intramuscular injection.

PHA
RM
AC
OLO
GY
381
for transport. To further clean soiled linen, wash it in cool water first, then disinfect with a diluted chlorine solution. After this, wash the linen with detergent at a temperature of at least 71°C (160°F) for 25 minutes.
Some situations, such as a large spill of infected bodily fluid, may require higher concentrations of disinfectant, as lower concentrations of solution will actually be inactivated by the large amount of organic matter. Not only should a higher concentration be used, but the solution should
stay in contact with the infected material for a longer period of time. This is known as contact time, and it is the time that the infectious material requires to become completely inactivated by the disinfectant solution.
No matter which disinfectant solution is used, you must ensure that it is used before its expiry date. Always follow the manufacturers’ guidelines or other specific guidelines for that particular solution.

• Responder follows the patient’s specific directions to help with medication.
• Does not require special training.
• Responder actually introduces the drug into the patient’s body after deciding to give medication.
• Requires special training or authorization from a physician who: 1. Is allowed to administer medication. 2. Will provide medical direction.
ASSISTING WITH MEDICATION ADMINISTERING MEDICATION
1. Right Person
2. Right Medication
3. Right Dosage
4. Right Time
5. Right Route
6. Right Documentation
Ensure the patient receiving the medication is the one whose name is on the label of the medicine container.
Read the label and confirm the name of the medication.
Accurately measure the indicated quantity of medication.
Give the medication at the right time.
Read the directions carefully and administer with the correct method.
Completely document your actions and findings, including time, dosage, route, and effect.
SIX RIGHTS OF MEDICATION
Drug Absorption
Drug Distribution
Biotransformation
Excretion
The movement of drug molecules from the site of entry into general circulation
The transport of a drug through the bloodstream to various tissues of the body and to its site of action; rate of distribution is affected by capillary permeability and cardiac output of regional blood flow
The process by which a drug is chemically converted to a metabolite; liver is primary site
The elimination of toxic or inactive metabolites from the body; organs of excretion include the kidneys, intestines, lungs, sweat glands, salivary glands, and mammary glands
ELEMENTS OF PHARMACOKINETICS
General Guidelines for Injections
• Immediately discard needles and syringes directly into a proper sharps disposal bin. • Never replace the needle guard or attempt to break the needle or syringe. • Always use a new needle and syringe when drawing medicines from a multi-dose vial. • Do not remove the small tear-off seal on rubber-capped vials until the drug is required.
382
SUMMARYPH
AR
MA
CO
LOG
Y
382

MA
RIN
E EN
VIR
ON
MEN
T
23 Marine Environment
383
Key ContentMaritime Occupational Health and Safety Regulations (MOHS) ................................ 384 Sterilization Techniques ......... 385 Managing Dangers at the Scene.................................... 385 Toxicological Hazards on Board a Ship ........................ 386Psychological Well-Being of Seafarers .............................. 387Medical Care of Rescued Persons ................................ 388 Radio Medical Advice ............ 390 Transfer and Transport .......... 396 Marine Pharmacology ............ 396 Medications and Health Supplies Carried on Board ................................ 396 Drugs Requiring Medical Advice ............................... 397
IntroductionAs a marine advanced first aid attendant, you are required to hold a marine first aid certificate specified by Transport Canada, Marine Safety. While most of the principles and techniques described in this text are applicable in a marine environment, some unique considerations or modifications are necessary for this context.
This chapter references the need for specialized training for responders who are responsible for the medical care of seafarers. Although this chapter outlines procedures intended for those with specialized training, as a marine first aid attendant, you may be requested to gather supplies and/or assist a ship’s physician or more advanced medical personnel with procedures. This information is being provided to familiarize you with the necessary equipment and safety precautions.

MA
RIN
E EN
VIR
ON
MEN
T
384
As a marine first aid attendant, it is important for you to be aware of the location of the following items on your ship: • First aid station(s), which are found in the
wheelhouse, engine room, galley, and life-saving equipment (e.g., lifeboats)
• First aid kits (Figure 23–1) and equipment • Medical supplies
MARITIME OCCUPATIONAL HEALTH AND SAFETY REGULATIONS (MOHS)
The Maritime Occupational Health and Safety Regulations (MOHS) of the Canada Labour Code specify the legal requirements around first aid and medical care in a marine environment. The MOHS is a living document that is updated regularly, so you must ensure that you have familiarized yourself with the most recent version. It is available for free online from the Government of Canada. The following section summarizes key points from the MOHS, but you must ensure that you are familiar with this important legal document.
Part 6, Section 114 of the regulation covers legislative requirements for the following topics: • First aid providers on board • Medical care ashore • First aid kit, medicine chest, and medical guide • Transportation of injured employees • Posting of information • Records
First Aid Kit, Medicine Chest, and Medical GuideThe tables in the MOHS regulations specify the type of first aid kit that must be on board a vessel based on the number of employees on the vessel, and the type and quantity of items that must be included in each type of kit. The MOHS regulations also specify which vessels must carry a medicine chest and what it must contain.
First aid kits and medicine chests must be accessible to employees on board and clearly marked with conspicuous signs. It is the
responsibility of the employer to ensure that the ship is equipped in accordance with these regulations.
The first aid kit and its contents, along with the medicine chest, other medical equipment, and the medical guide, must be properly maintained and inspected by a qualified person at regular intervals, at least once every 12 months.
Any employee responsible for medical care or first aid must be instructed in the use of the medical guide by his or her employer.
RecordsWhenever an injured or ill employee reports for first aid to a person, or if a person who holds a first aid certificate renders first aid to an employee, the person must complete and sign a first aid record with the following information: • The date and time of the reporting of the
injury, disabling injury, or illness
Figure 23–1: A first aid kit.

MA
RIN
E EN
VIR
ON
MEN
T
385
• The full name of the injured or ill employee • The date, time, and location of the occurrence
of the injury, disabling injury, or illness • A brief description of the injury, disabling
injury, or illness • A brief description of the first aid rendered,
if any • A brief description of arrangements made for
the treatment or transportation of the injured or ill employee
This record must be kept by the employer for 2 years.
Unless there is a qualified person (e.g., a registered nurse or doctor) on board the ship, the ship’s captain is ultimately responsible for the administration of medicine. However, the decision as to whether to administer medicine is made after consulting with the medical advisor. Also, the captain must maintain a log book of all medicine administered during the voyage and for which type of illnesses. An official entry in the ship’s log book must also be made.
STERILIZATION TECHNIQUES
It is important to understand and follow the proper procedure for sterilizing surgical equipment and work surfaces. Sterilizing surgical instruments is essential for decreasing the risk of disease transmission. Currently, the most common methods of sterilization are:1. Steam sterilization (autoclaving).2. Dry heat.3. Chemical antiseptics.
Steam SterilizationSteam sterilization (also known as autoclaving) is the preferred means of sterilizing instruments. Prior to beginning the sterilization procedure, disinfect all instruments and cleanse them of all organic materials. This will significantly decrease the risk of exposure to the persons handling the instruments.
All viruses become inactive with steam sterilization if the following protocols are followed: 20 minutes at 121°C to 132°C (250°F to 270°F) or 30 minutes in the same temperature range if wrapped in packs. There are indicators that show whether sterilization has been successful. For example, wet spots on a pack of instruments after the procedure has finished indicates that sterilization was not successful and therefore must be repeated.
Dry HeatIf autoclaving is not possible, another fairly effective method of sterilization is the application of dry heat for a period of 1 to 2 hours at a temperature of 170°C (338°F). For this to be effective, the instruments must be free of grease or oil contamination. This method is only effective on metal instruments and a few natural suture materials.
Chemical AntisepticsMost surgical instruments are no longer stored in liquid antiseptics. However, chemicals such as glutaral (glutaraldehyde), formaldehyde, or chlorhexidine can be applied to sharp instruments, as well as certain catheters and tubes, to effectively sterilize them.
If you have chosen to use glutaral, ensure that you follow the manufacturer’s instructions. This chemical is very effective against several contaminants, including bacteria, fungi, and a wide range of viruses. If you have chosen to use formaldehyde for cleaning, you must also expose the instruments to vapour from paraformaldehyde tablets. This is done in a closed container that must be sealed for a minimum of 48 hours.
MANAGING DANGERS AT THE SCENE
When arriving at an emergency scene in a maritime environment, the following items should be evaluated:1. Location of the emergency2. Extent of the problem3. Apparent dangers4. Apparent number of ill or injured people

MA
RIN
E EN
VIR
ON
MEN
T
386
5. Behaviour of ill or injured people and bystanders6. Need for additional assistance
Responders should ensure their safety by:1. Evaluating present and potential dangers.2. Wearing proper protective gear.3. Doing only what they are trained to do.4. Summoning additional resources.
Different types of emergencies present different degrees of danger. Examples of emergencies that are more dangerous include those involving water and ice, high winds, hazardous materials, natural disasters, or confined spaces. If the scene is unsafe, retreat. Notify appropriate personnel and wait for their arrival. Never enter a dangerous scene unless you have the training and equipment to do so.
If you are being called to a cabin or sleeping quarters, ensure your safety by: • Having ship personnel clear you to enter the
cabin. • Standing to one side of the door when
knocking. • Asking how many people are in the cabin at
that time.
TOXICOLOGICAL HAZARDS ON BOARD A SHIP
Global Harmonized System (GHS) Many workers are exposed to chemical hazards in the workplace. To help protect employees, the federal, provincial, and territorial governments have legislated WHMIS, a nationwide class identification system that provides Canadian workers and employers with information on the hazardous materials they use on the job.
WHMIS regulations require employers to:1. Clearly label hazardous materials, including all
toxic substances. 2. Inform employees about risks and precautions.
WHMIS uses the following three approaches to help identify and handle hazardous materials safely:1. Labels (risks, precautionary measures, and
first aid to be given in case of exposure or poisoning)
2. Safety Data Sheets (SDSs)3. Worker education
If you are required to work with or near controlled products, you must receive training in the following areas: • Use of WHMIS labels and SDSs • Location of SDSs (they should be easily
accessible) • Procedures for safely using, storing, handling,
and disposing of the hazardous materials on site
• Procedures to follow in case of an emergency that involves hazardous materials
• Specific codes that are used on your vessel (pipes, pumps, and large containers that carry hazardous materials should be marked with these codes)
To minimize safety and health risks, workers should observe all warning labels, tags, and placards in the workplace and follow the required precautions. When both employer and employee follow these government guidelines, hazardous-materials injuries in the workplace can be prevented.
Safety Data Sheets (SDSs) contain important technical information for workers on the work site. An SDS must be available for every hazardous material on the work site. More information on SDSs can be found on page 32.
Inhalation is the most common method of poisoning in the shipping industry. A toxic substance may consist of vapour, gas, mist, spray, dust, or fumes.
It is recommended that copies of all relevant SDSs be kept in a location where the first aid attendant will have ready access to the information. For worker reference, appropriate SDSs must also be available at all locations where the products are used.
Potentially Toxic SubstancesToxic substances can cause death, illness, or serious injury. They can be harmful when they are swallowed or inhaled or when they come into contact with skin. Toxic substances can be gases, solids, or liquids.

MA
RIN
E EN
VIR
ON
MEN
T
387
Carbon monoxide gas can occur in hold fires, as the product of an explosion, in the waste gases of petroleum and oil-driven engines, and when refrigerated meat cargoes decompose. Refrigerant gases such as ammonia vapour, carbon dioxide, or Freon will displace oxygen, making the air unsafe to breathe. In the presence of an open flame, the properties of Freon change, producing a toxic substance.
Certain refrigerated cargoes, including fruit, vegetables, and cheese, generate carbon dioxide during normal storage. After the failure of a refrigerating plant, food cargoes, especially meat, may generate poisonous and inflammable cargo space. This can be particularly dangerous if the cargo space is flooded. Carbon monoxide, ammonia, hydrogen sulphide, and hydrogen may be generated in addition to carbon dioxide. In any great concentration, these gases are extremely poisonous, and some are explosive.
Never enter a confined space without the authorization of the master or a responsible officer.
Storage of Dangerous Goods on BoardEvery hazardous substance stored, handled, or used in a workplace must be managed to ensure that the potential hazard to workers is minimal. This is accomplished by clearly marking and labelling packages and by placing warning placards on containers and transport units as indicated by national and international regulations.
Confined Space: Characteristics and DangersCrew members may be risking injury or death when entering confined spaces in which air cannot support life. Some confined spaces may lack oxygen content; some may even contain asphyxiating or toxic gases. Pump rooms or tanks that previously contained petroleum or chemicals are a particular risk for toxic gases. Rust, fire, and bacteria present in any enclosed space, such as
shipping containers or holds, can also use up and deplete oxygen content.
Only specially trained personnel are permitted to work in a confined space. When respiratory protection is required, workers in a confined space must wear a safety or body harness securely attached to a lifeline. Never enter a confined space without the permission of the master or a responsible officer who has ensured that the space is safe to enter.
A safety watch is a worker who must be stationed outside the confined space to provide constant watch and maintain communication with the worker inside. The safety watch must activate a suitable alarm if a rescue in a confined space becomes necessary. If a responder is on safety watch outside the space and sees a worker collapse inside, he or she should raise the alarm immediately and wait for help before entering the confined space.
If a responder needs to work in a confined space, he or she must make sure to have: • Proper respiratory protection. • Communication with people outside the space. • Safety/first aid equipment. • Proper training.
PSYCHOLOGICAL WELL-BEING OF SEAFARERS
Marine environments create unusual social conditions. A seafarer may be in extremely close quarters with his or her colleagues for weeks or months, yet still feel isolated and alone. Separation from loved ones, monotonous environments, and long work hours can all contribute to mental health concerns. Suicide is a serious problem in marine environments.
Seafarers should be attentive to their own mental states, as well as those of the people around them. If you find yourself experiencing depression, anxiety, or other mental health conditions, there may be resources available to you. Speak with someone that you trust about your experiences.

MA
RIN
E EN
VIR
ON
MEN
T
388
MEDICAL CARE OF RESCUED PERSONS
Immediate Care of SurvivorsSurvival in a rescue craft (lifeboat or raft) is one of the most strenuous ordeals a person can face (Figure 23–2). Rescued survivors must receive immediate care. Rescued survivors may be found suffering from various injuries and conditions, including the following: • Drowning • Hypothermia and other cold-related injuries • Emotional conditions • Seasickness • Sunburn • Heat exposure (heat cramps, heat exhaustion,
and heat stroke) • Contamination with oil • Dehydration and malnutrition • Immersion foot (trench foot)
Medical Care of Rescued Persons from SeaUnder ideal conditions, a healthy, uninjured person may be able to survive for at least 3 days at sea (and even as long as a month, depending on available resources) in a rescue craft. Survivors may need emotional support and/or crisis intervention in addition to care for any physical conditions. Keep the person quiet and warm and let him or her sleep. Dry foods, such as crackers, may help settle the stomach.
Many injuries and illnesses that occur in the marine environment are described elsewhere in this text, but the following are more specific to this context.
SEASICKNESSSeasickness (motion sickness) is an acute illness largely due to the motion of the ship or vessel. Signs and symptoms of seasickness vary but include: • Loss of appetite. • Headaches. • Nausea. • Cold sweat. • Dizziness.
• Abdominal cramps. • Vomiting. • Exhaustion. • Dry mouth.
Patients who are not accustomed to the sea are most susceptible to seasickness, but even experienced seafarers may be affected in rough water conditions (Figure 23–3). To treat seasickness: • Keep the patient quiet and warm. • Provide dry foods, such as crackers or toast,
in small portions to help settle the patient’s stomach.
• Offer cracked ice to help relieve the patient’s thirst.
• More severe cases of prolonged vomiting may be managed with over-the-counter preventive medications in dosages recommended by the
Figure 23–2: A survival rescue craft.
Figure 23–3: Vomiting is a symptom of seasickness and can affect even experienced seafarers.

MA
RIN
E EN
VIR
ON
MEN
T
389
manufacturer. It is very important to note the contraindications and side effects of these medications before drug administration (see Chapter 22).
In mild cases, the condition will gradually wear off and no specific treatment may be necessary.
CONTAMINATION BY OILSurvivors of shipwrecks are sometimes covered in oil. If a patient has suffered oil contamination, follow these guidelines: • Clean the skin only after the patient is warm
and comfortable (clean the areas around the mouth and eyes immediately).
• Wipe the skin with a soft cloth or strong paper towels.
• Have the patient take a warm shower using regular hair shampoo and body soap. If the patient has any signs of burns, do not wipe the affected areas directly.
Oil can cause breathing difficulties if inhaled, or nausea and vomiting if ingested.
DEHYDRATION AND MALNUTRITIONSurvivors who have been adrift for several days may be found suffering from dehydration. If they have been adrift for several weeks, malnutrition may also have developed. To care for dehydration and malnutrition: • Give food and water in small amounts at first. • Seek radio medical advice on how to treat the
patient. • Provide a diet of nourishing liquids (sugar and
water combination, milk, or soup), as this will help satisfy nutritional requirements.
This diet should continue until the survivor can be transferred to medical care ashore.
IMMERSION FOOT (TRENCH FOOT) Immersion foot is caused by exposure of the lower extremities to water above freezing temperatures, but usually below 10ºC (50ºF), for more than 12 hours. It typically occurs in shipwrecked sailors who have survived in lifeboats or rafts in adverse weather conditions and with wet and constrictive clothing, especially in combination with a poor diet.
Preventing Immersion FootTo prevent immersion foot: • Keep your feet clean and dry. • Wear proper-fitting boots. • Wear wool or synthetic socks. • Sleep in dry socks or barefoot. • Dry and massage your feet twice a day.
Signs and Symptoms of Immersion FootInitial signs and symptoms of immersion foot include: • Swollen, cold, waxy feet (Figure 23–4). • Peeling skin. • Reduced sensitivity to touch. • Wooden feeling in feet. • Delayed capillary refill time (nail beds stay
white after being squeezed).
After the foot warms up, it may present the following signs and symptoms: • Warm, dry, red skin • Blisters • Pain • Tingling or itching • Increased sensitivity to cold
Figure 23–4: A sign of immersion foot is swollen, waxy feet.

MA
RIN
E EN
VIR
ON
MEN
T
390
Care for Immersion FootWhen caring for immersion foot, handle the area gently and warm it slowly. Raise the foot (or feet), and continue to monitor the patient as well as the affected area.
RADIO MEDICAL ADVICE
As a general rule for a marine first aid attendant, procedures beyond your training and ability should not be attempted. However, you should be aware that medical advice is available, especially in cases in which more advanced medical procedures are required. A vessel is required by law to carry a complete and up-to-date list of radio stations from which medical advice can be obtained.
Medical advice can be accessed from a physician by:
• Mobile phone.• Direct radiotelephone contact with a shore
radio station using a prearranged radiofrequency (e.g., Rescue Coordination Centre[RCC]/Maritime Rescue Sub-Centres [MRSC]or the Marine Communications and TrafficServices Centre [MCTS]). You should request tospeak to a physician.
• Contacting a nearby port or nearby ship witha physician on board. The advice received
from a medical advisor will depend on the severity of the situation and the supplies and medical personnel available on board the ship. You should prepare for the medical advice by having the list of available medications and supplies on hand during the call.
Preparing Information for Radio Medical AdviceWhen seeking radio medical advice, provide as much information as possible to the medical advisor. Remember to repeat the information back to the advisor to ensure that the information exchanged is accurate. You may want to record the exchange on tape to help clarify any written notes.
For legal reasons, it is important to write down any exchange of information. Afterwards, copy the notes, including the actions that were taken, into both the patient’s and ship’s records. Examples of specific forms are:
• The Ship Master’s Report form.• The Patient Health Status form.• The Medical Advice form.
Prior to seeking radio medical advice, you should prepare key information about your ship, the ill or injured person, and the treatment required or rendered (Table 23–1).
TABLE 23–1: FORMS TO BE USED IN COMMUNICATING TO A DOCTOR INFORMATION ABOUT A PERSON’S ILLNESS (PART A) OR INJURY (PART B)1
(A) IN THE CASE OF ILLNESS
1. Routine information about the ship
1.1 Name of ship1.2 Call sign1.3 Date and time (GMT)1.4 Course, speed, position, and cargo1.5.1 Port of destination _____________ which is _____________ hours/days away1.5.2 Nearest port _____________ which is _____________ hours/days away1.5.3 Alternative port _____________ which is _____________ hours/days away1.6 Local weather (if relevant)
2. Routine information about the person
2.1 Surname2.2 Other names2.3 Rank2.4 Job on board (specify kind of work, not just the trade)2.5 Age and sex

MA
RIN
E EN
VIR
ON
MEN
T
391
(B) IN THE CASE OF INJURY
1. Routine information about the ship
1.1 Name of ship1.2 Call sign1.3 Date and time (GMT)1.4 Course, speed, position, and cargo1.5.1 Port of destination _____________ which is _____________ hours/days away1.5.2 Nearest port _____________ which is _____________ hours/days away1.5.3 Alternative port _____________ which is _____________ hours/days away1.6 Local weather (if relevant)
2. Routine information about the person
2.1 Surname2.2 Other names2.3 Rank2.4 Job on board (specify kind of work, not just the trade)2.5 Age and sex
(A) IN THE CASE OF ILLNESS
3. Details of illness
3.1 When did the illness first begin?3.2 Has the illness occurred before? If so, when?3.3 How did the illness begin (suddenly, slowly, etc.)?3.4 What did the person first complain of?3.5 List all the person’s complaints and symptoms.3.6 Describe the course of the present illness from the start of the illness to the present time.3.7 Give details of past illnesses/injuries/operations.3.8 List serious illnesses of parents, brothers, sisters, if known (family history).3.9 List social pursuits and previous occupations, including hobbies (social and occupational history).3.10 List all medicines/tablets/drugs that the person was taking before the present illness began and
indicate the dose(s) and frequency of administration.3.11 Does the person smoke? If so, how much and how often?3.12 Does the person drink alcohol? If so, how much (on how many days a week, on average, and how
many drinks a day, on average)?3.13 Does the person take any herbal or folk medicines? If so, how are they taken?3.14 Does the person use recreational drugs? If so, how are they taken?
4. Results of examination of person
4.1 Note temperature, pulse, blood pressure, and respiration.4.2 Describe the general appearance of the person (healthy, obviously ill, pale, etc.).4.3 Describe the appearance of affected parts of the body (consider faxing or emailing a digital
photograph).4.4 Describe your observations about the affected parts of the body (swelling, tenderness, lack of
movement, etc.).4.4.1 W hat tests have you done (urine, blood, other) and what were the results?4.4.2 Give the results, if available, of any previous blood tests, X-rays, or other investigations.
5. Diagnosis
5.1 What is your diagnosis?
6. Treatment
6.1 Describe care you have administered since the illness began.6.2 List ALL medicines/tablets/drugs that the person has taken or been given, and indicate the dose(s),
the number of times given, and the frequency of administration.6.3 How has the person responded to the treatment?
7. Problems
7.1 What problems are worrying you now?7.2 What do you need advice about?
8. Other comments
9. Comments by the physician

MA
RIN
E EN
VIR
ON
MEN
T
392
Radiotelephone ProceduresTransport Canada provides a reference regarding radiotelephone procedures (TP 9878E: Safety and Distress Radiotelephone Procedures), which should be displayed next to your vessel’s radiotelephone. The procedures in this reference advise that safety and distress radio messages should be made on Channel 16 (156.8 MHz) or on frequency 2,182 kHz, MF.
The normal procedure to obtain radio medical advice is as follows:1. Make contact with the shore radio station and
request medical advice (Figure 23–5).2. Give the physician all the information you can
so that a medical assessment of the situation can be made.
3. The physician will give advice on the immediate care of the patient.
(B) IN THE CASE OF INJURY
3. History of the injury or injuries
3.1 Exactly how did the injury or injuries occur?3.2 Did the person lose any blood? If so, how much?3.3 When did the injury or injuries occur?3.4 How long before the incident did the person last eat or drink?3.5 What does the person complain of? (List the complaints in order of importance or severity.)3.6 List all past illnesses/injuries/operations.3.7 List all medicines/tablets/drugs that the person was taking before the present injury or injuries
occurred; indicate the dose(s) and frequency of administration.3.8 Has the person been taking any alcohol?3.9 Do you think the person might have taken narcotic drugs, amphetamine, etc.?3.10 Does the person remember everything that happened? If not, how long before the accident is his or
her last clear memory?3.11 Did the person lose responsiveness, even for a very short time? If so, for how long and when in
relation to the injury?
4. Results of examination of person
4.1 Note temperature, pulse, blood pressure, and respiration.4.2 Describe the general condition of the person.4.3 List what you believe to be the person’s injuries in order of importance and severity.4.4.1 What tests have you done (urine, blood, other) and what were the results?4.4.2 Give the results, if available, of any previous blood tests, X-rays, or other investigations.
5. Treatment
5.1 Describe the care you have administered since the injury or injuries occurred.5.2 List ALL medicines/tablets/drugs that the person has taken or been given, and indicate the dose(s),
including the number of times given, and the frequency of administration.5.3 How has the person responded to the treatment?
6. Problems
6.1 What problems are worrying you now?6.2 What do you need advice about?
7. Other comments
8. Comments by the physician
Figure 23–5: Obtaining radio medical advice.

MA
RIN
E EN
VIR
ON
MEN
T
393
TABLE 23–2: MEDICAL REPORT FORMS FOR SEAFARERS
SHIP MASTER’S REPORT FORM
4. After the link call is over, the physician will advise the Search and Rescue (SAR) authority or coast guard service (e.g., RCC) on the best method of evacuation.
5. If helicopter evacuation is necessary, the coast guard will keep in touch with the ship.
The phonetic alphabet (see Appendix C) may be useful when clarifying important details over the radio.
Communication With PhysiciansA written letter or form should always accompany any patient seeing a physician. A clearly written communication in a foreign language is sometimes better understood than a spoken one (see Table 23–2).
Date of report _________________________________________________________
✵✵✵✵✵✵✵✵✵✵✵✵✵✵✵✵✵✵✵✵✵✵✵✵✵✵✵✵✵✵✵✵✵✵✵✵✵✵✵✵✵
Ship’s Identity and Navigation Status
Name _________________________________________________________________________________
Owner _________________________________________________________________________________
Name and address of on-shore agent _________________________________________________________
______________________________________________________________________________________________
Position (latitude, longitude) at onset of illness ________________________________________________
Destination and ETA (expected time of arrival) _________________________________________________
______________________________________________________________________________________________
✵✵✵✵✵✵✵✵✵✵✵✵✵✵✵✵✵✵✵✵✵✵✵✵✵✵✵✵✵✵✵✵✵✵✵✵✵✵✵✵✵
The Person and the Medical Problem
Surname and first name ________________________________________________
Gender: Male ■ Female ■
Date of birth (dd-mm-yyyy) ___________________________________________________________________
Nationality __________________________________________________________________________________
Seafarer registration number _________________________________________________________________
Shipboard job title __________________________________________________________________________
Hour and date when taken off work __________________________________________________________
Hour and date when returned to work ________________________________________________________

MA
RIN
E EN
VIR
ON
MEN
T
394
Injury or Illness
Hour and date of injury or onset of illness ____________________________________________________
Hour and date of first examination or treatment ______________________________________________
Location on ship where injury occurred ______________________________________________________
Circumstances of injury ______________________________________________________________________
______________________________________________________________________________________________
Symptoms ___________________________________________________________________________________
Findings of physical examination ______________________________________________________________
______________________________________________________________________________________________
Findings of X-ray or laboratory tests ___________________________________________________________
Overall clinical impression before treatment ____________________________________________________
______________________________________________________________________________________________
Treatment given on board ____________________________________________________________________
______________________________________________________________________________________________
Overall clinical impression after treatment _____________________________________________________
______________________________________________________________________________________________
✵✵✵✵✵✵✵✵✵✵✵✵✵✵✵✵✵✵✵✵✵✵✵✵✵✵✵✵✵✵✵✵✵✵✵✵✵✵✵✵✵
Telemedical Consultation (on-line medical control)
Hour and date of initial contact _______________________________________________________________
Mode of communication (radio, telephone, fax, other) _________________________________________
Surname and first name of telemedical consultant ______________________________________________
Details of telemedical advice given ___________________________________________________________
______________________________________________________________________________________________
✵✵✵✵✵✵✵✵✵✵✵✵✵✵✵✵✵✵✵✵✵✵✵✵✵✵✵✵✵✵✵✵✵✵✵✵✵✵✵✵✵
N.B. Attach all relevant medical reports to this report form.

MA
RIN
E EN
VIR
ON
MEN
T
395
Person Health Status Form(To accompany person being evacuated)
Surname and first name ________________________________________________________________
Age (years) _______________________________________________________________
Gender _______________________________________________________________
Time (hour) and date _______________________________________________________________
Vital signs _______________________________________________________________
• Blood pressure (systolic/diastolic) ____________________________________________
• Pulse (beats/min.) ____________________________________________
• Body temperature (oral), note F or C ___________________________________________
Presenting medical problem: symptoms, site(s) of pain or injury, time of onset, duration of problem,
contributing factors _________________________________________________________________________
______________________________________________________________________________________________
______________________________________________________________________________________________
Treatment given (medication, dressings, etc.) __________________________________________________
______________________________________________________________________________________________
Telemedical advice (on-line medical control) received __________________________________________
______________________________________________________________________________________________
Other current medical problems ______________________________________________________________
______________________________________________________________________________________________
Past history of significant medical problems ___________________________________________________
______________________________________________________________________________________________
Current medication being taken (generic and brand names; dosage; time of last dose)
______________________________________________________________________________________________

MA
RIN
E EN
VIR
ON
MEN
T
396
TRANSFER AND TRANSPORT
Medical Evacuation From a ShipPeople who require rapid transport to a hospital facility due to severe trauma or medical emergency require medical evacuation from a ship. This decision is the responsibility of the vessel’s chief officer.
Evacuation by HelicopterIf helicopter evacuation is determined to be necessary, the following measures should be taken:
• Give the ship’s position and description, anddetails of the patient’s condition.
• Advise the bridge and engine room watchesthat someone should maintain directcommunication with the helicopter.
• Send a message via a shore radio stationor coast guard station on 2,182 kHz, MF, oron VHF (if direct communication with thehelicopter cannot be made), and follow allinstructions provided.
• Clear as large an area as possible on the deckand mark the area in white with a large letter“H” to identify the hoist area. If possible, takedown whip and wire aerials in and around thearea.
• Ensure that all loose articles are securely tieddown.
• Identify the ship to the flight crew with asignal (orange-coloured smoke, for example,which is often used in lifeboats). This is helpfulin heavy shipping areas.
• Never hook the hoist cable of the helicopter toany part of the ship.
• Wear rubber gloves to handle the winch wirebecause a helicopter can build up a significantcharge of static electricity.
• Point search lights vertically upward to aid inlocating the ship if the hoist is being carriedout at night. Light the pickup area as muchas possible. Be sure not to blind the pilot byshining any lights directly on the helicopter.
• Obey the helicopter crew’s instructions at alltimes.
MARINE PHARMACOLOGY
Medications and Health Supplies Carried on BoardIn the International Medical Guide for Ships, 3rd Edition (2007) (Table 23–3), the World Health Organization (WHO) has recommended a list of medications and health supplies in the ship’s medicine chest. This list can be found in Chapter 33 of the guide.
In the International Medical Guide for Ships, Quantification Addendum 2010, the WHO updated the list of recommended medications in the ship’s medicine chest section of the International Medical Guide for Ships to include recommended quantities of medicines required to be held by ships.
This addendum also provides recommended stock holdings for the medicines listed in the International Medical Guide for Ships. The listing is standardized to quantities per number of crew.
TABLE 23–3: CATEGORIES OF SHIPS
CATEGORY A CATEGORY B CATEGORY C
International Medical Guide for Ships, 3rd Edition (2007)
Ocean-going merchant vessels without a physician on board
Merchant vessels engaged in coastal trade or going to nearby ports, and not more than 24 hours away from port of call
Fishing boats or private craft that are never more than a few days from home port, or only a few hours from a port of call

MA
RIN
E EN
VIR
ON
MEN
T
397
Crew Sizes and Trip DurationsThe WHO has chosen to calculate quantities per 10 crew members. Trip durations have been based on 3 to 4 weeks.
Medical supplies and medications are most likely located in the ship’s sick bay (ship’s hospital). Cabinets and drawers in the sick bay should hold a working quantity of the recommended medications and should be clearly labelled. The contents of the ship’s medicine chest should be inspected annually by a pharmacist.
It is important to be familiar with the list of medications on the ship and know where to find them. Some medications can’t be given without the approval of a physician. They should be labelled “Give only on radio medical advice from a physician.” A drug guide outlines the side effects and precautions of the medications carried on board. It is important to know the location of this guide on board the ship. Before and after administering medication, check the patient’s signs and symptoms, as well as the patient’s vital signs.
During the first assessment, question the patient to find out if he or she has allergies, medical conditions, or medications. This will allow you to find out whether the patient has a medication that may be helpful for the situation. It will also allow you to discover any contraindications or situations that may change the choice of medication or the way a medication is used. If someone develops a pronounced side effect from a medication, obtain radio medical advice.
Drug administration requires specialized training and is intended for those who provide advanced medical care. The following section—which describes medications found on ships, and their side effects—is intended to provide a basic overview only.
Drugs Requiring Medical AdviceSafe drug therapy requires clear communication between the ill or injured patient and medical
professionals. In some situations, first aid attendants must access radio medical advice before administering medication (see Radio Medical Advice in this chapter). For example, nitroglycerin spray (Figure 23–6) is a medication restricted to “on the advice of a doctor” in DFO/5758. The International Medical Guide for Ships, 3rd Edition (2007), gives advice on other specific medications, with precautions stating:
• “Give only on radio medical advice from a doctor.”
• “Should the patient be allergic to the drug, radio medical advice should be obtained for an alternative anti-infective treatment.”
• “Do not administer this drug before obtaining radio medical advice.”
In a marine environment, refer to the drug guide stored on your ship, or check with local standards and protocols for clarification. For some medications, first aid attendants are likely to assist a patient in taking medications from his or her own supply. Assisting a patient with his or her medications may include: • Finding the medication bottle. • Getting water for pills. • Helping the patient hold a glass or read
a label.
Figure 23–6: Nitroglycerin spray.

MA
RIN
E EN
VIR
ON
MEN
T
398
USE (INDICATIONS) AND PRECAUTIONS (CONTRAINDICATIONS AND SIDE EFFECTS)The three essential characteristics of each medication are indications, side effects, and contraindications. The name, strength, dose, and directions are printed on the label of each drug container (see Chapter 22 for more information). In a marine environment, the International Medical Guide for Ships, 3rd Edition (2007), provides a drug guide in the following format for each medicine: dosage, indications, contraindications, and side effects.
Before administering or assisting with a medication, read the precaution(s) (contraindications and side effects) and note(s) relating to each drug. The process for drug administration may include: • Obtaining authorization to administer the
drug. • Knowing the drug’s use. • Knowing the precautions of the drug. • Assessing a patient before and after a
medication is taken.

Date and time of the reporting of the injury, disabling injury, or illness
Full name of the injured or ill employee
Date, time, and location of the occurrence of the injury, disabling injury, or illness
Brief description of the injury, disabling injury, or illness
Brief description of the first aid rendered (if any)
Brief description of arrangements made for treatment or transportation of the injured or ill employee
RECORDING FIRST AID—INFORMATION REQUIREMENTS
Evaluate the following upon arrival:1. Location of the emergency2. Extent of the problem3. Apparent dangers
4. Apparent number of ill or injured people5. Behaviour of ill or injured people and bystanders6. Need for additional assistance
• Evaluate present and potential dangers.
• Wear proper protective gear.
• Do only what you are trained to do.
• Summon additional resources.
• Have ship personnel clear you to enter the cabin.
• Stand to one side of the door when knocking.
• Ask how many people are in the cabin at the time.
MANAGING DANGERS AT THE SCENE
GENERAL METHODS TO ENSURE YOUR SAFETYMETHODS TO ENSURE YOUR SAFETY WHEN ENTERING SLEEPING QUARTERS
Required Training for Working With or Near Controlled Products
Requirements for Working With Hazardous Materials in a Confined Space
• Use of the Workplace Hazardous Materials Information System (WHMIS) and Safety Data Sheets (SDSs)
• Location of SDSs• Procedures for safely using, storing, handling, and disposing of the materials
on site• Procedures to follow in case of an emergency that involves the materials• Specific codes that are used on your vessel
• Proper respiratory protection• Communication with people outside the space• Safety/first aid equipment• Proper training
HANDLING HAZARDOUS MATERIALS
Obtaining Radio Medical Advice—General Procedure
1. Make contact with the shore radio station and request medical advice.2. Give the physician all the information you can for a medical assessment of
the situation.3. The physician will give advice on the immediate care of the patient.4. After the link call is over, the physician will advise the Search and Rescue (SAR)
authority or coast guard service on the best method of evacuation.5. If the helicopter is necessary, the coast guard will keep in touch with the ship.
SUMMARY
MA
RIN
E EN
VIR
ON
MEN
T
399

400

WO
RK
PLA
CE
24 Workplace
401
Key ContentRoles and Responsibilities of the Advanced First Aid Attendant ............................ 402Responsibilities of the Employer and Other Employees ........................... 402 Return-to-Work Protocol ......................... 402Workplace First Aid Equipment ........................... 403 Workplace First Aid Transportation .................... 403 Regulations and Documentation ................... 403 Workplace Occupational
Health and Safety Regulations ...................... 403
Workplace Hazardous Materials Information System .............................. 404
Documentation ................... 405Typical Workplace Injuries ..... 405 Workplace Emergencies ........ 406
IntroductionSome of the most serious injuries occur at workplaces because of the equipment involved and/or the nature of the work being performed. Emergencies happen in all kinds of workplace settings—industrial work sites, agricultural operations, construction sites, remote locations such as in forestry and mining industries, and even office environments. Most workplaces are required by law to have first aid attendants. When you are employed as a workplace first aid attendant, you have the duty to act. Regulations require you to provide care to the level of your training and to document all incidents appropriately.
Your knowledge of what to do and your ability to react quickly can make a difference for an ill or injured employee. Applying your knowledge and expertise will help promote a safe and healthy workplace.

WO
RK
PLA
CE
402
ROLES AND RESPONSIBILITIES OF THE ADVANCED FIRST AID ATTENDANT
Workplace first aid is first aid performed in the workplace by a designated person: the advanced first aid attendant. The first aid attendant must be familiar with workplace occupational health and safety regulations in his or her jurisdiction, and must be an employee with a current, recognized first aid certificate from a recognized training agency. This certification must be for a level required by law for the particular workplace. The first aid attendant is an essential part of first aid services in the workplace under health and safety regulations.
The first aid attendant has the authority to send a worker for medical care if necessary. The patient is the responsibility of the attendant until care is transferred to qualified pre-hospital emergency medical personnel or hospital staff.
The advanced first aid attendant must:• Have current certification at the required level.• Maintain his or her knowledge and skills.• Be prepared to respond both alone and as part
of a first aid team.• Provide all care in a professional manner.• Provide care within the scope of his or her
training.• Thoroughly document any first aid-related
actions and process paperwork according tolegislative requirements (Figure 24–1).
• Report to the supervisor and joint health andsafety committee as required.
• Conduct follow-up with the ill or injuredperson approximately three days after theperson returns to work.
• Be familiar with specific elements of theparticular work site, including:
◆ The first aid room, rescue transportvehicles, and first aid equipment.
◆ Work site entry and exit areas.◆ Specific hazards and precautions related
to the work site.◆ Legislative regulations.◆ Means of communication (e.g., radio
system, satellite phone).◆ Emergency phone numbers.
RESPONSIBILITIES OF THE EMPLOYER AND OTHER EMPLOYEES
Employers and employees are responsible for ensuring that care is provided in a timely manner in an emergency. Everyone on the work site should know how to access first aid assistance, including:
• Activating their workplace emergencyresponse system.
• Calling EMS/9-1-1.• Locating the first aid room.• Summoning the first aid attendant.• Locating first aid kits and other equipment
(e.g., defibrillators).
Return-to-Work ProtocolEach person has the right to choose either to return to work immediately after an illness or injury or to seek further medical attention. This is a decision to be made by the ill or injured person based on recommendations by the first aid attendant. Supervisors cannot override the decision of the first aid attendant with respect to the treatment of an ill or injured person.
Regardless of the severity of the incident, documentation must be thorough and in
Figure 24–1: First aid attendants must document all first aid-related actions.

WO
RK
PLA
CE
403
accordance with legislative requirements. Across the country, different jurisdictions may have specific forms. First aid attendants must be familiar with legislative and employer requirements regarding documentation.
WORKPLACE FIRST AID EQUIPMENT
Workplace first aid attendants will likely have access to most of the equipment described throughout this text, but exceptions may exist. Workplace first aid attendants may not be required to assess blood pressure or may not have access to certain commercial splints, for example. As a workplace first aid attendant, it is important to be familiar with the first aid equipment available at your workplace and to consider alternative means of applying your skills if commercial equipment is unavailable. For example, you might use a rolled blanket to improvise a head immobilization device. Workplace first aiders must know the specific first aid kits and equipment required for their worksites. Workplace first aiders should reference the CSA standard for first aid kits (CSA Z1220-17).
Workplace occupational health and safety programs are required to include written policies and procedures regarding AEDs in the workplace. The workplace first aid attendant is required to be in compliance with all workplace AED policies and procedures, including all written procedures regarding AED access, AED training, and AED operation and maintenance.
WORKPLACE FIRST AID TRANSPORTATION
Workplace first aid attendants have the option of transporting an injured worker to medical aid by: • Company vehicle • Taxi • Ambulance
Preparing the patient for transport and ensuring optimal transportation to the hospital is the
workplace first aid attendant’s responsibility. Written procedures for the evacuation of injured workers must be developed for each worksite. Procedures for transporting injured workers must address a number of factors, including type of injury, location of incident and distance from medical care, and EMS response times. First aid attendants must be familiar with the procedures for transporting injured workers.
Depending on their size, location, and industry, some workplaces may be required to have an emergency transport vehicle (ETV) to transport ill or injured people. An ETV is a dedicated vehicle that is available to respond rapidly during an emergency. ETVs must conform to many regulations: Many jurisdictions have specific requirements regarding vehicle characteristics, onboard equipment, and safe operation.
Properly trained and licensed employees should be available to drive the ETV if the first aid attendant is providing care.
It is recommended that each ETV: • Be capable of traversing the area it is intended
to serve. • Have headspace of at least 1 metre (3 feet). • Provide protection from the elements (e.g.,
dust, sun, extreme temperatures). • Allow effective communication between the
driver and the first aid attendant, as well as between the vehicle and the hospital/medical advisor.
• Conform to any legislative requirements where it is operating.
REGULATIONS AND DOCUMENTATION
Workplace Occupational Health and Safety RegulationsThe Canadian Centre for Occupational Health and Safety (CCOHS) states that all Canadians have a fundamental right to a healthy and safe working environment.1 It explains that a health and safety program is a plan of action designed to prevent

WO
RK
PLA
CE
404
injuries and illness at work, and that it is required under Occupational Health & Safety (OH&S) legislation in most Canadian jurisdictions.2
Such programs outline the first aid requirements on a work site. Each province and territory in Canada interprets workplace health and safety regulations differently. In addition, there are regulations that apply to the federal government and other national organizations.
Employers are required to have a minimum number of first aid attendants on the work site at all times. The level of first aid training and the number of required first aid attendants are generally determined by the size and type of workplace. Workplace first aid attendants must be familiar with the legislation governing the jurisdiction in which they are employed.
To better understand the regulations governing training levels and mandatory first aid equipment, contact or refer to the website of your legislative workers’ compensation body or visit the Canadian Red Cross website at redcross.ca.
Workplace Hazardous Materials Information SystemThe Workplace Hazardous Materials Information System (WHMIS) is Canada’s national hazard communication standard. The key elements of the system are cautionary labelling of hazardous materials, the provision of Safety Data Sheets (SDSs), and worker education and training programs.
HAZARDOUS MATERIALS IN THE WORKPLACEA hazardous material is any chemical substance or material that can pose a threat to the health, safety, and property of an individual. If the presence of hazardous materials is suspected at the scene of an emergency, EMS should be contacted (if not already done by this point) and provided with the information. When approaching any scene, be aware of dangers involving toxic materials.
Transport Canada’s 2016 Emergency Response Guidebook helps responders to quickly identify the hazardous materials in a transportation incident and protect themselves and the general public during the initial response phase of the incident.
Specialized training is required for dealing with situations involving toxic substances. When dealing with a hazardous material (haz-mat) situation, such as a chemical spill, responders will work within a structured system that provides guidance in managing the scene. At a minimum, responders should take awareness-level training dealing with haz-mat response.
PREVENTION OF INJURIES DUE TO HAZARDOUS MATERIALS IN THE WORKPLACEAbout one-quarter of all workers are exposed to chemical hazards in their workplace. According to WHMIS regulations, employers must: • Clearly label hazardous materials, including all
toxic substances. • Tell employees about risks and precautions. • Have a detailed SDS available for every
hazardous substance in the workplace. • Give workers who may be exposed to
hazardous materials the proper training in safety measures and emergency procedures (Figure 24–2).
Employees should: • Check all warning labels, tags, and posters
in the workplace and follow the instructions carefully.
• Read labels and SDSs to find out the risks of each hazardous material, the safety measures

WO
RK
PLA
CE
405
to prevent poisoning, and first aid for poisoning.
• Never use a product that is in an unidentifiedcontainer.
Note that many everyday substances can be hazardous in large enough quantities.
DocumentationIt is important to document any actions taken when providing first aid for a workplace emergency. Whether an employee is returning to work or being referred for further medical attention, documentation must be completed. More than one type of form may be required. Regardless, proper documentation must include the following items:
• The name and occupation of the ill or injuredperson
• The names of any witnesses• The date that the report was filed• The date and time that the report was
received, that the response was made, thatcare was provided, and (if applicable) thatcare was handed off to advanced medicalpersonnel
• A description of how the illness or injuryoccurred
• A description of the illness or injury• A detailed description of the care provided• A description of any problems or shortcomings
at the scene that may have contributed to theinjury or illness
• A description of the outcome (including detailsof how and when care was transferred, ifapplicable)
• The signature of both the first aid attendantand the ill or injured person (if possible)
• A description of the follow-up with the ill orinjured person (approximately 3 days after theperson’s return to work)
If the patient’s care is transferred (e.g., if an EMR takes the patient to the hospital), this must be noted on the form as well. A copy of the patient assessment report should accompany the patient when he or she is transferred.
TYPICAL WORKPLACE INJURIES
Injuries in the workplace most often involve the hands and arms, which can get caught in machinery (Figure 24–3). The most common workplace injuries include:
• Soft tissue injuries (see Chapter 9):◆ Abrasions◆ Amputations◆ Avulsions◆ Burns◆ Contusions
Figure 24–3: In the workplace, injuries often involve the hands and arms.
Figure 24–2: Workers who may be exposed to hazardous materials, such as chemicals, need training in safety measures.

WO
RK
PLA
CE
406
◆ Impaled fish hooks ◆ Lacerations ◆ Punctures ◆ Subungual hematomas • Various skin conditions, such as abscesses,
dermatitis, and gangrene (see Chapter 9) • Musculoskeletal injuries (see Chapter 10): ◆ Fractures ◆ Sprains ◆ Strains • Head and/or spinal injuries (see Chapter 12): ◆ Concussions ◆ Eye injuries • Poisoning (see Chapter 14): ◆ Animal bites
WORKPLACE EMERGENCIES
Because of the nature of the work performed, some of the most serious workplace injuries occur at industrial and agricultural sites. This section outlines some common hazards and unique concerns for these settings.
Scene AssessmentAs always, size up the scene of an emergency before entering. Do not enter if there is any risk to your safety. An agricultural storage area or similar storage facility should not be entered by a worker who is alone. Look for hazards such as toxic chemicals, fires or fire hazards, unstable structures, running machinery, or unsecured livestock/animals. If necessary, call specialized personnel such as the fire department, the Emergency Response Team (ERT), or a hazardous-materials (haz-mat) removal team to stabilize the scene before you enter (Figure 24–4).
Be sure to observe lock-out/tag-out procedures. These safeguard against the unexpected start-up of machinery and equipment, or the possible release of hazardous energy, when machinery is being maintained. The individual using the machinery turns it off and disconnects it from its energy source before performing maintenance, and an authorized employee either locks or tags the energy-isolating device to prevent the unwanted release of energy.
Machinery that is turned on and/or that might be leaking fuel or hydraulic fluid should not be approached.
CONFINED SPACESConfined spaces pose specific safety concerns (see page 34). It is important that responders who are required to enter a confined space follow specific guidelines. Never attempt an emergency rescue involving entry into a confined space without training in safe confined-space entry and rescue procedures. Assume that a confined space is hazardous. A person qualified to enter a confined space must ensure that structures are safe from collapse prior to anyone entering the confined space.
A first aid attendant must be present directly outside the space to provide help to the responder inside, and there must be a plan for emergency rescue. There must be a safe method of communication between the responder inside the space and the first aid attendant.
Appropriate PPE must be worn by the responder entering the confined space. Exact equipment is determined by the specific hazards encountered in the confined space but may include eye/face, head, and foot protection, respiratory protection, safety belts, lifelines, and harnesses.
Confined spaces should be clearly identified, warning signs should be posted, and, when possible, the entry should be physically blocked. The conditions must be tested prior to the
Figure 24–4: Call specialized personnel, such as a haz-mat removal team, to safely remove toxic chemicals.

WO
RK
PLA
CE
407
responder entering and continuously monitored during entry. Testing must be performed by someone who is properly trained and has the appropriate equipment. Do not rely on your senses to determine whether the air in a confined space is safe. Many toxic gases and vapours are invisible and odourless, and a low-oxygen environment will not be visually obvious.
Adequate air conditions must be maintained in the confined space through proper ventilation. If safe atmospheric conditions cannot be maintained, the absolute necessity of entering should be evaluated. If it is necessary to enter, an appropriate respirator must be worn.
Properly trained workers must control utilities prior to entry into confined spaces, including, for example, electrical services, gas, propane, water, sanitary systems, communications, and any secondary service systems. If an unsafe situation develops, the space should be exited immediately.
ROADSIDE CONSTRUCTIONRoadside construction sites pose many hazards for workers, mainly due to passing vehicles. Use traffic control personnel (TCP) where signs, traffic control devices, and other procedures cannot provide effective traffic control, or when emergency or rapid work makes these impractical. Assess the level of risk faced by the TCP in each situation. Consider traffic speed, direction, and volume, as well as weather conditions and the time of day.
Plan and assess escape routes based on the traffic control layout but also on the time that is required to safely move out of the way if a vehicle does not stop as directed. Ensure that TCP stand in a safe position, are clearly visible, and have an unobstructed view of approaching traffic. A safe position is usually on the side of the shoulder of the road, out of the way of moving vehicles.
Ensure that TCP are trained to the required standard and have current qualifications.
REMOTE LOCATIONSWorking in remote locations (e.g., in mining or forestry) exposes workers to a variety of hazards. This workplace may include large areas of terrain
whose conditions may vary from mountainous to swampy. Safety concerns encompass a wide range of considerations.
While working in remote locations, workers need to consider several risk factors, including: • Rising water or flooding at times of high
runoff. • Vulnerability to forest fires. • Avalanches, falling rocks, or slide dangers. • Unsafe drinking water. • Animal habits (e.g., risks of a bear encounter
may be increased near old garbage dumps or camps, bear trails, spawning creeks, or berry patches).
• Camp size (i.e., whether the area is sufficient to carry out operations safely).
• Environmental factors, such as extreme temperatures.
• Tall or dead trees, especially dead branches that could fall into a campsite with strong winds or lightning strikes.
Remote locations also pose risks due to their sheer remoteness: In some cases, emergency transportation may be delayed due to weather or other factors. Workplace first aid attendants need to be prepared to provide care until the ill or injured person is handed over to personnel with more advanced qualifications (i.e., the hospital or EMS).
HAZARDOUS MATERIALS INCIDENTSWhen approaching any scene, you should be aware of dangers involving chemicals. Whether a motor vehicle collision or an industrial emergency is involved, you should be able to recognize clues that indicate the presence of hazardous materials, including: • Signs (placards) on vehicles or storage facilities
identifying the presence of hazardous materials.
• Spilled liquids or solids. • Unusual odours. • Clouds of vapour. • Leaking containers.
Placards, or signs, are required by law to be placed on any vehicles that contain specific quantities of hazardous materials (Figure 24–5). In addition,

WO
RK
PLA
CE
408
manufacturers and others associated with the production and distribution of these materials are required by law to display the appropriate placard. Placards can clearly identify the danger of a substance with universally recognized symbols. Terms such as explosive, flammable, corrosive, and radioactive are frequently used.
Unless you have been specially trained and possess the necessary equipment, clothing, and PPE for handling hazardous materials without danger, you should stay well away from the area. Stay out of low areas where vapours and liquids may collect. Position yourself upwind and uphill from a hazardous area. Remain alert for wind changes that could cause vapours to blow towards you. It is not uncommon for responding paramedics approaching the scene to recognize a hazardous-materials placard and immediately move to a safe area before summoning more advanced assistance. Do not attempt to enter a scene for which you are not trained or prepared.
Many fire departments have specially trained teams to handle incidents involving hazardous materials. While awaiting assistance, keep people away from the danger zone.
Some hazardous materials, such as natural gas, are flammable and can cause explosions. Even turning on a light switch or using a radio may create a
spark that sets off an explosion. When you call for help at a scene with a suspected hazardous material, use a telephone or radio that is located a safe distance away from the scene.
TOXIC CHEMICALSVarious industrial chemicals are used across many industries, and they may be found in a gas, aerosol, liquid, or solid state. These chemicals can be hazardous either because of the chemicals they contain (e.g., carcinogens, reproductive hazards, corrosives, or agents that affect the lungs or blood) or because of their physical properties (e.g., flammable, combustible, explosive, or reactive). Large quantities of these chemicals may pose a risk because of exposure through routine use.
Many types of toxic chemicals, particularly pesticides and fertilizers, are used in agriculture. Use protective clothing before entering a scene that may contain pesticides or other chemicals. If necessary, call a haz-mat removal team. If you know which pesticide was involved in a particular emergency, check the label for instructions and precautions, and take the label with you to the hospital. Before transporting a person, remove all clothing and flush the person’s body with water.
In any of their states (gas, aerosol, liquid, or solid), toxic industrial chemicals could enter the body by being inhaled, ingested, or absorbed through the skin (see page 262 to 265). The time it takes for these substances to have an effect depends mainly on the route through which they entered the body. Generally, poisoning occurs more quickly if the chemical is inhaled. SDSs or chemical information cards will provide information on the effects of each chemical and the symptoms of exposure.
If you or someone you are assisting is exposed to a toxic industrial chemical, get yourself and the person away from the area as quickly as you can. Avoid passing through the contaminated area if possible.
Employers should have an effective plan in place to assist employees for reaching shelter safely. They may be required to shelter-in-place if they cannot get out of a building or if the only place with clean air is indoors. Health and safety plans
12023
Figure 24–5: A hazardous material placard.

WO
RK
PLA
CE
409
should take into account the possible impact of a release of toxic industrial chemicals. Plans should include guidelines such as monitoring, detection, awareness training, PPE, decontamination, and medical surveillance of acutely exposed workers.
Health Canada provides guidelines for the PPE requirements to be used during or after a toxic chemical release and when the duration of the chemical release or airborne concentration of chemicals is unknown. Details are available on the Health Canada website.
WORKPLACE EQUIPMENTWorkplace equipment includes power tools, such as chainsaws, and also the many specialized vehicles used in industrial and agricultural workplaces (e.g., tractors, forklifts, and combines).
Many types of workplace equipment require special training: Never touch a control on a piece of machinery unless you are sure that you know what the control does.
ChainsawsPeople who work with chainsaws must understand how to control hemorrhages and deal with crush injuries (described in Chapter 9), so it is recommended that chainsaw operators hold an emergency first aid certificate. Operators should always carry a first aid kit that includes a large-wound dressing, and they should have reasonable access to a more comprehensive kit.
It is also important to consider the health risks that chainsaws pose to operators due to high levels of noise and hand-arm vibration. These risks can be controlled by using low-noise/low-vibration chainsaws, providing suitable hearing protection, maintaining chainsaws and protective equipment regularly, and providing operators with training on the health risks associated with operating chainsaws.
Workplace VehiclesBefore trying to extricate a person from industrial/agricultural equipment, the equipment must be stabilized and shut down. It might be necessary to contact a specialized crew to perform this task (Figure 24–6).
As a general principle, these vehicles can be stabilized, if necessary, using the techniques described in Chapter 19. The vehicle should be shut down by entering the cab to access the main controls. The engine should be slowed down with the throttle and then the machine switched off using the ignition key. Some diesel-powered machines are shut down via an air shut-off lever rather than an ignition key.
The engine can also be shut off by shutting the fuel line. This is done using the shut-off valve at the bottom of the fuel tank or using vice-grip pliers. If a diesel engine cannot be shut down and the person is in a life-threatening situation, a 9-kilogram (20-pound) CO2 fire extinguisher can be emptied into the air intake. This will shut down the engine but will also cause considerable damage to it.
Ride-on Rollers/CompactorsThose who work around or operate rollers/compactors face risks of injury related to a machine rollover or being struck by the machine or its components. Measures must be taken to prevent injury or death.
Figure 24–6: If necessary, call specialized personnel, such as the fire department, to stabilize and shut down heavy equipment.

WO
RK
PLA
CE
410
Develop site-specific safety plans for all aspects and stages of the job. Have the safety plans analyzed by a qualified person to determine the safest possible methods for performing the work. Provide all workers on site with training in site-specific safety procedures and for hazards they may encounter at the site. Continually evaluate safety plans to address changing conditions at the work site.
Minimize the presence of workers on foot near machinery. Use barriers to separate workers, pedestrians, and vehicles from moving equipment. Provide appropriate protective equipment, such as high-visibility reflective vests and hard hats. Ensure that workers use and maintain this equipment.
Ensure that machines are not operated on grades steeper than those specified by the manufacturer. Make sure that all of the manufacturer’s safety features are operational.
Tractors/ForkliftsMost tractor fatalities occur as a result of crush injuries following a rollover. Ensure that the tractor has been fully stabilized before attempting to extricate a trapped or injured patient.
An injured person trapped by a tractor can be freed by digging a trench underneath the person’s body or by cutting off a piece of the machine, such as the steering wheel. In some cases, however, the tractor may need to be lifted off the person by a specialized team.
Be aware that tractors can be fueled by diesel, gasoline, or propane: If fuel is leaking, this creates a serious fire hazard.
Power Take-Off (PTO)A power take-off (PTO) is a device used to transfer power from an engine (e.g., in a tractor) to another piece of equipment (e.g., a brush mower being towed by the tractor). When the engine is running, the PTO shaft rotates at engine speed, transferring energy from the engine to the attachment.
PTOs cause many injuries on the farm. Injuries can occur when clothing becomes snagged or tangled
in the rotating shaft. Amputations often occur in this situation, and these injuries are often fatal.
PTO injuries around tractors can also occur due to any of the following factors: • Many older tractor models lack PTO shields, or
have damaged or ineffective shields. • PTOs may be engaged without operator input.
For example, if a PTO shaft is attached to a moving tractor but is not also attached to an accessory, the rotating shaft may catch onto clothing, limbs, or hair and cause injury or death.
• Some farm equipment must be running in order to make adjustments or correct malfunctions. Since PTO shafts rotate when the equipment they are attached to is operating, a worker may be exposed to the rapidly spinning PTO shaft while examining the equipment.
• Work practices, such as clearing crop plugs, may expose operators to PTO shafts.
• Defective PTO shafts can disconnect from the machinery they are attached to. If so, they may swing and/or break off, striking anyone within range.
CombinesA combine is a large agricultural vehicle used to harvest and thresh grain.
Dangerous areas on a combine include: • The auger, which is the rotating part of the
screw conveyor. • The heads, with their oscillating cutting bars. • The reels, which are steel tines that can impale
a person. • The snapping rollers, which can cause crush
injuries (Figure 24–7).
The combine’s reverse feature should never be used in an attempt to extricate a patient from a combine. Since the safest approach to protect a patient is to prevent the machinery from moving, pry bars and other tools should be used to jam the moving parts in place before beginning extrication. The hydraulic system must be locked. Usually, a bar near the hydraulic cylinder will lock the header. If possible, the combine header should be separated from the drive mechanism. An acetylene torch can be used to cut off pieces of the

WO
RK
PLA
CE
411
combine to free a patient, but the combine and surrounding soil should be washed down first and the inside of the combine flushed to reduce the risk of fire.
If a patient is trapped inside the auger, the augur may need to be cut free, in which case it should be transported with the person. First, a large pipe wrench should be wedged on the shaft to prevent it from reversing, and then the auger drive should be disconnected. Do not attempt to extricate a patient in the field if the auger has caused an avulsion.
On older equipment, rescue tools can be used to spread snapping rollers, but this approach will not work on newer equipment.
Hay BalersHay balers compact hay and straw into bales by exerting tremendous force.
To free a person caught in a hay baler, the tines may need to be disassembled by unscrewing the bolts that are holding them together. The belts that drive the cross auger or raise the auger may need to be disassembled with rescue tools. To prevent reverse motion, a pipe wrench can be used to hold onto the input shaft as the auger is cut free. To release a person from the smooth rollers, the mounting bolts at each end should be removed to remove the bearings.
An acetylene torch should never be used to take apart a hay baler, as the combustible dust inside the baler may ignite.
Other Agricultural HazardsGrain AugerA grain auger is a long tube used to raise and transport grain from the ground to the top of grain bins, load trucks from a grain bin, or carry feed from a wagon to cattle feeders on a farm. It has a long, screw-shaped shank driven by a pulley or gear at the top. As the shank turns, the grain moves upwards in the tube. On a per-hour-of-use basis, augers are one of the most dangerous machines used in agriculture.
Common injuries that result from operating grain augers include: • Amputations: Contact with and/or
entanglement in the exposed screw at the intake end of the auger’s shaft often results in amputations.
• Soft tissue injuries and fractures: An auger’s sharp corkscrew blade rotates as it draws grain up. Coming into contact with an unguarded blade can result in worker mutilation.
• Electrocutions: Electrocution often occurs when moving a raised grain auger around the farm and coming into contact with electrical wires.
SilosThe major hazard in a silo is the gas formed during fermentation of stored crops, which, if inhaled, can kill a person within minutes (Figure 24–8). Keep in mind that silo gas can leak out to the surrounding area. Signs of this gas include a bleach-like smell, the presence of dead birds and insects, a yellowish or reddish vapour, and sick livestock nearby.
Specialized teams are usually required to extricate a patient from a silo. A self-contained breathing apparatus (SCBA) must be worn to rescue a patient in the presence of silo gas. Administer supplemental oxygen to the patient and place him or her in the rapid transport category.
Figure 24–7: Combine parts, such as the auger, heads, reels, and snapping rollers, can cause serious injuries.

WO
RK
PLA
CE
412
Manure StorageManure is often flushed from livestock facilities into a holding pond or a closed structure. This creates hazards including toxic fumes and the risk of drowning. To rescue a person in a manure storage area, you must wear an SCBA and a lifeline. Treat an immersed or submerged person as you would a drowning patient. Before transporting the patient, remove any contaminated clothing and flush the patient’s body with water. Do not bring any contaminated materials into the transport vehicle. Anyone and everything that came into contact with manure will require decontamination.
LivestockThere are more injuries each year from farm animals than there are from tractors or machinery. Poor judgment and lack of understanding of animal behaviour are the main causes of accidents. Livestock have unique vision characteristics, sensitivity to noise, and strong territorial instincts that need to be understood before handling them. Never enter an area with unsecured livestock. Treat injuries inflicted by livestock as you would any similar injury, but be sure to flush animal feces from any wound.
Figure 24–8: The gas formed during fermentation of crops stored in a silo can kill a person within minutes if inhaled.

Recommendations for Emergency Transport Vehicles (ETVs)
Your workplace ETV should: • Be capable of traversing the area it is intended to serve. • Have headspace of at least 1 metre (3 feet). • Provide protection from the elements (e.g., dust, sun, extreme temperatures). • Allow effective communication between the driver and the first aid attendant,
as well as between the vehicle and the hospital/medical director. • Conform to any legislative requirements where it is operating.
Requirements for a First Aid Attendant
The first aid attendant of a workplace must: • Have current certification at the required level. • Maintain his or her knowledge and skills. • Be prepared to respond both alone and as part of a first aid team. • Provide all care in a professional manner. • Provide care within the scope of his or her training. • Thoroughly document any first aid-related actions and process paperwork
according to legislative requirements. • Report to the supervisor and joint health and safety committee as required. • Conduct follow-up with the ill or injured person approximately 3 days after
the person returns to work. • Be familiar with specific elements of the particular work site.
Information Requirements for Proper Documentation
• Name and occupation of ill or injured person • Names of any witnesses • Date report was completed • Date and time report was received, response was made, care was provided, and
(if applicable) care was handed off to advanced medical personnel • Description of how the illness or injury occurred • Description of the illness or injury • Detailed description of treatment provided • Description of any problems or shortcomings at the scene that may have
contributed to the injury or illness • Description of the outcome • Signature of both the first aid attendant and the ill or injured person (if possible) • Description of the follow-up with the ill or injured person
SUMMARY
WO
RK
PLA
CE
413

414
Appendix A: Abbreviations for DocumentationA
PPEN
DIX
A: A
BB
REV
IATI
ON
S FO
R D
OC
UM
ENTA
TIO
N
414
Female Male Diminished, decreased, lower Elevated, increased, upper> Greater than< Less than= Equals≠ Not equali, ii, iii One, two, threeØ None, not present, not found
abd Abdomenac Before mealsACP Advanced care paramedicAED Automated external defibrillatorAE, A/E Air entryam Before noonANU Ambulance not usedAOB Alcohol on breathapprox ApproximatelyASA Acetylsalicylic acid, Aspirin®
ASAP As soon as possibleAV Atrioventricular node
bG Blood glucosebid Twice a dayBM Bowel movementBP Blood pressure
–c With°C Degrees CelsiusC-section Caesarean sectionC/C Chief complaintc/o Complains ofCa CancerCABG Coronary artery bypass graftCAD Coronary artery diseasecath CatheterCBC Complete blood countcc Cubic centimetreCCU Cardiac care unitCHF Congestive heart failureCIS Critical incident stressCO2 Carbon dioxideCOPD Chronic obstructive pulmonary
disease
CP Chest painCPR Cardiopulmonary resuscitationCSF Cerebrospinal fluidCT (CAT) Computed tomographyCVA Cerebrovascular accident
D5W Dextrose 5% in waterD10W Dextrose 10% in waterDNR Do not resuscitateDOA Dead on arrivalDPU Discharge planning unitDx Diagnosis
ECG, EKG ElectrocardiogramECU Extended care unitEEG ElectroencephalographEMR Emergency medical responderEMT Emergency medical technicianEP Emergency physicianER, ED Emergency room, departmentET EndotrachealETA Estimated time of arrivalETOH Ethanol
°F Degrees FahrenheitFR First responderFx, # Fracture
GI GastrointestinalGOA Gone on arrivalgtt Drops
Hb HemoglobinHct HematocritHg Chemical symbol for mercuryH2O Waterhr HourHs Evening, at bedtimeHx History
ICN Intensive care nurseryIDDM Insulin-dependent diabetes
mellitus

415
Appendix A: Abbreviations for Documentation
APP
END
IX A
: AB
BR
EVIA
TIO
NS
FOR
DO
CU
MEN
TATI
ON
415
IM IntramuscularIV Intravenous
kg Kilogram
L1 First lumbar vertebraeI, L Litrelg LargeLLQ Left lower quadrantLOC Level of consciousnessLOR Level of responsivenessLUQ Left upper quadrant
MCG, mcg MicrogramMCI Multiple-casualty incidentmEq/L Milliequivalents per litremg MilligramMI Myocardial infarctionml, mL MillilitremmHg Millimetres of mercuryMO Mental observation pointMRI Magnetic resonance imagingMVC Motor vehicle collision
N/A Not applicable/Not availableNIDDM Non-insulin-dependent diabetes
mellitusnitro NitroglycerinNKA No known allergiesN2O Nitrous oxide (Entonox®)NPO Nothing by mouth, oralNS Normal salineNYD Not yet diagnosed
O2 OxygenOB, OBS Obstetricsod Once per dayOD OverdoseOR Operating roomOTC Over the counter
P Pulsepalp PalpationPAU Psychiatric assessment unitpc After meals, after foodPCP Primary care paramedicper Through, by
PEARL Pupils equal and react to lightPERLA Pupils equal, round, react to light
and accommodationpm After noonPO By mouth, oralpost-op Postoperativepre-op Preoperativeprn As needed, as requiredpt Patient
q am Every morningQID/qid Four times per dayq1h, q2h Every hour, every two hours
R, resp RespirationsRBC Red blood cellsRLQ Right lower quadrantRUQ Right upper quadrantRx MedicationsR/O Rule out
s, w/o WithoutSA Sinoatrial nodeSC, sc SubcutaneousSCN Special care nurserySIDS Sudden infant death syndromeSL, sl SublingualSOB Shortness of breathSpO2 Peripheral oxygen saturationstat ImmediatelySV Stroke volume
T2 Second thoracic vertebraetab TabletTIA Transient ischemic attacktid Three times per dayTKO, TKVO To keep vein openTPR Temperature, pulse, respirationTPN Total parenteral nutritionTx Treatmenttx Transmit
U/K Unknown
vag Vaginal
yr Year

416
Appendix B: Sample Ambulance Equipment ListA
PPEN
DIX
B: S
AM
PLE
AM
BU
LAN
CE
EQU
IPM
ENT
LIST
416
SAMPLE AMBULANCE EQUIPMENT LIST
Quantity Size Description
1 Multi-level (with a minimum of 3 height-adjustment levels) ambulance cot with waterproof covered mattress and minimum of 2 restraint belts (preferably equipped with 5-point harness system)
1 Pediatric transport device
1 Folding stretcher with a minimum of 2 restraint belts (Ferno model 9 or equivalent with/without wheels)
1 3 (or D) Oxygen tank with oxygen and regulator/regulator assembly, complete with cylinder wrench
2 5 (or E) Oxygen tanks, with a minimum of 1 oxygen and regulator/regulator assembly; the in-use tank must be equipped with a cylinder wrench
3 Adult Oxygen face masks—3-in-1 type (non-rebreather)
2 Adult Oxygen face masks—Venturi type with 6 diluters or dials between 24 and 50% oxygen
2 Adult Nasal cannulas, complete with tubing
1 Pediatric Oxygen face mask—Venturi type with 6 diluters or dials between 24 and 50% oxygen
2 Pediatric Oxygen face masks—3-in-1 type (non-rebreather)
1 Adult (1,500–1,600 mL) Resuscitator (bag-valve-mask), complete with mask, bag, and reservoir/accumulator
1 Child (450–500 mL) Resuscitator (bag-valve-mask), complete with mask, bag, and reservoir/accumulator
1 Baby (150–300 mL) Resuscitator (bag-valve-mask), complete with mask, bag, and reservoir/accumulator
1 Adult CPR pocket mask in protective case with one-way valve, filter, oxygen outlet, and head strap
1 50 mm (or 55 mm) Oropharyngeal airway
1 60 mm Oropharyngeal airway
1 70 mm Oropharyngeal airway
1 80 mm Oropharyngeal airway
1 90 mm Oropharyngeal airway
1 100 mm Oropharyngeal airway
1 110 mm Oropharyngeal airway
1 Fixed electric suction apparatus with suction catheters in sizes 8, 10, 12 and 14, complete with tubing (intake manifold powered not permitted)
3 Yanker suction catheters, complete with tubing
1 Portable suction apparatus, complete with pump, 2 canisters, catheter set, adapters, etc.

417
Appendix B: Sample Ambulance Equipment List
APP
END
IX B
: SA
MPL
E A
MB
ULA
NC
E EQ
UIP
MEN
T LI
ST
417
SAMPLE AMBULANCE EQUIPMENT LIST
Quantity Size Description
1 Approximately 180 cm (71 in.) x 40 cm (16 in.)
Long backboard with a minimum of 3 straps and shoulder harness (Fastrap, V-8, Spider Straps, or equivalent); if backboard is wooden, it must be 2 cm (3/4 in.) plywood, sanded and coated/sealed on all sides and of an appropriate design (approved backboard restraints only)
1 Head immobilizer set (Ferno model 445, Ferno Red Head, Ambu disposable, Headgrip II, or equivalent)
1 Approximately85 cm (33 in.) x 40 cm (16 in.)
Short spinal motion restriction device (K.E.D.® board or equivalent); a short backboard of an appropriate design and construction is minimally acceptable, but only if equipped with a head pad, two 3 m (9 ft.) belts or three 2 m (7 ft.) belts as well as head and chinstraps
1 Baby Cervical immobilization device (CID)/rigid collar
1 Pediatric CID/rigid collar
1 Adult short CID/rigid collar (or adjustable hard collar)
1 Adult regular CID/rigid collar (or adjustable hard collar)
1 Adult tall CID/rigid collar (or adjustable hard collar)
2 CSA class 2 traffic safety vests
2 Fluid-impervious thigh splints
2 Fluid-impervious lower leg splints
2 Fluid-impervious arm splints
1 Adult size Femoral traction device
1 Bed pan
1 Urinal
1 Large Emesis basin
3 Large Biohazard bags
3 Urine and vomit convenience bags of a commercial design
1 Blood pressure apparatus with 1 gauge and at least 5 different cuff sizes, including baby, child, adult, large-size adult, and thigh-sized
1 Stethoscope (dual head)
1 14 cm (6 in.) Lister bandage scissors
1 19 cm (7 in.) Super shears/paramedic shears
1 14 cm (6 in.) Kelly forceps
1 Standard size (10 cm/4 in.) Dressing tweezers
1 Penlight
1 Commercially designed medical sharps container
2 2.3 kg (5 lb.) Dry chemical fire extinguishers (ABC, ULC rated), inspected as per fire code requirements

418
Appendix B: Sample Ambulance Equipment ListA
PPEN
DIX
B: S
AM
PLE
AM
BU
LAN
CE
EQU
IPM
ENT
LIST
418
SAMPLE AMBULANCE EQUIPMENT LIST
Quantity Size Description
1 Standard hatchet size Axe
2 Sized to fit tires Tire chains (as specified by regulations)
2 7.5 cm (3 in.)-diameter lense Battery operated hand lanterns
3 Roadside reflectors (or 2 red traffic triangles)
1 Standard short handle Steel shovel
1 90 cm (35 in.) and minimum 1.27 cm (0.5 in.) in diameter
Straight pry bar of a commercial design (to be stored under the squad bench)
1 Roll Duct tape
2 Level C haz-mat suit with hood (Tyvek®)
1 1 cm (0.4 in.) x 10 m (33 ft.) or21 cm (8 in.) x 5 m (16 ft.)
Rope
2 Safety helmets

419
Appendix C: The Phonetic Alphabet
APP
END
IX C
: TH
E PH
ON
ETIC
ALP
HA
BET
419
THE PHONETIC ALPHABET
Use plain language whenever possible. However, due to differences in accents and pronunciations throughout the world, or when conditions for reception are not completely clear, it is standard procedure to use the phonetic alphabet for your call sign and for confirming important elements of your communication.
Letter Word Pronounced as
A Alpha AL FAH
B Bravo BRAH VOH
C Charlie CHAR LEE or SHAR LEE
D Delta DELL TAH
E Echo ECK OH
F Foxtrot FOKS TROT
G Golf GOLF
H Hotel HOH TELL
I India IN DEE AH
J Juliette JEW LEE ETT
K Kilo KEE LOH
L Lima LEE MAH
M Mike MIKE
N November NO VEM BER
O Oscar OSS CAR
P Papa PAH PAH
Q Quebec KEH BECK
R Romeo ROW ME OH
S Sierra SEE AIR RAH
T Tango TANG GO
U Uniform YOU NEE FORM or OO NEE FORM
V Victor VIK TUR
W Whiskey WISS KEY
X X-ray ECKS RAY
Y Yankee YANG KEY
Z Zulu ZOO LOO

420
Appendix C: The Phonetic AlphabetA
PPEN
DIX
C: T
HE
PHO
NET
IC A
LPH
AB
ET
420
THE PHONETIC ALPHABET
Example of Urgency Call and Message Example of Reply
PAN PAN, PAN PAN, PAN PAN PAN PAN
HALIFAX COAST GUARD RADIO, HALIFAX COAST GUARD RADIO, HALIFAX COAST GUARD RADIO
CANCROSS VY1896, CANCROSS VY1896, CANCROSS VY1896
THIS IS CANCROSS VY1896, CANCROSS VY1896, CANCROSS VY1896
THIS IS HALIFAX COAST GUARD RADIO, HALIFAX COAST GUARD RADIO, HALIFAX COAST GUARD RADIO
ONE OF THE RESCUED PATIENTS HAS GONE INTO DEEP SHOCK REQUEST HELICOPTER AIR LIFT
HELICOPTER HAS BEEN DISPATCHED
MY POSITION IS 30 MILES SOUTH OF HALIFAX ESTIMATED TIME OF ARRIVAL IS 1215z (say “zulu” for “z”)
CANCROSS VY1896 OVER HALIFAX COAST GUARD RADIO OVER
If the vessel Cancross VY1896 had been asked to spell its name and call sign phonetically, it would do so as follows: “CHARLIE, ALPHA, NOVEMBER, CHARLIE, ROMEO, OSCAR, SIERRA, SIERRA, VICTOR, YANKEE, one, eight, niner, six.”

421
Appendix D: Medical Terminology
APP
END
IX D
: MED
ICA
L TE
RM
INO
LOG
Y
421
PART DEFINITION PART DEFINITION
a-, an- without, lacking
ab-, abs- away from
-ac pertaining to
acous-, acouso- hearing
aden-, adeno- gland
adip-, adipo- fat
adren-, adreno- gland
-alge-, -algesi pain
ambi- both sides
andr-, andro- male
angi-, angio- blood vessel
ante- before, forward
anti- against
arthr-, arthro- joint
ateri-, aterio- artery
auto- self
bi- two
bio- life
-blast-, -blasto, -blastic
bud, germ
blephar- eyelid
brady- slow
bronch-, bronchi- bronchus
bucc-, bucco- cheek
burs-, burso- bursa
carcin-, carcino- cancer
cardi-, cardio- heart
-cele bulge
-centesissurgical puncture to remove
fluid
cephal-, cephalo- head
chem-, chemo- chemistry
chlor-, chloro- green
chol- bile
chondr- cartilage
chrom-, chromato- colour
circum- around
contra- against
coron- heart
cost- rib
crani-, cranio- brain
cry-, cryo- cold
cutane skin
cyano- blue
cycl- circle, cycle
cyst-, cysti-, cysto- bladder or sac
cyt-, cyto- cell
-cyte, -cytic cell
dactyl-, dactylo- digit (finger or toe)
de- away from, ending
derm-, dermato- skin
-desis surgical binding
dextr-, dextro- right side
dia- across, through
diplo- double
dis- separation, taking apart
The following table shows common word-forming elements. When you encounter an unknown medical term, try to break it down into its component parts, and the meaning may become clear. For example, bradypnea has the elements brady-, meaning slow, and -pnea, meaning breathing, so you can confidently expect that it will mean slow breathing.
These word parts may be at the beginning, in the middle, or at the end of a compound word. Dashes are used to indicate where they most likely occur. For example, bio- ends in a dash, so it is usually the first part of the word (e.g., biology or biosphere).

422
Appendix D: Medical TerminologyA
PPEN
DIX
D: M
EDIC
AL
TER
MIN
OLO
GY
422
PART DEFINITION PART DEFINITION
duodeno- duodenum
-dynia pain, swelling
dys- difficult, abnormal
-eal, -ial pertaining to
ect-, ecto-, exo- outer, outside
-ectasis expansion or dilation
-ectomy cut out, removal
elect- electrical activity
-emesis vomiting
-emia blood condition
en- inside
end-, endo-, ent- enter-, entero-,
within, inner
epi- upon, outside of
erythr-, erythro- red
-esis state or condition
-esthesio sensation
eu- good, well
ex-, extra- beyond
fibr-, fibro- fiber
gastr- stomach
gloss- tongue
gluco-, glycol- glucose, sugar
gnath-, gnatho- jaw
-gram, -graph, -graphy
recording, written
grav- heavy
gyn-, gyno-, gynec- female
hem, hema-, hemat-, hemato-, hemo-
blood
hemi- half
hepat-, hepatico-, hepato-
liver
hetero- other, different
hidr-, hidro- sweat
hist-, histio-, histo- tissue
homo- same
hydr-, hydro- water
hyper- above, beyond, excessive
hypo- under, deficient
hyster-, hystero- uterus
-ia condition
-iasis condition, formation of
idio- self, one's own
ileo-ileum (the lower part of the
small intestine)
infra- beneath, below
inter- between
intra- within
irid-, irido- iris
ischi-, ischio-ischium (the lower and back
part of the hip bone)
-ism condition
iso- equal, like
-ites, -itis inflammation
-ity pertaining to
-ium structure or tissue
karyo- nucleus
kerat-, kerato- cornea (eye or skin)
kin-, kine-, kinesi-, kinesio-, kino-
movement
kyph-, kypho- humped
lacrim-, lacrimo- tear (from your eyes)
lact-, lacti-, lacto- milk
laryng-, laryngo- larynx (voice box)
leuk-, leuko- white
lingu-, linguo- tongue
lip-, lipo- fat
lith-, litho- stone, mineral concretion
lymph-, lympho- lymph
-lysis, -lytic, lyso-, lys-break down, destruction,
dissolving
macro- large, long, big
mal- bad, abnormal

423423
Appendix D: Medical Terminology
APP
END
IX D
: MED
ICA
L TE
RM
INO
LOG
Y
423
PART DEFINITION PART DEFINITION
-malacia softening
mamm, mast-, masto-
breast
-maniamorbid impulse towards an
object/thing
meg-, mega-, megal-, megalo-
great, large
-megaly enlargement
melan-, melano- black
mening-, meningo-meninges (the membranes
that surround the brain and spinal cord)
meso- middle
meta- beyond, change
-meter device used for measuring
-metry measurement of
mic-, micro- small
mon-, mono- one
morph-, morpho- shape
multi- many
muscul-, musclo- muscle
my-, myo- muscle
myc-, myco- fungus
myel-, myelo-spinal cord OR bone
marrow
myring-, myringo- eardrum
myx-, myxo- mucus
necr-, necro- death
neo- new
nephr-, nephro- kidney
neur-, neuri-, neuron nerve
normo- normal
oculo- eye
odont-, odonto- tooth
-odyn pain
-oid resembling
olig-, oligo- few, little
-oma tumor
onco- tumor, bulk, volume
onych-, onycho- fingernail, toenail
oo- egg, ovary
oophor-, oophoro- ovary
op-, opt- vision
ophthalm-, ophthalmo-
eye
-opsy visual examination
orchid-, orchido-, orchio-
testis
orth-, ortho- straight, normal, correct
-osis condition, usually abnormal
osseo- bony
ossi- bone
ost-, oste-, osteo- bone
-ostomy opening
ot-, oto- ear
-otomy incision
-ous pertaining to
ovari-, ovario-, ovi-, ovo-
ovary
oxy- sharp, acute, oxygen
pan-, pant-, panto- all or everywhere
para- alongside, abnormal
-pathy, patho-, path- disease
-penia deficiency, lack of
per- through
peri- around
-pexy surgical fixation
-phagia, phagy eating, swallowing
phalang- phalanx (any bone in the
fingers or toes)
pharmaco- drug, medicine
pharyng-, pharyngo- pharynx, throat
-phasia speech
phleb-, phlebo- vein
phob-, phobia fear

424
Appendix D: Medical TerminologyA
PPEN
DIX
D: M
EDIC
AL
TER
MIN
OLO
GY
424
PART DEFINITION PART DEFINITION
phon-, phono- sound
phos- light
phot-, photo- light
phren-, phreni-, phrenico-, phreno-
diaphragm
-plasia, -plastic growth
-plasty surgical reconstruction
-plegia paralysis
pleur-, pleura-, pleuro-
rib, pleura (membrane that wraps around the outside of your lungs and lines the inside of your chest cavity)
-pnea breathing
pneum-, pneuma-, pneumat-, pneumato-
air, lung
pod-, podo foot
-poiesis production
poly- many, excessive
post- behind, after
-praxia movement
pre- before, in front
pro- favouring, supporting
proct-, procto- anus, rectum
prostat- prostate
pseudo- false
psych-, psyche-, psycho-
mind
-ptosis falling, drooping
pyel-, pyelo- pelvis
pyo- pus
pyro- fever
quadri- four
rachi- spine
radio- radiation, radius
re- again, backward
rect-, recto- rectum
ren-, reno- kidney
retin- retina (of the eye)
retro- backward, behind
rhabd-, rhabdo- rod-shaped, striated
rhin-, rhino- nose
-rrhage, -rrhagic bleeding
-rrhaphy suture
-rrhea flow or discharge
salping-, salpingo- tube
sarco- muscular, flesh-like
schisto- split, cleft, division
schiz-, schizo split, cleft
sclera-, sclero- hardness
-sclerosis hardening
scoli-, scolio- twisted
-scope, -scopy examine, for examining
semi- half
sial-, sialo- saliva, salivary gland
sigmoid-, sigmoido- sigmoid colon
sinistr-, sinistro- left, left side
-sis condition
somat-, somatico-, somato-
body, bodily
-spasm muscle condition
spasmo- spasm
sperma-, spermato-, spermo-
sperm
spirat- breath, breathing
splanchn-, splanchni-, splanchno-
viscera (internal organ)
splen-, spleno- spleen
spondyl-, spondylo- vertebra
-stasis level, unchanging
sten-, steno- narrowed, blocked
stern- sternum (breastbone)
stom-, stoma-, stomat-, stomato-
mouth, opening

425425
Appendix D: Medical Terminology
APP
END
IX D
: MED
ICA
L TE
RM
INO
LOG
Y
425
PART DEFINITION
-stomy surgical opening
sub- under
super- above
supra- above, upon
sy-, syl-, sym-, syn-, sys-
together
tachy- fast
-taxis movement
tetra- four
thel-, thelo- nipples
therm-, thermo- heat
thorac-, thoracico-, thoraco-
chest
thromb-, thrombo- blood clot
thyr-, thyro- thyroid gland
-tomy cutting; incision
tono- tone, tension, pressure
trache-, tracheo- trachea (windpipe)
trans- across, through
tri- three
-tripsy crushing
-trophy growth
tympan-, tympano- eardrum
uni- one
ur-, uro- urine
uri-, uric-, urico- uric acid
-uria in the urine
vagin- vagina
varic-, varico- duct, blood vessel
vasculo- blood vessel
ven-, veno- vein
vertebr- vertebra, spine
vesic-, vesico- vesicle (cyst or pouch)
xanth-, xantho- yellow

426
GlossaryG
LOSS
ARY
426
A
Abandonment: Ending care of a patient without that patient’s consent or without ensuring that someone with equal or greater training will continue that care.
ABCs: Airway, breathing, and circulation.
Abdomen: The part of the trunk below the ribs and above the pelvis.
Abdominal aortic aneurysm (AAA): A rupturing of the abdominal aorta.
Abdominal cavity: An area located in the trunk that contains the liver, pancreas, intestines, stomach, and spleen.
Abdominal thrusts: A technique for unblocking an obstructed airway by forcefully compressing the abdomen.
Abrasion: A wound characterized by skin that has been scraped or rubbed away.
Abruptio placentae: A partial or complete detachment of a normally implanted placenta at more than 20 weeks’ gestation.
Absorbed poison: A poison that enters the body through the skin or mucous membranes.
Abuse: Any behaviour or action that is used to scare, harm, threaten, control, exploit, or intimidate another person.
Acid: A substance with a pH of less than 7; usually corrosive and may cause chemical burns on the skin.
Acquired immune deficiency syndrome (AIDS): A condition caused by the human immunodeficiency virus (HIV).
Active listening: A process that helps you more fully communicate with a patient by focusing on what the patient is saying.
Acute: Having a rapid and severe onset and then quickly subsiding.
Acute mountain sickness (AMS): One of three forms of high-altitude illness; not a specific disease but a group of varied symptoms caused by altitude.
Acute myocardial ischemia: An episode of chest pain due to reduced blood flow to the heart muscle.
Acute pulmonary edema: Fluid buildup in the lungs.
Acute respiratory distress syndrome (ARDS): A serious lung disease that leads to an increase in the quantity of fluid between the alveolar membrane and the surrounding pulmonary capillaries, which decreases the amount of oxygen the red blood cells can absorb.
Adolescent: A person between 13 and 18 years of age.
Adult: A person who is past the onset of puberty.
Adverse effects: Side effects that cause problems in a patient. These are the effects you must watch for when administering medications such as nitroglycerin.
Agonal respiration: Isolated or infrequent gasping in the absence of normal respiration; can occur when a patient is in cardiac arrest. Airborne transmission: The transmission of a disease by inhaling infected airborne droplets when an infected person coughs or sneezes.
Airway: The pathway for air to travel from the mouth and nose to the lungs.

427427
Glossary
GLO
SSA
RY
427
Alkali: A substance with a pH greater than 7; can cause chemical burns on the skin.
Altered mental status: A disturbance in a patient’s level of responsiveness, including confusion and delirium; causes include injury, infection, poison, drug abuse, and fluid/electrolyte imbalance.
Alveoli: Small air sacs in the lungs where gases are exchanged between the lungs and the blood.
Alzheimer’s disease: A progressive, degenerative disease that affects the brain, resulting in impaired memory, thinking, and behaviour.
Amniotic sac: A fluid-filled sac that encloses and protects the developing fetus.
Amputation: The complete or partial severing of a body part.
Anaphylaxis: A severe allergic reaction in which the air passages constrict and restrict the patient’s breathing.
Anatomical splint: A splint that uses an uninjured body part to immobilize an injured body part.
Anatomical obstruction: The blockage of the airway by an anatomical structure, such as the tongue.
Anatomical position: The natural, neutral position of the body.
Anatomy: The study of structures, including gross anatomy (structures that can be seen with the naked eye) and microscopic anatomy (structures seen under the microscope).
Aneurysm: A condition in which the wall of an artery or vein weakens, balloons out, and possibly ruptures.
Angina: Chest pain or pressure resulting from the heart needing more oxygen-rich blood than it is getting; pain or pressure usually lasts less than 10 minutes; also called angina pectoris.
Anterior: Toward the front of the body.
Antibodies: A type of protein found in blood and other bodily fluids; used by the immune system to identify and neutralize pathogens, such as bacteria and viruses.
Appendicitis: Acute inflammation of the appendix.
Arrhythmia: A disturbance in the conduction of electrical impulses within the heart; also called dysrhythmia.
Arteries: Large blood vessels that carry oxygen-rich blood from the heart and lungs to the body.
Arteriosclerosis: A form of cardiovascular disease marked by a hardening and narrowing of the arteries in the heart and other parts of the body; also called atherosclerosis.
Arthritis: An inflammation of the joints causing pain and swelling, and sometimes limiting motion.
Aspiration: Taking blood, vomit, saliva, or other foreign material into the lungs.
Assault: Abuse, either physical or sexual, resulting in injury and often emotional crisis.
Assisted ventilations: Artificially simulating normal respiration in a non-breathing patient (e.g., with a BVM).
Asthma: A condition that narrows the air passages and makes breathing difficult.
Asystole: A type of life-threatening arrhythmia in which there is no electrical activity in the heart.
Atria: The upper chambers of the heart.

428
GlossaryG
LOSS
ARY
428
Aura: An unusual sensation or feeling a patient may experience before an epileptic seizure; may be a visual hallucination, an urgent need to get to safety, or a strange sound, taste, or smell.
Auscultation: Listening to the internal sounds of the body, usually with a stethoscope.
Automated external defibrillator (AED): An electronic device that shocks a patient’s heart to stop certain arrhythmias.
Avulsion: A wound in which a portion of the skin, and sometimes other soft tissue, is partially or completely torn away.
B
Baby: A child up to 1 year of age; also called an infant.
Bacteria: Single-celled micro-organisms that may cause infections.
Bag-valve-mask (BVM) resuscitator: A hand-held ventilation device consisting of a self-inflating bag, a one-way valve, and a face mask; can be used with or without supplemental oxygen.
Bandage: Material used to wrap or cover a part of the body; commonly used to hold a dressing or splint in place.
Bariatric: The science of providing healthcare to those who have extreme obesity.
Behavioural disorder: Any behaviour, resulting from situational, organic, or psychiatric causes, that is dangerous or disturbing to the patient or those around him or her.
Biological death: The irreversible damage caused by the death of brain cells.
Birth canal: The passageway from the uterus to the vaginal opening through which a baby passes during birth.
Bladder: An organ in the pelvis in which urine is stored until released from the body.
Blast injury: An injury resulting from an explosion; caused by pressure waves, flying debris, or being thrown.
Blood-borne pathogens: Bacteria and viruses present in human blood and bodily fluids that can cause disease in humans.
Blood glucose level (BGL): The amount of sugar (glucose) in the blood.
Blood pressure (BP): The force exerted by blood against the blood vessel walls as it travels throughout the body.
Blood pressure cuff: A device used to measure a patient’s blood pressure.
Blood volume: The total amount of blood circulating within the body.
Body cavity: A hollow place in the body that contains organs, glands, blood vessels, and nerves.
Body mechanics: Using the body to gain mechanical advantage in the safest and most efficient way.
Body system: A group of organs and other structures working together to carry out specific functions.
Bone: A dense, hard tissue that forms the skeleton.
Bowel obstruction: An occlusion of the intestinal cavity that prevents normal flow of intestinal contents.
Brachial artery: A large artery located in the upper arm.

429429
Glossary
GLO
SSA
RY
429
Brain: The centre of the nervous system that controls all body functions.
Breathing emergency: An emergency in which breathing is so impaired that life can be threatened.
Breech birth: The delivery of a baby feet- or buttocks-first.
Bronchi: The air passages that lead from the trachea to the lungs.
Bronchitis: A disease causing excessive mucous secretions and inflammatory changes to the bronchi.
Burn: An injury to the skin or other body tissues caused by heat, chemicals, electricity, or radiation.
C
Capillaries: Tiny blood vessels linking arteries and veins that transfer oxygen and other nutrients from the blood to all body cells and remove waste products.
Capillary refill: An estimate of the amount of blood flowing through the capillary beds, such as those in the fingertips. Assessed by how quickly the nail beds return to pink after being compressed.
Carbon dioxide: A colourless, odourless gas; a waste product of respiration.
Cardiac arrest: A condition in which the heart has stopped functioning.
Cardiopulmonary resuscitation (CPR): A technique that combines rescue breathing and chest compressions for a patient whose breathing and heart have stopped.
Cardiovascular disease: A disease of the heart and blood vessels; commonly known as heart disease.
Carotid arteries: Arteries located in the neck that supply blood to the head and neck.
Cartilage: An elastic tissue that acts as a shock absorber when a person is walking, running, or jumping.
Catheter: See suction tip.
Cell: The basic unit of all living tissue.
Cervical collar: A rigid device positioned around the neck to limit movement of the head and neck.
Cervix: The upper part of the birth canal.
Chemical burns: Burns that are caused by caustic chemicals, such as strong acids or alkalis.
Chest thrusts: Forceful pushes on the chest; delivered to a patient with an obstructed airway in an attempt to expel any foreign object blocking the airway.
Chief complaint: A brief description, usually in the patient’s own words, of why EMS personnel were called to the scene.
Child: For the purpose of providing emergency medical care, anyone who appears to be between the ages of about 1 year and puberty; when using an AED, anyone between the ages of 1 and 8 years.
Child abuse: The physical, psychological, or sexual assault of a child, resulting in injury and/or emotional trauma.
Chocking: A technique involving the placement of items, such as wooden blocks, against the wheels of a vehicle to help stabilize it.
Cholesterol: A fatty substance made by the body and found in certain foods.

430
GlossaryG
LOSS
ARY
430
Chronic: Persistent over a long period of time.
Chronic obstructive pulmonary disease (COPD): A disease characterized by a loss of lung function.
Circulatory emergencies: Sudden illnesses or injuries involving the heart or blood vessels.
Circulatory system: A group of organs and other structures that carry oxygen-rich blood and other nutrients throughout the body and remove waste.
Clavicle: See collarbone.
Clinical death: The condition in which the heart stops beating and breathing stops.
Closed fracture: A fracture in which the skin is left unbroken.
Closed wound: A wound in which soft tissue damage occurs beneath the skin but the skin is not broken.
Clotting: The process by which blood thickens at a wound site to seal an opening in a blood vessel and stop bleeding.
Collarbone: A horizontal bone that connects with the sternum and the shoulder; also called the clavicle.
Community-associated MRSA (CA-MRSA): Methicillin-resistant Staphylococcus aureus (MRSA) that occurs in groups of people who have not been recently hospitalized or have not had a medical procedure.
Compassion: An understanding of the emotional state of another person, combined with the desire to alleviate or reduce the suffering of that person.
Competence: The state or quality of being adequately qualified for, or the ability to perform, a particular role; the ability of a patient to understand a responder’s questions and the implications of a decision.
Complete airway obstruction: A blockage of the airway that completely prevents air from reaching a patient’s lungs.
Concussion: A temporary impairment of brain function, usually without permanent damage to the brain.
Confidence: The state of being certain that a chosen course of action is the best or most effective.
Confidentiality: Protecting a patient’s privacy by not revealing any personal information you learn about the patient except to law enforcement or more advanced medical care personnel.
Conflict: A disagreement or difference of opinion between people or groups.
Conflict resolution: A method of settling disagreements through open communication and negotiation.
Congestive heart failure (CHF): A condition in which the heart loses its pumping ability, causing fluid buildup in the body; results in heart failure.
Consent: Permission to provide care, given by a patient or qualified representative, to a responder.
Contraction: The rhythmic tightening of muscles in the uterus during labour; or, the pumping action of the heart.
Coronary arteries: Blood vessels that supply the heart muscle with oxygen-rich blood.
Coronary heart disease (CHD): A disease in which cholesterol and plaque build up on the inner walls of the arteries that supply blood to the heart; also called coronary artery disease (CAD).
Cranial cavity: An area in the body that contains the brain and is protected by the skull.

431431
Glossary
GLO
SSA
RY
431
Crepitus: A grating, crackling, or popping sound under the skin that can be due to a number of causes, including two pieces of bone rubbing against each other.
Critical burn: Any burn that is potentially life threatening, disabling, or disfiguring; a burn requiring more advanced emergency care.
Croup: A viral infection that causes swelling of the tissues below the vocal cords; a common childhood illness.
Crowning: The time during labour when the baby’s head begins to emerge from the opening of the vagina.
Crush injury: An injury caused when a crushing force is applied to any part of the body over a short or long period of time.
Cyanosis: A bluish colouration of the skin and mucous membranes due to the presence of deoxygenated blood in the vessels near the skin’s surface.
D
Decomposition: The chemical break-down of organic matter after death; may release toxic gases in enclosed spaces (e.g., when grain decomposes in a silo).
Defibrillation: An electric shock administered to correct a life-threatening heart rhythm.
Depressants: Substances that affect the central nervous system to slow physical and mental activity.
Dermis: The deeper of the two layers of skin.
Designer drug: A potent and illegal street drug formed from a medicinal substance whose chemical composition has been modified (designed).
Developmental disability: Impaired mental function, resulting from injury or genetics.
Diabetes: A disease in which there are high levels of blood glucose due to defects in insulin production, insulin action, or both.
Diabetic emergency: A situation in which a patient becomes ill because of an elevated or reduced blood glucose level (BGL).
Diaphragm: A dome-shaped muscle that aids breathing and separates the chest from the abdomen.
Diastolic blood pressure: The pressure in the arteries when the heart is at rest.
Digestive system: A group of organs and other structures that digest food and eliminate waste.
Dignity: The state of being worthy of honour and respect.
Direct contact transmission: The transmission of a disease by touching an infected person’s bodily fluids.
Direct pressure: The pressure applied on a wound to control bleeding.
Discretion: The ability to make responsible decisions.
Dislocation: The displacement of a bone from its normal position at a joint.
Distal: Away from the trunk of the body.
Distal circulation: Blood flow below the site of an injury.

432
GlossaryG
LOSS
ARY
432
Downwind: In the direction in which the wind blows.
Dressing: A pad placed directly over a wound to absorb blood and other bodily fluids and to prevent infection.
Drowning: A form of suffocation caused by being immersed in water or other liquid.
Drug: Any substance other than food intended to affect the functions of the body.
Duty to act: A legal responsibility of some individuals to provide a reasonable standard of emergency care; may be required by case law, statute, or job description.
Dyspnea: Difficulty breathing; shortness of breath.
Dysrhythmia: A disturbance in the conduction of electrical impulses within the heart; also called arrhythmia.
E
Ectopic pregnancy: When a fertilized ovum implants anywhere other than in the uterus.
Elder abuse: Any of four types of abuse: the infliction of pain or injury (physical abuse); mental anguish or suffering (psychological abuse); financial or material abuse; or unnecessary confinement or willful deprivation (neglect) by an older adult’s caretaker.
Electrical burn: A burn caused by an electrical source, such as an electrical appliance or lightning.
Embolism: A sudden blockage of a blood vessel by a travelling clot or other material, such as fat or air.
Emergency medical responder (EMR): A responder who has successfully completed a recognized training program in the care and transportation of a patient.
Emergency medical services (EMS) system: A network of community resources and medical personnel that provides emergency care to people who are injured or suddenly ill.
Emergency move: Moving a patient before completing care; done only when necessary.
Emotional crisis: A highly emotional state resulting from stress, often involving a significant event in a person’s life, such as the death of a loved one.
Empathy: Understanding another person’s emotions and mentally sharing those feelings.
Emphysema: A disease in which the alveoli lose their elasticity, become distended with trapped air, and stop working.
Endocrine system: A group of organs and other structures that regulate and coordinate the activities of other systems by producing chemicals that influence the activity of tissues.
Endotracheal: Pertaining to something within the trachea.
Enteral: Pertaining to the small intestine; within the small intestine; also called enteric.
Epidemic: An increase in the number of cases of a disease in a given group of people or geographical area, above what is normally expected for that population or area.
Epidermis: The outer layer of skin.
Epidural hematoma: Arterial bleeding between the skull and dura mater.

433433
Glossary
GLO
SSA
RY
433
Epiglottis: The flap of tissue that covers the trachea to keep food and liquid out of the lungs.
Epiglottitis: A bacterial infection that causes a severe inflammation of the epiglottis.
Epilepsy: A chronic condition characterized by recurrent seizures.
Epinephrine: A naturally occurring hormone; can be used to counter the effects of anaphylaxis.
Epistaxis: A nosebleed.
Esophagus: The tube leading from the mouth to the stomach.
Ethanol (ETOH): Grain alcohol or drinking alcohol; commonly referred to simply as alcohol.
Ethical: Conforming to accepted standards of conduct.
Exhale: To breathe air out of the lungs.
External bleeding: Bleeding from an open wound in the skin.
Extremities: The limbs of the body.
Extrication: The freeing of someone or something from an entanglement or difficulty.
F
Fainting: A loss of responsiveness resulting from a temporary reduction in blood flow to the brain; also called syncope.
Febrile seizure: A seizure caused by a rapid increase in body temperature.
Femur: The thighbone.
Fibula: One of the bones in the lower leg.
Finger sweep: A technique used to remove foreign material from a patient’s airway.
First responder: A person trained in emergency care who may be called on to provide such care as a routine part of his or her job; often the first trained professional to respond to emergencies.
Flail chest: An injury involving fractured ribs that become completely separated from the rib cage and do not move with the rest of the chest during respiration.
Foreign-body airway obstruction: A blockage of the airway by a foreign object, such as a piece of food or small toy, or by fluids such as vomit, blood, mucus, or saliva; also referred to as a mechanical obstruction.
Fracture: A break or disruption in bone tissue.
Freeboard: The distance between the top of a watercraft, or the deck of a ship, and the waterline.
Frostbite: A serious condition in which body tissues freeze, most commonly in the fingers, toes, ears, and nose.
Full-thickness burn: A burn injury involving both layers of skin and underlying tissues; skin may be brown or charred, and underlying tissues may appear white.
G
Gastric distention: Air in the stomach, causing it to bloat.
Gastroenteritis: A condition often resulting from an infection of the gastrointestinal tract.

434
GlossaryG
LOSS
ARY
434
Genitalia: The external reproductive organs.
Genitourinary system: A group of organs and other structures that eliminate waste and enable reproduction.
Glands: Organs that release fluid and other substances into the blood or on the skin.
Glasgow Coma Scale (GCS): A standardized system used to determine a patient’s level of responsiveness; often performed on patients with suspected head injuries.
Glucometer: A device used to measure a patient’s blood glucose level.
Glucometry: The process of measuring the level of glucose circulating in the blood.
Good Samaritan laws: Laws that protect people who willingly give emergency care while acting in good faith, without negligence, with reasonable care and skill, and within the scope of their training.
H
Hallucinogens: Substances that affect mood, sensation, thought, emotion, and self-awareness; alter perceptions of time and space; and produce delusions.
Hazard: Any source of potential damage, harm, or adverse health effects.
Hazardous materials: Substances that are harmful or toxic to the body; can be liquids, solids, or gases.
Head-tilt/chin-lift: A method of opening the airway when there is no suspected head and/or spinal injury.
Hearing impairment: Partial or complete deafness.
Heart: A fist-sized muscular organ that pumps blood throughout the body.
Heart attack: A sudden illness involving the death of heart muscle tissue when it does not receive enough oxygen-rich blood; also called myocardial infarction (MI).
Heat cramps: Painful spasms of skeletal muscles following exercise or work in warm or moderate temperatures; usually involve the calf and abdominal muscles.
Heat exhaustion: A form of shock, often resulting from strenuous work or exercise in a hot environment.
Heat stroke: A life-threatening condition that develops when the body’s cooling mechanisms are overwhelmed and body systems begin to fail.
Hemorrhage: A loss of a large amount of blood in a short time.
Hemorrhoids: Clumps of tissue within the anal canal that contain blood vessels and the surrounding, supporting tissue made up of muscle and elastic fibres.
Hemothorax: A condition in which blood enters the pleural space as a result of a blunt or penetrating trauma.
Hepatitis: A viral infection of the liver.
Herpes: A viral infection that causes eruptions of the skin and mucous membranes.
High-altitude cerebral edema (HACE): An accumulation of fluid between the brain and skull; a progressive stage of acute mountain sickness that occurs 2 to 3 days after arrival at altitude; a serious condition that is difficult to diagnose.

435435
Glossary
GLO
SSA
RY
435
High-altitude pulmonary edema (HAPE): A serious, life-threatening condition in which fluid pools in the lungs, resulting in a breathing emergency; a progressive stage of acute mountain sickness that usually occurs 1 to 4 days after arrival at altitude.
Homeostasis: A constant state of balance or well-being of the body’s internal systems that is continually and automatically adjusted.
Human immunodeficiency virus (HIV): The virus that destroys the body’s ability to fight infection. The resulting state is referred to as AIDS.
Humerus: The bone of the upper arm.
Hyperglycemia: A condition in which too much sugar is in the bloodstream.
Hypertension: High blood pressure.
Hyperventilation: Rapid breathing that upsets the body’s balance of oxygen and carbon dioxide. Hypoglycemia: A condition in which too little sugar is in the bloodstream.
Hypothermia: A life-threatening condition in which the body’s warming mechanisms fail to maintain normal body temperature and the entire body cools.
Hypoxia: A condition in which cells in the body’s tissues are deprived of adequate oxygen.
I
Immobilize: To use a splint or other method to keep an injured body part from moving.
Immune system: The body’s group of responses for fighting disease.
Immunization: A specific substance containing weakened or killed pathogens that is introduced into the body to build resistance to a specific infection.
Impaled object: An object remaining in a wound.
Implied consent: A legal concept assuming that patients who are unresponsive, or so severely injured or ill that they cannot respond, would consent to receive emergency care.
Incident command system (ICS): A system used to manage resources, such as personnel, equipment, and supplies, at the scene of an emergency. ICS is a component of the Incident Management System (IMS).
Indication: A sign, situation, or condition that formally indicates that a given intervention is appropriate.
Indirect contact transmission: The transmission of a disease by touching a contaminated object.
Infant: A child between the ages of 28 days (4 weeks) and 1 year.
Infection: A condition caused by disease-producing micro-organisms, also called pathogens or germs, in the body.
Infectious disease: Disease capable of being transmitted from people, objects, animals, or insects.
Inferior: Towards the feet.
Influenza: Respiratory illness caused by influenza viruses and transmitted from patient to patient via large, virus-laden droplets from coughing or sneezing.

436
GlossaryG
LOSS
ARY
436
Informed (actual) consent: Permission the patient, parent, or guardian gives the responder to provide care. This consent requires the responder to explain his or her level of training, what the responder thinks is wrong, and the care he or she intends to give.
Ingested poison: A poison that is swallowed.
Inhalants: Substances inhaled to produce an effect.
Inhale: To breathe in.
Inhaled poison: A poison breathed into the lungs.
Injected poison: A poison that enters the body through a bite, sting, or syringe. In-line stabilization: A technique used to bring a patient’s head and neck into neutral alignment and minimize movement.
Insulin: A hormone that enables the body to use sugar for energy; frequently used to treat diabetes.
Integumentary system: A group of organs and other structures that protect the body, retain fluids, and help prevent infection.
Interaction: The beneficial or detrimental modification of the effects of one drug by the prior or concurrent administration of another drug, thereby increasing or decreasing the pharmacological or physiological action of one or both drugs.
Internal bleeding: Bleeding that occurs inside the body.
Interpersonal communication: The process of speaking and listening to other people at an emergency scene; can be verbal or nonverbal.
Intervention: A medication, device, therapy, or action that produces an effect or that is intended to alter the course of an illness or injury.
Intracerebral hematoma: Bleeding within the brain. Intramuscular: Within the muscle; a route for administering a drug.
J
Jaw thrust: A method of opening the airway when there is a suspected head and/or spinal injury.
Joint: A structure in which two or more bones are joined.
K
Kidney: An organ that filters waste from the blood to form urine.
Kidney stones: Solid concentrations of dissolved minerals found in the kidneys or ureters.
L
Labour: The birth process; beginning with the contraction of the uterus and dilation of the cervix and ending with the stabilization and recovery of the mother.
Laceration: A cut, usually from a sharp object; may have jagged or smooth edges.
Landing zone: The area where an aircraft lands.
Larynx: A part of the airway connecting the pharynx with the trachea; commonly called the voice box.
Lateral: Away from the midline.

437437
Glossary
GLO
SSA
RY
437
Level of responsiveness (LOR): A patient’s state of awareness, ranging from being fully alert to unresponsive.
Ligament: A fibrous band that holds bones together at a joint.
Limb presentation: An abnormal birth in which the baby’s arms or legs present first; prevents possibility of a normal delivery and could be fatal. Lividity: Following death, a large pooling of blood in the trunk resulting in discolouration.
Lungs: A pair of organs in the chest that provides the mechanism for taking oxygen in and removing carbon dioxide during breathing.
Lyme disease: An illness transmitted by a certain kind of infected tick.
Lymphatic system: A group of glands that supports the circulatory system and protects the body through the formation of antibodies.
M
Malignancy: A characteristic of a disease (usually cancer) in which abnormal cells divide without control and can spread to other cells of the body.
Mechanism of injury (MOI): The event or forces that caused a patient’s injury.
Medial: Towards the midline.
Medical control: The process that allows a physician to direct care given to a patient by pre-hospital professionals (may also be known as transfer of function or medical delegation).
Medication: A drug given to prevent or correct the effects of a disease or condition or otherwise enhance mental or physical well-being.
Membranes: A thin sheet of tissue that covers a structure or lines a cavity, such as the mouth or nose.
Meningitis: An inflammation of the brain or spinal cord caused by a viral or bacterial infection.
Mental disability: Impaired mental function that interferes with normal activity.
Metered-dose inhaler (MDI): A device prescribed to many people with asthma, containing a medication that counters the effects of an asthma attack.
Methicillin-resistant Staphylococcus aureus (MRSA): A staph bacterium that can cause infection by being spread from one person to another through casual contact or contaminated objects and is resistant to many types of antibiotics.
Miscarriage: The spontaneous termination of pregnancy before 20 weeks of gestation.
Multiple-casualty incident (MCI): An emergency situation involving two or more patients.
Muscle: A tissue that lengthens and shortens to create movement.
Musculoskeletal system: A group of tissues and other structures that supports the body, protects internal organs, allows movement, stores minerals, manufactures blood cells, and creates heat.
Myocardial infarction (MI): The death of cardiac muscle tissue due to a sudden deprivation of circulating blood; heart attack.
N
Narcotics: Powerful depressant substances used to relieve anxiety and pain.

438
GlossaryG
LOSS
ARY
438
Nasal cannula: A device used to administer oxygen through the nostrils to a breathing patient.
Nasopharyngeal airway (NPA): A curved tube inserted into the nose to assist in maintaining an open airway.
Nebulization: The use of a small-volume nebulizer to administer aerosolized medication (mist) over a few minutes, ensuring efficient drug delivery.
Neglect: A failure to provide the necessary care, aid, or guidance to dependent persons by those responsible for their care.
Negligence: The failure to provide care at the level for which you are trained, thereby causing injury or damage to another.
Neonate: A child between the age of 0 and 28 days (0 being the day of birth).
Nervous system: A group of organs and other structures that regulates all body functions.
Nitroglycerin: A medication often prescribed to people diagnosed with angina.
Non-rebreather mask: A special mask combined with a reservoir bag, used to administer high-concentration oxygen to a breathing patient through a mask covering both the nose and the mouth.
Nonverbal communication: Communication through body language, such as a nonthreatening posture, facial expressions, and tone of voice.
O
Occlusive dressing: A dressing or bandage that seals a wound and protects it from the air.
Older adult: An individual who is 65 years of age or older.
Open fracture: A fracture that results when bone ends tear the skin and surrounding tissue or when an object penetrates the skin and breaks a bone.
Open wound: A wound resulting in a break in the skin surface.
Organ: A collection of similar tissues acting together to perform specific body functions.
Oropharyngeal airway (OPA): A curved plastic tube inserted into the mouth and positioned at the back of the throat to keep the tongue from blocking the airway.
Osteoporosis: A disease characterized by low bone mass and bone tissue deterioration.
Overdose: A situation in which a patient takes enough of a substance that it has poisonous or fatal effects.
Oxygen: A tasteless, colourless, odourless gas necessary to sustain life.
Oxygen cylinder: A steel or alloy cylinder that contains 100% oxygen under high pressure.
Oxygen delivery device: A device used to administer oxygen from an oxygen cylinder to a patient.
Oxygen regulator: A device used to regulate the amount of oxygen administered to a patient in litres per minute (LPM).
P
Palpation: A method of assessing a patient by applying gentle pressure with the hands.
Pandemic: An epidemic that involves multiple countries, usually affecting a large number of people.

439439
Glossary
GLO
SSA
RY
439
Paradoxical movement: The movement of one part of the chest wall in the opposite direction from the rest of the chest wall.
Paralysis: A loss of muscle control; a permanent loss of feeling and movement.
Paresthesia: A tingling, burning, or prickling sensation in the extremities.
Partial airway obstruction: A blockage of the airway that still allows air to enter a patient’s lungs; typically dislodged by coughing.
Partial-thickness burn: A burn injury involving both layers of skin; characterized by red, wet skin and blisters.
Patella: The kneecap.Pathogen: A disease-causing agent; also called a micro-organism or germ.
Pathophysiology: The study of the abnormal changes in mechanical, physical, and biochemical functions that are caused by injury or illness.
Pelvic cavity: The lowest part of the trunk that contains the bladder, rectum, and, in females, the reproductive organs.
Pelvis: The lower part of the trunk that includes a group of large bones that form a protective girdle around the organs in the pelvic cavity.
Peptic ulcer: A small erosion in the gastrointestinal tract caused by the destruction of the gastric or intestinal mucosal lining by hydrochloric acid.
Perfusion: The circulation of blood throughout the body.
Peritonitis: An inflammation of the peritoneum, the lining of the abdominal cavity.
Personal flotation device (PFD): A buoyant device designed to be worn to keep a person afloat.
Personal protective equipment (PPE): Specialized clothing or equipment worn for protection from hazards.
Pharmacology: The study of drugs and how they interact with the body.
Pharynx: A part of the airway formed by the back of the nose and throat.
Physical assault: Abuse that may result in injury to the body.
Physical disability: A serious injury that results in the loss of limb function or a condition with which there is an impairment that interferes with activity or movement.
Physiology: How living organisms function (e.g., movement and reproduction).
Placard: A sign or notice; a poster.
Placenta: An organ attached to the uterus and unborn child through which nutrients are delivered to the baby; it is expelled after the baby is delivered.
Placenta previa: A condition in which the placenta is attached in the lower uterus.
Plasma: The liquid part of blood.
Platelets: Disc-shaped structures in the blood that are made of cell fragments; help stop bleeding by forming blood clots at wound sites.
Pneumonia: A group of illnesses characterized by lung infection and fluid- or pus-filled alveoli, resulting in inadequate oxygen in the blood.
Pneumothorax: A condition in which air enters the pleural space, usually as a result of a blunt or penetrating trauma.
Poison: Any substance that causes injury, illness, or death when introduced into the body.

440
GlossaryG
LOSS
ARY
440
Poison Control Centre: A specialized health centre that provides information in cases of poisoning or suspected poisoning emergencies.
Posterior: Towards the back.
Postpartum bleeding: Bleeding after the birth of a neonate; characterized by more than 500 mL (17 oz.) of blood loss.
Pregnancy: A condition in which the egg (ovum) of the female is fertilized by the sperm of the male, forming an embryo.
Preschooler: A child 3 to 5 years of age.
Pressure bandage: A bandage applied snugly to create pressure on a wound to aid in controlling bleeding.
Pressure regulator: A device attached to an oxygen cylinder that reduces the delivery pressure of oxygen to a safe level.
Primary assessment: A check for conditions that are an immediate threat to a patient’s life.
Prolapsed cord: A complication of childbirth in which a loop of umbilical cord protrudes through the vagina prior to delivery of the baby.
Prone: A position in which a patient is lying face-down on his or her stomach.
Protocols: Standardized methods.
Proximal: Closer to the trunk of the body.
Pulmonary embolism: A blockage of a pulmonary artery by a clot or other foreign material.
Pulse: The beat felt in arteries with each contraction of the heart.
Pulse oximeter: A device used to measure the percentage of red blood cells that are saturated with oxygen.
Pulseless electrical activity (PEA): A life-threatening arrhythmia in which there is electric activity in the heart, but it is insufficient to produce a pulse.
Puncture: A wound that results when the skin is pierced with a pointed object, such as a nail, a piece of glass, or a knife.
R
Rabies: A disease caused by a virus transmitted through the saliva of an infected animal.
Radial pulse: The pulse felt in the wrist.
Radiation burn: A burn caused by rays, energy, or electromagnetic waves.
Rapid body survey (RBS): A hands-on check that is completed quickly, unless intervention is required; used to look for life-threatening injuries and conditions.
Rapid transport category (RTC): The category that describes patients who require immediate transport to medical care; associated with load-and-go emergencies.
Recovery position: A position for an unresponsive patient that helps to keep the airway open and allows any blood or vomit to drain from the mouth.
Refusal of care: The declining of care by a person.
Reproductive system: A group of organs and other structures that enable sexual reproduction.
Respiration: The process by which the body takes in oxygen and eliminates carbon dioxide; breathing.
Respiratory arrest: A condition in which breathing has stopped.

441441
Glossary
GLO
SSA
RY
441
Respiratory distress: A condition in which breathing is difficult.
Respiratory rate: The number of times a patient breathes per minute.
Respiratory system: A group of organs and other structures that bring air into the body and remove waste through a process called breathing or respiration.
Responsiveness: The state of being aware of one’s self and one’s surroundings.
Resuscitation mask: A pliable, dome-shaped device that fits over the nose and mouth; used to administer oxygen and assist with rescue breathing.
Rib cage: The cage of bones formed by the 12 pairs of ribs, the sternum, and the spine.
Ribs: Bones that attach to the spine and sternum and protect the heart and lungs.
Right-of-way: The right of a vessel or vehicle to cross in front of other vessels or vehicles.
Rigid splint: A splint made of hard, inflexible material such as boards, metal strips, and folded magazines or newspapers.
Rigor mortis: The rigid stiffening of heart and skeletal muscle after death.
Roller bandage: A bandage made of gauze or gauze-like material used to wrap a dressing.
Routine maintenance: Maintenance work that is planned and performed on a regular basis to ensure proper working order of equipment and/or vehicles.
Rule of Nines: A method used to estimate the percent of body surface area burned.
Rule of Palms: A method used to estimate the percent of body surface area burned.
Rule of Thirds: A method of determining if an injury is a joint or mid-shaft injury; works by dividing the long bones into thirds.
S
SAMPLE: An acronym for remembering the questions to ask when gathering important information about a patient; stands for Signs and symptoms, Allergies, Medications, Past medical history, Last oral intake, and Events before the incident.
Scapula: See shoulder blade.
School age: A child between 5 and 12 years of age.
Secondary assessment: A check for injuries or conditions that could become life threatening if not cared for.
Seizure: A disorder in the brain’s electrical activity, marked by loss of responsiveness and often uncontrollable muscle movement.
Sepsis: A life-threatening illness in which the body is overwhelmed by its response to infection; commonly referred to as blood poisoning.
Severe acute respiratory syndrome (SARS): A viral respiratory illness caused by the SARS-associated Coronavirus (SARS-CoV).
Sexual assault: Forcing another person to take part in a sexual act.
Shock: A life-threatening condition that occurs when the circulatory system fails to provide adequate oxygen-rich blood to all parts of the body.

442
GlossaryG
LOSS
ARY
442
Shoulder blade: A large, flat, triangular bone at the back of the shoulder in the upper part of the back; also called the scapula.
Side effect: An often unavoidable effect of using a drug; an action or effect other than those for which the drug was originally given.
Signs: Any observable evidence of injury or illness, such as bleeding or an unusually pale skin colour.
Skeletal muscles: Muscles that attach to bones.
Skeleton: The bones of the body considered together.
Skin: A tough, supple membrane that covers the entire surface of the body.
Sling: A bandage used to hold and support an injured part of the body; often used to support an injured arm.
Soft tissues: Body structures that include the layers of skin, fat, and muscles.
Spinal cavity: An area in the body that contains the spinal cord and is protected by the bones of the spine.
Spinal column: The series of vertebrae extending from the base of the skull to the tip of the tailbone (coccyx).
Spinal cord: A bundle of nerves extending from the base of the skull to the lower back, protected by the spinal column.
Spine: A series of bones (vertebrae) that surrounds and protects the spinal cord; also called the backbone.
Splint: A device used to immobilize body parts.
Sprain: The excessive stretching and tearing of ligaments and other soft tissue structures at a joint.
Stable patient: A patient who does not have a life-threatening condition.
Standard of care: The minimal standard and quality of care expected of an emergency care provider.
START system: A simple system used at the scene of multiple-casualty incidents to quickly assess and prioritize care according to three conditions: respiration, circulation, and level of responsiveness.
Status epilepticus: A continuous seizure or succession of seizures without a period of responsiveness.
Sternum: The long, flat bone in the middle of the front of the rib cage; also called the breastbone.
Stillbirth: The birth of an infant after 20 weeks of pregnancy that died during the pregnancy or labour.
Stimulants: Substances that affect the central nervous system to speed up physical and mental activity.
Stimuli: Anything that rouses or excites an organism or body part to respond.
Stoma: An artificial opening connecting a typically hollow organ (e.g., the trachea or gut) to the outside environment.
Stomach: One of the main organs of digestion, located in the abdomen.
Strain: The excessive stretching and tearing of muscles and tendons at a location other than a joint.
Stress: A normal response to an abnormal physical or emotional situation; occurs when demands are out of balance with resources for coping.

443443
Glossary
GLO
SSA
RY
443
Stress management: Techniques or interventions designed to help an individual cope with stress.
Stroke: A disruption of blood flow to a part of the brain that causes permanent damage; also called a cerebrovascular accident (CVA).
Subarachnoid hematoma: Arterial bleeding in the subarachnoid space.
Subcutaneous: Under the skin.
Subdural hematoma: Venous bleeding in the subdural space.
Substance abuse: The deliberate, persistent, excessive use of a substance without regard to health concerns or accepted medical practices.
Substance misuse: The use of a substance for purposes other than those intended by the manufacturer, or exceeding the recommended dosage.
Sucking chest wound: A type of penetrating chest injury in which a sucking sound is heard with each breath a patient takes due to air freely passing in and out of the chest cavity.
Suctioning: The process of removing matter such as saliva, vomitus, or blood from a patient’s mouth and throat by means of a mechanical or manual device.
Suction tip: A rigid or flexible tubing attached to the end of a suction device and placed in the mouth or throat of a patient to remove foreign matter; sometimes referred to as a catheter.
Sudden infant death syndrome (SIDS): The sudden death of a seemingly normal, healthy infant that occurs during the infant’s sleep without evidence of disease.
Suicide: Self-inflicted death.
Superficial burn: A burn injury involving only the top layer of skin, characterized by red, dry skin.
Superior: Towards the head.
Supine: A position in which a patient is lying face-up on his or her back.
Sympathy: Understanding another person’s emotions.
Symptoms: Something the patient tells you about his or her condition, such as “my chest hurts,” or “I feel sick to my stomach.”
Syncope: Temporary loss of responsiveness; usually related to temporary insufficient blood flow to the brain; also known as fainting, blacking out, or passing out.
Systolic blood pressure: The pressure in the arteries when the heart is contracting.
T
Tachypnea: Rapid breathing.
Tact: Acting appropriately according to one’s situation and environment; the ability to communicate without offending others.
Tendon: A fibrous band that attaches muscle to bone.
Tension pneumothorax: The continual flow of air into the pleural space, which cannot escape; eventually causes the lung to collapse.
Third trimester bleeding: Bleeding during the last 3 months of pregnancy. Usually caused by abruptio placentae, placenta previa, or uterine rupture.
Thoracic cavity: An area in the body that contains the heart and lungs and is protected by the rib cage and upper portion of the spine.

444
GlossaryG
LOSS
ARY
444
Tibia: One of the bones in the lower leg.
Tissue: A collection of similar cells acting together to perform specific body functions.
Titrate: To continuously monitor and adjust the flow of oxygen (or other substances) to a patient.
Toddler: A child 1 to 2 years of age.
Tourniquet: A constricting band applied over an artery above the site of an open wound with severe bleeding; used to decrease blood flow to the injured area for a short period of time.
Trachea: A tube leading from the upper airway to the lungs.
Traction: A pulling force applied to a body part to care for specific musculoskeletal injuries.
Traction splint: A splint used primarily to stabilize fractures of the femur.
Transient ischemic attack (TIA): A temporary disruption of blood flow to the brain; sometimes called a mini-stroke.
Trendelenburg position: A position in which a patient is in a supine position with his or her feet elevated 20 to 30 cm (8 to 12 in.) above the head; helps to improve blood flow to the head and torso.
Triage: The process of sorting and providing care to multiple patients according to the severity of their injuries or illnesses.
Triangular bandage: A bandage that can be used as a sling or to hold a dressing or splint in place.
Tripod position: A position in which a patient is sitting upright, leaning forward, struggling to breathe.
Trunk: The part of the body containing the chest, abdomen, and pelvis.
Tuberculosis (TB): A respiratory disease caused by a bacterium.
U
Umbilical cord: A flexible structure that attaches the placenta to the unborn child, allowing for the passage of blood, nutrients, and waste.
Universal precautions: Safety measures taken to prevent occupational-risk exposure to blood or other bodily fluids.
Unresponsiveness: The state of a patient who is unaware of the surrounding environment and is unresponsive to stimuli.
Unstable patient: A patient with a life-threatening condition.
Upwind: In the direction from which the wind is blowing.
Urinary system: A group of organs and other structures that eliminate waste products from the blood.
Urinary tract infection (UTI): An infection, usually bacterial, at any point within the urinary tract.
Uterine rupture: A spontaneous or traumatic rupture of the uterine wall.
Uterus: A pear-shaped organ in a woman’s pelvis in which an embryo is formed and develops into a baby.
V
Vaccine: A medical substance containing killed or weakened micro-organisms that is introduced into the body to prevent, kill, or treat a disease.

445445
Glossary
GLO
SSA
RY
445
Vagina: The lower part of the birth canal through which the baby passes during birth.
Vascular system: A group of blood vessels that carry blood through the body.
Vector-borne transmission: The transmission of a disease by an animal or insect bite through exposure to blood or other bodily fluids.
Veins: Blood vessels that carry oxygen-poor blood from all parts of the body to the heart.
Ventilation: The process of providing oxygen to the lungs through rescue breathing or by other means.
Ventricles: The two lower chambers of the heart.
Ventricular fibrillation: A life-threatening arrhythmia in which the heart muscle quivers rather than pumping blood.
Ventricular tachycardia: A life-threatening arrhythmia in which the heart muscle contracts too quickly for adequate pumping of blood to the body.
Vertebrae: The 33 bones of the spinal column.
Virus: A disease-causing agent or pathogen that requires another organism to live and reproduce.
Visual impairment: Inability to see adequately or at all; also referred to as blindness or partial blindness.
Vital organs: Organs whose functions are essential to life, including the brain, heart, and lungs.
Vital signs: Important information about the patient’s condition, obtained by checking level of responsiveness, breathing, pulse, skin characteristics, blood pressure, and pupils.
W
Workplace first aid attendant: A designated person who provides advanced first aid in the workplace.
Wound: An injury to the soft tissues.

446
SourcesSO
UR
CES
446
Chapter 1
1. Adapted from the Paramedic Association of Canada. “National Occupational Competency Profile.” 2011. Available at www.paramedic.ca/nocp/ (accessed February 2012).
2. Canadian Organization of Paramedic Regulators. “History.” Available at www.copr.ca/Content.aspx?ContentID=2 (accessed February 2012).
3. Adapted from the Canadian Organization of Paramedic Regulators. “History.” Available at www.copr.ca/Content.aspx?ContentID=2 (accessed February 2012).
4. Adapted from the Paramedic Association of Canada. “National Occupational Competency Profile.” 2011. Available at www.paramedic.ca/nocp/ (accessed February 2012).
5. Paramedic Association of Canada. “About the NOCP.” Available at http://www.paramedic.ca/site/nocp?nav=02 (accessed May 2017).
6. Paramedic Association of Canada. “NOCP Area 2: Communication.” 2011. Available at www.paramedic.ca/nocp/nocp_professionalresponsibilities/ (accessed February 2012).
7. Paramedic Association of Canada. “NOCP Area 1: Professional Responsibilities.” 2011. Available at www.paramedic.ca/nocp/nocp_professionalresponsibilities/ (accessed February 2012).
Chapter 23
1. Adapted with permission from World Health Organization, International Medical Guide for Ships, 3rd Edition. Geneva: World Health Organization, 2007.
2. Ibid.
Chapter 24
1. Adapted from the Canadian Centre for Occupational Health and Safety. “About CCOHS.” 2016. Available at www.ccohs.ca/ccohs.html (accessed August 2017).
2. Adapted from the Canadian Centre for Occupational Health and Safety. “Programs.” 2017. Available at http://www.ccohs.ca/topics/programs/management/ (accessed August 2017).

447447
Index
IND
EX
447
(t means table; f means
figure)
Abandonment, 21
ABCs, 84–86, 91, 102
Abdomen, 55, 101–102,
220–222.
See also Stomach.
Abdominal aortic aneurysm
(AAA), 222–223
Abdominal cavity, 56
Abdominal injuries, 220–223
Abdominal thrusts, 109–110
Abrasions, 178
Abscesses, 182–183
Absence seizure, 252
Acute respiratory distress
syndrome (ARDS), 116
Advance directives, 20, 325
Agonal respiration, 59, 85
AIDS, 42
Air transport, 353–355
Airbags, 339–340
Airway, 57, 84, 106
obstruction of, 107–114
Airway adjuncts, 131–136
Allergic reaction, 114, 116,
377
Allergic response, 63, 64
Altered mental status, 248
Ambulance, 350–352,
416–418
Amputation, 191, 411
Anaphylactic shock, 113, 165
Anaphylaxis, 64, 113–114
Anatomical terminology,
54–55
Aneurysm, 158, 222, 233
Angina pectoris, 142–143
Antibodies, 64
Antigens, 63, 64
Antiseptics, 385
Antivenins, 265
APGAR score, 307–308
Appendicitis, 253–254
Army-type stretcher, 346
Arrhythmia, 148
Arteries, 60, 97–98, 142, 175
Arteriosclerosis, 142
Aspiration, 135
Assault, 31, 332
Assessment model, 80
Assisted ventilation, 119–121,
138
Asthma, 116–117
Asystole, 148, 149f
Atherosclerosis, 142
Atmospheric pressure, 293
Atria, 59–61
Atrioventricular (AV) node, 61
Auscultation, 97, 98–99
Auscultation, chest, 101
Autoimmune disease, 63
Automated external
defibrillator (AED), 28, 148.
See also Defibrillator.
AVPU, 83, 361
Avulsions, 179
B cells, 63–64
Back blows, 109, 111–112
Bacteria, 38, 63. See also
Pathogens.
Bag-valve-mask (BVM)
resuscitator, 119, 123–124,
129t
Ballistics injuries, 181
Bandages, 172, 173t, 174f
Bariatric patients, 109–110,
324, 346–347
Barometric pressure, 278
Barotrauma, 294
Basket stretcher, 344–345
Battle’s sign, 228
Behavioural emergency, 333
Bends, the, 294
Biological agents, 362, 363t
Biological death, 147
Biotransformation, 373
Bladder, 73–74
Blast injuries, 192
Blindness, 325–326
Blisters, 187
Blood, 61, 72, 175
Blood clot, 118, 145
Blood glucose level (BGL),
99–100
Blood pressure (BP), 96–99,
164
Blood pressure cuff, 97
Blood sugar. See Blood
glucose level (BGL).
Blood vessels, 169
Blunt force, 75
Body cavities, 56
Body Mass Index (BMI), 324
Body mechanics, 341
Body part, caring for
amputated, 191
Body structures, 54
Body systems, 56, 74
Bones, 68, 70, 196
Bowel obstruction, 254, 323
Brachial artery, 85, 95
Brachial pulse, 95f
Bradypnea, 120
Brain death, 147
Brain injury, 68, 230–232, 242
Brain trauma, 228
Braxton Hicks contractions,
310
Breastfeeding, 308
Bronchial tubes, inflamed, 115
Bronchioles, 57, 115
Bronchitis, 115
Bronchodilator, 117
Bronchospasm, 115–116
Buildings, 34, 338, 411–412
Bulb syringe, 136
Bullet wound, 180, 181
Burns, 184–191
Bystanders, 14–15, 21, 30–31,
81, 92
Canadian Centre for
Occupational Health and
Safety (CCOHS), 403–404
Canadian C-Spine Rule,
234–235
Canadian Red Cross, 5–6, 404
Capillaries, 57, 60, 175, 178
Capillary refill, 96, 102, 165
Carbon dioxide (CO2), blood,
61
Carbon monoxide (CO), 387
Carbon monoxide (CO)
poisoning, 87–88, 263
Cardiac arrest, 147–148,
148–157
Cardiac arrhythmias, 148
Cardiac contusion, 183
Cardiopulmonary
resuscitation (CPR), 149–157
Cardiovascular disease (CVD),
142–143, 147
Cardiovascular system, 62
Cardioverter-defibrillator
(ICD), 156
Carotid artery, 85, 95
Carotid pulse, 95f
Carpals, 70, 204
Cartilage, 211
CBRNE emergencies, 361–366
Cerebral hematoma, 232–233
Cerebrospinal fluid (CSF), 233
Cerebrovascular accident
(CVA), 142, 157–160. See
also Stroke.
Cerebrovascular disease, 142
Cervical collar, 236–237,
238–240
Cessation of care, 21
Cervix, 303
Chemical agents, 362
Chemical burns, 189–190
Chemicals, caustic, 189
Chest cavity. See Thoracic
cavity.
Chest injuries, 216–220
Chest muscles, 57, 58f
Chest occlusion, 220
Chest thrusts, 110
Childbirth, 302–311, 311–313
Chin-lift, 84, 119
Chocking, 339
Chronic obstructive
pulmonary disease (COPD),
115–116
Cilia, 63
Cincinnati Pre-hospital Stroke
Scale (CPSS), 160
Circulation, 85–86, 102, 361
Circulatory cycle, 60
Circulatory impairment, 107
Circulatory system, 56, 59–62,
106
Clamshell, 344
Clinical death, 147
Closed chest wound, 216
Closed fracture, 196
Closed wound, 170, 182–183
Clot formation, 61
Cognitive impairment, 328
Cold environment, 279

448
IndexIN
DEX
448
Cold-related illness, 280,
284–288
Cold-water immersion,
290–291
Collarbones, 101
Communication, 14–15,
23–24, 29
Compartment syndrome, 192
Confined spaces, 31, 34,
406–407
Confusion, 323, 324
Congenital heart disease, 142
Congestive heart failure
(CHF), 118, 146–147
Consent, 19–21, 100
Contraction, heart, 60
Contraction, muscle, 76
Contraction phase, heart,
96, 97
Contrecoup effect, 231
Contusion, 178
Coronary artery disease, 142
Coronary heart disease
(CHD), 142
Coronavirus, 44
Counselling, 17, 366
Coup effect, 231
Cranial cavity, 56
Crime scene, 30–31, 181, 332
Crisis intervention, 331–336
Critical Incident Stress (CIS),
16–17
Crossed-finger technique,
133
Crowd management agents,
274, 362t
Crowning, 302, 303f, 305
Crush injuries, 170, 191–192
Crush syndrome, 192
Cushing’s reflex, 230
Cushing’s response, 230
Cushing’s triad, 230, 231f
Cyanosis, 95
Dams, 33
Decontamination, 49, 365
Deep vein thrombosis, 142
Defences, 39, 62
Defibrillation, 148–149,
154–156
Defibrillator, 148, 154–157.
See also Automated
external defibrillator (AED).
Depression, 334–335
Dermatitis, 183
Dermis, 71
Development impairment,
325
Diabetes, 99
Diabetes mellitus, 249
Diabetic emergencies,
249–251
Diaphragm, 57, 58f
Diastolic blood pressure (D),
97, 98
Digestive system, 73
Direct pressure, 175–176
Directed first aid, 364
Disabilities, 325–328
Disaster response plans, 29
Disease transmission, 39–41,
45–50
Disinfection, 380–381
Dislocation, 196–197
Dispatcher, 261
Disposables, 49
Distal position, 55
Do not resuscitate order
(DNR), 325
Documentation, 22–23, 103
Domestic violence, 332
Dorsalis pedis pulse, 102
Downed electrical wires, 33,
187
Dressings, 172, 173t
Drip set, 374–375
Drowning, 288–291
Drug labs, 31
Drug names, 372
Drug–receptor interaction,
373–374
Drugs, 270
Dry heat sterilization, 385
Durable powers of attorney
for healthcare, 20
Dyspnea, 85, 106
Dysrhythmias, 148
E+V+M, 93t
Ear, fluid draining from, 230
Earthquakes, 31
Ectopic pregnancy, 310–311
Electrical burns, 190
Electrical lines, downed, 33,
187
Electricity, 33
Electrocardiogram (ECG), 61
Electrocution, 147, 190, 228,
411
Electronic Patient Care
Reports (e-PCRs), 23
Embolus, 118
Emergency Medical
Responder (EMR), 8, 10, 13,
14, 18
duties, 351
guidelines, 366
personal hygiene, 46
preparation, 27–29
psychological impact of
CBRNE events on,
365–366
responsibilities in crises,
336
responsibilities in
workplace, 402, 403
roles of, 8, 333, 402
safe lifting technique,
341
Emergency medical system, 7
Emergency response, 8, 28–29
Emergency Scene
Management (ESM), 338
Emergency scene safety
guidelines, 30
Emergency Vehicle Operator
(EVO) course, 351
Emphysema, 115
Endocrine system, 72–73
Enhancement programs, 13
Enteral administration, 372
Environment, assessing, 80–82
Epidemic, 41
Epidermis, 71
Epilepsy, 252
Epinephrine auto-injector, 114
Epistaxis, 176–177
Equipment, 28, 49
Esophagus, 57
Evidence, 31
Evisceration, 222
Explosion, 192
Explosive devices, 363
Exposure, 277
Exposure control plans, 49–50
Exposure to infection, 50
External bleeding, 88, 174–176
Extrication, 338–341
Eye-opening response, 92–93
Eye socket, 228, 230
Facial trauma, 230f
False labour, 310
Farm equipment, 409–411
FAST, 160
Fat layer, 72
Febrile seizure, 252
Femoral artery, 209
Fentanyl, 272
Fever, 63, 254, 322
Fibrillation, 148
Finger sweep, 110
Fingers, 102, 207
Fingertips, 96
Fire, 33
Firearms injury, 181
First aid attendant, 402
First aid incidents, 50
First aid kit. See Trauma
response kit.
First-degree burn, 184
First responders, 8
Fish hook, 182
Flail chest, 217–218
Flail segment, 217
Flesh-eating disease, 172
Flexion, 67
Floods, 31
Forces, 75–76
Fore-and-aft lift, 343
Foreign-body airway
obstruction (FBAO), 107–113
Forest fires, 31
Fowler position, 89, 90f
Fractures, 196, 201, 202
French catheter, 136
Frost nip, 286
Frostbite, 286, 288
Full-thickness burn, 185, 186,
188–189
Fungi, 38
Furanocoumarins, 264

449449
Index
IND
EX
449
Gasping, 106
Gastroenteritis, 254
Gastrointestinal (GI) system,
73
Gastrointestinal tract, 220,
254–255
Gel disinfectant, 46
Generalized seizures, 251.
See also Seizures.
Generic name, 372
Genital injuries, 225
Genitalia, 74
Genitourinary system, 73–74
Geriatric patients, 323–324
Gestational diabetes, 249
Giant hogweed, 264–265
Glands, 72
Glasgow Coma Scale (GCS),
92–93
Global Harmonized System
(GHS), 386
Gloves, 47, 48, 380
Glucagon, 251
Glucometer, 99–100, 250
Glucose, 99–100
Glucose gel, 251
Glucose level, 249, 250
Glutaral, 385
Golden Hour, 89
Good Samaritan laws, 20
Grand mal seizure, 251
Grease burns, 188
gtt/min, 375
Gunshot wounds, 31
Hamstring, 67
Handwashing, 46, 49
Hazardous materials, 32–34,
404–405, 407–408
Hazards, 30, 29–34, 80–82, 338
Haz-mat, 404, 406
Head grip, 236–237
Head injury, 101, 203–204,
228–242
Head-tilt/chin-lift, 84, 119
Head-to-toe examination,
100–103. See also Toe-to-
head examination.
Heart, 59f, 60–61, 94, 96–97
Heart failure, 146–147
Heartbeat, 60, 94
Heat cramps, 281, 282, 283f
Heat Escape Lessening
Position (HELP), 290
Heat exhaustion, 281, 282,
283f
Heat-related illness, 280–283
Heat stress, 281
Heat stroke, 281, 282, 283f
Helicopter, 353, 354f
Helmets, 242–244
Hemoglobin, 61, 86
Hemorrhage control, 174
Hemothorax, 218
Hepatitis, 40t, 41–42
Hepatitis A–E, 41
Herpes, 40t
High-altitude illness, 292,
292t–293t
High-pressure injection (HPI)
injuries, 192
Histamine, 63, 64
HIV/AIDS, 40t, 42
Homeostasis, 39
Hormones, 72
Hostage situations, 31
Hostility, 21
Hot environment, 279–280
Humoral immunity, 64
Hurricanes, 31
Hyperglycemia, 100, 249,
250, 251
Hypersensitivity, 64
Hyperventilation, 119, 138
Hypoglycemia, 100, 250, 251
Hypoperfusion, 87–88
Hypothermia, 284, 290
Hypothermia wrap, 284, 286,
287f
Hypoxemia, 292
Hypoxia, 87t, 106, 124
Hypoxic, 59
Hypoxic drive, 115–116
Ibuprofen, 145
Ice, 33
Ice storm, 31
Iliac crest, 88
Immune system, 39, 62–64
Immunization, 45, 64
Impaled object, 180–182
Incident command system
(ICS), 358–359
Incident commander, 358–359
Incident Management
System (IMS), 358
Incident report, 19
Incident Scene Management
(ISM), 338
Industrial equipment, 409–411
Infants, 92–93, 316. See also
Neonate; Pediatric patients.
Infection, 38–39, 42–47,
170–172
exposure to, 50
Health Canada
recommendations for,
50
responses to, 62–64
Infectious diseases, 37, 39, 40t
Inflammation, 63
Inflammatory immune
response, 64
Inflammatory response, 63
Influenza, 44–45
Inhalants, 272
Inhalation injury, 189
Injections, 378–380
Injuries, how they occur,
75–76. See also Mechanism
of injury (MOI).
In-line stabilization, 235–236
Innate defence, 62, 63
Instructional directives, 20
Insulin, 249–250
Insulin pump, 249
Insulin reaction, 250
Integumentary system,
71–72. See also Skin.
Intellectual impairment, 325
Intercostal muscles, 57
Internal hemorrhaging, 101,
177–178, 223
International Medical Guide
for Ships, 396–398
Interstitial fluid, 62
Intracellular pathogens, 64
Intracranial pressure (ICP), 232
Intranasal administration, 378
Intravenous (IV)
administration, 374–378
Involuntary muscles, 67–68
Jaw thrust technique, 84, 119
Joint, 67–68, 70–71, 196–197,
199–201, 209
Jugular venous distention
(JVD), 147
Kidney stones, 255
Kidneys, 73–74
Labour, 302–304, 310
Lacerations, 178–179
Lateral position, 54
Lateral recumbent position,
89, 90f
Lawsuits, 17, 20, 22
Left-sided heart failure,
146–147
Leg bones, 70
Leg injuries, 102, 209–211
Legal and ethical issues, 17–23
Leukocytes. See White blood
cells.
Level of responsiveness (LOR),
65, 82–84, 89, 92-93, 361
Liability, 20, 352
Lifting devices, 344–346
Ligaments, 68, 70, 197
Lightning, 190, 228
Limb presentation, 312–313
Linen, soiled, 381
Liver injury, 220
Living will, 325
Lockjaw, 171
Lock-out/tag-out, 406
Log-rolling, 240
Long board, 344
Long bones, 70
Lower extremities, 208–212
Low-flow maintenance
oxygen, 88
Lymph, 62
Lymph nodes, 62
Lymphatic duct, 62
Lymphatic system, 62
Lymphocytes, 63–64
Lysozyme, 63
Macrophages, 64
Malaria, 38
Marine environment, 383–399

450
IndexIN
DEX
450
Marine Occupational Health
and Safety Regulations
(MOHS), 384–385
Mast cell, 64
Mechanical energy, 75–76
Mechanism of injury (MOI),
80, 81, 196, 228. See also
Injuries, how they occur.
Meconium aspiration, 306
Medical control protocols
(MCPs), 12
Medical director, 11–12, 24,
369
Medical identification
product, 100
Medical oversight, 11
Medical terminology, 24–25,
421–425
Medications, 370–373, 398
Memory B cells, 64
Meningitis, 40t, 43
Mental health, 29
Mental health crises, 333–335
Mental state, 21
Metered-dose inhaler, 116–117
Methicillin-resistant
Staphylococcus aureus
(MRSA), 43
community-associated
MRSA (CA-MRSA), 43
Middle East Respiratory
Syndrome (MERS), 44
Middle East Respiratory
Syndrome Coronavirus
(MERS-CoV), 44
Midwives, 309
Migraines, 253
Mines, 34
Mites, 320
Mobility, labour, 9–10
Mood disorder, 333, 334
Motion restriction devices,
241–242
Motor functions, 65
Motor response, best, 93
Motor-sensory assessment,
102
Motor vehicle collision
(MVC), 33, 338–340
Mouth, techniques for
opening, 133, 134f
Mouth-to-mask ventilation,
154
Moving patient, 340–347
Mucous membranes, 39, 63
Multi-level stretcher, 345, 346
Multiple-casualty incidents,
357–367, 361t
CBRNE emergencies,
361–366
Muscle compartment, 192
Muscles, 66–68, 76
Musculoskeletal injuries,
195–197, 201–204
Musculoskeletal system,
66–71
Myocardial contusion, 183
Myocardial infarction (MI),
142, 143–146
Myocardial infarction, silent,
145
Naloxone, 272
Nasal cannula, 127–128
Nasopharyngeal (nasal)
airways (NPA), 134–135
National Occupational
Competency Profile (NOCP),
9
Natural disasters, 31–32
Natural gas, 408
Nebulization, 117
Neck, 101, 197
Necrotizing fasciitis, 172
Needles, 379
precautions with, 48
Negligence, 20
Neonate, 156, 306–308, 316.
See also Newborns.
Nerve cells, 65
Nervous system, 64–66, 68
body temperature and, 72
effects of drugs on, 271,
373–374
Neurological damage, 92–93
Newborns, 316. See also
Neonate.
Nitroglycerin, 143, 145–146
Nitroglycerin patch, 156
Non-convulsive seizure, 252
Non-proprietary name, 372
Non-rebreather mask, 128,
129t
Non-shockable rhythm, 149f
Non-specific response, 62, 63
Nose, fluid coming from, 228
Nosebleed, 176–177
Notes, 31
Nuchal cord, 305
Obesity, as risk factor, 324.
See also Bariatric patients.
Occupational Health & Safety
(OH&S), 404
Off-chest time, 149
Ongoing assessment, 103
Open chest wound, 216
Open fracture, 196
Open wound, 170, 178–182
Opioid overdose, 272
Opioids, 272, 273
Opportunistic infections, 42
OPQRST, 91–92, 100, 144
Orbit fractures, 228, 230
Organs, 56, 222
Oropharyngeal airways
(OPA), 131–133
Osteoarthritis, 71
Osteoporosis, 70, 324
Overdose, 270
Oxygen, 106, 124
Oxygen cylinder, 125–127
Oxygen humidifier, 128
Oxygen saturation (SpO2),
86–88, 125
decreased, 292
Oxygen starvation, 58
Oxygen, supplemental, 88,
124–131, 156
“blow by,” 307
calculations for, 126
flow rates, 129t
in neonate, 307
Oxygenation, 86
Pacemaker, 156
Pain, assessing, 91–92, 144
Palliative patients, 324–325
Palpation with blood
pressure cuff, 97–98
Pandemic, 41
Panic attack, 334
Panic disorder, 334
Paradoxical movement, 217
Paramedicine, 8–11
Parasitic worms, 38
Parenteral administration,
372
Partial seizure, 252
Partial-thickness burn, 185,
186
Pathogens, 38–41, 62
Pathophysiology, 56
Patient, 81–82, 91–92, 370
Patient Care Report, 22–23
Patient entrapment, 338
Patient positioning, 89, 90f
Pediatric patients, 316–322.
See also Infants; Neonate.
Pelvic cavity, 56
Pelvic injuries, 223–225
Penetrating force, 75
Penetrating wound, 181
Pepper spray, 274, 362t
Peptic ulcer, 255
Peripheral arterial disease,
142
Peripheral edema, 147
Peri-shock pause, 155
Peristalsis, 62
Peritonitis, 221, 253
Personal hygiene, 46
Personal protective
equipment (PPE), 45, 47–48,
363
Petit mal seizure, 252
Pharmacodynamics, 373–374
Pharmacokinetics, 373
Pharmacology, 369–382
shipboard, 396
Pharmacological
terminology, 371
Phonetic alphabet, 419–420
Pillow splint, 212
Pink eye, 321
Placenta, 303, 308, 311
Plan of action, 28–29
Plants, 260–261, 263–265
Plaque, in arteries, 142
Plasma, 61, 62
Platelets, 61
Pleural space, 218–219
Pneumonia, 118

451451
Index
IND
EX
451
Pneumothorax, 218–219
Pocket mask, 121
Point tenderness, 100
Poison, 259, 261–262, 275
by absorption, 260, 263–265
by ingestion, 260, 262
by inhalation, 260, 262–263
by injection, 265–270
by marine animals, 266–267
Poison Control Centres, 261,
262
Poisoning, 261–275
Posterior tibialis pulse, 102
Postpartum bleeding, 309
Post-rescue collapse, 290
Post-traumatic stress disorder
(PTSD), 16–17
Power of attorney, 20
Pregnancy and delivery,
302–311, 313. See also
Neonate.
Pre-hospital care system, 7,
8, 10–12
Premature labour, 310
Preparation, psychological,
29
Preplanning, 28
Preschoolers, 316
Pressure bandage, 172
Pressure regulator, 129, 130f,
131
Pressure waves, 192
Primary assessment, 82–90
Professional development, 29
Prolapsed cord, 311–312
Proprietary name, 372
Protective recommendations,
47t
Protozoa, 38
Proximal position, 55
Proxy directives, 20
Psilocybin (“mushrooms”),
273
Psychiatric condition, 333
Psychological crises, 332–333
Puffer. See Metered-dose
inhaler.
Pulmonary barotrauma, 294
Pulmonary edema, 118, 146
Pulmonary embolism,
118–119, 142, 165
Pulse, 60, 85–87, 94–95
Pulse oximeter, 86–87
Pulse oximetry (SpO2), 86–88.
See also SpO2.
Pulseless electrical activity
(PEA), 148
Puncture wound, 180
Pupils, 96, 97f, 232
Pus, 63
Quadrants, 55
Quadriceps, 67
Rabies, 41, 268
Raccoon eyes, 228
Radial artery, 85, 95
Radial pulse, 94, 95f, 98
Radiation burns, 191
Radiotelephone, 392–393,
419–420
Range of motion (ROM)
assessment, 102
Rapid body survey (RBS), 88,
90–91
Rapid transport category
(RTC), 88
Reassessment, 90–91
Recovery position, 83, 89
Recurrent seizures. See
Epilepsy.
Red blood cells, 61
Red Crescent Society, 5
Red Cross Society, 5–6
Refusal of care, 20, 21
Remote locations, 407
Reproductive systems, 74
Rescued survivors at sea,
388–389
Rescuer safety, 338
Respiration, 57, 94, 361
averages, 94t
Respiratory arrest, 105, 107,
119–121, 138
Respiratory distress, 105, 114,
116, 138
Respiratory emergencies,
106–107
Respiratory system, 57–59, 60
Responsiveness, 65
Resuscitation devices,
121–124
Resuscitation masks, 119,
121–124, 128, 129t, 154
Retinal damage, 322
Return of spontaneous
circulation (ROSC), 149, 157
Rib cage, 57, 58f
RICE, 203
Rickettsia, 38
Right-sided heart failure, 147
Riot control agents, 274, 362t
Road rash, 178
Roadside construction sites,
407
Roller bandage, 172–173,
174f, 200
Room air saturation, 87
Rug burn, 178
Rule of Nines, 186–187
Rule of Thirds, 199
Sacral coccygeal spine,
223–224
Safety, 14, 30
Safety Data Sheets (SDSs),
32–33
for poisons, 262
shipboard, 386
in workplace, 404
Safety perimeter, 364
Safety, personal, 30
Saliva, 63
SAMPLE, 91
Scene assessment, 80–82,
338, 406
Schizophrenia, 335
Scope of Practice, 17–18
SCUBA-related illness,
293–295
Secondary assessment,
91–103, 318
Second-degree burn, 185
Security perimeter, 364
Seizures, 89, 251–253, 257
Self-care, 15–17, 113
Self-protection, 189, 288, 289
Sensitivity to allergen, 64
Sensory functions, 65
Septic shock, 165
Sesamoid bones, 70
Severe Acute Respiratory
Syndrome (SARS), 44
Shaken Baby Syndrome (SBS),
322
Sharps, 48–49, 99
Ship-to-ship transfer, 355
Shock, 86, 106, 163–168
Shock position, 166
Shockable rhythms, 148
Short boards, 241
Shrapnel, 192
Sildenafil, 146
Sinoatrial (SA) node, 60–61
Sinus rhythm (SR), 61, 148
Six Rights of Medication,
114, 371
Skeletal muscles, 66–68
Skeleton, 68–70
Skin, 39, 71–72, 86, 95–96.
See also Integumentary
system.
Slings, 201, 206
Sliver, 181–182
Slow-motion snapping
motion, 133
Soft tissues, 169, 191–192
Specific response, 62, 63–64
Spill management, 49, 380
Spinal cavity, 56
Spinal cord, 65, 67, 68, 233.
See also Spinal injury;
Spine.
Spinal immobilization,
240–242
Spinal injury, 101, 203–204,
228, 233–244
moving, 342, 344
opening airway with, 122
Spinal motion restriction
(SMR), 83–84, 233–242
Spine, 57, 83–84, 101, 228, 229f
Spine board, 344
Spleen injury, 220
Splints, 198–201, 204–205
SpO2, 125, 128. See also Pulse
oximetry (SpO2).
Spontaneous abortion, 310
Spontaneous pneumothorax,
219
Sprain, 197, 202
Sputum, 115
Stabbings, 31
Staging officer, 358

452
IndexIN
DEX
452
Standard mask, 128, 129t
Standards, 17–18
START system, 360–361, 362t
Status epilepticus, 252
Steam sterilization, 385
Sterilization techniques, 385
Sternal forehead grip, 238
Sternal/spinal grip, 238
Stitches, 173–174
Stoma, 120, 137
Stomach, 120, 220. See also
Abdomen.
Strain, 197, 202
Stretchers, 344–346
Stridor, 135
Stroke, 147, 157–160. See
also Cerebrovascular
accident (CVA).
Structures, unsafe, 34. See
also Buildings.
Subcutaneous emphysema
(SCE), 219
Substance misuse/abuse,
270–274
Subungual hematoma, 183
Sucking chest wound, 219
Suction devices, 136–137
Suctioning, 136–137
Sudden infant death
syndrome (SIDS), 322
Suicide, 31, 332, 334–335
Sunburn, 191
Superficial burn, 184, 187
Supraglottic airway (SGA),
135–136
Surgical instruments, 385
Sutures, 173–174
Syncope, 248
Synovial fluid, 70
Systemic infection, 170
Systolic blood pressure, 97, 98
T cells, 63–64
Tachypnea, 119, 120, 138, 144
Tadalafil, 146, 293t
Tarsals, 70, 208, 212
Tear gas, 274
Tears, 63
Temperature homeostasis,
278–280
Tendons, 67, 76, 197
Tension pneumothorax, 165,
219
Terrorism, 362
Thermal burns, 188–189
Third-degree burn, 185
Third trimester bleeding, 311
Thoracic cavity, 56
Thoracic duct, 62
Thrombocytes. See Platelets.
Thrombophlebitis, 376
Thrombosis, 376
Thrombus, 118
Toddlers, 316
Toe-to-head examination, 318
Tongue-jaw lift, 133, 134f
Tonic-clonic seizures, 251
Tonsil tip catheter, 136
Tornadoes, 31
Tourniquets, 174, 175f
Toxic chemicals, 408–409
Traffic, 33–34
Training, 29
Training levels, 10
Transfer board, 346
Transfer of care, 21–22
Transient ischemic attack
(TIA), 157–160
Transport, 88–89, 253, 393,
396, 403
Trap stabilization, 237
Trapezius squeeze, 237
Trauma response kit, 28
Treatment/interventions,
order of, 103
Trenches, 34
Trendelenburg position, 89,
90f
Triage, 358–361, 364
Trunk, 55
Tuberculosis (TB), 40t, 42
multidrug-resistant
(MDR TB), 43
Type 1 diabetes, 249
Type 2 diabetes, 249
Typhus, 38
Umbilical cord, 302, 305, 308,
311–312
Unresponsiveness, 82–84,
106, 110, 111f, 112, 290
Upper body motion
restriction devices, 241–242
Upper extremity injuries,
204–207, 208f
Urinary stasis, 256
Urinary system, 73
Urinary tract infection (UTI),
256
Urushiol, 263–264
USP, 372
Uterine rupture, 311
Vaccinations, 45, 50, 64
Vancomycin, 43
Vancomycin-resistant
enterococci (VRE), 43–44
Vardenafil, 146
Vascular disease, increased
risk for, 324
Vascular system, 60, 142–143
Veins, 60, 175
Ventricles, 59–60
Ventricular fibrillation (VF),
148, 149f
Ventricular tachycardia (VT),
148
pulseless VT, 149f
Verbal response, best, 92–93
Vertebrae, 65, 70, 233
Viruses, 38
Vital signs, 92–100
Voluntary muscles, 67–68
Vomiting, 254, 262, 322
Water breaking, 302
Water, as hazard, 33
Water rescue, 33
Weapons of mass
destruction, 361
Wells, 34
White blood cells, 61, 62, 63
Wild parsnip, 264–265
Workplace, 11, 28, 48–50,
401–413
Workplace Hazardous
Materials Information
System (WHMIS), 386, 404
Wounds, 170–176

We would like to thank the American Red Cross for permission to use the following illustrations and photographs
(copyright © The American National Red Cross).
41 mosquito; ©iStockphoto.com/Michael Pettigrew
117 child with nebulizer; © iStockphoto.com/Gordana Joanovic
172 gangrenous foot; © 2012 MICHAEL ENGLISH,
M.D. - Custom Medical Stock Photo. All Rights Reserved.
183 abscess; © 2012 MICHAEL ENGLISH,
M.D. - Custom Medical Stock Photo. All Rights Reserved.
260 inhaled poisons; © iStockphoto.com/toddmedia
260 absorbed poisons; © iStockphoto.com/savageultralight
260 injected poisons; © iStockphoto.com/Michael Pettigrew
262 stingray; ©iStockphoto.com/Niko Guido
264 poison ivy; © iStockphoto.com/NoDerog
Images by Wendy Gu
57 Figure 4–7
58 Figure 4–8
58 Figure 4–9, a-b
59 Figure 4–11
66 Figure 4–16, a-b
68 Figure 4–19
69 Figure 4–22, a-c
70 Figure 4–23
71 Figure 4–24
75 Figure 4–30
97 Figure 5–14
101 chest auscultation
inset images
118 Figure 6–17
119 Figure 6–18
145 Figure 7–3
149 Figure 7–8
149 Figure 7–9
149 Figure 7–10
171 Figure 9–1, b
56 Figure 4–4
57 Figure 4–6
59 Figure 4–10
65 Figure 4–15
67 Figure 4–17
69 Figure 4–21
71 Figure 4–25
72 Figure 4–26
73 Figure 4–27
73 Figure 4–28
74 Figure 4–29
95 Figure 5–12
132 Figure 6–39
133 Figure 6–43
142 Figure 7–1
152 chest compression
illustrations
178 Figure 9–8, b
179 Figure 9–9, b
179 Figure 9–10, b
180 Figure 9–11, b
180 Figure 9–12, b
196 Figure 10–1
197 Figure 10–2
264 poison sumac; © iStockphoto.com/AlpamayoPhoto
264 poison oak; © iStockphoto.com/devdogg
266 black widow spider; © iStockphoto.com/Mark Kostich
266 brown recluse spider; © iStockphoto.com/Clint
268 Northern Pacific Rattlesnake;
© iStockphoto.com/Dave Rodriguez
268 Massasauga Rattlesnake; © Reptilia Zoo and
Education Centre
268 Prairie Rattlesnake; © Reptilia Zoo and Education Centre
292 hyperbaric pressure bag; Eric Johnson
186 Figure 9–20
187 Figure 9–21
204 Figure 10–15
217 Figure 11–2
217 Figure 11–3
221 Figure 11–8
223 Figure 11–10
224 Figure 11–11
229 Figure 12–1
230 Figure 12–2
232 Figure 12–4
233 Figure 12–5
235 Figure 12–6
235 Figure 12–7
303 Figure 16–2
305 Figure 16–3
311 Figure 16–8
312 Figure 16–9
323 Figure 17–2
197 Figure 10–3
200 Figure 10–10
202 Figure 10–13
205 Figure 10–16
207 Figure 10–19
209 Figure 10–23
209 Figure 10–24
218 Figure 11–4
218 Figure 11–5
219 Figure 11–6
221 Figure 11–8
222 Figure 11–9, a-d
260 Figure 14–1, a
269 Figure 14–8
302 Figure 16–1
305 Figure 16–4
305 Figure 16–5
306 Figure 16–6
312 Figure 16–10
312 Figure 16–11
313 Figure 16–12
409 Figure 24–6
411 Figure 24–7
412 Figure 24–8

EMERGENCY CARE for Professional
Responders
redcross.ca/firstaid | 1-877-356-3226
shop.redcross.caShop for first aid kits, merchandise, and many safety items—for work, home, travel, or as meaningful gifts.
redcross.ca/appsDownload our Free First Aid App and have instant access to videos, interactive quizzes, and simple step-by-step advice.
redcross.ca/firstaidBecome a First Aid Instructor. Teach others invaluable skills that can help save lives.
redcross.ca/firstaidfeedbackLet us know what you think about the Red Cross course you just completed.
redcross.ca/findacourseAs well as traditional courses, Red Cross offers a variety of online health and safety courses including WHMIS, Transportation of Dangerous Goods (TDG), and more.
Red Cross First Aid. The Experience to Make a Difference.
Free Red Cross First Aid AppDownload it today!redcross.ca/apps .CA
CA
NA
DIA
N R
ED C
RO
SSEM
ERG
ENC
Y C
AR
E FOR
PRO
FESSION
AL R
ESPON
DER
S