
Easy-Windows-Troubleshooting - World Radio History
212
-
Upload
khangminh22 -
Category
Documents
-
view
2 -
download
0
Transcript of Easy-Windows-Troubleshooting - World Radio History

R. A
. Penfold


EasyWindowstroubleshooting

Other Computer Titles
by
Robert Penfold
BP450 How to Expand and Upgrade You- PCBP467 How to Interface PCsBP470 Linux for Windows usersBP479 How to Build Your Own PCBP484 Easy PC troubleshooting
Other Windows Titles
BP445 Windows 95 - Hard Disc and File ManagementBP455 Windows 98 - Hard Disc and File ManagementBP456 Windows 98 ExplainedBP458 Tune up Windows 98BP459 Windows 98 ConnectionsBP466 Understanding Windows 98 RegistyBP469 Simple Networking with Windows 98BP493 Windows Me ExplainedBP496 Getting the Most from Windows MeBP502 Windows Me Multimedia Explained

EasyWindowstroubleshooting
Robert Penfold
Bernard Babani (publishing) LtdThe GrampiansShepherds Bush RoadLondon W6 7NFEnglandwww.babanibooks.corn

Please note
Although every care has been taken with the production of this book toensure that any projects, designs, modifications, and/or programs, etc.,contained herewith, operate in a correct and safe manner and also thatany components specified are normally available in Great Britain, thePublisher and Author do not accept responsibility in any way for thefailure (including fault in design) of any projects, design, modification,or program to work correctly or to cause damage to any equipment thatit may be connected to or used in conjunction with, or in respect of anyother damage or injury that may be caused, nor do the Publishers acceptresponsibility in any way for the failure to obtain specified components.
Notice is also given that if any equipment that is still under warranty ismodified in any way or used or connected with home -built equipmentthen that warranty may be void.
© 2001 BERNARD BABANI (publishing) LTD
First Published - March 2001
Reprinted - June 2001
British Library Cataloguing in Publication Data
A catalogue record for this book is available from the British Library
ISBN 0 85934 495 9
Cover Design by Gregor Arthur
Printed and bound in Great Britain by Cox & Wymai

Preface
Although the Windows 95, 98, and Me operating systems are widelyregarded as having a lack of stability, this reputation is not entirely fair.Software as complex as any version of Windows is never likely to befully debugged, but it is not really any built-in bugs that are the majorproblem with Windows. It is the alterations that are made to the operatingsystem after the basic installation process has been completed. Theoperating system is added to and altered each time any hardware ormajor piece of software is added or removed. Windows can be usedwith an enormous range of software and hardware, but this leaves itvulnerable to problems that originate in hardware drivers, installationprograms, and uninstallers. Applications programs can also introducedifficulties if they do not str ctly abide by the rules involving memorymanagement, file naming, etc.
Ideally the user would install Windows and some applications programs,and then make no further changes to the system. For most users th s isnot practical though, and r ew hardware has to be added, softwareupgrades have to be installed from time to time, and so on. Most modernPCs tend to evolve over a period of time, and the operating system hasto change to accommodate this evolution. If Windows should ceaseworking it is not usually too difficult to get it up and running again. Mostfaults introduced into the system are easily reversed, provided you knowhow. This book details some simple procedures that enable mostWindows faults to be quickly pinpointed and rectified. You do not haveto be a computer expert in cyder to follow these procedures, but you dohave to be familiar with the basics of using the Windows user interface.
Where a Windows installation becomes seriously damaged t may notbe practical to repair it. Even if numerous files have been corrupted ordeleted it is probably possible to repair the installation given enoughtime, but the more sensible approach is to reinstal the operating syslem.Full instructions for reinstalling Windows are provided, includingreinstallation over an existing version and the "from scratch" approach.Either option may seem to be a rather dauntinc prospect fcr those oflimited experience at Windows troubleshooting, but reinstalling Windowsis not particularly difficult. It is the guaranteed metiod of curing Windowsproblems and getting your PC back in full working order again.
Robert Penfold

WARNING
Sensible safety precautions should always be observed when dealingwith electrical and electronic equipment, particularly any equipment thatconnects to the mains supply or operates at high voltages. Do not openthe case of a monitor or a PC power supply unit. Apart from the factthat both of these are mains powered, they operate using high voltagesthat can remain on the circuit boards even after the equipment has beenswitched off for some time. If you use a PC connected to the mainssupply as an earth for anti -static purposes, make sure that the power isswitched off at the mains outlet so that the PC can not be accidentallyswitched on. With an AT case and power supply, examine the connectionsto the on/off switch before connecting the unit to the mains supply. Allfour connections should be completely covered by plastic insulators.Do not use the unit if there are any signs at all of problems with theinsulation. Never work on a PC while it is switched on.
TrademarksMicrosoft, MS/DOS, Windows, Windows Me, Windows 98 and Windows95 are either registered trademarks or trademarks of MicrosoftCorporation.
All other brand and product names used in this book are recognisedtrademarks, or registered trademarks of their respective companies.There is no intent to use any trademarks generically and readers shouldinvestigate ownership of a trademark before using it for any purpose.

Contents
1
2
Prevention is... 1
Do not tweak 1
Careful deletion 2Custom uninstaller 3Windows uninstaller 3Third party .3Leftovers 5Softly, softly 9Icon and menu entries 10Old and new 11
Memory 12Windows problem? 13System files 14First boot 15Late problems 17On the cards 18Diagnostics software 20What is a virus? 23Virus protection 25If at first 30Closing notes 31Emergency exit 34Background information 36System Tray 38Points to remember 40
Troubleshooting 41
Booting problems. 41Safety first . 42Microsoft Windows 98 Startup Menu 43In the mode 44Normal 44Logged mode 44
Safe mode 44Step-by-step confirmation 44Command prompt only 45Safe mode command prompt 45Previous MS/DOS mode 45Using Safe mode 45Basic checks 47Hardware drivers 48Old hardware 50Hardware problems 52Logging 54Step-by-step 57Later problems 58Error message 59File hunt 60Searching Windows 61
Me safe 63Windows Registry 66What is it? 68Editing 68Navigation 71
HKEY_CLASSES_ROOT 71
INKEY_CURRENT_USER 71
HKEY_LOCAL_MACHINE 72HKEY_USERS 72HKEY_CURRENT_CONFIG 72HKEY DYN _DATA 72_Backup 74Windows checkers 75Sysedit 76Reinstallation 79Knowledge Base 80Recurring problems 82Points to remember 83

3
4
Data rescue 85Learning the hard way 85Split discs 86Clean copy 87Windows on Windows 88Preliminaries 89Floppy discs 89Large scale 90Second disc 91Add ng a drive 92Bare facts 94Static 95Jumpers 96Getting physical 98Cabling 100BIOS Setup 102BIOS basics 102Entry 104Stardard CMOS 106Drive settings 107Drive letters 110Partitioning 111FDISK 113Using FDISK 115Formatting 118Xcopy 121Disc swap 121Be prepared 122Points to remember 122
Backup and restore 125Backup? 125Better save than sorry 125

Backup software 126Win 98 Backup 133Wizards 135Emergency restoration 138Me Restore 140In use 141Me Backup 146Backup programs 147System files 149Registry backup 151Registry Checker 153System File Checker 155Points to remember 159
5
Reinstallation 161
Clean sweep 161Booting up 163Windows Setup 165Installation 166Hardware drivers 176Awkward hardware 177Screen settings 181Disc -free Me 183Points to remember 184
Appendix 1Tweak UI 187Appendix 2Useful web addresses 190Appendix 3Regclean 191
Index 195

1
Prevention is...
CausesAn installation of the Windows operating system coming to grief s notexactly a rare occurrence, but why should these problems happen atall? I suppose that the chances of removing every single bug fromsoftware as complex as this is virtually nil, but genuine bugs in Windowsare almost certainly responsible for only a small percentage of theproblems. Modern PC hardware is very reliable, and hardware glitchesprobably have nothing to do with the vast majority of problems either.Most of the difficulties seem to be due to things that either the user orapplications programs do to Windows.
Unfortunately, quite minor things can prevent Windows from operatingcorrectly, and it is easily "gummed up" by users making alteraticns tosystem settings or deleting essential files. Software that does not strictlyabide by the rules can also generate problems. Probably the only sure-fire way o' preventing Windows from getting into difficulties is to neverinstall any applications programs at all, which is not exactly a practicalproposition. However, you can certainly reduce the risk of problemsoccurring by following some simple rules.
Do not tweakExperienced users fiddle around with the Windows configuration filesand manage to customise the user interface in ways that are not normallypossible. This is fine for trose having suitable experience of Windows,because they know what they are doing. They can largely avoid problemsand can soon backtrack to safety if something should go wrong.Inexperienced users are almost certain to damage the operating systemif they try this sort of tweaking, and will not have the expertise to c[..icklysort things out when problems arise. Just the opposite in fact, an: onething can lead to another, with the operating system soon getting beyondredemption.
1

1 Prevention Is...
If you are not an expert on the inner workings of Windows it is best notto delve into its configuration files. A great deal of customisation can bedone using the normal Windows facilities, and there are applicationsprograms that enable further customisation to be undertaken withouthaving to directly alter files.
Careful deletionIn the days of MS/DOS it was perfectly acceptable b delete a programand any files associated with it if you no longer wished to use the program.Matters are very different with Windows 95/98/Me, where most softwareis installed into the operating system. There are actually some simpleprograms that have just one file, and which do no require any installation.These standalone program files are quite rare these days, but they canbe used much like old MS/DOS programs. To use the program youcopy it onto the hard disc, and to run it you use the Run option from theStart menu, or locate the file using Windows Explorer and double-clickon it. No installation program is used, and it is perfectly all right toremove the program by deleting the program file.
Most programs are installed onto the computer using an installationprogram, and this program does not simply make folders on the harddisc and copy files into them from the CD-ROM. It will also make changesto the Windows configuration files so that the program is properlyintegrated with the operating system. If you simply delete the program'sdirectory structure to get rid of it, Windows will not be aware that theprogram has been removed. During the boot -up process the operatingsystem will probably look for files associated with the deleted program,and will produce error messages when it fails to find them.
There is another potential problem in that Windows utilizes shared files.This is where one file, such as a DLL type, is shared by two or moreprograms. In deleting a program and the other f les in its directorystructure you could also be deleting files needed by other programs.This could prevent other programs from working prcperly, or even fromstarting up at all.
If a program is loaded onto the hard disc using an installation program,the only safe way of removing it is to use an uninstaller program. Thereare three possible ways of handling this.
2

Prevention Is... 1
Custom uninstallerSome programs load an uninstaller program onto the hard disc as partof the installation process. This program is then available via the Startmenu if you choose Procrams, and then the name of the programconcerned. When you cl-oose this option there will be the programitself, plus at least one additional option in the sub -menu that appears.If there is no uninstall option here, no custom uninstaller has beeninstalled for that program. Uninstaller programs of this type are a mostinvariably automatic in operation, so you have to do little more thaninstruct it to go ahead with the removal of the program.
With any uninstaller software you may be asked if certain files should beremoved. This mostly occurs where the program finds shared files thatno longer appear to be shared. In days gone by it did no seem to natterwhether you opted to remove or leave these files, with Windows tailingto work properly thereafter! These days things seem to be more reliable,and it is reasonably safe to accept either option. To leave the fies inplace is certainly the safest option, but it also results in files and possiblyfolders being left on the disc unnecessarily.
Windows uninstallerWindows has a built-in uninstaller that can be accessed via the controlpanel. From the Start menu select Settings, control Panel and Add/Remove programs. By default this takes you to the uninstaller, and thelower section of the screen shows a list of the programs that can beuninstalled via this route (Figure 1.1). In theory the list should include allprograms that have been added to the hard cisc using ar instalationprogram. In practice there -nay be one or two that have not been installed"by the book" and can no be removed using this method. Someprograms can only be removed using their own uninstaller program,while others have no means of removal at all. It is mainly older softwarethat falls into the non -removable category, particularly programs thatwere written for Windows 3.1 and not one of the 32 -bit versions ofWindows. In fact it is very J r usual for old Windows 3.1 software to haveany means of removal.
Third partyThere are uninstaller programs available that can be used to mon tor aninstallation and then uninstall the software at some later time. As thisfeature is built into Windows 95/98/Me, and the vast majority of
3

Prevention is...
Add/Remove Programs Properties
Install/Uninstall I Windows Setup I Startup Disk
To install a new program from a floppy disk or CD-ROMdrive, click Install
Install
The following software can be automatically removed byWindows. To remove a program or to modify its installedcomponents, select it from the list and click Add/Remove
Adaptec DirectCDAdaptec DirectCD ReaderAdaptec Easy CD CreatorAdaptec Easy -CD AudioAdobe Acrobat 4 0Adobe PageMaker 6 5Adobe PageMill 3 0Adobe Photoshop 5 0Adobe Type ManagerATI mach64 Display Driver
OK I Cancel
Fig.1.1 The built-in Windows uninstaller
applications programs now either utilize the built-in facility or have theirown uninstaller software, these programs are perhaps less useful thanthey once were. Most will also assist in the removal of programs thatthey have not been used to install, and this is perhaps the more usefulrole. Most will also help with the removal of things like unwanted entriesin the Start menu and act as general cleanup software, although Windowsitself provides means of clearing some of this software debris. Figure1.2 shows the CyberMedia Uninstaller program in action, but there arenumerous programs of this type to choose from.
4

Preventio.
SI Applicatoun Cleanup
Select theappbcshon
Step 2Renew oceans anddelete theapplEcehor
Step 3Renew summarymformahor
$elect the epploCebon
4- _J Appltcatione et the Start Menu
Corgi WoniPertect Sude
1-thetlYSAI4.1 Moulin CD P-08.4 Catalog..11 Netscape Seneellipdale
New Noe Document,a; Open Oboe Document
Programs1.1
No veld SMGCSOM
Uick B ow. e ro locate an applscenon that Is not hsted
Select tta ot. &aeon you want to perform
fr. QfI"r Mr ye
rC PansPoo
Brgpse
,i,nur, tie!,
Fig.1.2 The CyberMedia uninstaller in action
LeftoversHaving removed a program by whatever means, you will sometimesfind that there are still some files and folders associated with tie programremaining on the hard disc. In some cases the remaining files are srriplydata or configuration files that have been generated while you were tryingout the program. If they are no longer of any use to you there should beno problems if they are deleted using Windows Explorer. In other casesthe files could be system files that the uninstaller has decided not toremove in case they are needed by other applications. Removing filesof this type is more risky and it is probably better to leave them in place.
Sometimes the folders may seem to be empty, but it is best to checkcarefully before removing frem. An important point to bear in mindhere is that not all files are shown when using the default settirgs ofWindows Explorer. Using the default settings hidden files will live up totheir name and files having certain extensions are not shown either. In
normal use this can be helpful because it results in files that are likely tobe of interest being shown, while those that are of no interest are hidden.This makes it much easier to find the files you require in a folder thatcontains large numbers o' files. It is not helpful when Windowstroubleshooting because it tends to have the opposite effect to normal.Things like data files that are of little interest are shown, while many of
5

i s . . .
IJ ren,ofins oo I 1:1111p
0.,r1Y.
154.161111_1.317 re
tJ 18.1319
.j2001fpnl*1301
1J 1101 emu
J ±1370e **InX11
J Delp40 n1
'1 Deg .151
Drsokty mlornelon abc OaCh norr n wig. a«
zCopy Pomp
/
Undo-11
Dalai* Plopebe, V..,
2K11
2KB P1F Re282 RIF Fi2K11 RIF Ft%2KB RF Fir21110 PE FieMEI RIF 211*
RF FA*212 FVF Fee
Pr Flo.12 RFFY
FtF Fir RiF Fie
Fen4KB RIF Fie20B Rif' NsMB Pa, Pik21(13 RIF He28± EMU CU
'Y/U,-.11U18/07/101n 3719/07/00107019/07/00 10 3018/07/n0 10 3710/02/00 10 3819/07/0010.3010/01/1010 3,19/07/0010 3110/02/00 107019/07/0010 1719/07,00 to 3F1
19/0740 to 71310/00/10 10 3018/07/10103819/07/00103519/07/00107518/07/80101019/07/00103011107= 10 30
Fig.1.3 Windows can be set to show details for each file listed
the system files that are of interest are hidden. Windows Explorer shouldbe set to show as much detail about the files as possible.
First go to the View menu and select the Details option (Figure 1.3).This will result in the size, type, and date of each file being shown. Thengo to the View menu again, select Folder Options, and then left -click onthe View tab in the new Window that appears (Figure 1.4). Under theHidden Files entry in the main section of the window select the "Showall files" option. The hidden files are certain critical system files, such asthose associated with the Windows Registry, that are not normallydisplayed by Windows Explorer so that they can not be accidentallyaltered or erased by the user. I would recommend ticking the checkboxfor "Display full path in title bar". This way you can always see exactlywhat folder you are investigating, even if it is one that is buried deep ina complex directory structure.
Remove the tick in the checkbox next to "Hide the extension for knownfile types". The extension should then be shown for all file types, whichmakes it easy to see which one is which when several files have thesame main file name. When viewing the contents of directories you canuse either the List or Details options under the View menu, but the Details
6

Prevention Is... 1
Folder Options
General View
Folder views
File Types
You can nake all your folders look the same.
Like Lirrent Folder
Advarced settings:
Reset All Folders
J Files and Folders Allow all uppercase names Display the full path in title barJ Hidden files
O Do not show hid del filesO Do not show hid fei or system filesO Show all tiles
Hide file extensions for known file typessa Remember each folder's view settings Show file attributes n Detail View Show Map Network Dive button in toolbarRI Show pop-up desclption for folder and desktop items.Visual Settings
Restore Qefaults
AL
OK Caicel f .Apply
Fig.1.4 Windows Explorer can be made to show all file types
option provides a little more information. It provides the file type it it is arecognised type, and the date that the file was created or last altered. If
the "Show attributes in Detail view" checkbox is ticked, it will also showthe attribute of the file. These are the letters used for each of the fourattributes:
A Archive
H Hidden
R Read-only
S System
7

1 Prevention Is...
chl him Properties ElElGene,
cit 1 hen
Type HTML Document
Loctenon C\frontPttge
Sue 1 74KB (1.763 bytes) 6 192 bytes used
MS-DOS name 0-11 HTM
I 16 Apnl 1999 09 34 16
P., 16 Apni 1999 09 34 18
Accessed 04 December 2000
Attributes r fused -only r thdden
A Archive
Cancel
Thus a file that has"R" as its attributeletter it is a read-onlytype, and one thathas "HA" in theattribute column is ahidden archive file.Choose the Listoption if you prefer tohave as many files aspossible listed on thescreen. Details ofany file listed can beobtained by right -clicking on its entryin Windows Explorerand then choosingthe Properties optionfrom the pop-up
Fig.1.5 An example file properties windowmenu. This will bringup a screen of thetype shown in Figure
1.5, which shows the type of file, the creation date, when it was lastmodified, size, etc.
Make sure that the checkbox for the "Remember each folder's viewsettings" is not ticked. Placing a tick in this box gives each folder itsown settings, making it necessary to alter the settings for individual foldersrather than altering them globally.
If any folders are definitely empty, there should be no problem if they areremoved. The same is true of data and configuration files that are nolonger needed. With other files it may not be clear what their exactpurpose is, and it is a bit risky removing files of unknown function.Unfortunately, it is not uncommon for uninstallers to leave large numbersof files on the hard disc. The uninstaller seems to go through its routinein standard fashion, and reports that the program has been fully removed,but an inspection of the hard disc reveals that a vast directory structureremains.
I have encountered uninstallers that have left more than 50 megabytesof files on the disc, removing only about 10% of those initially installed.Other uninstallers report that some files and folders could not be removed,and that they must be dealt with manually. Some uninstallers seem to
8

Prevention is... 1
concentrate on extricating the program from the operating system byremoving references to the program in the Windows registry, etc., ratherthan trying to remove all trace of it from the hard disc.
Softly, softlySo what do you do if the disc is left containing vast numbers of unwantedfiles after a program has been uninstalled? The temptation, and whatmany people actually do, is to simple drag the whole lot into the RecycleBin. Sometimes this may be acceptable, but there is the risk that sooneror later Windows will look for some of the deleted files and start to produceerror messages. If you are lucky, the deleted files will still be in theRecycle Bin, and they can then be restored to their original locations onthe hard disc. If not, you may have problems sorting things out.
The safer way of handling things is to leave the directory structure andfiles intact, but change some file or folder names. If only a few files havebeen left behind, try adding a letter at the front of each filename. Forexample, a file called "draworog.d11" could be renamed "zdrawproa.dII".This will prevent Windows from finding the file if it should be needed forsome reason, but it is an easy matter for you to co-rect things by removingthe "z" from the filename if problems occur. If there are numerous filesin a complex directory structure to deal with it is not practical to renameall the individual files. Instead, the name of the highest folder in thedirectory structure is renamed. This should make it impossible forWindows to find the file unless it does a complete search of the harddisc, and it is easily reversed if problems should occur.
Ideally the complete directory structure should be copied to a massstorage device such as a CD writer, a backup hard disc drive, or anotherpartition on the hard disc. The original structure can then be deleted. If
problems occur and some cf the files have been cleaned from the RecycleBin, you can reinstate everything from the backup copy.
Modern hard disc drives lave very high capacities so it is perhapsworthwhile considering whether it is really necessary to remove leftoverfiles. If you do not need the hard disc space they can be left in place,avoiding the risks involved if they are removed Do you really need touninstall the program at all? The less installing and uninstalling you dothe better the chances of avoiding problems. Eventually you will end upwith a large number of installed programs and this could generally slowthe system down. In particular, the boot -up process can become a verylong and drawn out process. However, this can be overcome by wiping
9

1 Prevention is...
the hard disc clean and reinstalling the operating system and applicationssoftware from scratch. This is not a particularly quick and easy process,but it is the only totally reliable method of getting Windows back to alean installation that operates at peak efficiency.
Icon and menu entriesAfter uninstalling a program you will often find that the shortcut icon isstill present on the Windows desktop. If the installation program did notput the icon there in the first place it will not remove it. Shortcut icons
that are placed on theWindows desktopmanually must beremoved manually.
BunThis simply entailsdragging the icon to
Lou J the Recycle Bin..41 Shiji Down There is no risk of this
having an adverseeffect on Windowsoperation.
An uninstaller shouldremove the entry inthe Programs sectionof the Start menuwnen removinga program.Unfortunately, this
Cancel I item does sometimesseem to beoverlooked, and afterremoving a number of
programs there can be a growing band of orphan entries in the menu.Once again, removing these entries manually should not entail any riskof "gumming up" Windows.
To remove an entry go to the Settings entry in the Start menu, and thenselect Taskbar And Start Menu. This brings up the Window shown inFigure 1.6. The Taskbar menu is offered by default, so left -click the StartMenu tab to bring up the Window of Figure 1.7. Next left -click on theRemove button, which will bring up a scrollable list of all the items in theStart menu. Left -click on the item you wish to remove in order to highlight
Taskbar Properties
eisS her Options I Sten Menu Programs
Oirt
r Always on to pi
r Agto hide
r Show imall icons in Start menu
i7 Show clod,
1
OK
Fig.1.6 The Taskbar Properties window
10

Prevention is...
it (Figure 1.8), andthen left -click theRemove button. Awarning message willappear onscreen togive you a chance tochange your mind,and the entry will bedeleted if you confirmthat you wish to goahead. A quick checkof the Start menushould show that theoffending entry hasbeen removed. It is
actually placed in theRecycle Bin, so it canbe easily reinstated ifyou make a mistake.
Old and newBoth old and brandnew software arepotential sources ofproblems withWindows. In the caseof brand newsoftware it is the betatest versions or anyother versions prior tothe commercialrelease that are themain problem. Theseare not fully tried andtested, and can notbe guaranteed to dothings "by the book".People who make aliving testing this typeof software almostinvariably use one PC
Taekber Properties
las kbar Options Stan Menu Programs
Customize Stan menu
-01I You can customize your Stan menu byridding or remcrvirg items from e
Add
Documents menu
Gila the Dear burton to remove the contentsof the Documents -menu and other personalhistory fists
AiitvancedRemove
IsClear
K I Cancel I
Fig.1.7 The Start Menu Programs screen
Remove Shortcuts/Folders
To remove an dem from the Stet menu. select the earn end ckRemove
" fiuSound Audio Setwere- Ser,ces
RS Electronic Coteo ue
bemove CAose
Fig. 1.8 Selecting a menu entry for removal
11

1 Prevention Is...
for testing the software and a second PC for other purposes. That waythere is no major loss if the test software runs amok and deletes half thefiles on the hard disc. If you do not have a second PC for use withdubious software it is best not to try it at all.
At one time the initial commercial releases of programs were not alwaysreliable, and some software publishers seemed to be guilty of gettingtheir customers to unwittingly do the final testing for them. This sort ofthing may still go on in some niche markets, but it is thankfully somethingof a rarity these days. The cost of sending out replacement discs plusthe loss of reputation makes it an unsustainable tactic. New software,whether it is totally new or an upgrade version should be very reliablethese days. In the past it was advisable to let new software maturebefore buying it, but this should no longer be necessary. If new softwareshould prove troublesome there should be a help -line that can give adviceon the problem. Software publishers' web sites often have softwarepatches that can fix any obscure problems that have come to light afterthe final versions of the programs have been sent out to the shops.
MemoryIn the early days of Windows 95 it was not unusual for the dreaded redcross to appear on the screen complete with a brief error message. Infact there seemed to be one or two of these messages every timesomeone used a PC. Thankfully, this type of thing is relatively rare thesedays. There were probably two main reasons for these early problems,and one of them was a lack of memory in the PCs of the day. At thattime memory was quite expensive. 8 megabytes of RAM was quite typical,and 16 megabytes was considered to be a large amount of RAM.Software manufacturers were eager for their programs to appeal to asmany people as possible, which often led them to be overoptimisticabout the system requirements. If the requirements listed 8 megabytesof memory as the minimum and recommended at least 16 megabytesshould be used, then 16 megabytes was probably the minimum thatwould really give trouble free and usable results.
These days memory is relatively cheap, and PCs are mostly well endowedin this respect. On the other hand, programs seem tc require ever morememory. Also, many users now have two or more programs runningsimultaneously, possibly with some background tasks running as well.If you run memory hungry programs on a computer that has a modestamount of memory and error messages keep on appearing, it is worthinvesting in some extra memory. Even if it does not cure the problem,Windows and your programs will almost certainly run more quickly.
12

Prevention is... 1
The other problem in the early days of Windows 95 was that mostWindows applications softwa-e was designed to work under Windows3.1 and not Windows 95. Maybe in theory the programs should naverun perfectly well, but in practice things did not always go well. In factwith some programs you were lucky to get to the end of the nstallationprocedure without problems! Some of this software altered system filesin a way that was permissible with MS/DOS and Windows 3.1, but wasnot the approved way of doing things with Windows 95 and later versionsof Windows.
32 -bit versions of Windows definitely work best with programs that arespecifically written for use with them. Whereve- possible use modernapplications software and avoid the older programs. Apart from anythingelse, if you get into problems with software that is about five or moreyears old, it is unlikely that The software publisher will be eager to offermuch help in getting it to run properly. It is by no means certain that thesoftware publisher will still be in existence. Mergers, take-overs, andfailures are not exactly unknown in the software world. Where there isno alternative to an old program you have little option but to use it andhope for the best. One precaution I would recommend is to copy theconfig.sys and autoexec.bat fies onto a floppy d sc before installing thevintage software. They can then be reinstated if there are boot problemsafter the program has been installed.
Windows problem?Some users tend to jump to conclusions when there are problems witha PC running Windows. Probably most problems are the result o4 theoperating system becoming damaged, but by no means all problemsare caused in this way. I have often been asked to help with supposedWindows problems that turn out to be due to some other cause. Acrucial consideration when locating the cause of a PC fault is whe-e inthe proceedings is it that things go awry? If the FC fails to start up at all,with no initial messages, etc., from the BIOS's POST (power -on self -test) program, the fault is clearly nothing to do with a Windows problem.The fault is occurring long before the PC starts to boot into Windows,and is presumably due to a hardware problem.
Matters are less clear cut if the PC gets through its initial checking, startsto boot into Windows, but rapidly comes to a halt. When this happensthere will often be an error message along the lines that the boot disc ismissing or has a corrupted boot sector, and you will be asked to inserta system disc and then press any key. This means that the computerhas looked at the boot drives specified in the BIOS Setup program but
13

1 Prevention is...
has not found a bootable disc. An obvious first step is to check theBIOS settings by going into the Setup program. The manual for yourcomputer should give at least brief details of how tc enter the BIOS andchange the settings. This is also covered in more detail in chapter 4.Assuming the settings are suitable, the problem could be due to hardwarefault with the disc or the IDE interface on the motherboard, or it could becaused by corruption of the data in the boot sector of the disc.
Sometimes the PC will start booting, but it will stop almost immediately.When this happens there will not necessarily be an error messagedisplayed on the screen. In fact there will probably be no message, withthe computer instead "freezing". The Control -Alt -Del key combinationmight reset the computer so that it tries to boot acain, but a hardwarereset will probably be needed. In other words, operate the reset buttonon the computer if it has one, or switch off, wait a few seconds, and thenswitch the PC back on again. If the boot process almost instantly faltersagain it is possible that there is a hardware fault, but a corrupted bootsector on the disc is the most likely cause of the problem.
System filesIf the system files in the boot sector of the disc have become damaged,the obvious first step is to replace them. In order to do this the computershould be booted using the Windows Startup disc ii drive A:. A Startupdisc is normally made during the Windows installation process, but onecan also be made by selecting Settings from the Start menu, and thenchoosing Control Panel and Add/Remove Programs (Figure 1.9). Nextoperate the Startup Disk tab on the Window that appears, and follow theonscreen prompts. Note that the Windows installation disc will berequired during the creation of the Startup disc, as will a 1.44 -megabyte(formatted or unformatted) floppy disc.
Of course, if you can not boot the PC into Windows it is not possible tomake the Startup disc this way, so make sure you have one of thesediscs available before trouble strikes. If you do get "caught short", oneoption is to find a friend who has a PC running the same version ofWindows that you are using, and use their PC to make a Startup disc. Infact I would recommend having two Startup discs available, so that youcan try the second disc if the PC fails to boot from the first one.
With Windows 98 there is another option provided the PC can be bootedin MS/DOS mode with CD-ROM support. Whether or not the PC bootswith CD-ROM support depends on the way it has oeen set up, but the
14

Pre
a)
PC should really be supplied with the necessary drivers.in MS/DOS mode, set the CD-ROM drive as the currentcommand, and press the Return key:
cd tools\mtsutil\fat32ebd
Next place a formatted 1 44 -megabyte disc in drive A:, then type thiscommand and press the Return key:
fat32ebd
Type "Y" to confirmthat you wish toproceed, and the fileswill then betransferred to thefloppy disc. Albeitvery slowly, thisprocess produceswhat seems to be amore or less normalWindows 98 Startupdisc, complete withCD-ROM support.The disc contains theutility programs suchas Scandisk, but itdoes not produce avirtual disc. It isintended as a meansof producing a virus-
Add/Remove Programs Properb3s
!nsin!)/Umn ;eel I Windows Setup ,tamp Disk
II you have trouble slanng Windows 90 iou :en usestartup disk to start yo, computer run diegnosac prop tensarid to marry problems
To create a startup din.. click Create Disk 1.)1.1 will nee donetlapp, clink
c://am Oak.. j
free boot disc having oK I Cancel
FAT32 support, but itcan presumably be Fig.1.9 Creating a Windows Startup dis:used as a general-purpose emergencyboot disc.
First bootWith most PCs the BIOS is set so that the PC tries to boot from ciive A:first, and then the hard disc (drive C:), so the computer shoulc bootfrom drive A: without any problems. If not, check that the appropriateBIOS parameter has drive A: as the initial boct device, and charge it if
necessary. It is virtually ce-tain that there is a hardware problem if thePC will not boot from floppy disc or from the hard disc drive.
15

Mon is...
Assuming you can get the computer booted using the Startup disc, thebasic System files can be replaced on the hard disc. Booting from theStartup disc results in the creation of a virtual disc in the computer'smemory, and this contains the program needed to replace the systemfiles. In the drive letter sequence the virtual disc is normally placedbetween the hard disc and the CD-ROM drive. If there is a single harddisc with one partition, this will be drive C:, the virtual disc will be driveD:, and the CD-ROM will be drive E:. With two hard disc drives or onedrive having two partitions, the virtual and CD-ROM drives will be movedup by one letter, becoming drives E: and F:. For the sake of this examplewe will assume that there is one hard disc drive with a single partition,and that the virtual disc is drive D:.
First make the virtual disc the current drive by typing "D:" and pressingthe Return key. Then type "dir" and press the Return key, which shouldbring up an onscreen list of the files on drive D:. One of these is"sys.com", the program needed to replace the system files. This programwill only work if the system is on the default drive, so type "A:" to goback into drive A:, and then type this command to place the system filesonto drive C::
E: \sys C:
After pressing the return key the program will immediately start copyingthe files from the floppy disc onto the hard disc. Assuming all goes wella "System Transferred" message will appear on the screen. Removethe Startup disc from drive A: and then press the Control, Alt, and Deletekey together to reset the PC, With luck it will boot properly into Windows.At the very least the boot process should get further than it did previously,and with Windows 95 and 98 installations it should be possible to bootthe computer in MS/DOS mode. This is not possible with Windows Mebecause the appropriate menu option is absent when the F8 functionkey is pressed at the start of the boot -up process. However, it may bepossible to boot the computer in Safe mode even if this was not possiblepreviously.
Reinstalling the basic system files will sometimes permit Windows toload again, but it is only fair to point out that it will fail to totally cure theproblem in the majority of cases. All sys.com does is to reinstall the MS/DOS system files, and it does not repair any of the Windows systemfiles. If the PC still fails to boot properly into Windows it is a matter ofdelving further into the problem using the techniques described in chapter2. If there is wholesale damage to the Windows files t may be a matterof reinstalling Windows. In an extreme case any important data on the
16

Prevention Is... 1
hard disc that has nothard disc wiped cleanEmergency rescue ofWindows are covered
been backed up must be rescued, and then theso that Windows can be installed "from scra'ch".data, backing up the hard disc, and reinstallingin chapters 3, 4, and 5.
Late problemsSometimes Windows seems to get 90 percent of the way through theboot -up process before it comes to a halt. Wheel this happens it is likelythat the problem is in the Windows installation and not due to a hardwarefault. When things come to a halt with an error message stating that acertain file or files could nct be found, this indicates that the problem iswithin Wirdows itself. Matters are less clear cut if any error messagesrefer to an item of hardware, or Windows tries to reinstall an item ofhardware that was previously installed correctly. It could be that thetrouble is due to problems with a corrupted driver program, out it is alsopossible that a faulty item of hardware is giving the Windows Plug andPlay facility some difficulties.
Fig.1.10 A typical expansion card. The mounting bracket is on the left
17

1 Prevention Is...
18
On the cardsFixing hardware problems goes beyond the scope of this book, but it iscovered in "Easy PC troubleshooting (BP484)" from the same publisherand author as this book. However, if the item of hardware that seems tobe giving problems is an expansion card, it is probably worthwhilechecking that it is properly seated in its expansion slot. To do this youwill have to remove either the outer casing or a side panel, dependingon the style of case used for your PC. An expansicn card has a metalbracket that is used to secure it to the rear of the PC's chassis, andconnections on the bottom edge that fit into the expansion slot. Themetal bracket can be seen at the left end of the card shown in Figure1.10, and the connections can be seen on the extended part of the cardat the bottom.
To remove the card the fixing bolt on the mounting bracket must beremoved (Figure 1.11), and then the card can be pulled free. Many PC
expansion cards are- vulnerable to damage
frcm static charges,even those charges ofmodest voltage, so a
MI certain amount ofcare must beexercised whenpulling the card free ofthe expansion slot. Inthis case things areeased by the fact thatthe card does notneed to becompletely removedfrom the PC. It is justa matter of pulling thecard free of theexpansion slot andthen pushing it firmlyback into positionagain. This makessure that the card isful y pushed downinto place in its slot.Removing and
".41.
Fig.1.11 An expansion card ready for removal

Prevention is... 1
Expansion ca -d
1111111111111111111111111111111
Fig.1.12 An expansion card can cause problems if its mountingbracket does not have the correct right-angled bend
replacing the card also tends to clean the connectors so th 3t anyconnections that were previously a bit iffy make good contact once more.
In order to avoid damage from static charge it is advisable to leave thePC connected to the mains supply, but to switch it off at bcth the mains
19

1 Prevention is...
socket and the PC's on/off switch. Although the PC is switched off it willbe earthed to the mains earth connection. Touch the metal chassis ofthe chassis before pulling the card from its slot. This will remove anystatic charge in your body and should be sufficient to ensure that noharm comes to any of the PC's hardware. Make sure that the card isparallel to the slot as in the upper view of Figure 1.12, and not at anangle to it as in the lower view. The bend at the top of the mountingbracket is often something less than a perfect right angle, which tendsto skew the card slightly as the fixing bolt is screwed into place. Therefore,make quite sure that the card stays parallel to the expansion slot whenthe card is fixed in place. If necessary, remove the card again andcarefully bend the top of the bracket to produce a better approximationto a right angle.
Diagnostics softwareDiagnostics software intended to help to locate the scurce of a hardwareproblem can be useful if you are unsure if a problem is due to an obscureWindows fault or an intermittent hardware problem. Suppose you havea PC that is largely working but seems to be a bit erratic or unreliable.Perhaps it sometimes boots into Windows all right but it hangs up onother occasions. Once into Windows, things may go perfectly well for afew minutes and then the computer suddenly crashes. This sort of thingcan be caused by a software fault, but it is often due to something like amemory, processor, or disc problem.
If a problem only occurs when a certain applications program is run, theproblem probably has its origins in that piece of software. Runninghardware checks is then a little pointless, and it is matter of contactingthe software publisher in search of a solution to the problem. Similarly,if the problem only occurs after a particular program has been used, it isvery unlikely that either Windows or a hardware fault is the cause of theproblem. It is again a matter of contacting the softwa-e publisher to seeif there is a known problem with the applications program.
You may have some hardware diagnostics software, and if so it is certainlyworthwhile running the software on a PC that is giving intermittentproblems. In my experience, if a PC has a tendency to simply grind to ahalt with the display freezing, the problem is more likely to be in thehardware than the software. This is also the case where things come toa halt with the screen going blank. The fault is more likely to be in thesoftware if the dreaded Windows error messages ("This program hasperformed an illegal operation and will shut down", etc.) keep appearing.However, this is only a general rule and there are exceptions.
20

Prevention is...
Type al Test
R Normal Testing
r' Deep Testing
Type of Memory Test
isP Memory found (except
xi Bete Memory (Pk - 640ri
E :tended Meitner,' (All eon,
Expanded Memory (EMS)
Video Memory
SprahOOS
Tools I Enter
For Help press Ft
Test Instructions:To test system sesory sccu ertely the testrill close Ihndoss to pert an this test.Mien the test is complete %lidos, will rester.
.1 CheckIt sill display tie results. Pierceo.ose nil open ',roguesss be ore running this
Teft:- .1111 test the be.e, upper, expanded
. ... xi.iied seeory instal ed in your PC.; test unser- currently °couple I
arid Device Drivers. Thiouph no ter thl sues, the p.p.emo iy pr,.[ I3 you bey ttit ittr,
I
Fig.1 .13 The Checkit memory test screen
Diagnostics programs wil run tests on many parts of We system,including hard and floppy disc drives, the main memory, video memory,the processor, and the ports. Programs of this type sometimes operateunder MS/DOS. This is pnrrarily so that they pan take control of thememory when making mencry tests. Windows places restrictions onthe way memory is allocated to programs, and would therefore placemuch of the memory beyond tie reach of the diagnostics software. Evenwhere diagnostics programs t'un under Windows, to make certain teststhey will often reboot into MS/DOS to perform the tests, and thei goback into Windows to display the results. Figure 1.13 shows the Checkitmemory test screen, and Figure 1.14 shows an e).ample set of test resultsafter rebcoting into MS/DOS and then back into Windows 98 again.Ths makes the testing rather longwinded, but it is perhaps a moreconvenient way of doing thir gs than rebooting into MS/DOS and car-yingout all the tests from there.
For those that prefer to use diagnostic programs from within MS/DOSrather than Windows there ale still programs 01 this type available. In
order to work properly a proc ram of this type normally requires the PCto boot into a very basic MS/DOS environment that is free from anymemory management prcgi-ams or other software that runs in the
21

1 Prevention is...
4 Ckmern rpl - Notepad _ xE.,e
CheckIt (S/N D8-211893)Licensed To. Robert Penfold
NO FAILURES MEMORY TEST v5.00 01-27-2086 23.09
Memory Installed: Selected for Test.
Base: 648K from 8 to 640K AllUpper. None None
Extended: 95.006M from I.808M to 96.800M AllExpanded None Non.
Video. 256K UGA None
Test Setup Wick
Base/Upper Memory Passed
Extended Memory Passed
Expanded Memory Skipped
Fig.1.14 A test result screen produced by Checkit
background. Even things like mouse and CD-ROM drivers have to beavoided in most cases. The PC is therefore booted using a basic floppyboot disc produced using the Format command with the /s switch, orusing sys.com to copy the system files onto an otherwise blank disc.
A Windows Startup disc loads various drivers and other programs duringthe boot process and is unlikely to be suitable as the boot disc whenusing diagnostics software. With Windows 95 anc 98 it is possible toperform a very basic MS/DOS boot -up by pressing the F8 function keyas Windows starts to load, and then selecting option 6 (Safe modecommand prompt only) from the menu that appears. This option is notavailable with Windows Me incidentally. With some of these programsthe PC must be booted using a custom boot disc, and the instructionmanual should give details of how this disc is produced.
Once into a diagnostics program of this type things are not much differentto a Windows equivalent. Control is via the keyboard rather than usingthe mouse, but is otherwise similar. The same kinds of test are available,as can be seen from the screen shot of Figure 1.15, which shows themain screen of Amidiag 5.4. Figure 1.16 shows the result of a processortest using this program.
22

Prevention Is... 1
AMIIIAG PC Diagnostic Software, Ver 5.42a (C) 1994 American Megitrends inc.
lawn Memory IDE r'DD
Processor1 Processor Tests
DMA Contro
Interrupt
Timer Test
Real Time
CMOS !.+I id
Basic Funct orality Test
Processor Speed Test
CPU Protected Mode Test
Coprocessor Test
CONTINUE;IrciF.!; let
PCI System
Plug n Play Test
nn T, t
sa
Fig.1.15 The main screen of the Amidiag diagrostics program
If a fault only occurs intermittently it might be necessary to repeat thetest procedures a few times in order to coax :he system into ar errorwhile the diagnostics software is running. Obviously you should try toconcentrate on tests that are likely to bring results, and nct bother toomuch about tests on parts of the system that are unlikely to be causingthe problem. Faults associated with the ports and the floppy disc driveare unlikely to be responsible for bringing the system to a halt at timeswhen none of these are in use. On the other hand, you may as well giveevery part of the system a 'quick once over" while you are using thediagnostics software, just in case the problem does actually lie in anunlikely part of the system. If the system has a tendency to hang upperiodically, the memory, processor and video card are probably themost likely sources of the p-oblem.
What is a virus?Do not overlook the possibil ty of problems being caused by a computervirus. There is actually a variety of program types that can attack acomputer system and damage files on any accessible disc drive. These
23

1 Prevention Is...
AMIDIAG PC Diagnostic Software, Ver 5.42a (C) 1998 Amer.can Megatrends Inc.
Hpfinn;
Processor Test 1.04
CPU - NM, MD -2 - MMX
Control Word Read/Write: OK
?STEM/ instruction Test : OK
FPO Stack Read/Write: OR
Integer Rounding Test: OK
Integer Loading Test: OK
PU Tag Condition: OK
TE:T PASSED
Return to Main Menu
Browse Current Test Errors
Browse All Test Errors
Erase Errcr List
Code Paraul Parau2 Parana
Select (r> Exit <ESC)
Fig.1.16 Processor test result produced by Amidiag
tend to be lumped together under the term "virus", b_it strictly speakinga virus is a parasitic program that can reproduce itself and spread acrossa system, or from one system to another. A virus attaches itself to otherprograms, but it is not immediately apparent to the user that anythinghas happened. A virus can be benign, but usually it starts to do seriousdamage at some stage, and will often infect the boot sector of the harddisc, rendering the system unbootable. It can also affect the FAT (fileallocation table) of a disc so that the computer can not find some of thefiles stored on the disc. The partition table can also be affected, so thatthe reported size of a disc does not match up with its true capacity. Thedisc might even be rendered totally inaccessible. The less subtle virusestake more direct action such as attempting to erase or overwriteeverything on the hard disc, or erasing the system files while flashing anabusive message on the screen.
A virus can be spread from one computer to another via an infected file,which can enter the second computer via a disc, a modem, or over anetwork. In fact any means of transferring a file from one computer toanother is a potential route for spreading viruses. A program is reallyonly a virus if it attaches itself to other programs and replicates itself. A
24

Prevention is... 1
program is not a virus if it is pit forward as a useful applications prcgrambut it actually starts damaging the system when it is run. This type ofprogram is more correctly called a "Trojan horse" or just a "Trojan".Either way, these programs can cause immense damage to the files onthe disc, but there should be no risk of any hardware damage occurring.
Virus protectionThis is a case where the old adage of "prevertion is better than cure"certainly applies. There is probably a cure for every computer virus, butidentifying and eradicating a virus can take a great deal of time. Also,having removed the virus there is no guarantee that all your files will stillbe intact. In fact there is a good chance that some damage wil havebeen done. The ideal ap,DrDach is to avoid doing anything that couldintroduce a virus into the system, but for most users this is not a practicalproposition. These days computing is increasingly aboutcommunications between PCs and any swapping of data between PCsprovides a route for the spread of viruses. It used to be said that PCviruses could only be spread via discs that contained programs, andthat data discs posed no major threat. It is in fact possible for a virus toinfect a PC from a data disc, but only if the disc is left in the drive aid thecomputer tries to boot from it at switch -on.
These days there is another method for viruses to spread from datadiscs, and this is via macros contained within the data files. Obviouslynot all applications software supports macros, but it is as well to regarddata discs as potential virus carriers. Some of the most widespread andharmful viruses in recent times have been propagated via Emailscontaining macros infected with a virus, so this problem is one that needsto be taken very seriously.
Given that it is not practical for most users to avoid any possible contactwith computer viruses, the alternative is to rely on anti -virus software todeal with any viruses that do come along. Ideally one of the "big name"anti -virus programs should be installed on the system and it shou d thenbe kept up to date. This should ensure that any infected disc is soonspotted and dealt with. Software of this type is designed for use beforeany problems occur, and it normally runs in the background, checkingany potential sources of infection as they appear. There is usually adirect mode as well, which enables discs, memory, etc., tc be checkedfor viruses.
25

1 Prevention Is...
1111 VIRUSWEIP
Scan for Viruses
Protect System-
Toolbox
Exit
Fig.1.17 The ViruSweep start up screen
ViruSweep Scan
Pre -defined scan sets
V
Browse
Figure 1.17 shows thestart up screen for theQuarterdeckViruSweep program,and selecting the"Scan For Viruses"option takes the userinto further screensthat permit variousoptions to beselected. The firstscreen (Figure 1.18)permits the user toselect the parts of the
:100*(0-SCAN
save QsI
I
Scan Properties I Report I Upon Detection I Schedile
How to Scan
Standard Scan
Smart Scan
Remove integrity files
P Show animation
What to Scan
P Files inside girchtve files
I- All files
Files to scan aiways
help Scan howl Qancel
Fig.1.18 The first ViruSweep screen when scanning for viruses
26

Prevention Is... 1
VonaSweep Scan
II'Pre-detned scan sets
IMMI11.1111E
vioswe RAN
eve I
Save 2s I J
3rowse I Scan Properties I Peport I Upon Detection I Schedule
- Al My ComputerVII Memory checi,
A \ 91.__P C\U.1D1
}3ehesh
delp Scan Novel cancel
Fig.1.19 This screen enables the type of scan to be selected
system that will be checked. Viruses can exist n memory as well as indisc files, so checking the n-emory is normally an option. Further screensenable the type of scan to be selected (Figure 1.19), and the action tobe taken if a virus is detected (Figure 1.20). Most anti -virus software hasthe option of removing a virus rather than simply indicating that it hasbeen detected. Note though, that in some cases it might not oe possibleto automatically "kill" a virus. The program will then usually give detailsof how to manually remove tie virus.
Things are likely to be very difficult if you do not use anti -virus softwareand your PC becomes infected. On the face o- it, you can simply loadan anti -virus program onto the hard disc and then use it to remove thevirus. In practice it is definitely not advisable to try this method, andmost software of this type will not load onto the hard disc if it de:ectsthat a virus is present. This may seem to greatly reduce the usefulness
27

1 Prevention is...
./ VimSweep Scan
Pre -defined scan sets
Default Save Save as
Browse I Scan Properties I Report Upon Detection I Schedule
In case of this event:
'Removable virus
Whet to do?
Ask user
r Inform user
Fi Write to alert file
r I2elete file
r Bemove virus
helpI
Scan Noveln
I i.ancel
Fig.1.20 This screen gives control over the action taken when a virusis detected
of the software, but there is a good reason for not loading any softwareonto an infected system. This is the risk of further spreading the virus byloading new software onto the computer. With a lot of new files loadedonto the hard disc there is plenty of opportunity for the virus to infectmore files.
Most viruses can actually be removed once they have infected a system,but not usually by loading a major piece of anti -virus software onto thehard disc and using it to remove the virus. The method offered by manyanti -virus suites is to boot from a special floppy disc that contains anti-virus software. With this method there is no need to load any softwareonto the hard disc, and consequently there is no r sk of the anti -virussoftware causing the virus to be spread further over the system. Withthe Norton Anti -virus 2000 program a boot disc plus four support discsare made during the installation process (Figure 1.21). If boot problems
28

Prevention is... 1
Typr,
dm.
.111+
j
drip
Fig.1.21 Most anti -virus programs can make recovery discs. NortonAnti -virus 2000 rhaPes a set of five recovery discs
Norton Mains
Rescue Disk
Description
Morton AntiUirus
Disk: Norton AntiUirus Program Disk
Scans your system for viruses.
Commonly Used Options
/b Scan boot records
/R. Scan memorg
/repair Repair infected files
/a Scan all d'iues except F: 8 B:
Scanning takes a lotg tine. stop the
scan, press Ctrl*Break.
rig.1.22 Virus scanning w th the aid of the Norton Anti -virus 2000recovery discs
29

1 Prevention is...
occur at a later date, the PC can be booted using the Norton boot disc,and with the aid of the other discs a comprehensive range of virus scanscan be undertaken (Figure 1.22). In some cases the virus can be removedautomatically, and it might also be possible to have any damage to thesystem files repaired automatically as well.
Often it will soon become clear if a virus or similar program is the causeof Windows problems. The virus will proudly proclaim its presence withan onscreen message. In other cases it will not do so, making it difficultto determine whether the problem is due to a virus o a genuine problemwith Windows. If there are repeated problems with the boot filesbecoming damaged or erased, it is very likely that a virus or similarprogram is responsible. A lot of inexplicable changes to the WindowsRegistry and other system or configuration files is also good groundsfor suspicion.
If at first...There is plenty of anti -virus software available commercially, on theInternet at low cost or free, and it is often given away on the cover -mounted CD-ROMs supplied with computer magazines. If you suspectthere may be a virus causing the problem it is best to use at least twoand preferably three up to date anti -virus programs to check the PC'shard disc. Where applicable, download updates for the software so thatyou are using the most up to date versions that should detect any newviruses. There is no guarantee that the problem is not due to a virus inthe event that the programs fail to detect one. On the other hand, itbecomes an outside chance and it is probably better to follow otheravenues of investigation rather than pursue a virus that is probably notthere.
It is only fair to point out that even if the anti -virus software does find avirus and kill it, you may still need to do some work in order to get thecomputer up and running again. The anti -virus program may be able torepair all the damage inflicted by the virus, but there ,s a fair chance thatthe damage will be too great for everything to be fixed. Anyway, with thevirus killed off you are at least in a position to start repairing the damageand return things to normality.
Before continuing with this it is not a bad idea to give some thought tothe way in which the virus found its way into your PC. There is otherwisea risk that it will soon return and undo the repairs you have made. If youhad been using some discs from another computer prior to the problem
30

Prevention is... 1
occurring, check all those discs using the anti -virus programs. Bear inmind that many viruses have a sort of gestation period, and that therecan be a substantial gap between the virus program finding its way intoyour PC and the program actually starting to do its worst. Ideally youshould check all discs that have been used with the PC in the previousfew weeks or even months.
Closing notesIt helps to avoid problems if the PC is closed down in the app-ovedfashion at the end of each session. Simply switching off with Windowsstill runnirg is unlikely to do any harm, but is certainly not a good idea.Switching off with applicatbris programs running is worse, and can leadto problems with Windows or the applications programs. One polentialcause of difficulties is that Windows itself and many applicationsprograms place temporary files on the hard disc drive. When Windowsand the applications programs are shut down in the correct manner
I- ayer
Close Program
)<-Stream Client] [Not -esponding]Microsoft Word - Chi iocEolorerC =tireRealplayRr aappDi ectcdLvcomsStmonAt schedGirdsys32
WARNING Pressing =TRLALTDEL again Adl restart ,ou-co -nputer You will lose unsaved information in allare running
End Task Shut Down I
Fig.1.23 The Close Programs window, which can also be used toclose Windows itself
31

1 Prevention Is...
these files are deleted. If you simply switch off with things still running,or the PC is suddenly switched off due to a power failure or hardwarefault, these files are left on the disc. This may not matter, but there is arisk of the files confusing matters when the PC is switched on again.
Even if you do close down Windows correctly every time, it is still possibleto run into difficulties with problem software. You are unlikely to useWindows for very long without encountering a program that either just"freezes" and does not respond to the mouse or keyboard. The moreinteresting variation is the program that starts to behave erratically withcommands having the wrong effect, odd things happening on the screen,etc. Often when this occurs the program fails to close down when thecross icon in the top right-hand corner of the screen is operated. Oncean application program has gone seriously awry it is not uncommon forWindows itself to behave erratically, and it will often fail to close downproperly.
Wherever possible applications and Windows should be shut downproperly, or in a reasonably orderly fashion, rather than simply resortingto the on/off switch or Reset button. Windows does provide an escaperoute that will usually do the trick if the PC becomes seriously "gummedup". With MS/DOS the Control -Alt -Delete key combination resets thecomputer, but it has a somewhat different effect in Windows 95/98/Me.Rather than immediately resetting the PC, a message appears on thescreen, as in Figure 1.23. These four options are available:
1 Press Control -Alt -Delete again to reset the computer, which willthen reboot
2 Operate the Cancel button to return to Windows without changinganything
3 Operate the End Task button to close the program that ishighlighted in the program list
4 Operate the Shut Down button to shut down Windows
If an application program is proving troublesome and can not be shutdown in the usual way, the third option offers a poss ble solution to theproblem. You may well be puzzled at the number of programs in the list,since with Windows and a couple of applications programs running therecould be half a dozen or more programs listed. The reason for thediscrepancy is that modern PCs tend to have various background tasksrunning. In the list of Figure 1.23, amongst other things there is a screencapture program and the driver software for a CD -RCM writer. Exploreris effectively Windows itself incidentally, so if you c ose that programWindows will shut down.
32

Prey
a.
X -Stream Client' [Not responding]
This program is nor responding It may be busy waiting for aresponse horn}or; or it may have stopped running
- Jick Cancel No ignore and return to Wrndcws
- To dose this program immediately. di& End Task Youwill lose ary lntaved inforrnanon in this grogram
Lrd Tasl
r r eV I *eh]. 1,Vr
50
Cancel
ExplorerCaptureRealplay
'easeknemet
Fig.1.24 When this message appears it should finally be possible toclose down the troublesome program
To close a program using this route, simply left -click on its entry in theprogram list and then operate the End Task button. This never seems toinstantly shut down the program, and instead a further message appearson the screen (Figure 1.24). Note that this second message can appearwithin a couple of seconds, or it can take some time, so be patient andwait to see what happens. If you have made a mistake and chosen thewrong program, left -click on the Cancel button and then press Control -Alt -Delete again so that ycu can have another try. Operate the End Taskbutton to close the program. Incidentally, this is not meant to be a normalmethod of closing a program, and should only be used in ar emergency,or to close down a background task that can not be terminated in anyother way.
The PC may operate normally once a troublesome program has beenclosed down. If so, I wculd not recommend simply carrying on as ifnothing had happened. It is safer to save any unsaved data and closedown any applications that are running. Then restart Windows andlaunch the applications p-ograms again. This way you should manageto avoid any nasty surprises that the rogue application might have leftbehind.
33

.lion Is...
41Find All Files PIEICIEde Ldit view Qptions tjelp
Name 8 Location I Date I Advanced
Named
Lou. Ir.
te,t
(C)
Include sublolders browse I
Find Now
New Search I
Fig.1.25 Using the Find Files or Folders facility of Windows Explorer
Emergency exitUnfortunately, in situations where the crashed software has managed toget Windows seriously out of kilter it may not be possible to regain propercontrol. Where possible, save any unsaved data before trying to exitWindows. Try to close any running applications programs via the normalroute first, or by way of the Control -Alt -Delete route if that proves to beimpossible. Where possible Windows should be closed down via theStart menu in the normal fashion, but if this proves fruitess or impossible,try the Control -Alt -Delete method.
If the Shut Down button does not have the desired effect, press Control -Alt -Delete again to check for more programs that are -lot responding. If
no crashed programs are reported, pressing Control -Alt -Delete againwill probably reset the PC and get the system out of Windows. Anotheroption is to start closing down the background tasks one by one in anattempt to regain proper control of the PC. It is quite likely that a fault inone of these programs is causing the problem, and by a process ofelimination it should be possible to find the culprit.
If Windows has well and truly crashed, often the screen will freeze or thecomputer will ignore input from the keyboard or the mouse buttons.Another possibility is that you will find yourself going round in "everdecreasing circles" repeatedly closing down Windows without it actuallyclosing down. In these situations it is probably not worthwhile trying tofind an orderly exit route. It is quite likely that there is no tidy way of
34

Prevention is... 1
Find: Files named reboot vxd
File Edit View Qptions Help
Name 8. Location Date I Ad vanced
coritrain,no
F.; include Browse.. I
Name In FolderThere are no items to show in nn_, view
ll tile(s) found
Find Now I
New Search
Size Type
Monitoring New Items
Fig.1.26 In this case the search proved fruitless, and another avenueof investigation had to be pursued
closing down Windows once things get this badly messed up. Simplypress the reset button or switch the PC off, wait a few seconds thenswitch it on again and hope.
Sometimes the Control -Alt -Delete combinatior will fail to bring up theClose Program window. This can be due to a surplus reboot.vxd file,and deleting the unnecessary file should solve the problem. Start byusing Windows Explorer to search for files of th s name. Go to the Toolsmenu and then select Find followed by Files or Folders. This will bringup a Window like the one shown in Figure 1.25. Enter "reboot.vxd" asthe name of the file to search for, make sure that you are checkinc. driveC: and that the "include subfolders" checkbox is ticked. Left -click theFind Now button and the program will search all the folders on drive C:for the file. It should not find it, giving a Window like Figure 1.26 oncethe search has been completed. If "reboot.vxd" is found, left -click on itsentry to highlight it, and then either select Delete from the Edit menu orjust press the Delete key.
35

1 Prevention is...
Met ro,o11 tom Information
Ele Eat
:IR31
Yew hely
S stem lelormetionHercAveue Resourcescomponents
Software EmnronmentInternet Explorer
For Help. press Fl
System InformationMans oft Windows 90 4.10 1998Upgrade ustng CD /T CVMNINSTO 400 /SrcDimE WAN% a /IS /10 /IT1E 55 50 4134 0600
Uptme 0 04 53 26Norm. modeOn "DEFAULT' es 'Robed Penfold"
Gernonelnbal Pensum(r) II Processor Intel t.44.0(1 -M) Technology2566413 RAM
72% system resources treeWondares-managed swop 5b nn dove C (7272MB toe)Meek*** space on thus C 72721.48 of 13016648 (FAT32)
Current System Intormebon
Fig.1.27 The Windows 98 System Information screen includesinformation about the amount of memory currently in use
Background informationAs pointed out in the previous section, most modern PCs usually have anumber of background tasks in operation, and not just Windows plusany applications you are running. If you use the Control -Alt -Deleteimmediately after a PC has booted into Windows you will probably findquite a list of programs, and not just Windows Explorer in the programlist. Some of these programs are probably providing essential Windowsfunctions, while others are drivers for complex pieces of hardware, anti-virus monitoring routines, etc.
In theory there should be no problem in having numerous backgroundtasks provided the PC has enough memory to accommodate everything.In practice the PC might not have sufficient memory to accommodate allthe programs if there is a large number of them and you use memoryhungry applications. Also, if your PC has only the minimumrecommended amount of memory for the version cf Windows in use,having large numbers of background tasks is inviting problems. Theappearance of error messages mentioning illegal operations, fatalexception errors, and page faults are often indicative of faulty memoryor inadequate memory allied with poor memory management.
With any version of Windows 95, 98 or Me you can check the amount offree memory by running the System Information utility. From the Start
36

Prevention is... 1
Help and Suppo-t
r,e% Nene ROBERTKvu ,ettnrice: inVT&7:597.1362.4.1 PC
Fig.1.28 This is the Windows Me version of the system informationscreen
- Al
menu select Accessories, System Tools, and tien System Information.The Windows 98 version of this utility is shown in operation in zigure1.27. The important figure here is the one that gives the percentage ofsystem resources that are free. In this example some 72 percent is free,which should give trouble -free operation.
Figure 1.28 shows the Windows Me equivalent, which does not presentthe information in quite the same way. The total physical memory isquoted, which is the amount of RAM fitted to tl-e computer. This seemsto be about 1 megabyte less than the amount of RAM actually installed,and I would guess that it coes not include the lowest 1-mecabyte whichis used by MS/DOS but net by 32 -bit versions of Windows. The virtualmemory includes hard disc space that can be used as a sort cf slowalternative to RAM. In tie example of Figure 1.28 the PC has 95 -megabytes of RAM, of which only about 6 -megabytes are free. As thingsstand there is no major problem, but running another major appl cationwould seem to be out of the question.
Another potential problem is that of the background tasks proving to beincompatible. In theory this should not happen, but with something as
37

Prevention Is...
complex as this there is always a chance of things going wrong, and inpractice things will go wrong from time to time. The computer mightsimply "freeze", but a more likely outcome is that an error message willappear, probably explaining that a task has a fatal problem and that itwill shut down.
With this type of thing it is easy to jump to conclusions that the programthat has generated the error message is the one that is causing theproblem. It can in fact be due to one program interfering with anotherprogram and causing it to crash. If a variety of programs suddenly havea tendency to crash it is likely that there is a problem in Windows itself ora background task is causing problems.
If a problem starts just after some new software has been added it isalways likely that there is a problem with the new software. In caseswhere the new software includes a background task i: is that much morelikely that the new software is responsible for the system's instability. If
problems occur after new software has been installed, it is worthwhileuninstalling the program to see if normality returns. When a new programdoes seem to be the culprit it is a matter of contacting the softwarepublisher to see if they can offer any assistance. Some backgroundtasks seem to be mutually incompatible, and you may have to opt forleaving one or other of them off the system.
System TrayThe System Tray, also known as "Systray" is at the bottom right cornerof the main Windows screen, and here you will find icons for a numberof background tasks, such as audio control panel, anti -virus software,etc., and the Windows clock. These programs, and probably a numberof others, are launched as part of the Windows start-up routine. If yoususpect that something here is giving problems, it is possible to stopthe program from loading via the System Configuration utility. In orderto start this utility select Programs from the Start menu, followed bySystem Tools and System Information. Then choose SystemConfiguration Utility from the Tools menu and left-cl ck on the Startuptab. This should produce a window something like Figure 1.29.
All the programs that run at start up are listed here, and there is acheckbox beside each one. Uncheck the box for any program that youdo not wish to be launched at start up. Alternatively, if there is a programthat should be launched at start up but it is failing to appear, make surethat it is in the list and that its checkbox is ticked. Sone of the entries in
38

Preys
System Configuration Utility
Ede View belp
General I Cxdig sys Autoexec bat I Systemini I Win ini SAartuP
Select the check box to enable a startup itern, or clear the cieck box to disaole astartup item
pnrchl,miciset
vAdaptec DirectCDScanRegistryTaskMonitorAtiOwd32LoedPowerProtileAbkeyStillImageMonitorGrcSys321-1X1,4APntrh 9R111 A
SysTray.Exepnpchk.exemidiset.exeC. \ Program Files \ C\ybarMedia Unlnstaler\c PROGRA-1 CD-WRr 1 \ D1RECTCD DIC \WINDOWS \ scanreqw exe /autorunC' \WINDOWS \taskmcn.exeAticwd32.exeRundtl32 exe powrprot_d11,LoadCurrentRwrSAbtask exeC \WINDOWS \ SYSTEM \ ST1MON EXECAProgram Files \LibedySurt\ GrdSys32 ex
\ wiNnnws% 914111A PIP /0 A
OK I Cancel
Fig.1.29 The System Configuration utility enables the user to decidewhich programs are run at start up
the list are sometimes a bit cryptic, but you shculd be able to find theones you need. Note that some of the programs are part of Wintowsand not software you have added to the basic installation. For example,the Registry Checker utility is run each time Wirdows starts up. Whenyou have finished, operate :he Apply and OK bi_ttons. You will then beasked if you would like to restart the computer. The changes will nottake effect until Windows has rebooted.
39

tondos Is...
Points to rememberDo not mess around with the Windows Registry or configuration filesunless you know exactly what you are doing.
Do not delete files manually unless you are sure it is safe to removethem. Where possible, programs should be removed using their ownuninstall utility or the built-in facility of Windows.
Avoid using any form of beta or test software. If yoJ wish to experimentwith software of dubious stability, have a PC specifically for this purpose.Try to avoid using old software that was not written for 32 -bit versions ofsoftware. Modern software is safer and should run much better.
Do not blame Windows if things grind to a halt before the boot -upsequence starts. A failure this early in the start up sequence is due to ahardware fault or an error in the BIOS settings.
A hardware fault can be responsible for the boot -up process failing almostas soon as it starts, or never actually starting. However, it could be dueto damaged or missing boot files, so try replacing them using the MS/DOS Sys program.
If you have access to some diagnostics software, use it to check that theproblem is not due to a hardware fault. Make sure the expansion cardsare fitted into their expansion slots correctly.
If the boot process stalls late in the boot sequence check that thehardware drivers are properly installed. One of the programs that runsat start up could also be the cause of the problem.
The fact that a virus has not announced its presence does not mean it isnot there. If there are inexplicable problems with the system use anti-virus programs to scan the files on the hard disc, recently used floppydiscs, etc. Ideally an anti -virus program should be installed on the PCand used to make regular checks of the system.
Do not switch off your PC while Windows is still running. Shut downWindows first, and then switch off your PC if it is a type that does notswitch off automatically.
Even if the operating system or applications software are behavingabnormally, try to close down the system properly.
Do not get your computer to "bite off more than it can chew". There is alimit to the amount of software that a PC can have running at the sametime. The operating system can be damaged if the computer keepsrunning out of resources and crashing.
40

N
Troubleshooti
Booting problemsMany users of MS/DOS were surprised at the ease with which the newoperating system could be halted in its tracks when they moved toWindows 95. A relatively simple operating system such as MS/COSdoes not usually fail to boot unless there is damage to one of the bootfiles. When things go wrong it will throw up a few error messages &ringthe boot process, and it may rot operate exactly as you would like nicethe system has booted, but the system will usually boot. Having booed,it will to a large extent be functioning and usable.
The situation is different with a complex operating systems suc7 asWindows 95, 98, and Me which are dependent on numerous files beingpresent and correct on the hard disc. If any one of these files is damagedor absent, or a configuration file erroneously specifies a file that is notpresent, the boot process will often stop about half way through theprocess. In fact quite minor problems seem to bring the boot processto a halt, such as the system running out of "environmental space",which seems to mean a lac of memory set aside for use as buffers, foruse by the PATH command, etc.
Windows 95/98/Me do not operate under the "boot anyway" philoscphyof MS/DOS. This cautious approach could be by accident -ether thandesign, but it is probably a safety measure to ensure that the systemonly boots if it can do so reliably. With a more complex operating systemsuch as Windows 95, 98, or Me the last thing you need is the systembooting but then running amok.
Not all Windows problems centre on boot problems, but it is probablytrue to say that the vast majority do. Windows can boot normally andthen give difficulties, but this is often the result o' problems elsewhere inthe system. Hardware faults and bugs in applications software can bothproduce this kind of behaviour. Much of this chapter is therefore devotedto boot problems, and it is this topic that is covered first.
41

Jubleshooting
Microsoft Windows 95 Startup Menu
2. Logged (\BOOTLOC.TXT)
3. Safe mode
4. Step-by-step confirmation
5. Command prompt only
6. Safe mode command prompt only
7. Previous version of MS-DOS
Enter a choice: 1
FS -Safe mode ShlftP5 -Command prompt Shift.TO-Step-by -step confirmation
Fig.2.1 The upgrade version of Windows 95 otters seven options
Safety firstDo not jump to the conclusion that the system has become unusablebecause Windows crashes during the boot -up sequence. There couldbe a major problem, but it is worth resetting the computer a couple oftimes to see if the problem clears itself. Also try switching off, waiting afew seconds, and then turning the PC on again. There can be anoccasional problem with a piece of hardware failing to reset properly atswitch -on. Switching the PC off and on again will usually clear this sortof problem. If that fails, boot in Safe mode (as described in the next partof this chapter), shut down Windows in the usual way, and then tryrebooting normally.
When repeated attempts to boot the system result in the boot processcoming to a premature end, Windows should 'De booted in Safe modeagain. This is a sort of very basic "boot at all costs" mode that can beused when troubleshooting. There are other modes that can be usefulwhen Windows troubleshooting. In order to boot into one of these modesthe F8 function key must be pressed as soon as the BIOS start up routineends and the boot process begins.
42

Troubleshooting 2
Microsoft Windows Millennium Startup Menu
2. Logged (\BOOTILIC.TXT)
3. Safe mode
4. Step-by-step confirmation
Enter a choice: 1
FS -Safe mode ShiftF8-Step-by-step confirmation fill
Fig.2.2 Windows Me offers just four start up options
There is only a very brief gap between the BIOS finishing .ts sta-: upprocesses and the system starting to boot, so you must press F8 assoon as the BIOS has finished its routine. In fact with some systems theonly reliable way of entering Safe mode is to repeatedly press F8 as theend of the start up routine approaches. Pressing F8 when using Windows98 brings up the simple menu system shown here:
Microsoft Windows 98 Startup Menu
1. Normal
2. Logged \BOOTLOG.TXT)
3. Safe mode
4. Step-by-step confirmation
5. Command prompt only
6. Safe mode command prompt only
43

2 Troubleshooting
In the modeThere is an additional option in the Windows 95 equivalent (Figure 2.1),but this only appears in the upgrade version. Windows Me has a muchreduced set of options (Figure 2.2), and is more dependent on Safemode than the other versions of Windows, so we will consider WindowsMe separately. It is perhaps worth considering the various Windows 95and 98 options before proceeding to consider Safe mode in detail.
1. Normal
Booting using the Normal option takes the PC through a normal Windowsboot -up process, but is obviously of no use if this process fails and thecomputer hangs up.
2. Logged modeLogged mode produces a normal boot sequence, but a log of the bootprocesses is placed in a text file on the boot drive. As we shall see later,this can be useful in determining the cause of a boot failure.
3. Safe mode
Safe Mode boots into Windows, but only a of theoperating system. The display is a basic 640 by 480 pixel type using 16colours, and items of hardware such as the soundcard, CD-ROM driveand modem will not be operational in this mode. Some of the Windowsfacilities either fail to operate at all or only work in a simplified mode.Because Safe Mode provides a very basic version of Windows it is usuallypossible to boot in this mode even if the Windows installation is badlydamaged. Unfortunately, once into Safe mode it can sometimes bedifficult to track down the cause of the problem and fix it due to thereduced functionality.
4. Step-by-step confirmationUsing step-by-step confirmation means that Windows will ask the userfor confirmation before processing configuration files, device drivers,etc. The point of this is that it enables parts of the boot process to bebypassed, and this can help to locate the cause of the problem. In
many cases it can also help to get the PC booted into a version ofWindows that has more functionality than Safe Moce, possibly makingit easier to sort out the cause of the problem.
44

Troubleshooting 2
5. Command prompt only
The "Command prompt only" option boots tie computer into theWindows 95 or 98 version o' MS/DOS. Depending on how the PC is setup, this might get some of the hardware such as the CD-ROM drive andsoundcard working, whereas they are left non-functioning in Safe Mcde.However, when Windows fault finding it is often better to boot from driveA: using a Windows Startup disc rather than use this mode. The Startupdisc provides some useful utility programs whi:h are not necessarilyavailable when booting into the Command prompt mode from drive C:.
6. Safe mode command prompt
Do not confuse option 3 (Safe Mode) with option E (Safe mode commandprompt only). Using option 6 results in the PC booting into a very basicversion of MS/DOS, with the autoexec.bat and config.sys files IDE ingignored. One reason for using this mode is that the PC will always bootinto MS/DOS provided the boot files are intact. Anything in theconfiguration files that causes the boot to fail will be ignored. It is unusualfor an entry in the configuration files to prevent MS/DOS from booting,but it can occasionally happen. This is usually when a severe case ofrecursion results in the boot J p process repeating something indefintely.Another reason for using this mode is that some diagnostics and anti-virus software requires the PC to be booted into a "clean" version of MS/DOS having no drivers, etc., installed. This mode provides an easy wayof booting into a completely "clean" version of MS/DOS.
7. Previous MS/DOS mode
As pointed out previously, option 7 is only provided when using theupgrade version of Windows 95. Normally this will have been insta ledon top of MS/DOS, and with this option it is possible to boot into theversion of MS/DOS that was installed prior to the upgrade. This optionis presumably included to make it easier to run MS/DOS applicationssoftware, and it is probably not of any value in the current context.
Using Safe modeSelect option three to boot the system in Safe mode, or simply use F5rather than F8 to skip the menu and boot straight into this mode. Aspointed out previously, booting the system in Safe mode will alrostinvariably get the PC into Wirdows, and the computer will be "up andrunning" to some extent. A warning message towards the end of the
45

2 Troubleshooting
seisitillikikee(s) you went to check. for errors
j 3'h Floppy tok
MEI
T /pe attest
Standard
(checks tiles and folders for errors)
4' Thorough(performs Standard test and sums disk surface for errors)
eror,
Qptrons
AidFig.2.3 Scandisk offers two basic modes of operation, which are
Standard and Thorough
boot process explains that Safe mode provides a simplified version ofthe operating system. It is only intended to permit problems with thesystem to be traced and fixed, and it is not designed to permit the systemto be used normally. I suppose that in an emergency it might be possibleto run applications programs in Safe mode, but this is something thatshould only done when suitably desperate.
One major difference between Safe mode and normal operation is thelack of proper hardware support. The video card w II of course function,but only in a basic VGA mode. Exotic pieces of hardware will not functionbecause their drivers will not have been loaded, aid even some basicpieces of hardware such as the CD-ROM drive and the soundcard willnot function for the same reason. Provided the mouse is a reasonablystandard type is should still function in Safe mode. It is important torealise that the lack of hardware support is not the only failing. Some ofthe facilities provided by the operating system will a so be lacking, whichis a pity because this can sometimes make life difficult when trying tosort out a problem.
46

Troubleshooting 2
1 NI
ScanDisk Results - (C ) El11)D elrn, ern:, on this
F -L p
ran t
b65 114 total elloo5tion units on dtsF
930 242 evallablE ediocation units
C.ose
Cenc.el
Fig.2.4 Scandisk provides a report once a scan has been completed
Basic checksOnce the PC is booted in Safe mode you can undertake some Dasicchecks, and the usual starting point is the Windows Scandisk utility,which can be accessed from the Start menu Dy selecting Programs,Accessories, System Tools, and Scandisk. The Scandisk utility seemsto be the much same in both Windows 95 and 98, and it offers twomodes of operation. These are Standard and Thorough modes, andyou operate the radio buttcns to select the one you require (Figure 2.3).
The Standard check looks for irregularities in the file and folder structure.This includes simple things like filenames that do not adhere to the rules,and more serious problems such as one sector of the disc being assignedto two or more files. Program crashes can leave problems of tnesetypes, so it is not a bad idea to run Scandisk if a program comes to anunscheduled finish. If you tick the appropriate checkbox Scandis< willtry to repair any errors that it finds.
Initially I would recommend using the Standard mode with the checkboxticked. This test should be relatively fast, tak,ng no more than a few
47

2 Troubleshooting
System hormones minutes. If the
General 115evZilianaosr Hardware ProfitsI PetamarrceI program discoversany problems it willreport them viaonscreen messages,and at the end it alsogees a brief summaryo= its findings (Figure2.4). Unfortunately, ifScandisk does findsome errors and fixesthem, this does notnecessarily mean thatthe Windows will thenboot perfectly. Theproblems will be fixedin the sense thatfilenames will adheretc the rules, linkedfiles will be unlinkedso that each sector ofthe disc is assigned to
only one file, and so on. Any damaged files may rot be fully restoredusing Scandisk. If one file partly overwrites another file there is no waythat a utility program such as Scandisk can restore the overwritten partof the file. Unless you have a backup copy the damaged file will be lostpermanently. However, Scandisk should at least restore order to thedisc if things have gone wrong, improving the chances of getting thingsrunning smoothly again.
The Thorough mode performs the same tests as the Standard mode,but it additionally carries out a surface scan of the disc. In other words,it checks that there are no weak spots on the disc that are causing datato become corrupted. It is certainly worth using the Thorough mode ifyou suspect that the disc itself may be causing problems. Note though,that a thorough check of this type on a large hard disc drive will takequite a long time. It will probably take a few hours rather than a fewminutes for the test to be completed.
5 IMIE IS CDROM tar Dusk drives
Display adapters
-kb Floppy disk controllers
45 Hard disk ccotrolers
Modern
Montas
lenagsng Devoe
Keyboard
) Mouse If Network adapters
4Othas damesPen
Ports ICOM E LPT I
6,1,1 wieu 1rd garr,
Rasmus& I 82- Prot
OK Cancel I
Fig.2.5 The System Properties screen
Hardware driversDevices such as soundcards, video cards, and even the built-in interfacesof the PC such as the parallel and USB ports require drivers to integrate
48

Troubleshooting 2
System Properties
General Device Manager I Ha-dware Profiles I Performance
( View devices by type r View devices by connection
+ ..;:g Hard disk controllers
+ Imaging Device
+ 4 Keyboard+ 4 Modem+ Monitors
- 47D Mouse
1'.. Logitech First/Pilot Mouse Serial (M34M35,C43)r
j PS/2 Compatible Mouse Port+ 1111/ Network adapters
- \> Pen-\.. Micrograt Tabby 2
i Ports (COM & LPT)- & 0,ound, video end game controllers
AZTECH 2320 (PnF) Gameport Joystick Device
AZTECH 2320 (PIP) MPU-401 Device
Aztech 2320 Compatible PnP Audio (WOM)
Properties I Reyiesh I Remove Pnnt
OK I Cancel
Fig.2.6 Device Manager uses yellow exclamation marks to indicateproblems with items of hardware
them with the Windows operating system. Problems with Windowsdrivers are not exactly a rarity, and it is best to check for driver `cultssooner rather than later. The normal way of doing this is to go intoDevice Manager. This cal be run from the Start menu by selectingSettings, Control Panel, and then double clicking on the System icon.Left -click on the Device Manager tab of the window that appears, andyou will then have a screen something like Figure 2.5.
Normally there will be a yellow exclamation mark (!) against an entry ifthe program has detected a problem with the tern of hardware in thatcategory. Double clicking or an entry in the table expands it to show allthe drivers in that category and where appropriate there will be anexclamation mark against al entry (Figure 2.6). In fact Windows will
49

2 Troubleshooting
Creative SB32 PnP Properties
Gemmel I Driver I Resources
Creative SE 32 PrP
Device type: Other devices
Mantiacturer None specified.
Hardware version: 1.0.12
Device status
Status is not available when Windows is running in SateMode
Device usage
r Distkie n.this hardworis profile
Exists in al hardware profiles
OK.
usuallyusually expand acategory for you if it
contains an item ofhardware that seemsto have a problem. Innormal operation it ispossible to double -c ick on an entry thathas a question orexclamation mark inorder to get furtherdetails on theproblem.
Unfortunately, in Safemode DeviceManager is not fullyoperational, and itsd agnostic abilitiesare practically zero.
Cancel Figures 2.5 and 2.6,which actually showthe Device Manager
forthcoming when used in Safe mode fcr the samecomputer but running
in Safe mode and Normal mode respectively, demonstrate this point. If
you try to get status information in Safe mode you simply get a messageof the type shown in Figure 2.7, explaining that stati_s information is notavailable in Safe mode. In order to use Device Manager properly it is
necessary to get the PC booted in normal mode, even if this meansbypassing some parts of the boot -up process and having Windows lessthan fully operational for the time being. This can usually be achievedusing the step-by-step confirmation method of booting, as describedlater in this chapter.
Fig.2.7 Device Manager can be less than
Old hardwareIt is best not to jump to conclusions where the PC is one that has beenin use for some time and it has undergone some changes to the hardwareover the years. In the example of Figure 2.6 the faulty mouse is in factone that had been removed long ago and replaced by a mouse porttype. The driver for the old mouse had not been removed, but the PCworked properly because the drivers for the new mouse had been
50

Troubleshooting 2
installed properly. This demonstrates the point that problems withhardware will not necessarily prevent Windows from booting. With thingssuch as mice and soundcards the PC will often boot -up even if there isa problem, but the hardware concerned will not work properly. Thedrivers for more crucial items of hardware such as the hard disc driveand the video card are more likely to bring the boot process to a halt.
Where hardware problems are found in Device Manager it certainly makessense to sort them out before trying to proceed further. This might getthe system working properly again or there could still be boot problems,but it at least clears away some potential causes of the prob em.Reinstalling drivers can be problematic with the old drivers still in place.Even though there is a suspected problem with the existing Dies,Windows can be reluctant to replace them with drivers that do not havea later date.
It is best to remove the existing drivers and then shut down Windowsand reboot the system. Drivers are easily removes using Device Manager,and it is just a matter of left clicking on the relevant entry to highlight itand then operating the Remove button. Left -click on the OK buttonwhen the warning message appears on the screen (Figure 2.8). Therelevant entry should then disappear from the list of devices. Note thatit is not possible to select and remove a category from the DeviceManager list.
Where all the drivers in a category are giving problems they must beremoved individually. Even where (say) just one out of four drivers for asoundcard is not working properly, it is best to remove all the driversand reinstall everything "frcm scratch". The drivers can be reinstalledvia Device Manager provided the system was nct booted in Safe mode.If the system can only be booted in Safe mode it is worth trying the AddNew Hardware option of the Control Panel, which usually seems to workin this mode. Note also that some hardware drivers have their owninstallation program and do not have to use the standard Windowsmethods. Before attempting to reinstall the drivers make sure you readthe manufacturer's installat on instructions.
If you have an Internet connection it is a gcod idea to check themanufacturer's web site to see if a more recent version of the driversoftware is available. There are usually frequent updates to the dnversfor newer items of equipment. In general it is not a good idea to installan updated driver with the old version still in place, so use DeviceManager to remove the original driver before nstalling the new one.One exception to this is where the updated drive- is not actually a full setof driver software. Sometimes the new version uses some of the original
51

2 Troubleshooting
General Device Manager Hardware Profiles' Performance'
a View devices by fype C View devices by connection
5 Computer
, CDROM+ Disk drives
+ Display adapters+ Flociov disk controllers
+
+
+ Logitech First/Pilot Mouse Serial (M34M35.C43)
+ 4
r Warning You are about to remove this device from your system
Confirm Device Removal
+ 1
Properties
OK
Alb
Cancel
Refresh Remove f Print.
OK I Cancel
Fig.2.8 Device drivers are easily removed using Device Manager
files, while changing other files and (or) adding new ones. As always,read the installation instructions before installing the new software. Thisshould state whether or not the original drivers should be left in place orremoved. It is does not, then the old drivers should be removed prior toinstalling the new ones.
Hardware problemsIf repeated reinstallation of the drivers fails to clear the yellow exclamationmarks, and updated drivers do not help either, it is quite likely that thecause of the trouble is a hardware fault. In the case of an expansiolcard, check that it is fitted in its expansion slot using the simple method
52

1Youbleshooting 2
as Perlore-nem:a
AZTECH 2320 (PnP) MPU-401 Device Properties ElGeier& I Driver I Resoirces
AZTECH 232C (PnP) MPU-401 Device
Cevice type Sotrici. video and game controllsrs
Manufacturer Aztech Labs
hardware version 1 0 82
Device status
This device cannot fnd any free Interrupt Request (IRO)resources to use (Code 12 )
If you went to use this device, you must disable a lather devicethat is using the resources this device needs To do this, clickHardware Troubleshocter and tallow the instructions in thewizard
Device usage
r Qsable in this hardware profile
P Exists in all hardware profiles
Hardware Troubleshooter
ht
OK I Cance
Fig.2.9 When Windows is tooted in Normal mode, Device Managerwill give some details of hardware or dotter problems
cutlined in chapter 1. If the PC can be booted in normal mode useDevice Manager to check the cause of the problem. Double-click on theEntry for the troublesome device to bring up a window like the one inFigure 2.9. The program may be vague in its reporting of the fault,stating something along the lines that the device is not working properly,and that the hardware is faulty or the drivers are not installed.
the example of Figure 2.9 It is quite specific, reporting that there is ahardware conflict. In other words, this device needs to use resources oftie computer that are already used by another piece of hardware. A
53

2 Troubleshooting
problem of this type should not occur if the PC has been in use andworking well for some time. It is more the type of thing that happenswhen new hardware is added to a PC. A hardware conflict is not strictlyspeaking a Windows problem, and goes beyond the scope of this book.Windows provides some built-in help for dealing with this type of thingin the form of the Hardware Troubleshooter. This can be launched byoperating the Hardware Troubleshooter button in the Device Propertieswindow. Wizards will then guide you through the process of sortingthings out. With luck the problem will soon be cured, but if inadequateresources are available for all the hardware there will be no alternative todisabling one of the devices producing the conflict.
LoggingIf no problems can be found with the hardware, or sorting out theproblems that are found makes no different to the boot problems, it istime to look elsewhere for the fault. Newly installed software that makesa mess of a configuration file is probably the most common cause ofWindows start up problems. If the system refuses to boot just aftersome new software has been installed it is odds-on that the installationprogram has made a mistake somewhere in the process. There are twooptions in the Windows 95/98 start up menu that help you to discoverthe root cause of the fault when the system refuses to boot. The first ofthese is option two, which provides a logged start up.
Depending on the way your PC is configured, it may provide a longstring of messages detailing what is happening during the boot process,or it may suppress these messages. Even if these messages aredisplayed, on a modern PC you often find that many of them scroll offthe screen so fast that there is little chance of reading them. The basicfunction of the logged boot up is to write these messages to a file calledBootlog.txt that is placed in the root directory of the boot disc. This filecan be read using any text editor or word processor. Incidentally, theprevious version of the file, if there is one, will be saved as Bootlog.prv.
One of Window's built-in text editors can be used to examine the Bootlogfile if your PC is not equipped with a word processor. From the Startmenu choose Programs, Accessories and then Wordpad. This producesa simple but effective word processor, and the Booticg file can be loadedby selecting File and Open. This produces the standard Windows filerequester that can be directed to the root directory of drive C:. Makesure that either text (txt) files (Figure 2.10) or all files (*.*) is selected inthe lower part of the window, or Bootlog.txt will be ''invisible" to the filerequester.
54

Troubleshooting 2
DIaluldilal211I lel.
11-moshhowNmm MH"
upon lrnLook in I (C) Frr2.1
asp,sec
Tempemp2
errnp 3
Teinp4Temps
L'reinplaiec
0
F le name
1-4.,eiype
J unzipped Dialog at1Wavnder :D Netted at
_J Yelnek Ses.iploq to_JVOndosis SSdisig td_J Windows Update Setup Files_JWp_J Ziptemp
Bootleg at 4
Fur Help press Fl
Fig.2.10 Make sure that the word processor is set to recognise a filehaving a "txt" extension
Once loaded, there is no difficulty in making a detailed examination ofthe file's contents. The list of messages is comprehensive and providesa full list of every action dLring boot up. The file also shows whetter ornot each action was successful. This is just a small sample from a longBOOTLOG file:
[00109EE9] Loading DeviceC:\WINDOWS\SETVER.EXE[00109EE9] LoadSuccessC:\WINDOWS\SETVER.EXE[00109EE9] Loading Device =C:\WINDOWS\COMMAND\ANSI.SYS[00109EE9] LoadSuccess
55

2 Troubleshooting
C:\WINDOWS\COMMAND\ANSI.SYS[00109EE9] Loading Device = C:\MTM\MTMCDAI.SYS[00109F0B] LoadSuccess = C:\MTM\MTMCDAI.SYS[00109F0B] Loading Device =C:\WAVRIDER\DRIVERS\SGIDECD.SYS[00109F26] LoadFailedC:\WAVRIDER\DRIVERS\SGIDECD.SYS[00109F26] Loading Device =C:\WINDOWS\COMMAND\DISPLAY.SYS[00109F32] LoadSuccessC:\WINDOWS\COMMAND\DISPLAY.SYS[00109F32] Loading Device =C:\WINDOWS\HIMeM.SYS[00109F32] LoadSuccessC:\WINDOWS\HIMeM.SYS[00109F32] Loading Device =C:\WINDOWS\DBLBUFF.SYS[00109F32] LoadSuccessC:\WINDOWS\DBLBUFF.SYS[00109F32] Loading Device =C:\WINDOWS\IFSHLP.SYS[00109F32] LoadSuccessC:\WINDOWS\IFSHLP.SYS[00109F33] C:\COLOUR.EXE[00109F33] starting[00109F33]C:\WINDOWS\COMMAND\MODE.COM[00109F34] starting[00109F33]C:\WINDOWS\COMMAND\MODE.COM[00109F33] starting[00109F33] C:\WINDOWS\COMMAND\KEYB.COM(Logodisabled)[00109F33] starting[00109F45] C:\WINDOWS\AZTPNP.EXE[00109F45]starting[00109F56] C:\WINDOWS\AZTPNP.EXE[00109F56]starting
As with all faultfinding, resist the temptation to jump to conclusions. Inthis list there is one line that failed, but it is obvious that this did not bringthings to an immediate halt because the boot process continued on for
56

Troubleshooting 2
dozens more lines and processes. The system file (SGIDECD.SYS) thatfailed to load is a driver for a soundcard no longer fitted to the system.The required file was no longer on the system, anc was no longer needed.Its failure to load was ignored by the system, which continued to boot.Most Boot.log files seem to show a few failed processes that turn out tobe of no consequence. It is conceivable that an error early it theproceedings could result in failure later in the boot process, but it is
towards the end of the Boot og file that the cause of the problem is mostlikely to be found.
Step-by-stepOption four in the Windows start up menu provides an alternative me:hodof locating the problem, and is the one I would recommend using. Step-by-step confirmation, as one would expect from its name, means thatthe system will go through the boot process step-by-step, and that it willonly include those steps that the user authorises. This enables the userto see exactly where things grind to a halt, and with further attempts it ispossible to bypass certain stages of the boot process to see if this enablesthe system to boot. Note that this method of booting offers the option ofhaving a Boot.log file generated. It is a good idea to select this option.You may not need the Boot.log file, but it will be there if it should berequired.
It is often helpful to try booting the computer without the config.sys filebeing processed, or if that does not get the system to boot try againwithout the autoexec.bat file being processed. I' blocking one of theseenables the system to boot, examine the relevant file (which will be inthe root directory of the bool drive) using a word processor or text editor.When editing any configuration file it is necessary to take great care notto make inadvertent changes to the file. If you are not very careful youcould easily end up doing more harm than good. Always save anunchanged version of the file to provide a backup if you make a mess ofthings and need to return to the original version of the file. I recommendmaking a backup on the ha -d drive called something like config.bak orautoexec.bak, and also making a backup copy on a floppy disc whichshould be write protected so that it can not be accidentally overwrilen.
If you wish to get rid of a in the file that seems to be causinc theproblem, a useful ploy is to add "Rem" followed by a space at thebeginning of that line. This to Is the operating system to ignore the linebecause it contains a rema-k that is merely there as an aid to anyoneexamining the file. The advantage of this method over deleting the line
57

2 Troubleshooting
is that it is so easy to put things back the way they were. If you need toreinstate the line you simply delete the four charactes you added. Thereis little chance of accidentally altering the line, because you never makeany changes to the original text. It is worth looking for repetition in theseconfiguration files.
Some installation programs make automatic changes to configurationfiles, and things do not always work quite as they should. For example,you will often find two or three almost identical PATH commands in theautoexec.bat file. What seems to happen is that an installation programadds a new PATH command that is the same as the original except thatit has one or two additions at the end. Presumably the original PATHcommand is supposed to be erased, but a flaw in the installation programleaves it intact.
The same sort of thing can happen with other commands. The additionalcommands may seem to be of no consequence, but they will take upmemory, and the memory set aside for this purpose may be used up.This usually produce error messages along the lines "not enoughenvironment space". Lines in the configuration files that run drivers thatare no longer necessary or undertake any unnecessary operations canwaste memory and prevent the system from bootinc properly. Strangelyperhaps, MS/DOS problems that prevent Windows from booting will notnecessarily prevent MS/DOS from booting. Hence it is sometimespossible to boot into MS/DOS, type "win" and press the Return key, andlaunch Windows successfully, even though booting directly into Windowsis not possible.
As can be seem from the screen shot of Figure 2.11, if you opt to havethe config.sys or autoexec.bat file processed at boot -up, you then havecontrol over the individual lines of each file. If the problem does exist ineither of the MS/DOS configuration files, by a process of elimination thismethod should enable the exact cause of the problem to be located.
Later problemsIf Windows stalls quite late in the boot sequence it is unlikely that theprocessing of the MS/DOS configuration files is causing the problem.In this case you should opt to have the Windows Registry processedduring boot -up and to have the Windows graphical user interfaceinstalled. Initially try loading everything on offer until the boot processcomes to a halt. The last boot process prior to the system hanging -up isprobably the one that is causing the problem, but it could conceivablybe something earlier on that is causing the problem.
58

Troubleshooting 2
Illcrosoft Wisdoms 98 Startup Mess
1. Normal
Z. Logged (\1001106.TXT)
3. Safe mode
6. Safe mode coumasd prompt oily
Inter a choice:
Window will prompt you to confirm each startup command.
Process the system registry lEnterq,Esc.81711
Create startap log file (11007186.TXT) lEnterrY.Escz817Y
Process your startup device drivers (CONFIG.SYS) Itster.Y.Esc.817Y
IMUICE=C:WINDOUSCOMMAMIDISPI.AY.SYS C011.(EGA1) (Inter.Y,Esc.81711COMNTIY.941.858.C:WINIOUS\CONNAND\000NTIY.SYS lEnteref.Esc.111711
OrVICI.C:\41100181\811118.SYS Itater.Y,fac.81111
OWICI=C:WINDOWS\IILSUrr.SYS lteter.Y.Esc:1117YOCUICENIGN.C:\MINSOUS\IPSNLP.SYS Itsterof,Esc:0117Y
Process your startup commend file (sifT0EXEC.NAT) Itster.Y.Isc.1111_
Fig.2.11 Step-by-step mode give good control over which bootprocesses are carried out
Try booting again but with the suspect process bypassed to see if :hisgets the PC booted into Windows. If that fails, try eliminating the processthat occurs one stage earlier, then the one a further s:age earlier, and soon. With luck you will soon get the system to boot, and the problemstage will be identified.
Error messageThe cause of Windows stallirg during start up is something you will nctnecessarily have to strive to discover. More often than not Windows wi Ihalt with a message stating the reason for everything suddenly grindingto a halt. Sometimes the pro Dlem will be due to a missing file. In fad inmost instances it seems to be due to a damaged or missirg file. Adamaged file could be one that has become corrupted, but more usuallyit is one that has been overwritten by an earlier version of the same file.This is something we will consider in detail later ii this chapter.
59

2 Troubleshooting
If the problem occurs after a piece of software has ,ust been uninstalled,it is likely that the uninstaller removed a file that is needed by anotherprogram. The easy solution is to boot in Safe mode and reinstall thesoftware, which should reinstate the file that Windows considers to beessential. Assuming that this is successful, you can either take the easyoption and leave the reinstalled program in place, or try removing itagain. The fact that the original removal of the program did not goentirely according to plan does not necessarily mean that a secondattempt will also fail. On the other hand, it will not be a great surprise ifit does fail.
It is worth making the point that installing and uninstalling software tendsto be less troublesome if you always opt for the default directory ratherthan choosing another directory. I am not entirely sure why this shouldbe, but it is probably due to minor errors in some installer and uninstallerprograms. Anyway, unless there is a good reason to do otherwise, alwayssettle for the default directory.
In the event of the boot process failing again, reinstalling the softwareonce more should restore normal operation. You are not necessarilystuck with the program for life, and normal operation should be possibleif the program is removed again and the contentious file is reinstated.The file causing the problem could be in the program's directory structureor in the Windows directory structure. Either way, using the file searchfunction of Windows Explorer should soon locate it. Copy the file to atemporary directory and then uninstall the program. If the file was copiedfrom somewhere in the Windows directory structure, copy it back to thatlocation. If it was in the program's own directory structure, the directoryit came from might have been removed by the uninstaller.
One approach to the problem is to remake part o, the erased directorystructure so that the file can be copied back to its original location. Thismight not be necessary though, and in most cases Windows will findthe file if it is placed in the Windows directory structure where files of asimilar type are located. In the case of a DLL file for example, Windowsshould find the file if it is copied to the Windows/System folder.
File huntIn cases where reinstalling a recently uninstalled program is ineffective,or there is no recently uninstalled software to put back, reinstallingWindows is probably the best option. If Windows is reinstalled on top ofthe existing installation there should be no problems with your
60

Ttouble0
applications software. Any programs that are correctly instiWindows should remain so after Windows itself has been rein
Although one might think that reinstalling Windows would alwany boot problems, it is only fair to point out that it is not a i.panacea. In a fair proportion of cases it will get things back into workingorder, but sometimes the problem with the old installation is carriedthrough into the new one. When Windows is installed over an existinginstallation, some of the settings from the old installation are copied tothe new one. This provides a route for an existing problem to find itsway into the new installation.
If no easy solution can be found to a Windows boot problem it is certainlyworthwhile trying reinstallation before spending large amounts of tinetrying to precisely identify and cure the problem. Reinstalling Windowsdoes not take all that long and there is a reasonable chance that it willget the operating system fully operational again. If the problem is dueto a missing file, and it is a standard Windows file That has gone "absentwithout leave", reinstallation should get Windows running properly again.Similarly, if a standard Windows file has become corrupted, reinstallingWindows should overwrite the damaged file with a sound version andcure the problem. Installing Windows "from scratch" and on top of anexisting installation are both covered in chapter E.
Problems with missing and corrupted files often involve dynamic linklibrary files, or DLL files as they are usually termed. These files areeasily spotted when browsing the hard disc as they all have a "d11"extension. Some users make a backup copy of all the DLL files on thehard disc so that any files cf this type that are accidentally erased oroverwritten by an earlier version can be easily replaced. Backing upDLL files is covered in chapter 4. There will be a vast number of DLLfiles on the backup disc or directory, but if the one you require is actuallythere it should not take too long to locate it usirg the Find Folders orFiles facility in Windows Explorer. It can then be copied to the appropriatefolder using Windows Explorer.
Searching WindowsOn the face of it, if a DLL file is damaged or missing and you think itmight be on the Windows installation disc, browsing the disc shouldbring it to light. In practice there is a minor complication in that most ofthe Windows files are not stored on the installation disc as individualfiles. Instead you will find a number of cabinet files on the disc, andthese are the ones that have a "cab" extension. Many of the Windows
61

.aleshootIng
joj thlSystem '
System Fie Checker venires the warty ot your system lies
Select et option end click Stan
e'r Scan for °kneel filen
tittles is bend to be conhipt yciu tea be prompted to restore the ongral He Byclicking Settings. System File Checker can also be configured to way you atchanged and deleted Was.
r &tact one He tom installatoo diskSpecify the system lie you would like to restore
close I Simis
For Hein press Fl Current System Information
Fig.2.12 Running the System File Checker, which is part of the SystemInformation program
It4 System File Checker PI El
System File Checker verifies the integrity of your system tiles
Select en option and click Start
r Scan for altered filesIf a file is found to be corrupt you will be prompted to restore the original file. Byclicking Settings. System File Checker can also be conigured to notify you ofchanged and deleted files
Extract one file from installation disk
Specify the system file you would like to restore
browse I
2"'tart Close I Settings
Fig.2.13 Selecting a file to be copied from the installation disc
62

Troubleshooting 2
files are compressed and grouped together in these cabinet files, out ifyou double-click on one of Them using Windows Explorer, provided youare using Windows Me the files within each one will be shown as if :heywere separate entities. Furthermore, the files within a cabinet file cal becopied using the normal W.ndows Explorer methods such as Copy andPaste.
This does not seem to work wIth Windows 95 or S8, but a decompressionutility such as Winzip will show the contents of a cabinet file and permitthe contents to be extracted. The MS/DOS Extract program shoulc alsodo the job, but is relatively awkward to use. It can be found it theWindows\Command folder. In Windows 98 the System File Checkerprogram can also be used to extract a file from the installation disc. Thiscan be problematic in the first version of Windows 98, incidentally. It is
probably worth trying if you use Windows 98 SE, but otherwise Winzipis a better bet.
In order to run the Systen File Checker program select Accessoriesfrom the Start menu and tnen choose System Information. Go to theTools menu in the window that appears and select System F le Checker.This will produce aWindow like the onein Figure 2.12.Activate the lower ofthe two radio buttons "rn12 ai
and type the name ofthe file you wish toextract from theWindows installationdisc (Figure 2.13).Next operate the Start Fig.2.14 Specifying the source and
button, and type the destination for the file
source for the file andthe location to which it is to be copied (Figure 2.14). Operate the OKbutton and the file should be extracted from the disc and copied to thespecified destination directcry.
Ce locato, want to eu Me
EV... I
hff7fe.
Me safeUsing Windows Me it is possible to do your own troubleshooting whenboot problems occur, but tt-ere is a troubleshooter Wizard to he p sortout this type of problem. I' you enter Safe mode using Wincows Me youare greeted with a screen of the type shown in Figure 2.15. This gives
63

2 Troubleshooting
2 Help and Summit Ignrr---
MIHcioselppft and SupportSearch
-/ Home 1 lode.; I isabisted support 1 lours t. bolo/leis
Safe Mode TroubleshooterIf this troubleshooter appeared automatically, Windows is running in Safe mtdj.
If you got here unexpectedly, shut down your computer. Click Start, dick Shutdown, selectShutdown, and then dick OK. If your computer doesn't power down, turn it eft Wait ten seconds,and then turn it back on. If Windows still starts in Safe mode, this troubleshooter may be able tohelp. Click Next below to continue with this troubleshooter.
You can also use II System Restore to restore your computer to the most recent configuration inwhich it started normally. (To open System Restore from the Start menu, clinc Mort, click Help,and then dick Using System Restore under FIN a problem.)
If you came to Safe mode intentionally, you can use this troubleshoc ter to try to fix aproblem, or you can click the Close (0) button in the upper -right c unit, of the window toclose this troubleshooter.
Next I
'Stasi!a x *Help and Supped
Fig.2.15 The Windows Me Sale mode troubleshooter
the option of using the System Restore program to take the systemback to an earlier stage where it worked properly. System Restore iscovered in chapter 4 and will not be considered in detail here. It is notapplicable if the operating system has only just been installed, or thereare problems installing it at all. It is not likely to help if the problemoccurred after adding a new piece of hardware, or if an existing item ofhardware is proving troublesome, but in most other cases it offers thequickest and easiest means of getting the computer operational again.
Operate the Next button if you decide to use the troubleshooter to sortthings out. This produces the screen of Figure 2.16. The five radiobuttons at the side of the window are used to select the description thatbest suits the way in which you ended up in Safe mcde. These are thefive descriptions:
I added new hardware and my computer started in Safe mode
During or immediately following Windows Millennium Setup my computerunexpectedly started in Safe mode
I added new software and my computer started in Safe mode
I don't know how I got here
Another troubleshooter instructed me to start in Safe mode
64

Troubleshooting 2
There is an omissionhere in that there is nooption if youuninstalled some
r- mdie`and Support
641.914Zde TIOUble1100t9Er
software and then 14hadto start in Safe 6'
mode. Presumably r-
either the third or ,
fourth option shouldrr
be used if thishappens. In thisexample the PC hadbeen workingnormally but for noapparent reasonstopped in the middleof the boot sequence with an error message. This gave the optbn ofpressing Enter to return tc Windows, but this failed to work. Probablybecause Windows had not fiiished booting and there was no Wirdowsto boot into. The Control -M -Delete keys therefore had to be used toreboot the computer, which was then rebooted in Safe mode. Althoughnot strictly accurate, the "I don't know" option seems the mostappropriate.
Selecting this option and operating the Next button brings up the screenof Figure 2.17. This inst-u:,Is the user to restart the compute-. Onrestarting thecomputer it bootedinto Windows inNormal mode withoutany problems, andanother rebootproduced the sameresult. It wasthereforeunnecessary to goany further with thefaultfinding process.As pointed outpreviously, a one-offstart-up problem ofthis type is notunknown with
11I 9 99..1 *99 la S.I. mad. I
Search
9 .-99: . 11., 1 9 9, ,..99p.....1 or SI, ow.Dung r mewl., lb*, W996. 15/96, rbo, , cl vrAwaortedl 9J10 modeI *Wed r 9.049 and , non f..11.1 S. .1.I .wt w.. 1.ot we.
9.019 MM. ',tr.. 99.1. SO* made.
9999 it,
a -
Fig.2.16 Starting to use the Windows Metroubleshooter
"144; and Support-;.; 1401.1r 411.4.6. 44,,k6,1111..1
Red./two/ .199919~.79 - r. stops re...vs Own. S.P. SAS S. rr a.11,r Yr., OwnF.,<or evror 9411. Tao .1* rod meta. yew am,*I ele wry dd. OW D.7 9-.9.. Y. ra rorI 99 r. deo., prwor der,
*G. .0 old then turn your Crer., r. .n
9 919, ..r9"., 199.9999
4, 0.1,11. 19 carts r9 r..1 m on9199wr
9 rr se 599 t .199 9 tr 99999, who
Fig 2.17 The next stage in using theWindows Me troubleshooter
65

2 Troubleshooting
1111.. MEWpow_
Mi, HairH p and SupportMilani=MMEMi
Search
try disabling your startup tiles.
importantThe following procedure may require you to restart your computer, which will dose thistroubleshooter. If possible, print this information from another computer, and then perform the stepson the computer you are troubleshooting.
There might be a problem with any one of several files that normally load when you start windows.
Set your computer to start without loading System static _y_tC., files, and the programs in yourStarttlp folder, and see whether this solves the problem.
+ To start without loading these files
NoteIf you change settings and your computer starts normally, but you want to reopen thistroubleshooter, dick Start, click Help, and then search Help and Support for Safe ModeTroubleshooter.
If your computer starts and shuts down correctly when you don't load these files, there might be a problemwith one of the files.
SI To determine which file or entry is causing the problemIf you determine that a particular entry is causing the problem, leave that entry turned off, turn on theother entries, and then restart your computer.
you can leave a problem entry turned off as a workaround, or you can contact the manufacturer of the .,:t1
*Staid' a 7'; I :11 4s Help and Smsort 'f6
Fig.2.18 This help screen enables the PC to be booted into Windowswithout the Win.ini and System.ini files being processed
Windows, and it could be due to a glitch in Windows itself. It can alsobe caused by something like a piece of hardware not initialising properlywhen the computer is switched on. If a problem of this type only happensvery infrequently it is probably not worth investigating further. With avery intermittent boot problem the chances of finding the cause are verylimited.
If restarting the computer fails to clear the problem there is plenty ofhelp available if the Safe mode is used again. For example, the screenof Figure 2.18 helps the user to try booting the computer without theWin.ini and System.ini files being processed. The screen of Figure 2.19helps the user to restore an earlier version of the Windows Registry, andthere are help screens for the usual steps when Windowstroubleshooting.
Windows RegistryThe Windows Registry seems to be regarded by many as the place togo in order to cure any Windows problem, but matters are not as simpleas that. Problems with Windows are not necessarily due to anything
66

Troubleshooting 2
sia Help and Support F.","
!II,
Help and SupportSearch
Try restoring a previous version of your registry.
0 Important The 'okaying procedure may require ycv t restart your computer, whech will close this
troubleshooter. If possible, pint this infartrabon from another computer, and then perform the stepson the computer you are troubleshootenj.
To restore a previous version of your WincOrt% registry, you need to start he computer by use aWindows Startup disk.
You might have xeated a Startup disk when ou installed Windows. If you don't have a Startuo disk,create one.
ti To create a Startup diskM To restore a registry backup
Does restoring a previous version of the rgietry solve the problem'
r. No, this doesn't solve the problem
Yes. this solves the Problem
1 scant to skip this step and try else.
Nest I Back I Sled Over I
Asst.t1 ...I Supped 22 CI)
Fig.2.19 This help screen enables an earlier version of the WindowsRegistry to be restored
amiss in the Registry. If a ha'dware driver is not installed properly or isfaulty, the Windows Registry is unlikely to provide an answer to theproblem. Perhaps of greater importance, even wnere editing the Registrycan clear a problem, unless great care is taken it is likely that the problemwill be made worse rather than better. Making any changes to the registryhas to be regarded as a high -risk activity.
As pointed out in chapter 1, Windows automatically produces backupcopies of the Registry, anc it is possible to resort to one of these if theRegistry becomes seriously damaged. Also, you can make your ownbackup copies of the Registry files, which can be restored if you somehowmanage to get the Registry files beyond redemption.
If you are determined to go ahead and experiment with editing theRegistry I would certainly recommend making backup copies j.ist incase things go seriously awry. Even if the Registry is well anc trulybacked up, it is still not a good idea to start making changes unless youare sure you know what you are doing. You can resort to a backup copyif things go seriously awry, but realistically, your chances of success areminimal.
67

Troubleshooting
What is it?Probably most Windows users have heard of the Registry, but there areprobably relatively few that know its exact nature and purpose. Althoughthe name suggests that it is one file, it is actually two hidden files in theWindows folder called System.dat and User.dat. It is a database thatcontains all manner of Windows system settings. If you change settingsvia the Control Panel, you are actually making changes to the WindowsRegistry.
The same is true when you install or remove software or hardware, ormake practically any changes to the system. It is not just the Windowssettings that are stored in the Registry, and it can be used to storeconfiguration information for applications programs as well. This factorprobably increases the risk of the Registry being corrupted when softwareis installed or uninstalled. The Registry files can easily be damaged ifthe installer or uninstaller gets it slightly wrong.
Windows experts often edit the Registry as a means of customising theirWindows installation. Obviously many aspects of Windows are easilychanged via the standard routes, such as using the Control Panel tochange things such as screen colours, resolution, etc. Hackers oftenprefer to go direct to the Registry because they can make some changesthat are not possible via the approved channels. This is fine for thosehaving the necessary expertise to make this type of change, but it is notto be recommended for occasional dabblers.
EditingMany computer configuration files can be edited by simply loading theminto a text editor or word processor and making the required changes.
This method is notnormally used withthe Registry files,and instead they areedited via the specialediting utility. Thisprogram is called
t\tors I Cancel I browse I Regedit, and it can
be found in theFig.2.20 The Run option from the Start menu is Windows directory.
One way to runRegedit is to go to
Run 1113
Qpen
Type the name of a program folder. document or Internetresource and Windows wt11 open n for you
used to run the Regedit program
68

Troubleshooting 2
- _J we_CLASSL ,_k0OT _J HKE JwE LOCA_IAACHLIE
_j EY:JEEPS_j 111 E,2"1,1--tt r_i..)NFEI,
_I MY E DAT.
,,+ C,^Po'w
Fig.2.21 The initial screen of the Registry Editor
the Start menu, choose Run. type "regedit" in the text box, and thenoperate the OK button (Figure 2.20). There is io need to include thepath to the Regedit.exe file; Windows will know where to find it.
Alternatively, use the Run function but use the Browse facility to locatethe Regedit.exe file and then operate the OK button. This will bring upthe rather blank looking initia screen of Figure 2.21.
In operation Regedit is designed to be much ike Windows Explorer.There are what appear to be files and folders, and there is no hint hat itis actually two files that are being edited. You need to bear in mina theprogram is showing the coitents of a database, and that it can not beused in exactly the same way as Windows Explorer. For example, thedrag and drop approach does not work when using Regedit. Dcubleclicking on one of the entries in the left-hand section of The screenexpands it, as in Figure 2.22, to show what appear to be subfolde.s.
In Windows Registry terminology the left-hanc section of the screenshows keys, and double clicking on one of these expands its entry toshow the sub -keys. With subfolders double clicking on an entry willsometimes reveal further sublolders. Likewise, double clicking on sub -keys will sometimes reveal a further layer of the key structure. A markbeside a key icon indicates that a further layer of sub -keys is available.
69

2 Woubleshooting
1,1 PICIE1849,Y Eat Y.aw balp
_1 stt_1 to-_J 4-1 40I)j IDY
J CMP_j 1-tSk_j 12J 38E
)os
_J_j 40C
4DC414
- 4004DObie
CJ41F
_J_J
_J_J_J
glil4DR
4DS
4CO3
4C4,&4F1
4FA
41.8
4 I
my C,,,,,,e0-glE,_:LASSESRooT
Nern Dela4911 &teat) (wkie rot sal
Fig.2.22 Double-clicking on a key expands it, like expanding a folder inWindows Explorer
Once the lowest level in the key structure has been reached, doubleclicking on an entry produces something like the window of Figure 2.23.Including the icons on the left, the right-hand section of the screen breaksdown into three sections. The icon indicates the type of data stored inthe key. An icon containing "ab" indicates that the key holds a string,which means that it contains letters and (or) numbers. The string isalways contained within double quotation marks("). An icon containing"011110" indicates that the key holds a numerical code, which is oftenin the form of a binary number and not an ordinary decimal type. Thehexadecimal numbering system is also used, and r umbers of this typeare preceded by "Ox" to show that they are in this numbering system.No quotation marks are used for numeric values.
Next to the icons in the Name column are the values, but this term isperhaps a bit misleading. The Name heading at the top of this columnis more accurate, since the values are names that tell you which piece ofdata is stored for each entry in the database. Fortunately, the namesused here usually give a good idea as to the purpcse of each piece ofdata, although the names have to be kept reasonably short. The fourthcolumn is the actual data stored in each value.
70

Troubleshooting 2
6. te It I dm !M©329.1,Y Ea do!,
J HKEY. CURRE!T USER Name DaftJaePEHree M110,10 00
Unbil 0.11C30000] (0)
Womb.. Fl-soCeoeledMon 0.01,J000011 (0)
InstalLocaeonclANU y3W.:aalOr-^amr1 R4000001 ))) _J kortmentl lertuA
J Network
j RornokActes,- _J SctwIre
J J AdnpIt- J Adobe
J /vcbc _f 4r111.41,
j Ambe. Read*,Ado. Cp4t,w4
J Ackver'Sg(4,01,
_I PticoMee, 65 J Mttgel, 2 2
J PhotnshrpJ
_I ^mot.,AWriest J AWARE
+ _J Beige Beg Softwen._J edettnen
fMy l'kEY-CURPENT-USER
Fig.2.23 Including the icons, the right-hand sec'ion of the screenbreaks down into three sections
NavigationYou do not have to move around the Registry for long in order to realisethat the number of values stored there is vast. I do not know how manyvalues are to be found in an average Windows Registry, but it must bemany thousands. There are six main Registry keys in the "root directory",which are known as "hive" keys incidentally. It is obviously much easierto find the required value if you understand the significance of the hivekeys, and know which one to search. These are the six hive keys andthe types of value that each one contains:
HKEY CLASSES ROOT
All the file associations are stored within this key. This includes OLEinformation, shortcut data, a -id file associations for the recognised filetypes.
INKEY_CURRENT_USER
The desktop preferences are stored in this key. This mainly n-eansparameters that are set via the Control Panel, out other data is stored
71

2 Troubleshooting
here. Under the Software sub -key there is a further sub -key for eachitem of installed software, so there can be a vast number or entries hereas well.
HKEY_LOCAL_MACHINE
Machine in a Windows context means the PC that is running on. Thishive key therefore contains data that is specific to the particular PCconcerned. As one would expect, there is a Hardware sub -key here,but there are others such as a Network sub -key and a security type.There is a Software sub -key here as well, but it is different to the onefound under the HKEY_CURRENT_USER hive key. The informationstored in this Software sub -key seems to be largely associated withhardware configuration and uninstalling the software, rather than thingslike screen colours.
HKEY_USERS
If the PC has more than one user, this hive key is used to store thepreferences for each user. In most cases the users feature of Windowsis not utilized, so the information here will simply duplicate that stored inthe HKEY_CURRENTUSER hive key. Perhaps more accurately,HKEY_CURRENT USERS will duplicate the data stored in HKEY_USERS.
HKEY CURRENT CONFIG
This key contains the current software and hardware configuration data.In the likely event that you are only using one configuration, it will containthe same data as HKEY_LOCAL_MACHINE.
HKEY DYN DATA
The dynamic data is stored in this hive key. Dynamic in this contextmeans that it is data that must always be stored in memory so that it canbe accessed quickly. As one would expect, the data stored here ishighly technical in nature.
Even if you know what you are looking for and roughly where to find it,searching through the numerous entries in the Registry can still be verytime consuming. Fortunately, the Registry Editor has a Find facility thatis similar to the Find Files and Folders facility of Windows Explorer.Selecting Find from the Edit menu brings up a window like the one ofFigure 2.24. Use the textbox to enter the text you wish to search for, and
72

Troubleshooting
select the fields ofthe Registry you wishto search. You can
Looknialso opt for a whole Leys
string search. Inother words, a match P
will only be r Matt tole *g My
produced if the fullstring in the Registry Fig.224 The Registry Editor's Find facilitymatches the one youhave entered. If this option is not selected, a match will be produced ifthe string you entered matches part of an entry in the Registry. Thewhole string option can help to keep the number of matches to moremanageable proportions, bit you have to know precisely what you arelooking for.
Press the Find Next button to search for the string. If a match is found,it will be shown highlighted the main window of the Registry Editcr. If
this one is not the entry you are looking for, call up the Find facility againand operate the Find Next button. Keep doing this until the requiredentry is located or the whole cf the Registry has seen searched.
and
Canual
OMIT
JAcrobtMPsndJ
v'n vo gem
los
cote
111111
Cob(..eve not sel
c*. cnncn
b.)CAWABE
*Act
Beg. Beg StiC,HE a __J oltvr,
_I Blegronm )Pt.k.F. ..0
- _J &Ala d tt1P,Ln' ''''
- _J D.AI _...11-1,f-, "ENV
- __I 3o t9PNAME "PAGEI.W.R.
-J ActNe t.JPREM
_J Oose, "ji-ViliUS_J &pet, APiEFS__I K,00l___, .)SERIA. 113E652/472'Wr135-
.J Lbw t.)-r,pf it_j Pewibmi tb)vERcrot, ,An2 2 our
el I,11
My CornpubAkIKL'N'JJSERS \ Default\ SolbranAAdobekPecoMekst6 5 \ Ropeteloo
Fig.2.25 Editing an entry in 'he Registry
73

2 Troubleshooting
sNNIV:11( .
NORTON Utilities f Find and Fix Problems
Find and FixProblems
ft ImprovePerformance
.! PreventativeMaintenance
Troubleshoot
Lig
401
Norton System CheckOne button checkup for your system
Norton WinDoctorCheck for Windows problems
ie Norton Disk DoctorDiagnose and repair problems with your disk
Norton Connection DoctorCheck your system for modem problems
UnErase WizardZ.7 Recover your erased files
46)
Qptions Help I Edit
CJ
Fig.2.26 The opening screen of the Norton Utilities
In order to edit a Registry entry double-click on it to bring up the editingwindow, as in Figureedited in the normal way. Left -click the OK button when you have finished,or the Cancel button if you change your mind. It is also possible to left -click on an entry and then use the Edit menu to either delete or renameit. Clearly it is necessary to know exactly what you are doing beforealtering any registry entries. If you suspect an entry is giving problemsit is not possible to remedy the problem by editing its data unless youknow the correct data to use. Unless you have the necessary expertiseit is better to alter the Registry only via indirect routes, such as installingor uninstalling software, using the Control Panel, etc.
BackupFor inexperienced users it is better to rely on backup copies of the registryrather than fiddling with Registry settings when something goes wrong.Chapter 4 deals with the general topic of backups, including backing upand restoring the Registry. Windows runs the built-in Registry Checkerprogram each time Windows is started, and it can also be run manually.From the Start menu select Programs, Accessories, System Tools, andSystem Information. Then select Registry Checker from the Tools menuof the window that appears.
74

Troubleshooting 2
WinDoctor 1 now checking for Windows problems Pressstop' to stop the diagnosis
Exarraimr. I Status] Windows Registry Scan Help Section Done
Windows Registry Scan. Microsoft Shared Section Done
Windows Registry Scan Run Section's Done
"/ Widows Registry Scan Sound Cusbrnization Se Done
Wrdows Registry Scan Symantec Shared Section Done
Wrdows Registry Scan Unristal Section Done
Wrdows Registry Scan VxD Sectary Done
Ragmen Integrity Scan Common Projam Locates Ar alyang
Program intNirity Scan. Common ProgramLocations
D TRCGRAM FILE bViE T MEE TINGlCALLCONT DLL
atop
Help 1
Fig.2.27 The Norton WinDoctor utility in action
If all is well, once the check has been completed you will be askedwhether or not you wish to backup the Registry. It is automatically backedup each time Windows boots, so there is not usually any point in doingso. However, it will not do ary harm to have a new backup produced. IfRegistry Checker finds a problem, which it never has in my experience,it will provide a warning message. Since Registry Checker runsautomatically at start up, it will only find the newest of problems, whichis presumably why it hardly ever finds anything wrcng when run manually.
Windows checkersThere is not exactly a world shortage of software to help fix Windowsproblems. The software on offer ranges from simple utilities that aredesigned to investigate and fix problems in one particular aspect ofWindows, to large suites of software that cover just about everything.These larger software suites often have utilities that are designed to "tune"the system and maintain it in peak condition. The Norton Utilities suiteis probably the best known program of this type, and Figure 2.26 showsthe start up screen. Here it is possible to select from a range of options,which include hard disc utilities an enhanced Registry editor, and various
75

2 Troubleshooting
^".. I Hinton WinnortotFie Dobbin View het)
Reps Al Reims tohl:/rt Advanced History
7:0!
Scan
r1 J2<
Stye; Pohl,N Olive changed hem C to D. VISO pedaloes)
Problem A menoveble dr... has teen vienciii a removed , a doecinly r.es nosed to an!. dive causing dine C to appe
x Invalid AclnroX/COM Enliven (5 piohlwaslRadon The Actrve:</COM sections at you Widows Reginry contain ore 3111,je r. aW e.
doounents to ocen inotooaly, applications not to M. or you carrots to awl'
O Invalid Application Paths 11 nativism) MediumPobiern The Aprinehen Pc Wndows Raysty rehire to one a note maid atm:tales This can cause
application: tot to
O Invalid File Ealension, 14 on Mlesull MeowsPicibiern The T vindows Registry contains one a more eat d wines Thn can cause
Medium
O Invalid ',hint. Lit: I V oblems)Problem ties that have been moved at no lancet exist.
Medium
Missing Multesedso l des (3 pmblensi MatinsProblem The Multimedia sections of you Windows Registry !elm to are a dole rasing ties. This can cause you sound ties
to Nov nolopetly a not at al
Reedy
Fig.2.28 Example results produced by the DiskDoctor utility
diagnostic tools. Figure 2.27 shows the Norton WinDoctor facility inaction, and amongst other things this scans the Windows Registry andother configuration files in search of errors.
Figure 2.28 shows an example of the test results produced by theWinDoctor utility. You always have to be slightly wary with this type ofthing, because the checking utility might think it has found an error whenthings are in fact correct. The section of the report headed "DriveChanged from C to D" notes some 160 problems, but the PC in questionis a dual boot type, and this has confused the checking utility. Theproblems that the program thinks it has found disappear when the PC isbooted using the second hard disc drive. The program correctly advisesagainst fixing the problems automatically. In most cases problems willbe reported correctly, especially if your PC does lot have an unusualconfiguration. Many of the faults can be fixed autorr atically by a programsuch as the Norton Utilities.
Sysed itSometimes Windows boot problems result in tne system simply grindingto a halt, giving little clue as to what is wrong. Often though, Windows
76

Troubleshooting 2
will provide an error message, and this is likely to refer to some form ofWindows driver or system file that is mentioned n a configuration file.The problem can be due to the driver or other system file being absentor faulty, or it can simply be that the file is being called up in error.Uninstallers sometimes get things slightly wrong, and leave a referenceto something like a driver or DLL file in a configuration file, even thoughthat file is no longer needed and has been deleted. This might bringWindows to a halt during the boot -up process, but often the processcan be continued without the missing file.
Normally when Windows reports that a file is missing it is necessary toreinstate it somehow. If a program has just been uninstalled, reinstal ingthe program will probably put the missing file back again. If the file inquestion is a standard Windows type that is present on the installationdisc, it can be copied from the disc. Where the system seems to workperfectly well without the file, it is likely that the reference to it in theconfiguration file is erroneous.
You can simply put up with an error message being produced each t meWindows boots, but it is better to remove the incorrect entry in theconfiguration file. The error message will usually mention theconfiguration file by name so that you know which one to edit. Thesefiles are usually straightforward text files, so they can be edited using aword processor or text ed tor. Whenever anything of this type isundertaken it is a good idea tc make a copy of the file before you startediting. That way you can restore the backup copy if the changes makethings worse rather than betel.
Windows 95/98 has a built-in editor for the configL ration files. It is calledSysedit, and it can be run by selecting Run from the Start menu, typing"sysedit" into the text box, and then operating the OK button. There isno need to give the path to the Sysedit program file. Running thisprogram produces a window like Figure 2.29, w th five windows openwithin the main window. Each pf the five windows contains the text for adifferent configuration file. Two of these are for the MS/DOS configurationfiles autoexec.bat and config.sys.
The autoexec.bat file is used tc run any ordinary programs that mus: belaunched at the end of the toot process. Any programs mentioned inthis file should be normal MS/DOS commands or program fi es.config.sys is similar, but it is used to run prog -ems that have a sysextension. These are programs that can only be run from Config.sys,and they are mainly used to provide a backgrounc task such as a mousedriver.
77

2 Woubleshooting
SY!
aa. rurust Nu
Un da,,FtEsot - SET CI ASSPATtittCAPROGRKIcrywRr BAdobeWobeConnectables
[d2 dlb b" rem------- MTM ATAPI CD ROM - --ye' cot to, rem - By Windows Setup - CAWINDOWS1COMMAND1MSCDEXE,CEID:MIMIDE01no, sta ref ram MTM ATAPI CD-ROMWe (
ke Tu. - SET PATH- CAWINDOWS;CAWINDOWS1COMMAND.CtDOS; ME)U SE;CIOR40,for wa DE SET PAT ri= CAW1NDOWS:CIWINDOWSICOMMAND.C.VROGRA BNUMBER-IIiar pa re' rem - By Windows Setup - MOUSEoeI de echo oftMil pat
lCcC°prompt Sp Sy
dis colour 32mo la cic
Cw VET
@rem - By Windows Setup - GAWINDOWS1AZTPNP Da- /A:ONmode con codepage prepare ((850) CiWINDOWS1COMMANDIega.cpi)
Fig.2.29 Sysedit opens five configuration files in separate windows.It is basically just a simple text processor
The other three files are Windows configuration files, and in myexperience it is System.ini that is most likely to require editing. It is notexactly unknown for Win.ini to require some adjustment, but I have neveryet needed to edit Protocol.ini. Both System.ini and Windows.ini havetheir origins in the pre Windows 95 era, and are presumably retainedmainly to provide compatibility with software written for earlier versionsof Windows. The Windows Registry is the main scurce of configurationdata for Windows 95/98/Me. This does not mean that these two files areno longer used by the system though, and mistakes in the initialisationfiles can still cause problems with modern versions of Windows.
If you wish to edit a configuration file using Sysedit, left -click on its Windowto make it the current one, and it is a good idea to maximise the Windowas well. The text can then be edited in standard Windows word processoror text editor fashion, and the usual facilities are available from the Fileand Edit menus (Figure 2.30). These can be used to save the editedversion, but make sure that you save an unedited version under a differentname before you start making changes. If things go seriously wrong itis then quite easy to return to the original version of the file.
78

!;yslem Conlogurnhon I dill., ICAWINCIOWSSYSTEM INIJ
Edit yeech
key 5eve'coo
[bokey E.a dard 1011102 Key or Mlcrosott Natural Keyboardas)dls RAGF PRO (FngIsh) (DlrectX)
Imouse.drv=LogItech Mousesystem.drv= Standard PC
11306Enhlebios = webios
Idevice= m/s naredevice= wvpddevice=wintlmouse=wvrnouse, msmouse.vxdwoafont=app850.tonDMAautterSIze=32device- wdynapagedevice=motvcd.vxddevice=«enablekeyboard= Nvkddisplay= wvdd.wflatdCOM4FIF0=1
Andow
[power.drv)
Fig.2.30 Sysedit has the usual File and Edit facilities
ReinstallationIf the usual methods of fixing Windows fail to get results, realisticallythere are only two options available. One is to continue searching forthe cause of the problem, running diagnostic software, checking throughconfiguration files, checking the hardware and drivers, or anything elseyou can think of. Option two is to reinstall Windows. Initially reinstall iton top of the existing version, which will leave your applications softwareproperly installed and with luck will cure the problem. If that fails, anyimportant data must be backed up to another hard disc or other massstorage device. The hard disc can then be wiped clean and Wincowsplus all the applications software and data must be reinstalled tromscratch".
This may seem like a defeatist attitude, but searching for the cause of anobscure fault in Windows can be very time consuming. A straightforwardreinstallation is almost certain to be quicker, and even reinstallingWindows "from scratch" could be a quicker route to success. It is also
79

eshooting
5I.
4Car Strew y. 011 debS. I. e. 0 ct
No. u Aix sue usu..
Worldwide Support
Self Support. Searchable
15nowledgetiase. Download
CeEdiuI AS25 by Praluct
Assisted Support.
I inert.,. Qnitne SupportBethaulk
Pliont_tlumbas
Custom Support. M CpSlprllMiurprt
WorldwideSupport
. by
Knowledge Base Searchsupport inlortnytkat end sell help tools
3
My search is about:'Windows 98
I want to search by:r Keyword Search usingForkii nook,r Specific article In nonilietr Specific driver re downloadable Ills
Specific trouhieshontinq toolr Asking a question luting a flee tert query
What's new within the laatr-A day(s)
My question is:ISto. up rg-0
Search OptionsI want to search against:6 hill rest Title only
I want the search results to show.6 litle and excerpts lilies only
Fig.2.31 The Microsoft Knowledge Base has a good search engine
worth bearing in mind that reinstalling everything has the beneficial effectof removing the numerous unnecessary files that tend to start clutteringthe hard disc as a Windows installation grows older. This will oftenproduce a significant reduction in the time it takes for the system toboot, for programs to load and the general speed of operation whenhard disc accesses are involved.
Where there is no easy solution to a Windows problem, professional PCmaintenance engineers tend to opt for the reinstallation option soonerrather than later. For those with less experience of these things it willprobably be more of a last resort than a routine method of fixing andstreamlining a damaged Windows installation. However, havingreinstalled everything you will probably be quite happy that you did.
Knowledge BaseIn some circumstances there may be no option but to press on in anattempt to find a cure for the problem. With masses of important dataon the hard disc and no means of backing it up, wiping the disc clean is
80

Troubleshooting 2
(.Ant[Mia ru.toll Sup 'on ....wedge hese Seen.% this eh.]
j.S. Lei LJ trIeJw :irp ],*4
/ & O. 4.gm. few sr Imo
O..411.
9. :.? a. S.+
Search ResultsSelf Support Y Ulf h In; Start up Mund 12 in.dirlyw 1 through 124rP listed toilow
Solving Problems with DriveSgece in Windows 90
LunLer !AL.., trr
Assisted Sodom'.
SupportU1181.4.8 Ytorsion SuppoitP.V.U1.14Z-ilaa
Custom Support
Worldvd deSupport
.
3 Solving Problems with Memory in Windows 98
4 Solving PI obleilis with Modems m Windows 98
S Solving Problems nods Winting in Window. 98
6 solving Pi obleins with the Active Desktop
7 Solving Display and Multi Monitor Problems in Vicdows 96
8 solving 19 °Wenn with Networking in Windows Sle
Fig.2.32 The search engine succeeded in finding a start uptroubleshooter
not an option. The best course of action would be to have the computerfitted with some form of mass storage device so that the data could bebacked up. Apart from leaving your reinstallat on options open, Thisalso guards against losing important data due to a hard disc failure. If
you have an Internet connection and decide to press on rather thanreinstall, it Is worthwhile investigating the Microsoft Knowledge Base.There is actually a massive amount of help available at Microsoft's Nebsite (www.microsoft.com), including articles and troubleshooting Wizardsfor a large range of Microsoft products.
A good place to start is the Self Support section. This brings up a screenlike the one in Figure 2.31, where you can specify the product for w7ichyou require support, and the type of support required (article,troubleshooter, driver file, etc.). You can also put in some key words tohelp the search engine come up with something suitable. ft Windowswill not start up properly for example, "start up problem" will help thesearch engine to come up with some suitable suggestions.
A search for a Windows 98 troubleshooter to assist with a start up prob emproduced the screen of Figure 2.32. Here there is a troubleshooter for
81

Troubleshooting
problems with both starting up and closing down Windows. This asksthe user questions and then makes suggestions on how to fix theproblem. With perseverance, I would guess that practically any Windowsproblem could be solved using the information available from theMicrosoft Knowledge Base. The only problem is that you will probablyneed a second PC to access the Internet while your faulty PC is beingsorted out. Possibly a friend can assist if you do not have a sparecomputer.
Recurring problemsIf you are very unlucky, having reinstalled everythirg "from scratch" theproblem will return again. It is likely that the problem will keepreappearing if you keep reinstalling Windows. Where the problem is insome way hardware related, perhaps only happening when thesoundcard is used, the most likely explanation is that one of the driversor the hardware itself is faulty. It is more likely to be a driver problemthan a fault in the hardware, so check with the technical supportdepartment of the hardware manufacturer to see if a later version of thedriver software is available. These days most manufacturers have thelatest drivers available on their web sites, where there may also be sometroubleshooting hints, so the relevant web site should be the first port ofcall.
If everything works fine at first, but things go ser ously wrong after awhile or steadily worsen, the most likely culprit is an applications program.Finding the program that is causing the problem can be quite timeconsuming. If one program consistently goes "walkabout" and all theothers work perfectly, it is virtually certain that the troublesome programis responsible for its own downfall. It is possible for one program tointerfere with the system and cause problems with just one other program,but this is quite rare. Normally this occurs because irstalling one programresults in a DLL file for a second program being overwritten with anolder version of the file. Provided the problem is fixed by reinstating thenewer version of the file there should be no further difficulties. If yousimply keep reinstalling Windows and then install the applications in thesame order, the problem will keep coming back. Installing theapplications in reverse order should banish the problem, since the newerversion of the DLL file will then replace the older version, rather than theother way round.
It is more common for the faulty software to damage the Windowsinstallation, causing problems for itself and for other applications
82

Troubleshooting 2
programs. The normal solution where recurring problems occur s toreinstall Windows plus one application. If that works all right for a whileadd a further application. If all is well add another application, an: soon until a program is added and things start tc go awry. It is then areasonable assumption that the last program to be added is the onethat is damaging the Windows installation.
Points to rememberIf Windows fails to boot properly, do not be toc eager to start fiddlingwith the system to find a cure. Try rebooting a few times to see if theproblem clears itself.
Where the boot process halts quite early it is likely that the problem is inbooting MS/DOS. Check the Autoexec.bat and Config.sys files forrepetitive entries and other obvious errors, such as hardware driversthat are not needed any more.
Unless the Windows installation is badly damaged it will be possible toboot in Safe mode. Some basic checks can then be made, such asrunning Scandisk, etc., but bear in mind that Safe mode has somelimitations.
Getting the computer to produce a Bootlog file can help to pinpoin: theprocess that is causing the boot process to stall.
Booting in step-by-step mode can also be used to find the stage that iscausing problems. By bypassing sections of the boot process a processof elimination can be used tc find the one that is causing the problem.
Device Manager can be used to check whether or not the hardware andthe hardware drivers are functioning correctly, but not with the computerbooted in Safe mode. Get the computer booted in normal mode, evenif this means bypassing some boot processes so that Windows issomething less than fully cperational.
If a hardware driver is suspected of causing problems, use DeviceManager to remove the exist ng driver before reinstallation. Also checkthe hardware manufacturer's web site for an up -dated driver.
Windows will often give an error message that gives some clue to thenature of the problem. II a program has recently been uninstalled,reinstalling it will probably reinstate the damaged or missing file.
83

2 'Troubleshooting
Installing a program can also damage a file. This can result in a filebeing overwritten by an older version. Reinstalling Windows or one ofthe other application files will cure this problem. It the damaged file ison the Windows installation disc it can be copied from the disc using afile decompression program (Winzip, etc.).
In some cases the missing file is not actually needed any more. Removingthe reference to it in a configuration file will then cure the problem.
Windows includes a Registry Editor program, but only use this utility ifyou know what you are doing.
Reinstalling Windows over the existing installation will cure boot problemsin a fair proportion of cases, but not all of them.
Reinstalling Windows from scratch will cure boot problems unless it isnot really a Windows problem. Recurring problems are due to a hardwarefault or a bug in an applications program.
There are numerous Windows checking programs available, and thesewill often help to sort out boot problems, and more minor annoyances.Many will also help to keep Windows working efficiently.
Windows Me has a troubleshooter that provides a great deal of help ifthe PC is booted in Safe mode. You can still do your own investigationsif you prefer.
Similar help for other versions of Windows can be found at the Microsoftweb site (www.microsoft.com).
Windows Me has a very useful restore facility that will usually cure bootproblems. There are Registry backup facilities and other facilities inWindows 95/98 that can often be effective. These topics are covered indetail in chapter 4.
84

3
Data rescue
Learning the hard wayA hard disc failure is potentially a major disaster for all those who usethe PC, but if you use PCs for some years it is a failure you are almostcertain to experience. A complete failure of the disc means that all thedata it contains is lost. There are companies that offer a data recoveryservice, but there is no guarantee that the contents of the disc will berecoverable, and the cost of a recovery service is too high for manyusers anyway. As a minimum, any important data files should be backedup onto floppy discs, CDRs cr any suitable mecia, so that tt.ey can berestored onto a new hard disc if the old unit fails.
Ideally the entire contents of The hard disc drive should be backed upusing a program that enables it to be properly restored onto a new narddisc. This is very much quicker and easier than having to reinstall andconfigure the operating system, and then reinstall all the applicationsprograms and data. Also, any customisation of the operating system orother software will be automatically restored. If you have heavilycustomised software, after reinstallation it can take a great deal time toget it set up to your satisfaction.
Having a backup copy of the nard disc's contents is not only insuranceagainst a loss of valuable data if a hardware failure occurs. It can greatlysimplify things if there is a major problem with the operating system.Provided the PC was fully operational when the backup copy was made,resorting to the backup will provide a fully functioning PC again. Somebackup software enables the system to be quickly restored to a prev.ousand fully working configuration, but retains any -ecently produced datafiles. The Windows Me Restore utility provides a facility of th s type. butit is not present in earlier versions of Windows. When a major problemwith the operating system occurs and some form of restoration option isavailable, it is almost certainly best to resort to ths method sooner ratherthan later.
There is little point in spending large amounts of time trying to repair adamaged installation if it can be replaced with a backup copy quite
85

Data rescue
quickly and easily. It is certainly worthwhile spending a small amount oftime first to check for any minor problems that are easily sorted out. Thebackup method is "using a sledgehammer to crack a nut" if the problemis something minor that is easily corrected. If a search for any obviousproblems proves to be in vain, it is time to resort to -.he backup software.The backup program's manual should give detailed instructions onmaintaining an up-to-date backup and restoring the hard disc's contents.
The problem with the full back up method is that it takes a fair amount oftime to maintain an up to date copy of the hard disc. Also, it is onlyfeasible if your PC is equipped with some form of mass storage devicethat can be used for backup purposes, such as a CDR writer or a Zipdrive. It could otherwise require well in excess cf a thousand floppydiscs to do a full backup of the hard drive! Even using some form ofmass storage it can take a long while to backup the gigabytes ofprograms and data stored on many modern hard disc drives. Thequickest and easiest way of providing a backup is to opt for a secondhard disc drive. Due to the current low cost of hard discs, this could wellbe the cheapest method as well.
Split discsMany PC users now split their large hard drives into two logical drives,which become drives C: and D: as far as the cperating system isconcerned. Drive C: is then used in the normal way and drive D: isreserved for backup purposes. This method is useless in the event thatthe hard drive develops a serious fault, because the main and backupdrives are the two halves of one physical drive. If one becomes faulty itis unlikely that the other will be usable either. The point of this system isthat the backup copy on drive D: is usable if there is a software problemrather than a fault in the hardware. Since most users have far moreproblems with the software than with hard disc faults this method shouldget the user out of trouble more often than not.
Some users take a compromise approach and make a backup copy ofthe hard disc when it contains a newly installed operating system havingall the hardware properly integrated into the operating system and fullyoperational. Ideally the disc should also have the applications programsinstalled, and any customisation completed. Any important data isbacked up separately as it is generated. If the operating system becomesseriously damaged it is then easy to resort to the backup which shouldbe reasonably compact, but gives you a basic system that is fully
86

Data rescue 3
customised and ready to use. Any essential data can also be restored,but there is no need to restore any data files that are no longer neededon the hard disc.
Clean copyAn advantage of this method is that it returns the PC to a "clean" copy ofthe operating system. Over a period of time most modern operatingsystems seem to become slightly "gummed up" with numerous 'desthat no longer serve any purpose, and things can generally slow dcwn.By returning to a fresh copy of the operating system you will probablyfree up some hard disc space and things might run slightly 'aster. Bynot restoring any unimportant data files you free up further hard discspace.
If you lack a proper backup copy of the hard disc and only have copiesof the data files, all is not lost. In this situation you might prefer to put afair amount of effort into fixing the damaged Windows installation ratherthan simply reinstalling everything. Even if you only use a few applicationsprograms, reinstalling Windows and the applications software is Ikelyto be pretty tedious and time consuming. If there a -e numerous programsto reinstall, the process is likely to be very tedious and time consuming.
Looking on the bright side, if everything does have to be restored f-omscratch you will have a "clean" copy of the operating system that shouldprovide optimum performance. In fact many users habitually take thereinstallation route and consider any extra time and effort involved beingwell worthwhile.
I would not go as far as to acvocate reinstalling everything at the firstsign of trouble, but I would definitely advise against the oppositeapproach of always repairing the original set up regardless of how longit takes. Apart from the fact this could be a very time consumingapproach, an installation that has been patched up on numerousoccasions, and perhaps had a number of programs added, upgraded,and removed over a period of time, is unlikely to provide peakperformance. In fact I have encountered several installations of thistype that took an eternity to go through the boot -up sequence, in onecase taking almost 10 minutes to complete the process! Once booted,PCs of this type seem to give the hard disc drive a "hammering" at everyopportunity. Apart from makirg the computer slow and irksome in use,this type of thing increases the wear on the hard disc drive andpresumably shortens its operating life. It should be possible to discover
87

Data rescue
the sources of the problem and improve results, but reinstallingeverything "from scratch" is the solution favoured by most when thissituation arises. This should ensure optimum performance and mightbe quicker anyway.
Windows on WindowsOn the face of it there is no need to wipe the hard disc clean andundertake a complete reinstallation from the beginning. Simplyreinstalling Windows over the old installation should restore normality.As with so many things in computing it is a case of yes and no. Yes, insome cases simply going through the Windows set up routine will fixproblems with the operating system and restore normal operation.Unfortunately, in other cases the problem will still exist once thereinstallation is complete. When Windows is installed on a hard disc,the Windows Setup program searches the disc for a previous installationand installed Windows application programs. Any installed softwarewill be integrated with the new Windows installation, as may driverprograms and other support files.
As a consequence, having reinstalled Windows it should not benecessary to reinstall the applications software as Nell. The down sideis that any files giving problems with the old installation may be retained,in the new one. Having reinstalled the operating system you could wellfind that it does not work any better than before. My experiences suggestthat reinstalling Windows on top of the existing installation probablyhas little more than a 50 percent chance of success. As it is a reasonablyquick and easy process it is probably worthwhile giving it a try beforeresorting to an installation "from scratch", but do not be surprised if itdoes not have the desired effect.
Do not be tempted to try upgrading to a newer version of Windows byinstalling it on top of a non -working version. People sometimes try this,working on the basis that the new version will have little dependency onthe old one, and the problem with the old version will be "blown away"by the new version. In practice there is little likelihood of this happening.The Windows Setup program may detect that there is a problem andrefuse to go ahead with the upgrade. If it does proceed, the most likelyoutcome is that the reinstallation will go very wrong somewhere alongthe line, and that it will never be completed. If you co manage to get thenew version installed, it will probably have more problems than the oldone.
88

Data rescue 3
PreliminariesIf you do decide to go ahead with reinstallation "from scratch" it is
essential to backup any important data files first. It you are using heavilycustomised applications programs it is also a good idea to make copiesof the configuration files so that the customisation files are easilyreinstated. In fact any files that are unique to your particular irstallationshould be backed -up, including things like speech profiles of vcicerecognition programs. Some of your applications programs may havefacilities for saving and reinstating customisation files. In other casessimply overwriting the default files with your customised versions willprobably have the desired effect.
It is worth emphasising that backing -up important files should not be leftuntil the PC gives problems. If there is a serious fault in the hard disc itmay be impossible to recover any files that have not been backed -up.Matters are less dire if the problem lies in the operating system ratherthan the disc itself, but it could still be difficult to make backup copies ofimportant files. With the computer not booting into the operating systemproperly, you are unlikely to have proper access to all the drives andapplications programs. Provided Safe Mode is functioning prcperly youcan boot into a version of Windows, but one where drives other than thehard and floppy discs will not be functioning. This limits your backupoptions. There are ways of making a backup of a hard disc drive it anemergency, but this might invclve buying some additional hardware. It
is better to avoid getting into situations where drastic measures areneeded in order to recover the situation.
Floppy discsFloppy discs are suitable for backup purposes where only a lim tedamount of data is involved. The upper limit depends on how manyfloppy discs you are prepared to use, a factor that s probably a reflectionof how desperate you are! Backing up 30 megabytes of data onto about20 or so floppy discs will be quite time consuming, but is still well withinthe bounds of reason. Backing up several hundred megabytes ontodozens of floppy discs is not a very practical proposition, and the d scscould well cost more than some more convenier t backup systems, In
terms of megabytes per pound, floppy discs are not very competitivethese days.
Where floppy discs are suitable, there is a potential problem in that someof the files you wish to copy may be too big to fit on a single floppy cisc.
89

3 Data rescue
The capacity of a high -density 3.5 -inch floppy disc is 1.44 megabyteswhen the standard PC disc format is used. Things ike DTP and graphicsfiles can be substantially larger than this. The normal copying facilitiesof MS/DOS and Windows can not spread a large file across one or morediscs. If you try to copy a file that is too large to fit onto the disc an errormessage to that effect will be produced. Fortunately, there are severalMS/DOS and Windows programs that can handle this problem. Thelater versions of the popular Winzip program for example, will compressand copy large files to several floppy discs if necessary. You can evencopy a collection of files and save them as one large file spread acrossseveral discs.
Large scaleIf floppy discs are not up to the task it is clearly recessary to resort tosome form of mass storage device. It is highly unlikely that any installeddevice of this type will work in Safe Mode, including a simple read-onlyCD-ROM drive, but it might be possible to get non-standard drives tooperate in MS/DOS. In this context, non-standard means just aboutanything other than a floppy disc drive or an IDE hard disc drive.
With Windows 95 and 98 you have the option of restarting the computerin MS/DOS mode. From the Start menu select Shut down and Restart inMS/DOS mode. The computer can also be started in MS/DOS modepressing F8 as the computer starts to boot into Windows, and thenselecting the appropriate option from the menu. Neither of these routesis available in Windows Me. The MS/DOS prompt is still available viathe Start button and the Programs menu option, but this is unlikely to beof much help.
In fact you may find that the mass storage device mysteriously disappearsfrom the operating system's repertoire when the PC is booted in MS/DOS mode. In the case of a CD writer it may still be accessible, but onlyfor reading purposes. Trying to write files to it will probably produce anerror message. It is possible that the storage device simply lacks MS/DOS compatibility, in which case it will only be usable if you can getWindows largely operational again. It is more likely that the device canbe used with MS/DOS, but the MS/DOS drivers are not installed bydefault. The instruction manual for the drive should make it clear whetheror not the device can be used with MS/DOS.
If it can, installation instructions and the necessary software should beincluded with the drive. Usually the easiest way of tackling the problemis to make a bootable floppy disc and to then boot the PC using this.
90

Data rescue 3
The simplest way of making a bootable disc is to place a blank (formattedor unformatted) floppy disc in drive A: and then issue this command atthe MS/DOS prompt:
format A:/s
Follow any onscreen promp's, and the disc will then be formatted afterwhich the system files will be copied onto it. This gives a basic bootdisc, but the support software for the mass storage device must then beinstalled onto the disc. The drive's instructior manual should givedetailed installation instructions, and may well give full details of how tomake an emergency boot disc. Note that the BIOS settings may have tobe changed before the PC will boot from a floppy disc. Changing driveand boot settings in the BIOS s covered later in this chapter.
Second discIf you have large amounts of data to backup and no mass storage device,your choices are limited. One option is to simply' keep trying to repairthe Windows installation until you are successful. Any Windowsinstallation should be repairable, and persistence should evertually payoff. You may get lucky and f x the problem fairly quickly, or a great dealof time could be involved in locating and removing the problem. Thebiggest drawback of this method is that you will still have no oackup ofthe hard disc's contents, limitng your options if there are further problemswith the Windows installation. Also, the contents of the disc will probablybe lost forever if the drive becomes faulty.
Many users save data onto a hard disc thinking that their work is safeand secure, but this is definitely not the case. Having data on a harddisc is sometimes likened to hanging paper documents by a thin threadover an open fire. Modern hard drives are relatively reliable, but if usedfor long enough a hard disc drive will go wrong, and you will probablyend up throwing away the drive together with all your hard work.
A better option is to add some form of mass storage device. An external(parallel port) Zip drive is not particularly expensive, and in an emergencyit should work quite happily with the computer booted into MS/DOS. Afew Zip discs can store several hundred megabytes of data, which shouldbe sufficient to backup any mportant data files, configuration files, etc.Note that any form of USB or SCSI storage device is unlikely to workwith Windows in Safe mode or with MS/DOS. This is simply becausethe interface will not be recognised in Safe mode or in MS/DOS, renderingthe drive "invisible" to the operating system.
91

3 Data rescue
My preferred option is to add another hard disc drive. These days thisprobably represents the cheapest means of adding large amounts ofextra storage capacity to a PC, and a hard disc also has the advantageof being very fast. Read and write speeds are measured in megabytesper second, unlike some other storage systems w-iere it is specified asso many megabytes per minute. A further advantage of the hard discapproach is that the disc should work properly with Windows booted inSafe Mode, or with the PC booted in MS/DOS mode. It should evenwork using the Windows MS/DOS Prompt program. A hard disc drive isone of the standard PC drives, and as such it toes not require anyspecial drivers for basic operation. This makes life easier at the best oftimes, but greatly eases things when the Windows installation isdamaged.
Adding a driveFitting a second hard disc drive obviously requires the lid or side panelof the PC to be removed, followed by some delving around inside thecomputer. It is not one of the more difficult upgrades, but unless youare reasonably practical it would be advisable to have the upgrade doneprofessionally. Most shops that sell hard disc drives also offer an upgradeservice, but it will almost certainly cost substantially more to have thedrive fitted for you. However, this extra cost is preferable to damagingthe PC and having to pay a hefty repair bill. Assuming that you feelconfident enough to go ahead with the upgrade yourself, the first task isto open up the PC to determine the current configuration.
With older PCs the top and two sides of the case are in one piece, andare released by removing four or six screws at the rear of the unit. Becareful, because there will probably be other screws here that hold otherthings in place, such as the power supply unit. With the right screwsremoved the outer casing should pull away upwards and rearwards, butit will probably take a certain amount of force to pull it free. More moderncases have removable side panels, and in most cases these are againheld in place by four or six screws at the rear of the unit. Both panelsmust be removed in order to give full access to the drive bays. If yourPC has one of the more unusual case styles it will be necessary to carefullyexamine the exterior in order to "crack" it.
A modern PC has the hard disc interface on the motherboard ratherthan provided by an expansion card. In fact there are two hard discinterfaces on the motherboard, or possibly four on a modern PC. Theseare known as IDE interfaces, and this simply stands for integrated drive
92

Data rescue 3
electronics. In other words, most of the electronics for the hard discdrive controller is built into the drive itself. At one time the IDE interfaceswere strictly for hard disc drives, but in a modern PC they can be usedfor other types of drive. These multipurpose interfaces are moreaccurately called EIDE interfaces, which stands for enhanced integrateddrive electronics. In practice they are still often referred to as just plainIDE interfaces. Many types of drive can be used with an EIDE interface,including CD-ROM, Zip, and LS120 drives.
In a typical PC the hard disc drive is connected to IDE port 1 and the CD-ROM drive is wired to IDE port 2. However, each IDE interface supportsup to two devices, so the hard disc and CD-ROM drive could beconnected to IDE port 1 via a single cable. Assuming that your PC hasno more than three internal crives, excluding any floppy drives, it shouldcertainly be able to support another hard drive. If you look at the cablinginside the PC you should find some wide cables, know as "ribbon" cables,that connect the drives to the motherboard. With luck, at least one ofthese cables will have an unused connector that can be used with thenew drive.
Note that any spare connector on the drive that connects to the floppydisc drive is of no use with a hard disc drive. The floppy variety uses acompletely different interlacehaving a smaller connector. Asuitable power supply lead andconnector is also needed. Theconnectors come in two saes,which are a larger one for 5.25 -inch drives and a smaller one forthe 3.5 -inch variety (Figure 3.1).However, all the hard disc drivesI have encountered use thelarger connector regardless of Fig.3.1 3.5 -inch (left) and 5.25-iitchwhether they fit 3.5 -inch or 5.25- (right) power connectorsinch bays.
If you are out of luck, one or other of the required leads and connectorswill not be present. If the hard disc and CD-ROM drive share an IDEinterface, the other IDE interface will be available for the additional drive,but it will not be fitted with a cable. Another poss bility is that the existingdrives are connected to separate IDE interfaces using single cables ratherthan types having two connectors for drives. In either case a standardtwin IDE data lead is needed in addition to the drive (Figure 3.2).
93

3 Data rescue
Fig.3.2 A standard twin IDE data cable
Bare factsHard drives are available in so called "bare" anc "retail" or "boxed"versions. A bare drive may consist of nothing more than the drive itself.However, it will usually include an instruction manual and a set of fixingscrews, but no data cable. Incidentally, if you find yourself with a harddrive but no matching manual, the web sites of most hard discmanufacturers include downloadable versions of the manuals for mostof their hard disc units. Unless you are dealing with a very old or unusualdrive, the information you require should be available on themanufacturer's web site.
The retail versions of hard drives normally include a cable in addition toa set of fixing screws and a more comprehensive manual. There maybe other items such as a mounting cradle to permit a 3.5 -inch drive tobe used in a 5.25 -inch drive bay. With modern drives there may well betwo data cables included with the drive. One of these is a standard IDEcable that can be used with any IDE drive and any IDE interface. Theother cable enables the drive to be used with a modern IDE interfacethat supports UDMA66 or possibly the new UDMA100 standard. UDMA66
94

Data rescue 3
and UDMA100 have the potential of faster data transfers than olderstandards such as the UDMA33 variety, but they can only be used if theyare supported by the motherooard, the drive itself, and the correct cableis used.
The instruction manual for your PC should state whether or not it supportsanything beyond UDMA33. If in doubt, the safe option is to use a standardIDE cable. This may provide something less than the ultimate inperformance, but the disc should still work very well. It should certainlywork well enough for making a backup of the main drive. Drive speedsare improving, but with mary drives it is still the drive itself rather thanthe interface that limits performance. Do not ty to use a mixture ofUDMA33 and UDMA66 or UDMA100 devices on one interface. The cablewill only be right for one type or the other, and each interface can onlywork in one mode or the other. It is perfecly all right to have UDMA33devices on one IDE interface and UDMA66 or UDMA100 devices or theother.
StaticIf you buy virtually any computer add-on to fit inside a PC it wi I besupplied in packaging plastered with dire warni'igs about the dangersof static electricity. Some o' these are a bit "ove- the top", and suggestthat going anywhere near the device without the protection of expensiveanti -static equipment will resu tin it being instantly zapped. In reality therisks of static induced damage occurring are probably quite small. Onthe other hand, computer add-ons have yet to fall in price so far thatthey are in the "two a penny' category, and the risk of damage occurringis a real one. By observing a few simple rules the likelihood of damagecan be reduced to insignificant proportions.
Rule number one is to leave tie device in its packaging until it is tine toinstall it. The plastic bags, foam lined boxes, etc., used for computerbits and pieces are designed to keep static electricity at bay. In somecases the packaging is designed to insulate the contents from highvoltages. In others it is designed to conduct electricity so that nosignificant charge can build up between any two points in the devicebeing protected. Any charges of this type will be almost instantly short-circuited by the conductive packaging.
Rule number two is to make sure that you are not charged with a highstatic voltage that could damage the device wren you remove it fromthe packing. When working on computers do rot wear clothes that are
95

3 Data rescue
known to be good generators of static electricity. Manmade fibres arethe most prolific static generators, but most modern clothes are madefrom natural fibres or a mixture of manmade and natural fibres, so this isnot the major problem that it was at one time.
To make quite sure that both yourself and the device being installed arecharge free, hold the device in its packing in ale hand, and touchsomething that is earthed with the other hand. Any charge in you or thedevice should then leak away to earth. The metal case of the computeris a convenient earth point. With the cover or side panels removedthere should be plenty of bare metal to touch. Touching the paintworkwill not provide reliable earthing since most paints are excellent electricalinsulators. Note that the computer must be plugged into the mainssupply, but it does not have to be switched on.
Rule number three is to keep the work area free of any large staticcharges. Any obvious sources of static charges should be removedfrom the vicinity of the computer. Television sets and computer monitorsare good static generators, which means that the computer must bemoved away from the monitor before you start work on it. This willnormally be necessary anyway, because with the computer's base unitin its normal location it will probably be difficult to get proper access tothe interior of the unit. It needs to be placed on a table where there isgood access to the interior and plenty of light so that you can see whatyou are doing.
The table should preferably be one that it not precious, but if necessarythe top can be protected with something like a generous quantity of oldnewspapers. It is a good idea to have the PC plugged into the mainssupply but switched off at the mains socket. The earthed metal chassisof the computer will then tend to earth any static charges in its vicinity,preventing any dangerous charges from building up.
If you follow these simple rules it is very unlikely that the add-on devicewill be damaged by static charges. When dealing with hard disc drivesit is as well to bear in mind that they are relatively delicate physically.Modern drives, although more intricate, are not as vulnerable as theearly types. Even so, dropping a hard disc drive onto the floor is definitelynot a good idea!
JumpersAn IDE device has configuration jumpers that are used to set whetherthe unit will be used as the master or slave device on its IDE channel.Even if there is only one device on an IDE channel, that device must still
96

Data a
Cable select
Slave
Master
0 0
Power input IDE
Fig.3.3 Typical layout for the rear of an IDE drive
be set as the master or slave snit. By convention, a single drive on anIDE channel is set as the master device. Therefore, if you are adding thenew disc to an IDE channel tl'at already has one device installed, thenew drive must be set to operate as the slave device. If the new d-ivewill be the sole device on its IDE channel, it must be set for masteroperation.
The rear of most CD-ROM drives and some IDE hard disc drives looksomething like Figure 3.3. The connector on the left is the power inputand the one on the right is forthe data cable. In between theseare three pairs of terminals :hatcan be bridged electrically by atiny metal and plastic gadgetcalled a jumper. A jumper canbe seen in place in Figure 3.4.The "cable select" option is notused in a PC context, so only twopairs of contacts are relevanthere. You simply place thejumper on the master or savecontacts, depending on whichoption you require. Theconfiguration jumper should be supplied with the drive incidentally, andis normally set at the maste option by default on a hard disc drive
With hard disc drives matters are not always as simple as the arrangementshown in Figure 3.3. There is often an additional set of terminals, andthese are used where the dr ve will be used as the only device on an IDEchannel. Using this setting will allow a lone drive to be correctly identifiedand used by the PC. If the drive has these additional terminals (or they
Fig.3.4 A jumper fitted to a drive
97

eta rescue
are fitted in place of the cable select pins), you must use them for a soleIDE drive, as it is unlikely that the drive will be picked up properly by theBIOS if the normal master setting is used. Getting it wrong is not likelyto produce any damage, but the drive will be unusable until the mistakehas been corrected. The manual supplied with the drive should givedetails of the configuration settings available.
If the new drive is used as the slave device on the primary IDE channel,the other hard drive will presumably be the master device on this channel.The existing drive will need its configuration setting altered if it is set tooperate as the sole IDE device on its channel. The manual suppliedwith the PC should give details of the configuration settings. Alternatively,it should be possible to identify the drive from its markings, and it willalmost certainly be possible to find its instruction manual on the Internet.
Where there is no device on the secondary IDE channel, or only a CD-ROM, it would probably be best to add the new drive on this channel. If
a CD-ROM is present on this channel, adding the new drive as thesecondary slave device is unlikely to require any configuration changesto the CD-ROM drive. If no device is already present, simply add thenew drive as the master device or sole device, as appropriate. In theory,data exchanges between the two hard disc drives will be quicker if theyare on different IDE channels, so where possible t is better to arrangethings this way.
It is definitely a good idea to check the configuration setting of the newdrive, and where necessary alter it, prior to fitting the drive in the case.Once the drive is fitted inside the case it can be difficult to get at thejumper and terminals, and it can be very difficult indeed to see what youare doing when adjusting the jumper.
Getting physicalIt is not essential to install the new hard drive in the computer as a fixture.You may prefer to simply connect the new drive to the data and powercables, do the backup, reinstallation and restoration, and then disconnectthe drive again. It can then be stored safely away somewhere in case itis needed at some later date. With the drive in storage rather than in useit should not wear out, and should be ready for use if it is needed a fewyears "down the line". I used this method success'ully with a couple ofPCs for many years, although not strictly out of choice.
With a PC that has one of the minimalist cases you may find that thereare no spare bays for another hard disc drive. Note that it is possible touse a 3.5 -inch drive in a 5.25 -inch drive bay using an adapter. This is
98

Data rescue 3
.4ja:T. t ':;;;141/iiiii;001. ..... .V,31. ..
T....21:r,..iii'llijii:.7j:L.Y-. L. -tttt.
1-:-4i.
t cat ,A, .
NtaiguiegnmENINIIIINL-
-AA*,pijjI. Iti1t1... 4
Fig.3.5 The connections on the underside of the drive must not beallowed to come frito contact with the chassis, etc.
just a metal cradle into which the drive is bolted and the whole assemblythen fits into the drive bay just like a 5.25 -inch dive. This adapter shouldbe available from any large computer store. As pointed 00 previously,it is sometimes (but not always) included with boxed retail versions ofhard disc drives.
When temporarily connecting a drive it is essential to make sure that noexposed connections on the unit come into electrical contact with themetal case, expansion cards, etc. Some drives are fully enclosed, butmost have the underside of the circuit board exposed (Figure 3.5). Oftenthe easiest way of keeping the drive safe is to place it cn top of thecomputer with some newspaper to insulate the drive from the case. Witha PC that has some form of tower case it is usually easier to work on theunit if it is placed on its side. The drive can then be placed on the sideof the drive cage, again with newspaper being used to provide insulation.
Probably most users will wish to use the additional disc as a permanentfeature. This is essential if you wish to use it to make frequent backupsor you will be making backup copies of data files as they are generated.If you are using a drive pay that has no front opening, the new drive
99

3 Data rescue
must be slid in from the rear. Any expansion cards that get in the waymust be removed temporarily. Remove the screws that fix the cards tothe rear of the chassis and it should then be possible to pull the cardsfree.
The sockets on the drive are at the rear, so the other end is pushed intothe rear of the drive bay. The manufacturer's name, etc., are marked onthe top plate of the drive, so this side should be facing upward. In mostcases the drive can be fully pushed into the bay, but it is sometimesnecessary to ease it back slightly to get the mounting holes in the driveand the bay to match up properly.
In days gone by it was necessary to use plastic guide rails to mount thedrives in the case, but any PC made within the last seven years or moreshould have drive bays that take the drives without the need for theserails. Four mounting bolts are normally supplied with the drive, andthese are used to secure it to the bay. If no fixing screws were suppliedwith the drive, the PC may have been supplied with some odds andends of hardware. If so, there will probably be some suitable screws inamongst these. Failing that, you will have to buy some metric M3 screwsabout 6 millimetres long. Note that the mounting screws must be quiteshort, and should not protrude more than a few millimetres into the drive.Longer mounting bolts could easily damage something inside the drive.
With a so-called "external" drive bay, it might be easier to insert the drivefrom the front. Where the interior of the computer is very crowded thiscan avoid having to remove expansion cards to get the drive in place.An external bay is really intended for use with a floppy drive, CD-ROMdrive, or some other type where access is needed to the drive forchanging discs. However, an external bay is perfectly suitable for awholly internal drive such as a hard disc unit. The plastic cover at thevery front of the bay can be carefully prised out using a flat bladedscrewdriver, and it might then be possible to slide the drive in throughthe front of the case. There will probably be a metal plate behind theplastic cover though. It may be possible to remove this by first removingtwo or three fixing screws, but in most cases the plate has to be repeatedlytwisted backwards and forwards until the thin pieces of metal holding itin place fatigue and break.
CablingThe ribbon cable used to provide the data connection has three identicalconnectors. There is no specific connector for the motherboard andeach drive, but because the cable is quite short it will probably have to
100

Data rescue 3
immatimmiNMINSIMIT
Fig.3.6 Two polarised IDE connectorson a motherboard
connect everything together in a particular way in order to reacheverything. It should not take too long to fathom out the best way ofusing the cable. Things are much easier when the new hard drive is thesole device on an IDE channel. The cable should then conned themotherboard to the drive without difficulty.
The connectors must be fitted to the motherboard and drives The co.-ectway round. In theory the connectors are polarised and can only befitted the right way round. There is a protrusion on the lead's connectorsand a matching groove in the connectors on the motherboard and drives.Figure 3.6 shows the polarising keys in the two IDE connectors on amotherboard. Unfortunatel, some connectors, and mainly those onmotherboards, aresometimes a bit too
0,11,1"Mirminimalist and arenot properlypolarised. A searchthrough theappropriateinstruction manualsshould show which ispin 1 on eachconnector. Thisinformation is oftenmarked on themotherboard and thedrives themselves. To make things easier, the ribbon cable has one redlead while the other 39 are grey. The convention is for the red lead tocarry the pin 1 connection. Provided this lead is adjacent to pin 1 cn theconnector for the motherboard and both drives, everything wi I beconnected together properly.
A spare power cable is needed for the new drive, and if there is a sparedrive bay there should realy be a spare power lead as well. However, itmight be fitted with the smaller connector for 3.5 -inch floppy drives,whereas it is the larger power connector that is required for hard discdrives, whether they are of the 3.5 -inch or 5.25 -inch variety. A argecomputer store should be able to provide a 3.5 to 5.25 -inch powerconnector adapter. If there is no spare power cable, a splitter adapter isavailable. This provides two power connectors from a single powerlead. Remove the power lead from the exist ng hard disc drive andconnect it to the splitter. The two remaining connectors of the splitterare then connected to the hard disc drives. The power connectors are
101

3 Data rescue
fully polarised and can only be connected the right way around. Theyare also quite stiff, and often need a certain amount of force in order toget them properly connected or disconnected again.
BIOS SetupHaving physically installed the hard disc it will be necessary to go intothe BIOS Setup program and set the appropriate parameters for thenew disc. The BIOS is something that most PC users never need to getinvolved with, but for anyone undertaking PC upgrading it is likely thatsome involvement will be needed from time to time. It is certainlysomething that can not be avoided if you add a second hard disc drive.In days gone by it was necessary to have a utility program to makechanges to the BIOS settings, but this program is built into a modern PCBIOS. A modern BIOS Setup program enables dozens of parameters tobe controlled, many of which are highly technical. This tends to makethe BIOS intimidating for newcomers and even to those who have someexperience of dealing with PC technicalities. However, most of the BIOSsettings are not the type of thing the user will need to bother with, andvery few are relevant to the hard disc drives.
BIOS basicsBefore looking at the BIOS Setup program it would perhaps be as wellto consider the function of the BIOS. BIOS is a acronym and it standsfor basic input/output system. Its primary function is to help the operatingsystem handle the input and output devices, such as the drives, andports, and also the memory circuits. It is a program that is stored in aROM on the motherboard. These days the chip is usually quite smalland sports a holographic label to prove that it is the genuine article(Figure 3.7). The old style ROM is a standard ROM chip in the muchlarger DIL (dual in -line) encapsulation.
Either way its function is the same. Because the BIOS program is in aROM on the motherboard it can be run immediately at start-up withoutthe need for any form of booting process. It is the BIOS that providesthe test procedures when a PC is switched on, and tie BIOS also startsthe boot process.
The BIOS can provide software routines that help the operating systemto utilize the hardware effectively, and it can also store information aboutthe hardware for use by the operating system, and possibly other
102

Data rescue 3
Fig.3.7 A modern BIOS chip. This contains the Setup program inaddition to the BIOS
software. It is this second role that makes it necessary to have the Setupprogram. The BIOS can actually detect much of the system hardwareand store the relevant technical information in memory. Also, a modernBIOS is customised to suit the particular hardware it is dealing with, andthe defaults should be sensible ones for the hardwa-e on themotherboard. However, some parameters have to be set manually, suchas the time and date, and the user may wish to override some o' thedefault settings.
The Setup program enables the user to control the settings that theBIOS stores away in its memory. A backup battery powers this memorywhen the PC is switched off, E 0 its contents are available each time thePC is turned on. Once the correct parameters have been set it shouldnot be necessary to change hem unless the hardware is altered, suchas a new hard disc drive being added or the existing hard disc beingupgraded. In practice the BIOS settings can sometimes be scrambledby a software or hardware glitch, although this is not a common problemwith modern PCs.
103

3 Data rescue
rz,%%?m,,m,, .04(>4.040..0
Sgit'SMI. 0.40 4,0. 6. 10*
t4N1.4.... r)Y?Z°. 'r'Vl ";
.'0,g101
Stan.lar4 Advanced Chteset
a -7 e.4r,
1314
Power Moot PCl/PnP PeripheAl
Set D.., Tim, H.,J
Fig.3.8 The initial screen of an AMI BIOS Setup program
EntryIn the past there have been several common means of getting into theBIOS Setup program, but with modern motherboats there is only onemethod in common use. This is to press the Delete key at the appropriatepoint during the initial testing phase just after switch -on. The BIOS willdisplay a message, usually in the bottom left hand corner of the screen,telling you to press the "Del" key to enter the Setup program. Theinstruction manual should provide details if the motherboard you areusing has a different method of entering the Setup program. The mostcommon alternative is to press the "Escape" key rather than the "Del"key, but numerous alternatives have been used over the years, and nodoubt some of these are still in use.
Every PC should be supplied with a manual that has a section dealingwith the BIOS. Actually a lot of PCs are supplied with a very simple"Getting Started" style manual, but this is usually augmented by themanufacturers' manuals for the main components. It is then themotherboard manual that will deal with the BIOS. It is worth lookingthrough the BIOS section of the manual before you actually go into the
104

Data rescue 3
STANDARD CMOS SETUP
DIOS FEATURES SETUP
SeePU 8 CHIPSET SETUP
POWER MANAGEMENT SETUP
PAP/PC! CONFIGURATION
LOAD SETUP DEFAULTS
ROM PC VISA DIOS (2A59IC3E)
NOS SETUP UTILITY
AWARD SOFTWARE, INC.
INTEGRATED PERIPHERALS
SUPERVISOR PASSWORD
USER PASSWORD
IDE HDD AUTO DETECTION
SAVE & EXIT SETUP
EXIT WITHOUT SAVING
Esc : Quit t i : Select Item
FIB : Save i Exit Setup (Shlft)F2 : Change Color
Virus Protection, Boot Sequence...
Fig.3.9 The initial screen of an Award BIOS Setup program
BIOS program. This will give you an idea of how things work, but do notbother too much about the more obscure settings.
In the current context it is only some of the Standard CMOS settings thatare of interest. Do not expect the manual to give detailed explanationsof the various settings. Most motherboard instruction manuals assumethe user is familiar with all the BIOS features, and here will be few detailedexplanations. In fact there will probably just be a list of the availableoptions and no real explanations at all. This does not really matter, andyou really only need to know how to get into the BIOS, make a fewchanges, save the changes, and exit the program.
There are several BIOS manufacturers and their BIOS Setup programseach work in a slightly different fashion. The Award BIOS and AMI BIOSare two common examples, and although they control the same basicfunctions, they are organised in somewhat different ways. A modernAMI BIOS has a Setup prog-am that will detect any reasonably standardmouse connected to the PC, and offers a simple form of WIMPenvironment (Figure 3.8). It can still be contraled via the keyboard ifpreferred, or if the BIOS does not operate with the mouse you are using.The Award BIOS is probably .he most common (Figure 3.9), and as faras I am aware it only uses keyboard control.
105

3 Data rescue
ROM PCl/ISA BIOS (28591C3E)
STANDARD CMOS SETUP
AWARD SOFTWARE, INC.
Date (mm:dd:gy) : Tee, Sep 21 1999
Tins lhli:mm:ss) : 22 : 39 : 15
MAID DISKS TYPE SIZE CYLS HEAD MOM AMU SECTOR MODE
Primary Master: Auto 8 8 8 8 8 B AUTO
Primary Slave: Nose 8 8 8 8 8 8
Secoodary Master : Auto 8 8 8 8 8 0 AUTOSecomdary Slave
: Nose
Drive A : 1.4411, 3.5 in.
Drive I : None
Uldeo : ECA/UCA
Halt Os : All Errors
8 8 8 8 8 8
Ilse Memory:
Extolled Memory:
Other Memory:
640K
64512K
384K
Total Memory: 65536K
ESC : kitP1 : Nelp
1 4 : Select Item PU/P11/./- : Modify
(Shift)F2 : gangs Color
Fig.3.10 A typical standard CMOS Setup screen
Apart from variations in the BIOS due to diff3rent manufacturers, theBIOS will vary slightly from one motherboard to another. This is simplydue to the fact that features available on one mctherboard may be absentor different on another motherboard. Also, the world of PCs in generalis developing at an amazing rate, and this is reflected in frequent BIOSupdates. Fortunately, the Standard CMOS secticn has not changedmuch over the years, so it should not differ significantly from the onedescribed here unless you are dealing with a computer than falls intothe "antique" category.
Standard CMOSThere are so many parameters that can be controlled via the BIOS Setupprogram that they are normally divided into half a dozen or so groups.The most important of these is the "Standard CMOS Setup" (Figure 3.10),which is basically the same as the BIOS Setup in the original AT stylePCs. The first parameters in the list are the time and date. These anusually be set via an operating system utility these days, but you can stillalter them via the Setup program if you prefer. There are on -screen
106

Data rescue 3
ROM PCl/ISA BIOS (214591C3E)
STANDARD CMOS SETUP
AdAID SOFTWARE, INC.
Date (mm:dd:gy) : Tue, Sep 21 1999
Time (hb:mm:ss) : 22 : 49 : 9
HARD DESKS 2 SECTOR MODE
FIXED DISK
Primary Master 8 0 AUTO
Primary Slave Selects the type of fixed disk. 8 8
Secondary Master 'User type' will let you select the 8 8 AUTO
Secondary Slave number of cylinders, heads, etc. 8 8
Drive A : 1.44M,
Drive I : None
Note: PRECOMP-I5535 means NONE !
y: 64EK
y: 64512K
Video : ECA/VC y: 384K
Halt On : All Ery: 65536K
ESC : Quit
Fl : Help
Press Fl or ESC to exit help
(Shift)F2 : Change Color
: Modify
Fig.3.11 Most Setup programs provide context sensitive help
instructions that tell you how to alter and select options. One sightoddity to watch out for is that you often have to use the Page Up key todecrement values, and the Page Down key to increment them.
With virtually any modern BIOS a help screen can be brought up bypressing Fl, and this will usually be context sensitive (Figure 3.11). In
other words, if the cursor is in the section that deals with the hard drives,the help screen produced by pressing Fl will tell you about the harddisc parameters. It would be unreasonable to expect long explanationsfrom a simple on-line help system, and a couple of brief and to the pointsentences are all that will rormally be provided.
Drive settingsThe next section is the one we need, and it is used to set the operatingparameters for the devices on the IDE ports. Tie hard disc is normallythe master device on the primary IDE channel ( DE1), and the CD-ROMis usually the master device on the secondary IDE charnel (IDE2).However, to avoid the need for a second data cable the CD-ROM driveis sometimes the slave device on the primary IDE interface. You, new
107

3 Data rescue
drive could therefore be any of the four available devices apart from theprimary device on IDE1, which will be the original hard disc drive. If indoubt, this table should help you decide which device it is:
IDE chan/device
IDE1 secondary
IDE2 primary
IDE2 secondary
If the new drive is...
on the same cable as the original hard drive
the sole device on the opposite channel to theoriginal hard disc
on the same cable as the CD-ROM drive (or otherdevice such as a CD writer)
Having decided how the new drive fits into the overall scheme of thingsyou can set the appropriate parameters. The drive should really besupplied with a manual that provides the correct BIOS settings, but it isusually possible to get by without it. One of the parameters is the harddisc's type number. In the early days there were about 40 standardtypes of hard disc drive, and it was just a matter of selecting theappropriate type number for the drive in use. The BIOS would thensupply the appropriate parameters for that drive.
This system was unable to cope with the ever increasing range of drivesavailable, and something more flexible therefore had to be devised. Theoriginal 40 plus preset drive settings are normally still available from amodern BIOS, but there is an additional option that enables the driveparameters to be specified by the user. This is the method used with allmodern PCs and their high capacity hard disc drives, so choose theCustom setting and ignore the drive numbers.
The drive table parameters basically just tell the operating system thesize of drive, and the way that the disc is organised. Although we referto a hard disc as a singular disc, most of these units use both sides oftwo or more discs. Each side of the disc is divided into cylinders (tracks),and each cylinder is subdivided into several sectors. There are usuallyother parameters that enable the operating system to use the disc quicklyand efficiently. You do not really need to understand these parameters,and just have to make sure that the correct figures are placed into thedrive table. As pointed out previously, the manual for the hard driveshould provide the correct figures for the BIOS. If you do not have themanual, it can probably be downloaded from the disc manufacturer'sweb site.
108

Data rescue 3
RON PCI/ISA BIOS (2A59IC3E)
CMOS SETUP UTILITY
WARD SOFTWARE, INC.
HARD DISKS TYPE SIZE CYLS HEAD PRECO1Q LANOZ SECTOR NODE
Primary Waster :
Select Primary Raster Option (NSkip) :
OPTIONS SIZE CYLS HEAD PRECOMP LANDZ SECTOR NODE
2(Y) 1624 787 64 8 3147 63 LIR
1 1624 3148 16 65535 3147 63 NORMAL
3 1624 787 64 65535 3147 63 LARGE
Note: Some 3Ses (like SCO -UNIX) must use 'NORMAL' for iastallation
ESC : Skip
Fig.3.12 Ai IDE auto -detection screen
If you do nct have the manual or prefer to take an easier option, a modernBIOS makes life easy for you by offering an "Auto" option. If this isselected, tie BIOS examines the hardware during the start-up routineand enters the correct figures automatically. This usually works verywell, but with some drives if can take a while, which extends the boo -uptime. If the PC has been se: up with this option enabled, the dr ve tablewill be black.
There is an alternative menod of autcmatic detection that avoids theboot -up delay, and any reasonably modern BIOS should have this facility.If you go back to the initial menu you will find a section called "IDE HDDAuto Detection" (Figure 3.12; , and this offers a similar auto-cetedionfacility. When this option is selected the Setup program examines thehardware on each IDE channel, and offers suggested settings for eachof the four possible ICE devices. If you accept the suggested settingsfor the hard disc drive (or drives) they will be entered into the CMOSRAM. There may actually be several alternatives offered per IDE device.but the default suggestions almost invariably the correct one. 11 you do
not know the correct settings 'or a drive, this faci ity should find them fo-you.
109

3 Data rescue
It is perhaps worth mentioning that with an IDE drive the figures in thedrive table do not usually have to match the drive's physicalcharacteristics. Indeed, they rarely if ever do so. The electronics in thedrive enable it to mimic any valid physical arrangement that does notexceed the capacity of the drive. In practice it is advisable to use thefigures recommended by the drive manufacturer, as these are tried andtested, and should guarantee perfect results. Other figures cansometimes give odd problems such as unreliable booting, even thoughthey are within the acceptable limits.
The last parameter for each IDE drive is usually something like Auto,Normal, LBA (large block addressing), and Large. Normal is for drivesunder 528MB, while LBA and Large are alternative modes for driveshaving a capacity of more than 528MB. Modern drives have capacitiesof well in excess of 528MB, and mostly require the LBA mode. Themanual for the hard drive should give the correct setting, but everythingshould work fine with "Auto" selected.
It is increasingly common for modern motherboards to have four ratherthan two IDE interfaces. With a motherboard of this type it will usuallybe possible for the added hard disc drive to have its own IDE interfaceeven if the PC already is already fitted with something like one hard discdrive, a CD-ROM drive and a CD writer. Finding a snare IDE channel forthe new drive should be that much easier, but in other respects thingsare essentially the same as when dealing with a twin IDE portmotherboard.
Drive lettersSome users get confused because they think a hard drive that will bepartitioned should have separate entries in the BIOS for each partition.This is not the case, and as far as the BIOS is concerned each physicalhard disc is a single drive, and has just one entry in the CMOS RAMtable. The partitioning of hard discs is handled by the operating system,and so is the assignment of drive letters. The BIOS is only concernedwith the physical characteristics of the drives, and not how data will bearranged and stored on the discs.
If you are adding a drive for backup purposes there is usually no pointin using more than one partition. The only and fairly obvious exceptionif where the drive you are backing up has been partitioned to operate astwo or more logical drives. It is then advisable to have the partitioning ofthe backup drive match that of the main drive as closely as possible.
110

Data rescue 3
The other Standard CMOS settings are concerned with the floppy discsand the default display type, and should simply be left as they are. Thesame is true of the settings it the other pages of the BIOS Setup program.Do not be tempted to start playing around with these unless you knowexactly what you are doing. Entering silly settings is unlikely to damageanything, but could well prevent the PC from operating properly. TheBIOS will probably have options that enable the previous setings to bereinstated, or default settings to be used. These can be useful if youshould accidentally scramble a few parameters. Note though, that nosettings are actually altered unless and until you select the SaveParameters and Exit option, and then answer Yes when asked to confirmthis action. This is clearly the route you should take if everything hasgone according to plan. Take the Exit Without Saving option if thungshave not gone well. Simply switching off the PC or pressing the resetbutton should have the same effect.
PartitioningWith the early PC hard disc drives it was necessary to do low levelformatting of the drive before it could be partitioned and the high levelformatting could be undertaken. Modern hard drives are supplied withthe low level formatting alreacy done. If there is a low level 'ormattingoption in the BIOS Setup program, never use i: on an IDE hard discdrive. Do not use any similar facility in any utility suites that you mighthave.
No low level formatting is required, but with operating systerrs such asMS/DOS, Windows 95/98, and Windows Me the hard disc drive must bepartitioned and high-level fo-matted before it car be used.
Start by booting the computer in MS/DOS mode, or from the floppy discdrive using a Windows Startup disc. If you do not have a Startup also,one can be made by going into the Windows Control Panel. One routeto this is to operate the Start button, and then select Settings and ControlPanel. Once in the control panel double-click on the Add/RemovePrograms icon, select Startup Disk, and finally operate the Create Diskbutton. Then follow the onscreen prompts. A blank 1.44 megabytefloppy disc is required. Note that you will be askec to insert the Windows95/98/Me CD-ROM into the CD-ROM drive, because some cf the tilesrequired are not normally stored on the hard disc. The method of matingthe disc is exactly the same for all three operating systems incidentally.
It is probable that the BIOS will already be set to boot from the floppydisc drive, but if necessary you must use the BIOS Setup program to set
111

3 Data rescue
ROM PCI/ISA BIOS (2A59IC3E)
BIOS FEATURES SETUP
AWARD SOFTWARE, INC.
Trend ChIpAwey Uirus : Disabled
Boot Sector Intrusion Alert: Disabled
CPU 'eternal Cache : Enabled
External Cache : Enabled
Quick Power On Self Test : Enabled
loot Sequence : CDROM,C,A
Swop Floppy Drive : Disabled
Soot Up Floppy Seek : Enabled
Soot Up Numilock Status : Off
loot Up System Speed : High
Typemetic Rate Setting : Disabled
Typemetic Rate (Chars/Sec) : 6
Typemetic Delay (Meec) : 258
Security Option : Setup
PCPUICA Palette Snoop : Disabled
OS Select (For DRAM > 64MB): Non -0S2
Uldeo BIOS Shadow
C0880-CBFFF Shadow
CCOE10-CFFFF Shadow
D0000-D3FFF Shadow
D4800-D7FFF Shadow
DO88U-DBFFF Shadow
DC889-DFFFF Shadow
: Enabled
: Disabled
: Disabled
: Disabled
: Disabled
Disabled
: Disabled
ESC : Quit ti.. : Select Item
Fl : Help PU/PD//- : Modify
F5 : Old Woes (Shift)F2 : Color
F7 : Load Setup Defaults
Fig.3.13 An example BIOS features Setup screen. Amongst otherthings, this is used to set the required boot option
the floppy drive as a boot device. There will be a page in the BIOScalled something like BIOS Features Setup (Figure 3.13), and this shouldenable various boot sequences to be chosen. Choose one that has thefloppy disc (drive A:) as the first boot device, and hard drive C: as thesecond. Any subsequent boot options are irrelevant, since the PC willalways boot from one or other of the first two options.
With the computer booted -up and running MS-DOS or the Windows 95/98/Me equivalent of MS-DOS, the new hard drive will not be accessible.Until it has been partitioned it will be largely "invisible" to the operatingsystem. Once partitioned the operating system will be more willing toadmit to its existence, but it will still be of no use until high-level formattinghas been performed using the MS-DOS FORMAT program. However,you must first prepare the disc using the FDISK partitioning program.
The Windows Startup disc contains copies of both FDISK and FORMAT,which are automatically placed on the disc for you when the Startupdisc is created. Consequently, booting from the Startup disc is the easierway of doing things. If the PC is booted from the hard disc, either theStartup disc must be used to provide the FDISK and FORMAT programs,or you must find them on the hard disc. Unfortunately, they may not be
112

Data rescue 3
present on the hard disc, cr on the Windows CD-ROM in standaloneform, so I would definitely recommend using the Startup disc. Ir thedescription that follows it is assumed that Format and FDISK are on thefloppy disc in drive A:.
FDISK
FDISK is used to create one or more DOS partit ons, and with discs of2.1 gigabytes or less you may wish to have the whole of the disc as asingle partition. Assuming the original hard disc has one partition, thenew hard disc drive then becomes drive D:. By creating further partit onsit can also operate as drive E:, drive F:, etc. The primary part tion is thenormally the boot disc, and this is where the operating system would beinstalled. Obviously this does not apply to a second hard drive, anc theprimary partition is simply tt-e first partition on the disc.
The MS/DOS and Windows 95 file systems set the 2.1 -gigabyte partitionlimit. There is also an 8.4 -gigabyte limit on the physical size of the drive.With Windows 98 and any reasonably modern BIOS these limits do notapply, but you must use the FAT32 file system. Tc do this simply answeryes when FDISK is first run, and you are asked if you require support forlarge hard disc drives. Even if you do not wish to have a large discorganised as one large partition, it is still best to opt for large hard discsupport. FAT32 utilizes the available disc space more efficiently andreduces wastage. Note that if you only require a single partition youmust still use the FDISK program to set up this single partition, and thatthe FORMAT program will not work on the hard drive until FDISK hascreated a DOS partition.
Some hard discs are supplied complete with partitioning software :hatwill also format the disc and add the system files, which will be copiedfrom the boot disc. Where e utility program of this type is available itmight be better to use it instead of the FDISK and FORMAT programs.These MS-DOS programs are fairly straightforward in use, but using thesoftware supplied with the dr ve will almost certainly be even easier.The only problem is that the software might be intended for use withdrive C:, and might give problems if you try to use it with drive D:. Theinstructions supplied with the software should make it clear whether thesoftware is suitable for use with a second hard disc drive.
Should the program insist or placing the system files on drive D:, this isnot really a major problem. The system files will waste a small amcuntof disc space, but should not give any problems when the system isbooted provided the boot opt-ons are set correctly in the BIOS. If indoubt, simply use FDISK and FORMAT.
113

3 Data rescue
FSISI Options
Current fixed disk drive: 1
Choose one of the following:
1. Create DOS partition or Logical DOS Driue
2. Set active partition
3. Delete partition or Logical DOS Drive
4. Display partition information
5. Change current fixed disk drive
Enter choice: lil
Press Inc to exit P1431
Fia.3.14 -The main menu of the FDISK program
Change Current Fixed Usk blue
Disk Dru Mbytes Free Usage
1 9782 1061
C: 9762
2 2441 2411
(1 Mlyte = 1046576 bytes)
Enter Fixed Disk Driue Mueller (1-2)
Press lac to return to FDISK Options
Fig.3.15 Th.? partition information screen
114

Data r
Create DOS Partition or Logical DOS Drive
Current fixed disk drive I
Choose one of the following:
1. Create Primary DOS Partition
2. Create Extended DOS Partition
3. Create Logical DOS Dr:ve(s) in the Extended DOS Partition
Enter choice: Ill
Press Sic to return to HIM Options
Fig.3.16 Creating a partition on the new hard disc
Using FDISKOnce you are in FDISK there is a menu offering these choices (see alsoFigure 3.14):
1. Create DOS partition or logical DOS drive
2. Set the active partition
3. Delete partition or logical DOS drive
4. Display partition information
5 Change current fixed drive
Normally the first thing we need to do is create a DOS partition usingoption one, which is the default. However, in this case we are dea ingwith an additional hard drive, and we must first make sure that it is theone FDISK is dealing with. It is ,ery important that you do rot accidentallyuse FDISK with the wrong drive, since to do so would almost certa nlyremove all the data from the disc you are trying to backup Select option5, which should bring up a screen like that in Figure 3.15. The orig nal
115

.rata rescue
Mirky Partition imformatios
Current fixed disk drive: 2
Partition Status Type Volume Label Mbytes System Usage1: 1 PRI DOS 1803 UNIM06.1 74z
Total disk space is 2441 Mbytes (1 Mbyte . 1848576 bytes)
Press Ise to continue_
Fig.3.17 Checking that the new partition has been c'eated
Create Ixteeded 103 Partitive
Current fixed disk drive 2
Partition Status Type Mime Label Mbytes System UsageD: 1 ?II MS 1893 MOM 74z
Total disk space is 2441 Mbytes Mbyte . 1018579 bytes'
Maximum space auailable for partition Is OD Mbytes ( tia
Enter partition size iv Mbytes or percent of disk space (z) tocreate an Extended DOS tirtition
: I MI
Press Inc to return to FI1S) Options
Fig.3.18 Provided there is some spare capacity one or moreadditional partitions can oe added
116

Data 1.
hard disc unit is drive 1 and the new hard disc is drive 2. In this exampledrive 1 (C:) is the original drive of about 10 gigabytes in capacity, anddrive 2 is the additional rescue drive having a capacity of about 2.4gigabytes. Drive 2 will eventually be drive D:, but at this stage it has notyet been assigned a drive letter. If the current disc is drive 1, enter 2 forthis parameter and press the Enter key to go back to the man screen.
Once drive 2 has been set as the current drive it can be partitioned, andoption 1 can be selected. -his takes you into a further meru offeringthese three options (Figure 3.16):
1. Create primary DOS partition
2. Create extended DOS partition
3. Create logical DOS drive(s) in the extended DOS partition
It is a primary DOS partition that is required, so select option one, whichshould again be the default. After the disc has been given a quick testyou will be asked if you wish to use the maximum space for the partition.If you answer yes, the whole disc, or as much of it as FDISK can handle,will be used for the partitior. If you answer no, you will then have tospecify the size of the primary partition in megabytes. After a furtherquick check of the disc the new partition will be created. Having createdthe partition, press the Escape key to return to the original menu.good idea to select option four to check that the partition las beencreated successfully (Figure 3.17).
If a further partition is required select option one, and then option two,which is "Create extended DOS partition" (Figure 3.18). Enter the sizeof the partition you require and press the Return key to create the partition.Then press the Escape key, which will bring up a message saying "Nological drives defined" (Figure 3.19). In other words, you have createda partition, but as yet it does not have a drive letter. Assuming yourequire all the space in the partition to be one logical drive, simply pressthe Return key. This will make the partition drive E:, and a screen givingthis information will appear (Figure 3.20). Press the Escape key to returnto the main menu, and use option four to check that the partition hasbeen created successfully.
It has been assumed here that the original hard disc has a single partition.If it has more than one partition these will be drives C;, D;, etc., and Thedrive letter or letters for the additional drive will be moved up accordingly.For example, if the original disc is used as drives C: and D:, partitions ofthe new drive would become dives E:, F:, etc.
117

.0
C.)
Create Logical 181 Drivels) Is the Cirtedsi 10$ Partition
No logical drives defined
Total Extended DOS Partition size is 6.38 Mbytes (1 Mlyte = 1048576 Wes)
Maximum space available for logical drive is in Mbytes (isex )
Enter logical drive size i Mbytes or percent of disi space (z) ( 6311
Press Bac to return to FEU Options
Fig.3.19 An extended partition must be given a drive number
FormattingHaving created the partitions you require, the "FORMAT" command canthen be run. First you will have to press the Escape key twice to exitFDISK, and then the computer must be rebooted so that the new partitioninformation takes effect. Make sure you format the correct disc, becauseformatting a disc that is already in use will destroy any data it contains.To format drive D: use this command:
format D:
This will bring up a warning to the effect that all data in drive D: will belost if you proceed with the format. As yet t-iere is no data to lose, soanswer yes to proceed with the formatting. It might take several minutesto complete the task, since there are a large number of tracks to beprocessed and checked. If the hard disc has more than one partitionand is operating as drive D:, drive E:, etc., each partition must formattedusing a separate "FORMAT" command. To format drive F: for example,this command would be used:
format F:
118

Data rescue 3
Create Logical NIS Drivels) le the Mended lI1I Partition
Dru Uoluse Lalel 11ytes listes Usage
1: 638 UMENIMM 1087.
All available spice to the hiseded 113 Pertitise
is assigned to logical drives.
Press Ise to continue
Fig.3.20 If all goes well, a screen showing the drive letter of the newpartition will appear
The new hard disc drive should then be fully operational. If the new dischas been added as an insurance measure and the Windows instal ationis fully operational, any bac,<up software should be able to copy thespecified data from the old drive to the new one, or even copy every fileif that is what you require. Due to the speed of modern hard disc &yes,even copying several gigabytes of data should be relatively swift.
Matters are slightly less straightforward if the operating system is seriDuslydamaged 3nd the second lard disc has been added as a desperationmeasure. Any existing backup software alreadi installed will probablywork well enough if the PC Is booted into Safe Mode. With the CD-ROMdrive unavailable in Safe Mode, installing new backup software isproblematic. It is probably easier to run Windows Explorer and use thisto do the copying. Files or even complete directory structures can bedragged and dropped from one disc to the other. Thus, even if there arelarge numbers of files to ccpy in complex file structures, the task is nottoo difficul'.
Things would have to go disastrously wrong with the operating systemfor Windows to be unable to boot in Safe Mode, but I suppose it could
119

3 Data rescue
happen if a lot of Windows files are damaged or erased. Copying singlefiles using MS/DOS is easy enough, and is achieved using the Copycommand. This is an internal command, which means that it is alwaysavailable at the MS/DOS prompt, and does not rely on a program storedon disc. The easiest way of using the Copy command is to go into thedirectory where you require the copied files to be stored. Since the discis blank to start with, the new directory must be created first. These twocommands would first take the system into drive D:, and then make adirectory (folder) called "wordproc" off the root directory of drive D::
D:
and wordproc
Of course, the Return key must be operated after each command hasbeen typed in. Remember that in MS/DOS filenames directory namesare limited to eight characters plus an optional three -character extension.These two commands would take the system into the new directory andthen copy a file from drive C: into the new directory:
cd wordproc
copy C:\wordproc\letterl .doc
In this example the file being copied is called "letterl doc" and it is in the"wordproc" directory of drive C:, but it can be any file on any directory ofan accessible drive. The full path for the file must be specified, and notjust the basic filename.
In most cases you need to copy all the files in a directory and not justone or two. This can be accomplished using this Copy command:
copy C: \wordproc\*.*
The first "*" character tells the computer to apply the command to fileshaving any filename. The second "*" character tells the PC to apply thecommand to files having any extension. Hence this easygoing versionof the command will copy any files in the specified directory. A variationon this method enables any files with a specified extension to be copied.Suppose you wished to copy only the files having "doc" as the extension.This version of the command would give the desired effect:
copy C: \wordproc\*.doc
The "*" character is used so that the command copies files having anymain filename, but using "doc" as the extension ersures that only fileshaving this extension are actually copied.
120

Data rescue 3
XcopyThe Copy command is not able to copy a directory structure, completewith all subdirectories and the files that they contain. However, MS'JOScan accomplish this using the Xcopy command, but this is not an internalfunction of the operating system. In order for Xcopy to work the systemmust have access to the Xcopy program file (xcopy.exe). This rile isavailable on the Wincows 98 installation CD-ROM in the\TOOLS\OLDMSDOS subdirectory. It should also be on the hard disc inthe \WINDOWS\COMMAND subdirectory. A quick search failed to locatethe file on a Windows 95 installation CD-ROM, but it was present on thehard disc in the \WINDOWS\COMMAND subdirectory. The same is trueof the Windows Me upgrade version, although the Xcopy.exe file can belocated on the CD-ROM within the \Win9X\WIN_17.CAB file usingWindows Explorer. However, it would seem to be easier to use the non -archived version of the file Dr the hard disc.
Suppose that you wish to copy a directory off the root directory of driveC:, plus any files and subdirectories it contains. There is more than oneway of doing this, but the one I would recommend is to go into thedirectory that contains Xcopy.exe, and then specify the full paths fcr thesource and destination. For example, to copy C:\wcrdprcc toD:\wordproc, this command would be used:
Xcopy C:\wordproc D:\wordproc /s
Note that without the "Is" at the end of the command, Xcopy will workjust like the Copy command and will not copy subdirectories.
Disc swapThere is another way of handl ng things where a Windows installaticn isdamaged to the point that it will not even boot in Safe mode. This is toadd the new drive as drive C:, and to have the criginal one as drive D:.This will probably require some changes to the cabling and jurpersettings of the old drive, but it should not be too difficult to reorganisethings so that the new drive is drive C:. The new drive is then set up asthe boot drive, and Windows is installed on the drive once it has beenpartitioned and formatted. Your applications programs are then installed,and any data files on drive D: are easily copied across to drive C: usingWindows Explorer.
The old drive then becomes the backup drive, and can be w ped deanonce you are sure that any rrportant data it cortains has been copied
121

3 Data rescue
to drive C:. Having cleared drive D:, it can be used to take a full backupof drive C:, which should make life much easier the next time a majorWindows problem occurs.
Be preparedIt is definitely better to be ready for any problems that arise rather thanhaving to improvise to get out of trouble when things go wrong. However,if the files you need to back up are safely stored on the hard disc, itshould be possible to copy them even if the Windows installation hasbeen damaged to the point where it is totally unbootable. You mayneed to add some hardware such as an external (parallel port) ZIP driveor a hard disc if there is a large amount of data to copy, but that is asmall price to pay for saving large amounts of hard work.
Points to rememberDo not wait until things go wrong before backing up data. It should bepossible to rescue your data if the operating system becomes seriouslydamaged, but it might be expensive to have it rescued from a faultyhard drive.
Data rescue services are available, but there is no guarantee that datawill be retrievable from a damaged hard drive.
Not all backup devices will work with Windows in Safe mode or in MS/DOS. Lack of operation in either of these modes does not render abackup device useless, but life is easier when using a moreaccommodating drive.
If you find yourself with a Windows installation that seems to beimpossible to repair, and no usable device to backup masses of importantdata, there are three options. Carry on trying to repair Windows for aslong as it takes, abandon your data and reinstall Windows from scratch,or add a suitable backup device so that the data can be rescued prior toreinstalling Windows.
Another hard drive is the most practical option whet disaster has struckand an emergency backup of data is required. These days a hard discdrive is a relatively cheap backup option that will work in both Safe modeand MS/DOS since it is a standard MS/DOS and Windows drive. Harddiscs are also relatively fast in operation.
122

Data rescue 3
A modern PC can have at least four IDE drives (hard discs, CD-ROMdrives, etc.) and will usually be able to accept an additional hard drive.
A hard disc drive has to be partitioned using FRISK and then high-levelformatted using FORMAT before it is ready for use. These are both MS/DOS programs that are present on the Windcws Startup disc. FDISKmust be used even if the disc will be organised as one large pattion.No low-level formatting is required, as this is done at the factory.
Proper backup software can be used to backup your data, but WindowsExplorer enables data to be easily copied from one drive to another.Complete directory structures can be copied by dragging them fromone drive to another.
Where Safe mode is not available the MS/DOS Copy command can beused to copy all the files from one directory to another. Tie MStDOSXcopy command can be used to copy director/ structures and the filesthat they contain.
The easiest way of rescuing your data might be to fit a new C: drive andhave the old one as drive D:. With Windows and all your applicationssoftware installed on drive C:, the old drive D: becomes the backupdrive from which your data can be copied to drive C:.
123

3 Data rescue
124

Backupand restore
Backup?Using the methods outlined in the previous chapter it is possible torecover data from the hard disc when there is a serious problem with theoperating system. Using a data recovery service it might even be possibleto recover data from a faulty hard disc, albeit at a price. It s defi -iitelyadvisable to avoid putting yourself into a situation where emergencymeasures have to be taken in order to avoid the loss of vital data andthis means backing up any important data. Of course, if you use a PCpurely for pleasure and do not have any important data to back up,there will probably be little point in going to the trouble of backing upthe hard disc. In the event of a serious problem everything can bereinstalled and there is no important data to lose.
These days most computer users are not dabblers, and their PCs areput to good uses. This means that important data is usually generated,and generated in large quantities. Whether it is family photographs froma digital camera, the company accounts, or your latest novel, most PCscontain data that is precious to the users. It makes sense to producebackup copies of this data, even if it does involve a certain amount oftime and expense.
Better save than sorryIf you are going to do the sensible thing and backup important data it isnot essential to use any backup software. Having stored a file onto thehard disc using the SAVE function of the application software you cansimply select SAVE AS and store it again on anotner drive, such as a ZIPdrive or CD writer. This method enables data files to be restored to the
4
125

4 Backup and restore
hard disc using Windows Explorer if a major failure of some kind shouldoccur, but it does not allow the operating system to be restored. Neitherwill it restore any of your applications software or any customisation ofthat software. If the hard disc has to be replaced or the operating systembecomes seriously damaged, the operating system has to be reinstalled,the applications programs are then installed again, and finally the datafiles are restored.
This is not a particularly quick or neat way of doing things, but for mostusers it will get the PC fully operational again in a reasonable amount oftime. It has the advantage that it requires a minimal amount of time tomaintain the backup copies, since only data files are being copied. Aspointed out in previous chapters, it also gives you a "clean" copy ofWindows that should operate quickly and efficiently.
If you use applications that only generate small amounts of data, anordinary floppy disc drive is adequate for this met-iod of backing up.Unfortunately, modern applications programs tend to generate largeamounts of data. With a relatively simple application such as wordprocessing the amounts of data generated might be reasonably small,but software such as graphics and desktop publishing programs usuallyproduce large amounts of data. The folder used to store the files for this
probably contain something like 500 megabytes of data by thetime the book is finished. Backing up data requires some form of massstorage device when large files or large amounts of small files areinvolved.
Backup softwareFor anything beyond backing up data files it is best to resort to somesort of backup program. With these it is possible to save selecteddirectories or directory structures, or the entire contents of the hard discdrive. Windows is supplied complete with a backup program that hasthe imaginative name of Backup. Although basic compared to someprograms of this type it does the job well enough for most users. Its lackof popularity possibly stems from the fact that the equivalent facility inWindows 3.1 was something less than user friendly, causing many usersto look elsewhere for a backup utility. Perhaps the problem is simplythat the Backup program is a part of Windows that is easily overlooked.Anyway, it is easier to use than some of the earlier versions, and it isdefinitely there if you seek it out.
Backup is easily overlooked when using Windows 95, since it seems tobe absent from a default installation. Backup is installed from the
126

Backup and restore 4
Add/Remove Programs Properties
Install/Uninstall Windows Setup I Startup Disk I
To add or remove a component, click the check. box. A shaded boxmeans that only part of th.. component will be installed. To seewhat's included in a component, click Details.
Components:
:(t2. Accessibility Options 0 4 MB
_AAccessories 9 2 ME:
Communications 0 7 t.:1E:
Microsoft Fax 2.6 ME 2:1
Space required: 2.4 MB
Space available on disk: 1703.5 MB
Description
Includes utilities for compressing and maintaining your disks.
1 of 1 components selected etails...
Have Disk .
Fig.4.1 The Backup program is in the Disk Tools grourp
Windows Control Panel. First operate the Start button and then selectSettings and Control Panel. Then double-click on the Add/RemovePrograms icon and operate the Windows Setup tab of the wirdow hatpops up. Tick the box beside the Disk Tools entry (Figure 4.1) andoperate the Apply button. Then follow the onscreen prompts to actuallyinstall the Backup program. Note that the Windows 95 disc will be neecedduring installation.
127

4 Backup and restore
System Tools
To add a component select the check box or click to dear it if you don'twant the component. A shaded box means that only part of thecomponent will be installed. To see what's included in a componentclick Details.
components
O Bad. up
"jo Character Map
j Clipboard Viewer*Disk compression tools®Drive Converter (FAT32),./ Group Policies
5 2 MB
0.0 MB
0 0 MB
0.0 MB -0 4 MB
0.0 MB z_j
Space used by installed components 36.4 MB
Space required. 0.0 MB
Space available on disk: 7360.9 MB
Description
Program to backup and save data and files Supports backup tofloppy and tape drives.
OK I Cancel
Fig.4.2 Adding the Backup program to Windows 98
If Backup is absent from Windows 98 it is added in much the same wayas for Windows 95. Go into the Windows Setup program via the ControlPanel as before, double-click on System Tools, and then check the boxnext to Backup. It may well be installed already, and the checkbox willalready contain a tick mark (Figure 4.2) where this is the case. If thecheckbox is ticked, operate the Cancel buttons to exit the Control Panel.If Backup is not already installed, operate the OK button and then theApply button. Then follow the onscreen prompts to actually install theprogram. Have the Windows 98 disc handy as it will be required duringthe installation process.
128

Backup and restore 4
Untitled Microsoft Backup
Fie aeltinga 100B dell?
Restore I Compare I
What to back up
Select tees to back up
Desktop
A My Compute;a 3ki Floppy IA I
win98P)
Fie set Untitled
k ace I Size I Type j Modeledp,
Fees selected 0 0 kilobytes selBcted
Fig.4.3 The Windows 95 version of Backup
Windows Me does have the Backup program but it is seems to havebeen included as something of an afterthought. Therefore, we willconsider the Backup program of this version of W ndows separately. InWindows 95 or 98 the Backup program is run from the Start menu byselecting Accessories, System Tools, and Backup. The two programsare not the same, and the biggest difference is that the Windows 95version does not have Wizards to assist the user. It has an initial s:artscreen that gives some basic information about using the program, andthen the program itself appears (Figure 4.3). We will consider theWindows 95 version first.
When Backup is run it provides a message inform.ng the user that a fileset called Full System Backup has been created, and that this one mistbe used if a full backup of the hard disc drive is required. By default theprogram goes into the backup mode, and the first task for the user is toselect the files that must be backed up. If a tick is placed in the checktoxbeside drive C:, all the files on this drive will be selected. However, theleft-hand section of the screen shows the files in the root directory, plusits sub -directories. These can be individually deselected and reselectedby removing or replacing the ticks in their checkboxes. It is pcssible to
129

4 Backup and restore
Untitled - Microsoft lockup PIP[de ledngs look bdp
See, We; to LI, -Jp
A 1,1, top- m my conpute,
i7 38 Floppy IA 1- ' IC I
_ReecteEdon
_J CotelProyeri Firs
_j TernsTestBU
_J Wredowsvire98 ID
.41 1E I
I Mcdftetl.N 3617 8485 ,r.elnet bocab 6301001 1%04 Carol PHOT 3/10:9
edosen001 228127 Cxel PHO T 1 /30.".11 - 4
5edaon002 244748 CxeIPHOT 1/27^3t'.edson003 199627 Cool PHOT 1/27..11 .
031 on 004 219679 Cord PHOT 1/27'3'''.,irson005 121642 Cool PHOT 1
1111,1Gon006 145773 Gee P140 T 1/27.4, '
edeson007 160224 C-3191PHOT 1 /277.39.. 4
SureneSketch 1426432 t1ezokabcn 4/5/99 8 1:
Fie set Urteded Fies selected 10 2773 K kbyles selected
Fig.4.4 It is easy to select the files and folders that are to bebacked up
navigate the directory structure in standard Windows fashion, removingand reselecting any files or directories, as required (Figure 4.4).
If you would like to do a simple dummy run to see how files are backedup and restored, make a new folder off the root directory and placesome files in it. Limit the number and size of the files so that the newdirectory holds no more than two or three megabytes of data. One ortwo floppy discs can then be used for the backup copy, and the testshould be reasonably quick. As only one directory is to be selected, donot tick the box for drive C: in the backup program and then deselecteverything but the required directory. Instead, double-click on the entryfor drive C: to expand it, and then place a tick in the checkbox for yourtest directory. The right-hand section of the screen will then show thefiles within that directory so that they can be individually chosen. Forthis exercise just leave them all selected.
Having selected the files to be backed up, the Next Step button isoperated and this brings up a screen like the one in Figure 4.5. Thisenables the destination for the backup to be selected, and in this casefloppy disc A: is being used. Left -clicking the mouse on the floppy disc's
130

Backup and restore 4
UnWed Mimosa Becky
4.--3 IC I
Wrt-38 ID I
IE I
Ancrosol Backup &I not detect a '5,.hs
Fee set Unitled FAe. selected 10 2 773 hlobytti selected
Fig.4.5 Selecting the destination for the backup copy
entry in the left-hand section of the screen will select it as the destination,and this should be confirmed by "A: \" appearing in the text box. Nextthe Start Backup button is operated and you will then be asked to prcvidea name for this set of backup discs. Having supplied a suitable name("Testi " will do), operate the OK button and the program will start copyingthe files to the floppy disc drive.
In most cases the quantity of data being copied will be too large to fitonto a single floppy disc, CD-ROM, or whatever. The program will prcmptyou to change discs as and when necessary. The discs in multi -discbackup sets should be numbered in sequence. If you use re -writablediscs that already contain data the Windows Backup program will beable to use them, but any existing data on the d scs will be cverwrrttenand lost. Once the process has been completed a message to thateffect will appear on the screen, and you are then -eturned to the Backupprogram.
If you use Windows Explorer to examine the contents of the backupdiscs you will discover that they each contain one file. The name of thisfile will be the same for each disc, and it will be whatever name you
131

4 Backup and restore
%clown 13..kup
Ltle .5eklrl0: I0olk delP
Bwkup ':FIerlore 1 Compare I
Resta., has
Reno. horn Backup se
I
INF
I
C,ctop- 411 My Computel
.0 3'k FbPPY IA__. (C I
j Win918 ID I
,;;;) fE l
:al letcrossit Back:added not derect a tap
Name I Crewed I
.11
Backup not 0 kilobyte:
Fig.4.6 Specifying the source for the backup
assigned to the set of discs. This is not just of academic importance,and it means that the files stored on the disc can not be recovered simplyby copying the contents of the discs back onto the hard disc drive. Theonly way of recovering the files is to use the Restore facility built into theBackup program.
To try out the restore feature, delete the test directory on the hard disc,run Backup, and then operate the Restore tab. This brings up the screenof Figure 4.6, which enables the source of the backup file to be specified.In this example we are using floppy drive A:, so this should be selectedby left -clicking on its entry. The first disc in the backup set should beplaced in drive A:, and the right-hand section of the window shouldconfirm that the appropriate backup file is present on the disc. Nextdouble-click on the entry for the backup file in the right-hand section ofthe screen. The left-hand section then changes to allow the files fromthe backup set to be selected.
In this example we will restore all the files, and this just requires thecheckbox for the relevant directory to be ticked. Operate the Start Restorebutton to start the copying process, and change discs when directed by
132

Backup and restore 4
Met ro...tti Bra I. kip II hpfill...11
10b Ett 1006 Help
12L,A;31 alPs up uP 1 Rests,* I
Beal* ids
't ees.
whet*, bad up * All se Wei Ides
Nfieec neck up
IF ,myBac.-cm<
r and rhsnged Nos
Hco-,o Ikea un
Lill [1.,14 .-ornpress
ratans
MEI rI
=tr Help pips, F'
Fig.4.7 The Windows 98 Backup program is similar to theWindows 95 version
onscreen prompts. A new window will appear while the files are beingcopied, and this shows how far things have progressed. Once thecopying has been finished, operate the OK buttons to return to theBackup program. Exit the program and then us= Windows Explorer tocheck that the directory and the files have been correctly restored.
Win 98 BackupThe Windows 98 Backup utility (Figure 4.7) is similar to the Wndows 95version, but has some additional facilities. Operating the Options buttontowards the bottom right-hand corner of the screen brings up a window(Figure 4.8) that enables various aspects of the program to becustomised. The main ones are that the files can be stored witl- nocompression or two degrees of compression, and password protectioncan be used.
Using compression reduces the amount of storage space needed forthe backup copy. The amount of space saved defends on the nature ofthe files being stored. Program and some types of data file will often
133

4 Backup and restore
Backup Job Options
General I Password I Type I Exclude I Report I Advanced I
I Compare original and backup files to verify data wassuccessfully backed up
When backing up to media
Never compress the data.
C compress data to save time.
a Maximize compression to save space
If the media already contains backups
r overwrite the media with this backup.
a Let me choose this option during the backup.
Fig.4.8 The options section of the Backup program
take up less than a third as much space, but something like a graphicsfile that is already heavily compressed is unlikely to benefit significantlyfrom using further compression. Overall the files might be reduced insize by about 50%, which is certainly worthwhile. Apart from reducingthe number of discs needed to store the backup copy, compression cansignificantly speed up both the backup and restoration processes.
Despite the advantages, some users prefer not 70 use compression.This is due to the fact that recovering data from a disc that has someminor corruption of the contents can be very difficult or impossible if
134

Backup and restore 4
compression has been used. This is not to say that data is easilyrecovered when a non-comp-essed disc becomes corrupted. There isno guarantee of success either way, and ideally two backup copiesshould be made where a hard disc contains very important data.
Another refinement of the program is that the radio buttons towards thetop of the screen enable the user to opt for a full backup, or to onlybackup new files or ones that have changed since the previous backupwas carried out. Obviously this second option is only applicable if aprevious backup set has been made, and it can greatly speed up theprocess of maintaining up to date backup copies.
WizardsAnother refinement of the Windows 98 version of the program is that ithas the option of using Wizards to control its operation. The Wizardsare used by defaultwhen the program isrun, and the processstarts with the initial
141.-ment finrkup Fi
Welcome, lo 1.6crosott Backup,
window of Figure 4.9, A be,clup is e copy et INA Net from yOur COMM& stored onmach, ,ch as ape.floppy desks.. or ...movable dn., Awhich enables the be, 41 00 :Jan be created Med, tells your compile haw wr,enn,1 Awe to hariarp your A.srequired function to
be selected. If you do whet roCutd you 1,11.1.07
not wish to use a c'00.!/ a rta. aapt9/91?
Wizard, simply r L5per emstnq berkur rot
operate the Close r backed up tlesbutton and you willthen be left with the
- ,eradelottwee or,unaided Backupprogram. If you wishto proceed using a Fig.4.9 The first Wizard when using the
Wizard, select the Windows 98 Backup program
required functionusing the radio buttons and then press the OK button. The options arethe normal backup and restore, plus an option to open an existing backupset. When first running the program a backup copy must be made, sothe Backup option should be selected.
This launches the Backup Wizard, and the initial screen of Figure 4.10appears. This gives the op -ion of copying all files on the disc or justselected files. Once the required files have been selected or the "allfiles" option has been taken, the next Wizard (Figure 4.11) appears.
135

4 Backup and restore
Backup Wizard
What to back up
You can either beck up everything on your :omputer. or you canback up specific drives. folders end files lick Next to continue
( Back up M,y Computer(Backup all files and folders on my local drive(s))
r Beck up sglected files folders and dives(Click Next to select tiles. folders ancldnves)
Cancel Llext > I
Fig.4.10 The Backup Wizard gives the option of making a full backupor copying selected files
Here you choose whether to backup all the selected files or only thosethat have been added or changed since the last backup was made.Only the all files option is relevant when an initial backup is being made.
The next window(Figure 4.12) is usedto select thedestination for thebackup copy. Notethat you must specifya drive and a filenameand not just a driveletter.
IK ug-1, We; ebrd
Wtsalo beck up
Spuu1s. *Ale, ba. .* My Wes ryru henn, i...1or<M %ea tee ono mow or neve y.erg.d e FrrouGINAWIP
1;rhrtr:a
14r end changed,.
cs,-,.1 I <p,$
Fig.4.11 There is the option of backing upall the files or only those that havechanged since the last backup
Next you are giventwo options relating tohow the backup copyis processed (Figure4.13). The first oneenables verification toDe used. In otherwords, the saved
136

Backup and restore 4
Backup Wizard
Where to beck up
Select e destination for the backup. The selected drives,folders, snd files will be stored on the 4teclits in the destinationyou select
V1+ her? to back up
Vsils+Backup qic
Cancel I < Back text > I
Fig.4.12 Selecting the backup's destination
copy can be compared to the original to make sure there are no copyingerrors. This is the safer option, as it should avoid the possibility of findingthat a corruptedbackup set can notbe restored properly.The downside is thatthe verificationprocess will result inthe backup processtaking significantlylonger. Usingverification isprobably worth theextra time involved.
4 3[0,The second button Canal
enables compressionto be used if desired. Fig.4.13 Verification and compressionI opt to use options are availablecompression, but youmay prefer not to if only a modest amount of data is being copied, or ifyou have a large and fast backup medium.
Onr.kup Werard
Howl, OPP,
two IP. lollnotng 01 wagrrlarq prelanorc
P Compfue olipisd owl becl,up w. a yent, dada v..suvrasNly o..440
P tbevress the tea** deft 4, Ie.. Spw:.
137

4 Backup and restore
Ha. *up Wezan1 The next window(Figure 4.14) is usedto give a name to thebackup job. Thiswindow also showsthe settings that havebeen selectedpreviously so that youcan check thateverything is set upcorrectly. The Backbuttons can be used
Fig.4.14 The backup must be given a name to retrace your stepsif you changeyour mind about
something, or to correct any mistakes. Simply press the Start button tobegin the backup process. Restoration of a backup is an equallystraightforward process using the Wizard method. Even if you are familiarwith backup programs, it is probably easier to use the Wizards ratherthan opt for direct control of the program.
Emergency restorationAn obvious drawback of the Windows 95 and 98 Backup programs isthat they are strictly Windows programs, and files can only be restoredif the computer can be booted into Windows. In some circumstances itcould be better, or even essential, to restore the files from MS/DOS.This is actually possible using Windows 98 via a batch file on theinstallation CD-ROM. The backup copy is made from Windows in thenormal way, using the Backup program. This method of restoration willonly work with a full backup incidentally. Bear in mind that it will only bepossible to restore the files from MS/DOS if the backup medium is onethat can be read from MS/DOS. The easiest options are a hard disc orCD-ROMs. If using the latter, ordinary CD -R discs are better than CD-RW discs, since the latter are usually only readable using a special utilityprogram. This utility is usually a Windows program, and it is unlikelythat a MS/DOS version of the utility will be available.
In order to restore a backup copy the computer must be booted usingthe Windows 98 Startup disc, and CD-ROM support should be selectedwhen the menu appears. Next place the Windows 98 installation disc inthe CD-ROM drive, and then set that drive as the current one. The Startup
138

Backup and restore 4
Preparrg tc -unveroowt *Setup
Callectlitotriferawdoe aboutyour compluarm
CoPYm9Yeralows altlies toyour co pees
Restartro yourcomputer
11, Seen] up hsrelwereand frees.% :deo*
41110 beetled theeremaining
42 minutes
Ester the Protur Keythat mime wsh rurcopy ot Windows ale
Microsoft
. Windows 98 Setup
Windows 98 Setu
Fig.4.15 Tne restoration starts with Windows 98 being reinstalled.Here the product Key is entered
disc places some utilities on a virtual disc that is actually bah of thecomputer's memory. This will usually be given a drive letter ahead ofthe CD-ROM drive, which is therefore shifted up one letter from normal.For example, if the CD-ROM drive is normally drive E:, it will becomedrive F: when the Startup disc is used. To move the system into drive F:simply type "F:" and then press the Return key. A batch file it thetools \ sysreo directory controls the restoration process, so the next stepis to move the system into this directory using this command:
cd tools\sysrec
There is a text file called Recovertxt in this directory, and this gives usefulinformation about the recovery process. To run the batch file use thiscommand:
perestor
This may look incorrect, but it will not work if you add the missing "e" tothe command. MS/DOS only permits filenames of up to eight charactersplus a three -character extension. Hence this command is called"perestor" and not "perestore". This brings up a message on tie screen,and then the Windows Setup program is started. After some checlcing
139

4 Backup and restore
and initialisation you are presented with the screen shown in Figure4.15, where your Windows 98 product key is entered. It is then just amatter of using the Setup Wizard to go through the installation andrestoration process. This really just seems to be a variation on a normalWindows 98 reinstallation process, but it is probaby best to do thingsthis way if Windows is to be reinstalled followed by a full restoration ofthe hard disc.
Me RestoreAs pointed out previously, Windows Me does not have the Backupprogram as standard, although it is still there if you care to unearth itfrom the installation CD. Instead it has a program called System Restore.It has to be emphasised that this is not a conventional backup program,and it can not be used to make a set of backup discs for use in the eventof a hard disc failure. This is simply because it uses the hard disc tostore the backup files, and if the hard disc fails, the backup files areinaccessible. System Restore is designed specifically to deal withproblems in the operating system, and a separate backup utility isrequired to deal with hard disc failures.
This book is primarily concerned with fixing or working around problemsthat occur with the Windows operating systems, so the System Restoreprogram is one that is fully relevant. Its purpose is to take the systemback to a previous configuration. It is therefore a program that will workaround problems rather than fix them. The general idea is to periodicallyadd new restore points so that if something should subsequently gowrong with the operating system, it can be taken back to a recent restorepoint. Incidentally, Windows adds restoration points periodically, so it isnot essential to routinely add your own.
The main reason for adding your own restoration points is that there isincreased likelihood of problems occurring. The most common exampleof this is adding a restore point prior to installing new software. If anythingshould go horribly wrong during the installation process, going back tothe restoration point should remove the rogue program and fix theproblem with the operating system. You can then contact the softwarepublisher to find a cure to the problem, and in the mean time your PCshould still be functioning properly.
When going back to a restoration point the program should remove anyrecently added programs, but it should leave recently produced datafiles intact. Of course, with any valuable data that has not been backed
140

Backup and restore 4
&longs
t%:.;
Bun
jug On %bled PetttolJ
ill Shy'
la! Sind .e." :1 "
1 Ganesj Oaten!
PeraorrAegoc by Portent:1.st
kestrel fibre,Me$:fin CD ROM Ceentoque
1,470,01iWOrd Verret
Outlook Express
Pe Wee:we Med et Pletyet
Me01113001111
tlEt Mel tr.A.D 2000
n WM. 01.010 D.:WT.1MM 3
EttiereerneetOwe Cleamtp
b D D...,scirnelter1.4eireetwo,
Scan() sk_el edt be Test,10 System ,riotmetort
Fig.4.16 The System Restcre program is deep sr the menu structure
up already, it would be prudent to make backup copies before usingSystem Restore, just in case things do not go according to plan. Theprogram itself does provide a way around this sort of problem in that itdoes permit a restoration to be undone. If a valuable data file shouldvanish "into thin air" it should be possible to return the PC to its originalconfiguration, backup the restored data, and then go back to therestoration point again.
In useThe System Restore program is buried deep in the menu structure (F:gure4.16), but it can be started by going to the Start menu and then selectingPrograms, Accessories, System Tools, and System Restore. The programis controlled via a Wizard, so when it is run you get the screen of Figure4.17 and not a conventiona Windows style interface. The radio buttonsgive three options, which are to go back to a restoration point, create anew one, or undo the last restoration. When the program is run for thefirst time there is no restoration to undo, so this option will not be present.
As pointed out previously the system will automatically create restorationpoints from time to time, bit you will probably wish to create your ownbefore doing anything that will make large chances to the system. Startby selecting the "Create a restore point" option and then operate theNext button. The next screen (Figure 4.18) asks the user tc provide aname for the restore point, and it is helpful if the name is something that
141

4 Backup and restore
Welcome to System Restore
Or car use System Restore to ureic, harmfulcharges to your computer and restore Rs settingsand perTormarce. System Restore teems yarcomputer to an starlet time (called a restore port)entrut ceeng you to bse recent work, such assaved documents. e -mad, a helory and Tavareslets
Ny ohsages that System Restore make; b 'mucon re completely newsiest
Your computer automstrally creates restore ports(called system chedpaesy but you car also useSystem Restore ticreate you awl restore poresThis t useful tam are about to snake a majorcharge to vox swam such as nstallig a newVotT/RRT a &twang yaw YeakirY
in conerte rick Meld.
To begin. seer t the talk that you welt toperform:
Restore my computer to a, ea law time
C Create a restore pore
r Undo my Last rest:raw
Fig.4.17 The welcome screen of the System Restore program
Create a Restore Point
you compeer autornaticale creams restore points at regularity schabled nines or teforecolor or °gams are Installed. Harmer, you can use System Restore to create exr ownrestore points at tares 0.16r tun tow schtabled by your computer
Type a desorption for rote restore post en The followng text boa Make ere that you choosea descrpton that s easy to identify in case you reed to restore yaw computer later.
Restore point description:
Fig.4.18 The system creates restore points, but you can add your own
142

Backup and restore 4
Confirm New Restore Point
Sot, I I ,I4pro powo
rc rhaige this restore port desuption, click Back
Fig.4.19 You have a chance to check things before creating arestoration point
will be meaningful. There is no need to bother about including a cate,as the program automatical y records the date and time for you.
There will be a delay of at least several seconds when the Next button ispressed, and then a screen like the one shown in Figure 4.19 will appear.This gives you a chance to check that everything is correct before therestoration point is created. If everything is all right, operate the OKbutton to create the restoration point and terminate the program.
To go back to a restoration point, run the program as before, and selectthe Return my computer to an earlier time option. Operate the Nextbutton, and after a short delay a screen like the Dne of Figure 4.20 willappear. If there are a numbei- of restore points available you can use thearrow heads in the calendar to find the one you -equire. The dates onthe calendar in larger text are the ones that have restore pcints. Leftclicking on one of these will show the available pcints in the screen areajust to the right of the calendar. Left -click on the required restore paintand then operate the Next button. This brings up a screen and warningmessage, like Figure 4.21. Left -click the OK button to remove the warningmessage, and close any prcgrams that are running.
143

4 Backup and restore
Choose a Restore Point
1 hp fr iowry calendar deplays r, trohl al, of the dates tot ha, rector e pGr.ts ava:labe The letdaplays the restore pone that we available for te selected data.
Possble types arenas ponts are: system checkpoints (edsedrled restore ports created byyour conwir), manual restore pbsts (rear, pons created by vas), and Installation restoreponts (automate restre pont, created MIDI carter prowarne we retailed).
Select a bold date on Rte calendar. and then select one of Re available restore Fonts tom thelost
=1171=1:111M1=1IMIN111111111E11E111011EEEEEEEE
2°Mi 22EB;_jiLIri2WIWNE===
I
15 Nos/ender .11.,
19.03 Frst16 26 System CteckPont
Fig.4.20 Choosing a restore point
System flew :tote
Confirm Restore Point Selection
rstorF [Hod
The process des rot cause you to lose recent *oak, such as saved &commis a chmaifa.
Before restonng yew computer. son end dose ell °panties and close ail open programsDo not eller open or delete any ales or programs ante M resionstior rs complete
To resirre your [Oripulir to thus date awl bop, cItiNext
.r
Fig.4.21 A warning message gives you a chance to change your mind
144

Backup and restore 4
Restoration in Progress
resat rig trout conss.te.r May (-lie a ter, no -r.15 A,ter 7e reSffir atCrl e complete. yourcomputer autornatrall, restarts.
Seller led restore point:
25 Wveerlor ?feelIll: 0 3 Hest
let red alter, open, nr delete any files no programs tint/ the rotoratite.t trplete.
Fig.4.22 You can see how the restoration process is proceeding
If you are satisfied that the correct restore point has been selected,operate the Next button and the program will begin the restorationprocess. A screen showing how things are progressing will appear(Figure 4.22). Heed the warning on this screen, and do not do anytiingthat will alter, open or delete any files while the program is running. Justsit back and do not touch the computer until the program has finishedits task. Once the restoration has been completed the computer willreboot, and a message will appear on the screen (Figure 4.23). Thisconfirms the point to which the computer has been returned, andindicates the options if the PC fails to operate properly using this restorepoint. Left -click the OK button to finish the toot process, and thecomputer should then have shifted back in time to the appropriaterestoration point.
Windows Me is still relatively new at the time of writing this, but theSystem Restore utility certa fly seems to be a very worthwhile facility.Some consider that this feature alone justifies upgrading from Windows95 or 98. To date I have only used it a few times in earnest, but it certainlyprovided the desired result on each occasion. It s probably rot a goodidea to use the System Restore program as a first resort if there is a
145

4 Backup and restore
tivTtem eto stole
Restoration Complete
-----71111111111MYes conpiar ha town vammuslulk,
25111omo6er ImoWOO tiro
tf ram doss not correct $ thirn, ca,
Goose anoihir notes Pont Undo du naval:WI
Fig.4.23 Once the restoration has been completed the computer willreboot. This message appears after the reboot is finished
problem with the operating system, but it is certair ly worth a try wherethe problem has no simple solution.
Me BackupIf you wish to use the Windows Me Backup program it is no good tryingto install it via the usual Windows Setup section of the Control Panel. It
no longer seems to be a standard Windows component that can beinstalled via the usual route. Instead, you must use Windows Explorerto delve into the Windows Me installation disc. Go into the Add-onsfolder and then into the MSBackup folder. Here you will find a text filecalled backup.txt and a program called msbexp.exe. To find out moreabout installing and uninstalling the Backup program double-click onthe entry for the text file. In order to install the program it is just a matterof double clicking on the entry for msbexp.exe ard then following theonscreen prompts. Once installed, the program can be run from theStart menu via the usual route (Programs, Accessories, and SystemTools). The program seems to be much the same as the Windows 98version, as can be seen from Figure 4.24.
146

Backup
Microsoft Backup - (Untitled]
job Oil yiew loots deli)
AL4,11a1 I l :slts1 f21 LIF It?!Backup Restore I
- Elackup Job
F10,1!ed
What to back up 61 selected Nes r Now and changed Iles
Start
Desktop !Verne I Size I Type I WaleM, Cernr,ter my Computer system Folder
1system Folder
D_J1:1 E
r.ieNvuri.
Where to back up
- IRIe
IC \ MyBacl, up clic
How to back up
ILI IVenty. Compass Prompt
Qpttons
For Help. press Fl
Fig.4.24 The Windows Me Backup program is much like the Windows98 version
Backup programsIf you prefer not to use the built-in backup and restore facilities ofWindows, or you would like to augment them, there are plenty ofprograms to choose from. These include various backup programsand software that restores the computer to an earlier configuration, ratherlike System Restore in Windows Me. One type of software that shouldnot be overlooked is the type tiat copies the consents of one drive ontoanother, producing what is generally termed an "image" of the originaldrive. Although it might seem that simply copying the files from Dnedisc to the other would produce an exact clone of the original, the clonewould probably fail to boot. This is due to the fact that some of thesystem files have to be in the right place on the hard disc, and not merelypresent on it in order to make the drive bootable. If you simply requirea backup copy of data files tits is of no consequence, but it is a crucialfactor if you require a drive that can be used in place of the original ifdisaster strikes.
147

and restore
Entire Di* To Disk Copy
Select Source and Destination Drive
Seed the :mice and deciinai. trcgr, the liar_
Sotsce De .P
Dez44131.ori Drr,e
..-i,..11[.(i'PLi Size MB e Leiter:
12ieriow _ley -
Fig.4.25 "Cloning" a hard disc drive is easy using a program such asDrive Copy
It is actually possible to make a bootable copy of a hard disc drive usingthe MS/DOS Xcopy program, but it requires just the right switches to beused in the Xcopy command and other factors also have to be just right.The process can also be very slow when applied to same PCs. A programdesigned specifically for producing drive images will usually do the jobmuch more quickly and easily. Probably the best known program ofthis type is Drive Copy, which is shown in action in Figure 4.25. Thisprogram is supplied on CD-ROM, but it is used to make a bootablefloppy disc that is used when undertaking the copying. You have to dolittle more than make sure that the program is copying the data in theright direction, and then sit back while it makes the copy.
Once you have a clone of the original hard disc it can either be removedfrom the PC and stored away safely or it can be left in place as drive D:.Storing the drive has the advantage that the disc will not be subject towear, and it should be ready and working if it is needed at some laterdate. On the other hand, the drive will not be suojected to significantwear if it is just sitting in the PC getting little or no use. The drive motorwill be operating while the PC is in use, but the motors are very reliableand can be expected to last a very long time. Another advantage ofremoving the drive is that the data it contains can not be accidentally
148

Backup and restore 4
corrupted. This avoids the slight risk that when switching to The backupdrive it does not work any better than the one containing the damagedWindows installation.
The obvious advantage of keeping the drive in place is that it is ready forimmediate use if the main drive should fail or the Windows installationbecomes damaged. With most PCs it is possible to go into the BIOSand set drives D:, E:, or F: as the boot drive, so t should be oossible toboot into the standby drive. This could be useful in trying to fix theoperating system on the main drive and in backing up data Windowshas to be installed "from scratch". For instance, all the drives includingthings like CD writers and re -writers should be fully operational whenbooting from the standby drive.
Another advantage of keeping the standby drive in place is that it can beused to backup data files as they are produced so that a failure of themain drive will cause no loss or a minimal loss of data. However, usingthe standby disc does increase the risk of its contents becomingcorrupted so that it no longer bootable.
There are various backup programs available that can be used as analternative to the Windows Backup program. Some of these will monitordisc activity and make automatic backup copies when new files aregenerated or existing files are altered. These are very convenient in usebecause they are largely "transparent" to the user, but they runcontinuously in the background and add to the arain on the computer'sresources.
System filesIf Windows becomes troublesome due to a missing or damaged systemfile, life is a lot easier if you have a backup copy of the file in question.One of the main causes of problems are DLL (dyiamic link library) files,which are used extensively by Windows and applications programs.DLL files provide program coda for frequently per'ormed functions, suchas displaying menus and dialogue boxes. Some are suppliec as part ofthe Windows operating system, while others are loaded onto the harddisc when applications programs are installed.
Reinstalling a standard DLL f le from the Windows installation disc shouldnot be difficult, but one installed by an application program could bemore difficult to replace. Firstly, you might not know which programsupplied the file. The second problem is that searching the relevant CD-ROM for the file might not be successful. Files are often stores on
149

4 Backup and restore
installation discs in some form of compressed or archived form, makingit difficult to locate and extract the one you require.
The DLL files are likely to be liberally spread across the hard disc, butusing Windows Explorer it is easy to locate all of these files and copythem to a mass storage device such as a CD-ROM writer. The amountof storage space required will vary considerably from one Windowsinstallation to another, and the more applications that are installed themore DLL files there will be. Backing up the DLL files on one of my PCsrequired some 500 megabytes or so of storage space, which is probablyquite typical.
In order to copy the DLL files launch Windows Explorer and then selectFind and Files or Folders from the Tools menu. Enter "*.d11" as thefilename, and then make sure that drive C: is entered in the Look In boxand that the "search subfolders" checkbox is ticked. The "*" characterin the filename tells the search program to accept anything as the mainpart of the filename. When you operate the Find Now button, the programwill therefore search for any file that has "d11" as the extension. Youshould end up with something like Figure 4.26, with a large number ofDLL files listed in the lower section of the window. I am not exaggeratingwhen I say that there will probably be a few thousand files listed! Tohighlight all the files go to the Edit menu and choose the Select All option.Then go to the Edit menu again a select Copy.
The DLL files can then be Pasted to a backup folder on the hard drive, aCD -R, or whatever, using Windows Explorer. If the files are to be storedon something like Zip discs that can not store all the files on a singledisc, the copying process becomes more difficult. Batches of files mustbe highlighted manually and copied to the backup discs, being carefulnot to have any batch larger than the storage capacity of the disc. It ispossible that during the copying process you will be asked whether ornot to overwrite a file that has already been copied, with another file ofthe same name. The rule here is to not replace a newer file with an olderversion, so check the dates of the two files and proceed accordingly.
Obviously it could be very time consuming to manually search the backupdisc or discs for a specific DLL file that you need. The quick way is touse the Find Files or Folders facility of Windows Explorer. This cansearch through thousands of files and locate the one you require in afew seconds. Having found the required file, the Copy and Paste facilitiesof Windows Explorer can be used to copy it to the appropriate folder onthe hard disc.
150

Backup and restore 4
41 Find Files named DLL
File Edit view Qptions belp
lame 8 Location I Date I Ad.:lanced I
Named
,_urdainir q teo I
Ok in )
Include subickii,i Brew., e
Find Nci,k,
New Searcy
4t.
Name In Folder
j mwbackt&I Li C ',DOS2.1 Mwbadcrolll ....J C 1 DOS
2.1Mstools.d11 LI C\DOSaudmme dl LI C: \ IBMVType \ bin
Jsmapi.dll LI C 1 IBMVTyp? \ Pin2J vidtil 6 dll Ll C. \ IBMVTyp3 \ bin
vidtt32 dll LI CAIBMVType \ binItIvidmw dll .1.J C: \IBMVT,op ? \ bin
zdDrnapi dll LI C' \IBMVTip ? \ bin
4I
2884 file(s) found Monitoring New Items
Size I Type
15KB Application109KB Application
14KB Application40KB Application
176KB Application16KB Application20KB Applicabon21KB Application
276KB Application v
Fig.4.26 The Find Files or Folders facility of Windows Explorer can beused to find and copy all the DLL files on a hard drive
Registry backupAlthough Windows makes its own backup copies of the Registry, someusers prefer to have an additional backup copy. Since the file sizesinvolved are quite small it makes sense to keep the backup copies onfloppy discs, a Zip disc, etc., rather than on the hard disc where they arevulnerable to disc failures. The Windows Registry sounds as though itshould be a single file, but as explained in chapter 2, it is actually systemdata contained in two files called User.dat and System.dat. In order tobackup these files it is merely necessary to locate them on the hard discusing Windows Explorer anc then drag them to a floppy drive, Zip drive,or whatever
Bear in mind that these are system files, and that using the default settingsof Windows Explorer they are hidden from view. If you are going toundertake Windows troubleshooting the settings in Windows Explorer
151

4 Backup and restore
Folder Options
General View 'File Types I
older views
You can make all your folders look the same
Like Current Folder
Advanced settings
s Files and Folders Allow all uppercase names0 Display the full path in title barLI Hidden files
0 Do not show hidden files0 no not shop- hidden or system files0
Hide tile extensions for known file types
Reset All Folders
Show all files
Remember each folder's view settingsO Show file attributes in Detail View Show Map Network Drive button in toolbarQ Show pop-up description for folder and desktop items.Visual Settings
Restore Qetaults
Fig.4.27 Windows Explorer can be made to show hidden files andother information that is not shown by default
should be such that the system files are visible anyway, but it is essentialif you are going to use Explorer to backup any of these files. Activatethe View menu and then select Folder Options. Operate the View tab ofthe new window that appears, which will produce a number of checkboxes and radio buttons that can be used to select the desired options(Figure 4.27). Under the Hidden files section make sure that the Showall files radio button is selected.
The User.dat file is usually quite small and will fit onto a 1.44 -megabytefloppy disc quite comfortably. The System.dat file tends to vary in size
152

Backup and restore 4
?,4
Id! 4 !I_
CernponenIs U. install using CT.) /1 C WANINSTO 400 /Sirlor-t. VNIN98 /1:. /IS /10Sot', , Environment 1E5 5 00 2314 1403
Upbeat 0 00 12 ?0
Forl-lep ore., F`
liegestry Scan Results
?) No Error; levee
The seism regtsey hes been backed up efreetty iodeywove you bke to bedtil up &gem/
Current System nsortneton
Fig.4.28 The Registry Checker can be used to make a backup of tl-.eRegistry files
quite substantially from one DC to another, but in general it seems to bemuch larger and can be several megabytes in size. Even us ngcompression it is unlikely that this file will fit on a single floppy disc, outthere are programs that can spread large files across several floppydiscs and reconstitute them again. For instance, later versions of thepopular Winzip program can accomplish this. Al-Rrnatively, copy it to alarger disc such as a CD -R or Zip type.
Registry CheckerOf course, there are plenty of other Windows files that can be baccedup, but these are less likely to be of use for a quick fix than the DLL andregistry files. Two possible exceptions are system.ini and win.ini, bothof which will be found on the boot disc in the Windows folder.
Windows does actually have a facility to backup and restore the Registry.Probably the main use of this feature is when undertaking sometl-ingthat involves a higher than normal risk of the Registry becomingdamaged, which mainly means installing or L ninstalling softwa-e,including the drivers for hardware. The Registry can be backed -up before
153

4 Backup and restore
Microsoft Registry Checker
1! t r el rb002 cab
1 As/oe Started
12/14/00 Started
12/13/00 Started
rb001.cab
rb000.cab
rb005.cab
3131:3013
Select a cab to restore from.
I
Fig.4.29 Restoring a backup copy of the Registry from MS/DOS
the software is installed or removed from the system, and restored againif things go awry. In order to backup the registry select Programs fromthe Start menu, followed by Accessories, System tools, and RegistryChecker. The Registry Checker will look for errors in the Registry, but itwill presumably fail to find any. It will then display the message of Figure4.28. The last backup copy made by the system automatically is probablysufficient, but operate the Yes button to ensure that there is a fully up todate backup copy of the Registry.
The Registry Checker runs automatically each time the computer isbooted, and it will ask for confirmation that you wish to resort to a backupcopy if the Registry is found to be damaged. It makes sense to restorean earlier version of the Registry when major corruption has beendetected, since there is no chance of the computer booting successfullyusing the corrupted Registry. The Registry Checker program will notalways detect a problem in the Registry, and it is mainly designed to findsomething fairly major such as part of the file being obliterated.Consequently, the Registry Checker may fail to find any problems but aRegistry fault could still result in the computer failing to boot properly.
If the system fails to boot properly, perhaps after some software hasbeen installed or removed, boot into MS/DOS. Booting from drive A:
154

Backup and restore 4
using a Windows Startup d sc or from C: using MS/DOS mode are bothacceptable in this case. Next type this command and press Return,which will produce a screen like the one in Figure 4.29:
C: \windows \ command \scranreg /restore
This command includes the full path to the Scanreg program, so thesystem does not have to be in a particular drive or directory when it isissued. By default, Windows keeps five copies of the Registry, but thisincludes the one that is currently in use. This sa-een enables any cf thefour backup copies to be restored. Thus, if the most recent backup isfaulty, you can revert to an earlier version and try again. Use the up anddown cursor keys to select the backup copy you require and then pressenter. If you change your mind and do not wish to reinstate a backupcopy of the registry, press The right cursor key to highlight the Canceloption and then press Return.
The backup copies of the Registry files can also be restored from withinWindows. The backup copies are stored in cabinet files in the\Windows \sysbckup folder, but this is a hidden folder so it will only bevisible to Windows Explorer if it is set to show h,dden files and folders.There are several cabinet files in this folder (the ones having a "cab"extension), and the dates of the files indicate the ages of the backupcopies that they contain. To restore a pair of backup files they areextracted from the cabinet file and copied to the main Windows directory.The existing Registry files will have to be overwritten so answer "yes" ifyou are asked if you wish tc overwrite them.
System File CheckerAlthough Windows 98 does not have a true equivalent to the SystemRestore facility of Windows Me, the System File Checker does provide asimilar but more restricted restore facility. Unfortunately, this facility cango seriously wrong using the original version of Windows 98, so it is
best not to use it unless you are using Windows 98 SE. In order to runthe System File Checker select Programs from the Start menu, followedby Accessories, System Tools, and System Information. Then selectSystem File Checker from the Tools menu of the window that appears.This will produce the window shown in Figure 4.30.
Use the default settings and operate the Start button. The program willthen scan the disc, recording a list of system files and checking thatthey are in good working older. If all goes well. System File Checkershould produce an onscreei message stating that the scan has been
155
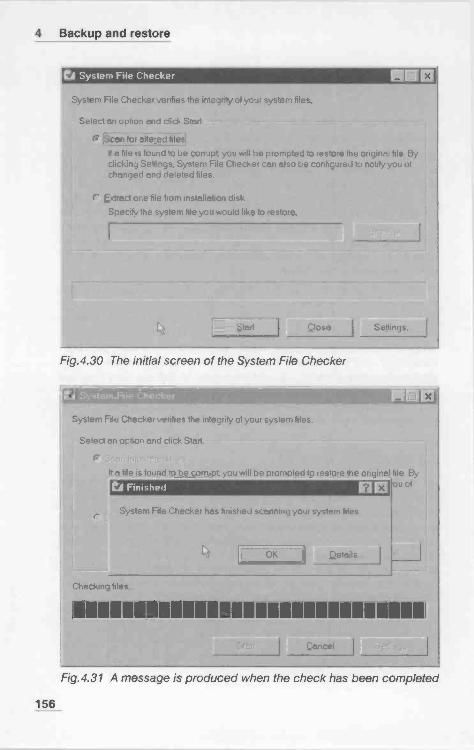
4 Backup and restore
EA System File Checker
System File Checker verifies the integrity of your system files
Select an option and click Start.
a' Scan for altered files
It a file is found to be corrupt you will be prompted to restore the original file. Byclicking Settings, System File Checker can also be conficured to notify you ofchanged and deleted files
r Extract one file from installation disk
Specify the system file you would like to restore
atert close I Settings
Fig.4.30 The initial screen of the System File Checker
I xl
System File Checker verifies the integrity of your system file
Select an option and click Start
It a tile is found to be corrupt you will be prompted to restore the original file By
CI Finished
System File Checker has finished scanning your system files
Uetails
Checking files
u of
11111111111111111111101111111111111111111111110
Cancel I
Fig.4.31 A message is produced when the check has been completed
156

Backup and restore 4
Settings I Search Criteria I Actvan,:ed
Back up tile before restoring
r Always tack up before restoring
a- Prompt tor backup
never back up before restoring
Default backup location C \WINDOWS1Helpdesk \ SFC
Qhange I
Log file
r. Append to existing log
r Qverwrite existing log
No fog
Yiew Log. I
Fig.4.32 The Settings screen of the System File Checker program
completed successfully (Figure 4.31). Suppose that you now install oruninstall some software and Windows is left with 3 problem or two. RunSystem File Checker again, but this time operate the Settings button tobring up a screen like the one in Figure 4.32. Put ticks in both the cteckboxes towards the bottom of the window so that System File Checkerwill search for files that have been altered or deleted since the previouscheck. Operate the Apply and OK buttons to make the new settingstake effect, and then run System File Checker acain.
A warning screen like the one of Figure 4.33 will appear if a file is missingor has been altered since the previous time the program was run. Youthen have several options available. Clearly the Ignore option shouldbe chosen if you have reason to believe that tt e file in question hasbeen correctly changed or deleted. If the file is one that is on the Windowsinstallation disc and it is not one that has been deliberately changed ordeleted, the obvious choice is to restore the file.
157

4 Backup and restore
CI File Changed - MSISYS VXD
System File Checker identified that the following file has changed
File MSISYS VXID
Location C wINDOWS \ SYSTEM
Previous Current
Date and Time 16/12/00 13.01 16/12/00 1:04
Size 11KB 11KB
Version 403 4 03
If you upgraded this file. click Update venhcation information Otherwise. click Restore file
What do you want to do?
a Update verificahon information]
Select this option if you know the file has been updated
Bestore fileSelect this option if you want to restore the file from your installation disks
Ignore
Select this option to ignore the warning The next time you use System File Checkeryou will be prompted about this file again
C Update ventication information for AM changed files
Select this option only if you know many files have been updated and you don't wentto verify each one individually
OK Cancel
Fig.4.33 The user is warned if a file has been altered or deleted
To do this, first left -click on the Restore file radio button and then operatethe OK button. A Window with two dialogue boxes will then appear(Figure 4.34). The default destination should be correct, but you will
either have to type inthe path for the
Speaty ,he loceilon tat oDelonSOWIfileyOu went res1.13 matte ie.., source or use theBrowse feature tolocate it. It is not
I necessary to point theprogram directly tothe missing file, which, I
' will probably behidden away inside a
Fig.4.34 Selecting the source and destination cabinet file anyway.when replacing an altered file Just direct it to the
e4 Restore file
%.- tolme
158

Backup and restore 4
drive that contains the Windows 98 installation disc, and the correctfolder on that disc. This will usually be the Win98 folder. The missing orcorrupted file should then be replaced, and the Program will continuewith its checking process.
Points to rememberBacking up data and (or) system information to another drive is the cnlyway to guard against a hard disc failure. Backing up system informationto the main hard drive is sufficient to guard against problems with theoperating system.
Floppy discs are inadequate to cope with the large amounts of dataproduced by many modern applications. A CD writer, Zip drive, additionalhard disc, or some other form of mass storage device is recuired. Amass storage device is also -equired in order to make a full backup ofthe main hard disc drive.
It is only necessary to save important data and configuration files, but itis much quicker to get things back to normal if ycu make a full back upof the hard drive.
Plenty of third party backup software is available, but the WindowsBackup utility is adequate for most purposes. It is included with Windows95, 98, and Me, but is not necessarily included as part of the defaultinstallation. In fact it has to be "dug out" from the installation CD-ROMwith Windows Me.
The Windows Backup program can be used to backup selected files, ora full backup of the hard disc can be provided. Backing up the fullcontents of a hard disc can be time consuming, but restoring a full backupis the quickest way to get the computer into full working order again f amajor problem occurs.
Windows Me has a System Restore program that can be used to takethe system back to the way it was at some previous time. Using SystemRestore to take the system back a day or two will usually remedy bootproblems, etc.
Windows 95 and 98 lack a System Restore facility, but there are otherfacilities that provide a sim lar effect and will often cure Windowsproblems. The simplest approach is to revert to one of the backupcopies of the Registry. In Wirdows 98 the System File Checker can Peused to check for altered or deleted system files and to make repairs.
159

4 Backup and restore
It is worthwhile making a backup copy of all the DLL files on the harddisc. In the event of a DLL file becoming deleted or overwritten by anolder version, the original is easily found and reinstated. It is worthwhilebacking up System.ini and Win.ini configuration files as well.
The Registry is stored in two hidden files called Jser.dat and System.dat.These are routinely backed up by the operati ig system, but it can beuseful to store backup copies on floppy discs, a CD -R, etc.
If the computer will not boot into Windows, backup copies of the Registrycan be restored using the Scanreg program with the computer bootedinto MS/DOS. Of course, your own backup copies can be restored inMS/DOS using the Copy command.
160

5
Reinstallation
Clean sweepHaving decided to install Windows and your applications from scratch,and having also done any necessary backing up of data files, etc., It istime to start the reinstallation process. I would not recommend trying toreinstall Windows by booting into Windows. If you can only bootWindows in Safe Mode there will be no CD-ROM support, so it will :-,otbe possible to install Windows from the installation CD-ROM. Ever ifthe PC can be booted into a largely working version of Windows, aninstallation started from Wind°Ns will simply place the new version ontop of the old one, but it will not necessarily repair any problems in :heexisting Windows set up.
Unless you have definitely decided that it is time to "sweep away -hecobwebs" and start from scratch, I would certainly recommend tryinc tofix Windows by reinstalling it on top of the broken ersion. If this fails tocure the problem it is time to install Windows from scratch. Either wE.y,I would recommend booting from a Windows Startup disc in drive A:and selecting CD-ROM suppert when the menu appears. The differerceis that when installing Windows "from scratch" it is necessary to wipethe hard disc clean first. W-1En installing Windcws over the existingversion all the existing files on the hard disc are left in place. Simply runthe Windows Setup program once the computer has booted into MB/DOS.
The basic installation process is much the same for Windows 95, 98,and Me. Although the description provided here is for an installation ofWindows Me, the basic procedure is therefore much the same forWindows 95 and 98. Also, the process is much the same whether theoperating system is installed from scratch or on top of an existingWindows installation. If Windows is already on the hard disc it will bedetected by the Setup program, which will then reinstall it on top of tieexisting Windows installation, by default. Any Windows applicationsprograms on the disc should remain properly installed with the newWindows installation.
161

5 Reinstallation
It is because Windows finds any existing installation and merges thenew version into it that an installation "from scratch" is sometimes needed.Completely wiping is the easiest way to ensure that there is no informationleft on the disc to lead the new installation astray. However, it also meansthat any data on the disc will be lost unless it is properly backed up. Youcan try a middle course with the Windows directory structure beingdeleted, but everything else being left on the disc
With luck this will result in Windows being reinstalled successfully, andany problems in the old installation will not resurface. In practice thereis no absolute guarantee of success though. Also, bear in mind thatany Windows applications on the hard disc will not be installed in thenew version of Windows. All the applications will therefore have to bereinstalled on top of the existing software. An advantage of this methodis that any data files should be left intact, but note that configuration filesfor the applications programs will probably be overwritten when theprograms are reinstalled.
Things can be taken a stage further, with the da'.a files and any otherimportant files being copied to a new folder. Everything else on the discis then deleted and Windows is installed "from scratch". Where there isno other means of backing up important files, this method has theadvantage that the files should still be intact once Windows has beenreinstalled, and there are no system files, etc., left on the disc that couldhave a detrimental effect on the new Windows installation. Backing upimportant files to another disc is still preferable, because the backupcopies on the main disc will be lost if there is a disc fault or a majorproblem during the Windows reinstallation.
If you decide to delete certain directories rather than simply wiping thedisc clean, it is best to do most of the deleting in Windows using WindowsExplorer. Using Windows Explorer it is possible to "zap" completedirectory structures almost instantly. Deleting large numbers of filesand directories in MS/DOS tends to be a very long, slow, and drawn outprocess.
The reinstallation process described here provides a true installation"from scratch", with the hard disc being wiped clean. However, theinitial part of the process is easily modified to accommodate one of thealternative methods outlined previously. The main installation thenproceeds in more or less the same fashion.
162

Reinstallation 5
Booting upThe first task is to boot the computer from a Windows Startup disc. If
you do not have a Startup disc, one can be mace by selecting Settingsfrom the Start menu, then Control Panel and Add/Remove Programs.Left -click on the Startup Disk tab, operate the Create Disk button, andthen follow the onscreen prcmpts. With the Startup disc in drive A:,restart the computer and with luck it will boot using the Startup disc.The BIOS settings are unsuitable if the computer ignores this disc andtries to boot from the hard disc instead. In this event you must go intothe BIOS and choose a boot -up option that has A: as the initial boot discand drive C: as the second boot disc. Any subsequent boot options areirrelevant, because the PC will boot before it gets to them.
Once the PC starts to boot -up using the Startup disc you will be presentedwith a menu offering three or four choices. Select the one that boots thecomputer using CD-ROM support. This is important, because you cannot run the Setup program on the Windows CD-ROM without the CD-ROM support. The CD-ROM support works with the vast majority of CD-ROM drives, including virtJally all types that use an IDE interface.However, it does not work with all drives. If it does not work with the CD-ROM drive of your computer you must make ycur own boot disc withCD-ROM drivers.
To make a boot disc first boot the PC in MS/DOS mode. To do this youmust operate function key F8 as the system starts to boot into Windows,and then select the appropriate option from the menu that appears.Once the computer has booted into MS/DOS put a blank disc in drive A:and issue this command:
format A: /s
This will format the disc and add the system files needed to make itbootable. In Windows Me there is no option to boot in MS/DOS mode,but the computer can be booted using a Startup disc, and then thiscommand can be used:
format B: /s
In the unlikely event that your PC has a drive B:, tiis will format the discin drive B: and place the system files onto it. If there is no drive B:, theoperating system will use drive A: as both drive A: and drive B:, and youwill have to do some disc swapping when indicated by the onscreeninstructions. The CD-ROM and mouse drivers should then be installedonto the floppy disc. The PC should have been supplied with this dr versoftware, together with instructions for using the installation programs.
163

5 Reinstallation
Microsoft ScanDisk
ScanDisk checked the following driues:
rrror,
4 Uiew Log < Exit ;
Fig.5.1 The MS/DOS version of Scandisk is run automatically as theinitial stage of the Setup routine
Once this has been done the PC should be rebooted, and it should thenbe possible to access the CD-ROM drive.
It is necessary to wipe everything from the hard disc if Windows and theapplications programs are to be installed from scratch. The easiest wayof achieving this is to reformat the hard disc. It will presumably be driveC: that will take the new installation, so this command would be used toformat this disc:
format C:
It does not seem to be necessary to have the system files placed on thedisc, and they are presumably added by the Windows Setup programduring the installation process. The "Is" switch is therefore unnecessary,although adding it will not do any harm. Before formatting the disc theprogram will warn that all data on the disc will be lost. Make sure that allimportant data has been backed up properly before the disc isreformatted.
164

Reirtstai.
gi Preparing tomtniinclows Sett'
11 Cogocting informationoloctA you ccmoxter
Igh. Copying ihirxtowslies to your ampule
Restarting yonampule,
Sitting up hoodwareend fireliting merge
Winkled limoramming
30.80 oilman
weld, hero terntonnation dosWindows Setup.
Microsoft
. Windows Millennium Edition Setup
Windows Millennium Editioa Setup Wizard
Welcome to Windows Me Seam
1-7;--1 J
Fig.5.2 The welcome screen of the Windows Setup program
Windows SetupOnce the mouse and CD-ROM drive have been installed it should bepossible to run the Setup program on the Windows 95/98/Me installationdisc. If the PC was booted using a Startup disc, this command is a I thatis needed:
setup
If the PC was booted using another boot -up cl,sc the CD-ROM's driveletter must be specified in the command. For example, if the CD-ROM isdrive D:, this command wculd be used:
DAsetup
After a welcome message on the screen the Scandisk utility will be run,and it will check for errors on the hard disc drives and any logical drives.Assuming all is well a screen like Figure 5.1 will appear. Press the "x"key to exit Scandisk and (if necessary) operate the Enter key to removethe onscreen message and go into the first screen of the Windows Setupprogram (Figure 5.2). It is then a matter of following the on -screenprompts to complete the Windows installation, providing the informationthat is requested, as described in the next sect on.
165

ig
RoJter
Copying VAxiomstdes to your computer
Restating yourconmitet
a Strang up hardwire- and theliiing settings
Estimated rimetenoning
30.60 mattes
It you decide not toaccept tne Agreement,windows Setup wfa 0.Aand vov compAer wire,11,ffri to tne previousmemonment
Alliaosoft
Windows Millennium Edition Setup
Windows Millennium Edition Selo. Wizard
License AgreementPlo the frkytng
r eY I Agfeer,o1
11, i'tyc..rot
Fig.5.3 Windows can only be installed if you agree to the licenceconditions
Note that you can install the upgrade version of Windows 95, 98 or Meonto a "clean" hard disc, and that it is not essential to load your old
i
I version of Windows fir§t so that you have something to upgrade.However, during the installation process you will probably be asked toprove that you have a qualifying upgrade product by putting the Setupdisc into the floppy drive or CD-ROM drive, as appropriate. Do notthrow away or recycle your old Windows discs, as tiis could leave youunable to reinstall the Windows upgrade.
InstallationFirst you have to agree to the licensing conditions (Figure 5.3), and it isnot possible to install Windows unless you do. At the next screen theWindows Product Key has to be entered (Figure 5.4). This code numberwill be found on the Windows certificate of authenticity and (or) on theback of the CD's jewel case. Next you are asked to select the directoryinto which Windows will be installed (Figure 5.5), out unless there isgood reason to do otherwise, simply accept the default (C:\Windows).
166

ReInstallatoon 5
g Priam/lb ran~Oars Situp
sr Cobeen] atornatonbat you comparer
eh Cada® WndowsIles to your Kebab,
0 Postmen] yourcobble,
Se up hardwareand bearing barge
E abinaled toeresibria;
43 oases
&ter the abode KeyMud came wih yourearl Of air sows
Aficesoft
. Windows Millennium Edition Setup
111111111111111"runrWomble.: Prockacl Key
,.., w 1,L,Lat.
u 414erman Eaton tredrrlGLICL.nLoLaiLlt, o art. yuta Wedorrs .43, or.,
be found cr. IhLL t;.- ci LT,
the c.o4oc, L ey excluding the d. bet:.
Fig. 5.4 With an installation "from scratch" the product key is requ.red
GI Papaya to nilYahtltiwa Saab
rCollactng nfornalka=oft your CC444.4.4e1
Copying birdowslo yaw tempter
r2 Fiedollng yarcomputer
1, Seery up hardwereend finabing 'ellivs
:ranted fib
41 move:
Yon orm artaWrodows io a tuberother Menthe default(C Vandows)
Mictosoft
. Windows Millennium Edition Setup
Windows Millennium Edition Setu Wizard
Select Decd.:frySebc. tie Or a:rory wine you want r :111 Wroclo,
Fig. 5.5 It is normally best to install Windows in the default folder
167

5 Reinstallation
PreperrotsWI doves Setvp
rCollecting ntonneionabout your cows tie
. Windows Millennium Edition Setup
Windows Millennium Edition Set Wizard
gh, copying Winiewetiles to yaw orrraler
Restarting fOlfCOMPUiet
Settrg up hienteme- and Malang wares
E singed tyreremaining
rre.ter.
-cent a SeloC °WMtit twist reflects youomputer's eartranierilyois na level
Microsoft
Setup Options
Fig. 5.6 Four 'ypes of installation are available
a Fteyerrgtenrlwin:lows SeOP
it Collo:Iry Ortsrmel.,Oat you csnoutr
"rCapylnelindcwsainewyar cannier
Mosisillne rowamphist
1, same uP h.d»,sssand Ilmitelsc setup
ip Estimated tirereineining
37 minutes
You must win a caneThe compeny wiryorbsnsi
Microsoft
. Windows Millennium Edition Se -.up
Windows Millennium Eddon Setu. Wizard
U.1 Intone 'loonPleaie er ref yfpe tioni intrrrvibon teloos,
Type sios one and you company name. Gr.compare roma !este the ter t
_LL
Fig.5.7 You must enter your name, but the company namE is optional
168

Reinstallation 5
ir CoWIN Inikomotionattar your computer
16 Copying%WPM"" flat to your cOmpler
Restating VOW
computer
Q Seam up heachresse- and tinaltOrg settings
Estimated trierremaining
36 airman
Windows comes wth evanotY et 0P tonalcomponents Sett, caninstal these now, orYou can ndal themMeat by ClIckong ireAckvRemoye Programs$i:on al Control Pawlft
Windows Millennium Edition Setup
Windows Millennium Edilirn Seto, Wizard
.11
4.1 Can, I
Fig.5.8 You can select the components to be installed or settle for astandard set of the rr.ost common ones
After some checking of the hard disc you are offered several installationoptions (Figure 5.6), but for most users the default option of a Typicalinstallation will suffice. Remember that you can add and delete Windowscomponents once the operating system is installed, so you are not tiedto the typical installation forever.
The Custom option enables the user to select precisely the recuiredcomponents, but this can be time consuming and you need to knowwhat you are doing. The Compact option is useful if hard disc space islimited, but with a new PC the hard disc will presumably be large eroughto make this option superfluous. The Portable option is optimised forportable PCs, and is the obvious choice if you are installing the systemon a computer of this type.
At the next screen you type your name and company name into thedialogue boxes (Figure 5.7). If an individual owns the PC the box fir thecompany name can be left plank. The purpose of the next screen (Figure5.8) is to let you choose the Windows components to be installed, butyou can simply select a standard set of components if preferred.Operating the Next button may bring up a network identification screen
169

Reinstallation
G Proposing* rulYarxtowS Setup
Colactnp etc:orationabout YOU :wog&
%, Copying WW:bwatin to yea cony:0er
Reirlarlir% yourmaculae.'
A Ssoino kr. herelwerand firainry adtlogps
Ott neas34 mirage
Illms Mat ammo totilt compiler. thew=iercnat t wi appearla. nod shotcarcrybon or 11.ecarve.,
Mscrosoft
. Windows Millennium Edition Setup
Windows Millsnnium Seto Wi,
Spsay 7 male 4'0 to tel Xt
Fig.5.9 The network selection screen is not relevant to most users
(Figure 5.9). Where appropriate, make sure that this contains the correctinformation. In most cases the PC will nct be used on a network, andthe default settings can be used
4bannares.1111111
V. mare
sera. am., a*awry
lelawasiort
. Windk>ws Millennium Edition Setup
111111111111111==ssmasal
Fig.5.10 This country selection screen
Next the appropriatecountry has to beselected from a list(Figure 5.10), andthen the requiredtime zone is selected(Figure 5.11). Thisscreen also providesthe option ofautomaticallyimplementingdaylight savingchanges. The nextscreen (Figure 5.12)enables a WindowsStartup disc to be
170

Reinstallation 5
Prepemg to tunVandows Sale
ir Collecting marathonabout your el:ovular
Copyng ~glowsMee to your computer
Restarting yourcomPae,
g Seeing up him:twiceend Inelzing seines
4. Estimated tamremaining
31 mnutet
Select the hme acnewhere you we use Pacompaer
ft
. Windows Millennium Edition Setup
Windows Millennium Edition Setts, Wizard
Establtshing Yaw Tine loneWindaet leienrworn Edition rot Po, y .4 lens vie
-Vey) tint :ere es' 3binte.: the .,erklaid I. !IC re curt n etrch feju,qoata. - t-ratFA
_J
.17
1- 1
Fig.5.11 This screen is used to select the correct time zone
produced. If you already have one of these you may prefer to skip thissection by operating the Cancel button and then the OK button.Unfortunately, floppy discs are not the most reliaole of storage med ums.If you only have one Startup disc already, I would suggest That you goahead and make another one so that you have a standby copy.
If you are using an upgrade version of Windows there will be an additionalsection in the setting up procedure where you have to prove that youhave a qualifying product to upgrade from. The screen of Figure 5.13will appear, so that you can point the Setup program towards the discthat conta ns the earlier ve-sion of Windows. To do this you will have toremove the upgrade disc from the CD-ROM drive and replace it with thedisc for the previous version of Windows. Then either type the path tothe CD-ROM drive in the text box (e.g. E: \) or operate the Browse buttonand point to the appropriate drive in standard Niiindows fashon. It takessome time for the program to check the Windows installation disc, butthe program keeps you informed of its progress (Figure 5.14). Note thatthis stage will be passed over if you are reinstalling an upgrade versionon top of an existing Windows installation. Windows will find the existinginstallation and will deduce from this that you are a bona fide user.
171

Reinstallation
g Preparing to rueWorkers Setup
Coleonj rdOricitiOnsiboUt Mu commits,
ClXrialg VAnd°"e"." eft IC rat XisIgUIef
Reitomirg you.comm-le,
Suers to harems.,erel Ireto; merino
Esteemed wrerendirwer
30 ended
111140 le pismire loends imoOop Mettat =Mote 'he mostoamori C2610:01 &MOS
Microsoft
. Windows Millennium Billion Setup
S tided Desk
*OM
J
t.
Fig.5.12 There is the op'ion of making a Windows Star tip
- elm or? . ur,,dr..icr, Setup
a
Cop Whdowslee to -od corroder
Rimortv youreareerier
I Seem apthr-O.moOr M00%
ellinehld seenerainrsr
12 nen Jeer
the pit In hedisk woo+
ord ver.C11 ofcows
-rosott
. Windows Millennium Edition Setup
Fig.5.13 An upgrade product requi-es evidence of a previous version
172

Reinstallation 5
Preparing to runWindows Setup
div Collecting rrionnationsiva your oonevuter
CoPVrisi Wirskrwsties to your computer
Redertrig yawcompute,
&Aim up hardwareend inflame settings
*Estimated thereenehiss
42 'Prates
Eater the path to theInstil disk for youprevious version ofWindows
i*CfaSolt
. Windows Millennium Edition Setup
Windows Millennium Edilic n Setu Wizard
Quaidawag Ptod2es :aterikSetup : yc.:A 1.40
Fig.5.14 It can take some time for the check of the previous Windowsinstallation disc to be completed, but the program keeps youinformed of its progress
Having completed all this you will have finally progressed to the maininstallation screen (Figure 5 1E,, and from thereon installation is largelyautomatic. A screenshowing how theinstallation isprogressing willappear (Figure 5.16).The computer willreboot itself two orthree times during theinstallation process,so if you opted toproduce a WindowsStartup disc duringthe initial set upprocedure rememberto remove this fromthe floppy drive. Fig.5. f5 The main installation screen
173

5 Reinstallation
. Windows Millennium Edition Setup2Mpliring 0 runMeows Soh*
Welcome to Microsoft WindowsMillennium EdItion
Please sit back and relax:Wide Ain kiwis Me IS(stalled on your comptter
Dunng this automated astallabon ; rx ess, yowl leanabout some of the enharx ements c Windows Me ands few of its exciting new features
Microsoft
Fig 5.16 Eventually the installation begins
rg la saVINOCIftil SAL.
- C dream itoaritliOn*rail pout -Camp Widowslin to pourooropuet
FooloOlnp uorOnipti
a Sot row lusoduoioonchnobn somnos
istalimitsd oresosanimg
5 routus
srp rd now exilesae tonpuber'sku-Oooto and n.,ret tot you' =raft Iso,- onotornrAillipiCe t OMtine sari all end norbids
/We -6T s.1 -ft
I
Sorting up H.
1.,d, '04
4areaungammolleCIMIMINIENNLFig.5 17 The Setup program keeps you irlormec! of what it is doing
174

Reinstallation 5
Otherwise thecomputer mightreboot from thefloppy rather than thehard disc, whichwould interfere withthe installationprocess.
TA, apa.wa
Nn.tr i., Fr.i you wart b
In the later stages of Fig.5.18 The password is optionalthe installation therewill be further screenstelling you what the compute is doing, and giving an indication of howfar things have progressed (Figure 5.17). No input is required from theuser during all this, so you can let the computer get on with the installation.The one exception is that near the end of the installation process youwill be asked to supply a user name and password (Figure 5.18). Simplyleave the password text box blank if you do not require passwordprotection. Eventually you should end up with a basic Windowsinstallation, and the familiar init al screen (Figure 5.19).
Sometimes the Windows Se:up program comes to a halt. Either thecomputer shows no signs of any disc activity for some time, or theremay be repeated discactivity with theinstallation failing to Sow.
}Ye
make any progress.The usual cure is to klP,P...m Mb*
switch off the !If 1°'computer, wait a few as, Mato No.
seconds, and thenswitch on again. The
nkr.et
Setup program willusually detect thatthere was a problem,and will avoid making
1.4.sot
the same mistake awlagain. If thecomputer is switched Fig.5.19 With installation complete theon and off on several familiar Windows screen appearsoccasions, but theinstallation still fails to complete, it will be necessary to reboot using theStartup disc, wipe the hard disc clean, and try again. If Windowsrepeatedly refuses to install i: is likely that the PC has a hardware faJlt.
175

5 Reinstallation
Hardware driversThere will probably still be a certain amount of work to be done in orderto get all the hardware fully installed, the required screen resolution set,and so on. Windows 95/98/Me might have but -in support for all thehardware in your PC such as the sound and video cards, but this isunlikely. In order to get everything installed correctly you will probablyrequire the installation discs provided with the various items of hardwareused in the PC. These discs may be required di..ring the installation ofWindows 95/98/Me, or they may have to be used after the basicinstallation has been completed. The instruction manuals provided withthe hardware should explain the options available and provide preciseinstallation instructions.
These days even the motherboards seem to come complete with driversoftware for things such as special chipset features and the hard disc
interface. It is once
General Dewce Menai/et Had ate Pieties I Performance I
a Mew deices by lype Vow devices by pxrtection
.4 CDROMkw/ Disk doves
# Dooley adaptersk,,j Floppy disk controlen
' Hard clok controllers 4 Keyboard # Monitors
') Mouse up Network adapters- Other devices
PCI Semi Controler
System dames
Ports (COM LPT I Once everything isSand wdeo and game controllers
supposedly installedcorrectly it is a goodidea to go into theControl Panelprogram and double-
Cancel I
click the System icon.Then select theDevice Manager tabto bring up a windowof the type shown in
Figure 5.20. Look down the various entries to check for any problems.These are indicated by yellow exclamation marks, or possibly by yellowquestion marks. Certain items of hardware will not be picked up properly
ProPerbet I Raftekh I Arrow I Rut
OK I
Fig.5.20 Device Manager is used to checkfor hardware that needs furtherinstallation
176
again a matter ofreading theinstruction manual todetermine whichdrivers have to beinstalled, and how togo about it. Get allthe hardwareproperly installedbefore you install theapplicationssoftware.

Reinstallation 5
by Windows, and some types of modem fall into this category. Thequestion mark in Figure 5.20 is caused by a Windows modem that thesystem is unable to sort out on its own. A Windows modem uses arelatively simple hardware plus software in the computer to provide Theencoding and decoding. Uilike a conventional modem, a Windowsmodem does not interface to the computer via a true serial port. It isinterfaced via a sort of pseudo serial port, and it is this factor that makesit difficult to correctly identify tt-e hardware.
If a problem is indicated, or an Item of hardware is missing from the list,it will be necessary to load the drivers for the hardware concerned inorder to get things working properly. This would be a good time tosearch the relevant web sites for updated driver software for the iardwarein your PC. You may well filo some newer and better drivers for tiehardware in your PC. The hardware can be integrated into Windowsusing the Add New Hardware facility in the Control Panel. However,many items of PC hardware do not take the standard Windows routeand have special installation programs instead. Read the installationmanuals carefully and use the exact methods described therein.
Awkward hardwareAny awkward hardware will have to be added via the Add New Hardwarefacility without utilizing Windows hardware detection facility. FirstWindows tries todetect Plug and Playdevices, and then it
TM redid .Md the softwage tae new Issoiware
Plug and Play Before contrung. dose elm open goobers
can try to find non- tierce
hardware. Failing To
the newNed.
gin roteinalthe softwete lot yod ne, &tyre dr,
hardware has to be.4001frinstalled manually
using the driversdisc or discsprovided with theitem of hardware.The process is canco
slightly differentdepending on the Fig.5.21 The initial Add New Hardware screen
version of Windowsyou are using, but the basic process is the same with all three versions.Here we will consider the V/ ndows Me version.
====111M1111111t
177

5 Reinstallation
Add New Hardware Wizard
Windows MI now search for any new Plug and Playdevices on your system.
Your screen may go blank dunnc this process This isnormal.
To continue, click Next.
4
< Back IL.... t..1!)4 ......... Cancel
Fig.5.22 A search for Plug and Play devices is made first
Add New Hardware Wizard
Is the device that you want to mall listed below?
r No, the device isn't in the list
device isinthe isle;
Select the device that you want to instal, and thenclick Next.
Qevices:
1, MPU -401 Compatible MIDI Device
PCI Serial Contralti
4
< Back Cancel I
Fig.5.23 Any Plug and Play devices that are found are listed
178

Reinstallation 5
The opening screenof Figure 5.21appears when theAdd New Hardwareprogram is run. Heedthe warning andclose any programsthat are runningbefore proceedingfurther. To continueleft -click on the Nextbutton, which willbring up a screen likethe one in Figure5.22. This informsyou that the programwill look for Plug andPlay devices connected
=2MEM11111111=11111111111111111rWr.dows can now ,each la hat &gm that a trot Plugand Flay campattle. or you cen seder) you htlondle hena kst
When Waldowe deeds new hagdware d anoxic*detenmes the anent stems Ice the dente and mtallsthe cogged &wet Far *o, reason 0 a *an*gecortmanded that ..ou have Vindoors mach for younew hagdwate
Do you ward Wrydows to switch log you new hardware'
e, (Plecormendedi
r No. I ward to select the hoick/ate train a Yd
Bad I Had I Cancel
Fig.5.24 A search can be made fornon -Plug and Play devices
to the system, and not to panic if the screengoes blank for a time. Press the Next button to proceed with the search.Eventually you will get a screer something like the one in Figure 5.23,complete with a list of any Plug and Play devices that have been found.If the device you wishto install is in the list,leave the Yes radiobutton checked, left -click on the deviceyou wish to install,and then operate theNext button toproceed with theinstallation.
Any non -Plug andPlay devices will notbe in the list, and it is 1111then a matter ofchecking the No Fig.5.25 This screen enables the typeradio button andoperating the Nextbutton. This brings up the window of Figure 5.24, which provides theoption of having the program search for the hardware you wish to install.There is no harm in letting the program search for tt7e hardware, althoughthis can be quite time consuming. It is likely that a standard item of
Staled the tote of t-eldroare you weed to not at
barchase types
Acceitia.:CD-ROM cogabolm
CXP
Day* odortbtdFloppy Mk canbolegs
Global pagdanng devices
Hard tick cc-nolegs
Human trier ace Dawes
howdy Derce
of device to be selected manually
179

5 Reinstallation
Windows wi now try to detect yourcontinuing, you should:
Before
1. If the modern is attached to yourcomputer, make sure it is turned on.
2. Quit any programs that may be using themodem.
Click Next when you are ready to continue.
r gon't detect my, modem; I will select it horn a 'est.!
< Eack Next > Cancel
Fig. 5.26 Even at this stage, automatic detection is still possible
180
Install New Modem
Click the manufacturer and model of you n If you modem is not listed,or if you have an installation disk, dick Have Disk.
Manufacturers -
AIWABritish TelecomDynalinkMotorola Internationalni-14
Models
11111111111111111111111111r"..Standard 2400 bps ModernStandard 9600 bps Modell -Standard 14400 bps ModenStandard 19200 bps ModenStandard 28800 bps Modem
1.3S111 Ms Marten
Have Disk...
< jack I Next > Ca_2_Icel
Fig.5.27 The Have Disk option is used if you have a drivers disc

Reinstallation 5
hardware such as an additional serial or parallel Dort will be detected,but it is by no means certain that anything exotic will be located.
If you decide not to opt for automatic detection, check the No radiobutton and operate the Next button. This produces the window of Figure5.25 where you can select the appropriate catecory for the hardwareyou are installing. A wide variety of devices are covered, with moreavailable under the "Other" category. In this example the modemcategory was selected, and operating the Next button moved things onto the window of Figure 5.25. Here you are once again offered theoption of automatic detection, but this does not work properly with m Dst"soft" modems, so the No buttcn was checked and the Next button wasoperated.
If you opt for manual selection you will eventually be shown a windowcontaining a list of devices, as in Figure 5.27. The right device mightappear in the list, but with recent hardware or geleric devices you 'NWprobably be out of luck. It is then a matter of se'ecting the Have Diskoption, which brings up a file browser so that you can direct the programto the correct disc drive, and where appropriate, the correct folder of thedisc in that drive. With the drivers installed the computer will probablyhave to be rebooted before the hardware will operate properly.
Screen settingsOnce the video card has been installed properly the required screenparameters can be set. To alter the screen resolution and colour depth,go to the Windows Control Panel and double-click on the Display icon.Then left -click on the Settings tab to bring up a screen of the type shownin Figure 5.28. It is then just a matter of using the onscreen controls toset the required screen resolution and colour depth. To use the rewsettings left -click the Apply button. It may be necessary to let thecomputer reboot in order to use the new settings, but in most casesthey can be applied without doing this. Instead Windows will apply thenew settings for a few seconds so that you can see that all is well. Sin -plyleft -click on the Yes button to start using the new screen settings.
If there is a problem with the picture stability do nothing, and thingsshould return to the original settings after a few seconds. This shculdnot really happen if the monitor is installed correctly, because Windowswill not try to use scan rates that are beyond the capabilities of the installedmonitor. If a problem of this type should occur, check that the monitor isinstalled properly. In the Display window of Control Panel select Settings,Advanced, and then Monitor. This will bring up a screen Ike Figure
181

5 Reinstallation
Display Properties
Background I Screen Saver I Appearance I Effects I Web
r
Display.
Plug and Play Monitor on Matrox MGAG100 AGP PowisrDesk
Coors
I
1.1211
Settings
Screen area
Less More
800 by 600 pixels
Advanced I
OK Cancel I
Fig.5.28 The Display Properties screen is used to set screenresolution, colour depth, etc.
5.29, which shows the type of monitor that is installed. If the installedmonitor is not the correct one, or is just one of the generic monitor types,left -click the Change button and select the correct one. If the picture isstable with the new settings but the size and position are completelywrong, there is probably no problem. It should be possible to positionand size the picture correctly using the monitor's co-itrols. Many graphicscards are supplied with utility software that helps tc get the best possibledisplay from the system, and it is worth trying any software of this typeto see if it gives better results.
182

Reinstallation 5
Matrox MGA-G100 AGP PowerDesk Properties_
General I Adapter Monitor I Performance I Color M 9nagement I 111:1 Color 1
Ai10 Plug and Play Monitor
Options
E
l Automatically detect Plug & Play monitors.
f Reset display on suspend/resume
Change
OK I :ancel I
Fig.5.29 If there is screen instability check tha' the correct monitoris installed
Disc -free MeIt has been assumed in this chapter that you have a Windows installationCD-ROM. Some computers are supplied with Windows Me pre -installed,and they do not come complete with a Windows installation CD-ROM.Instead, the hard disc has two partitions with dive C: acting as th 3 maindisc and a much smaller drive D: containing the Windows files. There isusually a CD-ROM that can be used to recover the situation in the eventof a hard disc failure, but this is not an ordirary Windows installation
183

5 Reinstallation
disc. With a computer of this type it is necessary to resort to the instructionmanual for details of reinstalling Windows.
Manufacturers are able to customise the installation software to suit theirPCs and any software bundled with them. Consequently there aredifferences in the installation procedures, but there should be a quickand easy way of getting back to a basic Windows installation. In factsome manufacturers provide a quick means of getting back to the factorysettings. in other words, the computer will have Windows installed andset up correctly for the hardware installed at the factory. Of course, ifyou have changed the hardware configuration of the PC, it will benecessary to install the drivers for the new items of hardware.
Points to rememberInstalling Windows on top of an existing version might cure problemswith the operating system, but it is not guaranteed to do so.
Installing Windows "from scratch", with all the previous files removedfrom the hard disc should effect a cure to any Windows problems. If it
does not, the computer probably has a hardware fault.
You can erase the existing Windows folder structure and then reinstallWindows. This will usually remove any problems with the originalinstallation, but all the applications software will still have to be reinstalled.
Everything but data files can be erased from the hard disc prior toreinstalling Windows. Unless you are very unlucky, this will give a fullyworking Windows installation and your data files will remain intact. Thismethod is worth trying if you have no way of backing up the data files.
Whether reinstalling Windows over an existing installation or "fromscratch" it is advisable to boot from a Windows Startup disc, opting forCD-ROM support.
The basic installation process is largely automatic. The user providessome basic information and then the Setup program installs the Windowsfiles and sets up the essential hardware. Some further installation isthen required to get all the hardware properly installed, the screenresolution and colour depth set correctly, etc.
Not all hardware can be installed with the aid of the automatic detectionfacilities. Manual installation of hardware drivers is not difficult, but whereappropriate, make sure that items of hardware are supplied completewith a disc or discs containing the driver software. Some hardware has
184

Reinstallation 5
its own installation routines and does not go through the normal Windowsroutes. Always install hardware in accordance with the manufacturer'sinstructions.
PCs that are supplied with 'N ndows Me preinstalled are not necessarilysupplied with a normal Windows installation Windows then r as tobe installed in accordance wit-i the computer manufacturer's ir-istruc:;ons.The exact method of reirstallation varies somewhat from onemanufacturer to another.
185

5 Reinstallation
186

Appendix 1
Tweak UI
Tweak UI is a Microsoft program for making changes to the user interface.Changes that would otherwise require editing of the Registry can bemade using this utility. It was originally supplied as part of the Windows95 Power Toys package, which was a free but unsupported set of ut Pies.
Tweak UI FIEIAdd/RemoveGeneral
Menu speed
Fast
Mouse sensitryity
Qouble-click
Drag
Boot
Expicrer
Repair
Desktop
Slow
Effects
l Window animatior
Smooth scrolling
1.7 seep on errors
Tips
Paranoia
New
Drag or double-click the testicon with the eft mouse bulonto test settincs.
Test Icon
Bestore Factory Settngs
cK Cancel I
Fig.6.1 The opening screer of the Tweak Ul prcgram
187

Tweak UI
General I Explorer
Add/Remove I Boot
DesktopRepair
New
Paranoia
For an explanation of a button, click the question mark at thetop of the dialog box then click the button you wishexplained.
41
Rebuild Icons
Repair Font Folder
Repair System Files
Repair Regedit
Repair Alsociations
OK Cancel
Fig.6.2 Tweak Ul can repair various types of Windows fault, includingsome problems with the system files
It proved to be very popular, and was included as an optional extra onthe original Windows 98 installation CD-ROMs. It can be found in the\Tools \ reskit\ powertoy folder, but note that it was omitted from theWindows 98 SE CD-ROM. It does not seem to be included with WindowsMe either. For a time it was not available as a download from the Microsoftweb site, but Power Toys, complete with Tweak UI, has since made acomeback. In fact the new version is bigger and Letter than ever.
There is no Setup program to install Tweak UI. Instead, use WindowsExplorer to find the file called Tweakui.inf, right -click click on its entry
188

and then select Install from the pop-up menu. Having installed TweakUI there is no apparent way to run it! However, if you go to the CcntrolPanel there should be an icon for it there. Double clicking on the iconwill bring up a window like the one of Figure 6.-. There are at least twodifferent varsions of the program, so you might find that the versio- youare using has more or less tabs than the one it Figure 6.1.
Tweak UI provides control over various aspects of the user interface, butin the currant context the facilities provided under the Repair tab (Figure6.2) are the most useful. The buttons that appea enable various aszectsof Windows to be repaired The Repair System Files option is perhapsthe one of most interest. This will repair various system files, includingsome of those that are most likely to bring the boot process *.o a hat. Inorder to use this facility you simply operate the appropriate button andthen reboot the computer in Normal mode. If the repair has beensuccessful the computer will then boot straight into Normal mode.
189

Appendix 2
Useful web addresses
www.microsoft.com
This is the Microsoft web site, and a vast amount of Windows support isavailable here (see chapter 2).
www.shareware.com
A vast range of shareware, freeware, commercia demonstration software,etc., is available from this site. There are also Lsefu links to other sites.Some useful utility programs and anti -virus software can usually beobtained from here, or via one of the links.
www.symantec.com
Symantec are the publishers of the Norton range utilities. Their website has demonstration versions of their procrams plus some virusremoval tools and general anti -virus informaticr.
190

Appendix 3
Regclean
Regclean is a freely obtainable utility program from Microsoft that canbe used to scan the Registry for errors. Any that are found can then Defixed. Unfortunately, Regclean is not guaranteed to give perfect resultsevery time, and under certain circumstances it can add problems raterthan remove them. If you decide to give this program a try it woulddefinitely be advisable to read the text file or files that accompany it.
Windows ;egistryAnalysrs and Correction
RegClean is checking a part of your registry for errors This willtake several minutes. When it is finished. you may cancel aridexit RegClean, or let rt fix the errors rttound If you let RegCleanfix the e-rc-s. it will generate an Undo file in the folder withRegClean Double-click on this file to reverse the corrections,RegClean makes
Please report all bugs. suggestions and comments toTegclearrigmicrosoft corn
The RegClean Team
Scanning Type Library Identifiers for errorsBBBBB HIM BBBBBBBBB l OOOOOOOO Mine
Fig.7.1 Regclean starts to operate as soon as it is launched
Also, I would not recommend it as an initial means of trying to cureproblems with Windows. Just the opposite in fact, and it is probablybest to leave Regclean until other avenues of investigation have beenexhausted.
In order to run Regclean either use the Run option from the Start menuto run the Regclean.exe program file, or locate this file using WindowsExplorer and double-click on its entry. It starts to cperate immediately,
191

Microsoft RegClean
Windows Registry Analysis and Cprrection
RegClean has finished checiung the registry It can now correctthe errors that if found, or you can cancel it If you let it tnii theerrors it found, it will generate en Undo file in the folder withRegOeen. Double-click on this file to reverse the correctionsReggeen makes.
Please report all bugs. suggesbor s and comments toregclean@microsoft corn
Finished checking Waiting to Fn Errors
The RegClean Teem
EC( Errors I Cancel
Fig.7.2 Regclean be be used to correct any errors it finds
with a check being made of various parts of the Registry (Figure 7.1).The window of Figure 7.2 appears if any errors are found, but you canoperate the Exit button to quite the program without fixing them.Alternatively, operate the Fix Errors button and the suspected errors willbe corrected. The window of Figure 7.3 should then appear, confirmingthat the errors have been fixed. Of course, there is no guarantee thatany problems will be found, but Regclean usually seems to find at leastone or two discrepancies. If no errors are found, the screen of Figure7.4 appears.
If things should go badly wrong and Regclean adds rather than removesproblems, there is an easy solution to the problem. When Regcleanfixes errors it produces an undo file which is placed in the same folderas the Regclean.exe program file. This file has a quite a long name, butit is easily located because it starts with "Undo" and has a "Reg"extension. In order to undo the changes to tne Registry locate theUndo.....Reg file using Windows Explorer and tien double-click on itsentry. A message will appear onscreen, asking if you wish to undo thechanges to the Registry. Left -click the Yes buttor if you wish to proceed.The changes will then be made and a further message will appearonscreen confirming that the undo operation was successful.
192

Microsoft RegClean
Windows Registry Analysis and Ccrrection
RegCeen is finishedi
It has writen changes to the registry to correct the errors itfound Click Exit to end Regr_lean
Please report all bugs, suggestions and comments toregcleangmicrosoft corn
The Regclean Team
Fig.7.3 Having fixed the errors, Regclean reports that it hascompleted its task
Windows Registry Analysis and Correction
Regclean has not found any registry entries that it can correct
Click Exit o end RegClean
Please report all bugs, suggestions and comments toregclean@microsoft corn
The RegClean Team
Finrshec check rg Waiting to Exit
Eat
Fig.7.4 This screen appears in the event that Regclean findsnothing amiss
193

'01/74.Y.4.12
rq-c.$) 401 ,obt'

Index Index
A
adding a drive 92anti -static 95anti -virus 25archive 7
attribute 7
auto -detection 109autoexec.bat 13, 45, 57, 77automatic detection 181
B
background task 12. 34backup 57. 74Backup program 126basic checks 47beta test 11
BIOS 13
BIOS features 105BIOS settings 163
BIOS Setup 104boot sector 13
boot -up 9
booting problems 41
booting up 163Bootlog 54
C
cable select 97cabling 100cards 18causes 1
CD-ROM support 14, 163certificate of authenticity 166checkbox 8
CMOS 105colour depth 182Command prompt only 45compact installation 169components 169compressed 63compression 134. 137config.sys 13.configuration file
45. 57,2.
7758
configuration files 78configuration jumper 96Control Panel 127
Copy and PasteCopy commandcustom installationcustomisation
D
data cabledata rescuedefault directorydeletiondesktop preferencesDevice Managerdiagnostics softwareDisc -free MeDisk ToolsDisplay PropertiesDLLDOS partitiondrive baydrive imagedrive lettersdrive settingsdrive tabledriver faultsdynamic link library
E
earthedediting (Registry)EIDE interfaceemergency exitemergency restorationEnd Taskenvironment spaceerror messageexpansion slotExplorerextended DOS partitionextensionExtract
F
factory settingsFATFAT32fatal exception error
63121
16989
948560
2
71
49, 17620
183127182
2, 61, 149115, 117
10014811010710849
149
20689334
1383258
20, 591832
1175
63
18424
15. 11336
195

Index
FDISK 113file allocation table 24file associations 71
file hunt 60Find 150Find command 73fixing screws 100folder options 6FORMAT 112Format command 22formatting 118freeware 190
G
guide rail
H
hard dischardware configurationhardware drivershardware faulthardware problemsHardware Troubleshooterhidden filehidehive key
iconIDE auto -detectionIDE channelIDE data cableIDE interfaceillegal operationimageinitialisation fileinstallationinstallation disc
J
jumpers
K
keyKnowledge Base
9
7248, 176
175254
5
6
71
10
1099894
14, 9236
14878
16663
L
large block addressingLarge modeLBA modeLogged modelogginglogical drivelogical drives
Mmachinemanual installationmanual selection
100 mass storagemasterMe BackupMe RestoreMe Safe modememorymemory managementmemory testmenuMicrosoft Knowledge BasemonitorMS DOS mode
N
non -Plug anc PlayNormal modeNorton Utilitiesnumerical code
0OLE informwion
P
page faultparasitic programpartitioning
96 passwordpathPlug and Playportable installationPOSTpower cablepower connector
6980
1101101104454
11786
72177181
9, 7996
146140
6312, 36
3621
1080
18192
179447570
71
3624
110175
6
17, 177169
13101
93
196

Index
power -on self -test 13
preliminaries 89prevention 1
Previous MS DOS mode 45primary DOS partition 117primary IDE 98Product Key 166
0qualifying product 166
RAMread-onlyreboot.vxdrecognised file typesRecovertxtrecurring problemsRecycle BinRegcleanRegeditRegistryRegistry backupRegistry Checkerreinstallatio1Remremoving driversresetreset buttonrestoration pointRestorerestorerestoringribbon cable
S
127
3571
1398211
191
696. 58. 66
67, 15139, 74, 15379, 87, 161
5752
14, 4232
141
13264
154100
Safe mode 16. 42Safe mode command prompt 45ScandiskScranregscreen reso utionscreen settingsSCSIsecondary IDESelf Suppor.Setup programSetup Wizard
46. 164155182181
91
9881
14, 104140
sharewareshut downslave devicesoftware configurationStandard CMOSStandard modeStartup discStartup menuStartup utilitiesstaticstatic chargesStep-by-steStep -by -stew confirmationstringsub -keysurface scansys comma idSyseditsystemSystem File Checkersystem files 16,
System Infcrmationsystem resourcesSystem RestoreSystem ToolsSystem TraySystem.datSystem.iniSystray
T
TaskbarThorough modeTrojan horseTroubleshootertroubleshootertroubleshootingtweakTweak UItypical installation
U
UDMA100UDMA33UDMA66uninstallerupgrade product
190329672
10546
14, 17143
139951857447069481676
7
63, 155149. 188
3E. 7437
64, 14012938
68, 1527838
1046255481
411
187169
949594
3
166
197

Index
upgrade version 166. 171
USB 91
user 72User.datutilities
68, 152139
V
verification 136virtual disc 16virtual memory 37virus 23virus scanning 29
W
WIMP 105WinDoctor 76Windows checkers 75Windows components 169Windows Explorer 5
Windows Registry 66Windows Setup 165Windows upgrade 166Windows.ini 78Wizard 63Wizards 135
X
Xcopy 121
Z
Zip drive 91
198

1
1

Babani Computer Books
Easy Windows troubleshootingProblems with the Windows Me, 98 and 95 operating systems are notexactly a rarity, and are perhaps inevitable with software of such com-plexity and sophistication. These Windows operating systems will oper-ate with a massive range of hardware in numerous applications, but thisversatility may lead to various periodic problems. The cause could be anobscure bug in Windows itself, an installer or uninstaller that gets thingsslightly wrong, an applications program that does not stick to the rules,or a glitch in the hardware, but problems with Windows are generallyaccepted as part of PC life. Troubleshooting problems with Windows is adaunting task for non -expert computer users, but in fact, most faults canbe fixed quite quickly and easily by using the simple methods describedin this book. Problems with configuration files, hardware drivers, etc., canusually be tracked down quite quickly, or with a particularly awkwardfault Windows can be reinstalled. Either way, the procedures described inthis book should soon have your PC running properly again.
This book shows you how to: -
Verify 'hat the fault is not in the hardware.Replac.:e the boot files and check for viruses.
Use the step-by-step start up mode to find the cause of boot -up problems. Check and correct problems in the configuration files. Check, backup. and restore the Windows Registry.
Back. 'p and restore essential files or even the whole system. View ..nd edit the Windows Registry using the Regedtt Rescue important data prior to reinstallation.
Reinstall Windows over the current version.Reinstall Windows 'from scratch'.
An invaluable tool for all Windows Me, 98 and 95 users, as you never knowwhen a problem could occur. Much frustration, expense and waiting timemay be saved by not having to rely on help lines or service desks.
4 Beginners n Intermediate Ig Advanced
r
-r 9
ISBN 0-85934-495-9
78 085 9 34 1
00699>
111