District Level Troubleshooting Manual - ICDS
39
-
Upload
khangminh22 -
Category
Documents
-
view
6 -
download
0
Transcript of District Level Troubleshooting Manual - ICDS

ICT - RTM
District Level
Troubleshooting Manual
ICDS Systems Strengthening and Nutrition Improvement Project
(ISSNIP)
Ministry of Women & Child Development,
Government of India

2
Abbreviations
AWC Aanganwadi Centre
AWW Aanganwadi Worker
APK Android Application Package
PIN Personal Identification Number
ICDS Integrated Child Development Services
ICDS-CAS Integrated Child Development Services - Common Application Software
ICT Information and Communication Technology
RTM Real Time Monitoring
ICT-RTM Information and Communication Technology enabled Real Time Monitoring
ISSNIP ICDS Systems Strengthening and Nutrition Improvement Project
MWCD Ministry of Women and Child Development
GoI Government of India
SDA Software Development Agency
GPS Global Positioning System
URL Uniform Resource Locator
LS Lady Supervisor
DPO District Program Officer
BHD Block Helpdesk
CDPO Child Development Project Officer
3
Contents
1 Introduction .......................................................................................................................................... 5
1.1 Roles and Responsibilities for District Helpdesk ............................................................................ 5
2 Common Troubleshooting Guide ......................................................................................................... 7
2.1 User forgets ICDS - CAS Dashboard / mobile application password ............................................. 7
2.2 User damages/loses device ........................................................................................................... 9
2.3 User’s app needs to be updated .................................................................................................. 10
2.3.1 How Auto Updates Work ................................................................................................... 10
2.3.2 How Manual Updates Work (Remotely) ........................................................................... 11
2.3.3 How Manual Updates Work (In Person) ............................................................................ 11
2.4 A new Dashboard user needs to be created ............................................................................... 12
2.5 When a Block Helpdesk user leaves and a new Block Helpdesk user joins ................................. 15
2.5.1 Steps for handover of Dashboard ...................................................................................... 15
2.5.2 Steps for handover of Issue Tracker application ............................................................... 16
2.6 When a District ICDS official leaves and a new District ICDS official joins .................................. 17
2.7 Verify User friendly settings on devices ...................................................................................... 17
3 User Management.............................................................................................................................. 20
3.1 Types of Users ............................................................................................................................. 20
3.2 Mobile and Dashboard Users – Username and Password Overview .......................................... 20
4 District Level Issue Tracker User Manual ........................................................................................... 23
4.1 Objectives of the Issue Tracker Manual ...................................................................................... 23
4.2 How to Start ................................................................................................................................ 23
4.3 Modules ....................................................................................................................................... 24
4.3.1 Issue Management ............................................................................................................. 25
4.3.2 Ticket Information and Issue Information ......................................................................... 26
4.3.3 Follow up with an issue ...................................................................................................... 27
4.4 Escalation Matrix ........................................................................................................................ 35
4.5 Issue Tracker Reports .................................................................................................................. 36
4.5.1 Issue Tracker – Individual Issues ........................................................................................ 36
4.5.2 Issue Tracker - Issues (Block) .............................................................................................. 37
4.5.3 Issue Tracker – Issue by type .............................................................................................. 38
4
List of Figures
Figure 1: Selecting Mobile Workers .............................................................................................................. 7
Figure 2: Searching for a Username .............................................................................................................. 7
Figure 3: User Details .................................................................................................................................... 8
Figure 4: Password Tab ................................................................................................................................. 8
Figure 5: Selecting Mobile Workers ............................................................................................................ 12
Figure 6: Creating new Dashboard User ..................................................................................................... 13
Figure 7: Assigning user Roles ..................................................................................................................... 13
Figure 8: Account Settings .......................................................................................................................... 14
Figure 9: Changing Password ...................................................................................................................... 15
Figure 10: Login Screen ............................................................................................................................... 23
Figure 11: Home Screen .............................................................................................................................. 24
Figure 12: Modules ..................................................................................................................................... 25
Figure 13: Issue Management Module ....................................................................................................... 25
Figure 14: Ticket Information and Issue Information ................................................................................. 26
Figure 15: Closing Request .......................................................................................................................... 27
Figure 16: Selecting a ticket ........................................................................................................................ 27
Figure 17: Moving forward to update or resolve the ticket ....................................................................... 28
Figure 18: "Follow Up with Issue" module ................................................................................................. 28
Figure 19: Information about the issue ...................................................................................................... 29
Figure 20: Select "New Information/Other Details" ................................................................................... 30
Figure 21: Enter information in Notes ........................................................................................................ 30
Figure 22: Closing Instructions and escalate/de-escalate the issue ........................................................... 31
Figure 23: Select "Unsuccessful attempt at fixing the phone" ................................................................... 31
Figure 25: Enter information in Notes ........................................................................................................ 32
Figure 24: Enter date and other details ...................................................................................................... 32
Figure 26: Closing instructions and escalate/de-escalate the issue ........................................................... 33
Figure 27: Select "Issue resolved/Close issue" ........................................................................................... 33
Figure 28: Enter date and other details ...................................................................................................... 34
Figure 29: Enter information in Notes and submit closing instructions ..................................................... 34
Figure 30: Apply filters ................................................................................................................................ 36
Figure 31: View individual Issue Tracker reports ........................................................................................ 36
Figure 32: Apply filters ................................................................................................................................ 37
Figure 33: View Block-wise Issue tracker report ......................................................................................... 37
Figure 34: Apply filters ................................................................................................................................ 38
Figure 35: Bar chart representation of issues ............................................................................................. 38
List of Tables
Table 1: List of Roles for Dashboard users .................................................................................................. 22

5
1 Introduction
The Integrated Child Development Service (ICDS) scheme is a flagship program of the Government of
India (GoI) and is one of the world’s largest programs for early childhood development. The program
addresses the nutritional needs of children, pregnant women and lactating mothers. Efficient service
delivery, effective monitoring & supervision and timely deployment of appropriate interventions at
appropriate places are critical factors in the implementation of ICDS scheme for better outcomes.
Ministry of Women and Child Development (MWCD) is implementing the ICDS System Strengthening
and Nutrition Improvement Project (ISSNIP) with an objective of strengthening the ICDS policy
framework, systems and capacities, and facilitate community engagement, to ensure greater focus on
children under three years of age and also to strengthen convergent actions for improved nutrition
outcomes.
Information and Communication Technology enabled Real Time Monitoring (ICT-RTM) of ICDS is one of
the key activities in ISSNIP. It will leverage a mobile solution, called ICDS -Common Application Software
(ICDS-CAS) for improving the service delivery and ensuring better supervision of ICDS scheme. ICDS-CAS
is designed to be a beneficial job aid for Aanganwadi Workers (AWWs) and Supervisors that will assist
them in catering to the needs of women and children more efficiently through mobile device based
application. The ICDS-CAS solution will also allow automation of ten out of eleven ICDS registers, thus
giving the ICDS workers more time to focus on the service delivery.
The troubleshooting manual has been developed to guide the District Helpdesk in providing general
application support, identifying, troubleshooting and resolving issues escalated by Block Helpdesk
through the Issue Tracker application.
It will also assist the District Helpdesk through common troubleshooting scenarios related to inventory,
username management and providing reports with real time information collected by Aanganwadi
workers on their phones.
1.1 Roles and Responsibilities for District Helpdesk
The troubleshooting manual is designed to assist the District Helpdesk to cover their scope of work
which will include the following tasks:
1. Providing application support by solving issues escalated from Block Helpdesk in regards to
AWW and LS mobile application and resolving issues faced by Block Helpdesk and District ICDS
officials while accessing ICDS-CAS dashboard and by Block Helpdesk while using Issue Tracker
Application.
2. Assist the Block Helpdesk in inventory management (reporting loss of devices, facilitate repair of
devices at authorized service centers).
3. Supervise and monitor the Block Helpdesk’s tasks.
4. Coordination with Block Helpdesk to manage usernames and passwords of Block level ICDS-CAS
dashboard and Issue tracker application users, AWWs and Sector Supervisors.
5. Monitoring and follow up on the usage of the application from “worker activity reports”
generated on the ICDS-CAS Dashboard.

6
6. Escalating unresolved issues to the State Helpdesk via the Issue Tracker Application.
7. Regularly following up on closing request tickets in the Issue Tracker Application, making sure
they are resolved and closed.
8. Regularly following up with the Block Helpdesk and ensuring that the issues with closing
requests for the Block level are resolved.
9. Support District ICDS officials on usage of CAS system.
10. Ensure in person updating of the ICDS-CAS application for AWW and LS is being carried out by
the Block Helpdesk.
11. Ensure reinstallation of ICDS-CAS mobile application is being done by the Block Helpdesk in
cases where the application has become corrupt.
7
2 Common Troubleshooting Guide
This section contains common issues that may be faced by users (like block helpdesk etc.) while using
the ICDS-CAS mobile application or the ICDS-CAS dashboard along-with detailed troubleshooting steps
for District Helpdesk.
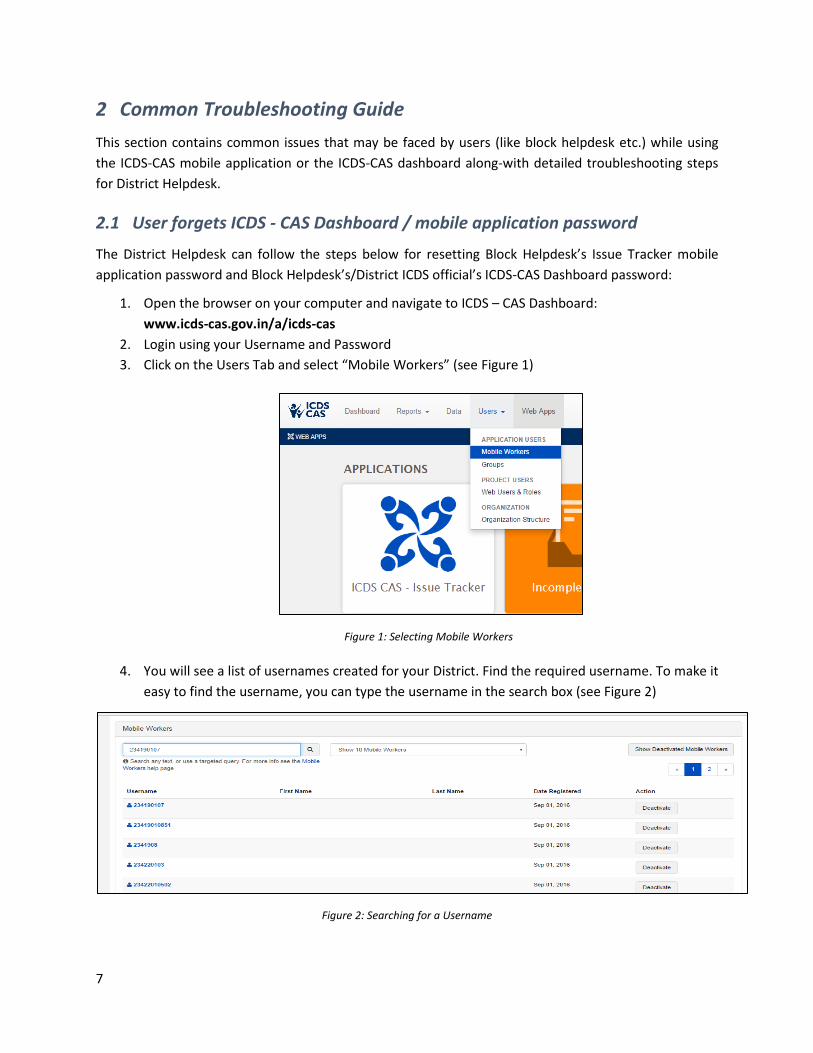
2.1 User forgets ICDS - CAS Dashboard / mobile application password
The District Helpdesk can follow the steps below for resetting Block Helpdesk’s Issue Tracker mobile
application password and Block Helpdesk’s/District ICDS official’s ICDS-CAS Dashboard password:
1. Open the browser on your computer and navigate to ICDS – CAS Dashboard:
www.icds-cas.gov.in/a/icds-cas
2. Login using your Username and Password
3. Click on the Users Tab and select “Mobile Workers” (see Figure 1)
Figure 1: Selecting Mobile Workers
4. You will see a list of usernames created for your District. Find the required username. To make it
easy to find the username, you can type the username in the search box (see Figure 2)
Figure 2: Searching for a Username

8
5. Click on the username and it should open a window with more details (see Figure 3)
Figure 3: User Details
6. Select the password tab (see Figure 4)
Figure 4: Password Tab
7. A new password will be auto generated by ICDS-CAS. Note down this password mentioned
against the new password.
8. Click on the “Reset Password” button and the new password will be set.
9. Communicate the new password to the Block Helpdesk/District ICDS official.
After the new password has been communicated to the Block Helpdesk for Issue tracker mobile
application, make sure you supervise them to follow the steps below:
1. The Block Helpdesk inputs the new password in the Issue Tracker application provided by
District Helpdesk and clicks on Log in.
2. A window should open asking the Block Helpdesk to set a PIN.
3. Block Helpdesk chooses a 4-digit PIN and enters it in the application.
4. Log out of Issue Tracker application.
5. Log in again to the Issue Tracker application with the username and 4-digit PIN.
9
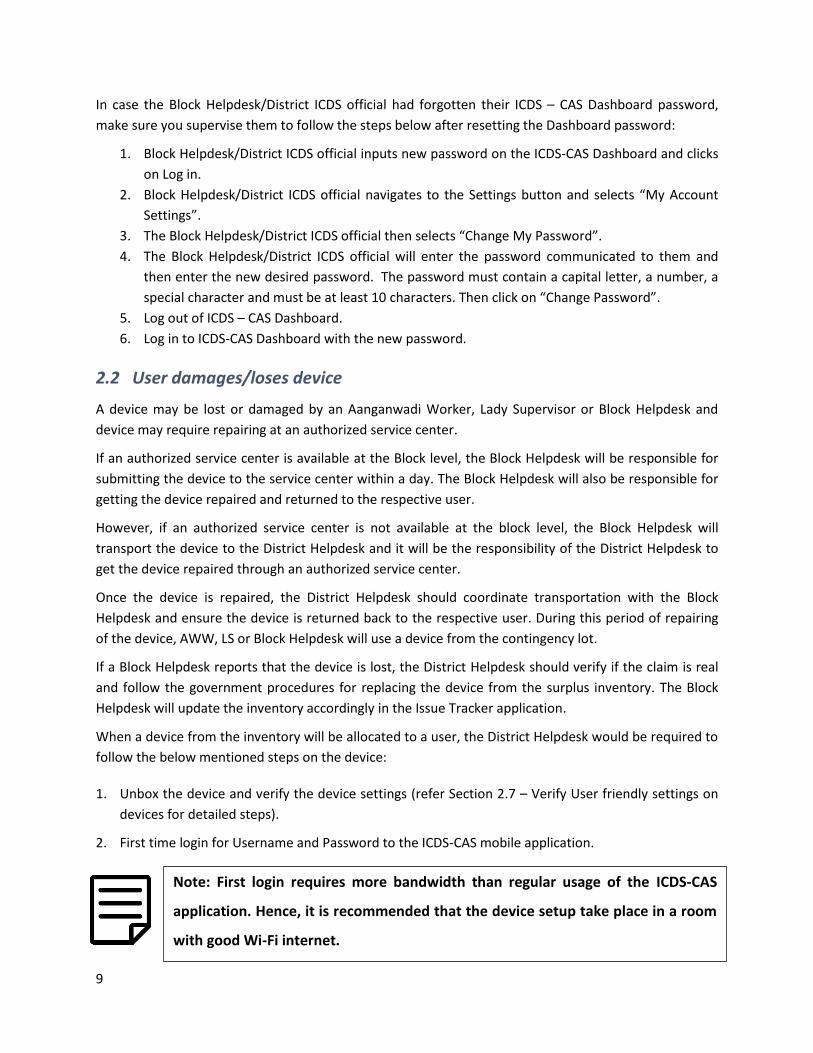
In case the Block Helpdesk/District ICDS official had forgotten their ICDS – CAS Dashboard password,
make sure you supervise them to follow the steps below after resetting the Dashboard password:
1. Block Helpdesk/District ICDS official inputs new password on the ICDS-CAS Dashboard and clicks
on Log in.
2. Block Helpdesk/District ICDS official navigates to the Settings button and selects “My Account
Settings”.
3. The Block Helpdesk/District ICDS official then selects “Change My Password”.
4. The Block Helpdesk/District ICDS official will enter the password communicated to them and
then enter the new desired password. The password must contain a capital letter, a number, a
special character and must be at least 10 characters. Then click on “Change Password”.
5. Log out of ICDS – CAS Dashboard.
6. Log in to ICDS-CAS Dashboard with the new password.
2.2 User damages/loses device
A device may be lost or damaged by an Aanganwadi Worker, Lady Supervisor or Block Helpdesk and
device may require repairing at an authorized service center.
If an authorized service center is available at the Block level, the Block Helpdesk will be responsible for
submitting the device to the service center within a day. The Block Helpdesk will also be responsible for
getting the device repaired and returned to the respective user.
However, if an authorized service center is not available at the block level, the Block Helpdesk will
transport the device to the District Helpdesk and it will be the responsibility of the District Helpdesk to
get the device repaired through an authorized service center.
Once the device is repaired, the District Helpdesk should coordinate transportation with the Block
Helpdesk and ensure the device is returned back to the respective user. During this period of repairing
of the device, AWW, LS or Block Helpdesk will use a device from the contingency lot.
If a Block Helpdesk reports that the device is lost, the District Helpdesk should verify if the claim is real
and follow the government procedures for replacing the device from the surplus inventory. The Block
Helpdesk will update the inventory accordingly in the Issue Tracker application.
When a device from the inventory will be allocated to a user, the District Helpdesk would be required to
follow the below mentioned steps on the device:
1. Unbox the device and verify the device settings (refer Section 2.7 – Verify User friendly settings on
devices for detailed steps).
2. First time login for Username and Password to the ICDS-CAS mobile application.
Note: First login requires more bandwidth than regular usage of the ICDS-CAS
application. Hence, it is recommended that the device setup take place in a room
with good Wi-Fi internet.

10
i. Reset the password of the user to whom the device is to be allocated (refer Section 2.1 – User
forgets ICDS-CAS Dashboard/mobile application password for detailed steps).
ii. Open Commcare LTS application on the device.
iii. Login using the username of the user and the password generated after resetting.
iv. The screen will ask to create a PIN
v. Select “Yes” and input a PIN of “1234”
vi. Logout of the application
vii. Now, login again and configure demo username and password on the device according to the
below steps:
For an AWW device, input username “aww.test”
For a Supervisor device input username “supervisor.test”
For a Block Helpdesk device, input username “block.test”
viii. Enter password “123”
ix. Logout of the application
x. Switch off the device and label the device with AWC/LS/Block code (depending upon the
user), AWC/Sector/Block name and IMEI number.
xi. Pack the device for delivery to the Block Helpdesk and ensure Block Helpdesk sets up google
account and registers the allocation of the device in the Issue Tracker application.
2.3 User’s app needs to be updated
The ICDS-CAS application will often need to be updated after it has already been provided and used by
Aanganwadi workers, Lady Supervisors and Block Level Helpdesks. These updates could include smaller
bug fixes or larger changes to the ICDS-CAS application. The following is a summary of how updates are
structured and how the application will be updated.
The application is comprised of two major pieces:
CommCare LTS APK: This is the CommCare mobile application framework that is installed
through the Google Play Store. This is shared between the AWW, Supervisor and Issue Tracker
application.
Application Files (CCZ): This is the specific ICDS-CAS AWW, ICDS-CAS Supervisor or ICDS-CAS
Issue Tracker application and includes the forms and multimedia.
2.3.1 How Auto Updates Work
For updates to the CommCare LTS APK, the phone will automatically download the update from the
Google Play Store if the phone has a Google account setup and is connected to the network. Once the
update is downloaded, the phone will automatically install the update. This will cause the application to
restart and the user will be required to login again.
11
For updates to the CCZ, the phone will download the update in the background from the ICDS-CAS
server. Once the update is downloaded, the update will be installed the next time the user logs in. This
process could take up to one hour so users should be informed in advance that this could happen.
2.3.2 How Manual Updates Work (Remotely)
If the user does not auto-update to the latest APK and CCZ, it is possible to manually update the
application by following the steps below:
For the APK, the user should navigate to the Google Play Store and search for CommCare LTS. They will
get an option to “Update” from the Google Play Store. If they have network connectivity, they can click
on Update and download and install the latest version of the APK.
For the CCZ, the user can choose the “Update CommCare” option from the ICDS-CAS app menu. They
will then be required to wait while the update downloads (between 30 minutes and one hour depending
on internet speed). Once the update has downloaded, the user can then choose the Install Update
button to install the update (which may again take up to one hour).
2.3.3 How Manual Updates Work (In Person)
In person updates should be carried out by the Block Helpdesk person and it is the responsibility of the
District Helpdesk to ensure that the Block Helpdesk follows the steps below while performing in person
updates.
For the APK:
1. Ensure that the phone has network connection.
2. Login to the application.
3. Sync the phone so that all forms are submitted.
4. If there is good internet connectivity on the device, navigate to the Google Play Store and search
for CommCare LTS. You’ll get an option to “Update” from the Google Play Store.
5. If there is low/no internet connectivity, copy the latest APK that you have received from the
State helpdesk to the phone and open it.
6. This should prompt the phone to update the new version of the APK.
7. Confirm and update the application.
For the CCZ:
1. Ensure that the phone has network connection and login to the application.
2. Sync the phone so that all forms are submitted.
3. Ensure that the APK is updated to the latest version.
4. Copy the latest CCZ to the phone.
It’s best for the user to download and install the updates at night while the phone
is charging.
12
5. On the phone, clear CommCare LTS data by navigating to the phone's applications management
menu: Settings -> Applications -> Manage Applications. Navigate to CommCare LTS and press
Clear Data and Confirm.
6. Manually install the latest CCZ on the phone (could take up to one hour).
7. Login using the user’s full password and give them the phone back to setup a PIN.
2.4 A new Dashboard user needs to be created
The District Helpdesk will follow the following steps to create a new Dashboard user for the Block
Helpdesk/District ICDS official:
1. Open the browser on your computer and navigate to: www.icds-cas.gov.in/a/icds-cas
2. Login using your Username and Password
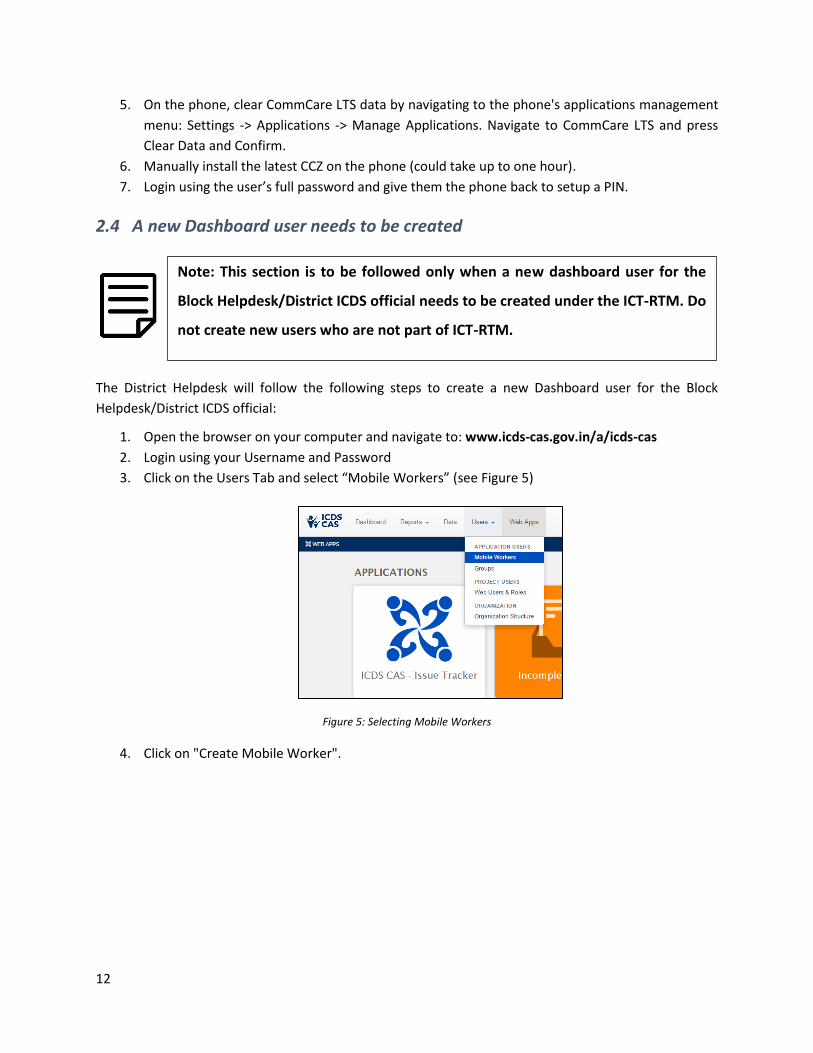
3. Click on the Users Tab and select “Mobile Workers” (see Figure 5)
Figure 5: Selecting Mobile Workers
4. Click on "Create Mobile Worker".
Note: This section is to be followed only when a new dashboard user for the
Block Helpdesk/District ICDS official needs to be created under the ICT-RTM. Do
not create new users who are not part of ICT-RTM.
13
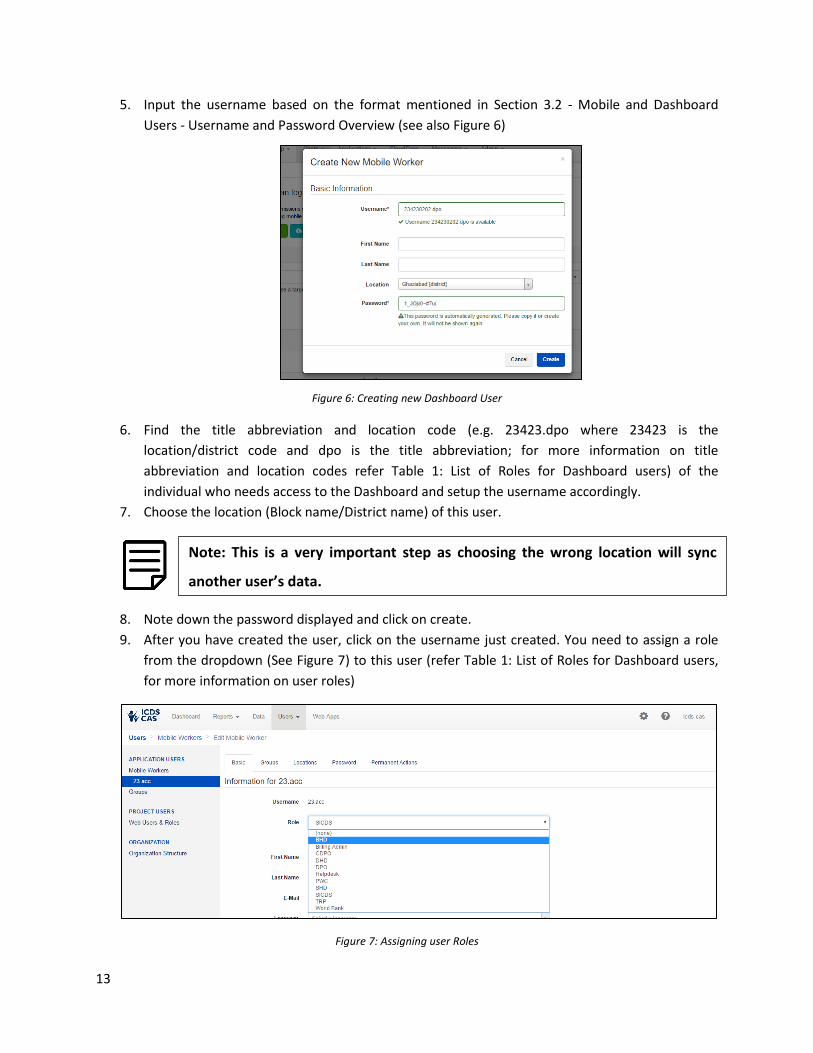
5. Input the username based on the format mentioned in Section 3.2 - Mobile and Dashboard
Users - Username and Password Overview (see also Figure 6)
Figure 6: Creating new Dashboard User
6. Find the title abbreviation and location code (e.g. 23423.dpo where 23423 is the
location/district code and dpo is the title abbreviation; for more information on title
abbreviation and location codes refer Table 1: List of Roles for Dashboard users) of the
individual who needs access to the Dashboard and setup the username accordingly.
7. Choose the location (Block name/District name) of this user.
8. Note down the password displayed and click on create.
9. After you have created the user, click on the username just created. You need to assign a role
from the dropdown (See Figure 7) to this user (refer Table 1: List of Roles for Dashboard users,
for more information on user roles)
Figure 7: Assigning user Roles
Note: This is a very important step as choosing the wrong location will sync
another user’s data.
14
10. Scroll down and click on “Update information” to save the user role.
11. Communicate the username and password to the intended user and ensure they login and
perform the below mentioned steps.
The District Helpdesk should facilitate logging into ICDS-CAS Dashboard by asking their respective
officials to follow these steps:
1. The URL for accessing ICDS-CAS Dashboard is: www.icds-cas.gov.in/a/icds-cas. Navigate to this
URL on your web browser.
2. Enter the username and password as communicated by the District Helpdesk and Click on Sign
in.
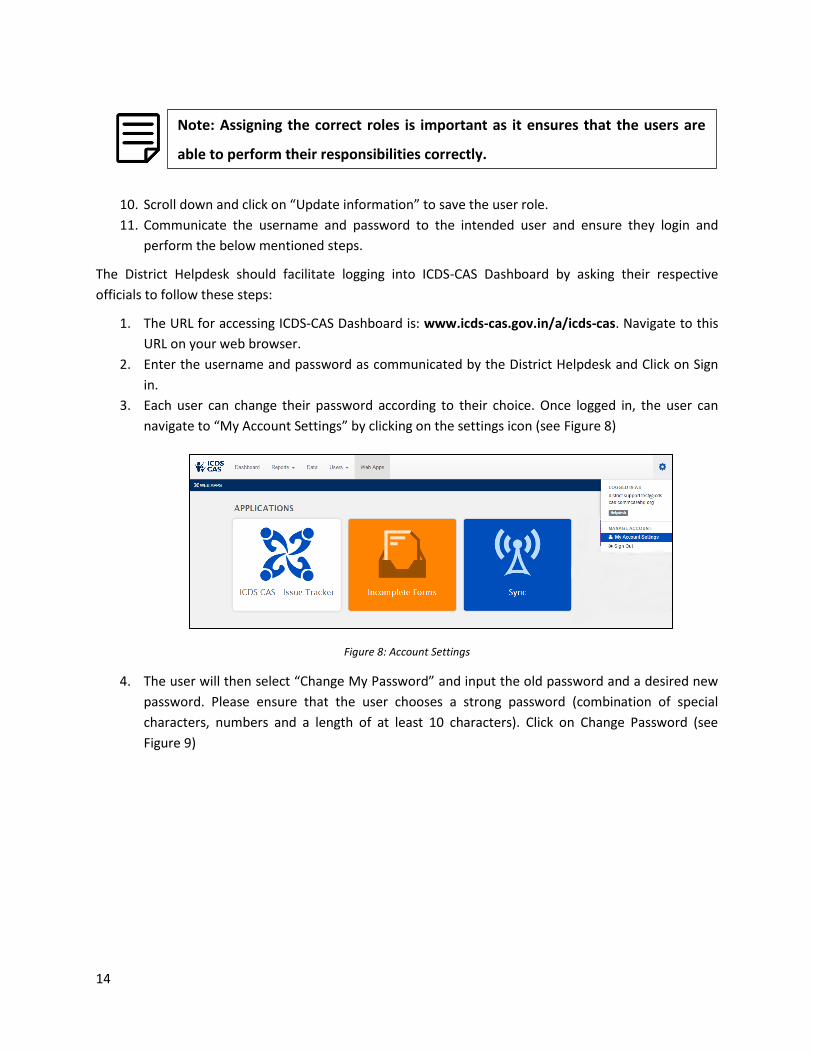
3. Each user can change their password according to their choice. Once logged in, the user can
navigate to “My Account Settings” by clicking on the settings icon (see Figure 8)
Figure 8: Account Settings
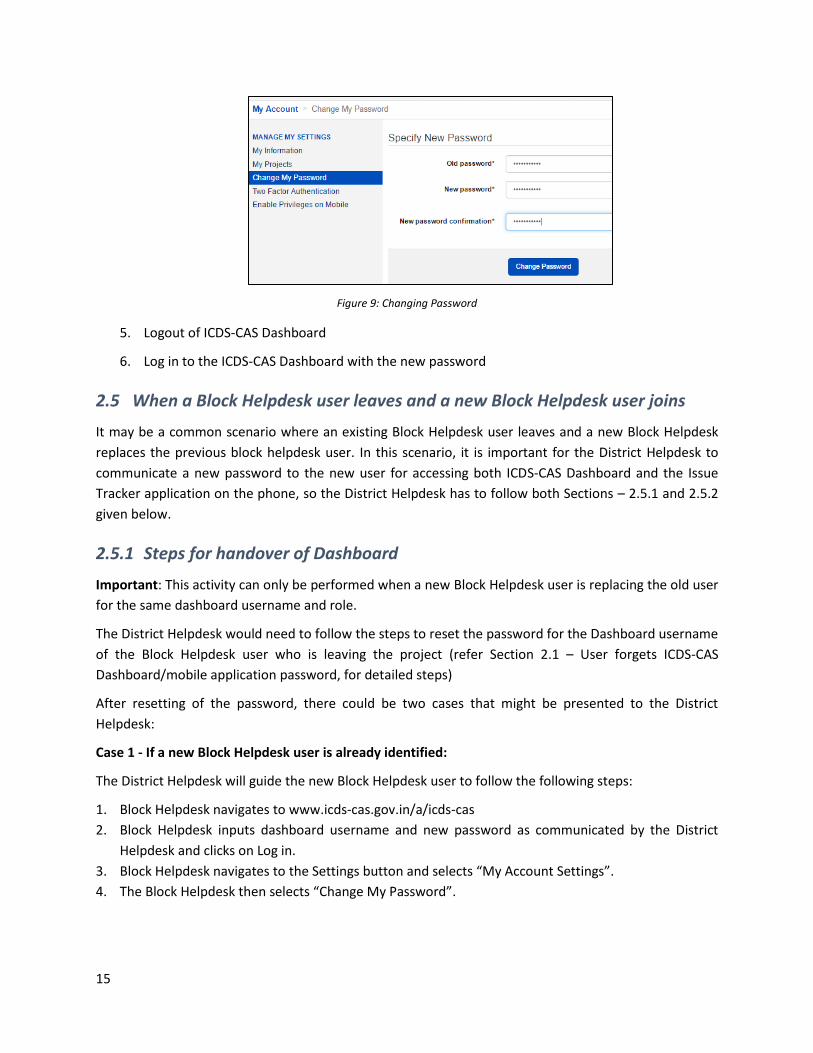
4. The user will then select “Change My Password” and input the old password and a desired new
password. Please ensure that the user chooses a strong password (combination of special
characters, numbers and a length of at least 10 characters). Click on Change Password (see
Figure 9)
Note: Assigning the correct roles is important as it ensures that the users are
able to perform their responsibilities correctly.
15
Figure 9: Changing Password
5. Logout of ICDS-CAS Dashboard
6. Log in to the ICDS-CAS Dashboard with the new password
2.5 When a Block Helpdesk user leaves and a new Block Helpdesk user joins
It may be a common scenario where an existing Block Helpdesk user leaves and a new Block Helpdesk
replaces the previous block helpdesk user. In this scenario, it is important for the District Helpdesk to
communicate a new password to the new user for accessing both ICDS-CAS Dashboard and the Issue
Tracker application on the phone, so the District Helpdesk has to follow both Sections – 2.5.1 and 2.5.2
given below.
2.5.1 Steps for handover of Dashboard
Important: This activity can only be performed when a new Block Helpdesk user is replacing the old user
for the same dashboard username and role.
The District Helpdesk would need to follow the steps to reset the password for the Dashboard username
of the Block Helpdesk user who is leaving the project (refer Section 2.1 – User forgets ICDS-CAS
Dashboard/mobile application password, for detailed steps)
After resetting of the password, there could be two cases that might be presented to the District
Helpdesk:
Case 1 - If a new Block Helpdesk user is already identified:
The District Helpdesk will guide the new Block Helpdesk user to follow the following steps:
1. Block Helpdesk navigates to www.icds-cas.gov.in/a/icds-cas
2. Block Helpdesk inputs dashboard username and new password as communicated by the District
Helpdesk and clicks on Log in.
3. Block Helpdesk navigates to the Settings button and selects “My Account Settings”.
4. The Block Helpdesk then selects “Change My Password”.
16
5. The Block Helpdesk will enter the password communicated to them and then enter the new desired
password. The password must contain a capital letter, a number, a special character and must be at
least 10 characters. Then click on “Change Password”.
6. Log out of ICDS – CAS Dashboard.
7. Log in to ICDS-CAS Dashboard with the new password.
Case 2 - If a new user is not yet identified:
The District Helpdesk will follow the following steps:
1. Navigate to www.icds-cas.gov.in/a/icds-cas, click on the “Users tab”. Select “Mobile Workers”
2. Search for the dashboard username (see step 4 in Section 2.1 - User forgets ICDS-CAS
Dashboard/mobile application password of this document for more information) and then click on
deactivate user (this will ensure that that the user is not counted towards active users).
3. When a new user is identified, follow step 1 above and click on “Show deactivated mobile workers”
and then find the user that was deactivated. Search using dashboard username or name.
4. Click on the user and then click on Reactivate user. The dashboard username will disappear from
this section and will now be among active users.
5. Follow all steps given in Case 1.
2.5.2 Steps for handover of Issue Tracker application
Important: This activity can only be performed when a new Block Helpdesk user is replacing the old user
for the same block and mobile username. The block code must match.
In this case, the District Helpdesk should carry out the following steps to ensure all the data is secured
and the new Block Helpdesk user has the most up to date data and a secure password:
1. Before a Block Helpdesk user leaves, they must report to the District Helpdesk and deposit the
phone in person.
2. The District Helpdesk will then reset the password for the mobile username on the ICDS-CAS
website (see Section 2.1 - User forgets ICDS-CAS Dashboard/mobile application password of this
document for detailed steps on how to reset user password).
3. Open Issue Tracker application on the phone and enter the new password.
4. When asked if you want to set a PIN, select “Yes” and enter “1234” as the PIN.
5. Click on Sync Data and wait till the syncing finishes.
6. Log out of the application.
After logging out there could be two cases that may be presented to the District Helpdesk:
Case 1 - If a new user is already identified:
1. Assist the user to log in to the Issue Tracker application on the phone. Enter the mobile username
and PIN (1234).
2. Assist the user to set their own 4-digit PIN.
Case 2 - If a new user is not yet identified:
17
The District Helpdesk will follow the following steps:
1. Navigate to www.icds-cas.gov.in/a/icds-cas, click on the “Users tab”. Select “Mobile Workers”
2. Search for the mobile username (see step 4 in section 2.1 - User forgets ICDS-CAS Dashboard/mobile
application password of this document for more information) and then click on deactivate user (this
will ensure that that the user is not counted towards active users).
3. When a new user is identified, follow step 1 above and click on “Show deactivated mobile workers”
and then find the user that was deactivated. Search using mobile username or name.
4. Click on the user and then click on Reactivate user. The mobile username will disappear from this
section and will now be among active users.
5. Follow all steps given in Case 1.
2.6 When a District ICDS official leaves and a new District ICDS official joins
It may be a common scenario where an existing District ICDS official leaves the program and a new
District ICDS official joins in place of him. In this scenario, it is important for the District Helpdesk to
communicate a new password to the new user for accessing the ICDS-CAS Dashboard.
Important: This activity can only be performed when a new District ICDS official is replacing the old user
for the same username and role.
The steps for handover of Dashboard account to a new District ICDS official are exactly similar to the
steps for handover of Dashboard account when a new Block Helpdesk user joins in place of an existing
one (refer Section 2.5.1 – Steps for handover of Dashboard, for detailed steps).
2.7 Verify User friendly settings on devices
There can be scenarios like device settings being altered by the user, a new device to be setup etc.
During this time, the District Helpdesk would need to make sure that the user friendly settings are setup
on the device for Aanganwadi workers / Lady Supervisors / Block Helpdesks to be able to use the phone
easily. Follow the steps below to achieve this:
Step 1: Remove all extra home screens if there is more than one by default. For some devices, pinching
the screen does this, for others, remove all icons from the screen.
Step 2: Set wallpaper and lock screen to a simple theme: tap and hold background.
Step 3: Update device firmware: Settings > About Device > System Update. Verify system is up to date,
otherwise update.
Step 4: Update existing apps: Play Store > Top Menu > All Apps > Update all
Step 5: Create CommCare LTS shortcut on each home screen
a) Go to Applications
b) Press and Hold CommCare LTS to create a shortcut on the home screen
c) Remove all other shortcuts from the home screen

18
d) If there are multiple home screens, make sure you’ve added “CommCare LTS” shortcut to each
screen
Step 6: Increase the Display Time Out
a) Go to Settings > Display
b) Set screen timeout or sleep to 2 minutes
Step 7: Turn Off Screen Auto-rotate
a) Go to Settings > Display
b) Uncheck auto-rotate screen
Step 8: Set the Display Brightness
a) Go to Settings > Display
b) Set the Brightness to Auto if available (recommended for battery savings)
c) If Auto is not available, set Brightness to high level
Step 9: Disable notifications for extraneous apps:
a) On older devices, go to Settings > Apps. Select the relevant apps, and for each one, disable the
"Show notifications".
b) On newer devices, go to Settings > Sounds and notifications > App notifications. Select the relevant
apps and enable "Block notifications".
Step 10: Set Device to Local Language
a) Go to Settings > Locale and Text or Settings > Language & Input
b) Change the Language to the local language depending on the state of the purchase order
i) Andhra Pradesh > Telugu
ii) Maharashtra > Marathi
iii) All Others > Hindi
Step 11: Setup the keyboard
a) Settings > Language & Input > Current Keyboard
b) Make sure “English & Indic Languages” is listed.
i) If not, select “Choose Keyboards” and enable “Google Indic Keyboard”
c) Select “English & Indic Languages”
d) Open up a text message or a browser in order to access a keyboard
e) Click the keyboard tab with the Devanagari symbol twice and select the keyboard with no symbols
(bottom left)
f) Click the symbol at right and select the language depending on the state of the purchase order
i) Andhra Pradesh > Telugu
ii) Maharashtra > Marathi
iii) All Others > Hindi
Step 12: Setup GPS
19
a) Go to Settings > Location and Security OR Settings > Location Access
b) Make sure Access to my Location is On (if setting is available)
c) Check GPS satellites
d) Check Wi-Fi & mobile network location OR Use Wireless networks
Step 13: Verify that App Lock is hidden – Verify App lock is not visible anywhere on the device
If App lock is not hidden, then follow these steps to hide App Lock
a) Hide the App Lock icon from Android Home Screen to prevent the user from uninstalling the app
b) Unlock the AppLock and go to “Protect”
c) Go to Security >Unlock Settings > Password
d) Enter ‘1947’ as the four-digit password
e) Go back to Protect -> Magic -> Hide AppLock
f) Turn on Hide AppLock
g) To now access AppLock, go to dialpad and enter #password (e.g. #1947) followed by app pattern
that was set up above. You will now have to use this password to unlock AppLock related locks
everywhere.
Step 14: Verify the following apps are locked
a) Google Play Store
b) Email
c) Gmail
d) Chrome
e) Drive
f) Google
g) Google +
h) Hangouts
i) Internet
j) Play Books
k) Play Games
l) Play Movies & TV
m) Play Newsstand
n) Radio
o) YouTube
Step 15: Double confirm - Disassociate or remove any/all Google account from the device by going to
Settings -> Accounts -> Google -> Select Account -> Options (Three dots) -> Remove account
Verification and Setup is complete at this point.
20
3 User Management
The user management section covers the process of managing usernames and passwords for the long
term maintenance of ICT-RTM.
User Management includes creation and maintenance of usernames and passwords for accessing the
ICDS – CAS Dashboard and the mobile applications. All usernames will be created online on ICDS - CAS
dashboard by the CPMU two weeks before the expected delivery of devices. The CPMU will also provide
a detailed document titled: ICT-RTM – User Management Guidelines on username and password
management for ICT-RTM closer to the delivery of phones. The document will describe in detail the roles
and responsibilities at the State, District and Block level.
Each type of web user will have their own set of permissions to ensure that they only access data for
their geography and are able to perform functions based on their responsibility. E.g. a DPO can only
access data for his/her district, and can drill-down to each AWC and beneficiary in the district. The State
and District Helpdesk staff will also use the ICDS – CAS Dashboard for accessing the Issue Tracker
application as well as for executing administrative tasks like user management.
3.1 Types of Users
For ICDS-CAS there are primarily two types of users:
1) Mobile users: AWWs, Supervisors and Block Helpdesk users who will be using either a phone or
a tablet.
2) Dashboard users: ICDS officials and Helpdesk personnel at various administrative levels who will
be using a computer.
3.2 Mobile and Dashboard Users – Username and Password Overview
Having a secure username and password is essential for the functioning of ICT-RTM ICDS-CAS. The
mobile application captures sensitive information about households, their health and nutrition status
and ensuring that Aanganwadi workers and Lady Supervisors are keeping the information safe is
essential.
Since each Aanganwadi worker belongs to a particular Aanganwadi Center and a Lady Supervisor
belongs to a sector, usernames are associated with their location for ease of setup and long term
maintenance.
Usernames must be unique and passwords must be strong. For Dashboards, since there can be many
users at a state, district or block level, usernames will have to be developed according to their role/title
abbreviation along with the location.
Usernames must be unique and passwords need to have the following format - 1
special character, 1 number, 1 capital letter and a minimum length of 10
characters
21
Examples of usernames for mobile users and dashboard users:
AWW usernames will be the same as 11-digit Aanganwadi Center code (E.g.: 10224020101)
Supervisor usernames will be the same as their 9-digit code for the sector (E.g.:102240201)
Block Helpdesk usernames (for Issue Tracker app in mobile devices) will be the same as their 7-
digit block code (Example. 1022402)
Dashboard usernames (for State, District and Block Helpdesk) will be a combination of location
code and title abbreviation. For example, a username for Block Helpdesk personnel of Madhya
Pradesh will be 2341910.bhd (2341910 being the block code and bhd the title abbreviation for
Block Helpdesk). For more details on title abbreviations, please refer Table 1: List of Roles for
Dashboard users.
In addition to the 10-character long password, mobile users will have the functionality to update their
password on first login. This ensures each mobile worker can create their own password so it can be
easy to remember and is more secure. Dashboard users can also manually change their password any
time after their first login.
Usernames will be of two categories based on the user type:
a. For mobile users
b. For dashboard users
a) For mobile users
For mobile users, the username format will be as described above i.e. 11-digit Aanganwadi Center Code
for AWW, 9-digit sector code for supervisors and 7-digit block code for Block Helpdesk.
b) For Dashboard users
For Dashboard users, the username format will be as described above (Example. 2341910.bhd etc.).
They will also have appropriate roles assigned to them. The list of roles, title abbreviations and sample
usernames are detailed below (see Table 1)
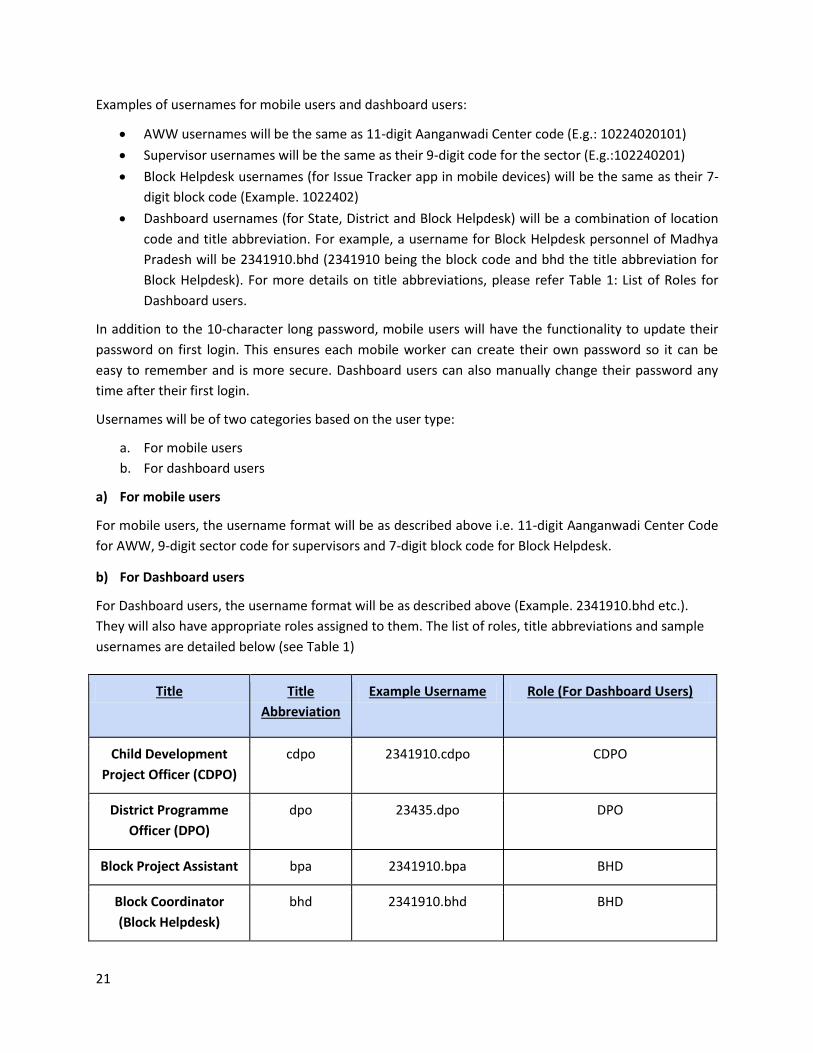
Title Title
Abbreviation
Example Username Role (For Dashboard Users)
Child Development
Project Officer (CDPO)
cdpo 2341910.cdpo CDPO
District Programme
Officer (DPO)
dpo 23435.dpo DPO
Block Project Assistant bpa 2341910.bpa BHD
Block Coordinator
(Block Helpdesk)
bhd 2341910.bhd BHD
22
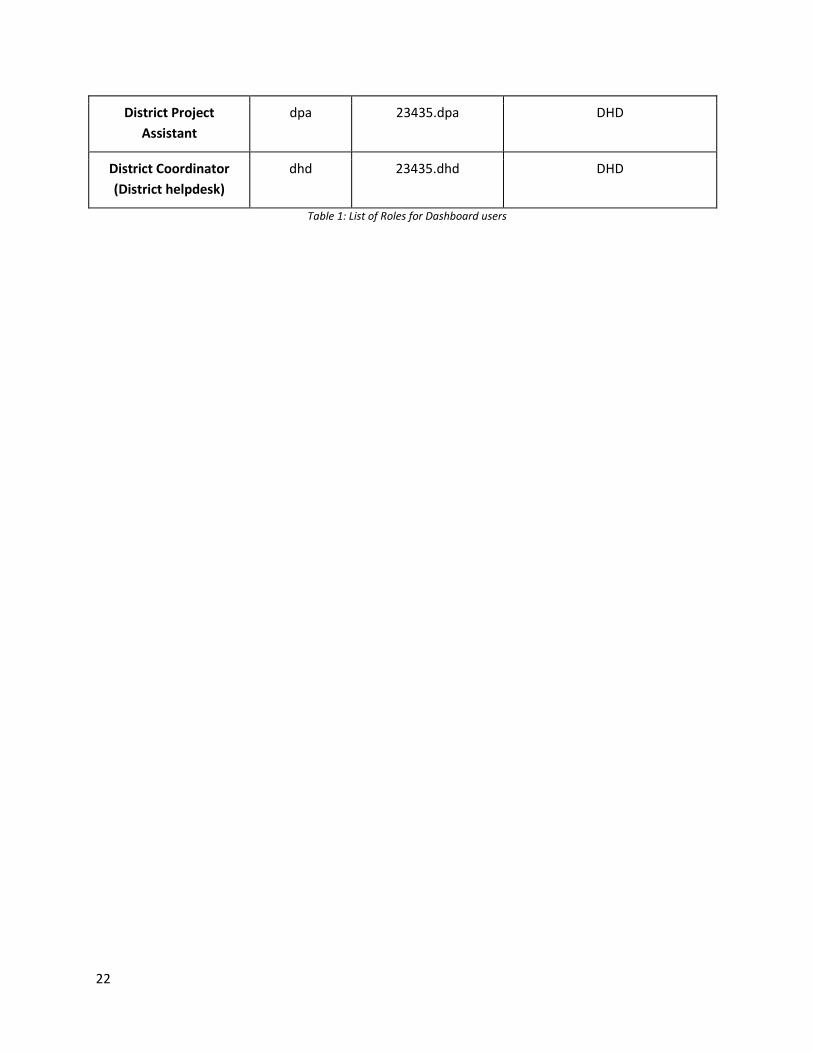
District Project
Assistant
dpa 23435.dpa DHD
District Coordinator
(District helpdesk)
dhd 23435.dhd DHD
Table 1: List of Roles for Dashboard users
23
4 District Level Issue Tracker User Manual
4.1 Objectives of the Issue Tracker Manual
The issue tracker web application will assist District Helpdesk in troubleshooting and resolving
issues that have been escalated to the District level by the Block Helpdesk.
The issue tracker web application will also be used by the District Helpdesk to escalate
unresolvable issues reported by the Block Helpdesk, to the State level.
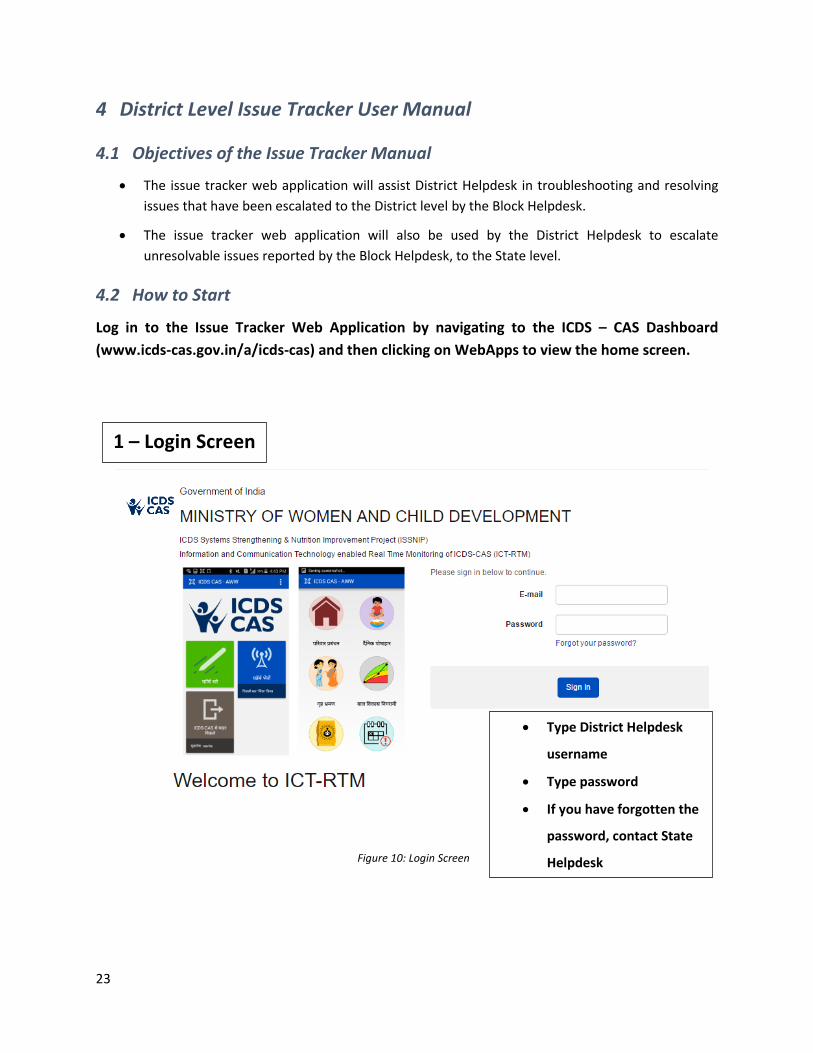
4.2 How to Start
Log in to the Issue Tracker Web Application by navigating to the ICDS – CAS Dashboard
(www.icds-cas.gov.in/a/icds-cas) and then clicking on WebApps to view the home screen.
1 – Login Screen
Figure 10: Login Screen
Type District Helpdesk
username
Type password
If you have forgotten the
password, contact State
Helpdesk

24
4.3 Modules
2 – Home Screen
Enter the issue tracker application from this screen by clicking on the ICDS
CAS – Issue Tracker icon
Exit the application by clicking on the gear icon and clicking on “Sign out”
Sync with the server updates your information
NOTE: Whenever you escalate / de-escalate an issue, make sure you have synced
with the server to complete escalation / de-escalation
What is a module?
A module is a part of an application. Inside each module, there are forms to fill in
about specific subject area. The District Helpdesk will only use the “Issue
Management” module to troubleshoot, resolve & escalate / de-escalate issues.
Click on Web Apps to view the home screen
Every time you log in, make sure you sync with server to see
updated information
Figure 11: Home Screen
25
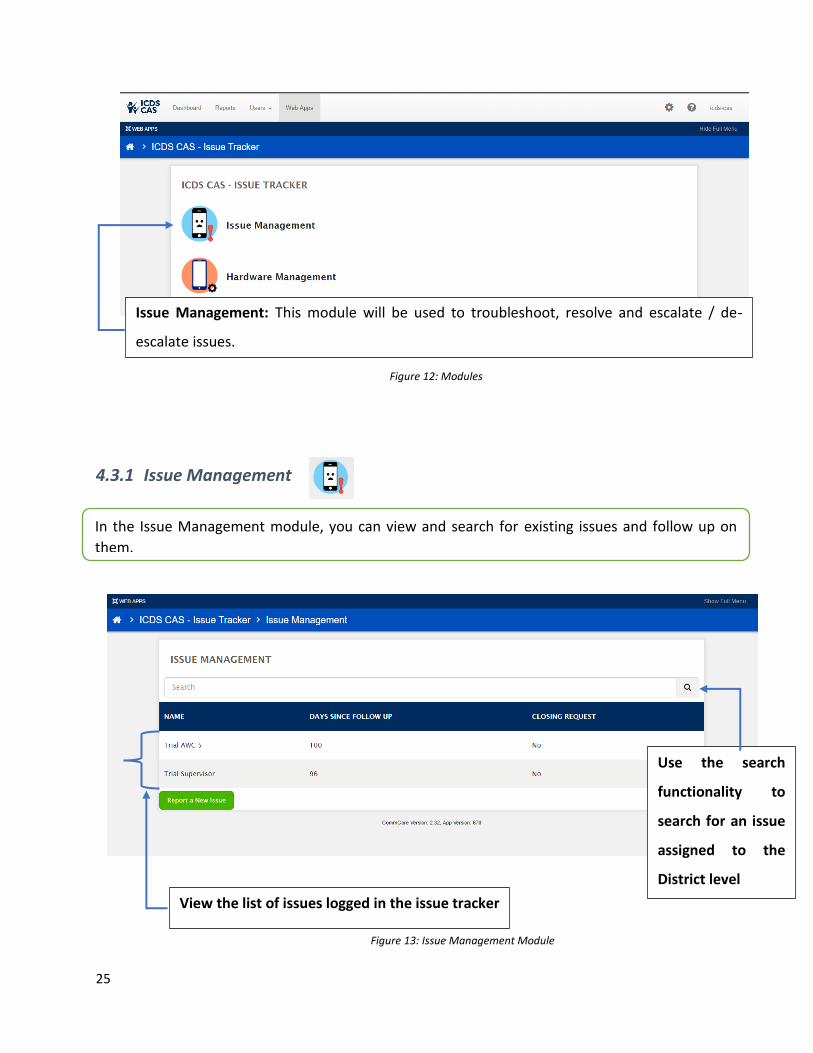
4.3.1 Issue Management
In the Issue Management module, you can view and search for existing issues and follow up on
them.
Issue Management: This module will be used to troubleshoot, resolve and escalate / de-
escalate issues.
View the list of issues logged in the issue tracker
Use the search
functionality to
search for an issue
assigned to the
District level
Figure 12: Modules
Figure 13: Issue Management Module
26
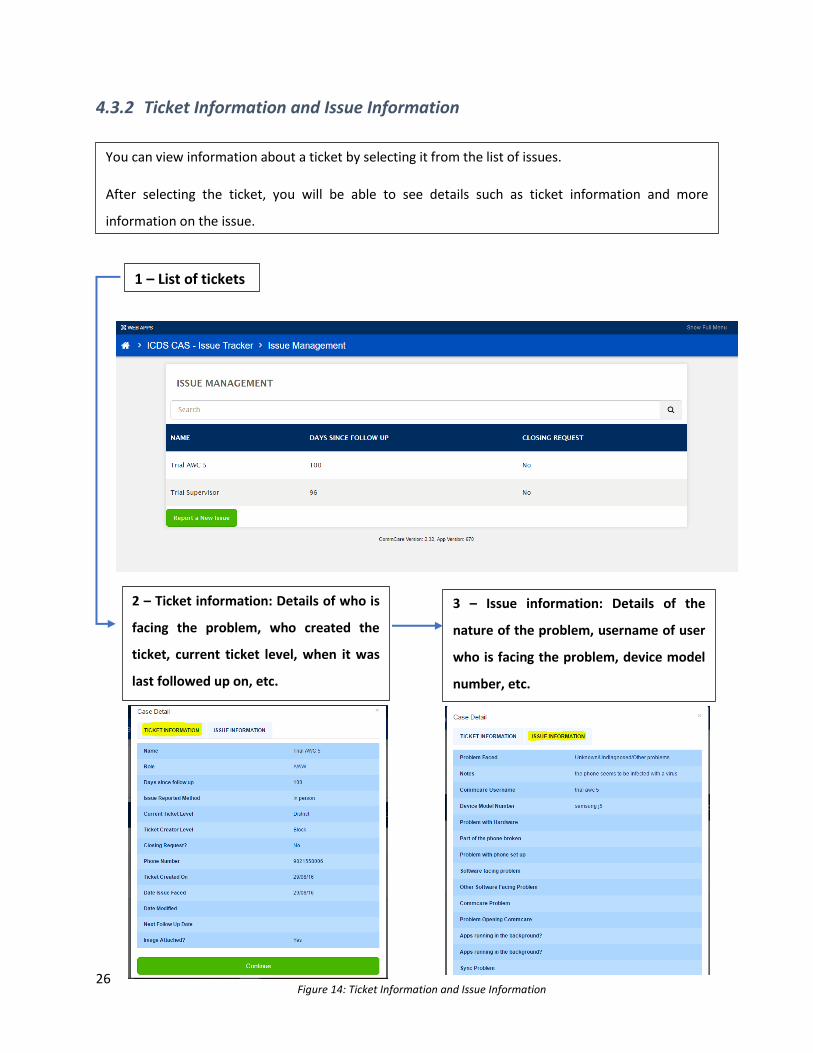
4.3.2 Ticket Information and Issue Information
You can view information about a ticket by selecting it from the list of issues.
After selecting the ticket, you will be able to see details such as ticket information and more
information on the issue.
1 – List of tickets
2 – Ticket information: Details of who is
facing the problem, who created the
ticket, current ticket level, when it was
last followed up on, etc.
3 – Issue information: Details of the
nature of the problem, username of user
who is facing the problem, device model
number, etc.
Figure 14: Ticket Information and Issue Information
27
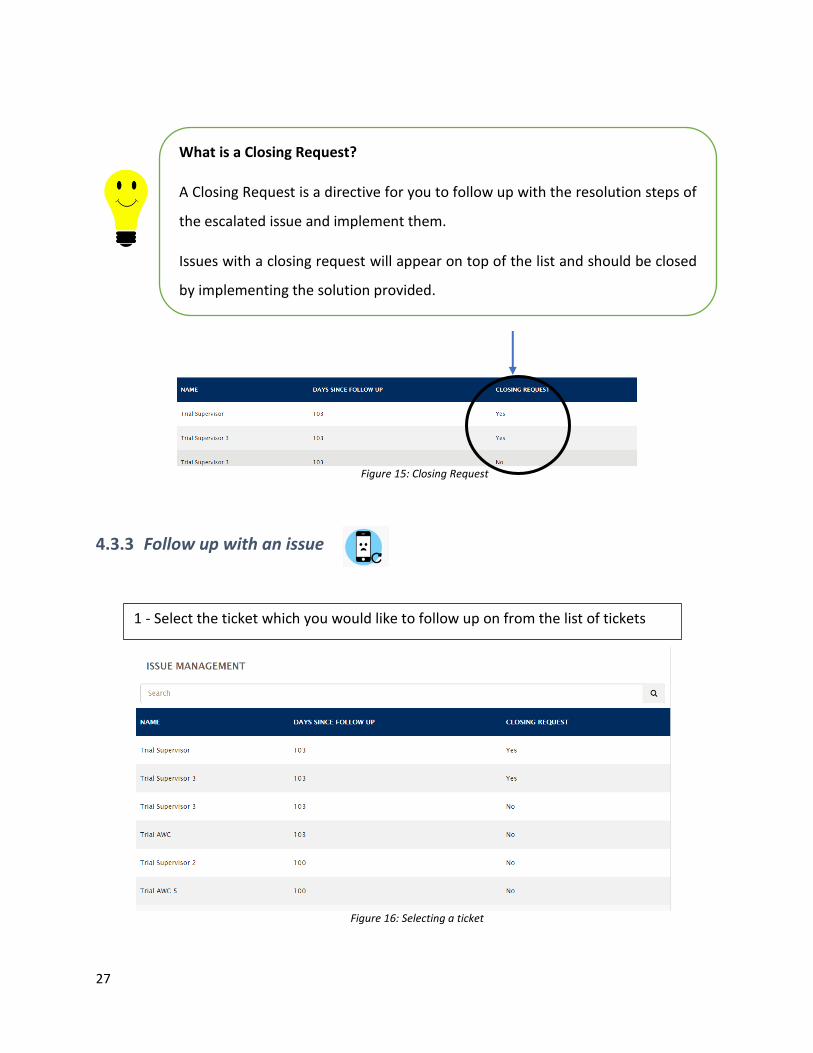
4.3.3 Follow up with an issue
What is a Closing Request?
A Closing Request is a directive for you to follow up with the resolution steps of
the escalated issue and implement them.
Issues with a closing request will appear on top of the list and should be closed
by implementing the solution provided.
1 - Select the ticket which you would like to follow up on from the list of tickets
Figure 15: Closing Request
Figure 16: Selecting a ticket

28
2 – After viewing the ticket details, click on “Continue” to update or resolve the ticket.
3 – Select the “Follow Up with Issue” module to enter the follow up form.
Figure 17: Moving forward to update or resolve the ticket
Figure 18: "Follow Up with Issue" module
29
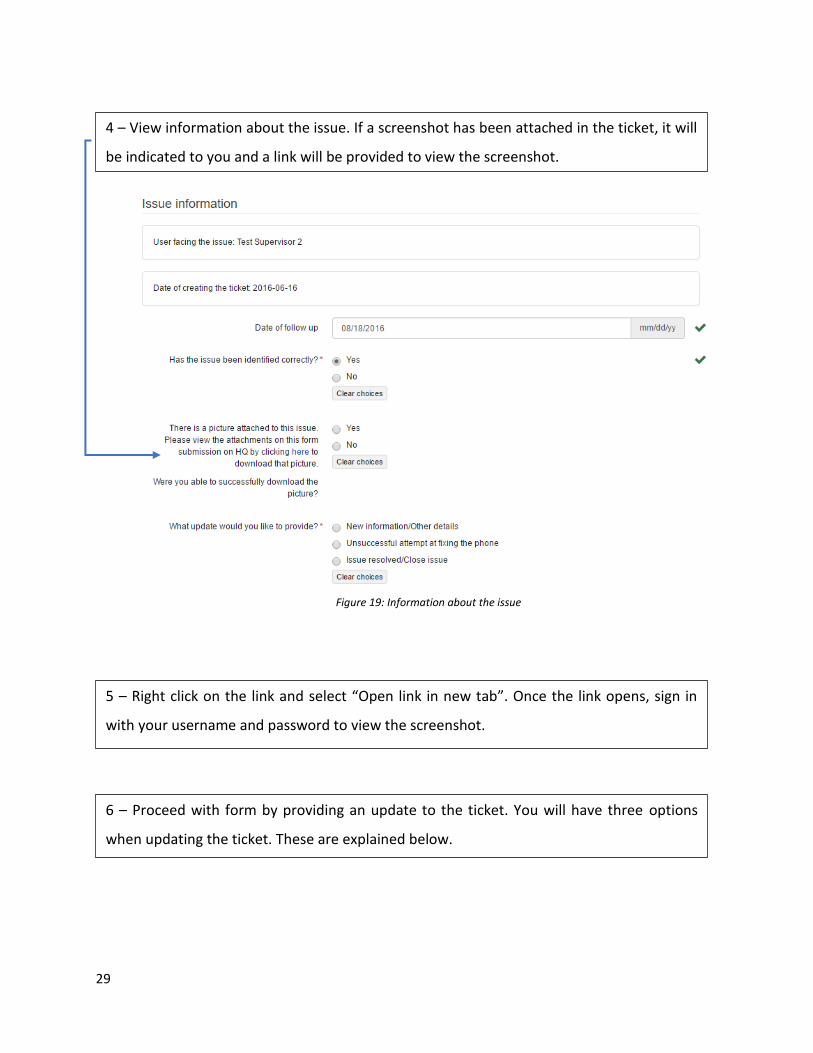
4 – View information about the issue. If a screenshot has been attached in the ticket, it will
be indicated to you and a link will be provided to view the screenshot.
5 – Right click on the link and select “Open link in new tab”. Once the link opens, sign in
with your username and password to view the screenshot.
6 – Proceed with form by providing an update to the ticket. You will have three options
when updating the ticket. These are explained below.
Figure 19: Information about the issue

30
Option 1: New information/ Other details
1. Enter the date of follow up and Select the “New information/Other Details”
2. Enter the complete information in the notes
Figure 20: Select "New Information/Other Details"
Figure 21: Enter information in Notes
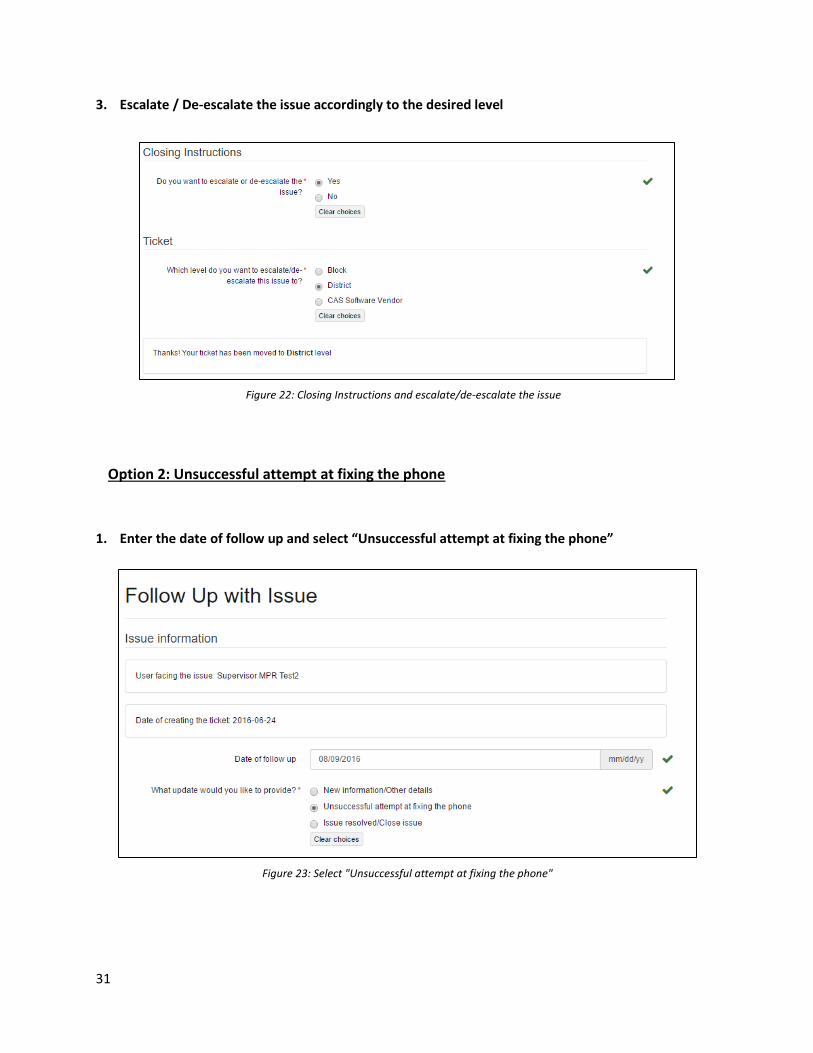
31
3. Escalate / De-escalate the issue accordingly to the desired level
1. Enter the date of follow up and select “Unsuccessful attempt at fixing the phone”
Option 2: Unsuccessful attempt at fixing the phone
Figure 22: Closing Instructions and escalate/de-escalate the issue
Figure 23: Select "Unsuccessful attempt at fixing the phone"
32
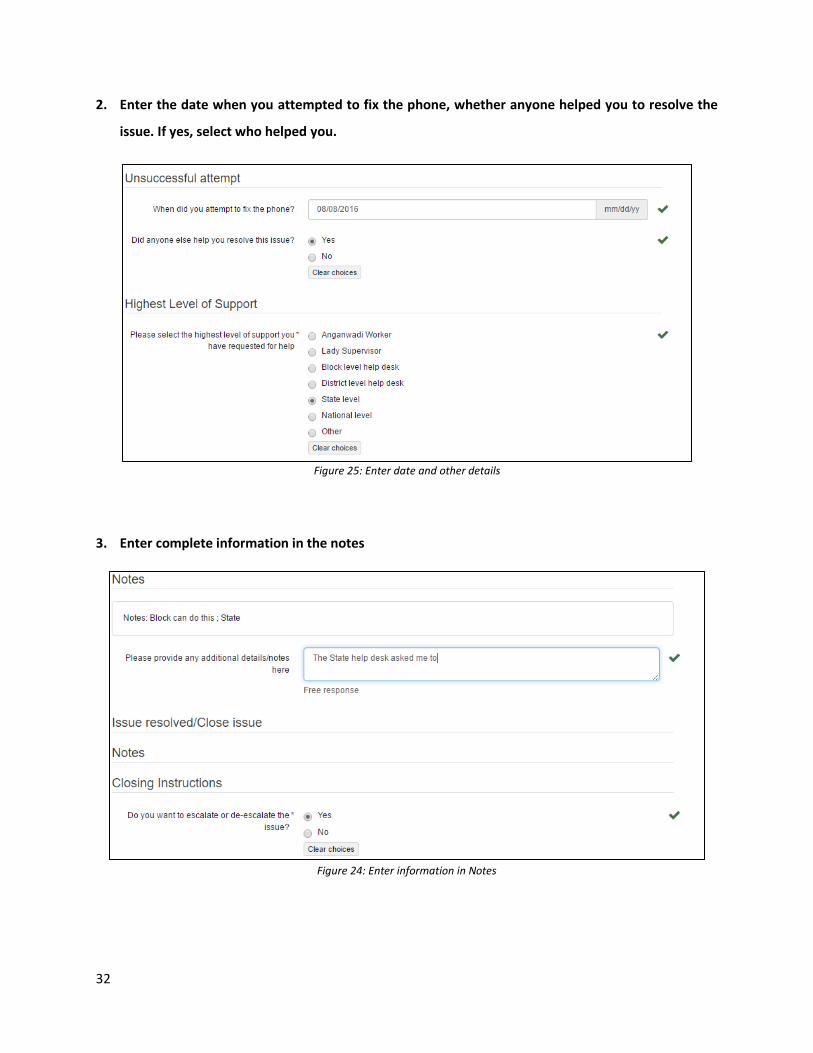
2. Enter the date when you attempted to fix the phone, whether anyone helped you to resolve the
issue. If yes, select who helped you.
3. Enter complete information in the notes
Figure 25: Enter date and other details
Figure 24: Enter information in Notes
33
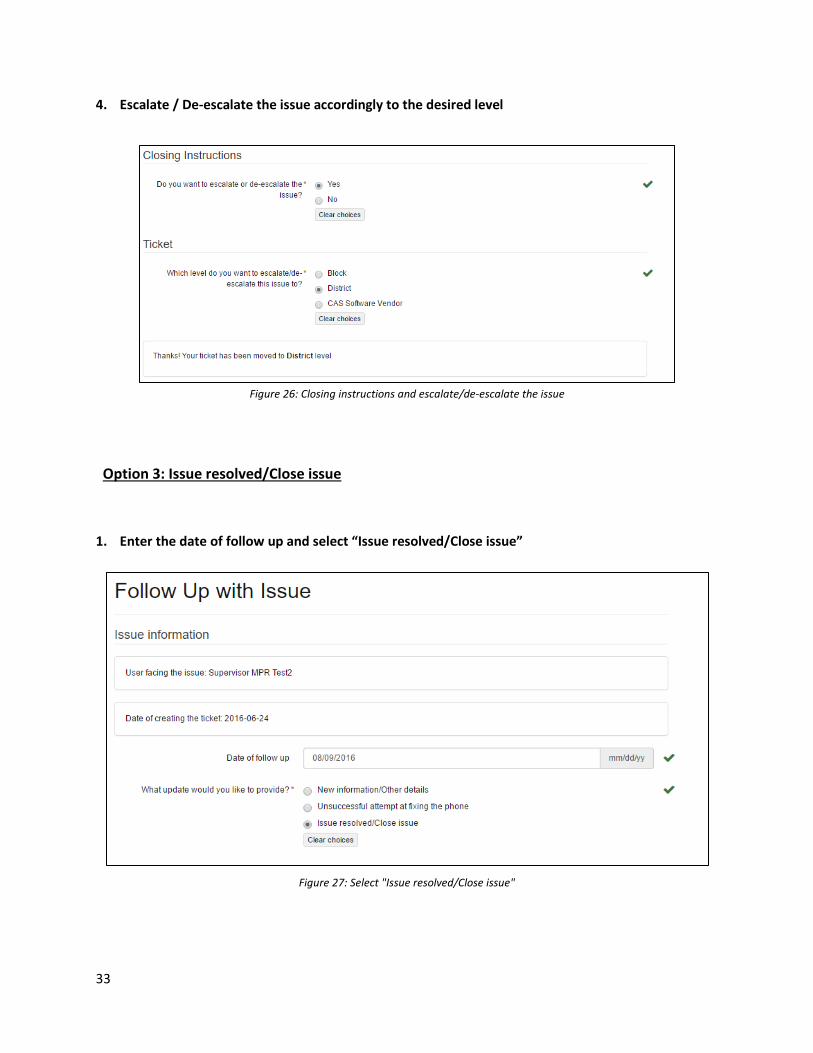
4. Escalate / De-escalate the issue accordingly to the desired level
1. Enter the date of follow up and select “Issue resolved/Close issue”
Option 3: Issue resolved/Close issue
Figure 27: Select "Issue resolved/Close issue"
Figure 26: Closing instructions and escalate/de-escalate the issue

34
2. Select the date when the issue was resolved, and if anyone helped you resolve the issue, enter the
details accordingly.
3. Enter information in Notes and submit Closing instructions
Figure 28: Enter date and other details
Note: If the issue is resolved or incorrectly logged, it will be removed from your list.
For incorrectly logged issues, close the issue and ask the Block Helpdesk to report a
new issue by using the “Report a new issue” form and log the issue correctly.
Figure 29: Enter information in Notes and submit closing instructions

35
First level of support for AWWs, Supervisors, CDPO
Escalate unsolvable issues to District Helpdesk
Second level of support for AWWs, Supervisors, CDPO
First level of support for DPO, District ICDS team
Escalate unsolvable issues to State Helpdesk
4.4 Escalation Matrix
BLOCK
DISTRICT
STATE
CPMU
36
4.5 Issue Tracker Reports
Issue tracker reports will provide the District Helpdesk with an insight into the performance of the Block
level Helpdesk, as well as monitor the number of issues that are existing and need to be followed up.
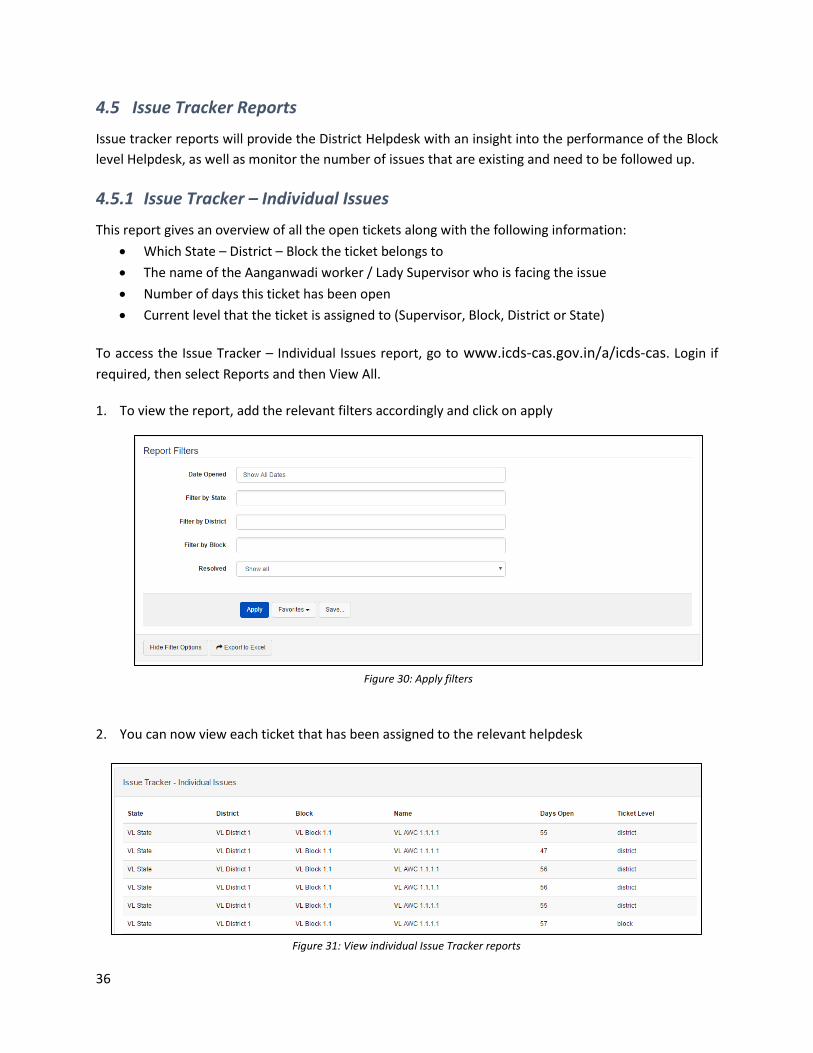
4.5.1 Issue Tracker – Individual Issues
This report gives an overview of all the open tickets along with the following information:
Which State – District – Block the ticket belongs to
The name of the Aanganwadi worker / Lady Supervisor who is facing the issue
Number of days this ticket has been open
Current level that the ticket is assigned to (Supervisor, Block, District or State)
To access the Issue Tracker – Individual Issues report, go to www.icds-cas.gov.in/a/icds-cas. Login if
required, then select Reports and then View All.
1. To view the report, add the relevant filters accordingly and click on apply
2. You can now view each ticket that has been assigned to the relevant helpdesk
Figure 30: Apply filters
Figure 31: View individual Issue Tracker reports
37
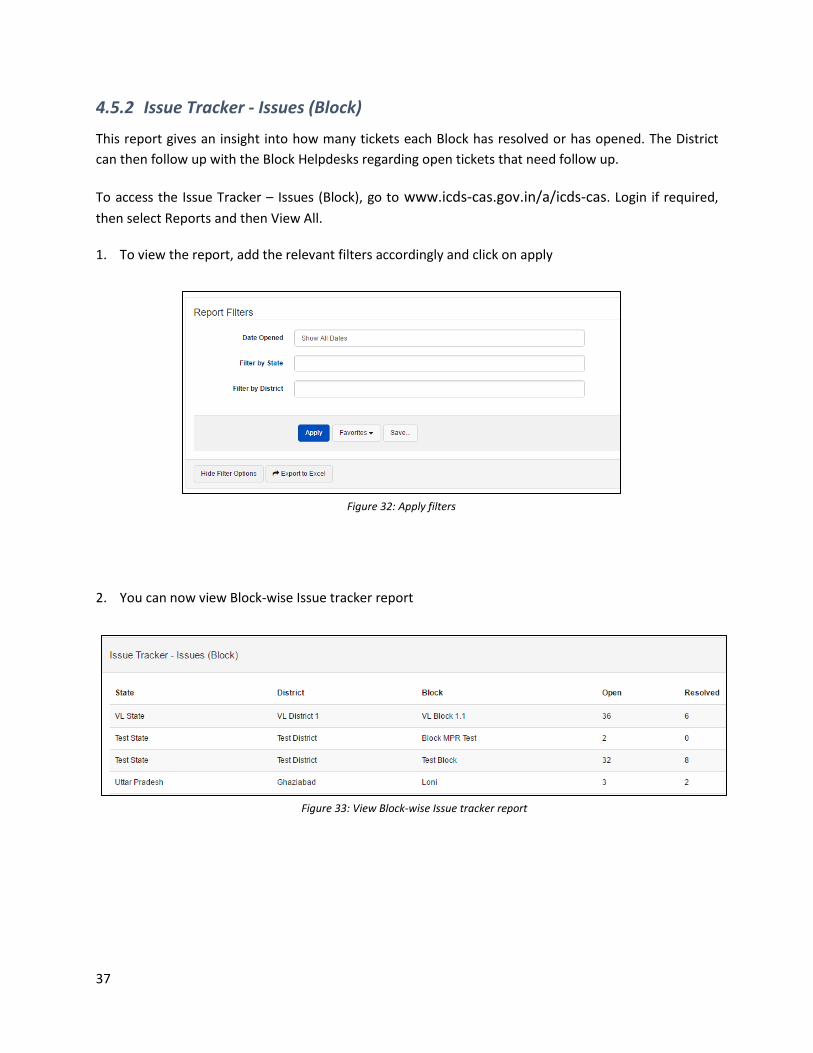
4.5.2 Issue Tracker - Issues (Block)
This report gives an insight into how many tickets each Block has resolved or has opened. The District
can then follow up with the Block Helpdesks regarding open tickets that need follow up.
To access the Issue Tracker – Issues (Block), go to www.icds-cas.gov.in/a/icds-cas. Login if required,
then select Reports and then View All.
1. To view the report, add the relevant filters accordingly and click on apply
2. You can now view Block-wise Issue tracker report
Figure 32: Apply filters
Figure 33: View Block-wise Issue tracker report
38
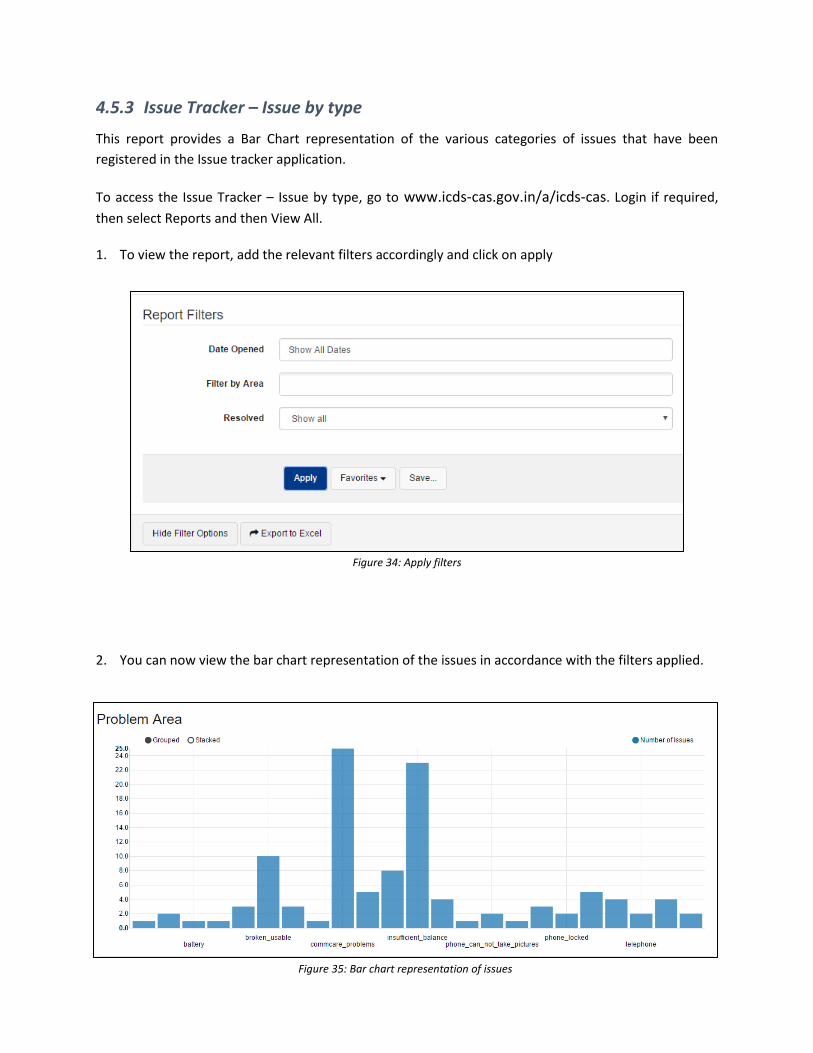
4.5.3 Issue Tracker – Issue by type
This report provides a Bar Chart representation of the various categories of issues that have been
registered in the Issue tracker application.
To access the Issue Tracker – Issue by type, go to www.icds-cas.gov.in/a/icds-cas. Login if required,
then select Reports and then View All.
1. To view the report, add the relevant filters accordingly and click on apply
2. You can now view the bar chart representation of the issues in accordance with the filters applied.
Figure 34: Apply filters
Figure 35: Bar chart representation of issues