Earth and Space SCE 3110 Activities
22
Earth and Space SCE 3110 Activities
Transcript of Earth and Space SCE 3110 Activities
Earth and Space SCE 3110
Activities

Activities for Earth
Activity 1
Investigating the Relationship between Wind and Wave Size.
What you need:
Electric fanTrayWaterSand and Pebbles.
What to do:
1. Construct a beach with sand and pebbles at one end of thetray. Slowly fill the tray with water to a depth of 3cm.
2. Position the fan at the opposite end of the tray to the sand.Aim the fan so that it will hit the water at roughly a 45°angle.
3. Using the low speed of the fan, turn it on for 3 minutes.Record your observations in the table. Allow water to calm.
4. Using the high speed of the fan, turn it on for 3 minutes.Record your observations on the table. Allow water to calm.
5. Write a prediction that describes what you think will happenwhen you turn the fan on for 5 seconds at high speed.
6. Turn the fan on for 5 seconds at high speed. Record yourobservations next to your prediction.
7. Using your observations what can you say about the linkbetween wave size and wind.
8.Fanspeed Time Observations
Prediction of High speed for 5 seconds.
1

_________________________________________________________________
_________________________________________________________________
__________
Observation of High speed for 5 seconds._________________________________________________________________
_________________________________________________________________
_________________________________________________________________
_______________
Activity 2
Investigating the Relationship between Wave Speed and WaterDepth.
What you need:
Tray WaterTwo different lengths of wood.Stopwatches
What you need:
1. Fill the stream tray to a depth of 1cm. 2. Use the longer piece of wood at one end to act as a reflector.3. Using the shorter piece of wood, make a wave pulse by dropping
or pushing the wood into the water one end at a time.4. Time how fast it takes the wave to travel the distance of the
tray.5. Record your findings in the table.6. Complete again with water depths of 2cm, 3cm, 4cm and 5cm.7. Record your observations and explanations you might have.
WaterDepth Time Observations
2
Explanations_________________________________________________________________
_________________________________________________________________
_________________________________________________________________
_______________
3
Activity 3
Formation of volcano
What you need:
Baking SodaVinegarModelling Clay
What to do:
1. In groups students build a mini volcano using modelling clay,baking soda and vinegar.
2. Students reflect on the reaction that caused their volcano toerupt and how this is similar to active volcanoes.
*Use your creativity to make this experiment a successful one
4
Activities for Space
Activity 1.1
Finding North
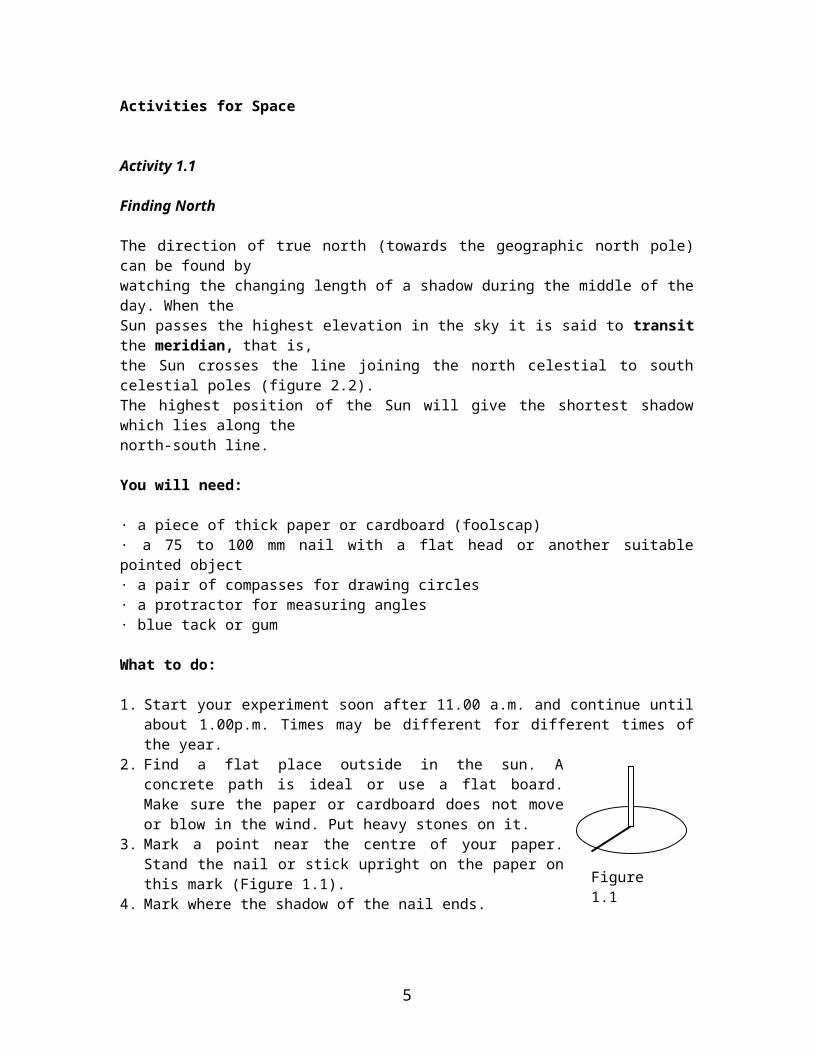
The direction of true north (towards the geographic north pole)can be found bywatching the changing length of a shadow during the middle of theday. When theSun passes the highest elevation in the sky it is said to transitthe meridian, that is,the Sun crosses the line joining the north celestial to southcelestial poles (figure 2.2).The highest position of the Sun will give the shortest shadowwhich lies along thenorth-south line.
You will need:
· a piece of thick paper or cardboard (foolscap)· a 75 to 100 mm nail with a flat head or another suitablepointed object· a pair of compasses for drawing circles· a protractor for measuring angles· blue tack or gum
What to do:
1. Start your experiment soon after 11.00 a.m. and continue untilabout 1.00p.m. Times may be different for different times ofthe year.
2. Find a flat place outside in the sun. Aconcrete path is ideal or use a flat board.Make sure the paper or cardboard does not moveor blow in the wind. Put heavy stones on it.
3. Mark a point near the centre of your paper.Stand the nail or stick upright on the paper onthis mark (Figure 1.1).
4. Mark where the shadow of the nail ends.
5
Figure 1.1
5. Take away the nail and use your compass to quickly draw acircle with a radius less than the length of the shadow. Yourcircle should not reach the end of the shadow.
6. Put the nail back in exactly the same position. Make sure thenail shadow ends where it did before.
7. Leave the paper and nail in position for about 2 hours. Markthe position of the top of the nail shadow every 15 minutes.You should also mark the point on the circle when the tip ofthe shadow just touches the circle you drew.
8. Watch carefully as the shadow lengthens again after local noontime.
9. Mark the position when the top of the nail’s shadow againtouches the circle.
10. Remove the nail. Join the centre of your circle to the twopoints where the shadows touched the circle. Be careful not tomove the paper.
11. Use a protractor or your compass to divide the angle betweenthe shadow lines into two equal parts. Draw this line rightacross your circle. This line points true north and south.
12. Mark this line on the concrete or ground. Now remove yourpaper. It is a good idea to paint the line or put some whitepaint on a post or object that is along this line. It can beused for other activities later on.
6

Activity 1.2
Locating And Recording The Position Of Objects
To locate and record the changing positions of objects in the skywe need to be able to measure angles in a simple way. You carrywith you one of the best and easy to use devices for this It iscalled your hand. The activity that follows shows you how toestimate angles with your hand span and knuckle span.
Azimuth and altitude
We need a way of measuring two things to find the position of anobject. The first is the direction or azimuth from true Northwhich you will find using your hand span. Thesecond is the angle above the ground which you will find usingyour knuckle span. This is called the altitude.
What to do:
1. To find the size of your hand span, stand up and stretch yourarm out straight. Spread your fingers wide apart. Close oneeye and line the outer edge of your thumb up with a distanttree or object. See what your little finger is lined up with.Move your thumb to this position.
2. Keep doing this and keep count of the number of times to goaround a complete circle (360°). Divide the number of handspans into 360°. This will give you thesize of your hand span.
Example: Number of hand spans in a circle = 20 Therefore one hand span = 360°/20= 18° perhand span
3. The width across your knuckles (fist) will be approximatelyhalf of your hand span.
4. To make it simple for you, most adults with average hands havea hand span of 20° and a knuckle span of 10°.
You now have two useful ways to measure angles.
Question
7
1. Using your hand span estimate the altitude of a tree orbuilding in the grounds.
2. A student with a hand span of 18° measures the position of themoon early one evening. The measurements are five hand spansfrom north and three knuckle spans up from the horizon. Whatis the azimuth and altitude of the moon?
8
Activity 2.1
Using Star Chart to Locate Stars
A star chart is used to identify stars and constellations. Eachnight the stars move across the sky, rising in the east andsetting in the west.
What you need: A star chart for the Equatorial region set at 8.00 pm A torch light (cover with transparent red paper) or red
flashlight
What to do:1. Since Malaysia is in the equatorial region, a star chart for
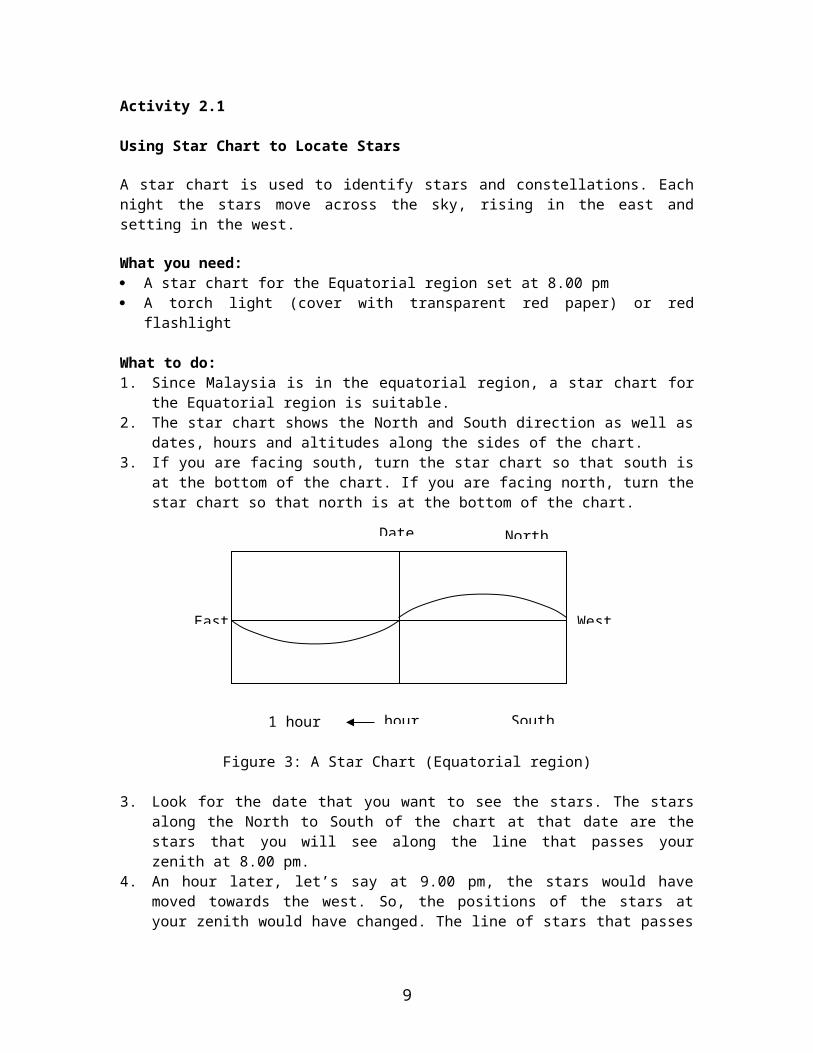
the Equatorial region is suitable. 2. The star chart shows the North and South direction as well as
dates, hours and altitudes along the sides of the chart. 3. If you are facing south, turn the star chart so that south is
at the bottom of the chart. If you are facing north, turn thestar chart so that north is at the bottom of the chart.
Figure 3: A Star Chart (Equatorial region)
3. Look for the date that you want to see the stars. The starsalong the North to South of the chart at that date are thestars that you will see along the line that passes yourzenith at 8.00 pm.
4. An hour later, let’s say at 9.00 pm, the stars would havemoved towards the west. So, the positions of the stars atyour zenith would have changed. The line of stars that passes
9
North
South
East West
1 hour
Date
hour
your zenith would be the stars an ‘hour’ nearer east on thestar chart.
4. The star chart also shows the relative brightness of thestars by their size on the chart. Dim stars are shown as tinydots. Bright stars are shown by big dots. Observe therelative brightness of stars.
5. Use your star chart to identify(a) the constellations Orion, Taurus, etc.(b) the stars Sirius, Betelgeuse, Procyon, Antares, etc.
Question
1. At what time of the year is Orion, the Southern Cross andScorpio visible in the Malaysian sky?
10
Activity 2.2
Star Patterns
Many stars have been grouped together into recognisable groups orpatterns called constellations. Some of these patterns were madeup by the ancients and you need a lot of imagination to see someof the mythical creatures. Most of the names of theconstellations are based on the ancient names however manysouthern star groups were only seen during the explorations intothe southern oceans. The Southern Cross (Crux) was named by theseearly seafarers. However we should also recognise that thesouthern constellations were also well known, by different namesand different legends, by southern civilisations. For example,the Polynesians such as the Tongans call the Southern Cross Toloa(wild duck).
You will need:
· a piece of dark coloured cardboard· sticky tape· pin and nail· another small piece of cardboard
What to do:
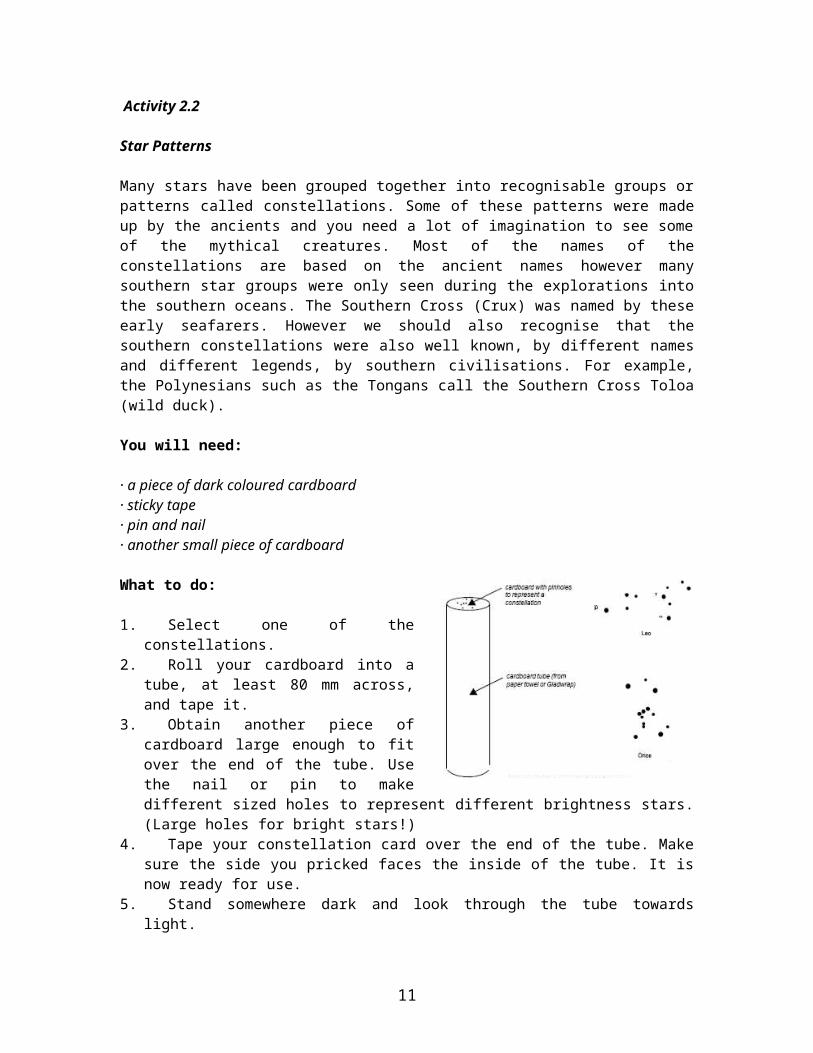
1. Select one of theconstellations.
2. Roll your cardboard into atube, at least 80 mm across,and tape it.
3. Obtain another piece ofcardboard large enough to fitover the end of the tube. Usethe nail or pin to makedifferent sized holes to represent different brightness stars.(Large holes for bright stars!)
4. Tape your constellation card over the end of the tube. Makesure the side you pricked faces the inside of the tube. It isnow ready for use.
5. Stand somewhere dark and look through the tube towardslight.
11
6. Twist or rotate the tube and observe what happens to the starpattern.7. Move your tube from east to west over the top of your head
without twisting the tube. Observe what happens to theappearance of the constellation. Where is the top and bottom?
Question:
1. What is the effect of the rotation of the earth on theapparent movement of the constellations?
2. The constellation Orion rises with the three stars of the beltpointing east. Predict what you would observe when it sets?Sketch the changing orientation of Orion with reference to thecardinal points.
12
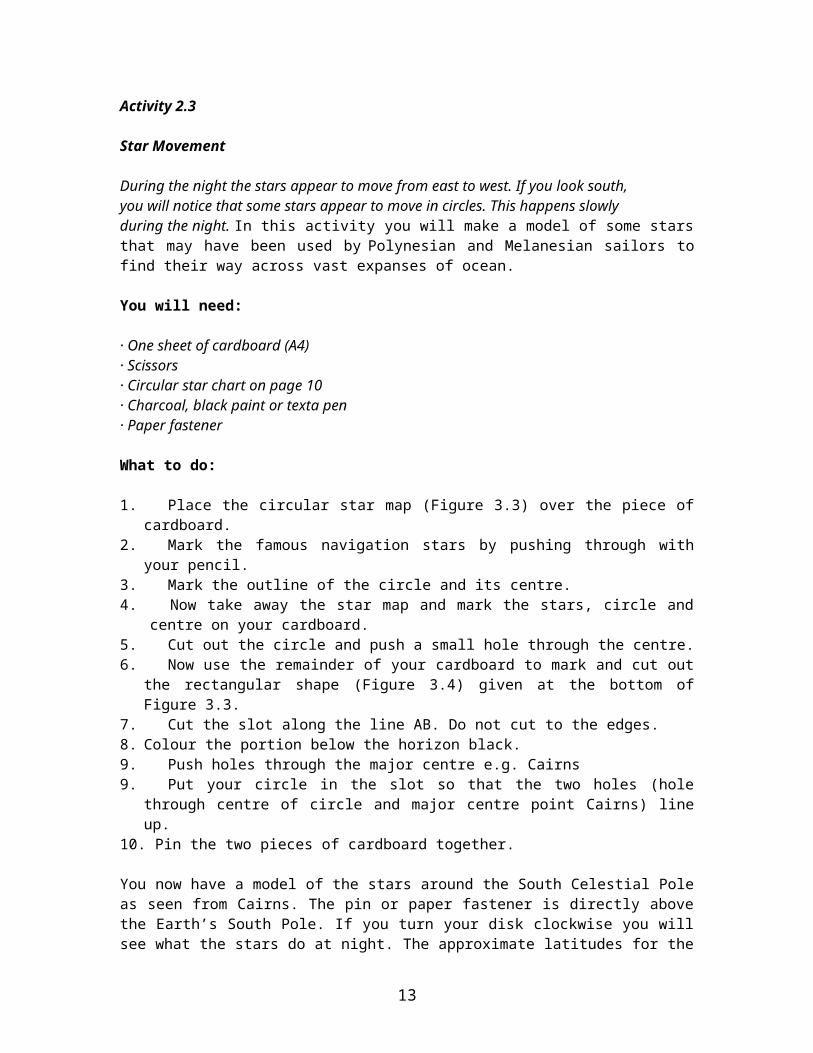
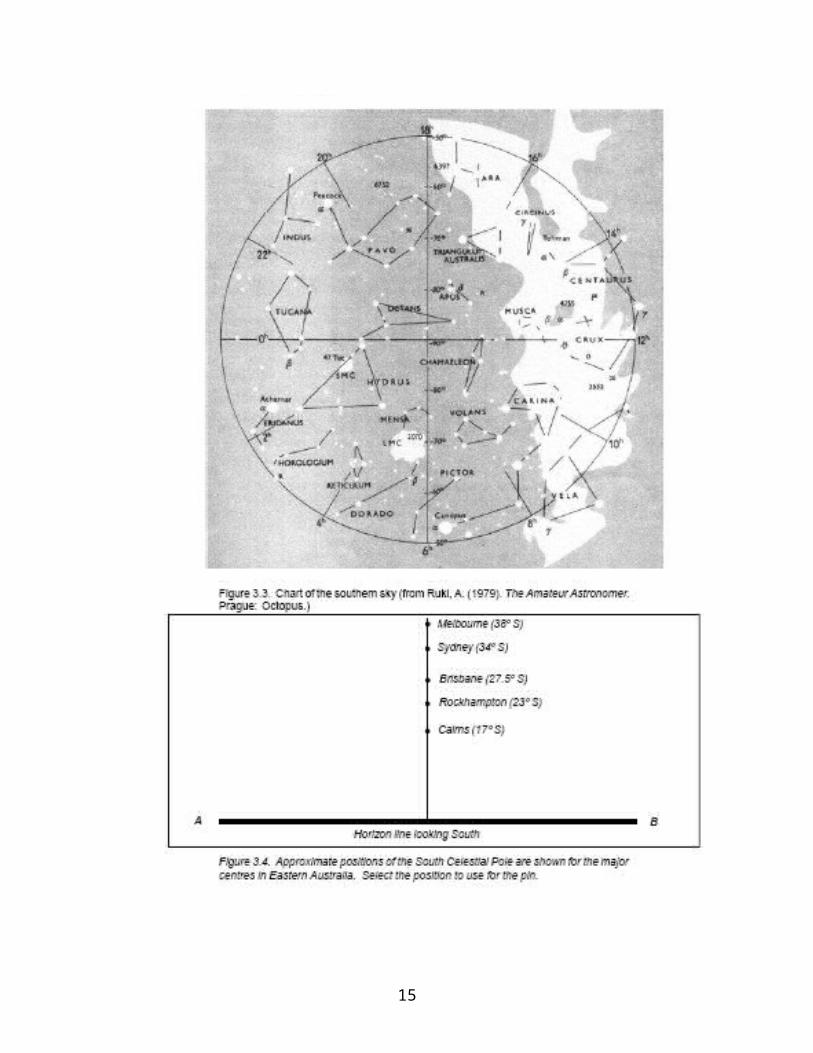
Activity 2.3
Star Movement
During the night the stars appear to move from east to west. If you look south,you will notice that some stars appear to move in circles. This happens slowlyduring the night. In this activity you will make a model of some starsthat may have been used by Polynesian and Melanesian sailors tofind their way across vast expanses of ocean.
You will need:
· One sheet of cardboard (A4)· Scissors· Circular star chart on page 10· Charcoal, black paint or texta pen· Paper fastener
What to do:
1. Place the circular star map (Figure 3.3) over the piece ofcardboard.
2. Mark the famous navigation stars by pushing through withyour pencil.
3. Mark the outline of the circle and its centre.4. Now take away the star map and mark the stars, circle and
centre on your cardboard.5. Cut out the circle and push a small hole through the centre.6. Now use the remainder of your cardboard to mark and cut out
the rectangular shape (Figure 3.4) given at the bottom ofFigure 3.3.
7. Cut the slot along the line AB. Do not cut to the edges.8. Colour the portion below the horizon black.9. Push holes through the major centre e.g. Cairns9. Put your circle in the slot so that the two holes (hole
through centre of circle and major centre point Cairns) lineup.
10. Pin the two pieces of cardboard together.
You now have a model of the stars around the South Celestial Poleas seen from Cairns. The pin or paper fastener is directly abovethe Earth’s South Pole. If you turn your disk clockwise you willsee what the stars do at night. The approximate latitudes for the
13

major centres in Eastern Australia are Cairns (17° S),Rockhampton (23° S), Brisbane (27.5°S), Sydney (34° S), Melbourne(38° S) and Hobart (43° S).
14
15

Activity 2.4
Using Computer Programmes
There are many computer programs like (Earth-centred universe,Starry night, Stellarium) that simulate the sky for differentlocations and time of the year. Find any one of these programmefrom the internet or buy one yourself. Explore the programme thatyou have. Look for locations and magnitude of stars and movementof the sun and moon.
Activity 3.1
Relative Size And Distance Of Planets From The Sun
The planets and sun in our solar system have different sizes andare at different distances from the sun. How big and how far iseach planet from the sun?
What you need:
cardboard pencil colour pencils scissors
What to do:
1. Form 9 groups, each group is to draw the relative size of aplanet or the sun.
2. Search the internet for information on the size and positionof each planet from the sun.
3. Decide on a suitable scale for all the groups.4. Draw, colour and cut each planet and the sun.5. Paste the planets and sun on a wall with a suitable scale of
the distances between the planet and the sun.
16

Activity 4.1
How Can A Small Moon Cover A Big Sun?
The size of the sun is 400 times the size of the moon. How can asmall moon cover a big sun during an eclipse of the sun?
Moon SunDiameter 3,476 1,392,000
What you need:
black sugar paper scissors cellotape ten-cent coin
What to do:
Draw a circle 5 times the size of a ten-cent coin on a blacksugar paper. Cut out the circle and paste in on a wall at eye level.Hold the ten-cent coin a fixed distance in front of your eye andstand in front of the circle on the wall.Move away from the wall until the coin just covers the circle onthe wall.Measure and record the distance of the coin from the wall and theeye from the coin in a table. Repeat with circles 10 times, 15 times and 20 times the size ofthe coin.Analyse your data and draw a conclusion.
Question:
What do you think is the relative distance of the moon from theearth and the sun from the earth?How far do you think the moon is from the sun for the moon tocover the sun?
Activity 4.2
Lines of Nodes and Eclipse Season
17
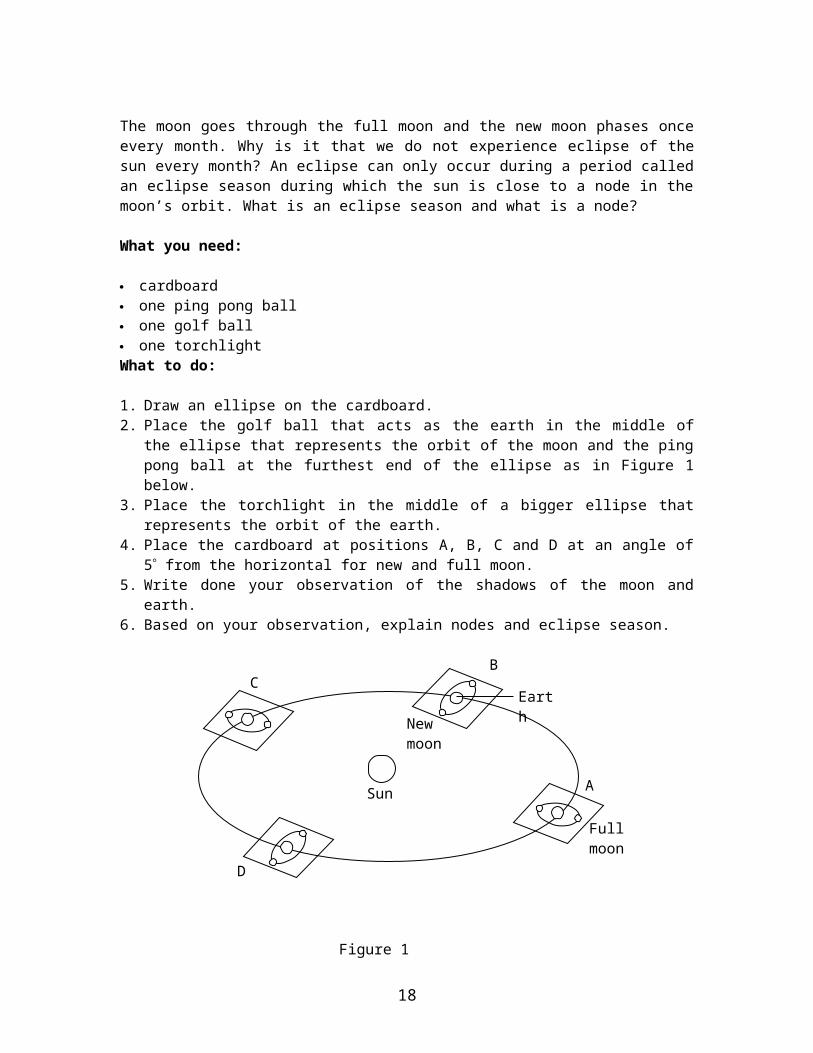
The moon goes through the full moon and the new moon phases onceevery month. Why is it that we do not experience eclipse of thesun every month? An eclipse can only occur during a period calledan eclipse season during which the sun is close to a node in themoon’s orbit. What is an eclipse season and what is a node?
What you need:
cardboard one ping pong ball one golf ball one torchlightWhat to do:
1. Draw an ellipse on the cardboard.2. Place the golf ball that acts as the earth in the middle of
the ellipse that represents the orbit of the moon and the pingpong ball at the furthest end of the ellipse as in Figure 1below.
3. Place the torchlight in the middle of a bigger ellipse thatrepresents the orbit of the earth.
4. Place the cardboard at positions A, B, C and D at an angle of5 from the horizontal for new and full moon.
5. Write done your observation of the shadows of the moon andearth.
6. Based on your observation, explain nodes and eclipse season.
18
A
BC
D
Sun
Full moon
EarthNew
moon
Figure 1

Activity 5.1
Earth’s Magnetosphere
The interaction of the solar wind and earth’s magnetic fieldproduces a region called the magnetosphere. The magnetosphereprevents most of the particles from the sun, carried in solarwind from hitting the earth. Sometimes some particles from thesolar wind enter the magnetosphere and create the auroral ovallights.
The magnetosphere has many regions. In this activity, you willidentify the different regions of the magnetosphere.
What you need:
Paper cut-out of the earth’s magnetosphere Scissors Colour pencils Tape
What to do:
1. Print Attachment given.2. Colour the different regions of the magnetosphere. Colors may
distinguish the Plasma Sheet (including area marked "PlasmaConvection?"), Plasma Mantle and Low Latitude Boundary Layer(use same color), Tail Lobes and Inner Radiation Belt. Theregion outside the magnetosphere (in the solar wind) may beleft white or given a light color. You may link to the colorimage above and use it as a guide.
3. Cut out the area marked "Cut Out" but leave tab intact. 4. Fold along the crosslines across the page to produce a three-
sided corner with the printed picture on the inside. 5. Use tape to attach the tab to the back side of the panel
carrying the words "Tail Lobes" and "Plasma Sheet," to holdthe paper in its folded position. If no tape is available,carefully cut a slot in the marked place to the right of thewords "Plasma Sheet" and insert the end of the tab.
19
Question
1. What are the regions of the magnetosphere?2. Why is the magnetic field around the earth important to us?
Teachers’ notes
The solar wind compresses the magnetic field lines facing it onthe day side of the Earth and confines those lines into a roundedcavity. In the opposite direction, on the night side, the samesolar wind stretches field lines into a long "magnetotail" andthe cavity then becomes a long cylinder. That gives the shape ofthe magnetosphere.
A magnetosphere has many regions, such as the bow shock,magnetosheath, magnetotail, plasmasheet, lobes, plasmasphere andradiation belts. These regions are composed of charged particlesand magnetic flux. These particles are responsible for manywonderful natural phenomena such as the aurora and natural radioemissions such as lion roars and whistler waves. The particlesmove and circulate about the magnetosphere and even generatestorms. The magnetosphere changes constantly, even flipping itsorientation every few thousand years.
20

Attachment
Resources:
21