
E-1 E-2 INSTALLATION INSTRUCTIONS
39
E-1 WARNING Read all instructions before using the appliance. 1. To reduce the risk of fire in the oven cavity: a. Do not overcook food. b. Remove wire twist-ties from paper or plastic bags before placing bag in the oven. c. Do not heat oil or fat for deep frying. The temperature of the oil cannot be controlled. d. Attend the oven closely when using disposable containers made from plastic, paper or other combustible material. e. If materials inside the oven should smoke or ignite, keep oven door closed, turn oven ott and disconnect the power cord, or shut off power at the fuse or circuit breaker panel. 2. To reduce the risk of explosion and sudden boiling: a. Do not place sealed containers in the oven. Baby bottles fitted with a screw cap or teat are considered to be sealed containers. b. When boiling liquids in the oven, use the wide-mouthed container and stand about 20 seconds at the end of cooking to avoid delayed eruptive boiling of liquids. 3. This oven is for home food preparation only and should only be used for heating, cooking and defrosting food and beverage. It is not suitable for commercial or laboratory use. 4. Never operate the oven whilst any object is caught or jammed between the door and the oven. 5. Do not try to adjust or repair the oven yourself because of hazard. The oven must be adjusted or repair by a gualified service technician trained by SHARP. 6. Do not operate the oven if it is not working correctly or damaged until it has been repaired by a qualified service technician trained by SHARP. It is particularly important that the oven door closes properly and that there is no damage to: (1) Door (warped), (2) Hinges and Latches (broken or loosened), (3) Door Seals and Sealing Surfaces, (4) Wareguide Cover (burn). 7. Do not catch the utensils, your clothes or accessories on the door safety latches when you take out the food from the oven. 8. Do not store metal or any other items inside the oven. 9. Do not hit or press the Latches. 10. Always use oven mittens to prevent bruns when handling utensils that are in contact with hot food. Enough heat from the food can transfer through utensils to cause skin burns. 11. Should the supply cord become damaged, it must be replaced with a special cord supplied or approved by the SHARP SERVICE CENTRE. And it must be replaced by a qualified service tecnnician trained by SHARP. 12. If the oven lamp fails please consult your dealer or a gualified service technician trained by SHARP. 13. After cooking, use oven mittens when taking out the food and avoid steam burns by directing steam away from the face and hands. Slowly lift the furthest edge of dish’s cover or microwave plastic wrap and carefully open popcorn and oven cooking bags away from the face. 14. Make sure that the power supply cord is undamaged, and that it does not run under the oven or over any hot surface or sharp edges. 15. To prevent the turntable from breaking: a. Before cleaning the turntable with water, leave the turntable to cool. b. Do not put hot foods or hot utensils on the cold turntable. c. Do not put cold foods or cold utensils on the hot turntable. 16. Do not place anything on the outer cabinet. 17. This microwave oven should be earthed. 18. Only allow children to use the oven without supervision when adequate instructions have been given so that the child is able to use the oven in a safe way and understands the hazards of improper use. 19. This appliance is not intended for use by young children or infirm persons without supervision. 20. Young children should be supervised to ensure that they do not play with the appliance. R-292 [EN] (01-18).indd EN-1 R-292 [EN] (01-18).indd EN-1 11/26/08 1:16:43 PM 11/26/08 1:16:43 PM
-
Upload
independent -
Category
Documents
-
view
1 -
download
0
Transcript of E-1 E-2 INSTALLATION INSTRUCTIONS
E-1
WARNINGRead all instructions before using the appliance. 1. To reduce the risk of fire in the oven cavity: a. Do not overcook food. b. Remove wire twist-ties from paper or plastic bags before placing bag in the oven. c. Do not heat oil or fat for deep frying. The temperature of the oil cannot be controlled. d. Attend the oven closely when using disposable containers made from plastic, paper or other combustible material. e. If materials inside the oven should smoke or ignite, keep oven door closed, turn oven ott and disconnect the power cord, or shut off power at the fuse or circuit breaker panel. 2. To reduce the risk of explosion and sudden boiling: a. Do not place sealed containers in the oven. Baby bottles fitted with a screw cap or teat are considered to be sealed containers. b. When boiling liquids in the oven, use the wide-mouthed container and stand about 20 seconds at the end of cooking to avoid delayed eruptive boiling of liquids. 3. This oven is for home food preparation only and should only be used for heating, cooking and defrosting food and beverage. It is not suitable for commercial or laboratory use. 4. Never operate the oven whilst any object is caught or jammed between the door and the oven. 5. Do not try to adjust or repair the oven yourself because of hazard. The oven must be adjusted or repair by a gualified service technician trained by SHARP. 6. Do not operate the oven if it is not working correctly or damaged until it has been repaired by a qualified service technician trained by SHARP. It is particularly important that the oven door closes properly and that there is no damage to: (1) Door (warped), (2) Hinges and Latches (broken or loosened), (3) Door Seals and Sealing Surfaces, (4) Wareguide Cover (burn). 7. Do not catch the utensils, your clothes or accessories on the door safety latches when you take out the food from the oven. 8. Do not store metal or any other items inside the oven. 9. Do not hit or press the Latches. 10. Always use oven mittens to prevent bruns when handling utensils that are in contact with hot food. Enough heat from the food can transfer through utensils to cause skin burns. 11. Should the supply cord become damaged, it must be replaced with a special cord supplied or approved by the SHARP SERVICE CENTRE. And it must be replaced by a qualified service tecnnician trained by SHARP. 12. If the oven lamp fails please consult your dealer or a gualified service technician trained by SHARP. 13. After cooking, use oven mittens when taking out the food and avoid steam burns by directing steam away from the face and hands. Slowly lift the furthest edge of dish’s cover or microwave plastic wrap and carefully open popcorn and oven cooking bags away from the face. 14. Make sure that the power supply cord is undamaged, and that it does not run under the oven or over any hot surface or sharp edges. 15. To prevent the turntable from breaking: a. Before cleaning the turntable with water, leave the turntable to cool. b. Do not put hot foods or hot utensils on the cold turntable. c. Do not put cold foods or cold utensils on the hot turntable. 16. Do not place anything on the outer cabinet. 17. This microwave oven should be earthed. 18. Only allow children to use the oven without supervision when adequate instructions have been given so that the child is able to use the oven in a safe way and understands the hazards of improper use. 19. This appliance is not intended for use by young children or infirm persons without supervision. 20. Young children should be supervised to ensure that they do not play with the appliance.
R-292 [EN] (01-18).indd EN-1R-292 [EN] (01-18).indd EN-1 11/26/08 1:16:43 PM11/26/08 1:16:43 PM
E-2
INSTALLATION INSTRUCTIONS 1. Remove all packing materials from the oven cavity. Check the unit for any damage, such as a misaligned
door, damaged door seals around the door or dents inside the oven cavity or on the door. If there is any damage, please do not operate the oven until it has been checked by a SERVICE CENTRE APPROVED BY SHARP and repaired, if necessary.
2. Accessories provided 1) Turntable tray 2) Roller stay 3) Operation manual and cooking guide 3. Fitting the roller stay and turntable. Locate the roller stay in the centre of the oven, then fit the
turntable on the roller stay. Make sure the turntable is centrally located and locked together. Never operate the oven with out the roller stay and turntable.
4. The oven should not be installed in any area where heat and steam are generated. for example, next to a conventional oven unit. The oven should be installed so as not to block ventilation openings. Allow at least 15 cm. on the top, 5 cm. on the both sides and at the rear of the oven for free air space.
5. Neither the manufacturer nor the distributors can accept any liability for damage to the machine or personal injury for failure to observe the correct electrical connecting procedure.
The A.C. voltage must be single phase •Thailand 220 V., 50 Hz. 6. Operate the oven from a general purpose domestic outlet. If a generator is used do not operate the
oven with NON-SINUSOIDAL outputs.
R-292 [EN] (01-18).indd EN-2R-292 [EN] (01-18).indd EN-2 11/26/08 1:16:45 PM11/26/08 1:16:45 PM
E-3
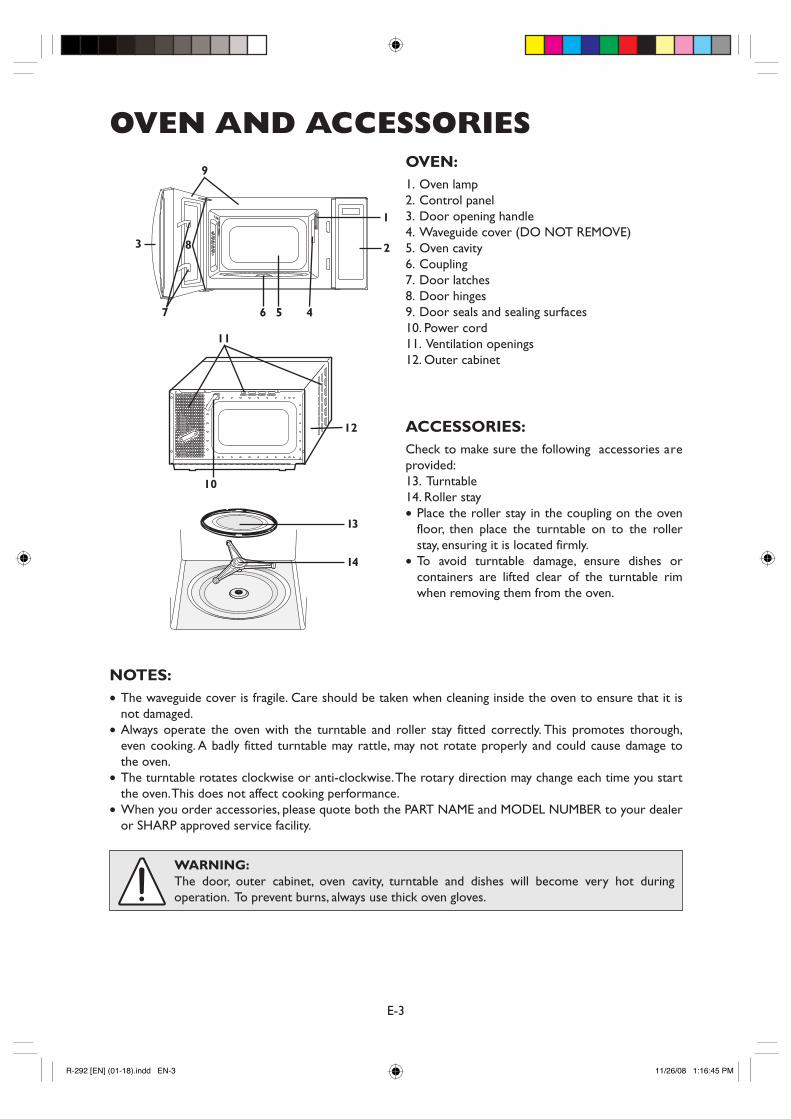
OVEN AND ACCESSORIESOVEN: 1. Oven lamp 2. Control panel 3. Door opening handle 4. Waveguide cover (DO NOT REMOVE) 5. Oven cavity 6. Coupling 7. Door latches 8. Door hinges 9. Door seals and sealing surfaces 10. Power cord 11. Ventilation openings 12. Outer cabinet
ACCESSORIES: Check to make sure the following accessories are provided: 13. Turntable 14. Roller stay
Place the roller stay in the coupling on the oven floor, then place the turntable on to the roller stay, ensuring it is located firmly. To avoid turntable damage, ensure dishes or containers are lifted clear of the turntable rim when removing them from the oven.
•
•
NOTES: The waveguide cover is fragile. Care should be taken when cleaning inside the oven to ensure that it is not damaged. Always operate the oven with the turntable and roller stay fitted correctly. This promotes thorough, even cooking. A badly fitted turntable may rattle, may not rotate properly and could cause damage to the oven. The turntable rotates clockwise or anti-clockwise. The rotary direction may change each time you start the oven. This does not affect cooking performance. When you order accessories, please quote both the PART NAME and MODEL NUMBER to your dealer or SHARP approved service facility.
•
•
•
•
WARNING: The door, outer cabinet, oven cavity, turntable and dishes will become very hot during operation. To prevent burns, always use thick oven gloves.
R-292 [EN] (01-18).indd EN-3R-292 [EN] (01-18).indd EN-3 11/26/08 1:16:45 PM11/26/08 1:16:45 PM
E-4
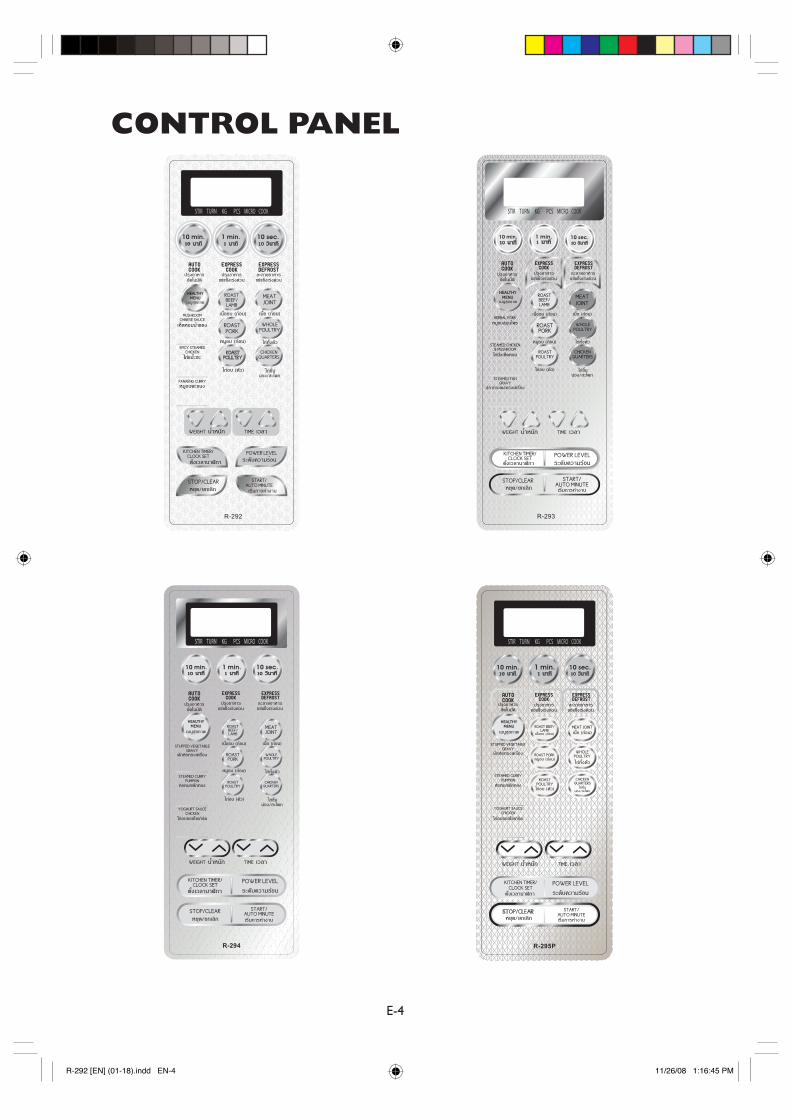
CONTROL PANEL
R-292 [EN] (01-18).indd EN-4R-292 [EN] (01-18).indd EN-4 11/26/08 1:16:45 PM11/26/08 1:16:45 PM
E-5
Your oven has a 12 hour and a 24 hour clock.
To select the 12 hour clock, press the KITCHEN TIMER/CLOCK SET key once. will appear on the display.
To select the 24 hour clock, press the KITCHEN TIMER/CLOCK SET key twice. will appear on the display.
To set the time of day follow the instructions below:
•
•
1. Select the clock type required.
2. Enter the hours by pressing the TIME keys.
4. Enter the minutes by pressing the TIME keys.
5. To start the clock, press the KITCHEN TIMER/CLOCK SET key once.
NOTES: Press the STOP/CLEAR key if you make a mistake during programming. If you press any of the TIME keys too many times, continue to press the key until the desired time re-appears. To check the time of day during a cooking process, press the KITCHEN TIMER/CLOCK SET key and the time of day will remain on the display as long as you keep your finger on the key. This does not affect the cooking process. If the clock is set, when cooking is complete, the display will show the correct time of day. If the clock has not been set, the display will only show when cooking is complete. If the electrical power supply to your microwave oven is interrupted, the display will intermittently show after the power is reinstated. If this occurs during cooking, the programme will be erased. The time of day will also be erased. When you want to reset the time of day, follow the above example again.
••
•
•••
•
3. Press the KITCHEN TIMER/ CLOCK SET key once.
Plug in the oven.
1. The oven display will flash: 2. Press the STOP/CLEAR key. 3. The display will show: To set the clock, see below.
1.
2.
3.
x1
BEFORE OPERATION
x1
x2
x1
x1
SETTING THE CLOCK
R-292 [EN] (01-18).indd EN-5R-292 [EN] (01-18).indd EN-5 11/26/08 1:16:46 PM11/26/08 1:16:46 PM

E-6
Your oven enables you to cook and defrost food using the automatic programmes, or to cook and defrost food manually. Automatic cooking and defrosting allows you to cook and defrost using preset programmes where the timings have been calculated for you, e.g Express Cook, Express Defrost and Auto Cook. Manual cooking and defrosting allows you to cook/defrost foods and weights which are not included in the automatic programmes. Following are examples of manual cooking and defrosting. For automatic cooking and defrosting refer to pages E-8 to E-11.
MANUAL COOKING Enter the cooking time and use microwave power levels 10P to 100P to cook Stir or turn the food, where possible, 2 - 3 times during cooking. After cooking, cover the food and leave to stand, where recommended. Refer to the cooking charts in the cookbook section, pages E-33 to E-36.
Example: To cook for 2 minutes and 30 seconds on 70P microwave power.
••••
Opening the door: To open the oven door, pull the door opening handle. Starting the oven: Prepare and place food in a suitable container onto the turntable or place directly onto the turntable. Close the door and press the START/AUTO MINUTE key. Stopping the oven: If you want to stop the oven during cooking press the STOP/CLEAR key once or open the oven door. If you want to cancel the cooking programme, press the STOP/CLEAR key twice.
HOW TO OPERATE YOUR OVEN
1. Enter the cooking time by pressing the 1 MIN key twice and then the 10 SEC key 3 times.
2. Input the power level by pressing the POWER LEVEL key twice for 70P.
3. Press the START/AUTO MINUTE key once to start cooking.
The display will count down through the set cooking time.
x2 x3 x1 x2
R-292 [EN] (01-18).indd EN-6R-292 [EN] (01-18).indd EN-6 11/26/08 1:16:47 PM11/26/08 1:16:47 PM
E-7
NOTES: When the oven starts, the oven lamp will light and the turntable will rotate clockwise or anti-clockwise. Your oven can be programmed up to 99 minutes, 90 seconds (99.90). When the door is opened during cooking, the cooking time on the display stops automatically. The cooking time starts to count down again when the door is closed and the START/AUTO MINUTE key is pressed. When oven operation has finished, the time of day will reappear on the display, if the clock has been set. If you wish to know the power level during cooking, press the POWER LEVEL key. As long as your finger is touching the key the power level will be displayed.
•••
••
MANUAL DEFROSTING Enter the defrosting time and use microwave power levels 10P or 30P to defrost. Stir or turn the food, where possible, 2 - 3 times during defrosting. After defrosting, cover the food in foil and leave to stand until thoroughly defrosted. Refer to the defrosting chart in the cookbook section, page E-32.
Example: To defrost for 10 minutes on 30P microwave power.
••••
HOW TO OPERATE YOUR OVEN
1. Enter the defrosting time by pressing the 10 MIN. key once.
3. Press the START/AUTO MINUTE key once to start defrosting.
The display will count down through the set cooking time.
x1 x1 x4
2. Input the power level by pressing the POWER LEVEL key 4 times.
R-292 [EN] (01-18).indd EN-7R-292 [EN] (01-18).indd EN-7 11/26/08 1:16:47 PM11/26/08 1:16:47 PM
E-8
EXPRESS COOK/EXPRESS DEFROST enables you to cook or defrost the foods listed on the control panel and the charts on pages E-9, E-10. Follow the example below for details on how to operate these functions. EXPRESS COOK allows you to cook 3 popular menus from frozen or chilled. When cooking from frozen (-18°C) press the desired menu key once, will appear on the display. When cooking from chilled (5°C) press the desired menu key twice, will appear on the display.
Example 1: To cook medium Roast Beef weight 1.2 kg from child using EXPRESS COOK.
•
•••
EXPRESS COOK / EXPRESS DEFROST
1. Press the ROAST BEEF/ LAMB key twice to select cooking from chilled.
2. Enter the weight by pressing the WEIGHT keys until the desired weight is displayed.
3. Press the START/AUTO MINUTE key once to start cooking.
x2 x8 x4 x1
The display will count down through the set cooking time.
Example 2: To defrost a Meat Joint weighing 1.2 kg using EXPRESS DEFROST. 1. Select the menu required by pressing the MEATJOINT key once.
2. Enter the weight by pressing the WEIGHT keys until the desired weight is displayed.
3. Press the START/AUTO MINUTE key once to start defrosting.
x8 x4 x1 x1
The display will count down through the defrosting time.
NOTE: If the DOWN ( ▼ ) weight key is pressed the display will count down from the highest weight range, each time the key is pressed. If the UP ( ▲ ) weight key is pressed the display will count up from the lowest weight range, each time the key is pressed. You can enter the weight by holding down the WEIGHT keys, as well as by pressing, until the desired weight appears.
•
•
•
R-292 [EN] (01-18).indd EN-8R-292 [EN] (01-18).indd EN-8 11/26/08 1:16:47 PM11/26/08 1:16:47 PM
E-9
EXPRESS COOK CHART
WEIGHT RANGE: Food weight should be rounded up or down to the nearest 0.1kg, for example, 0.65kg to 0.7kg or 0.34kg to 0.3kg. You are restricted to enter a weight within the range (see the following charts). To cook/defrost weights above or below that range or foods not included in the charts below, refer to the charts in the Cookbook section.
NOTES:
Press the MORE or LESS TIME keys before pressing the START/AUTO MINUTE key where recommended in the charts below. When action is required (example, to turn food over), the oven stops, the audible signals sound, the remaining cooking time and an indicator will flash on the display. To continue cooking, press the START/AUTO MINUTE key. The final temperature will vary according to the initial food temperature. Check food is piping hot after cooking. If necessary, you can extend the cooking manually. When freezing foods for Express Cook, ensure food is fresh and of good quality.
EXPRESS COOK
MENU WEIGHT RANGE COOKING PROCEDURE
Roast Beef/Lamb
x1: Frozen x2: Chilled
0.5kg - 1.5kg Place meat in a flan dish on the turntable. Turn meat over when the audible signal sounds. After cooking, leave meat to stand wrapped in aluminium foil for 10 minutes.
NOTE: Select MORE for well done. It is not possible to use the LESS function for beef/
lamb.
•••
Roast Porkter
x1: Frozen x2: Chilled
0.5kg - 1.5kg Place meat in a flan dish on the turntable. Turn meat over when the audible signal sounds. After cooking, leave meat to stand wrapped in aluminium foil for 10 minutes.
NOTE: It is not possible to use the LESS function for pork.
•••
Roast Poultry
x1: Frozen x2: Chilled
0.4kg - 1.2kg Pierce skin (chilled only) a few times and place poultry breast side down in a flan dish on the turntable. Turn poultry over when the audible signal sounds. When cooking frozen poultry with giblets, remove the giblets at first or second turn over. After cooking, leave poultry to stand wrapped in aluminium foil for 10 minutes.
NOTE: It is not possible to use the LESS function for poultry.
This menu is only suitable for cooking whole poultry.
•
•
•
•
••
•
•
•
•
R-292 [EN] (01-18).indd EN-9R-292 [EN] (01-18).indd EN-9 11/26/08 1:16:48 PM11/26/08 1:16:48 PM
E-10
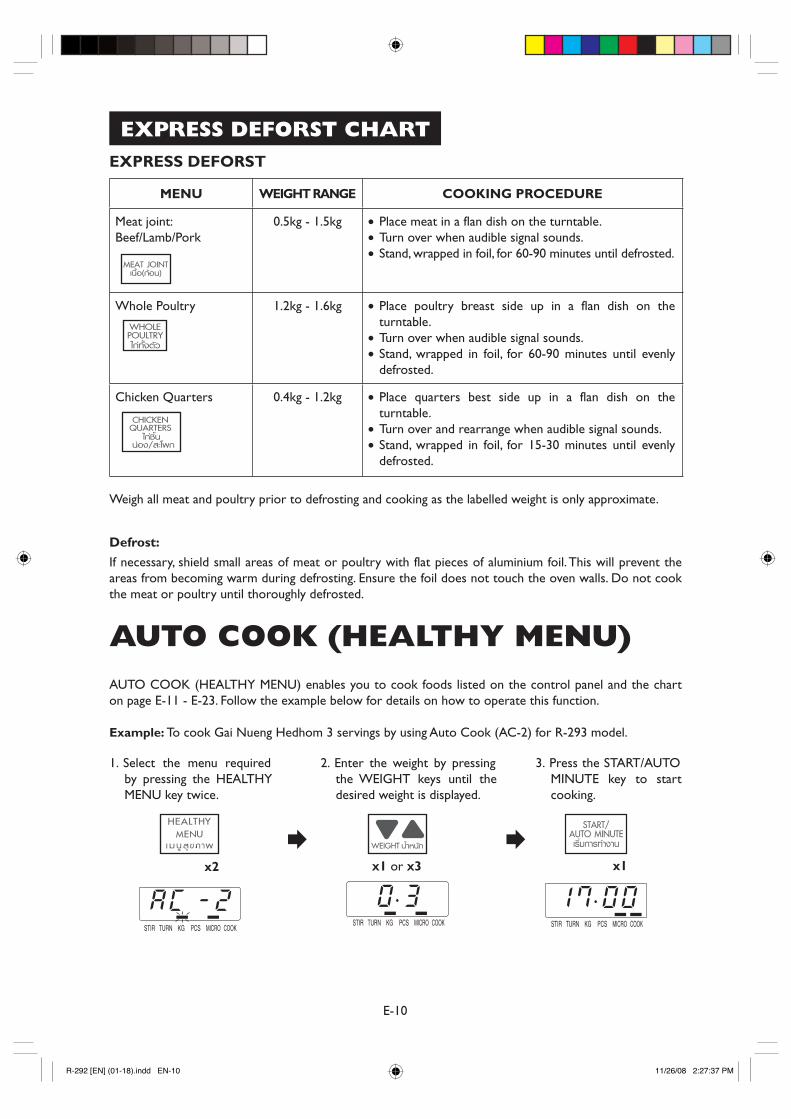
EXPRESS DEFORST CHART EXPRESS DEFORST
MENU WEIGHT RANGE COOKING PROCEDURE
Meat joint: Beef/Lamb/Pork
0.5kg - 1.5kg Place meat in a flan dish on the turntable. Turn over when audible signal sounds. Stand, wrapped in foil, for 60-90 minutes until defrosted.
•••
Whole Poultry
1.2kg - 1.6kg Place poultry breast side up in a flan dish on the turntable. Turn over when audible signal sounds. Stand, wrapped in foil, for 60-90 minutes until evenly defrosted.
•
••
Chicken Quarters
0.4kg - 1.2kg Place quarters best side up in a flan dish on the turntable. Turn over and rearrange when audible signal sounds. Stand, wrapped in foil, for 15-30 minutes until evenly defrosted.
•
••
Weigh all meat and poultry prior to defrosting and cooking as the labelled weight is only approximate.
Defrost:
If necessary, shield small areas of meat or poultry with flat pieces of aluminium foil. This will prevent the areas from becoming warm during defrosting. Ensure the foil does not touch the oven walls. Do not cook the meat or poultry until thoroughly defrosted.
AUTO COOK (HEALTHY MENU)AUTO COOK (HEALTHY MENU) enables you to cook foods listed on the control panel and the chart on page E-11 - E-23. Follow the example below for details on how to operate this function. Example: To cook Gai Nueng Hedhom 3 servings by using Auto Cook (AC-2) for R-293 model.
1. Select the menu required by pressing the HEALTHY MENU key twice.
2. Enter the weight by pressing the WEIGHT keys until the desired weight is displayed.
3. Press the START/AUTO MINUTE key to start cooking.
x1 X1 or X3 x2
R-292 [EN] (01-18).indd EN-10R-292 [EN] (01-18).indd EN-10 11/26/08 2:27:37 PM11/26/08 2:27:37 PM
E-11
AUTO COOK CHART (HEALTHY MENU) SELECTING MENU: The menu will be changed automatically by holding down the HEALTHY MENU key. WEIGHT RANGE:
You are restricted to enter number of servings (food weight) within the range given (see the chart below). To cook for more or less number of servings (weight) than given range, or cook any food which not included in the chart below, refer to the charts in the Cookbook section.
NOTES:
If (▼) key is pressed, the highest number of servings (weight) will be displayed and counted down each time the key is pressed. If (▲) key is pressed, the lowest number of servings (weight) will be displayed and counted up each time the key is pressed. When action is required (example, to turn food over or to add the ingredients), the oven will stops and the audible signals sound, the remaining cooking time and an indicator will flash on the display. Open the door, turn food over or add the ingredients then close the door. Press the START/AUTO MINUTE key to continue cooking. The final temperature will vary according to the initial food temperature. After cooking, check if the food is hot enough or not. If necessary, you can extend the cooking time manually.
Menu
No. MENU
Number of servings (Weight)
Procedure
AC1
Hedhom Namdang (R-292) Moo Ob Samun Prai (R-293) Pak Hor Song Kreung (R-292, R-295)
1-4 servings (0.1-0.4kg) 1-4 servings (0.1-0.4kg) 1-4 servings (0.1-0.4kg)
See ingredients and cooking method next page.
AC2 Gai Pae-Sa (R-292) Gai Nueng Hedhom (R-293) Hor Mok Fak Tong (R-292, R-295)
1-3 servings (0.1-0.3kg) 1-3 servings (0.1-0.3kg) 1-3 servings (0.1-0.3kg)
AC3 Moo Ob Panang (R-292) Pla Grapong Song Kreung (R-293) Gai Ob Sauce Yoghurt (R-292, R-295)
1-4 servings (0.1-0.4kg) 1-4 servings (0.1-0.4kg) 1-4 servings (0.1-0.4kg)
•
•
•
•
•
•
R-292 [EN] (01-18).indd EN-11R-292 [EN] (01-18).indd EN-11 11/26/08 2:27:39 PM11/26/08 2:27:39 PM
E-12
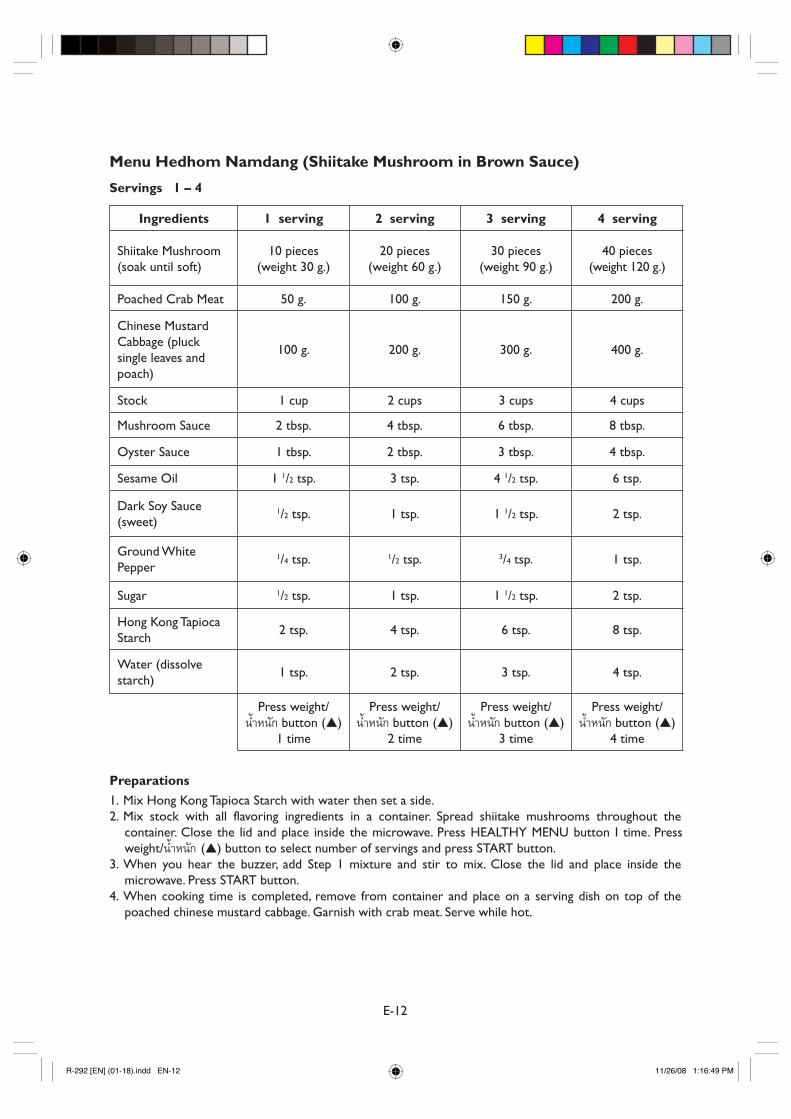
Menu Hedhom Namdang (Shiitake Mushroom in Brown Sauce)
Servings 1 – 4
Ingredients 1 serving 2 serving 3 serving 4 serving
Shiitake Mushroom (soak until soft)
10 pieces (weight 30 g.)
20 pieces (weight 60 g.)
30 pieces (weight 90 g.)
40 pieces (weight 120 g.)
Poached Crab Meat 50 g. 100 g. 150 g. 200 g.
Chinese Mustard Cabbage (pluck single leaves and poach)
100 g. 200 g. 300 g. 400 g.
Stock 1 cup 2 cups 3 cups 4 cups
Mushroom Sauce 2 tbsp. 4 tbsp. 6 tbsp. 8 tbsp.
Oyster Sauce 1 tbsp. 2 tbsp. 3 tbsp. 4 tbsp.
Sesame Oil 1 1/2 tsp. 3 tsp. 4 1/2 tsp. 6 tsp.
Dark Soy Sauce (sweet)
1/2 tsp. 1 tsp. 1 1/2 tsp. 2 tsp.
Ground White Pepper
1/4 tsp. 1/2 tsp. 3/4 tsp. 1 tsp.
Sugar 1/2 tsp. 1 tsp. 1 1/2 tsp. 2 tsp.
Hong Kong Tapioca Starch
2 tsp. 4 tsp. 6 tsp. 8 tsp.
Water (dissolve starch)
1 tsp. 2 tsp. 3 tsp. 4 tsp.
Press weight/
πÈ”Àπ—° button (▲) 1 time
Press weight/ πÈ”Àπ—° button (▲)
2 time
Press weight/ πÈ”Àπ—° button (▲)
3 time
Press weight/ πÈ”Àπ—° button (▲)
4 time
Preparations
1. Mix Hong Kong Tapioca Starch with water then set a side. 2. Mix stock with all flavoring ingredients in a container. Spread shiitake mushrooms throughout the
container. Close the lid and place inside the microwave. Press HEALTHY MENU button I time. Press weight/πÈ”Àπ—° (▲) button to select number of servings and press START button.
3. When you hear the buzzer, add Step 1 mixture and stir to mix. Close the lid and place inside the microwave. Press START button.
4. When cooking time is completed, remove from container and place on a serving dish on top of the poached chinese mustard cabbage. Garnish with crab meat. Serve while hot.
R-292 [EN] (01-18).indd EN-12R-292 [EN] (01-18).indd EN-12 11/26/08 1:16:49 PM11/26/08 1:16:49 PM
E-13
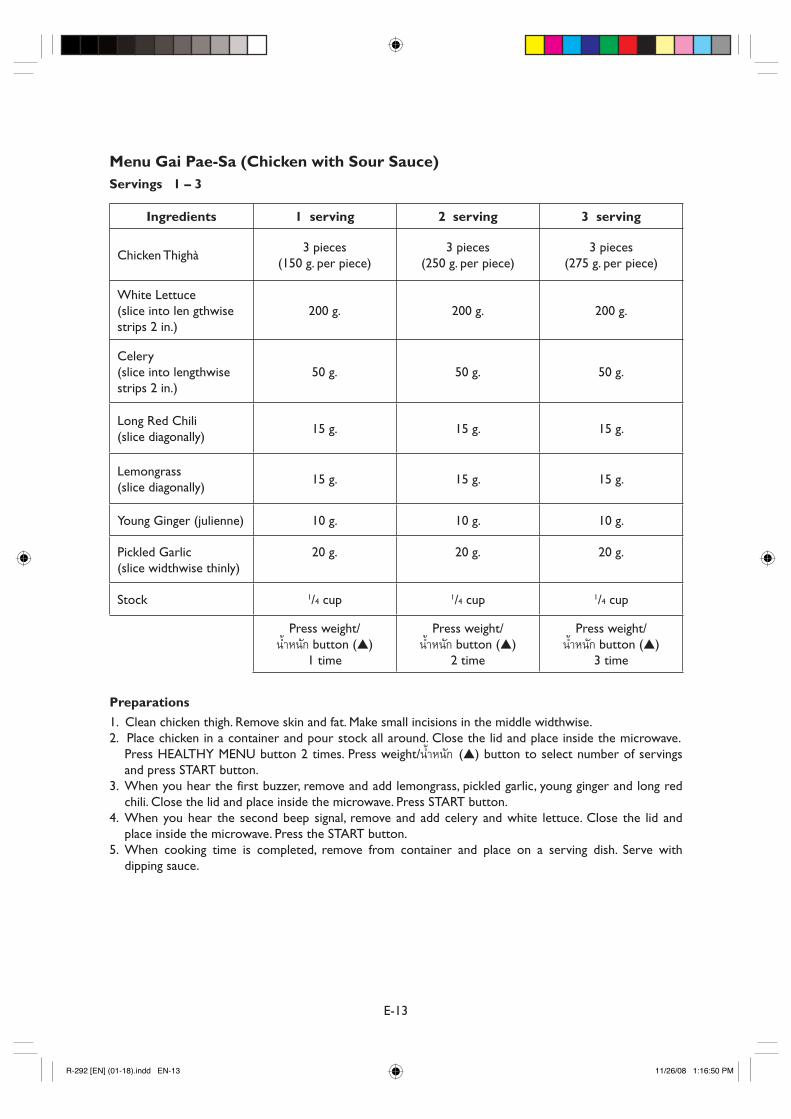
Menu Gai Pae-Sa (Chicken with Sour Sauce) Servings 1 – 3
Ingredients 1 serving 2 serving 3 serving
Chicken Thighà 3 pieces
(150 g. per piece) 3 pieces
(250 g. per piece) 3 pieces
(275 g. per piece)
White Lettuce (slice into len gthwise strips 2 in.)
200 g. 200 g. 200 g.
Celery (slice into lengthwise strips 2 in.)
50 g. 50 g. 50 g.
Long Red Chili (slice diagonally)
15 g. 15 g. 15 g.
Lemongrass (slice diagonally)
15 g. 15 g. 15 g.
Young Ginger (julienne) 10 g. 10 g. 10 g.
Pickled Garlic (slice widthwise thinly)
20 g.
20 g.
20 g.
Stock 1/4 cup 1/4 cup 1/4 cup
Press weight/
πÈ”Àπ—° button (▲) 1 time
Press weight/ πÈ”Àπ—° button (▲)
2 time
Press weight/ πÈ”Àπ—° button (▲)
3 time
Preparations
1. Clean chicken thigh. Remove skin and fat. Make small incisions in the middle widthwise. 2. Place chicken in a container and pour stock all around. Close the lid and place inside the microwave.
Press HEALTHY MENU button 2 times. Press weight/πÈ”Àπ—° (▲) button to select number of servings and press START button.
3. When you hear the first buzzer, remove and add lemongrass, pickled garlic, young ginger and long red chili. Close the lid and place inside the microwave. Press START button.
4. When you hear the second beep signal, remove and add celery and white lettuce. Close the lid and place inside the microwave. Press the START button.
5. When cooking time is completed, remove from container and place on a serving dish. Serve with dipping sauce.
R-292 [EN] (01-18).indd EN-13R-292 [EN] (01-18).indd EN-13 11/26/08 1:16:50 PM11/26/08 1:16:50 PM

E-14
Dipping Sauce Ingredients
Red chili 15 g. Garlic 20 g. Coriander Root 1 tsp. (slice widthwise thinly) Fish Sauce 2 1/2 tbsp. Lime Juice 1/2 tbsp. Paste Sugar 1/2 tbsp. Salt 1/8 tsp. Peanut Brittle 25 g. (pound coarsely) Coriander 2 tsp. (slice into lengthwise strips 1/2 cm.)
Preparations
1. Pound red chili, garlic and coriander root together 2. Mix all of the remaining ingredients except coriander leaves. Stir until sugar dissolves. Add Step 1.
mixture and stir to mix. Garnish with coriander leaves.
R-292 [EN] (01-18).indd EN-14R-292 [EN] (01-18).indd EN-14 11/26/08 1:16:50 PM11/26/08 1:16:50 PM
E-15
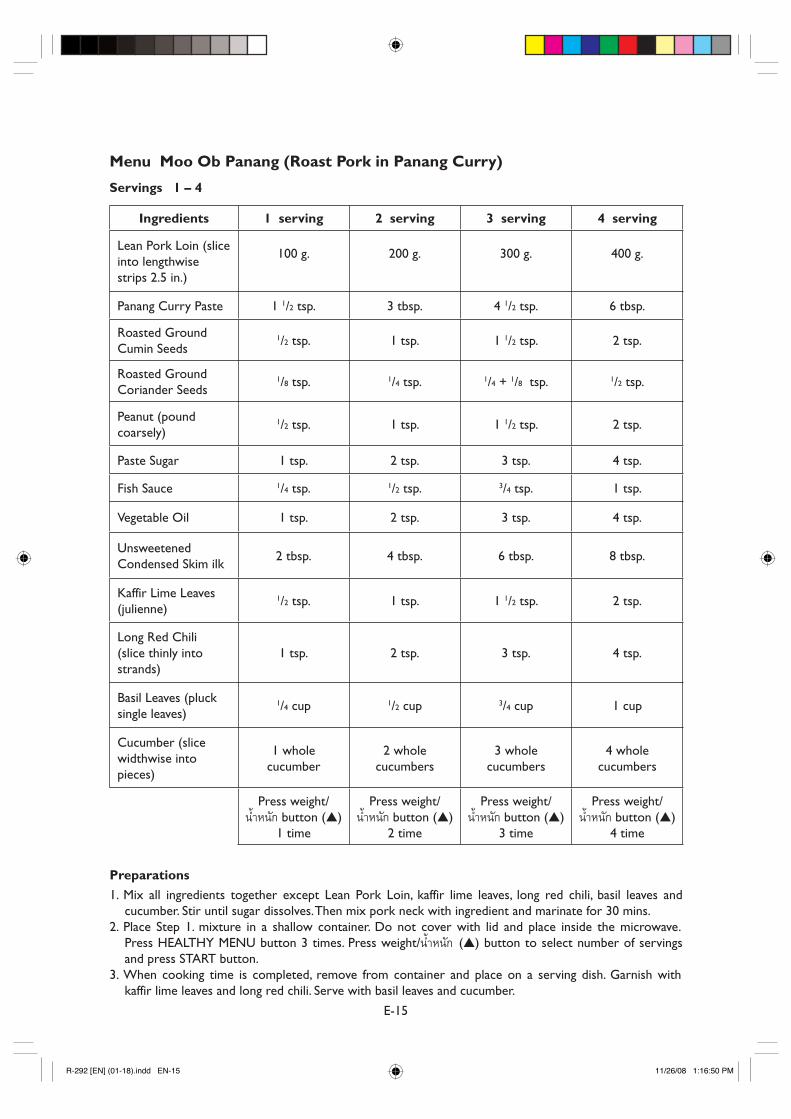
Menu Moo Ob Panang (Roast Pork in Panang Curry)
Servings 1 – 4
Ingredients 1 serving 2 serving 3 serving 4 serving
Lean Pork Loin (slice into lengthwise strips 2.5 in.)
100 g.
200 g.
300 g.
400 g.
Panang Curry Paste 1 1/2 tsp. 3 tbsp. 4 1/2 tsp. 6 tbsp.
Roasted Ground Cumin Seeds
1/2 tsp. 1 tsp. 1 1/2 tsp. 2 tsp.
Roasted Ground Coriander Seeds
1/8 tsp. 1/4 tsp. 1/4 + 1/8 tsp. 1/2 tsp.
Peanut (pound coarsely)
1/2 tsp. 1 tsp. 1 1/2 tsp. 2 tsp.
Paste Sugar 1 tsp. 2 tsp. 3 tsp. 4 tsp.
Fish Sauce 1/4 tsp. 1/2 tsp. 3/4 tsp. 1 tsp.
Vegetable Oil 1 tsp. 2 tsp. 3 tsp. 4 tsp.
Unsweetened Condensed Skim ilk
2 tbsp. 4 tbsp. 6 tbsp. 8 tbsp.
Kaffir Lime Leaves (julienne)
1/2 tsp. 1 tsp. 1 1/2 tsp. 2 tsp.
Long Red Chili (slice thinly into strands)
1 tsp. 2 tsp. 3 tsp. 4 tsp.
Basil Leaves (pluck single leaves)
1/4 cup 1/2 cup 3/4 cup 1 cup
Cucumber (slice widthwise into pieces)
1 whole cucumber
2 whole cucumbers
3 whole cucumbers
4 whole cucumbers
Press weight/
πÈ”Àπ—° button (▲) 1 time
Press weight/ πÈ”Àπ—° button (▲)
2 time
Press weight/ πÈ”Àπ—° button (▲)
3 time
Press weight/ πÈ”Àπ—° button (▲)
4 time
Preparations
1. Mix all ingredients together except Lean Pork Loin, kaffir lime leaves, long red chili, basil leaves and cucumber. Stir until sugar dissolves. Then mix pork neck with ingredient and marinate for 30 mins.
2. Place Step 1. mixture in a shallow container. Do not cover with lid and place inside the microwave. Press HEALTHY MENU button 3 times. Press weight/πÈ”Àπ—° (▲) button to select number of servings and press START button.
3. When cooking time is completed, remove from container and place on a serving dish. Garnish with kaffir lime leaves and long red chili. Serve with basil leaves and cucumber.
R-292 [EN] (01-18).indd EN-15R-292 [EN] (01-18).indd EN-15 11/26/08 1:16:50 PM11/26/08 1:16:50 PM
E-16
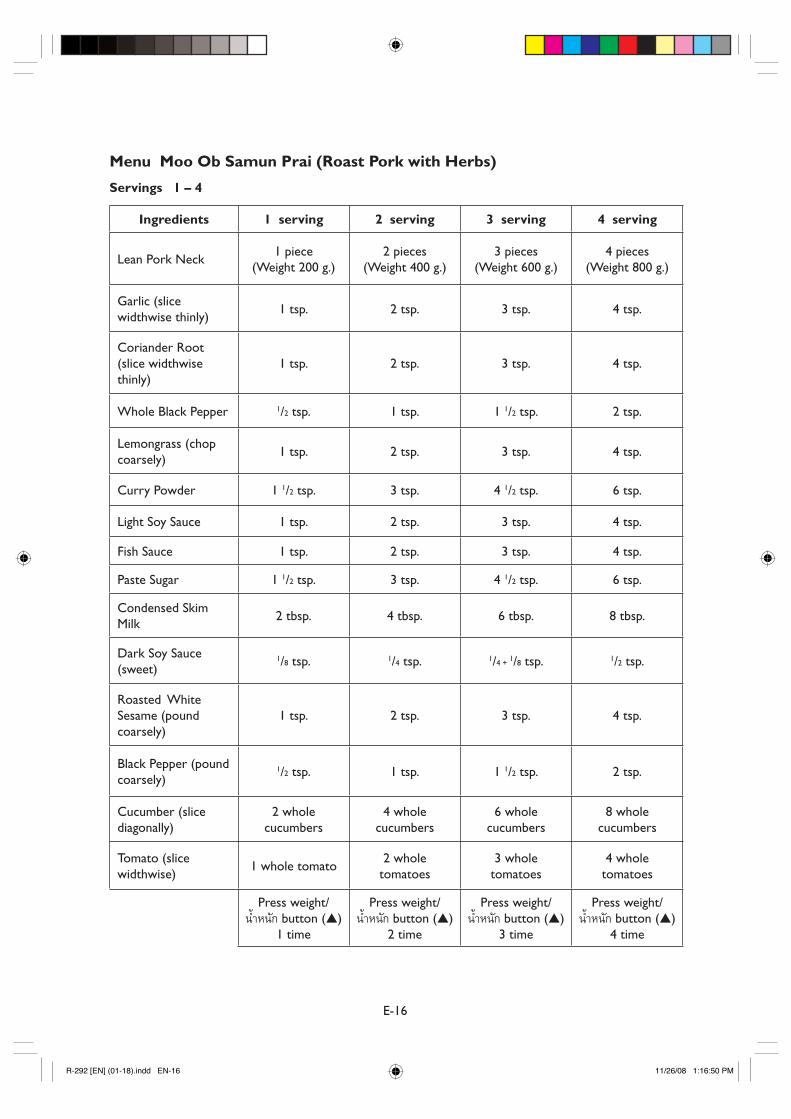
Menu Moo Ob Samun Prai (Roast Pork with Herbs)
Servings 1 – 4
Ingredients 1 serving 2 serving 3 serving 4 serving
Lean Pork Neck 1 piece
(Weight 200 g.) 2 pieces
(Weight 400 g.) 3 pieces
(Weight 600 g.) 4 pieces
(Weight 800 g.)
Garlic (slice widthwise thinly)
1 tsp. 2 tsp. 3 tsp. 4 tsp.
Coriander Root (slice widthwise thinly)
1 tsp. 2 tsp. 3 tsp. 4 tsp.
Whole Black Pepper 1/2 tsp. 1 tsp. 1 1/2 tsp. 2 tsp.
Lemongrass (chop coarsely)
1 tsp. 2 tsp. 3 tsp. 4 tsp.
Curry Powder 1 1/2 tsp. 3 tsp. 4 1/2 tsp. 6 tsp.
Light Soy Sauce 1 tsp. 2 tsp. 3 tsp. 4 tsp.
Fish Sauce 1 tsp. 2 tsp. 3 tsp. 4 tsp.
Paste Sugar 1 1/2 tsp. 3 tsp. 4 1/2 tsp. 6 tsp.
Condensed Skim Milk
2 tbsp. 4 tbsp. 6 tbsp. 8 tbsp.
Dark Soy Sauce (sweet)
1/8 tsp. 1/4 tsp. 1/4 + 1/8 tsp. 1/2 tsp.
Roasted White Sesame (pound coarsely)
1 tsp. 2 tsp. 3 tsp. 4 tsp.
Black Pepper (pound coarsely)
1/2 tsp. 1 tsp. 1 1/2 tsp. 2 tsp.
Cucumber (slice diagonally)
2 whole cucumbers
4 whole cucumbers
6 whole cucumbers
8 whole cucumbers
Tomato (slice widthwise)
1 whole tomato 2 whole
tomatoes 3 whole
tomatoes 4 whole
tomatoes
Press weight/
πÈ”Àπ—° button (▲) 1 time
Press weight/ πÈ”Àπ—° button (▲)
2 time
Press weight/ πÈ”Àπ—° button (▲)
3 time
Press weight/ πÈ”Àπ—° button (▲)
4 time
R-292 [EN] (01-18).indd EN-16R-292 [EN] (01-18).indd EN-16 11/26/08 1:16:50 PM11/26/08 1:16:50 PM
E-17
Preparations
1. Clean the pork and pound all over using a meat pounder then set aside. 2. Pound coriander roots, garlic and black pepper together. 3. Mix all ingredients together except roasted white sesame, cucumber and tomato. Then mix pork neck
with ingredient and marinate for 15 mins. 4. Place Step 3. mixture in a shallow container. Do not cover with lid and place inside the microwave. Press HEALTHY MENU button 1 time. Press weight/πÈ”Àπ—° (▲) button to select number of servings
and press START button. 5. When you hear the buzzer, remove from microwave and turn over the pork neck. Spread roasted white
sesame all over. Do not cover with lid and place inside the microwave. Press START button. 6. When cooking time is completed, remove from container and slice the pork neck. Place on a serving
dish and serve with cucumber and tomato.
R-292 [EN] (01-18).indd EN-17R-292 [EN] (01-18).indd EN-17 11/26/08 1:16:51 PM11/26/08 1:16:51 PM
E-18
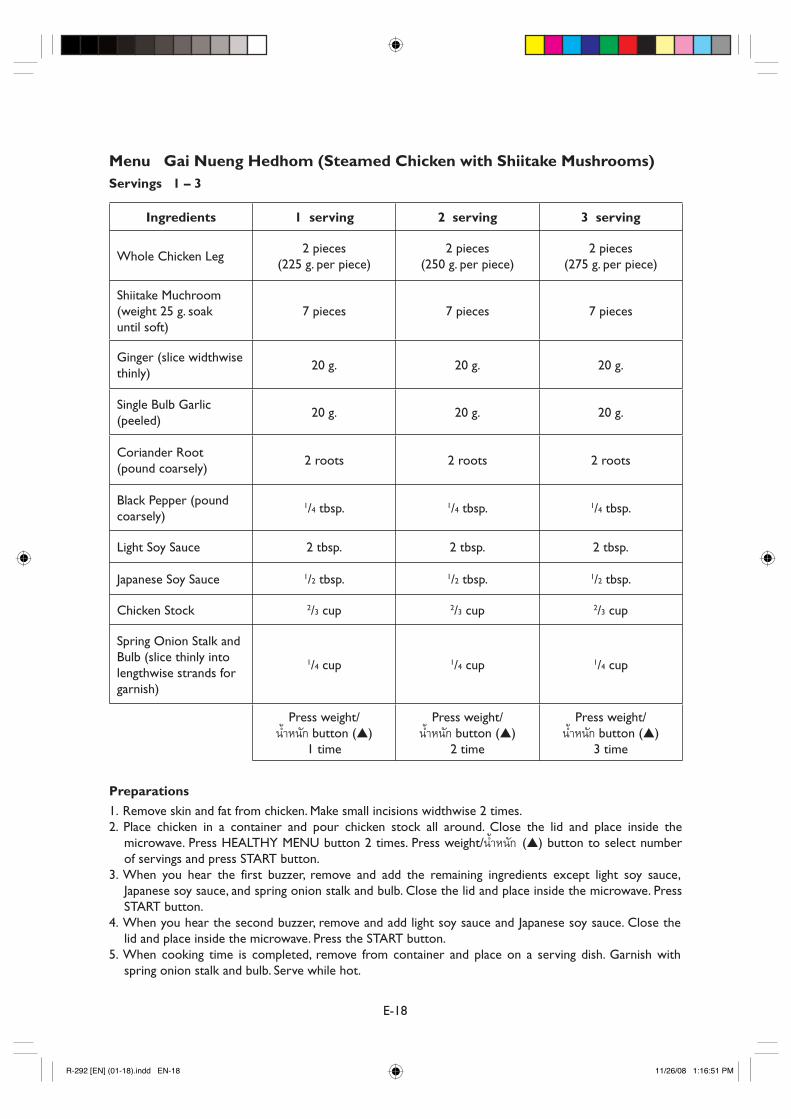
Menu Gai Nueng Hedhom (Steamed Chicken with Shiitake Mushrooms) Servings 1 – 3
Ingredients 1 serving 2 serving 3 serving
Whole Chicken Leg 2 pieces
(225 g. per piece) 2 pieces
(250 g. per piece) 2 pieces
(275 g. per piece)
Shiitake Muchroom (weight 25 g. soak until soft)
7 pieces 7 pieces 7 pieces
Ginger (slice widthwise thinly)
20 g. 20 g. 20 g.
Single Bulb Garlic (peeled)
20 g. 20 g. 20 g.
Coriander Root (pound coarsely)
2 roots 2 roots 2 roots
Black Pepper (pound coarsely)
1/4 tbsp. 1/4 tbsp. 1/4 tbsp.
Light Soy Sauce 2 tbsp. 2 tbsp. 2 tbsp.
Japanese Soy Sauce 1/2 tbsp. 1/2 tbsp. 1/2 tbsp.
Chicken Stock 2/3 cup 2/3 cup 2/3 cup
Spring Onion Stalk and Bulb (slice thinly into lengthwise strands for garnish)
1/4 cup 1/4 cup 1/4 cup
Press weight/
πÈ”Àπ—° button (▲) 1 time
Press weight/ πÈ”Àπ—° button (▲)
2 time
Press weight/ πÈ”Àπ—° button (▲)
3 time
Preparations
1. Remove skin and fat from chicken. Make small incisions widthwise 2 times. 2. Place chicken in a container and pour chicken stock all around. Close the lid and place inside the
microwave. Press HEALTHY MENU button 2 times. Press weight/πÈ”Àπ—° (▲) button to select number of servings and press START button.
3. When you hear the first buzzer, remove and add the remaining ingredients except light soy sauce, Japanese soy sauce, and spring onion stalk and bulb. Close the lid and place inside the microwave. Press START button.
4. When you hear the second buzzer, remove and add light soy sauce and Japanese soy sauce. Close the lid and place inside the microwave. Press the START button.
5. When cooking time is completed, remove from container and place on a serving dish. Garnish with spring onion stalk and bulb. Serve while hot.
R-292 [EN] (01-18).indd EN-18R-292 [EN] (01-18).indd EN-18 11/26/08 1:16:51 PM11/26/08 1:16:51 PM
E - 19
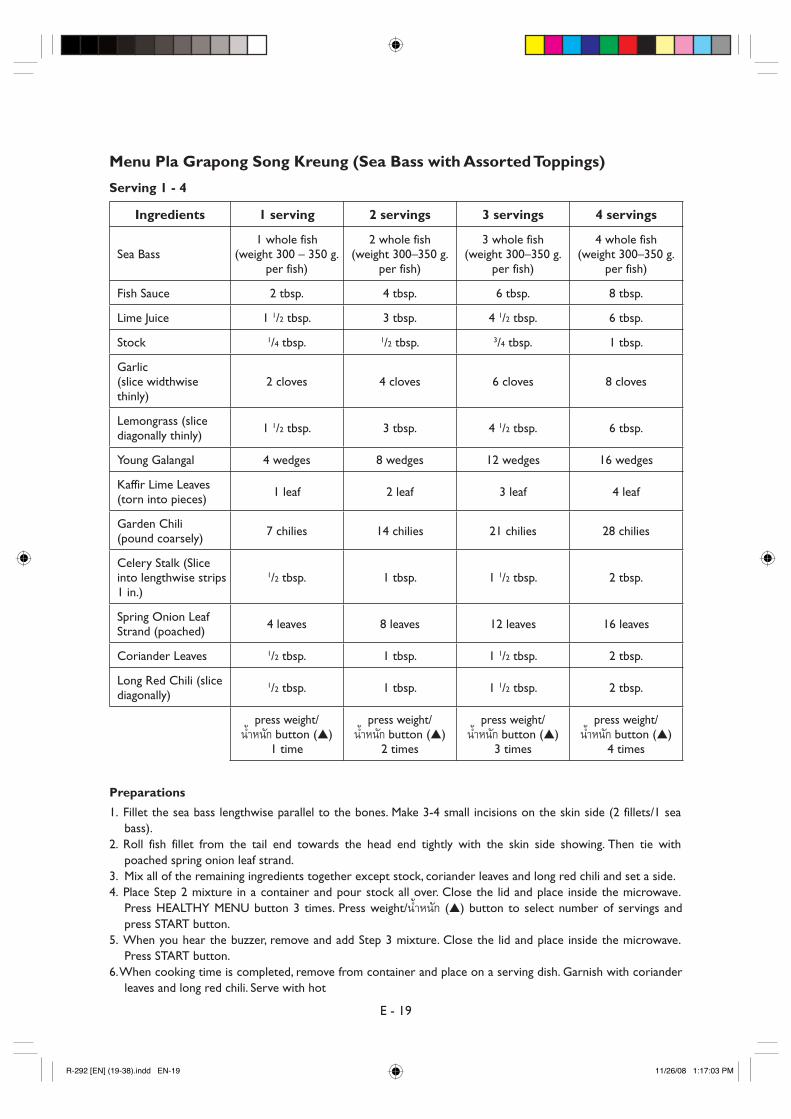
Menu Pla Grapong Song Kreung (Sea Bass with Assorted Toppings)
Serving 1 - 4
Ingredients 1 serving 2 servings 3 servings 4 servings
Sea Bass 1 whole fish
(weight 300 – 350 g. per fish)
2 whole fish (weight 300–350 g.
per fish)
3 whole fish (weight 300–350 g.
per fish)
4 whole fish (weight 300–350 g.
per fish)
Fish Sauce 2 tbsp. 4 tbsp. 6 tbsp. 8 tbsp.
Lime Juice 1 1/2 tbsp. 3 tbsp. 4 1/2 tbsp. 6 tbsp.
Stock 1/4 tbsp. 1/2 tbsp. 3/4 tbsp. 1 tbsp.
Garlic (slice widthwise thinly)
2 cloves 4 cloves 6 cloves 8 cloves
Lemongrass (slice diagonally thinly) 1 1/2 tbsp. 3 tbsp. 4 1/2 tbsp. 6 tbsp.
Young Galangal 4 wedges 8 wedges 12 wedges 16 wedges
Kaffir Lime Leaves (torn into pieces) 1 leaf 2 leaf 3 leaf 4 leaf
Garden Chili (pound coarsely) 7 chilies 14 chilies 21 chilies 28 chilies
Celery Stalk (Slice into lengthwise strips 1 in.)
1/2 tbsp. 1 tbsp. 1 1/2 tbsp. 2 tbsp.
Spring Onion Leaf Strand (poached) 4 leaves 8 leaves 12 leaves 16 leaves
Coriander Leaves 1/2 tbsp. 1 tbsp. 1 1/2 tbsp. 2 tbsp.
Long Red Chili (slice diagonally)
1/2 tbsp. 1 tbsp. 1 1/2 tbsp. 2 tbsp.
press weight/
πÈ”Àπ—° button (▲) 1 time
press weight/ πÈ”Àπ—° button (▲)
2 times
press weight/ πÈ”Àπ—° button (▲)
3 times
press weight/ πÈ”Àπ—° button (▲)
4 times
Preparations
1. Fillet the sea bass lengthwise parallel to the bones. Make 3-4 small incisions on the skin side (2 fillets/1 sea bass).
2. Roll fish fillet from the tail end towards the head end tightly with the skin side showing. Then tie with poached spring onion leaf strand.
3. Mix all of the remaining ingredients together except stock, coriander leaves and long red chili and set a side. 4. Place Step 2 mixture in a container and pour stock all over. Close the lid and place inside the microwave.
Press HEALTHY MENU button 3 times. Press weight/πÈ”Àπ—° (▲) button to select number of servings and press START button.
5. When you hear the buzzer, remove and add Step 3 mixture. Close the lid and place inside the microwave. Press START button.
6. When cooking time is completed, remove from container and place on a serving dish. Garnish with coriander leaves and long red chili. Serve with hot
R-292 [EN] (19-38).indd EN-19R-292 [EN] (19-38).indd EN-19 11/26/08 1:17:03 PM11/26/08 1:17:03 PM
E - 20
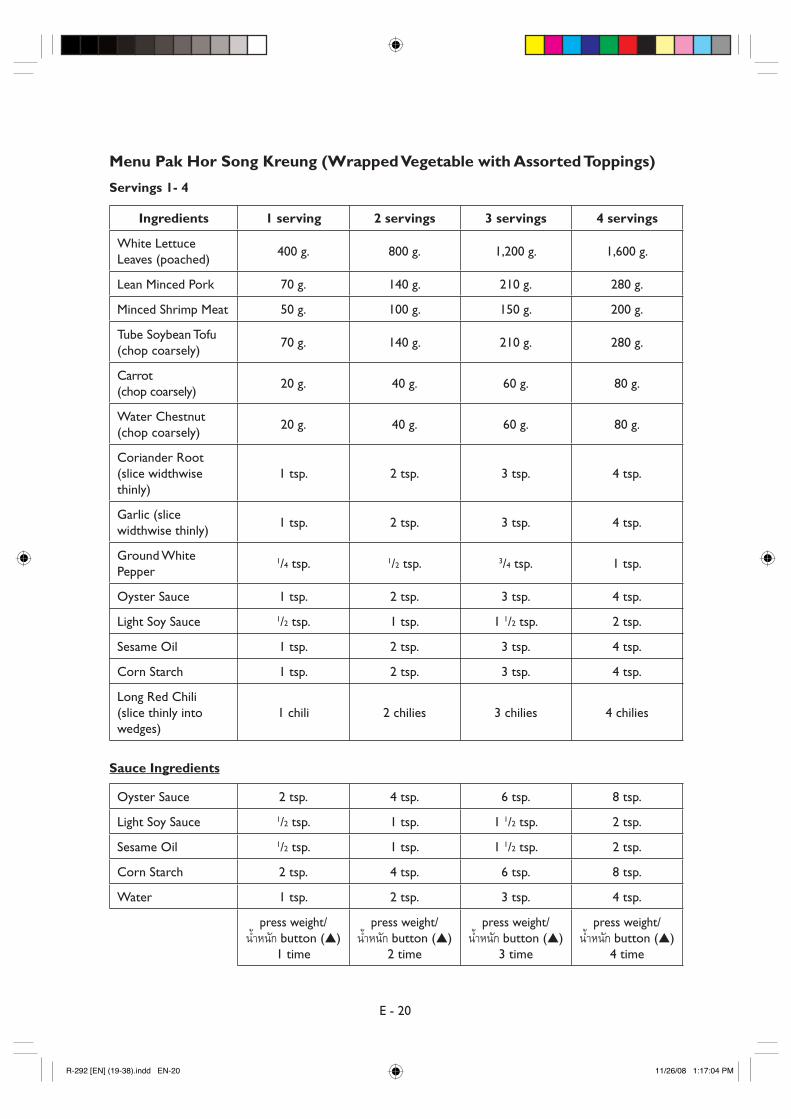
Menu Pak Hor Song Kreung (Wrapped Vegetable with Assorted Toppings)
Servings 1- 4
Ingredients 1 serving 2 servings 3 servings 4 servings
White Lettuce Leaves (poached)
400 g. 800 g. 1,200 g. 1,600 g.
Lean Minced Pork 70 g. 140 g. 210 g. 280 g.
Minced Shrimp Meat 50 g. 100 g. 150 g. 200 g.
Tube Soybean Tofu (chop coarsely)
70 g. 140 g. 210 g. 280 g.
Carrot (chop coarsely)
20 g. 40 g. 60 g. 80 g.
Water Chestnut (chop coarsely)
20 g. 40 g. 60 g. 80 g.
Coriander Root (slice widthwise thinly)
1 tsp. 2 tsp. 3 tsp. 4 tsp.
Garlic (slice widthwise thinly)
1 tsp. 2 tsp. 3 tsp. 4 tsp.
Ground White Pepper
1/4 tsp. 1/2 tsp. 3/4 tsp. 1 tsp.
Oyster Sauce 1 tsp. 2 tsp. 3 tsp. 4 tsp.
Light Soy Sauce 1/2 tsp. 1 tsp. 1 1/2 tsp. 2 tsp.
Sesame Oil 1 tsp. 2 tsp. 3 tsp. 4 tsp.
Corn Starch 1 tsp. 2 tsp. 3 tsp. 4 tsp.
Long Red Chili (slice thinly into wedges)
1 chili 2 chilies 3 chilies 4 chilies
Sauce Ingredients
Oyster Sauce 2 tsp. 4 tsp. 6 tsp. 8 tsp.
Light Soy Sauce 1/2 tsp. 1 tsp. 1 1/2 tsp. 2 tsp.
Sesame Oil 1/2 tsp. 1 tsp. 1 1/2 tsp. 2 tsp.
Corn Starch 2 tsp. 4 tsp. 6 tsp. 8 tsp.
Water 1 tsp. 2 tsp. 3 tsp. 4 tsp.
press weight/
πÈ”Àπ—° button (▲) 1 time
press weight/ πÈ”Àπ—° button (▲)
2 time
press weight/ πÈ”Àπ—° button (▲)
3 time
press weight/ πÈ”Àπ—° button (▲)
4 time
R-292 [EN] (19-38).indd EN-20R-292 [EN] (19-38).indd EN-20 11/26/08 1:17:04 PM11/26/08 1:17:04 PM
E - 21
Preparations
1. Mix all of the sauce ingredients together then set aside. 2. Pound coriander roots, garlic, and ground white pepper together. 3. Cut the bottom of the stalk from the white lettuce leaves. Spread the leaves and place Step 2 mixture in
the middle approx. 1 tbsp. Fold the leaves and wrap into square pieces about bite size until the filling runs out.
4. Place Step 3 mixture in a container. Close the lid and place inside the microwave. Press HEALTHY MENU button 1 time. Press weight/πÈ”Àπ—° (▲) button to select number of servings and press START button.
5. When you hear the buzzer, remove and add Step 1 mixture. Stir to mix. Close the lid and place inside the microwave. Press START button.
6. When cooking time is completed, remove from container and place on a serving dish. Pour the sauce all over and garnish with long red chili. Serve while hot.
R-292 [EN] (19-38).indd EN-21R-292 [EN] (19-38).indd EN-21 11/26/08 1:17:04 PM11/26/08 1:17:04 PM
E - 22
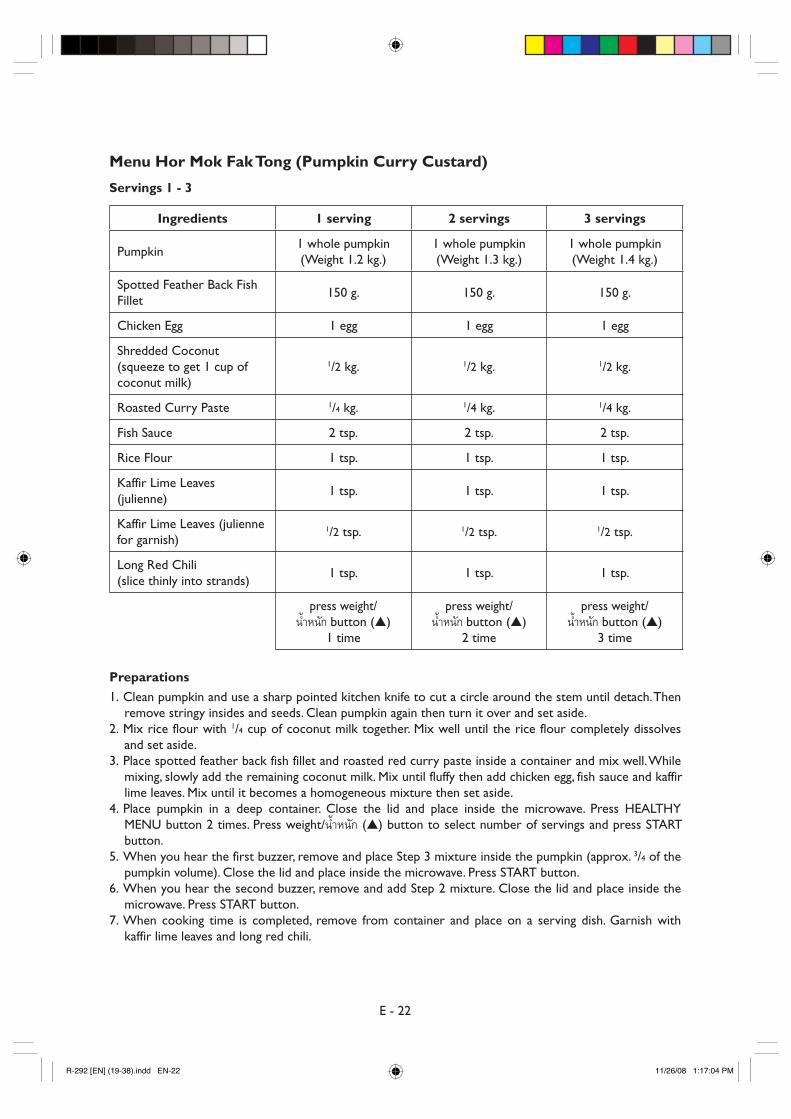
Menu Hor Mok Fak Tong (Pumpkin Curry Custard)
Servings 1 - 3
Ingredients 1 serving 2 servings 3 servings
Pumpkin 1 whole pumpkin (Weight 1.2 kg.)
1 whole pumpkin (Weight 1.3 kg.)
1 whole pumpkin (Weight 1.4 kg.)
Spotted Feather Back Fish Fillet
150 g. 150 g. 150 g.
Chicken Egg 1 egg 1 egg 1 egg
Shredded Coconut (squeeze to get 1 cup of coconut milk)
1/2 kg. 1/2 kg. 1/2 kg.
Roasted Curry Paste 1/4 kg. 1/4 kg. 1/4 kg.
Fish Sauce 2 tsp. 2 tsp. 2 tsp.
Rice Flour 1 tsp. 1 tsp. 1 tsp.
Kaffir Lime Leaves (julienne)
1 tsp. 1 tsp. 1 tsp.
Kaffir Lime Leaves (julienne for garnish)
1/2 tsp. 1/2 tsp. 1/2 tsp.
Long Red Chili (slice thinly into strands)
1 tsp. 1 tsp. 1 tsp.
press weight/
πÈ”Àπ—° button (▲) 1 time
press weight/ πÈ”Àπ—° button (▲)
2 time
press weight/ πÈ”Àπ—° button (▲)
3 time
Preparations
1. Clean pumpkin and use a sharp pointed kitchen knife to cut a circle around the stem until detach. Then remove stringy insides and seeds. Clean pumpkin again then turn it over and set aside.
2. Mix rice flour with 1/4 cup of coconut milk together. Mix well until the rice flour completely dissolves and set aside.
3. Place spotted feather back fish fillet and roasted red curry paste inside a container and mix well. While mixing, slowly add the remaining coconut milk. Mix until fluffy then add chicken egg, fish sauce and kaffir lime leaves. Mix until it becomes a homogeneous mixture then set aside.
4. Place pumpkin in a deep container. Close the lid and place inside the microwave. Press HEALTHY MENU button 2 times. Press weight/πÈ”Àπ—° (▲) button to select number of servings and press START button.
5. When you hear the first buzzer, remove and place Step 3 mixture inside the pumpkin (approx. 3/4 of the pumpkin volume). Close the lid and place inside the microwave. Press START button.
6. When you hear the second buzzer, remove and add Step 2 mixture. Close the lid and place inside the microwave. Press START button.
7. When cooking time is completed, remove from container and place on a serving dish. Garnish with kaffir lime leaves and long red chili.
R-292 [EN] (19-38).indd EN-22R-292 [EN] (19-38).indd EN-22 11/26/08 1:17:04 PM11/26/08 1:17:04 PM
E - 23
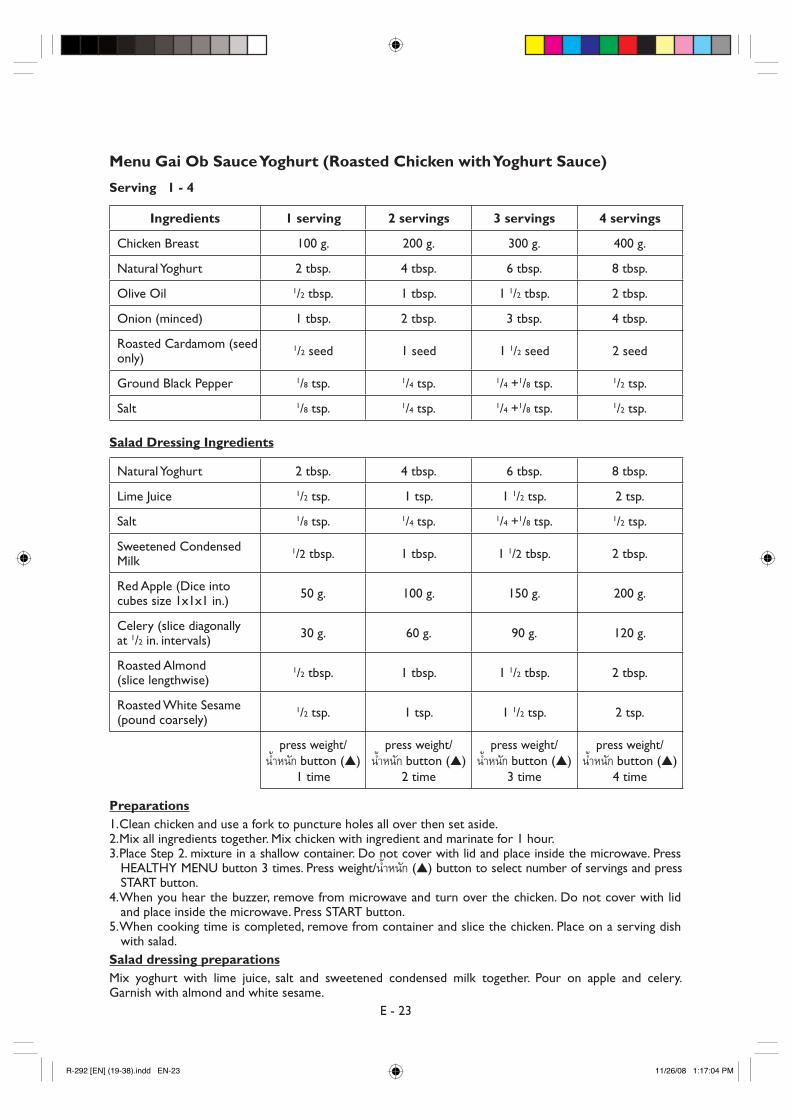
Menu Gai Ob Sauce Yoghurt (Roasted Chicken with Yoghurt Sauce)
Serving 1 - 4
Ingredients 1 serving 2 servings 3 servings 4 servings
Chicken Breast 100 g. 200 g. 300 g. 400 g.
Natural Yoghurt 2 tbsp. 4 tbsp. 6 tbsp. 8 tbsp.
Olive Oil 1/2 tbsp. 1 tbsp. 1 1/2 tbsp. 2 tbsp.
Onion (minced) 1 tbsp. 2 tbsp. 3 tbsp. 4 tbsp.
Roasted Cardamom (seed only)
1/2 seed 1 seed 1 1/2 seed 2 seed
Ground Black Pepper 1/8 tsp. 1/4 tsp. 1/4 +1/8 tsp. 1/2 tsp.
Salt 1/8 tsp. 1/4 tsp. 1/4 +1/8 tsp. 1/2 tsp.
Salad Dressing Ingredients
Natural Yoghurt 2 tbsp. 4 tbsp. 6 tbsp. 8 tbsp.
Lime Juice 1/2 tsp. 1 tsp. 1 1/2 tsp. 2 tsp.
Salt 1/8 tsp. 1/4 tsp. 1/4 +1/8 tsp. 1/2 tsp.
Sweetened Condensed Milk
1/2 tbsp. 1 tbsp. 1 1/2 tbsp. 2 tbsp.
Red Apple (Dice into cubes size 1x1x1 in.) 50 g. 100 g. 150 g. 200 g.
Celery (slice diagonally at 1/2 in. intervals) 30 g. 60 g. 90 g. 120 g.
Roasted Almond (slice lengthwise)
1/2 tbsp. 1 tbsp. 1 1/2 tbsp. 2 tbsp.
Roasted White Sesame (pound coarsely)
1/2 tsp. 1 tsp. 1 1/2 tsp. 2 tsp.
press weight/
πÈ”Àπ—° button (▲) 1 time
press weight/ πÈ”Àπ—° button (▲)
2 time
press weight/ πÈ”Àπ—° button (▲)
3 time
press weight/ πÈ”Àπ—° button (▲)
4 time
Preparations 1. Clean chicken and use a fork to puncture holes all over then set aside. 2. Mix all ingredients together. Mix chicken with ingredient and marinate for 1 hour. 3. Place Step 2. mixture in a shallow container. Do not cover with lid and place inside the microwave. Press
HEALTHY MENU button 3 times. Press weight/πÈ”Àπ—° (▲) button to select number of servings and press START button.
4. When you hear the buzzer, remove from microwave and turn over the chicken. Do not cover with lid and place inside the microwave. Press START button.
5. When cooking time is completed, remove from container and slice the chicken. Place on a serving dish with salad.
Salad dressing preparations Mix yoghurt with lime juice, salt and sweetened condensed milk together. Pour on apple and celery. Garnish with almond and white sesame.
R-292 [EN] (19-38).indd EN-23R-292 [EN] (19-38).indd EN-23 11/26/08 1:17:04 PM11/26/08 1:17:04 PM

E - 24
CONVENIENT FUNCTIONS1. SEQUENCE COOKING
This function enables continued and uninterrupted operation of up to 3 different stages.
Example:
To cook for: 5 minutes on 100P power (Stage 1) 16 minutes on 30P power (Stage 2)
STAGE 1
1. Enter the cooking time by pressing the 1 min. key 5 times.
2. Input the power level by pressing the POWER LEVEL key once.
x5 x1
STAGE 2
3. Enter the cooking time by pressing the 10 min. key once and then the 1 min. key 6 times.
4. Input the power level by pressing the POWER LEVEL key 4 times.
x4
5. Press the START/AUTO MINUTE key once to start.
x1 x6 x1
The oven will begin to cook for 5 minutes on 100P and then for 16 minutes on 30P. NOTE: If 100P is selected as the final power level, it is not necessary to input the power level.
2. AUTO MINUTE AUTO MINUTE enables you:
To cook on 100P microwave power in multiples of 1 minute. To extend cooking time in multiples of 1 minute.
You can use this function for manual cooking only.
Example: To cook on 100P for 2 minutes, press the START/AUTO MINUTE key twice.
NOTE:
The AUTO MINUTE function for direct start, can only be input within 3 minutes after cooking completion, closing the door or pressing the STOP/CLEAR key. The cooking time may be extended to a maximum of 99 minutes.
••
•
•
x2
R-292 [EN] (19-38).indd EN-24R-292 [EN] (19-38).indd EN-24 11/26/08 1:17:04 PM11/26/08 1:17:04 PM
E - 25
CONVENIENT FUNCTIONS
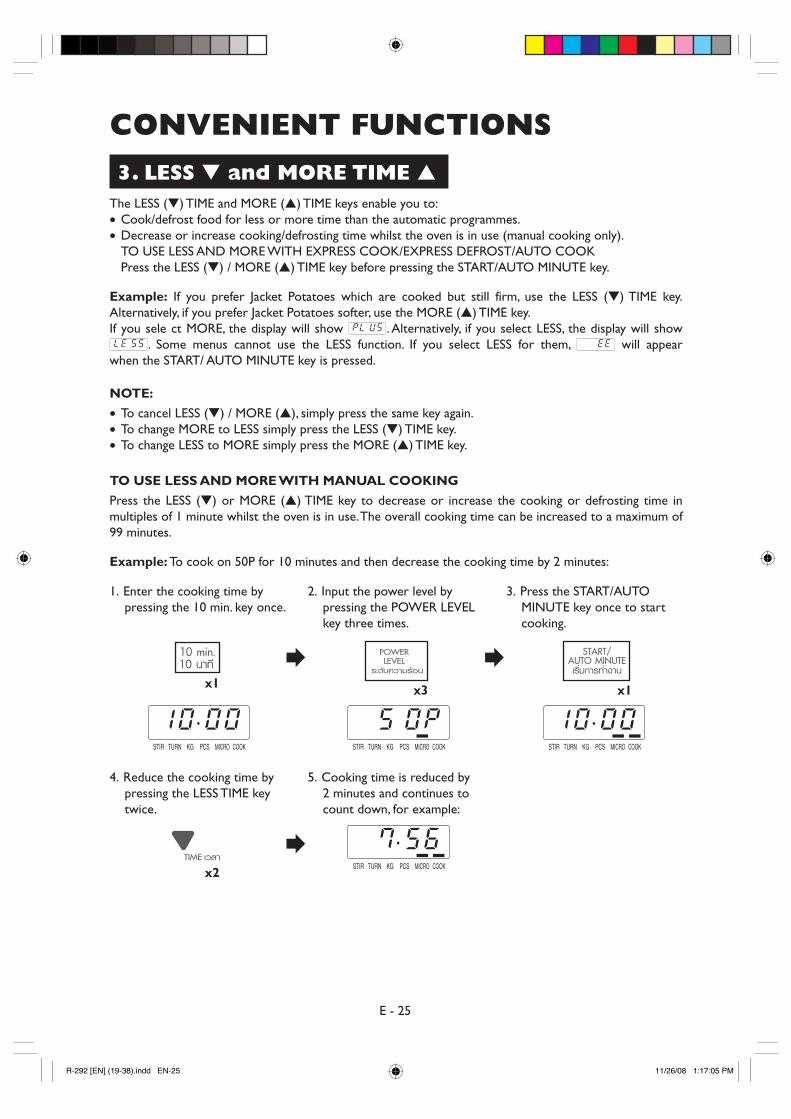
3. LESS ▼ and MORE TIME ▲
The LESS (▼) TIME and MORE (▲) TIME keys enable you to: Cook/defrost food for less or more time than the automatic programmes. Decrease or increase cooking/defrosting time whilst the oven is in use (manual cooking only).
TO USE LESS AND MORE WITH EXPRESS COOK/EXPRESS DEFROST/AUTO COOK Press the LESS (▼) / MORE (▲) TIME key before pressing the START/AUTO MINUTE key.
Example: If you prefer Jacket Potatoes which are cooked but still firm, use the LESS (▼) TIME key. Alternatively, if you prefer Jacket Potatoes softer, use the MORE (▲) TIME key. If you sele ct MORE, the display will show . Alternatively, if you select LESS, the display will show
. Some menus cannot use the LESS function. If you select LESS for them, will appear when the START/ AUTO MINUTE key is pressed.
NOTE:
To cancel LESS (▼) / MORE (▲), simply press the same key again. To change MORE to LESS simply press the LESS (▼) TIME key. To change LESS to MORE simply press the MORE (▲) TIME key.
TO USE LESS AND MORE WITH MANUAL COOKING
Press the LESS (▼) or MORE (▲) TIME key to decrease or increase the cooking or defrosting time in multiples of 1 minute whilst the oven is in use. The overall cooking time can be increased to a maximum of 99 minutes.
Example: To cook on 50P for 10 minutes and then decrease the cooking time by 2 minutes:
••
•••
1. Enter the cooking time by pressing the 10 min. key once.
2. Input the power level by pressing the POWER LEVEL key three times.
x3
3. Press the START/AUTO MINUTE key once to start cooking.
x1 x1
4. Reduce the cooking time by pressing the LESS TIME key twice.
5. Cooking time is reduced by 2 minutes and continues to count down, for example:
x2
R-292 [EN] (19-38).indd EN-25R-292 [EN] (19-38).indd EN-25 11/26/08 1:17:05 PM11/26/08 1:17:05 PM
E - 26
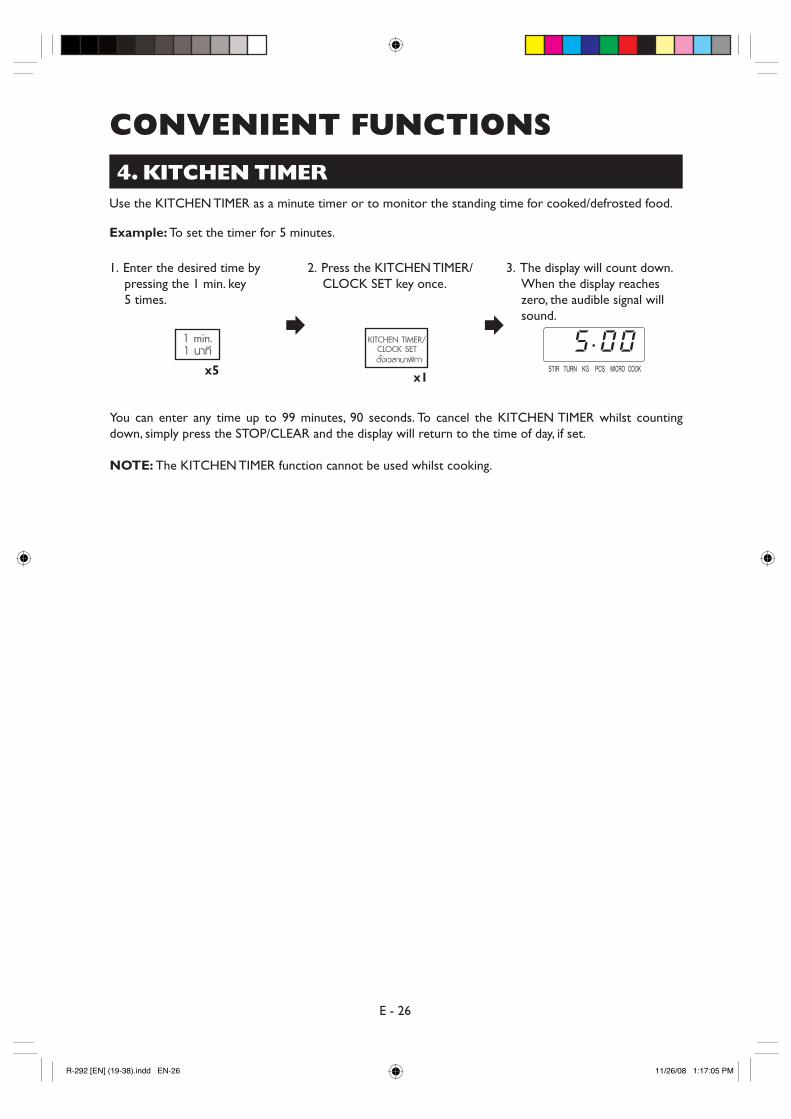
CONVENIENT FUNCTIONS4. KITCHEN TIMER
Use the KITCHEN TIMER as a minute timer or to monitor the standing time for cooked/defrosted food.
Example: To set the timer for 5 minutes.
You can enter any time up to 99 minutes, 90 seconds. To cancel the KITCHEN TIMER whilst counting down, simply press the STOP/CLEAR and the display will return to the time of day, if set. NOTE: The KITCHEN TIMER function cannot be used whilst cooking.
1. Enter the desired time by pressing the 1 min. key 5 times.
2. Press the KITCHEN TIMER/CLOCK SET key once.
3. The display will count down. When the display reaches zero, the audible signal will sound.
x5 x1
R-292 [EN] (19-38).indd EN-26R-292 [EN] (19-38).indd EN-26 11/26/08 1:17:05 PM11/26/08 1:17:05 PM
E - 27
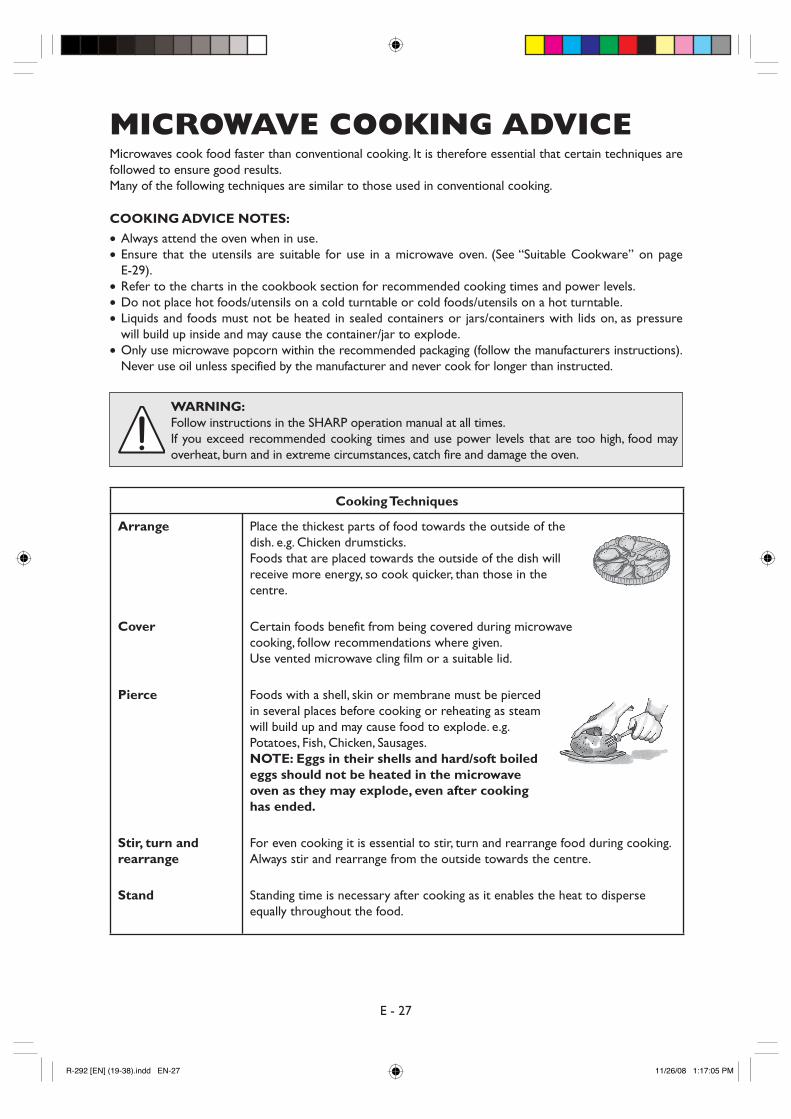
MICROWAVE COOKING ADVICEMicrowaves cook food faster than conventional cooking. It is therefore essential that certain techniques are followed to ensure good results. Many of the following techniques are similar to those used in conventional cooking.
COOKING ADVICE NOTES:
Always attend the oven when in use. Ensure that the utensils are suitable for use in a microwave oven. (See “Suitable Cookware” on page E-29). Refer to the charts in the cookbook section for recommended cooking times and power levels. Do not place hot foods/utensils on a cold turntable or cold foods/utensils on a hot turntable. Liquids and foods must not be heated in sealed containers or jars/containers with lids on, as pressure will build up inside and may cause the container/jar to explode. Only use microwave popcorn within the recommended packaging (follow the manufacturers instructions). Never use oil unless specified by the manufacturer and never cook for longer than instructed.
Cooking Techniques
Arrange Place the thickest parts of food towards the outside of the dish. e.g. Chicken drumsticks. Foods that are placed towards the outside of the dish will receive more energy, so cook quicker, than those in the centre.
Cover Certain foods benefit from being covered during microwave cooking, follow recommendations where given. Use vented microwave cling film or a suitable lid.
Pierce Foods with a shell, skin or membrane must be pierced in several places before cooking or reheating as steam will build up and may cause food to explode. e.g. Potatoes, Fish, Chicken, Sausages. NOTE: Eggs in their shells and hard/soft boiled eggs should not be heated in the microwave oven as they may explode, even after cooking has ended.
Stir, turn and rearrange
For even cooking it is essential to stir, turn and rearrange food during cooking. Always stir and rearrange from the outside towards the centre.
Stand Standing time is necessary after cooking as it enables the heat to disperse equally throughout the food.
••
•••
•
WARNING: Follow instructions in the SHARP operation manual at all times. If you exceed recommended cooking times and use power levels that are too high, food may overheat, burn and in extreme circumstances, catch fire and damage the oven.
R-292 [EN] (19-38).indd EN-27R-292 [EN] (19-38).indd EN-27 11/26/08 1:17:05 PM11/26/08 1:17:05 PM
E - 28
MICROWAVE COOKING ADVICEFood Characteristics
Composition Foods high in fat or sugar (e.g. Christmas pudding, mince pies) require less heating time. Care should be taken as overheating can lead to fire. Bones in food conduct heat, making the food cook more quickly. Care must be taken so that the food is cooked evenly.
Density Food density will affect the amount of cooking time needed. Light, porous foods, such as cakes or bread, cook more quickly than heavy, dense foods, such as roasts and casseroles.
Quantity The number of microwaves in your oven remains the same regardless of how much food is being cooked. The cooking time must be increased as the amount of food placed in the oven increases. e.g. Four potatoes will take longer to cook than two.
Size Small foods and small pieces cook faster than large ones, as microwaves can penetrate from all sides to the centre. For even cooking make all the pieces the same size.
Shape Foods which are irregular in shape, such as chicken breasts or drumsticks, take longer to cook in the thicker parts. For even cooking, place the thickest parts to the outside of the dish where they will receive more energy. Round shapes cook more evenly than square shapes when microwave cooking.
Temperature of food
The initial temperature of food affects the amount of cooking time needed. Chilled foods will take longer to cook than food at room temperature. e.g. A cake made with chilled ingredients, (i.e. margarine) will take longer to cook than a cake made with ingredients at room temperature. The temperature of the container is not a true indication of the temperature of the food or drink. Cut into foods with fillings, for example jam doughnuts, to release heat or steam.
Face & Hands: Always use oven gloves to remove food or cookware from the oven. Stand back when opening the oven door to allow heat or steam to disperse. When removing covers (such as cling film), opening roasting bags or popcorn packaging, direct steam away from face and hands.
Check the temperature of food and drink and stir before serving. Take special care when serving to babies, children or the elderly. The contents of feeding bottles and baby food jars are to be stirred or shaken and the temperature is to be checked before consumption to avoid burns.
R-292 [EN] (19-38).indd EN-28R-292 [EN] (19-38).indd EN-28 11/26/08 1:17:06 PM11/26/08 1:17:06 PM
E - 29
SUITABLE COOKWARETo cook/defrost food in a microwave oven, the microwave energy must be able to pass through the container to penetrate the food. Therefore it is important to choose suitable cookware. Round/oval dishes are preferable to square/oblong ones, as the food in the corners tends to overcook. A variety of cookware can be used as listed below.
Cookware Microwave
Safe Comments
Aluminium foil Foil Containers
✔ / ✘ Small pieces of aluminium foil can be used to shield food from overheating. Keep foil at least 2cm from the oven walls, as arcing may occur. Foil containers are not recommended unless specified by the manufacturer, e.g. Microfoil ®, follow instructions carefully.
Browning dishes ✔
Always follow the manufacturers instructions. Do not exceed heating times given. Be very careful as these dishes become very hot.
China and ceramics ✔ / ✘ Porcelain, pottery, glazed earthenware and bone china are usually suitable, except for those with metallic decoration.
Glassware e.g. Pyrex ®
✔ Care should be taken if using fine glassware as it can break or crack if heated suddenly.
Metal ✘ It is not recommended to use metal cookware as it will arc, which can lead to fire.
Plastic/Polystyrene e.g fast food containers
✔ Care must be taken as some containers warp, melt or discolour at high temperatures.
Cling film ✔ It should not touch the food and must be pierced to let the steam escape.
Freezer/Roasting bags
✔ Must be pierced to let steam escape. Ensure bags are suitable for microwave use. Do not use plastic or metal ties, as they may melt or catch fire due to the metal ‘arcing’.
Paper - Plates, cups and kitchen paper
✔ Only use for warming or to absorb moisture. Care must be taken as overheating may cause fire.
Straw and wooden containers
✔ Always attend the oven when using these materials as overheating may cause fire.
Recycled paper and newspaper
✘ May contain extracts of metal which will cause ‘arcing’ and may lead to fire.
NOTE: When heating food in plastic or paper containers, monitor the oven due to the possibility of ignition.
R-292 [EN] (19-38).indd EN-29R-292 [EN] (19-38).indd EN-29 11/26/08 1:17:06 PM11/26/08 1:17:06 PM
E - 30
DEFROSTING ADVICE Defrosting food using your microwave oven is the quickest method of all. It is a simple proccess but the following instructions are essential to ensure the food is thoroughly defrosted.
Rearrange Foods that are placed towards the outside of the dish will defrost quicker than foods in the centre. It is therefore essential that the food is rearranged up to 4 times during defrosting. Move closely packed pieces from the outside to the centre and rearrange over-lapping areas. This will ensure that all parts of the food defrosts evenly.
Separate Foods may be stuck together when removed from the freezer. It is important to separate foods as soon as it is possible during defrosting. e.g. bacon rashers, chicken fillets.
Shield Some areas of food being defrosted may become warm. To prevent them becoming warmer and starting to cook, these areas can be shielded with small pieces of foil, which reflect microwaves. e.g. legs and wings on a chicken.
Stand Standing time is necessary to ensure food is thoroughly defrosted. Defrosting is not complete once the food is removed from the microwave oven. Food must stand, covered, for a length of time to ensure the centre has completly defrosted.
Turn over It is essential that all foods are turned over at least 3 - 4 times during defrosting. This is important to ensure thorough defrosting.
NOTES:
Remove all packaging and wrapping before defrosting. To defrost food, use microwave power levels MEDIUM LOW or LOW. Please refer to the defrosting chart on page E-32 for further information.
•••
R-292 [EN] (19-38).indd EN-30R-292 [EN] (19-38).indd EN-30 11/26/08 1:17:06 PM11/26/08 1:17:06 PM
E - 31
REHEATING ADVICE For the reheating of foods, follow the advice and guidelines below to ensure food is thoroughly reheated before serving.
Plated meals Remove any poultry or meat portions, reheat these separately, see below. Place smaller items of food to the centre of the plate, larger and thicker foods to the edge. Cover with vented microwave cling film and reheat on MEDIUM, stir/ rearrange halfway through reheating. NOTE: Ensure the food is thoroughly reheated before
serving.
Sliced meat Cover with vented microwave cling film and reheat on MEDIUM. Rearrange at least once to ensure even reheating. NOTE: Ensure the meat is thoroughly reheated before
serving.
Poultry portions
Place thickest parts of the portions to the outside of the dish, cover with vented microwave cling film and reheat on MEDIUM HIGH. Turn over halfway through reheating. NOTE: Ensure the poultry is thoroughly reheated
before serving.
Casseroles Cover with vented microwave cling film or a suitable lid and reheat on MEDIUM. Stir frequently to ensure even reheating. NOTE: Ensure the food is thoroughly reheated before
serving.
To achieve the best results when reheating, select a suitable microwave power level appropriate to the type of food. e.g. A bowl of vegetables can be reheated using HIGH, while a lasagne which contains ingredients that cannot be stirred, should be reheated using MEDIUM.
NOTES:
Remove food from foil or metal containers before reheating. Reheating times will be affected by the shape, depth, quantity and temperature of food together with the size, shape and material of the container.
••
Never heat liquids in narrow-necked containers, as this could result in the contents erupting from the container and may cause burns.
To avoid overheating and fire, special care must be taken when reheating foods with a high sugar or fat content, e.g. mince pies or Christmas pudding. Never heat oil or fat for deep frying as this may lead to overheating and fire. Canned potatoes should not be heated in the microwave oven, follow the manufacturer's instructions on the can.
•
••
The contents of feeding bottles and baby food jars are to be stirred or shaken and the temperature is to be checked before consumption to avoid burns.
R-292 [EN] (19-38).indd EN-31R-292 [EN] (19-38).indd EN-31 11/26/08 1:17:06 PM11/26/08 1:17:06 PM
E - 32
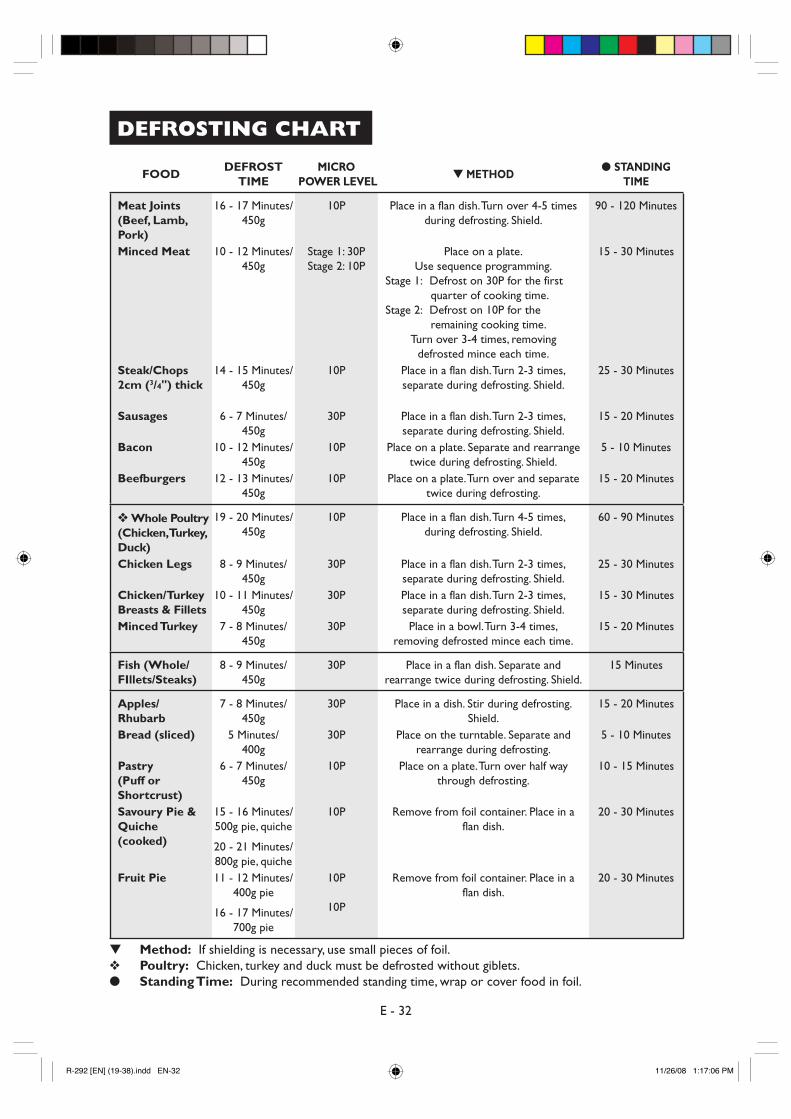
DEFROSTING CHART
FOOD DEFROST
TIME MICRO
POWER LEVEL ▼ METHOD
● STANDING TIME
Meat Joints (Beef, Lamb, Pork)
16 - 17 Minutes/ 450g
10P Place in a flan dish. Turn over 4-5 times during defrosting. Shield.
90 - 120 Minutes
Minced Meat 10 - 12 Minutes/ 450g
Stage 1: 30P Stage 2: 10P
Place on a plate. Use sequence programming.
Stage 1: Defrost on 30P for the first quarter of cooking time.
Stage 2: Defrost on 10P for the remaining cooking time.
Turn over 3-4 times, removing defrosted mince each time.
15 - 30 Minutes
Steak/Chops 2cm (3/4") thick
14 - 15 Minutes/ 450g
10P Place in a flan dish. Turn 2-3 times, separate during defrosting. Shield.
25 - 30 Minutes
Sausages 6 - 7 Minutes/ 450g
30P Place in a flan dish. Turn 2-3 times, separate during defrosting. Shield.
15 - 20 Minutes
Bacon 10 - 12 Minutes/ 450g
10P Place on a plate. Separate and rearrange twice during defrosting. Shield.
5 - 10 Minutes
Beefburgers 12 - 13 Minutes/ 450g
10P Place on a plate. Turn over and separate twice during defrosting.
15 - 20 Minutes
❖ Whole Poultry (Chicken, Turkey, Duck)
19 - 20 Minutes/ 450g
10P Place in a flan dish. Turn 4-5 times, during defrosting. Shield.
60 - 90 Minutes
Chicken Legs 8 - 9 Minutes/ 450g
30P Place in a flan dish. Turn 2-3 times, separate during defrosting. Shield.
25 - 30 Minutes
Chicken/Turkey Breasts & Fillets
10 - 11 Minutes/ 450g
30P Place in a flan dish. Turn 2-3 times, separate during defrosting. Shield.
15 - 30 Minutes
Minced Turkey 7 - 8 Minutes/ 450g
30P Place in a bowl. Turn 3-4 times, removing defrosted mince each time.
15 - 20 Minutes
Fish (Whole/FIllets/Steaks)
8 - 9 Minutes/ 450g
30P Place in a flan dish. Separate and rearrange twice during defrosting. Shield.
15 Minutes
Apples/Rhubarb
7 - 8 Minutes/ 450g
30P Place in a dish. Stir during defrosting. Shield.
15 - 20 Minutes
Bread (sliced) 5 Minutes/ 400g
30P Place on the turntable. Separate and rearrange during defrosting.
5 - 10 Minutes
Pastry (Puff or Shortcrust)
6 - 7 Minutes/ 450g
10P Place on a plate. Turn over half way through defrosting.
10 - 15 Minutes
Savoury Pie & Quiche (cooked)
15 - 16 Minutes/ 500g pie, quiche
20 - 21 Minutes/ 800g pie, quiche
10P Remove from foil container. Place in a flan dish.
20 - 30 Minutes
Fruit Pie 11 - 12 Minutes/ 400g pie
16 - 17 Minutes/ 700g pie
10P
10P
Remove from foil container. Place in a flan dish.
20 - 30 Minutes
▼ Method: If shielding is necessary, use small pieces of foil. ❖ Poultry: Chicken, turkey and duck must be defrosted without giblets. ● Standing Time: During recommended standing time, wrap or cover food in foil.
R-292 [EN] (19-38).indd EN-32R-292 [EN] (19-38).indd EN-32 11/26/08 1:17:06 PM11/26/08 1:17:06 PM
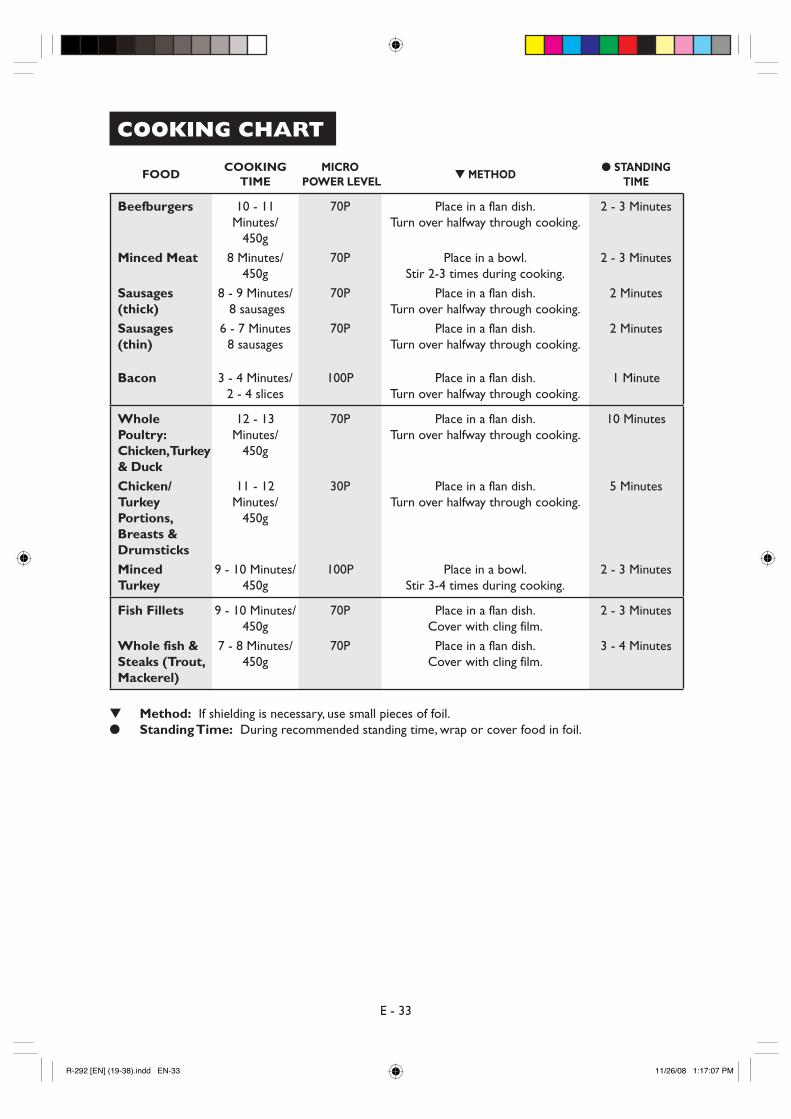
E - 33
FOOD COOKING
TIME MICRO
POWER LEVEL ▼ METHOD
● STANDING TIME
Beefburgers 10 - 11 Minutes/
450g
70P Place in a flan dish. Turn over halfway through cooking.
2 - 3 Minutes
Minced Meat 8 Minutes/ 450g
70P Place in a bowl. Stir 2-3 times during cooking.
2 - 3 Minutes
Sausages (thick)
8 - 9 Minutes/ 8 sausages
70P Place in a flan dish. Turn over halfway through cooking.
2 Minutes
Sausages (thin)
6 - 7 Minutes 8 sausages
70P Place in a flan dish. Turn over halfway through cooking.
2 Minutes
Bacon 3 - 4 Minutes/ 2 - 4 slices
100P Place in a flan dish. Turn over halfway through cooking.
1 Minute
Whole Poultry: Chicken, Turkey & Duck
12 - 13 Minutes/
450g
70P Place in a flan dish. Turn over halfway through cooking.
10 Minutes
Chicken/Turkey Portions, Breasts & Drumsticks
11 - 12 Minutes/
450g
30P Place in a flan dish. Turn over halfway through cooking.
5 Minutes
Minced Turkey
9 - 10 Minutes/ 450g
100P Place in a bowl. Stir 3-4 times during cooking.
2 - 3 Minutes
Fish Fillets
9 - 10 Minutes/ 450g
70P Place in a flan dish. Cover with cling film.
2 - 3 Minutes
Whole fish & Steaks (Trout, Mackerel)
7 - 8 Minutes/ 450g
70P Place in a flan dish. Cover with cling film.
3 - 4 Minutes
▼ Method: If shielding is necessary, use small pieces of foil. ● Standing Time: During recommended standing time, wrap or cover food in foil.
COOKING CHART
R-292 [EN] (19-38).indd EN-33R-292 [EN] (19-38).indd EN-33 11/26/08 1:17:07 PM11/26/08 1:17:07 PM
E - 34
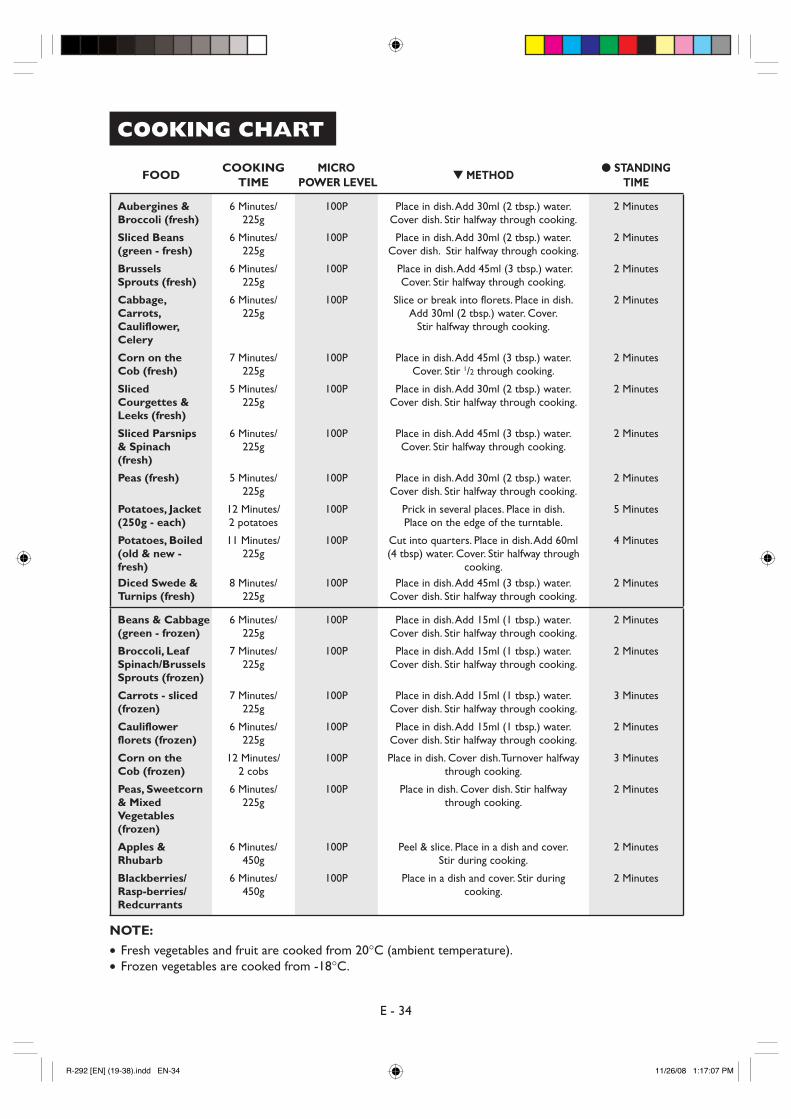
FOOD COOKING
TIME MICRO
POWER LEVEL ▼ METHOD
● STANDING TIME
Aubergines & Broccoli (fresh)
6 Minutes/ 225g
100P Place in dish. Add 30ml (2 tbsp.) water. Cover dish. Stir halfway through cooking.
2 Minutes
Sliced Beans (green - fresh)
6 Minutes/ 225g
100P Place in dish. Add 30ml (2 tbsp.) water. Cover dish. Stir halfway through cooking.
2 Minutes
Brussels Sprouts (fresh)
6 Minutes/ 225g
100P Place in dish. Add 45ml (3 tbsp.) water. Cover. Stir halfway through cooking.
2 Minutes
Cabbage, Carrots, Cauliflower, Celery
6 Minutes/ 225g
100P Slice or break into florets. Place in dish. Add 30ml (2 tbsp.) water. Cover.
Stir halfway through cooking.
2 Minutes
Corn on the Cob (fresh)
7 Minutes/ 225g
100P Place in dish. Add 45ml (3 tbsp.) water. Cover. Stir 1/2 through cooking.
2 Minutes
Sliced Courgettes & Leeks (fresh)
5 Minutes/ 225g
100P Place in dish. Add 30ml (2 tbsp.) water. Cover dish. Stir halfway through cooking.
2 Minutes
Sliced Parsnips & Spinach (fresh)
6 Minutes/ 225g
100P Place in dish. Add 45ml (3 tbsp.) water. Cover. Stir halfway through cooking.
2 Minutes
Peas (fresh) 5 Minutes/ 225g
100P Place in dish. Add 30ml (2 tbsp.) water. Cover dish. Stir halfway through cooking.
2 Minutes
Potatoes, Jacket (250g - each)
12 Minutes/ 2 potatoes
100P Prick in several places. Place in dish. Place on the edge of the turntable.
5 Minutes
Potatoes, Boiled (old & new - fresh)
11 Minutes/ 225g
100P Cut into quarters. Place in dish. Add 60ml (4 tbsp) water. Cover. Stir halfway through
cooking.
4 Minutes
Diced Swede & Turnips (fresh)
8 Minutes/ 225g
100P Place in dish. Add 45ml (3 tbsp.) water. Cover dish. Stir halfway through cooking.
2 Minutes
Beans & Cabbage (green - frozen)
6 Minutes/ 225g
100P Place in dish. Add 15ml (1 tbsp.) water. Cover dish. Stir halfway through cooking.
2 Minutes
Broccoli, Leaf Spinach/Brussels Sprouts (frozen)
7 Minutes/ 225g
100P Place in dish. Add 15ml (1 tbsp.) water. Cover dish. Stir halfway through cooking.
2 Minutes
Carrots - sliced (frozen)
7 Minutes/ 225g
100P Place in dish. Add 15ml (1 tbsp.) water. Cover dish. Stir halfway through cooking.
3 Minutes
Cauliflower florets (frozen)
6 Minutes/ 225g
100P Place in dish. Add 15ml (1 tbsp.) water. Cover dish. Stir halfway through cooking.
2 Minutes
Corn on the Cob (frozen)
12 Minutes/ 2 cobs
100P Place in dish. Cover dish. Turnover halfway through cooking.
3 Minutes
Peas, Sweetcorn & Mixed Vegetables (frozen)
6 Minutes/ 225g
100P Place in dish. Cover dish. Stir halfway through cooking.
2 Minutes
Apples & Rhubarb
6 Minutes/ 450g
100P Peel & slice. Place in a dish and cover. Stir during cooking.
2 Minutes
Blackberries/Rasp-berries/Redcurrants
6 Minutes/ 450g
100P Place in a dish and cover. Stir during cooking.
2 Minutes
NOTE:
Fresh vegetables and fruit are cooked from 20°C (ambient temperature). Frozen vegetables are cooked from -18°C.
••
COOKING CHART
R-292 [EN] (19-38).indd EN-34R-292 [EN] (19-38).indd EN-34 11/26/08 1:17:07 PM11/26/08 1:17:07 PM
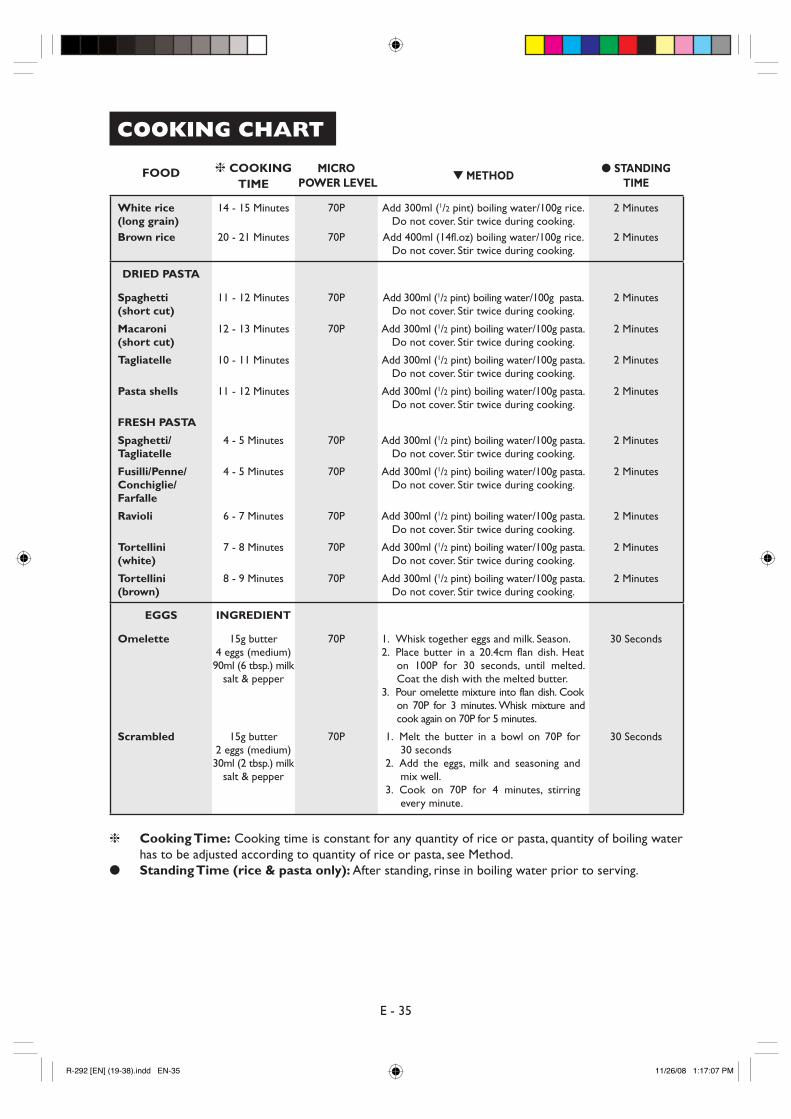
E - 35
FOOD ❈ COOKING TIME
MICRO POWER LEVEL
▼ METHOD ● STANDING
TIME
White rice (long grain)
14 - 15 Minutes 70P Add 300ml (1/2 pint) boiling water/100g rice. Do not cover. Stir twice during cooking.
2 Minutes
Brown rice 20 - 21 Minutes 70P Add 400ml (14fl.oz) boiling water/100g rice. Do not cover. Stir twice during cooking.
2 Minutes
DRIED PASTA
Spaghetti (short cut)
11 - 12 Minutes 70P Add 300ml (1/2 pint) boiling water/100g pasta. Do not cover. Stir twice during cooking.
2 Minutes
Macaroni (short cut)
12 - 13 Minutes 70P Add 300ml (1/2 pint) boiling water/100g pasta. Do not cover. Stir twice during cooking.
2 Minutes
Tagliatelle 10 - 11 Minutes Add 300ml (1/2 pint) boiling water/100g pasta. Do not cover. Stir twice during cooking.
2 Minutes
Pasta shells 11 - 12 Minutes Add 300ml (1/2 pint) boiling water/100g pasta. Do not cover. Stir twice during cooking.
2 Minutes
FRESH PASTA
Spaghetti/ Tagliatelle
4 - 5 Minutes 70P Add 300ml (1/2 pint) boiling water/100g pasta. Do not cover. Stir twice during cooking.
2 Minutes
Fusilli/Penne/ Conchiglie/ Farfalle
4 - 5 Minutes 70P Add 300ml (1/2 pint) boiling water/100g pasta. Do not cover. Stir twice during cooking.
2 Minutes
Ravioli 6 - 7 Minutes 70P Add 300ml (1/2 pint) boiling water/100g pasta. Do not cover. Stir twice during cooking.
2 Minutes
Tortellini (white)
7 - 8 Minutes 70P Add 300ml (1/2 pint) boiling water/100g pasta. Do not cover. Stir twice during cooking.
2 Minutes
Tortellini (brown)
8 - 9 Minutes 70P Add 300ml (1/2 pint) boiling water/100g pasta. Do not cover. Stir twice during cooking.
2 Minutes
EGGS INGREDIENT
Omelette 15g butter 4 eggs (medium) 90ml (6 tbsp.) milk
salt & pepper
70P 1. Whisk together eggs and milk. Season. 2. Place butter in a 20.4cm flan dish. Heat
on 100P for 30 seconds, until melted. Coat the dish with the melted butter.
3. Pour omelette mixture into flan dish. Cook on 70P for 3 minutes. Whisk mixture and cook again on 70P for 5 minutes.
30 Seconds
Scrambled 15g butter 2 eggs (medium) 30ml (2 tbsp.) milk
salt & pepper
70P 1. Melt the butter in a bowl on 70P for 30 seconds
2. Add the eggs, milk and seasoning and mix well.
3. Cook on 70P for 4 minutes, stirring every minute.
30 Seconds
❈ Cooking Time: Cooking time is constant for any quantity of rice or pasta, quantity of boiling water has to be adjusted according to quantity of rice or pasta, see Method.
● Standing Time (rice & pasta only): After standing, rinse in boiling water prior to serving.
COOKING CHART
R-292 [EN] (19-38).indd EN-35R-292 [EN] (19-38).indd EN-35 11/26/08 1:17:07 PM11/26/08 1:17:07 PM
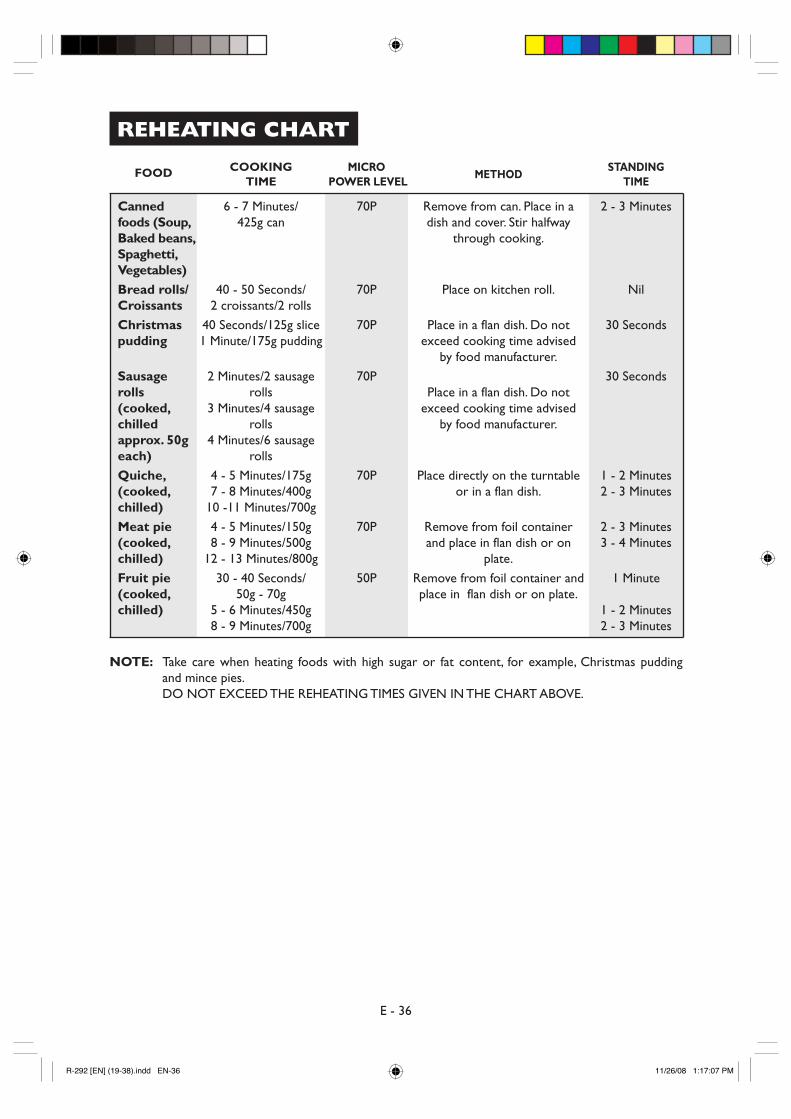
E - 36
FOOD COOKING TIME
MICRO POWER LEVEL
METHOD STANDING
TIME
Canned foods (Soup, Baked beans, Spaghetti, Vegetables)
6 - 7 Minutes/ 425g can
70P Remove from can. Place in a dish and cover. Stir halfway
through cooking.
2 - 3 Minutes
Bread rolls/ Croissants
40 - 50 Seconds/ 2 croissants/2 rolls
70P Place on kitchen roll. Nil
Christmas pudding
40 Seconds/125g slice 1 Minute/175g pudding
70P Place in a flan dish. Do not exceed cooking time advised
by food manufacturer.
30 Seconds
Sausage rolls (cooked, chilled approx. 50g each)
2 Minutes/2 sausage rolls
3 Minutes/4 sausage rolls
4 Minutes/6 sausage rolls
70P Place in a flan dish. Do not
exceed cooking time advised by food manufacturer.
30 Seconds
Quiche, (cooked, chilled)
4 - 5 Minutes/175g 7 - 8 Minutes/400g
10 -11 Minutes/700g
70P Place directly on the turntable or in a flan dish.
1 - 2 Minutes 2 - 3 Minutes
Meat pie (cooked, chilled)
4 - 5 Minutes/150g 8 - 9 Minutes/500g
12 - 13 Minutes/800g
70P Remove from foil container and place in flan dish or on
plate.
2 - 3 Minutes 3 - 4 Minutes
Fruit pie (cooked, chilled)
30 - 40 Seconds/ 50g - 70g
5 - 6 Minutes/450g 8 - 9 Minutes/700g
50P Remove from foil container and place in flan dish or on plate.
1 Minute
1 - 2 Minutes 2 - 3 Minutes
NOTE: Take care when heating foods with high sugar or fat content, for example, Christmas pudding and mince pies.
DO NOT EXCEED THE REHEATING TIMES GIVEN IN THE CHART ABOVE.
REHEATING CHART
R-292 [EN] (19-38).indd EN-36R-292 [EN] (19-38).indd EN-36 11/26/08 1:17:07 PM11/26/08 1:17:07 PM
E - 37
CARE AND CLEANINGDisconnect the power supply cord before cleaning or leave the door open to inactivate the oven during cleaning.
SERVICE CALL CHECKPlease check the following before calling for service: 1. Does the display light? YES _______ NO _______ 2. When the door is opened, does the oven lamp come on? YES _______ NO _______ 3. Place one cup of water (approx. 250 ml) in a glass measure in the oven and close the door securely. Oven lamp should go off if door is closed properly. Press the START/AUTO MINUTE pad once.
A. Does the oven lamp light? YES _______ NO _______ B. Does the cooling fan work? YES _______ NO _______ (Put your hand over the rear ventilation openings.) C. Does the turntable rotate? YES _______ NO _______ (The turntable can rotate clockwise or counterclockwise. This is quite normal.) D. After one minute, did an audible signal sound and COOK YES _______ NO _______ indicator go off? E. Is the water inside the oven hot? YES _______ NO _______
If “NO” is the answer to any of the above questions, please check your wall socket and the fuse in your meter box. If both the wall socket and the fuse are functioning properly, CONTACT YOUR NEAREST SERVICE CENTRE APPROVED BY SHARP. NOTE: If you cook the food over 20 minutes on 100P (HIGH POWER), the microwave power will be
automatically reduced to avoid overheating.
CLEAN THE OVEN AT REGULAR INTERVALS - Keep the oven clean, or it could lead to deterioration of the surface. This could adversely affect the life of the appliance and possibly result in a hazardous situation.
Exterior: The outside may be cleaned with mild soap and warm water, wipe clean with a damp cloth. Avoid the abrasive cleaners.
Door: Wipe the door and window on both sides, the door seals and adjacent parts frequently with a damp cloth to remove any spills or spatters. Do not use abrasive cleaner.
Control Panel: Wipe the panel with a cloth dampened slightly with water only. Do not scrub or use any sort of chemical cleaners. Avoid the use of excess water.
Interior walls: To clean the interior surfaces, wipe with a soft cloth and warm water for hygienic reasons. After use wipe the waveguide cover in the oven with a soft damp cloth to remove any food splashes. Built up splashes may overheat and begin to smoke or catch fire. Do not remove the waveguide cover. DO NOT USE A COMMERCIAL OVEN CLEANER, ABRASIVE OR HARSH CLEANERS AND SCOURING PADS ON ANY PART OF YOUR MICROWAVE OVEN. NEVER SPRAY OVEN CLEANERS DIRECTLY ONTO ANY PART OF YOUR OVEN. Avoid using excess water. After cleaning the oven, ensure any water is removed with a soft cloth.
Turntable/Roller Stay: Wash with mild soapy water and dry thoroughly.
R-292 [EN] (19-38).indd EN-37R-292 [EN] (19-38).indd EN-37 11/26/08 1:17:08 PM11/26/08 1:17:08 PM
E - 38
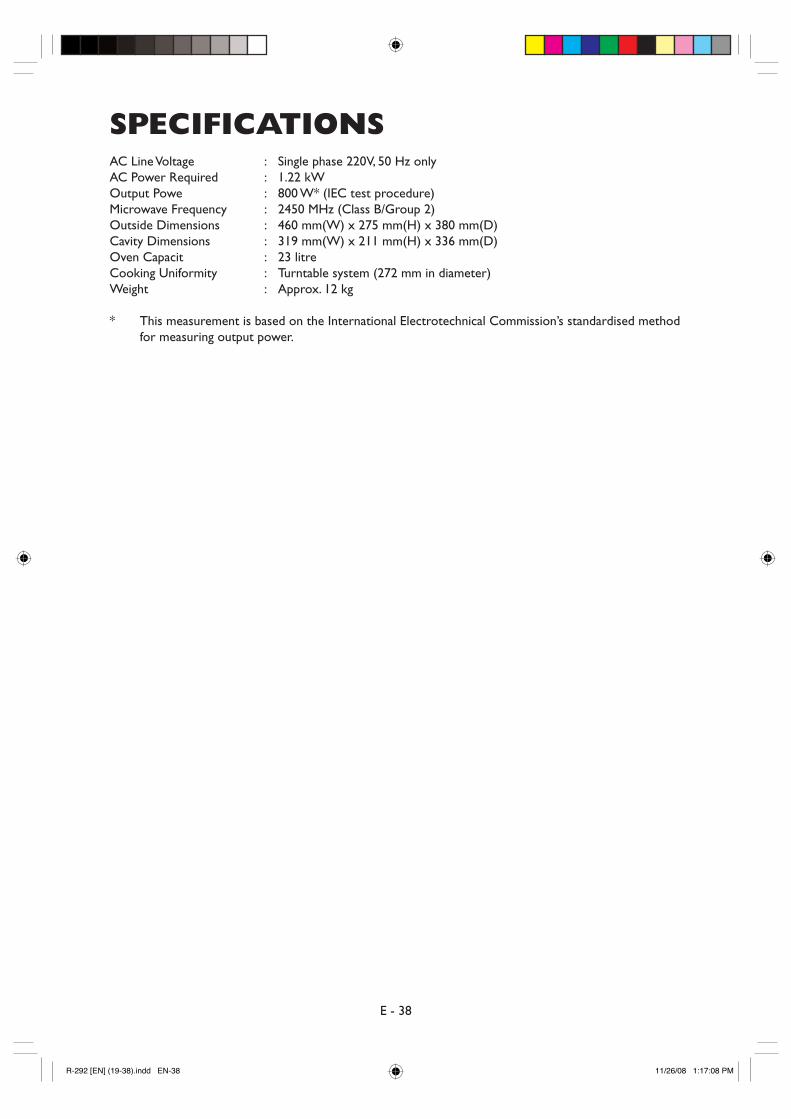
SPECIFICATIONSAC Line Voltage : Single phase 220V, 50 Hz only AC Power Required : 1.22 kW Output Powe : 800 W* (IEC test procedure) Microwave Frequency : 2450 MHz (Class B/Group 2) Outside Dimensions : 460 mm(W) x 275 mm(H) x 380 mm(D) Cavity Dimensions : 319 mm(W) x 211 mm(H) x 336 mm(D) Oven Capacit : 23 litre Cooking Uniformity : Turntable system (272 mm in diameter) Weight : Approx. 12 kg * This measurement is based on the International Electrotechnical Commission’s standardised method for measuring output power.
R-292 [EN] (19-38).indd EN-38R-292 [EN] (19-38).indd EN-38 11/26/08 1:17:08 PM11/26/08 1:17:08 PM

∫√‘…—∑ ™“√åª ‰∑¬ ®”°—¥952 ™—Èπ 12 Õ“§“√√“¡“·≈π¥å
∂ππæ√–√“¡∑’Ë 4 ·¢«ß ÿ√‘¬«ß»å ‡¢μ∫“ß√—° °√ÿ߇∑æœ 10500‚∑√: 0-2638-3500 E-mail: www.sharpthai.co.th
TINSZA 172WRRZ-T81
R-292 [TH] cover.indd 2R-292 [TH] cover.indd 2 11/26/08 2:28:06 PM11/26/08 2:28:06 PM