DVD PLAYER Hi-Fi VIDEO CASSETTE RECORDER USER'S ...
60
DVD PLAYER Hi-Fi VIDEO CASSETTE RECORDER USER’S GUIDE For model: HR-XV1EK DIGITAL VIDEO LPT0716-001B
-
Upload
khangminh22 -
Category
Documents
-
view
5 -
download
0
Transcript of DVD PLAYER Hi-Fi VIDEO CASSETTE RECORDER USER'S ...

DVD PLAYERHi-Fi VIDEO
CASSETTERECORDER
USER’S GUIDEFor model:HR-XV1EK
DIGITAL VIDEO
LPT0716-001B
2A77501C E Cover 9/25/02, 9:00 PM1

2
SAFETY FIRSTThe rating plate and the safety caution are on the rear of the unit.
WARNING: DANGEROUS VOLTAGE INSIDEWARNING: TO PREVENT FIRE OR SHOCK HAZARD, DO NOT EXPOSE THIS UNIT
TO RAIN OR MOISTURE.
Safety Precautions
CAUTION When you are not using the recorder for a long period of time, it is recommended that you disconnect thepower cord from the mains outlet.
Dangerous voltage inside. Refer internal servicing to qualified service personnel. To prevent electric shockor fire hazard, remove the power cord from the mains outlet prior to connecting or disconnecting any signallead or aerial.
IMPORTANTConnection to the mains supply in the United Kingdom. DO NOT cut off the mains plug from thisequipment. If the plug fitted is not suitable for the power points in your home or the cable is too short toreach a power point, then obtain a proper safety approved extension lead/adapter or consult your dealer.In the unlikely event of the plug fuse failing be sure to replace the fuse only with an identical ap-proved type, as originally fitted, and to replace the fuse cover. If the fuse fails again consult yournearest JVC dealer.If nonetheless the mains plug is cut off remove the fuse and dispose of the plug immediately, to avoid apossible shock hazard by inadvertent connection to the mains supply.If this product is not supplied fitted with a mains plug then follow the instructions given below:DO NOT make any connection to the Larger Terminal coded E or Green.The wires in the mains lead are coloured in accordance with the following code:
Blue to N (Neutral) or BlackBrown to L (Live) or Red
If these colours do not correspond with the terminal identifications of your plug, connect as follows:Blue wire to terminal coded N (Neutral) or coloured Black.Brown wire to terminal coded L (Live) or coloured Red.If in doubt – consult a competent electrician.
IMPORTANT Please read the various precautions on page 2 and 3 before installing or operating the recorder. It should be noted that it may be unlawful to re-record pre-recorded tapes, records, or discs without theconsent of the owner of copyright in the sound or video recording, broadcast or cable programme and inany literary, dramatic, musical, or artistic work embodied therein.
Video tapes recorded with this video recorder in the LP (Long Play) mode cannot be played back on a single-speed video recorder.
The STANDBY/ON button does not completely shut off mains power from the unit, but switches operatingcurrent on and off. “ ” shows electrical power standby and “ I ” shows ON.
MOISTURE CONDENSATIONMoisture in the air will condense on the recorder when you move it from a cold place to a warm place, or underextremely humid conditions-just as water droplets form in the surface of a glass filled with cold liquid. Moisturecondensation on the head drum will cause damage to the tape. In conditions where condensation may occur,keep the recorder turned on for a few hours to let the moisture dry.
2A77501C E(02-05) 9/25/02, 9:00 PM2

3
Safety PrecautionsWhen the equipment is installed in a cabinet or a shelf, make sure that it has sufficient space on all sides to allowfor ventilation (10 cm or more on both sides, on top and at the rear.)
When discarding batteries, environmental problems must be considered and the local rules or laws governingthe disposal of these batteries must be followed strictly.
Failure to heed the following precautions may result in damage to the recorder, remote control or videocassette.
1. DO NOT place the recorder ...... in an environment prone to extreme temperatures or humidity.... in direct sunlight.... in a dusty environment.... in an environment where strong magnetic fields are generated.... on a surface that is unstable or subject to vibration.
2. DO NOT block the recorder’s ventilation openings or holes.(If the ventilation openings or holes are blocked by a newspaper or cloth, etc., the heat may not be able to getout.)
3. DO NOT place heavy objects on the recorder or remote control.4. DO NOT place anything which might spill on top of the recorder or remote control.
(If water or liquid is allowed to enter this equipment, fire or electric shock may be caused.)5. DO NOT expose the apparatus to dripping or splashing.6. DO NOT use this equipment in a bathroom or places with water. Also DO NOT place any containers filled
with water or liquids (such as cosmetics or medicines, flower vases, potted plants, cups, etc.) on top of thisunit.
7. DO NOT place any naked flame sources, such as lighted candles, on the apparatus.8. AVOID violent shocks to the recorder during transport.
Some Do's And Don'ts On The Safe Use Of Equipment
This equipment has been designed and manufactured to meet international safety standards but, likeany electrical equipment, care must be taken if you are to obtain the best results and safety is to beassured.DO read the operating instructions before you attempt to use the equipment.DO ensure that all electrical connections (including the mains plug, extension leads and interconnec-
tions between pieces of equipment) are properly made and in accordance with the manufacturer'sinstructions. Switch off and withdraw the mains plug when making or changing connections.
DO consult your dealer if you are ever in doubt about the installation, operation or safety of yourequipment.
DO be careful with glass panels or doors on equipment.DON'T continue to operate the equipment if you are in any doubt about it working normally, or if it is
damaged in any way – switch off, withdraw the mains plug and consult your dealer.DON'T remove any fixed cover as this may expose dangerous voltages.DON'T leave equipment switched on when it is unattended unless it is specifically stated that it is
designed for unattended operation or has a standby mode. Switch off using the switch on theequipment and make sure that your family knows how to do this. Special arrangements mayneed to be made for infirm or handicapped people.
DON'T use equipment such as personal stereos or radios so that you are distracted from the require-ments of road safety. It is illegal to watch television whilst driving.
DON'T listen to headphones at high volume, as such use can permanently damage your hearing.DON'T obstruct the ventilation of the equipment, for example with curtains or soft furnishings.
Overheating will cause damage and shorten the life of the equipment.DON'T use makeshift stands and NEVER fix legs with wood screws – to ensure complete safety
always fit the manufacturer's approved stand or legs with the fixings provided according to theinstructions.
DON'T allow electrical equipment to be exposed to rain or moisture.
ABOVE ALL...
– NEVER let anyone especially children push anything into holes, slots or any other opening inthe case – this could result in a fatal electrical shock;
– NEVER guess or take chances with electrical equipment of any kind – it is better to be safe than sorry!
2A77501C E(02-05) 9/25/02, 9:00 PM3

4
FeaturesVideo Cassette Recorder• High Quality (HQ) Images• On-Screen Displays (OSD)• Nicam Hi-Fi Stereo Audio
Recording and Playback• Auto TV Station Tuning and Auto
Clock Set• 80 Memory for presets• Auto Time Setting• 30 Minute Back-Up in case of
Power failure• 6 rotary Head (4 Video Head and
2 Hi-Fi Audio Head)• Long play• Programme Delivery Control
System• Timer Recording of up to 8
Programme per Month• VIDEO Plus+® rapid timer
programming• Instant Timer Recording (ITR)• Video index Search System• Slow Motion• NTSC Video Cassette Tape
Playback on PAL TV• Real-Time Tape Counter with
ZERO RETURN-Function
• Digital AUTO Tracking (ATRFunction)
• Repeat/Playback• On-Screen Display in 3
Language• AV-Front input jack• Audio Mixing
DVD Player• Digital Audio Jack (Coaxial)• Multi-Language• Multi-Angle• Surround audio• Repeat Playback• Memory/Random Playback• Zoom• Video Aspect Ratio• Parental Control• 3 Scene memory• Digital (Optical or Coaxial) output
for Dolby Digital (AC-3) and DTS• Playback of DVD, Video-CD and
Audio-CD• PAL & NTSC DVDs playback• A-B Repeat playback• MP3 CD playback
• Cassettes marked “VHS” (or “S-VHS”) can be used with this video cassette recorder. However, S-VHS recordingis not possible with this model.
• This model is equipped with SQPB (S-VHS QUASI PLAYBACK) that makes it possible to play back S-VHSrecordings with regular VHS resolution.
• HQ VHS is compatible with existing VHS equipment.• VIDEO Plus+ and PlusCode are registered trademarks of Gemstar Development Corporation. The VIDEO
Plus+ system is manufactured under license from Gemstar Development Corporation.
PAL
2A77501C E(02-05) 9/25/02, 9:00 PM4

5
* This product incorporates copyright protection technology that is protected by method claims of certain U.S. patentsand other intellectual property rights owned by Macrovision Corporation and other rights owners. Use of this copy-right protection technology must be authorized by Macrovision Corporation or other rights owners and is intended forhome and other limited viewing uses only unless otherwise authorized by Macrovision Corporation or other rightsowners. Reverse engineering or disassembly is prohibited.
* Manufactured under license from Dolby Laboratories. “Dolby” and the double-D symbol are trademarks of DolbyLaboratories. Confidential unpublished works. © 1992-1997 Dolby Laboratories, Inc. All rights reserved.
* “DTS” and “DTS Digital Out” are trademarks of Digital Theater Systems, Inc.
* Certain audio features of this product manufactured under license from Desper Products,Inc. Spatializer and thecircle - in - square device are trademarks owned by Desper Products,Inc.
* Unauthorized recording of copyrighted television programs, films, video cassettes and other materials may infringethe rights of copyright owners and be contrary to copyright laws.
Contents
Safety Precautions ........................................... 2Features ........................................................... 4Contents ........................................................... 5Parts and functions .......................................... 6Display ............................................................. 7Remote control ................................................. 8Connections and Installation .......................... 10Playback connection ...................................... 11
Before using your unit
Recording a TV Programme .......................... 24Instant Timer Recording (ITR) ........................ 26VIDEO Plus+® Recording ............................... 27Timer Recording Manually ............................. 29
Recording
Advanced function of VCR section
Loading and Unloading a Cassette Tape ....... 18Cassette tape playback .................................. 19Special playback/Playback sharpness/Skip Search ........ 20Repeat Playback ............................................ 21Counter Display.............................................. 22Video Index Search System ........................... 23
Tape playback operation
Tuning the TV Stations and Setting the Timeand Date Automatically .................................. 13On-screen Language Selection...................... 14Setting the Time and Date Manually .............. 15Tuning the TV Stations Manually ................... 16Setting the VIDEO Plus+ Channel Number(Guide CH) ..................................................... 17
Setting up the VCR section
DISC............................................................... 36Setting setup language .................................. 37Playback procedure ....................................... 38Special playback ............................................ 39DVD Picture Signal Selection/Zooming.......... 40Repeat playback ............................................ 41Memory playback/Random playback ............. 42MP3 Playback ................................................ 43Changing soundtrack language /Changing Subtitles language ......................... 44Changing angles / Title selection /DVD menu...................................................... 45
Disc playback operation
Parental control .............................................. 46Setting menu language .................................. 48Setting audio soundtrack language ................ 49Setting subtitle language ................................ 50Setting the aspect ratio of TV screen /Setting on Screen display .............................. 51Setting Audio .................................................. 52Setting Operation ........................................... 53Selecting the sound enhancement (E.A.M.)/Setting Background/Setting Screen Saver ..... 54Setting initial setup/output soundconversion table ............................................. 55Status display of Disc ..................................... 56Table of languages ......................................... 57
Advanced function of DVD section
Problems and troubleshooting ....................... 58Video head cleaning ....................................... 59Specifications ................................................. 60
Additional information
NICAM Stereo Recordingand Playback.................................................. 32Audio Mixing................................................... 34Duplicating a Video Tape ............................... 35
2A77501C E(02-05) 9/25/02, 9:00 PM5

6
SCART-socket(for VCR/DECODER)
SCART PRISE PERITEL
Parts and functionsFront
STOP button
Rear
AC power cord
PLAY button
OPEN/CLOSE button
Disc tray
Standby/Onbutton
DVD COAXIAL DIGITALAUDIO OUT jack
RF IN jack
PR +/– buttonsAUDIO (L/R)/
VIDEO IN jacks FF (Fast Forward) button
Remote sensor
EJECT button
VCR indicator
VCR/DVD mode selector button
Cassette Loading Slot
REW (Rewind) button REC button
DVD indicator
DVD AUDIO (L/R) OUT jacks
RF OUT jack
Display window
SCART-socket(for TV-RGB/Composite)DVD S-VIDEO OUT jack
DVD OPTICALDIGITAL AUDIO
OUT jack
2A77501C E(06-11) 9/25/02, 9:00 PM6

7
No. Display Description
VCR mode of TV/VCR switch1
2
3
4
5
6
1 2 3 4
6
5
Display
7
8
9
10
VCR
DVD
CD
10 : 00
01 : 00
2
A1/A2/A3
TRK
REC
CH 2
Playback (lights) / Auto resume (flashes)
Still picture
DVD disc is inserted.
CD is inserted.
Clock display (colon[ : ] flashes)
Counter display by hour/minute at VCR/DVD / by minute/second at CD
Track number display for CD
TV channel position display
External input display
Timer recording display
Video tape is in the unit
Track display for CD
Normal recording display (flashes during Instant Timer Recording - ITR)
Note:Some discs may be displayed wrong or e.g. chapter number, playback time, etc. may not be displayed.
789
10
Display window
2A77501C E(06-11) 9/25/02, 9:00 PM7

8
Remote controlPage
TV/VCR/DVD switchSwitch to operate TV or VCR or DVD 14,37Standby/On 14Turn the connected TV on or off 8
DVD MENU Display menu of DVD software 45MEMORY Index for DVD 42RETURN Remove DVD set up menu 46OPEN/CLOSE Open or Close the tray 38DISPLAY Change the front Display mode 22A.TRK Digital AUTO TRACKING 20SUB TITLE Set Subtitle of a DVD disc 44C. RESET Reset the counter to 00:00 22ANGLE Change playback angle of a DVD disc 45ZERO RETURN Stop the tape when the counter reaches 00:00 22
(SP/LP) Sets the tape speed for recording 24,26,35PLAY MODE Select playback mode 41,42ZOOM Zoom (for DVD playback) 40TITLE Select title of a DVD disc 45REPEAT A-B Repeat playback between A and B (DVD/CD) 410-9 Direct channel selection of TV 24,26
Input setting 16~17,24,26,42,43Enter a password 46
AUX Scart input or AV-Front input 35PROG. VIDEO Plus Recording 27
Confirmation of Timer Recording 31• Set the unit to start recording at a preset time. 28,30TV ∏ (INPUT) Switch the connected TV to external mode 8TV/VCR Switches between TV and VCR 25TV @ +/– Adjust the connected TV’s volume 88 Rewind/Review playback 19,20,391 Playback 19,38,439 Fast Forward/Forward search playback 19,20,392 Recording 24,26,353 Stop 19,38,434 Still picture/Recording pause on/off 20,24,35,39SKIP 6/7 Skip chapter to forward or reverse direction 39INDEX 6/7 Search for the INDEX mark of a tape 23TV/VCR PR +/– Select channel of the connected TV or VCR
8,24,26,35C/D Cursor buttonsSET –/+ Setting buttons 28~30
Manual tracking buttons in playback mode 20B/A Cursor buttons - To move Up in the VCR menu
you press the A. To move Down in the VCRmenu you press the B.
OK Enter information in the menu/Select option in the menuSET UP MENU Display menu of setup 14~21,37,46~55CANCEL Delete Timer program 31
Cancel input data in the setting mode 27,31,42~46OSD Display VCR or DVD operation status 24~25,56A.MONITOR Switches sound 33
Change sound track language of DVD 44SLOW Slowmotion playback 20,39SKIP SEARCH Skip the unwanted short material of a tape 20
JVC TV Remote ControlThis Remote can control some functions( , NUMBER (0-9), TV ∏, TV @ +/–,TV PR +/– and OK) of a remote controllableJVC TV by slide TV/VCR/DVD switch to TV.
NOTE:• It’s not possible to operate a unit not
equipped with a remote sensor.• This Remote can control a JVC TV only.• When you operate the VCR or DVD, the
TV/VCR/DVD switch must be slided toVCR/DVD again. Otherwise the DVD/VCR may not operate properly.
• Since this unit is combined type of DVDand VCR, the remote code of DVD isindividual. So please note that the DVD-keys on the RCU of the other JVCRECEIVER/TV is not effective for this unit.
2A77501C E(06-11) 9/25/02, 9:00 PM8

9
Remote control
1 2 3 Replace the compartmentcover.
Install two "AA" batteries (notsupplied), paying attention to thepolarity diagram in the batterycompartment.
Open the battery compart-ment cover in the direction ofthe arrow.
How to install the batteriesUse micro batteries type AA.
Distance of RemoteControl Operation
Battery precautionsThe precautions below should be followed when using batteries in this device:1.Use only the size and type of batteries specified.2.Be sure to follow the correct polarity when installing the batteries as indicated in the battery compartment.
Reversed batteries may cause damage to the device. To avoid a potential short circuit, insert the “–” end first.3.Do not mix different types of batteries together (e.g. Alkaline and Carbon-zinc) or old batteries with fresh ones.4. If the device is not to be used for a long period of time, remove the batteries to prevent damage or injury from
possible battery leakage.5. Do not try to recharge batteries not intended to be recharged; they can overheat and rupture.
Change the custom code for remote controlIf you operate this DVD/VCR with another JVC’s VCR simultaneously arranging them side by side, the bothrecorders will react to this remote control. In this case, you can change the remote control and DVD/VCR toother frequency (“ ”). Then you can operate only this DVD/VCR with this changed remote control.When you purchased, the DVD/VCR and remote control have been set to the frequency-“ ”.
Example: Change frequency to
Remote control:While holding VCR, press 2 (code: b) of Number keys.(in case of code: A, press 1). Then press OK.
DVD/VCR:In the POWER off mode, press and hold PLAY formore than 5 seconds. The current code (“A” or “b”) willappear on the display. Then press 3 on the remotecontrol. The current code of the remote control will betransmitted to the unit and the unit will be adjusted tothe transmitted code. Then the code will disappearafter approx. 4 seconds.
NOTE:• If the remote control has been set to b, the DVD/VCR also must be set to b. Otherwise, the DVD/VCR can not
be operated with this remote control.• To reset to “A”, repeat above procedure. However press 1 instead of 2.
Effective angle:approx. 60°approx.
5m
Point the remotecontrol directly at theremote sensor.
2A77501C E(06-11) 9/25/02, 9:00 PM9

10
Connections and InstallationConnect your DVD/VCR to your home's aerial and to your TV-set as shown in the illustration.When you have finished these connections you connect your DVD/VCR to the 230-240 V / 50 Hz mains.
TV
AC power cord 230V/50 Hz
DVD/VCR
Aerial-Input
To Scart socketRF-Input (fromhouse antenna)
TV Scart Socket (A1)
RF-Output (to TV)
Aerial
Supplied Coaxial cable
In addition to the coaxial cable connection, connect also with scart cable. The picture and sound will be transmittedbest through the scart cable. In this case, the TV need not be tuned to the video recorder. The Video channel alsoneed not be tuned. The video recorder switch the television to video operation through the scart cable automatically.The stereo-playback is possible in only case through a scart cable!
Connect a TV with the Scart socket
If your TV-set does not switch to video-playback operation automatically, pleaseturn your TV's video switch to VIDEO position manually.
Scart cable (not supplied)
VCR/DECODERScart Socket (A2)
2A77501C E(06-11) 9/25/02, 9:01 PM10

11
Playback connectionThe exact arrangement you use to interconnect various video and audio components to the DVD/VCR isdependent on the model and features of each component. Check the Owner's Manual provided with eachcomponent for the location of SCART socket.
Connection to a Satellite ReceiverIf a Satellite Receiver is used, we recommend the following configuration:
To record from Satellite Receiver press "AUX" on the remote control of DVD/VCR twice. "A2" will appearon the front display. Select the desired TV-program at Satellite Receiver.
Connect to a TV with S-Video Output
SCART-cable (not supplied)
SatelliteAerial
SatelliteReceiver
DVD/VCRTV
SCART-cable (not supplied)
DVD/VCR
TVS-Video Cord (not supplied)
To Audio (R) InputTo S-Video Input
To Audio (L) InputS-Video Output
AUDIO Cord (not supplied)
Audio (L) Output
Audio (R) Output
Note:• The S-VIDEO jack is useful only for DVD section.• If you use the connection with S-Video Cord, set the “Video Out Select” (P.40) to “Video”.
2A77501C E(06-11) 9/25/02, 9:01 PM11

12
Connect to an AV Amplifier with built-in digital surroundIf you are using an Amplifier with a built-in digital surround as follows, you can enjoy the various audio systemssuch as Dolby Digital and DTS by using the Coaxial Digital Output.
Use this connection to connect an:• AV amplifier with built-in *Dolby Digital decoder• AV amplifier with built-in *DTS decoder
Playback connectionConnect to a Stereo Amplifier with Audio Output
Connecting the optical digital cableYou may connect to an AV Amplifier with an Optical digital cable (not supplied) instead of a Coaxial digitalcable.When you connect the optical digital cable (not supplied), remove the dust protection cap from the rear panel.When not using the optical digital cable, attach the dust protection cap to protect against dust.
NOTES:• The OPTICAL, COAXIAL jacks are useful only for DVD section.
VHS signal is output only from the SCART-sockets, AUDIO L/R jacks and RF OUT jack.• When you make the connections above, do not set DOLBY DIGITAL to DOLBY DIGITAL or DTS to ON on the AV
Amplifier. If you do, a loud noise will suddenly come out from the speakers, affecting your ears or causing thespeakers to be damaged.
• DTS audio will be output only from the COAXIAL output. To hear DTS audio, DTS-Decoder is necessary.When playing DTS-encoded CDs, only noise will be heard from the speakers or analogue stereo outputs.
• Some DTS decoders which do not support DVD-DTS interface may not work properly with the unit.
Coaxial digital cable(not supplied)
AV Amplifier withbuilt-in variousdecoder as above
DVD/VCR
TV
If your DVD/VCR is connected to a stereo amplifier, the video soundtrack can output through the loudspeakers ofthe stereo system.
To Audio (L) InputTo Audio (R) Input
TV
AUDIO Cord (not supplied)
Stereo Amplifier
DVD/VCR
Audio (R) Output
SCART-cable (not supplied)
Audio (L) Output
Coaxial digitalAudio Output
SCART-Socket(for TV-RGB/Composite)
To SCARTinput
SCART-cable (not supplied)To SCARTinput
SCART-Socket(for TV-RGB/Composite)
2A77501C E(12-17) 9/25/02, 9:01 PM12

13
Plug your DVD/VCR's plug into the mains supply. "Auto"will start to flash in the display. Your DVD/VCR will auto-matically tune itself in and set the correcttime and date (This may takeapprox. 4 minutes).
Plug your DVD/VCR into the mains sup-ply and it will start to automaticallytune itself in and set the correct dateand time. After setting itself up, youmust set the TV to the video channel.
Preparation••
•
Make sure that your DVD/VCR is connected properly to the TV.If a satellite receiver is connected with the coaxial lead, makesure it’s switched ON and set to SKY ONE.Turn on the TV and select the channel you wish to allocate forvideo use.
Tuning the TV Stations and Setting the Time andDate Automatically
2
1
• The DVD/VCR automatically correctsthe clock setting every hour andautomatically adjusts the clock settingfor Daylight Saving Time.
• Your DVD/VCR will tune the TVstations as follows.
CH 1 BBC 1CH 2 BBC 2CH 3 ITVCH 4 Channel 4CH 5 Channel 5CH 6 SatelliteCH 7 etc.
For VIDEO Plus+ recording to workcorrectly, this order should not bechanged.
• If you want to change the RF outputchannel or switch to "OFF", press and
hold the DVD/VCR on the front ofyour DVD/VCR in the Standby modeuntil the current RF output channelappears. Press PR on your DVD/VCRto select the RF channel you desire.
• Skipped channels still may be selected directly through the 1 to 0 keys.• To cancel skipping select the skipped
channel using the 1 to 0 keys, thenpress CANCEL. The channel No. doesnot blink any longer, and the channelNo. now may be selected again usingPR.
Notes:
Press and hold the button on the front of your DVD/VCR in the Standby mode until "rF"and RF output channel "52" willappear in the display.
4
Now the output from the DVD/VCR istuned to this channel. Whenever youwant to play back a tape, select thischannel.
If there is interference in the picture (wavy lines, pictureroll, etc.), press PR on your DVD/VCR to select any RFchannel between 23 and 69, retuning your TV until theword "TEST" flashes on the TV screen.
5 Press the button to turn OFF the DVD/VCR.Now the TV is tuned to your DVD/VCR.
To skip a channel positionUnwanted channels can beskipped so that they cannotbe called up by pressing PR.Select the channel to beskipped,
CH 29
3 If you have used a 21PIN scart lead you now, simply se-lect the AV channel on your TV and go to step 5. Tune theTV in the same way as tuning in a TV broadcast stationuntil the word "TEST" flashes on the TV screen. Refer tothe TV operating instructions for tuning.
If you connected a satellite receiver as explained on page11, you must switch off the DVD/VCR’s transmitter. Pressthe VCR’s PR repeatedly until OFF appears in the displaywindow (OFF will appearafter 69 or before 23).
...e.g. channel 29. Select channel 29, then pressCANCEL.This channel’s number will be flashing. That way you cancancel further channels one after the other.
2A77501C E(12-17) 9/25/02, 9:01 PM13
14
SELECT :
CHANNEL SETUP
ENTEREXIT
: OK: MENU
VCR SETUPAUTO REPEAT OFF
SYSTEM SETUP
TIMER REC SET
SELECT :
SYSTEM SETUP
LANGUAGE/SPRACHE/LANGUE
ENTEREXIT
: OK: MENU
CLOCK SET
On-screen Language SelectionPreparation• Press the button to turn on the DVD/VCR.• Make sure TV/VCR/DVD switch has been slided to VCR/DVD.
Then press VCR to select the VCR mode. (The VCR indicatorwill light)
2 Press or to selectthe LANGUAGE. Thenpress OK.
1 Press SET UP MENU. Press or to select theSYSTEM SETUP.Then press OK.
3 Press or to selectthe desired language.Then press OK.
4 Press SET UP MENU repeatedly until the TV pictureappears on the screen.
LANGUAGE/SPRACHE/LANGUE
ENGLISH
DEUTSCH
FRANCAIS
SELECT : OK : OK
Notes:• If the unit does not operate properly,
or No key operation (by the unit and /or the remote control): Static electric-ity, etc., may affect the player’s opera-tion. Disconnect the AC power cord once,then connect it again.
• If you use the unit for the first time andpress SET UP MENU, instead of theMENU screen in steps 1 and 2, the one instep 3 may appear. This is normal for thisDVD/VCR and is no indication of a mal-function.Please first select the language to oper-ate this unit.
Turn on your TV and select the VCRchannel which you have already tunedon your TV. The TV will switch to AV(VCR mode) automatically by the Scartlead connection. The on-screen menucan display any of three languages;English, German and French.
2A77501C E(12-17) 9/25/02, 9:01 PM14

15
Setting the Time and Date Manually
• Turn on the TV, and select the VCR channel on TV.• Make sure TV/VCR/DVD switch has been slided to VCR/
DVD. Then press VCR to select the VCR mode. (The VCRindicator will light)
Preparation
4 Set the month, year, hour and minute in the sameway as in step 3. Then press OK.
3 Press or repeatedlyuntil 26 appears. Thenpress to continue.
2 Press or to selectthe CLOCK SET. Thenpress OK.
1Example: Setting the clock to 11:30, 26 Oct. 2002.
Press SET UP MENU. Press or to select the SYS-TEM SETUP. Then pressOK.The step-2 will appearwhen clock is not set.
• In case of an error,press to go back toone step and enteragain.
Notes:• The AUTO TIME function adjusts the
clock only if the error is within 5minutes.
• The VCR automatically adjusts theclock setting for Daylight Saving Timeonce you set AUTO TIME to ON.
Press or to select AUTO TIME ON or OFF.The VCR automatically corrects the clock setting everyhour once you set AUTO TIME to ON.
5
6 Press SET UP MENU repeatedly until the TV pictureappears on the screen.
7 The clock will begin operation.
You must set the date and time manuallyfor timer recordings if Automatic tuningprocess did not set them correctly.
SELECT :
SYSTEM SETUP
LANGUAGE/SPRACHE/LANGUE
ENTEREXIT
: OK: MENU
CLOCK SET
SELECT :
CHANNEL SETUP
ENTEREXIT
: OK: MENU
VCR SETUPAUTO REPEAT OFF
SYSTEM SETUP
TIMER REC SET
SELECT :
:
YEAR
SET
OK : OK EXIT : MENU
MONTH
DAY
TIME
2002
10
26 SAT
11: 30
AUTO TIME ON
CLOCK SET
SELECT :
:
YEAR
SET
OK : OK EXIT : MENU
MONTH
DAY
TIME
2000
1
26 WED
0: 00
AUTO TIME ON
CLOCK SET
2A77501C E(12-17) 9/25/02, 9:01 PM15
16
This VCR has one built-in tuner toreceive broadcasts. Before yourecord a TV broadcast, you must set andpreset all channels. This VCR can presetup to 80 channels.
Tuning the TV Stations Manually
• Turn on the TV, and select the VCR channel on TV.• Make sure TV/VCR/DVD switch has been slided to VCR/
DVD. Then press VCR to select the VCR mode. (The VCRindicator will light)
Preparation
CH 01
CH 02
CH 03
CH 04
CH 05
CH 06
BBC 1
BBC 2
ITV
CH4
CH5
SATELLITE
3 Press (falling frequency) or (rising frequency)once to start the search. It stops at each broadcast
Press or repeatedlyuntil 2 is displayed. (Orenter 0 2 with the 1 to 0numbered keys). Thenpress OK.
4
56 Press SET UP MENU repeatedly until the TV picture ap-
pears on the screen.
Repeat the steps 3 and 4 to preset other TV stations.
automatically (" "changes to " "). Press
or repeatedly untilBBC 2 appears. Only incase of receiving a weakbroadcast (driftingpicture), does search failto stop. If you want tostop, press or .Press OK to preset. Thesearch menu screen willdisappear if the nextmode is not activated inless than 50 seconds.
CH 1
: MENUSEARCH :EXIT
CH 1
EXIT : MENUCH : / 0-9OK : OK
1 Press SET UP MENU.Press or to selectthe CHANNEL SETUP.Then press OK.
Example: Preset the BBC 2 on programme position 2.
Note:Occasionally, the auto search might catcha weak signal and stop. If the TV stationsignal is weak, you shouldn't store thisstation.In that case restart the auto searchusing or .
CH 2
EXIT : MENU
SEARCH :
OK : OK
SELECT :
CHANNEL SETUP
ENTEREXIT
: OK: MENU
VCR SETUPAUTO REPEAT OFF
SYSTEM SETUP
TIMER REC SET
2 Press or to selectthe CH TUNING.Press OK to select CHTUNING screen.
SELECT :
CH TUNING
ENTEREXIT
: OK: MENU
GUIDE CH SET
CHANNEL SETUP
2A77501C E(12-17) 9/25/02, 9:01 PM16

17
• Turn on the TV, and select the VCR channel on TV.• Press the button to turn on the VCR.
Preparation
1
The TV stations must be stored accordingto the tuning guide given on page 13,otherwise the VIDEO Plus+ feature will notwork. If for any reason you did not selectchannels BBC1, BBC2, ITV, CH4, CH5 andSatellite in channel positions 1 through to 6respectively, you must set each VIDEO Plus+channel number (GUIDE CH) manually.
2 Press or to selectthe GUIDE CH SET.Then press OK.
3 Enter "SAT" with or ornumber keys.Then press OK.
SET : / 0-9
GUIDE CH SET
GUIDE
6
VCR
CH CH8
OKEXIT
: OK: MENU
SET : / 0-9
GUIDE CH SETGUIDE
6
VCRCH CH
6
CLEAROK
: CANCEL: OK
EXIT : MENU
For other Codes, repeat steps 3 and 4.56 Press SET UP MENU repeatedly until the TV picture
appears.
Enter "6" with or ornumber keys.Then press OK.
4
If you have connectedyour satellite using thescart socket, you mustselect "AV" for the VCRCH number.
TV
STATION
BBC1
BBC2
ITV
CH4
CH5
Satellite
1
2
3
4
5
6
GUIDE CH
GUIDE CHANNEL TABLE
Example: Satellite channel has been incorrectly stored onchannel 8 of your VCR.
Press SET UP MENU.Press or to selectthe CHANNEL SETUP.Then press OK.
Setting the VIDEO Plus +® Channel Number (Guide CH)
SELECT :
CHANNEL SETUP
ENTEREXIT
: OK: MENU
VCR SETUPAUTO REPEAT OFF
SYSTEM SETUP
TIMER REC SET
SELECT :
CH TUNING
ENTEREXIT
: OK: MENU
GUIDE CH SET
CHANNEL SETUP
2A77501C E(12-17) 9/25/02, 9:01 PM17

18
Automatic tape ejectThis VCR will automatically rewind the tape when the tape has ended. And when the tape is rewinded to itsbeginning, the cassette tape will be ejected automatically.
Loading and Unloading a Cassette Tape
To prevent accidental erasureRemove the erase prevention tab with a screwdriver. Cover the hole with a piece of adhesive tape.
To record again
Screwdriver
Press EJECT on the unit. Even if a tape is beingplayed, press this button only once.
Remove the cassette tape.
LoadingPush the centre of the tape until it is automaticallyinserted.
Insert the cassette tape with its labeled side facing upand the erase prevention tab positioned at your left.An inverted cassette tape cannot be inserted.
Automatic playbackWhen loading a cassette tape without an erase prevention tab, playback will start automatically.
Automatic power ONWhen you insert a cassette tape the DVD/VCR power will turn ON automatically.
Unloading
1 2
Use only video cassette tapes marked and .
• Cassettes marked “VHS” (or “S-VHS”) can be used with this video cassette recorder. However, S-VHS recordingis not possible with this model.
• This model is equipped with SQPB (S-VHS QUASI PLAYBACK) that makes it possible to play back S-VHSrecordings with regular VHS resolution.
• HQ VHS is compatible with existing VHS equipment.• SQPB playback can be seen only at PAL SP mode.
VCR
VCR
VCR
Erase prevention tab Adhesive tape
Erase prevention tab
2A77501C E(18-23) 9/25/02, 9:01 PM18

19
Load a prerecorded tape(When loading a cassette tapewithout the erase preventiontab, playback will start auto-matically).
1
2Press .Playback will start.If the cassette has not loadedyet, will blink for 4 seconds.
To start playback
Press 3.
To stop playback
To rewind the tape or forward it rapidly
Stop the playback or recording with 3.
To rewind the tape:
Press .
To forward the tape:
Press .
To stop the tape-winding, press 3. To switch to playback directly(without 3), press .
Forward/Reverse picture search modeWhen the tape is being winded, you can switch to picture searchmode (see next page). To do this, press or and hold it down.The unit will resume the tape winding as soon as the button isreleased.
• This VCR selects the playback tapespeed SP or LP automatically.
• The Cassette tape and DVD disc canbe played back simultaneously. If youpress VCR or DVD, the tape playbackand DVD playback alternate with eachother on the screen.
NOTES:
Turn ON the TV and select the VCR channel on TV.Make sure TV/VCR/DVD switch has been slided to VCR/DVD. Thenpress VCR to select the VCR mode. (The VCR indicator will light)
Preparation:••
NTSC video cassette playbackWhen using a pre-recorded NTSC video cassette tape, theconnected TV set must operate with a 60 Hz vertical frequency.Otherwise the on-screen picture will be affected by verticalrolling. Even if your VCR set is capable of processing NTSC videosignals, the picture may be shortened vertically (appearance ofblack bars at the top and at the bottom of the TV screen). Thedubbing of a NTSC video cassette tape to a standard PAL VCRis not possible.
Cassette tape playback
VCR
VCR
2A77501C E(18-23) 9/25/02, 9:01 PM19

20
To return to the initial sharpness setting, press CANCELwhile the sharpness setting screen is appearing.
Note:
Playback sharpnessAdjust the sharpness of playback picture during playback.During slow motion, still picture and picture search,sharpness-adjusting is impossible.
TIMER REC SETAUTO REPEAT
CHANNEL SETUPSYSTEM SETUP
SELECT :ENTER : OK
MENUEXIT :
VCR SETUP[OFF]
1 Start the playback of video tape.
Press SET UP MENU.Press or to selectVCR SETUP. Then pressOK.
Press or to selectPLAYBACK SHARP-NESS. Then press OK.
4 Press or to adjustthe playback sharpnessto the level you reguire.
5 Press SET UP MENU repeatedly until the TV pictureappears on the screen.
2
3AUDIO MIXNICAM
VCR SETUP
SELECT :ENTER : OK
MENUEXIT :
PLAYBACK SHARPNESS[OFF][AUTO]
PLAYBACK SHARPNESS
+ Ð Ð + Ð Ð + Ð Ð + Ð Ð
SET :
CANCELCENTRE :
MENUEXIT :
2
softer sharper
Special playback/Playback sharpness/Skip Search
Adjusting tracking condition
Whenever you insert a tape and start playback,automatic tracking starts working and continuouslyanalyzes the signal to enable optimum picture qualityduring playback.
Notes:• The audio output is muted during SPEED SEARCH,
STILL, FRAME ADVANCE and SLOW MOTION.• During picture search mode there will be noise bars
which are caused by the system.• The Special Playback will automatically change to
playback after approx. 5 minutes to protect the videotape against excessive wear.
Automatic tracking adjustment
If automatic tracking cannot eliminate noises well duringplayback, press SET + or SET – to eliminate the noises.“MANUAL TR.” will appear. Press it briefly for a fineadjustment, or press and hold for a coarse adjustment.
Manual tracking adjustment
To return to automatic tracking, press A. TRK.
Special playback
Slow MotionDuring playback press SLOW.You can change the slow speed by the additionalpressing of SLOW.To return to playback: Press .
VCR
VCR
Reverse picture search functionPress x 1 or x 2 during the playback.
Picture Search
Forward picture search functionPress x 1 or x 2 during the playback.To return to playback: Press .
Still PicturePress 4 during playback. To resume normalplayback: Press .
During playback, press 4 one by one: The pictureadvances frame by frame.To return to playback: Press .
Frame by Frame picture
Slow tracking and vertical lock adjustmentIf noise bars appear in the picture during slow motion,press the SET + or – to reduce the noise bars.If the still picture jitters excessively, press SET + or –to stabilize the still picture.
VCR
Skip SearchEach time you press SKIP SEARCH while a tape is playing,the unit will fast-forward ahead 30 seconds on the tape. Youmay press the button up to six times in a row to move 180seconds (three minutes) ahead.
For example: 1 press: Approx. 30 seconds of tape2 presses: Approx. 60 seconds of tape3 presses: Approx. 90 seconds of tape
2A77501C E(18-23) 9/25/02, 9:01 PM20

21
Repeat Playback
To cancel the auto repeat mode, followthe above steps 1 and 2, then select "OFF"and confirm by pressing SET UP MENU.
Note:
If the Repeat function is switchedon, the playback will continue untilit reaches the tape-end and thenrewind to the beginning of the tape.This process will repeat until theunit is turned off.
To set the Repeat function
• Turn on the TV and select the VCR channel on TV.• Press VCR to select the VCR mode.
Preparation
3 Press SET UP MENU repeatedly until the TV pictureappears. If "ON" has been selected, the tape will berepeatedly played.
1 Press SET UP MENU.Press or to select the AUTOREPEAT.
Press or to select[ON] or [OFF].
2
SELECT : /
CHANNEL SETUP
ENTEREXIT
: OK: MENU
VCR SETUPAUTO REPEAT ON
SYSTEM SETUP
TIMER REC SET
SELECT : /
CHANNEL SETUP
ENTEREXIT
: OK: MENU
VCR SETUPAUTO REPEAT OFF
SYSTEM SETUP
TIMER REC SET
2A77501C E(18-23) 9/25/02, 9:01 PM21

22
Preparation:• Turn ON the TV and select the VCR channel on TV.• Make sure TV/VCR/DVD switch has been slided to VCR/DVD. Then
press VCR to select the VCR mode. (The VCR indicator will light)
1 Press OSD.The counter display shows thetape running time duringplayback or recording.The Recorder will indicate RECduring recording for itself.
2 Press C.RESET at the desiredtape position.The counter display will be resetto the "00:00:00" position (e.g.the beginning of recording).
3 Press 3 when playback or recording is finished.Press ZERO RETURN.The tape will be rewinded or fast forwarded and automaticallystop at the ”00:00:00” position.
4 Press OSD once again to make the all indicator disappear.
The DISPLAY-buttonPress DISPLAY during the playback. The clock and tape counteralternate with each other in the display.
VCR
VCR
Counter DisplayZERO RETURN functionThis function makes tape-rewindingstop at the counter 00:00:00 positionautomatically.
Note:• When you load a video cassette, the dis-
play indication changes to "00:00".• The counter display does not function
on non-recorded (blank) sections of thetape. When you rewind, fast forward orplay tapes through blank sections, thecounter display stops.
Note:You can set the tape counter to 00:00:00 with C.RESET anytime.Therefore, the counter display can also indicate 00:00:00, even whenthe tape counter does not reach its beginning yet. Even if the tapecounter indicates 00:00:00, it can be rewinded moreover. If the tapewas rewinded over the point of 00:00:00, the minus mark (–) appearsin the counter display. Although the tape counter seems to forwardwhen you press , in fact the tape is being rewinded. When thetape reaches the beginning, the tape-rewinding stops automatically.
CH 212:00 SUN
00:04:38 SP
STEREO
CH 212:00 SUN
00:00:00 SP
STEREO
VCR
VCR
2A77501C E(18-23) 9/25/02, 9:01 PM22

23
2
Video Index Search System
1
Recording several Index MarksDue to the system only one index mark will be recorded at thebeginning of a recording. If you intend to set several index marksduring a single recording, follow the procedure below:
At the point of the recording wherean index mark is to be set press 4.The unit will switch to the recordingpause mode.
Whenever a recording is begun aninvisible index mark is recorded on thetape. These index marks are all identical,and each mark means: "Here starts anew recording". Every DVD/VCRequipped with the Video Index SearchSystem (VISS) can locate these marksat the beginning of any recording.
While holding 2, press once. When the "INDEX" on-screenindication goes off, 3 may be pressed. This short recordingprocess will be sufficient to set an index mark.This will result in about 10 seconds of the TV commercials to beoverwritten by another recording. Due to the system the end ofthis recording will be followed by a recording gap (noise signal)of approx. 5 seconds.
Press PR repeatedly to switch backto the original TV program. Press4 to resume recording.
Start playback and wait until theend of the TV commercial isreached, then press 3.
Example: Indexing of TV commercials.
2
1
CH 2
INDEX
RECVCR
RECVCR
Index SearchPress INDEX + or – during stop or playmode.For Succeeding programs:Press INDEX +.For Preceding programs:Press INDEX –.(Additional press increases the INDEXNO. up to 9.)When the INDEX + or – is pressed, theunit starts searching the INDEX NO.selected and finds the portion, thenplayback starts automatically.To stop the Index Search, press 3.
Notes:When you record an INDEX mark atthe very beginning of the tape, themark may not be found.During INDEX search, the tape maystop and begin to play at a slightlydifferent location.INDEX may not function properly withold or worn out video tapes.INDEX marks may not be found if it isextremely close to the point where thesearch began.In recording, if you stop recording tem-porarily, the INDEX mark is not re-corded on the tape.
•
•
•
•
•
+3
INDEX NO. (up to 9)
7 or 6 is displayed
2A77501C E(18-23) 9/25/02, 9:01 PM23

24
Preparation:• Turn ON the TV and select the VCR channel on TV.• Make sure TV/VCR/DVD switch has been slided to VCR/DVD. Then
press VCR to select the VCR mode. (The VCR indicator will light)
1 Load a blank cassette tape with theerase prevention tab intact. (TheDVD/VCR will automatically turnon.)
2 Select the program(e.g.29) you want to record with PR +/– ornumber keys.
1~9 : e.g. 5 = press “5”10~80 : e.g. 29 = press “2” and “9”.
3 If a recording in Long Play mode is intended, press (TAPESPEED) to display "LP". (see Note below)
4 On the VCR, press 2.Or on the Remote, while holding 2,press ." " will appear on the screen forabout 4 seconds and “REC” willappear on the display.
If the erase prevention tab is removed, the tape will eject whenboth the 2 and are pressed for recording. (see p.18)
To Stop RecordingPress 3.
To Stop Recording TemporarilyTo stop a recording for a shortperiod of time press 4. Press thisbutton again if you want to resumethe recording.
Attention:A safety circuit turns the pause mode off automatically after 5minutes, and the DVD/VCR will stop the recording mode.
RECVCR
VCR
RECVCR
Recording a TV Programme
Notes:• Since the DVD/VCR has a built-in TV
tuner the TV set may be turned off whenrecording. The TV set may only be usedto check for accurate program adjust-ments or to monitor recordings.
• You can confirm on the TV-screenwhether you selected SP or LP. PressOSD to see the status display. (seepage 25)
• If you wish to watch the DVD playbackduring the normal recording on VCR,press DVD to change to DVD mode andperform the DVD playback (see page38).
CH 29
INDEX
VCR
VCR
2A77501C E(24-29) 9/25/02, 9:01 PM24

25
VCR
Recording a TV Programme
Recording with a SCART Lead:You can record a programme usingthe TV receiver of the DVD/VCR and atthe same time watch another pro-gramme on the TV set using its re-ceiver. As the DVD/VCR automaticallyswitches the TV set the followingpoints should be observed:
Auto Rewind FeatureThe DVD/VCR will automatically rewindwhen the tape has ended (except duringITR and TIMER REC). It will also ejectthe cassette tape.
Press TV/VCR until "VCR" appears on the display. Selectthe program on the DVD/VCR you want to record. Thisprogram can be watched on the screen and recorded by theDVD/VCR.
1
While the VCR is recording press TV/VCR until the "VCR"indicator on the display goes off. The TV set now displaysthe program of its built-in receiving module. Select the TVchannel you want to watch on the TV set. Although the TVset now shows another program the DVD/VCR will con-tinue recording the previously selected programme.
2
Using TV/VCR you can switch the TV screen between theDVD/VCR picture and the TV picture. If the "VCR" indicatoris lit on the display, you will watch the DVD/VCR picture. Thishas no trouble on the recording.
3
To Display VCR operation Status
Press OSD. The clock, day of the week and more informa-tions will be indicated.To cancel the indicating: Press OSD until all indicatordisappear.
REC
RECVCR
“VCR” indicator goes on.
“VCR” indicator goes off.
“VCR” indicator goes on.
CH 8023:59 MON
01:36:58 SPSTEREO
HI-FI
Audio Select
Deck-statushere: PlaybackTime
Stand of Tape counter
Day of the week
Indication forHi-Fi-playbackor stereo-reception
Tape speed
Cassette inUnit
Programmenumber orScart input(AV1,AV2 orAV3)
2A77501C E(24-29) 9/25/02, 9:02 PM25

26
Preparation:• Turn ON the TV and select the VCR channel on TV.• Make sure TV/VCR/DVD switch has been slided to VCR/DVD. Then
press VCR to select the VCR mode. (The VCR indicator will light)
1 Load a blank cassette tape with theerase prevention tab intact. (TheDVD/VCR will automatically turnon.)
2 Select the program (e.g.29) you want to record with PR +/– ornumber keys.
1~9 : e.g. 5 = press “5”10~80 : e.g. 29 = press “2” and “9”.
3 If a recording in Long Play mode is intended, press (TAPESPEED) to display "LP". (see note on page 28)
4 Press 2 on the VCR or while holding 2, press onthe Remote to begin recording. Press 2 on the VCR again tostop recording after 30 minutes. Each additional press of 2 willincrease recording time as shown in the chart below, up to amaximum of 5 hours. The ITR andrecording time will appear on thescreen for about 4 seconds. And,REC will keep blinking in the display.
Instant Timer Recording (ITR)
Note:• If you wish to watch the DVD playback
during the ITR, press DVD to change toDVD mode and perform the DVD play-back (see page 38).
• If the tape supply has not sufficed forITR recording, the clock symbol ( ) willblink at the tape-end and then VCRmode will change to DVD mode.In this case, press • to cancel the blink or press EJECT to remove the cas-sette tape.
The instant timer recording featureprovides a simple and convenient wayto make a timed recording.
To Extend the Recording TimeWhile holding 2, press .repeatedly until the desired timeappears on the display.
To stop the ITRPress 3.
ITR 1 : 30CH 29
“REC” will keep blinkingin the display.
VCR
VCR
Tape speed: SP
Tape speed: LP
CH 29ITR 0:30
INDEX
STEREO
RECVCR
2:005:00 4:00 3:00
1:30Recording 0:30 1:00
Recording 0:30 1:00 1:30
10:00
2:00
3:004:005:00.......
2A77501C E(24-29) 9/25/02, 9:02 PM26

27
PLUSCODE NO.DATESTARTENDCHSPEEDPDC
15 FRI17:3018:003SPOFF
SELECTSETEXIT
: :
: MENU
57378
OK : OK
Look up the PlusCode Number in anappropriate TV programme magazine.Select the desired TV programme forrecording and refer to the PlusCodeNumber next to it.
VIDEO Plus+® Recording
Preparation• Turn on the TV and select the VCR channel on TV.• Make sure TV/VCR/DVD switch has been slided to VCR/
DVD. Then press VCR to select the VCR mode. (The VCRindicator will light)
1 Press PROG..
2 Enter the PlusCodeNumber using numberkeys.
3
Note: If any button is notpressed within 60 seconds,the Recorder switchesback to TV operation.
• In case of an error, pressCANCEL and enter thedesired number again.
Press or to select ONCE, DAILY or WEEKLY.
PLUSCODE NO.ONCEDAILYWEEKLY
PLUSCODESELECTCLEAROKEXIT
: CANCEL: : 0–9
: OK: PROG.
NO.
PLUSCODE NO.ONCEDAILYWEEKLY
PLUSCODE SELECTCLEAROKEXIT
: CANCEL
57378
: : 0–9
: OK: PROG.
NO.
4 Press OK. By the PlusCode Number, the entered data
• If the entered Numberis not correct, theindicator "PLUS CODEERROR" will appear.Enter the correct number.
appears on the screen.Select your tape speed.
PLUSCODE NO.ONCEDAILYWEEKLY
PLUSCODE SELECTCLEAROKEXIT
: CANCEL
57378
: : 0–9
: OK: PROG.
NO.
ONCE = To record aprogramme only once
DAILY = To record TVprogrammes transmitteddaily
WEEKLY = To record TVprogrammes transmittedonce a week.
VIDEO Plus+ and PlusCode areregistered trademarks of Gemstar Development Corporation.The VIDEO Plus+ system is manufactured under licensefrom Gemstar Development Corporation.
Note:• The built-in timer stores 8 memories. If
the "PROGRAM FULL" indicationappears, you must delete one memory(see page 31).
• When the power supply is interruptedfor more than 30 minutes, the presetprogramme is cleared. In this case,you have to set the timer again.
2A77501C E(24-29) 9/25/02, 9:02 PM27

28
TIMER REC SETDATESTARTENDCHSPEEDPDC
15 FRI17:3018:003LPON
SELECTSETEXIT
: :
: MENU OK : OK
VIDEO Plus+ Recording
The recording end-time will be set by VIDEO Plus+automatically. However you can extend the recordingend-time manually. The time END must blink.If it does not blink, then press or repeatedly untilthe time end blinks. Then press to extend.
Recording period extension
5 Press OK after the confir-mation. Then press SETUP MENU repeatedly untilthe TV picture appears. Toenter another programme,repeatsteps 1 - 5.
If you have selected Daily or Weekly in step 3, then youcan select a recording date again. The date must blink.If it does not blink, then press or repeatedly untilthe DATE blinks. Then press or repeatedly untilthe desired date appears. The following date options areavailable:SUN-SAT: all dates from Sunday to Saturday, orMON-SAT: only from Monday to Saturday, orMON-FRI: only from Monday to Friday.WKL-MON: each Monday, WKL-TUE: each TuesdayWKL-SUN: each Sunday, etc.
Note:• If you watch a TV during timer recording
standby mode, the TV enters VCR modeautomatically when a timer recording starts.This is not a fault.Press the TV/VCR button to switch to theTV mode.
• As long as the timer is activated (clocksymbol indicated on the display), youcannot use the VCR. If you want to usethe VCR, first press • to deactivate thetimer.
• Not all TV Stations transmit PDC signalall of the time, therefore it is advisable tocheck before setting PDC to ON, if youdo set PDC to ON and no signal isreceived your recording might not takeplace at all. To check PDC status,change to the channel on your DVD/VCRyou wish to record from, if the word"PDC" appears on the screen for a fewseconds then that channel isbroadcasting PDC and you can set thefeature to ON.
6 Although the data is stored in the timer memory, the timerfunction is not yet ready for recording. To accomplish this,activate it by pressing •.If no cassette tape is loaded, theclock symbol does not appear.
:::::
:::::
SELECT : / OKEXIT : MENU
15 FRI 17:30 18:00 3
: :: :
SP
To record with the PDC (ProgrammeDelivery Control)systemThe PDC system startsrecording when it picks up a
special signal transmitted
by the broadcaster with theTV programme – even if the
TV programme starts early,
late or runs on longer than scheduled. In step 4, press repeatedly until PDC OFF flashes, then press or
to display "ON" for recording with PDC.
2A77501C E(24-29) 9/25/02, 9:02 PM28

29
SELECT :
TIMER REC SET
STARTDATE 23 FRI
END
SETEXIT
:: MENU
CHSPEED
19:30
3LP
PDC OFF
OK : OK
21:30Note:• When the power supply is interrupted for
more than 30 minutes, the presetprogramme is cleared. In this case, youhave to set the timer again.
• If you want to set the timer with the PDCfunction, see "To record with the PDCsystem" on page 28.
The built-in timer allows unattendedrecording of up to 8 programmeswithin 1 month.
Preparation• Turn on the TV and select the VCR channel on TV.• Make sure TV/VCR/DVD switch has been slided to VCR/
DVD. Then press VCR to select the VCR mode. (The VCRindicator will light)
• Load a video cassette with the erase prevention tab intact.Make sure that the time and date are correct.
Example: Timer recording for the 23rd, Friday, on channel 3,19:30 to 21:30 and LP mode.
1
2
3
4
Set the desired dates with or . Then press
to accept them.
Set the Starting time (19:30), ending time (21:30)channel (3) and tape speed (LP) in the same way as instep 3.
Press SET UP MENU.
Press or to selectthe TIMER REC SET.Then press OK.
Each line stands for oneprogramme of the 8memories. Select oneline with or .Then press OK.
• Daily/weekly settingscan be found bypressing or repeatedly (see page30).
• In case of an error,press to go back tothe previous step andrepeat.
Timer Recording Manually
SELECT :
TIMER REC SET
STARTDATE 23 FRI
END
EXIT : MENU
CHSPEED
:11:30
1SP
PDC OFF
SET :
:::::
:::::
SELECT : / OKEXIT: MENU
: :: :: :
SELECT :
CHANNEL SETUP
ENTEREXIT
: OK: MENU
VCR SETUPAUTO REPEAT OFF
SYSTEM SETUP
TIMER REC SET
2A77501C E(24-29) 9/25/02, 9:02 PM29

30
SUN-SAT MON-SAT MON-FRI WKL-THU WKL-WED WKL-TUE
DATE-DAY WKL-FRI WKL-SAT WKL-SUN WKL-MON
Timer Recording Manually
5
6 Although the data is stored in the timer, it is not ready forrecording. To start timer recording, press • to turn it on.When no video cassette is loaded, the clock symbol doesnot appear.
Press OK to accept them.To enter other programmes,repeat steps 2 to 4, or pressSET UP MENU repeatedlyuntil the TV picture appears.
In case of overlapping Timer programmes• Do not overlap timer programmes as portions of the
conflicting programmes will be lost. The first recordingtime has priority over the next recording time asshown in the diagram below.
8 : 00 11 : 009 : 00 10 : 00Program 1
Prog.1
Deleted Parts
Non Recorded Portion Parts
Prog.2 Prog.3
Program 2
Program 3
Recording Control Settings
Note:The daily/weekly recording can bemade continuously until the recording iscancelled or the tape reaches the end.During timer recording, the automaticrewinding mechanism does not function.
•
•
When you turn the unit off, the timer will be switched onautomatically. The clock symbol will appear on the display.If you still want to use the recorder, press • first. Thenthe clock symbol will disappear from the display.
Weekly (e.g. WKL-TUE: each Tuesday) or daily (e.g.MON-SAT Monday to Saturday) Timer recording
Follow the procedure for timer recording on the previouspage. In picture/step 3 (when date and day is blinking),press repeatedly until the desired setting appears(weekly or daily).
Set other START, END, CH, SPEED as previous pages.
Note:• In case of a timer recording from the Scart
socket, proceed as follows: When "CH" isblinking in picture/step 4, press or repeatedly until "AV" appears.
• If you watch a TV during timer recordingstandby mode, the TV enters VCR modeautomatically when a timer recordingstarts.This is not a fault.Press the TV/VCR button to switch to theTV mode.
• If the clock symbol blinks when the timerrecording is completed, the TV programmehas not been completely recorded becauseof an insufficient tape supply.
• As long as the timer is activated (clocksymbol indicated on the display), you cannotuse the DVD/VCR. If you want to use theDVD/VCR, press • to deactivate the timer.
:::::
:::::
: :: :
23 FRI 19:30 21:30 3 LP
SELECT : / OKEXIT : MENU
2A77501C E(30-32) 9/25/02, 9:02 PM30

31
Timer Recording Manually
Press or to selectthe timer programme youwish to cancel.Then press CANCEL.This line is now cancelled.
To cancel a Timer programme.
1 If the Timer has been activated, now press • to deacti-vate the timer. The clock symbol will disappear. Then pressVCR to change to VCR mode.
3
4 Press SET UP MENU (or PROG.) button repeatedly untilthe TV picture appears.
28 FRI30 SUN
19:3012:15
21:0013:00
31
LPSP
:::::
:::::
SELECT : / OKEXIT : MENU
: :
Press PROG. twice. Allthe timer programmes willappear.
To confirm a Timer programme.
28 FRI30 SUN30 SUN
19:3012:1519:00
21:0013:0022:00
313
LPSPLP
:::::
:::::
SELECT : / OK
CLEAR EXIT : MENU: CANCEL
2
Confirmation/Cancellation of the Timer Recording
2A77501C E(30-32) 9/25/02, 9:02 PM31

32
NICAM OFF
NICAM M1/2
NICAM M1
NICAM ST
TIMER REC SETAUTO REPEAT
CHANNEL SETUPSYSTEM SETUP
SELECT :ENTER : OK
MENUEXIT :
VCR SETUP[OFF]
NICAM Stereo Recording and Playback
Note:
This DVD/VCR is capable of recordingsound in Hi-Fi system. The recordingwill be performed automatically.NICAM STEREO broadcasts arerecorded in its original sound systemregardless of the setting. If you wishto record NICAM programmes, selectNICAM "AUTO" as follows.
When listening to a stereo broadcast orplaying back a tape Hi-Fi recorded instereo, you have to connect the DVD/VCR with the stereo audio system or thestereo TV. The sound which is outputfrom the RF OUT jack is monaural.
Press SET UP MENU. Press or to select VCR SETUP.Then press OK.
Press or to select NICAM.Then press / or OK toselect [AUTO].
Press the SET UP MENU repeatedly until the TV pictureappears.
NICAM programmes are divided into 4 types asshown below.
1
2
3
AUDIO MIXNICAM
VCR SETUP
SELECT :ENTER : OK
MENU
/
EXIT :
PLAYBACK SHARPNESS[OFF][AUTO]
NICAM stereo sound reception:
NICAM OFFIt will be displayed for the NICAMsignal when the "NICAM [OFF]" isselected in menu screen.
NICAM MONO A B broadcast"NICAM M1/2" illuminates when aNICAM MONO A and MONO Bbroadcast signal is received.
NICAM MONO A broadcast"NICAM M1" illuminates when aNICAM MONO A broadcast signal isreceived.
NICAM STEREO broadcast"NICAM ST" illuminates when aNICAM STEREO broadcast signal isreceived.
Preparation:• Turn ON the TV and select the VCR channel on TV.• Make sure TV/VCR/DVD switch has been slided to VCR/DVD. Then
press VCR to select the VCR mode. (The VCR indicator will light)
2A77501C E(30-32) 9/25/02, 9:02 PM32

33
When playing HiFi cassette tapes recordedon another VCR, the sound output may bedistorted. This is normal and no indicationof a unit malfunction. Try to minimize sounddistortions by using SET +/– or change toMONO by pressing of A.MONITOR.
NICAM Stereo Recording and Playback
PlaybackUse A.MONITOR to select under stereo/mono or bilingualplayback. See the table below for more information.
Bilingual playbackperformed as follows:
On-screen indications(for 4 sec.)
Stereo playbackperformed in:
Simultaneouslyboth languagesfrom HiFi track(Mixed sounds)
Original soundtrack (Sub sound)
One's mothertongue dubbing(Main sound)
One's mothertongue dubbing(Main sound)
Stereo
Mono
Right channelsignal output fromboth loudspeakers
Left channel signaloutput from bothloudspeakers
L CH
R CH
MONO
STEREO
Note:
HiFi signal indicationIt will be displayed for approx. 4seconds when playing HiFi videocassette tapes.
HI-FI
2A77501C E(33-37) 9/25/02, 9:02 PM33

34
TIMER REC SETAUTO REPEAT
CHANNEL SETUPSYSTEM SETUP
SELECT :ENTER : OK
MENUEXIT :
VCR SETUP[OFF]
Audio MixingYou can listen to both sound tracks (Hi-Fi and MONO), by setting AUDIO MIX-ING mode.
1 Press SET UP MENU.Press or to selectVCR SETUP. Then pressOK.
Press or to selectAUDIO MIX.
Press / or OK to select[ON].If you select [ON], the unitwill play both sound tracks(Hi-Fi and MONO) until theAUDIO MIXING mode is can-celled.
4 Press SET UP MENU repeatedly until the TV pictureappears.
Note:To deactivate the AUDIO MIX functionfollow the above procedure from step 1 to3, select [OFF], and confirm the settingby pressing SET UP MENU.
2
3
AUDIO MIXNICAM
VCR SETUP
SELECT : /ENTER : OK
MENUEXIT :
PLAYBACK SHARPNESS[OFF]
[AUTO]
AUDIO MIXNICAM
VCR SETUP
SELECT :ENTER : OK
MENUEXIT :
PLAYBACK SHARPNESS[ON]
[AUTO]
/
• Turn ON the TV and select the VCR channel on TV.• Make sure TV/VCR/DVD switch has been slided to VCR/DVD.
Then press VCR to select the VCR mode. (The VCR indicatorwill light)
Preparation:
2A77501C E(33-37) 9/25/02, 9:02 PM34

35
Before starting the duplicating process, select the propertape speed using . For a pre-recorded tape thecorrect tape speed will be set automatically duringplayback.
Duplicating a Video TapeWhen you try to connect with a cable, make sure the power of both units have been turned off.Connect the recording unit with the TV. Therefore you can just watch what the recording unit is recording.
Load a blank cassette tape with the erase prevention tabintact into the recording DVD/VCR. Load the previouslyrecorded cassette tape into the playback VCR or a videocamera.
Note:
Use AUX or PR of the recording DVD/VCR to select the"A1", "A2" or "A3" instead of the preset channel.
A1 = TV-RGB/Composite Scart Socket
A2 = VCR/DECODER Scart Socket
A3 = Front AV jacks
While holding 2, press and then 4 of Recording unit.
Press PLAY-button and then PAUSE/STILL-button ofPlayback unit. Now you can see the still picture of thescene that you wish to duplicate.
5 Press 4 of both units simultaneously to start the Duplicat-ing.
Connection with second Video recorder or Video camera
1
2
34
VCR
Press AUX on therecording unit repeatedlyuntil A3 appears.
OR
Playback oncamera
Playback unit
(not supplied)
Recording unit
(notsupplied)
You can record disc material in DVD, Video CD, Audio CD, etc. onto a video tape with this DVD/VCR only.If the DVD disc has a Copy-guard feature, the duplicating is not possible. A symbol mark “ ” will appearon the screen for approx. 4 seconds. See page 38 for more information about the DVD playback.
Press DVD to select the DVD mode. (The DVD indi-cator will light)
1Press to start the disc playback.2
During disc playback, while holding 2, press .3
Duplicating a disc material onto a video tape
Load a cassette tape with the erase prevention tabintact.Select the tape speed in the VCR mode. (see P.24)Load a disc you wish to duplicate.
Preparation:•
••
You can set the duplicating time using the ITR-function.At step 3 above press 2 repeatedly until the desiredduplicating time appears on the screen.(P.26)
Note:
2A77501C E(33-37) 9/25/02, 9:02 PM35

36
DiscThis unit applies to DVD discs from Region 2 only.The loaded Disc (DVD, Video-CD, Audio-CD and MP3-CD) will be recognized automatically.The suitable Disc-formats are: DVD, CD-R and CD-RW.Some CD-R/RW discs may be incompatible.This DVD/VCR uses the PAL color system. The NTSC-DVDs can be playback on PAL 60Hz.
Do not play DVD-ROM, DVD-Audio, CDV, CD-G or Photo CD to prevent accidental erasure of prerecorded material.
Some DVDs is played back with a Copy guard system. In case of a dubbing on video tape, strong disturbance mayoccur. This is not a defect of this DVD/VCR.
TitleWhen two or more movies are recorded on a disc,the disc is divided into two or more sections. Eachsection is called a “TITLE”.
ChapterThe titles can be subdivided into many sections.Each section is called a “CHAPTER”.
TrackAn Audio CD can contain several items.These are assigned to the tracks.
Removing Disc from CaseBe sure to hold the edge of disc. Do not touch the surface of the disc.Pick up the disc gently from the case.
• Do not scratch the disc.• Do not get dirt on the surface of the disc.• Do not stick a label or adhesive tape on the disc.• Do not drop or bend the disc.
Storing Disc• Store the disc in the case to avoid risk of scratches, dirt or damage.• Do not leave disc exposed to direct sunlight or in hot or humid places.
Cleaning DiscWipe the disc with a clean, dry cloth from centre to edge.• Do not wipe the disc round.• Do not use liquid or aerosol cleaners.
CHAPTER 1
TITLE1 TITLE2
DVD DISC
CHAPTER 2 CHAPTER 2 CHAPTER 3CHAPTER 1
TRACK 1 TRACK 2 TRACK 3 TRACK 4 TRACK 5
CDAudio-CD
2A77501C E(33-37) 9/25/02, 9:02 PM36
37
English
Espa olFran ais
AB C
Language
Subtitle Language ENGAudio Language ENGDisc Menu Language ENGOn-Screen Language ENG
: Select : Enter
AB C
Language
Subtitle Language ENGAudio Language ENGDisc Menu Language ENGOn-Screen Language ENG
: Select : Enter
4
Setting setup languageThe setup language can be selected.
Press / to select desiredlanguage: English (English),German (Deutsch) or French(Français).
2 Press SET UP MENU in the stopmode. The SETUP MENU ofDVD will appear on the screen.
To make the SETUP screen disappear, press SET UP MENU(or RETURN).
If the DVD/VCR does not operateproperly: Static electricity, etc., mayaffect the player's operation. Disconnectthe AC power cord once, then connectit again.
3 Press / to select On-ScreenLanguage, then press OK (En-ter).
Then press or to select“Language”.
AB C
: Select : Enter
PictureTV Shape 4:3LBVideo Out Select Video
1 Press DVD to select the DVDmode. (The DVD indicator willlight.)“No Disc” will appear on thescreen. (If a DVD disc has al-ready loaded, the playback willstart automatically.) No Disc
• Turn ON the TV and set to the video input mode.• Make sure TV/VCR/DVD switch has been slided to VCR/DVD.• When using an amplifier, switch on the amplifier.
Preparation:
5
2A77501C E(33-37) 9/25/02, 9:02 PM37

38
4
Playback procedure
Press or OPEN/CLOSE.The disc tray closes automati-
cally.On the screen, changes to
“ ” and then playback willcommence.
• A menu screen may appear onthe TV screen, if the disc hasa menu feature. In this case,press , , , or OK tooperate a menu feature.
1 Press OPEN/CLOSE.The disc tray will open.
2 Place a disc onto the tray.Hold the disc, position it with theprinted label side up, align it withthe guides, and place it in itsproper position.
3
Press 3 to end playback.• The DVD/VCR memorizes the stopped point, depending on
the disc. “To Return To The Last Scene Viewed, Press Play. ToDisable This Operation, Press STOP Again.” appears on thescreen for approx. 4 seconds. “ ” will continue blinking in thedisplay until the playback is stopped completely. Press toresume playback (from the scene point).
• If you press 3 again (“ 3 ” appears on the screen) or unloadthe disc, the DVD/VCR will clear the stopped point.
5 Then press OPEN/CLOSE.The disc tray opens.Remove the disc and press , (POWER).The disc tray closes automatically and DVD/VCR turns off.
NOTES:• If a non-compatible disc is loaded, "Please Check Disc", "Disc playback unauthorized Consult owners manual
for further information" or "Parental Lock" will appear on the TV screen according to the type of loaded disc. Inthis case, check your disc again (See pages 36 and 46, 47).
• Some discs may take a minute or so to start playback.• A “Prohibition” symbol may appear at the upper right of the screen. This symbol means either the feature you
tried is not available on the disc, or the DVD/VCR can not access the feature at this time. This does not indicatea problem with the DVD/VCR.
• When you set a single-faced disc label downwards (ie. the wrong way up) and press or OPEN/CLOSE, " "will appear and remain on the screen for approx. 30 seconds and then it will change to "Please Check Disc".
• Some playback operations of DVDs may be intentionally fixed by software producers. Since this DVD/VCR playsDVDs according to the disc contents the software producers designed, some playback features may not beavailable. Also refer to the instructions supplied with the DVDs.
• When playing DTS-encoded Audio CDs, excessive noise will be heard from the analog stereo outputs. To avoidpossible damage to the audio system, the consumer should take proper precautions when the analog stereooutputs of the DVD/VCR are connected to an amplification system.
• Turn ON the TV and set to the video input mode.• Make sure TV/VCR/DVD switch has been slided to VCR/DVD. Then
press DVD to select the DVD mode. (The DVD indicator will light)
Preparation:
2A77501C E(38-43) 9/25/02, 9:03 PM38

39
Special playback
Press during normal playback.Each press of will increase the speed of the search x2 ( ), x8( ), x30 ( ), x100 ( ). (in case of Audio-CD: x4 ( ) and x8( ) are available)
• To resume normal playback, press .
Fast Forward Playback
Press during normal playback.Each press of will increase the speed of the search x2 ( ), x8( ), x30 ( ), x100 ( ). (in case of Audio-CD: x4 ( ) and x8( ) are available)
• To resume normal playback, press .
Review Playback
Press 4 during normal playback.
Still Playback
To resume normal playback, press.
Press 4 during still playback.One frame is advanced each timeyou press 4.
Frame Advance
• To resume normal playback, press .• To resume the still playback, press 4.
Press SLOW during normal playback or still playback.Each press of SLOW will change the speed of the slow x1/2, x1/4,x1/8.
Slow-motion Playback
To resume normal playback, press.
Locating a chapter or track
• The unit is capable of holding a stillvideo image or On screen display imageon your television screen indefinitely. Ifyou leave the still video image or Onscreen display image displayed on yourTV for an extended period of time, yourisk permanent damage to yourtelevision screen. Projection televisionsare very susceptible.
• Some titles may not display chapternumbers.
• When you set “Title Stop” to “Off” (Seepage 53), you can access chapter inanother title. If you go back to thepreceding title by pressing the SKIP, theDVD/VCR locates the first chapter of thetitle. When “Title Stop” is set to “On”.you can access chapters only within thecurrent title.
Press SKIP ( ) Forward or SKIP( ) Reverse during playback tolocate a chapter or track that youwant to watch.Each time you press the button, a“C (chapter)” number or “T (track)”number is skipped.
NOTES:
Note: There may be a slight delay be-tween pressing the button and thefunction activation.
T C1 1
When you press SKIP ( ), playback starts from the beginningof the current chapter or track.When you press SKIP ( ) twice, playback starts from thebeginning of the preceding chapter or track.
2A77501C E(38-43) 9/25/02, 9:03 PM39

40
DVD Picture Signal Selection/Zooming
Note:• Picture Signal Selection is only
available for connecting with a 21 pinScart Cable.
• Depending on your TV, NTSC discmay not playback correctly in colour. Inthis case, it is recommended to selectthe Picture Signal RGB on step 2.
• Only use RGB setting if your TV isRGB compatible.
You can select the output signal ofDVD playback picture to the TVscreen as an VIDEO signal or a RGBsignal.
AB C
: Select : Enter
PictureTV Shape 4:3LBVideo Out Select Video
AB C
: Select : Enter
PictureTV Shape 4:3LBVideo Out Select Video RGB
Video
2 Press OK (Enter).Press or to select thedesired picture signal, “Video”or “RGB”.
To make SETUP screen disappear, press SET UP MENU.3
1 Press SET UP MENU in thestop mode.
Press or to select “Pic-ture”, then press or toselect “Video Out Select”.
• Turn ON the TV and set to the video input mode.• Make sure TV/VCR/DVD switch has been slided to VCR/DVD.
Then press DVD to select the DVD mode. (The DVD indicatorwill light)
Preparation:
Press ZOOM during playback.The centre part of the imagewill be zoomed in.As you repeatedly press theOK or ZOOM while “ZOOM” isselected, the magnificationlevel changes. Variation of thelevels includes image reduc-tion.
: Select : ChangeZoom Off
ZOOMEXIT
This unit will allow you to zoom in on the frame image. Youcan then make selections by switching the position of theframe.
While “ZOOM” is selected, press ZOOM repeatedly to re-turn to a 1:1 view.
1
2
3
Zooming
Press / or / to view a different part of the frame.You may move the frame from the centre position to UP,DOWN, LEFT or RIGHT direction.
• If you select “EXIT” and press the OK, you can turn off thesymbol mark, keeping the current magnification level.
• Press CANCEL to restore the zoom point to the centreof the picture.
Notes:• If you use the connection with S-Video cord, be sure to set the
“Video Out Select” at step 2 above to “Video”. If you select “RGB”,the TV screen will be disturbed.
• If you selected “RGB” at step 2 above, press TV/VCR to selectVCR. (VCR indicator will appear on the display) Otherwise, theTV screen will be disturbed when you select the channel withTV’s CHANNEL UP/DOWN buttons.
2A77501C E(38-43) 9/25/02, 9:03 PM40

41
A-
NOTES:Some discs may not work with therepeat operation.In A-B repeat mode, subtitles nearpoint A or B may not appear.During the A-B Repeat Playback theANGLE feature will not operate.You may not be able to set A-B Re-peat, depending on the scenes of theDVD.A-B repeat does not work with an in-teractive DVD and MP3-CD.Random playback can not be com-bined with Repeat playback.
Repeat playback
•
•
•
•
•
•
2 During playback repeat playback will start automatically.To start repeat playback during stop mode, press withinabout 5 seconds after you press PLAY MODE.• To resume normal playback, press PLAY MODE repeatedly
until “Off” appears on the TV-screen.
REPEAT PLAYBACK
• Turn ON the TV and set to the video input mode.• Make sure TV/VCR/DVD switch has been slided to VCR/DVD.
Then press DVD to select the DVD mode. (The DVD indicatorwill light)
Preparation:
A-B repeat playback allows you to repeat material between twoselected points.
1 Press REPEAT A-B duringplayback.The start point is selected.
2 Press REPEAT A-B again.The end point is selected.Playback starts at the point thatyou selected. Playback stops atthe end point, returns to Point Aautomatically, then starts again.
A-B Repeat Playback
To resume normal playback,press REPEAT A-B again.“Repeat Off” appears on the screen.
A-B
Track Repeat
1 Press PLAY MODE repeatedly to select “Chapter Repeat”,“Title Repeat” or “All Repeat”. (In case of CD, select “TrackRepeat” or “ All Repeat” )
CD
Chapter Repeat
DVD
2A77501C E(38-43) 9/25/02, 9:03 PM41

42
1 T:- - CT:- - -2 T:- - CT:- - -3 T:- - CT:- - -4 T:- - CT:- - -5 T:- - CT:- - -6 T:- - CT:- - -7 T:- - CT:- - -
: Select 0-9 : Input : PlayMemory
Memory playback/Random playback
1 Press MEMORY.
2 Press / toselect “T” Titlenumber or “CT”Chapter or Tracknumber. Usenumbe keys toInput the favoritenumber.
3 Press or OK.Set the “T” and“CT” in the nextbar as In step 2.
4 Press to start MEMORY playback.
You can arrange the order of titles, chapter or tracks on the disc.
Memory playback
• Turn ON the TV and set to the video input mode.• Make sure TV/VCR/DVD switch has been slided to VCR/DVD. Then
press DVD to select the DVD mode. (The DVD indicator will light)
Preparation:
NOTES:• The memory playback is cancelled
when press 3 during memoryplayback.
• Random playback can not becombined with Repeat playback.
• You can program up to 30 selectionsinto the memory.
• Depending on the DVD, ChapterRandom operation may not workduring playback.
• You cannot use the random playbackwith memory playback.
• If you input a large number than the number that is recordedon the disc, the bar will be skipped.
• The input number into "T" for CD or MP3 is not effective.
• When you select another chapter In the same title, you donot need to select the title number.
• To cancel the programmed selection, press CANCEL.
Random playback
1
2
Press PLAY MODE repeatedly to select “ Chapter Random”or “Title Random”.(In case of CD, select Track Random)
During playback random playback will start automatically.To start random playback during stop mode, press withinabout 5 seconds after you press the PLAY MODE.• To resume normal playback, press PLAY MODE repeatedly
until “Off” appears on the TV-screen.
: Select 0-9 : Input : PlayMemory
1 T:01 CT:0022 T:02 CT:0043 T:- - CT:- - -4 T:- - CT:- - -5 T:- - CT:- - -6 T:- - CT:- - -7 T:- - CT:- - -
In stop mode
In stop mode
1 T:- - CT:- - -
: Select 0-9 : Input : PlayMemory
In playback
: Select 0-9 : Input : PlayMemory
1 T:01 CT:0022 T:- - CT:- - -3 T:- - CT:- - -4 T:- - CT:- - -5 T:- - CT:- - -6 T:- - CT:- - -7 T:- - CT:- - -
In stop mode
1 T:01 CT:002
: Select 0-9 : Input : PlayMemory
In playback
2 T:02 CT:004
: Select 0-9 : Input : PlayMemory
In playback
Track Random
CD
Chapter Random
DVD
• To resume normal playback, press CANCEL.
2A77501C E(38-43) 9/25/02, 9:03 PM42

43
EAM
: Select : Enter
T 1 000:23MP3
PCM
4
3
MP3 PlaybackThis player can play back the MP3-datawhich has been recorded on CD-R or CD-RW. To produce the MP3-data, you need aWindows-PC with CD-ROM drive and a MP3-encoding Software (not supplied).The Apple-HFS-System can not be played.
Press OSD.Then press / to selectMP3 and press OK (Enter).
Press / or / to select the desired track, then pressOK (Enter). Track is selected and play commences.• In case the folder includes more than 9 tracks, press /
to display next track list.• To remove track list, press CANCEL.• Press / to select “T” and press number keys to
input your desired track.
5 Press 3 to end playback.• The unit records the stopped track.
Press to resume playback (from the beginning oftrack).
• If you press 3 again or unload the disc, the unit will clearthe stopped track.
6 Press OPEN/CLOSE.The disc tray opens.Remove the disc and press .The disc tray closes automatically and DVD/VCR turns off.
1 Press OPEN/CLOSE.The disc tray will open.Place a disc onto the tray.
2 Press or OPEN/CLOSE. Thedisc tray closes automatically. Onthe TV-screen, “ ” and thenreading file number will appear.Then playback will commence.• Reading will take as much time
as the number of file.• Press 3 to end playback.
NOTES:During MP3-Playback, you can not use SEARCH, A-BRepeat functions.You can use Repeat(Track or All) and Random functions forMP3 CD Playback.(See page 41 and 42)
•
•
• Turn ON the TV and set to the video input mode.• Make sure TV/VCR/DVD switch has been slided to VCR/DVD.
Then press DVD to select the DVD mode. (The DVD indicatorwill light)
Preparation:
EAM
: Select : Search
T 1 000:23MP3
PCM
1. \ CRYINI~12. \ DANGER~13. \ GITARREN4. \ LILYWA~15. \ MERCYS~16. \ OBSESS~17. \ PINKPA~18. \ RUNNIN~1
T 11
Limitations on MP3 CD playback• MP3 CD is the disc that is standardized by
ISO9660, its file name must include 3-digitsextension letters, “mp3”.
• The directory and file names of the MP3CD must correspond to the ISOstandardized files.
• This unit can read 200 files per disc. Ifone directory has more than 200 files, itreads up to 200 files, the remaining files willbe omitted.
• As for multi-session disc, only the firstsession can be played.
• If the CD has both audio tracks and MP3files, only audio tracks are played.
• It may take more than one minute for thisunit to read MP3 files depending on itsstructure.
• Music recorded by “Joliet RecordingSpecification” can be played back, the filename is displayed (within 8 letters) on thescreen. Long file names will be condensed.
• The music files recorded by “HierarchicalFile System” (HFS) cannot be played.
Limitations on displayThe maximum number for display is 8letters. Available letters for display are thefollowing: capital or small alphabets of Athrough Z, numbers of 0 through 9, and _(under score).
Notes on MP3 filesTo play back MP3 CD in the recorded order,1. Use MP3 software that records data
alphabetically or numerically.2. Name each file including a two-digit or three-
digit number (e.g. “01” “02” or “001” “002”).3. Refrain from making too many sub-folders.
CAUTION:• Some MP3 CDs can not be played back
depending on the recording conditions.• The CD-R/RW that has no music data or
non-MP3 files can not be played back.
MP3 CD Information
2A77501C E(38-43) 9/25/02, 9:03 PM43

44
: Select : ReturnAudio:ENG1 2CH 2CH
ENG2 5.1CHFRE1 2CH
ENG1 2CH
: Select : ReturnAudio:FRE1 2CH 2CH
ENG2 5.1CHFRE1 2CH
ENG1 2CH
Changing soundtrack language / Changing Subtitles language
1 Press A.MONITOR during play-back.The current soundtrack languageis displayed.
2 Press A.MONITOR repeatedlyuntil the desired language is se-lected.The on-screen display will disap-pear after a few seconds.• To turn off the soundtrack
setting display, press theCANCEL or OK button.
Changing soundtrack language
• Turn ON the TV and set to the video input mode.• Make sure TV/VCR/DVD switch has been slided to VCR/DVD. Then
press DVD to select the DVD mode. (The DVD indicator will light)
Preparation:
You can select the language when you play a multilingual disc.
NOTES:• If the desired language is not heard after
pressing A.MONITOR several times, thelanguage is not recorded on the disc.
• Changing soundtrack or subtitlelanguage is cancelled when you open thedisc tray or turn the power off. The initialdefault language or available languagewill be heard and seen if the disc isplayed back again.
• Depending on the DVD you may beunable to turn on, turn off, or change thesubtitles, even if they are recorded on thedisc. While playing the DVD, the subtitlemay change while opening or closing thedisc tray, or while changing the title.
• During some scenes, the subtitles may notappear immediately after you select “On”.
• The abbreviation of the languageappears instead of the language name.Refer to the list of languages and theirabbreviations. (See on page 57.)
In case of VIDEO CD playback
Audio type changes as follows each time you press A.MONITOR.
L.R
L
R
: Select : ReturnSubtitle:ENG1 On
: On/Off
ENG 1SPA 1FRE 1
Off
: Select : ReturnSubtitle:- - - Off
GER 1DUT 1SV 1NO 1
Off
Press SUB TITLE duringplayback.
Then press / to select thedesired language.• To turn off the subtitle setting
display, press the CANCELor OK button.
• To turn the subtitles off, select“Off”.
Changing Subtitles language
Press SUB TITLE repeatedly toturn Subtitles on or off.
You can select the language when playing back a disc recordedwith multi-lingual subtitles.
1
2
L.R
L
R
L.R
L
R
2A77501C E(44-49) 9/25/02, 9:03 PM44

45
Changing angles / Title selection / DVD menu
Two or more titles are recorded on some discs. If the title menuis recorded on the disc, you can select the desired title.
1 Press TITLE during playback.Title menu appears on the screen.• Press TITLE again to resume playback at the scene
when you pressed TITLE.
2 Press / or / to select the desired title.
3
Title Selection
Some DVDs allow you to select the disc contents using themenu.When you play back these DVDs, you can select the subtitlelanguage and sound-track language,etc. using the DVD menu.
Press OK.The menu continues to another screen. Repeat steps 2 and 3 toset the item completely.
1 Press DVD MENU during playback.The DVD menu appears on the screen.
• Press DVD MENU again to resume playback atthe scene when you pressed DVD MENU.
2 Press / or / to select the desired item.
3
DVD Menu
NOTE:Depending on the DVD, you may notbe able to change the angles even ifmulti-angles are recorded on the disc,or you may be unable to select the title,and a “title menu” may simply be calleda “menu” or “title” in the instructionssupplied with the disc.
• Turn ON the TV and set to the video input mode.• Make sure TV/VCR/DVD switch has been slided to VCR/DVD. Then
press DVD to select the DVD mode. (The DVD indicator will light)
Preparation:
Press OK or .The playback of the selected title will start.
: Select : ReturnAngle :1
23
1
When playing back a disc recorded with multi-angle facility, youcan change the angle that you are viewing the scene from.
1 Press ANGLE during playback.The current angle will appear.
2 Press ANGLE or / repeatedly until the desired angle isselected.• To turn off the angle number display, press the CANCEL.• You can change the camera angle directly by pressing the
number keys corresponding to its angle number instead ofusing the / buttons.
Changing Angles
2A77501C E(44-49) 9/25/02, 9:03 PM45

46
AB C
Operation
Title Stop OffParental Lock Off
PBC On
Pause/Still AutoOnOff
: Select : Enter
AB C
Operation
Title Stop OffParental Lock Off
PBC On
Pause/Still AutoOnOff
: Select : Enter
Parental control
1 Press SET UP MENU in the stopmode.Press or to select “Opera-tion”.
2 Press or to select“Parental Lock”, then press OK.
3 Press or to select Off or On.
4 Press number keys to input a4-digits security code thenpress OK.• If you input a wrong number,
press CANCEL.• To return to the before step,
press RETURN.
Parental control setting
• Turn ON the TV and set to the video input mode.• Make sure TV/VCR/DVD switch has been slided to VCR/DVD. Then
press DVD to select the DVD mode. (The DVD indicator will light)
Preparation:
Off: The parental lock featuredoes not function.After pressing OK (Enter),follow step 4 and 6 below.
On: To activate the parental lockfeature or change thesetting, press OK (Enter)and follow steps 4-6 below.
Some discs are specified not suitablefor children. Such discs can beprevented from play back with theunit.
AB C
: Select : Enter
PictureTV Shape 4:3LBVideo Out Select
5 Enter the code of a country/areawhose standards were used torate the DVD disc. (See the liston the page 47)
Example: Set to GB (UNITEDKINGDOM).Press or to select “G” thenpress to move to the rightcharacter. Then select “B” sameas above. Then press OK (En-ter).
NOTES:If each setup (page 46~55) has beencompleted, the unit can always beworked under the same conditions(especially with DVD discs).Each setup will be retained in thememory if you turn the power off.Depending on the discs, the unit can-not limit playback.Some discs may not be encoded withspecific rating level information thoughits disc jacket says "adult". For thosediscs, the age restriction will not work.Do not forget the security code. If youforget the security code, delete it. (Seestep 7 on next page)
•
•
•
•
PBC On
AB C
Operation
Title Stop OffParental Lock OffPause/Still Auto
Security Code ----
: Select : Enter
OnOff
PBC On
AB C
Operation
Title Stop OffParental Lock OffPause/Still Auto
OnOff
: Select : Enter
Area Code D E
2A77501C E(44-49) 9/25/02, 9:03 PM46
47
Parental control
To change the parental lock levelFollow steps 1- 6.
6 Press / to select the paren-tal lock level, then press OK (En-ter).
You cannot play DVD discs rated higher than the level you selectedunless you cancel the parental lock function.For example, when you select level 7, discs rated higher than level7 are locked out and cannot be played.
AB C
Operation
Title Stop OffParental Lock Off
PBC On
Pause/Still AutoOnOff
: Select : Enter
Level 7Area Code D E
To change your 4-digit security code
1) After selecting “On” or “Off” at step 3 press 3 four times, thenpress OK (Enter).The 4-digit security code is deleted.
2) Press number keys to create a new 4-digit security code at step 4.
Country/Area CodeNETHERLANDS NLNORWAY NOPHILIPPINES PHRUSSIAN FEDERATION RUSINGAPORE SGSPAIN ESSWEDEN SESWITZERLAND CHTAIWAN TWTHAILAND THUNITED KINGDOM GBUNITED STATES US
Country/Area CodeAUSTRALIA AUBELGIUM BECANADA CACHINA CNCHINA HONG KONG HKDENMARK DKFINLAND FIFRANCE FRGERMANY DEINDONESIA IDITALY ITJAPAN JPMALAYSIA MY
7 To make the SETUP screen disappear, press SET UP MENU.
• Level 1: DVD software for adults cannot be played back.• Level 8: All DVD software can be played back.• Select from the level 1 to level 8. The limitation will be more severe
as the level number is lower.
2A77501C E(44-49) 9/25/02, 9:03 PM47

48
AB C
Language
Subtitle Language ENGAudio Language ENG
On-Screen Language ENG
GermanOthers
Code E N
French
: Select : Enter
Disc Menu Language ENEnglish
Setting menu language
Press OK (ENTER).Press or to select yourdesired language, then press OK(ENTER).
1
2
3
To make the SETUP screen disappear, press SET UP MENU.
Others: Other languages can be selected (See the Table oflanguages on page 57).
Example:Set to EN (ENGLISH).Press or to select “E” then press to move tothe right character. Then select “N” same as above.Then press OK (ENTER).
English, French, GermanThe selected language is the first-priority Menu language.
Press or to select “DiscMenu Language”.
4
You can select the language of thedisc menu messages of DVDs. • Turn ON the TV and set to the video input mode.
• Make sure TV/VCR/DVD switch has been slided to VCR/DVD. Thenpress DVD to select the DVD mode. (The DVD indicator will light)
Preparation:
Press SET UP MENU in the stopmode.Press or to select “Lan-guage”.
AB C
: Select : Enter
PictureTV Shape 4:3LBVideo Out Select Video
AB C
Language
Subtitle Language ENGAudio Language ENGDisc Menu Language ENGOn-Screen Language ENG
: Select : Enter
2A77501C E(44-49) 9/25/02, 9:03 PM48

49
AB C
: Select : Enter
PictureTV Shape 4:3LBVideo Out Select Video
AB C
Language
Subtitle Language ENGAudio Language ENDisc Menu Language ENGOn-Screen Language ENG
: Select : Enter
GermanOthers
Code E N
FrenchEnglish
AB C
Language
Subtitle Language ENGAudio Language ENGDisc Menu Language ENGOn-Screen Language ENG
: Select : Enter
Setting audio soundtrack language
Press OK (Enter).Press or to select yourdesired Audio Language, thenpress OK (Enter).
1 Press SET UP MENU in the stopmode.Press or to select“Language”.
2
3
To make the SETUP screen disappear, press SET UP MENU.4NOTES:• If the selected language is not re-
corded on the disc, the original lan-guage will be heard.
• Some DVD discs may be played in adifferent language than you selected.A prior language may be programmedon the disc.
The same audio soundtrack languagecan always be selected by your uniteven if you replace the disc or turnthe power off.
English, French, GermanThe language you have selected will play if it is recorded onthe disc.
Press or to select “AudioLanguage”.
• Turn ON the TV and set to the video input mode.• Make sure TV/VCR/DVD switch has been slided to VCR/DVD. Then
press DVD to select the DVD mode. (The DVD indicator will light)
Preparation:
Others: If you want to select another language, enter the lan-guage code (See the Table of languages on page 57).
Example:Set to EN (ENGLISH).Press or to select “E” then press to move tothe right character. Then select “N” same as above.Then press OK (Enter).
2A77501C E(44-49) 9/25/02, 9:04 PM49

50
AB C
Language
Subtitle Language ENAudio Language ENGDisc Menu Language ENGOn-Screen Language ENG
: Select : Enter
GermanNo SubtitleOthers
Code E N
FrenchEnglish
AB C
Language
Subtitle Language ENGAudio Language ENGDisc Menu Language ENGOn-Screen Language ENG
: Select : Enter
AB C
: Select : Enter
PictureTV Shape 4:3LBVideo Out Select Video
Others: If you want to select another language, enter thelanguage code (See the Table of languages onpage 57).
Example:Set to EN (ENGLISH).Press or to select “E” then press to move tothe right character. Then select “N” same as above.Then press OK (Enter).
English, French, GermanThe subtitle is displayed with the selected language if it isrecorded on the disc.
Setting subtitle language
Press OK (Enter).
Press or to select yourdesired language, then press OK(Enter).
1 Press SET UP MENU in the stopmode.Press or to select“Language”.
2
3
To make the SETUP screen disappear, press SET UP MENU.4NOTES:• If the selected language is not recorded
on the disc, the first-priority language isselected.
• Some DVD discs may be set to displaysubtitles in a different language than youselected. A prior subtitle language maybe programmed on the disc.
The same subtitle language canalways be selected even if you replacethe disc or turn the power off.
Press or to select “SubtitleLanguage”.
Subtitles do not appear.No Subtitle:
• Turn ON the TV and set to the video input mode.• Make sure TV/VCR/DVD switch has been slided to VCR/DVD. Then
press DVD to select the DVD mode. (The DVD indicator will light)
Preparation:
2A77501C E(50-53) 9/25/02, 9:04 PM50

51
AB C
: Select : Enter
PictureTV Shape 4:3LBVideo Out Select Video
Setting the aspect ratio of TV screen / Setting on Screen display
Press OK (Enter).Press or to select yourdesired screen type.
1 Press SET UP MENU in the stopmode.Press or to select“Picture”, then press or to select “TV shape”.
2
To make the SETUP screen disappear, press SET UP MENU.3
NOTES:• The displayable picture size is preset on
the DVD video disc. Therefore, theplayback picture of some DVD videodiscs may not conform to the picture sizeyou select.
• When you play DVD video discs re-corded in the 4:3 picture size only, theplayback picture always appears in the4:3 picture size regardless of the TVshape setting.
• If you select “16:9 widescreen” and youown a 4:3 TV set, the DVD playbackpicture will be horizontally distorted dur-ing playback. Images will appear to behorizontally compressed. Always besure that your TV shape conforms to theactual TV in use.
You can select the aspect ratio foryour TV.
4:3 Letterbox:Select when a standard 4:3 TV is connected.Displays theatrical images with masking bars above and belowthe picture.
4:3 Normal:Select when a standard 4:3 TV is connected.Displays pictures cropped to fill your TV screen. Either or bothsides of the picture are cut off.
16:9 Widescreen:Select this mode when connecting to a wide-screen TV.A wide screen picture is displayed full size.
You have the following screen sizes to choose from:
AB C
TV Shape 4:3LBPicture
Video Out Select Video
: Select : Enter
16:9 Widescreen4:3 Normal4:3 Letterbox
• Turn ON the TV and set to the video input mode.• Make sure TV/VCR/DVD switch has been slided to VCR/DVD. Then
press DVD to select the DVD mode. (The DVD indicator will light)
Preparation:
AB C
Display
Screen Saver OnBackground PictureOn-Screen Displays On
: Select : Enter
AB C
Display
Screen Saver OnBackground PictureOn-Screen Displays Off
OnOff
: Select : Enter
Press OK (Enter).Press or to select “On” or“Off”.
1
2
3
On: Operational modes (e.g.“ ”, “ ”) appear when youpress the buttons (factorysetting).
Off: Operational modes (e.g. “ ”, “ ”) do not appear whenyou press any buttons.
Press or to select “On-Screen Displays”.
Press SET UP MENU in the stopmode.Press or to select “Display”
To make the SETUP screen disappear, press SET UP MENU.4
Setting on Screen display
Setting the aspect ratio of TV screen
2A77501C E(50-53) 9/25/02, 9:04 PM51

52
AB C
Audio
Karaoke Vocal OnDynamic Range Control OnAudio Out Select Bitstream
Analog 2chPCM
Bitstream
: Select : Enter
Setting Audio
1 Press SET UP MENU in the stop mode.Press or to select “Audio”.
2
NOTES:• The Dynamic Range Control function
works only during playback of DolbyDigital recorded discs.
• The level of Dynamic Range Controlmay differ depending on the DVD videodisc.
• The vocal output feature is used duringplayback of Dolby Digital (multi-channel)recorded DVD KARAOKE discs. Thisfeature allows you to turn off vocal audiotracks, or restore them for backgroundaccompaniment.
• When playing KARAOKE, connect theappropriate audio equipment such as anamplifier to the DVD player.
Press or to select “Audio OutSelect”, then press OK (Enter). Press
or to select your desired outputsound.
• Turn ON the TV and set to the video input mode.• Make sure TV/VCR/DVD switch has been slided to VCR/DVD. Then
press DVD to select the DVD mode. (The DVD indicator will light)
Preparation:
Audio Out SelectSelect the output sound format corresponding to your system connection.For details of sound recording systems, see on page 55.
Bitstream: Select when connected to an amplifier equipped with a DolbyDigital, DTS, MPEG1 or MPEG2 decoder. The DVD/VCR outputsdigital audio information in the bitstream format when you play aDVD video disc recorded on the Dolby Digital, DTS, MPEG1 orMPEG2 recording system.
Analog 2ch: Select when connected to a TV, Dolby Pro Logic or stereo systemvia the analog audio jacks.
PCM: Select when connected to a 2 channel digital stereo amplifier.The DVD/VCR outputs sounds in the PCM 2ch format when youplay a DVD video disc recorded on the Dolby Digital. MPEG1 orMPEG2 recording system.
Dynamic Range ControlTurn on or off a function that makes faint sounds easier to heareven if you lower the volume during late hours playback.
3 To make the SETUP screen disappear, press SET UP MENU.
1 Press SET UP MENU in the stopmode.Press or to select “Audio”.
2 Press or to select “DynamicRange Control”, then press OK (Enter).Press or to select “On” or “Off”.
AB C
Audio
Karaoke Vocal OffDynamic Range Control OnAudio Out Select Bitstream
: Select : Enter
OnOff
Off: Full dynamic range is maintained.On: Dynamic range is reduced.
3 To make the SETUP screen disappear,press SET UP MENU.
Karaoke VocalTurn on or off the vocal output during DVD KARAOKE discplayback.
1 Press SET UP MENU in the stop mode.Press or to select “Audio”.
2 Press or to select “KaraokeVocal”, then press OK (Enter).Press or to select “On” or “Off”.
AB C
Audio
Karaoke Vocal Off
: Select : Enter
Dynamic Range Control OnAudio Out Select Bitstream
OnOff
Off: The primary vocal is not output.On: The primary vocal is output when
it is recorded on the disc.
3 To make the SETUP screen disappear, press SET UP MENU.
2A77501C E(50-53) 9/25/02, 9:04 PM52

53
Setting Operation
• Turn ON the TV and set to the video input mode.• Make sure TV/VCR/DVD switch has been slided to
VCR/DVD. Then press DVD to select the DVD mode.(The DVD indicator will light)
Preparation:
Title StopTurn on or off a feature that automatically stopsplayback after a title has been viewed.
1 Press SET UP MENUin the stop mode.Press or to se-lect “Operation”.
AB C
: Select : Enter
PictureTV Shape 4:3LBVideo Out Select Video
2 Press or toselect “Title Stop”,then press OK(Enter).Press or toselect “On” or “Off”,then press OK(Enter).
PBC On
AB C
Operation
Title Stop OffParental Lock OffPause/Still Auto
: Select : Enter
OnOff
3 To make the SETUP screen disappear,press SET UP MENU.
3 To make the SETUP screen disappear, press SET UPMENU.
Off: The DVD/VCR continues after playback ofa title is completed.
On: The DVD/VCR stops after playback of a titleis completed.
2 Press or to select “PBC”, then press OK(Enter).
Press or to select “On” or “Off”, then pressOK (Enter).
3
Off: When playing a VIDEO CD without usingthe menu.
On: To use the menu when playing a PBC-featured VIDEO CD.
To make the SET UP screen disappear, press SETUP MENU.
PBC
AB C
: Select : Enter
PictureTV Shape 4:3LBVideo Out Select Video
1 Press SET UPMENU in the stopmode.Press or toselect “Operation”.
PBC On
AB C
Operation
Title Stop OffParental Lock OffPause/Still Auto
: Select : Enter
OnOff
AB C
: Select : Enter
PictureTV Shape 4:3LBVideo Out Select Video
1 Press SET UP MENUin the stop mode.Press or toselect “Operation”.
Pause/StillSelect the resolution of still pictures.
AB C
Operation
Title Stop OffPBC On
Parental Lock OffPause/Still Auto
FrameAuto
: Select : Enter
2 Press or toselect “Pause/Still”,then press OK(Enter). Press or
to select “Auto”or “Frame”, thenpress OK (Enter).
Auto: For normal use. Still and fast motion imagescan be paused.
Frame:The resolution of still pictures is improved,so that you can make a motionless pictureclearer when you pause it.
2A77501C E(50-53) 9/25/02, 9:04 PM53

54
Selecting the sound enhancement (E.A.M.)/Setting Background/Setting Screen Saver
• Turn ON the TV and set to the video input mode.• Make sure TV/VCR/DVD switch has been slided to
VCR/DVD. Then press DVD to select the DVD mode.(The DVD indicator will light)
Preparation:
1 Press OSD twice.
Selecting the sound enhancement (E.A.M.*)You can easily switch a preferred audio enhancement.
*E.A.M.: Enhanced Audio Mode
3 -0:21:282
Then press BBBBB/AAAAA toselect the E.A.M.icon, then press OK(Enter).The sound enhance-ment menu appears.
2 Select the sound enhancement by pressing / .Each time you press the button, the sound enhance-ment changes.
Normal:Normal sound.
3D:To obtain expansive virtual surround soundeffects from just two speakers.
Dialogue:To control critical centre channel informationto make dialogue more intelligible (onlywhen playing a DVD video disc recorded onthe Dolby Digital recording system).• To use this enhancement on sounds output
from the BITSTREAM/PCM jack, be sure toset “Audio Out Select” to “PCM.” (see page 52).
To exit the audio enhancement selection PressCANCEL.
Notes:• Actual effects to sounds may vary depending on the speaker
system. Make selection according to your preference.• Actual effects to sounds may vary depending on the disc.• When the DVD/VCR is connected to an amplifier equipped
with Dolby Pro Logic Surround, select “Normal”.Otherwise, Dolby Pro Logic Surround may functiondifferently than usual.
• Selecting “Dialogue” disables “Dynamic Range Control”function (see page 52).
• During MP3 playback, the sound enhancement is noteffective.
AB C
: Select : Enter
PictureTV Shape 4:3LBVideo Out Select Video
1 Press SET UP MENUin the stop mode.Press or to se-lect “Display”.
2 Press or toselect “Back-ground”, then pressOK (Enter). Press
or to selectyour desiredbackground, thenpress OK (Enter).
Setting BackgroundSelect the background color or background picture.
Setting Screen Saver (DVD only)To turn the screen saver on or off.
3 To make the SETUP screen disappear, press SETUP MENU.
AB C
Display
Screen Saver On
On-Screen Display OnGray
Jacket
Blue
: Select : Enter
Background PicturePicture
Blue: Blue background.Gray: Gray background.Picture: Use the picture which appears when you
turn on the DVD/VCR as a background.Jacket: Use the jacket picture included on some
discs as a background. If it is not included,a gray background will be substituted.
AB C
: Select : Enter
PictureTV Shape 4:3LBVideo Out Select Video
1 Press SET UP MENUin the stop mode.Press or toselect “Display”.
2 Press or toselect “ScreenSaver”, then pressOK (Enter).Press or toselect “On” or “Off”,then press OK(Enter).
3 To make the SETUP screen disappear, press SETUP MENU.
AB C
Display
Screen Saver OnBackground PictureOn-Screen Display On
OnOff
: Select : Enter
Off: The screen saver is disengaged.On: The screen saver operates in 10
minutes after you press 4 .
2A77501C E(54-BACK) 9/25/02, 9:04 PM54

55
FrançaisEspañol
AB C
Initial Setup
Audio Out Select BitstreamTV Shape 4:3LBOn-Screen Language ENG English
: Select : Enter
Deutsch
AB C
: Select : Enter
PictureTV Shape 4:3LBVideo Out Select Video
1 Press SET UP MENU in the stopmode.Press or to select “InitialSetup”.
2 Press OK, then press or to select “On-Screen Language”,“TV Shape” or “Audio OutSelect”.
• Turn ON the TV and set to the video input mode.• Make sure TV/VCR/DVD switch has been slided to VCR/DVD. Then
press DVD to select the DVD mode. (The DVD indicator will light)
Preparation:
Setting initial setup
Setting initial setup/output sound conversion tableYou can install the initial systemsetting.
On-Screen Language: See on page 37.TV Shape: See on page 51.Audio Out Select: See on page 52.
Output sound conversion table (sampling frequency/quantization bit)You can select the output sound format corresponding to your system connection (see page 52).
48 kHz/16 bit
48 kHz/20 bit
48 kHz/24 bit
96 kHz/16 bit
96 kHz/20 bit
96 kHz/24 bit
DIGITAL AUDIOOUT jack
Bitstream
Bitstream
Bitstream
44.1 kHz/16 bit
Bitstream
ANALOG AUDIOOUT jack
(Noise)
Recording system
Dolby Digital
DTS
MPEG1, MPEG2
Linear PCM 44.1 kHz/16 bit
DTS
Linear PCM
DIGITAL AUDIOOUT jack
Bitstream
Bitstream
Bitstream
— —
48 kHz/16 bit
44.1 kHz/16 bit 44.1 kHz/16 bit 44.1 kHz/16 bit
Bitstream
ANALOG AUDIOOUT jack
(Noise)
—
—
—
DIGITAL AUDIOOUT jack
48 kHz/16 bit
48 kHz/16 bit
—
48 kHz/16 bit
44.1 kHz/16 bit
Bitstream
ANALOG AUDIOOUT jack
(Noise)
Bitstream Analog 2ch PCMDiscs
CDs
DVD video discs
48 kHz/16 bit
48 kHz/16 bit
48 kHz/16 bit
48 kHz/16 bit
48 kHz/16 bit
48 kHz/16 bit
48 kHz/16 bit
48 kHz/16 bit
48 kHz/16 bit
48 kHz/16 bit
48 kHz/16 bit
48 kHz/16 bit
48 kHz/20 bit
48 kHz/16 bit
48 kHz/20 bit
48 kHz/24 bit
48 kHz/16 bit
48 kHz/20 bit
48 kHz/24 bit
48 kHz/20 bit
—
48 kHz/16 bit
44.1 kHz/16 bit
48 kHz/16 bit
48 kHz/20 bit
48 kHz/24 bit
48 kHz/16 bit
48 kHz/16 bit
48 kHz/16 bit
48 kHz/16 bit
48 kHz/20 bit
48 kHz/24 bit
48 kHz/20 bit
48 kHz/16 bit
48 kHz/20 bit
48 kHz/24 bit
96 kHz/16 bit
96 kHz/20 bit
96 kHz/24 bit
3 To make the SETUP screen disappear, press SET UP MENU.
2A77501C E(54-BACK) 9/25/02, 9:04 PM55

56
DVD
Status display of DiscYou can view information on the operation status and access and settings.
With each press of OSD, the status of the disc will appear on the screen and change as follows.1
Press or to select the desired symbol mark, then press OK (Enter).2T : Title number (Track number)
Press / or number keys to locate a title ortrack, then press OK (Enter).
C : Chapter number
Press / or number keys to locate a Chapter,then press OK (Enter).
: Elapsed (remaining) time of the current title
Press number keys to locate a desired Location,then press OK (Enter).
Audio setting
See page 44.
: Subtitle setting
See page 44.
: Angle setting
See page 45.
ZOOM : To zoom a picture
See page 40.: Audio Out Select setting
BST: Bitstream 2CH:Analog 2ch PCM:PCMSee page 52.
: To stop playback
See page 38.: Playback starts from the beginning of the
current chapter or track.See page 39.
: Fast reverse playback
See Page 39.: To start playback
See page 38.: Fast forward playback
See page 39.
: To pause playback
See page 39.
: To begin slow motion playback
See page 39.
: To locate succeeding chapters or tracks.
See page 39.
Data transfer rate (Mbit/s)Amount of picture, sound and subtitle data in the DVDvideo disc transferred per second.The larger the value is, the more data processed, butthis does not necessarily insure better picture quality.
EAM
T C2 3 0:08:16
2CHZOOM
X 1
C
EAM
T C2 3 -0:21:28ZOOM
2CHZOOM
X 1
C
EAM
T C2 3 0:08:16 9.2MbpsBIT
RATE
2CHZOOM
X 1
C
EAM
OFF
T C2 3
2CHZOOM
X 1
C
EAM
Audio/Video CD
EAM
T 1 00:30
PCM
EAM
EPM
EAM
EAMT 1 -03:38
PCM
EAM
Disc Title:No TextTrack Title:No Text
----- CD TEXT -----
T 1 01:14
PCM
EAM
T 1
PCM
EAM
: To turn off the display
CD TEXTDisplays CD text data if included on the audioCDs. (Some letters may not be displayedproperly depending on the disc.)
OFF
Symbol mark of the featureyou selected is displayed.
(Audio CD only)
mark is only forVideo CD.
: E.A.M. (Enhanced Audio Mode)See page 54.
2A77501C E(54-BACK) 9/25/02, 9:04 PM56

57
Table of languagesEnter the appropriate code for the initial settings"Menu", "Audio" and/or "Subtitle" (see pages 48~50).
Language
No alternatelanguageChineseDutchEnglishFrenchGermanltalianJapaneseKoreanMalaySpanishAfarAbkhazianAfrikaansAmharicArabicAssameseAymaraAzerbaijaniBashkirBelorussianBulgarianBihariBislamaBengali, BanglaTibetanBretonCatalanCorsicanCzechWelshDanishBhutaniGreekEsperantoEstonianBasquePersianFinnishFijiFaroeseFrisianIrishScottish GaelicGalician
Abbreviation
– – –
CHI (ZH)DUT (NL)ENG (EN)FRE (FR)GER (DE)
ITA (IT)JPN (JA)KOR (KO)MAY (MS)SPA (ES)
AAABAFAMARASAYAZBABEBGBHBIBNBOBRCACOCSCYDADZELEOETEUFAFIFJFOFYGAGDGL
Language
GuaraniGujaratiHausaHindiCroatianHungarianArmenianInterlinguaInterlingueInupiakIndonesianIcelandicHebrewYiddishJavaneseGeorgianKazakhGreenlandicCambodianKannadaKashmiriKurdishKirghizLatinLingalaLaotianLithuanianLatvian, LettishMalagasyMaoriMacedonianMalayalamMongolianMoldavianMarathiMalteseBurmeseNauruNepaliNorwegianOccitan(Afan) OromoOriyaPanjabiPolishPashto, Pushto
Abbreviation
GNGUHAHIHRHUHYIAIEIKINISIWJI
JWKAKKKLKMKNKSKUKYLALNLOLTLVMGMIMKMLMNMOMRMTMYNANENOOCOMORPAPLPS
Language
PortugueseQuechuaRhaeto-RomanceKirundiRumanianRussianKinyarwandaSanskritSindhiSangoSerbo-CroatianSinghaleseSlovakSlovenianSamoanShonaSomaliAlbanianSerbianSiswatiSesothoSundaneseSwedishSwahiliTamilTeluguTajikThaiTigrinyaTurkmenTagalogSetswanaTonganTurkishTsongaTatarTwiUkrainianUrduUzbekVietnameseVolapükWolofXhosaYorubaZulu
Abbreviation
PTQURMRNRORURWSASDSGSHSISKSLSMSNSOSQSRSSSTSUSVSWTATETGTHTITKTLTNTOTRTSTTTWUKURUZVIVOWOXHYOZU
2A77501C E(54-BACK) 9/25/02, 9:04 PM57

58
SYMPTOMS POSSIBLE SOLUTIONS
•Make sure the power cord is plugged in.•Try another AC outlet.•Power is off, check fuse or circuit breaker.•Unplug unit, then plug it back in.•Select the DVD or VCR mode before operating.
DVD/VCR does not operate.
Problems and troubleshootingUse the following check list for troubleshooting when you have problems with your unit. Consult your localdealer or service outlet if problems persist.Be sure all connections are properly made when using with other units.
DVD/VCR
PAGE
––––
14,37
The remote control does notfunction.
• Aim the remote control at the remote sensor.• Operate within Approx. 5 Meters or reduce the light in the room.• Clear the path of the beam.• The batteries are weak. Replace the batteries.• Check the batteries are inserted correctly.• Check the frequency code is set correctly.
9
DVD
No picture.
• Antenna connection is not correct or antenna cable is disconnected.• The video channel is not in the correct position or the TV is not
set to the video channel.• Check the unit is connected correctly.• The video input selector of the TV is not set to VIDEO. Set to
VIDEO (or equivalent).• Channel is set to the external mode.
No sound.• Check the unit is connected correctly.• Check the input selector of the amplifier is set properly.• The unit is in the Special playback mode.
1013
10~12–
–
10~12–
20,39
•Select proper language in the menu options.Display is not shown in yourlanguage.
37
Playback doesn’t start.• No disc is inserted.• The disc may be dirty. Clean up the disc.• The unit cannot play DVD-ROMs, etc.
Stopping playback, slow-motionplay, repeat play, or memory play,etc. cannot be performed.
• Some discs may not do some of the functions.
383636
–
Noise bars on screen.
• Tracking adjustment beyond range of automatic tracking circuit.Try Manual tracking adjustment.
• Video heads are dirty.• The tape is worn or damaged.
VCR
•The erase prevention tab of the video cassette is broken off.•The unit is in the external input mode.
TV recording does not work. 18
Timer recording does not work.• The time is not set correctly.• The recording start/end time is not set correctly.• The • has not been pressed ( is not lit).
152930
20
59–
The DVD-keys on the RCU of theother JVC RECEIVER/TV is noteffective.
• This is not a defect. Since this unit is combined type of DVD andVCR, the remote code of DVD is individual.
8
2A77501C E(54-BACK) 9/25/02, 9:04 PM58
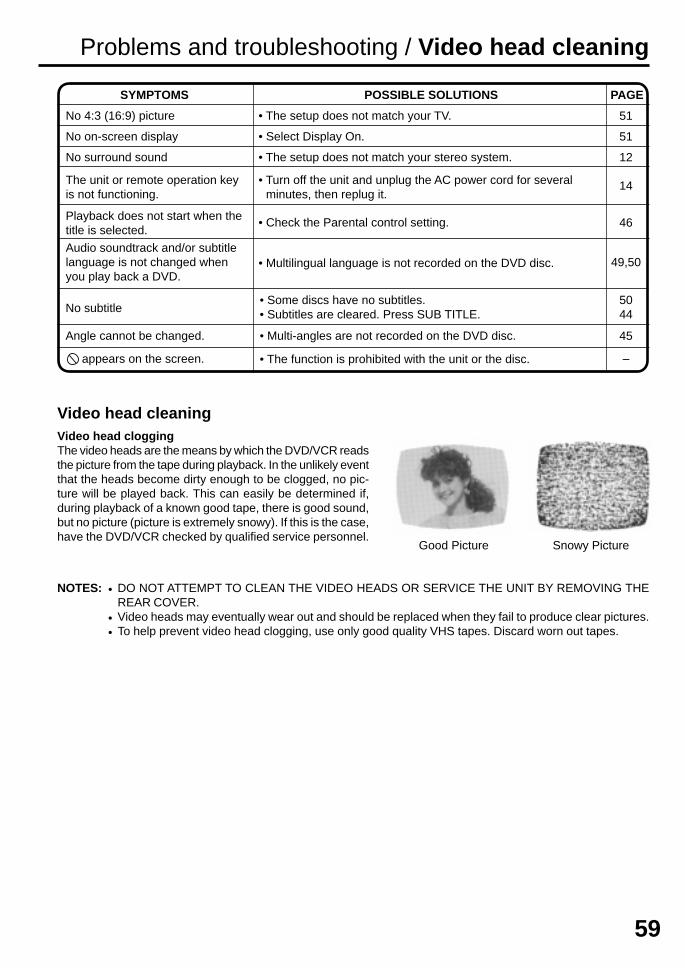
59
No subtitle• Some discs have no subtitles.• Subtitles are cleared. Press SUB TITLE.
Angle cannot be changed. • Multi-angles are not recorded on the DVD disc.
• The function is prohibited with the unit or the disc.appears on the screen.
5044
45
–
SYMPTOMS POSSIBLE SOLUTIONS PAGE
Problems and troubleshooting / Video head cleaning
Good Picture Snowy Picture
No 4:3 (16:9) picture • The setup does not match your TV.
No on-screen display • Select Display On.
51
51
No surround sound • The setup does not match your stereo system.
The unit or remote operation keyis not functioning.
• Turn off the unit and unplug the AC power cord for severalminutes, then replug it.
12
Playback does not start when thetitle is selected.
• Check the Parental control setting.
Audio soundtrack and/or subtitlelanguage is not changed whenyou play back a DVD.
• Multilingual language is not recorded on the DVD disc.
14
46
49,50
Video head cleaning
NOTES: • DO NOT ATTEMPT TO CLEAN THE VIDEO HEADS OR SERVICE THE UNIT BY REMOVING THEREAR COVER.
• Video heads may eventually wear out and should be replaced when they fail to produce clear pictures.• To help prevent video head clogging, use only good quality VHS tapes. Discard worn out tapes.
Video head cloggingThe video heads are the means by which the DVD/VCR readsthe picture from the tape during playback. In the unlikely eventthat the heads become dirty enough to be clogged, no pic-ture will be played back. This can easily be determined if,during playback of a known good tape, there is good sound,but no picture (picture is extremely snowy). If this is the case,have the DVD/VCR checked by qualified service personnel.
2A77501C E(54-BACK) 9/25/02, 9:04 PM59

GENERALPower supply:Power consumption:
Weight:Dimensions:
Input Level:
Output Level:
Hi-Fi Frequency Response:Hi-Fi Dynamic Range:
VCR sectionVideo Head:Audio Track:Channel covevage:RF Channel Output:F.FWD/REW Time at 25˚C:
DVD sectionSignal system:Applicable disc:Audio characteristics:Frequency response:S/N Ratio:Harmonic distortion:Wow and flutter:Dynamic range:Output:
Pickup:
ACCESSORIES:
AC 230-240V 50HzOperation: 22WStand by: 5W4.5 kgWidth : 430 mmHeight : 99 mmDepth : 310.5 mmSCART-socket:
Audio IN jack: 500 mV, 50 k ΩSCART-socket:
Audio OUT jack: 500 mV, 1 k Ω20Hz to 20,000HzMore than 75dB
4 Rotary HeadsHi-Fi Sound - 2 Tracks / MONO Sound - 1 Track2-12, X, Y, Z, Z+1,Z+2, S1-S41, 21-69UHF channel 36 (23 to 69)Approx. 1minute and 48 seconds (with E-180 Cassette Tape)
PALDVD (12cm, 8cm), CD (12cm, 8cm)DVD: 4Hz - 22KHzCD: 4Hz - 20KHz90dB0.1%Below Measurable Level90dBAudio : (RCA) 500 mV, 1KohmDigital Audio : 0.5Vp-p/75 ohmCD : Wavelength: 775 - 805 nm
Maximum output power: 0.5 mWDVD : Wavelength: 640 - 660 nm
Maximum output power: 1.0 mW
Remote control x 175 ohm Coaxial Cable x 1Battery (AA) x 2
Specifications
VIDEO: 1 Vp-p, 75 ΩAUDIO: 500 mV, 50 k Ω
VIDEO: 1 Vp-p, 75 ΩAUDIO: 500 mV, 1 k Ω
2A77501C02/11
X
2A77501C E(54-BACK) 9/25/02, 9:04 PM60