Digitize SOX and Audit Workflows - Oracle
79
1 Digitize SOX and Audit Workflows Step-by-step guide to deploying financial reporting compliance October 2020 | Version 1.1 Copyright © 2020, Oracle and/or its affiliates
-
Upload
khangminh22 -
Category
Documents
-
view
1 -
download
0
Transcript of Digitize SOX and Audit Workflows - Oracle

1
Digitize SOX and Audit Workflows
Step-by-step guide to deploying financial reporting compliance
October 2020 | Version 1.1 Copyright © 2020, Oracle and/or its affiliates

2
SUMMARY ........................................................................................................................................................... 3
GETTING STARTED: MAKING CONFIGURATION DESCITIONS ................................................................................. 4
PART 1: PREPARE IN A NON-PRODUCTION ENVIRONMENT .................................................................................. 7
PREREQUISITES ............................................................................................................................................................. 7 PREPARING AND IMPORTING LEGACY DATA ...................................................................................................................... 19 CREATE USER ASSIGNMENT SECURITY GROUPS ................................................................................................................. 30
PART 2: VALIDATE IN NON-PRODUCTION ENVIRONMENT .................................................................................. 36
PART 3: MIGRATE TO PRODUCTION ................................................................................................................... 77

3
SUMMARY If your company is like most, it already has a process for generating financial statements and testing your key financial controls. For many companies the process involves spreadsheets, custom tools and consultants – things that make it time-intensive, inefficient and costly. This document provides step-by-step instructions for trading up to a streamlined process that will:
• Centralize risk management and risk-control matrix • Streamline your assessment processes and reduce audit effort and consulting fees • Quickly tailor financial reports and dashboards using embedded tools • Eliminate the risks of miscommunication copying and distributing financial audits • View assessment status and results in minutes using pre-built reports

4
GETTING STARTED: MAKING CONFIGURATION DECISIONS
The objective of this document is to enable your core audit team to be able to access FRC and manage their audit assessment activities. Customers take advantage of a phased implementation approach. In the first phase the core audit team will have the ability to manage their risk and control matrix, be able to test their key financial controls, remediate issues and report on findings.
You will start configurations in a non-production environment. It is important to take the appropriate amount of time to determine both short and long term FRC business needs. An example is to determine the overall methodology your organization will use to categorize your process, risk and controls, e.g. Major Processes, Organization, and Standards, using perspective hierarchies.
A phased approach is recommended:
A recommended approach is to only include your core audit team in phase one. Once you are comfortable with the core team using FRC, then you can introduce the larger team (e.g. Business Owners for completing certifications)
• Example: o Phase 1: Import existing Risk and Control library with the objective to audit your key
controls. o Phase 2: Expand your FRC community and manage control certifications
o Phase 1 Features to Implement:
§ Process Object: • Recommendation: If you do not intend to perform assessment against your
process records, leverage FRC’s Perspectives to document and manage your financial processes.
§ Risk Object • Note: If your intent is to leverage treatment plans, events and
consequences at a later phase, the FRC configuration for these items will need to be enabled.
§ Control Object § Issue Object
• Remediation Plan Object § Assessments § Surveys
Note, even if an FRC feature will not be used until a later time, it is important to think about those features during the initial implementation.

5
o Determine how your data will be categorized. This information will translate to the mapping of object records to perspectives values.
Perspective hierarchies will translate to the mapping of object records to perspective values. By organizing your data you can generate reports by ‘Major Process’ and/or ‘Organization’, manage assessment batches by major process, search and filter by perspectives.
§ The initial recommendation is to define two perspectives: Organization and Major Processes. Each of the control and risk records will be associated to one or more perspective values within both perspectives.
• Organization § Corporation § EU Corporation § Japan Corporation § India
• Major Processes § Revenue
§ Quote to Order § Global Order Management § Deal Management § Shipment Verification § Project Accounting § Support Renewal
§ Order to Cash § Credit § Accounts Receivable
o Determine if specific customer configuration is needed: § Determine customer defined Lookup Codes
• For Example: Control Frequency is a defined control definition attribute. The predefined values are Daily, Monthly, Weekly, Yearly. You may have additional frequency values, e.g. Quarterly. This value would be created within Lookup Tables.
§ Determine if any additional attributes are required, through the use of FlexFields. • For Example: Actual Hours spent to complete an assessment can be captured at the
control assessment record.
Note: These items need to be configured prior to the creation of the FRC import template

6
o Determine user access that will be required § Who should be eligible for what access:
• Owner – user can create, edit and update security assignment at the record level • Editor – user can edit a record • Viewer – user has read only access to a record • Reviewer – part of two-step approval process for record changes, assessments and
the closure of issues • Approver – part of two-step approval process for record changes, assessments and
the closure of issues • Assessor – user who completes the assessment • Issue Validator – user who validates issues created against a record
§ Recommendation for participants: • Compliance Team – The Leadership Team of the audit group, who are responsible
for the following: § Creating and managing new records § Creating and managing assessment batches § Reviewing and/or approving records § Validating and/or managing Issues
• Audit Team – Users will complete assessment, edit and view records • External Auditors – Users will have read only access to specific data records and
assessment results. § Leverage User Groups – Group of users with the same security eligibility.
o Organize legacy data for importing the data into FRC § Prior to importing the legacy data, take the time to ‘clean-up’ the data. This will eliminate
the need for cleanup after the data has been imported into FRC.
o Determine the reporting requirements § During this phase, you may encounter specific reporting requirements that could impact
your initial implementation. Changes can be made once the data has been imported, however some larger organizational structure changes can require significant changes to the data within the application.

7
PART 1: PREPARE IN A NON-PRODUCTION ENVIRONMENT Start in a non-production environment. Once you’re satisfied with the initial set of your data and configuration, you are ready to migrate to production.
Prerequisites
Overview & Participants
Your security team will enable the Risk Management offering and grant access to the compliance team who will set up the financial compliance.
Your risk administrator will run various jobs and deploy your Risk Management dashboard.
Step 1: Activate Risk Management Your first step is to make sure Risk Management is activated in your instance. Ask your system administrator to navigate to Setup and Maintenance:
8
Then, navigate to Actions > Go to Offerings. On the Offerings page, click on ‘Risk Management’ and make sure Status is ‘Enabled’:
Step 2: Assign Risk Management Job Roles Assign the risk administrator (product champion/FRC super user a member of the compliance team) with the following job roles:
• Risk Administrator • Risk Activities Manager
These job roles will enable the user to complete the implementation of the application.

9
Step 3: Run the Import User and Role Application Security Data Process Most likely this is already a scheduled job that runs several times each day. However, that may not be the case in a development environment. To make sure, navigate to Scheduled Processes and run the “Import User and Role Application Security Data” process. You might need someone with IT Security Manager access to help you.

10
Step 4: Run the Security Synchronization Job Anytime you make changes in Security Console, be sure to follow up by running the Security Synchronization job, which updates who can access what in Risk Management. The job should be scheduled to run at least daily. Navigate to Risk Management > Setup and Administration, then click the Scheduling tab:

11
Step 5: Manage Financial Reporting Compliance Configuration Options The simplest approach is to leverage the default configuration settings. This step is only required if you need to modify the predefined configuration to expose risk treatment plans, event and consequences. . Navigate to Risk Management > Setup and Administration > Manage Configuration Options
Select Financial Reporting Compliance Select Risk and edit the configuration to Show for both treatment plans, events and consequences.

12
Step 6: Create Customer Defined Look Up Codes This step is needed if you need to extend the predefined lookup values with additional values (e.g. record’s Details forms). If not, this step should be skipped. For example, attribute Control Frequency’s list of values can be extended. Step 6.a : Navigate to Risk Management > Setup and Administration > Lookup Tables
Step 6.b: Some Lookup Types can be extended, meaning you can create additional Lookup Codes (attribute values). In addition, if there are predefined values you will not use you can update the code from Active to Inactive.
13
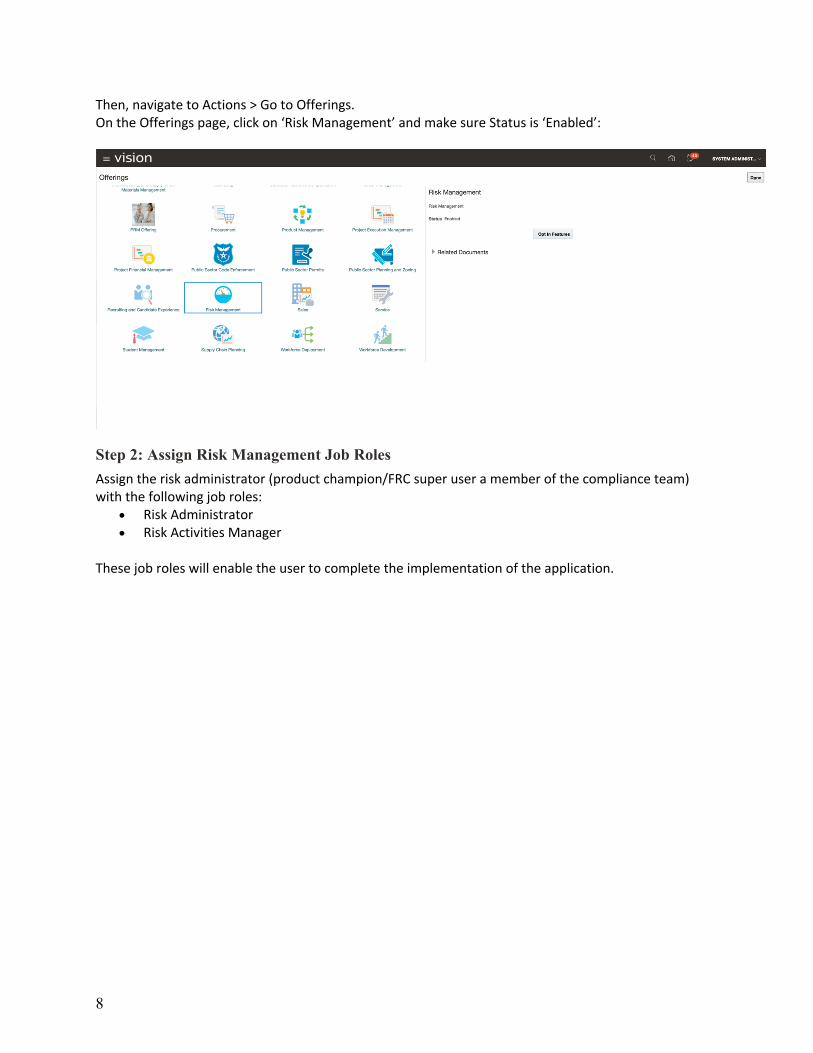
Step 6.c: To create a new Lookup Code, identify the Lookup Type. For example, to extend the control frequency values and add Real Time as a value, you would extend Lookup Type GRC_CONTROL_FREQUENCY Click the create icon and complete the form.
Lookup Type = GRC_CONTROL_FREQUENCY Lookup Code = REAL_TIME (Database value, which is also applied in the import template) Meaning = Real Time (Display label) Once completed, save and close.
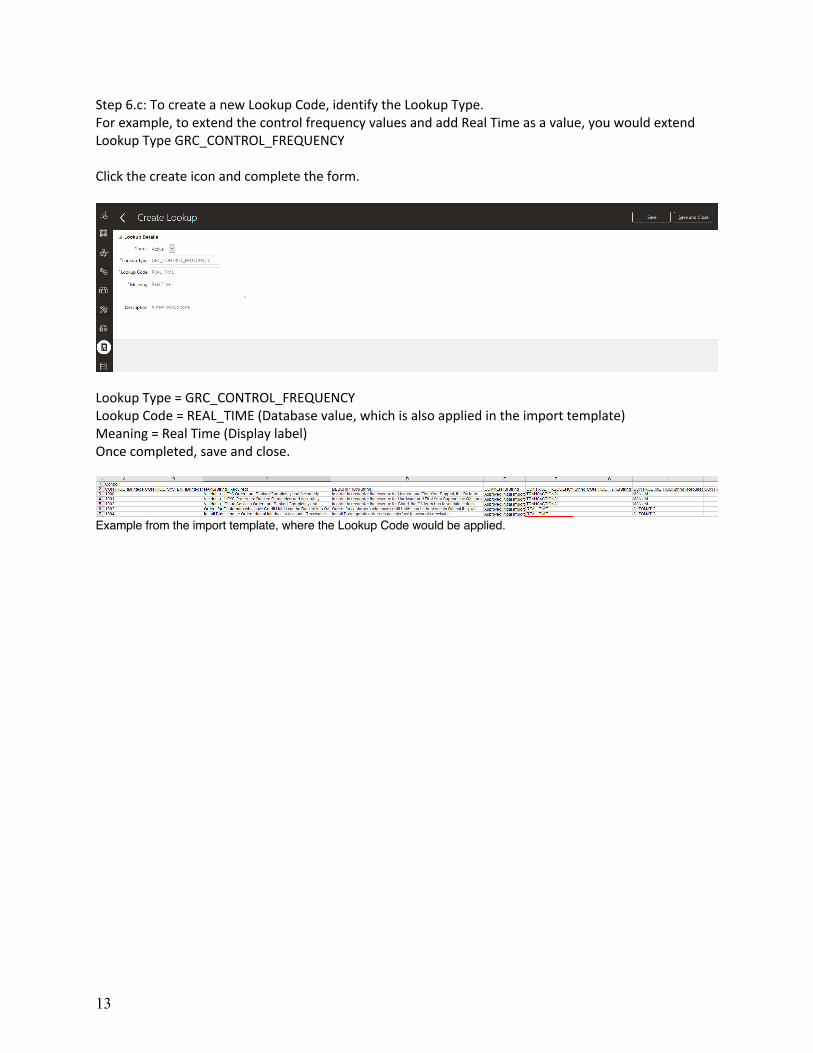
Example from the import template, where the Lookup Code would be applied.

14
Step 7: Create FlexFields This step is only needed if you need to extend the available attributes for specific object types or the assessment results. If not, this step will be skipped. Consider creating two FlexFields, Budgeted Hours and Actual Hours. These attributes will enable you to manage your assessment budget.
• Budgeted Hours – document the number of budgeted hour to complete the assessment. The attribute will render within the Control Test Plan definition.
• Actual Hours – document the number of hours actual spent performing the assessment. This attribute will appear within the ‘Complete Assessment’ train stop.
Step 7.a: Navigate to Settings and Actions > Setup and Maintenance
The system administrator will need to create the FlexFields that are needed. Step 7.b: Expand the right hand side task tab and select ‘Search’.

15
Step 7.c : Within this page, search for ‘Manage Descriptive Flexfields’
Step 7.d: Within the ‘Manage Descriptive Flexfields’ page, search for Module ‘Risks and Controls Top’. You should be able to see the flex fields within Risk Management.
Step 7.e: Highlight the ‘RM Assessment Control Flexfield’ and click Edit from the toolbar.
Within RM Assessment Control Flexfield you will be creating ‘Actual Hours’ to appear within the ‘Complete Assessment’ train stop.

16
Step 7.f: Within the ‘Edit Descriptive Flexfield’ page for RM Assessment Control Flexfield, create a global segment by clicking the + icon on the Global Segments section
Step 7.g: Select Data Type ‘Number. The Table Column will be auto-populated
The Table Column will automatically populate.
Step 7.h: Click “Create Value Set”

17
Step 7.i: Within the Create Value Set page, you will need to populate the Validation section.
In the Create Value Set page, enter these values (see screenshot below):
• Value Set Code: COMPX_FRC_ACTUAL_HOURS_NUMB o COMPX would be replaced with your company’s abbreviation.
• Description: COMPANY X Actual Hours Value Set o COMPANY X will be replaced with your company name
• Module: Risks and Controls Top • Validation Type: Format Only • Value Data Type: Number
Under the Definition section: • Maximum Value = 1000
Click ‘Save and Close’.

18
Step 7.j: Back on the ‘Edit Descriptive Flexfield’ page, make sure that the Display Type attribute under ‘Context Segment’ section is set to ‘Hidden’ and ‘BI Enabled’ is unchecked.
Note: Currently FlexFields support the following Data Types, take this into consider when you determine the type of FlexFields you need to create.

19
Prepare and Import Legacy Data
Overview & Participants
If your company is like most, you already have a defined risk and control matrix. Preparing the legacy data will require the greatest amount of time during the implementation of FRC. As mentioned, it is important to take the time to ‘clean-up’ your legacy data prior to importing the data into FRC. It is recommended for the compliance team to be involved in this effort. Each team member will make necessary updates to the risk and control records which they are responsible for. Once completed, the primary team member can apply the data to FRC’s import template.
Step 1: Preparing Your Legacy Data You can import your defined risks, controls, control test plans and the perspective hierarchies (Major Process and Organization). In many cases risks and controls are associated to more than one perspective value. The FRC import template enables you to ‘map records’ through the use of IDs. The IDs are defined by you and it is highly recommended you implement a numbering strategy. The following are the object records that will need to be mapped:
• Risk Records to Perspective Value • Control Records to Perspective Value • Risk records to Control Records
For example Perspective tab: Organization = ID start with 100 Major Process = ID start with 200 Entity = ID 201 Revenue = ID 202 Quote to Order = 203 Control Records = ID starts with 1000 Control Test Plans = ID starts with 2000 Risk Records = ID starts with 3000
20
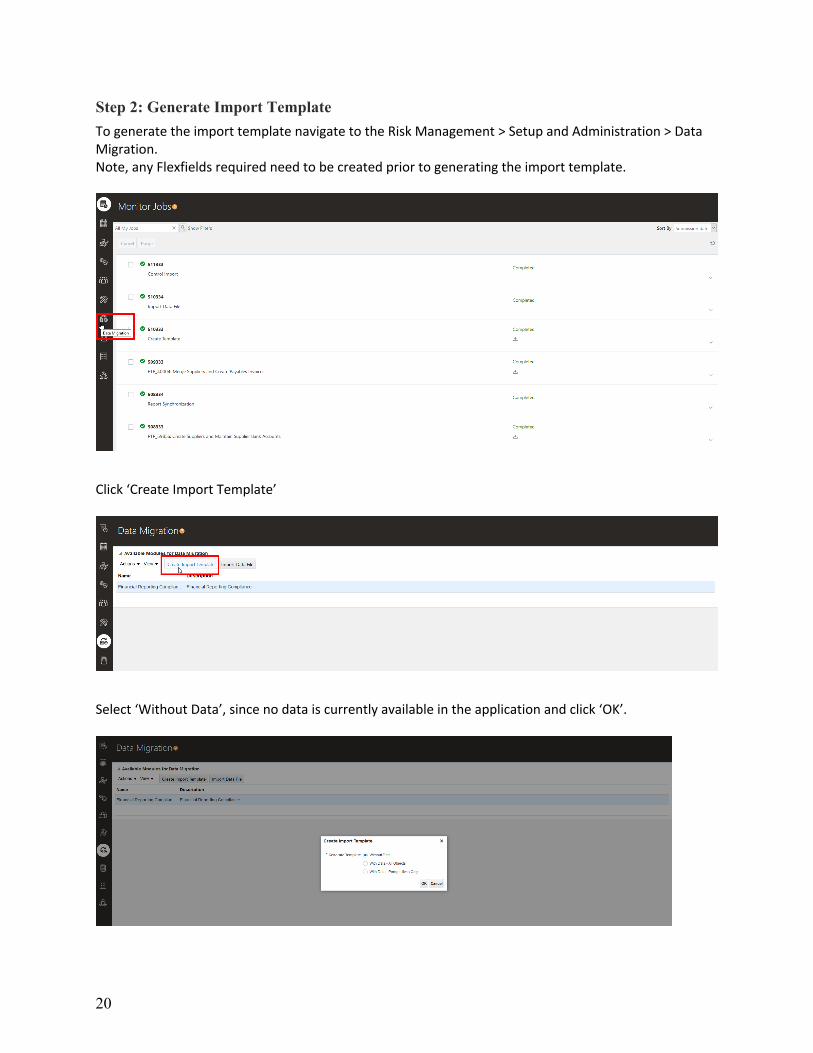
Step 2: Generate Import Template To generate the import template navigate to the Risk Management > Setup and Administration > Data Migration. Note, any Flexfields required need to be created prior to generating the import template.
Click ‘Create Import Template’
Select ‘Without Data’, since no data is currently available in the application and click ‘OK’.

21
Copy the job number to be as a reference within Monitor Jobs.
Navigate to Monitor Jobs
Once the job is completed, you can download the import template.
Note: Steps 6 and 7 need to be completed prior to generating the import template.

22
Step 3: Prepare Legacy Data within the Import Template Now it is time to apply your legacy data to the import template you just created. The import template is an excel document with a number of predefined tabs.
Note: Take the time now to clean up your object records – control definitions, test steps, risk and control mapping etc. FRC implementation are much more successful when the customer takes the time ensure being imported is current and updated.
The following are the tabs which you will need to populate: Perspective tab – The name for each perspective hierarchy being imported
PerspectiveItem tab – The name of each perspective value within the hierarchy
PerspectiveHierarchy tab – Defines the hierarchical structure of the perspective
To indicate the perspective value is a root (parent) node using the value ‘Y’.

23
Control tab – Definition for each control record For any control record that will require to be assessed, set the ‘AUDIT_TEST’ to Y. If you are planning to user the other available control assessment activity types set ‘ASSESSMENT_TEST’ value to ‘Y’. Reference columns ‘K’ and ‘L’ below.
TestPlan tab – Definition for each control test plan and mapping to the control record (Control Record ID defined on the Control tab)
TestStep tab – Definition for each test step per test plan. In addition the mapping to the corresponding test plan ID.
PerspectiveItemControl tab – Each unique control and perspective value (perspective value) mapping

24
Risk tab – Definition for each risk record
RiskControl tab – Each unique control and risk mapping
PerspectiveItemRisk tab -– Each unique risk and perspective value (perspective value) mapping

25
If you have create FlexFields, you will need to map the FlexField Table Column, to the corresponding object’s column header located within the import template tab.
Step 4: Import Legacy Data Once the template is complete it is now time to import your legacy data. Navigate Risk Management > Setup and Administration > Data Migration.
Click ‘Import Data File’

26
Associate your import template and click ‘Import’.
The application will initiate a process job, copy the job number as a reference to monitors the job’s progress. Navigate to the Monitor Jobs tab and search by the job number.
If any errors are generated the application will itemize the list of errors. If one record generates an error the entire import will fail. Work through correcting any issues and then import your data again.
Note that the user importing this file will become the default owner of the FRC records and these records will need to be reassigned after user groups are created.

27
Step 5: Deploy the Risk Management Dashboard To deploy the Risk Management Dashboard, you must have a job role that grants access to the BI Administrator duty role. Ask a system administrator to help you; there might already be a job role with the access needed. Navigate to Reports and Analytics, then select Browse Catalog:
Under Shared Folders, select Custom. Unarchive our Solution Blueprint Risk Management catalog: https://cloudcustomerconnect.oracle.com/posts/6ac0498b5e; that will create a Risk Management folder. Select “00 Dashboard,” then click edit on the Risk Management Dashboards:
Edit the “02 AAC Control Summary” analysis found in the “Risk Management > 20 SoD Reporting” folder:

28
Click the Criteria tab and edit the “Name begins with CI-“ filter and change this to “BP-“ (or however you prefer to prefix your controls):
Click OK in the Edit filter pop up. Then click the gear box on the Pending Incidents column and select column properties:

29
Edit the action link URL:
Replace the host name (highlighted below) with the host name of your environment:
Save the report and run the dashboard by navigating to the “00 Dashboard” and click on Open for the “Risk Management Dashboards”:
30
Create User Assignment Security Groups
Overview & Participants
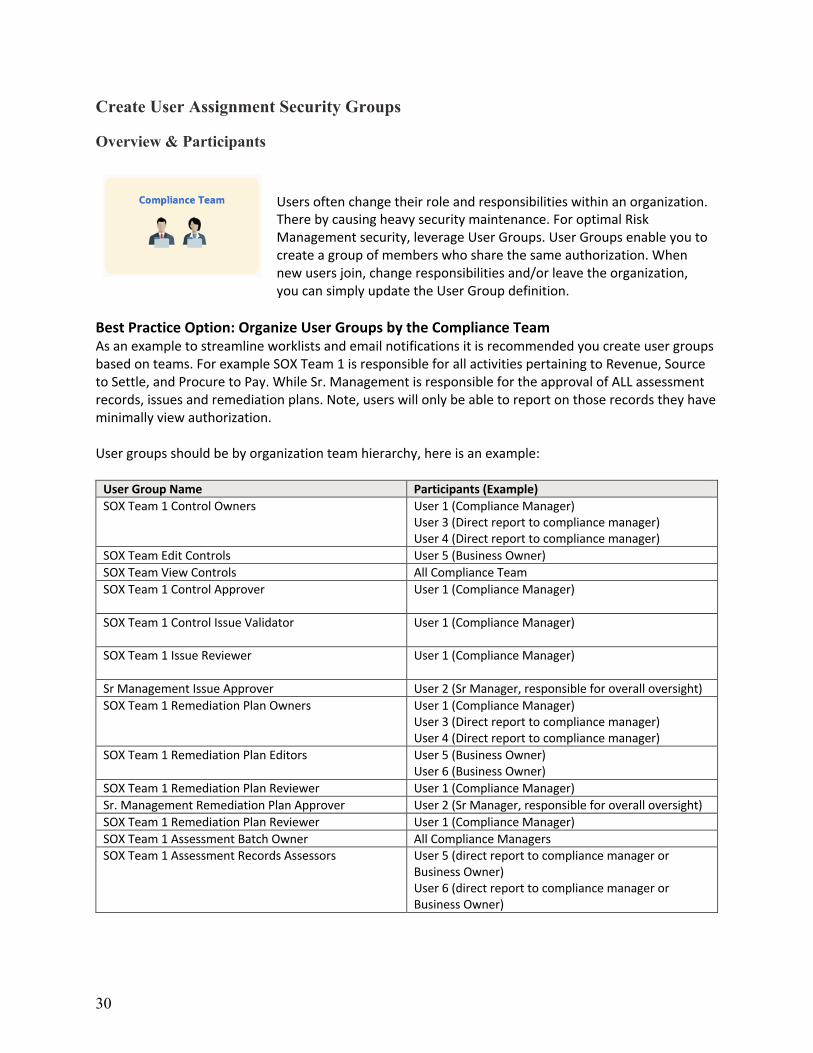
Users often change their role and responsibilities within an organization. There by causing heavy security maintenance. For optimal Risk Management security, leverage User Groups. User Groups enable you to create a group of members who share the same authorization. When new users join, change responsibilities and/or leave the organization, you can simply update the User Group definition.
Best Practice Option: Organize User Groups by the Compliance Team As an example to streamline worklists and email notifications it is recommended you create user groups based on teams. For example SOX Team 1 is responsible for all activities pertaining to Revenue, Source to Settle, and Procure to Pay. While Sr. Management is responsible for the approval of ALL assessment records, issues and remediation plans. Note, users will only be able to report on those records they have minimally view authorization. User groups should be by organization team hierarchy, here is an example:
User Group Name Participants (Example) SOX Team 1 Control Owners
User 1 (Compliance Manager) User 3 (Direct report to compliance manager) User 4 (Direct report to compliance manager)
SOX Team Edit Controls User 5 (Business Owner) SOX Team View Controls All Compliance Team SOX Team 1 Control Approver User 1 (Compliance Manager)
SOX Team 1 Control Issue Validator User 1 (Compliance Manager)
SOX Team 1 Issue Reviewer User 1 (Compliance Manager)
Sr Management Issue Approver User 2 (Sr Manager, responsible for overall oversight) SOX Team 1 Remediation Plan Owners User 1 (Compliance Manager)
User 3 (Direct report to compliance manager) User 4 (Direct report to compliance manager)
SOX Team 1 Remediation Plan Editors User 5 (Business Owner) User 6 (Business Owner)
SOX Team 1 Remediation Plan Reviewer User 1 (Compliance Manager) Sr. Management Remediation Plan Approver User 2 (Sr Manager, responsible for overall oversight) SOX Team 1 Remediation Plan Reviewer User 1 (Compliance Manager) SOX Team 1 Assessment Batch Owner All Compliance Managers SOX Team 1 Assessment Records Assessors User 5 (direct report to compliance manager or
Business Owner) User 6 (direct report to compliance manager or Business Owner)

31
SOX Team 1 Assessment Records Reviewer User 1 (Compliance Manager)
Sr. Management Assessment Records Approver User 2 (Sr Manager, responsible for overall oversight) The following are a list of duty roles to be applied to a customer define job role. Note, the user needs the corresponding roles to be eligible for performing a specific task. Duty Role Names Description Control Manager Enables users to create, edit and view control records, in
addition to manage record level security. NOTE: If you need a groups of users to only be eligible to edit control records and not create new control records or update record’s security assignment, the System Administrator can create a copy of this duty and remove the Create Control and Assign Users
Control Assessor Enables users to complete all control assessment activity types. Assessment Batch Manager Enables user to manage all aspects of assessment batches;
create, view, edit and security assignment at the batch and assessment results.
Control Assessment Manager Enables users to manage all aspects of control assessments Control Viewer Enables users to view control records Remediation Plan Manager Enables users to create, edit and view remediation plans, in
addition to manage record level security. Risk Assessment Manager Risk Manager Enables users to create, edit and view risk records, in addition
to manage record level security. Risk Viewer Enables users to view risk records Survey Responder Enables users to complete surveys Survey Manager Enables users to manage all aspects of surveys; survey
templates, questions, choice sets, initiating surveys and responses
Issue Manager Enables users to create, edit and view issue records, in addition to manage record level security.
Issue and Remediation Plan Viewer Enables users to view issues and remediation plan records Risk Management Folder Reporting Duty
To view predefined FRC reports
Financial Reporting Compliance Transaction Analysis Duty
Enables user to manage and view OTBI reports

32
The following are the customer define job roles to be created. Job Role Associated Duty Roles Control Auditor Job Role Control Assessor Issue and Remediation Plan Viewer Survey Responder Compliance Manager Job Role Control Manager Control Assessor Assessment Batch Manager Control Assessment Manager Control Viewer Remediation Plan Manager Risk Assessment Manager Risk Manager Risk Viewer Survey Responder Survey Manager Issue Manager Issue and Remediation Plan Viewer Risk Management Folder Reporting Duty Financial Reporting Compliance Transaction
Analysis Duty External Auditors Job Role Control Viewer Risk Viewer Issue and Remediation Plan Viewer
Note: The compliance team should determine at least one user who will have access to all of the data and this user should be added to each ‘owner’ user group. In addition, this user/s security configuration will include the Risk Administrator and Risk Activities Manager Job Role thereby enabling eligibility to access all FRC features and tasks.
During the non-production validation the compliance team POC should enable themselves to have access to all of the legacy data; to validate your import file. This user can perform the Mass Edit task. However, a point of consideration, you do not need to update all of the legacy data with the appropriate user group access. The objective is to test and validate the different workflows for your user community. Therefore, select one or a few major processes you wish to perform all workflow validation against, and determine if adjustments are needed to the workflow. If changes are identified, apply them to the non-production environment for validation, and then fully implement security access during the migration to production.
33
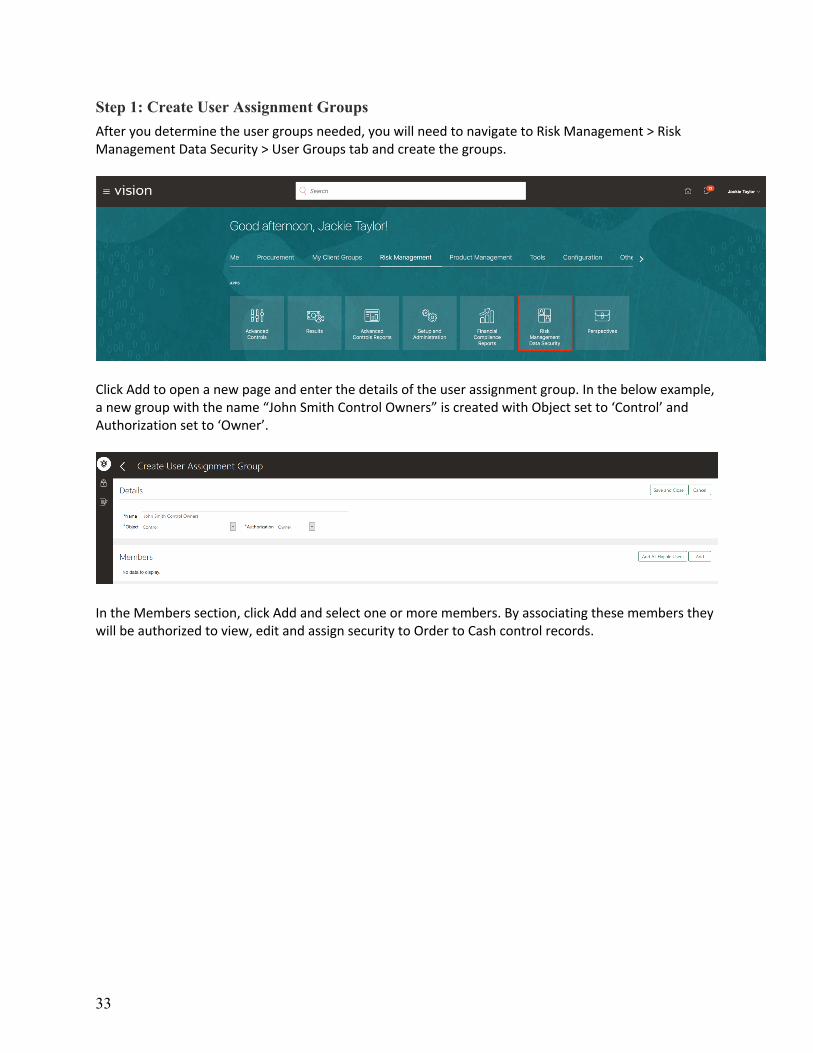
Step 1: Create User Assignment Groups After you determine the user groups needed, you will need to navigate to Risk Management > Risk Management Data Security > User Groups tab and create the groups.
Click Add to open a new page and enter the details of the user assignment group. In the below example, a new group with the name “John Smith Control Owners” is created with Object set to ‘Control’ and Authorization set to ‘Owner’.
In the Members section, click Add and select one or more members. By associating these members they will be authorized to view, edit and assign security to Order to Cash control records.

34
Step 2: Mass Edit the Legacy Data Once the data has been imported, and User Groups are defined, it is time to update the security assignment for the legacy data. Navigate to Risk Management > Risk Management Data Security > Mass Edit
To perform mass edit, select the Object (control, risk) and expand the filters. This will enable you to ‘Add’ and filter by the records you are editing associated perspective value/s. In this example, ‘Order to Cash’ is being used. Click ‘Edit’.

35
The application will guide you through a process flow, by asking specific questions. What Assignment Type Do You Want to Update? Group Assignment What Action Do You Want to Perform? Append Click ‘Continue’
Begin to type the name of the User Group you need to associate, for this example ‘Order to Cash Control Owner’ was selected. Once completed, click ‘Submit’. A process job is automatically invoked and once the job is completed, the security assignments are applied. These steps will need to be performed for each set of data, to enable users to have access to the data in the application.

36
PART 2: VALIDATE IN NON-PRODUCTION ENVIRONMENT
Overview & Participants
To validate the configuration only key resources will be included in the initial test. A subset of the business process owners, compliance, and internal audit team will works through their specific flows and specific security. Compliance team will test the following flows:
• Initiate batch assessments, • Manage controls, risks, issues and remediation plans
o Create o Edit o Review and approve changes o Update security assignment at the record level
Business process owners will test the following flows:
• Edit existing controls, risks, issues, remediation plans • View assessment results.
The internal audit team will test the following flows (act on required actions):
• Complete assessment tasks • Reject or return for information workflow tasks • Create issues • Be able to view risks and controls they have been granted access to
view
Note: The security configuration will be dependent on your business requirements. Meaning the Internal Audit team may be eligible to edit risks, controls, issues and remediation plans.
Step 1: Validate the Data and User Security Access The initial step is to validate your imported legacy data and confirm that the test users have the appropriate authorization and can only access those records they have been granted during the step: Create User Assignment Security Group > Step 2: Mass Edit the Legacy Data. During the validation, you will need to test each variation of security that you have implemented. As noted during the introduction of this section, it does not mean each user needs to log into the application to ensure they have the appropriate access. Select a team of individuals for a specific business unit, who can work through each of the business flows.

37
For example validate the Accounts Payable business process flows by the appropriate stakeholders: Accounts Payable Controls:
• Owner • Editors • Viewers • Issue Validators/Owners
Accounts Payable Risks:
• Owner • Editors • Viewers • Issue Validators/Owners
Accounts Payable Assessments:
• Assessment Batches o Owner o Editors o Viewers
• Assessment Records o Assessor o Reviewer o Approver o Viewers
Accounts Payable Issues:
• Issue o Owner o Editors o Viewers o Reviewer o Approver
• Remediation Plan o Owner o Editor o Viewers o Reviewer o Approver
• As the administrator, you should have access to all the data. Validate all the risks and controls
are visible. Perform a variations of searches to validate the records have been imported as intended. Validate the Accounts Payable business process owners can edit a control.
• Validate that the Order to Cash compliance manager can only view risks and controls mapped to Order to Cash.
• Validate that the Order to Cash assessor can only view risks and controls mapped to Order to Cash. In addition, they only have view access to those records.

38
The job roles defined in this blueprint, will only grant you access to the highlighted icons. If you have implemented additional Risk Management modules the corresponding icon will render.
Step 2: Create and Initiate an Assessment Batch An assessment batch is a group of records to be assessed. Start with your existing controls and navigate Assessments work area. Navigate to Risk Management > Assessments

39
First you will need to create an Assessment Template; navigate to Risk Management > Assessments > Templates and click the create icon.
The template defines the framework for the assessment batch. For now you will only need to create one template where the primary object is ‘Control’.

40
Click the plus icon to apply the assessment activity type.
Select ‘Audit Test’ and click ‘OK’. For Phase 1, the only assessment activity being performed is audit, therefore the activity type selected will be Audit Test. In addition, only one assessment template is needed. You will not need to create a new template for each assessment batch that is initiated.
Step 3: Create Assessment Plan Next you will need to create an assessment plan and associate the assessment template you just created. Navigate to Risk Management > Assessments > Plans. The assessment plan enables you to create a reusable baseline of the scoping criteria. Click the create icon to define a new assessment plan.

41
Select the template you had just created. The remainder sections enables you to define the scoping criteria for the plan.
Note, the criteria can be updated at the point in time you are initiating the assessment batch. When the criteria is define it provides a scoping criteria baseline. Deselect ‘No Perspectives’ and click the add icon, to apply perspective criteria. By applying this criteria the application will only return those controls associated to the perspective values you have selected.
Select ‘OK’

42
Once completed, click ‘Save and Close’.
43
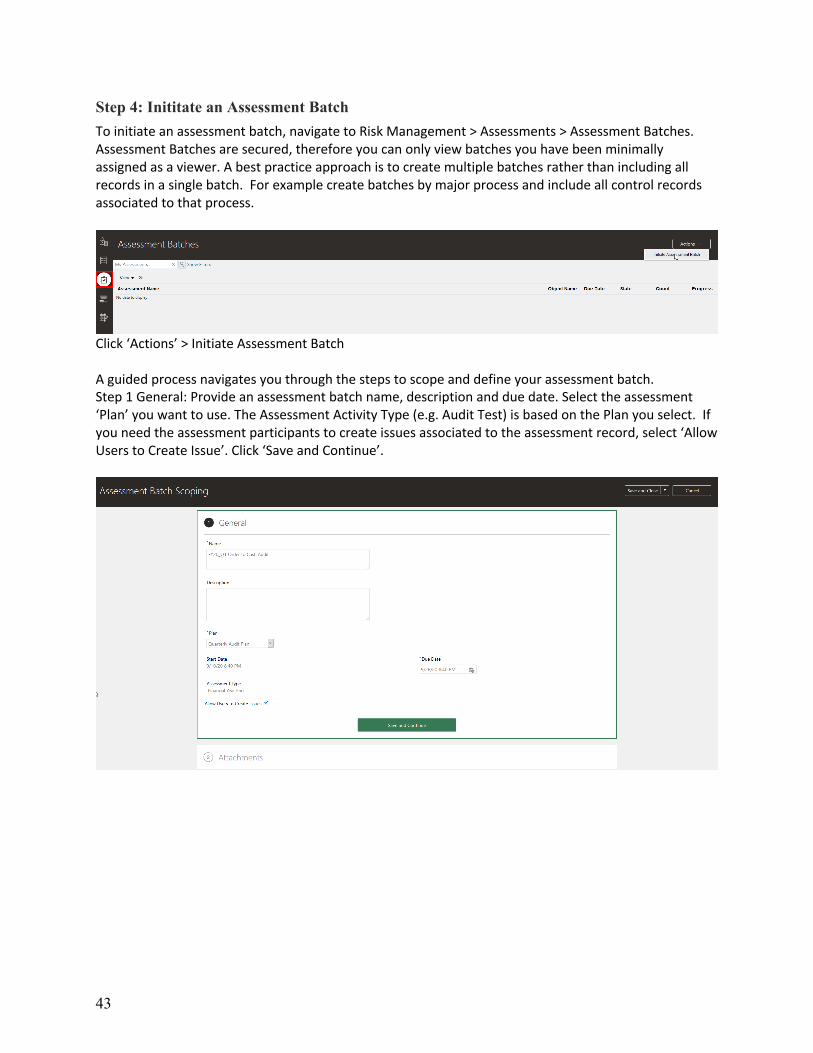
Step 4: Inititate an Assessment Batch To initiate an assessment batch, navigate to Risk Management > Assessments > Assessment Batches. Assessment Batches are secured, therefore you can only view batches you have been minimally assigned as a viewer. A best practice approach is to create multiple batches rather than including all records in a single batch. For example create batches by major process and include all control records associated to that process.
Click ‘Actions’ > Initiate Assessment Batch A guided process navigates you through the steps to scope and define your assessment batch. Step 1 General: Provide an assessment batch name, description and due date. Select the assessment ‘Plan’ you want to use. The Assessment Activity Type (e.g. Audit Test) is based on the Plan you select. If you need the assessment participants to create issues associated to the assessment record, select ‘Allow Users to Create Issue’. Click ‘Save and Continue’.
44
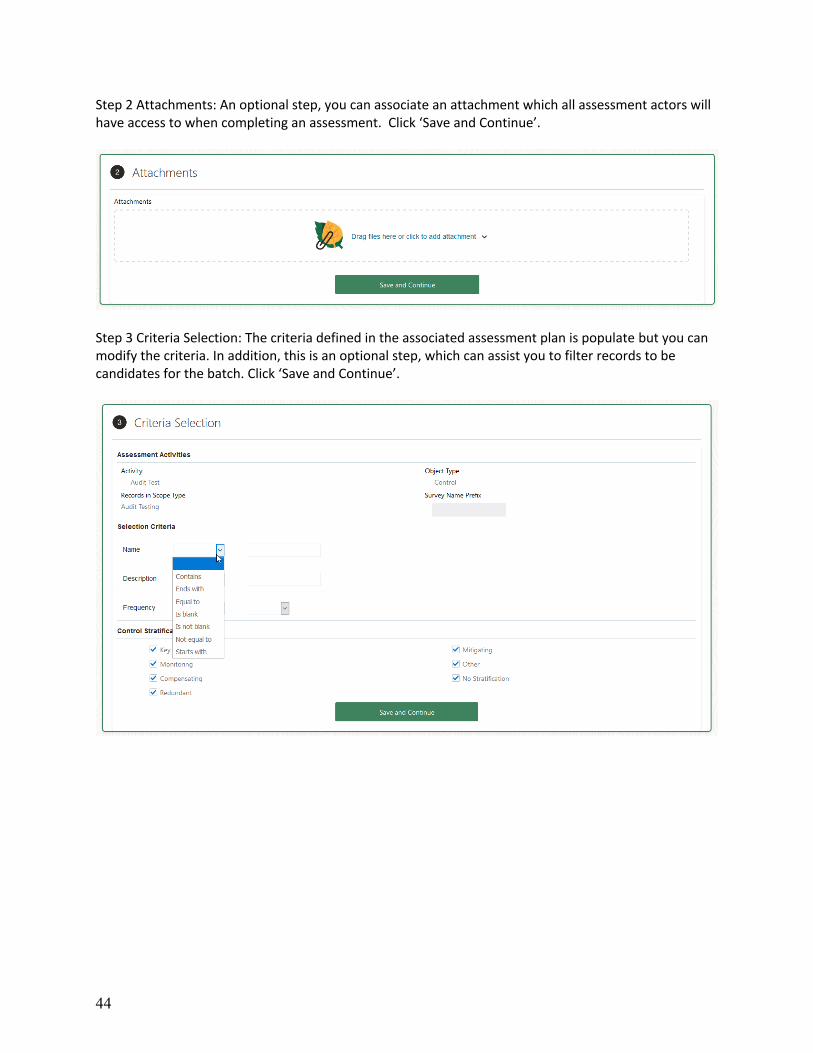
Step 2 Attachments: An optional step, you can associate an attachment which all assessment actors will have access to when completing an assessment. Click ‘Save and Continue’.
Step 3 Criteria Selection: The criteria defined in the associated assessment plan is populate but you can modify the criteria. In addition, this is an optional step, which can assist you to filter records to be candidates for the batch. Click ‘Save and Continue’.

45
Step 4 Perspectives Selection: The criteria defined in the associated assessment plan is populate but you can modify the perspective selection. In addition, this is an optional step, which can assist you to filter records to be candidates for the batch. Click ‘Save and Continue’ .
Step 5 Proposed Records to Be Assessed: Based on the criteria, the application will return a proposed list of records to be assessed. By default all records returned are included. Click ‘Save and Continue’.

46
Step 6 Assessment Batch Security Assignment: Batches are separately secured from the assessment records. User authorized at the batch level will automatically be authorized to view all associated assessment records.
Before clicking “Save and Define Assessment Record Security” ensure the list of records is accurate, once you have progressed to the next page you cannot update the list of records to be assessed. Next you will assign the assessor, reviewers, approvers and viewers at the assessment record level. At a minimum each record must be assigned one assessor.

47
Select the user or user group and the associated values for each actor to be assigned to the group of records, elect those records which will have the same assignment, and click ‘Apply’. You can apply additional users and/or user groups by following the step. Once all the user have been applied, click ‘Initiate’.
Once initiated, the application will notified all the assigned assessors. Users who are minimally authorized to view the batch, will be able to manage the batch within the Assessment Batches tab. User can filter by due date and see the count of assessment records per batch. To view the batch details, click on the assessment batch name. To view the assessment records click on the count number.

48
Based on your authorization you can perform different actions.

49
Step 5: Completing an Assessment Record Navigate to Risk Management > Assessments > My Assessments At this point you are validating the assessment process flow that includes; completing the control test steps and submitting the assessment, creating an issue, and reviewing and/or approving assessment workflow.
Navigate to Risk Management > Assessments Click on ‘My Assessments’ tab. The user is able to view all assigned assessment tasks. My Assessments provides and assessment worklist, allowing the user a list view of all assessments requiring their action.

50
Select the assessment you wish to complete > Actions > Perform Assessment. The completion of the assessment is a guided process. The first step is the Introduction; enabling the user to view the assessment information and the assigned assessor can view the record being assessed by clicking on the Record Being Assessed ‘Name’.
The second step is the Enter Test Results; enabling the assessor to view the control’s defined test steps. The assessor can provide a result for the overall test plan and the individual steps. Once completed, click ‘Next’.
51
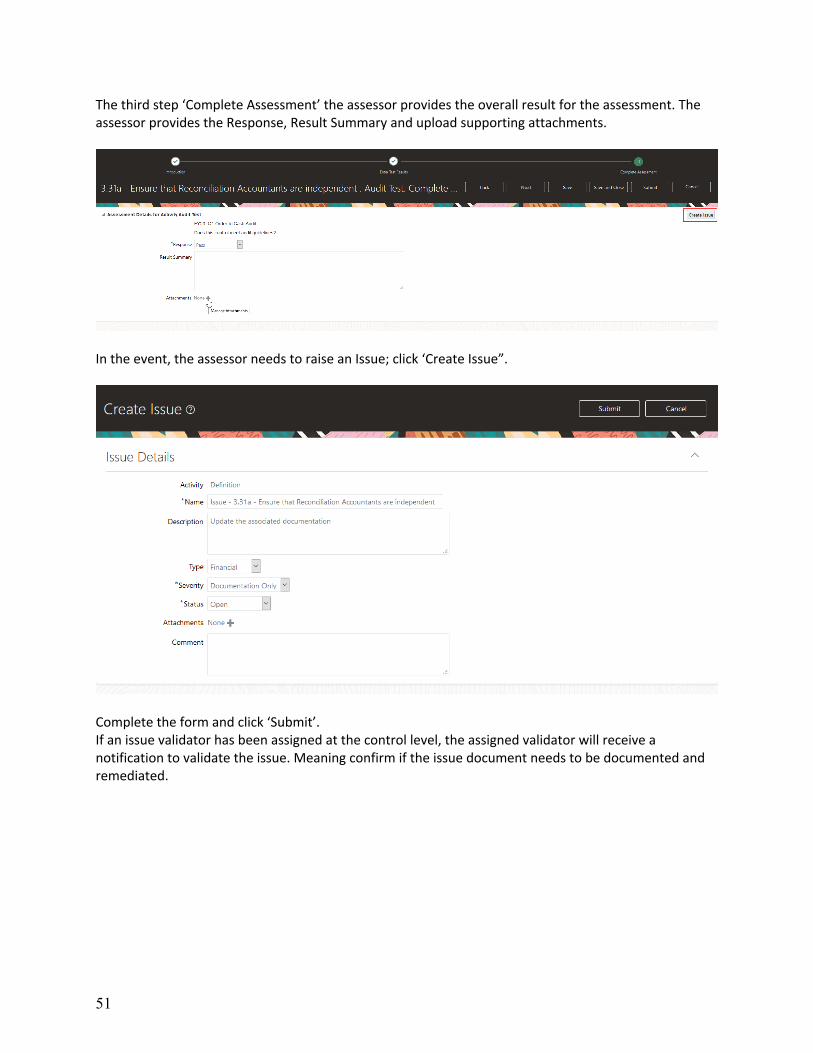
The third step ‘Complete Assessment’ the assessor provides the overall result for the assessment. The assessor provides the Response, Result Summary and upload supporting attachments.
In the event, the assessor needs to raise an Issue; click ‘Create Issue”.
Complete the form and click ‘Submit’. If an issue validator has been assigned at the control level, the assigned validator will receive a notification to validate the issue. Meaning confirm if the issue document needs to be documented and remediated.

52
Once the issue has been submitted, the assessor will return to the Complete Assessment step. To submit the assessment record click ‘Submit’. At this point the assigned Reviewer or Approver will be notified.
Step 6: Managing Assessment Review/Approve Work Flow Once an assessment record has been submitted, the assigned reviewer or approver will be notified to complete the assessment task they have been assigned. For this example, only an approver has been assigned. The application will bypass the ‘In Review’ record state and progress directly to ‘Awaiting Approval’ record state. The assigned approver will navigate to Risk Management > Assessments > Worklist and click on task name.

53
At this point the approver can view the results submitted. In addition, the approver can view the test plan results, by clicking ‘Enter Test Results’. Once viewed; click ‘Approve’.
The approver can provide a comment and then select the action. For this example, the assessment record will be rejected. The approver provides a comment and clicks ‘Reject’
.

54
The worklist is now gone and the assessor who submitted the assessment record will be notified that the assessment record has been rejected. Assessor Resubmitting Assessment Record: Navigate to Risk Management > Assessments > My Assessments.
By default, the saved filters defaults to displaying assessment records where the state is New.
Update the filter state selection to ‘Rejected’.

55
The assessors needs to view the comments submitted by the approver noting why the assessment was rejected. Select the assessment record > Actions > View Approvals. Once reviewed, the assessor will click back ‘<’.
For the same record, the assessor select the record > Actions > Perform Assessment

56
The assessor would navigate to the Complete Assessment train stop, by clicking the third train stop.
Click on the attachments ‘+’ to add an attachment. The assessor can either add a digital attachment or an URL. For this example, an URL will be associated.

57
Select URL for the Type and then copy and paste the URL. Click OK. If you need to associate an additional attachment, click ‘Add Attachment’.
Now the attachment is associated. If no other changes are required the assessor clicks ‘Submit’.
By clicking submit, the approval process will be invoked. The authorized approvers will receive a required action notification.

58
Navigate to Risk Management > Assessments > Worklist and click on task name. At this point the approver can view the results submitted. In addition, the approver can view the test plan results, click ‘2 Enter Test Results’. Once viewed; click ‘Approve’.
The approver clicks ‘Accept’.
Once accepted by the approver, the assessment record is locked to any additional changes. Users who are authorized at a minimum ‘Viewers’ can view the assessment records.
Note, the action ‘Request for Information’ (RFI) enables the reviewer and/or approver to ask for additional information by the assessor. The assessor will be notified, however this is only to obtain additional information. The assessor can’t modify the assessment record.

59
The assessor provides a response and clicks ‘Reply’. At this point the approver who requested the information would be notified and the assessment record in ‘Awaiting Approval’ state.
The approver can view the response and take the necessary action.
Once satisfied with the assessment, the approver clicks ‘Accept’.
At this point the assessment record is completed and no additional action can be taken. Users with the appropriate authorization can view the assessment record.

60
Step 7: Managing Issues and Remediation Plans During Step 5 Completing an Assessment Result Record, issues can be created before the submitting an assessment record. Authorized users can also create issues directly against the object record. The ability to create issues against a specific record is based on the record’s security assignments. In addition you can either enable issue validation or bypass the issue validation step. The validation step enables a user (typically the business or record owner) to determine the validity of the issue. If the issue validator determines it should not be documented, then he/she can close the issue and it is permanently deleted.
Issue validation and owner authorization is assigned at the object record’s security assignment. If neither of these have been assigned to a user, users will not be able to create an issue against that specific record. Once an issue has been created the Issue Validator will receive a required action notification. For this test scenario navigate to Risk Management > Issues.

61
The task description ‘Reported Issue’ indicates the issue needs to be validated.
Drill on the issue name.
As the validator, you can Cancel Issue. Meaning the issue will no longer be available to view and/or report on.

62
By submitting the issue record, you have validated the issue needs to be documented and remediated. Prior to submitting the issue you can update the issue details and security assignment. Update the security assignment by clicking ‘Security Assignment’.
To add a new user as a Viewer, click ‘Add’ Begin to type the name of the user you would like to add within ‘Search by first name and last name’ Select the Viewer as the Authorization and click ‘Save’.

63
In addition to adding users and/or user groups you can edit the current assignments of the owners. Meaning you can edit a user to be assigned as a reviewer and/or approver. If not, any changes made to the issue record will not be approved by another user.
Click the edit icon for the user you wish to update. Select ‘Approver’ as the additional authorization and click ‘Save’. One all changes have been made, click the back button.
Once the issue has been validated a Remediation Plan can be created and associated to the issue record. Navigate to Risk Management > Issues > Remediation Plans tab.

64
Select the add icon. Once you complete the details form, click ‘Save’ and now you need to edit the user authorization, click ‘Security Assignment’
Update the user and/or group assignments authorization: Owner, Editor, Viewer and the additional authorization as reviewer or approver.
Once complete click ‘Submit’.

65
Once the remediation plan has been created, you can associate it to the issue record. Navigate to the Issue tab.
Select the issue record and click ‘Edit’.
Navigate to the Remediation Plan section and click ‘Add’.
Select the remediation plan and click ‘Done’.

66
Validate the close issue process, by selecting the issue record > Actions > Close Issue.
Provide a reason and click submit. If reviewers and/or approvers have been assigned, these users will need to approve the action.
Step 8: Managing Control Records The management of controls occurs within the control work area; navigate to Risk Management > Controls > Controls tab. Note: Depending on the security you have implemented, validate the corresponding user
group members can only view the records they have been assigned to. In addition, validate users who are authorized to only edit controls – meaning the ‘add’ icon will not be enabled.
Step 8.a: Login as a user who has view authorization only (e.g. All Compliance Team member). User who have only view access, can view the control definition by clicking the name of the record.

67
Expand the Related Records to ensure the correct risk records are associated and the user can drill to the risk definition. Click ‘<’ done. Expand the Perspectives to ensure the correct perspective values are associated to the control record.
Step 8.b – Logged in as the control record owner (e.g. Compliance Manager).

68
By selecting a row and then ‘Edit’; update the control definition.
Note: At any point the Owner can update Security Assignment. By changing the assignment,
the approval workflow will not be invoked.
Edit the control definition and click ‘Submit’. By clicking submit, this will invoke the approval workflow.
Once the record has been submitted the assigned ‘Approver’ will receive a Require Action notification. This scenario is like the approval flow documented in Step 6.

69
Step 8.c – Logged in as an Owner (e.g. Compliance Manager), navigate to the Risk Management > Controls > Controls tab and click the add icon.
Complete the control details form. In addition, associate the control to one or multiple perspective values.
Click ‘Save’, not ‘Submit’. By clicking ‘Save’ the Security Assignment button will become available. In you only click ‘Save and Close’ you will be able to access the control record, however the record will remain in a ‘New’ state.

70
Click ‘Security Assignment’.
Click ‘Add’ At this point you should assign all appropriate user groups:
• You will default as an Owner • Assign additional owners • Assign editors and/or viewers • Assign the approver and if using the Issue Validator. If you are not using the validation
feature, if your intent is to enable users to create issues against the record you must define an Issue Owner. If not, users will not be able to create an issue against the record.
• Click ‘Save’ for each user group you add. Once you have made all necessary assignments click ‘<’ done and if the definition is completed click ‘Submit’. If you assigned an approver, the approver will receive a ‘Required Action’ notification to approve the new control record. The same workflow as noted in Step 6.

71
Step 9: Managing Risk Records The management of risks occurs within the risk work area; navigate to Risk Management > Risks > Risks tab.
Note: Depending on the security you have implemented, validate the corresponding user
group members can only view the records they have been assigned to. As you will notice the overall design is similar to the Control work area. The first tab ‘Worklist’ will display the pending task you need to complete.
The second tab ‘Risks’ is your view of the risk library. Step 9.a Login as a user who has view authorization only (e.g. All Compliance Team). User who have only view access, can view the risk definition by clicking the name of the record. Click on a risk record name.

72
Click on a risk record name.
• Expand the Related Records to ensure the correct control records are associated and the
user can drill to the control definition. As long as the user is authorized to view the control record. Click ’<’ done.
• Expand the Perspectives to ensure the correct perspective values are associated to the risk record.
• The Analysis and Evaluation tabs that are available, will not be used in phase 1 of your deployment.
Click on the Related Controls tab to view the related records and the assigned stratification.

73
Step 9.b – Logged in as the risk record editor.
The user will notice the only action available to take is edit.

74
Step 9.c – Create a new risk record. Login as an Owner, navigate to the Risk Management > Risks > Risks tab and click the add icon.
Complete the risk details form, in addition associate the risk to one or multiple perspective values. Click ‘Save’ Perform the same steps to define user assignment within Managing Control Records: Step 8.c. Once completed, the ‘<’ and then click Actions > Edit Related Controls

75
Click ‘Add Primary’
Note: Disregard Inherent and Control Impact for phase 1.
Select one or multiple defined control records. Once selected click the ‘<’ done icon.
Select the Control Stratification values for each associated control records.
Once completed, click ‘Submit’. The assign ‘Approver’ will receive a Required Action notification to approve the changes. Navigate through the risk approval flow to confirm it meets your business process.

76
Step 10: Update Configuation While you have worked through your main business processes, prior to migrating to production make any necessary changes and re-validate.

77
PART 3: MIGRATE TO PRODUCTION Once you’re comfortable with the steps you’ve taken in a non-production environment and the key stakeholders have validated the process flows to be applied, perform the same steps in production, including the prerequisites.
Overview & Participants
Your security team will enable the Risk Management offering and grant access to the entire compliance team and business process owners who will need to access the application
Your risk administrator will run various jobs, deploy your Risk Management dashboard, create FlexFields and Lookup codes and import the legacy data.
The product champion or FRC super user will create the user groups and perform mass edit to apply security to the compliance team members.
Step 1: Perform the steps within Prerequisites The Security Team will enable your production environment, by following the steps 1 – 4.
Step 2: Apply Financial Reporting Compliance Congifurations The job roles you had defined and validated within the non-production environment, the Security Console Administrator will need to apply these to the production environment. Create a list of those users who will need access; the list should include their email address, first and last name along with the job role/s needing to be assigned. Consult your Security Console Administrator for the best onboarding method.

78
Step 3: Apply Financial Reporting Compliance Congifurations Follow the same steps defined within the Prerequisites Step 5, Step 6 and Step 7. If you are implementing new Lookup Codes and/or FlexFields you must define these exactly as you had done within your non-production environment. The values must match what you have applied to the import template. If not, you will receive errors while importing your data.
Step 4: Import Your Legacy Data Follow the same steps defined within the Prepare and Import Legacy Data: Step 4: Import Legacy Data. You can use the final import template used to import your legacy data to the non-production environment.
Step 5: Create User Assignment Groups Prior to this step being completed, all users must be updated to include your FRC custom job roles created in Create User Assignment Groups: Step 1 Create User Assignment Groups. If not, these users will not be available when creating the user groups.
Step 6: Mass Edit the Legacy Data Upon the completion of the legacy data being imported, no user will be granted to any of the data. While you were in the non-production environment, you may have not updated all the data loaded. For the production environment, you will need to update all risk and control records. Reference Create User Assignment Security Groups: Step 2: Mass Edit Legacy Data. Validate you can view the data and perform expected tasks. However, avoid creating ‘test’ data, since this is your production environment.
Step 7: Deploy the Risk Management Dashboard Reference Prepare and Import Legacy Data: Step 5: Deploy the Risk Management Dashboards
Step 8: Trainng Your Compliance Team and Business Process Owners When defining you training material consider the frequency your audience will be accessing the application. Create an internal user guide to be used as a reference guide. Include step by step instructions which are accompanied by screenshots. It is recommended to hold a training session where each key process flows are demonstrated.

79
CONNECT WITH US Call +1.800.ORACLE1 or visit oracle.com. Outside North America, find your local office at oracle.com/contact.
blogs.oracle.com facebook.com/oracle twitter.com/oracle
Copyright © 2020, Oracle and/or its affiliates. All rights reserved. This document is provided for information purposes only, and the contents hereof are subject to change without notice. This document is not warranted to be error-free, nor subject to any other warranties or conditions, whether expressed orally or implied in law, including implied warranties and conditions of merchantability or fitness for a particular purpose. We specifically disclaim any liability with respect to this document, and no contractual obligations are formed either directly or indirectly by this document. This document may not be reproduced or transmitted in any form or by any means, electronic or mechanical, for any purpose, without our prior written permission. Oracle and Java are registered trademarks of Oracle and/or its affiliates. Other names may be trademarks of their respective owners. Intel and Intel Xeon are trademarks or registered trademarks of Intel Corporation. All SPARC trademarks are used under license and are trademarks or registered trademarks of SPARC International, Inc. AMD, Opteron, the AMD logo, and the AMD Opteron logo are trademarks or registered trademarks of Advanced Micro Devices. UNIX is a registered trademark of The Open Group. 0120