Asymmetric Attention: Visualizing the Uncertain Threat - DTIC
Upload
independentCategory
view
0download
0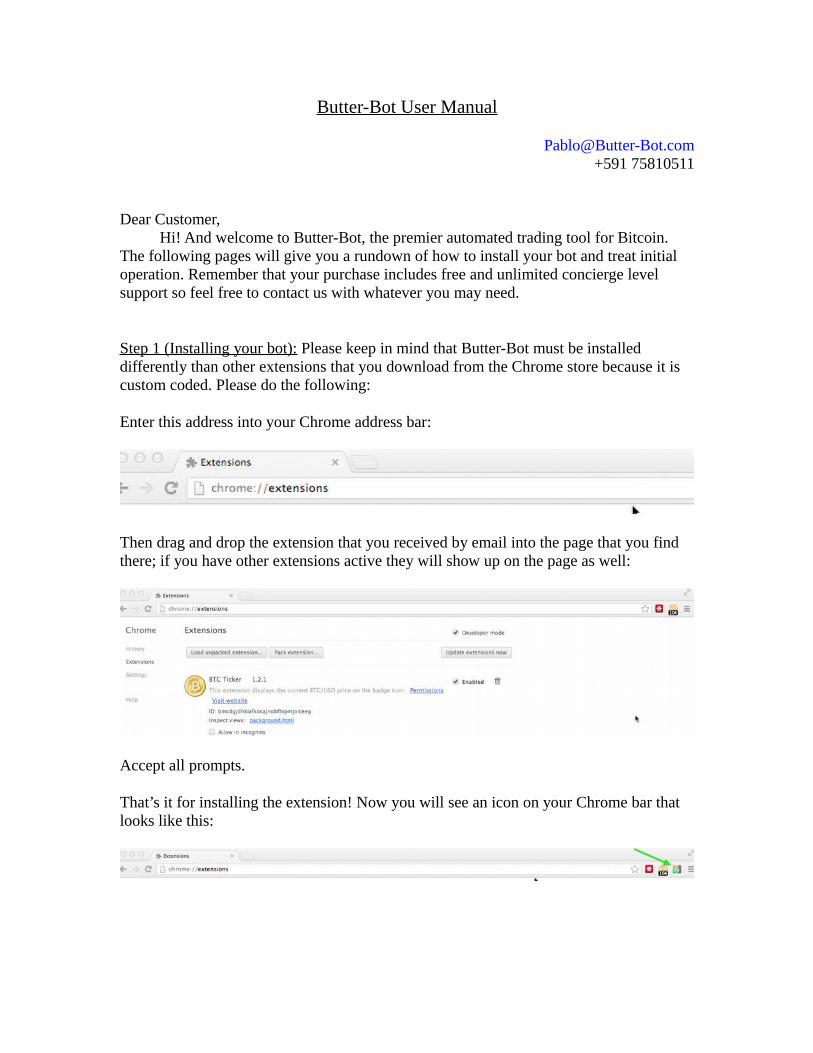
Butter-Bot User Manual
[email protected]+591 75810511
Dear Customer, Hi! And welcome to Butter-Bot, the premier automated trading tool for Bitcoin. The following pages will give you a rundown of how to install your bot and treat initial operation. Remember that your purchase includes free and unlimited concierge level support so feel free to contact us with whatever you may need.
Step 1 (Installing your bot): Please keep in mind that Butter-Bot must be installed differently than other extensions that you download from the Chrome store because it is custom coded. Please do the following:
Enter this address into your Chrome address bar:
Then drag and drop the extension that you received by email into the page that you find there; if you have other extensions active they will show up on the page as well:
Accept all prompts.
That’s it for installing the extension! Now you will see an icon on your Chrome bar that looks like this:

Step 2 (Setting up your bot):
Click the icon to go to the main interface menu, you will be prompted to accept our TOS; please read them and accept the terms; then you should see a menu that looks like this:
Please enter the License Key you received by email into the box denominated “License Key.” This should get your bot up to the first stage of connectivity.

Next please switch over to the “Engine” Tab:
This is where you input general settings for the bot. This is where you specify your EMA crossover points and where you enter your threshold values (explained below); for now, the most important thing to know about this menu is that it represents global settings for all 3 exchanges, but if you wish to trade at each exchange with different values, you can override these global values at the given exchange tab as seen below:

Click on “Override Global Settings” and that will give you an additional menu where you can set independent settings for each exchange:

Next, flip over to the “Email” Tab:
Please enter the email address where you wish to receive communications from the bot into the “Mail To” box above.
The bot is designed to send you two types of notifications, a “Trade Imminent” email when the First Threshold has been crossed, and a “Trade Executed” email when both the First and Second Thresholds have been crossed (More on this later). To reduce your email load we suggest you only check the “Orders Triggered” email and uncheck the “Orders are Imminent” Box.

Now Flip Over to the Mt. Gox, Bitstamp, or BTC-E Tabs:
All of the exchange tabs are set up in the exact same way and require the same type of information that you will find at the respective exchange:
You must create an API Key and API Secret at each individual exchange that you wish to trade at. In Mt. Gox this can be done in the “Security Center,” “Advanced API Key Creation” Sub Menu; in BTC-E this is done in the “Profile” Tab, “API Keys” sub-menu,

Please bear in mind that in both cases the ONLY permissions your should give each key are “Trade” and “Get Info” this limits the ability of any party who has access to your keys to only trade your coins and see pricing info, without the ability to make deposits or withdrawals. Please note that your keys are stored on your computer and they never pass through our servers.
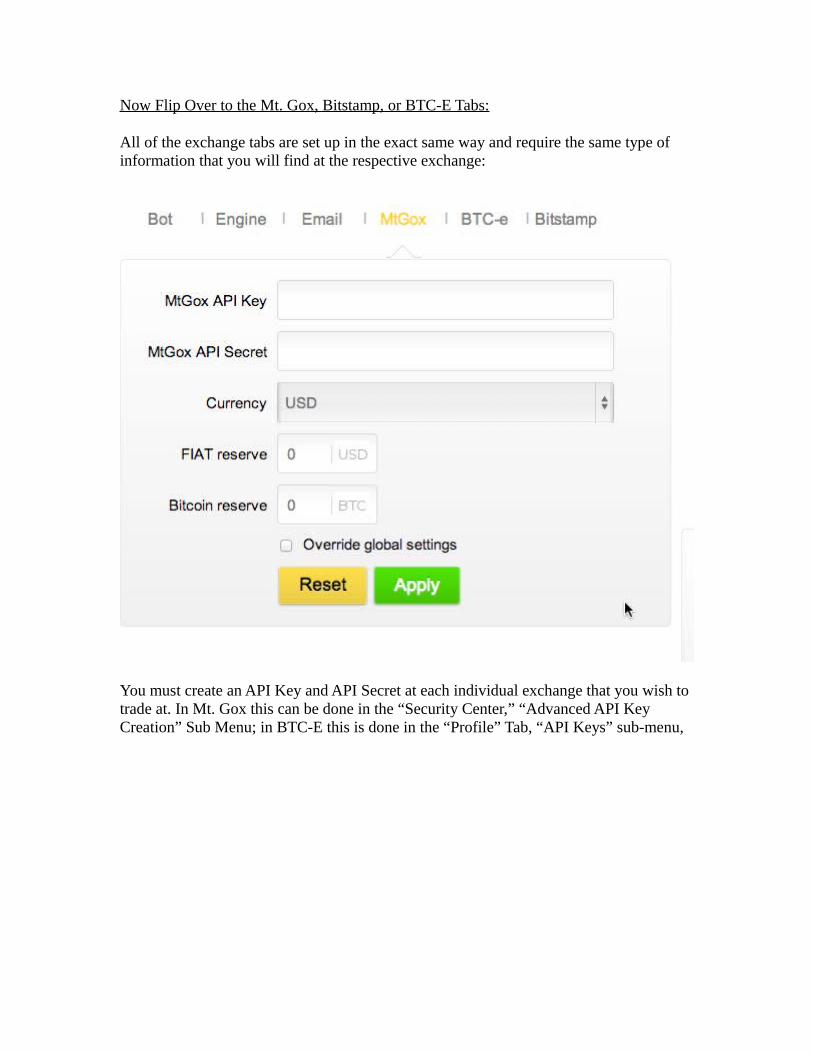
In the case of Bitstamp, you can set up an API Key in the “Account” tab, “Security” section, “API Access” link. Here you have to grant six different permissions to the API Key like that:
After generating the API Key make sure to activate it using the “Activate” link on the API Access page:
You will have to confirm this action using the link they send you via email. When your key is ready you API Access page should look like that:

Copy and paste the Key and Secret into the Butter Bot configuration page and also enter your user id, then the Bitstamp module is set up.
Remember to click “Apply” and you are done with setting up your bot.
Step 3 (Up and running and the EMA logic):
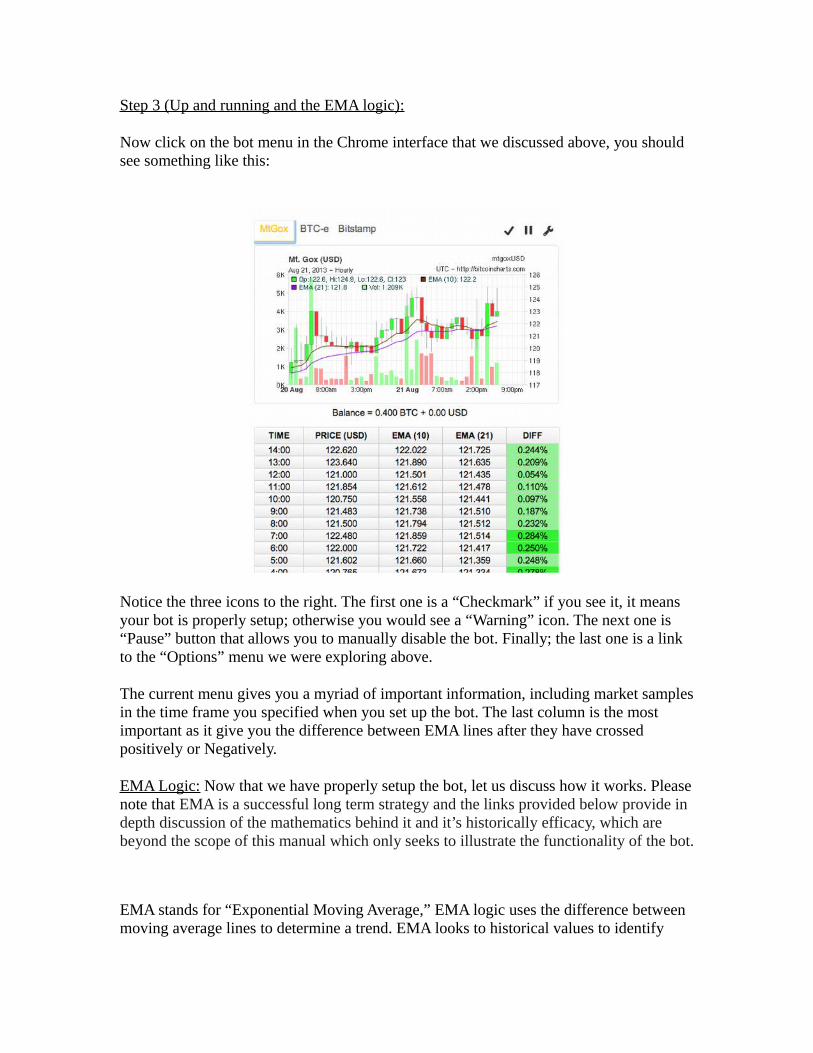
Now click on the bot menu in the Chrome interface that we discussed above, you should see something like this:
Notice the three icons to the right. The first one is a “Checkmark” if you see it, it means your bot is properly setup; otherwise you would see a “Warning” icon. The next one is “Pause” button that allows you to manually disable the bot. Finally; the last one is a link to the “Options” menu we were exploring above.
The current menu gives you a myriad of important information, including market samples in the time frame you specified when you set up the bot. The last column is the most important as it give you the difference between EMA lines after they have crossed positively or Negatively.
EMA Logic: Now that we have properly setup the bot, let us discuss how it works. Please note that EMA is a successful long term strategy and the links provided below provide in depth discussion of the mathematics behind it and it’s historically efficacy, which are beyond the scope of this manual which only seeks to illustrate the functionality of the bot.
EMA stands for “Exponential Moving Average,” EMA logic uses the difference between moving average lines to determine a trend. EMA looks to historical values to identify

where the market may be headed in the future. A very in depth discussion of this can be found here:
https://bitcointalk.org/index.php?topic=60501.0
A general discussion of EMA can be found here:
http://en.wikipedia.org/wiki/Exponential_moving_average#Exponential_moving_average
Generally, the threshold values you input in the “Bot” settings refer to the difference between EMA lines after they have crossed either positively or negatively. The bot can, but does not by default trade merely on the crossover, the bot trades when the crossover has exceeded the values input by you. This is a step up from other trading systems.
There are two threshold values instead of one to allow you to fine tune your settings. When the first threshold value is crossed, the bot “gets ready” to trade but a trade will only happen if both the first and second threshold values are crossed consecutively.
Lets say that these are your thresholds:
I have set EMA(10,21) and
Buy Threshold 1 0.15
Buy Threshold 2 0.23
Sell Threshold 1 0.10
Sell Threshold 2 0.13
"Buy" and "Sell" refers to BTC, not USD.
So lets suppose that you are holding some USD in your account at 9:00 AM with a 30 minute time setting, and this is the read out:
Time-Threshold
9:30 0.17
10:00 0.22
Now in this scenario, the bot did not "buy" because although threshold 1 was met, threshold 2 was not. Lets try again.

Time-Threshold
10:30 0.11
11:00 0.31
Again here the bot did not buy because both thresholds were not met, the bot would actually look at the 11:00 value as "threshold 1 met."
Time-Threshold
11:30 0.15
12:00 0.27
In this case, the bot will execute a "buy" because both thresholds were met.
WARNING: We highly discourage the use of time frames below 30 minutes. Time frames of 15 minutes and below force the bot to act as a High Frequency Trader (HFT) which it is not designed to be. EMA is a trend seeking strategy and trends are more easily identified over longer periods of time; setting your bot is a balancing act between getting in/out of a market early and trading on market noise. Please do not fall into the HFT trap, the time frame makes all the difference.

Step 4 (Back Testing Engine and Reserves):
Please note that the bot has a solid back testing engine that allows you to try your settings against historical data to see how they would have faired over time and allow you to get a glimpse of how those settings may behave in the future.
Here, you can adjust EMA, Starting Balance, Trade Frequency, Thresholds, Trade Fee, and Test History Period.
The one feature that merits explanation here is the “Starting Balance” interface. It allows you to enter an arbitrary value, (e.g. 100 USD) and see what your final balance would have been at the end of the back testing period, it’s a useful tool for profit calculation.
Feel free to try as many combinations and variations as you please; please note that with an EMA strategy, the longer you back test for, the more effective and profitable your results will be (As pictured above [Real Data]).

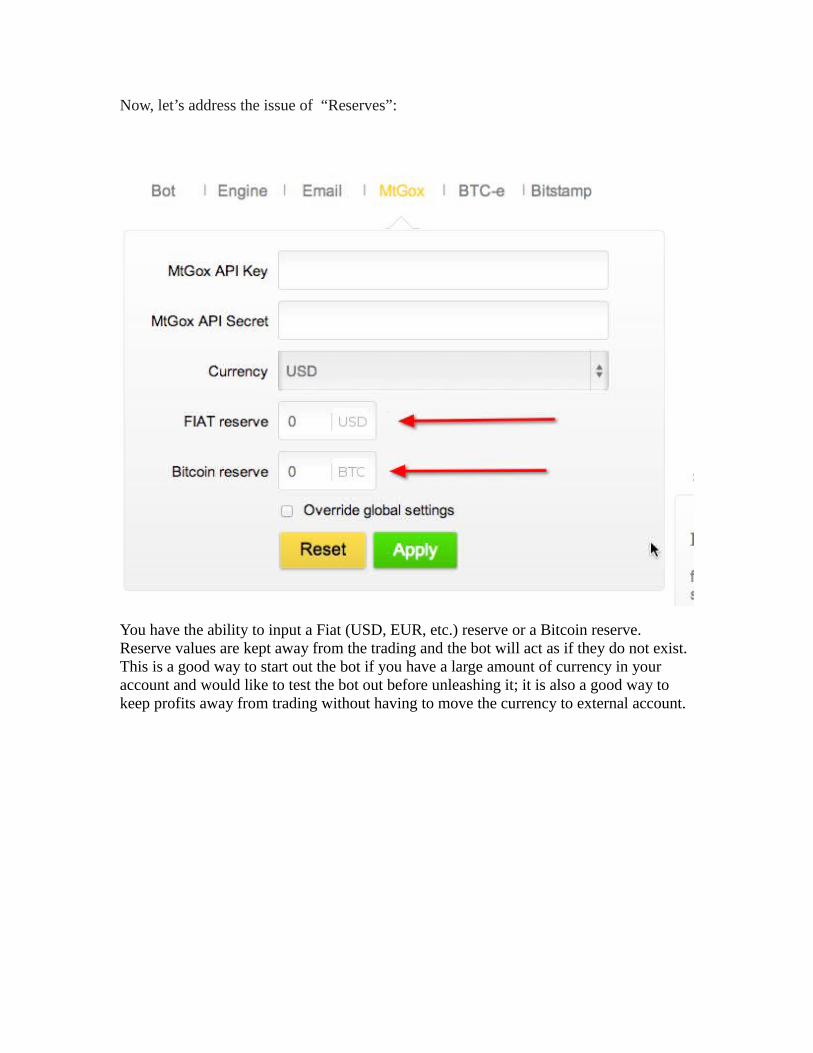
Now, let’s address the issue of “Reserves”:
You have the ability to input a Fiat (USD, EUR, etc.) reserve or a Bitcoin reserve. Reserve values are kept away from the trading and the bot will act as if they do not exist. This is a good way to start out the bot if you have a large amount of currency in your account and would like to test the bot out before unleashing it; it is also a good way to keep profits away from trading without having to move the currency to external account.
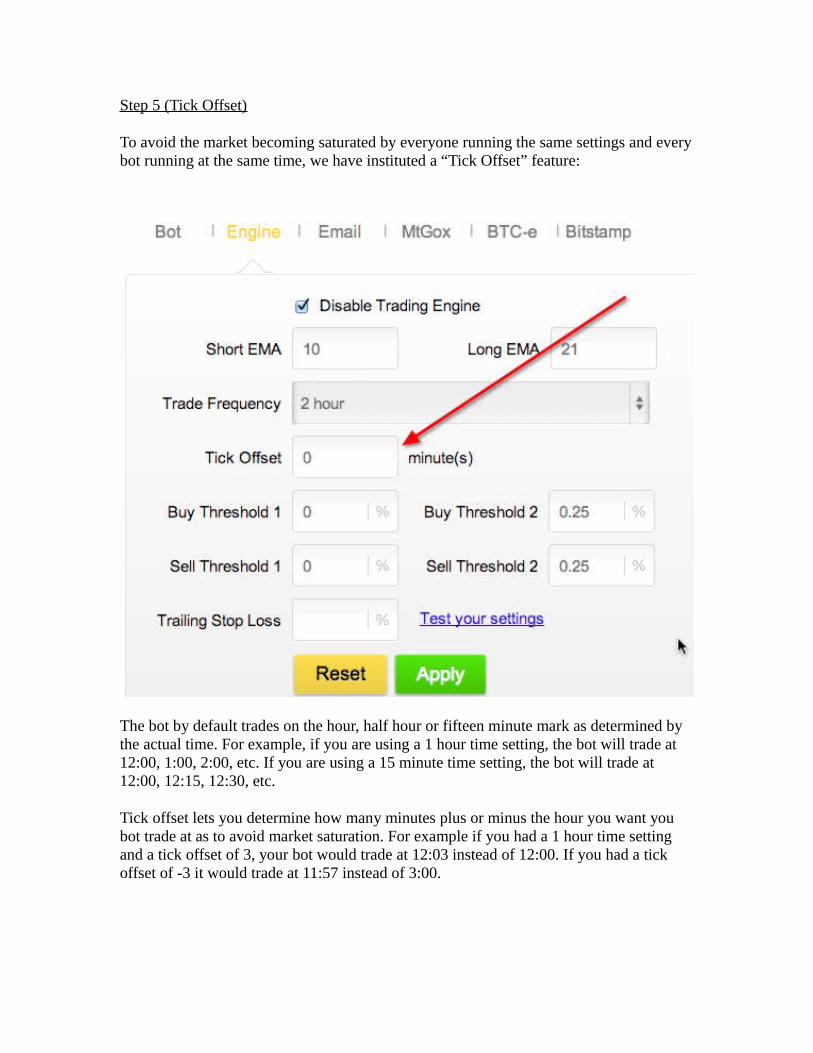
Step 5 (Tick Offset)
To avoid the market becoming saturated by everyone running the same settings and every bot running at the same time, we have instituted a “Tick Offset” feature:
The bot by default trades on the hour, half hour or fifteen minute mark as determined by the actual time. For example, if you are using a 1 hour time setting, the bot will trade at 12:00, 1:00, 2:00, etc. If you are using a 15 minute time setting, the bot will trade at 12:00, 12:15, 12:30, etc.
Tick offset lets you determine how many minutes plus or minus the hour you want you bot trade at as to avoid market saturation. For example if you had a 1 hour time setting and a tick offset of 3, your bot would trade at 12:03 instead of 12:00. If you had a tick offset of -3 it would trade at 11:57 instead of 3:00.
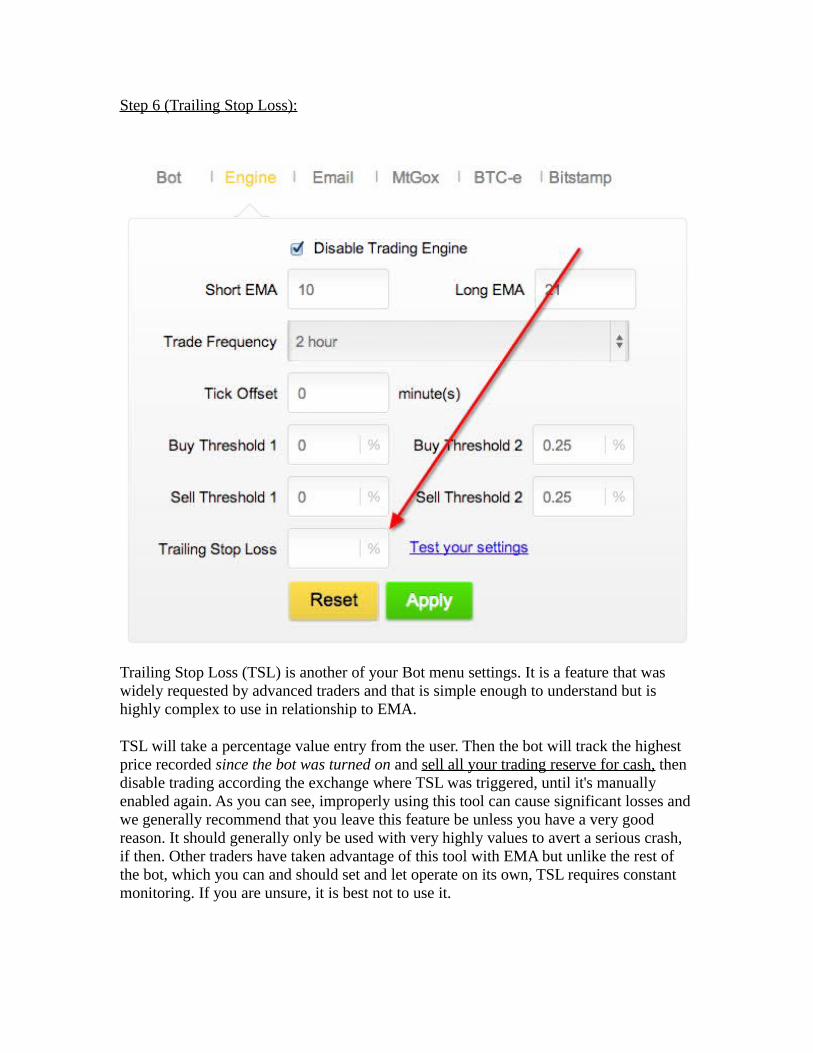
Step 6 (Trailing Stop Loss):
Trailing Stop Loss (TSL) is another of your Bot menu settings. It is a feature that was widely requested by advanced traders and that is simple enough to understand but is highly complex to use in relationship to EMA.
TSL will take a percentage value entry from the user. Then the bot will track the highest price recorded since the bot was turned on and sell all your trading reserve for cash, then disable trading according the exchange where TSL was triggered, until it's manually enabled again. As you can see, improperly using this tool can cause significant losses and we generally recommend that you leave this feature be unless you have a very good reason. It should generally only be used with very highly values to avert a serious crash, if then. Other traders have taken advantage of this tool with EMA but unlike the rest of the bot, which you can and should set and let operate on its own, TSL requires constant monitoring. If you are unsure, it is best not to use it.

Well, that’s it, that’s all there is to it.
If you have any questions, please do not hesitate to drop us a line:
[email protected]+591 75810511
Copyright © 2022 FDOKUMEN