


DEALING WITH DATA - Download Center - Microsoft
102
THE MICROSOFT JOURNAL FOR DEVELOPERS COLUMNS EDITOR’S NOTE Does Your Program Smell Like Bacon? Keith Ward page 4 CUTTING EDGE Don’t Worry, Be Lazy Dino Esposito page 6 DATA POINTS Deny Table Access to the Entity Framework Without Causing a Mutiny Julie Lerman page 14 TEST RUN Fault Injection Testing with TestApi James McCaffrey page 84 THE WORKING PROGRAMMER Inside SQLite Ted Neward page 88 UI FRONTIERS Multi-Touch Manipulation Events in WPF Charles Petzold page 92 DON’T GET ME STARTED Mars and Venus David Platt page 96 AUGUST 2010 VOL 25 NO 8 DEALING WITH DATA Passive Authentication for ASP.NET with WIF Michele Leroux Bustamante . . . . . . . . . . . . . . . . . . . . . . . . . . . . . . . . . . . 20 Tips for Migrating Your Applications to the Cloud George Huey and Wade Wegner . . . . . . . . . . . . . . . . . . . . . . . . . . . . . . 36 Creating Synchronization Providers with the Sync Framework Joydip Kanjilal . . . . . . . . . . . . . . . . . . . . . . . . . . . . . . . . . . . . . . . . . . . . . . . . 46 Building an AtomPub Server Using WCF Data Services Chris Sells . . . . . . . . . . . . . . . . . . . . . . . . . . . . . . . . . . . . . . . . . . . . . . . . . . . . 54 Tuning Your Database Calls with Tier Interaction Profiling Mark Friedman . . . . . . . . . . . . . . . . . . . . . . . . . . . . . . . . . . . . . . . . . . . . . . . 62 Building Distributed Apps with NHibernate and Rhino Service Bus, Part 2 Oren Eini . . . . . . . . . . . . . . . . . . . . . . . . . . . . . . . . . . . . . . . . . . . . . . . . . . . . . 72 Windows Phone and the Cloud: an Introduction Ramon Arjona . . . . . . . . . . . . . . . . . . . . . . . . . . . . . . . . . . . . . . . . . . . . . . . . 78
-
Upload
khangminh22 -
Category
Documents
-
view
0 -
download
0
Transcript of DEALING WITH DATA - Download Center - Microsoft

THE MICROSOFT JOURNAL FOR DEVELOPERS
COLUMNSEDITOR’S NOTEDoes Your Program Smell Like Bacon?Keith Ward page 4
CUTTING EDGEDon’t Worry, Be LazyDino Esposito page 6
DATA POINTSDeny Table Access to the Entity Framework Without Causing a MutinyJulie Lerman page 14
TEST RUNFault Injection Testing with TestApiJames McCaffrey page 84
THE WORKING PROGRAMMERInside SQLiteTed Neward page 88
UI FRONTIERSMulti-Touch Manipulation Events in WPFCharles Petzold page 92
DON’T GET ME STARTEDMars and VenusDavid Platt page 96
AUGUST 2010 VOL 25 NO 8
DEALING WITH DATAPassive Authentication for ASP.NET with WIFMichele Leroux Bustamante . . . . . . . . . . . . . . . . . . . . . . . . . . . . . . . . . . . 20
Tips for Migrating Your Applications to the CloudGeorge Huey and Wade Wegner . . . . . . . . . . . . . . . . . . . . . . . . . . . . . . 36
Creating Synchronization Providers with the Sync FrameworkJoydip Kanjilal . . . . . . . . . . . . . . . . . . . . . . . . . . . . . . . . . . . . . . . . . . . . . . . . 46
Building an AtomPub Server Using WCF Data ServicesChris Sells . . . . . . . . . . . . . . . . . . . . . . . . . . . . . . . . . . . . . . . . . . . . . . . . . . . . 54
Tuning Your Database Calls with Tier Interaction Profi lingMark Friedman . . . . . . . . . . . . . . . . . . . . . . . . . . . . . . . . . . . . . . . . . . . . . . . 62
Building Distributed Apps with NHibernate and Rhino Service Bus, Part 2Oren Eini . . . . . . . . . . . . . . . . . . . . . . . . . . . . . . . . . . . . . . . . . . . . . . . . . . . . . 72
Windows Phone and the Cloud: an IntroductionRamon Arjona . . . . . . . . . . . . . . . . . . . . . . . . . . . . . . . . . . . . . . . . . . . . . . . . 78

Sure, Visual Studio 2010 has a lot of great functionality—we’re excited that it’s only making our User Interfacecomponents even better! We’re here to help you go
beyond what Visual Studio 2010 gives you so you can createKiller Apps quickly, easily and without breaking a sweat! Go
to infragistics.com/beyondthebox today to expand yourtoolbox with the fastest, best-performing and most powerful
UI controls available. You’ll be surprised by your own strength!
Infragistics Sales 800 231 8588 Infragistics Europe Sales +44 (0) 800 298 9055
Infragistics India +91-80-6785-1111twitter.com/infragistics
Copyright 1996-2010 Infragistics, Inc. All rights reserved. Infragistics and the Infragistics logo and NetAdvantage are registered trademarks of Infragistics, Inc.
Untitled-5 3 3/5/10 10:16 AM

magazine
Printed in the USA
LUCINDA ROWLEY DirectorDIEGO DAGUM Editorial Director/[email protected] GRASSL Site Manager
KEITH WARD Editor in Chief/[email protected] DORSEY Technical EditorDAVID RAMEL Features EditorWENDY GONCHAR Managing EditorMARTI LONGWORTH Associate Managing Editor
SCOTT SHULTZ Creative DirectorJOSHUA GOULD Art DirectorALAN TAO Senior Graphic Designer
CONTRIBUTING EDITORS K. Scott Allen, Dino Esposito, Julie Lerman, Juval Lowy, Dr. James McCaffrey, Ted Neward, Charles Petzold, David S. Platt
Henry Allain President, Redmond Media Group Matt Morollo Vice President, PublishingDoug Barney Vice President, Editorial DirectorMichele Imgrund Director, MarketingTracy Cook Online Marketing Director
ADVERTISING SALES: 508-532-1418/[email protected]
Matt Morollo VP, PublishingChris Kourtoglou Regional Sales ManagerWilliam Smith National Accounts DirectorDanna Vedder Microsoft Account ManagerJenny Hernandez-Asandas Director Print ProductionSerena Barnes Production Coordinator/[email protected]
Neal Vitale President & Chief Executive Offi cerRichard Vitale Senior Vice President & Chief Financial Offi cerMichael J. Valenti Executive Vice President
Abraham M. Langer Senior Vice President, Audience Development & Digital MediaChristopher M. Coates Vice President, Finance & AdministrationErik A. Lindgren Vice President, Information Technology & Application DevelopmentCarmel McDonagh Vice President, Attendee MarketingDavid F. Myers Vice President, Event Operations
Jeffrey S. Klein Chairman of the Board
MSDN Magazine (ISSN 1528-4859) is published monthly by 1105 Media, Inc., 9201 Oakdale Avenue, Ste. 101, Chatsworth, CA 91311. Periodicals postage paid at Chatsworth, CA 91311-9998, and at additional mailing offi ces. Annual subscription rates payable in U.S. funds: U.S. $35; Canada $45; International $60. Single copies/back issues: U.S. $10, all others $12. Send orders with payment to: MSDN Magazine, P.O. Box 3167, Carol Stream, IL 60132, e-mail [email protected] or call 847-763-9560. POSTMASTER: Send address changes to MSDN Magazine, P.O. Box 2166, Skokie, IL 60076. Canada Publications Mail Agreement No: 40612608. Return Undeliverable Canadian Addresses to Circulation Dept. or IMS/NJ. Attn: Returns, 310 Paterson Plank Road, Carlstadt, NJ 07072.
Printed in the U.S.A. Reproductions in whole or part prohibited except by written permission. Mail requests to “Permissions Editor,” c/o MSDN Magazine, 16261 Laguna Canyon Road, Ste. 130, Irvine, CA 92618.
Legal Disclaimer: The information in this magazine has not undergone any formal testing by 1105 Media, Inc. and is distributed without any warranty expressed or implied. Implementation or use of any information contained herein is the reader’s sole responsibility. While the information has been reviewed for accuracy, there is no guarantee that the same or similar results may be achieved in all environments. Technical inaccuracies may result from printing errors and/or new developments in the industry.
Corporate Address: 1105 Media, Inc., 9201 Oakdale Ave., Ste 101, Chatsworth, CA 91311, www.1105media.com
Media Kits: Direct your Media Kit requests to Matt Morollo, VP Publishing, 508-532-1418 (phone), 508-875-6622 (fax), [email protected]
Reprints: For single article reprints (in minimum quantities of 250-500), e-prints, plaques and posters contact: PARS International, Phone: 212-221-9595, E-mail: [email protected], www.magreprints.com/QuickQuote.asp
List Rental: This publication’s subscriber list, as well as other lists from 1105 Media, Inc., is available for rental. For more information, please contact our list manager, Merit Direct. Phone: 914-368-1000; E-mail: [email protected]; Web: www.meritdirect.com/1105
All customer service inquiries should be sent to [email protected] or call 847-763-9560.
AUGUST 2010 VOLUME 25 NUMBER 8

programmersparadise.com
Your best source for software development tools!
Prices subject to change. Not responsible for typographical errors.
®
programmers.com/theimagingsource
Download a demo today.
NEWRELEASE!
Professional EditionParadise #
T79 02101A02$1,220.99
programmers.com/ca
CA ERwin® Data Modeler r7.3 – Product Plus 1 Year Enterprise Maintenanceby CACA ERwin Data Modeler is a data modeling solution that enables you to create and maintain databases, data warehouses andenterprise data resource models. These modelshelp you visualize data structures so that youcan effectively organize, manage and moderatedata complexities, database technologies andthe deployment environment.
• .NET WinForms control for VB.NET and C#• ActiveX for VB6, Delphi, VBScript/HTML, ASP• File formats DOCX, DOC, RTF, HTML, XML, TXT• PDF and PDF/A export, PDF text import• Tables, headers & footers, text frames,
bullets, structured numbered lists, multipleundo/redo, sections, merge fields, columns
• Ready-to-use toolbars and dialog boxes
TX Text Control 15.1Word Processing ComponentsTX Text Control is royalty-free, robust and powerful word processing software in reusable component form.
programmers.com/pragma
“Pragma SSH for Windows”Best SSH/SFTP/SCP Serversand Clients for Windowsby Pragma SystemsGet all in one easy to use high performance package. FIPS Certified and Certified for Windows.• Certified for Windows Server 2008R2• Compatible with Windows 7• High-performance servers with
centralized management• Active Directory & GSSAPI authentication• Supports over 1000 sessions• Hyper-V and PowerShell support• Runs in Windows 2008R2/2008/2003/
7/Vista/XP/2000
Paradise # P35 04201A01 $550.99
Paradise # P26 04201E01
$3,931.99
programmers.com/vSphereprogrammers.com/LEAD
LEADTOOLS Recognition SDKby LEAD TechnologiesDevelop desktop and server document imagingand ECM applications that require high-speedmulti-threaded forms recognition and process-ing, OCR, ICR, OMR, and barcode technology.• Supports text, OMR, image, and
barcode fields• Recognize machine print and constrained
handwritten text• Auto-registration and clean-up to
improve recognition results• Includes comprehensive confidence
reports to assess performanceParadise # L05 26301A01 $3,214.99
Certified for Windows7/2008R2
VMware vSphere Put time back into your day.Your business depends on how you spend your time. You need to manage IT costs without losing time or performance. With proven cost-effective virtualization solutions from VMware, you can:
• Increase the productivity of your existing staff three times over
• Control downtime—whether planned or not
• Save more than 50% on the cost of managing, powering and cooling servers
Make your time (and money) count for more with virtualization from VMware.
VMware Advanced
Acceleration Kit for 6 processors
Paradise # V55 78101A01
$9,234.99
programmers.com/vmware
Client LicensesMinimum 500 withBasic Level Support
Paradise # V55 MIGRATION
$16.99
programmers.com/multiedit
Multi-EditX
by Multi Edit Software
Multi-EditX is “The Solution” for your editing needs with support for over 50 languages. Edit plain text, ANY Unicode, hex, XML, HTML, PHP, Java, Javascript,Perl and more! No more file sizelimitations, unlimited line length,any file, any size Multi-EditX is “The Solution”!
Pre-Order Your Copy and Save!
1-49 UsersParadise #
A30Z10101A01$223.20
ActiveReports 6by GrapeCityIntegrate Business Intelligence/Reporting/DataAnalysis into your .NET applications using theNEW ActiveReports 6.
• Fast and Flexible reporting engine
• Data Visualization and Layout Controls suchas Chart, Barcode and Table Cross SectionControls
• Wide range of Export and Preview formatsincluding Windows Forms Viewer, WebViewer, Adobe Flash and PDF
• Royalty-Free Licensing for Web and Windows applications
Professional Ed.Paradise # D03 04301A01 $1,310.99
NEWVERSION
6!
programmers.com/grapecity
NEWRELEASE!
NEWRELEASE!
programmers.com/flexera
InstallShield Professionalfor Windowsby Flexera SoftwareIf your software targets Windows®,InstallShield® is your solution. It makes it easy to author high-quality reliable WindowsInstaller (MSI) and InstallScript installationsand App-V™ virtual packages for Windowsplatforms, including Windows 7. InstallShield,the industry standard for MSI installations,also supports the latest Microsoft technologiesincluding Visual Studio 2010, .NETFramework 4.0, IIS7.0, SQL Server 2008SP1, and Windows Server 2008 R2 andWindows Installer 5, keeping your customershappy and your support costs down.
Intel Parallel Studioby IntelIntel Parallel Studio is a comprehensiveWindows parallelism toolset designed forMicrosoft Visual Studio C/C++ developers.Parallel Studio is interoperable with the widelyused Microsoft Visual Studio, supports higher-level parallelism abstractions to simplify andspeed development such as Intel ThreadingBuilding Blocks and Open MP, is fully supported,and provides an immediate opportunity to real-ize the benefits of multicore platforms. Tools aredesigned so novices can learn as they go, andprofessional developers can more easily bringparallelism to existing and new projects. Createoptimized, innovative parallel applications andcompete in a multicore industry.
Microsoft OfficeProfessional 2010by MicrosoftOrganize projects, manage finances and build a better way to do business with toolsfrom Microsoft® Office Professional 2010.This software suite includes 2010 versions of Word, Excel®, PowerPoint®, OneNote®,Outlook®, Publisher® and Access®. It offers a Backstage™ view which replaces the traditional File menu to give you one go-to spot to conveniently save, open andprint documents. Additionally, the server integration capabilities make it easier totrack. Besides this, the Office ProfessionalPlus 2010 also offers complete packagethrough familiar intuitive tools.
Upgrade from Active IS Pro +
IS Pro Silver MtnParadise #
I21 02301S01
$1,399.00
866-719-1528
VMware ThinApp Windows7 Migration Promotion by VMware
Migration to the new Windows 7 OS is forcing companies to rethink their desktopdelivery. VMware ThinApp is the easiest and most cost effective way to prepare for your Win 7 journey. By virtualizing yourapplications first with ThinApp, you will mitigate risk, dramatically speed up themigration process—and save money when you migrate to Windows 7!
SAVE75%!
LIMITED TIME OFFER!
programmers.com/microsoftprogrammers.com/intel
Complete DVD Windows
32/64 bitParadise #
M47 21301A01$442.99
Single User Commercial Paradise #
I23 63101A04
$753.99
NEWRELEASE!
programmers.com/adobe
Adobe Creative Suite 5fro Windowsby AdobeDiscover breakthrough interactive designtools that enable you to create, deliver,and optimize beautiful, high-impact digitalexperiences across media and devices.Create once and deliver that same experi-ence virtually everywhere, thanks to thehighly anticipated releases of the Adobe®
Flash® Player 10.1 and Adobe AIR® 2runtimes. Maximize the impact of whatyou’ve created through integration of signature Omniture® technologies.
Paradise # A14 06201A02
$2,555.99
NEWVERSION
5!
Untitled-2 1 7/1/10 2:19 PM

msdn magazine4
Double whoa! Th en it told me that the pizza was on its way, who the driver was and what time the driver left . Wowser!
The graphics were outstanding; clear, large and well-labeled. You didn’t have to wonder about anything. For instance, at every stage, the particular segment on the timeline that was in process fl ashed; in other words, when it was in
the oven, that part of the timeline fl ashed. I immensely enjoyed following my
pizza’s progress on that colorful timeline.
Th e pizza arrived, direct to my room, within 15 minutes of the driver leaving.
Needless to say, I gave him a big tip.This experience, to me, really demonstrated the pow-
er of customer- focused development. The UI answered any question I could possibly have about my pizza; in fact, it went above and beyond my expectations (how of-ten does that happen?), informing me at every step of the process what was going on. As strange as it sounds, I felt personally connected to the pizza delivery company—and my pizza—through this experience. Isn’t that how you want your users to feel?
Th e key take-away from this experience: You must do more than just “Get it to work.” Th ink like an end user, and ask yourself, “What would make me excited about this program? What functionality would make me go ‘Wow!’?” Has your program gone beyond the minimum requirements? Is the UI more than just functional—does it make users happy?
If not, you’ve got some work to do. Do you have examples of great UI design? Send them to me at
mmeditor@microsoft .com.
Does Your Program Smell Like Bacon?
Has a UI experience ever just made you really happy? I had one at Tech•Ed in June, and wanted to share it with you.
I was in my hotel room in New Orleans and wanted a pizza. I found the Web site of a nation-ally known pizza delivery company and decided to see how well its online order/delivery system worked. I’m always a bit hesitant to order food online; I’m never sure that the store will get my order, or whether the employee responsible for monitoring Internet orders will see it. Then, if they get it, will they make it right away? When will it be delivered? So many questions, so few answers from most on-line food-ordering systems.
I went through the ordering process—medium pepperoni, bacon, black olives (yeah, I’m strange). Th en I hit “Order,” and the magic began.
A timeline appeared—it told me that my order was received. Then it told me that the pizza was being made, and by whom (Susie). Whoa! Th at’s something I didn’t expect. Th en the sys-tem informed me that the pizza was in the oven. Th en out of the oven and going through a quality assurance check by Susie.
EDITOR’S NOTE KEITH WARD
© 2010 Microsoft Corporation. All rights reserved.
Complying with all applicable copyright laws is the responsibility of the user. Without limiting the rights under copyright, you are not permitted to reproduce, store, or introduce into a retrieval system MSDN Magazine or any part of MSDN Magazine. If you have purchased or have otherwise properly acquired a copy of MSDN Magazine in paper format, you are permitted to physically transfer this paper copy in unmodifi ed form. Otherwise, you are not permitted to transmit copies of MSDN Magazine (or any part of MSDN Magazine) in any form or by any means without the express written permission of Microsoft Corporation.
A listing of Microsoft Corporation trademarks can be found at microsoft.com/library/toolbar/3.0/trademarks/en-us.mspx. Other trademarks or trade names mentioned herein are the property of their respective owners.
MSDN Magazine is published by 1105 Media, Inc. 1105 Media, Inc. is an independent company not affi liated with Microsoft Corporation. Microsoft Corporation is solely responsible for the editorial contents of this magazine. The recommendations and technical guidelines in MSDN Magazine are based on specifi c environments and confi gurations. These recommendations or guidelines may not apply to dissimilar confi gurations. Microsoft Corporation does not make any representation or warranty, express or implied, with respect to any code or other information herein and disclaims any liability whatsoever for any use of such code or other information. MSDN Magazine, MSDN, and Microsoft logos are used by 1105 Media, Inc. under license from owner.
Visit us at msdn.microsoft.com/magazine. Questions, comments or suggestions for MSDN Magazine? Send them to the editor: [email protected].
The pizza arrived, direct to my room, within 15 minutes of the driver leaving. Needless to say,
I gave him a big tip.

msdn magazine6
tion. If applied appropriately, lazy instantiation of objects can also be a formidable tool to make applications start much faster. Th e following code shows how to initialize an object in a lazy manner:
var container = new Lazy<DataContainer>();
In this example, the DataContainer class indicates a plain data container object that references arrays of other objects. Right aft er invoking the new operator on a Lazy<T> instance, all you have back is a live instance of the Lazy<T> class; in no case will you have an instance of the specifi ed type T. If you need to pass an instance of DataContainer to members of other classes, you must change the signature of these members to use Lazy<DataContainer>, like this:
void ProcessData(Lazy<DataContainer> container);
When does the actual instance of DataContainer get created so that the program can work with the data it needs? Let’s have a look at the public programming interface of the Lazy<T> class. Th e public inter-face is fairly slim as it includes only two properties: Value and IsValue-Created. Th e property Value returns the current value of the instance associated with the Lazy type, if any. Th e property is defi ned as follows:
public T Value { get { ... }}
Th e property IsValueCreated returns a Boolean value and indi-cates whether or not the Lazy type has been instantiated. Here’s an excerpt from its source code:
public bool IsValueCreated{ get { return ((m_boxed != null) && (m_boxed is Boxed<T>)); }}
Th e m_boxed member is an internal private and volatile member of the Lazy<T> class that contains the actual instance of the T type, if any. Th erefore, IsValueCreated simply checks whether a live in-
Don’t Worry, Be Lazy
In soft ware development, the term laziness refers to delaying certain expensive activity as long as possible much more than it relates to idleness. Soft ware laziness is still about doing things, but it means that any action will take place only when it’s needed to complete a certain task. In this regard, laziness is an important pattern in soft ware development and can be successfully applied to a variety of scenarios, including design and implementation.
For example, one of the fundamental coding practices of the Extreme Programming methodology is summarized simply as “You Aren’t Gonna Need It,” which is an explicit invitation to be lazy and incorporate in the codebase only the features you need—and only when you need them.
On a diff erent note, during the implementation of a class, you might want to be lazy when it comes to loading data from a source that isn’t so cheap to access. Th e lazy loading pattern, in fact, illus-trates the commonly accepted solution of having a member of a class defi ned but kept empty until its content is actually required by some other client code. Lazy loading fi ts perfectly in the context of object-relational mapping (ORM) tools such as the Entity Frame-work and NHibernate. ORM tools are used to map data structures between the object-oriented world and relational databases. In this context, lazy loading refers to a framework’s ability to load, for example, Orders for a customer only when some code is trying to read the exposed Orders collection property on a Customer class.
Lazy loading, though, isn’t limited to specifi c implementation scenarios such as ORM programming. Moreover, lazy loading is about not getting an instance of some data before it actually becomes useful. Lazy loading, in other words, is about having special factory logic that tracks what has to be created and creates it silently when the content is eventually requested.
In the Microsoft .NET Framework, we developers have long had to implement any lazy behavior manually in our classes. Th ere’s never been built-in machinery to help with this task. Not until the advent of the .NET Framework 4, that is, where we can start leveraging the new Lazy<T> class.
Meet the Lazy<T> ClassTh e Lazy<T> is a special factory you use as a wrapper around an object of a given type T. Th e Lazy<T> wrapper represents a live proxy for a class instance that doesn’t yet exist. Th ere are many reasons for using such lazy wrappers, the most important of which is improving performance. With lazy initialization of objects, you avoid any com-putation that isn’t strictly needed, so you reduce memory consump-
CUTTING EDGE DINO ESPOSITO
Laziness is an important pattern in software development and can be successfully applied to
a variety of scenarios, including design and implementation.

msdn magazine8 Cutting Edge
stance of T exists and returns a Boolean answer. As mentioned, the m_boxed member is private and volatile, as shown in this snippet:
private volatile object m_boxed;
In C#, the volatile keyword indicates a member that can be modi-fi ed by a concurrently running thread. Th e volatile keyword is used for members that are available in a multithread environment but lack (essentially for performance reasons) any protection against possible concurrent threads that could access such members at the same time. I’ll return to the threading aspects of Lazy<T> later. For now, suffi ce it to say that public and protected members of Lazy<T> are thread-safe by default. Th e actual instance of the type T is created the fi rst time any code attempts to access the Value member. Th e details of the object creation depend on the threading attributes optionally specifi ed via the Lazy<T> constructor. It should be clear that implications of the threading mode are only important for when the boxed value is actually initialized or accessed for the fi rst time.
In the default case, an instance of the type T is obtained via reflection by placing a call to Activator.CreateInstance. Here’s a quick example of the typical interaction with the Lazy<T> type:
var temp = new Lazy<DataContainer>();Console.WriteLine(temp.IsValueCreated);Console.WriteLine(temp.Value.SomeValue);
Note that you are not strictly required to check IsValueCreated before invoking Value. You typically resort to checking the value of IsValueCreated only if—for whatever reason—you need to know whether a value is currently associated with the Lazy type. Th ere’s no need for you to check IsValueCreated to avoid a null reference exception on Value. Th e following code works just fi ne:
var temp = new Lazy<DataContainer>();Console.WriteLine(temp.Value.SomeValue);
Th e getter of the Value property checks whether a boxed value already exists; if not, it triggers the logic that creates an instance of the wrapped type and returns that.
The Process of InstantiationOf course, if the constructor of the Lazy type—DataContainer in the previous example—throws an exception, your code is responsible for handling that exception. Th e exception captured is of type TargetInvocationException—the typical exception you get when .NET refl ection fails to create an instance of a type indirectly.
Th e Lazy<T> wrapper logic simply ensures that an instance of type T is created; in no way does it also guarantee that you won’t get a null reference exception as you access any of the public members on T. For example, consider the following code snippet:
public class DataContainer{ public DataContainer() { }
public IList<String> SomeValues { get; set; }}
Imagine now that you attempt to call the following code from a client program:
var temp = new Lazy<DataContainer>();Console.WriteLine(temp.Value.SomeValues.Count);
In this case, you’ll get an exception because the SomeValues property of the DataContainer object is null, not because the Data-Container is null itself. Th e exception raises because the DataCon-tainer’s constructor doesn’t properly initialize all of its members; the error has nothing to do with the implementation of the lazy approach.
The Value property of Lazy<T> is a read-only property, meaning that once initialized, a Lazy<T> object always returns the same instance of the type T or the same value if T is a value type. You can’t modify the instance but you can access any public properties the instance may have.
Here’s how you can confi gure a Lazy<T> object to pass ad hoc parameters to the T type:
temp = new Lazy<DataContainer>(() => new Orders(10));
One of the Lazy<T> constructors takes a delegate through which you can specify any action required to produce proper input data for the T constructor. Th e delegate isn’t run until the Value property of the wrapped T type is accessed for the fi rst time.
Thread-Safe Initialization By default, Lazy<T> is thread-safe, meaning that multiple threads can access an object and all threads will receive the same instance of the T type. Let’s look at aspects of threading that are important only for the fi rst access to a Lazy object.
The first thread to hit the Lazy<T> object will trigger the instantiation process for type T. All following threads that gain access to Value receive the response generated by the fi rst—what-ever that is. In other words, if the fi rst thread causes an exception when invoking the constructor of the type T, then all subsequent calls—regardless of the thread—will receive the same exception. By design, different threads can’t get different responses from the same instance of Lazy<T>. Th is is the behavior you get when you choose the default constructor of Lazy<T>.
Th e Lazy<T> class, however, also features an additional constructor:public Lazy(bool isThreadSafe)
Th e Boolean argument indicates whether or not you want thread safety. As mentioned, the default value is true, which will off er the aforementioned behavior.
Value DescriptionNone The Lazy<T>instance isn’t thread-
safe and its behavior is undefi ned if it’s accessed from multiple threads.
PublicationOnly Multiple threads are allowed to concurrently try to initialize the Lazy type. The fi rst thread to complete wins and the results generated by all others are discarded.
ExecutionAndPublication Locks are used to ensure that only a single thread can initialize a Lazy<T> instance in a thread-safe manner.
Figure 1 TheLazyThreadSafetyMode Enumeration
In the Microsoft .NET Framework, we developers have long had to implement any lazy behavior manually in our classes.

msdn magazine10 Cutting Edge
If you pass false instead, the Value property will be accessed from just one thread—the one that initializes the Lazy type. Th e behavior is undefi ned if multiple threads attempt to access the Value property.
Th e Lazy<T> constructor that accepts a Boolean value is a special case of a more general signature where you pass the Lazy<T> constructor a value from the LazyTh readSafetyMode enumeration. Figure 1 explains the role of each value in the enumeration.
You can set the PublicationOnly mode using either of the fol-lowing constructors:
public Lazy(LazyThreadSafetyMode mode)public Lazy<T>(Func<T>, LazyThreadSafetyMode mode)
Th e values in Figure 1 other than PublicationOnly are implicitly set when you use the constructor that accepts a Boolean value:
public Lazy(bool isThreadSafe)
In that constructor, if the argument isTh readSafe is false, then the selected threading mode is None. If the argument isTh readSafe is set to true, then the threading mode is set to ExecutionAndPublication. ExecutionAndPublication is also the working mode when you choose the default constructor.
The PublicationOnly mode falls somewhere in between the full thread safety guaranteed by ExecutionAndPublication and the lack thereof you get with None. PublicationOnly allows concurrent threads to try to create the instance of the type T but ensures that only one thread is the winner. Th e T instance created by the winner is then shared among all other threads regardless of the instance that each may have computed.
Th ere’s an interesting diff erence between None and Execution-AndPublication regarding a possible exception thrown during the initialization. When PublicationOnly is set, an exception generated during the initialization isn’t cached; subsequently, each thread that attempts to read Value will have a chance to re-initialize if an instance of T isn’t available. Another diff erence between Publication-Only and None is that no exception is thrown in PublicationOnly mode if the constructor of T attempts to recursively access Value. Th at situation will raise an InvalidOperation exception when the Lazy<T> class works in None or ExecutionAndPublication modes.
Dropping thread safety gives you a raw performance benefi t, but you need to be careful to prevent nasty bugs and race conditions.
Th us, I recommend you use the option LazyTh readSafetyMode.None only when performance is extremely critical.
If you use LazyTh readSafetyMode.None, it remains your respon-sibility to ensure the Lazy<T> instance will never be initialized from more than one thread. Otherwise, you may incur unpredictable results. If an exception is thrown during the initialization, the same exception is cached and raised for each subsequent access to Value within the same thread.
ThreadLocal Initialization By design, Lazy<T> doesn’t let diff erent threads manage their own personal instance of type T. However, if you want to allow that behavior, you must opt for a diff erent class—the Th readLocal<T> type. Here’s how you use it:
var counter = new ThreadLocal<Int32>(() => 1);
Th e constructor takes a delegate and uses it to initialize the thread-local variable. Each thread holds its own data that’s completely out of reach of other threads. Unlike Lazy<T>, the Value property on Th readLocal<T> is read-write. Each access is therefore independent from the next and may produce diff erent results, including throwing (or not) an exception. If you don’t provide an action delegate via the Th readLocal<T> constructor, the embedded object is initialized using the default value for the type—null if T is a class.
Implementing Lazy PropertiesMost of the time, you use Lazy<T> for properties within your own classes, but which classes, exactly? ORM tools off er lazy loading on their own, so if you’re using these tools, the data access layer probably isn’t the segment of the application where you’ll fi nd likely candidate classes to host lazy properties. If you aren’t using ORM tools, the data access layer is defi nitely a good fi t for lazy properties.
Segments of the application where you use dependency injection might be another good fi t for laziness. In the .NET Framework 4, the Managed Extensibility Framework (MEF) just implements extensibility and inversion of control using Lazy<T>. Even if you’re not using the MEF directly, management of dependencies is a great fi t for lazy properties.
Implementing a lazy property within a class doesn’t require any rocket science, as Figure 2 demonstrates.
Filling a Hole Wrapping up, lazy loading is an abstract concept that refers to load-ing data only when it’s really needed. Until the .NET Framework 4, developers needed to take care of developing lazy initialization logic themselves. Th e Lazy<T> class extends the .NET Framework programming toolkit a nd gives you a great chance to avoid waste-ful computation by instantiating your expensive objects only when strictly needed and just a moment before their use begins.
DINO ESPOSITO is the author of “Programming ASP.NET MVC” from Microsoft Press and the coauthor of “Microsoft .NET: Architecting Applications for the Enterprise” (Microsoft Press, 2008). Based in Italy, Esposito is a frequent speaker at industry events worldwide. You can join his blog at weblogs.asp.net/despos.
THANKS to the following technical expert for reviewing this article: Greg Paperin
public class Customer{ private readonly Lazy<IList<Order>> orders;
public Customer(String id) { orders = new Lazy<IList<Order>>( () => { return new List<Order>(); } ); }
public IList<Order> Orders { get { // Orders is created on first access return orders.Value; } }}
Figure 2 Example of a Lazy Property

© 1987-2010 ComponentOne LCC. All rights reserved. iPhone and iPod are trademarks of Apple Inc. While supplies last. Void whereprohibited or restricted by law. All other product and brand names are trademarks and/or registered trademarks of their respective holders.
Untitled-8 2 7/14/10 4:03 PM

msdn magazine14
How the Entity Framework processes requests to retrieve or persist data is one such behavior that can be modifi ed. You’re not required to build a model that depends on the Entity Framework to have access to your data tables. You can build a model that knows only about your database’s views and stored procedures without impacting the application code that uses the model. By combining the Entity Framework’s stored procedure support with its database view support, you can base all database interaction on stored procedures and views.
Mapping Entities to Database Views, Not TablesTh ere are a few ways to build a model. I’ll focus on models that are built from a legacy database by reverse-engineering the database. Visual Studio has a wizard for this process.
In the wizard, users can select database tables, views and stored procedures. Th e stored procedure section also lists scalar-valued, user-defi ned functions that can be brought into the model.
Typically, a developer will select tables and let the wizard create entities from them. In the change-tracking and SaveChanges process I described earlier, the Entity Framework automatically generates INSERT, UPDATE and DELETE commands for the entities based on tables.
Let’s fi rst take a look at how you can force the Entity Framework to query against views instead of tables.
Database views brought into the model also become entities. Th e Entity Framework tracks changes to those entities just as it would for entities that are mapped to tables. Th ere’s a caveat about identity keys when using views. A database table will likely have one or more
Deny Table Access to the Entity Framework Without Causing a Mutiny
One of the fi rst things I hear from database owners when they see the Entity Framework command creation at work is: “What? I have to provide access to my tables?” Th ey react this way because one of the core capabilities of the Entity Framework is generation of SELECT, UPDATE, INSERT and DELETE commands.
In this column, I will give database administrators some insight into how the Entity Framework generates commands and then introduce features that let you limit its access to your database by allowing it to work only with views and stored procedures. And you can do this without impacting application code or alienating the developers on your team.
Exploring Default Command GenerationHow does this command generation work? Th e focal point of the Entity Framework is the Entity Data Model (EDM), a conceptual model that describes an application’s domain objects. Th e Entity Framework lets developers express queries against the model rather than concern themselves with details of the database. Th e model, its entities and their relationships are defi ned as XML, and develop-ers work with strongly typed classes based on the model’s entities. Th e Entity Framework runtime uses the model’s XML combined with additional metadata (which describes the database schema and mappings to get from the model to the database schema) to bridge the classes with the database (see Figure 1).
At run time, with the help of database-specific ADO.NET providers, the Entity Framework transforms queries composed against the model into store queries—for example, T-SQL—which it then sends to the database. Th e Entity Framework transforms the query results into objects defi ned by the strongly typed entity classes as shown in Figure 2.
As the user works with these objects, the Entity Framework uses identity keys to track changes to properties as well as relationships between the objects. Finally, when the code calls the Entity Frame-work SaveChanges method to persist changes back to the database, the Entity Framework runtime reads through all of the change tracking information it has collected. For each entity that has been modifi ed, added or deleted, the Entity Framework once again reads the model and engages the provider to build store commands and then executes them in a single, reversible transaction on the database.
Th is description of the default behavior of the Entity Framework tends to send database owners out of the room screaming, but I would like to emphasize the word “default” here. Th e Entity Frame-work has many default behaviors that can be altered.
DATA POINTS JULIE LERMAN
Figure 1 The Entity Framework Runtime Metadata Is Used to Build Database Commands
EF Runtime Metadate (XML files)
ConceptualModel
Schema
DatabaseStructureSchema
Mappings
DBApp

Give your users an effective way to visualize and analyze their data
so they can make more informed decisions and solve business problems.
By subscribing to the ESRI® Developer Network (EDNSM), you have access to the complete ESRI
geographic information system (GIS) software suite for developing and testing applications on
every platform. Whether you’re a desktop, mobile, server, or Web developer, EDN provides the
tools you need to quickly and cost-effectively integrate mapping and GIS into your applications.
Subscribe to EDN and leverage the power of GIS to get more from your data. Visit www.esri.com/edn.
ESRI®
Developer Network Integrate Mapping and GIS into Your Applications
Copyright © 2010 ESRI. All rights reserved. ESRI, the ESRI globe logo, EDN, and www.esri.com are trademarks, registered trademarks, or service marks of ESRI in the United States, the European Community, or certain other jurisdictions. Other companies and products mentioned herein may be trademarks or registered trademarks of their respective trademark owners.
Untitled-10 1 7/9/10 3:03 PM

msdn magazine16 Data Points
columns marked as its primary key or keys. By default, the wizard will compose an entity’s identity key from a table’s primary key(s). When creating entities that map to views (which lack primary keys), the wizard does its best job of inferring this identity key by building a composite key from all non-nullable values in the table. Consider an entity created from a view that has four non-nullable columns: ContactID, FirstName, LastName and TimeStamp.
Th e four resultant properties will be marked as EntityKeys (the designer uses a key icon to indicate EntityKey properties), which means that the entity has an EntityKey composed of these four properties.
Th e ContactID is the only property that’s needed to uniquely identify this entity. Th erefore, aft er the model has been created, you can use the designer to change the EntityKey attribute of the other three properties to False, leaving only the ContactID as a designated EntityKey.
Alternatively—if it’s possible—you can plan ahead, designing database views that provide the correct, non-nullable columns.
With the key in place, the Entity Framework can uniquely identify each entity and is therefore able to perform change tracking on these entities and then persist changes back to the database when SaveChanges is called.
Overriding Command Generation with Your Own Stored ProceduresFor persistence back to the database, you can override the default command generation and instead direct the Entity Framework to use your own Insert, Update and Delete stored procedures when it’s time to persist changes back to the database. Th is is referred to as “stored procedure mapping.” Let’s take a look at how that works.
Any stored procedure that you select in the EDM Wizard (or subsequently in the Update Wizard) to come into your model becomes a function in the section of the model’s XML metadata that describes the database schema. It isn’t automatically part of the conceptual model and you won’t see any representation of it on the design surface.
Here’s a simple Insert stored procedure for a Person table in one of my databases.
ALTER procedure [dbo].[InsertPerson] @FirstName nchar(50), @LastName nchar(50), @Title nchar(50)ASINSERT INTO [Entity FrameworkWorkshop].[dbo].[Person] ([FirstName] ,[LastName] ,[Title] ) VALUES(@FirstName,@LastName,@Title)SELECT @@IDENTITY as PersonID
Th is stored procedure not only performs the database insert, it then returns the primary key value that SQL Server has created for the new row.
When you choose this procedure in the wizard, it’s represented in the model’s database schema as the following function:
<Function Name="InsertPerson" Aggregate="false" BuiltIn="false" NiladicFunction="false" IsComposable="false" ParameterTypeSemantics="AllowImplicitConversion" Schema="dbo"> <Parameter Name="FirstName" Type="nchar" Mode="In" /> <Parameter Name="LastName" Type="nchar" Mode="In" /> <Parameter Name="Title" Type="nchar" Mode="In" /></Function>
You can then use the designer’s Mapping Details window to map this InsertPerson function to the Person entity that was created based on the Person table, as shown in Figure 3.
Notice that in Figure 3, the PersonID property maps to the return value from the stored procedure. Th is particular mapping will cause the Entity Framework to update the in-memory Person object with the database-generated key once the insert has been executed in the database.
A critical requirement when mapping functions is that every parameter in the function must map to a property in the entity. You can’t map a formula or a value to the parameters. However, developers have many opportunities to customize the Microsoft .NET Framework classes that represent these entities.
You can also map the Update and Delete func-tions. While it isn’t necessary to map all three actions (Insert, Update and Delete), developers will have to pay attention to some rules described in the documentation pertaining to mapping only some of the functions.
In Figure 3, notice that there are two columns to the right of property (abbreviated due to col-
Figure 2 The Entity Framework Executes Queries and Processes Their Results
Entity FrameworkModel &Metadata
ADO.NET DB Providers(e.g. SqlClient)
Link toEntitiesQuery
StoreQuery
(e.g. T-SQL)DataStore
Object(s)
Figure 3 Mapping Stored Procedures to an Entity

Image Formats & Compression: Supports 150+ image formats and compressions including TIFF, EXIF, PDF, JPEG2000, JBIG and CCITT.Display Controls: ActiveX, COM, Win Forms, Web Forms, WPF and Silverlight.Image Processing: 200+ lters, transforms, color conversion and dra ing
functions supporting region of interest and extended grayscale data.OCR/ICR/OMR: Full page or zonal recognition for multithreaded 32 and 64 bit
development.Forms Recognition and Processing: Automatically identify forms and extract
user lled data.Barcode: Detect, read and rite 1D and 2D barcodes for multithreaded 32 and
64 bit development.Document Cleanup/Preprocessing: Des e , despec le, hole punch, line and
border removal, inverted text correction and more.PDF and PDF/A: ead and rite searchable PDF ith text, images and
annotations.Annotations: Interactive UI for document mark-up, redaction and image
measurement (including support for DICOM annotations).Medical Web Viewer Framework: Plug-in enabled frame ork to uickly
build high- uality, full-featured, eb-based medical image delivery and vie er applications.Medical Image Viewer: igh level display control ith built-in tools for image
mark-up, indo level, measurement, zoom pan, cine, and UT manipulation.DICOM: Full support for all IOD classes and modalities de ned in the 200
DICOM standard (including Encapsulated PDF CDA and a Data).PACS Communications: Full support for DICOM messaging and secure
communication enabling uick implementation of any DICOM SCU and SCP services.JPIP: Client and Server components for interactive streaming of large images
and associated image data using the minimum possible band idth.Scanning: TWAIN 2.0 and WIA (32 and 64-bit), autodetect optimum driver
settings for high speed scanning.DVD: Play, create, convert and burn DVD images.DVR: Pause, re ind and fast-for ard live capture and UDP or TCP IP streams.Multimedia: Capture, play, stream and convert MPEG, AVI, WMV, MP4, MP3,
OGG, ISO, DVD and more.Enterprise Development: Includes WCF services and WF activities to create
scalable, robust enterprise applications.
Vector
DICOM Medical
Form Recognition & Processing
Multimedia
Barcode
Document
Free 60 Day Evaluation! www.leadtools.com/msdn 800 637-1840
ig evel Design ow evel Control
Develop your application ith the same robust imaging technologies used by Microsoft, HP, Sony, Canon, Kodak, GE, Siemens, the US Air Force and Veterans Affairs Hospitals.
EADTOO S provides developers easy access to decades of expertise in color, grayscale, document, medical, vector and multimedia imaging development. Install EADTOO S to eliminate months of research and programming time hile maintaining high levels of uality, performance and functionality.
Silverlight, .NET, WPF, WCF, WF, C API, C++ Class Lib, COM & more!
Untitled-1 1 5/28/10 11:41 AM

msdn magazine18 Data Points
umn width): Use Original Value and Rows Affected. The Entity Framework supports optimistic concurrency, and you can use these attributes to provide concurrency checking with the Update and Delete functions. Check the MSDN document, “Walkthrough: Mapping an Entity to Stored Procedures (Entity Data Model Tools),” at msdn.microsoft.com/library/cc716679 for more information on this feature.
At run time, if a user has created a new Person type and then triggers the SaveChanges method, the Entity Framework will see the Insert function mapping in the metadata (based on the map-ping defi ned in Figure 3). It will send the following command, executing the stored procedure, rather than generating its own INSERT command on the fl y:
exec [dbo].[InsertPerson] @FirstName=N'Julie',@LastName=N'Lerman',
@Title=N'Ms.'
Closing the Gap and Preventing Table Access by the Entity FrameworkTh e Entity Framework will generate commands to persist data from view-based entities, but views may not be updatable. In the case of non-updatable views, you can map Insert, Update and Delete stored procedures to the entities and get the full roundtrip of retrieving and persisting data without providing direct access to the database tables.
You could do something as simple as create database views that match the tables and create stored procedures that update the table columns. Or you might have more complex views and complex
stored procedures that contain advanced logic for performing updates. You could even supplant some of your read stored procedures with views that will enable developers to compose queries over the views—something that can’t be done against stored procedures.
As an example of this composability, the application could request a query against the CustomersInPastYear entity, fi ltering the view even further using the customer’s LastName property:
from c in context.CustomersInPastYears where c.LastName.StartsWith("B") select c;
This results in the following command being executed on the database:
SELECT[Extent1].[CustomerID] AS [CustomerID], [Extent1].[FirstName] AS [FirstName], [Extent1].[LastName] AS [LastName], [Extent1].[EmailAddress] AS [EmailAddress], [Extent1].[TimeStamp] AS [TimeStamp]FROM (SELECT [CustomersInPastYear].[CustomerID] AS [CustomerID], [CustomersInPastYear].[FirstName] AS [FirstName], [CustomersInPastYear].[LastName] AS [LastName], [CustomersInPastYear].[EmailAddress] AS [EmailAddress], [CustomersInPastYear].[TimeStamp] AS [TimeStamp] FROM [dbo].[CustomersInPastYear] AS [CustomersInPastYear]) AS [Extent1]WHERE [Extent1].[LastName] LIKE N'B%'
Th e .NET compiler would accept a similar query composed over a stored procedure that’s been mapped into the model. However, the Entity Framework would execute the stored procedure on the database, return all of its results to the application and then apply the fi lter to the in-memory objects returned by the stored proce-dure. Th is could potentially waste resources and hurt performance without the developer’s knowledge.
Figure 4 shows a stored procedure that updates the Customer table using the same columns that participate in the Customers-InPastYear view. It can be used as the Update function for the CustomersInPastYear entity.
Now you can map this stored procedure to the entity. Th e mapping shown in Figure 5 sends the original TimeStamp to the stored procedure and then, using the Result Column Bindings, captures the updated TimeStamp returned by the stored procedure.
Wrapping up, as long as the model is designed well, the view-based entities have appropriate identity keys and the functions are properly mapped, there’s no need to expose your database tables to an application that uses the Entity Framework for its data access strategy. Database views and stored procedures can provide the
EDM and the Entity Framework all that they need to successfully interact with your database.
JULIE LERMAN is a Microsoft MVP, .NET mentor and con-sultant who lives in the hills of Vermont. You can fi nd her presenting on data access and other Microsoft .NET topics at user groups and conferences around the world. Lerman blogs at thedatafarm.com/blog and is the author of the highly acclaimed book, “Programming Entity Framework” (O’Reilly Media, 2009). You can follow her on Twitter.com at julielerman.
THANKS to the following technical experts for reviewing this article: Noam Ben-Ami and Srikanth MandadiFigure 5 Mapping a Stored Procedure to an Entity Based on a View
ALTER PROCEDURE UpdateCustomerFirstNameLastNameEmail@FirstName nvarchar(50),@LastName nvarchar(50),@Email nvarchar(50),@CustomerId int,@TimeStamp timestamp
AS
UPDATE Customer SET [FirstName] = @FirstName ,[LastName] = @LastName ,[EmailAddress] = @Email WHERE CustomerID=@CustomerId AND TimeStamp=@TimeStamp SELECT TimeStamp FROM Customer WHERE CustomerID=@CustomerId
Figure 4 UpdateCustomerFirstNameLastNameEmail Stored Procedure

Why is Amyuni PDFso interesting?
Develop with the fastest PDFconversion on the market, designedto perform in multithreaded and64-bit Windows environments.
License and distribute productsquickly and easily with a PDFtechnology that does not rely onexternal open-source libraries.
Produce accurate and stable PDFdocuments using reliable toolsbuilt by experts with over ten yearsof experience.
Let our experienced consultantshelp you turn your software requirements into customized PDF solutions.
Integrate PDF conversion, creationand editing into your .NET andActiveX applications with just a fewlines of code.
Choose a PDF technology that isintegrated into thousands ofapplications behind millions ofdesktops worldwide.
High-Performance
OEM LicensesExpertise
Rapid IntegrationProven
Customization
We understand the challenges that come with PDF integration.From research and development, through design andimplementation, we work with you every step of the way.
Get 30 days of FREE technical support with your trial download!
USA and CanadaToll Free: 1 866 926 9864Support: (514) 868 9227
Info: [email protected]
EuropeSales: (+33) 1 30 61 07 97Support: (+33) 1 30 61 07 98
Customizations: [email protected]
All trademarks are property of their respective owners. © 1999-2009 AMYUNI Technologies. All rights reserved.
www.amyuni.com
Now v4.0!
Project1 12/2/09 12:51 PM Page 1

msdn magazine20
FE DE RAT ED IDENT IT Y
Passive Authentication for ASP.NET with WIF
The goal of federated security is to provide a mechanism for establishing trust relationships between domains so that users can authenticate to their own domain while being granted access to applications and services belonging to another domain. This makes authentication techniques like single sign-on possible, removes the need to provision and manage duplicate accounts for users across applications and domains, and signifi cantly lowers the cost to extend applications to trusted parties.
In a federated security model, an Identity Provider (IdP) performs authentication and supplies a Security Token Service (STS) to issue security tokens. Th ese tokens, in turn, assert information about the authenticated user: her identity and possibly other information including roles and more granular access rights. In a federated world, this information is referred to as claims, and claims-based access control is central to a federated security model. In this model, applications and services authorize access to features and function-ality based on claims from trusted issuers (the STS).
Michele Leroux Bustamante
Platform tools like Windows Identity Foundation (WIF) make it much easier to support this type of identity federation. WIF is an identity model framework for building claims-based applications and services, and for supporting SOAP-based (active) and browser-based (passive) federation scenarios. In the article “Claims-Based Authorization with WIF,” in the November 2009 issue of MSDN Magazine (msdn.microsoft.com/magazine/ee335707), I focused on using WIF with Windows Communication Foundation (WCF). In that article I described how to implement claims-based security models for WCF services and how to migrate to identity federation.
In this follow-up article I will focus on passive federation. I will explain the fl ow of communication for passive federation, show you several techniques for enabling federation in your ASP.NET applications, discuss claims-based authorization techniques for ASP.NET, and talk about single sign-on and single sign-out sce-narios. Along the way, I will explain the underlying WIF features and components that support passive federation scenarios.
Passive Federation BasicsPassive federation scenarios are based on the WS-Federation speci-fi cation. Th is describes how to request security tokens and how to publish and acquire federation metadata documents, which makes establishing trust relationships easy. WS-Federation also describes single sign-on and sign-out procedures and other federation implementation concepts.
While WS-Federation discusses many details about federa-tion, there are sections devoted to browser-based federation that
This article discusses:• Passive federation basics
• WIF and passive federation
• Claims-based authorization
• Single sign-on and sign-out
Technologies discussed:Windows Identity Foundation, ASP.NET

21August 2010msdnmagazine.com
rely on HTTP GET and POST, browser redirects and cookies to accomplish the goal.
Some aspects of passive federation messaging are based closely on the WS-Trust specifi cation. For example, passive federation employs a browser-compatible form of Request Security Token (RST) and RST Response (RSTR) when a security token is requested of an STS. In the passive federation scenario, I’ll call the RST a sign-in request message and the RSTR a sign-in response message. Th e WS-Trust specifi cation focuses on SOAP-based (active) federation, such as between Windows clients and WCF services.
A simple passive federation scenario is illustrated in Figure 1. Users authenticate to their domain and are granted access to a Web application according to their roles. Th e participants in this authentication scheme include the user (the subject), a Web browser (the requester), an ASP.NET application (the relying party or RP), an IdP responsible for authenticating the users within its domain and an STS belonging to the user’s domain (IP-STS). A sequence of browser redirects ensures that the user is authenticated at her domain prior to accessing the RP.
Th e user browses to the RP application (1) and is redirected to her IdP to be authenticated (2). If the user has not yet been authen-ticated at the IdP, the IP-STS may present a challenge or redirect her to a login page to collect credentials (3). Th e user supplies her credentials (4) and is authenticated by the IP-STS (5). At this point, the IP-STS issues a security token according to the sign-in request, and the sign-in response containing the token is posted to the RP via browser redirect (6). Th e RP processes the security token and authorizes access based on the claims it carries (7). If successfully authorized, the user is presented with the page she originally requested and a session cookie is returned (8).
Implementing this passive federation scenario with WIF and ASP.NET involves only a few steps: 1. Establish a trust relationship between the RP and IdP (IP-STS)2. Enable passive federation for the ASP.NET application3. Implement authorization checks to control access to
application features In the next sections I’ll discuss the features of WIF that support
passive federation, walk through the steps to confi gure this simple scenario, and then explore other practical considerations for this and other scenarios.
WIF Features for Passive FederationBefore discussing implementation, let me review the features of WIF specifi cally useful for identity federation within your ASP.NET applica-tions. To begin with, WIF supplies the following useful HTTP modules:
• WSFederationAuthenticationModule (FAM): Enables browser-based federation, handling redirection to the appropriate STS for authentication and token issuance, and processing the resulting sign-in response to hydrate the issued security token into a ClaimsPrincipal to be used for authorization. This module also handles other important federation messages such as sign-out requests.
• SessionAuthenticationModule (SAM): Manages the authenticated session by generating the session security token that contains the ClaimsPrincipal, writing it to a cookie,
managing the lifetime of the session cookie and rehydrating the ClaimsPrincipal from the cookie when it’s presented. Th is module also maintains a local session token cache.
• ClaimsAuthorizatonModule: Provides an extensibility point to install a custom ClaimsAuthorizationManager that can be useful for centralized access checks.
• ClaimsPrincipalHttpModule: Creates a ClaimsPrincipal from the current user identity attached to the request thread. In addition, provides an extensibility point to install a custom ClaimsAuthenticationManager that can be useful for custom-izing the ClaimsPrincipal to be attached to the request thread.
ClaimsPrincipalHttpModule is most useful for applications without passive federation. You can think of it as a useful tool for implementing a claims-based security model in the ASP.NET application prior to moving to passive federation. I discussed this technique for WCF in my previous article.
Th e other three modules are typically used together for passive federation—although ClaimsAuthorizationModule is optional. Figure 2 illustrates how these core modules fi t into the request pipe-line and their functions in a typical federated authentication request.
Keeping in mind the fl ow of passive federation from Figure 1, when the user fi rst browses to a protected page in the RP (1), access
Figure 1 A Simple Passive Federation Scenario
1 68
Resource
SetSessionCookie
POSTSign-In
Response
RP Domain
AuthorizeAccess
Web Site (RP)
7
2 4
POSTCredentials
Sign-InRequest
3
LoginPage
IP-STS (IdP)
IdP Domain
Authenticate /Issue Token
5
Browser(Requester)
User (Subject)
Passive federation scenarios are based on the
WS-Federation specifi cation.

msdn magazine22 Federated Identity
to the application will be denied. Th e FAM processes unauthorized requests, produces the sign-in message and redirects the user to the IP-STS (2). The IP-STS authenticates the user (3), produces a sign-in response that includes the issued security token, and redirects back to the RP application (4).
Th e FAM processes the sign-in response—ensuring that the response contains a valid security token for the authenticated user—and hydrates a ClaimsPrincipal from the sign-in response (5). Th is will set the security principal for the request thread and HttpCon-text. Th e FAM then uses the SAM to serialize the Claims Principal to an HTTP cookie (6) that will be presented with subsequent requests during the browser session. If ClaimsAuthorizationModule is installed, it will invoke the confi gured ClaimsAuthorization-Manager, providing an opportunity to perform global access checks (7) against the ClaimsPrincipal prior to accessing the requested resource.
Once the requested resource is presented, access control can be implemented with traditional ASP.NET login controls, IsInRole checks and other custom code that queries the user’s claims (8).
On subsequent requests the session token is presented with the cookie previously written by the SAM (9). Th is time the SAM is engaged to validate the session token and rehydrate the Claims-Principal from the token (10). Th e FAM is not engaged unless the request is a sign-in response, a sign-out request, or if access is denied, which can happen if the session token is not present or has expired.
In addition to these modules, there are two ASP.NET controls that are also useful in passive federation:
• FederatedPassiveSignIn Control: Can be used in lieu of the FAM if the application will redirect all unauthorized calls to a login page that hosts this control only when authentication
is required. Th is assumes the user will interact with the sign-in process—useful in step-up authentication scenarios where the user is prompted for credentials, possibly additional credentials from the original login, as required by the application. Th e control handles redirection to the STS, processing the sign-in response, initializing the ClaimsPrincipal from the response and establishing a secure session by leveragingfunctionality exposed by the FAM and SAM.
• FederatedPassiveSignInStatus Control: Th is control provides an interactive way for the user to sign in or sign out from the RP application, including support for federated sign-out. Figure 3 illustrates how the fl ow of communication changes
when the FederatedPassiveSignIn control is employed. Th e ap-plication relies on Forms authentication to protect resources and redirect to the login page, which hosts the control (1). Th e user clicks the FederatedPassiveSignIn control (or can be redirected to it automatically), which triggers a redirect to the STS (2). Th e control page receives the response from the STS, relying on the FAM and the SAM to process the sign-in response (3), hydrate the Claims Principal and write the session cookie (4). When the user is redirected to the originally requested page (5), the SAM is engaged to validate the session cookie and hydrate the ClaimsPrincipal for the request. At this point, the ClaimsAuthorizationModule and that page can perform their authorization checks as illustrated in Figure 2.
Both the FAM and SAM rely on the appropriate Security-TokenHandler type to process incoming tokens. When a sign-in response arrives, the FAM iterates through SecurityTokenHandler-Collection looking for the correct token handler to read the XML token. In a federated scenario this will typically be Saml11Security-
TokenHandler or Saml2Security-TokenHandler—though other token formats may be employed if you add custom token handlers. For the SAM, SessionSecurity-TokenHandler is used to process the session token associated with the session cookie.
Several identity model confi g-uration settings are important to the fl ow of passive federation—and are used to initialize the FAM and the SAM and the Federated-PassiveSignIn control (although the latter also exposes properties confi gurable from the Visual Stu-dio designer). Programmatically, you can supply an instance of the Service Confi guration type from the Microsoft .IdentityModel.Confi gu-ration namespace, or you can sup-ply declarative confi guration in the <microsoft .identityModel> section. Figure 4 summarizes identity mod-el settings, many of which will be discussed in subsequent sections. Figure 2 WIF Components and HTTP Modules Engaged in Passive Federation
Claims AuthZManager
Security TokenHandler
SAM
ClaimsAuthorization
Module
Web Page
10
16
2
Authenticate /Issue Token
SessionCookie
CreateClaimsPrincipal
CreateClaimsPrincipal
Sign-In Request
Sign-In Response
Authorize AccessBased on ClaimsPrincipal
3
5 FAM IP-STSClaims Principal
9
8
7
4
<authorization>
Login Controls
Principal Permission/PrincipalPermissionAttribute
ClaimsPrincipalClaims Checks

Presenting Telerik OpenAccess ORM – The easiest way to build your data layer
www.telerik.com/ORMEurope HQ: +359.2.80.99.850 US Sales: +1.888.365.2779 Germany Sales: +49.89.8780687.70
e-mail: [email protected]
Powerful Visual Designer
Forward and Reverse Mapping capabilities
Full LINQ support
Automatic web service layer
Silverlight support
Optimized for complex scenarios
Untitled-1 1 7/6/10 2:54 PM

msdn magazine24 Federated Identity
Enabling Passive FederationWIF makes it easy to configure passive federation for your ASP.NET applications. An STS should supply federation metadata (as described in the WS-Federation specifi cation) and WIF supplies a Federation Utility (FedUtil.exe), which uses federation metadata to establish trust between an RP and an STS (among other features useful to both active and passive federation scenarios). You can invoke FedUtil from the command line or from Visual Studio by right-clicking on the RP project and selecting Add STS reference.
You’ll complete the following simple steps with the FedUtil wizard:• Th e fi rst page of the wizard allows you to confi rm the confi gura-
tion fi le to be modifi ed by the wizard and the RP application URI. • Th e second page requests the path to the federation metadata
XML document for the STS with which the RP will establish trust. • Th e third page allows you to supply a certifi cate to be used for
decrypting tokens.• Th e fi nal page shows a list of claims off ered by the STS—which
you can use to plan access control decisions, for example.When the wizard steps are completed, FedUtil modifies the
project to add a reference to the Microsoft .IdentityModel assembly. It also modifies the web.config to install the FAM and SAM modules and to supply identity model confi guration settings for those modules. Th e application now supports passive federation and will redirect unauthorized requests to the trusted STS.
Th ere’s an assumption here that the STS has prior knowledge of the RP, will thus issue tokens for authenticated users trying to access the RP, and of course that it has the public key the RP requires the STS to use to encrypt tokens. Th is is an easy way to get your ASP.NET applications initially set up for federation. Of course, it helps to understand how to set this up from scratch in case adjustments are required, and how to go beyond the basic settings enabled by the wizard. I’ll focus on the “from scratch” approach from here on in.
Without using FedUtil, you need to manually add a reference to the Microsoft .IdentityModel assembly, and manually confi gure the FAM and the SAM modules along with the necessary identity model settings. HTTP modules are added to two sections: system.web for Internet Information Services (IIS) 6 and system.webServer for IIS 7. Assuming the application is hosted in IIS 7, the WIF modules are confi gured as follows:
<modules> <!--other modules--> <add name="SessionAuthenticationModule" type="Microsoft.IdentityModel.Web.SessionAuthenticationModule, Microsoft.IdentityModel, Version=3.5.0.0, Culture=neutral, PublicKeyToken=31bf3856ad364e35" preCondition="managedHandler" /> <add name="WSFederationAuthenticationModule" type="Microsoft.IdentityModel.Web.WSFederationAuthenticationModule, Microsoft.IdentityModel, Version=3.5.0.0, Culture=neutral, PublicKeyToken=31bf3856ad364e35" preCondition="managedHandler" /></modules>
By default this confi guration will only protect resources with extensions explicitly mapped to be handled by the ASP.NET pipe-line (.aspx, .asax, and so on). To protect additional resources with federated authentication, you should map those extensions to the ASP.NET pipeline in IIS, or you can set runAllManagedModules-ForAllRequests to true in the modules setting (IIS 7 only) as follows:
<modules runAllManagedModulesForAllRequests="true">
For the FAM to kick in, you must also set the ASP.NET au-thentication mode to None and deny anonymous users access to application resources:
<authentication mode="None" />
<authorization> <deny users="?" /></authorization>
Both modules rely on identity model configuration settings described in Figure 4, a typical example of which is shown in Figure 5. Most of these settings are generated for you by FedUtil, with the exception of certifi cateValidation and a few of the settings within federatedAuthentication. I typically recommend using Peer-Trust certifi cate validation mode—which means that you explicitly add all trusted certifi cates, including that of the trusted issuer, to the local machine’s TrustedPeople store.
You should typically require HTTPS/SSL for passive federation to protect the issued bearer token from man-in-the-middle attacks, and require HTTPS/SSL for session cookies. By default, cookies are hidden from script, but it’s an important setting, which is why I call it out in Figure 5.
As for the name and path of the cookie, the name defaults to FedAuth, the path to the application directory. It can be useful to specify a unique name for the cookie, in particular if many RP applications in the solution share the same domain. Conversely, you can choose to specify a generic path when you want cookies to be shared across several apps on the same domain.
You will typically use FedUtil to confi gure your ASP.NET applica-tions for passive federation using the FAM and SAM, then tweak the
Figure 3 Passive Federation with the FederatedPassive -SignIn Control
1
2
SessionCookie Sign-In Request
Sign-InResponse
3
IP-STS
ClaimsAuthorization
ModuleWeb PageSAM
FormsAuthorization
Module
Login.aspx
FederatedPassiveSignIn
SAM FAM
45
WIF makes it easy to confi gure passive federation for your
ASP.NET applications.

Alpha Five v10.5 with Codeless AJAXBuilds Powerful & Secure
Web 2.0/AJAX Database Applications5-10x faster than other
Web database development tools
Design AJAX Web apps against SQL databases that run as fast as desktop
apps. Professional developers can extend Alpha Five using open Javascript libraries, the Xbasic or SQL languages, Genies and Xdialogs, the Report Builder, the Security Framework, over 1000 built-in functions, and more.
500 no charge full copies of Alpha Five v10.5
developer have been set aside for professional
developers, normally the cost on these is $395,
But if you hurry to www.alphafive.com/500free
you should qualify to get one of
these reserved copies.
Free Copies of #1 Rated AJAX Web DB Development tool, (Normally the price is $395 - see below for details)
www.alphafive.com/500freeNo Purchase Required, Limited Time Offer
Untitled-10 1 7/9/10 2:59 PM

msdn magazine26 Federated Identity
appropriate settings according to the requirements of the solution. You can also use the PassiveFederationSignIn control in lieu of the FAM as illustrated in Figure 3. Th e control can either load its settings from the microsoft .identityModel section, or you can set properties directly on the control.
Th e control approach is useful if you want unauthorized requests to be redirected to a login page where the user can explicitly sign in by clicking the control, rather than having the FAM automatically redirect to the STS. For example, if the user may belong to more than one identity provider (home realm), the login page could provide a mechanism for her to indicate her home realm prior to redirecting to the STS. I’ll discuss home realm discovery shortly.
Passive Token IssuanceAs mentioned earlier, passive federation relies on HTTP GET and POST and browser redirects to facilitate communication between the
RP and STS. Figure 6 shows the primary request parameters involved in the sign-in request and sign-in response during this process.
When the STS receives the sign-in request, it will verify that it knows about the RP by checking the wtrealm parameter against its list of known RP realms. Presumably the STS will have prior knowledge of the RP, the certifi cate required for token encryption, and any expectations with respect to the desired claims to be included in the issued token. Th e RP can indicate which claims it requires if it supplies the optional wreq parameter with a full sign-in request, and the STS can optionally respect that list or decide autonomously which claims to grant based on the authenticated user.
In a simple federation scenario like that described in Figure 1, there is a single RP and a single IP-STS responsible for authenti-cating users. If the IP-STS authenticates users against a Windows domain, it might issue role claims such as Admin, User or Guest. Th e assumption is that these roles have meaning to the RP for authorization. In the next section, I’ll assume these roles suffi ce and discuss authorization techniques. Following that I will discuss claims transformation at the RP to convert STS claims into some-thing more useful for authorization as needed.
Claims-Based Authorization As I discussed in my previous article, role-based security in the .NET Framework expects that a security principal is attached to each thread. Th e security principal, based on IPrincipal, wraps the identity of the authenticated user in an IIdentity implementation. WIF supplies ClaimsPrincipal and ClaimsIdentity types based on IClaimsPrinci-pal and IClaimsIdentity (which ultimately derive from IPrincipal and IIdentity). When the FAM processes the sign-in response, it hydrates a ClaimsPrincipal for the issued security token. Likewise, the SAM hydrates a ClaimsPrincipal for the session cookie. Th is ClaimsPrin-cipal is the heart of WIF authorization for your ASP.NET application.
You can use any of the following approaches to authorization: • Use location-specifi c authorization settings to restrict access
to directories or individual application resources. • Use ASP.NET login controls, such as the LoginView control,
to control access to functionality. • Use ClaimsPrincipal to perform dynamic IsInRole checks (for
example, to dynamically hide or show UI elements).
<microsoft.identityModel> <service> <issuerNameRegistry type="Microsoft.IdentityModel.Tokens.ConfigurationBasedIssuerNameRegistry, Microsoft.IdentityModel, Version=3.5.0.0, Culture=neutral, PublicKeyToken=31bf3856ad364e35"> <trustedIssuers> <add thumbprint="EF38A0A6D1274766093D3D78BFE4ECA77C62D5C3" name="http://localhost:60768/STS/" /> </trustedIssuers> </issuerNameRegistry> <certificateValidation certificateValidationMode="PeerTrust" revocationMode="Online" trustedStoreLocation="LocalMachine"/> <audienceUris> <add value="http://localhost:50652/ClaimsAwareWebSite2/" /> </audienceUris> <federatedAuthentication> <wsFederation passiveRedirectEnabled="true" issuer="http://localhost:60768/STS/" realm="http://localhost:50652/ClaimsAwareWebSite2/" requireHttps="true" /> <cookieHandler requireSsl="true" name="FedAuth" hideFromScript="true" path="/ClaimsAwareWebSite2" /> </federatedAuthentication> <serviceCertificate> <certificateReference x509FindType="FindByThumbprint" findValue="8A90354199D284FEDCBCBF1BBA81BA82F80690F2" storeLocation="LocalMachine" storeName="My" /> </serviceCertificate> </service></microsoft.identityModel>
Figure 5 Identity Model Confi guration for Passive Federation
Section Description<issuerNameRegistry> Specify a list of trusted certifi cate issuers. This list is primarily useful for validating the token signature so that tokens
signed by un-trusted certifi cates will be rejected.<audienceUris> Specify a list of valid audience URIs for incoming SAML tokens. Can be disabled to allow any URI, though not recommended.<securityTokenHandlers> Customize confi guration settings for token handlers or supply custom token handlers to control how tokens are
validated, authenticated, and serialized. <maximumClockSkew> Adjust the allowed time difference between tokens and application servers for token validity. The default skew is 5 minutes.<certifi cateValidation> Control how certifi cates are validated.<serviceCertifi cate> Supply a service certifi cate for decrypting incoming tokens.<claimsAuthenticationManager> Supply a custom ClaimsAuthenticationManager type to customize or replace the IClaimsPrincipal type to be attached to
the request thread.<claimsAuthorizationManager> Supply a custom ClaimsAuthorizationManager type to control access to functionality from a central component.<federatedAuthentication> Supply settings specifi c to passive federation.
Figure 4 Summary of the Essential <microsoft.identityModel> Elements

msdn magazine28 Federated Identity
• Use the PrincipalPermission type to perform dynamic permis-sion demands, or the PrincipalPermissionAttribute if declarative permission demand seems appropriate on a particular method.
• Provide a custom ClaimsAuthorizationManager to centralize access checks in a single component, even prior to loading the requested resource.The first three of these options rely on the IsInRole method
exposed by the ClaimsPrincipal type. You must select a role claim type fi tting for the IsInRole check so that the correct claims will be used to control access. Th e default role claim type for WIF is:
http://schemas.microsoft.com/ws/2008/06/identity/claims/role
If ClaimsPrincipal includes defi ned claims, the role claim type will match the default. Later, I will discuss permission claims in the context of claims transformation. When these are utilized, you should specify the permission claim type as the role claim type so that IsInRole will be eff ective.
You can control access to specifi c pages or directories globally from the web.confi g fi le. In the application root, supply a location tag specifying the path to protect, allow a list of acceptable roles and deny access to all other users. The following allows only Administrators to access fi les beneath the AdminOnly directory:
<location path="AdminOnly"> <system.web> <authorization> <allow roles="Administrators" /> <deny users="*"/> </authorization> </system.web></location>
As an alternative, you can put a web.confi g in any subdirectory and specify authorization rules. Placing the following confi guration in the AdminOnly directory achieves the same result:
<configuration> <system.web> <authorization > <allow roles="Administrators" /> <deny users="*"/> </authorization> </system.web></configuration>
To dynamically hide and show UI components or otherwise control access to features within a page, you can leverage the role-based features of controls such as the LoginView. However, most developers prefer to explicitly set control properties for access control during page load for more granular control. To do this, you can call the IsInRole method exposed by Claims-Principal. You can access the current prin-cipal through the Thread.CurrentPrincipal static property as follows:
if (!Thread.CurrentPrincipal.IsInRole("Administrators")) throw new SecurityException("Access is denied.");
Aside from explicit IsInRole checks at run-time, you can also write classic role-based permission demands using the Principal-Permission type. You initialize the type with the required role claim (the second con-structor parameter), and when Demand is
called, the IsInRole method of the current principal is called. An exception is thrown if the claim is not found:
PrincipalPermission p = new PrincipalPermission("", "Administrators");p.Demand();
Th is approach is useful for rejecting a request with an exception, when the appropriate roles aren’t present.
It’s also useful to centralize authorization checks common to all requested resources. Sometimes, if you have an access control policy—for example, rules stored in a database—you can use a central component to read those rules to control access to features and functionality. For this, WIF supplies a ClaimsAuthorization-Manager component that you can extend. Recall from my previous article that you can confi gure this type of custom component in the identity model section:
<microsoft.identityModel> <service> <!--other settings--> <claimsAuthorizationManager type="CustomClaimsAuthorizationManager"/> </service></microsoft.identityModel>
Figure 7 illustrates a custom ClaimsAuthorizationManager that verifi es the presence of the name claim and whether the requested resource is within the AdminsOnly directory requires the Administrators role claim.
The CustomClaimsAuthorizationManager overrides Check-Access to provide this functionality. Th is method supplies an Autho-rizationContext parameter, which provides information about the request action (for passive federation this is an HTTP verb such as
Figure 6 Primary Sign-In Request and Response Parameters Involved in Passive Federation Requests
Sign-In Request
RequestedSecurityToken
SAML 1.1 Token
Signature
Subject Confirmation
Token Lifetime
Attributes(Claims = name,role)
HTTP GETwa=wsignin1.0wtrealm=[Uri]whr=[Uri]wreply=[Uri]wctx=[context]
HTTP POSTwresult=RSTR
wctx=[context]
Web Site (RP) IP-STS (IdP)
Browser(Requester)
12
Role-based security in the .NET Framework expects that a security principal is attached
to each thread.
DynamicPDF Generator v6.0 for .NET
ceTe Software has been delivering quality software applications and components to our customers for over 10 years. Our DynamicPDF product line has proven our commitment to delivering innovative software components and our ability to respond to the changing needs of software developers. We back our products with a first class support team trained to provide timely, accurate and thorough responses to any support needs.
Easy-to-use Highly efficient Industry leading support Huge feature set
DynamicPDF…Proven .NET Components for Real-Time PDFs
Layout reports in DynamicPDF Designer with its Visual Studio look and feel.
.
Untitled-1 1 3/15/10 11:50 AM

msdn magazine30 Federated Identity
GET or POST), the requested resource (a URI), and the Claims-Principal, which is not yet attached to the request thread.
Claims TransformationOft en, the claims issued by the IP-STS, although useful for describing the authenticated user, are not relevant to the authorization requirements of the RP. It isn’t the IdP’s job to know what type of roles, permissions or other fi ne-grained artifact is necessary for authorization at each RP. It’s the IdP’s job to grant claims that are relevant to the identity provider domain, claims that the IdP can assert about the authenticated user.
As such, the RP may need to transform claims from the IP-STS into something more relevant for authorization. Th is implies that the RP may map the user identity (perhaps by user name or UPN) to a set of RP claims. Assuming the IP-STS grants default role claims, Figure 8 lists a possible set of permission claims that the RP could issue based on each incoming role claim. Th e permission claim type may be a custom claim type defi ned by the RP such as:
urn:ClaimsAwareWebSite/2010/01/claims/permission
A good place to transform incoming IP-STS claims is with a custom ClaimsAuthenticationManager. You can install a custom ClaimsAuthenticationManager by adding the following to the microsoft .identityModel section:
<microsoft.identityModel> <service> <!--other settings--> <claimsAuthenticationManager type="CustomClaimsAuthenticationManager"/> </service></microsoft.identityModel>
Figure 9 shows a sample CustomClaimsAuthenticationMan-ager that transforms incoming role claims granted by the IP-STS into permission claims relevant to the RP.
For IsInRole checks (as described earlier) to work, you must provide the permission claim type as the role claim type. In Figure 9, this is specifi ed when the ClaimsIdentity is constructed because the RP is creating the ClaimsIdentity.
In the case where incoming SAML tokens are the source of claims, you can provide the role claims type to the SecurityToken-Handler. Th e following illustrates how to declaratively confi gure the Saml11SecurityTokenHandler to use the permission claim type as the role claim type:
<microsoft.identityModel> <service> <!--other settings--> <securityTokenHandlers> <remove type="Microsoft.IdentityModel.Tokens.Saml11.Saml11SecurityTokenHandler, Microsoft.IdentityModel, Version=3.5.0.0, Culture=neutral, PublicKeyToken=31bf3856ad364e35"/> <add type="Microsoft.IdentityModel.Tokens.Saml11.Saml11SecurityTokenHandler, Microsoft.IdentityModel, Version=3.5.0.0, Culture=neutral, PublicKeyToken=31bf3856ad364e35"> <samlSecurityTokenRequirement > <roleClaimType value= "urn:ClaimsAwareWebSite/2010/01/claims/permission"/> </samlSecurityTokenRequirement> </add> </securityTokenHandlers> </service></microsoft.identityModel>
SAML token handlers have a samlSecurityTokenRequirement section where you can provide a setting for the name and role claim type, along with other settings related to certifi cate validation and Windows tokens.
Home Realm DiscoverySo far, I have focused on a simple federation scenario with a single IP-STS. The assumption is that the RP will always redirect to a particular IP-STS to authenticate users.
In the world of federation, however, the RP may trust multiple token issuers from several domains. A new challenge presents itself in this case because the RP must decide which IP-STS should authenticate users requesting access to resources. Th e domain to which users authenticate is known as the user’s home realm, and thus this process is called home realm discovery.
Th ere are a number of mechanisms an application may use for home realm discovery:
• As in the current example, the home realm is known in advanced and so requests are always redirected to a particular IP-STS.
• Users may browse to the RP from another portal, which can provide a query string to indicate the home realm for users from that portal.
• The RP may require that users land on a particular entry page for each home realm. Th e landing page could assume a particular home realm.
• Th e RP may be able to determine the home realm by the IP address of the request or some other heuristic.
• If the RP can’t determine the home realm from one of the afore-mentioned techniques, it can present a UI where the user can select the home realm or provide information that helps the RP determine this.
Role Claim Permission ClaimsAdministrators Create, Read, Update, DeleteUsers Create, Read, UpdateGuest Read
Figure 8 Transforming Role Claims to Permission Claims at the RP
public class CustomClaimsAuthorizationManager: ClaimsAuthorizationManager {
public CustomClaimsAuthorizationManager() { }
public override bool CheckAccess( AuthorizationContext context) {
ClaimsIdentity claimsIdentity = context.Principal.Identity as ClaimsIdentity; if (claimsIdentity.Claims.Where( x => x.ClaimType == ClaimTypes.Name).Count() <= 0) throw new SecurityException("Access is denied."); IEnumerable<Claim> resourceClaims = context.Resource.Where(x=>x.ClaimType==ClaimTypes.Name); if (resourceClaims.Count() > 0) { foreach (Claim c in resourceClaims) { if (c.Value.Contains("\AdminOnly") && !context.Principal.IsInRole("Administrators")) throw new SecurityException("Access is denied."); } }
return true; }}
Figure 7 Custom ClaimsAuthorizationManager Implementation

(888) 850-9911Sales Hotline - US & Canada:
/update/2010/08
US Headquarters ComponentSource650 Claremore Prof WaySuite 100WoodstockGA 30188-5188USA
© 1996-2010 ComponentSource. All Rights Reserved. All prices correct at the time of press. Online prices may vary from those shown due to daily fluctuations & online discounts.
European Headquarters ComponentSource30 Greyfriars RoadReadingBerkshireRG1 1PE United Kingdom
Asia / Pacific Headquarters ComponentSource3F Kojimachi Square Bldg3-3 Kojimachi Chiyoda-kuTokyoJapan102-0083 www.componentsource.com
www.componentsource.com
We accept purchase orders.Contact us to apply for a credit account.
ContourCube from $900.00OLAP component for interactive reporting and data analysis.
BEST SELLER
BEST SELLER TX Text Control .NET and .NET Server from $499.59Word processing components for Visual Studio .NET.
BEST SELLER
FusionCharts from $195.02Interactive and animated charts for ASP and ASP.NET apps.
BEST SELLER
BEST SELLER LEADTOOLS Recognition SDK from $3,595.50Add robust 32/64 bit document imaging & recognition functionality into your applications.
BEST SELLER
Untitled-1 1 7/6/10 2:53 PM

msdn magazine32 Federated Identity
• If the RP supports information cards, the selected card can drive authentication to the appropriate home realm using active federation.
• Th e WS-Federation briefl y describes how one might imple-ment a discovery service for resolving the home realm, but there isn’t a well-defi ned specifi cation for this.No matter how the home realm is discovered, the goal is to
redirect the user to authenticate with the correct IP-STS. Th ere are
a few possible scenarios here. In one scenario, the RP may need to dynamically set the issuer URI so that the sign-in request is sent to the correct IP-STS. In this case, the RP must list all trusted IP-STS in the trustedIssuers section, for example:
<trustedIssuers> <add thumbprint="6b887123330ae8d26c3e2ea3bb7a489fd609a076" name="IP1" /> <add thumbprint="d5bf17e2bf84cf2b35a86ea967ebab838d3d0747" name="IP2" /></trustedIssuers>
In addition, you can override the RedirectingToIdentityProvider event exposed by the FAM and, using relevant heuristics, deter-mine the correct URI for the STS. To do this, place the following code in the Global.asax implementation:
void WSFederationAuthenticationModule_RedirectingToIdentityProvider( object sender, RedirectingToIdentityProviderEventArgs e) { if (e.SignInRequestMessage.RequestUrl.Contains( "IP1RealmEntry.aspx")) { e.SignInRequestMessage.BaseUri = new Uri("https://localhost/IP1/STS/Default.aspx"); } else if (e.SignInRequestMessage.RequestUrl.Contains( "IP2RealmEntry.aspx")) { e.SignInRequestMessage.BaseUri = new Uri( "https://localhost/IP2/STS/Default.aspx"); }}
Th e other scenario involves passing the home realm parameter (whr) with the sign-in request to the primary STS. Th e RP may, for example, have a Resource STS (R-STS or RP-STS) responsible for claims transformation. The RP-STS doesn’t authenticate users (it’s not an IdP), but it has trust relationships with one or more other IdPs.
Th e RP has a trust relationship with the RP-STS, and will always respect tokens issued by the RP-STS. Th e RP-STS is responsible for redirecting to the correct IdP for each request. Th e RP-STS can determine the correct IP-STS to redirect to as in the code just described, but another option is for the RP to supply infor-mation about the home realm, passing this in the home realm parameter to the RP-STS. In this case, the RP dynamically sets the home realm parameter:
void WSFederationAuthenticationModule_RedirectingToIdentityProvider( object sender, RedirectingToIdentityProviderEventArgs e) { if (e.SignInRequestMessage.RequestUrl.Contains( "IP1RealmEntry.aspx")) { e.SignInRequestMessage.HomeRealm = "https://localhost/IP1/STS/Default.aspx"; } else if (e.SignInRequestMessage.RequestUrl.Contains( "IP2RealmEntry.aspx")) { e.SignInRequestMessage.HomeRealm = "https://localhost/IP2/STS/Default.aspx"; }}
Th e RP-STS uses this parameter to redirect to the correct IP-STS and subsequently transforms claims from the IP-STS into claims relevant to the RP.
public class CustomClaimsAuthenticationManager: ClaimsAuthenticationManager {
public CustomClaimsAuthenticationManager() { }
public override IClaimsPrincipal Authenticate( string resourceName, IClaimsPrincipal incomingPrincipal) {
IClaimsPrincipal cp = incomingPrincipal; ClaimsIdentityCollection claimsIds = new ClaimsIdentityCollection();
if (incomingPrincipal != null && incomingPrincipal.Identity.IsAuthenticated == true) {
ClaimsIdentity newClaimsId = new ClaimsIdentity( "CustomClaimsAuthenticationManager", ClaimTypes.Name, "urn:ClaimsAwareWebSite/2010/01/claims/permission");
ClaimsIdentity claimsId = incomingPrincipal.Identity as ClaimsIdentity; foreach (Claim c in claimsId.Claims) newClaimsId.Claims.Add(new Claim( c.ClaimType, c.Value, c.ValueType, "CustomClaimsAuthenticationManager", c.Issuer));
if (incomingPrincipal.IsInRole("Administrators")) { newClaimsId.Claims.Add(new Claim( "urn:ClaimsAwareWebSite/2010/01/claims/permission", "Create")); newClaimsId.Claims.Add(new Claim( "urn:ClaimsAwareWebSite/2010/01/claims/permission", "Read")); newClaimsId.Claims.Add(new Claim( "urn:ClaimsAwareWebSite/2010/01/claims/permission", "Update")); newClaimsId.Claims.Add(new Claim( "urn:ClaimsAwareWebSite/2010/01/claims/permission", "Delete")); }
else if (incomingPrincipal.IsInRole("Users")) { newClaimsId.Claims.Add(new Claim( "urn:ClaimsAwareWebSite/2010/01/claims/permission", "Create")); newClaimsId.Claims.Add(new Claim( "urn:ClaimsAwareWebSite/2010/01/claims/permission", "Read")); newClaimsId.Claims.Add(new Claim( "urn:ClaimsAwareWebSite/2010/01/claims/permission", "Update")); }
else { newClaimsId.Claims.Add(new Claim( "urn:ClaimsAwareWebSite/2010/01/claims/permission", "Read")); }
claimsIds.Add(newClaimsId); cp = new ClaimsPrincipal(claimsIds); }
return cp; }}
Figure 9 Custom Claims Transformation at the RP
The domain to which users authenticate is known as the
user’s home realm.

33August 2010msdnmagazine.com
Single Sign-On and Single Sign-OutSingle sign-on and single sign-out are important parts of federation. Single sign-on is a feature that allows authenticated users to access multiple RP applications while authenticating only once. Single sign-out, as it implies, facilitates sign-out from all RP applications and any relevant STS chain with a single request.
In a simple federation scenario like that shown in Figure 1, the user authenticates to the IP-STS and is authorized at the RP based on the issued security token. Post-authentication, the user has a session cookie for the STS and another for the RP. Now, if the user browses to another RP, she will be redirected to the IP-STS for authentication—assuming both RP applications trust the same IP-STS. Because the user already has a session with the IP-STS, the STS will issue a token for the second RP without prompting for credentials. Th e user now has access to the second RP and has a new session cookie for the second RP.
As I’ve discussed, WIF supplies the SAM to write out the session cookie for authenticated users. By default, this session cookie is issued for the relative application address for the domain, and its base name is FedAuth. Because federated session cookies can be large, the token is usually split into two (or more) cookies: FedAuth, FedAuth1, and so on.
If you are hosting more than one application at the same domain, as part of the federation scenario, the default behavior would be that the browser has a FedAuth cookie for each RP (see Figure 10). Th e browser sends only those cookies associated with the domain and path for the request.
This default behavior is generally fine, but sometimes it’s necessary to supply a unique, per-application name for each session cookie—in particular if they’re hosted on the same domain. Or multiple applications at the same domain may share a session cookie, in which case you can set the cookie path to “/”.
If the session cookie expires, the browser will remove it from the cache and the user will be redirected once again to the STS for au-thentication. Separately, if the issued token associated with the ses-sion cookie has expired, WIF will redirect to the STS for a new token.
Sign-out is more explicit—usually driven by the user. Single sign-out is an optional feature of the WS-Federation specifi cation that suggests the STS should also notify other RP applications for which it has issued tokens of the sign-out request. Th is way, the session cookie is removed for all applications the user browsed to during the single sign-on session. In a more complex scenario, where multiple STSs are involved, the primary STS receiving the sign-out request should also notify other STSs to do the same.
For the purpose of this discussion, I will focus on what you should do at the RP to facilitate federated single sign-out. You can place the FederatedPassiveSignInStatus control on any page from which you want to support sign-in and sign-out and the control will automatically indicate its state. Once signed-in, the control presents a link, button or image for signing out.
When you click the control, it will handle sign-out according to the SignOutAction property, which can be Refresh, Redirect, Redi-rectToLoginPage or FederatedPassiveSignOut. Th e fi rst three delete the session cookie for the application, but do not notify the STS of the sign-out request. When you select the FederatedPassiveSignOut setting, the control will call SignOut on WSFederationAuthentica-tionModule. Th is ensures that federated session cookies are removed for the application. In addition, a sign-out request is sent to the STS:
GET https://localhost/IP1/STS?wa=wsignout1.0
If you aren’t using the FederatedPassiveSignInStatus control, you can directly call WSFederationAuthenticationModule.SignOut to trigger a redirect to the STS with the sign-out request.
Single sign-out implies that the user is signed out of all applications she signed into with her federated identity. If the STS supports this, it should hold a list of RP applications the user logged in to during her session, and issue a clean-up request to each RP when federated sign-out is requested:
GET https://localhost/ClaimsAwareWebSite?wa=wsignoutcleanup1.0
In more complex scenarios, the same clean-up request should be sent to any other STS involved in the federated session. To that end, the STS would have to have prior knowledge of the clean-up URI for each RP and STS. To support single sign-out, your RPs should be able to process these clean-up requests. Both the FAM and the Federated-PassiveSignInStatus control support this. If you’re using the FAM, the clean-up request can be posted to any URI at the RP and the FAM will process the request and clean up any session cookies. If you’re using the FederatedPassiveSignInStatus control, the clean-up request must be posted to a page that contains the control.
In fact, the WS-Federation specifi cation does not detail how to implement single sign-out and clean-up behavior beyond the rec-ommended query strings and fl ow of communication. It’s not easy to guarantee single sign-out will be eff ective across all federation partners as a result—but if you own the environment and want to achieve this goal, it’s indeed possible.
MICHELE LEROUX BUSTAMANTE is chief architect at IDesign (idesign.net) and chief security architect at BiTKOO (bitkoo.com). She’s also a Microsoft regional director for San Diego and a Microsoft MVP for Connected Systems. Visit her blog at michelelerouxbustamante.com.
THANKS to the following technical expert for reviewing this article: Govind Ramanathan
Figure 10 Session Cookies Associated with Each RP and the STS
RP1 IP-STS RP2
Set Cookie: FedAuthSet Cookie: FedAuth1 Set Cookie: .ASPXAUTH Set Cookie: FedAuth
Set Cookie: FedAuth1Set Cookie: FedAuthSet Cookie: FedAuth1 Set Cookie: .ASPXAUTH Set Cookie: FedAuth
Set Cookie: FedAuth1
Browser
Single sign-on and single sign-out are important
parts of federation.

msdn magazine36
W IN DOWS A ZUR E
Tips for Migrating Your Applications to the Cloud
One of our favorite aspects of technology is that it is constantly evolving and continually changing—there’s always more to learn! As students and followers of cloud computing, we’re tremendously excited about the Windows Azure platform. As tech-nical evangelists for Microsoft , we have the great fortune to work with customers in the adoption of new technology. As a result, we’ve seen a host of diff erent ways in which to apply Windows Azure.
Early on, George had a personal reason for wanting to use Windows Azure. George is involved in many community activities, and the ability to quickly spin up temporary applications and spin them down when no longer needed proved tremendously useful. For developers with experience writing Microsoft .NET Framework code, there’s hardly any learning curve—build your application, deploy it and run it.
Because of the interest many of our corporate customers express-ed in Windows Azure, we decided to hold a set of Windows Azure
George Huey and Wade Wegner
Migration Labs at the Microsoft Technology Centers. Th e intent was for customers to bring their applications into the lab and actually mi-grate them to Windows Azure. Th rough this process, every single customer was able to successfully migrate its Web applications and SQL databases to the Windows Azure platform.
We weren’t surprised—we already had plenty of experience with Windows Azure and were confi dent our customers would meet with success. But in the course of helping the lab attendees migrate their various applications, we learned quite a few tricks that help migrations go smoothly. In this article, we’ll share some of those tips and tricks we discovered working with customers on real-world migrations.
Migration BasicsWhen deciding to migrate an application from on-premises to the cloud (or to create a new application on a cloud service), there are several aspects of the application architecture that need to be considered:
• Application management• Application security• Application compatibility• Database compatibility
Th e questions and concerns we heard most frequently during the migration labs tended to revolve around these four areas. As a result, we’ll focus our discussion around these topics.
One misconception we oft en encountered was the idea that, by using Windows Azure, developers don’t have to worry about common
This article discusses:• Planning for security
• Application compatibility
• Database compatibility
• Migrating your data to SQL Azure
Technologies discussed:Windows Azure, SQL Azure, SQL Server

37August 2010msdnmagazine.com
architectural patterns regarding issues such as availability, scalabil-ity, reliability and security when moving to or creating applications in the cloud. Th e truth is that architectural patterns in the context of distributed computing are equally valid for applications architected for on-premises deployment or Windows Azure deployment.
Application ManagementNo matter whether your application is running on-premises or in the cloud, the operations management team needs data that will enable them to make eff ective decisions. Th e issues you’ll need to consider include service-level agreements, capacity planning, customer billing, auditing, application monitoring, traffi c analysis and managing costs (knowing when to scale up or down). Th ese need to be resolved before the application is deployed to production— and for best results, oft en before the application is created.
Th ese were just some of the issues that were considered during the Windows Azure Migration Labs. By utilizing the Windows Azure Diagnostics API provided in the Windows Azure SDK (Microsoft .WindowsAzure.Diagnostics), customers were able to expose application crash dumps, failed request tracing, Windows event logs, IIS logs, Windows Azure logs and performance counters.
Th is is much more straightforward than you might expect. You tell the diagnostic monitor which types of diagnostic infor-mation to collect (see Figure 1 for an example) and set the data transfer schedule for the information to be transferred to a central Windows Azure storage location.
For more information about Windows Azure diagnostics, see the article “Cloud Diagnostics: Take Control of Logging and Tracing in Windows Azure” by Mike Kelley, in the June 2010 issue of MSDN Magazine (msdn.microsoft.com/magazine/ff714589).
Application SecurityA top concern of any organization moving to the cloud is secu-rity. Most companies have invested a substantial amount of time, money and engineering into designing and developing a security model and it’s important that they’re able to leverage existing invest-ments such as identity stores, single sign-on solutions and fi rewalls.
While there are many ways for a company to go about securing cloud-based applications, an increasingly popular pattern is a claims-based approach.
Th is process is shown in Figure 2. In order for an application to be able to process security tokens from a Security Token Service (STS), a trust relationship must be established between the STS and the application.
Th e access control rules (step 1) are defi ned to meet business requirements (who can log into the application). Th ese rules are stored with the STS. When a user tries to access the application, she’s redirected to the STS so she can receive a valid token (step 2). Th e user provides a set of input claims (for example, a Live ID or a domain account) to the STS for authentication purposes. Th e STS will map these claims to a set of output claims once the user is authenticated (step 3). In step 4, the output claims are packaged into a Security Assertions Markup Language (SAML) token, signed by the STS, and returned to the user for forwarding to the application (the relying partner in step 5). The application
confi rms that the SAML token is valid and from the trusted STS (step 6). Once the token is validated, the application checks the claims in the token and sends back the appropriate response (step 7). Pretty simple! The beauty of this approach is that it fits in extremely well within the ASP.NET provider model. Th e process of making your ASP.NET application claims-aware is really quite simple.
In order to make life easier for the developer, Microsoft intro-duced the Windows Identity Foundation (WIF) SDK. Th is does all of the grunt work of parsing SAML 2.0 tokens, letting the developer concentrate on his application without having to worry about the underlying security technology.
Th e fi rst thing to do is download WIF (microsoft.com/downloads/ details.aspx?FamilyID=eb9c345f-e830-40b8-a5fe-ae7a864c4d76) and the WIF SDK (microsoft.com/downloads/details.aspx?familyid=C148B2DF-C7AF-46BB-9162-2C9422208504). Once these are installed, you’ll have what you need to make your application claims-aware.
In the Visual Studio solution with your ASP.NET Web appli-cation, right-click and select Add | Add New Web Site. Select the
public class WebRole : RoleEntryPoint { public override bool OnStart() { DiagnosticMonitorConfiguration config = DiagnosticMonitor.GetDefaultInitialConfiguration();
// To see which counters you can capture, type // "typeperf.exe /q" in a command window.
// Capture CPU utilization. PerformanceCounterConfiguration procUtilization = new PerformanceCounterConfiguration(); procUtilization.CounterSpecifier = @"Processor(*)\% Processor Time"; procUtilization.SampleRate = System.TimeSpan.FromSeconds(30.0); config.PerformanceCounters.DataSources.Add(procUtilization);
// Monitor available memory. PerformanceCounterConfiguration procAvailMemory = new PerformanceCounterConfiguration(); procAvailMemory.CounterSpecifier = @"\Memory\Avail MBytes"; procAvailMemory.SampleRate = System.TimeSpan.FromSeconds(30.0); config.PerformanceCounters.DataSources.Add(procAvailMemory);
// Add event collection from Windows Event Log // (System and Application event logs). config.WindowsEventLog.DataSources.Add("System!*"); config.WindowsEventLog.DataSources.Add("Application!*");
// All of the information monitored so far is being stored locally. // Tell diagnostic monitor what schedule period should be used when // transfering the events. config.Directories.ScheduledTransferPeriod = TimeSpan.FromMinutes(1); config.Logs.ScheduledTransferPeriod = TimeSpan.FromMinutes(1);
// Start the diagnostics monitor. DiagnosticMonitor.Start("DiagnosticsConnectionString", config);
// True gives full crash dumps. False gives small crash dumps. CrashDumps.EnableCollection(false);
System.Diagnostics.Trace.TraceInformation("OnStart Completed");
RoleEnvironment.Changing += RoleEnvironmentChanging;
return base.OnStart(); }...
Figure 1 Setting Up Diagnostics

msdn magazine38 Windows Azure
ASP.NET Security Token Service Web Site template. This will allow you to set up an STS for your development environment.
Once you have your STS created, you can add a reference to the STS by right-clicking on your application and clicking “Add STS reference.” Th is starts a wizard that walks you through the process of establishing a relationship between your application and the STS. Point to the application’s web.confi g fi le for your site and specify the Application URI (see Figure 3).
In the next step, choose “Use an existing STS” and then specify the location of the FederationMetadata.xml fi le in the STS project (see Figure 4). Choose the defaults for the remainder of the process.
Take a look at your web.config file. You’ll see that the Fed-Util.exe wizard changed a substantial amount of code. Th e most important changes were made to the microsoft.identityModel node of the web.confi g fi le. Here you’ll see references to your STS project, along with the claim types expected by the application. To ensure that your application is appropriately receiving the claims back from your STS, put the following code in your default.aspx page (note that you’ll have to add a reference to the Microsoft.IdentityModel from the WIF SDK):
IClaimsIdentity ici = (IClaimsIdentity)Thread.CurrentPrincipal.Identity;
foreach (Claim c in ici.Claims) { Response.Write(c.ClaimType + " - " + c.Value + "<br/>");}
When you next run your application, you will be automatically redirected to your STS. By default, the STS allows you to authenticate as “Adam Carter.” Just click the Login button (you don’t need a password).
After the STS authenticates the login, you will be redirected back to your Web application, along with a SAML token needed for authentication. Your application will accept the token and allow the default.aspx page to run. Because the WIF modules intercept your security credentials, you’re able to cast the identity principal as an IClaimsIdentity, and,
consequently, you can extract the claims type and value out of the identity object (see Figure 5).
Now that the Web application is claims-aware, it’s easy to adapt it to your existing identity model. Simply update your confi guration fi le so that it points to your production STS and ensure that you’ve confi gured your application as a relying party. Additionally, you can use this information to create a custom role provider so that you can translate claims types into roles.
Th is is an extremely powerful technique, and will let you move your applications to almost any environment—on-premises, the cloud or even a partner datacenter—and still validate against your identity stores through a publicly exposed STS.
Application CompatibilityWindows Azure is an application platform, so it’s important to understand the types of applications suited to the Windows Azure platform. While you have the ability to run native code and you can run applications with full trust, you must package your appli-cation before deploying it to the cloud, which means it’s important to evaluate your application to see if it’s a good fi t.
Here’s an example. One of our customers at the Windows Azure Migration Labs had an existing application consisting of a SQL Server 2005 back end, a LINQ to SQL data-access layer and a front end using both MVC Framework 1.0 and ASP.NET 3.5 SP1 running on IIS.
Th e application sat in a Web farm with a load balancer routing the traffi c. Th e application itself was stateless so it didn’t matter to which server the user was ultimately directed.
An interesting detail about this application was that the MVC application manages more than 220 separate Web sites. The company used a combination of MVC routing and information stored in the SQL Server database to determine which content should be loaded for each Web site. Th ere were fi ve Web servers behind the load balancer serving more than 4 million page visits per month for the collection of Web sites.
Figure 3 Starting the Federation Utility Wizard
Figure 2 Claims-Based Identity in an Application Context
Security TokenService (STS)
THE ACCESS CONTROL PATTERN
User(Application)
Your App(Relying Party)
5. Send token
7. Get response
Trust
exch
ange
d;
secret
s, ce
rts
2. Send token
(input claims; e.g. identity)4. Return token
(output claims from 3)
6. Checkclaims
3. Map input claimsto output claims based onaccess control rules
1. Define accesscontrol rules

Learn more:
Imagine......an intranet employees want to use
Copyright © 2010 Ektron, Inc. All rights reserved. | http://www.ektron.com | 1-877-4-WEB-CMS
http://www.ektron.com/intranet
Why is user adoption such a large hurdle for intranets? eIntranet overcomes this hurdle by transforming the user experience. Employees connect with the right people and content instantly. Information fi nds them, no matter where they go.
Collaboration – Complete projects faster in collaborative groupspaces with powerful communication and sharing tools
Timeline and Social Navigation – Find content and collateral based on when it was created and who is using it
Easy to deploy, customize and extend – Integrate with business infrastructures and extend the functionality to meet unique needs
Mobile engagement – Engage employees on the go, delivering updates via SMS alerts, e-mail or the eIntranet Mobile App
Untitled-1 1 6/11/10 11:48 AM

msdn magazine40 Windows Azure
Th e primary challenge the company faced was the length of time it took to provision a new Web server for its environment: months! When the company considered migrating the application to Windows Azure, its primary motivation was saving a tremen-dous amount of time. Scaling out would become a confi guration detail rather than a quarter-long nightmare.
The migration process to Windows Azure is actually quite straightforward. Here’s the generic process we used:1. Verify that the application is running correctly in the
development environment.2. Migrate the SQL Server back end to SQL Azure using the SQL
Azure Migration Wizard (we’ll discuss the details later in this article).3. Update the local application to work with the SQL Azure
database. Th is was as simple as changing the connection string.4. Convert the application into a Web Role project.5. Validate that the application runs on the local develop ment
fabric.6. Package up the Web Role and deploy it to Windows Azure.7. Validate that the application runs from Windows Azure.
In order to reduce the size of the Web role package, we ended up pulling all the images and CSS fi les out of their content folders and placing them in Windows Azure blob storage.
Because all the content was in Windows Azure blob storage, GGP was able to leverage the Windows Azure content-delivery network (CDN). Th is allowed caches of data to sit closer to the end users.
For an overview of development, testing and deployment for Windows Azure, see the article “Windows Azure: Developing and Deploying Windows Azure Apps in Visual Studio 2010” in the April 2010 issue of MSDN Magazine (msdn.microsoft.com/magazine/ee336122). For a deeper look at storage issues, see “Cloud Storage: Fueling Your Application’s Engine with Windows Azure Storage” in the January 2010 issue (msdn.microsoft.com/magazine/ee335721).
Database CompatibilityWhen SQL Azure fi rst came out, we migrated a couple of our SQL Server databases to it. Along with our experience hold-ing the Windows Azure Migration Labs, we learned a few important things you should consider before em-barking on the migration process.
First, it’s important to check the size of your data-base and how it fi ts within the database allowances used by SQL Azure. Currently, SQL Azure off ers Web Editions in 1GB and 5GB sizes and Business Editions in 10, 20, 30, 40 and 50GB sizes. You need to check your database and make sure it isn’t larger than 50GB. If your database is larger than 50GB, then you’ll need to examine your database and see if it can be broken down into smaller databases (in other words, sharding your database) or moving large data to blobs.
SQL Azure supports only SQL Authentication, so you’ll need to consider whether changes are needed to the authentication scheme used by your application. On top of that, SQL Azure has a resource throttle that limits connection time. We’ll discuss both of these issues a little later in the article.
Th e version of your SQL Server database is another item you need to take into consideration before migrating your database to SQL Azure. SQL Azure is built on top of SQL Server 2008. Th is means that if you want to migrate your SQL Server 2000 or SQL Server 2005 databases to SQL Azure, you need to make sure your databases are compatible with SQL Server 2008. For example, earlier versions of SQL Server support the old style TSQL joins such as *= and =* operators in the WHERE clause. SQL Server 2008 only supports ANSI style joins. For example:
SELECT ProcessClassTypeName , bpa.PropertyMetadata AS PropertyMetadataOverride , act.PropertyMetadata AS PropertyMetadataDefault FROM dbo.BusinessProcessActivities bpa LEFT JOIN dbo.Activities act ON act.Activity_ID = bpa.Activity_ID
When the compatibility level of the database is set to SQL Server 2005 or SQL Server 2008, the old style TSQL joins (*= and =*) are not supported. Th is is only one example of compatibility issues you’ll fi nd when migrating to SQL Server 2008.
It’s beyond the scope of this article to discuss in detail the migration process to SQL Server 2008. If you’re interested in database migration best practices, please check out the “Ultimate guide for upgrading to SQL Server 2008” (microsoft.com/downloads/details.aspx?FamilyID=66d3e6f5-6902-4fdd-af75-9975aea5bea7). Th ere’s also a wealth of resources available from the MSDN SQL Server developer center (msdn.microsoft.com/sqlserver).
You’ll find the best path is to migrate from a SQL Server 2008- compatible database to SQL Azure. Th is means that if you want to migrate your SQL Server 2000 or 2005 database to SQL Azure, you can go through an on-premises upgrade to SQL Server 2008 before you migrate to SQL Azure.
Microsoft off ers a great tool called SQL Server Upgrade Advisor (microsoft.com/downloads/details.aspx?FamilyId=F5A6C5E9-4CD9-4E42-A21C-7291E7F0F852) that analyzes instances of SQL Server 2000 and SQL Server 2005 to identify features and confi guration changes that might aff ect your upgrade. It provides links to documentation that describes each identifi ed issue and how to resolve it. Once you’ve verifi ed that your database is compatible with SQL Server 2008, you can fast-forward to migrating the database to SQL Azure.
Figure 4 Confi guring the STS

Copyright 1996-2010 Infragistics, Inc. All rights reserved. Infragistics and the Infragistics logo and NetAdvantage are registered trademarks of Infragistics, Inc.
At Infragistics, we make sure our NetAdvantage for.NET controls make every part of your User Interfacethe very best it can be. That’s why we’ve tested and re-tested to make sure our Data Grids are the veryfastest grids on the market and our Data Chartsoutperform any you’ve ever experienced. Use ourcontrols and not only will you get the fastest loadtimes, but your apps will always look good too. Fastand good-looking…that’s a killer app. Try them foryourself at infragistics.com/wow.
Infragistics Sales 800 231 8588 Infragistics Europe Sales +44 (0) 800 298 9055 Infragistics India +91-80-6785-1111twitter.com/infragistics
Fast Data Chart
WPF Grid
Silverlight Grid
ASP.NET Grid
Untitled-12 1 4/9/10 2:27 PM
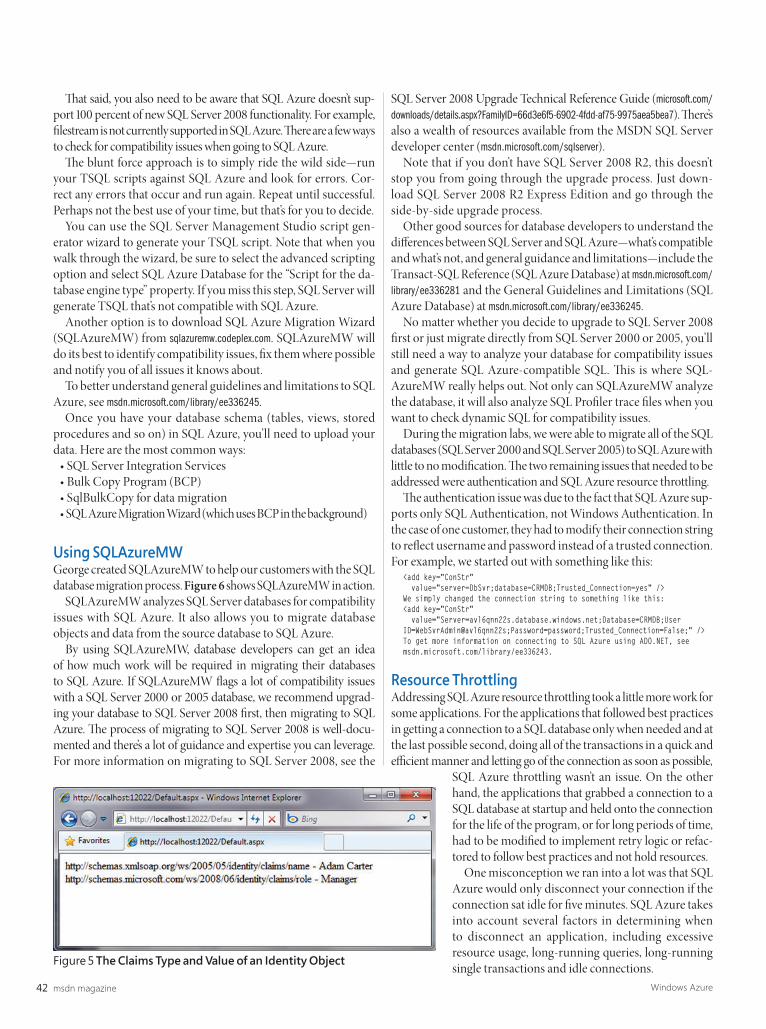
msdn magazine42 Windows Azure
Th at said, you also need to be aware that SQL Azure doesn’t sup-port 100 percent of new SQL Server 2008 functionality. For example, fi lestream is not currently supported in SQL Azure. Th ere are a few ways to check for compatibility issues when going to SQL Azure.
Th e blunt force approach is to simply ride the wild side—run your TSQL scripts against SQL Azure and look for errors. Cor-rect any errors that occur and run again. Repeat until successful. Perhaps not the best use of your time, but that’s for you to decide.
You can use the SQL Server Management Studio script gen-erator wizard to generate your TSQL script. Note that when you walk through the wizard, be sure to select the advanced scripting option and select SQL Azure Database for the “Script for the da-tabase engine type” property. If you miss this step, SQL Server will generate TSQL that’s not compatible with SQL Azure.
Another option is to download SQL Azure Migration Wizard (SQLAzureMW) from sqlazuremw.codeplex.com. SQLAzureMW will do its best to identify compatibility issues, fi x them where possible and notify you of all issues it knows about.
To better understand general guidelines and limitations to SQL Azure, see msdn.microsoft.com/library/ee336245.
Once you have your database schema (tables, views, stored procedures and so on) in SQL Azure, you’ll need to upload your data. Here are the most common ways:
• SQL Server Integration Services• Bulk Copy Program (BCP)• SqlBulkCopy for data migration• SQL Azure Migration Wizard (which uses BCP in the background)
Using SQLAzureMWGeorge created SQLAzureMW to help our customers with the SQL database migration process. Figure 6 shows SQLAzureMW in action.
SQLAzureMW analyzes SQL Server databases for compatibility issues with SQL Azure. It also allows you to migrate database objects and data from the source database to SQL Azure.
By using SQLAzureMW, database developers can get an idea of how much work will be required in migrating their databases to SQL Azure. If SQLAzureMW fl ags a lot of compatibility issues with a SQL Server 2000 or 2005 database, we recommend upgrad-ing your database to SQL Server 2008 fi rst, then migrating to SQL Azure. Th e process of migrating to SQL Server 2008 is well-docu-mented and there’s a lot of guidance and expertise you can leverage. For more information on migrating to SQL Server 2008, see the
SQL Server 2008 Upgrade Technical Reference Guide (microsoft.com/ downloads/details.aspx?FamilyID=66d3e6f5-6902-4fdd-af75-9975aea5bea7). Th ere’s also a wealth of resources available from the MSDN SQL Server developer center (msdn.microsoft.com/sqlserver).
Note that if you don’t have SQL Server 2008 R2, this doesn’t stop you from going through the upgrade process. Just down-load SQL Server 2008 R2 Express Edition and go through the side-by-side upgrade process.
Other good sources for database developers to understand the diff erences between SQL Server and SQL Azure—what’s compatible and what’s not, and general guidance and limitations—include the Transact-SQL Reference (SQL Azure Database) at msdn.microsoft.com/library/ee336281 and the General Guidelines and Limitations (SQL Azure Database) at msdn.microsoft.com/library/ee336245.
No matter whether you decide to upgrade to SQL Server 2008 fi rst or just migrate directly from SQL Server 2000 or 2005, you’ll still need a way to analyze your database for compatibility issues and generate SQL Azure-compatible SQL. Th is is where SQL-AzureMW really helps out. Not only can SQLAzureMW analyze the database, it will also analyze SQL Profi ler trace fi les when you want to check dynamic SQL for compatibility issues.
During the migration labs, we were able to migrate all of the SQL databases (SQL Server 2000 and SQL Server 2005) to SQL Azure with little to no modifi cation. Th e two remaining issues that needed to be addressed were authentication and SQL Azure resource throttling.
Th e authentication issue was due to the fact that SQL Azure sup-ports only SQL Authentication, not Windows Authentication. In the case of one customer, they had to modify their connection string to refl ect username and password instead of a trusted connection. For example, we started out with something like this:
<add key="ConStr" value="server=DbSvr;database=CRMDB;Trusted_Connection=yes" />We simply changed the connection string to something like this:<add key="ConStr" value="Server=avl6qnn22s.database.windows.net;Database=CRMDB;User ID=WebSvrAdmin@avl6qnn22s;Password=password;Trusted_Connection=False;" />To get more information on connecting to SQL Azure using ADO.NET, see msdn.microsoft.com/library/ee336243.
Resource ThrottlingAddressing SQL Azure resource throttling took a little more work for some applications. For the applications that followed best practices in getting a connection to a SQL database only when needed and at the last possible second, doing all of the transactions in a quick and effi cient manner and letting go of the connection as soon as possible,
SQL Azure throttling wasn’t an issue. On the other hand, the applications that grabbed a connection to a SQL database at startup and held onto the connection for the life of the program, or for long periods of time, had to be modifi ed to implement retry logic or refac-tored to follow best practices and not hold resources.
One misconception we ran into a lot was that SQL Azure would only disconnect your connection if the connection sat idle for fi ve minutes. SQL Azure takes into account several factors in determining when to disconnect an application, including excessive resource usage, long-running queries, long-running single transactions and idle connections.Figure 5 The Claims Type and Value of an Identity Object
Untitled-5 1 6/7/10 12:05 PM
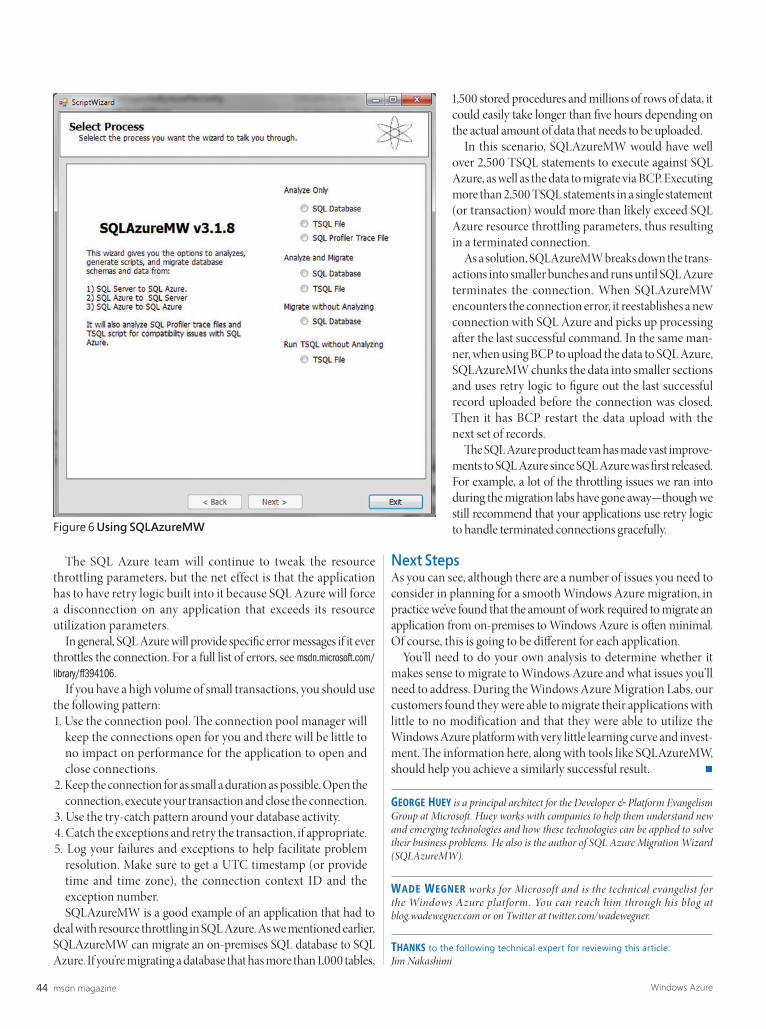
msdn magazine44 Windows Azure
The SQL Azure team will continue to tweak the resource throttling parameters, but the net effect is that the application has to have retry logic built into it because SQL Azure will force a disconnection on any application that exceeds its resource utilization parameters.
In general, SQL Azure will provide specifi c error messages if it ever throttles the connection. For a full list of errors, see msdn.micro soft.com/library/ff394106.
If you have a high volume of small transactions, you should use the following pattern:1. Use the connection pool. Th e connection pool manager will
keep the connections open for you and there will be little to no impact on performance for the application to open and close connections.
2. Keep the connection for as small a duration as possible. Open the connection, execute your transaction and close the connection.
3. Use the try-catch pattern around your database activity.4. Catch the exceptions and retry the transaction, if appropriate. 5. Log your failures and exceptions to help facilitate problem
resolution. Make sure to get a UTC timestamp (or provide time and time zone), the connection context ID and the exception number.SQLAzureMW is a good example of an application that had to
deal with resource throttling in SQL Azure. As we mentioned earlier, SQLAzureMW can migrate an on-premises SQL database to SQL Azure. If you’re migrating a database that has more than 1,000 tables,
1,500 stored procedures and millions of rows of data, it could easily take longer than fi ve hours depending on the actual amount of data that needs to be uploaded.
In this scenario, SQLAzureMW would have well over 2,500 TSQL statements to execute against SQL Azure, as well as the data to migrate via BCP. Executing more than 2,500 TSQL statements in a single statement (or transaction) would more than likely exceed SQL Azure resource throttling parameters, thus resulting in a terminated connection.
As a solution, SQLAzureMW breaks down the trans-actions into smaller bunches and runs until SQL Azure terminates the connection. When SQL AzureMW encounters the connection error, it reestablishes a new connection with SQL Azure and picks up processing aft er the last successful command. In the same man-ner, when using BCP to upload the data to SQL Azure, SQLAzureMW chunks the data into smaller sections and uses retry logic to fi gure out the last successful record uploaded before the connection was closed. Then it has BCP restart the data upload with the next set of records.
Th e SQL Azure product team has made vast improve-ments to SQL Azure since SQL Azure was fi rst released. For example, a lot of the throttling issues we ran into during the migration labs have gone away—though we still recommend that your applications use retry logic to handle terminated connections gracefully.
Next StepsAs you can see, although there are a number of issues you need to consider in planning for a smooth Windows Azure migration, in practice we’ve found that the amount of work required to migrate an application from on-premises to Windows Azure is oft en minimal. Of course, this is going to be diff erent for each application.
You’ll need to do your own analysis to determine whether it makes sense to migrate to Windows Azure and what issues you’ll need to address. During the Windows Azure Migration Labs, our customers found they were able to migrate their applications with little to no modification and that they were able to utilize the Windows Azure platform with very little learning curve and invest-ment. Th e information here, along with tools like SQLAzureMW, should help you achieve a similarly successful result.
GEORGE HUEY is a principal architect for the Developer & Platform Evangelism Group at Microsoft . Huey works with companies to help them understand new and emerging technologies and how these technologies can be applied to solve their business problems. He also is the author of SQL Azure Migration Wizard (SQLAzureMW).
WADE WEGNER works for Microsoft and is the technical evangelist for the Windows Azure platform. You can reach him through his blog at blog.wade wegner.com or on Twitter at twitter.com/wadewegner.
THANKS to the following technical expert for reviewing this article: Jim Nakashimi
Figure 6 Using SQLAzureMW

msdn magazine46
IN S YN C
Creating Synchronization Providers with Sync Framework
Microsoft Sync Framework is a comprehensive platform for synchronizing offl ine and online data, and facilitates collabora-tion and offl ine access for applications, services and devices alike. It is protocol- and database-independent and includes technologies and tools that enable device roaming, sharing and the ability to take networked data offl ine before synchronizing it back at a later point in time.
Sync Framework can be used to build applications that syn-chronize data from any data store using any protocol over a net-work. It’s a comprehensive synchronization platform that facilitates offl ine and online data access for applications, services and devices. Sync Framework has an extensible provider model and can be used with both managed and unmanaged code to synchronize data between two data sources.
Joydip Kanjilal
Th is article takes a look at the concepts of synchronization and how Sync Framework can be integrated into your own projects. Specifi cally, I’ll be discussing the fundamentals of data synchroni-zation, the architectural components of Sync Framework and how you use sync providers.
To work with Sync Framework and the code examples in this article, you’ll need to install Visual Studio 2010 and the Sync Frame-work runtime 2.0 or later. You can download the runtime with the Microsoft Sync Framework 2.0 Redistributable Package from the Sync Framework Developer Center (msdn.microsoft.com/sync).
Sync Framework BasicsSync Framework comprises four primary components: a runtime, metadata services, synchronization providers and participants.
Th e Sync Framework runtime provides the infrastructure for synchronizing data between data sources. It also provides an SDK that developers can extend to implement custom providers.
Metadata services provide the infrastructure to store sync meta-data, which contains information used during a synchronization session. Sync metadata includes versions, anchors and change detection information. You’ll also use sync metadata in the design and development of custom providers.
Synchronization providers are used to synchronize data between replicas or endpoints. A replica is a unit of synchronization and is used to denote the actual data store. As an example, if you’re syn-chronizing data between two databases, then each of the databases
This article discusses:• Sync Framework basics
• Default synchronization providers
• Filtering fi les, handling confl icts
• Creating a custom provider
Technologies discussed:Visual Studio 2010, Sync Framework
Code download available at:code.msdn.microsoft.com/mag201008Sync
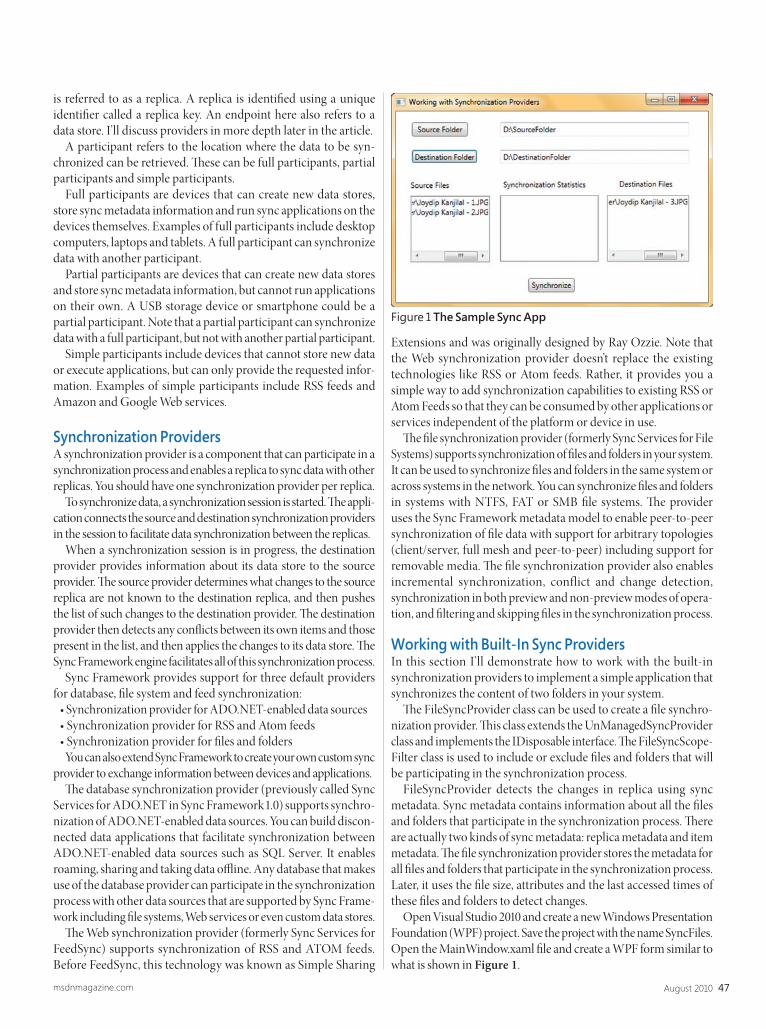
47August 2010msdnmagazine.com
is referred to as a replica. A replica is identifi ed using a unique identifi er called a replica key. An endpoint here also refers to a data store. I’ll discuss providers in more depth later in the article.
A participant refers to the location where the data to be syn-chronized can be retrieved. Th ese can be full participants, partial participants and simple participants.
Full participants are devices that can create new data stores, store sync metadata information and run sync applications on the devices themselves. Examples of full participants include desktop computers, laptops and tablets. A full participant can synchronize data with another participant.
Partial participants are devices that can create new data stores and store sync metadata information, but cannot run applications on their own. A USB storage device or smartphone could be a partial participant. Note that a partial participant can synchronize data with a full participant, but not with another partial participant.
Simple participants include devices that cannot store new data or execute applications, but can only provide the requested infor-mation. Examples of simple participants include RSS feeds and Amazon and Google Web services.
Synchronization ProvidersA synchronization provider is a component that can participate in a synchronization process and enables a replica to sync data with other replicas. You should have one synchronization provider per replica.
To synchronize data, a synchronization session is started. Th e appli-cation connects the source and destination synchronization providers in the session to facilitate data synchronization between the replicas.
When a synchronization session is in progress, the destination provider provides information about its data store to the source provider. Th e source provider determines what changes to the source replica are not known to the destination replica, and then pushes the list of such changes to the destination provider. Th e destination provider then detects any confl icts between its own items and those present in the list, and then applies the changes to its data store. Th e Sync Framework engine facilitates all of this synchronization process.
Sync Framework provides support for three default providers for database, fi le system and feed synchronization:
• Synchronization provider for ADO.NET-enabled data sources• Synchronization provider for RSS and Atom feeds• Synchronization provider for fi les and folders
You can also extend Sync Framework to create your own custom sync provider to exchange information between devices and applications.
Th e database synchronization provider (previously called Sync Services for ADO.NET in Sync Framework 1.0) supports synchro-nization of ADO.NET-enabled data sources. You can build discon-nected data applications that facilitate synchronization between ADO.NET-enabled data sources such as SQL Server. It enables roaming, sharing and taking data offl ine. Any database that makes use of the database provider can participate in the synchronization process with other data sources that are supported by Sync Frame-work including fi le systems, Web services or even custom data stores.
Th e Web synchronization provider (formerly Sync Services for FeedSync) supports synchronization of RSS and ATOM feeds. Before FeedSync, this technology was known as Simple Sharing
Extensions and was originally designed by Ray Ozzie. Note that the Web synchronization provider doesn’t replace the existing technologies like RSS or Atom feeds. Rather, it provides you a simple way to add synchronization capabilities to existing RSS or Atom Feeds so that they can be consumed by other applications or services independent of the platform or device in use.
Th e fi le synchronization provider (formerly Sync Services for File Systems) supports synchronization of fi les and folders in your system. It can be used to synchronize fi les and folders in the same system or across systems in the network. You can synchronize fi les and folders in systems with NTFS, FAT or SMB fi le systems. Th e provider uses the Sync Framework metadata model to enable peer-to-peer synchronization of fi le data with support for arbitrary topologies (client/server, full mesh and peer-to-peer) including support for removable media. Th e fi le synchronization provider also enables incremental synchronization, conflict and change detection, synchronization in both preview and non-preview modes of opera-tion, and fi ltering and skipping fi les in the synchronization process.
Working with Built-In Sync ProvidersIn this section I’ll demonstrate how to work with the built-in synchronization providers to implement a simple application that synchronizes the content of two folders in your system.
Th e FileSyncProvider class can be used to create a fi le synchro-nization provider. Th is class extends the UnManagedSyncProvider class and implements the IDisposable interface. Th e FileSyncScope-Filter class is used to include or exclude fi les and folders that will be participating in the synchronization process.
FileSyncProvider detects the changes in replica using sync metadata. Sync metadata contains information about all the fi les and folders that participate in the synchronization process. Th ere are actually two kinds of sync metadata: replica metadata and item metadata. Th e fi le synchronization provider stores the metadata for all fi les and folders that participate in the synchronization process. Later, it uses the fi le size, attributes and the last accessed times of these fi les and folders to detect changes.
Open Visual Studio 2010 and create a new Windows Presentation Foundation (WPF) project. Save the project with the name SyncFiles. Open the MainWindow.xaml fi le and create a WPF form similar to what is shown in Figure 1.
Figure 1 The Sample Sync App

msdn magazine48 In Sync
As you can see, you have controls to pick the source and desti-nation folders. You also have controls to display the synchroniza-tion statistics and content of the source and the destination folders.
Right-click on the project in Solution Explorer, click Add Reference and add the Microsoft .Synchronization assemblies.
Now add a new GetReplicaID method in MainWindow.xaml.cs fi le to return a GUID as shown in the code in Figure 2. Th e Syn-chronize method, when called on the instance of SyncOrchestrator, creates a metadata fi le called fi lesync.metadata in each of the folders or replicas using the unique GUID. Th e GetReplicaID method persists this GUID in a fi le so that the next call to this method doesn’t generate a new GUID for that particular folder. Th e GetReplicaID method first checks whether the file containing a replica ID exists. If the fi le isn’t found, a new replica ID is created and stored in the fi le. If the fi le exists (because a replica ID for that folder was previously generated), it returns the replica ID from the fi le.
Next, add a method called GetFilesAndDirectories to return a list of the fi les and folders under the replica location (see Figure 3). Th e folder name should be passed to it as a parameter.
Th is method would be used to display the list of fi les and folders inside the source and destination folders both before and aft er the synchronization process. Th e methods PopulateSourceFileList and PopulateDestinationFileList call GetFilesAndDirectories to pop-ulate the list boxes that display the fi les and directories inside the source and destination folders (see the code download for details).
The btnSource_Click and the btnDestination_Click event handlers are used to select the source and the destination folders. Both methods make use of the FolderBrowser class to display a
dialog box from where the user can select the source or destina-tion folders. Th e complete source code of the FolderBrowser class is available for download with the code download for this article.
Now I need to write the Click event handler of the Button control, which starts by disabling the button before synchroniza-tion starts. It then calls the Synchronize method with the source and destination paths as parameters. Finally, I start the synchro-nization process, catch any errors, and enable the button when synchronization completes:
btnSyncFiles.IsEnabled = false; // Disable the button before synchronization startsSynchronize(sourcePath, destinationPath);btnSyncFiles.IsEnabled = true; // Enable the button after synchronization is complete
Th e Synchronize method accepts the source and destination path and synchronizes content of the two replicas. In the Synchronize method, I take an instance of the SyncOperationStatistics class to retrieve statistical information on the synchronization process:
SyncOperationStatistics syncOperationStatistics;
I also create the source and destination sync providers, create a SyncOrchestrator instance named synchronizationAgent, assign the GUIDs to the source and destination replicas and attach the two providers to it. Th e SyncOrchestrator is responsible for coordinating the synchronization session:
sourceReplicaID = GetReplicaID(Path.Combine(source,"ReplicaID"));destinationReplicaID = GetReplicaID(Path.Combine(destination,"ReplicaID"));
sourceProvider = new FileSyncProvider(sourceReplicaID, source);destinationProvider = new FileSyncProvider(destinationReplicaID, destination);
SyncOrchestrator synchronizationAgent = new SyncOrchestrator();synchronizationAgent.LocalProvider = sourceProvider;synchronizationAgent.RemoteProvider = destinationProvider;
Finally, I start the synchronization process, catch any errors and release resources as appropriate as shown in Figure 4. Th e code download for this article includes the complete source project with error handling and other implementation details.
You can also report the synchronization progress for a synchro-nization session. To implement this, follow these steps:1. Register an event handler for the ApplyingChange event.2. Enable preview mode by setting the PreviewMode property
of FileSyncProvider to true.3. Take an integer counter and increase it each time the Applying-
Change event is triggered.4. Start the synchronization process.5. Set the PreviewMode property of FileSyncProvider to false to
disable PreviewMode.6. Start the synchronization process again.
Filtering and Skipping FilesWhen synchronizing using Sync Framework, some fi les are skipped automatically, including Desktop.ini and Th umbs.db, fi les with sys-tem and hidden attributes, and metadata fi les. You can apply static fi lters to control the fi les and folders you want to be synchronized. Specifi cally, these fi lters exclude the fi les you don’t want to be a part of the synchronization process.
private Guid GetReplicaID(string guidPath) { if (!File.Exists(guidPath)) { Guid replicaID = Guid.NewGuid(); using (FileStream fileStream = File.Open(guidPath, FileMode.Create)) { using (StreamWriter streamWriter = new StreamWriter(fileStream)) {
streamWriter.WriteLine(replicaID.ToString()); } }
return replicaID; } else { using (FileStream fileStream = File.Open(guidPath, FileMode.Open)) { using (StreamReader streamReader = new StreamReader(fileStream)) {
return new Guid(streamReader.ReadLine()); } } }}
Figure 2 GetReplicaID
Synchronization providers are used to synchronize data
between replicas or endpoints.

msdn magazine50 In Sync
To use static fi lters, create an instance of the FileSyncScopeFilter class and pass the inclusion and exclusion fi lters as parameters to its constructor. You can also use the FileNameExcludes.Add method on your FileSyncScopeFilter instance to filter out one or more fi les from the synchronization session. You can then pass in this FileSyncScopeFilter instance when creating your FileSyncProvider instance. Here’s an example:
FileSyncScopeFilter fileSyncScopeFilter = new FileSyncScopeFilter();fileSyncScopeFilter.FileNameExcludes.Add("filesync.id");FileSyncProvider fileSyncProvider = new FileSyncProvider(Guid.NewGuid(), "D:\\MyFolder",fileSyncScopeFilter,FileSyncOptions.None);
Similarly, you can exclude all .lnk fi les from the synchroniza-tion process:
FileSyncScopeFilter fileSyncScopeFilter = new FileSyncScopeFilter();fileSyncScopeFilter.FileNameExcludes.Add("*.lnk");
You can even use FileSyncOptions to explicitly set options for the synchronization session:
FileSyncOptions fileSyncOptions = FileSyncOptions.ExplicitDetectChanges | FileSyncOptions.RecycleDeletedFiles | FileSyncOptions.RecyclePreviousFileOnUpdates | FileSyncOptions.RecycleConflictLoserFiles;
To skip one or more fi les during the synchronization process, register an event handler on the ApplyingChange event and set the SkipChange property to true:
FileSyncProvider fileSyncProvider;fileSyncProvider.AppliedChange += new EventHandler (OnAppliedChange);destinationProvider.SkippedChange += new EventHandler (OnSkippedChange);
Now I can implement the OnAppliedChange event handler to show what changes occur:
public static void OnAppliedChange( object sender, AppliedChangeEventArgs args) { switch (args.ChangeType) { case ChangeType.Create: Console.WriteLine(“Create ” + args.NewFilePath); break; case ChangeType.Delete: Console.WriteLine(“Delete” + args.OldFilePath); break; case ChangeType.Overwrite: Console.WriteLine(“Overwrite” + args.OldFilePath); break; default: break; }}
Note that this example is simplifi ed for clarity. A more robust implementation is included in the code download.
To understand why a particular fi le has been skipped during the synchronization session, you can implement the OnSkipped-Change event handler:
public static void OnSkippedChange( object sender, SkippedChangeEventArgs args) {
if (args.Exception != null) Console.WriteLine(“Synchronization Error: “ + args.Exception.Message); }
Build and execute the application. Click on the Source Folder button to select the source folder. Use the Destination Folder to select the destination folder. You’ll see the list of the files in each of the folders before synchronization is displayed in the respective list boxes (see Figure 1). The Synchronization
Statistics list box doesn’t display anything as synchronization is yet to be started.
Now click the Synchronize button to start the synchronization process. Once the source and destination folders have been synchronized, you’ll see the content of both folders aft er synchro-nization in the respective list boxes. Th e Synchronization Statistics list box now displays information about the tasks that were completed (see Figure 5).
Handling Confl ictsSync Framework manages all the complexities involved in time-stamp-based synchronization that include deferred conflicts, failures, interruptions and loops. To handle data confl icts when a synchronization session is in progress, Sync Framework follows one of the following strategies:
• Source Wins: In this strategy, the changes that have been made in the source data store in the event of a confl ict always win.
try { syncOperationStatistics = synchronizationAgent.Synchronize();
// Assign synchronization statistics to the lstStatistics control lstStatistics.Items.Add("Download Applied: " + syncOperationStatistics.DownloadChangesApplied.ToString()); lstStatistics.Items.Add("Download Failed: " + syncOperationStatistics.DownloadChangesFailed.ToString()); lstStatistics.Items.Add("Download Total: " + syncOperationStatistics.DownloadChangesTotal.ToString()); lstStatistics.Items.Add("Upload Total: " + syncOperationStatistics.UploadChangesApplied.ToString()); lstStatistics.Items.Add("Upload Total: " + syncOperationStatistics.UploadChangesFailed.ToString()); lstStatistics.Items.Add("Upload Total: " + syncOperationStatistics.UploadChangesTotal.ToString());}catch (Microsoft.Synchronization.SyncException se) { MessageBox.Show(se.Message, "Sync Files - Error");}finally { // Release resources once done if (sourceProvider != null) sourceProvider.Dispose(); if (destinationProvider != null) destinationProvider.Dispose();}
Figure 4 Synchronizing Replicas
private List<string> GetFilesAndDirectories(String directory) { List<String> result = new List<String>(); Stack<String> stack = new Stack<String>(); stack.Push(directory);
while (stack.Count > 0) { String temp = stack.Pop();
try { result.AddRange(Directory.GetFiles(temp, "*.*"));
foreach (string directoryName in Directory.GetDirectories(temp)) { stack.Push(directoryName); } } catch { throw new Exception("Error retrieving file or directory."); } }
return result;}
Figure 3 Getting Replica Files and Folders
msdnmagazine.com
• Destination Wins: In this strategy, the changes that have been made in the destination data store in the event of a confl ict always win.
• Merge: In this strategy, the changes in the event of a confl ict are merged together.
• Log confl ict: Th is is a strategy in which the confl ict is deferred or logged.
Understanding the Synchronization FlowA SyncOrchestrator instance controls a synchronization session and the fl ow of data during the session. Th e synchronization fl ow is always unidirectional and you have a source provider attached to the source replica and a destination provider attached to the destination replica. The first step is to create your source and destination providers, assign unique replica IDs to them and attach the two providers to the source and destination replicas:
FileSyncProvider sourceProvider = new FileSyncProvider(sourceReplicaID, @"D:\Source");FileSyncProvider destinationProvider = new FileSyncProvider(destinationReplicaID, @"D:\Destination");
Next, create an instance of SyncOrchestrator and attach the two pro-viders to it. A call to the Synchronize method on the SyncOrchestrator instance creates a link between the source and the destination providers:
SyncOrchestrator syncAgent = new SyncOrchestrator();syncAgent.LocalProvider = sourceProvider;syncAgent.RemoteProvider = destProvider;syncAgent.Synchronize();
From that point, a number of calls can be made by Sync Framework while a synchronization session is in progress. Let’s walk through them.
BeginSession is called on both the source and destination providers to indicate the synchronization provider is about to join a synchronization session. Note that the BeginSession method throws InvalidOperationException if the session cannot be started or the provider is not initialized properly:
public abstract void BeginSession( SyncProviderPosition position, SyncSessionContext syncSessionContext);
Sync Framework calls GetSyncBatchParameters on the instance of the destination provider. Th e destination provider returns its knowledge (a compact representation of versions or changes that a particular replica is aware of) and the requested batch size. Th is meth-od accepts two out parameters, namely, batchSize and knowledge:
public abstract void GetSyncBatchParameters( out uint batchSize, out SyncKnowledge knowledge);
Sync Framework invokes GetChangeBatch on the source pro-vider. Th is method accepts two input parameters, the batch size and the knowledge of the destination:
public abstract ChangeBatch GetChangeBatch( uint batchSize, SyncKnowledge destinationKnowledge, out object changeDataRetriever);
A SyncOrchestrator instance controls a synchronization
session and the fl ow of data.

msdn magazine52 In Sync
As an example of a custom provider, say you wanted to imple-ment a synchronization provider for synchronizing data between databases. Th is is just an overview of a simple example, and it could be extended to accommodate much more complicated scenarios.
Start by creating three databases in SQL Server 2008 (I named them ReplicaA, ReplicaB and ReplicaC) and create a table in each database called Student. Th e custom provider will sync records between these three Student tables. Next, create an entity called Student for performing CRUD operations on the Student table.
Create a class called Student with StudentID, FirstName, Last-Name as fi elds, and the necessary helper methods to execute CRUD operations in the database:
public class Student { public int StudentID { get; set; } public String FirstName { get; set; } public String LastName { get; set; } //Helper methods for CRUD operations...}
Create a class called CustomDBSyncProvider and extend it from the KnowledgeSyncProvider, IChangeDataRetriever, INotifyingChangeApplierTarget and IDisposable interfaces:
using System;using System.Collections.Generic;using System.IO;using Microsoft.Synchronization;using Microsoft.Synchronization.MetadataStorage; public class CustomDBSyncProvider : KnowledgeSyncProvider, IChangeDataRetriever, INotifyingChangeApplierTarget,IDisposable {...
Implement the necessary methods in your custom database syn-chronization provider and create the UI to display the content of each of the Student tables (see the code download for this article for details).
Now, create three instances of the custom synchronization provider and attach them to each of the Student database tables. Finally, synchronize the content of one replica with another with the help of the custom synchronization provider:
private void Synchronize( CustomDBSyncProvider sourceProvider, CustomDBSyncProvider destinationProvider) {
syncAgent.Direction = SyncDirectionOrder.DownloadAndUpload; syncAgent.LocalProvider = sourceProvider; syncAgent.RemoteProvider = destinationProvider; syncStatistics = syncAgent.Synchronize();}
Synced UpAs you’ve seen, Sync Framework provides a simple yet comprehen-sive synchronization platform that provides seamless synchroniza-tion between offl ine and online data. It can be used to synchronize data independent of the protocol and the data store in use. It could be used for simple fi le backup or easily extended for collaboration-based networks. You can also create custom synchronization providers to support data sources that aren’t accommodated out of the box.
JOYDIP KANJILAL is an independent soft ware consultant as well as a Microsoft MVP in ASP.NET since 2007. He’s also a speaker and author of several books and articles and blogs at aspadvice.com/blogs/joydip.
THANKS to the following technical expert for reviewing this article: Liam Cavanagh
Th e source synchronization provider now sends the summary of changed versions and knowledge to the destination provider in the form of changeDataRetriever object.
Th e ProcessChangeBatch method is called on the destination provider to process the changes:
public abstract void ProcessChangeBatch( ConflictResolutionPolicy resolutionPolicy, ChangeBatch sourceChanges, object changeDataRetriever, SyncCallbacks syncCallbacks, SyncSessionStatistics sessionStatistics);
SaveItemChange is called on the destination synchronization provider for each of the changes in the batch. If you’re implement-ing your own custom provider, you should update the destination replica with the changes sent by the source replica and then update the metadata in the metadata store with the source knowledge:
void SaveItemChange(SaveChangeAction saveChangeAction, ItemChange change, SaveChangeContext context);
StoreKnowledgeForScope is called on the destination synchro-nization provider to save knowledge in the metadata store:
public void StoreKnowledgeForScope( SyncKnowledge knowledge, ForgottenKnowledge forgottenKnowledge)
EndSession is called on both the source and destination providers to indicate that the synchronization provider is about to leave the synchronization session it joined earlier:
public abstract void EndSession( SyncSessionContext syncSessionContext);
Custom Synchronization ProvidersNow you’ve seen how the default synchronization providers work. As I’ve mentioned before, you can also implement custom synchro-nization providers. A custom synchronization provider extends the functionality of a built-in synchronization provider. You may need a custom synchronization provider if there’s no provider for the data stores to be synchronized. You can also create a custom synchronization provider that implements change units for better control over change tracking and to reduce the number of confl icts.
To design your own synchronization provider, create a class that extends the KnowledgeSyncProvider abstract class and imple-ments the IChangeDataRetriever and INotifyingChangeApplier-Target interfaces. Note that these classes and interfaces are part of the Microsoft .Synchronization namespace.
Figure 5 Synchronization Finished
TRAININGCAMP.COM | 800.698.5501
MICROSOFT,MICROSOFT,MICROSOFT,MICROSOFT,CISCO, APPLE,,,,,,,,,,,,,,,,,, CISCO, APPLE,,,,,,,,,,,,CISCO, APPLE,,,,,,,,,,,,CISCO, APPLE,,,,,,,,LINUX, ORAAAAAAAAAAAAAAAAAAACCCCCCCCCCCCCCCCCCCLLEE,,LINUX, ORAAAAAAAAAAACCCCCCCCCCCCLE,LINUX, ORAAAAAAAAAAACCCCCCCCCCCCLE,LINUX, ORAAAAAAAACCCCCCCCLE,COMPTIIIIIIIIIIIIIIIIIAAAAAAAAAAAAAAAAAAA,, ((IISSCC))COMPTIIIIIIIIIIIIAAAAAAAAAAAA, (ISC)COMPTIIIIIIIIIIIIAAAAAAAAAAAA, (ISC)COMPTIIIIIIIIAAAAAAAA, (ISC)22222
Untitled-1 1 5/7/10 3:10 PM

msdn magazine54
ODATA AND ATOMPUB
Building an AtomPub Server Using WCF Data Services
If you’re not familiar with it, the Open Data Protocol (OData) is a thing of beauty. OData (described in detail at odata.org) builds on the HTTP-based goodness of Atom for publishing data; AtomPub for creating, updating and deleting data; and the Microsoft Entity Data Model (EDM) for defi ning the types of data.
If you have a JavaScript client, you can get the data back directly in JSON instead of Atom format, and if you’ve got something else—including Excel, the .Microsoft NET Framework, PHP, AJAX and more—there are client libraries for forming OData requests and consuming OData responses. If you’re using the .NET Framework on the server side, Microsoft also provides an easy-to-use library called WCF Data Services for exposing .NET Framework types or databases supported by the Microsoft Entity Framework as OData
Chris Sells
sources. Th is makes it easy to expose your data over the Internet in an HTTP- and standards-based way.
Having said all that, there are some things that you might like to do with OData that aren’t quite part of the out-of-box experience, such as integrating OData with existing Atom- and AtomPub-based readers and writers. Th at’s what we’re going to experiment with.
A Simple BlogAs an example, let’s imagine that I’m building a simple blogging system (and, in fact, this work is based on me rewriting the content management system on sellsbrothers.com). I’m a big fan of the model-fi rst support in Visual Studio 2010, so I created an ASP.NET MVC 2.0 project, added an ADO.NET EDM fi le called MyBlogDB.edmx and laid out a Post entity, as shown in Figure 1.
More complicated blogging soft ware will want to track more data, but the fields in Figure 1 are the basics. When I right-click on the designer surface, I can choose Generate Database From Model, which shows the SQL file that will be created for me (MyBlogDB.sql in this case) and the SQL that will be generated to create my database. Clicking Finish will create the SQL fi le and bind the database to the entities I created in the EDM designer. Th e important bits of the SQL are shown in Figure 2.
Basically, we’re just creating a single table from our single entity, as expected, and mapping the fi elds to SQL types. Notice that the PublishDate is set to NULL, which is not the default. I explicitly chose that setting in the EDM designer because I wanted it to be
This article discusses:• OData
• Building a blogging system with ASP.NET MVC 2.0
• Mapping between Atom and OData
• Building a rich text editor with Windows Live Writer
Technologies discussed:OData, Atom, AtomPub, ASP.NET MVC 2.0, Entity Data Model,Entity Framework, WCF Data Services
Code download available at:code.msdn.microsoft.com/mag201008Atom

55August 2010msdnmagazine.com
OK not to have a publish date (some tools don’t provide one by default).
To execute this SQL and create the database is just a matter of right-clicking on the SQL in the Visual Studio text editor and choosing Execute SQL. It will ask you for your connection information and the database name. Because this is a new database, you’ll want to type in the new name, for example, MyBlogDB, and click OK to create it when prompted. When your database has been created, you can explore it in the Server Explorer under the connection that Visual Studio has just created for you.
To make testing easier, you can add data directly into the table by right-clicking on Posts and choosing Show Table Data, which will give you a little grid, as shown in Figure 3.
It’s not the best editing experience in the world, but it’s better than writing SQL statements until we’ve got an end-to-end editing solution up and running (it’s coming—keep reading!).
Now that we’ve got some data, we can do a little bit of ASP.NET coding to show it by updating HomeController.cs (read more about MVC at asp.net/mvc/):
...namespace ODataBloggingSample.Controllers { [HandleError] public class HomeController : Controller { MyBlogDBContainer blogDB = new MyBlogDBContainer();
public ActionResult Index() { return View(blogDB.Posts); }
public ActionResult About() { return View(); } }}
Here all I did was create an instance of the MyBlogDBContainer class, which is the top-level ObjectContext-derived class created from our MyBlogDB.edmx fi le to let us access our new database. (If you’re not familiar with the Entity Framework, you should be: see msdn.com/data/aa937723.) When the Index method is called on the HomeController class, someone is requesting the home page of our new Web application, which we’d like to use to show our new blog posts, so we route the Posts collection from the database to an instance of the Home/Index.aspx view, which we’ve modifi ed like so:
<%@ Page Language="C#" MasterPageFile="~/Views/Shared/Site.Master" Inherits="System.Web.Mvc.ViewPage<IEnumerable<ODataBloggingSample.Post>>" %>
<asp:Content ID="indexTitle" ContentPlaceHolderID="TitleContent" runat="server"> Home Page</asp:Content><asp:Content ID="indexContent" ContentPlaceHolderID="MainContent" runat="server"> <% foreach (var post in Model) { %> <h1><%= post.Title %></h1> <div><%= post.Content %></div> <p><i>Posted <%= post.PublishDate %></i></p> <% } %></asp:Content>
Here we changed the base class to take a collection of the Post type generated (along with the MyBlogDBContainer class) to model our Posts table. We also replaced the home page content with a foreach statement to show each post’s title, content and publish date.
Th at’s all we need. Now when we execute the project (Debug | Start Debugging), the browser starts and the blog posts are shown (just one post, unless you’ve put more than that into the data-base), as shown in Figure 4.
Now, I told you everything up to this point so I could tell you this: Th e reason OData is so fabulous is that, with a fl ick of my mouse and two shakes of my keyboard, I can expose a complete program-matic interface to this data that I can access from JavaScript, the .NET Framework, PHP and more. To see this magic happen, right-click on your project in the Solution Explorer, choose Add | New Item, choose WCF Data Service, pick a name (I used odata.svc) and click Add. What you’ll get
is a skeleton piece of code in a fi le (odata.svc.cs in this case) that, ignoring security just now, we’d like to make look like the following:
using System.Data.Services;using System.Data.Services.Common;using ODataBloggingSample;
namespace ODataBloggingSample { public class odata : DataService<MyBlogDBContainer> { public static void InitializeService(DataServiceConfiguration config) { config.SetEntitySetAccessRule("*", EntitySetRights.All); config.DataServiceBehavior.MaxProtocolVersion = DataServiceProtocolVersion.V2; } }}
Notice that we’ve thrown in MyBlogDBContainer—our top-level database access class—as the template parameter to the DataService class, which is the core of server-side WCF Data Services (see msdn.com/data/bb931106). Th e DataService class allows us to easily expose our database via HTTP verb-based create, read, update and delete (CRUD) operations defi ned in the OData protocol. Th e type passed to the DataService is examined for public properties that expose collections. In our example, the Entity Framework-generated object context class contains the Posts collection that fi ts the bill nicely:
...namespace ODataBloggingSample { ... public partial class MyBlogDBContainer : ObjectContext { ... public ObjectSet<Post> Posts {...} ... }
... public partial class Post : EntityObject { ... public global::System.Int32 Id { get { ... } set { ... } } public global::System.String Title { get { ... } set { ... } } public Nullable<global::System.DateTime> PublishDate { get { ... } set { ... } } public global::System.String Content { get { ... } set { ... } } ... }}
Notice that the generated MyBlogDBContainer exposes an ObjectSet (which is just a kind of collection) called Posts that contains instances of the Post type. Furthermore, the Post type is defi ned to provide the mapping between the Id, Title, PublishDate and Content properties to the underlying columns on the Posts table we created earlier.
Figure 1 A Post Entity Created in Visual Studio 2010

msdn magazine56 OData and AtomPub
With odata.svc in place, we can surf to the service document that exposes our object context collection properties using the name of the data service endpoint fi le in the URL, for example, localhost:54423/odata.svc:
<?xml version="1.0" encoding="utf-8" standalone="yes" ?><service xml:base="http://localhost:54423/odata.svc/" xmlns:atom="http://www.w3.org/2005/Atom" xmlns:app="http://www.w3.org/2007/app" xmlns="http://www.w3.org/2007/app"> <workspace> <atom:title>Default</atom:title> <collection> <atom:title>Posts</atom:title> </collection> </workspace></service>
Th is entire fi le is defi ned by the AtomPub specifi cation (ietf.org/ rfc/rfc5023.txt). Taking it one level deeper, we can see our posts exposed as a set of Atom entries at localhost:54423/odata.svc/Posts, as shown in Figure 5.
This file is almost completely plain-vanilla Atom (ietf.org/rfc/ rfc4287.txt) except for the Microsoft-based URIs, which are used to layer OData functionality into Atom. Specifically, you’ll want to notice the “properties” element inside the “content” element. You’ll recognize these properties as the same ones defined earlier in the Post entity and corresponding Posts table. This data is contained in the envelope defined by Atom and exposed via the CRUD comments, which themselves are defined by AtomPub and allow you to create, read, update and delete via the HTTP methods POST, GET, PUT and DELETE, respectively. The problem is that this isn’t quite plain-vanilla-Atom enough. For example, if we surf to odata.svc/Posts in an Atom reader, like Internet Explorer 8, the title and content don’t come through properly, as shown in Figure 6.
You can see that the data is there (notice the date is right and the category is showing), but the title and content are nowhere to be seen. Th at’s because the places where Internet Explorer is looking for title and content—the “title” and “content” elements in each entry, logically enough—don’t contain what it expects to be there. Th e “title” element is blank and the “content” element is in a format that Internet Explorer doesn’t recognize. Th e format that Internet Explorer would really like to see looks like this:
<feed ...> <title type="text">Posts</title> <id>http://localhost:54423/atompub.svc/Posts</id> <updated>2010-03-15T00:42:32Z</updated> <link rel="self" title="Posts" href="Posts" /> <entry> <id>http://localhost:54423/atompub.svc/Posts(1)</id> <title type="text">My first blog post</title> <updated>2010-03-15T00:42:32Z</updated> ... <content type="html">Hi! How are you?</content> <published>2010-03-14T00:00:00-08:00</published> </entry></feed>
Notice that the “title” element has what used to be buried in the Title property from the OData “properties” element in the “content” element, the “content” element has been overwritten with the Content property and the “published” element was added from the value of PublishDate property. When this data is viewed in Internet Explorer, we get something much more like what we’d like to have, as shown in Figure 7.
I should mention that it’s only for support of blogging tools that we even care. Internet Explorer isn’t expecting to see a customer list or an invoice; it’s expecting to see titles and publish dates and HTML con-tent. Sometimes it makes sense to do this mapping for customer lists and invoices, in which case Microsoft has a feature in WCF Data Services called “Friendly Feeds” (see blogs.msdn.com/astoriateam/archive/2008/09/28/making-feeds-friendly.aspx). It doesn’t quite do everything, however (specifi cally, it won’t remap the Atom “content” element), because the WCF Data Services team wants to make sure even “friendly” feeds still work with various client libraries. Th e goal is to make the OData feeds friendly, not abandon OData in favor of Atom/AtomPub.
In this case, however, we’re abandoning OData and just using WCF Data Services as our AtomPub endpoint, which requires a mapping between Atom and OData, as shown in Figure 8.
Figure 3 The Show Table Data Grid Makes Testing Easier Figure 4 The Completed Web Page
...USE [MyBlogDB];GO...-- Dropping existing tablesIF OBJECT_ID(N'[dbo].[Posts]', 'U') IS NOT NULL DROP TABLE [dbo].[Posts];GO...-- Creating table 'Posts'CREATE TABLE [dbo].[Posts] ( [Id] int IDENTITY(1,1) NOT NULL, [Title] nvarchar(max) NOT NULL, [PublishDate] datetime NULL, [Content] nvarchar(max) NOT NULL);GO...-- Creating primary key on [Id] in table 'Posts'ALTER TABLE [dbo].[Posts]ADD CONSTRAINT [PK_Posts] PRIMARY KEY CLUSTERED ([Id] ASC);GO
Figure 2 The SQL Code Resulting from “Generate Database From Model”

You’ve got the data, but time, budget and staffconstraints can make it hard to present that valuableinformation in a way that will impress. With Infragistics’NetAdvantage for Silverlight Data Visualization, youcan create Web-based data visualizations anddashboard-driven applications on Microsoft Silverlight(and coming soon for WPF) that will not only impressdecision makers, it actually empowers them. Go toinfragistics.com/sldv today and get inspired to createkiller apps.
Infragistics Sales 800 231 8588 Infragistics Europe Sales +44 (0) 800 298 9055 Infragistics India +91-80-6785-1111twitter.com/infragistics
Copyright 1996-2010 Infragistics, Inc. All rights reserved. Infragistics and the Infragistics logo and NetAdvantage are registered trademarks of Infragistics, Inc.
GeospatialMaps
SilverlightPivotGrids
FastDataCharts
Untitled-12 1 4/9/10 2:28 PM

msdn magazine58 OData and AtomPub
The trick is, how do we get this mapping to happen? We’ve obviously got the data, but we need to remap it to Atom properties so that Atom readers (and writers) know where the data is tucked away. Th e reason to do this is so WCF Data Services can still do the mapping to our .NET Framework types or, via Entity Framework, our databases. All we have to do is a little at-the-door mapping of Atom/AtomPub to/from OData.
Th e code sample that comes with this article has some code to inject into the WCF pipeline that allows just exactly this kind of message data transformation. You can read it to your heart’s content (check out ODataBlogging.cs), but I’m going to show you how to use it.
First, create a new WCF Data Services endpoint just like you did before, but with a diff erent name (I used atompub.svc). Hook up the top-level object context class and expose whatever entity sets you like, just as before, but also tag your service class with the ODataBloggingServiceBehavior, like so:
...using ODataBlogging;
namespace ODataBloggingSample { [ODataBloggingServiceBehavior(typeof(MyBlogDBContainer))] [EntityAtomMapping("Posts", "PublishDate", "published")] public class atompub : DataService<MyBlogDBContainer> { public static void InitializeService(DataServiceConfiguration config) { config.SetEntitySetAccessRule("*", EntitySetRights.All); config.DataServiceBehavior.MaxProtocolVersion = DataServiceProtocolVersion.V2; } }}
Th is does the mapping from Atom/AtomPub coming in—for example, “title,” “content” and “published” elements—to the corresponding OData format via the nested “properties” element inside the “content” element. By default, if the names on the entities match (ignoring case), then the mapping (and type coercion) will just happen.
For example, when an entity is exposed that contains a Title property (like our Post entity), it’s mapped to the Atom “title” element.
On the other hand, if there’s no automatic mapping, you can override that behavior by providing an explicit mapping based on the entity name, as we’ve done to map the PublishDate prop-erty for objects in the “Posts” collection to the “published” atom property. Th ose two attributes are enough to turn our OData feed into an Atom feed, giving us the full-featured view of the data as shown in Figure 7.
This mapping is not one-way; it supports all of the HTTP methods, so you can use the AtomPub protocol to create, up-
<?xml version="1.0" encoding="utf-8" standalone="yes" ?><feed xml:base="http://localhost:54423/odata.svc/" xmlns:d="http://schemas.microsoft.com/ado/2007/08/dataservices" xmlns:m= "http://schemas.microsoft.com/ado/2007/08/dataservices/metadata" xmlns="http://www.w3.org/2005/Atom"> <title type="text">Posts</title> <id>http://localhost:54423/odata.svc/Posts</id> <updated>2010-03-15T00:26:40Z</updated> <link rel="self" title="Posts" href="Posts" /> <entry> <id>http://localhost:54423/odata.svc/Posts(1)</id> <title type="text" /> <updated>2010-03-15T00:26:40Z</updated> <author> <name /> </author> <link rel="edit" title="Post" href="Posts(1)" /> <category term="MyBlogDB.Post" scheme= "http://schemas.microsoft.com/ado/2007/08/dataservices/scheme" /> <content type="application/xml"> <m:properties> <d:Id m:type="Edm.Int32">1</d:Id> <d:Title>My first blog post</d:Title> <d:PublishDate m:type= "Edm.DateTime">2010-03-14T00:00:00</d:PublishDate> <d:Content>Hi! How are you?</d:Content> </m:properties> </content> </entry></feed>
Figure 5 Posts Exposed as a Set of Atom Entries
Figure 6 Viewing Blog Posts in Atom Reader Shows That Title and Content Are Missing
Figure 7 Tweaking the XML Format Results in Correct Display of the Title and Content

msdn magazine60 OData and AtomPub
date and delete items in the Posts collection as well as read them. Th is means you can confi gure a tool like Windows Live Writer (WLW), which supports AtomPub as a blog API, and use it for rich text editing of your posts. For example, given the atompub.svc endpoint, in WLW, you could choose Blogs | Add blog account and fi ll in the following options in the dialogs that follow:
• What blog service do you use? Other blog service• Web address of your blog: http://<<server>>:<<port>>/
atompub.svc• Username: <<username>> (required and should be implemented
on your AtomPub endpoint using standard HTTP techniques)• Password: <<password>>• Type of blog that you’re using: Atom Publishing Protocol• Service document URL: http://<<server>>:<<port>>/
atompub.svc• Blog nickname: <<whatever you like>>
Click Finish and you’ve got a rich text editor for managing your blog posts, as shown in Figure 9.
Here we’ve taken the Data Services engine, which supports full CRUD functionality by packing properties into the Atom “content” element, and have done a little bit of mapping to make it support plain ol’ Atom and AtomPub, too.
Th e little sample library that I used to make this work (which I built with Phani Raj, a soft ware engineer at Microsoft on the WCF Data Ser-vices team), does the barest minimum and it’s never going to be all you need to build a real blog. Here’s a list off the top of my head of things it still needs to really support just Atom and AtomPub:
• Mapping the Atom author element sub-elements, such as name, uri and e-mail.
• Handling images (although WLW allows for FTP, so that might be enough).
• Exposing capabilities to make WLW recognize these features.If you’re interested in pushing this experiment further, Joe Cheng,
a member of the WLW team, has written a series of blog posts about AtomPub support in WLW that inspired this work in the fi rst place: jcheng.wordpress.com/2007/10/15/how-wlw-speaks-atompub-introduction.
Enjoy!
CHRIS SELLS is a Microsoft program manager in the Business Platform Divi-sion. He’s written several books, including the coauthored “Programming WPF” (O’Reilly Media, 2007), “Windows Forms 2.0 Programming” (Addison-Wesley Professional, 2006) and “ATL Internals” (Addison-Wesley Professional, 1999). In his free time, he hosts various conferences and makes a pest of himself on Micro-soft internal product team discussion lists. More information about Sells, and his various projects, is available at sellsbrothers.com.
THANKS to the following technical expert for reviewing this article: Pablo Castro
Figure 8 Mapping Between Atom and OData
Figure 9 Atom/OData Mapping Facilitates Building a Rich Text Editor to Manage Your Blog Posts
The goal is to make the OData feeds friendly, not abandon OData
in favor of Atom/AtomPub.

Word Processing Components for Windows Forms & ASP.NET www.textcontrol.com
US +1 877 - 462 - 4772 (toll-free)EU +49 421 - 4270671 - 0
WORD PROCESSINGCOMPONENTS
( WHAT YOU SEE IS WHAT YOU GET )
WINDOWS FORMS / WPF / ASP.NET / ACTIVEX
Untitled-8 1 6/3/10 1:04 PM

msdn magazine62
S PE E D S QL
Tuning Your Database Calls with Tier Interaction Profi ling
Many applications are designed explicitly to use multiple tiers, where the performance of calls into the data access tier is crucial to the overall responsiveness of the application. Th e use of multiple tiers increases the fl exibility of the application. Th e n-tiered approach also fosters isolation of key components, which can be used to improve both reliability and scalability. Th e use of multiple tiers promotes scalability because components that are isolated into distinct tiers can then more readily be distributed across available computing resources.
Tier interaction profi ling (TIP) is designed to help you un-derstand the performance of the data layer on which the application relies. TIP is a new feature of the Visual Studio profi ling tools that measures and reports the duration of data tier delays .NET Frame-work applications experience when waiting for synchronous calls
Mark Friedman
to ADO.NET-compliant databases to complete. For response-time-oriented applications that make frequent calls to databases, TIP helps you to understand which data requests contribute the most to response delays.
In this article, I’ll introduce you to TIP and demonstrate its reporting capabilities. I’ll also discuss the instrumentation tech-nology that TIP relies on and provide some best practices for using TIP eff ectively to diagnose performance problems related to database activity. I will walk you through using TIP on a sample two-tiered ASP.NET Web application that is data-intensive and that accesses data from Microsoft SQL Server using the LINQ to SQL technology. Finally, I will discuss how you can augment the TIP performance data by using standard SQL Administrator performance tools to gain an even deeper understanding of the performance of a data tier.
Getting Started with TIPTIP dynamically adds instrumentation code to measure the duration of calls to the data layer of your application during a profi ling run. Th e Visual Studio profi ling tools are available in Visual Studio 2010 Premium Edition and Visual Studio 2010 Ultimate Edition.
To begin a profi ling session, you can either click Launch Perfor-mance Wizard from the Analyze menu, click Start Performance Analysis from the Debug menu, or use the Alt+F2 keyboard shortcut. Th e fi rst page of the Performance Wizard then asks you to select a profi ling method.
This article discusses:• Introduction to Tier Interaction Profi ling (TIP)
• Using TIP to improve the performance of applications
• Reading a TIP Report
• TIP data with LINQ to SQL
• Choosing a primary profi ling method
Technologies discussed:ADO.NET, Visual Studio, SQL Server

63August 2010msdnmagazine.com
TIP can be used with any profil-ing method (sampling, instrumen-tation, memory, or concurrency), but it isn’t enabled by default. To enable TIP, you will need to un-check the “Launch profiling after the wizard finishes” checkbox on page 3 of the Performance Wizard. (Because TIP isn’t turned on yet, you’re not ready to launch your application and begin profiling.) For best results, I recommend selecting the sampling method of profiling initially, especially if what you care about most is the data tier interaction data. This is mainly because sampling has least impact on the performance of your application.
To enable TIP data collection, access the Performance Session in the Performance Wizard just cre-ated in the Performance Explorer window and right-click to see its properties. In the properties dialog, select the Tier Interactions tab, then check the "Enable tier interaction profi ling" checkbox. Click the OK button to dismiss the dialog. Now that TIP is enabled, you’re ready to start profi ling your application.
To start the actual profi ling run, click the Launch with Profi ling toolbar button in the Performance Explorer window
For complete instructions on enabling TIP in Visual Studio, see Habib Heydarian’s blog post “Walkthrough: Using the Tier Interac-tion Profi ler in Visual Studio Team System 2010” at blogs.msdn.com/
b/habibh/archive/2009/06/30/walkthrough-using-the-tier-interaction-profi ler-in-
visual- studio-team-system-2010.aspx.
How TIP Measures PerformanceTIP inserts code into your application during a profiling run that measures calls to the ADO.NET data layer your application uses. When tier interaction profi ling is active, the Visual Studio Profiler inspects the Microsoft intermediate language (MSIL) in your solution, looking for references to ADO.NET functions. Prior to calling the just-in-time (JIT) compiler to generate the native code run by the application, the profi ler inserts instructions that add instrumentation to key ADO.NET methods. Th is instru-mentation code keeps track of the amount of time spent during each ADO.NET call.
As the application executes, TIP captures and records timing data. When your application is being profi led, this instrumentation records the duration of any ADO.NET calls that are made and also captures a copy of the command text used in the database call. As your application runs, timing data is gathered for all database
accesses performed using synchronous methods of the ADO.NET classes, including SQL, OLE DB, Open Database Connectivity (ODBC), and SQL Server Compact (SQL CE) APIs. TIP also captures timing data if your application uses LINQ to SQL or the Entity Framework APIs to access SQL databases.
Th e timing data is stored along with any other data gathered during the profi ling session in a Visual Studio profi ler fi le (.vsp). Because an application making a call to an external database performs an out-of-process call, the instructions that TIP adds to instrument the application have very little impact on overall application performance.
Tuning for PerformanceA common design pattern involves dividing a Web application into a presentation layer, a business logic layer and a data layer. Th is
Figure 1 A Visual Studio Profi ler Tier Interaction Report
TIP helps you to understand which data requests contribute the most to response delays.
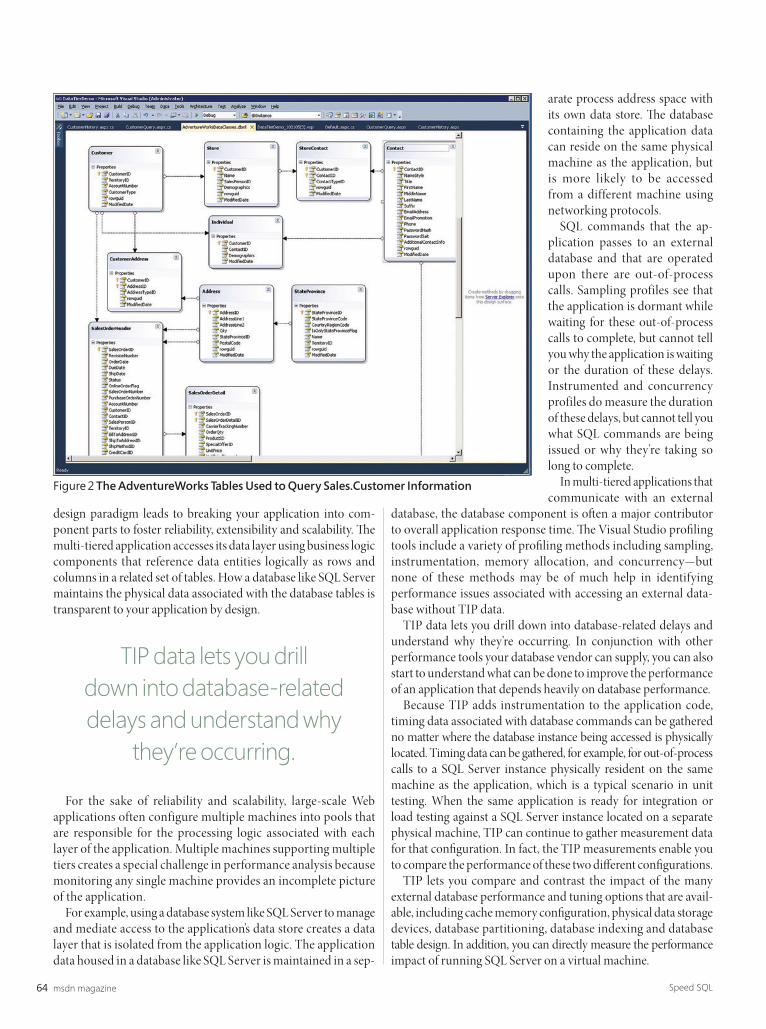
msdn magazine64 Speed SQL
design paradigm leads to breaking your application into com-ponent parts to foster reliability, extensibility and scalability. Th e multi-tiered application accesses its data layer using business logic components that reference data entities logically as rows and columns in a related set of tables. How a database like SQL Server maintains the physical data associated with the database tables is transparent to your application by design.
For the sake of reliability and scalability, large-scale Web applications often configure multiple machines into pools that are responsible for the processing logic associated with each layer of the application. Multiple machines supporting multiple tiers creates a special challenge in performance analysis because monitoring any single machine provides an incomplete picture of the application.
For example, using a database system like SQL Server to manage and mediate access to the application’s data store creates a data layer that is isolated from the application logic. The application data housed in a database like SQL Server is maintained in a sep-
arate process address space with its own data store. Th e database containing the application data can reside on the same physical machine as the application, but is more likely to be accessed from a different machine using networking protocols.
SQL commands that the ap-plication passes to an external database and that are operated upon there are out-of-process calls. Sampling profiles see that the application is dormant while waiting for these out-of-process calls to complete, but cannot tell you why the application is waiting or the duration of these delays. Instrumented and concurrency profiles do measure the duration of these delays, but cannot tell you what SQL commands are being issued or why they’re taking so long to complete.
In multi-tiered applications that communicate with an external
database, the database component is oft en a major contributor to overall application response time. Th e Visual Studio profi ling tools include a variety of profi ling methods including sampling, instrumentation, memory allocation, and concurrency—but none of these methods may be of much help in identifying performance issues associated with accessing an external data-base without TIP data.
TIP data lets you drill down into database-related delays and understand why they’re occurring. In conjunction with other performance tools your database vendor can supply, you can also start to understand what can be done to improve the performance of an application that depends heavily on database performance.
Because TIP adds instrumentation to the application code, timing data associated with database commands can be gathered no matter where the database instance being accessed is physically located. Timing data can be gathered, for example, for out-of-process calls to a SQL Server instance physically resident on the same machine as the application, which is a typical scenario in unit testing. When the same application is ready for integration or load testing against a SQL Server instance located on a separate physical machine, TIP can continue to gather measurement data for that confi guration. In fact, the TIP measurements enable you to compare the performance of these two diff erent confi gurations.
TIP lets you compare and contrast the impact of the many external database performance and tuning options that are avail-able, including cache memory confi guration, physical data storage devices, database partitioning, database indexing and database table design. In addition, you can directly measure the performance impact of running SQL Server on a virtual machine.
Figure 2 The AdventureWorks Tables Used to Query Sales.Customer Information
TIP data lets you drill down into database-related delays and understand why
they’re occurring.

65August 2010msdnmagazine.com
TIP Report BasicsOnce a profi ling session with TIP activated completes, the timing data associated with any of your application’s interaction with its ADO.NET data layer is summarized in the Tier Interactions view. Figure 1 shows an example of the profi ler when TIP data gathering is active and there is ADO.NET activity during the profi ling run.
Th e top half of the report is a summary of the profi ling data that was gathered. For ASP.NET applications, the view is organized by URL. Th e report groups server-side response time of Web appli-cation GET requests by URL.
Below the application layer, the report shows each connection to a database tier (which in this example was the AdventureWorks sample database). It measures and reports the portion of the server- side processing time for ASP.NET requests that is associated with synchronous database calls using ADO.NET. In this example three summary lines appear, each tabulating the database activity associated with three different ASP.NET pages in the Web site being profi led. For each ASP.NET page identifi ed during profi ling, the number of ASP.NET requests that were processed during the profi ling run and the server-side response times for each response message that was generated are reported.
Additional summary lines show response-time data for other GET requests, including requests for stylesheets, Javascript code, and images linked in the pages. Any database calls that the profi ler is unable to associate with a specifi c ASP.NET request are grouped under an Other Requests category.
When you’re profi ling a Windows desktop or console applica-tion that utilizes a data layer, the report organizes the ADO.NET activity under the process name.
Below each Web page summary line is a single summary line that reports the number of synchronous database requests, organized by database connection, that were made during ASP.NET processing. In this example, you can see that six ASP.NET requests to Customer-Query.aspx were handled over a single database connection. Th ese six requests took a total of 0.959 seconds to process on the server, for an average response time of 160 milliseconds. Th ese requests issued 12 SQL queries that took approximately 45 milliseconds to complete. Waiting for the database requests accounted for only about 5 percent of the elapsed time associated with generating the response messages for this Web page.
If you highlight one of the database connection summary lines, the bottom half of the Tier Interactions view breaks out the specifi c SQL commands that the application issued. Th e SQL commands are grouped by the command text issued and sorted by elapsed time within the page group.
In the example, one SQL command was issued three times, another command was issued six times, and a third query was
issued three times. In the detail view, the elapsed time of each specifi c query that is rolled up into a single line on the summary report is reported separately. You can see the total elapsed time, the average across all instances of the command, and the minimum and maximum delays that were observed for each query.
If you double-click the SQL command detail line, the full text of the SQL command that was issued is displayed in a Database Command Text window. Th is is the actual command the applica-tion passed to the database across the ADO.NET interface during execution. If the request is for execution of a stored procedure, the specifi c call to the stored procedure is shown.
A LINQ to SQL ExampleLet’s look at a simple example of using TIP to understand an ASP.NET application that depends heavily on accessing infor-mation from a database.
TIP can be especially helpful with applications that use LINQ to SQL to access data stored in an external SQL Server database because LINQ tends to remove the developer one step further from the physical database and its performance characteristics. With LINQ to SQL, the Entity:Relationship (E:R) diagrams that you create in the Object Relational Designer generate classes that are then used by Visual Studio as templates for building syntactically correct SQL commands automatically.
Because LINQ to SQL eliminates most SQL language coding considerations and is easy to use, it also tends to mask important performance considerations associated with database design, confi guration and tuning. As this example illustrates, using LINQ,
var customerquery = from customers in db.Customers from custaddrs in db.CustomerAddresses from addrs in db.Addresses where (customers.CustomerID == custid && customers.CustomerID == custaddrs.CustomerID && custaddrs.AddressID == addrs.AddressID)
select new { customers.CustomerID, customers.CustomerType, addrs.AddressLine1, addrs.AddressLine2, addrs.City, addrs.StateProvince, addrs.PostalCode, customers.TerritoryID };
Figure 3 LINQ to SQL Customer Query
SELECT [t0].[CustomerID], [t0].[CustomerType], [t2].[AddressLine1], [t2].[AddressLine2], [t2].[City], [t3].[StateProvinceID], [t3].[StateProvinceCode], [t3].[CountryRegionCode], [t3].[IsOnlyStateProvinceFlag], [t3].[Name], [t3].[TerritoryID], [t3].[rowguid], [t3].[ModifiedDate], [t2].[PostalCode], [t0].[TerritoryID] AS [TerritoryID2]FROM [Sales].[Customer] AS [t0]CROSS JOIN [Sales].[CustomerAddress] AS [t1]CROSS JOIN [Person].[Address] AS [t2]INNER JOIN [Person].[StateProvince] AS [t3] ON [t3].[StateProvinceID] = [t2].[StateProvinceID]WHERE ([t0].[CustomerID] = @p0) AND ([t0].[CustomerID] = [t1].[CustomerID]) AND ([t1].[AddressID] = [t2].[AddressID])
Figure 4 SQL Command for customerquery
TIP can be especially helpful with applications that
use LINQ to SQL.

msdn magazine66 Speed SQL
you can easily create a complex query that joins multiple tables with-out having to consider the performance implications of doing so.
With TIP, you can see the actual SQL command text that LINQ to SQL generates and gather measurements from the runtime execution of these SQL queries. With the SQL command text in hand, you can then access other database tuning tools to help you better understand the performance implications of any particular LINQ to SQL operation.
My example is a Web Form application that queries the Adventure-Works Sales.Customer tables using a specifi c customer ID to retrieve that customer’s order history. Th e AdventureWorks tables involved in this query include the Customer, SalesOrderHeader, Sales-OrderDetail and StateProvince tables, as illustrated in the Object Relational Designer view in Figure 2.
If you also wanted to display the customer mailing and e-mail address information alongside the order history, the Customer-Address, Address, and Contact tables need to be accessed. As shown in the Object Relational Designer, the AdventureWorks tables contain primary and foreign keys such as CustomerID, SalesOrder, and ContactID that allow these tables to be joined logically.
The C# code to create an AdventureWorks customer query using LINQ to SQL is shown in Figure 3. In this case custid is
the specific CustomerID value requested. This query returns a customeryquery collection that contains a single data row contain-ing the data fi elds listed in the select new clause.
The customeryquery can then be bound to a control on an ASP.NET Web page:
DetailsView1.DataSource = customerquery;DetailsView1.DataBind();
Now I can create a query to retrieve the order history of this customer:
var orderquery = from orderhdr in db.SalesOrderHeaders where (orderhdr.CustomerID == custid) orderby orderhdr.OrderDate select new { Date = orderhdr.OrderDate.ToShortDateString(), orderhdr.AccountNumber, InvoiceNo = orderhdr.SalesOrderID, orderhdr.TotalDue };
When this LINQ to SQL operation executes, orderquery will contain a row corresponding to each row in the OrderHdr table associated with a specifi c Customer ID. Th e orderquery collection will contain multiple rows if the customer history indicates there were multiple sales transactions.
Th ese queries look straightforward on the surface. But using TIP, you can start to understand the performance implications of these seemingly simple LINQ to SQL operations.
Using TIP Data for TuningLet’s take a closer look at customerquery. At run time, LINQ to SQL takes the logical database SELECT operations implied in the LINQ statement and uses it to generate a valid SQL command that joins data from four AdventureWorks tables: Customers, Customer-Addresses, Addresses and the static StateProvince table. You don’t see this in the LINQ to SQL code here.
When you run this code under the Visual Studio profiler, the TIP instrumentation reports the number of times this query was executed and measures the time the Web page was delayed waiting for its execution. Th is is, in fact, the operation that executed six times during the profi ling run illustrated back in Figure 1.
In addition, as you saw earlier, the SQL command generated by the LINQ to SQL code is also available when the application is profi led. Figure 4 shows the actual SQL command for this operation. Note that the SQL command text includes a token (designated here as “@p0”) to represent the customer ID parameter that LINQ feeds into the query.
Now that the actual SQL com-mand text generated by LINQ is Figure 5 The Execution Plan for the Example LINQ to SQL Operation
Using TIP, you can start to understand the performance
implications of these seemingly simple LINQ to SQL operations.

It’s so powerful it makes the Kraken look like a gimp sea monkey.
It’s so fast it makes warp drive look like a hobbit running backwards.
IT’S SO EASY IT MIGHT AS WELL BE “GOD MODE”It makes other reporting solutions seem like
you’re trying to crack RIJNDAEL ENCRYPTION,
or like driving the “ROAD OF DEATH” in the
Bolivian Andes, backwards, while blindfolded.
No other solution can match Windward’s array of features, STREAMLINED IMPLEMENTATION, and already familiar interface. You create custom report templates with Word, Excel, or PowerPoint. Even your co-workers who need IT to turn on their computers can use Microsoft Office to format reports.
I F YOU F IND A L L OF T H IS HA RD T O S WALLOW,
D O W N L O A D T H E F R E E T R I A L A T
Design Reports in Microsoft Word, Excel, and PowerPoint.
Drag N’Drop data into report templates no coding required!
Solutions for .Net, Java and SharePoint platforms
Integrates easily into any software application
Unless of course you enjoy designing
report templates with endless code,
apologies for keeping you from your current mind-numbingly dull solution.
the ONLY EPIC REPORT ING & DOCUMENT GENERAT ING SOLUT ION
A N D S E E F O R Y O U R S E L F .
(303) 499-2544
www.WindwardReports.com/msdn.aspx
Untitled-1 1 7/19/10 11:53 AM

msdn magazine68 Speed SQL
available, it’s possible to understand how the database design is aff ecting the performance of the query.
One thing you can do is execute this SQL command in SQL Server Management Studio and examine its execution plan, as shown in Figure 5. To access the execution plan for this query, you need to add a command to point to the appropriate database:
USE AdventureWorks ;GO
Next, copy the SQL command text from the TIP report, remem-bering to replace the “@p0” token with a valid CustomerID from the database. Then execute this example query in SQL Server Management Studio and access the execution plan that shows how the query optimizer translated the logical request into a physical plan of execution.
In this example, the execution plan for the query shows that the SELECT statement accessed the Customer table using a clustered index on the CustomerID fi eld that returned exactly one row in the table. In SQL Server Management Studio you can use the mouse to hover over an operation to view its properties or highlight the operation and right-click to view the Properties window. In this fashion, you can cycle through each of the remaining operations that the command requests. Each of the three subsequent JOINs that augment the initial Customer SELECT also accesses a table using its clustered index and returns a single unique row.
From this investigation, you can see that, to process this query, a total of four rows, each from a diff erent table in the Adventure-Works database, needs to be accessed. Each access is performed effi ciently utilizing the table’s unique primary key.
Similarly, you can use TIP to see the SQL command for the orderquery code and feed it to SQL Server Management Studio to see its execution plan (see Figure 6). Th is query accesses a single table called OrderHdr using the CustomerID as a foreign key, so it needs to access both an ordinary nonclustered index as well as the clustered index on SalesOrderHeaderID.
This particular instance of the query returns nine rows. The orderby clause in the LINQ to SQL code translates into a SQL ORDER BY clause that entails an additional Sort operation on the resultset of the SELECT. Th is operation represents 40 percent of the overall cost of executing the request, as estimated by SQL Server Plan Optimizer.
Choosing a Profi ling ContextTIP is designed to supplement existing Visual Studio profi ling methods to gather specifi c measurements on data tier interactions. TIP is a secondary data-gathering facility and cannot be gathered without specifying a primary profi ling method. TIP data can be gathered during sampling, instrumentation and concurrency profi ling runs for any application that communicates with a data tier using ADO.NET.
Given that you need to choose a primary profiling method for an application for which you want to gather TIP data, which should you use? Let’s walk through some of the considerations for choosing a primary profi ling method.
Are the delays associated with data tier interactions the primary focus of the performance investigation? If so, sampling profi ling is the recommended primary method because it’s usually the least intrusive form of profi ling.
If data tier delays aren’t the primary focus of the performance investigation, choose a profi ling method based on what is most likely to provide the measurement data that is most applicable in the cur-rent context. For instance, if you’re investigating a problem associated with the concurrent execution of multiple threads, gather concurrency data. If you’re investigating a problem associated with a CPU-bound application, gather sampling data. For additional guidance on which primary collection method to choose, see the article “How to: Choose Collection Methods” (msdn.microsoft.com/library/ms182374(VS.100)).
If you’re not already familiar with the data layer code, you may need help from the primary profi ling data to fi nd the exact code where these ADO.NET calls originate. TIP does not capture a call stack when it gathers timing information on synchronous ADO.NET out-of-process calls. If you need to understand where in the application calls to ADO.NET methods are being made, instru-mented profi les will be the most helpful. Sampling data can also help you do this, but not with the precision of an instrumented profi le.
You can choose to gather resource-contention data along with the tier interaction measurements, but gathering contention data
Figure 6 The Execution Plan for orderquery
TIP data can be gathered during sampling, instrumentation and
concurrency profi ling runs.

You have the vision, but time, budget and staffconstraints prevent you from seeing it through. With rich user interface controls like Gantt Charts that Infragistics NetAdvantage® for .NET adds to your Visual Studio 2010 toolbox, you can go to marketfaster with extreme functionality, complete usabilityand the “Wow-factor!” Go to infragistics.com/sparknow to get innovative controls for creating Killer Apps.
Infragistics Sales 800 231 8588 Infragistics Europe Sales +44 (0) 800 298 9055 Infragistics India +91-80-6785-1111twitter.com/infragistics
Copyright 1996-2010 Infragistics, Inc. All rights reserved. Infragistics, the Infragistics logo and NetAdvantage are registered trademarks of Infragistics, Inc. All other trademarks or registered trademarks are the property of their respective owner(s).
Gantt Chart
Untitled-12 1 4/9/10 2:29 PM

msdn magazine70 Speed SQL
tends to be a higher-overhead function than sampling, and the contention data is unlikely to provide any assistance in helping to determine where specifi c ADO.NET calls originate. Investigations that require .NET Memory Allocation profiling, which are normally very high impact, are unlikely to benefi t from gathering tier interaction measurements.
Sampling Profi lesOft en, the data tier interactions themselves are the primary focus of a performance investigation. In this case, best results are usually obtained when sampling is chosen as the primary profi ling method. Sampling is preferred in this case mainly because it’s the profi ling method that usually aff ects an application’s performance the least. Sampling profi les can also prove helpful in navigating to the source code where the ADO.NET calls that most affect performance originate.
With data tier functions that run out-of-process, the instruction execution samples gathered during a sampling profi le normally do not refl ect any of the time that an application spends waiting for synchronous calls across an ADO.NET interface to complete. During periods when an application’s execution thread is waiting for these out-of-process calls to complete, the application thread is blocked and no execution samples are recorded against it. When sampling is used, gathering TIP data is the best way to understand which application delays occur that are due to synchronous calls to a data tier.
Th e instrumentation used by TIP doesn’t capture call stacks when it gathers timing data. So, if you’re profi ling a tiered application and aren’t thoroughly familiar with the code, it can be diffi cult to deter-mine precisely where the calls to the data layer originate. Sampling profi les may also help identify where in the application code calls to these ADO.NET interfaces are performed. If the application makes frequent calls to ADO.NET interfaces, some samples showing time spent in ADO.NET modules, including System.Data.dll and System.Data.Linq.dll, are likely to be gathered.
In reviewing the sampling data and comparing it to the tier interaction measurements, keep in mind that while an application thread is blocked waiting for a synchronous database call to complete, no sampling data for the thread is gathered. Th e samples accumulated during execution exclude the out-of-process delays TIP explicitly measures. What you can expect, however, is a rough correlation between the execution samples gathered in ADO.NET methods and the number of ADO.NET commands that TIP observes and measures. In such cases, sampling profi les can assist
you in navigating to the source code where the ADO.NET calls that TIP measures and reports originate.
Note that if an application has SQL queries that return large resultsets that are then bound to a data-bound control on a form, you’re apt to fi nd a signifi cant number of execution samples in the control’s DataBind method. Seeing which DataBind methods appear in the sampling profi le may also assist you in navigating to the source code where the ADO.NET calls originate.
Instrumented Profi lesWhen instrumented profi les are gathered, the timing data for methods recorded by the instrumentation already include any time spent waiting for out-of-process calls to complete inside the method. Th e timing data recorded in an instrumented profi le is gathered by measur-ing the time at the entry and exit of each of the application’s methods that are selected for instrumentation. Timing data for methods in an application that interface to a data-tier layer using ADO.NET calls implicitly include the delay in executing any out-of-process calls.
Th e timing data gathered from TIP explicitly identifi es and measures out-of-process delays separately. Th e delay measured by tier interaction profi ling should be a subset of the overall time spent inside the method, as measured during an instrumented profi ling run. With this understanding, you should be able to match the timing data from tier interaction profi ling against the timing data gathered at the method level in an instrumented profi le to pinpoint the method where the call to the data layer originated.
If instrumentation at the method level is suffi cient to allow you to fi gure out where in the application any ADO.NET calls originate, then instrumented profiling can be used without hesitation. However, instrumented profi les are usually much more intrusive than sampling profi les, incur greater overhead, and tend to generate signifi cantly larger .vsp collection fi les. In addition, if your application uses methods that make multiple calls to ADO.NET functions, the data gathered by instrumentation will only help you navigate to the method level, not diff erentiate among multiple ADO.NET calls embedded inside a single method.
More Data, PleaseBuilding multi-tiered applications is a design pattern that promotes reliability and scalability, but does lead to performance-monitoring challenges when application components execute on diff erent machines.
A simple view of a multi-tiered application that doesn’t encom-pass all of its interconnected layers can’t provide a complete picture of its performance. As you’ve seen, TIP can supply key timing data that’s otherwise missing. As the example in this article suggests, this timing data can be augmented with other performance data from standard data base administrator tools.
MARK FRIEDMAN is an Architect on the Visual Studio Ultimate team at Micro-soft . He’s the author of two books on Windows performance and blogs periodi-cally about performance issues at blogs.msdn.com/ddperf/.
THANKS to the following technical experts for reviewing this article: Daryush Laqab and Chris Schmich
Tier Interaction Profi ling explicitly identifi es and
measures out-of-process delays separately.

If you’re looking for no-nonsense .NET development training, look no further than Visual Studio Live! From Visual Studio and Sharepoint, to Silverlight, Data Management, and Cloud Computing, we’ve got you covered. Seriously.
For more reasons on why you should attend Visual Studio Live!, visit www.vslive.com/serious.
Are you serious?
NOVEMBER 14–17, 2010ORLANDO, FL
Untitled-1 1 7/13/10 10:46 AM

msdn magazine72
S MA RT C L I ENT
Building Distributed Apps with NHibernate and Rhino Service Bus, Part 2
In the July 2010 issue of MSDN Magazine, I started walking through the process of building a smart client application for a lending library. I called the project Alexandria, and decided to use NHibernate for data access and Rhino Service Bus for reliable communication with the server.
NHibernate (nhforge.org) is an object-relational mapping (O/RM) framework, and Rhino Service Bus (github.com/rhino-esb/rhino-esb) is an open source service bus implementation built on the Microsoft .NET Framework. I happen to be deeply involved in developing both of these frameworks, so it seemed like an opportunity to im-plement a project with technologies I know intimately, while at the same time provide a working example for developers who want to learn about NHibernate and Rhino Service Bus.
In the previous article, I covered the basic building blocks of the smart client application. I designed the back end, along with the communication mode between the smart client application and the back end. I also touched on batching and caching, how to manage transactions and the NHibernate session, how to consume and reply to messages from the client, and how everything comes together in the bootstrapper.
In this installment, I will cover best practices for sending data between the back end and the smart client application, as well as patterns for distributed change management. Along the way, I’ll
Oren Eini
cover the remaining implementation details, and will present a completed client for the Alexandria application.
You can download the sample solution from github.com/ayende/ alexandria. Th e solution comprises three parts: Alexandria.Backend hosts the back-end code; Alexandria.Client contains the front-end code; Alexandria.Messages contains the message defi nitions shared between them.
No One Model RulesOne of the most common questions people ask when writing distributed applications is: How can I send my entities to the client application and then apply the change set on the server side?
If that’s your question, you’re probably thinking in a mode where the server side is mostly a data repository. If you build such applications, there are technology choices you can make that simplify this task (for example, employing WCF RIA Services and WCF Data Services). Using the type of architecture I’ve outlined so far, however, it doesn’t really make sense to talk about sending entities on the wire. Indeed, the Alexandria appli-cation uses three distinct models for the same data, each model best suited for diff erent parts of the application.
Th e domain model on the back end, which is used for querying and transactional processing, is suitable for use with NHibernate (and further refi nement would be to split the querying and trans-actional processing responsibilities). Th e message model represents messages on the wire, including some concepts that map closely to domain entities (BookDTO in the sample project is a data clone of Book). In the client application, the View Model (like the Book-Model class) is optimized to be bound to the XAML and to handle user interactions.
While at fi rst glance you can see many commonalities among the three models (Book, BookDTO, BookModel), the fact that they have diff erent responsibilities means that trying to cram all of them into a
This article discusses:• Commands over change sets
• Local state management
• Back-end processing
• Handling complex operations
Technologies discussed:NHibernate, Rhino Service Bus

73August 2010msdnmagazine.com
single model would create a cumbersome, heavy-weight, one-size-doesn’t-fi t-anyone model. By split-ting the model along the lines of responsibilities, I made the work much easier because I can refi ne each model independently to fi t its own purposes.
From a conceptual point of view, there are other reasons to want to create a separate model for each usage. An object is a combination of data and behavior, but when you try to send an object over the wire, the only thing you can send is the data. Th at leads to some interesting questions. Where do you place business logic that should run on the back-end server? If you put it in the entities, what happens if you execute this logic on the client?
Th e end result of this sort of architecture is that you aren’t using real objects. Instead, you’re using data objects—objects that are simply holding the data—and the business logic resides elsewhere, as procedures that run over the object data. Th is is frowned upon, because it leads to scattering of logic and code that’s harder to maintain over time. No matter how you look at it, unless the back-end system is a simple data repository, you want to have different models in diff erent parts of the application. Th at, of course, leads to a very interesting question: how are you going to handle changes?
Commands over Change SetsAmong the operations I allow users in the Alexandria application are adding books to their queue, reordering books in the queue, and removing them entirely from the queue, as shown in Figure 1. Th ose operations need to be refl ected in both the front end and the back end.
I could try to implement this by serializing the entities over the wire and sending the modified entity back to the server for persistence. Indeed, NHibernate contains explicit support for just such scenarios, using the session.Merge method.
However, let’s assume the following business rule: When a user adds a book to her queue from the recommendations list, that book is removed from the recommendations and another recommendation is added.
Imagine trying to detect that a book was moved from the recom-mendations list to the queue using just the previous and current state (the change set between the two states). While it can be done, to say that it would be awkward to handle is an understatement.
I call such architectures Trigger-Oriented Programming. Like triggers in a database, what you have in a system based on change sets is code that deals mostly with data. To provide some meaningful business semantics, you have to extract the meaning of the changes from the change set by brute force and luck.
Th ere’s a reason that triggers containing logic are considered an anti-pattern. Though appropriate for some things (such as replication or pure data operations), trying to implement busi-ness logic using triggers is a painful process that leads to a system that’s hard to maintain.
Most systems that expose a CRUD interface and allow you to write business logic in methods such as UpdateCustomer are giving you Trigger-Oriented Programming as the default (and usually the only choice). When there isn’t signifi cant business logic
involved—when the system as a whole is mostly about CRUD—this type of architecture makes sense, but in most applications, it’s not appro-priate and not recommended.
Instead, an explicit interface (Remove-BookFromQueue and AddBookToQueue, for instance) results in a system that’s much easier to understand and think about. Th e ability to exchange information at this high level allows a great degree of freedom and easy modifi cation down the road. Aft er all, you don’t have to fi gure
out where some functionality in the system is based on what data is manipulated by that functionality. The system will spell out exactly where this is happening based on its architecture.
Th e implementation in Alexandria follows the explicit interface principle; invoking those operations resides in the application model and is shown in Figure 2. I’m doing several interesting things here, so let’s handle each of these in order.
First, I modify the application model directly to immediately refl ect the user’s desires. I can do this because adding a book to the user’s queue is an operation that is guaranteed never to fail. I also remove it from the recommendations list, because it doesn’t make sense to have an item on the user’s queue also appear on the recommendations list.
Next, I send a message batch to the back-end server, telling it to add the book to the user’s queue, and also to let me know what the user’s queue and recommendations are aft er this change. Th is is an important concept to understand.
Th e ability to compose commands and queries in this manner means that you don’t take special steps in commands like Add-BookToQueue to get the changed data to the user. Instead, the front end can ask for it as part of the same message batch and you can use existing functionality to get this data.
Th ere are two reasons I request the data from the back-end server even though I make the modifi cations in memory. First, the back-end server may execute additional logic (such as fi nding new recommendations for this user) that will result in modifi cations you don’t know about on the front-end side. Second, the reply from the back-end server will update the cache with the current status.
Disconnected Local State ManagementYou might have noticed a problem in Figure 2 with regard to disconnected work. I make the modification in memory, but
public void AddToQueue(BookModel book) { Recommendations.Remove(book); if (Queue.Any(x => x.Id == book.Id) == false) Queue.Add(book);
bus.Send( new AddBookToQueue { UserId = userId, BookId = book.Id }, new MyQueueQuery { UserId = userId }, new MyRecommendationsQuery { UserId = userId });}
Figure 2 Adding a Book to the User’s Queue on the Front End
Figure 1 Possible Operations on the User’s Books Queue

msdn magazine74 Smart Client
until I get a reply back from the server, the cached data isn’t going to reflect those changes. If I restart the application while still disconnected, the app will display expired information. Once communication with the back-end server resumes, the messages would fl ow to the back end and the fi nal state would resolve to what the user is expecting. But until that time, the application is displaying information that the user has already changed locally.
For applications that expect extended periods of disconnection, don’t rely only on the message cache; instead implement a model that’s persisted aft er each user operation.
For the Alexandria application, I extended the caching conven-tions to immediately expire any information that’s part of a com-mand-and-queries message batch such as the one in Figure 2. Th at way, I won’t have the up-to-date information, but I also won’t show erroneous information if the application is restarted before I get a reply from the back-end server. For the purposes of the Alexandria application, that’s enough.
Back-End ProcessingNow that you understand how the process works on the front-end side of things, let’s look at the code from the back-end server point of view. You’re already familiar with the handling of queries, which I showed in the previous article. Figure 3 shows the code for handling a command.
Th e actual code is pretty boring. I load the relevant entities and then call a method on the entity to perform the actual task. However, this is more important than you might think. An architect’s job,
I’d argue, is to make sure that the developers in the project are as bored as possible. Most business problems are boring, and by removing technological complexities from the system, you get a much higher percentage of developer time spent working on boring business problems instead of interesting technological problems.
What does that mean in the context of Alexandria? Instead of spreading business logic in all the message consumers, I have centralized as much of the business logic as possible in the entities. Ideally, consuming a message follows this pattern:
• Load any data required to process the message• Call a single method on a domain entity to perform the
actual operationTh is process ensures that the domain logic is going to remain in
the domain. As for what that logic is—well, that’s up to the scenarios you need to handle. Th is should give you an idea about how I handle the domain logic in the case of User.AddToQueue(book):
public virtual void AddToQueue(Book book) { if (Queue.Contains(book) == false) Queue.Add(book); Recommendations.Remove(book);
// Any other business logic related to // adding a book to the queue}
You’ve seen a case where the front-end logic and the back-end logic match exactly. Now let’s look at a case where they don’t. Removing a book from the queue is very simple on the front end (see Figure 4). It’s pretty straightforward. You remove the book from the queue locally (which removes it from the UI), then send a message batch to the back end, asking it to remove the book from the queue and update the queue and the recommendations.
On the back end, consuming the RemoveBookFromQueue message follows the pattern shown in Figure 3, loading the entities and calling the user.RemoveFromQueue(book) method:
public virtual void RemoveFromQueue(Book book) { Queue.Remove(book); // If it was on the queue, it probably means that the user // might want to read it again, so let us recommend it Recommendations.Add(book); // Business logic related to removing book from queue}
Th e behavior is diff erent between the front end and the back end. On the back end, I add the removed book to the recommendations, which I don’t do on the front end. What would be the result of the disparity?
Well, the immediate response would be to remove the book from the queue, but as soon as the replies from the back-end server reach the front end, you’ll see the book added to the recom-mendations list. In practice, you’d probably be able to notice the diff erence only if the back-end server was shut down when you remove a book from the queue.
Which is all very nice, but what about when you actually need confi rmation from the back-end server to complete an operation?
Complex OperationsWhen the user wants to add, remove or reorder items in her queue, it’s pretty obvious that the operation can never fail, so you can allow the application to immediately accept the operation. But for operations such as editing addresses or changing the credit card, you can’t just accept the operation until you have a confi rmation of success from the back end.
public class AddBookToQueueConsumer : ConsumerOf<AddBookToQueue> {
private readonly ISession session;
public AddBookToQueueConsumer(ISession session) { this.session = session; }
public void Consume(AddBookToQueue message) { var user = session.Get<User>(message.UserId); var book = session.Get<Book>(message.BookId);
Console.WriteLine("Adding {0} to {1}'s queue", book.Name, user.Name);
user.AddToQueue(book); }}
Figure 3 Adding a Book to the User’s Queue
public void RemoveFromQueue(BookModel book) { Queue.Remove(book);
bus.Send( new RemoveBookFromQueue { UserId = userId, BookId = book.Id }, new MyQueueQuery { UserId = userId }, new MyRecommendationsQuery { UserId = userId });}
Figure 4 Removing a Book from the Queue

We get it—web design is your world. That’s why Web Design World is bringing the top minds in web
design to Las Vegas this October. Join us for three days of the real deal: new sessions devoted to the
coding, design, and production techniques you need today, presented by some of the top minds in the
fi eld. Oh, and did we mention it’s in Vegas?
Here are just a few of the expert speakers you’ll fi nd at Web Design World Las Vegas:
We take our mantra—provide practical, no-fl uff, how-to—very seriously. If you’ve joined us before,
you know that. Get the insights you need to build user-friendly sites emphasizing emerging web standards
and hands-on learning with the latest tools helping you achieve great design.
SAVE $200 WHEN YOU REGISTER BY SEPTEMBER 15!LAS VEGAS • OCTOBER 18 - 20, 2010
Go to WEBDESIGNWORLD.COM today and use Priority Code NQW2 to save $200 when you
register before September 15th!
Steve MulderVice President,
Experience Strategy Isobar
Greg RewisPrincipal Worldwide Evangelist,
Creative Suite Web Premium,
Adobe Systems, Inc.
Dan RubinDesigner,
Sidebar Creative
Stephanie Sullivan RewisConsultant,
W3Conversions
Untitled-1 1 7/16/10 11:13 AM

msdn magazine76 Smart Client
In Alexandria, this is implemented as a four-stage process. It sounds scary, but it’s really quite simple. Figure 5 shows the possible stages.
The top-left screen shot shows the normal view of the sub-scription details. This is how Alexandria shows confirmed changes. The bottom-left screen shot shows the edit screen for the same data. Clicking the save button on this screen results in the screenshot shown on the top–right; this is how Alexandria shows unconfirmed changes.
In other words, I accept the change (provisionally) until I get a reply back from the server indicating that the change was accepted (which moves us back to the top-left screen) or rejected, which moves the process to the bottom-right screenshot. That screenshot shows an error from the server and allows the user to fi x the erroneous detail.
The implementation isn’t complex, despite what you may think. I’ll start in the back end and move outward. Figure 6shows the back-end code required to handle this and it isn’t anything new. I’ve been doing much the same thing throughout this article. Most of the conditional command functionality (and complexity) lives in the front end.
One thing that’s diff erent from what you’ve seen before is that here I have explicit success/fail code for the operation, while before I simply requested a data refresh in a separate query. Th e operation can fail, and I want to know not only whether the operation is successful or not, but why it failed.
Alexandria makes use of the Caliburn framework to handle much of the drudgery of managing the UI. Caliburn (caliburn.codeplex.com) is a WPF/Silverlight framework that relies heavily on conventions to make it easy to build much of the application functionality in the application model rather than writing code in the XAML code behind.
As you’ll see from looking at the sample code, just about every-thing in the Alexandria UI is wired via the XAML using conventions, giving you both clear and easy to understand XAML and an application model that directly refl ects the UI without having a direct dependency on it. Th is results in signifi cantly simpler code.
Figure 7 should give you an idea about how this is implemented in the SubscriptionDetails view model. In essence, Subscription-Details contains two copies of the data; one is held in the Editable property and that’s what all the views relating to editing or display-ing unconfi rmed changes show. Th e second is held in the Details property, which is used to hold the confi rmed changes. Each mode has a diff erent view, and each mode selects from which property to display the data.
In the XAML, I wired the ViewMode binding to select the appropri-ate view to show for every mode. In other words, switching the mode to Editing will result in the Views.SubscriptionDetails.Editing.xaml view being selected to show the edit screen for the object.
It is the save and confi rmation processes you will be most inter-ested in, however. Here’s how I handle saving:
public void Save() { ViewMode = ViewMode.ChangesPending; // Add logic to handle credit card changes bus.Send(new UpdateAddress { UserId = userId, Details = new AddressDTO { Street = Editable.Street, HouseNumber = Editable.HouseNumber, City = Editable.City, ZipCode = Editable.ZipCode, Country = Editable.Country, } });}
Th e only thing I’m actually doing here is sending a message and switching the view to a non-editable one with a marker saying that those changes have not yet been accepted. Figure 8 shows the code for confi rmation or rejection. All in all, a miniscule amount of code to implement such a feature, and it lays the foundation for imple-menting similar features in the future.
You also need to consider classic request/response calls, such as searching the catalog. Because communication in such calls is accomplished via one-way messages, you need to change the UI to indicate background processing until the response from the back-end server arrives. I won’t go over that process in detail, but the code for doing it exists in the sample application.
public void Consume(UpdateAddress message) { int result; // pretend we call some address validation service if (int.TryParse(message.Details.HouseNumber, out result) == false || result % 2 == 0) { bus.Reply(new UpdateDetailsResult { Success = false, ErrorMessage = "House number must be odd number", UserId = message.UserId }); } else { var user = session.Get<User>(message.UserId); user.ChangeAddress( message.Details.Street, message.Details.HouseNumber, message.Details.City, message.Details.Country, message.Details.ZipCode);
bus.Reply(new UpdateDetailsResult { Success = true, UserId = message.UserId }); }}
Figure 6 Back-End Handling of Changing a User’s Address
Figure 5 Four Possible Stages for a Command Requiring Confi rmation

77August 2010msdnmagazine.com
Checking OutAt the beginning of this project, I started by stating the goals and challenges I anticipated facing in building such an application. Th e major challenges I intended to address were data synchronization, the fallacies of distributed computing, and handling an occasionally connected client. Looking back, I think Alexandria does a good job of meeting my goals and overcoming the challenges.
Th e front-end application is based on WPF and making heavy use of the Caliburn conventions to reduce the actual code for the applica-tion model. Th e model is bound to the XAML views and a small set of front-end message consumers that make calls to the application model.
I covered handling one-way messaging, caching messages at the infrastructure layer and allowing for disconnected work even for operations that require back-end approval before they can really be considered complete.
On the back end, I built a message-based application based on Rhino Service Bus and NHibernate. I discussed managing the session and transaction lifetimes and how you can take advantage of the NHibernate fi rst-level cache using messages batches. Th e message consumers on the back end serve either for simple queries or as delegators to the appropriate method on a domain object, where most of the business logic actually resides.
Forcing the use of explicit commands rather than a simple CRUD interface results in a clearer code. Th is allows you to change the code easily, because the entire architecture is focused on clearly defi ning the role of each piece of the application and how it should be built. Th e end result is a very structured product, with clear lines of responsibility.
It’s hard to try to squeeze guidance for a full-blown distributed application architecture into a few short articles, especially while trying to introduce several new concepts at the same time. Still, I think you’ll fi nd that applying the practices outlined here will result in applications that are actually easier to work with than the more traditional RPC- or CRUD-based architectures.
Oren Eini (who works under the pseudonym Ayende Rahien) is an active member of several open source projects (NHibernate and Castle among them) and is the founder of many others (Rhino Mocks, NHibernate Query Analyzer and Rhino Commons among them). Eini is also responsible for the NHibernate Profi ler (nhprof.com), a visual debugger for NHibernate. You can follow his work at ayende.com/Blog.
public void BeginEdit() { ViewMode = ViewMode.Editing;
Editable.Name = Details.Name; Editable.Street = Details.Street; Editable.HouseNumber = Details.HouseNumber; Editable.City = Details.City; Editable.ZipCode = Details.ZipCode; Editable.Country = Details.Country; // This field is explicitly ommitted // Editable.CreditCard = Details.CreditCard; ErrorMessage = null;}
public void CancelEdit() { ViewMode = ViewMode.Confirmed; Editable = new ContactInfo(); ErrorMessage = null;}
Figure 7 Moving Between View Modes in Response to User Input
public class UpdateAddressResultConsumer : ConsumerOf<UpdateAddressResult> { private readonly ApplicationModel applicationModel;
public UpdateAddressResultConsumer( ApplicationModel applicationModel) {
this.applicationModel = applicationModel; }
public void Consume(UpdateAddressResult message) { if(message.Success) { applicationModel.SubscriptionDetails.CompleteEdit(); } else { applicationModel.SubscriptionDetails.ErrorEdit( message.ErrorMessage); } }}
//from SubscriptionDetailspublic void CompleteEdit() { Details = Editable; Editable = new ContactInfo(); ErrorMessage = null; ViewMode = ViewMode.Confirmed;}
public void ErrorEdit(string theErrorMessage) { ViewMode = ViewMode.Error; ErrorMessage = theErrorMessage;}
Figure 8 Consuming the Reply and Handling the Result

msdn magazine78
W IN DOWS PHONE 7
Windows Phone and the Cloud: an Introduction
I’m learning to read and write in Spanish. Because of where I live, I can practice my Spanish by trying to read the bilingual signs that show up in many public places. Th e thing is, sometimes I get stuck on one particular word and can’t fi gure it out, or sometimes I’m confused by a whole sentence. It’s also tough to be sure that I’ve understood what I’ve read without a parallel English translation to refer to. I could carry a Spanish-English dictionary with me, but fl ipping through all of those pages is just so analog.
What I really want, because I always seem to have my phone in my hand, is an easy way for my phone to help me with the trans-lation. Going to Bing with my phone and using the cloud-based
Ramon Arjona
Microsoft Translator is helpful, but it takes a lot of key presses to get to the translation screen. If only there were a way—an easy way—to somehow get the translator on my phone. Well, with the advent of Windows Phone 7, there is.
Th is article serves as an introduction to developing Windows Phone applications and shows how to tie such an app into a Web service in the cloud. You should have some familiarity with C# and Visual Studio, and it would be helpful if you have at least some experience developing applications with Extensible Application Markup Language (XAML), but this isn’t required. I used the April refresh of the community technology preview (CTP) of the Windows Phone tools. By the time you read this, things may have changed, so go to developer.windowsphone.com to read the latest documentation and download the latest tools.
First Things First: Getting an AppIDIf you’re going to interact with Translator—or any of the Bing Web services—the fi rst step is to get an AppID. It’s used by the service API to validate that a request is coming from a registered Bing application developer.
Go to bing.com/developers/createapp.aspx and sign in with your Windows Live ID. Then fill out the form, which asks you for your application’s name and description, as well as details such as your company name and e-mail address. Your e-mail address is used to notify you when these APIs change, for example, as new versions are rolled out or old versions taken offl ine. For the Trans-
This article uses a community technology preview of the Windows Phone tools. All information is subject to change.
This article discusses:• Obtaining an AppID to work with Microsoft Translator
• Defi ning an application user scenario
• Using XAML to design a UI
• Changing an application icon
• Working with the Microsoft Translator API
• Expanding an application with a default list project
Technologies discussed:Windows Phone 7, Visual Studio Express 2010 for Windows Phone, Microsoft Translator, XAML

79August 2010msdnmagazine.com
lator API in particular, at the time of this writing the documentation says that old versions will remain online for 90 days following the release of a new version.
Next, read the terms of use, check the box to signify you accept them and click the “Accept” button, and you’ll be taken to a page with your newly minted AppID in it. You can always come back to this page for reference, but I usually copy and paste my AppID into my applica-tion’s source fi le when I fi rst create it.
Always read the terms of use for any Web service you plan to con-sume in an app. Seriously, resist the temptation to just scan them, especially if you plan to distribute your application to users through Marketplace. You owe it to your customers to understand the service-level goals and other conditions set by the partners who provide the services your app consumes. So make sure you read and understand the terms of use, whether your app is consuming a service from Microsoft or from any other party.
Now that you have an AppID, we’re ready to start working on the mobile translator app.
Defi ning the ScenarioBefore I started to work on my first app, I took a look at some successful mobile applications on the market. I looked at applica-tions for Windows phones and other smartphones to try to get a sense of what makes a truly successful mobile application. I read product reviews. I interviewed people. I pestered my friends to let me play with their phones.
Aft er all this research, I concluded that the key to a successful mobile app is simplicity. Every popular app fulfi lls one or two key user scenarios and fulfi lls them well. For example, I discovered a whole class of apps whose sole purpose is to generate rude noises. In practice, they’re essentially a re-implementation of the whoopee cushion on a phone. People seem to fi nd them amusing, at least enough to pay money to load them onto their phones.
Similarly, there are apps that roll simulated dice, recommend a restaurant for dinner and even calculate the tip amount for that par-ticular dinner. All of these have a focused user scenario and execute on that scenario in a way that’s simple and intuitive. Th is approach isn’t unique to any particular brand of smartphone. Th e idea that we should have a polished, intuitive user experience is reinforced by the Windows Phone UI Design and Interaction Guide published at developer.windowsphone.com/windows-phone-7.
So when I started to work on my translator app, it was impor-tant to focus on exactly what I wanted the app to accomplish, and nothing else. To do this, I fi rst had to have a clear picture of what I wanted to accomplish. Once I had this picture in mind, I could resist the temptation to add cool new features that—while
interesting—wouldn’t serve the main user scenario. I decided my app should translate between English and Spanish. It should easily switch translation modes from Spanish to English or English to Spanish, and it should deal with only single words or simple sentences. Moreover, I only cared about Spanish and English, so my app would ignore other languages.
Building the AppTo get started building the translator app, open Visual Studio Express 2010 for Windows Phone. Choose “New project...” and select “Windows Phone Application.” Th is opens the default Windows Phone project with a screen divided into two sections: Title and Content. Th ese sections are delineated with a XAML Grid object, which lets us defi ne a series of rows and columns in which we can position child UI elements such as Buttons and TextBlocks (see Figure 1).
First, edit the application name and the page title by selecting these UI elements in the designer. This highlights the related XAML in the code view window of the designer, showing you which element you need to edit. Next, open the toolbox and drag some UI elements to the lower grid on the page, which is named ContentGrid. Choose a TextBox, where we’ll put the words we want to translate, then a TextBlock, where the translation will be rendered. Finally, add two buttons (see Figure 2).
One button will execute the translation and the second will toggle the direction of the translation from Spanish to English or back again.
XAML: the Modern UITh e heart of the Windows Phone 7 user experience is the design system code-named “Metro.” And the heart of implementing a UI according to the Metro system is XAML. If you’ve worked with Silverlight or Windows Presentation Foundation (WPF) before, XAML is probably familiar to you. If you haven’t, this section provides a brief introduction.
XAML is a way to declaratively structure your UI, giving you a strict separation between your app’s logic and its look and feel. You’ll notice that the code for your app’s main page, for example, is
Figure 1 Default Windows Phone Project with Display and Code Views
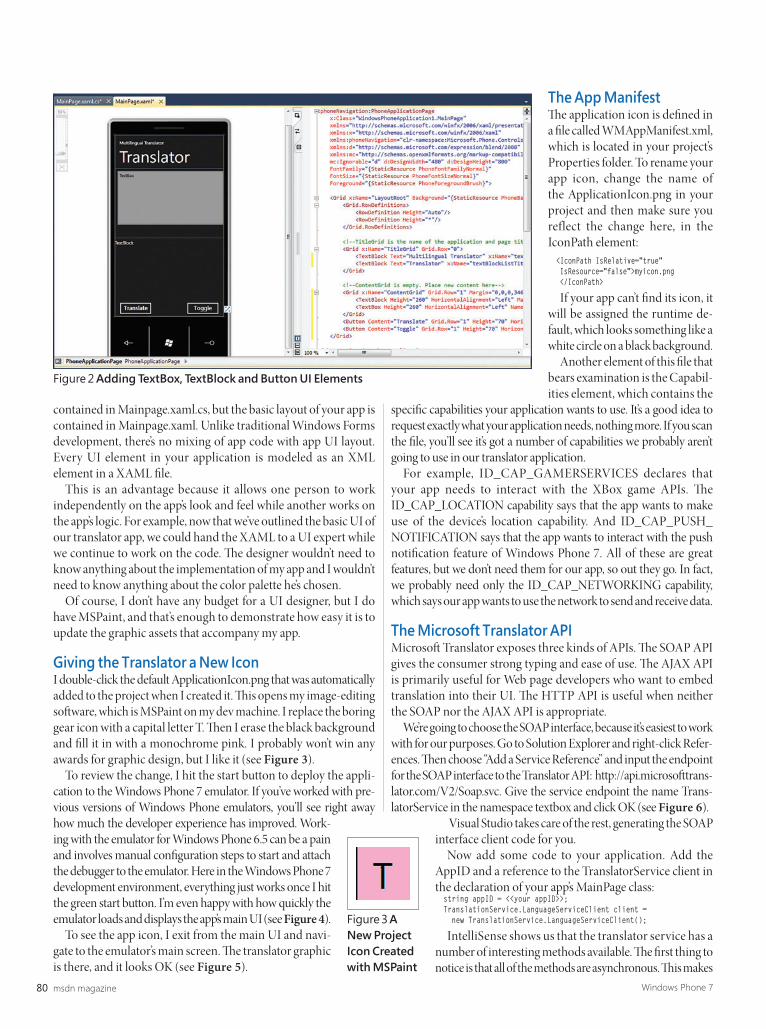
msdn magazine80 Windows Phone 7
contained in Mainpage.xaml.cs, but the basic layout of your app is contained in Mainpage.xaml. Unlike traditional Windows Forms development, there’s no mixing of app code with app UI layout. Every UI element in your application is modeled as an XML element in a XAML fi le.
This is an advantage because it allows one person to work independently on the app’s look and feel while another works on the app’s logic. For example, now that we’ve outlined the basic UI of our translator app, we could hand the XAML to a UI expert while we continue to work on the code. Th e designer wouldn’t need to know anything about the implementation of my app and I wouldn’t need to know anything about the color palette he’s chosen.
Of course, I don’t have any budget for a UI designer, but I do have MSPaint, and that’s enough to demonstrate how easy it is to update the graphic assets that accompany my app.
Giving the Translator a New IconI double-click the default ApplicationIcon.png that was automatically added to the project when I created it. Th is opens my image-editing soft ware, which is MSPaint on my dev machine. I replace the boring gear icon with a capital letter T. Th en I erase the black background and fi ll it in with a monochrome pink. I probably won’t win any awards for graphic design, but I like it (see Figure 3).
To review the change, I hit the start button to deploy the appli-cation to the Windows Phone 7 emulator. If you’ve worked with pre-vious versions of Windows Phone emulators, you’ll see right away how much the developer experience has improved. Work-ing with the emulator for Windows Phone 6.5 can be a pain and involves manual confi guration steps to start and attach the debugger to the emulator. Here in the Windows Phone 7 development environment, everything just works once I hit the green start button. I’m even happy with how quickly the emulator loads and displays the app’s main UI (see Figure 4).
To see the app icon, I exit from the main UI and navi-gate to the emulator’s main screen. Th e translator graphic is there, and it looks OK (see Figure 5).
The App ManifestTh e application icon is defi ned in a fi le called WMAppManifest.xml, which is located in your project’s Properties folder. To rename your app icon, change the name of the ApplicationIcon.png in your project and then make sure you reflect the change here, in the IconPath element: <IconPath IsRelative="true" IsResource="false">myicon.png </IconPath>
If your app can’t fi nd its icon, it will be assigned the runtime de-fault, which looks something like a white circle on a black background.
Another element of this fi le that bears examination is the Capabil-ities element, which contains the
specifi c capabilities your application wants to use. It’s a good idea to request exactly what your application needs, nothing more. If you scan the fi le, you’ll see it’s got a number of capabilities we probably aren’t going to use in our translator application.
For example, ID_CAP_GAMERSERVICES declares that your app needs to interact with the XBox game APIs. Th e ID_CAP_LOCATION capability says that the app wants to make use of the device’s location capability. And ID_CAP_PUSH_ NOTIFICATION says that the app wants to interact with the push notifi cation feature of Windows Phone 7. All of these are great features, but we don’t need them for our app, so out they go. In fact, we probably need only the ID_CAP_NETWORKING capability, which says our app wants to use the network to send and receive data.
The Microsoft Translator APIMicrosoft Translator exposes three kinds of APIs. Th e SOAP API gives the consumer strong typing and ease of use. Th e AJAX API is primarily useful for Web page developers who want to embed translation into their UI. Th e HTTP API is useful when neither the SOAP nor the AJAX API is appropriate.
We’re going to choose the SOAP interface, because it’s easiest to work with for our purposes. Go to Solution Explorer and right-click Refer-ences. Th en choose “Add a Service Reference” and input the endpoint for the SOAP interface to the Translator API: http://api.microsoft trans-lator.com/V2/Soap.svc. Give the service endpoint the name Trans-latorService in the namespace textbox and click OK (see Figure 6).
Visual Studio takes care of the rest, generating the SOAP interface client code for you.
Now add some code to your application. Add the AppID and a reference to the TranslatorService client in the declaration of your app’s MainPage class: string appID = <<your appID>>; TranslationService.LanguageServiceClient client = new TranslationService.LanguageServiceClient();
IntelliSense shows us that the translator service has a number of interesting methods available. Th e fi rst thing to notice is that all of the methods are asynchronous. Th is makes
Figure 2 Adding TextBox, TextBlock and Button UI Elements
Figure 3 A New Project Icon Created with MSPaint

81August 2010msdnmagazine.com
sense, because there’s no good reason to block the client application while we’re waiting for a network operation to complete. It means we’ll need to register a delegate for each specifi c operation we per-form. In our case, we’re only interested in the TranslateAsync method and the TranslateAsyncComplete event exposed by the Language-ServiceClient. But the other methods certainly do look interesting. Let’s take a look at them and see if they fi t into our user scenario.
Two methods that stand out are GetLanguagesForTranslateAsync and GetLanguageNamesAsync. Th e fi rst method provides a list of language codes supported by the Translator service. By calling this method, you can see the language code for Spanish is “es.” Th e GetLanguageNamesAsync method returns a list of language names for a given set of language codes, localized for a given locale. For example, if you pass “es” into this method as the locale and the language code, you get back the string “Español.” If we were doing a multilingual translator, these would both be useful.
Another interesting method is named SpeakAsync. It accepts a string and a locale and returns a URL to a WAV fi le that’s the native-sounding pronunciation of a word. Th is is an awesome feature. For example, I could type in a string, get the translation and then pass this string to the SpeakAsync method to get a WAV fi le I could use to communicate with others in Spanish. Or if I were unsure of the pronunciation of a particu-lar word, I could use the SpeakAsync method to hear what it was supposed to sound like.
Th ese are pretty cool, and it’s tough to resist the temp-tation to put them into the app just because they’re cool. For now, though, we should stand fi rm and focus only on fulfi lling the user scenario we outlined at the start. Having this clear picture in mind makes it easier when faced with the temptation to add “just one more feature.” I’m sure I’ll end up using the features off ered in the Translator API at some point, just not right now.
Wiring up the code to make our translator app is easy. First, we register the delegates for TranslateCompleted:
client.TranslateCompleted += new EventHandler<TranslationService.TranslateCompletedEventArgs> (client_TranslateCompleted);
Th en we implement the event handler for the TranslateCompleted, which sets the text of our TextBlock to the translated text:
void client_TranslateCompleted(object sender, TranslationService.TranslateCompletedEventArgs e) { TranslatedTextBlock.Text = e.Result; }
We wire up the button to submit the text we’ve entered for translation: private void TranslateButton_Click(object sender, RoutedEventArgs e) { client.TranslateAsync(appID, TranslateTextBox.Text, fromLanguage, toLanguage); }
Th en we add some simple code to the second button to toggle between translation modes, from “Spanish to English” or from “English to Spanish.” Th is button manages a global state variable and changes the text of our translate button to indicate that state.
Finally, we deploy the app to the emulator to test it. We’ve now got a fully functional translator app, with just a few lines of code and an hour or so of development time.
Expanding the Translator ApplicationTh e simple translator app is nice, but we could take it further by expanding our user scenario. It would be great if we could tie more of the languages off ered by the Translator API into our app in a way that fi ts with the Metro design guidelines. And it would be even better if we could eliminate the button that manages the translation direction and instead have a simpler, more intuitive way of managing the direction of the translation. Whatever we do, it has to be friendly to a person using his fi ngers to interact with the device, and it has to feel fast and easy.
Figure 4 The App Displayed by the Windows Phone 7 Emulator
Figure 5 Checking the New App Icon in the Emulator
Figure 6 Adding a SOAP Service Reference

msdn magazine82 Windows Phone 7
So what do we do? We build an application using the default list project. Start a new project and select “Windows Phone List Application.” This gives you a default screen with a ListBox control in the ContentGrid. Th e ListBox will contain six languages we want to translate our text into, replacing the dummy text (see Figure 7).
We’ll edit the MainViewModelSampleData.xaml fi le, which is contained in the SampleData folder in your project. You’ll see some XML that looks something like this:
<local:ItemViewModel LineOne="design one" LineTwo="Maecenas praesent accumsan bibendum" LineThree="Maecenas praesent accumsan bibendum dictumst eleifend facilisi faucibus habitant inceptos interdum lobortis nascetur"/>
By editing the XML, you can change the design-time view of the ListBox to include all of the languages we want to work with: Span-ish, German, English, Portuguese, Italian and French. Notice that aft er you save this fi le, the design-time view will refl ect your changes. This is because the ListBox control is databound to the Items element defi ned in MainViewModelSampleData.xaml. Th is is
controlled by the ItemsSource attribute of the ListBox control.
You can also update the contents of the ListBox at run time. If you look into the file generated by Visual Studio, you’ll see an Observable-Collection<ItemViewCollection> being filled with placeholder data similar to that contained in the MainViewModelSample-Data.xaml fi le. For example, if I wanted to dynamically gen-erate the list of languages in the UI based on the languages re-turned by the GetLanguage-NamesAsync method, I would edit the MainViewModel.cs fi le to populate the Items collection. I prefer to specify a static list of
languages for now and just edit the collection of ItemViewModel objects directly. Now when we run the list application, we should see a UI something like Figure 8.
When the user touches one of these buttons, he’ll be taken to a details page that looks essen-tially the same as the UI of our Simple Translator. Th ere’s a Text-Box to enter the words to trans-late, a TextBlock to contain the translated text and a button to submit the translation. Instead of adding another button to man-age the direction of the transla-tion, however, we’ll rely on the Translator API. Th e bidirectional translation of our SimpleTranslator
app doesn’t make sense in this multilingual scenario, and adding additional layers of UI would make the app start to feel clunky instead of smooth. Fortunately, the Translator API provides a way to automatically detect the language being passed in.
We add some code to fi rst call the DetectAsync method of the translator client, passing in the text we want to translate, then call TranslateAsync from the DetectAsyncComplete event handler. Th e event handler now looks like this:
void client_DetectCompleted(object sender, TranslationService.DetectCompletedEventArgs e){ string languageCode = e.Result; client.TranslateAsync(appID, TranslateTextBox.Text, fromLanguage, tolanguage);}
We know the language we want to translate into because of the button the user selected. We know the language that we want to translate from because the Translator API has autodetected it. We’re able to create a simple, multilingual translator that allows the user to get a translation with just two touches—not counting typing—and less than an hour of coding.
SimplicitySimplicity is at the heart of development for Windows Phone 7. An app should focus on fulfi lling one user scenario, and fulfi lling it well. Th e tools that come with the Windows Phone 7 SDK CTP make it not only possible but easy to deliver apps that are both simple and powerful. We’ve also seen that interacting with the cloud is straightforward, and that the Microsoft Translator Web service can be wired into a Windows Phone app with just a small investment of developer time. By taking familiar tools such as Visual Studio and clear guidelines such as Metro, Windows Phone and the cloud come together to open up a world of new opportunities for developers and users.
RAMON ARJONA is a senior test lead working on the Windows team at Microsoft .
THANKS to the following technical experts for reviewing this article: VikramDendi and Sandor Maurice
Figure 7 The Default Windows Phone List Application
Figure 8 The List Application UI

NOVEMBER 14–17, 2010ORLANDO, FL | HILTON WALT DISNEY WORLD RESORT
VSLIVE.COM/ORLANDODETAILS AND REGISTRATION AT
USE PRIORITY CODE NQZF1
Supported by:
REAL-WORLD TRAINING. KILLER SKILLS.Register today for Visual Studio Live! Orlando and learn how to maximize the development capabilities of Visual Studio, .NET 4.0, and so much more. Join us for four action-packed days of workshops, 50+ sessions by expert instructors, and keynotes by industry heavyweights. Topics covered include:
PROGRAMING WITH WCF
ARCHITECTING FOR AZURE
WPF & SILVERLIGHT
ASP.NET 4
jQUERY FOR ASP.NET
WHAT’S NEW IN VISUAL STUDIO 2010
SHAREPOINT 2010 FOR ASP.NET DEVELOPERS
Untitled-1 1 7/13/10 10:47 AM

msdn magazine84
tips about when the use of fault injection testing is appropriate and when alternative techniques are more suitable. Although the FaultHar-ness.exe program itself is quite simple and most of the diffi cult work is performed behind the scenes by the TestApi DLLs, understanding and modifying the code I present here to meet your own testing sce-narios requires a solid understanding of the .NET programming envi-ronment. Th at said, even if you’re a .NET beginner, you should be able to follow my explanations without too much diffi culty. I’m confi dent you’ll fi nd the discussion of fault injection an interesting and possibly useful addition to your toolset.
The Application Under TestMy dummy application under test is a simplistic but representative C# WinForm application that simulates a hypothetical card game called Two Card Poker. The application consists of two main components: TwoCardPokerGame.exe provides the UI and TwoCardPokerLib.dll provides the underlying functionality.
To create the game DLL I launched Visual Studio 2008 and selected the C# Class Library template from the File | New Project
Fault Injection Testing with TestApi
Fault injection testing is the process of deliberately inserting an error into an application under test and then running the application to determine whether the application deals with the error proper-ly. Fault injection testing can take several diff erent forms. In this month’s column, I explain how you can introduce faults into .NET applications at run time using a com-ponent of the TestApi library.
The best way for you to see where I’m headed in this column is to take a look at the screenshot in Figure 1. Th e screenshot shows that I’m performing fault injection testing on a dummy .NET WinForm application named TwoCar-dPokerGame.exe. A C# program named FaultHarness.exe is running in the com-mand shell. It alters the normal behavior of the application under test so the application throws an exception the third time a user clicks on the button labeled Evaluate. In this situation, the Two Card Poker application does not handle the application exception gracefully and the result is the system-generated message box.
Let’s take a closer look at this scenario to consider some of the details involved. When FaultHarness.exe is launched from the command shell, behind the scenes the harness prepares profi ling code that will intercept the normal code execution of TwoCard-PokerGame.exe. Th is is called the fault injection session.
Th e fault injection session uses a DLL to start watching for calls to the application’s button2_Click method, which is the event handler for the button labeled Evaluate. Th e fault injection session has been confi gured so that the fi rst two times a user clicks on the Evaluate button, the application behaves as coded, but on the third click the fault session causes the application to throw an exception of type System.ApplicationException.
The fault session records session activity and logs a set of fi les to the test host machine. Notice in Figure 1 that the fi rst two ap-plication Deal-Evaluate click pairs work properly, but the third click generated an exception.
In the sections that follow, I’ll briefl y describe the dummy Two Card Poker Game application under test, present and explain in detail the code in the FaultHarness.exe program shown in Figure 1, and provide some
TEST RUN JAMES MCCAFFREY
Figure 1 Fault Injection Testing in Action
Code download available at code.msdn.microsoft.com/mag201008TestRun.
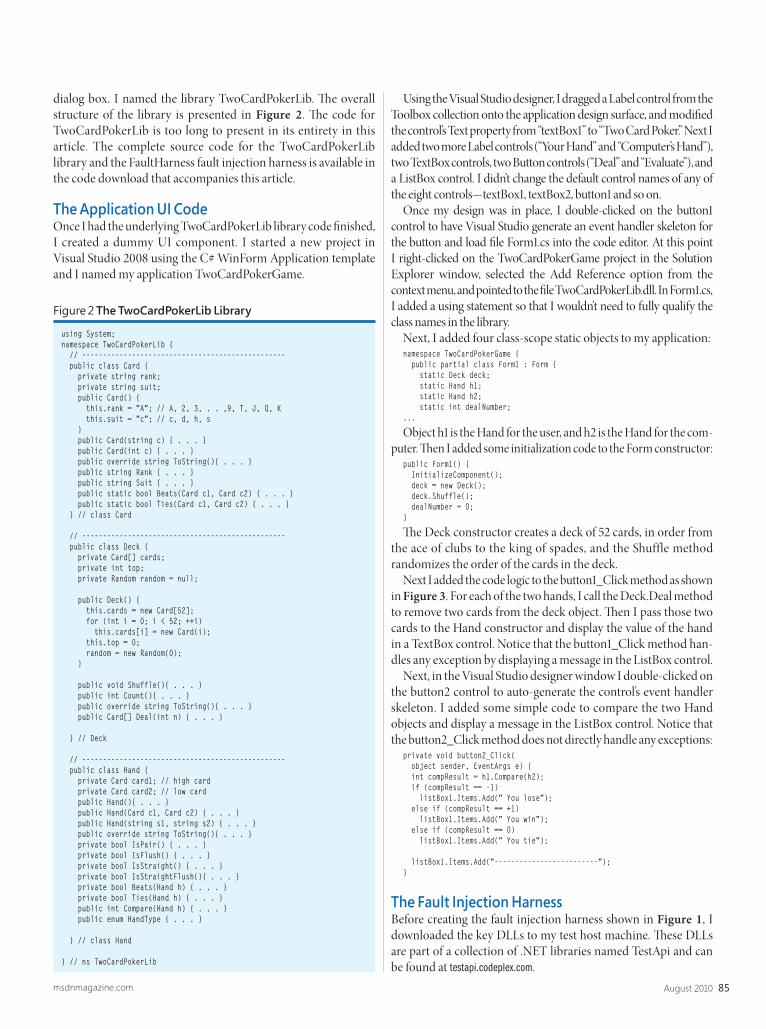
85August 2010msdnmagazine.com
dialog box. I named the library TwoCardPokerLib. Th e overall structure of the library is presented in Figure 2. Th e code for TwoCardPokerLib is too long to present in its entirety in this article. The complete source code for the TwoCardPokerLib library and the FaultHarness fault injection harness is available in the code download that accompanies this article.
The Application UI CodeOnce I had the underlying TwoCardPokerLib library code fi nished, I created a dummy UI component. I started a new project in Visual Studio 2008 using the C# WinForm Application template and I named my application TwoCardPokerGame.
Using the Visual Studio designer, I dragged a Label control from the Toolbox collection onto the application design surface, and modifi ed the control’s Text property from “textBox1” to “Two Card Poker.” Next I added two more Label controls (“Your Hand” and “Computer’s Hand”), two TextBox controls, two Button controls (“Deal” and “Evaluate”), and a ListBox control. I didn’t change the default control names of any of the eight controls—textBox1, textBox2, button1 and so on.
Once my design was in place, I double-clicked on the button1 control to have Visual Studio generate an event handler skeleton for the button and load fi le Form1.cs into the code editor. At this point I right-clicked on the TwoCardPokerGame project in the Solution Explorer window, selected the Add Reference option from the context menu, and pointed to the fi le TwoCardPokerLib.dll. In Form1.cs, I added a using statement so that I wouldn’t need to fully qualify the class names in the library.
Next, I added four class-scope static objects to my application:namespace TwoCardPokerGame { public partial class Form1 : Form { static Deck deck; static Hand h1; static Hand h2; static int dealNumber; ...
Object h1 is the Hand for the user, and h2 is the Hand for the com-puter. Th en I added some initialization code to the Form constructor:
public Form1() { InitializeComponent(); deck = new Deck(); deck.Shuffle(); dealNumber = 0;}
Th e Deck constructor creates a deck of 52 cards, in order from the ace of clubs to the king of spades, and the Shuffle method randomizes the order of the cards in the deck.
Next I added the code logic to the button1_Click method as shown in Figure 3. For each of the two hands, I call the Deck.Deal method to remove two cards from the deck object. Th en I pass those two cards to the Hand constructor and display the value of the hand in a TextBox control. Notice that the button1_Click method han-dles any exception by displaying a message in the ListBox control.
Next, in the Visual Studio designer window I double-clicked on the button2 control to auto-generate the control’s event handler skeleton. I added some simple code to compare the two Hand objects and display a message in the ListBox control. Notice that the button2_Click method does not directly handle any exceptions:
private void button2_Click( object sender, EventArgs e) { int compResult = h1.Compare(h2); if (compResult == -1) listBox1.Items.Add(" You lose"); else if (compResult == +1) listBox1.Items.Add(" You win"); else if (compResult == 0) listBox1.Items.Add(" You tie");
listBox1.Items.Add("-------------------------");}
The Fault Injection HarnessBefore creating the fault injection harness shown in Figure 1, I downloaded the key DLLs to my test host machine. Th ese DLLs are part of a collection of .NET libraries named TestApi and can be found at testapi.codeplex.com.
using System;namespace TwoCardPokerLib { // ------------------------------------------------- public class Card { private string rank; private string suit; public Card() { this.rank = "A"; // A, 2, 3, . . ,9, T, J, Q, K this.suit = "c"; // c, d, h, s } public Card(string c) { . . . } public Card(int c) { . . . } public override string ToString(){ . . . } public string Rank { . . . } public string Suit { . . . } public static bool Beats(Card c1, Card c2) { . . . } public static bool Ties(Card c1, Card c2) { . . . } } // class Card
// ------------------------------------------------- public class Deck { private Card[] cards; private int top; private Random random = null;
public Deck() { this.cards = new Card[52]; for (int i = 0; i < 52; ++i) this.cards[i] = new Card(i); this.top = 0; random = new Random(0); }
public void Shuffle(){ . . . } public int Count(){ . . . } public override string ToString(){ . . . } public Card[] Deal(int n) { . . . } } // Deck
// ------------------------------------------------- public class Hand { private Card card1; // high card private Card card2; // low card public Hand(){ . . . } public Hand(Card c1, Card c2) { . . . } public Hand(string s1, string s2) { . . . } public override string ToString(){ . . . } private bool IsPair() { . . . } private bool IsFlush() { . . . } private bool IsStraight() { . . . } private bool IsStraightFlush(){ . . . } private bool Beats(Hand h) { . . . } private bool Ties(Hand h) { . . . } public int Compare(Hand h) { . . . } public enum HandType { . . . } } // class Hand
} // ns TwoCardPokerLib
Figure 2 The TwoCardPokerLib Library

msdn magazine86 Test Run
Th e TestApi library is a collection of soft ware-testing-related utilities. Included in the TestApi library is a set of Managed Code Fault Injection APIs. (Read more about them at blogs.msdn.com/b/ivo_manolov/archive/2009/11/25/9928447.aspx.) I downloaded the latest fault injection APIs release, which in my case was version 0.4, and unzipped the download. I will explain what’s in the download and where to place the fault injection binaries shortly.
Version 0.4 supports fault injection testing for applications created using the .NET Framework 3.5. Th e TestApi library is under active development, so you should check the CodePlex site for updates to the techniques I present in this article. Additionally, you may want to check for updates and tips on the blog of Bill Liu, the primary developer of the TestApi fault injection library, at blogs.msdn.com/b/billliu/.
To create the fault injection harness I started a new project in Visual Studio 2008 and selected the C# Console Application template. I named the application FaultHarness and I added some minimal code to the program template (see Figure 4).
I hit the <F5> key to build and run the harness skeleton, which created a \bin\Debug folder in the FaultHarness root folder.
The TestApi download has two key components. The first is TestApiCore.dll, which was located in the Binaries folder of the unzipped download. I copied this DLL into the root directory of the FaultHarness application. Th en I right-clicked on the FaultHarness project in the Solution Explorer window, selected Add Reference,
and pointed it to TestApiCore.dll. Next, I added a using statement for Microsoft .Test.FaultInjection to the top of my fault harness code so my harness code could directly access the functionality in TestApiCore.dll. I also added a using statement for System.Diag-nostics because, as you’ll see shortly, I want to access the Process and ProcessStartInfo classes from that namespace.
Th e second key component in the fault injection download is a folder named FaultInjectionEngine. Th is holds 32-bit and 64-bit versions of FaultInjectionEngine.dll. I copied the entire Fault-InjectionEngine folder into the folder holding my FaultHarness executable, in my case C:\FaultInjection\FaultHarness\bin\Debug\. Th e 0.4 version of the fault injection system I was using requires the FaultInjectionEngine folder to be in the same location as the harness executable. Additionally, the system requires that the appli-cation under test binaries be located in the same folder as the harness executable, so I copied fi les TwoCardPokerGame.exe and TwoCard-PokerLib.dll into C:\FaultInjection\FaultHarness\bin\Debug\.
To summarize, when using the TestApi fault injection system, a good approach is to generate a skeleton harness and run it so that a harness \bin\Debug directory is created, then place fi le TestApi-Core.dll in the harness root directory, place the FaultInjectionEngine folder in \bin\Debug, and place the application under test binaries (.exe and .dll) in \bin\Debug as well.
Using the TestApi fault injection system requires that you specify the application under test, the method in the application under test that will trigger a fault, the condition that will trigger a fault, and the kind of fault that will be triggered:
string appUnderTest = "TwoCardPokerGame.exe";string method = "TwoCardPokerGame.Form1.button2_Click(object, System.EventArgs)";ICondition condition = BuiltInConditions.TriggerEveryOnNthCall(3);IFault fault = BuiltInFaults.ThrowExceptionFault( new ApplicationException( "Application exception thrown by Fault Harness!"));FaultRule rule = new FaultRule(method, condition, fault);
Notice that, because the system requires the application under test to be in the same folder as the harness executable, the name of the ap-plication under test executable does not need the path to its location.
Specifying the name of the method that will trigger the injected fault is a common source of trouble for TestApi fault injection beginners. Th e method name must be fully qualifi ed in the form Name space.Class.Method(args). My preferred technique is to use the ildasm.exe tool to examine the application under test to help me determine the triggering method’s signature. From the special Visual Studio tools command shell I launch ildasm.exe, point to the application under test, then double-click on the target method. Figure 5 shows an example of using ildasm.exe to examine the signature for the button2_Click method.
When specifying the trigger method signature, you do not use the method return type, and you do not use parameter names. Getting the method signature correct sometimes requires a bit of trial and error. For example, on my fi rst attempt to target button2_Click, I used:
TwoCardPokerGame.Form1.button2_Click(object,EventArgs)
I had to correct it to: TwoCardPokerGame.Form1.button2_Click(object,System.EventArgs)
Th e TestApi download contains a Documentation folder contain-ing a concepts document that provides good guidance on how to
private void button1_Click( object sender, EventArgs e) {
try { ++dealNumber; listBox1.Items.Add("Deal # " + dealNumber); Card[] firstPairOfCards = deck.Deal(2); h1 = new Hand(firstPairOfCards[0], firstPairOfCards[1]); textBox1.Text = h1.ToString();
Card[] secondPairOfCards = deck.Deal(2); h2 = new Hand(secondPairOfCards[0], secondPairOfCards[1]); textBox2.Text = h2.ToString(); listBox1.Items.Add(textBox1.Text + " : " + textBox2.Text); } catch (Exception ex) { listBox1.Items.Add(ex.Message); }}
Figure 3 Dealing the Cards
using System;namespace FaultHarness { class Program { static void Main(string[] args) { try { Console.WriteLine("\nBegin TestApi Fault Injection environmnent session\n");
// create fault session, launch application
Console.WriteLine("\nEnd TestApi Fault Injection environment session"); } catch (Exception ex) { Console.WriteLine("Fatal: " + ex.Message); } } } // class Program} // ns
Figure 4 FaultHarness

87August 2010msdnmagazine.com
correctly construct diff erent kinds of method signatures including constructors, generic methods, properties, and overloaded operators. Here I target a method that’s located in the application under test, but I could have also targeted a method in the underlying Two-CardPokerLib.dll, such as:
string method = "TwoCardPokerLib.Deck.Deal(int)"
Aft er specifying the trigger method, the next step is to specify the condition under which the fault will be injected into the application under test. In my example I used TriggerEveryOnNthCall(3), which as you’ve seen injects a fault every third time the trigger method is called. Th e TestApi fault injection system has a neat set of trigger conditions including TriggerIfCalledBy(method), TriggerOnEveryCall, and others.
Aft er specifying the trigger condition, the next step is to specify the type of fault that will be injected into the system under test. I used BuiltInFaults.Th rowExceptionFault. In addition to exception faults, the TestApi fault injection system has built-in return type faults that allow you to inject erroneous return values into your application under test at run time. For example, this will cause the trigger method to return a (presumably incorrect) value of -1:
IFault f = BuiltInFaults.ReturnValueFault(-1)
Aft er the fault trigger method, condition, and fault kind have been specifi ed, the next step is to create a new FaultRule and pass that rule to a new FaultSession:
FaultRule rule = new FaultRule(method, condition, fault);Console.WriteLine( "Application under test = " + appUnderTest);Console.WriteLine( "Method to trigger injected runtime fault = " + method);Console.WriteLine( "Condition which will trigger fault = On 3rd call");Console.WriteLine( "Fault which will be triggered = ApplicationException");FaultSession session = new FaultSession(rule);
With all the preliminaries in place, the last part of writing the fault harness code is to programmatically launch the application under test in the fault session environment:
ProcessStartInfo psi = session.GetProcessStartInfo(appUnderTest);Console.WriteLine( "\nProgrammatically launching application under test");Process p = Process.Start(psi);p.WaitForExit();p.Close();
When you execute the fault harness, it will launch the application under test in your fault session, with the FaultInjection-Engine.dll watching for situations where the trigger method is called when the trigger condition is true. Th e tests are performed manually here, but you can also run test automation in a fault session.
While the fault session is running, information about the session is logged into the current directory—that is, the directory that holds the fault harness executable and the application under test executable. You can examine these log fi les to help resolve any problems that might occur while you’re develop-ing your fault injection harness.
DiscussionTh e example and explanations I’ve presented here should get you up and running with creating a fault injection harness for your own application under test. As with any activity that’s part of the soft -ware development process, you will have limited resources and you should analyze the costs and benefi ts of performing fault injection testing. In the case of some applications, the eff ort required to create fault injection testing may not be worthwhile, but there are many testing scenarios where fault injection testing is critically important. Imagine soft ware that controls a medical device or a fl ight system. In situations such as these, applications absolutely must be robust and able to correctly handle all kinds of unexpected faults.
Th ere is a certain irony involved with fault injection testing. Th e idea is that, if you can anticipate the situations when an exception can occur, you can in theory oft en programmatically guard against that exception and test for the correct behavior of that guarding behavior. However, even in such situations, fault injection testing is useful for generating diffi cult to create exceptions. Additionally, it’s possible to inject faults that are very diffi cult to anticipate, such as System.OutOfMemoryException.
Fault injection testing is related to and sometimes confused with mutation testing. In mutation testing, you deliberately insert errors into the system under test, but then execute an existing test suite against the faulty system in order to determine whether the test suite catches the new errors created. Mutation testing is a way to measure test suite effectiveness and ultimately increase test case coverage. As you’ve seen in this article, the primary purpose of fault injection testing is to determine whether the system under test correctly handles errors.
DR. JAMES MCCAFFREY works for Volt Information Sciences Inc., where he manages technical training for software engineers working at the MicrosoftRedmond, Wash., campus. He’s worked on several Microsoft products, including Internet Explorer and MSN Search. Dr. McCaff rey is the author of “.NET Test Automa-tion Recipes” (Apress, 2006) and can be reached at jammc@microsoft .com.
THANKS to the following technical experts for reviewing this article: Bill Liu and Paul Newson
Figure 5 Using ILDASM to Examine Method Signatures
msdn magazine88
In case there are concerns about its applicability or stability, SQLite is slowly making its way into a variety of “lightweight” environments—it already appears inside the Mozilla Firefox browser (for HTML 5 support), as well as the Symbian, iOS and Android environments, among others. In other words, this is how the “other half ” of the development world (that is, non- Microsoft -centric) does the lightweight database. SQLite continues to enjoy ongoing development and bug fi xing, making it a pretty safe bet as a minimal SQL engine.
Of course, no database would be complete without some kind of administrator interface, and SQLite doesn’t disappoint. It has a command-line console tool for accessing and manipulat-ing SQLite databases—but that may not impress your sysadmin all that much. Fortunately, the open source community has a number of SQLite tools available (a long list of them is on the SQLite Web site), but if you just need a quick Query Analyzer-like tool, try SQLite Administrator, a free tool available for download at sqliteadmin.orbmu2k.de.
Goin’ NativeSQLite was intended from the beginning to be a database for the native code developer, which is why it’s implemented as a native C/C++ DLL. Th is native fl avor of SQLite is both a blessing and a curse: blessing, in that it cuts out a lot of the overhead (such as that of traversing the network to the server and back again) from the total time required to execute a given SQL statement; but curse in that, because the original SQLite database is a native C/C++ DLL, getting to it from a Microsoft .NET Framework-based application can be challenging.
Fortunately, the savvy .NET Framework developer realizes that accessing a native DLL is really just an exercise in P/Invoke declarations, and it’s relatively easy to create a wrapper class around the native declarations exposed in the SQLite DLL. In fact, for the
Inside SQLite
In keeping with the theme of this issue, it’s time to return to the roots of SQL and relational databases. Naturally, it would thus seem apropos to write something about SQL Server, something about its new feature set or performance improvements or whatnot, but that’s just not my style. Don’t get me wrong, SQL Server is a great database, and highly recommended for those “big iron” enterprise-class scenarios, but not every problem demands (as a friend once put it) a “big honkin’ centralized database.”
In fact, developers have long been using relational databases merely as a place to “put stuff for next time”—stuff such as confi guration options, user settings, internationalization values and so on. Although it’s sometimes convenient to put these into a centralized SQL Server instance, in some cases, particularly in rich client scenarios (and especially Microsoft Silverlight or Windows Phone 7 rich client scenarios), maintaining a constant connection back to the SQL Server instance is infeasible at best, and oft en just fl at-out impossible.
Developers don’t necessarily want to give up the power and fl exibility of a relational database, but even SQL Server Express is sometimes too heavy an install. What’s to be done?
Go light, of course: SQLite, to be precise.
Introducing SQLiteAs described by its Web site (sqlite.org), “SQLite is a soft ware library that implements a self-contained, serverless, zero-confi guration, transactional SQL database engine.” Th e key elements in that state-ment revolve around the noun “library.” Unlike SQL Server, which uses a client-side assembly to send requests to a server for parsing and execution, SQLite lives entirely inside the client process, making it an “embedded” database. The running footprint of a SQLite database during use is a single file stored someplace on the client fi le system, and typically the install footprint is equally small.
For all that, the SQLite database is remarkably feature-rich, in that it supports the majority of the SQL-92 specifi cation, minus a few things (described in more detail on the SQLite Web site) such as RIGHT and FULL OUTER JOIN, ALTER TABLE, some trigger support, GRANT/REVOKE and writing to VIEWs. What’s impressive is how much is supported, including transactions and a wide range of data types. Although it’s probably beyond credibility to expect that a SQL Server database schema will port to SQLite without modifi cation, it’s reasonable to assume that a fairly straightforward (that is, not taking advantage of SQL Server-specifi c types or features) schema will port with minimal trouble. Th is makes SQLite ideal for scenarios where just a “lightweight SQL” is necessary.
THE WORKING PROGRAMMER TED NEWARD
Code download available at code.msdn.microsoft.com/mag201008WorkProg.
Not every problem demands (as a friend once put it) a “big honkin’ centralized database.”

89August 2010msdnmagazine.com
basics, as with so many things in the open source community, it’s already been done; navigate to switchonthecode.com/tutorials/csharp-tutorial-writing-a-dotnet-wrapper-for-sqlite, and we fi nd a working set of P/Invoke declarations already laid down, shown in Figure 1.
Th e high fi delity of P/Invoke to C/C++ APIs makes this a relatively simple process—the SQLite API uses a raw pointer to represent the database itself, which P/Invoke sees as a System.IntPtr, and every so oft en the SQLite API uses a pointer to an int as a parameter so it can modify the contents, described by P/Invoke with the C# “out” keyword. (For more on P/Invoke, see pinvoke.codeplex.com.)
I’ll refer you to the SQLite Web site for most of the details about how to use the SQLite API, but a quick glance at how to open a database, execute a query and then close the database would show you something like Figure 2.
Th is code, as can probably be inferred, opens the database around the fi le “persons.sqlite,” prepares to create a table, executes that state-ment, cleans up that statement and then closes up the database. If for some reason the database fails to prepare or execute the query, an error message is harvested from the database (and can then be printed or logged or whatever else is needed).
I’m Feelin’ Mighty LowThe most striking thing about this API is that it’s a bit on the low-level side. If you’re an old C++ hack like me, this may be a good thing, giving us a wonderful opportunity to reminisce about the Good Old Days, back when men were men, memory was managed by hand, and women swooned at cocktail parties over our scary stories of chasing down untamed pointers in the wilds of Windows 95 … but to the rest of these C# whipper-snappers, these Johnny-Come-Latelys who actually want to get productive work done, it’s a bit too low to the ground, so to speak. What’s needed is a good abstraction wrapper around that API to make it more manageable and cut down on the number of lines of code required to use it.
Wrapping this up into a single class isn’t that diffi cult, particularly because System.Data provides some good classes that can handle most of the user-API interaction. Showing the full details of
static void NativeMain() { // Open the database--db is our "handle" to it IntPtr db; if (SQLiteNative.sqlite3_open(@"cities.sqlite", out db) == SQLiteNative.SQLITE_OK) { // Prepare a simple DDL "CREATE TABLE" statement string query = "CREATE TABLE City " + "(name TEXT, state TEXT, population INTEGER)"; IntPtr stmHandle; if (SQLiteNative.sqlite3_prepare_v2(db, query, query.Length, out stmHandle, IntPtr.Zero) != SQLiteNative.SQLITE_OK) { // Something went wrong--find out what var err = SQLiteNative.sqlite3_errmsg(db); } if (SQLiteNative.sqlite3_step(stmHandle) != SQLiteNative.SQLITE_DONE) { // Something went wrong--find out what var err = SQLiteNative.sqlite3_errmsg(db); } if (SQLiteNative.sqlite3_finalize(stmHandle) != SQLiteNative.SQLITE_OK) { // Something went wrong--find out what var err = SQLiteNative.sqlite3_errmsg(db); }
// ... Now that we've created a table, we can insert some // data, query it back and so on
// Close the database back up SQLiteNative.sqlite3_close(db); } }
Figure 2 Opening a Database, Executing a Query and Closing the Database
namespace SQLiteWrapper{ public class SQLiteException : Exception { public SQLiteException(string message) : base(message) { } }
public class SQLite { const int SQLITE_OK = 0; const int SQLITE_ROW = 100; const int SQLITE_DONE = 101; const int SQLITE_INTEGER = 1; const int SQLITE_FLOAT = 2; const int SQLITE_TEXT = 3; const int SQLITE_BLOB = 4; const int SQLITE_NULL = 5;
[DllImport("sqlite3.dll", EntryPoint = "sqlite3_open")] static extern int sqlite3_open(string filename, out IntPtr db);
[DllImport("sqlite3.dll", EntryPoint = "sqlite3_close")] static extern int sqlite3_close(IntPtr db);
[DllImport("sqlite3.dll", EntryPoint = "sqlite3_prepare_v2")] static extern int sqlite3_prepare_v2(IntPtr db, string zSql, int nByte, out IntPtr ppStmpt, IntPtr pzTail);
[DllImport("sqlite3.dll", EntryPoint = "sqlite3_step")] static extern int sqlite3_step(IntPtr stmHandle);
[DllImport("sqlite3.dll", EntryPoint = "sqlite3_finalize")] static extern int sqlite3_finalize(IntPtr stmHandle);
[DllImport("sqlite3.dll", EntryPoint = "sqlite3_errmsg")] static extern string sqlite3_errmsg(IntPtr db);
[DllImport("sqlite3.dll", EntryPoint = "sqlite3_column_count")] static extern int sqlite3_column_count(IntPtr stmHandle);
[DllImport("sqlite3.dll", EntryPoint = "sqlite3_column_origin_name")] static extern string sqlite3_column_origin_name( IntPtr stmHandle, int iCol);
[DllImport("sqlite3.dll", EntryPoint = "sqlite3_column_type")] static extern int sqlite3_column_type(IntPtr stmHandle, int iCol);
[DllImport("sqlite3.dll", EntryPoint = "sqlite3_column_int")] static extern int sqlite3_column_int(IntPtr stmHandle, int iCol);
[DllImport("sqlite3.dll", EntryPoint = "sqlite3_column_text")] static extern string sqlite3_column_text(IntPtr stmHandle, int iCol);
[DllImport("sqlite3.dll", EntryPoint = "sqlite3_column_double")] static extern double sqlite3_column_double(IntPtr stmHandle, int iCol); }}
Figure 1 P/Invoke Declarations

msdn magazine90 The Working Programmer
that wrapper class, called SQLite, is a bit too lengthy to include here, but the declarations shown in Figure 3 give a pretty clear indication of how it’s supposed to be used.
Using it, then, would look something like the example in Figure 4.Clearly there are more operations that could be added to the
SQLite wrapper class in Figure 4, but it’s already got the necessary barebones functionality, thanks in part to the wonderful database-agnostic nature of the core DataTable/DataRow/DataColumn classes in System.Data.
Abstractions, AbstractionsIn some ways, the SQLite database’s advantage is its low-level design and implementation—being embeddable means the “fric-tion” involved in using it is pretty light. Add the wrapper classes, make sure the SQLite DLL is somewhere accessible to the program (typically by putting it into the directory with the executable) and now you’re writing SQL statements like a champion. Assuming that’s what you want to do, of course.
But it’s likely that a significant majority of .NET Framework developers are either out of practice in managing a SQL database entirely “by hand” via console APIs, never knew how to do it or just want to leave that world behind. Th e modern .NET Framework environment provides such a wealth of tools for creating and man-aging relational schema that going back to this manual approach feels positively primitive and, more importantly, unproductive.
Furthermore, Microsoft has already spent eff ort creating an API that eff ectively describes most things a programmer wants to do against a relational database, and lots of those tools (LINQ to SQL, the Entity Framework and even the Visual Studio designer) are built on top of that API. I refer, of course, to ADO.NET and its provider model. Not having the ability to slide SQLite “underneath” ADO.NET means that all of that coolness is unavailable to the developer using SQLite, and that feels like a pretty signifi cant shortcoming. Th e solution, then, is to build an ADO.NET provider for SQLite.
As we’ve already discovered, one of the nice things about the open source community is that there’s a really good chance that whatever you’re looking to do, somebody’s already done it, and this is no diff erent. System.Data.SQLite, available for download at sqlite.phxsoftware.com, is a full ADO.NET 3.5 provider, meaning that everything a developer can do with a traditional client/server relational database provider is available to the SQLite developer, including all the Visual Studio designer support as well as LINQ and the Entity Framework.
Using System.Data.SQLite is pretty straightforward. Grab the download (either the source, so you can build it yourself and poke
around in the code to see how everything works—this is a good example to work from to learn how to build an ADO.NET pro-vider, if you’re curious—or grab just the binaries if you only want to get to “done” more quickly). Th en drop the bits somewhere on your hard drive, reference System.Data.SQLite.dll from the project and life is good. Not surprisingly, the API classes live in System.Data.SQLite, and once they’re referenced, you can write good ol’ ADO.NET code against the database, as shown in Figure 5.
So far, so good. When the code is run from a Visual Studio 2005 or 2008 project, everything works fl awlessly. But when the code is executed from Visual Studio 2010, an error comes up, claiming “Unhandled Exception: System.IO.FileLoadException: Mixed mode assembly is built against version 'v2.0.50727' of the run-time and cannot be loaded in the 4.0 runtime without additional confi guration information.” A mixed-mode assembly, for those
public class SQLite : IDisposable { private IntPtr _db; //pointer to SQLite database private bool _open; //whether or not the database is open
/// <summary> /// Opens or creates SQLite database with the specified path /// </summary> /// <param name="path">Path to SQLite database</param> public void OpenDatabase(string path);
/// <summary> /// Closes the SQLite database /// </summary> public void CloseDatabase();
/// <summary> /// Executes a query that returns no results /// </summary> /// <param name="query">SQL query to execute</param> public void ExecuteNonQuery(string query);
/// <summary> /// Executes a query and stores the results in /// a DataTable /// </summary> /// <param name="query">SQL query to execute</param> /// <returns>DataTable of results</returns> public DataTable ExecuteQuery(string query); }
Figure 3 Declarations of the SQLite Wrapper Class
static void NativeWrapperMain() { using (SQLite db = new SQLite("persons.sqlite")) { db.ExecuteNonQuery("CREATE Table Persons " + "(first TEXT, last TEXT, age INTEGER)");
db.ExecuteNonQuery("INSERT INTO Persons (first, last, age) " + "VALUES ('Aaron', 'Erickson', 38)"); db.ExecuteNonQuery("INSERT INTO Persons (first, last, age) " + "VALUES ('Rick', 'Minerich', 29)"); db.ExecuteNonQuery("INSERT INTO Persons (first, last, age) " + "VALUES ('Talbott', 'Crowell', 35)");
DataTable table = db.ExecuteQuery("SELECT * FROM Persons");
foreach (DataRow row in table.Rows) { Console.WriteLine("{0} {1} {2}", row[0], row[1], row[2]); } } }
Figure 4 Using the SQLite Wrapper Class
It’s relatively easy to create a wrapper class around the native declarations exposed
in the SQLite DLL.
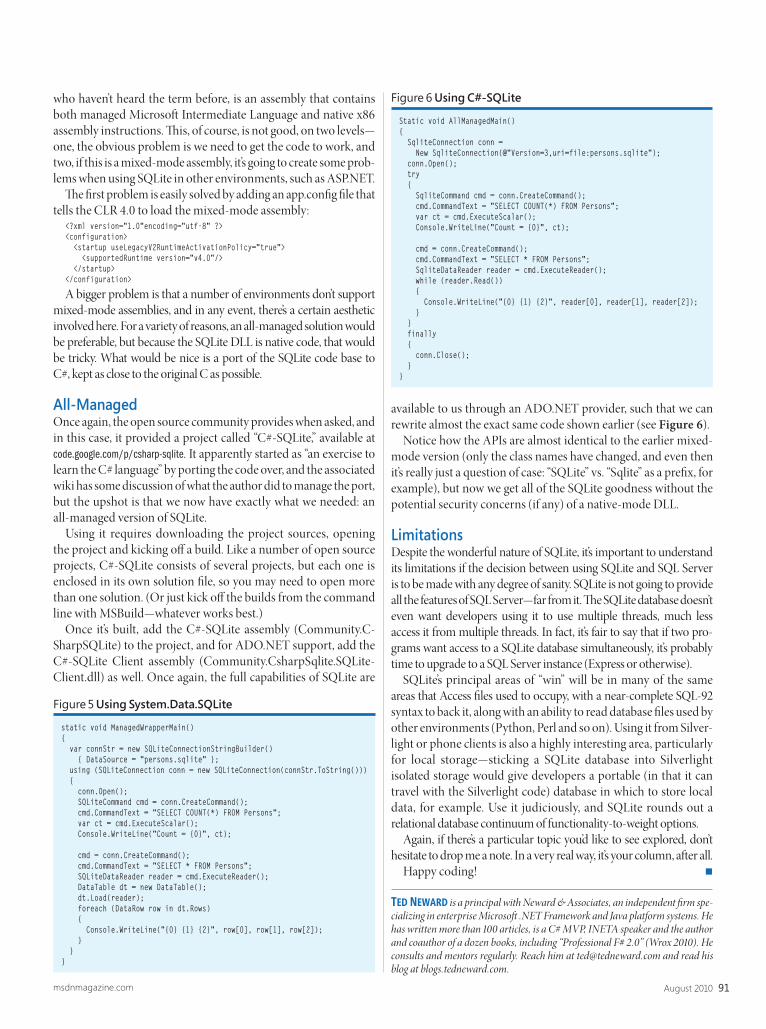
91August 2010msdnmagazine.com
who haven’t heard the term before, is an assembly that contains both managed Microsoft Intermediate Language and native x86 assembly instructions. Th is, of course, is not good, on two levels—one, the obvious problem is we need to get the code to work, and two, if this is a mixed-mode assembly, it’s going to create some prob-lems when using SQLite in other environments, such as ASP.NET.
Th e fi rst problem is easily solved by adding an app.confi g fi le that tells the CLR 4.0 to load the mixed-mode assembly:
<?xml version="1.0"encoding="utf-8" ?><configuration> <startup useLegacyV2RuntimeActivationPolicy="true"> <supportedRuntime version="v4.0"/> </startup></configuration>
A bigger problem is that a number of environments don’t support mixed-mode assemblies, and in any event, there’s a certain aesthetic involved here. For a variety of reasons, an all-managed solution would be preferable, but because the SQLite DLL is native code, that would be tricky. What would be nice is a port of the SQLite code base to C#, kept as close to the original C as possible.
All-ManagedOnce again, the open source community provides when asked, and in this case, it provided a project called “C#-SQLite,” available at code.google.com/p/csharp-sqlite. It apparently started as “an exercise to learn the C# language” by porting the code over, and the associated wiki has some discussion of what the author did to manage the port, but the upshot is that we now have exactly what we needed: an all-managed version of SQLite.
Using it requires downloading the project sources, opening the project and kicking off a build. Like a number of open source projects, C#-SQLite consists of several projects, but each one is enclosed in its own solution fi le, so you may need to open more than one solution. (Or just kick off the builds from the command line with MSBuild—whatever works best.)
Once it’s built, add the C#-SQLite assembly (Community.C -Sharp SQLite) to the project, and for ADO.NET support, add the C#-SQLite Client assembly (Community.CsharpSqlite.SQLite-Client.dll) as well. Once again, the full capabilities of SQLite are
available to us through an ADO.NET provider, such that we can rewrite almost the exact same code shown earlier (see Figure 6).
Notice how the APIs are almost identical to the earlier mixed-mode version (only the class names have changed, and even then it’s really just a question of case: “SQLite” vs. “Sqlite” as a prefi x, for example), but now we get all of the SQLite goodness without the potential security concerns (if any) of a native-mode DLL.
LimitationsDespite the wonderful nature of SQLite, it’s important to understand its limitations if the decision between using SQLite and SQL Server is to be made with any degree of sanity. SQLite is not going to provide all the features of SQL Server—far from it. Th e SQLite database doesn’t even want developers using it to use multiple threads, much less access it from multiple threads. In fact, it’s fair to say that if two pro-grams want access to a SQLite database simultaneously, it’s probably time to upgrade to a SQL Server instance (Express or otherwise).
SQLite’s principal areas of “win” will be in many of the same areas that Access fi les used to occupy, with a near-complete SQL-92 syntax to back it, along with an ability to read database fi les used by other environments (Python, Perl and so on). Using it from Silver-light or phone clients is also a highly interesting area, particularly for local storage—sticking a SQLite database into Silverlight isolated storage would give developers a portable (in that it can travel with the Silverlight code) database in which to store local data, for example. Use it judiciously, and SQLite rounds out a relational database continuum of functionality-to-weight options.
Again, if there’s a particular topic you’d like to see explored, don’t hesitate to drop me a note. In a very real way, it’s your column, aft er all.
Happy coding!
TED NEWARD is a principal with Neward & Associates, an independent fi rm spe-cializing in enterprise Microsoft .NET Framework and Java platform systems. He has written more than 100 articles, is a C# MVP, INETA speaker and the author and coauthor of a dozen books, including “Professional F# 2.0” (Wrox 2010). He consults and mentors regularly. Reach him at [email protected] and read his blog at blogs.tedneward.com.
static void ManagedWrapperMain(){ var connStr = new SQLiteConnectionStringBuilder() { DataSource = "persons.sqlite" }; using (SQLiteConnection conn = new SQLiteConnection(connStr.ToString())) { conn.Open(); SQLiteCommand cmd = conn.CreateCommand(); cmd.CommandText = "SELECT COUNT(*) FROM Persons"; var ct = cmd.ExecuteScalar(); Console.WriteLine("Count = {0}", ct);
cmd = conn.CreateCommand(); cmd.CommandText = "SELECT * FROM Persons"; SQLiteDataReader reader = cmd.ExecuteReader(); DataTable dt = new DataTable(); dt.Load(reader); foreach (DataRow row in dt.Rows) { Console.WriteLine("{0} {1} {2}", row[0], row[1], row[2]); } }}
Figure 5 Using System.Data.SQLite
Static void AllManagedMain(){ SqliteConnection conn = New SqliteConnection(@"Version=3,uri=file:persons.sqlite"); conn.Open(); try { SqliteCommand cmd = conn.CreateCommand(); cmd.CommandText = "SELECT COUNT(*) FROM Persons"; var ct = cmd.ExecuteScalar(); Console.WriteLine("Count = {0}", ct);
cmd = conn.CreateCommand(); cmd.CommandText = "SELECT * FROM Persons"; SqliteDataReader reader = cmd.ExecuteReader(); while (reader.Read()) { Console.WriteLine("{0} {1} {2}", reader[0], reader[1], reader[2]); } } finally { conn.Close(); }}
Figure 6 Using C#-SQLite

msdn magazine92
A subset of the Manipulation events is listed in the documen-tation of Silverlight 4, but that’s a bit deceptive. Th e events are not yet supported by Silverlight itself, but they are supported in Silver-light applications written for Windows Phone 7. Th e Manipulation events are listed in Figure 1.
Web-based Silverlight 4 applications will continue to use the Touch.FrameReported event that I discussed in the article “Finger Style: Exploring Multi-Touch Support in Silverlight” in the March 2010 issue of MSDN Magazine (msdn.microsoft.com/magazine/ee336026).
Along with the Manipulation events themselves, the UIElement class in WPF also supports overridable methods such as On-ManipulationStarting corresponding to the Manipulation events. In Silverlight for Windows Phone 7, these overridable methods are defi ned by the Control class.
A Multi-Touch ExamplePerhaps the archetypal multi-touch application is a photograph viewer that lets you move photos on a surface, make them larger or smaller with a pair of fi ngers, and rotate them. Th ese operations are sometimes referred to as pan, zoom and rotate, and they correspond to the standard graphics transforms of translation, scaling and rotation.
Obviously a photograph-viewing program needs to maintain the collection of photos, allow new photos to be added and photos to be removed, and it’s always nice to display the photos in a little graphical frame, but I’m going to ignore all that and just focus on the multi-touch interaction. I was surprised how easy it all becomes with the Manipulation events, and I think you will be as well.
All the source code for this column is in a single downloadable solution named WpfManipulationSamples. The first project is
Multi-Touch Manipulation Events in WPF
Just within the past few years, multi-touch has progressed from a futuristic sci-fi film prop to a mainstream UI. Multi-touch displays are now standard on new models of smartphones and tablet computers. Multi-touch is also likely to become ubiquitous on computers in public spaces, such as kiosks or the table computer pioneered by Microsoft Surface.
Th e only real uncertainly is the popularity of multi-touch on the conventional desktop computer. Perhaps the greatest impedi-ment is the fatigue known as “gorilla arm” associated with moving fi ngers on vertical screens for long periods of time. My personal hope is that the power of multi-touch will actually provoke a redesign of the desktop display. I can envision a desktop computer with a display resembling the confi guration of a draft ing table, and perhaps almost as large.
But that’s the future (perhaps). For the present, developers have new APIs to master. Th e support for multi-touch in Windows 7 has fi ltered down and settled into various areas of the Microsoft .NET Framework with interfaces both low and high.
Sorting out the Multi-Touch SupportIf you consider the complexity of expression that’s possible with the use of multiple fi ngers on a display, you can perhaps appreciate why nobody seems to know quite yet the “correct” programming interface for multi-touch. Th is will take some time. Meanwhile, you have several options.
Windows Presentation Foundation (WPF) 4.0 has two multi-touch interfaces available for programs running under Windows 7. For specialized uses of multi-touch, programmers will want to explore the low-level interface consisting of several routed events defi ned by UIElement named TouchDown, TouchMove, TouchUp, TouchEnter, TouchLeave, with preview versions of the down, move and up events. Obviously these are modeled aft er the mouse events, except that an integer ID property is necessary to keep track of multiple fi ngers on the display. Microsoft Surface is built on WPF 3.5, but it supports a more extensive low-level Contact interface that distinguishes types and shapes of touch input.
Th e subject of this column is the high-level multi-touch support in WPF 4.0, which consists of a collection of events whose names begin with the word Manipulation. Th ese Manipulation events perform several crucial multi-touch jobs:
• consolidating the interaction of two fi ngers into a single action• resolving the movement of one or two fi ngers into transforms• implementing inertia when the fi ngers leave the screen
UI FRONTIERS CHARLES PETZOLD
Code download available at code.msdn.microsoft.com/mag201008UF.
Event Supported by Windows Phone 7?ManipulationStarting NoManipulationStarted YesManipulationDelta YesManipulationInertiaStarted NoManipulationBoundaryFeedback NoManipulationCompleted Yes
Figure 1 The Manipulation Events in Windows Presentation Foundation 4.0

93August 2010msdnmagazine.com
SimpleManipulationDemo, and the MainWindow.xaml file is shown in Figure 2. Th e Grid contains four Image elements.
First notice the setting on all three Image elements:IsManipulationEnabled="True"
Th is property is false by default. You must set it to true for any element on which you want to obtain multi-touch input and generate Manipulation events.
Th e Manipulation events are WPF routed events, meaning that the events bubble up the visual tree. In this program, neither the Grid nor MainWindow have the IsManipulationEnabled property
set to true, but you can still attach handlers for the Manipulation events to the Grid and MainWindow elements, or override the OnManipulation methods in the MainWindow class.
Notice also that each of the Image elements has its Render-Transform set to a six-number string:
RenderTransform="0.5 0 0 0.5 100 100"
This is a shortcut that sets the RenderTransform property to an initialized MatrixTransform object. In this particular case, the Matrix object set to the MatrixTransform is initialized to perform a scale of 0.5 (making the photos half their actual size) and a translation of 100 units to the right and down. The code-behind file for the window accesses and modifies this MatrixTransform.
Th e complete MainWindow.xaml.cs fi le is shown in Figure 3, and overrides just two methods, OnManipulationStarting and OnManipulationDelta. Th ese methods process the manipulations generated by the Image elements.
Manipulation BasicsA manipulation is defi ned as one or more fi ngers touching a particular element. A complete manipulation begins with the Manipulation-Starting event (followed soon thereaft er by ManipulationStarted) and ends with ManipulationCompleted. In between, there might be many ManipulationDelta events.
Each of the Manipulation events is accompanied by its own set of event arguments encapsulated in a class named aft er the event with EventArgs appended, such as ManipulationStartingEventArgs and ManipulationDeltaEventArgs. Th ese classes derive from the familiar InputEventArgs, which in turn derives from RoutedEvent-Args. Th e classes include Source and OriginalSource properties indicating where the event originated.
In the SimpleManipulationDemo program, Source and Original-Source will both be set to the Image element generating the Manipulation events. Only an element with its IsManipulation-
<Window x:Class="SimpleManipulationDemo.MainWindow" xmlns="http://schemas.microsoft.com/winfx/2006/xaml/presentation" xmlns:x="http://schemas.microsoft.com/winfx/2006/xaml" Title="Simple Manipulation Demo">
<Window.Resources> <Style TargetType="Image"> <Setter Property="Stretch" Value="None" /> <Setter Property="HorizontalAlignment" Value="Left" /> <Setter Property="VerticalAlignment" Value="Top" /> </Style> </Window.Resources>
<Grid> <Image Source="Images/112-1283_IMG.JPG" IsManipulationEnabled="True" RenderTransform="0.5 0 0 0.5 100 100" />
<Image Source="Images/139-3926_IMG.JPG" IsManipulationEnabled="True" RenderTransform="0.5 0 0 0.5 200 200" /> <Image Source="Images/IMG_0972.JPG" IsManipulationEnabled="True" RenderTransform="0.5 0 0 0.5 300 300" /> <Image Source="Images/IMG_4675.JPG" IsManipulationEnabled="True" RenderTransform="0.5 0 0 0.5 400 400" /> </Grid></Window>
Figure 2 The XAML File for SimpleManipulationDemo
using System.Windows;using System.Windows.Controls;using System.Windows.Input;using System.Windows.Media;
namespace SimpleManipulationDemo { public partial class MainWindow : Window { public MainWindow() { InitializeComponent(); }
protected override void OnManipulationStarting( ManipulationStartingEventArgs args) {
args.ManipulationContainer = this;
// Adjust Z-order FrameworkElement element = args.Source as FrameworkElement; Panel pnl = element.Parent as Panel;
for (int i = 0; i < pnl.Children.Count; i++) Panel.SetZIndex(pnl.Children[i], pnl.Children[i] == element ? pnl.Children.Count : i);
args.Handled = true;
base.OnManipulationStarting(args); }
protected override void OnManipulationDelta( ManipulationDeltaEventArgs args) {
UIElement element = args.Source as UIElement; MatrixTransform xform = element.RenderTransform as MatrixTransform; Matrix matrix = xform.Matrix; ManipulationDelta delta = args.DeltaManipulation; Point center = args.ManipulationOrigin;
matrix.ScaleAt( delta.Scale.X, delta.Scale.Y, center.X, center.Y); matrix.RotateAt( delta.Rotation, center.X, center.Y); matrix.Translate( delta.Translation.X, delta.Translation.Y); xform.Matrix = matrix;
args.Handled = true; base.OnManipulationDelta(args); } }}
Figure 3 The Code-Behind File for SimpleManipulationDemo

msdn magazine94 UI Frontiers
Enabled property set to true will show up as the Source and OriginalSource properties in these Manipulation events.
In addition, each of the event argument classes associated with the Manipulation events includes a property named Manipulation-Container. This is the element within which the multi-touch manipulation is occurring. All coordinates in the Manipulation events are relative to this container.
By default, the ManipulationContainer property is set to the same element as the Source and OriginalSource properties—the element being manipulated—but this is probably not what you want. In general, you don’t want the manipulation container to be the same as the element being manipulated because tricky interactions get involved with dynamically moving, scaling and rotating the same element that’s reporting touch information. Instead, you want the manipulation container to be a parent of the manipulated element, or perhaps an element further up the visual tree.
In most of the Manipulation events, the ManipulationContainer property is get-only. Th e exception is the very fi rst Manipulation event that an element receives. In ManipulationStarting you have the opportunity to change ManipulationContainer to something more appropriate. In the SimpleManipulationDemo project, this job is a single line of code:
args.ManipulationContainer = this;
In all subsequent events, ManipulationContainer will then be the MainWindow element rather than the Image element, and all coordinates will be relative to that window. Th is works fi ne because the Grid containing the Image elements is also aligned with the window.
Th e remainder of the OnManipulationStarting method is dedicated to bringing the touched Image element to the foreground by resetting the Panel.ZIndex attached properties of all the Image elements in the Grid. Th is is a simple way of handling ZIndex but probably not the best because it creates sudden changes.
ManipulationDelta and DeltaManipulationThe only other event handled by SimpleManpulationDemo is ManipulationDelta. Th e ManipulationDeltaEventArgs class defi nes two properties of type ManipulationDelta. (Yes, the event and the class have the same name.) Th ese properties are DeltaManipulation and CumulativeManipulation. As the names suggest, DeltaManipulation refl ects the manipulation that occurred since the last Manipulation-Delta event, and CumulativeManipulation is the complete manipula-tion that began with the ManipulationStarting event.
ManipulationDelta has four properties:• Translation of type Vector• Scale of type Vector• Expansion of type Vector• Rotation of type double
Th e Vector structure defi nes two properties named X and Y of type double. One of the more signifi cant diff erences with the Manipulation support under Silverlight for Windows Phone 7 is the absence of the Expansion and Rotation properties.
Th e Translation property indicates movement (or a pan) in the horizontal and vertical directions. A single fi nger on an element can generate changes in translation, but translation can also be part of other manipulations.
Th e Scale and Expansion properties both indicate a change in size (a zoom), which always requires two fi ngers. Scale is multi-plicative and Expansion is additive. Use Scale for setting a scale transform; use Expansion for increasing or decreasing the Width and Height properties of an element by device-independent units.
In WPF 4.0, the X and Y values of the Scale vector are always the same. The Manipulation events do not give you sufficient information to scale an element anisotropically (that is, diff erently in the horizontal and vertical directions).
By default, Rotation also requires two fi ngers, although you’ll see later how to enable one-finger rotation. In any particular ManipulationDelta event, all four properties might be set. A pair of fi ngers might be enlarging an element, and at the same time rotating it and moving it to another location.
Scaling and rotation are always relative to a particular center point. Th is center is also provided in ManipulationDeltaEvent-Args in the property named ManipulationOrigin of type Point. This origin is relative to the ManipulationContainer set in the ManipulationStarting event.
Your job in the ManipulationDelta event is to modify the Render-Transform property of the manipulated object in accordance with the delta values in the following order: scaling first, then rotation, and finally translation. (Actually, because the horizontal and vertical scaling factors are identical, you can switch the order of the scaling and rotation transforms and still get the same result.)
Th e OnManipulationDelta method in Figure 3shows a standard approach. Th e Matrix object is obtained from the MatrixTransform set on the manipulated Image element. It’s modifi ed through calls to ScaleAt and RotateAt (both relative to the ManipulationOrigin) and Translate. Matrix is a
Figure 4 The SimpleManipulationDemo Program
Figure 5 The Manipulation-ModeDemo Display

95August 2010msdnmagazine.com
structure rather than a class, so you must fi nish up by replacing the old value in the MatrixTransform with the new one.
It’s possible to vary this code a little. As shown, it scales around a center with this statement:
matrix.ScaleAt(delta.Scale.X, delta.Scale.Y, center.X, center.Y);
Th is is equivalent to translating to the negative of the center point, scaling and then translating back:
matrix.Translate(-center.X, -center.Y);matrix.Scale(delta.Scale.X, delta.Scale.Y);matrix.Translate(center.X, center.Y);
Th e RotateAt method can likewise be replaced with this:matrix.Translate(-center.X, -center.Y);matrix.Rotate(delta.Rotation);matrix.Translate(center.X, center.Y);
Th e two adjacent Translate calls now cancel each other out, so the composite is:
matrix.Translate(-center.X, -center.Y);matrix.Scale(delta.Scale.X, delta.Scale.Y);matrix.Rotate(delta.Rotation);matrix.Translate(center.X, center.Y);
It’s probably a little bit more effi cient.Figure 4 shows the SimpleManipulationDemo program in action.
Enabling the Container?One of the interesting features of the SimpleManpulationDemo program is that you can simultaneously manipulate two Image elements, or even more if you have the hardware support and a suffi cient number of fi ngers. Each Image element generates its own ManipulationStarting event and its own series of Manipulation-Delta events. Th e code eff ectively distinguishes between the multiple Image elements by the Source property of the event arguments.
For this reason, it’s important not to set any state information in fi elds that implies that only one element can be manipulated at a time.
Th e simultaneous manipulation of multiple elements is possible because each of the Image elements has its own IsManipulation-Enabled property set to true. Each of them can generate a unique series of Manipulation events.
When approaching these Manipulation events for the fi rst time, you might instead investigate setting IsManpulationEnabled to true only on the MainWindow class or another element serving as a container. Th is is possible, but it’s somewhat clumsier in practice and not quite as powerful. Th e only real advantage is that you don’t need to set the ManipulationContainer property in the ManipulationStarting event. Th e messiness comes later when you must determine which element is being manipulated by hit-testing on the child elements using the ManipulationOrigin property in the ManipulatedStarted event.
You would then need to store the element being manipulated as a fi eld for use in future ManipulationDelta events. In this case, it’s safe to store state information in fi elds because you’ll only be able to manipulate one element in the container at a time.
The Manipulation ModeAs you saw, one of the crucial properties to set during the Manipu-lationStarting event is the ManipulationContainer. Another couple of properties are useful to customize the particular manipulation.
You can limit the types of manipulation you can perform by initializing the Mode property with a member of the Manipulation-
Modes enumeration. For example, if you were using manipulation solely for scrolling horizontally, you might want to limit the events to just horizontal translation. Th e ManipulationModesDemo program lets you set the mode dynamically by displaying a list of RadioButton elements listing the options, as shown in Figure 5.
Of course, the RadioButton is one of the many controls in WPF 4.0 that respond directly to touch.
The Single Finger RotationBy default, you need two fi ngers to rotate an object. However, if a real photo is sitting on a real desk, you can put your fi nger on the corner and rotate it in a circle. Th e rotation is roughly occurring around the center of the object.
You can do this with the Manipulation events by setting the Pivot property of ManipulationStartingEventArgs. By default the Pivot property is null; you enable one-fi nger rotation by setting the property to a ManipulationPivot object. Th e key property of ManipulationPivot is Center, which you might consider calculating as the center of the element being manipulated:
Point center = new Point(element.ActualWidth / 2, element.ActualHeight / 2);
But this center point must be relative to the manipulation container, which in the programs I’ve been showing you is the element handling the events. Translating that center point from the element being manipulated to the container is easy:
center = element.TranslatePoint(center, this);
Another little piece of information also needs to be set. If all you’re specifying is a center point, a problem arises when you put your fi nger right in the center of the element: just a little movement will cause the element to spin around like crazy! For this reason, ManipulationPivot also has a Radius property. Rotation will not occur if the fi nger is within Radius units of the Center point. Th e ManipulationPivotDemo program sets this radius to half an inch:
args.Pivot = new ManipulationPivot(center, 48);
Now a single finger can perform a combination of rotation and translation.
Beyond the BasicsWhat you’ve seen here are the basics of using the WPF 4.0 Manipulation events. Of course, there are some variations on these techniques that I’ll show in future columns, as well as the power of manipulation inertia.
You may also want to take a look at the Surface Toolkit for Windows Touch (msdn.microsoft.com/library/ee957352), which provides touch-optimized controls for your apps. Th e ScatterView control in particular eliminates the need for using the Manipulation events directly for basic stuff like manipulating photos. It has some snazzy eff ects and behaviors that will make sure your app behaves the same as other touch apps.
CHARLES PETZOLD is a longtime contributing editor to MSDN Magazine. He’s currently writing “Programming Windows Phone 7,” which will be published as a free downloadable e-book in the fall of 2010. A preview edition is currently avail-able through his Web site, charlespetzold.com.
THANKS to the following technical experts for reviewing this article: Doug Kramer, Robert Levy and Anson Tsao

msdn magazine96
once all-male, back when the Earth was still cooling off and the last few dinosaurs tottered around wondering where their friends had gone; today it isn’t. Half of your users are female, which means that their thought processes probably resemble those of my client’s wife more than they do yours.
And it’s oft en more than half. Many user populations contain far more women than men—nurses, for example (94 percent female, according to nursingadvocacy.org/faq/rn_facts.html ) or elementary school teachers (85 percent female, according to a bnet.com article: tinyurl.com/26xub2p). I recently walked through the customer service department of one of my fi nancial-industry clients and counted 100 percent females, mostly in their 40s and 50s, soon to be using soft ware built by men in their 20s. At least I got those guys thinking about the diff erences.
What pleases a female user? If I knew for sure, I’d be retired on my private island, not knocking out these columns for a pittance per word. I remember trying to convince my mother how great my idea was of self-location and directions on her cell phone (back in 2004, before this became ubiquitous). She wasn’t interested. “I can usually fi gure out where I am without much trouble, and if not, I ask someone. I know you want me to say yes because you think it’s so cool, but I don’t really care. Sorry.” I had a fl ash of sympathy for the geekiest guy in the galaxy when Harry Mudd told him: “You’re an excellent science offi cer, Mr. Spock, but you couldn’t sell false patents to your mother.”
When we’re trying to develop soft ware that doesn’t suck, we have to consider the diff erence between an X and a Y chromo-some. It’s bigger than you think. Next time you’re roughing out a design, ask your mother what she would do with it. And listen to what she tells you.Reader mail department: In response to my statement in the May issue that “your mother might [be interested in your soft ware], because you wrote it and she loves you,” a reader named Barclay drew my attention to B. B. King’s classic blues song, “Nobody Loves Me But My Mother, And She Could Be Jivin’ Too.” You’ll fi nd it online in the usual places, such as youtube.com/watch?v=OIW4ARVbhrw.
DAVID S. PLATT teaches Programming .NET at Harvard University Extension School and at companies all over the world. He is the author of 11 programming books, including “Why Soft ware Sucks” (Addison-Wesley Professional, 2006) and “Introducing Microsoft .NET” (Microsoft Press, 2002). Microsoft named him a Soft ware Legend in 2002. He wonders whether he should tape down two of his daughter’s fi ngers so she learns how to count in octal. You can contact him at rollthunder.com.
Mars and Venus
A client of mine was scratching his head over his wife’s behavior when he’d taken her shopping for a new netbook. “Look at this, honey,” he had told her. “A dual-core processor. How’d they get one into this little box? Wow, what a neato heat sink.”
“Th at’s nice, dear,” she said to him. “But will it do Facebook? Th at’s what I want.”
“I told her all about the disk and the memory, how it was a really nice unit for the price,” the guy told me, “But all she kept asking was, ‘Will it do Facebook?’ How can she not care about this important stuff ?”
I don’t think he’d been married very long.My client was reporting a common, almost archetypal, division of
thought, which market research guru Paco Underhill discussed in his book “Why We Buy: Th e Science of Shopping” (Simon & Schuster, 1999). “Men are in love with the technology itself, with the gee-whiz
factor, with the horsepower. … [They’re] gathered around the barbecue comparing the size of their hard drives and the speed of their modems. As they say, it’s a dude thing.” Women, on the other hand, “take a completely diff erent approach to the world of high-tech. Th ey take technologies and turn them into appliances. Th ey strip even the fanciest gizmo of all that is mysterious and jargony in order to determine its usefulness. Women look at technology and see its purpose, its reason—what it can do [for them]. Th e promise of technology is always that it will make our lives easier and more effi cient. Women are the ones who demand that it fulfi ll its purpose.” Th e husband in my example obsessed over hardware—the means. Th e wife concentrated on Facebook—the desired end.
Th e developer population is almost entirely male. It reached 25 percent female at one point; now it’s down to 10 percent in the United States, and less in Europe. Th e user population was also
DON’T GET ME STARTED DAVID PLATT
Half of your users are female, which means that their thought processes probably resemble those of my client’s wife more
than they do yours.