DAN Basic Life Support Manual-EN.pdf
82
Student book / EN
-
Upload
khangminh22 -
Category
Documents
-
view
0 -
download
0
Transcript of DAN Basic Life Support Manual-EN.pdf

Sezione VIII | Lesioni legate alla temperatura
DAN Basic Life Support i
Student book / EN


DAN Basic Life Support 1
DAN BASIC LIFE SUPPORT
Editor: Guy ThomasPrincipal Author: Guy Thomas
Contributors: Orr, M.S., John Lippmann, Yoshiro Mano M.D., Frans Cronjé M.D., Alessandro Marroni M.D.Photos: Guy Thomas, Marjo Maebe ( "Fig. 5" -page 10 )
© 2011 Divers Alert Network
All rights reserved. No part of this publication may be reproduced, stored in a retrieval system or transmit-ted, in any form or by any means, electronic mechanical, photocopying or otherwise, without prior written
permission of Divers Alert Network, P.O. Box DAN, 64026 Roseto, Italy.
First Edition published August 2006Second Edition published February 2011
Divers Alert Network Contact Information
DAN Europe, P.O. Box DAN, 64026 Roseto, Italy Tel: +39-085-8930333Fax +39-085-8930050
E-mail (general): [email protected] E-mail (training): [email protected]
www.daneurope.org

DAN Basic Life Support2
Table of Contents
DAN Basic Life Support 3
Section 1. Basic Anatomy and Physiology 6
Review Questions 8
Section 2. Chain of survival 9
Review Questions 11
Section 3. Basic Life Support 13
Review Questions 19
Section 4. Scene Safety Assessment 21
BLS Skill: Scene Safety Assessment - Safety First 24Review Questions 25
Section 5. Resuscitation - CPR 26
BLS Skill:Resuscitation - CPR 36Optional Skill:The use of a resuscitation mask 40Optional Skill:Providing Care with an AED 41Review Questions 42
Section 6. Recovery Position 43
BLS Skill:Recovery Position 44Review Questions 45
Section 7. Foreign-Body Airway Obstructions (FBAO) 47
BLS Skill: Foreign-Body Airway Obstruction 50Review Questions 52
Section 8. Control of external bleeding 53
BLS Skill:(Severe) External bleeding 55Review Questions 56
Section 9. Shock management 57
BLS Skill:Shock management 61Review Questions 62
Section 10. Additional information 63
Divers Alert Network DAN Europe 68
BLS Review Questions : Answers 70
Basic Life Support course evaluation 72
Home Emergency Plan 73

DAN Basic Life Support 3
DAN Basic Life Support
Course OverviewThe DAN Basic Life Support provider ("DAN BLS Provider") programme is de-signed to teach you the skills and knowl-edge needed to perform Basic Life Sup-port (BLS).
Knowledge Development (1,5 hour)The Knowledge Development portion of this course is designed to provide in-formation that will allow you to:1) Understand basic Anatomy and
Physiology2) List the 4 links of the “chain of survival” 3) Protect yourself against disease
transmission and danger4) Check responsiveness5) Check for normal breathing 6) Perform chest compressions and
rescue breathing – CPR7) Provide care for choking8) Place an unconscious injured per-
son in the recovery position9) Provide care for external bleeding10) Provide care for injured persons in
shock
You will attend a lecture provided by your DAN BLS Instructor. This lecture supports the information presented in this handbook. The handbook supplies information in a simple, easy-to-under-stand manner. At the end of each sec-tion, review questions are provided to help you assess your comprehension of the material previously covered.
Skills Development (2.5 to 3 hours)The skills development portion of the course will give you an opportunity to perform BLS skills, under the guidance of a DAN BLS Instructor. This hands-on part of the course is designed to have you apply what you have learned in the knowledge development part of this course.
Assessment and CertificationUpon completion of the DAN BLS course, you will receive a DAN BLS Provider cer-tification card indicating that you have been trained to provide Basic Life Sup-port.
PrerequisitesThere are no prerequisites to this course. BLS however is a prerequisite for many other First Aid or Rescue courses.
DAN Basic Life Support

DAN Basic Life Support4
DAN Basic Life Support
Learning ObjectivesAt the end of this programme, you will be able to perform BLS by:1. Performing a Scene safety assesment2. Performing 1 rescuer CPR to a non breathing person.3. Placing an unconscious injured person in the recovery position4. Providing assistance to a choking adult.5. Providing care for external bleeding6. Providing care for shock
Remark:Although this book will positively influence the learning process before and during a BLS course, the book only will not train you as a BLS provider.
In order to be able to perform the techniques described in this book you must participate in a BLS course, organised by a qualified and active BLS Instructor.
This book is also a valuable resource for after a BLS course.
This manual is made according to the 2010 ERC Guidelines for Basic Life Support

Visit the DAN Europe website to find out what DAN Europe is and what DAN can do for you!The website contains a wealth of information about DAN membership and its advantages, Dive Medicine, Diving Safety, Dive Research, DAN Training programs and much more...The online catalogue gives you the possibility to order DAN Europe materials online, with special discounts for DAN Europe members

DAN Basic Life Support66
Section 1 | Basic Anatomy and Physiology
1.1
Airway – Breathing - Circulation
Air contains about 21% of oxygen and about 79% of nitrogen.
Our body (cells, organs, etc) needs a con-stant supply of oxygen in order to pro-duce energy / to survive. This can be com-pared with the function of fuel in a car.
Without this constant supply (and trans-port) of oxygen to the body, organs and cells will deteriorate and die.
A-Airway:An open Airway (nose, mouth and tra-chea) makes sure air can pass to the lungs (Fig. 1).
Note:All information presented in the following sections is based on the most recent diving medical literature. References are available from your DAN Instructor or the DAN Training Department in your region.
Basic Anatomy and Physiology
Fig. 1: An open airways makes sure air can pass to the lungs
1
Remark: The oesophagus, the tube that carries food from the mouth to the stomach, is just behind the trachea (windpipe) and the larynx. The openings of the oesophagus and the larynx are very close together in the throat. When we swallow, a flap called the epiglottis moves down over the larynx to keep food and liquid out of the windpipe.

DAN Basic Life Support 77
Section 1 | Basic Anatomy and Physiology
1.3
1.2 B-BreathingEach time we inhale (breathe in), air goes into our nose or mouth, then through the larynx, down the trachea or windpipe.
The windpipe divides itself into a left and right bronchus and air enters via these bronchi in respectively, the left or right lung. These bronchi are like branches, di-viding themselves into smaller branches or bronchioles. At the end of the bronchi-oles the air arrives in small air sacs. These tiny sacs are called alveoli.
There are about 300 million alveoli in the lungs and every alveolus is sur-rounded by capillaries (tiny blood ves-sels with very thin walls).
Oxygen (from the air) goes from the al-veoli through these thin walls to the cap-illaries. This process is called diffusion.
In these capillaries we also find carbon dioxide (CO2). This is the waste prod-uct of the body’s metabolism (used oxygen returns to the lungs under the form of CO2).
This Carbon dioxide diffuses from the capillaries back to the alveoli.
The diffusion of oxygen to the blood is only possible when the concentration of oxygen in the lungs is higher than the concentration of oxygen in the capillaries.
By breathing in we make sure the oxy-gen concentration in the lungs remains higher.
When we exhale (breathe out), the air (with an increased CO2 concentration )
goes out of the lungs and is transported via the bronchi and windpipe to the mouth or nose where it leaves the body.
C-CirculationThe heart pumps the oxygenated blood (from capillaries) around and transports it to all parts in the body.
This is done by the pulmonary (to and from the lungs) and systemic (rest of the body) circulation.
De-oxygenated blood returning form the systemic circulation (containing CO2) enters the right atrium, goes to the right ventricle and is pumped to the lungs for gas exchange in the alveoli (pulmonary circulation).
Blood that returns from the lungs en-ters in the left atrium, is transported to the left ventricle and from there it is pumped to the rest of the body (via the systemic circulation).
This blood will carry the oxygen to the body cells until it arrives back to the right atrium.
Medical terminology.
Atrium — Chamber of the heart that provides access to another chamber called the ventricle.
Larynx — The organ of voice produc-tion; also known as the voice box.
Pharynx — Portion of the airway con-necting nasal cavity and larynx.

DAN Basic Life Support88
?
Review answers are on page 70
Section 1 | Review Questions
1. The body needs a constant supply of oxygen in order to survive.a. Trueb. False
2. In order to make sure air can pass to the lungs, the ________ must be open.a. airwayb. mouth only
3. The epiglottis prevents food and liquid from entering the ___________a. stomach b. heartc. trachead. oesophagus
4. Gas exchange takes place in the _________.a. arteriolesb. aortac. alveolid. atrium
5. The ______ pumps the oxygenated blood around and transports it to all parts in the body.a. stomach b. heartc. musclesd. liver
Section 1REVIEW QUESTIONS

DAN Basic Life Support 99
Section 2 | Chain of survival
2.2
2.1
There are 4 steps that positively influ-ence the chance of survival.
These 4 steps are commonly referred to as the 4 links in the chain of survival.
Early Access to the EMSCalling an ambulance or trained health-care providers is essential in order to increase the chance of survival (Fig. 2).
It is therefore important to recognise the problem as soon as possible to avoid time getting lost.
It is important that the person alerting the ambulance is calm and as clear as possible.
Tell the ambulance dispatcher:
- The exact location of the emergency
- What happened- How many injured persons- The condition of the injured
person(s)- The care provided
In order to make sure that the person you asked to call for help activated the ambulance service you should ask him to return immediately after the call.
It is also recommended to have the caller repeat the needed info before having him leave to call for help. That way you can correct him if needed and are mak-ing sure the message will be correct.
Keep in mind that the sooner you make the call, the sooner Advanced Life Sup-port will arrive.
Early BLS Early BLS significantly improves the chance of survival (Fig. 3).
During BLS or CPR we try to avoid dam-age to the vital organs by circulating oxy-genated blood
Chest compressions temporary taking over the function of the heart, by “manu-ally” pumping around the blood in the body.
Chain of survival
Fig. 3: Start BLS as soon as possible
3Fig. 2: Call for help is essential in order to increase the chance of survival
2

DAN Basic Life Support1010
Section 2 | Chain of survival
2.4
2.3
Rescue breaths deliver air (oxygen) to the lungs and are making sure there will be a gas exchange in the alveoli.
Early defibrillationIn most cases the reason why a per-sons stops breathing is a cardiac arrest. Cardiac arrest is often caused by “Ven-tricular Fibrillation –VF”.
This is an electrical disturbance of the heart, which makes the heart muscle quivers and creates an abnormal cha-otic rhythm.
Due to the absence of the normal elec-trical impulse, the heart is no longer pumping effectively.
In these cases CPR would not restart the heart. While CPR would delay (brain or other) damage because of the lack oxy-gen, only a defibrillator could be able to revert the rhythm and make the heart beating again (Fig. 4).
It is therefore crucial to defibrillate a person with Sudden Cardiac Arrest as soon as possible.
After 7-10 minutes the chance of sur-vival will be minimal.
Early Advanced Life SupportBLS and defibrillation might not restart the heart. In those cases, medical inter-ventions like advanced airway manage-ment and the delivery of medications might increase the success of resuscita-tion (Fig. 5).
Should BLS and/or defibrillation be suc-cessful, advanced Life Support will sta-bilise the injured diver and make him ready for transportation to the hospital.
Remember: Advanced Life Support will not arrive when the ambulance is not called!
Fig. 5: Advanced airway management increases the success of resuscitation
5
Fig. 4: If trained in it, use an AED
4

DAN Basic Life Support 1111
?
Review answers are on page 70
Section 2 | Review Questions
1. What are the 4 links in the chain of survival (in correct order)?
2. During early BLS, ________ temporary taking over the function of the heart, while __________ deliver oxygen to the lungs.
Section 2REVIEW QUESTIONS

Automated External Defibrillation course (AED)
Sudden Cardiac Arrest is responsible for thousands of deaths each year.Providing CPR delays the inevitable by helping to oxygenate blood and keep it circulating throughout the body. CPR cannot reset the heart rhythm and start it beating again; only defibrillation can.
Every minute defibrillation is delayed, the chance of survival drops by 7 to 10 percent.
The DAN AED course teaches you how to provide care with an AED, making your role as rescuer crucial in the chain of survival.This four hour course could mean the difference between life or death.
Ask your instructor how to become a DAN AED Provider, or visit our website at www.daneurope.org

DAN Basic Life Support 1313
Section 3 | Basic Life Support
3.2
3.1 What is BLS?BLS is a total of first aid techniques used to support (or restore) life and include:
• Protecting yourself • Activation of the Ambulance• Provide care for life threatening
injuries• Establishing or maintaining ABC’s
(performing CPR - Fig. 6)
To be able to provide care for life threat-ening injuries it is crucial to learn these basic First Aid techniques:
• Scene Safety Assessment (and personal protection)
• CPR (Cardio Pulmonary Resuscitation) • Recovery Position• Foreign-body Airway
Obstruction / Choking• (Severe) External Bleeding• Shock Management
In order to guarantee the best possible care to an injured person it is important to keep BLS skills and knowledge up-to-date.
Regular refresher training or participa-tion in more advanced first aid courses, like an AED or oxygen provider course, is recommended and encouraged.
Why BLS?It is vital that the oxygen supply to our organs is maintained.
The supply of oxygen to our organs is achieved when:
1) We have an open and clear Airway. Obstructions in the airway (or a closed airway) will block the air supply to our lungs.
2) We keep on Breathing so the inhaled air goes from the airway to the lungs and oxygen can diffuse to the blood stream.
3) The oxygen in the blood vessels is transported from the lungs to the body tissues. This is done thanks to the heart which takes care of the Circulation of the blood throughout our body.
Basic Life Support
Fig. 6: Chest compressions circulate blood throughout the body
6

DAN Basic Life Support1414
Section 3 | Basic Life Support
When this supply is interrupted our or-gans will suffer and eventually die. Brain tissue will for example already start to die after 3-6 minutes without oxygen.
The need for immediate action (Basic Life Support - Resuscitation) is therefore crucial.
During Basic Life Support the rescuer takes care (establishing or maintaining) of the above mentioned Airway, Breath-ing and Circulation, commonly referred to as the ABC’s or vital functions.
When performing CPR or resuscitation (main part of BLS) we:1. check for responsiveness2. open the Airway (or maintain an
open airway) and check for normal breathing
3. provide chest compressions in order to temporary take over the function of the heart and pump the blood around as soon it has been confirmed the injured person is not breathing normally
4. give rescue breaths in order to de-liver air (oxygen) to the lungs.
The goal of resuscitation is not to re-start the heart, but to provide a small but critical blood flow to the heart and brain, thus keeping oxygenated blood circulating.
Indeed, in most cases CPR will not restart the heart, but delays damage to vital or-gans (such as the brains) and buys time.
It also increases the chance on a suc-cessful defibrillation (chest compres-
sions are especially important if a shock can not be delivered within 4-5 minutes after collapse).
The goal of BLS is to:
• Preserve Life• Prevent further injury• Provide first aid and basic stabilisa-
tion of the victim until the arrival of the ambulance. This might have a positive influence of the victim’s re-covery process.
BLS is not limited to CPR, and the other first aid techniques seen in the DAN BLS course might prevent a person from having a circulatory (and / or respira-tory) arrest and can save lives. A BLS course will not only train a rescuer to resuscitate a person with a circulatory arrest, but can also prevent a person from getting in that condition. External bleeding and shock for example can lead to severe circulatory and respira-tory problems.
Note:The air we use during rescue breathing is our expired air and does not contain 21% oxygen anymore, but only 16-17%.
For a better oxygenation of the blood it is recommended to use supplemental oxygen during resuscitation (if trained in it).
Techniques of providing oxygen to non breathing persons (divers) are seen in the DAN Oxygen and Advanced Oxygen Pro-vider course.

DAN Basic Life Support 1515
Section 3 | Basic Life Support
3.3 Alerting the Emergency Medical Services (EMS)Many times underestimated, but not less important is calling the EMS.
The EMS should be called from the mo-ment you have established a person is breathing or not. If you are alone, you will need to activate the EMS be-fore CPR is started. If you are not alone, you can send somebody for help while starting CPR.
An exception to this rule is when the victim is:• a child or • a victim of drowning.
In this case, the lone rescuer should perform one minute CPR before calling for help.
In many countries the EMS can be reached by dialling 1-1-2 (depending from the country) or a similar national emergency number. It might be pos-sible that you are asked which kind of emergency service you would like to talk to (police, fire department, EMS).
When calling the EMS, the caller should be calm and clearly state:• His name• What happened: what is the emer-
gency and the condition of the victim• How many victims are involved• The first aid provided• The location of the emergency
If you are he rescuer at the scene of an accident it is recommended to give one of the bystanders clear instruc-tions that he should call the EMS and ask him to come back.
This way you have an idea how long it will last before the ambulance would arrive and you are sure the EMS was ac-tivated. It might be a good idea to ask the caller to repeat the info you gave him, to make sure the info he will give to the EMS is correct.

DAN Basic Life Support1616
Section 3 | Basic Life Support
3.4 Emotional stress and fear of doing the wrong thing…Helping others in need gives you a good feeling, but it might also create emo-tional stress before, during and after the rescue.
When a person is the victim of an acci-dent or of a sudden cardiac arrest it is not uncommon that bystanders are waiting until somebody else stands up and pro-vide first aid.
Hesitating to step forward and start BLS is often caused by:• fear of not being able to provide
the best possible care, doing something wrong, causing harm or not being able to bring back life
• fear of being sued • fear of infection (in the next sec-
tion you will learn how to avoid infection)
Anxiety is normal when providing first aid. The rescuer and injured person are both in a stressful situation and the rescuer might consider not to provide care, so he doesn’t have to take the risk of making any mistakes or not being able to provide perfect care.
It is however OK not to provide “perfect” care. A small mistake will rarely result in an injury or getting the victim into a worse condition. A small mistake while providing care is much better than no mistake but not providing care at all.
Keep in mind that when a rescuer would not react the victim’s condition will surely stay the same or get worse. A per-son with a circulatory arrest (no signs of life) is in the worse possible condition. When providing CPR you can impossi-bly make that condition worse. The fear of causing harm is thus irrelevant and overestimated.After being certified as DAN BLS pro-vider you can be confident you are able to provide BLS in a good and effective way and when you step forward to provide care you will be surprised how clearly the needed first aid skills will come back in your mind. To keep this level of competence it is required to refresh your knowledge at least once every 2 years, by following a BLS re-fresher course.
The rescuer might also have an in-creased heartbeat and can be a bit shaky when providing first aid. This is a natural reaction from the human body (adrenaline) and actually help us to step forward and provide first aid. After providing care and when the rescuer relaxes (by for example walking a bit), he will feel his heartbeat coming back to normal and calm down.
It is however important that the rescu-er doesn’t show that he is anxious, as this would only make the victim nerv-ous and more stressed. Injured persons might react very strange, going from anger to violence. A rescuer should try to keep as calm as possible and talk to the injured person, informing him what he is doing and calming him down.

DAN Basic Life Support 1717
Section 3 | Basic Life Support
3.5Unsuccessful rescues might also create a severe emotional stress to the rescuer.
This rescuer might blame himself for not “saving” (bringing back) a life and/or think he did something wrong. It might be appropriate to talk with the rescuer after the rescue in order to men-tally support him and to let him know he did whatever was possible. Rescuers with severe emotional problems after providing first aid might need to seek professional help.
An unsuccessful rescue means that a dead (no signs of life) person stayed in that condition and not that the res-cuer did something wrong, with dead as the result.
It is behind any rescuer’s control to bring back life.
Telling that CPR saves lives or that when CPR is performed correctly you will save a life, actually gives a wrong impression and is not entirely true. This will only make a rescuer feel worse af-ter an unsuccessful rescue.
Remember that in most cases the heart does not restart when performing CPR, even if performed perfectly. CPR increas-es the chances of survival, but does not guarantee it.
CPR, as part of “early BLS” is only one link in the chain of survival.
Legal aspectsDuty of care
A duty of care is present when there is a certain person that has a responsibil-ity towards somebody else.
It is for example an obligation that sports centres (like a dive centre) pro-vide a duty of care towards the clients (for example divers) paying the centre for a service (or to dive). The centre should be prepared to provide first aid (care) related to the activities offered.
The same for Instructors (like sport In-structors) from whom it is expected that they are able to provide care to their students.
In most countries there is no law that tells a rescuer with no duty of care to provide first aid. Although the law might tell a citizen to provide assistance.
When a rescuer with no duty of care provides first aid he must not however try to provide first aid beyond his level of training. Should he do that he might be held responsible for causing further injury to the victim.
To avoid legal problems it is recom-mended to ask an injured person for his permission before you provide first aid. This can be done by saying: “My name is …… and I am a First Aid Pro-vider. Can I help you?”
If the victim is responsive, he should give permission before care is provid-ed. When not asking this permission or

DAN Basic Life Support1818
Section 3 | Basic Life Support
3.6
forcing care against his will, the victim might take legal action for involuntary assistance or assault. Should the victim be unresponsive the law assumes that permission is given.
BLS guidelinesBLS guidelines are established by an international scientific medical committee called “The International Liaison Committee on Resuscitation (ILCOR)”.
This committee exists of expert regional organisations like the Australian Resusci-tation Committee (ARC), the American Heart Association (AHA) and the European Resuscitation Council (ERC).
Although ILCOR publishes international BLS guidelines, it are the regional organisations that are responsible to write their own regional resuscitation guidelines.
It is therefore possible that there are minor regional differences. This manual re-spects the 2010 ERC guidelines.
Guidelines also may change with time and it is possible that older books are us-ing different / older standards.
You can contact DAN in order to find our about the latest European Resusci-tation Guidelines. Ongoing refresher training makes sure you always get re-trained using the most current standards

DAN Basic Life Support 1919
?
Review answers are on page 70
Section 3 | Review Questions
1. During Basic Life Support the rescuer establishes or maintains the _________.
2. Inhaled air contains ____% of oxygen. Exhaled air only contains _____% of oxygen. For better oxygenation of the blood it is recommended to use supplemental ________________, if trained in it.
3. The goal of resuscitation is not to restart the __________, but to provide a small but critical _________ to the heart and brain. It keeps _________ blood circulating and avoid damage to _________organs.
4. The goal of BLS is to ________ life, ________ further injury and to ________ first aid.
5. When calling the EMS you should:a. Inform them about what happened and the condition of the victimb. Tell them the location of the emergencyc. Tell them how many victims are involvedd. Tell your name and the first aid providede. All of the above
6. In most cases the heart restarts after performing CPRa. Trueb. False
7. To avoid legal problems it is recommended to ask an injured person for his _________ before you provide first aid. This can be done by saying ________
Section 3REVIEW QUESTIONS

Continental Europe Office
Dive safe without borders DAN Europe means the best medical and insurance coverage for all divers.As a DAN member you belong to the only global network able to intervene 24/7 in case of emergency, anywhere in the world.And there is more. DAN has been committed for over 25 years in making diving a safer sport, through medical research and specific first aid courses.Before your next dive, visit our website and enroll. You can only benefit from DAN!

DAN Basic Life Support 2121
Section 4 | Scene Safety Assessment
4.24.1 Danger and Cross InfectionA rescuer would not be able to provide first aid if he is injured himself. Rescuer safety therefore comes first.
Before providing BLS it is important to assess the scene of the accident and to eliminate or remove any danger that might be present (Fig. 7).
Dangers can be:• Fire• Electricity or gas• Traffic• Chemicals• Animals (even tentacles from for ex-
ample a jelly fish)
Cross InfectionAlthough the risk of infection during first aid is minor, it is always present and the risk of transmission of viruses such as Hepatitis, Tuberculoses and the Hu-man Immunity deficiency Virus (HIV), mostly referred to as AIDS, needs to be minimised.
For this reason rescuer safety also means protection against blood, vomit or other body fluids.
To protect yourself against these cross infections you should:• use disposable gloves (avoid con-
tact with sharp objects)• resuscitation barriers like an orona-
sal resuscitation mask or face shield (Fig. 8)
• eye protection• avoid contact with syringes • wash your hands after providing first
aid (more than a simple rinse)
Scene Safety Assessment
Fig. 7: Make sure the scene is safe.
7
Fig. 8: Oronasal Resuscitation Mask
8

DAN Basic Life Support2222
Section 4 | Scene Safety Assessment
Should the rescuer come in contact with body fluids from the victim it is recommended to have him examined by a Doctor.
The decision to use these universal pre-cautions lies with the rescuer and might be influenced depending on the person to whom first aid is given (for example own child or complete stranger) and the availability of barrier devices.
It is recommended to have protective barrier devices present in every first aid kit or even in the glove compartment of your car.
A face shield can be as small as a key-chain, but might be of invaluable im-portance during CPR (Fig. 9).
Do not rush when approaching the scene of an accident. Take your time to think and assess the scene to make sure your safety as a rescuer is assured.
It is recommended to get the first aid kit before assistance is given should you have no gloves or other barrier de-
vices (immediately) available. This spe-cially when contact with body fluids is expected.
TIP:
Before putting on gloves, blow air in them and close the opening of the glove (pulse) making a balloon of them.
Check if the glove remains full of air to make sure the glove is intact and can be used without fear of direct contact with blood or body fluids (Fig. 10).
Fig. 10: Check if the gloves are not damaged
10
Fig. 9: Key ring with face shield inside
9

DAN Basic Life Support 2323
Section 4 | Scene Safety Assessment
And what after you have given first aid?
Any reusable first aid materials must be cleaned and disin-fected after each use.
Gloves protect a rescuer during first aid, but after first aid is given, blood (or body fluids) might be present on the gloves. It is important to avoid contact with that blood when removing the gloves.
When removing gloves take the first glove at the outside of the wrist (Fig. 11) and pull the glove towards the fingers of that hand (Fig. 12). The glove will then turn inside out. Remove the glove and use your protected hand (Fig. 13) to crumble the glove into a ball (making a fist with the gloved hand).
When the removed glove is in the palm of the still protect-ed hand (fist), go with an “unprotected” finger inside the second glove (between wrist and glove - Fig. 14) and pull the glove towards the fingers as done before (Fig. 15).
This glove will also turn inside out and the first glove will be inside the second avoiding all possible contact with the blood or body fluids present at the gloves.
Place the gloves in an “hazardous waste” bag to avoid others having contact with the gloves. This bag can also be used for all other infected materials that have to be disposed after use (Fig. 16).
Ventilation barriers
The use of ventilation barriers is discussed in the following section of this book. It is however important to get theses barriers as well during the Scene Safety Assessment.
11
12
13
14
15
16
DAN Basic Life Support2424
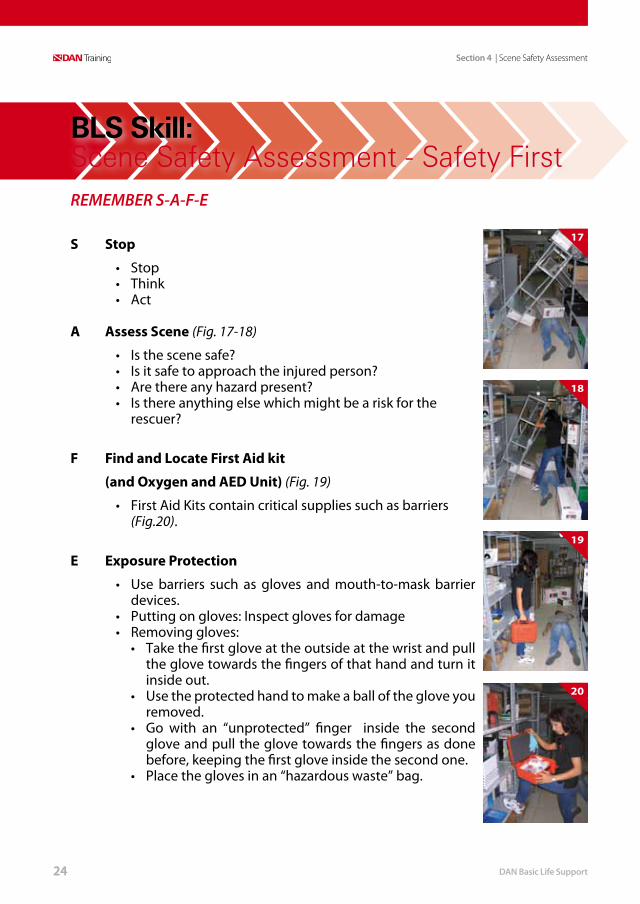
REMEMBER S-A-F-E
S Stop
• Stop• Think• Act
A Assess Scene (Fig. 17-18)
• Is the scene safe?• Is it safe to approach the injured person?• Are there any hazard present?• Is there anything else which might be a risk for the
rescuer?
F Find and Locate First Aid kit
(and Oxygen and AED Unit) (Fig. 19)
• First Aid Kits contain critical supplies such as barriers (Fig.20).
E Exposure Protection
• Use barriers such as gloves and mouth-to-mask barrier devices.
• Putting on gloves: Inspect gloves for damage• Removing gloves:
• Take the first glove at the outside at the wrist and pull the glove towards the fingers of that hand and turn it inside out.
• Use the protected hand to make a ball of the glove you removed.
• Go with an “unprotected” finger inside the second glove and pull the glove towards the fingers as done before, keeping the first glove inside the second one.
• Place the gloves in an “hazardous waste” bag.
BLS Skill: Scene Safety Assessment - Safety First
17
18
19
20
Section 4 | Scene Safety Assessment

DAN Basic Life Support 2525
?
Review answers are on page 70
Section 4 | Review Questions
1. Which dangers can be present at the site of an accident?
2. Rescuers protection also means protecting against ____________, _________ or other ___________.
3. What materials can you use to protect yourself against cross infection?
4. After providing first aid, reusable materials must be _______ and_________.
5. Avoid contact with the outside of your _______ when removing them after first aid has been provided.
Section 4REVIEW QUESTIONS

DAN Basic Life Support2626
Section 5 | Resuscitation - CPR
5.2
5.1 Cardio Pulmonary Resuscitation (CPR)As seen earlier in the general BLS sec-tion it is of extreme importance to start CPR as soon as possible to avoid dam-age to brain tissues and body organs.
The most common reason why an adult victim is not breathing is a Sudden Cardi-ac Arrest (SCA). The heart stopped beat-ing unexpected and there still is a rela-tively high amount of oxygen present in the blood vessels, heart and brain.
Ventilation is therefore initially less im-portant than chest compressions.
In the case of asphyxial cardiac arrest (cardiac arrest after suffocation – for ex-ample in drowning) the level of oxygen in the body is drastically reduced (hypox-ia), making ventilations more important.
When the victim is a child, heart prob-lems are far less common and we might also expect a lower level of oxygen in the child’s body.
For this reason the BLS protocol for chil-dren and in case of drowning is slightly different.
Cardio (heart) Pulmonary (lungs)Resus-citation is a technique that consists of chest compressions and ventilations (rescue breaths):• Chest compressions generate a
small but critical amount of blood flow to the brain and myocardium
(heart) and increase the likelihood that defibrillation will be successful.
• Rescue breaths will bring air to the lungs and increase the oxygen concentration in the alveoli, which will then go to he capillaries by diffusion.
Compressions – Ventilations RatioA mathematical model suggests that a ratio of 30:2 would provide the best compromise between blood flow and oxygen delivery, but interruptions in giv-ing chest compressions must be kept to a minimum.
Resuscitation should be continued until• Qualified help take over• The victim starts to wake up: to move,
opens eyes and to breathe normally• You become exhausted
Resuscitation - CPR

DAN Basic Life Support 2727
Section 5 | Resuscitation - CPR
5.3 Gastric Distention – RegurgitationGastric distention or regurgitation is the expulsion of the content of the stomach and is caused when air enters the stom-ach during rescue breathing.
It is very similar to vomiting. During vomiting the content of the stomach is forced out of the stomach by mus-cle contraction. In the case of gastric distention, there is no muscle activity, but the increased pressure inside the stomach will push out its content. This content will flow out (not spurting or forceful as in vomiting) of the stomach into the mouth.
If regurgitation happens, the reaction of the rescuer should be to turn the victim on his side and clean the airway.
However, after cleaning the airway there is still a risk that when giving new ventila-tions parts of the content of the stomach are blown in the windpipe and lungs.
Therefore gastric distention should be avoided at all times.
In order to avoid regurgitation, the vol-ume of the ventilation should be kept approximately 500-600 ml (6-7 ml per kg of body weight).
Rapid and forceful ventilations can also lead to distention. This because the mus-cle that separates the oesophagus from the stomach (oesophageal sphincter) opens at an airway pressure of 15-20cm H2O. When blowing too hard during ventilations, this pressure can easily be
reached. This sphincter might also not function anymore in victims with cardiac arrest.
In order to avoid gastric distention you should:• Give rescue breaths of about 1 second
in duration with enough volume to make the victim’s chest rise (Fig. 21)
• Avoid rapid or forceful rescue breaths
• Open the airway completely• Allow the chest to fall back in the
normal position before giving the second rescue breath
• Avoid putting pressure on the stomach
• Watch the stomach for signs of overexpansion
Fig. 21: Rescue breaths
21

DAN Basic Life Support2828
Section 5 | Resuscitation - CPR
5.5
5.4 Adult Resuscitation sequence – Actions of the rescuer explained
The resuscitation sequence can be di-vided in 3 main parts:• Approach, assessing responsiveness• Assess breathing • Start CPR, if needed.
Approach – Assessing responsiveness – Opening AirwayOnce a rescuer assured the scene is safe, he should assess responsiveness.
If the victim responds, he should be left in the position in which he was found and the EMS (Emergency Medical Serv-ices) should be activated.
The rescuer should reassure the injured person and try to find out what has hap-pened.
He should introduce himself by stating his name, that he is trained to provide first aid and should express his desire to help. He should reassure the injured per-son by showing a carrying attitude and inform the victim about what is happen-ing and that he is taking care of him.
The rescuer should also try to keep by-standers at a distance to avoid stressing the victim even more.
Chances are that the injured person is upset or afraid about his condition and what is happening. If the rescuer reas-sures him, the victim will feel safer and will keep calm.
If the injured person is not responding, he should be turned on his back and the airway should be opened immediately.
When the airway is closed, it would not only be impossible to check for breath-ing, but the victim would not be able to breath either.
Later in this book you will learn about Foreign body airway obstruction, but the airway can also be obstructed be-cause of the tongue. It is possible that the tongue falls backwards and blocks the air passage when the victim has a low level of responsiveness.
Opening of the airway is done by using the head tilt-chin lift technique (Fig. 22).
Note: The exact Resuscitation techniques are de-scribed on the skills pages of this section.
Fig. 22: Head tilt – chin lift
22

DAN Basic Life Support 2929
Section 5 | Resuscitation - CPR
5.7
5.6
This is an easy to learn technique, which is described on the following pages.
In some cases it might be enough to open the airway and keep it open un-til the arrival of the ambulance (when breathing is present).
Assessing breathingOnce the airway is open, the rescuer should check for breathing by looking for chest movement, listing for breath sounds coming out of the mouth (Fig. 23) and feeling for air movement on his cheek or ear.
This is done while keeping the airway open and for no more than 10 seconds .
If normal breathing is present, the vic-tim should be placed in the recovery position to ensure an open airway at all times and an ambulance must be called immediately.
The rescuer must check for continued breathing and should act accordingly.
Starting CPR – Support CirculationWhen breathing is absent or no normal breathing is present, the EMS should be activated immediately (inform them no normal breathing is present) and the rescuer should start chest compres-sions, by placing the hands with the fin-gers of both hands interlocked on the centre of the chest.
Current CPR guidelines request 30 chest compressions at a rate of at least 100 per minute (but not exceeding 120).
This means that for a rate of 100 per minute, the 30 compressions should be given in 18 seconds (a little less than 2 compressions a second). At a rate of 100 – not exceeding 120, this would mean 15-18 seconds. The depth of the compression should be at least 5 cm (but not exceeding 6cm) and it is im-portant to release the pressure on the chest between the compressions, but without loosing contact between the chest and your hands (at the sternum). The exact hand position is described in detail on the skill page.
Important:In the first minutes after a cardiac arrest, an injured person may be barely breathing, or taking infrequent, noisy (agonal) gasps. Do not confuse this with normal breathing. If you have any doubt whether breathing is normal, act as if not normal.
Fig. 23: Assess breathing
23

DAN Basic Life Support3030
Section 5 | Resuscitation - CPR
With every compression, blood is pushed out of the left side of the heart, from where it goes throughout the body (Fig. 24). At the same time, deoxygenated blood is squeezed from the right side of the heart to the lungs, where it will take oxygen from the alveoli. When releasing the pressure on the chest, blood flows back into the right side of the heart and oxygenated blood returns from the lungs to the left side of the heart.
When compressing too fast, the heart would not get the time to fill with blood and the compressions would therefore not move enough blood around, thus being ineffective. When compressing too slow, the blood would move too slow and the blood pressure would stay too low, avoiding an effective circula-tion as well.
When compressions are not deep enough, the amount of blood pushed out of the heart would be minimal and inadequate to support circulation.
Immediately after these 30 compressions, the rescuer must give 2 effective ventila-tions.
This is done by opening the airway again, placing the mouth around the victim’s mouth and closing the victims nose. The rescuer should blow air from his lungs into the mouth of the victim. Should the nose not be closed, the exhaled air from the rescuer would escape through the nose of the victim.
It is important to blow steadily into the mouth while watching the chest rise.
This should take about 1 second (Fig. 25). When the chest has returned to his nor-mal position, the second ventilation can be given. The 2 breaths should not take more than 5 seconds in all.
When providing rescue breaths, the exhaled air from the rescuer’s lungs (16% of oxygen) goes to the lungs of the victim.
Fig. 24: Chest compressions
24
Fig. 25: Take about 1 second for each ventilation
25

DAN Basic Life Support 3131
Section 5 | Resuscitation - CPR
5.8If the oxygen concentration in the lungs (alveoli) is high enough, the oxygen will diffuse to the capillaries and the blood becomes oxygenated.
Obviously, during this process and be-cause the victim is not breathing, the oxygen concentration in the lungs is getting lower. Should the concentration become too low, diffusion would stop.
To avoid this we need to give new ven-tilations. However, in normal conditions breathing is about 12-20 times a minute (depending from age and activity) and during resuscitation it drops to about 5 a minute.
The lower amount of oxygen in the in-spired air (16% instead of 21%) and the low amount of ventilations are keeping the oxygen concentration in the lungs relatively low. By increasing the oxygen concentration during ventilations, more oxygen would diffuse to the capillaries and oxygenation would be better. Oxy-gen concentration can be increased by using supplemental oxygen.
What about children?Many children do not receive resusci-tation because potential rescuers fear causing harm. This fear is unfounded; it is far better to use the adult resusci-tation sequence for resuscitation of a child than to do nothing.
The following minor modifications should however be respected:
• if not breathing normally, give 5 initial rescue breaths (1-1.5 seconds in duration sufficient to make the chest rise)
• then check for signs of life for no more than 10 seconds
• if there are signs of life, continue rescue breathing
• if there are no signs of life, start chest compressions:• compress the chest by
approximately one third of its depth; use two fingertips for an infant under 1 year; use one or two hands for a child over 1 year as needed to achieve an adequate depth of compression (4cm for infants - 5cm for children over 1 year)
• alone rescuer should perform CPR for approximately 1 minute before going for help unless in the case of a witnessed, sudden collapse (in this case seek help immediately).
Note:• Remove the dentures if they cannot be
kept in place. In all other situation, keep them in the victim’s mouth as they will make it easier to create a seal.
• If a rhythm has been restored, giving chest compressions does not increase the chance of a cardiac arrest recurring.
• Chest compressions only at a rate of 100 per minute (but not exceeding 120) may be used if the rescuer is untrained or unwilling to give rescue breaths (fear for risk of disease transmission)

DAN Basic Life Support3232
Section 5 | Resuscitation - CPR
5.9 The use of Face shield and Resuscitation masks
When giving rescue breaths it is recom-mended to use a resuscitation mask or face shield as protection (Fig. 26).
Face shields are easy to use and are available as keyring. The technique of rescue breathing using a face shield is the same as the technique for normal mouth to mouth ventilations.
Face shields are available with or with-out a protective filter. Even when both types only give a basic protection it is better to use a face shield with a filter..
When using a resuscitation mask, an-other technique must be used (Fig. 27 - described later).
A resuscitation mask is a better pro-tection then the face shield, but is also much bigger and less comfortable to carry in your pocket.
It can however be carried in a first aid kit, backpack or a glove compartment of a car.
The resuscitation mask is also called Pocket Mask (which is a brand name), although it is slightly too big to put in the pocket of trousers.
Fig. 27: Resuscitation using an Oranasal Resuscitation Mask
27
Fig. 26: It is recommended to use a barrier during rescue breathing
26

DAN Basic Life Support 3333
Section 5 | Resuscitation - CPR
5.10 The use of Oxygen during resuscitationWhen trained in it, and when available, it is recommended to provide oxygen during resuscitation. This can be done by using a resuscitation mask with an oxygen inlet or by using more advanced materials such as a Bag Valve Mask (BVM) or oxygen resuscitation valve. When con-nected to an oxygen source, the concen-tration of inspired oxygen can increase from 16% to 50%, using a oronasal resus-citation mask or even to 97-100%, when using the BVM or oxygen resuscitation valve (Fig. 28).
The resuscitation mask needs to have a nozzle to connect oxygen to. This noz-zle has a one way valve or can be closed with a small tap, which is attached to the nozzle in case the mask is used without supplemental oxygen. The mask is then
connected to the constant flow outlet of an oxygen regulator with a clear plas-tic tubing.
The use of oxygen is very important for victims of drowning and in diving acci-dents, where hypoxia is a major concern. Oxygen should therefore be present in every swimming pool and at every dive site. BLS providers are encouraged to follow one or more DAN Oxygen Cours-es to be able to provide or to resuscitate with oxygen.
DAN has specialised training programs to provide oxygen to divers or to victims of drowning, as well as a course to train students in the use of advanced oxygen resuscitation techniques.
Fig. 28: The use of a BVM during resuscitation
28

DAN Basic Life Support3434
Section 5 | Resuscitation - CPR
5.11 Early defibrillation – The need for an AEDYour body and heart have an elec-trical system that keeps the heart muscles contracting. As these electri-cal impulses fire, the muscles contract and blood flows through the arteries and veins.
When something upsets these elec-trical impulses and breaks the heart's rhythm a sudden cardiac arrest occurs. The most common rhythm that occurs during a SCA is called ventricular fibril-lation (VF). Essentially, the chambers of your heart are no longer beating in the rhythm necessary to keep the blood flowing. They are all firing at once — the heart muscle appears to be quiver-ing — and no blood is moving through the body.
Regardless of the cause, when the heart stops beating, if you cannot reset the heart's rhythm, the person will die. The only way to reset a heart in ventricular fibrillation is with defibrillation.
While CPR delays the inevitable by helping to oxygenate blood and circu-late it throughout the body, CPR can-not reset the heart rhythm and make it start beating again. Only defibrillation can do that.
Defibrillation sends an electric shock through the heart and essentially hits a “reset” button. The electrical shock does not tell the heart how to beat or contract. What it does is scramble all of the misfiring signals and stop all of the electrical activity. The heart stops for a moment, and the body's natural pace-maker begins firing again, restoring a normal rhythm.
When defibrillation is provided within the first few minutes after VF begins, the person has a very high chance of survival.
Until recently, it required a tremen-dous amount of training to operate a defibrillator. You had to understand the heart rhythms (ECG interpretation) on the monitor before you could ad-minister a shock. If the person wasn't already in ventricular fibrillation when you applied the shock, you could put him there. The necessary training re-quired made defibrillators the domain of medical professionals. Doctors and nurses could use them in the hospital, or paramedics could use them at the scene of an emergency. Unfortunate-ly, survival rates drop by about 7 to 10 percent every minute a person is in ventricular fibrillation. Long response times from emergency medical serv-ices professionals decrease the effec-tiveness of defibrillators in the field.

DAN Basic Life Support 3535
Section 5 | Resuscitation - CPR
Defibrillation technology has evolved to give us Automated External Defibrilla-tors (AEDs) which simplify defibrillation operation and greatly reduce the train-ing needs to use a defibrillator (Fig. 29).
ECG interpretation (analysing of the heart) is done by software internal to the defibrillator that has been tested in thou-sands of simulated cases in the labora-tory and clinically field tested.
AEDs are designed to advise the opera-tor if a “shockable” rhythm is detected. If a non-shockable rhythm is detected it is designed to give the operator a “ no shock advised” message.
By taking an AED course, you can in-crease your response time to using an AED by a few minutes and you may im-prove someone's chance of survival by as much as 30 or 40 percent!
Fig. 29: The use of an AED is highly recommended and can be of vital importance
29

DAN Basic Life Support3636
1. Make sure you, the injured person and any bystanders are safe
2. Check the injured person for a response • State your name, training and desire to help.• Ask permission to help.• Gently shake the injured person’s shoulders and ask loudly: “are you all
right?” (Fig. 30)
3a. If he responds:• Leave him in the position in which you find him provided there is no
further danger• Try to find out what is wrong with him and get help if needed• Reassess him regularly
3b. If he does not respond:• Shout for help.• Turn the injured person on his back and then open the airway using head
tilt and chin lift:• Place your hand on his forehead and gently tilt his head back (Fig. 31) • With your fingertips under the point of the injured person’s chin, lift the
chin to open the airway (Fig. 32)
4. Keeping the airway open, look, listen and feel for breathing• Look for the chest movement.• Listen at the injured person’s mouth for breath sounds.• Feel for air on your cheek.• Decide if breathing is normal, not normal or absent.
In the first minutes after cardiac arrest, an injured person may be barely breathing, or taking infrequent, noisy gasps. Do not confuse this with normal breathing. Look, listen and feel for no more than 10 seconds to determine whether the injured person is breathing normally (Fig. 33). If you have any doubt whether breathing is normal, act as if not normal.
BLS Skill:Resuscitation - CPR
30 31 32 33
Section 5 | Resuscitation - CPR

DAN Basic Life Support 3737
5a. If he is breathing normally:• Turn him into the recovery position• Send or go for help / call an ambulance (Fig. 34)• Continue to assess that breathing remains
normal
5b. If the breathing is not normal or absent:• Send someone for help and to find and bring
an AED if available; or, if you are on your own, use your mobile phone to alert the ambulance service - leave the injured person when there is no other option
• start chest compressions as follows:• Kneel by the side of the injured person;• Place one heel of one hand in the centre
of the chest (which is the lower half of the injured person’s breastbone (sternum))
• Place the heel of your other hand on top of the first hand:
• Interlock the fingers of your hands and ensure that pressure is not applied over the injured person’s ribs. Keep your arms straight, Do not apply pressure over the upper abdomen or the bottom end of the sternum (Fig. 35);
• Position yourself vertically above the chest and press down on the sternum at least 5cm (but not exceeding 6cm) (Fig. 36);
• After each compression, release all the pressure on the chest without loosing contact between your hands and the sternum; repeat a rate of at least 100/minute (but not exceeding 120/minute)
• Compression and release should take equal amounts of time.
34
35
36
Section 5 | Resuscitation - CPR

DAN Basic Life Support3838
6a. Combine chest compressions with rescue breaths.• After 30 compressions open the airway again using the head tilt and
chin lift• Use an oronasal resuscitation mask or pinch the soft part of the nose closed,
using the index finger and thumb of your hand of the forehead (Fig. 37).• Allow the mouth to open, but maintain chin lift• Take a normal breath and place your lips on the inlet of the oronasal
resuscitation mask, or around his mouth, making sure that you have a good seal (Fig. 38).
• Blow steadily in to the mask / mouth while watching the chest to rise, taking about 1 second as in normal breathing; this is an effective rescue breath.
• Maintaining head tilt and chin lift, take your mouth away from the injured person and watch for the chest to fall as air comes out.
• Take another normal breath and blow into the person’s mouth (or in the mask), to achieve a total of 2 effective rescue breaths. The two breaths should not take more than 5 seconds in all. Then return your hands without delay to the correct position on the sternum and give another 30 compressions (Fig. 39)
• Continue CPR in a ratio of 30:2• Stop to recheck the injured person only if he starts to wake up: to move,
open eyes and to breath normally. Otherwise do not interrupt resuscitation.
• If your initial rescue breath do not make the chest rise as in normal breathing, then before your next attempt:
• Check the injured person’s mouth and remove any obstruction• Recheck that there is adequate head tilt and chin lift• Do not attempt more than 2 breaths each time before returning to chest
compressions
37 38 39
Section 5 | Resuscitation - CPR

DAN Basic Life Support 3939
Note:For victims of drowning: give 5 initial rescue breaths before starting chest compressions and perform 1 minute of CPR before getting help
• If there is more than one rescuer present, another rescuer should take over delivering CPR every 2 minutes to prevent fatigue. Ensure that interruption of chest compressions is minimal during the changeover of rescuers.
6b. Chest-compression-only CPR may be used as follows:• If you are not trained, or are unwilling to give rescue breaths, give chest
compressions only• If chest compressions are given, these should be continuous, at a rate of at
least 100/minute (but not exceeding 120/minute)
7. Do not interrupt resuscitation until:• Professional help arrives and takes over; or• The injured person start to wake up: to move, opens eyes and to breathe
normally; or• You become exhausted
Section 5 | Resuscitation - CPR

DAN Basic Life Support4040
Optional Skill:The use of a resuscitation mask
• Remove the mask from the plastic box (Fig. 40).• Position yourself beside the victim’s head to provide rescue breathing and
chest compressions.• Apply the mask to the victim’s face, using the bridge of the nose as a guide for
correct position.• You can use the elastic to keep the mask in place (Fig. 41).• Seal the mask by placing your index finger and thumb of the hand closer to the
top of the victim’s head along the border of the mask and placing the thumb (also possible to use thumb and index finger) of your other hand along the lower margin of the mask (Fig. 42).
• Place your remaining fingers on the hand closer to the injured diver’s feet along the bony margin of the jaw and lift the jaw while performing a head tilt-chin lift (Fig. 43).
• Compress firmly and completely around the outside margin of the mask to pro-vide a tight seal.
• Provide slow effective rescue breaths while observing for chest rise (Fig. 44).
40 41 42 43 44
Section 5 | Resuscitation - CPR

DAN Basic Life Support 4141
Optional Skill:Providing Care with an AED
Note:While AEDs can be used in an aquatic environment, you must dry the chest off before placing the pads. The AED pads should be placed on the injured person's chest accord-ing to the diagrams on the pads and then the first aid provider should follow the unit's prompts.
REMEMBER S-A-F-E.
Unresponsive.• Shout for help
Not breathing normally.• Send or go for AED and call EMS (Fig. 45)• CPR 30:2 until AED is attached• Attach the defibrillator pads to the patient and AED (Fig. 46).• Allow the AED to analyse heart rhythm.• Don't touch the patient.
If shock required: Follow the AED unit's prompts.• Visually and physically clear the patient.• State “I’m clear. You’re clear. All clear.”• Administer shock.• Resume CPR 30:2 for 2 minutes• Continue as directed by the voice/visual prompts
If no shock required:• Continue CPR 30:2 until the injured person starts to wake up: to move, open eyes and to breathe normally• Continue as directed by the voice/visual prompts
Section 5 | Resuscitation - CPR
45
46

DAN Basic Life Support4242
?
Review answers are on page 70
Section 5 | Review Questions
1. The current (ERC 2010 guidelines) compression / ventilation ratio is:a. 30:2b. 15:2c. 5:1d. 50:2
2. How can you avoid air entering the stomach and causing gastric distension?
3. What must you do when a victim regurgitates?
4. A rescuer should ____ the injured person by showing a carrying attitude, inform the _______ about what is happening and that he is taking care of him and keep bystanders ________.
5. Chest compressions should be given at a rate of ____ a minute , but not exceeding ____ a minute or ___ compressions in about ____ seconds.a. 100, 120 , 30, 15-18b. 120, 140, 30, 12-15c. 100, 120, 30, 12-15d. 100, 140, 15, 15-18
6. Each ventilation should take about ____ second in duration.
7. The use of supplemental oxygen or an AED are ____________ and might _________ the chance of survival.a. Forbidden, decreaseb. recommended, increase
Section 5REVIEW QUESTIONS

DAN Basic Life Support 4343
Section 6 | Recovery Position
Placing an unconscious, breathing per-son in the recovery position (Fig. 47) is im-portant to maintain an open airway and to prevent blood and vomit obstructing the airway (or flowing into the lungs).
The position in which the victim needs to be placed should be stable, near a true lateral position with the head sup-ported and airway open. There should be no pressure on the chest to avoid breathing problems.
Should vomiting occur or when blood is present in the mouth, gravity will make sure it leaves the body and is not in-haled. It will also be easier for the rescu-er to see the presence of blood or vomit in the mouth.
There are several small variations of the recovery position. The position de-scribed in this book is the position the ERC recommends, but is not the only adequate position possible.
In general however, the following points must be respected:• Persons with back or neck injury
should not be placed in the recovery position. Movement might do more damage.
• A person with a chest injury should be turned onto the injured side. This is to ensure that any blood within the chest cavity is more likely to affect only one lung rather than both of them,
• A person with a lung injury should be turned onto the side of the in-jured lung to ease breathing .
Recovery Position
Notes:• If the recovery position is used, you
should take care to monitor the pe-ripheral circulation of the lower arm, and to ensure that the duration for which there is pressure on this arm is kept to a minimum.
• If the injured person has to be kept in the recovery position for more than 30 minutes, he should be turned to the opposite side.
Fig. 47: Recovery position
47

DAN Basic Life Support4444
• Remove spectacles.• Kneel beside the injured person and make sure
that both his legs are straight (Fig. 48).• Place the arm nearest to you at right angles to
the body, elbow bent with the hand palm up-permost (Fig. 49).
• Bring the far arm across the chest and hold the back of the hand against the injured person’s cheek nearest to you (Fig. 50).
• With your other hand, grasp the far leg just above the knee and pull it up, keeping the foot on the ground (Fig. 51).
• Keeping the hand pressed against the cheek, pull the far leg to roll the injured person to-wards you onto his side.
• Adjust the upper leg so that both the hip and knee are bent at right angles (Fig. 52).
• Tilt the head back to make sure the airway re-mains open (Fig. 53).
• Adjust the hand under the cheek, if necessary, to keep the head tilted (Fig. 54).
• Check breathing regularly
BLS Skill:Recovery Position
Section 6 | Recovery Position
48 49
50 51
52
53 54

DAN Basic Life Support 4545
?
Review answers are on page 70
Section 6 | Review Questions
1. Placing an unconscious, breathing victim in the recovery position is important to maintain an open airway and to prevent blood and vomit obstructing the airway.a. Trueb. False
2. Persons with back or neck injury should not be placed in the recovery position.a. Trueb. False
3. A person with a chest injury should be turned onto the _______ side.
4. A person with a lung injury should be turned onto the side of the good lung to ease breathing.a. Trueb. False
Section 6REVIEW QUESTIONS

Imagine your a diving holiday......During one of the dives you've been stung by a marine animal......
What should you do?Are you prepared to provide First Aid?
The DAN First Aid for Hazardous Marine Life Injuries (HMLI) course is developed to make sure you know how act when any Hazardous Marine Animal came closer than you wanted.
Be prepared. Ask your instructor how to become a DAN HMLI First Aid Provider or visit our website at www.daneurope.org.

DAN Basic Life Support 4747
Section 7 | Foreign-Body Airway Obstructions (FBAO)
In an unresponsive person, airway ob-struction might be caused because the tongue fell backwards in the mouth due to a decreased muscle tone. The Head Tilt – Chin lift technique will open the airway again in his case.
With responsive persons, the presence of foreign bodies in the airway is the main reason why a person has a blocked airway and is choking.
The most common cause of choking in adults is airway obstruction caused by food.
With infants and children choking is mostly caused by food (such as candy), toys or coins.
This obstruction prevents a normal flow of air in the windpipe and might result in a respiratory arrest.
Since choking occurs mostly while eat-ing, the problem can be recognised soon and assistance might be given in an early phase while the victim is still re-sponsive.
Foreign bodies might cause mild or se-vere airway obstruction.
In general the victim may grip his neck and stand up (Fig. 55).
It is important to ask the victim “Are you choking” to differentiate between mild and severe airway obstruction.
In the case of Mild Airway Obstruction the victim will be able to answer your question, will be coughing (effective) and is breathing.
With Severe Airway Obstruction the victim will be unable to speak, but might nod his head as a response to your ques-tion. He will not be able to breathe or will have a wheezy breathing and can make silent attempts to cough (ineffec-tive). He also might loose consciousness soon.
First Aid depends on the Severity of the Airway Obstruction.
In the case of a mild airway obstruction the rescuer should encourage the chok-ing victim to cough, but should do noth-ing else.
Foreign-Body Airway Obstructions (FBAO)
Fig. 55: Gripping the neck and standing up is a common sign in airway obstructions.
55

DAN Basic Life Support4848
Section 7 | Foreign-Body Airway Obstructions (FBAO)
7.1If the victim shows signs of a severe air-way obstruction and is conscious the rescuer should give up to 5 back blows (Fig. 56) (sharp blows between the shoul-der blades), followed by up to 5 abdomi-nal thrusts (Heimlich manoeuvre) in case the back blows didn’t relieve the ob-struction.
These actions should be repeated until the obstruction is relieved.
If the victim at any time becomes un-conscious, the rescuer should start CPR.
Removing foreign matter from the mouth
Finger Sweep:When solid materials in the airway can be seen, the rescuer can also use his fin-gers to remove the foreign matter.
The victim however should in this case be unresponsive and preferably placed at his side.
While one hand is used to keep the jaw open, the rescuer can use the index fin-ger from the other hand to go along the cheek to the back of the mouth. The in-dex finger should be hooked behind the foreign material and the material can be pulled out.
Removing liquids in the Airway Blood, and vomit (regurgitation of gas-tric contents) can also cause an obstruc-tion of the airway.
In most cases, and thanks to gravity, turning the victim at his side, while keeping the airway open will remove these fluids from the mouth (you can use a half “Log Roll” as described in the final section of this book).
It is also possible to use a suction device to remove liquid from the upper airway.
This technique is however not discussed in this book.
Fig. 56: The use of back blows to relieve obstruction
56
7.1.1
7.1.2

DAN Basic Life Support 4949
Section 7 | Foreign-Body Airway Obstructions (FBAO)
Victims of Drowning: aspiration of waterThe aspiration of water can be suspected in victims of drowning. However, in most cases, drowning victims aspirate only a modest amount of water and this is ab-sorbed quickly into the central circulation.
There is therefore no need to clear the airway of aspirated water before starting CPR.
Regurgitation is however common following resuscitation from water and can make it difficult to maintain a clean and open airway.
Whenever regurgitation occurs, the rescuer should turn the victim on his side and clean the airway by removing the regurgitated materials.
A finger sweep or suction technique can be used when doing this.
7.1.3

DAN Basic Life Support5050
In the case of a mild airway obstruction you should encourage the choking victim to cough, but should do nothing else.
If the victim shows signs of a severe airway obstruction and is conscious you should:
• Give up to 5 back blows:• Stand to the side and slightly behind the victim. • Support chest with one hand and lean the victim well forward so that when
the obstructing object is dislodged, it comes out of the mouth rather than going further down the airway (Fig. 57).
• Give up to 5 sharp blows between his shoulder blades with the heel of your other hand (Fig. 58).
• Check to see if each back blow has relieved the obstruction. The aim should be to relieve the obstruction with each slap rather than necessarily to give all five.
BLS Skill: Foreign-Body Airway Obstruction
57 58
Section 7 | Foreign-Body Airway Obstructions (FBAO)

DAN Basic Life Support 5151
59 60 61
• If back slapping fails, give up to 5 abdominal thrusts:• Stand behind diver and put both arms round the upper part of his abdo-
men.• Lean the victim forwards so that when the obstructing object is dislodged,
it comes out of the mouth.• Clench your fist and place it between the navel and bottom tip of the ster-
num (Fig. 59).• Grasp it with your other hand and pull sharply inwards and upwards; the
obstructing object should be dislodged (Fig. 60-61).• Repeat up to 5 times.
62• If the obstruction is still not relieved, continue alter-nating five back blows with five abdominal thrusts (Fig. 62).
If the victim at any time becomes unconscious:
• Support the victim carefully to the ground• Activate EMS• Start CPR (chest compressions followed by rescue
breaths)
Section 7 | Foreign-Body Airway Obstructions (FBAO)

DAN Basic Life Support5252
?
Review answers are on page 70
Section 7 | Review Questions
1. The most common cause of chocking in adults is airway obstruction caused by _____. With infants and children chocking can also be caused by ____.
2. As a common sign during choking, the victim may grip his neck. a. Trueb. False
3. To differentiate between mild and severe airway obstruction you must:a. look in the mouth of the victimb. check responsiveness c. ask “are you choking?”d. ask a doctor
4. With Severe Airway Obstruction the victim will be unable to _____, but might nod with his head as a response to your question. He will not be able to ______ or will have a wheezy breathing and can make silence attempts to ______. He also might loose ___________ soon.
5. In the case of a mild airway obstruction the rescuer should encourage the choking victim to cough, but should do nothing else.a. Trueb. False
6. If the victim shows signs of a severe airway obstruction and is conscious the rescuer should give up to ___________, followed by up to ___________ in case the obstruction was not relieved.
7. If the victim at any time becomes unconscious, the rescuer should ________.
Section 7REVIEW QUESTIONS

DAN Basic Life Support 5353
Section 8 | Control of external bleeding
The primary function of the blood is to supply nutrients and oxygen to the body tissues and to remove the waste products (like carbon dioxide).
Blood is composed for 55% of plasma (liquid) and for 45% of cells or solid par-ticles (44% red blood cells, and 1% white blood cells and platelets).
The blood plasma, which is a clear yel-lowish fluid, carries blood cells and plate-lets. Without this plasma blood would not be able to flow.
Red Blood cells contain Haemoglobin, which gives the blood his red colour. This haemoglobin is the body’s primary transporter of oxygen and is saturated with about 97% of oxygen when the blood is leaving the lungs. About 98,5% of oxygen in the blood is chemically combined with haemoglobin. The rest is dissolved in the plasma.
These red blood cells also transport the carbon dioxide back to the lungs, where it will leave our body.
White blood cells are colourless and are protecting the body against viruses and bacteria (some white blood cells can form antibodies, which can kill mi-crobes). They also help to remove the cells which died in the body.
Platelets are the smallest cells and have an important role in the bodies natural blood clotting process. During bleed-ing, these platelets will create an artificial dam to reduce or stop the blood loss.
An adult human has about 5,5 litres of blood, depending on his body weight.
When loosing approximately 1 litre of blood an adult can go into hypovolemic shock because of the decreased or low blood volume (also called hypovolemia).
This is a life threatening situation that will be discussed in the next section of this book.
Severe bleeding (Haemorrhage) must be stopped to avoid hypovolemia. Be-cause the total amount of blood in a child is much less than in an adult, even minor bleedings in children could lead to hypovolemia.
When bleeding occurs, the blood ves-sels will constrict to slow blood loss and the platelets will start to create an artificial dam in order to stop the bleed-ing and to avoid bacteria entering the bloodstream from outside.
For minor bleeding this process works extremely well, but for severe bleeding help is needed.
Bleeding can be internal or external. In this section we will discuss external bleeding.
We have 3 categories of bleeding:
Capillary bleeding: an easy to control bleeding that occurs when capillaries are damaged. Capillaries are the small-est blood vessels in the body. Capillary bleeding is slow and tends to ooze rath-er than flow. In most cases this kind of
Control of external bleeding

DAN Basic Life Support5454
Section 8 | Control of external bleeding
8.1bleeding will stop without any interven-tion from outside. Note however that even when there is minor bleedings, there is a risk of infection and the wound should be disinfected and covered with a sterile dressing.
Venous bleeding: This bleeding can still be controlled quite easily, but is al-ready more severe. It occurs when veins are damaged. Veins are blood vessels re-turning the blood to the heart. Venous bleeding is dark red in colour and comes out of the wound in a steady flow. This bleeding mostly stops when applying direct pressure and bandaging.
Arterial bleeding: Arterial bleedings are always severe bleedings that need immediate attention. Arterial bleeding occurs when an artery is damaged. Ar-teries carry the oxygenated blood from he heart throughout the body. Because it comes from the heart the blood spurts from the wound at a relatively high pressure (pumping of the heart) and has a bright red colour. This bleed-ing is hard to control.
The rescuer should not loose any time to differentiate between venous and arte-rial bleeding. Both kinds of (severe) exter-nal bleeding require the same first aid.
The use of pressure pointsIt might be needed to use pressure points if direct pressure does not stop the bleed-ing. Pressure points of the arm are on the inside of the arm just above the elbow and just below the armpit (Fig. 63). Pres-sure points of the leg are just behind the knee and in the groin. Squeeze the main artery in these areas against the bone, while with your other hand you continue to apply pressure on the wound itself.
If the bleeding does not stop, reposition your hand and try again.
Fig. 63: The use of a pressure point
63

DAN Basic Life Support 5555
Section 8 | Control of external bleeding
BLS Skill:(Severe) External bleeding
64
65
66 67 68
• Assess the scene and the ABC’s (use gloves).• Call the ambulance if required• Place a pad (sterile gauze) over the wound and apply direct pressure (with your
hand) to the wound (Fig. 64). • Elevate the extremity (wound) to slow blood flow (Fig. 65).• Secure the pad with a sterile dressing. The pad should not be moved and the
dressing big enough to cover the pad and wound site completely (Fig. 66 - 67). • The dressing should be tight, but should also not prevent circulation. You
can check circulation by squeezing the fingertips and looking for the pink colour under the nail to return quickly.
• Reassure the injured person and keep him still• When bleeding has stopped, immobilise the wound or extremity. A triangular
bandage can be used to limit movement (Fig. 68).• Monitor vital signs, look for signs of shock and act accordingly.• If trained in it and when available, the rescuer can provide oxygen.
Notes:• If the bleeding continues and seeps through the pad you are holding on the wound,
don't remove it as it would remove blood clots which help to control bleeding. Instead, add more absorbent material
• Use pressure points if direct pressure does not stop the bleeding.

DAN Basic Life Support5656
?
Review answers are on page 70
Section 8 | Review Questions
1. The primary function of the blood is to supply oxygen to the body tissues and to remove the carbon dioxide.a. Trueb. False
2. Red blood cells contain Haemoglobin ,which carry the _______, white cells are protecting the body against ____________ and the platelets take care of the ________ process.
3. During venous bleeding, blood has a _____ red colour and the blood _____ out of the wound. In arterial bleeding, the colour is _____ red and the blood _____ out of the wound.
4. During severe bleeding you should apply direct pressure and elevate the extremity.a. Trueb. False
5. The rescuer should use a tourniquet when bleeding does not stop.a. Trueb. False
Section 8REVIEW QUESTIONS

DAN Basic Life Support 5757
Section 9 | Shock management
9.1 What is shock?Shock is a life threatening condition caused by an inadequate oxygen sup-ply to the major body organs.This reduced oxygen supply is mostly caused by:• Severe bleeding: internal or
external bleeding, or • An excessive fluid loss: like in cases
of severe burn or severe vomiting and/or diarrhoea (dehydration)
This type of shock is also called hypovo-lemic (low volume) shockOther types of shock include:• Cardiogenic Shock: Shock due to
inadequate pumping of the heart. This may occur after a heart attack, heart failure, or certain other heart problems (resulting in a low blood pressure or bad circulation),
• Septic Shock: Shock due to circulatory insufficiency caused by infection (such as blood poisoning),
• Anaphylactic Shock: Caused by a severe allergic reaction. This can include a reaction to a bee sting, penicillin or shellfish (crustaceans),
• Insulin shock: Caused by a very low blood sugar level such as occurs with diabetes
• Neurogenic Shock: Caused by a severe damage to the central nervous system, after for example a head of spinal cord injury, resulting in vasodilatation (dilating of blood vessels) and a decreased blood pressure.
Due to a low blood pressure or a low volume or circulating fluids, caused by for example a bad heart function or se-vere blood loss, there will be an inad-equate blood (and oxygen) supply to body cells.
As a reaction, the body will try to sup-ply the brain (which is very sensitive to a reduced oxygen supply) with enough oxygen by reducing the oxygen supply to for example muscle tissues, limbs and skin (less sensitive to a reduced oxygen supply)
This will result however in other (vital) or-gans or cells receiving also less oxygen, even if they are sensitive to the lack of oxygen themselves (like kidneys, which are vulnerable to damage from low blood pressure).
Because of these changes in the body, the following signs and symptoms can be present:• Anxiety, restlessness, confusion:
caused by the reduced oxygen level in the brain.
• Rapid, shallow breathing: breathing increases as reaction from the brain to the decreased oxygen supply.
• Rapid, weak pulse: because the heart increases the circulation of oxygen (blood) to compensate the decrease in oxygen supply.
• Pale and cold skin: caused because of a reduced oxygen supply to muscles and skin.
Shock management

DAN Basic Life Support5858
Section 9 | Shock management
9.2
• Clammy skin: because the changes in the body make the victim sweat.
• Thirst: a sign that the amount of circulating fluids isn’t enough.
• Nausea and vomiting: because the intestines and stomach receive less blood (less oxygen), they are not working properly anymore and this causes nausea and vomiting.
• Enlarged pupils.• Weakness and (in case of severe
shock) unconsciousness .
Why does extreme fluid loss might lead to shock?As seen before, oxygen is transported by the blood. It therefore is logical that a severe blood loss can lead to shock.When vomiting or diarrhoea occurs a persons looses a lot of fluid in his body. This fluid comes from body cells and tissues, but also out of the blood ves-sels. This reduces the blood volume and might lead to shock in severe cases of vomiting or diarrhoea.With severe burns there is a fluid loss because of the burned skin and the amount of fluid in the tissues and under the skin increases. This results in oede-ma (swelling of tissue). This extra fluid in the tissues comes out of the blood ves-sels, also leading to a lower blood vol-ume and in severe cases shock.
In the case of dislocations, contusions or fractures we see the same and there is an increased risk of internal bleed-ing, making the fluid loss even worse.
Note: Although a person in shock might be extreme-ly thirsty, no fluids should be orally given dur-ing first aid (Fig. 69). The reason is that the victim is assumed not entirely conscious and giving him to drink might lead to aspiration and choking.
In profound shock, water absorption may be impaired, and that may be another com-pounding factor, although water is mostly not considered dangerous, but probably sim-ply useless.
Giving something to drink might also increase the likelihood of vomiting, making dehydra-tion (or fluid loss) even worse.
Administration of IV fluids is however recom-mended, but can only be given by profession-al health care providers.
Fig. 69: No fluids should be given in case of shock
69

DAN Basic Life Support 5959
Section 9 | Shock management
9.3 What to do?The rescuer should deal with the under-lying cause of the shock. In general for the first aid provider this means to stop external bleeding (see section 8).
In case of an Anaphylactic or Cardiogenic it might also be possible that the victim carries medication.
Rescuers should also:
• Make sure the scene is safe• Assess the vital signs• Activate EMS• Maintain open airway• Keep the victim calm• Position the victim on the floor, with
the legs slightly elevated (20-25cm), unless shock is caused by a heart fail-ure or head injury 3. Elevation of the legs increases the amount of blood returning to the heart (Fig. 70).
• Provide oxygen, if available and trained in its use, to compensate the decreased level of oxygen in the body.
• Maintain a normal body tempera-ture. The victim will not be able to regulate his body temperature him-self. (Isothermal) blankets or other materials (like a sweater or jacket) can be used to protect he victim from the cold. The rescuer must also avoid that the victim becomes overheated. If outside the injured person can be placed in the shadow. (See notes concerning the use of an isothermal blanket).
Fig. 70: Elevate legs slightly in case of shock
70

DAN Basic Life Support6060
Section 9 | Shock management
Persons with shock will need to be hospitalised for further treatment. How-ever, even with treatment, shock after a massive heart attack or due to blood poisoning is often fatal.
Note: Do not force a person to lie down or put his feet up, if he is not comfortable in that position. Don’t elevate his legs if it would make another injury worse.
Note: Isothermal blanket (Fig. 71).
The reflecting material of some isother-mal blankets can be used as protection from the cold as well as protection from the heat. These rescue blankets have a gold and a silver coloured side.
When the victim is wrapped in the blan-ket and the golden side is up, then he will be protected against hypothermia (undercooling). When the silver side is up, the blanket protects against heat. These blankets do not take much space and have a low cost.
Fig. 71: The use of an isothermal blanket
71

DAN Basic Life Support 6161
BLS Skill:Shock management
76
• Make sure the scene is safe• Assess the vital signs• Activate EMS• Control (severe) external bleeding if present• Maintain open airway• Comfort and reassure injured person• Position the victim on the floor, with the legs slightly
elevated (20-25cm) (Fig. 72).• Provide oxygen (Fig. 73- 74). • Protect the victim from cold or heat. Maintain normal body temperature
(Fig. 75).• Monitor the level of responsiveness• Monitor and ensure breathing
Remarks: • Do not give food or drinks to a person in shock (Fig. 76)• Do not force a person (specially with a heart or breathing
problem) to lie down. Place him in the most comfortable (sitting) position
• Don’t elevate his legs if it would make another injury worse
72 73 74
75
Section 9 | Shock management

DAN Basic Life Support6262
?
Review answers are on page 70
Section 9 | Review Questions
1. What is Shock?
2. Shock is mostly caused by _________ bleeding or excessive _____ ______.
3. List 3 types of shock.
4. List the signs or symptoms of shock.
5. During first aid you should control ______________, position the victim on the ___________ with the legs __________, provide _______ and maintain a normal ______ _________.
6. Fluids, like water, should be given orally to a person in shock.a. Trueb. False
7. Persons with shock will need to be hospitalised for further treatment.a. Trueb. False
Section 9REVIEW QUESTIONS

DAN Basic Life Support 6363
Section 10 | Additional information
10.2
10.1 First aid courses & refresher trainingThis book and the DAN BLS course do not provide complete first aid training, but is limited to BLS techniques used to provide first aid for life threatening injuries.
By following a general first aid course you will also be trained to provide first aid for non life threatening injuries or sickness.
Other first aid courses, like an AED or Oxygen administration course will in-crease your knowledge and will im-prove the quality of the first aid provid-ed. It is recommended to follow these courses (Fig. 77).
Also important is keeping a good level of training. Participation in a refresher course is encouraged and should be
done at least once every 2 years to maintain a good level of competence. This will also increase confidence when providing first aid.
Moving an injured PersonIt is recommended to leave a respon-sive injured person in the position in which he is found, specially when he is the victim of an accident (trauma) and a back or neck injury is suspected.
In some cases however it might be nec-essary for the rescuer to move the vic-tim in order to assess breathing, provide first aid or because there is a danger, like for example a fire, present.
Victims can be moved quickly by using the Rautek technique (Fig. 78):• Go with your arms under the arm
pits of the victim, between his arm and body
Additional information
78 Fig. 78: Rautek technique
Fig. 77: It is recommended to get trained as a DAN Oxygen Provider
77

DAN Basic Life Support6464
Section 10 | Additional information
10.4
10.3• Bring one of the victim’s arms in a right angle in front of his body
• Place your hand with closed fingers over the underarm between his el-bow and wrist.
• Stand close to the victim and place your feet at both sides of the vic-tim’s body.
• Pull op the injured person by stretch-ing your legs, while keeping your back as straight as possible (to avoid injury to your back)
• Pull the victim away from the dan-ger. Keep the distance that you carry the victim as short as possible (just outside the danger zone is enough).
• Place the injured person on his back on the floor.
If the injured person is sitting down it will be easy to use this technique. If the person lies on the floor you must first:• Turn him on his back, if needed.• Kneel at the left side of the victim,
next to his shoulders• Go with your right hand under the
victim’s neck and grab his arm pit with your hand (fingers)
• Place your left hand in the left arm pit• Bring the victim in one fluent move-
ment in a sitting position by lifting him with your arms and positioning yourself close behind him.
Other techniques:The arm drag is another technique that could be used for emergency moves.In this case you can drag the injured person by his arms, while he is still on the floor (Fig. 79).An alternative is to drag him at his clothes.
The use of a stabilisation board:The use of a back board could be useful when more than one rescuer is available.The back board will avoid back and neck movement during transportation, but is normally not available for during first aid (Fig. 80).
Fig. 79: Arm drag
79
80 Fig. 80: The use of a back board

DAN Basic Life Support 6565
Section 10 | Additional information
10.5
10.6
Spinal Injury ManagementTrauma to the head, neck and/or back can be expected when a person is the vic-tim of a traffic accident (crash) or when a person fell (or dived) from a height with a severe blow or strong impact as result. It might also be caused because an ob-ject fall upon a person. In these kind of accidents a spinal injury is a concern for the rescuer.
The spinal cord can be found inside the spinal column and is a bundle of nerves, taking care of the communica-tions (sending out impulses) between our brain and the rest of the body. A damaged spinal cord and/or column it might lead to paralysis.
It is therefore important not to move a person with a suspected spine injury as movement might make the condition of the victim worse.
When a victim is responsive you should therefore leave him in the position in which he is found and you should sta-bilise his head by holding it still with your hands on each side of the injured person’s head (preventing movement), while waiting for the EMS to arrive.
However, when the victim is unrespon-sive, you would need to turn him on his back in order to open the airway, as-sess breathing or start CPR. When this is done, movement should be limited to a minimum.
When the victim is already on his back, you can open the airway as seen be-
fore. If breathing is present, stabilise his head, but do not place him in the recovery position.
If no breathing is present, provide CPR as learned before.
Log Roll:If the Inured person is not on his back, you should need to roll him in that po-sition, while avoiding movement of the neck and back as much as possible:• Kneel at the injured person’s side• Carefully straighten the victim’s
arms and legs: place the arms close against his side.
• Support the head and neck with one hand
• Place the other hand on the far away elbow and squeeze it gently into his side
• Roll the victim towards you, while avoiding to twist his head, neck and back.
• Bring him first on his side, while making sure movement is limited to a minimum and then roll him further onto his back.
Notes:• When 2 rescuers are present, one can
immobilise the head while the sec-ond person rolls the injured person on his back.
• This technique can also be used when a person is on his back and need to be turned onto his side to clear the air-way from fluids.

DAN Basic Life Support6666
Section 10 | Additional information
10.810.7 Home Emergency PlanWhen an accident happens at your house you should have emergency contact de-tails within reach. It will only save valuable time but it might also be possible that, should you not able yourself, your child or another family member will need to call the EMS and doesn’t know all needed details.
It therefore is recommended to have this info close to your phone and teach your child what to do and who to call in case of an emergency.
A example of a Home Emergency Plan can be found on the last page of he books and can be personalised fir your use.
First Aid KitsA First Aid Kit should be suitable to fulfil the personal needs or those of the en-vironment where the kit will be used (Fig. 81).
The basic content of a first aid kit should allow us to provide BLS and first aid in a safe and effective way.
The following items should be a part (minimal) of a standard first aid kit:• Protective case (waterproof is used
in wet environments)• Resuscitation barrier device (like
face shield)• Medical gloves• Cleansing wipes• Sterile saline for wound irrigation• Bandages• Sterile dressings of various sizes
Fig. 81: A First Aid Kit should be suitable to fulfil the personal needs or those of the environment where the kit will be used
81

DAN Basic Life Support 6767
Section 10 | Additional information
• Sterile gauzes (can be a part of the dressing)
• Sterile eye pads• Adhesive tape• Scissors (strong enough
to cut away clothes)• Triangular bandage• Safety pins• Tweezers• Adhesive dressings (several sizes)
Optional, but recommended are:• Wound closure strips (suture strips)• Irrigation syringe• Disposable razor• Cold and Hot compress• Isothermal blanket• Infectious waste bag• Splint to immobilise fractures• Oronasal resuscitation mask• First Aid manual• A list with emergency numbers
Because there might be legal restrictions in the use or sales of medication (and ointments), these are often not present in purchased first aid kits. They can be obtained in the pharmacy and added to the personal first aid kit if wished.
Recommended medications are:• Antiseptic solution• Hydrocortisone ointment• Antibiotic ointment• Eye wash• Antihistamine tablet• Pain reliever
In several countries it is however forbid-den to administer medications to others as they may cause allergic reactions.
You can further personalise a first aid kit by adding materials like cotton swabs, needles, a small light and a thermom-eter.
The content of a first aid kit and free space might be a concerns when pur-chasing a First aid kit that suits your need.

DAN Basic Life Support68
Founded in 1980, DAN is an interna-tional, non-profit dive safety organisa-tion, committed to improving diving safety and to conducting dive research.
IDAN (International DAN) with its head-quarters in the USA and affiliates in Southeast Asia-Pacific, Japan, Southern Africa and Europe can assist you in the unlikely event of a scuba diving acci-dent or injury.
While the DAN Europe headquarter is located in Italy, DAN Europe also has regional offices most European Coun-tries and has affiliates in Egypt, Israel and the Maldives.
DAN also consults with the emergency medical professionals who continue care after your initial first aid.
If you suspect you've been injured while scuba diving, you can call the DAN Div-ing Emergency Hotline. DAN provides this service to the diving community 24 hours a day, 365 days a year to assist and help arrange for evaluation and treat-ment of injured divers. Whenever you need help, DAN is there for you.
DAN also works to prevent diving inju-ries and accidents. If you have a ques-tion concerning diving medicine, dive safety, fitness for diving or for a referral to a physician knowledgeable in diving medicine, you can call the DAN Dive Safety and Medical Information Line.
DAN also conducts research on scuba diving such as the DAN Diving Safety
Laboratory and looking into how flying after diving and various environmental and physiological conditions may affect diver health.
Another way DAN improves dive safety is through training and education. DAN has developed an Automated External Defibrillator programme, oxygen first aid programmes and related oxygen delivery equipment to promote the ben-efits of emergency oxygen first aid for in-jured divers. DAN also offers training pro-grammes for physicians and emergency medical services personnel.
DAN provides these valuable services to the entire dive community because of the support of the world's largest as-sociation of recreational divers, the DAN membership. For an annual fee, DAN members receive many valuable ben-efits including dive accident insurance, Alert Diver, diving's leading safety maga-zine; DAN Travel Assist, access to poten-tial evacuation in a medical emergency when you travel, and others.
DAN is Your Dive Safety Association!
Divers Alert Network DAN Europe

DAN Basic Life Support 69
DAN Shop
A sea of products is only a click away...
www.daneurope.orgA sea of products is only a click away...www.daneurope.org

DAN Basic Life Support70
BLS Review Questions : Answers
Section 1:
Section 3:
Section 5:
Section 4:
Section 6:
Section 2:
1. A 2. A3. C 4. C5. B
1. Fire, electricity or gas, traffic, chemicals, animals
2. blood, vomit, body fluids3. gloves, resuscitation barriers
and eye protection 4. cleaned, disinfected5. gloves
1. A 2. A3. injured 4. B
1. Early Access to the EMS, Early BLS, Early defibrillation, Early Advanced Life Support.
2. Chest compressions - rescue breaths.
1. A2. Avoid long, rapid or force-
ful rescue breaths, open the airway completely, allow the chest to fall back in the nor-mal position before giving the second rescue breath, avoid putting pressure on the stom-ach, watch the stomach for signs of overexpansion
3. Turn the victim on his side and clean the airway
4. calm, victim, at a distance5. A6. 1 7. B
1. ABC’s or vital functions2. 21, 16-17, oxygen3. heart, blood flow, oxygenated,
vital 4. preserve, prevent, provide5. E6. B7. permission, “My name is ……
and I am a DAN First Aid Provid-er. Can I help you?”

DAN Basic Life Support 71
Section 7:
Section 9:
Section 8:
1. food, toys2. A3. C4. speak, breathe, cough, con-
sciousness5. A6. 5 back blows, 5 abdominal
thrusts7. start CPR
1. Shock is a life threatening condition caused by an inadequate oxygen sup-ply to the major body organs.
2. severe, fluid loss 3. Hypovolemic, Cardiogenic, Septic, Anaphylactic, Insulin and Neurogenic
Shock4. Rapid and weak pulse, pale and cold skin, clammy skin, thirst, nausea and
vomiting, enlarged pupils, weakness and unconsciousness5. external bleeding, floor, elevated, oxygen, body temperature6. B7. A
1. A 2. oxygen, bacteria and viruses,
clotting3. dark, flows steadily, bright,
spurts 4. A5. B

DAN Basic Life Support72
Basic Life Support course evaluation
Congratulations on completing your DAN BLS Provider Course!To help us improve this programme, please complete and return this questionnaire.Safe Diving!
Sincerely,Guy ThomasDAN Europe Director of TrainingStrongly Agree: 5Agree: 4Neutral: 3Disagree: 2Strongly Disagree: 1
1. The course met my expectations. 5 4 3 2 12. The course was taught in a relaxed, positive manner. 5 4 3 2 13. The course was fun. 5 4 3 2 14. The instructor clearly understood the material. 5 4 3 2 15. I feel confident in providing BLS. 5 4 3 2 16. Did you learn and practise these skills? 5 4 3 2 1
Scene Safety Assessment Yes / No / UnsureResuscitation – CPR Yes / No / UnsureProviding care with an AED Yes / No / UnsureRecovery position Yes / No / UnsureProviding assistance to a choking person Yes / No / UnsureProviding care for external bleeding Yes / No / UnsureShock Management Yes / No / UnsureCombined Scenario’s (optional) Yes / No / Unsure
7. How many hours was your course? ________________8. Course Date: ________________________9. Overall quality of the course ___________________ (1 Low – 10 High)
10. Instructor’s name: __________________________________________11. Your name (optional): _______________________________________12. Comments or suggestions: ________________________________________
__________________________________________________________________________________________________________________
Please copy this form and return it to your DAN Instructor or to:DAN Europe Training Division, P.O. Box DAN, 64026 Roseto (TE), ItalyFax: +39-085-893 00 50 - Email: [email protected]

DAN Basic Life Support 73
Home Emergency Plan
■ When you recognise that an emergency exists:
Dial:
(Write the national EMS number above)
■ The EMS will ask you: “what is the emergency?”
■ Stay on the line, keep calm and follow instructions.
Your street address __________________________________
Your phone number _________________________________
■ If possible send someone outside to meet with the arriving EMS
Additional Important information
National Poison control centre: ________________________________
House Doctor: ______________________________________________
Neighbour: _________________________________________________
Family member: _____________________________________________

DAN Basic Life Support7474
Notes:

DAN Basic Life Support 7575
Notes:

DAN Basic Life Support7676
Notes:

DAN Basic Life Support 7777
Notes:

DAN Basic Life Support7878
Notes:

DAN Basic Life Support 7979
Notes:

DAN Basic Life Support iii