
DAM401 COURSE TITLE: Oracle Applications
248
1 NATIONAL OPEN UNIVERSITY OF NIGERIA SCHOOL OF SCIENCE AND TECHNOLOGY COURSE CODE: DAM401 COURSE TITLE: Oracle Applications
-
Upload
khangminh22 -
Category
Documents
-
view
0 -
download
0
Transcript of DAM401 COURSE TITLE: Oracle Applications

1
NATIONAL OPEN UNIVERSITY OF NIGERIA
SCHOOL OF SCIENCE AND TECHNOLOGY
COURSE CODE: DAM401
COURSE TITLE: Oracle Applications

2
COURSE GUIDE
COURSE CODE: DAM 401
COURSE TITLE: ORACLE APPLICATIONS
COURSE DEVELOPER/WRITER: FAGBAMILA OLAITAN
Crawford University, Igbesa ,Ogun State.
Programme Leader Prof. Afolabi Adebanjo National Open University of Nigeria
Course Coordinator Greg Onwodi
National Open University of Nigeria

3
Contents Page
Introduction 1
What you will learn in this course 1
Course Aims 1
Course objectives 2
Working through this course 2
The course material 3
Study units 3
Presentation schedule 5
Assessment 5
Tutor-marked Assignment 5
Final Examination and Grading 6
Course marking scheme 6
Facilitator/Tutors and Tutorials 6
Summary 7

4
INTRODUCTION
Oracle Applicationis a first semester course. It is a two credit degree course available to
students offering Bachelor of science (B.Sc) computer and information communication
technology.
Oracle Application is a complete set of business application for managing and automating
processes across any organization. The scholar who specializes in the field of Oracle may end up
to be one of the following Database administrator, Oracle programmer and so on.
WHAT YOU WILL LEARN IN THIS COURSE
The course consists of units and a course guide. This course guide tells you briefly what
the course is about, what course materials you will be using and how you can work with these
materials. In addition, it advocates some general guidelines for the amount of time you are
likely to spend on each unit of the course in order to complete it successfully.
It gives you guidance in respect of our Tutor-Marked Assignment which will be
made available in the assignment file. There will be regular tutorial classes that are related
to the course. It is advisable for you to attend these tutorial sessions. The course will prepare
you for the challenges you will meet in the economic statistics.
COURSE AIM
The aim of the course is to provide you with an understanding of oracle application . It
also aims to provide you solutions to real life problems.
COURSE OBJECTIVES
To achieve the aims set out. The course has a set of objectives. Each unit has specific
objectives which are included at the beginning of the unit. You should read these objectives
before you study the unit. You may wish to refer to them during your study to check on your
progress. You should always look at the unit objectives after completion of each unit. By
doing so, you would have followed the instructions in the unit.
Below are comprehensive objectives of the course as a whole. By meeting these
objectives, you should have achieved the aims of the course as a whole. In addition to the

5
aims above, this course sets to achieve some objectives. Thus, after going through the
course, you should be able to:\
• Create an Oracle database
• Explain the Oracle database architecture
• Install software with the Oracle Universal Installer
• Obtain tablespace information from Enterprise Manager and the data dictionary
• Create and modify tables
• Define constraints
• Manipulate data through SQL using INSERT, UPDATE, and DELETE
• Identify PL/SQL objects
• Describe triggers and triggering events
• Detect and resolve lock conflicts
• Manage deadlocks
• Describe the relationship between transactions and lock
• Troubleshoot invalid and unusable objects
• Gather optimizer statistics
• Use Database Control to create additional listeners
• Use Database Control to create Oracle Net service aliases
• Detect database corruptions using the utilities ANALYZE and DBVERIFY
• Identify the importance of checkpoints, redo logfiles, and archived logfiles
• Describe the basics of database backup.restore and recovery
Working through this Course
To complete this course you are required to read each study unit, read the textbooks
and read other materials also which may be provided by the National Open University of
Nigeria.
Each unit contains self-assessment exercises and at certain points in the course you
would be required to submit assignments for assessment purposes. At the end of the course
there is a final examination. The course should take you about a total of 17 weeks to
complete. Below you will find listed all the components of the course, what you have to do

6
and how you should allocate your time to each unit in order to complete the course on time
and successfully.
This course entails that you spend a lot of time to read. I would advice that you avail
yourself the opportunity of attending the tutorial sessions where you have the opportunity of
comparing your knowledge with that of other people.
The Course Materials
The main component of the course are
1. The course material
2. Study units
3. References/Further Readings
4. Assignments
5. Presentation Schedule
Study unit
Module 1: Introduction to Oracle application
Unit 1: Basic Oracle concepts
Unit 2: Installing Oracle Database 10g
Unit 3: Creating Oracle Database Architecture
Module 2: Oracle database Management
Unit 1 Managing Oracle Storage Structures
Unit 2: Managing DATABASE OBJECT
Unit3: : Manipulating Database Data Unit 4: Programming Oracle with PL/SQL Module 3: Oracle Configuration
Unit 1: Configuring Oracle Networking
Unit 2: Managing Database Performance
Unit 3: Dealing with Locking
Module 4: Data Concurrency and Consistency
Unit: 1 Introduction to Data Concurrency and Consistency

7
Unit 2: Managing data and concurrency
Module 5: Database Curruption
Unit 1: Detecting and Recovering from Database Corruption
Module 6: Backup and Recovery
Unit 1: Configuration The Database For Backup And Recovery(I) Unit2: Configuration The Database For Backup And Recovery(Ii) The first unit focuses on basic concept of oracle application, Database object, structure Query
language. The second unit deals with oracle system requirement, optimal flexible architecture,
file naming syntax, installing oracle software, the third focuses on how to create an oracle
database and architecture. The forth unit concerned with management of database objects. Unit
six focuses on manipulating database data.
Units seven, eight and nine are concerned with programming language and the oracle
database, oracle configuration, managing the performance of database, unit ten deals with oracle
database locking, unit eleven and twelve focus on data concurrency and consistency.
The thirteen unit is concerned with detecting and recovering from database corruption, and
lastly unit fourteen and fifteen focus on database backup and recovery
Each unit consists of one or two weeks' work and
include introductions, objectives, reading materials, exercises, conclusion, summary
Tutor Marked Assignments (TMAs), references and other resources. The unit directs you to
work on exercises related to the required reading. In general, these exercises test you on the
materials you have just covered or require you to apply it in some way and thereby assist
you to evaluate your progress and to reinforce your comprehension of the material. Together
with TMAs, these exercises will help you in achieving the stated learning objectives of the
individual units and of the course as a whole.

8
Presentation Schedule
Your course materials have important dates for the early and timely completion and
submission of your TMAs and attending tutorials. You should remember that you are required
to submit all your assignments by the stipulated time and date. You should guard against falling
behind in your work.
Assessment
There are three aspects to the assessment of the course. First is made up of self-assessment
exercises, second consists of the tutor-marked assignments and third is the written
examination/end of course examination.
You are advised to do the exercises. In tackling the assignments, you are expected to apply
information, knowledge and technique you gathered during the course. The assignments must be
submitted to your facilitator for formal assessment in accordance with the deadlines stated
in the presentation schedule and the assignment file. The work you submit to your tutor for
assessment will count for 30% of your total course work. At the end of the course you will
need to sit for a final or end of course examination of about a three hour duration. This
examination will count for 70% of your total course mark.
Tutor-Marked Assignment
The TMA is a continuous assessment component of your course. It accounts for 30% of the
total score. You will be given four (4) TMAs to answer. Three of these must be answered before
you are allowed to sit for the end of course examination. The TMAs would be given to you by your
facilitator and returned after you have done the assignment. Assignment questions for the units
in this course are contained in he assignment file. You will be able to complete your assignment from
the information and material contained in your reading, references and study units. However, it is
desirable in all Degree level of education to demonstrate that you have read and researched
more into your reference;,, which will give you a wider view point and may provide you with a
deeper understanding of the subject.
Make sure that each assignment reaches your facilitator on or before the deadline given in the
presentation schedule and assignment file. If for any reason you can not complete your work on
time, contact your facilitator before the assignment is due to discuss the possibility of an extension.
Extension will not be granted after the due date unless there are exceptional circumstances.

9
Final Examination and Grading
The end of course examination for economic statistics will be for about 3 hours and it
has a value of 70% of the total course work. The examination will consist of questions,
which will reflect the type of self-testing, practice exercise and tutor-marked assignment
problems you have previously encountered. All areas of the course will be assessed.
Use the time between finishing the last unit and sitting for the examination to
revise the whole course. You might find it useful to review your self-test, TMAs and
comments on them before the examination. The end of course examination covers
information from all parts of the course.
Course Marking Scheme
Assignment Marks
Assignments 1-4 Four assignments, best three marks of the
four count at 10% each -30% of course
marks.
End of course examination 70% of overall course marks.
Total 100% of course materials.
Facilitators /Tutors and Tutorials
There are 16 hours of tutorials provided in support of this course. You will be
notified of the dates, times and location of these tutorials as well "as the name and phone
number of your facilitator, as soon as you are allocated a tutorial group.
Your facilitator will mark and comment on your assignments, keep a close watch on
your progress and any difficulties you might face and provide assistance to you during the
course. You are expected to mail your Tutor Marked Assignment to your facilitator before
the schedule date (at least two working days are required). They will be marked by your
tutor and returned to you as soon as possible.
Do not delay to contact your facilitator by telephone or e-mail if you need assistance.
The following might be circumstances in which you would find assistance
necessary, hence you would have to contact your facilitator if:
• You do not understand any part of the study or the assigned readings

10
• You have difficulty with the self-tests
• You have a question or problem with an assignment or with the grading of an assignment.
You should endeavour to attend the tutorials. This is the only chance to have face to face
contact with your course facilitator and to ask questions which are answered instantly.
You can raise any problem encountered in the course of your study.
To gain much benefit from course tutorials prepare a question list before attending them.
You will learn a lot from participating actively in discussions.
SUMMARY
Oracle application is a course to provide solution to real life problems, especially in the data
management. It also serves as a tool which often enables the DBA to widen their knowledge.
I wish you success in the course and I hope that you will find it comprehensive and interesting.

11
COURSE CODE: DAM 401
COURSE TITLE: ORACLE APPLICATIONS
COURSE DEVELOPER/WRITER: FAGBAMILA OLAITAN
Crawford University, Igbesa ,Ogun State.
Programme Leader Prof. Afolabi Adebanjo National Open University of Nigeria
Course Coordinator Greg Onwodi
National Open University of Nigeria
12
MODULE 1: INTRODUCTION TO ORACLE APPLICATION
UNIT 1: Basic Oracle Concepts
Page
1.0 Introduction 2
2.0 Objectives 2
3.0 The Relational Model of Databases 2
4.0 SQL: The Structured Query Language 6
5.0 Object Relational Database Management System 8 6.0 Database Objects 7.0 The Oracle Data Dictionary
8.0 Summary 11
9.0 Tutor Marked Assignment 12
10.0 Further reading/References 12CHAPTER 1
13
1.0 INTRODUCTION Someone once said that the best place to start is at the beginning. With Oracle, that means understanding where the idea of a relational database management system (RDBMS) came from and what a database is—in computer and everyday terms. Even though the material presented here may not be directly tested on the exam, this is assumed knowledge, however, so a quick read is probably a good idea. 1.1 Introduction to Databases and the Relational Model In one form or another, databases have always been around, though their exact shape was not always easily recognizable. As long as some form of data had to be stored, there was always a method of storing it. Databases, in their most simple form, are a mechanism for storing data. The data can be logical, like the values stored in a computer program, or may be physical, like a file or receipt. You probably have databases in existence all around you, but you may not see them as such. For example, the shoe box in which you’ve placed your tax receipts for the accountant is a database of your annual expenses. When you open a file cabinet and take out a folder, you are accessing a database. The content of the file folder is your data (e.g., your credit card statements, your bank statements, invoices, purchase orders, etc.). The file cabinet and drawers are your data storage mechanisms.Before the advent of computers, all data was stored in some easily recognizable physical form. The introduction of computers simply changed the data from a physical form that you can touch and feel to a digital form that is represented by a series of 1’s and 0’s. Does the information that you display for an expense report on the computer screen differ greatly from the same information in the hard-copy version of the expense form? Perhaps the information is laid out differently than on the screen, but the key elements—who was paid, what amount, how much was the tax, what was the purpose of the expense, and so on—are all the same. In looking at a database and its most basic set of characteristics, the following points hold true: • A database stores data. The storage of data can take a physical form, such as a filing cabinet or a shoebox. • Data is composed of logical units of information that have some form of connection to each other. For example, a genealogical database stores information on people as they are related to each other (parents, children, etc.). • A database management system (DBMS) provides a method to easily retrieve, add, modify, or remove data. This can be a series of filing cabinets that are properly indexed, making it easy to find and change what you need, or a computer program that performs the same function.PART I When data began to move from a physical form to a logical form using computers, different theoretical versions of systems to manage data evolved. Some of the more common database management systems in use over the last 50 years include the hierarchical, network, and relational. Oracle is a relational database management system (RDBMS). 2.0 OBJECTIVES In this unit you will learn • What a database is and what makes a database relational • What SQL is • Which database objects are supported in Oracle 10g

14
• What a database administrator does • How the Oracle database fits into the Oracle product family 3.0 The Relational Model of Databases The relational model for database management systems was proposed in the June 1970 issue of Communications of the ACM—the Association of Computing Machinery journal—by Dr. E.F. Codd, an IBM researcher, in a paper called “A Relational Model of Data for Large Shared Data Banks.” For its time it was a radical departure from established principles because it stated that tables that have related data need not know where the related information is physically stored. Unlike previous database models, including the hierarchical and network models, which used the physical location of a record to relate information between two sets of data, the relational model stated that data in one table needed to know only the name of the other table and the value on which it is related. It was not necessary for data in one table to keep track of the physical storage location of the related information in another. The relational model broke all data down into collections of objects or relations that store the actual data (i.e., tables). It also introduced a set of operators to act on the related objects to produce other objects (i.e., join conditions to produce a new result set). Finally, the model proposed that a set of elements should exist to ensure data integrity so that the data would be consistent and accurate (i.e., constraints). Codd proposed a set of twelve rules that would allow designers to determine if the databasemanagement system satisfied the requirements of the relational model. Although no database today satisfies all twelve rules (because the database would run very slowly if it did, since theory is not always the same as practice), it is generally accepted that any RDBMS should comply with most of them. The essence of the relational model is that data is made up of a set of relations. These relations are implemented as two-dimensional tables with rows and columns as shown in Figure 1-1. In this example, the Customers table stores information about clients we deal with—their customer ID, their company name, their address, and so on. The Orders table stores information about the client orders (but not the order line items—these are in another table), including the order data, the method of payment, the order date, and the ship date. The CustomerID column in both tables provides the relationship between the two tables and is the source of the relation. The tables themselves are stored in a database that resides on a computer. The physical locations of the tables need not be known—only their names.

15
Figure 1.1 For a database to be considered relational, and because the physical location of rows is not something that a user querying data needs to know, the table must allow for each row to be uniquely identified. The column (or set of columns) that uniquely identifies a row is known as the primary key. Each table in a relational database (according to database theory) must have a primary key. In this way, you are certain that the specific value appears only once in the table. In Figure 1-1, the CustomerID column of the Customers table is a primary key, ensuring that each CustomerID appears only once in the table. For the Orders table, the OrderID is the primary key. When relating tables together (the whole point of a relational database), the valueof a primary key column in one table can be placed in a column in another table. The column in the second table holding the value is known as the foreign key. A foreign key states that the value in this column for a row exists in another table and must continue to exist, or else the relationship is broken. In Figure 1-1, the CustomerID column of the Orders table is a foreign key to the CustomerID column in the Customers table. In order for the relationship to be valid, any value placed in the CustomerID column of the Orders table must already exist in the CustomerID column of the Customers table. In other words, in order for a client to place an order, we need to know some basic information about them. If we don’t have this information, the customer cannot place an order. Oracle enforces the primary key–foreign key relationship through the use of database constraints.

16
. PART I 4.0 SQL: The Structured Query Language All of the relations in a relational database are managed by a relational database management system. As indicated earlier, an RDBMS allows you to manipulate relational tables and their contents. It provides a language that allows you to create, modify, and remove objects in the database, as well as add, change, and delete data. The language that Oracle uses is the Structured Query Language, or SQL. SQL was originally developed by IBM, for whom E.F. Codd worked, and was first called Structured English Query Language (or SEQUEL, for short). The name has been shortened to Structured Query Language, or SQL, but it is still pronounced sequel. SQL is actually a collection of several different “languages,” each designed for a particular purpose. It is made up of the following: • Data definition language (DDL) DDL is used to create and modify database objects. DDL statements include CREATE, ALTER, DROP, RENAME, and TRUNCATE. If you need to add a new table to the database, you use the CREATE TABLE statement to perform this task. To remove an index, you usethe DROP INDEX statement, and so on. • Data manipulation language (DML) DML is used to modify data in tables in the database. DML statements include INSERT, UPDATE, and DELETE, as well as extensions to control transactions in the database, including COMMIT, ROLLBACK, and SAVEPOINT. The SELECT statement used to query data in the database is not technically considered a DML command, although it is sometimes included with the definition of DML because it deals with the retrieval of data. • Data control language (DCL) DCL is used to configure security to perform database tasks and manipulate database objects. DCL statements include GRANT and REVOKE. Permissions can be granted to allow a user to perform a task such as creating a table, or to manipulate or query data, as by performing an insert into a table in the database. Another characteristic of an RDBMS is that tables in a relational database do not have their relationship represented by data in one table storing the physical location of the data in a related table. As you can see in Figure 1-1, the Customers table and the Orders table are related by the data that exists in the CustomerID column of both tables. The physical location on disk of each table does not factor into the relationship between them. As long as a user querying the two tables knows the column that relates them, he/she is able to formulate a SQL statement that will extract the data satisfying the condition of that relationship (also known as the “join condition”). Should one of the tables be moved to a different hard disk used to store data in the database, the relationship will still hold true. A third characteristic of an RDBMS is that the language used to manipulate the database has a rich and varied set of operators that can be used to manipulate the data and explore the relationships between the various tables. The SQL language allows you to determine, through the proper use of operators, data that is related 5.0 Object Relational Database Management System (ORDBMS) Releases of Oracle prior to Oracle 8 were RDBMSs; that is, they followed the relational model and complied with its requirements, and often improved upon them. Witht he introduction of Oracle 8, Oracle was considered an object relational database management system—something that is even more true with Oracle 10g. An ORDBMS complies with the relational model but

17
also extends it to support the newer object relational database model introduced in the 1980s.An ORDBMS is characterized by a number of additional features, including these: • Support for user-defined datatypes This means that users can create their own datatypes based upon the standard Oracle datatypes or other user-defined datatypes. This feature allows for more accurate mapping of business objects to database features and can reduce the time it takes to maintain databases after they have been implemented. • Support for multimedia and other large objects Oracle 8 and subsequent releases up to 10g have full support for binary large objects, or BLOBs. This means that it is possible to store large amounts of information such as video clips, images, and large amounts of text in the column of a row. Even though earlier releases of Oracle had a similar feature, it lacked functionality and was not implemented in a way that conformed to object relational standards. The current implementation is much improved. • Full compatibility with relational database concepts Even though object extensions have been added to Oracle, in order for it to remain an ORDBMS, it needs to conform to the requirements of an RDBMS. Because of Oracle’s strong legacy as an RDBMS, its object features can be leveraged along with the relational features to provide robust solutions. The one thing that defines Oracle as an ORDBMS is its capability to allow you to create a user-defined datatype, which becomes an object in Oracle. For example, if you wanted to use a common definition for a telephone number in several tables (Customers, Suppliers, Employees, etc.) and wanted to be sure that any changes to its characteristics would be inherited by all tables using it, you could create a new datatype called “PhoneNumber” with the proper characteristics and then create the tables using the PhoneNumber datatype as one of the column definitions. If the rules for area codes, for example, changed, you could modify the attributes and methods of the PhoneNumber datatype and all tables would inherit the change. 6.0 Database Objects Every RDBMS needs to support a minimum number of database objects in order to comply with the basic requirements for a relational database. Oracle supports these and many more. This chapter presents only a listing of those objects, while subsequent unit will allow you to create and manipulate many of these objects. Oracle’s collection of database objects includes all of those that are needed for it to be called a relational database (tables, views, constraints, etc.) as well as others that go beyond what is required and are included because they provide additional functionality (packages, object types, synonyms, sequences, etc.). The full list of database objects that Oracle 10g supports appears in Table 1-1. Table 1-1 Oracle 10g Database Objects Object Description Table A collection of columns and rows representing a single entity (e.g.,
customers,orders, employees, etc.). Column A single attribute of an entity stored in a table. A column has a name and
a datatype. A table may have, and typically does have, more than one column as part of its definition.
Row A single instance of an entity in a table, including all columns. For example, a student row will store all information about a single student, such as that student’s ID, name, and address.

18
Cell The term cell is used to refer to the intersection of a single column in a
single row. For example, the CompanyName column for CustomerID 10002 in our example would be a cell holding that data—Bradley Systems.
Constraint A database object that is used to enforce simple business rules and database integrity. Examples of constraints are PRIMARY KEY, FOREIGN KEY, NOT NULL, and CHECK.
View A view is a logical projection of data from one or more tables as represented by a SQL statement stored in the database. Views are used to simplify complex and repetitive SQL statements by assigning those statements a name in the database.
Index An index is a database object that helps speed up retrieval of data by storing logical pointers to specific key values. By scanning the index, which isorganized in either ascending or descending order according to the key value,you are able to retrieve a row quicker than by scanning all rows in a table.
Indexorganized table A table whose physical storage is organized like an index. Unlike a regular table, where rows are inserted in no particular order and querying all rows will retrieve the data in random order, index-organized tables store data organized according to the primary key defined on the table. The difference between a table (referred to as storing data on a heap) and an indexorganized table is like the difference between storing all of your receipts in a shoebox (i.e., in no specific order) and storing it chronologically according to the date the expense was incurred. Taking the receipts out of the shoebox will result in no specific logic in their retrieval, while doing the same when the receipts are organized chronologically will allow you to predict that the June 2 receipt will appear before the August 1 receipt.
Partition Tables in Oracle can be cut into pieces for more efficient physical storage.A partition (or subpartition) holds a subset of the table’s data, typically on a separate physical disk, so that data retrieval is quicker either by allowing reads from more than one physical disk simultaneously (multipartition parallel reads) or by not reading a partition’s data at all if it is not required to satisfy the query (partition elimination).
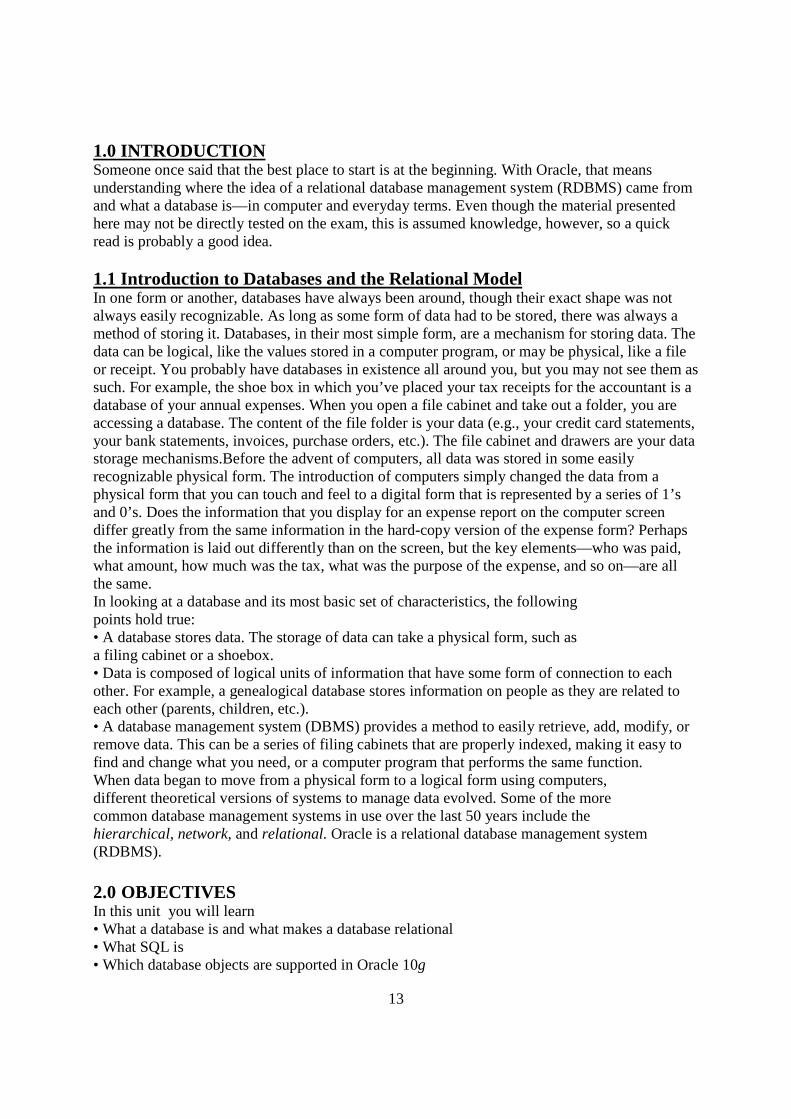
Cluster A storage mechanism object that allows rows from more than one table to be physically stored together for quicker retrieval. For example, if you store the Order information (customer, payment info, delivery details, etc.) in one table and the line items (item, cost, sale price, quantity, etc.) in a different table, you will need to perform at least two reads to retrieve
19
information about an order: one for the order info and the second for line item info. Creating both tables on the cluster organized by the order ID will allow Oracle to place the order and line item data for the same order ID on the same physical block, thereby reducing retrieval of that order’s information to a single read. The downside of clusters is that they force you to preallocate a certain portion or all of the disk space they require when rows are added or the cluster is created.
Sequence A sequence allows you to create and increment a counter that can be used to generate numerical values to be used as primary key values for a table.
Synonym As in the English language, a synonym is another name for an existing object. Synonyms are used in Oracle as shorthand for objects with long names, or to make it easier to remember a specific object. Stored
Procedure A stored procedure is a collection of SQL and PL/SQL statements that perform a specific task, such as to insert a row into a table or to update data.
Trigger A trigger is a special kind of stored procedure that cannot be invoked manually but rather is automatically invoked whenever an action is performed on a table. Triggers can be associated with a table and a corresponding action such as INSERT, UPDATE, or DELETE as well as system events such as user logon and logoff, or database STARTUP and SHUTDOWN.
Function A function is a stored program that must return a value. Unlike stored procedures, which can have parameters passed to them and do not need to return any value as output, a function must return a value.
Package A package is a collection of stored procedures and functions grouped under a common name. This allows you to logically group all program elements for a particular part of the database under a single name for maintenance and performance reasons.
User-defined datatype
A user-defined datatype is a database object that can be used in any table or another object definition. Using user-defined datatypes allows you to ensure consistency between tables and also lets you apply methods (i.e., actions that can be performed by the object) as part of the definition.
BLOB A BLOB is a binary large object used to store video, images, and large amounts of text. BLOBs are defined as a column in a table and can be one of several datatypes: BLOB, CLOB, NCLOB, or BFILE.

20
PART I (7.0)The Oracle Data Dictionary As you may well imagine, a database may contain hundreds and even thousands of objects. Keeping track of all this information is the job of the Oracle data dictionary. A data dictionary in any database contains metadata information. Metadata is “data about data,” or a set of tables and other database objects that store information about your own tables and database objects. The data dictionary in Oracle is a set of tables, called base tables, which contain the most basic information about user-created database objects. These base tables are owned by an Oracle user called SYS, which is created when the database itself is created. The base tables are never accessed directly, as their names are cryptic by design to discourage users from querying and modifying them. To make it easier to access the data dictionary and get information on objects in the database, a series of views are created during the database creation process. These views are commonly referred to as data dictionary views. Oracle has three sets of data dictionary views. They are as follows: • USER_ views These views allow users to get information on objects that are in their schema (i.e., objects that they have created and own). • ALL_ views These views allow users to get information on objects that they own or that they have been given access to. The ALL_ views contain a subset of the information presented in the USER_ views for the same object and allow users to find out what other objects they are allowed to reference or manipulate in the database, in addition to the objects that they own. • DBA_ views The DBA_ views, designed to be used by the database administrator (DBA) of the database, provide a full set of information for objects in the database, i.e., any object created by any user. Normal users do not have access to these views, as special privileges are needed to SELECT from them. As you delve further in this book, you will be introduced to many DBA_ views to help you in your duties as a database administrator. But, what does a database administrator do in the Oracle world? 7.1 Responsibilities of a Database Administrator One of my colleagues likes to comment that users of the databases for which he is responsible think they control the databases. The reality, as he quite correctly puts it (if in a control-freakish sort of way), is quite different. As a DBA, he can do whatever he wants in any database he is responsible for, so he’s the one with control. Databaseadministrators do have a great deal of power, but it is important to remember that with great power also comes great responsibility. Ultimately, the success and failure of a database to respond to user requirements and satisfy corporate objectives rests with the DBA. The DBA must take the blame and the praise for good

21
or bad database management. The kinds of tasks DBAs in the Oracle world are responsible for include the following: • Sizing and evaluating server hardware As the individual responsible for the smooth operation of databases in your organization, you will be called upon to suggest the configuration of the server that will be used to run Oracle. Your experience will play a key role here in determining the amount of memory, hard disk, CPU, and other resources required to support the target database’s operations. Understanding the architecture of Oracle and the data needs of the business and the application will help you perform this task. • Installing Oracle software and updates After you buy the software, the first thing you need to do is bring it up. Installation of the Oracle software on the target platform is the job of the DBA. It usually involves more than putting in the CD and answering the prompts of the setup program because Oracle is a very powerful system comprising a complex piece of software that has many hooks and interactions with the operation system. Ensuring that the software is installed and working properly is a key to being a successful DBA. PART I • Planning and designing the database structure Once the software is installed, you need to make sure that the layout of the physical data structures and logical elements of Oracle is done in an optimal way. If this is not the case, performance will suffer and users will make their displeasure known. If you have properly sized the hardware, this should be an easy task, since you should have taken the database size and structure into account; if you inherited the environment, you may need to use your expertise to determine the optimal configuration. • Creating databases As you will see in the next unit, this is a somewhat anticlimactic task. Creation of the database is the first step to administering it. Although relatively straightforward, the process can run into problems; with experience, however, you should grow well equipped to fix these problems. • Backing up databases and implementing other ways to safeguard the data Once a database is in production and users are connecting to it, they may not take it well if the database becomes unavailable. Even worse, if data is lost it could mean lost productivity, sales, and customers. Ensuring that a database is always available to users, that data loss is minimized, and that recovery is quick and complete is perhaps one of the most important responsibilities of the DBA. • Creating and maintaining database users Once a new user needs to gain access to the database or when the requirements and permissions of another user change, the DBA must be able to make the necessary security modifications to ensure appropriate access. In some cases, application developers may not make use of Oracle’s built-in security fully, so being able to recognize these situations and take appropriate action is also necessary. • Implementing application and database designs Organizations may purchase third-party software applications or hire database architects todesign a database to suit a specific database requirement when in-house expertise is lacking. However, the actual implementation of these designs will be undertaken by the DBA, since the DBA will be responsible forensuring that the database continues to work properly after the softwarevendor or database architect leaves. • Restoring and recovering databases Sometimes things go wrong. Hardware fails, users improperly modify or delete data, or a natural disaster or some other calamity befalls the data center. Being able to recover from a variety of scenarios is critical. This is when the fault tolerance disaster recovery strategy is tested for real—but it should also be tested in mock scenarios to ensure it works. The DBA is the one that is answerable for their success or failure.

22
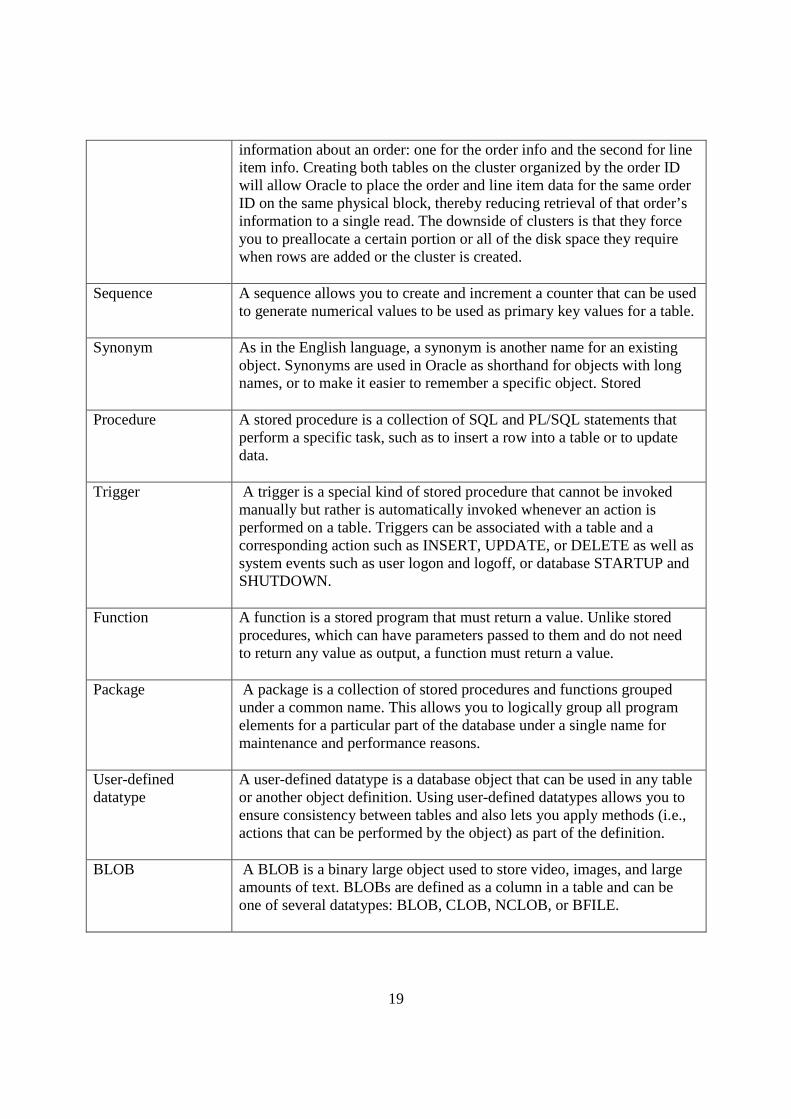
• Monitoring and tuning database performance In Star Trek: The Next Generation there is an episode where the Enterprise assists a stranded vessel. The vessel’s occupants are somewhat lacking in both engineering and communication skills, but they do ask Captain Picard and Giordi to make us go fast. Your users will frequently comment that the database is not fast enough. Keeping those comments to a minimum and solving performance problems when (or before) they occur will reduce your stress level and increase job satisfaction. As you can tell, the duties of a DBA are wide and varied. It is an exciting position whose goal can sometimes be summed up in one phrase: reduce the number of times the phone rings in a day. If you get a lot of phone calls from users or management, this is probably not a good sign and can make your day an unhappy one. Well-tuned databases on appropriate hardware with good disaster recovery and backup strategies will reduce your phone calls, make happy users, and increase your job satisfaction. Sounds simple, right? (8.0) Summary In this unit you learned a bit about the history of the relational database management system (RDBMS) concept. You also learned that SQL is actually three languages: a data control language (DCL) for managing permissions on database objects, a data definition language (DDL) for creating and managing those objects, and a data manipulation language (DML) for adding, updating, or deleting data from the database, as well as controlling those transactions. You saw what objects may appear in an Oracle 10g database and read a brief description of each object, and you were briefed on your responsibilities as a database administrator. Finally, you learned that Oracle is not just a database company but one with a wealth and breadth of products and services. At this point, you’re ready to start working with Oracle (after a few questions). (9.0) TURTOR MARKED ASSIGNMENT 1. You need to recommend a platform for the deployment of your web-based application written in Java. You need to make the management of web page content easy as well as integrate security with your Active Directory infrastructure. Which Oracle product will satisfy your requirements? (Choose the best answer.) A. Oracle Database B. Oracle Application Server C. Oracle Collaboration Suite D. Oracle E-Business Suite E. Oracle Developer Suite 2. For which of the following types of information stored in a database would the use of a sequence be appropriate? (Choose two correct answers.) A. Invoice line item B. Invoice number C. Employee name D. Atomic element E. Customer identifier 3. What is a key benefit to making use of user-defined datatypes in Oracle? (Choose the best answer.)
23
A. Ability to rename Oracle built-in datatypes B. Inheritance C. Polymorphism D. Consistency of similar data structures across multiple tables E. Easier maintenance of databases 4. Your organization has outgrown its hosted e-mail system. You also need to implement web conferencing. Development of an interface to your in-house telephone system will take place and needs to be integrated with a new voice mail platform. Your developers are versed in Java on a Linux platform. Which Oracle product provides the best fit for your organization’s requirements? (Choose the best answer.) A. Oracle Database B. Oracle Application Server C. Oracle Collaboration Suite D. Oracle E-Business Suite E. Oracle Developer Suite 5. Which of the following is not typically a responsibility of an Oracle database administrator? (Choose the best answer.) A. Creating new users B. Creating database objects C. Installing Oracle software D. Application development to manipulate database data E. Backing up the database (10.0) FURTHER READING/REFERENCES
(I) Chapple, Mike. "SQL Fundamentals". Databases. About.com. Retrieved 2009-01-28.
(II)Codd, Edgar F (June 1970), "A Relational Model of Data for Large Shared Data
Banks", Communications of the ACM 13 (6): 377–87.
(III) Lorentz, Diana; Roeser, Mary Beth; Abraham, Sundeep; Amor, Angela; Arora, Geeta;
Arora, Vikas; Ashdown, Lance; Baer, Hermann et al. (2010-10) [1996], "Basic Elements of
Oracle SQL: Data Types", Oracle® Database SQL Language Reference 11g Release 2 (11.2),
Oracle Database Documentation Library, Redwood City, CA: Oracle USA, Inc., retrieved 2010-12-29,
"Do not define columns with the following SQL/DS and DB2 data types, because they have no corresponding Oracle
data type:… TIME".
24
1
MODULE 1: INTRODUCTION TO ORACLE APPLICATION
UNIT 2: Installing Oracle Database 10g
Page
1.0 Introduction 2
2.0 Objectives 2
3.0 Oracle system Requirement 2
4.0 Optimal Flexible Architecture 3
5.0. Installing Oracle Using the Oracle Universal Installer 6.0 Setting the Environment 8 7.0 Installing Oracle Software
8.0 Summary 15
9.0 Tutor Marked Assignment 15
10.0 Further Reading /References 15
1.0 Introduction Understanding how a database works is a good starting point, but you actually need to get the software installed in order to see the real thing in action. Ironically, installing

25
the software need not mean that you even create a database. Installing the Oracle 10g database software means that you now have the tools to create and manage databases at your disposal. 2.0 Objectives In this unit you will learn how to • Identify system requirements • Use Optimal Flexible Architecture • Install software with the Oracle Universal Installer • Identify and configure commonly used environment variables 3.0 Oracle System Requirements In order for Oracle 10g database software to be installed on a computer, you need to ensure that all the prerequisites are met. Oracle, because it runs on so many platforms, requires various forms of other software to be configured in order for it to work properly. This includes additional packages on Linux systems, specific services and software on Windows, kernel parameter sizing on Unix-based systems or any combination of these, as well as other, platform-specific environment settings and prerequisites. Table 2-1 lists the minimum and recommended system requirements across most Oracle platforms. Notice that the CPU type and speed are not listed. This is because the operating system you are running will already determine which CPUs are supported. Oracle will work on the CPUs supported by the operating system you intend to run the software on. For a more specific list of system requirements, you should refer to the operating system–specific installation guide found on the installation CD or on the Oracle Technology Network (OTN) web site (www.oracle.com/technology/ documentation/database10g.html). As a general rule, the more RAM you have in the computer, the better it is for Oracle. RAM is the one resource that provides the best bang for the buck when it comes to performance of an Oracle database. If you plan on running many databases on the same server, increase the amount of RAM in the server to allow for smooth operation of all instances. System Requirement Minimum Random Access Memory (RAM)
512MB 1GB
Swap / Page File Space 1GB
Twice the size of RAM
Disk Space 1.5GB for Oracle software 1.5GB for starter database
1.5GB for Oracle software 1.5GB for starter database
Operating system and version As specified in Oracle docs
As specified in Oracle docs
Table 2-1 Minimum and Recommended System Requirements for the Oracle 10g Database

26
PART I In terms of disk space, if you plan on having your databases grow, you should allocate additional disk space. The current thinking is disk is cheap, so add more space as needed to support the size of databases you plan on running. Adding more disk space can also allow you to more efficiently allocate that disk space for Oracle and take advantage of striping or other techniques to further improve performance. Oracle 10g database is supported on many different operating systems and hardware platforms. While Linux and Windows may be the two most popular choices these days, Oracle is also available for Solaris, IBM AIX, HP-UX, HP (formerly Compaq) Tru64, and IBM z/OS (OS/390), as well as both 64-bit (AMD and Itanium) and 32-bit variants of Windows and Linux. When deciding on a specific version of an operating system, it is important to check Oracle’s MetaLink support site (http:// metalink.oracle.com) to ensure that your version of the operating system and platform is on the certified list. Oracle supports only certified versions of the operating system. For example, running Oracle on Red Hat’s Fedora Project Linux is not officially supported, but Red Hat Linux Enterprise Edition AS and ES are supported. Always verify, either through the documentation or by checking on the Certify and Availability link on MetaLink, that you are installing Oracle on a supported platform. (4.0)Optimal Flexible Architecture With the release of Oracle 8, Oracle introduced Optimal Flexible Architecture, or OFA. OFA is a method of naming mount points and directories and of organizing datafiles and database components to make it easy for a DBA to locate files and administer the database. The Oracle Universal Installer, when creating a starter database, will conform to OFA rules in the creation of that database. Furthermore, the Oracle Universal Installer will create a file and directory structure that will make compliance with OFA easy to achieve in the creation of additional databases using the Database Configuration Assistant. The Optimal Flexible Architecture was developed by Oracle’s consulting services to make the performance and monitoring of Oracle databases easier. OFA specifies that at least three sets of directories should be used to reduce contention and provide good performance. One set of directories will be used to store Oracle binary files such as the Oracle executables themselves, as well as associated support files that should normally not be changed. A second set of directories will be used to store controlfiles, redo log files, and other administrative files such as the parameter file for each database on the computer. Finally, a third set of directories will be used to store all the data files. Each set of directories should be on a separate physical hard disk, and further manual optimization may also be required to ensure good performance. While OFA is not perfect, it does provide the basis for good performance and easier administration, including: • A structured approach for locating the various files that are required and used by Oracle. This structured approach, when followed, will allow any DBA to easily become familiar with any database and server that they are asked to administer. • Easier administration of databases while performing such tasks as backing
27
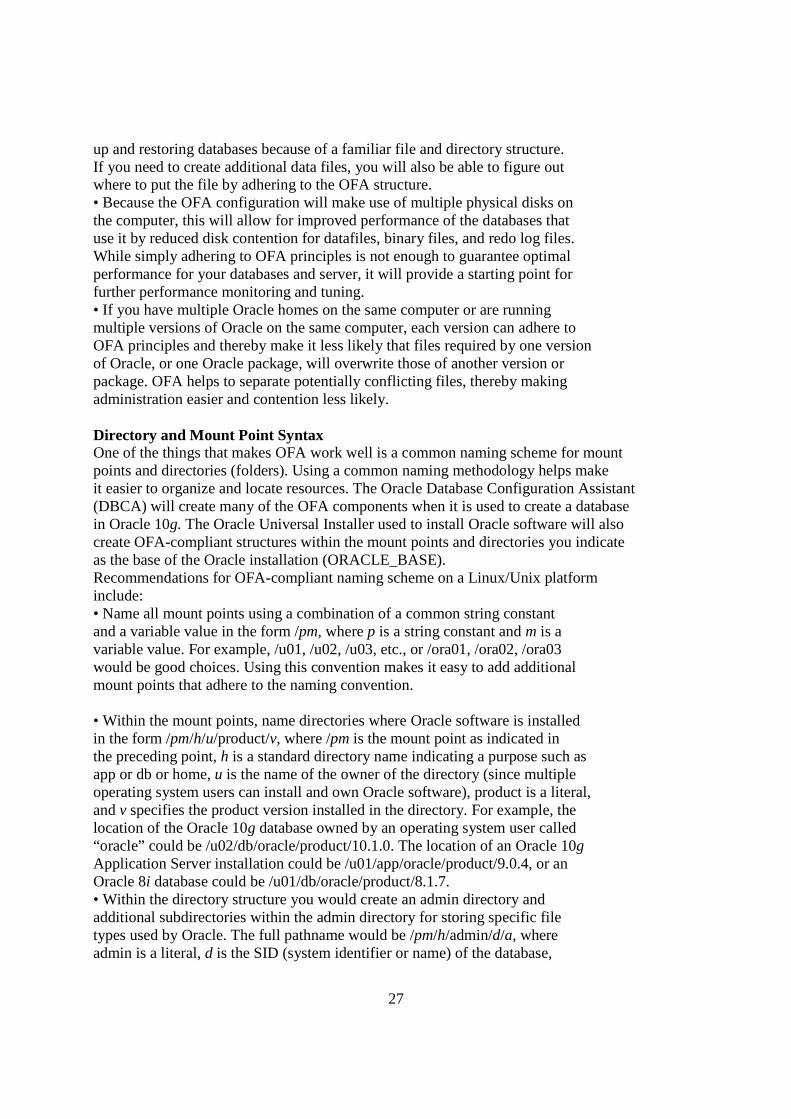
up and restoring databases because of a familiar file and directory structure. If you need to create additional data files, you will also be able to figure out where to put the file by adhering to the OFA structure. • Because the OFA configuration will make use of multiple physical disks on the computer, this will allow for improved performance of the databases that use it by reduced disk contention for datafiles, binary files, and redo log files. While simply adhering to OFA principles is not enough to guarantee optimal performance for your databases and server, it will provide a starting point for further performance monitoring and tuning. • If you have multiple Oracle homes on the same computer or are running multiple versions of Oracle on the same computer, each version can adhere to OFA principles and thereby make it less likely that files required by one version of Oracle, or one Oracle package, will overwrite those of another version or package. OFA helps to separate potentially conflicting files, thereby making administration easier and contention less likely. Directory and Mount Point Syntax One of the things that makes OFA work well is a common naming scheme for mount points and directories (folders). Using a common naming methodology helps make it easier to organize and locate resources. The Oracle Database Configuration Assistant (DBCA) will create many of the OFA components when it is used to create a database in Oracle 10g. The Oracle Universal Installer used to install Oracle software will also create OFA-compliant structures within the mount points and directories you indicate as the base of the Oracle installation (ORACLE_BASE). Recommendations for OFA-compliant naming scheme on a Linux/Unix platform include: • Name all mount points using a combination of a common string constant and a variable value in the form /pm, where p is a string constant and m is a variable value. For example, /u01, /u02, /u03, etc., or /ora01, /ora02, /ora03 would be good choices. Using this convention makes it easy to add additional mount points that adhere to the naming convention. PART I • Within the mount points, name directories where Oracle software is installed in the form /pm/h/u/product/v, where /pm is the mount point as indicated in the preceding point, h is a standard directory name indicating a purpose such as app or db or home, u is the name of the owner of the directory (since multiple operating system users can install and own Oracle software), product is a literal, and v specifies the product version installed in the directory. For example, the location of the Oracle 10g database owned by an operating system user called “oracle” could be /u02/db/oracle/product/10.1.0. The location of an Oracle 10g Application Server installation could be /u01/app/oracle/product/9.0.4, or an Oracle 8i database could be /u01/db/oracle/product/8.1.7. • Within the directory structure you would create an admin directory and additional subdirectories within the admin directory for storing specific file types used by Oracle. The full pathname would be /pm/h/admin/d/a, where admin is a literal, d is the SID (system identifier or name) of the database,

28
and a is a subdirectory for a specific administrative file type. The common administration directories are shown in Table 2-2. Subdirectory Name adhoc
Purpose Ad hoc SQL and PL/SQL scripts for the database
Example /u02/db/admin/ocp10g/adhoc
arch Location of archived redo log files
/u02/db/admin/ocp10g/arch
adump Location of audit files—need to set AUDIT_FILE_DEST parameter first
/u02/db/admin/ocp10g/adump
bdump Location of background process trace files and the alert log file. Set with the BACKGROUND_DUMP_ DEST parameter
/u02/db/admin/ocp10g/bdump
cdump Core dump file location. Set with the CORE_DUMP_DEST parameter
/u02/db/admin/ocp10g/cdump
create
Location of scripts used to create the database. DBCA places scripts in this location when you use it to create a new database
/u02/db/admin/ocp10g/create
exp Recommended location of database export files created by the Export utility or Oracle Data Pump
/u02/db/admin/ocp10g/exp
logbook Location of database history and status log files
/u02/db/admin/ocp10g/logbook
pfile
The parameter files used to start the database is placed here
/u02/db/admin/ocp10g/pfile
udump User process trace files are /u02/db/admin/ocp10g/udump

29
located here. Set with the USER_DUMP_ DEST parameter
Table 2-2 OFA-Compliant Administrative Directories and Their Contents The naming of the mount points and directories is not enforced by Oracle. Rather, it is strongly recommended that you follow the recommendations to make it easier for you to identify what is installed on your computer’s hard drive. In a Windows environment, the syntax is similar, though you could use drive letters for the mount points or mount the partition in an empty NTFS folder that serves as the base of your Oracle installation. File-Naming Syntax The final piece of a naming strategy needs to deal with the files located in the directories. For Oracle’s data files, redo log files and controlfiles, the naming strategy starts with a directory naming component—the root of your database file structure (as opposed to the admin files outlined in the preceding section). The root of the datafile structure is a directory in the form /pm/q/d, where pm is the mount point, q is a literal indicating that the directory contains Oracle database data (e.g., “oradata” or “oracle”), and d is the name of the database sourced either from the DB_NAME parameter (recommended) or the ORACLE_SID environment variable. Examples include /u03/oradata/ocp10g and /u01/ORACLE/mydb. It is possible, and quite common, to have data for a database on multiple mount points to spread the I/O workload across multiple physical disks and thereby provide better performance. For this reason, you will probably see the same directory name corresponding to a database on several mount points, such as /u02/oradata/ocp10g and /u03/oradata/ocp10g. This method can also be used to separate different Oracle database file types. These file types, and recommended naming convention are outlined in Table 2-3. File Type Purpose Naming Convention
Controlfiles
Used to store information about the database, its files, and their status.
As control.ctl or controlnn.ctl, where nn is a number (control01.ctl)
Redo log
files Store a record of changes to database data as they occur.
As redonn.log, where nn is a number (redo01.log)
Datafiles
Store database data. As tablespacenamenn.dbf, where

30
tablespacename is the name of the logical Oracle database storage structure and nn is a number (“system01.dbf” or “undo01.dbf”)
Table 2-3 Recommended Naming Conventions for Oracle Database Files An important point to remember is that only Oracle database files indicated in Table 2-3 should be stored in the OFA-compliant database file location. Storing other files makes it harder to keep track of which file is where. The administrative directory structure is used to store the other files used by an Oracle database and instance, whereas the database file location is used to store all files related to the Oracle database during normal operation—the control, redo log, and datafiles. (5.0) Installing Oracle Using the Oracle Universal Installer Now that you are familiar with OFA and have decided upon the directory structure to be used for your Oracle installation, you can get the CDs out and are almost ready to install Oracle on your computer. Because Oracle is a complex piece of software running on many different operating systems, CPU architectures, and storage systems, additional requirements will need to be verified and tasks completed in order to ensure a successful installation. Operating System Preparation One of the first things you should do before installing the Oracle database software is to read the appropriate installation guide for your operating system and platform. These can be found on the Oracle Technology Network in the product documentation section for Oracle 10g database (www.oracle.com/technology/documentation/ database10g.html). It is always a good idea to review the specific tasks that need to be performed on your environment because kernel parameters, other systems settings, and prerequisite software differ by platform. However, a couple of things are similar across all platforms. Creating the User and Groups for Oracle One of the first things you need to do before installing Oracle Database 10g is to create an operating system user and group that will own the Oracle software. The methods used depend on the operating system, but you should create at least one user (called oracle from here on in) and two groups, one to own the Oracle installation (oinstall will be used) and another to which users can be added for administering Oracle (dba is a commonly used group name). For a Linux-based computer, you could issue the following commands while
31
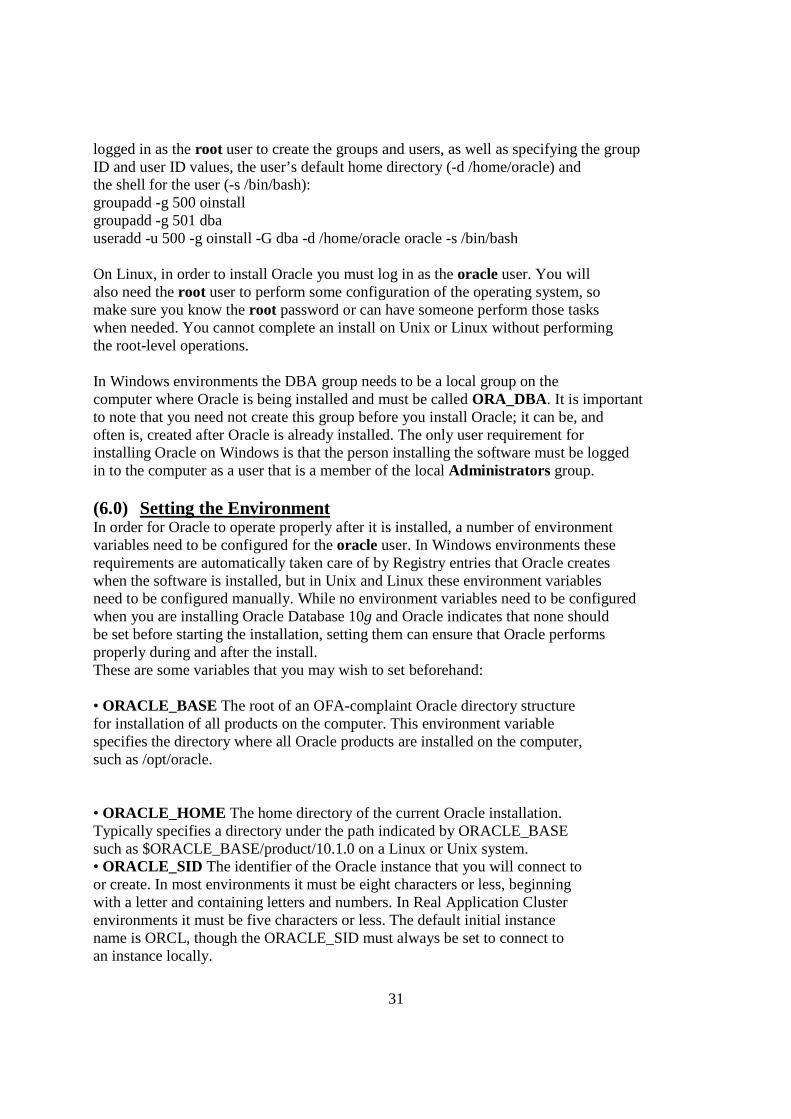
logged in as the root user to create the groups and users, as well as specifying the group ID and user ID values, the user’s default home directory (-d /home/oracle) and the shell for the user (-s /bin/bash): groupadd -g 500 oinstall groupadd -g 501 dba useradd -u 500 -g oinstall -G dba -d /home/oracle oracle -s /bin/bash On Linux, in order to install Oracle you must log in as the oracle user. You will also need the root user to perform some configuration of the operating system, so make sure you know the root password or can have someone perform those tasks when needed. You cannot complete an install on Unix or Linux without performing the root-level operations. In Windows environments the DBA group needs to be a local group on the computer where Oracle is being installed and must be called ORA_DBA. It is important to note that you need not create this group before you install Oracle; it can be, and often is, created after Oracle is already installed. The only user requirement for installing Oracle on Windows is that the person installing the software must be logged in to the computer as a user that is a member of the local Administrators group. (6.0) Setting the Environment In order for Oracle to operate properly after it is installed, a number of environment variables need to be configured for the oracle user. In Windows environments these requirements are automatically taken care of by Registry entries that Oracle creates when the software is installed, but in Unix and Linux these environment variables need to be configured manually. While no environment variables need to be configured when you are installing Oracle Database 10g and Oracle indicates that none should be set before starting the installation, setting them can ensure that Oracle performs properly during and after the install. These are some variables that you may wish to set beforehand: • ORACLE_BASE The root of an OFA-complaint Oracle directory structure for installation of all products on the computer. This environment variable specifies the directory where all Oracle products are installed on the computer, such as /opt/oracle. PART I • ORACLE_HOME The home directory of the current Oracle installation. Typically specifies a directory under the path indicated by ORACLE_BASE such as $ORACLE_BASE/product/10.1.0 on a Linux or Unix system. • ORACLE_SID The identifier of the Oracle instance that you will connect to or create. In most environments it must be eight characters or less, beginning with a letter and containing letters and numbers. In Real Application Cluster environments it must be five characters or less. The default initial instance name is ORCL, though the ORACLE_SID must always be set to connect to an instance locally.

32
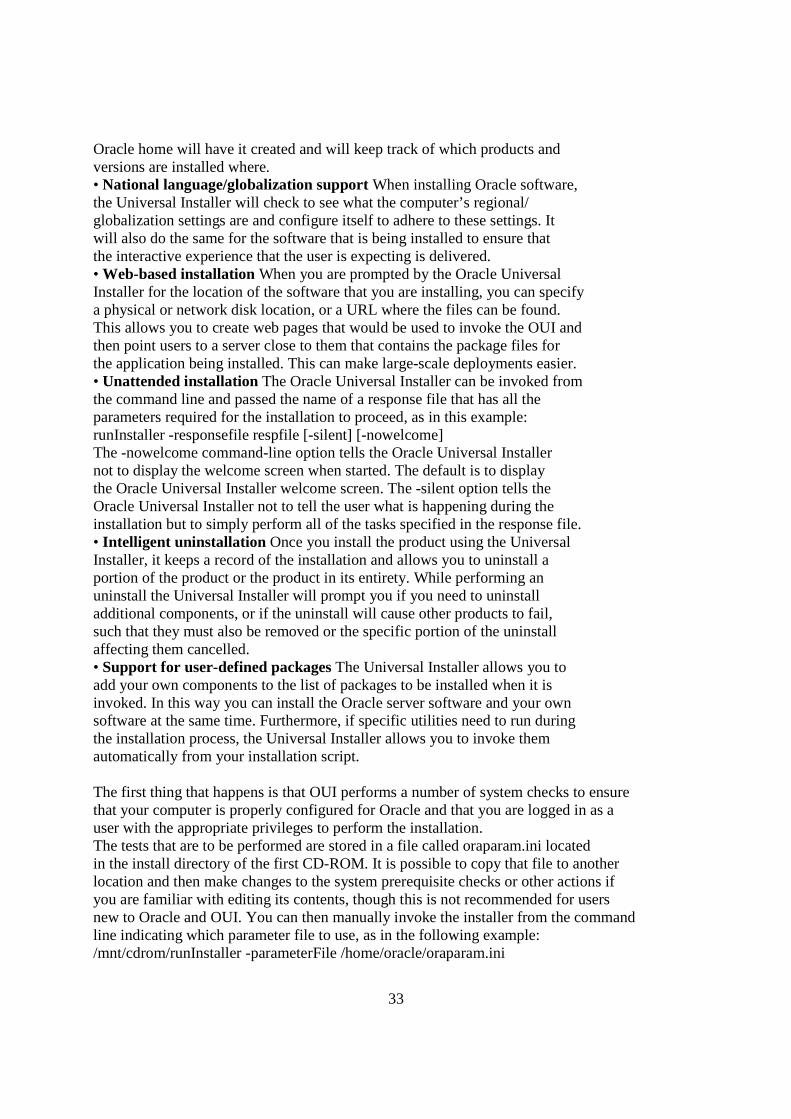
• NLS_LANG Specifies the globalization settings for the Oracle installation in the form language_territory.character_set. The default value for NLS_LANG is “American_America.US7ASCII” in all environments except Windows, where this value is set to the regional settings specified for the operating system and keyboard setting. • DISPLAY On Unix environments you need to indicate to the Oracle Universal Installer where to send graphical screen displays. The default behavior is to inherit the value of the DISPLAY environment variable from the operating system and send all output there. If you want to redirect the graphical display to an X Window terminal or some other location, you will need to set the DISPLAY environment variable in the form hostname:display, such as opus01.haunting.com:1.0. The user installing Oracle must have permissions to write to the display as well, which can be set using the xhost command in Unix-based environments. Before starting the installation of Oracle on Unix-based systems, it is a good idea to at least set the value of the ORACLE_HOME environment variable as the oracle user to tell Oracle where the software is to be installed and to create the directory path, as follows: mkdir -p /opt/oracle/product/10.1.0 ORACLE_HOME=/opt/oracle/product/10.1.0 ; export ORACLE_HOME (7.0) Installing Oracle Software Oracle is installed on all platforms by running the Oracle Universal Installer (OUI). This program is automatically invoked when you insert CD-ROM 1 of the installation media for Oracle Database 10g in the CD drive. You can also start it by issuing the runInstaller command from the CD-ROM on Unix-based systems or setup.exe from the root of the CD-ROM in Windows. The Oracle Universal Installer The Oracle Universal Installer is a Java-based application that looks and feels the same on all platforms. It includes a number of characteristics and features that facilitate a robust installation and configuration set: • Java-based design The Oracle Universal Installer is written in Java and looks and feels the same on any Oracle platform. • Dependency checking When you use OUI to install products on your computer, it will automatically check to see which other products might also need to be installed in order for your choice to function properly. The Universal Installer will then determine if the required components are already on the computer and select any it requires for installation. • Multiple Oracle home support OUI will keep track of all the Oracle home directories that exist on the target computer. Multiple Oracle homes are required if you want to install the Oracle database, Application Server, and other Oracle products and versions on the same computer. The Oracle Universal Installer will ensure that each product that requires a separate
33
Oracle home will have it created and will keep track of which products and versions are installed where. • National language/globalization support When installing Oracle software, the Universal Installer will check to see what the computer’s regional/ globalization settings are and configure itself to adhere to these settings. It will also do the same for the software that is being installed to ensure that the interactive experience that the user is expecting is delivered. • Web-based installation When you are prompted by the Oracle Universal Installer for the location of the software that you are installing, you can specify a physical or network disk location, or a URL where the files can be found. This allows you to create web pages that would be used to invoke the OUI andPART I then point users to a server close to them that contains the package files for the application being installed. This can make large-scale deployments easier. • Unattended installation The Oracle Universal Installer can be invoked from the command line and passed the name of a response file that has all the parameters required for the installation to proceed, as in this example: runInstaller -responsefile respfile [-silent] [-nowelcome] The -nowelcome command-line option tells the Oracle Universal Installer not to display the welcome screen when started. The default is to display the Oracle Universal Installer welcome screen. The -silent option tells the Oracle Universal Installer not to tell the user what is happening during the installation but to simply perform all of the tasks specified in the response file. • Intelligent uninstallation Once you install the product using the Universal Installer, it keeps a record of the installation and allows you to uninstall a portion of the product or the product in its entirety. While performing an uninstall the Universal Installer will prompt you if you need to uninstall additional components, or if the uninstall will cause other products to fail, such that they must also be removed or the specific portion of the uninstall affecting them cancelled. • Support for user-defined packages The Universal Installer allows you to add your own components to the list of packages to be installed when it is invoked. In this way you can install the Oracle server software and your own software at the same time. Furthermore, if specific utilities need to run during the installation process, the Universal Installer allows you to invoke them automatically from your installation script. The first thing that happens is that OUI performs a number of system checks to ensure that your computer is properly configured for Oracle and that you are logged in as a user with the appropriate privileges to perform the installation. The tests that are to be performed are stored in a file called oraparam.ini located in the install directory of the first CD-ROM. It is possible to copy that file to another location and then make changes to the system prerequisite checks or other actions if you are familiar with editing its contents, though this is not recommended for users new to Oracle and OUI. You can then manually invoke the installer from the command line indicating which parameter file to use, as in the following example: /mnt/cdrom/runInstaller -parameterFile /home/oracle/oraparam.ini

34
If you do not want the Oracle Universal Installer to perform any system checks, you can invoke it with the following command line: /mnt/cdrom/runInstaller -ignoreSysPrereqs In both of these examples /mnt/cdrom is the path to the CD-ROM root in a Red Hat Linux environment, and all commands and parameters are case sensitive. If you are installing Oracle on a Unix-based system, you will next be asked to provide the location of the Oracle installation inventory used by the Oracle Universal Installer to keep track of the Oracle products installed on the computer, as well as the operating system group to be used to install Oracle products—the oinstall group referred to earlier. The default location for the inventory is $ORACLE_BASE/ oraInventory if the ORACLE_BASE environment variable is set; otherwise, anotherPART I location will be indicated. Specify the inventory path and Oracle installation group and then click Next to continue. NOTE Unix and Linux will be used interchangeably in this book. You should assume that when one is mentioned, both are included. 1. Log on to your computer as the oracle user (on Linux) or a user that is a member of the Administrators group on Windows. 2. Insert the Oracle Database 10g CD-ROM in the CD-ROM drive. The install program should start automatically. If not, execute setup.exe (Windows) or runInstaller from the root of the CD drive to invoke it. 3. If you are on Windows, choose the Advanced Installation option and click Next; for Linux click Next on the Welcome screen. 4. If you are installing on Linux, you will be asked to confirm the location of the inventory directory and the install group. Verify the information presented and click Next. 5. If you are installing on Linux and are asked to run a script as root, launch a new terminal window and run the script and then click Continue. 6. Verify the source and destination file locations in the Specify File Locations screen. Enter a name for the Oracle home (16 characters or less) and then click Next. 7. When prompted for the edition of Oracle to install, choose Enterprise Edition and then click Next. 8. The Oracle Universal Installer will perform prerequisite checks. If there are any errors, correct them and then click Next. 9. On the Select Database Configuration screen select a General Purpose starter database and then click Next. 10. Enter a database name and SID. Choose a database name in the format database.domain such as orcl.haunting.com and a SID name of ORCL. Leave the character set and other choices as is and click Next to continue. 11. When prompted whether to use the Database Control or Grid Control to manage the database, select Database Control and click Next. 12. On the File Storage Option screen, choose File System as the storage type and a path for the datafiles, or leave the default and click Next. PART I 13. On the Backup and Recovery screen leave the default of no backups and

35
click Next. 14. Select “Use the same password for all accounts” on the following screen and enter and confirm a password you will easily remember, such as “oracle.” Then click Next. 15. Verify the installation parameters on the Summary screen and then click Install to begin the installation of Oracle Database 10g. 16. Monitor the installation on the following screen and then review activity as the configuration assistants are launched. This may take some time to complete. Acknowledge the completion of the Database Configuration Assistant by clicking OK on the dialog box presented and then review the information on ports configured. Click Exit to end the Oracle Universal Installer. 17. Start your web browser and navigate to http://localhost:5500/em to connect to the Enterprise Manager web site. Enter a username of SYSTEM with the password you specified in Step 14 and then click Login, acknowledge the licensing screen by clicking “I Agree” to display the EM web site for your database. 18. Close your browser. Congratulations—you have successfully installed Oracle Database 10g on your computer. (8.0) SUMMARY Oracle Database 10g can be installed on many platforms, including Windows, Linux, and several varieties of Unix, as well as others. The Oracle Universal Installer is used to perform the installation and provides a similar interface on all Oracle platforms. Before installing Oracle, you will need to ensure your target computer and operating system satisfy the prerequisites, as well as perform some preconfiguration tasks. Optimal Flexible Architecture is a set of standard directory and file naming conventions, as well as directory structures to make management of Oracle databases easier. Though using an OFA-compliant directory and file naming method is not enforced, it is strongly recommended to make your life easier. Oracle Database 10g software is available in several editions, with Enterprise Edition providing all of the features and functions, while Standard Edition lacks some of the more advanced features such as Oracle OLAP and high-availability architecture. Even though you have purchased the Enterprise Edition, you may not be licensed to use the additional-cost features, such as Oracle Advanced Security, Oracle Partitioning, or Oracle Data Mining. (9.0) TUTOR MARKED ASSIGNMENT 1. You are asked to describe the benefits of the Oracle Universal Installer to your manager. Which of the following are key features of OUI? (Choose all correct answers.) PART I A. OUI performs identically on all platforms on which Oracle runs. B. Web-based deployments can be performed using OUI. C. OUI is written using a .NET-based language ideal for Windows platforms. D. OUI is a text-based application not requiring a graphical display.

36
E. Unattended installations can be performed using OUI. 2. The oratab file contains the following information. (Choose two correct answers.) A. A list of all Oracle products installed on the computer B. A list of all database instances and Oracle homes installed on the computer C. Version-specific information about each Oracle product and database on the computer D. Startup information for database instances on the computer E. Information to help Enterprise Manager manage Oracle databases on the computer 3. When installing Oracle on Unix-based systems, which of the following must you create before starting the installation? (Choose three correct answers.) A. The root user account B. The oracle user account C. The oracle group account D. The oinstall user account E. The oinstall group account F. The dba group account 4. Installing Oracle on a Windows computer requires that you be logged in as whom? (Choose the best answer.) A. The oracle user B. A user that is a member of the Domain Admins group C. A user that is a member of the oinstall group D. A user that is a member of the local Administrators group E. Any user with login privileges on the computer 5. Which of the following environment variables must be set on Unix-based computers before starting to install Oracle software? (Choose all correct answers.) A. ORACLE_HOME B. ORACLE_BASE C. ORACLE_SID D. LD_LIBRARY_PATH E. All of the above F. None of the above 6. When deciding between Enterprise Edition and Standard Edition of Oracle software, which of the following needed features would require that you purchase and install Enterprise Edition? (Choose two correct answers.) A. Real Application Clusters B. N-tier authentication C. Support of multiple CPUs on the server platform D. Oracle Enterprise Manager Database Control E. The ability to partition data in the database 7. Which of the following paths are consistent with Optimal Flexible Architecture? (Choose all correct answers.) A. /opt/oracle/ocsdb

37
B. /opt/oracle/product/10.1.0/ocsdb C. /opt/oracle/admin/ocsdb/bdump D. /oracle/mydb E. /opt/oracle/admin/bdump 8. You are deciding on whether or not to implement Optimal Flexible Architecture for your Oracle installation. What are some of the considerations in favor of using OFA? (Choose all correct answers.) A. It provides a standardized directory structure, making files easier to find. B. It provides a standardized naming convention for Oracle executable files. C. It automatically spreads Oracle files across multiple disks when creating a new database using a standard directory structure. D. It makes all Oracle installations appear similar, reducing learning curves for database administration of many servers. E. It is required by Oracle. 9. You are installing Oracle Database 10g on a computer with the Red Hat Enterprise Linux ES 4 operating system. You are certain that the Oracle Universal Installer system check will fail on this operating system, but you want to install Oracle anyway. How would you invoke the OUI and force it not to perform system checks? (Choose the best answer.) A. setup -ignorePreReqs B. setup -ignorePrereqs C. runInstaller -ignoreSysPrereqs D. runInstaller -ignoreSysprereqs E. runInstaller -bypassPrereqs F. setup -bypassPrereqs PART I 10. If you wanted to modify the file used by the Oracle Universal Installer with system prerequisite information, which file would you modify? (Choose the best answer.) A. oraparam.ini B. oraparam.ora C. oraparam.ins D. sysprereqs.ini E. sysprereqs.ora F. sysprereqs.ins (10) FUTHER READING/REFERENCES
1 Installation centos; official Oracle Wiki". Wiki.oracle.com. Retrieved 2009-12-19.
2.Installation on Debian-based systems; official Oracle Wiki". Wiki.oracle.com. Retrieved
2009-12-19.

38
3.0 Rick Greenwald and Robert Hoskin , Oracle Power Objects , 1997 O’Reilly and Associates Inc.

39
MODULE 1: INTRODUCTION TO ORACLE APPLICATION
UNIT 3: Creating an Oracle Database and architecture
Page
1.0 Introduction 2
2.0 Objectives 2
3.0 Architecture of the Oracle Server 2
5.0 The Instance: Memory Structures and Processes 3
5.0. The Database: Physical Structures
6.0 Logical Structures: Tablespaces and Segments
7.0 The Data Dictionary
8.0 Management Tools 11
9.0 External Files
10.0 Creating a Database
11.0 Summary 16
12.0 Tutor Marked Assignment 16
13.0 Further Reading/Reference 16
1.0 INTRODUCTION
40
This unit goes through the theory and practice of creating a database: a review of
the Oracle server architecture, followed by the mechanics of database creation with a look at the relevant tools, both GUI and command line, and the management options. But one immediate objective is to demystify the process. Creating a database is not a big deal. You can create twenty databases during a tea break (and you may well have to do this if you are, for example, supporting an IT teaching institution) once you understand what is required and have prepared appropriate scripts. Furthermore, do not worry about getting it right. Hardly anything is fixed at database creation time. It certainly makes sense to think about how your database will be structured, its purpose and environment, at creation time, but (with one exception) everything can be changed afterward. As a general rule, keep things as simple as possible at this stage. Get the thing created and working first, worry about configuring it for use later. 2.0 OBJECTIVES In this unit you will learn how to • Create an Oracle database • Explain the Oracle database architecture • Explain the instance architecture • Use the management framework • Use DBCA to create a database • Use DBCA to configure a database • Use DBCA to drop a database • Use DBCA to manage templates 3.0 Architecture of the Oracle Server An Oracle server consists of two entities: the instance and the database (as shown in Figure 3-1). They are separate, but connected. During the creation process, the instance is created first, and then the database. In a typical single instance environment the relationship of instance to database is one-to-one, a single instance connected to a single database, but always bear in mind that the relationship may be many-to-one: multiple instances on different computers opening a common database on a shared disk system. This is known as Real Application Clusters, or RAC. RAC gives amazing capabilities for performance, fault tolerance, and scalability (and possibly cost savings) and is integral to the Oracle’s concept of the grid. With previous releases RAC (or its precursor, Oracle Parallel Server) was an expensive add-on, but with Database release 10g Standard Edition, RAC is bundled. This is an indication of how much Oracle Corporation

41
PART I wants to push users toward the RAC environment. Standard Edition RAC is limited to computers with no more than two CPUs, and a maximum of four computers in the cluster, but even that gives access to a phenomenally powerful environment. RAC is an extra cost option for the Enterprise Edition, where the scalability becomes effectively limitless: bounded only by the capacities of the underlying operating system and hardware. It is also possible for one instance, through database links, to connect to multiple databases. For the most part, you will be dealing with the most common environment in this book: one instance on one computer, opening a database stored on local disks. The instance consists of memory structures and processes. Its existence is transient, in your RAM and on your CPU(s). The database consists of physical files, on disk. Thus the lifetime of the instance is only as long as it exists in memory—it can be started and stopped. By contrast, the database, once created, persists indefinitely— until you deliberately delete the files that compose it. Within the physical structures of the database, which our system administrators see, are the logical structures that our end users (developers, business analysts, data warehouse architects, etc.) see. The Oracle architecture guarantees abstraction of the logical from the physical: there is no way that a programmer can determine where, physically, a bit of data is located. He/she addresses only logical structures, such as tables. Similarly, it is impossible for a system administrator to know what bits of data are in any physical structure: all he can see is the operating system files, not what is within them. Only you, the database administrator, is permitted (and required) to see both sides of the story. The data dictionary, which contains metadata describing the whole server, manages the relationship between physical and logical structures. Creating the data dictionary is an integral part of database creation. The final stages of the creation process make the newly created database usable, by generating various views and PL/SQL packages, and manageable, by generating the Enterprise Manager Database Control facility. 4.0 The Instance: Memory Structures and Processes
42
An Oracle instance consists of a block of shared memory known as the System Global Area, or SGA, and a number of processes. At a minimum, the SGA will contain three data structures: the shared pool, the database buffer cache, and the log buffer. It may, optionally, also contain a large pool, a Java pool, and a streams pool. Some of these SGA structures are fixed in size when you start the instance; others can be changed dynamically. But none are fixed at database creation time: you can stop the instance and restart it whenever you please, with a totally different memory configuration. You should remember, though, that if you are continually making memory configuration changes on a live system and those changes are of a type that requires the instance to be shut down, incurring downtime, your end users will not be happy with you. The shared pool is further subdivided into a number of other structures. This book will only briefly mention two of the shared pool components: the library cache and the data dictionary cache. The library cache is a memory area for storing recently executed code, in its parsed form. Parsing is the conversion of code written by programmers into something executable, and it is a slow process that Oracle does on demand. By caching parsed code in the shared pool so that it can be reused without reparsing, performance can be greatly improved. The data dictionary cache stores recently used object definitions: descriptions of tables, indexes, users, and other metadata definitions. Keeping such definitions in memory, rather than having to read them repeatedly from the data dictionary on disk, enhances performance. The database buffer cache is Oracle’s work area for executing SQL. Users don’t ever update data on disk. They copy data into the database buffer cache and update it there, in memory. Ideally, all the data that is frequently accessed will be in the database buffer cache, therefore minimizing the need for disk I/O. The log buffer is a very small memory structure used as a short-term staging area for all changes that are applied to data in the database buffer cache. Chapter 9 will describe in detail how the log buffer and the database buffer cache are used when SQL statements retrieve and manipulate data. The large pool is an optional area that, if created, will be used automatically by various processes that would otherwise take memory from the shared pool. You will be introduced to one of its main uses in Chapter 13 in the discussion on shared (or multithreaded) servers. The Recovery Manager, RMAN, covered in later chapters, will also use the large pool for its disk and tape I/O slave processes. The Java pool is required only if your application is going to run Java stored procedures within the database: it is used for the heap space needed to instantiate the Java objects. However, a number of Oracle options are written in Java, so the Java pool is considered standard nowadays. The streams pool is used by Oracle streams, an advanced tool that is beyond the scope of the exam or this book. Along with its SGA, the instance will also have, at a minimum, five processes: the system monitor, SMON; the process monitor, PMON; the database writer, DBWn (you may have up to ten of these); the log writer, LGWR; and the checkpoint process, CKPT. These are known as “background” processes, because they always exist while the instance is running, whether or not any sessions are actually logged onto the instance, or indeed even if a database has not yet been created or opened. SMON’s major function is opening the database: enabling the connection between

43
the instance and a database. Chapter 5 will detail how it does this. During normal running, it carries out a number of monitoring and tidying-up operations. PMON looks after user sessions, taking appropriate action if a session gets into trouble. For instance, if a user’s PC reboots while the user is logged on to the database, PMON will detect this and tidy up whatever work the user had in progress. The DBWn process or processes (by default, an instance will have one database writer per eight CPUs) is responsible for all writing to datafiles. Remember, no sessions ever update data on disk; they update only data in the database buffer cache: all updates are then funneled through the DBWn to disk. In general, DBWn writes as little and as rarely as possible. The assumption is that disk I/O is bad for performance, so Oracle keeps it to a minimum. The LGWR propagates all changes applied to data in the database buffer cache to the online redo log files on disk. In contrast with DBWn, this disk write activity is done as near as possible in real time—and when you issue the COMMIT statement, it really is done in real time: it immediately flushes the changes from their small and temporary staging area, the log buffer in the SGA, to the online redo log files on disk. This is to ensure that all users’ work is saved so that, in the event of damage to the database’s datafiles, the changes can be applied to a restored backup. In this manner (as is covered in later chapters), Oracle can guarantee that data will never be lost. The CKPT process is responsible for ensuring that, from time to time, the instance is synchronized with the database. In principle, the database is always out of date: there will be changes that have been applied in memory that have not yet been written to the datafiles by DBWn (though the changes themselves will have been streamed out to the online redo log files by LGWR as they happen). There are occasions when it is necessary to force a write of all changed data from the database buffer cache to the datafiles, to bring the database right up-to-date. The CKPT process controls the frequency of this. There are also a number of optional background processes (far more with 10g than with previous releases), some of which you will see in later chapters. Some of the background processes can be tuned. For example, you can decide how many database writer processes to launch, and you can (to a certain extent) control how frequently they will write changed data bocks from the database buffer cache to the datafiles. You do not need to consider this at database creation time: you can sort such things out later, always bearing in mind that some changes will require downtime. 5.0 The Database: Physical Structures Three file types make up an Oracle database, along with a few others that exist externally to the database and, strictly speaking, are optional. The required files are the controlfiles, the online redo log files, and the datafiles. The external files are the initialization parameter file, the password file, and archived redo log files. Every database has one controlfile, but a good DBA will always create multiple copies of the controlfile so that if one copy is damaged, the database itself will survive. If all copies of the controlfile are lost, it is possible (though perhaps awkward) to recover, but you should never find yourself in that situation. You don’t have to worry about keeping multiplexed copies of the controlfile synchronized—Oracle will take care of that. The controlfile is small, but vital. It contains pointers to the rest of the database:

44
the locations of the online redo log files and of the datafiles. It also stores information required to maintain database integrity: various critical sequence numbers and timestamps, for example. If you use the Recovery Manager, RMAN, then some backup information will also be stored in the controlfile. The controlfile will usually be no more than a few megabytes big, but you can’t survive without it. Its maintenance is automatic; your only control is how many copies to have, and where to put them. If you get the number of copies, or their location, wrong at creation time, you can add or remove copies later, or move them around—but you should bear in mind that any such operations will require downtime. Every database has at least two online redo log files, but as with the controlfile, a good DBA creates multiple copies of each online redo log file. The online redo logs store a continuous chain in chronological order of every change applied to the database. This will be the bare minimum of information required to reconstruct, or redo, changes. The redo log consists of groups of redo log files, each file being known as a member. Oracle requires at least two groups of at least one member each to function. You may create more than two groups for performance reasons, and more than one member per group for safety. The requirement for a minimum of two groups is in order that one group can accept the current changes while the other group is being backed up (or “archived,” to use the correct term). One of the groups is the “current” group: changes are written to the current logfile group by LGWR. As user sessions update data in the database buffer cache, they also write out the minimal changes to the redo log buffer. LGWR continually flushes this buffer to the current online log group. Redo log files are fixed size; therefore, eventually the file members making up the current group will fill. LGWR will then perform what is called a log switch. It makes the second group current, and starts writing to that. If your database is configured appropriately, you will then archive (back up) the logfile members making up the first group. When the second group fills, LGWR will switch back to the first group, making it current, and overwriting it. Thus, the online redo log groups (and therefore the members making them up) are used in a circular fashion. As with the controlfile, if you have multiple members per group (and you should!) you don’t have to worry about keeping them synchronized. LGWR will ensure that it writes to all of them, in parallel, thus keeping them identical. If you lose one member of a group, as long as you have a surviving member, the database will continue to function. The size and number of your online redo log file groups is a matter of tuning. In general, you will choose a size appropriate to the amount of activity you anticipate. A very busy database will require larger members than a largely static database. The number of members per group will depend on what level of fault tolerance is deemed appropriate. However, you don’t have to worry about this at database creation time. PART I You can move your online redo log files around, add or drop them, and create ones of different sizes as you please at any time later on. Such operations are performed “online” and don’t require downtime; therefore, they are transparent to the end users. The third file type making up a database is the datafile. At a minimum, you must have two datafiles, to be created at database creation time. With previous releases of Oracle, you could create a database with only one datafile—10g requires two. You will,

45
however, have many more than that when your database goes live, and you will usually create a few more to begin with. Datafiles are the repository for data. Their sizes and number are effectively unlimited. A small database, of only a few gigabytes, might have just half a dozen datafiles of only a few hundred megabytes each. A larger database could have thousands of datafiles, whose size is limited only by the capabilities of the host operating system and hardware. The datafiles are the physical structures visible to the system administrators. Logically, they are the repository for the segments containing user data that the programmers see, and also for the segments that make up the data dictionary. Datafiles can be renamed, resized, moved, added, or dropped at any time in the lifetime of the database, but remember that some operations on some datafiles may require downtime. 6.0 Logical Structures: Tablespaces and Segments The physical structures that make up a database are visible as operating system files to your system administrators. Your users see logical structures such as tables. Oracle uses the term “segment” to describe any structure that contains data. Your typical segment is a table, containing rows of data, but there are more than a dozen possible segment types in an Oracle database. Of particular interest (for exam purposes) are table segments, index segments, and undo segments, all of which are investigated in detail in later chapters. For now, you don’t need to know more than that tables contain rows of information; that indexes are a mechanism for giving fast access to any particular row; and that undo segments are data structures used for storing information that might be needed to reverse, or roll back, any transactions that you do not wish to make permanent. System administrators see physical datafiles; programmers see logical segments. Oracle abstracts the logical storage from the physical storage by means of the tablespace. A tablespace is logically a collection of one or more segments, and physically a collection of one or more datafiles. Put in terms of relational analysis, there is a many-to-many relationship between segments and datafiles: one table may be cut across many datafiles; one datafile may contain bits of many tables. By inserting the tablespace entity between the segments and the files, Oracle resolves this many-to-many relationship. A number of segments must be created at database creation time: these are the segments that make up the data dictionary. These segments are stored in two tablespaces, called SYSTEM and SYSAUX. The SYSAUX tablespace is new with 10g: in previous releases, the whole of the data dictionary went into SYSTEM. The database creation process must create at least these two tablespaces, with at least one datafile each, to store the data dictionary. 7.0The Data Dictionary The data dictionary is metadata: data about data. It describes the database, both physically and logically, and its contents. User definitions, security information, integrity constraints, and (with release 10g) performance monitoring information are all part of the data dictionary. It is stored as a set of segments in the SYSTEM and SYSAUX tablespaces. In many ways, the segments that make up the data dictionary are segments like

46
any other: just tables and indexes. The critical difference is that the data dictionary tables are generated at database creation time, and you are not allowed to access them directly. There is nothing to stop an inquisitive DBA from investigating the data dictionary directly, but if you do any updates to it, you may cause irreparable damage to your database, and certainly Oracle Corporation will not support you. Creating a data dictionary is part of the database creation process. It is maintained subsequently by data definition language commands. When you issue the CREATE TABLE command, you are in fact inserting rows into data dictionary tables, as you are with commands such as CREATE USER or GRANT. To query the dictionary, Oracle provides a set of views. The views come in three forms, prefixed DBA_, ALL_, or USER_. Most of the views come in all three forms. Any view prefixed USER_ will be populated with rows describing objects owned by the user querying the view, so no two people will see the same contents. If user SCOTT queries USER_TABLES, he will see information about his tables; if you query USER_ TABLES, you will see information about your tables. Any view prefixed ALL_ will be populated with rows describing objects to which you have access. Thus ALL_TABLES will contain rows describing your own tables, plus rows describing tables belonging to anyone else that you have been given permission to see. Any view prefixed DBA_ will have rows for every object in the database, so DBA_TABLES will have one row for every table in the database, no matter who created it. These views are created as part of the database creation process, along with a large number of PL/SQL packages that are provided by Oracle to assist database administrators in managing the database and programmers in developing applications. PL/SQL code is also stored in the data dictionary. PART I 8.0 Management Tools Oracle database 10g provides two management environments: Enterprise Manager Database Control and Enterprise Manager Grid Control. Both are optional, but Oracle strongly advises you to use one or the other. Grid control is more complicated, and more capable. To use Grid Control, you must have already installed it somewhere on your network and installed the Grid Control Management agent on the computer where you are creating the database. You are going to create Database Control in this exercise, which is implemented as a set of tables and procedures within the database, generated at database creation time. Throughout this book, and for the purposes of the exam, Database Control is the tool to be used. Grid Control is undoubtedly more powerful, but it is not necessary in a straightforward environment; it also has licensing implications. There are also numerous third-party products you can buy (and a few that you can download free of charge) to assist you in managing the Oracle environment. By all means investigate these, but Enterprise Manager in one of its two forms is Oracle’s approved tool. 9.0 External Files The remaining topic to cover before creating a database is the three file types that exist externally to the database: the parameter file, the password file, and the archive log files. The parameter file defines the instance. You already know that an instance consists

47
of memory structures and processes. The instance parameters specified in the parameter file control, among other things, how big the various memory structures should be, and how the background processes will behave. They also set certain limits, such as how many user sessions are permitted to log on to the instance concurrently. There are defaults for all parameters except one: DB_NAME, the name of the database to which the instance will connect. With this exception it is possible to start an instance relying totally on defaults, but such an instance will be useless for any practical purpose. Many parameters are dynamic, meaning that their values can be changed while the instance is running and the database is open, but some are fixed at instance startup. With one exception, all parameters can be changed subsequent to database creation by closing the database, shutting down the instance, editing the parameter file, and starting up again. The one exception is DB_BLOCK_SIZE, more on which later. You must create a parameter file and use it to build an instance in memory before creating a database. There are two types of parameter files: the old-fashioned static parameter file (usually called init/SID/.ora, where /SID/ is the name of the instance) and the dynamic parameter file introduced with release 9i (called spfileSID.ora). A static parameter file is a simple text file that you create and edit with any ASCII editor you please, typically Notepad on Windows, or vi on Unix. It is read only once by the instance, at startup time. The dynamic parameter file is a binary file that is maintained and edited by Oracle itself, in response to commands you issue. The password file causes much confusion in the Oracle world, particularly among computer auditors who do not understand its purpose. The problem it addresses is how to authenticate a user when the database is not open, or indeed before the database has even been created or an instance started. Users are nothing more than rows in a table in the data dictionary. You can see them and their encrypted passwords by querying the data dictionary view DBA_USERS. When you create a user, as you will in Chapter 7, you are simply inserting rows into the data dictionary. Now, it is a simple fact in the Oracle environment that if you have the privileges that let you start an instance and subsequently open or create a database, you can do absolutely anything within that database. It is therefore vitally important that Oracle should authenticate you, before letting you connect as such a user. But if the database is not already created and open, how can Oracle query the data dictionary to validate your username and password, and thus work out who you are and what you are allowed to do? To resolve this paradox, Oracle has provided two means of authentication that are not data dictionary based and therefore do not require the database to be open, or even to exist. These are operating system authentication and password file authentication. For operating system authentication, Oracle delegates responsibility for identifying a user to the host operating system. At installation time (not database creation time!) you specified an operating system group name that would own the Oracle software, defaulting to dba on Unix, ORA_DBA on Windows. If you are logged on to the computer hosting the Oracle installation as a member of that group, then you will be allowed to connect (using appropriate syntax) to an instance, start it up, and open or create a database without any username/password prompt. Clearly, this relies totally on your operating system being secure, which it should be: that is out of Oracle’s control and relies on decent system administration. But this mechanism can’t work if you are

48
connecting to the instance remotely, across a network: you will never actually log on to the operating system of the machine hosting the Oracle server, only to the machine where you are working. This is where the password file comes in: it is an operating system file, with usernames and passwords encrypted within it, that exists independently of the database. Using appropriate syntax, you can connect to an instance, respond to a prompt with a username/password combination that exists in the password file, start the instance, and open an existing database or create a new one. If you do not need to start the instance and open the database across a network but you can always log on to the computer hosting the Oracle installation, then a password file is not strictly necessary because you can use operating system authentication instead. However, for practical purposes, you will always have one. PART I Archive log files will be dealt with in detail in later chapters. They are copies of filled online redo log files: as the online logs are filled with changes, they should be copied to one or more destinations as archived logs, thus giving you a complete history of all changes applied to the database. While it is not an Oracle requirement to archive your online redo logs, in virtually all live installations it will certainly be a business requirement, as it is the archive logs that guarantee the impossibility of losing data. 10.0 Creating a Database To create a database, there are a number of steps that must be followed in the correct order: 1. Create a parameter file and a password file. 2. Use the parameter file to build an instance in memory. 3. Issue the CREATE DATABASE command. This will generate, at a minimum, a controlfile; two online redo log files; two datafiles for the SYSTEM and SYSAUX tablespaces, and a data dictionary. 4. Run SQL scripts to generate the data dictionary views and the supplied PL/SQL packages. 5. Run SQL scripts to generate Enterprise Manager Database Control, along with any options (such as Java) that the database will require. On Windows systems, there is an additional step because Oracle runs as a Windows service. Oracle provides a utility, ORADIM.EXE, to assist you in creating this service. These steps can be executed interactively from the SQL*Plus prompt or through a GUI tool, the Database Configuration Assistant (DBCA). Alternatively, you can automate the process by using scripts or a DBCA response file. Whatever platform you are running on, the easiest way to create a database is through the DBCA. You may well have run this as part of the installation. It will give you prompts that walk you through the whole process. It first creates a parameter file and a password file, and then it generates scripts that will start the instance, create the database, and generate the data dictionary, the data dictionary views, and Enterprise Manager Database Control. Alternatively, you can create the parameter file and the password file by hand and then do the rest from a SQL*Plus session. Many DBAs combine the two techniques: they use DBCA to generate the files and scripts and then look at them and perhaps edit them before running them from SQL*Plus.

49
DBCA is written in Java; it is therefore the same on all platforms. The only variation is that on Microsoft Windows you must be sitting in front of the machine where you are running it, because that is where the DBCA windows will open. On Unix, you run DBCA on the machine where you wish to create the database, but you can launch and control it from any machine that has an X server to display the DBCA windows. This is standard for the X Window System: you set an environment variable DISPLAY to tell the program where to send the windows it opens. For example, export DISPLAY=10.10.10.65:0.0 will redirect all X windows to the machine identified by IP address 10.10.10.65, no matter which machine you are actually running DBCA on. Exercise 3-1: Creating a Database with Database Configuration Assistant In this exercise, you will first use DBCA to create a database and then inspect and interpret the scripts that it generates. 1. Log on to your computer as a member of the group that owns the Oracle software. By default, this will be the group dba on Unix, ORA_DBA on Windows. 2. Confirm that your ORACLE_HOME is set to point to the directory where your software is installed. On Unix, run echo $ORACLE_HOME On Windows, it will be the registry variable that was set at installation time. 3. Confirm that your search path includes the directory bin within your Oracle home. On Unix, display your search path with echo $PATH On Windows, echo %PATH% One additional required variable for Unix is DISPLAY. This must point to the terminal on which you are working. Show it with echo $DISPLAY. If you are working on the machine where you want to create the database, a suitable setting might be export DISPLAY=127.0.0.1:0.0 4. Launch DBCA. On Unix it is called dbca; on Windows it is dbca.bat. It is located in your ORACLE_HOME/bin directory, which must be in your search path. 5. Respond to the prompts as follows: a. At the prompt “Select the operation you wish to perform,” type Create a database and click Next. b. At the prompt “Select a template,” type Custom database and click Next. c. Type ocp10g for both the Global database name and the SID, and then click Next. d. Select the checkboxes for “Configure the database with enterprise manager” and “Use database control for database management,” but not the checkbox for “Use grid control for database management,” and click Next. e. Do not select the checkboxes for “Enable email notification” or “Enable daily backup.” Click Next.

50
f. Select the checkbox for “Use the same password for all accounts” and enter the password as ORACLE. Enter it again to confirm, and click Next. g. Select “file system” as the storage mechanism, and click Next. h. Select “Use file locations from template” as the location for the database files, and click Next. i. Select the checkbox for “Specify flash recovery area” but not the checkbox for “Enable archiving,” and click Next. j. De-select the checkboxes for “Oracle text,” “Oracle OLAP,” and “Oracle spatial.” Select the check box for “Enterprise Manager Repository.” In “Standard Database Components,” de-select everything. Click Next. k. Leave the Memory, Sizing, Character Sets, and Connection Mode on defaults, and click Next. l. Leave the Database Storage on defaults, and click Next. . Select the check boxes for “Create database” and “Generate database creation scripts,” de-select the checkbox for “Save as a database template.” Click Next. The final screen shows the details of the instance and the database that will be created. Depending on the speed of your computer, creation as suggested in this exercise (excluding all options) may take from fifteen to forty minutes. DBCA Additional Functions The opening screen of DBCA gives you four options: • Create A Database • Configure Database OptionsRT I • Delete A Database • Manage Templates Configure Database Options helps you change the configuration of a database you have already created. In Exercise 3-1, you de-selected all the options; this was to make the creation as quick and simple as possible. . If you decide subsequently to install some optional features, such as Java or OLAP, running DBCA again is the simplest way to do it. An alternative method is to run the scripts to install the options by hand, but these are not always fully documented and it is possible to make mistakes; DBCA is better. The Delete A Database radio button will prompt you for which database you wish to delete, and then give you one more chance to back out before it deletes all the files that make up the database and (for a Windows system) invokes ORADIM.EXE to delete the service as well. Finally, you manage templates to store database definitions for use later. Remember that in the exercise, you chose to create a “custom” database. A custom database is not preconfigured; you chose it in order to see all the possibilities as you worked your way through DBCA. But apart from “custom,” there were options for “data warehouse,” “general purpose,” and “transaction processing.” If you take any of these, you’ll be presented with an abbreviated version of the DBCA prompts that will create a database with different defaults, at least partly optimized for decision support systems (DSS, the data warehouse option), online transaction processing systems (OLTP, the transaction processing option), or mixed workload (the general purpose option). The final question
51
when you created your database gave you the possibility of saving it as a template, that is, not to create it at all, but to save the definition for future use. DBCA will let you manage templates, either the presupplied ones or ones you create yourself, by copying, modifying, or deleting them. Templates can be extremely useful if you are in a position where you are frequently creating and re-creating databases that are very similar. 11.0 SUMMARY This chapter began with a detailed description of the Oracle server architecture. A thorough understanding of this is essential for further progress. You must be familiar with the elements that make up an instance and a database: the memory structures, the processes, and the file types. Then there was a brief look at the purpose and contents of the data dictionary, and a brief discussion of the logical storage of segments within tablespaces. Finally you used the DBCA to create a database, and you walked through the various scripts and commands it generated for this purpose. 12.0 TUTOR MARKED ASSIGNMENT 1. Which of the following memory structures are required, rather than optional, parts of the SGA? (Choose three answers.) A. Database buffer cache B. Java pool C. Large pool D. Redo log buffer E. Shared pool F. Streams pool 2. You are creating a database. Put these steps in the correct sequence: A. Build the data dictionary. B. Create a parameter file. C. Create the data dictionary views. D. Issue the CREATE DATABASE command. E. Issue the STARTUP NOMOUNT command. 3. If you do not specify a SYSAUX datafile on your CREATE DATABASE command, what will happen? (Choose the best answer.) A. The command will fail because SYSAUX is a required tablespace. B. The command will succeed, but you must add a SYSAUX tablespace after database creation. C. The command will succeed, and a default SYSAUX tablespace will be created for you. D. The command will succeed, but the whole data dictionary will be in the SYSTEM tablespace. 4. Which of the following can never be changed after database creation? (Choose the best answer.) A. Database block size B. Database character set C. Database name D. None of the above: nothing is fixed at database creation time 5. Which of the following is required to create a database? (Choose the best
52
answer.) A. The operating system’s root (for Unix/Linux) or Administrator (for Windows) password B. Execute permission on the DBCA PART I C. At least as much RAM as the size of the SGA D. None of the above 6. On Unix/Linux, you launch the DBCA, and nothing happens. What could be the cause of this? (Choose the best answer.) A. You are not a member of the dba group. B. Your DISPLAY variable is not set to your terminal’s address. C. You have not set your DISPLAY variable. D. You have not set your ORACLE_SID variable. 7. Which of the following files are optional? (Choose three answers.) A. Online redo log files B. Parameter file C. Password file D. SYSAUX tablespace datafile E. SYSTEM tablespace datafile F. UNDO tablespace datafile 8. If you do not specify an UNDO tablespace on your CREATE DATABASE command, what will happen? (Choose the best answer.) A. The command will fail because an UNDO tablespace is required. B. The command will succeed, and a default UNDO tablespace will be created for you. C. The command will succeed, but you must create an UNDO tablespace later. D. The command will succeed, and you may create an UNDO tablespace later. 9. You have created a database but cannot connect to it with Database Control. What could be the cause of this? (Choose the best answer.) A. You are not being authenticated by the operating system, or by password file authentication. B. You have not run the scripts to create Database Control. C. Grid control is a prerequisite for Database Control. D. You are not licensed to use Database Control. 10. When does the data dictionary get created? (Choose the best answer.) A. When you create a database B. When you run the post-creation scripts catalog.sql and catproc.sql, called by CreateDBcatalog.sql C. When the SYSTEM and SYSAUX tablespaces are created D. It does not need to be created; it is always available as part of the instance 11. Which of the following processes are optional? (Choose three answers.) A. Archive process B. Checkpoint process C. Database listener D. Grid Control Management Agent E. Log writer
53
F. Process monitor 12. You created a database with two online redo log file groups, one member each. What must you do to provide fault tolerance? (Choose the best answer.) A. Add two more groups, to mirror the first two. B. Add one more member to each group. C. You can do nothing; these characteristics are fixed at creation time. D. You need do nothing; the second group already mirrors the first. 13. Which data dictionary view will show you all the tables in the database? (Choose the correct answer.) A. ALL_TABLES B. DBA_TABLES C. USER_TABLES D. None. To see all the tables, you must query the data dictionary directly. 14. Which of the following is not stored in the data dictionary? (Choose the best answer.) A. User definitions B. Supplied PL/SQL packages C. Data dictionary views D. None; they are all stored in the data dictionary 15. You de-selected the Oracle Java Virtual Machine when running DBCA, but you later wish to install it. What must you do? (Choose the best answer.) A. Create the Java pool in the database. B. Run scripts to create the JVM. C. Drop the database and re-create it with the JVM. D. Start the JVM background process. 13.0 FURTHER READING/REFERENCES
1.0 Installation centos; official Oracle Wiki". Wiki.oracle.com. Retrieved 2009-12-19.
2.0 Rick Greenwald and Robert Hoskin , Oracle Power Objects , 1997 O’Reilly and Associates Inc.
3.0 Greenwald, Rick; Stackowiak, Robert; Stern, Jonathan (2007). Oracle Essentials: Oracle
Database 11g. Essential Series (4 ed.). O'Reilly Media. p. 31. ISBN 9780596514549. Retrieved
2010-06-08. "Today, Oracle offers other embedded databases including TimesTen, Berkeley DB,
and Oracle Database Lite."

54
MODULE 2: ORACLE DATABASE MANAGEMENT
UNIT 1: Managing Oracle Storage Structures
Page
1.0 Introduction 2
2.0 Objectives 2
3.0 Oracle Storage Basics: Tablespaces and Datafiles 6.0 Physical Storage Structures
5.0. Segments 6.0 Extents 7.0 Database Blocks
8.0 Creating and Managing Tablespaces
9.0 Summary
10.0 Tutor Marked Assignment
11 .0 Further Reading /References 11
HAPTER 6
55
1.0 INTRODUCTION You have now created a database and know how to manage the instance to get access to the database data. The next logical step is to create storage structures in the database to hold your data and to ensure that those storage structures are managed efficiently. You don’t want to overallocate disk space, and you don’t want to underallocate. Furthermore, you want to ensure that the use of disk space is as efficient as possible for the type of database you will be managing and the disk resources available to you. Understanding how Oracle manages storage, both logically and physically, and understanding the different components involved in storing Oracle database data are some of the key concepts any DBA must master. 2.0 OBJECTIVES In this unit you will learn how to • Define the purpose of tablespaces and datafiles • Create tablespaces • Manage tablespaces (alter, drop, generate DDL, take offline, put online, add datafiles, make read-only or read/write) • Obtain tablespace information from Enterprise Manager and the data dictionary • Drop tablespaces • Describe the default tablespace 3.0 Oracle Storage Basics: Tablespaces and Datafiles Storage in an Oracle database has two distinct “sides”: physical and logical. Physical storage is how the storage components that make up an Oracle database at the operating system level are seen, normally, as a series of datafiles. Logical storage is how Oracle internally manages the objects that are stored in the database. The logical and physical storage structures in Oracle and their relationships can be expressed as a model shown in Figure 6-1. Looking at the model of Oracle storage, a few key elements can be discerned, such as these: • Every database must consist of one or more tablespaces. Every tablespace must belong to one and only one database. • Every tablespace must consist of one or more datafiles. Each datafile must belong to one and only one tablespace.
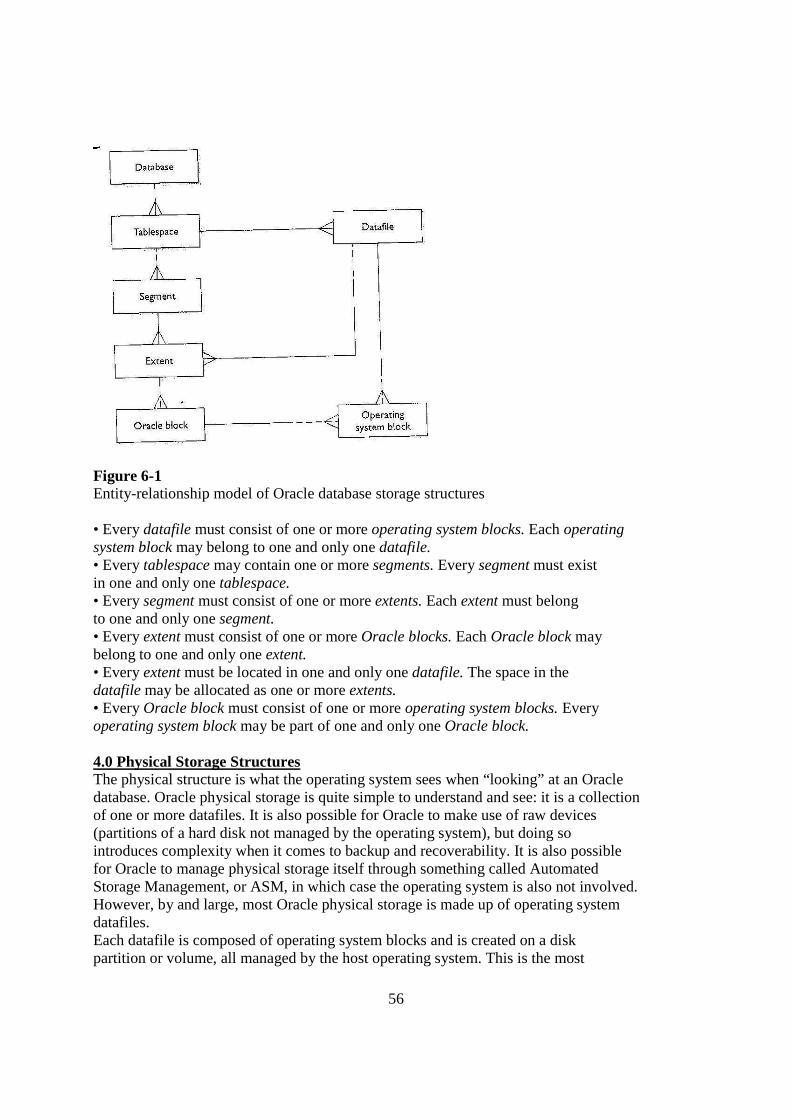
56
Figure 6-1 Entity-relationship model of Oracle database storage structures PART I • Every datafile must consist of one or more operating system blocks. Each operating system block may belong to one and only one datafile. • Every tablespace may contain one or more segments. Every segment must exist in one and only one tablespace. • Every segment must consist of one or more extents. Each extent must belong to one and only one segment. • Every extent must consist of one or more Oracle blocks. Each Oracle block may belong to one and only one extent. • Every extent must be located in one and only one datafile. The space in the datafile may be allocated as one or more extents. • Every Oracle block must consist of one or more operating system blocks. Every operating system block may be part of one and only one Oracle block. 4.0 Physical Storage Structures The physical structure is what the operating system sees when “looking” at an Oracle database. Oracle physical storage is quite simple to understand and see: it is a collection of one or more datafiles. It is also possible for Oracle to make use of raw devices (partitions of a hard disk not managed by the operating system), but doing so introduces complexity when it comes to backup and recoverability. It is also possible for Oracle to manage physical storage itself through something called Automated Storage Management, or ASM, in which case the operating system is also not involved. However, by and large, most Oracle physical storage is made up of operating system datafiles. Each datafile is composed of operating system blocks and is created on a disk partition or volume, all managed by the host operating system. This is the most
57
common scenario and one that you will encounter most frequently. Oracle Datafiles Datafiles are operating system files that hold Oracle data. When you create a database, a number of datafiles are created to hold the data dictionary and the SYSAUX tablespace data, along with any other tablespaces you decided to create at that time. The datafiles consist of the header and the space that can be used to allocate extents to segments. In effect, most datafiles have three parts: the header, the extents (allocated space), and free (unallocated space). The header of a datafile identifies it as part of a database and stores specifics of that datafile: which tablespace it belongs to and the last checkpoint performed. This way, Oracle can check that all files are synchronized when it starts up. If it detects that one of the files is older than the rest (or all files are older than the controlfile), it will assume that the file was restored from a backup and initiate recovery. The rest of the datafile consists of extents and free space, the management of which is performed by creating, dropping, and altering the logical storage components of Oracle: segments. Each Oracle datafile belongs to one and only one tablespace and is made up of operating system blocks. As you will see later in this chapter, it is possible to specify growth characteristics for datafiles and resize them either manually or automatically. You can also take a datafile offline, making its contents unavailable, provided it does not belong to the SYSTEM tablespace. Operating System Blocks Operating system blocks are the minimum allocation unit for the file system. Each file system has its own minimum and default sizes, which often vary with the hard disk geometry and size, as well as the file system used to format the drive. Most systems will allow you to configure the block size when formatting the drive. It is a good idea to keep the operating system block size the same as the Oracle block size. So, if you are planning to add a drive in order to keep Oracle datafiles on it, and your database block size is 8KB, you may want to format the drive using 8KB blocks. However, because Oracle Database 10g allows you to create tablespaces with differing block sizes, you may want to ensure that the operating system block size is the same size as the largest database block. This way, for every Oracle I/O request the operating system needs to retrieve only one block. Logical Storage Structures As a DBA, you will be spending a great deal of your time looking at database storage from the logical point of view. You will be creating and managing tablespaces, segments, and extents and ensuring that the Oracle block size is efficiently configured for your database. The logical structure of the database is the left side of the model in Figure 6-1. The database is the highest and final unit of organization for Oracle. It is selfcontained and consists of at least three tablespaces (preferably more) in Oracle 10g (up from one in previous releases). In order to access database data, an instance must be started. Tablespaces Within a database the tablespace is the largest storage structure. A database in Oracle 10g must have at least three tablespaces: SYSTEM, SYSAUX, and one undo tablespace. These are created when you create the database; you create others for a specific purpose

58
in order to manage your database objects and ensure the instance and database perform well. You should also create at least one additional tablespace for specific data: a temporary tablespace to hold temporary objects created when a sort takes place and cannot be completely performed in memory. Tablespace Types Tablespaces can be classified using many different criteria, the first of which is based upon the type of objects the tablespace stores: SYSTEM or non-SYSTEM. In Oracle 10g two tablespaces make up the SYSTEM type: SYSTEM and SYSAUX. All other tablespaces are classified as non-SYSTEM. . The SYSTEM tablespace contains the data dictionary—internal tables that describe the structure of the database itself, all of the objects in it, users, roles, and privileges. When a user issues a query or a DML statement, the data dictionary is used in order to verify the user’s permissions and find the data that belongs to the segment being queried or changed. When a DDL statement is processed, the internal tables are modified in order to reflect the change: CREATE, ALTER, or DROP. The SYSTEM tablespace also contains the SYSTEM undo or rollback segment (also called SYSTEM), which can be used only for operations on objects stored in the SYSTEM tablespace. User objects should be kept out of the SYSTEM tablespace in order to keep it operating efficiently. After you create the database, you will need to create additional tablespaces to store your data. The number of tablespaces you create and what is stored within them depend on what your database will be used for and the amount of data. Here are some of the guidelines to follow when creating additional tablespaces and to help with performance: • Separate data that will participate in resource contention For example, a table and its indexes will normally be accessed simultaneously during inserts and updates, so to prevent a bottleneck, it is best to place them on different hard drives. One way to do this is to create different tablespaces—DATA and INDEX—to hold the data and then place each tablespace’s datafiles on a different hard disk. This way, you can update both the table and its index simultaneously and not risk resource contention. • Separate objects that have different storage requirements Keeping small tables and large tables on different tablespaces will provide better space management and performance. While extent management can be largely automated in Oracle 10g, there is no reason to make Oracle’s job more difficult by placing dissimilar objects on the same tablespace. • Store different partitions in different tablespaces One of the benefits of partitioning your data is to gain performance improvements for queries. Place each partition on a separate tablespace and, preferably, each tablespace’s datafiles on a separate hard disk. In this way Oracle can read data from more than one hard disk at the same time when satisfying the query. Tablespace Contents A tablespace can store one of three types of segments: permanent, temporary, and undo. Permanent segments are what you expect to find in a database, such as a table or index. Temporary segments are those that exist for a short time and are then overwritten, such as a sort operation. Undo segments hold the before image of the data being modified so that other users can still have their

59
queries answered even if the data is in the process of being changed. When you create a user in Oracle, you specify the default tablespace that will be used to store extents for any segment the user creates, as well as a temporary tablespace to store temporary segments, although a global temporary tablespace defined for the database can be used as well. All users share the undo tablespace, which is set by the DBA. To determine what the users’ default and temporary tablespaces are, you can issue this query: SQL> SELECT username, default_tablespace, temporary_tablespace 2 FROM DBA_USERS; USERNAME DEFAULT_TABLESPACE TEMPORARY_TABLESPACE -------------------- ------------------------- ------------------------- SYS SYSTEM TEMP SYSTEM SYSTEM TEMP OUTLN SYSTEM TEMP DBSNMP SYSAUX TEMP SYSMAN SYSAUX TEMP MGMT_VIEW SYSAUX TEMP WK_TEST SYSAUX TEMP MDSYS SYSAUX TEMP ORDSYS SYSAUX TEMP CTXSYS SYSAUX TEMP ANONYMOUS SYSAUX TEMP EXFSYS SYSAUX TEMP DMSYS SYSAUX TEMP WMSYS SYSAUX TEMP XDB SYSAUX TEMP WKPROXY SYSAUX TEMP ORDPLUGINS SYSAUX TEMP SI_INFORMTN_SCHEMA SYSAUX TEMP OLAPSYS SYSAUX TEMP WKSYS SYSAUX TEMP MDDATA USERS TEMP DIP USERS TEMP SCOTT USERS TEMP Tablespaces in Databases Created with the Database Configuration Assistant A typical example of tablespaces that exist in most databases can be ascertained by looking at the tablespaces created when you use the Database Configuration Assistant. The DBCA will create a database with the following tablespaces, as shown in Figure 6-2. PART I • SYSTEM Used to store the Oracle data dictionary and all objects in the SYS schema. Access to these objects is restricted to the user SYS and others that have been granted the DBA role, by default. Every database must have a SYSTEM tablespace. • SYSAUX The SYSAUX tablespace was introduced in Oracle Database 10g

60
to store objects not owned by SYS but required in order for the database to function. In previous releases of Oracle these were stored in the SYSTEM tablespace; they include Oracle Enterprise Manager components, among others. Every Oracle 10g database must have a SYSAUX tablespace. • TEMP Used to store temporary objects and their data. Examples of these include the data portion of a global temporary table and sort segments created when a sort cannot be completely performed in memory. Every database should have a temporary tablespace, though it is not required, and one should be designated as the default temporary tablespace to be assigned to users if one is not specified when the user is created. Temporary tablespaces consist of tempfiles instead of datafiles. If no temporary tablespace is created, then temporary segments are created in the SYSTEM tablespace by default—a bad idea from a performance perspective.
Figure 6-2 Tablespaces in a database created by the Database Configuration Assistant • UNDOTBS1 Used to store undo information for the database. Undo is data kept in the database to allow users to read rows that are in the process of being changed but whose transactions have not yet committed. This allows any user needing to get a read-consistent image of the data to avoid being held up by people changing the data. An undo tablespace is required in each database. • USERS When a database user creates a segment, its data needs to be stored in a tablespace. The USERS tablespace serves this purpose. You can create additional tablespaces and allow users to store their segments in them, but one tablespace needs to be made the default users’ tablespace, which the USERS tablespace is for nonsystem (i.e., not SYS or SYSTEM) users. If you decided to load the example schemas when you created the database with DBCA, you will also have an EXAMPLE tablespace that stores those segments in the example schemas. 5.0 Segments Within a tablespace, space is allocated to segments. A segment is an object in the

61
database that requires storage, such as a table or an index. A view, on the other hand, is not a segment, since it does not store data; it is just a prewritten query that allows easy access to data stored in tables. Oracle allows you to create many different segment types. A query against the DBA_SEGMENTS view will display a list of segments created in the database, as follows: SQL> SELECT DISTINCT segment_type FROM DBA_SEGMENTS; SEGMENT_TYPE ------------------ CLUSTER INDEX INDEX PARTITION LOB PARTITION LOBINDEX LOBSEGMENT NESTED TABLE ROLLBACK TABLE TABLE PARTITION TYPE2 UNDO This query shows only the segment types that exist in your database, not all possible types. How to manage many (but not all) of the segment types listed will be the discussion of several future chapters. PART I 6.0 Extents When space is allocated for segments in a tablespace, it is allocated an extent at a time. A segment consists of one or more extents, and when a segment (e.g., a table or an index) is created, at least one extent is allocated at creation time. Extents are made of contiguous data blocks and can be managed either manually by the DBA or automatically by Oracle, depending upon the conditions specified by the DBA, or Oracle defaults. Extents are created in the datafiles belonging to the tablespace on which the segment is defined. A segment can exist in only one tablespace, and an extent exists in a datafile belonging to the tablespace. Extent Management in Tablespaces When you create a tablespace, you can specify whether extents should be locally managed or dictionary-managed. Locally managed extents are more efficient and are recommended for all database data. In a tablespace where extents are locally managed, free extents are stored in a bitmap in the tablespace. Each bit in the bitmap represents a single database block or a multiple of database blocks if extent management has been configured to be of a uniform size or automatic. As an extent is allocated to a segment or freed up because a segment was dropped, truncated, or resized, the bitmap is updated to reflect the change. . Dictionary-managed tablespaces are the historical way of managing extents and require any allocation or deallocation of an extent to update a table in the data dictionary. This means that any time an extent is allocated to a table, the data dictionary must be touched to record the change. When a table is dropped or truncated, the data dictionary must be changed. Because of the amount of work required on the data
62
dictionary when using dictionary-managed extents, they are no longer recommended and exist primarily for backward compatibility. All tablespaces should be created with local extent management. 7.0 Database Blocks A database block is the minimum unit of I/O in the database. When the database needs to read data, it cannot read just one row; it must read the entire block. The same happens with writing: even if only one row in a block is changed, the DBWn process has to write the entire block during the checkpoint. When a database is created, the default block size for tablespaces is specified. It is possible to have more than one block size specified for a database, but a tablespace and its datafiles will always only have one database block size. In other words, you specify the block size for the tablespace when you create it, or assume the database default. For a different tablespace you can specify a different block size. You cannot change the block size for a tablespace once it is created, except by dropping and re-creating it (and possibly losing all the tablespace contents). 8.0 Creating and Managing Tablespaces There are two ways to create a tablespace in Oracle: using Oracle Enterprise Manager (OEM) or by issuing the CREATE TABLESPACE command in SQL*Plus or iSQL*Plus. The end result is the same, since OEM will send the appropriate command to the database to perform the operation. The CREATE TABLESPACE Command The CREATE TABLESPACE and CREATE TEMPORARY TABLESPACE commands allow you to create a tablespace using SQL*Plus or iSQL*Plus. Alternatively, you can create a tablespace from Enterprise Manager, which provides a nice point-and-click interface, and then optionally view the command sent to the Oracle server before it is executed. The overall syntax of the command is somewhat complex because of the number of options available, but we will break it down into manageable chunks. CREATE [BIGFILE | SMALLFILE] [TEMPORARY] TABLESPACE tablespace name DATAFILE datafile spec | TEMPFILE tempfile spec [MINIMUM EXTENT minimum extent size] [BLOCKSIZE blocksize] [[COMPRESS|NOCOMPRESS] DEFAULT STORAGE (default storage clause)] [LOGGING|NOLOGGING] [FORCE LOGGING] [ONLINE|OFFLINE] [EXTENT MANAGEMENT DICTIONARY | LOCAL [AUTOALLOCATE|UNIFORM SIZE size]] [SEGMENT SPACE MANAGEMENT MANUAL|AUTO] [FLASHBACK ON|OFF] To create a tablespace, all you need is the name of the tablespace and the datafile specification; all other settings are left at Oracle defaults, as in this example: CREATE TABLESPACE default_demo DATAFILE '$ORACLE_BASE/oradata/default_demo01.dbf' SIZE 10M;

63
This one command did everything: physically created the datafile, created the tablespace, updated the controlfile and the data dictionary, and set all the defaults for the new tablespace. NOTE If the datafile already exists on disk, the creation of the tablespace will fail. You can specify the REUSE parameter to the datafile specification to instruct Oracle to overwrite any file with the same name as the datafile you want to create. This is useful when re-creating tablespaces that you dropped. PART I Perhaps the best way to create a tablespace in Oracle 10g is to use Enterprise Manager. With EM you can create a tablespace with an easy interface and also learn about the syntax to do so by displaying the SQL code to perform the action. Exercise 6-1: Using Enterprise Manager to Create a Tablespace In this exercise you will connect to Enterprise Manager and create a tablespace in your database. 1. Start a web browser and connect to the Enterprise Manager URL on your Oracle database server, specifying the appropriate port number and machine name. 2. Log in to your database as the user SYSTEM with the appropriate password. If you receive the licensing information page, click I Agree to continue. 3. On the Enterprise Manager main page, click the Administration hyperlink to display the Administration page. 4. Click the Tablespaces hyperlink under Storage to display the current tablespaces in the database and their space utilization. 5. To create a new tablespace, click Create on the right side to bring up the Create Tablespace screen. 6. In the Name text box, enter the name of the tablespace you want to create, OCP10gData, for example. You will notice that you also have a number of selections to make regarding the tablespace characteristics, including extent management (local or dictionary), tablespace type (permanent, temporary, or undo), and status (read/write, read-only, or offline). Permanent tablespaces are the default and can be used to hold segment data such as tables, indexes, and clusters. The majority of the tablespaces you create will be of the Permanent variety. If you select the Set As Default check box for the tablespace, any user created in the database that does not have a default tablespace specified at creation time will be assigned this tablespace as his default tablespace. Any segments the user creates will occupy space on this tablespace by default, unless a different tablespace is specified when the object is created. Status determines the initial state of the tablespace after creation. Read/write means that objects can be created and otherwise modified on the tablespace and its contents can change. Read-only means that it cannot be written to, and offline means that the contents of the tablespace are not available. When creating a tablespace, it is best to choose Read Write; you can always change the status later. Leave your tablespace at the default values of Locally Managed, Permanent, and Read Write.
64
PART I 7. Under the Datafiles heading you have the option to add one or more datafiles to the tablespace. If you select the Use Bigfile Tablespace check box, your tablespace can have only one datafile whose size limit is as large as the file system will allow. Bigfile tablespaces cannot be dictionary-managed. Leave the Use Bigfile Tablespace option unchecked and then click Add to bring up the Add Datafile page. 8. On the Add Datafile page, enter the name of the datafile for the tablespace and verify that the location provided is appropriate. Enterprise Manager will display the default location for datafiles according to OFA guidelines, typically the directory pointed to by the location $ORACLE_BASE/oradata/<db_name>. You also need to specify a file size or accept the default value. Under Storage you can specify whether or not to automatically grow the file (AUTOEXEND) when it becomes full as well as how much to grow it by and whether or not to specify a maximum size the file can grow to. Autoextend allows you to automate file growth while at the same time optionally providing a limit on the growth so that a file does not occupy all available disk space. Leave the datafile size at the default of 100MB and specify autogrowth in increments of 50MB up to a maximum size of 500MB. Click Continue when done. 9. On the Create Tablespace page, click Show SQL to display the SQL commands that will be sent to the database to create the tablespace. Click Return when done reviewing the code. 10. Click the Storage hyperlink to display the Storage Options page. Because you specified that the tablespace will be locally managed, here you can specify whether extent allocation will be automatically handled by Oracle based upon the data stored on the tablespace, in which case you cannot control extent sizing. If you want to make all extents the same size, you can specify Uniform sizing, which defaults to extent sizes of 1MB. Uniform sizing makes sense for temporary tablespaces and for those tablespaces where the data being stored is of the same row size (i.e., all large rows or all small rows, etc.). You cannot use automatic extent allocation for temporary tablespaces. PART I The second option on this screen deals with the way that space will be managed within the segment. With automatic segment space management Oracle will use bitmaps to determine which blocks are free and which contain large amounts of data. The amount of space that exists for inserting rows will be automatically tracked by the bitmap containing all blocks allocated to the segment. This is an efficient method that frees the DBA from setting segment space management parameters manually. Using manual space management requires the DBA or the creator of the segment to specify values for the PCTFREE, PCTUSED, FREELISTS, and FREELIST GROUPS parameters when creating the object and maintaining them as the volume of segment data increases. The last section requires you to specify whether changes made to segments in the tablespace should be logged to the redo log files (LOGGING) or not
65
(NOLOGGING). While you can specify this parameter when you create the segment, if you do not, the segment will inherit it from the tablespace. If you specify NOLOGGING, then it may not be possible to recover segments in the tablespace in the event of failure. If you created a dictionary-managed tablespace, you would also need to specify default storage parameters using the DEFAULT STORAGE clause of the CREATE TABLESPACE command. Table 6-1 lists the parameters of the DEFAULT STORAGE clause and their values. Specify automatic extent management, automatic segment management, and logging for the tablespace. Setting Description MINEXTENTS The number of extents each segment will be created with, which defaults to the minimum of 1. MAXEXTENTS The maximum number of extents a segment will be allocated if necessary. The default value depends on the DB_BLOCK_SIZE setting, while the maximum is UNLIMITED. Avoid setting MAXEXTENTS to UNLIMITED, as this will allow a segment to take all the available space in the tablespace and can disrupt normal operation of the database. INITIAL Allows you to specify the size of the first extent for the segment in bytes (use K or M as suffixes to the numeric value to specify KB or MB). The default is 5 database blocks, with a minimum of 2 database blocks. NEXT Specifies the size of the second or subsequent extents in bytes, KB or MB. PCTINCREASE Specifies how much bigger to make the third extent compared to the second extent, the fourth compared to the third, etc., as a percentage. For example, if PCTINCREASE is set to 20, the INITIAL and NEXT are set to 100K, the third extent will be 120K, the fourth, 144K, etc., rounded up to the next multiple of DB_BLOCK_SIZE. If PCTINCREASE is set to 0, SMON will not automatically coalesce the free space in the tablespace. PART I 11. Click the Thresholds hyperlink to bring up the Thresholds page. Thresholds allow you to have Enterprise Manager warn you when space in the tablespace is getting used up. You can specify thresholds for the database, specify them for the individual tablespace, or disable them for the tablespace. Thresholds will be covered in more detail in Chapter 15. Leave the current settings at the default values and then click OK to create the tablespace. 12. After a short delay, you will be presented with the Tablespaces page of Enterprise Manager, shown next, where the tablespace you just created is listed. You can also create more tablespaces or manage the ones that are there. Modifying Tablespaces

66
Since databases generally are not static, you will from time to time need to make changes to the tablespaces you created. These can be common tasks such as adding datafiles to a tablespace or increasing the size of existing datafiles, taking a tablespace offline for maintenance or recovery purposes, or changing the mode from read/write to read-only or vice versa. All of these tasks can be accomplished from the command line using the ALTER TABLESPACE command or using Enterprise Manager. You can also rename a tablespace if needed, but this is generally not recommended after segments have been created on it. Exercise 6-2: Using Enterprise Manager to Alter a Tablespace In this exercise you will connect to Enterprise Manager and change the characteristics of the tablespace you created in the previous exercise. 1. Start a web browser and connect to the Enterprise Manager URL on your Oracle database server specifying the appropriate port number and machine name. 2. Log in to your database as the user SYSTEM with the appropriate password. If you receive the licensing information page, click I Agree to continue. PART I 3. On the Enterprise Manager main page, click the Administration hyperlink to display the Administration page. 4. Click the Tablespaces hyperlink under Storage to display the current tablespaces in the database and their space utilization. 5. Select the tablespace created in the preceding exercise (OCP10GDATA, for example) and then click Edit to display the Edit Tablespace page. Note that the majority of options are grayed out except for the check box to make this the default tablespace for the database, and the various status options. This is because the extent management and type of tablespace cannot be modified after creation time; you must drop and then re-create the tablespace to change these. The normal mode of operation of a tablespace is read/write, meaning that objects can be created on the tablespace and their contents modified—data inserted, updated, or deleted. Making a tablespace read-only does not allow any changes to segment data on the tablespace but does allow SELECT statements to be executed against it. The read-only status of a tablespace does not prevent dropping objects created on the tablespace, since the object definition is not stored on the tablespace but rather in the data dictionary. Think of this as similar to the phone company changing your phone number—they have to come to the house to install the phones, but to change your phone number all they have to do is modify an entry at the central office to specify which number will cause your phone at home to ring. 6. Click the drop-down list box next to Offline Mode to display the four available modes. Taking a tablespace offline makes its contents unavailable until the tablespace is brought back online, but taking a tablespace offline should be done gracefully to prevent having to perform recovery when the tablespace is brought online. The NORMAL and IMMEDIATE options will issue a checkpoint before taking all datafiles belonging to the tablespace offline, although the IMMEDIATE option cannot be used if the database is in noarchivelog mode. Using the TEMPORARY option will gracefully take

67
the datafiles offline and not require recovery unless one of the datafiles was already offline due to media failure, in which case recovery will be needed. FOR RECOVER is deprecated and should not be used; it is included for backward compatibility. 7. If you want to add a datafile to the tablespace, you can click Add. For now click Edit to display the Edit Datafile page. Notice that you can change the size of the datafile by entering a new value. You can specify a value smaller or larger than the existing file size, but no smaller than the amount of data physically in the file; otherwise, you receive the “ORA-03297: file contains used data beyond requested RESIZE value” error. You can also change autogrowth characteristics, rename the datafile, or change its location. Decrease the size of the datafile to 50MB and click Continue. PART I 8. Click Show SQL to display the SQL code required to make your changes, as in this code listing example, and then click Return: ALTER DATABASE DATAFILE '/oracle/oradata/ocp10g/ocp10gdata01.dbf' RESIZE 50M 9. Click Apply to save your changes. 10. Click the Tablespaces hyperlink at the top of the Enterprise Manager page to display the list of tablespaces in the database. 11. Click the drop-down list box next to Actions to display the list of available actions. Actions are activities that can be performed on the selected tablespace. They are described in more detail in Table 6-2. 12. Close Enterprise Manager. Action Description Add Datafile Allows you to add another datafile to the tablespace. Create Like Uses the selected tablespace as a template for another tablespace. Characteristics such as extent and segment management, datafile location, and size are copied to the new tablespace. Generate DDL Displays a page with the generated SQL statement used to re-create the tablespace. Make Locally Managed Converts a dictionary-managed tablespace to a locally managed tablespace. Make Read Only Makes a read/write tablespace read-only. Current transactions are allowed to complete, but no new transactions can be started on segment data in the tablespace. Also forces a checkpoint to update the controlfile and datafile headers. This action cannot be performed on UNDO, SYSTEM, and SYSAUX tablespaces.

68
Make Writable Allows writes on tablespace segment data. Place Online Brings a currently offline tablespace online. Reorganize Starts the Reorganization Wizard of Enterprise Manager to allow you to move objects around to make space utilization more efficient. This process can severely impact performance of tablespace data and should be performed during off-hours. Show Dependencies Lists objects dependent on this tablespace (i.e., segments created on it) or objects the tablespace is dependent upon. Run Segment Advisor Segment Advisor allows you to determine if segments on the tablespace have space available to be reclaimed for use by other objects. Take Offline Takes a tablespace offline. Cannot be performed on the SYSTEM or SYSAUX tablespace. Dropping Tablespaces The DROP TABLESPACE command allows you to drop an existing tablespace in the database. To perform this action, you must have the DROP TABLESPACE system privilege. You can then issue the following command: DROP TABLESPACE OCP10GDATA; If there are objects in the tablespace, you will get the following error: DROP TABLESPACE OCP10GDATA * ORA-01549: tablespace not empty, use INCLUDING CONTENTS option If there are foreign key constraints that depend on tables on the tablespace, you can modify the syntax to drop those links too by using the following syntax: DROP TABLESPACE OCP10GDATA INCLUDING CONTENTS CASCADE CONSTRAINTS; . The result of dropping a tablespace is that any reference to it is erased from the data dictionary and the controlfile of the database. The datafile is not actually deleted, so you will need to do that manually (though Enterprise Manager can be used to do that step as well). . Exercise 6-3: Using Enterprise Manager to Drop a Tablespace In this exercise you will connect to Enterprise Manager and drop the tablespace you created earlier. 1. Start a web browser and connect to the Enterprise Manager URL on your Oracle database server, specifying the appropriate port number and machine name. 2. Log in to your database as the user SYSTEM with the appropriate password. If you receive the licensing information page, click I Agree to continue. 3. On the Enterprise Manager main page, click the Administration hyperlink

69
to display the Administration page. 4. Click the Tablespaces hyperlink under Storage to display the current tablespaces in the database and their space utilization. PART I 5. Select the tablespace created in Exercise 6-1 (OCP10GDATA, for example) and then click Delete to display the Delete Tablespace warning page. Read the warning and note that a backup should always be performed before deleting a tablespace in case you want to get the data back. 6. Ensure that the Delete Associated Datafiles From The OS check box is checked, and then click Yes to delete the tablespace. 7. Notice that the tablespace is no longer listed on the Tablespaces page. Verify at the operating system to ensure that the datafile is also removed. 8. Close Enterprise Manager. Viewing Tablespace Information The easiest way to view tablespace information is by using Enterprise Manager— selecting a tablespace and then clicking the View button is the best way to get full information on a tablespace. Oracle also includes a number of data dictionary and dynamic performance views that can be used to gather information on tablespaces. To get a list of tablespaces in the database and their characteristics, you can use the DBA_TABLESPACES or V$TABLESPACE views. The DBA_TABLESPACES view provides information on tablespace storage characteristics not found in V$TABLESPACE. For a list of datafiles, you can query the DBA_DATA_FILES view or the V$DATAFILE view. The DBA_DATA_FILES view will list the name of the tablespace to which the datafile belongs, whereas V$DATAFILE lists only the tablespace number, which must be joined to V$TABLESPACE to get the tablespace name, but V$DATAFILE provides more details on the file status. . 9.0 SUMMARY A database has a physical structure and a logical structure. From the physical point of view, the database consists of datafiles built out of operating system blocks. The logical representation of a database consists of tablespaces, which contain segments built out of extents. The smallest logical unit in the database is the database block. A tablespace is the link between the physical and logical structures of a database. By using tablespaces, we can control the location of data and administer parts of the database separately. A segment is an object that is allocated space in the datafiles. There are different types of segments: tables, indexes, rollback, temporary, and many others. A segment can be located in only one tablespace. An extent is the unit of space allocation in a tablespace. An extent is a group of contiguous blocks and must exist in one datafile. Different extents belonging to the same segment can be located in different datafiles belonging to the same tablespace. Multiple segments cannot share an extent in Oracle. A database block is the minimum unit of I/O within the database. The size of all blocks in the database is set at its creation and cannot be changed. Tablespaces can be of different types: SYSTEM or non-SYSTEM, permanent or

70
temporary, locally managed or dictionary-managed. Tablespaces can contain permanent objects or temporary objects. Temporary objects are segments created for sort operations and temporary tables. Tablespaces are created using the CREATE TABLESPACE command, either from the command line or using Enterprise Manager. When creating a tablespace, you need to specify the datafiles it will use, extent management characteristics, storage settings for the segments created in it, and whether it can be written to. Datafiles can extend automatically if necessary by using the AUTOEXTEND clause in the datafile definition. When using AUTOEXTEND, make sure that you specify NEXT (how much the file will grow by) and MAXSIZE (the maximum size it will grow to) values so that a file does not occupy all available disk space. You can increase the size of an existing tablespace by increasing the size of an existing datafile or adding new ones. You can make a tablespace unavailable by taking it offline using the ALTER TABLESPACE command. A tablespace that contains static or PART I historical data should be made Read Only by using the ALTER TABLESPACE command. Read-only tablespaces do not need to be backed up regularly, and most changes to data are prevented. You can, however, drop an object located in a read-only tablespace. If you no longer need a tablespace, it can be dropped. Dropping the tablespace does not delete the operating system files, but it does remove the tablespace from the controlfile and from the data dictionary. If the tablespace contains objects, you need to use the DROP TABLESPACE ... INCLUDING CONTENTS command. In order to view information on your tablespaces and datafiles, you can use the DBA_TABLESPACES, DBA_DATA_FILES, and DBA_TEMP_FILES views. When the database is not open, you can query the V$TABLESPACE, V$DATAFILE and V$TEMPFILE views. 10.0 TURTOR MARKED ASSIGNMENT 1. Which line of code will cause the following SQL statement to fail? (Choose the best answer.) 1 CREATE BIGFILE TABLESPACE OCP10gDATA 2 DATAFILE '/oracle/ocp10gdata/ocp10gdata02.dbf' 3 EXTENT MANAGEMENT LOCAL 4 FREELISTS 5 5 NOLOGGING; A. 1 B. 2 C. 3 D. 4 E. 5 F. The statement will succeed 2. You have mounted the database but did not open it. Which views do you need to query if you need the locations of all datafiles and the names of the tablespaces they belong to? (Choose all correct answers.) A. V$DATAFILE B. DBA_DATA_FILES

71
C. V$TABLESPACE D. DBA_TABLESPACES E. V$TEMPFILE F. DBA_TEMP_FILES G. V$UNDOFILE 3. You attempt to create a tablespace but receive an error that the datafile for the tablespace cannot be created. The size of the datafile you wanted to create is 3GB, and you specified the SMALLFILE option for the tablespace. You verify that the operating system directory where the file will reside is owned by the same user as Oracle and the user has full read/write permissions. You are logged in to the database as the user SYSTEM, and there is plenty of disk space on the hard drive. What is the likely cause of the error? (Choose the best answer.) A. You cannot create a file larger than 2GB in an Oracle database when specifying SMALLFILE. B. The operating system cannot create a file larger than 2GB. C. You must specify the WITH OVERWRITE option for the datafile specification. D. You must specify the REUSE option for the datafile specification. E. You must specify the AUTOEXEND option for the datafile specification. 4. You want to be able to re-create a tablespace quickly in case of failure but do not have the SQL code to perform the operation. What is the best way to determine which SQL statement will properly re-create the tablespace with all options correctly set? (Choose the best answer.) A. Use the Generate DDL option of iSQL*Plus. B. Use the Generate DDL option of Enterprise Manager. C. Use the Create Like option of iSQL*Plus. D. Use the Create Like option of Enterprise Manager. E. Query the CODE column of the V$TABLESPACE view. F. Query the TEXT column of the DBA_TABLESPACES view. 5. Which line of code will cause the following SQL statement to fail? (Choose the best answer.) 1 CREATE BIGFILE TABLESPACE OCP10gDATA 2 DATAFILE '/oracle/ocp10gdata/ocp10gdata02.dbf' 3 EXTENT MANAGEMENT DICTIONARY 4 FREELISTS 5 5 NOLOGGING; A. 1 B. 2 C. 3 D. 4 E. 5 F. The statement will succeed 6. You determine that a datafile belonging to your ARCHIVE2002 tablespace is too large. You want to reduce the size of the datafile so that disk space is not wasted. This tablespace will not have any data added to it. When you use Enterprise Manager to reduce the size of the datafile belonging to the
72
tablespace, you receive an error. What is the most likely cause? (Choose the best answer.) A. You cannot reduce the size of datafiles in Oracle. B. You cannot reduce the size of datafiles using Enterprise Manager. PART I C. You do not have sufficient permissions to reduce the size of the file. D. The file does not exist. E. The file contains data beyond the size you want to reduce the file to. 7. You issue the following command to drop a tablespace and receive an error indicating that the tablespace cannot be dropped. What is the likely cause? (Choose the best answer.) DROP TABLESPACE SYSAUX INCLUDING CONTENTS CASCADE CONSTRAINTS; A. System tablespaces cannot be dropped. B. You do not have permissions to drop the SYSAUX tablespace. C. Objects in other tablespaces depend on objects in the tablespace being dropped. D. You cannot drop objects in the tablespace that you did not create. E. The command should succeed. 8. You want to change extent management on your DATA09 tablespace from local to dictionary to match the other tablespaces in the DATA01–DATA08 range. Which method can be used to make this change? (Choose the best answer.) A. DBMS_SPACE_ADMIN.TABLESPACE_DICTIONARY_MANAGED B. DBMS_SPACE_ADMIN.TABLESPACE_MIGRATE_TO_DICITONARY C. Enterprise Manager D. ALTER TABLESPACE DATA09 EXTENT MANAGEMENT DICTIONARY E. You cannot convert a locally managed tablespace to dictionary management
11.0 FURTHER READING/REFERENCE 1.0 Rick Greenwald and Robert Hoskin , Oracle Power Objects , 1997 O’Reilly and Associates Inc. 2.0 Steven Feverstein , Oracle PL/ SQL Programming , 1997 O’Reilly and Associates Inc.
3.0 Greenwald, Rick; Stackowiak, Robert; Stern, Jonathan (2007). Oracle Essentials: Oracle Database 11g. Essential Series (4 ed.). O'Reilly Media. p. 31. ISBN 9780596514549. Retrieved 2010-06-08. "Today, Oracle offers other embedded databases including TimesTen, Berkeley DB, and Oracle Database Lite."
73
MODULE 2: ORACLE DATABASE MANAGEMENT
UNIT 2: Managing DATABASE OBJECT
Page
1.0 Introduction 2
2.0 Objectives 2
3.0 Users, Schemas, and Schema Objects 2 7.0 SUMMARY
8.0 Tutor Marked Assignment
6.0 .0 Further Reading /References
unCHAPTER 8 1.0 INTRODUCTION

74
In a typical database, the greater part of the data is stored in tables. This chapter covers the syntax for creating tables with columns of various datatypes, and also creating some associated objects: the constraints that guarantee that the rows inserted into tables conform to certain business rules; the indexes that enhance the performance of retrieving rows from tables; and the views that can conceal the underlying table structures from end users. Finally, you will see how to create sequences: data structures that can deliver numbers that are guaranteed to be unique. All these objects are stored in schemas: a schema is associated with a user—create a user, and a schema is automatically created. Bear in mind that the topics covered in this chapter are very large, and that this is only a superficial introduction. 2.0 OBJECTIVES In this unit, you will learn how to • Create and modify tables • Define constraints • View the attributes of a table • View the contents of a table • Create indexes and views • Name database objects • Select appropriate datatypes • Create and use sequences 3.0 Users, Schemas, and Schema Objects A user is a person, uniquely identified by username, who exists within the database. Administer users covered the techniques for creating users and giving them the privileges that allow them to connect to the database, and then create and use objects. When a user is created, a schema is created too. A schema consists of the objects owned by a user; initially, it will be empty. As far as SQL is concerned, a schema is nothing more than a container for tables, views, code, and other database elements. 3.1 Users and Schemas Some schemas will always be empty: the user will never create any objects, because he does not need to and (if he is set up correctly) will not have the necessary privileges anyway. Users such as this will have been granted permissions, either through direct privileges or through roles, to use code and access data in other schemas, owned by other users. Other users may be the reverse of this: they will own many objects but will never actually log on to the database. They need not even have been granted the CREATE SESSION privilege, so the account is effectively disabled (or indeed it can be locked); these schemas are used as repositories for code and data, accessed by others. Schema objects are objects with an owner. The unique identifier for an object of a particular type is not its name; it is its name, prefixed with the name of the schema to which it belongs. Thus the table HR.REGIONS is a table called REGIONS that is owned by user HR. There could be another table SYSTEM.REGIONS that would be a completely different table (perhaps different in both structure and contents) owned by user SYSTEM and residing in his schema. A number of users (and their associated schemas) are created automatically at database creation time. Principal among these are SYS and SYSTEM. User SYS owns the data dictionary: a set of tables (in the SYS schema) that define the database and its contents. SYS also owns several hundred PL/SQL packages: code that is provided for the use of the Oracle kernel,

75
database administrators, and developers. Objects in the SYS schema should never be modified with DML commands. If you were to execute DML against the data dictionary tables, you would run the risk of corrupting the data dictionary, with disastrous results. You update the data dictionary by running DDL commands (such as CREATE TABLE), which provide a layer of abstraction between you and the data dictionary itself. The SYSTEM schema stores various additional objects used for administration and monitoring. Depending on the options selected during database creation, there may be more users created, perhaps up to thirty in total. These users are used for storing the code and data required by various options. For example, the user MDSYS stores the objects used by Oracle Spatial, an option that extends the capabilities of the Oracle database to manage geographical information. 3.2 Naming Schema Objects A schema object is an object that is owned by a user. The database will also contain non-schema objects: these may be objects that have nothing to do with users, such as tablespaces, or in some cases they are objects owned by SYS and directly accessible by all users; examples of the latter include public synonyms and public database links that can be used by all users regardless of privileges. To view schema objects through database control, take the appropriate link for the type of object of interest from the Schema section in the Administration window, as in Figure 8-1, and you will be prompted for various search criteria.All schema object names must conform to certain rules: • The name may be from one to thirty characters long, with the exception of database link names, which may be up to 128 characters long. • Reserved words (such as SELECT) cannot be used as object names. • All names must begin with a letter from A through Z. • Names can only use letters, numbers, the underscore (_), the dollar sign ($), or the hash symbol (#). • Lowercase letters will be converted to uppercase. By enclosing the name within double quotes, all these rules (with the exception of the length) can be broken, but to get to the object subsequently, it must always be specified with double quotes, as in the examples in Figure 8-2. Note that the same restrictions apply to column names.Although tools such as SQL*Plus will automatically convert lowercase letters to uppercase, unless the name is enclosed within double quotes, remember that object names are always case sensitive. In this example, the two tables are completely different: ocp10g> create table lower(c1 date); Table created. ocp10g> create table "lower"(col1 varchar(2)); Table created. ocp10g> select table_name from dba_tables where 2 lower(table_name) = 'lower'; TABLE_NAME ------------------------------ lower LOWER

76
3.3 Object Namespaces It is often said that the unique identifier for an object is the object name, prefixed with the schema name. While this is generally true, for a full understanding of naming it is necessary to introduce the concept of a namespace. A namespace defines a group of object types, within which all names must be uniquely identified—by schema and name. Objects in different namespaces can share the same name.
PART I These object types all share the same namespace: • Tables • Views • Sequences • Private synonyms
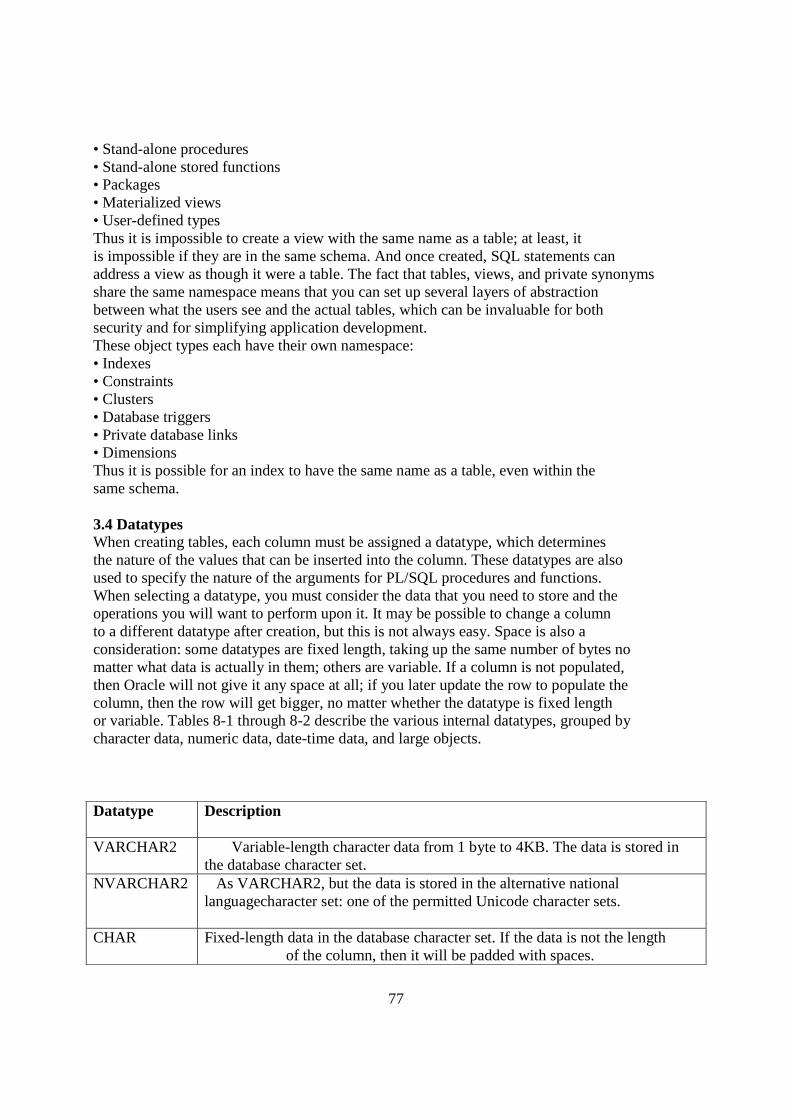
77
• Stand-alone procedures • Stand-alone stored functions • Packages • Materialized views • User-defined types Thus it is impossible to create a view with the same name as a table; at least, it is impossible if they are in the same schema. And once created, SQL statements can address a view as though it were a table. The fact that tables, views, and private synonyms share the same namespace means that you can set up several layers of abstraction between what the users see and the actual tables, which can be invaluable for both security and for simplifying application development. These object types each have their own namespace: • Indexes • Constraints • Clusters • Database triggers • Private database links • Dimensions Thus it is possible for an index to have the same name as a table, even within the same schema. 3.4 Datatypes When creating tables, each column must be assigned a datatype, which determines the nature of the values that can be inserted into the column. These datatypes are also used to specify the nature of the arguments for PL/SQL procedures and functions. When selecting a datatype, you must consider the data that you need to store and the operations you will want to perform upon it. It may be possible to change a column to a different datatype after creation, but this is not always easy. Space is also a consideration: some datatypes are fixed length, taking up the same number of bytes no matter what data is actually in them; others are variable. If a column is not populated, then Oracle will not give it any space at all; if you later update the row to populate the column, then the row will get bigger, no matter whether the datatype is fixed length or variable. Tables 8-1 through 8-2 describe the various internal datatypes, grouped by character data, numeric data, date-time data, and large objects. Datatype
Description
VARCHAR2 Variable-length character data from 1 byte to 4KB. The data is stored in the database character set.
NVARCHAR2 As VARCHAR2, but the data is stored in the alternative national languagecharacter set: one of the permitted Unicode character sets.
CHAR Fixed-length data in the database character set. If the data is not the length of the column, then it will be padded with spaces.
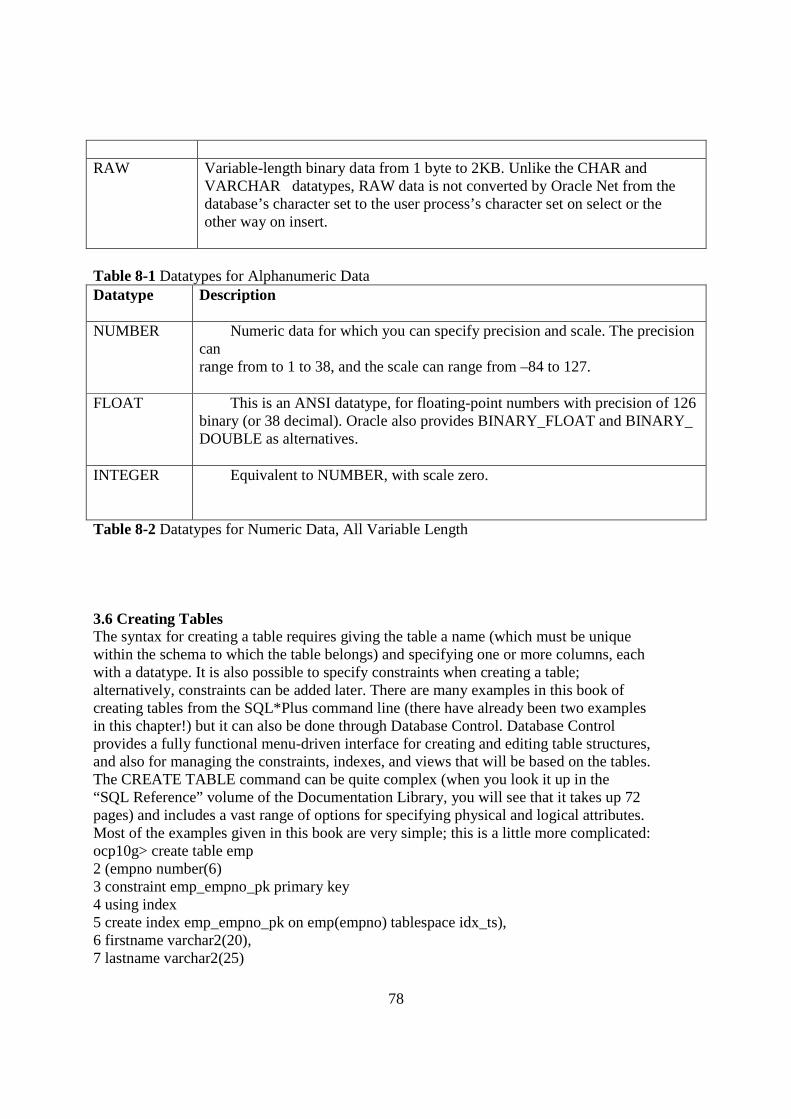
78
RAW Variable-length binary data from 1 byte to 2KB. Unlike the CHAR and
VARCHAR datatypes, RAW data is not converted by Oracle Net from the database’s character set to the user process’s character set on select or the other way on insert.
PART I Table 8-1 Datatypes for Alphanumeric Data Datatype
Description
NUMBER Numeric data for which you can specify precision and scale. The precision can range from to 1 to 38, and the scale can range from –84 to 127.
FLOAT This is an ANSI datatype, for floating-point numbers with precision of 126 binary (or 38 decimal). Oracle also provides BINARY_FLOAT and BINARY_ DOUBLE as alternatives.
INTEGER Equivalent to NUMBER, with scale zero.
Table 8-2 Datatypes for Numeric Data, All Variable Length PART I 3.6 Creating Tables The syntax for creating a table requires giving the table a name (which must be unique within the schema to which the table belongs) and specifying one or more columns, each with a datatype. It is also possible to specify constraints when creating a table; alternatively, constraints can be added later. There are many examples in this book of creating tables from the SQL*Plus command line (there have already been two examples in this chapter!) but it can also be done through Database Control. Database Control provides a fully functional menu-driven interface for creating and editing table structures, and also for managing the constraints, indexes, and views that will be based on the tables. The CREATE TABLE command can be quite complex (when you look it up in the “SQL Reference” volume of the Documentation Library, you will see that it takes up 72 pages) and includes a vast range of options for specifying physical and logical attributes. Most of the examples given in this book are very simple; this is a little more complicated: ocp10g> create table emp 2 (empno number(6) 3 constraint emp_empno_pk primary key 4 using index 5 create index emp_empno_pk on emp(empno) tablespace idx_ts), 6 firstname varchar2(20), 7 lastname varchar2(25)

79
8 constraint emp_last_name_nn not null, 9 hire_date date default sysdate, 10 salary number(8,2), 11 managerid number(6) 12 constraint emp_managerid_fk references emp(empno), 13 deptno number(4) 14 constraint emp_deptno_fk references dept(deptno), 15 photo blob, 16 resume clob, 17 email varchar2(25), 18 constraint emp_salary_min check (salary >= 0), 19 constraint emp_email_uk unique (email)) 20 lob (photo, resume) store as 21 (tablespace example chunk 4096); Table created. Lines 2, 3, 4, and 5 define a numeric column EMPNO, which is to be used as a primary key. Rather than letting Oracle create the primary key index using its defaults, the USING INDEX clause can specify a full index creation command. Lines 7 and 8 demonstrate creating a NOT NULL constraint. Line 9 creates a column with a default value to be applied at insert time, if the column is not populated by the INSERT statement. Line 10 creates a numeric column with a precision of two decimal places. Lines 11 and 12 create a column with a self-referencing foreign key constraint: each employee must have a valid manager, who is also an employee. Constraints of this nature can impact on the order in which rows can be inserted. Lines 13 and 14 create a foreign key constraint to a different table. Lines 15 and 16 create two large object columns. Lines 18 and 19 demonstrate creating constraints on columns defined earlier. The UNIQUE constraint will force the creation of an index, using defaults. Finally, lines 20 and 21 specify some storage options for the large objects. To reach the table management window of Database Control, from the database home page take the Administration tab, then the Tables link in the Schema section. Enter whatever search criteria are needed to locate the table of interest, and then open the Actions drop-down box to see what possibilities are available, as in Figure 8-4. PART I These are the actions: • CREATE LIKE Create a new table based on the same structure as the selected table. • CREATE INDEX Define and generate an index on the table. • CREATE SYNONYM Create a logical name, or alias, that can be used as a pseudonym for the table. • CREATE TRIGGER Create a block of PL/SQL code that will run automatically whenever DML is executed against the table. • GATHER STATISTICS Analyze the contents of the table, to gather statistics to be used by the optimizer to work out how best to access the table. • GENERATE DDL Reverse-engineer the table’s structure, to generate a CREATE

80
TABLE statement that could be used to re-create the table. • GRANT PRIVILEGES Give users permission to read or alter the data in the table. • REORGANIZE Run a wizard to go through the process of reorganizing the data in a table to move the table, or to change its structure. • RUN SEGMENT ADVISOR Use the advisor to generate a recommendation for whether the table should be shrunk. • SHRINK SEGMENT Use the online reorganization tool to reclaim wasted space from a segment. • SHOW DEPENDENCIES Display all the objects that are in some way related to the table and could therefore be affected by any action on the table. • VIEW DATA Run a wizard to assist with querying and displaying the contents of the table. • FLASHBACK TABLE Reverse all DML operations against the table, in reverse chronological order, to take the table back to a previous state. • FLASHBACK BY ROW VERSIONS Query historical data, to display previous versions of rows. 3.7 Creating Constraints Table constraints are a means by which the database can enforce business rules and guarantee that the data conforms to the entity-relationship model determined by the system’s analysis that defines the application data structures. For example, the business analysts of your organization may have decided that every customer and every invoice must be uniquely identifiable by number; that no invoices can be issued to a customer before he has been inserted; and that every invoice must have a valid date and a value greater than zero. These would be implemented by creating primary key constraints on the CUSTOMER_NUMBER column of the CUSTOMERS table and the INVOICE_ NUMBER column of the INVOICES table, a foreign key constraint on the INVOICES table referencing the CUSTOMERS table, a not-null constraint on the INVOICE_DATE column of the INVOICES table (the DATE datatype will itself ensure that any dates are valid automatically—it will not accept invalid dates), and a check constraint on the AMOUNT column on the INVOICES table. If any DML is executed against a table with constraints defined, if the DML violates a constraint then the whole statement will be rolled back automatically. If the statement is part of a multistatement transaction, then the statements that have already succeeded will remain intact, but uncommitted. These constraints are supported by Oracle: • UNIQUE No two rows can have the same value for a UNIQUE column. However, NULL values are permitted; indeed, multiple rows can have NULL values. • NOT NULL The column must have a value. • PRIMARY KEY The primary key is the means of locating a row: the value must be both UNIQUE and NOT NULL. • CHECK A CHECK constraint can be used to enforce simple rules, such as ranges of values. The internal implementation of NOT NULL is in fact a preconfigured CHECK constraint.
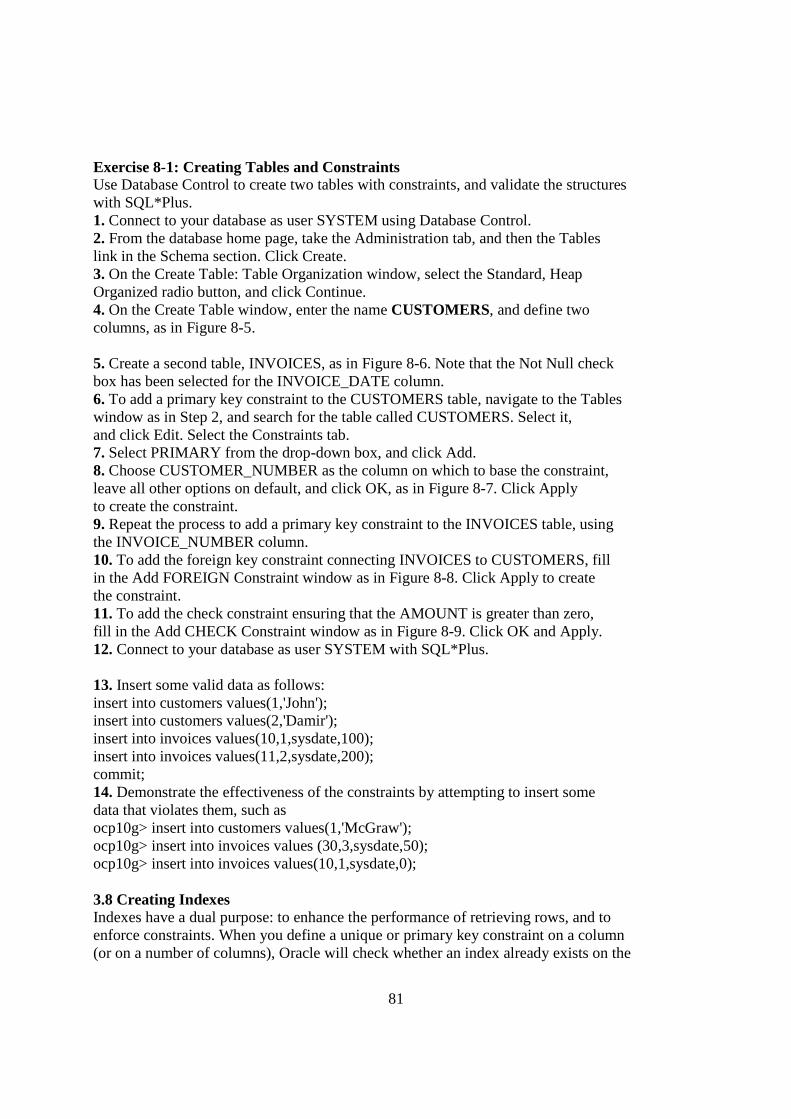
81
Exercise 8-1: Creating Tables and Constraints Use Database Control to create two tables with constraints, and validate the structures with SQL*Plus. 1. Connect to your database as user SYSTEM using Database Control. 2. From the database home page, take the Administration tab, and then the Tables link in the Schema section. Click Create. 3. On the Create Table: Table Organization window, select the Standard, Heap Organized radio button, and click Continue. 4. On the Create Table window, enter the name CUSTOMERS, and define two columns, as in Figure 8-5. PART I 5. Create a second table, INVOICES, as in Figure 8-6. Note that the Not Null check box has been selected for the INVOICE_DATE column. 6. To add a primary key constraint to the CUSTOMERS table, navigate to the Tables window as in Step 2, and search for the table called CUSTOMERS. Select it, and click Edit. Select the Constraints tab. 7. Select PRIMARY from the drop-down box, and click Add. 8. Choose CUSTOMER_NUMBER as the column on which to base the constraint, leave all other options on default, and click OK, as in Figure 8-7. Click Apply to create the constraint. 9. Repeat the process to add a primary key constraint to the INVOICES table, using the INVOICE_NUMBER column. 10. To add the foreign key constraint connecting INVOICES to CUSTOMERS, fill in the Add FOREIGN Constraint window as in Figure 8-8. Click Apply to create the constraint. 11. To add the check constraint ensuring that the AMOUNT is greater than zero, fill in the Add CHECK Constraint window as in Figure 8-9. Click OK and Apply. 12. Connect to your database as user SYSTEM with SQL*Plus. PART I 13. Insert some valid data as follows: insert into customers values(1,'John'); insert into customers values(2,'Damir'); insert into invoices values(10,1,sysdate,100); insert into invoices values(11,2,sysdate,200); commit; 14. Demonstrate the effectiveness of the constraints by attempting to insert some data that violates them, such as ocp10g> insert into customers values(1,'McGraw'); ocp10g> insert into invoices values (30,3,sysdate,50); ocp10g> insert into invoices values(10,1,sysdate,0); PART I 3.8 Creating Indexes Indexes have a dual purpose: to enhance the performance of retrieving rows, and to enforce constraints. When you define a unique or primary key constraint on a column (or on a number of columns), Oracle will check whether an index already exists on the

82
column(s), and if it does not, an index will be created for you. Indexes can be based on one column, on several columns, or on functions applied to columns: there are no restrictions regarding datatype or column order. A table can have any number of indexes, and they are maintained automatically to keep them synchronized with the table. When deciding on your indexing strategy, you must consider the nature of access to the data. As a general rule, indexes will improve performance of retrieving individual rows but will tend to reduce the performance of executing DML against them. So indexes will help SELECT statements but hinder INSERT statements. They will assist with finding rows to be updated or deleted but will work against the efficiency of actually doing the UPDATE or DELETE. It is not necessary for programmers to know the name of an index, or even that it exists. For all retrieval operations, the Oracle optimizer will make an intelligent decision about whether or not to use any available indexes, but for DML it has no choice: indexes must always be maintained. To create an index from the command line, use the CREATE INDEX command. For example, to index the CUSTOMER_NAME column of the CUSTOMERS table used in the previous exercise, you could use this command: ocp10g> create index name_idx on customers(customer_name); Alternatively, it can be done through Database Control as in Figure 8-10. To see what indexes exist on a table, query the DBA_INDEXES data dictionary view: ocp10g> select index_name from dba_indexes where owner='SYSTEM' 2 and table_name='CUSTOMERS'; INDEX_NAME ------------------------------ NAME_IDX SYS_C0010004 The first index listed is that created on the CUSTOMER_NAME column. The second, SYS_C0010004, is the index created automatically by Oracle when the primary key constraint on the CUSTOMER_NUMBER column was defined. Primary key constraints require an index, and if one does not exist, one is created for you, with a systemgenerated name. 3.9 Creating Views A view is a means of presenting data to your users. Rather than having your programmers address actual tables, they can address views instead. This can shield them from the complexities of the underlying data structures and can also be used for security: the views can conceal certain rows or columns. The tables on which a view is based are referred to as either the “detail” tables or the “base” tables. A view is in fact a query—a SELECT statement stored within the data dictionary. Whenever a user addresses a view, using the same syntax as to address a table, the query runs to generate a result set, and the user’s statement executes against this set. Note that there are no performance benefits. In order to simplify data access, a view might join many tables and perform aggregations or sorts to produce a simple result set; this will take some time, and it must be done every time the view is queried. Whether or not DML statements can be executed against a view depends on how complicated is the query on which the view is based.

83
PART I For example, a simple view defined by a query against just one detail table can be used for DML: ocp10g> create view emp_30 as 2 select * from employees where department_id=30; View created. ocp10g> select first_name,last_name from emp_30; FIRST_NAME LAST_NAME -------------------- ------------------------- Den Raphaely Alexander Khoo Shelli Baida 3 rows selected. ocp10g> delete from emp_30 where last_name='Raphaely'; 1 row deleted. A more complex view cannot support DML, as is the case with this example, which joins two tables and performs an aggregation: ocp10g> create view dept_sal as 2 select department_name,sum(salary) tot_sal from departments 3 join employees using(department_id) group by department_name; View created. ocp10g> select * from dept_sal; DEPARTMENT_NAME TOT_SAL ------------------------------ ---------- Views can also be created and edited through Database Control, as in Figure 8-11. Views can be created from detail tables in any schemas, providing that the owner of the view has been granted privileges to see the tables. Then the owner of the view can grant other users permission to see the view. This establishes a layer of abstraction between users and the tables that is useful for security: users can only ever get to data through views, and need not be given permissions against the tables themselves. 3.10 Creating and Using Sequences There are many cases in a typical database system where unique numbers are required. Typically, this is for primary key values. For instance, the business analysts of a sales organization may have decided that every invoice issued must have a unique invoice number. Relying on the data entry staff to supply unique numbers is impractical, so the database must generate them instead. A sequence is defined with a starting point and an increment, both defaulting to one. To read a value from the sequence (which will cause it to increment, ready for the next usage—either by the same session or any other session), use the NEXTVAL pseudocolumn: ocp10g> create sequence inv_nos start with 1 increment by 1; Sequence created. ocp10g> select inv_nos.nextval from dual;

84
NEXTVAL ---------- 1 ocp10g> select inv_nos.nextval from dual; NEXTVAL ---------- 2 PART I Selecting the NEXTVAL from a sequence will increment it automatically; there is no way to roll back this increment, and it is immediately visible to all other sessions that may be selecting from the same sequence. This means that there will be gaps in the sequence of numbers used. Exercise 8-2: Using Constraints, Views, and Sequences Create a sequence to generate unique invoice numbers, and create a view to join your INVOICES and CUSTOMERS tables. 1. Connect to your database as user SYSTEM using SQL*Plus. 2. Create a sequence. Since the previous exercise issued invoice numbers 10 and 11, start the sequence at 12. ocp10g> create sequence inv_nos start with 12; 3. Use the sequence to enter new invoices, with unique numbers. ocp10g> insert into invoices values (inv_nos.nextval,1,sysdate,150); ocp10g> insert into invoices values (inv_nos.nextval,2,sysdate,250); 4. Create a view to display invoices with the customers’ names, and select from it. ocp10g> create view cust_inv as 2 select invoice_number,customer_name,amount from 3 invoices join customers using (customer_number); View created. ocp10g> select * from cust_inv; INVOICE_NUMBER CUSTOMER_NAME AMOUNT -------------- -------------------- ---------- 10 John 100 11 Damir 200 12 John 150 13 Damir 250 5. Tidy up. ocp10g> drop table invoices; ocp10g> drop table customers; ocp10g> drop view cust_inv; ocp10g> drop sequence inv_nos; Note that there is no need to drop any constraints or indexes: they are dropped automatically along with the tables. 4.0 SUMMARY

85
This chapter has introduced tables, along with the commonly used associated objects: constraints, indexes, and views. Also shown were sequences, typically used for generating unique values for inserts into primary key–constrained columns. All these objects are “schema” objects, meaning that they must belong to a user; they cannot exist independently. A schema object must have a unique name within its namespace and schema; some objects, such as indexes, have their own namespace; others, such as tables and views, share a namespace. Tables are defined with one or more columns, which can be any of Oracle’s supported internal datatypes. Oracle is a strongly typed environment, and datatypes must match; however, in some circumstances Oracle can do automatic type casting to avoid errors when users attempt, for example, to insert a numeric value into a character column. Constraints are defined on tables to enforce business rules. Unique and primary key constraints are enforced through the use of indexes: if an index does not exist on the constrained column(s), one will be created for you. You can also create additional indexes to enhance performance. In many cases, the table structure within a database may be overly complex. Views can conceal these complexities by presenting the data in a simplified form. Some views can be treated exactly as though they were tables; others can only be selected from, DML being impossible. Views are also invaluable for security: users can be granted permissions against views, without being granted permissions against their detail (or “base”) tables. 5.0 TURTOR MARKED ASSIGNMENT 1. Which of these statements will fail because the table name is not legal? (Choose two answers.) A. create table "SELECT" (col1 date); B. create table "lower case" (col1 date); C. create table number1 (col1 date); D. create table 1number(col1 date); E. create table update(col1 date); 2. Several object types share the same namespace and therefore cannot have the same name in the same schema. Which of the following object types is not in the same namespace as the others? (Choose the best answer.) A. Index B. PL/SQL stored procedure C. Synonym D. Table E. View 3. Which of the following is not supported by Oracle as an internal datatype? (Choose the best answer.) A. CHAR B. FLOAT C. INTEGER D. STRING 4. You need to record date/time values, with a precision of one second. What would be a suitable datatype for a single column to store this information?

86
A. DATE B. TIMESTAMP C. Either DATE or TIMESTAMP D. You must develop your own user defined datatype, because the internal types store either the date or the time. 5. Which types of constraint require an index? (Choose all that apply.) A. CHECK B. NOT NULL C. PRIMARY KEY D. UNIQUE 6. A transaction consists of two statements. The first succeeds, but the second (which updates several rows) fails part way through because of a constraint violation. What will happen? (Choose the best answer.) A. The whole transaction will be rolled back. B. The second statement will be rolled back completely, and the first will be committed. C. The second statement will be rolled back completely, and the first will remain uncommitted. D. Only the one update that caused the violation will be rolled back; everything else will be committed. E. Only the one update that caused the violation will be rolled back; everything else will remain uncommitted. 7. Which of the following statements is correct about indexes? (Choose the best answer.) A. An index can be based on multiple columns of a table, but the columns must be of the same datatype. B. An index can be based on multiple columns of a table, but the columns must be adjacent and specified in the order that they are defined in the table. C. An index cannot have the same name as a table, unless the index and the table are in separate schemas. D. None of the above statements is correct. 8. For what purposes might you choose to create views? (Choose two answers.) A. To enhance security B. To present data in a simple form C. To improve performance D. To save result sets of commonly executed queries 9.0 FURTHER READING/REFERENCE
1.0 Rick Greenwald and Robert Hoskin , Oracle Power Objects , 1997 O’Reilly and Associates Inc. 2.0 Steven Feverstein , Oracle PL/ SQL Programming , 1997 O’Reilly and Associates Inc.
3.0 Greenwald, Rick; Stackowiak, Robert; Stern, Jonathan (2007). Oracle Essentials: Oracle Database 11g. Essential Series (4 ed.). O'Reilly Media. p. 31. ISBN 9780596514549. Retrieved 2010-06-08. "Today, Oracle offers other embedded databases including TimesTen, Berkeley DB, and Oracle Database Lite."
87
Un
MODULE 2: ORACLE DATABASE MANAGEMENT
UNIT 3: Manipulating Database Data
Page
1.0 Introduction 2
2.0 Objectives 2
3.0 Executing SQL statements 2
10.0 DDL and Transaction Control 5.0. SQL*Loaderr 6.0 Summary
7.0 Tutor Marked Assignment
8.0 Further Reading /References
9

88
1.0 INTRODUCTION This is not the place to go into detail on the relational database transactional paradigm— there are any number of academic texts on this, and there is not enough space to cover this topic in a practical guide—but a quick review of transaction theory is necessary before looking at how Oracle has implemented transaction management and the data manipulation language (DML). Oracle’s mechanism for transactional integrity combines undo segments and redo log files: this mechanism is undoubtedly the best of any database yet developed, and it conforms perfectly to the international standards for data processing. Other database vendors comply with the same standards with their own mechanisms, but with varying levels of effectiveness. In brief, any relational database must be able to pass the ACID test. 2.0 OBJECTIVES In this unit you will learn how to • Manipulate data through SQL using INSERT, UPDATE, and DELETE • Use Data Pump to export data • Use Data Pump to import data • Load data with SQL Loader • Create directory objects 3.0 Executing SQL statements The whole of the SQL language is only a dozen or so commands. The ones we are concerned with here are • SELECT • INSERT • UPDATE • DELETE • COMMIT • ROLLBACK Remember that from release 9i Oracle has included a very efficient and powerful MERGE command, but since the end result of a merge is identical to a combination of INSERT, UPDATE, and DELETE, there is no need to discuss it here. 3.1 Executing a SELECT Statement The SELECT command retrieves data. A SELECT statement is executed in stages: the server process executing the statement will first check whether the blocks containing the data required are already in memory, in the database buffer cache. If they are, then execution can proceed immediately. If they are not, the server must locate them on disk and copy them into the database buffer cache. Once the data blocks required for the query are in the database buffer cache, any further processing (such as sorting or aggregation) is carried out in the PGA of the session. When the execution is complete, the result set is returned to the user process. How does this relate to the ACID test? For read consistency, if the query encounters
89
a block that has been changed since the time at which the query started, the server process will go to the undo segment that protected the change, locate the old version of the data, and (for the purposes of the current query only) roll back the change. Thus any changes initiated after the query commenced will not be seen. Clearly, if the data needed to do this rollback is no longer in the undo segments, this mechanism will not work. That is when you get “ORA-1555: snapshot too old.” PART I 3.2 Executing an Update Statement For any DML operation, it is necessary to work on both data blocks and undo blocks, and also to generate redo: the A, C, and I of the ACID test require generation of undo; the D requires generation of redo. The first step in executing DML is the same as executing SELECT: the required blocks must be found in memory or copied into memory from disk. The only change is that an empty (or expired—more of that in Chapter 16) block of an undo segment is needed too. From then on, things are a bit more complicated. First, locks must be placed on any rows and associated index keys that will be affected by the operation. Then the redo is generated: the server process writes to the log buffer the changes that are going to be applied to the data blocks. This generation of redo is applied to both table block changes and undo block changes: if a column is to be updated, then the new value of the column is written to the log buffer (which is the change that will be applied to the table block), and also the old value (which is the change that will be applied to the undo block). If the column is part of an index key, then the changes to be applied to the index are also written to the log buffer, together with an undo block change to protect the index changes. Having generated the redo, the update is carried out in the database buffer cache: the block of table data is updated with the new version of the changed column, and the old version of the changed column is written to the block of an undo segment. From this point until the update is committed, all queries from other sessions addressing the changed row will be redirected to the undo data. Only the session that is doing the update will see the actual current version of the row in the table block. The same principle applies to any associated index changes. As a simple example, consider this statement: updateemp set sal=sal*1.1 where empno=7934; To execute this statement, the block of table data containing the row for employee number 7934 (and possibly several other rows too, if the rows are smaller than the block) is copied into the database cache and a block of an undo segment is copied into the cache. Then your server process writes to the log buffer the old version of the sal column (which is the change to be applied to the block of undo) and the new version of the sal column (which is the change to be applied to the block of table data). Finally, the blocks themselves are updated. And remember that because SQL is a set-oriented language, if there were many rows in the emp table with the same empno, they would all be updated by the one statement. But because empno will be a primary key, that can’t happen.

90
3.3 Executing Insert and Delete Statements Conceptually, INSERT and DELETE are managed in the same fashion as an UPDATE. Redo generation is exactly the same: all changes to be made to data and undo blocks are first written out to the log buffer. The difference is in the amount of undo generated. When a row is inserted, the only undo generated consists of writing out the new rowid to the undo block. This is because to roll back an INSERT, the only information Oracle requires is the rowid, so that a delete from <table> where rowid=<rowid of the new row> statement can be executed. For a DELETE, the whole row is written to the undo block, so that the deletion can be rolled back if need be by inserting the complete row back into the table. A more normal DELETE statement might be delete from emp where empno=7934; which will delete the one row (if 7934 really is unique) from the table, writing it out to the undo block as it does it. 3.4 Executing a Rollback Remember that if anything goes wrong, rollback of transactions in progress is completely automatic, carried out by background processes. For example, if the session that initiated the transaction fails (perhaps the PC running the user process reboots, or the network link goes down), then the PMON will detect that there is a problem, and roll back the transaction. If the server reboots, then on startup SMON will detect the problem and initiate a rollback. A manual rollback requires the user to issue the ROLLBACK command. But however the rollback is initiated, the mechanism is identical: in the case of an UPDATE, the pre-update versions of the columns are copied from the undo block back to the table blocks. To roll back an INSERT, Oracle retrieves the rowid of the inserted row from the undo block and uses it as the key for a delete on the table. To roll back a DELETE, Oracle constructs a complete insert statement from the data in the undo block. Thus, Oracle’s implementation of the ROLLBACK command is to use undo data to construct and execute another statement that will reverse the effect of the first statement. PART I If you do omit a WHERE clause—as by saying delete from emp;—and so delete all of the several million rows in the table, you can roll back the changes. During the deletion, your server process will have copied the rows to an undo segment as it deleted them from the table: ROLLBACK will insert them back into the table, and no one will ever know you made the mistake. Unless, of course, you typed COMMIT.... 3.5 Executing a Commit Commit processing is where many people (and even some experienced DBAs) show an incomplete, or indeed completely inaccurate, understanding of the Oracle architecture. When you say COMMIT, all that happens physically is that LGWR flushes the log buffer to disk. DBWn does absolutely nothing. This is one of the most important performance features of the Oracle database.
91
To make a transaction durable, all that is necessary is that the changes that make up the transaction be on disk: there is no need whatsoever for the actual data to be on disk. If the changes are on disk, in the form of multiplexed redo log files, then in the event of damage to the database the transaction can be reinstantiated by restoring the datafiles from a backup taken before the damage occurred and applying the changes from the redo log. This process is covered in detail in later chapters; for now, just hang on to the fact that a COMMIT involves nothing more than flushing the log buffer to disk, and flagging the transaction as complete. This is why a transaction involving millions of updates in thousands of tables over many minutes or hours can be committed in a fraction of a second. Because LGWR writes in very nearly real time, virtually all the transaction’s changes are on disk already. When you say COMMIT, LGWR actually does write in real time: your session will hang until the write is complete. This delay will be the length of time it takes to flush the last bit of redo from the log buffer to disk, which will take only milliseconds. Your session is then free to continue, and from then on all other sessions will no longer be redirected to the undo blocks when they address the changed table, unless the principle of consistency requires it. Having said that DBWn has nothing to do with commit processing, it does of course write changed, or “dirty,” blocks to disk—eventually. The algorithm used is intended to ensure that while changed blocks do get to disk, they will not be written so quickly as to impact on normal working. If DBWn never wrote blocks to disk, there would be a huge amount of work for it to do when a checkpoint was finally needed. The exception is when a checkpoint is issued: these are the rare occasions (typically, only during an orderly shutdown of the database and instance) when CKPT instructs DBWn to write all dirty blocks to the datafiles. Where there is often confusion is that the stream of redo written out to the redo log files by LGWR will contain changes for both committed and uncommitted transactions. Furthermore, at any given moment DBWn may or may not have written out changed blocks of data segments or undo segments to the datafiles for both committed and uncommitted transactions. So in principle, your database on disk is corrupted: the datafiles may well be storing uncommitted work and be missing committed changes. But in the event of a crash, the stream of redo on disk always has enough information toreinstantiate any committed transactions that are not in the datafiles (by use of the changes applied to data blocks), and to reinstantiate the undo segments (by use of the changes applied to undo blocks) needed to roll back any uncommitted transactions that are in the datafiles. 4.0 DDL and Transaction Control The COMMIT and ROLLBACK statements apply only to DML. You cannot roll back a DDL statement: once executed, it is immediately durable. If it were possible to see the source code for (for example) the CREATE TABLE command, it would be obvious why. When you create a table, you are in fact doing a transaction against some data dictionary tables: at the very least, you are inserting a row into SYS.TAB$, a data dictionary table with one row to define every table in the database, and one or more rows into SYS.COL$, a data dictionary table with one row for the definition of every column of every table
92
in the database. Then the command concludes with a COMMIT. This is to protect the data dictionary: if the COMMIT were not built into the CREATE TABLE command, the possibility of an incomplete transaction would arise, and an incomplete transaction in the data dictionary could have appalling side effects. 4.1 The So-Called “Auto-Commit” To conclude this discussion of commit processing, it is necessary to remove any confusion about what is often called “auto-commit,” or sometimes “implicit commit.” You will often hear it said that in some situations Oracle will “auto-commit.” One of these situations is when doing DDL, as just described; another is when you exit from a user process such as SQL*Plus. Quite simply, there is no such thing as an automatic commit. When you execute a DDL statement, a perfectly normal COMMIT is included in the source code that implements the DDL command. But what about when you exit from your user process? If you are using SQL*Plus on a Windows terminal (never mind what operating system the database server is running) and you issue a DML statement followed by an “exit,” your transaction will be committed. This is because a COMMIT statement is built into the SQL*Plus “exit” command: if we could see the source code, it would be obvious. But what if you click in the top-right corner of the SQL*Plus window? The window will PART I close, and if you log in again, you will see that the transaction has been rolled back. This is because the programmers who wrote SQL*Plus for Microsoft Windows included a ROLLBACK statement in the code that is executed when you close the window. By contrast, if you are using the X Window version of SQL*Plus, you will find that closing the window commits the transaction. So whether you get an “auto-commit” when you exit from a program in various ways is entirely dependent on how your programmers wrote the exit code. The Oracle server will simply do what it is told to do. Of course, a disorderly exit from the user process, such as killing it with an operating system utility, will be detected by PMON, and an active transaction will always be rolled back. 4.2 DML and Integrity Constraints By default, integrity constraints are always enforced during DML, at statement execution time. When an integrity constraint is violated by a statement, the whole statement is rolled back. For example, a statement that attempts to update many rows might successfully update a number of rows but then hit a problem: execution will cease, and the successful updates already carried out by the statement will be reversed. It makes no difference what the problem is. For instance, it could be an integrity constraint or perhaps a space problem. The various constraint errors that can be raised by the various DML statements are summarized next, with examples of the messages. PART I 4.3 Data Pump In the normal course of events, ordinary SELECT and DML commands are used to extract data from the database and to insert data into it, but there are occasions when
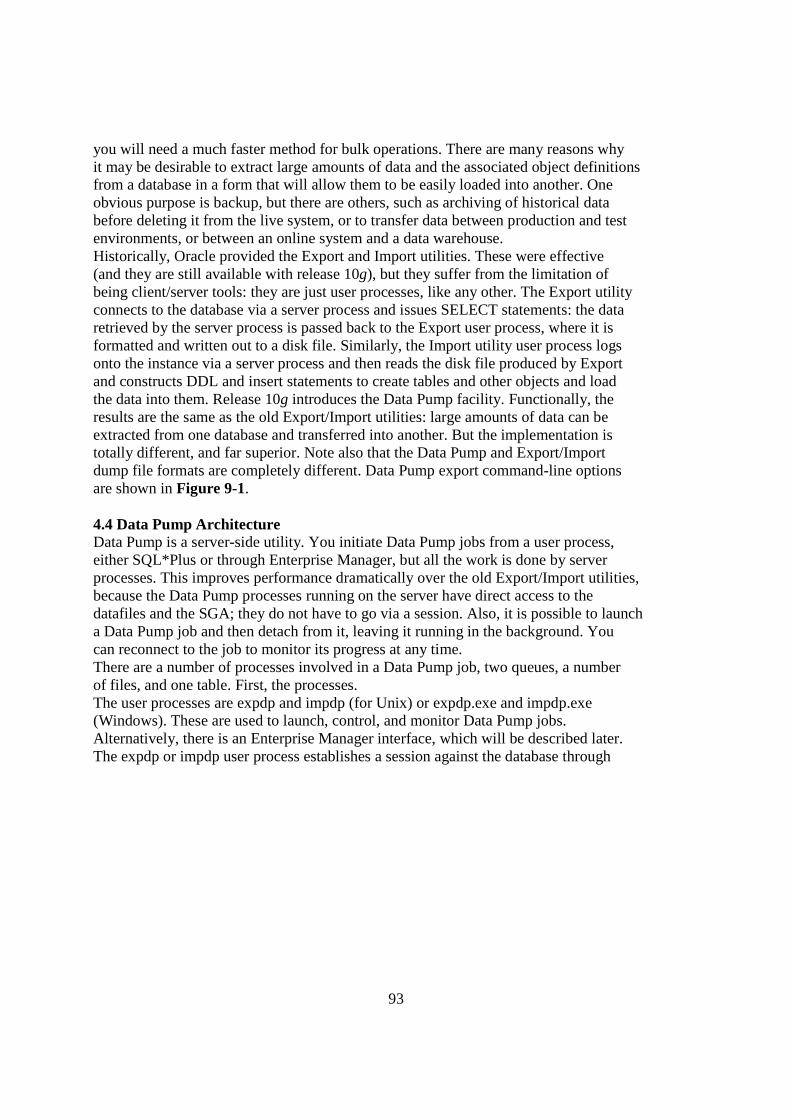
93
you will need a much faster method for bulk operations. There are many reasons why it may be desirable to extract large amounts of data and the associated object definitions from a database in a form that will allow them to be easily loaded into another. One obvious purpose is backup, but there are others, such as archiving of historical data before deleting it from the live system, or to transfer data between production and test environments, or between an online system and a data warehouse. Historically, Oracle provided the Export and Import utilities. These were effective (and they are still available with release 10g), but they suffer from the limitation of being client/server tools: they are just user processes, like any other. The Export utility connects to the database via a server process and issues SELECT statements: the data retrieved by the server process is passed back to the Export user process, where it is formatted and written out to a disk file. Similarly, the Import utility user process logs onto the instance via a server process and then reads the disk file produced by Export and constructs DDL and insert statements to create tables and other objects and load the data into them. Release 10g introduces the Data Pump facility. Functionally, the results are the same as the old Export/Import utilities: large amounts of data can be extracted from one database and transferred into another. But the implementation is totally different, and far superior. Note also that the Data Pump and Export/Import dump file formats are completely different. Data Pump export command-line options are shown in Figure 9-1. 4.4 Data Pump Architecture Data Pump is a server-side utility. You initiate Data Pump jobs from a user process, either SQL*Plus or through Enterprise Manager, but all the work is done by server processes. This improves performance dramatically over the old Export/Import utilities, because the Data Pump processes running on the server have direct access to the datafiles and the SGA; they do not have to go via a session. Also, it is possible to launch a Data Pump job and then detach from it, leaving it running in the background. You can reconnect to the job to monitor its progress at any time. There are a number of processes involved in a Data Pump job, two queues, a number of files, and one table. First, the processes. The user processes are expdp and impdp (for Unix) or expdp.exe and impdp.exe (Windows). These are used to launch, control, and monitor Data Pump jobs. Alternatively, there is an Enterprise Manager interface, which will be described later. The expdp or impdp user process establishes a session against the database through
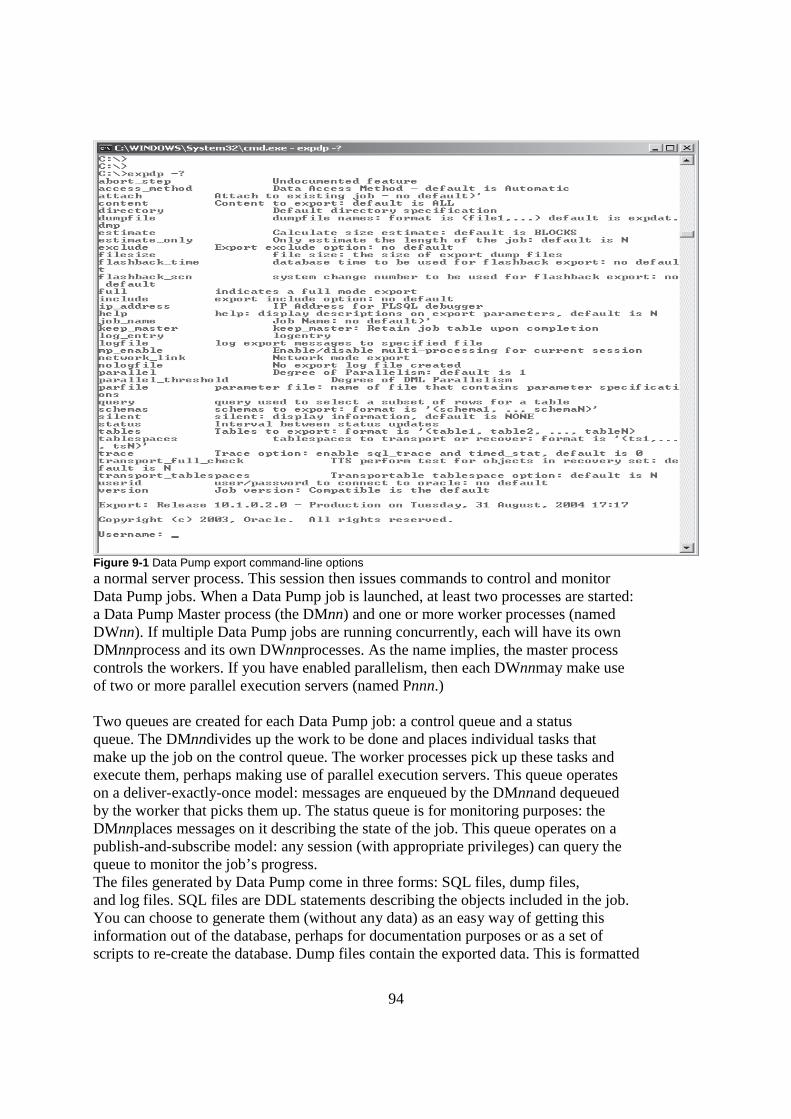
94
Figure 9-1 Data Pump export command-line options a normal server process. This session then issues commands to control and monitor Data Pump jobs. When a Data Pump job is launched, at least two processes are started: a Data Pump Master process (the DMnn) and one or more worker processes (named DWnn). If multiple Data Pump jobs are running concurrently, each will have its own DMnnprocess and its own DWnnprocesses. As the name implies, the master process controls the workers. If you have enabled parallelism, then each DWnnmay make use of two or more parallel execution servers (named Pnnn.) PART I Two queues are created for each Data Pump job: a control queue and a status queue. The DMnndivides up the work to be done and places individual tasks that make up the job on the control queue. The worker processes pick up these tasks and execute them, perhaps making use of parallel execution servers. This queue operates on a deliver-exactly-once model: messages are enqueued by the DMnnand dequeued by the worker that picks them up. The status queue is for monitoring purposes: the DMnnplaces messages on it describing the state of the job. This queue operates on a publish-and-subscribe model: any session (with appropriate privileges) can query the queue to monitor the job’s progress. The files generated by Data Pump come in three forms: SQL files, dump files, and log files. SQL files are DDL statements describing the objects included in the job. You can choose to generate them (without any data) as an easy way of getting this information out of the database, perhaps for documentation purposes or as a set of scripts to re-create the database. Dump files contain the exported data. This is formatted

95
with XML tags. The use of XML means that there is a considerable overhead in dump files for describing the data. A small table like the REGIONS table in the HR sample schema will generate a 94KB dump file, but while this overhead may seem disproportionately large for a tiny table like that, it becomes trivial for larger tables. The log files describe the history of the job run. Finally, there is the control table. Created for you by the DMnnwhen you launch a job, it is used both to record the job’s progress and to describe it. It is included in the dump file as the final item of the job. 4.5 Directories Data Pump reads and writes files in an Oracle directory. An Oracle directory gives a layer of abstraction between the user and the operating system: you as DBA create a directory within the database, which points to a physical path within the operating system file system. Directories can be created either from a SQL*Plus prompt as shown inFigure 9-2 or from within Database Control. To see information about directories, query the view DBA_DIRECTORIES. Each directory has a name, an owner, and the physical path to which it refers. Note that Oracle does not verify whether the path exists when you create the directory—if it does not, or if the operating system user who owns the Oracle software does not have permission to read and write to it, you will only get an error when you actually use Data Pump. Having created a directory, you must give the Oracle user who will be running Data Pump permission to read and write to it, just as your system administrators must give the operating system user permission to read and write to the physical path.
Figure 9-2 Creating directories from the command line . Directories can be contrasted with the initialization parameter UTL_FILE_DIR. This is a parameter that allows Oracle, through PL/SQL procedures, to write to the file system
96
of the database server machine, but it is a far cruder method: it is not possible to grant permissions within Oracle on UTL_FILE_DIR directories. Thus, if the parameter is set to UTL_FILE_DIR=/tmp PART I then any Oracle user can completely fill your /tmp directory. Furthermore, if it is set to UTL_FILE_DIR=* then anyone can write to any directory that the Oracle owner has permission on, which is a shocking security risk. 4.6 Direct Path or External Table Path? Data Pump has two methods for loading and unloading data: the direct path, and the external table path. The direct path bypasses the database buffer cache. For an export, Data Pump reads the datafiles directly from disk, extracts and formats the content, and writes it out as a dump file. For an import, Data Pump reads the dump file, uses its content to assemble blocks of table data, and writes them directly to the datafiles. The write is above the “high-water mark” of the table. The high-water mark is a marker in the table above which no data has ever been written. Once the load is complete, Data Pump shifts the high-water mark up to include the newly written blocks, and the rows within them are then visible to other users. This is the equivalent of a COMMIT. No undo is generated, and if you wish, you can switch off the generation of redo as well. Direct path is therefore extremely fast, and furthermore, it should have no impact on your end users because interaction with the SGA is kept to a minimum. The external table path uses the database buffer cache. Even though Data Pump is manipulating files that are external to the database, it uses the database buffer cache as though it were reading and writing an internal table. For an export, Data Pump reads blocks from the datafiles into the cache through a normal SELECT process. From there, it formats the data for output to a dump file. During an import, Data Pump constructs standard insert statements from the content of the dump file and executes them by reading blocks from the datafiles into the cache, where the insert is carried out in the normal fashion. As far as the database is concerned, external table Data Pump jobs look like absolutely ordinary (though perhaps rather large) SELECT or INSERT operations. Both undo and redo are generated, as they would be for any normal DML statement. Your end users may well complain while these jobs are in progress! Commit processing is absolutely normal. So what determines whether Data Pump uses the direct path or the external table path? You as DBA have no control: Data Pump itself makes the decision according to the complexity of the objects. Only simple structures, such as heap tables without active triggers, can be processed through the direct path; more complex objects such as clustered tables force Data Pump to use the external table path because it requires interaction with the SGA in order to resolve the complexities. In either case, the dump file generated is identical. 5.0 SQL*Loader Data Pump reads and writes files in an Oracle proprietary format: it is used to transfer data into and out of, or between, Oracle databases. But in many cases you will be faced with a need to do a bulk upload of datasets generated from some third-party system.

97
This is where SQL*Loader comes in. The input files may be generated by anything, but so long as the layout conforms to something that SQL*Loader can understand, it will upload the data successfully. Your task as DBA is to configure a SQL*Loader controlfile that can interpret the contents of the input datafiles; SQL*Loader will then insert the data, either using direct path or via the database buffer cache, in a similar fashion to Data Pump. The crucial differences are, first, that SQL*Loader can read any file no matter what its source, and second, that it is a user process like any other; unlike Data Pump, it is not a server-side utility. It establishes a session against the instance and the database via a server process. SQL*Loader uses a number of files. The input datafilesare the source data that it will upload into the database. These must conform to an agreed format. The controlfile is a text file written by the DBA with directives telling SQL*Loader how to interpret the contents of the input files, and what to do with the rows it extracts from them. Logfiles summarize the success (or otherwise) of the job, while detailing any errors. Rows extracted from the input files may be rejected by SQL*Loader (perhaps because they do not conform to the format expected by the controlfile) or by the database (for instance, insertion might violate an integrity constraint); in either case, they are written out to a bad file. If rows are successfully extracted from the input but rejected because they did not match some record selection criterion, they are written out to a reject file. SQL*Loader command-line options. 5.1 The SQL*Loader Controlfile The controlfile is a text file instructing SQL*Loader on how to process the input datafiles. It is possible to include the actual data to be loaded on the controlfile, but you would not normally do this; usually, you will create one controlfile and reuse it, on a regular basis, with different input datafiles. The formats that SQL*Loader can understand are fixed record format, variable record format, and stream record format. Remember that the examples following are very simple: the variety of input formats that SQL*Loader can understand is limited only by your ingenuity in constructing a controlfile. The fixed record format is the most straightforward, as well as the fastest to process. Each row of data is a fixed length, terminated with a carriage return character. Within the rows, you use some character as a field delimiter. A fixed record controlfile such as this, load data infile 'fixed.dat' "fix 15" into table names fields terminated by ',' (first,last) PART I will read the file fixed.dat, parse it into rows 15 bytes long (note that the 15 bytes must include one for the carriage return row terminator), divide the rows into two fields, and insert them into the columns “first” and “last” of the table “names.” A matching input datafile, called test.dat, could be John,Watsonaaa Damir,Bersinic McGraw,Hillaaa
98
Variable records include an entry at the head of each row to state how long the row is. The length of this entry is included in the controlfile. The controlfile might be load data infile 'names.dat' "var 3" into table names fields terminated by ',' (first,last) and a matching datafile would be 012John,Watson 015Damir,Bersinic 012McGraw,Hill Note that the length of each row is a three-digit number, as specified in the controlfile, and must include a character for the carriage return. Variable record format is not as fast as fixed format but is faster than stream format. Stream format requires SQL*Loader to do the most work. Rather than being given any information about the length of the rows, SQL*Loader must scan each row for the record terminator. This is the most flexible format but also the slowest to process. The controlfile might be load data infile 'names.dat' "str '\n'" into table names fields terminated by ',' (first,last) Note the use of the newline character, specified as “\n”. If you are familiar with the C programming language, that will not be new. If not, note that a number of nonprintable characters, such as the newline character, can be specified in this way: a leading backslash, then a letter used to indicate the nonprintable character. The combination “\n” is the most commonly used row delimiter (it indicates a line break), but tabs or form feed characters can be used as well. A matching datafile for the preceding controlfile might take the form John,Watson Damir,Bersinic McGraw,Hill As you can see, this format of input datafile is the easiest to generate. But it is also the slowest to process. PART I It is necessary to study the Utilities Manual for a full description of all the formatting capabilities of SQL*Loader, but in general you can assume that it is possible to construct acontrolfile that will understand just about any input datafile. However, do not think that it is always easy. 5.2 Loading Methods As with Data Pump, it is possible to use either a direct path or a conventional path for loading data into database tables. But also as with Data Pump, there are restrictions. Unlike when using Data Pump, you must tell SQL*Loader to use the direct path: add the keyword DIRECT to the controlfile or optionally specify DIRECT=Y on the

99
SQL*Loader command line. Remember that a conventional load is a straightforward insert, whereas for a direct load, the server process supporting the SQL*Loader session assembles blocks in memory and writes them directly to the datafiles, bypassing the database buffer cache. Exercise 9-4: Using SQL*Loader This exercise will insert some more rows into the table created in Exercise 9-2. 1. Using a text editor (such as Windows Notepad), create a SQL*Loader controlfile, called STREAMIN.CTL, as follows: load data infile 'STREAMIN.DAT' "str \n" append into table dp_test fields terminated by ',' (username,user_id) Note that the “append” keyword allows SQL*Loader to insert into a table that already contains rows. 2. Using a text editor as before, create the input datafile, to be called STREAMIN .DAT, as follows: John,100 Damir,200 McGraw,9999 3. From an operating system prompt, issue this command: sqlldruserid=system/oracle control=STREAMIN.CTL 4. Log in to your instance with SQL*Plus, and confirm that the three new rows have been inserted into the table: select * from dp_test 6.0 SUMMARY In this chapter you learned the internal mechanisms that Oracle uses to ensure transactional consistency, according to the requirements of the relational database model, and looked at what actually happens, in memory and on disk, when SQL statements are executed. Following this investigation on executing individual DML statements, you saw how the Data Pump and SQL*Loader utilities can be used for bulk operations. 7.0 TURTOR MARKED ASSIGNMENT 1. You issue a COMMIT command. Which of the following statements is correct? (Choose two correct answers.) A. DBWn writes the changed blocks to the datafiles. B. LGWR writes the changes to the logfiles. C. CKPT synchronizes the database buffer cache with the datafiles. D. The transaction is made durable.

100
E. The transaction can be rolled back. 2. You issue an UPDATE command, and then a COMMIT. Put the following actions in the correct order: A. Data blocks are copied from the datafiles into the database buffer cache. B. Data blocks in the cache are updated. C. The log buffer is updated. D. The changed blocks are flushed to disk. E. The log buffer is flushed to disk. 3. User JOHN updates some rows and asks user DAMIR to log in and check the changes before he commits them. Which of the following statements is true? (Choose the best answer.) PART I A. DAMIR can see the changes but cannot alter them because JOHN will have locked the rows. B. DAMIR will not be able to see the changes. C. JOHN must commit the changes, so that DAMIR can see them and if necessary roll them back. D. JOHN must commit the changes so that DAMIR can see them, but only JOHN can roll them back. 4. User JOHN updates some rows but does not commit the changes. User DAMIR queries the rows that JOHN updated. Which of the following statements is true? (Choose three correct answers.) A. DAMIR’s query will be redirected to the redo logs to show the original version of the rows. B. DAMIR’s session will roll back JOHN’s changes to show the original version of the rows. C. JOHN must commit the changes before DAMIR can see them. D. DAMIR cannot see the rows that were updated, because they will be locked. E. If DAMIR’s query started after JOHN’s update, the principle of read consistency means that he cannot see JOHN’s changes. F. If DAMIR’s query started after JOHN’s update, the principle of isolation means that he cannot see JOHN’s changes. 5. You are using Data Pump to upload rows into a table, and you wish to use the direct path. Which of the following statements is correct? (Choose three answers.) A. You must include the “DIRECT” keyword in the Data Pump controlfile. B. This is not possible if the table is in a cluster. C. You must disable insert triggers on the table first. D. You must enable insert triggers on the table first. E. You have no control over this; Data Pump will use the direct path automatically if it can. F. Direct path is slower than the external table path because it doesn’t cache data in memory. 6. You issue an INSERT command and then attempt to SELECT the rows you inserted before committing them. Which of the following is true? (Choose the

101
best answer.) A. You must commit the insert before you can see the rows. B. You will see the new rows, even though they are uncommitted. C. You must terminate the transaction with a COMMIT or ROLLBACK before you can issue a SELECT statement. D. You will see the new rows because your session will read them from an undo segment. 7. You issue an INSERT statement, and it fails with the message “ORA-02291: integrity constraint (HR.EMP_DEPT_FK) violated - parent key not found.” Which of the following statements is true? (Choose the best answer.) A. The transaction will have been rolled back. B. The statement will have been rolled back. C. You must create an index on the parent table before you can find parent keys. D. All of the above are correct. 8. Which of the following is not a Data Pump file type? (Choose the best answer.) A. Dump file B. Logfile C. Controlfile D. SQL file 9. You launch a Data Pump export job to export a number of tables, which runs for several hours. Which of the following is true? (Choose the best answer.) A. The tables being exported will be locked throughout the run. B. Transactions against the tables committed during the run will be included in the export. C. Transactions against the tables (committed or not) during the run will not be included in the export. D. SQL executed against the tables during the run will be written out to a SQL file. E. The DDL describing the tables will be written out to a SQL file. 10. Using SQL*Loader, place these file formats in order of speed to process, from slowest to fastest: A. Fixed record format B. Stream record format C. Variable record format 11. You want to transfer a large amount of data from one database to another: both databases are on the same machine. What should be the quickest method? (Choose the best answer.) A. Use the Export/Import utilities. B. Use Data Pump to write out the data, and a SQL*Loader direct load to bring it in. PART I C. Use Data Pump in network mode. D. Use Data Pump export to write out the data and then Data Pump import to read it in. 12. Which of the following is not a SQL*Loader file? (Choose one answer.) A. Bad file

102
B. Controlfile C. Discard file D. Good file E. Logfile 13. You create a directory with the statement create directory dp_dir as 'c:\tmp'; but when you try to use it with Data Pump, there is an error. Which of the following could be true? (Choose three answers.) A. The Oracle software owner has no permissions on c:\tmp. B. The Oracle database user has no permissions on dp_dir. C. The path c:\tmp does not exist. D. The path c:\tmp must exist, or the “create directory” statement would have failed. E. If you use Data Pump in network mode, then there will be no need for a directory. F. Issuing the command grant all on ‘c:\tmp’ to public; may solve some permission problems. 14. You launch a Data Pump job with expdp and then exit from the session. Which of the following is true? (Choose two answers.) A. The job will terminate. B. The job will continue running in the background. C. You cannot monitor the job once you have exited. D. You can reattach to the job to monitor it. E. The job will pause but can be restarted. 15. You run SQL*Loader on your PC, to insert data into a remote database. Which of the following is true? (Choose the best answer.) A. The input datafiles must be on your PC. B. The input datafiles must be on the server. C. Direct load is possible only if the input datafiles are on the server. D. Direct load is only possible if you run SQL*Loader on the server, not on the PC. 8.0 FURTHER READING/ REFERENCE 1.0 Rick Greenwald and Robert Hoskin , Oracle Power Objects , 1997 O’Reilly and Associates Inc. 2.0 Steven Feverstein , Oracle PL/ SQL Programming , 1997 O’Reilly and Associates Inc.
3.0 Greenwald, Rick; Stackowiak, Robert; Stern, Jonathan (2007). Oracle Essentials: Oracle Database 11g. Essential Series (4 ed.). O'Reilly Media.p. 31. ISBN 9780596514549.Retrieved 2010-06-08. "Today, Oracle offers other embedded databases including TimesTen, Berkeley DB, and Oracle Database Lite."
4.0Chapple, Mike. "SQL Fundamentals". Databases. About.com. Retrieved 2009-01-28.
5.0 "Structured Query Language (SQL)". International Business Machines. October 27, 2006. Retrieved 2007-06-10.
103
MODULE 2: : ORACLE DATABASE MANAGEMENT
UNIT 4: Programming Oraclewith PL/SQL
Page
1.0 Introduction 2
2.0 Objectives 2
3.0 Programming Languages and the Oracle Database
11.0 Instance Parameters for PL/SQL
12.0 Summary
6.0 Tutor Marked Assignment
7.0 Further Reading /References

104
1.0 INTRODUCTION PL/SQL is a programming language developed specifically for the Oracle database. It extends the SQL language by providing procedural structures, and facilities for generating user interface code. Theoretically, a database administrator may not need to be an expert in PL/SQL; programming work should be done by the development staff. But in practice, the more PL/SQL a DBA knows, the better. At the very least, you will need to be able to identify PL/SQL objects that have problems. Furthermore, at most Oracle installations, the DBA will be expected to assist programmers with writing code and when necessary to create PL/SQL objects as well. 2.0 OBJECTIVES In this unit you will learn how to • Identify PL/SQL objects • Describe triggers and triggering events • Identify configuration options that affect PL/SQL performance 3.0 Programming Languages and the Oracle Database The Oracle database, like all ISO-compliant relational databases, supports the use of Structured Query Language, or SQL. SQL is a set-oriented language designed for retrieving and manipulating data in a client/server environment. It is very efficient at this, but there are many occasions when your programmers will want to manipulate rows one at a time, rather than in groups. Also, SQL does not have any facilities for designing user interfaces. By contrast, procedural languages can manipulate individual rows. They have commands that will allow navigation from one row to another, and can include flow control structures. 3.1 SQL and Procedural Languages To combine the advantages of SQL’s set-oriented structures with the control facilities of a procedural language, your programmers need to use a language with elements of both. The universally accepted approach is to embed SQL commands in procedural code. There are two approaches to this. The pure client/server approach is to run the procedural code on a client machine (either a user’s terminal or an application server) and send the SQL commands it generates to the database server for execution. An alternative is to run the procedural code, as well as the SQL, within the database. In some ways, the second approach is more efficient: there is no network overhead, and all the code is centrally stored and managed. But it means that the language is proprietary: it will run within the database that is designed to run it, and nowhere else. A second possible problem is that all the processing workload is concentrated within the database. PL/SQL is Oracle’s proprietary third-generation language, which runs within the

105
database. You can use it to retrieve and manipulate data with SQL, while using procedural constructs such as IF...THEN...ELSE or FOR or WHILE. The PL/SQL code can be stored on a client machine and sent to the server for execution (this is known as “anonymous” PL/SQL), or it can be stored within the database as a named block of code. From release 8i of the Oracle database, it is also possible to use Java within the database. Like PL/SQL, Java can be used to provide a blend of procedural code with SQL statements. Since Java can run either on a client machine (typically, an application server) or within the database, it gives you the option of distributing the processing workload—at the cost of increased network traffic. And unlike PL/SQL, it is a nonproprietary industry standard: if your application is written in Java, it should be portable to any Java-compliant database. But Java is a much lower-level language and will often have a longer development cycle. The choice of language is dependent on many factors, but PL/SQL should always be considered in the Oracle environment. It is a very quick and easy language to work with, and all DBAs should be familiar with it—if only to assist programmers. 3.2 Stored and Anonymous PL/SQL PL/SQL runs within the database, but it can be stored on either the client or the server. PL/SQL code can also be entered interactively from a SQL*Plus prompt. Stored PL/SQL is loaded into the database and stored within the data dictionary as a named PL/ SQL object. When it is saved to the database, it is compiled: the compilation process checks for syntactical errors and also picks up errors relating to the data objects the code addresses. This saves time when the code is actually run and means that programmers should pick up errors at compilation time, before users hit them. Code stored remotely, or ad hoc code issued at the SQL*Plus prompt, is compiled dynamically: this impacts on performance and also raises the possibility that unexpected errors might occur. Figure 10-1 shows an example of running an anonymous PL/SQL block and of creating and running a stored procedure. The anonymous block in the figure creates a variable called INCREASE with the DECLARE statement and sets it to 10. Then the
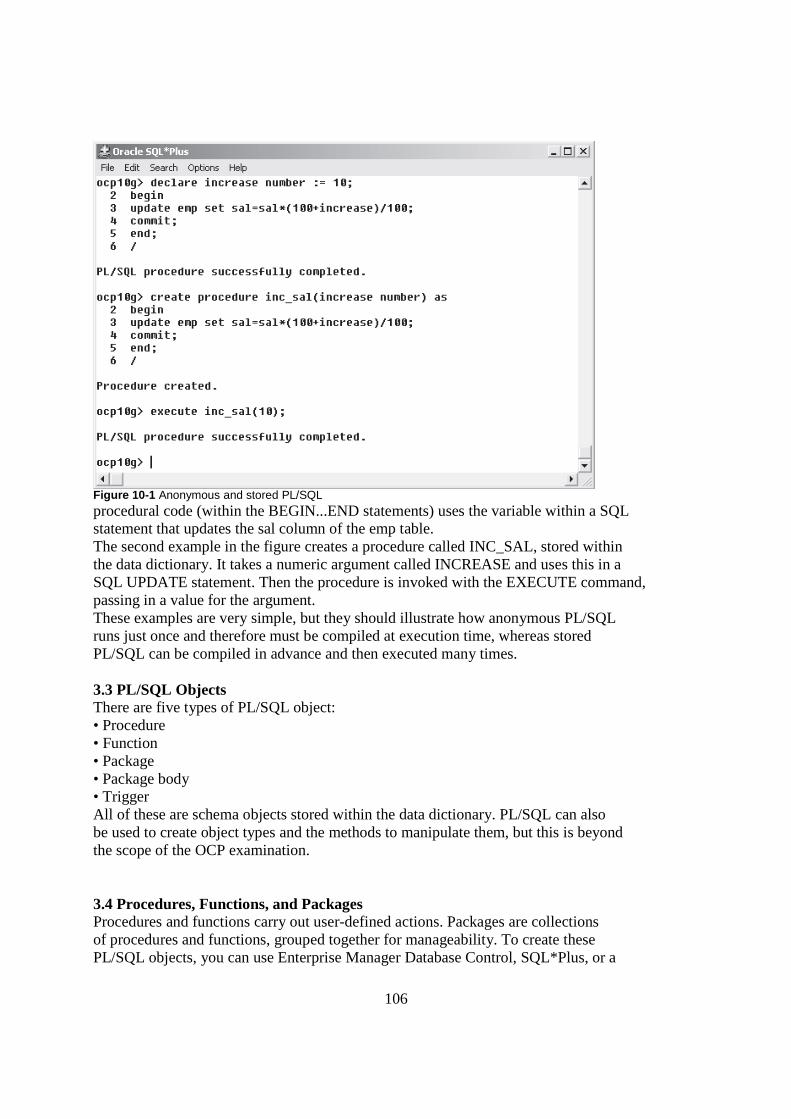
106
Figure 10-1 Anonymous and stored PL/SQL procedural code (within the BEGIN...END statements) uses the variable within a SQL statement that updates the sal column of the emp table. The second example in the figure creates a procedure called INC_SAL, stored within the data dictionary. It takes a numeric argument called INCREASE and uses this in a SQL UPDATE statement. Then the procedure is invoked with the EXECUTE command, passing in a value for the argument. These examples are very simple, but they should illustrate how anonymous PL/SQL runs just once and therefore must be compiled at execution time, whereas stored PL/SQL can be compiled in advance and then executed many times. 3.3 PL/SQL Objects There are five types of PL/SQL object: • Procedure • Function • Package • Package body • Trigger All of these are schema objects stored within the data dictionary. PL/SQL can also be used to create object types and the methods to manipulate them, but this is beyond the scope of the OCP examination. 3.4 Procedures, Functions, and Packages Procedures and functions carry out user-defined actions. Packages are collections of procedures and functions, grouped together for manageability. To create these PL/SQL objects, you can use Enterprise Manager Database Control, SQL*Plus, or a

107
tool specifically designed for generating PL/SQL code, such as Oracle’s Procedure Builder or various third-party products. PART I 3.5 Procedures and Functions A procedure is a block of code that carries out some action. It can, optionally, be defined with a number of arguments. These arguments are replaced with the actual parameters given when the procedure is invoked. The arguments can be IN arguments, meaning that they are used to pass data into the procedure, or OUT arguments, meaning that they are modified by the procedure and after execution the new values are passed out of the procedure. Arguments can also be IN-OUT, where the one variable serves both purposes. Within a procedure, you can define any number of variables that, unlike the arguments, are private to the procedure. To run a procedure, either call it from within a PL/SQL block or use the interactive EXECUTE command. A function is similar in concept to a procedure, but it does not have OUT arguments and cannot be invoked with the EXECUTE command. It returns a single value, with the RETURN statement. Anything that a function can do, a procedure could also do. Functions are generally used to support specific operations: small code blocks, that will be used many times. Procedures are more commonly used to divide code into modules, and may contain long and complex processes. Figure 10-2 shows an example of creating and invoking a function. The first line is an instruction to create the function, or if it already exists, to overwrite it. The function takes one numeric argument and will return a varchar2 value. Within the BEGIN...END is the procedural code, which includes the flow control construct IF…THEN...ELSE… END IF.
Figure 10-2 Creating and using a function with SQL*Plus
3.6 Packages To group related procedures and functions together, your programmers create packages. A package consists of two objects: a specification and a body. A package specification lists the functions and procedures in the package, with their call specifications: the

108
arguments and their datatypes. It can also define variables and constants accessible to all the procedures and functions in the package. The package body contains the PL/SQL code that implements the package: the code that creates the procedures and functions. To create a package specification, use the CREATE PACKAGE command. For example, ocp10g> create or replace package numbers 2 as 3 function odd_even(v1 number) return varchar2; 4 procedure ins_ints(v1 in number); 5 end numbers; 6 / Package created. Then to create the package body, use the CREATE OR REPLACE PACKAGE BODY statement to create the individual functions and procedures. Several hundred PL/SQL packages are provided as standard with the Oracle database. Many are documented in the “PL/SQL Packages and Types Reference” manual. These supplied packages are, for the most part, created when you create a database. Some of them are for the use of the database administrator (such as the DBMS_WORKLOAD_ REPOSITORY package, which lets you manage the Automatic Workload Repository); others are for your developers (such as the DBMS_OUTPUT package, that lets them write to a session’s user process). To invoke a packaged procedure, you must prefix the procedure name with the package name. For example, ocp10g> exec dbms_output.put_line('message to the user'); will run the PUT_LINE procedure in the DBMS_OUTPUT package. Exercise 10-1: Creating and Using Functions,Procedures, and Packages Use Database Control to create PL/SQL objects and execute them from SQL*Plus. 1. Connect to your database as user SYSTEM using SQL*Plus. 2. Create a table to be used for this exercise. ocp10g> create table integers (c1 number,c2 varchar2(5)); 3. Connect to your database as user SYSTEM using Database Control. 4. From the database home page, take the Administration tab and then the Packages link in the Schema section. Click Create. 5. In the Create Package window, enter NUMBERS as the package name, and the source code for the package as in Figure 10-4. Click OK to create the package. 6. From the database home page, take the Administration tab and then the Package bodies link in the Schema section. Click Create. 7. In the Create Package Body window, enter NUMBERS as the package name, and the source code for the package body as in Figure 10-5. Click OK to create the package body. 8. In your SQL*Plus session, describe the package, execute the procedure, and check the results. ocp10g>desc numbers; PROCEDURE INS_INTS

109
Argument Name Type In/Out Default? ------------------------- ------------------ ------ -------- V1 NUMBER IN FUNCTION ODD_EVEN RETURNS VARCHAR2 Argument Name Type In/Out Default? ------------------------- ------------------ ------ -------- V1 NUMBER IN ocp10g> execute numbers.ins_ints(5); PL/SQL procedure successfully completed. ocp10g> select * from integers; C1 C2 ---------- ----- 1 odd 2 even 3 odd 4 even 5 odd 5 rows selected. PART I 3.7 Database Triggers Database triggers are a special category of PL/SQL object, in that they cannot be invoked manually. A trigger runs (or “fires”) automatically when a particular action is carried out or a certain situation arises; this is the triggering event. There are a number of possible triggering events. For many of them, the trigger can be configured to fire either before or after the event. It is also possible to have both before and after triggers defined for the same event. The DML triggers, which fire when rows are inserted, updated, or deleted, can be configured to fire once for each affected row, or once per statement execution. All triggers have one factor in common: their execution is completely beyond the control of the user who caused the triggering event. He may not even know that the trigger fired. This makes triggers admirably suited to auditing user actions, as will be described in Chapter 11. These are the more commonly used triggering events: • Execution of INSERT, UPDATE, and DELETE DML commands • Execution of CREATE, DROP, ALTER, and TRUNCATE DDL commands • Session logon and logoff • Database startup and shutdown • Suspension of a statement because of a space problem • Detection of a server error Note that there is no such thing as a trigger on SELECT, though in next unit you will see how fine-grained auditing (FGA) can be used to produce a similar effect. There are numerous uses for triggers. Here are some examples: • Auditing users’ actions A trigger can capture full details of what was done and who did it, and write them out to an audit table. • Executing complex edits An action on one row may, in business terms, require a number of associated actions on other tables. The trigger can perform these automatically.
110
• Security A trigger can check the time, the user’s IP address, the program he is running, and any other factors that should limit what s/he can do. • Enforcing complex constraints An action may be fine in terms of the constraints on one table, but may need to be validated against the contents of several other tables. Consider an HR system. Before an employee is deleted from the current employees’ table, it is necessary to transfer all his details from a number of tables to archive tables. This could be enforced by creating a trigger as follows: create or replace trigger archive_emp before delete on current_emps for each row begin archive_emp(:old.employee_id); end; Whenever any session deletes rows from the CURRENT_EMPS table, before each row is actually deleted the procedure ARCHIVE_EMP will execute, taking the EMPLOYEE_ID of the row being deleted as its parameter. This procedure will do whatever is necessary to archive an employee’s data. This illustrates an important point: it is generally considered good practice to keep triggers small, and to do the bulk of the work with a stored procedure. PART I Exercise 10-2: Using DML Triggers Create a trigger to validate data, before committing it. 1. Connect to your database as user SYSTEM using SQL*Plus. 2. Create a trigger on the INTEGERS table as follows: ocp10g> create or replace trigger oe_check 2 after insert or update on integers 3 for each row 4 begin 5 if mod(:new.c1,2)=0 then 6 dbms_output.put_line(:new.c1||' is even'); 7 else 8 dbms_output.put_line(:new.c1||' is odd'); 9 end if; 10 end; 11 / Trigger created. 3. Enable printing to the screen for your SQL*Plus session. ocp10g> set serveroutput on; 4. Test the effect of the trigger as follows: ocp10g> insert into integers values(2,'odd'); 2 is even 1 row created. ocp10g> rollback; Rollback complete.
111
ocp10g> insert into integers values(3,'odd'); 3 is odd 1 row created. ocp10g> commit; Commit complete. Note that because triggers fire as part of the transaction, it is possible to roll back the incorrect insertion. 5. Connect to your database as user SYSTEM using Database Control. 6. From the database home page, take the Administration tab and then the Triggers link in the Schema section. 7. In the Search window, select Object Type as Trigger, Schema as SYSTEM, and Object Name as OE_CHECK. Then click Go. 8. Click View to see the source code of the trigger, as in Figure 10-6. Note that it is “Valid,” meaning that it has compiled correctly, and “Enabled,” meaning that it will fire. 9. Tidy up. ocp10g> drop trigger oe_check; ocp10g> drop table integers; ocp10g> drop package numbers; 4.0 Instance Parameters for PL/SQL The performance of PL/SQL code can be influenced by some instance parameters: • PLSQL_V2_COMPATIBILITY, default FALSE Setting this to TRUE forces Oracle to allow some abnormal behavior that was legal in earlier releases. Use this only if it is necessary for backward compatibility. • PLSQL_DEBUG, default FALSE Setting this to true forces Oracle to compile PL/SQL in a manner that will store additional information that may assist with debugging. This would not normally be set on a production system. • PLSQL_OPTIMIZE_LEVEL, default 2 Level 2, the highest, enables the use of all the compiler’s optimization features; this gives the best run-time performance PART I but perhaps increases compilation time. Lower settings (0 or 1) will result in quicker compilation but possibly slightly degraded execution. If the production system is doing a large amount of compilation (anonymous PL/SQL, for example), then it might be necessary to change this. • PLSQL_WARNINGS, default DISABLE:ALL This controls which messages should be displayed by the PL/SQL compiler. Other settings will cause the compiler to generate messages that may be of value when debugging code. This would not normally be set on a production system. • PLSQL_CODE_TYPE, default INTERPRETED The default setting means that PL/SQL code is compiled only down to byte code. Then when invoked, this is interpreted. Setting this to NATIVE, in conjunction with the parameter that follows, instructs Oracle to precompile the PL/SQL code to C code, and then to compile and link this with the C compiler and linker provided by your server’s operating system. This may improve performance. • PLSQL_NATIVE_LIBRARY_DIR, default NULL Specifies the operating system

112
path to store the dynamic link libraries that are generated by native PL/SQL compilation. In most cases, the default settings for all these instance parameters will be suitable. On a production system, you may wish to consider setting the PLSQL_CODE_TYPE to NATIVE; this is in fact recommended for Oracle E-Business Suite running in a 10g database. Details of how to do this are given in the PL/SQL Users Guide and Reference manual. 5.0 SUMMARY PL/SQL is a proprietary language for use with an Oracle database. It provides procedural constructs that can be used in conjunction with SQL statements. PL/SQL is usually used to write stored procedures and functions: these are compiled and stored within the data dictionary of the database and for ease of management can be grouped into packages. A package consists of a package specification, which publishes the call specifications of the procedures and functions, and a package body, which implements them. A special type of PL/SQL object is the trigger. Triggers are PL/SQL code blocks that cannot be invoked on demand: they run automatically when their triggering event occurs. The default mode for running PL/SQL is through an interpreter. It is compiled down to byte code, but no further. If you wish, and if you have a C compiler and a linker available, you can convert your PL/SQL code to C code, compile and link it, and save it as a dynamically linkable shared object library. 6.0 TURTOR MARKED ASSIGNMENT 1. Which of the following, if any, can be PL/SQL objects? (Choose all that apply.) A. Constraints B. Functions C. Package bodies D. Package specifications E. Procedures F. Sequences G. Triggers H. Views 2. Which of the following PL/SQL objects can be invoked with the EXECUTE command? (Choose the best answer.) A. Functions B. Packages C. Procedures D. Triggers E. All of the above 3. Where does PL/SQL code run? (Choose the best answer.) A. Within the session’s user process B. Within the data dictionary C. Within the instance D. It depends on whether the PL/SQL is anonymous or stored 4. Which PL/SQL object types can be packaged? (Choose all that apply.)

113
A. Anonymous PL/SQL blocks B. Functions C. Procedures D. Triggers 5. When PL/SQL is compiled, where is the resulting code stored? (Choose the best answer.) A. In the data dictionary B. As an operating system file C. In the default tablespace of the user who owns the code D. It depends on the PLSQL_CODE_TYPE parameter 13.0 FURTHER READING /REFERENCE 1.0 Rick Greenwald and Robert Hoskin , Oracle Power Objects , 1997 O’Reilly and Associates Inc. 2.0 Steven Feverstein , Oracle PL/ SQL Programming , 1997 O’Reilly and Associates Inc.
3.0 Greenwald, Rick; Stackowiak, Robert; Stern, Jonathan (2007). Oracle Essentials: Oracle Database 11g. Essential Series (4 ed.). O'Reilly Media.p. 31. ISBN 9780596514549.Retrieved 2010-06-08. "Today, Oracle offers other embedded databases including TimesTen, Berkeley DB, and Oracle Database Lite."
4.0 Chapple, Mike. "SQL Fundamentals". Databases. About.com. Retrieved 2009-01-28.
5.0 "Structured Query Language (SQL)". International Business Machines. October 27, 2006. Retrieved 2007-06-10.

114
MODULE 3: ORACLE CONFIGURATION
UNIT 1: Configuring Oracle Networking
Page
1.0 Introduction 2
2.0 Objectives 2
3.0 Oracle system Requirement 2
14.0 Optimal Flexible Architecture 3
5.0. Installing Oracle Usingthe Oracle Universal Installer 6.0 Setting the Environment 8
7.0Installing Oracle Software
8.0 Summary
9.0 Tutor Marked Assignment
11.0 Further Reading /References
CHAPTER 1UN2
115
1.0 INTRODUCTION
Networking is an integral part of the client/server database architecture that isfundamental to all
modern relational databases. The Oracle database had the potential
for client/server computing from the beginning (the first release, in 1978, made a
separation between the Oracle code and the user code), but it was only with version 4
in 1984 that Oracle introduced interoperability between PC and server. True client/
server support came with version 5, in 1986. This unit introduces the Oracle Net
services. Oracle Net was previously known as Sqlnet, and you will still hear many DBAs
refer to it as such. But before going into the detail of Oracle Net, this chapter has a
review of how Oracle implements the client/server paradigm: a full understanding of
this is essential if one is to appreciate what Oracle Net is doing for you.
2.0 OBJECTIVES
In this unit you will learn how to
• Use Database Control to create additional listeners
• Use Database Control to create Oracle Net service aliases
• Use Database Control to configure connect-time failover
• Use Listener features
• Use the Oracle Net Manager to configure client and middle-tier connections
• Use tnsping to test Oracle Net connectivity
• Describe Oracle Net services
• Describe Oracle Net names resolution methods
3.0 Oracle’s Implementationof the Client/Server Paradigm
There are many layers between the user and the database. In the Oracle environment,
no user ever has direct access to the database—nor does the process that he is running.
Client/server architecture guarantees that all access to data is controlled by the server.
A user interacts with a user process: this is the software that he runs on his local
terminal. For example, it could be Microsoft Access plus an ODBC driver on a Windows
PC; it could be something written in C and linked with the Oracle Call Interface (or
116
OCI) libraries; it could even be our old friend SQL*Plus. Whatever it is, the purpose
of the user process is to prompt the user to enter information that the process can use
to generate SQL statements. In the case of SQL*Plus, the process merely waits for you to
enter a SQL statement or SQL*Plus command; a more sophisticated user process will
paint a proper data entry screen, validate your input, and then, when you click the
Submit button, construct the statement and send it off to the server process.
The server process is a process running on the database server machine that executes
the SQL it receives from the user process. This is your basic client/server split: a user
process generating SQL, a server process executing it. The execution of a SQL statement
goes through four stages: parse, bind, execute, and fetch.
In the parse phase your server process works out what the statement actually means,
and how best to execute it. Parsing involves interaction with the shared pool of the
instance: shared pool memory structures are used to convert the SQL into something
that is actually executable.
In the bind phase, any variables are expanded to literal values. Then the execute
phase will require more use of the instance’s SGA, and possibly of the database.
During the execution of a statement, data in the database buffer cache will be read
or updated and changes written to the redo log buffer, but if the relevant blocks are not
in the database buffer cache, your server process will read them from the datafiles. This
is the first point in the execution of a statement where the database itself is involved;RT I
all the work so far has occurred in the instance.
4.0 A Word on Oracle Netand Communication Protocols
Oracle Net is a layered protocol: it runs on top of whatever communications protocol
is supported by your operating system. Historically, Sqlnet could work with all the
popular protocols (with the exception of NETBIOS/NETBEUI, which has too limited
functionality to be used for large database systems), but in release 10g Oracle’s network
support is limited to TCP, Named Pipes (or NMP), and the new Sockets Direct Protocol
(or SDP) over InfiniBand high-speed networks. The secure sockets variants of these
protocols can also be used. All operating systems also have an Inter-Process
Communication (or IPC) protocol proprietary to the operating system—this is also

117
available to Oracle Net for local connections where the user process is on the same
machine as the server.
This layering of Oracle Net on top of whatever is provided by your operating
system gives Oracle platform independence. You as DBA do not need to know anything
about the underlying network: you configure Oracle Net to use whatever protocol has
been configured by your network administrators, and you need not concern yourself
with what is happening beneath. TCP is, for better or worse, undoubtedly the most
popular protocol worldwide, so that is the one used in the examples that follow.
With regard to conformance with the Open Systems Interconnection (or OSI)
seven-layer model to which all IT vendors are supposed to comply, Oracle Net maps
onto layers five, six, and seven: the session, presentation, and application layers. The
protocol adapters installed with the standard Oracle installation provide the crossover
to layer four, the transport layer, provided by your operating system. Thus Oracle Net
is responsible for establishing sessions between end systems once TCP (or whatever
else you are using) has established a layer four connection. The presentation layer
functions are handled by the Oracle Net Two-Task Common (or TTC) layer. TTC is
responsible for any conversions necessary when data is transferred between the user
process and the server process, such as character set changes. Then the application
layer functions are the user and server processes themselves.
5.0 Establishing a Session
When a user, through his user process, wishes to establish a session against an instance,
he will issue a command something like
SQL> CONNECT SCOTT/TIGER@OCP10G
Of course, if he is using a properly written user interface, he won’t type in those words—
he will be prompted to enter the details into a logon screen—but one way or another
that is the command the user process will generate. It is now time to go into what
PART I
actually happens when that command is processed. First, break down the command
into its components. There is a database username (“SCOTT”), followed by a database
password (“TIGER”), and the two are separated by a “/” as a delimiter. Then there is
118
an “@” symbol, followed by a connect string, “OCP10G”. The “@” symbol is an
indication to the user process that a network connection is required. If the “@” and
the connect string are omitted, then the user process will assume that the instance you
wish to connect to is running on the local machine, and that the always-available IPC
protocol can be used. If the “@” and a connect string are included, then the user
process will assume that you are requesting a network connection to an instance on
a remote machine—though in fact, you could be bouncing off the network card and
back to the machine you are logged on to.
6.0 Connecting to a Local Instance
Even when you connect to an instance running on your local machine, you still use
Oracle Net. All Oracle sessions use a network protocol, but for a local connection
the protocol is IPC: this is the protocol provided by your operating system that will
allow processes to communicate within the host machine. This is the only type of
connection that does not require a listener; indeed, local connections do not require
any configuration at all. The only information needed is to tell your user process which
instance you want to connect to. Remember that there could be several instances
running on your local computer. You give the process this information through an
environment variable. Figure 12-2 shows examples of this in Linux;
7.0 Name Resolution
When connecting using Oracle Net, the first stage is to work out exactly what you
want to connect to. This is the process of name resolution. If your connect statement
includes the connect string “@OCP10g”, Oracle Net has to work out what is meant by
“OCP10g”. This means that the string has to be resolved into four pieces of information:
the protocol you want to use (in modern times, one can usually assume that this is TCP),
the IP address on which the database listener is running, the port that the listener is
monitoring for incoming connection requests, and the name of the instance (which
need not be the same as the connect string) to which you wish to connect. There are
variations: rather than an IP address, the connect string can include a hostname, which
then gets further resolved to an IP address by a DNS server. Rather than specifying an
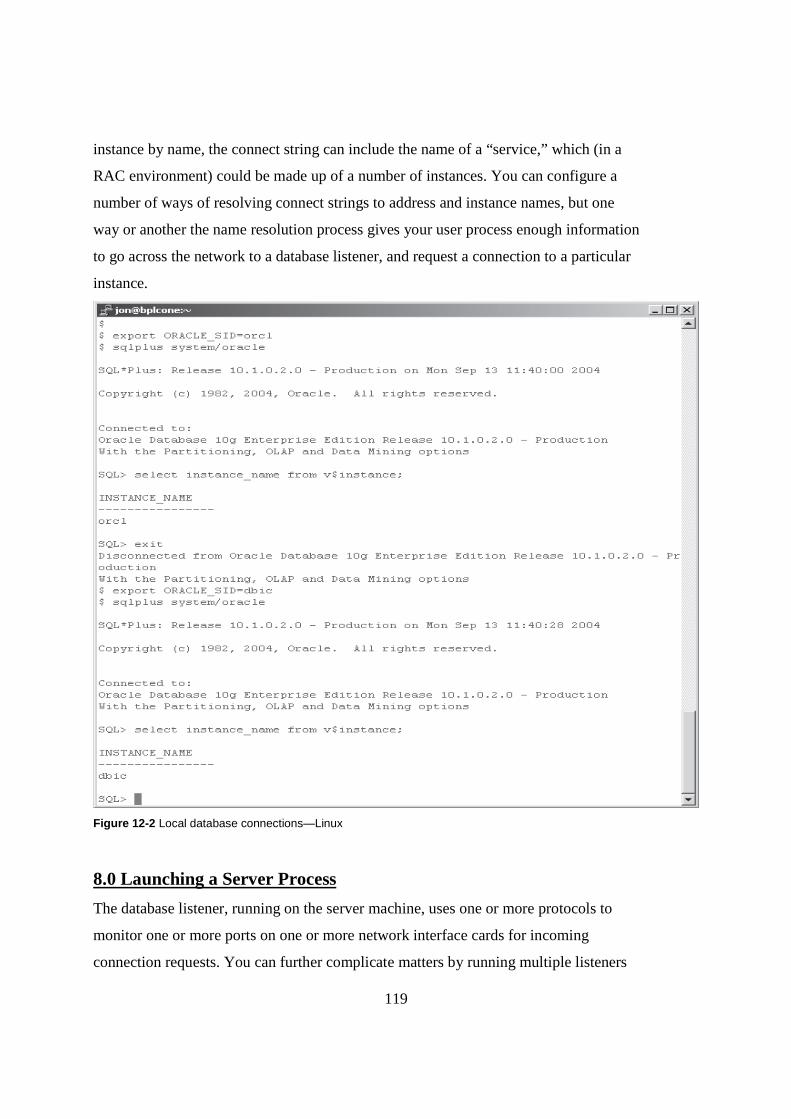
119
instance by name, the connect string can include the name of a “service,” which (in a
RAC environment) could be made up of a number of instances. You can configure a
number of ways of resolving connect strings to address and instance names, but one
way or another the name resolution process gives your user process enough information
to go across the network to a database listener, and request a connection to a particular
instance.
Figure 12-2 Local database connections—Linux
8.0 Launching a Server Process
The database listener, running on the server machine, uses one or more protocols to
monitor one or more ports on one or more network interface cards for incoming
connection requests. You can further complicate matters by running multiple listeners

120
on one machine, and any one listener can accept connection requests for a number of
instances. When it receives a connect request, the listener must first validate whether
the instance requested is actually available. Assuming that it is, the listener will launch
PART I
a new server process to service the user process. Thus if you have a thousand users
logging on concurrently to your instance, you will be launching a thousand server
processes. This is known as the “dedicated server” architecture, where each user process
is given a server process, dedicated to its session (in the next chapter you’ll see the
“shared server” alternative).
In the TCP environment, each dedicated server process launched by a listener will
acquire a unique TCP port number. This will be assigned at process startup time by
your operating system’s port mapping algorithm. The port number gets passed back
to the user process by the listener (or on some operating systems the socket already
opened to the listener is transferred to the new port number), and the user process
can then communicate directly with its server process. The listener has now completed
its work and waits for the next connect request. If the listener is not running, no new
server processes can be launched, but this will not affect any existing sessions that have
already been established.
9.0 Creating and Managing a Listener
A listener is defined in a file: the listener.ora file whose default location is in the
ORACLE_HOME/network/admin directory. As a minimum, the listener.ora file must
include a section for one listener that states its name and the protocol and listening
address it will use. You can configure several listeners in the one file, but they must
all have different names and addresses.
As with other files used to configure Oracle Net, this file can be very fussy about
seemingly trivial points of syntax, such as case sensitivity, white spaces, and
abbreviations. For this reason, many DBAs do not like to edit it by hand (though
there is no reason not to). Oracle provides three graphical tools to manage Oracle
Net: Database Control, the Net Manager, and the Net Configuration Assistant. There
is considerable overlap between the functionality of these tools, though there are a
121
few things that can be done only in one or the other.
10.0 Database Registration
A listener is necessary to spawn server processes against an instance. In order to do this,
it needs to know what instances are available on the computer on which it is running.
A listener finds out about instances by the process of “registration.”
itself, at startup time,
10.1 Static Registration
As a general rule, dynamic registration is a better option, but there are circumstances
when you will resort to static registration. Dynamic registration was introduced with
release 8i, but if you have older databases that your listener must connect users to,
you will have to register them statically. Also, some applications may require static
registration: typically, management tools. To register an instance statically, take the
Static Database Registration link within Database Control, and enter the name of the
service, the name of the instance, and the location of the ORACLE_HOME directory
for that instance. In a simple, single-instance, environment
the service name and the instance name will often be the same, but if you are in any
doubt about this, log in to your instance using SQL*Plus and check the values of the
parameters INSTANCE_NAME and SERVICE_NAMES by querying the V$PARAMETER
view.
If SERVICE_NAMES was not set in your parameter file, it will have defaulted to
the INSTANCE_NAME suffixed with the DB_DOMAIN. The default for DB_DOMAIN
is NULL.
10.2 Dynamic Instance Registration
This is the preferred method by which an instance will register with a listener. There
is an initialization parameter LOCAL_LISTENER, which tells the instance the network
PART I
address that it should contact to find a listener with which to register. At instance
startup time, the PMON process will use this parameter to locate a listener and
inform it of the INSTANCE_NAME and SERVICE_NAMES. At any time subsequent

122
to instance startup, you can force a re-registration by executing the command
SQL> alter system register;
Dynamic registration is a better option than static registration because it ensures
that only running instances are registered with the listener, and also that there are no
errors in the instance and service names. It is all too easy to make mistakes here,
particularly if you are editing the listener.ora file by hand. Also, when the instance
shuts down, it will de-register from the listener automatically.
From release 9i onward, dynamic registration requires no configuration at all if
your listener is running on the default port, 1521. All instances will automatically
look for a listener on the localhost on that port and register themselves if they find
one. However, if your listener is not running on the default port, you must specify
where the listener is by setting the parameter local_listener and re-registering, for
example,
SQL> alter system set local_listener=list2;
SQL> alter system register;
In this example, the local_listener has been specified by name. This name needs
to be resolved into an address in order for the instance to find the listener and register
itself; you’ll see how to do this soon, but first take a more detailed look at the listener
control utility, lsnrctl.
11.0The Listener Control Utility
You can start and stop listeners through Database Control, but there is also a commandline
utility, lsnrctl (lsnrctl.exe on Windows). You can run lsnrctl commands directly
from an operating system prompt , or through a simple user interface. For all the commands, you
must specify the name of the listener, if it is not the default name of LISTENER. The following
figures show how to check the status of a listener and to stop and start it, issuing the commands
either from the operating system prompt or from within the user interface.
PART I
Note that the status command always tells you the address on which the listener is
accepting connection requests, the name and location of the listener.ora file that defines
the listener, and the name and location of the logfile for the listener. Also, in the

123
examples in the figures, the listener LIST2 “supports no services.” This is because
there are no services statically registered in the listener.ora file for that listener, and
Using lsnrctl commands from the operating system prompt to check the status and
then starting the listener LIST2 no instances have dynamically registered either. uses both the
status and services commands to show the state of the listener after an instance has
registereddynamically., the output of the status command tells you that the listener supports
two services: orcl and orclXDB. The orcl service is the regular database service: this
listener is prepared to launch server processes for sessions against the orcl service. But
what does the orcl service actually consist of? That is shown by the output of the services
command, which shows you that the orcl service consists of one instance, also called
orcl. In a RAC environment, it would be possible for one service to consist of multiple
instances.
PART I
12.0Techniques for Name Resolution
At the beginning of this chapter you saw that to establish a session against an instance,
your user process must issue a connect string. That string resolves to the address of a
listener and the name of an instance or service. In the discussion of dynamic instance
registration, you saw again the use of a logical name for a listener, which needs to be
resolved into a network address in order for an instance to find a listener with which
to register. Oracle provides four methods of name resolution: Easy Connect, local
naming, directory naming, and external naming. It is probably true to say that the
majority of Oracle sites use local naming, but there is no question that directory
naming is the best method for a large and complex installation.
13.0Easy Connect
The Easy Connect name resolution method is new with release 10g. It is very easy to
use; it requires no configuration at all. But it is limited to one protocol: TCP. The other
name resolution methods can use any of the other supported protocols, such as TCP
with secure sockets, or Named Pipes. Another limitation is that Easy Connect cannot
be used with any of Oracle Net’s more advanced capabilities, such as load balancing
or connect-time failover across different network routes. It is fair to say that Easy

124
Connect is a method you as DBA will find very handy to use, but that it is not a
method of much use to your end users. Easy Connect is enabled by default. You
invoke it with a syntax such as this as your connect string:
SQL> connect scott/[email protected]:1522/ocp10g
In this example, SQL*Plus will use TCP to go to port 1522 on the IP address ora10g
.haunting.com. Then if there is a listener running on that port and address, it will ask
the listener to spawn a server process against an instance that is part of the service
ocp10g. Easy Connect can be made even easier:
SQL> connect scott/[email protected]
will also work, but only if the listener is using port 1521, and the service name registered
with the listener is ora10g.haunting.com: the same as the computer name.
14.0Configuring Service Aliases
Having decided what name resolution method to use, your next task is to configure
the clients to use it. You can do this through Database Control, but since Database
Control is a server-side process, you can only use it to configure clients running on
the database server. An alternative is to use the Net Manager, a stand-alone Java utility
shipped with all the Oracle client-side products.
To launch the Net Manager, run netmgr from a Unix prompt, or on Windows you
will find it on the Start menu.
The Net Manager menu tree has three branches. The Profile branch is used to set
options that may apply to both the client and the server sides of Oracle Net and can
be used to influence the behavior of all Oracle Net connections. This is where, for
example, you can configure detailed tracing of Oracle Net sessions. The Service Naming
branch is used to configure client-side name resolution, and the Listeners branch is
used to configure database listeners.
When you take the Profile branch , you are in fact
configuring a file called sqlnet.ora. This file exists in your ORACLE_HOME/network/
admin directory. It is optional—there are defaults for every sqlnet.ora directive—but
you will usually configure it, if only to select the name resolution method.
In the Profile branch, you will see all the available naming methods, with two
125
(TNSNAMES and EZCONNECT) selected by default: these are Local Naming and Easy
PART I
Connect. The external methods are NIS and CDS. LDAP is Directory Naming, and
HOSTNAME is a previous version of Easy Connect that is retained for backward
compatibility.
Then you need to configure the individual Oracle Net service aliases. This is done in
the Service Naming branch, which in fact creates or edits the Local Naming tnsnames.ora
file that resides in your ORACLE_HOME/network/admin directory. If you are fortunate
enough to be using Directory Naming, you do not need to do this: choosing LDAP in
the Profile as your naming method is enough.
Exercise 12-2: Creating an Oracle Net Service Alias
Use the Net Manager to create and test an Oracle Net service alias. This alias will connect
you to your database through the listener LIST2 that you configured in Exercise 12-1.
1. Launch the Net Manager. On Unix, run netmgr from an operating system
prompt. On Windows, it will be on the Start menu, in Oracle’s Configuration
and Migration Tools submenu.
2. Highlight the Service Branch, and click the “+” symbol on the left of the window
to add a new alias.
3. Enter ocp10g_1522 as the Net Service Name, and click Next.
4. Select TCP/IP as the protocol, and click Next.
5. Enter the name of your server machine as the Host Name and 1522 as the
Port Number, and click Next.
6. Enter ocp10g as the Service Name, and click Next.
7. Click the Test button. This will attempt to connect using the alias you have
created. The test should fail, because even though the newly created alias does
resolve to the address of the listener LIST2, the listener does not have your
instance registered.
8. Close the Test window, and from the File menu select Save Network
Configuration. Note the directory path at the top of Net Manager’s window:
this is where the Oracle Net files will be saved.
126
Exercise 12-3: Configuring DynamicService Registration
In this exercise you will set the local_listener parameter for your instance so that it
will register with your nondefault listener LIST2. Then check that the registration has
occurred and test the connection you created in Exercise 12-2. Finally, put everything
back to normal.
1. Using SQL*Plus, connect to your instance as user SYSTEM, and issue the
commands
SQL> alter system set local_listener='ocp10g_1522';
SQL> alter system register;
2. From an operating system prompt, use lsnrctl to check that your instance has
registered dynamically with your list2 listener.
C:\>lsnrctl services list2
3. Test the alias by connecting using SQL*Plus.
SQL> connect system/oracle@ocp10g_1522;
4. Reset your instance to use the default listener by putting the local_listener
parameter back to default, and re-register it.
SQL> alter system set local_listener='';
SQL> alter system register;
15.0 SUMMARY
This unit has covered the theory behind Oracle Net and how to configure client/
server connections. You have seen how Oracle Net is controlled by a set of files: the
server-sidelistener.ora file, which defines listeners, and the client-side tnsnames.ora
file, which provides a name resolution capability for the most commonly used name
resolution method: local naming. There is also the sqlnet.ora file, an optional file for
either the client or server side. There are graphical configuration tools for managing
Oracle Net, which you are strongly advised to use in order to avoid problems with
connectivity that can be very difficult to resolve. Finally, you saw some of the more
advanced capabilities of Oracle Net, and the testing tools to test Oracle Net connections.

127
16.0 TURTOR MARKED ASSIGNMENT
1. Which protocols can Oracle Net 10g use? (Choose four answers.)
A. TCP
B. UDP
C. SPX/IPX
D. SDP
E. TCP with secure sockets
F. Named Pipes
G. LU6.2
H. NetBIOS/NetBEUI
2. Where is the division between the client and the server in the Oracle
environment? (Choose the best answer.)
A. Between the instance and the database
B. Between the user and the user process
C. Between the server process and the instance
D. Between the user process and the server process
E. The client/server split varies depending on the stage of the execution cycle
3. Which of the following statements about listeners is correct? (Choose the best
answer.)
A. A listener can connect you to one instance only.
B. A listener can connect you to one service only.
PART I
C. Multiple listeners can share one network interface card.
D. An instance will accept connections only from the listener specified on the
LOCAL_LISTENER parameter.
4. You have decided to use local naming. Which files must you create on the
client machine? (Choose the best answer.)
A. tnsnames.ora and sqlnet.ora
B. listener.ora only
C. tnsnames.ora only
D. listener.ora and sqlnet.ora

128
E. None. You can rely on defaults if you are using TCP and your listener is
running on port 1521.
5. If you stop your listener, what will happen to sessions that connected through
it? (Choose the best answer.)
A. They will continue if you have configured failover.
B. They will not be affected in any way.
C. They will hang until you restart the listener.
D. You cannot stop a listener if it is in use.
E. The sessions will error out.
6. If you stop a Connection Manager, what will happen to sessions that connected
through it? (Choose the best answer.)
A. They will continue if you have configured failover.
B. They will not be affected in any way.
C. You cannot stop a Connection Manager if it is in use.
D. The sessions will error out.
7. If you are running your user process on the same machine as the instance you
wish to connect to, which of the following is correct? (Choose two answers.)
A. You do not need to go via a listener.
B. You can only use the IPC protocol.
C. You cannot use the IPC protocol.
D. You do not need to use Oracle Net at all.
E. You do not need to configure Oracle Net at all.
8. Your organization has many databases on many servers, and a large number
of users. The network environment is always changing. What would be the
best naming method to use? (Choose the best answer.)
A. Easy Connect, because it means that you don’t have to maintain tnsnames
.ora files.
B. Directory naming, because it centralizes the naming information.
C. Local naming, because each user can maintain his own configuration files
locally.
D. External naming, because you can rely on a third-party product to maintain

129
the configuration information.
9. Your server is using a European character set, and your client is using an
American character set. How will Oracle Net handle this? (Choose the best
answer.)
A. It cannot; you must change the character set of the database or of the client.
B. The underlying network protocol will handle the conversion.
C. Oracle Net will handle the conversion.
D. The application software must do any necessary conversion.
10. Why might you set up multiple listeners for one instance? (Choose the best
answer.)
A. You can’t; there can be only one local listener.
B. To provide fault tolerance and load balancing.
C. If the listeners are on separate computers, you will get better performance.
D. To spread the workload of maintaining sessions across several processes.
17.0 FURTHER READING/ REFERENCE
1.0Philip A. Bernstein, VassosHadzilacos, Nathan Goodman (1987): Concurrency Control and
Recovery in Database Systems (free PDF download), Addison Wesley Publishing Company,
1987, ISBN 0-201-10715-5
2.0 Greenwald, Rick; Stackowiak, Robert; Stern, Jonathan (2007). Oracle Essentials: Oracle Database 11g. Essential Series (4 ed.). O'Reilly Media.p. 31. ISBN 9780596514549.Retrieved 2010-06-08. "Today, Oracle offers other embedded databases including TimesTen, Berkeley DB, and Oracle Database Lite."
3.0 Chapple, Mike. "SQL Fundamentals". Databases. About.com. Retrieved 2009-01-28.
4.0 Tony, Morales; et al. (October 2009). "Overview of the Dynamic Performance
Views"(PDF). Oracle Database Reference 11g Release 2 (11.2). Oracle Corporation. p. 8-1.
Retrieved 2010-03-09. "V$INDEXED_FIXED_COLUMN displays the columns in dynamic
performance tables that are indexed (X$ tables)."[dead link]
5.0 "Oracle Process architecture concepts". Download.oracle.com. Retrieved 2009-12-19.

130
MODULE 3: ORACLE CONFIGURATION
UNIT 2: Managing DatabasePerformance
Page
1.0 Introduction 2
2.0 Objectives 2
3.0 Invalid Objects 2
15.0 Unusable Indexes
5.0. Optimizer Statistics 6.0 Reacting to Performance Issues
7.0 Summary
8.0 Tutor Marked Assignment
9.0 Further Reading /References
CHAPTER 1UN2

131
1.0 INTRODUCTION Performance monitoring can take two general forms: reactive or proactive. The “reactive” approach means taking some action when or after a problem manifests itself; “proactive” means to identify pending issues before they become problems. Clearly, proactive monitoring is the ideal technique to minimize the impact of problems on end users, but reactive monitoring is also necessary in many cases. Chapter 15 goes through the use of the server alert system and the Automatic Database Diagnostic Monitor to assist with proactive monitoring, while this chapter concentrates on identifying problems after they have occurred. Two types of problems are addressed: objects that have become useless, and drops in performance. Procedural objects, views, materialized views, and indexes can be invalidated if the objects to which they refer are changed in certain ways; when this happens, this should be detected and fixed. Performance of SQL statements is critically dependent on statistics that the optimizer uses to design efficient execution plans. Collection of statistics can be manual or automatic. If, after gathering statistics, performance is still an issue, then various metrics can be used to drill down to the cause of the problem. 2.0 OBJECTIVES In this unit you will learn how to • Troubleshoot invalid and unusable objects • Gather optimizer statistics • View performance metrics • React to performance issues 3.0 Invalid Objects Stored PL/SQL is code stored and compiled within the data dictionary, as PL/SQL objects. This code can take these forms: • Procedures • Functions • Triggers • Packages • Object types Most, if not all, of these procedural objects will refer to data objects, such as tables. When a procedural object is compiled, the compiler checks the data objects to which it refers in order to confirm that their definition is correct for the code and whether the privileges are appropriate. For example, if the code refers to a column, the column must exist or the code will not compile. If any of the data objects to which a procedural object refers change after the procedural object has been compiled, then the procedure will be marked INVALID. Procedural objects may also be invalid for more mundane reasons: perhaps the programmer made a simple syntactical mistake. In that case, the object will be created INVALID and will be useless. The same situation can occur with views. When created they may be fine, but they will be invalidated if the tables on which they are based have their definitions changed. PART I

132
3.1 Identifying Invalid Objects Objects can be created invalid because of programmer error, or they can become invalid some time after creation. The view DBA_OBJECTS (and the derived views ALL_OBJECTS and USER_OBJECTS) has a column, STATUS, which should ideally always be VALID. To identify all invalid objects in the database, as user SYSTEM or another privileged user run the query SQL> select owner,object_name,object_type from dba_objects where status=’INVALID’; If any objects are listed by this query, the first question to ask is whether the object was ever valid. It may never have worked and not be needed, in which case the best thing to do may be to drop it. But if, as is likely, you do not know if the object was ever valid, then a sensible first step is to attempt to compile it. The first time an invalid object is accessed, Oracle will attempt to compile it automatically, but if the compilation fails, the user will receive an error. Clearly, it is better for the DBA to compile it first; then, if there is an error, he can try to fix it before a user notices. Even if the object does compile when it is accessed, there may be a delay while the compilation takes place; it is better for perceived performance if this delay is taken by the DBA in advance. Invalid objects can also be displayed through Database Control. From the database home page, take the Administration tab, and then select whatever object type you are interested in from the Schema section. All the objects of that type will be displayed, as in Figure 14-1, with the status.
Figure 14-1 The status of a view, displayed by Database Control 3.2 Repairing Invalid Objects To compile procedural objects, use the ALTER...COMPILE; command. For example, SQL> alter procedure hr.add_reg compile; will attempt to compile the procedure ADD_REG in the HR schema, and SQL> alter view rname compile; will compile the view RNAME. If the compilation succeeds, you have no further
133
problems. If it fails, then you need to work out why. If a procedure does not compile, use the SQL*Plus command SHOW ERRORS to see why not. (Unfortunately, SHOW ERRORS is not supported for views.) Often a useful starting point in identifying the cause of compilation errors is to use the DBA_DEPENDENCIES view, described here: ocp10g>descdba_dependencies; Name Null? Type --------------------------------- -------- ------------- OWNER NOT NULL VARCHAR2(30) NAME NOT NULL VARCHAR2(30) TYPE VARCHAR2(17) REFERENCED_OWNER VARCHAR2(30) REFERENCED_NAME VARCHAR2(64) REFERENCED_TYPEVARCHAR2(17) REFERENCED_LINK_NAMEVARCHAR2(128) DEPENDENCY_TYPE VARCHAR2(4) For every object, identified by NAME, there will be rows for each object on which it depends. For example, if a view retrieves columns from a dozen tables, they will each be listed as a REFERENCED_NAME. If a view does not compile, then investigating these tables would be sensible. There will be occasions when you are faced with the need to recompile hundreds or thousands of invalid objects. Typically, this occurs after an upgrade to an application, or perhaps after applying patches. Rather than recompiling them individually, use the supplied utility script. On Unix, SQL> @?/rdbms/admin/utlrp or on Windows, SQL> @?\rdbms\admin\utlrp This script, which should be run when connected AS SYSDBA, will attempt to compile all invalid objects. If after running it there are still some invalid objects, you can assume that they have problems that should be addressed individually. You can also recompile objects with Database Control. Having identified an INVALID object, as in Figure 14-1, click Edit to reach a window with a Compile button. PART I Exercise 14-1: Repairing Invalid Objects Create some objects, force them to go invalid, and fix the problem. 1. Using SQL*Plus, connect to your database as user SYSTEM. 2. Create a user to be used for this exercise; grant him the DBA privilege. SQL> grant dba to testuser identified by testuser; 3. Connect as TESTUSER, and create some objects. SQL> conn testuser/testuser Connected. ocp10g> create table testtab(n1 number,d1 date); Table created. ocp10g> insert into testtabvalues(1,sysdate); 1 row created ocp10g> create or replace view v1 as select d1 from testtab;
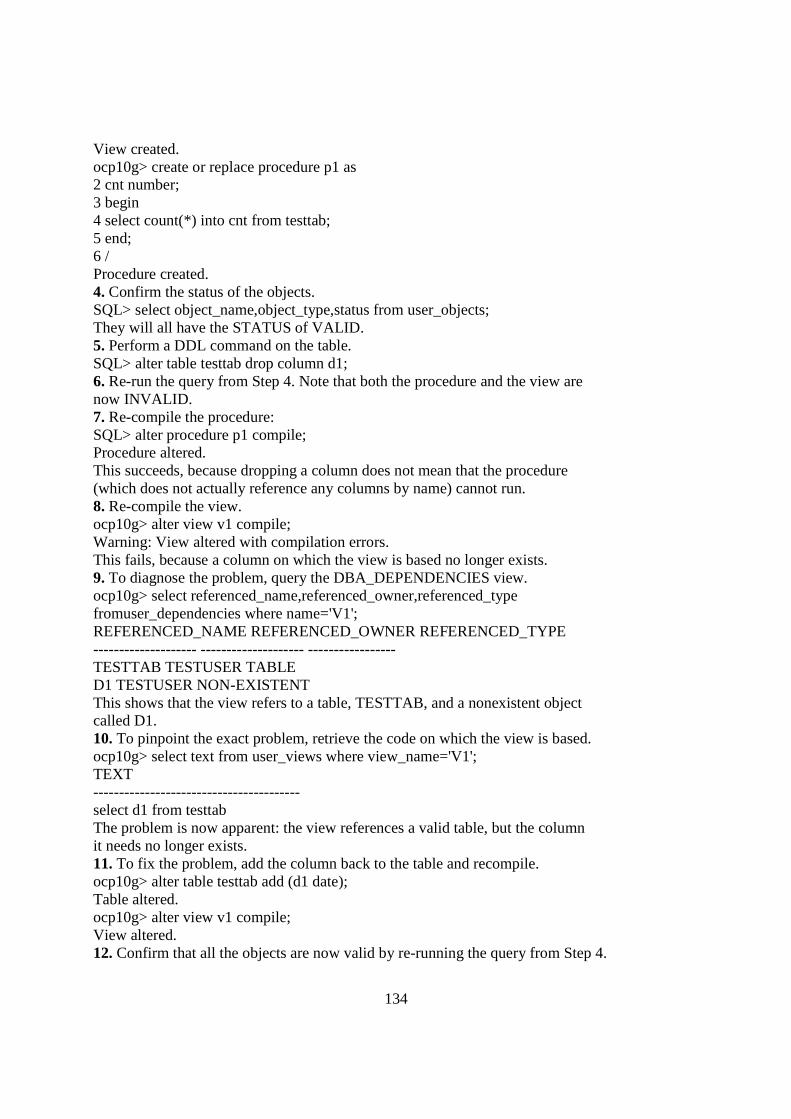
134
View created. ocp10g> create or replace procedure p1 as 2 cnt number; 3 begin 4 select count(*) into cnt from testtab; 5 end; 6 / Procedure created. 4. Confirm the status of the objects. SQL> select object_name,object_type,status from user_objects; They will all have the STATUS of VALID. 5. Perform a DDL command on the table. SQL> alter table testtab drop column d1; 6. Re-run the query from Step 4. Note that both the procedure and the view are now INVALID. 7. Re-compile the procedure: SQL> alter procedure p1 compile; Procedure altered. This succeeds, because dropping a column does not mean that the procedure (which does not actually reference any columns by name) cannot run. 8. Re-compile the view. ocp10g> alter view v1 compile; Warning: View altered with compilation errors. This fails, because a column on which the view is based no longer exists. 9. To diagnose the problem, query the DBA_DEPENDENCIES view. ocp10g> select referenced_name,referenced_owner,referenced_type fromuser_dependencies where name='V1'; REFERENCED_NAME REFERENCED_OWNER REFERENCED_TYPE -------------------- -------------------- ----------------- TESTTAB TESTUSER TABLE D1 TESTUSER NON-EXISTENT This shows that the view refers to a table, TESTTAB, and a nonexistent object called D1. 10. To pinpoint the exact problem, retrieve the code on which the view is based. ocp10g> select text from user_views where view_name='V1'; TEXT ---------------------------------------- select d1 from testtab The problem is now apparent: the view references a valid table, but the column it needs no longer exists. 11. To fix the problem, add the column back to the table and recompile. ocp10g> alter table testtab add (d1 date); Table altered. ocp10g> alter view v1 compile; View altered. 12. Confirm that all the objects are now valid by re-running the query from Step 4.
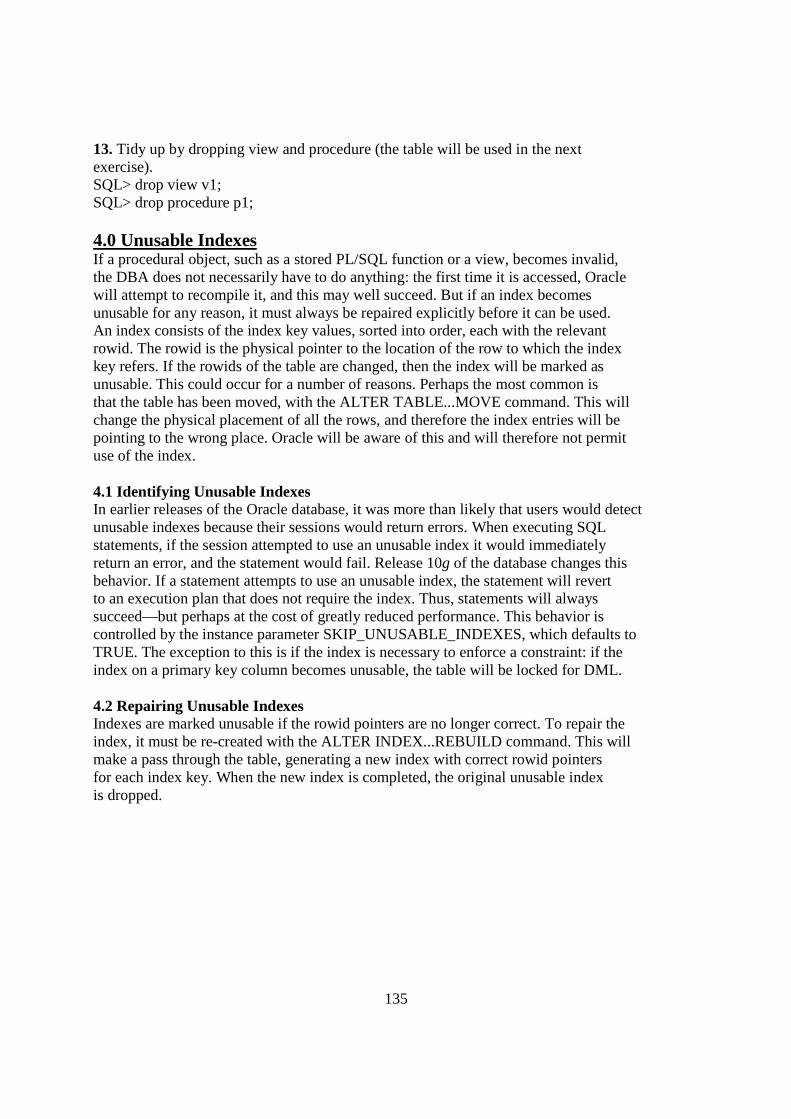
135
13. Tidy up by dropping view and procedure (the table will be used in the next exercise). SQL> drop view v1; SQL> drop procedure p1; 4.0 Unusable Indexes If a procedural object, such as a stored PL/SQL function or a view, becomes invalid, the DBA does not necessarily have to do anything: the first time it is accessed, Oracle will attempt to recompile it, and this may well succeed. But if an index becomes unusable for any reason, it must always be repaired explicitly before it can be used. An index consists of the index key values, sorted into order, each with the relevant rowid. The rowid is the physical pointer to the location of the row to which the index key refers. If the rowids of the table are changed, then the index will be marked as unusable. This could occur for a number of reasons. Perhaps the most common is that the table has been moved, with the ALTER TABLE...MOVE command. This will change the physical placement of all the rows, and therefore the index entries will be pointing to the wrong place. Oracle will be aware of this and will therefore not permit use of the index. 4.1 Identifying Unusable Indexes In earlier releases of the Oracle database, it was more than likely that users would detect unusable indexes because their sessions would return errors. When executing SQL statements, if the session attempted to use an unusable index it would immediately return an error, and the statement would fail. Release 10g of the database changes this behavior. If a statement attempts to use an unusable index, the statement will revert to an execution plan that does not require the index. Thus, statements will always succeed—but perhaps at the cost of greatly reduced performance. This behavior isPART I controlled by the instance parameter SKIP_UNUSABLE_INDEXES, which defaults to TRUE. The exception to this is if the index is necessary to enforce a constraint: if the index on a primary key column becomes unusable, the table will be locked for DML. 4.2 Repairing Unusable Indexes Indexes are marked unusable if the rowid pointers are no longer correct. To repair the index, it must be re-created with the ALTER INDEX...REBUILD command. This will make a pass through the table, generating a new index with correct rowid pointers for each index key. When the new index is completed, the original unusable index is dropped.

136
Figure 14-2 Index status as shown by Database Control Exercise 14-2: Repairing Unusable Indexes Create indexes, force them to become unusable, and repair them using SQL*Plus and Database Control. 1. In your SQL*Plus session, connect as TESTUSER and create two indexes. SQL> create index d1_idx on testtab(d1); SQL> create index n1_idx on testtab(n1); 2. Confirm the index creation and status. Both will be VALID. SQL> select index_name,status from user_indexes; 3. Move the table. SQL> alter table testtab move; 4. Run the query from Step 2 again. The move of the table, which changed any rowids, will have rendered the indexes unusable, as shown in Figure 14-3. 5. Rebuild one index, using the NOLOGGING and ONLINE options. SQL> alter index n1_idx rebuild online nologging;PART I 6. Connect to your database as user SYSTEM using Database Control. 7. From the database home page, take the Administration tab and then the Indexes link in the Schema section. 8. In the Search section of the Indexes window, enter TESTUSER as the Schema, and click Go. This will show the two indexes on the TESTTAB table, one of which, D1_IDX, is still unusable. 9. Select the radio button for the unusable index, select Reorganize in the Actions drop-down box, and click Go to launch the Reorganize Objects Wizard. 10. Click Next, leave all the options on default, and click Next again to generate the reorganization script and reach the Impact Report window, shown in Figure 14-4. This should confirm that there is sufficient free space for the operation to proceed. Click Next to proceed. 11. On the Reorganize Objects: Schedule window, leave everything on default to run the job immediately, and click Next to reach the Review window. 12. In the Review window, click Submit Job to rebuild the index.
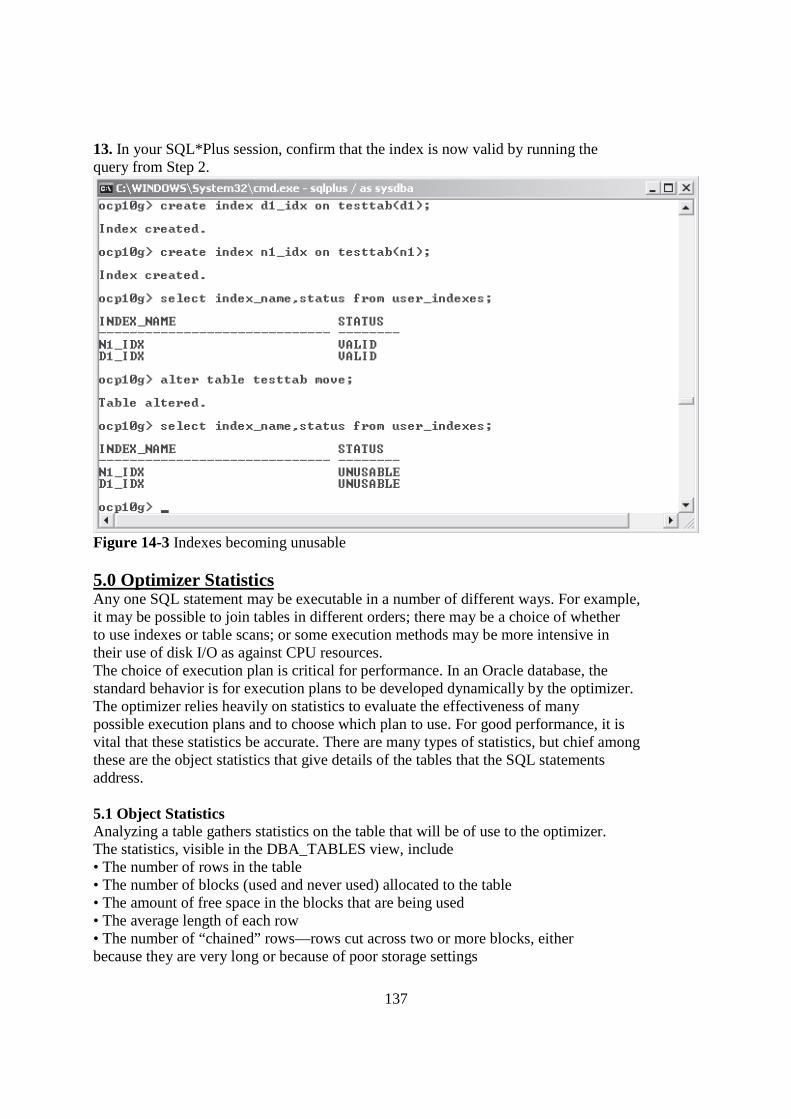
137
13. In your SQL*Plus session, confirm that the index is now valid by running the query from Step 2.
Figure 14-3 Indexes becoming unusable 5.0 Optimizer Statistics Any one SQL statement may be executable in a number of different ways. For example, it may be possible to join tables in different orders; there may be a choice of whether to use indexes or table scans; or some execution methods may be more intensive in their use of disk I/O as against CPU resources. The choice of execution plan is critical for performance. In an Oracle database, the standard behavior is for execution plans to be developed dynamically by the optimizer. The optimizer relies heavily on statistics to evaluate the effectiveness of many possible execution plans and to choose which plan to use. For good performance, it is vital that these statistics be accurate. There are many types of statistics, but chief among these are the object statistics that give details of the tables that the SQL statements address. 5.1 Object Statistics Analyzing a table gathers statistics on the table that will be of use to the optimizer. The statistics, visible in the DBA_TABLES view, include • The number of rows in the table • The number of blocks (used and never used) allocated to the table • The amount of free space in the blocks that are being used • The average length of each row • The number of “chained” rows—rows cut across two or more blocks, either because they are very long or because of poor storage settings

138
Apart from statistics regarding the table as a whole, each column of the table is also analyzed. Column statistics are visible in the DBA_TAB_COLUMNS view and include • The number of distinct values • The highest and lowest values • The number of nulls • The average column length When a table is analyzed, its indexes are also examined. The statistics on indexes are shown on the DBA_INDEXES view and include • The depth of the index tree • The number of distinct key values • The clustering factor—how closely the natural order of the rows follows the order of the index keys These statistics, which are stored within the data dictionary, give the optimizer the information it needs to make vital decisions about how best to execute SQL statements. If statistics are missing or incorrect, performance may degrade dramatically. It is also possible to gather statistics on indexes. These are displayed in the INDEX_STATS view; they include • The number of index entries referring to extant rows • The number of index entries referring to deleted rows This information is of value because of the manner in which indexes are maintained: when rows are deleted, the index keys remain; after a prolonged period, indexes can become inefficient due to the amount of space occupied by these references to deleted rows. 5.2 Gathering Statistics Object statistics are not real-time: they are static, which means that they become out of date as DML operations are applied to the tables. It is therefore necessary to gather statistics regularly, to ensure that the optimizer always has access to statistics that reflect reasonably accurately the current state of the database. Statistics can be gathered manually, or the process can be automated. Manual statistics gathering can be done either with the ANALYZE command or by executing procedures in the DBMS_STATS package, as in Figure 14-5, or else through Database Control. In Figure 14-5, first the table REGIONS is analyzed, using the ANALYZE command. The keywords COMPUTE STATISTICS instruct Oracle to analyze the whole table, not just a proportion of it. The following query shows that there are four rows in the table. Then there is a row inserted, but the statistics haven’t been updated in real time: the number of rows is incorrect, until the table is analyzed again, this time with the DBMS_STATS.GATHER_TABLE_STATS procedure. There are numerous arguments that can be supplied to the GATHER_TABLE_STATS procedure to control what it does; this is the simplest form of its use.
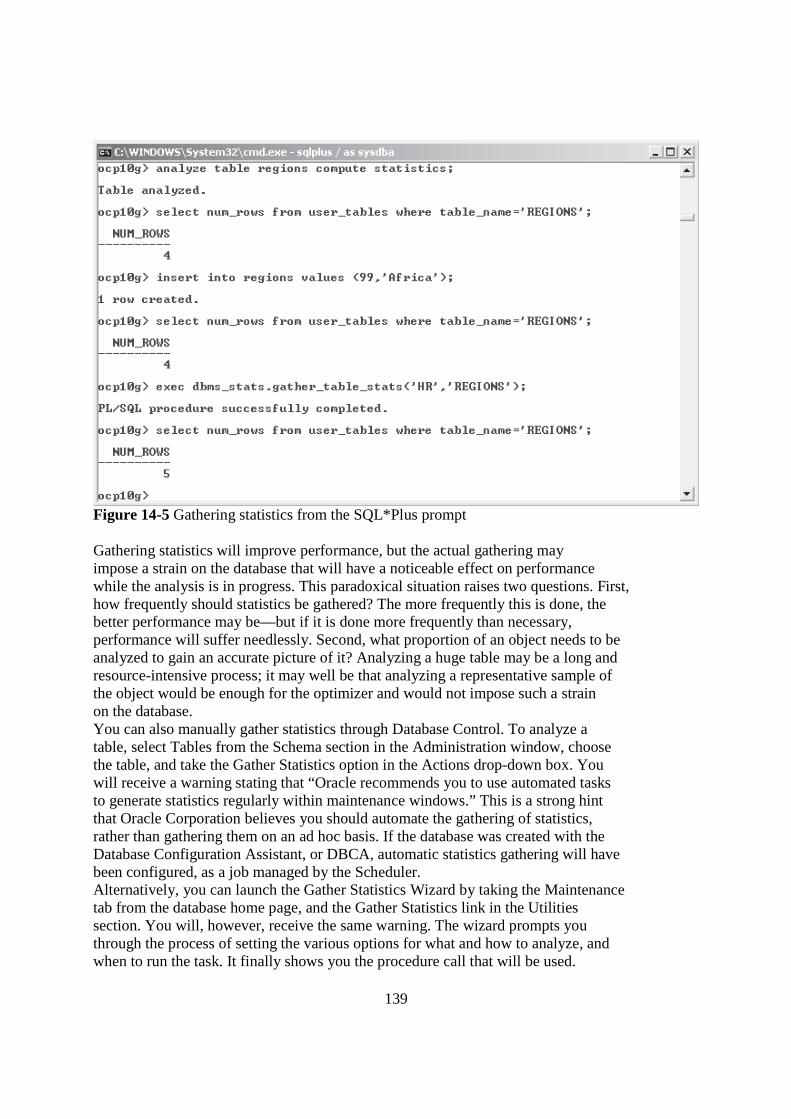
139
Figure 14-5 Gathering statistics from the SQL*Plus prompt PART I Gathering statistics will improve performance, but the actual gathering may impose a strain on the database that will have a noticeable effect on performance while the analysis is in progress. This paradoxical situation raises two questions. First, how frequently should statistics be gathered? The more frequently this is done, the better performance may be—but if it is done more frequently than necessary, performance will suffer needlessly. Second, what proportion of an object needs to be analyzed to gain an accurate picture of it? Analyzing a huge table may be a long and resource-intensive process; it may well be that analyzing a representative sample of the object would be enough for the optimizer and would not impose such a strain on the database. You can also manually gather statistics through Database Control. To analyze a table, select Tables from the Schema section in the Administration window, choose the table, and take the Gather Statistics option in the Actions drop-down box. You will receive a warning stating that “Oracle recommends you to use automated tasks to generate statistics regularly within maintenance windows.” This is a strong hint that Oracle Corporation believes you should automate the gathering of statistics, rather than gathering them on an ad hoc basis. If the database was created with the Database Configuration Assistant, or DBCA, automatic statistics gathering will have been configured, as a job managed by the Scheduler. Alternatively, you can launch the Gather Statistics Wizard by taking the Maintenance tab from the database home page, and the Gather Statistics link in the Utilities section. You will, however, receive the same warning. The wizard prompts you through the process of setting the various options for what and how to analyze, and when to run the task. It finally shows you the procedure call that will be used.
140
The example in Figure 14-6 shows the use of the GATHER_SCHEMA_STATS procedure, which will analyze all the objects belonging to one user. Taking the arguments in turn, • OWNNAME specifies the schema to be analyzed. • ESTIMATE_PERCENT controls how much of the tables to analyze. The setting given instructs Oracle to make an intelligent guess at the amount needed for a meaningful sample. • GRANULARITY refers to how best to analyze objects consisting of a number of subobjects, such as a table that is divided into partitions. The setting given lets Oracle decide. • BLOCK_SAMPLE determines whether the table should be sampled by row or by block. The default, by row, is more accurate but possibly more time consuming. • CASCADE controls whether to analyze any dependent objects, such as the indexes of tables. • DEGREE controls the number of parallel execution servers to use for the task. The setting given lets the optimizer decide on the best number. • METHOD_OPT controls for which columns to build up histograms, and how many buckets they should have. The setting given lets Oracle decide. • OPTIONS determines which objects to analyze. The setting given instructs Oracle to analyze all objects that have no statistics, and also all objects where Oracle considers the statistics to be out-of-date. This example illustrates that you can delegate all decisions on what needs to be analyzed, in what way, and to what depth to Oracle itself. If a command such as the one just described is run sufficiently frequently, it should ensure that the optimizer always has the statistics it needs, without overburdening the database by gathering statistics unnecessarily. PART I The remaining point to consider is how frequently to run the command. The automatic statistics gathering configured by the DBCA will do this every weekday night, and again at the weekend. To see the job details, you must connect to Database Control as user SYS as SYSDBA. From the database home page, take the Administration tab, and then the Jobs link in the Scheduler section to see the page shown in Figure 14-7. The GATHER_STATS_JOB shown in the figure will run the procedure DBMS_ STATS.GATHER_STATS_JOB_PROC. This is a procedure specially designed for running automatically through the Scheduler. It will analyze the whole database, using automation options similar to those described for earlier Figure 14-6, and in addition it will analyze the objects that Oracle considers to be most in need of analysis first. The schedule it will run on, the MAINTENANCE_WINDOW_GROUP, instructs the Scheduler to run the job every night and weekend, during the preconfigured WEEKEND_WINDOW and WEEKNIGHT_WINDOW windows. The job will run with a priority, controlling its use of system resources, determined by the AUTO_TASKS_ JOB_CLASS, which should ensure that it does not impact adversely on other users. Full details of how the Scheduler can be configured (including the use of Windows and Job Classes) will be given in Chapter 36.

141
Exercise 14-3: Automating Statistics Collection Create a scheduled job to gather statistics on the TESTTAB table. The job will carry out a complete analysis of the table and its indexes, and also develop histograms on the columns used as index keys. 1. Connect to your database as user TESTUSER using Database Control. 2. Take the Administration tab, then the Jobs link in the Scheduler section to reach the Scheduler Jobs window. 3. Click Create to reach the Create Job window. In the General section, enter the Name as Analyze testtab, and leave everything else on default. 4. In the Command section, replace the sample code with this: begin dbms_stats.gather_table_stats( ownname=>'TESTUSER', tabname=>'TESTTAB', estimate_percent=>100, cascade=>true, method_opt=>'for all indexed columns size auto'); end; 5. Take the Schedule link to reach the Schedule window. Leave everything on default, to run the job once only right away, and return to the Scheduler Jobs window. 6. Take the Run History link, and you will see that the job has succeeded. 7. In your SQL*Plus session, set your NLS_DATE_FORMAT session parameter to show the full time and confirm that statistics were indeed collected, as in Figure 14-8. 8. Tidy up by connecting as user SYSTEM and dropping the TESTUSER schema. SQL> drop user 'TESTUSER' cascade;
Figure 14-8 Verifying statistics collection PART I 5.3 Performance Metrics Oracle collects hundreds of performance metrics. These are accumulated as statistics in memory and periodically flushed to the data dictionary, from which they can be
142
analyzed by various Advisors. The mechanism for this and a description of the capabilities of the advisors appear in Chapter 15. But it is also possible to view the performance metrics interactively: querying various dynamic performance views will show you the real-time values of statistics, and by using Database Control, you can see them converted into more meaningful graphics. Remember that in the Oracle environment a distinction is made between “statistics” and “metrics.” A statistic is a raw figure, which may be useless in itself. A metric is a statistic converted into something meaningful. For example, the number of disk reads carried out by the instance is a statistic that does not convey any performance monitoring information, but the number of disk reads per transaction or per second is a useful metric. 5.4 Viewing Statistics with the Dynamic Performance Views There are more than three hundred dynamic performance views. You will often hear them referred to as the “Vee dollar” views, because their names are prefixed with “V$”. In fact, the “Vee dollar” views are not views at all; they are synonyms for views that are prefixed with “V_$”. The dynamic performance views give access to a phenomenal amount of information about the instance, and (to a certain extent) about the database. The majority of the views are populated with information from the instance, the remainder are populated from the controlfile. All of them give real-time information. Dynamic performance views that are populated from the instance, such as V$INSTANCE or V$SYSSTAT, are available at all times, even when the instance is in NOMOUNT mode. Dynamic performance views that are populated from the controlfile, such as V$DATABASE or V$DATAFILE, cannot be queried unless the database has been mounted, which is when the controlfile is read. By contrast, the data dictionary views (prefixed DBA, ALL, or USER) can only be queried after the database—including the data dictionary— has been opened. The dynamic performance views are created at startup, updated during the lifetime of the instance, and dropped at shutdown. This means that they will contain values that have been accumulated since startup time: if your database has been open for six months nonstop, they will have data built up over that period. After a shutdown/ startup, they will start from the beginning again. While the totals may be interesting, they will not tell you anything about what happened during certain defined periods, when there may have been performance issues. For this reason, it is generally true that the dynamic performance views give you statistics, not metrics. The conversion of these statistics into metrics is a skilled and sometimes time-consuming task, made much easier by the self-tuning and monitoring capabilities of release 10g of the database. As an example of a dynamic performance view, you cannot do better than V$SYSSTAT, described here: ocp10g>descv$sysstat; Name Null? Type --------------------------------- -------- ------------- STATISTIC# NUMBER NAME VARCHAR2(64) CLASS NUMBER

143
VALUE NUMBER STAT_ID NUMBER This shows over three hundred statistics that are fundamental to monitoring activity: ocp10g> select name, value from v$sysstat; NAME VALUE ------------------------------ ---------- logons cumulative 356 logons current 34 opened cursors cumulative 154035 opened cursors current 5490 user commits 2502 user rollbacks 205 user calls 37574 recursive calls 6446648 recursivecpu usage 39263 session logical reads 4613746 session stored procedure space 0 <output truncated...> PART I Another critical view is V$SYSTEM_WAIT_CLASS, which summarizes the various categories of problems that can cause sessions, or the whole database, to run slowly: ocp10g> select wait_class,time_waited from v$system_wait_class 2 order by time_waited; WAIT_CLASS TIME_WAITED -------------------- ----------- Network 32 Application 44 Configuration 1545 Concurrency 4825 Commit 5212 Other 10483 System I/O 41787 User I/O 102743 Idle 13087012 This query shows that the worst problems since the instance started have been “Idle” events. These are not problems: they are events such as server processes waiting to receive SQL statements from user processes. The worst real problem is disk I/O caused by user sessions, followed by disk I/O by the instance itself. 5.5 Viewing Metrics with Database Control The Database Control interface converts statistics to metrics. To reach the metrics display, take the All Metrics link in the Related Links section of the database home page. From there, take the link for the area of interest and drill down to the individual metric. For example, in the preceding query you can see that there have been 2502 commits by user sessions. But this figure is since the instance was started; it says nothing about the rate of activity. Figure 14-10 shows the metric, User Commits (per second): this gives

144
more useful information, in this case, that activity has fallen off dramatically in the last ten minutes. 6.0 Reacting to Performance Issues In an ideal world, you would not react to performance issues; you would have anticipated them before they occurred. In practice, though, all database administrators rely to a certain extent on real-time figures to identify problem areas. Database Control provides an extremely simple interface to diagnose causes of performance problems. From the database home page, take the Performance tab, as in Figure 14-11. This will show a set of five graphs, correlating activity against time: • The run queue length, which indicates whether the server machine’s CPU resources are being strained • The paging rate, which will increase if the server is short of memory • The count of database sessions waiting, and why • The number of logins and transactions per second • The number of physical reads and amount redo generated by second Of these, the first and last pairs are informative, but it is the middle graph, of sessions waiting, that is diagnostic. The waiting sessions are grouped into color-coded classes showing why the sessions are waiting. In the figure, the worst problems can immediately be seen as user I/O and system I/O. Taking the link for any one class will generate a graph breaking down the figure into individual wait events. For instance, the user I/O wait class is divided into I/O related to table scans and I/O related to index lookups. Having identified the problem areas, the next step is to resolve them. For this, the advisors described in the next chapter will be of great assistance. PART I 7.0 SUMMARY Objects can become not valid. PL/SQL procedural objects will become INVALID if the objects on which they depend are changed. Indexes will become UNUSABLE if the tables they are based on undergo certain operations. In either case, you can ignore the problem and the application may continue to function. But it may run with reduced performance as objects are compiled dynamically, and as the optimizer resorts to full table scans rather than index lookups. It is also possible that the application will fail if the procedural objects do not recompile successfully, or if the indexes are needed to enforce constraints. These damaged objects should be identified and fixed before their state impacts on end users. When the optimizer develops execution plans, it relies heavily on statistics. Object statistics give the optimizer the information it needs to determine the most efficient way to execute a statement. You should gather statistics regularly, either by invoking the commands interactively or by using a scheduled job. Failure to do this will result in performance degradation, as the optimizer develops execution plans that are not appropriate to the current state of the data. Oracle gathers hundreds of statistics. Interpreting these requires converting them into metrics. A metric is a meaningful figure that relates statistics to each other, or to time; metrics are what you need for tuning. The hundreds of dynamic performance views accumulate statistics from the time the instance starts; they are cleared on

145
shutdown. Database Control can show these statistics converted into metrics, which are the starting point for problem resolution and tuning. 8.0 TURTOR MARKED ASSIGNMENT 1. If you create a table and a procedure that refers to it, and then change the definition of the table, what will happen when you try to run the procedure? (Choose the best answer.) A. The procedure will recompile automatically and run successfully. B. The procedure will fail until you recompile it. C. The procedure will run with reduced performance until you analyze the table. D. The procedure may or may not compile, depending on the nature of the change. 2. If a SELECT statement attempts to use an UNUSABLE index, what will happen? (Choose the best answer.) A. The statement will fail. B. The statement will succeed, but at reduced performance. C. The index will be rebuilt automatically if possible. D. It depends on the SKIP_UNUSABLE_INDEXES parameter. 3. You determine that an index is unusable, and decide to rebuild it. Which of the following statements, if any, are correct? (Choose all that apply.) A. The NOLOGGING and ONLINE keywords cannot be used together when rebuilding the index. B. A rebuild may require double the disk space while it is in progress. C. If you do not use the ONLINE keyword during a rebuild, the table will be unavailable for SELECT and DML statements. D. The NOLOGGING keyword applied to a rebuild means that DML against the index will not generate redo. PART I 4. You can analyze an index with the ANALYZE INDEX command, or with the DBMS_STATS.GATHER_INDEX_STATS procedure. Which view will be populated after this? (Choose the best answer.) A. INDEX_STATS B. DBA_INDEXES C. DBA_IND_COLUMNS D. DBA_INDEX_STATS 5. Object statistics are gathered and become out of date. What will cause them to be gathered again? (Choose two correct answers.) A. The optimizer can be configured to gather statistics automatically when it considers them out of date. B. You can configure a Scheduler job to gather statistics automatically. C. You can always force the gathering of statistics by using the ANALYZE command. D. Applying the GATHER AUTO option to the DBMS_STATS.GATHER_ DATABASE_STATS procedure will force collection of statistics for all objects. 6. From where are dynamic performance views populated? (Choose all correct
146
answers.) A. The instance B. The controlfile C. The data dictionary D. The Automatic Workload Repository 7. When you shut down an instance, what happens to the information in the dynamic performance views? (Choose the best answer.) A. It is lost. B. It is saved to the Automatic Workload Repository by the MMON process. C. It is saved to the controlfile. D. It depends on the method of shutdown: a crash or SHUTDOWN ABORT will lose it; otherwise, it will be saved. 8. If a primary key index becomes unusable, what will the effect be upon an application that uses it? (Choose the best answer.) A. SELECT will succeed, but perhaps at reduced performance. B. DML commands will succeed, but perhaps at reduced performance. C. The primary key constraint can no longer be enforced. D. All of the above. 9.0 FUERTHER READING/ REFERENCE 1.0Philip A. Bernstein, VassosHadzilacos, Nathan Goodman (1987): Concurrency Control and
Recovery in Database Systems (free PDF download), Addison Wesley Publishing Company,
1987, ISBN 0-201-10715-5
2.0 Greenwald, Rick; Stackowiak, Robert; Stern, Jonathan (2007). Oracle Essentials: Oracle Database 11g. Essential Series (4 ed.). O'Reilly Media.p. 31. ISBN 9780596514549.Retrieved 2010-06-08. "Today, Oracle offers other embedded databases including TimesTen, Berkeley DB, and Oracle Database Lite."
4.0 Chapple, Mike. "SQL Fundamentals". Databases. About.com. Retrieved 2009-01-28.
4.0 Tony, Morales; et al. (October 2009). "Overview of the Dynamic Performance
Views"(PDF). Oracle Database Reference 11g Release 2 (11.2). Oracle Corporation. p. 8-1.
Retrieved 2010-03-09. "V$INDEXED_FIXED_COLUMN displays the columns in dynamic
performance tables that are indexed (X$ tables)."[dead link]
5.0 "Oracle Process architecture concepts". Download.oracle.com. Retrieved 2009-12-19.

147
MODULE 3: ORACLE CONFIGURATION
UNIT 3: Dealing with Locking
Page
1.0 Introduction 2
2.0 Objectives 2
3.0 Shared and Exclusive Locks 2
16.0 DML and DDL Locks
5.0. The Enqueue Mechanism 6.0 Lock Contention
7.0 Deadlocks
8.0 Summary
9.0 Tutor Marked Assignment
12.0 Further Reading /References
CHAPTER 1UN2
CHAPTER 17

148
1.0 INTRODUCTION
In any multiuser database application it is inevitable that, eventually, two users will
wish to work on the same row at the same time. This is a logical impossibility, and the
database must ensure that it is a physical impossibility. The principle of transaction
isolation—the I of the ACID test—requires that the database guarantee that one
session cannot see or be affected by another session’s transaction until the transaction
has completed. To accomplish this, the database must serialize concurrent access to
data; it must ensure that even though multiple sessions have requested access to the
same rows, they actually queue up and take turns.
Serialization of concurrent access is accomplished by record and table locking
mechanisms. Locking in an Oracle database is completely automatic. Generally
speaking, problems only arise if software tries to interfere with the automatic locking
mechanism, or if programmers write poor code.
2.0 OBJECTIVES
In this unit you will learn how to
• Detect and resolve lock conflicts
• Manage deadlocks
• Describe the relationship between transactions and locks
• Explain lock modes within the Oracle Database 10g
3.0 Shared and Exclusive Locks
The standard level of locking in an Oracle database guarantees the highest possible
level of concurrency. This means that if a session is updating one row, the one row is
locked, and nothing else. Furthermore, the row is locked only to prevent other sessions
from updating it; other sessions can read it at any time. The lock is held until the
transaction completes, either with a COMMIT or a ROLLBACK. This is an “exclusive”
lock: the first session to request the lock on the row gets it, and any other sessions
requesting write access must wait. Read access is permitted, though if the row has
been updated by the locking session, as will usually be the case, then any reads will
149
involve the use of undo data to make sure that reading sessions do not see any
uncommitted changes.
Only one session can take an exclusive lock on a row, or a whole table, at a time,
but “shared” locks can be taken on the same object by many sessions. It would not
make any sense to take a shared lock on one row, because the only purpose of a row
lock is to gain the exclusive access needed to modify the row. Shared locks are taken
on whole tables, and many sessions can have a shared lock on the same table. The
purpose of taking a shared lock on a table is to prevent another session from acquiring
an exclusive lock on the table: you cannot get an exclusive lock if anyone else already
has a shared lock. Exclusive locks on tables are required to execute DDL statements.
You cannot issue a statement that will modify an object (for instance, dropping a
column of a table) if any other session already has a shared lock on the table.
To execute DML on rows, a session must acquire exclusive locks on the rows to
be changed, and shared locks on the tables containing the rows. If another session
already has exclusive locks on the rows, the session will hang until the locks are
released by a COMMIT or a ROLLBACK. If another session already has a shared lock
on the table and exclusive locks on other rows, that is not a problem. An exclusive
lock on the table would be, but the default locking mechanism does not lock whole
tables unless this is necessary for DDL statements.
4.0 DML and DDL Locks
All DML statements require at least two locks: an exclusive lock on each row affected,
and a shared lock on the table containing the row. The exclusive lock prevents another
session from interfering with the row, and the shared lock prevents another session
from changing the table definition with a DDL statement. These locks are requested
automatically. If a DML statement cannot acquire the exclusive row locks it needs,
then it will hang until it gets them.
To execute DDL commands requires an exclusive lock on the object concerned.
This cannot be obtained until all DML transactions against the table have finished,
thereby releasing both their exclusive row locks and their shared table locks. The
exclusive lock required by any DDL statement is requested automatically, but if it

150
cannot be obtained—typically, because another session already has the shared lock
granted for DML—then the statement will terminate with an error immediately.
Exercise 17-1: Automatic and Manual Locking
Demonstrate the effect of automatic shared and exclusive locks, using DML and DDL
commands.
1. Connect to your database with SQL*Plus as user SYSTEM.
2. Create a table, and insert a row into it.
ocp10g> create table t1(c1 number);
Table created.
ocp10g> insert into t1 values(1);
1 row created.
ocp10g> commit;
Commit complete.
3. Open a second session, again connecting with SQL*Plus as user SYSTEM.
4. In session 1, issue a DML command that will take an exclusive lock on the
row and a shared lock on the table.
ocp10g> update t1 set c1=2 where c1=1;
1 row updated.
5. In session 2, issue a DDL statement against the table.
ocp10g> alter table t1 add (c2 date);
alter table t1 add (c2 date)
*
ERROR at line 1:
ORA-00054: resource busy and acquire with NOWAIT specified
The attempt to add a column to the table fails, because the exclusive table
lock necessary for a DDL statement conflicts with the shared lock already
granted for a DML statement. Note that whereas a DML statement will wait
and continually retry until it gets its lock (in other words, it hangs), DDL
statements terminate immediately with an error.
6. In session 1, commit the transaction.
ocp10g> commit;
151
Commit complete.
7. In session 2, repeat Step 5. This time it will succeed because there are no
shared DML locks blocking the exclusive DDL lock.
8. In session 1, lock the whole table.
ocp10g> lock table t1 in exclusive mode;
Table(s) Locked.
9. In session 2, insert a row. The session will hang.
ocp10g> insert into t1 values (1,sysdate);
10. In session 1, release the table lock by issuing a COMMIT. Note that a
ROLLBACK would do just as well.
ocp10g> commit;
Commit complete.
11. Session 2 will now be released, and the insert will complete; issue a COMMIT
to terminate the transaction and release the row exclusive lock.
12. Leave both sessions open; they will be used in later exercises.
5.0 The Enqueue Mechanism
Requests for locks are queued. If a session requests a lock and cannot get it because
another session already has the row or object locked, the session will wait. It may be
that several sessions are waiting for access to the same row or object; in that case,
Oracle will keep track of the order in which the sessions requested the lock. When the
session with the lock releases it, the next session will be granted it, and so on. This is
known as the “enqueue” mechanism.
If you do not want a session to queue up if it cannot get a lock, the only way to
avoid this is to use the WAIT or NOWAIT clause of the SELECT...FOR UPDATE
command. A normal SELECT will always succeed, because SELECT does not require
any locks, but a DML statement will hang. The SELECT...FOR UPDATE command will
select rows and lock them in exclusive mode. If any of the rows are locked already, the
SELECT...FOR UPDATE statement will be queued and the session will hang until the
locks are released, just as a DML statement would. To avoid sessions hanging, use
either SELECT...FOR UPDATE NOWAIT or SELECT...FOR UPDATE WAIT <n>, where

152
<n> is a number of seconds. Having obtained the locks with either of the SELECT...
FOR UPDATE options, you can then issue the DML commands with no possibility
of the session hanging.PART I
Exercise 17-2: The SELECT...FOR UPDATE Command
Use the SELECT...FOR UPDATE command to control enqueue waits.
1. In your first SQL*Plus session, select and lock both the rows in the T1 table.
ocp10g> select * from t1 for update;
C1 C2
---------- ---------
2
1 09-FEB-05
2. In your second session, attempt to lock the rows, but use the NOWAIT
keyword to terminate the statement immediately if the locks cannot be
obtained.
ocp10g> select * from t1 for update nowait;
select * from t1 for update nowait
*
ERROR at line 1:
ORA-00054: resource busy and acquire with NOWAIT specified
The statement fails immediately, and the session can continue.
3. In your second session, try to lock the rows again but specify a time-out of ten
seconds.
ocp10g> select * from t1 for update wait 10;
select * from t1 for update wait 10
*
ERROR at line 1:
ORA-30006: resource busy; acquire with WAIT timeout expired
The session hangs for ten seconds before the statement fails and the session
is freed.
4. Repeat Step 3, but before the ten seconds expire issue a COMMIT in your first
session. Session 2 will then continue.

153
ocp10g> select * from t1 for update wait 10;
C1 C2
---------- ---------
2
1 09-FEB-05
5. Release the locks obtained by session 2 by issuing a COMMIT.
6.0 Lock Contention
When a session requests a lock on a row or object and cannot get it because another
session has an exclusive lock on the row or object, it will hang. This is lock contention,
and it can cause the database performance to deteriorate appallingly as all the sessions
queue up waiting for locks. Some lock contention may be inevitable, as a result of
normal activity: the nature of the application may be such that different users will
require access to the same data. But in many cases, lock contention is caused by
program and system design.
The Oracle database provides utilities for detecting lock contention, and it is also
possible to solve the problem in an emergency. A special case of lock contention is the
“deadlock,” which is always resolved automatically by the database itself.
6.1 The Causes of Lock Contention
It may be that the nature of the business is such that users do require write access to
the same rows at the same time. If this is a limiting factor in performance of the
system, the only solution is business process re-engineering, to develop a more
efficient business model. But although some locking is a necessary part of business
data processing, there are some faults in application design that can exacerbate the
problem.
Long-running transactions will cause problems. An obvious case is where a user
updates a row and then does not commit the change. Perhaps s/he even goes off to
lunch, leaving the transaction unfinished. You cannot stop this from happening if
users have access to the database with tools such as SQL*Plus, but it should never
occur with well-written software. The application should take care that a lock is only

154
imposed just before an update occurs, and released (with a COMMIT or ROLLBACK)
immediately afterward.
Poorly written batch processes can also cause problems, if they are coded as long
transactions. Consider the case of an accounting suite nominal ledger: it is a logical
impossibility in accountancy terms for the ledger to be partly in one period and partly
in another, so the end-of-month rollover to the next period is one business transaction.
This transaction may involve updating millions of rows in thousands of tables and
take hours to complete. If the rollover routine is coded as one transaction with a
COMMIT at the end, millions of rows will be locked for hours, but in accountancy
terms, this is what should happen. Good program design would avoid the problem
by updating the rows in groups, with regular commits, but the programmers will also
have to take care of simulating read consistency across transactions and handling the
situation where the process fails part way through. If it were one transaction, this
wouldn’t be a problem: the database would roll it back. If it is many small transactions,
they will have to manage a ledger that is half in one period and half in another. These
considerations should not be a problem: your programmers should bear in mind that
long transactions impact on the usability of the system, and design their systems
accordingly.
Third-party user process products may impose excessively high locking levels. For
example, some application development tools always do a SELECT...FOR UPDATE to
avoid the necessity of re-querying the data and checking for changes. Some other
products cannot do row-level locking: if a user wants to update one row, the tool locks
a group of rows—perhaps dozens or even hundreds. If your application software is
PART I
written with tools such as these, the Oracle database will simply do what it is told to
do: it will impose numerous locks that are unnecessary in business terms. If you
suspect that the software is applying more locks than necessary, investigate whether
it has configuration options to change this behavior.
Finally, make sure your programmers are aware of the capabilities of the database.
A common problem is repeatable reads. Consider this example:
ocp10g> select * from regions;
155
REGION_ID REGION_NAME
---------- -------------------------
1 Europe
2 Americas
3 Asia
4 Middle East and Africa
ocp10g> select count(*) from regions;
COUNT(*)
----------
5
How can this be possible? The first query (the detail report) shows four rows, and
then the second query (the summary report) shows five. The problem is that during
the course of the first query, another session inserted and committed the fifth row.
One way out of this would be to lock the tables while running the reports, thus
causing other sessions to hang. A more sophisticated way would be to use the SET
TRANSACTION READ ONLY statement. This will guarantee (without imposing any
locks) that the session does not see any DML on any tables, committed or not, until it
terminates the read-only transaction with a COMMIT or ROLLBACK. The mechanism
is based on use of undo segments and is the same as that used for Flashback Query.
6.2 Detecting Lock Contention
To reach the Database Control lock manager, take the Performance tab from the
database home page, and then the Database Locks link in the Additional Monitoring
Links section. Figure 17-1 shows the Database Locks window, with Blocking Locks
selected. There may be any number of locks within the database, but it is usually only
the locks that are causing sessions to hang that are of interest. These are known as
blockinglocks.
In the figure, there is one problem. Session number 138, logged on as user HR, is
holding an exclusive lock on one or more rows of the table HR.REGIONS. This session
is not hanging; it is operating normally. But session number 162, logged on as user

156
SYSTEM, is blocked; it is waiting for an exclusive lock on one or more of the rows
locked by session 138. Session 162 is hanging at this moment, and it will continue to
hang until session 138 releases its locks by terminating its transaction with a COMMIT
or a ROLLBACK.
6.3 Resolving Lock Contention
Lock contention is a natural consequence of many users accessing the same data
concurrently. The problem can be exacerbated by badly designed software, but in
principle lock contention is part of normal database activity. It is therefore not
possible for the DBA to resolve it completely; s/he can only identify that it is a
problem, and suggest to system and application designers that they bear in mind the
impact of lock contention when designing data structures and programs.
In an emergency, however, it is possible for the DBA to solve the problem by
terminating the session, or sessions, that are holding too many locks for too long.
When a session is terminated forcibly, any locks it holds will be released as its active
transaction is rolled back. The blocked sessions will then become free and can
continue.
To terminate a session, use either Database Control or the ALTER SYSTEM KILL
SESSION command. In the preceding example, if you decided that the HR session is
holding its lock for an absurd period of time, you would select the radio button for
the session and click the KILL SESSION button. HR’s transaction will be rolled back,
and SYSTEM’s session will then be able to take the lock(s) it requires and continue
working.
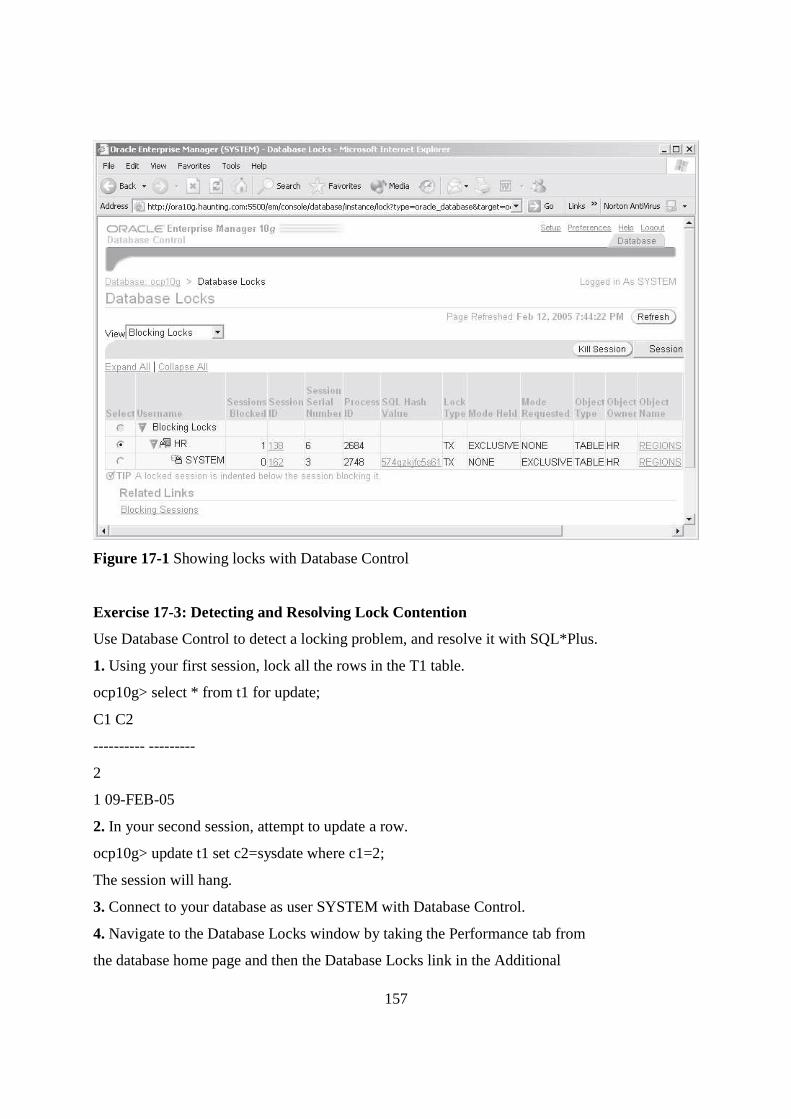
157
Figure 17-1 Showing locks with Database Control
PART I
Exercise 17-3: Detecting and Resolving Lock Contention
Use Database Control to detect a locking problem, and resolve it with SQL*Plus.
1. Using your first session, lock all the rows in the T1 table.
ocp10g> select * from t1 for update;
C1 C2
---------- ---------
2
1 09-FEB-05
2. In your second session, attempt to update a row.
ocp10g> update t1 set c2=sysdate where c1=2;
The session will hang.
3. Connect to your database as user SYSTEM with Database Control.
4. Navigate to the Database Locks window by taking the Performance tab from
the database home page and then the Database Locks link in the Additional
158
Monitoring Links section.
5. Observe that the second session is shown as waiting for an EXCLUSIVE lock.
This will be the hanging session. The first session is the one holding the lock
that is causing the problem.
6. Note the Session ID and Session Serial Number of the blocking session—138
and 6 in the example in Figure 17-1.
7. Launch a third SQL*Plus session and connect as user SYSTEM.
8. In your third session, issue this command, substituting your blocking
session’s session and serial number:
ocp10g> alter system kill session '138,6';
System altered.
9. Note that in your second session, the update has now succeeded.
10. In your first session, issue any statement you please; you will get the message
“ORA-00028: your session has been killed,” indicating that you have been
forcibly disconnected.
7.0 Deadlocks
It is possible to construct a scenario where two sessions block each other in such
a fashion that both will hang, each waiting for the other to release its lock. This is
known as a deadlock. Deadlocks are not the DBA’s problem; they are caused by bad
program design and are resolved automatically by the database itself. Information
regarding deadlocks is written out to the alert log, with full details in a trace file; as
part of your daily monitoring, you will pick up the occurrence of deadlocks and
inform your developers that they are happening.
If a deadlock occurs, both sessions will hang, but only for a brief moment. One of
the sessions will detect the deadlock within seconds, and it will roll back the
statement that caused the problem. This will free up the other session, returning the
message “ORA-00060: Deadlock detected.” This message must be trapped by your
programmers in their exceptions clauses, which should take appropriate action.
It must be emphasized that deadlocks are a program design fault. They occur
because the code attempts to do something that is logically impossible. Well-written

159
code will always request locks in a sequence that cannot cause deadlocks to occur, or
will test whether incompatible locks already exist before requesting them.
Exercise 17-4: Automatic Deadlock Resolution
Using the first and second sessions you have open from previous exercises, force a
deadlock, and observe the reporting through trace files.
1. In your first session, lock a row with an update statement.
ocp10g> update t1 set c2=sysdate where c1=1;
1 row updated.
2. In your second session, lock the other row.
ocp10g> update t1 set c2=sysdate where c1=2;
1 row updated.
3. In your first session, request a lock on the row already locked by the second
session, by issuing the statement in Step 2. The session will hang.
4. In your second session, issue the statement in Step 1, to complete the
construction of the deadlock by requesting a lock on the row already locked
by your first session.
5. Within a second or two, your first session will come free with an ORA-00060
message.
ocp10g> update t1 set c2=sysdate where c1=2;
update t1 set c2=sysdate where c1=2
*
ERROR at line 1:
ORA-00060: deadlock detected while waiting for resource
Note that the other session is still hanging.
6. Open your alert log with any editor you please (remember, it is located in
the directory specified by the BACKGROUND_DUMP_DEST instance
parameter, and named alert_<instance name>.log) The final entry
will resemble this:
Mon Feb 14 09:27:03 2005
ORA-00060: Deadlock detected. More info in file

160
/oracle/product/10.1.0/admin/ocp10g/udump/ocp10g_ora_420.trc.
PART I
7. Open the trace file listed. Note that it is in the directory specified by the
USER_DUMP_DEST instance parameter. It will include information such as
*** 2005-02-14 09:27:03.242
*** ACTION NAME:() 2005-02-14 09:27:03.212
*** MODULE NAME:(SQL*Plus) 2005-02-14 09:27:03.212
*** SERVICE NAME:(SYS$USERS) 2005-02-14 09:27:03.212
*** SESSION ID:(133.26) 2005-02-14 09:27:03.212
DEADLOCK DETECTED
Current SQL statement for this session:
update t1 set c2=sysdate where c1=2
The following deadlock is not an ORACLE error. It is a
deadlock due to user error in the design of an application
or from issuing incorrect ad-hoc SQL. The following
information may aid in determining the deadlock:
8. Interpret the deadlock information: it gives the statement that caused the
problem, as well as information on which program module caused the problem.
In particular, note the phrase “The following deadlock is not an ORACLE error.
It is a deadlock due to user error in the design of an application or from
issuing incorrect ad-hoc SQL.” This places the responsibility squarely on the
programmers, which is where it belongs.
9. Tidy up: issue a commit in all sessions, and drop the table.
8.0 SUMMARY
Locking is implemented by the enqueue mechanism, which tracks what locks have
been requested, and the order in which they were requested. Sessions will hang while
waiting for an enqueue.
Row and table locking can be completely automatic in the Oracle environment. The
default level of locking delivers the highest possible level of concurrency: individual
rows are locked exclusively, which is necessary for transaction integrity, and tables are

161
only ever locked in shared mode, in order to protect the structure of the objects being
manipulated. Programmers can impose higher levels of locking if they wish; whole
tables can be locked indefinitely.
9.0 TURTOR MARKED ASSIGNMENT
1. Which of the following commands will impose one (or more) exclusive row
lock(s)? (Choose all that apply.)
A. ALTER TABLE EMP ADD COLUMN DOB(DATE);
B. UPDATE EMP SET SAL=SAL*1.1;
C. UPDATE EMP SET SAL=SAL*1.1 WHERE EMPNO=7839;
D. SELECT * FROM EMP WHERE EMPNO=7839 FOR UPDATE;
E. DROP TABLE EMP;
F. CREATE INDEX ENAME_IDX ON EMP(ENAME);
2. Study the following sequence:
ocp10g> select * from emp where empno=7839 for update nowait;
select * from emp where empno=7839 for update nowait
*
ERROR at line 1:
ORA-00054: resource busy and acquire with NOWAIT specified
What best describes the situation? (Choose the best answer.)
A. The row for employee number 7839 is already locked exclusively, and your
session will hang until the lock is released.
B. The NOWAIT keyword cannot be combined with an UPDATE.
C. Another session has an exclusive lock either on the row for employee 7839
or on the whole EMP table.
D. There is already a shared lock on the row for employee 7839, which is
incompatible with the share mode lock required by SELECT...FOR UPDATE.
3. If several sessions request an exclusive lock on the same row, what will
happen? (Choose the best answer.)
A. The first session to request the lock will get an exclusive lock; the others
will be granted shared locks.
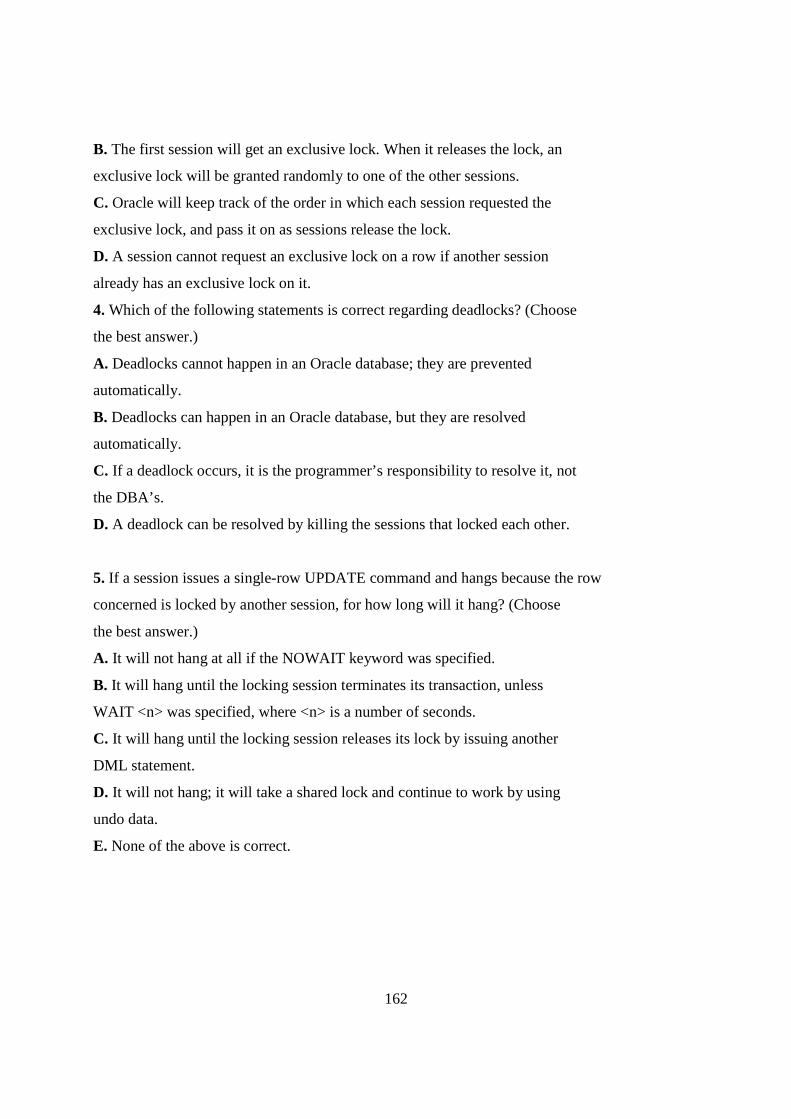
162
B. The first session will get an exclusive lock. When it releases the lock, an
exclusive lock will be granted randomly to one of the other sessions.
C. Oracle will keep track of the order in which each session requested the
exclusive lock, and pass it on as sessions release the lock.
D. A session cannot request an exclusive lock on a row if another session
already has an exclusive lock on it.
4. Which of the following statements is correct regarding deadlocks? (Choose
the best answer.)
A. Deadlocks cannot happen in an Oracle database; they are prevented
automatically.
B. Deadlocks can happen in an Oracle database, but they are resolved
automatically.
C. If a deadlock occurs, it is the programmer’s responsibility to resolve it, not
the DBA’s.
D. A deadlock can be resolved by killing the sessions that locked each other.
PART I
5. If a session issues a single-row UPDATE command and hangs because the row
concerned is locked by another session, for how long will it hang? (Choose
the best answer.)
A. It will not hang at all if the NOWAIT keyword was specified.
B. It will hang until the locking session terminates its transaction, unless
WAIT <n> was specified, where <n> is a number of seconds.
C. It will hang until the locking session releases its lock by issuing another
DML statement.
D. It will not hang; it will take a shared lock and continue to work by using
undo data.
E. None of the above is correct.

163
10.0 FURTHER READING/ REFERENCES
1.0Philip A. Bernstein, VassosHadzilacos, Nathan Goodman (1987): Concurrency Control and
Recovery in Database Systems (free PDF download), Addison Wesley Publishing Company,
1987, ISBN 0-201-10715-5
2.0 Greenwald, Rick; Stackowiak, Robert; Stern, Jonathan (2007). Oracle Essentials: Oracle Database 11g. Essential Series (4 ed.). O'Reilly Media.p. 31. ISBN 9780596514549.Retrieved 2010-06-08. "Today, Oracle offers other embedded databases including TimesTen, Berkeley DB, and Oracle Database Lite."
5.0 Chapple, Mike. "SQL Fundamentals". Databases. About.com. Retrieved 2009-01-28.
4.0 Tony, Morales; et al. (October 2009). "Overview of the Dynamic Performance
Views"(PDF). Oracle Database Reference 11g Release 2 (11.2). Oracle Corporation. p. 8-1.
Retrieved 2010-03-09. "V$INDEXED_FIXED_COLUMN displays the columns in dynamic
performance tables that are indexed (X$ tables)."[dead link]
5.0 "Oracle Process architecture concepts". Download.oracle.com. Retrieved 2009-12-19.

164
MODULE 4: DATA CONCURRENCY AND CONSISTENCY
UNIT 1: INTRODUCTION TO DATA CONCURRENCY AND CONSISTENC Y
Page
1.0 Introduction 2
2.0 Objectives 2
3.0 Transactions and Data Concurrency
4.0 Deadlocks
5.0 Types of Locks
6.0 DML Locks Automatically Acquired for DML Statements
7.0 DDL Locks
8.0 Latches and Internal Locks 9.0 Summary
10.0 Tutor Marked Assignment
11.0 Further Reading /References

165
1.0 INTRODUCTION
Locks are mechanisms that prevent destructive interaction between transactions accessing the same resource—either user objects such as tables and rows or system objects not visible to users, such as shared data structures in memory and data dictionary rows.
In all cases, Oracle Database automatically obtains necessary locks when executing SQL statements, so users need not be concerned with such details. Oracle Database automatically uses the lowest applicable level of restrictiveness to provide the highest degree of data concurrency yet also provide fail-safe data integrity. Oracle Database also allows the user to lock data manually.
2.0 OBJECTIVES
In this unit you will learn how to
-Define Transactions and Data Concurrency
-Understand Locking and deadlock
-Detect deadlock
3.0 Transactions and Data Concurrency
Oracle Database provides data concurrency and integrity between transactions using its locking mechanisms. Because the locking mechanisms of Oracle Database are tied closely to transaction control, application designers need only define transactions properly, and Oracle Database automatically manages locking.
Keep in mind that Oracle Database locking is fully automatic and requires no user action. Implicit locking occurs for all SQL statements so that database users never need to lock any resource explicitly. The Oracle Database default locking mechanisms lock data at the lowest level of restrictiveness to guarantee data integrity while allowing the highest degree of data concurrency.
3.1 Modes of Locking
Oracle Database uses two modes of locking in a multiuser database:
• Exclusive lock mode prevents the associated resource from being shared. This lock mode is obtained to modify data. The first transaction to lock a resource exclusively is the only transaction that can alter the resource until the exclusive lock is released.
• Share lock mode allows the associated resource to be shared, depending on the operations involved. Multiple users reading data can share the data, holding share locks to prevent

166
concurrent access by a writer (who needs an exclusive lock). Several transactions can acquire share locks on the same resource.
3.2 Lock Duration
All locks acquired by statements within a transaction are held for the duration of the transaction, preventing destructive interference including dirty reads, lost updates, and destructive DDL operations from concurrent transactions. The changes made by the SQL statements of one transaction become visible only to other transactions that startafter the first transaction is committed.
Oracle Database releases all locks acquired by the statements within a transaction when you either commit or undo the transaction. Oracle Database also releases locks acquired after a savepoint when rolling back to the savepoint. However, only transactions not waiting for the previously locked resources can acquire locks on the now available resources. Waiting transactions will continue to wait until after the original transaction commits or rolls back completely.
3.3 Data Lock Conversion Versus Lock Escalation
A transaction holds exclusive row locks for all rows inserted, updated, or deleted within the transaction. Because row locks are acquired at the highest degree of restrictiveness, no lock conversion is required or performed.
Oracle Database automatically converts a table lock of lower restrictiveness to one of higher restrictiveness as appropriate. For example, assume that a transaction uses aSELECT statement with the FOR UPDATE clause to lock rows of a table. As a result, it acquires the exclusive row locks and a row share table lock for the table. If the transaction later updates one or more of the locked rows, the row share table lock is automatically converted to a row exclusive table lock.
Lock escalation occurs when numerous locks are held at one level of granularity (for example, rows) and a database raises the locks to a higher level of granularity (for example, table). For example, if a single user locks many rows in a table, some databases automatically escalate the user's row locks to a single table. The number of locks is reduced, but the restrictiveness of what is being locked is increased.
Oracle Database never escalates locks. Lock escalation greatly increases the likelihood of deadlocks. Imagine the situation where the system is trying to escalate locks on behalf of transaction T1 but cannot because of the locks held by transaction T2. A deadlock is created if transaction T2 also requires lock escalation of the same data before it can proceed.
4.0 Deadlocks
A deadlock can occur when two or more users are waiting for data locked by each other. Deadlocks prevent some transactions from continuing to work. Figure 13-3 is a hypothetical illustration of two transactions in a deadlock.

167
In Figure 13-3, no problem exists at time point A, as each transaction has a row lock on the row it attempts to update. Each transaction proceeds without being terminated. However, each tries next to update the row currently held by the other transaction. Therefore, a deadlock results at time point B, because neither transaction can obtain the resource it must proceed or terminate. It is a deadlock because no matter how long each transaction waits, the conflicting locks are held.
Figure 13-3 Two Transactions in a Deadlock
Description of "Figure 13-3 Two Transactions in a Deadlock"
4.1Deadlock Detection
Oracle Database automatically detects deadlock situations and resolves them by rolling back one of the statements involved in the deadlock, thereby releasing one set of the conflicting row locks. A corresponding message also is returned to the transaction that undergoes statement-level rollback. The statement rolled back is the one belonging to the transaction that detects the deadlock. Usually, the signalled transaction should be rolled back explicitly, but it can retry the rolled-back statement after waiting.
Note: In distributed transactions, local deadlocks are detected by analyzing wait data, and global deadlocks are detected by a time out. Once detected, nondistributed and distributed deadlocks are handled by the database and application in the same way.
Deadlocks most often occur when transactions explicitly override the default locking of Oracle Database. Because Oracle Database itself does no lock escalation and does not use read locks for queries, but does use row-level locking (rather than page-level locking), deadlocks occur infrequently in Oracle Database.
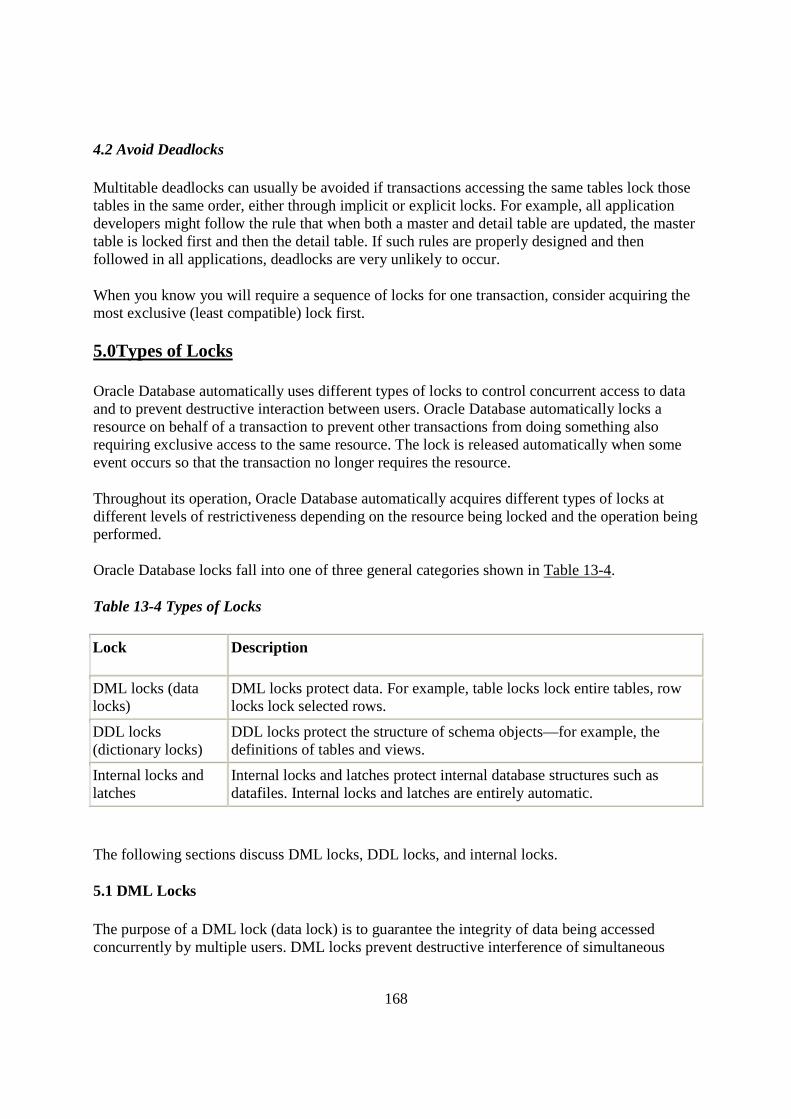
168
4.2 Avoid Deadlocks
Multitable deadlocks can usually be avoided if transactions accessing the same tables lock those tables in the same order, either through implicit or explicit locks. For example, all application developers might follow the rule that when both a master and detail table are updated, the master table is locked first and then the detail table. If such rules are properly designed and then followed in all applications, deadlocks are very unlikely to occur.
When you know you will require a sequence of locks for one transaction, consider acquiring the most exclusive (least compatible) lock first.
5.0Types of Locks
Oracle Database automatically uses different types of locks to control concurrent access to data and to prevent destructive interaction between users. Oracle Database automatically locks a resource on behalf of a transaction to prevent other transactions from doing something also requiring exclusive access to the same resource. The lock is released automatically when some event occurs so that the transaction no longer requires the resource.
Throughout its operation, Oracle Database automatically acquires different types of locks at different levels of restrictiveness depending on the resource being locked and the operation being performed.
Oracle Database locks fall into one of three general categories shown in Table 13-4.
Table 13-4 Types of Locks
Lock Description
DML locks (data locks)
DML locks protect data. For example, table locks lock entire tables, row locks lock selected rows.
DDL locks (dictionary locks)
DDL locks protect the structure of schema objects—for example, the definitions of tables and views.
Internal locks and latches
Internal locks and latches protect internal database structures such as datafiles. Internal locks and latches are entirely automatic.
The following sections discuss DML locks, DDL locks, and internal locks.
5.1 DML Locks
The purpose of a DML lock (data lock) is to guarantee the integrity of data being accessed concurrently by multiple users. DML locks prevent destructive interference of simultaneous

169
conflicting DML or DDL operations. DML statements automatically acquire both table-level locks and row-level locks.
Note: The acronym in parentheses after each type of lock or lock mode is the abbreviation used in the Locks Monitor of Enterprise Manager. Enterprise Manager might display TM for any table lock, rather than indicate the mode of table lock (such as RS or SRX).
5.2 Row Locks (TX)
Row-level locks are primarily used to prevent two transactions from modifying the same row. When a transaction must modify a row, a row lock is acquired.
There is no limit to the number of row locks held by a statement or transaction, and Oracle Database does not escalate locks from the row level to a coarser granularity. Row locking provides the finest grain locking possible and so provides the best possible concurrency and throughput.
The combination of multiversion concurrency control and row-level locking means that users contend for data only when accessing the same rows, specifically:
• Readers of data do not wait for writers of the same data rows. • Writers of data do not wait for readers of the same data rows
unless SELECT ... FOR UPDATE is used, which specifically requests a lock for the reader.
• Writers only wait for other writers if they attempt to update the same rows at the same time.
Note: Readers of data may have to wait for writers of the same data blocks in some very special cases of pending distributed transactions.
A transaction acquires an exclusive row lock for each individual row modified by one of the following statements: INSERT, UPDATE, DELETE, and SELECT with the FOR UPDATEclause.
A modified row is always locked exclusively so that other transactions cannot modify the row until the transaction holding the lock is committed or rolled back. However, if the transaction dies due to instance failure, block-level recovery makes a row available before the entire transaction is recovered. Row locks are always acquired automatically by Oracle Database as a result of the statements listed previously.
If a transaction obtains a row lock for a row, the transaction also acquires a table lock for the corresponding table. The table lock prevents conflicting DDL operations that would override data changes in a current transaction.
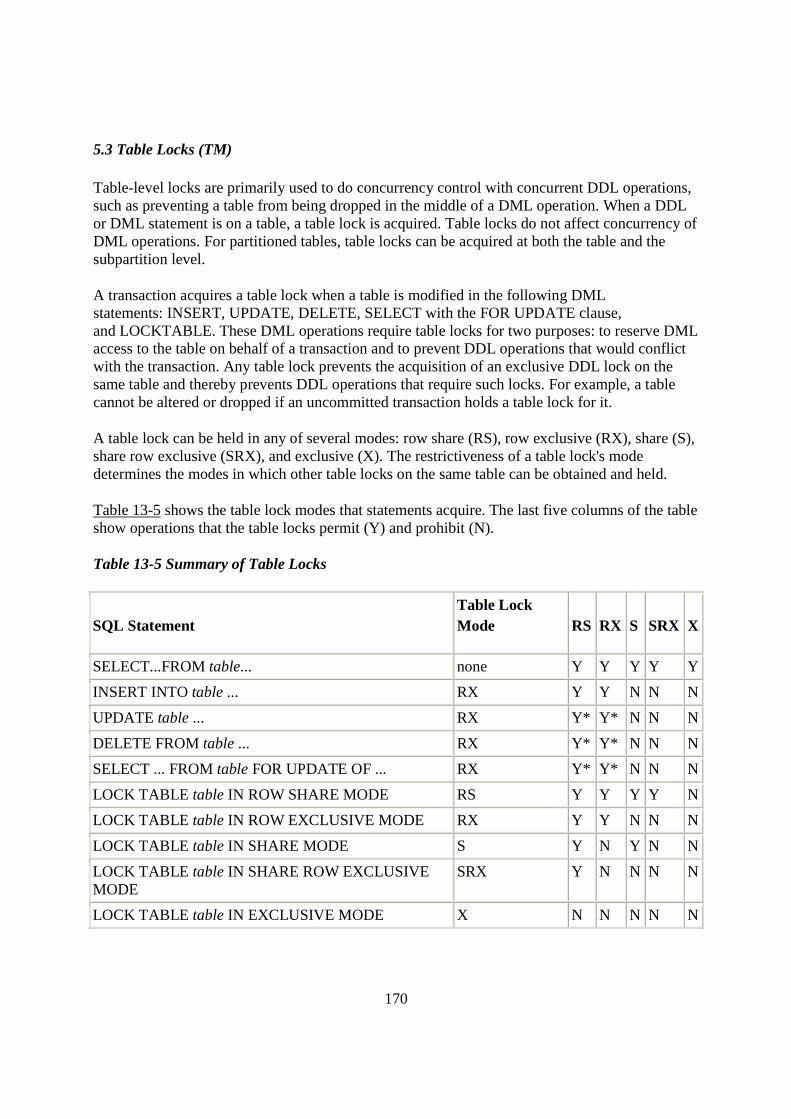
170
5.3 Table Locks (TM)
Table-level locks are primarily used to do concurrency control with concurrent DDL operations, such as preventing a table from being dropped in the middle of a DML operation. When a DDL or DML statement is on a table, a table lock is acquired. Table locks do not affect concurrency of DML operations. For partitioned tables, table locks can be acquired at both the table and the subpartition level.
A transaction acquires a table lock when a table is modified in the following DML statements: INSERT, UPDATE, DELETE, SELECT with the FOR UPDATE clause, and LOCKTABLE. These DML operations require table locks for two purposes: to reserve DML access to the table on behalf of a transaction and to prevent DDL operations that would conflict with the transaction. Any table lock prevents the acquisition of an exclusive DDL lock on the same table and thereby prevents DDL operations that require such locks. For example, a table cannot be altered or dropped if an uncommitted transaction holds a table lock for it.
A table lock can be held in any of several modes: row share (RS), row exclusive (RX), share (S), share row exclusive (SRX), and exclusive (X). The restrictiveness of a table lock's mode determines the modes in which other table locks on the same table can be obtained and held.
Table 13-5 shows the table lock modes that statements acquire. The last five columns of the table show operations that the table locks permit (Y) and prohibit (N).
Table 13-5 Summary of Table Locks
SQL Statement Table Lock Mode RS RX S SRX X
SELECT...FROM table... none Y Y Y Y Y
INSERT INTO table ... RX Y Y N N N
UPDATE table ... RX Y* Y* N N N
DELETE FROM table ... RX Y* Y* N N N
SELECT ... FROM table FOR UPDATE OF ... RX Y* Y* N N N
LOCK TABLE table IN ROW SHARE MODE RS Y Y Y Y N
LOCK TABLE table IN ROW EXCLUSIVE MODE RX Y Y N N N
LOCK TABLE table IN SHARE MODE S Y N Y N N
LOCK TABLE table IN SHARE ROW EXCLUSIVE MODE
SRX Y N N N N
LOCK TABLE table IN EXCLUSIVE MODE X N N N N N

171
RS: row share
RX: row exclusive
S: share
SRX: share row exclusive
X: exclusive
*Yes, if no conflicting row locks are held by another transaction. Otherwise, waits occur.
The following sections explain each mode of table lock, from least restrictive to most restrictive. They also describe the actions that cause the transaction to acquire a table lock in that mode and which actions are permitted and prohibited in other transactions by a lock in that mode.
•
5.3.1Row Share Table Locks (RS)
A row share table lock (also sometimes called a subshare table lock, SS) indicates that the transaction holding the lock on the table has locked rows in the table and intends to update them. A row share table lock is automatically acquired for a table when the following SQL statement is run:
LOCK TABLE table IN ROW SHARE MODE;
A row share table lock is the least restrictive mode of table lock, offering the highest degree of concurrency for a table.
Permitted Operations: A row share table lock held by a transaction allows other transactions to query, insert, update, delete, or lock rows concurrently in the same table. Therefore, other transactions can obtain simultaneous row share, row exclusive, share, and share row exclusive table locks for the same table.
Prohibited Operations: A row share table lock held by a transaction prevents other transactions from exclusive write access to the same table using only the following statement:
LOCK TABLE table IN EXCLUSIVE MODE;
5.3.2 Row Exclusive Table Locks (RX)
A row exclusive table lock (also called a subexclusive table lock, SX) generally indicates that the transaction holding the lock has made one or more updates to rows in the table or issued SELECT ... FOR UPDATE. A row exclusive table lock is acquired automatically for a table modified by the following types of statements:

172
SELECT ... FROM table ... FOR UPDATE OF ...; INSERT INTO table... ; UPDATE table... ; DELETE FROM table... ; LOCK TABLE table IN ROW EXCLUSIVE MODE;
A row exclusive table lock is slightly more restrictive than a row share table lock.
Permitted Operations: A row exclusive table lock held by a transaction allows other transactions to query, insert, update, delete, or lock rows concurrently in the same table. Therefore, row exclusive table locks allow multiple transactions to obtain simultaneous row exclusive and row share table locks for the same table.
Prohibited Operations: A row exclusive table lock held by a transaction prevents other transactions from manually locking the table for exclusive reading or writing. Therefore, other transactions cannot concurrently lock the table using the following statements:
LOCK TABLE table IN SHARE MODE; LOCK TABLE table IN SHARE ROW EXCLUSIVE MODE; LOCK TABLE table IN EXCLUSIVE MODE;
5.3.4 Share Table Locks (S)
A share table lock is acquired automatically for the table specified in the following statement:
LOCK TABLE table IN SHARE MODE;
Permitted Operations: A share table lock held by a transaction allows other transactions only to query the table (without using SELECT ... FOR UPDATE) or to run LOCKTABLE ... IN SHARE MODE statements successfully. No updates are allowed by other transactions. Multiple transactions can hold share table locks for the same table concurrently. In this case, no transaction can update the table. Therefore, a transaction that has a share table lock can update the table only if no other transactions also have a share table lock on the same table.
Prohibited Operations: A share table lock held by a transaction prevents other transactions from modifying the same table and from executing the following statements:
LOCK TABLE table IN SHARE ROW EXCLUSIVE MODE;

173
LOCK TABLE table IN EXCLUSIVE MODE; LOCK TABLE table IN ROW EXCLUSIVE MODE;
5.3.5 Share Row Exclusive Table Locks (SRX)
A share row exclusive table lock (also sometimes called a share-subexclusive table lock, SSX) is more restrictive than a share table lock. A share row exclusive table lock is acquired for a table as follows:
LOCK TABLE table IN SHARE ROW EXCLUSIVE MODE;
Permitted Operations: Only one transaction at a time can acquire a share row exclusive table lock on a given table. A share row exclusive table lock held by a transaction allows other transactions to query the table (without using SELECT ... FOR UPDATE) but not update the table.
Prohibited Operations: A share row exclusive table lock held by a transaction prevents other transactions from obtaining row exclusive table locks and modifying the same table. A share row exclusive table lock also prohibits other transactions from obtaining share, share row exclusive, and exclusive table locks, which prevents other transactions from executing the following statements:
LOCK TABLE table IN SHARE MODE; LOCK TABLE table IN SHARE ROW EXCLUSIVE MODE; LOCK TABLE table IN ROW EXCLUSIVE MODE; LOCK TABLE table IN EXCLUSIVE MODE;
5.3.6Exclusive Table Locks (X)
An exclusive table lock is the most restrictive mode of table lock, allowing the transaction that holds the lock exclusive write access to the table. An exclusive table lock is acquired for a table as follows:
LOCK TABLE table IN EXCLUSIVE MODE;
Permitted Operations: Only one transaction can obtain an exclusive table lock for a table. An exclusive table lock permits other transactions only to query the table.
Prohibited Operations: An exclusive table lock held by a transaction prohibits other transactions from performing any type of DML statement or placing any type of lock on the table.

174
6.0 DML Locks Automatically Acquired for DML Statements
The previous sections explained the different types of data locks, the modes in which they can be held, when they can be obtained, when they are obtained, and what they prohibit. The following sections summarize how Oracle Database automatically locks data on behalf of different DML operations.
Table 13-6 summarizes the information in the following sections.
Table 13-6 Locks Obtained By DML Statements
DML Statement Row Locks? Mode of Table Lock
SELECT ... FROM table
INSERT INTO table ... X RX
UPDATE table ... X RX
DELETE FROM table ... X RX
SELECT ... FROM table ... FOR UPDATE OF ... X RX
LOCK TABLE table IN ...
ROW SHARE MODE RS
ROW EXCLUSIVE MODE RX
SHARE MODE S
SHARE EXCLUSIVE MODE SRX
EXCLUSIVE MODE X
X: exclusive
RX: row exclusive
RS: row share
S: share
SRX: share row exclusive

175
•
6.1 Default Locking for Queries
Queries are the SQL statements least likely to interfere with other SQL statements because they only read data. INSERT, UPDATE, and DELETE statements can have implicit queries as part of the statement. Queries include the following kinds of statements:
SELECT INSERT ... SELECT ... ; UPDATE ... ; DELETE ... ;
They do not include the following statement:
SELECT ... FOR UPDATE OF ... ;
The following characteristics are true of all queries that do not use the FOR UPDATE clause:
• A query acquires no data locks. Therefore, other transactions can query and update a table being queried, including the specific rows being queried. Because queries lacking FOR UPDATE clauses do not acquire any data locks to block other operations, such queries are often referred to in Oracle Database as nonblocking queries.
• A query does not have to wait for any data locks to be released; it can always proceed. (Queries may have to wait for data locks in some very specific cases of pending distributed transactions.)
6.2 Default Locking for INSERT, UPDATE, DELETE, and SELECT ... FOR UPDATE
The locking characteristics of INSERT, UPDATE, DELETE, and SELECT ... FOR UPDATE statements are as follows:
• The transaction that contains a DML statement acquires exclusive row locks on the rows modified by the statement. Other transactions cannot update or delete the locked rows until the locking transaction either commits or rolls back.
• The transaction that contains a DML statement does not need to acquire row locks on any rows selected by a subquery or an implicit query, such as a query in aWHERE clause. A subquery or implicit query in a DML statement is guaranteed to be consistent as of the start of the query and does not see the effects of the DML statement it is part of.
• A query in a transaction can see the changes made by previous DML statements in the same transaction, but cannot see the changes of other transactions begun after its own transaction.

176
• In addition to the necessary exclusive row locks, a transaction that contains a DML statement acquires at least a row exclusive table lock on the table that contains the affected rows. If the containing transaction already holds a share, share row exclusive, or exclusive table lock for that table, the row exclusive table lock is not acquired. If the containing transaction already holds a row share table lock, Oracle Database automatically converts this lock to a row exclusive table lock.
7.0 DDL Locks
A data dictionary lock (DDL) protects the definition of a schema object while that object is acted upon or referred to by an ongoing DDL operation. Recall that a DDL statement implicitly commits its transaction. For example, assume that a user creates a procedure. On behalf of the user's single-statement transaction, Oracle Database automatically acquires DDL locks for all schema objects referenced in the procedure definition. The DDL locks prevent objects referenced in the procedure from being altered or dropped before the procedure compilation is complete.
Oracle Database acquires a dictionary lock automatically on behalf of any DDL transaction requiring it. Users cannot explicitly request DDL locks. Only individual schema objects that are modified or referenced are locked during DDL operations. The whole data dictionary is never locked.
DDL locks fall into three categories: exclusive DDL locks, share DDL locks, and breakable parse locks.
•
7.1 Exclusive DDL Locks
Most DDL operations, except for those listed in the section, "Share DDL Locks" require exclusive DDL locks for a resource to prevent destructive interference with other DDL operations that might modify or reference the same schema object. For example, a DROP TABLE operation is not allowed to drop a table while an ALTER TABLE operation is adding a column to it, and vice versa.
During the acquisition of an exclusive DDL lock, if another DDL lock is already held on the schema object by another operation, the acquisition waits until the older DDL lock is released and then proceeds.
DDL operations also acquire DML locks (data locks) on the schema object to be modified.
7.2 Share DDL Locks
Some DDL operations require share DDL locks for a resource to prevent destructive interference with conflicting DDL operations, but allow data concurrency for similar DDL operations. For example, when a CREATE PROCEDURE statement is run, the containing transaction acquires share DDL locks for all referenced tables. Other transactions can concurrently create procedures

177
that reference the same tables and therefore acquire concurrent share DDL locks on the same tables, but no transaction can acquire an exclusive DDL lock on any referenced table. No transaction can alter or drop a referenced table. As a result, a transaction that holds a share DDL lock is guaranteed that the definition of the referenced schema object will remain constant for the duration of the transaction.
A share DDL lock is acquired on a schema object for DDL statements that include the following statements: AUDIT, NOAUDIT, COMMENT, CREATE [OR REPLACE] VIEW/PROCEDURE/PACKAGE/PACKAGE BODY/FUNCTION/ TRIGGER, CREATE SYNONYM, and CREATE TABLE (when the CLUSTER parameter is not included).
7.3 Breakable Parse Locks
A SQL statement (or PL/SQL program unit) in the shared pool holds a parse lock for each schema object it references. Parse locks are acquired so that the associated shared SQL area can be invalidated if a referenced object is altered or dropped. A parse lock does not disallow any DDL operation and can be broken to allow conflicting DDL operations, hence the name breakable parse lock.
A parse lock is acquired during the parse phase of SQL statement execution and held as long as the shared SQL area for that statement remains in the shared pool.
7.4 Duration of DDL Locks
The duration of a DDL lock depends on its type. Exclusive and share DDL locks last for the duration of DDL statement execution and automatic commit. A parse lock persists as long as the associated SQL statement remains in the shared pool.
7.5 DDL Locks and Clusters
A DDL operation on a cluster acquires exclusive DDL locks on the cluster and on all tables and materialized views in the cluster. A DDL operation on a table or materialized view in a cluster acquires a share lock on the cluster, in addition to a share or exclusive DDL lock on the table or materialized view. The share DDL lock on the cluster prevents another operation from dropping the cluster while the first operation proceeds.
8.0 Latches and Internal Locks
Latches and internal locks protect internal database and memory structures. Both are inaccessible to users, because users have no need to control over their occurrence or duration. The following section helps to interpret the Enterprise Manager LOCKS and LATCHES monitors.

178
8.1 Latches
Latches are simple, low-level serialization mechanisms to protect shared data structures in the system global area (SGA). For example, latches protect the list of users currently accessing the database and protect the data structures describing the blocks in the buffer cache. A server or background process acquires a latch for a very short time while manipulating or looking at one of these structures. The implementation of latches is operating system dependent, particularly in regard to whether and how long a process will wait for a latch.
8.2 Internal Locks
Internal locks are higher-level, more complex mechanisms than latches and serve a variety of purposes.
8.2 Dictionary Cache Locks
These locks are of very short duration and are held on entries in dictionary caches while the entries are being modified or used. They guarantee that statements being parsed do not see inconsistent object definitions.
Dictionary cache locks can be shared or exclusive. Shared locks are released when the parse is complete. Exclusive locks are released when the DDL operation is complete.
8.3 File and Log Management Locks
These locks protect various files. For example, one lock protects the control file so that only one process at a time can change it. Another lock coordinates the use and archiving of the redo log files. Datafiles are locked to ensure that multiple instances mount a database in shared mode or that one instance mounts it in exclusive mode. Because file and log locks indicate the status of files, these locks are necessarily held for a long time.
8.4 Tablespace and Rollback Segment Locks
These locks protect tablespaces and rollback segments. For example, all instances accessing a database must agree on whether a tablespace is online or offline. Rollback segments are locked so that only one instance can write to a segment.

179
8.5 Explicit (Manual) Data Locking
Oracle Database always performs locking automatically to ensure data concurrency, data integrity, and statement-level read consistency. However, you can override the Oracle Database default locking mechanisms. Overriding the default locking is useful in situations such as these:
• Applications require transaction-level read consistency or repeatable reads. In other words, queries in them must produce consistent data for the duration of the transaction, not reflecting changes by other transactions. You can achieve transaction-level read consistency by using explicit locking, read-only transactions, serializable transactions, or by overriding default locking.
• Applications require that a transaction have exclusive access to a resource so that the transaction does not have to wait for other transactions to complete.
Oracle Database automatic locking can be overridden at the transaction level or the session level.
At the transaction level, transactions that include the following SQL statements override Oracle Database default locking:
• The SET TRANSACTION ISOLATION LEVEL statement • The LOCK TABLE statement (which locks either a table or, when used with views, the
underlying base tables) • The SELECT ... FOR UPDATE statement
Locks acquired by these statements are released after the transaction commits or rolls back.
At the session level, a session can set the required transaction isolation level with the ALTER SESSION statement.
Note: If Oracle Database default locking is overridden at any level, the database administrator or application developer should ensure that the overriding locking procedures operate correctly. The locking procedures must satisfy the following criteria: data integrity is guaranteed, data concurrency is acceptable, and deadlocks are not possible or are appropriately handled.
9.0 Oracle Database Lock Management Services
With Oracle Database Lock Management services, an application developer can include statements in PL/SQL blocks that:
• Request a lock of a specific type • Give the lock a unique name recognizable in another procedure in the same or in another
instance • Change the lock type • Release the lock
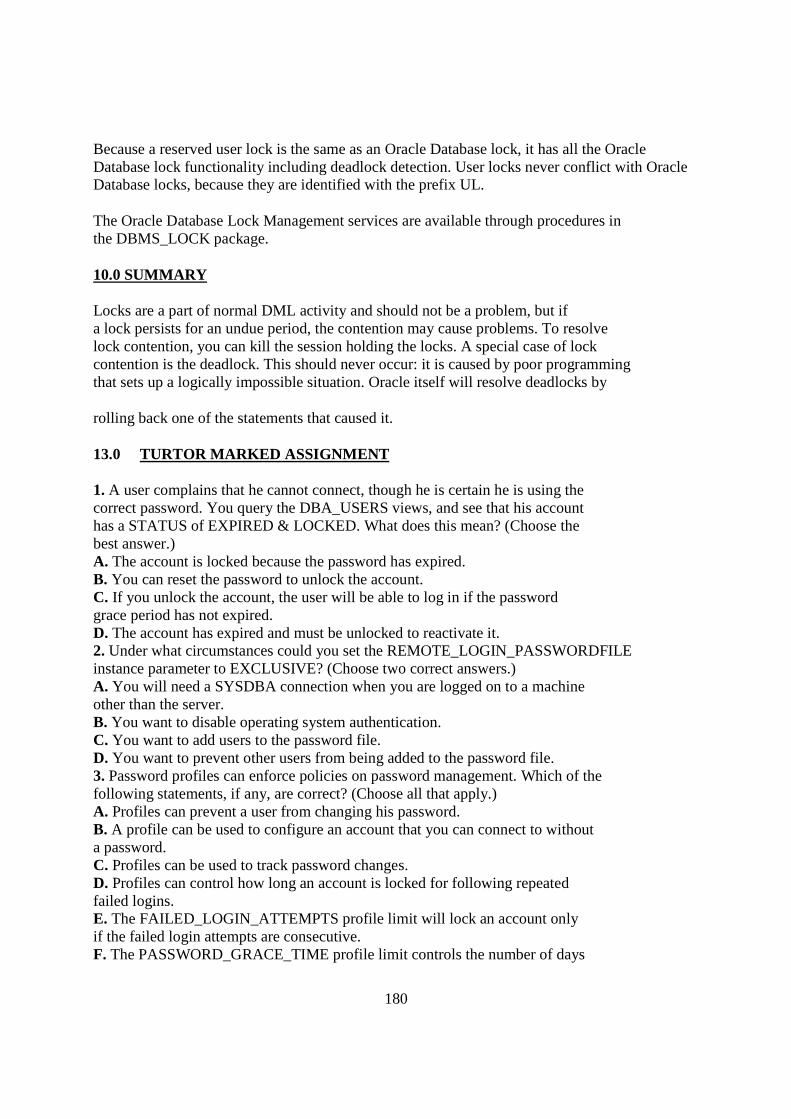
180
Because a reserved user lock is the same as an Oracle Database lock, it has all the Oracle Database lock functionality including deadlock detection. User locks never conflict with Oracle Database locks, because they are identified with the prefix UL.
The Oracle Database Lock Management services are available through procedures in the DBMS_LOCK package.
10.0 SUMMARY
Locks are a part of normal DML activity and should not be a problem, but if a lock persists for an undue period, the contention may cause problems. To resolve lock contention, you can kill the session holding the locks. A special case of lock contention is the deadlock. This should never occur: it is caused by poor programming that sets up a logically impossible situation. Oracle itself will resolve deadlocks by
rolling back one of the statements that caused it.
13.0 TURTOR MARKED ASSIGNMENT
1. A user complains that he cannot connect, though he is certain he is using the correct password. You query the DBA_USERS views, and see that his account has a STATUS of EXPIRED & LOCKED. What does this mean? (Choose the best answer.) A. The account is locked because the password has expired. B. You can reset the password to unlock the account. C. If you unlock the account, the user will be able to log in if the password grace period has not expired. D. The account has expired and must be unlocked to reactivate it. 2. Under what circumstances could you set the REMOTE_LOGIN_PASSWORDFILE instance parameter to EXCLUSIVE? (Choose two correct answers.) A. You will need a SYSDBA connection when you are logged on to a machine other than the server. B. You want to disable operating system authentication. C. You want to add users to the password file. D. You want to prevent other users from being added to the password file. 3. Password profiles can enforce policies on password management. Which of the following statements, if any, are correct? (Choose all that apply.) A. Profiles can prevent a user from changing his password. B. A profile can be used to configure an account that you can connect to without a password. C. Profiles can be used to track password changes. D. Profiles can control how long an account is locked for following repeated failed logins. E. The FAILED_LOGIN_ATTEMPTS profile limit will lock an account only if the failed login attempts are consecutive. F. The PASSWORD_GRACE_TIME profile limit controls the number of days

181
before password expiration during which you will be prompted to change your password. 4. If you want a block of PL/SQL code to run whenever certain data is accessed with SELECT, what auditing technique could you use? (Choose the best answer.) A. Database auditing B. Fine-grained auditing C. Database triggers D. You cannot do this PART I 5. What is necessary to audit actions done by a user connected with the SYSDBA privilege? (Choose the best answer.) A. Set the AUDIT_SYS_OPERATIONS instance parameter to TRUE. B. Use database auditing to audit use of the SYSDBA privilege. C. Set the REMOTE_LOGIN_PASSWORDFILE instance parameter to NONE, so that SYSDBA connections can only be made with operating system authentication. Then set the AUDIT_TRAIL parameter to OS, and make sure that the DBA does not have access to it. D. This is not possible: any user with SYSDBA privilege can always bypass the auditing mechanisms.
14.0 FURTHER READING/ REFERENCE
1.0 Philip Bernstein and Nathan Goodman (1981). "Concurrency Control in Distributed
Database Systems". ACM Computing Surveys.
2.0 DB2 Version 9.7 LUW Information Center, Currently committed semantics improve
concurrency
3.0 Graves, Steve (May 1, 2010). "Multi-Core Software: To Gain Speed, Eliminate
Resource Contention". RTC Magazine.

182
MODULE 4: DATA CONCURRENCY AND CONSISTENCY
UNIT 2: Managing data and concurrency
Page
1.0 Introduction 2
2.0 Objectives 2
3.0 Preventable Phenomena and Transaction Isolation Levels
17.0 How Oracle Database Manages Data Concurrency and Consistency
5.0. Comparison of Read Committed and Serializable Isolation
6.0 Choice of Isolation Level
7.0 How a Database Is Quiesced
8.0 Summary
9.0 Tutor Marked Assignment
15.0 Further Reading /References
1.0 Introduction to Data Concurrency and Consistency in a Multiuser Environment
183
In a single-user database, the user can modify data in the database without concern for other users modifying the same data at the same time. However, in a multiuser database, the statements within multiple simultaneous transactions can update the same data. Transactions executing at the same time need to produce meaningful and consistent results. Therefore, control of data concurrency and data consistency is vital in a multiuser database.
• Data concurrency means that many users can access data at the same time. • Data consistency means that each user sees a consistent view of the data, including
visible changes made by the user's own transactions and transactions of other users.
To describe consistent transaction behavior when transactions run at the same time, database researchers have defined a transaction isolation model called serializability . The serializable mode of transaction behavior tries to ensure that transactions run in such a way that they appear to be executed one at a time, or serially, rather than concurrently.
While this degree of isolation between transactions is generally desirable, running many applications in this mode can seriously compromise application throughput. Complete isolation of concurrently running transactions could mean that one transaction cannot perform an insert into a table being queried by another transaction. In short, real-world considerations usually require a compromise between perfect transaction isolation and performance.
Oracle Database offers two isolation levels, providing application developers with operational modes that preserve consistency and provide high performance.
2.0 OBJECTIVES
In this unit you will learn how to -Overview of Locking Mechanisms - Manage Data Concurrency and Consistency
-Compare Read Committed and Serializable Isolation -A Database Is Quiesced
.
3.0 Preventable Phenomena and Transaction Isolation Levels
The ANSI/ISO SQL standard (SQL92) defines four levels of transaction isolation with differing degrees of impact on transaction processing throughput. These isolation levels are defined in terms of three phenomena that must be prevented between concurrently executing transactions.
The three preventable phenomena are:

184
• Dirty reads: A transaction reads data that has been written by another transaction that has not been committed yet.
• Nonrepeatable (fuzzy) reads: A transaction rereads data it has previously read and finds that another committed transaction has modified or deleted the data.
• Phantom reads (or phantoms): A transaction re-runs a query returning a set of rows that satisfies a search condition and finds that another committed transaction has inserted additional rows that satisfy the condition.
SQL92 defines four levels of isolation in terms of the phenomena a transaction running at a particular isolation level is permitted to experience. They are shown in Table 13-1.
Table 13-1 Preventable Read Phenomena by Isolation Level
Isolation Level Dirty Read Nonrepeatable Read Phantom Read
Read uncommitted Possible Possible Possible
Read committed Not possible Possible Possible
Repeatable read Not possible Not possible Possible
Serializable Not possible Not possible Not possible
Oracle Database offers the read committed and serializable isolation levels, as well as a read-only mode that is not part of SQL92. Read committed is the default.
3.1 Overview of Locking Mechanisms
In general, multiuser databases use some form of data locking to solve the problems associated with data concurrency, consistency, and integrity. Locks are mechanisms that prevent destructive interaction between transactions accessing the same resource.
Resources include two general types of objects:
• User objects, such as tables and rows (structures and data) • System objects not visible to users, such as shared data structures in the memory and data
dictionary rows
4.0 How Oracle Database Manages Data Concurrency and Consistency
Oracle Database maintains data consistency in a multiuser environment by using a multiversion consistency model and various types of locks and transactions. The following topics are discussed in this section:

185
4.1 Multiversion Concurrency Control
Oracle Database automatically provides read consistency to a query so that all the data that the query sees comes from a single point in time (statement-level read consistency). Oracle Database can also provide read consistency to all of the queries in a transaction (transaction-level read consistency).
Oracle Database uses the information maintained in its rollback segments to provide these consistent views. The rollback segments contain the old values of data that have been changed by uncommitted or recently committed transactions. Figure 13-1 shows how Oracle Database provides statement-level read consistency using data in rollback segments.
Figure 13-1 Transactions and Read Consistency
Description of "Figure 13-1 Transactions and Read Consistency"
As a query enters the execution stage, the current system change number (SCN) is determined. In Figure 13-1, this system change number is 10023. As data blocks are read on behalf of the query, only blocks written with the observed SCN are used. Blocks with changed data (more recent SCNs) are reconstructed from data in the rollback segments, and the reconstructed data is returned for the query. Therefore, each query returns all committed data with respect to the SCN recorded at the time that query execution began. Changes of other transactions that occur during a query's execution are not observed, guaranteeing that consistent data is returned for each query.

186
4.2 Statement-Level Read Consistency
Oracle Database always enforces statement-level read consistency. This guarantees that all the data returned by a single query comes from a single point in time—the time that the query began. Therefore, a query never sees dirty data or any of the changes made by transactions that commit during query execution. As query execution proceeds, only data committed before the query began is visible to the query. The query does not see changes committed after statement execution begins.
A consistent result set is provided for every query, guaranteeing data consistency, with no action on the user's part. The SQL statements SELECT, INSERT with a subquery,UPDATE, and DELETE all query data, either explicitly or implicitly, and all return consistent data. Each of these statements uses a query to determine which data it will affect (SELECT, INSERT, UPDATE, or DELETE, respectively).
A SELECT statement is an explicit query and can have nested queries or a join operation. An INSERT statement can use nested queries. UPDATE and DELETE statements can use WHERE clauses or subqueries to affect only some rows in a table rather than all rows.
Queries used in INSERT, UPDATE, and DELETE statements are guaranteed a consistent set of results. However, they do not see the changes made by the DML statement itself. In other words, the query in these operations sees data as it existed before the operation began to make changes.
Note: If a SELECT list contains a function, then the database applies statement-level read consistency at the statement level for SQL run within the PL/SQL function code, rather than at the parent SQL level. For example, a function could access a table whose data is changed and committed by another user. For each execution of the SELECT in the function, a new read consistent snapshot is established.
4.3 Transaction-Level Read Consistency
Oracle Database also offers the option of enforcing transaction-level read consistency. When a transaction runs in serializable mode, all data accesses reflect the state of the database as of the time the transaction began. Thus, the data seen by all queries within the same transaction is consistent with respect to a single point in time, except that queries made by a serializable transaction do see changes made by the transaction itself. Transaction-level read consistency produces repeatable reads and does not expose a query to phantoms.
4.4 Read Consistency with Oracle Real Application Clusters
Oracle Real Application Clusters (Oracle RAC)s uses a cache-to-cache block transfer mechanism known as Cache Fusion to transfer read-consistent images of blocks from one instance to another. Oracle RAC does this using high speed, low latency interconnects to satisfy remote requests for data blocks.
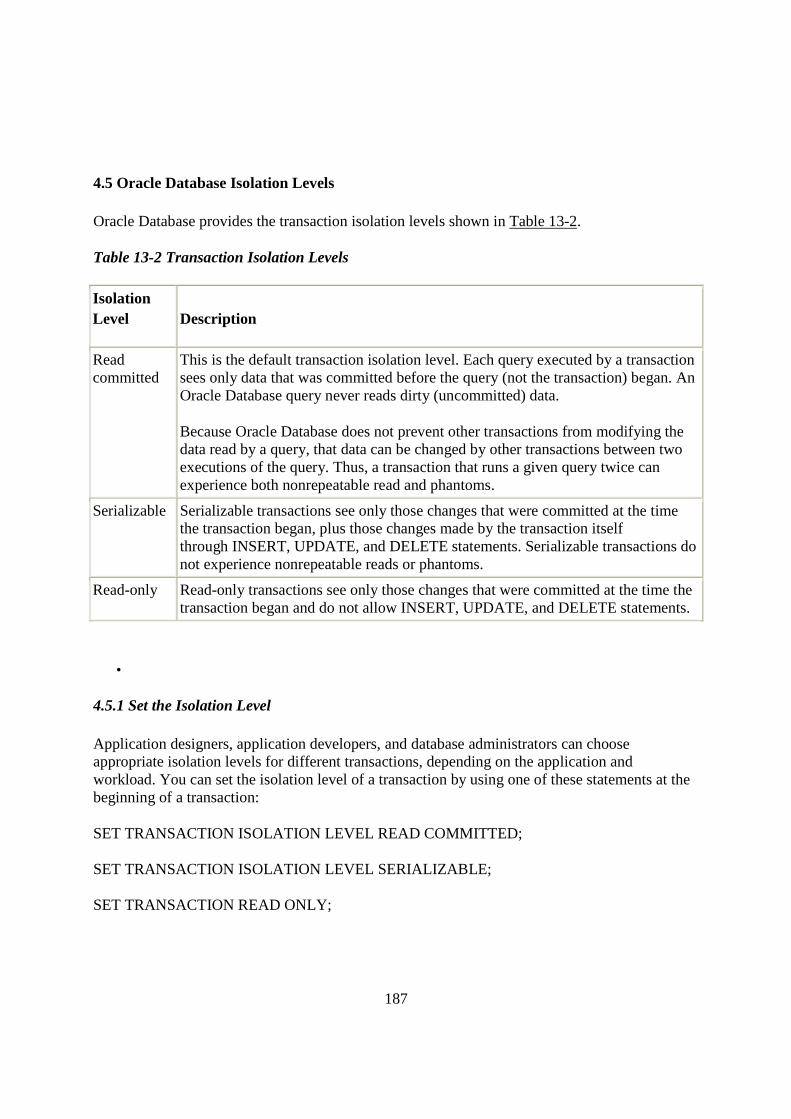
187
4.5 Oracle Database Isolation Levels
Oracle Database provides the transaction isolation levels shown in Table 13-2.
Table 13-2 Transaction Isolation Levels
Isolation Level Description
Read committed
This is the default transaction isolation level. Each query executed by a transaction sees only data that was committed before the query (not the transaction) began. An Oracle Database query never reads dirty (uncommitted) data.
Because Oracle Database does not prevent other transactions from modifying the data read by a query, that data can be changed by other transactions between two executions of the query. Thus, a transaction that runs a given query twice can experience both nonrepeatable read and phantoms.
Serializable Serializable transactions see only those changes that were committed at the time the transaction began, plus those changes made by the transaction itself through INSERT, UPDATE, and DELETE statements. Serializable transactions do not experience nonrepeatable reads or phantoms.
Read-only Read-only transactions see only those changes that were committed at the time the transaction began and do not allow INSERT, UPDATE, and DELETE statements.
•
4.5.1 Set the Isolation Level
Application designers, application developers, and database administrators can choose appropriate isolation levels for different transactions, depending on the application and workload. You can set the isolation level of a transaction by using one of these statements at the beginning of a transaction:
SET TRANSACTION ISOLATION LEVEL READ COMMITTED; SET TRANSACTION ISOLATION LEVEL SERIALIZABLE; SET TRANSACTION READ ONLY;

188
To save the networking and processing cost of beginning each transaction with a SET TRANSACTION statement, you can use the ALTER SESSION statement to set the transaction isolation level for all subsequent transactions:
ALTER SESSION SET ISOLATION_LEVEL = SERIALIZABLE; ALTER SESSION SET ISOLATION_LEVEL = READ COMMITTED;
4.5.2 Read Committed Isolation
The default isolation level for Oracle Database is read committed. This degree of isolation is appropriate for environments where few transactions are likely to conflict. Oracle Database causes each query to run with respect to its own materialized view time, thereby permitting nonrepeatable reads and phantoms for multiple executions of a query, but providing higher potential throughput. Read committed isolation is the appropriate level of isolation for environments where few transactions are likely to conflict.
4.5.3 Serializable Isolation
Serializable isolation is suitable for environments:
• With large databases and short transactions that update only a few rows • Where the chance that two concurrent transactions will modify the same rows is
relatively low • Where relatively long-running transactions are primarily read only
Serializable isolation permits concurrent transactions to make only those database changes they could have made if the transactions had been scheduled to run one after another. Specifically, Oracle Database permits a serializable transaction to modify a data row only if it can determine that prior changes to the row were made by transactions that had committed when the serializable transaction began.
To make this determination efficiently, Oracle Database uses control information stored in the data block that indicates which rows in the block contain committed and uncommitted changes. In a sense, the block contains a recent history of transactions that affected each row in the block. The amount of history that is retained is controlled by the INITRANS parameter of CREATE TABLE and ALTER TABLE.
Under some circumstances, Oracle Database can have insufficient history information to determine whether a row has been updated by a too recent transaction. This can occur when many transactions concurrently modify the same data block, or do so in a very short period. You can avoid this situation by setting higher values of INITRANS for tables that will experience many transactions updating the same blocks. Doing so enables Oracle Database to allocate sufficient storage in each block to record the history of recent transactions that accessed the block.

189
Oracle Database generates an error when a serializable transaction tries to update or delete data modified by a transaction that commits after the serializable transaction began:
ORA-08177: Cannot serialize access for this transaction
When a serializable transaction fails with the Cannot serialize access error, the application can take any of several actions:
• Commit the work executed to that point • Execute additional (but different) statements (perhaps after rolling back to a savepoint
established earlier in the transaction) • Undo the entire transaction
Figure 13-2 shows an example of an application that rolls back and retries the transaction after it fails with the Cannot serialize access error:
Figure 13-2 Serializable Transaction Failure
Description of "Figure 13-2 Serializable Transaction Failure"
5.0 Comparison of Read Committed and Serializable Isolation
Oracle Database gives the application developer a choice of two transaction isolation levels with different characteristics. Both the read committed and serializable isolation levels provide a high degree of consistency and concurrency. Both levels provide the contention-reducing benefits of the Oracle Database read consistency multiversion concurrency control model and exclusive row-level locking implementation and are designed for real-world application deployment.
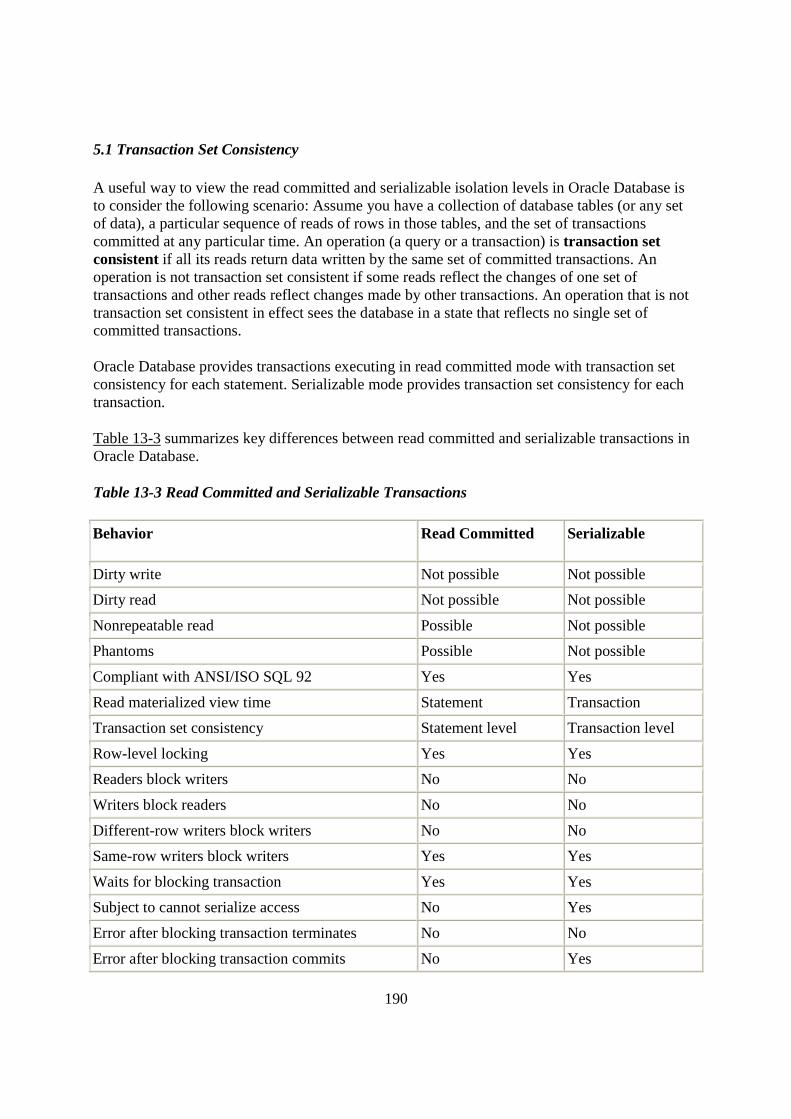
190
5.1 Transaction Set Consistency
A useful way to view the read committed and serializable isolation levels in Oracle Database is to consider the following scenario: Assume you have a collection of database tables (or any set of data), a particular sequence of reads of rows in those tables, and the set of transactions committed at any particular time. An operation (a query or a transaction) is transaction set consistent if all its reads return data written by the same set of committed transactions. An operation is not transaction set consistent if some reads reflect the changes of one set of transactions and other reads reflect changes made by other transactions. An operation that is not transaction set consistent in effect sees the database in a state that reflects no single set of committed transactions.
Oracle Database provides transactions executing in read committed mode with transaction set consistency for each statement. Serializable mode provides transaction set consistency for each transaction.
Table 13-3 summarizes key differences between read committed and serializable transactions in Oracle Database.
Table 13-3 Read Committed and Serializable Transactions
Behavior Read Committed Serializable
Dirty write Not possible Not possible
Dirty read Not possible Not possible
Nonrepeatable read Possible Not possible
Phantoms Possible Not possible
Compliant with ANSI/ISO SQL 92 Yes Yes
Read materialized view time Statement Transaction
Transaction set consistency Statement level Transaction level
Row-level locking Yes Yes
Readers block writers No No
Writers block readers No No
Different-row writers block writers No No
Same-row writers block writers Yes Yes
Waits for blocking transaction Yes Yes
Subject to cannot serialize access No Yes
Error after blocking transaction terminates No No
Error after blocking transaction commits No Yes
191
5.2 Row-Level Locking
Both read committed and serializable transactions use row-level locking, and both will wait if they try to change a row updated by an uncommitted concurrent transaction. The second transaction that tries to update a given row waits for the other transaction to commit or undo and release its lock. If that other transaction rolls back, the waiting transaction, regardless of its isolation mode, can proceed to change the previously locked row as if the other transaction had not existed.
However, if the other blocking transaction commits and releases its locks, a read committed transaction proceeds with its intended update. A serializable transaction, however, fails with the error Cannot serialize access error, because the other transaction has committed a change that was made since the serializable transaction began.
5.3 Referential Integrity
Because Oracle Database does not use read locks in either read-consistent or serializable transactions, data read by one transaction can be overwritten by another. Transactions that perform database consistency checks at the application level cannot assume that the data they read will remain unchanged during the execution of the transaction even though such changes are not visible to the transaction. Database inconsistencies can result unless such application-level consistency checks are coded with this in mind, even when using serializable transactions.
Note: You can use both read committed and serializable transaction isolation levels with Oracle Real Application Clusters.
5.4 Distributed Transactions
In a distributed database environment, a given transaction updates data in multiple physical databases protected by two-phase commit to ensure all nodes or none commit. In such an environment, all servers, whether Oracle or non-Oracle, that participate in a serializable transaction are required to support serializable isolation mode.
If a serializable transaction tries to update data in a database managed by a server that does not support serializable transactions, the transaction receives an error. The transaction can undo and retry only when the remote server does support serializable transactions.
In contrast, read committed transactions can perform distributed transactions with servers that do not support serializable transactions.

192
6.0 Choice of Isolation Level
Application designers and developers should choose an isolation level based on application performance and consistency needs as well as application coding requirements.
For environments with many concurrent users rapidly submitting transactions, designers must assess transaction performance requirements in terms of the expected transaction arrival rate and response time demands. Frequently, for high-performance environments, the choice of isolation levels involves a trade-off between consistency and concurrency.
Application logic that checks database consistency must take into account the fact that reads do not block writes in either mode.
Oracle Database isolation modes provide high levels of consistency, concurrency, and performance through the combination of row-level locking and the Oracle Database multiversion concurrency control system. Readers and writers do not block one another in Oracle Database. Therefore, while queries still see consistent data, both read committed and serializable isolation provide a high level of concurrency for high performance, without the need for reading uncommitted data.
6.1 Read Committed Isolation
For many applications, read committed is the most appropriate isolation level. Read committed isolation can provide considerably more concurrency with a somewhat increased risk of inconsistent results due to phantoms and non-repeatable reads for some transactions.
Many high-performance environments with high transaction arrival rates require more throughput and faster response times than can be achieved with serializable isolation. Other environments that supports users with a very low transaction arrival rate also face very low risk of incorrect results due to phantoms and nonrepeatable reads. Read committed isolation is suitable for both of these environments.
Oracle Database read committed isolation provides transaction set consistency for every query. That is, every query sees data in a consistent state. Therefore, read committed isolation will suffice for many applications that might require a higher degree of isolation if run on other database management systems that do not use multiversion concurrency control.
Read committed isolation mode does not require application logic to trap the Cannot serialize access error and loop back to restart a transaction. In most applications, few transactions have a functional need to issue the same query twice, so for many applications protection against phantoms and non-repeatable reads is not important. Therefore many developers choose read committed to avoid the need to write such error checking and retry code in each transaction.

193
6.2 Serializable Isolation
The Oracle Database serializable isolation is suitable for environments where there is a relatively low chance that two concurrent transactions will modify the same rows and the long-running transactions are primarily read only. It is most suitable for environments with large databases and short transactions that update only a few rows.
Serializable isolation mode provides somewhat more consistency by protecting against phantoms and nonrepeatable reads and can be important where a read/write transaction runs a query more than once.
Unlike other implementations of serializable isolation, which lock blocks for read as well as write, Oracle Database provides nonblocking queries and the fine granularity of row-level locking, both of which reduce read/write contention. For applications that experience mostly read/write contention, Oracle Database serializable isolation can provide significantly more throughput than other systems. Therefore, some applications might be suitable for serializable isolation on Oracle Database but not on other systems.
All queries in an Oracle Database serializable transaction see the database as of a single point in time, so this isolation level is suitable where multiple consistent queries must be issued in a read/write transaction. A report-writing application that generates summary data and stores it in the database might use serializable mode because it provides the consistency that a READ ONLY transaction provides, but also allows INSERT, UPDATE, and DELETE.
Note: Transactions containing DML statements with subqueries should use serializable isolation to guarantee consistent read.
Coding serializable transactions requires extra work by the application developer to check for the Cannot serialize access error and to undo and retry the transaction. Similar extra coding is needed in other database management systems to manage deadlocks. For adherence to corporate standards or for applications that are run on multiple database management systems, it may be necessary to design transactions for serializable mode. Transactions that check for serializability failures and retry can be used with Oracle Database read committed mode, which does not generate serializability errors.
Serializable mode is probably not the best choice in an environment with relatively long transactions that must update the same rows accessed by a high volume of short update transactions. Because a longer running transaction is unlikely to be the first to modify a given row, it will repeatedly need to roll back, wasting work. Note that a conventional read-locking, pessimistic implementation of serializable mode would not be suitable for this environment either, because long-running transactions—even read transactions—would block the progress of short update transactions and vice versa.
Application developers should consider the cost of rolling back and retrying transactions when using serializable mode. As with read-locking systems, where deadlocks occur frequently, use of

194
serializable mode requires rolling back the work done by terminated transactions and retrying them. In a high contention environment, this activity can use significant resources.
In most environments, a transaction that restarts after receiving the Cannot serialize access error is unlikely to encounter a second conflict with another transaction. For this reason, it can help to run those statements most likely to contend with other transactions as early as possible in a serializable transaction. However, there is no guarantee that the transaction will complete successfully, so the application should be coded to limit the number of retries.
Although Oracle Database serializable mode is compatible with SQL92 and offers many benefits compared with read-locking implementations, it does not provide semantics identical to such systems. Application designers must consider the fact that reads in Oracle Database do not block writes as they do in other systems. Transactions that check for database consistency at the application level can require coding techniques such as the use of SELECT FOR UPDATE. This issue should be considered when applications using serializable mode are ported to Oracle Database from other environments.
6.3 Quiesce Database
You can put the system into quiesced state. The system is in quiesced state if there are no active sessions, other than SYS and SYSTEM. An active session is defined as a session that is currently inside a transaction, a query, a fetch or a PL/SQL procedure, or a session that is currently holding any shared resources (for example, enqueues--enqueues are shared memory structures that serialize access to database resources and are associated with a session or transaction). Database administrators are the only users who can proceed when the system is in quiesced state.
Database administrators can perform certain actions in the quiesced state that cannot be safely done when the system is not quiesced. These actions include:
• Actions that might fail if there are concurrent user transactions or queries. For example, changing the schema of a database table will fail if a concurrent transaction is accessing the same table.
• Actions whose intermediate effect could be detrimental to concurrent user transactions or queries. For example, suppose there is a big table T and a PL/SQL package that operates on it. You can split table T into two tables T1 and T2, and change the PL/SQL package to make it refer to the new tables T1 and T2, instead of the old table T.
When the database is in quiesced state, you can do the following:
CREATE TABLE T1 AS SELECT ... FROM T; CREATE TABLE T2 AS SELECT ... FROM T; DROP TABLE T;
You can then drop the old PL/SQL package and re-create it.

195
For systems that must operate continuously, the ability to perform such actions without shutting down the database is critical.
The Database Resource Manager blocks all actions that were initiated by a user other than SYS or SYSTEM while the system is quiesced. Such actions are allowed to proceed when the system goes back to normal (unquiesced) state. Users do not get any additional error messages from the quiesced state.
7.0 How a Database Is Quiesced
The database administrator uses the ALTER SYSTEM QUIESCE RESTRICTED statement to quiesce the database. Only users SYS and SYSTEM can issue the ALTER SYSTEMQUIESCE RESTRICTED statement. For all instances with the database open, issuing this statement has the following effect:
• Oracle Database instructs the Database Resource Manager in all instances to prevent all inactive sessions (other than SYS and SYSTEM) from becoming active. No user other than SYS and SYSTEM can start a new transaction, a new query, a new fetch, or a new PL/SQL operation.
• Oracle Database waits for all existing transactions in all instances that were initiated by a user other than SYS or SYSTEM to finish (either commit or terminate). Oracle Database also waits for all running queries, fetches, and PL/SQL procedures in all instances that were initiated by users other than SYS or SYSTEM and that are not inside transactions to finish. If a query is carried out by multiple successive OCI fetches, Oracle Database does not wait for all fetches to finish. It waits for the current fetch to finish and then blocks the next fetch. Oracle Database also waits for all sessions (other than those of SYS or SYSTEM) that hold any shared resources (such as enqueues) to release those resources. After all these operations finish, Oracle Database places the database into quiesced state and finishes executing the QUIESCE RESTRICTED statement.
• If an instance is running in shared server mode, Oracle Database instructs the Database Resource Manager to block logins (other than SYS or SYSTEM) on that instance. If an instance is running in non-shared-server mode, Oracle Database does not impose any restrictions on user logins in that instance.
During the quiesced state, you cannot change the Resource Manager plan in any instance.
The ALTER SYSTEM UNQUIESCE statement puts all running instances back into normal mode, so that all blocked actions can proceed. An administrator can determine which sessions are blocking a quiesce from completing by querying the v$blocking_quiesce view.
8.0 SUMMARY
Concurrency control mechanisms firstly need to operate correctly, i.e., to maintain each transaction's integrity rules (as related to concurrency; application-specific integrity rule are out of the scope here) while transactions are running concurrently, and thus the integrity of the entire transactional system. Correctness needs to be achieved with as good performance as possible. In

196
addition, increasingly a need exists to operate effectively while transactions are distributed over processes, computers, and computer networks. Other subjects that may affect concurrency control are recovery and replication.
9.0 TURTOR MARKED ASSIGNMENT
1 .You want to transfer a large amount of data from one database to another: both databases are on the same machine. What should be the quickest method? (Choose the best answer.) A. Use the Export/Import utilities. B. Use Data Pump to write out the data, and a SQL*Loader direct load to bring it in. C. Use Data Pump in network mode. D. Use Data Pump export to write out the data and then Data Pump import to read it in. 2. Which of the following is not a SQL*Loader file? (Choose one answer.) A. Bad file B. Controlfile C. Discard file D. Good file E. Logfile 3. You create a directory with the statement create directory dp_dir as 'c:\tmp'; but when you try to use it with Data Pump, there is an error. Which of the following could be true? (Choose three answers.) A. The Oracle software owner has no permissions on c:\tmp. B. The Oracle database user has no permissions on dp_dir. C. The path c:\tmp does not exist. D. The path c:\tmp must exist, or the “create directory” statement would have failed. E. If you use Data Pump in network mode, then there will be no need for a directory. F. Issuing the command grant all on ‘c:\tmp’ to public; may solve some permission problems. 4. You launch a Data Pump job with expdp and then exit from the session. Which of the following is true? (Choose two answers.) A. The job will terminate. B. The job will continue running in the background. C. You cannot monitor the job once you have exited. D. You can reattach to the job to monitor it. E. The job will pause but can be restarted. 5. You run SQL*Loader on your PC, to insert data into a remote database. Which of the following is true? (Choose the best answer.) A. The input datafiles must be on your PC.

197
B. The input datafiles must be on the server. C. Direct load is possible only if the input datafiles are on the server. D. Direct load is only possible if you run SQL*Loader on the server, not on the PC.
10.0 FURTHER READING/ REFERENCE
1.0 Philip Bernstein and Nathan Goodman (1981). "Concurrency Control in Distributed
Database Systems". ACM Computing Surveys.
4.0 DB2 Version 9.7 LUW Information Center, Currently committed semantics improve
concurrency
5.0 Graves, Steve (May 1, 2010). "Multi-Core Software: To Gain Speed, Eliminate
Resource Contention". RTC Magazine.
198
MODULE 4: DATABASE CORRUPTION
UNIT 1: Detecting and Recovering from Database Corruption
Page
1.0 Introduction 2
2.0 Objectives 2
3.0 Block Corruption and Its Causes 2
18.0 The DBVERIFY Utility
5.0. The ANALYZE Command 6.0 The DBMS_REPAIR Package 7.0 Recovering Corrupt Blocks with RMAN
8.0 Dealing with Corruptions
9.0 Summary
10.0 Tutor Marked Assignment
11.0 Further Reading /References
CHAPTER 1UN2

199
1.0 INTRODUCTION Sometimes the Oracle blocks that make up a datafile get corrupted. You may be fortunate enough to go though your whole career and never see a corrupted block— or you may be hit by any number of them tomorrow. It is impossible for the DBA to prevent corruptions from occurring, but he can detect them and perhaps mitigate the impact of them on end users. And provided that an adequate backup strategy is in place, he can repair the damage. It is also possible for a block of an online redo log file, an archive redo log file, or even the controlfile to be corrupted, but managing this is totally beyond the control of the DBA. These files are protected by multiplexing, which should be sufficient. The level of redundancy is specified by your organization’s standards, and any further fault tolerance, such as RAID mirroring, is a matter for your system administrators. This chapter deals with datafile corruption. Although the cause of datafile corruption may be beyond your control, surviving it with no loss of data (and possibly with no downtime either) is certainly within the DBA domain. 2.0 OBJECTIVES In this unit you will learn how to • Define block corruption and list its causes and symptoms • Detect database corruptions using the utilities ANALYZE and DBVERIFY • Detect database corruptions using the DBMS_REPAIR package • Implement the DB_BLOCK_CHECKING parameter to detect corruptions • Repair corruptions using RMAN 3.0 Block Corruption and Its Causes Blocks may be corrupted in two ways: either media corruption or logical (also known as “software”) corruption. A media-corrupt block is a block where the contents of the block make no sense whatsoever: its contents do not match the format expected by Oracle, according to the formatting rules for the tablespace and the objects within it. When a datafile is created, it is formatted into Oracle blocks, of whatever block size was chosen for the tablespace. This is the first level of formatting. A second level occurs when the block is actually used. When an object is allocated an extent, the blocks in the extent are not further formatted, but as the high-water mark of the object is advanced into the new extent, then the blocks receive a second level of formatting, as they take on the characteristics required for that particular segment. If, because of damage to the disks, this formatting is lost, then the block will be “media corrupt.” A logically corrupt block is a block where the Oracle formatting is correct—the block does have the correct header area and a data area—but the contents of the block are internally inconsistent. For example, the block header of a table block includes a row directory, stating where each row begins. If when attempting to find a row, there isn’t one, this will be a logical corruption—an Oracle internal error, rather than a media problem. If the causes of block corruption were fully known, the problem would never occur. As a general rule, block corruption is a hardware or operating system problem. A problem in the I/O system can mean that somewhere in the chain of cause and

200
effect between the DBWn process instructing the operating system to write a block to disk and a server process receiving the block from the operating system in response to a read request, the block has been damaged. It is also possible for a fault in memory to be flushed, accurately, to disk. If block corruptions are reported consistently, then the problem is almost certainly hardware or operating system related. Logical corruption is also usually hardware related, but it is possible—though extremely rare—for a bug within Oracle itself to cause Oracle to create an inconsistent block. If the hardware and operating system diagnostics do not show any problems, then check the Metalink web site for any known problems with your release of the server software. Any bugs relating to block corruption will have been widely reported, and a patch will be available. 3.1 Parameters Relating to Block Corruption There are two instance parameters that will assist in detecting corrupted blocks: DB_ BLOCK_CHECKSUM, which defaults to TRUE, will help detect damage introduced by the disk or I/O systems. DB_BLOCK_CHECKING, which defaults to FALSE, will help detect damage introduced by faulty memory. With DB_BLOCK_CHECKSUM on TRUE, whenever the DBWn process writes a block to disk it will compute a checksum for the block and include it in the block header. When a server process reads a block, if the checksum is present it will recalculate it and compare. This will mean that any damage occurring in the time between the DBWn writing the block and its being read back will be detected. For normal running on reliable hardware, this should be adequate and will have only a minimal impact on performance. Oracle Corporation advises leaving this parameter on default, so that any damage caused while the block is on disk, or corruptions introduced during the write and read process, will be detected. Even when this parameter is on false, checksumming is still enabled for the SYSTEM tablespace. Setting DB_BLOCK_CHECKING to TRUE will have an impact on performance, and Oracle Corporation advises leaving it on default unless there are specific problems related to corruptions occurring in memory. When set to TRUE, the Oracle processes will check the block for consistency every time the buffer containing the block is accessed. This will mean that if corruptions are occurring in memory, they will be detected immediately, but the price is high—perhaps as much as 10 percent of processing capacity. As with checksumming, block checking is always enabled for the SYSTEM tablespace irrespective of the setting of this parameter. 3.2 Detecting Block Corruptions A corrupted block may be detected by your users when they try to read it, but ideally you will have detected it before any user notices the problem. There are utilities that will help with this.The examples that follow are from a Windows system, based on a tablespace called DAMAGED with a datafile DAM.DBF. The tablespace was created and a table, CORRUPT_TAB, created within it, and a primary key constraint added. This caused the creation of an index, called CORR_PK, on the constrained column. Then the file was deliberately damaged by using an editor to change a few bytes of some blocks of the CORRUPT_TAB table. This is a reasonable simulation of either media or logical

201
corruption: the file still exists and is of the correct size, but the contents have been damaged externally to Oracle. The index, however, is not directly affected. 3.3 The Corrupted Block Error Message Figure 30-1 shows the message you hope you will never see, an ORA-01578 telling you that there is a corrupted block. The first query succeeds. This is because although the query appears to request a full table scan, in fact Oracle can execute the query without reading the table at all. There is a primary key constraint on the table, which means that Oracle can count the number of rows by scanning the index, not the table. It will usually be quicker to do this. The second query, which requires reading the table itself, fails with an ORA- 01578 error message that lists the address of the corrupted block. The message is
Figure 30-1 A corrupt block encountered during a full table scan PART II returned to the session that detected the problem, but there is also this message in the alert log: Hex dump of (file 7, block 5) in trace file c:\oracle\product\10.1.0\admin\ocp10g\udump\ocp10g_ora_3508.trc Corrupt block relative dba: 0x01c00004 (file 7, block 5) Bad header found during buffer read Data in bad block: type: 16 format: 2 rdba: 0x01c02004 last change scn: 0x2020.20267bf9 seq: 0x2 flg: 0x04 spare1: 0x20 spare2: 0x20 spare3: 0x2020 consistency value in tail: 0x7bf91002 check value in block header: 0x2cbf computed block checksum: 0x0 Reread of rdba: 0x01c00004 (file 7, block 5) found same corrupted data Thu Dec 16 14:25:40 2004

202
Corrupt Block Found TSN = 21, TSNAME = DAMAGED RFN 7, BLK = 5, rdba = 29360132 OBJN = 52077, OBJD = 52077, OBJECT= , SUBOBJECT = Segment Owner= , Segment Type = This tells you again the file and block number, and at the end another vital piece of information: the number of the object that the block is part of, in this case object number 52077. To identify the object, run SQL> select owner,object_name,object_type from dba_objects where object_id=52077; An alternative query to identify the object would be to match the data block address against the DBA_EXTENTS view. To identify which segment includes an extent that covers the fifth block of the seventh datafile, ocp10g> select owner,segment_name,segment_type from dba_extents where 2 file_id=7 and 5 between block_id and block_id + blocks; OWNER SEGMENT_NAME SEGMENT_TYPE -------------------- --------------- ------------------ HR CORRUPT_TAB TABLE This is an example of a problem that could have existed for some considerable time. Unless the corruption is in the header blocks of the datafile, it will only be detected when the block is read by a server process. Generally, you should aim to detect such problems before a user hits them. 4.0 The DBVERIFY Utility DBVERIFY is an external utility run from an operating system prompt to verify datafiles (see Figure 30-2). It can be run against files while they are in use, or against image copies made with user-managed backups or by RMAN. It cannot verify online or archive redo logs, nor the controlfile, nor RMAN backup sets. The files to be verified can exist on a conventional file system, or on Automatic Storage Management disks, or on raw devices; the syntax is identical except that for a raw device you must tell DBVERIFY a range of blocks to look at, because it will have no other way of knowing where the file ends. The only required argument is the name of the file to verify—the optional arguments START and END let you specify a range of blocks to be verified. The executable for DBVERIFY is $ORACLE_HOME/bin/dbv on Unix, %ORACLE_ HOME%\bin\dbv.exe on Windows. In the output, a block is referred to as a page. The output (with the possible exception of “Total Pages Influx”) is self-explanatory: details of every block found to be corrupt, followed by a summary of the state of all blocks. If “Total Pages Influx” is greater than zero, it is not an indication of any problem; it merely shows that while DBVERIFY was running against an open file, it encountered a block that was currently being written to by the DBWn process. When that happens, it will re-read the block until it gets a consistent image. “Total Pages Influx” is the number of times it had to do this. If you are using RMAN to back up your datafiles, DBVERIFY is not needed, because RMAN will perform its own verification. DBVERIFY is essential if you are using usermanaged backups, in order to determine that the backups are actually usable.

203
Figure 30-2 Running DBVERIFY PART II 5.0 The ANALYZE Command The primary purpose of ANALYZE is to gather statistics that will be used by the optimizer to work out the most efficient way of executing a SQL statement. But it does have another use: checking whether a table or an index is corrupted. There are three forms of the command: SQL> analyze table <tablename> validate structure; SQL> analyze index <indexname> validate structure; SQL> analyze table <tablename> validate structure cascade; When validating the structure of a table, ANALYZE verifies the integrity of each of the data blocks and rows; when validating the structure of an index, it verifies the integrity of the data blocks and the index keys. The CASCADE option will verify both the table and any associated indexes. The check will be of all blocks below the highwater mark of the segments, so unlike DBVERIFY it will not warn you of problems in space not yet used. Two side effects of ANALYZE...VALIDATE STRUCTURE are that for partitioned tables it will check that rows are in the correct partition, and for indexes it will compute the ratio of space devoted to active index entries and space wasted because the index entries refer to deleted rows. To see the latter information, query the view INDEX_STATS.

204
6.0 The DBMS_REPAIR Package DBMS_REPAIR is a set of procedures that will check objects for problems and make the objects usable again. Before you can do anything with it, you must create a table that DBMS_REPAIR uses to store its output: SQL> exec dbms_repair.admin_tables(- table_name=>'REPAIR_CORRUPT_TAB',- table_type=>dbms_repair.repair_table,- action=>dbms_repair.create_action); This procedure call creates a table REPAIR_CORRUPT_TAB, which will store details of any problems encountered when checking a table. The table’s name must be prefixed with REPAIR_ and will be created in the SYS schema. Then invoke the CHECK_OBJECT procedure as in Figure 30-3. If any blocks in a table are found to be corrupted, the details of which block and the object affected will be written out to the repair table. There will also be a suggestion as to how to repair the damage: in the example, by marking the block as “software corrupt.” This would not repair the damage in the sense of correcting the damage, but
Figure 30-3 Using DBMS_REPAIR to verify a table it would make the object usable again, which may be better than having statements fail repeatedly with ORA-01578. To follow the advice, use DBMS_REPAIR.FIX_CORRUPT_BLOCKS to mark the damaged blocks as corrupted, then DBMS_REPAIR.SKIP_CORRUPT_BLOCKS to instruct Oracle to ignore any blocks so marked. This will allow sessions to access the
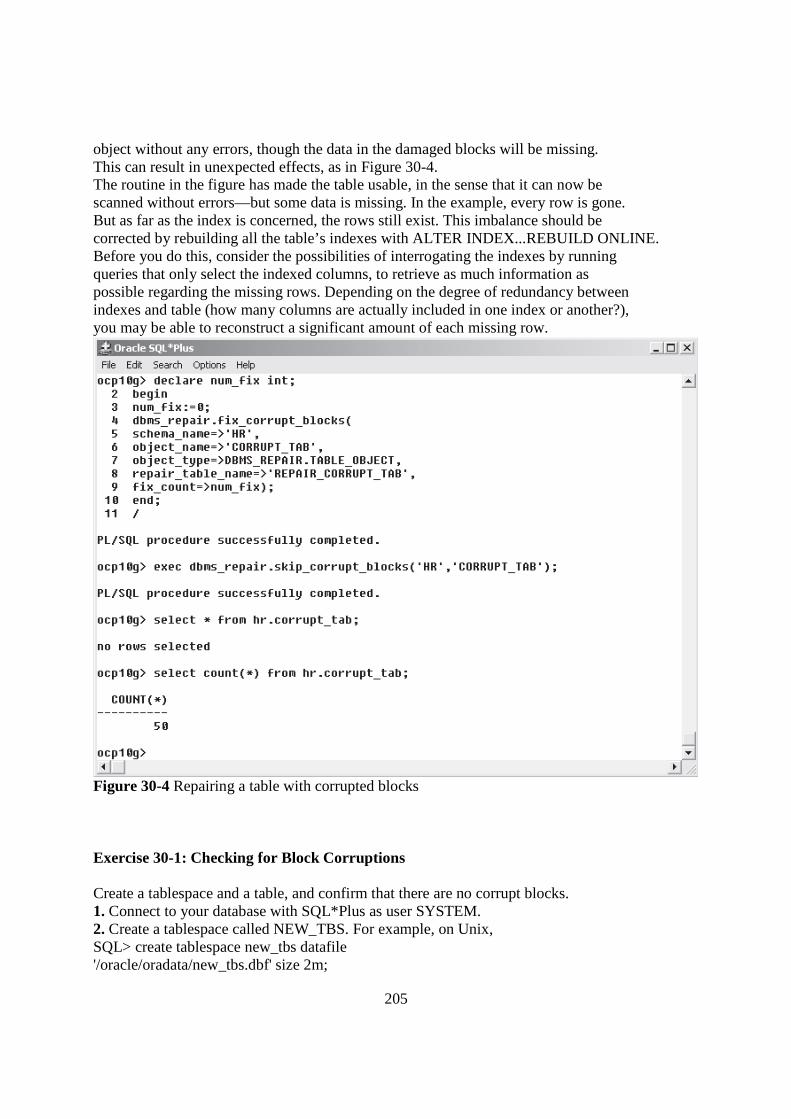
205
object without any errors, though the data in the damaged blocks will be missing. This can result in unexpected effects, as in Figure 30-4. The routine in the figure has made the table usable, in the sense that it can now be scanned without errors—but some data is missing. In the example, every row is gone. But as far as the index is concerned, the rows still exist. This imbalance should be corrected by rebuilding all the table’s indexes with ALTER INDEX...REBUILD ONLINE. Before you do this, consider the possibilities of interrogating the indexes by running queries that only select the indexed columns, to retrieve as much information as possible regarding the missing rows. Depending on the degree of redundancy between indexes and table (how many columns are actually included in one index or another?), you may be able to reconstruct a significant amount of each missing row.
Figure 30-4 Repairing a table with corrupted blocks Exercise 30-1: Checking for Block Corruptions Create a tablespace and a table, and confirm that there are no corrupt blocks. 1. Connect to your database with SQL*Plus as user SYSTEM. 2. Create a tablespace called NEW_TBS. For example, on Unix, SQL> create tablespace new_tbs datafile '/oracle/oradata/new_tbs.dbf' size 2m;
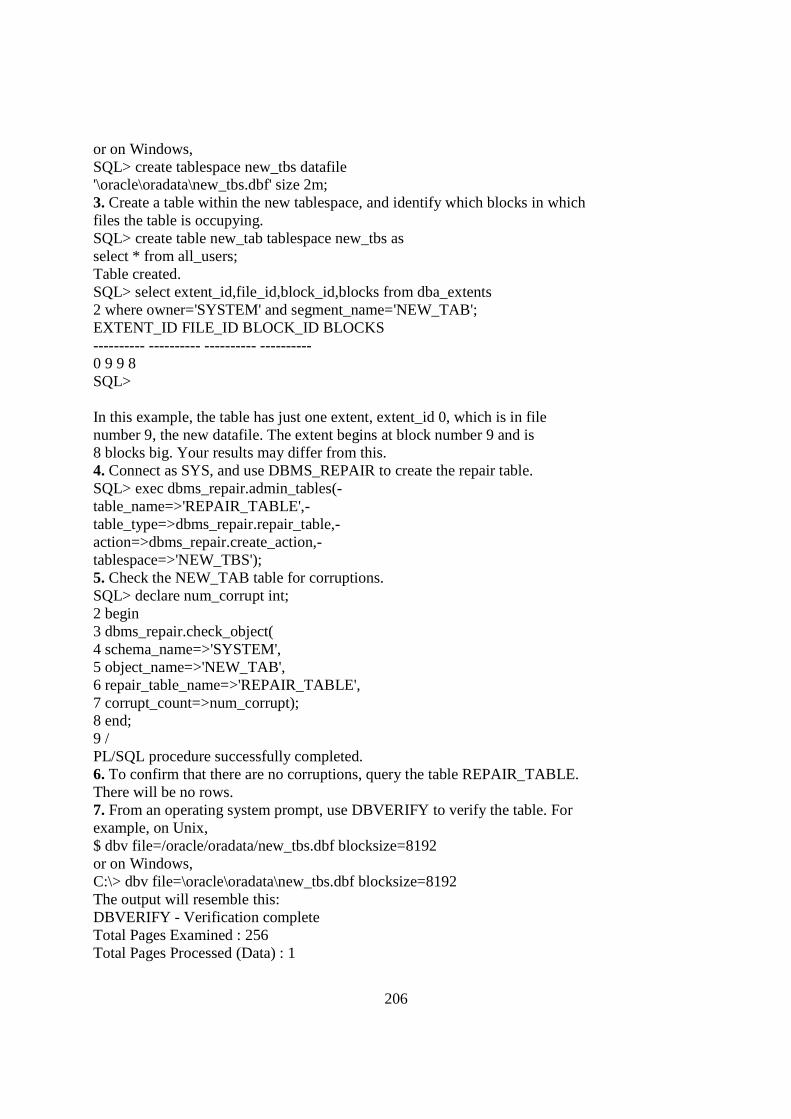
206
or on Windows, SQL> create tablespace new_tbs datafile '\oracle\oradata\new_tbs.dbf' size 2m; 3. Create a table within the new tablespace, and identify which blocks in which files the table is occupying. SQL> create table new_tab tablespace new_tbs as select * from all_users; Table created. SQL> select extent_id,file_id,block_id,blocks from dba_extents 2 where owner='SYSTEM' and segment_name='NEW_TAB'; EXTENT_ID FILE_ID BLOCK_ID BLOCKS ---------- ---------- ---------- ---------- 0 9 9 8 SQL> In this example, the table has just one extent, extent_id 0, which is in file number 9, the new datafile. The extent begins at block number 9 and is 8 blocks big. Your results may differ from this. 4. Connect as SYS, and use DBMS_REPAIR to create the repair table. SQL> exec dbms_repair.admin_tables(- table_name=>'REPAIR_TABLE',- table_type=>dbms_repair.repair_table,- action=>dbms_repair.create_action,- tablespace=>'NEW_TBS'); 5. Check the NEW_TAB table for corruptions. SQL> declare num_corrupt int; 2 begin 3 dbms_repair.check_object( 4 schema_name=>'SYSTEM', 5 object_name=>'NEW_TAB', 6 repair_table_name=>'REPAIR_TABLE', 7 corrupt_count=>num_corrupt); 8 end; 9 / PL/SQL procedure successfully completed. 6. To confirm that there are no corruptions, query the table REPAIR_TABLE. There will be no rows. 7. From an operating system prompt, use DBVERIFY to verify the table. For example, on Unix, $ dbv file=/oracle/oradata/new_tbs.dbf blocksize=8192 or on Windows, C:\> dbv file=\oracle\oradata\new_tbs.dbf blocksize=8192 The output will resemble this: DBVERIFY - Verification complete Total Pages Examined : 256 Total Pages Processed (Data) : 1

207
Total Pages Failing (Data) : 0 Total Pages Processed (Index): 0 Total Pages Failing (Index): 0 Total Pages Processed (Other): 10 Total Pages Processed (Seg) : 0 Total Pages Failing (Seg) : 0 Total Pages Empty : 245 Total Pages Marked Corrupt : 0 Total Pages Influx : 0 7.0 Recovering Corrupt Blocks with RMAN If you are making user-managed backups, you cannot perform a block recovery, because the granularity of a user-managed restore is the datafile. If one block of a file many gigabytes big is corrupted, you must restore and recover the entire datafile through the usual routine: • Take the damaged file offline. PART II • Restore the file from a backup made before the corruption occurred. • Recover the file completely. • Bring the recovered file online. This can be done with zero data loss, but the impact on your users, in terms of downtime, may be enormous. RMAN backups open the possibility of block-level restore and recovery, perhaps with no downtime at all. 7.1 Detection of Corrupt Blocks RMAN will detect corrupt blocks as it performs backup operations. A user-managed backup routine will generally detect a hardware corruption, because the operating system utility you are using will have a problem reading the file, but it cannot detect software corruption: damage where the file is still readable by the operating system but the contents would not make sense to Oracle. RMAN, being an Oracle-aware tool, will verify the contents of data blocks as it reads them; unless instructed otherwise, it will terminate the backup as soon as it hits a corrupt block. If you wish, you can run RMAN backups that specify a tolerance for corrupted blocks. If this is done, then rather than throwing an error and terminating the backup immediately when a corruption is detected, RMAN will continue to back up the datafile but will record the addresses of any corruptions it encounters in its repository. This example instructs RMAN to continue a backup as long as no more than one hundred corrupt blocks are encountered: RMAN> run { set maxcorrupt for datafile 7 to 100; backup datafile 7;} The details of corrupt blocks are visible in two places. The view V$DATABASE_ BLOCK_CORRUPTION shows the address of the cause of the problem: the datafile file number and block number. The address of the block in the backup is recorded in V$BACKUP_CORRUPTION for backup set backups, or in V$COPY_CORRUPTION if the backup were to an image copy. In normal running, you would not use the SET
208
MAXCORRUPT keywords. Without them, the backup will fail and you will thus be made aware of the problem immediately. Then re-run the backup with SET MAXCORRUPT and after completion query the views to determine the extent of the damage. By default, RMAN will always check for physical corruption, known as “media corruption” in the non-RMAN world. An example of this would be a block that Oracle cannot process at all: an invalid checksum, or a block full of zeros. RMAN can also be instructed to check for logical corruption, also known as “software corruption,” as well. These checks will occur whenever a file is backed up, whether as an image copy or into a backup set. To override the defaults, RMAN> backup nochecksum datafile 7; will not check for physical corruption, and RMAN> backup check logical datafile 6; will check for logical as well as physical corruption. 7.2 Block Media Recovery If RMAN has detected a block corruption, it can do Block Media Recovery, or BMR. BMR changes the granularity of a restore and recovery operation from the datafile to just the damaged blocks. This has two huge advantages over file restore and recover: first, the file does not have to be taken offline; normal DML can continue. Second, the mean time to recover is much reduced, since only the damaged blocks are involved in the operation, not the whole file. The only downtime that will occur is if a session happens to hit a block that is actually damaged and has not yet been recovered. The BMR mechanism provides RMAN with a list of one of more blocks that need recovery. RMAN will extract backups of these blocks from a backup set or an image copy and write them to the datafile. Then RMAN will pass through the archive logs generated since the backup and extract redo records relevant to the restored blocks and apply them. The recovery will always be complete—it would be logically impossible to do an incomplete recovery; incomplete recovery of just one block would leave the database in an inconsistent state. If a session hits a corrupted block before the BMR process has completed, then it will still receive an ORA-01578 error, but it is quite possible that the BMR operation will be complete before any users are aware of the problem. 7.3 The BLOCKRECOVER Command The BLOCKRECOVER command always specifies a list of one or more blocks to be restored and recovered, and it optionally specifies the backup from which the restore should be made. For example, this command, RMAN> blockrecover datafile 7 block 5; Instructs RMAN to restore and recover the one specified block from the most recent backup set or image copy of the file (see Figure 30-5). The syntax would also accept a list of blocks in several files: RMAN> blockrecover datafile 7 block 5,6,7 datafile 9 block 21,25; PART II There may be doubt regarding the integrity of the backups. In that case, you can instruct RMAN to restore the block(s) from a backup that is known to be good: RMAN> blockrecover datafile 7 block 5 from backupset 1093;

209
will restore from the nominated backup set, which could also be specified by a tag: RMAN> blockrecover datafile 7 block 5 from tag monthly_whole; If the damage is more extensive, then two other options for BMR will simplify the process. First, provided that RMAN has populated the view V$DATABASE_BLOCK_ CORRUPTION by running a backup with MAXCORRUPT set to greater than zero, then the CORRUPTION LIST option will instruct RMAN to restore and recover every block listed in the view. Second, to ensure that the backup(s) used for the restore are from a time before the corruption occurred, there is the UNTIL option. For example, RMAN> blockrecover corruption list until time sysdate - 7; instructs RMAN to restore and recover every block that has been discovered to be damaged by a previous backup operation, using only backups made at least one week ago.
Figure 30-5 Block media recovery with RMAN Exercise 30-2: Carrying Out a Block Media Recovery 1. Connect to your database with RMAN, using operating system authentication. rman target / 2. Back up the datafile created in Exercise 30-1, Step 2, either by name or by specifying the file number listed by the query in Exercise 30-1, Step 3, and tag the backup. For example, RMAN> backup datafile 9 tag file9; 3. From your SQL*Plus session, force a log switch and archive. SQL> alter system archive log current; 4. Perform a block recovery of some of the blocks assigned to the NEW_TAB table. Choose any blocks covered by the extent listed by the query in Exercise 30-1, Step 3. For example, RMAN> blockrecover file 9 block 10,11,12 from tag 'file9'; 5. Tidy up by dropping the tablespace.
210
SQL> drop tablespace new_tbs including contents and datafiles; 8.0 Dealing with Corruptions The first step is to identify that a corruption has in fact occurred. You could wait for users to report ORA-01578 errors, or you can detect corruptions in advance by running DBVERIFY against your live datafiles and your user-managed backups. RMAN will also detect corruptions: by default, the RMAN backup will fail when it hits a corrupted block. Having located one or more corrupt blocks, you must identify the object to which they belong. Or if you know the object that is damaged, then the DBMS_REPAIR .CHECK_OBJECT procedure can scan the object to identify the corrupted blocks. Once the extent of the damage is known, you can decide what action to take. Provided that you have an adequate backup strategy in place, either user-managed or with RMAN, you will always be able to carry out a complete recovery. The only exception would be if the corruption occurred so long ago that it is included in all your backups. By default this is not possible with RMAN, but it could occur with user-managed backups if you don’t ever verify them with DBVERIFY. A normal complete recovery involves downtime: any objects with extents in the datafile being restored and recovered will not be available for use until the recovery is finished. There are other techniques that will avoid this. If the damage is limited to an index, you can drop the index and re-create it. This may be transparent to your end users, though if the index is used for enforcing a unique or primary key constraint, the constraint will have to be disabled and the table locked for DML until the index is rebuilt by re-enabling the constraint: ocp10g> alter table corrupt_tab disable validate constraint corr_pk; Table altered. ocp10g> delete from corrupt_tab; delete from corrupt_tab * ERROR at line 1: ORA-25128: No insert/update/delete on table with constraint (HR.CORR_PK) disabled and validated ocp10g> alter table corrupt_tab enable validate constraint corr_pk; Table altered. ocp10g> If the damage is to a table, you can consider using the DBMS_REPAIR package to fix the table. This will make the table usable, but the rows in the damaged blocks will be gone. Also you must rebuild all associated indexes, but this can be done online. This decision to lose data is a grave one, but the zero downtime may sometimes make it the best option. Finally, if you are using RMAN for your backups, you have the possibility of a complete block recovery, with no downtime. This is often the best answer. While fixing the data damage caused by a corruption, you must also identify and fix the cause of the problem. This problem is likely to be due to faults occurring in the server machine’s I/O systems, on its disks, or in its memory: this type of error is outside the database administration domain. Your system administrators will have appropriate
211
diagnostic tools to check all of these. There is also a remote possibility that some releases of the Oracle database software on some platforms may have bugs that can cause software corruptions; these will be documented on Metalink, and there will be patches available to correct the problem. 9.0 SUMMARY Database block corruption should never occur. But it does happen. Oracle will, by default, detect media corruptions that occurred during a block’s sojourn on disk; by setting the DB_BLOCK_CHECKING parameter, you can extend its checking to include software corruptions, or with DB_BLOCK_CHECKSUM you can disable the physical check. If a server process detects an error, it will return an ORA-01578 message to the session, and a message goes to the alert log. A good DBA will proactively detect corruptions before the users hit them, by using DBVERIFY to scan datafiles, or by monitoring the success of his RMAN backups. Then, depending on the extent of the damage and the objects damaged, he has the choice between a restore and complete recovery of the datafiles affected; or simply marking the damaged blocks as corrupted with DBMS_REPAIR; or dropping and re-creating the object. A better solution, if using RMAN for backups, may be block media recovery. 10.0 TURTOR MARKED ASSIGNMENT 1. You have these parameter settings: DB_BLOCK_CHECKSUM=true DB_BLOCK_CHECKING=false Which of these statements are correct? (Choose all the correct answers.) A. Checksums will be calculated and checked whenever a block is accessed in the database buffer cache. B. Checksums will be calculated and checked whenever a block is accessed on disk. C. Blocks of the SYSTEM tablespace will always be checked for internal consistency. D. Blocks of the SYSTEM, SYSAUX, and active UNDO tablespaces will always be checked for internal consistency. E. No blocks will be checked for internal consistency. 2. If a table has corrupted blocks but the primary key index does not, what will be the effect on SELECT statements? (Choose two correct answers.) A. Index searches may succeed, depending on what columns are selected. B. Index searches may succeed, depending on what rows are selected. C. Full table scans may succeed, depending on what columns are selected. D. Full table scans may succeed, depending on what rows are selected. 3. Which of the following file types can DBVERIFY verify? (Choose three answers.) A. Offline datafiles B. Online datafiles C. Datafile image copies D. RMAN backup sets E. Online redo log files

212
F. Archive redo log files 4. DBVERIFY reports that a block is INFLUX. What does this mean? (Choose the best answer.) A. It is an error denoting a type of corruption. B. DBVERIFY could not check the block because it was in use. C. DBVERIFY did check the block after a retry. D. It indicates that the image of the block on disk is not the same as the image in memory. 5. You issue the command analyze table tab1 cascade; What will be analyzed? (Choose the best answer.) PART II A. The table TAB1 and any child tables related to it by a foreign key constraint B. The table TAB1 and any parent tables related to it by a foreign key constraint C. The table TAB1 and all tables, parent or child, to which it is related D. The table TAB1 and its indexes E. The table TAB1 and all its partitions F. All of the above 6. Which of the following is true about the DBMS_REPAIR package? (Choose the best answer.) A. You can use it to reconstruct the data contained within a corrupted block by block media recovery. B. You can use it to reconstruct the data contained within a corrupted block by extracting data from relevant index blocks. C. You can use it to scan datafiles, but not individual objects. D. It can make objects usable, but it cannot retrieve lost data. 7. You want to repair a table with corrupted blocks using DBMS_REPAIR. This requires four procedure calls. Put them in the correct order: A. DBMS_REPAIR.ADMIN_TABLES B. DBMS_REPAIR.CHECK_OBJECT C. DBMS_REPAIR.FIX_CORRUPT_OBJECT D. DBMS_REPAIR.SKIP_CORRUPT_BLOCKS 8. Which of the following statements are correct about Block Media Recovery (BMR)? (Choose two answers.) A. BMR can be performed only with RMAN. B. BMR can be performed only with SQL*Plus. C. Both RMAN and SQL*Plus can be used for BMR. D. BMR is always a complete recovery. E. BMR is always an incomplete recovery. F. BMR can be either complete or incomplete; the DBA decides. 9. If, during an RMAN backup, a corrupt block is encountered, what will happen? (Choose the best answer.) A. The backup will fail. B. The backup will succeed. C. It depends on the MAXCORRUPT setting.

213
D. If the corruption is in the SYSTEM tablespace, the backup will fail; otherwise, it will continue, but the address of the corrupt block will be written to the RMAN repository. 10. To what file types is BMR applicable? (Choose the best answer.) A. Archive log files B. Controlfiles C. Datafiles D. Online logfiles E. Tempfiles F. All of the above 11. What will be the effect of issuing this command: blockrecover corruption list until time sysdate - 7; (Choose the best answer.) A. The recovery will be up to but not including the system change number of the time specified. B. The recovery will be up to and including the system change number of the time specified. C. The recovery will be complete, but the restore will be from before the time specified. D. The recovery will be of all blocks entered onto the corruption list before the time specified. E. The recovery will be of all blocks entered onto the corruption list after the time specified. completes. F. If a session hits a block being recovered, it will report an ORA-01578 error. 11.0 FURTHER READING /REFERENCE 1.0 Alapati, Sam R. (2005) Expert Oracle database 10g administration Apress p. 845ISBN 9781590594513 .
Retrieved 2009-05-25 "... ASH records very recent session activity (within the last five or ten minutes)."
2.0 Oracle Database 10g: Administration 1 and 2
PAty1ikhj 11.11
MODULE 6: BACKUP AND RECOVERY
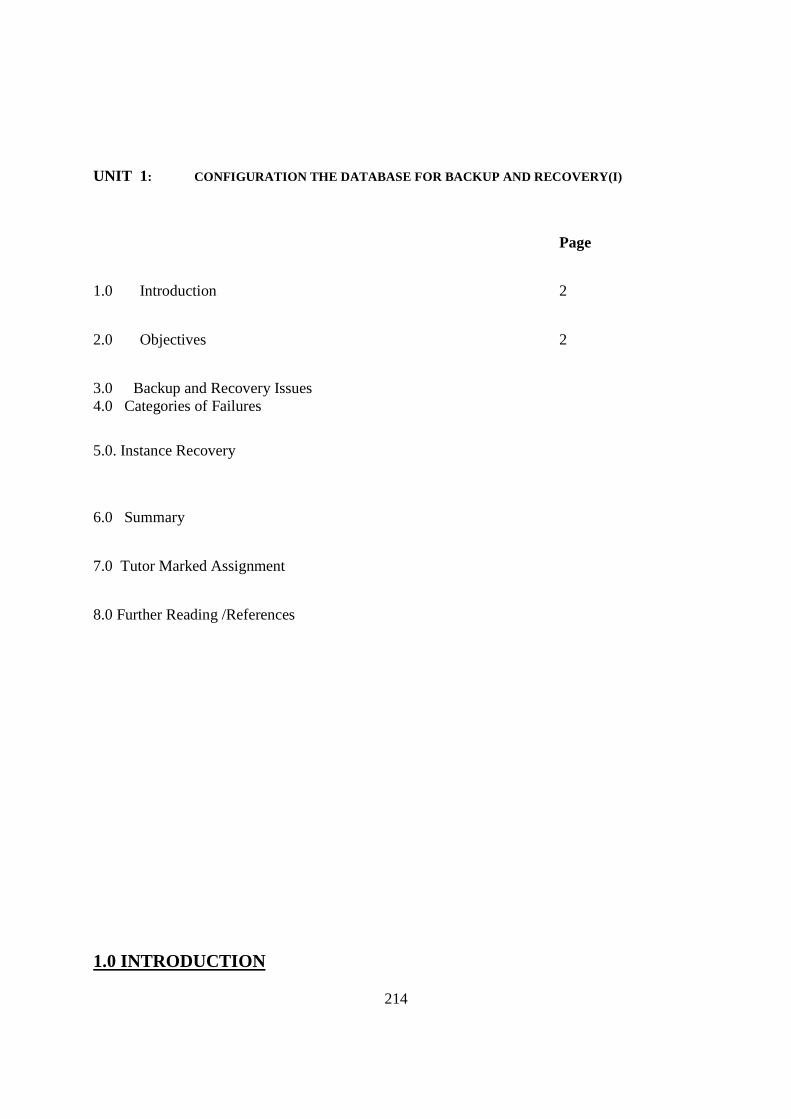
214
UNIT 1: CONFIGURATION THE DATABASE FOR BACKUP AND RECOVERY(I)
Page
1.0 Introduction 2
2.0 Objectives 2
3.0 Backup and Recovery Issues 4.0 Categories of Failures
5.0. Instance Recovery
6.0 Summary
7.0 Tutor Marked Assignment
8.0 Further Reading /References
HAPTER 6 UCHAPTER 18
1.0 INTRODUCTION

215
Perhaps the most important aspect of a database administrator’s job is to ensure that
the database does not lose data. The mechanisms of redo and undo ensure that it is
absolutely impossible to corrupt the database no matter what the DBA does, or does
not do. After working through the section of this chapter headed “Instance Recovery”
you will be able to prove this. However, it is possible for an Oracle database to lose
data if the DBA does not take appropriate precautions. From release 9i onward, an
Oracle database can be configured so that no matter what happens the database
will never lose a single row of committed data. It is also possible to configure an
environment for 100 percent availability. This chapter will go through the concepts
behind Oracle’s backup and recovery mechanisms: the enabling structure within
which you will configure whatever level of data security and availability is demanded
by your organization. But first, a summary of what you are trying to achieve with your
backup and recovery strategy.
2.0 OBJECTIVES
In this unit you will learn how to
• Describe the basics of database backup.restore and recovery
• Identify the types of failure that may occur in an Oracle database
• Describe ways to tune instance recovery
3.0 Backup and Recovery Issues
This is an area where the DBA cannot work in isolation. The amount of downtime and
data loss that an organization can stand is a matter for the business analysts, not the DBA.
The business analysts in conjunction with the end users will determine the requirement,
and the DBA will then configure the database appropriately. To do this, s/he will require
the cooperation of the system administrators and other support staff. Sometimes there
will be budget constraints to consider: a zero data loss and hundred percent uptime
environment will be far more expensive to configure than an environment that does
not have such guarantees. Performance may also tend to degrade as the uptime and
data loss requirements become more demanding.
216
The end result of considering the business requirements, performance, and financial
considerations is often a compromise. It is vitally important that this be documented,
usually in the form of a service level agreement that details exactly what is being done,
and what the effects will be of various types of failure. For the DBA, there is no such
thing as “good” or “bad” database administration in this environment; there is only
whether the procedures s/he is following confirm to the service level agreement, or not.
This protects the DBA from criticism (you can’t be fired for doing what it has been
agreed that you will do) and guarantees the end users the level of service that they
have agreed they require. The three areas of a service level agreement relevant to backup
and recovery are the mean time between failures (the MTBF), the mean time to recover
(the MTTR), and loss of data. Your objective as DBA is to increase the MTBF while
reducing the MTTR and data loss.
MTBF refers to how frequently the database becomes unavailable. For some
organizations, the database must be available all the time. Real-time systems, such as
satellite flight control or process control in an oil refinery, must run all the time; even
a few minutes failure can be catastrophic. Oracle provides two advanced options that
can contribute to 100 percent availability: RAC and Streams. A RAC, or clustered,
database consists of one physical database opened by multiple instances on multiple
PART I
computers. If any one computer or instance fails, the database remains open for use
through a surviving instance. RAC protects against hardware, operating system, and
software failure. The Streams environment consists of two or more databases on separate
computers, which may be geographically widely separated. The Streams mechanism
takes care of keeping the two databases synchronized, in real time if necessary. Users
can connect to either, and changes made on each database are published to the other
database. If one database becomes unavailable for any reason, work can continue on
the other. Streams goes further than RAC for fault tolerance, because it protects against
disk and network failure as well as hardware, operating system, and software failure.
MTTR refers to the length of downtime following a failure. For many organizations,
this is actually more significant than losing data. For example, every minute that the
billing system for a telco is unavailable could mean subscribers are getting free cell
217
phone calls, and extended downtime could cost a lot more money than losing a few
minutes of data. Clearly the ideal is to have the system available all the time, but when
it does fail, it is your duty to bring it back up with minimal delay. A critical part of
reducing MTTR is practice. When a database crashes, you will be under enormous
pressure to open it as soon as possible. It is vital to be prepared. You do not want to
be looking up things in manuals before taking appropriate action. Practice, practice,
practice—if you can’t test recovery on a live system, test on a backup system. Run
simulations of all possible types of failure, and prepare for all eventualities.
The third objective is to minimize data loss. Some organizations cannot stand any
data loss whatsoever. For example, a stock trading system must not lose a trade. It might
be preferable to have no trades taking place—temporarily close the exchange—than to
take the risk of losing a transaction. In other environments it may be acceptable to lose
a few hours of data, but make sure that this is documented. From release 9i onward,
an Oracle database can be configured for zero data loss, under any circumstances
whatsoever. This is done through Data Guard. In a Data Guard system the live database,
known as the primary, is protected by one or more standby databases. The standby is
continually updated with all the changes applied to the primary. These changes can
be propagated in real time if necessary.
These three advanced options—RAC, Streams, and Data Guard—all have
performance implications (which may be for better or for worse, depending on how
things are set up and what the objective is) and should not be embarked upon lightly.
Any fault-tolerant environment will rely heavily on hardware redundancy. This
is where you cannot work independently of the system administrators. If a datafile
becomes unavailable because of a disk failure, your database will also (at least partially)
become unavailable. Your objective of increasing the MTBF must be aligned with your
system administrators’ targets for disk redundancy and replacement. Similarly, you are
totally dependent on the network. If your users cannot connect, they will not care
whether the reason is that a router has failed. Your targets for the database must be set
with the whole IT environment in mind, and the service level agreements must make
this clear. Your role as DBA is to ensure that you can meet the agreed standards for
uptime and data loss, no matter what the nature of the failure.

218
4.0 Categories of Failures
Failures can be divided into a few broad categories. For each type of failure, there
will be an appropriate course of action to resolve it. Each type of failure may well
be documented in a service level agreement; certainly the steps to be followed
should be documented in a procedures manual.
4.1 Statement Failure
An individual SQL statement can fail for a number of reasons, not all of which are
within the DBA’s domain—but even so, s/he must be prepared to fix them. The first
level of repair will be automatic. Whenever a statement fails, the server process
executing the statement will detect the problem and roll back the statement. Remember
that a statement might attempt to update many rows and fail part way through
execution; all the rows that were updated before the failure will have their changes
reversed through use of undo. This will happen automatically. If the statement is part
of a multistatement transaction, all the statements that have already succeeded will
remain intact, but uncommitted. Ideally, the programmers will have included exception
clauses in their code that will identify and manage any problems, but there will always
be some errors that get through the error handling routines. As shown in Figure 18-1,
there are four common causes of statement failure: invalid data, insufficient privileges,
space allocation problems, and logic errors. You will read about each of them next.
A common cause of statement failure is invalid data, usually a format or integrity
constraint violation. A well-written user process will avoid format problems, such as
attempting to insert character data into a numeric field, but they can often occur when
doing batch jobs with data coming from a third-party system. Oracle itself will try to
solve formatting problems by doing automatic type casting to convert data types on
the fly, but this is not very efficient and shouldn’t be relied upon. Constraint violations
will be detected, but Oracle can do nothing to solve them. Clearly, problems caused
by invalid data are not the DBA’s fault, but you must be prepared to deal with them
by working with the users to validate and correct the data, and with the programmers
to try to automate these processes.

219
A second class of non–DBA related statement failures consists of logic errors in
the application. Programmers may well develop code that in some circumstances is
impossible for the database to execute. A perfect example is the deadlock that you
saw in the last chapter. A deadlock is not a database error; it is an error caused by
programmers writing code that permits an impossible situation to arise. Another
example would be if the application attempts to insert a child row before the parent row.
PART I
Space management problems are frequent, but they should never occur. A good DBA
will monitor space usage proactively and take action before problems arise. Space related
causes of statement failure include inability to extend a segment because the
tablespace is full; running out of undo space; insufficient temporary space when
running queries that use disk sorts; a user hitting his quota limit; or an object hitting
its maximum extents limit. Database Control includes the undo advisor, the segment
advisor, the Automatic Database Diagnostic Monitor, and the alert mechanism, all
described in previous chapters, which will help to pick up space-related problems before
they happen. The effect of space problems that slip through can perhaps be alleviated
by setting datafiles to auto-extend, or by enabling resumable space allocation , but ideally, space
problems should never arise in the first place.

220
Figure 18-1 Examples of statement failures
Statements may fail because of insufficient privileges. Remember from Chapter 7
how privileges let a user do certain things, such as select from a table or execute a
piece of code. When a statement is parsed, the server process checks whether the user
executing the statement has the necessary permissions. This type of error indicates
that the security structures in place are inappropriate, and the DBA (in conjunction
with the organization’s security manager) should grant appropriate system and object
privileges.
4.2 User Process Failure
A user process may fail for any number of reasons, including the user exiting
abnormally instead of logging out, the terminal rebooting, or the program causing
an address violation. Whatever the cause of the problem, the outcome is the same.
221
The PMON background process periodically polls all the server processes to ascertain
the state of the session. If a server process reports that it has lost contact with its user
process, PMON will tidy up. If the session was in the middle of a transaction, PMON
will roll back the transaction and release any locks. Then it will terminate the server
process and release the PGA back to the operating system.
This type of problem is beyond the DBA’s control, but s/he should watch for any
trends that might indicate a lack of user training, poorly written software, or perhaps
network or hardware problems.
4.3 Network Failure
In conjunction with the network administrators, it should be possible to configure
Oracle Net such that there is no single point of failure. The three points to consider
are listeners, network interface cards, and routes.
A database listener is unlikely to crash, but there are limits to the amount of work
that one listener can do. A listener can service only one connect request at once, and
it does take an appreciable amount of time to launch a server process and connect it
to a user process. If your database experiences high volumes of concurrent connection
requests, users may receive errors when they try to connect. You can avoid this by
configuring multiple listeners (each on a different address/port combination) and
using connect-time load balancing, as discussed in Chapter 12, to spread the workload
across them all.
At the operating system and hardware levels, network interfaces can fail. Ideally,
your server machine will have at least two network interface cards, for redundancy as
well as performance. Create at least one listener for each card.
Routing problems or localized network failures can mean that even though the
database is running perfectly, no one can connect to it. If your server has two or more
PART I
network interface cards, they should ideally be connected to physically separate subnets.
Then on the client side configure connect-time fault tolerance as well as load balancing,
as described in Chapter 12. This step not only balances the network traffic across all
available routes and devices but also permits the user processes to try a series of routes

222
until they find one that is working.
4.4 User Errors
Historically, user errors were undoubtedly the worst errors to manage. Release 10g of
the database improves the situation dramatically. The problem is that user errors are
not errors as far as the database is concerned. Imagine a conversation on these lines:
User: “I forgot to put a WHERE clause on my UPDATE statement, so I’ve just
updated a million rows instead of one.”
DBA: “Did you say COMMIT?”
User: “Oh, yes.”
DBA: “Um....”
As far as Oracle is concerned, this is a transaction like any other. The “D” for
“Durable” of the ACID test states that once a transaction is committed, it must be
immediately broadcast to all other users and be absolutely nonreversible. But at least
with DML errors such as the one dramatized here, the user does get the chance to roll
back his statement if he realizes that it was wrong before committing. But DDL
statements don’t give you that option. For example, if a programmer drops a table when
he thinks he is logged onto the test database but is actually logged onto the production
database, there is a COMMIT built into the DROP TABLE command. That table is gone;
you can’t roll back DDL.
The ideal solution to user errors is to prevent them from occurring in the first place.
This is partly a matter of user training, but more especially of software design: no user
process should ever let a user issue an UPDATE statement without a WHERE clause.
But even the best-designed software cannot prevent users from issuing SQL that is
inappropriate to the business. Everyone makes mistakes. Oracle provides a number of
ways whereby you as DBA may be able to correct user errors, but this is often extremely
difficult—particularly if the error isn’t reported for some time.
Flashback query is running a query against a version of the database as it existed at
some time in the past. The read-consistent version of the database is constructed, for
your session only, through the use of undo data. Figure 18-2 shows one of many uses
of flashback query. The user has “accidentally” deleted every row in the EMP table and
223
committed the delete. Then s/he retrieves the rows by querying a version of the table
as it was five minutes previously.
Flashback drop reverses the effect of a DROP TABLE command, as shown in
Figure 18-3. In previous releases of the database, a DROP command did what it says:
it dropped all references to the table from the data dictionary. There was no way to
reverse this. Even flashback query would fail, because the flashback query mechanism
does need the data dictionary object definition. But in release 10g the implementation
of the DROP command has changed: it no longer drops anything; it just renames the
object so that you will never see it again, unless you specifically ask to.
The Log Miner is an advanced tool that extracts information from the online and
archived redo logs. Redo includes all changes made to data blocks. By extracting the
changes made to blocks of table data, it is possible to reconstruct the changes that
were made—thus, redo can be used to bring a restored backup forward in time. But
the redo stream also has all the changes made to undo blocks, and it is therefore
possible to construct the changes that would be needed to reverse transactions, even
though they have been committed. Conceptually, the Log Miner is similar to flashback
query: the information to reverse a change is constructed from undo data, but whereas
flashback query uses undo data that is currently in the undo segments, Log Miner
extracts the undo data from the redo logs. This means that Log Miner can go back in
time indefinitely, if you have copies of the relevant logs. By contrast, flashback query
can go back only as far as your undo tablespace will allow.

224
Figure 18-2 Correcting user error with flashback query
Figure 18-3 Correcting user error with flashback dropPART I
Incomplete recovery and flashback database are much more drastic techniques for
reversing user errors. With either approach, the whole database is taken back in time
to before the error occurred. The other techniques just described let you reverse one
bad transaction, while everything else remains intact. But if you ever do an incomplete
recovery or a flashback of the whole database, you will lose all the work done from

225
time you go back to—not just the bad transaction.
4.5 Media Failure
Media failure means damage to disks, and therefore the files stored on them. This is
not your problem—but you must be prepared to deal with it. The point to hang on
to is that damage to any number of any files is no reason to lose data. With release 9i
and later, you can survive the loss of any and all of the files that make up a database
without losing any committed data—if you have configured the database appropriately.
Prior to 9i, complete loss of the machine hosting the database could result in loss of
data; the Data Guard facility, not covered in the OCP curriculum, can even protect
against that.
Included in the category of “media failure” is a particular type of user error: system
or database administrators accidentally deleting files. This is not as uncommon as one
When a disk is damaged, one or more of the files on it will be damaged, unless
the disk subsystem itself has protection through RAID. Remember that a database
consists of three file types: the controlfile, the online redo logs, and the datafiles. The
controlfile and the online logs should always be protected through multiplexing. If
you have multiple copies of the controlfile on different disks, then if any one of them
is damaged you will have a surviving copy. Similarly, multiple copies of each online
redo log mean that you can survive the loss of any one. Datafiles can’t be multiplexed
(other than through RAID, at the hardware level); therefore, if one is lost, the only
option is to restore it from a backup. This introduces the concept of “recovery.” The
restored backup will be out-of-date; “recovery” means applying changes extracted from
the redo logs (both online and archived) to bring it forward to the state it was in at
the time the damage occurred.
Recovery requires the use of archived redo logs. These are the copies of online redo
logs, made after each log switch. After restoring a datafile from backup, the changes to
be applied to it to bring it up-to-date are extracted, in chronological order, from the
archive logs generated since the backup was taken. Clearly, you must look after your
archive logs because if any are lost, the recovery process will fail. Archive logs are
initially created on disk, and because of the risks of losing disk storage, they, just like
226
the controlfile and the online logfiles, should be multiplexed: two or more copies on
different devices.
So to protect against media failure, you must have multiplexed copies of the
controlfile, the online redo logfiles, and the archive redo logfiles. You will also take
backups of the controlfile, the datafiles, and the archive logfiles. You do not back up
the redo logs; they are, in effect, backed up when they are copied to the archive logs.
Datafiles cannot be protected by multiplexing; they need to be protected by hardware
redundancy: either conventional RAID systems or Oracle’s own Automatic Storage
Management (ASM) detailed in Chapter 33.
4.6 Instance Failure
An instance failure is a disorderly shutdown of the instance, popularly referred to as
a crash. This could be caused by a power cut, by switching off or rebooting the server
machine, or by any number of critical hardware problems. In some circumstances
one of the Oracle background processes may fail; this will also trigger an immediate
instance failure. Functionally, the effect of an instance failure, for whatever reason, is the
same as issuing the SHUTDOWN ABORT command. You may hear people talking about
“crashing the database” when they mean issuing a SHUTDOWN ABORT command.
After an instance failure, the database may well be missing committed transactions
and storing uncommitted transactions. This is the definition of a corrupted database.
This situation arises because the server processes work in memory: they update blocks
of data and undo segments in the database buffer cache, not on disk. DBWn then,
eventually, writes the changed blocks down to the datafiles. The algorithm that DBWn
uses to select which dirty buffers to write is oriented toward performance, and it results
in the blocks that are least active getting written first; after all, there would be little
point in writing a block that is getting changed every second. But this means that at
PART I
any given moment there may well be committed transactions that are not yet in the
datafiles and uncommitted transactions that have been written: there is no correlation
between a COMMIT and a write to the datafiles. But of course, all the changes that
have been applied to both data and undo blocks are already in the redo logs.
Remember the description of commit processing detailed in Chapter 9: when you

227
say COMMIT, all that happens is that LGWR flushes the log buffer to the current online
redo logfiles. DBWn does absolutely nothing on COMMIT. So for performance reasons,
DBWn writes as little as possible as rarely as possible; this means that the database is
always out-of-date. But LGWR writes with a very aggressive algorithm indeed. It writes
as nearly as possible in real time, and when you (or anyone else) say COMMIT, it really
does write in real time. This is the key to instance recovery. Oracle accepts the fact that
the database will be corrupted after an instance failure, but there will always be enough
information in the redo log stream on disk to correct the damage.
5.0 Instance Recovery
The rules to which a relational database must conform, as formalized in the ACID test,
require that it may never lose a committed transaction, and never show an uncommitted
transaction. Oracle conforms to the rules perfectly. If the database is corrupted, Oracle
will detect the fact and perform instance recovery to remove the corruptions. It will
reconstitute any committed transactions that had not been saved to the datafiles at
the time of the crash, and it will roll back any uncommitted transactions that had been
written to the datafiles. This instance recovery is completely automatic; you can’t stop it,
even if you want to. If the instance recovery fails, which will only happen if there is media
failure as well as an instance failure, you cannot open the database until you have used
media recovery techniques to restore and recover the damaged files. The final step of
media recovery is automatic instance recovery.
5.1 The Mechanics of Instance Recovery
Because instance recovery is completely automatic, it can be dealt with fairly quickly,
unlike media recovery, which will take several chapters. In principle, instance recovery
is nothing more than using the contents of the online logfiles to rebuild the database
buffer cache to the state it was in before the crash. This will replay all changes extracted
from the redo logs that refer to blocks that had not been written to disk at the time
of the crash. Once this has been done, the database can be opened. At that point, the
database is still corrupted, but there is no reason not to allow users to connect, because
the instance (which is what users see) has been repaired. This phase of recovery, known
228
as the roll forward, reinstates all changes: changes to data blocks and changes to undo
blocks, for both committed and uncommitted transactions. Each redo record has the
bare minimum of information needed to reconstruct a change: the block address, and
the new values. During roll forward, each redo record is read, the appropriate block is
loaded from the datafiles into the database buffer cache, and the change is applied.
Then the block is written back to disk.
Once the roll forward is complete, it is as though the crash had never occurred.
But at that point, there will be uncommitted transactions in the database—these must
be rolled back, and Oracle will do that automatically in the rollback phase of instance
recovery. However, that happens after the database has been opened for use. If a user
connects and hits some data that needs to be rolled back but hasn’t yet been, this is
not a problem; the roll forward phase will have populated the undo segment that was
protecting the uncommitted transaction, so the server can roll back the change in the
normal manner for read consistency.
Instance recovery is automatic, and unavoidable, so how do you invoke it? By
issuing a STARTUP command. Remember from Chapter 5, on starting an instance, the
description of how SMON opens a database. First, it reads the controlfile when the
database transitions to mount mode. Then in the transition to open mode, SMON
checks the file headers of all the datafiles and online redo logfiles. At this point, if
there had been an instance failure, it is apparent because the file headers are all out
of sync. So SMON goes into the instance recovery routine, and the database is only
actually opened after the roll forward phase has completed.
5.2 The Impossibility of Database Corruption
It should now be apparent that there is always enough information in the redo log
stream to reconstruct all work done up to the point at which the crash occurred, and
furthermore that this includes reconstructing the undo information needed to roll
back transactions that were in progress at the time of the crash. But for the final proof,
consider this scenario.
User JOHN has started a transaction. He has updated one row of a table with some
new values, and his server process has copied the old values to an undo segment. But

229
before these updates were done, his server process wrote out the changes to the log
buffer. User DAMIR has also started a transaction. Neither has committed; nothing has
been written to disk. If the instance crashed now, there would be no record whatsoever
of either transaction, not even in the redo logs. So neither transaction would be
recovered, but that is not a problem. Neither was committed, so they should not
be recovered: uncommitted work must never be saved.
Then user JOHN commits his transaction. This triggers LGWR to flush the log
buffer to the online redo logfiles, which means that the changes to both the table
and the undo segments for both JOHN’s transaction and DAMIR’s transaction are now
in the redo logfiles, together with a commit record for JOHN’s transaction. Only when
the write has completed is the “commit complete” message returned to JOHN’s user
process. But there is still nothing in the datafiles. If the instance fails at this point, the
roll forward phase will reconstruct both the transactions, but when all the redo has
PART I
been processed, there will be no commit record for DAMIR’s update; that signals SMON
to roll back DAMIR’s change, but leave JOHN’s in place.
But what if DBWR has written some blocks to disk before the crash? It might be
that JOHN (or another user) was continually requerying his data, but that DAMIR had
made his uncommitted change and not looked at the data again. DBWn will therefore
decide to write DAMIR’s changes to disk in preference to JOHN’s; DBWn will always
tend to write inactive blocks rather than active blocks. So now, the datafiles are storing
DAMIR’s uncommitted transaction but missing JOHN’s committed transaction. This is
as bad a corruption as you can have. But think it through. If the instance crashes now—
a power cut, perhaps, or a shutdown abort—the roll forward will still be able to sort
out the mess. There will always be enough information in the redo stream to reconstruct
committed changes; that is obvious, because a commit isn’t completed until the write
is done. But because LGWR flushes all changes to all blocks to the logfiles, there will
also be enough information to reconstruct the undo segment needed to roll back
DAMIR’s uncommitted transaction.
So to summarize, because LGWR always writes ahead of DBWn, and because it
writes in real time on commit, there will always be enough information in the redo

230
stream to reconstruct any committed changes that had not been written to the datafiles,
and to roll back any uncommitted changes that had been written to the datafiles. This
instance recovery mechanism of redo and rollback makes it absolutely impossible to
corrupt an Oracle database.
5.3 Tuning Instance Recovery
A critical part of many service level agreements is the MTTR, the mean time to recover
after various events. Instance recovery guarantees no corruption, but it may take a
considerable time to do its roll forward before the database can be opened. This time
is dependent on two factors: how much redo has to be read, and how many read/write
operations will be needed on the datafiles as the redo is applied. Both these factors
can be controlled by checkpoints.
A checkpoint guarantees that as of a particular time, all data changes made up to a
particular SCN, or System Change Number, have been written to the datafiles by DBWn.
In the event of an instance crash, it is only necessary for SMON to replay the redo
generated from the last checkpoint position. All changes, committed or not, made
before that position are already in the datafiles; so clearly, there is no need to use redo
to reconstruct the transactions committed prior to that. Also, all changes made by
uncommitted transactions prior to that point are also in the datafiles, so there is no
need to reconstruct undo data prior to the checkpoint position either; it is already
available in the undo segment on disk for the necessary rollback.
The more up-to-date the checkpoint position is, the faster the instance recovery. If
the checkpoint position is fully up-to-date, no roll forward will be needed at all; the
instance can open immediately and go straight into the rollback phase. But there is
a heavy price to pay for this. To advance the checkpoint position, DBWn must write
changed blocks to disk. Excessive disk I/O will cripple performance. But on the other
hand, if you let DBWn get too far behind, so that after a crash SMON has to process
hundreds of megabytes of redo and do millions of read/write operations on the
datafiles, the MTTR following an instance failure can stretch into hours.
Tuning instance recovery time used to be largely a matter of experiment and
guesswork. It has always been easy to tell how long the recovery actually took: just
look at your alert log, and you will see the time when the STARTUP command was

231
issued and the time that the startup completed, with information about how many
blocks of redo were processed, but until release 9i of the database it was almost
impossible to calculate in advance. Version 9i introduced a new parameter, FAST_
START_MTTR_TARGET, that makes controlling instance recovery time a trivial exercise.
You specify it in seconds, and Oracle will then ensure that DBWn writes out blocks at
a rate sufficiently fast that if the instance crashes, the recovery will take no longer than
that number of seconds. So the smaller the setting, the harder DBWn will work in an
attempt to minimize the gap between the checkpoint position and real time. But note
that it is only a target—you can set it to an unrealistically low value, which, no matter
what DBWn does, is impossible to achieve. Database Control also provides an MTTR
advisor, which will give you an idea of how long recovery would take if the instance
failed. More detailed information can be obtained from the view V$INSTANCE_
RECOVERY.
Exercise 18-1: Instance Recovery and the MTTR
This exercise demonstrates the effect of checkpointing on the MTTR following an
instance failure.
1. Using SQL*Plus, connect as user SYSTEM.
2. Disable checkpoint tuning by setting the FAST_START_MTTR_TARGET
parameter to zero.
SQL> alter system set fast_start_mttr_target=0;
3. Simulate a workload by creating a table and starting a transaction.
SQL> create table t1 as select * from all_objects where 1=2;
SQL> insert into t1 select * from all_objects;
4. Run a query to see how much work would be required to recover the instance
if it crashed right now.
SQL> select RECOVERY_ESTIMATED_IOS, ACTUAL_REDO_BLKS,
ESTIMATED_MTTR
from v$instance_recovery;
The query shows how many read/write operations would be required on the
datafiles and how many blocks on redo would have to be processed during
232
PART I
an instance recovery. The ESTIMATED_MTTR column shows, in seconds, how
long the recovery would take.
5. Commit the transaction, and re-run the query from Step 2. Note that nothing
much has changed: COMMIT has no effect on DBWn and will not advance
the checkpoint position.
6. Issue a manual checkpoint.
SQL> alter system checkpoint;
This may take a few seconds to complete, as DBWn flushes all changed blocks
to disk.
7. Re-run the query from Step 2. Note that the RECOVERY_ESTIMATED_IOS and
ACTUAL _REDO_BLKS columns have dropped substantially, perhaps to zero.
The ESTIMATED_MTTR column may not have reduced, because this column
is not updated in real time.
8. Tidy up by dropping the table.
SQL> drop table t1;
6.0 SUMMARY
This unit covered the concepts and architecture that underpin Oracle’s recovery
capabilities. A thorough understanding of this is essential before proceeding to the
details of backup and recovery techniques. You have seen the various types of failure
that can occur, and how the database and the DBA manage them. In particular, the
instance recovery mechanism makes it absolutely impossible to corrupt an Oracle
database.
7.0 TURTOR MARKED ASSIGNMENT
1. Which of the following files should be multiplexed, for safety? (Choose two
answers).
A. Archive logfiles
B. Controlfile
C. Initialization file

233
D. System tablespace datafiles
2. You want to add a controlfile copy. Which of these sequences is correct and
sufficient? (Choose the best answer.)
A. Copy the controlfile, and issue an alter system... command to
change the CONTROL_FILES parameter.
B. Mount the database to read the controlfile, and issue an alter
database... command to add a new copy.
C. Copy the controlfile, shut down the database, start up in nomount mode,
issue an alter system... command to change the CONTROL_FILES
parameter, and open the database.
D. Start up in nomount mode, copy the controlfile, issue an alter
system... command to change the CONTROL_FILES parameter, and
open the database.
E. Issue an alter system... command to change the CONTROL_FILES
parameter, shut down the database, copy the controlfile, and start up the
database.
3. You want to multiplex a redo log group. Will this involve downtime? (Choose
the best answer.)
A. Yes, because logfiles can’t be manipulated while the database is open.
B. No, you can always reconfigure logfiles online.
C. No, if your database is in archivelog mode.
D. Yes, because database logging is controlled by static parameters.
4. If an online logfile gets damaged, what might happen next? (Choose the best
answer.)
A. The instance will terminate as soon as the corruption is detected.
B. The instance will continue to run, if the group is multiplexed.
C. If you have more than two surviving logfile groups, the instance will
continue to run.
D. The instance will terminate, unless you are in archivelog mode.
5. If your database is in archivelog mode, how can you force an archive?
A. Issue an alter database switch logfile command.

234
B. Issue an alter system switch logfile command.
C. Issue an alter system log_archive_start command.
D. There is no command to force an archive; they happen automatically.
6. You are concerned that performance is poor. What might you do to address
this? (Choose two answers.)
A. Increase the FAST_START_MTTR_TARGET setting.
B. Reduce the FAST_START_MTTR_TARGET setting.
C. Carry out manual checkpoints, to advance the checkpoint position.
D. Give each logfile group its own disk, to avoid contention between groups.
E. Ensure that members of the same redo group are on separate disks.
F. Take the database out of archivelog mode.
7. After a crash, you issue a STARTUP command. Put the events that follow in
the correct order:
A. Normal users can connect.
B. SMON carries out roll forward.
C. SMON performs rollback.
D. The instance starts in nomount mode.
E. The database is mounted.
F. The database is opened.
8. Which of the following circumstances could result in a corrupted database?
(Choose the best answer.)
A. Loss of all copies of the current logfile group
B. Loss of all copies of the controlfile
C. A crash during an instance recovery
D. Loss of the system tablespace and the undo tablespace
E. None. It is impossible to corrupt an Oracle database.
9. Neither your controlfile, nor your online logs, nor your archive logs are
multiplexed. To multiplex them, which will require downtime? (Choose the
best answer.)
A. Archive logs
B. Controlfile

235
C. Redo logs
D. None. All these operations can be done online.
PART I
7.0 FURTHER READING/REFERENCE
1.0 Alapati, Sam R. (2005) Expert Oracle database 10g administration Apress
p. 845ISBN 9781590594513 . Retrieved 2009-05-25 "... ASH records very recent session
activity (within the last five or ten minutes)."
2.0Oracle Database 10g: Administration 1 and 2
3.0 Rick Greenwald and Robert Hoskin , Oracle Power Objects , 1997 O’Reilly and Associates Inc.
4.0 Steven Feverstein , Oracle PL/ SQL Programming , 1997 O’Reilly and Associates Inc.
5.0 3.0 Greenwald, Rick; Stackowiak, Robert; Stern, Jonathan (2007). Oracle Essentials: Oracle Database 11g. Essential Series (4 ed.). O'Reilly Media. p. 31. ISBN 9780596514549. Retrieved 2010-06-08. "Today, Oracle offers other embedded databases including TimesTen, Berkeley DB, and Oracle Database Lite."
236
MODULE 2: BACKUP AND RECOVERY
UNIT 2: CONFIGURATION THE DATABASE FOR BACKUP AND RECOVERY(II)
Page
1.0 Introduction 2
2.0 Objectives 2
3.0 Protecting the Controlfile
4.0 Summary
5.0 Tutor Marked Assignment
6 .0 Further Reading /References
HAPTER 6 APTER 18

237
1.0 INTRODUCTION
To guarantee maximum recoverability for a database, the controlfiles must be
multiplexed; the online redo logs must be multiplexed; the database must be running
in archivelog mode, with the archive logfiles also multiplexed; and finally there must
be regular backups.
2.0 OBJECTIVES
In this unit you will learn how to
• Identify the importance of checkpoints, redo logfiles, and archived logfiles
• Configure archivelog mode
• Configure a database for recoverability
3.0 Protecting the Controlfile
The controlfile is small, but vital. It is used to mount the database, and while the
database is open, the controlfile is continually being read and written. If the controlfile
is lost, it is possible to recover; but this is not always easy, and you should never be in
that situation, because there should always be at least two copies of the controlfile, on
different physical devices.
In an ideal world, not only will each copy of the controlfile be on a different disk,
but each of the disks will be on a different channel and controller if your hardware
permits this. However, even if your database is running on a computer with just one
disk (on a small PC, for instance) you should still multiplex the controlfile to different
directories. There is no general rule saying that two copies is too few, or eight copies is
too many, but there will be rules set according to the business requirements for fault
tolerance.
Provided that the controlfile is multiplexed, recovering from media damage that
results in the loss of a controlfile is a trivial matter. Oracle ensures that all copies of
the controlfile are identical, so just copy a surviving controlfile over the damaged or
missing one. But damage to a controlfile does result in downtime. The moment that
Oracle detects that a controlfile is damaged or missing, the instance will terminate
immediately with an instance failure.

238
If you create a database with the DBCA, by default you will have three controlfiles,
which is probably fine; but they will all be in the same directory, which is not so good.
To move or add a controlfile, first shut down the database. No controlfile operations
can be done while the database is open. Second, use an operating system command
to move or copy the controlfile. Third, edit the CONTROL_FILES parameter to point
to the new locations. If you are using a static initSID.ora parameter file, just edit it
with any text editor. If you are using a dynamic spfileSID.ora parameter file, start up
the database in NOMOUNT mode, and issue an alter system set control_
files=... command as shown in Figure 18-5. Fourth, open the database as normal.
3.1 Protecting the Online Redo Log Files
Remember that an Oracle database requires at least two online redo logfile groups to
function, so that it can switch between them. You may need to add more groups for
performance reasons, but two are required. Each group consists of one or more members,
which are the physical files. Only one member per group is required for Oracle to
function, but at least two members per group are required for safety.
The one thing that a DBA is not allowed to do is to lose all copies of the current
online logfile group. If that happens, you will lose data. The only way to protect
against data loss when you lose all members of the current group is to configure a

239
Figure 18-5 Multiplexing the controlfile
Data Guard environment for zero data loss, which is not a trivial exercise. Why is it so
critical that you do not lose all members of the current group? Think about instance
recovery. After a crash, SMON will use the contents of the current online logfile group
for roll forward recovery, to repair any corruptions in the database. If the current online
logfile group is not available, perhaps because it was not multiplexed and media damage
has destroyed the one member, then SMON cannot do this. And if SMON cannot
correct corruptions with roll forward, you cannot open the database.

240
Just as with multiplexed copies of the controlfile, the multiple members of a
logfile group should ideally be on separate disks, on separate controllers. But when
considering disk strategy, think about performance as well as fault tolerance. In the
discussion of commit processing in Chapter 9, it was made clear that when a COMMIT
is issued, the session will hang until LGWR has flushed the log buffer to disk. Only
then is “commit complete” returned to the user process, and the session allowed to
continue. This means that writing to the online redo logfiles is one of the ultimate
bottlenecks in the Oracle environment: you cannot do DML faster than LGWR can
flush changes to disk. So on a high-throughput system, make sure that your redo logfiles
are on your fastest disks served by your fastest controllers. Related to this, try not to
put any datafiles on the same devices; if the one LGWR process has to compete for
disk I/O resources with DBWn and many server processes, performance may degrade.
If a member of a redo logfile group is damaged or missing, the database will remain
open if there is a surviving member. This contrasts with the controlfile, where damage
to any copy will crash the database immediately. Similarly, groups can be added or
removed and members of groups can be added or moved while the database is open,
as long as there are always at least two groups, and each group has at least one valid
member.
If you create a database with DBCA, by default you will have three groups, but
they will have only one member each. You can add more members (or indeed whole
groups) either through Database Control or from the SQL*Plus command line. There
are two views that will tell you the state of your redo logs. V$LOG will have one row per
group, and V$LOGFILE will have one row per logfile member. Examine Figure 18-6.
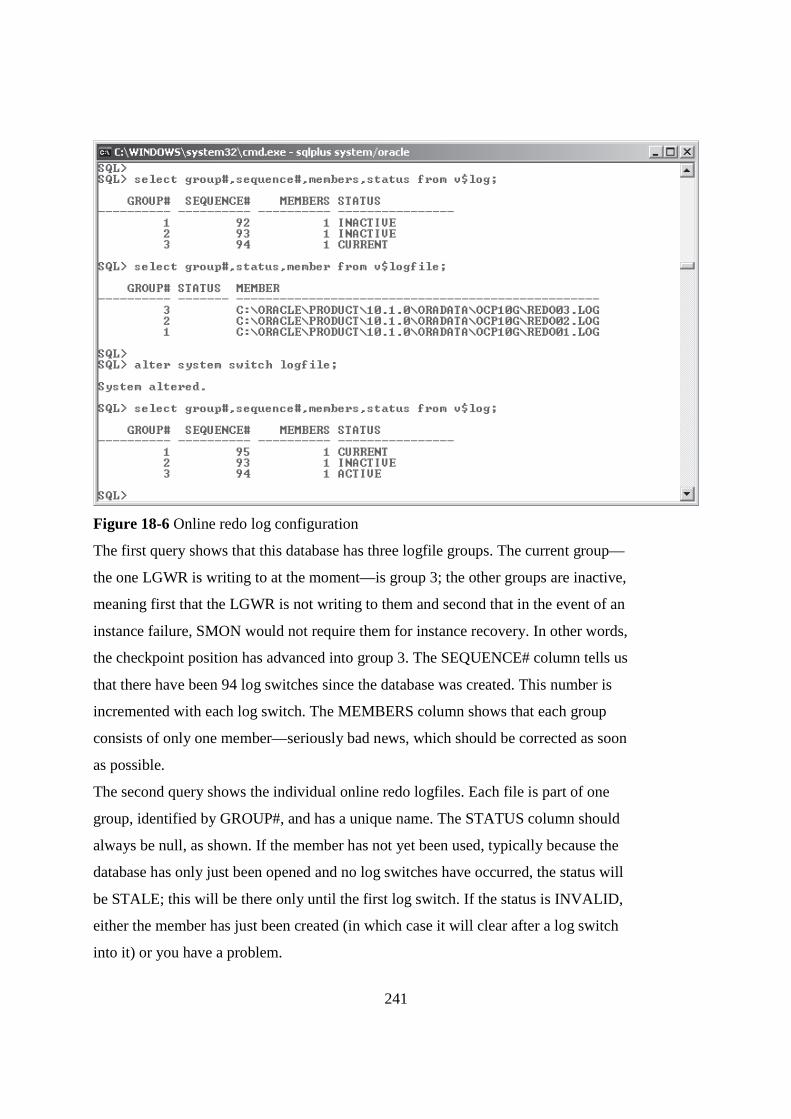
241
Figure 18-6 Online redo log configuration
The first query shows that this database has three logfile groups. The current group—
the one LGWR is writing to at the moment—is group 3; the other groups are inactive,
meaning first that the LGWR is not writing to them and second that in the event of an
instance failure, SMON would not require them for instance recovery. In other words,
the checkpoint position has advanced into group 3. The SEQUENCE# column tells us
that there have been 94 log switches since the database was created. This number is
incremented with each log switch. The MEMBERS column shows that each group
consists of only one member—seriously bad news, which should be corrected as soon
as possible.
The second query shows the individual online redo logfiles. Each file is part of one
group, identified by GROUP#, and has a unique name. The STATUS column should
always be null, as shown. If the member has not yet been used, typically because the
database has only just been opened and no log switches have occurred, the status will
be STALE; this will be there only until the first log switch. If the status is INVALID,
either the member has just been created (in which case it will clear after a log switch
into it) or you have a problem.

242
Then there is an alter system switch logfile; command to force a log switch, which would happen
automatically eventually if there were any DML in progress once the current group was full. The
log switch, either
automatic or manual, causes the LGWR to start writing out redo data to the next online
logfile group.
The last query shows that after the log switch, group 1 is now the current group that
LGWR is writing to at log switch sequence number 95. The previously current group,
group 3, has status ACTIVE. This means that it would still be needed by SMON for
instance recovery if the instance failed now. In a short time, as the checkpoint position
advances, it will become INACTIVE. Issuing an
alter system checkpoint;
command would force the checkpoint position to come up-to-date, and group 3 would
then be inactive immediately.
The number of members per group is restricted by settings in the controlfile,
determined at database creation time. Turn back to Chapter 3 and the CREATE
DATABASE command called by the CreateDB.sql script; the MAXLOGFILES directive
limits the number of groups that this database can have, and the MAXLOGMEMBERS
directive limits the maximum number of members of each group. The DBCA defaults
for these (16 and 3 respectively) may well be suitable for most databases, but if they
PART I
prove to be inappropriate, it is possible to re-create the controlfile with different values.
However, as with all controlfile operations, this will require downtime.
Exercise 18-2: Multiplexing the Redo Log
This exercise will add a member to each online redo log group through Database
Control and then confirm the addition from SQL*Plus. The assumption is that there
is currently only one member per group, and that you have three groups; if your groups
are configured differently, adjust the instructions accordingly.
1. Using Database Control, log on as user SYSTEM.
2. From the database home page, take the Administration tab, and then the Redo
Log Groups link in the Storage section.

243
3. Select the first group, and click Edit.
4. In the Redo Log Members section, click Add. The Add Redo Log Member page appears.
5. Enter a filename REDO01b.LOG for the new member for group 1.
6. Click Continue.
7. Click Show SQL and study the command that will be executed, and then click Return.
8. Click Apply to execute the command—or Revert if you would rather return to Step 4.
9. Take the Redo Log Groups link at the top of the screen to the Redo Log
Groups window, and repeat Steps 3–8 for the other groups.
10. Using SQL*Plus, connect as user SYSTEM and issue these queries to confirm the creation of
the new members:
SQL> select group#,sequence#,members,status from v$log;
SQL> select group#,status,member from v$logfile;
The result will show the new members with status INVALID. This is not a
problem; it happens merely because they have never been used.
11. Issue the following command three times, to cycle through all your logfile groups:
SQL> alter system switch logfile;
12. Reissue the second query in Step 10 to confirm that the status of all your logfile group
members is now null.
3.2 Archivelog Mode and the Archiver Process
Oracle guarantees that your database is never corrupted, through the use of the online
redo logfiles to repair any corruptions caused by an instance failure. This is automatic,
and unavoidable. But to guarantee no loss of data following a media failure, it is
necessary to have a record of all changes applied to the database since the last backup
of the database; this is not enabled by default. The online redo logfiles are overwritten
as log switches occur; the transition to archivelog mode ensures that no online redo
logfile is overwritten unless it has been copied as an archive log first. Thus there will
be a series of archive logfiles that represent a complete history of all changes ever
applied to the database. If a datafile is damaged at any time, it will then be possible to
restore a backup of the datafile and apply the changes from the archive log redo stream
to bring it up-to-date. By default, a database is created in noarchivelog mode; this means

244
that online redo logfiles are overwritten by log switches with no copy being made
first. It is still impossible to corrupt the database, but data could be lost if the datafiles
are damaged by media failure. Once the database is transitioned to archivelog mode,
it is impossible to lose data as well—provided that all the archive logfiles generated
since the last backup are available.
Once a database is converted to archivelog mode, a new background process will
start, automatically. This is the archiver process, ARCn. By default Oracle will start two
of these processes, but you can have up to ten. In earlier releases of the database it was
necessary to start this process either with a SQL*Plus command or by setting the
initialization parameter LOG_ARCHIVE_START, but a 10g instance will automatically
start the archiver if the database is in archivelog mode.
The archiver will copy the online redo logfiles to an archive logfile after each log
switch, thus generating a continuous chain of logfiles that can be used for recovering
a backup. The name and location of these archive logfiles is controlled by initialization
parameters. For safety the archive logfiles can be multiplexed, just as the online logfiles
can be multiplexed, but eventually, they should be migrated to offline storage, such as
a tape library. The Oracle instance takes care of creating the archive logs with the ARCn
process, but the migration to tape must be controlled by the DBA, either through
operating system commands or by using the Recovery Manager utility RMAN (described
in later chapters) or another third-party backup software package.
The transition to archivelog mode can be done only while the database is in mount
mode after a clean shutdown, and it must be done by a user with a SYSDBA connection.
It is also necessary to set the initialization parameters that control the names and
locations of the archive logs generated. Clearly, these names must be unique, or archive
logs could be overwritten by other archive logs. To ensure unique filenames, it is
possible to embed variables such as the log switch sequence number in the archive
logfile names (see Table 18-1).
The minimum archiving necessary to ensure that recovery from a restored backup
will be possible is to set one archive destination. But for safety, it will usually be a
PART I
requirement to multiplex the archive logfiles by specifying two or more destinations,

245
ideally on different disks served by different controllers. From 9i onward, it is possible
to specify up to ten archive destinations, giving you ten copies of each filled online redo
logfile. This is perhaps excessive for safety. One archive destination? Good idea. Two
destinations? Sure, why not. But ten? This is to do with Data Guard. For the purposes
of this book and the OCP exam, an archive log destination will always be a directory
on the machine hosting the database, and two destinations on local disks will usually
be sufficient. But the destination can be an Oracle Net alias, specifying the address of
a listener on a remote computer. This is the key to zero data loss: the redo stream can
be shipped across the network to a remote database, where it can be applied to give a
real-time backup. Furthermore, the remote database can (if desired) be configured and
opened as a data warehouse, meaning that all the query processing can be offloaded
from the primary database to a secondary database optimized for such work.
Exercise 18-3: Transition the Database
to Archivelog Mode
Convert your database to archivelog mode, and set parameters to enable archiving to
two destinations. The instructions for setting parameters in Step 3 assume that you are
using a dynamic spfile; if your instance is using a static pfile, make the edits manually
instead.
1. Create two directories with appropriate operating system commands. For example, on
Windows,
c:\> md c:\oracle\archive1
c:\> md c:\oracle\archive2
or on Unix,
$ mkdir /oracle/archive1
$ mkdir /oracle/archive2
2. Connect with SQL*Plus as user SYS with the SYSDBA privilege.
SQL> connect / as sysdba
%d A unique database identifier, necessary if multiple databases are being archived
to the same directories.
%t The thread number, visible as the THREAD# column in V$INSTANCE. This is

246
not significant, except in a RAC database.
%r The incarnation number. This is important if an incomplete recovery has been
done, as described in Chapter 27.
%s The log switch sequence number. This will guarantee that the archives from any
one database do not overwrite each other.
3. Set the parameters to nominate two destination directories created in Step 1
and to control the archive logfile names. Note that it is necessary to include
a trailing slash character on the directory names (a backslash on Windows).
SQL> alter system set log_archive_dest_1='location=/oracle/archive1/' scope=spfile;
SQL> alter system set log_archive_dest_2='location=/oracle/archive2/' scope=spfile;
SQL> alter system set log_archive_format='arch_%d_%t_%r_%s.log' scope=spfile;
4. Shut down the database cleanly.
SQL> shutdown immediate;
5. Start up in mount mode.
SQL> startup mount;
6. Convert the database to archivelog mode.
SQL> alter database archivelog;
7. Open the database.
SQL> alter database open;
8. Confirm that the database is in archivelog mode and that the archiver is
running with these two queries.
SQL> select log_mode from v$database;
SQL> select archiver from v$instance;
9. Force a log switch.
SQL> alter system switch logfile;
10. The log switch will have forced an archive to both the destinations. Confirm
this from within the Oracle environment with this query:
SQL> select name from v$archived_log;
and then from an operating system prompt confirm that the files listed by this
query were in fact created.

247
4.0 SUMMARY
Then the mechanism of archiving makes it impossible to lose data, provided
that you do not lose your current, unarchived, online redo logfile group, and that you
have adequate backups. To protect the online redo logs, you should multiplex them
onto different disks. It is also good practice to multiplex the controlfile and the archive
logfiles.
PART I
5.0 TURTOR MARKED ASSIGNMENT
1. On querying V$LOG, you see that you have one logfile group whose status is
“ACTIVE.” Which of the following statements are true? (Choose two answers.)
A. This is the group to which LGWR is writing redo.
B. In the event of a crash, SMON would use this group for recovery.
C. The group has not yet been archived.
D. Completing a checkpoint would change the status to null.
E. This group was in use before the last log switch.
2. While executing a multirow update statement, you hit a constraint violation.
What will happen next?
A. The update that hit the problem will be rolled back, but the rest of the
statement will remain intact.
B. The whole statement will be rolled back.
C. The whole transaction will be rolled back.
D. It depends on whether you have issued the alter session enable
resumable command.
3. From the following table, match the appropriate solution to each possible
problem.
A. Accidentally dropping a table a. Mirroring with RAID
B. Committing a bad transaction b. Enable resumable
C. Datafiles filling up c. Flashback drop
D. Deleting a datafile d. Flashback query
E. Losing a disk e. Restore and recover

248
F. Omitting a “where” clause on a delete f. Rollback
4. A multiplexed copy of the controlfile gets damaged while the instance is shut
down. Which of the following statements is true? (Choose the best answer.)
A. The database can be opened immediately if there is a surviving copy of the
controlfile.
B. In mount mode, you can change the CONTROL_FILES parameter to remove
the reference to the damaged copy of the controlfile, and then open the
database.
C. You can replace the damaged file with a surviving copy of the controlfile
and then open the database.
D. After restoring the controlfile, SMON will recover it as part of the instance
recovery process.
5. The MTTR advisor will tell you.... (Choose two answers.)
A. The estimated MTTR
B. The value of the FAST_START_MTTR_TARGET parameter
C. What the FAST_START_MTTR_TARGET should be set to
D. How the MTTR will change, depending on the rate of redo generation
E. How many I/Os on datafiles and how much redo would be processed
in the event of an instance failure
5.0 FURTHER READING/ REFERENCE
1.0 Alapati, Sam R. (2005) Expert Oracle database 10g administration Apress
p. 845ISBN 9781590594513 . Retrieved 2009-05-25 "... ASH records very recent session
activity (within the last five or ten minutes)."
2.0Oracle Database 10g: Administration 1 and 2
3.0 Rick Greenwald and Robert Hoskin , Oracle Power Objects , 1997 O’Reilly and Associates Inc. 4.0 Steven Feverstein , Oracle PL/ SQL Programming , 1997 O’Reilly and Associates Inc.
5.0 Greenwald, Rick; Stackowiak, Robert; Stern, Jonathan (2007). Oracle Essentials: Oracle Database 11g. Essential Series (4 ed.). O'Reilly Media. p. 31. ISBN 9780596514549. Retrieved 2010-06-08. "Today, Oracle offers other embedded databases including TimesTen, Berkeley DB, and Oracle Database Lite."