Creating and Maintaining an Effective Picture File for ES/FL Instruction
14
“A Picture is Worth a Thousand Words” © Mark E. Wenger, 1993. Revised 1995, 2005, 2013. Professor of English and Composition, Columbia International University. A Russian woman stands before her classmates, voice quavering as she describes her first shopping experience in America. Tears trickle from her eyes and the picture of the grocery store aisle trembles in her hand. A Mexican lady, eyes sparkling, introduces the class to her boy friend, recently created in her imagination and represented in the laminated photo for the class to admire. A Peruvian housemaid, in her forties, hesitantly, and then with growing confidence, describes the interior of her ideal home; her hands excitedly pointing to the picture of the exterior of a typical American house. Three students, three unique individuals from vastly different backgrounds and with greatly different needs. Each one telling things of the heart because of what they hold in their hand. Pictures are valuable tools for the teacher who knows how to use them. The question, “Why use pictures to teach a language?” hardly needs asking. The answer is obvious – it works! A better question: “How do I make pictures work for me in the classroom?” Four more questions will give us an answer: 1. What pictures should I use? 2. How can I effectively use these pictures? 3. How can I efficiently file these pictures? 4. Where do I find useful pictures? I. First, what pictures should I use? A. Two presuppositions: 1. ES/FL instruction requires flexibility – materials and teacher must be mobile and if you’re headed overseas, compact, lightweight, durable, and best if it’s your hand luggage. If you plan on using it, count on toting it. 2. ES/FL means teaching people – all ages, all types of backgrounds, all kinds of future plans. There is no stereotypical ES/FL classroom. So, B. Choose pictures you will use – not as easy as you might think, especially if you are
-
Upload
artsandsciences-sc -
Category
Documents
-
view
0 -
download
0
Transcript of Creating and Maintaining an Effective Picture File for ES/FL Instruction

“A Picture is Worth a Thousand Words”© Mark E. Wenger, 1993. Revised 1995, 2005, 2013.
Professor of English and Composition, Columbia International University.
A Russian woman stands before her classmates, voice quavering as shedescribes her first shopping experience in America. Tears trickle fromher eyes and the picture of the grocery store aisle trembles in her hand.
A Mexican lady, eyes sparkling, introduces theclass to her boy friend, recently created in herimagination and represented in the laminatedphoto for the class to admire.
A Peruvian housemaid, in her forties, hesitantly,and then with growing confidence, describes theinterior of her ideal home; her hands excitedlypointing to the picture of the exterior of a typicalAmerican house.
Three students, three unique individuals from vastly different backgrounds and with greatlydifferent needs. Each one telling things of the heart because of what they hold in their hand. Pictures are valuable tools for the teacher who knows how to use them.
The question, “Why use pictures to teach a language?” hardly needs asking. The answer isobvious – it works! A better question: “How do I make pictures work for me in the classroom?” Four more questions will give us an answer:
1. What pictures should I use?2. How can I effectively use these pictures?3. How can I efficiently file these pictures?4. Where do I find useful pictures?
I. First, what pictures should I use?
A. Two presuppositions:
1. ES/FL instruction requires flexibility – materials and teacher must be mobile and ifyou’re headed overseas, compact, lightweight, durable, and best if it’s your handluggage. If you plan on using it, count on toting it.
2. ES/FL means teaching people – all ages, all types of backgrounds, all kinds of futureplans. There is no stereotypical ES/FL classroom.
So,
B. Choose pictures you will use – not as easy as you might think, especially if you are

Wenger 2
creating your picture file before you have done much teaching. But you have done someliving, so there’s hope. Here are a few principles to follow so that you will choosepictures you will use.
1. Choose pictures that relate to life.
I have a great picture (from a Merrill Lynch ad, I believe) of a bull in a bubble bath. Love it. Never have used it. I put it out as a choice; students look at it, move on andchoose a picture of reality as they know it. We live in an image-saturated society, andnot much catches our eye any more. Whatdoes, is usually bizarre, strange, unusual, butnot typical. But your students don’t want tospeak bizarre, strange, unusual English. Theywant to study, work, play, romance, amuse,move. In other words, they want to learnEnglish they can live with. Pictures tap intothat desire and allow the students to talkabout what’s important to them. If thestudents want to say something, doing thework to say it won’t be a chore.
Therefore,Choose pictures that relate to:
a. being young and single (many of your students will be, you know).
b. being in a family (family is more important in most cultures than it is here inAmerica – and it’s important here, too).
c. being a man (a son, a brother, a boy friend, a fiancé, a husband, a father, an uncle).
d. being a woman (a daughter, a sister, a girl friend, a fiancé, a wife, a mother, anaunt).
e. being a child (we all were, once, and most of us love children, too. Two goodreasons to let the number of such pictures grow in your file).
f. being a student (you are now; they will be when you teach them).
g. being an employee (it’s why you’re studying and what will be motivating them,too).
h. being human – fears, laughter; sorrows, triumphs; relaxation, excitement; habits,hobbies. (We may speak different languages, come from different countries, pray

Wenger 3
to different gods, but we all tremble at something, enjoy a good laugh, cry andshout, take a rest and a risk).
2. Choose pictures that show actions.
A picture of a pencil is useful. Except you can always pick one upfrom a desk. A picture of a classroom is not bad. Except you willalmost always be in one (not guaranteed, by the way). But apicture of a child learning to draw – pencil in balled up fist – thatyou can’t easily find in an adult-education classroom. And apicture of a student being helped by a teacher – well, that has allsorts of possibilities.
3. Choose pictures that show culture, and cultural differences.
A shopping mall, decked out in satin, Santas, and sales tells moreabout American and differences and similarities between it andother nations than any text book, lecture, or single item can. Ageneral rule of thumb: the more normal you find the picture, themore likely it is to filled with potential for bringing up the desire to speak in yourstudents. What you find strange and unusual has its place in your file, but it is not theplace of majority.
4. Choose pictures that beg to be explained – Story Pictures.
Some bizarre pictures fall into this category. The bull inthe bubble bath was one, or so I thought. After all, why isthe bull in the bath tub? And how did it get there? Apparently none of my students have ever wonderedenough to try and explain it to me. I’m not sure I wouldwant to try, either (especially not in another language,which I am struggling to learn). On the other hand, a picture of a child crying on abus might elicit a story of a first day at school, or an evacuation from a war zone. Pictures which have the expectation of something soon to happen, or of somethinghaving just happened, are great pictures to get your students talking, or writing, orlistening, or sharing from the heart.
5. Choose pictures of people.
People are like canaries – we respond to ourselves. Put in a mirror infront of a canary in a cage and it’ll twitter itself silly. Put before yourstudents pictures that touch their hearts, and they’ll surprise, amuse,impress, charm. In short, they’ll cease to be students and begin to befriends.

Wenger 4
6. Choose pictures that can be used in more than just one way.
Architecture appeals to me. I have a whole section ondoorways – wonderful doors: dark and mysterious, bright andairy; ancient and forgotten. Those doors sat unused for years,waiting to invite my students into adventures and discovery –through a lesson plan on writing and modals. Unfortunately,th opportunity never presented itself to me while I taughtES/FL, and only once I started teaching creative writing in aprison did this doorway exercise prove useful.
It’s a good think my resource files didn’t contain too many “teacher’s pet” files.
Instead:7. Choose pictures that relate to:
a. verb tenses (past, present, future, progressive, perfect, perfect progressive,passive).
b. social situations (introductions, polite phrases and customs, biographicalinformation, small talk, as well as holidays andfestivals).
c. survival situations (hospitals, grocery stores,department stores, police stations, restaurants).
d. day-to-day life (cooking food, choosing clothes,traveling to and from work and home, hugging andkissing, loving and leaving).
e. time, seasons, events (planting, harvest, school andholiday, marriage, birth, death, graduation, work,retirement; Spring Summer, Autumn, Winter; day andnight, morning and evening, breakfast, lunch, anddinner, late and early).
f. life in different nations, cultures, neighborhoods, homes (African, American,African-American, Australian, Aborigine, middle-class, upper-class, poor).
g. history – not just WASP (Great Zimbabwe, The Great Wall, Martin Luther King,Jr., Genghis Khan).
The more categories a picture belongs to, the more you will use it, and those interesting butrarely used materials won’t clutter up your file space. Remember – if you plan on using it,count on carrying it.

Wenger 5
And so, of course,
II. How can I effectively use these pictures?
A. A few presuppositions:
1. Ideal textbooks do not exist. And if you think you’ve found one, it probably won’t bethe one you’re assigned to use, or if it is, the publisher will bring out a new editionthat changes everything. Face it; you’re going to use crummy books for much of yourcareer. Best learn to deal with it.
2. Ideal positions do not exist – ES/FL teachers are the cow-pokes of academia. Learnto make do.
3. Dream lessons take time, and time is something you’ll rarely have. Apparently itbelongs to other people. I’ve never met them, but I’m sure they don’t prepare lessonswhile peddling a bicycle to class. I have done so, and you probably will preparelessons like that, too.
So,
B. Use pictures to supplement your text.
A text book can be your best friend and sometimes your worst enemy; it should never beyour dictator. Well written texts are a joy to use; poorly written ones a challenge. Neither kind should be all that you use. The text book author does not know yourstudents, has no way of understanding the unique joys and sorrows you have in yourclassroom each day. The exercises and drills are cold and lifeless: words on a page. Butthose words are also the key to unlock your students’ hearts. From the language they willlearn comes love poems and letters, term papers and research, political speeches andpurchase of peaches. Do don’t abandon or be bound by the text – supplement it.
1. Supplement drills with relevant pictures.
Drills are necessary, but they needn’t be tedious. Pictures canhelp break the monotony while also adding clarity andcharacter to this text book tradition.
A: Is it raining?B: yes, it is. It’s raining very hard.A: Does it rain very much in this area?B: yes. It rains a lot in the spring and the fall.”
(Modern American English: Shanghai Foreign Language Education Press, 1987. p. 7)
This simple drill, with the help of pictures of snow, rain, and a map, can become

Wenger 6
much livelier, more interesting, and probably communicative. Who knows, it couldlead to a student sharing his love of walking in the rain, or to you telling of meetingyour spouse in a snow storm. Pictures could allow that to happen.
2. Introduce topics, functions, and themes with pictures.
Concrete floors, wooden benches, three bare walls, and a bougainvillaea vine for afourth. Fifteen fourth grades scuffle onto this porch-turned-English-classroom. Throughout the room, on tables and benches, stuck to walls and windows are picturesof children. The lesson: the first of several on the present continuous tense. Thefunction: description of people. The theme: family and friends.
Teacher: “What is his name?”“Simba!”, says Simba, an aggressive boy who like the sweater in the picture.“What is he wearing?”“He wear jersey! Blue jersey!” answers Simba.With a questioning look and a walk to the chalk board, the teacher gets Simba to
say “His name is Simba. He wears a blue jersey.”
So begins a lesson that will show simple present describes habitual action, andpresent continuous describes current action. The pictures captured the interest of thechildren, allowed them to talk about their interests, and drew them into needing to usethe continuous tense.
3. Build community with pictures.
A picture works because the student interprets it.
Remember the Russian lady? Who would have thought a picture of a grocery aisleand a shopping cart could bring so many tears? Nina didn’t cry because she wasnervous; Nina didn’t cry because she was afraid – Nina chose that picture andvolunteered to tell her story: Volunteered her way into our hearts. None of us willever forget Nina’s friends who must still stand in standing still bread lines back inByelorussia. None of us will forget her tears, or the Kleenex from a friend.
Community.
C. Use pictures to teach conversational English.
Pictures stretch your student’s vocabulary and ability.
Allow each student to choose a picture of a person (have at least twice as many picturesas students so real choices can be made). Write on the board: “Name, age, job, family”. Give students a few moments to think. Break students into pairs and have each introducethe other to the person in his or her picture. Each student then introduces the partner’s

Wenger 7
picture to the class.
This simple activity allows each student the opportunity to speak, listen, and report. Writing can easily be added to the activity. And each student is able to choose his or hercomfort level, but in reporting on another’s “person” cannot merely stay within his or hercomfort level.
Remember the Mexican woman? Her boyfriend came from this activity. She had studiedEnglish for eight weeks when she created him out of her imagination.
D. Use pictures to teach pronunciation.
Two examples:
1. By assigning names to people in pictures, and then giving those pictures to peoplewho have difficulty with the sounds in the given names, you, the teacher, can focusattention on sounds needing pronunciation work while still allowing communicativeactivities to take place.
“Reverend Roland Leer” could be assigned to a native Japanese-speaker, forexample, while “Pablo Baptista” could be given to an student who speaks Arabic ashis native language. Using such names and pictures to go along with them alongwith another activity would allow for pronunciation practice while not detractingfrom the communicative goal of your lesson. Minimal pairs and “Sammy diagrams”could be used to supplement the pronunciation focus.
2. Action pictures can be used to work on the pronunciation of regular verb tenses verbs(the final “ed” on the regular verbs is pronounced [ed], [t ], or [d], depending uponh
the final letter of the main verb). A rapidly paced activity involving pictures forcesstudents to apply the rules of pronunciation of past tense verbs without the crutch ofthe written form.
E. Use pictures to teach writing.
From novice to advanced, students can be prompted by pictures towrite both creatively and academically.
Examples:1. Have students write a descriptive paragraph on a picture. (For
novice students and low-intermediates, have students write asentence or two, or even just a few words of description).
2. Have students write a narrative story, explaining a story picture. (For novice or low-intermediates, have students write a sequenceof three or four simple sentences, explaining what happened, orwill happen in the picture).

Wenger 8
3. Have advanced or high-intermediate students write an essay about a social problemillustrated by a picture. (For lower level students, have them write a sentence ortwo, identifying what they see as the problem in the picture, or perhaps what is apossible solution for the problem seen in the picture).
F. Use pictures to teach reading.
Using pictures in conjunction with text material is not only another way to incorporatepictures into your teaching, it is commons sense that newspapers, magazines, text books,and advertisements follow every time they seek to communicate. Introduce topics andthemes of a reading with pictures. Illustrate vocabulary with pictures. Have studentschoose what picture(s) best fit a particular reading (identification of topic and main idea). The opportunities are limitless.
G. Use pictures to teach listening.
Listening instruction seeks to increase the quantity and quality of what the studentunderstands through listening to native and near-native speech. What better way to see ifstudents are understanding than to incorporate visual and tactile response with the aural? Have students demonstrate understanding by choosing or using pictures that correspondwith what they are hearing.
Example: (A novice-mid/novice-high class of mostly Asian immigrants).
On the table before the students are a dozen pictures of both men and women. Eachpicture is numbered. The teacher describes one of the people pictured: “She is wearingbrown pants and a white shirt.” The students write down the number that matches thepicture described. The teacher then asks a student to point to the picture described. Theteacher may also ask the student to answer the question, “What is she wearing?” Emphasis is obviously upon the pronouns “he” and “she”, as well as upon vocabulary ofcolors and clothing. “His” and “her” could easily be focused upon, as well.
In other words,
Pictures relate to every aspect and level of teaching.
Ok, pictures are worth a thousand words...And the English language has about a million and a half words, so
should I have about a thousand, five hundred pictures?
III. How can I efficiently file these pictures?
A thousand pictures might be too many – remember, what you plan to use, count on carrying. But possibly hundreds of pictures need to be filed in a manner that makes using them easy. Not such an easy task.

Wenger 9
A. Some presuppositions.1. A file system is only as good as its simplicity of use. If refiling a picture takes more
than a few seconds, it won’t be re-filed after a while. Pretty soon you’ll have a mess.
2. Time invested in preparing useful materials will make all the difference in the worldbetween failure and success. Getting serious about teaching once you start teaching isfrustrating. Invest now. It pays later.
3. Create a flexible filing system. Your picture file will grow and change. Don’t bedependent upon technology or materials that may not be available where you teach. Remember: ES/FL teachers are the cow-pokes of academia – you’ve got to learn tomake do.
4. Pictures never belong just to one category. Create a system that makes sense to youand allows pictures to be found where filed. If you can’t find it, why file it?
5. Categories, or headings, require careful thought.
6. No filing system is perfect.
B. An overview of various filing systems.
Filing is a personal thing – it reflects much of who we are. The perfectionist among us getmuch pleasure from having a place for everything and everything in its place. The rest ofus have varying degrees of desire for order, but it usually boils down to a piling systemrather than a filing system. Unfortunately, piles don’t work as well as files, and ES/FLteachers must be able to bet their hands on materials at a moment’s notice. Piling doesn’twork if you want to teach with large quantities of materials you like and can use well.
1. The file folder method.
The file folder method is the most obvious of filing methods. It’s what you already useto keep track of bills and other important papers.
a. Set up:The set up of this system is the easiest of all the options. Manila file folders arelabeled with the appropriate headings and the pictures are tucked inside. Thefolders may be kept in a box or file folder carrying case. Hanging file folders aremore useful, and only slightly more expensive.
b. Advantages:Low cost, low tech, and high flex. This system can be used anywhere at a minimalcost, and can be easily expanded. Another useful advantage is that pictures ofvarious sizes can be filed together.

Wenger 10
c. Disadvantages:This system is very time consuming to use. The time saved in setting it up is faroutweighed by the time spent finding and re-filing materials. A second (andsignificant) disadvantage, which is not unique to this system, is that pictures canonly be filed in one category.
2. The notebook method.
The notebook method lends itself nicely to a teaching format. Large three-ring bindersare used with plastic sleeves to file pictures between dividers. Color coding (of paperon which pictures are placed) can be used to visually link pictures with categories.
a. Set up:The set up requires much more expense than the file folder system. Notebooks
must be purchased, along with a sufficient number of plastic sleeves – neither areexpensive, however. If color coding is used, categories/headings must be chosenwith much thought, and pictures must be consistently attached to paper thatcorresponds with the categorizing colors.
b. Advantages:No need for lamination of pictures is a primary advantage of this system. Notebooks pack fairly easily for long distance travel. Sleeves may be reused andpictures added or subtracted with ease.
c. Disadvantages:The primary disadvantages are time and maintenance. Removing pictures from thefile and returning them requires opening and closing the rings repeatedly (this willcause the rings to wear out quickly, and when they begin to warp, they catch on thesleeves, causing tearing and slippage of pictures from the notebook). Thenotebooks are cumbersome to carry to and from class. Plastic sleeves areunavailable in many countries – but can be done without, if necessary, or they canbe mailed to you by friends or family, relatively inexpensively. Again, anotherdisadvantage is that pictures can only be filed under one category, although, ifcolor coding is employed effectively, two categories are possible for each picture(the physical location as one category, and the color of the paper as anothercategory). A final disadvantage is that growth of the categories is somewhatlimited by how many pictures can be filed between dividers.
3. The numbered inventory method.
This method assumes growth of a picture file, and therefore easily allows for it. Pictures are divided by size, and then numbered (with stickers on the back, or bywriting directly on the backing to which the picture is attached). An inventory is keptwith various categories (which can grow over time). Under each category, thenumbers of the pictures that belong to that category are listed.
Wenger 11
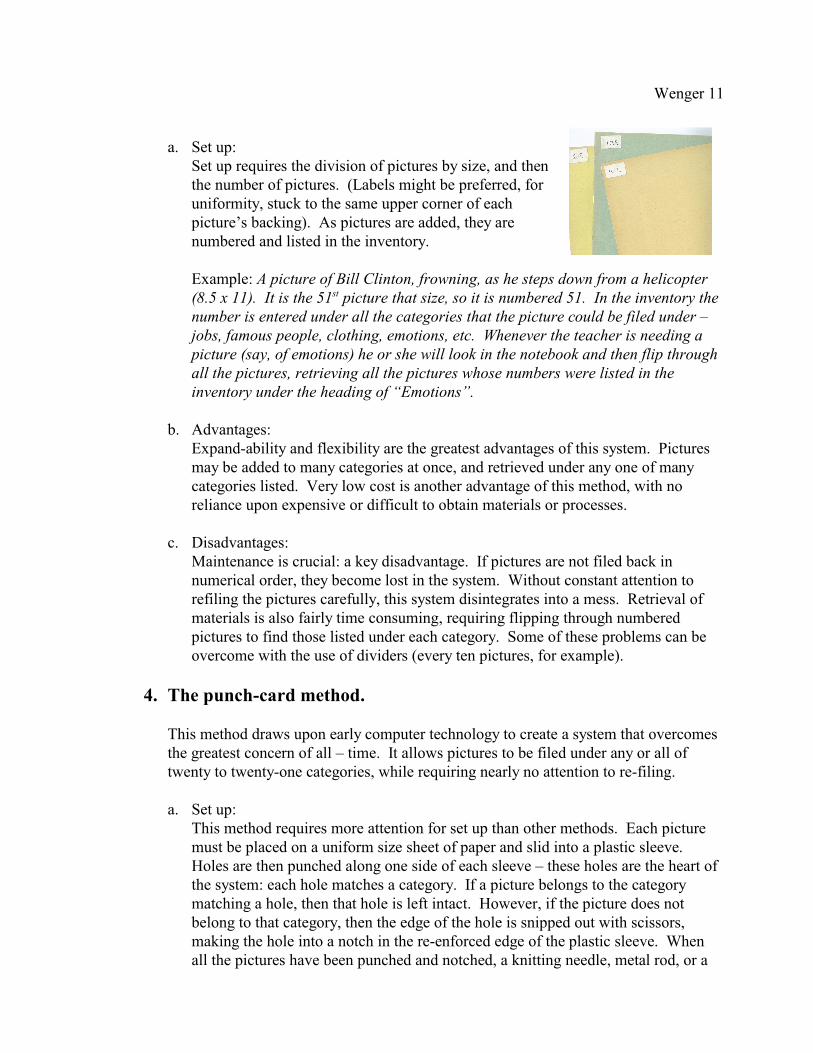
a. Set up:Set up requires the division of pictures by size, and thenthe number of pictures. (Labels might be preferred, foruniformity, stuck to the same upper corner of eachpicture’s backing). As pictures are added, they arenumbered and listed in the inventory.
Example: A picture of Bill Clinton, frowning, as he steps down from a helicopter(8.5 x 11). It is the 51 picture that size, so it is numbered 51. In the inventory thest
number is entered under all the categories that the picture could be filed under –jobs, famous people, clothing, emotions, etc. Whenever the teacher is needing apicture (say, of emotions) he or she will look in the notebook and then flip throughall the pictures, retrieving all the pictures whose numbers were listed in theinventory under the heading of “Emotions”.
b. Advantages:Expand-ability and flexibility are the greatest advantages of this system. Picturesmay be added to many categories at once, and retrieved under any one of manycategories listed. Very low cost is another advantage of this method, with noreliance upon expensive or difficult to obtain materials or processes.
c. Disadvantages:Maintenance is crucial: a key disadvantage. If pictures are not filed back innumerical order, they become lost in the system. Without constant attention torefiling the pictures carefully, this system disintegrates into a mess. Retrieval ofmaterials is also fairly time consuming, requiring flipping through numberedpictures to find those listed under each category. Some of these problems can beovercome with the use of dividers (every ten pictures, for example).
4. The punch-card method.
This method draws upon early computer technology to create a system that overcomesthe greatest concern of all – time. It allows pictures to be filed under any or all oftwenty to twenty-one categories, while requiring nearly no attention to re-filing.
a. Set up:This method requires more attention for set up than other methods. Each picturemust be placed on a uniform size sheet of paper and slid into a plastic sleeve. Holes are then punched along one side of each sleeve – these holes are the heart ofthe system: each hole matches a category. If a picture belongs to the categorymatching a hole, then that hole is left intact. However, if the picture does notbelong to that category, then the edge of the hole is snipped out with scissors,making the hole into a notch in the re-enforced edge of the plastic sleeve. Whenall the pictures have been punched and notched, a knitting needle, metal rod, or a

Wenger 12
thin dowel may be used to retrieve pictures belong to any desired category.
Example:A picture of a child wearing a rain coat while riding a bicycle: This picture couldbelong to many categories – weather/seasons, clothing, children, single verbpictures, transportation, etc. With the Punch-card system, the picture is preparedas described in the “Set up”, and placed into the file storage with the otherpictures. No attention to where it goes is required, other than assuring that it isfacing the same way as all the other pictures, with the punched and notched edgeat the top. To retrieve the picture, the teacher need only to use a stylus (metal rod,or knitting needle) slid into the hole that matches the category desired. Sliding therod into the 17 hole would bring up the picture along with all other picturesth
cataloged under the heading “Weather/Seasons”. The rod is lifted up, and allpictures that have the 17 hole intact (notth
notched) pull up out of the file box, whileall others drop back in. If many picturescome up, the number of pictures can bereduced by sliding the stylus into anotherslot (“children” for example) so that onlypictures of children in various types ofweather and seasons will be pulled up. After use, the pictures only need to bereturned to the file box, facing all thesame way, with the notched and punchededge at the top.
b. Advantages:Using and maintaining this system is simplicity itself. A teacher with this systemcan quickly pull pictures out of the file relating to any of nearly two dozencategories, and then fine-tune the groups of pictures to meet specific needs. Theteacher can then re-file materials in a matter of seconds, with no concern forordering the pictures or maintaining file folders or notebooks.
c. Disadvantages:This system takes much time to set up. It also requires the pictures to be in asleeve, or to be reinforced along the punched edge of the paper (if no sleeve isused). The holes and notches on the edge of the pictures is also an aestheticconcern for some, perhaps.
I have used all of the above systems and have settled on the punch-card system. Whatsystem you choose is your choice, but remember: A system is only as good as itssimplicity of use. If re-filing takes much time and attention, the system will soon fail, andyour file will become a pile, with relatively little usefulness to you.
C. Categories or headings.

Wenger 13
The categories or headings you use to group your pictures will reflect your personality andteaching experiences and needs. However, in order to find pictures for use in languagelearning situations, consider the example of the author’s headings:
1. Catastrophes, Crises, and Social Ills (A broad category that covers many issues,problems, and concerns that plague many people around the world – floods, drought,famine, but also traffic jams, and pollution).
2. Children (pictures of those in their mid to early teens on down to newborns rest here).3. Clothing (pictures clearly showing items of clothing fit under this heading).4. Couples (any picture that shows a pair of people relating to each other as partners joins
this category).5. Elderly (any picture that shows someone nearing retirement age, or in the age of
retirement, works its way, or rests in this category).6. Emotions (any picture that shows identifiable emotions are found in this heading).7. Family Relationships (pictures showing all the relations of family – the clearer the
better – relate to this heading).8. Key Events (pictures of turning points in life – birth, first day of school, graduation,
etc., fit here).9. Holidays and Cultural Customs (snapshots of celebrations and customs of many
cultures pop into this category).10. Locations (all places people live their lives – resting, working, sleeping, eating, playing
– reside in this category).11. Middle Aged (men and women in the midst of careers, family, and friends find their
way into this category).12. Places, famous and/or beautiful (photos of famous or important tourist attractions
around the world go in this location).13. Professions (this category is employed for pictures that show identifiable jobs).14. Single Verbs (This category applies to pictures where the majority of the action in the
picture can be described with a single verb – swimming, singing, working, etc.)15. Sports (any picture showing an identifiable game and/or its paraphernalia plays into
this category).16. Story Pictures (pictures needing a story to explain them – either what has happened, or
what is about to happen in the pictures – belong to this category).17. Weather/Seasons (pictures showing identifiable weather and/or seasons fall here).18. Young People (another broad age group – it pictures those between late teens and mid-
life).Sub-Categories:These are used to break the main categories into sub-sets, which I have found useful for teachingin various situations I have been in.
19. African descent20. Asian descent21. Latin descent22. Male23. Female24. Irregular Verbs

Wenger 14
Separate Files – I have separate files for three categories (I use the file folder method forthese three), since they really don’t overlap into other categories easily:
1. Animals2. Food3. Transportation.
IV. Where do I find pictures?
This is the fun part. Our culture is saturated with images – you’ll find them everywhere. Hereare some hints to get you started.
A. Subscribe to free mailings – such as mailbox advertisements. Quite a few of them havevery good quality pictures, especially of food.
B. Pick up old magazines and materials from local libraries. Many libraries have difficultydisposing of all their magazines and print material which are out of date or have beenconverted to digital (or even microfiche and microfilm). Contact local schools, countylibraries, and colleges to see if you can receive some of these materials. NationalGeographic magazines are often tossed away – an especially valuable resource.
C. Hunt out garage sales. Often boxes of old magazines are cheaply sold.D. Ask friends and family for their old magazines. If they ever need an idea for a present for
you, suggest a magazine subscription.E. Frequent end-of-season book sales, and any sales of books. Many times “coffee table
books” that flopped on the market are for sale at low prices. These often have excellentpictures.
F. Take a trip to your local tourism promotion center. Pick up free materials in smallquantities, and ask for any outdated materials if you are wanting larger quantities.
G. Call upon your local travel agencies. Explain who you are and ask for any outdatedmaterials. You’d be surprised how helpful people will be when they learn you are ateacher (or a teacher in training).
H. Stop at state welcome centers when you travel. All sorts of materials are usually availableinside.
I. Check with embassies or consulates for materials on other nations – valuable resources,and people are often quite willing to help.
J. Pick up catalogs and advertisements from department stores and grocery stores. Theyoften contain a wealth of useful pictures.
A final word: Remember the Peruvian housemaid? Nearly illiterate in her native language ofSpanish, and a resident in America for nearly fifteen years, she finally got up the courage toattend English classes for adults. She struggled, convinced she could not succeed. Then, shespoke about her dream home, an activity prompted by pictures. The words bubbled out of her– barely intelligible, but she was communicating. Pictures drew thousands of words out ofher. They can draw them out of your students, too – unlocking their hearts and minds. Afterall, isn’t that our goal?


![9229w] 999.999 9 9 9 . . A. 9A a 9.9 1 9 9.9 fl fl fl aw 9.999999 9..](https://static.fdokumen.com/doc/165x107/631f96a163f0eba19606edfd/9229w-999999-9-9-9-a-9a-a-99-1-9-99-fl-fl-fl-aw-9999999-9.jpg)