CPFAFFD 73 th
49
-
Upload
khangminh22 -
Category
Documents
-
view
2 -
download
0
Transcript of CPFAFFD 73 th
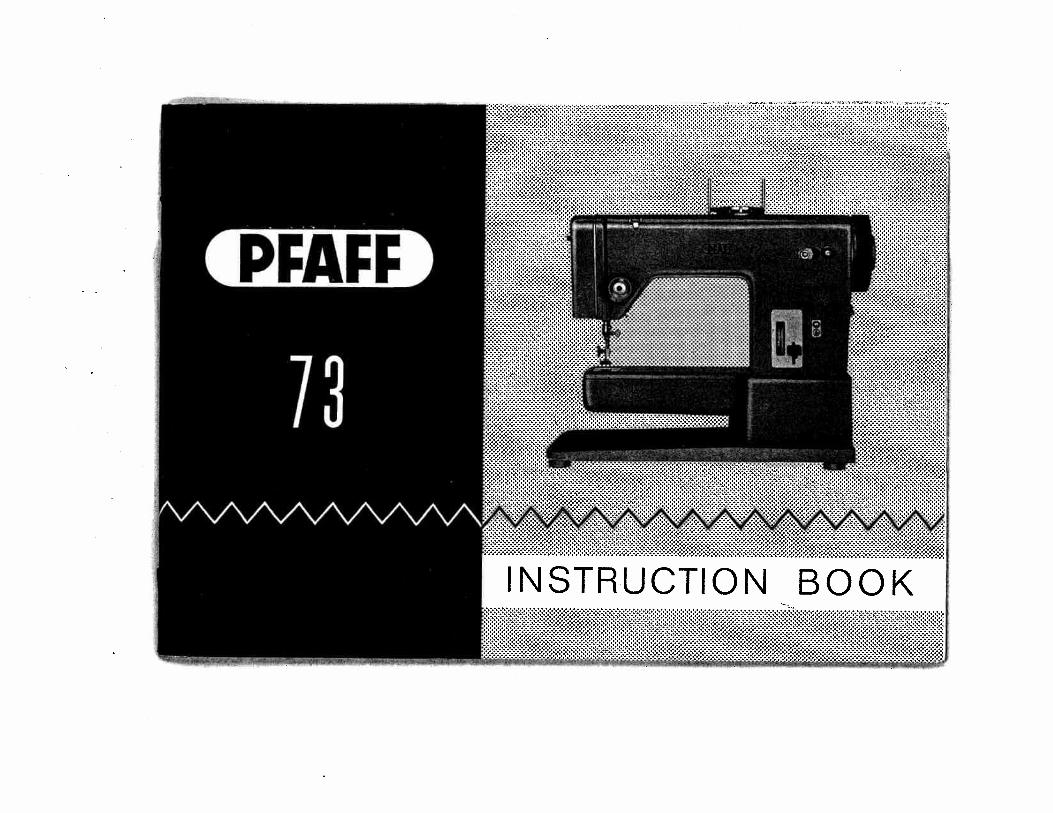
3
________________
CPFAFFD 73 th1111INSTRUCTIONS
FOREWORD
Your dream has come true.:1You are now the proud owner of a Pfaff 73, the sewing machine which will enable you to master all ordinary sewing, --ornamental stitching and darning jobs that may come up in a home.
This Instruction book will help you understand the machine and give you valuable tips to make sewing more fun for you.Even if you are an experienced seamstress, you will find this book a valuable guide to easy sewing.
Follow these simple instructions and familiarize yourself with the exclusive features of your machine. You will find sewingexciting on your easyto-operate Pfaff 73.
If you have any sewing problems, please contact your Pfaff dealer. He will be glad to help you at any time.
G. M. PFAFF AGrKarlsruhe-Durlach Branch
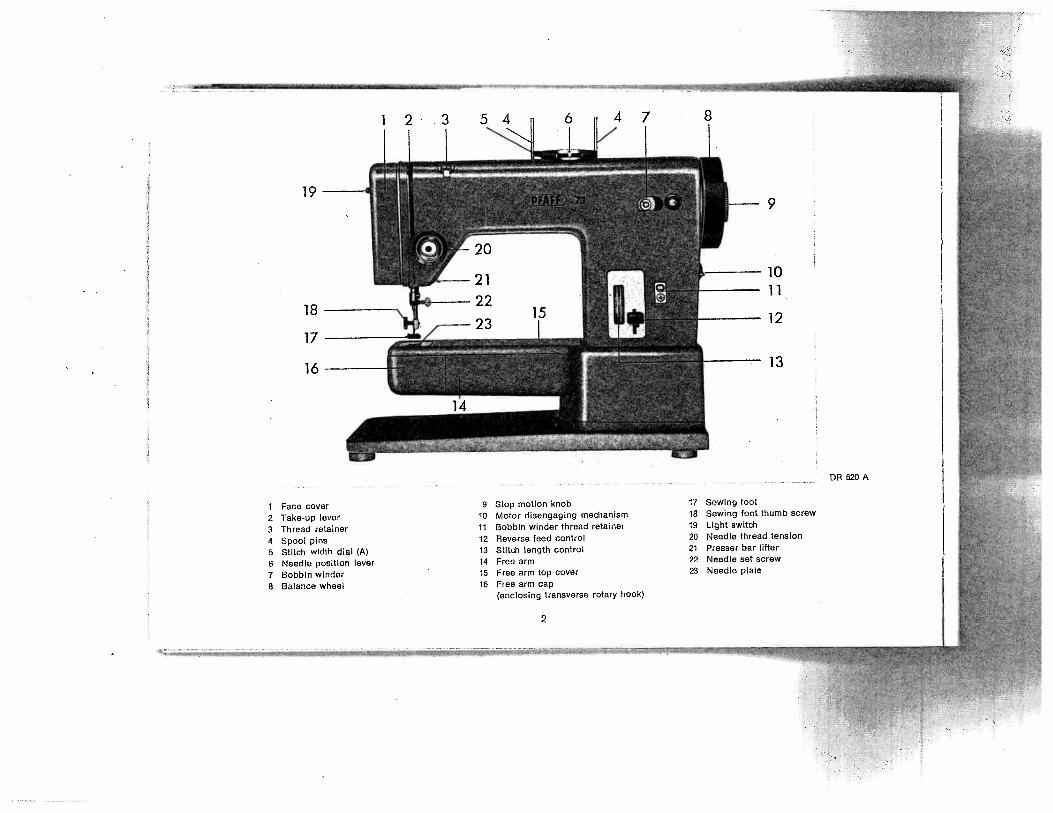
I Face cover2 Take-up lever3 Thread retainer4 Spool pins5 Stitch width dial (A)6 Needle position lever7 BobbIn winder8 Balance wheel
9 Stop motion knob10 Motor disengaging mechanism
11 Bobbin winder thread retainer
12 Reverse teed control13 Stitch length control14 Free arm15 Free arm top cover16 Free arm cap
(enclosing transverse rotary hook)
2
17 Sewing foot10 Sewing toot thumb screw
19 Light switch20 Needle thread tension21 Presser bar lifter22 Needle set screw23 Needle plate
199
17
11
12
13
DR62OA
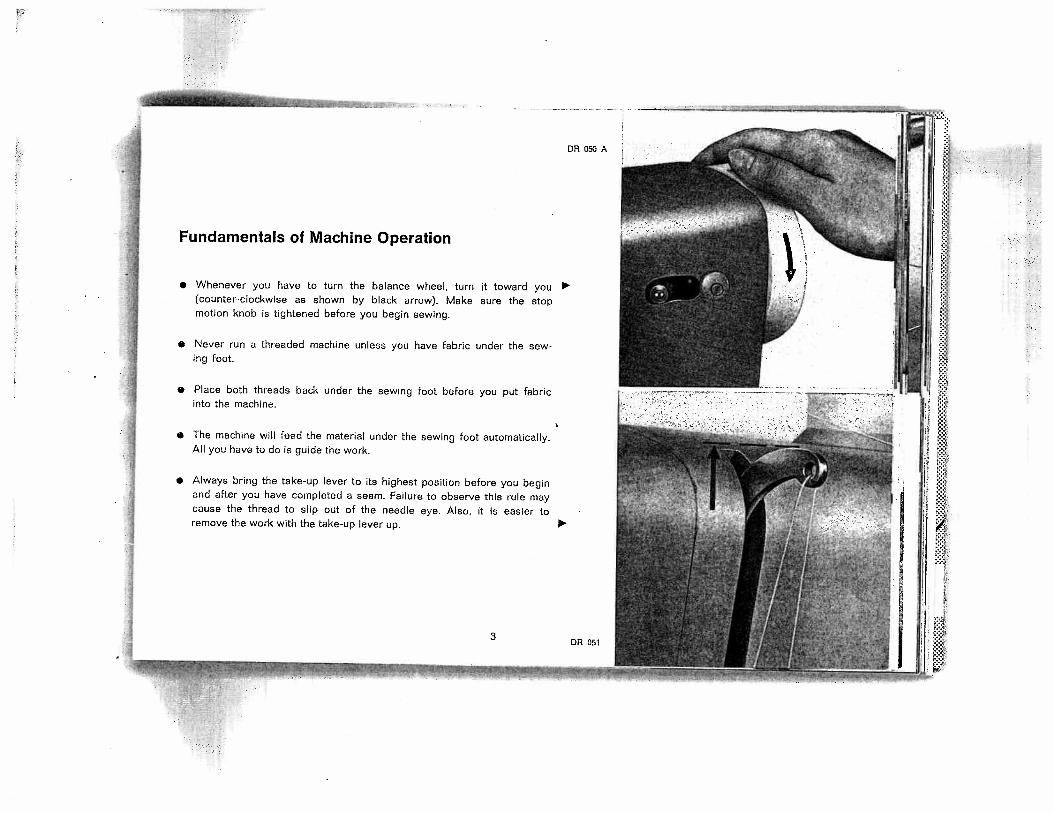
Fundamentals of Machine Operation
• Whenever you have to turn the balance wheel, turn it toward you(counter-clockwise as shown by black arrow). Make sure the stopmotion knob is tightened before you begin sewing.
• Never run a threaded machine unless you have fabric under the sewing foot.
• Place both threads back under the sewing foot before you put fabricinto the machine.
• The machine will feed the material under the sewing foot automatically.All you have to do is guide the work.
• Always bring the take-up lever to its highest position before you beginand after you have completed a seam. Failure to observe this rule maycause the thread to slip out of the needle eye. Also, it is easier toremove the work with the take-up lever up.
DR 050 A :It
—-H’
3DR 051

.4
-;
How to Operate Your Sewing MachineEngaging the Sewing Mechanism
.4 Hold balance wheel and turn stop motion knob clockwise (as indicated byblack arrow).
Disengaging the Sewing MechanismHold balance wheel and turn stop motion knob counter-clockwise (towardyou). The sewing mechanism is disengaged for bobbin winding.
The WorkplateThe workplate is used to enlarge the working area for ordinary sewing.Before you attach the workplate, raise the presser bar lifter and turn thebalance wheel until the take-up lever is at its lowest position (see arrowat right).
.4 Hold workplate level and push it between free arm and sewing foot.Tilt it slightly so that its lugs enter the holes in the machine base (seearrows in right illustration).
,,__..
4- -
Jr 444 —-
- -
_,r4 -
. .
.4 Swing down the support and press it firmly against the base plate (seeill, at bottom).
4
OR 510
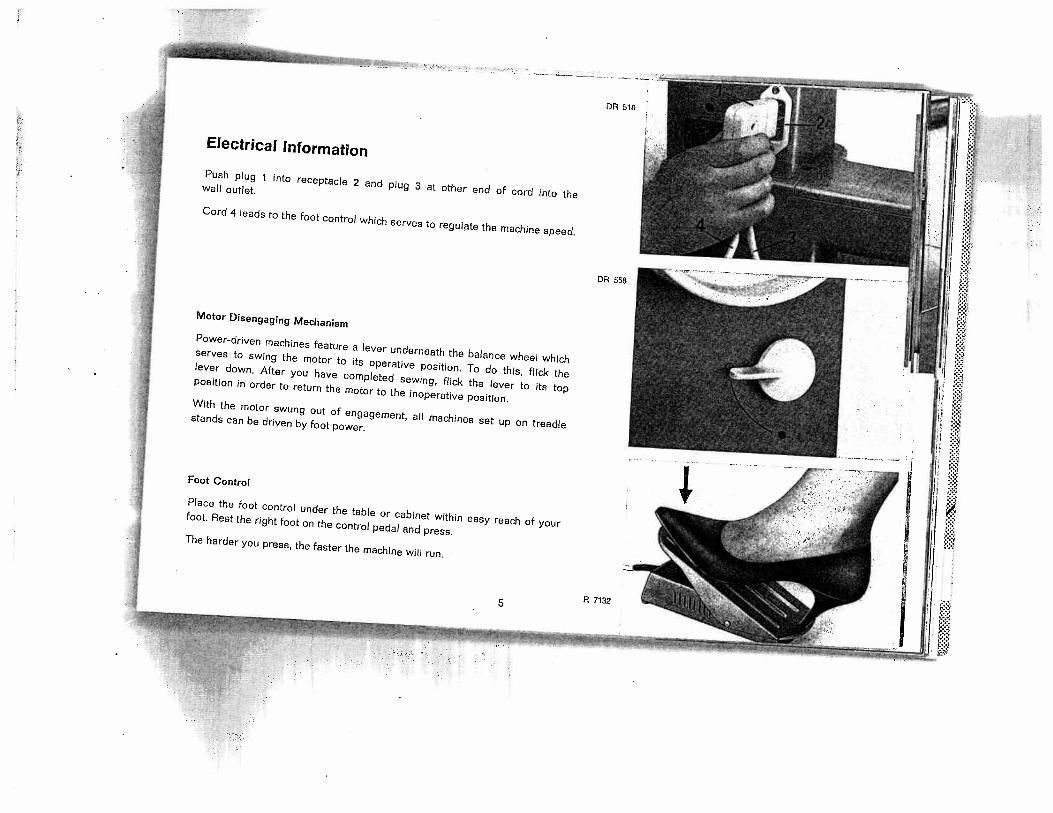
Electrical InformationPush plug I into receptacle 2 and plug 3 at other end of cord into the
wall outlet.
Cord 4 leads to the foot control which serves to regulate the machine speed.
Motor Disengaging Mechanism
Powerdriven machines feature a lever underneath the balance wheel whichserves to swing the motor to its operative position. To do this, flick thelever down. After you have completed sewing, flick the lever to its topposition in order to return the motor to the inoperative position.With the motor swung out of engagement, all machines set up on treadlestands can be driven by foot power.
Foot Contro’
Place the foot control under the table or cabinet within easy reach of yourfoot. Rest the right foot on the control pedal and press.The harder you press, the faster the machine will run.
OR 558
R 71325
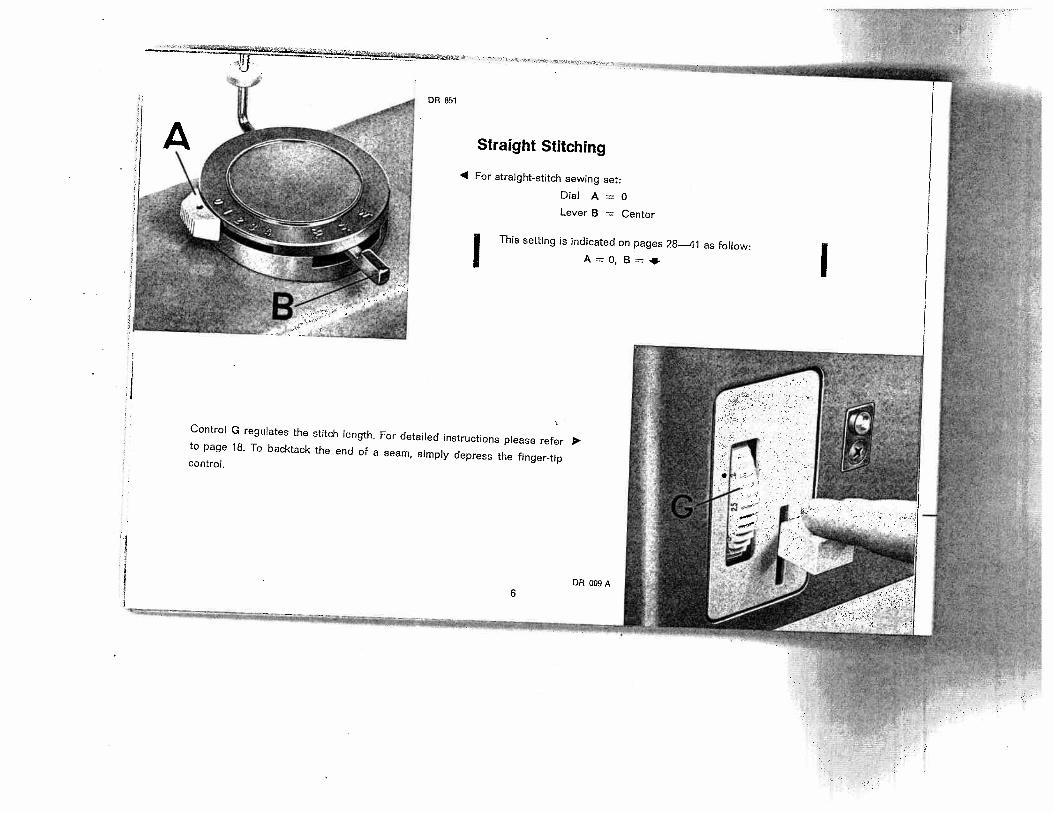
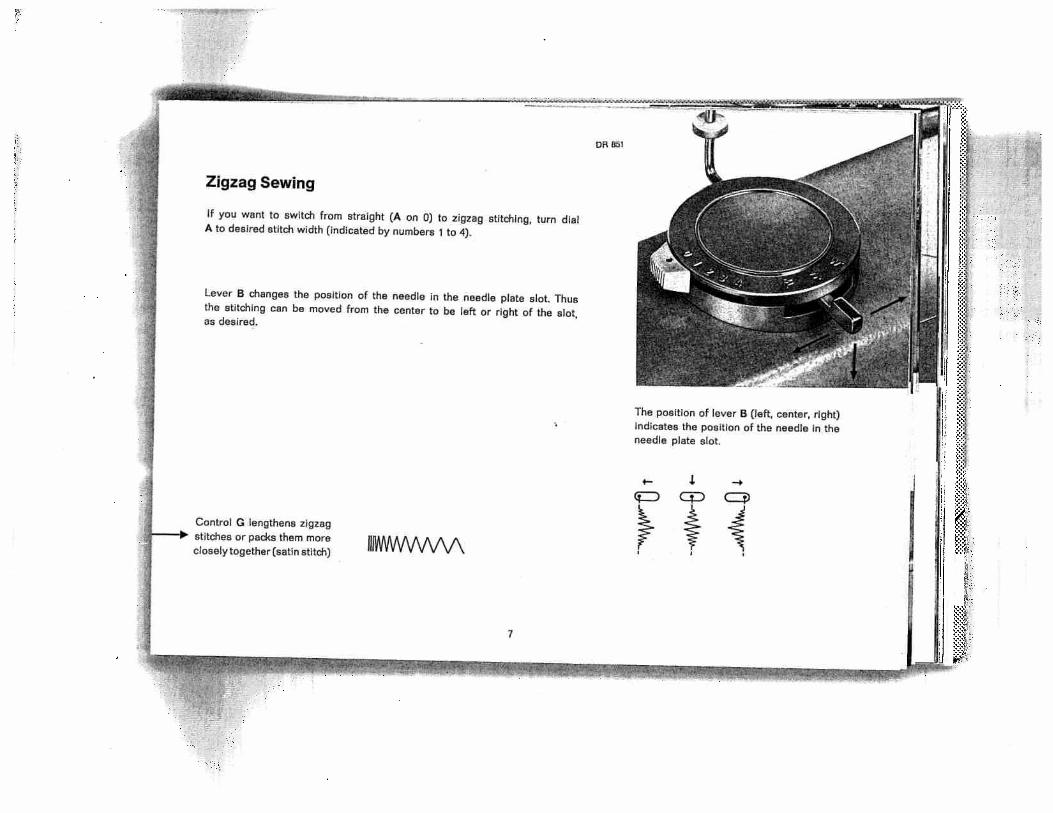
DR 851
Straight Stitching
4 For straight-stitch sewing set:Dial A 0Lever B = Center
I This setting is indicated on pages 28—41 as follow:A = 0, B = I
Control G regulates the stitch length. For detailed instructions please referto page 18. To backtack the end of a seam, simply depress the finger-tipcontrol.
6DR 009 A
O CD. CD
,-
COD
CO
_C
DDC
‘D0C
DD N
3‘ N
-‘DC
CDC
O
N CD N to U)
CD CD
I
DC‘
CDCD
CD
< CD
0 CD
CD
CD
CDD
0a
CD
DC
OW
CD
CD CD
— oc
-_
0)
> Sf. 0) 0C
C) :5-
- 0
0Ci
)D
C
0.
CO
30
Ci)‘
- ON C
O N DC CO CO 0 :5-
CO D 0.
DC
4M
‘t• 4-
CD—
0C
D‘0
0) _
CD
CD
CO
’0S,
_O
—.
CCC DO
CD
CD
CD
D
CD
’
C’
D_
DC
D...
HE
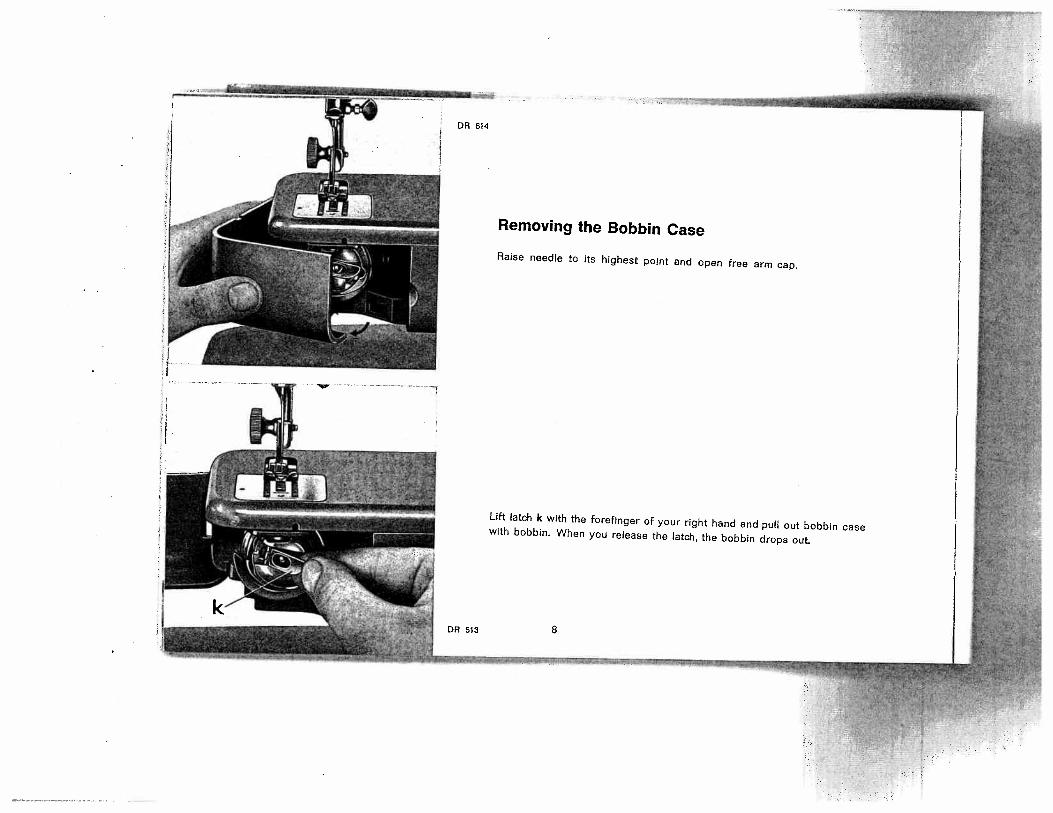
Removing the Bobbin Case
Raise needle to its highest po!nt and open free arm cap.
Lift latch k with the forefinger of your right hand and pull out bobbin casewith bobbin. When you release the latch, the bobbin drops out.
8
DR 614
DR 613

C)0
-—4
•
CDC
CD
CD
CD
CD
3
CD0
CD‘
0’
9,,.
CDcn
CCCCD
CDC
0’
:5—
CD0
0—
.CD
-!
2C
0O
CD
CD-C
O:5
—CD
(CC0’
0’
g. 3
—E
’CD
C—
33’
:5-
-,•
CD
CD
3’:1
’C)
0’
0CD
O g
3.S.
—-
COCD
a (0 P. m 0 0
0’
CDCD
CO
3’c
o3
(CC
C
:5-
DC
DC
DC
D— 9:
CD‘
B-‘
DC
DC
DC
D
-CD
Cr
CD:5
-
CO—
:50
’—
CD
”O
D0
’CD
;- ; CD0
’CD
—
0—
t,-E
;0
’CD
CDCD0-C
D05
0’C
D0’C
D:5
‘0’
-(CC
CD:5
’’<
0
CDC
CD—
9,,
CD
_0’:
5-
-,
CT
0,
CD0
CDC
rCD
<C
D)
CT
CD
CD0
.
0CD
-
(CC0
’CD
CDa
-,
O9,
,CCC
CD(0
—CD
9,,-1,
CDCD
,00.C
DCD -C 0
‘C
D2,
0’
0.
0C
OO
CrC
cC
r0
9CC
‘2.D
:53’
—:5
0CO C
OC
DC
D
CDD
CD
C)C
DC
DC
D
-V *:5
-CD :5 CD B CD :5 0 CD CD CD :5
-CC
C
CD C C
CD
0
0
0
0
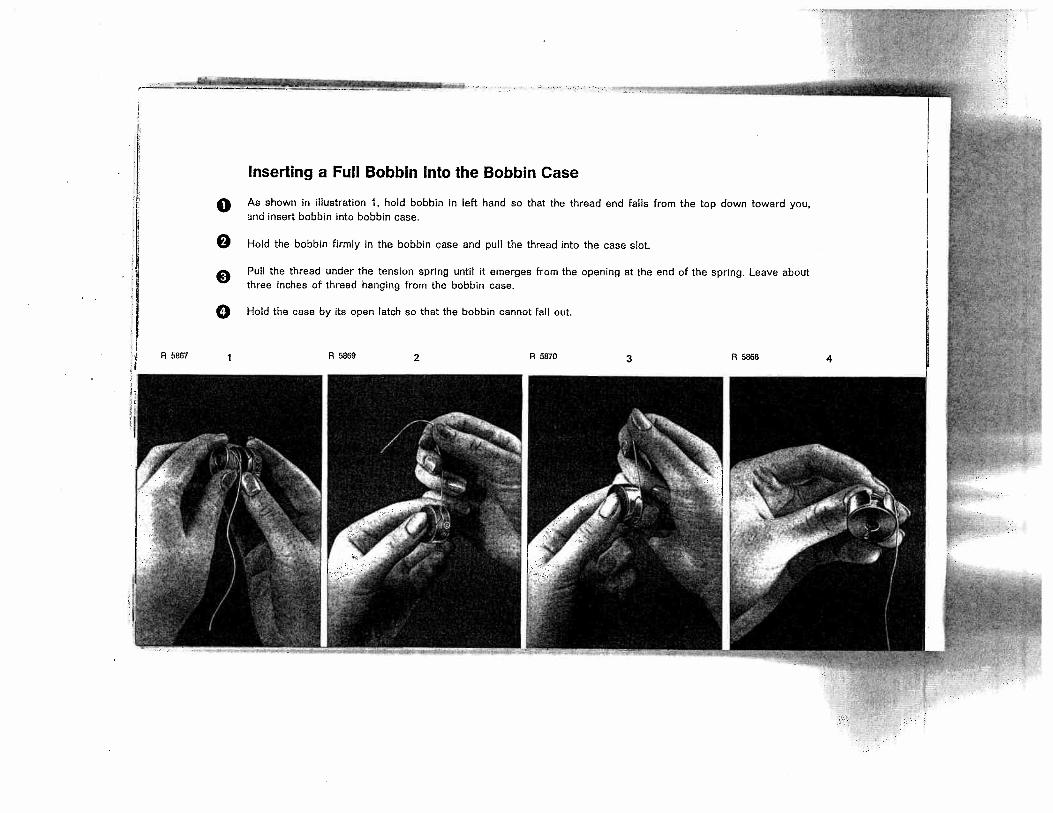
Inserting a Full Bobbin into the Bobbin Case
As shown in illustration 1, hold bobbin in left hand so that the thread end falls from the top down toward you,and insert bobbin into bobbin case.
Hold the bobbin firmly in the bobbin case and pull the thread into the case slot.
Pull the thread under the tension spring until it emerges from the opening at the end of the spring. Leave aboutthree inches of thread hanging from the bobbin case.
Hold the case by its open latch so that the bobbin cannot Fall out.
R 5867 R 5869 2 R 5870 3 R 5868 4
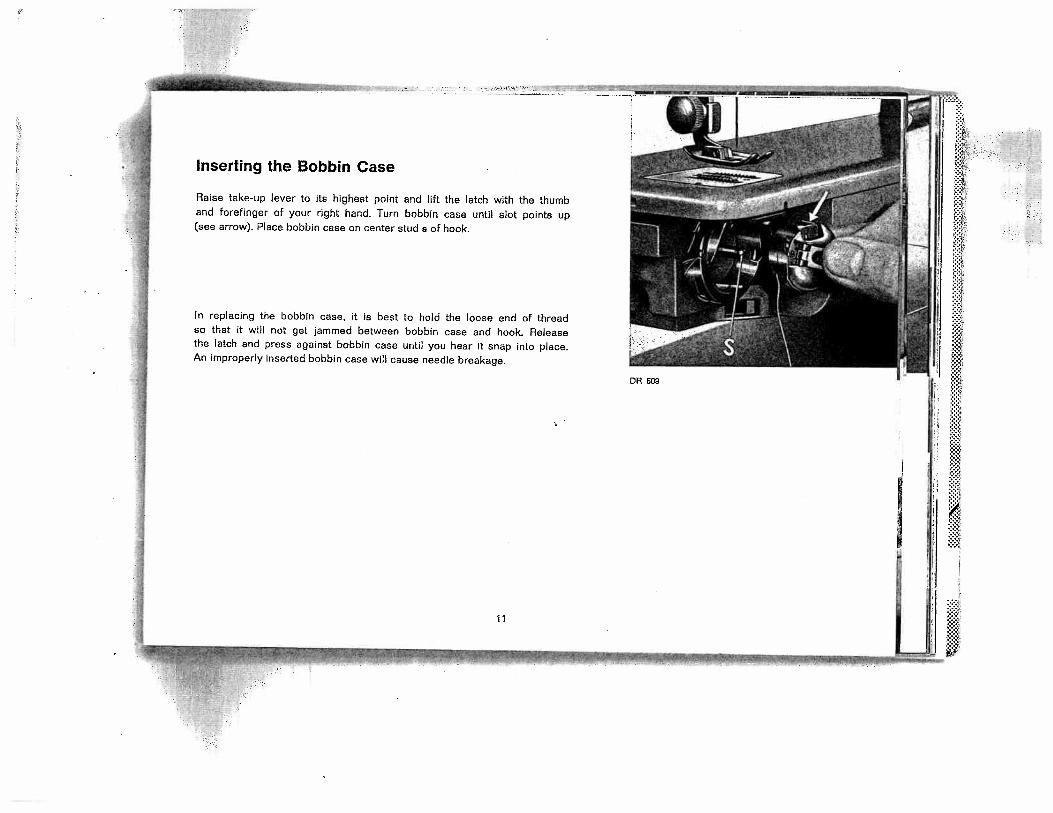
Inserting the Bobbin Case
Raise take-up lever to its highest point and lift the latch with the thumband forefinger of your right hand. Turn bobbin case until slot points up(see arrow). Place bobbin case on center stud s of hook.
In replacing the bobbin case, it is best to hold the loose end of threadso that it will not get jammed between bobbin case and hook. Release
4 the latch and press against bobbin case until you hear it snap into place.An improperly inserted bobbin case will cause needle breakage.
I
II
iij
DR 609
11
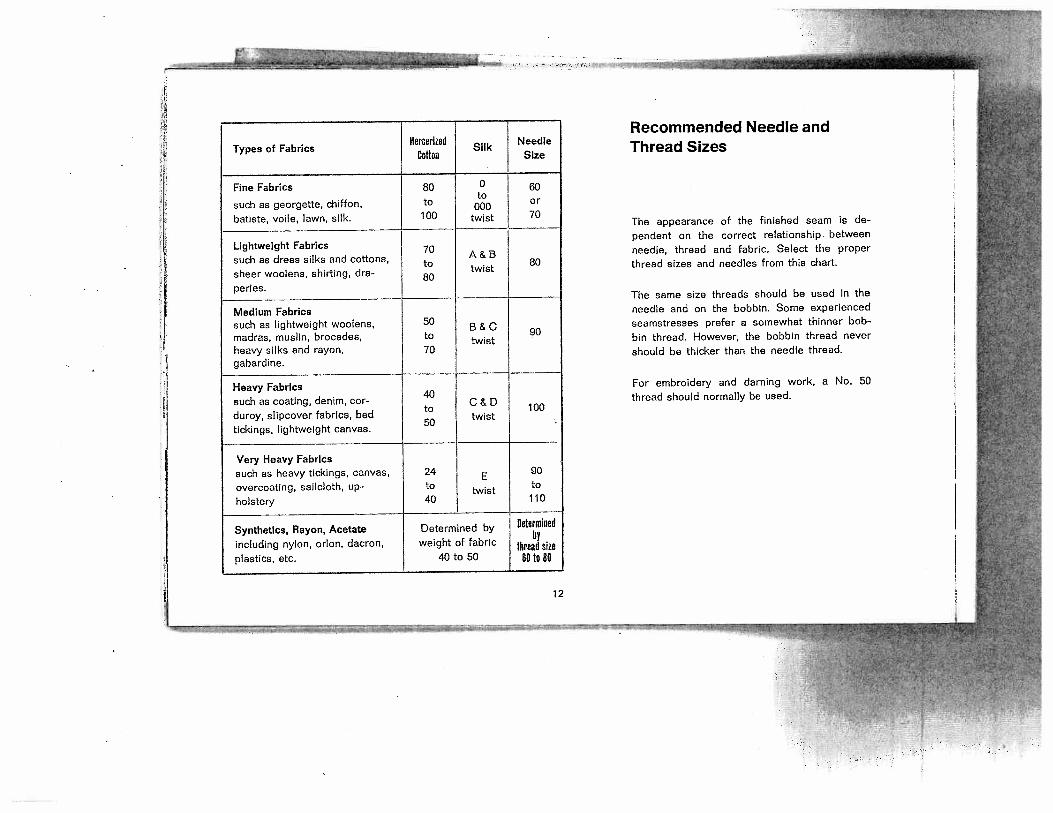
Recommended Needle andThread Sizes
The appearance of the finished seam is de
pendent on the correct relationship between
needle, thread and fabric. Select the proper
thread sizes and needles from this chart.
Mercerized NeedleTypes of Fabrics Silk
Cotton Size
Fine Fabrics 80to
such as georgette, chiffon, to 000or
batiste, voile, lawn, silk. 100 twist 70
Lightweight Fabrics 70such as dress silks and cottons, A & B
to 80sheer woolens, shirting, dra- 80
twist
peries.
Medium Fabricssuch as lightweight woolens, 50 8 & cmadras, muslin, brocades, to twistheavy silks and rayon, 70gabardine.
Heavy Fabrics40
such as coating, denim, cor- c & Dduroy, slipcover fabrics, bed to 100
twist50
tickings, lightweight canvas.
Very Heavy Fabricssuch as heavy tickings, canvas, 24 E 90
overcoating, sailcloth, up- to twist to
holstery 40 110
Synthetics, Rayon, Acetate Determined byby
including nylon, orIon, dacron, weight of fabric Thread sizeplastics, etc. 40 to 50 60 to 80
The same size threads should be used in the
needle and on the bobbin. Some experienced
seamstresses prefer a somewhat thinner bob
bin thread. However, the bobbin thread never
should be thicker than the needle thread.
For embroidery and darning work, a No. 50
thread should normally be used.
12
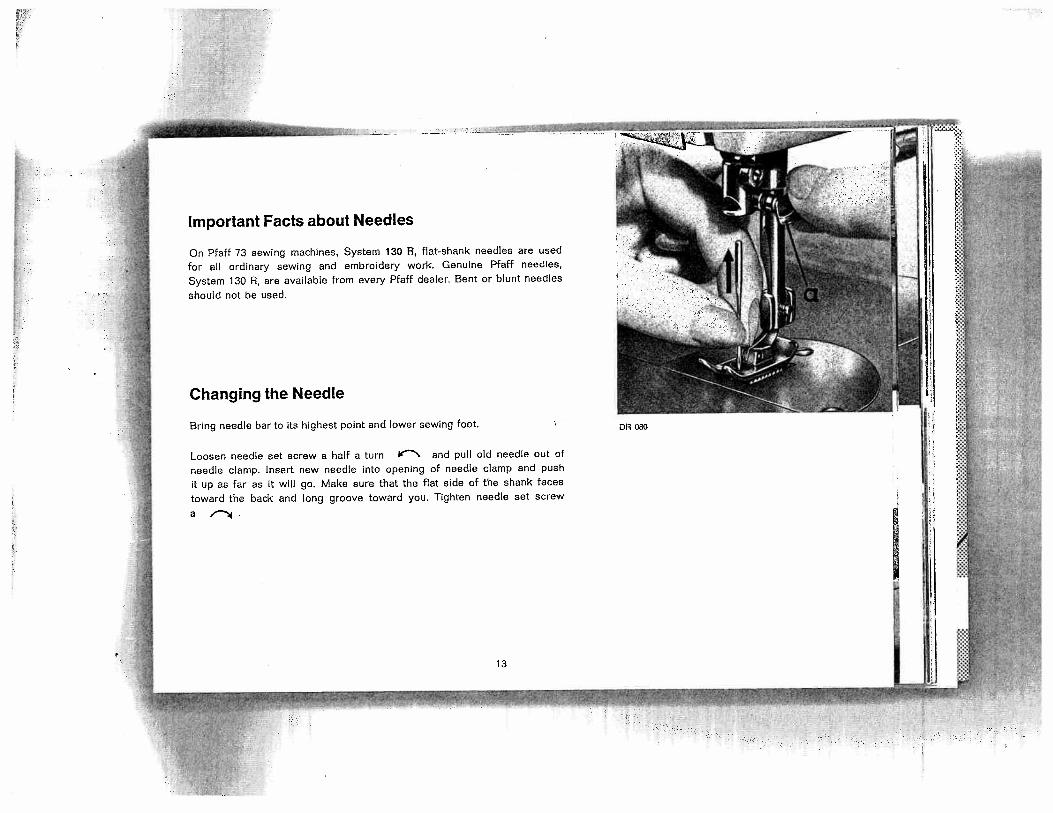
Important Facts about Needles[1
On Pfaff 73 sewing machines, System 130 R, flat-shank needles are used
for all ordinary sewing and embroidery work. Genuine Pfaff needles,
System 130 P are available from every Pfaff dealer. Bent or blunt needles
should not be used.
Changing the Needle
Bring needle bar to its highest point and lower sewing foot.
Loosen needle set screw a half a turn \ and pull old needle out of
needle clamp. Insert new needle into opening of needle clamp and push
it up as far as it will go. Make sure that the flat side of the shank taces
toward the back and long groove toward you. Tighten needle set screw
a
DR 080
13 4

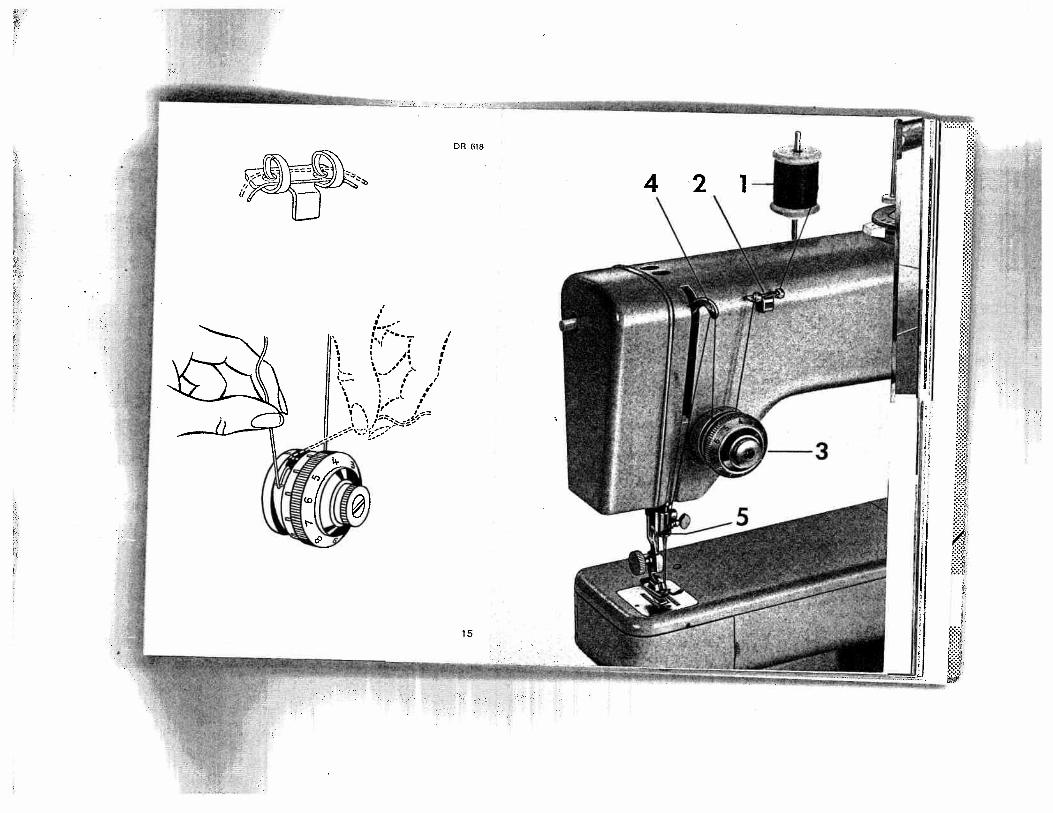
Upper Threading
Raise the presser bar lifter and swing the spool pins upto the vertical position. Place spool 1 on one of the spool pins
and lead the thread behind both scrolls of thread retainer 2 (see ill, at top,ofp. 15). Seize !he thin the right and
left of the thread retainer and pull It toward you until it snaps into he eyelets. It suffices to draw the thread into the
left eyelet.
Pull the thread between any two of tension discs 3 (see ill, at bottom of p. 15) and jerk it far to the right so that it slips
properly into the slot and under the thread check spring. As you do this, press the thread against the casting between
spool and tension.
Bring take-up lever 4 as high as it will go and pass the thread from right to left through the hole at its end. Lead the
thread down and into slot 5. Then thread the needle from front to back.
14
- --
01
0,
0,
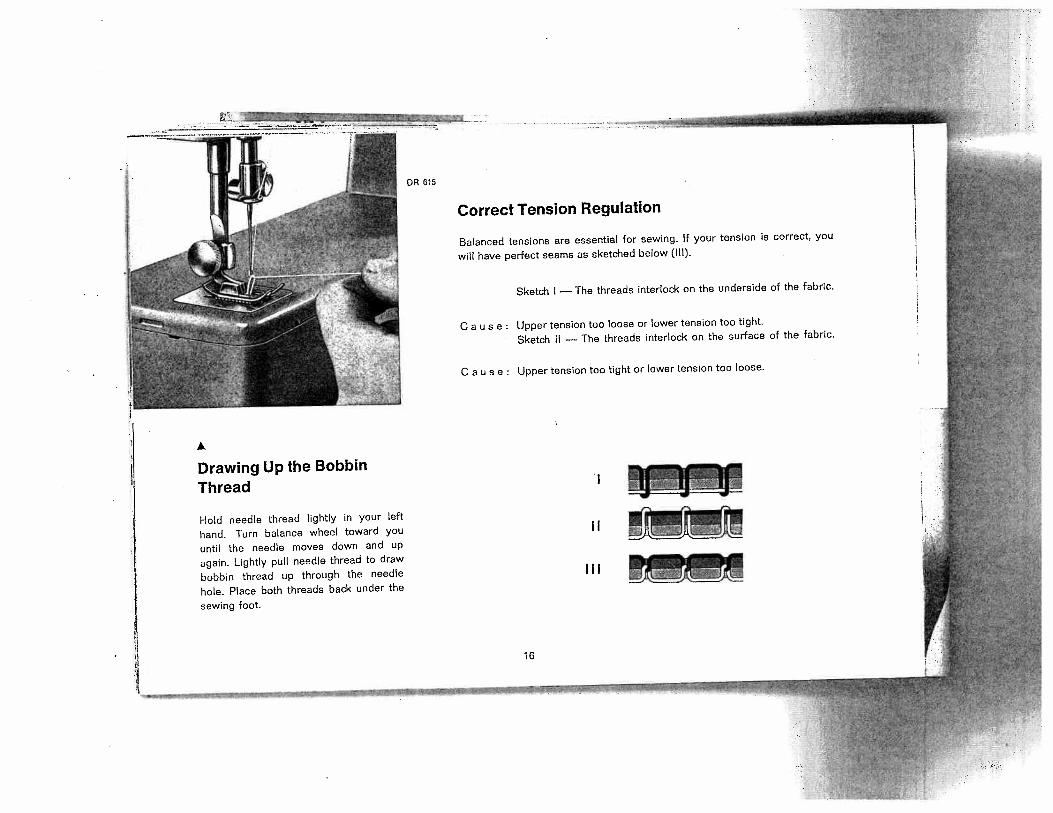
Drawing Up the Bobbin
Thread
Hold needle thread lightly in your left
hand. Turn balance wheel toward you
until the needle moves down and up
again. Lightly pull needle thread to draw
bobbin thread up through the needle
hole. Place both threads back under the
sewing foot.
Correct Tension Regulation
16
II
DR 615
A
Balanced tensions are essential for sewing. If your tension is correct, you
will have perfect seams as sketched below (lii).
Sketch I — The threads interlock on the underside of the fabric.
C a u s e: Upper tension too loose or lower tension too tight.
Sketch Ii The threads interlock on the surface of the fabric.
C a u s e: Upper tension too tight or lower tension too loose.
III

Regulating the Thread Tension DR 580
The bobbin thread tension has been set for a medium grade at the factory
and need not be adjusted for all ordinary sewing operations. If a special
sewing operation should require a looser or tighter tension, turn the small
knurled screw on the bobbin case as follows:
Turn it left W\ for looser tension. 4Turn it right for tighter tension.
The thread tension screw can be turned with the thumb tip.
Determine whether the bobbin thread tension is set for a medium grade
J by holding the thread end between thumb and forefinger and letting the
bobbin case hang freely. The tension should be strong enough to keep the
bobbin case from being pulled down by its own weight. However, as you
jerk your hand slightly, the bobbin case should gradually slide down.
IvThe final stitch appearance can be regulated by the [
4Jupper tension knob, as follows:
Turnleft ‘‘ for looser tension.
Turn right f4 for tighter tension.
The upper tension is so designed that all grades of
tension — loose to tight — can be covered with one
complete turn of the tension dial. The numbers on the
tension dial indicate different degrees of tension. The
higher the number, the greater the tension. Only in
very rare cases will it be necessary to reset the tension.
For ordinary sewing, the upper tension should be set
between 3 and 5.
Your upper tension has a third tension disc for two-
needle work.
A
R8029 17
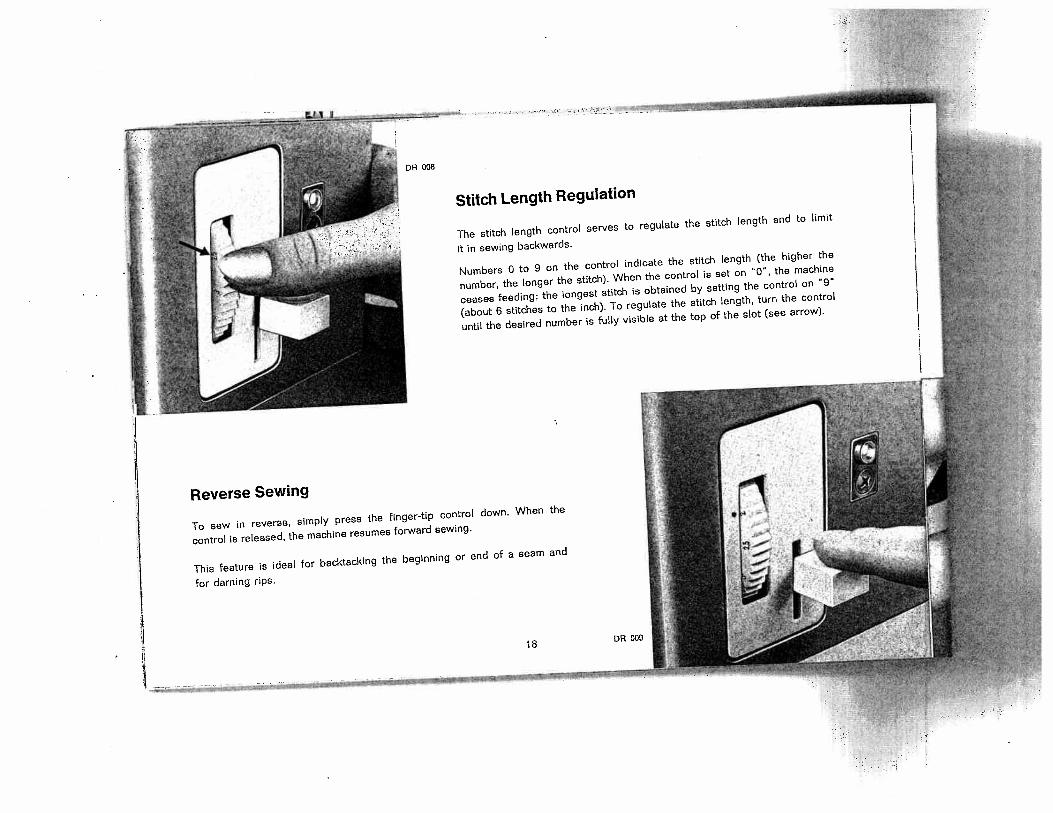
Stitch Length Regulation
To sew in reverse, simply press the finger-tip control down. When the
control is released, the machine resumes forward sewing.
18DR 009
DR 008
1.
The stitch length control serves to regulate the stitch length and to limit
it in sewing backwards.
Numbers 0 to 9 on the control indicate the stitch length (the higher the
number, the longer the stitch). When the control is set on “0”. the machine
ceases feeding; the longest stitch is obtained by setting the control on ‘9”
(about 6 stitches to the inch). To regulate the stitch length, turn the control
until the desired number is fully visible at the top of the slot (see arrow).
Reverse Sewing
This feature is ideal for backtacking the beginning or end of a seam and
for darning rips.
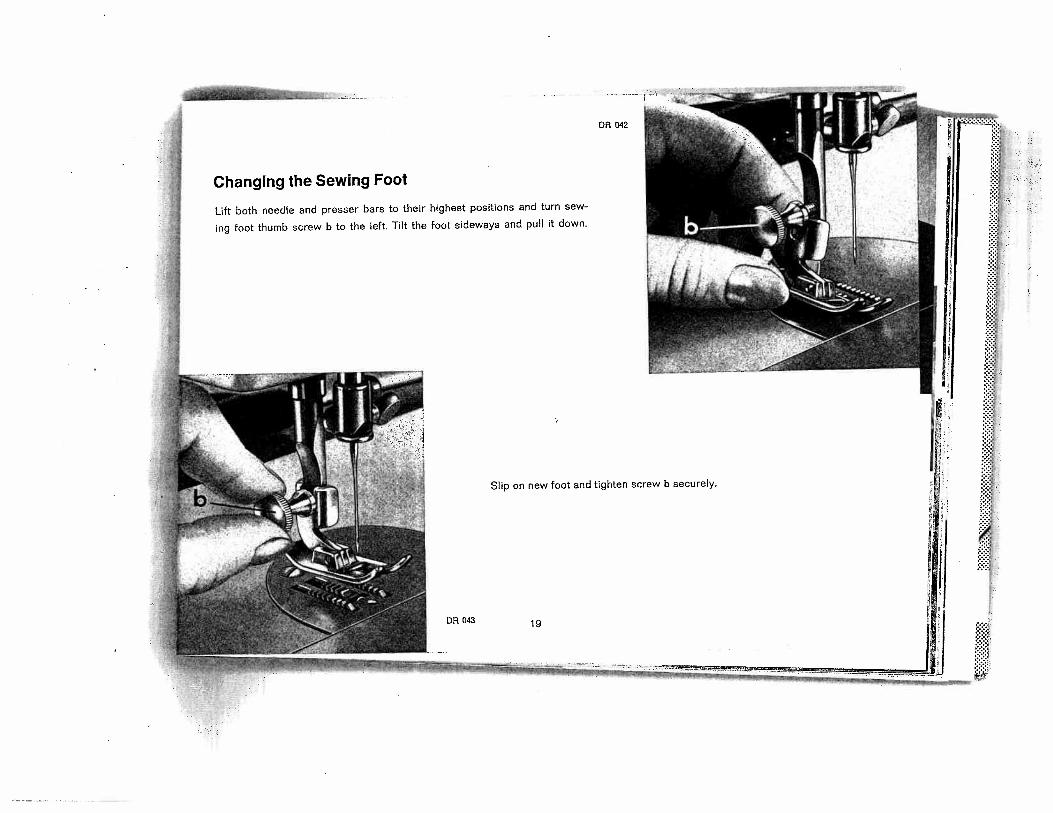
Changing the Sewing Foot
Lift both needle and presser bars to their highest positionS and turn sew
ing foot thumb screw b to the left. Tilt the foot sideways and pull it down.
DR 042
1jij
I .
- 1L Slip on new foot and tighten screw b securely.
DR 043 19
DR 616
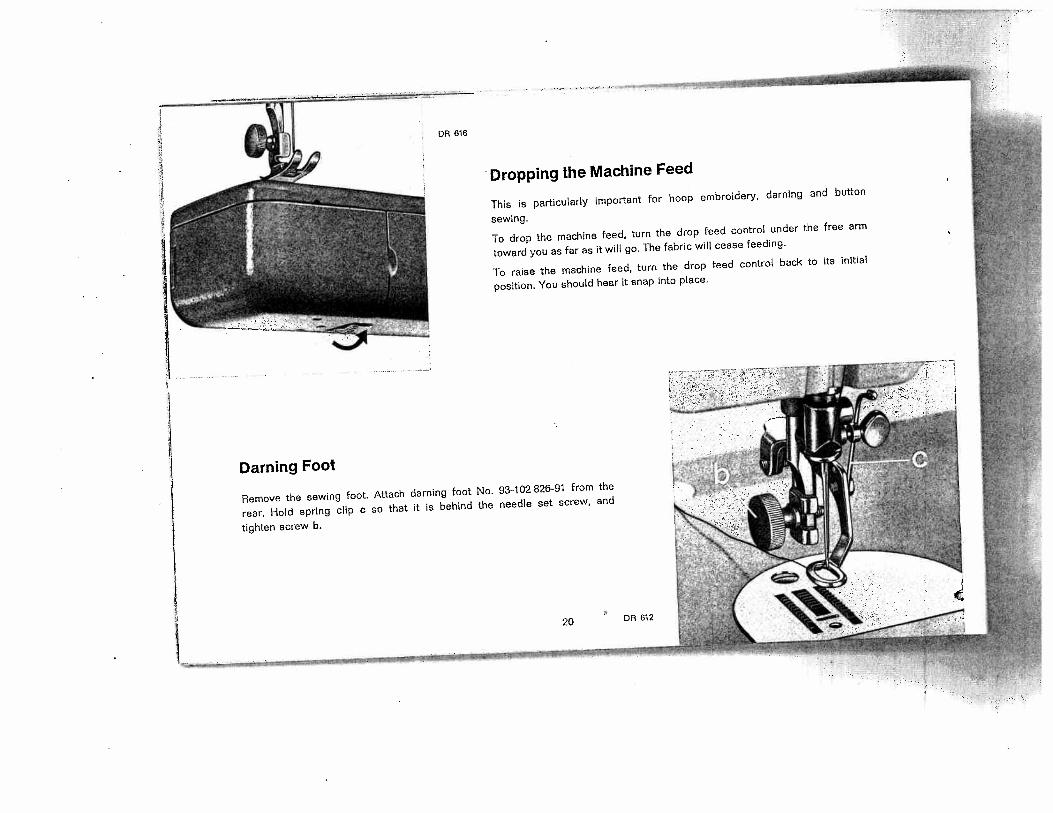
• Dropping the Machine Feed
This is particularly important for hoop embroidery, darning and button
sewing.
To drop the machine feed, turn the drop feed control under the free arm
toward you as far as it will go. The fabric will cease feedin9.
To raise the machine feed, turn the drop feed control back to its initial
position. You should hear it snap into place.
LrDarning Foot
Remove the sewing foot. Attach darning foot No. 93-102826-91 from the
rear. Hold spring clip c so that it is behind the needle set screw, and
tighten screw b.
20 DR612
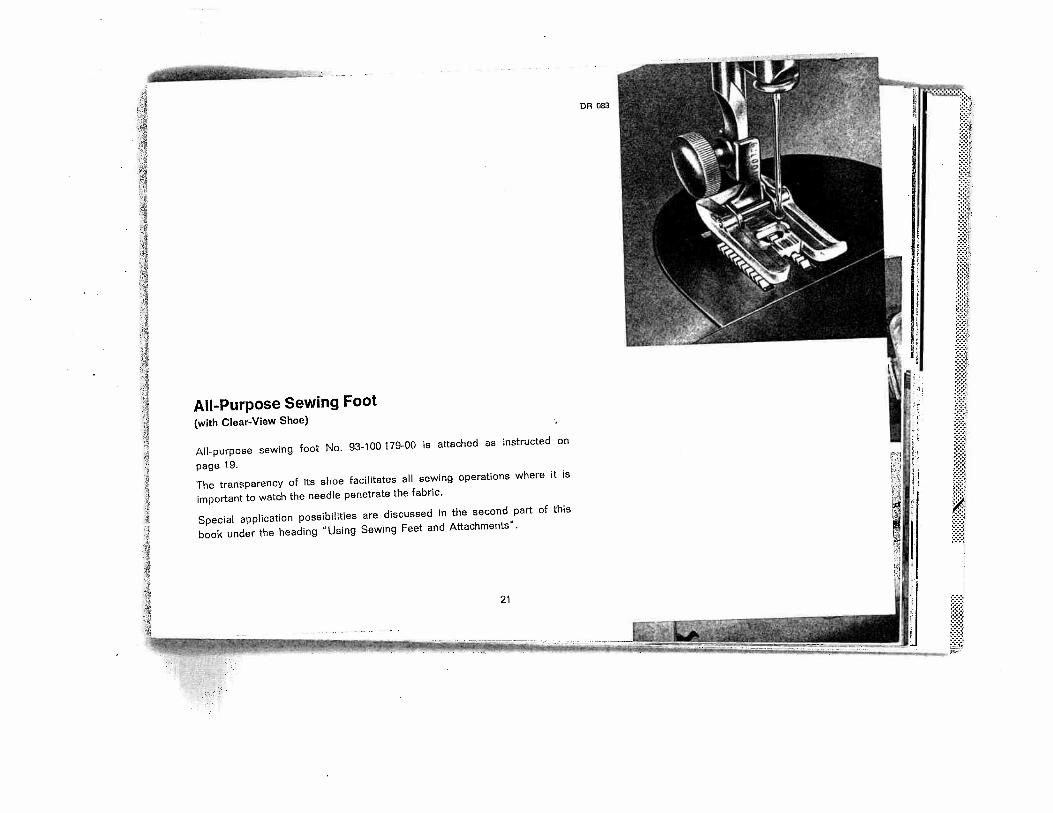
All-Purpose Sewing Foot(with Clear-View Shoe)
All-purpose sewing foot No. 93-100 179-00 is attached as instructed on
page 19.
The transparency of its shoe facilitates all sewing operations where it is
important to watch the needle penetrate the fabric
Special application possibilities are discussed in the second part of this
book under the heading Using Sewing Feet and AttaChments.
)
OR 083
I
21
dk.

4 To oil mechanism in free arm, remove sewing foot, raise needle and swing
out free arm cap. Turn out the top cover screw (see arrow) with a screw
driver. Lift front end of top cover and pull the latter out lengthwise of the
arm.
To replace and secure top cover, proceed in reverse order.
From time to time, lubricate the needle bar frame bearings in the sewing
head.
22
Care and Maintenance
Longevity and smooth machine performance are dependent on regular and proper cleaning and
oiling.
Use Pfaff sewing machine oil only. Never lubricate machine with animal or vegetable oils. All
moving and rotating parts require regular lubrication.
DR 605
DR 606
The raceway in the sewing hook is the most important oiling point. Put onedrop of oil into the raceway each day you sew.
From time to time, remove the needle plate and clean the machine feedwith a soft brush Take a toothpick and remove accumulations of packedlint. Take out the bobbin case and the bobbin and clean the vicinity of thesewing hook.
Before you begin to oil the mechanism under the arm top cover and atthe needle-bar end of the machine, remove the dirt and lint which haveaccumulated on these parts.
‘4 There are two openings in the rim of the stitch width dial, one on the left and the other at theback (see arrows). These openings are the oil holes of the zigzag mechanism.
Do not lubricate the bobbin winder.
/
L23
DR 6flDR 610
Changing the Light Bulb
The built-in 15-watt sewing light illuminates the area of stitching perfectly.To change the light bulb, remove the face cover, push the bulb into itssocket, turn left, and pull out. When inserting new light bulb, be sure toslide bulb pins into socket slots. Press bulb in and turn right.
Removing the Face Cover
To change the light bulb or oil the partsat the needle-bar end, remove the facecover by pulling it upwards.
Replacing the Face Cover
4 Slip tip d into slot e and push face coverup until it snaps into place.
l3R120R50524
OR 024
IL
Trouble Shooting
1. Machine Skips Stitches
Cause:Remedy:
Needle incorrectly inserted. Push needle up as far as it will go and be sure that the long
groove faces toward you, and flat side of shank away from you.
Wrong needle.Consult needle and thread chart on page 12.
(For ordinary sewing, use System 130 R needles.)
Needle bent.Insert new needle.
Machine threaded improperly. Check and correct threading as instructed on pages 14 and 15.
Needle too fine or too thick for the thread. Use correct needle and thread (see page 12).
2. Needle Thread Breaks
Cause:Remedy:
The above-mentioned may cause thread See remedies listed under 1. above.
breakage.
Thread tension too tight.Adjust tensions as instructed.
Poor or knorty thread used. Use good quality threads only.4:
Hook raceway is jammed with thread or needs Clean and oil hook raceway.
oiling.
Burrs or sharp edges on needle plate slot. Polish needle plate slot with fine emery cloth.
25

3. Needle Breaks
Cause:
Bent needle strikes point of sewing hook.
Needle too thin or thread too heavy.
Fabric pulls needle so it bends and
strikes needle plate.
Bobbin case inserted incorrectly.
4. Faulty Stitch Formation
Cause:
Improper tension.
Thread too heavy, knotty or hard.
Bobbin unevenly wound.
Pieces of thread between tension discs.
5. Machine Feeds Improperly
Cause:
Feed dog dropped.
Machine does not feed because stitch length
control is set on “0.
Accumulations of lint packed between feed
teeth.
Remedy:
Replace needle at once to prevent further damage.
Use correct needle and thread sizes.
Don’t force the feeding motion. Guide the material lightly.
Push bobbin case until you hear it snap into place (see page 11).
Remedy:
Adjust tensions as instructed.
Use only firstrate thread — the correct size for the needle and fabric.
Dont run thread over finger when winding the bobbin. (For
threading the machine see page 9).
Raise presser bar lifter and remove thread.
Remedy:
Raise feed dog (see page 20).
Regulate stitch length, as desired.
Take off needle plate and remove lint with a stiff brush.
26
6. Machine Works Heavily
Cause:Remedy:
Hook raceway lacks oil or is obstructed by Clean and oil hook raceway.
pieces of thread.
Mechanism clogged by inferior oil. Use only Pfaff sewing machine oil — never salad oil or glycerine.
Bobbin winder working while sewing Stop bobbin winder.
(when a bobbin is not being filled).
7. Motor Idles
Cause:Remedy:
Motor disengaging lever raised. Flick lever down (see page 5).
S
Thread Jamming
The Pfaff rotary hook will not normally jam, even if the machine should be handled improperly. If thread should happen
to jam in the hook raceway, the power of the motor in most instances will be sufficient to overcome hard working of the
mechanism.
If this action should not free the jammed thread, put a drop of oil into the hook raceway, jerk the balance wheel back,
then rock it back and forth.
27

Edge stitcher No. 847 600 used with the quilting gauge sews parallel rows
of stitching over the entire surface of the fabric. Always guide the gauge
finger along the preceding row of stitches.
Using Sewing Feet and Attachments
(setting see page 6) 847 60
Zipper Insertion
Machine Setting: A 0 B
Pin or baste closed zipper on wrong side of fabric. Position of zipper
depends on whether or not you want the edge of the fabric to overlap the
zipper. Turn fabric to right side. Run a straight seam close to left edge of
zipper, stitch across end and up the other side in one continuous operation.
Use right edge of foot as a guide.
DR 002
Quilting
.4
Machine Settin9: A = 0 B =
Attractive tea cosies, slippers, seat pads and covers can be quilted.
DR 003 A 28

Lay pieces together with the wrong sides facing and the bottom pieceprotruding Va inch. Feed both pieces into felling foot, as illustrated, sothat the bottom fabric isfolded over edge of toppiece and stitched down.Make sure that protruding seam allowance is notfolded twice.
Open the two pieces, place them under the needle right side up, insertseam ridge into felling foot opening, and stitch down to the left. Make surethat the second seam is placed close to the edge but not beyond it.The felling foot has a needle slot, rather than a needle hole, to permitzigzag felling.
847 56Flat Felled Seams
Machine Setting: A = 0 or 2 (optional) B =
Flat felled seams are used to durably join two pieces of fabric. They aremade in two operations.
Flat felled seams usually are straight-stitched. Narrow zigzag stitches areused for felling on elasticized fabrics only.
‘4 First Seam
DR 075
Second Seam
29 DR 049
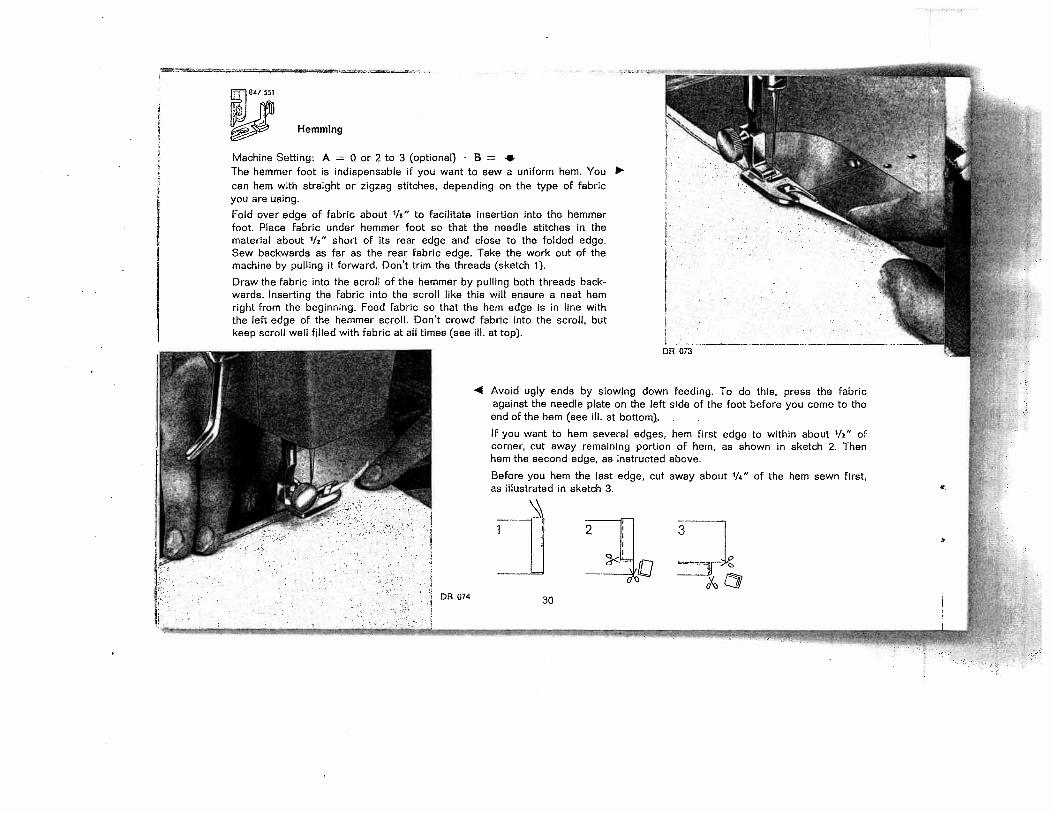
847 551
Hemming
Machine Setting: A = 0 or 2 to 3 (optional) B =
The hemmer foot is indispensable if you want to sew a uniform hem. Youcan hem with straight or zigzag stitches, depending on the type of fabricyou are using.
Fold over edge of fabric about 1/8” to facilitate insertion into the hemmerfoot. Place fabric under hemmer foot so that the needle stitches in thematerial about 1/2” short of its rear edge and close to the folded edge.Sew backwards as far as the rear fabric edge. Take the work out of themachine by pulling it forward. Don’t trim the threads (sketch 1).
Draw the fabric into the scroll of the hemmer by pulling both threads backwards. Inserting the fabric into the scroll like this will ensure a neat hemright from the beginning. Feed fabric so that the hem edge is in line withthe left edge of the hemmer scroll. Don’t crowd fabric into the scroll, butkeep scroll well filled with fabric at all times (see ill, at top).
‘4 Avoid ugly ends by slowing down feeding. To do this, press the fabricagainst the needle plate on the left side of the foot before you come to theend of the hem (see ill, at bottoni).
If you want to hem several edges, hem first edge to within about 1/2” ofcorner, cut away remaining portion of hem, as shown in sketch 2. Thenhem the second edge, as instructed above.
DR 073
Before you hem the last edge, cut away about 1/4” of the hem sewn first,as illustrated in sketch 3.
DR074 30

— 838 954
Overcasting Edges
Machine Setting: A — 2 to 4 (optional) B =
Two similar pieces of fabric which do not ravel easily may be butted
together and joined with zigzag stitches. Worn bed sheets may be mended
this way. Cut out worn center strip. Place the selvaged edges of the
remaining pieces of sheet under the sewing foot so that the abutted edges
are centered under the needle. Join them with close, wide zigzag stitches.
Hem raw edges of sheet.
Butt Seaming
Machine Setting: A = 3 or 4 B = ‘I
.4 Overcasting prevents frayed edges. Use a long, wide zigzag stitch and
sew edge with the needle taking one stitch into the fabric and the other
over its edge. You may overcast edges after fabric is cut and before the
pieces are joined.
DR 081
838 954u31
DR 045
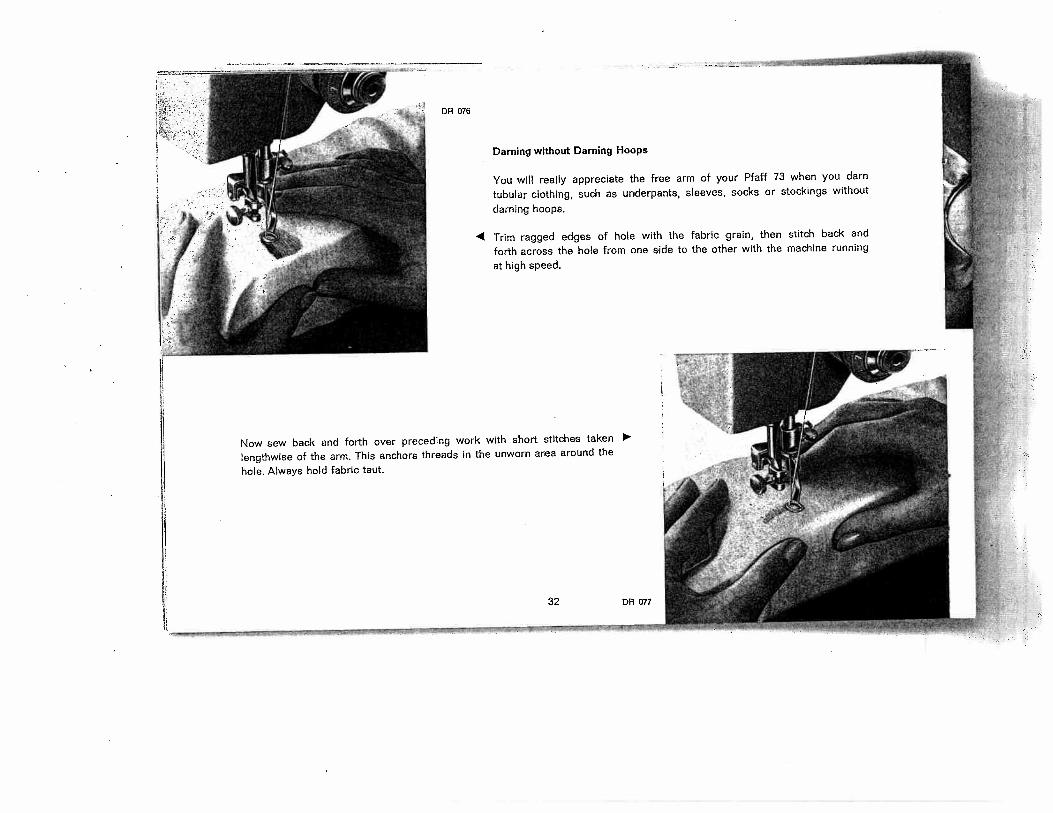
You will really appreciate the free arm of your Pfaff 73 when you darn
tubular clothing, such as underpants, sleeves, socks or stockings without
darning hoops.
4 Trim ragged edges of hole with the fabric grain, then stitch back and
forth across the hole from one side to the other with the machine running
at high speed.
Now sew back and forth over preceding work with short stitches taken
lengthwise of the arm. This anchors threads in the unworn area around the
hole. Always hold fabric taut.
DR 076
Darning without Darning I-loops
32 DR 077
section. This job can be done with
out foot, too.
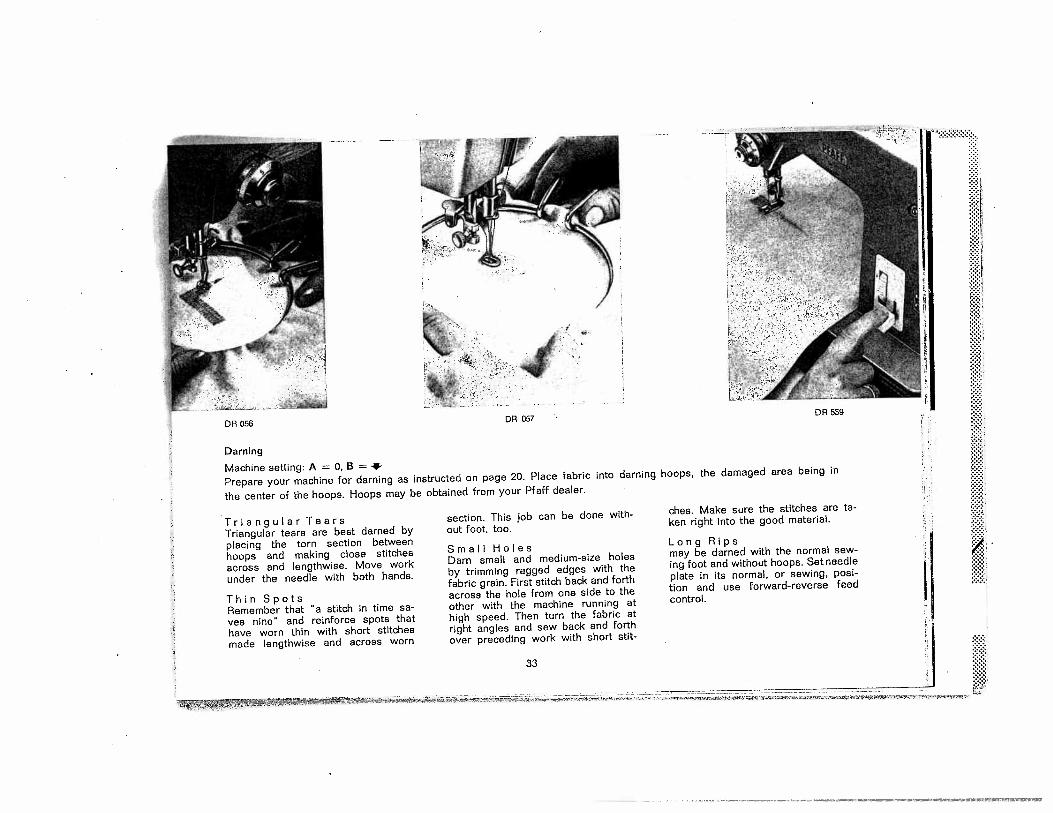
Small HolesDarn small and medium-size holes
by trimming ragged edges with the
fabric grain. First stitch back and forth
across the hole from one side to theother with the machine running athigh speed. Then turn the fabric atright angles and sew back and forthover preceding work with short stit
ches. Make sure the stitches are taken right into the good material.
/
DR 056 DR 057
A
,.
.
Long Ripsmay be darned with the normal sewing foot and without hoops. Set needle
plate in its normal, or sewing posi
tion and use forward-reverse feedcontrol.
Darning
Machine setting: A 0, B ‘
Prepare your machine for darning as instructed on page 20. Place fabric into darning hoops, the damaged area being in
the center of the hoops. Hoops may be obtained from your Pf off dealer.
DR 559
Triangular TearsTriangular tears are best darned byplacing the torn section betweenhoops and making close stitchesacross and lengthwise. Move work
under the needle with both hands.
Thin SpotsRemember that “a stitch in time saves nine” and reinforce spots thathave worn thin with short stitchesmade lengthwise and across worn
33

838 954
Inserting Patches
U Machine Setting: A = 4 8 =
Large holes can be patched quickly. The following method may be used
for jersey fabrics. Cut patch so that the grain will match the rest of the
fabric. Place the patch over the damaged area.
Sew it down with a wide zigzag stitch of medium length.
For additional strength stitch over corners twice. Turn over and trim close
to seams.
838 954
Attaching Lace
Machine Setting: A = 2 B
You can attach lace edging in one simple operation. Fold the edge of the
fabric about /“ over to the wrong side, following the texture, and pre
ferably iron it down. Place the straight edge of the lace on the fold of the
fabric and sew it down with narrow zigzag stitches, taking one stitch into
lace and fabric and the other into lace only. Cut off excessive cloth on
the wrong side of the material close to the seam.
DR 055
R 7157
.4
4
DR 044 34
DR 033
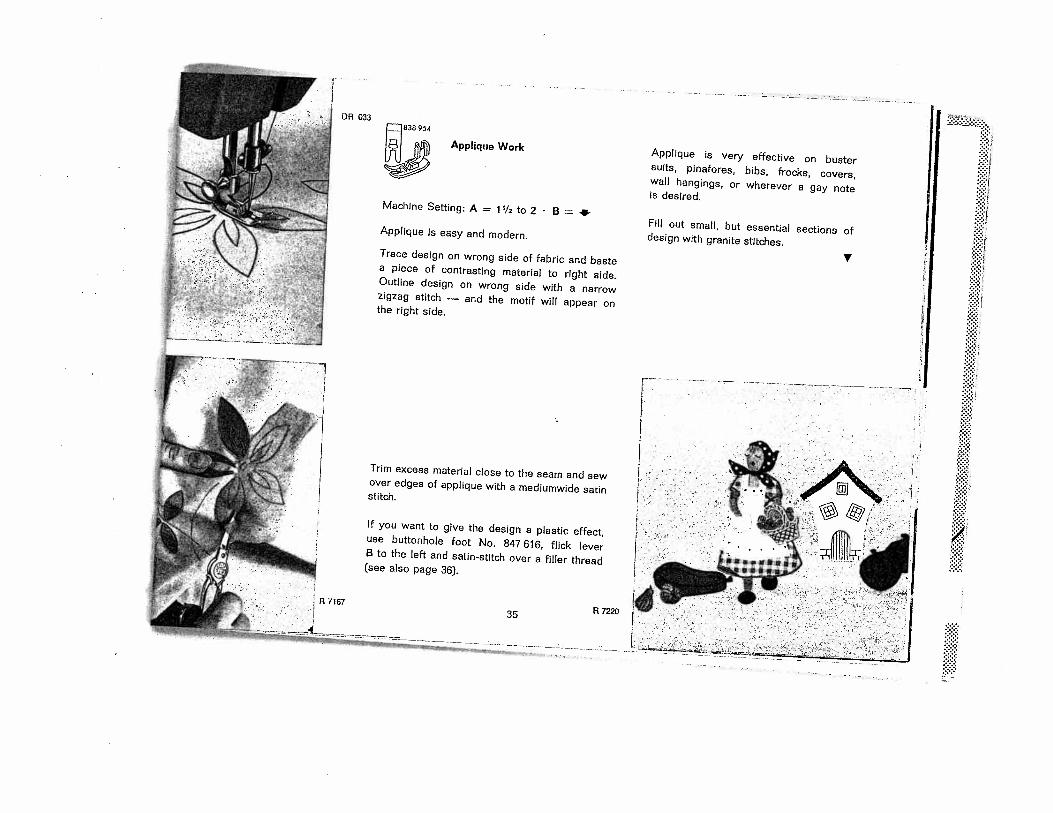
Applique is very effective on bustersuits, pinafores, bibs, frocks, covers,wall hangings, or wherever a gay noteis desired.
Fill out small, but essential sections ofdesign with granite stitches.
V
838 954
Applique Work
Machine Setting: A 1’/2 to 2 B
Applique is easy and modern.
Trace design on wrong side of fabric and bastea piece of contrasting material to right side.Outline design on wrong side with a narrowzigzag stitch — and the motif will appear onthe right side.
Trim excess material close to the seam and sewover edges of applique with a mediumwide satinstitch.
If you want to give the design a plastic effect,use buttonhole foot No. 847616, flick leverB to the left and satin-stitch over a filler thread(see also page 36).
R7220R7167
35
C
DR 082
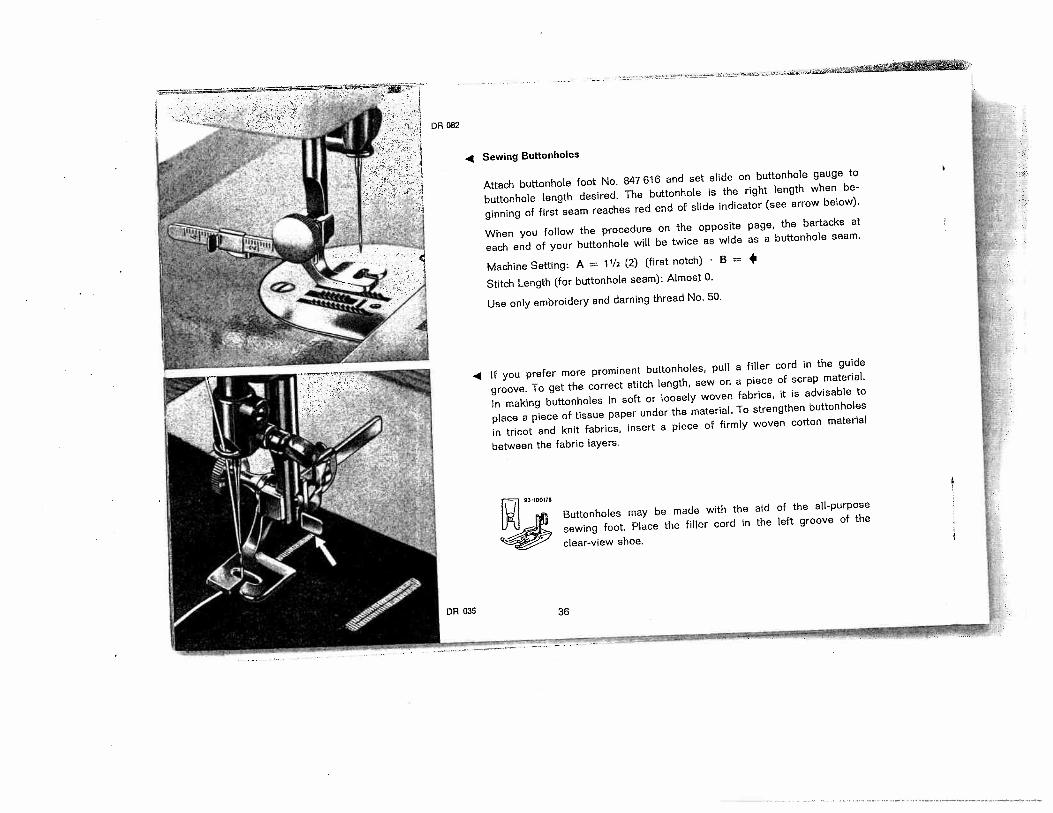
.4 Sewing Buttonholes
Attach buttonhole foot No. 847 616 and set slide on buttonhole gauge to
buttonhole length desired. The buttonhole is the right length when be
ginning of first seam reaches red end of slide indicator (see arrow below).
When you follow the procedure on the opposite page, the bartacks at
each end of your buttonhole will be twice as wide as a buttonhole seam.
Machine Setting: A = 11/2 (2) (first notch) B =
Stitch Length (for buttonhole seam): Almost 0.
Use only embroidery and darning thread No. 50.
.4 If you prefer more prominent buttonholes, pull a filler cord in the guide
groove. To get the correct stitch length, sew on a piece of scrap material.
In making buttonholes in soft or loosely woven fabrics, it is advisable to
place a piece of tissue paper under the material. To strengthen buttonholes
in tricot and knit fabrics, insert a piece of firmly woven cotton material
between the fabric layers.
5IOO7
Buttonholes may be made with the aid of the all-purpose
sewing foot. Place the filler cord in the left groove of the
clear-view shoe.
DR 035 36

Instructions for Buttonholing
I Sew first side over a filler cord. When beginning of seamreaches red end of slide indicator on buttonhole gauge, it is theright length. Leave needle in fabric on right side of its throw.
2 Lift foot, turn fabric around clockwise, using needle as a pivot.Pull filler cord around the needle to the left and lay it parallelto completed line of stitching. Lower foot and take one stitchto the left.
3 Turn dial A until it is caught in second notch (or stops at 4).Make 4 to 6 bartack stitches, slightly closing together buttonhole end to reduce length of bar.
4 Change dial A to IV,.’ (2). Trim filler cord at endof first stitch row. Sew second row and stop about4 to 6 stitches from end of first row.
5 Turn dial A to second notch position (or ‘4). Makesecond tack, as instructed above.
6 Turn dial A to O” and make 3 or 4 fasteningstitches.
7 Trim both the sewing and filler threads. Open thebuttonhole with your seam ripper. Be careful notto injure the bartacks.
DC
aCl)
0
C0
0a
:Y:.1
37

0R583
Button Sewing
Don’t be afraid to sew on buttons or rings with your Pfaff. The needle
won’t break and the threads will not get loose either, The latter may
happen only with ready-made clothing sewn with a chain stitch. It won’t
be worthwile to take the machine out for sewing on a single button, but
you will appreciate this feature when sewing lines of buttons on pillow
and bed covers, on shirts or dresses, or when fastening rings on curtains
etc. There your machine will come in very handy. Attach all-purpose
sewing foot No. 93-1 00 179-00. Set stitch length control on 0.
Hooks and eyes are sewn on with the aid of a special button sewing
foot, No, 847 608, which can be obtained from your Pfaff dealer.
Machine Setting: A = 0 ‘ B = •, feed dog dropped.
Place button under button sewing foot and align so that needle will enter left hole. Let needle stitch through hole and
make one or two tying stitches. Raise needle. Turn dial A counter-clockwise, usually to 3, until needle on the right of its
throw is centered over right hole. Start machine and sew as many zigzag stitches as you deem necessary to fasten
button securely. Return dial A to 0 and make two or three tying stitches.
When sewing on four-hole buttons, reposition button and repeat the above process, stitching through the second pair
of holes.
-
[: ,
38
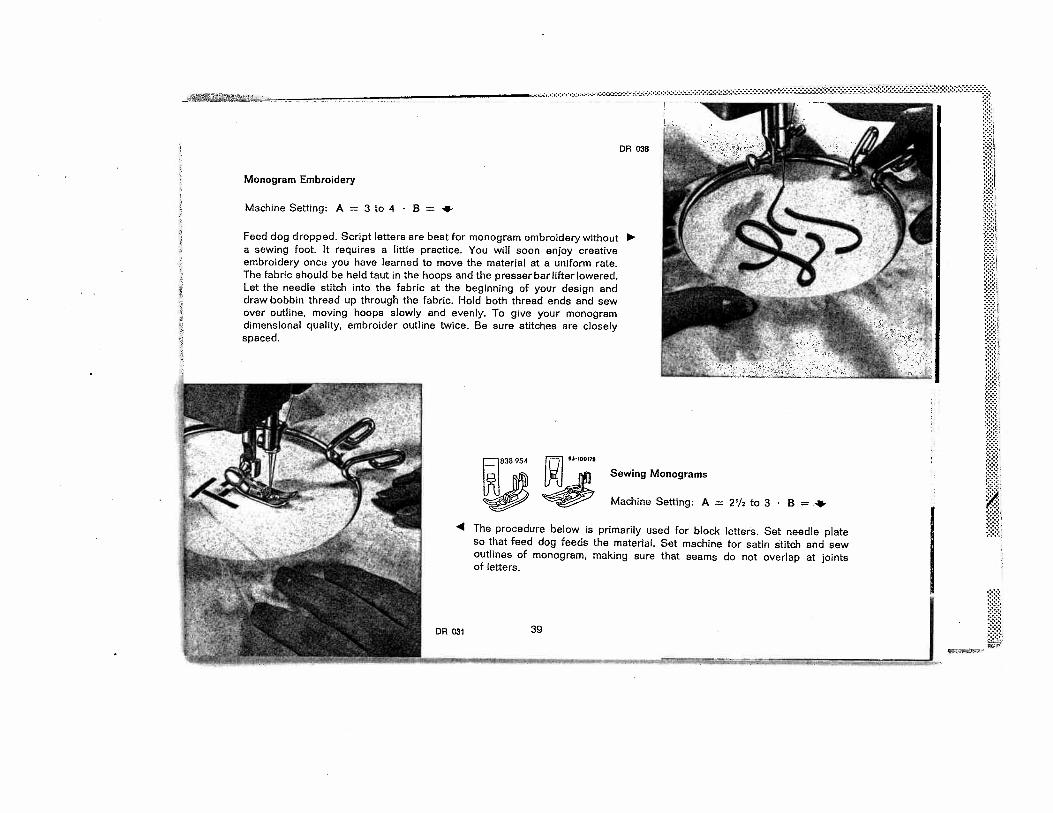
Monogram Embroidery
MachineSetting: A = 3to4 B =
Feed dog dropped. Script letters are best for monogram embroidery without ‘
a sewing foot. It requires a little practice. You will soon enjoy creativeembroidery once you have learned to move the material at a uniform rate.The fabric should be held taut in the hoops and the presser bar lifter lowered.Let the needle stitch into the fabric at the beginning of your design anddraw bobbin thread up through the fabric. Hold both thread ends and sewover outline, moving hoops slowly and evenly. To give your monogramdimensional quality, embroider outline twice. Be sure stitches are closelyspaced.
4 The procedure below is primarily used for block letters. Set needle plateso that feed dog feeds the material. Set machine for satin stitch and sewoutlines of monogram, making sure that seams do not overlap at jointsof letters.
DR 036
535 954 93-50179
Sewing Monograms
Machine Setting: A 2’/2 to 3 B =
DR 031 39

538954
Straight-Stitch Hemstitching
Machine Setting: A 0 B + Stitch Length: 2 to 4
Insert twin hemstitching needle, System 130 Zwi-Ho, as instructed on
page 13. Turn out needle set screw a little further than for ordinary
needles.
The thread size, threading procedure and thread tension are the same as
for cording work (see page 42).
Beautiful hemstitching effects on blouses, dresses, handkerchiefs, doilies
and so forth, can be obtained with Pfaff’s System 130 twin needle. The
harder the fabric yarn, the more pronounced the hemstitching will be.
For this reason, batiste, organdy, georgette, etc. are best suited to hem-
stitching, while woolly fabrics are not recommended.
Fold fabric to mark seamline or trace seamline on fabric. Sew first row.
Guide fabric so that wing needle stitches along traced line. At the end of
the seam, turn fabric half a turn and sew second row. Guide fabric in
such a way that wing needle penetrates the needle holes it has made and
enlarged previously.
Imitation hemstitching thus requires at least two operations. If desired,
additional straight or curved ornamental seams may be stitched parallel to
the first one. Exciting decorative effects may be obtained by using vari
colored embroidery and darning threads.
4 Zigzag Hemstitching
Machine Setting: A = Upto 1/2 B 4
Same as above, except that the wing needle should penetrate the traced
line only when it is on the left of its throw.
DR 001
Procedure
Procedure
40
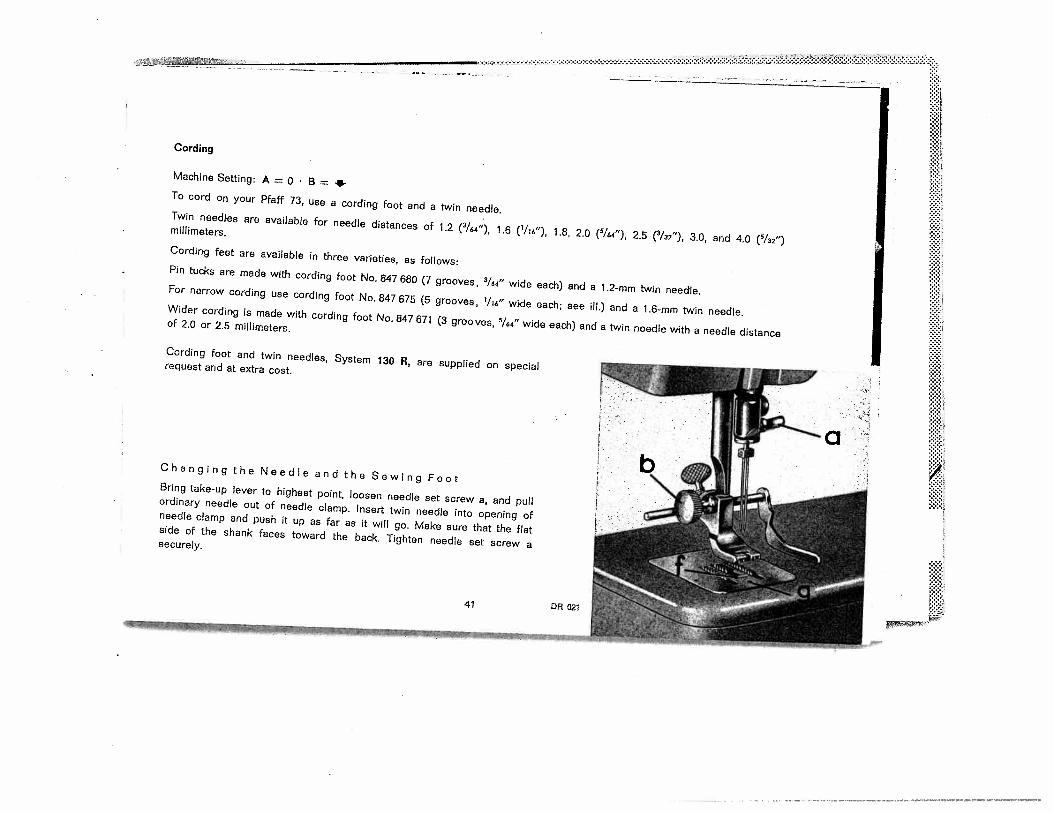
Cording
Machine Setting: A = 0 - BTo cord on your Pfaff 73, use a cording foot and a twin needle.Twin needles are available for needle distances of 1.2 (3/4), 1.6 (‘/e”), 1.8, 2.0 (/64”), 2.5 (/32”), 3.0, and 4.0 (/32”)
millimeters.
Cording feet are available in three varieties, as follows:Pin tucks are made with cording foot No. 847 680 (7 grooves, 3/4 wide each) and a 1.2-mm twin needle.For narrow cording use cording foot No. 847 675 (5 grooves, 1/u.” wide each; see ill.) and a 1.6-mm twin needle.Wider cording is made with cGrding foot No. 847 671 (3 grooves, I64” wide each) and a twin needle with a needle distanceof 2.0 or 2.5 millimeters.
Cording foot and twin needles, System 130 R, are supplied on specialrequest and at extra cost.
Changing the Needle and the Sewing FootBring take-up lever to highest point, loosen needle set screw a, and pullordinary needle out of needle clamp. Insert twin needle into opening ofneedle clamp and push it up as far as it will go. Make sure that the flatside of the shank faces toward the back. Tighten needle set screw asecurely.
41

Turn sewing foot thumb screw b to the left and take out the sewing foot. Slip on cording foot and tighten screw bsecurely.
it is best to turn out screw b completely if you want to slip on a cording foot with the guide attached.
Thread SizePin tucks and narrow cording are made with a No. 50 embroidery thread, wider cording with sewing silk in the needleand on the bobbin.
Set the machine for a medium stitch length (about 4).
Place a spool of thread on each of the two spool pins. Pass both thread ends through both thread retainer openings 2,as Illustrated on page 15. Lead one thread between the rear and center tension discs, and the other between the centerand front tension discs of upper tension 3. Raise take-up lever 4 to its highest position and pass both threads throughthe hole at its end. Pull threads into slot 5 and thread each needle from front to back.
The bobbin thread is drawn up as instructed on page 16. To do this, hold both needle threads in your left hand.
Thread Tension
Slightly increase the bobbin thread tension, and increase or decrease theneedle thread tension depending on the type of fabric used. If the tensionhas been set correctly, the bobbin thread should appear as a faint zigzagline on the other side.
Filled Cording
If you want to make cording in filmy fabrics or render your cording moreprominent, Pfaff recommends that you insert a filler cord, Its thicknessdepends on the cording size you want.
Remove the bed slide and pass the filler cord through hole g from below(see ill, on page 41). Lay the end of the filler cord back under the cordingfoot (together with the needle and bobbin thread ends). Pull a filler cordforward under the bed slide and place the ball in your lap.
Upper Threading
DR 521 42
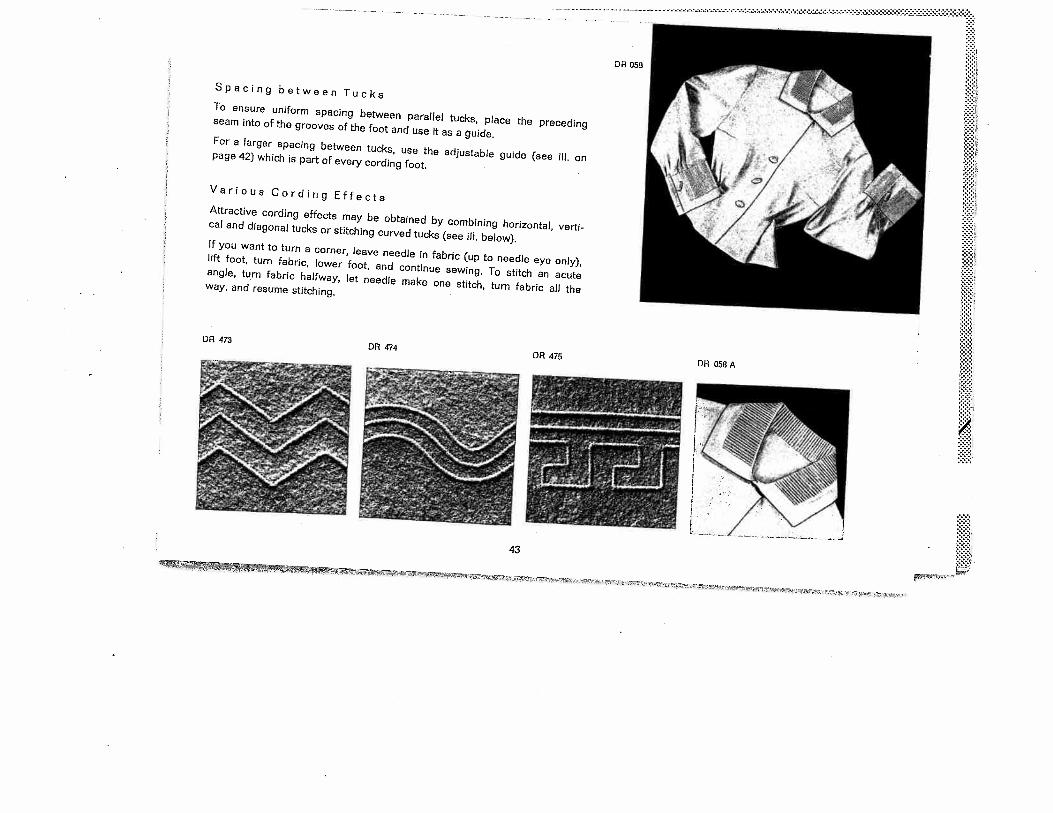
Spacing between TucksTo ensure uniform spacing between parallel tucks, place the precedingseam into of the grooves of the foot and use it as a guide.For a larger spacing between tucks, use the adjustable guide (see ilL onpage 42) which is part of every cording foot.
Various Cording EffectsAttractive cording effects may be obtained by combining horizontal, vertical and diagonal tucks or stitching curved tucks (see ill, below).If you want to turn a corner, leave needle in fabric (up to needle eye only),lift foot, turn fabric, lower foot, and continue sewing. To stitch an acuteangle, turn fabric halfway, let needle make one stitch, turn fabric all theway, and resume stitching.
0R058
OR 475ORO5BA
OR 473OR 474
43
DR 05993100t19
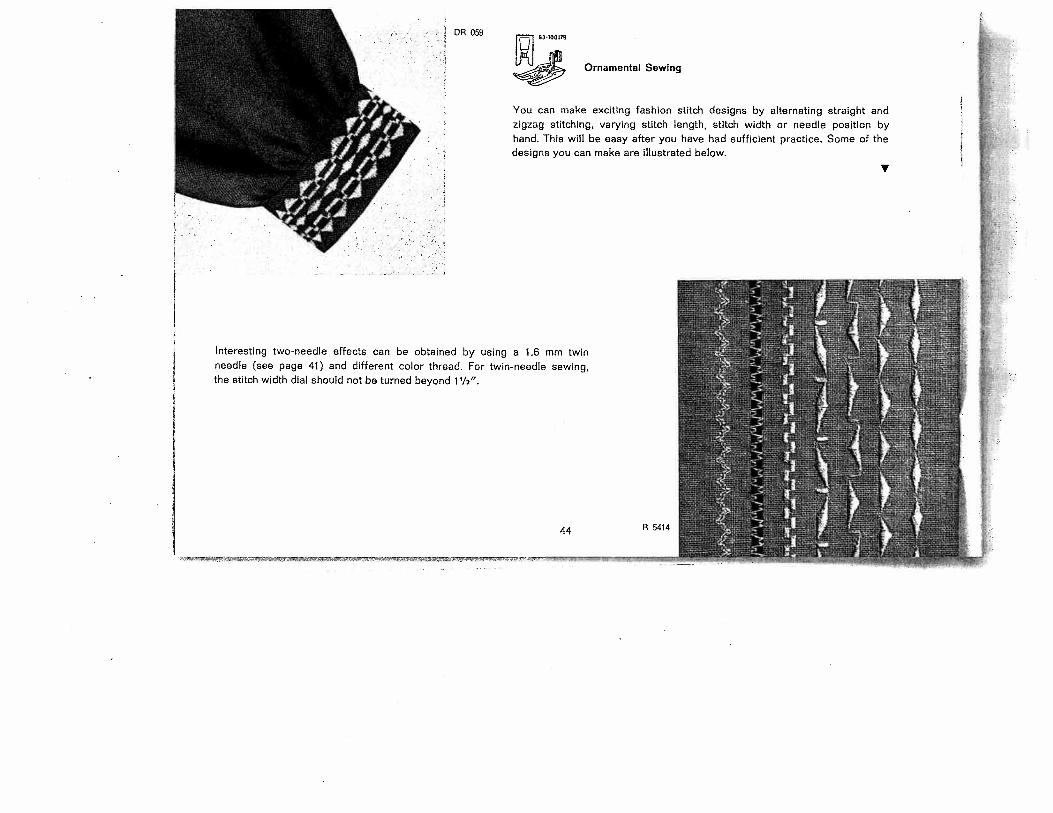
Ornament& Sewing
Interesting two-needle effects can be obtained by using a 1.6 mm twinneedle (see page 41) and different color thread. For twin-needle sewing,the stitch width dial should not be turned beyond 1 1/2”.
You can make exciting fashion stitch designs by alternating straight andzigzag stitching, varying stitch length, stitch width or needle position byhand. This will be easy after you have had sufficient practice. Some of thedesigns you can make are illustrated below.
V
II
44 R5414
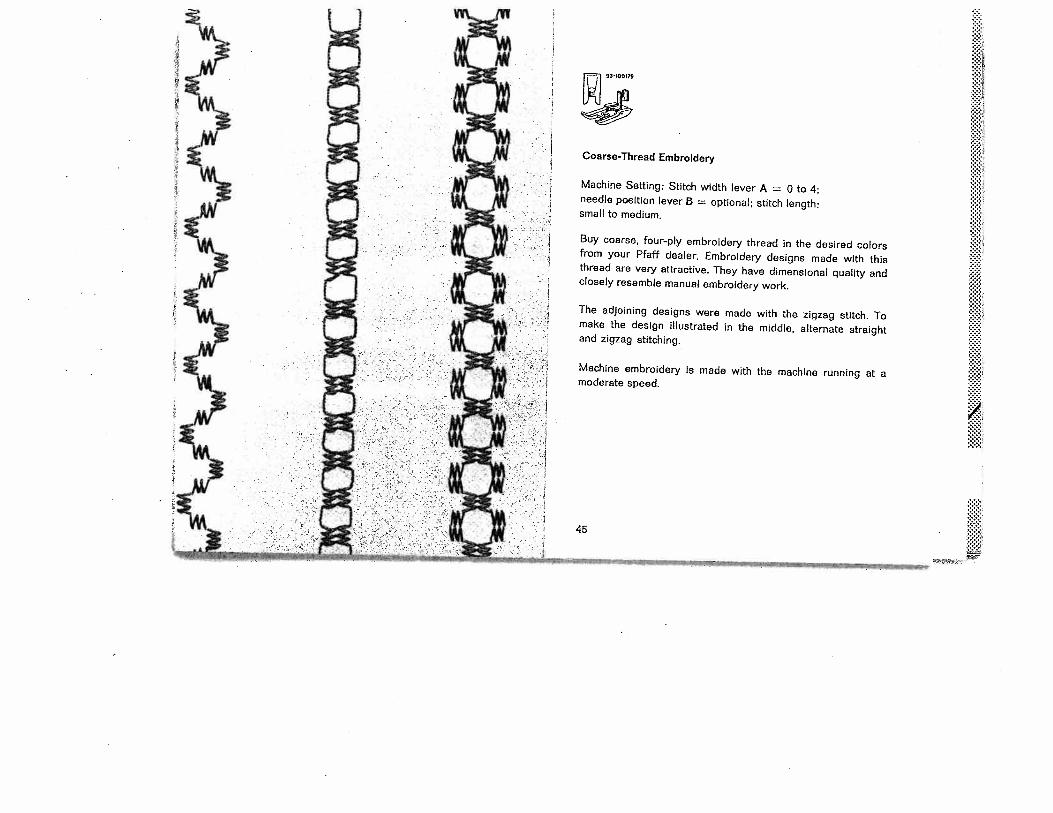
The adjoining designs were made with the zigzag stitch. Tomake the design illustrated in the middle, alternate straightand zigzag stitching.
93100178
Coarse-Thread Embroidery
Machine Setting: Stitch width lever A = 0 to 4;needle position lever B = optional; stitch length:small to medium.
Buy coarse, four-ply embroidery thread in the desired colorsfrom your Pfaff dealer. Embroidery designs made with thisthread are very attractive. They have dimensional quality andclosely resemble manual embroidery work.
Machine embroidery is made with the machine running at amoderate speed.
45

[E838 Stitching Synthetic Materials
Curtains
Machine Setting: Stitch width lever A = I to 3, depending on material; needle position lever B =
stitch length control = 1.
To finish the edge of synthetic curtain fabrics, such as Diolen, use a matching synthetic thread. If necessary, ease the
upper and lower tensons somewhat.
Both these hints should be adhered to in order to avoid shrinking of both the thread and the fabric in the laundry.
To butt seam the various sections of curtains, proceed as instructed on p. 31.
Plastic Sheets
Machine Setting: Stitch width lever A = 0 to 2; needle position lever B = 4- stitch length: medium.
Plastic curtains, as are used in kitchens and bathrooms, are sewn with synthetic thread or cotton and a fine needle.
Place a piece of tissue paper under sticky plastic sheets which can be easily removed after the sewing. To prevent plastic
sheets from sticking to the sewing foot, wipe its sole with an oily cloth.
46

CONTENTS
ForewordEssential Parts.Fundamentals of Machine Operation
How to Operate Your Sewing Machine
Engaging and Disengaging the Sewing Mechanism
The WorkplateElectrical InformationMotor Disengaging MechanismFoot ControlStraight StitchingZigzag SewingRemoving the Bobbin CaseWinding the BobbinInserting a Full Bobbin into the Bobbin Case
Inserting the Bobbin CaseRecommended Needle and Thread Sizes
Important Facts about NeedlesChanging the NeedleUpper ThreadingCorrect Tension RegulationDrawing Up the Bobbin ThreadRegulating the Thread TensionStitch Length RegulationReverse SewingChanging the Sewing FootDropping the Machine Feed
Page
3
Using Sewing Feet and Attachments
Zipper InsertionQuiltingFlat Felled SeamsHemmingOvercasting EdgesButt SeamingDarning without Darning HoopsDarningInserting PatchesAttaching LaceApplique WorkSewing ButtonholesButton SewingSewing and Embroidering MonogramsHemstitchingCordingOrnamental SewingCoarse Thread Embroidery .
Stitching Synthetic Materials .
22
242425
28282930313132333434353638394041444546
Page
1 Darning Foot 202 All-Purpose Sewing Foot 21
Care and Maintenance
Changing the Light BulbRemoving and Replacing the Face CoverTrouble Shooting4
455567
89
10111213131416161718181920
48
CPFAFFD°
Nr. 20011 engL (US)WI iiPrinted in Germany©