Corinth and Athens: Numismatic circulation from the Late Republic to the High Empire

CORINTH
EXCAVATIONS
ARCHAEOLOGICAL SITE MANUAL
AMERICAN SCHOOL OF CLASSICAL
STUDIES
2008

2
CONTENTS
1 METHODOLOGY
1.1 Stratigraphic Excavation
1.2 The Open Area Method
1.3 Single Context Recording
1.4 The Harris Matrix
2 EXCAVATION PROCEDURES
2.1 General Practice
2.2 North and East Measurements and Elevations
2.3 Archaeological Cleaning
2.4 Baulks
2.5 Excavating Special Deposits
2.5.1 Floors, Surfaces and Roads
2.5.2 Foundation Trenches and Robbing Trenches
2.5.3 Pits and Wells
2.6 Dry Sieving
2.7 Sampling for Flotation
2.7.1 Completing the Sample Recording Sheet
2.8 Excavating Structures
3 FIELD DRAWINGS 3.1 Drawing Conventions
3.2 Top Plans
3.3 Vertical Sections
3.4 Measuring Off The Grid & Laying Out a Right Angle
4 SITE PHOTOGRAPHS
5 FIELD RECORDING PROCEDURES 5.1 The Context Register
5.2 DEPOSITS 5.2.1 Title Tag
5.2.2 Elevations
5.2.3 Slope Down To and Degree
5.2.4 Coordinates
5.2.5 Soil Color
5.2.6 Soil Composition
5.2.7 Soil Compaction
5.2.8 Inclusions

3
5.2.8.1 Sorting
5.2.8.2 Size
5.2.8.3 Shape and Roundness
5.2.9 The Harris Matrix and Stratigraphic Relationships
5.2.10 Boundaries with Other Contexts
5.2.11 Formation/Interpretation
5.2.12 Method and Conditions
5.2.13 Sieving
5.2.14 Samples Taken
5.2.15 Inventoried Objects & Coins
5.2.16 Excavation Notes
5.3 CUTS
5.3.1 Title Tag
5.3.2 Coordinates
5.3.3 Elevations
5.3.4 Shape In Plan
5.3.5 Dimensions
5.3.6 Break Of Slope - Top
5.3.7 Sides
5.3.8 Break Of Slope – Base
5.3.9 Base
5.3.10 Orientation
5.3.11 Truncation
5.3.12 Harris Matrix
5.3.13 Filled By
5.3.14 Notes
5.4 STRUCTURES
5.4.1 Title Tag
5.4.2 Coordinates
5.4.3 Elevations
5.4.4 Dimensions
5.4.5 Materials
5.4.6 Size Of Materials
5.4.7 Finish Of Stones
5.4.8 Masonry Style 5.4.9 Bonding Material
5.4.10 Special Features
5.4.11 Harris Matrix
5.4.12 Formation/Interpretation
5.4.13 Internal or External Structure

4
5.4.14 Related Contexts
5.4.15 Sieving
5.4.16 Inventoried Objects & Coins
5.4.17 Notes
6 BURIALS AND SKELETONS 6.1 Coordinates, Elevations and Orientation
6.2 Type of Burial
6.3 Grave Cut & Fill(s)
6.4 Sarcophagus/Ossuary
6.5 Truncation and Disturbance
6.6 Skeleton Diagram
6.7 Stick-Figure Sketch
6.8 Harris Matrix
6.9 Position of Body Parts
6.10 List In Situ Broken Bones
6.11 Associated Objects
6.12 Sieving and Soil Sampling
6.13 Specialist Osteological Data
6.14 Excavation Notes
6.15 Drawing Skeletons
7 FINDS
7.1 Finds Labels In The Field
7.2 Pottery
7.3 Unworked Animal Bone And Shell
7.4 Roof Tiles
7.5 Coins
7.6 “Small Finds”
8 EXCAVATION SUMMARY REPORTS
9 POTTERY READING
9.1 Sorting
9.2 Reading
9.3 The Pottery Database Fields
9.4 Saved and Thrown Pottery 9.5 Pottery Weights And Counts
9.6 “Good Things From Bad Places” (GTs)
10 LOTTING

5
11 INVENTORYING IN THE MUSEUM
11.1 POTTERY
11.1.1 Dimensions
11.1.2 Description
11.1.3 Standard Terms for Description
11.1.4 Decoration
11.2 LAMPS
11.2.1 Dimensions
11.2.2 Description
11.2.3 Sample Descriptions
11.2.4 Decoration
11.2.5 Terms
11.3 FIGURINES, STATUARY
11.3.1 Dimensions
11.3.2 Condition
11.3.3 Material
11.3.4 Description
11.3.5 Decoration
11.4 ARCHITECTURAL TERRACOTTAS 11.4.1 Pan and Cover Tiles
11.4.2 Eaves Tile
11.4.3 Antefix
11.4.4 Sima
11.4.5 Acroterion
11.5 INSCRIPTIONS
11.5.1 Description
11.5.2 Tooling
11.5.3 Text
11.6 FABRICS
11.6.1 Color
11.6.2 Hardness
11.6.3 Appearance
11.6.4 Feel
11.6.5 Inclusions
11.6.6 Frequency
11.6.7 Shape
11.6.8 Identification 11.6.9 Voids
11.6.10 Porosity

6
Corinth Excavations
Archaeological Site Manual
G.D.R. Sanders, Alicia Carter and Sarah James,
With contribution from I. Tzonou, J. Herbst, N.
Bookidis, C.K.Williams, and A. Rohn
This manual describes the present state of excavation and documentation at
Corinth. It has evolved over five decades of digging in response to both the nature
of the anthropogenic activities and the ultimate goals of the excavation: a
diachronic archaeological and cultural history of Corinth. The practicalities of
removing archaeological material from the ground, recording it, analyzing it and
storing it for future use have been developed over the past 100+ years of
excavation at Corinth and are well-suited to the field here, to the post-excavation
methods used and to the facilities available at Corinth. The current field methods
employed, specifically open-area excavation and single-context recording, have
been adapted for use at Corinth from the archaeological site manual of the Museum
of London Archaeology Service (MOLAS). Modifications to the MOLAS
methods are the product of accumulated experience of excavations in the Unites
States, Britain, Greece, the Near East and Cyprus and a response to the specific
conditions that exist at Corinth Excavations and impact archaeological research
here. This manual is instructive and will be of use to the student and to the
seasoned archaeologist alike.

7
1. METHODOLOGY
1.1 STRATIGRAPHIC EXCAVATION
Archaeological sites are made up of discrete layers of cultural debris and other
natural features (like soil washed over the site by a flood). Stratigraphic excavation
is the isolation and identification of different deposits and features and then the
careful removal of each of these separately in the reverse order of their deposition.
This concept was developed for application in archaeology from the Law of
Superposition, a geological concept relating to the formation of horizontal layers of
rock in the earth’s crust. In plain language the “Last In, First Out” principle means
that a pit must be isolated and dug before the earth into which it was cut is
excavated. This is the basic tenant of modern archaeological excavation.
1.2 THE OPEN AREA METHOD Traditionally, archaeologists in Greece have used trenches and baulks to excavate
ancient remains. These typically take the form of “Wheeler boxes,” or 5 x 5m
squares with baulks that separate them (Fig. 1A), named after Sir Mortimer
Wheeler, the archaeologist who first pioneered their use in the 1920s and 1930s.
Proponents of this method argue that the baulks allow the archaeologist to have
permanent access to the stratigraphy of the site by preserving permanent and
frequent vertical views of the strata throughout excavation. Ironically, with this
method, the archaeological remains that have not been excavated (the baulks) are
more important to the archaeologist than those which have been excavated (the
trenches). However, it has been demonstrated time and again that the vertical
section preserved by the baulk can be more misleading to the archaeologist than
simply excavating context by context without creating arbitrary trenches. The
reasons for this include situations where the baulk ‘just missed’ a context that was
excavated inside the trench and so the section preserves a false or incomplete
record of the stratigraphic relationships of the contexts in that area.
Figure 1. Excavation of a pit using A) the baulk-debris method (8 baskets), B) the
open area method (1 basket) and C) the modified baulk-debris method (2 baskets).

8
At Corinth, we have recently reassessed our own methodology and abandoned
trench and baulk methods in favor of the open area method (Fig 1B), now standard
practice all over Britain, much of the US and in other parts of Europe. Instead of
arbitrarily sectioning all the stratigraphic contexts on the site and removing them
based on what trench they happen to be located in, open-area excavation, in a
sense, treats the entire excavation area as one large trench, and each individual
context is identified, recorded and removed (if possible) in chronological and
stratigraphic sequence. This method allows us to see more or all of any given
context at the same time and thus have more information at the moment of
excavation with which to interpret findings and stratigraphic relationships. It also
allows for more chronological control of the site, that is, it is possible to
concentrate all attention on the stratigraphic relationships and the material record
of the chronological period being excavated instead of having one trench at early
modern levels, another at Roman and another at Mycenaean and trying to piece
these disparate records back together after the excavation season has ended.
However, it is important to be flexible in your approach to the variety of situations
you will encounter in the field. There may be specific situations where it is helpful
to section a context or series of contexts in order to be able to have a vertical view
of the strata before the entirety of the material is removed (Fig. 1C). This might be
useful in an area of the site with particularly complicated stratigraphy, for example.
If this strategy is employed, it is important to note what you are doing and WHY
on your recording sheets and to describe and draw the soil section you have
created. Later on it will also be important to reunite the material taken from the
contexts you have sectioned into two or four parts (by half-sectioning or quarter-
sectioning).
1.3 SINGLE CONTEXT RECORDING
Each action that leaves a trace in the stratification of an archaeological site, be it
anthropogenic or a natural event, is called a context. Some actions will have left a
positive trace: these are either deposits of soil and other materials (like a dump of
rubbish in a pit or the fill inside a grave), or built structures (like walls). Others
actions will have left a negative trace: these are cuts (they cut into other contexts,
like when a grave or a well or a foundation trench for the building of a wall is dug).
By identifying, excavating and recording each context individually, it is possible to
reconstruct the history of activity at a site. Each context is recorded on a
standardized form which encourages the recorder to make certain observations and
attempt certain interpretations. In theory, by keeping consistent, careful and
detailed records, it should be possible at any time in the future to reconstruct the
site layer by layer, context by context, integrating finds and features. In an open
area excavation deposits are recorded and removed in their entirety However,
certain walls and features may be left for future restoration and presentation
making total removal of these contexts impossible.

9
Experienced archaeological technicians trained by the excavations and overseen by
the foreman do excavation. But supervisors should also do a certain amount of
excavation. Although their main responsibility is for recording individual contexts
as they are removed, excavation will help them to understand differences in color,
composition and texture which differentiate deposits. The Director of Excavations
and the field director are responsible for assessing the stratigraphic relationships of
the excavation area as a whole and to coordinate the supervisors in the recording of
contexts as they are removed in stratigraphic sequence.
1.4 THE HARRIS MATRIX In 1975 Harris published and copyrighted the Harris Winchester Matrix. At
Corinth, the Harris matrix is one of the principle organizing features of the
excavation and of the post-excavation analytical process and is something that
must be added to and updated in and out of the field on a daily basis. The Harris
matrix is not a matrix at all but rather a two dimensional diagram which represents
the special and temporal relationships between archaeological contexts. Since 1975
numerous books and articles have been written on the subject and several computer
programs have been designed to help assemble the diagrams. At Corinth we use a
program called ArchEd (first developed in 1996 at the Max Plank Institute) to
render Harris matrices on the computer. All contexts are included in the matrix:
deposits as well as cuts, walls, floors and other structures. Each and every one of
these should have its own individual context number.
There are four basic time relationships which exist between contexts:
A. 1 is later than 2. This is the immediate chronological relationship.
B. 1 is earlier than 2. This is the immediate chronological relationship.
C. 1 is contemporary with 2. This relationship can only be determined by
material culture or a full understanding of the site, e.g. wall 1 bonds with wall 2.
D. 1 equals 2. In other words the same context excavated in two or more
operations, like when you section a context of a series of contexts or when the
same context has been cut into two parts by later human activity.
In constructing a Harris matrix it is the stratigraphic sequence which is of
importance. A context may overlie several other strata but it is the latest of these
strata which is most relevant. For example, if the foundation trench for a wall cuts
through several different layers of soil, it is most important to establish the
LATEST layer it cuts, as this helps date the construction of the wall.

10
In this way, the matrix is a very important tool of organization as it moves beyond
simple physical relationships and forces the archaeologist to refine their
understanding of chronological relationships. As you and your fellow supervisors
proceed back through time through excavation, you will need to constantly update
your Harris matrix to reflect your understanding of the stratigraphic relationships
of your contexts.
Example: In the section illustrated below, the topsoil (context 1) is the latest
context present in this example. 1 overlies several discrete deposits, 2, 3, 4 and 10,
physically touching all of them. But through further excavation it is revealed that 2
cuts 10 and thus has to be later in time. Further, 2 and 3 are both cutting into
context 4, 4 overlies 5, 5 cuts 6 and 7…and so on. However, if you look at the
Harris matrix for this hypothetical situation, you will see that the relationships have
been streamlined so that redundant relationships are not expressed. For example,
even though we’ve already established that 1 is later than 2, 3, 4 and 10, it is
unnecessary to draw additional lines from 1 to 4 and from 1 to 10 since the matrix
is already expressing the fact that 1 is later in time than both 4 and 10 as it is
situated above them in the diagram. (Note, in this example, cuts are not included.)
Figure 2. Hypothetical plans and vertical section showing several strata overlying
bedrock. The Harris matrix expresses these relationships in a diagram.
1
2 3
4
5
6
7
8
9 11
10
Bedrock

11
2. EXCAVATION PROCEDURES
2.1 GENERAL PRACTICE
Since contexts are dated by the latest material in them, it is essential to avoid
contamination. Make sure, therefore, that you have removed ALL of the soil of any
context before moving on to the next. For the purposes of dating strata by material,
it is irrelevant if you dig a bit into a context BELOW the context you are recording
since it is definitely earlier anyway, so pottery or other finds contained within it
cannot contaminate your context.
Cleanliness is next to godliness on an archaeological site. A few millimeters of
dust or loose soil on the surface of the excavation area will completely obscure soil
changes and make stratigraphic excavation impossible. Sweep often (see §2.3
below for instruction on recording archaeological cleaning). It is also very
dangerous to allow loose soil to accumulate around the edge of the excavation.
This will happen naturally by the act of us walking around, but you must keep
these areas clean or risk material from the topsoil falling into the excavation area
and contaminating your contexts.
The hot and dry climate of Greece makes it difficult to see the stratigraphy of the
site as dry soil loses much of the color is has when moist. Do not hesitate to spray
down the soil with water when this becomes a problem.
Ideally, it will be possible to recognize each archaeological context on site by
appearance or texture and to remove it neatly. However, in practice, some
stratigraphic relationships will be difficult to discern without careful exploration.
In situations where it is difficult to find the edges between similar contexts, the
junctions should be explored carefully until the boundaries can be established with
certainty and the soil should be sprayed with water to help restore soil color.
There may be times, however, when you will have made a mistake in deciding
which context is stratigraphically the latest. When you see your mistake,
immediately stop collecting material from what you are recording and describe
your observations and interpretations on your recording sheet for that context,
noting when and how the mistake was caught. You will need to assign a new
context number to and take new measurements of whatever you begin excavating
next, as appropriate to your new understanding of the stratigraphic sequence.
As you record the removal of different contexts on site, realize that what you write
will be examined, analyzed and weighed by future scholars wishing to publish the
archaeological material of Corinth and understand aspects of the development of
the site. The future researcher will be interested in specific contexts and the
materials contained within it, the context's relation to other deposits and features.
For example, future scholars will want to know if a certain context is a floor and if

12
(A) the floor is cut by a foundation trench for a wall, or (B) the floor goes directly
up to the wall, over the cut of the foundation trench, or (C) the floor goes over the
top of the wall. In case A, the floor pre-dates the wall – any context that is cut by
the foundation trench will have existed before the wall was built, and finds from
these contexts could give a "pre-occupation" date (the terminus post quem for the
structure); in case B, the floor was laid after the foundation trench was dug and the
wall built and they are all part of the same structure – any finds from this floor are
from the use phase of the building. In case C the floor is covering the top of a wall
from an earlier building that was abandoned previously; finds from the floor will
help date the abandonment of the structure (its terminus ante quem). Describing
these relationships requires you to interpret not only the function and/or formation
of the context you are recording, but to interpret how it is part of a greater web of
human activity in this area over time.
Your opinion should be stated and the evidence given in support of it, but
sometimes it is only possible to fully interpret a context after it is excavated, its
pottery and finds analyzed, and related contexts similarly studied. You should
frequently return to your context records in the database and add amendments to
your interpretations as you come to new conclusions. Please explicitly state that
these later thoughts are “Later Notes” or “Post-Excavation Interpretation” as it is
very important for anyone to be able to distinguish in the records what was
recorded in the field during excavation and direct observation of the context and
what was interpreted later.
During the recording process, in the field and out, it is important to communicate
with fellow supervisors as, ultimately, all contexts are related in some manner and
these relationships are crucial to understanding the site as a whole.
2.2 NORTH AND EAST MEASUREMENTS AND ELEVATIONS
The overall grid at Corinth is based on the Greek Army Mapping Service
coordinates. For the sake of uniformity with other work on the site since 1960, all
measurements are related to the benchmarks established from the Greek Army
Mapping Service monuments then in use (Hesperia 1960 p.238). Measurements
are taken using a Total Station and all descriptions and drawings reflect these
benchmarks (meters north and east, and above or below a permanent benchmark on
the slope of Acrocorinth).
All supervisors are trained in using the Total Station at the beginning of the
excavation season, in particular how to physically set up the machine and tripod
and how to use the programming in the machine to take accurate readings using the
reflective prism.
Measurements should be taken to the nearest 0.01m.

13
Each time that you start to excavate a new context, take representative elevations
of the deposit; if the stratum runs into the edge of excavation, then along that edge.
Take highest and lowest elevation of the context, but also several elevation
readings at different points on the surface of the context before it is excavated and
on the surface revealed by its removal. In the case of a wall, take an elevation on
the highest preserved stone, the last stone at both ends of the wall and/or the last
stone before the wall disappears into the edge of excavation.
You should check that the instrument is level before taking readings, take care
not to lean on or kick the tripod and to hold the prism and rod perfectly vertical.
Should the instrument require adjustment, you must set up the machine again.
2.3 ARCHAEOLOGICAL CLEANING
There may be times when it is necessary to scrape or sweep down an area that is
composed of several different soil contexts (for example, cleaning a section for
drawing, or a large area of the site for a photograph). Any material from this
operation should be collected on its own and with a new unique context number so
that it will not be added to the material from another discrete context, thus
contaminating it. If it is possible to ascertain exactly which contexts are
contributing materials to this cleaning operation, note them on the recording sheet
for the cleaning operation. While any material collected during the cleaning of
multiple contexts is not going to be useful in dating or interpreting any individual
context on site, this material might be useful to the museum staff at the end of the
season for the purposes of mending pottery or other finds and so is well worth
keeping. Cleaning “contexts” are NOT included in the Harris matrix as they
are not true contexts, but created by us as a means of tracking finds during
cleaning. If cleaning baskets extend over multiple contexts, do not waste your time
filling out the deposit recording sheet to its full extent. Simply explain what you
are doing and why you are doing it in the Excavation Notes section, take
measurements and elevations, and select ‘Mixed’ from the appropriate soil
description fields on the record sheet.
2.4 BAULKS (or “martyrs”)
If the “Last In, First Out” principle cannot he followed for some reason, a
protective strip of soil or "baulk" should be left around the later soil, while the
earlier soil is being excavated. Such a protective baulk will allow one to avoid
contamination of the earlier context by a bit of later material that might
inadvertently be removed with the excavation of the earlier context. The baulk can
be excavated later with its own context number; note which context it was
originally a part of before it was made a baulk in your notes and reflect this in your
Harris matrix.

14
2.5 EXCAVATING SPECIAL DEPOSITS
2.5.1 FLOORS, SURFACES AND ROADS
The term ‘floor’ is reserved for a purposefully constructed surface inside or
associated with a structure. It is sometimes constructed using special materials fit
for purpose (like plaster or mosaic or stone slabs). This kind of floor, since it is
built, will be recorded as a ‘Structure’ (see §5.4 regarding Structures) as the data
fields on the Structure recording sheet will most accurately record this feature. A
floor that is not built of these or other materials and is simply packed earth will be
recorded as a deposit as the Deposit sheet data fields will most accurately describe
this feature. These floors are recognizable on the ground as a crust of hard-packed
earth. Describe the relationship of the floor to any visible architectural and/or other
features (foundation trench cuts, pits, hearths etc.). On coming down on a floor,
clean it well before excavating it as a new context, then remove the crust itself on
its own. Change context numbers to excavate the underlying fill. Often you will
find several superimposed or repaired floors - repeat the process of cleaning and
removal as often as is necessary. In the case of repairs, record and remove the
repaired part separately from the original floor – each action will have its own
context number. Always sieve floors 100% and consider a water-sieving strategy.
‘Surfaces’ are also hard-packed, but are not contained within the walls of a
structure and are not constructed with specialized materials. A surface might be,
for example, the surface of an open courtyard or a pathway. Surfaces are not as
easy to recognize as floors as they are not typically contained by walls and are not
built of special materials, but their hardness will be distinctive and they might have
pottery or other finds lying horizontally on top of them. Record surfaces as
‘deposits.’ Always sieve surfaces 100% and consider a water-sieving strategy.
Roads should be recorded with the same issues in mind. A road that is built should
be recorded on a Structure sheet; road surfaces that are not built should be recorded
with a Deposit sheet. Repairs and repaving/resurfacing are each recorded
separately with their own context numbers. Always sieve roads 100% and consider
a water-sieving strategy.
2.5.2 FOUNDATION TRENCHES AND ROBBING TRENCHES When some walls are built, first a trench is dug where the wall will run and then
the foundations of the wall are built inside this trench. When the foundations are
laid, the gaps in the foundation trench are filled in on one or both sides of the
foundations and the wall itself is built upon these foundations. Examine all
deposits that run up to a wall or a foundation to see whether an area of looser soil
can be distinguished against the wall face. Chances are that the foundation will
have a 10 to 40 cm. wide patch of looser soil along its side. (Note: A very narrow
loose area immediately against the face may not be a foundation trench; rather, this
softness may be the result of root or water action.) Dig the loose fill of the
foundation trench separately as its own context. This context, together with the

15
material from the dismantling of the wall itself (if it is excavated), can provide a
date of construction for the wall. If, however, the wall is light and its foundation
light, or if the wall has no rougher lower segment, or if the wall is built directly
upon the remains of an earlier wall, no foundation trench may exist.
If the foundation is Roman and constructed in rubble and mortar, the chances are
that the foundation trench may not have a fill. In a case such as this, the foundation
for the wall was dumped into the foundation trench and completely filled it – there
was no later backfilling of gaps in the foundation trench since no gaps were left
during construction.
A robbing trench is created by later action. The stones of a wall and sometimes
even the foundation are robbed (removed) to build something new. These are
common features as it is easier to rob out an existing wall than to quarry new
building material. Unless it is logistically impossible or unsafe, it is good practice
to dig one or more section through the fills of a robbing trench before digging them
in entirety (see §3.3 on Vertical Sections). This will help ensure that even very
subtle changes between fill contexts are observed and the stratification of the
robbing trench fills are fully understood; the section can also allow for more
complex environmental sampling. The series of images below illustrates what
foundation trenches and robbing trenches can look like in section. Image 1 shows
the wall in use; 2 shows the wall after the structure has gone out of use and
collapsed; 3 shows the robbing trench after the wall and foundations have been
robbed out and the trench backfilled; 4 shows the same robbing trench after the
earth above it has been plowed.
Figure 3. Sections at 4 stages of the creation of a robbing trench (Barker 1994).

16
2.5.3 PITS AND WELLS
Pits are of particular importance as they are discrete units that usually contain
dumped material that will be very useful for dating purposes as well as supplying
valuable environmental data collected by flotation. Unless it is logistically
impossible or unsafe, it is good practice to dig section the fills of a pit (see §3.3 on
Vertical Sections). This will help ensure that even very subtle changes between fill
contexts are observed and the stratification of the pit fills are fully understood; the
section can also allow for more complex environmental sampling. Sieve pits 100%
and consider a flotation strategy.
When starting the excavation of the fills of a well, establish an elevation point at
the mouth of the well. Use this point to measure the depths of the fills within the
shaft using a tape measure if and when it becomes impossible to use the total
station as the depth inside increases. All attempts should be made to identify the
stratigraphy of different fills within the well shaft and to excavate them in
stratigraphic sequence. However, if the well is very deep, has been subjected to a
lot of sorting by the action of the water inside, or has one massive backfill dumped
inside, this might not be possible. In this case, remove the fill inside the shaft in
units of 10 cm depths each, using a single context number with a running
alphabetic marker (Deposit 20A, 20B, 20C, 20AA, 20AB and so on). Generally,
the earth from within a well is too waterlogged to sieve as it is excavated. Set out
plastic sheeting on which to pile the excavated earth to dry. Keep contexts separate
and marked with wooden tags. The earth should be 100% dry-sieved when dry and
samples need to be taken for flotation.
2.6 DRY SIEVING
Certain contexts will be more rewarding to sieve than others and it is essential to
consider what kind of data you are seeking before determining the proportion,
mesh size and method of sieving. Please make note of why you are sieving a
particular context in the Excavation Notes of your recording sheet, and in the
Methods field, what percentage of the context you are sieving (this can be done by
counting shovel-fulls of soil, for example) and the size of mesh you are using.
Please do not sieve topsoil/plow zone unless you have lost a contact lens. The fills
of pits, hearths, floors and foundation trenches should be 100% sieved, with a
portion sampled for flotation. Mounted stacking sieves can be operated by a single
person. There are three grades of mesh: 1. Large, for breaking up clods; 2.
Medium, for pottery and large bone fragments and 3. Fine, for glass, coins, chipped
stone and small bone. Please write “from sieve” on the wooden labels you make
for any materials collected from sieved earth.
Sieving obviously affects the amount of pottery collected from each context. Some
contexts you may want to squeeze for dating evidence - some deposits may contain
an overwhelming majority of early material and you want to see if there are a few
later pieces - sieve a proportion, or if needed, sieve 100%. Sieving pottery deposits

17
ensures almost complete recovery and is excellent for statistical purposes.
However, sieving for pottery in a context composed of mudbrick results in huge
quantities of tiny sherds reused as temper for the mudbrick - a good experiment to
prove a point but is not a good habit.
2.7 SAMPLING FOR WATER FLOTATION
There is a water flotation machine at Pietri, a simple machine that forces water up
from below a sample of soil. Light things like small bones, seeds, and carbonized
organics float and are propelled by the flow of water towards collection sieves. The
rest of the sample is washed clean of any soil by the action of the water leaving
behind heavier things that can be sorted once they are dry: any larger micro-fauna
and –botanical material and any anthropogenic finds. Although limey soils, such as
those at Corinth, are generally not good for pollen preservation, the
microchemistry of certain contexts may be ideal. Water floatation is also the best
way to collect carbonized materials since they are damaged or destroyed in a dry-
sieve.
Certain deposits are better suited to water flotation than others. Hearths, pits,
sewers or drains, wells, floors and surfaces, depressions on floors, areas with a
high concentration of burned material, storage and working areas and the contents
of whole vessels are should always be sampled. If the fill of a pit or well is
sampled, take a sample of the context it cuts for comparison. When you take a
sample for water flotation, you should dry sieve all or a percentage of the
remainder of the context. As a general rule, contexts should only be sampled if
they are well-stratified and an archaeologically understandable feature whose
relationship to the site is understood. Sampling a random anomalous feature will
not help you to know what it is and sampling a context that is poorly stratified is
useless. By keeping the Harris Matrix up-to-date, relationships between contexts
will be easy to see and this will help to come up with a more successful sampling
strategy.
A minimum sample size is 10 Liters (about 2.5 gallons) and is collected in plastic
bags or buckets that need to be labeled with wooden tags. If the context is too
small to remove 10 L of earth, then take a percentage of the context and state what
that percentage is (100%, 50%, etc).
Please note if you have taken a sample on your deposit recording sheet, the
volume of the sample (10L, 30 L, 60 L, etc), and what percentage of the whole this
figure is (this can be an estimate when the deposit is very large). Then complete the
Sample Recording Sheet.
2.7.1 COMPLETING THE SAMPLE RECORDING SHEET
1. Enter the Title Tag from the context being sampled (see §5.2.1) and when you
know it, the Chronological Range of the context and what material dated it.

18
2. Enter the context number of the context being sampled and note how many
samples are taken from this context (so the sample you are recording could be ‘1
of 4’, for example). This will be useful in situations where you want to take
several samples of the same context but keep them separate for comparative
analysis (like a large floor or a burial).
3. Take measurements on the location and size of the sample using the Total
Station and/or measuring tapes (see §3.4, §5.2.2 and §5.2.4). This is the location
of the Sample, not the context itself. Use these measurements to figure the
dimensions of the sample in meters.
4. Note whether the sample is taken from Plan (i.e. from above the context – this
will be the norm) or from Section (i.e. from the vertical face of a cross-section,
see §3.3).
5. Note the % of the context sampled (this can be an estimate), the size of the
sample taken in Liters and the number of containers used to take the sample (see
§5.2.13 and §5.2.14)
6. Briefly describe the methods used to collect the sample, the weather and soil
conditions (§5.2.12).
7. List the inclusions in the context being sampled, giving particular note to the
inclusions that suggested that sampling would be valuable (organics, carbon,
shells, etc) (see §5.2.8).
8. Copy the Harris matrix of the context from the context recording sheet to the
sample recording sheet.
9. Discuss the reasons you are sampling this context, for example, Is there a good
amount of organic material or carbonized organics preserved here? Is the context
particularly wet or water-logged? Did you sample other related contexts and
need this sample for comparison? Etc…
10. Discuss specific questions you have about this sample, for example, Will
frequent animal bone give information about diet? Will any seeds recovered give
information about the environmental conditions or the farming practices in use
when this context was deposited? Etc… These will not be the only questions that
are taken into account during the post-excavation analysis, but will help those
consulting your records in the future to understand why you sampled here.
11. Draw a sketch of the context (does NOT have to be to scale since you have
already done this with the top plan of this context) showing the location of the
sample. Note dimensions or coordinate points and draw a Right Arrow. If you
are taking multiple samples from the same context, include them all so it is easy
to see where they were all taken in relation to each other. If you sampled a fill
from a pit or well, sketch a simple section showing the relationship of this
context to other fills in the pit or well.
12. The notes section is reserved for the recording of the materials collected from

19
flotation.
2.8 EXCAVATING STRUCTURES
A ‘structure’ is any built feature. The Director decides whether or not to remove a
wall or other structure during the course of excavations. Some walls and structures
will be left in situ to preserve that period of use on site and for display to the
public. Walls and other structures can still be recorded even if they are not fully
excavated and there is a separate recording sheet for structures. However, if they
are excavated (and thus destroyed), then all efforts should be made to collect the
soil and other material from inside and treat this like all other contexts. This soil
should be sampled for floatation and the rest 100% dry-sieved.
3 FIELD DRAWINGS The site architect is responsible for producing professional plans of the excavation
and the archaeological site as a whole. Professional drawings of specific features
will be produced through the course of the season. However, supervisors will be
doing the majority of the drawing in the field on a daily basis, drawing each
context before it is excavated and drawing vertical sections as appropriate.
3.1 DRAWING CONVENTIONS
It is important that the drawings you produce are understandable to others, now and
in the future. Consistency is very important in an open area excavation as many
different hands will be drawing contexts that are related. For this reason, James
Herbst has developed conventions that must be followed in all field drawings.
3.2 TOP PLANS
A Top Plan is a ‘bird’s eye view’ of the context you are recording before it is
excavated and must be drawn in the field at the time of excavation of every
context you record (deposits, cuts and structures all need top plans). Top plans
must clearly show the position and limits of the context and how the context is
related to other features such as walls, pits, etc. The context being planned and any
other related features all need to be clearly labeled. Elevations and find spots of
objects such as coins and concentrations of pottery should also be marked.
DO use the total station to establish the basic location of your context, and to put in
temporary points from which to measure your context, but DO NOT “DRAW”
using the total station. Top plans that are based on a series of total station points
are simply polygons and are not a true reflection of the shape or boundaries of the
context. Top plans should be carefully measured and accurate. (See §3.4 below for
instruction on laying out a right angle as an aid for producing measured drawings.)
All plans must be drawn at a scale of 1:20 [5cm = 1m] and grid measurements
(north and east measurements) need to be labeled at the edges of the grid paper.
This allows anyone to take two or more plans and easily compare them. If the

20
context you are drawing is very small and you want to draw it at a larger scale, you
must first draw it at 1:20 and then supplement the record with a second drawing at
a larger scale. If your context is very large, you should draw a top plan at a smaller
scale (1:50, 1:100, etc.) and draw a second drawing at 1:20, even if this entails
using more than one piece of grid paper to do so.
Write your name, the date, the area of excavation (Nezi or N of Nezi), the context
number, and the scale (usually 1:20), in the fields provided. Using a compass,
draw in a north arrow here as well. If you needed more than one sheet of grid
paper for your context, write ‘1 of x’, ‘2 of x’, etc, on the plan here. Include TOP
elevations (do not include bottom elevations) on your drawing using the
convention shown above in § 3.1.
If you find coins in a deposit, use the measurements taken with the total station to
label their exact find spot on the top plan of that context.
3.3 VERTICAL SECTIONS
Make a note on all applicable context sheets that a section has been drawn.
A vertical section, or cross section, is a vertical slice into a site, revealing strata
that can then be viewed from the side (see §2.5.2 for example illustrations of
sections).Vertical sections are a useful visual tool to show stratigraphic
relationships, as excavated, if they are systematically used with top plans. In most
cases on an open area excavation, it is only possible to draw a section after the
contexts are excavated, and this is done using the top and bottom elevations and
the top plans that you drew of each individual context. This is a reconstructed
section since you are reconstructing site stratification using measurements after
excavation. As a rule, you should draw reconstructed sections any time you feel
that the stratigraphy of a part of the site will be better understood by later scholars
with the aid of a visual illustration. Because each context is recorded and drawn
individually, we can reconstruct sections wherever we want on site. If you
reconstruct a section, make a note on all applicable context record sheets that you
have done this by checking the Section box in the Drawings field. Make careful
note on the drawing itself as well as in your notes where you drew the section (N
and E coordinates) and which direction you are facing.
If you sectioned a series of contexts during excavation, for example, if you half-
sectioned multiple fills inside a pit and have dug the first half, then you should
draw a section of the vertical scarp that you created. The vertical edges of the
excavation might also require section drawings. However, in a careful excavation,
many stratigraphic changes are easier to perceive horizontally than vertically, so
don’t let the section dictate how you excavate the surrounding areas – don’t
assume the section will tell you everything about the surrounding area, it won’t.
These kinds of sections should be drawn on site using measurements you can take

21
then and there with the total station and a measuring tape. Always scrape and
sweep down the vertical section before you draw it (see §2.3).
3.4 MEASURING OFF THE GRID & LAYING OUT A RIGHT ANGLE The total station is often used to establish grid lines and mark them on the ground
with nails and labels. By laying out a measuring tape along this line, you can easily
measure contexts for drawing by using a second measuring tape, holding the end
on the point you want measured, and swinging it until the shortest distance it
achieved against the grid-line tape. This procedure is illustrated below:
Figure 5. A quick way to
take accurate measurements
off a grid line (adapted from
Barker 1993).
If there is no labeled grid
line located in a convenient place for you to use to draw, you can put in a
temporary one using the total station, or by laying out a right angle from an
existing grid line.
The hypotenuse of a right angled triangle where the adjacent sides equal the integer
one is 2 = 1.4142. If you want to lay out a 1 x 1 meter square the diagonals will
measure 1.414 meters.
2 can be multiplied by the length of the sides
desired to create whatever sized square you
need:
2 m x 1.4142 = a diagonal of 2.828 m

22
3 m = 4.243
4 m = 5.657
5 m = 7.071
4 SITE PHOTOGRAPHS Both digital and film photography is used to document the excavation. Photographs
MUST be taken of:
Floors and surfaces, postholes, pits, well heads, robbing and foundation trenches,
pipes and pipe trenches, graves (the top and bottom of the cut and then the skeleton
before removal), structures when the tops are first revealed and then later when
fully revealed, any structure that is going to be removed.
Photos are taken before and after excavation of these features. It is the
responsibility of everyone on site to make sure this happens. Additional
photographs must be taken of complete vessels and any other finds that will be
inventoried in the museum as they are revealed in situ and any unusual soil feature.
If you are unsure if a photo should be taken, consult with the field director. The
field director is responsible for taking the photographs, uploading digital images to
the database, and noting photo numbers on recording sheets.
5 FIELD RECORDING PROCEDURES In an open area excavation, no trenches are split away from the excavation area as
a whole. We excavate and record as a team, working our way through the
stratigraphy context by context. Rather than being assigned to a specific trench or
a specific area of the site, supervisors must move around the area and record
whatever context is revealed next. Teamwork and communication is key to
understanding not only the contexts you personally record, but the site as a whole.
Our records are all kept together as one notebook, rather than each student having
their own set of records. The paper records we make in the field are transferred
into a computer database at the end of each day, the goal being that at the end of
the excavations all of our records will be fully digitized and searchable.
All the recording sheets are made up of two types of fields: more ‘objective’ pull
down menus and more ‘subjective’, less structured, free text descriptions. For the
pull down menus you will be asked to submit a structured response. If a
characteristic from a pull down menu truly does not fit then you can give a
subjective textual response in the Excavation Notes section. Keep in mind that
there needs to be a balance between structure (which aids in searching, indexing

23
and creating relationships and associations) and precision (accurately defining the
characteristics of a context to the Nth degree). All observation in the field is
ultimately interpretive but using a standardized system of recording helps to make
the data we produce as useful as possible.
Lot Number and Chronological Range fields are filled in at Pottery Reading.
5.1 THE CONTEXT REGISTER To prevent the same context number being assigned to more than one context or a
number in the sequence being skipped, you must register your context number
BEFORE you begin recording a context. The context register is shared between
all supervisors and the field director. For the purpose of the register, the description
of the context is not terribly important, but it should be intelligible to anyone
consulting the register during the excavation season.
5.2 DEPOSITS All contexts are classified as deposits, cuts or structures. Deposits are positive
contexts (opposed to cuts) and are not built features (like structures). Most contexts
are deposits. Pit fills, surfaces, agricultural plow zone, natural events like flood
wash and grave fills are all examples of deposits.
5.2.1 TITLE TAG
This is the essential summary of the context. The best way to write a title tag is to
keep it short and to the point. Use keywords and phrases that not only describe the
deposit, but define it. Don't try and get clever, just say what you mean, and call the
context what it is. You should never use more than 10 words and strive to use as
few as possible, recording only the essence of the context. These title tags can be
modified if new information allows for more precise interpretation later. Title tags
are most useful as a quick reference tool.
Describe the defining characteristics of the context but do not simply reference
other contexts. If referencing a related context, use its title tag in a shortened form
and do not reference context numbers. There is no need to mention the
chronological date of the context as this information will appear in the
Chronological Range field. However, it may be important to note earlier or later
relative phases. Likewise, avoid referencing any database field (color, compaction,
sorting, composition, etc.) that has a pull down menu unless you find it absolutely
definitive of the context (i.e. there is literally nothing else that you could say about
it to define it). Avoid abbreviations. Put the most important and definitive
words first. Here are some examples of good and bad title tags:
Good Title Tags
Pit fill, third deposit from top
Agricultural zone cut by modern plow furrows

24
Ashy fill of small pit
Destruction debris: tile scatter
Floor
Destruction debris of Frankish structure
Robbing trench fill of N-S wall cut by Late Roman E-W wall
Well fill, tenth deposit from top
Bad Title Tags
Fill of orange tree pit (pit cut = context 9)
Third deposit of fill in pit
Reddish soil E of context 43
Middle Roman destruction debris
Fill of well
5.2.2 ELEVATIONS You must take elevations on top of every context you record – take the highest of
the top elevations and enter that number in the Top Elevation field and when you
are finished excavating a context, take the lowest of the bottom elevations and
enter that number in the Bottom Elevation field. Elevations can be taken with the
total station or with the dumpy level if it is in the field. Although the recording
sheets only ask for “highest of the high” and “lowest of the low” it will take several
elevations to adequately describe a basket and these should be recorded on your
top plan.
5.2.3 SLOPE DOWN TO AND DEGREE
By comparing the different elevations you take at the top of your context, you will
be able to see if the surface slopes down towards any particular cardinal direction
(N, NE, E, SE, S, etc). The Slope Degree is an estimate of the degree to which the
top surface slopes: chose one of the following options:
level, slight, moderate, steep, vertical, or uneven.
5.2.4 COORDINATES Based on your measurements of the size and shape of your context, determine the
furthest North, South, East, and West extents of your context. Your top plan will
be useful here.
5.2.5 SOIL COLOR A Munsell chart is not required - who has ever seen Munsell Colors of soils used to
draw meaningful conclusions about a deposit? Ideally the sample should be moist
but that is difficult in mid-summer in Greece, so spray the soil if needed. Color
should always be assessed when the deposit is moist but not waterlogged. This
should be kept as simple as possible and standardized. Use the terms below (from
C. Spence ed. (1990) section 3.1.1.2 and the Munsell Soil Color Charts, 1994).

25
There are 3 components to describing soil color: a modifier, a hue and a color.
Chose from the following options, choose one term from each component:
MODIFIER: Light, Dark Very Dark
HUE: Greenish, Brownish, Greyish, Reddish, Yellowish, Pinkish
COLOR: Green, Brown, Grey, Red, Yellow, Pink, White, Black
If your basket is not uniform in color, select MIXED. You should then describe
the different colors that you see in the Excavation Notes field below. ‘Mixed,’ as a
rule, should be reserved for soils that truly are mixed and have more than one
distinct color component. It is much more important to describe the color of a
deposit in order to define it as different from surrounding contexts than it is to try
and analyze its color down to the individual particle level.
5.2.6 SOIL COMPOSITION
All soils will be made up from a combination of sand, silt or clay. Sand feels gritty
and you can see the individual grains with the naked eye. Silt is smooth and
slippery to the touch when wet and like powder when dry; the individual particles
are much smaller than those of sand and can only be seen with the aid of a
microscope. Clay is sticky and plastic-like to handle when wet and like concrete
when dry. The individual particles are extremely small and can only be seen with
the aid of an electron microscope. You have to physically touch and feel the soil to
be able to describe the texture and composition of a deposit.
This field asks for or the majority elements of a deposit. Inspect the soil with care,
but there is no need to go overboard describing percentages of sand or silt here.
You may chose from the following options:
Fine sand, coarse sand, clay, or silt (all rare)
Silty sand (common) or clayey sand (rare)
Sandy silt (common) or clayey silt (rare)
Sandy clay or silty clay (rare)
Or MIXED (if mixed, please elaborate in the Excavation Notes section).

26
Figure 6. Diagnostic questions for soil (after C. Spence 1994).
5.2.7 SOIL COMPACTION
This describes how compact the soil in a deposit is. You should excavate some of
the deposit and discuss compaction with the excavator in order to make this
observation. First you must determine the composition of the soil.
If the MAIN component is fine-grained (silt or clay), choose from:
Hard, firm, soft, or very soft.
If the MAIN component is coarse-grained (sand), choose from:
Strongly cemented, weakly cemented, compact, or loose.
Figure 7. Chart for describing soil compaction (after C. Spence 1994).
RUB MOIST SEDIMENT BETWEEN FINGERS
1. Is the sediment sandy or gritty? YES > 2 NO > 6
2. Can the sediment be formed into a ball? YES > 3 NO > 4
3. Will it form a U-shape without breaking? YES > CLAYEY SAND
NO > SILTY SAND
4. Are the sand grains like granular sugar? YES >COARSE SAND
NO > 5
5. Are they the size of castor sugar? YES >FINE SAND
NO > FINE SAND
6. Does the sediment stain the fingers? YES > 7 NO > 9
7. Sediment texture is smooth and silky? YES > 8
NO > SANDY SILT
8. Is it also sticky? YES > CLAYEY SILT
NO > SILT
9. Is it sticky and hard to break? YES > CLAY NO > 10
10. Does it break easily and cleanly? YES > SANDY CLAY
NO > SILTY CLAY
SEDIMENT TERM DEFINITION TYPE
COARSE-GRAINED STRONGLY CEMENTED Cannot be broken with hands.
WEAKLY CEMENTED Pick removes sediment in lumps
which can be broken with hands.
COMPACT Requires pick for excavation.
LOOSE Can be excavated with trowel.
FINE-GRAINED HARD Brittle or very tough.
FIRM Molded by strong finger pressure.
SOFT Easily molded with fingers.
VERY SOFT Non-plastic, crumbles in fingers

27
5.2.8 INCLUSIONS
Inclusions are anything in the soil that is not soil (ceramic sherds, glass fragments,
stones, shell, bone and other organics like carbon or land shells, plaster fragments,
mudbrick fragments, tile [small or large fragments] and other building materials).
List all inclusions that are present and to estimate the % of inclusions in the soil.
Figure 8. Chart for estimating
percentage composition of
inclusions. Each square equals the
percentage. (Redrawn after
Hodgson 1974).
5.2.8.1 SORTING
This term refers to the distribution of inclusions in your soil; usually random in the
case of dumped fill, water-sorted in the case of water-laid sediments, gravity sorted
in tipped fill, etc. A complex depositional history often produces a complex
particle distribution in a single stratum. The degree of sorting is a measure of the
frequency with which particles of the same size occur. For example, if the deposit
consists mainly of fine pebbles, it is 'well sorted'. An appreciation of sorting gives
some idea of the processes responsible for deposition. When describing the level of
sorting of the inclusions in your context, chose from the following options:
well, moderately, poorly, very poorly
Figure 9. Chart for estimating
degree of sorting (redrawn
after Folk 1988).

28
5.2.8.2 SIZE
This is not a field on your recording sheet (or in the database) but should be
described in the Inclusions field. Describe the size of the primary inclusions in a
deposit. For stones, use the chart below to standardize your vocabulary in your
descriptions. For other inclusion it is more useful to give average dimensions (in
meters).
Figure 10. Modified Wentworth Scale for describing the size of stones.
5.2.8.3 SHAPE AND ROUNDNESS
This is not a field on your recording sheet (or in the database) but should be
described in the Inclusions field. Describe the shape and roundness of stone
inclusions. This information helps to determine the nature and origin of the deposit.
ROUNDED
SUB -ROUNDED
ANGULAR Spherical Tabular Platy
Figure 11. Guide to describing the shapes of stones.
5.2.9 THE HARRIS MATRIX AND STRATIGRAPHIC RELATIONSHIPS
See §1.4 for an explanation of the principles behind the Harris matrix. Use this
field to begin assembling the overall Harris matrix for the site, by focusing on the
context you are recording (the center rectangle) and any and all other contexts
physically related (that means actually touching). You will use this information as
well as the physical relationships of other contexts to refine this picture into a
proper Harris matrix that maps chronological relationships rather than purely
physical ones.
In the matrix, Context numbers ABOVE the context you are recording are LATER
in time than your context. Context numbers BELOW the context you are recording
are EARLIER in time than your context.
FINE PEBBLES 0.002m - 0.006m
MEDIUM PEBBLES 0.006m - 0.02m
COARSE PEBBLES 0.02m - 0.06m
COBBLES 0.06m - 0.2m.
BOULDERS 0.2m.

29
7 8 9
10
a b c
11 12 13 14
d e f g
Figure 12. A modified Harris matrix with hypothetical contexts.
When the overall site Harris matrix is composed, positive features (deposits,
structures, skeletons) will be represented as a context number inside a rectangle (as
shown above), and negative features (cuts) with an oval. However, for the field
version – a work in progress – all contexts besides the context being recorded will
be represented with rectangles.
Use the empty circles incorporated into the lines that connect contexts to describe
physical relations between contexts, WHY and HOW you interpret one context as
being distinct from another. These should be simple comparisons based on your
observations and description of the soil of a context. So, for the example matrix
shown above, in the Physical relationships field, it might read:
a) 7 is harder than 10, 7 overlies 10
b) 8 is blacker than 10, 8 overlies 10
c) 9 is blacker and has fewer inclusions than 10, 9 cuts 10
d) 10 is softer and redder than 11, 10 cuts 11
e) 10 is very slightly redder than 12, 10 overlies 12
f) 10 is softer and redder and has more inclusions than 13, 10 overlies 13
g) 14 is a cut and 10 fills it
5.2.10 BOUNDARIES WITH OTHER CONTEXTS
This field can only be filled-in when your basket has been completely dug. This
describes how dramatic the change was between the basket you are recording and
the context(s) revealed below it. Please choose from:
Sharp: the change is dramatic and very easy to see (a major change in color,
texture, inclusions or all of the above).
Clear: the change is clear, but not dramatic (a clear change in color or texture or
inclusions).

30
Diffuse: the change is not clear or easy to see, but it is perceived by a slight change
in color or texture or inclusions.
If more than one context is revealed below the one you are recording and they
differ in how distinctly different they are from your context, leave this field blank
and elaborate in the Excavation Notes section.
5.2.11 FORMATION/INTERPRETATION
This is your initial interpretation of the nature of the context, what it is and how it
got there. Sometimes this is easy, like when you are digging the fill of a pit.
Sometimes it is difficult to determine in the field during excavation and you will
only be able to describe your context in general terms, like “Deposit accumulated
over N-S wall”, “Dumped debris”, or “Possibly a leveling operation?”. This
information will be helpful when coming up with a title tag for your context when
you enter it into the database. If the nature of the formation of the deposit is not
clear at the time of excavation, state this clearly – it is better to be honest than to
force an interpretation with no evidence to back it up. You can always add to or
modify this field later, just make sure you note that your new interpretation is a
“Later note” or “post-excavation interpretation” and explain in the Notes section
why you are modifying your position (these notes should also be designated as
“Later”).
5.2.12 METHOD AND CONDITIONS
Please give the following information:
Tools used: small pick, big pick, trowel, souvlaki stick, broom, etc.
Soil Conditions: Excavated Dry or Excavated Moist. If your basket has been
exposed to the elements for a length of time, comment on how long (a
week? 2 weeks? Longer?). Mention if there was a recent significant rain
or if you sprayed the soil down with water prior to excavation.
5.2.13 SIEVING
Indicate whether or not you have sieved soil from this context, what size of mesh
sieve you used (usually this is 3mm) and what percent of the total context you have
sieved. You can estimate this by counting the number of zembils or wheelbarrows
of soil that are removed and then calculating the ratio between those taken to the
dump and those taken to be sieved – explain how you arrived at this number in
your Excavation Notes.
5.2.14 SAMPLES TAKEN
Indicate if you have taken sample(s) for water flotation, how much (in L) and what
percent of the context this sample is.
5.2.15 INVENTORIED OBJECTS & COINS

31
You won’t enter information about inventoried objects in the field, but you will
enter coin information. When a coin is found while excavating a context,
immediately take a reading on it using the total station. Then mark the find-spot on
your top plan using these measurements, with the elevation written next to the
word ‘coin’. In the data field on the recording sheet, list each coin with its
elevation, “Coin (87.23 El.):____ ” and leave space as each coin will be given a
unique number (something like 2008-178) at the museum that you will need to
write in this space.
All coins are taken to the museum at the end of the day in individual paper
envelopes. On the outside of the envelope, record the area of excavation (Nezi or N
of Nezi), the date, the context number and the north, east and elevation
measurements from the total station. Draw and outline around the coin on the
outside of the envelope in pencil. Coins found while sieving also go to the museum
packaged like this, but instead of noting the measurements of their find spot, write
‘from sieve.’
The pickmen and shovelmen have an excellent eye for coins and recovery rates are
generally very good. I have found that sieving for coins rarely produces coins in
the sieve but does increase the number found in the soil itself.
5.2.16 EXCAVATION NOTES
This is your opportunity to put into words in the field anything you observe about
the context you are recording and any other interpretations of the excavation. It is
okay to be repetitive here if it is necessary to get the point across (to repeat
information you entered into the data fields above) but do try to step beyond simple
description and attempt more complicated interpretation. This is the best place to
explain WHY you think the things you do about your context. It is not helpful or
appropriate to treat this area as your personal diary – keep your notes professional.
For each deposit please attempt to record the following information:
1. Any descriptive information relating to the fields above that needs
elaboration or clarification.
2. What contexts this deposit reveals – this will help with the Harris matrix later
on – you won’t have context numbers for these new contexts yet, but you can
describe them.
3. If you were expecting to reveal something with the excavation of this deposit,
did you? Or did this deposit reveal something unexpected?
4. Any information about the excavation or revelation of this context that was
not recorded in the data fields above.
5. Anything else you think is important, or any ideas you have about how this
deposit relates to the rest of the excavation.

32
If you want to add to these notes at any point after the initial composition in
the field, you MUST write “later note” or “later interpretation” and give a
date. This applies to the paper form itself as well as the database copy.
5.3 CUTS All contexts are classified as deposits, cuts or structures. Deposits and structures
are positive features; a cut is the remainder of a negative human action – the
removal of something. You cannot excavate a cut, you can only observe it. All cuts
must be recorded and assigned a context number so they can be integrated into the
Harris matrix as they are the remainder of human action and are thus part of the
history of the site as a whole.
5.3.1 TITLE TAG
See§ 4.2.1.
5.3.2 SHAPE IN PLAN
Describe the shape at the top of the cut. Choose from the following terms:
Square, Rectangular, Circle, Semi-circular, Oval, Sub-rectangular, Linear, or
Irregular.
If you choose Irregular, you must elaborate on the shape of the top of the cut in the
Notes section.
5.3.3 DIMENSIONS
If the shape is asymmetrical (so not a circle or a square), measure the longest
distance first, this is your Length, the shortest distance is the Width, and the
Depth is the difference between the highest top elevation and the lowest bottom
elevation. Record in meters. If the cut is square, the length and the width will be
the same measurement. If the cut is a circle, give the Diameter rather than the
length and width.
5.3.4 BREAK OF SLOPE-TOP
Describe the degree with which the top surface of the edge of the cut breaks into
the sides. Choose from the following terms:
Figure 13. Guide to describing the break of slope – top (C. Spence 1994).
5.3.5 SIDES

33
Describe the sides of the cut using the following terms:
Vertical, Convex, Concave, Stepped, or Mixed.
If you choose Mixed, you must elaborate on the sides of the cut in the Notes
section.
5.3.6 BREAK OF SLOPE – BASE
Describe the degree with which the sides break into the base of the cut using the
following terms:
Figure 14. Guide to describing the break of slope – base (C. Spence 1994).
5.3.7 BASE
Describe the base of the cut with the following terms:
Flat, Concave, Sloping, Pointed, Tapered – blunt, Tapered – sharp, Uneven.
If you choose Uneven, you must elaborate on the base of the cut in the Notes
section.
Figure 15. Guide to describing the base of a cut (C. Spence 1994).
5.3.8 ORIENTATION
This only applies to linear cuts. If linear, note the orientation of the cut in
cardinal directions (N-S, E-W, NE-SW, NW-SE).
5.3.9 TRUNCATION
Does the cut have its original shape or has it been truncated (cut by) by another
action/context? If so, describe what part is truncated and, if possible, state what has
truncated it.
5.3.10 HARRIS MATRIX
See §1.4 for an introduction to the principles of the Harris Matrix and §4.2.9 for
instruction on using the Harris matrix for deposits. Using the Harris matrix for cuts
is very similar. The principle difference for cuts is that you are not asked to
describe the differences between soil contexts as the cut is itself an interface

34
between soil contexts. Note that cuts are expressed with ovals in the final Harris
matrix produced for the site as a whole.
5.3.11 FILLED BY
This field asks for the context numbers of ALL the deposits filling this cut.
5.3.12 NOTES
This is your opportunity to put into words in the field anything you observe about
the context you are recording and any other interpretations of the excavation. It is
okay to be repetitive here if it is necessary to get the point across (to repeat
information you entered into the data fields above) but do try to step beyond simple
description and attempt more complicated interpretation. This is the best place to
explain WHY you think the things you do about your context. It is not helpful or
appropriate to treat this area as your personal diary – keep your notes professional.
For each cut please attempt to record the following information:
1. Any descriptive information relating to the fields above that needs elaboration
or clarification.
2. How you came to recognize this cut based on the observations you recorded
above.
3. What this cut cuts into (you will not have a context number for this deposit yet,
but you should describe it well as you will need to add the context number(s) to
your Harris matrix in the future when this deposit is excavated.)
4. Cuts of pits and trenches are important as the material from the fill inside and
the deposits they cut are very good dating tools. Describe how this cut and its
related deposits might aid the dating of this part of the site.
5. Any information about the excavation or revelation of this context that was not
recorded in the data fields above.
6. Anything else you think is important, or any ideas you have about how this cut
relates to the rest of the excavation.
If you want to add to these notes at any point after the initial composition in
the field, you MUST write “later note” or “later interpretation” and give a
date. This applies to the paper form itself as well as the database copy.

35
5.4 STRUCTURES
All contexts are classified as deposits, cuts or structures. Structures are purposely
built features like walls, built floors, built roadways, hearths, and well heads.
5.4.1 TITLE TAG
See §4.2.1.
5.4.2 COORDINATES
Based on your measurements of the size and shape of the structure, determine the
furthest North, South, East, and West that the structure extends. Your top plan will
be useful here.
5.4.3 ELEVATIONS
Take elevations at several points on the structure, but only record the highest of the
high and the lowest of the low in this field. The other measurements should be
added to the top plan.
5.4.4 DIMENTIONS
Overall length, width and height of the structure, in meters.
5.4.5 MATERIALS
List all forms of building material used in the structure. If there are different
materials and they are being used in different and purposeful ways (like if marble
was only used on the corners or large stones only at the base of a wall) then please
elaborate here.
Frequently used building materials at Corinth: *Not an exhaustive list*
limestone, sandstone, marble
roof tiles, diamond tiles, brick (fired), mudbrick, clay
plaster, hydroplaster
tesserae – stone, tesserae – glass,
5.4.6 SIZE OF MATERIALS
Measure several examples of each form of building material in the structure and
list the average size for each type, in meters.
5.4.7 FINISH OF STONES

36
See illustration below. This describes the exterior surface of any STONES used in
the structure and is not to be applied to other forms of building material. If there
are no stones used, leave this field blank. Choose from the following terms:
Unworked, Roughly Hewn, Squared, Dressed Face, Ashlar, Scoinson, or
Mixed.
If you select Mixed, you must elaborate in the Notes section below. Often, a
change observed in the masonry style or the building materials used in a structure
is evidence of a later repair or addition to the structure and so a new phase of the
use of the structure. Make sure that this is not the case here – all repairs and
additions must be recorded separately and given their own context number.
If it is a wall being recorded and the two faces are significantly different from each
other, please select the Mixed option, and then describe each face in the Notes
section, explaining the differences you observe.
5.4.8 MASONRY STYLE
See illustration below. This field is only applicable to structures built up from the
ground (so not built roads or built floors or hearths or mosaics). There are two
fields: one is a more general description of the way the structure was built. Only if
possible, fill in the second field which is more specific to the Classical world and
to Corinth. Select from the following general terms:
Dumped rubble (present in some foundations)
Random coursed, regular coursed, or uneven coursed
Quoins (corners) stressed
Mixed
If you select Mixed, you must elaborate in the Notes section below. Often, a
change observed in the masonry style or the building materials used in a structure
is evidence of a later repair or addition to the structure and so a new phase of the
use of the structure. Make sure that this is not the case here – all repairs and
additions must be recorded separately and given their own context number.
If possible, select from the following specific masonry terms:
cyclopean, lesbian, polygonal, ashlar, orthostates
opus cementicium opus incertum, opus mixtum, opus reticulatum, opus
signinum,,

37
Figure 16. Diagram of stone finishes and masonry styles (C. Spence 1994).

38
5.4.9 BONDING MATERIAL
Describe the bonding material of the structure. Select one of the following terms:
None, Mud-plaster, Plaster, Cement, Modern Cement (from modern
restoration work).
5.4.10 SPECIAL FEATURES
List any significant special features of this structure, like mason’s marks, spolia,
graffiti, or evidence for tools or quarrying methods used on stones (e.g. Lewis
holes and surface treatments), arches or vaults, doors or windows, etc. This is only
a list; describe these features fully in the Notes section.
5.4.11 HARRIS MATRIX
See §1.4 for an introduction to the principles of the Harris Matrix and §4.2.9 for
instruction on using the Harris matrix for deposits. Using the Harris matrix for
structures is very similar. The principle difference for structures is that you are not
asked to describe the differences between soil contexts as the structure will
obviously be very easy to distinguish from the surrounding soil. Note that
structures are expressed with rectangles in the final Harris matrix produced for the
site as a whole.
5.4.12 INTERPRETATION
This is a brief definition of your interpretation of the nature and function of the
structure. You should explain in the Notes section how you arrived at this decision.
This field will be useful in creating the Title Tag for this context. Choose from the
following terms:
Wall – superstructure or Wall – foundation
Wall repair/addition
Built Floor
Built Road
Built Hearth
Well Head
Drain or Manhole
Stairs
Platform (or Stylobate)
Ramp
5.4.13 INTERNAL OR EXTERNAL STRUCTURE
This field will only be used if the structure being recorded is a wall. If it is a wall,
state whether or not you are able to interpret the wall as external or internal (or if
one face was internal and the other external). If you are unable to do this, explain
why. If you are able to do this, site the evidence for this interpretation, (if
necessary include comparisons to other walls or other contexts related to the one
being recorded to make your case).

39
5.4.14 RELATED CONTEXTS
Briefly mention any and all related structures with their context numbers. Define
the relationship – do they bond or not, are they physically connected or related by
stratigraphy or building style? Briefly discuss the structure being recorded in the
context of the greater building activities of this moment – is it part of a room, a
building, a city block? Is it part of a campaign of later refurbishment, remodeling
or repair? Mention directly related deposits and cuts – floors, foundation or
robbing trenches and their cuts – anything directly associated with the structure
you are recording. This is a list of related contexts, use the Notes field to elaborate
on these relationships and cite your evidence for them.
5.4.15 SIEVING
This field will only be used if the structure being recorded is subsequently
excavated/dismantled. If so, treat all soil inside the structure as if it was a deposit.
It will not receive a new context number as it is part of this structure. Describe the
soil briefly in the fields provided. Soil from inside structures is ALWAYS 100%
dry-sieved with 3mm mesh unless it is deemed necessary to take a sample for
flotation, and then the rest is dry-sieved.
5.4.16 INVENTORIED OBJECTS & COINS
See§4.2.15.
5.4.17 NOTES
This is your opportunity to put into words in the field anything you observe about
the context you are recording and any other interpretations of the excavation. It is
okay to be repetitive here if it is necessary to get the point across (to repeat
information you entered into the data fields above) but do try to step beyond simple
description and attempt more complicated interpretation. This is the best place to
explain WHY you think the things you do about your context. It is not helpful or
appropriate to treat this area as your personal diary – keep your notes professional.
For each structure please attempt to record the following information:
1. Any descriptive information relating to the fields above that needs elaboration
or clarification.
2. If this structure is to be excavated or if it will be left for presentation on site.
3. Any information about the excavation of this context that was not recorded in
the data fields above.
4. Anything else you think is important, or any ideas you have about how this
structure relates to the rest of the excavation.
If you want to add to these notes at any point after the initial composition in
the field, you MUST write “later note” or “later interpretation” and give a
date. This applies to the paper form itself as well as the database copy.

40
6 BURIALS & SKELETONS Recording burials requires you to document each action that went into burying the
individual(s) present in the grave. For example, the digging of the grave left the
grave cut; a sarcophagus could have been placed in the grave next (or if the body
was cremated it might have been placed in an ossuary before burial); the body
followed (maybe already in a coffin); and possibly later the grave was dug out
again and the bones of the skeleton were shifted around as part of a secondary
burial ritual. Each of these actions is an individual context that requires individual
recording so they can be incorporated into the Harris matrix of the site. Grave cuts,
grave fills and sarcophagi should be recorded with Cut, Deposit and Structure
sheets, respectively. Skeletons, be they articulated or disarticulated, have their own
recording sheets.
Take soil samples for flotation from the fill of the grave – see also §6.12.
In certain complicated situations like a female skeleton with a fetus in position or a
mass-grave, there might be multiple discernable individual skeletons in the same
context. If this is the case, talk to the Director or the field director about how to
record each skeleton best (for example, having one skeleton be context #-A and the
other being context #-B).
Bone Lot Numbers will be assigned at the end of the season if necessary.
6.1 COORDINATES, ELEVATIONS AND ORIENTATION
The coordinates should reflect the N, S, E and W extent of the skeleton. Use these
to determine the Maximum Dimensions (L, W, Depth) of the skeleton and enter
that information in the field below. Elevations should be taken at various points on
the skeleton before and after removal (these should be recorded on your top plan),
but only the elevations taken on top of the skull and on the earth after the skull
is removed should be recorded in the Elevations data field. Using a compass, take
a bearing from pelvis to skull; record the bearing and draw a North Arrow in the
box provided in the Skeleton Diagram field.
6.2 TYPE OF BURIAL
This field asks for a very brief and simple description of the type of burial you are
recording. Like Title Tags, keep this brief: “Cist/Pit”, “Pit lined with tiles”,
“Cremation in urn”, “Bone Stack”, or “Inhumation in sarcophagus” is sufficient.
Speak with the Director or the field director if you are unsure what type of burial
you have.
6.3 GRAVE CUT & FILL(S)
These fields ask for the context numbers of the grave cut and any fills inside the
cut. Please record context numbers only, not descriptions of these contexts (they
will already have been described on their own context sheets).

41
6.4 SARCOPHAGUS/OSSUARY
Only enter information in this field if the skeleton was buried in a sarcophagus or
some other kind of ossuary (like a ceramic vessel or a coffin). If the burial was in a
sarcophagus or other built tomb, this should be recorded with a Structure sheet –
enter that context number here. If there was some other kind of non-built ossuary,
this item should be made a small find and may be inventoried in the museum. If it
gets an inventory number, enter this information in this field. If you have either a
sarcophagus or an ossuary, circle this term on the recording sheet in this field.
Wooden coffins were used at different periods at Corinth, but the wood rarely
survives. However, often the coffin will be able to re noticed and reconstructed by
making careful note of where the coffin nails are arranged around the skeleton.
Coffins (even if they survive only as nails) should be given a context number,
incorporated into the Harris matrix, and recorded with a Deposit sheet.
6.5 TRUNCATION and DISTURBANCE
The principle of “Last In, First Out” means that when you record an individual
skeleton, any later truncations or disturbances should have already been recorded
and/or removed as individual contexts. The term ‘disturbance’ could be interpreted
as something burial-related, like if your skeleton was disturbed by the deposition of
a secondary burial in the same grave. But ‘truncation’ is later action that is not
related to the burial activities of this particular grave and cuts and even removes
part of the burial contexts, like a later wall being founded over part of your grave,
or a later burial cutting your skeleton. If the skeleton has been truncated by later
action, list the context number(s) of these actions in the ‘Truncation’ field. There is
a larger field below on the recording sheet to briefly describe truncations and
disturbances. If this space is not sufficient, continue your description in the
Excavation Notes. Any disturbing natural action from roots or animals should be
described in this longer field and elaborated on in Excavation Notes.
6.6 SKELETON DIAGRAM
Shade in the bones that are present at the time of excavation. Use a hashed line to
show any truncation. Record the north arrow and compass bearing (taken pelvis to
skull) in the box provided. Use the check-boxes to note whether the skeleton is
Articulated or Disarticulated and a Primary or a Secondary burial.
6.7 STICK-FIGURE SKETCH
This is just what it sounds like: a very crude stick-figure sketch of the body as it
lies in the grave, expressing the position of the limbs especially. Save detail for the
top plan, this is simply a thumbnail. If you are recording a secondary burial of a
bone pile, do not bother to sketch this – your top plan will be sufficient.
6.8 HARRIS MATRIX
Like other contexts, a skeleton will be a distinct unit in the Harris matrix.

42
6.9 POSITION OF BODY PARTS
These fields are for articulated skeletons only. Detail the position of the body and
its different parts in the appropriate fields. For the Body, note whether the skeleton
is prone (front down), supine (front up), extended or flexed, or laying on left or
right side. Note which way the Head faces and if it is propped by stones or other
materials. If the body is twisted or half supine/half on its side, note this in the
Trunk field. Note whether the Arms are straight or flexed, at the side, over the
chest, on the pelvis, or under the body; and the position of the Hands (open or
clenched, palms up or down, or if fingers are entwined or grasping an object, for
example). Note whether Legs are extended or flexed, side-by-side or crossed (left
over right or right over left), and the position of the Feet (pointing down, splayed
to either side, etc.).
6.10 LIST IN SITU BROKEN BONES
List any broken bones that were broken before you attempted to remove them
during excavation, that is, they were already broken before you revealed them
through excavation. Use the check-boxes to note if the state of preservation of the
bones is Good, Fair, or Poor. Use the following diagrams to identify the bones of
an adult, a juvenile, or a Neonate.
Adult
Juvenile: 3 yr old
Juvenile: 3-years old Neonate

43
Figure 17. Diagram of skeletal components (C. Spence 1994).
6.11 ASSOCIATED OBJECTS
Note here the items directly associated with the skeleton, these will be the remains
of any clothing and accessories on the skeleton or any grave goods deliberately
placed in the grave at the time of burial. Do not list material that happens to be in
the fill of the grave cut. If any of these items are inventoried in the museum, add
these numbers to the record when you have them.
6.12 SIEVING AND SOIL SAMPLING
Consult with the Director and the field director before removing the skeleton. It
might be fruitful to take several soil samples for flotation at different points on top
of, beside and under the body to see if the remains of perishable grave goods can
be detected in the soil and where they were placed on or around the body.
Whatever is not sampled, should be dry-sieved 100% with a fine mesh. Be
involved with the sieving and be careful that the sieving action is not too harsh that
it damages any bone still in the soil.
6.13 SPECIALIST OSTEOLOGICAL DATA
These fields are filled in by an osteologist.
6.13 EXCAVATION NOTES
Use this space to more fully describe the state of the skeleton and the way it was
buried; any disturbances or truncation; the way the skeleton or the
sarcophagus/ossuary is situated within the grave cut; any remains of burial ritual or
practice; describe complicated burial situations, like a female with fetus in position
or multiple burials in the same cut or multiple cuts. Any of the data fields above
that needed elaboration can be discussed here.
6.14 DRAWING SKELETONS
See also §3. The site architect will produce a professional plan of each burial, but
each skeleton also needs a measured top plan. As skeletons are less easy to draw,
consider using a drawing frame – talk to the architect or the field director for
advice if needed. Unlike other top plans where each context is drawn separately,
please include the grave cut in your drawing of the skeleton (this can be traced
from the top plan of the fill of the grave that will have already been partially
recorded). Also include clothing, accessories and grave goods in the drawing of the
skeleton.
7 FINDS
7.1 FINDS LABLES IN THE FIELD
You will be given wooden tags by which to label the baskets and boxes used to
collect material excavated in each context. Each supervisor or supervisor pair has a
different color. On the tag write in pencil: the area of excavation (Nezi or N of

44
Nezi), the context number, the date and the type of material being collected
(pottery or bone/shell). Other finds (like coins, wall plaster, metal objects, etc.) are
collected separately by type in envelopes (or boxes, if needed) and are taken to the
museum for specialized cleaning, analysis and recording.
7.2 POTTERY
This is the most prolific find on site and almost every deposit and excavated
structure will yield pottery. Collect large amounts of pottery in a basket and small
amounts in a box. All pottery is taken to Pietri to be washed and laid out to dry.
The foreman is responsible for this task. Pottery can stay out on site overnight if
the basket used to collect it is not yet full and the context is still being excavated.
Make a note on your recording sheets in the field provided how many baskets and
boxes of pottery were sent to Pietri from any single context as this will help you at
pottery reading to collect all the pottery from one context on the same table to be
read at the same time.
7.3 UNWORKED ANIMAL BONE AND SHELL
Collect unworked animal bone and shell from any given context together in the
same box. The bone/shell from this context will be taken to Pietri when the pottery
is – the foreman is responsible for this task. Contexts with higher quantities of
bone should be sieved 100%. With contexts like pits, wells, kitchen floors, garbage
dumps, and house destructions, take special care to collect bone and shell by
sieving. Be sure that the bone will withstand the mechanical process of sieving -
waterlogged horn cores are very fragile. We are looking for bones of different size,
ranging from rodent and sprat up to buffalo, therefore different sieve sizes should
be considered.
Choose the appropriate sieve(s) and note its size and the percentage sieved on the
recording sheet. It is a good idea to consult with the Director or the Field Director.
7.4 ROOF TILES
Fragments of roof tile are a frequent inclusion in deposits at Corinth and are of
little to no value in determining context formation or dating the context. Whole
tiles are more informative, or tiles that have an edge or preserve the shape of the
tile. If you have a fall of roof tiles from a destruction, collect the tiles, weigh them,
note whether they are Sicilian, Corinthian or Laconian, and give percentage of each
by weight in the Notes section of your recording sheet. No need to weigh the tiles
if they are part of a dumped fill or are random finds. If a complete profile can be
reconstructed, sketch the tile and give its dimensions (L x W x Th x H). It is not
useful to collect all roof tile fragments with the pottery from a context as tile
fragments give little to no information at pottery reading.
7.5 COINS
See §5.2.15.

45
Coins are taken to the museum and registered with the Assistant Director after
work ends each day. Each coin is given a sequential and unique number to aid in
future study. Coins are cleaned by the conservator and analyzed by the
numismatist; their findings are given to you later for recording on the appropriate
context sheet and in the database.
7.6. “SMALL FINDS”
Small finds are anything man-made recovered from the excavation that is NOT
pottery, unworked animal bone/shell, roof tiles, or coins. Mostly small finds will be
glass and small objects made of metal or worked bone. Collect each type of find
together in a separate box or envelope (metals collected together, glass all together,
etc.) and label the boxes and envelopes with the area of excavation (Nezi), the date,
the context number from which the material came and the type of material it is. All
small finds must go to the museum at the end of every single day – they cannot
be left out on site even if they come from a context that is still being excavated at
the end of the day.
8 EXCAVATION SUMMARY REPORTS At the end of each week, all supervisors need to collaborate to create a summary of
the findings of the excavation in their appropriate areas. Most supervisors will be
working as a team to summarize the open area excavation as a whole (Nezi), while
some supervisors might be recording the excavation of the contexts associated with
a single room or other feature and this part of the excavation will be written up
separately (N of Nezi). New summaries build upon the summaries of the previous
excavation season and each week can simply be updated as needed. Summaries are
organized chronologically and are meant to give an overall impression of the
excavation – the high points – and not to be a regurgitation of every context
recorded (soil descriptions NEVER appear in a Summary Report, for example).
There are example summaries from past seasons on hand in Hill House for
consultation. It is the responsibility of the field director to see that summaries are
composed and to request corrections if needed. These documents will be uploaded
to the database and become part of the permanent archive of the excavations.
All Summary Reports must be accompanied by an up-to-date Harris matrix
produced on the computer and annotated with chronological markers and any other
useful information as needed (see §1.4 and §5.2.9). This document will also be
checked by the field director.
9 POTTERY READING
9.1 SORTING

46
Every afternoon and on Saturdays each supervisor is responsible for sorting the
pottery from the contexts they recorded in the field. Even if your material is
already sorted, others will appreciate it if you help them with theirs. Instruction is
given on pottery types and sorting procedures at the beginning of each excavation
session and your knowledge and grasp of the material will increase with practice
each day.
Separate the decorated/fine wares from the course wares from the cooking wares.
Separate out any diagnostic sherds (rims, bases, handles). Do a finer sorting when
you are more confident with the different pottery types. Pull aside anything that
looks unusual and ask the Director about it during the reading.
9.2 READING
The Director is responsible for reading your pottery and he will tell you what
information to record in the database for each context as well as give you the
Chronological Range of your pottery. As far as possible, standardized vessel forms
are used to identify pottery but inventory numbers and published references may
also be used.
9.3 THE POTTERY DATABASE FIELDS
Deposit and Structure recording sheets have pottery fields associated in the
database for the recording of the pottery at pottery reading. Since the pottery from
many contexts is eventually discarded or partially discarded these records are an
essential part of the excavation archive. The Director will dictate what information
is entered into these fields and it is the responsibility of the student who recorded
the context in the field to record the pottery at the reading. Enter both the pottery
date and whether the pottery is saved, partially saved or thrown on the context
sheets as well as in the database. At the end of the reading of each context the
Director must tell you whether to Save or Throw the pottery. This decision is based
on the material itself and on the stratigraphic relationships of the context to the rest
of the site.
9.4 SAVED AND THROWN POTTERY Saved pottery is counted and weighed and put aside for later consultation. This
pottery needs to be put in a tin with a wooden label marked ‘Saved.’ You must
note why the pottery is being saved (ask the Director); is it for mending, or for
lotting or to see how things shape up stratigraphically as more of the site is
excavated? Saved status is noted in the database and on the wooden tag. Pottery
can also be Partially Saved (the rest of the context is then Thrown).
Pottery is Thrown when the Director has retrieved all useful information from any
given context and it is of no further use. Thrown status must also be noted on the
database and on the wooden tag. After weighing and counting Thrown pottery, put
it in a tin and place it on the shelves at Pietri, it will be reburied later.

47
9.5 POTTERY WEIGHTS AND COUNTS This is the count and weight of pottery before moving it to the Saved or the
Thrown area. Enter the count and weight of sherds by category (course, semi-
course, fine and cooking) here and the total weight at the bottom. If pottery is
Partially Saved, you need to separate out the Saved pieces and weigh and count
these separately. Do not enter any information into the final weights and counts
field until decisions about lotting have been made.
9.6 “GOOD THINGS FROM BAD PLACES” (GTs)
This is a special category reserved for particularly nice or otherwise interesting
finds that were not found in their primary context, that is, they have been disturbed
since their original deposition in the ground and are chance finds in another
context. GTs do not actually tell us anything about the context they were found in,
but we don’t want to Throw them because of some special quality they have. The
weight(s) and count(s) of GTs are recorded in the final field in the database and
then go to the museum after pottery reading. Make sure to check the GT box next
to this object(s) in the database.
10 LOTTING In conceptual terms, a ‘Lot’ is a group of individual contexts that can be
meaningfully grouped together as an archaeologically understandable feature, like
a ‘pit’ or a ‘floor’ or a ‘destruction’. In practical terms, a ‘Lot’ is how finds from
these features are organized and stored. ‘Lotting’ is the process by which you, the
field director and the Director decide which material is to be saved and
permanently stored from the excavation. This process takes place at the end of the
excavation season.
You should keep a careful record of what contexts have been saved and what
contexts have been thrown during each pottery session with the Director, both in
the database and on the context sheets. The next step is to organize the contexts
that have saved pottery into meaningful stratigraphic and historical events. For
example the contexts that made up the fill of a pit or a floor level or a foundation
trench. You should use the Harris Matrix which you have been working on all
season to help create lots from your contexts.
Lotting example 1:
76 is the floor associated with the N-S wall
78 is the fill of the foundation trench for the N-S wall covered by a floor (76).
In terms of lotting, these two contexts, although related by their association with
the same building, should be kept separate as two different phases of the history of
the building (i.e. the construction and the use), and therefore also as two different
lots.

48
Lotting example 2:
48 is destruction debris consisting mostly of tile
50 is destruction debris consisting primarily of mudbrick, 50 is beneath 48
52 is the clay floor beneath 50.
Contexts 48 and 50 can probably be understood as two contexts created by the
same destruction and part of the same phase of the history of this building– these
will be stored as a single lot. These are lotted separately from the floor (52), as it is
not part of the phase of destruction, but part of the use phase of the building.
Once you have organized your saved contexts into potential lots, discuss them with
the field director and the Director. At this point the Director will make final
decisions about what pottery will be lotted and the field director will assign lot
numbers. All pottery within a single lot is then labeled with the lot number and
placed on the storage shelves at Pietri. Note that although contexts may be assigned
to the same lot the pottery from different contexts is NEVER physically combined
but is always stored separately. Any small finds that belong with lotted contexts are
stored with the pottery.
When you have been given your lot numbers, add them to the necessary database
entries and the context sheets. Previously saved pottery that was not put into a lot
should be marked as thrown. For pottery that was lotted, the “all held” button
should be clicked in the database so that the held boxes are checked beside each
read piece and the final weights and counts field should be filled in. In the
comments field below weights and counts, the Lot number should be recorded.

49
11 INVENTORYING IN THE MUSEUM
11.1 POTTERY
11.1.1 DIMENSIONS
Height = H; Diameter = D; Thickness = T; Maximum = max A. If full
profile preserved: Height = Actual
If much of profile preserved: Height (in so far as preserved) = preserved
Diameter foot,
Diameter max. ( = body, if greater than rim/lip)
Diameter max lip/rimB. If a fragment, and orientation clear, then take:
Height
Width
Thickness, if unusual
If a fragment, and orientation unclear, then:
MPDim = maximum preserved dimensionIn general, all dimensions are
considered maximum and do not need to be specified as such, unless you are trying
to distinguish between two dimenions. E.g., if a handle projects above a rim, you
might want: H00.000 (rim) H00.000 (max)
11.1.2DESCRIPTION: Use the illustration along with the text that follows:
Description goes from the bottom up, outside first, then in, if significant. Start
with what the object is “Cup with / plate with…”
Shape only (not decoration or state of preservation), in following order:

50
1. Foot
2. Resting surface or bottom, if no foot
3. Undersurface describe whether flat, convex, nippled, etc.
For descriptions of Foot, resting surface and bottom use terms illustrated in section
6.1.3
4. Body – use terms shown in section 6.1.3
4B. Shoulder, if distinct from body
5. Neck, if a closed shape
6. Rim/Lip: every vessel has a lip: is the upper edge; not every vessel has a rim: it
is an articulation or thickening of the mouth of the vessel – use terms shown in
section 6.1.3
7. Handle– use terms shown in section 6.1.3
8. References to parallels for shape.
11.1.3 STANDARD TERMS FOR DESCRIPTIONS
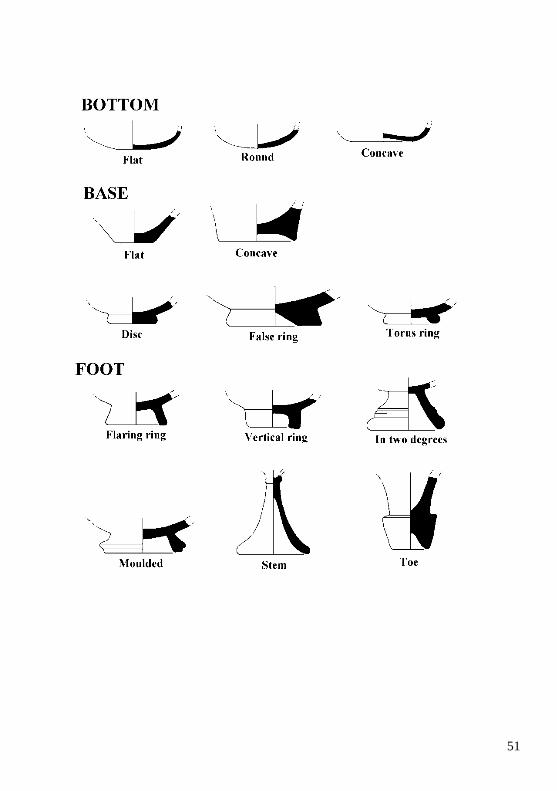
51

52
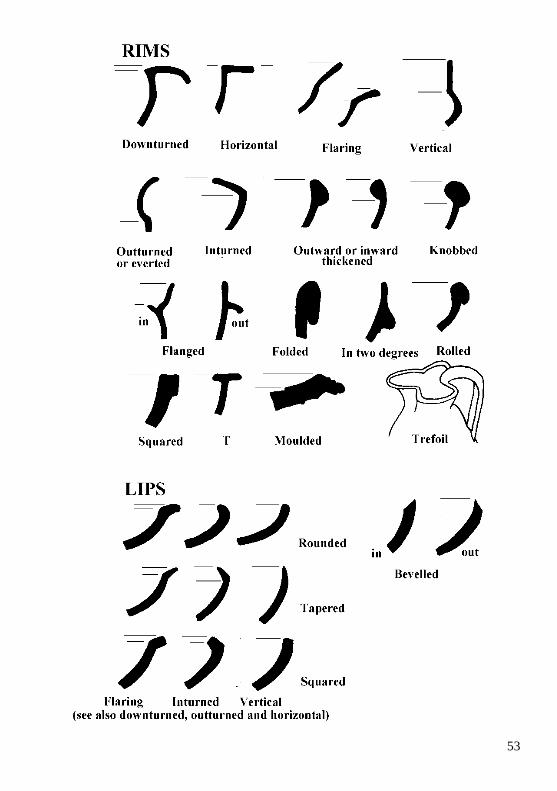
53

54
11.1.4 DECORATION From bottom up, outside first, then in if significant. Or, for medieval pottery,
where important decoration of open shapes on interior, interior first, then exterior.
1. First, grooves or relief decoration: e.g., grooves, wheel-ridging, combing,, fluted
2. Glaze/slip: glaze generally used for black color on pre-Roman pottery, or for
vitreous Byzantine decoration; slip used rather than glaze for Roman pottery.
3. Painted decoration (note can also have burnishing)
11.2 LAMPS
11.2.1 DIMENSIONS
1. Height to rim
2. Max. Height = Height to handle, if handle extends above rim.
3. Length: from tip of handle to tip of nozzle
4. Diameter of foot, rim
11.2.2 DESCRIPTION First, Mold or hand made then general type, then:
1. Foot or bottom
2. Body
3. Rim
4. Disc (if Roman)
5. Fill hole
6. Nozzle (and air hole, if Late Roman), wick hole
7. Handle
11.2.3 EXAMPLE DESCRIPTIONS
Greek: lamp with vertical ring foot, deep convex body, flat rim, large fill hole, long
nozzle, flat on top with small wick hole at tip. Horizontal strap handle.

55
Roman: flat bottom, echinoid body, narrow rim, deep concave disc with three fill
holes, small air hole at base of short U-shaped nozzle, small wick hole, vertical lug
handle, pierced and grooved.
11.2.4 DECORATION
1. Relief or impressed, if it exists
2. Slip/glaze.
11.3 FIGURINES, STATUARY
11.3.1 DIMENSIONS
Height = H; Length = L; Width = W; T = Thickness
Only what would be anatomically important:
Height, Height head, Width shoulders, etc.
If a base, length, width, height.
11.3.2 CONDITION
In somewhat general terms, e.g., Six joining frgts., complete from neck to feet,
missing right hand; deep gash over right knee; surface stained purple.
11.3.3 MATERIAL, if marble: not type of marble, unless you are an expert, but
color, size of crystals, colored or micaceous veins, if exist, laminating fracture if
exists.
11.3.4 DESCRIPTION:
1. GeneraL first: Sex, Nude or Draped, Pose, Position of legs, arms,
2. Then, specific from top down,
e.g. Female figure, nude, standing with weight on right leg, left turned out, arms
at side. Hair worn long, with spirally curls framing forehead, square face, low
forehead, thick straight eyebrows, deepset eyes, short nose, pursed lips, short fat
neck, ..... etc.
3. If draped, then drapery after head, again, going from general to specific:
e.g. Wears a frilly chiton that covers upper arms, over which a diagonal himation,
hung from left shoulder, wrapped around waist to hang over extended left forearm.
Deep vertical folds fall to feet. ....
4. Last, plinth or base
5. Tooling: i.e., use of claw chisel, flat chisel, drill
6. If a figurine, whether hollow or solid, handmade, vs. mould made.
11.3.5 DECORATION: Painted decoration only, again systematically presented.
11.4 ARCHITECTURAL TERRACOTTAS
Look at the reconstruction of the south Stoa roof on the site:

56
11.4.1 PAN AND COVER TILES
- Classical Corinthian pan tile: flat floor, triangular sides; undercut at one end for
overlap to next tile.
- Corinthian cover tile: pentagonal in shape.
- Laconian pan tile: shallow curve with flattened edges.
- Laconian cover tile: semi-circular in section
- Roman Corinthian pan tile: Flat with vertical edges along two long sides.
11.4.2 EAVES TILE: Is bottommost pan tile, at edge of roof; decorated on outer
face and underside (= soffit)
11.4.3 ANTEFIX: Is the decorative plaque that covers the bottommost cover tile;
usually takes the form of a palmette. The antefix that runs along the ridge or apex
of the roof is called the ridge antefix.
11.4.4 SIMA: Is the gutter that initially runs down either facade along the edge of
the roof and turns the corner, ending in a lion-head spout, before giving way to
decorative eaves-tiles and antefixes. along the flanks.

57
In the 4th century B.C. the sima extends along the long sides too. Distinguish
between the raking sima (facade) and lateral sima (flanks)
11.4.5 ACROTERION: The decorative element that falls at the apex of the roof
and at the corners. Can be simply a floral motif, or a piece of sculpture.
11.5 INSCRIPTIONS
11.5.1 DESCRIPTION: describe the form of the block - thin, thick, plain,
decorated with mouldings ? Also describe the treatment of all preserved stone
faces.
11.5.2 TOOLING: Punch ( = very coarse point); point-dressed; claw-chisel;
smooth; polished; anathyrosis
11.5.3 TEXT: given under “Writing”: language, letter Ht., distance between lines;
if have finished edges of stone, then give distance between edge of block and start
of text.
11.6 FABRICS Color, hardness, feel and fracture all relate to the entire sherd rather than its
components.
11.6.1 COLOR: The color of a fresh break should, where possible, be described
using a Munsell Soil Color Chart or a CEC chart in natural light. Munsell color
notations may seem to be inappropriate but they too follow a system that bridges
the cultural idiom of subjective color description. "yellowish red" defines a specific
hue, value and chroma range within the scale which "buff" does not.
Be careful in matching colors but remember that different people do not
have the same capacity for matching a sample to the tabs illustrated but nearly
everybody is capable of placing a color approximately within the three-
dimensional scale.
11.6.2 HARDNESS: Based on a modified Moh’s scale and can be made with a
fingernail and knife tip. This is actually not a hardness test but a test of
cohesiveness. Firing and soil conditions both affect mineral cohesion; a sherd from
the forum at Corinth may be extremely "hard" while a sherd of the same fabric
from the Demeter Sanctuary can be a extremely soft.

58
MODIFIED MOH’S
SCALE
11.6.3 APPEARANCE The appearance of a fresh break IS an indicator of hardness and content of the
ceramic body and may be suggestive of the technology used. Granular fractures
tend to have numerous large inclusions while smooth breaks tend to have few or no
inclusions. Laminar - platy, stepped appearance, Hackly - large angular irreg-
ularities, Granular - fine, more rounded irregularities, Conchoidal - large,
smooth, angular facets like chert, Smooth - even, without apparent irregularities.
APPEARANCE
OF BREAK
11.6.4 FEEL
A description of how the surface, as opposed to the break, "feels" is useful and
complements a description of the appearance. The terms suggested can be used in
conjunction with each other; it is possible for a sherd to be both harsh and powdery
(as Late Roman Palestinian amphoras), smooth and greasy (Middle Bronze Age
“Minyan Ware”) or rough and greasy (Early Bronze Age “Talc Ware”). It too is an
indicator of cohesiveness and content.
Harsh Abrasive surface
Rough Angular irregularities present
Smooth No irregularities discernible
Greasy Slick, almost slippery surface
Powdery Grainy feel often leaving powder on finger
Very soft fingernail scratches easily
Soft fingernail scratches
Medium hard penknife scratches
Hard penknife just scratches
Very hard penknife will not scratch
Laminar Hackly Granular Conchoidal Smooth

59
11.6.5 INCLUSIONS
11.6.5.1 FREQUENCY: A verbal estimate of the frequency of inclusions can be
made using a frequency chart). Obviously inclusion size affects the perception of
frequency. A size estimate, with the assistance of a modified Udden-Wentworth
Scale, and a frequency estimate should be indicated for all inclusions contained
within the new break before going on describe the size and frequency of different
individual types of inclusion.
FREQUENCY CHART:
MODIFIED UDDEN-WENTWORTH SCALE:
V. Large >1mm. (very coarse sand); Large 0.5<>1.0mm (coarse sand); Medium
0.2<>0.5 (medium sand); Small 0.1<>0.2 (fine sand) Fine <0.1 (very fine sand).
0.50-1.50 0.25-1.50 0.25-0.50 mm.
1% Rare
3% Few
5% Frequent
10% Common
20% Abundant
Large to Medium to Medium
V.Large V.Large

60
11.6.5.2 SHAPE
Description of inclusion shape is assisted by a chart illustrating gradations from
rounded to angular grains on one axis and from spherical to platy on the other.
Remember that the observed surface presents only two dimensions of a three
dimensional object, thus a cylindrical object may appear tubular, spherical or oval
in cross-section. Only a simple subjective color notation, for instance brown or
white, qualified by adjectives such as milky, vitreous or glassy, is necessary.
SHAPE AND
ROUNDNESS OF
INCLUSIONS
11.6.5.3 IDENTIFICATION: Inclusions are usually too small to identify with any
certainty in a hand specimen and it cannot be stressed enough that an accurate
description is of far greater value than a wrong identification. The question of
identity can be begged without dishonor but a qualified guess may be tentatively
made after description if the identity is fairly sure. If the latter course is taken a
pipette, a small bottle of 5% hydrochloric acid or vinegar, and a steel dress-maker's
pin can be useful accessories.
Table for inclusion identification:
I. Inclusions that react with dilute hydrochloric acid
When dilute (5%) hydrochloric acid is put on these inclusions they will effervesce.
Care should be taken so as too observe that the reaction is taking place on the
inclusion rather than a reaction involving the surrounding clay matrix which may
be of a calcareous nature.
1. Long curved structures, sometimes an
observable lamination = shell
2. Spherical or slightly ovoid, sometimes
concentric banding = ooliths
3. Inclusions irregular to rounded = limestone
4. White or clear vitreous inclusions,
Rounded
Sub-rounded
Angular
Spherical Tabular Platy

61
sometimes rhomb-shaped = calcite
II. Inclusions that do not react with dilute hydrochloric acid
These inclusions can include mineral and rock fragments. The classification is
divided into light and dark colored inclusions.
A. Light colored minerals:
1. Glistening flakes = mica
2. Clear/white vitreous grains, very hard = quartz/quartzite
3. Aggregate of white vitreous grains = sandstone
4. Dull white grains or rhombs, medium hard = dolomite
5. Dull milky white to orange/pink grains, hard = feldspar
6. Range of colors, light to dark, very hard,
can show conchoidal fracture = chert
B. Dark colored minerals
1. Glistening flakes = mica
2. Range of colors (Brown/grey/red),
usually slightly elongate and subangular = mudstone or grog
3. Black grains = e.g. Fe-Ti oxide,
ferromagnesian silicate, rock fragment
4. Range of colors, light to dark, very hard,
can show conchoidal fracture = chert
III. Heterogeneous Inclusions that do not react with dilute hydrochloric acid
1. Composed of a number of grains,
variable colors = rock fragments
(It may be possible to identify these further if the grains are large enough).
11.6.6 VOIDS. Voids can be confusing for the non-specialist, especially when it
comes to differentiating between vughs, vesicles, channels and chambers. If they
can be seen using a hand lens, they are probably vughs or vesicles. Some idea of
the percentage of the visible surface area made up of voids, expressed verbally
rather than numerically, is useful and uncomplicated. The orientation of voids
relative to the surfaces of the pottery should be recorded, for example; parallel,
inclined (approximate angle if possible), no preferred orientation.
1. Thin elongate voids = planar voids
2. Smooth, spherical voids = vesicles
3. Rounded voids = cross sections of channels
4. Irregularly shaped voids = vughs (divide into large [2-
3 mm] and fine [less than 1
mm long] scale)

62
Channels Planes
11.6.7 POROSITY. An estimation of porosity can be quantified with the help of a
domestic oven. The sherds are heated at 105oC for an hour and weighed dry of
unassociated water. They are then immersed in water for 24 hours and reweighed
after having dried the surface. The difference in weight represents the water
retained in the open pores and can be expressed as a percentage of the dry weight.
Copyright © 2022 FDOKUMEN