Core HR - User Manual HRMS
224
User Manual Template FCI HRMS Module Name: Core HR Version: 0.2 Prepared By: Soham Banerjee and Ashish Gupta Business Owner: Food Corporation of India Project Manager: Arun Kumar Srivastava
-
Upload
khangminh22 -
Category
Documents
-
view
6 -
download
0
Transcript of Core HR - User Manual HRMS
User Manual Template
FCI HRMS Module Name: Core HR
Version: 0.2
Prepared By: Soham Banerjee and Ashish Gupta
Business Owner: Food Corporation of India
Project Manager: Arun Kumar Srivastava
FCI HRMS
User Manual Version 0.2
Copyright © 2020 HRMS All Rights Reserved to FCI Page 2 of 224
Revision History
Date Version Description Author
2-Sep-20 0.1 Initial Draft Soham Banerjee,
Ashish Gupta
10-Nov-20 0.2 Including PMU Feedbacks Soham Banerjee
FCI HRMS
User Manual Version 0.2
Copyright © 2020 HRMS All Rights Reserved to FCI Page 3 of 224
Table of Contents
List of Figures ............................................................................................................... 4
1 Introduction ............................................................................................................ 15
1.1 Objective ......................................................................................................... 15 1.2 Target Audience.............................................................................................. 15
2 Overview ................................................................................................................. 15
3 User Access and Permissions .............................................................................. 15
3.1 Set Up Consideration ...................................................................................... 15 3.2 Know Your Icons ............................................................................................. 15 3.3 User Access and Permissions ........................................................................ 16 3.4 Accessing the system / System Organization and Navigation (Login, ESS
and MSS) ........................................................................................................ 17
3.5 Exiting the System .......................................................................................... 21 3.6 HRMS Login Configuration ............................................................................. 21
4 Using the System ................................................................................................... 21
4.1.1 Country Master ......................................................................................... 23
4.1.2 State Master ............................................................................................. 26
4.1.3 District Master ........................................................................................... 30 4.1.4 City Class Master...................................................................................... 35
4.1.5 City Master ............................................................................................... 39 4.1.6 Zone Master ............................................................................................. 43 4.1.7 Region Master .......................................................................................... 47
4.1.8 Office Type Master ................................................................................... 51 4.1.9 Office Setup Master .................................................................................. 55
4.1.10 Division Master ......................................................................................... 68 4.1.11 Section Master .......................................................................................... 78
4.1.12 Cell Master ............................................................................................... 83 4.1.13 Cadre Master ............................................................................................ 88
4.1.14 Category Master ....................................................................................... 91 4.1.15 Pay Grade Master ..................................................................................... 95 4.1.16 Item Master ............................................................................................... 98 4.1.17 Designation Master ................................................................................. 104
4.2 User Management ........................................................................................ 110
4.2.1 Initiator Access Mapping ......................................................................... 110 4.2.2 Multiple Role Assignment ....................................................................... 115 4.2.3 DoP Master ............................................................................................. 118
4.3 Upload Policy ................................................................................................ 123 4.4 Appointment & Probation .............................................................................. 127
4.4.1 Employee Cardex Assignment ............................................................... 127
4.4.2 Employee Cardex Listing ........................................................................ 130
4.4.3 Work Allocation ....................................................................................... 142 4.4.4 Item Allocation ........................................................................................ 155 4.4.5 Employee Probation Listing .................................................................... 167
4.5 Employee Records Management .................................................................. 177
FCI HRMS
User Manual Version 0.2
Copyright © 2020 HRMS All Rights Reserved to FCI Page 4 of 224
4.5.1 Employee Portfolio Detail ....................................................................... 177 4.5.2 Employee Profile Edit ............................................................................. 179
4.6 HR Letters ..................................................................................................... 179 4.6.1 Ad-hoc Letter Listing ............................................................................... 179
4.6.2 Letter Template Listing ........................................................................... 182 4.7 Sanction of Telephone .................................................................................. 186 4.8 Pay Fixation .................................................................................................. 196
4.8.1 Navigation ............................................................................................... 197 4.8.2 Landing Page ......................................................................................... 197
4.8.3 Initiate Pay Fixation ................................................................................ 199 4.8.4 Pay Fixation Reviewer Landing .............................................................. 201
4.8.5 Pay Fixation Review ............................................................................... 203
4.8.6 Pay Fixation Approver Landing ............................................................... 205 4.8.7 Pay Fixation Approve .............................................................................. 206 4.8.8 Pay Fixation Service Book ...................................................................... 207
4.9 Common System Provisions ......................................................................... 208 4.9.1 Add Reviewer Provision .......................................................................... 208
4.9.2 Selective Revert Provision ...................................................................... 212 4.9.3 Action and Version History ..................................................................... 216
5 Troubleshooting and Support ............................................................................. 219
5.1.1 Error Messages ...................................................................................... 219 5.1.2 Frequently Asked Question .................................................................... 221
6 Helpdesk ............................................................................................................... 224
List of Figures
Table 3-1 Icons ............................................................................................................. 16
Table 3-2: User Profile and Permissions ....................................................................... 16
Table 3-3 User Profile and Roles .................................................................................. 16
Figure 3-1 Login Screen ................................................................................................ 17
Figure 3-2 Home Page .................................................................................................. 18
Figure 3-3 ESS - Employee Dashboard ........................................................................ 19
Figure 3-4 Manager Dashboard .................................................................................... 20
Figure 3-5 : Logout ........................................................................................................ 21
Figure 4-1: Country Master ........................................................................................... 23
Figure 4-2: Add Country ................................................................................................ 24
Figure 4-3: New Country Added .................................................................................... 25
Figure 4-4: Edit Country ................................................................................................ 25
FCI HRMS
User Manual Version 0.2
Copyright © 2020 HRMS All Rights Reserved to FCI Page 5 of 224
Figure 4-5: Existing Country Detail Updated ................................................................. 26
Figure 4-7: Add State .................................................................................................... 28
Figure 4-8: New State Added ........................................................................................ 29
Figure 4-9: Edit State .................................................................................................... 30
Figure 4-12: Add District ................................................................................................ 32
Figure 4-13: New District Added ................................................................................... 33
Figure 4-14: Edit District ................................................................................................ 34
Figure 4-15: Existing District Updated ........................................................................... 35
Figure 4-16: City Class Master ...................................................................................... 36
Figure 4-17: Add City Class .......................................................................................... 37
Figure 4-18: New City Class Added .............................................................................. 37
Figure 4-19: Edit City Class ........................................................................................... 38
Figure 4-20: Existing City Class Updated ...................................................................... 39
Figure 4-21: City Master ................................................................................................ 39
Figure 4-22: Add City .................................................................................................... 40
Figure 4-23: New City Added ........................................................................................ 41
Figure 4-24: Edit City ..................................................................................................... 42
Figure 4-25: Existing City Updated ................................................................................ 43
Figure 4-26: Zone Master .............................................................................................. 44
Figure 4-27: Add Zone .................................................................................................. 45
Figure 4-28: New Zone Added ...................................................................................... 46
Figure 4-29: Edit Zone ................................................................................................... 46
Figure 4-30: Existing Zone Updated .............................................................................. 47
Figure 4-31: Region Master ........................................................................................... 48
Figure 4-32: Add Region ............................................................................................... 49
Figure 4-33: New Region Added ................................................................................... 50
Figure 4-34: Edit Region ............................................................................................... 51
Figure 4-35: Office Type Master .................................................................................... 52
Figure 4-36: Add Office Type ........................................................................................ 53

FCI HRMS
User Manual Version 0.2
Copyright © 2020 HRMS All Rights Reserved to FCI Page 6 of 224
Figure 4-37: Office Type Master .................................................................................... 54
Figure 4-38: Edit Office Type ........................................................................................ 55
Figure 4-39: Existing Office Type Updated .................................................................... 55
Figure 4-40: Office Setup Master .................................................................................. 56
Figure 4-41: Add Office Detail ....................................................................................... 58
Figure 4-42: New Office Added ..................................................................................... 59
Figure 4-43: Edit Office Detail ....................................................................................... 60
Figure 4-44: Existing Office Detail Updated for Approval .............................................. 61
Figure 4-45: View Office Detail ...................................................................................... 62
Figure 4-46: Office Setup Reviewer Landing Page ....................................................... 63
Figure 4-47: Reviewing Office Detail ............................................................................. 63
Figure 4-48: Successfully Reviewed Office Setup Detail ............................................... 64
Figure 4-49: Office Setup Master Approval Page .......................................................... 65
Figure 4-50: Approve Office Setup Master .................................................................... 66
Figure 4-51: Initiated Office Request Approved ............................................................ 67
Figure 4-52: Division Master ......................................................................................... 69
Figure 4-53: Add Division Master .................................................................................. 70
Figure 4-54: New Division Added .................................................................................. 70
Figure 4-55: Edit Division Master .................................................................................. 71
Figure 4-56: Existing Office Detail Updated for Approval .............................................. 71
Figure 4-57: View Division Master ................................................................................. 72
Figure 4-58: Division Master Reviewer Landing Page .................................................. 72
Figure 4-59: Review Division Master ............................................................................. 73
Figure 4-60: Successfully Reviewed Division Detail ...................................................... 74
Figure 4-61: Division Master Approval Landing Page ................................................... 75
Figure 4-62: Approve Division Master ........................................................................... 76
Figure 4-64: Section Master .......................................................................................... 78
Figure 4-65: Add Section ............................................................................................... 79
Figure 4-66: New Section Added .................................................................................. 81
FCI HRMS
User Manual Version 0.2
Copyright © 2020 HRMS All Rights Reserved to FCI Page 7 of 224
Figure 4-67: Edit Section Master ................................................................................... 82
Figure 4-68: Existing Section Updated .......................................................................... 83
Figure 4-69: Cell Master ................................................................................................ 84
Figure 4-70: Add Cell .................................................................................................... 85
Figure 4-71: New Cell Added ........................................................................................ 86
Figure 4-72: Edit Cell Master ......................................................................................... 87
Figure 4-73: Existing Cell Updated ................................................................................ 88
Figure 4-74: Cadre Master ............................................................................................ 88
Figure 4-75: Add Cadre ................................................................................................. 89
Figure 4-76: New Cadre Added ..................................................................................... 90
Figure 4-77: Edit Cadre Master ..................................................................................... 90
Figure 4-78: Existing Cadre Updated ............................................................................ 91
Figure 4-79: Category Master ....................................................................................... 92
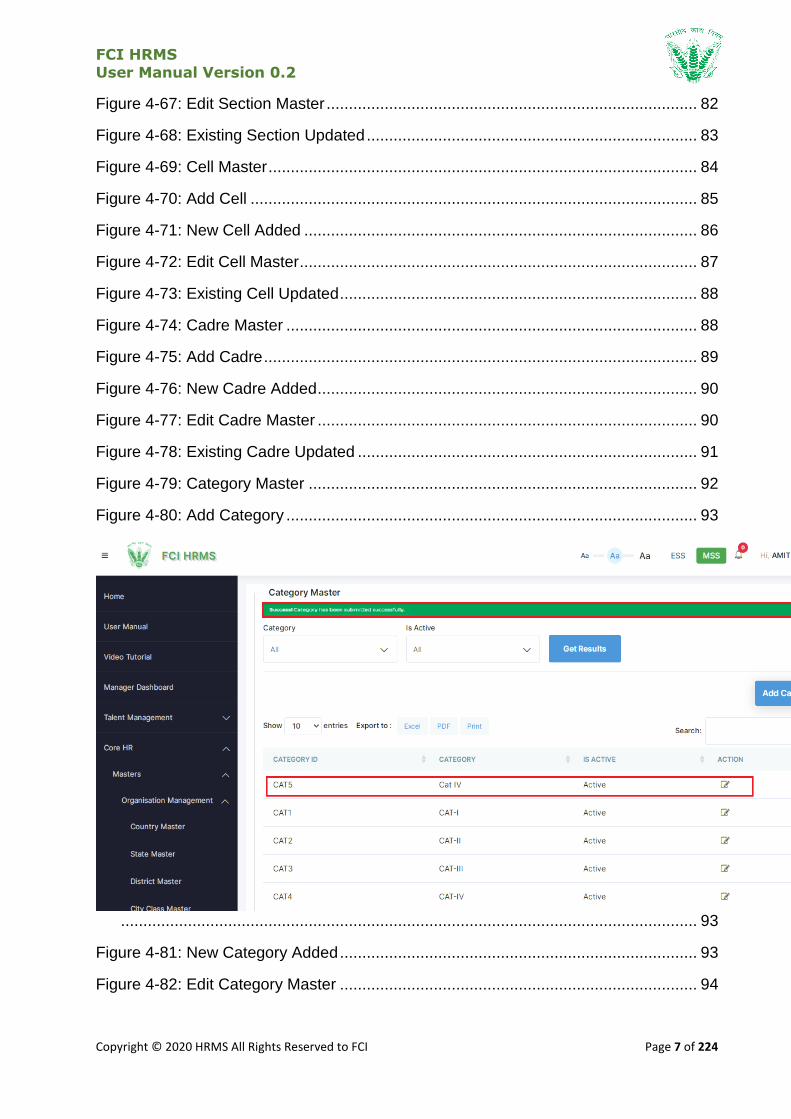
Figure 4-80: Add Category ............................................................................................ 93
................................................................................................................................. 93
Figure 4-81: New Category Added ................................................................................ 93
Figure 4-82: Edit Category Master ................................................................................ 94

FCI HRMS
User Manual Version 0.2
Copyright © 2020 HRMS All Rights Reserved to FCI Page 8 of 224
Figure 4-83: Existing Category Updated ....................................................................... 94
Figure 4-84: Pay Grade Master ..................................................................................... 95
Figure 4-85: Add Pay Grade ......................................................................................... 96
................................................................................................................................. 97
Figure 4-86: New Pay Grade Added ............................................................................. 97
Figure 4-87: Edit Pay Grade Master .............................................................................. 97
Figure 4-88: Existing Pay Grade Updated ..................................................................... 98
Figure 4-89: Item Master ............................................................................................... 99
Figure 4-90: Add Asset ................................................................................................ 100
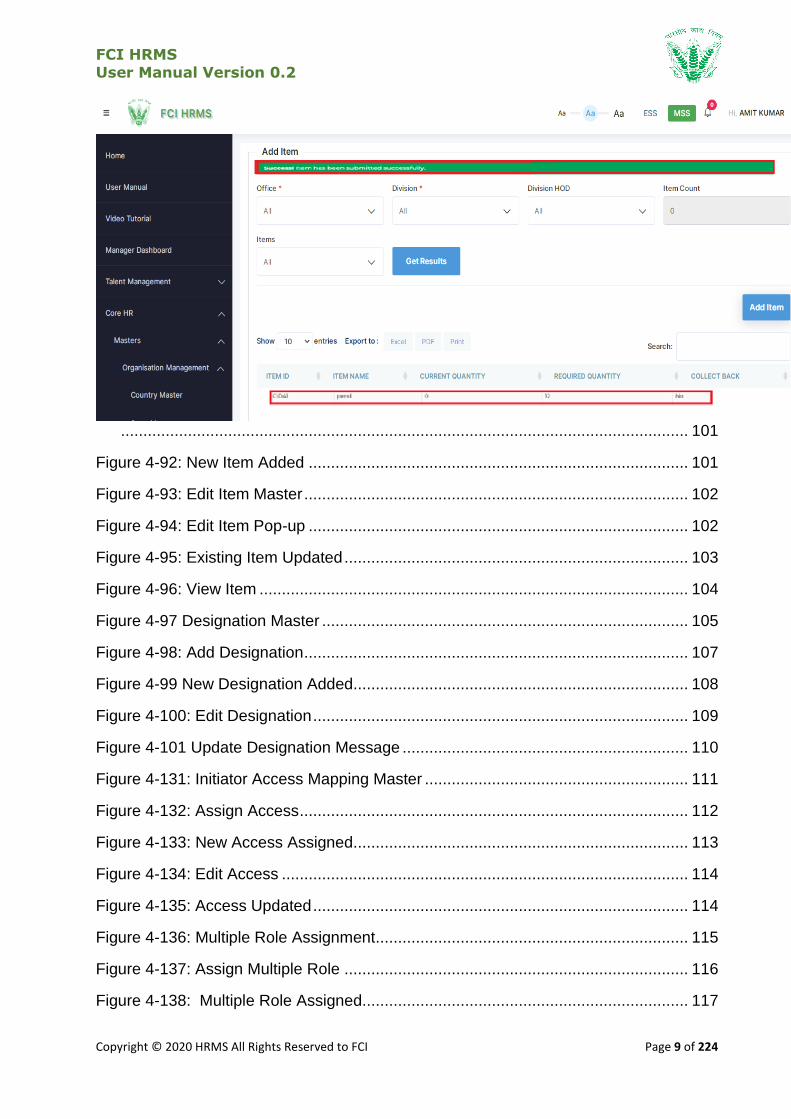
Figure 4-91: Add Item .................................................................................................. 101
FCI HRMS
User Manual Version 0.2
Copyright © 2020 HRMS All Rights Reserved to FCI Page 9 of 224
............................................................................................................................... 101
Figure 4-92: New Item Added ..................................................................................... 101
Figure 4-93: Edit Item Master ...................................................................................... 102
Figure 4-94: Edit Item Pop-up ..................................................................................... 102
Figure 4-95: Existing Item Updated ............................................................................. 103
Figure 4-96: View Item ................................................................................................ 104
Figure 4-97 Designation Master .................................................................................. 105
Figure 4-98: Add Designation ...................................................................................... 107
Figure 4-99 New Designation Added........................................................................... 108
Figure 4-100: Edit Designation .................................................................................... 109
Figure 4-101 Update Designation Message ................................................................ 110
Figure 4-131: Initiator Access Mapping Master ........................................................... 111
Figure 4-132: Assign Access ....................................................................................... 112
Figure 4-133: New Access Assigned........................................................................... 113
Figure 4-134: Edit Access ........................................................................................... 114
Figure 4-135: Access Updated .................................................................................... 114
Figure 4-136: Multiple Role Assignment ...................................................................... 115
Figure 4-137: Assign Multiple Role ............................................................................. 116
Figure 4-138: Multiple Role Assigned......................................................................... 117

FCI HRMS
User Manual Version 0.2
Copyright © 2020 HRMS All Rights Reserved to FCI Page 10 of 224
Figure 4-139: Edit Multiple Roles ............................................................................... 117
Figure 4-140: Multiple Roles Updated ........................................................................ 118
Figure 4-141: DoP Master .......................................................................................... 119
Figure 4-142: Add Process ......................................................................................... 120
Figure 4-143: Process Workflow Created ................................................................... 121
Figure 4-144: Edit Process Workflow ......................................................................... 122
Figure 4-145: Process Workflow Updated .................................................................. 123
Figure 4-146: Policy Listing ......................................................................................... 124
Figure 4-147: Add Policy/Circulars .............................................................................. 125
Figure 4-148: Policy Uploaded .................................................................................... 125
Figure 4-149: Policy Notice ......................................................................................... 126
Figure 4-150: Edit Circulars/Policy .............................................................................. 126
Figure 4-151: Policy Updated ...................................................................................... 127
Figure 4-175: Landing Page ........................................................................................ 128
Figure 4-176: Add Assignment .................................................................................... 129
Figure 4-177: Successful Message ............................................................................. 129
Figure 4-178: Edit Information ..................................................................................... 130
Figure 4-179: Landing Page ........................................................................................ 131
Figure 4-180: Add Listing ............................................................................................ 132
Figure 4-181: Successful Message ............................................................................. 133
Figure 4-182: View Information ................................................................................... 134
Figure 4-183: Reviewer Landing Page ........................................................................ 135
Figure 4-184: Reviewing Detail ................................................................................... 136
Figure 4-185: Successfully Reviewed ......................................................................... 138
Figure 4-186: Approval Listing Page ........................................................................... 139
Figure 4-187: Approve Screen .................................................................................... 140
Figure 4-188: Successfully Approved .......................................................................... 142
Figure 4-189: Landing Page ........................................................................................ 143
Figure 4-190: Add Listing ............................................................................................ 144
FCI HRMS
User Manual Version 0.2
Copyright © 2020 HRMS All Rights Reserved to FCI Page 11 of 224
Figure 4-191: Successful Message ............................................................................. 145
Figure 4-192: View Information ................................................................................... 146
Figure 4-193: Edit Information ..................................................................................... 147
Figure 4-194: Edit Successful of Request ................................................................... 148
Figure 4-195: Reviewer Landing Page ........................................................................ 149
Figure 4-196: Reviewing Detail ................................................................................... 150
Figure 4-197: Successfully Reviewed ......................................................................... 151
Figure 4-198: Approval Listing Page ........................................................................... 152
Figure 4-199: Approve Screen .................................................................................... 153
Figure 4-200: Successfully Approved .......................................................................... 154
Figure 4-201: Landing Page ........................................................................................ 155
Figure 4-202: Add Listing ............................................................................................ 156
Figure 4-203: Successful Message ............................................................................. 157
Figure 4-204: View Information ................................................................................... 158
Figure 4-205: Edit Information ..................................................................................... 159
Figure 4-206: Edit Successful of Request ................................................................... 160
Figure 4-207: Reviewer Landing Page ........................................................................ 161
Figure 4-208: Reviewing Detail ................................................................................... 162
Figure 4-209: Successfully Reviewed ......................................................................... 163
Figure 4-210: Approval Listing Page ........................................................................... 164
Figure 4-211: Approve Screen .................................................................................... 165
Figure 4-212: Successfully Approved .......................................................................... 166
Figure 4-213: Landing Page ........................................................................................ 167
Figure 4-214: Update Listing ....................................................................................... 168
Figure 4-215: Successful Message ............................................................................. 169
Figure 4-216: View Information ................................................................................... 170
Figure 4-217: Reviewer Landing Page ........................................................................ 171
Figure 4-218: Reviewing Detail ................................................................................... 172
Figure 4-219: Successfully Reviewed ......................................................................... 173

FCI HRMS
User Manual Version 0.2
Copyright © 2020 HRMS All Rights Reserved to FCI Page 12 of 224
Figure 4-220: Approval Listing Page ........................................................................... 174
Figure 4-221: Approve Screen .................................................................................... 175
Figure 4-222: Successfully Approved .......................................................................... 176
Figure 4-152: Employee Portfolio Detail ...................................................................... 177
Figure 4-153: Employee Portfolio Detail ...................................................................... 178
Figure 4-154: Employee Portfolio Report .................................................................... 179
Figure 4-135: Landing Page ........................................................................................ 180
Figure 4-136: Generate new Order/Letter ................................................................... 181
Figure 4-137: New Order/Letter Added/Listed ............................................................. 182
Figure 4-138: View Speaking/Ad-hoc Order ................................................................ 182
Figure 4-139: Landing Page .................................................................................. 183
FCI HRMS
User Manual Version 0.2
Copyright © 2020 HRMS All Rights Reserved to FCI Page 13 of 224
Figure 4-140: Generate Template Based Letter .......................................................... 184
Figure 4-141: New Letter Generated ........................................................................... 185
Figure 4-142: View Order ............................................................................................ 185
Figure 4-143: Landing Page ........................................................................................ 186
Figure 4-144: Generate a new Telephone request ...................................................... 187
Figure 4-145: New Request generated successfully ................................................... 188
Figure 4-146: ESS- View Request Information ............................................................ 189
Figure 4-147: MSS- Landing page .............................................................................. 189
Figure 4-148: ESS- View Request Information ............................................................ 190
Figure 4-149: Reviewer Landing Page ........................................................................ 191
Figure 4-150: Reviewing Detail ................................................................................... 192
Figure 4-151: Successfully Reviewed ......................................................................... 193
Figure 4-152: Approval Listing Page ........................................................................... 194
Figure 4-153: Approve Screen .................................................................................... 195
Figure 4-154: Successfully Approved .......................................................................... 196
Figure 4-7255: Pay Fixation ........................................................................................ 198
Figure 4-156: Initiate Pay Fixation ............................................................................... 200
Figure 4-157: Request Added Successfully ................................................................ 201
Figure 4-158 Pay Fixation Reviewer Landing .............................................................. 202
Figure 4-164: Initiate Fixation ...................................................................................... 208
Figure 4-165: Reviewer Landing Page ........................................................................ 209
Figure 4-166: Reviewing Detail ................................................................................... 210
Figure 4-167: Add Reviewer ........................................................................................ 211
Figure 4-168: Reviewer added successfully ................................................................ 212
Figure 4-169: Landing Page ........................................................................................ 213
Figure 4-170: Request Screen .................................................................................... 214
Figure 4-171: Selective Revert Screen........................................................................ 215
Figure 4-172: Selective Revert successfully ................................................................ 216
Figure 4-173: Action History ........................................................................................ 217
FCI HRMS
User Manual Version 0.2
Copyright © 2020 HRMS All Rights Reserved to FCI Page 14 of 224
Figure 4-174: Action History View ............................................................................... 218
Figure 5-1: Validation Error: Duplicate Record ............................................................ 219
Figure 5-2: Validation Error: Mandatory Field Empty................................................... 219
Table 5-1: HTTP Status Error Codes .......................................................................... 221
Table 5-2: Troubleshooting and Next Steps ................................................................ 224

FCI HRMS
User Manual Version 0.2
Copyright © 2020 HRMS All Rights Reserved to FCI Page 15 of 224
1 Introduction
An HRMS (Human Resource Management System) is a type of HR software that enables the management of several HR functions through the use of information technology. An HRMS aims to improve the productivity and efficiency of the business through the automation of manual and repetitive tasks. This, in turn, also frees up the time which can then be used to address more strategic, business-critical tasks. This document is intent to contain the working and usability descriptions related to the Core HR processes identified and documented in System Requirement Specification document in the form of a user manual.
1.1 Objective
The following objectives shall be fulfilled with the user manual
Serve as a standard document for FCI employees to gain experience in adopting
the Core HR processes in HRMS
Provide comprehensive details about working on different Core HR processes and
managing exceptions and alerts as per different processes.
Reveal the user experience for working with the Core HR processes and act as a
reference for users to reinforce working tactics with the Core HR process area as
per requirement.
1.2 Target Audience FCI Officers and FCI Employees
2 Overview The process area of Core HR houses the core functions which set the tone for HRMS application in terms of configuration (Masters) and executable processes (Transaction) and summary of activities for the purpose reporting and decision making (Reports). The HRMS experience has been bifurcated both in the context of an employee who raises a request and in the context of a manager who either reviews the request or initiates himself on grounds of different reasons as per business process on behalf of the employee.
3 User Access and Permissions
3.1 Set Up Consideration
OS Compatibility: Microsoft Windows 7 and above
Browsers Supported: IE 9, 10+, Firefox 3.6+, Chrome 12+ on Windows, Firefox 3.6+, and Safari 4+ on Mac 10.5.7+
Minimum Software Requirements: IE 9, 10+ Firefox 3.6+, Chrome 12+ on Windows,
Firefox 3.6+, Safari 4+ on Mac 10.5.7+
Minimum Hardware Requirements: CPUs- Intel i3, RAM- 8GB, Disk Storage- 164GB (64GB for File Storage, 100GB for database storage)
3.2 Know Your Icons
Table 3-1 reflects the set of icons that have been used in HRMS application

FCI HRMS
User Manual Version 0.2
Copyright © 2020 HRMS All Rights Reserved to FCI Page 16 of 224
Icons Descriptions
It will allow editing a record.
It will allow reviewing the submitted record/request.
It will allow approving the submitted record/request.
It will allow viewing the details of the record/request in readable form.
It will allow processing a request like Annual Increment of the employee.
It will allow defining the employee compensation i.e. salary break-up of new joined employee’s.
It will allow viewing the uploaded document.
It will allow editing a Master (Configuration)/Transactions (Activities) records.
Table 3-1 Icons
3.3 User Access and Permissions HRMS user access and permissions is managed by a specialized workflow management system that is further supplemented with roles and permissions. The User Management Process (SRS_HRMS_CH_02) has been coined as the centralized access manager where employees are provided various roles and permissions to access different set of features. Table 2 showcases the permission and user access provisions in general to HRMS Processes
User Profile Employee Self Service Manager Self Service
Permissions View Add* View Add/Edit Approval
HRMS Admin Yes Yes Yes Yes No
Employee (ESS) Yes Yes No No No
Manager (MSS) No No Yes Yes Yes**
Competent Authority No No Yes No Yes Table 3-2: User Profile and Permissions
*(Add permission also provides an additional permission of Edit to update records by resubmission) ** (A manager who is a part of the reviewing or approving authority shall be able to perform approvals)
Table 3 defines the provision of different roles assigned as per the permissible architecture of HRMS application. A user role basically describes the user access of what the user can navigate around in the HRMS application. The user permissions as described in Table 2 combines with user roles to allow the user to “navigate” and “perform” the nature of processes as per the delegated power.
User Profile Employee Self Service Manager Self Service
Roles Initiator Reviewer Approver Initiator Reviewer Approver
HRMS Admin Yes NA NA Yes No No
Employee (ESS) Yes NA NA No No No
Manager (MSS) No NA NA Yes Yes No
Competent Authority No NA NA No Yes Yes Table 3-3 User Profile and Roles
*(For some process, the manager can initiate a transaction from the MSS on behalf of the employee but not based on grounds of request)
FCI HRMS
User Manual Version 0.2
Copyright © 2020 HRMS All Rights Reserved to FCI Page 17 of 224
3.4 Accessing the system / System Organization and Navigation
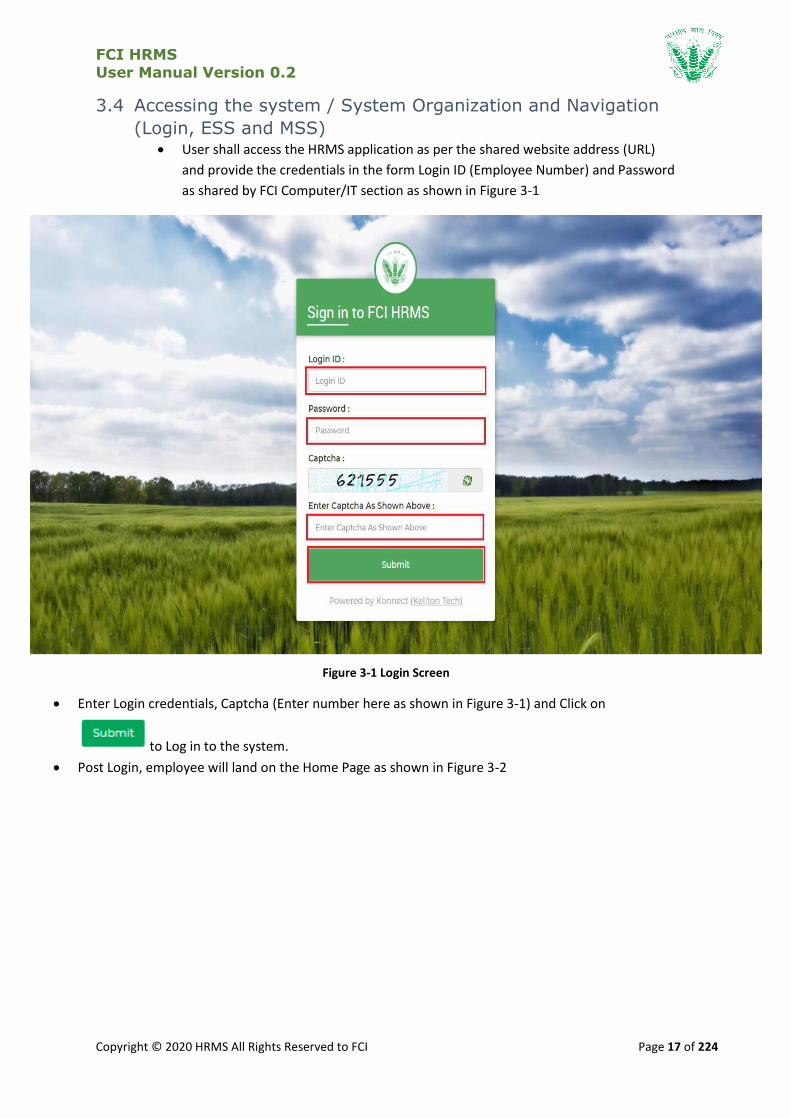
(Login, ESS and MSS) User shall access the HRMS application as per the shared website address (URL)
and provide the credentials in the form Login ID (Employee Number) and Password
as shared by FCI Computer/IT section as shown in Figure 3-1
Figure 3-1 Login Screen
Enter Login credentials, Captcha (Enter number here as shown in Figure 3-1) and Click on
to Log in to the system.
Post Login, employee will land on the Home Page as shown in Figure 3-2
FCI HRMS
User Manual Version 0.2
Copyright © 2020 HRMS All Rights Reserved to FCI Page 18 of 224
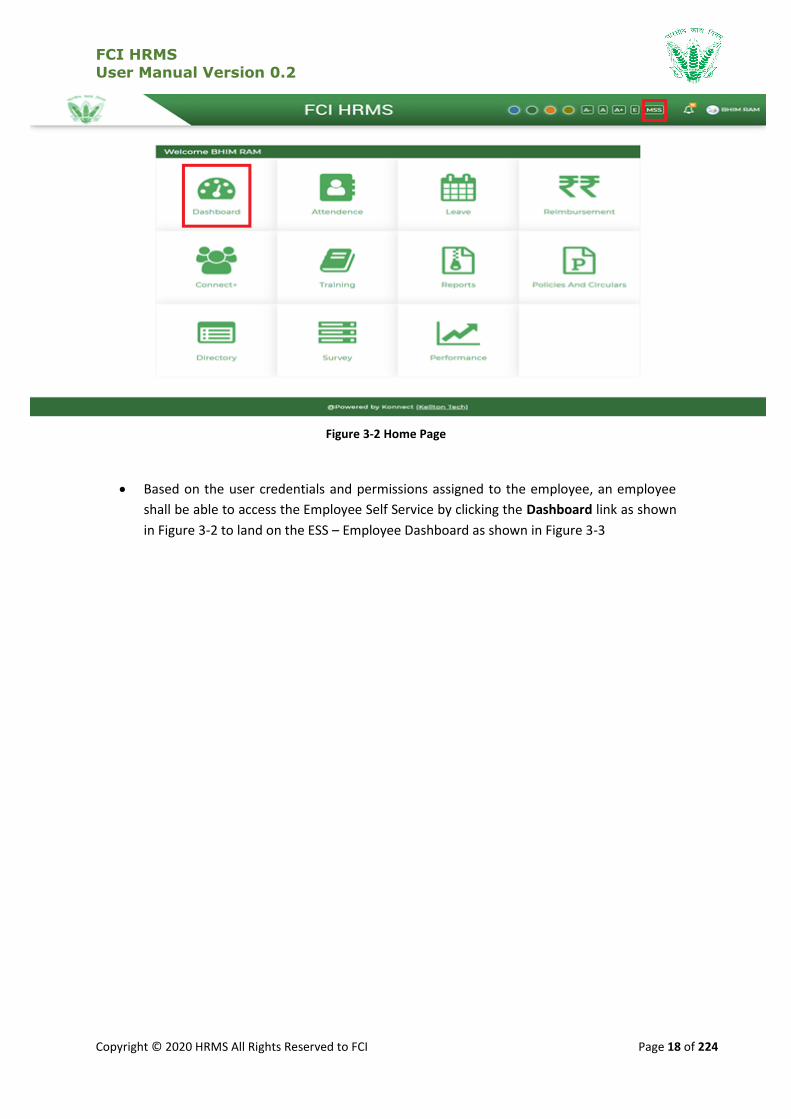
Figure 3-2 Home Page
Based on the user credentials and permissions assigned to the employee, an employee
shall be able to access the Employee Self Service by clicking the Dashboard link as shown
in Figure 3-2 to land on the ESS – Employee Dashboard as shown in Figure 3-3

FCI HRMS
User Manual Version 0.2
Copyright © 2020 HRMS All Rights Reserved to FCI Page 19 of 224
Figure 3-3 ESS - Employee Dashboard
If an employee has been assigned the roles and responsibilities of a manager or
competent authority, then by clicking the MSS link on the top right corner of the HRMS
FCI HRMS
User Manual Version 0.2
Copyright © 2020 HRMS All Rights Reserved to FCI Page 20 of 224
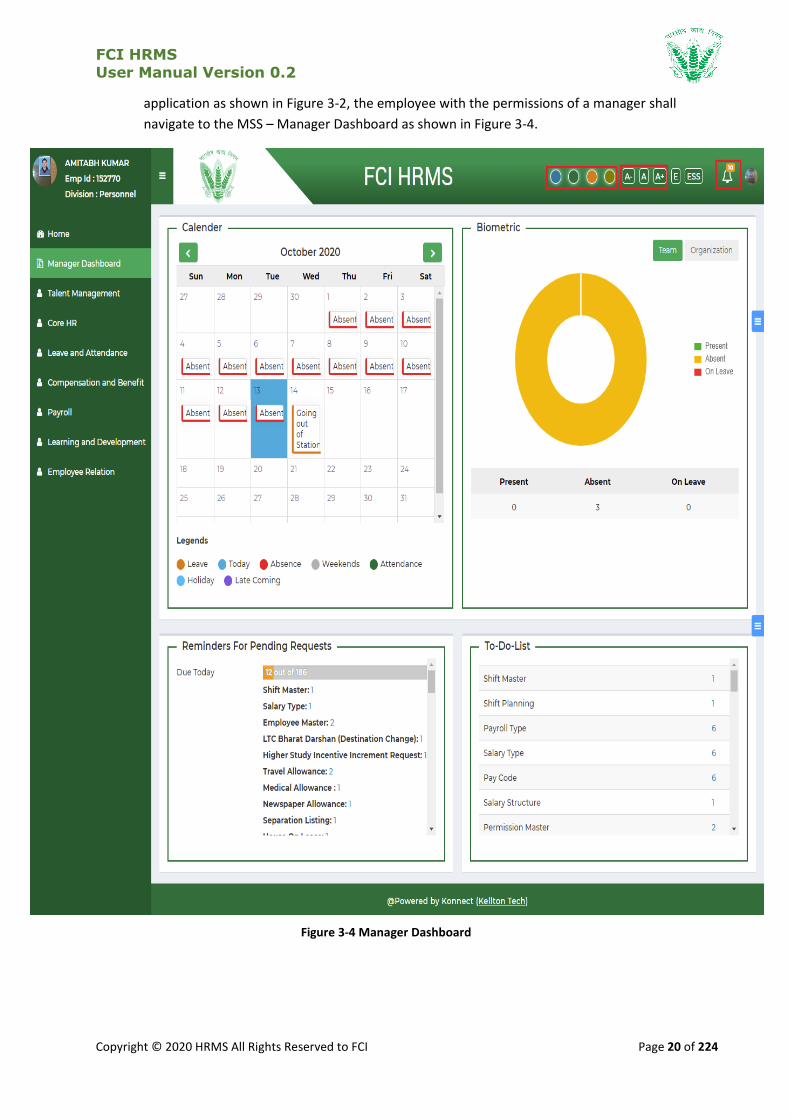
application as shown in Figure 3-2, the employee with the permissions of a manager shall
navigate to the MSS – Manager Dashboard as shown in Figure 3-4.
Figure 3-4 Manager Dashboard
FCI HRMS
User Manual Version 0.2
Copyright © 2020 HRMS All Rights Reserved to FCI Page 21 of 224
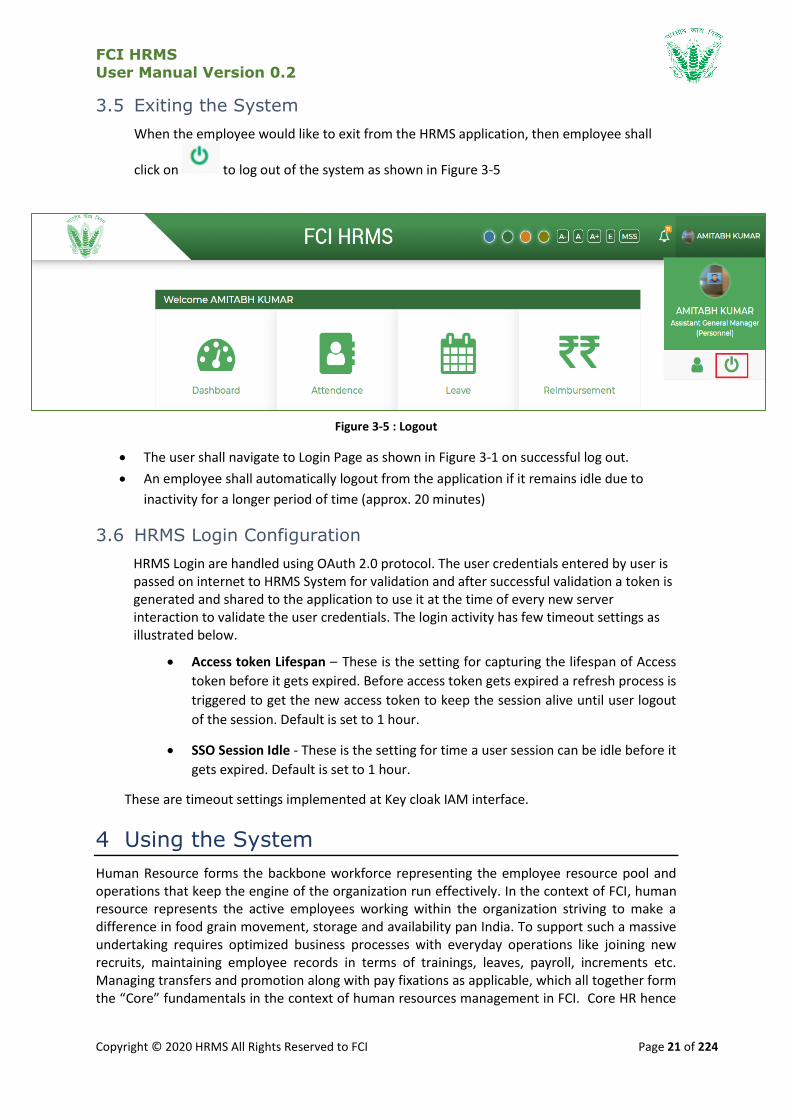
3.5 Exiting the System
When the employee would like to exit from the HRMS application, then employee shall
click on to log out of the system as shown in Figure 3-5
Figure 3-5 : Logout
The user shall navigate to Login Page as shown in Figure 3-1 on successful log out.
An employee shall automatically logout from the application if it remains idle due to
inactivity for a longer period of time (approx. 20 minutes)
3.6 HRMS Login Configuration
HRMS Login are handled using OAuth 2.0 protocol. The user credentials entered by user is passed on internet to HRMS System for validation and after successful validation a token is generated and shared to the application to use it at the time of every new server interaction to validate the user credentials. The login activity has few timeout settings as illustrated below.
Access token Lifespan – These is the setting for capturing the lifespan of Access
token before it gets expired. Before access token gets expired a refresh process is
triggered to get the new access token to keep the session alive until user logout
of the session. Default is set to 1 hour.
SSO Session Idle - These is the setting for time a user session can be idle before it
gets expired. Default is set to 1 hour.
These are timeout settings implemented at Key cloak IAM interface.
4 Using the System
Human Resource forms the backbone workforce representing the employee resource pool and operations that keep the engine of the organization run effectively. In the context of FCI, human resource represents the active employees working within the organization striving to make a difference in food grain movement, storage and availability pan India. To support such a massive undertaking requires optimized business processes with everyday operations like joining new recruits, maintaining employee records in terms of trainings, leaves, payroll, increments etc. Managing transfers and promotion along with pay fixations as applicable, which all together form the “Core” fundamentals in the context of human resources management in FCI. Core HR hence
FCI HRMS
User Manual Version 0.2
Copyright © 2020 HRMS All Rights Reserved to FCI Page 22 of 224
captures the most atomic level of employee details that respect and work around different exigency levels of work as required from employees of the corporation. This process area shall be responsible for the following activities but not limited to:
Organizational Management facilitating creation and management of new offices,
divisions and designations as per discretion of FCI.
User Management which focuses on permission settings that define the access
rights of each employee and approval matrix for each business processes of HRMS
Policy Uploads, which reflects collection and management of policies and circulars
for notification purpose to all FCI employees via ESS – Employee Dashboard.
Appointments and Probation that entails how different categories of recruitments
are inducted as new joining is strengthening the FCI workforce.
Employee Records Management and Service book focus on how HRMS shall help
in the management of employee information and record each activity initiated by
or instructed by an employee across day – day work in the FCI ecosystem. The
feature shall also strengthen the transparency of information among employees
and FCI division.
Reports and HR letters will provide easy access to different adhoc and predefined
reports important for FCI C-Level executives and managers with a provision for
Personnel division to generate different orders like – Joining, Relieving, Transfer,
Promotion, Demotion, Separation etc.
Sanction of Telephone will allow employees to raise request for telephone
extensions or raise a CUG allowance request.
Transfer Request and Posting will provide plethora of easy functions to manage
tenure transfer postings and permanent transfer requests made by employee of
different grounds as per the applicable bylaws of FCI staff regulation.
Pay Fixation and Stepping Up Pay will allow employees to request a step up in
salary if discrepancies are found as per FCI guidelines based on designation and
basic pay. Pay Fixation is a frequent activity performed by Personnel Division in
case of promotion, demotion, increments, and incentives to adjust revised basic as
per the scenario for employees.
Separation Process will allow Employees to initiate exit from FCI in terms of VRS,
Lien, and Resignation with additional capabilities to Personnel Division for
initiating exit activities on grounds of non-performance and vigilance orders.
Seniority Lists and Promotions will overcome the tedious process of generating
seniority lists manually with provision of creating integrated seniority lists as per
FCI rules and regulations in ease. Further a provision to setup the DPC/ZPC is also
provided where seniority desk and configure the committee members for
promotion evaluations.
System Provisions/Common Features (HRMS) lists the commonly used features of
import, export, digital signature, e-signature etc. as per the application of different
business processes that shall operate within HRMS. A provision for custom alert
and adding additional reviewers or approvers is described in detail for applied
purposes.

FCI HRMS
User Manual Version 0.2
Copyright © 2020 HRMS All Rights Reserved to FCI Page 23 of 224
Advanced Search will help employees to drill further down across complicated set
of information within HRMS as per search needs.
4.1.1 Country Master
Country Master is a list of different countries that will be used to identify the nationality of an FCI employee both who are domestic or working based on a permanent residency from a list of eligible countries as mentioned in the FCI staff regulation. With country master in place, HRMS admin shall be able to create, update and manage this specific list of countries as per requirements from time to time.
4.1.1.1 Navigation
Left Navigation: Core HR >>Masters >> Organization Management >> Country Master
4.1.1.2 Landing Page
HRMS administrator shall traverse the navigation as mentioned in Section 4.1.1.1 to reach the Country Master Landing Page as shown in Figure 4-1
Figure 4-1: Country Master
HRMS administrator shall be able to perform the following activities from the landing page:
Click on to apply the available filters.

FCI HRMS
User Manual Version 0.2
Copyright © 2020 HRMS All Rights Reserved to FCI Page 24 of 224
Click on to export the table records in Excel as per
table columns.
Click on to enter a search query that shall
search the table records.
Click on to sort the table records in ascending order or descending order
of entries.
Click on to navigate table records
Click on to add a new country in the table as mentioned in
Section 4.1.1.3 – Add Country.
Click on to edit an existing country in the table as mentioned in Section
4.1.1.4 – Edit Country.
4.1.1.3 Add Country
Click on to open the Add Country popup as shown in Figure 4-2
Figure 4-2: Add Country
Enter the details and click on such that a success message will be shown in the Country Master Landing Page for addition of a new record in the table as shown in Figure 4-3

FCI HRMS
User Manual Version 0.2
Copyright © 2020 HRMS All Rights Reserved to FCI Page 25 of 224
Figure 4-3: New Country Added
4.1.1.4 Edit Country
Click on to open Edit Country popup as shown in Figure 4-4
Figure 4-4: Edit Country
Enter the details and click on such that a success message will be shown in the Country Master Landing Page for updating the existing record in the table as shown in Figure 4-5
FCI HRMS
User Manual Version 0.2
Copyright © 2020 HRMS All Rights Reserved to FCI Page 26 of 224
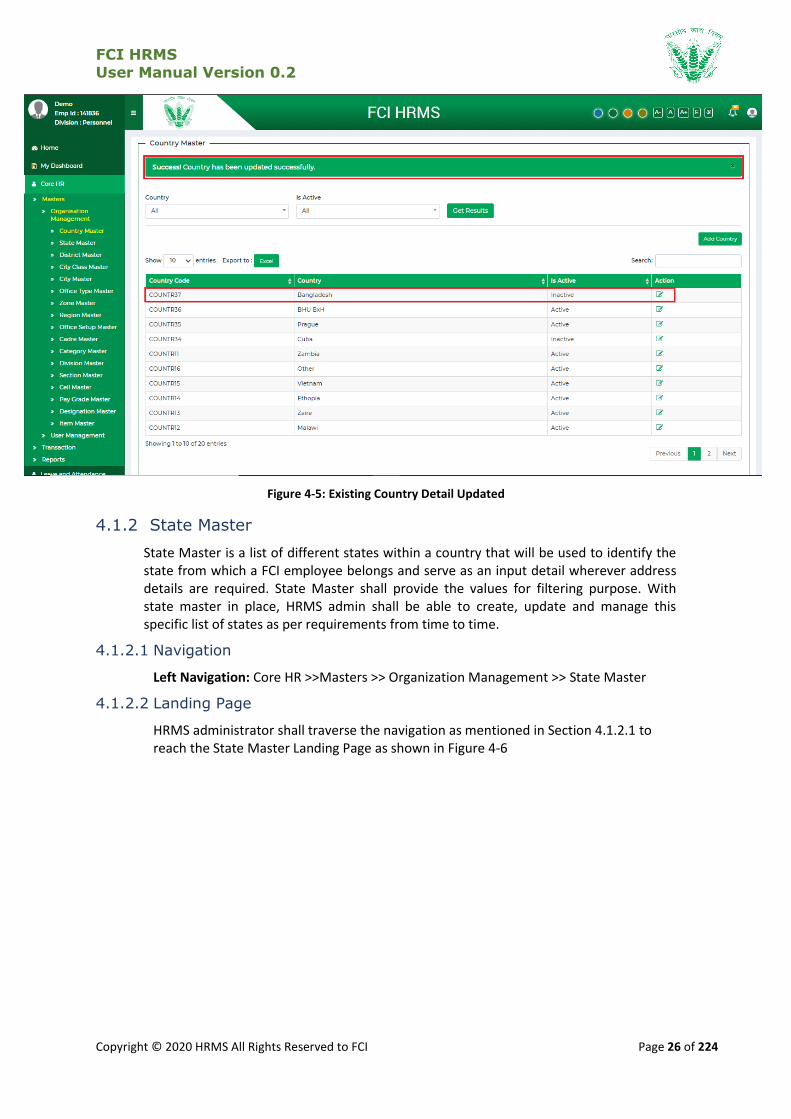
Figure 4-5: Existing Country Detail Updated
4.1.2 State Master
State Master is a list of different states within a country that will be used to identify the state from which a FCI employee belongs and serve as an input detail wherever address details are required. State Master shall provide the values for filtering purpose. With state master in place, HRMS admin shall be able to create, update and manage this specific list of states as per requirements from time to time.
4.1.2.1 Navigation
Left Navigation: Core HR >>Masters >> Organization Management >> State Master
4.1.2.2 Landing Page
HRMS administrator shall traverse the navigation as mentioned in Section 4.1.2.1 to reach the State Master Landing Page as shown in Figure 4-6
FCI HRMS
User Manual Version 0.2
Copyright © 2020 HRMS All Rights Reserved to FCI Page 27 of 224
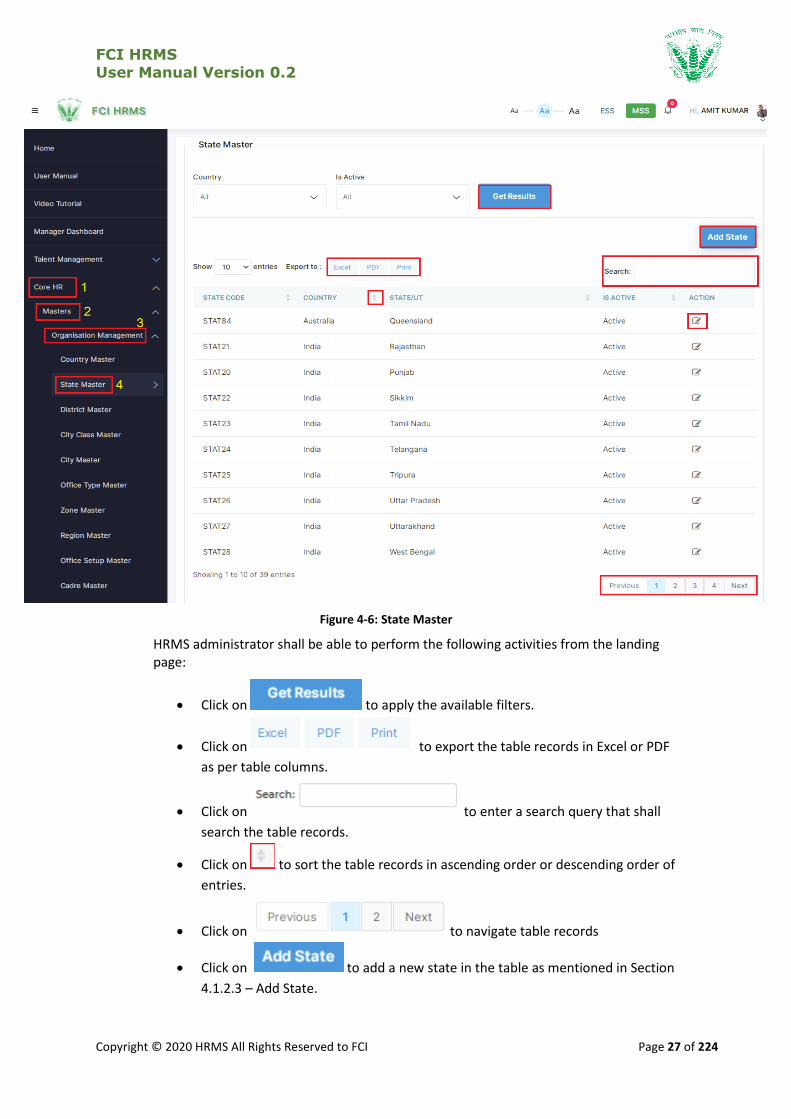
Figure 4-6: State Master
HRMS administrator shall be able to perform the following activities from the landing page:
Click on to apply the available filters.
Click on to export the table records in Excel or PDF
as per table columns.
Click on to enter a search query that shall
search the table records.
Click on to sort the table records in ascending order or descending order of
entries.
Click on to navigate table records
Click on to add a new state in the table as mentioned in Section
4.1.2.3 – Add State.
FCI HRMS
User Manual Version 0.2
Copyright © 2020 HRMS All Rights Reserved to FCI Page 28 of 224
Click on to edit an existing state in the table as mentioned in Section
4.1.2.4 – Edit State.
4.1.2.3 Add State
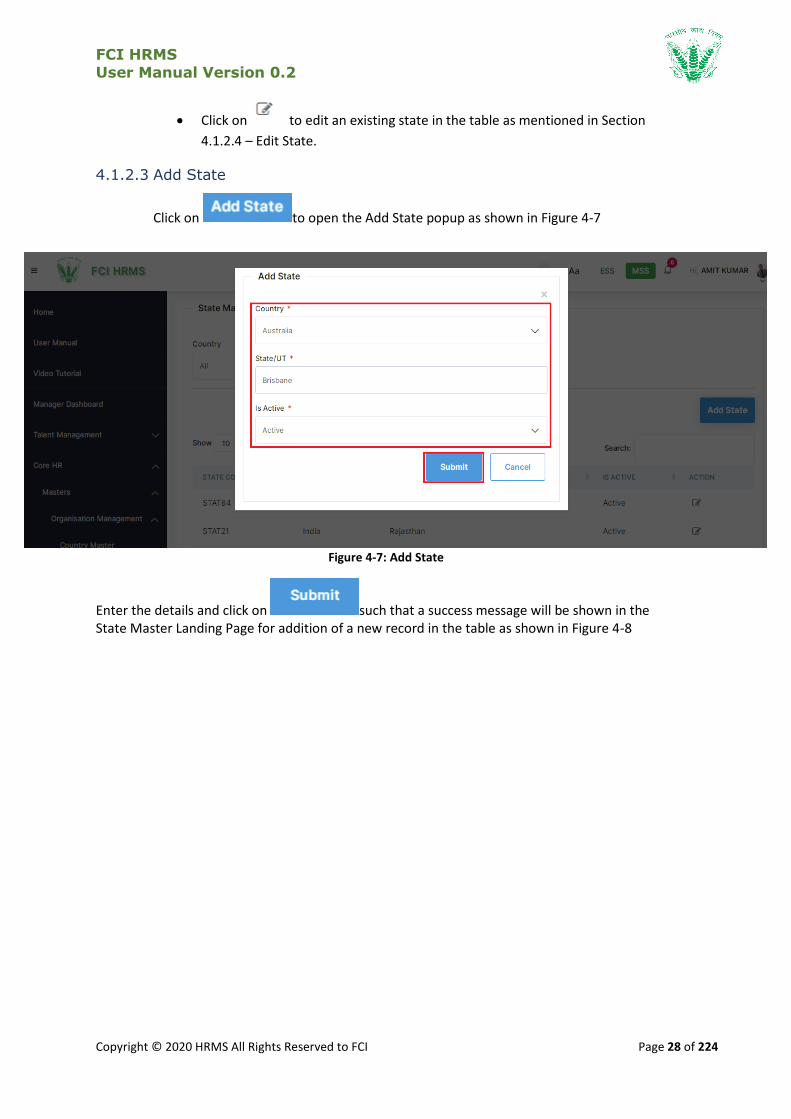
Click on to open the Add State popup as shown in Figure 4-7
Figure 4-7: Add State
Enter the details and click on such that a success message will be shown in the State Master Landing Page for addition of a new record in the table as shown in Figure 4-8

FCI HRMS
User Manual Version 0.2
Copyright © 2020 HRMS All Rights Reserved to FCI Page 29 of 224
Figure 4-8: New State Added
4.1.2.4 Edit Country
Click on to open Edit State popup as shown in Figure 4-9

FCI HRMS
User Manual Version 0.2
Copyright © 2020 HRMS All Rights Reserved to FCI Page 30 of 224
Figure 4-9: Edit State
Enter the details and click on such that a success message will be shown in the State Master Landing Page for updating the existing record in the table as shown in Figure 4-10
Figure 4-10: Existing State Detail Updated
4.1.3 District Master
District Master is a list of different districts within a state of a country that will be used to identify the district from which a FCI employee belongs and serve as an input detail wherever address details are required. District Master shall provide the values for filtering purpose. With district master in place, HRMS admin shall be able to create, update and manage this specific list of districts as per requirements from time to time.
4.1.3.1 Navigation
Left Navigation: Core HR >>Masters >> Organization Management >> District Master
4.1.3.2 Landing Page
HRMS administrator shall traverse the navigation as mentioned in Section 4.1.3.1 to reach the District Master Landing Page as shown in Figure 4-11.
FCI HRMS
User Manual Version 0.2
Copyright © 2020 HRMS All Rights Reserved to FCI Page 31 of 224
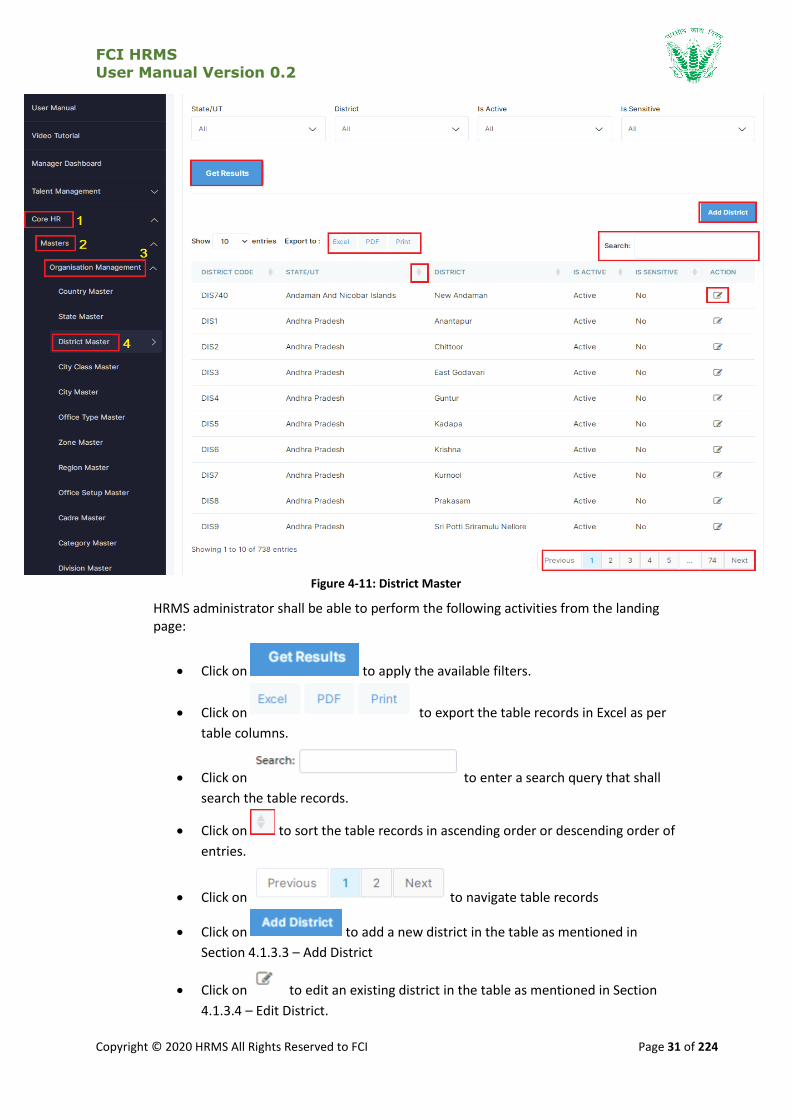
Figure 4-11: District Master
HRMS administrator shall be able to perform the following activities from the landing page:
Click on to apply the available filters.
Click on to export the table records in Excel as per
table columns.
Click on to enter a search query that shall
search the table records.
Click on to sort the table records in ascending order or descending order of
entries.
Click on to navigate table records
Click on to add a new district in the table as mentioned in
Section 4.1.3.3 – Add District
Click on to edit an existing district in the table as mentioned in Section
4.1.3.4 – Edit District.
FCI HRMS
User Manual Version 0.2
Copyright © 2020 HRMS All Rights Reserved to FCI Page 32 of 224
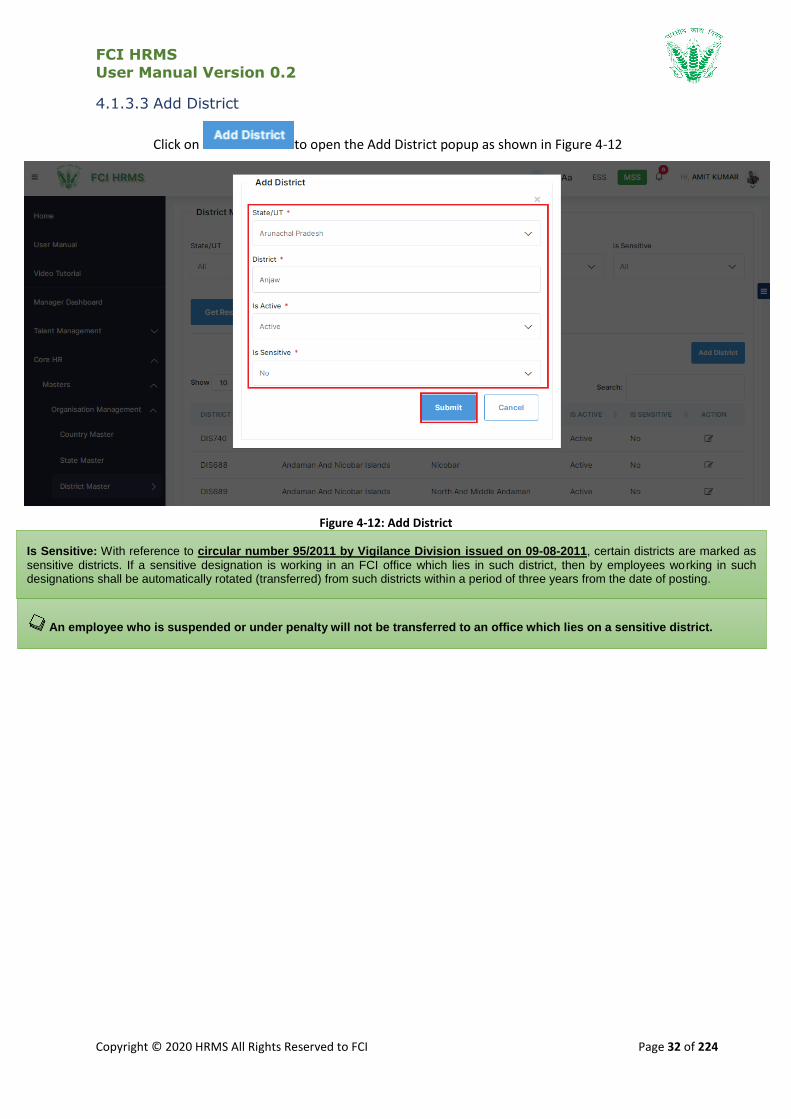
4.1.3.3 Add District
Click on to open the Add District popup as shown in Figure 4-12
Figure 4-12: Add District
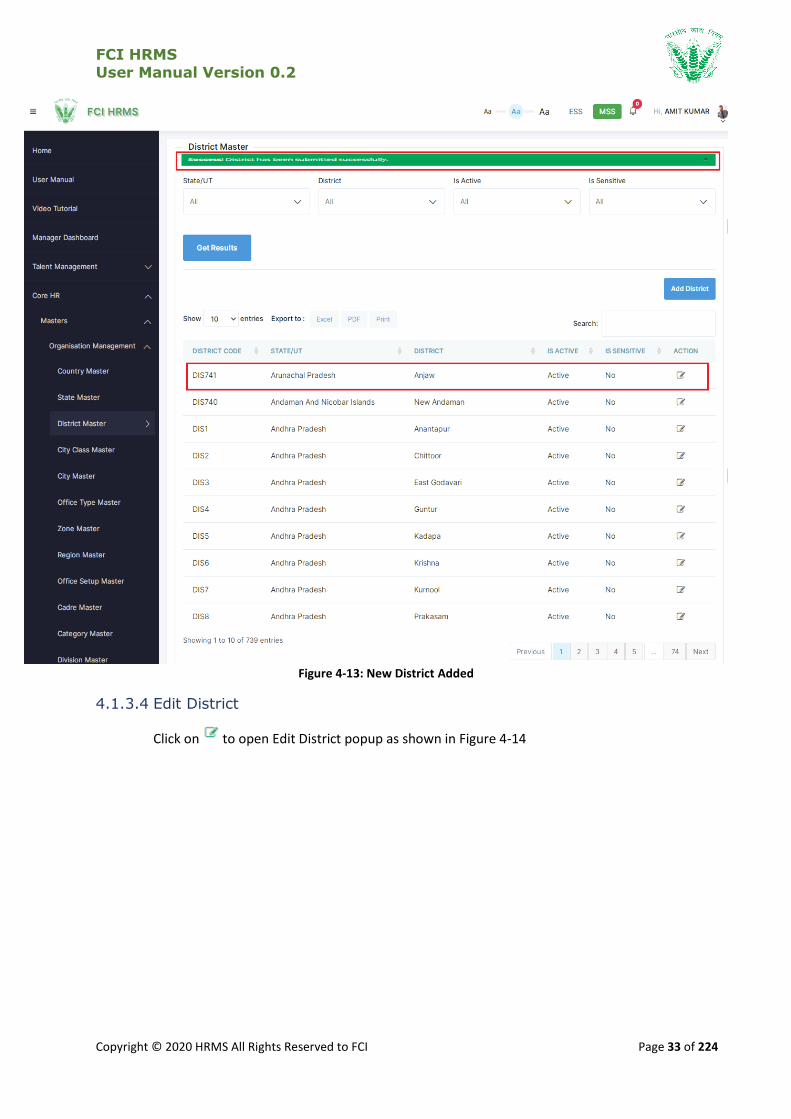
Enter the details and click on such that a success message will be shown in the District Master Landing Page for addition of a new record in the table as shown in Figure 4-13
Is Sensitive: With reference to circular number 95/2011 by Vigilance Division issued on 09-08-2011, certain districts are marked as
sensitive districts. If a sensitive designation is working in an FCI office which lies in such district, then by employees working in such designations shall be automatically rotated (transferred) from such districts within a period of three years from the date of posting.
An employee who is suspended or under penalty will not be transferred to an office which lies on a sensitive district.
FCI HRMS
User Manual Version 0.2
Copyright © 2020 HRMS All Rights Reserved to FCI Page 33 of 224
Figure 4-13: New District Added
4.1.3.4 Edit District
Click on to open Edit District popup as shown in Figure 4-14

FCI HRMS
User Manual Version 0.2
Copyright © 2020 HRMS All Rights Reserved to FCI Page 34 of 224
Figure 4-14: Edit District
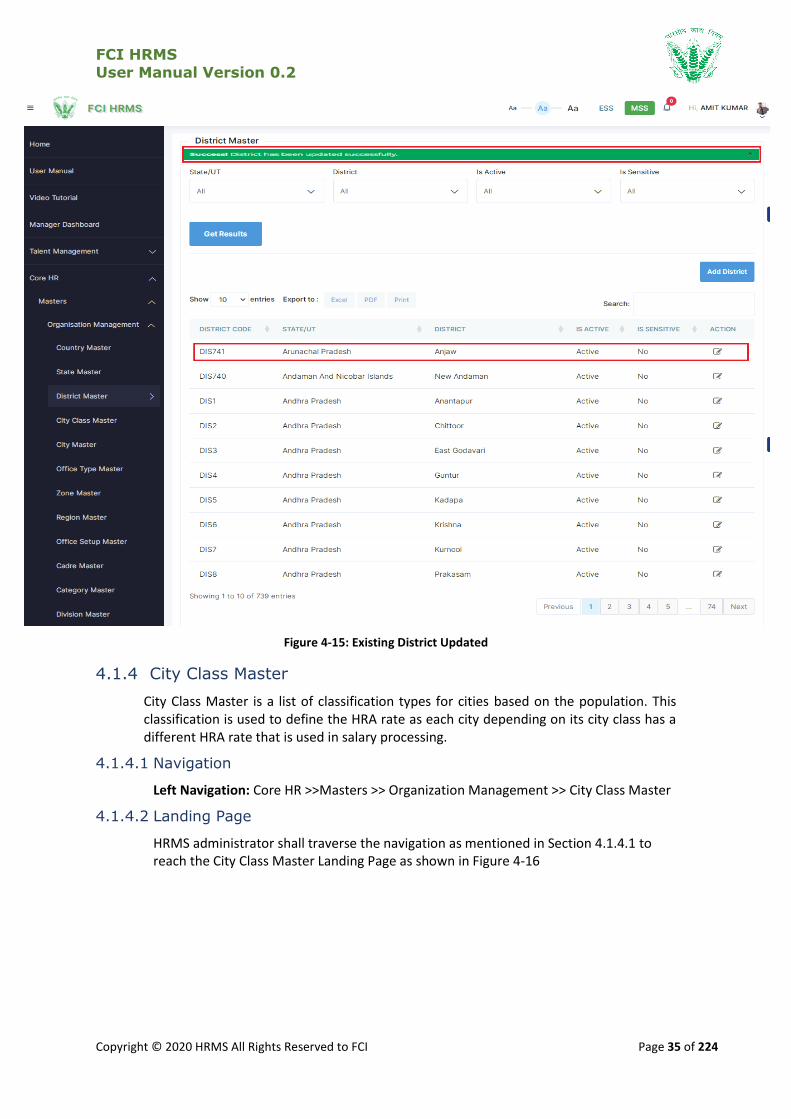
Enter the details and click on such that a success message will be shown in the District Master Landing Page for updating the existing record in the table as shown in Figure 4-15
FCI HRMS
User Manual Version 0.2
Copyright © 2020 HRMS All Rights Reserved to FCI Page 35 of 224
Figure 4-15: Existing District Updated
4.1.4 City Class Master
City Class Master is a list of classification types for cities based on the population. This classification is used to define the HRA rate as each city depending on its city class has a different HRA rate that is used in salary processing.
4.1.4.1 Navigation
Left Navigation: Core HR >>Masters >> Organization Management >> City Class Master
4.1.4.2 Landing Page
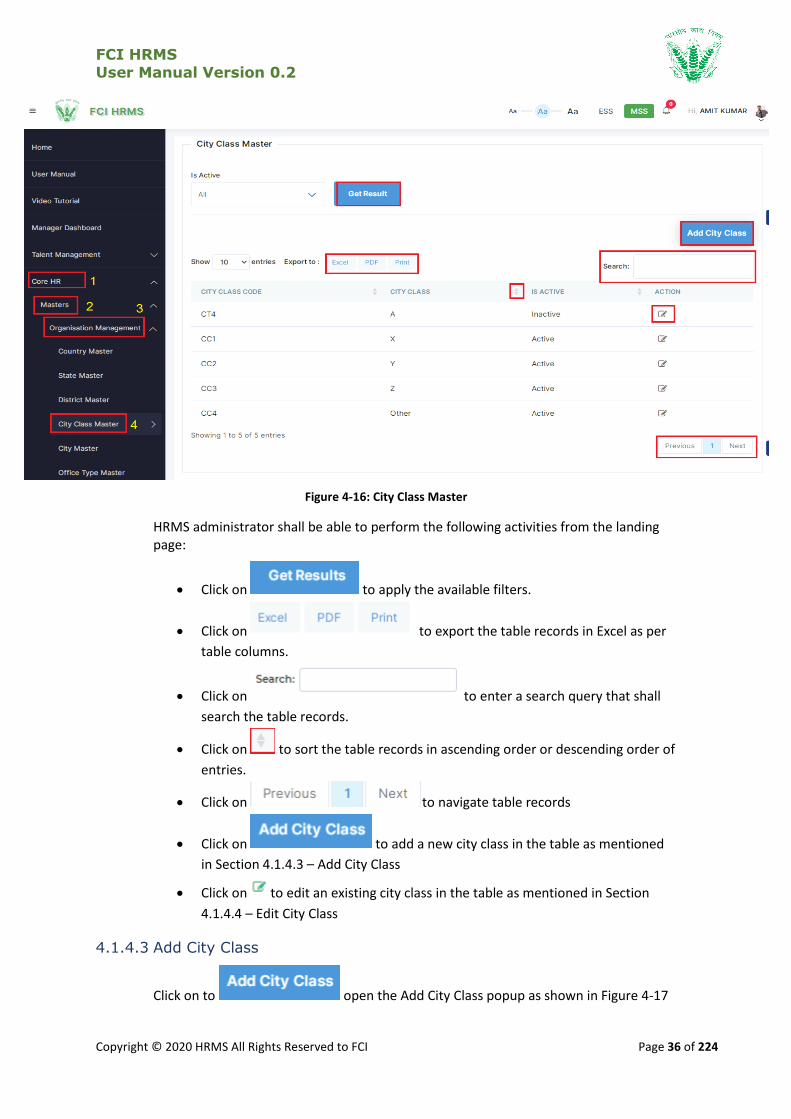
HRMS administrator shall traverse the navigation as mentioned in Section 4.1.4.1 to reach the City Class Master Landing Page as shown in Figure 4-16
FCI HRMS
User Manual Version 0.2
Copyright © 2020 HRMS All Rights Reserved to FCI Page 36 of 224
Figure 4-16: City Class Master
HRMS administrator shall be able to perform the following activities from the landing page:
Click on to apply the available filters.
Click on to export the table records in Excel as per
table columns.
Click on to enter a search query that shall
search the table records.
Click on to sort the table records in ascending order or descending order of
entries.
Click on to navigate table records
Click on to add a new city class in the table as mentioned
in Section 4.1.4.3 – Add City Class
Click on to edit an existing city class in the table as mentioned in Section
4.1.4.4 – Edit City Class
4.1.4.3 Add City Class
Click on to open the Add City Class popup as shown in Figure 4-17

FCI HRMS
User Manual Version 0.2
Copyright © 2020 HRMS All Rights Reserved to FCI Page 37 of 224
Figure 4-17: Add City Class
Enter the details and click on such that a success message will be shown in the City Class Master Landing Page for addition of a new record in the table as shown in Figure 4-18
Figure 4-18: New City Class Added
FCI HRMS
User Manual Version 0.2
Copyright © 2020 HRMS All Rights Reserved to FCI Page 38 of 224
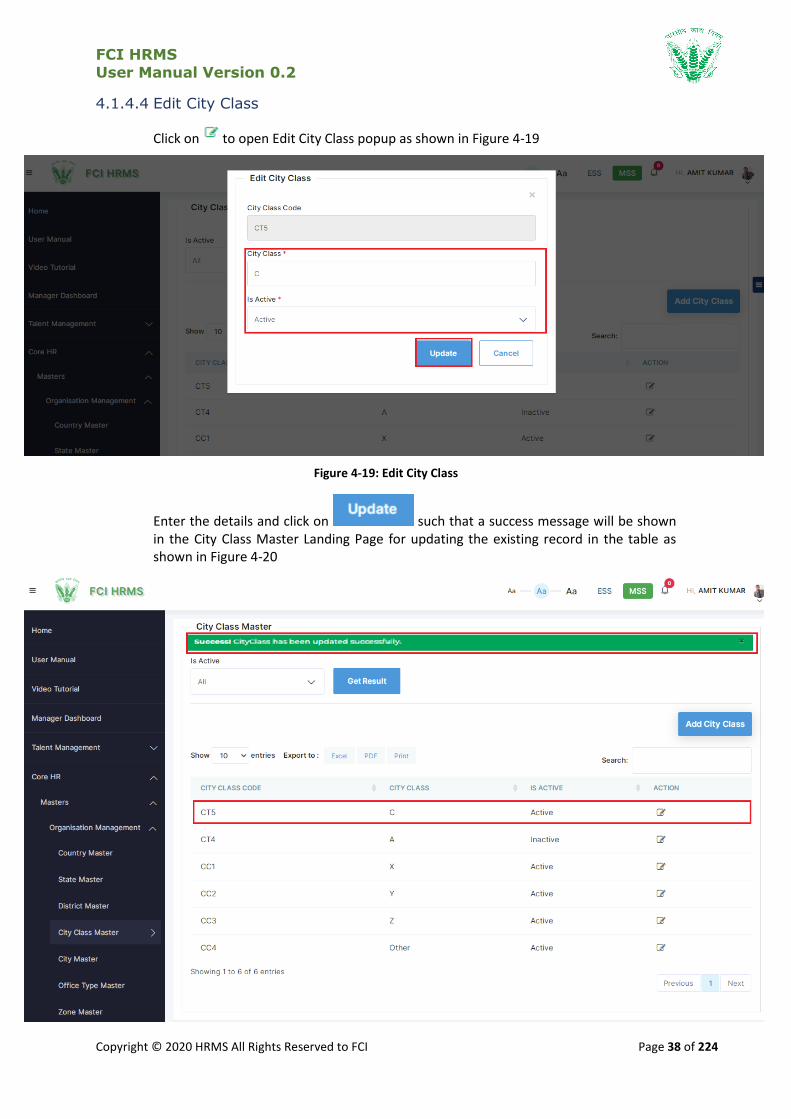
4.1.4.4 Edit City Class
Click on to open Edit City Class popup as shown in Figure 4-19
Figure 4-19: Edit City Class
Enter the details and click on such that a success message will be shown in the City Class Master Landing Page for updating the existing record in the table as shown in Figure 4-20
FCI HRMS
User Manual Version 0.2
Copyright © 2020 HRMS All Rights Reserved to FCI Page 39 of 224
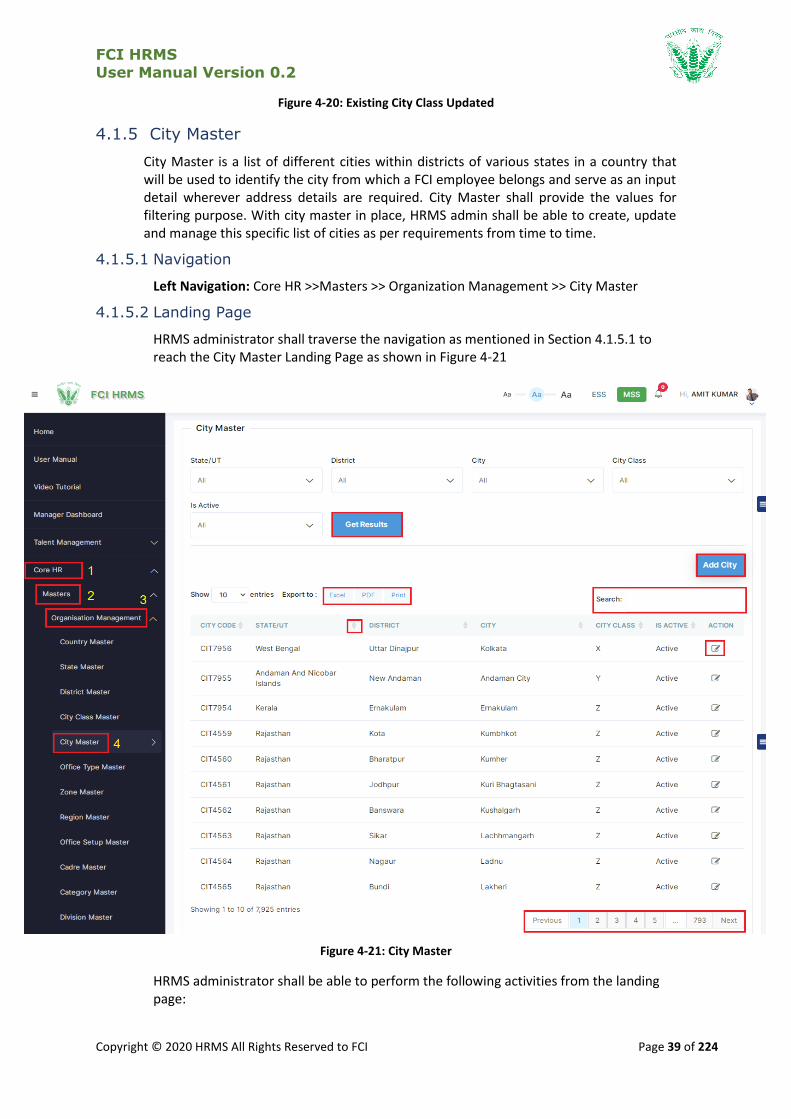
Figure 4-20: Existing City Class Updated
4.1.5 City Master
City Master is a list of different cities within districts of various states in a country that will be used to identify the city from which a FCI employee belongs and serve as an input detail wherever address details are required. City Master shall provide the values for filtering purpose. With city master in place, HRMS admin shall be able to create, update and manage this specific list of cities as per requirements from time to time.
4.1.5.1 Navigation
Left Navigation: Core HR >>Masters >> Organization Management >> City Master
4.1.5.2 Landing Page
HRMS administrator shall traverse the navigation as mentioned in Section 4.1.5.1 to reach the City Master Landing Page as shown in Figure 4-21
Figure 4-21: City Master
HRMS administrator shall be able to perform the following activities from the landing page:

FCI HRMS
User Manual Version 0.2
Copyright © 2020 HRMS All Rights Reserved to FCI Page 40 of 224
Click on to apply the available filters.
Click on to export the table records in Excel as per
table columns.
Click on to enter a search query that shall
search the table records.
Click on to sort the table records in ascending order or descending order of
entries.
Click on to navigate table records
Click on to add a new city in the table as mentioned in Section
4.1.5.3 – Add City
Click on to edit an existing city class in the table as mentioned in Section
4.1.5.4 – Edit City
4.1.5.3 Add City
Click on to open the Add City Class popup as shown in Figure 4-22
Figure 4-22: Add City
FCI HRMS
User Manual Version 0.2
Copyright © 2020 HRMS All Rights Reserved to FCI Page 41 of 224
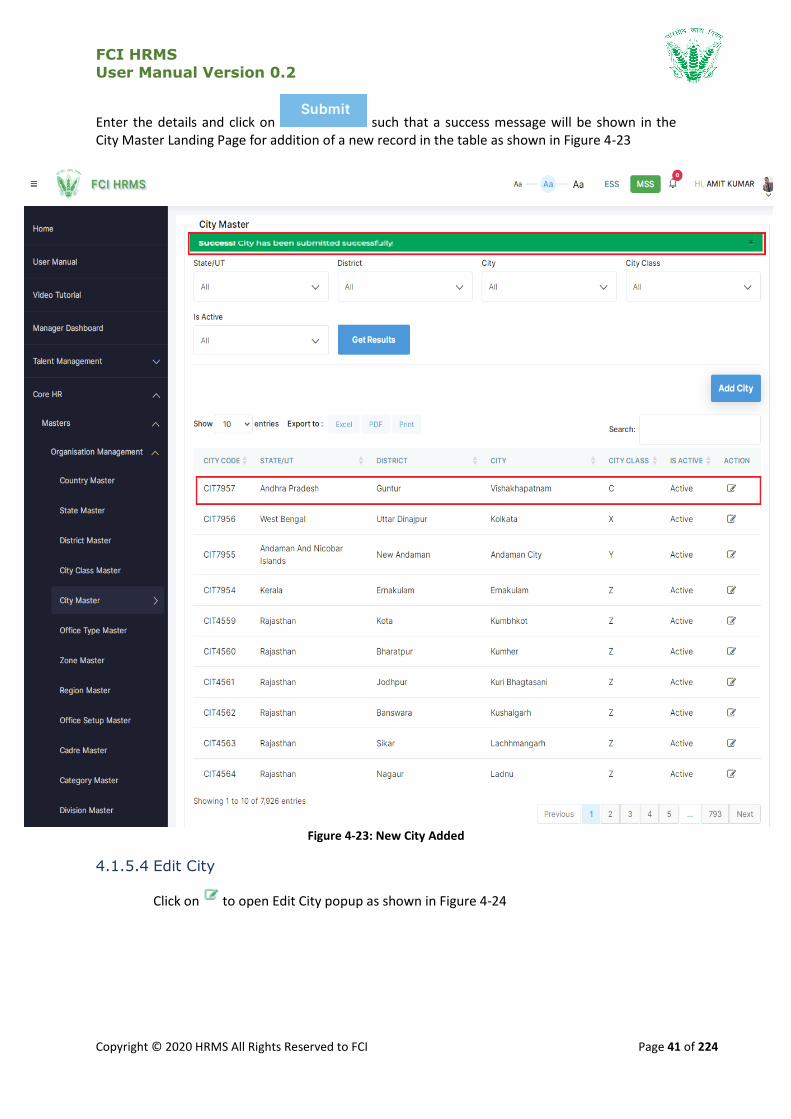
Enter the details and click on such that a success message will be shown in the City Master Landing Page for addition of a new record in the table as shown in Figure 4-23
Figure 4-23: New City Added
4.1.5.4 Edit City
Click on to open Edit City popup as shown in Figure 4-24
FCI HRMS
User Manual Version 0.2
Copyright © 2020 HRMS All Rights Reserved to FCI Page 42 of 224
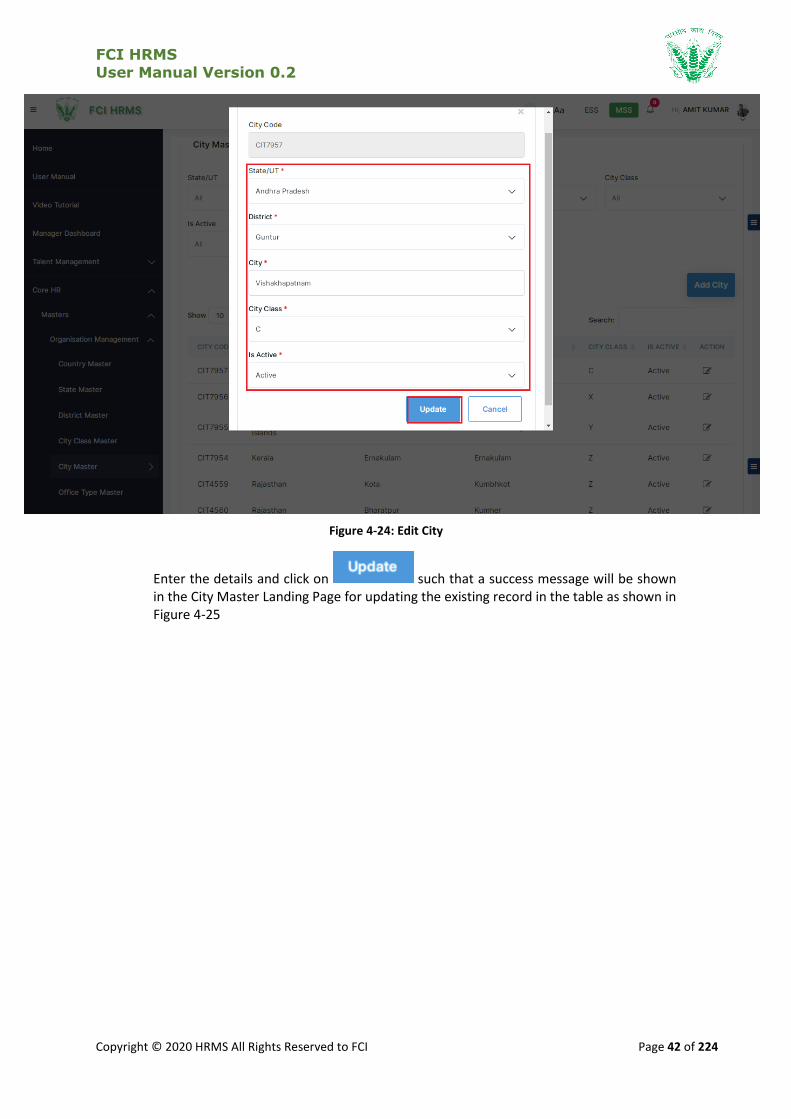
Figure 4-24: Edit City
Enter the details and click on such that a success message will be shown in the City Master Landing Page for updating the existing record in the table as shown in Figure 4-25
FCI HRMS
User Manual Version 0.2
Copyright © 2020 HRMS All Rights Reserved to FCI Page 43 of 224
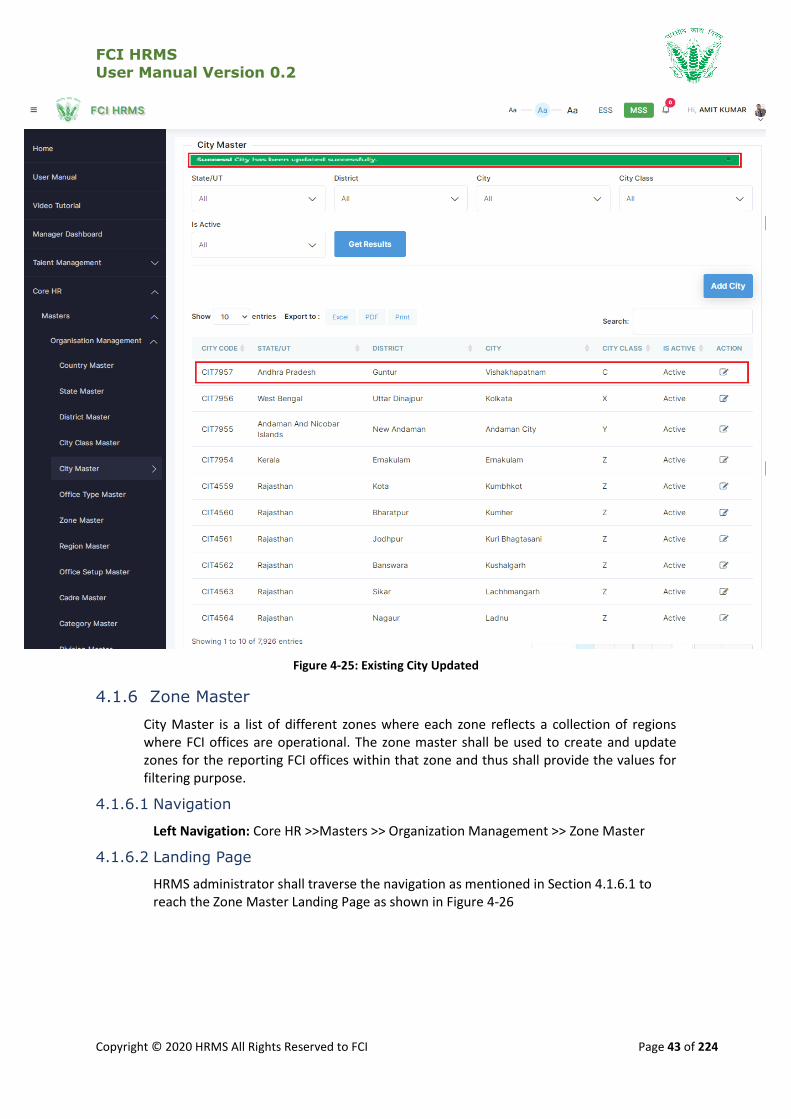
Figure 4-25: Existing City Updated
4.1.6 Zone Master
City Master is a list of different zones where each zone reflects a collection of regions where FCI offices are operational. The zone master shall be used to create and update zones for the reporting FCI offices within that zone and thus shall provide the values for filtering purpose.
4.1.6.1 Navigation
Left Navigation: Core HR >>Masters >> Organization Management >> Zone Master
4.1.6.2 Landing Page
HRMS administrator shall traverse the navigation as mentioned in Section 4.1.6.1 to reach the Zone Master Landing Page as shown in Figure 4-26

FCI HRMS
User Manual Version 0.2
Copyright © 2020 HRMS All Rights Reserved to FCI Page 44 of 224
Figure 4-26: Zone Master
HRMS administrator shall be able to perform the following activities from the landing page:
Click on to apply the available filters.
Click on to export the table records in Excel as per
table columns.
Click on to enter a search query that shall
search the table records.
Click on to sort the table records in ascending order or descending order of
entries.
Click on to navigate table records
Click on to add a new zone in the table as mentioned in Section
4.1.6.3 – Add Zone
Click on to edit an existing city class in the table as mentioned in Section
4.1.6.4 – Edit Zone

FCI HRMS
User Manual Version 0.2
Copyright © 2020 HRMS All Rights Reserved to FCI Page 45 of 224
4.1.6.3 Add Zone
Click onto open the Add Zone popup as shown in Figure 4-27
Figure 4-27: Add Zone
Enter the details and click on such that a success message will be shown in the Zone Master Landing Page for addition of a new record in the table as shown in Figure 4-28
FCI HRMS
User Manual Version 0.2
Copyright © 2020 HRMS All Rights Reserved to FCI Page 46 of 224
Figure 4-28: New Zone Added
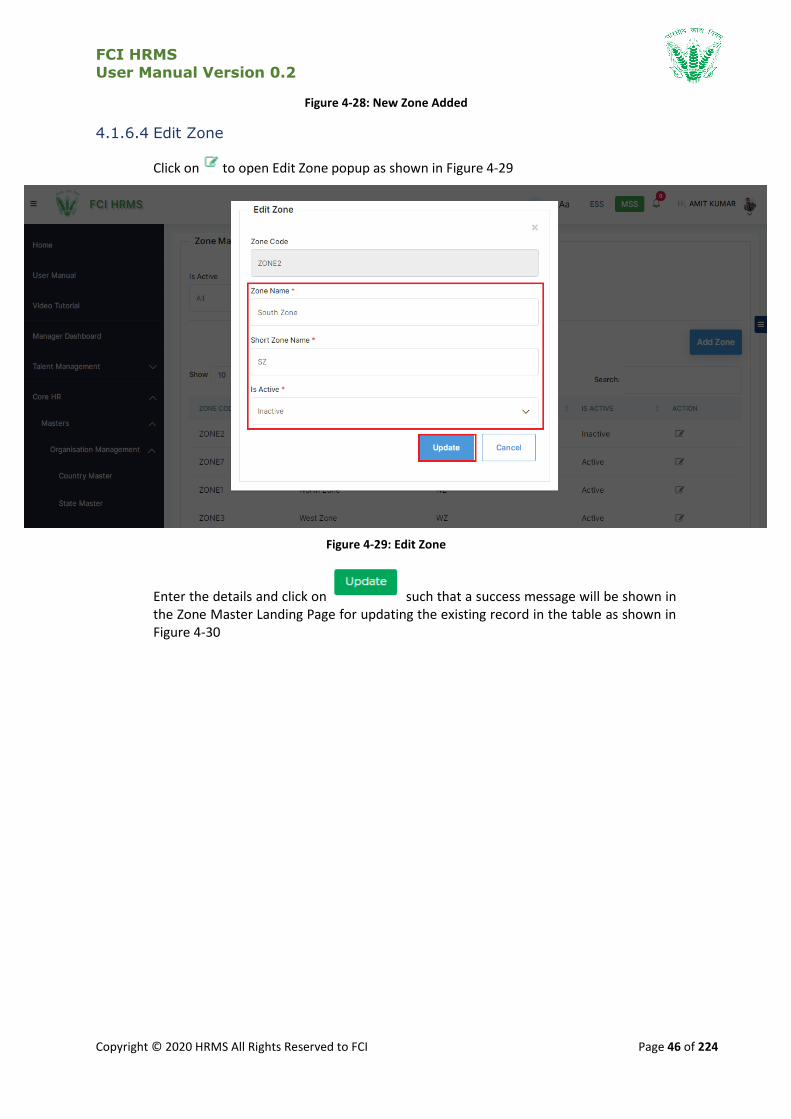
4.1.6.4 Edit Zone
Click on to open Edit Zone popup as shown in Figure 4-29
Figure 4-29: Edit Zone
Enter the details and click on such that a success message will be shown in the Zone Master Landing Page for updating the existing record in the table as shown in Figure 4-30

FCI HRMS
User Manual Version 0.2
Copyright © 2020 HRMS All Rights Reserved to FCI Page 47 of 224
Figure 4-30: Existing Zone Updated
4.1.7 Region Master
Region Master is a list of different regions within a zone. The region master shall be used to create and update regions for the reporting FCI offices within that region and thus shall provide the values for filtering purpose.
4.1.7.1 Navigation
Left Navigation: Core HR >>Masters >> Organization Management >> Region Master
4.1.7.2 Landing Page
HRMS administrator shall traverse the navigation as mentioned in Section 4.1.7.1 to reach the Region Master Landing Page as shown in Figure 4-31

FCI HRMS
User Manual Version 0.2
Copyright © 2020 HRMS All Rights Reserved to FCI Page 48 of 224
Figure 4-31: Region Master
HRMS administrator shall be able to perform the following activities from the landing page:
Click on to apply the available filters.
Click on to export the table records in Excel as per
table columns.
Click on to enter a search query that shall
search the table records.
Click on to sort the table records in ascending order or descending order
of entries.
Click on to navigate table records
Click on to add a new region in the table as mentioned in
Section 4.1.7.3 – Add Region
FCI HRMS
User Manual Version 0.2
Copyright © 2020 HRMS All Rights Reserved to FCI Page 49 of 224
Click on to edit an existing city class in the table as mentioned in Section
4.1.7.4 – Edit Region
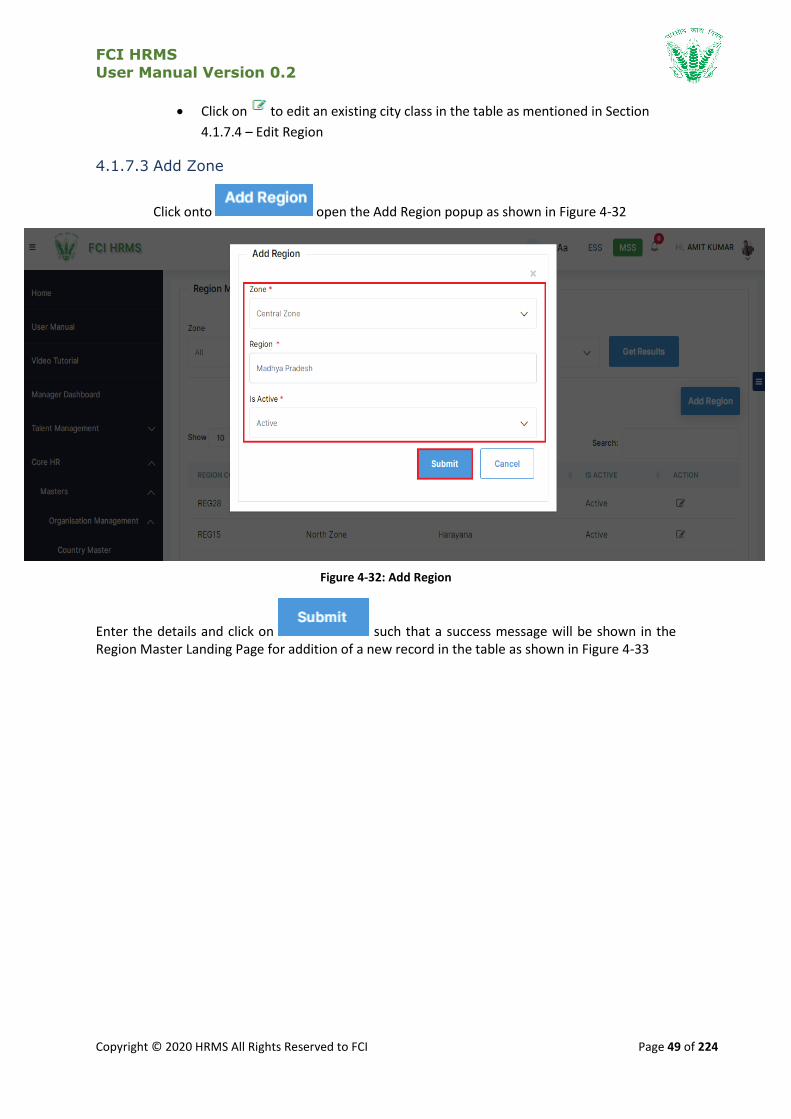
4.1.7.3 Add Zone
Click onto open the Add Region popup as shown in Figure 4-32
Figure 4-32: Add Region
Enter the details and click on such that a success message will be shown in the Region Master Landing Page for addition of a new record in the table as shown in Figure 4-33

FCI HRMS
User Manual Version 0.2
Copyright © 2020 HRMS All Rights Reserved to FCI Page 50 of 224
Figure 4-33: New Region Added
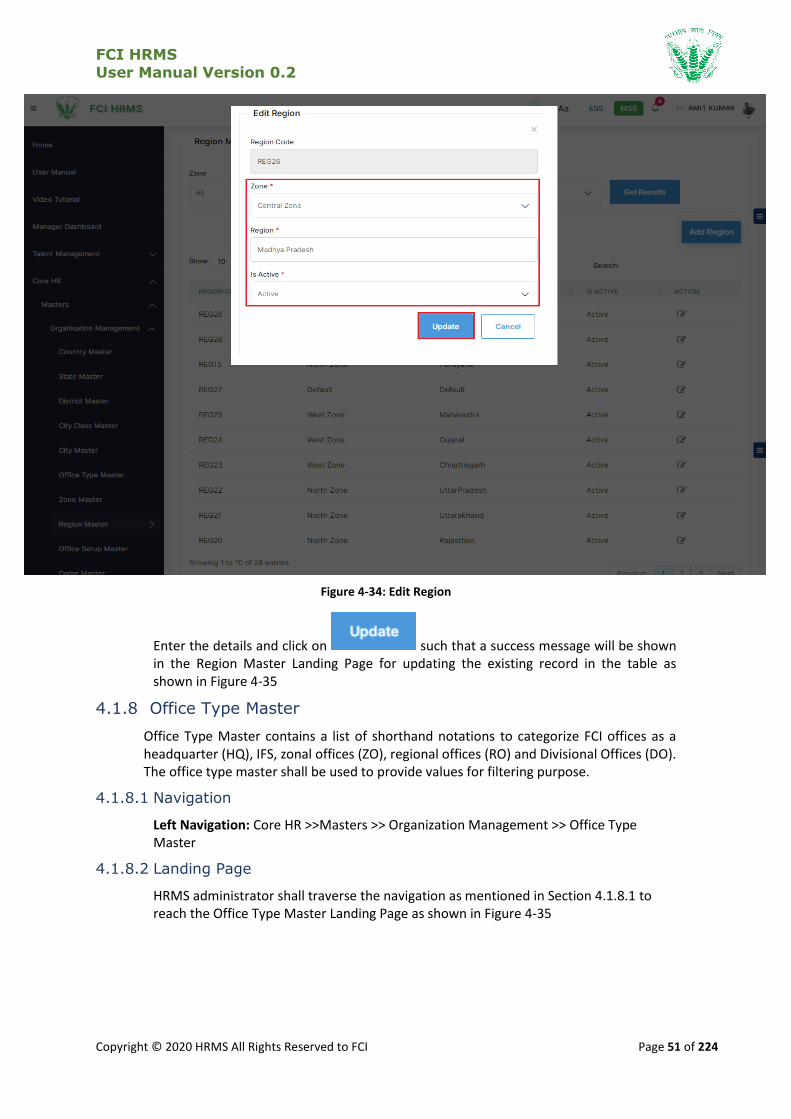
4.1.7.4 Edit Region
Click on to open Edit Region popup as shown in Figure 4-34
FCI HRMS
User Manual Version 0.2
Copyright © 2020 HRMS All Rights Reserved to FCI Page 51 of 224
Figure 4-34: Edit Region
Enter the details and click on such that a success message will be shown in the Region Master Landing Page for updating the existing record in the table as shown in Figure 4-35
4.1.8 Office Type Master
Office Type Master contains a list of shorthand notations to categorize FCI offices as a headquarter (HQ), IFS, zonal offices (ZO), regional offices (RO) and Divisional Offices (DO). The office type master shall be used to provide values for filtering purpose.
4.1.8.1 Navigation
Left Navigation: Core HR >>Masters >> Organization Management >> Office Type Master
4.1.8.2 Landing Page
HRMS administrator shall traverse the navigation as mentioned in Section 4.1.8.1 to reach the Office Type Master Landing Page as shown in Figure 4-35
FCI HRMS
User Manual Version 0.2
Copyright © 2020 HRMS All Rights Reserved to FCI Page 52 of 224
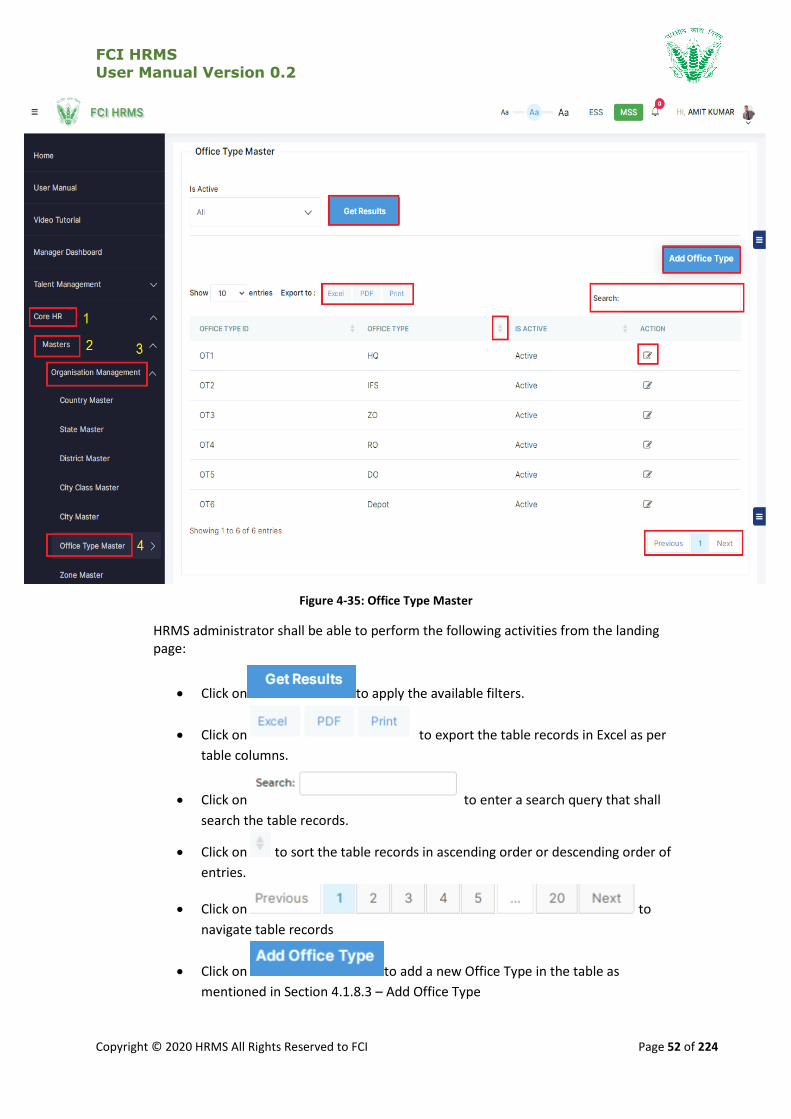
Figure 4-35: Office Type Master
HRMS administrator shall be able to perform the following activities from the landing page:
Click on to apply the available filters.
Click on to export the table records in Excel as per
table columns.
Click on to enter a search query that shall
search the table records.
Click on to sort the table records in ascending order or descending order of
entries.
Click on to
navigate table records
Click on to add a new Office Type in the table as
mentioned in Section 4.1.8.3 – Add Office Type

FCI HRMS
User Manual Version 0.2
Copyright © 2020 HRMS All Rights Reserved to FCI Page 53 of 224
Click on to edit an existing Office Type in the table as mentioned in Section
4.1.8.4 – Edit Office Type
4.1.8.3 Add Office Type
Click onto open the Add Office Type popup as shown in Figure 4-36
Figure 4-36: Add Office Type
Enter the details and click on such that a success message will be shown in the Office Type Master Landing Page for addition of a new record in the table as shown in Figure 4-37
FCI HRMS
User Manual Version 0.2
Copyright © 2020 HRMS All Rights Reserved to FCI Page 54 of 224
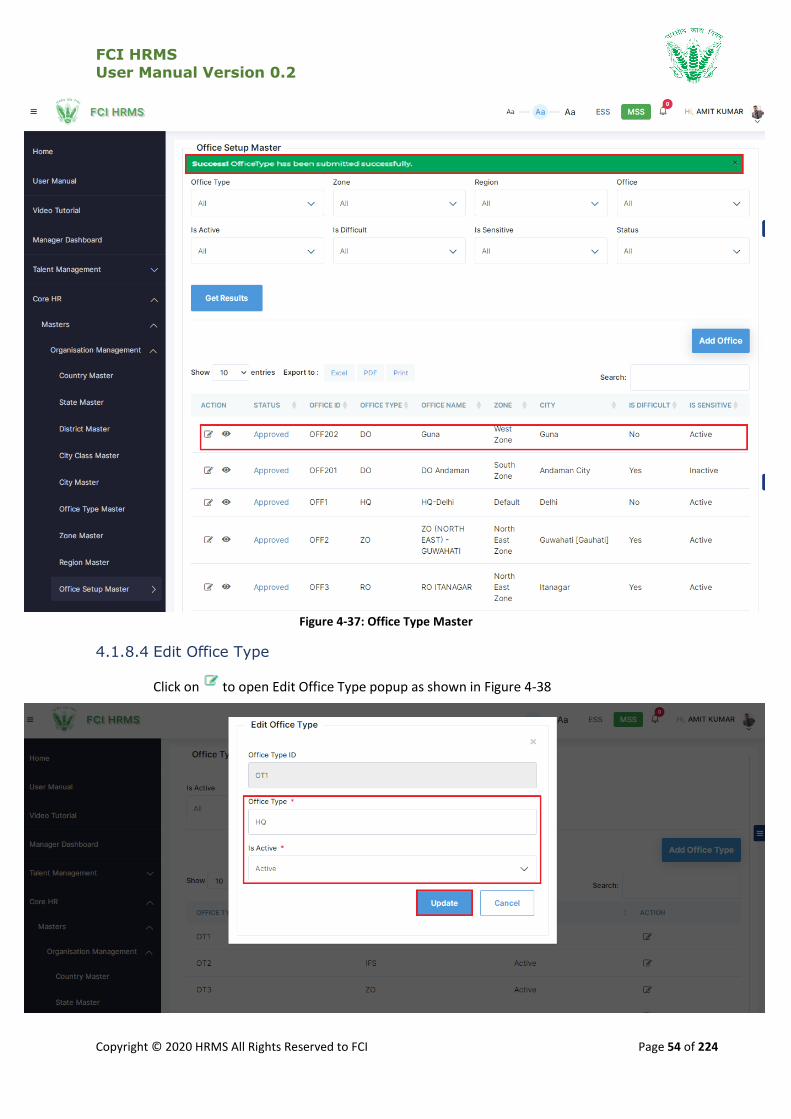
Figure 4-37: Office Type Master
4.1.8.4 Edit Office Type
Click on to open Edit Office Type popup as shown in Figure 4-38
FCI HRMS
User Manual Version 0.2
Copyright © 2020 HRMS All Rights Reserved to FCI Page 55 of 224
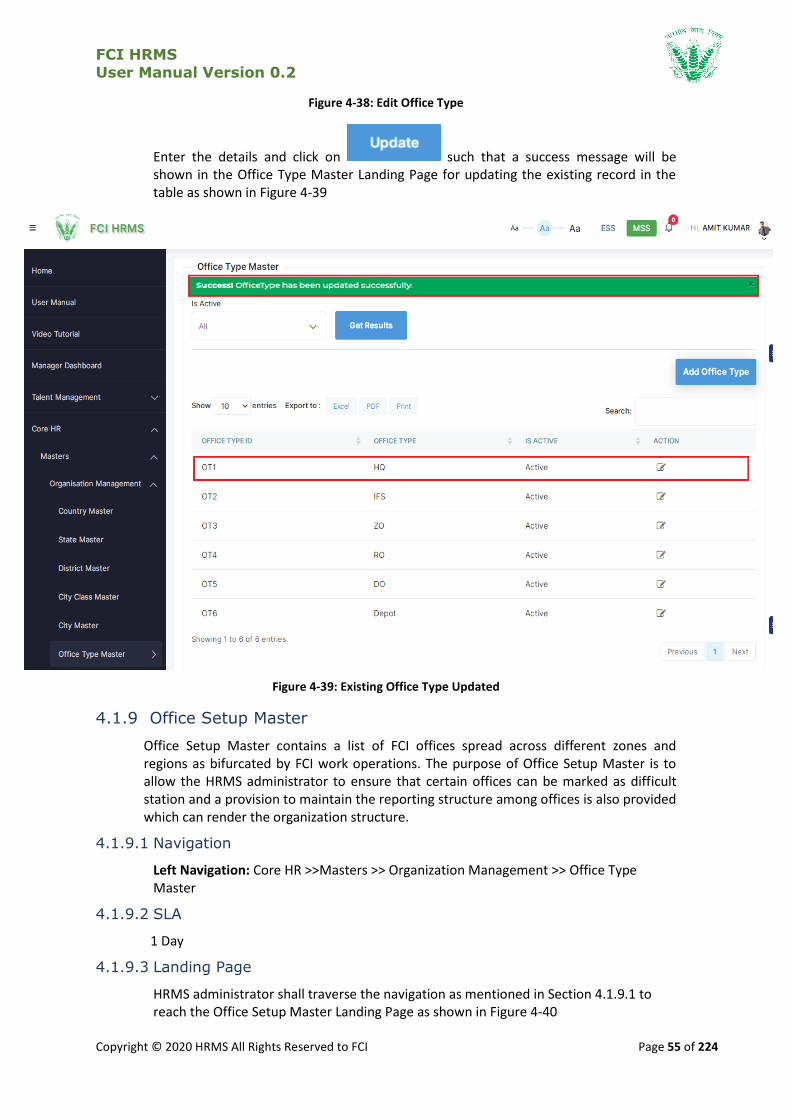
Figure 4-38: Edit Office Type
Enter the details and click on such that a success message will be shown in the Office Type Master Landing Page for updating the existing record in the table as shown in Figure 4-39
Figure 4-39: Existing Office Type Updated
4.1.9 Office Setup Master
Office Setup Master contains a list of FCI offices spread across different zones and regions as bifurcated by FCI work operations. The purpose of Office Setup Master is to allow the HRMS administrator to ensure that certain offices can be marked as difficult station and a provision to maintain the reporting structure among offices is also provided which can render the organization structure.
4.1.9.1 Navigation
Left Navigation: Core HR >>Masters >> Organization Management >> Office Type Master
4.1.9.2 SLA
1 Day
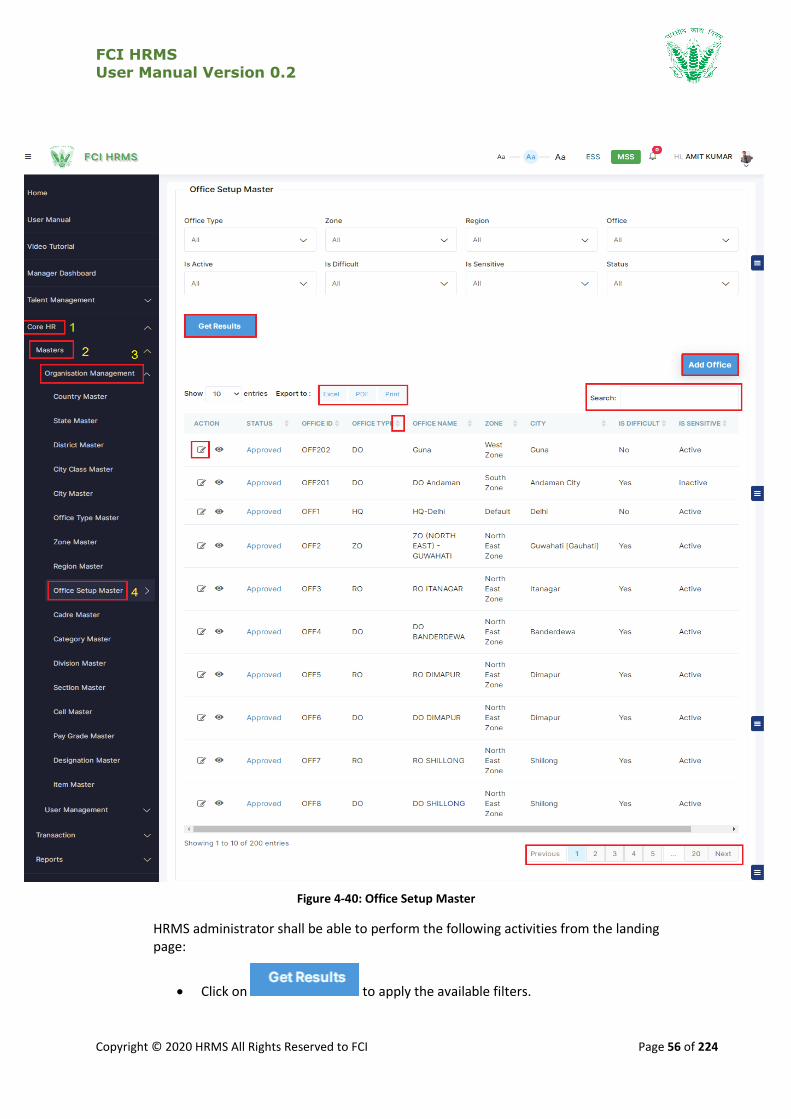
4.1.9.3 Landing Page
HRMS administrator shall traverse the navigation as mentioned in Section 4.1.9.1 to reach the Office Setup Master Landing Page as shown in Figure 4-40
FCI HRMS
User Manual Version 0.2
Copyright © 2020 HRMS All Rights Reserved to FCI Page 56 of 224
Figure 4-40: Office Setup Master
HRMS administrator shall be able to perform the following activities from the landing page:
Click on to apply the available filters.
FCI HRMS
User Manual Version 0.2
Copyright © 2020 HRMS All Rights Reserved to FCI Page 57 of 224
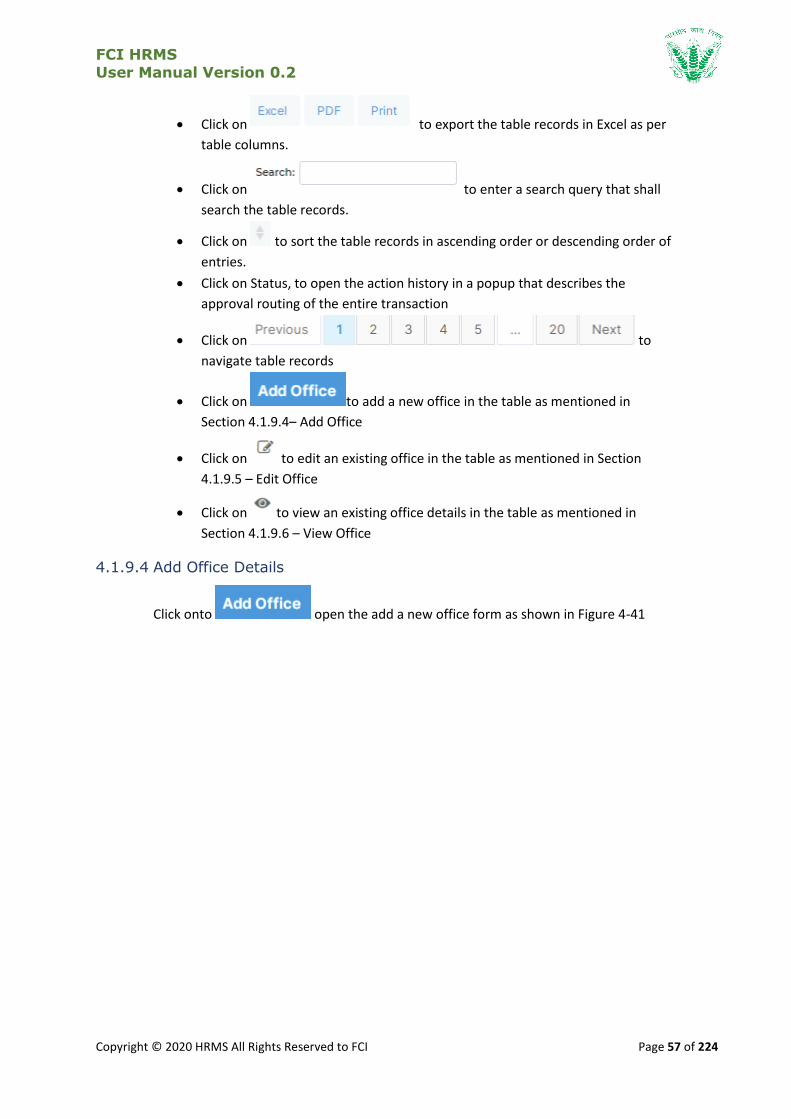
Click on to export the table records in Excel as per
table columns.
Click on to enter a search query that shall
search the table records.
Click on to sort the table records in ascending order or descending order of
entries.
Click on Status, to open the action history in a popup that describes the
approval routing of the entire transaction
Click on to
navigate table records
Click on to add a new office in the table as mentioned in
Section 4.1.9.4– Add Office
Click on to edit an existing office in the table as mentioned in Section
4.1.9.5 – Edit Office
Click on to view an existing office details in the table as mentioned in
Section 4.1.9.6 – View Office
4.1.9.4 Add Office Details
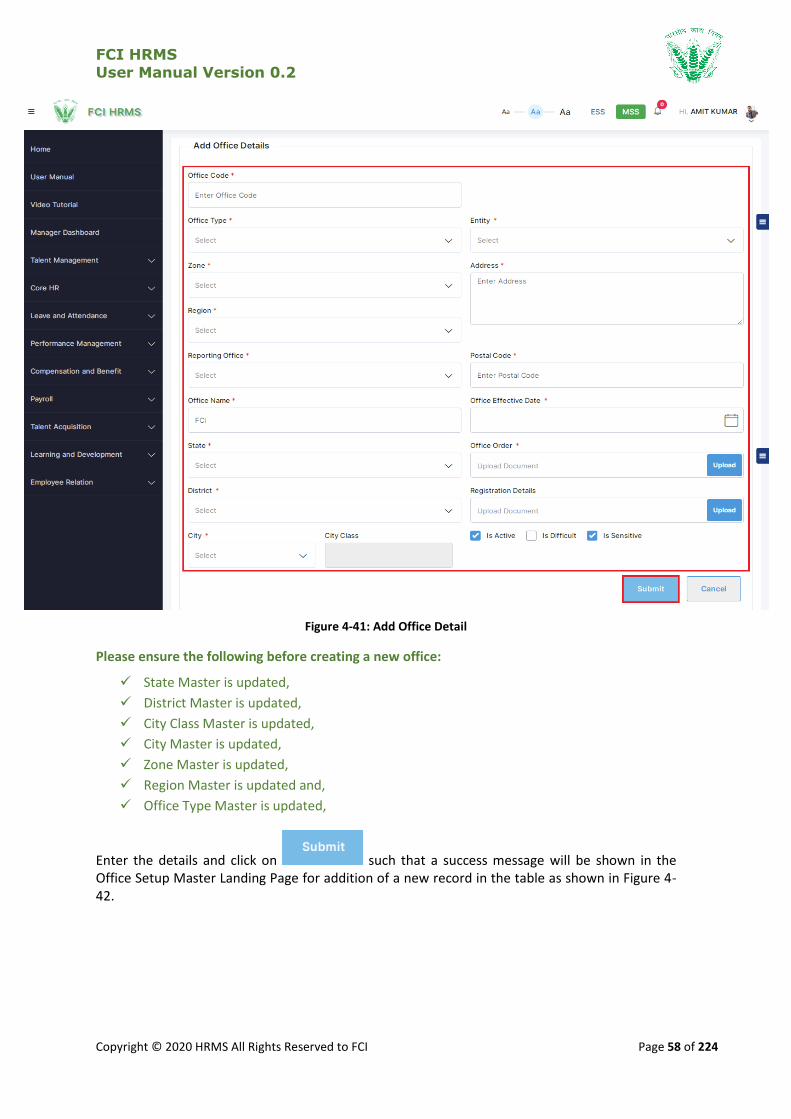
Click onto open the add a new office form as shown in Figure 4-41
FCI HRMS
User Manual Version 0.2
Copyright © 2020 HRMS All Rights Reserved to FCI Page 58 of 224
Figure 4-41: Add Office Detail
Please ensure the following before creating a new office:
State Master is updated,
District Master is updated,
City Class Master is updated,
City Master is updated,
Zone Master is updated,
Region Master is updated and,
Office Type Master is updated,
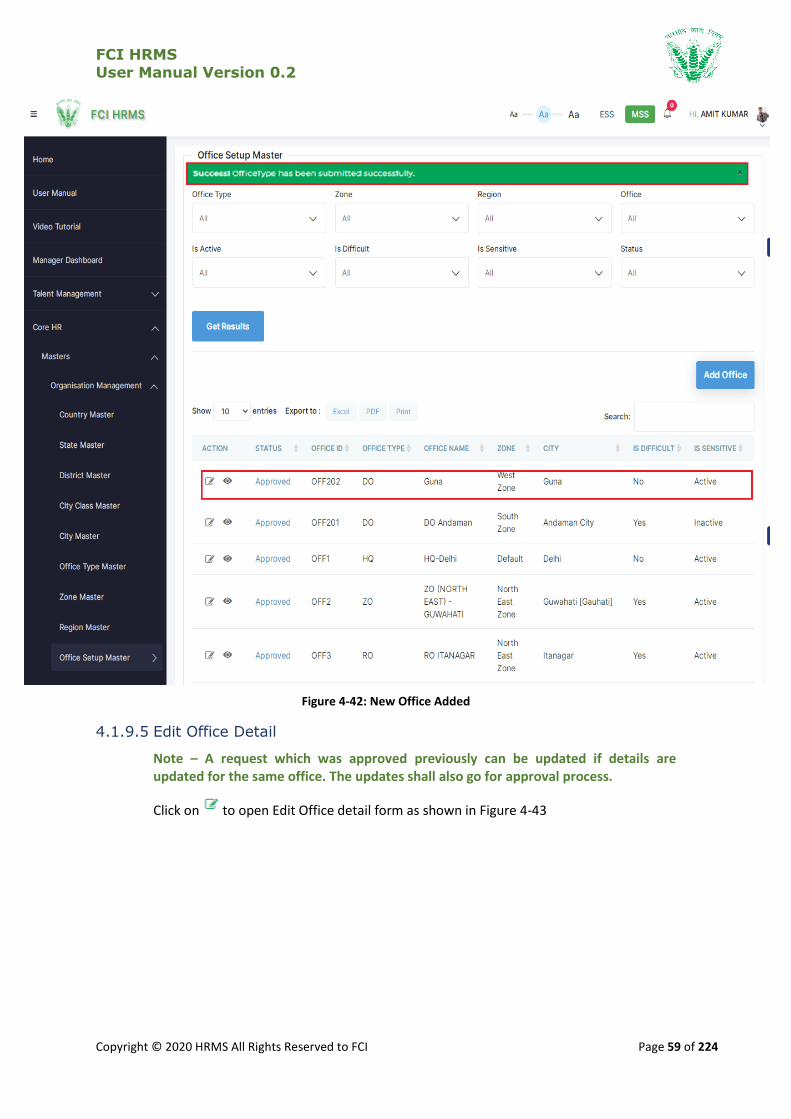
Enter the details and click on such that a success message will be shown in the Office Setup Master Landing Page for addition of a new record in the table as shown in Figure 4-42.
FCI HRMS
User Manual Version 0.2
Copyright © 2020 HRMS All Rights Reserved to FCI Page 59 of 224
Figure 4-42: New Office Added
4.1.9.5 Edit Office Detail
Note – A request which was approved previously can be updated if details are updated for the same office. The updates shall also go for approval process.
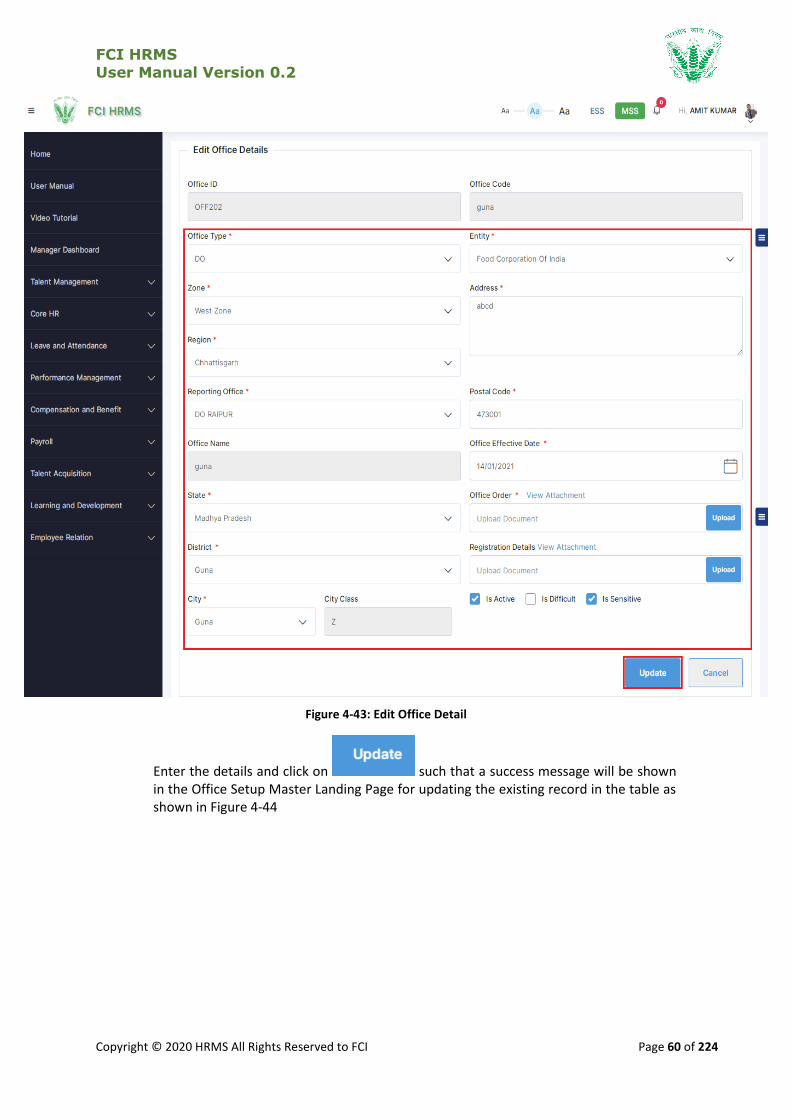
Click on to open Edit Office detail form as shown in Figure 4-43
FCI HRMS
User Manual Version 0.2
Copyright © 2020 HRMS All Rights Reserved to FCI Page 60 of 224
Figure 4-43: Edit Office Detail
Enter the details and click on such that a success message will be shown in the Office Setup Master Landing Page for updating the existing record in the table as shown in Figure 4-44

FCI HRMS
User Manual Version 0.2
Copyright © 2020 HRMS All Rights Reserved to FCI Page 61 of 224
Figure 4-44: Existing Office Detail Updated for Approval
4.1.9.6 View Office Detail
Click on to open View Office detail form as shown in Figure 4-45. Further the HRMS administrator can:
Click on to open the Action History which reflect
the approval routing for the specific transaction.
Click on to navigate to Office Setup Landing page.

FCI HRMS
User Manual Version 0.2
Copyright © 2020 HRMS All Rights Reserved to FCI Page 62 of 224
Figure 4-45: View Office Detail
4.1.9.7 Review Office Setup
To review the request submitted by HRMS administrator the reviewing authority shall navigate to Office Setup Master landing page as shown in Figure 4-46
FCI HRMS
User Manual Version 0.2
Copyright © 2020 HRMS All Rights Reserved to FCI Page 63 of 224
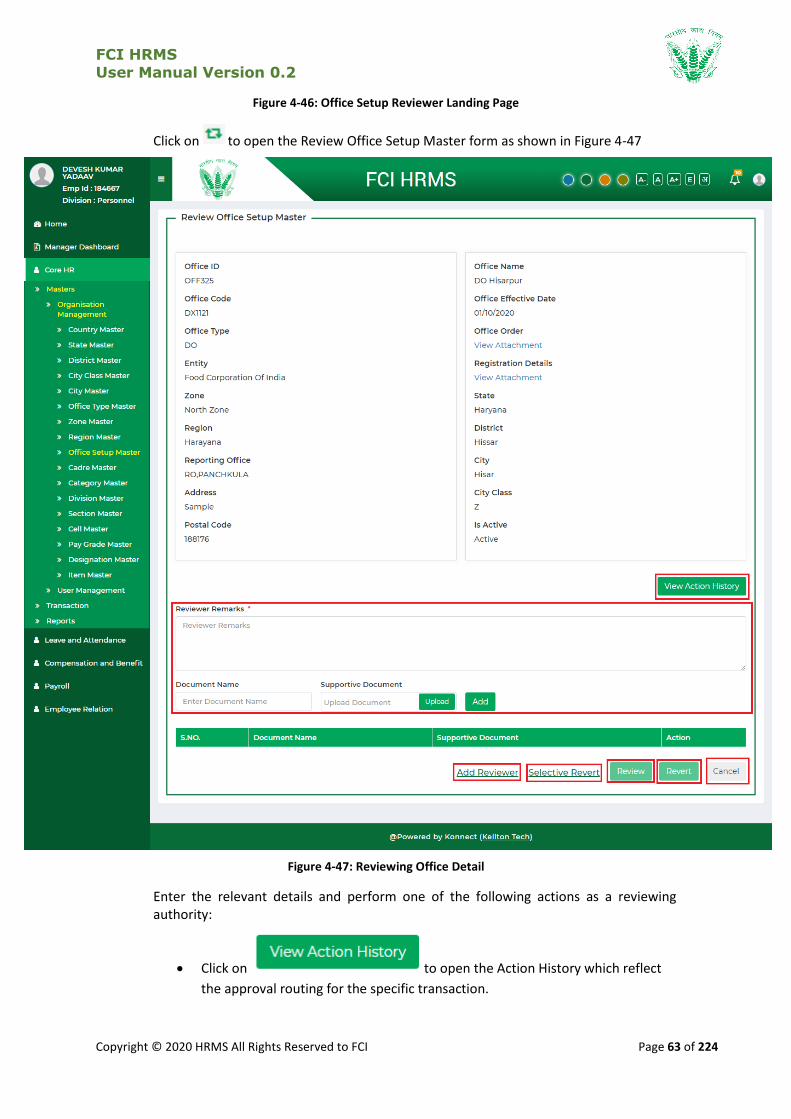
Figure 4-46: Office Setup Reviewer Landing Page
Click on to open the Review Office Setup Master form as shown in Figure 4-47
Figure 4-47: Reviewing Office Detail
Enter the relevant details and perform one of the following actions as a reviewing authority:
Click on to open the Action History which reflect
the approval routing for the specific transaction.
FCI HRMS
User Manual Version 0.2
Copyright © 2020 HRMS All Rights Reserved to FCI Page 64 of 224
Click on to attach a new document in PDF format with a document
name of not more than 5 MB
Click on link to open the additional reviewer popup where
the existing reviewing authority can add another reviewer in the line of
approval routing.
Click on link to open the selective revert popup from
where the reviewing authority can send back the transaction to any reviewer
who had previously reviewed the transaction.
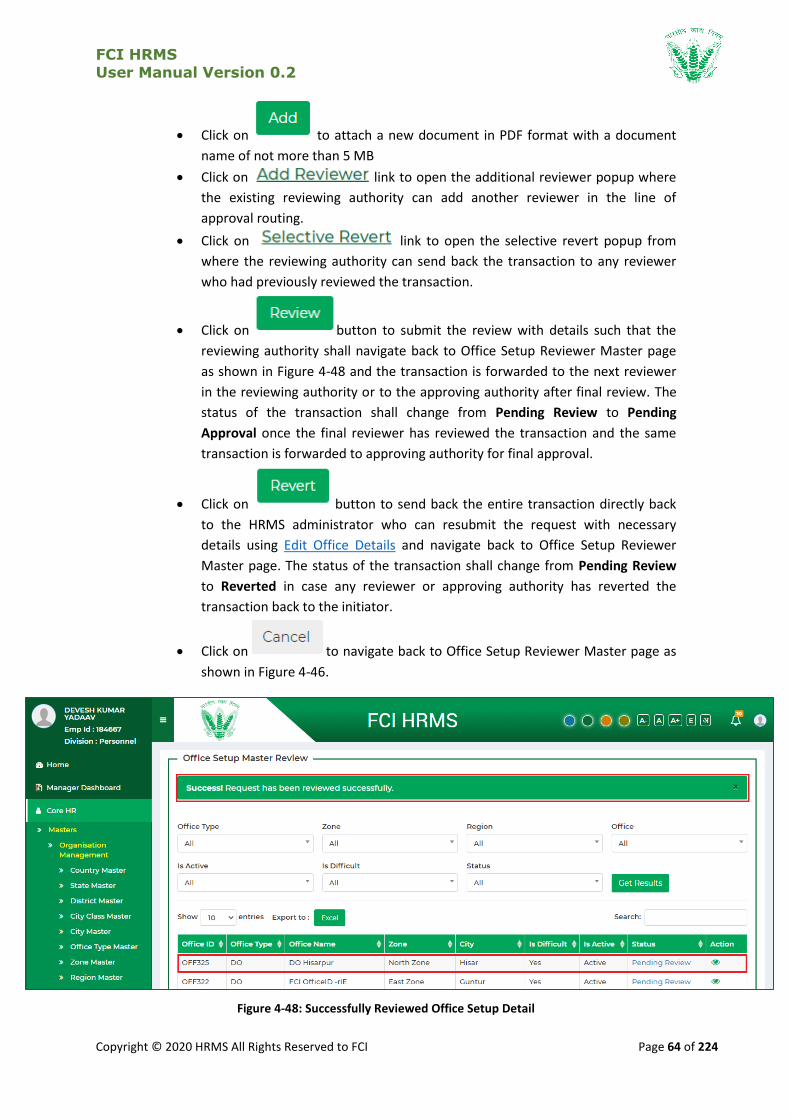
Click on button to submit the review with details such that the
reviewing authority shall navigate back to Office Setup Reviewer Master page
as shown in Figure 4-48 and the transaction is forwarded to the next reviewer
in the reviewing authority or to the approving authority after final review. The
status of the transaction shall change from Pending Review to Pending
Approval once the final reviewer has reviewed the transaction and the same
transaction is forwarded to approving authority for final approval.
Click on button to send back the entire transaction directly back
to the HRMS administrator who can resubmit the request with necessary
details using Edit Office Details and navigate back to Office Setup Reviewer
Master page. The status of the transaction shall change from Pending Review
to Reverted in case any reviewer or approving authority has reverted the
transaction back to the initiator.
Click on to navigate back to Office Setup Reviewer Master page as
shown in Figure 4-46.
Figure 4-48: Successfully Reviewed Office Setup Detail
FCI HRMS
User Manual Version 0.2
Copyright © 2020 HRMS All Rights Reserved to FCI Page 65 of 224
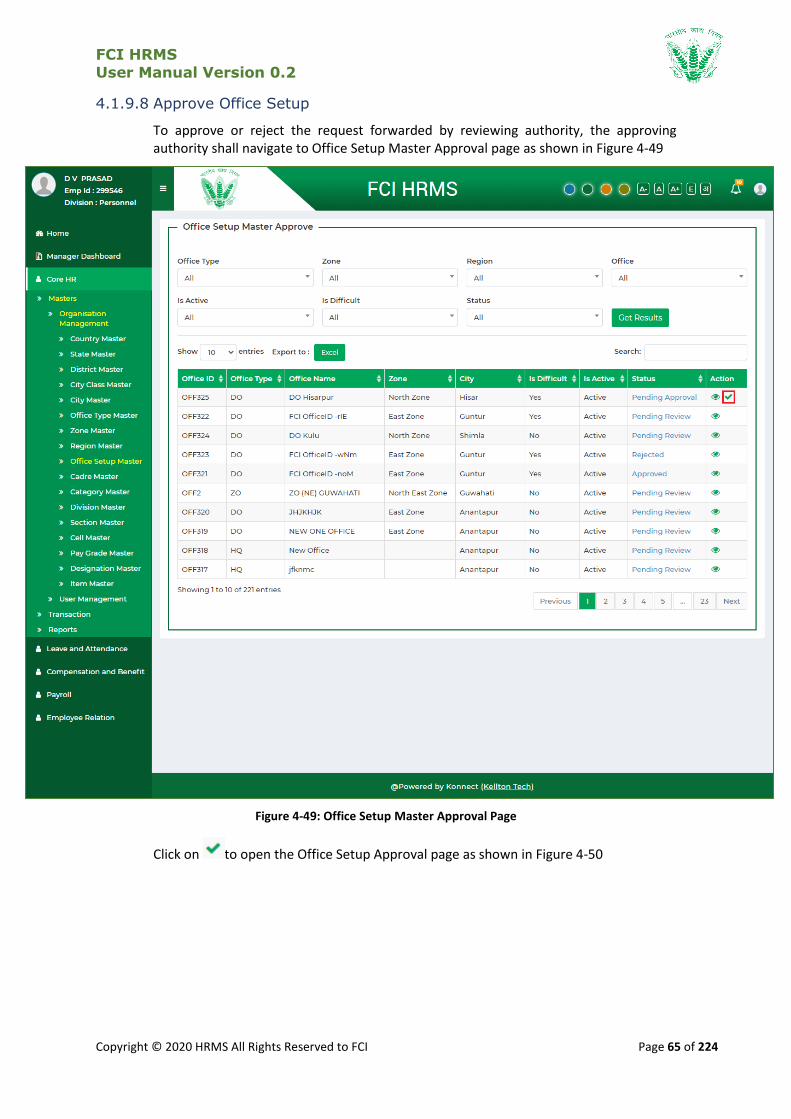
4.1.9.8 Approve Office Setup
To approve or reject the request forwarded by reviewing authority, the approving authority shall navigate to Office Setup Master Approval page as shown in Figure 4-49
Figure 4-49: Office Setup Master Approval Page
Click on to open the Office Setup Approval page as shown in Figure 4-50
FCI HRMS
User Manual Version 0.2
Copyright © 2020 HRMS All Rights Reserved to FCI Page 66 of 224
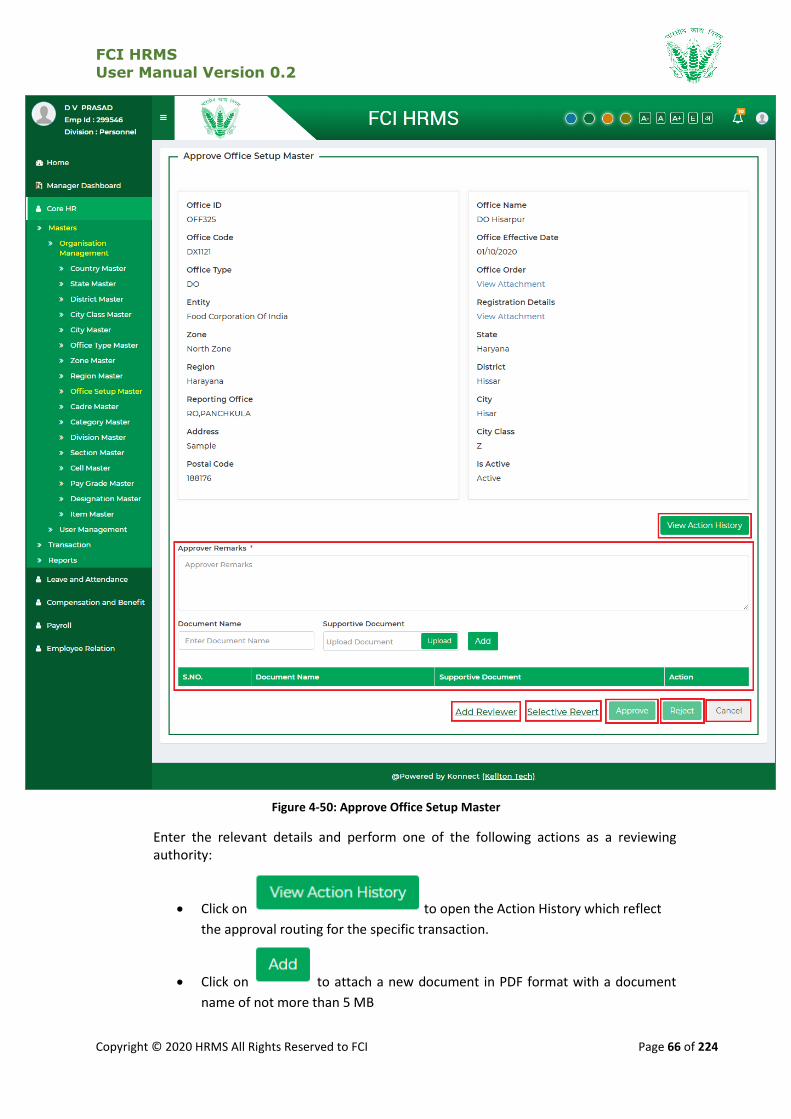
Figure 4-50: Approve Office Setup Master
Enter the relevant details and perform one of the following actions as a reviewing authority:
Click on to open the Action History which reflect
the approval routing for the specific transaction.
Click on to attach a new document in PDF format with a document
name of not more than 5 MB
FCI HRMS
User Manual Version 0.2
Copyright © 2020 HRMS All Rights Reserved to FCI Page 67 of 224
Click on link to open the additional reviewer popup where
the existing reviewing authority can add another reviewer in the line of
approval routing.
Click on link to open the selective revert popup from
where the reviewing authority can send back the transaction to any reviewer
who had previously reviewed the transaction.
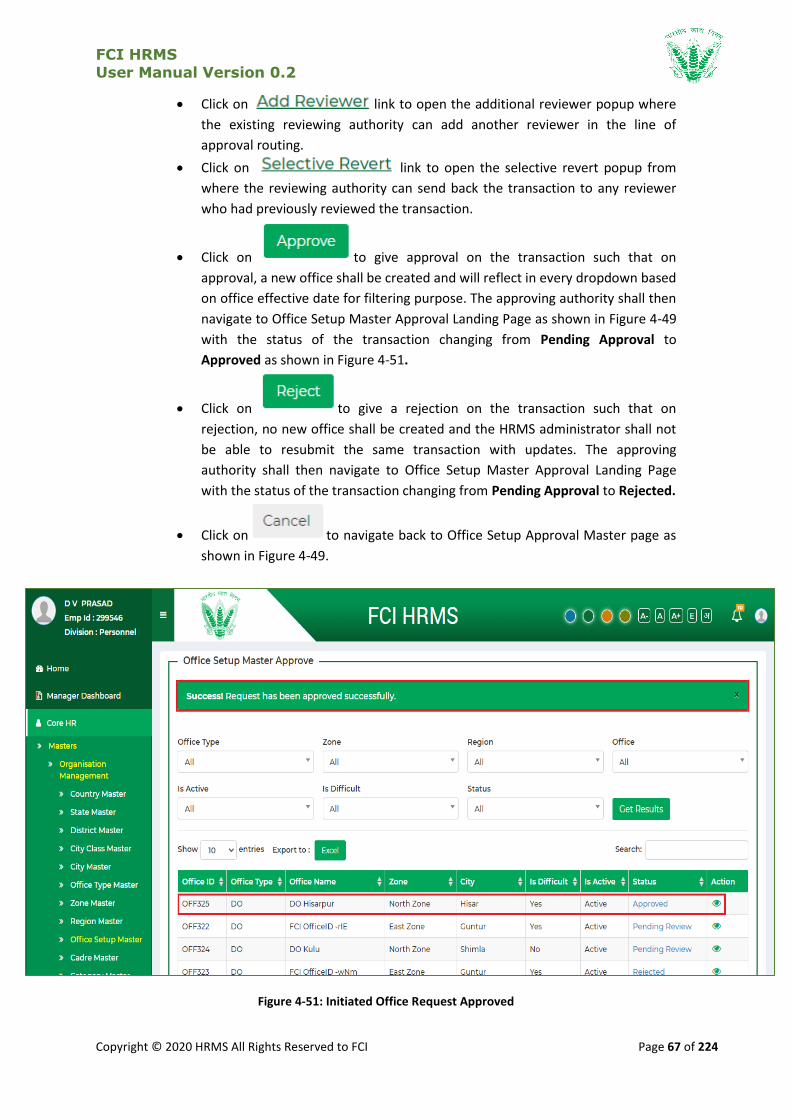
Click on to give approval on the transaction such that on
approval, a new office shall be created and will reflect in every dropdown based
on office effective date for filtering purpose. The approving authority shall then
navigate to Office Setup Master Approval Landing Page as shown in Figure 4-49
with the status of the transaction changing from Pending Approval to
Approved as shown in Figure 4-51.
Click on to give a rejection on the transaction such that on
rejection, no new office shall be created and the HRMS administrator shall not
be able to resubmit the same transaction with updates. The approving
authority shall then navigate to Office Setup Master Approval Landing Page
with the status of the transaction changing from Pending Approval to Rejected.
Click on to navigate back to Office Setup Approval Master page as
shown in Figure 4-49.
Figure 4-51: Initiated Office Request Approved

FCI HRMS
User Manual Version 0.2
Copyright © 2020 HRMS All Rights Reserved to FCI Page 68 of 224
4.1.10 Division Master
Division Master will contain a list of all divisions as per different FCI offices which will allow the HRMS administrator to keep track, filter, search and manage different divisions with a provision to nominate a head of department based on different FCI offices.
4.1.10.1 Navigation
Left Navigation: Core HR >>Masters >> Organization Management >> Division Master
4.1.10.2 SLA
1 Day
4.1.10.3 Landing Page
HRMS administrator shall traverse the navigation as mentioned in Section 4.1.10.1 to reach the Division Master Landing Page as shown in Figure 4-52

FCI HRMS
User Manual Version 0.2
Copyright © 2020 HRMS All Rights Reserved to FCI Page 69 of 224
Figure 4-52: Division Master
HRMS administrator shall be able to perform the following activities from the landing page:
Click on to apply the available filters.
Click on to export the table records in Excel as per
table columns.
Click on to enter a search query that shall
search the table records.
Click on to sort the table records in ascending order or descending order of
entries.
Click on Status, to open the action history in a popup that describes the
approval routing of the entire transaction
Click on to
navigate table records
Click on to add a new division in the table as
mentioned in Section 4.1.10.4 – Add Division
Click on to edit an existing division in the table as mentioned in Section
4.1.10.5 – Edit Division
Click on to view an existing division details in the table as mentioned in
Section 4.1.10.6 – View Division
4.1.10.4 Add Division Master
Click onto open the add division form as shown in Figure 4-53
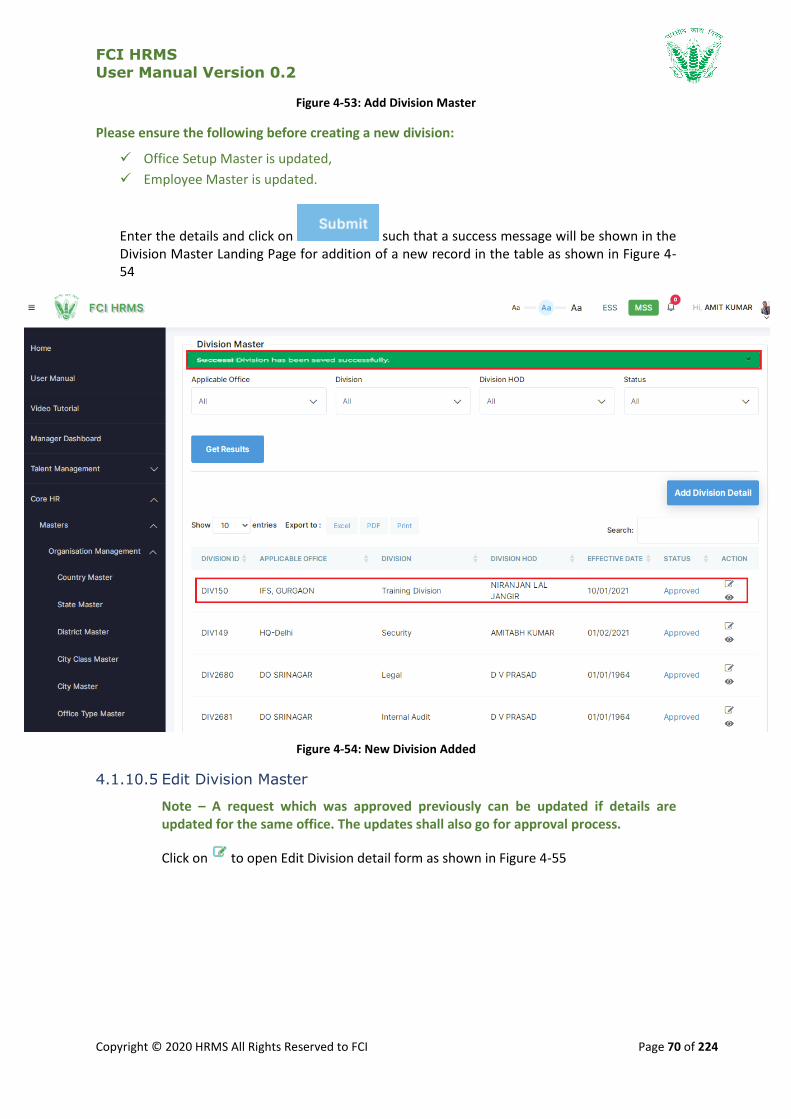
FCI HRMS
User Manual Version 0.2
Copyright © 2020 HRMS All Rights Reserved to FCI Page 70 of 224
Figure 4-53: Add Division Master
Please ensure the following before creating a new division:
Office Setup Master is updated,
Employee Master is updated.
Enter the details and click on such that a success message will be shown in the Division Master Landing Page for addition of a new record in the table as shown in Figure 4-54
Figure 4-54: New Division Added
4.1.10.5 Edit Division Master
Note – A request which was approved previously can be updated if details are updated for the same office. The updates shall also go for approval process.
Click on to open Edit Division detail form as shown in Figure 4-55
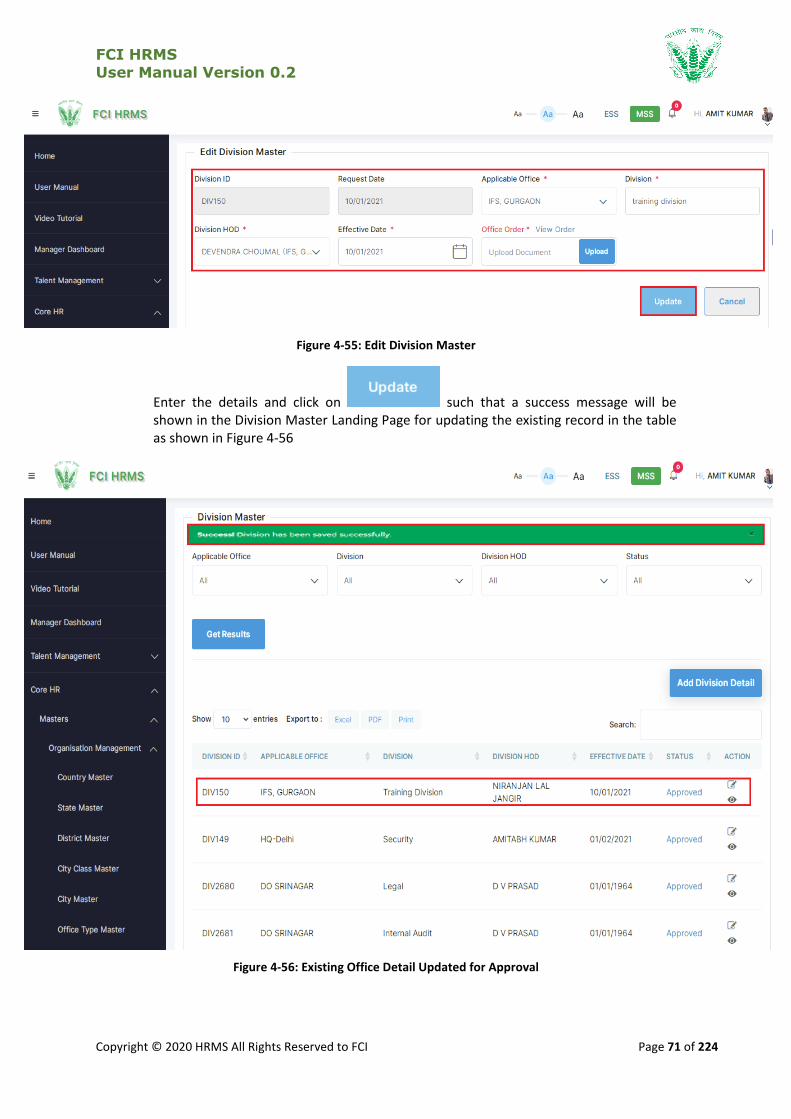
FCI HRMS
User Manual Version 0.2
Copyright © 2020 HRMS All Rights Reserved to FCI Page 71 of 224
Figure 4-55: Edit Division Master
Enter the details and click on such that a success message will be shown in the Division Master Landing Page for updating the existing record in the table as shown in Figure 4-56
Figure 4-56: Existing Office Detail Updated for Approval
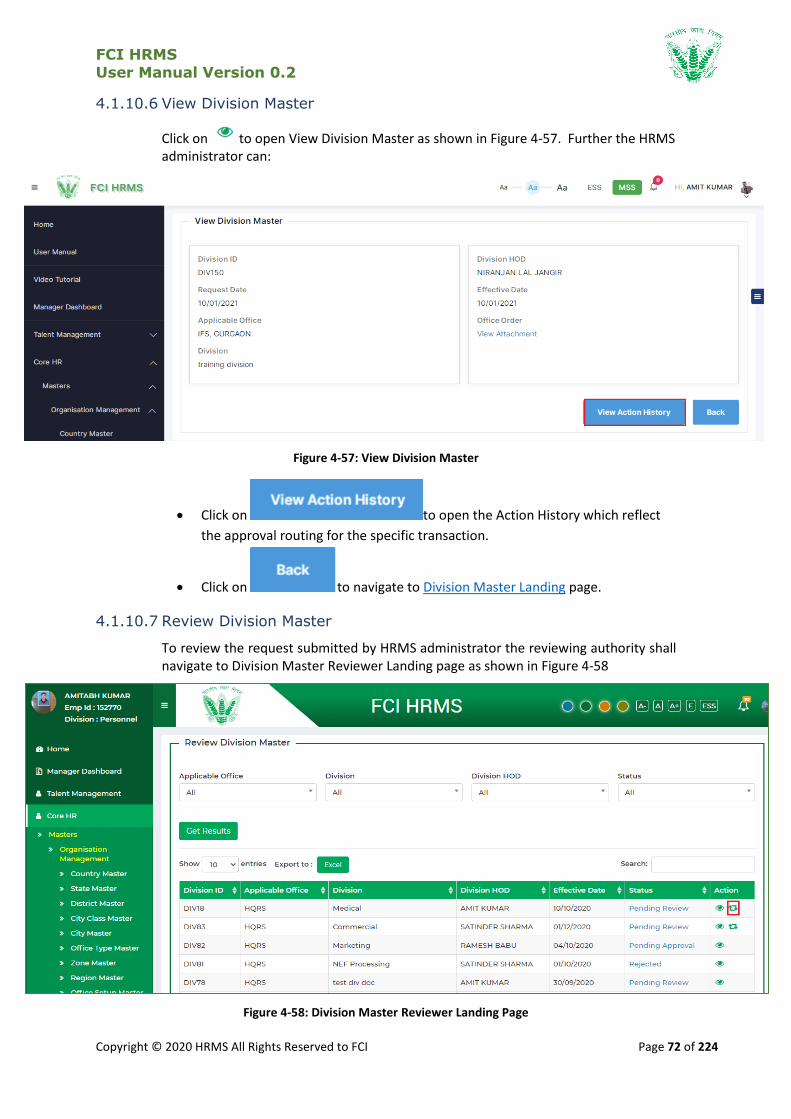
FCI HRMS
User Manual Version 0.2
Copyright © 2020 HRMS All Rights Reserved to FCI Page 72 of 224
4.1.10.6 View Division Master
Click on to open View Division Master as shown in Figure 4-57. Further the HRMS administrator can:
Figure 4-57: View Division Master
Click on to open the Action History which reflect
the approval routing for the specific transaction.
Click on to navigate to Division Master Landing page.
4.1.10.7 Review Division Master
To review the request submitted by HRMS administrator the reviewing authority shall navigate to Division Master Reviewer Landing page as shown in Figure 4-58
Figure 4-58: Division Master Reviewer Landing Page
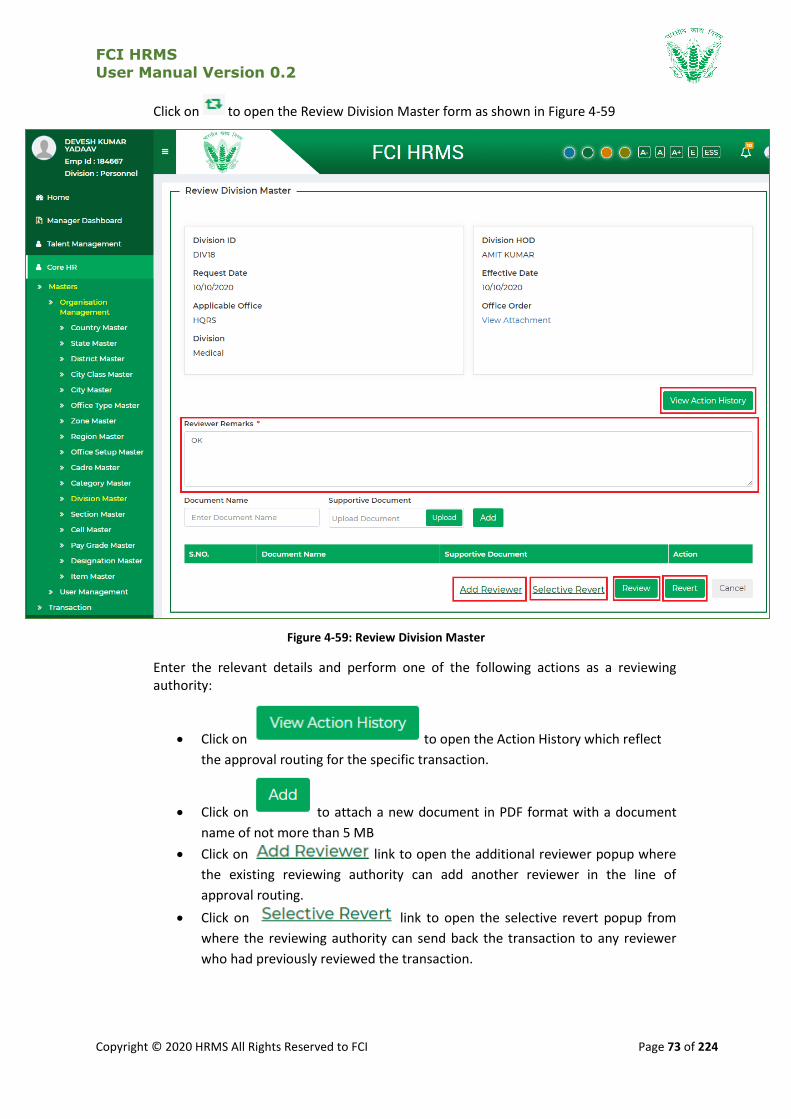
FCI HRMS
User Manual Version 0.2
Copyright © 2020 HRMS All Rights Reserved to FCI Page 73 of 224
Click on to open the Review Division Master form as shown in Figure 4-59
Figure 4-59: Review Division Master
Enter the relevant details and perform one of the following actions as a reviewing authority:
Click on to open the Action History which reflect
the approval routing for the specific transaction.
Click on to attach a new document in PDF format with a document
name of not more than 5 MB
Click on link to open the additional reviewer popup where
the existing reviewing authority can add another reviewer in the line of
approval routing.
Click on link to open the selective revert popup from
where the reviewing authority can send back the transaction to any reviewer
who had previously reviewed the transaction.
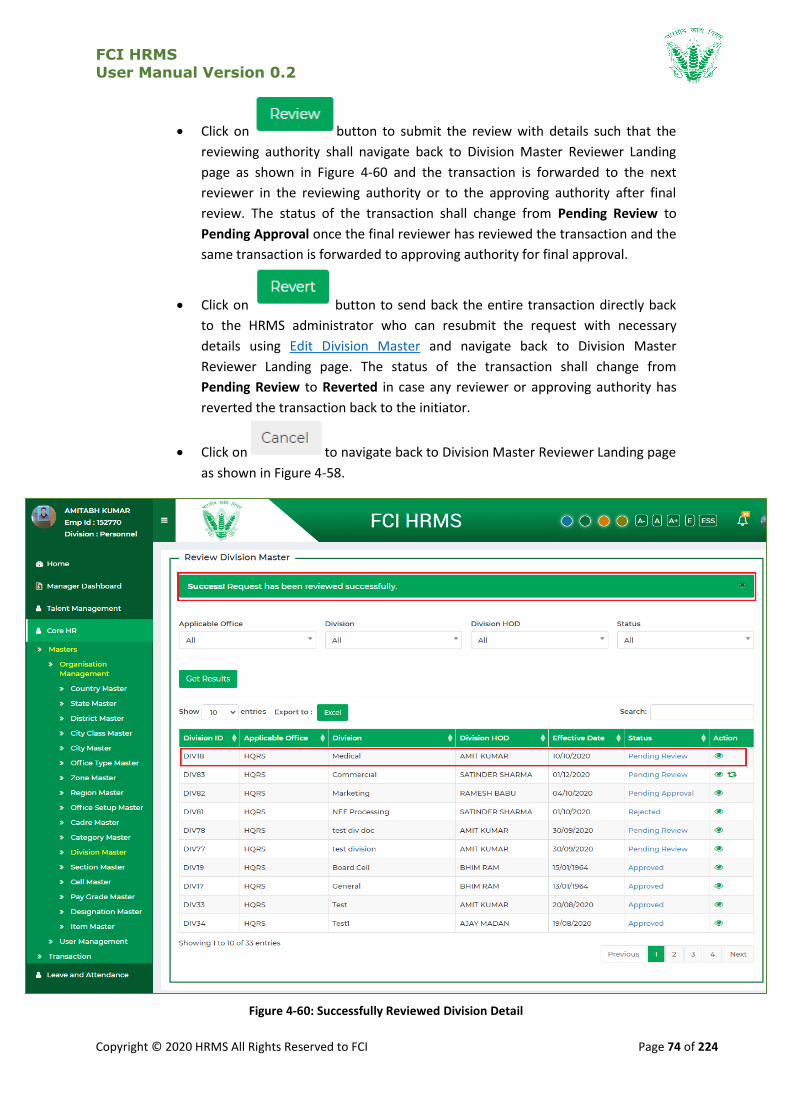
FCI HRMS
User Manual Version 0.2
Copyright © 2020 HRMS All Rights Reserved to FCI Page 74 of 224
Click on button to submit the review with details such that the
reviewing authority shall navigate back to Division Master Reviewer Landing
page as shown in Figure 4-60 and the transaction is forwarded to the next
reviewer in the reviewing authority or to the approving authority after final
review. The status of the transaction shall change from Pending Review to
Pending Approval once the final reviewer has reviewed the transaction and the
same transaction is forwarded to approving authority for final approval.
Click on button to send back the entire transaction directly back
to the HRMS administrator who can resubmit the request with necessary
details using Edit Division Master and navigate back to Division Master
Reviewer Landing page. The status of the transaction shall change from
Pending Review to Reverted in case any reviewer or approving authority has
reverted the transaction back to the initiator.
Click on to navigate back to Division Master Reviewer Landing page
as shown in Figure 4-58.
Figure 4-60: Successfully Reviewed Division Detail
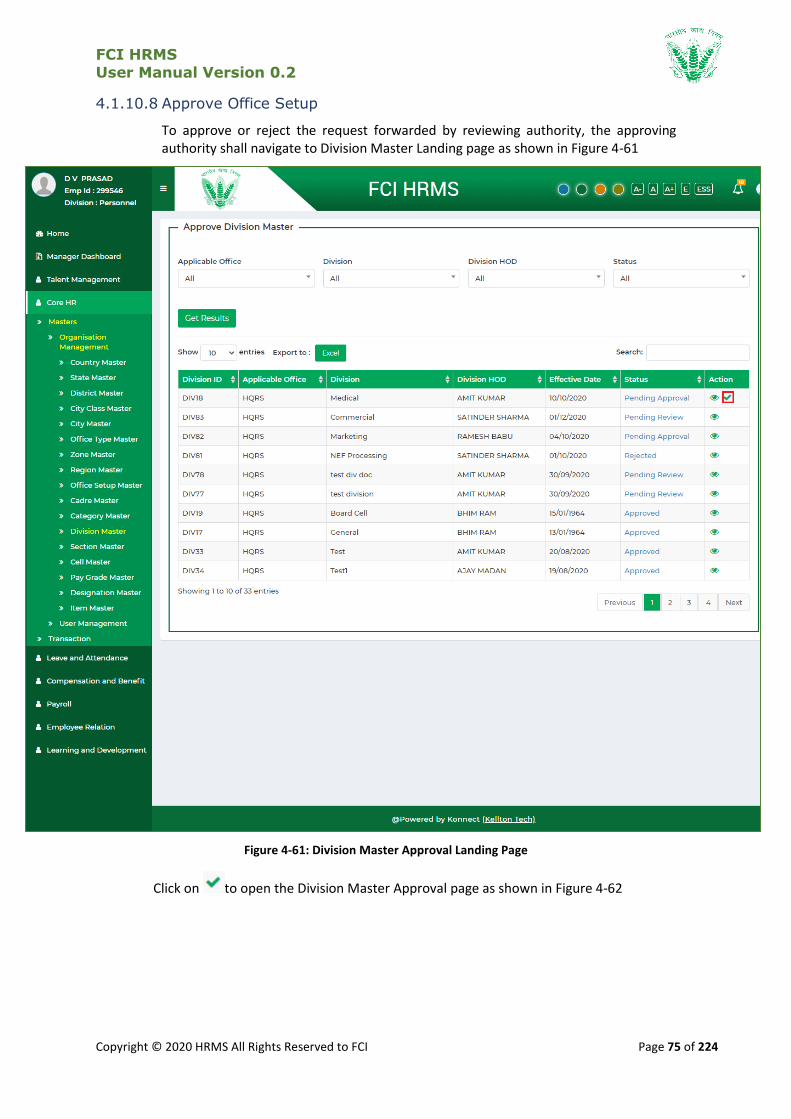
FCI HRMS
User Manual Version 0.2
Copyright © 2020 HRMS All Rights Reserved to FCI Page 75 of 224
4.1.10.8 Approve Office Setup
To approve or reject the request forwarded by reviewing authority, the approving authority shall navigate to Division Master Landing page as shown in Figure 4-61
Figure 4-61: Division Master Approval Landing Page
Click on to open the Division Master Approval page as shown in Figure 4-62
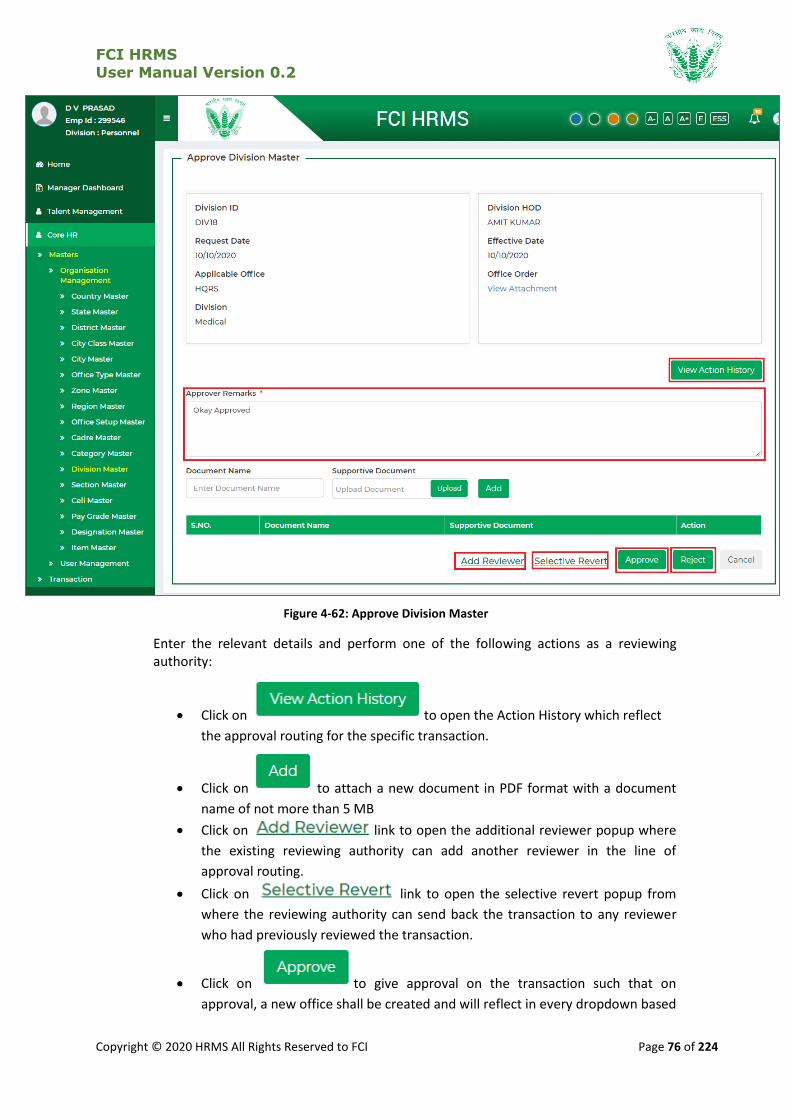
FCI HRMS
User Manual Version 0.2
Copyright © 2020 HRMS All Rights Reserved to FCI Page 76 of 224
Figure 4-62: Approve Division Master
Enter the relevant details and perform one of the following actions as a reviewing authority:
Click on to open the Action History which reflect
the approval routing for the specific transaction.
Click on to attach a new document in PDF format with a document
name of not more than 5 MB
Click on link to open the additional reviewer popup where
the existing reviewing authority can add another reviewer in the line of
approval routing.
Click on link to open the selective revert popup from
where the reviewing authority can send back the transaction to any reviewer
who had previously reviewed the transaction.
Click on to give approval on the transaction such that on
approval, a new office shall be created and will reflect in every dropdown based
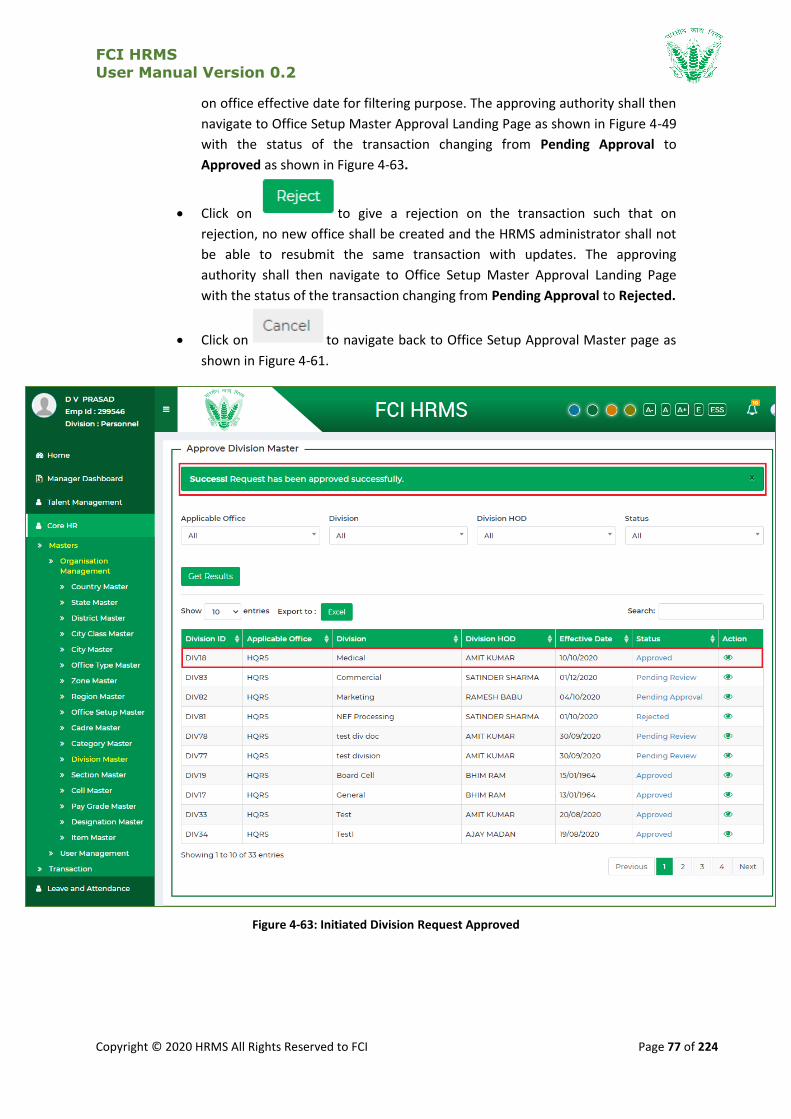
FCI HRMS
User Manual Version 0.2
Copyright © 2020 HRMS All Rights Reserved to FCI Page 77 of 224
on office effective date for filtering purpose. The approving authority shall then
navigate to Office Setup Master Approval Landing Page as shown in Figure 4-49
with the status of the transaction changing from Pending Approval to
Approved as shown in Figure 4-63.
Click on to give a rejection on the transaction such that on
rejection, no new office shall be created and the HRMS administrator shall not
be able to resubmit the same transaction with updates. The approving
authority shall then navigate to Office Setup Master Approval Landing Page
with the status of the transaction changing from Pending Approval to Rejected.
Click on to navigate back to Office Setup Approval Master page as
shown in Figure 4-61.
Figure 4-63: Initiated Division Request Approved

FCI HRMS
User Manual Version 0.2
Copyright © 2020 HRMS All Rights Reserved to FCI Page 78 of 224
4.1.11 Section Master
Section Master will contain a list of all sections as per different FCI divisions for all FCI offices which will allow the HRMS administrator to keep track, filter, and search and manage different subdivisions as sections.
4.1.11.1 Navigation
Left Navigation: Core HR >>Masters >> Organization Management >> Section Master
4.1.11.2 Landing Page
HRMS administrator shall traverse the navigation as mentioned in Section 4.1.11.1 to reach the Section Master Landing Page as shown in Figure 4-64
Figure 4-64: Section Master
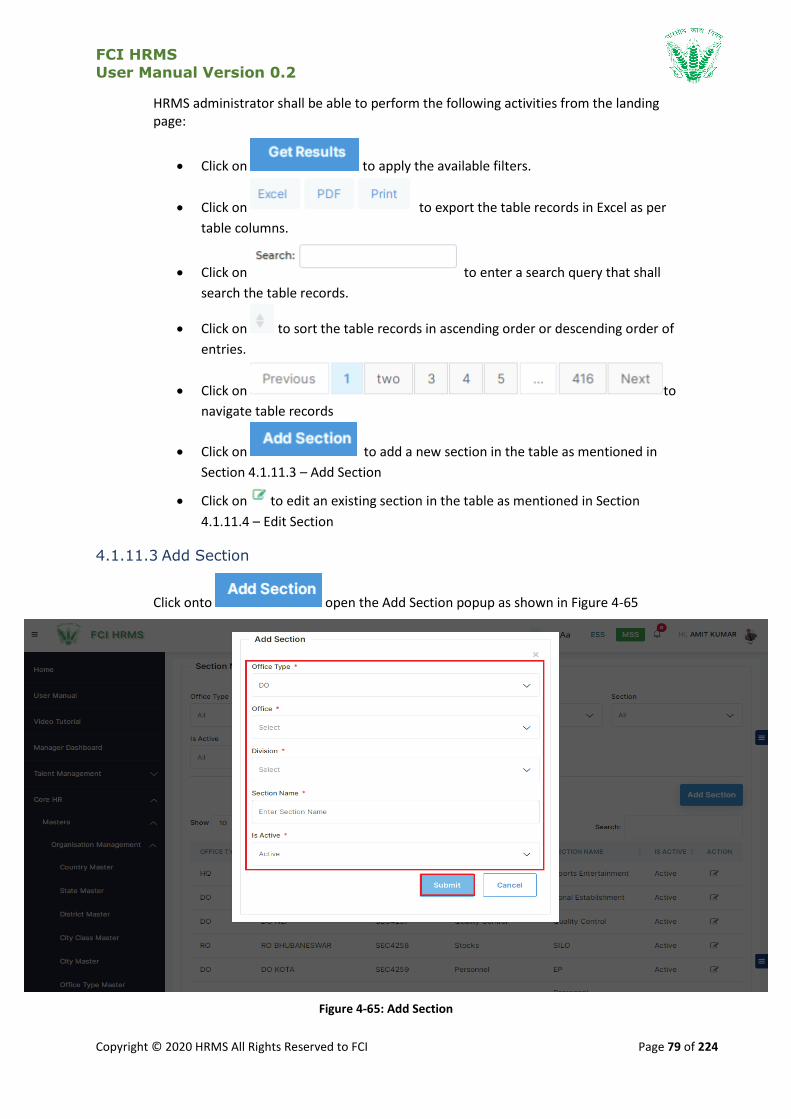
FCI HRMS
User Manual Version 0.2
Copyright © 2020 HRMS All Rights Reserved to FCI Page 79 of 224
HRMS administrator shall be able to perform the following activities from the landing page:
Click on to apply the available filters.
Click on to export the table records in Excel as per
table columns.
Click on to enter a search query that shall
search the table records.
Click on to sort the table records in ascending order or descending order of
entries.
Click on to
navigate table records
Click on to add a new section in the table as mentioned in
Section 4.1.11.3 – Add Section
Click on to edit an existing section in the table as mentioned in Section
4.1.11.4 – Edit Section
4.1.11.3 Add Section
Click onto open the Add Section popup as shown in Figure 4-65
Figure 4-65: Add Section

FCI HRMS
User Manual Version 0.2
Copyright © 2020 HRMS All Rights Reserved to FCI Page 80 of 224
Enter the details and click on such that a success message will be shown in the Section Master Landing Page for addition of a new record in the table as shown in Figure 4-66
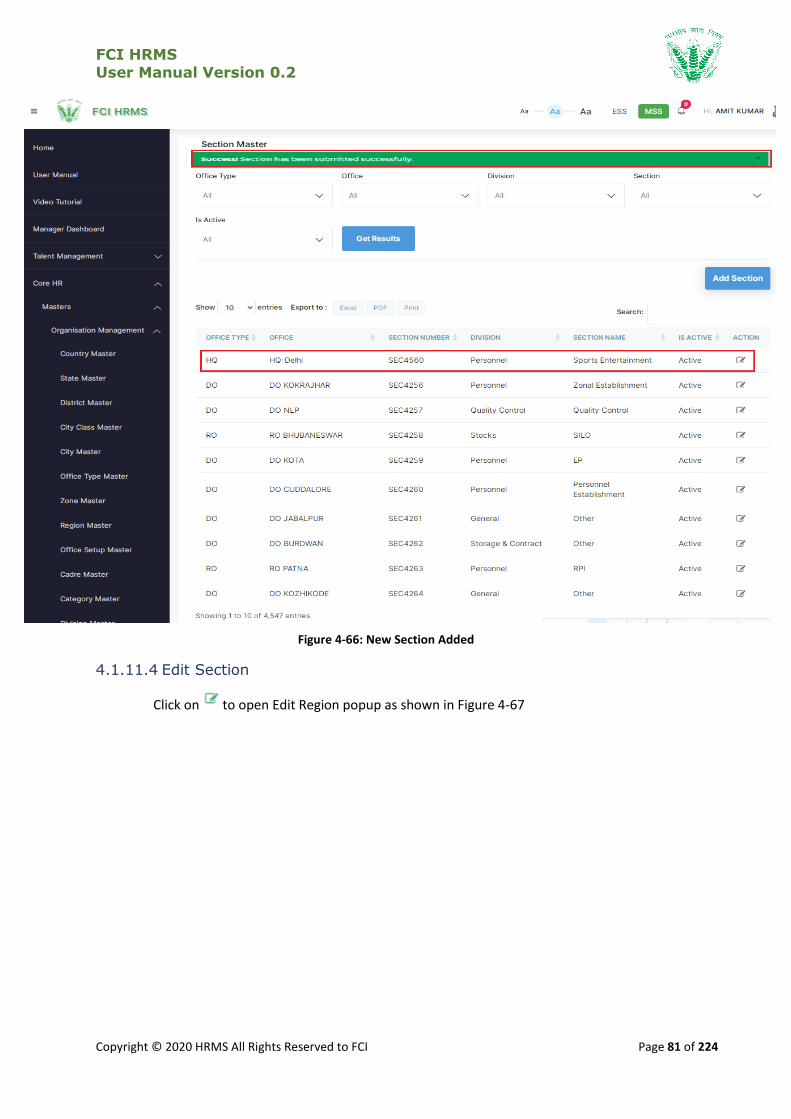
FCI HRMS
User Manual Version 0.2
Copyright © 2020 HRMS All Rights Reserved to FCI Page 81 of 224
Figure 4-66: New Section Added
4.1.11.4 Edit Section
Click on to open Edit Region popup as shown in Figure 4-67
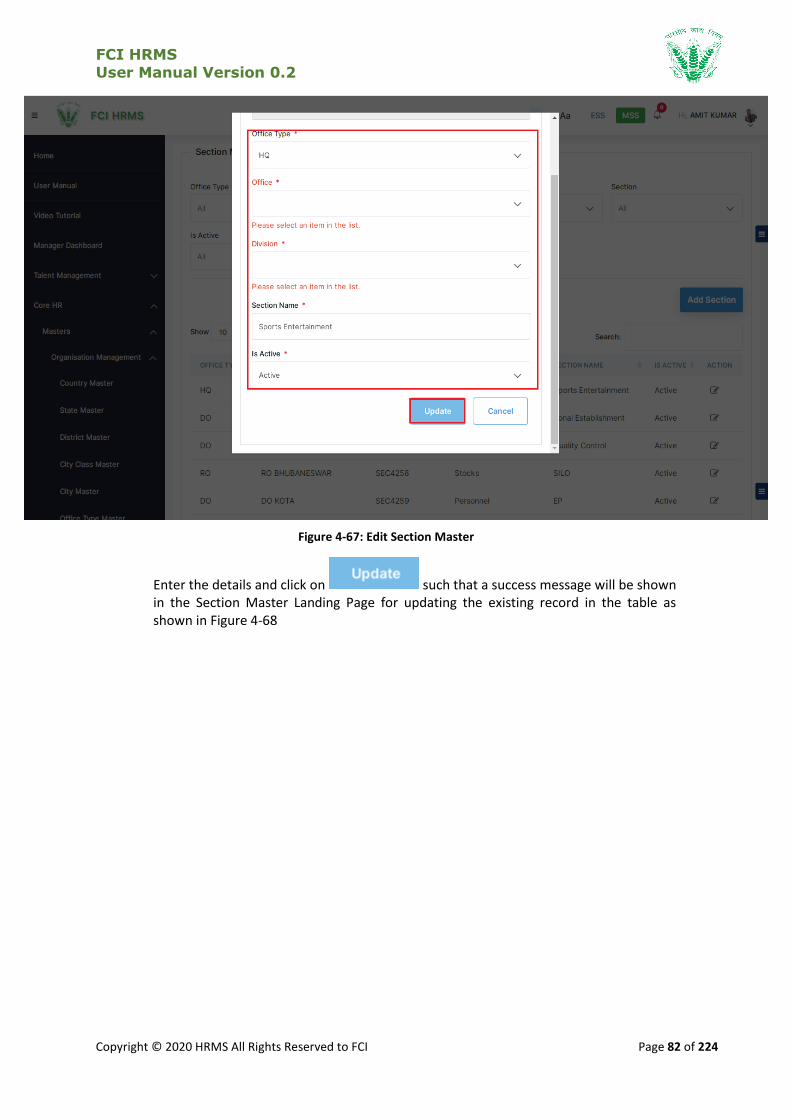
FCI HRMS
User Manual Version 0.2
Copyright © 2020 HRMS All Rights Reserved to FCI Page 82 of 224
Figure 4-67: Edit Section Master
Enter the details and click on such that a success message will be shown in the Section Master Landing Page for updating the existing record in the table as shown in Figure 4-68

FCI HRMS
User Manual Version 0.2
Copyright © 2020 HRMS All Rights Reserved to FCI Page 83 of 224
Figure 4-68: Existing Section Updated
4.1.12 Cell Master
Cell Master will contain a list of all Cells as per different FCI divisions for all FCI offices which will allow the HRMS administrator to keep track, filter, and search and manage them.
4.1.12.1 Navigation
Left Navigation: Core HR >>Masters >> Organization Management >> Cell Master
4.1.12.2 Landing Page
HRMS administrator shall traverse the navigation as mentioned in Section 4.1.12.1 to reach the Cell Master Landing Page as shown in Figure 4-69
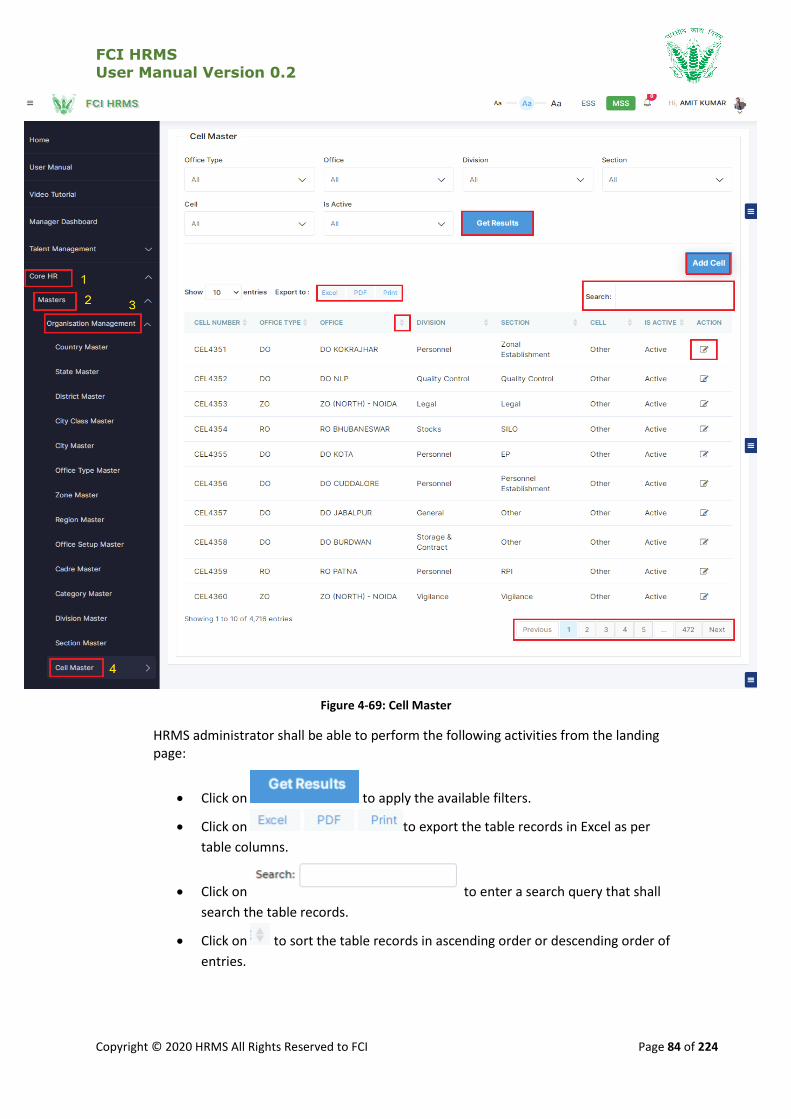
FCI HRMS
User Manual Version 0.2
Copyright © 2020 HRMS All Rights Reserved to FCI Page 84 of 224
Figure 4-69: Cell Master
HRMS administrator shall be able to perform the following activities from the landing page:
Click on to apply the available filters.
Click on to export the table records in Excel as per
table columns.
Click on to enter a search query that shall
search the table records.
Click on to sort the table records in ascending order or descending order of
entries.
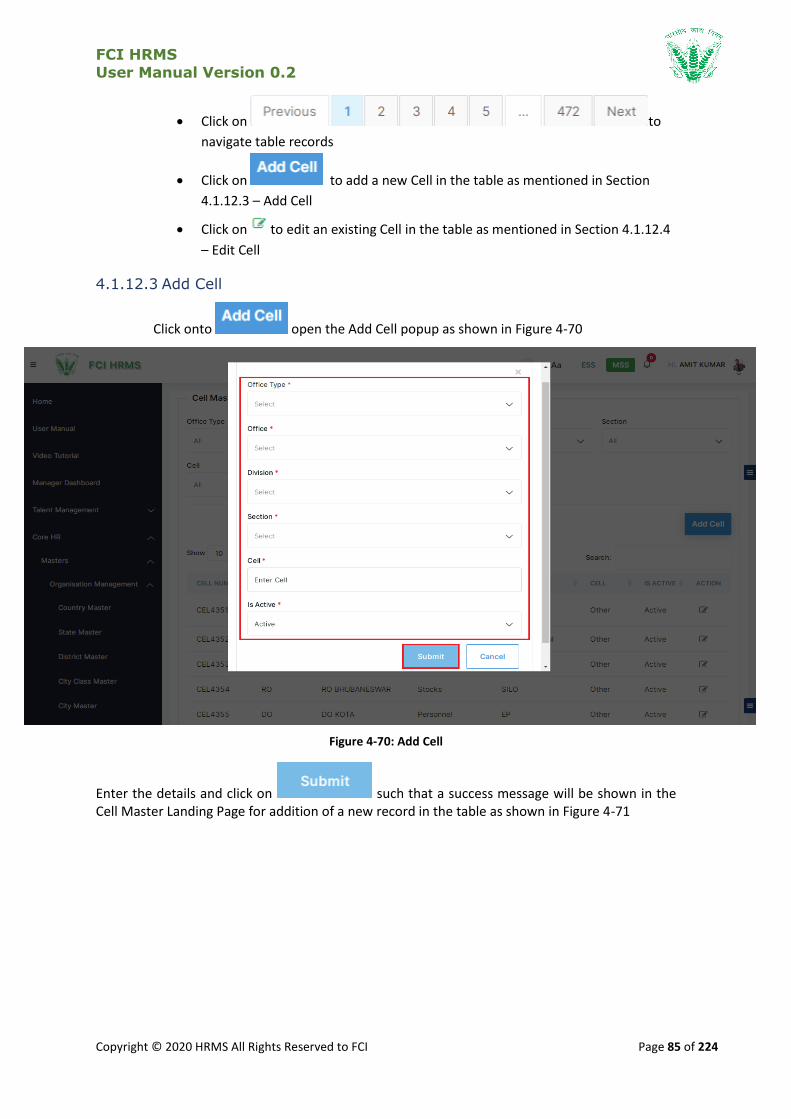
FCI HRMS
User Manual Version 0.2
Copyright © 2020 HRMS All Rights Reserved to FCI Page 85 of 224
Click on to
navigate table records
Click on to add a new Cell in the table as mentioned in Section
4.1.12.3 – Add Cell
Click on to edit an existing Cell in the table as mentioned in Section 4.1.12.4
– Edit Cell
4.1.12.3 Add Cell
Click onto open the Add Cell popup as shown in Figure 4-70
Figure 4-70: Add Cell
Enter the details and click on such that a success message will be shown in the Cell Master Landing Page for addition of a new record in the table as shown in Figure 4-71

FCI HRMS
User Manual Version 0.2
Copyright © 2020 HRMS All Rights Reserved to FCI Page 86 of 224
Figure 4-71: New Cell Added
4.1.12.4 Edit Cell
Click on to open Edit Region popup as shown in Figure 4-72
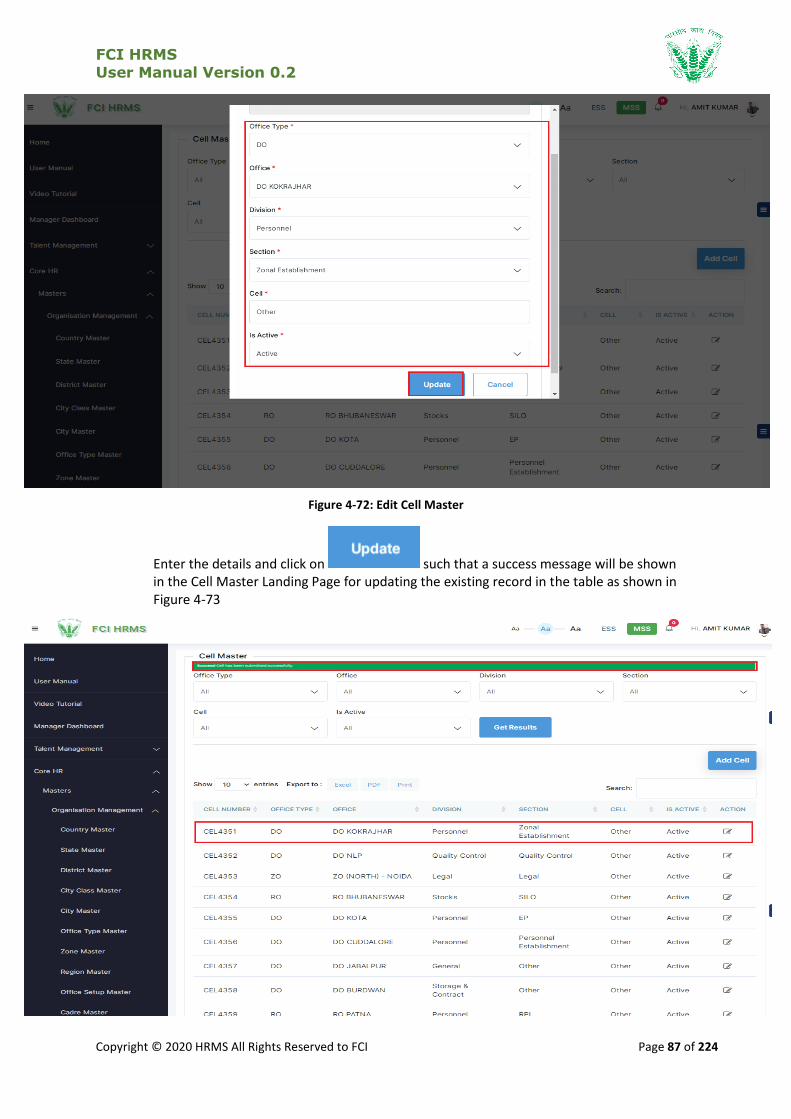
FCI HRMS
User Manual Version 0.2
Copyright © 2020 HRMS All Rights Reserved to FCI Page 87 of 224
Figure 4-72: Edit Cell Master
Enter the details and click on such that a success message will be shown in the Cell Master Landing Page for updating the existing record in the table as shown in Figure 4-73
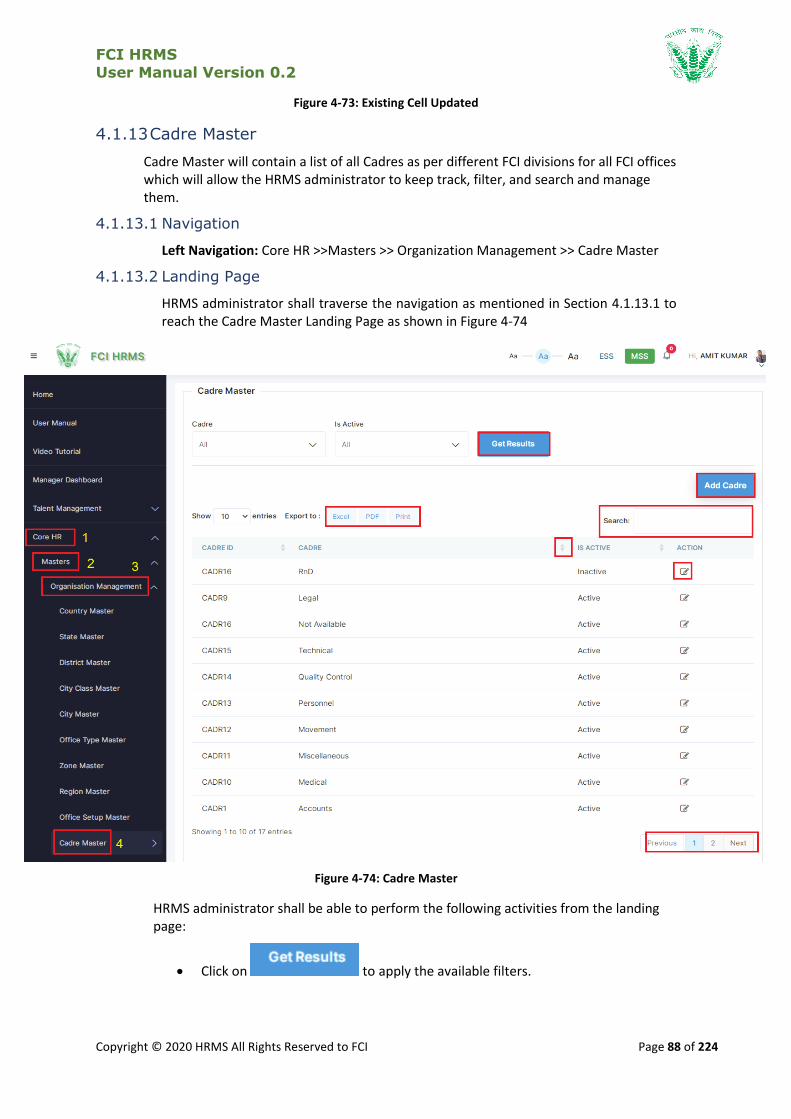
FCI HRMS
User Manual Version 0.2
Copyright © 2020 HRMS All Rights Reserved to FCI Page 88 of 224
Figure 4-73: Existing Cell Updated
4.1.13 Cadre Master
Cadre Master will contain a list of all Cadres as per different FCI divisions for all FCI offices which will allow the HRMS administrator to keep track, filter, and search and manage them.
4.1.13.1 Navigation
Left Navigation: Core HR >>Masters >> Organization Management >> Cadre Master
4.1.13.2 Landing Page
HRMS administrator shall traverse the navigation as mentioned in Section 4.1.13.1 to reach the Cadre Master Landing Page as shown in Figure 4-74
Figure 4-74: Cadre Master
HRMS administrator shall be able to perform the following activities from the landing page:
Click on to apply the available filters.
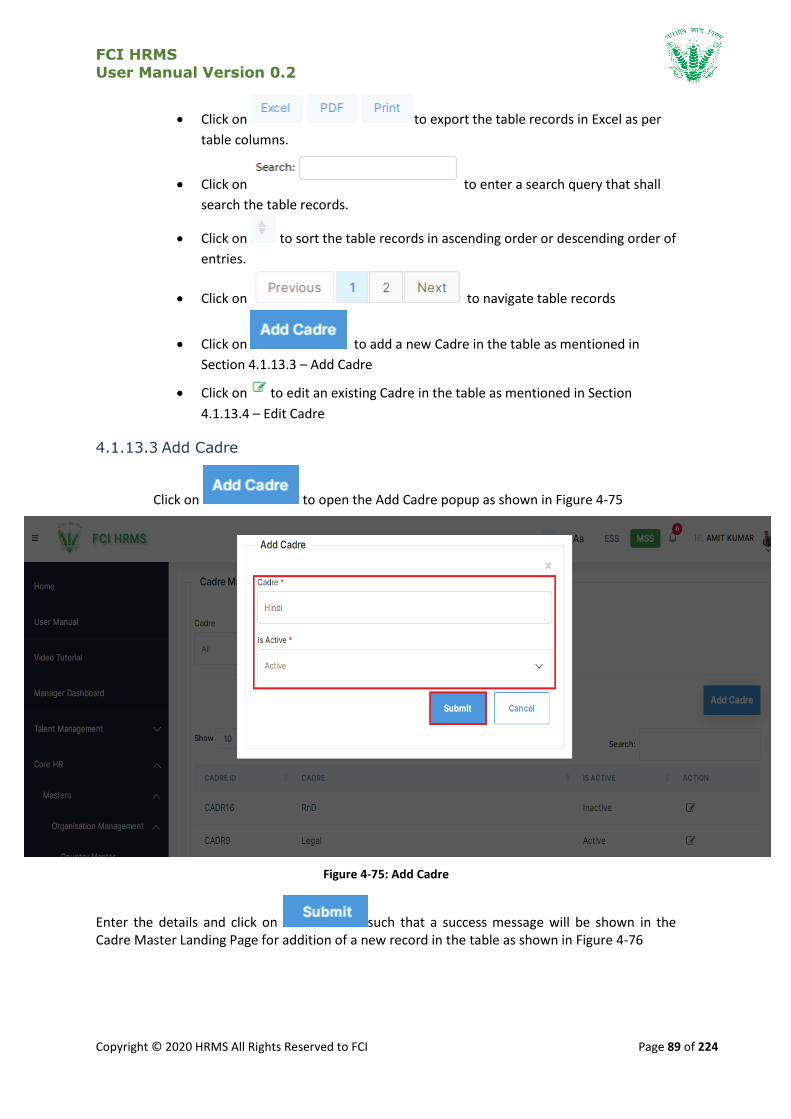
FCI HRMS
User Manual Version 0.2
Copyright © 2020 HRMS All Rights Reserved to FCI Page 89 of 224
Click on to export the table records in Excel as per
table columns.
Click on to enter a search query that shall
search the table records.
Click on to sort the table records in ascending order or descending order of
entries.
Click on to navigate table records
Click on to add a new Cadre in the table as mentioned in
Section 4.1.13.3 – Add Cadre
Click on to edit an existing Cadre in the table as mentioned in Section
4.1.13.4 – Edit Cadre
4.1.13.3 Add Cadre
Click on to open the Add Cadre popup as shown in Figure 4-75
Figure 4-75: Add Cadre
Enter the details and click on such that a success message will be shown in the Cadre Master Landing Page for addition of a new record in the table as shown in Figure 4-76

FCI HRMS
User Manual Version 0.2
Copyright © 2020 HRMS All Rights Reserved to FCI Page 90 of 224
Figure 4-76: New Cadre Added
4.1.13.4 Edit Cadre
Click on to open Edit Region popup as shown in Figure 4-77
Figure 4-77: Edit Cadre Master
Enter the details and click on such that a success message will be shown in the Cadre Master Landing Page for updating the existing record in the table as shown in Figure 4-78

FCI HRMS
User Manual Version 0.2
Copyright © 2020 HRMS All Rights Reserved to FCI Page 91 of 224
Figure 4-78: Existing Cadre Updated
4.1.14 Category Master
Category Master will contain a list of all Categories in FCI divisions for all FCI offices which will allow the HRMS administrator to keep track, filter, and search and manage them.
4.1.14.1 Navigation
Left Navigation: Core HR >>Masters >> Organization Management >> Category Master
4.1.14.2 Landing Page
HRMS administrator shall traverse the navigation as mentioned in Section 4.1.14.1 to reach the Category Master Landing Page as shown in Figure 4-79

FCI HRMS
User Manual Version 0.2
Copyright © 2020 HRMS All Rights Reserved to FCI Page 92 of 224
Figure 4-79: Category Master
HRMS administrator shall be able to perform the following activities from the landing page:
Click on to apply the available filters.
Click on to export the table records in Excel as per
table columns.
Click on to enter a search query that shall
search the table records.
Click on to sort the table records in ascending order or descending order of
entries.
Click on to navigate table records
Click on to add a new Category in the table as mentioned
in Section 4.1.14.3 – Add Category
Click on to edit an existing Category in the table as mentioned in Section
4.1.14.4 – Edit Category
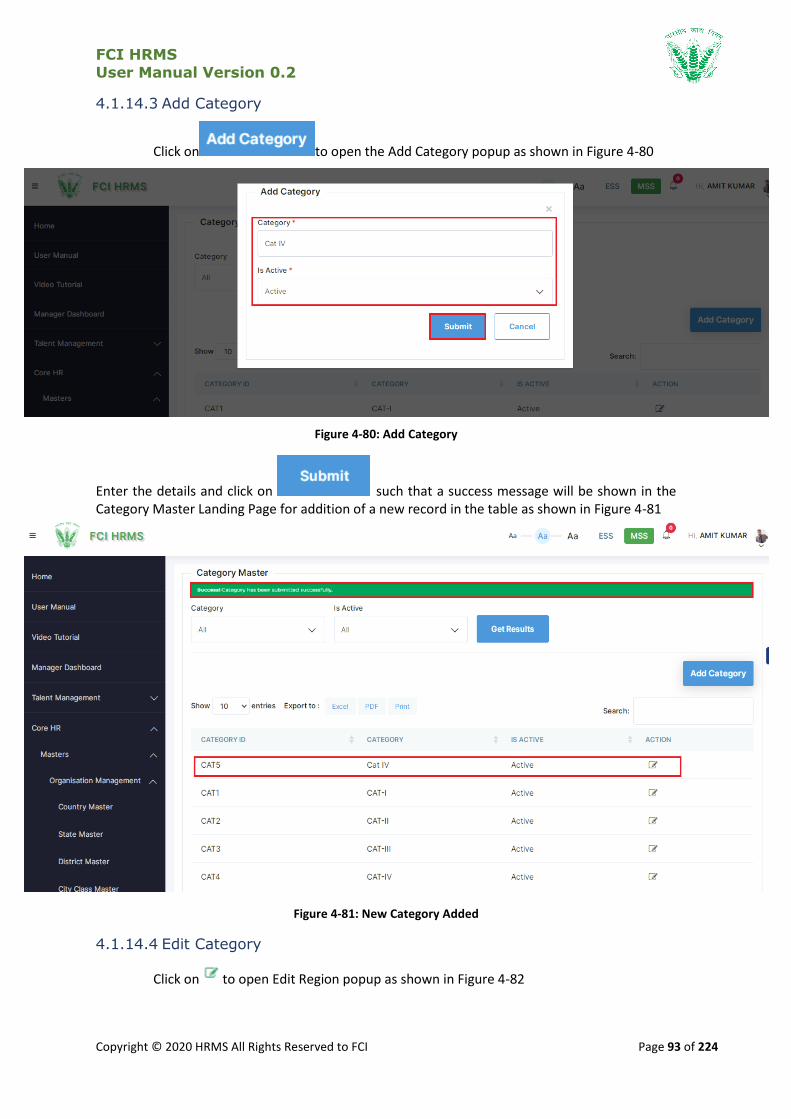
FCI HRMS
User Manual Version 0.2
Copyright © 2020 HRMS All Rights Reserved to FCI Page 93 of 224
4.1.14.3 Add Category
Click on to open the Add Category popup as shown in Figure 4-80
Figure 4-80: Add Category
Enter the details and click on such that a success message will be shown in the Category Master Landing Page for addition of a new record in the table as shown in Figure 4-81
Figure 4-81: New Category Added
4.1.14.4 Edit Category
Click on to open Edit Region popup as shown in Figure 4-82

FCI HRMS
User Manual Version 0.2
Copyright © 2020 HRMS All Rights Reserved to FCI Page 94 of 224
Figure 4-82: Edit Category Master
Enter the details and click on such that a success message will be shown in the Category Master Landing Page for updating the existing record in the table as shown in Figure 4-83
Figure 4-83: Existing Category Updated
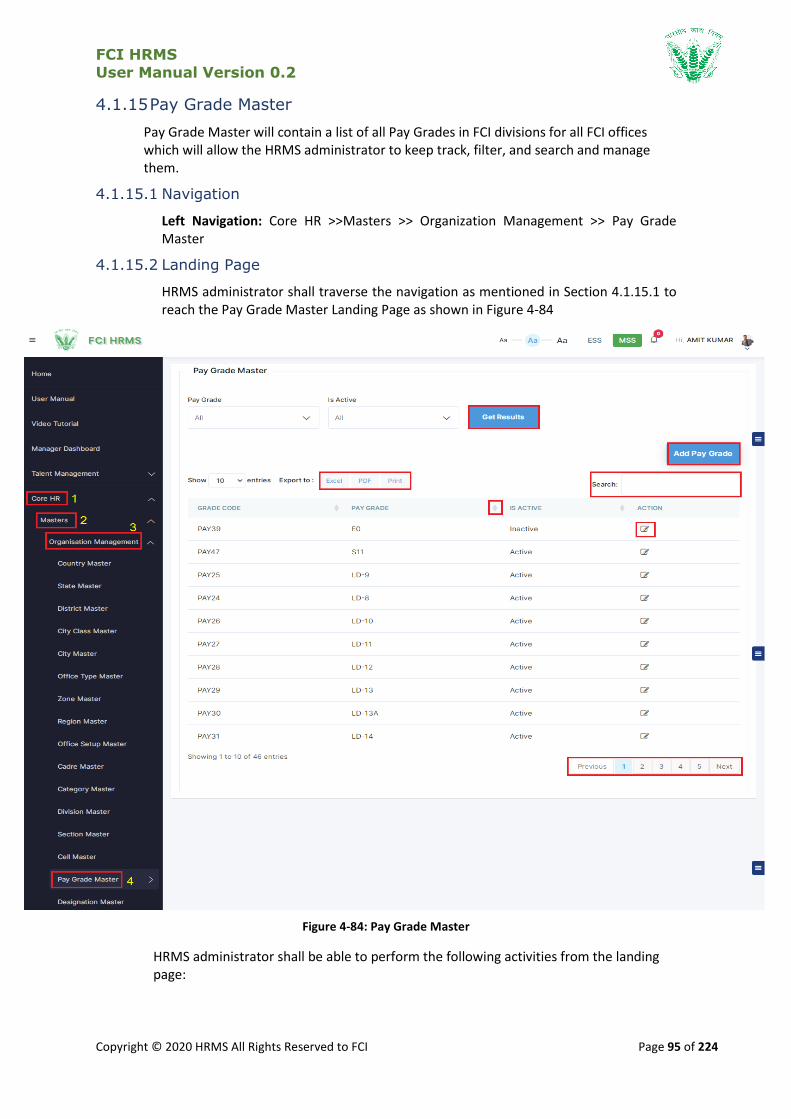
FCI HRMS
User Manual Version 0.2
Copyright © 2020 HRMS All Rights Reserved to FCI Page 95 of 224
4.1.15 Pay Grade Master
Pay Grade Master will contain a list of all Pay Grades in FCI divisions for all FCI offices which will allow the HRMS administrator to keep track, filter, and search and manage them.
4.1.15.1 Navigation
Left Navigation: Core HR >>Masters >> Organization Management >> Pay Grade Master
4.1.15.2 Landing Page
HRMS administrator shall traverse the navigation as mentioned in Section 4.1.15.1 to reach the Pay Grade Master Landing Page as shown in Figure 4-84
Figure 4-84: Pay Grade Master
HRMS administrator shall be able to perform the following activities from the landing page:

FCI HRMS
User Manual Version 0.2
Copyright © 2020 HRMS All Rights Reserved to FCI Page 96 of 224
Click on to apply the available filters.
Click on to export the table records in Excel as per
table columns.
Click on to enter a search query that shall
search the table records.
Click on to sort the table records in ascending order or descending order of
entries.
Click on to navigate table
records
Click on to add a new Pay Grade in the table as mentioned
in Section 4.1.15.3 – Add Pay Grade
Click on to edit an existing Pay Grade in the table as mentioned in Section
4.1.15.4 – Edit Pay Grade
4.1.15.3 Add Pay Grade
Click on to open the Add Pay Grade popup as shown in Figure 4-85
Figure 4-85: Add Pay Grade
Enter the details and click on such that a success message will be shown in the Pay Grade Master Landing Page for addition of a new record in the table as shown in Figure 4-86
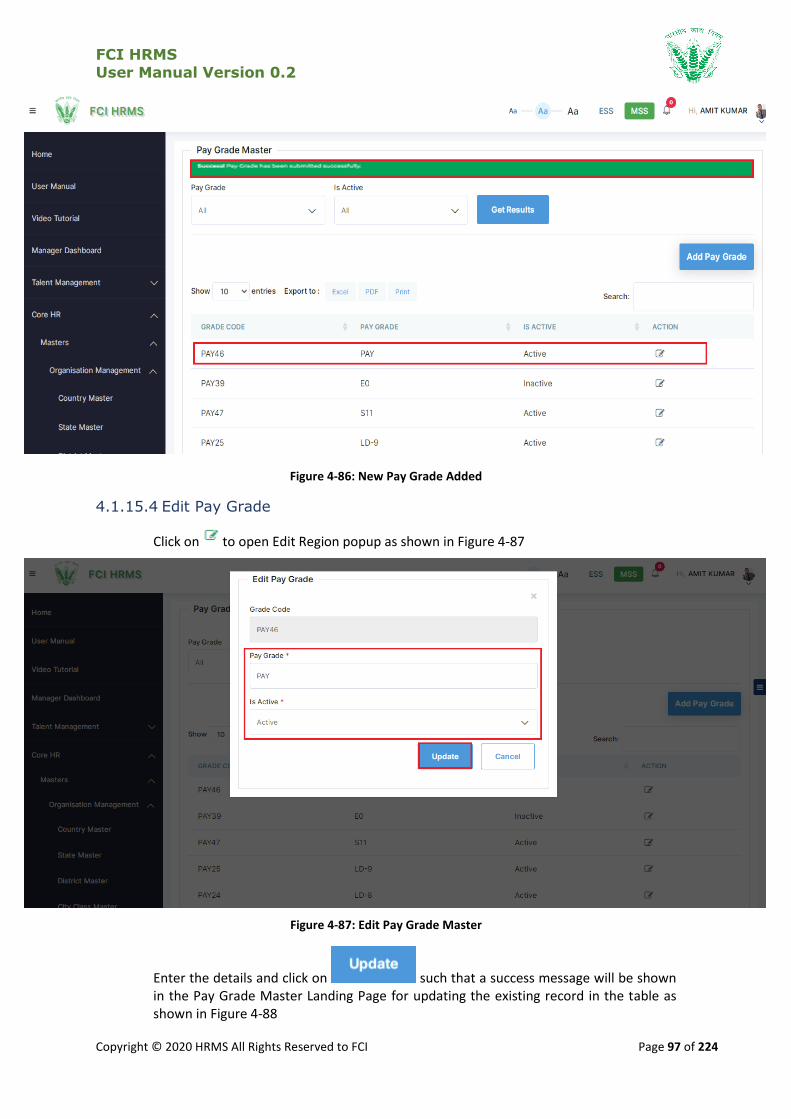
FCI HRMS
User Manual Version 0.2
Copyright © 2020 HRMS All Rights Reserved to FCI Page 97 of 224
Figure 4-86: New Pay Grade Added
4.1.15.4 Edit Pay Grade
Click on to open Edit Region popup as shown in Figure 4-87
Figure 4-87: Edit Pay Grade Master
Enter the details and click on such that a success message will be shown in the Pay Grade Master Landing Page for updating the existing record in the table as shown in Figure 4-88
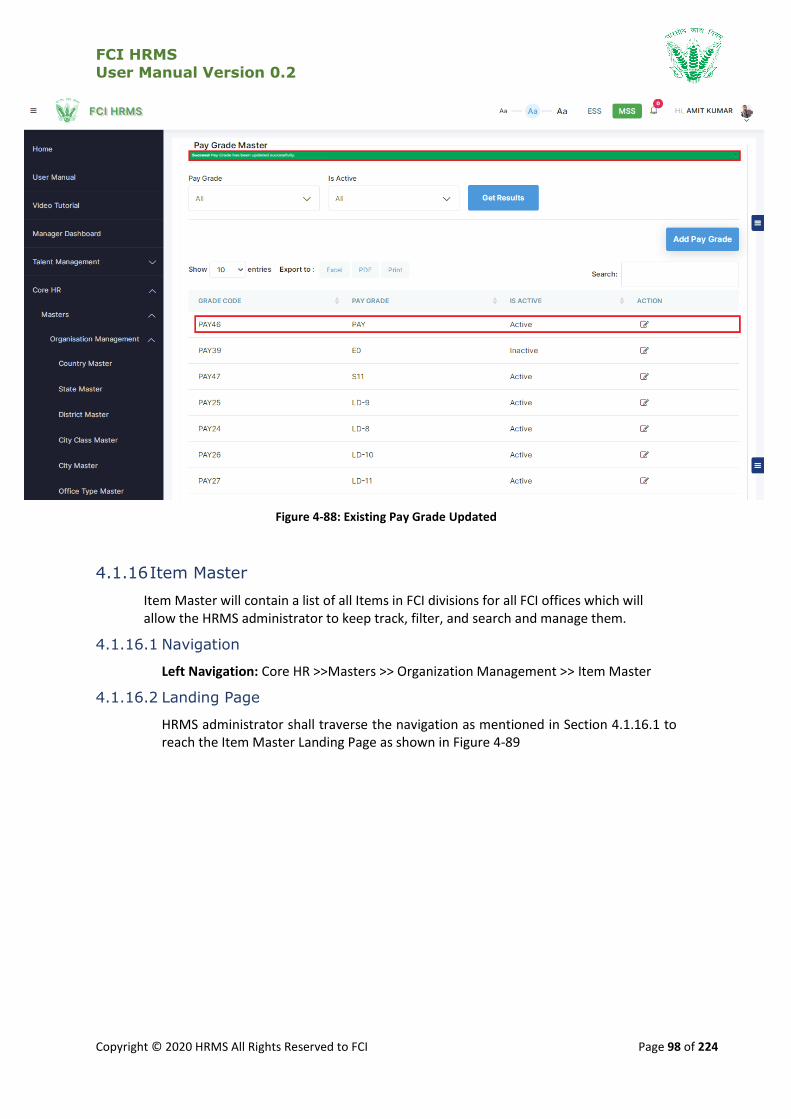
FCI HRMS
User Manual Version 0.2
Copyright © 2020 HRMS All Rights Reserved to FCI Page 98 of 224
Figure 4-88: Existing Pay Grade Updated
4.1.16 Item Master
Item Master will contain a list of all Items in FCI divisions for all FCI offices which will allow the HRMS administrator to keep track, filter, and search and manage them.
4.1.16.1 Navigation
Left Navigation: Core HR >>Masters >> Organization Management >> Item Master
4.1.16.2 Landing Page
HRMS administrator shall traverse the navigation as mentioned in Section 4.1.16.1 to reach the Item Master Landing Page as shown in Figure 4-89

FCI HRMS
User Manual Version 0.2
Copyright © 2020 HRMS All Rights Reserved to FCI Page 99 of 224
Figure 4-89: Item Master
HRMS administrator shall be able to perform the following activities from the landing page:
Click on to apply the available filters.
Click on to export the table records in Excel as per
table columns.
Click on to enter a search query that shall
search the table records.
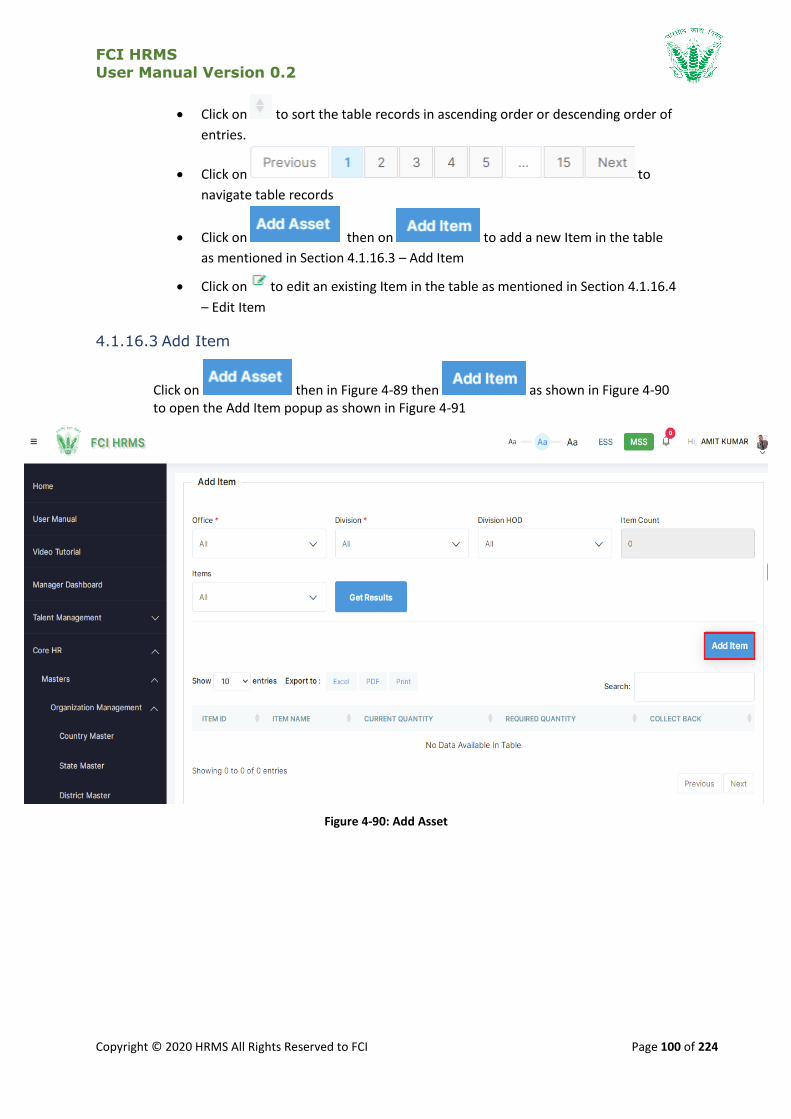
FCI HRMS
User Manual Version 0.2
Copyright © 2020 HRMS All Rights Reserved to FCI Page 100 of 224
Click on to sort the table records in ascending order or descending order of
entries.
Click on to
navigate table records
Click on then on to add a new Item in the table
as mentioned in Section 4.1.16.3 – Add Item
Click on to edit an existing Item in the table as mentioned in Section 4.1.16.4
– Edit Item
4.1.16.3 Add Item
Click on then in Figure 4-89 then as shown in Figure 4-90 to open the Add Item popup as shown in Figure 4-91
Figure 4-90: Add Asset
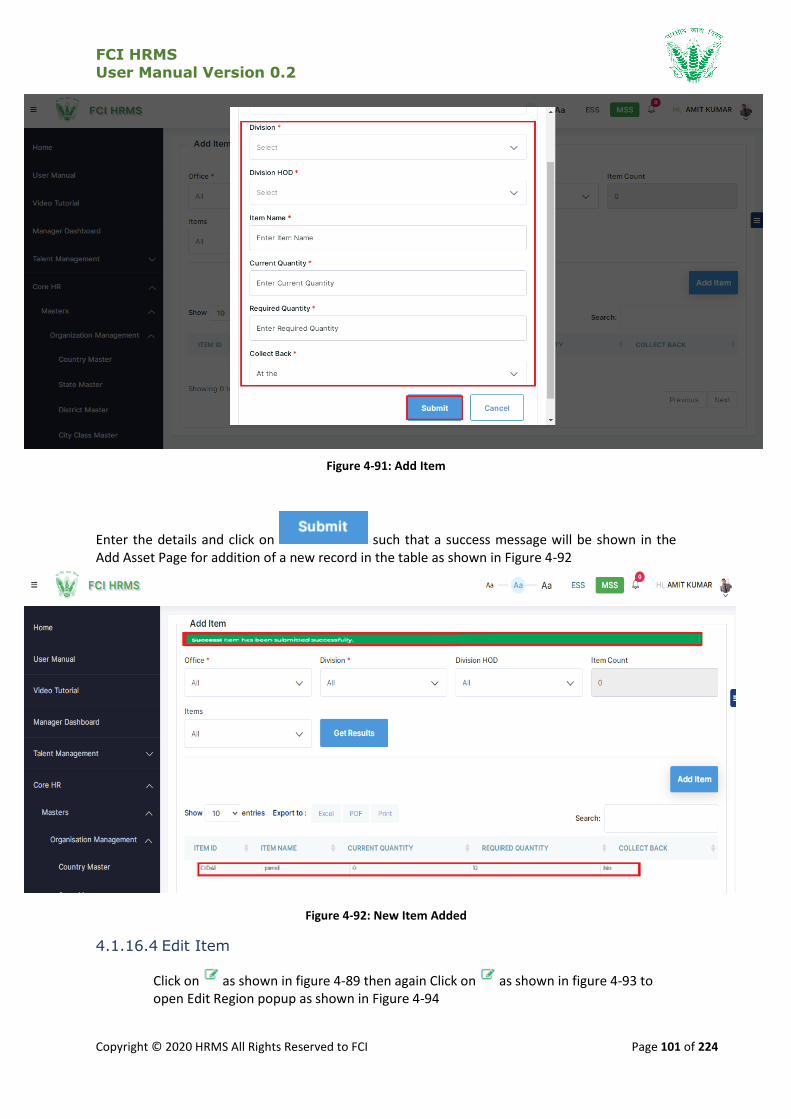
FCI HRMS
User Manual Version 0.2
Copyright © 2020 HRMS All Rights Reserved to FCI Page 101 of 224
Figure 4-91: Add Item
Enter the details and click on such that a success message will be shown in the Add Asset Page for addition of a new record in the table as shown in Figure 4-92
Figure 4-92: New Item Added
4.1.16.4 Edit Item
Click on as shown in figure 4-89 then again Click on as shown in figure 4-93 to open Edit Region popup as shown in Figure 4-94
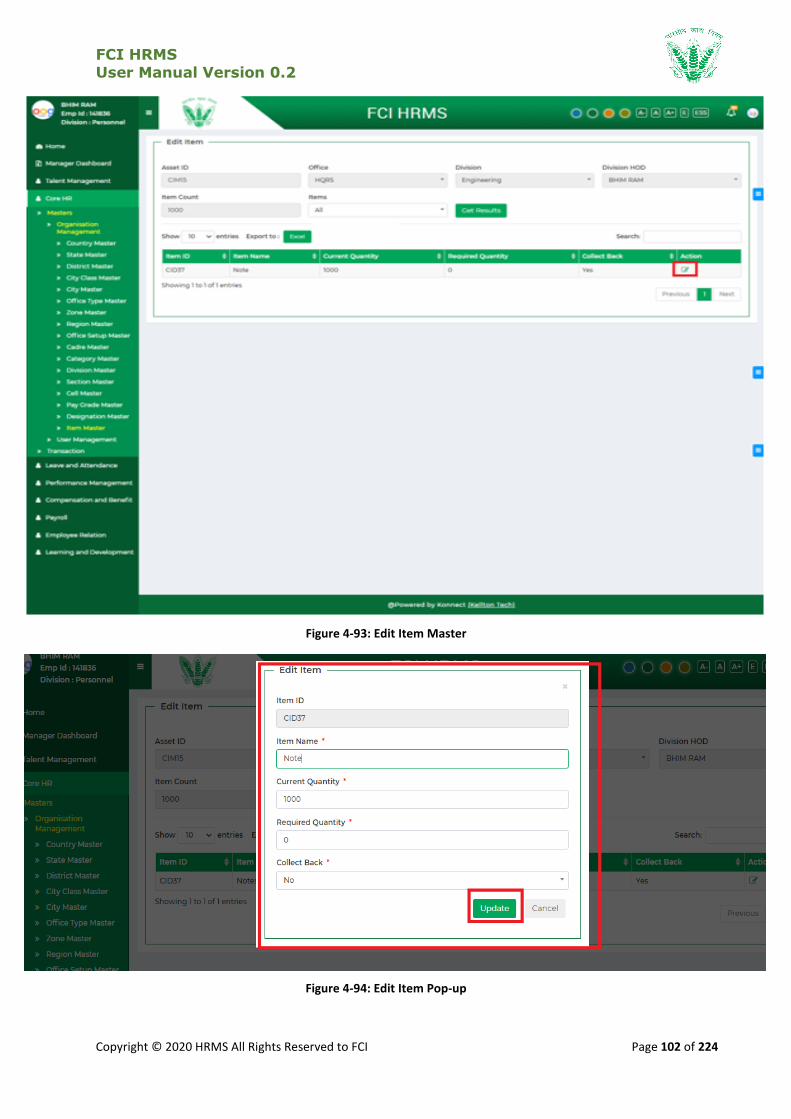
FCI HRMS
User Manual Version 0.2
Copyright © 2020 HRMS All Rights Reserved to FCI Page 102 of 224
Figure 4-93: Edit Item Master
Figure 4-94: Edit Item Pop-up
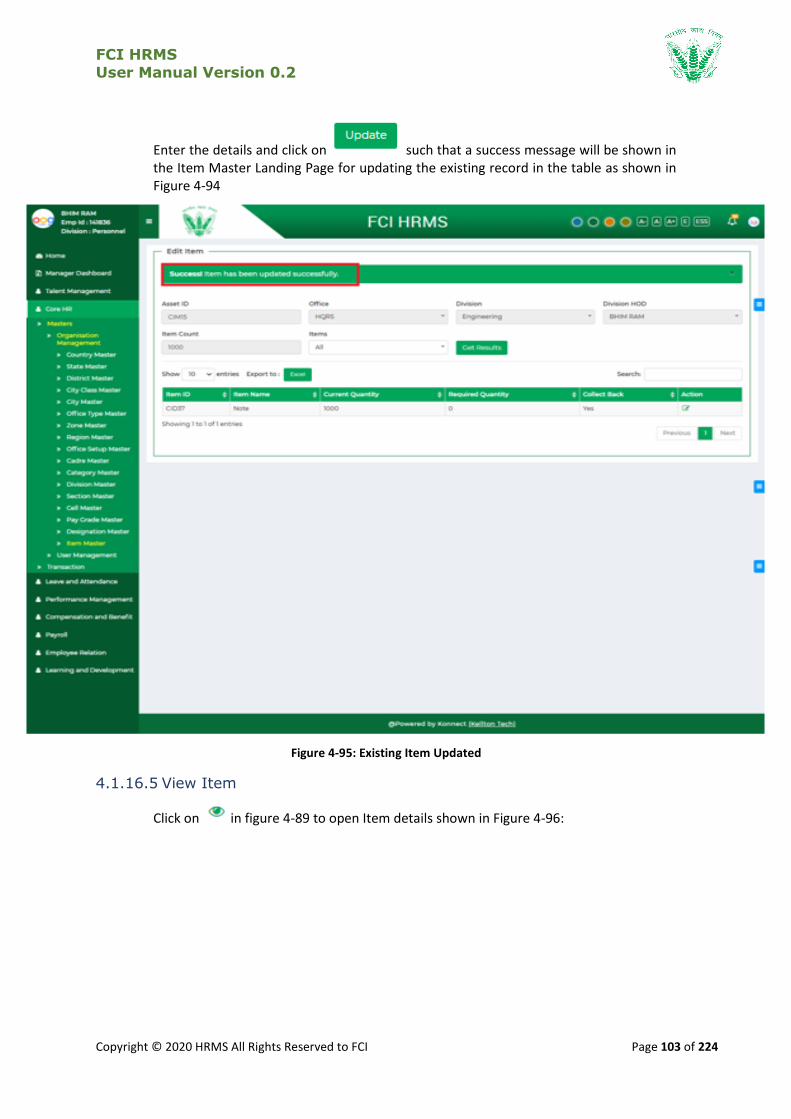
FCI HRMS
User Manual Version 0.2
Copyright © 2020 HRMS All Rights Reserved to FCI Page 103 of 224
Enter the details and click on such that a success message will be shown in the Item Master Landing Page for updating the existing record in the table as shown in Figure 4-94
Figure 4-95: Existing Item Updated
4.1.16.5 View Item
Click on in figure 4-89 to open Item details shown in Figure 4-96:
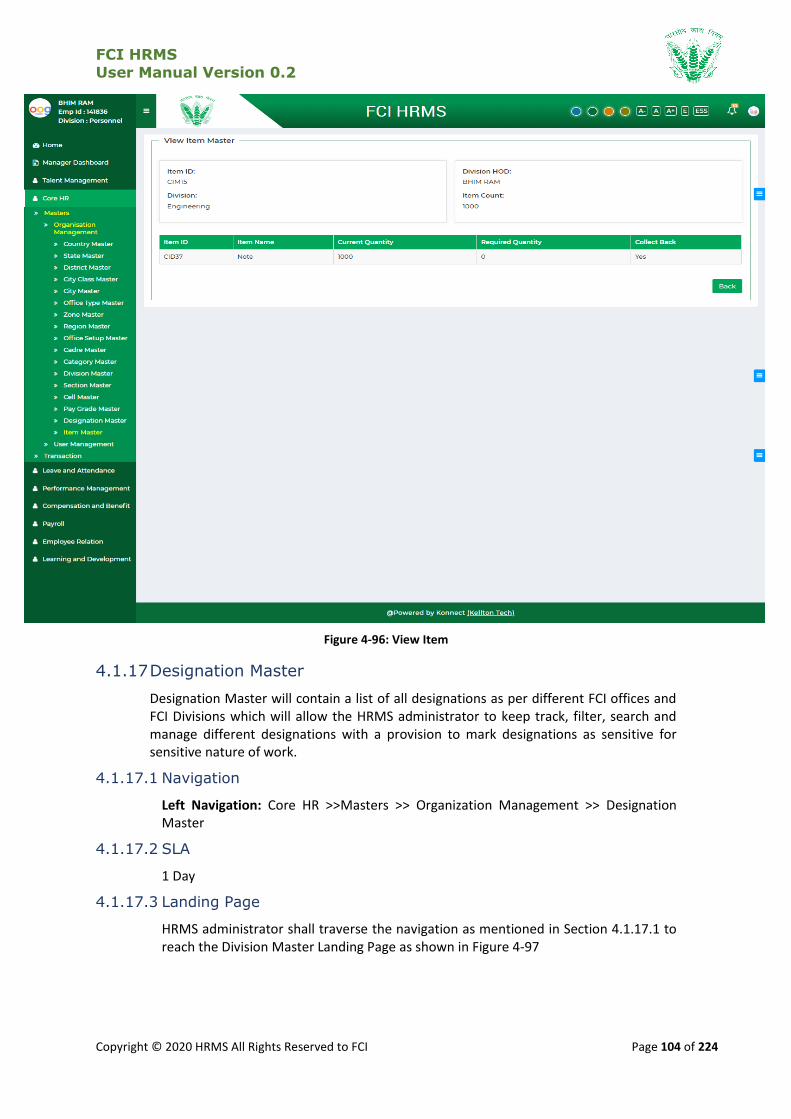
FCI HRMS
User Manual Version 0.2
Copyright © 2020 HRMS All Rights Reserved to FCI Page 104 of 224
Figure 4-96: View Item
4.1.17 Designation Master
Designation Master will contain a list of all designations as per different FCI offices and FCI Divisions which will allow the HRMS administrator to keep track, filter, search and manage different designations with a provision to mark designations as sensitive for sensitive nature of work.
4.1.17.1 Navigation
Left Navigation: Core HR >>Masters >> Organization Management >> Designation Master
4.1.17.2 SLA
1 Day
4.1.17.3 Landing Page
HRMS administrator shall traverse the navigation as mentioned in Section 4.1.17.1 to reach the Division Master Landing Page as shown in Figure 4-97

FCI HRMS
User Manual Version 0.2
Copyright © 2020 HRMS All Rights Reserved to FCI Page 105 of 224
Figure 4-97 Designation Master
HRMS administrator shall be able to perform the following activities from the landing page:
Click on to apply the available filters.
Click on to export the table records in Excel as per
table columns.
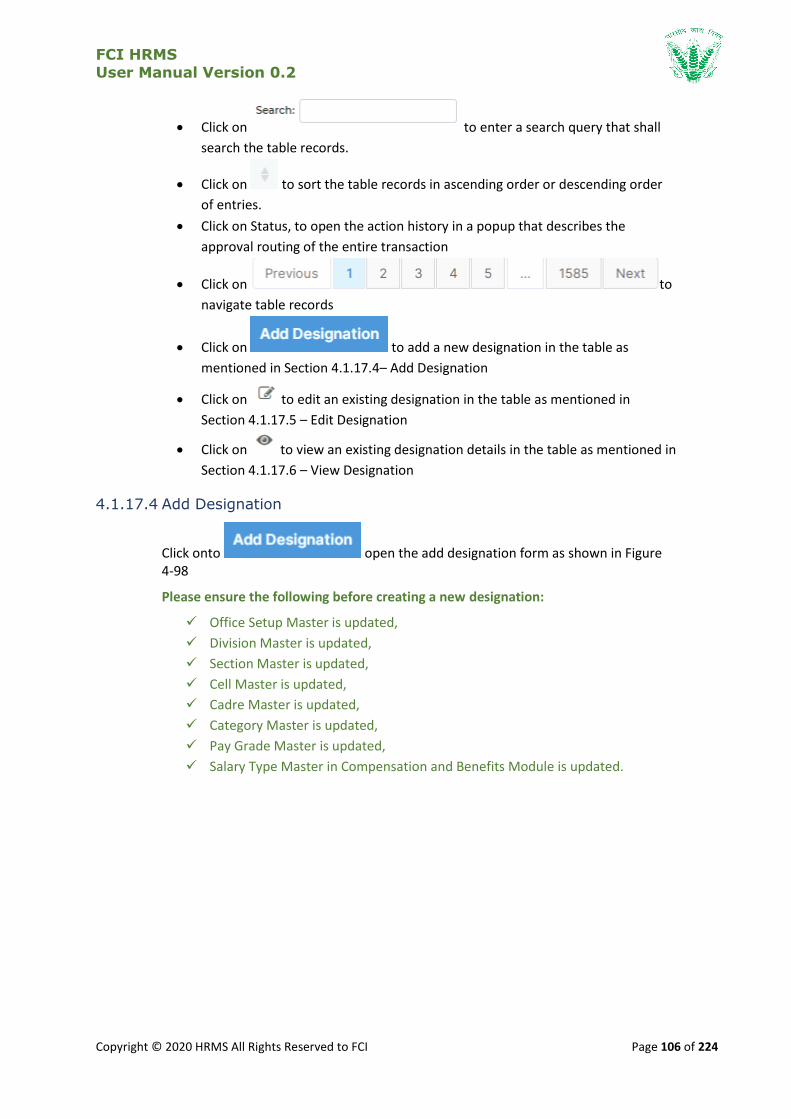
FCI HRMS
User Manual Version 0.2
Copyright © 2020 HRMS All Rights Reserved to FCI Page 106 of 224
Click on to enter a search query that shall
search the table records.
Click on to sort the table records in ascending order or descending order
of entries.
Click on Status, to open the action history in a popup that describes the
approval routing of the entire transaction
Click on to
navigate table records
Click on to add a new designation in the table as
mentioned in Section 4.1.17.4– Add Designation
Click on to edit an existing designation in the table as mentioned in
Section 4.1.17.5 – Edit Designation
Click on to view an existing designation details in the table as mentioned in
Section 4.1.17.6 – View Designation
4.1.17.4 Add Designation
Click onto open the add designation form as shown in Figure 4-98
Please ensure the following before creating a new designation:
Office Setup Master is updated,
Division Master is updated,
Section Master is updated,
Cell Master is updated,
Cadre Master is updated,
Category Master is updated,
Pay Grade Master is updated,
Salary Type Master in Compensation and Benefits Module is updated.
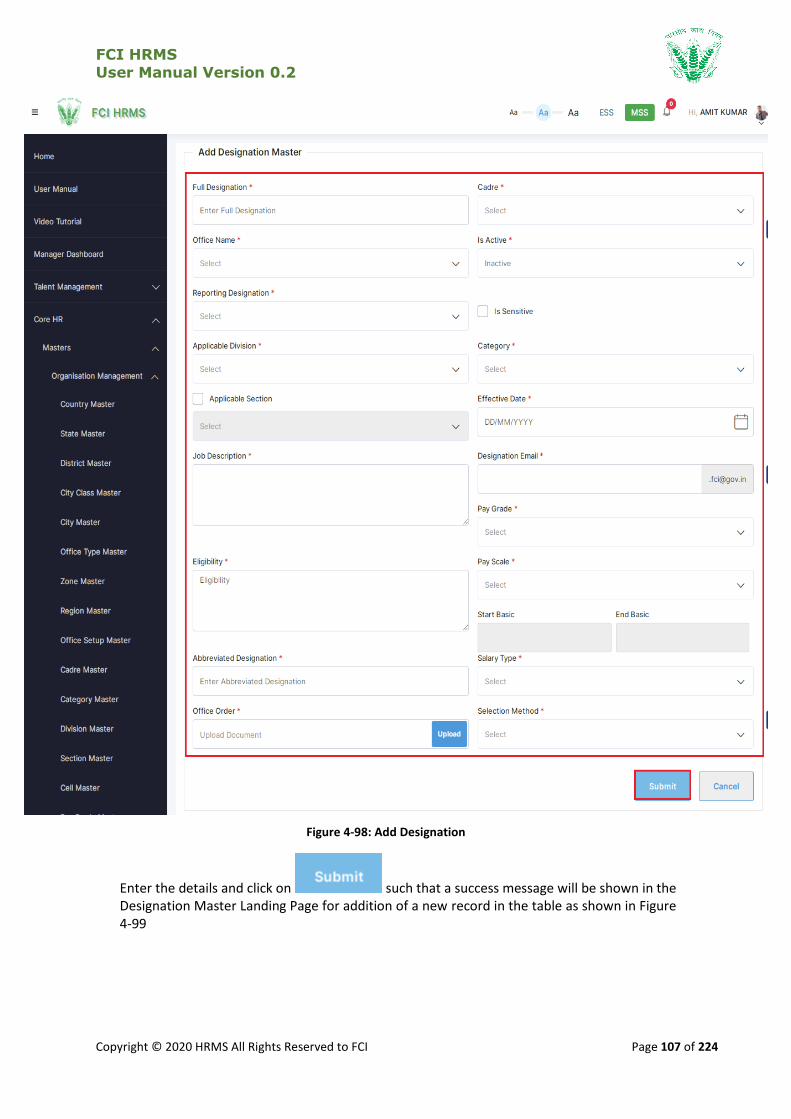
FCI HRMS
User Manual Version 0.2
Copyright © 2020 HRMS All Rights Reserved to FCI Page 107 of 224
Figure 4-98: Add Designation
Enter the details and click on such that a success message will be shown in the Designation Master Landing Page for addition of a new record in the table as shown in Figure 4-99
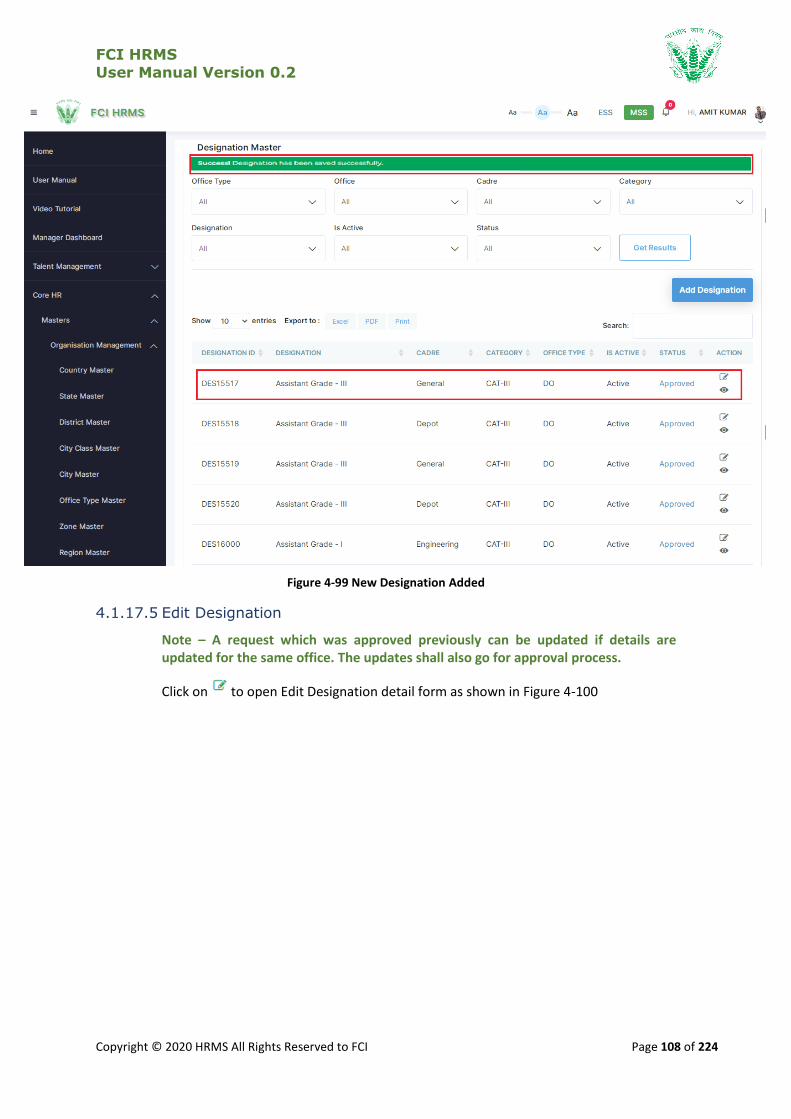
FCI HRMS
User Manual Version 0.2
Copyright © 2020 HRMS All Rights Reserved to FCI Page 108 of 224
Figure 4-99 New Designation Added
4.1.17.5 Edit Designation
Note – A request which was approved previously can be updated if details are updated for the same office. The updates shall also go for approval process.
Click on to open Edit Designation detail form as shown in Figure 4-100
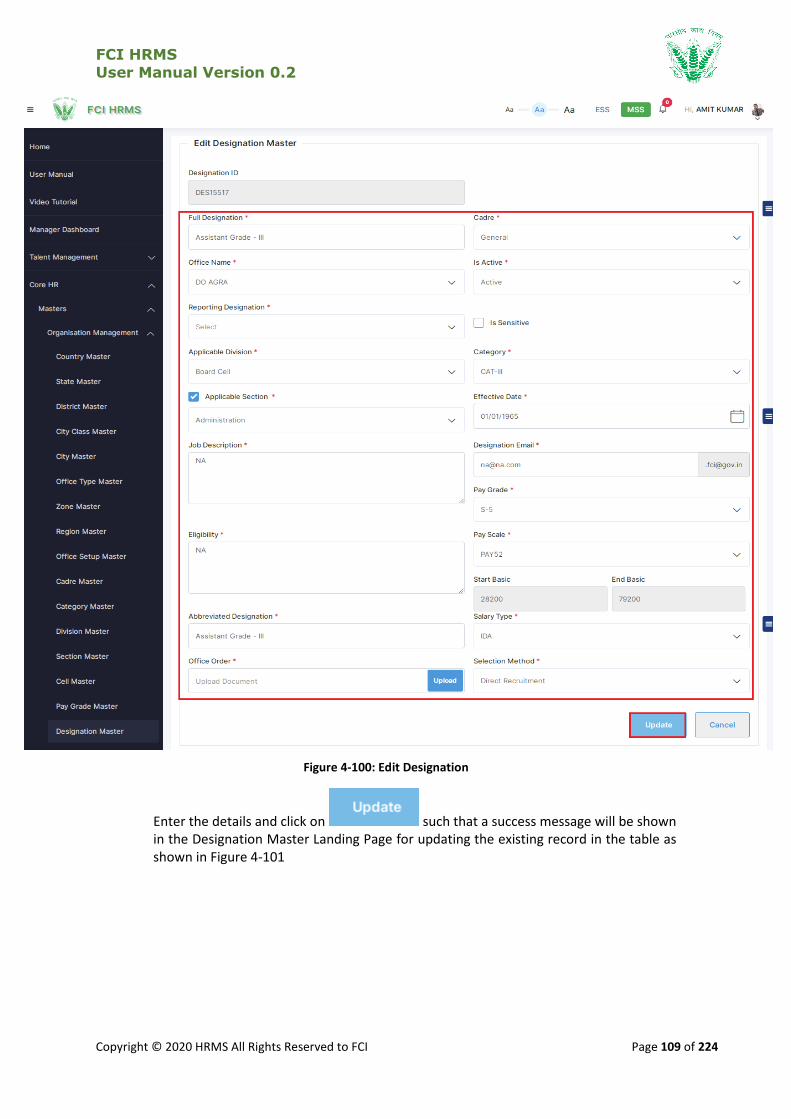
FCI HRMS
User Manual Version 0.2
Copyright © 2020 HRMS All Rights Reserved to FCI Page 109 of 224
Figure 4-100: Edit Designation
Enter the details and click on such that a success message will be shown in the Designation Master Landing Page for updating the existing record in the table as shown in Figure 4-101
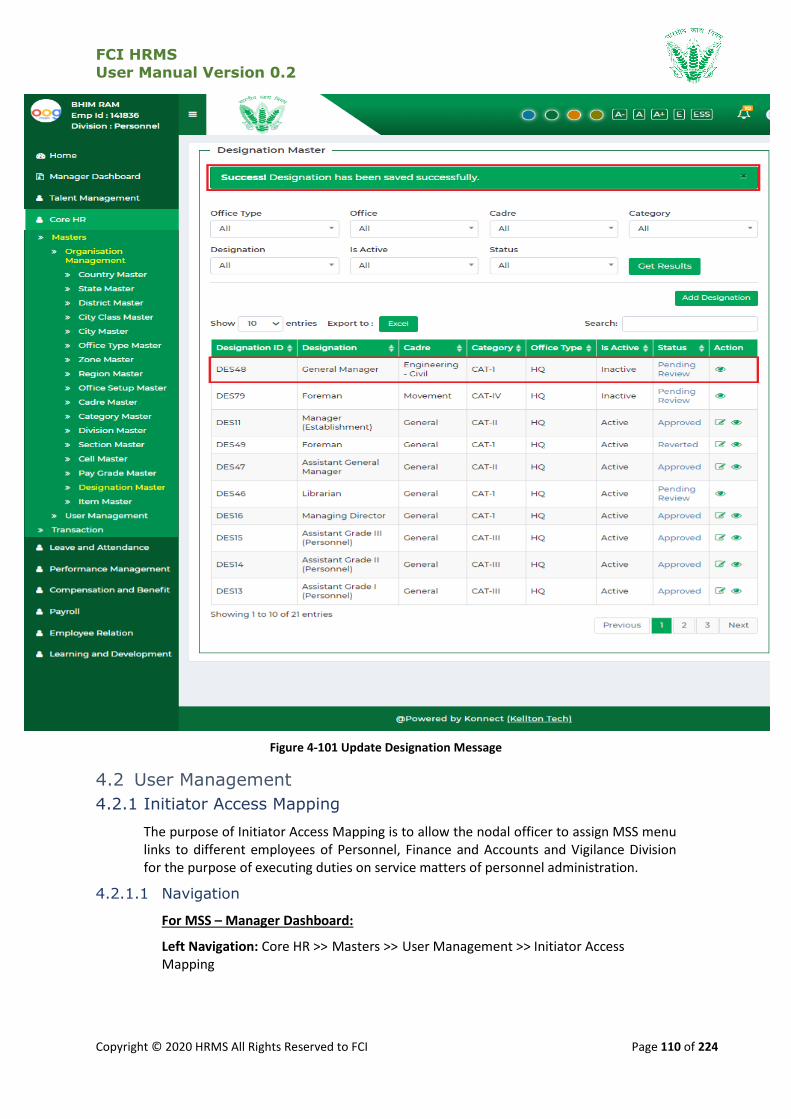
FCI HRMS
User Manual Version 0.2
Copyright © 2020 HRMS All Rights Reserved to FCI Page 110 of 224
Figure 4-101 Update Designation Message
4.2 User Management
4.2.1 Initiator Access Mapping
The purpose of Initiator Access Mapping is to allow the nodal officer to assign MSS menu links to different employees of Personnel, Finance and Accounts and Vigilance Division for the purpose of executing duties on service matters of personnel administration.
4.2.1.1 Navigation
For MSS – Manager Dashboard:
Left Navigation: Core HR >> Masters >> User Management >> Initiator Access Mapping
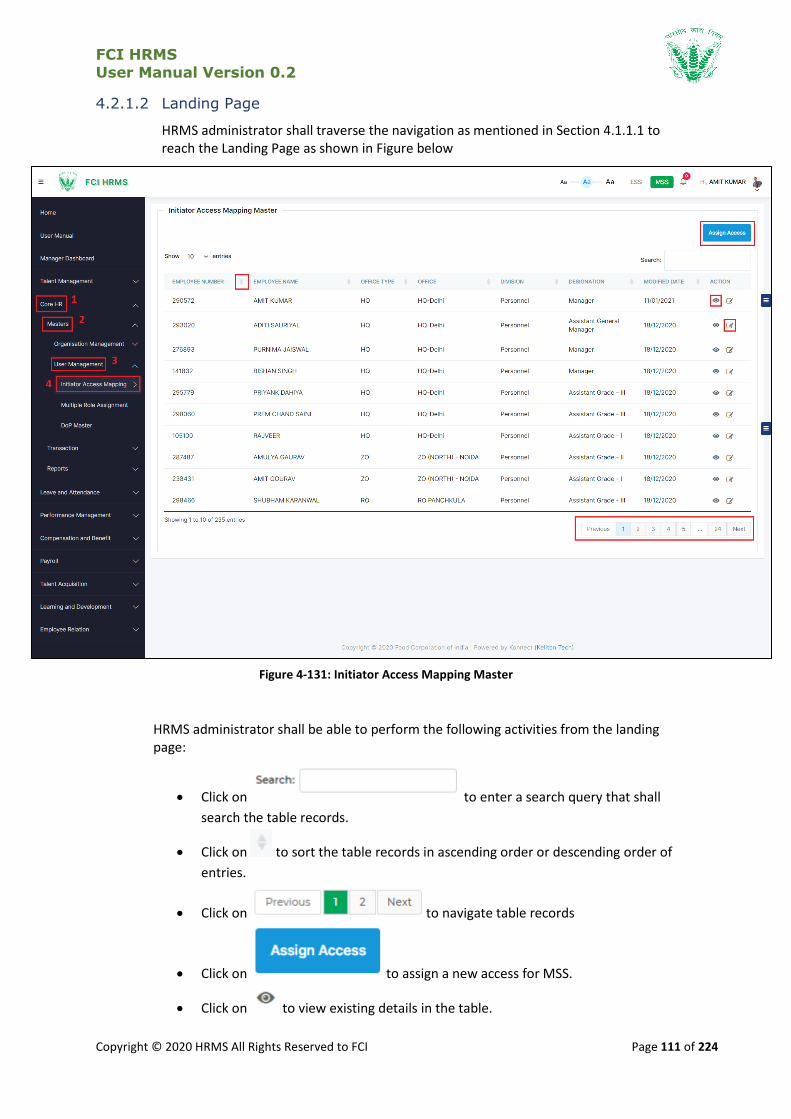
FCI HRMS
User Manual Version 0.2
Copyright © 2020 HRMS All Rights Reserved to FCI Page 111 of 224
4.2.1.2 Landing Page
HRMS administrator shall traverse the navigation as mentioned in Section 4.1.1.1 to reach the Landing Page as shown in Figure below
Figure 4-131: Initiator Access Mapping Master
HRMS administrator shall be able to perform the following activities from the landing page:
Click on to enter a search query that shall
search the table records.
Click on to sort the table records in ascending order or descending order of
entries.
Click on to navigate table records
Click on to assign a new access for MSS.
Click on to view existing details in the table.
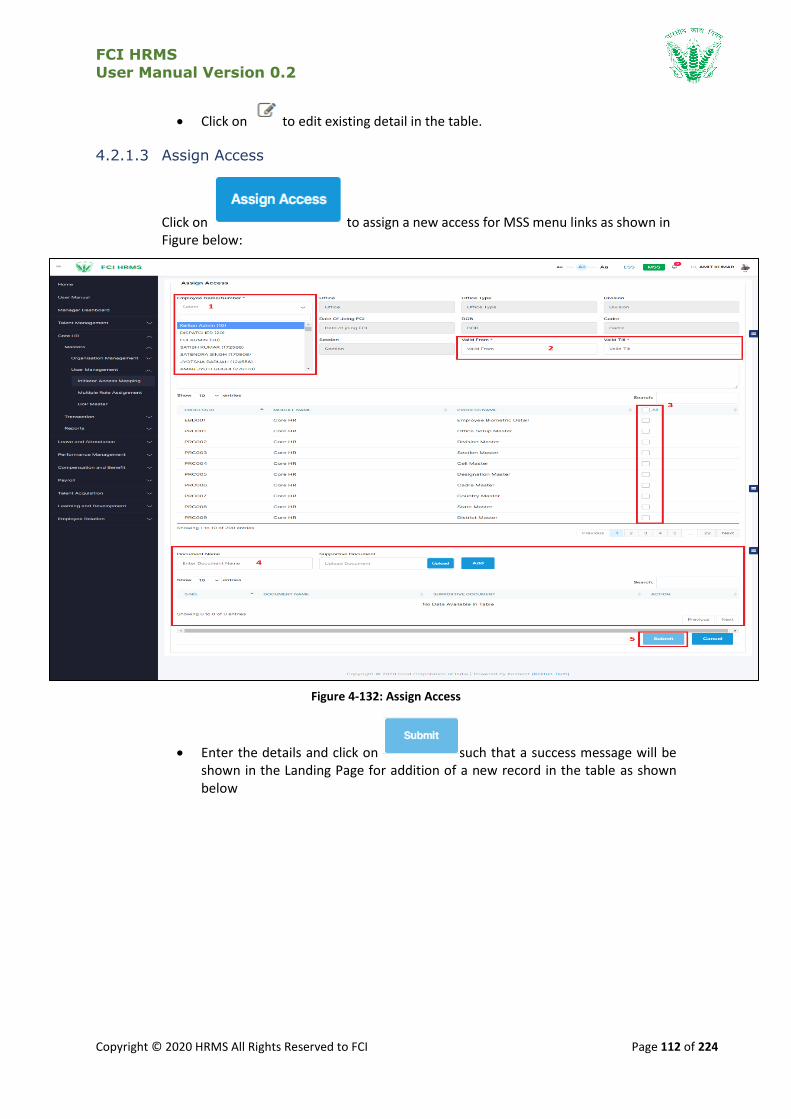
FCI HRMS
User Manual Version 0.2
Copyright © 2020 HRMS All Rights Reserved to FCI Page 112 of 224
Click on to edit existing detail in the table.
4.2.1.3 Assign Access
Click on to assign a new access for MSS menu links as shown in Figure below:
Figure 4-132: Assign Access
Enter the details and click on such that a success message will be shown in the Landing Page for addition of a new record in the table as shown below
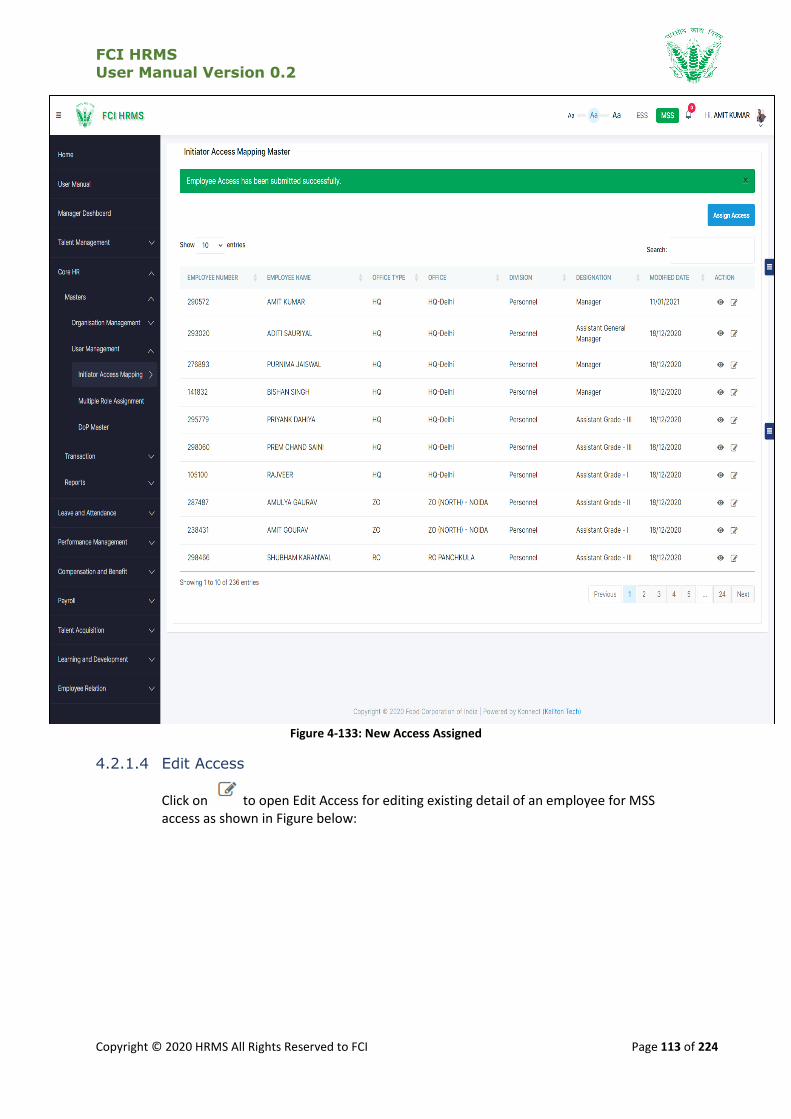
FCI HRMS
User Manual Version 0.2
Copyright © 2020 HRMS All Rights Reserved to FCI Page 113 of 224
Figure 4-133: New Access Assigned
4.2.1.4 Edit Access
Click on to open Edit Access for editing existing detail of an employee for MSS access as shown in Figure below:
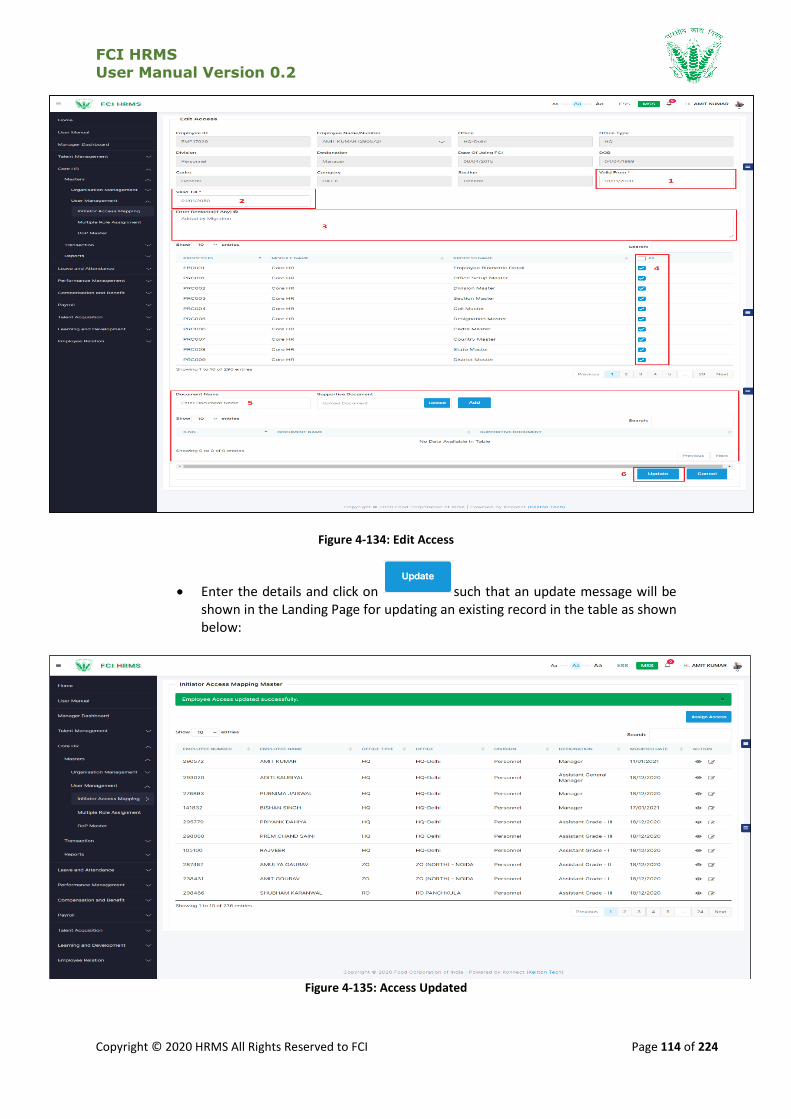
FCI HRMS
User Manual Version 0.2
Copyright © 2020 HRMS All Rights Reserved to FCI Page 114 of 224
Figure 4-134: Edit Access
Enter the details and click on such that an update message will be shown in the Landing Page for updating an existing record in the table as shown below:
Figure 4-135: Access Updated
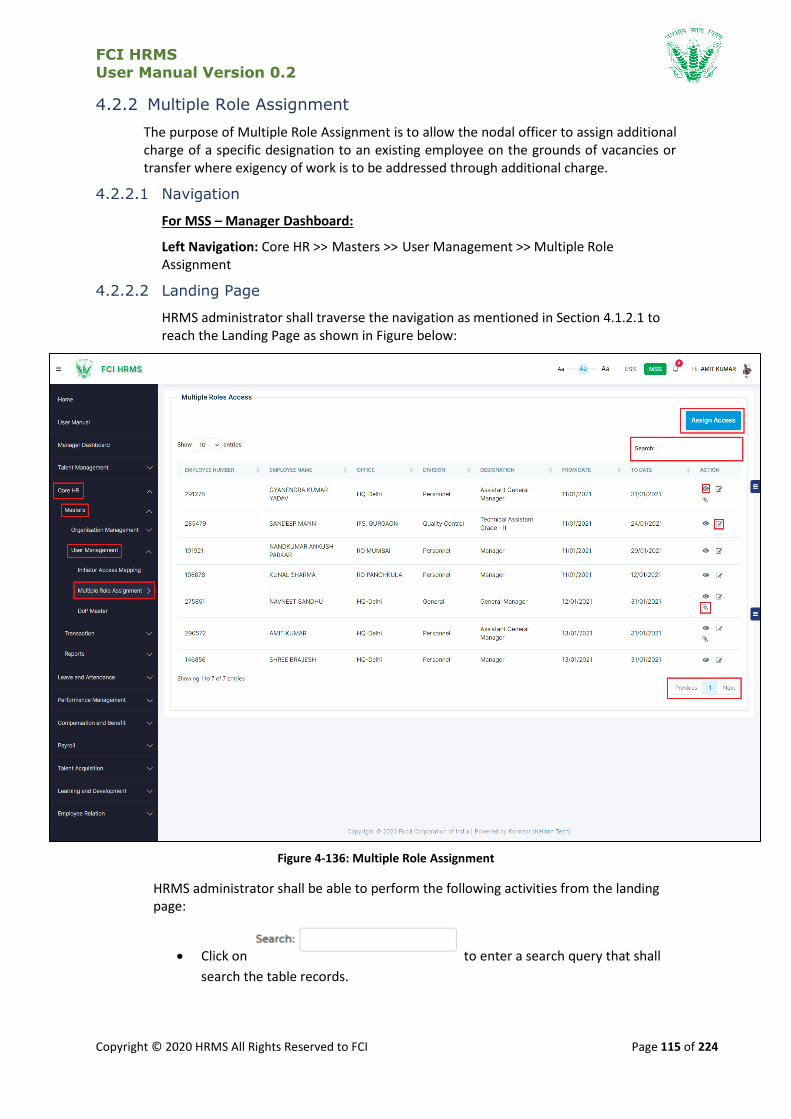
FCI HRMS
User Manual Version 0.2
Copyright © 2020 HRMS All Rights Reserved to FCI Page 115 of 224
4.2.2 Multiple Role Assignment
The purpose of Multiple Role Assignment is to allow the nodal officer to assign additional charge of a specific designation to an existing employee on the grounds of vacancies or transfer where exigency of work is to be addressed through additional charge.
4.2.2.1 Navigation
For MSS – Manager Dashboard:
Left Navigation: Core HR >> Masters >> User Management >> Multiple Role Assignment
4.2.2.2 Landing Page
HRMS administrator shall traverse the navigation as mentioned in Section 4.1.2.1 to reach the Landing Page as shown in Figure below:
Figure 4-136: Multiple Role Assignment
HRMS administrator shall be able to perform the following activities from the landing page:
Click on to enter a search query that shall
search the table records.

FCI HRMS
User Manual Version 0.2
Copyright © 2020 HRMS All Rights Reserved to FCI Page 116 of 224
Click on to sort the table records in ascending order or descending order of
entries.
Click on to navigate table records
Click on to assign a new access for MSS.
Click on to view existing details in the table.
Click on to edit existing detail in the table.
4.2.2.3 Assign Multiple Roles
Click on to assign additional charge as shown in Figure below:
Figure 4-137: Assign Multiple Role
Enter the details and click on such that a success message will be shown in the Landing Page for addition of a new record in the table as shown below
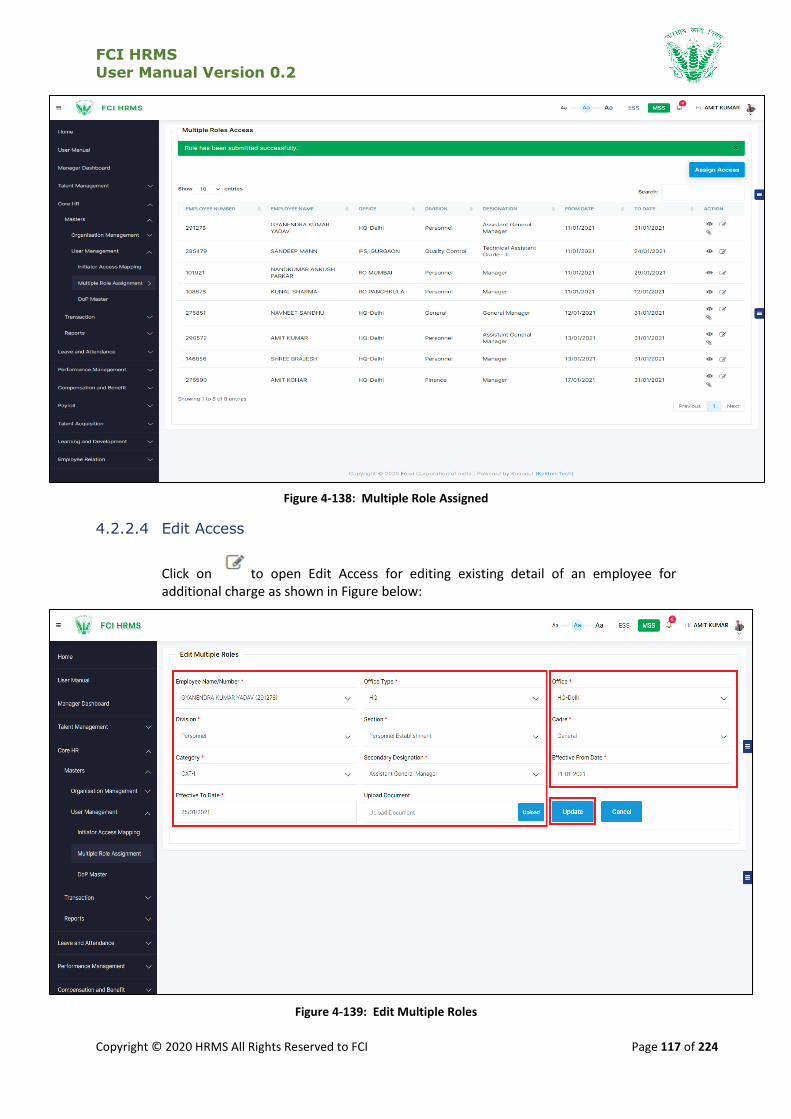
FCI HRMS
User Manual Version 0.2
Copyright © 2020 HRMS All Rights Reserved to FCI Page 117 of 224
Figure 4-138: Multiple Role Assigned
4.2.2.4 Edit Access
Click on to open Edit Access for editing existing detail of an employee for additional charge as shown in Figure below:
Figure 4-139: Edit Multiple Roles
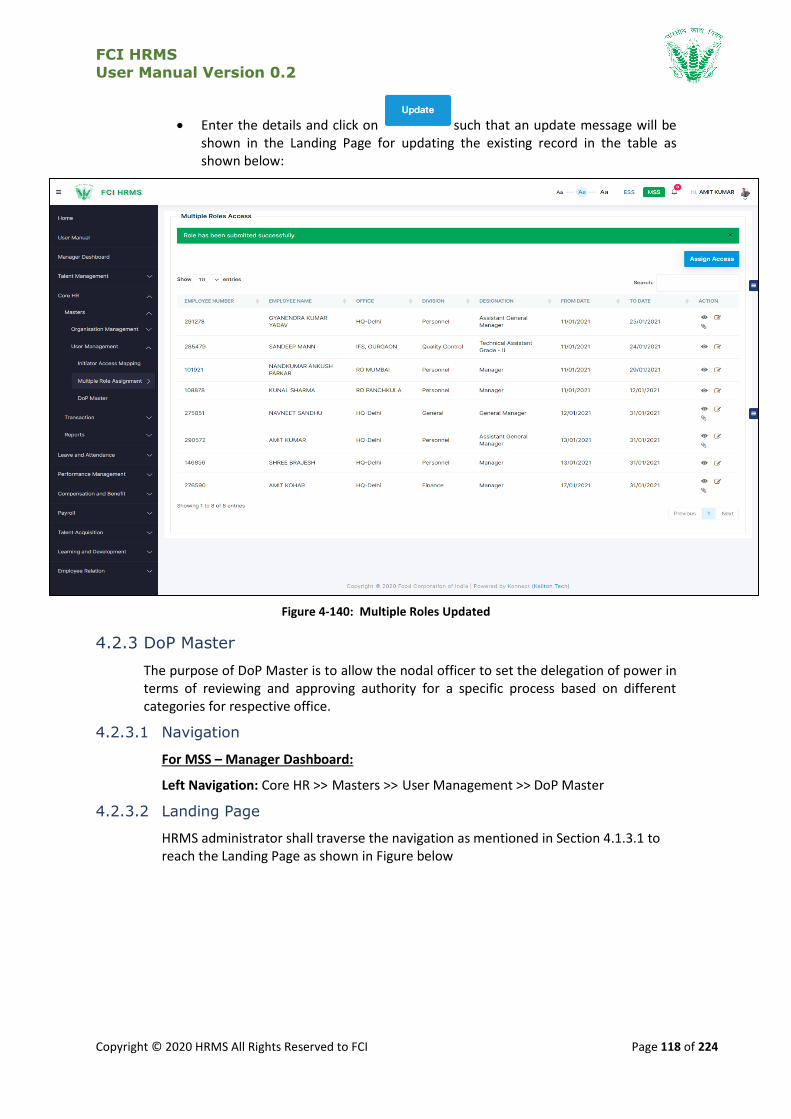
FCI HRMS
User Manual Version 0.2
Copyright © 2020 HRMS All Rights Reserved to FCI Page 118 of 224
Enter the details and click on such that an update message will be shown in the Landing Page for updating the existing record in the table as shown below:
Figure 4-140: Multiple Roles Updated
4.2.3 DoP Master
The purpose of DoP Master is to allow the nodal officer to set the delegation of power in terms of reviewing and approving authority for a specific process based on different categories for respective office.
4.2.3.1 Navigation
For MSS – Manager Dashboard:
Left Navigation: Core HR >> Masters >> User Management >> DoP Master
4.2.3.2 Landing Page
HRMS administrator shall traverse the navigation as mentioned in Section 4.1.3.1 to reach the Landing Page as shown in Figure below

FCI HRMS
User Manual Version 0.2
Copyright © 2020 HRMS All Rights Reserved to FCI Page 119 of 224
Figure 4-141: DoP Master
HRMS administrator shall be able to perform the following activities from the landing page:
Click on to apply the available filters.
Click on to enter a search query that shall
search the table records.
Click on to sort the table records in ascending order or descending order of
entries.
Click on to navigate table records
Click on to create a new DoP.
Click on to view existing details in the table.
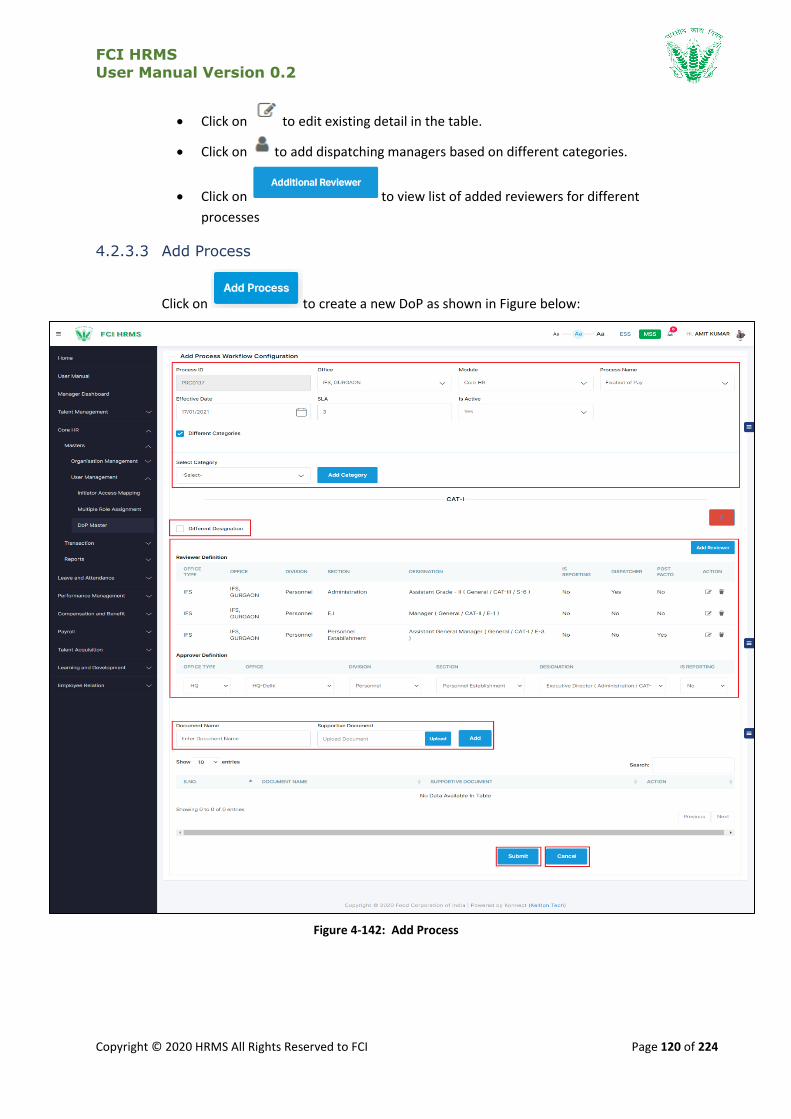
FCI HRMS
User Manual Version 0.2
Copyright © 2020 HRMS All Rights Reserved to FCI Page 120 of 224
Click on to edit existing detail in the table.
Click on to add dispatching managers based on different categories.
Click on to view list of added reviewers for different
processes
4.2.3.3 Add Process
Click on to create a new DoP as shown in Figure below:
Figure 4-142: Add Process

FCI HRMS
User Manual Version 0.2
Copyright © 2020 HRMS All Rights Reserved to FCI Page 121 of 224
Enter the details and click on such that a success message will be shown in the Landing Page for addition of a new record in the table as shown below
Figure 4-143: Process Workflow Created
4.2.3.4 Edit Process
Click on to open Edit Process for editing existing detail of a DOP as shown in Figure below:
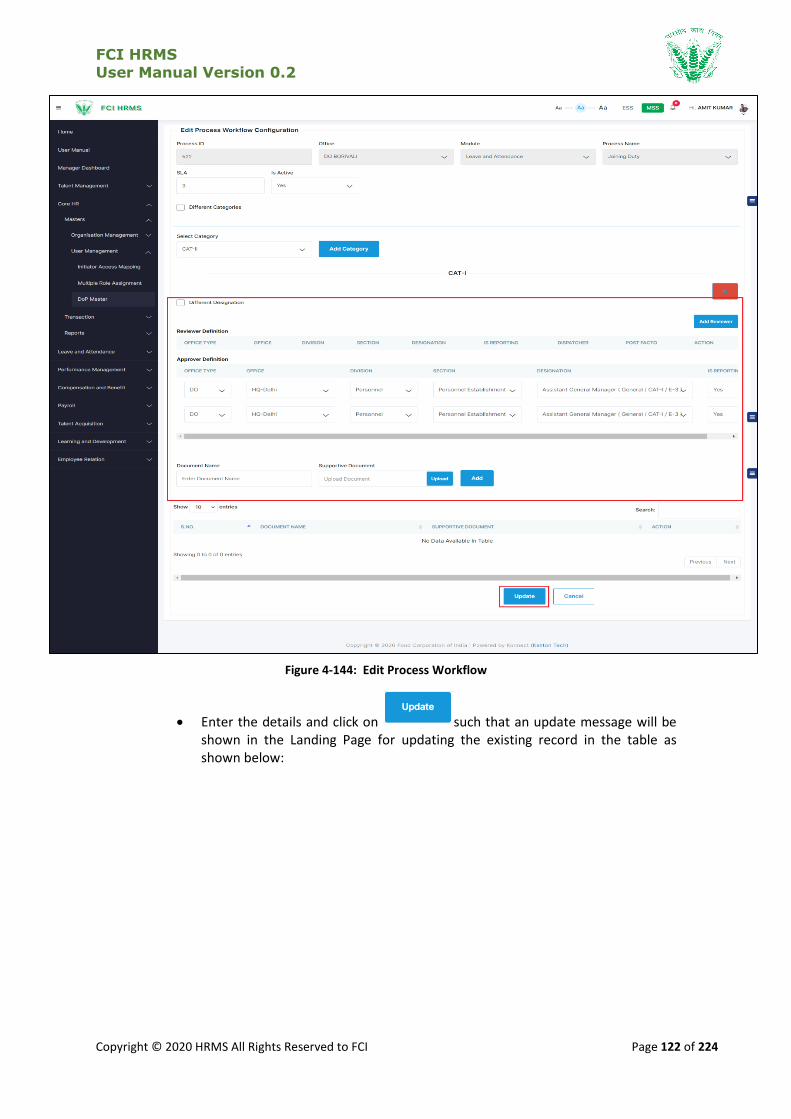
FCI HRMS
User Manual Version 0.2
Copyright © 2020 HRMS All Rights Reserved to FCI Page 122 of 224
Figure 4-144: Edit Process Workflow
Enter the details and click on such that an update message will be shown in the Landing Page for updating the existing record in the table as shown below:
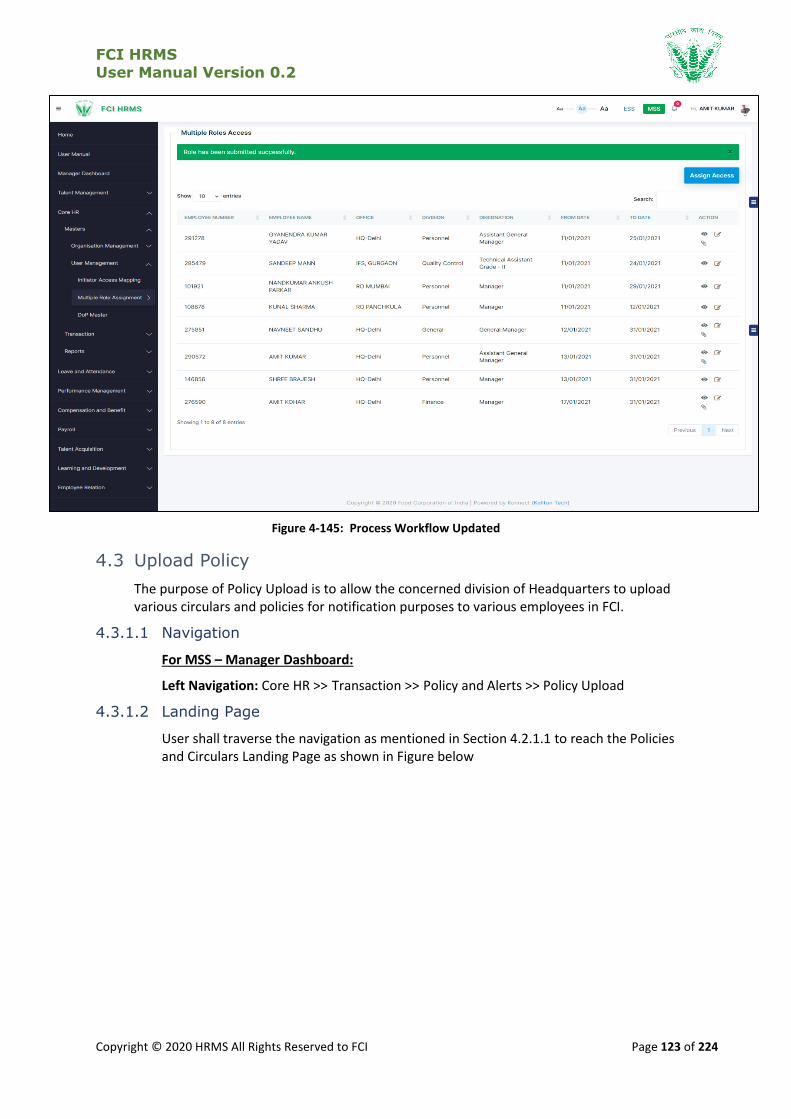
FCI HRMS
User Manual Version 0.2
Copyright © 2020 HRMS All Rights Reserved to FCI Page 123 of 224
Figure 4-145: Process Workflow Updated
4.3 Upload Policy
The purpose of Policy Upload is to allow the concerned division of Headquarters to upload various circulars and policies for notification purposes to various employees in FCI.
4.3.1.1 Navigation
For MSS – Manager Dashboard:
Left Navigation: Core HR >> Transaction >> Policy and Alerts >> Policy Upload
4.3.1.2 Landing Page
User shall traverse the navigation as mentioned in Section 4.2.1.1 to reach the Policies and Circulars Landing Page as shown in Figure below
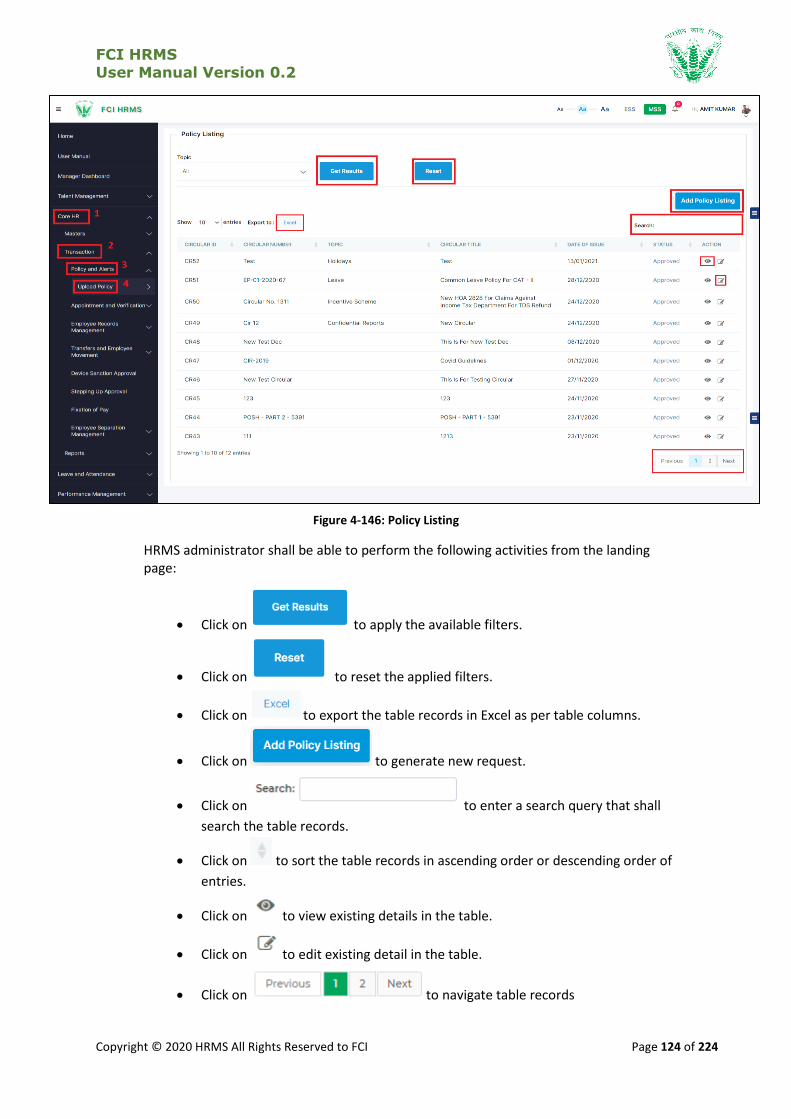
FCI HRMS
User Manual Version 0.2
Copyright © 2020 HRMS All Rights Reserved to FCI Page 124 of 224
Figure 4-146: Policy Listing
HRMS administrator shall be able to perform the following activities from the landing page:
Click on to apply the available filters.
Click on to reset the applied filters.
Click on to export the table records in Excel as per table columns.
Click on to generate new request.
Click on to enter a search query that shall
search the table records.
Click on to sort the table records in ascending order or descending order of
entries.
Click on to view existing details in the table.
Click on to edit existing detail in the table.
Click on to navigate table records

FCI HRMS
User Manual Version 0.2
Copyright © 2020 HRMS All Rights Reserved to FCI Page 125 of 224
4.3.1.3 Add Policy Listing
Click on to upload a new policy using upload policy form as shown in Figure below:
Figure 4-147: Add Policy/Circulars
Enter the details and click on such that a success message will be shown in the Landing Page for addition of a new record in the table as shown below
Figure 4-148: Policy Uploaded

FCI HRMS
User Manual Version 0.2
Copyright © 2020 HRMS All Rights Reserved to FCI Page 126 of 224
The uploaded policies shall reflect in the ESS: E-Notice section as shown in
below figure:
Figure 4-149: Policy Notice
4.3.1.4 Edit Circulars/Policy
Click on to open Edit Process for editing existing detail of a DOP as shown in Figure below:
Figure 4-150: Edit Circulars/Policy
Enter the details and click on such that an update message will be shown in the Landing Page for updating the existing record in the table as shown below:
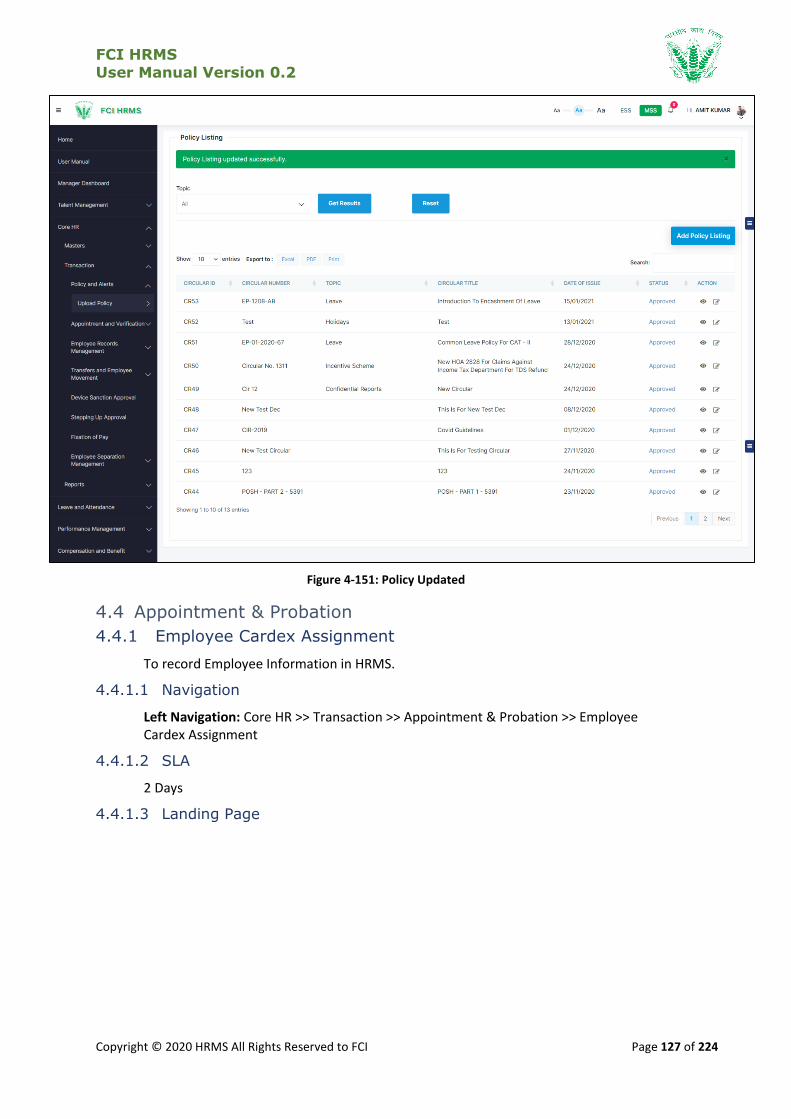
FCI HRMS
User Manual Version 0.2
Copyright © 2020 HRMS All Rights Reserved to FCI Page 127 of 224
Figure 4-151: Policy Updated
4.4 Appointment & Probation
4.4.1 Employee Cardex Assignment
To record Employee Information in HRMS.
4.4.1.1 Navigation
Left Navigation: Core HR >> Transaction >> Appointment & Probation >> Employee Cardex Assignment
4.4.1.2 SLA
2 Days
4.4.1.3 Landing Page
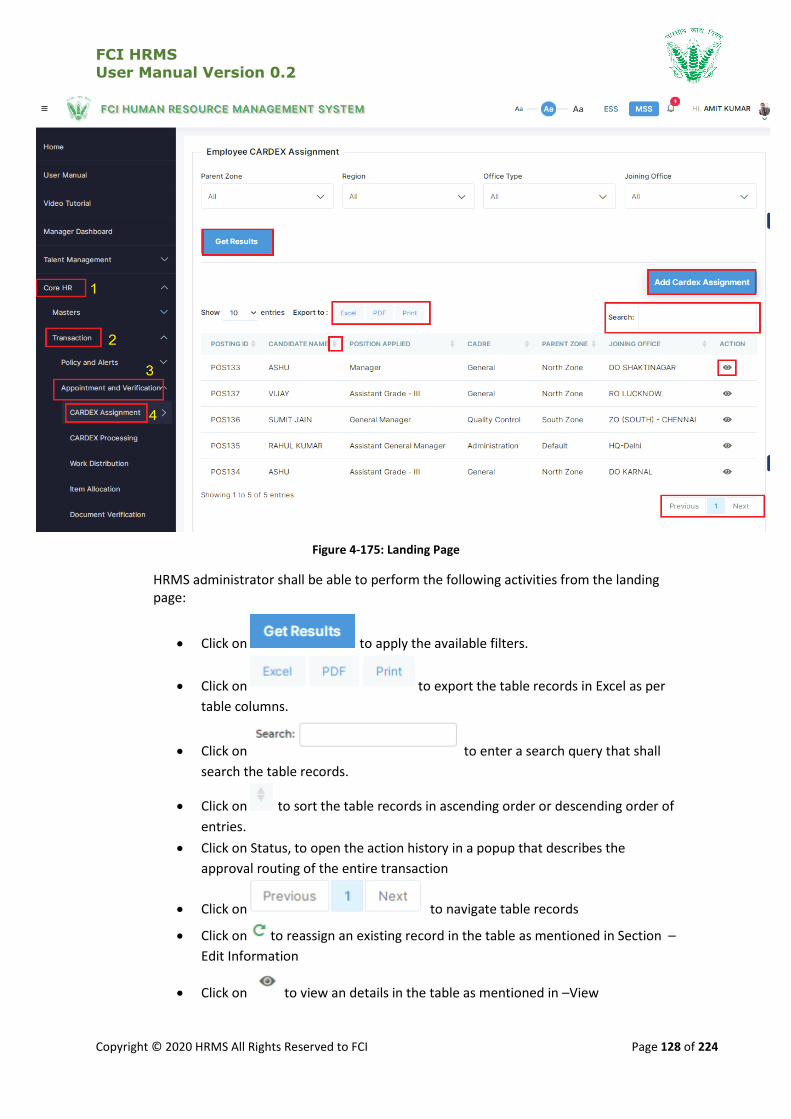
FCI HRMS
User Manual Version 0.2
Copyright © 2020 HRMS All Rights Reserved to FCI Page 128 of 224
Figure 4-175: Landing Page
HRMS administrator shall be able to perform the following activities from the landing page:
Click on to apply the available filters.
Click on to export the table records in Excel as per
table columns.
Click on to enter a search query that shall
search the table records.
Click on to sort the table records in ascending order or descending order of
entries.
Click on Status, to open the action history in a popup that describes the
approval routing of the entire transaction
Click on to navigate table records
Click on to reassign an existing record in the table as mentioned in Section –
Edit Information
Click on to view an details in the table as mentioned in –View
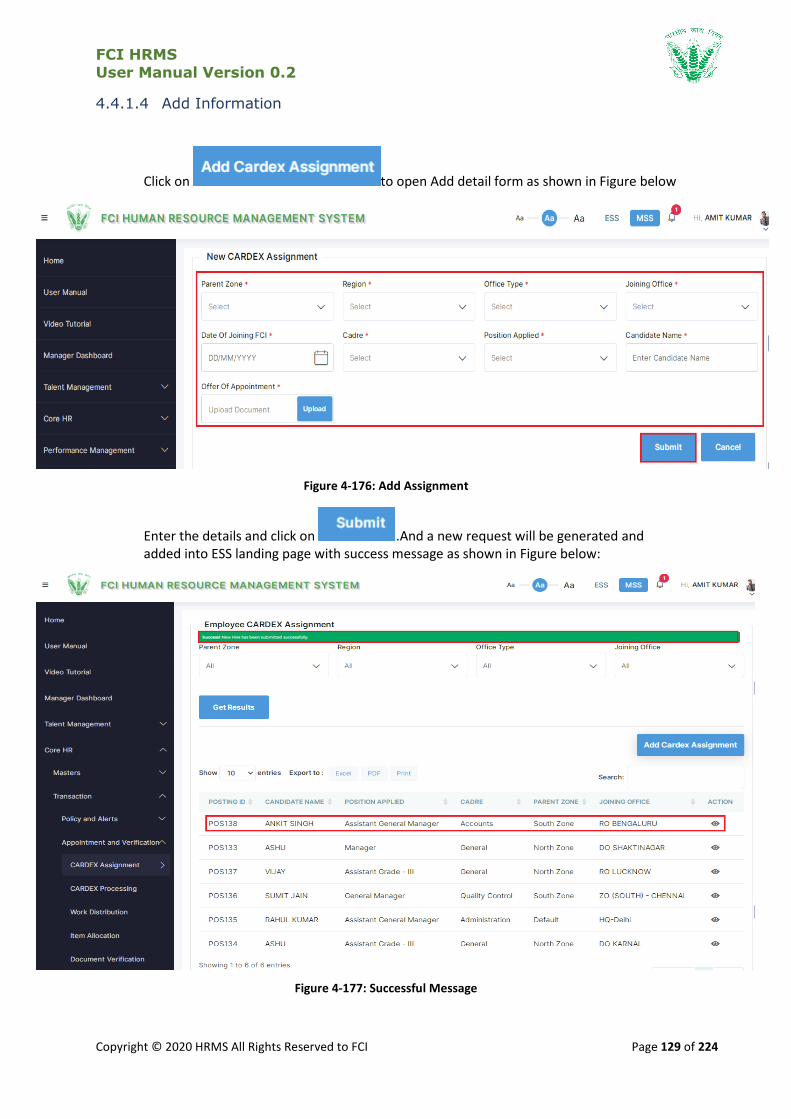
FCI HRMS
User Manual Version 0.2
Copyright © 2020 HRMS All Rights Reserved to FCI Page 129 of 224
4.4.1.4 Add Information
Click on to open Add detail form as shown in Figure below
Figure 4-176: Add Assignment
Enter the details and click on .And a new request will be generated and added into ESS landing page with success message as shown in Figure below:
Figure 4-177: Successful Message
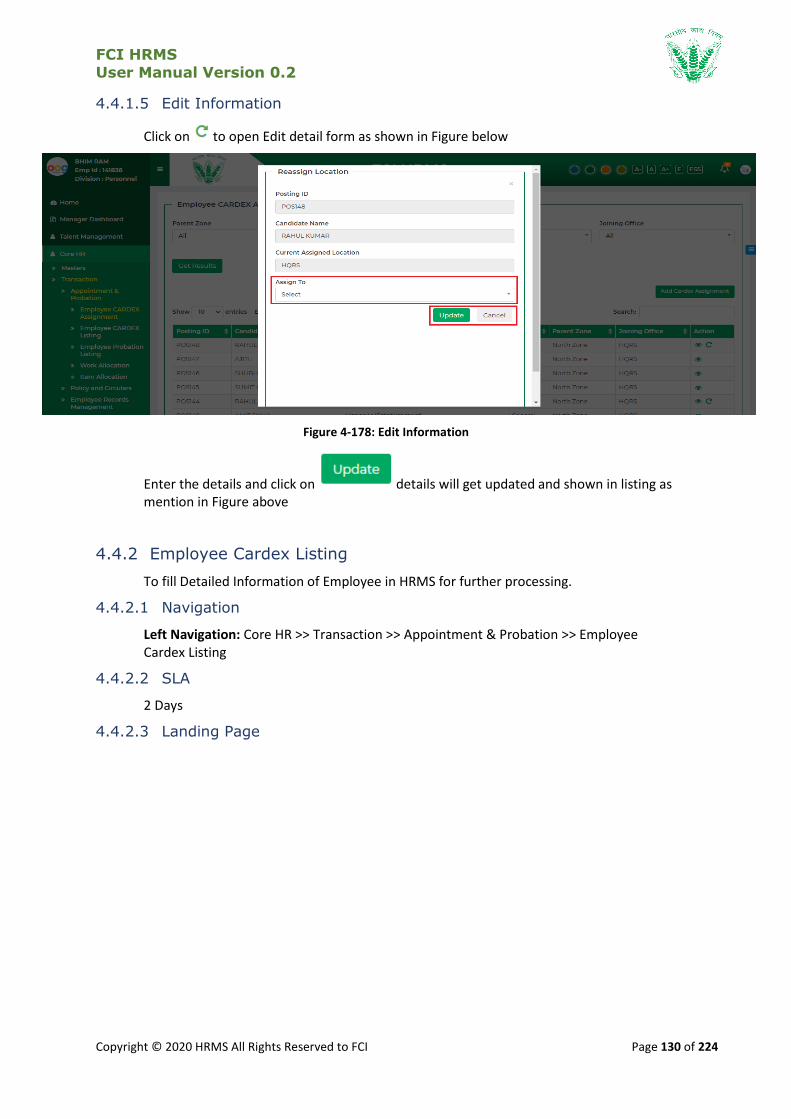
FCI HRMS
User Manual Version 0.2
Copyright © 2020 HRMS All Rights Reserved to FCI Page 130 of 224
4.4.1.5 Edit Information
Click on to open Edit detail form as shown in Figure below
Figure 4-178: Edit Information
Enter the details and click on details will get updated and shown in listing as mention in Figure above
4.4.2 Employee Cardex Listing
To fill Detailed Information of Employee in HRMS for further processing.
4.4.2.1 Navigation
Left Navigation: Core HR >> Transaction >> Appointment & Probation >> Employee Cardex Listing
4.4.2.2 SLA
2 Days
4.4.2.3 Landing Page

FCI HRMS
User Manual Version 0.2
Copyright © 2020 HRMS All Rights Reserved to FCI Page 131 of 224
Figure 4-179: Landing Page
HRMS administrator shall be able to perform the following activities from the landing page:
Click on to apply the available filters.
Click on to export the table records in Excel as per table columns.
Click on to enter a search query that shall
search the table records.
Click on to sort the table records in ascending order or descending order of
entries.
Click on Status, to open the action history in a popup that describes the
approval routing of the entire transaction
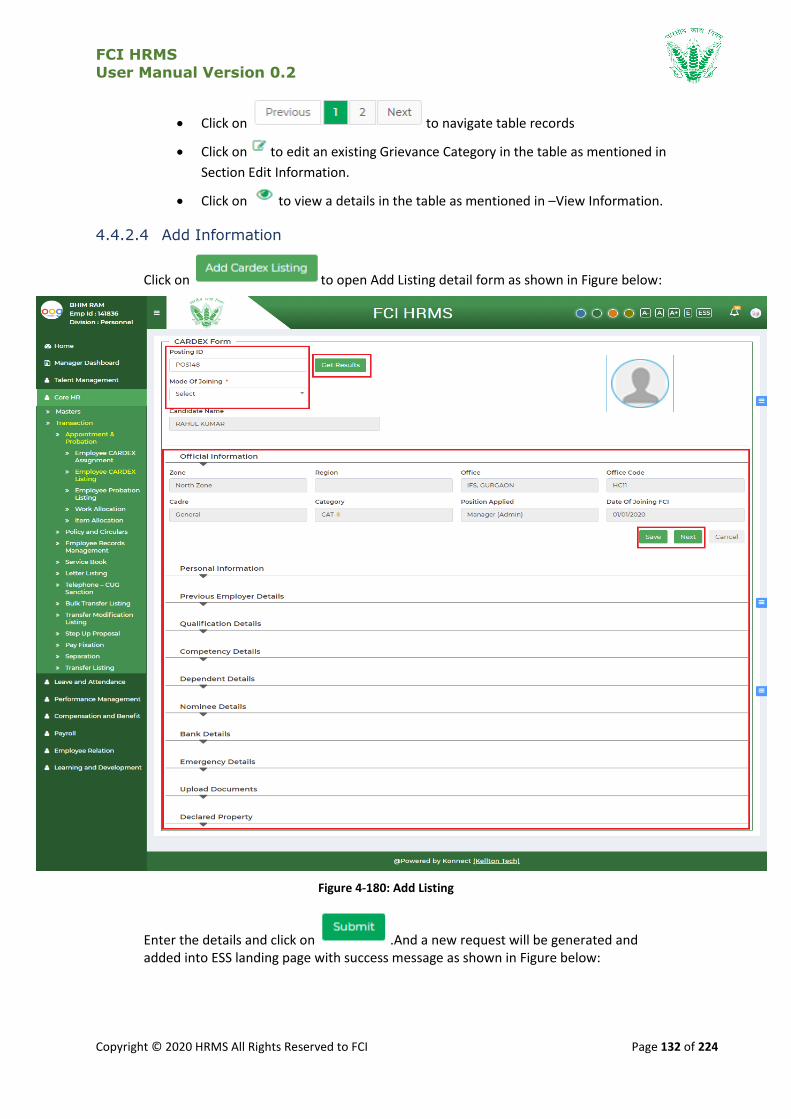
FCI HRMS
User Manual Version 0.2
Copyright © 2020 HRMS All Rights Reserved to FCI Page 132 of 224
Click on to navigate table records
Click on to edit an existing Grievance Category in the table as mentioned in
Section Edit Information.
Click on to view a details in the table as mentioned in –View Information.
4.4.2.4 Add Information
Click on to open Add Listing detail form as shown in Figure below:
Figure 4-180: Add Listing
Enter the details and click on .And a new request will be generated and added into ESS landing page with success message as shown in Figure below:
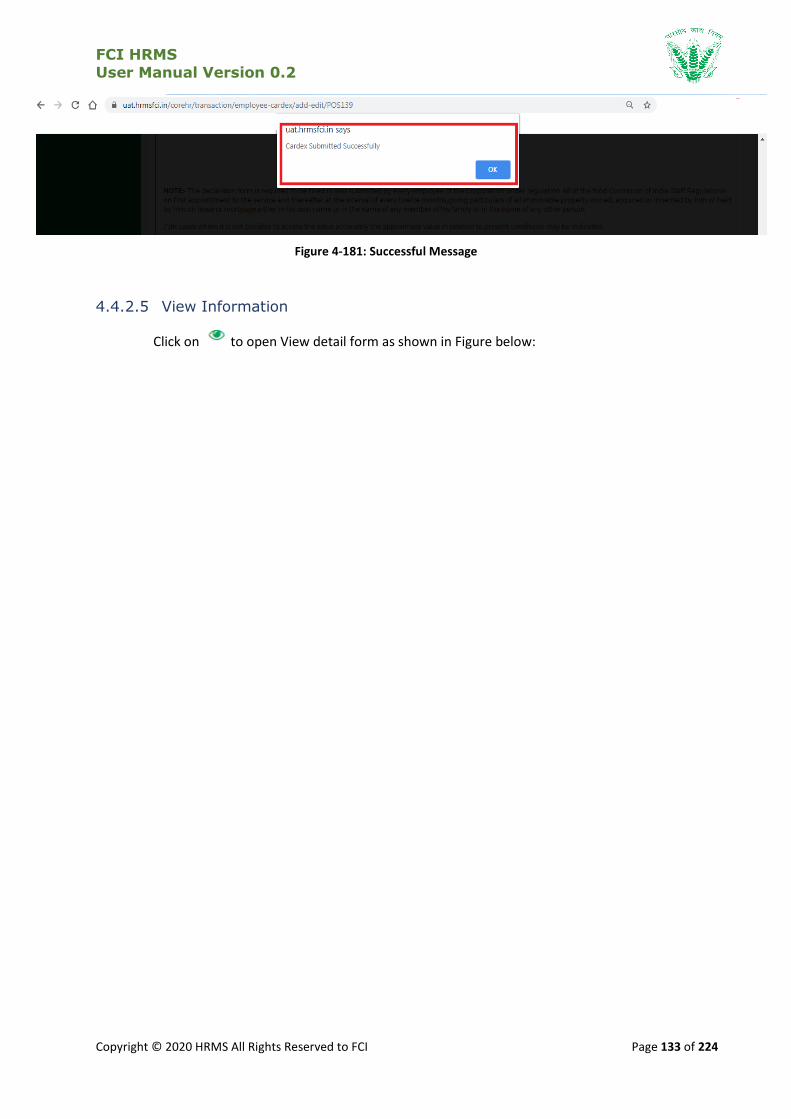
FCI HRMS
User Manual Version 0.2
Copyright © 2020 HRMS All Rights Reserved to FCI Page 133 of 224
Figure 4-181: Successful Message
4.4.2.5 View Information
Click on to open View detail form as shown in Figure below:

FCI HRMS
User Manual Version 0.2
Copyright © 2020 HRMS All Rights Reserved to FCI Page 134 of 224
Figure 4-182: View Information
Further the HRMS administrator can:
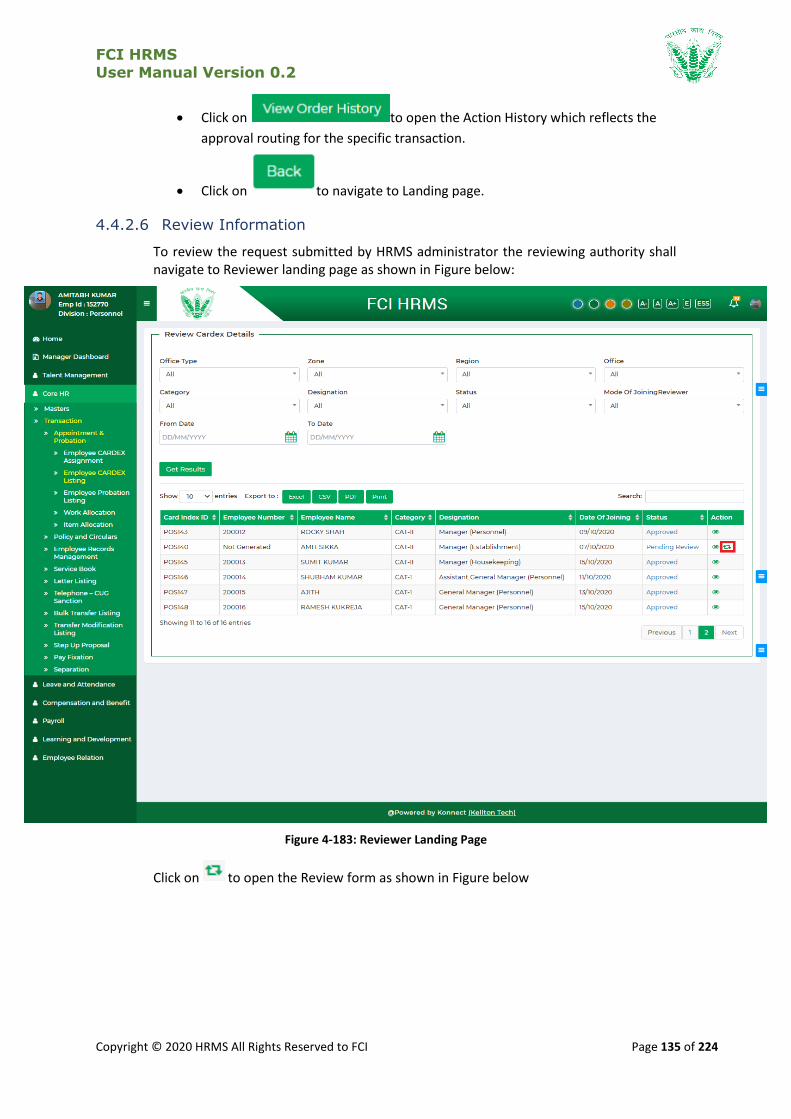
FCI HRMS
User Manual Version 0.2
Copyright © 2020 HRMS All Rights Reserved to FCI Page 135 of 224
Click on to open the Action History which reflects the
approval routing for the specific transaction.
Click on to navigate to Landing page.
4.4.2.6 Review Information
To review the request submitted by HRMS administrator the reviewing authority shall navigate to Reviewer landing page as shown in Figure below:
Figure 4-183: Reviewer Landing Page
Click on to open the Review form as shown in Figure below
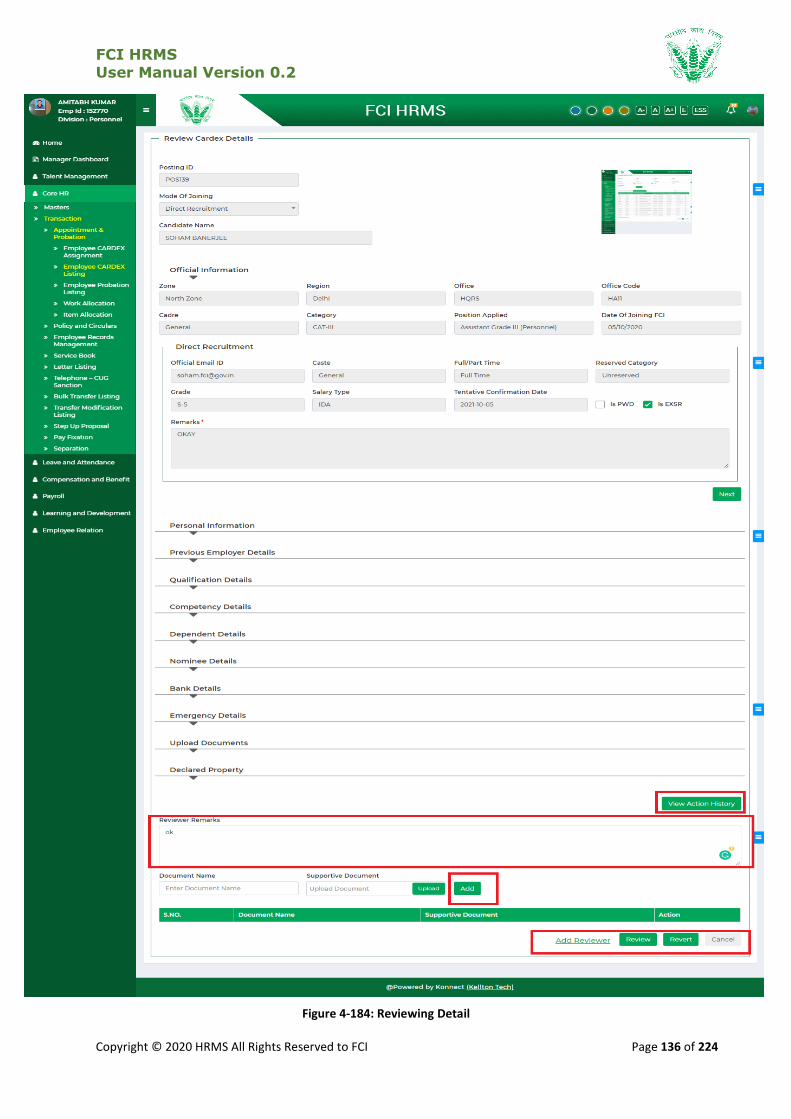
FCI HRMS
User Manual Version 0.2
Copyright © 2020 HRMS All Rights Reserved to FCI Page 136 of 224
Figure 4-184: Reviewing Detail
FCI HRMS
User Manual Version 0.2
Copyright © 2020 HRMS All Rights Reserved to FCI Page 137 of 224
Enter the relevant details and perform one of the following actions as a reviewing authority:
Click on to open the Action History which reflects
the approval routing for the specific transaction.
Click on to attach a new document in PDF format with a document
name of not more than 5 MB
Click on link to open the additional reviewer popup where
the existing reviewing authority can add another reviewer in the line of
approval routing.
Click on button to submit the review with details such that the
transaction is forwarded to the next reviewer in the reviewing authority or to
the approving authority after final review. The status of the transaction shall
change from Pending Review to Pending Approval once the final reviewer has
reviewed the transaction and the same transaction is forwarded to approving
authority for final approval.
Click on button to send back the entire transaction directly back
to the HRMS administrator who can resubmit the request with necessary
details. The status of the transaction shall change from Pending Review to
Reverted in case any reviewer or approving authority has reverted the
transaction back to the initiator.
Click on to navigate back.
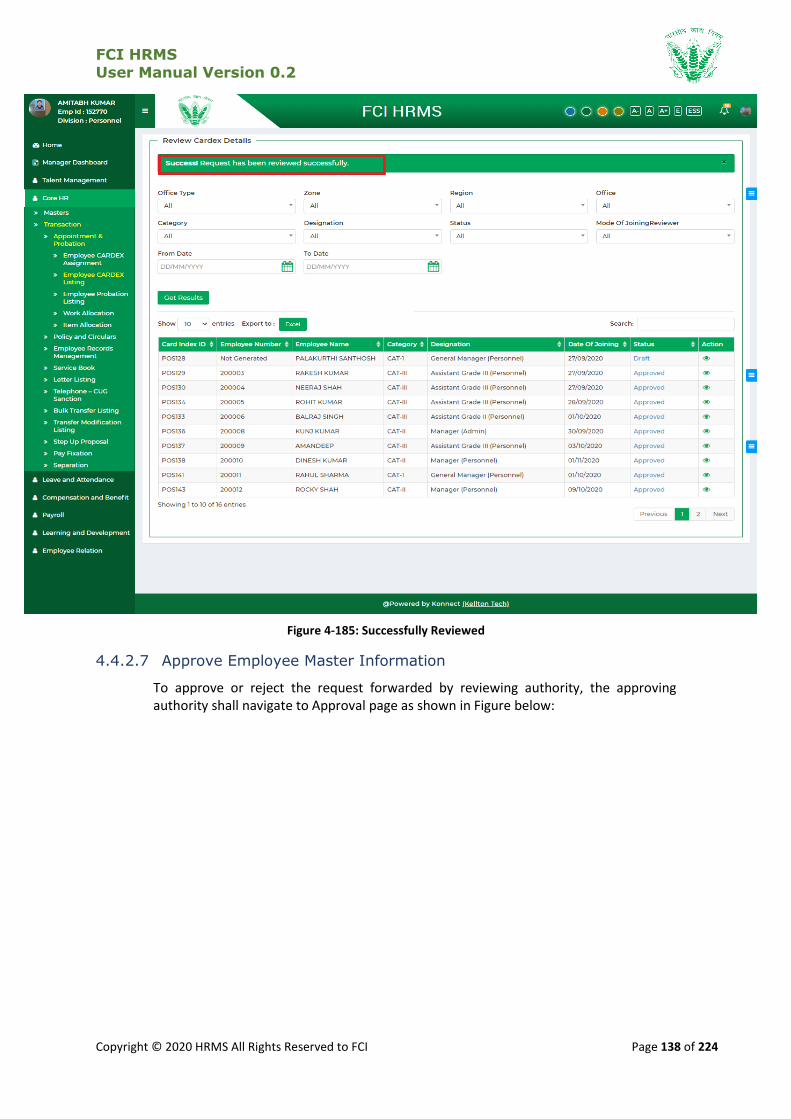
FCI HRMS
User Manual Version 0.2
Copyright © 2020 HRMS All Rights Reserved to FCI Page 138 of 224
Figure 4-185: Successfully Reviewed
4.4.2.7 Approve Employee Master Information
To approve or reject the request forwarded by reviewing authority, the approving authority shall navigate to Approval page as shown in Figure below:
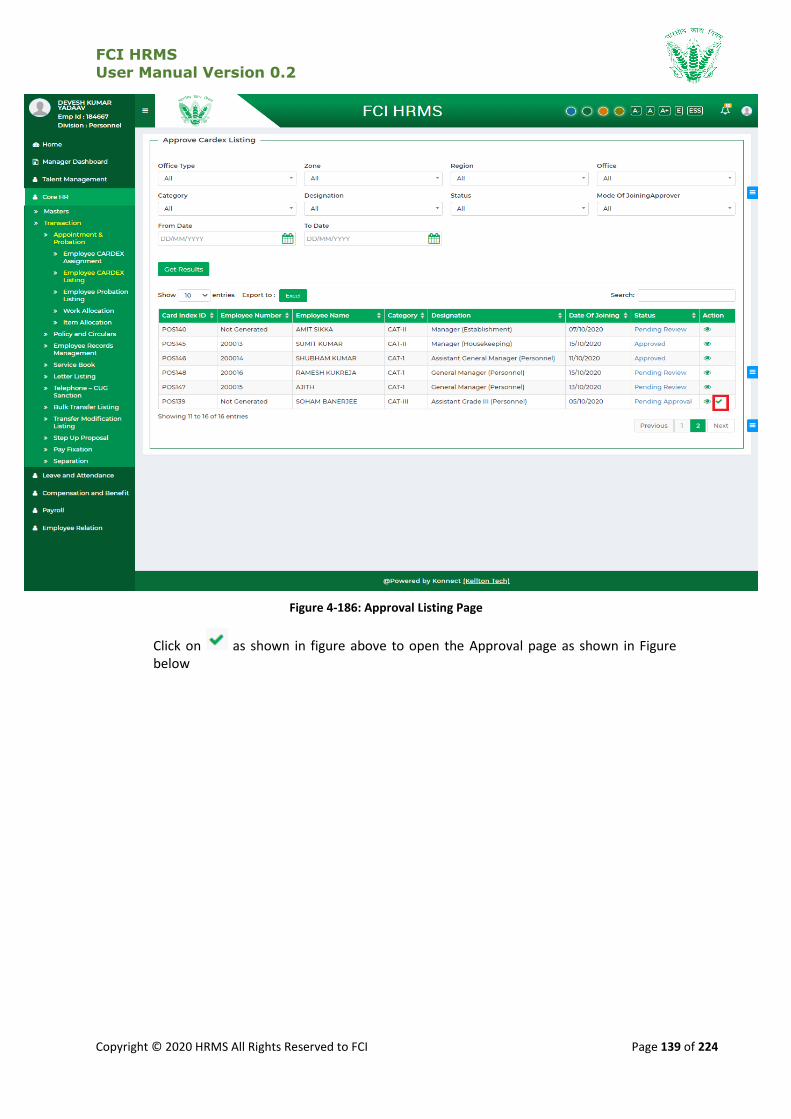
FCI HRMS
User Manual Version 0.2
Copyright © 2020 HRMS All Rights Reserved to FCI Page 139 of 224
Figure 4-186: Approval Listing Page
Click on as shown in figure above to open the Approval page as shown in Figure below

FCI HRMS
User Manual Version 0.2
Copyright © 2020 HRMS All Rights Reserved to FCI Page 140 of 224
Figure 4-187: Approve Screen

FCI HRMS
User Manual Version 0.2
Copyright © 2020 HRMS All Rights Reserved to FCI Page 141 of 224
Enter the relevant details and perform one of the following actions as a reviewing authority:
Click on to open the Action History which reflects the
approval routing for the specific transaction.
Click on to attach a new document in PDF format with a document
name of not more than 5 MB
Click on link to open the additional reviewer popup where
the existing reviewing authority can add another reviewer in the line of
approval routing.
Click on link to open the selective revert popup from
where the reviewing authority can send back the transaction to any reviewer
who had previously reviewed the transaction.
Click on to give approval on the transaction and On Approval
Landing Page status of the transaction changes from Pending Approval to
Approved.
Click on to give a rejection on the transaction and the HRMS
administrator won’t be able to resubmit the same transaction with updates. On
Approval Landing Page status of the transaction changes from Pending
Approval to Rejected.
Click on to navigate back to Approval Listing Page.
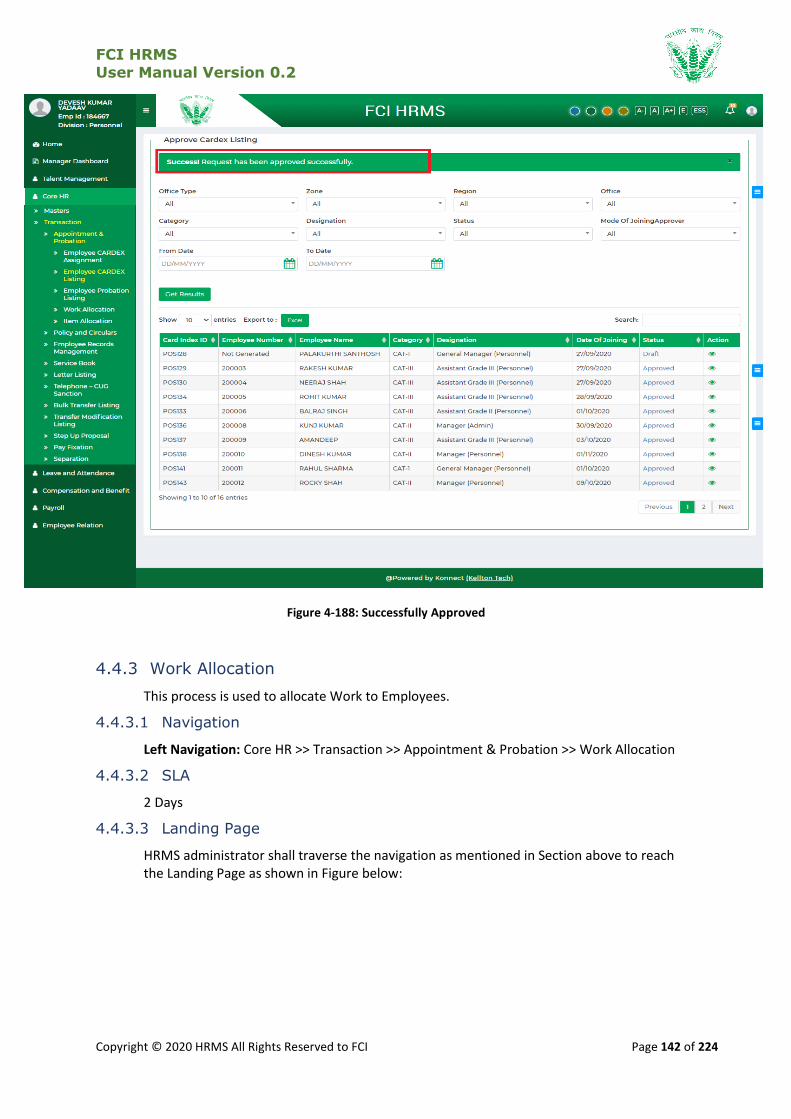
FCI HRMS
User Manual Version 0.2
Copyright © 2020 HRMS All Rights Reserved to FCI Page 142 of 224
Figure 4-188: Successfully Approved
4.4.3 Work Allocation
This process is used to allocate Work to Employees.
4.4.3.1 Navigation
Left Navigation: Core HR >> Transaction >> Appointment & Probation >> Work Allocation
4.4.3.2 SLA
2 Days
4.4.3.3 Landing Page
HRMS administrator shall traverse the navigation as mentioned in Section above to reach the Landing Page as shown in Figure below:

FCI HRMS
User Manual Version 0.2
Copyright © 2020 HRMS All Rights Reserved to FCI Page 143 of 224
Figure 4-189: Landing Page
HRMS administrator shall be able to perform the following activities from the landing page:
Click on to apply the available filters.
Click on to export the table records in Excel as per table columns.
Click on to enter a search query that shall
search the table records.
Click on to sort the table records in ascending order or descending order of
entries.
Click on Status, to open the action history in a popup that describes the
approval routing of the entire transaction
Click on to navigate table records
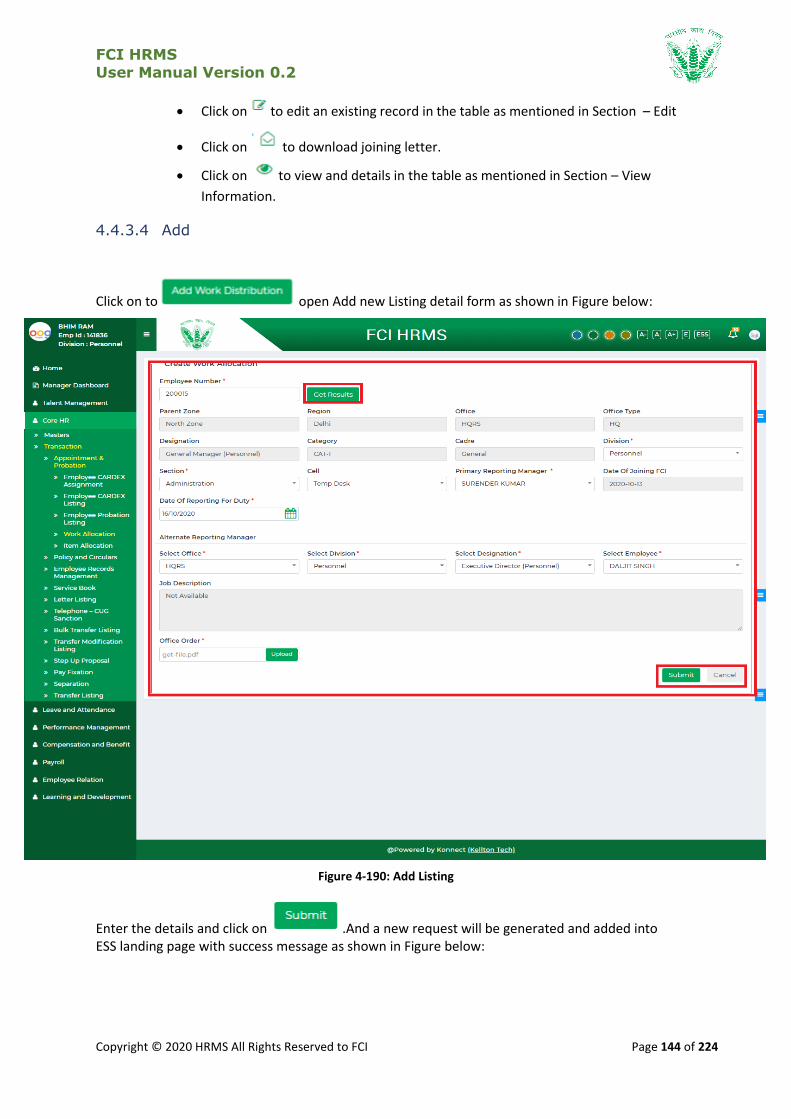
FCI HRMS
User Manual Version 0.2
Copyright © 2020 HRMS All Rights Reserved to FCI Page 144 of 224
Click on to edit an existing record in the table as mentioned in Section – Edit
Click on to download joining letter.
Click on to view and details in the table as mentioned in Section – View
Information.
4.4.3.4 Add
Click on to open Add new Listing detail form as shown in Figure below:
Figure 4-190: Add Listing
Enter the details and click on .And a new request will be generated and added into ESS landing page with success message as shown in Figure below:

FCI HRMS
User Manual Version 0.2
Copyright © 2020 HRMS All Rights Reserved to FCI Page 145 of 224
Figure 4-191: Successful Message
4.4.3.5 View Information
Click on to open View detail form as shown in Figure below:

FCI HRMS
User Manual Version 0.2
Copyright © 2020 HRMS All Rights Reserved to FCI Page 146 of 224
Figure 4-192: View Information
Further the HRMS administrator can:
Click on to open the Action History which reflects the
approval routing for the specific transaction.
Click on to navigate to Landing page.
4.4.3.6 Edit Information
Note – A request which was approved previously can be updated. The updates shall also go for approval process.
Click on to open edit detail form as shown in Figure below:
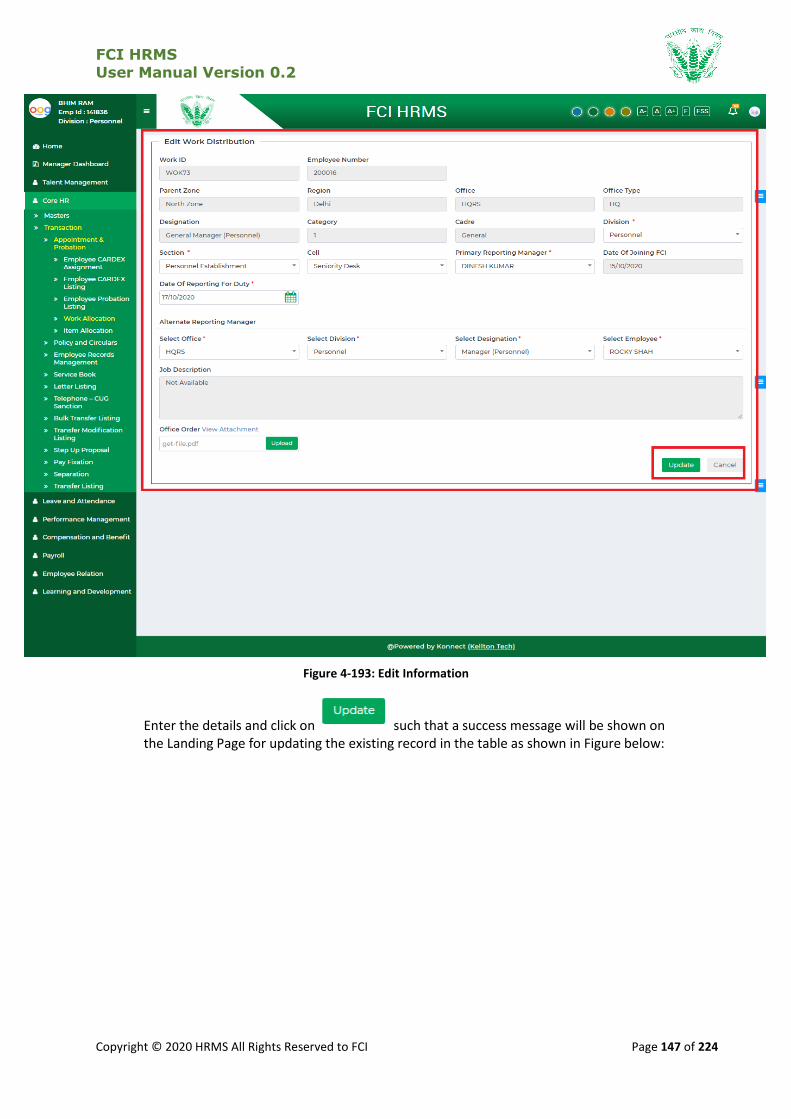
FCI HRMS
User Manual Version 0.2
Copyright © 2020 HRMS All Rights Reserved to FCI Page 147 of 224
Figure 4-193: Edit Information
Enter the details and click on such that a success message will be shown on the Landing Page for updating the existing record in the table as shown in Figure below:
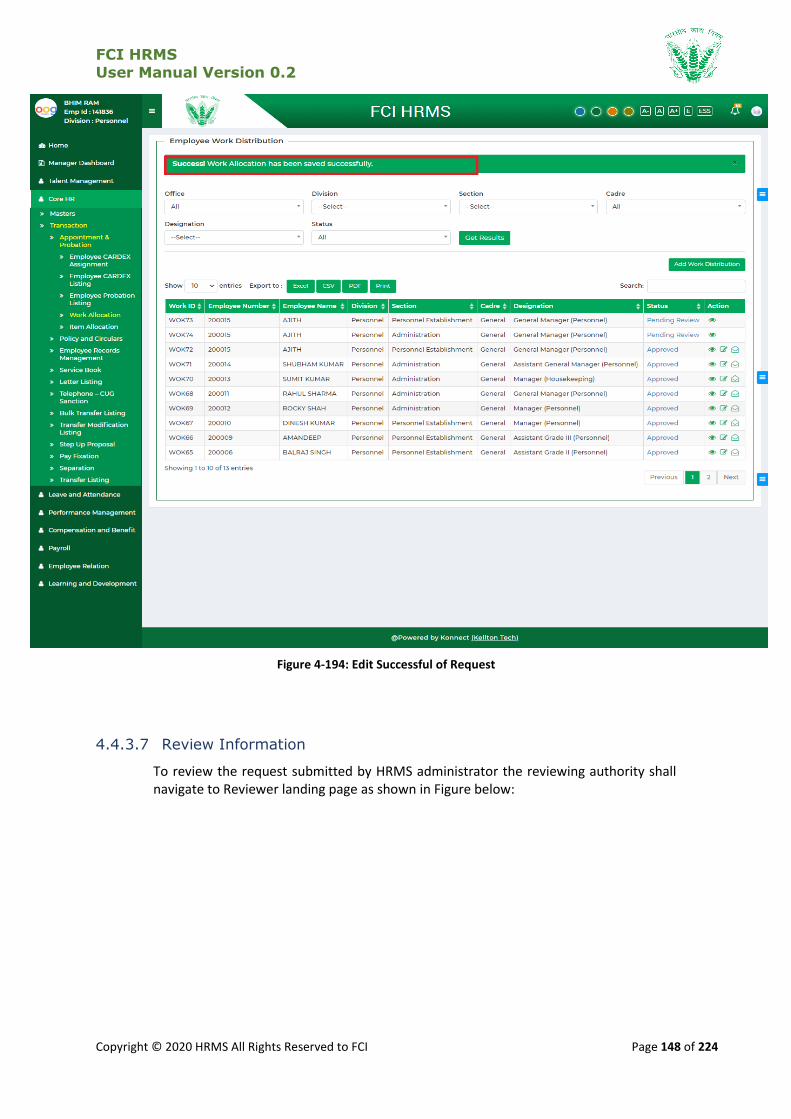
FCI HRMS
User Manual Version 0.2
Copyright © 2020 HRMS All Rights Reserved to FCI Page 148 of 224
Figure 4-194: Edit Successful of Request
4.4.3.7 Review Information
To review the request submitted by HRMS administrator the reviewing authority shall navigate to Reviewer landing page as shown in Figure below:
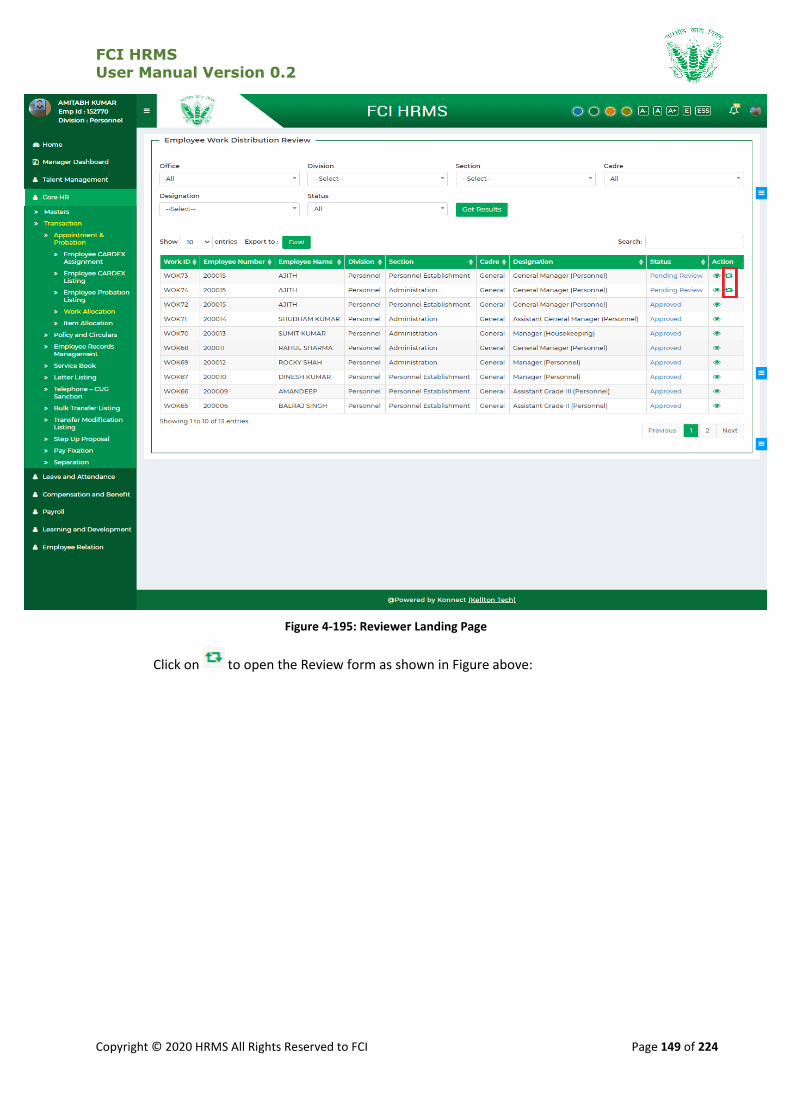
FCI HRMS
User Manual Version 0.2
Copyright © 2020 HRMS All Rights Reserved to FCI Page 149 of 224
Figure 4-195: Reviewer Landing Page
Click on to open the Review form as shown in Figure above:
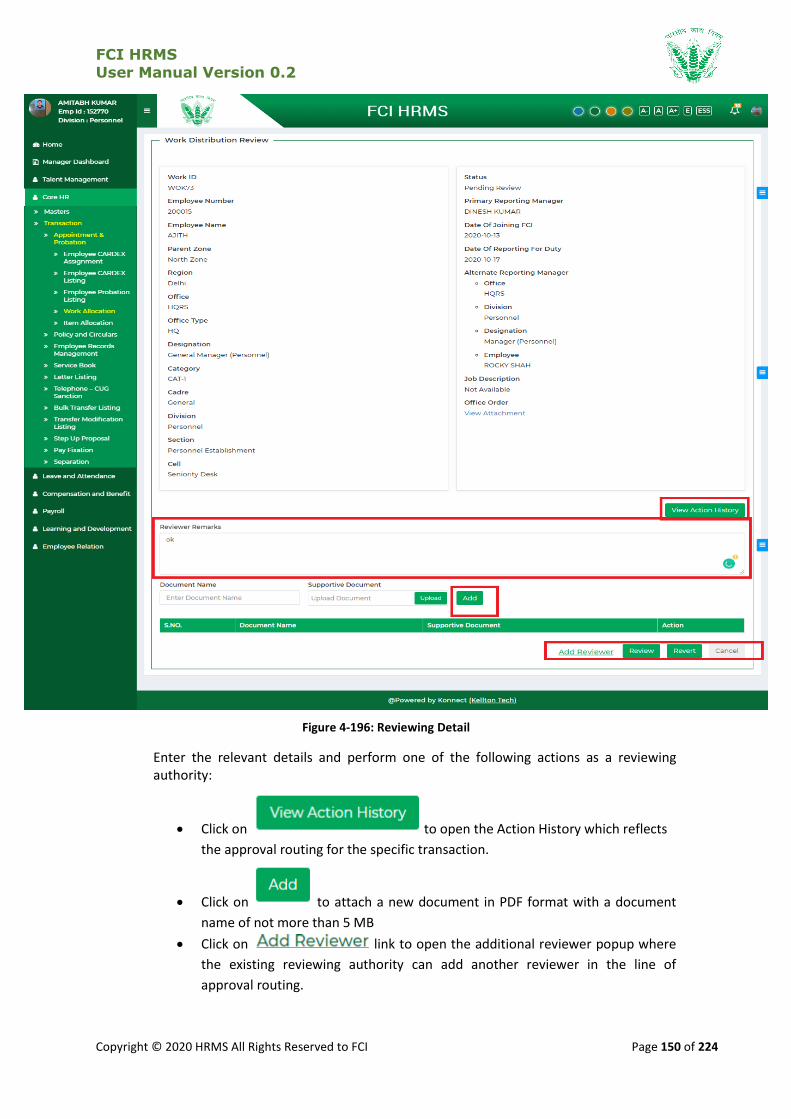
FCI HRMS
User Manual Version 0.2
Copyright © 2020 HRMS All Rights Reserved to FCI Page 150 of 224
Figure 4-196: Reviewing Detail
Enter the relevant details and perform one of the following actions as a reviewing authority:
Click on to open the Action History which reflects
the approval routing for the specific transaction.
Click on to attach a new document in PDF format with a document
name of not more than 5 MB
Click on link to open the additional reviewer popup where
the existing reviewing authority can add another reviewer in the line of
approval routing.
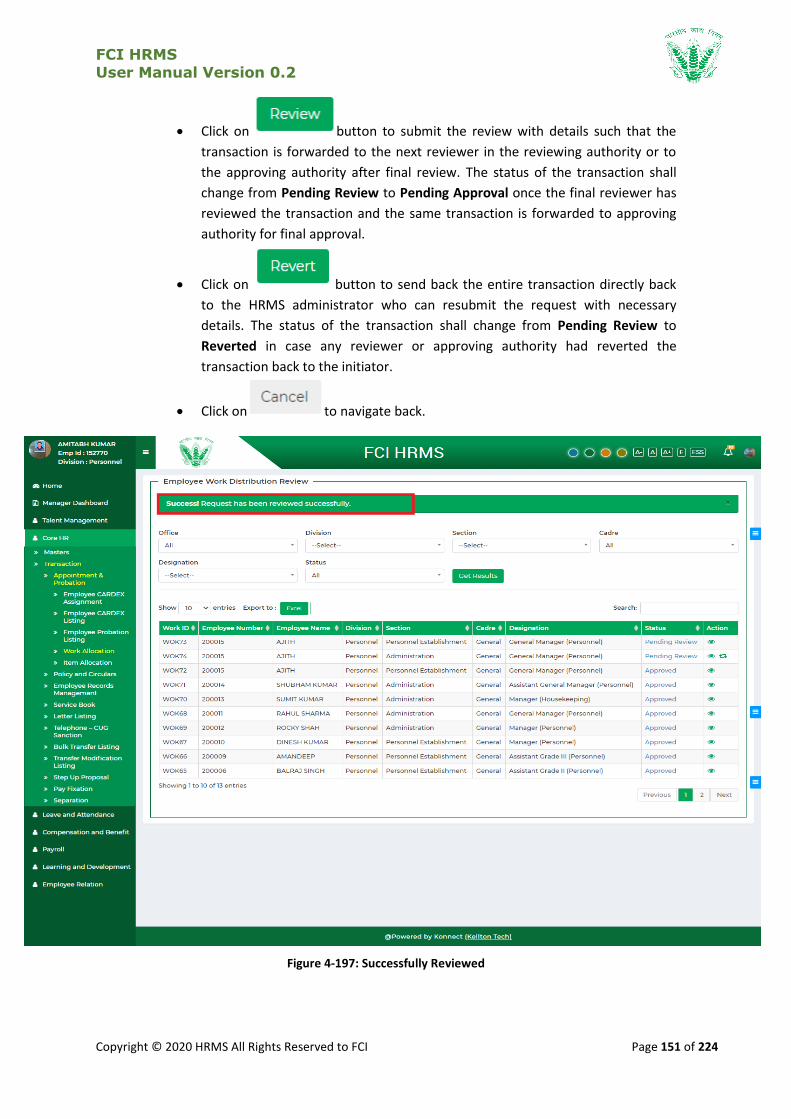
FCI HRMS
User Manual Version 0.2
Copyright © 2020 HRMS All Rights Reserved to FCI Page 151 of 224
Click on button to submit the review with details such that the
transaction is forwarded to the next reviewer in the reviewing authority or to
the approving authority after final review. The status of the transaction shall
change from Pending Review to Pending Approval once the final reviewer has
reviewed the transaction and the same transaction is forwarded to approving
authority for final approval.
Click on button to send back the entire transaction directly back
to the HRMS administrator who can resubmit the request with necessary
details. The status of the transaction shall change from Pending Review to
Reverted in case any reviewer or approving authority had reverted the
transaction back to the initiator.
Click on to navigate back.
Figure 4-197: Successfully Reviewed
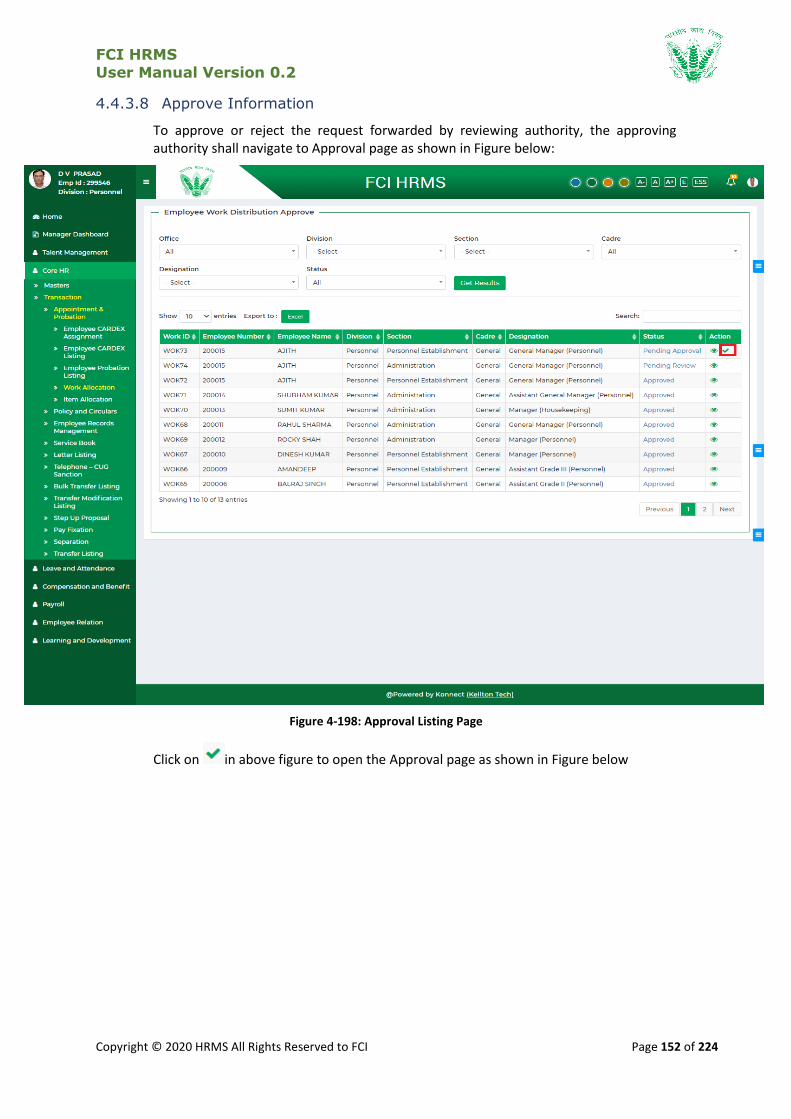
FCI HRMS
User Manual Version 0.2
Copyright © 2020 HRMS All Rights Reserved to FCI Page 152 of 224
4.4.3.8 Approve Information
To approve or reject the request forwarded by reviewing authority, the approving authority shall navigate to Approval page as shown in Figure below:
Figure 4-198: Approval Listing Page
Click on in above figure to open the Approval page as shown in Figure below
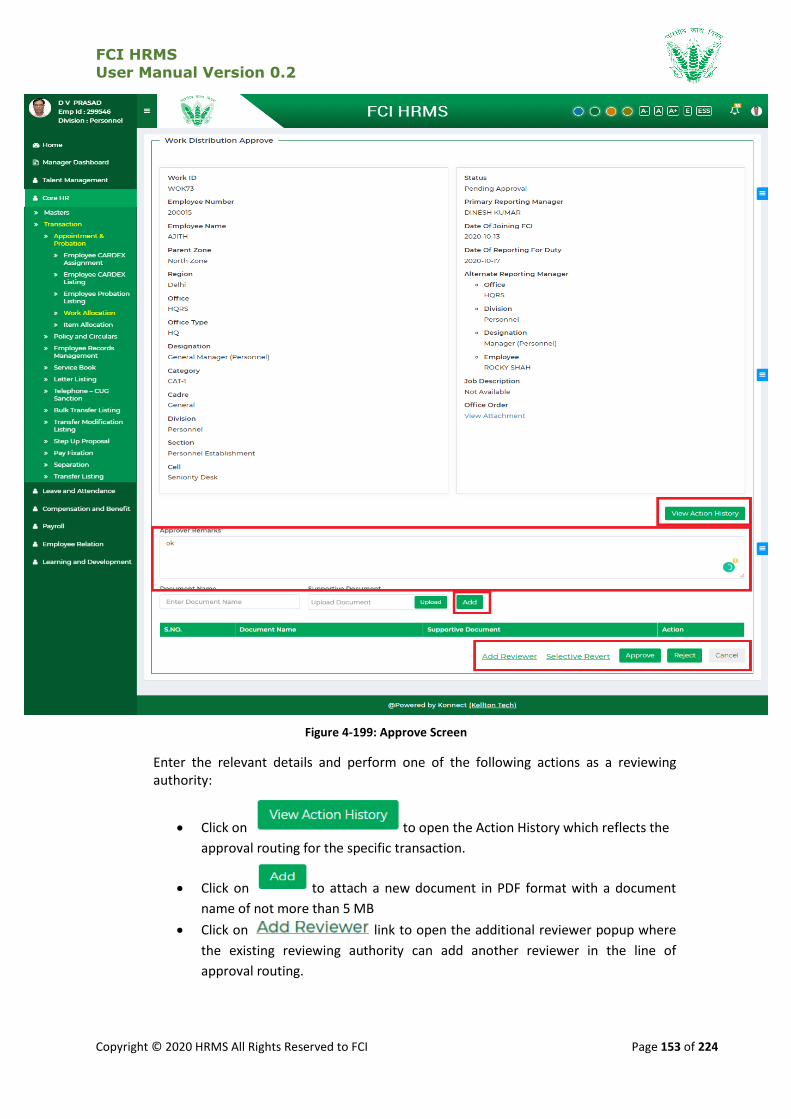
FCI HRMS
User Manual Version 0.2
Copyright © 2020 HRMS All Rights Reserved to FCI Page 153 of 224
Figure 4-199: Approve Screen
Enter the relevant details and perform one of the following actions as a reviewing authority:
Click on to open the Action History which reflects the
approval routing for the specific transaction.
Click on to attach a new document in PDF format with a document
name of not more than 5 MB
Click on link to open the additional reviewer popup where
the existing reviewing authority can add another reviewer in the line of
approval routing.
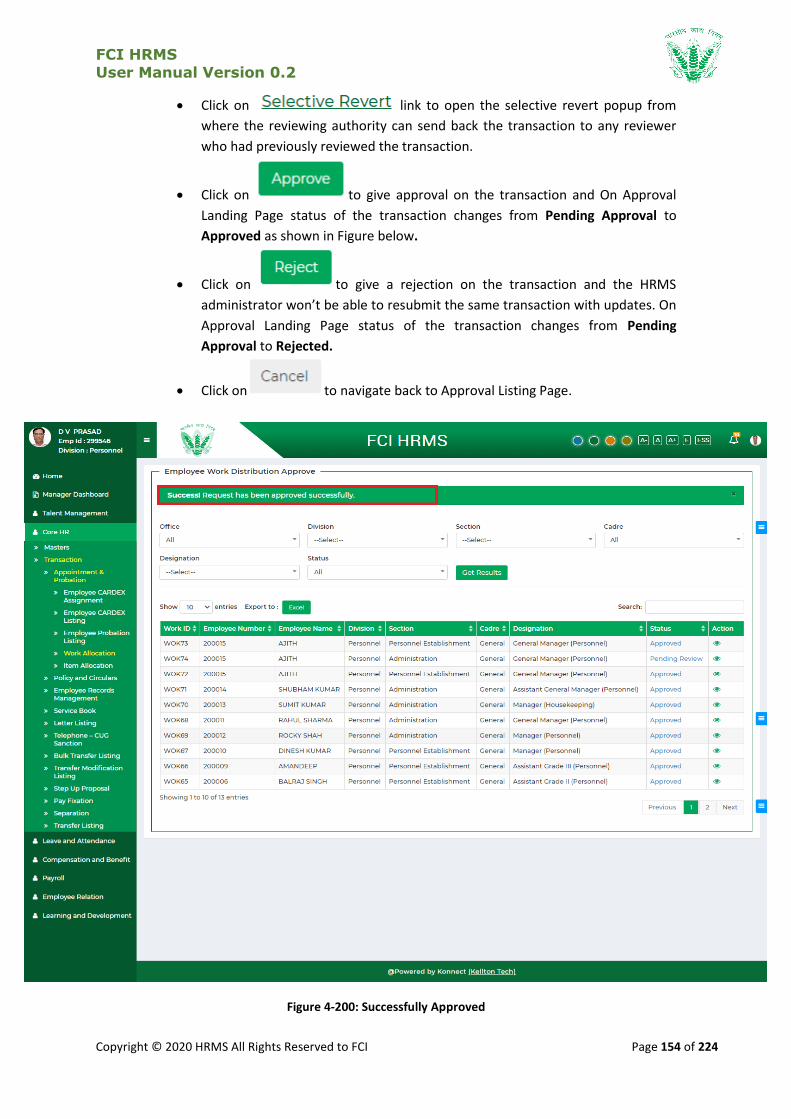
FCI HRMS
User Manual Version 0.2
Copyright © 2020 HRMS All Rights Reserved to FCI Page 154 of 224
Click on link to open the selective revert popup from
where the reviewing authority can send back the transaction to any reviewer
who had previously reviewed the transaction.
Click on to give approval on the transaction and On Approval
Landing Page status of the transaction changes from Pending Approval to
Approved as shown in Figure below.
Click on to give a rejection on the transaction and the HRMS
administrator won’t be able to resubmit the same transaction with updates. On
Approval Landing Page status of the transaction changes from Pending
Approval to Rejected.
Click on to navigate back to Approval Listing Page.
Figure 4-200: Successfully Approved
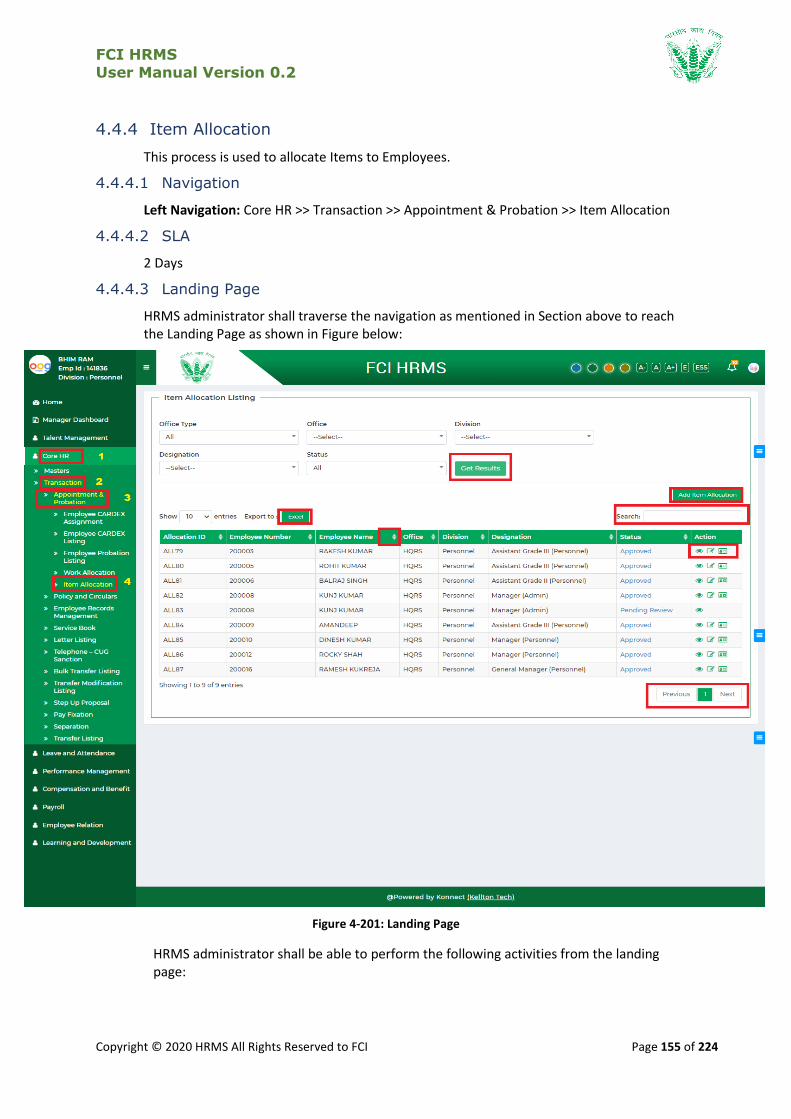
FCI HRMS
User Manual Version 0.2
Copyright © 2020 HRMS All Rights Reserved to FCI Page 155 of 224
4.4.4 Item Allocation
This process is used to allocate Items to Employees.
4.4.4.1 Navigation
Left Navigation: Core HR >> Transaction >> Appointment & Probation >> Item Allocation
4.4.4.2 SLA
2 Days
4.4.4.3 Landing Page
HRMS administrator shall traverse the navigation as mentioned in Section above to reach the Landing Page as shown in Figure below:
Figure 4-201: Landing Page
HRMS administrator shall be able to perform the following activities from the landing page:
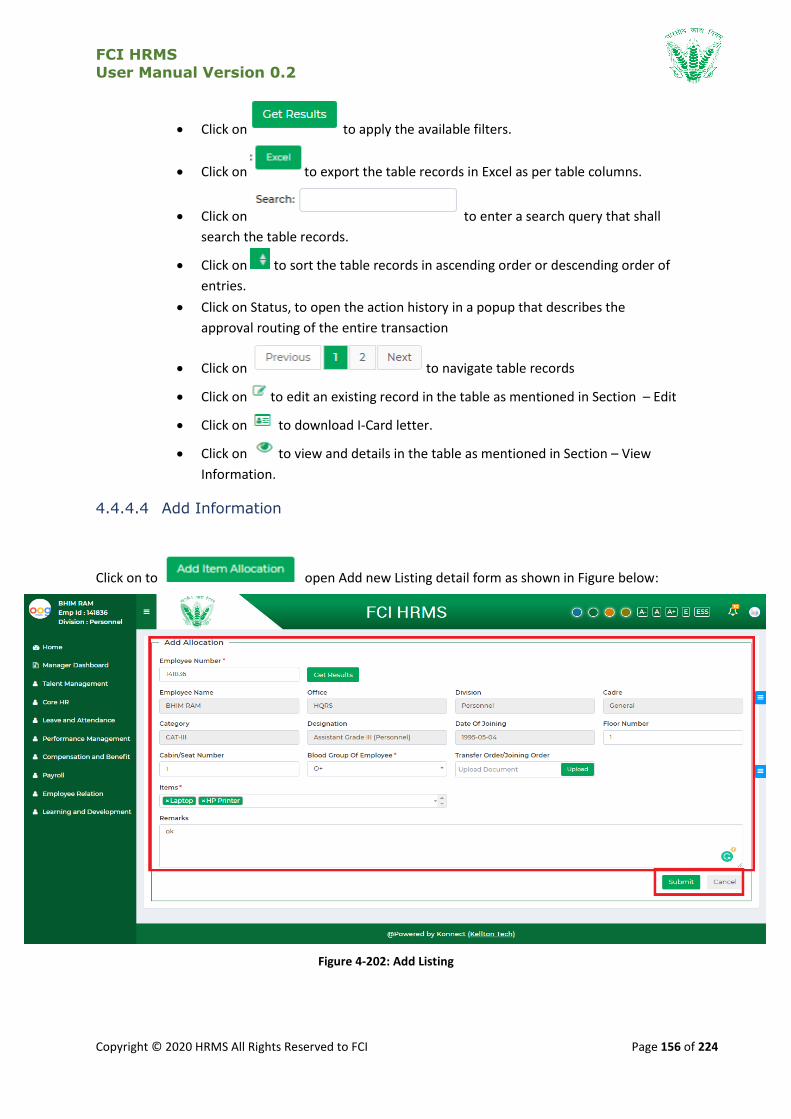
FCI HRMS
User Manual Version 0.2
Copyright © 2020 HRMS All Rights Reserved to FCI Page 156 of 224
Click on to apply the available filters.
Click on to export the table records in Excel as per table columns.
Click on to enter a search query that shall
search the table records.
Click on to sort the table records in ascending order or descending order of
entries.
Click on Status, to open the action history in a popup that describes the
approval routing of the entire transaction
Click on to navigate table records
Click on to edit an existing record in the table as mentioned in Section – Edit
Click on to download I-Card letter.
Click on to view and details in the table as mentioned in Section – View
Information.
4.4.4.4 Add Information
Click on to open Add new Listing detail form as shown in Figure below:
Figure 4-202: Add Listing

FCI HRMS
User Manual Version 0.2
Copyright © 2020 HRMS All Rights Reserved to FCI Page 157 of 224
Enter the details and click on .And a new request will be generated and added into ESS landing page with success message as shown in Figure below:
Figure 4-203: Successful Message
4.4.4.5 View Information
Click on to open View detail form as shown in Figure below:

FCI HRMS
User Manual Version 0.2
Copyright © 2020 HRMS All Rights Reserved to FCI Page 158 of 224
Figure 4-204: View Information
Further the HRMS administrator can:
Click on to open the Action History which reflects the
approval routing for the specific transaction.
Click on to navigate to Landing page.
4.4.4.6 Edit Information
Note – A request which was approved previously can be updated. The updates shall also go for approval process.
Click on on landing page to open edit detail form as shown in Figure below:
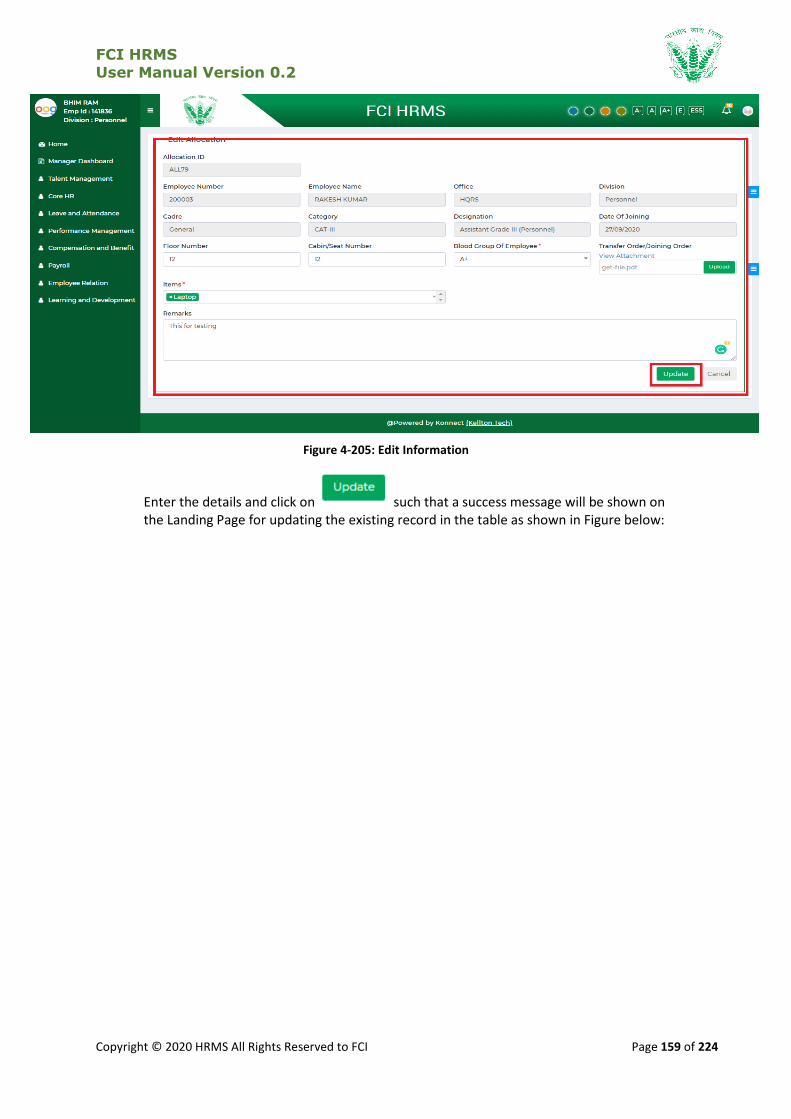
FCI HRMS
User Manual Version 0.2
Copyright © 2020 HRMS All Rights Reserved to FCI Page 159 of 224
Figure 4-205: Edit Information
Enter the details and click on such that a success message will be shown on the Landing Page for updating the existing record in the table as shown in Figure below:

FCI HRMS
User Manual Version 0.2
Copyright © 2020 HRMS All Rights Reserved to FCI Page 160 of 224
Figure 4-206: Edit Successful of Request
4.4.4.7 Review Information
To review the request submitted by HRMS administrator the reviewing authority shall navigate to Reviewer landing page as shown in Figure below:
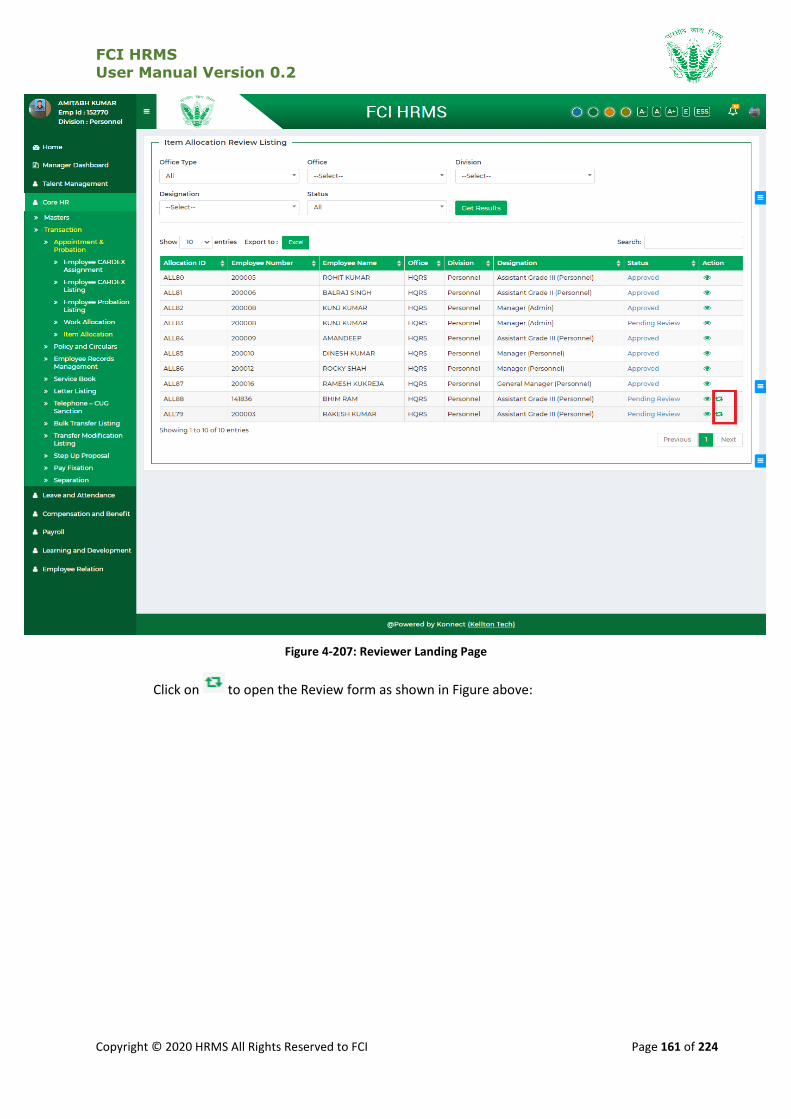
FCI HRMS
User Manual Version 0.2
Copyright © 2020 HRMS All Rights Reserved to FCI Page 161 of 224
Figure 4-207: Reviewer Landing Page
Click on to open the Review form as shown in Figure above:
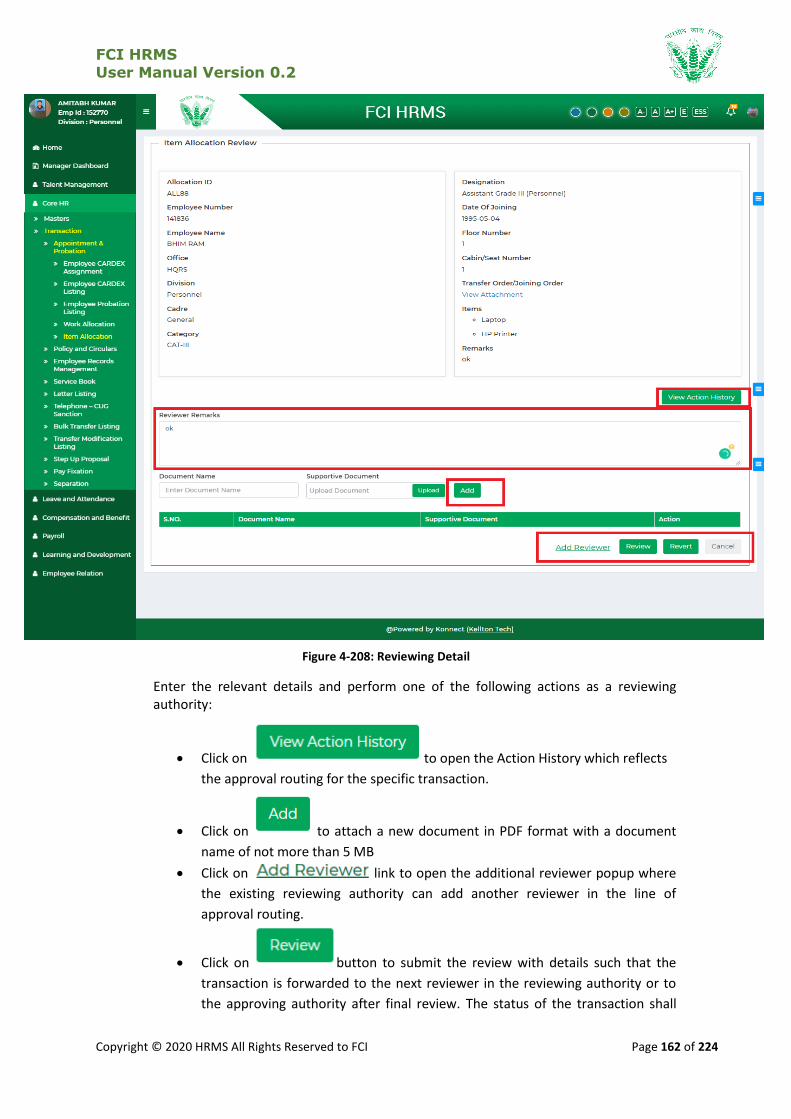
FCI HRMS
User Manual Version 0.2
Copyright © 2020 HRMS All Rights Reserved to FCI Page 162 of 224
Figure 4-208: Reviewing Detail
Enter the relevant details and perform one of the following actions as a reviewing authority:
Click on to open the Action History which reflects
the approval routing for the specific transaction.
Click on to attach a new document in PDF format with a document
name of not more than 5 MB
Click on link to open the additional reviewer popup where
the existing reviewing authority can add another reviewer in the line of
approval routing.
Click on button to submit the review with details such that the
transaction is forwarded to the next reviewer in the reviewing authority or to
the approving authority after final review. The status of the transaction shall
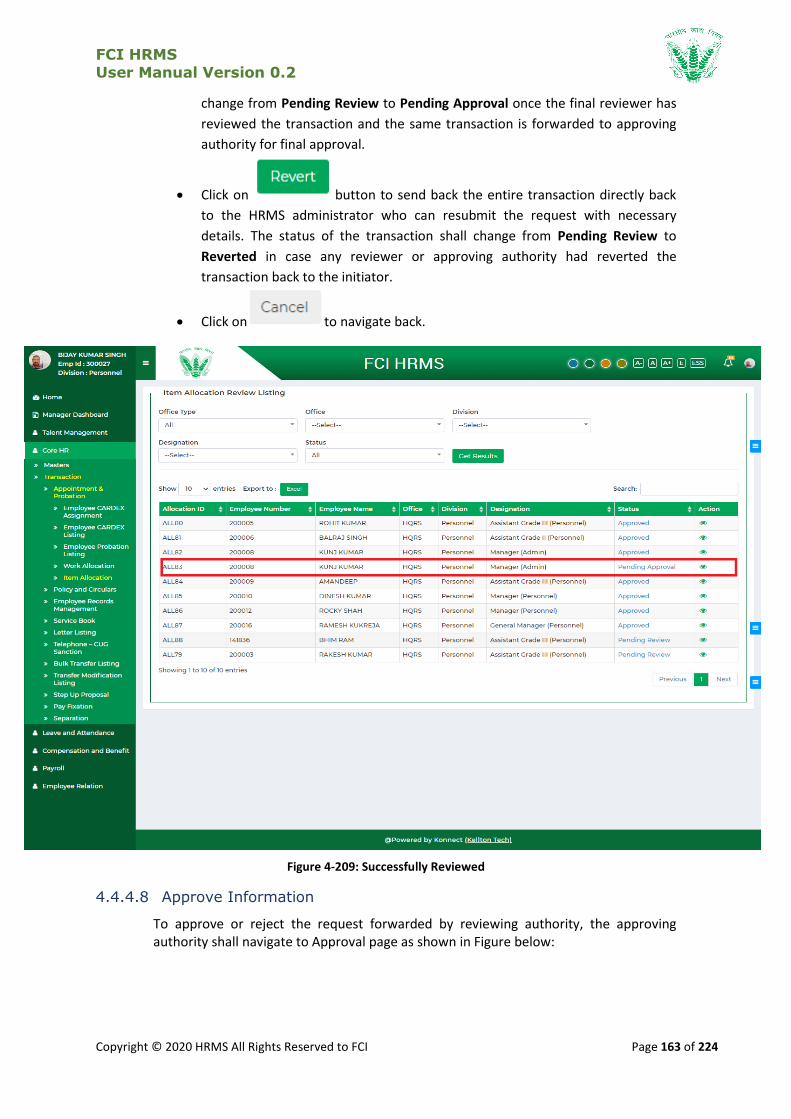
FCI HRMS
User Manual Version 0.2
Copyright © 2020 HRMS All Rights Reserved to FCI Page 163 of 224
change from Pending Review to Pending Approval once the final reviewer has
reviewed the transaction and the same transaction is forwarded to approving
authority for final approval.
Click on button to send back the entire transaction directly back
to the HRMS administrator who can resubmit the request with necessary
details. The status of the transaction shall change from Pending Review to
Reverted in case any reviewer or approving authority had reverted the
transaction back to the initiator.
Click on to navigate back.
Figure 4-209: Successfully Reviewed
4.4.4.8 Approve Information
To approve or reject the request forwarded by reviewing authority, the approving authority shall navigate to Approval page as shown in Figure below:
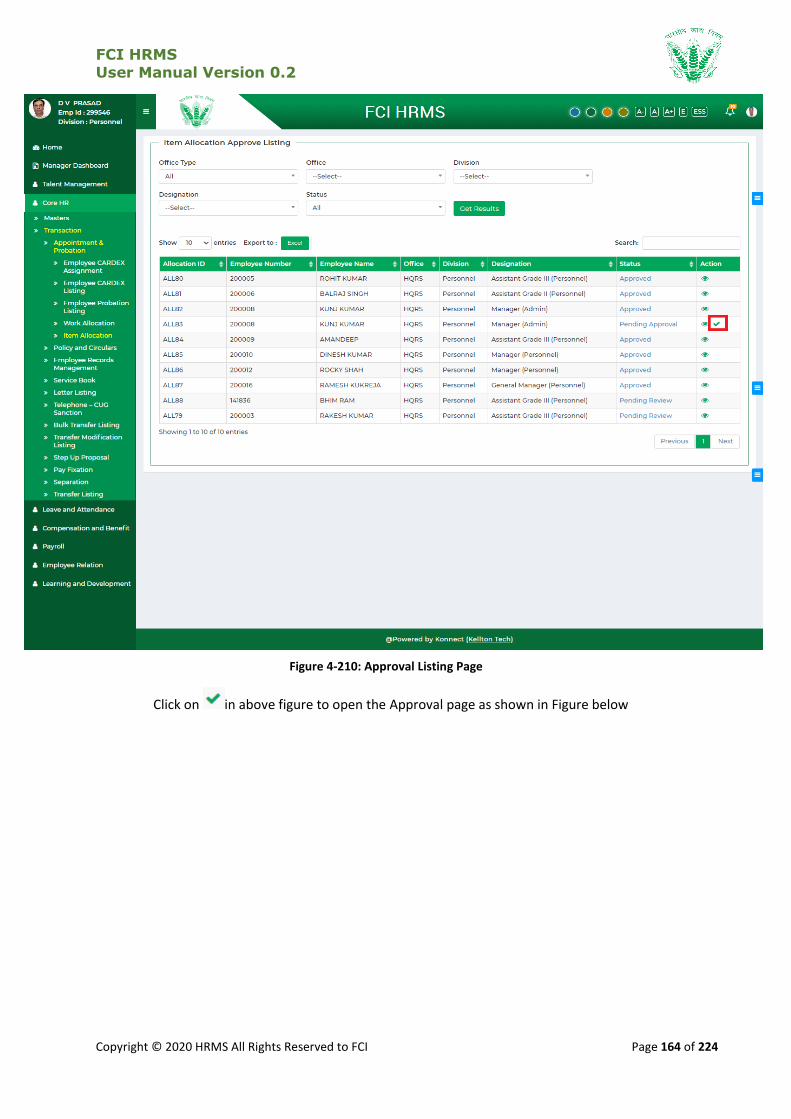
FCI HRMS
User Manual Version 0.2
Copyright © 2020 HRMS All Rights Reserved to FCI Page 164 of 224
Figure 4-210: Approval Listing Page
Click on in above figure to open the Approval page as shown in Figure below
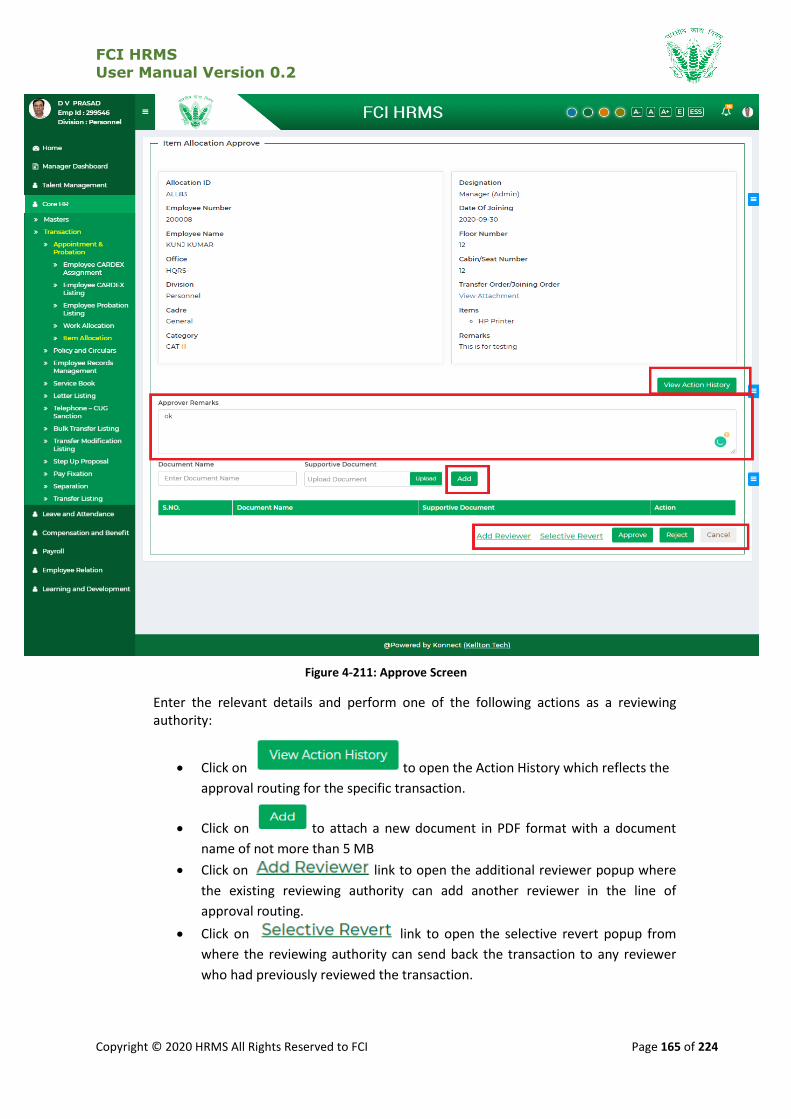
FCI HRMS
User Manual Version 0.2
Copyright © 2020 HRMS All Rights Reserved to FCI Page 165 of 224
Figure 4-211: Approve Screen
Enter the relevant details and perform one of the following actions as a reviewing authority:
Click on to open the Action History which reflects the
approval routing for the specific transaction.
Click on to attach a new document in PDF format with a document
name of not more than 5 MB
Click on link to open the additional reviewer popup where
the existing reviewing authority can add another reviewer in the line of
approval routing.
Click on link to open the selective revert popup from
where the reviewing authority can send back the transaction to any reviewer
who had previously reviewed the transaction.

FCI HRMS
User Manual Version 0.2
Copyright © 2020 HRMS All Rights Reserved to FCI Page 166 of 224
Click on to give approval on the transaction and On Approval
Landing Page status of the transaction changes from Pending Approval to
Approved as shown in Figure below.
Click on to give a rejection on the transaction and the HRMS
administrator won’t be able to resubmit the same transaction with updates. On
Approval Landing Page status of the transaction changes from Pending
Approval to Rejected.
Click on to navigate back to Approval Listing Page.
Figure 4-212: Successfully Approved

FCI HRMS
User Manual Version 0.2
Copyright © 2020 HRMS All Rights Reserved to FCI Page 167 of 224
4.4.5 Employee Probation Listing
This process is change status of Employee who are on probation.
4.4.5.1 Navigation
Left Navigation: Core HR >> Transaction >> Appointment & Probation >> Employee Probation Listing
4.4.5.2 SLA
2 Days
4.4.5.3 Landing Page
HRMS administrator shall traverse the navigation as mentioned in Section above to reach the Landing Page as shown in Figure below:
Figure 4-213: Landing Page
HRMS administrator shall be able to perform the following activities from the landing page:
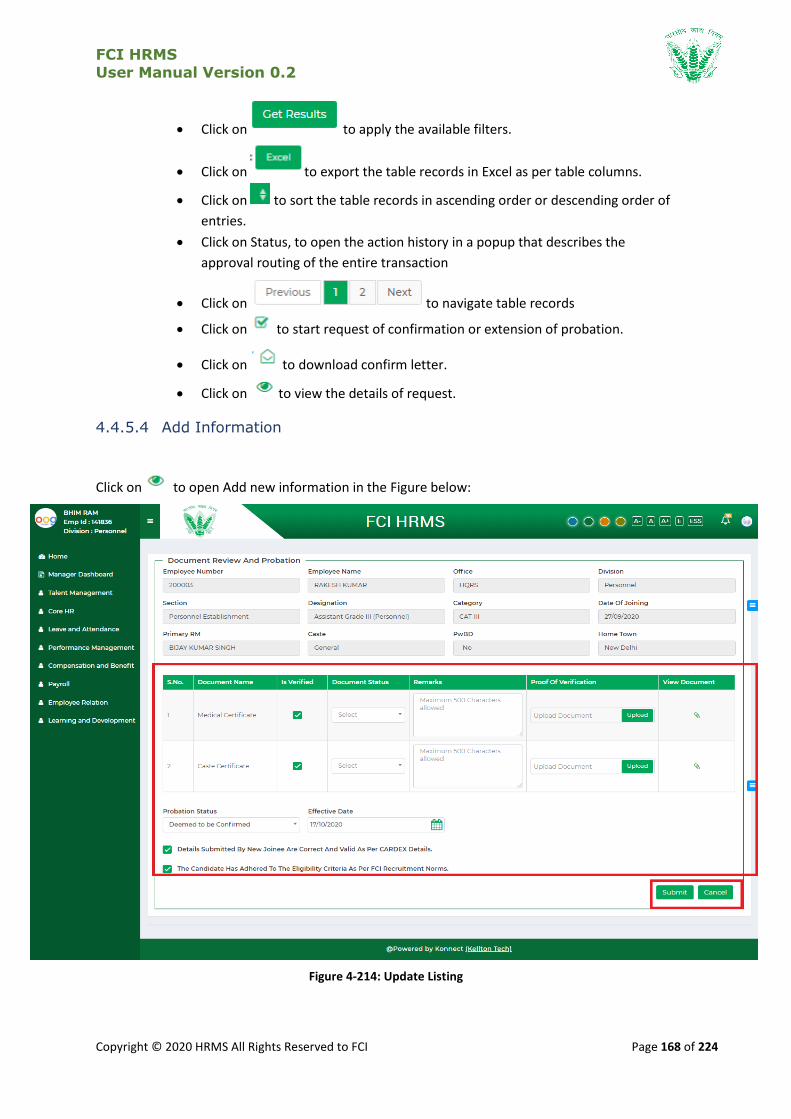
FCI HRMS
User Manual Version 0.2
Copyright © 2020 HRMS All Rights Reserved to FCI Page 168 of 224
Click on to apply the available filters.
Click on to export the table records in Excel as per table columns.
Click on to sort the table records in ascending order or descending order of
entries.
Click on Status, to open the action history in a popup that describes the
approval routing of the entire transaction
Click on to navigate table records
Click on to start request of confirmation or extension of probation.
Click on to download confirm letter.
Click on to view the details of request.
4.4.5.4 Add Information
Click on to open Add new information in the Figure below:
Figure 4-214: Update Listing
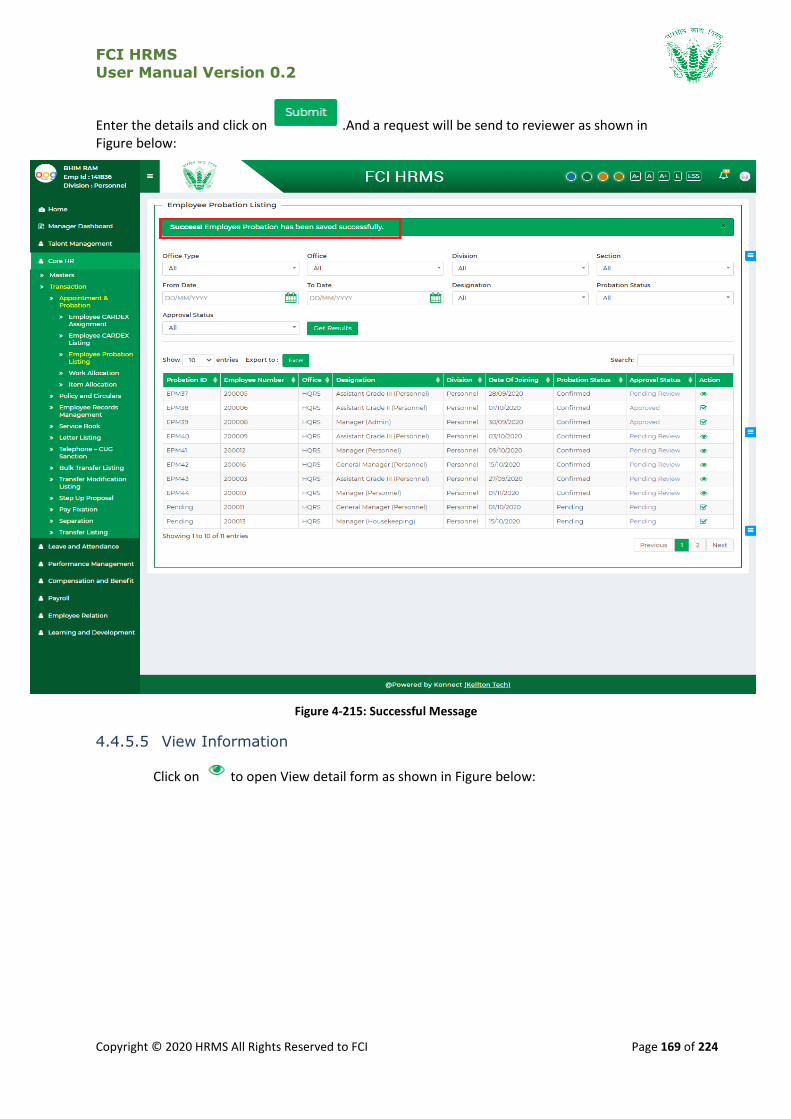
FCI HRMS
User Manual Version 0.2
Copyright © 2020 HRMS All Rights Reserved to FCI Page 169 of 224
Enter the details and click on .And a request will be send to reviewer as shown in Figure below:
Figure 4-215: Successful Message
4.4.5.5 View Information
Click on to open View detail form as shown in Figure below:
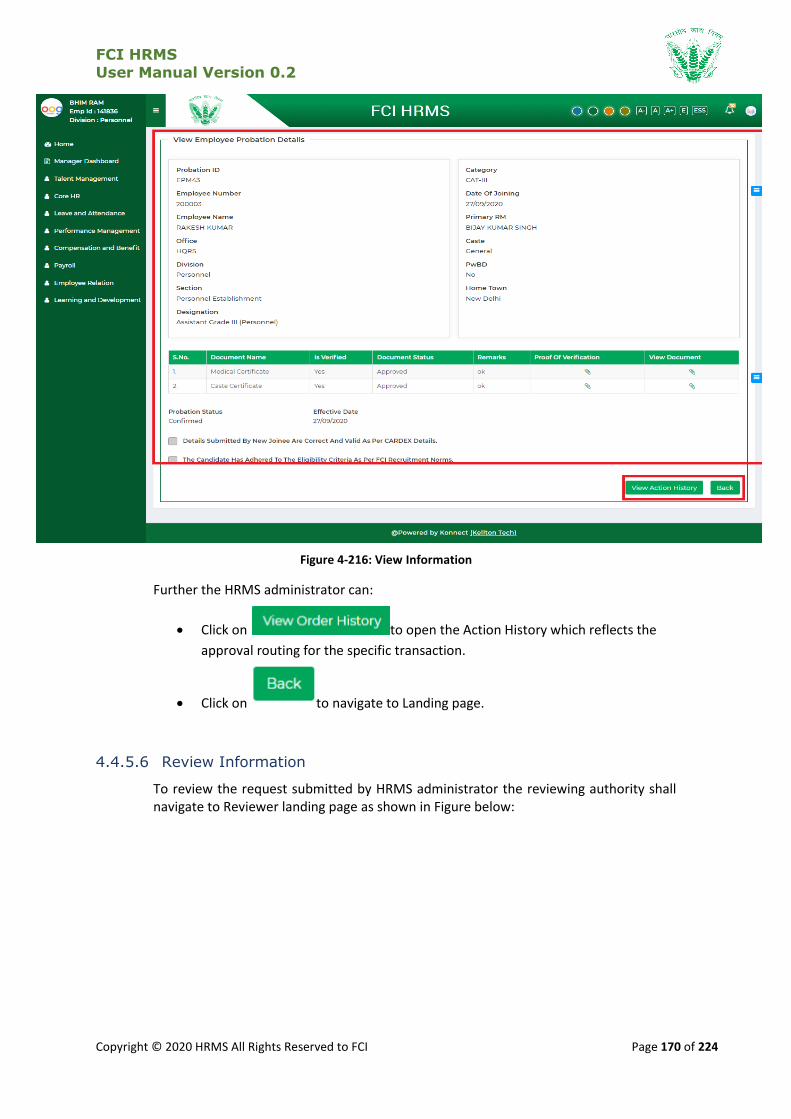
FCI HRMS
User Manual Version 0.2
Copyright © 2020 HRMS All Rights Reserved to FCI Page 170 of 224
Figure 4-216: View Information
Further the HRMS administrator can:
Click on to open the Action History which reflects the
approval routing for the specific transaction.
Click on to navigate to Landing page.
4.4.5.6 Review Information
To review the request submitted by HRMS administrator the reviewing authority shall navigate to Reviewer landing page as shown in Figure below:

FCI HRMS
User Manual Version 0.2
Copyright © 2020 HRMS All Rights Reserved to FCI Page 171 of 224
Figure 4-217: Reviewer Landing Page
Click on to open the Review form as shown in Figure above:
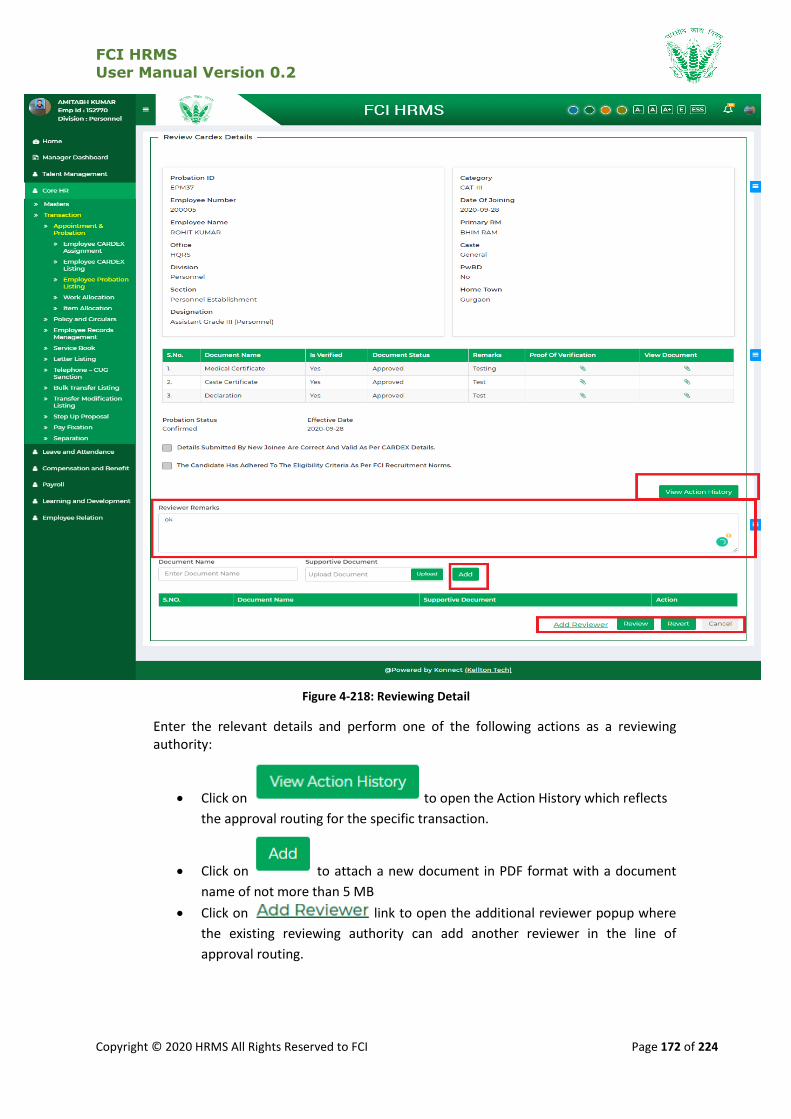
FCI HRMS
User Manual Version 0.2
Copyright © 2020 HRMS All Rights Reserved to FCI Page 172 of 224
Figure 4-218: Reviewing Detail
Enter the relevant details and perform one of the following actions as a reviewing authority:
Click on to open the Action History which reflects
the approval routing for the specific transaction.
Click on to attach a new document in PDF format with a document
name of not more than 5 MB
Click on link to open the additional reviewer popup where
the existing reviewing authority can add another reviewer in the line of
approval routing.

FCI HRMS
User Manual Version 0.2
Copyright © 2020 HRMS All Rights Reserved to FCI Page 173 of 224
Click on button to submit the review with details such that the
transaction is forwarded to the next reviewer in the reviewing authority or to
the approving authority after final review. The status of the transaction shall
change from Pending Review to Pending Approval once the final reviewer has
reviewed the transaction and the same transaction is forwarded to approving
authority for final approval.
Click on button to send back the entire transaction directly back
to the HRMS administrator who can resubmit the request with necessary
details. The status of the transaction shall change from Pending Review to
Reverted in case any reviewer or approving authority had reverted the
transaction back to the initiator.
Click on to navigate back.
Figure 4-219: Successfully Reviewed
4.4.5.7 Approve Information
To approve or reject the request forwarded by reviewing authority, the approving authority shall navigate to Approval page as shown in Figure below:
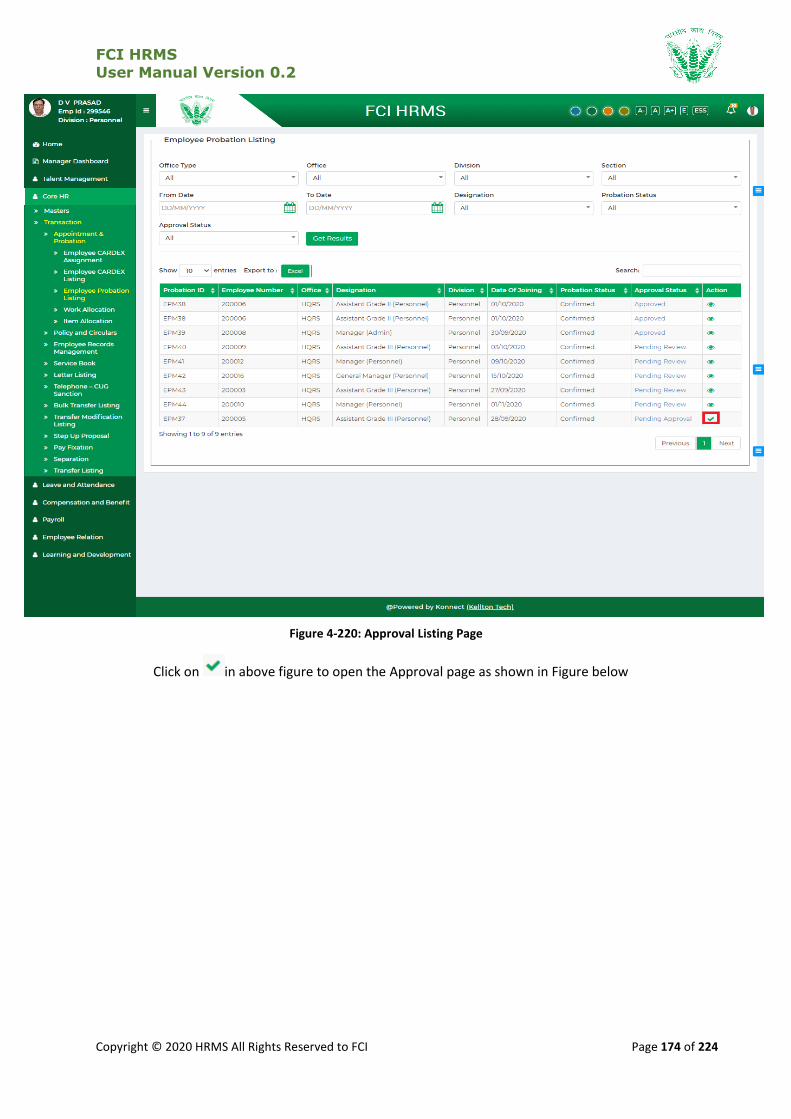
FCI HRMS
User Manual Version 0.2
Copyright © 2020 HRMS All Rights Reserved to FCI Page 174 of 224
Figure 4-220: Approval Listing Page
Click on in above figure to open the Approval page as shown in Figure below
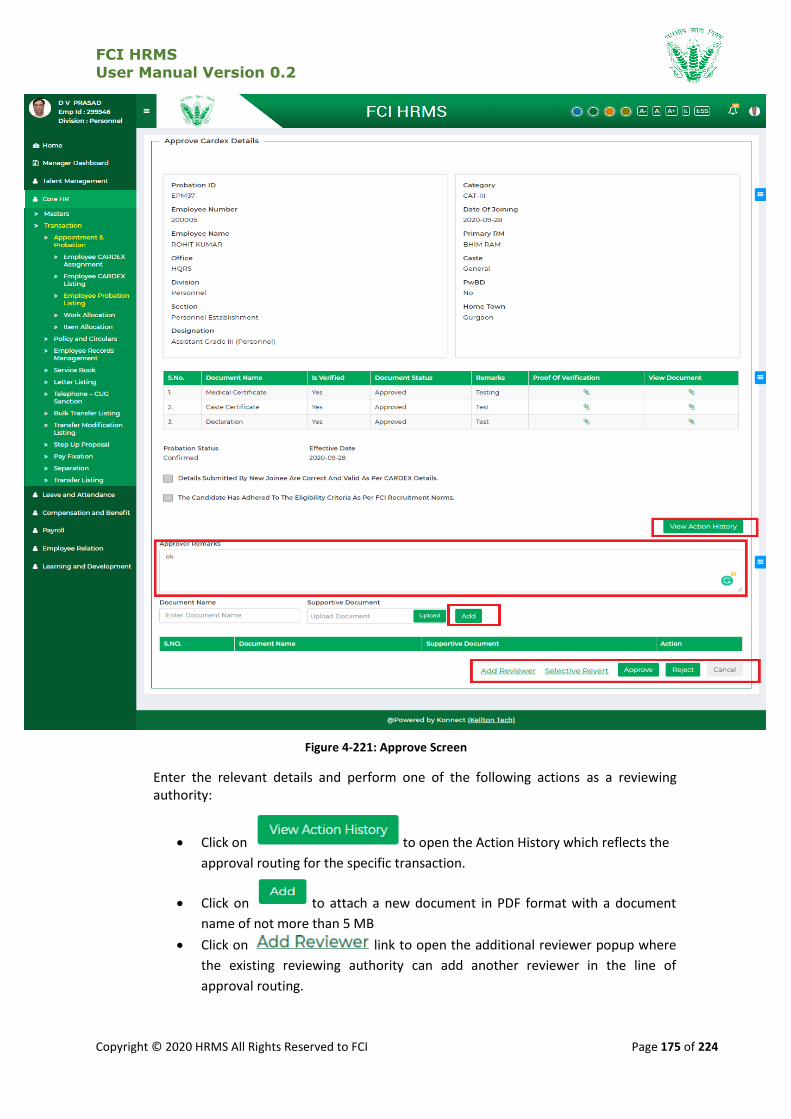
FCI HRMS
User Manual Version 0.2
Copyright © 2020 HRMS All Rights Reserved to FCI Page 175 of 224
Figure 4-221: Approve Screen
Enter the relevant details and perform one of the following actions as a reviewing authority:
Click on to open the Action History which reflects the
approval routing for the specific transaction.
Click on to attach a new document in PDF format with a document
name of not more than 5 MB
Click on link to open the additional reviewer popup where
the existing reviewing authority can add another reviewer in the line of
approval routing.
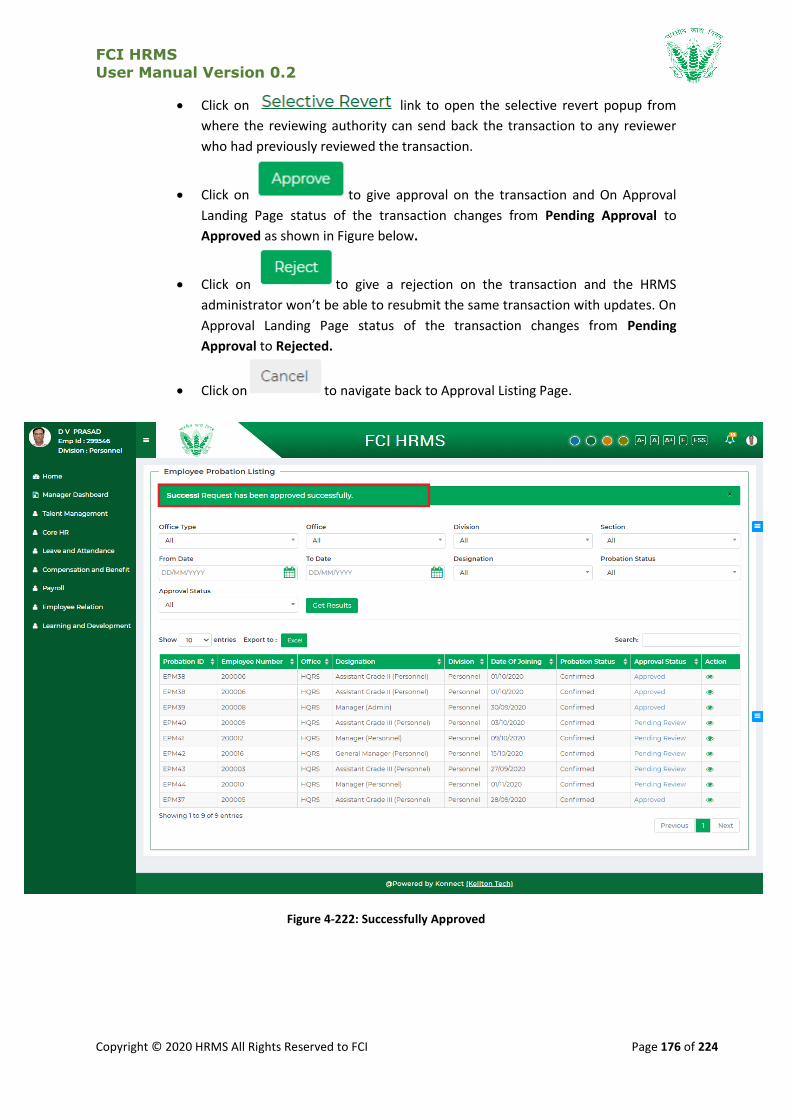
FCI HRMS
User Manual Version 0.2
Copyright © 2020 HRMS All Rights Reserved to FCI Page 176 of 224
Click on link to open the selective revert popup from
where the reviewing authority can send back the transaction to any reviewer
who had previously reviewed the transaction.
Click on to give approval on the transaction and On Approval
Landing Page status of the transaction changes from Pending Approval to
Approved as shown in Figure below.
Click on to give a rejection on the transaction and the HRMS
administrator won’t be able to resubmit the same transaction with updates. On
Approval Landing Page status of the transaction changes from Pending
Approval to Rejected.
Click on to navigate back to Approval Listing Page.
Figure 4-222: Successfully Approved
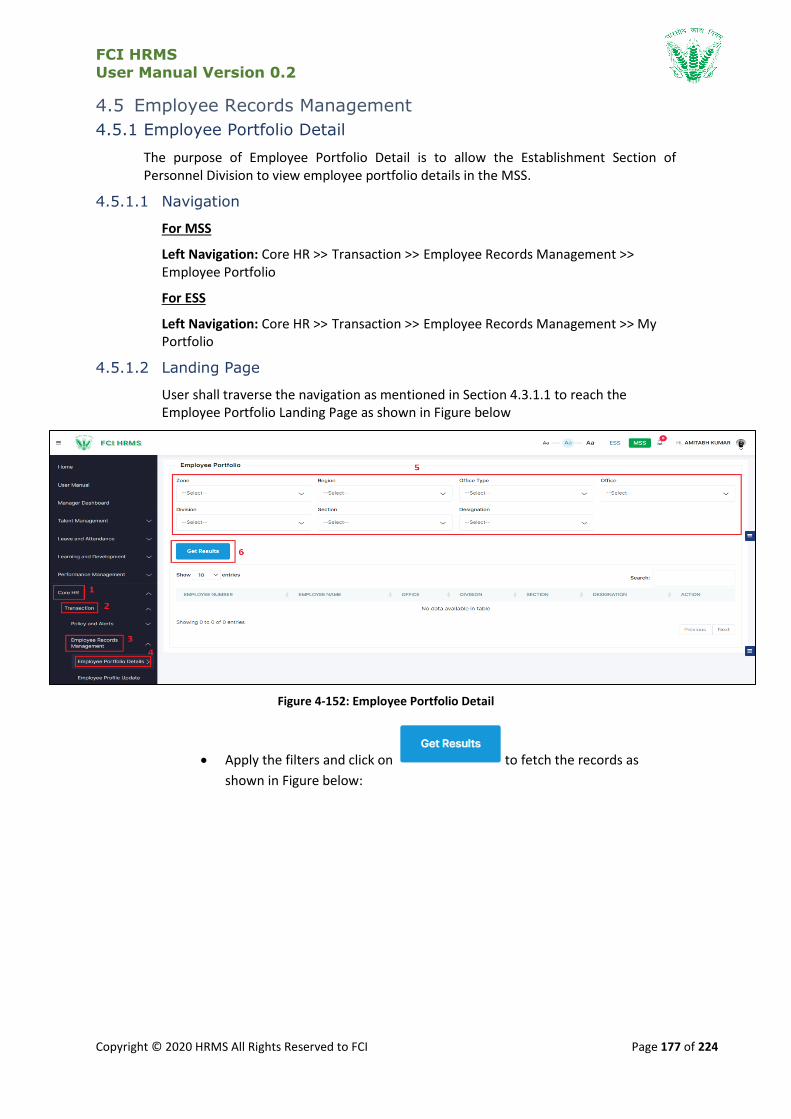
FCI HRMS
User Manual Version 0.2
Copyright © 2020 HRMS All Rights Reserved to FCI Page 177 of 224
4.5 Employee Records Management
4.5.1 Employee Portfolio Detail
The purpose of Employee Portfolio Detail is to allow the Establishment Section of Personnel Division to view employee portfolio details in the MSS.
4.5.1.1 Navigation
For MSS
Left Navigation: Core HR >> Transaction >> Employee Records Management >> Employee Portfolio
For ESS
Left Navigation: Core HR >> Transaction >> Employee Records Management >> My Portfolio
4.5.1.2 Landing Page
User shall traverse the navigation as mentioned in Section 4.3.1.1 to reach the Employee Portfolio Landing Page as shown in Figure below
Figure 4-152: Employee Portfolio Detail
Apply the filters and click on to fetch the records as
shown in Figure below:
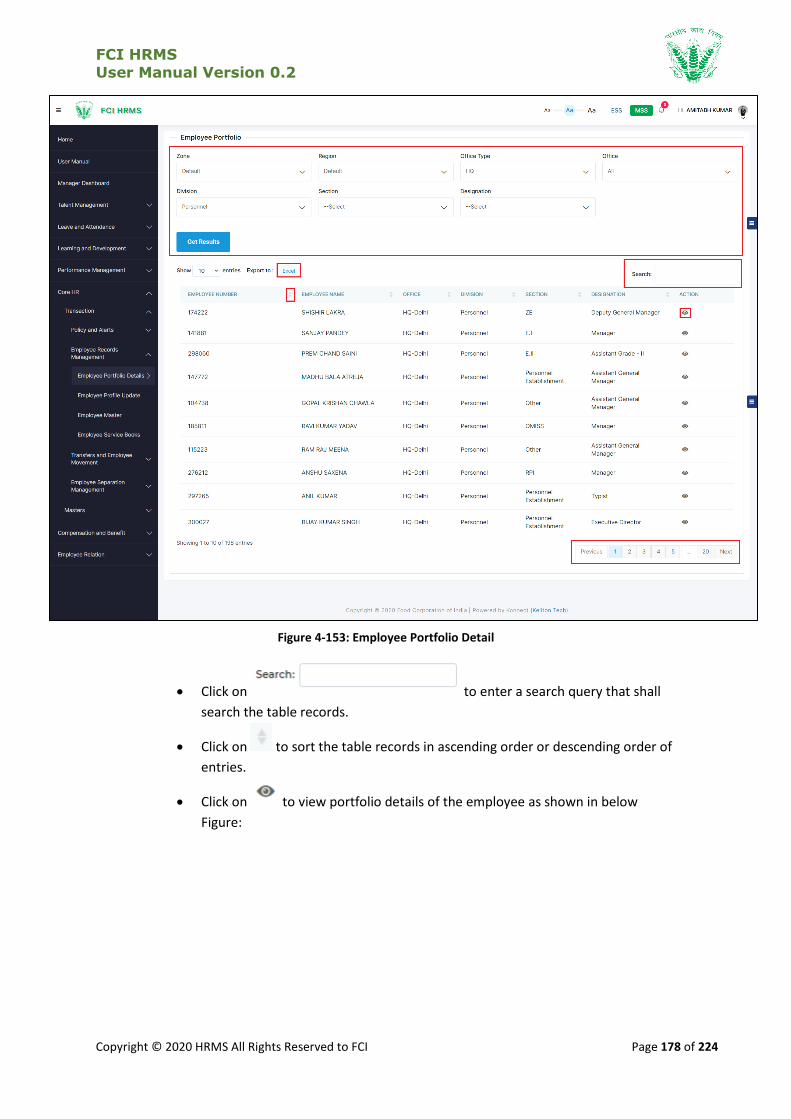
FCI HRMS
User Manual Version 0.2
Copyright © 2020 HRMS All Rights Reserved to FCI Page 178 of 224
Figure 4-153: Employee Portfolio Detail
Click on to enter a search query that shall
search the table records.
Click on to sort the table records in ascending order or descending order of
entries.
Click on to view portfolio details of the employee as shown in below
Figure:

FCI HRMS
User Manual Version 0.2
Copyright © 2020 HRMS All Rights Reserved to FCI Page 179 of 224
Figure 4-154: Employee Portfolio Report
4.5.2 Employee Profile Edit
4.6 HR Letters
4.6.1 Ad-hoc Letter Listing
When organization has to suddenly issue an order it can be done using this function in HRMS.
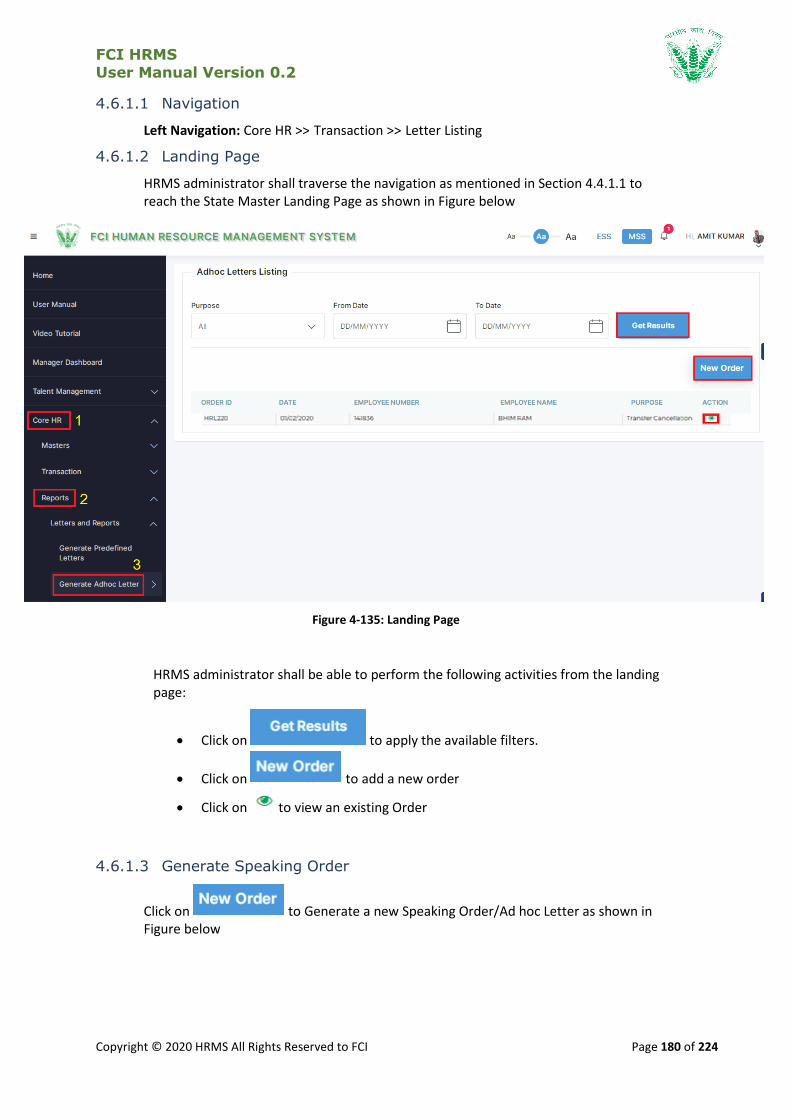
FCI HRMS
User Manual Version 0.2
Copyright © 2020 HRMS All Rights Reserved to FCI Page 180 of 224
4.6.1.1 Navigation
Left Navigation: Core HR >> Transaction >> Letter Listing
4.6.1.2 Landing Page
HRMS administrator shall traverse the navigation as mentioned in Section 4.4.1.1 to reach the State Master Landing Page as shown in Figure below
Figure 4-135: Landing Page
HRMS administrator shall be able to perform the following activities from the landing page:
Click on to apply the available filters.
Click on to add a new order
Click on to view an existing Order
4.6.1.3 Generate Speaking Order
Click on to Generate a new Speaking Order/Ad hoc Letter as shown in Figure below

FCI HRMS
User Manual Version 0.2
Copyright © 2020 HRMS All Rights Reserved to FCI Page 181 of 224
Figure 4-136: Generate new Order/Letter
Enter the details and click on such that a success message will be shown in Landing Page with addition of a new record in the table as shown in Figure below
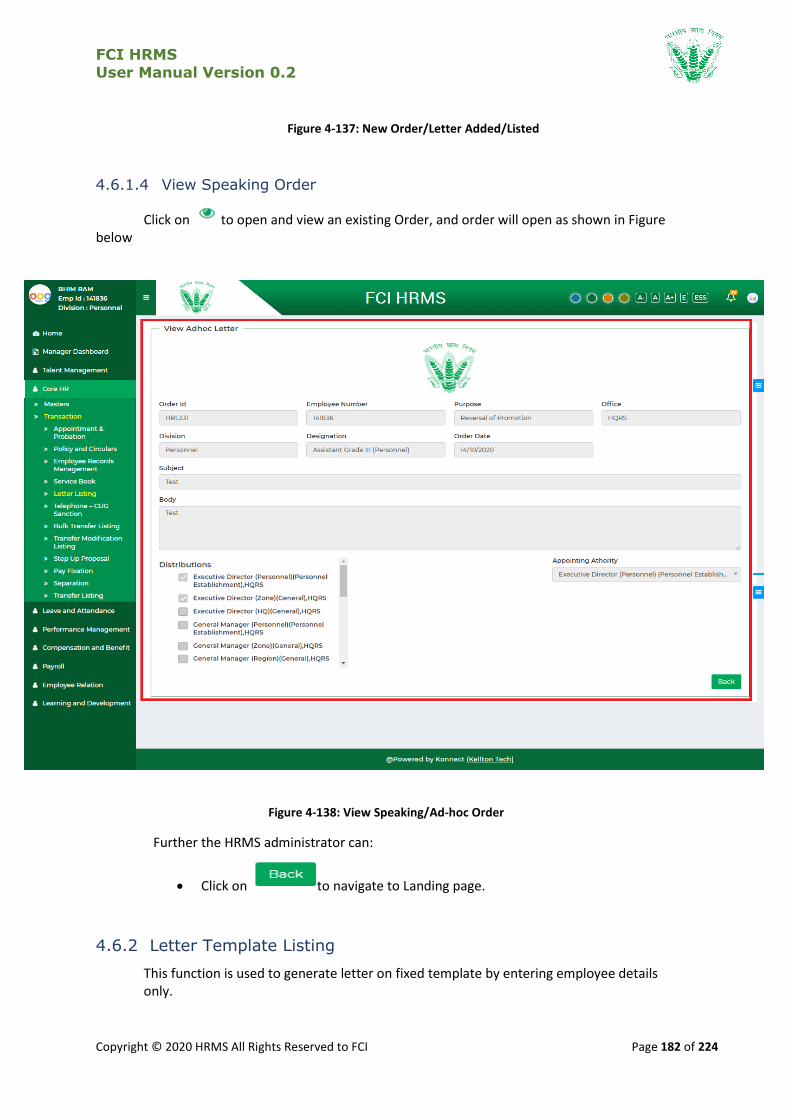
FCI HRMS
User Manual Version 0.2
Copyright © 2020 HRMS All Rights Reserved to FCI Page 182 of 224
Figure 4-137: New Order/Letter Added/Listed
4.6.1.4 View Speaking Order
Click on to open and view an existing Order, and order will open as shown in Figure below
Figure 4-138: View Speaking/Ad-hoc Order
Further the HRMS administrator can:
Click on to navigate to Landing page.
4.6.2 Letter Template Listing
This function is used to generate letter on fixed template by entering employee details only.

FCI HRMS
User Manual Version 0.2
Copyright © 2020 HRMS All Rights Reserved to FCI Page 183 of 224
4.6.2.1 Navigation
Left Navigation: Core HR >>Masters >> User Management >> Letter Template Master
4.6.2.2 Landing Page
HRMS administrator shall traverse the navigation as mentioned in Section 4.4.2.1 to reach the State Master Landing Page as shown in Figure below
Figure 4-139: Landing Page
HRMS administrator shall be able to perform the following activities from the landing page:
Click on to apply the available filters.
Click on to export the table records in Excel as per
table columns.
Click on to generate a new order.
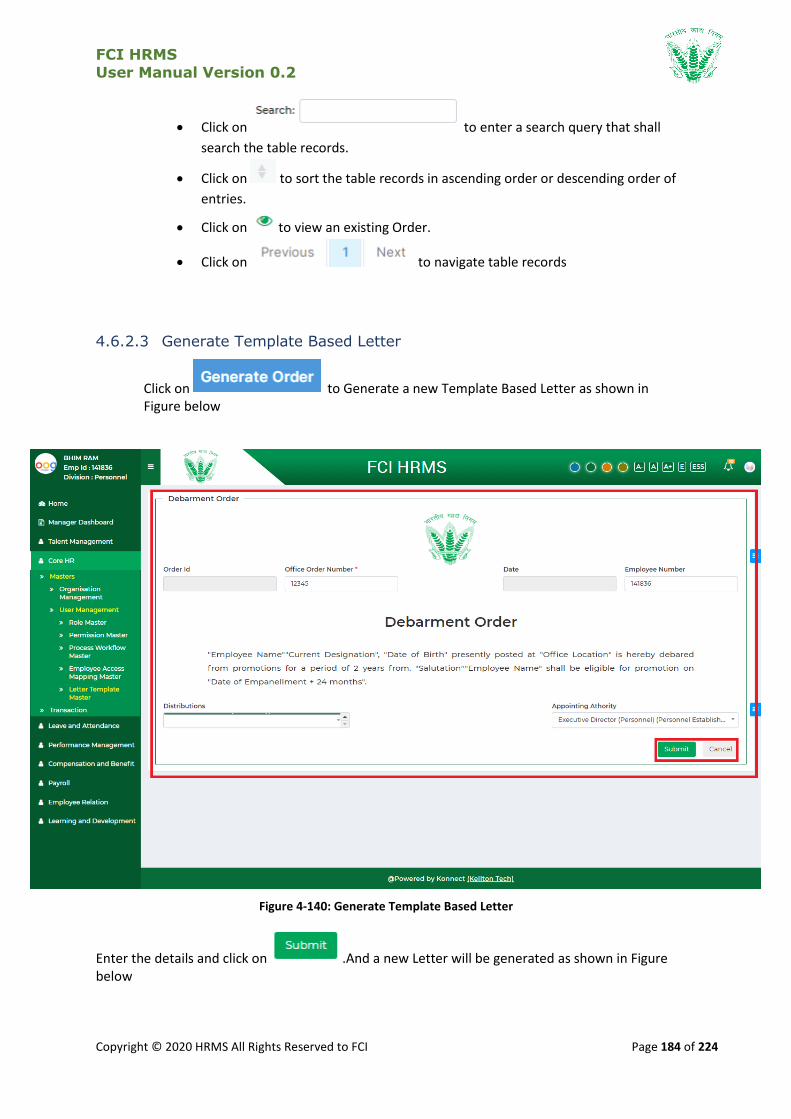
FCI HRMS
User Manual Version 0.2
Copyright © 2020 HRMS All Rights Reserved to FCI Page 184 of 224
Click on to enter a search query that shall
search the table records.
Click on to sort the table records in ascending order or descending order of
entries.
Click on to view an existing Order.
Click on to navigate table records
4.6.2.3 Generate Template Based Letter
Click on to Generate a new Template Based Letter as shown in Figure below
Figure 4-140: Generate Template Based Letter
Enter the details and click on .And a new Letter will be generated as shown in Figure below

FCI HRMS
User Manual Version 0.2
Copyright © 2020 HRMS All Rights Reserved to FCI Page 185 of 224
Figure 4-141: New Letter Generated
4.6.2.4 View Template Based Letter
Click on to open and view an existing Order, and order will open as shown in Figure below
Figure 4-142: View Order
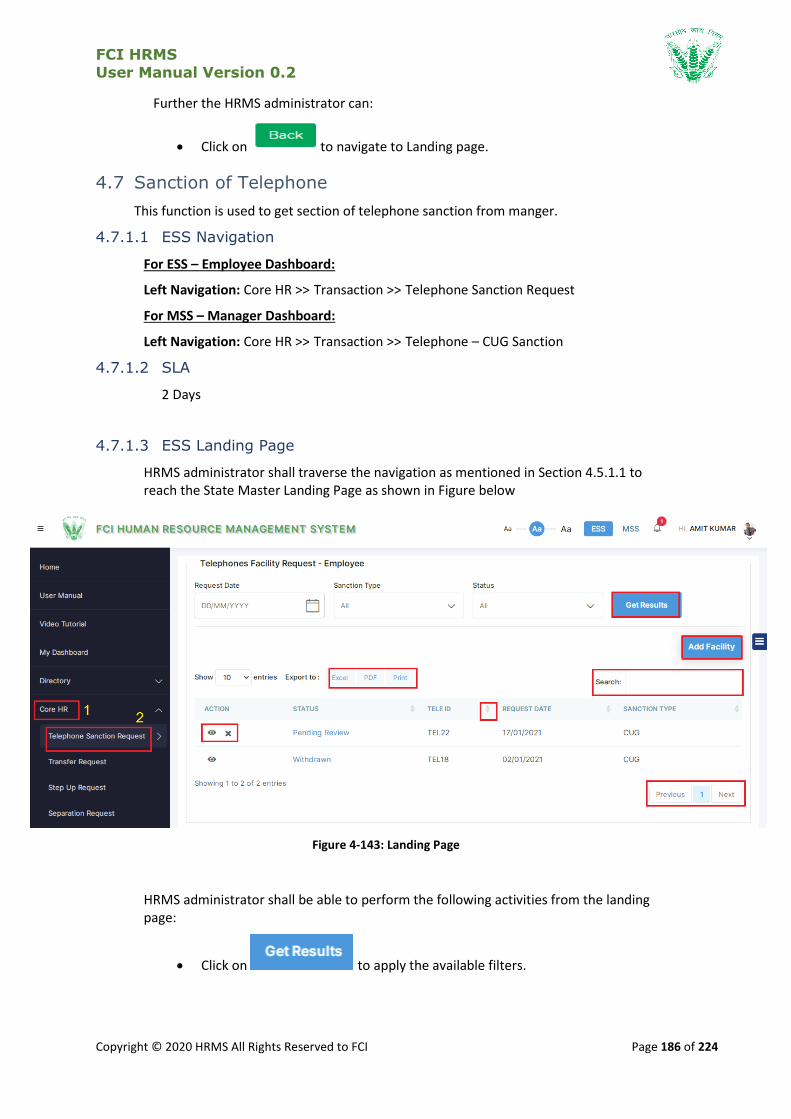
FCI HRMS
User Manual Version 0.2
Copyright © 2020 HRMS All Rights Reserved to FCI Page 186 of 224
Further the HRMS administrator can:
Click on to navigate to Landing page.
4.7 Sanction of Telephone
This function is used to get section of telephone sanction from manger.
4.7.1.1 ESS Navigation
For ESS – Employee Dashboard:
Left Navigation: Core HR >> Transaction >> Telephone Sanction Request
For MSS – Manager Dashboard:
Left Navigation: Core HR >> Transaction >> Telephone – CUG Sanction
4.7.1.2 SLA
2 Days
4.7.1.3 ESS Landing Page
HRMS administrator shall traverse the navigation as mentioned in Section 4.5.1.1 to reach the State Master Landing Page as shown in Figure below
Figure 4-143: Landing Page
HRMS administrator shall be able to perform the following activities from the landing page:
Click on to apply the available filters.
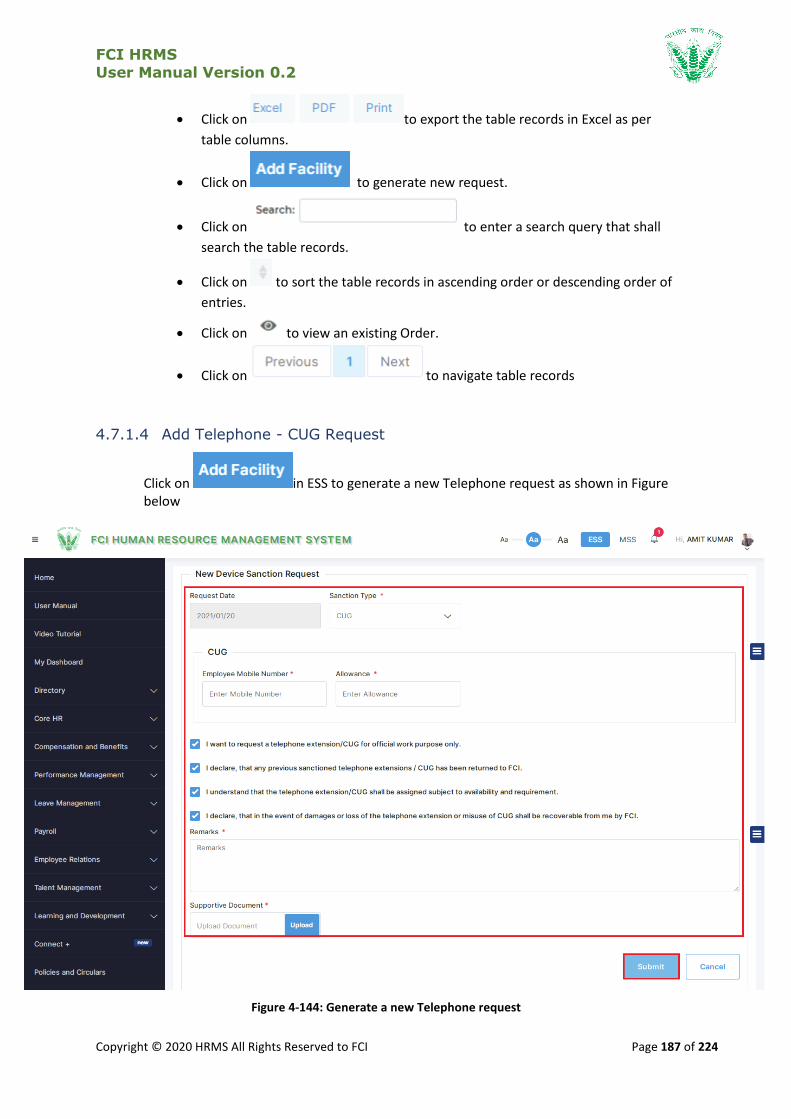
FCI HRMS
User Manual Version 0.2
Copyright © 2020 HRMS All Rights Reserved to FCI Page 187 of 224
Click on to export the table records in Excel as per
table columns.
Click on to generate new request.
Click on to enter a search query that shall
search the table records.
Click on to sort the table records in ascending order or descending order of
entries.
Click on to view an existing Order.
Click on to navigate table records
4.7.1.4 Add Telephone - CUG Request
Click on in ESS to generate a new Telephone request as shown in Figure below
Figure 4-144: Generate a new Telephone request

FCI HRMS
User Manual Version 0.2
Copyright © 2020 HRMS All Rights Reserved to FCI Page 188 of 224
Enter the details and click on .And a new request will be generated and added into ESS landing page with success message as shown in Figure below
Figure 4-145: New Request generated successfully
4.7.1.5 View Telephone - CUG Request
In ESS:
In ESS- Dashboard landing page of “Telephone Sanction Request” Employee can view request Raised by Him/her as shown in Figure 4-143.
Click on to View detail of request as shown in Figure below:
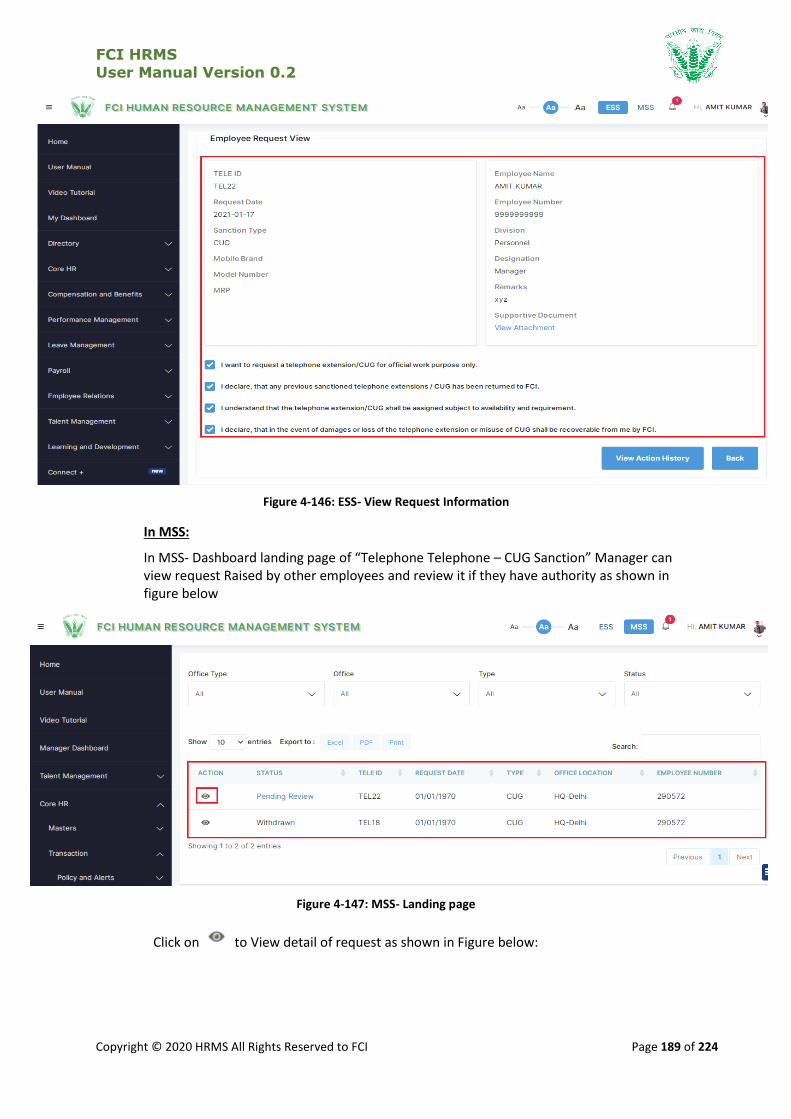
FCI HRMS
User Manual Version 0.2
Copyright © 2020 HRMS All Rights Reserved to FCI Page 189 of 224
Figure 4-146: ESS- View Request Information
In MSS:
In MSS- Dashboard landing page of “Telephone Telephone – CUG Sanction” Manager can view request Raised by other employees and review it if they have authority as shown in figure below
Figure 4-147: MSS- Landing page
Click on to View detail of request as shown in Figure below:
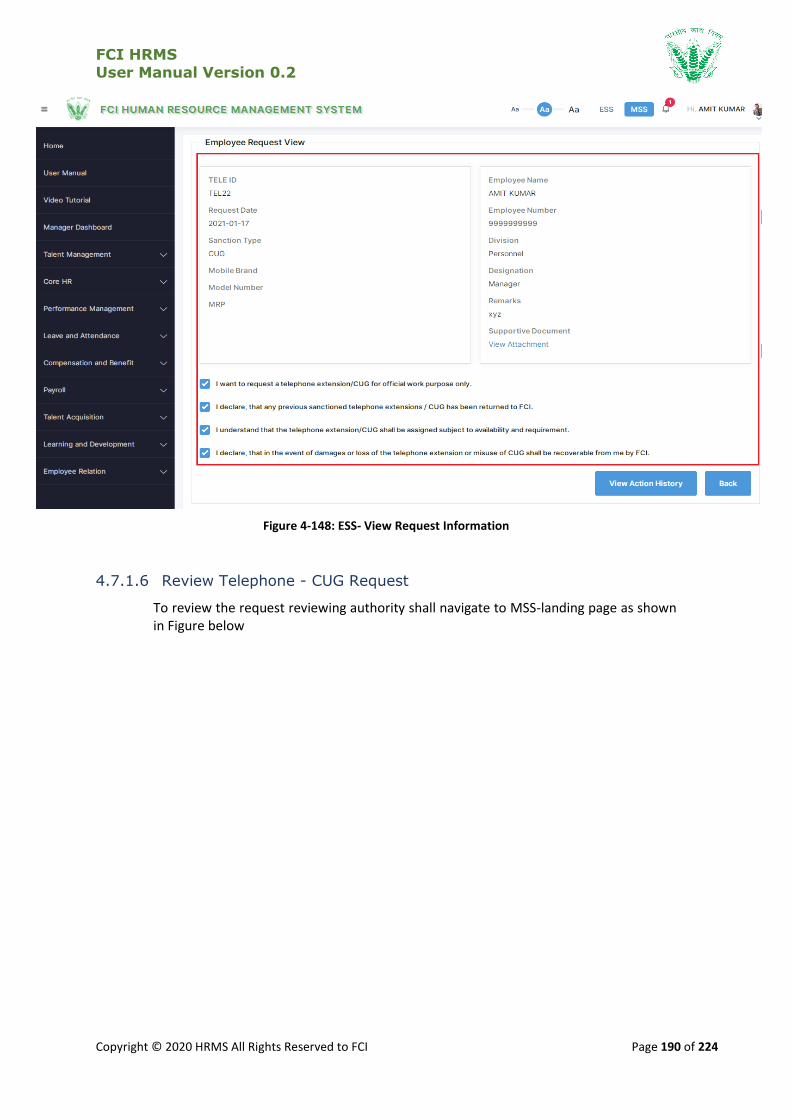
FCI HRMS
User Manual Version 0.2
Copyright © 2020 HRMS All Rights Reserved to FCI Page 190 of 224
Figure 4-148: ESS- View Request Information
4.7.1.6 Review Telephone - CUG Request
To review the request reviewing authority shall navigate to MSS-landing page as shown in Figure below
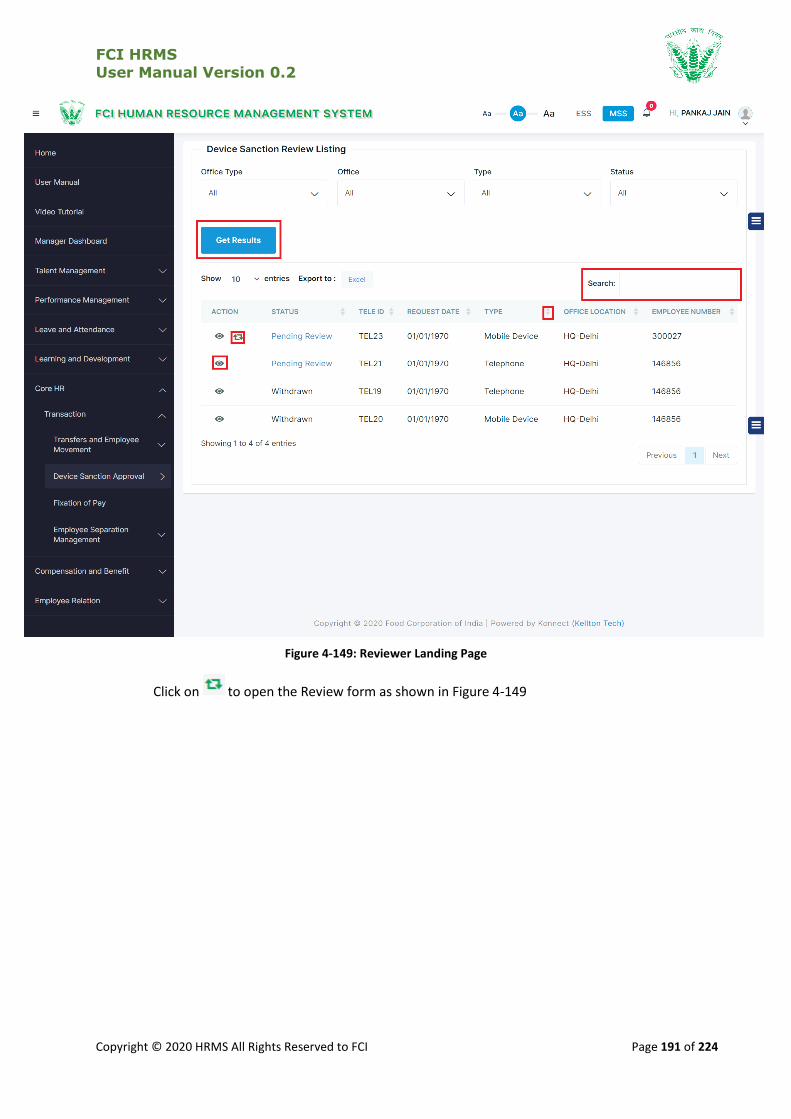
FCI HRMS
User Manual Version 0.2
Copyright © 2020 HRMS All Rights Reserved to FCI Page 191 of 224
Figure 4-149: Reviewer Landing Page
Click on to open the Review form as shown in Figure 4-149
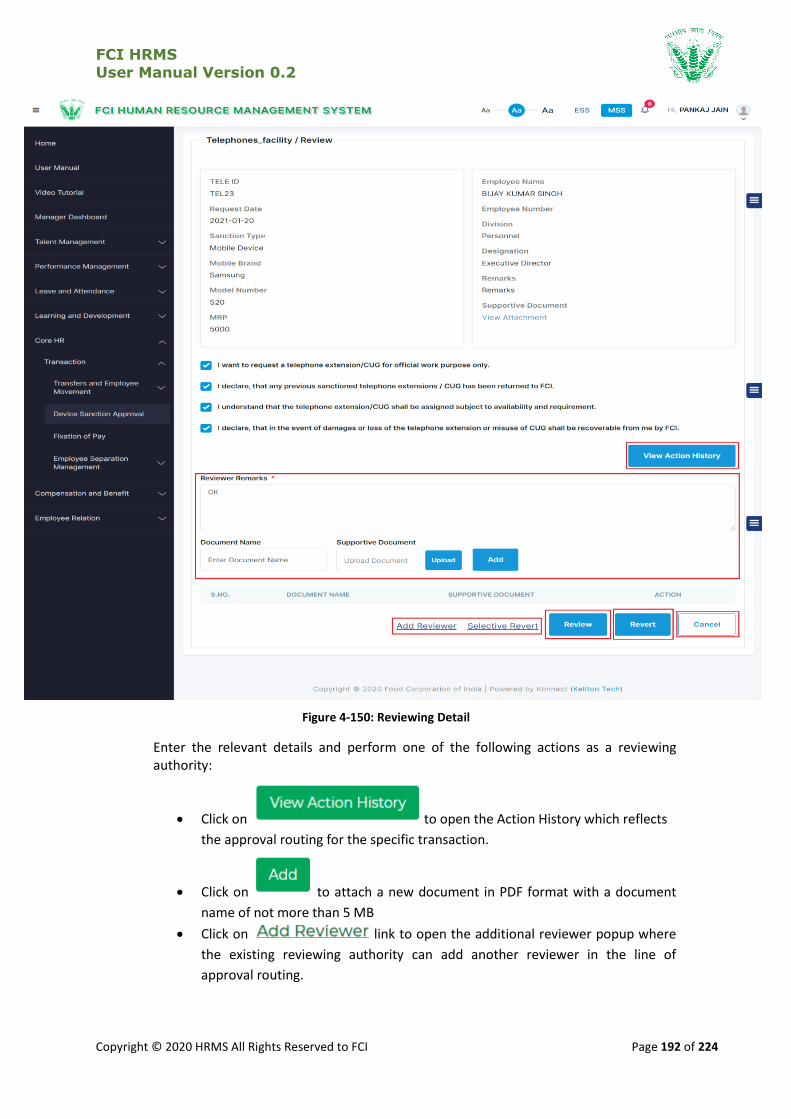
FCI HRMS
User Manual Version 0.2
Copyright © 2020 HRMS All Rights Reserved to FCI Page 192 of 224
Figure 4-150: Reviewing Detail
Enter the relevant details and perform one of the following actions as a reviewing authority:
Click on to open the Action History which reflects
the approval routing for the specific transaction.
Click on to attach a new document in PDF format with a document
name of not more than 5 MB
Click on link to open the additional reviewer popup where
the existing reviewing authority can add another reviewer in the line of
approval routing.
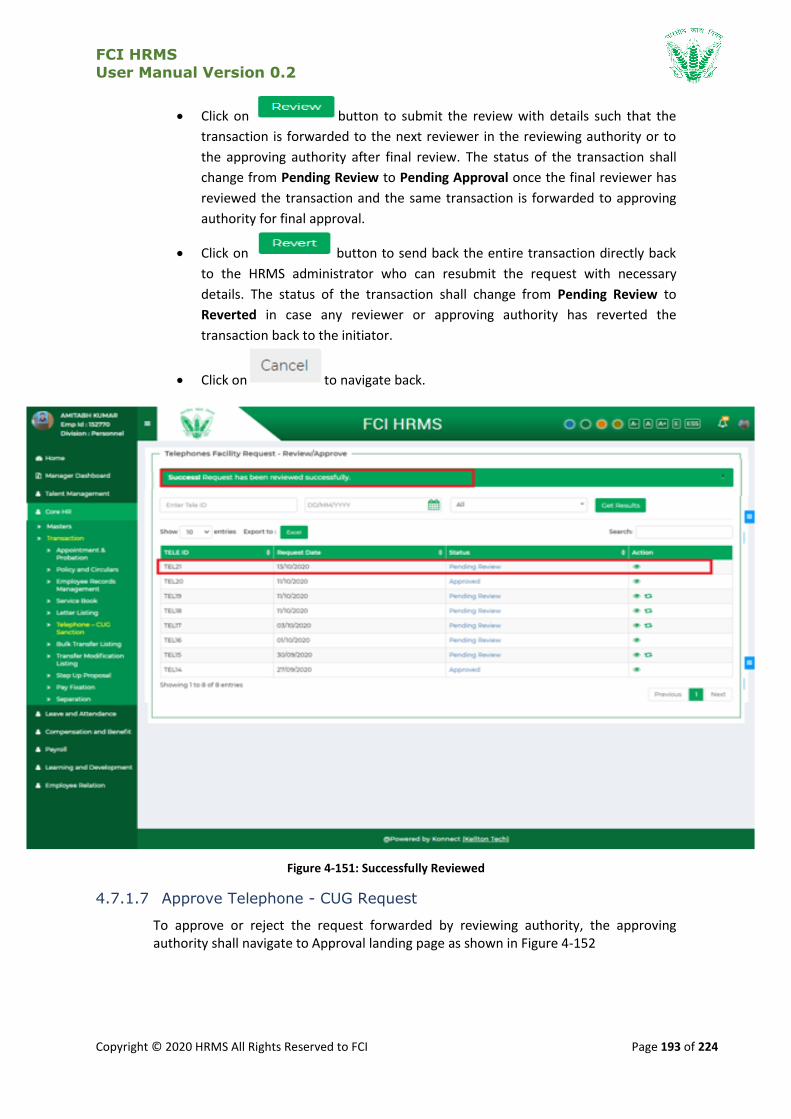
FCI HRMS
User Manual Version 0.2
Copyright © 2020 HRMS All Rights Reserved to FCI Page 193 of 224
Click on button to submit the review with details such that the
transaction is forwarded to the next reviewer in the reviewing authority or to
the approving authority after final review. The status of the transaction shall
change from Pending Review to Pending Approval once the final reviewer has
reviewed the transaction and the same transaction is forwarded to approving
authority for final approval.
Click on button to send back the entire transaction directly back
to the HRMS administrator who can resubmit the request with necessary
details. The status of the transaction shall change from Pending Review to
Reverted in case any reviewer or approving authority has reverted the
transaction back to the initiator.
Click on to navigate back.
Figure 4-151: Successfully Reviewed
4.7.1.7 Approve Telephone - CUG Request
To approve or reject the request forwarded by reviewing authority, the approving authority shall navigate to Approval landing page as shown in Figure 4-152
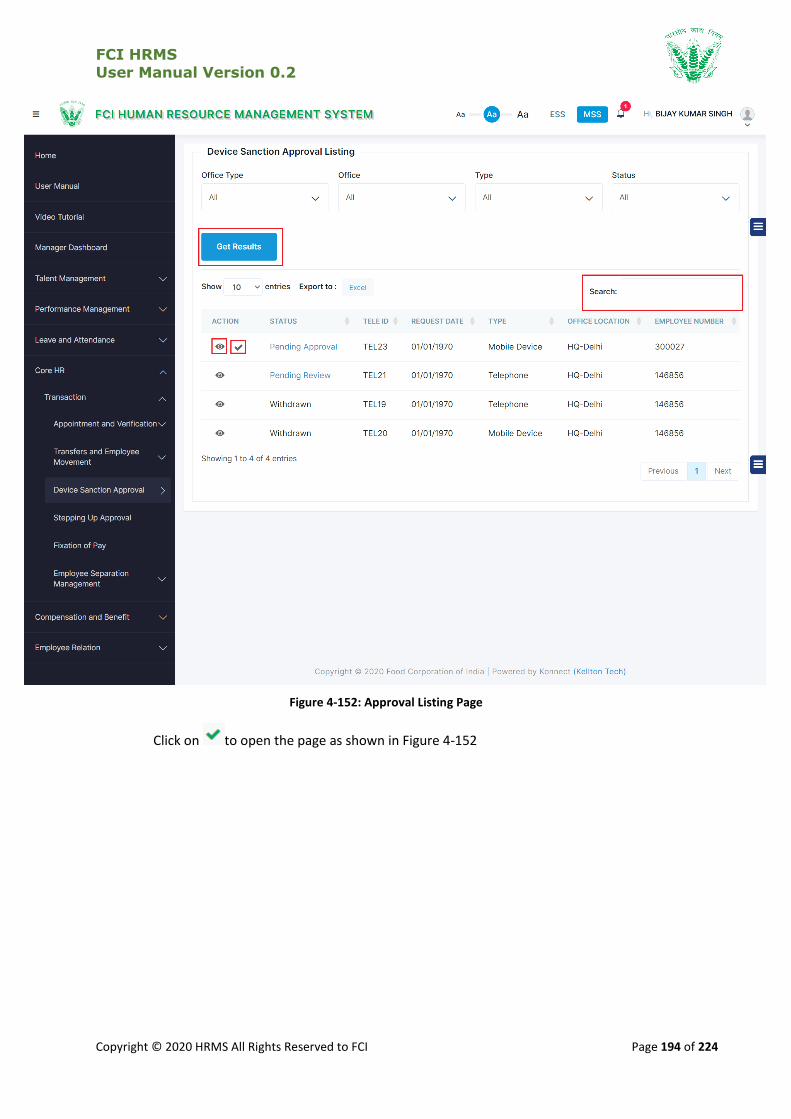
FCI HRMS
User Manual Version 0.2
Copyright © 2020 HRMS All Rights Reserved to FCI Page 194 of 224
Figure 4-152: Approval Listing Page
Click on to open the page as shown in Figure 4-152
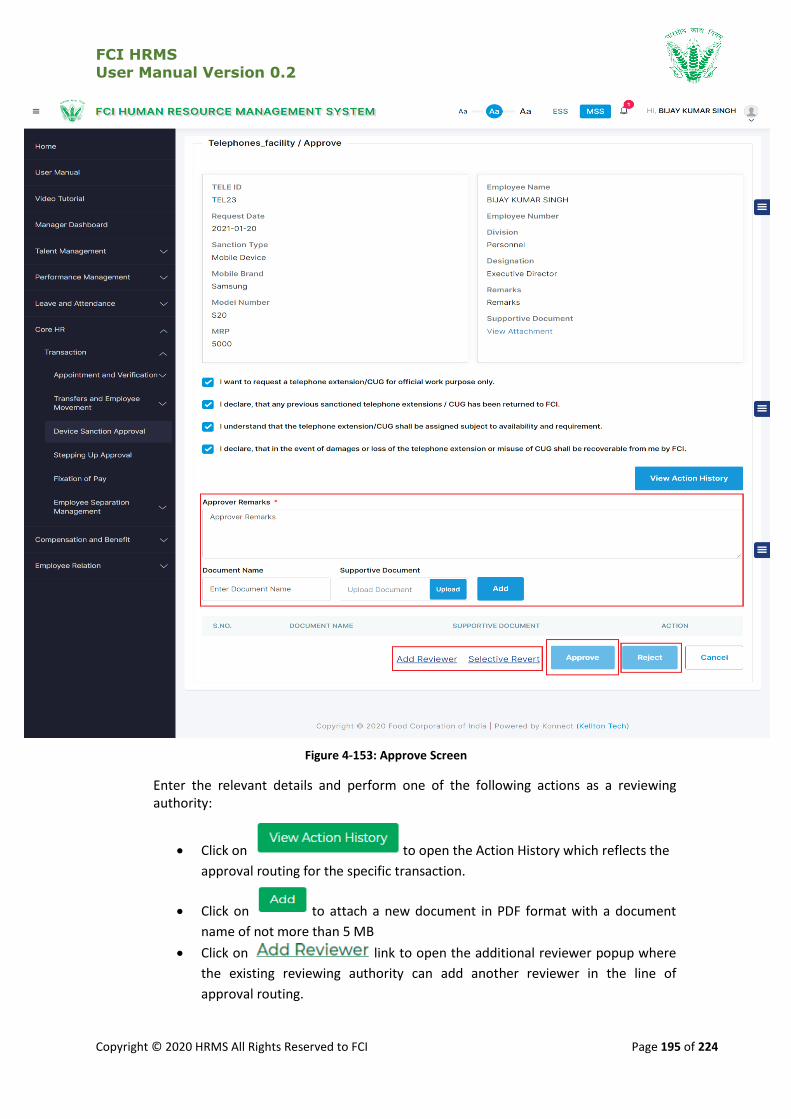
FCI HRMS
User Manual Version 0.2
Copyright © 2020 HRMS All Rights Reserved to FCI Page 195 of 224
Figure 4-153: Approve Screen
Enter the relevant details and perform one of the following actions as a reviewing authority:
Click on to open the Action History which reflects the
approval routing for the specific transaction.
Click on to attach a new document in PDF format with a document
name of not more than 5 MB
Click on link to open the additional reviewer popup where
the existing reviewing authority can add another reviewer in the line of
approval routing.
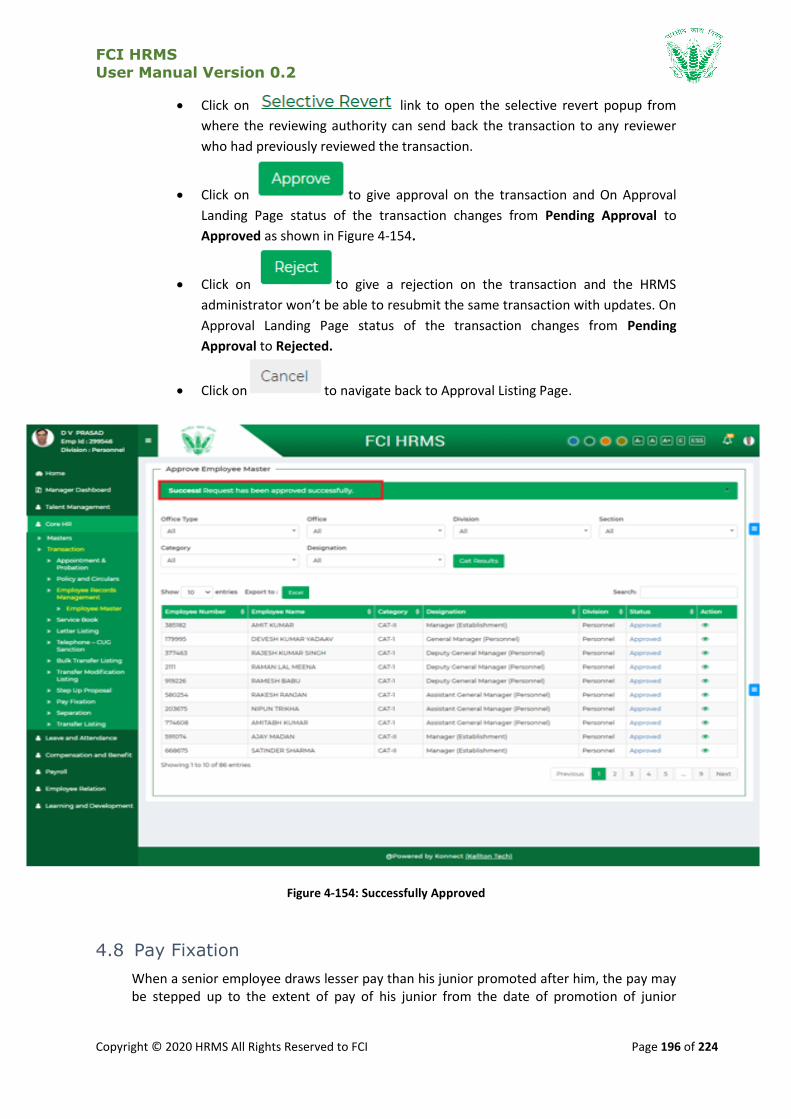
FCI HRMS
User Manual Version 0.2
Copyright © 2020 HRMS All Rights Reserved to FCI Page 196 of 224
Click on link to open the selective revert popup from
where the reviewing authority can send back the transaction to any reviewer
who had previously reviewed the transaction.
Click on to give approval on the transaction and On Approval
Landing Page status of the transaction changes from Pending Approval to
Approved as shown in Figure 4-154.
Click on to give a rejection on the transaction and the HRMS
administrator won’t be able to resubmit the same transaction with updates. On
Approval Landing Page status of the transaction changes from Pending
Approval to Rejected.
Click on to navigate back to Approval Listing Page.
Figure 4-154: Successfully Approved
4.8 Pay Fixation
When a senior employee draws lesser pay than his junior promoted after him, the pay may be stepped up to the extent of pay of his junior from the date of promotion of junior
FCI HRMS
User Manual Version 0.2
Copyright © 2020 HRMS All Rights Reserved to FCI Page 197 of 224
subject to following conditions. In this case, the senior employee can raise a request to step up his pay to Personnel division.
At the time of promotion or increment, Personnel division performs a pay fixation to ensure that increments and revised pay scales as per Ministry order or pay commission are included and updated to employee salary. Hence, the system shall have the provision that allows Personnel division to update pay scales as per fixation guidelines.
4.8.1 Navigation
Left Navigation: Core HR >> Transactions >> Pay Fixation
4.8.1.1 SLA
2 Days
4.8.2 Landing Page
HRMS administrator shall traverse the navigation as mentioned in Section 4.6.1 to reach the Pay Fixation Landing Page as shown in Figure 4-155
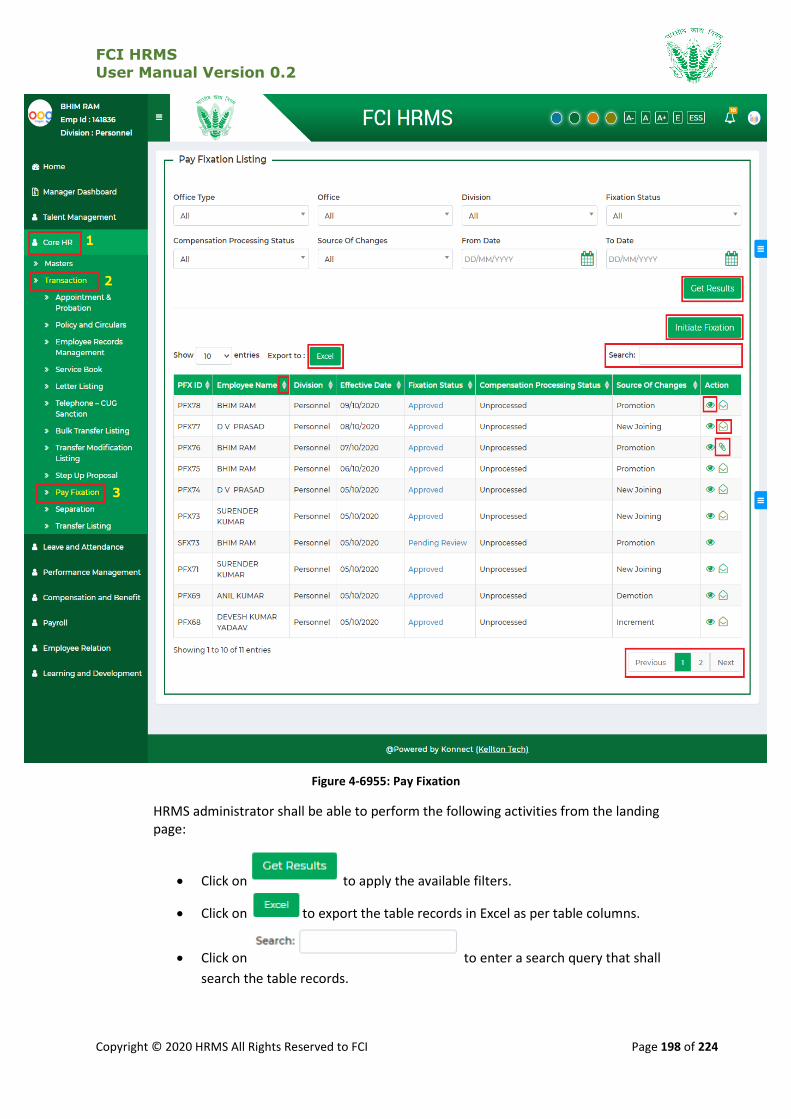
FCI HRMS
User Manual Version 0.2
Copyright © 2020 HRMS All Rights Reserved to FCI Page 198 of 224
Figure 4-6955: Pay Fixation
HRMS administrator shall be able to perform the following activities from the landing page:
Click on to apply the available filters.
Click on to export the table records in Excel as per table columns.
Click on to enter a search query that shall
search the table records.
FCI HRMS
User Manual Version 0.2
Copyright © 2020 HRMS All Rights Reserved to FCI Page 199 of 224
Click on to sort the table records in ascending order or descending order of
entries.
Click on to navigate table records
Click on to initiate a new fixation in the table as mentioned
in Section 4.6.4 – Initiate Fixation.
Click on to view an existing Fixation in the table as mentioned in Section
4.6.5 – View Pay Fixation.
Click on to generate the fixation order
Click on to download the generated letter.
4.8.3 Initiate Pay Fixation
Click on to open the Initiate Pay Fixation page as shown in Figure 4-156
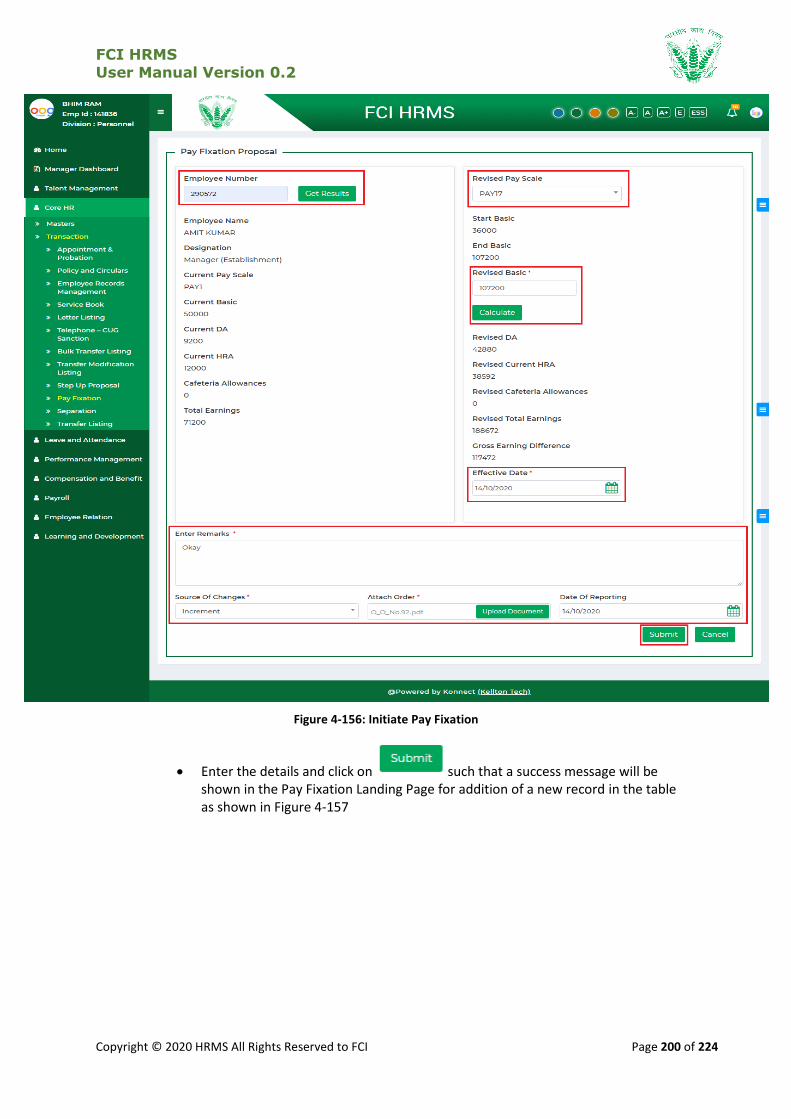
FCI HRMS
User Manual Version 0.2
Copyright © 2020 HRMS All Rights Reserved to FCI Page 200 of 224
Figure 4-156: Initiate Pay Fixation
Enter the details and click on such that a success message will be shown in the Pay Fixation Landing Page for addition of a new record in the table as shown in Figure 4-157
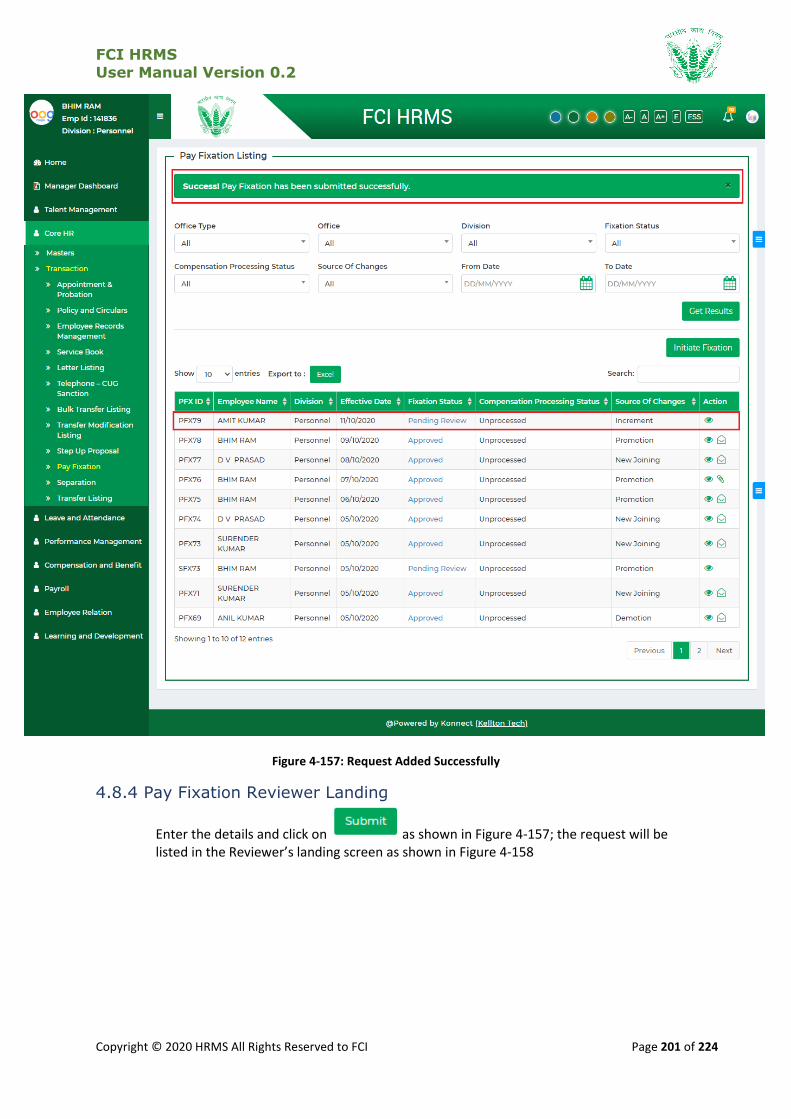
FCI HRMS
User Manual Version 0.2
Copyright © 2020 HRMS All Rights Reserved to FCI Page 201 of 224
Figure 4-157: Request Added Successfully
4.8.4 Pay Fixation Reviewer Landing
Enter the details and click on as shown in Figure 4-157; the request will be listed in the Reviewer’s landing screen as shown in Figure 4-158
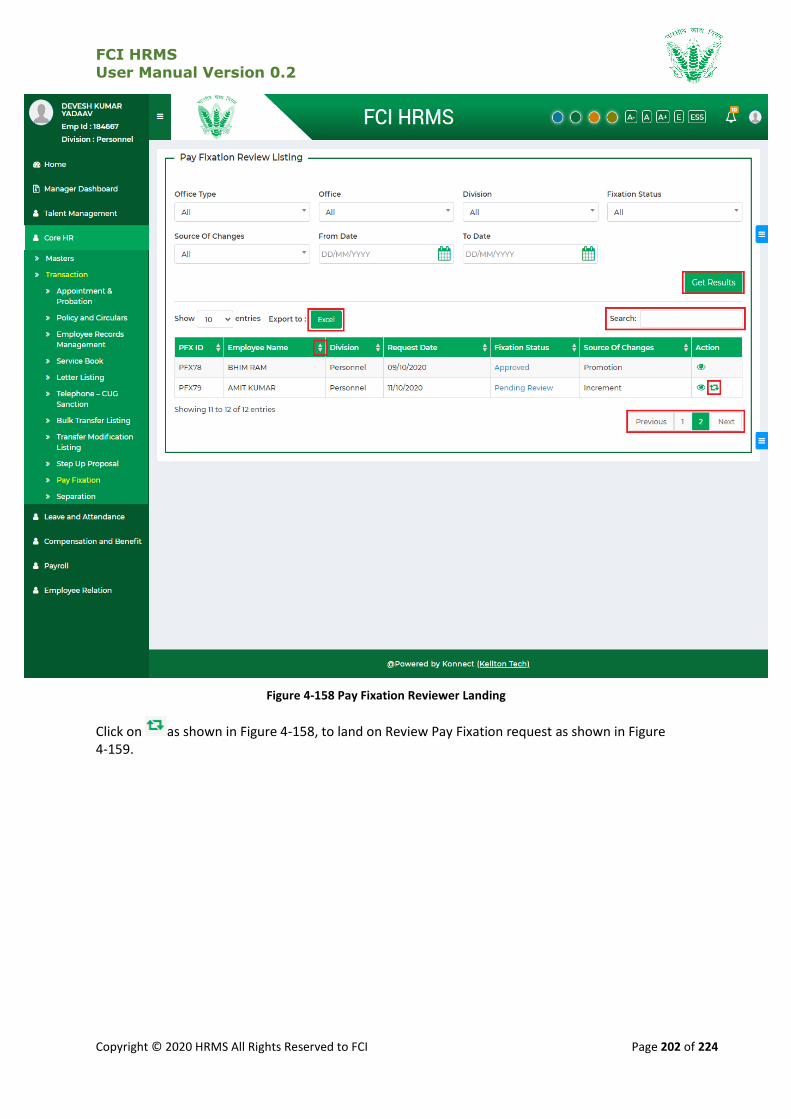
FCI HRMS
User Manual Version 0.2
Copyright © 2020 HRMS All Rights Reserved to FCI Page 202 of 224
Figure 4-158 Pay Fixation Reviewer Landing
Click on as shown in Figure 4-158, to land on Review Pay Fixation request as shown in Figure 4-159.
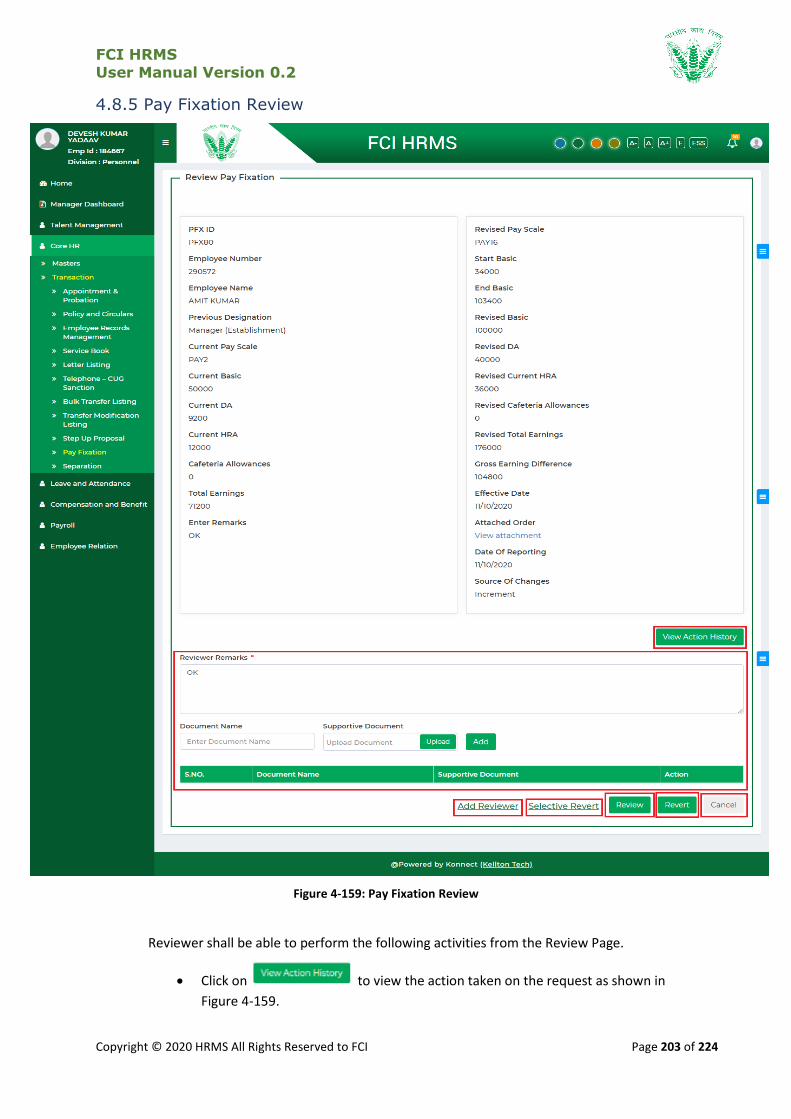
FCI HRMS
User Manual Version 0.2
Copyright © 2020 HRMS All Rights Reserved to FCI Page 203 of 224
4.8.5 Pay Fixation Review
Figure 4-159: Pay Fixation Review
Reviewer shall be able to perform the following activities from the Review Page.
Click on to view the action taken on the request as shown in
Figure 4-159.
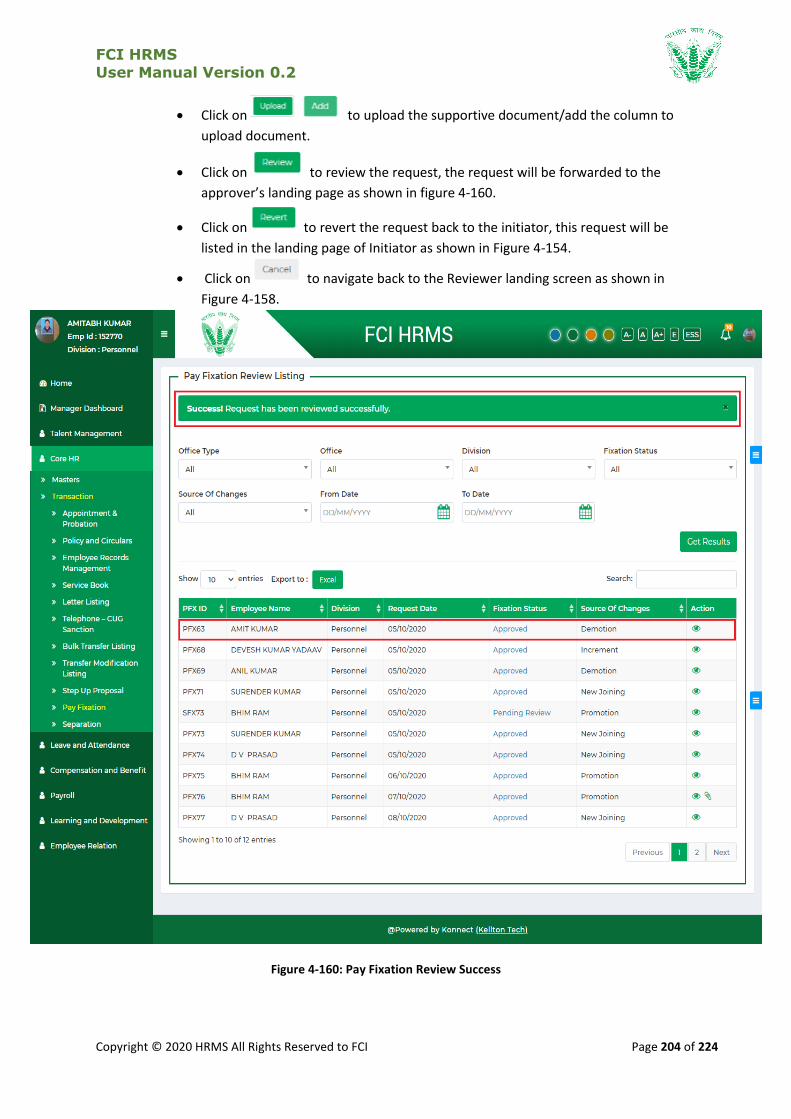
FCI HRMS
User Manual Version 0.2
Copyright © 2020 HRMS All Rights Reserved to FCI Page 204 of 224
Click on to upload the supportive document/add the column to
upload document.
Click on to review the request, the request will be forwarded to the
approver’s landing page as shown in figure 4-160.
Click on to revert the request back to the initiator, this request will be
listed in the landing page of Initiator as shown in Figure 4-154.
Click on to navigate back to the Reviewer landing screen as shown in
Figure 4-158.
Figure 4-160: Pay Fixation Review Success
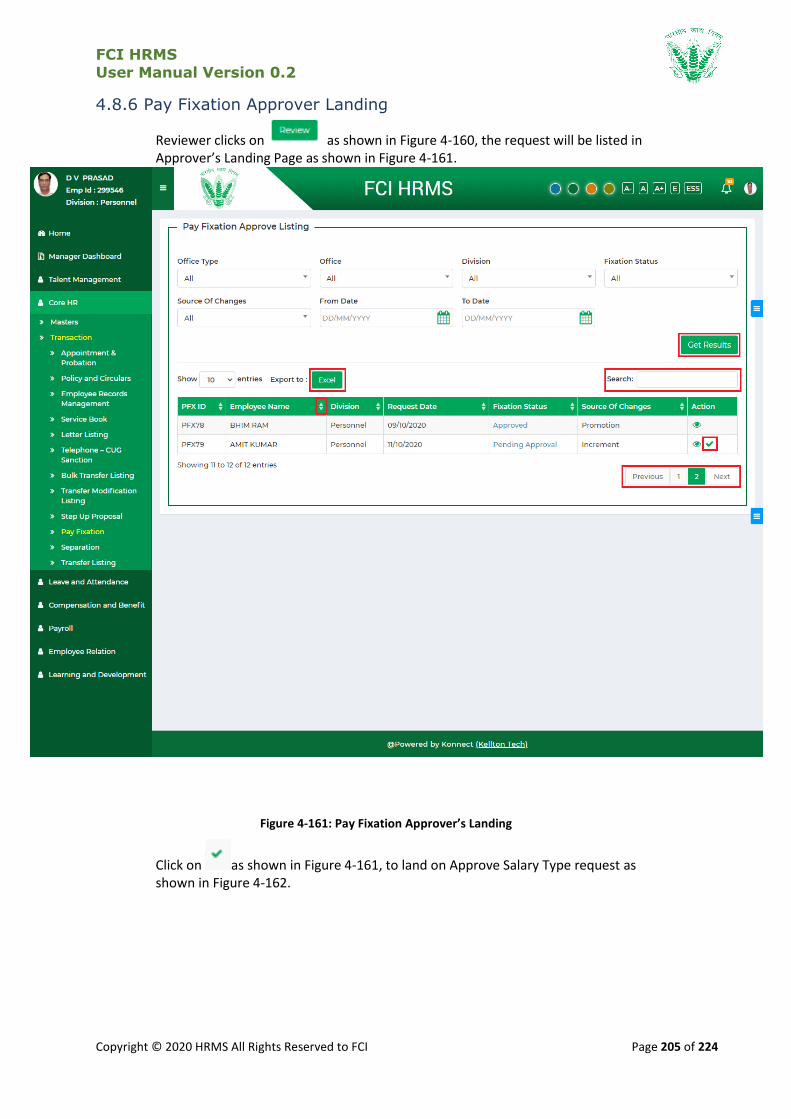
FCI HRMS
User Manual Version 0.2
Copyright © 2020 HRMS All Rights Reserved to FCI Page 205 of 224
4.8.6 Pay Fixation Approver Landing
Reviewer clicks on as shown in Figure 4-160, the request will be listed in Approver’s Landing Page as shown in Figure 4-161.
Figure 4-161: Pay Fixation Approver’s Landing
Click on as shown in Figure 4-161, to land on Approve Salary Type request as shown in Figure 4-162.

FCI HRMS
User Manual Version 0.2
Copyright © 2020 HRMS All Rights Reserved to FCI Page 206 of 224
4.8.7 Pay Fixation Approve
Figure 4-162: Salary Type Approve
Approver shall be able to perform the following activities from the Approve Page.
Click on to view the action taken on the request as shown in
Figure 4-164.
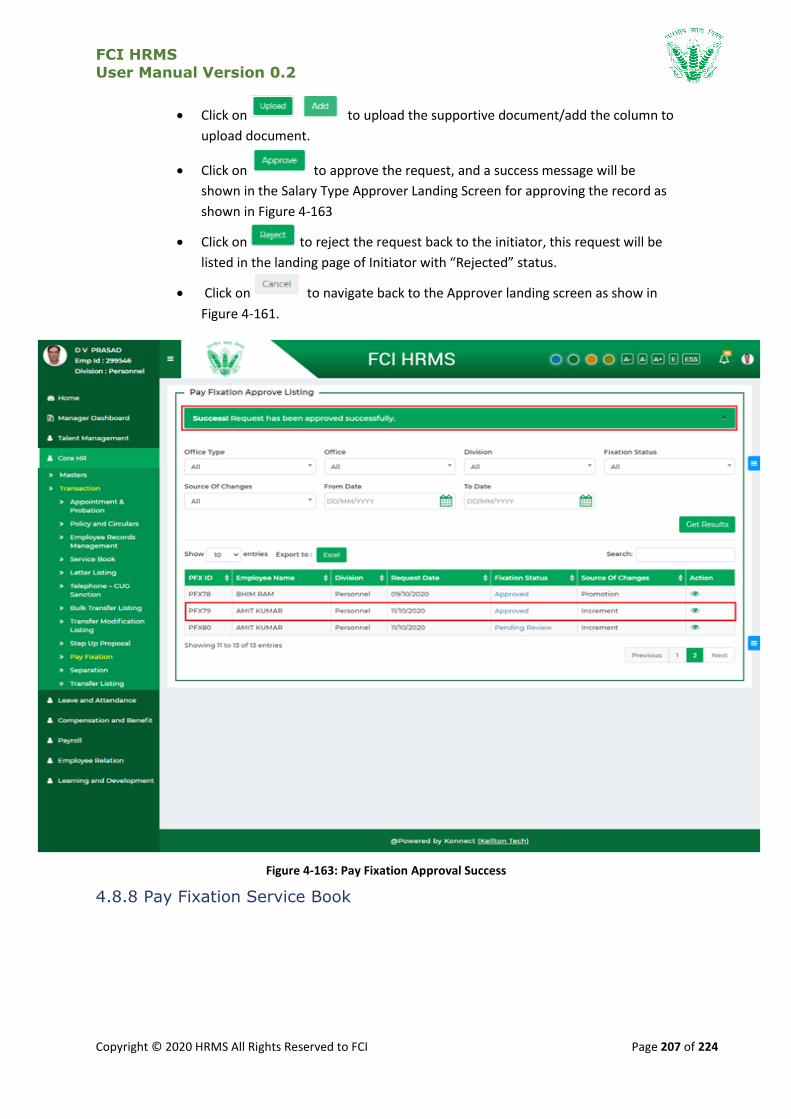
FCI HRMS
User Manual Version 0.2
Copyright © 2020 HRMS All Rights Reserved to FCI Page 207 of 224
Click on to upload the supportive document/add the column to
upload document.
Click on to approve the request, and a success message will be
shown in the Salary Type Approver Landing Screen for approving the record as
shown in Figure 4-163
Click on to reject the request back to the initiator, this request will be
listed in the landing page of Initiator with “Rejected” status.
Click on to navigate back to the Approver landing screen as show in
Figure 4-161.
Figure 4-163: Pay Fixation Approval Success
4.8.8 Pay Fixation Service Book

FCI HRMS
User Manual Version 0.2
Copyright © 2020 HRMS All Rights Reserved to FCI Page 208 of 224
Figure 4-164: Initiate Fixation
4.9 Common System Provisions
This section is to let user familiarize with Add Reviewer, Selective Revert and Action View and action History.
4.9.1 Add Reviewer Provision
To review the request submitted by HRMS administrator the reviewing authority shall Login via a reviewer Account and navigate to Reviewer landing to Section for which reviewer need to review request as shown in Figure below
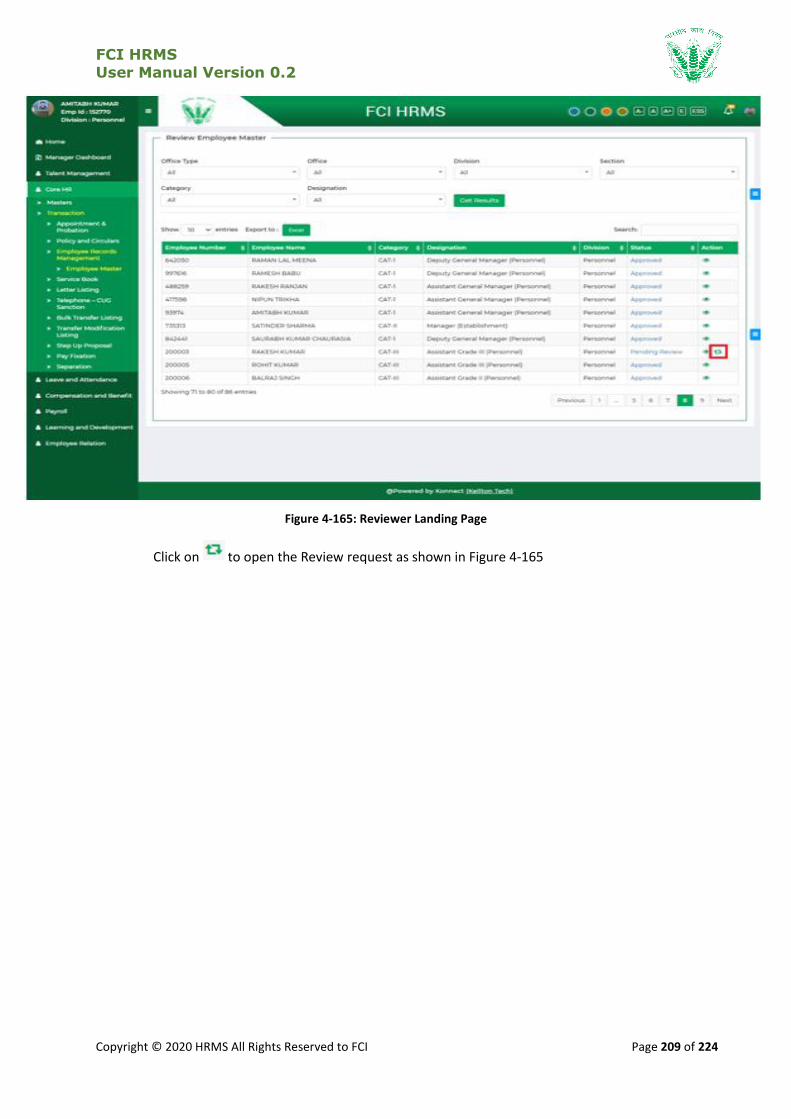
FCI HRMS
User Manual Version 0.2
Copyright © 2020 HRMS All Rights Reserved to FCI Page 209 of 224
Figure 4-165: Reviewer Landing Page
Click on to open the Review request as shown in Figure 4-165

FCI HRMS
User Manual Version 0.2
Copyright © 2020 HRMS All Rights Reserved to FCI Page 210 of 224
Figure 4-166: Reviewing Detail
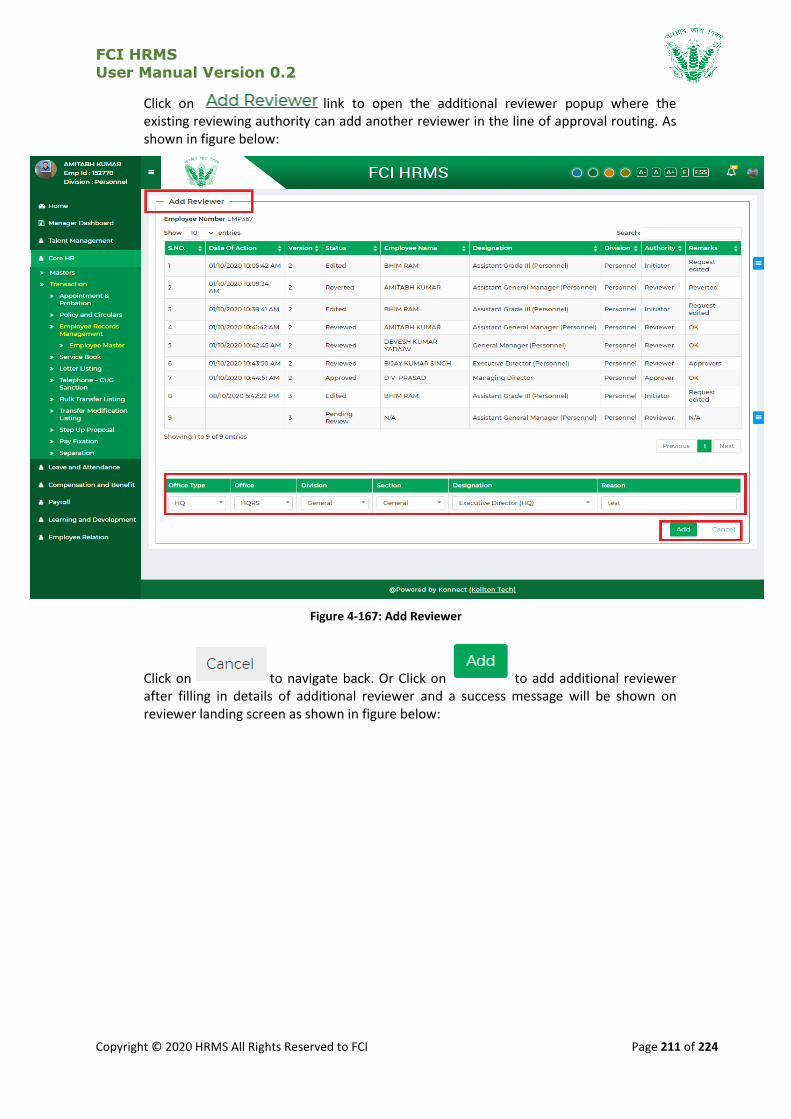
FCI HRMS
User Manual Version 0.2
Copyright © 2020 HRMS All Rights Reserved to FCI Page 211 of 224
Click on link to open the additional reviewer popup where the existing reviewing authority can add another reviewer in the line of approval routing. As shown in figure below:
Figure 4-167: Add Reviewer
Click on to navigate back. Or Click on to add additional reviewer after filling in details of additional reviewer and a success message will be shown on reviewer landing screen as shown in figure below:
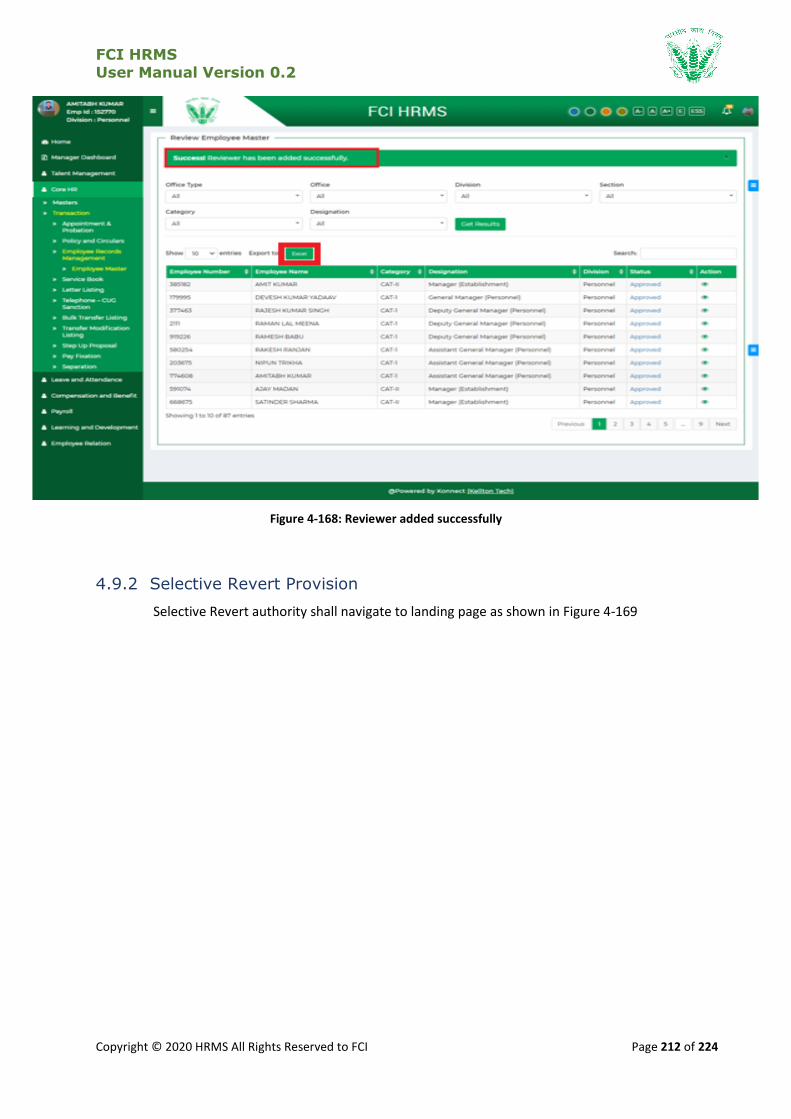
FCI HRMS
User Manual Version 0.2
Copyright © 2020 HRMS All Rights Reserved to FCI Page 212 of 224
Figure 4-168: Reviewer added successfully
4.9.2 Selective Revert Provision
Selective Revert authority shall navigate to landing page as shown in Figure 4-169
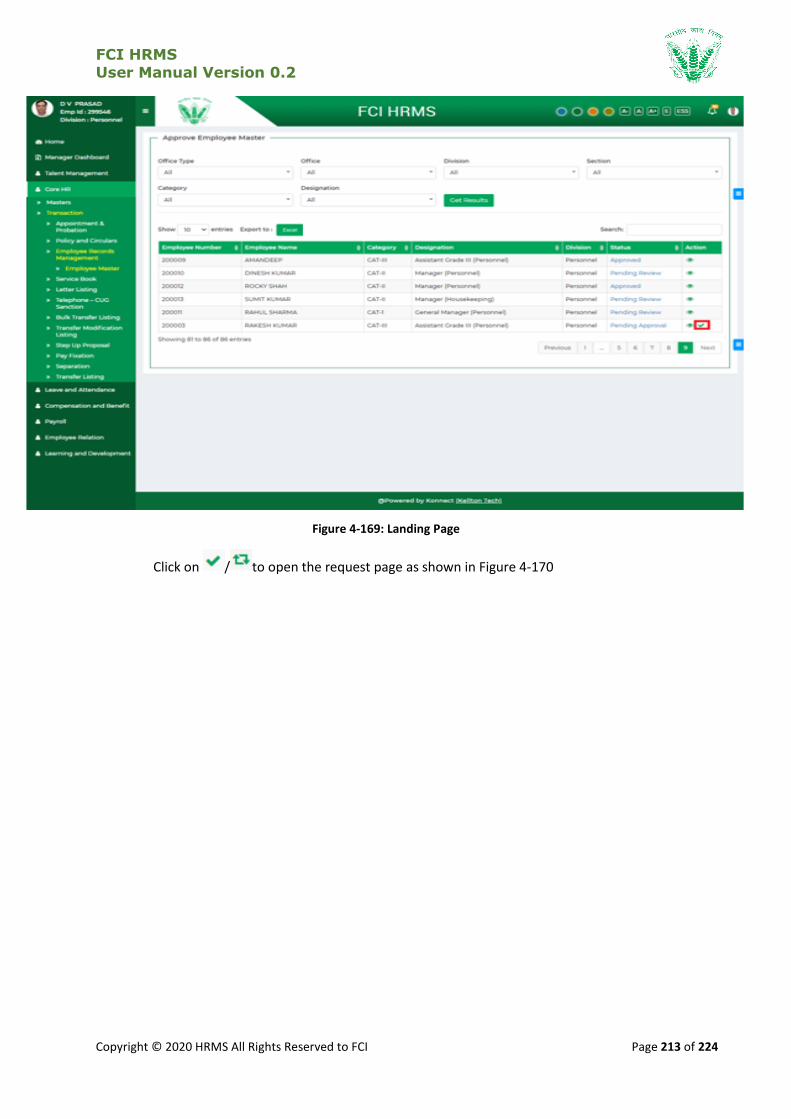
FCI HRMS
User Manual Version 0.2
Copyright © 2020 HRMS All Rights Reserved to FCI Page 213 of 224
Figure 4-169: Landing Page
Click on / to open the request page as shown in Figure 4-170
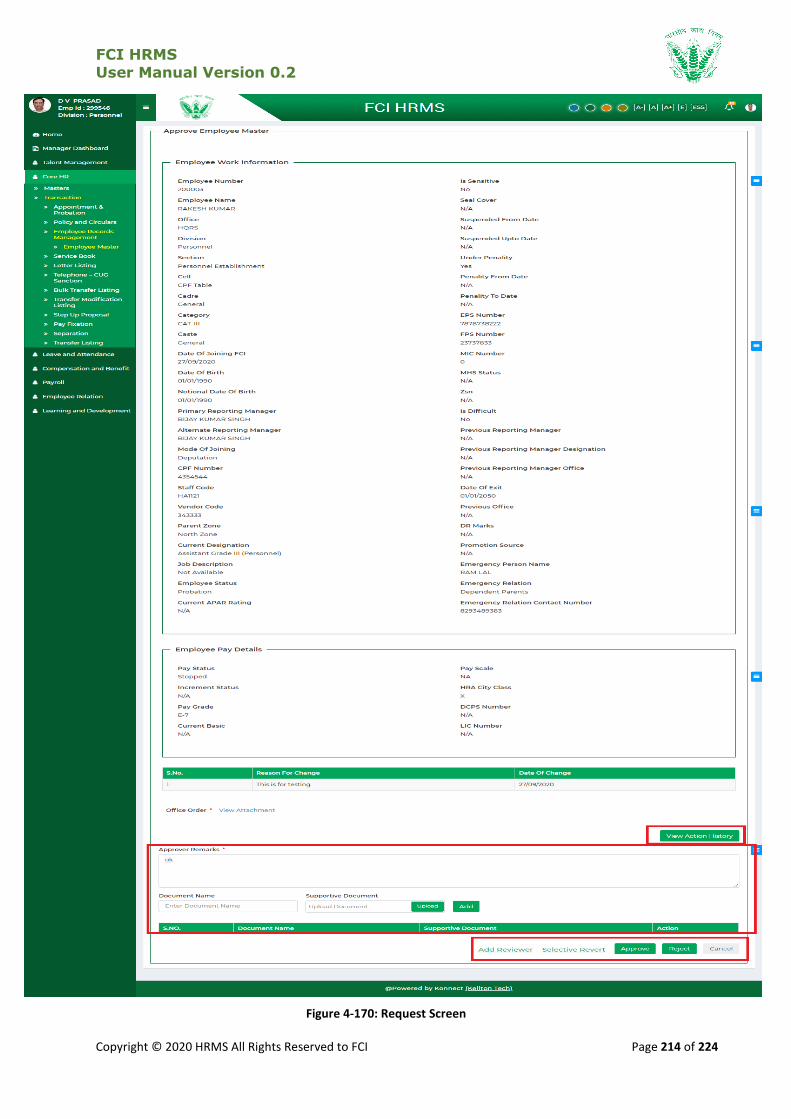
FCI HRMS
User Manual Version 0.2
Copyright © 2020 HRMS All Rights Reserved to FCI Page 214 of 224
Figure 4-170: Request Screen
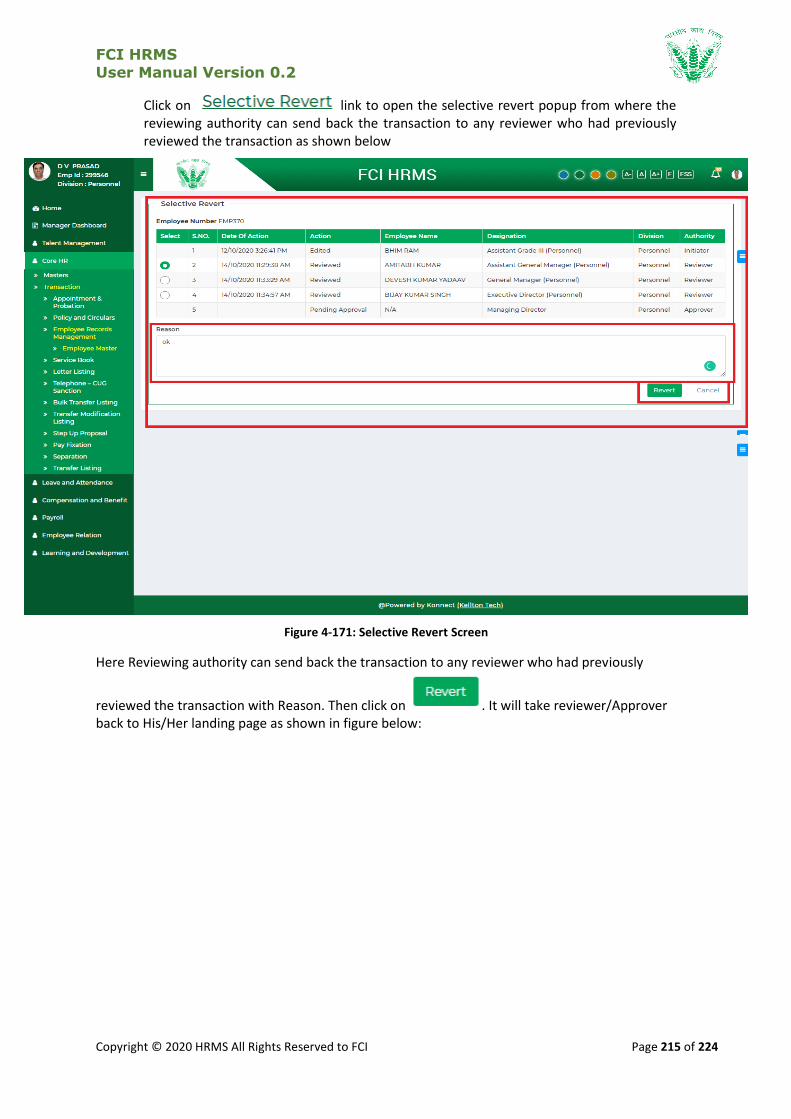
FCI HRMS
User Manual Version 0.2
Copyright © 2020 HRMS All Rights Reserved to FCI Page 215 of 224
Click on link to open the selective revert popup from where the reviewing authority can send back the transaction to any reviewer who had previously reviewed the transaction as shown below
Figure 4-171: Selective Revert Screen
Here Reviewing authority can send back the transaction to any reviewer who had previously
reviewed the transaction with Reason. Then click on . It will take reviewer/Approver back to His/Her landing page as shown in figure below:
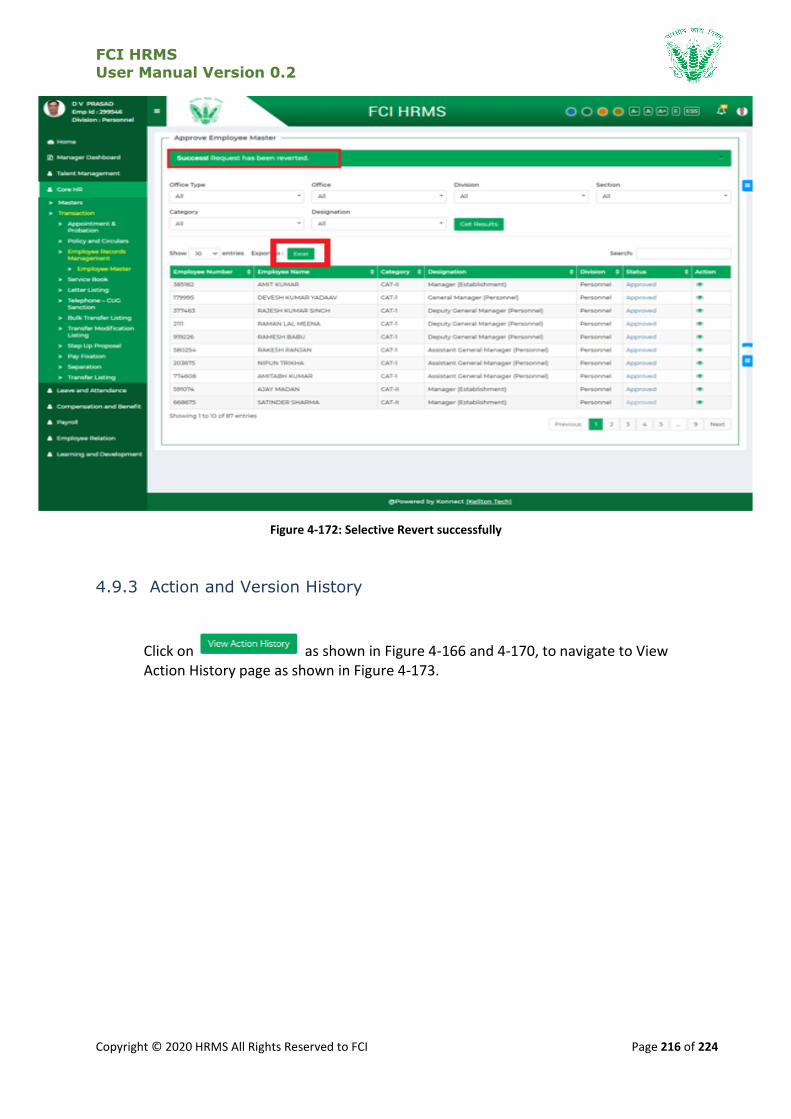
FCI HRMS
User Manual Version 0.2
Copyright © 2020 HRMS All Rights Reserved to FCI Page 216 of 224
Figure 4-172: Selective Revert successfully
4.9.3 Action and Version History
Click on as shown in Figure 4-166 and 4-170, to navigate to View Action History page as shown in Figure 4-173.
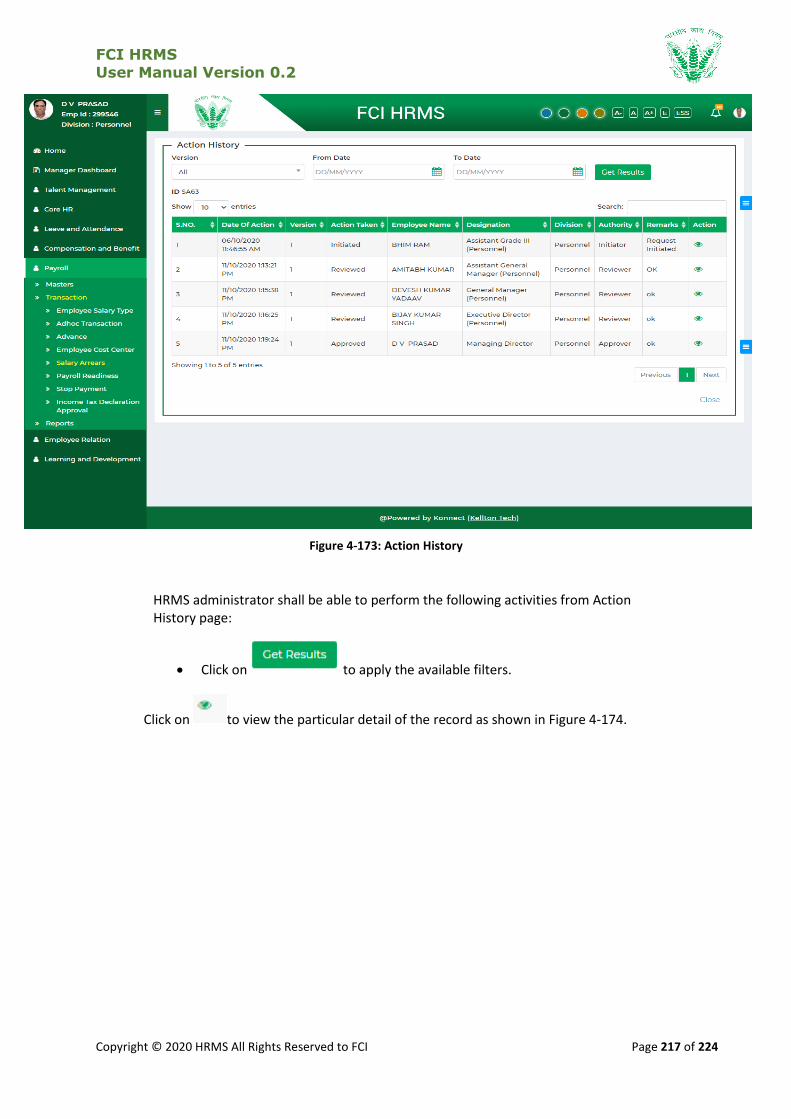
FCI HRMS
User Manual Version 0.2
Copyright © 2020 HRMS All Rights Reserved to FCI Page 217 of 224
Figure 4-173: Action History
HRMS administrator shall be able to perform the following activities from Action History page:
Click on to apply the available filters.
Click on to view the particular detail of the record as shown in Figure 4-174.
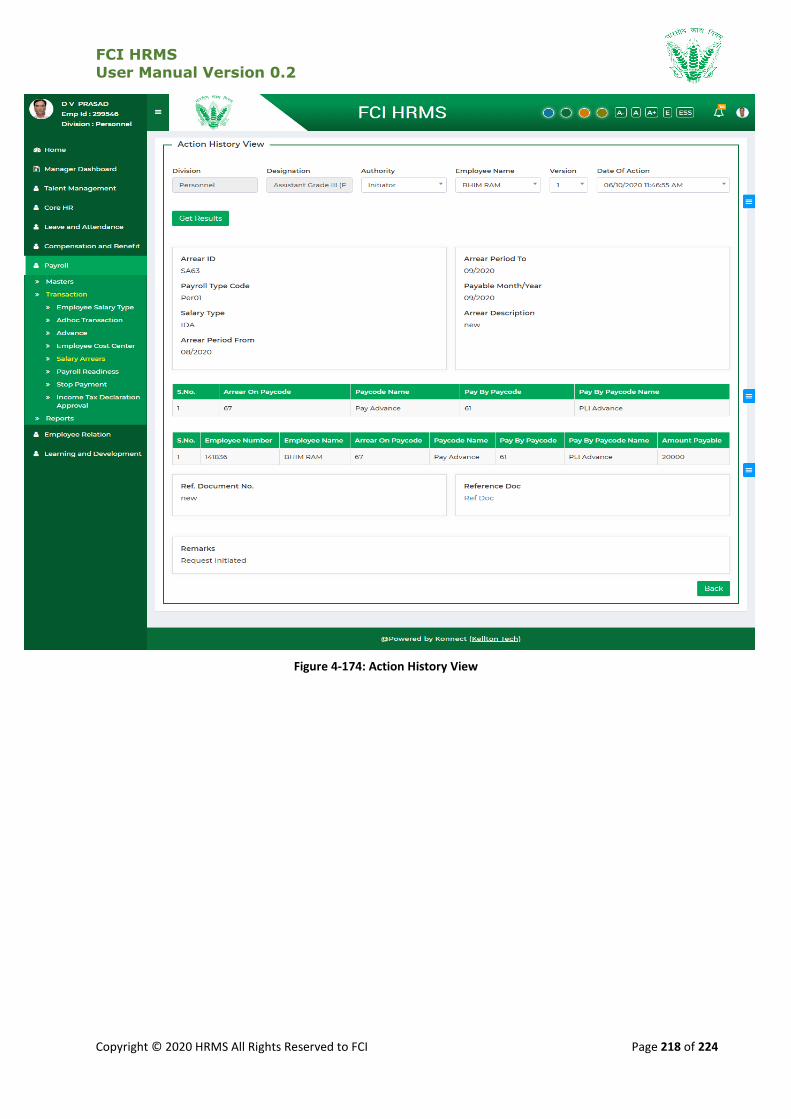
FCI HRMS
User Manual Version 0.2
Copyright © 2020 HRMS All Rights Reserved to FCI Page 218 of 224
Figure 4-174: Action History View

FCI HRMS
User Manual Version 0.2
Copyright © 2020 HRMS All Rights Reserved to FCI Page 219 of 224
5 Troubleshooting and Support
5.1.1 Error Messages
The following error messages shall be showcased based on user behavior:
If user enters a duplicate value, then HRMS shall throw a validation as shown in
Figure 5-1:
Figure 5-1: Validation Error: Duplicate Record
If user does not enter information which is required in the form, then HRMS
shall throw a validation as shown in Figure 4-7:
Figure 5-2: Validation Error: Mandatory Field Empty
In reference to standard error messages that may appear in the application with respect to user and internet settings, the following status codes may reflect:
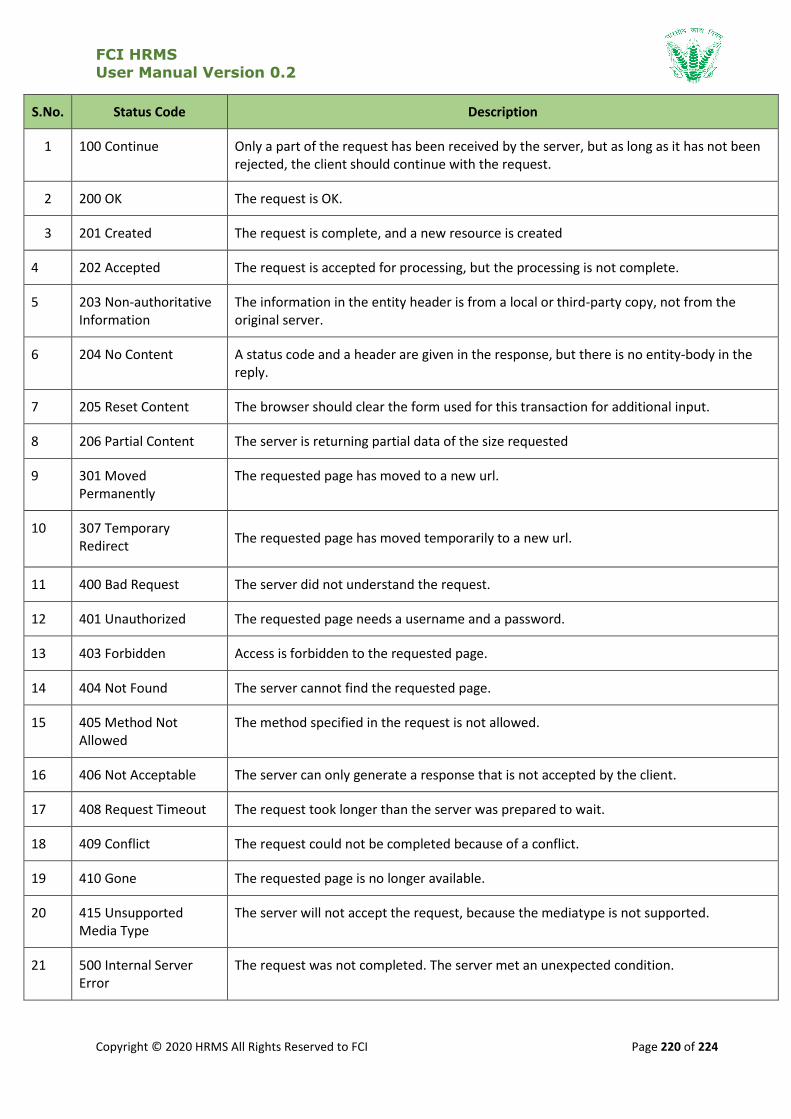
FCI HRMS
User Manual Version 0.2
Copyright © 2020 HRMS All Rights Reserved to FCI Page 220 of 224
S.No. Status Code Description
1 100 Continue Only a part of the request has been received by the server, but as long as it has not been rejected, the client should continue with the request.
2 200 OK The request is OK.
3 201 Created The request is complete, and a new resource is created
4 202 Accepted The request is accepted for processing, but the processing is not complete.
5 203 Non-authoritative Information
The information in the entity header is from a local or third-party copy, not from the original server.
6 204 No Content A status code and a header are given in the response, but there is no entity-body in the reply.
7 205 Reset Content The browser should clear the form used for this transaction for additional input.
8 206 Partial Content The server is returning partial data of the size requested
9 301 Moved Permanently
The requested page has moved to a new url.
10 307 Temporary Redirect
The requested page has moved temporarily to a new url.
11 400 Bad Request The server did not understand the request.
12 401 Unauthorized The requested page needs a username and a password.
13 403 Forbidden Access is forbidden to the requested page.
14 404 Not Found The server cannot find the requested page.
15 405 Method Not Allowed
The method specified in the request is not allowed.
16 406 Not Acceptable The server can only generate a response that is not accepted by the client.
17 408 Request Timeout The request took longer than the server was prepared to wait.
18 409 Conflict The request could not be completed because of a conflict.
19 410 Gone The requested page is no longer available.
20 415 Unsupported Media Type
The server will not accept the request, because the mediatype is not supported.
21 500 Internal Server Error
The request was not completed. The server met an unexpected condition.

FCI HRMS
User Manual Version 0.2
Copyright © 2020 HRMS All Rights Reserved to FCI Page 221 of 224
22 501 Not Implemented The request was not completed. The server did not support the functionality required.
23 502 Bad Gateway The request was not completed. The server received an invalid response from the upstream server.
24 503 Service Unavailable The request was not completed. The server is temporarily overloading or down.
25 504 Gateway Timeout The gateway has timed out.
26 505 HTTP Version Not Supported
The server does not support the "http protocol" version.
Table 5-1: HTTP Status Error Codes
5.1.2 Frequently Asked Question
This section shall address some of the frequently asked questions which may arise in the HRMS application under different circumstances as mentioned in Table 5-2
S.No Circumstance Next Step
1 Unable to Login to HRMS application Please contact the nodal officer in the HRMS application who shall crosscheck the roles and permissions assigned in the User Management module. In case roles are assigned and the issue persists then please drop an email along with the employee number, employee name and office to [email protected]
2 I am able to access the HRMS application but unable to access respective menu links
Please contact the nodal officer in the HRMS application who shall crosscheck the roles and permissions assigned in the User Management module. In case roles are assigned and the issue persists then please drop an email along with the employee number, employee name and office to [email protected]
3 I am unable to see my profile information in HRMS application
Please contact the nodal officer, whether the data for the concerned employee has been migrated to HRMS application or not. If the data has not been migrated, then kindly fill the required form and submit. The information for the employee shall be visible in the HRMS within 2 working days. In case the issue persists then please drop an email along with the employee number, employee name and office to [email protected]
4 I am unable to submit a request due to “Bad API Error”
Please contact the nodal officer in the HRMS application who shall crosscheck the roles and permissions assigned in the User Management module. In case roles are assigned and the issue persists then please drop an email along with the employee number, employee name and office to [email protected]
5 I am unable to submit a request due to “Unauthorized Access Error”
Please contact the nodal officer in the HRMS application who shall crosscheck the roles and permissions assigned in the User Management module. In case roles are assigned and the issue persists then please drop an email along with the employee number, employee name and office to [email protected]

FCI HRMS
User Manual Version 0.2
Copyright © 2020 HRMS All Rights Reserved to FCI Page 222 of 224
6 I am unable to open the HRMS application in my web browser
Go to browser settings and clear the cache. Also to ensure the issue is resolved, please type %TEMP% using the run command to delete all cookies permanently. If the issue persists, then contact the nodal officer in the HRMS application who shall crosscheck the roles and permissions assigned in the User Management module. In case roles are assigned and the issue persists then please drop an email along with the employee number, employee name and office to [email protected]
7 I am unable to upload the documents in the HRMS application
Kindly check the file size as the HRMS application restricts document attachment till 5 MB (Except for Service Book). Also ensure that either .pdf or .jpeg files are uploaded as these are only supported. If the issue still persists then please drop an email along with the employee number, employee name and office to [email protected]
8 I am a competent authority but unable to see the review or approval icon in my listing
Please contact the nodal officer in the HRMS application who shall crosscheck the roles and permissions along with the process workflow assigned in the User Management module. In case roles are assigned and the issue persists then please drop an email along with the employee number, employee name and office to [email protected]
9 Unable to open HRMS application in web browser
Please note that the HRMS application is compatible with the following browsers only:
Internet Explorer 11 and above
Google Chrome ver. 44 and above
Mozilla Firefox ver. 48 and above
Safari Browser ver. 5.1.7 and above
In case the issue persists then please drop an email along with the employee number, employee name and office to [email protected]
10 Unable to install the HRMS mobile application in Android/iOS mobile
Please note that the HRMS application is compatible with the following mobile OS versions:
Android KitKat (Ver. 4.4) and above
IOS 12 and above
In case the issue persists then please drop an email along with the employee number, employee name and office to [email protected]
11 I am unable to see the required information in the dropdowns and filters of HRMS application
The issue that the intended information is not available for data entry might be because:
Permission or Role not assigned for the employee.
Information has not been migrated into the HRMS application
Information has been modified after scheduled maintenance of HRMS
application
Please contact the nodal officer in the HRMS application who shall crosscheck the roles and permissions along with the process workflow assigned in the User Management module. In case roles are assigned and the issue persists then please drop an email along with the employee number,
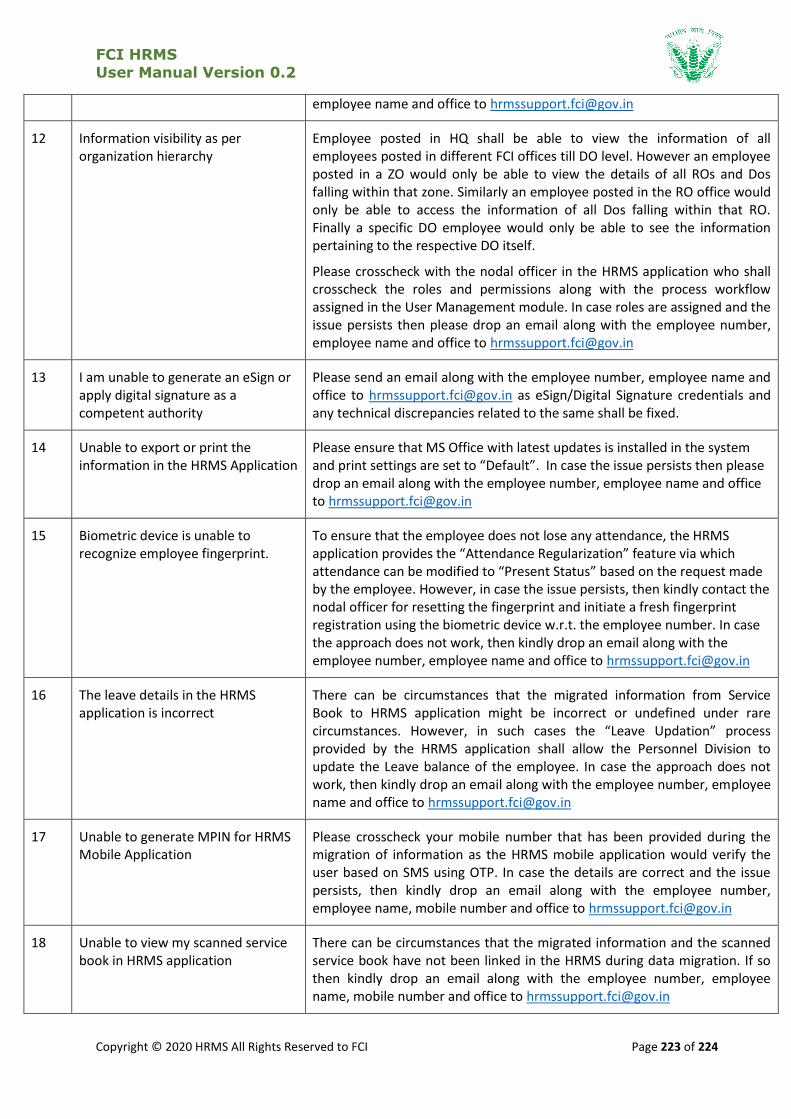
FCI HRMS
User Manual Version 0.2
Copyright © 2020 HRMS All Rights Reserved to FCI Page 223 of 224
employee name and office to [email protected]
12 Information visibility as per organization hierarchy
Employee posted in HQ shall be able to view the information of all employees posted in different FCI offices till DO level. However an employee posted in a ZO would only be able to view the details of all ROs and Dos falling within that zone. Similarly an employee posted in the RO office would only be able to access the information of all Dos falling within that RO. Finally a specific DO employee would only be able to see the information pertaining to the respective DO itself.
Please crosscheck with the nodal officer in the HRMS application who shall crosscheck the roles and permissions along with the process workflow assigned in the User Management module. In case roles are assigned and the issue persists then please drop an email along with the employee number, employee name and office to [email protected]
13 I am unable to generate an eSign or apply digital signature as a competent authority
Please send an email along with the employee number, employee name and office to [email protected] as eSign/Digital Signature credentials and any technical discrepancies related to the same shall be fixed.
14 Unable to export or print the information in the HRMS Application
Please ensure that MS Office with latest updates is installed in the system and print settings are set to “Default”. In case the issue persists then please drop an email along with the employee number, employee name and office to [email protected]
15 Biometric device is unable to recognize employee fingerprint.
To ensure that the employee does not lose any attendance, the HRMS application provides the “Attendance Regularization” feature via which attendance can be modified to “Present Status” based on the request made by the employee. However, in case the issue persists, then kindly contact the nodal officer for resetting the fingerprint and initiate a fresh fingerprint registration using the biometric device w.r.t. the employee number. In case the approach does not work, then kindly drop an email along with the employee number, employee name and office to [email protected]
16 The leave details in the HRMS application is incorrect
There can be circumstances that the migrated information from Service Book to HRMS application might be incorrect or undefined under rare circumstances. However, in such cases the “Leave Updation” process provided by the HRMS application shall allow the Personnel Division to update the Leave balance of the employee. In case the approach does not work, then kindly drop an email along with the employee number, employee name and office to [email protected]
17 Unable to generate MPIN for HRMS Mobile Application
Please crosscheck your mobile number that has been provided during the migration of information as the HRMS mobile application would verify the user based on SMS using OTP. In case the details are correct and the issue persists, then kindly drop an email along with the employee number, employee name, mobile number and office to [email protected]
18 Unable to view my scanned service book in HRMS application
There can be circumstances that the migrated information and the scanned service book have not been linked in the HRMS during data migration. If so then kindly drop an email along with the employee number, employee name, mobile number and office to [email protected]
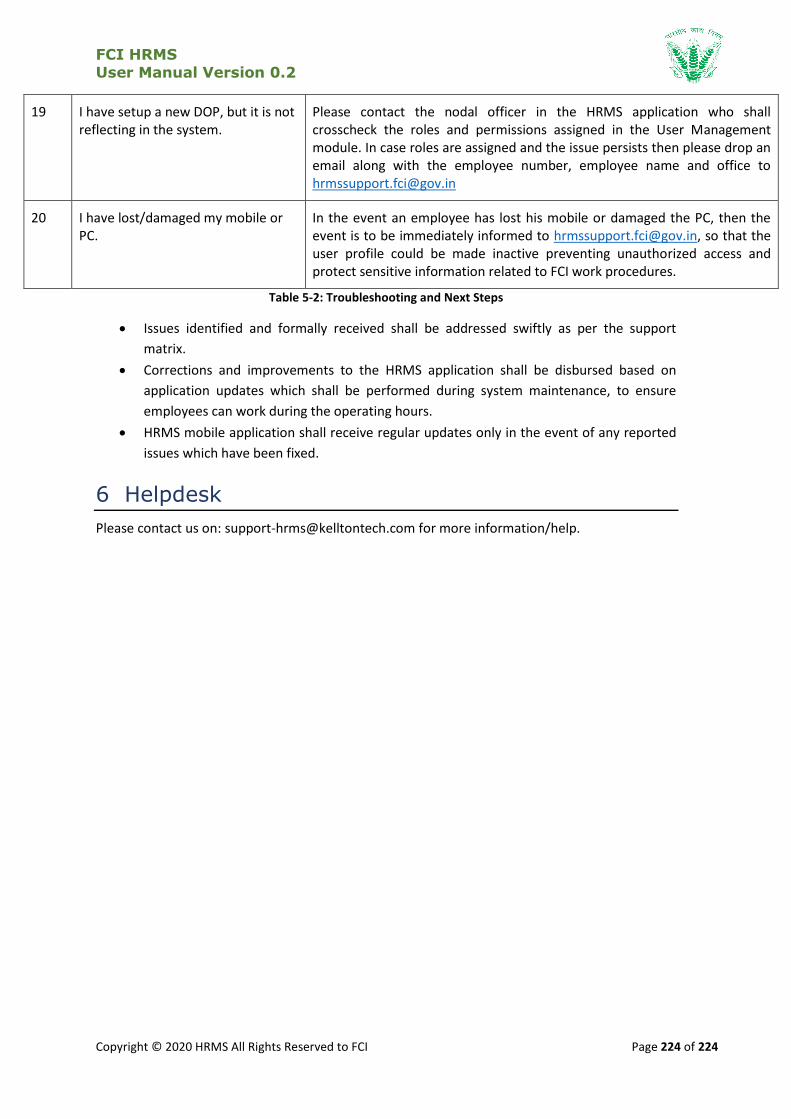
FCI HRMS
User Manual Version 0.2
Copyright © 2020 HRMS All Rights Reserved to FCI Page 224 of 224
19 I have setup a new DOP, but it is not reflecting in the system.
Please contact the nodal officer in the HRMS application who shall crosscheck the roles and permissions assigned in the User Management module. In case roles are assigned and the issue persists then please drop an email along with the employee number, employee name and office to [email protected]
20 I have lost/damaged my mobile or PC.
In the event an employee has lost his mobile or damaged the PC, then the event is to be immediately informed to [email protected], so that the user profile could be made inactive preventing unauthorized access and protect sensitive information related to FCI work procedures.
Table 5-2: Troubleshooting and Next Steps
Issues identified and formally received shall be addressed swiftly as per the support
matrix.
Corrections and improvements to the HRMS application shall be disbursed based on
application updates which shall be performed during system maintenance, to ensure
employees can work during the operating hours.
HRMS mobile application shall receive regular updates only in the event of any reported
issues which have been fixed.
6 Helpdesk
Please contact us on: [email protected] for more information/help.