Configure SAML SSO on Cisco Unified Communications ...
53
Configure SAML SSO on Cisco Unified Communications Manager with ADFS 3.0 Contents Introduction Prerequisites Requirements Components Used Configuration Pre-Check A Records Pointer (PTR) Records SRV Records are Needed to be in Place for Jabber Discovery Services ADFS3 Initial Configuration Configure SSO on CUCM with ADFS LDAP Configuration CUCM Metadata Configure ADFS Relying Party IDP Metadata Configure SSO on CUC CUC Metadata Configure SSO on Expressway Import Metadata to Expressway C Export Metadata From Expressway C Add a Relying Party Trust for Cisco Expressway-E OAuth with Refresh Login Authentication Path SSO Architecture On-Premise Login Flow MRA Login Flow OAuth Access/Refresh Token OAuth Authorization Code Grant Flow is better Configure Kerberos Select Windows Authentication ADFS Supports both Kerberos NTLM Configure Microsoft Internet Explorer Add ADFS URL under Security > Intranet zones > Sites Add CUCM, IMP, and Unity hostnames to Security > Trusted Sites User Authentication Jabber Login in SSO Troubleshoot Internet Explorer (IE) Sites Adding to IE
-
Upload
khangminh22 -
Category
Documents
-
view
4 -
download
0
Transcript of Configure SAML SSO on Cisco Unified Communications ...

Configure SAML SSO on Cisco UnifiedCommunications Manager with ADFS 3.0 Contents
IntroductionPrerequisitesRequirementsComponents UsedConfiguration Pre-CheckA RecordsPointer (PTR) RecordsSRV Records are Needed to be in Place for Jabber Discovery ServicesADFS3 Initial ConfigurationConfigure SSO on CUCM with ADFSLDAP ConfigurationCUCM MetadataConfigure ADFS Relying PartyIDP MetadataConfigure SSO on CUCCUC MetadataConfigure SSO on ExpresswayImport Metadata to Expressway CExport Metadata From Expressway CAdd a Relying Party Trust for Cisco Expressway-EOAuth with Refresh LoginAuthentication PathSSO ArchitectureOn-Premise Login FlowMRA Login Flow OAuthAccess/Refresh TokenOAuth Authorization Code Grant Flow is betterConfigure KerberosSelect Windows AuthenticationADFS Supports both Kerberos NTLMConfigure Microsoft Internet ExplorerAdd ADFS URL under Security > Intranet zones > SitesAdd CUCM, IMP, and Unity hostnames to Security > Trusted SitesUser Authentication Jabber Login in SSOTroubleshootInternet Explorer (IE)Sites Adding to IE

Out of Sync IssueRevoke a Token Bootstrap FileSSO Failing Due MSIS7066
Introduction
This document describes the steps to configure Single Sign-On with Active Directory FederationService (ADFS 3.0) with the use of Windows 2012 R2 on Cisco Unified Communication Manage(CUCM), Cisco Unity Connection (CUC), Expressway products. Steps to configure Kerberos arealso included in this document.
Prerequisites
Requirements
Cisco recommends that you have knowledge of Single Sign-On (SSO) and Windows products.
Components Used
The information in this document is based on these software and hardware versions:
CUCM 11.5●
CUC 11.5●
Expressway 12●
Windows 2012 R2 Server with these roles:●
Active Directory Certificate Services●
Active Directory Federation Services●
The information in this document was created from the devices in a specific lab environment. All ofthe devices used in this document started with a cleared (default) configuration. If your network islive, ensure that you understand the potential impact of any command.
Configuration Pre-Check
Before you install ADFS3, these server roles need to already exist in the environment:
• Domain Controller and DNS
• All servers must be added as A Records along with their Pointer Record (a type of DNS recordthat resolves an IP address to a domain or hostname)
A Records
In fhlab.com. hosts cmpubhcsc, cmsubhcsc, cucpubhcsc, cucsubhcsc, expwyc, expwye,impubhcsc and imsubhcsc have been added.

Pointer (PTR) Records
SRV Records are Needed to be in Place for Jabber Discovery Services

Root CA (assuming the certificates will be Enterprise CA-signed)●
A Certificate Template needs to be created based on the Web Server Certificate Template, theformer is duplicated, renamed and on the Extensions tab, Application Policies is modified adding aClient Authentication Application Policy. This template is needed to sign all internal certificates(CUCM, CUC, IMP and Expressway Core) in a LAB environment the internal CA can also sign theExpressway E Certificate Signing Requests (CSR).
The template created needs to be issued to be able to sign CSR.

On the CA certificate web, select the template that has been created previously.
CUCM, IMP and CUC Multi-Server CSR must be Generated and signed by the CA. The Certificatepurpose must be tomcat.
CA Root Certificate must be uploaded to Tomcat Trust and the signed Certificate to tomcat.

IIS●
If not, this section will go thru the installation of these roles. Otherwise, skip this section andproceed directly to the download of ADFS3 from Microsoft.
After you install Windows 2012 R2 with DNS, promote the server to a Domain Controller.
The next task will be to install Microsoft Certificate Services.
Navigate to Server Manager and add a new role:
Select the Active Directory Certificate Services role.

And deploy these services - Certificate Authority Certificate Enrollment Policy Web Service first.After those two roles are installed, configure them and then install Certificate Enrollment WebService and Certificate Authority Web Enrollment. Configure them.
Additional role services and features required such as IIS will also be added, when theCertification Authority is installed.
Depending on your deployment, you can select Enterprise or Standalone.

For the CA Type, you can select Root CA or Subordinate CA. If there is no other CA alreadyrunning in the organization, select Root CA.

The next step is to create a private key for your CA.
This step is only needed if you install the ADFS3 on a separate Windows Server 2012. After you

configure the CA, the Role Services for IIS needs to be configured. This is necessary for WebEnrollment on the CA. For most ADFS deployments, an extra Role in IIS, click on ASP.NET underApplication Development is required.
In Server Manager, click on Web Server > IIS, and then right-click on Default Web Site. TheBinding needs to be changed to also allow HTTPS in addition to HTTP. This is done to supportHTTPS.

Select Edit Bindings.
Add a new Site Binding and select HTTPS as the type. For the SSL certificate, pick the servercertificate that should have the same FQDN as your AD server.

All the prerequisite roles are installed in the environment, so now you can proceed with theinstallation of ADFS3 Active Directory Federation Services (on Windows Server 2012).
For the Server Role, navigate to Server Manager > Manage > Add Server Roles and Featuresand then select Active Directory Federation Services if you install the IDP inside the customernetwork, on the private LAN.

Once the installation completes, you can open it from the taskbar or start menu.
ADFS3 Initial Configuration
This section will go thru the installation of a new, Stand-alone Federation server but it can also beused to install it on a Domain Controller
Select Windows and type AD FS Management in order to launch the ADFS Managementconsole as shown in the image.

Select the AD FS 3.0 Federation Server Configuration Wizard option in order to start yourADFS server configuration. These screenshots represent the same steps in AD FS 3.
Select Create a new Federation Service and click Next.

Select Stand-alone Federation Server and click Next as shown in the image.

Under SSL certificate, select the self-signed certificate from the list. The Federation Service namewill auto-populate. Click Next.

Review the settings and click Next in order to apply the settings.

Confirm that all the components have completed successfully and click Close in order to end thewizard and return to the main management console. This might take a few minutes.

ADFS is now effectively enabled and configured as an Identity Provider (IdP). Next, you need toadd CUCM as a trusted Relying partner. Before you can do this, you need to first do someconfiguration in CUCM Administration.
Configure SSO on CUCM with ADFS
LDAP Configuration
The cluster needs to be LDAP-integrated with Active Directory and LDAP authentication needs tobe configured before going any further. Navigate to System tab > LDAP System as shown in theimage.

Then, navigate to System tab > LDAP Directory.

After Active Directory users have been synchronized with CUCM, LDAP authentication needs tobe configured.
An end-user in CUCM needs to have certain Access Control Groups assigned to his/her end-userprofile. The ACG is Standard CCM Super Users. The user will be used to test SSO when theenvironment is ready.

CUCM Metadata
This section will show the process for the CUCM Publisher.
The first task is to get the CUCM metadata, for that you need to browse to the URL;https://<CUCM Pub FQDN>:8443/ssosp/ws/config/metadata/sp or it can be downloaded fromSystem tab > SAML Single Sign-on. This can be done per node or Cluster Wide. Preferable todo this Cluster Wide.
Save the data locally with a meaningful name such as sp_cucm0a.xml, you are going to need itafter.
Configure ADFS Relying Party
Flip back to the AD FS 3.0 Management console.

Click on Add Relying Party Trust Wizard.
Click Start to continue.
Select the federationmedatada.xml metadata XML file that you saved earlier and click Next.

Use CUCM_Cluster_Wide_Relying_Party_trust as the display name and click Next.

Select the first option and click Next.

Select Permit all users to access this relying party and click Next as shown in the image.

Review the configuration and click Next as shown in the image.

Uncheck the box and click Close.

With the secondary mouse button select the Relying Party Trust you just created and Edit ClaimRules configuration as shown in the image.
Click Add Rule as shown in the image.

Select Send LDAP Attributes as Claims and click Next.

Configure these parameters:
Claim Rule Name: NameID
Attribute Store: Active Directory (double Click the drop-down menu arrow)
LDAP Attribute: SAM-Account-Name
Outgoing Claim Type: uid
Click FINISH/OK to continue.
Please note that uid is not in lower case and does not already exist in the drop-down menu. Typeit.

Click Add Rule again in order to add another rule.

Select Send Claims Using a Custom Rule and click Next.

Create a custom rule called Cluster_Side_Claim_Rule.
Copy and paste this text in the rule window directly from here. Sometimes, quotes are changed ifedited on a text editor and that will make the rule to fail when you test SSO:
c:[Type ==
"http://schemas.microsoft.com/ws/2008/06/identity/claims/windowsaccountname"]
=> issue(Type = "http://schemas.xmlsoap.org/ws/2005/05/identity/claims/nameidentifier",
Issuer = c.Issuer, OriginalIssuer = c.OriginalIssuer, Value = c.Value, ValueType = c.ValueType,
Properties["http://schemas.xmlsoap.org/ws/2005/05/identity/claimproperties/format"] =
"urn:oasis:names:tc:SAML:2.0:nameid-format:transient",
Properties["http://schemas.xmlsoap.org/ws/2005/05/identity/claimproperties/namequalifier"]
= "http://<ADFS FQDN>/adfs/com/adfs/services/trust",
Properties["http://schemas.xmlsoap.org/ws/2005/05/identity/claimproperties/spnamequalifier"] =
"<CUCM Pub FQDN>");
c:[Type == "http://schemas.microsoft.com/ws/2008/06/identity/claims/windowsaccountname"]
=> issue(Type = "http://schemas.xmlsoap.org/ws/2005/05/identity/claims/nameidentifier",
Issuer = c.Issuer, OriginalIssuer = c.OriginalIssuer, Value = c.Value, ValueType = c.ValueType,
Properties["http://schemas.xmlsoap.org/ws/2005/05/identity/claimproperties/format"] =
"urn:oasis:names:tc:SAML:2.0:nameid-format:transient",
Properties["http://schemas.xmlsoap.org/ws/2005/05/identity/claimproperties/namequalifier"] =
"http://AD.fhlab.com/adfs/services/trust",
Properties["http://schemas.xmlsoap.org/ws/2005/05/identity/claimproperties/spnamequalifier"] =
"cmpubhcsc.fhlab.com");
Click Finish to continue.

You should now have two rules defined on ADFS. Click Apply and OK to close the rules window.

CUCM is now successfully added as a trusted relying party to ADFS.
Before you continue, please Restart the ADFS service. Navigate to Start Menu > AdministrativeTools > Services.

IDP Metadata
You need to provide CUCM with information about our IdP. This information is exchanged usingXML metadata. Ensure to perform this step on the server where ADFS is installed.
First, you need to connect to the ADFS (IdP) using a Firefox browser to download the XMLmetadata. Open a browser to https://<ADFS FQDN>/FederationMetadata/2007-06/FederationMetadata.xml and SAVE the metadata to a local folder.
Now, navigate to CUCM configuration to the system Menu > SAML Single Sign-On menu.

Flip back to the CUCM Administration and select SYSTEM > SAML Single Sign-On.

Select Enable SAML SSO.
Click Continue in order to acknowledge the warning.
On the SSO screen and click on Browse.. in order to import the FederationMetadata.xml

metadata XML file you saved earlier as shown in the image.
Select the XML file and click Open in order to upload it to CUCM from the Downloads underFavourites.
Once uploaded click on Import IdP Metadata to import the IdP information to CUCM. Confirm theimport was successful and click Next to continue.

Select the user belonging to the Standard CCM Super Users and click RUN SSO TEST.

When presented with a user authentication dialogue box login with the appropriate username andpassword.
If everything was correctly configured you should see a message saying SSO Test Succeeded!
Click CLOSE and FINISH to continue.

We have now successfully completed the basic configuration tasks to enable SSO on CUCMusing ADFS.
Configure SSO on CUC
The same process can be followed to enable SSO in Unity Connection.
LDAP integration with CUC.
Configure LDAP Authentication.
Import the Users from LDAP that will have voicemail assigned and also the user that will serve fortesting SSO.

Navigate to Users > Edit > Roles as shown in the image.
Assign the testing user the role of System Administrator.
CUC Metadata
You should have by now downloaded CUC metadata, created the RelyingPartyTrust for CUC anduploaded CUC metadata and created the rules I AD FS on ADFS 3.0

Go to SAML Single Sign-On and Enable SAML SSO.

Configure SSO on Expressway
Import Metadata to Expressway C
Open a browser to https://<ADFS FQDN>/FederationMetadata/2007-06/FederationMetadata.xmland SAVE the metadata to a local folder
Upload to Configuration > Unified Communications > IDP.
Export Metadata From Expressway C
Go to configuration -> Unified Communications -> IDP -> Export SAML Data
Cluster mode uses a self-signed certificate (with long lifetime) that is included in the SAML
metadata and used for signing SAML requests
On cluster-wide mode, to download the single cluster-wide metadata file, click Download●
On per-peer mode, to download the metadata file for an individual peer, click Download nextto the peer. To export all in a .zip file, click Download All.
●
Add a Relying Party Trust for Cisco Expressway-E
First, create Relying Party Trusts for the Expressway-Es and then Add a claim rule to send identityas UID attribute.

OAuth with Refresh Login
In Cisco CUCM Enterprise Parameters, Verify OAuth with Refresh login flow parameter isenabled. Go to Cisco Unified CM Administration > Enterprise Parameters > SSO and OAuthConfiguration.
Authentication Path
If the authentication path is set to “SAML SSO authentication” only Jabber clients using an●

SSO enabled Unified CM cluster would be able to use MRA on this Expressway. This is anSSO only configuration. Expressway MRA support for all IP phones, all TelePresence endpoints, and any Jabberclients homed to a Unified CM cluster not configured for SSO will require the authenticationpath to include UCM/LDAP authentication.
●
If one or more of the Unified CM clusters supports Jabber SSO, select the “SAML SSO andUCM/LDAP” to allow for both SSO and basic authentication.
●
SSO Architecture
SAML is an XML-based open-standard data format that enables administrators to access adefined set of Cisco collaboration applications seamlessly after signing into one of thoseapplications. SAML SSO uses the SAML 2.0 protocol to offer cross-domain and cross-productsingle sign-on for Cisco collaboration solutions.
On-Premise Login Flow
MRA Login Flow
OAuth
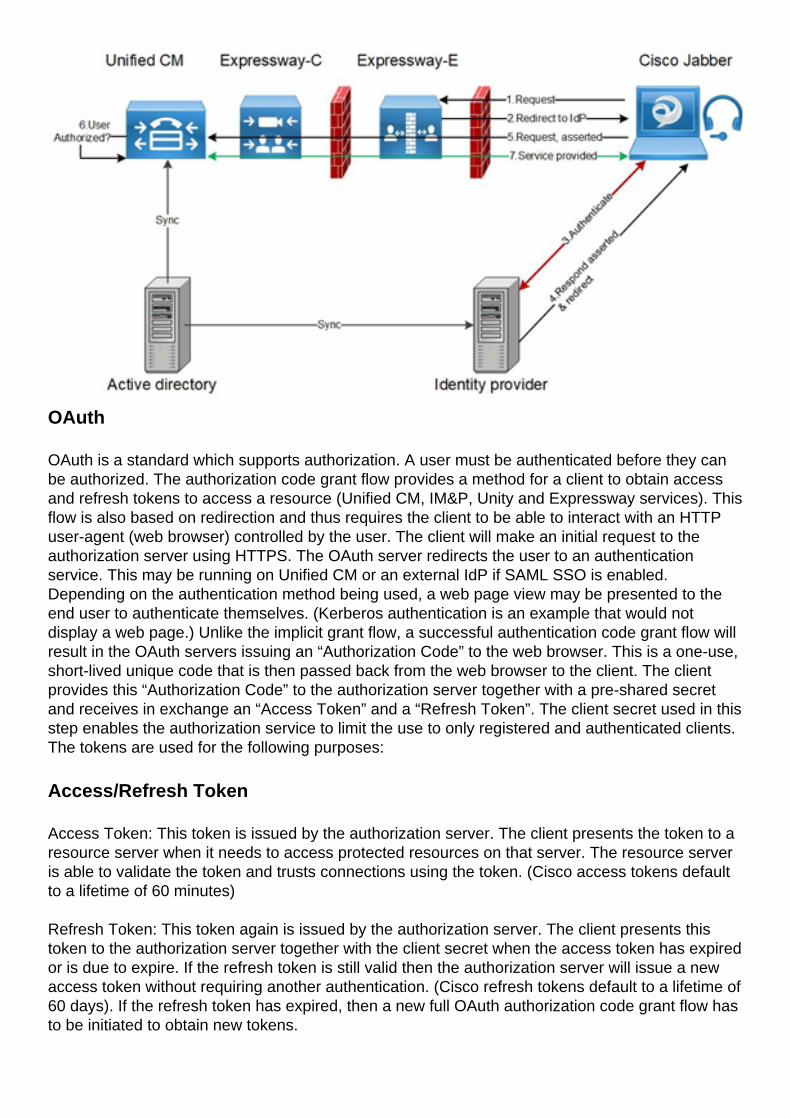
OAuth is a standard which supports authorization. A user must be authenticated before they canbe authorized. The authorization code grant flow provides a method for a client to obtain accessand refresh tokens to access a resource (Unified CM, IM&P, Unity and Expressway services). Thisflow is also based on redirection and thus requires the client to be able to interact with an HTTPuser-agent (web browser) controlled by the user. The client will make an initial request to theauthorization server using HTTPS. The OAuth server redirects the user to an authenticationservice. This may be running on Unified CM or an external IdP if SAML SSO is enabled.Depending on the authentication method being used, a web page view may be presented to theend user to authenticate themselves. (Kerberos authentication is an example that would notdisplay a web page.) Unlike the implicit grant flow, a successful authentication code grant flow willresult in the OAuth servers issuing an “Authorization Code” to the web browser. This is a one-use,short-lived unique code that is then passed back from the web browser to the client. The clientprovides this “Authorization Code” to the authorization server together with a pre-shared secretand receives in exchange an “Access Token” and a “Refresh Token”. The client secret used in thisstep enables the authorization service to limit the use to only registered and authenticated clients.The tokens are used for the following purposes:
Access/Refresh Token
Access Token: This token is issued by the authorization server. The client presents the token to aresource server when it needs to access protected resources on that server. The resource serveris able to validate the token and trusts connections using the token. (Cisco access tokens defaultto a lifetime of 60 minutes)
Refresh Token: This token again is issued by the authorization server. The client presents thistoken to the authorization server together with the client secret when the access token has expiredor is due to expire. If the refresh token is still valid then the authorization server will issue a newaccess token without requiring another authentication. (Cisco refresh tokens default to a lifetime of60 days). If the refresh token has expired, then a new full OAuth authorization code grant flow hasto be initiated to obtain new tokens.

OAuth Authorization Code Grant Flow is better
In the implicit grant flow, the access token is passed to the Jabber client via a HTTP user agent(browser). In the authorization code grant flow, the access token is exchanged directly betweenthe authorization server and the Jabber client. The token is requested from the authorizationserver using a time-limited unique authorization code. This direct exchange of the access token ismore secure and reduces risk exposure.
The OAuth authorization code grant flow supports the use of refresh tokens. This delivers a betterexperience to the end user since they don’t need to re-authenticate as frequently (by default 60days)
Configure Kerberos
Select Windows Authentication
Internet Information Services (IIS) Manager > Sites > Default Web Site > Authentication >Windows Authentication > Advance Settings.
Uncheck Enable Kernel-mode authentication.1.Ensure Extended Protection is Off.2.
ADFS Supports both Kerberos NTLM
Ensure that AD FS Version 3.0 supports both the Kerberos protocol and the NT LAN Manager(NTLM) protocol because all Non-Windows clients cannot use Kerberos and rely on NTLM.

In the right-pane, select Providers and ensure Negotiate and NTLM are present under EnabledProviders:
Configure Microsoft Internet Explorer
Ensure that Internet Explorer > Advanced > Enable Integrated Windows Authentication ischecked.

Add ADFS URL under Security > Intranet zones > Sites