CIMHT_006 – CIMPLICITY 9.0/9.0 R2 How to Configure the ...
12
1 CIMHT_006 – CIMPLICITY 9.0/9.0 R2 How to Configure the Database Logger v5.0 Proficy HMI/SCADA – CIMPLICITY 9.0 Outline The Proficy HMI/SCADA – CIMPLICITY product has the ability to log data to a Microsoft SQL Database. This data can be point values, alarms, or potentially events that have happened in the CIMPLICITY project. This document will explain the minimal configuration required to achieve Data logging on a CIMPLICITY Server. Requirements Software CIMPLICITY Development Server. Microsoft SQL Server Express 2012 NOTE: You will require the username and password of a valid Microsoft SQL user. Typically, it is suggested to use a system administrator (or “sa”) account to minimize the permissions based issues that can occur. If you do not know your SQL username and password, please contact your IT Administrator. How it works When a CIMPLICITY project is running it is maintaining a list of point values. These points can be based off of a Device such as a PLC, or calculated internally. These points can be logged to the database to keep a historical record of the data values that were obtained. The CIMPLICITY Database Logger Option inserts the data into the database. There are two processes that do the inserts to the SQL Server; the Point Datalogger (PTDL) process – which handles point value logging, and the Datalogger Process (DL) – which handles alarm and event logging. CIMPLICITY Project SQL Database Figure 1 – Data flow to the Microsoft SQL Server database.
-
Upload
khangminh22 -
Category
Documents
-
view
6 -
download
0
Transcript of CIMHT_006 – CIMPLICITY 9.0/9.0 R2 How to Configure the ...

1
CIMHT_006 – CIMPLICITY 9.0/9.0 R2 How to Configure the Database Logger v5.0 Proficy HMI/SCADA – CIMPLICITY 9.0 Outline The Proficy HMI/SCADA – CIMPLICITY product has the ability to log data to a Microsoft SQL Database. This data can be point values, alarms, or potentially events that have happened in the CIMPLICITY project. This document will explain the minimal configuration required to achieve Data logging on a CIMPLICITY Server.
Requirements Software
� CIMPLICITY Development Server.
� Microsoft SQL Server Express 2012 NOTE: You will require the username and password of a valid Microsoft SQL user. Typically, it is suggested to use a system administrator (or “sa”) account to minimize the permissions based issues that can occur. If you do not know your SQL username and password, please contact your IT Administrator.
How it works When a CIMPLICITY project is running it is maintaining a list of point values. These points can be based off of a Device such as a PLC, or calculated internally. These points can be logged to the database to keep a historical record of the data values that were obtained. The CIMPLICITY Database Logger Option inserts the data into the database. There are two processes that do the inserts to the SQL Server; the Point Datalogger (PTDL) process – which handles point value logging, and the Datalogger Process (DL) – which handles alarm and event logging.
CIMPLICITY Project SQL Database
Figure 1 – Data flow to the Microsoft SQL Server database.

2
Microsoft SQL Server Express Installation
Step 1: Installing Microsoft SQL Server Express The first step to getting the Database Logger functionality working is to install the Microsoft SQL Server Express software. If you have already installed the software on the system, you can skip this step. The software can be installed via the installation menu for CIMPLICITY, or it can be downloaded directly from Microsoft. To install the software from the CIMPLICITY installation media, do the following:
1. From the DVD run the InstallFrontEnd.exe 2. Choose “Install SQL Express 2012” from the install menu
Figure 2 – The CIMPLICITY installer front end.
3. A dialog will appear which is asking for the ‘sa’ user password. Enter a password that meets
the requirements:
Figure 3 – The SQL Express configuration utility.

3
Important: Be sure to write the password down that is entered, as it will be needed later.
4. Click on the “Install” button and let the installation complete. 5. Reboot the system 6. When the installation is complete, a new SQL Server Express installation will be installed on
the system. The instance name of this SQL Server is “COMPUTERNAME\CIMPLICITY” (where COMPUTERNAME is the name of the computer installed on), and a default logical database of ‘CIMPLICITY’ will be created.
If downloading the installer from Microsoft directly, please follow the instructions provided by Microsoft. However, please be aware that if using this method then please make sure to install the SQL Server Express installation with mixed-mode authentication, and it will be necessary to manually create the default ‘CIMPLICITY’ logical database in the SQL Server.
Step 2: Confirming the SQL Server Installation/Starting the Services The second step to getting the Database Logger functionality working is to confirm the SQL Server instance name, and to start the SQL Server Browser service, so that connections can be made to the SQL Server.
1. Open the Windows Control Panel->Administrative Tools->Services utility 2. In the services list confirm that the following services are listed and exist:
SQL Server (CIMPLICITY) SQL Server Browser
Figure 4 – The required services for the SQL Server.
Note:
The name in parenthesis for the “SQL Server Service” (in the example above it is CIMPLICITY) is the instance name. This is necessary to know if you are connecting to an SQL Server not provided by the CIMPLICITY installation.
3. Confirm that the “SQL Server (CIMPLICITY) Service” is started. If it is not started, then start it, and set it to be “Automatic” in the service properties. Setting the service to “Automatic” means that it will start on computer boot-up.
4. In the properties for the SQL Server Browser Service, open the properties, and set it to “Automatic” and Start it. Note: If the SQL Server Browser service is not running it may not be possible to connect to the SQL Server, so it is imperative that this service is started and running.
Step 3: Configuring the 32-Bit ODBC Data Source The third step is to configure the ODBC Data Source that the CIMPLICITY Database Logger will use to connect to the SQL Server database. Note that CIMPLICITY currently runs as a 32 bit application on a

4
64 bit operating system, and because of this restriction it is necessary to use the 32 bit Data Source administrator in Windows, and not the 64 bit Data Source Administrator. To configure the ODBC Data Source do the following:
1. Open the 32 Bit Data Source Administrator. This can be found in a variety of locations depending on the operating system. Windows 2012 R2 (64 bit) a. Open the Control Panel->Administrative Tools. b. Open “ODBC Data Sources (32 bit)”
Windows 7 (64 bit) a. Open Start->Programs->Proficy HMI/SCADA – CIMPLICITY 9.0->ODBCAD 32 Bit DSN’s Any other 32 bit Operating System a. Open the Control Panel->Administrative Tools b. Open “ODBC Data Sources”
Figure 5 – The 32 bit ODBC Data Source Administrator dialog.
2. Once the Data Source Administrator is open then navigate to the “System DSN” tab 3. Click on the “Add” button 4. When prompted to choose a driver choose “SQL Native Client 11.0” and click the “OK” button.

5
Figure 6 0 - Choosing the Correct ODBC Driver.
5. When the ODBC creation dialog appears, for the name of the DSN, it can be called whatever
the user likes. For the duration of this document it will be named “CIM SQL Database”.
Figure 7 – Configuring the SQL Server Connection
6. For the instance name enter:
COMPUTERNAME\CIMPLICITY Where COMPUTERNAME is the name of the computer the SQL Server is installed on. Note: If you are using a different/custom installation of SQL, it is imperative that the proper instance name is used.

6
When this is entered properly select the “Next” button. 7. On the next dialog change the radio button to choose:
“With SQL Server authentication using a login ID and password entered by the user”. Login ID: sa The password will be whatever was entered when the SQL Server was installed. If this is not known, then the password will have to be reset for the ‘sa’ user using either Microsoft SQL Server Express Management Studio, or by some other method.
Figure 8 – Configuring the SQL Server credentials.
8. When the Login ID and Password are entered click the “Next” button. 9. Select the “Change the default Database to” checkbox, and then click on the dropdown. From
the dropdown choose the “CIMPLICITY” database.

7
Figure 9 – Choosing the default SQL Database.
If the dialog throws an error about not being logged in then the Login ID/password used previously are invalid and should be checked. If the dialog does not show the “CIMPLICITY” database in the dropdown then the logical database must be created using the SQL Server Management Studio. Note: Do not ever log to the ‘master’ database as this would make the entirety of the SQL Database non-portable.
10. When done choosing the default database then select the “Next” button. 11. On the next dialog click on the “Finish” button.
Figure 10 – Finishing the ODBC Data Source configuration.
8
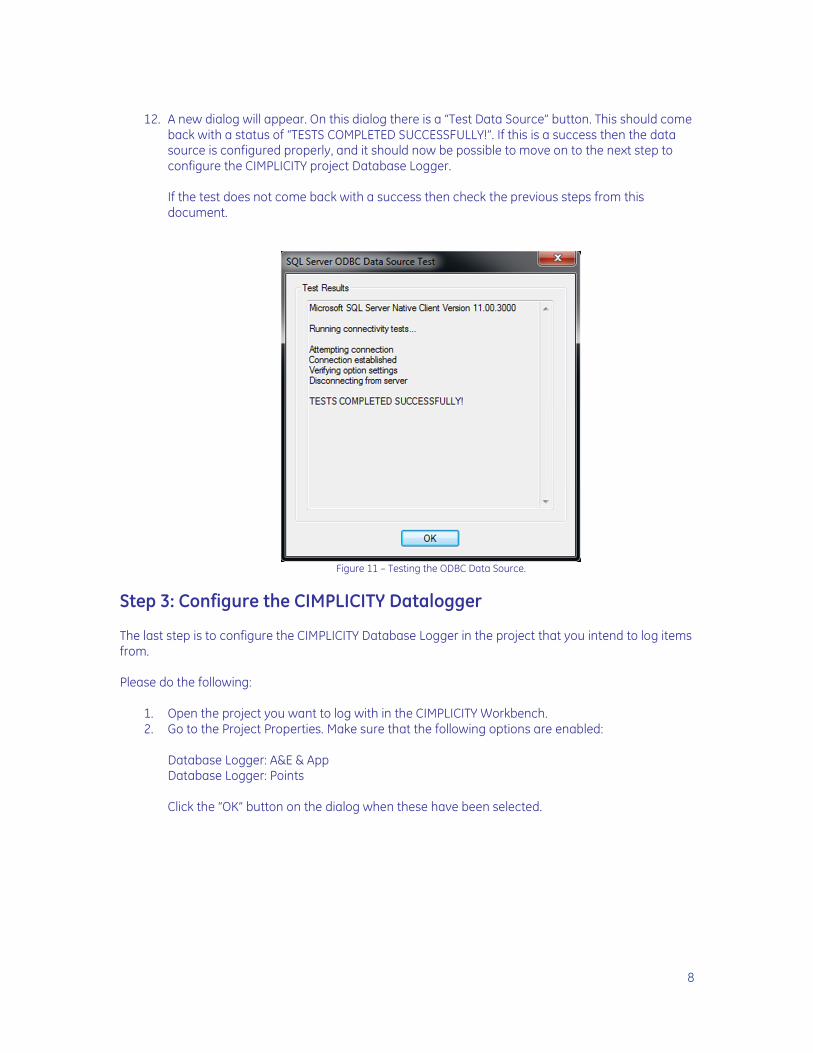
12. A new dialog will appear. On this dialog there is a “Test Data Source” button. This should come
back with a status of “TESTS COMPLETED SUCCESSFULLY!”. If this is a success then the data source is configured properly, and it should now be possible to move on to the next step to configure the CIMPLICITY project Database Logger. If the test does not come back with a success then check the previous steps from this document.
Figure 11 – Testing the ODBC Data Source.
Step 3: Configure the CIMPLICITY Datalogger The last step is to configure the CIMPLICITY Database Logger in the project that you intend to log items from. Please do the following:
1. Open the project you want to log with in the CIMPLICITY Workbench. 2. Go to the Project Properties. Make sure that the following options are enabled:
Database Logger: A&E & App Database Logger: Points Click the “OK” button on the dialog when these have been selected.

9
Figure 12 – The CIMPLICITY Project Properties
3. From the CIMPLICITY Workbench open the “Database Logger” utility. The following dialog will
appear:
Figure 13 – Configuring the Database Logger.
4. Highlight the DATA_LOG table and right click. On the right click menu choose “Logging
Properties”. The following dialog should appear:

10
Figure 14 – Configuring the Default Database Logging Connections.
5. Click on the “Default Alarm Connection” tab. Choose the DSN that you had configured
previously in the Data Source Administrator (“CIM SQL Database”) from the dropdown and put in the username and password that you used (“sa”).
Figure 15 – Setting the individual table connection properties.
6. Click on the “Default Point Connection” tab. When you transition from tab to tab in this dialog
it will attempt to authenticate the connection information. If you get an error dialog when moving between tabs then it means that the Data Source is invalid, or the username and/or password are invalid.

11
7. Configure the same information on the “Default Point Connection” tab.
Figure 16 – Configuring the default database logger connection.
8. Click OK to exit the dialog. 9. For each table in the Database Logger utility then highlight each table and right click. From
the popup choose “Properties”. A dialog should appear as follows:
Figure 17 – Configuring the table connection information.
If it does not open to the “Connection” tab then select it. For each table make sure that the checkbox “Use default Point” connection is selected. For the case of the ALARM_LOG, EM_LOG,

12
and EVENT_LOG tables you can choose the “Default Alarm Connection”. When this is done, then click “OK” on the dialog.
10. Close the Database Logger utility. 11. In the CIMPLICITY Workbench, do a configuration update of the project. 12. Start the project. At this point it should be set up for logging. You are free to add a point to the
DATA_LOG table with logging.