COMPLETE GUIDE TO MONITORING OF AZZURRO ZCS ...
38
Technical Note “Complete Guide to Monitoring the Azzurro ZCS Systems via Wi-Fi” - Rev. 1.2 of 20/05/2019 Zucchetti Centro Sistemi S.p.A. - Green Innovation Division Via Lungarno, 248 - 52028 Terranuova Bracciolini - Arezzo, Italy www.zcsazzurro.com Page 1 of 38 COMPLETE GUIDE TO MONITORING OF AZZURRO ZCS SYSTEMS VIA WI-FI
-
Upload
khangminh22 -
Category
Documents
-
view
0 -
download
0
Transcript of COMPLETE GUIDE TO MONITORING OF AZZURRO ZCS ...
Technical Note “Complete Guide to Monitoring the Azzurro ZCS Systems via Wi-Fi” - Rev. 1.2 of 20/05/2019
Zucchetti Centro Sistemi S.p.A. - Green Innovation Division Via Lungarno, 248 - 52028 Terranuova Bracciolini - Arezzo, Italy
www.zcsazzurro.com
Page 1 of 38
COMPLETE GUIDE TO MONITORING OF AZZURRO ZCS
SYSTEMS VIA WI-FI

Technical Note “Complete Guide to Monitoring the Azzurro ZCS Systems via Wi-Fi” - Rev. 1.2 of 20/05/2019
Zucchetti Centro Sistemi S.p.A. - Green Innovation Division Via Lungarno, 248 - 52028 Terranuova Bracciolini - Arezzo, Italy
www.zcsazzurro.com
Page 2 of 38
PURPOSE OF THE DOCUMENT The purpose of this document is to guide the user on how to configure the Wi-Fi card installed on Azzurro ZCS inverters in order to be able to monitor the system on one of the AzzurroZCS platforms. The document also contains a series of checks and inspections to be carried out in case of incorrect configuration of the Wi-Fi card. Finally, the document outlines the procedure for registering and configuring the system on two of the available monitoring platforms: AzzurroZCS APP and AzzurroZCS web portal.
PARAGRAPHS OF THE DOCUMENT 1 Preliminary notes on the configuration of the Wi-Fi card 2.1 Procedure for installing an internal Wi-Fi card 2.2 Procedure for configuring an internal Wi-Fi card 3.1 Procedure for installing an external Wi-Fi adapter 3.2 Procedure for configuring an external Wi-Fi adapter 4 Procedure for checking the correct configuration of the Wi-Fi card 5 Procedure for registering on the AzzurroZCS application 6 Procedure for registering on the AzzurroZCS portal
1 PRELIMINARY NOTES ON THE CONFIGURATION OF THE WI-FI CARD The AzzurroZCS inverters can be monitored by means of a Wi-Fi card connected to a Wi-Fi network present at the place of installation. Depending on the model purchased, this card may already be present on board the inverter or it can be installed at a later date, since all AzzurroZCS inverters are set up for monitoring. In the first case, it will only be necessary to configure the Wi-Fi card, connecting it to a suitable wireless network, as shown below. If the Wi-Fi needs to be installed, you will need a qualified installer or technician to correctly assemble the card. The following two types of Wi-Fi adapters are available on the market:
Internal Wi-Fi card (code ZSM-WIFI-KIT)
External Wi-Fi adapter (code ZSM-WIFI-EXT) The two devices, although different in appearance and method of installation and configuration, have the same function, i.e. to transmit data from the inverter to a web server to allow remote monitoring of the system.

Technical Note “Complete Guide to Monitoring the Azzurro ZCS Systems via Wi-Fi” - Rev. 1.2 of 20/05/2019
Zucchetti Centro Sistemi S.p.A. - Green Innovation Division Via Lungarno, 248 - 52028 Terranuova Bracciolini - Arezzo, Italy
www.zcsazzurro.com
Page 3 of 38
Figure 1 – Internal Wi-Fi card (left) and external Wi-Fi adapter (right)
It is also necessary to makes sue that the AzzurroZCS inverter is compatible with the Wi-Fi model, as shown in the table below
Internal Wi-Fi card (code ZSM-WIFI-KIT) External Wi-Fi adapter (code ZSM-WIFI-EXT)
Azzurro ZCS 1.1-3K TL inverter Azzurro ZCS 3-6K TLM LITE inverter
Azzurro ZCS 3-6K TLM inverter Azzurro ZCS 4.4-12K TL-X inverter
Azzurro ZCS 3000SP storage inverter Azzurro ZCS 10-20K TL Inverter
Azzurro ZCS 20-33K TL-G2 Inverter
Azzurro ZCS 30-40K TL Inverter
Azzurro ZCS 50-70K TL Inverter
Azzurro ZCS HYD 3-6K – ES hybrid inverter
The Wi-Fi card, whether internal or external, must be installed by an installer or technician who is specialised and able to carry out the procedure described in this document. In particular, the internal card requires the opening of the front cover of the inverter, an operation which, if not carried out correctly, can cause damage to people, objects or the inverter itself. The configuration of the Wi-Fi card, whether internal or external, requires the presence of a Wi-Fi network near the inverter in order to obtain a stable transmission of data from the inverter to the Wi-Fi modem. The configuration can be done by means of a smartphone, PC, tablet or any other device that can be connected to a Wi-Fi network. The configuration procedure can be performed at any time, as long as it is near the inverter at the time it is switched on. It is also required to know the password of the modem to which you want to connect the Wi-Fi card.

Technical Note “Complete Guide to Monitoring the Azzurro ZCS Systems via Wi-Fi” - Rev. 1.2 of 20/05/2019
Zucchetti Centro Sistemi S.p.A. - Green Innovation Division Via Lungarno, 248 - 52028 Terranuova Bracciolini - Arezzo, Italy
www.zcsazzurro.com
Page 4 of 38
2.1 PROCEDURE FOR INSTALLNG AN INTERNAL WI-FI CARD The installation of an internal Wi-Fi card is only required for single-phase AzzurroZCS 1-3K TL and 3-6K TLM photovoltaic inverters not equipped with a Wi-Fi card (the 3000SP storage inverter always comes with an internal Wi-Fi card).
1) Switch off the photovoltaic inverter by first disconnecting the AC line via the appropriate wall switch and then the DC line via the appropriate wall switch.
2) Unscrew and remove the four Allen screws on the front panel of the inverter using a suitably sized key.
Figure 2 – Position of the four Allen screws securing the front cover
3) Lift the front cover of the inverter using a screwdriver if necessary to lever the aluminium casing open; during this operation, be careful not to move the front cover too far from the body of the inverter, as it is still connected via the flat cable.
4) Lift the cover up as far as the flat cable allows it, and open the hooks connecting the flat cable to the terminal on the inverter’s communication board, so that both the cable and the front cover can be removed. Be sure to correctly open both plastic hooks before removing the cable.

Technical Note “Complete Guide to Monitoring the Azzurro ZCS Systems via Wi-Fi” - Rev. 1.2 of 20/05/2019
Zucchetti Centro Sistemi S.p.A. - Green Innovation Division Via Lungarno, 248 - 52028 Terranuova Bracciolini - Arezzo, Italy
www.zcsazzurro.com
Page 5 of 38
Figure 3 – Opening of the hooks on the seat of the flat connector
5) Insert the Wi-Fi card into the dedicated slot on the communication board, also marked by an outline
of the card, as show in the following image.
Figure 4 – Location of the Wi-Fi card on the communication card
Make sure to first insert the two plastic connectors in the slots positioned at the top, and then match the pins of the Wi-Fi card to the bottom slots. Press the card lightly to make sure it is mounted properly.
6) Pass the antenna connected to the card through the cable gland on the bottom of the inverter, after loosening the ring nut and removing the rubber stopper inside; finally, make sure the antenna is stable by rotating the ring nut in the opposite direction. If during this operation, the cable connected to the antenna detaches from the card, connect it again by placing the two connectors on top, and exerting a slight pressure, as shown in the following image.

Technical Note “Complete Guide to Monitoring the Azzurro ZCS Systems via Wi-Fi” - Rev. 1.2 of 20/05/2019
Zucchetti Centro Sistemi S.p.A. - Green Innovation Division Via Lungarno, 248 - 52028 Terranuova Bracciolini - Arezzo, Italy
www.zcsazzurro.com
Page 6 of 38
Figure 5 – Correctly installed Wi-Fi card
7) Reconnect the flat cable in its seat and close the two plastic hooks, making sure that they close
properly. Place the front cover in its original position and secure it by rescrewing the four Allen screws that were previously removed.
8) Start the inverter in the regular way as described in the manual, supplying first DC voltage and then AC voltage via the wall-mounted switches.
2.2 PROCEDURE FOR CONFIGURING AN INTERNAL WI-FI CARD Go to front of the inverter and search for the Wi-Fi network using a smartphone or computer, to make sure that the signal from the home Wi-Fi network reaches the place where the inverter is installed. If the Wi-Fi signal is present in the location where the inverter is installed, you can start the configuration procedure. If the Wi-Fi signal does not reach the inverter, it is necessary to install a system that amplifies the signal and brings it to the place of installation. 1) Search for any wireless networks in order to display the network of the inverter’s Wi-Fi card, which is:
AP_0805925180. The number indicates the serial number of the Wi-Fi card, which can be checked by referring to the smaller label located at the lower left side of the inverter.
2) Open the browser and enter the following IP address in the search bar to access the web server inside the Wi-Fi card: 10.10.100.254
3) For both the username and password, enter: admin

Technical Note “Complete Guide to Monitoring the Azzurro ZCS Systems via Wi-Fi” - Rev. 1.2 of 20/05/2019
Zucchetti Centro Sistemi S.p.A. - Green Innovation Division Via Lungarno, 248 - 52028 Terranuova Bracciolini - Arezzo, Italy
www.zcsazzurro.com
Page 7 of 38
Figure 6 – Screen for logging into the configuration page of the Wi-Fi card
Autenticazione richiesta Authentication required
http://10.10.100.254 richiede un nome utente e una password. La tua connessione a questo sito non è privata.
http://10.10.100.254 requires a username and password. Your connection on this site isn’t private.
Nome Utente Username
The following page will open:
Figure 7 – Status screen

Technical Note “Complete Guide to Monitoring the Azzurro ZCS Systems via Wi-Fi” - Rev. 1.2 of 20/05/2019
Zucchetti Centro Sistemi S.p.A. - Green Innovation Division Via Lungarno, 248 - 52028 Terranuova Bracciolini - Arezzo, Italy
www.zcsazzurro.com
Page 8 of 38
4) Click on the Wizard key shown on the left column to enter the configuration menu. Now click on Start to start the configuration wizard.
Figure 8 – Screen for starting (1) the Setup Wizard
Check the “Wireless connection” option; if present, select SOFAR as the inverter brand, then click NEXT.
Figure 9 – Network connection (2) screen

Technical Note “Complete Guide to Monitoring the Azzurro ZCS Systems via Wi-Fi” - Rev. 1.2 of 20/05/2019
Zucchetti Centro Sistemi S.p.A. - Green Innovation Division Via Lungarno, 248 - 52028 Terranuova Bracciolini - Arezzo, Italy
www.zcsazzurro.com
Page 9 of 38
5) From the list of wireless networks available, select your home Wi-Fi network, where you want to connect the Wi-Fi card. Click “Next.”
Figure 10 – Screen for selecting the available wireless network (3)
N.B.: make sure that the signal strength is greater than 30%; if not, make sure the antenna has been fully extended by following the three steps shown in the figure. If the antenna has been correctly extracted, bring the router closer or install a repeater or signal amplifier.
Figure 11 – Procedure for extracting the antenna connected to the internal Wi-Fi card
Estrarre Extract
Allentare Loosen
Serrare Fasten

Technical Note “Complete Guide to Monitoring the Azzurro ZCS Systems via Wi-Fi” - Rev. 1.2 of 20/05/2019
Zucchetti Centro Sistemi S.p.A. - Green Innovation Division Via Lungarno, 248 - 52028 Terranuova Bracciolini - Arezzo, Italy
www.zcsazzurro.com
Page 10 of 38
6) Enter and repeat the password of the selected home network.
Figure 12 – Screen for entering the password of the wireless network (4)
N.B.: The system will check that the two passwords entered match; if two different passwords were entered, an error message will be displayed and you will have to re-enter the password. During this step, the system is not able to make sure that the password entered is actually the one requested by the modem, therefore please make sure that you enter the correct password.

Technical Note “Complete Guide to Monitoring the Azzurro ZCS Systems via Wi-Fi” - Rev. 1.2 of 20/05/2019
Zucchetti Centro Sistemi S.p.A. - Green Innovation Division Via Lungarno, 248 - 52028 Terranuova Bracciolini - Arezzo, Italy
www.zcsazzurro.com
Page 11 of 38
Figure 13 – Screen showing the warning for entry of wrong password
7) Make sure that the “Enable” option is selected to automatically obtain the IP address from your router, then click Next.
Figure 14 – Screen for automatically obtaining the IP address (5)
8) Click on Next without making any changes or checking any options.

Technical Note “Complete Guide to Monitoring the Azzurro ZCS Systems via Wi-Fi” - Rev. 1.2 of 20/05/2019
Zucchetti Centro Sistemi S.p.A. - Green Innovation Division Via Lungarno, 248 - 52028 Terranuova Bracciolini - Arezzo, Italy
www.zcsazzurro.com
Page 12 of 38
Figure 15 - Screen for setting the security options (6)
9) Complete the configuration procedure by clicking OK, as shown in the following screen.
Figure 16 – Final configuration screen (7)
10) If the configuration procedure is successful, the following screen will appear. If this screen does not
appear, try updating the browser page.

Technical Note “Complete Guide to Monitoring the Azzurro ZCS Systems via Wi-Fi” - Rev. 1.2 of 20/05/2019
Zucchetti Centro Sistemi S.p.A. - Green Innovation Division Via Lungarno, 248 - 52028 Terranuova Bracciolini - Arezzo, Italy
www.zcsazzurro.com
Page 13 of 38
The screen prompts you to manually close the page; therefore, close the page from the background of your telephone or from the close button on your PC.
Figure 17 – Configuration complete screen
11) Enter the IP address 10.10.100.254 again, and the login credentials (“admin” as both username and password). When you log in again, the screen below will appear; click on the Remote Server information at the bottom of the screen, and check that “Pingable” is written to the right of Remote Server A. The word “Pingable” indicates that the Wi-Fi card and the remote server have been successfully connected.

Technical Note “Complete Guide to Monitoring the Azzurro ZCS Systems via Wi-Fi” - Rev. 1.2 of 20/05/2019
Zucchetti Centro Sistemi S.p.A. - Green Innovation Division Via Lungarno, 248 - 52028 Terranuova Bracciolini - Arezzo, Italy
www.zcsazzurro.com
Page 14 of 38
Figure 18 - Main screen of status and verification of correct configuration
3.1 PROCEDURE FOR INSTALLING AN EXTERNAL WI-FI ADAPTER Unlike the internal Wi-Fi card, the external adapter must be installed for all compatible inverters. However, the procedure is quicker and more streamlined as there is no need to open the front cover of the inverter. 1) Turn off the inverter following the procedure described in the manual:
a. In the case of a photovoltaic inverter, first disconnect the AC line via the appropriate switch installed on the wall and then the DC line via the appropriate switch installed on the wall or the knob switch on board the inverter.
b. In the case of a hybrid inverter, first disconnect the AC line via the appropriate switch installed on the wall and then the DC line of the batteries (ON/OFF or POWER switch on board the batteries) and the photovoltaic line (knob switch on the left side of the inverter)
2) Remove the cover for accessing the Wi-Fi connector on the bottom of the inverter by unscrewing the two cross screws, as shown in the figure.
Figure 19 – Seat of the external Wi-Fi adapter

Technical Note “Complete Guide to Monitoring the Azzurro ZCS Systems via Wi-Fi” - Rev. 1.2 of 20/05/2019
Zucchetti Centro Sistemi S.p.A. - Green Innovation Division Via Lungarno, 248 - 52028 Terranuova Bracciolini - Arezzo, Italy
www.zcsazzurro.com
Page 15 of 38
3) Insert the Wi-Fi adapter in the seat, taking care to follow the direction of the insertion and ensure proper contact between the two parts. Secure the external Wi-Fi adapter by tightening the two screws inside the package.
4) Turn on the inverter following the procedure described in the manual: a. In the case of a photovoltaic inverter, first supply DC voltage and then AC voltage by means of
the appropriate switches and ON/OFF buttons. b. In the case of a hybrid inverter, first supply DC voltage from the batteries (ON/OFF or POWER
switch on the batteries), then the AC voltage via the appropriate switch and finally voltage from the photovoltaic panels. For more details, refer to the appropriate section in the user manual.
3.2 PROCEDURE FOR CONFIGURING AN EXTERNAL WI-FI ADAPTER Position yourself in front of the inverter and search for the Wi-Fi network using a smartphone or computer, to make sure that the signal from the home Wi-Fi network reaches the place where the inverter is installed. If the Wi-Fi signal is present in the location where the inverter is installed, you can proceed with the configuration procedure. If the Wi-Fi signal does not reach the inverter, it is necessary to install a system that amplifies the signal and brings it to the place of installation.
1) Search for the Wi-Fi networks on your telephone or PC so that all the networks visible from your device are displayed.
Figure 20 – Search for Wi-Fi networks on a Smartphone (iOS)
Impostazioni Settings
Le nuove connessioni Wi-Fi sono state disattivate dal centro di controllo New Wi-Fi network connections have been turned off from the Control Center
SCEGLI UNA RETE…. CHOOSE A NETWORK…..

Technical Note “Complete Guide to Monitoring the Azzurro ZCS Systems via Wi-Fi” - Rev. 1.2 of 20/05/2019
Zucchetti Centro Sistemi S.p.A. - Green Innovation Division Via Lungarno, 248 - 52028 Terranuova Bracciolini - Arezzo, Italy
www.zcsazzurro.com
Page 16 of 38
2) Connect to the Wi-Fi network generated by the Wi-Fi adapter of the inverter (i.e. AP_51…), operating as an Access Point.
Figure 21 – Connection to Access Point of the Wi-Fi adapter (iOS)
3) Open a browser (Google Chrome, Safari, Firefox) and enter the IP address 10.10.100.254 in the search bar. Enter “admin” as both the username and password.
Figure 22 – Screen for accessing the IP address to configure the Wi-Fi adapter
Accedi al sito web Enter the website
Accedi a 10.10.100.254 Enter 10.10.100.254
La password verrà inviata in chiaro. Your password will be sent unencrypted

Technical Note “Complete Guide to Monitoring the Azzurro ZCS Systems via Wi-Fi” - Rev. 1.2 of 20/05/2019
Zucchetti Centro Sistemi S.p.A. - Green Innovation Division Via Lungarno, 248 - 52028 Terranuova Bracciolini - Arezzo, Italy
www.zcsazzurro.com
Page 17 of 38
4) The status screen will open showing the information of the logger, such as the serial number and firmware version.
Figure 23 – Status screen
5) Click the Wizard setup, shown in the left column. 6) In the new screen that opens, select the Wi-Fi network to which the Wi-Fi adapter is to be connected,
making sure that the Received Signal Strength Indicator (RSSI) is greater than 30%. N.B.: check that the signal strength is greater than 30%, if not, bring the router closer or install a repeater or signal amplifier.
7) Click Next.

Technical Note “Complete Guide to Monitoring the Azzurro ZCS Systems via Wi-Fi” - Rev. 1.2 of 20/05/2019
Zucchetti Centro Sistemi S.p.A. - Green Innovation Division Via Lungarno, 248 - 52028 Terranuova Bracciolini - Arezzo, Italy
www.zcsazzurro.com
Page 18 of 38
Figure 24 – Screen for selecting the available wireless network (1)
8) Enter the password of the Wi-Fi network (Wi-Fi modem), clicking on Show Password to make sure it is correct. N.B.: During this step, the system is not able to make sure that the password entered is the one actually requested by the modem, therefore please make sure you enter the correct password. Click Next.
Figure 25 – Screen for entering the password of the wireless network (2)
9) Click Next again without selecting any option

Technical Note “Complete Guide to Monitoring the Azzurro ZCS Systems via Wi-Fi” - Rev. 1.2 of 20/05/2019
Zucchetti Centro Sistemi S.p.A. - Green Innovation Division Via Lungarno, 248 - 52028 Terranuova Bracciolini - Arezzo, Italy
www.zcsazzurro.com
Page 19 of 38
Figure 26 - Screen for setting the security options (3)
10) Click OK.
Figure 27 – Final configuration screen (4)
11) At this point, if the configuration of the card is successful, the last configuration screen will appear, and the telephone or PC will unpair from the inverter’s Wi-Fi network.
12) Manually close the web page from the background of the telephone or with the close key on the PC.

Technical Note “Complete Guide to Monitoring the Azzurro ZCS Systems via Wi-Fi” - Rev. 1.2 of 20/05/2019
Zucchetti Centro Sistemi S.p.A. - Green Innovation Division Via Lungarno, 248 - 52028 Terranuova Bracciolini - Arezzo, Italy
www.zcsazzurro.com
Page 20 of 38
Figure 28 – Configuration complete screen
13) Go back to the network selection screen to check that the AP_51. network is no longer present. Absence of the Wi-Fi network in the list will confirm the configuration of the Wi-Fi card.
Figure 29 – Wi-Fi network search on Smartphone (iOS); Access point of the Wi-Fi card is no longer visible
STATUS OF THE LED OF THE EXTERNAL WI-FI ADAPTER
1) Initial status:
Central LED fixed Right LED flashing

Technical Note “Complete Guide to Monitoring the Azzurro ZCS Systems via Wi-Fi” - Rev. 1.2 of 20/05/2019
Zucchetti Centro Sistemi S.p.A. - Green Innovation Division Via Lungarno, 248 - 52028 Terranuova Bracciolini - Arezzo, Italy
www.zcsazzurro.com
Page 21 of 38
Figure 30 - Initial status of the LEDs
2) Final status:
Central LED fixed Right LED flashing Left LED fixed
Figure 31 - Final status of the LEDs
3) Incorrect configuration status of Wi-Fi adapter: Left LED fixed Central LED off Right LED flashing

Technical Note “Complete Guide to Monitoring the Azzurro ZCS Systems via Wi-Fi” - Rev. 1.2 of 20/05/2019
Zucchetti Centro Sistemi S.p.A. - Green Innovation Division Via Lungarno, 248 - 52028 Terranuova Bracciolini - Arezzo, Italy
www.zcsazzurro.com
Page 22 of 38
Figure 32 - Incorrect configuration status of Wi-Fi adapter
Check that the Modbus address set on the display of the inverter is 01 and in any case different from 00. To do this, refer to the next paragraph of the document. Check that the external logger is correctly and securely connected to the inverter, making sure to tighten the two cross screws supplied with the Wi-Fi card.
4) Incorrect configuration status of Wi-Fi adapter:
Left LED off Central LED off Right LED flashing
Figure 33 - Incorrect configuration status of Wi-Fi adapter
Check that the Modbus address set on the display of the inverter is 01 and in any case different from 00. To do this, refer to the next paragraph of the document.

Technical Note “Complete Guide to Monitoring the Azzurro ZCS Systems via Wi-Fi” - Rev. 1.2 of 20/05/2019
Zucchetti Centro Sistemi S.p.A. - Green Innovation Division Via Lungarno, 248 - 52028 Terranuova Bracciolini - Arezzo, Italy
www.zcsazzurro.com
Page 23 of 38
Check that the Wi-Fi adapter is correctly and securely connected to the inverter, making sure to tighten the two cross screws supplied with the Wi-Fi adapter. Check that the configuration has been carried out correctly, according to this procedure. Check that the router is working properly and that it is connected. Check that port 80 of the router is open and enabled for sending data. To do this, refer to the next paragraph of the document.
5) Display condition:
After configuration, check that the fixed or flashing Wi-Fi symbol (the first, in the case of a LITE single-phase inverter, and the second in the case of a three-phase inverter).
Figure 34 – Icons on the display of the LITE single-phase (left) and three-phase or hybrid (right) inverters
N.B.: to reset the configuration of the Wi-Fi adapter, press the reset button found on the back of the adapter for 5 seconds. After releasing the key, the 3 LEDs will flash simultaneously until the adapter returns to its initial configuration state. At this point, it is possible to repeat the configuration procedure again. The adapter can be reset only when the inverter is on.
4 PROCEDURE FOR CHECKING THE CORRECT CONFIGURATION OF THE WI-FI CARD Position yourself in front of the inverter and check the following steps:
1) When searching for the Wi-Fi network using a smartphone or PC, make sure that the signal of your home wireless network reaches the place where the inverter is installed (a minimum RSSI strength of 30% is required during configuration).
2) Connect to the inverter network AP_********, enter the IP address IP 10.10.100.254 on a browser, use “admin” as the default username and password and access the wireless section on the left column.
3) In the case of inverters equipped with internal Wi-Fi card, make sure that you have sufficiently extended the antenna (about 6-7 cm) by following the three steps shown in the figure.

Technical Note “Complete Guide to Monitoring the Azzurro ZCS Systems via Wi-Fi” - Rev. 1.2 of 20/05/2019
Zucchetti Centro Sistemi S.p.A. - Green Innovation Division Via Lungarno, 248 - 52028 Terranuova Bracciolini - Arezzo, Italy
www.zcsazzurro.com
Page 24 of 38
Figure 35 – Procedure for extracting the antenna connected to the internal Wi-Fi card
4) Check the RS485 address of the inverter. Enter the main menu with the ESC key (first key on the left), go to the SYSTEM INFO and press ENTER to enter the submenu. Scroll down, making sure that the number 01 appears next to the RS485 address.
5) N.B.: the following process can be performed either via smartphone or PC. 1) Search for any wireless networks so as to display and connect to the network of the inverter’s
Wi-Fi card, which is: AP_0805739627. The number indicates the serial number of the Wi-Fi card, which can be checked by referring to the smaller label located on the bottom left of the inverter.
2) Open the browser and enter the following IP address in the search bar to access the web server inside the Wi-Fi card: 10.10.100.254
3) For both the username and the password, enter: admin
Estrarre Extract
Allentare Loosen
Serrare Fasten

Technical Note “Complete Guide to Monitoring the Azzurro ZCS Systems via Wi-Fi” - Rev. 1.2 of 20/05/2019
Zucchetti Centro Sistemi S.p.A. - Green Innovation Division Via Lungarno, 248 - 52028 Terranuova Bracciolini - Arezzo, Italy
www.zcsazzurro.com
Page 25 of 38
Figure 36 – Screen for accessing the configuration page of the Wi-Fi card
The following page will open:
Figure 37 – Status screen
4) Make sure that “Remote Server A” is configured to “Pingable.” 5) In the Wireless STA mode section, check that there is an actual IP address and not
000.000.0.000. 6) Check that the router name (SSID Router) is actually the one you are connected to (not the
default name AP_SOLAR_PORTAL_) and that the signal percentage (Signal Quality) is greater than 30% and however different from 0%.

Technical Note “Complete Guide to Monitoring the Azzurro ZCS Systems via Wi-Fi” - Rev. 1.2 of 20/05/2019
Zucchetti Centro Sistemi S.p.A. - Green Innovation Division Via Lungarno, 248 - 52028 Terranuova Bracciolini - Arezzo, Italy
www.zcsazzurro.com
Page 26 of 38
If one of the above three conditions is not met, the configuration process has not been successful, maybe because the wrong router password was entered or the device was disconnected during connection.
Figure 38 – Status screen
However, if all these conditions have been met, the Wi-Fi card of the inverter has been correctly configured and is ready to monitor the system.
6) If at the end of the previous checks and subsequent configuration, the Remote server A is still configured to “Unpingable”, then it is very likely that there is a problem of transmission with the home network and, in particular, that the data between the Wi-Fi card and the server is not being transmitted correctly. In this case, it is advisable to carry out checks at the router level in order to ensure that there are no obstructions on the output of data packets to our server. To make sure that the problems lies in the home router and to exclude problems with the Wi-Fi card, configure the card by using the Wi-Fi hotspot function on your smartphone as a reference Wi-Fi network and not your home wireless network.
Using an Android mobile phone as a modem
a) Check that the 3G/LTE connection is active on your smartphone. Go to the Settings menu of the operating system (the gears icon on the screen with a list of all the apps installed on the phone), select “Other” from the Wireless and Networks menu and make sure Network Type is set to 3G/4G

Technical Note “Complete Guide to Monitoring the Azzurro ZCS Systems via Wi-Fi” - Rev. 1.2 of 20/05/2019
Zucchetti Centro Sistemi S.p.A. - Green Innovation Division Via Lungarno, 248 - 52028 Terranuova Bracciolini - Arezzo, Italy
www.zcsazzurro.com
Page 27 of 38
b) Open Settings and go to Wireless & networks > Tethering/portable hotspot, and turn ON “Wi-Fi portable hotspot;” wait a few seconds for the wireless network to be created. To change the name of the wireless network (SSID) or your access key, select Configure Wi-Fi hotspot.
Figure 39 – Configuration of an Android smartphone as a hotspot router
• Using an iPhone as a modem
a) To share the iPhone connection, verify that the 3G/LTE network is active by going to Settings > Mobile Phone, and make sure that the “Voice and data” item is set to 4G or 3G. To enter the iOS settings menu, click the grey gear icon in the phone’s home screen.
b) Go to settings > Personal Hotspot and tap the slider to turn it ON. The Hotspot is now enabled. To change the password of the Wi-Fi network, select Wi-Fi password from the personal hotspot menu.

Technical Note “Complete Guide to Monitoring the Azzurro ZCS Systems via Wi-Fi” - Rev. 1.2 of 20/05/2019
Zucchetti Centro Sistemi S.p.A. - Green Innovation Division Via Lungarno, 248 - 52028 Terranuova Bracciolini - Arezzo, Italy
www.zcsazzurro.com
Page 28 of 38
Figure 40 – Configuration of an iOS smartphone as a hotspot router
At this point, it is necessary to re-configure the Wi-Fi card using a PC or smartphone other than the one used as a modem. During this procedure, when you are asked to select the Wi-Fi network, you must choose the one activated by the smartphone and then enter the password associated with it (which can be obtained from the settings of the personal hotspot). If at the end of the configuration the word “pingable” appears next to “Remote Server A”, then the problem depends on the home router. It is therefore advisable to check the brand and model of the home router to which you are trying to connect the Wi-Fi card; some router brands (Vodafone, Fastweb, Infostrada) may have some communication ports closed. In this case, contact the customer service of the router’s manufacturer and ask them to open port 80 (direct from the network to external users).
5 PROCEDURE FOR REGISTERING ON THE AZZURROZCS APPLICATION 1) Go to PlayStore on your Android device or the AppStore on your iOS device and search for the
“AzzurroZCS” app with the following icon, and then install it.

Technical Note “Complete Guide to Monitoring the Azzurro ZCS Systems via Wi-Fi” - Rev. 1.2 of 20/05/2019
Zucchetti Centro Sistemi S.p.A. - Green Innovation Division Via Lungarno, 248 - 52028 Terranuova Bracciolini - Arezzo, Italy
www.zcsazzurro.com
Page 29 of 38
Figure 41 – AzzurroZCS App Icon
2) Enter the application and click on the + symbol, as shown below.
Figure 42 – Main screen of the AzzurroZCS app at first access
3) Click on “ENTER CODE” and then enter the serial number of the inverter by following one of these two
options: 1) Scan the barcode: allows you to scan the serial number directly from the side label of the
inverter. N.B.: the serial number to be scanned is the alphanumeric one printed above the barcode; if the numeric code is acquired (such as 080..), repeat the operation.
2) Write it down: manually enter the serial number of the inverter. N.B.: The serial number is printed on the small label at the bottom of the right side of the inverter, and will be something like: ZE1ES330H3G026 .

Technical Note “Complete Guide to Monitoring the Azzurro ZCS Systems via Wi-Fi” - Rev. 1.2 of 20/05/2019
Zucchetti Centro Sistemi S.p.A. - Green Innovation Division Via Lungarno, 248 - 52028 Terranuova Bracciolini - Arezzo, Italy
www.zcsazzurro.com
Page 30 of 38
Figure 43 – Procedure for manually entering and scanning the Serial Number
Cercare Inverter Search Inverter
Il numero di serie si trova nel lato destra dell’inverter The serial number is located on the right side of the inverter
INTRODURRE CODICE ENTER CODE
VALIDARE VALIDATE
Manuale Manual
Scrivi qui il numero di serie Enter the serial number here
Cancellare Delete
Salvare Save
4) Click “VALIDATE” to confirm the choice of inverter. IMPORTANT: If you are unable to proceed after pressing VALIDATE, please ask ZCS to activate the monitoring procedure. This operation can be done by simply sending the serial number of the inverter (e.g. ZE1ES330******) and of the Wi-Fi card (e.g. 080******) by email to [email protected], or by taking a photo of both labels found on the bottom right of the inverter. The process for activating the data transmission will take a few days, after which you can validate your code and proceed with the configuration of the app.
5) In the next screen, enter the name of the system and select the installation location from the map (if the
GPS is active, the installation location will be automatically identified); as an option, you can enter the description of the system and take or load a photo of the inverter.

Technical Note “Complete Guide to Monitoring the Azzurro ZCS Systems via Wi-Fi” - Rev. 1.2 of 20/05/2019
Zucchetti Centro Sistemi S.p.A. - Green Innovation Division Via Lungarno, 248 - 52028 Terranuova Bracciolini - Arezzo, Italy
www.zcsazzurro.com
Page 31 of 38
Figure 44 – Entering of system information
Aggiungere dispositivo Add device
Nome di riferimento Reference name
Localizzazione Localisation
Segna Posizione sulla Mappa Mark Location on Map
SELEZIONARE IMMAGINE SELECT PHOTO
Descrizione Description
Impianto di test realizzato per App Azzurro ZCS Test system created for Azzurro ZCS App
Impianto Test Test System
Selez. libreria Select. gallery
Usare camera Use camera
Cancellare Delete
6) Click send at the top right of the screen to complete the configuration and enter the home page of the app. From here, you can access the system you have just registered or enter other systems by following the same procedure.
Figure 1 – Main screen of the AzzurroZCS app after the systems have been inserted
Storage con due batterie Pylontech, capacità complessiva 4.8kwh, Fotovoltaico da 6 kw
Storage with two Pylontech batteries, total capacity of 4.8kwh, photovoltaic of 6 kw

Technical Note “Complete Guide to Monitoring the Azzurro ZCS Systems via Wi-Fi” - Rev. 1.2 of 20/05/2019
Zucchetti Centro Sistemi S.p.A. - Green Innovation Division Via Lungarno, 248 - 52028 Terranuova Bracciolini - Arezzo, Italy
www.zcsazzurro.com
Page 32 of 38
6 PROCEDURE FOR REGISTERING ON THE AZZURROZCS PORTAL
1) Type the following address in the address bar of your browser: http://www.zcsazzurrowebportal.com/index.jsp Alternatively, search for the words “AzzurroZCS Portal” in a search engine and open the first link shown.
2) If it is your first time entering the portal, you need to register and create a personal account.
Click “Configure your Portal” link at the bottom centre of the page.
Figure 46 – AzzurroZCS portal login screen
3) In the new screen, click “Sign up Now!” if you want to create a new user account.
If you already have an account, enter your credentials (username and password) in the panel shown above.
Figure 47 – Login screen for accessing the AzzurroZCS portal configuration panel
4) Enter the requested data in the next screen; the required data are marked with a red asterisk and are:
a. Registration email, for sending the confirmation b. Portal login password c. Name of account owner d. Default language of account

Technical Note “Complete Guide to Monitoring the Azzurro ZCS Systems via Wi-Fi” - Rev. 1.2 of 20/05/2019
Zucchetti Centro Sistemi S.p.A. - Green Innovation Division Via Lungarno, 248 - 52028 Terranuova Bracciolini - Arezzo, Italy
www.zcsazzurro.com
Page 33 of 38
e. Consent to the processing of personal data (check the box) The remaining data are optional and do not affect the monitoring of the system. After completion, click Register.
Figure 48 - Screen for creating an account on the AzzurroZCS portal
At the end of the registration, the following screen will appear and a confirmation email will be sent to the address used.
Figure 49 - Message indicating completion of the registration and sending of an email confirmation
f. Once you have created your account, go back to the section “CONFIGURE YOUR PORTAL” and enter the
username and password chosen during registration. Click LOGIN.

Technical Note “Complete Guide to Monitoring the Azzurro ZCS Systems via Wi-Fi” - Rev. 1.2 of 20/05/2019
Zucchetti Centro Sistemi S.p.A. - Green Innovation Division Via Lungarno, 248 - 52028 Terranuova Bracciolini - Arezzo, Italy
www.zcsazzurro.com
Page 34 of 38
Figure 50 – Main screen of the portal configuration panel
Benvenuto nel pannello di configurazione ZCS-Sunflower Welcome to the ZCS-Sunflower configuration panel
Modifica Informazioni Edit Information
Modifica Password Change Password
Crea Nuovo Campo Create New Field
Modifica Campo Change Field
Acquisisci Campo Acquire Field
Visualizza Campi View Fields
Richiesta di Upgrade Upgrade Request
g. The panel for the account configuration is easy and user-friendly, and allows you to:
a. Change the personal data of the account (name, address, reference language, logo).

Technical Note “Complete Guide to Monitoring the Azzurro ZCS Systems via Wi-Fi” - Rev. 1.2 of 20/05/2019
Zucchetti Centro Sistemi S.p.A. - Green Innovation Division Via Lungarno, 248 - 52028 Terranuova Bracciolini - Arezzo, Italy
www.zcsazzurro.com
Page 35 of 38
Figure 51 - Screen for changing information
Codice Fiscale / Partita IVA Tax Code / VAT Number
Indirizzo Address
CAP Postcode
Città City
Nazione Country
Lingua Language
Conferme Confirm
Modifica Logo Change Logo
Sfoglia Browse
Nessun file selezionato No file selected
b. Change the previous password.
Figure 52 - Screen for changing password
Vecchia Password Old Password
Nuova Password New Password
Conferma Nuova Password Confirm New Password

Technical Note “Complete Guide to Monitoring the Azzurro ZCS Systems via Wi-Fi” - Rev. 1.2 of 20/05/2019
Zucchetti Centro Sistemi S.p.A. - Green Innovation Division Via Lungarno, 248 - 52028 Terranuova Bracciolini - Arezzo, Italy
www.zcsazzurro.com
Page 36 of 38
c. Create a new field, which refers to the system installed at a certain site, indicating: language of reference, system name, rated power, installation location (you can click on Calculate Information to obtain the location data), incentive rate (optional). When requesting the Inverter Number, specify how many ZCS Azzurro inverters are present on the system and how many can be monitored. For example, specify 1 if the system consists of a single photovoltaic inverter or a 3000SP storage inverter combined with a photovoltaic inverter of a different brand. In the next screen, indicate the serial number of the inverter. N.B.: the serial number can be found on the left side of the inverter and is similar to ZAIES…
Figure 53 – Screen for creating a new field
Informazioni Campo Field Information
Nome Campo Field Name
Potenza Nominale [kW] Nominal Power [kW]
Calcola informazioni Location Calculate Location information
Tariffa incentivante [euro/kWh] Incentive rate [euro/kWh]
Informazioni inverter Inverter information
Numero inverter Inverter number
Inserisci Serial Number Enter Serial Number
d. Change an existing field, e.g. correcting the information of a field, entering a new inverter, removing or replacing an existing inverter.
Figure 54 - Screen for changing a field
e. Acquire a field already registered by another user (e.g. installer of the system).
This option allows monitoring the same system on different accounts.
Technical Note “Complete Guide to Monitoring the Azzurro ZCS Systems via Wi-Fi” - Rev. 1.2 of 20/05/2019
Zucchetti Centro Sistemi S.p.A. - Green Innovation Division Via Lungarno, 248 - 52028 Terranuova Bracciolini - Arezzo, Italy
www.zcsazzurro.com
Page 37 of 38
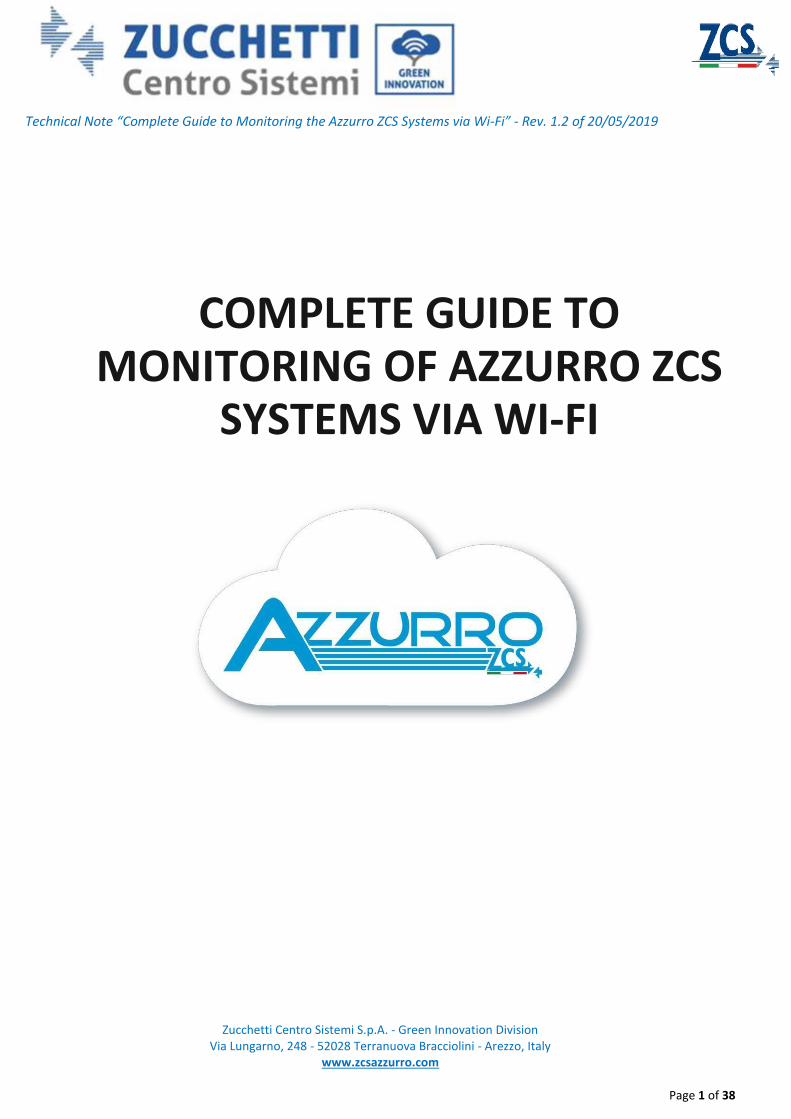
Figure 55 – Screen for Acquiring a Field
Acquisisci Campo Acquire Field
Inserisci Serial Number di un Inverter del campo Enter Serial Number of an Inverter in the field
Cerco Campo Search Field
f. Display the field(s) entered and their information (inverter number, serial number, model).
Figure 56 – Screen for Displaying Fields
g. Display the account status and request upgrades both in terms of multiuser and full account.
You can also request permission to use your own logo and image.
Figure 57 - Upgrade Request Screen
Trasforma il tuo Account in un Account Full Convert your Account into a Full Account
Effettua Richiesta Request
Trasforma in tuo Account in un Account Muliutenza Convert your Account into a Multi-user Account
Multi illimitato Multi unlimited
Visualizza il tuo logo e le tue immagini dei campi Display your logo and your field images
Technical Note “Complete Guide to Monitoring the Azzurro ZCS Systems via Wi-Fi” - Rev. 1.2 of 20/05/2019
Zucchetti Centro Sistemi S.p.A. - Green Innovation Division Via Lungarno, 248 - 52028 Terranuova Bracciolini - Arezzo, Italy
www.zcsazzurro.com
Page 38 of 38
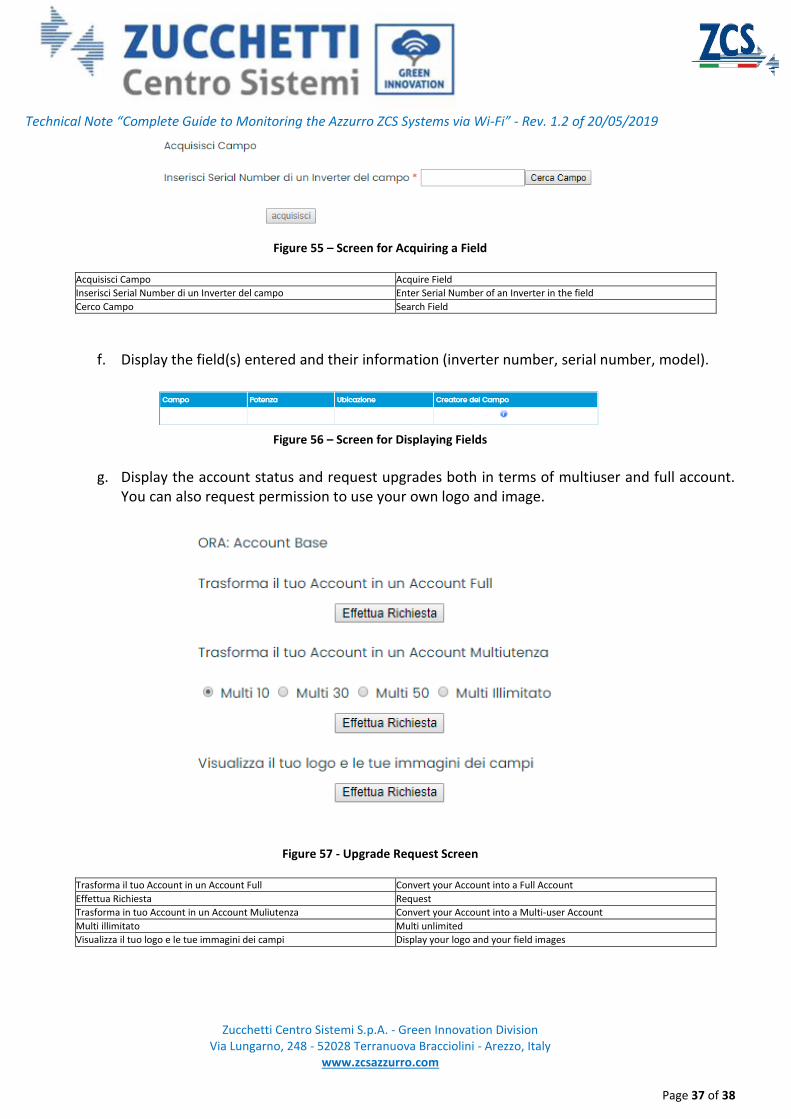
Figure 58 – Screen for Requesting Upgrade to Multiuser Account
h. Once the system has been configured, you can login to the monitoring portal by going back to the main screen (http://www.zcsazzurrowebportal.com/index.jsp), entering your credentials in the appropriate panel and clicking LOGIN.
Figure 59 – AzzurroZCS portal login screen
ORA: Account Multiutenza (illimitato) NOW: Multi-user account (unlimited)
Visualizza il tuo logo e le tue immagini dei campi Display your logo and your field images
Effettua richiesta Request