Pencil artist: Illustrations of Eduardo de Araújo Guerra in the
Upload
khangminh22Category
view
3download
0
NYPL RESEARCH LIBRARIES
3 3433 08191238 2


y^
3- M f\


Art RECREATIONS:
A COMPLETE GUIDE
Fsneil Drawing, Cone Work, Imitation of Pearl,
Oil Painting, Feather Flowers, The Aq,uarinm,
Wat3r-Co::r Painting, Potishomanie, Sealing-Wax Painting,
Crayon Drawing and Painting, Leather Work, Panorama Painting,
Fainting on Ground Glass, Hair Work, Coloring Photographs,
Grecian Pa-.nting, Taxidermy, Enamel Painting,
Antique Pa.nting, Gilding and Bronzing, Diaphanie,
Oriental Painting, Plaster Work, Charcoal Drawing, two kinds,
Sign Painting, Decalcomanie, Limneography,
Theorem Painting, Wax Work, Heraldry,
Ferneries, Shell Work, Flower Painting, four kinds,
Hoss Work, Ifagic Lantern, Sorrento-Wood Carving,
Papier Uache, Paper Flowers, Illuminating, &c.
.-r^ BY -'^
Mme. L. B. URBINO, Prof. HENRY DAY,• AND OTHERS.
tIVITH VALUABLE RECEIPTS FOR PREPARING MATERIALS.
Splendidly UlustrateJ.
BOSTON
:
SHEPARD AND1873-
EJl-Ui
GILL.

THE NEW YORK
PUBLIC LIBRARY737192AASTOR, LENOX AJ^D
TILDEW FOUNOATXON3R 1934 L
Entered according to Act of Congress, in the year 1859, uy
J. E. TILTON & COMPANY,
In the Clerk's Office of the District Court for the District of Massachusetts.
Entered according to Act of Congress, in the year 1872,
By SHEPARD & GILL,
In the Office of the Librarian of Congress at Washington.
f- *- t c » * c .

INTRODUCTORY NOTICE.
jN presenting this volume to the
public, the publishers would
state that it has its origin in
the fact that during the time
in which they have been en-
gaged in issuing pictures and
dealing in artists' materials, they have
been in the constant receipt of letters,
from all parts of the country, asking
for information in various departments of ornamental
work It has always given them pleasure to answer
such inquiries, and they will cheerfully in the future
furnish such information as may be called for. But
with an increasing business, and consequently more
extended correspondence, they have found it impos-
sible to meet the wants of their patrons to the ex-
tent they would wish, and therefore have prepared
1* (5)

6 INTRODUCTORY NOTICE.
this volume, which they think will be found, upon
examination, to contain a great amount of valuable
and original matter, in almost every department of
ornamental work ; and they hope the book will meet
with the approbation of their patrons and the public
generally, feeling assured that long experience and
an honest desire to make a valuable and instructive
book for teachers, amateur artists, and the family
circle, will gain for it a pleasing success.
We are indebted for many of these receipts and
valuable information to Professor Henry Day, a
successful teacher for the past twelve years in this
country, and formerly in England, Ireland, and
Scotland.
NOTE TO NEW EDITION.
In issuing a new edition of this book, we feel gratified in being able to say-
that " Art Recreations " has met with universal approval and a success
beyond the most sanguine hopes of the publishers. We have, since its pub-
lication, received and introduced some new things, a natural result to our
continued labors, extending business, and constant intercourse with artists
and teachers. Nearly all the matter from page 282 on to the end of the book
is new.

CONTENTS
Page.
Autumn Leaves, Treatment of 301
Anglo-Japanese Work ... .... 229
Antique Painting 187
Antique Varnish, To make 341
Aquarium, The 327
Backgrounds, Painting 145
Broken-Cake Colors, To make moist colors of . . .316Botanical Specimens, To preserve 281
Bronzing 198
Brushes, To clean ......... 322
Bronze Painting 199
Bronze Stencilling 318
Brushes, Choice of 131
Cabinet Work, To cleanse 343
Cabinet Varnish, To make 341
Chinese Raising 203
Chess Table Pattern, To paint 1 74
•Clear Varnish 326
Colors, List of 124-156
Colors, Mixing for Grecian Painting 90
Colors, Mixing fur Oriental Painting 171
(")
8 CONTENTS.
Colored Engravings, To varnish 342
Charcoal Drawing . . .291
Cone Work • •-266
Crayon Drawing 65, 69
Decalcomanie 282
Diaphanie 285
Draperies, Coloring 141
Drawing, Elements of 13
Drawing, Perspective 31, 41
Drawing, Crayon 65, 69
Driving, Monochromatic 67
Designers, Hints for 293
Ebony Inlaying, Imitation of 320
Enamel Painting 1^*
Engravings, To stretch, for framing 343
Engravings, To varnish colored 342
Engravings, To use upon Glass 319
Engravings, Varnish for 326
Feather Flowers 264
Fernery for a short Purse 335
Flesh Tints 136
Foliage "*'
Flower Painting on Tinted Paper 300
Flov.'cr Painting, Permanent • • 299
Flower Painting in Water Colors 105
Gilding Signs 186
Gilding on Satin, &c., 205
Gilding 206
Glass, Painting on1"^
Grecian Painting"^"^
Ground Glass, Painting on 183
CONTENTS. 9
Green Leaves in Water Colors 303
Gold Size, To make 342
Ground Glass, Imitation of 323
Gi'ecian Yarnish 324
Hair, Coloring The 138
Hints for Designers and Illustrators 293
Heraldic Emblazoning 310
Hair Work 262
Horn Paper, To make 113
Illuminating 307
Japanese (Anglo) Work 229
Linnaeography 296
Leather Work 209
Leaf Impressions, Taking 280
Magic Lantern 181
Mastic Varnish, To make 340
Monochromatic Drawing 67
Moss Work 259
Oil Painting 51
Oriental Painting 165
Painting in Oil 51
Painting Panoramas, Maps, &c., 63
Painting, Grecian 75
Painting in Water Colors 97
Painting, Theorem '. . . 143
Painting on Glass 179
Painting Photographs . . ..'. . . .119
Painting, Oriental 165
Painting, Permanent Flower 299
Preserving Varnish 326
Painting on Rice Paper 177

10 CONTENTS.
Painting Signs
Painting, Antique .
Panorama Painting .
Paper Ornaments, To cut out
Papier Mache', as taught by Prof. Day-
Papier Mache' Varnish .
Paper Flowers
.
Pearl, Imitation for Embroidery
Pearling . . . •
Potichomanie .
Pencils, Choice of .
Pencil Drawing, To preserve
Pictures for Grecian Painting
Photograph Painting
Perspective Drawing
Plaster Work .
Rice Paper Painting
Receipts, Miscellaneous .
Sea-Weeds
Sealing-Wax Work
Sorrento Wood Cutting .
Scene Painting
Sketching from Nature .
Shell Work .
Sign Painting .
Tamarind-Seed Work
Taxidermy
Tints, Flesh .
Tints, Hair
Tints for Photographs .
Tinting Glass Positives, &c.,

CONTENTS. 11
Tinting Photographs 184
Theorem Painting 113
Tracing Paper 339
Transparencies, To make 279
Transfer Paper, To make 340
Transfer on Wood 230
Transfer, Varnish 324
Varnish, Spirit Sandarac 339
Varnish, Transfer 339
Varnish, Mastic 340
Varnish, Antique 341
Varnish, Cabinet 341
Varnish, Turpentine 341
Varnish, Papier Mache' 341
Varnishing colored Engravings 342
Varnish, Transfer 324
Varnish, Grecian 324
Varnish, Clear 326
Varnish, Preserving 326
Water-Color Painting 99
Wax Work 233

Jratoing.
(13)

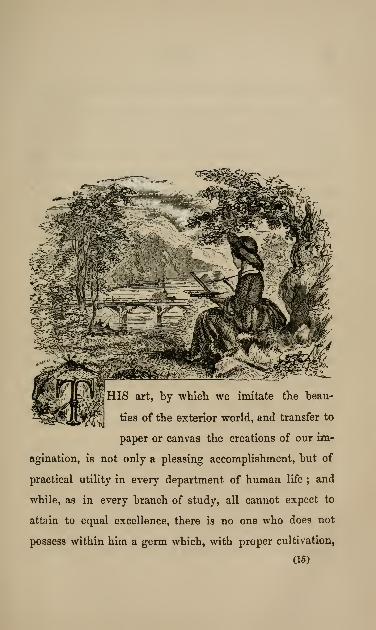
HIS art, by whicli we imitate the beau-
ties of the exterior world, and transfer to
paper or canvas the creations of our im-
agination, is not only a pleasing accomplishment, but of
practical utility in every department of human life ; and
while, as in every branch of study, all cannot expect to
attain to equal excellence, there is no one who does not
possess within him a germ which, with proper cultivation,
(15)

16 DRAWING.
will develop itself in some degree of artistic beauty.
As in music, so in drawing, to become a master of the
art requires a life-long labor and constant application;
and yet it is within the reach of all to acquire such
a knowledge, and such an experience, as to produce pleas-
ing effects, to cultivate and elevate our tastes for the
beautiful in nature and art, and decorate our dwellings
with representations of the outer world, and make per-
manent with the pencil the dreamy imaginations which
float in the ever-active mind.
Drawing should become an essential element in our
popular education, for while it conduces to our pleasure
and amusement, practical advantages naturally flow from
it; and although in an elementary treatise like this it
is impossible to enter into the minute details necessary
^for high proficiency in the art, yet it is believed the
attentive student will find here an incentive for further
study, and that, by following the concise but systematic
directions here given, he will, although a beginner, be
enabled to produce pleasing pictures with a true artistic
effect, and lay the foundation for a thorough knowledge
of the principles of drawing. Success in any thing is
in proportion to the exertion put forth, and the student-

DRAWING.1*J
artist who, with fixedness of purpose, and with patience,
applies his mind and hand to the work may feel as-
sured of the most gratifying results; and each suc-
cessive difficulty overcome, and every new idea gained,
add knowledge, experience, and encouragement.
A perfect muscular control of the hand is of the first
importance in drawing, as accuracy of outline and delicacy
of expression can only be obtained by having the fino-ers
in complete subjection to the will, so that the slightest
volition will be properly interpreted by the pencil. This
requisite facility in the use of the pencil or brush can be
acquired only by patient practice, the length of time neces-
sary for its attainment being in some degree dependent
upon the natural ability, taste, or "genius" of the
learner. Of equal importance, and as absolutely indis-
pensable, is correctness of eye in determining distances
and measurements -an attainment which can be carried
to a wonderful degree of perfection. Thorough practice
in making straight and curved lines demands the first
attention of the beginner. Commence luith short hori-
zontal lines^ gradually increasing the length, making the
Hne in a distinct, bold; and rapid manner, first from left
to right, and then vice versa, thus • .

18 DRAWING.
next, straight lines touching each other at different
angles, thus :
lines, thus
;
then perpendicular
Too much practice cannot be given to these lines, and
the difficulties at first experienced in drawing straight,
continuous lines will gradually diminish. When these
right-lines, horizontal, perpendicular, and at various
angles, can be drawn wdth accuracy and wdth freedom
of pencil, then practice the following, which is a com-
bination of them all, thus :
nations will suggest them-
inventive mind, and the
astonished in his practice in
variety of forms and almost
tions can be produced from
It may be well to copy some
posed of straight lines ; but
od is to draw from the store-
Other combi-
selves to the
learner will be
finding what a
endless varia-
straight lines,
figures com-
the best meth-
house of your

DRAWING.29-
own invention, taxing the mind for new combinations,
and thus adopting one of the surest means of success.'
The power to originate, as well as to imitate, is necessaryto make the true artist.
Having attained a degree of proficiency in straight
Hues, the next step is the curve, with all its variations.
Commence by drawing a horizontal line, connecting the endsby arches of difierent altitudes, then
perpendicular lines, connecting the
ends by arches in the same manner.
In each of these cases, the straight lines form
a basis by which to determine with more accu-
racy the true sweep of the arch curves; and
all irregular forms can best be determined by
their relative positions to straight lines. Apracticed eye will soon learn to detect right
lines in all things, and thus have an unerring
standard.
Now draw straight lines, and divide them into equal
parts, testing the accuracy of your eye by the compasses,
f and practice this until the eye can
measure with great accuracy. Then draw arches, (without
any base line,) and divide them in the same manner.

OA DRAWING.
Forms of grace and beauty being
dependent upon curved lines, great
attention and practice should be given to them in
the infinite variety in ,vhich they occur. Select simple
curvilinear forms, and having acquired some profi-
ciency in making them, advance to those of a more
difficult character; vases, goblets, shells, and numerous
other forms combining curved lines will readily occur to
the mind of the artist.
It will now be found a good practice to draw straight
and curved lines with their parallels, varying the spaces
between the lines until the hand becomes steady and accu-
rate in its motion, and the eye determines the equi-dis-
tances, tlius :
Make tlie lines with boldnesR, and a certain degree of
rapidity.
Thorougli practice in drawing these lines, and in divid-
ing them at equi-distances, gives to the learner the whole
alphabet of diawing. Too much attention cannot be given
to the combinations of which these various lines are sus-
ceptible, and patience and diligence are indispensable
requisites to success. All mistakes should be carefully
DRAWING. 21
corrected, not in imagination, but in reality, as thus the
hand and eye gain experience. Fruit and flowers are in-
teresting models from which to draw, and these can be
followed by more complicated subjects.
The drawing of the human head, and indeed of the whole
human form, being wholly dependent upon curved lines,
no more appropriate place will be found in which to give
a few elementary directions on this branch of the art of
drawing ; and it may be remarked, that in all the works
of nature no straight lines are to be found ; trees, flowers,
leaves, fruit, and every motion of air or water, are curvi-
linear in their character.
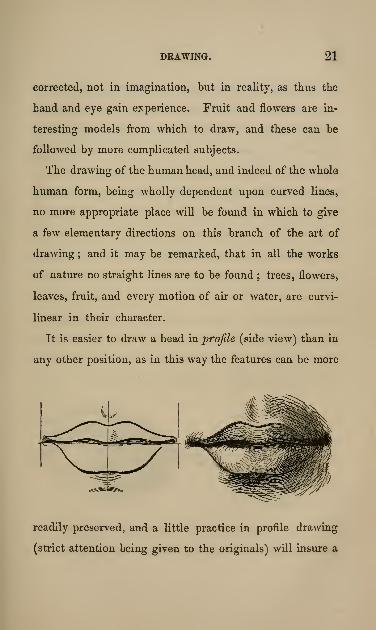
It is easier to draw a head in profile (side view) than in
any other position, as in this way the features can be more
readily preserved, and a little practice in profile drawing
(strict attention being given to the originals) will insure a
22 DRAWING.
creditable degree of proficiency. In drawing ^front view,
the artist should begin with the mouth; and as a general
rule, in the words of an artist-author, " before making any
attempt at expression he should become familiar with
the actual form of the features, and be capable of delin-
eating them knowingly." The line made by the meeting
of the lips is the first thing to be drawn. Draw a straight
Hne, and upon it mark with a dotted or faint line the
width of the mouth, center, thickness of lips, etc., giving
careful attention to the form ; then develop these marks
into a correct outline of the form to be imitated, and the
remaining steps of filling up will come in easy succession.
Repeated experiments should be made until the use of the
straight or base line can be dispensed with ;and the same
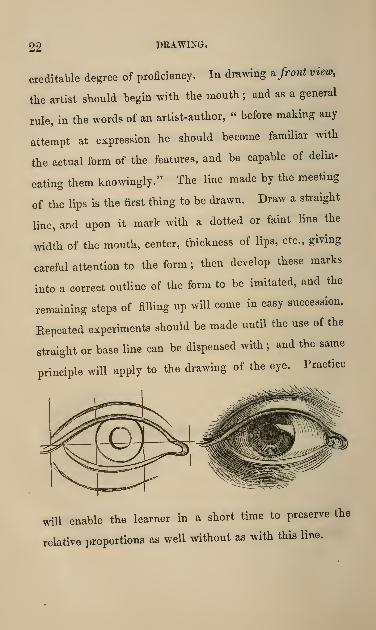
principle will apply to the drawing of the eye. Practice
will enable the learner in a short time to preserve the
relative proportions as well without as with this line.

DRAWING. 23
In making the lines which give form or rotundity, com-
mence with the most prominent ones, attending carefully
to all the details of light and shade, and not attempting
too rapid progress. The principles above given will apply
with the same force to other features, and the pupil
should practice with patience each and every feature before
attempting to combine them. The accompanying diagramswill be of essential service to the pupil.
Having attained some proficiency in these, the pupil
can next proceed with the following, practicing patiently
and thoroughly.
1
It has been remarked that it is easier to draw a profile
than a front view; therefore it is recommended to the
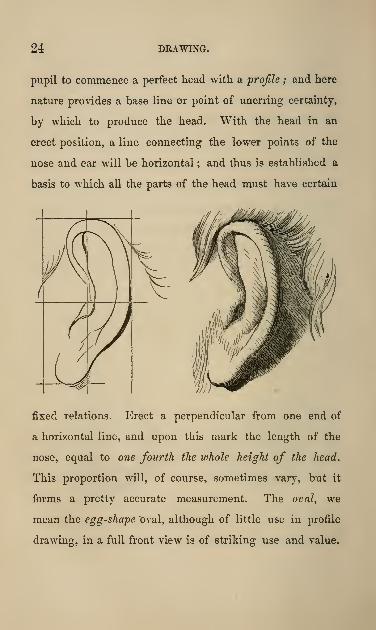
24 DRAWING.
pupil to commence a perfect head with a profile ; and here
nature provides a base line or point of unerring certainty,
by which to produce the head. With the head in an
erect position, a line connecting the lower points of the
nose and ear will be horizontal ; and thus is established a
basis to which all the parts of the head must have certain
fixed relations. Erect a perpendicular from one end of
a horizontal line, and upon this mark the length of the
nose, equal to one fourth the whole height of the head.
This proportion will, of course, sometimes vary, but it
forms a pretty accurate measurement. The oval, we
mean the egg-shape oval, although of little use in profile
drawing, in a full front view is of striking use and value.

i^RAWING. 25
The student unacquainted with the subject will be aston-
ished to see how nearly the human face partakes of theoval form, and this knowledge, when acted upon, will be of
great assistance. A single outline illustration will showbetter than pages of print the force of our remarks uponthe oval form of the human face.
The obtuse or elongated form of the oval must be deter-
mined by the individual cases.
3

26 DRAWING.
As a general obsen-ation, it may be said that just in
proportion as the head is elevated or depressed from an
erect position, the line from ear to nose, before alluded
to, will cease to be horizontal, and take a greater or less
curvature ; still it will continue to be a governing line.
Care and judgment in the use of the oval is necessary,
as at every inclination of the head to the left or right,
the perpendicular or center ceases to be a straight line,
and as the curvature increases the line loses its position
as a central line for determining the features, while the
oval is gradually lost for an outline as the picture a^i
proaches a profile. The imaginary central line of the head
and face should always receive the careful study and con-
tinual attention of the student, as it determines the gen-
eral character of the head and its separate parts.
Copying plaster casts is an excellent practice, and the
learner should improve every opportunity for observa-
tion and study ; and all attempts at imitation, either
from casts, living heads, or paintings, will insure gratify-
ing progress in the art. Proper subjects for copying
are within the reach of all those into whose hands this
book will fall. As the pupil passes on to advance pages,
he will find various directions for the minutiae of draw-
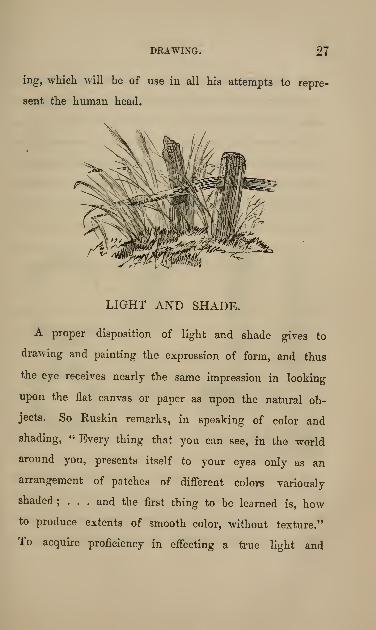
DRAWING. 27
ing, which will be of use in all his attempts to repre-
sent the human head.
LIGHT AND SHADE.
A proper disposition of light and shade gives to
drawing and painting the expression of form, and thus
the eye receives nearly the same impression in looking
upon the flat canvas or paper as upon the natural ob-
jects. So Ruskin remarks, in speaking of color and
shading, " Every thing that you can see, in the world
around you, presents itself to your eyes only as an
arrangement of patches of different colors variously
shaded; ... and the first thing to be learned is, how
to produce extents of smooth color, without texture."
To acquire proficiency in effecting a true light and

28 DRAWING.
shade, the pupil or learner must possess an accurate or
a cultivated eye to aid him in giving true representa-
tions of the objects to be painted or drawn.
The variety of form and direction in nature can only
be imitated by a corresponding variety in the lines and
touches used in their delineation, expressing as nearly
as possible the exact form and character of the original.
For instance, an even, smooth surface requires an even-
ness and regularity in the lines, approaching as nearly
as possible to an unbroken surface ; and if it is desired
to imitate a broken or uneven surface, recourse must
be had to broken, curved, or uneven lines, such as

DRAWING. 29
will best represent the object. It will readily be per-
ceived by the learner that the lines (if the shading par-
takes of the linear character) must vary according to
the subject.
The representation of a round object is managed by
a careful disposition of the light upon the convex part,
and the shade attending it. It is this difference in the
shading which gives objects drawn on a plain surface
their proper relief, and expresses space and distance.
Indian ink, or sepia, is useful for this purpose. Pre-
pare two, three, or more shades of either in small cups,
lay on the shades with camel's hair or sable brushes,
putting on the lighter shades first, and work gradually
darker until the required depth of color is secured. It
is better to have the shades too light than too dark, as
it is very easy to strengthen shades, but difficult to
lighten them. As a general rule, it must be observed
that the different tones are to be so blended together
as to form a gradual shade, becoming fainter as it ap-
proaches the light.
In the disposal of the shades, the following direc-
tions may be studied with benefit : —1st. All the shades of objects in the same piece

so DRAWING.
must fall the same way, that is, farthest from the light.
For instance, if the light comes from the right side of
the piece, the shades must Ml toward the left, and
vice versa,
2d. The part of an object nearest the light must
have the faintest shades. This rule is observable in
the folds of drapery, where the projecting folds appear
light, and the inner folds dark. Titian observed, that
" the best rule for the distribution of lights and shad-
ows may be drawn from an observation of a bunch of
grapes."
3d. Calm waters have either a faint shade or none
at all ; but there should always be a line of shade near
the banks. Agitated waters should have various shades.
4th. In large-extended views, as landscapes, the dis-
tant objects are faintly shaded, and the more distant
they are, the fainter the shades.
5th. With reference to the horizon and clouds, the
clouds nearest the top of the piece are more strongly
shaded than those more remote, the strength of shade
decreasing as the clouds descend toward the horizon,
where they become faint and indistinct, because at the
greatest distance from the point of view.

DRAWING. 31
6tli. Some substances have the property of reflect-
ing the light strongly, as satin, silk, and all po/isbed
metals. In these there must be very strong light, and
consequently a deep shade. All bright lights must be
contrasted with strong shades, and fainter lights with
weaker shades. The examination of busts and statues
is of great assistance in establishing these principles in
the mind ; and a critical attention to the effect of light
and shade in the world around us, in the open air, or
when the sunlight pours through the windows or door,
or where the rays of the moon light up the evening land-
scape, and steal in through the opening curtains, in-
deed, the opportunities for studying the various phe-
nomena of light and shade are ever present with us, and
the observing pupil will in this way learn more than by
pages of directions.
PERSPECTIVE.
Perspective is the art of drawing on a plain surface
the true representation or appearance of any given ob-
ject, as it would appear upon a pane of glass when held
upright between you and the object.
32 DRAWING.
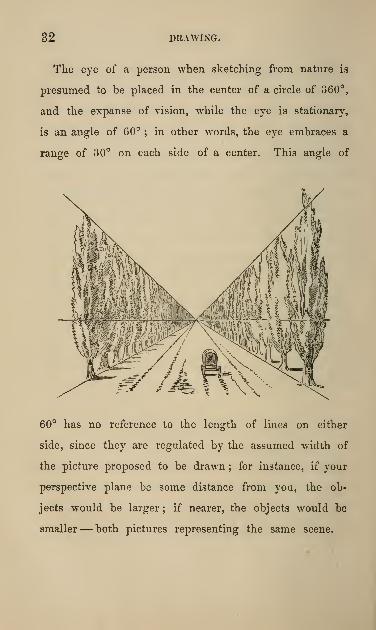
The eye of a person when sketching from nature is
presumed to be placed in the center of a circle of 360°,
and the expanse of vision, while the eye is stationary,
is an angle of 60^; in other words, the eye embraces a
range of 30° on each side of a center. This angle of
60° has no reference to the length of lines on either
side, since they are regulated by the assumed width of
the picture proposed to be drawn ; for instance, if your
perspective plane be some distance from you, the ob-
jects would be larger ; if nearer, the objects would be
smaller— both pictures representing the same scene.

DRAWING. gg
If a person standing on the sea shore look far awayover the expanse of water, he will observe a boundaryline— the water apparently meeting with the sky by awell-defined straight line. This is called the horizontal
line, and it is exactly opposite the range of the eye;
and that particular point of the horizontal line to whichthe eye of the sketcher is directed is called the point ofsight. If he ascend to any hight on the shore, the line
of the horizon must be placed higher in his drawing,
because his eye is so much higher; and the axiom lai'd
down in the previous paragraph holds true, that thehorizontal line is that line exactly on a level withthe eye.
Ai.y person looking on a straight road which con-tinues into the extreme distance, may observe that theedges of the road appear to terminate in a point. Per-haps a better illustration of this m,y be fonnd on thetrack of a railroad, in a part where it is perfectly straight.The rails, as they recede into the distance, converge u'ntil
apparently lost in a point, and at the same time appear tonse up, the extreme point being just level with the eye.From facts like these Chapman deduces these ele-
mentary principles ; that,—

34 DRAWING.
*' I. The point of sight must be in the center of the
perspective picture.
"II. All lines parallel to an imaginary line drawn
from the eye of the observer to the point of sight, must
terminate or vanish in that point.
" III. The line of the horizon must necessarily rise or
descend with the position of the eye, and consequently
with the point of sight.
*' IV. The base or ground line of the picture, and all
others parallel with it, must be parallel with the line of
the horizon.
" V. The diagonal of the square, perspectively repre-
sented, directs to a point on the line of the horizon,
the distance from which point to the point of sight repre-
sents the true distance of the eye of the observer from
the picture."
It is not too much to say that strict attention to
these principles will produce the most gratifying results
in the progress of the learner. One rule the true artist
should always remember, that is, never to carry the
point of sight outside the picture. The eye naturally
seeks a point of view in the picture, and the nearer this
point is to the center of the picture, the greater is the
harmony between nature and art.

DRAWING. 35
All objects appear to diminish in proportion to their
remoteness from the eye of the spectator. Hence col-
umns, posts, trees, etc., of equal hight, will appear to
diminish as they recede from the eye. The lines which
govern their diminution in perspective drawing are
called vanishing lines, and if perpendicular to you, van-
ish in the point of sight, or that point in the horizon
exactly opposite your eye as you stand when sketching;
if the lines are below the eye, they tend upward, as
the rails on the railroad ; but if above you, as the ceil-
ing of a long corridor, they would tend downward to-
wards the horizon.
The point of sight may be fixed at pleasure; and
although, strictly speaking, the center is the correct
place, it is generally better to place it a little removedfrom the center of the picture; for if the subject werea street, or an avenue of trees, the perspective would be
very formal, and the scene would thereby be dimin-
ished in interest.
Many contend that all objects appear better with onethan both eyes
;alleging that the sight is rendered more
powerful by one eye being shut. Be this as it may, it
is certain we see a piece of perspective better with one
Q^ DRAWING.
eye than we do with both, and it is undeniable that by
opening or shutting either eye the position and gen-
eral appearance of an object are changed. It is this
very fact that caused Sir David Brewster to reflect, and
that reflection has created a new era in the history of
discovery by introducing to the world the stereoscope.
SKETCHING.
Before beginning to sketch out of doors, the first
consideration should be to get the best point of view,
as a few steps to the right or left sometimes make a
great difference, always keeping a good lookout for
objects that will compose harmoniously and prettily.
DRAWING. 37
As this does not always occur in natural scenes, the
sketcher is allowed certain liberties; thus he may add
or take away ; he may add where there seems a defi-
ciency, so that he keeps the general character of the
scenery, or he may take away where it appears too
crowded. Sometimes artists insist upon having the fore-
ground entirely at their own disposal, provided they
keep up the general appearance of the view. In mak-
ing hasty sketches (as a pencil sketch is subject to
great inconvenience when there are two or three dis-
tances, and each drawn in with one kind of mark) it
is requisite to make a few written references, as the
sketcher may forget the distinctions.
A celebrated English landscape painter, in giving
advice to his pupils previous to their departure for a
sketching tour, was very particular in impressing upon
them the necessity of studying " little bits," meaning
by this not to take too much in one sketch, as is too
often the case with beginners. One of the best qual-
ities of a sketch is not only to refresh the memory of
the sketcher, but to be suggestive and intelligible to
every one. We will suppose that a spot is selected
containing not more than three or four objects. An
4

38 DRAWING.
artist seldom, if ever, takes any thing in its broadest
and most regular form, and never takes a house (for
instance) as if he had taken his position directly in
front, nor a row of trees or palisades at a right
angle to his own position.
For an early lesson in sketching from nature, a house
is very good, but must be viewed from a point a little
aside from the front, so as to bring in as many angular
features as possible. We will suppose a station to be
selected. One way of proceeding is —hold up the sketch
book in front, closing one eye in order to determine
how much of the scene is to be drawn ; the farther of!
the book is held, the less of the subject will be covered ;
when the extent is arranged, lower the book to a level,
and make a few dots on the margin, merely to point
out some of the relative positions ; find the horizontal
line by holding up your pencil horizontal with the eye,
and slightly mark it in; then get the point of sight op-
posite the eye, on the horizontal line;judge well of the
relative distances of the most prominent objects, and
faintly mark them in on the paper. By arranging these
particulars well at first, a great deal of trouble is saved
in erasing false marks. Be careful to give every line

DRAWING. 39
its proper position : a line that is upright in nature
must be upright in your picture ; lines that go direct
from you (that is, perpendicular to you as you stand)
go toward the point of sight ; if they are above the
horizontal line, they tend downward toward the point
of sight ; and if below, they tend upward. In sketch-
ing, it is well to have the lines a little broken, yet
having the general appearance of straightness. An easy,
rapid, and decided manner of sketching, so as to ob-
viate all appearance of stiffness or formality, is a power
acquired only by practice.
If the sketcher's productions after a first or second
attempt be not all that can be desired, it is a fair proof
that the mind is in advance of the hand, and should
operate as a stimulus to further exertion. In proceeding
with a sketch, the pencil gradually wears away, and
gives an increasing thickness of line : this can be used
to advantage, as bold lines of the pencil are frequently
needed, especially in the foreground. By a little prac-
tice, the pupil will discover that by a gentle twist of the
pencil, a sharp angle of the worn pencil will come in
contact with the paper, and a fine line can be drawn;
and by pressing harder on the pencil occasionally, an
40 DRAWING.
increase of depth may be produced, giving the sketch
additional spirit.
ON COMPOSITION.
Every production of the artist is reducible to its ele-
mentary or skeleton construction of lines and forms
;
and upon the skillful disposition of these depend the
excellence of the composition of the picture. The es-
sential spirit of composition in painting, as in many
other things, is variety. In order to make it agreeable,
it is requisite that all the minor parts be so harmonized
as to form one well-balanced whole, consisting of a few
prominent masses or groupings, which, according to the
best written treatises on the principal laws of compo-
sition, must be diversified in magnitude and in form.
One of these masses should be treated as the principal,
and the other as dependent upon it and contributing to
it, and at the same time it is necessary they should be
distinct in appearance and place. Whatever form may
be determined upon, it is necessary to guard against a
fixed regularity, so as not to repeat any form or shape ;
and whatever be the general outline of the masses, they

DRAWING. 41
should not be regular, nor must we fall into error on
the other side by having them too broken; but the
various parts should bear and preserve a relation to
each other, showing a whole so well balanced that one part
cannot be taken away without the deficiency being felt.
A TEUE Method of Drawing 12^ Perspective
WITHOUT A KXOWLEDGE OF THE RuLES.
Many persons would like to sketch from nature if
they could be free from the trouble of acquii-ing the
principles of perspective drawing. To such, and to
others, we present the following description of a
method in which little study is required, and yet the
proportions and distances of objects will be exactly pre-
served. Get a large piece of fine, clear glass, fitted in
a wooden frame. This frame is to slide between two
cheeks or pieces of wood one and a half inches thick,
which are raised at the two extremes of a board the
breadth of the frame : the cheeks are grooved to re-
ceive the frame. In the middle of this board square
holes must be made to receive the movable eye-hole
piece, so as to be raised or lowered at pleasure. Atthe top of this is a circular piece of tin, three or four
4*
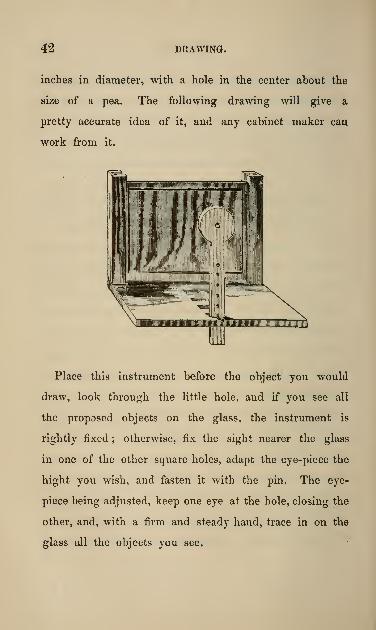
42 DRAWING.
inches in diameter, with a hole in the center about the
size of a pea. The following drawing will give a
pretty accurate idea of it, and any cabinet maker can
work from it.
Place this instrument before the object you would
draw, look through the little hole, and if you see all
the proposed objects on the glass, the instrument is
rightly fixed ; otherwise, fix the sight nearer the glass
in one of the other square holes, adapt the eye-piece the
hight you wish, and fasten it with the pin. The eye-
piece being adjusted, keep one eye at the hole, closing the
other, and, with a firm and steady hand, trace in on the
glass all the objects you see.

DRAWING. 43
You can draw on the glass with pen and ink, then
lay a moist sheet of paper on the glass, (the side that
has the design,) rub or press the paper gently thereon
with the hand, and the whole draught will be impressed
or transferred from the glass upon the paper.
Some use a fine brush with oil color, pressing the paper
on gently while the oil is wet ; but we leave you to your
own discretion, having given you a knowledge of the
method. The sketch of a palace is as easily taken as a
landscape, and a church as a house or chamber ; all re-
quired in any subject being a situation where the whole
object intended to be represented may be seen, and to
bring the sight to a proper nearness to the glass. These
drawings cannot fail to be according to the strict rules of
perspective : the eye-hole has the same efiect as the point
of sight in the other methods.
Another method of using the same apparatus is to
divide the glass into squares with threads, thus saving
the marking the glass with ink or color ; in this Avay you
have your drawing marked ofi" in the same number of
squares as much larger as you wish, and proceed sketch-
ing on your paper what you see in the corresponding
squares in the natural object.

44 DRAWING.
To enlarge and diminish a Drawing.— Divide the origi-
nal piece into a certain number of squares by perpendicular
and horizontal lines, making as many in the original as in
the space intended for the copy ; number the correspond-
ing squares alike, (your copy may either be larger or
smaller;) then observe what parts of each square the
different marks run in the original, and draw similar ones
to correspond in your copy. This is the best method for
enlarging and diminishing. For oil paintings, pieces of
twine or thread might be tacked across at equal intervals,
so as not to injure or mark the painting; or for small
engravings you can procure a piece of stout card paper
;
cut a square in it the size of the engraving you wish to
copy ; divide the sides and ends into half inches ; then
with a needle and thread pass through the various marks
from side to sid3 and from top to bottom, taking care that
the thread always comes from the same side of the card,
so as to lie close to the engraving when used. Number
the threads each way. If you wish to enlarge the copy,
it is necessary to determine the proportions one, two, or
more inches to the half inch of the thread card.
Pencil Drawixg. — After having the form of an
object drawn, we want it better defined ; for instance,

DRAWING. 45
if we wish to shade a ball, we must follow the shape,
and let all the shade marks be rounded, marking dark
on the side farthest from where the light strikes it,

46 DRAWING.
working gradually fainter until the shading is lost in
the spot of light ; if we wish the same circle to repre-
sent a flat surface, make all the shade marks straight and
even, so as to represent one shade. In this way, by
studying the natural object we are drawing, the pupil
will make pleasing progress.
In shading houses, trunks of trees, rocks, etc., observe
which way the natural direction of lines should run, so
as to best harmonize with the original, and proceed ac-
cordingly.

DRAWING. 47
FOLIAGE.
When a tree is in the foreground the leaves are dis-
tinctly seen ; we can readily distinguish the form, and the
light and shade is in strong contrast ; if we move our

48 DRAWING.
position, and make the same tree appear in the middle
distance, we can recognize the same tree, but the light and
'»,.,
r .f
,
ummMJ
^v ^'
*P;..!^I'^Jl wvmm'g
ti
^ ?;.-, nil', % »i'i
^ZM^'^
shades are not so strong ; if we again remove our position,
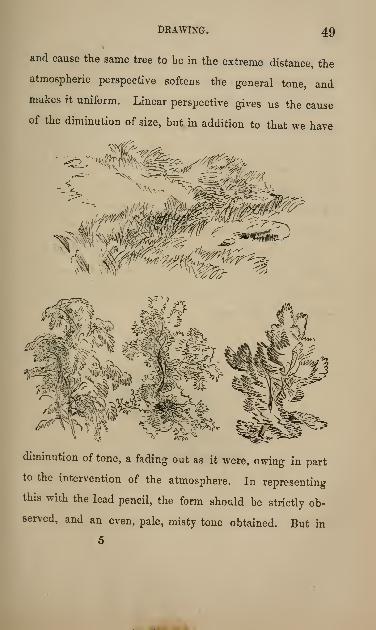
DRAWING. 49
and cause the same tree to be in the extreme distance, the
atmospheric perspective softens the general tone, and
makes it uniform. Linear perspective gives us the cause
of the diminution of size, but in addition to that we have
:^-'^.i^mM
diminution of tone, a fading out as it were, owing in part
to the intervention of the atmosphere. In representing
this with the lead pencil, the form should be strictly ob-
served, and an even, pale, misty tone obtained. But in

50 DRAWING.
the foreground, the high lights must be strictly kept, and
the shades deepened with an even gradation. We would
recommend a careful study, not only of all the pencil
practice we have here introdmced, but of numerous others ;
these should be practiced well from memory, as, by so
doing, ease, freedom, and facility are obtained. Masses of
foliage can be represented by any of the zigzag working
of the pencil ; the outside form of the tree has to be
studied, and the marks best adapted to it applied.
When a drawing or painting is finished, one of the best
means of improving is to study it well, and do another
from memory. By doing this conscientiously improve-
ment is far more rapid.

#il f aiitlhg.
(51)

IL painting, as a matter of course, re-
quires that the general principles of
outline should be familiar, and that a tolerably correct
sketch of ordinary subjects can be accomplished with
ease and facility. We will enumerate the requisite
materials for a " fitting out." They consist of colors,
brushes, palette, palette knife, canvas, easel, hand-rest,
oil, and varnish. A tin oil painting box can be pur-
5 *(53)

54 OIL PAINTING.
chased complete, containing hog-hair tools, sable and
badger brushes, port crayon, chalk, oil, varnish, palette,
and palette knife. Hog-hair tools are made flat and
round. Flat ones are generally used for the sky. The
badger hair brush is used to soften or blend together
the sky and other parts. Sable brushes are likewise
flat and round ; both are useful. After the badger has
been used for softening, the ends of the hairs get clotted
with paint ; the cleaning of this must be attended to
while the paint is wet. The better way to do this is by
pressing the hairs together in one hand, and rubbing
with a clean rag in the other, until all the paint is re-
moved. Be careful that every particle of paint is re-
moved, or your badger will be spoiled for delicate soften-
ing. It is likewise of equal importance that all the
other brushes should be attended to. The best way of
proceeding is, after you have done painting, wash them
out in turpentine, and occasionally in warm water and
soap, rubbing on the palm of the hand until the froth is
colorless. Rinse the brushes out in clean, cold water
to free them from soap, press all the water out, and
straighten the hairs to dry. In rubbing the brushes in
your hand, be careful not to rub too hard, or the hairs
will be injured.

OIL PAINTING. 55
To PREPAKE Canvas or Wood tor Oil Painting.
— Coat the material over with strong and warm isinglass
size ; when it is dry, coat it over with oil paint. Dryers
may be added to the oil paint, such as litharge, sugar
of lead, etc, to facilitate the drying. If a smooth sur-
face is desired, it will be requisite to rub the surface
with pumice sand and water.
Oils. — Several oils are used by artists — poppy
oil, drying oil, nut oil, and linseed oil. Linseed is
recommended rather than the others. Drying oil is
prepared by boiling linseed oil and litharge together
;
it makes it much darker, but it dries more rapidly.
Gold size, such as is used for bronzing, is often used as
a dryer for dark colors. Sugar of lead is likewise a
good dryer, and can be ground in with any color to fa-
cilitate the drying. Megilp is an indispensable article
in oil painting ; it serves as a good vehicle, and tempers
colors to any tint requisite for glazing or scumbling.
It is made with equal parts of strong mastic and
clarified oil. Artists differ very much in the compounds
used for drying, each one concocting a vehicle of his
own, keeping it a secret, and imagining he has some-
thing superior to any one else. Our recommendation is.

56 OIL PAINTING.
to use such as you can buy : it is a very good and ser-
viceable article. If you make it yourself, go according
to the receipt given above, which \\ill make a good, ser-
viceable vehicle for general use. Copal varnish is some-
times used, instead of mastic.
In oil painting, as in water color painting, there are
several kinds of manipulation peculiar to the different
styles. Water color has its own treatment of erasing,
rubbing, and wiping out, stippling, etc., while oil paint-
ing glories in glazing, scumbling, dragging, etc. Dif-
ferent artists have very various methods of manipula-
tion to produce the same effect, and yet each is truthful
to nature.
Explanation of Technical Terms used in Oil
Painting. Glazing.— To glaze is to coat thinly or
thickly over a portion of the picture with transparent
color : if the glaze is wanted thin and pale, megilp, or
oil, is added to dilute the strength of the color. Semi-
transparent and opaque colors are sometimes used for
glazing, but they are so diluted with megilp or oil, that
they are rendered nearly transparent. With opaque
colors used in this way a good representation of smoke,
dust, or vapor can be produced, likewise misty and hazy

OIL PAINTING. 57
appearances. Glazing must never be attempted until the
under paint is perfectly dry, or the color will mix with
the glaze, and destroy all the effect you have secured.
Scumbling is a term used for reducing any part of
a picture that is too forcibly painted. A bristle brush is
best adapted for this purpose, charged sparingly with
opaque color, of the tone you wish, drawing it lightly
over the parts, so as to modify them, make them cooler,
grayer, and less defined. Good distant atmospheric ef-
fects are produced by scumbling ; the under color must
in all cases be firm and dry, or the bristle brush will
disturb it.
Handling is another term for manipulation, and
means the method of working the brush to produce
certain effects.
Dragging or Dry Touching.— This process is used
when certain effects are wanted in the finishing. The
brush, being charged with thick paint, is held loosely
in the hand, and dragged over certain parts ; a portion
of the color sticks to the part of the picture with which
the hair thus gently comes in contact.
Management of Light. — When painting at the
easel, the light should come over the left shoulder; if
58 OIL PAINTING
tlie light is from a side window, cover the lower part
with a cloth or board. A north light is preferable to any
other, because it is more uniform. After painting, the
brushes should be washed, the palette well cleaned,
never leaving paint on it over night. If there be more
color on your palette than you like to throw away, procure
some small pieces of glass, three or four inches square; put
the paint on these, and place them in clean water : most
of the colors will keep good for a considerable time, if
immersed in water and the dust kept from them.
Look well to the blender every time it is used.
How TO coMMEXCE AX OiL PICTURE.— If you are
sufficiently accurate in sketching, you can with charcoal,
or white crayon, make a few guiding marks ; then mark
in correctly with lead pencil, dusting off the crayon or
charcoal as you proceed. If the subject is complicated,
the better way is to make a clear, correct outline on a
sheet of paper, and trace it on the canvas by means of
tracing paper ; then sketch it with a lead pencil. Some
artists sketch with umber, diluted with oil. The canvas
is now ready for the first coloring. Begin by preparing
tints for the sky. As white enters into this preparation
pretty extensively it is requisite to get sufficient from the

OIL PAINTING. 59
tube at once, and thin it with oil, as it is considerably too
thick for use in this stage of the painting. Sky tints are
composed of white, French or permanent blue, vermilion,
Naples yellow, and yellow ocher. Mix them as near the
tints as the subject demands. The same tints, strength-
ened with more color, will do for the mountains, usincr
a little more of the yellow ocher in the mid-distance, and
working gradually toward the foreground, for which mix
a set of requisite tints, keeping them all separate, and
painting with firmness, placing the color at once where it
is to remain. In some paintmgs, two, three, or more sit-
tings are requisite to complete what is called the first
painting.
Second Paixtixg.— It is requisite for the first paint-
ing to be dry before commencing the second. Prepare
the palette with the required tints for the clouds, and
paint them in with a little more attention to the shape,
and light and shade. When done, soften with the blend-
er. The mountains come next in order: attend more
particularly to their shapes and diff"erent shades ; and, as
a general rule, let the early painting be of a light style of
color, for in finishing the colors are cooled down by the
process of glazing and scumbling. All the colors in dry-
ing sink, and will partake a little of the color upon which
60 OIL PAINTING.
they are laid. This second painting should give a good
idea of the general effect of what the picture will be.
Thied Paixtii^g.— A few touches of scumbling may
be required to aid the effect of the distance ; or a little
glazing and scumbling may be wanted, to bring out cer-
tain desirable effects in the middle ground. The tints
used for these purposes may be, as occasion requires,
either brighter or darker than the parts to which they
are applied. In this stage of the painting, do not attempt
too much at one sitting, as the different glazings may in-
terfere with each other, and destroy the transparent effect.
It is much better to let the colors dry gradually, and re-
peat the glazing at another time.
Observations.— 1st. The sky in some pictures is
very important, having an influence over the entire paint-
ing. In preparing sky tints, they are gradually more or
less mixed with white. The tints are kept lighter as they
approach the sun; the colors vary, but they should be
produced by few. The most useful sky colors are white,
French or permanent blue, vermilion, madder lake, Naples
yellow, and yellow ocher.
2d. The boundary sky line, or extreme distance, varies
very much in tone ; sometimes distinctly seen, at others
scarcely distinguished from the horizontal tones. Suita-

OIL PAINTING. 61
ble colors must be selected to paint in these effects. Dis-
tant mountains will sometimes have their summits quite
visible, and their bases, although much nearer, not seen;
this is occasioned by mists and vapors. To obtain this
effect, scumbling must be resorted to.
3d. If it be possible, paint in the distance while the
sky is moist, with the same tints, only stronger, as the
case may be. If time will not allow, scumble over the
lower part of the sky at the next painting. This method
is sometimes attended with better effect than the other.
4th. As the objects advance toward the foreground, a
little more distinctness of color may be given. Acci-
dental touches of light give important aid by separating
the foliage, and different objects through the picture, from
distance to foreground. Such colors as terre verte, In-
dian red, Venetian red, Antwerp blue, emerald green,
and raw sienna, may be added to the colors already enu-
merated. Emerald green may be objected to by some
artists ; to such we would recommend to try with ver-
milion or one of the bright reds, and judge for them-
selves. The grays produced by these two colors can be
varied with a little Vandyke brown, or Naples yellow.
5th. Trees form an important item in general landscape.
6

62 OIL PAINTING.
The color and shape should be attended to, and the dispo-
sition of the branches carefully studied. Pencil in the
foliage against the sky, and all the extreme parts, neatly
with a small brush.
6th. In working up foregrounds, do not elaborate
them with a pre-raphaelite minuteness, or it might inter-
fere with the rest of the picture. The landscape is not
intended to be painted with botanical accuracy ; nor, on the
other hand, should you be too broad, coarse, and careless,
but finish with a general harmonious keeping of the whole.
7th. The distance must, to a certain degree, melt into
the horizon, so as to know where ethereal finishes, and
where solidity begins ; the mid-distance should be made
out more clearly, and particular attention should be paid
to the details of the foreground.
8th. It is well to have a glass slab, about seven or
eight inches square, in addition to your wooden palette,
on which to rub colors, as it is requisite to have some
colors in powder— a few that are seldom used. On
the glass slab they can be mixed or ground when occa-
sion requires.
FiGUKEs. — Figure drawing is an indispensable ac-
cessory in landscape painting. For the study of the

OIL PAINTING. 63
human figure, there is no better way than the study of
feet, hands, heads, etc., from casts. The introduction of
figures in landscape serve not only to enliven and break
the monotony of some passages, but it serves as a rela-
tive measurement— a scale whereby we can form ideas
of the real size of objects. The hight of an average
figure is eight times that of its head. This division can
easily be remembered. If a perpendicular line is drawn,
allow half of it for the lower portion of the body, and
half for the upper— from shoulder to shoulder two
heads wide.
Hints about Panorama, Map, and Scene
Painting.
^ AKE strong cloth (sail cloth or
canvas) of the requisite dimen-
sions, and stretch it on a frame ;
coat it thoroughly with parch-
ment size, and when dry ap-
ply a coating of common
slaked lime, or of chalk with
some size with it : when dry it
is ready for the design. The colors used for this kind of

64 OIL PAINTING.
painting are mostly the common paints— chalk, (carbon-
ate of lime,) vermilion, the two siennas, the two um-
bers, black, Prussian blue, all the ochers, Brunswick
green, emerald green, all the chromes, mineral red, and
the lakes. They are mixed with a size made of isinglass,
glue, or parchment : bristle brushes of various sizes are
mostly used. For extra brilliant effects, leaf silver,
Dutch metal, and silver foil are stuck on with oil size
in the same manner as for gilding, (See Gilding.) This
kind of painting is now called " distemper painting."
A bowl should be had for each color, likewise a brush.
The tints should appear a little darker when mixed
than what you want them to be, as they dry lighter :
wash the brushes in warm water when you wish to
clean them.
If the designs require to be painted in oil, the can-
vas is prepared with the parchment size in the same
way ; then coat over twice with oil paint, white, then
a pearly white. When dry, proceed as with an oil
painting.
It should be remembered, in all paintings of this char-
acter, that fine and delicate touchings are not necessary
;
indeed they are not suitable in any way, as they detract

OIL PAINTING. 65
from the boldness of the picture, deadening the sharp-
ness of outline, and giving a tame effect to the ^vhole
painting. These pictures are intended to be looked at
from a distance, and consequently the lines must be bold,
and the contrasts of light and shade very apparent. To
obtain these absolutely indispensable requisites requires
practice ; and the pupil will notice that those parts which
look harsh and coarse when closely examined, are the
very portions which give character to the picture when
viewed from an appropriate distance. All panorama and
scene painting is based on this principle. These remarks
are equally applicable to any object which is to be placed
at a distance from, or elevated above, the beholder.
%
Crayox Drawing.
RAWING in crayon is much easier of
execution than oil painting. One ad-
vantage over oil and water color is the
facility with which a drawing can bs
completed; this is manifest in out-door sketch-
ing, or upon any subject of which you wish a
few memoranda, and have but little time to
obtain them. The advantage of working with
6*
QQ OIL PAINTING.
dry material does away with the tediousness of waiting the
drying of oil or water color. Crayon or pastels are put up
in boxes of assorted tints for portraits or landscapes, and
by the blending of these every kind of shade and color
can be obtained, as in oil painting. Get dry colors, grind
them very fine in water, add any of the following gums,
dissolved in water : gum arable, gum tragacanth, honey
water, sugar candy water; a portion of this is added
merely to bind the color: some colors require a little
more than others. If too much gum is put in, they
will be hard, and not rub off so readily. Gradations of
tint are made by adding chalk or plaster to the color;
for
instance, we will select carmine ; add two parts of chalk
to one of carmine, and call that one tint; add three parts
chalk to one of carmine— call that another; add five
parts chalk to one of carmine— call that another; and
so with all the colors, in any number of tints to suit
yourself. In order to form the color into crayons, press
it and roll it out the size you wish ;place it upon ab-
sorbent paper,— white blotting paper is the best,—
and let them dry gradually.
Crayon Papers. — Almost any kind of paper may
be used by being previously rubbed with cuttle fish, (if
MONOCHROMATIC DRAWING. 67
it have a very smootli surface ;) but there are papers
manufactured especially for crayon painting and these
have the advantage of greatly assisting and facilitating
the progress by readily receiving the crayon.
A good paper for portraiture is pumice paper. The
paper is prepared with a coat of starch, or isinglass, put
over the surface while warm, after which it is dashed all
over equally with fine pumice sand. Panels of wood,
mill-boards, and canvas can be prepared in the same way.
The pupil is recommended to study the designs in pencil
drawino" ; many of the principles there illustrated are of
equal use in this.
Directions for Monochromatic Drawing.— Take
pasteboard or drawing paper of good quality, size with
isinglass, or paint with pure white lead. When this has
been thoroughly dried, smooth it well with sandpaper,
and paint again perfectly smooth ; while this coat is yet
hardly dry, sift upon it pulverized white marble, through
fine muslin. Marble can be easily pulverized after burn-
ing it. When dry, shake off" the loose particles. (The
process is rather tedious, and requires care, especially in
the marbling. The paper all prepared can be had of the
publishers of this book, or at any artist-supply store.)

68 MONOCHROMATIC DRAWING.
If you wish a tinted surface, add color to the white
paint.
You will need for this painting a knife or eraser, cray-
ons, fine sponge, pencils, cork, rubber, piece of kid, and
crayon holders. Fold several pieces of kid and soft
leather, and use in shading the sharp folded corners;
also double some pieces over the ends of pointed and
rounded sticks ; the learner will find use for several
kinds. Always commence painting with the dark shades,
and blend gradually into the light. For very dark
shades, rub the crayon directly upon the surface with a
light hand, and blend off carefully.
Paint the sky f rst as in water colors. It is well to
shade distant mountains very light at first, and be sure to
have the edges soft and faint.
For water, scrape some black crayon into a powder,
and lay it on your board with the kid, working it hori-
zontally, and making the lights and shades stronger
as it comes nearer. Your sponge may do good in ren-
dering the water transparent. Make sharp lights with the
penknife.
Ruins overgrown with moss, and dilapidated build-
ings, make pretty pictures. We have seen moonlight
I

COLORED CRAYON. 69
views, in this style of painting, more beautiful than
any thing else.
Great care must be taken to do the foliage icell ; many
a picture, which would have been good otherwise, has
been spoiled by a stiff, ugly tree. By a delicate use of
the round point of a penknife, beautiful effects can be
produced in the crayon shading.
Figures, animals, etc., are put in last, and a person
knowing how to shade in pencil will find no difficulty
in this.
Colored Ckayon. — The monochromatic board is
very good for this kind of painting.
Sometimes we make a strong frame of the size of the
picture which we intend to paint, and upon this we
stretch three thicknesses of paper ; then size or paint
it, and sift marble dust equally over every part while
wet. When dry, the superfluous particles are blown or
dusted off.
If you use the monochromatic board, it will be well
for you to transfer your picture, as in papier mache
painting. If you stretch your paper on a frame, draw
the picture on the paper, and shade it nicely with Indian
ink (water color) before sizing or painting it.

70 COLORED CRAYON.
For a group of fruit and flowers, first arrange the
natural ones and study the efi-ect. For a head, we con-
sider the drapery and groundwork ;and here allow us
to advise all persons to study penciling before attempt-
mg this kind of painting ; also, to begin by painting
simple and easy things. To those who absolutely wish
a colored picture, and have little ability to draw it,
we recommend that they stretch a nice engraving land-
scape or head on the frame, at the outset, and pre-
pare it with the sizing and sand. This gives a good
foundation.
The picture being drawn, proceed to fill in the back-
ground, not of one uniform tint, but varying in shade
and color according to the picture ; for example, if the
lights in your picture are on the right side, the darkest
shade in the groundwork must be placed on the right
side, and vice versa. See that the background be
smooth, the dark shades of rich brown or green, and
the light of gray, French blue, etc. ; then,—1st. Paint the dark shades of your picture with black
crayon, and rub it in with a soft cork. The cork pencils
ready prepared are best for that purpose, or rubbers of
soft leather will answer.

COLORED CRAYON. 71
2d. Put in the light, clear shades, as they belong,
with the soft and medium crayons, using the utmost
care in blending with the cork, (or leather,) to avoid a
dingy and dirty appearance.
3d. Lay on the browns and other dark colors. Where
it is necessary to put brown over black, or to blend it
in with it, do not rub the two together ; use your
finger, as well as the cork.
4th. Finish the picture wdth the hard crayon, laying
on in lines and blending with the cork.
Having a variety of colors for other styles of painting, we
leave you to use your judgment in selecting from your
boxes. You must have a box of soft and a box of hard
crayons, from which to obtain what you need.
Always try the colors on a bit of waste paper.
Do not expect to have just the right thing by simply
laying on the colors once ; you must work line over line
very carefully, and many times. The artist must exer-
cise great care that the picture does not become soiled
in the delicate parts.
In addition to the colors you find in your boxes, fur-
nish yourself with black and white crayons of different
tones, and a good supply of carmine. We prefer the
72 COLORED CRAYON.
lump to the pencil. French hlue is much used to pro-
duce clear lights.
Colored crayons are well adapted for landscape drawing,
and for this a harder crayon than that used for portraiture
is preferable. The most useful colors are white^ (white
Italian chalk,) straw color and light yellow, (pale and
middle, deepening to sober full yellows of the yellow and
and brown ocher hues.) Blue, (bright azure tints of
varied strength, pale and dark,) Gray, (pale and deep,
of blue, neutral, and warm tones.) Reds, (vermilion
tints, pale and middle, Indian red.) Blacks, (Nos. 1, 2,
and 3.) The paper must be of some available tint, as its
color appears through almost all portions of the work ; a
low-toned olive tint has been found very available. Hav-
ing the paper an inch or two larger than the proposed
picture, sketch the design lightly with the black crayon
No. 1, making sky and broad tints with the flat surface
of broken pieces of crayon, (1 and 2,) rubbed in with the
finger ; the breadths of the nearer and remote distances
are laid in with pieces of broken crayon blended and
worked together. The mountains, trees, rocks, etc., are
drawn in with black crayons, and then appropriately
tinted and glazed with the colored crayons.

PRESERVING DRAWINGS. 73
Method of fixik^g Ckayox Dkawixgs by Steam.
— Crayon drawings are more likely than any other kind
to become disfigured and defaced, if handled carelessly.
A method of preserving them is highly spoken of by
those who practice this branch. Get a tin vessel with a
tight-fitting lid, and a pipe projecting from the side of
the vessel, five or six inches long, with a small head
perforated with numerous holes, similar to a common
watering can ; into this vessel put two ounces of the
strongest alcohol, and two drams of powdered sugar
candy. Boil it over a spirit lamp ; the steam which
issues from the pipe must be directed to the back of
your picture, until the paper and colors are perfectly
saturated.
To PRESERVE Pencil Drawings. — Best alcohol,
two ounces ; camphor, four grains. When dissolved it
is ready for use. If the drawing is on ordinary draw-
ing paper, the solution can be coated on the back of
the drawing, and the paper will readily absorb suffi-
cient of the liquid to hold the lead pencil. If the
drawing is on Bristol board, it will be necessary to coat
it over rapidly on the drawing side ; or, what is better,
put the solution in a shallow dish, and slip the draw-
7

74 PRESERVING DRAWINGS.
ing through ; see that the liquid has been all over it
;
then stick a pin through one corner, and let it hang
up perpendicularly to dry. Another way is, to use
weak skim milk, and immerse your drawing in that,
drying it in the same manner as before.

^ruian f ainling
(7«)

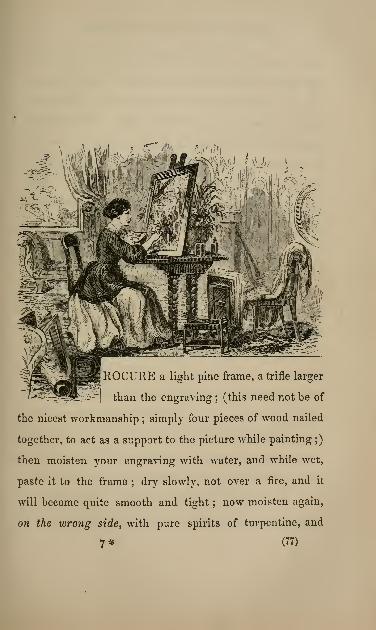
ROCURE a light pine frame, a trifle larger
than the engraving;(this need not be of
the nicest workmanship ; simply four pieces of wood nailed
together, to act as a support to the picture while painting ;)
then moisten your engraving with water, and while wet,
paste it to the frame ; dry slowly, not over a fire, and it
will become quite smooth and tight ; now moisten again,
on the wrong side^ with pure spirits of turpentine, and
7* (77)

78 DIRECTIONS FOR GRECIAN PAINTING.
while wet, with a coat of Grecian varnish on the same
side, which continue to apply, (keeping it damp only, not
too wet, or it will filter through in spots,) until it is
wholly transparent, and without spots. If it is found
difficult to remove the spots, apply the second coat of spirits,
and afterward the Grecian varnish. When ready to
paint, the back will have an even gloss all over it. When
perfectly clear, it should remain two or three days before
painting, which is done on the side that you have var-
nished, the shading of the engraving serving the same
purpose in painting ; this process is so simple that a child
able to read this can easily understand it. Each picture
we publish for these arts has complete and special rules
how to paint and how to mix colors for each part, etc.
A list of our pictures will be found at the close of this
article.
All materials used can be had of the publishers at the
lowest prices ; also, a new and choice assortment of small,
cheap, trial engravings, which will make desirable pictures
when completed ; Grecian varnish of the best quality, in
bottles at 33, 45, and 62 cents each ; Winsor & New-
ton's fine English oil tube paints. Five colors are
needed, and more might be used to advantage; those

DIRECTIONS FOR GRECIAN PAINTING. 79
actually needed are flake white, ivory black, permanent
blue, deep chrome, Chinese vermilion. Yellow ocher,
Indian red, emerald green, Vandyke brown, raw and
burnt sienna, the lakes and some others, can be used to
advantage, although from the five first mentioned almost
any shade of color can be made. For flesh color, white, a
trifle blue and vermilion; for the cheeks, rub through a
little vermilion with the finger, after painting with the
flesh color;
for other shades, see special directions fiir-
nished with our pictures, as mentioned above. A flat
varnish brush is also needed, price from 25 to 37 cents;
two or three -paint brushes, (sable hair are best with long
handles, costing 17 cents each;) a little spirits of turpen-
tine;a rag to wipe your brushes ; a bottle of bleached
drying oil, 20 cents; Outside varnish, 20 cents; this
last must be put on very thin, after your picture is
dry, on the face, with a stiff brush; then frame cbse
without a glass. Boxes of materials for Grecian and An-tique painting cost 83.50, 5.00 and 7.50 according to the
number of articles contained.
DiRECTioxs fokGreciax Vakxish.— Three ounces
fir balsam, two ounces fourth proof alcohol, (none but the
best will cut the balsam.) Mix well, and add one ounce
pure spirits of turpentine.
80 DIRECTIONS FOR GRECIAN PAINTING.
How TO FEAME A PiCTUKE AFTER IT IS PAINTED.
Let it remain in the frame in which it is first stretched till
it is fully dry and hard ; then cut it out carefully and frame,
taking care that it be not cut too small or too large. If
too small, the back board will not hold it in well ; if too
large, it touches against the side in parts, and causes it
to wa'inkle. To have it just right, lay it upon a flat surface
and the frame on it, and mark the size with a sharp point,
and then cut evenly. If, after all your care, it should wrinkle
in time, take it out of the frame and make another stretcher
or frame of wood, (as first directed to stretch the picture
on, only stronger perhaps,) that will just fit your gilt
frame ; then take a piece of strong cotton cloth, one or
two inches larger than the picture all round, and paste the
back of the picture and the cloth ; after pasting let both
stand a few minutes to become pliable, then lay the one
on the other, pasted sides together, and rub evenly till
well fastened ; now tack wdth small nails or lace tacks
tightly to the frame;place the frame against some smooth
surface, and secure it, while drying, with larger nails driven
through the frame, after making suitable holes. It will
dry smooth and tight if properly done.
Varnish the picture hut once on the face, after it is

DIRECTIONS FOR GRECIAN PAINTING. 81
framed, (not before,) with Outside varnish; this must
be put on evenly, and with care that it does not run
;
have but little in the brush at a time. Grecian varnish
should be of the best materials; if you cannot get ours,
make it by our rules, and see that the ingredients are of
the first quality and unmixed.
Professor Day's Method.
/HIS style of painting, lately in-
troduced into this country, has
already gained for itself a wide
circle of patrons, owing to the
readiness with which it is ac-
quired. This and Oriental
painting have run a pretty
even race— the latter glorying
in a gorgeous array of brilliant colors, with sparkling
aids, the former of a more sombre and antique appearance^
Grecian painting is not a new style with an old name, as
some think, but an old style with probably a fanciful
name;
for I can well remember doing it in England whena boy, and hearing old artists say that they did the same

82 DIRECTIONS FOR GRECIAN PAINTING.
thing in their boyhood. This method of painting h more
satisfactory to mediocre painters than any other style as the
difference between a good artist and an inferior one is not
so readily distinguished. It admits of all classes of paint-
ers, from the beginner to the finished artist ; the veriest
tyro producing a pleasing picture with a little care, at the
same time advancing a step in the study of color. Many
celebrated artists do not hesitate to avail themselves of
the Grecian style, by commencing the picture, (after being
finished in the Grecian method,) as if it were only in the
dead color for a highly-finished picture ; shading and
manipulating with the various tints in opaque color, glaz-
ing and painting, scumbling and painting again until the
desired effect is obtained. When finished highly in this
way by an experienced artist, it is very difficult to tell
it from an exquisite picture on copper. I was intro-
duced, many years ago, to a gentleman in Scotland, who
had a very valuable collection of modern and ancient paint-
ings. After looking through several well-stocked rooms,
he said he had one (a gem) in reserve for me— an original
by Raphael, a portrait of La Fornarina. I looked at it,
knowing that it was not the size of the original, although
it was painted beautifully ; all the glowing tints of nature

DIRECTIONS FOR GRECIAN PAINTING. 83
SO carefully handled that not a brush mark was visible.
After looking at it some time, I thought it might be a
carefullj-painted engraving done in the Grecian style, and
mentioned the same to the owner, who seemed very indig-
nant at my plebeian opinion of one of his choicest pictures.
I took the painting out of the frame, and, convinced of the
truth of my conjecture, explained to him the modus ope-
randi of Grecian painting, and then tore up a corner of
the paper to satisfy him that I was right. Of course, he
was very much astonished, and seemed hardly to thank
me for detecting the cheat, and opening his eyes to the
fact. The painting was beautifully done, and neatly
pasted on canvas. After leaving his house, I thought I
had hardly done right in exposing his pet original, for it
was a good painting, and he considered it invaluable ; but
the mischief was done and it was too late for remedy. In
the course of a few weeks after the unfortunate expose, I
accidentally met with his valet de chamhre, who, in con-
versation, informed me that La Fornarina was deposed
from her choice locality in the drawing-room, and was at
present suffering in an obscure corner in the housekeeper's
room ; but the butler, who had an eye for beauty, had
offered it a prominent place in his sitting-room. So I

84 DIRECTIONS FOR GRECIAN PAINTING.
presume La Fornarina ever after had her eye on the but-
ler. Pardon this digression, but it is a true occurrence,
and proves pretty conclusively that even a lover of art and
a connoisseur may be deceived with a painted engraving.
Directions.— 1st. Procure a pine frame about an
inch in thickness and half an inch in width, the inside to
measure exactly the size of the engraving.
2d. Place the frame upon the engraving, and mark
round the outside with a lead pencil ; cut down the paper
with scissors to the pencil line.
3d. Choose the best side of your pine frame, and coat it
over with thick paste.
4th. Place your engraving, face down, on a piece of
clean white paper upon a table; saturate your engrav-
ing thoroughly with a sponge wet with clean water;
press your pasted side of the frame firmly down upon the
picture ; then turn it over, and press gently with the flat
of your hand, so as to have it stick evidently all round the
edge of the frame, and then leave it till entirely dry.
5th. Pour on your Grecian varnish, and rub it in with
a bristle brush; repeat this four or five times at inter-
vals of ten or fifteen minutes.
•6th. When thoroughly transparent, place it where it

DIRECTIONS FOR GRECIAN PAINTING. 85
will be free from dust for a week or so, to allow it to
dry ; it will then be ready for painting.
Observations.— 1st. Great care must be taken with
the pasting, so as to have it perfectly secure, as many
good engravings have been spoiled by inattention to
this stage of the process. In our practice we find it
a more certain way to place a damp piece of paper on
the middle part of the picture, so as to keep the paper
moist until the pasted edges of the paper are sufficiently
dry to resist the contraction of the paper.
2d. The engraving while moist hangs loosely, but as
it dries (it should always be allowed to dry gradually)
it becomes quite tight ; this is owing to the expansion
and contraction of moist and dry paper. When thor-
oughly dry, it is ready for varnishing. Saturate it well
the first time with the varnish ; in about ten minutes the
paper will probably absorb nearly all of it : then sat-
urate it a second tim.e. Look at it again in fifteen min-
utes, and if dull parts are to be seen, apply more varnish.
This process of varnishing must be repeated until it all
shines, and is completely transparent. Look at it the
next day, and if any white spots are visible, apply a
coating of turpentine.
8

86 DIRECTIONS FOR GRECIAN PAINTING.
Treatment or White Spots.— One of the greatest
difficulties with which artists in Grecian painting have to
contend is the breaking out of white spots after the
picture has been carefully varnished ; it has been
facetiously termed the ''white spot plague,'' and is
certainly as great an eyesore to Grecian painters as
any plague spots to the world at large. None but the
initiated can imagine the chagrin felt by the artist,
after, as he imagines, carefully and thoroughly varnish-
ing a choice picture, making it look as transparent as
clear water, and placing it snugly away in a corner
free from dust, with a full belief that all is safe, on
taking it up some subsequent day for painting, to find
that the plague spots have appeared perhaps across the
face and neck of a beautiful young lady, or may be on
the lips of a sleeping babe, or on the knee of a war-
rior, threatening to lame him for life, or making a dis-
tressing attack on the eye of a coquette, depriving her
of her magnetic charms. All these, and many, many
more have we been subject to in the course of picture
clearing. The great panacea for these white plague
spots is ''turpentine:' If rubbed on the back of the
picture soon after they make their appearance, the dis-
DIRECTIONS FOR GRECIAN PAINTING. 87
aster is soon remedied ; but if allowed to remain for
weeks or months, it is very difficult. We invariably
proceed as follows : If the spots come out a day or
two after varnishing, coat the picture on the back with
clear turpentine, and let it remain half an hour ; if the
spots do not disappear in that time, repeat the process
;
at the end of another half hour, or an hour, if they have
not disappeared, and the turpentine is evaporated, apply
still more : the spots are sure to yield sooner or later.
"When they have disappeared, and the turpentine has
all evaporated, or nearly so, apply one more generous
coat of varnish, and leave it; in all probability, white
spots will never again mar the picture. In cases where
the cleared picture has remained several months before
being discovered, much greater perseverance is required.
We proceed then by placing the picture near the fire,
face down, so that a moderate heat will act upon it:
apply the turpentine, the action of which is facilitated
by the heat. The design of this process is to soften the
varnish, then weaken it, and by this means penetrate the
paper. These stubborn cases require much time and
perseverance; but if you feel disposed to bestow the
time and trouble, the spots are sure to disappear. In

88 DIRECTIONS FOR GRECIAN PAINTING.
all our experience we never have had one failure ; indeed,
if this treatment is persevered in, failure is out of the
question. The Grecian painter will, doubtless, think that
this is considerable trouble. We echo the thought, and
say, yes, it is considerable trouble, as we can fully testify,
having had some smart pupils, whose pictures we have
been obliged to keep in a continual turpentine bath for
a couple of days ; and we fancy we hear more than one
shrewd observer, desirous of avoiding it if possible, ask
if there is any way of avoiding it. We answer, yes;
the appearance of the white spots is caused by not apply-
ing as much varnish as the paper will absorb. The
picture should be well Avatched during the varnishing,
and as soon as the dull parts appear, more varnish
should be applied, for those are just the places where
white spots would make their appearance if allowed to
remain. The varnishing should be continued until the
whole picture has a glassy appearance. On the other
hand, care must be observed not to get on too much
varnish ; for by running into this extreme upon some
warm day, when Fahrenheit indicates about 100° in the
shade, the colors will be apt to float from their places,
owing to the softening of the gummy varnish. On some

DIRECTIONS FOR GRECIAN PAINTING. 89
pictures ^Yhite spots will sometimes appear, with their
crystallized radiations, when such pictures have been
painted two or three years. The spots in this stage
require a very different treatment, and more artistic skill
is requisite. The part affected must be matched very
exactly with opaque color, the precise tint, and stippled
in on the right side with a small brush ; this is the
only treatment for white spots starting after the paint-
ing is finished.
Articles desirable for Grecian Paintixg.—Palette, palette knife, one inch flat bristle brush, one
inch flat varnish brush, (we use two different brushes;
one we keep entirely for the Grecian varnish, the other
for varnishing over the front with mastic varnish when
finished,) three sized sable brushes, (one miniature size.)
Grecian varnish, mastic varnish, (or Outside varnish,)
spirits of turpentine, drying and nut oil.— Colors. Flake
white, Naples yellow, raw and burnt umbers, Indian
red, Venetian red, vermilion, rose madder, crimson lake,
Vandyke brown, raw and burnt sienna, Italian pink,
chrome yellow, deep chrome, yellow ocher, ivory black,
verdigris, emerald green, Prussian or Antwerp blue,
cobalt or permanent blue, and megilp.
8*

90 DIRECTIONS FOR GRECIAN PAINTINa.
We will give a few general hints for mixing various
tints, without reference to any particular picture. They
will always be found useful. Flesh tints, white, Naples
yellow and a little vermilion ; sometimes for children,
white and a very little vermilion ; for old age, (weather-
beaten,) Indian red and white. Light hair, raw umber
and white ; these two colors will give all the shades of
liffht and dark brown hair. Flaxen hair, raw sienna
and white. Golden hair, raw sienna, white, and a little
burnt sienna. Distant mountains, permanent blue, Na-
ples yellow, and Venetian red. Nearer ones, use yellow
ocher instead of Naples yellow. Mid-distances, the
same, sometimes allowing the yellow ocher and blue to
predominate. Distant foliage^ yellow ocher, deep chrome,
Antwerp blue, and a little Venetian red. Near foliage,
chrome and Antwerp blue, with a little white ; very
bright foliage, emerald green, chrome yellow, and a lit-
tle white. Brown foliage, burnt sienna, deep chrome,
and Antwerp blue ; Vandyke brown, substituted for
brown sienna, will make another. Grays, white and a
little ivory black ; another, Naples yellow, permanent
blue, and a little vermilion. Pink, rose madder, and
white ; for crimson, vermilion ; for deep maroon, use
DIRECTIONS FOR GRECIAN PAINTING. 91
Indian red. Buff, Naples yellow ; warmer buff, white
and a little deep chrome. Orange, chrome yellow and
vermilion. Blue eyes, permanent blue and white.
Hazel, Naples yellow and a little raw umber ; these
tints are all for the hack of the picture; the front is
treated dififerently. Any part that is required to be
brif'hter must be glazed over with transparent color
;
for instance, a bright red garment or flower is coated
with vermilion on the back side, and crimson lake,
diluted a little with megilp, on the right side. Fink,
dress or flower, paint with rose madder and white,
on the wrong side, and glazed over on the front with
rose madder. Blue dresses or floicers, paint on the
back with Antwerp blue and white, and finish on the
front with blue and megilp. All dresses or flowers, of
the yellow class, are finished on the front wdth burnt
sienna, weakened with megilp. Brown hair, with van-
dyke brown. Lij)S, with vermilion and white on the
wrong side, and vermilion and megilp on the right.
For purple, mix vermilion, Antwerp blue, and white,
for the back color, and finish on the front ^\ith crim-
son lake and blue.
Observations.— 1st. All colors used for the back of

92 DIRECTIONS FOR GRECIAN PAINTING.
the picture must be opaque ; the opaque colors used are,
white, black, raw and burnt umber, chromes, Naples yellow,
Indian red, vermilion. The transparent colors are, both
siennas, crimson lake, rose madder, Italian pink, Prussian or
Antwerp blue, Vandyke brown and verdigris. As a gen-
oral rule, the tronsparent color that is mixed with white
for the back color, is the transparent color that must be
used for the front, diluted with megilp, to suit the re-
quired strength of tint ; this stands good in all cases,
except yellows ; these various shades of yellow we inva-
riably tint on the front with burnt sienna and megilp.
The transparent color for foliage is Italian pink, and a
little Antwerp blue.
2d. In tinting on the front side, we invariably use
megilp with the color, in preference to oil. If we wish
to high ten any part still more, we use a touch of
opaque very sparingly ; for instance, if we want a
reddish brown dress, inclining to a deep crimson, we
coat the back with fine Indian red, and the front with
crimson lake ; and if we wish to bring out a few high
lights, we add a little of the Indian red ; if too strong,
subdue it with some megilp.
3d. In painting faces, paint a spot of pure vermilion

DIRECTIONS FOR GRECIAN PAINTING. 93
on the cheeks, and the rest of the face (omitting the
eyes and lips) with flesh tint ; then, with the end of
your finger, blend in the vermilion (working your finger
round) with the flesh tint ; this must be done carefully.
Look occasionally on the front side, to see if the tints
are blending evenly, and in the right place of the
cheek ; if this part is done satisfactorily, the beautiful
roseate tinge on the cheek is made much softer than
in any other way. Foliage tints, mountains, and clouds
can be manipulated in the same way.
4th. Water is generally the reflected color of the
sky, unless something intervenes to overshadow it ; in
that case, make the back tint with verdigris, Vandyke
brown, and a little yellow ocher;
glaze with verdigris
and Vandyke brown on the front. If any light ripples
are introduced, use Naples yellow very sparingly with
the same.
5th. Sometimes, when painting on the back, the color,
after standing a day or so, separates into small fissures
or cracks. This is caused by the varnish not being
thoroughly dry ; it is of no consequence, and is only
mentioned here to satisfy the fears of some. To rem-
edy it, coat it over again at a later stage of the paint-
ing, when it is drier.

94 DIRECTIONS FOR GRECIAN PAINTING.
When the pamtmg is entirely finished, let it remain
a week or so, till thoroughly dry ; then give it an even
coat of mastic or outside varnish ; let the painting lie
flat down until the varnish is quite dry, or it is liable
to run in streaks. The picture is then ready for framing,
and should be allowed to remain on the
stretching frame, as it keeps smooth and
firm. The rabbet of the frame should be
made wide enough to admit the full size
of your picture, stretching frame included.
JCTURES FOR GRECIAN PAINTING.
— Two difficulties have been met with
{ by nearly all artists in Grecian painting,
one in finding pictures suitable or well
adapted for this style, and the other, in
" clearing " the paper on which engravings
are sometimes printed. The publishers of this book have
endeavored to obviate these difficulties, and will send to
any address a list of pictures executed in the highest
style of the lithographic art, and printed upon paper
suitable for Grecian painting. Accompanying each pic-
ture are full directions for painting every part, so
DIRECTIONS FOR GRECIAN PAINTING. 95
that the beginner, or the artist who may distrust his owa
taste, will meet with no trouble in securing a pleasing
picture. We would not have it understood that other
pictures cannot be cleared ; they can ; but while they will
have the appearance of painted engravings, the pictures
here noticed will, when painted, closely resemble oil
paintings. Of course the independent painter will use
his or her own discretion and taste in coloring, and
may, or may not, follow the printed rules; still, they
serve as a great assistance to young artists.


fainting
in
<^f^
nttx €fihxB
(97)
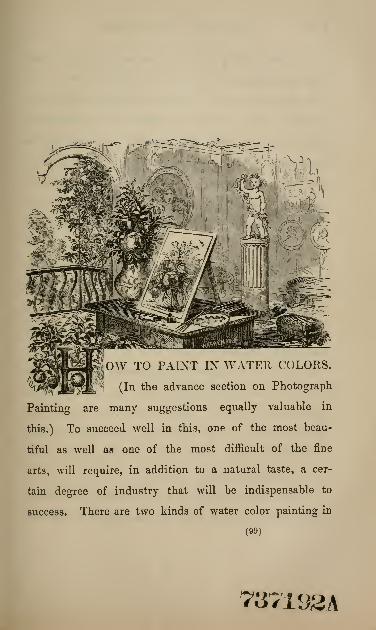
^^tfOW TO PAIXT IN WATER COLORS.
'Ox^iXMO^fmS:-^.^jji tiig advance section on Photograph
Painting are many suggestions equally valuable in
this.) To succeed well in this, one of the most beau-
tiful as well as one of the most difficult of the fine
arts, will require, in addition to a natural taste, a cer-
tain degree of industry that will be indispensable to
success. There are two kinds of water color painting in
(99)
7li7VJ2\

100 PAINTING IN WATER COLORS.
general use. We prefer using the moist colors for land-
scape painting, and the dry cake colors for flowers. The
moist colors are put in little earthen pans, and fitted into
a tin box, with a palette, all complete for painting out of
doors or on the table. The materials to be procured for
water color painting are, colors, sable brushes, paper, a
drawing board, an eraser, an old silk handkerchief for
wiping out lights, a small bottle of gum water, a soft
sponge, a one and a half inch flat camel's hair brush, a
china palette, or a set of saucers.
The paper most desirable for landscapes in water color
should be rather rough on the surface, as, if it is too
smooth, the painting loses much of that boldness which
characterizes the English school. Whatman's paper is
considered the best.
Brushes. — A complete set of brushes comprises a one
and a half inch flat cameFs hair, one each of swan,
goose, duck, and crow ; best sable brushes ; select those
that come to a point when charged with water, and
when bent a little on one side, will spring back to the
proper position without splitting.
Colors.— For landscapes, a tin sketching box, contain-
ing gamboge, French blue, raw and burnt sienna, yel-

PAINTING IN WATER COLORS. 101
low ocher, Venetian red, Vandyke brown, Prussian blue,
olive green, brown madder, crimson lake, Indian yellow,
and a bottle of Chinese white.
Stretching and Preparing the Paper.— The painting
side of Whatman's paper is known by holding up the
paper between your .eye and the light, and reading the
name in proper position from left to right. This must
be the outside. Place the paper on a table, and moisten
the back well with a soft sponge and clean water ; let it
remain a short time, if the paper is thick, so that it may
become saturated ; then place it in the frame of your
drawing board, confining it with the cross-bars. Some-
times the paper, after being damped, is put upon a plain
clamped drawing board, fastened down with glue round
the edges ; this mode of straining causes a little more
care, and is not so expeditious.
Wiping out Lights,— The parts of a picture (after the
color is on) that require half lights, should be treated as
follows : Mark out with your brush, and clean water, the
parts you wish lighter, and then apply a little blotting
paper to absorb the moisture ; next wipe it hard with a
silk handkerchief, and if not sufficient, repeat it ; if you
desire it still lighter, use the rubber.
9*

102 PAINTING IN WATER COLORS.
Scraping.— Before using the eraser for any extra high
lights, the painting must be perfectly dry.
Rays of Light. — Such as occur from an opening in
the cloud, through windows, etc., can be successfully pro-
duced by placing a straight-edged piece of paper in the
direction of the rays, and gently washing the exposed
part with the damp sponge.
Using the Brush.— The effective handling of the brush
requires rapidity and experience in covering large spaces
with flat washes of color. It is well to commence brush-
work, after making suitable proficiency in outline, with
India ink or sepia;
you then have but one color to
deal with, and, with a little practice, all the mechanical
difiiculties of floating the color evenly will soon disap-
pear. As a general rule, the brush for broad shades
should be pretty full of color ; but for finishing, all the
colors are worked much drier, and the brush worked
chiefly on the point.
Outline.— We will suppose that the paper has been
properly strained on the drawing board, and allowed suf-
ficient time to dry ; the outline is then commenced. In
making a sketch for water-color landscape, it is best to
sketch very lightly at first, so that the marks can read-

PAINTING IN WATER COLORS. 103
ily be removed if required ; as by hard rubbing the sur-
face of the paper is liable to be disturbed. Proceed with
all the minute details, sparing no pains in the sketching
;
the time is by no means thrown away, for you are remu-
nerated for it when painting, as you can work with per-
fect confidence up to your sketch-marks. The appear-
ance of a good sketch should be lightness in the extreme
distance, working a little stronger as the foreground is
approached. In the foreground, boldness, observing a
fineness of line on the light side, and breadth and depth
on the shade side, so that even the pencil sketch may be
suggestive of what the picture will be.
In commencing to color, the drawing should be ele-
vated a little at the back, to allow the color to flow
downward. Moisten all your drawing with the flat
brush;press your blotting paper upon it to absorb the
superfluous moisture. As an example of a method, we
will suppose that the artist has a tin sketching box, with
divisions in it. In one of these, make a pale tint of
Indian yellow and crimson lake ; in another, a tint of
French blue, with a little of the other with it, so as to
make it pearly ; charge your swan quill brush pretty full
with this pearly tint, and then work in the crimson tint.

104 PAINTING IN WATER COLORS.
gradually adding a little more Indian yellow as you ap-
proach the horizon ; carry the tints down to the edge,
varying with burnt sienna, or more yellow, or the pearly
tint, according to the nature of the subject. When dry,
if the colors are not blended sufficiently together, or too
dark, pass the flat brush, with clean water, backward
and forward, to subdue and soften them. The white-
ness of the paper will thus be removed by a graduated
tint, which may be made available as an undertone for the
colors that come over them. The sky may now be deli-
cately tinted with pure French blue, and clouds formed.
The distant hills can be carefully painted in with pearly
gray, and increased with more color as you proceed to-
ward the middle distance, adding more or less madder
brown and yellow ocher, as the subject may require.
The distant hills may be strengthened, if required, with
a little French blue, and perhaps warmed with a little
crimson lake. Let the foreground be paler than the
general tone ; the sky and hills should be finished be-
fore the trees are commenced. Have a free touch, leav-
ing little openings now and then for the light to strike
through ; beginning at the top and working downward,
with your brush pretty well charged, varying the greens

PAINTING IN WATER COLORS. 105
as you wish them, making them with gamboge, raw and
burnt sienna, and Prussian blue. Increase the tone of
the shadows with another brush, but with the same
color, only adding a trifle more blue, and some crimson
lake, to make a neutral tint. The foliage that catches
the sunlight should incline to a yellow tint. Paint the
trunks and stems with Vandyke brown. Repeat the
tints on the foliage when dry, until the required form
and depth are obtained. For winter trees, cobalt blue
and Vandyke brown, mixed, make a good color to
paint in the network and branches of fine trees. Some
artists, in finishing their paintings, use gum to brino-
out and enrich colors. Never use gum water in the
sky or distance, as it washes ofi" so readily, and disturbs
every color near it. In finishing up the picture, you
are referred to the diff'erent methods of producing effects
by wiping out and scraping. The opaque white is very
serviceable in finishing, or for assisting in the introduc-
tion of figures in the foreground. Parts can be pen-
ciled in with white, and stained over with the requi-
site color.
Flower Painting in Water Colors.— Henry WardBeecher, in one of his lectures, asserts that " if a man

106 PAINTING IN WATER COLORS.
does not love flowers, he is not born perfect." This
remark we cheerfully indorse, as it sponges out the pre-
tended superiority of a class of artists who look down
from their high pinnacle of fame, and ignore flower paint-
ing, considering it merely a genteel trifle. This opinion,
we are sorry to say, is prevalent among some artists who
ought to know better ; for flowers and their associations
are ever attended with pleasing reminiscences, and he
who can best transfer their appearance to paper should
be classed among the valuable artists.
The artist's palette is greatly enriched by the color
maker who obtains his brightest suggestions from flower
tints, and is consequently enabled to imitate more close-
ly those brilliant colors Xature has so bountifully scat-
tered among her choice flowers.
The colors and materials requisite for flower painting
are, carmine, crimson lake, cobalt blue, Prussian blue,
vermilion, gamboge, raw sienna, burnt sienna, burnt
umber, Chinese white, yellow ocher, and Indian ink ; in
addition to these, a set of saucers, a little dissolved gum
arable, and a few sable brushes. These colors are suf-
ficient for ordinary purposes ; but if flowers of superior
finish are required, it will be necessary to add the fol-

PAINTING IN WATER COLORS. 107
lowing : Rose pink, or rose madder, royal scarlet, Indian
yellow, Indian red, indigo, smalts blue, sepia, Vandyke
brown, sapphire green, and emerald green.
Flower painting can be done to good advantage on
Whatman's hot pressed paper, stretched on a board, in
the same manner as directed for water-color landscape
painting. Bush flowers are more generally painted on
London board ; the ivory surface is sometimes preferred.
In sketching flowers from nature, or from copies, it
is essentially requisite to make an accurate and clean
sketch ; for this purpose make a fine point to your pen-
cil, and draw the marks faint, so as not to require too
frequent use of the rubber, as by rubbing (unless A-ery
carefully done) the smooth surface of the paper is liable
to be disturbed, "When the sketch is finished, moisten
all the parts intended to be painted with a brush mod-
erately full of water. (Distilled water, or, if this can not
be readily obtained, soft or rain water will answer ; never
use hard water, unless it has been boiled.) By coating
the piece over with water, it prepares the paper better
to receive the colors. Most of the flowers are com-
menced by coating over the shaded parts with Indian
ink, or neutral tints very pale, so blending the shades

108 PAINTING IN WATER COLORS.
that they will be imperceptibly lost. To do this, two
brushes are required, one charged with the color, the
other nearly dry. The leaves are treated in the same
way ; the flowers, after being carefully shaded with neu-
tral, are coated with local color, or as near their respec-
tive color as the general tint can be obtained ; finish
either with a number of soft washes, or with small
touches. This latter style is called stippling, and if
done with skill, is very beautiful ; but as it takes time,
taxing the patience of the most patient, it is not so gen-
erally adopted as the wash and softening style., By
practice, the eye will become accustomed to observe a
variety of shades, where before they could barely dis-
criminate any.
Green leaves, when of a yellowish pale green, and
bright, are painted with gamboge, and a very little
Prussian blue, and penciled over until the desired effect
is obtained ; for darker green leaves, use more Prussian
blue, finishing with stronger color ; for the deepest
shades, add a little crimson lake, or Vandyke brown, or
burnt sienna, as the shades may require ; for decayed
leaves, use burnt sienna, Indian yellow, and crimson
lake.

PAINTING IN WATER COLORS. 109
Yellmc Flowers.— In painting yellow flowers, examine whether
the shades are warm or cool ; and if the latter, paint them with
Indian ink ; if the former, paint them in with a little burnt umber.
When dry, coat evenly over with gamboge— the general tint of the
flower. "WTiere the high light strikes, it can be washed out a little
•with the second brush, slightly moist. Repeat the color in the
stronger parts, finishing, if requisite, with a little carmine, or burnt
sienna, added to the gamboge.
Blue Flowers. — Coat them evenly with cobalt or smalts, accord-
ing to the tint. Smalts blue is rather difficult to coat on evenly,
and should not be used until some skill and experience are obtained.
Cobalt, with a little rose madder added, may be used as a substi-
tute. Shade the deeper parts of the flower with a little Prussian
blue added to it ; and if a very deep shade is required, add indigo.
Purple Flowers.— Make the desired tint with carmine and Prus-
sian blue, increasing the shade to the depth required, using more
color and less water.
Scarlet Floicei's. — Paint the shades in with cobalt blue and a lit-
tle Indian red ; then coat it smoothly with royal scarlet, or, in lack
of this color, use carmine and gamboge mixed, the proper tint,
finishing up with carmine on the shades. If the flower is coated
with royal scarlet, add carmine to it in the finishing.
T^liite Floicers. — Some are first shaded with Indian ink, while
others are shaded with a neutral composed of cobalt blue, rose
madder, and a little Indian yellow. When dry, some of the petals
are slightly tinted with a weak shade of yellow ocher, some por-
tions with cobalt blue, others with a greenish neutral : the anthers,
if not left white, should be done with permanent white, added to
Indian yellow, and carefully dotted with weak burnt sienna.
The Deep Crimson, Tuscan Rose.— Shade all the petals more or
10

110 PAINTING IN WATER COLORS.
less with Indian ink, until it would pass for a finished drawing in
Indian ink ; then coat it twice with strong carmine, and finish the
deep shades by adding a little Prussian blue to the carmine.
Pi7ik Rose. This flower is the most difficult of any to paint, as
it requires so much delicacy of manipulation to give it its true
representation. The most successful method is to paint in the
shades with pure cobalt blue, and then coat all over with a pale
shade of carmine, with a little vermilion added. This is repeated
on some of the petals until the requisite depth is obtained : some
of the outside petals may require a second working over with the
cobalt, to give them a thin, transparent, neutral appearance.
Arranging and Grouping. — With those who possess
naturally a good eye for color, the most pleasing arrange-
ments of form and color will naturally suggest them-
selves without the least effort on the part of the designer.
For those who are deficient in innate taste, it would be
well to study a few groupings and colorings of the best
flower painters. Sometimes a very pleasing eff'ect is ob-
tained by placing the light flowers in the center, such as
white, light pink, pale yellows, and have the rich, dark-
colored flowers outside— such as dark roses, hollyhocks,
fleurs de lis, etc., thereby making color a substitute for
light and shade. The most pleasing groups are painted
with a slight predominance of w^arm coloring. Some
artists paint nearly two thirds of the flower grouping with
warm colors.

Cfjeirrm fainting
(111)


HEOREM PAINTING. This style of
painting has had many names, namely,
Poonah Painting, Theorem Painting, and
Oriental Painting. It is better adapted to fruits, birds,
and butterflies, than to landscapes and heads. It will
enable you to paint on paper, silk, velvet, crape, and
light-colored wood.
To make Horn Paper.— Take equal parts of copal,
10* (113)

114 THEOREM PAINTING.
mastic, and Japan varnish ; add to the mixture half as
much .balsam of fir as there is of either of the var-
nishes, and a piece of white wax the size of a thim-
ble ; simmer these together till the wax is melted. If
the composition is too thick, add a little spirits of tur-
pentine. Put it upon one side of the paper while it is
warm, the paper having been previously prepared with
painter's oil, to make it transparent ; the oil must be
put upon both sides of the paper, rather warm, and the
whole of the paper lie together one night ; then wiped
with a cloth to absorb the oil on the surface, and dried
one week in the sun before varnishing. Each side of
the paper must be varnished twice, and the greatest care
taken to dry it well.
Trace the picture you intend to copy on white paper,
with a soft lead pencil, then mark those parts which do
not touch each other with a figure 1. Lay the horn
paper over the sketch, and trace with a sharp-pointed
penknife, or large pin, all the objects marked 1. Mark
another piece of horn paper for theorem 2, and cut again
;
thus continue till you have enough theorems cut for your
whole picture. Of course, it will require much more time
to cut a set of theorems nicely, than it would to draw one

THEOREM PAINTING. 115
picture ; but remember that a good set of theorems is
equal to twenty-five or thirty sketches. The durability
of your theorems will depend upon the care with which
you treat them.
Do not attempt to paint with lass than a dozen stiff
brushes, because you must have one for every color you
need to use;and, as has been mentioned elsewhere, put
a few drops of water on your palette with the end of
the brush, to avoid dipping the bristles in water.
Lay the theorem on the paper on which you intend to
paint. (Good drawing paper is best for the first at-
tempt.) Press the theorem firmly down with weio-hts
at each corner, and proceed to paint.
Commence with a leaf; take plenty of paint, a very
little moist, on your brush, and paint in the cut leaf of
the theorem; hold the brush upright, and manipulate
quickly with a circular motion. It is best to begin at
a little distance from, and work toward, the edge ; if you
take just enough paint, it goes on softly and smoothly;
if too much, it looks dauby ; if too little, spotted.
To shade the leaves, cut bits of horn paper on the
edge, in the form of the large veins, and laying on the
leaf already painted, paint from this edge into the leaf;
116 THEOREM PAINTING.
slip the paper, and paint other veined parts in the
same way.
If successful with a leaf, try a grape. We paint first
purple, then blue, and finish off with carmine.
On removing the last of your theorems, if you see any
inequality in the painted parts, lay the theorem on again
and correct ; if any spaces, fill up by dotting in with a
fine brush. All stalks, fibers, dots, etc., must be put in
with camel's hair pencils.
In many parts of a painting, the effect is hightened
by striking on paint here and there with the stifi* brush,
and blending the edges together to produce softness.
To paint on Wood.— Choose hard .wood, of light
color;paint as above, and varnish when done.
To paint on Vclcet. — Select firm, white cotton
velvet. Use the paints a little more moistened.
To paint on Silk, Satin, and Crape. — Size the
parts to be painted with gum arable, or isinglass, and
proceed as with drawing paper. We have seen ball
dresses painted, with belts and neck ribbon to match;
also white crape dresses, with vines of gold and silver.
See article upon Gilding.
||i).li)gra|fj |ainling
in
Mdiitx €shxB.
(IIT)


m of I
AND OBSERVATIONS UPON THEM.* ,
1^ (?^^SE a light photograph for coloring, in
preference to a very dark one, and
let the general hue be gray, inclin-
ing to black in the shadows. See
that it be well defined, that the
shadows and middle tints are clear,
and that the background be free
from blemishes and black and
white spots.
The heavy, dark tints which pre-
vail in some photographs are badly adapted for fair
complexions, as considerable difficulty is experienced in
working the gray tints over them ; indeed, the only
way ' left for the artist is to lighten them up with
* Many of the principles and suggestions in this section are equally appli-
cable to painting in general.
(119)
120 PHOTOGRAPH PAINTING IN WATER COLORS.
a little body color, than which nothing can be more
objectionable, because all gray and pearly tints ought to
be purely transparent, so that the flesh color may be
seen under them. When the complexion is dark, the
difficulty is considerably lessened ; for, upon the applica-
tion of the warm colors, these heavy photographic tones
decrease in depth, and assume a color which is not badly
adapted for finishing the pearly tints upon. Ladies' and
children's portraits should always be lighter in the
shadows than the masculine head, for the purpose of
giving that softness which is their characteristic;painters
usually throw more light upon them than they do upon
the mab he.id, which is better suited to a depth of shadow.
Heads of aged persons, of both sexes, should likewise be
placed in a full light, as it tends to soften and subdue the
prominent markings of age.
Always have a duplicate copy before you while at
work, to refer to and assist in keeping the resemblance;
but, if possible, get the original of the photograph to
give you two or three sittings, so that you may copy the
colors from life, for it must be evident to every one that
a good portrait can not be produced unless nature be taken
for the model.
PHOTOGRAPH PAINTING IN WATER COLORS. 121
It is evident that you must first paint the flesh, thereby
partially obscuring the photographic tones and shadows,
and upon it lay the shadows, gray and pearly tints, as
they really do occur in nature, all, in point of color,
being widely different from the photographic shades.
If you have never attempted any thing from the life, it
will be advisable to procure a photograph from an oil or
crayon portrait, and, placing it before you, proceed to copy
the various tints as they appear in the picture. It will
perhaps surprise you to observe how much of a good
painting is made up of shadows, gray and pearly tints,
which you will easily detect by moving a piece of white
paper about to various parts of the face : you will then
observe how much these tints prevail, and how far they
go toward forming one harmonious whole.
If you are an amateur photographer, place your sitter
a little higher than is usually done, as by that means you
will give the neck its due length, and consequently add
dignity to the head ; for it looks exceedingly ungraceful
to see the shoulders upon a line with the ears, which is
always the case when the sitter is upon a low chair, and
the operator is looking down upon him. Portrait and
miniature painters invariably place their sitters higher than
themselves— photographers too frequently the reverse.
11
122 PHOTOGRAPH PAINTING IN WATER COLORS.
If you use a screen to form a background, place it
some distance from the sitter— say three feet, or even
more— to gain space or atmosphere behind the head
;
and if you introduce curtains, take care to keep them
away from the portrait, so that they may not appear to
be a part of it. Do not be over-anxious to crowd your
picture, as many professed photographers do, with gaudy
bed-furniture curtains, old-fashioned chairs, vases of arti-
ficial flowers, plaster of Paris pillars, etc., and the usual
table placed so conveniently for the sitter to lean upon,
and for no otheiy purpose— making the head a secondary
object entirely. Such " professors " either know nothing
of the rules of composition, or are anxious to give their
customers as much as they can for their money.
Preparation for Photographs. — There being some dif-
ficulty in apportioning the ingredients for size to harden
the surface of photographs, and many chemists having
urged objections against its use, as tending to injure the
photographic tones, we have, therefore, given the matter
a careful consideration, which has resulted in the follow-
ing receipt :—
Take a piece of white glue, (that made from parchment is
the best,) about as large as a nut, and put it into a cup with
three table-spoonfuls of warm water, and as much ground

PHOTOGRAPH PAINTING IN WATER COLORS. 123
alum as will cover a quarter of a dollar ; stir tliem well till
the size and alum are dissolved, and apply the mixture.
To prepare the Photograph.— Dip a flat camel-hair
brush into the preparation, and go gently over the whole
surface of the photograph, taking care not to make it too
wet. It should be merely brushed over slightly ; but
every part must be covered, or the color will sink into
the places you have missed.
When it is dry, wash it with a sponge and cold water,
to remove any extraneous matter which may have lodged
on it. Gum or pasts the back, and lay it down on a good
thick piece of card-board, and, placing a sheet of writing
paper on the face of the photograph, with a silk hand-
kerchief rub it softly, to smooth and flatten it down
;
when dry, it is ready to work upon.
Some photographic papers are more porous than others,
and will therefore require two coats of the preparation
;
but one is generally enough. Wet a corner of the pho-
tograph with color, and if it washes off, leaving no indi-
cation of a stain, it is in a condition to work upon ; but
should the color sink into the paper, it will be necessary
to give it another coat. It is essential that the paper be
well hardened, as every thing depends upon it ; for, if

124 PHOTOGRAPH PAINTING IN WATER COLORS.
it be not properly prepared, it will not take the colors
kindly— you will be unable to obtain force or brilliancy,
and, in fact, all the labor which you can bestow upon it
will be " stale, flat, and unprofitable."
Albumenized paper seldom requires any preparation,
but need only be carefully washed with cold water and a
soft sponge;you may then hold it up before the light,
and if you observe any transparent spots upon it, like
grease, there the water has gone through, and you will
find it necessary to touch them with the preparation al-
ready referred to.
Colors. — The under-mentioned colors, in cakes, are
necessary. (We aflix the prices of Winsor & Newton's
paints, as they are by far the best.)
Carmine $1.50 ! Emerald Green
Rose ^Madder 1.00 Indigo . . ,
Crimson Lake 45
Venetian Red 30
Indian Red 30
Vermilion 30
Chrome, 1, 2, 3 . . . . 30
Indian Yellow 45
Roman Ocher 30
Gamboge 30
Cobalt 70
French Blue LOO
Prussian Blue .
Burnt Sienna .
Burnt Umber .
Sepia ....Vandyke Brown
Madder Brown
Ivory Black .
Chinese "NMiite .
Constant \Miite
Half cakes at half price
.30
30
30
30
30
45
31)
45
30
45
45
PHOTOGRAPH PAINTING IN WATER COLORS. 125
Constant White is nearly out of use, Chinese or zinc white hav-
ing almost superseded it ; the only parts it is adapted for being the
light on the eye, lace, and linen. It possesses little or no body,
and is therefore valueless in cloth fabrics.
CJmiesii, or Zinc White. — This is the most valuable white that a
photographic colorist can use : it washes freely, either by itself or
in combination with other colors, and possesses this advantage
over other whites, that it does not change color in drying. Flake
white, which was so much used by miniature painters, invariably
dried several shades lighter than when first applied to the paper
or ivory, and was liable to change. Chinese white must be kept
away as much as possible fi-om any color which has iron in its
composition, as it has been found to be affected by it. It is used
for lights upon cloth, metal, etc. In its pure state it is shadowed
with cold gray, deepening into a black in the darkest places.
Indian Yelloic. — A most powerful color, used in flesh and dra-
peries ; is permanent, and works extremely well ; forms, with
indigo and burnt sienna, several beautiful greens, etc. ; shadowed
with sepia and purple lake.
Indian Yellow, Indigo, and Burnt Sienna are useful for green dra-
peries and backgrounds.
Gamboge, Indigo, and Burnt Sienna form a good green for dra-
peries and backgrounds. Green is not a good color to use too
freely in portraits, for unless the flesh be very sallow, it spoils it.
Subdue it as much as possible, and shadow with lake and sepia,
glazing with Vandyke brown.
Cadmium Yelloiv. — A very bright color, and its durability may
be relied upon ; it is serviceable in draperies, and in forming orange
tints, but is too powerful for flesh.
Gamboge.— Not a good color for flesh, as it is too brassy ; use-
11*

126 PHOTOGRAPH PAINTING IN WATER COLORS.
ful in its combination with indigo and burnt sienna, in forming a
multitude of greens and browns.
Emerald Green. — Very useful for the high lights of some bright
greens and stones in jewelry ; when mixed with gamboge it forms
a delicate pale green for ladies' dresses, the high lights for which
have zinc white and lemon chrome added to the local color.
All green drapery should be kept away from the flesh as much
as possible. Shaded as other greens.
Clirome. — There are five different shades of chrome, commencing
with a pale primrose, and deepening into a powerful orange ; they
are all opaque, are good workmg colors, and are sometimes used
in dark flesh tints, and always for the reflected lights under the
chin. With indigo they form a number of different shades of
green, which may occasionally be used for background draperies,
when the photograph is heavy and dark Chrome is hkewise used
for gold ornaments, although Roman ocher is to be preferred;
when used in its pure state, it is shaded with burnt umber, and, in
the darkest parts, burnt umber and lake. High lights, the local
color and Chinese white.
Roman Ocher.— Useful in draperies and for strengthening up the
yellows in very dark complexions, and is, perhaps, the best yellow
for gold ornaments. It serves likewise for all kinds of flaxen hair,
either by itself, or when combined with sepia, but is not often used
in draperies.
Bur7it Sienna is too foxy a color for flesh, although in very dark
complexions it is sometimes admitted ; but generally the Indian yel-
low or Roman ocher is to be preferred. If there be an out-door
scene for the background of the portrait, this color, when combined
with indigo and gamboge, will be found very useful for all kinds of
foliage, these three colors forming a number of green tints. High
lights, chrome ; shadows, umber and lake.

PHOTOGRAPH PAINTING IN WATER COLORS. 127
XJltramarijie, — For durability and brilliancy, there is no other
blue at all to be compared to ultramarine, and although many sub-
stitutes have been offered, yet none have approached it in beauty.
Cobalt, which is very generally used instead, sinks into utter insig-
nificance when placed near it. Genuine, it is a very expensive
color; the imitation is known as French blue. If you wish to
substitute ultramarine for cobalt in the grays, you must be very
sparing of it, because it is a very powerful color— sometimes used
for ladies' dresses and the sky in backgrounds. Cobalt and a little
lake make a color approximating to it, shaded as cobalt. Highlights, the local color and Chinese white.
Froich Blue is well adapted for draperies, and occasionally for
the sky in backgrounds, but for the latter purpose cobalt is prefer-
able. It is a powerful color, possessing great body, and, like all
blues, requires subduing with warm browns. By candle-light it
assumes a dark, heavy appearance, almost approaching to black.
Treated in the lights, and shaded as cobalt ; when the color is used
in great strength, the shadows must be powerful.
Cobalt Permanent, and a good working color ; used freely in
grays, pearly tints, and shadows— washed or stippled over indigo
for blue skies and backgrounds. Blue, being a cold color, is apt
to destroy the effect of your picture, unless you subdue or kill it
;
negative it, therefore, as much as you can, by toning it down with
warm colors, keeping all your shadows of a brownish tint, andlea\ang your high lights only positive blue. These remarks apply
solely to blue draperies.
Prussian Blue is not admissible in flesh tints at all, being liable
to turn to a greenish hue. It is very useful for blue draperies, andwhen mixed with gamboge, bright greens are produced. Prussian
blue, and lake or carmine, make a number of purples, violets,
Hlacs, &c.
128 PHOTOGRAPH PAINTING IN WATER COLORS.
Indigo. — A very dark blue, and a good working color ; useful,
with gamboge and burnt sienna, in forming greens and browns of
almost every possible shade ; while with carmine it produces pur-
ples and A'iolets, and may sometimes be taken, instead of cobalt,
for the dark shadows of the face. Indigo and Prussian blue make
an excellent color for blue cloth— add a little lake if you desire
to produce a coppery blue, which so frequently occurs.
If you would have a blue background of considerable depth, but
at the same time not glaring, wash in with indigo, or indigo and
lake, and work over with cobalt.
Indigo and Carmim An excellent purple, and better adapted
for draperies than Prussian blu3 and carmine, being less gaudy ; in
both instances the carmine used should be dissolved in ammonia,
and no gum added.
Carmine is the most brilliant crimson we possess, and when
mixed with vermihon, forms the best color for officers' coats and
background draperies, but for the latter purpose it must be much
subdued. Spirit carmine and the blues form many useful purples,
&c. (See Prussian Blue.) Spirit carmine is made in the follow-
ing manner : Obtain some color in poAvder, wet it Avith a few
drops of liquid ammonia, and let it stand till the spirit evaporates,
and it is then, with the addition of a little water, fit for use. It is
better for draperies than the cake color, but it must not be used
in flesh tints. Should it become dry and unfit for use, put in a
little water to moisten it ; there is no necessity for a second
application of ammonia, unless it dries upon the photograph and
comes off.
Indigo, Gamboge, and Burnt Sienna. — A brown made up of the
above three colors is useful in hair, draperies, etc.
Carmine and Vennilion makes, perhaps, the very best color for
officers' coats, and draperies of a like description, but it is too

PHOTOGRAPH PAINTING IN WATER COLORS. 129
bright to use in the background, unless you subdue it, which may
be done with sepia and lake.
Rose Madder A most useful color in flesh and carnations, and
when necessary, may be strengthened with lake or vermilion; it
works well, but possesses little intensity. Rose madder tints are
found in youth ; but as your sitter approaches middle age, a little
lake or vermilion is added to heighten them. Portraits of aged
persons have more lake than madder ; . while in the complexions of
cliildren vermilion predominates over the latter color. Rose mad-
der is a good color for glazing the under lip.
Crimson Lake. — For flesh tints and draperies, all lakes arc ex-
ceedingly useful, not only by themselves, but in their combinations
with other colors. When used as a shadow color with sepia, it
is better to have purple lake.
Vermilion is frequently used in flesh washes for fair people and
children; but it must be with extreme caution, as it is a very heavy
color. In its pure state it is a good color for the lips. Elemen-
tary works generally give three dLfiFerent vermilions, viz., vermil-
ion, scarlet vermilion, and orange vermilion ; but you can make
the two last named, by adding to the fir.^t, carmine for the scarlet,
and gamboge for the orange, which Avill answer every purpose.
Combined with rose madder for children's carnations.
Light Red. — A durable color, and of great use in flesh ; with
carmine or vennilion, and a little Indian yellow, it forms a wash
which, when properly modified, will do for almost every complex-
ion. Miniature painters, with this color, cobalt, rose madder, and
Indian yellow, make their gray shadows and pearl tints.
Venetian Red, diff'ering but slightly fi-om light red, may be used
for precisely the same purposes.
Indian Red.— A good color for strengthening the darkest shad-
ows on the face, but must be used sparingly, being in its nature
130 PHOTOGRAPH PAI'NTING IN WATER COLORS.
very powerful ; has great body, and inclines to a purple hue. It is
durable and works well, and when used with lake, is a good color
for putting in the upper lip with.
Burnt Umber. — A good working color, but seldom used, except
for hair and draperies.
Vandyke Broxcn.— So named, after the prince of jjortrait paint-
ers, in consequence of the free use of it in his works. It is a fine
glazing color, and is well adapted for strengthening the shadoAvs
under the nose, glazing the darkest shades of green draperies and
the hair. This is, perhaps, the most beautiful brown that we have.
Madder Broken. — A very rich brown, and of great use in dra-
peries ; combined M'ith cobalt, it forms many very excellent grays
suitable either for the face or backgromid.
All madders are said to be permanent.
Sejna is the most useful brown, no other entering so largely
into combination with other colors as this does ; AA'ith lake, indigo,
and gamboge, a pure transparent black is formed, calculated for
silks, satins, and black cloth. Sepia and lake, again, make the
best color for giving the sharp touches about the eyes, eyebrows,
etc. ; and for the hair it stands unrivaled by any other brown,
being useful not only in the lightest, but also in the very darkest
tints.
Sepia and Indigo. — A gray formed of the above colors is of use
for backgrounds ; may be strengthened in the darker parts with
sepia alone, and warmed with Vandyke brown.
Sepia, Indigo, and Lake form an excellent black, used for
silks, satins, and as a shadow color for black cloth. With these
three colors you may make a black of any required tint. Keep
the darkest shadows rather red. Another black is made up of
indigo, purple lake, and gamboge, and is equally as good as the
former, and used for precisely the same purposes.

PHOTOGRAPH PAINTING IN WATER COLORS. 131
Lampblack. —A strong body color ; is chiefly used with Chinese
white for black cloths and velvets.
Ivory Black. — Much the same as lampblack, and is occasionally
used in lieu of it. It is, however, a little browner than the former
;
both work freely.
Choice of Pencils.— Let the pencils which you select
be sable, and of a middling size ; it is very injudicious
to use small ones, as they impart to the work a harsh
appearance, which is by all means to be avoided ; there-
fore work with a good-sized pencil, the quill being some-
what smaller than a goose or swan pen, and capable of
holding a reasonable quantity of color in fluid. With
such a one you will be able to give those firm touches
which are so much admired by judges. You will, how-
ever, sometimes need to use small pencils, in marking in
the eyes, nostrils, etc. : but for all large washes they are
worthless. When purchasing pencils, dip them into
water, and bring them to a point on the nail of your
thumb. The hairs must be all of a proportionate length,
having a fine flue attached to the points, and, when mod-
erately full of w^ater, should, upon being bent, spring
back to their original form. See that there be no strag-
gling hairs about them, and that they do not split or
divide. A few French camel-hair pencils must also be

132 PHOTOGRAPH PAINTING IN WATER COLORS.
obtained, for you will find them very useful in laying
large washes upon the background where you require
smoothness, but they are not elastic enough for general
purposes. A flat camel-hair tool, with which to size the
photograph, is also necessary.
Coloring the face, etc. - Commence with a large
pencil to wash in the flesh tint;go over the whole face,
and leave it to dry. Then put in the carnations, but
do not be in a hurry to do too much at once;keep all
the colors under, for it is easier to highten up, as you
go on, than to reduce them, if they are made too pow-
erful. Put a little color now on each lip;
the upper
one, which is almost always in shadow, may be laid in
with lake and vermilion, and the under one with car-
mine and vermilion, the latter predominating, if the sub-
ject be juvenile. Give the background a wash, and pro-
ceed with the draperies. Highten the carnations, and
lay on the yellows, which are perceptible in almost all
faces, but more particularly aged ones, about the tem-
ples, eyes, and mouth. Strengthen up the eyes, nostrils,
and mouth with lake, and do the like to the hair with
the proper shadow color, working in the direction of the
curls, or in a wavy manner, just as it may be adjusted;
PHOTOGRAPH PAINTING IN WATER COLORS. 133
and glaze over the under lip with lake or rose madder,
in accordance with the natural tint. The white of the
eye, as it is commonly called, varies in color as age
advances— in childhood and youth it is nearly a posi-
tive blue; gradually it loses that tint, and merges into
a pearly tone, while in old age it becomes nearly yel-
low. For the pearly tone, you will use a like color to
the pearly tints of the face, increasing the blue as you
approach to childhood, while for aged sitters a pale wash
of Indian yellow may be taken. The iris must be laid
in with transparent color, then shaded, and afterward
finished with Chinese white. The pupil is always
touched in with a dark color, and the speck of white
is laid on at the last. If the eye be black or brown,
the same lights are used as for black or brown hair,
namely, light red and Chinese white for the former, and
neutral or purple tint and white for the latter.
It is a practice with several miniature painters, in
hightening the complexion, to lay the colors in little
square forms, working their pencils in various directions,
and leaving the interstices to be filled up afterward by
stippling. This method gives what is called a fatty ap-
pearance to the work, and renders it bold and masterly.
12
134 PHOTOGRAPH PAINTING IN WATER COLORS.
Others, again, finish off with hatches, and the crossings
of the pencil somewhat resemble the lines in a fine-line
engraving of the face, being worked as much as possible
in the direction of the muscles. But this should not be
resorted to till near the end of the work ; for if you
begin too early, you will never be able to gain depth,
and the more you labor, the more wiry, harsh, and dry
will the character of your performance be. When the
flesh color has been sufiiciently hightened, and is as
near to the original as you think you can get it, then
begin with the pearly gray and shadow tints, keeping
them as pure and transparent as possible, working with
a light hand, for fear of disturbing the under color,
which must not be suffered to mix with them, or they
will become muddy, and consequently lose all their
transparency. Grays are not intended to hide the
local color, but only to be passed over it as a glaze.
In coloring photographs of ladies, you can not fail
observing that their necks are always much lighter in
color than their faces, and that the pearly tints are seen
in them to advantage ; use the flesh wash much lighter
for the former than the latter.
Note that the delicate blending of these pearly tints

PHOTOGRAPH PAINTING IN WATER COLORS. 135
into the flesh and shadows, gives softness and rotundity
to the work ; for if the shadows be left hard against the
lights, not being duly graduated into them with the
pearly tint, your picture will appear crude and harsh,
wanting that connecting link which they form. The
palms of the hands and tips of the fingers are generally
of a pinky hue, and the backs are much the same in tone
as the neck. In your anxiety, however, to make them
appear delicate, be careful not to keep them too white,
as that will mar your picture. But in many instances
this caution is unnecessary ; for unfortunately photo-
graphs generally are heavy and dark, so that you will
be necessitated to brighten them up considerably.
It may now be presumed that the face is nearly fin-
ished ; all remaining to be done being to give the sharp,
spirited touches which occur about the eyes, mouth, and
nostrils, and impart life and intelligence to the whole
countenance. If the original of the photograph be dark,
5'ou will use sepia and purple lake in nearly equal pro-
portions for that purpose ; but if the sitter be fair, you
must discard the greater part of the sepia.
It should have been remarked before, that the shadow,
which almost always occurs under the nose, may be

136 PHOTOGRAPH PAINTING IN WATER COLORS.
glazed ^vith Vandyke brown ; but be careful not to
make it heavy.
The background, hair, and draperies, will next claim
your attention ; but ere you finish the hair, it will be
necessary to complete the background, so that the hair
may not be interfered with by the background color com-
ing up to or over it ; but let the hair be brought over
and finished upon the background in a light, feathery
manner. When the background is complete, give the
last touches to the shadowed parts of the hair, and lay
on the high lights.
No mention has yet been made of gum, which is in
request with some photographic colorists, but which had
better not be resorted to at all if you can possibly do
without it. However, if your work appears dull and
spiritless in those places where it should be otherwise,
a little gum may be used for the eyes, parting of the
lips, hair, and eyebrows. You may either mix it in the
color for the last touches, or use it by itself, as a glaze
;
but do not use much on the picture, for it gives it a dis-
agreeable appearance.
Flesh Tints. No. 1. Fair Complexion, — Light red, a little
carmine or vermiHon, and Indian yellow ; be very careful in using

PHOTOGRAPH PAINTING IN WATER COLORS. 137
the latter, for the reasons before specified ; and, in the flesh tints
of very fair children, allow the vermilion to predominate. Carna-
tions, rose madder, and, if the face be full of color, add a little ver-
milion to it.
No. 2. Middling Complexion Much the same as No. 1, saving
that the light red must be in excess over the other colors— carna-
tions, rose madder, and lake.
No. 3. Dark Complexion. — Light red and Lidian yellow, or
light red and Koraan ocher, and if the complexion be generally
ruddy, you may add a little Indian red ; but it must be sparingly
used, as it is a powerful color, and likely to impart a purple tone
to the flesh. Carnations chiefly lake ; but if the complexion be
warm, lake and a little yellow. The carnations for children's por-
traits are rose madder and vermilion, inclining more to the latter
tint. Aged persons have rose madder and a little cobalt, to give a
cold appearance to the color in their cheeks and lips.
These tints, Xos. 1. 2, and 3, are indispensable, as general washes,
for the purpose of receiving the other colors, which are to be
worked over them to bring up the complexion to the life.
I'ncolored photographic portraits vary so much in tone, that the
beginner will, perhaps, find some difficulty in mixing up the tints
for the washes. He must note that the warm-toned ones do not
require so much Indian yellow as the cold ones do.
Shadow, Gray, axd Pearly Tixts. No. 1. Fair Complexion,
— Cobalt, rose madder, Indian yellow, and light red, v.ill produce
every variety of the above, from the most delicate pearl up to the
strongest shadow color, and are suitable for every complexion. It
must be borne in mind that the gray should be kept cool, and the
shadows warm, and that in laying them on, particular care must be
taken that the under tints are not disturbed, otherwise you will
12*

138 PHOTOGRAPH PAINTING IN WATER COLORS.
muddle the grays, etc., and make them opaque, -which is always to
be avoided, as it is intended to show the flesh color under them.
These tints appear to differ in different complexions, but the dif-
ference is caused more through the local color that they go over,
than any great alteration in themselves ; when the flesh, however,
is very powerful in color, the grays, etc., must be stronger than
when it is delicate.
No. 2. Middling Complexion Shadoiv.— Darker than No. 1, and
composed of cobalt, Indian yellow, and madder brown. These three
colors produce a great number of very useful grays.
No. 2. Dark Coinplexion Shadoiv.— Rather warmer than No. 2,
having a little more of the Indian yellow added to the cobalt and
madder brown. These three tints will answer all purposes in pho-
tography. No. 1, with, or, if the paper be of a warm hue, without
the yellow, forms a good serviceable gray or pearly tint, useful for
all complexions. It may be necessary to remark, that yellow is not
so much in request for coloring photographs as for painting on
ivory or Bristol-board ; the photographic paper, in itself partaking
so much of a warm color, renders it less necessary.
Hair Colors.— In coloring hair, never shadow it with
the local color ; all the shadows must be somewhat dif-
ferent ; and the same may be said of the high lights.
Upon brown hair they partake of a purple tinge, and
the shadows are in general formed with sepia, or sepia
and lake ; and upon some particular kind of flaxen they
incline to a greenish color, which is produced by sepia.
Burnt umber is most useful in brown and auburn hair
;

PHOTOGRAPH PAINTING IN WATER COLORS. 139
and here, again, the sepia and lake form the best shadow
colors. A good mixture for black hair is composed of
sepia, indigo, and lake, or lake, indigo, and gamboge;
the lights slightly inclining to a purple tint, the blue
predominating. But black hair is of so many different
hues, that it is impossible to give one general tint which
will do for all kinds;you must be guided by nature,
endeavoring to match the colors to the best of your abil-
ity. Put in the general wash broadly, and bring it into
form with the shadow color ; then lay on the high lights
and reflects with the proper tints, mixed with Chinese
white. Upon flaxen hair, you will sometimes be able to
preserve them; but in consequence of the photographs
being dark and heavy, you will generally have to put
them on. Be very particular in keeping the hair in
masses, and to assist in doing so, use a good-sized pen-
cil to work with, and never fritter it away into little
pieces, as if you had determined to show "each partic-
ular hair."
Against the background, let it be a little feathery,
as it appears in nature, and do not permit it to cut
into the face, as if it were glued upon it. For the
purpose of assisting the beginner, a few local washes
are given.

140 PHOTOGRAPH PAINTING IN WATER COLORS.
Flaxen Hair. — The best wash for flaxen hair is txndoubtedly
Roman ocher. which may be modified with sepia to suit the various
shades. A warmer flaxen is composed of Roman ocher alone, both
being shaded with Roman ocher and sepia. The high lights for the
former are m.ade of Chinese white, mixed with a delicate purple
;
but if the hair be of a sunny color, then use Roman ocher and
white only. Always lay in the shadows first, and then put mthe high lights, taking care to keep them thin, working with a
bare pencil, so that the color of the hair may appear through
them ; and in shadowing, also use the tints thin, for the same
reason. Never put any white in the shadows; they must always
be transparent. Gum is occasionally added to the shadow color, to
bring it out ; but as it gives a meretricious effect to the work, it
is better to avoid it.
Aubiati Hair. — Local color, burnt umber, and sometimes burnt
umber and lake, according to the particular shade. "When the
auburn is very warm, add a little burnt sienna to the umber and
lake, shadow with burnt umber and lake, and glaze in the darkest
parts with a cold purple. High lights, neutral tint and Chinese
white.
Chestnut Hair. — The lights much the same as for auburn hair;
local tint, burnt umber, sepia, and lake ; shadow with sepia, lake,
and indigo ; in the darkest shadows let the indigo and lake pre-
dominate.
Red Hair. — Very red hair is a color which does not often occur,
and when met with, subdue or kill it as much as possible, for few
people are ambitious of possessing it.
Venetian red and lake, with a little sepia to cool them, form a
very good mixture for the local tint ; if it be too red, add a little
gamboge or Roman ocher.
Should a lady rejoice in this colored hair, keep all blues as far
PHOTOGRAPH PAINTING IN WATER COLORS. 141
from it as you can, because their presence only helps to exaggerate
its fiery appearance. Shadow with lake and burnt xrniber ; very
darkest parts, sepia and lake. High lights, a delicate piirple and
Chinese white.
Dark Broicn Hair. — Sepia alone, or sepia and lake, or sepia and
burnt umber ; lights inclining to purple.
Gray Hair. — Sepia and cobalt, or sepia and indigo, made into a
pale wash ; indeed, any of the grays may be used, provided they
are in accordance with the color intended to be represented. Gray
hair is sometimes of a warm hue, and sepia is a close approximation
to it ; shadow with sepia.
Black Hair. — The best color for black hair is composed of sepia,
indigo, and lake, or lake, indigo, and gamboge, making the red or
blue predominate, as it may appear in nature. Keep the shadows
of a warm brown tint, and the lights cold, inclining to neutral tint
;
and sometimes, when the hair is exceedingly black and hea^y, the
lights are laid in with light red and Chinese white, being exactly
the same as the lights for black cloth.
Draperies, and other Cloth Fabrics. — In painting
cloth fabrics, it will be advantageous to use the local
color at first much lighter than you desire it to appear
when finished, as it will permit the folds of the drapery
to be discernible under it ; but to render the matter as
clear as possible, proceed as follows : Take, for example,
a black coat to paint ; begin by laying in a weak local
wash as directed, and when it is dry, go over the folds
with a thin shadow color, which will prevent them being

142 PHOTOGRAPH PAINTING IN WATER COLORS.
obscured by the next local wash. Having repeated this
process two or three times, you will most likely find the
coat to be as dark as necessary , but the shadows will
be too poor and feeble. You will then strengthen them
with sepia and lake ; and when brought to the required
depth, lay on the high lights with light red and Chinese
white, remembering to use a bare pencil and a gentle
hand for that purpose, for if you work your pencil about,
and press heavily upon it, you will inevitably disturb the
local color, and mix it with the lights. These repeated
shadowings after each wash would be quite unnecessary
did they not serve to retain the photographic folds in-
tact, for if you laid on the local color at once, and as
powerful as you desired, you would be almost certain
of hiding them, and having them to draw in from your
duplicate copy. By laying in the washes one over the
other as directed, you gain a texture and evenness of
tint which you could not otherwise obtain. If the pho-
tograph be bold in the shadows, and bright in the
lights, there will be no necessity for going over the
former after each wash. All cloth fabrics may be
handled after the same manner. You must take care
that these under shadowings do not become heavy ; they

PHOTOGRAPH PAINTING IN WATER COLORS. 143
are only meant to save you the trouble of copying, should
the local color hide them, for, as a matter of course, all
shadows must be painted upon, and not under, the color
on which they are projected.
A good black for gentlemen's drapery is made of in-
digo, lake, and gamboge, or indigo, spirit carmine, and
gamboge. When you require a blue black, first make
a blue purple, and then add the gamboge till the tint
is changed into a black A red black must be made of
a red purple, or inclining that way. ^Miniature painters
generally use lamp or ivory black for cloth drapery ; but
as both of these are body colors, they will hide the
shadows of the photograph, which must be kept per-
fectly transparent, and finished upon with sepia and
lake. The shadow tint must in all cases be used rather
thin, as it is intended only partially to obscure the local
color, not to hide it, which it would do if it were made
powerful, besides imparting a hard, patchy appearance
to the work.
In shadowing, never work across the folds, but always
carry your pencil in the direction that they run, and
from, not to, the outline. Your own judgment must
guide you in apportioning the sepia and lake for shad-
144 PHOTOGRAPH PAINTING IN WATER COLORS.
ows ; some blacks require them to be much redder than
others. A camel-hair pencil is better adapted for lay-
ino- in the draperies than a sable one, because the color
flows from it more freely, and the markings of the tool
are not perceptible.
Silks, Sati7is, etc. — The tints for the above are made up precisely
the same way as for cloth fabrics, and must be painted in broadly,
keeping the lights bright, and the shadows transparent. White is
admitted sometimes into the local color for the purpose of forming
the high lights ; black silk and satin always excepted, which re-
ceive the same lights as black cloth, viz., light red and Chuaese
white.
Cnm.so7u — Crimson is made of pure liquid carmine, modified
with lake for the shadows, and sepia and lake, without the carmme,
are used in the deepest shades. The high Hghts are a little Chinese
white mixed with the local color.
Scarlet. — Scarlet vermilion and carmine make the best opaque
scarlet for officers' coats, etc., shadoAved with carmine and lake, and,
in the darkest shades, lake and a little sepia, without the carmine.
A transparent scarlet for silks etc., is made of carmine and gam-
boge, or carmine and Indian yellow, with gamboge, is preferable,
shadowed as the opaque scarlet.
Pink. — Pink is simply carmine or lake reduced with water, or
Chinese white delicately shadowed with lake. High hghts, Chinese
white and the local color. Rose and pink madder frequently rep-
resent this color, shadowed as the last.
Yellows are shadowed with the local color, modified with umber ;
but some pale yellows have a cold gray tint coming agamst the

PHOTOGRAPH PAINTING IN WATER COLORS. 145
lights. The lights upon all yellows are composed of the local color
and Chinese white.
Orange. — Orange is made of Indian yellow and carmine
or carmine and gamboge. A very good orange is produced by
the union of red chrome with gamboge ; but it is too heavy for
silks.
Green. — Indigo and gamboge form an excellent color for cloth
draperies, shadowed with the same and a little burnt umber ; the
darkest shades have lake and umber or lake and sepia. High
lights, the local color and lemon chrome, or the latter alone on the
local color and Chinese white. If the green be very yellow, the
lemon chrome is the best adapted for the lights ; but if it be a cold
color, then use Chmese white.
Purjile. — Purple tints are formed of blues and lakes, or blues
and sph-it carmine, and lilacs the same. The purples receive a
warm shadow, composed of the local color and brown madder,
and if they are very heavy, the dark shadows are brown madder
and purple lake. Lilacs have similar shadows, but much lighter.
High lights, the local color and Chinese white.
Blues. — Blues of every tint are shadowed with the local color
and a little brown madder, and in the darke.-t places brown mad-
der is only used. High lights, the local color and Chinese white.
Backgrounds.— The best colors for fair people and
children are blues, purples, (not bright, but negative,)
and grays. Dark complexions may have dark grounds,
inclining to red or warm broAvn ; and where the flesh
tint is sallow, use warmer colors,— greens approaching
to olive,— to throw up the reds in the face to advan-
13

146 PHOTOGRAPH PAINTING IN WATER COLORS.
tao-e. If the usual curtain be allowed to creep into theo
picture, make it a connecting color with some other
analogous to it in the figure or accessories.
Never paint a bright blue ground and crimson cur-
tain, but keep every thing quiet and subdued, so that
the eye may take all in at one glance, having no light
patches of color spread over the picture to dazzle and
distract the gaze from the head, but let every color
blend and harmonize.
The following are a few background colors which will
assist the beginner in his work :—
Stone is represented by a tint formed of carmine, in-
digo, and yellow ocher ; and the more distant you wish
to make it appear, the more must the indigo prevail.
If the photograph be a very white one, it will be neces-
sary to lay a foundation of neutral tint, to support the
local color.
Grays : cold and warm .grays of many different hues
are made with sepia and indigo. The grays which
are used in the flesh, will also answer the same pur-
pose. A background capable of many modifications is
made of cobalt, burnt sienna, and a little rose madder
worked into it.

PHOTOGRAPH PAINTING IN WATER COLORS. 147
Madder-brown and cobalt are well adapted for the
same purpose, and form good grounds for fair subjects,
and may be strengthened in the darkest places with the
addition of a little indigo.
Indigo and madder-brown produce a duller gray than
the former, and of more depth.
A purple, cloudy ground is made of indigo and liquid
carmine or lake ; be very careful not to paint it too
bright.
An opaque ground, of a chocolate color, is composed
of lampblack and Indian red, and may be lightened by
the use of Chinese white.
Burnt umber, chrome yellow, and Chinese white pro-
duce a lighter ground than the last named.
Opaque backgrounds are far from being artistic, and
are but seldom used ; if very dark, they give the head
and figure the appearance of having been cut out and
pasted down upon colored paper. If you resort to them,
you will require to soften around the outline to take off
that effect, and that can only be done by adding a little
white to the color. If the background of the photograph
be very dark, and you are desirous to make it lighter,
lay on the transparent color, and lighten them up by

148 PHOTOGRAPH PAINTING IN WATER COLORS.
stippling"^' some white mixed with the local tint over
them, which will have the effect of relieving the head,
and whatever parts of the figure you want to bring out.
Very dark grounds may also be lightened by dusting
some photographic powder colors over them, and they
may sometimes be used on the draperies — but it
must be held in remembrance, that they are not per-
manent.
Photographers are, however, getting into the way of
producing pictures with the backgrounds entirely white,
and consequently they are ready to receive whatever shade
of color may be desired, and are infinitely better calcu-
lated for artistic display than those heavy grounds, which
require considerable discernment on the part of the artist
to understand where the outline of the hair terminates,
and the background commences.
Paint curtains, etc., over the background, and put on
the lights with body colors.
* Stippling.— Toward the end of the work you will observe a number of
inequalities in the tints, catised by the square patches of color which you have
laid on durina the procress of hi^htenin? the carnations, prays, etc. These
require to be filled up by the point of the pencil, with an assimilating color;and
that filling up is termed "stippling." Be careful not to begin doing so till the
work is nearly finished ; for if you commence too early, you will most assuredly
impart a woolly appearance to it, which is by all means to be avoided.
PHOTOGRAPH PAINTING IN WATER COLORS. 149
When white spots appear on the background of the
photograph, stipple them in with a color that assimilates
to it, and then proceed as usual. When the spots are
black, you may take them out with a piece of glass
paper, and finish as above.
Tinting Glass Positives, Daguerreofijpe Plates, etc.
— Photographic powder colors are most frequently used
for the above purpose, and they are applied to the pic-
ture in a dry state with sable pencils ; camel-hair pencils
being employed for softening, and bringing the work into
form and character.
Begin by breathing lightly upon the surface of the
portrait, and dip your pencil into the bottle containing
the flesh color, and work in a circular direction, press-
ing gently upon the glass, to cause the color to adhere
— the breathing is for the same purpose ; then blow off
the superfluous powder with an India-rubber bottle. As
the color approaches the outline, soften it off with gray,
and be careful to preserve the roundness of the cheeks
and forehead which is observable in nature, by keeping
the high lights in the center, and graduating the flesh
tints into the grays and shadows. Next put in the
darkest parts of the draperies and hair. When engaged
13*

150 PHOTOGRAPH PAINTING IN WATER COLORS.
upon the latter, cause your pencil to move in a wavy
manner, as the hair flows. The lights are to be laid in
last, with the colors provided for that purpose, and be
particular not to soil them with the shadow tints, keep-
ing them as bright as possible. Proceed in the same
way with all the other colors, and if the tints contained
in the bottles be too powerful for your picture, you can
reduce them with ivhite, which bears the same relation-
ship to powder colors that w^ater does to the ordinary
cakes. When at w^ork, have a piece of black cloth or
velvet on the reverse side, which wall show up the head
to advantage. The same process as the above is appli-
cable to daguerreotype portraits and paper pictures,
the breathing on the plate, and the varnishing, alone
excepted.
Hitherto glass positives have only been tinted in the
manner described, and which the veriest tyro in the arts
may accomplish with ease. Artists have given very
little attention to the subject, believing that glass pic-
tures would never be much esteemed by the public, be-
cause they are taken upon such a brittle material ; but
in consequence of the increasing demand for them, and
the low prices for \vhich they can be obtained, it has
PHOTOGRAPH PAINTING IN WATER COLORS. 151
been deemed advisable to say something upon the sub-
ject ; and experience shows that more can be done with
them now than formerly, as they are capable of receiv-
ing a considerable amount of finish.
Having put in the general tints with powder colors,
assimilating them as much as possible to the complex-
ion, you may finish them up with cake colors, by mark-
ing out the eyes, eyebrows, mouth, nostrils, etc., taking
care, however, not to run the water colors into the grays
or carnations, as they must be kept intact.
These various touchings produce a sharp and spirited
effect, and will give to the portrait a most decided and
artistic appearance. If ornaments of gold or silver occur,
they may be put in with metal.
If glass positives are varnished, which is the work of
the photographer, you may use water colors upon them
almost as freely as on paper ; but in general all that is
done to them is merely to apply a little powder color for
the flesh, a touch of carnation in the cheeks, and a tint
upon the hair, eye, and eyebrows.
On coloring glass positives entirely in water colors, no
more need be said than what has already been urged in the
case of paper pictures, the manner of working being exactly

152 PHOTOGRAPH PAINTING IN WATER COLORS.
the same, the chief difficulty which presents itself being
that of getting the colors to flow smoothly ; but that is
easily overcome by the addition of a small quantity of
ox-gall.
Oil colors may also be successfully used upon glass,
provided the amateur has a competent knowledge of draw-
ing to carry him through the work ; the same objections
"\3resenting themselves here as upon paper.
ULES FOR TINTING PHOTO-
GRAPHS SLIGHTLY. — Having
prepared the photograph in the
usual way, take a little pink mad-
der, carmine, and Indian yellow,
or whatever color most resembles
the carnation ; lay it on the cheek,
and, with a clean pencil, soften it
carefully all round the edges, blend-
ing the tint into the face. Repeat
the process once and again, till you have obtained nearly
as much color as necessary— I say nearly as much,
because you have to pass the general flesh-wash over it,
which has the efl'ect of darkening it considerably. For

PHOTOGRAPH PAINTING IN WATER COLORS. 153
the purpose of softening, it will be as well to have two
pencils on one holder. It might appear that putting on
the color of the cheek at once, and softening it, would
suffice ; but you will get it far softer by doing it with a
very pale tint two or three times, than you possibly can
by making it at once as powerful as necessary ; besides,
it is impossible to soften a strong color so well as a pale
tint. When the color is quite dry, go over the whole of
the face with the flesh tint, then put in the hair, eyes,
eyebrows, and lips ; round off the forehead with a gray,
and apply the same to those parts of the face where you
observe it to be in nature. If your photograph be a very
dark one, you will not require so much gray in it as if
it were a light impression ; next wash in the background,
and proceed with the draperies, etc.
Return now to the face, strengthen the carnations,
grays, and shadows, by hatching* delicate tints over
them;put the light in the eye and the spirited touches
about it. and the eyebrows, mouth, etc., and finish off the
hair. In dark photographs you will require to lay the
* Hatching is that effect which is produced by the crossings of tiie pencil,
after you have given to the head all the larger washes, and must be done in the
manner described above. To an inexperienced eye, hatching assumes the ap-
pearance of a series of dots.

154 PHOTOGRAPH PAINTING IN WATER COLORS.
lights on the hair with body color, as it is generally much
darker than it appears in nature. Make out the linen
with a gray, deepening it in the darkest parts, and lay on
the high lights with constant or Chinese white. Proceed
next to shadow the drapery, and when you have ob-
tained the required depth, scumble in the high lights,
using a bare pencil and a very gentle hand, as before
directed.
Give the background another wash, if requisite, and
your photograph is finished.
If there be metal buttons, chains, or epaulets, they
must be laid over the dress with body colors ; a very good
ground for them is red chrome and gamboge, shadowed
with burnt umber, and hightened on the lights with
iemon chrome and Chinese white.
By the foregoing method, it will be unnecessary to
hatch or stipple a great deal, for you will find that the
face will come out very soft and round without it ; but
the effect is far inferior to that produced by the other
process.
Prepared Ox-gall. — It is necessary to have a little of
the above preparation, but be sparing in your use of it.
Too much of it in the colors will cause them to sink

PHOTOGRAPH PAINTING IN WATER COLORS. 155
into the paper, and there is no possibility of getting them
out again, nor can you wash over the parts to any advan-
tage. Ox-gall can only be of use in the first coloring, to
kill the grease; after the photograph has been fairly
covered all over, there can be little to apprehend on that
point.
When the paper is greasy, and you find a diffi-
culty in getting a tint to run smoothly, rub the point
of your pencil on the gall, and mix it up in the
color.
Painting Photographs in Oil— To meet the wishes of
those who are anxious to obtain an insight into the pro-
cess of painting photographs in oil, the following direc-
tions are offered : Care has been taken to render them
plain, concise, and as general in their application as pos-
sible. But it must be remembered that the art of paint-
ing is not to be acquired even from the best treatises, by
the most accomplished masters, while, in this trifling
sketch, all that is sought to be conveyed is to initiate the
tyro into a method.
A few lessons by an experienced hand, and assiduous
study on the student's part, will, in a short time, do more
than twenty books could accomplish.
156 PHOTOGRAPH PAINTING IN OIL COLORS.
REQUISITES FOR OIL PAINTING.
White,
Naples Yellow,
Yellow Ocher,
Brown Ocher,
Raw Sienna,
Burnt Sienna,
Light Red,
Venetian Red,
Vermilion,
Indian Red,
Purple Lake,
Crimson Lake,
Rose Madder,
Ultramarine,
Cobalt,
Prussian Blue,
A BOX OF TUBE COLORS COXTAINIXG,
Purple :Madder,
Raw Umber,
Burnt Umber,
Vandyke Brown,
Terre Verte,
Emerald Green,
Ivory Black,
Palette and Knife,
Sables,
Softeners,
Pale Drj-uig Oil,
Mastic,
Megilp,
Turpentine,
Poppy Oil.
How to prepare the Photograph. — Get some size, and
melt it in a dish over a slow fire ; when it is dissolved,
strain it through flannel into a soup plate, and immerse
the photograph in it. When it is suflficiently saturated
with the size, take it out and let it dry, then paste it
down on card-board, and it is ready for use. Another
method : Dip a flat camel-hair tool into the size, and go

PHOTOGRAPH PAINTING IN OIL COLORS. 157
over both sides of the photograph. If it be insuffi-
ciently prepared, the colors will sink in those parts where
there is a paucity of size, and you must give it another
coat.
Oil Colors.— The following is a table of tints in very
general use with artists ; but it must, however, be
clearly understood that they are capable of many mod-
ifications to meet almost every variety of color observable
in nature. Portraits of ladies, but children more espe-
cially, require the tints for the first and subsequent paint-
ings to be kept exceedingly delicate and pearly ; for the
adult male head the colors must be more powerful.
TABLE OF TINTS FOR THE FIBST PAINTING.
TVliite and Light Red. I Deep Shades
White, Naples Yellow, and Ver- Ught Red and Raw Umber.milion.
"NMiite and Naples Yellow.
"White,Vermilion, and Light Red.
Gray, Pearly, and Half Tints.
White, Vermilion, and Black.
"White and Terre Verte.
^^^lite, Black, Indian Red, and
Raw Umber.
14
Indian Red, Lake, and Black.
Car?iations.
Wliite and Indian Red, (powerful
color.)
WTiite and Rose Madder.
White and Lake.

158 PHOTOGRAPH PAINTING IN OIL COLORS.
HAIR.
Light Hair.
White and Yellow Ocher.
White and Roman Ocher.
White and Vandyke Brown, for
the dark parts.
TMiite and Raw Umber for the
dark parts.
Dark Brown Hair.
Raw and Burnt Umber.
White and Raw Umber.
White, Vandyke Brown.
First Painting. — Lay out the palette in the following
order: Place the lightest flesh tints nearest the right
hand ; next in succession those having more color in
them ; then the middle and shade tints ; and lastly, the
pure colors. Use megilp * as a vehicle, if you wish to
paint thinly, and add a little turpentine to it.
Begin by laying on the high lights, gradually descend-
ing into the more florid parts, till you arrive at the mid-
dle tones, which in their turn descend into the shadows.
Lay the color on the lights of some consistency, but let
the shadows be thin.
Be careful not to work the lights about with your
brush, but lay them on boldly and full. Put in a gray
tint for the white of the eye, and paint the iris and pupil
upon it. Take a warm shade color, and mark out the
features, and lay in the lips with a tint considerably
* Megilp is composed of drying oil and mastic varnish ; stir gently together till
they incorporate, and let the mixture remain until it becomes thick.

PHOTOGRAPH PAINTING IN OIL COLORS. 159
under nature ; indeed, it is necessary to force up the
whole of the coloring to allow for it sinking in drying.
Proceed to the hair and eyebrows, lay in the shades, and
after them the lights, define the draperies in the like
way, and rub in the background, beginning with the
lightest part. When you have got on thus far, take a
softener— a badger's hair tool— and go gently over the
whole of the face to round it, and make the various tints
blend into, and unite with, each other.
Second Painting. — Having allowed the picture ten or
twelve hours to dry, the next operation will be preparing
it for the second painting.
Take a sponge •" moderately charged with water, and
go gently over all the work ; when it is dry, dip a brush
in poppy oil, and again go over the surface ; then wipe off
the superfluous oil with a piece of soft silk as gently as
you applied it. This is termed " oiling out," and is
done that the subsequent paintings may unite with the
first, Xevertheless, it is frequently omitted ; but wash-
ing with the sponge cannot be dispensed with, for without
it, the glazes will not lie, but curdle on the picture.
* Breathe upon tlie surface of the picture. If it becomes dull ormisty, you
mny f?afely use the sponge ; but if the breath does not affect it, do not go on— it
is not dry enough.

160 PHOTOGRAPH PAINTING IN OIL COLORS.
TABLE OF TINTS FOR THE SECOND AND THIRDPAINTING.*
High Lights.— "SMiite and Naples yeUow.
Carnations.— Rose madder and white. Indian red, rose madder,
and Avhite.
Green Tints. — "White and ultramarine with any of the yellows.
White and terre verte, with the addition of a little raw umber.
The above green tints may be converted into green grays.
Gray Tints. — Ultramarine, light red, and Avhite. Indian red, lake,
black, and white. White, ultramarine, Indian red, and raw umber.
Purple Tints.— Any of the lakes, or red madders, Avith ultra-
marine and white.
Powerful Shadoio Tints Indian red, purple lake, and black.
Indian red, raw umber, and black.
Strong Glazing Colors Light red and lake. Brown madder.
Vandyke brown, Indian red, and lake asphaltum.
Proceed now to improve the lights, yellows, and florid
tones, M'ith tints that approach your model ; then glaze
the shadows where they are wanting in depth and color.
The alterations, which at this stage are necessary,
should be made with the shade tint, your own judg-
ment guiding you to the requisite depth of color for
that purpose. Look carefully over all the photograph,
* These and the following tints might be increased aXmoai ad infinitum ; but
it is better to present only a few to the learner, as a great number would only
serve to bewilder hira.

PHOTOGRAPH PAINTING IN OIL COLORS. 161
and put in some of the spirited touches about the eyes,
mouth, etc. Then improve the gray and pearly tints,
(those about the mouth and eyes require very delicate
handling,) and blend them into their proximate colors
with a softener. Next look to the reflexes, which are
to be painted, if possible, without any white in them.
Soften the outline of the head with the background, so
as to take off every appearance of hardness, remembering
that there should be no such thing as a sharp outline in
the face ; a glance at a plain photograph will at once
show this to you. The lines of the eyes, mouth, and
nostrils must also be carefully blended ; but they must
not be rendered too soft, or they will impart an air of
insipidity to the countenance.
Third Painting.— Having proceeded thus far, it will
be necessary to sponge the picture again. Scumble over
the lights again where necessary, improve still further
the luminous tints, and look to the glazing and reflexes.
In finishing the carnations, as little white as possible
should enter into their composition ; and they, together
with the lights, should be laid on with a fine pencil, and
a quick and decided touch, keeping them pure from the
preceding colors. Soften all the parts which appear
14*
162 PHOTOGRAPH PAINTING IN OIL COLORS.
crude or hard, and finish off the background and
draperies. The hands require a flesh tint similar to
the face, and the same gray and pearly tints are used
for them. If extreme finish be aimed at, you may re-
touch your work several times, allowing it to dry be-
tween every retouching.
Draperies.— The scale of colors is nearly the same
as for water; but, instead of gamboge, yellow ocher
and ocher yellows are used, and Prussian blue is taken
for indigo.
The shades, being laid in, are met by the half tones
and lights, and are blended with a softener. The shad-
ows are then finished by glazing, and the lights by
scumbling over them.
Background Colors. Pear/y. — ^Tiite, vermiHon, and blue.
AMiite, vermilion, and black. 'SMiite and black.
Gray.— "SMiite, Venetian red, and black.
Yellow.— Yellow ochre and white.
Olive Yellow ocher, terre verte, and umber.
Sfoti£.— Raw umber and yellow. Black, white, and raw umber.
SA-y. — French blue and white, French blue, vermilion, and
white.
Edges of Clouds. — Yellow ocher and white.
Clouds. Indian red, lake, black, and white. Brown madder,
French blue, and white.

Oriental fainting.
(163)

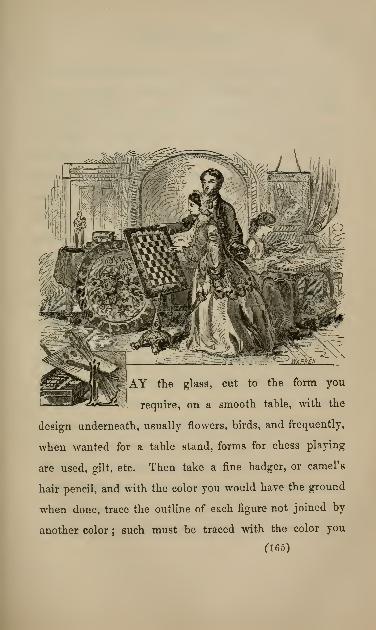
^. AY tlie glass, cut to the form you
k1 require, on a smooth table, with the
design underneath, usually flowers, birds, and frequently,
when wanted for a table stand, forms for chess playing
are used, gilt, etc. Then take a fine badger, or camel's
hair pencil, and with the color you would have the ground
when done, trace the outline of each figure not joined by
another color ; such must be traced with the color you
(165)
166 ORIENTAL PAINTING.
would have the figure ; as, green, if a leaf or stem ; for
rose or flower, the color of the rose or flower. After
this has been traced out as perfectly as possible, shade
the leaves by laying thicker coats when you would have
it darker. This will be easy, as you have only to fol-
low the pattern. Also make the veins with a darker
shade, tipping the edge with the same. A little practice
will show where efl"ect can best be obtained. Now put
on your ground, which should be composed of fine white
picture varnish, or, what is better, our Outside varnish,
colored with any dry or tube oil colors. If black, lamp-
black may be used ; it should be well ground. After
this is thoroughly dry, lay on and confine with this same
mixture, tin foil, or tinsel, either smooth or crimpled.
Pearl is frequently used in the Oriental style;yet a per-
son well practiced can imitate it perfectly with the foil,
which is much cheaper. Cover the whole with black, or
very dark cambric, confined with the same mixture.
The colors used must be transparent, or nearly so;
oil tube colors will answer, or powders mixed well with
Outside varnish. The lakes are all transparent, eme-
rald green, raw and burnt sienna, and others which any
artist colorman will inform vou when buying your colors.

ORIENTAL PAINTING. 167
We have published, for Oriental painting, two fine
copies ; one, a handsome wreath, with fountain, birds,
etc. ; the other, an elegant vase of flowers, with birds'
iiests, birds, butterflies, etc.;
price, one dollar the pair,
post-paid, on a roller, to any address. Also, two smaller
ones, that will combine with the vase and wreath to
make innumerable combinations, or may be used sepa-
rately;
price, forty cents the pair ; or we will send
the four ou one roll for $1.25, post-paid. A fine
copy for chess-tables has just beeu added to the list,
the design of which is very beautiful;
price, eighty
cents.
For gold lines, etc., draw with the varnish, as if paint,
and when dry to a tack, lay on gold leaf, or rub on gold
bronze of any color. If bronze is used, apply as soon as
varnished. Gold work, in most cases, should be left till
the last.
The publishers of this book have put up, under their
personal -obsefvation, boxes of dry colors, assorted colors
in bottles, suitable for Oriental painting, which they
seud by mail for $1.25. This method has proved very
satisfactory.
Prof. Day's Method. — Oriental painting on glass
168 ORIENTAL PAINTING.
is SO called from its capability of producing effects of
coloring equal to the colors of Oriental flowers, and the
plumage of Oriental birds. This beautiful, showy, and
gorgeous style of painting never fails to attract admirers
wherever it has been introduced. No style of painting
has yet been invented that shows transparent colors to
such advantage as this, when properly and carefully done.
If the purest transparent colors are to be used, and mixed
with the lightest varnish, and the lights and shades of the
flowers carefully attended to, and any light body (even
paper) put at the back of the glass, the painting will
show with good effect ; but when the brilliancy of
the color is reflected back by means of the brightly
planished silver foil, every shade of tone is made to
yield its otherwise concealed beauty, making this style
of painting well adapted to reflect the many splendid
colors nature has in store for the admirer of flowers
and showy plumage of birds.
Directions.— Procure ten thimbles, large size and long; ten
buttons to fit on the top ; a piece of wood ten inches long, two
wide, one thick ; bore ten holes in it in which to fit the thimbles,
A jmiyxt stand can be made of tin, or in a box, or in any other
way that will suggest itself to the convenience and ingenuity
of the artist. A ground glass slab, from six to eight inches
ORIENTAL PAINTING. 169
square, on which to mix the colors ; a palette knife, four inch
blade, (rather stiff is preferable ; it muxes up the color better ;)
a bottle of copal varnish, and one of turpentine ; set of mix-
ing colors ; all of which may be had from the publishers of
this work.
To commence a picture, procure a glass the size you wish, then
get a clear outline drawing on white paper, and fit it on your glass
;
next prepare a little lampblack (lampblack is not down in the
list of colors, because it is readily procured) by mixing it on your
glass slab with copal varnish, using sufficient varnish to make a
semi-transparent or neutral color, thinning it a Httle with turpentine
if necessary, and put it into one of the thimbles. Take a crow
quill brush, with hairs about five eighths of an inch long, and
with the neutral black trace every line, and mark off your draw-
ing on the glass. This is a long and tedious affair, if the design
is large and compHcated, and to look well requires to be done
neatly. Next, all the little stems, and fine tracery work of weeds,
etc., that is sometimes introduced to take off the crowded appear-
ance of a group of flowers ;pencil in with opaque green made of
chrome yellow and a little Prussian blue, (directions for mLxing are
on an advance page ;) sometimes a little bronze is introduced in the
same way for variety ; for this, mix a little bronze with copal varnish,
put it on with the same brush as you used for the green work and
outlining ; sometimes a dot of scarlet mixed with varnish is put on,
or pale blue, made of white and blue. This being done, see that the
glass io free from finger marks, and commence the groundwork with
lampblack mixed with copal varnish, going carefully around the
design, avoiding all the parts you wish to paint with transparent
colors ; the small work done with the opaque colors can be gone
over with the black. ^VTien you have gone over it once, hold it up
15

170 ORIENTAL PALNTING.
to the light, and you will perceive it full of places not sufficiently
covered ; touch all such again, to make it perfectly solid. When
all this is done, it is ready for the transparent colors on the flow-
ers, which are, of course, varied according to the design. To make
scarlet flowers : coat over the flowers about three times with piire
yellow lake, then once or twice with crimson lake, according to
the intensity of the shade ; make the deeper shades by adding a
httle blue in the crunson lake. Yellow flowers: paint with a
weak shade of yellow lake, and the shades by adding a very little
burnt sienna with it. Blue flowers : use light blue ;and for the
deep shades add a little Prussian blue. Purple flowers : purple
made of crimson lake and Prussian blue, according to the tint
required ; a very delicate purple is obtained by mixing rose pink
and a little light blue. Pink roses and geraniums : use rose pink,
and for the deeper shades add a little crimson lake. "White flowers :
use a neutral on the shaded parts composed of a litde Vandyke
brown and a little blue, diluted with varnish to suit the tint re-
quired ; the high lights of white flowers are left clear glass, and
sometimes for small flowers a little opaque white is introduced on
the high lights to imitate pearl. Real p^arl is often put on ; but
this will be referred to again. Stamens of flowers are done with
Vandj'ke brown ; anthers sometimes with chrome yellow and a
little burnt sieima mixed with them, and sometimes yellow lake,
dotted with burnt sienna. Green leaves are stained with transpar-
ent green, made with yellow lake and Prussian blue ; a good deal
of yellow lake if a yellow green is required, and not so much if a
cold blue gi-een is wanted. Autumnal greens : add a little burnt
sienna. The leaves are painted over two or three times in the
parts that are wanted darker, also the deep shades against flowers,
where the leaf goes under a flower. Use a little Vandyke bro-v^Ti
vnth. the gi-een. 'SMien the painting is fiaiished, it is better to allow

ORIENTAL PAINTL\G. 171
it to remain a few days before putting on the foil. "WTien it is suf-
ficiently dry, if you wish to introduce any pearl, select the white
flowers, because there is a portion of the glass left clear, and the
pearl shows to advantage. The pearl must be cut pretty near the
shape of the flower, and two or three dots of clear varnish put on
;
then it is to be fitted to the flower, and left for a few hours to dry.
Sometimes it is well to put a weight on, then fix on the foil and
fasten it with black putty, or some of your black that is left
from your coating. Cover the entire piece with a board, and let
it remain a few hours ; or if you are going to frame it, put it im-
mediately in the frame, and the back board wiU. keep it in its place
;
or if it is a table, the back of the table -will answer the same
purpose ; if neither, take a strong piece of brown paper and cover
it, pasting carefully round the edges, and make it stick fast.
Observatioxs Be sure that the glass is well cleaned before
beginning. All fine stems, and fine work that is intended to be
done with opaque color or bronze, has no occasion to be touched in
the outlining.
Directions fok mixixg Colors.— Be careful to have the glass
slab clean and free from dust— also the palette knife ; then put
on the glass as much of the powder color as you think you may
want;put enough copal or outside varnish to it to make it absorb
all the color and flow easily, and mix by moving it round and
round, with a little pressure upon it, so as to make fine all the
little color particles that are visible ; occasionally add turpentine
to thin it, and mix again. When it is sufficiently fine, put it into
one of the thimbles. All the colors are mixed in the same way.
If you are to use most or all of the transparent colors at one sit-
ting, the best plan will be to mix them as follows : yellow lake
first, then burnt sienna, then Vandyke bro-wm. These three colors,
if mixed in this order, can be mixed without cleaning the glass,

172 ORIENTAL PAINTING.
because the yellow lake which would remain on the glass after
scraping it up to put in the thinible would not injure the sienna,
nor would the sienna injure Vandyke brown. The glass must be
thoroughly cleaned for rose pink ; then mix crimson lake ; then
clean your glass for light blue, then Prussian blue. When you
mix white, the glass must be rubbed until it is perfectly clean.
Chrome yellow can be mLxed after white without cleaning. In
mixing yellow lake, rose pink, crimson lake, and white, the glass
must be as clean as if color had never been upon it. This can
easily be done by rubbing it with turpentine and a clean rag. Weare particular in detailing this, and in trAing to impress upon the
artist the necessity of having all the colors pure, especially the four
colors named above ; likewise to have them well mixed, free from
all particles of color. All this must be strictly attended to, in
order that the paintmg may look well. Some colors require
more varnish than others. Yellow lake, rose pink, blue, and
crimson lake require about the same ; the three opaque colors,
chrome yellow, -white, and scarlet, a little more ; Vandyke brown,
sienna, and Prussian blue require still more. Prussian blue and
crimson lake are the most difficult colors to mix, and more time
for mixing should be allowed.
In the absence of a glass slab, a clean white china plate— as
smooth a one as can be chosen— is a very good substitute. Nine
of the thimbles are now occupied. In the tenth put in some clear
varnish, as it is useful and convenient to dip your brush in when
you A^'ish to reduce any shade— that is, make it lighter. It is not
necessary to have a thimble for green, as there is so little used
;
you can make it from the thimbles as you require it. In painting,
when a light shad? is required, u'se a little more varnish with your
color ; and when your color becomes thick, always thin it with

ORIENTAL PAINTING. 173
turpentine. By attending to these two remarks, much trouble
will be saved, as the evaporation of the turpentine is continually
going on, and the paint gradually becomes too thick for use.
After painting, if you do not wish your thimbles again for some
time, put a drop of clean turpentine on each color, then carefully
press the buttons on so as to exclude the air. Thus the colors will
keep good for several days. The black for the groundwork is
made of lampblack mixed with copal or Outside varnish, and had
better be put in something larger than a thimble, as so much of it
is used. (It can be had of the publishers of this work at twenty-
five cents per bottle.) Lampblack is a common color, and may be
purchased any where ; or you can make it yourself, by lighting a
common oil lamp, make it smoke well, put a tin shade over it, and
the collected particles on the shade make the best lampblack.
For variet}'. Oriental painting is sometimes grounded with
white, or other light tints, similar to those enumerated in Poticho-
mania. In doing these, much greater care is requisite, owing to
the delicate grounding ; and, instead of outlining with the neutral
tints, it is better to outline with burnt sienna. Greater care is
likewise necessary in cleaning the glass, as any finger mark will
show, when coated with white. Foil is sometimes wrinkled or
crumpled between the fingers very much, before applying it. Weprefer to use it plain.
Sometimes leaf gold is introduced. To do this, a size must be
made of isinglass ; a very weak solution is sufficient— about one
inch strip of common isinglass to a teacup of hot water ; when
thoroughly dissolved, strain and use it cold. The part you design
to gild must be floated with this water ; then get a •' gilder's tip,"
(a technical term for a long, thin-haired, flat brush ;) have your
leaf gold all ready ; draw the tip down between your hand and
15*

174 ORIENTAL PAINTING.
cheek, for the purpose of giving to the tip a little electric heat,
which causes the leaf gold to be slightly attracted ; when on the
tip, you can place it readily where you please. ^Vhen you have
applied all the gold you wish, slightly elevate your picture to let
the water drain off, and when completely dry, you can remove any
part you do not wish to have gilded, with a little moisture. That
which you wish to remain, you can paint over with black ; or, if
you wish the gold to show on both sides, as is sometimes required
in other gildmg, such as lettering, you may then varnish it with
clear Outside varnish. Some persons object to the foQ at the back
of the Oriental, thinking it too glaring. This glare can be obvi-
ated by means of the gold. For this process, when your painting
is quite finished, float it well Avith the isinglass size, and use pale
gold by means of the tip. It has a very good effect, and shows the
transparent colors to good advantage, but not so brilliant as the foil.
Hoiv to paint the neic Pattern for a Chess Table.—This has been made to use either as a square or round.
The squares had better be finished first, and a very
pretty way to do this is to draw with gold size the lines
around outside of the squares, and also around each
square, very fine, with a hair pencil, and after it has dried
about twelve hours, lay on gold leaf, as directed for
gilding: first press, then rub off with a cotton ball the
superfluous gold, or, if you choose, draw the lines with
the Outside or copal varnish, and apply fine gold bronze
directly. The squares may then be filled in with opaque

ORIENTAL PAINTING. 175
colors— say vermilion and black, or black and white,
or as fancy may direct, or the squares may be laid in
gold and silver bronze. The light squares may be fixed
to imitate pearl, as directed before ; in fact, there ara
innumerable ways to complete even these simple squares.
Now you should draw the line in the same way as
directed for the squares around the circle ; and if you
use the pattern as a square, make the lines about the out-
side of the whole, as seen in the design ; these lines may
be gilded or silvered like the others, or varnished. It
will improve the whole to draw very finely a black line
outside of these last, after the gold or silver is dry.
The beautiful designs used to fill up the blanks may be
finished in the antique style, (see proper page,) which
would be very fine and more simple ; or they may be
painted in the Oriental style, as the other. If in the
Antique style, cut out the part as curved carefully, and
prepare one part at a time, using great care not to rub
through on the light parts. If you conclude on Oriental
method, paint as follows :—
The cottage and landscape at the top we need hardly
speak of, as even a common artist knows the colors that
will be best. Draw the lines as we have directed

176 ORIENTAL PAINTING.
before for the outlines, then shade by laying more coats
of the colors used for darker tints, placing the pearl
or foil under, and fixing the whole. It will be well to
experiment on another piece of glass first, so as to be
sure you are right as to colors, and not to injure your
other work. The parrot and peacock will look beauti-
fully, admitting the brilliant colors which nature allows
them, touched as your pattern directs, which is shaded to
give lights and shades natural to the colors used. For the
race at the bottom we would give the same simple direc-
tions as for the cottage, etc., at the top. Draw in the
outlines, and shade neatly, covering all with the foil.
The scrolls in the corners, if you use the whole as a
square instead of a round, should be drawn in with
black for the darkest parts, and shaded with sienna and
yellow lake, the white parts left till the last, when they
should be gilded as directed for the squares. After this is
dry, cover with a background, and the color of the tint
on the patten will be rich and pretty.
Another fine Way to use this Chess Patten.— Have a
small table made of the proper size, and varnish the top
several times after each drying, rubbing well with fine sand
paper to get a good surface, or, have the table finished at

ORIENTAL PAINTING. 177
the cabinet shop ; then you will only have to polish it
well for use. Now varnish with the Antique varnish, and
treat as directed in the Antique painting ; rub off all the
paper, leaving the print only ; do this carefully, as if on
the glass. Touch up with proper colors, bronze and var-
nish over the whole with Outside varnish or best copal,
and you will have a splendid piece of furniture, the
beauty of which depends on the care and skill of the
artist.
Another heautiful way is to do the whole in the Gre-
cian style, touching up on the face with bright colors,
bronze, etc.;glue or paste to the table or board, and
varnish and finish.
The paper is prepared and the drawing made for all
these styles, and many others will suggest themselves to
the ingenious.
A new Way of pointing on Rice Paper. — Make the
outline with a dark lead pencil, on clear and perfect white
paper, the same as for Oriental painting;
place the rice
paper on the top of it, and proceed to paint with the
transparent colors mixed with varnish in the same manner
as for Oriental : opaque colors can also be used. No
difficulty will be found in painting on rice paper with the

178 ORIENTAL PAINTING.
varnisli colors, and the paper will not wrinkle as it does
with water colors.
The inventive mind and the imagination of the artist
will suggest many pleasing combinations of the Oriental
studies published by us. For instance, the fountain can
be taken out from the center of the wreath, and the
basket of flowers substituted in its place. Practice of
this kind is fine exercise, stimulating the inventive fac-
ulties, and giving the artist a happy facility in different
styles of ornamental work. In our limited space, we
can only give hints, without entering into the minute
details. But from the principles laid down, the apt
scholar will easily make pleasing progress.

fainting 0n ihss
(179)


^agk faiitern.
NWV
LACE the glass upon whatever you wish
to paint, whether a colored design or
only a sketch, and outline with your fine brush and
neutral black in the same manner as for Oriental, and
paint them in with your transparent colors, the same
as used in Oriental painting. If it is a landscape,
make the distant mountains (if any) with a pale shade
of blue and crimson lake ; at a later painting add a
16 (181)

182 PAINTING ON GLASS.
little yellow lake, and repeat with these three colors in
different proportions until the effect required is produced.
Paint the foliage with yellow lake and a little blue. For
autumnal foliage, add a little burnt sienna; stems of
trees, Vandyke brown and burnt sienna ; flesh tints make
with yellow lake, crimson lake, and burnt sienna, reduced
very much with varnish. The coloring generally must be
painted strong, as it is to be magnified very much when
exhibited on the disk. Paint the clouds pale blue, and
dab the paint, while wet, with a bit of cotton rolled into a
light ball. This process, if done with care, has a very
soft, fleecy effect.

lainling on ^xmrin §lmB.
-^""'•^
,...!:t
1 1
um^^fc L/—
^
HIS is a very useful style of painting,
as articles of every-day need can be
made beautiful and artistic, such as lamp shades,
glass doors, vases, and in fact any thing for which
ground glass is used. The same transparent colors
are used that have already been mentioned, mixed
with varnish. Commence with making a very faint
outline with a hard lead pencil, drawing out the
(183)

184 PAINTING ON GROUND GLASS.
design you wish to paint ; then proceed to paint the
flowers or birds in precisely the same way as laid down
for Oriental painting. Be careful, in this style, not to
have any of the outline visible. Landscapes can be done
with very good effect on ground glass by proceeding
according to the method of bronze painting. All the
difference is painting on ground glass instead of bronze
ground. Wreaths of flowers around globe shades for
gas or solar lamps look very well.

ANY small signs are now done in the Oriental
style. For this method, make a clear and
^/7) correct outline of the letters, if you are not
familiar with printing or lettering ; then re-
verse it. This can be best done by placing
it against the window, and marking over all the letters
clearly and distinctly on the wrong side. Now fit the
glass on this side of your paper, and commence marking
out the letters with black. (Supposing it to be for a
black ground, your paint can in this case either be
mixed with varnish, as in Oriental, or oil paints.) After
they are all marked out, fill in the remaining part of the
uncovered glass. AVhen the black is sufiiciently dry,
you can fasten on the pearl, or the silver foil, in the
16* (185)

186 SIGN PAINTING.
same manner as for the Oriental. If it is desired to
have the foil wrinkled, rub it between the hands to
crumple it. Sometimes the letters are partially scum-
hied ; that is, opaque color, reduced with megilp, and
shaded on ; sometimes stained with the different trans-
parent colors, the same as in painting the flowers in Ori-
ental work ; then put on the foil.
If other tints of grounding, more delicate than black,
are desired, consult the tints we have given for Poti-
chomania ; any of these will do, always observing that
the letters must be outlined with the same tint. Signs
in this style can likewise be done in the antique trans-
fer method, with open letters. After the paper is re-
moved, coat over with the grounding preferred, and
apply the silver foil.
Gilding for Signs.— Gilding for out- door work re-
quires a stronger size than for other gilding ; the size
for this is best made of drying oil, the old and fat
being the best ; chrome yellow or white lead mixed
with it, sufficient to color it and give it a little more body.
We have a fine article at seventy-five cents per bottle.
It will take from twelve to twenty-four hours to dry,
according to the weather, before it is ready for the
leaf gold.

Antique famtrng 011 ilass.
[ROCURE the first quality of German
or French glass, (cut quarter of an
inch larger all round than the picture, to allow for
framing,) and make it perfectly clean ; apply with
a stiff brush a very thin coat of Antique varnish,*
* The Antique Varnish is made only by us, and will have our name on each
bottle. Any not so lal)eled is an imitation, and probably worthless. It can ho
had of us, or at any artists' material store.
(187)

188 ANTIQUE PAINTING ON GLASS.
which will be thoroughly dry in six hours. Then
apply another coat of the same, thin and very equal
and smooth ; allow this to dry about one hour, until
nearly dry, strongly adhering to the finger when touched,
but not sticky. Then put on the engraving, (having
damped it thoroughly with warm water, not too wet,
absorbing the extra moisture with a cloth or blotting
paper,) with the face to the varnish side of the glass;
press it gently until every part adheres to the surface;
rub carefully with the finger a part of the paper, being
sure not to rub through the engraving. After it has
dried twelve hours, wet again, and rub off all the paper,
leaving only the engraving. When again dry, moisten
carefully with fine bleached drying oil. It is then ready
for painting. The colors will strike through very freely,
as there is no paper left, and will not spot as the Gre-
cian is liable to do. Do not use any tvirpentine in
this style. The directions are the same as for Grecian
painting, except more pains should be taken to shade
and blend in the colors, to help the shading in the en-
graving, particularly the flesh color with the hair. It
will be found that fine transparencies may be made as
above. The glass, after it is prepared for painting, re-
sembles ground glass.

lapier lTiu|e.
(189)

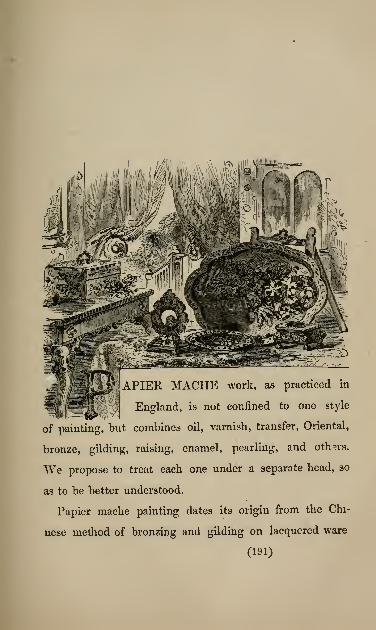
,\ v^ iiiiiiYiUiyL
^f^''f\\
APIER MACHE work, as practiced in
England, is not confined to one style
of painting, but combines oil, varnish, transfer, Oriental,
bronze, gilding, raising, enamel, pearling, and others.
We propose to treat each one under a separate head, so
as to be better understood.
Papier mache painting dates its origin from the Chi-
nese method of bronzing and gilding on lacquered ware
(191)
192 PAPIER MACHE.
but has undergone so many changes and improvements,
that in some branches bronze and gilding have little or
nothing to do with it, and a complete change has taken
place. Flower painting with varnish colors has been intro-
duced with splendid effect ; birds, with a gorgeous array
of brilliant plumage, contributing to make the style attrac-
tive. An impetus was given to papier mache manufac-
turers as a good remunerative trade ; the ornamental
department had to keep pace with it ; superior artistic
talent was called for, and in this splendid and superb
work the artist had another avenue opened for his
skill. A new style of bronze painting, with landscape
designs, was introduced, and combination designs of land-
scape, flowers, and birds soon found their way to the
public eye. Papier mache, (when well made,) being a
compact, unyielding body, capable of being wrought by
skillful workmen into a variety of useful and ornamental
articles, soon found its way into general favor, until
it may be said that no boudoir or drawing room is
fashionably furnished without papier mache holding a
perspicuous situation, to reflect the taste of the pro-
prietor.
We do not intend to give a minute description of the

PAPIER MACHE. 193
method of manufacture — it would be foreign to our
purpose;
but as we are to write pretty fully concern-
ing the ornamentation, we will give a theoretical glance
at it. There are two ways of making it ; one, makingit with sheets of paper ; the other, with pulp, as the
name implies. To make the sheet, absorbent paper is
employed, and the sheets pasted together with a paste
composed of flour and glue, upon moulds of the re-
quired shape, then put into stoves, or hot rooms, as
they are called, heated to about 200° Farenheit, or more
;
when dry, they are taken from the moulds and staeped
in oil, and allowed to absorb as much as they will take,
and put again into the hot room; let them remain there
until perfectly dry; then the fabric is ready to be dressed,
as the technical term is— in other words, it is worked by
cabinet makers like wood, and wrought into the required
shapes;then coated with black varnish, or varnish paint,
the color desired; hardened again in a hot room of about
150° Fahrenheit, then rubbed smooth with pumice sand
and polished with rottenstone. In the other way, the
paper is reduced to a pulp with water; the water
strained from it when the paper is sufficiently soft, and
paste and glue mixed with it; the pulp is then ready

194 PAPIER MACHE.
to put into moulds, with great pressure, hardened, and
finished off in various ways.
The flower painting on papier mache is frequently called enamel
painting. The style of painting -when acquired can as readily be
painted on prepared wood, iron, tin, paper, etc., as papier mache.
The colors to be used are precisely the same as those enumerated
for the Oriental, and are mixed in the same way. To com-
mence a painting, make a correct outline of the picture on
thin white paper, rub some of your white powder all over the
back of it, and trace the design on your picture with the end of
one of your pencil sticks cut to a sharp point ; when you have
carefully traced in all the design, remove the paper, and you have
your picture drawn out, transferred, as it were. Now, with your
white mixed according to directions in another page, coat over all
the flowers (retaining the shape) thmly with white, and by the
tune you have finished the last one the first will be dry enough for
another coat. Each flower should have three coats of white to
make it solid. The flowers that are mtended for yeUow should
now be coated over once entirely with chrome yellow, and the
scarlet flowers once over with the opaque scarlet ;the leaves
must next be penciled in with opaque green made with chrome
yellow, a little white, and some Prussian blue ;go over the
whole with a middle tint first ; then use more white and yel-
low, and put on some lighter tints where you wish the hghts to be.
For stems and fine work use the same colors. Transparent colors
are next to be ready, and it is better in this stage of the painting
to allow a day to intervene before proceeding further. Paint pink
roses and geraniums with rose pink ; the darker shades with
crimson lake ; dark red flowers ^^ith crimson lake ;for darker
shades, use a little blue with the crimson lake. For blue flowers

PAPIER MACHE. 195
use light blue in the light shades, and finish the darker parts by
adding a little of the Prussian blue ; for delicate pui-ple flowers
use rose pink and a little light blue ; for stronger and darker pur-
ples, use crimson lake and Prussian blue ; for yellow flowers, use
a pale shade of burnt sienna ; for scarlet, use crimson lake in
difierent degrees of strength ; for the darker shades it will be
requisite to use the full strength of the crimson lake, and for
still darker add the least touch of blue ; white flowers must be
shaded delicately with neutral tint made of yellow lake, crimson
lake, and blue, weakened very much with varnish ; or another neu-
tral is made with Vandyke brown and light blue, likewise weak-
ened very much with varnish. The shades of all the flowers must
be repeated until finished to suit the eye. The green leaves come
next. They are coated over partially with transparent green made
with yellow lake and Prussian blue ; the shades are varied and
repeated according to the tints required. If a yellowish green,
the yellow lake must predominate ; if a cooler and bluer green, use
a little more blue ; for autumnal leaves, or withered ones, use burnt
sienna and a little crimson lake, and a little yellow lake if requi-
site. Some few darker shades will be requii-ed on some parts of
the leaves, especially those that are underneath the flowers. To
obtain this, use a little Vandyke brown and Prussian blue. The
leaves are now ready for the veins ; do these with Vandyke brown
and a little crimson lake with it ; the stamens to the flowers are
painted in with the same color; the anthers do in with chrome
yellow, and dot them with burnt sienna; the green leaves are
finished by touching the veins Avith a faint outline, here and there,
with chrome yellow against the veins already on. The flowers
are all finished with this exception; some of them, especially
the pink ones, may want a slight tinge of neutral (very pale)
just against the edges, to soften them a little ; and a little white,
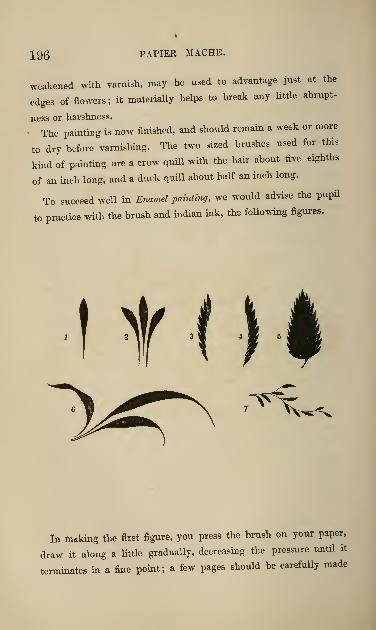
196 PAPIER MACHE.
M-eakened .vith varnish, may be used to advantage just at the
edges of flowers; it materially helps to break any Uttle abrupt-
ness or harshness.
. The paintmg is now finished, and should remain a week or more
to dry before varnishing. The two sized brushes used for this
kind of painting are a crow quill with the hair about five eighths
of an inch long, and a duck quill about haK an inch long.
To succeed well in Enaviel painting, we would advise the pupil
to practice with the brush and Indian ink, the followmg figures.
'^'^^^
In todking the first figure, you press the brush on your paper,
draw it along a little gradually, decreasing the pressure until it
terminates in a fine point; a few pages should be carefuUy made

PAPIER MACHE. 197
of that one figure. The second is produced in the same manner,
with one inclining to the right and one to the left ; make at least
a page of these. The third figure is made of the same marks
repeated, and brought close to each other. The fourth is the
same. The fifth is the third and fourth combined, and is the way
to form leaves. The sixth commences with the brush just touch-
ing, then gradually pressing down a little, and tapering off again
with light presstire. The seventh is the same but very small.
These figures, when well practiced, greatly facihtate the free ma-
17*
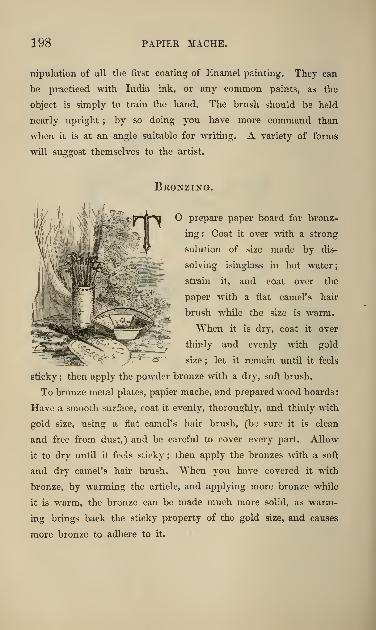
198 PAPIER MACHE.
nipulation of all the first coating of Enamel painting. They can
be practiced with India ink, or any common paints, as the
object is simply to train the hand. The brush should be held
nearly upright ; by so doing you have more command than
when it is at an angle suitable for writing. A variety of forms
will suggest themselves to the artist.
Bronzing.
O prepare paper board for bronz-
ing: Coat it over with a strong
solution of size made by dis-
solving isinglass in hot water
;
strain it, and coat over the
paper with a flat camel's hair
brush while the size is warm.
"When it is dry, coat it over
thinly and evenly with gold
size ; let it remain xmtil it feels
sticky ; then apply the powder bronze with a dry, soft brush.
To bronze metal plates, papier mache, and prepared wood boards
:
Have a smooth surface, coat it evenly, thoroughly, and thinly with
gold size, using a flat camel's hair brush, (be sure it is clean
and free from dust,) and be careful to cover every part. Allow
it to dry until it feels sticky ; then apply the bronzes with a soft
and dry camel's hair brush. AVhen you have covered it with
bronze, by warming the article, and applying more bronze while
it is warm, the bronze can be made much more solid, as warm-
ing brings back the sticky property of the gold size, and causes
more bronze to adhere to it.

PAPIER MACHE, 199
Bronze Painting.
ROCEED to bronze according to
the directions under the head of
Bronzing, only you can introduce
a variety of shades of bronze, if
you %vish. We invariably use
three, if not more, \'iz., pale,
blush, and white. Blend them
together to suit your subject, and
allow a couple of days to elapse
before commencing to paint, so
that it may dry. We will suppose it is a landscape, with moun-
tains in the distance, water mid-distance, and foliage and building
and figures in the foreground. Make a correct drawing of what
you want, on thin white paper, rub some white on the back of it,
fit it upon your picture, and mark over with the sharp end of a
pencil stick, pressing on very lightly ; after all is drawn in, remove
your sketch, and faintly mark over the lines with a lead pencil.
If you are copying from an engra\ing, observe on what part of the
building the light strikes, and select those parts for gold, coating
them over with gold size, and putting on the leaf gold when suf-
ficiently dry, (according to the directions already given.) If there
are any parts of your figure (such as rich dresses) which you want
rich color, do them at the same time with gold. The painting must
now be wiped with a clean silk handkerchief, to remove aU the
bits of gold and dust ; and supposmg that the thimble palette is
ready, with all the colors mixed, according to the directions
previously given, we first mix a pale tint of purple, made with
Prussian blue and a Uttle crimson lake, and pencil over the moun-

200 PAPIER MACHE.
tains evenly, then go over the water with a very pale shade of
blue. After coating the mountains and water once, it is better
not to touch them again until they are dry. Now paint in the
foliage, making the tints with yellow lake and Prussian blue ; if
you want them bright, for the different shades add burnt sienna, or
Vandyke brown, or both, as your tints require. Stems of trees
are mostly done with Vandyke brown, and other tints added to
suit the eye ; faces of figures do with white and a little sienna
mixed together ; white drapery coat over with white, scarlet with
scarlet, and yellow with chrome yellow ; all other parts of figures
with white, except the parts you have already gilded. This will
suffice for the fir.st painting. The second shade upon the moun-
tains is made with a neutral composed of the three primitive colors,
viz., crimson lake, yellow lake, and Prussian blue. The tone that
you desire must predominate in making all your neutrals ; for
instance, if you want a bluish neutral, the blue must predominate ;
if you want a greenish, the j-ellow lake must predominate ; and
if reddish neutral, let the crimson lake predominate. Having
selected your shade, be sure to have it about the right strength
before beginning, as it is difficult to avoid a patched appearance on
the moimtains with varnish color, especially on the second and
third coating, unless you are quick in your movements. If the
water requires more color, paint it in the darker places, then
repeat the shades on the foliage where it is requisite. Yoiir figures
now claim some attention. Any part you want crimson, paint
over gold with crimson lake, and you have a splendid color
;
repeat it w^hen a little dry, if you Avish it darker, and for the
shades add a little blue with your crimson lake. Blue dresses
paint with a pale shade of Prussian blue on white or pale gold
;
for the shades, paint in with a little stronger Prussian blue.
(^Please bear in mind, when you wish a pale shade of any of these

PAPIER MACHE. 201
colors, especially mountains, to add varnish ; and when you want
to thin it, use turpentine. We call attention to this, because it is
rather difficult to manage varnish colors at first, owing to their
drj4ng up so rapidly ; but by a little practice you soon find out that
if worked with proper consistency the process is not difficult.)
Green dress, with yellow lake and Prussian blue on pale gold or
white; purple dresses, with crimson lake and a little Prussian
blue on white or pale gold. Any part of the figure you do with
scarlet, shade it with crimson lake;
yellows shade with burnt
sienna, pale shade. Faces : paint the features in with Vandyke
brown, and difi"erent tints with yellow lake, crimson lake, and
sienna, paled down, and repeated to suit the eye. Parts of the
mountains may require a third and fourth wash ; if so, attend to
them with the neutrals named above. Sometimes we highten the
effect of the near foliage by touching the edges with a little opaque
color made of chrome yellow, white, and a little blue. It must be
done very carefully, as opaque colors are powerful, compared
with transparent ones. K what you do shows too abruptly, you
have a remedy by putting on a little more of the transparent color.
Parts of the figures may be hightened by a touch here and there
of opaque color, and the faces are almost sure to want a little
retouching with opaque. When your painting is all finished, a
full week should intervene before varnishing ; and great care must
be observed not to touch the bronze, as the hand or fingers inva-
riably leave a stain, bronze being so delicate.
Varnishing. — In varnishing papier mache paintings, care must
be taken to have a clean brush, and yo\ir painting must be wiped
with a silk handkerchief to free it from dust. Lay the painting
flat, and with a one-inch flat camel's hair brush coat over with
copal varnish as evenly as possible, being careful to cover every
part ; leave it flat down, as it is, for a couple of hours or more,

202 PAPIER MACHE.
before removing, or the varnish is liable to run in streaks. Once
varnishing is quite sufficient to preserve the painting ; but if you
wish to polish it, another coat of varnish must be given, allowing a
week between ; then after another week, it should be rubbed with
pumice sand and water, in the following njanner :—
How TO POLISH. — Get a piece of woolen, put it over some
cotton, to make a rubber of it ; wet the rubber with water pretty-
thoroughly, dip it into some fine pumice sand, and rub it back-
wards and forwards on your varnished picture carefully with a
moderate pressure. After you have rubbed a short time, wipe
the sand from a part of it, to see the progress. If not sufficiently
smooth, rub a little more, care being taken not to rub through the
varnish, or you will rub the paint. When it is pretty smooth,
wash all the sand off, wipe it perfectly dry, and give it another
coat of varnish, allowing the same time for it to dry; then rub
again as before with water and pumice sand. "SMien smooth
enough, wash off aU the sand, and proceed to polish with very
finely powdered rottenstone, and a rubber made of soft satin or
silk. Saturate this with water, and rub with the rottenstone for
a little time, until it shines ; then wash it all off. You can make it
shine more by rubbing it with your hand, using a few touches of
sweet oil and a little more rottenstone.
How TO PREPA.E,E "SVooD. — \Mien wood is used for painting
any of the papier mache styles, it is better to choose the closest
grain, and proceed to coat it over several times with paint (either
oil paint or varnish paint), rubbing do-wn with pumice sand and
water after the third coat. The number of coats taken to prepare
varies according to the texture of the wood, as it is necessary to
coat it over until it is perfectly smooth and level. . Proper time
should be allowed between each coat of paint, so that it may
dry hard.
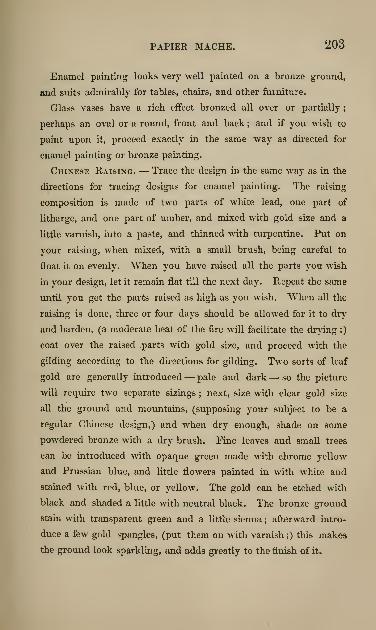
PAPIER MACHE. 203
Enamel painting looks very well painted on a bronze ground,
and suits admirably for tables, chairs, and other furniture.
Glass vases have a rich effect bronzed all over or partially
;
perhaps an oval or a round, front and back ; and if you wish to
paint upon it, proceed exactly in the same way as directed for
enamel painting or bronze paintrng.
Chinese Raising. — Trace the design in the same way as in the
directions for tracing designs for enamel painting. The raising
composition is made of two parts of white lead, one part of
litharge, and one part of umber, and mLxed Avith gold size and a
Httle varnish, into a paste, and thinned with turpentine. Put on
your raising, when mixed, with a small brush, bemg careful to
float it on evenly. AVhen you have raised all the parts you wish
in your design, let it remain flat till the next day. Repeat the same
until you get the parts raised as high as you wish. When all the
raising is done, three or four days should be allowed for it to dry
and harden, (a moderate heat of the fire Avill facilitate the drying ;)
coat over the raised parts with gold size, and proceed with the
gilding according to the directions for gilding. Two sorts of leaf
gold are generally introduced— pale and dark— so the picture
will require two separate sizings ; next, size with clear gold size
all the ground and mountains, (supposing your subject to be a
regular Chinese design,) and when dry enough, shade on some
powdered bronze with a dry brush. Fine leaves and small trees
can be introduced with opaque green made with chrome yellow
and Prussian blue, and little flowers painted in with white and
stained with red, blue, or yellow. The gold can be etched with
black and shaded a little with neutral black. The bronze ground
stain with transparent green and a little sienna ; afterward intro-
duce a few gold spangles, (put them on with varnish ;) this makes
the ground look sparkling, and adds greatly to the finish of it.

204 PAPIER MACHE.
"When quite finished, let it dry a week before vamishing : there
is no occasion to varnish all over your picture, but only the part
that is painted.
Pearling.— Prepare the design, marking all the parts you wish
to have pearl. Trace the desigii upon the article, — we will sup-
pose it to be a small table, — same as tracing for enamel, before
explained. Remove your drawing, and place on all your pearl.
See how it looks. K satisfactory, get some spirit varnish and a
small camel's hair brush. Remove one piece of pearl at a time, put
some of the varnish in the place with the small brush, and fit on the
pearl, pressing it down so as to lie flat. Go through with all the
pearl in the same way ; some of the large pieces may want a weight
put on to keep them flat. Next day give it a coat all over with
black varnish made with the spirit varnish and lampblack. Repeat
the coat (a flat camel's hair brush is best for varnishing) twice a
day for the first three or four days. When the pearl seems pretty
nearly even with the black, scrape all the black off the pearl by
means of a chisel or knife, being careful not to remove any of the
black any where else by letting the knifo or chisel slip. When
all is scraped off", you can commence coating it over again. This
time add a little Prussian blue with your black varnish : it makes a
more brilliant black. (The proportions arc, to one pint of spirit
varnish add one and a half ounces of lampblack and half an ounce
of Prussian blue.) Coat it three or four times over if it requires
it ; then scrape ofl" the black from the pearl again. If it seems
pretty level, we will proceed with the next process;
(if not, coat
again as before, and scrape.) Get some stout broadcloth, and make
a good substantial rubber by stuffing in some soft cotton ; tie it
round, so that you can handle it conveniently;put some turpentine
in a saucer with some pumice sand, and charge your rubber well
with this, and rub away till you get a smooth surface all over.

PAPIER MACHE. 205
"When smooth enough, wash the sand all off with turpentine ; then
rub it with rottenstone and Avater, using this time a rubber made
of silk or satin ; this rids it of all sticky property that remains from
the turpentine rubbing. You have now got through the troublesome
part of it;getting rid of every thing in the shape of black varnish
specs, you are ready for the next step. If you wish to have
some leaf gold introduced, make your selection of what you will
have, and prepare a little gold size by mixing in a little chrome yel-
low, so as to enable you to see better what you are about. Coat
over the leaves or stems, or both, with the gold size, and proceed
with the gilding according to the directions for gilding. If any
more flowers are in your group than what are pearl, it is requisite
to coat them over with white, proceeding exactly in the same way as
in the directions laid down under the head of Enamel Painting. The
pearl flowers you shade with their respective colors, so as not to
cover up too much pearl. For instance, if you want to shade a
rose, do it with crimson lake on the shade side of the flower, leav-
ing the pure pearl to answer for the lights. "VMien your painting is
all finished, you allow sufficient time for it to dry, and proceed with
the varnishing precisely as in enamel work and bronzing.
GiLDixG ox Satin, Paper, Cloth, Light-colored, Uxpre-
PARED "SVooDs, ETC. — Sometimes gilding is required upon only
small parts of articles. In such cases use strong isinglass solution,
made according to the directions "WTitten before — the purer the
better. Take a small camel's hair brush, and coat over with the
isinglass size, while it is warm, the places you \vish to gild. When
dni', proceed with your gold size, same as the gold size gilding.
The reason of apphing the isinglass size is to satisfy the porous
nature of the fabric, and make a delicate kind of crust as a fotmda-
tion for the gold size. If you wish to paint flags and banners with
oil paint, you must coat over the parts first with isinglass size.
18

206 PAPIER MACHE.
Gilding.
NY part you wish to have leaf
gold it is requisite to cover
evenly with gold size, (a little
chrome yellow or white lead
may be mixed in with the gold
size merely to enable you to see
the process,) and alloAv it to
dry until it feels a little sticky;
it can remain much longer than
for bronzing, as leaf gold does
not require so strong a sticky property as bronze. "Wlien suffi-
ciently dry, put on the gold by means of the tip, as described in
glass gilding; or, if you are expert enough, put it on with your
fingers from the gold book. Be careful to cover every part of
the gold size with smooth leaf gold, and when all covered, press
gently with a piece of soft chamois leather on all the gilded parts,
and remove the superfluous gold. If these directions are strictly
followed, you can not fail to have good smooth gilding ; but if the
gold size is put on thick and uneven, and the leaf gold put on too
soon, the gold Avill look rough and dark, and be very unsatisfactory
to the eye when you get more experienced.

(207)


.vy/-''
^
HIS work, when well and tastefully done,
closely resembles rich carving in wood,
and can be used for a great variety of
useful and ornamental purposes.
We have adopted the following method with suc-
cess :—
Select a soft sheep skin rather thick ; cut from it flowers andleaves to suit your fancy. It is well to have pasteboard patterns
free from blemishes and neatly cut, and with these it will be easy to
cut^om the leather. Due attention should be given to different
18*(209)
210 LEATHER WORK.
sizes and kinds. When you have a sufficient number cut from the
leather, wet them in cold water, and squeeze them drj-, and pull
them into shape, and form the leaves and flowers to suit your taste;
while wet, put them into the oven to dry. Make a solution of
\-inegar and Venetian red, and dip them into it. When perfectly
dry, dip them in thin black varnish ; if the varnish be too thick,
dilute it with spirits of turpentine. When dry, they will have the
color of rosewood.
Take gum shellac, and the night before you wish to use it, pour
on sufficient alcohol to dissolve it. Dip the flowers and leaves into
this solution, taking care not to have it too thick. If not stifl"
enough, dip them a second time. Put them on a board to dry in
the siin, as the drying by a /re will have a tendency to make them
sticky.
Paint your fiame, or whatever is to be covered, with Venetian
red and vinegar, and when dry, rub it smooth. Varnish with thin
black varnish, and when dry, nail on the leaves and flowers with
small tacks, and paint with a solution of shellac dissolved in al-
cohol; finally, varnish with the best copal varnish.
Again, for general purposes, basil leather is good. Select that of
an even texture and light color.
The skiver leather is used for grapes, small leaves, and delicate
work. (The artist will find that the sheep skin, easily to be had,
will answer all purposes, by using discretion in selecting the thick,
soft, or thin portions, as the work may require.) Place a piece
of the basil leather in water for a moment;
press it in a linen
cloth until the surface dries. While damp, cut out your leaf with
scissors or a leather-cutting knife. Pasteboard patterns can easily
be made from natural leaves. By lapng these patterns upon the
leather, the leaves can be readily cut. MVeia with a pointed instrument, by marking on the smooth side

LEATHER WORK. 211
of the leather ; then bend and mold your leaves as you msh
them to appear when the work is completed. Dry them quickly to
harden them.
A\lien thoroughly dry, brush all over with prepared stiffening,
which is sold in convenient sized bottles. After this process, brush
the leaves all over with black varnish ; two thin coats are sufficient.
For stems, take strips of basil leather, wet and roll with the hand
upon the table, or over a wire.
For tendrils, wmd the leather, while wet, around a small round
stick or tool, fastening the ends ; dry quickly by the fire ; remove
from the stick, and apply a coat of stiffening ; the finish is the same
as for leaves.
Grapes are very handsome in this work. They are made by tying
bits of cotton or wadding, peas, marbles, etc., into the leather with
strong thread, then putting a piece of wire through the part which
has been tied up for the stalk. Stain and make into clusters, taking
care to conceal the part tied. All fr-uits and flowers are stained,
etc., precisely in the same manner as leaves.
The Frame. — Have a frame made of well-seasoned wood, with
the outer edge thinner than the inner, though this is a matter of
taste. Size it all over. Let it dry
for an hour or so. Then apply a
coating of oak varnish stain ; when
dry, it will be ready for use. Com-
mence by attaching the stem with
small tacks. Suppose you have a
vine ; cover the wood with the foli-
age as naturally as possible. Fasten
with strong glue, where necessary.
^ narrow gold beading gives a fin-
ished appearance to a frame.
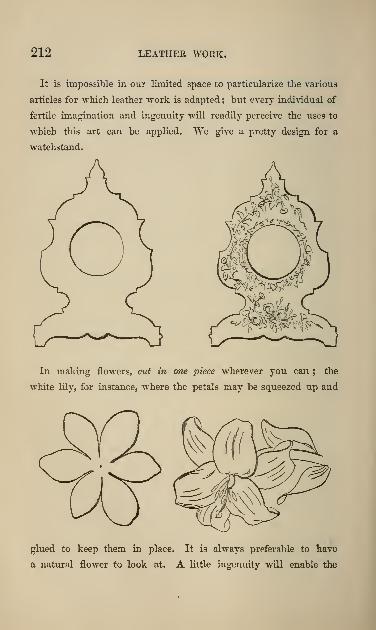
212 LEATHER WORK.
It is impossible in our limited space to particularize the various
articles for which leather work is adapted ; but every ir^di^'idual of
fertile imagination and ingenuity will readily perceive the uses to
which this art can be applied. We give a pretty design for a
watchstand.
In making flowers, cut in one piece wherever you can ; the
white lily, for instance, where the petals may be squeezed up and
glued to keep them in place. It is always preferable to have
a natural flower to look at. A little ingenmty will enable the

LEATHER WORK. 213
5. 8,
learner to cut the leather to ad-
vantage, and the fewer the pieces
used, the simpler the work will
be.
The bud of the white lily is
made by folding the whole corolla
close together.
A convolvulus may be made by
folding and stretching the leather,
while wet, over the tool used to
make the wax convolvulus. It
is very pretty, and not difficult to
make.
Roses, camellias, etc., can all be
made handsomely by a little care
and ingenuity.
Do not forget our favorite the
hop vitie. To make it, wind a
piece of leather around the end
of a Avire ; fasten well. !Mold
the requisite number of petals in
a convex form, and glue separately
around this center.
TJie Fuschia. — The calyx forms the external part of this flower,
and is made ^^'ith one piece of leather cut as in the figure. The
petals within this are four, and are cut out, the four in one piece,
in the form of the dotted line. They must be molded into shape,
and glued to the stamina inside the calyx, so as to alternate with
its petals. This flower has nine stamina, and they are cut in one
piece of leather. To put the fuschia together : Cut the nine
stamina, and attach to them the wire, to form the stalk; then
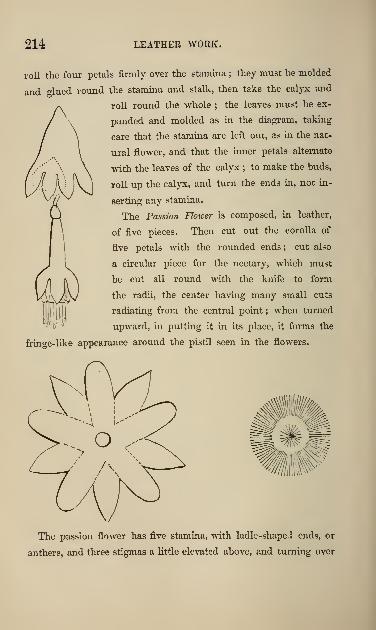
214 LEATHER WORK.
roll the four petals firmly over the stamina ; they must be molded
and <^lued round the stamina and stalk, then take the calyx and
roll round the whole ; the leaves must be ex-
panded and molded as in the diagram, taking
care that the stamina are left out, as in the nat-
ural flower, and that the inner petals alternate
>nth the leaves of the calyx ; to make the buds,
roll up the calyx, and turn the ends in, not in-
serting any stamina.
The Passion Floicer is composed, in leather,
of five pieces. Then cut out the corolla of
five petals with the rounded ends; cut al-;o
a circular piece for the nectary, which must
be cut all round with the knife to form
the radii, the center having many small cuts
radiating from the central point ; when turned
upward, in putting it in its place, it forms the
fringe-like appearance around the pistil seen in the flowers.
The passion flower has five stamina, with ladle-shaped ends, or
anthers, and three stigmas a little elevated above, and turning over

LEATHER WORK. 215
the stamina ; the anthers and stigmas are made of one piece
of leather. The involucrum is formed also of one piece, and
the three leaves are laid one over the other, as in the annexed
flower.
To put together the various
parts above described and form
the passion flower, begin by-
doubling a piece of wire over
the angles of the stamma,
twisting it underneath ; roll a
piece of skiver leather round
the wire to form the style of
the pistil and the stem of the
whole flower ; then turn up the
three stigmas and roll a i^raall
piece of leather round them
close to the stamina, and turn
them over ; this being done,
place the nectary on the stem, taking care that the cut portion
:n the center be arranged upward around the pistil. The petals
are next placed on the stem, followed by the calyx ; the leaves
of the calyx must alternate with the petals ; liquid glue must
be inserted between each portion of the flower to give it flrm-
ness.
The involucrum, which is a sort of calyx, is put on the stem
last, a little way below the true calyx ; we may just add, that
all the leaves, petals, etc., with the exception of the involucrum,
must have the smooth side of the leather uppermost ; the petals
and calyx must be hollowed out with the modelling tool for that
purpose, or if that is not at hand, use the handle of the veining
^ol, and laying the petals and also the calyx on a smooth surface,

216 LEATHER WORK.

LEATHER WORK. 217
rub them with the ivory end of the veining tool till they become
hollow and smooth, as in the natural flower.
The above is the way, as plainly as we can possibly describe it,
to make a passion flower. We have repeatedly made the flower
exactly upon the above plan, and it has always been much admired.
Camellias vary in the form of leaves, and the petals vary in
number. To make a camellia, cut out two pieces, as in the annexed
diagram, containing four petals
in each ; then cut out one or two
larger pieces, witli six petals in
each, and one or more still larger,
with seven or eight petals ; then,
ha-ving a natiural camellia at hand,
moidd them all into form, fasten
all the pieces of leather together,
the smallest at the top, and the
largest at the bottom, so that the petals alternate, with liquid glue,
and put a piece of wire through the whole for the stalk ; cover it
with skiver bather.
To make the Jessamine, copy the corolla from the annexed
design, by cutting a star-like piece of basil, into which insert the
wire for the stalk as closely as possible. As the
stamina are not visible in this flower, it is need-
less to make them. The tube upon which the
corolla rests can be made by rolling a piece of
leather round the wire thickest at the flower,
and then add another piece of leather about an
inch below the corolla, which must have five fine-
pointed leaves for the calyx.
The Daifiy is formed by making two pieces of
leather like the pattern, one larger than the other, and putting
19
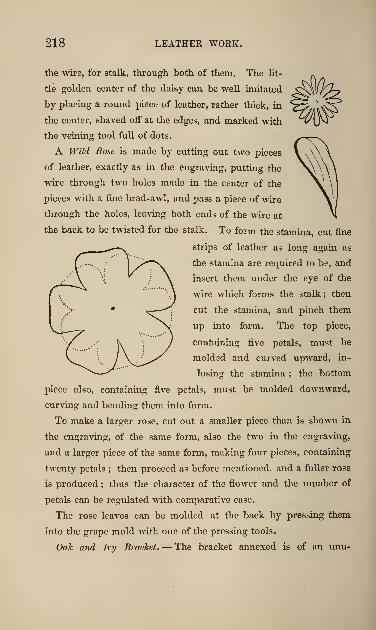
218 LEATHER WORK.
the -wire, for stalk, through both of them. The lit-
tle golden center of the daisy can be well imitated
by placing a round piece of leather, rather thick, mthe center, shaved off at the edges, and marked with
the veining tool full of dots.
A Wild Rose is made by cutting out two pieces
of leather, exactly as in the engraving, putting the
wire through two holes made in the center of the
pieces with a fine brad-awl, and pass a piece of wire
through the holes, leaving both ends of the wire at
the back to be twisted for the stalk. To form the stamina, cut fine
^—
Y
strips of leather as long again as
f.j/"""X the stamina are required to be, and
.
' \ !;
' \ insert them under the eye of the
r ..
'
\ wire which forms the stalk ; then
I
'.;=• t:-—^ cut the stamina, and pinch them
V£____^ ^v up into form. The top piece,
•/^ ..-' K J containing five petals, niu-^^t be
\^^ / \ /^.^ molded and curved upward, in-
^—
^
losing the stamina ; the bottom
piece also, containing five petals, must be molded downward,
curving and bending them into form.
To make a larger rose, cut out a smaller piece than is sho-wTi in
the engraving, of the same form, also the two in the engraving,
and a larger piece of the same form, making four pieces, containing
twenty petals ; then proceed as before mentioned, and a fuller rose
is produced ; thus the character of the flower and the number of
petals can be regulated with comparative ease.
The rose leaves can be molded at the back by pressing them
into the grape mold with one of the pressing tools.
Oak and Ivy Bracket. — The bracket annexed is of an unu-

LEATHER WORK. 219
sually pretty pattern, and we give two diagrams. The vine and
the convolvulus pattern are much used, with very beautiful effect.
We intended this design to exhibit old oak. It should be stained
very dark, the oak stems being very thick, while the stems of
ivy can be formed of tendrils. To make the oak stem, get very
thick vrxre, and have it cut to the desired lengths ; then cover the
wires with leather, and bend them to resemble gnarled oak
;
attach, as naturally as possible, oak leaves and acorns at the
back of the wires, and on the wood Avork, as sho\\Ti in the
skeleton bracket in a former part of this work ; then attach the
ivy tendrils, leaves, and berries around the oak stems, and the
bracket is completed.

220 LEATHER WORK.
It improves the appearance of any piece of ornamental work,
to give the whole when completed a slight coat of varnish.
Card Racks can be made in a variety of ways. The design
here exhibited is novel, and at the same time very useful. The
back is made either with wood or calf-skin
leather ; and the leaves forming the rack
are also made of the same material. Calf-
skin dries very hard, being treated exactly
the same as the basil leather m the manner
of working.
The Round Open-tcork Frame. — The
beautiful design on the opposite page is
made wi h a round frame of any width
desired, having two rebates, one inside and
one outside the frame— the inside rebate
being to admit the picture, and the outside
one to allow of the nailing firmly to the
frame the open-work, which is to be made
in the following manner : Take a flat board,
— an ironing board will do, — lay the frame upon it, and with a
black lead pencd or a pioce of chalk, mark the size all round,
making allowance for the rebate ; then having ready the stems,
work them in and out, so as to form the open-work as in the
drawing ; when finished, nail it to the frame, and work stems and
tendrils of the vine, hop, passion flower, or any other beautiful
creeping plant, attachmg the fruit or flowers in an artistic manner,
and the result will be one of the most elegant frames ever beheld.
The open or trellis-work of this frame should have stout wire
inclosed in the basil leather, and in order that it may not appear
formal, wind pieces of leather round the naked wire at irregular
intervals, to resemble knots, etc. ; then cover the whole with basH
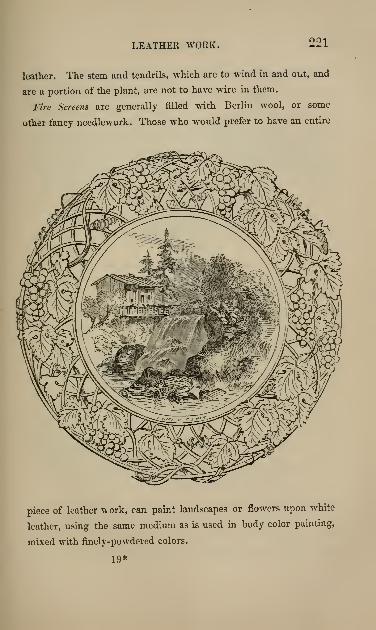
LEATHER WORK. 221
leather. The stem and tendrils, which are to wind in and out, and
are a portion of the plant, are not to have wire in them.
Fire Screens are generally filled with Berlin wool, or some
other fancy needlework. Those who would prefer to have an entire
piece of leather w ork, can paint landscapes or flowers upon white
leather, using the same medium as is used in body color painting,
mixed with finely-powdered colors.
19*
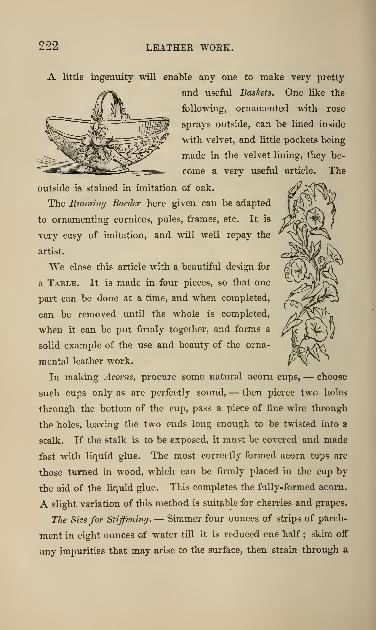
999 LEATHER WORK.
A little ingenuity will enable any one to make very pretty
and useful Baskets. One like the
follo-vving, ornamented with rose
sprays outside, can be lined inside
with velvet, and little pockets being
made in the velvet lining, they be-
come a very useful article. The
outside is stained in imitation of oak.
The Rumunrj Border here given can be adapted
to ornamenting cornices, poles, frames, etc. It is
very easy of imitation, and will well repay the
artist.
We close this article with a beautiful design for
a Table. It is made in four pieces, so that one
part can be done at a time, and when completed,
can be removed until the whole is completed,
when it can be put firmly together, and forms a
solid example of the use and beauty of the orna-
mental leather work.
In making Acorns, procure some natural acorn cups,
such cups only as are perfectly sound, — then pierce two holes
through the bottom of the cup, pass a piece of tine wire through
the holes, leaving the two ends long enough to be twisted into a
stalk. If the stalk is to be exposed, it must be covered and made
fast with liquid glue. The most correctly formed acorn tops are
those turned in wood, which can be firmly placed in the cup by
the aid of the liquid glue. This completes the fully-formed acorn.
A slight variation of this method is suit&ble for cherries and grapes.
TJie Size for Stiffe)iing. — Simmer fovir ounces of strips of parch-
ment in eight ounces of water till it is reduced one half ; skim off
any impurities that may arise to the surface, then strain through a
choose

LEATHER WORK. 223
fine sieve, or cloth, into a basin ; leave it till cold, when it will be
firm and clear. When required for use, cut off as much as you
want, and warm it. Use while warm.
A thin glue size of a light color will answer when the above
materials are not handy.
In this, as in all other kinds of fancy work, every thing depends
upon the neatness of the work. You must not only arrange taste-
224 LEATHER WORK.
fully, but you must secure every leaf, tendril, and flower firmly
;
and, above all things, do not crowd together such a mass of work
as to displease the eye and offend good taste.
A very pretty effect is produced by gilding and bronzing the
leather. Go over the surface of your leaf or petal with a camel's
hair pencil dipped in gold size, and when ^o dry that it will stick to
the finger lay on your gold leaf or gold bronze as in directions
for bronze painting, on another page.
In painting leather work, use finely-powdered colors, mixing
them to the consistency of cream, by using the white of an egg with
two ounces of distilled vinegar. Keep this in a bottle, and shake
it well whenever you wiish to mbc colors with it. Colors can be
also mixed Avith warm parchment size, or with a weak solution of
gum arabic. In all of these methods apply a coat of quick drying
pale varnish. Oil colors are not suitec* to this kind of material.

Caiiiermir.
(22S)


AKE out the entrails ; remove the skin
with the greatest possible care ;rub
over the whole interior with arsenic,
(a deadly poison ;)put wires from the head to the legs
to preserve the natural form, and stuff immediately with
tow, wool, or the like. If allowed to dry after apply-
ing the arsenic, the skin becomes too stiff to handle.
Another, and, as we think, a better way for very small
(227)

228 TAXIDERMY.
birds, is, " after taking out the entrails, to open a pas-
sage to the brain, which must be scooped out through
the mouth; introduce into the cavities of the skull and
the whole body a mixture of salt, pepper, and alum, put-
ting some through the gullet and whole length of the
neck ; then hang the bird in a cool, airy place— first
by the feet, that the body may be impregnated by the
salt, and afterward by a thread through the under man-
dible of the bill, till it appears to be sweet ; then hang
in the sun, or near a fire. After it is well dry, clear
out what remains of the mixture, and fill up the cavity
of the body with wool, oakum, or any soft substance."

ANGLO-JAPANESE WORK. 229
ANGLO-JAPANESE WORK.
" This is an elegant and easy domestic art. Take
yellow withered leaves, dissolve gum, get mixed black
paint and some copal varnish, etc. Any articles may be
ornamented with these simple materials— an old work-
box, tea-caddy, fire screen, flower pots, etc. Select per-
fect leaves, dry and press them between the leaves of
books, rub the surface of the article to be ornamented
with fine sand paper, then give it a coat of fine black
paint, which should be procured mixed at a color shop.
When dry, rub smooth with pumice stone ; then apply
two other coats. Dry ; arrange leaves in any manner
and variety, according to taste. Gum the leaves on the
under side, and press them upon their places. Then
dissolve some isinglass in hot water, and brush it over
the work while the solution is warm ; when dry, give
three coats of copal varnish, allowing ample time for
each coat to dry. Articles thus ornamented last for
years, and are very pleasing."
20
230 TRANSFER ON WOOD.
TRANSFER ON WOOD.
Dissolve salt in soft water ; float your engraving on
the surface, picture side up ; let it remain about one
hour. Your screen, box, or table should be of bird's-
eye maple, or other light-colored hard wood ; varnish
with best copal or transfer varnish.
Take the picture from the water, dry a little between
linen rags ; then put the engraving, picture side down,
on the varnished wood, and smooth it nicely. If the
picture entirely covers the wood after the margin is cut
off, so that no varnish be exposed, lay over it a thin
board and heavy weight ; leave it thus in press over
night. If you wish but a small picture in the center
of your wood, apply the varnish only to a space the
size of your picture. Dip your fore finger i.i salt and
water, and commence rubbing off the paper ; the nearer
you come to the engraving, the more careful you must
be, as a hole would spoil your work. Rub slowly and
patiently, till you have taken off every bit of the paper,
and left only the black lines and touches of your picture
on the wood, in an inverted direction. Finish up with
two or three coats of copal varnish.

Mu SlorL
(231)


'.^HE tools requisite in this delightful branch
of ornamental work, are as follows, and
as the learner advances 'n knowledge and experience,
he will easily originate other forms and models from
which to make particular designs :—
A " dipper," or " plunger," (for sheeting the wax,)
made of lignumvitse, or some very close-grained, hard
wood, as smooth as glass, from four to six inches in
20* (233>

234 WAX WORK.
diameter across the face, (which should be slightly
convex.)
Molding sticks of this form, and of two or more
sizes.
One of this, for convol-
vulus.
One of this, for lily of
the valley, and centers of
flowers.
One of this, for the lilac
and cups of jonquil.
If you wish to make other varieties of bell flowers,
get the sticks turned by some skillful workman, from
natural flowers ; they should be very hard, and as smooth
as possible.
The brushes used in painting the smooth surface of
flowers are the round, stifi*, bristle brushes, called scrubs^
or theorem brushes. For fine lines, spots, etc., take fine
camel's hair pencils.
Wire of three different sizes, annealed.

WAX WORK. 235
To PREPARE "Wax por Flowers.— Take the very best quality
of white wax, and melt it slowly in an earthen vessel or porcelain
porringer ; when melted, stir into it one table-spoonful of fir balsam
to every cup of melted wax.
Have at hand a basin of warm soap suds, fine towels or rags, and
your dipper.
"WTien the wax is melted, wet your dipper in the suds, rub soap
all over it, rinse it in the basin, shake off" the water, dip with a
quick motion into the hot wax, so as barely to skim the surface,
bending the dipper over, so as to exclude the air ; raise your dipper
from the wax, and plunge it into the basin of suds. A sheet of
thin, semi-transparent, flexible wax will be found therein of the
right consistency for roses, azalias, and all flowers of similar tex-
ture. Continue dipping off sheets until you wish to change the
quality of the wax ; be careful that the wax be neither bubbling hot
nor cool.
Japonicas, orange blossoms, and all thick, opaque petals require a
difl'erent white. To make this, we put into the wax, when hot, a
small bag of flake or German white ; never more than one third of
a tea-spoonful, and dip as before, only regulating the thickness of
the wax by heat. VThen you have dipped off as many sheets as you
require, pour the rest into a well-soaped cup to form a lump for
pinks.
Next to the white, prepare yellow wax in the same way as the
white, only using yellow-powdered chrome. After you have
made the yellow, put together all the bits and edges of wax which
vou have pulled from the sheets, add green powdered paint, and
dip off various shades of green, from very light to very dark. Other
colors, as red and blue, may be prepared in the same way ;but we
prefer painting the white and yellow wax to obtain more brilliancy
of tone.

236 WAX WORK.
The melted wax, as for japonicas, is used for bell-flowers. Soap
the stick very thoroughly, wash off the particles of soap, plunge
your stick into the hot wax, then into the suds. In taking the
stick from the wax, let the wax drip from the end rather than the
sidco We think it best to plunge the stick quickly and raise it
perpendicularly ; in this way, if there be a little extra thickness, it
will come in the right place.
The utmost care must be taken with the lily of the valley ; be
not discouraged if you dip two or three times before getting a per-
fect bell. The wax must be hot, Avithout simmer or bubble.
Green leaves made by dipping the natural leaf into the hot
green wax, then putting the two wax sides together, with a wire be-
tween, are more natural than when cut and veined ; but they tax
the patience, and require more time.
Another Method of jJreparing Wax. — Melt the wax in a vessel
of hot water ; the wax will rise to the top. Put in fir balsam,
sweet oil, and spirits of turpentine, in the proportion of 1, 2, 3, —that is, one part turpentine, two oil, and three balsam, — six tea-
spoonfuls to a pint of wax in warm weather, and one third more in
cold weathero Immerse a junk bottle into the wax ; it will form
around it. Cut down the wax on the bottle, and you Avill thus
have a strip instead of a round sheet of Avax.
We prefer the former to the latter method of preparing the wax,
though we use both.
To make Patterns for Flotvers- — Dissect natural flowers, and
cut paper patterns from their petals, writing on them the num-
ber of each size and the number of sizes, likewise the color desired.
Flower Making.— Where a flower requires fine work
or minute penciling, the sable brushes are to be used for
WAX WORK. 237
this purpose, and they will be found essentially neces-
sary in the imitation of geraniums, carnations, heart's-
ease, or flowers of similar character.
Before you commence cutting, take care to render your
scissors loose in the rivet. Dip them constantly in the
cup of water at your side, to prevent their adhesion to
the wax ; should they, in spite of this, become clogged,
place them in your mouth for a few seconds, and the heat
will clear the edges so that you can wipe them easily.
You will perceive that the wax has a dull side and a
glossy one— a right and a wrong.
It is better to lay the paper pattern upon the dull side,
so that, in cutting out, you secure a sharp and clear edge.
Be cautious that you place the pattern in such a position
as to cut with the grain of the wax. Be sure to cut
the same number of petals as you found in the natural
flower, or the harmony of proportion desirable in your
flower will be lost.
Spread half a sheet of tissue paper over the table upon
which you intend to work, so as to prevent the slightest
dust or impurity of any kind from injuring your wax, to
which every particle of dust will adhere.
As we have remarked in speaking of painting the

238 WAX WORK.
fruit, the stiff brushes are held perfectly upright, and the
color applied rapidly.
Damask roses, fuschias, camellias, etc., may be painted
with crimson powder mixed with water on the palette.
(See list of colors.)
A bright scarlet for poppies, scarlet dahlies, etc., is
obtained by painting the same crimson on yellow wax.
The same on a light lemon-colored wax gives another
beautiful shade. Various shades of rose tints can be
gained by carmine more or less deep. Sometimes we
paint with dry powder. If the wax be slightly warm, the
powder will adhere, and a soft, velvety surface be pro-
duced, such as can not be made by the use of the water
color alone. In making a bouquet, you need the various
colors and surfaces, if you will be true to nature. Bo
very careful to avoid painting that portion of each petal
which is to be joined to the foundation of the flower, as
any moisture or color prevents a secure adhesion.
To make a Pink Rose.— Lay the cut paper pattern on the
wrong side of the wax, cut with the small, sharp scissors, fre-
quently dipping them in warm water, or putting them in your
mouth. Faint very lightly with carmine, leavmg the lower part of
the petal white. Lay a petal on the palm of your hand, right side
down;press the head of the wooden pin, first on the right, then on

WAX WORK. 239
the left side, endeavoring not to press the middle. This will give a
graceful curl to the petal, as you will observe by the natural one.
Half-blown roses and buds need to be curled more than full-
blown ones.
Your petals painted and arranged in order, proceed to make the
stamens. This is done by binding a strip of yellow wax, one eighth
of an inch in width, on a strip of white wax, nearly one inch in
width, and cutting through the yellow half way down into the
white, so as to make a fringe. The finer you cut it, the better ; or
you can cut the unbound white wax ; then dip the cut ends into a
solution of gum arable, and afterward into powdered yellow ; this
will give a pollen.
The calyx is cut from a suitable shade of green, and from a pat-
tern taken from the calyx of a natural rose.
For the leaves take two shades of green— one for the upper, the
other for the under side of the leaf; put them together, and cut
your green leaf through the double wax ; insert a wire between the
two parts of the leaf to form the fibre and pedicle of the same
;
then press the two sides firmly together, and serrate the edges with
your sharp scissors.
The leaf has a neater finish if the wire be covered with wax before
inserting. Take a very narrow strip of wax, lay it perpendicularly
against the wire ; then twist the Avire round and round between the
thumb and finger, until it is entirely covered with a smooth surface
of green.
Observe how s^Tnmetrically Nature has arranged her rose leaves,
and try to imitate — one large one for the top of the stalk, two a
little smaller placed just below, and a third pair still farther down.
Fine wii-e doubled is better than coarse, stiff wire. Take of such
a piece the desired length ; turn the end over two or three times, to
prevent the flower slipping off while you are putting it together.

240 WAX WORK.
Cover the end thus bent with green wax, pinching up a bit in the
center for a pistil ; wind around this the strip of fringed wax, and
compare with the natural flower. Now set around the petals,
commencing with the smallest size;press the lower part of each
petal on the lump which is around the wire. Take the other sizes
one after the other, pressing them in the same manner, and so on
till all are used. "Work down the lower parts of the petals with
the small end of the molding stick.
Set the calyx around neatly, and cover the stalk. You will have
a rose natural and beautiful in proportion to the neatness of your
work and the accuracy with which you have imitated your pattern,
a natural one.
Persons often smell of our roses, then, with a look of astonish-
ment, exclaim, " Why, what kind of a rose is it! " Nature alone
can give the perfume.
Caynellia. — After modeling a rose, any person can make a
japonica by having one to look at. In case our reader has none, we
give these directions.
Cut sLx petals from each of the heart-shaped patterns from which
you cut your rose, only a trifle longer. "^lake a ball of wax on the
end of the wire, turned as before to prevent the flower slipping off",
and bend over it eight or ten of the smallest petals ; then place three
rows of the succeeding sizes of petals turned inward around the
ball in the center, and the other rows turn outward. The calyx is
of light green, roimd at the top ; the leaves are large, brilliant,
dark-green color.
Colored japonicas vary only in color. Crimson painted on yel-
low gives a fine color, and carmine on white makes a beautiful
japonica.
Convolvulus. — Convolvuli are dipped on a stick made for that
purpose from the natural flower. Paint the veins with a fine

WAX WORK. 241
brush. Put a bit of wax on the end of a fine wire, and cut toimitate stamens
;pierce the wire through the tube of the flower,
twist with green wax, and finish off with tendrils and leaves.
Tendrils are made by covering a small wire with wax, and twi.tingit around a molding stick, commencing at the point, and turning it
round and round from the center of the stick to the point, to fo'rm
a spiral cone. A few small green leaves make a pretty finish.
Lily of the Valley. — - Consider the lilies, how they grow ; theytoil not, they sphi not, and yet I say unto you, that Solomonin all his glory was not arrayed like one of these." Cut the edgeof the little white bells into scallops, turn them back a little, puta bit of yellow wax on the end of a bent wire, dip it in gum arable,
then in yellow powder for pollen ; draw the wire through thecenter of the flower, and twist for a stalk with very delicate light
green. The leaves are too large and stifl" to be pretty in wax.Violets should be painted with a soft brush ; they require much
time and care.
Orange Bhssoms must be made from thick wax ; the stamenscut longer than for a rose. The beautiful white buds and various
"
green leaves can hardly be equaled by any other flower made inwax. They are pretty wedding presents for the hair.
Dahlia. — Cut the petals from the natural flower; roll eachpetal with the head of the molding stick from the top to the hot-
tom;draw a perpendicular line with the point of the stick through
the center of the leaf, and curved lines on each side, like the longi-
tudinal lines on a globe ; turn the top of the three largest sizes
back a little.
As this flower is very broad at the base, pass your wire doubledtwice through a large button mold, twist it firmly underneath, andcover it with yellow or very pale green wax ; roll up a small bit of
yellow wax, and mold it to the center of the button; press closely
21

242 WAX WORK.
around this the lower end of a cut fringe of yellow wax dipped in
gum arabic and powdered for pollen ; around these stamens mold
the twenty-five or thirty small petals. Care must be taken to keep
them pressed very closely together, and as the surface of the button
becomes filled, wind around its edges strips of yellow wax ; con-
tinue to set the petals around in the order of their sizes, keeping a
broad surface.
The calyces help to support the flower. Below the two rows
of flat calyces, place five nipped at the ends and turned back-
ward.
This flower is rather difficult to put together, but amply repays
the labor by its naturalness and beauty.
Pinks.— The petals may be cut and pointed with sharp scissors,
then painted with a soft brush, or with the dry powder, as hereto-
fore du-ected, according to the color desired.
Another and Better Method. — Paint all over the lump of wax
which you have run in the cup for that purpose ; then scrape
from it with a sharp penknife. K you hold the knife between the
thumb and fore finger of the right hand, and begin to scrape at the
center of the knife, leaving off* at the point, you will get a beauti-
fully variegated pointsd petal, smooth on one side, and slightly •
quilled on the other. We draw a bit of quill feather over the
knife for the two stamens, and arrange the petals around in order,
beginning Avith the smallest. Finish off" with a pointed calyx
;
imitate the natural one.
Hyacinths can be made single or double, of various shades and
colors. Do not paint the lower part of the petals. Roll them
from the top to the bottom, draw a line through the middle, press
it on the imder side to make a strong indenture, put the lower part
under the thiunb, and turn the top over the fore finger— easy to
make.

WAX WORK. 243
We have now spoken of the various methods which
we employ in making flowers, and will only add, that
in our study to imitate natural flowers, we use what-
ever suits our purpose best ; for some stamens, as those of
the dahlia, we dry the center of a natural dahlia, and use
it instead of the cut stamen. Sometimes we dip sewing
cotton into hot wax, drawing it through the fingers
;
this is good where the filaments are long. Again, ma-
nilla grass is used, as it is stifl" as well as delicate.
If we wish to represent a petal having one color on
one side, and one on the other, as the white lily, which
is green and white, we put a piece of thin white mus-
lin between green and white wax, and cut the petal
through the two ; this interlining gives a clear green
on one side, and a clear white on the other ; the same
may be done with other colors, as the bufi* and pink
for honeysuckles.
WHiite Passion Flmcers.— To form the three purple anthers to
be seen on the top of the pistil, roll white -wax round fine -wires of
about three quarters of an inch in length, till the proper size and
length are obtained, remembering to make them thicker as you
approach the top, which in itself is nearly globular.
Color these anthers with the darkest shade of piirple, and twist
the ends of the three wires together.

244 WAX WORK,
In order to form the pistil, place, one over the other, a sufficient
quantity of light green, light yellow, and white wax, the latter be-
ing intended for the outside ; roll these together round second sized
wire into the desired shape, the top being thicker than the base,
which terminates in a globe of lemon-colored wax, representing the
ovary or seed cup.
The three purple anthers are placed on the crown of the pistil, so
that their tops are equidistant from each other, forming a triangle,
the sides of which are about an inch in length.
Five ladle-shaped stamens are next formed from the same union
of wax as used in the pistil, properly cut by the pattern, curled and
united to the stem of the pistil, having been previously colored
round the edges with yellow.
Cut a piece of white w»x into a fine fringe about half an inch
deep and two inches long; color the fringe with a rich deep pur-
ple, and roll it round the ovary, turning the purple portions over
the globe, and touching the pistil.
Double a piece of white wax the same length as before, and snip
the edge with the point of the scissors about the twentieth part of
an inch; this short fringe, being colored purple upon its edge, is
rolled close to the base of the preceding piece.
The ravs are formed from a double piece of white wax, and cut
in fine shreds to pattern ; roll each between your finger and thumb,
as for a stem, and when all are rolled, place them upright, and close
to each other, upon a strip of white wax about two and a half
inches long and half an inch deep, taking care that the rays are so
placed that their points extend about three quarters of an inch
above the strip.
We now proceed to color the points with blue, leaving the centers
white, and tinting the base with purple.
WAX WORK. 245
This done, bend the points backward, and arrange the rays round
the portions already attached to the seed cup.
Place one sheet of lemon-colored wax between two of white, and
from this cut the petals. Color them on either side with light
green ; curl upon the uncolored side~ first with the head of the stick
round the edges, and then once down the center.
The calyx is cut from light green wax, and curled upon the
glossy side.
After placing the petals so as to form a double star, proceed to roll
green wax round the stem formed of wire.
The passion flower is a native of Brazil, where it at-
tains a luxuriance of growth unknown to our temperate
regions. The legend connectsd with it has given it an
interest almost sacred, even wh^n viewed by other eyes
than those of superstitious devotees.
It is said that certain Jews, bewailing in Jerusalem
the death of Christ, saw for the first time this flower,
by some said to have sprung wherever drops of his
blood had fallen, and, with the scene of his wondrous
passion and death still fresh in their memory, gave to
this beautiful blossom a symbolic meaning, indicative of
his sufi'erings and the manner of his death.
The anthers are supposed to represent the three nails
used at the crucifixion.
The rays represent the glory of our Lord. The purple
21*
246 WAX WORK.
fringe, sometimes found with red spots upon it, is a type
of the crown of thorns.
The petals, ten in number, are the representatives
of those apostles who were faithful to their heavenly-
Master.
The three sepals forming the calyx are emblematic
of the Trinity.
This poetical conception has caused the passion flower
to be held, in esteem almost amounting to veneration
in Catholic countries ; and the blossom is found en-
twined in many cases with emblazoned inscriptions, and
borders of old manuscripts of the sacred writings.
Who does not love the passion flower ? And who,
among God's children, does not recognize his glory in
every flower that grows ? The anemone, the buttercup,
the daisy, the violet, all lead our thoughts to him, and
we are forced to cry out, " How wondrous are thy
works, O God !
"
Wax Fruit.— Some people use the poorer kinds of
wax for fruit, thinking to economize ; but our experience
has taught us that the best is the cheapest, and there-
fore we get the best the market afl'ords. We melt the
wax in small earthen or stone pitchers, putting a white

WAX WORK. 247
muslin bag of paint, say one third of a tea-spoonful, into
the hot wax. For lemons, yellow apples, peaches, etc.,
we use yellow or lemon powdered chrome ; for oranges,
orange chrome ; for green apples, cucumbers, green pears,
etc., green chrome, varying the shades according to what
we desire to make.
The wax should never be heated to boiling, neither
should it be made thick with the powdered paint. If
a sufficiently dark color can not be obtained by the use
of the little muslin bag, then add oil paint of the de-
sired shade, from the tubes. AVe furnish Winsor and
Newton's colors,— the best in use.
For a rich plum, for example, we color the wax with
drop red powdered, and add rich dark blue, or purple,
from the tubs.
Oil the inside of the mold by gently patting it with
a bit of cotton batting dipped in lamp oil and tallow,
as before mentioned. Place the mold so that you can
see how to bring the locks together in an instant.
Hold one half the mold firmly in your left hand ; with
the right hand pour into it the melted wax from the pitch-
er ; shut the empty half over it as quickly as possible,
and holding the mold with both your hands, press the
248 WAX WORK.
two sides together, turn round and round and shake in
every direction, until you can no longer hear the mo-
tion of the wax ; then set the mold aside to cool.
While you are waiting for that piece of fruit to cool,
mold others in the same way.
If one person is to work alone, and wait upon him-
self, we advise him to make fruit of but one color, say
yellow, as in peaches, yellow^ apples, lemons, yellow pears,
crab apples, until he has acquired some skill, and is able
to move quickly and manage many things. Before pour-
ing the heated wax into the mold, try it by placing a
thin bit on the surface of the melted wax : if it melts
immediately it is too hot, and will spoil the mold ; if
it floats on the surface, slowdy melting at the edges, it
is all right. To have the fruit look well, the wax must
be neither too hot nor too cold.
In from ten to fifteen minutes the mold will feel cool
to your hand, when you can open it and take out the
fruit ; scrape away, in a slanting direction, the seam
where the two parts of the mold united ; after which,
rub it with a soft rag dipped in turpentine.
The fruit being nicely clean, smooth, and without
cracks, proceed to paint it with a bristle brush, of which

WAX wop.K. 249
you must have half a dozen, as you must always use
the same brush for the same color.
Take, with a small palette knife or spatula, out of the
bottle, a minute portion of the color required ; if you
have a peach, for instance, take carmine, dip the end of
the brush stick into water, letting the end of the globule
fall upon the palette near the powder, and mix well to-
gether, until the tint be of the consistency of cream, and
perfectly smooth. We must caution against dipping
the body of the brush, or bristles, into water. The
brushes used are held upright, and the color applied
rapidly.
If possible, have a natural peach, and try to imitate
it in color.
For the down of the peach, put some dry flour on the
palms of your hands, roll the peach between your hands
until every part be covered with the flour ; after which,
the peach should be as little handled as possible.
To have a variety in your peaches, paint some a little
green or brown ; a brown spot now and then, has a
good eff"ect.
Oranges and lemons, eggs and plums, need no out-
side painting.

250 WAX WORK.
Red apples are painted over the yellow wax, and can
be nicely finished up with the camel's hair pencil; for
the apple calyx, insert a bit of carbonated paper, tobacco,
or tea leaf; for the stem, take a natural one. Finish
your apple by rubbing it with the hand till it shines;
or, what is better, varnish it with fine copal varnish.
Tomatoes are handsome, and, provided you get a nice
mold, they are easily made. Various small fruits, as
barberries, strawberries, etc., are formed with the fingers,
and stuck with beads where necessary. Blackberries ^re
handsome, if made with care.
Grapes.— Many persons make purple grapes by put-
ting a lump of wax on the end of a bent wire, and after-
ward in melted rosin. They look well at a distance, if
nicely powdered with blue paint ; but we prefer forming
them of purple wax entirely, or dipping grape glasses
into the purple, as we do into green wax for green
grapes.
We obtain various glass globes of the sizes of grapes,
glue fine wire into each of them for a stalk, and plunge
into green wax, prepared expressly for grapes, as atten-
tion must be paid to their color.
Have the wax very hot, and dip the glass globe as

WAX WORK. 251
quickly as possible, holding uprightly to let the wax run
under the grape. (Don't mind if the hot wax makes
your fingers tingle;
you want a beautiful bunch of
grapes ; " pay for a thing and have it ;" we have dipped
two hundred without stopping.) Bunch the grapes,
the small ones at the end ; wind the stalks, and finish
up with tendrils and leaves.
Having good molds, it will be easy for you to make
wax dolls, birds, sheep, etc.
Hold the mold in your left hand;pour the melted
wax into the aperture. As soon as it forms around the
edges, pour back into the vessel what remains, and set
the mold aside to cool.
To color dolls, we stir a very little vermilion into the
hot wax ; or, what is better still, tie it up in a bit of
muslin, and paint the cheeks with the stifi* brush, in the
same manner as rose leaves.
We put hair on their heads, and insert enameled eyes
or beads, according to the size of the doll.
Before concluding our article on wax flowers, we
would say that ladies need not be deterred from making
them by the trouble of preparing the wax, since very
nice sheet-wax, of all shades and colors, and of difierent

252 WAX WORK.
thicknesses, can be procured of the publishers of this
book ; as also powdered paints and bottles of adhesive
mixtures, to use with water-colors in the fine pencilings
of such flowers as pansies, morning-glories, &c. These
mixtures are superior to gum-arabic, inasmuch as they
are less liable to crack tiian gum arable.
The powdered paints, rubbed carefully on the surface
of the wax with tlie fiuger, produce that soft and deli-
cate texture so necessary to the perfection of wax
flowers. And here it may be well to describe other
methods of making green leaves, in which we have been
very successful : one is, to soak green leaves, say rose-
leaves, or those of a similar texture, in soap and water
for a few hours ; shake off the water, and plunge the
leaf directly into hot wax of the desired shade of green;
take out, and remove the coating of wax from both the
upper and under side of the leaf; put the two together,
with a wire between them, and you get a beautiful leaf.
Another, less perfect, but easier method, is to make a
mold of a natural leaf, either of plaster or by pressing
together pieces of wax in a solid lump, and getting the
impression of the veined side upon it ; then cut the wax-
leaf, and take the impression from it or the plaster mold.

fliister llorit.
&c.
22 (253)


PLASTER WORK.
REAT care is necessary in regard to the
consistency of the plaster, and the thorough
greasing of the molds.
Pro^dde yourself with the best ground
Erench plaster, some good lamp or neat's
foot oil, (if the former, add a very small
bit of mutton tallow,) camel's hair pen-
cil, penknife, rags, thick brown paper, small
bowls, or a box of sand, and well water.
Wipe such fruit as you have selected for molds
very carefully, and remove the calyx and stems
without marring the skin. If you wish to mold
nuts, or fruit having a rough surface, (except
oranges and lemons,) it is best to grease them in such a manner
that all the surface may be perfectly smeared, without being greasy,
^lake hollows in your sand, or, as we think preferable, lay
cloths as smoothly as possible in the bowls to receive the plaster.
You will see the advantage of the rags over the sand, when you
finish up the molds, particularly if you wish them to look very
neatly on the outside.
Having every thing at hand, (and be sure that you do have
every thing ready, for the plaster will not wait your motion,)
begin to mLx your plaster ; at first, take but little, say a
half pint of water or less ; into this filter your plaster until
you get the consistency of batter for cakes; we usually mix
with an iron spoon. Pour the plaster into the hollows in
(255)

256 PLASTER WORK.
the sand, or into the bowls in which you have spread the
cloth ; insert just one half of each piece of fruit thus : —let it remain until the plaster is
hard ; then remove the fruit with
the greatest care. If your plaster
was properly mixed, you will have
the exact impression of the fruit on the inside, and on raising
from the cloth, a pretty smooth outside surface. Now trim the
edges, cutting the plaster horizontally to the level of the impres-
sion on the inner side of the mold ; the reason for this will be ob-
vious when you see how beautifully the parts will fit together ; now
make three or four grooves in the horizontal plane of the mold,
thus : we make one oblong, another
round, one large, another small,
quite unlike for convenience sake
;
this done, oil every groove and all
the edges just formed by your knife.
The mold being now thoroughly oiled with the brush, except,
of course, the inside, reset the fruit;
pin the thick brown paper
around the mold which contains it, so as to form a case, which
must be, at least, two inches higher than the fruit as it stands in
the mold.
The vessel in which you have mixed the plaster, as well as the
spoon, being perfectly cleaned, mix again ; this time pour the
plaster into the paper case ; it will cover the fruit and run down
the grooves forming nice locks ; when hard enough to remove
the paper, take hold of the plaster with both hands, and pull
the two parts asunder, remove the fruit which was entirely en-
cased in the plaster, and you will have a nice mold with firm
locks. If our directions are carefully followed, there will be little
need of trimming the last part.
PLASTER WORK. 257
Should there be a feAv holes in your mold, mix up a little fresh
plaster, and insert it with the point of your knife, smoothing andtrimming the edges with your fingers.
The molds being perfectly made, set them m a warm oven,
or in an airy place, to dry ; they will not be hard enough for
use for three or four weeks, when they will become hard as
stone, and do many years' service. We have on hand some peachmolds which we have used these ten years; and, for aught weknow, they will be good for ten years to come.
Do not expect to make the very best molds at the first attempt.
The plaster hardens so quickly that you must have a Httle prac-tice in order to get things just right. Again, if you stir it toomuch or too little, it will in the first instance lose its strength,
and in the second be lumpy. Be sure to have every thing perfectly
cleaned at every mixing.
We recommend Experience as the best of teachers ; she hastreated us very kindly, and wiU be to you what she has everbeen to others.
Sometimes we make one mold in three or four pieces, ofcourse mLxing fresh plaster, and making new locks for everyadditional piece.
While we ad\ise you to mix but little plaster at a time, untUyou can mLx it easily, we wish you to have several things in readi-
ness, that you may use up all you mix. About a pint of themixture would be sufficient for the half mold of a middlingsized peach, an egg, and a nut; therefore it is best to have as
many things in readiness, otherwise you must throw away yoursuperabundant mixture. Now that we have told you hmo to
make molds, we must lead your attention to the forms of the
fruit, or whatever you intend for your model.
22*

258 PLASTER WORK
If you wish to make a mold from an ear of com, in which
the grains are irregular, it will be almost impossible for you to
make it in two pieces. Try it, and you will see that you can not
get the ear from the mold without breaking it; and this will
teach you that unless the model can be easUy removed from the
plaster, it is worthless, inasmuch as you could not take an object
in wax safely from such a mold. (See engraving.)
In order to obviate all difficulty, either choose such fruits, etc.,
as can be made in a mold of two parts, or make your mold
in three or more parts, according to the fruit.
Molds for small wax dolls can be made in two parts, the doll
placed in the plaster in a lying position.
Molds for dolls' heads of medium size may be made in two
parts, and left open where the head is fastened on the body,. Cut
the plaster off level on the open side.
Molds for sheep, lambs, and dogs, (lying down,) also for human
hands, may be made in the same way. If you wish to take the
mold of a hand, be sure to oil it nicely (that is, to oil it without
leaving oil standing on the surface) before laying on the plaster
;
leave the opening at the wrist.
When you have succeeded in making good molds, you can try
your skill at plaster fruits and figures. As much of your suc-
cess will depend upon the non-adhesion of the plaster to the
model, remember the oil and talloAV.
Mix the plaster as for molds;pour into the mold as soon
as it thickens on the sides;pour out that which remains, if you
wish your mold hollow.
Should you wish to make plaster fruit, you must cut an open-
ing in your mold, (while it is fresh, of course,) to admit the
thin plaster being poured from the spout of the vessel in which
it is mixed.

MOSS WORK. 259
MOSS WORK.
OLLECTING and arranging, in va-
rious forms of grace and beauty,
the delicate and many-colored
mosses with which our fields and
forests abound, has long been a
favorite pastime with all lovers of
the beautiful in nature. A fertile
imagination and inventive mind
will readily perceive the many ob-
jects for which moss work is well
adapted— vases neatly and tastefully covered with delicate mosses,
arranged with an eye to the harmony of colors, are very appropri-
ate for holding dried grasses; crosses, little towers, «* ancient and
moss-grown," for watch stands ; frames for holding collections of
leaves, grasses, or flowers, — indeed, it is needless to particularize.
Beautiful landscapes can be made, closely resembling nature.
Collect all the varieties of wood moss, beautiful bits of bark,
and dried leaves, within your reach. ^lake a design, perhaps of
a landscape, in which are ruins, bridges, rocks, etc. Paint a sky
as in water colors, then cut and glue thin bits of bark and moss
on the ruins ; moss on the rocks ; dried algse or forest leaves on
the distant mountains, and the bright-colored and green mosses, of
various hues, on the foreground. Such a landscape is calculated
to draw out the ingenuitj^ of the pupil, and requires no little
study, and when well done, is a very pleasant picture. Set in a
deep frame.

260 SEA WEED.
SEA WEED.
HE sea shore is an inexhaustible
sovirce of pleasirre and instruc-
tion ; and to one who has a taste
for the beautiful, or who loves to
search out the wonders of the
ocean, and trace in them the "foot-
prints of the Creator," new ave-
nues are constantly being opened
for the acquisition of knowledge,
and the means of rational and
elevatmg pleasures.
The great variety of sea weeds, their beauty and delicacy, and
the graceful and attractive forms in which they can be arranged
by skiiilul hands, have given to their collection and arrangement a
deserved popularity among all frequenters of the sea shore ;and it
is a pleasant sight to see groups of children and adults, wandering
along the surf-Avorn beach, selecting the delicate fringes of moss ;
and afterward, to see the fruit of their labors arranged in beautiful
groupings, their bright colors well preserved, and the whole form-
ing a picture pleasing to the eye and elevating to the taste.
After having collected your sea weeds, throw them into fresh
water ; cut a piece of paper relative to the size of the weed, oil the
surface, and put it under the weed you are about to lay out
;
spread with a camel's hair pencil, or pick apart with a pin ; we
prefer the former. Great care, patience, and delicacy of handling
are necessary in this process, for much of the beauty of the specimen
depends upon preserving the minute thread-like fibers of the weed.

SEA WEED. 261
Trace out each thread, separating them all, and giving them such a
position on the paper as will show the plant to the best advantage.
Then gently raise the paper from the water, holding it in a slanting
direction to let the water run off. Then put in press. A good
way to make the press is to put three layers of blotting paper on
a board, and upon this place your specimens ; over this, muslin or
linen, and over that, paper again, and then another board. Dry the
paper and cloths above if necessary to facilitate the process.
Take your specimens from the papers and arrange on paper in
bouquets, wreaths, or what you like, adjusting them according to
the different colors, and thus obtain a pleasing variety ; secure the
ends neatly with gum arable. It is well to brush over the coarser
kinds of algse with spirits of turpentine, in which a very little gum
mastic has been dissolved.
Having arranged beautiful specimens of moss and sea weeds, we
sometimes cut a very small basket through the middle, and sew it
on the paper in front of our specimens ; then we fill our basket with
various kinds of moss, which, standing out in rehef against that
gummed on the paper, presents a basket of moss to the admiring
eye of the lover of nature.
" There 's beauty in the sea."
A lady of our acquaintance, who has been in the habit of spend-
ing much time in collecting sea-weeds, tells us that she filled no
less than forty little baskets with moss, in one season, for presents
to friends. AVe are so happy as to have one of them hanging
in our parlor, which does great credit to the artist, so beautiful are
the combination of colors and the delicacy and taste displayed in
their arrangement.

262 HAIR WORK.
HAIR WORK.
O make hair flowers we need live
hair, that is, hair from the head
of a living person ; annealed
wire, very fine ;pearl or gold
beads, scissors, a pair of pinchers,
a bit of whalebone, and knittmg
needles of three sizes. Brush the
hair as smoothly as possible, and
tie in bunches. Double a piece
of wire in the middle, and twist
about two inches.
Let us begin with a leaf. Take the twisted wire between the
thumb and fore finger of the left hand for a handle, as it were
;
fasten to this the ends of a thin strand of smooth hair : (it is well
to draw it several times between the thumb and finger to make it
glossy,)
Bend the ends of the wire to the right and left ; then, holding
the end of a knitting needle horizontally over the twist of the wire,
pass the strand of hair around the needle, and fasten it by crossing
the wires below to the right and left. So continue till you have
woven sufficient for the leaf. Slip from the needle, and you have
nice loops neatly fastened by a fine wire much resembling ghnp.
Bend this mto the desired shape, twist the ends of the wire, and
cover with silk braid as near the color of the hair as possible.
The leaves may be made of difierent sizes, and varied by the size of
the knittmg needle.
To make daisies, asters, etc., turn this looped wire round and
round to present a flat surface ; make firm by fine wire im.demeath.
HAIR WORK. 263
It is well to have a pattern. If you can not see hair flowers, take
natural ones, and by fastening strands of hair to a wire, and binding
with floss, endeavor to imitate Nature.
With the pinchers you make your wire fast, and with the whale-
bone you obtain the desired width of a petal by laying the hair over
it. Thus, for a pansy, smooth a short strand of hair, fasten one end
to a bit of wire, then pass the hair over the whalebone, wmding to
the same wire, but lower dowTi ; this makes it firm, and enables you
to give it what form you like, by bending the wire. Make five of
these petals, and set them around a wire having a pearl bead on
its end.
Forget-me-not is a pretty little flower, and easy to make;put
a gold bead in the middle.
Roses require much time and great care ; buds are easily made.
Many persons moisten the hair with oil ; but our experience
teaches us that the work is much more durable and neater when
smoothed by the friction of the fingers.
As it is often necessary to economize the hair as much as possible,
it is well to state that as a general rule a piece of hair work is
half the length of the hairs which make it. If you have but a
scant pattern, use the short hairs first, not the shortest, but begin-
ning with those perhaps of five inches in length, and then taking
those which are longer.
Practice in this art is of more value than precept. The artist
will find the difficulties gradually disappear as the work is perse-
vered in, and to study specimens of hair vork, now so common,
wiU assist the learner in many points.

264 FEATHER FLOWERS.
FEATHER FLOWERS.
HOSE who are so fortunate as to
have in their possession fine
feathers can certainly make fine
flowers. Have at hand gum in
solution, French paper for wind-
ing stems, and wire of different
sizes. Draw the under side of
the feather gently over the edge
of your penknife to bend it in
the required direction ; make a
lump of bookbinder's thick paste or wax on the end of a wire for
a stalk, and begin your flower by sticking the smallest sized feathers
into it for a center;place other feathers of the same kind, but
larger in size, around in order. Choose green feathers for leaves
and calyx, and pure white ones for japonicas and white roses.
Twist the ends of the same on a wire, and make fast with gum,
glue, paste, or other similar adhesive substance. Be careful to
select feathers of the same kind for the same flower. Arrange in a
vase, and cover to keep free from dust. In this, as in all kinds of
fancy work, let taste and neatness govern the process.
It will often be found necessary to color the feathers to give the
desired variety of hues ; and this can easily be done by attending to
the following directions : Put the feathers into hot water, then drain
them ; rinse two or three times in clear cold water ; place them on
a tray, over which a cloth has been spread, before a good fire ; as
they dry, draw them gently into shape between the thumb and finger.
To dye Feathers blue. — Into about three cents' worth of oil of
vitriol mix as much of the best indigo in powder ; let it stand one

FEATHER FLOWERS. 265
or two days. "V\Tien -wanted for use, shake it well, and into a
quart of boiling water put one table-spoonful of the liquid. Stir
well, put the feathers in, and let them simmer a few minutes.
Yellow.— Put a table- spoonfvd of the best turmeric into a quart
of boiling water ; when well mixed, put in the feathers. More or
less turmeric gives different shades.
For orange, add a small quantity of soda to the preparation for
yellow.
Pink. — Three good pink saucers to a quart of boiling water,
with a small quantity of cream of tartar. K a deep color is re-
quired, use four saucers. Let the feathers remain in this dye sev-
eral hours.
Red. — Dissolve a tea-spoonful of cream of tartar in a quart of
boiling water;put in one tea-spoonful of prepared cochineal, and
then a few drops of muriate of tin. This dye is expensive ; there-
fore use the plumage of the bird ibis.
Lilac. — About two tea-spoonfuls of cudbear in a quart of
boiling water ; let it simmer a few minutes before you put in the
feathers. A small quantity of cream of tartar turns the color from
Hlac to amethyst.
Bunches of orange blossoms can be made with good success in
feathers ; the buds are to be made of starch and gum mixed ; the
stamens of ground rice, colored with turmeric, into which the
gummed ends of manilla grass have been dipped.
The "untutored savages" of the Pacific Islands make beautiful
feather flowers, rivaling the natviral ones in delicacy and beauty.
Pinks, orange blossoms, and roses of exquisite workmanship are
often brought from these "heathen lands" which would put to the
blush our most accomplished artists. Old ostrich feathers can be
made to look as well as new by holding over hot steam, then draw-
ing each vane of the feather separately over a knife to curl it.
23

266 CONE WORK.
CONE WORK.
ELECT good clear cones, and dis-
sect some which have handsome,
large scales, and brush them clean
;
lay nice white putty, or a similar
adhesive substance, smoothly on
your frame ; set into this putty
whole cones, large and small, in
such figures as suit your taste,
and fill up the entire gi'oundwork
with the scales, lapping one neatly
over the other.
Cut oval and round frames for light pictures, from bookbinder's
pasteboard, and cover with the scales in layers or rows. Scallop
the edges with small whole cones, set in large cones surrounded
by little ones equidistant, if the frame be broad, and fill in with
the scales. When dry, take out those which are not firm, and
replace. Add acorns ad libitum. Varnish the whole once or twice.
If you wish something nice, go over every part with a fine brush,
and leave no varnish standing in drops.
Cones can be found by almost any one in an hour's walk through
pine woods. Indeed, if one has a taste for the beautiful, and is
quick in perception, it is impossible to ramble through woods and
fields without finding many curiosities in the shape of mosses,
grasses, cones, etc.

SHELL WORK. 26T
SHELL WORK.
HIS is very pretty for vases, frames,
. boxes, etc. ^lany shell flowers,
animals, birds, and the like, are
brought here fi-om the Mediter-
ranean. AVe have seen some that
we would like to own ; but in
general they have a stiff appear-
ance. However, we will tell you
how they are made.
Assort your shells according to
size and color — the more rice and other small shells you
have, the better^ Melt white wax and glue together, two parts
of the former and one of the latter. Have a clear idea of what
you intend to do ; or, what is better, make a pattern before
you begin to set your shells. If you will ornament a box, a rose
in the center looks well. Take thin round shells, those most
resembling rose leaves, of the smaller size, and dipping the lower
ends in the hot wax mLxture, set them close together for the
center of a rose; place other similar shaped shells around in
circles, the largest outward. Care must be taken to form the
shells into perfect circles, and to take up wax enough to make
them adhere to the cover. Shells of different form, say more
oblong, can be used for leaves. After arranging such figures as
you like with the shells you have, fill up the spaces with the very
small ones. Rice shells are the prettiest, but they are costly. Some
prefer sticking the shells into a puttied surface, which does very
well. Varmsh with a very little copal varnish, ming great care.

268 SHELL WORK.
Animals are made of tliick pasteboard, or turned in wood, and
covered with one kind of shell.
Shell Flowers. — The basis of each large flower is a piece of
thick round pasteboard. The shells for petals are sometimes
tinged with water color, and the leaves made of green paper. Del-
icate sprays are made by threading small shells on fine wire.
Thus made, with half a dozen huge black berries of wax on the
top, in a vase all covered with shells, it will pass for the imported
article.
Ornaments for the hair are made from rice shells, thus: File
down the conical end of the shell, and clean out the opposite end
with a pin;pass a silver wire (a guitar string) through the filed
end, bring it down and twist for a stalk. From fifteen to twenty
pairs on one branch, neatly covered with white or green silk floss.
Two or three such stalks of diflerent lengths are sufficient.
Satin beads wired with a guitar string, and wound in pairs to
form sprigs, with now and then a tendril, are beautiful for evening
dress.
In almost every family, enough shells, small and appropriate, can
be found to make some ornamental article. Sea captains bring
home valuable collections; and who among our readers has not
some friends or acquaintances who «' go down to the sea in
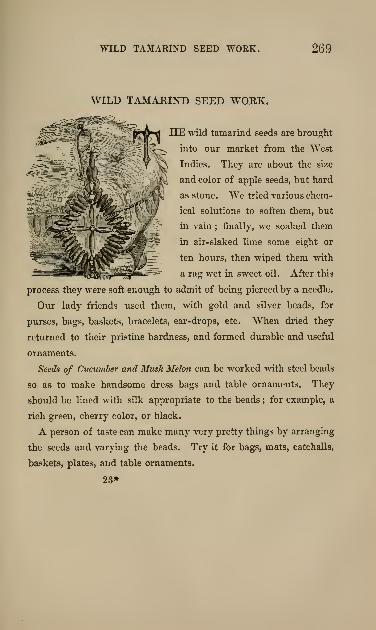
WILD TAMARIND SEED WORK. 269
WILD TAMARIND SEED WORK.
HE wild tamarind seeds are brought
into our market from the West
C>\ Indies. They are about the size
Aaj and color of apple seeds, but hard
'.V=^^B'
as stone. W^e tried various chem-
ical solutions to soften them, but
in vain ; finally, we soaked them
in air-slaked lime some eight or
ten hours, then wiped them -wdth
_^^ ^ ^ a rag wet in sweet oil. After this
process they were soft enough to admit of being pierced by a needle.
Our lady friends used them, with gold and silver beads, for
purses, bags, baskets, bracelets, ear-drops, etc. \Vhen dried they
returned to their pristine hardness, and formed durable and useful
ornaments.
Seeds of Cucitmher and Musk Melon can be worked with steel beads
so as to make handsome dress bags and table ornaments. They
should be lined with silk appropriate to the beads ; for example, a
rich green, cherry color, or black.
A person of taste can make many very pretty things by arranging
the seeds and varying the beads. Try it for bags, mats, catchalls,
baskets, plates, and table ornaments.
23*

270 IMITATION PEARL WORK.
BnTATIOX PEAEL WORK FOR EMBROIDERY.
We do not think that a preparation of fish scales has ever
been used in this country instead of the so much admii-ed pearl
;
and so ue give it to our readers, kno%ving that they will like some-
thing entirely new.
Take the shining scales from a carp, or any other fish— the larger
the scales, the better;put them in strong salt water over night
;
lay them on a linen cloth or smooth board ; wipe them carefully
on both sides, and lay them between clean, strong paper, \mder a
board, on which place a weight ; let them remain a day or two,
until the scales are pressed dry and become hard. Draw some-
thing, say an ivy leaf, on strong drawing paper ; cut it out, and
lay it on each scale as a pattern by which to cut the scales with
very fine scissors. Such a pattern, however, is superfluous to per-
sons acquainted with drawing, who can cut leaves of that kind
without one. Vein your scale leaves with a fine steel needle ; do
it slowly, bearing on hard to give clearness: the leaves are nowready.
Stretch a rich, dark-colored silk velvet tightly in an embroidery
frame;
place the pattern, which you intend to copy, before you,
and imitate it by sewing the scale leaves, one at a time, on the
velvet, with fine gold thread, and the leaf stalks and tendrils em-
broidered with the same. It is well to draw the thread through
water before using it, to render it flexible.
The beautiful eff'ect produced by this simple process fully repays
one for the trouble. That manifold changes may be made accord-
ing to the taste and ingenuity of the copyist, is evident to the
reader.
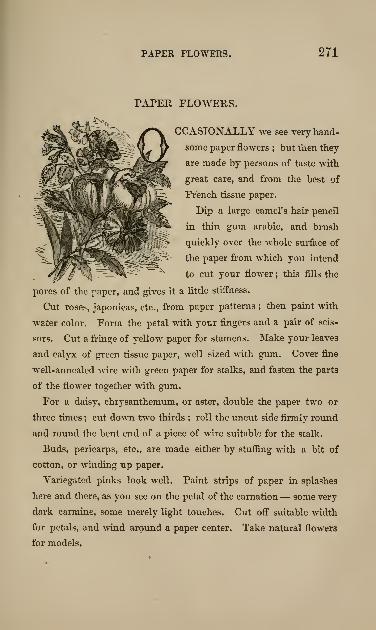
PAPER FLOWERS. 2T1
PAPER FLO^MERS.
CCASIONALLY we see very hand-
some paper flowers ; but t'nen they
are made by persons of taste with
great care, and from the best of
French tissue paper.
Dip a large camel's hair pencil
in thin gum arable, and brush
quickly over the whole surface of
the paper from which you intend
to cut your flower ; this fills the
pores of the paper, and gives it a little stiffness.
Cut roses, japonicas, etc., from paper patterns ; then paint with
water color. Form the petal with your fingers and a pair of scis-
sors. Cut a fringe of yellow paper for stamens. ^lake your leaves
and calyx of green tissue paper, well sized with gum. Cover fine
well-annealed wire with green paper for stalks, and fasten the parts
of the flower together with gum.
For a daisy, chrysanthemum, or aster, double the paper two or
three times ; cut doA\-n two thirds ; roll the uncut side firmly round
and rovmd the bent end of a piece of wire suitable for the stalk.
Buds, pericarps, etc., are made either by stuffing with a bit of
cotton, or winding up paper.
Variegated pinks look well. Paint strips of paper in splashes
here and there, as you see on the petal of the carnation— some very
dark carmine, some merely light touches. Cut off" suitable width
for petals, and wind around a paper center. Take natural flowers
for models.


(273)


ins style of imitating the Chinese, Porcelain,
Sevres, Japanese, and other kinds of vases, is
I quite simple, and if the following directions
are closely adhered to, no difficulty will present itself.
Choose such a glass vase as will be adapted to the style you
mean to imitate, which can be readily obtained, with the mate-
rials described, of the publishers of this book. Witli fine-pointed
scissors, cut the paper close to the figures you use, which may
be flowers, birds, or Chinese figures of bright colors, which are
imported in variety for this purpose. After you have cut out
what you need, and have determined their arrangement, gum them
(275)

276 DIRECTIONS FOR POTICHOMANIE.
on the face several times, until they are damped through and
softened, letting them remain until the gum thickens a little;
then press them closely to the glass till every spot adheres, for
otherwise white spots will appear, which disfigure the work.
Many use Antique varnish now instead of gum, appljdng as in
the instructions for that style of work ; though more difficult, it
is a far better method, both as it is likely to be more durable,
and also more beautiful. "WTien the figures all adhere, and are
dry, apply gently to the back, and on the edges of the work, a
thin coat of gum. This will stop all varnish or paint from running
between the figures and glass. Again, when it is dry, varnish
over with Antique varnish ; or with Mastic or Outside varnish,
only, if you use either of the latter, varnish only where you last
gummed. After this is dry, paint the inside over with the ground
color, which should be always a pale tint, greenish white, bluish
white, sHght rose white, or, what contrasts better with the figures
generally used, a pale yellow, or pine color slightly broMTi.
Another way of making a beautiful style is, to take the common
kind of potter's ware, and gum the figures on the outside instead
of inside ; then gum the face and varnish, and afterward paint
between the figures the ground you wish, with a small pencil,
generally reddish brown, dark blue, etc. These colors may be
mixed with oil, varnish, or enameled ; the best material readily
obtained is fine zinc paint, tinted, and mixed with Outside varnish.
The tmts may be made by mixing the Oriental colors spoken of in
directions to that style.
This art of ornamenting glass originated in France ; and from
the easy method of gaining a beautiful effect, soon became a favor-
ite source of employment for those who had leisure time, and a
profitable art to those who made a business of it. By it, glass
vases appear like richly painted porcelain, so much so, that, when

DIRECTIONS FOR POTICHOMANIE. 277
carefully done, it would deceive any but the initiated. The process
is perfectly simple, and has one thing to recommend it strongly
to those who can only work in ^^ snatches," as it can be put down
and taken up at any moment without injury. By observing the
following directions closely, no difficulty wiU be found by the
most ordinary manipulator.
1st. Select the pictures, either in sheets or otherwise ;go over the
back with a strong coating of isinglass, taking care to cover every
part.
2d. ^Mien they are dry, select those wanted for use, and cut
them out carefully, so as to have them in good shape and no paper
seen.
3d. "WTien you have as many as you want, arrange them on
the table, in the order you wish to have them on the vase, num-
bering them, if requisite, on the back to prevent any mistake
when placing them on the vase.
4th. See that the vase is perfectly clean, and free from spot
or stain ; wet the front side of your pictures with gum tragacanth
or gum arabic, and press them carefully -with the flat of the nail
against the inner side of the vase.
5th. ^Tien all is completed, and the vase submitted to a close
scrutiny, to ascertain whether all the pictures keep their places,
and whether there are any finger marks to remove, — if every thing
is satisfactory, then mix your tint for grounding; it is better to
mix up as much as will coat the entire over twice, so as to have it
solid.
6th. "WTien the color is thoroughly mixed, apply it with a soft
camel's hair brush, (a one inch flat camel's hair is the best,) begin-
ning at the bottom, and working carefully so as to cover every part
equally.
24

278 DIRECTIONS FOR POTICHOMANIE.
7th. Allow a day or two to intervene, then coat it over again, so
as to make it perfectly solid.
These we consider quite sufficient directions to work from.
In the fourth direction, two gums are named. We prefer using
gum tragacanth, and Avould strongly recommend the manipulator
to be exceedingly careful in the process of sticking the figures on
;
to be sure that the edges are securely fastened ; to look at them
occasionally afterward, and if any little corner is found raised up,
pertinaciously to insist upon its being fast down before leaving it.
We dwell upon this, and make an important point of it, because
so much depends upon it— whether your work is good and per-
fect in shape, or blotched and deformed with paint, as the least
rising up of the picture makes an entrance for the coating paint to
flow in.
The reason we recommend the coating of isinglass on the back
of the picture is, some paper is not sufficiently compact to resist
the effect of oil paint, but with a coating of isinglass the picture
is sure to retain its beauty. The isinglass should be put on
warm. A few of the best delicate tints for coating are as follows :
Pearl— white with very little black; Buff— white lead or zinc
white with a little deep chrome ; Pale Blue— white or zinc white
with a little ultramarine ; Salmon— white or zinc white with a
trifle mineral red ; Faicti— white or zinc white tinted with burnt
sienna; Pea Gree?j, Emerald Green— white and a very little pale
chrome ; Chocolate — Indian red and Vandyke brown ; Pink—white and pink madder ; Red Pink— white and a little vermilion.
Any of these colors can be procured at paint shops, or of the pub-
lishers of this book, in packages to suit, mixed in their usual way,
with oil and turpentine, same as regular house painting, (inside
nice Avork.) For pink, we would recommend tube paints of Win-
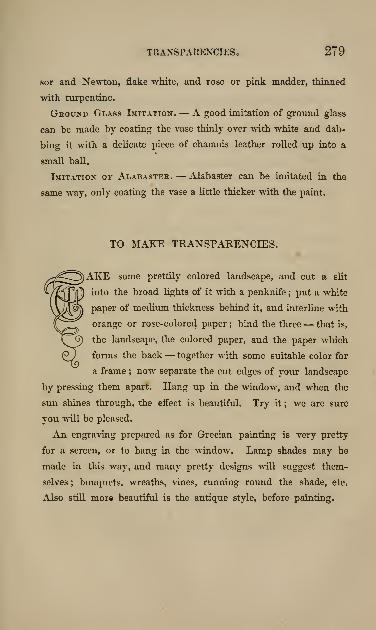
TRANSPARENCIES, 279
sor and Xewton, flake -white, and rose or pink madder, thinned
with turpentine.
Ground Glass Imitation. — A good imitation of ground glass
can be made by coating the vase thinly over with white and dab-
bing it with a delicate piece of chamois leather rolled up into a
small ball.
Imitation of Alabaster. — Alabaster can be imitated in the
same way, only coating the vase a little thicker with the paint.
TO MAKE TRANSPARENCIES.
lAKE some prettily colored landscape, and cut a slit
into the broad lights of it with a penknife; put a white
paper of medium thickness behind it, and interline with
orange or rose-colored paper ; bind the three— that is,
the landscape, the colored paper, and the paper which
forms the back— together with some suitable color for
a frame ; now separate the cut edges of your landscape
by pressing them apart. Hang up in the -window, and when the
sun shines through, the eflect is beautiful. Try it ; we are sure
you will be pleased.
An engra\'ing prepared as for Grecian painting is very pretty
for a screen, or to hang in the window. Lamp shades may be
made in this way, and many pretty designs will suggest them-
selves ; bouquets, WTcaths, vines, rimning round the shade, etc.
Also still more beautiful is the antique style, before painting.

280 LEAF IMPRESSIONS.
DIRECTIONS FOR TAKLNG LEAF IMPRESSIONS.
OLD oiled paper in the smoke of a lamp, or of pitch,
until it becomes coated with the smoke ; to this paper
apply the leaf of which you wish an impression, having
previously warmed it between your hands, that it may
be phable;place the lower surface of the leaf upon the
blackened surface of the oiled paper, that the nTunerous
veins that are so prominent on this side may receive
from the paper a portion of the smoke ; lay a paper over the leaf,
and then press it gently upon the smoked paper, with the fingers
or with a small roller, (covered with woolen cloth, or some like
soft material,) so that every part of the leaf may come in contact
with the sooted oil paper, A coating of the smoke will adhere to
the leaf. Then remove the leaf carefully, and place the blackened
surface on a piece of white paper, not ruled, or m a book prepared
for the purpose, covering the leaf with a clean slip of paper, and
pressing upon it with the fingers or roller, as before. Thus may
be obtained the impression of a leaf, showing the perfect outlines,
together with an accurate exhibition of the veins which extend in
every direction through it, more correctly than the finest drawing.
And this process is so simple, and the materials so easily obtained,
that any person, with a little practice to enable him to apply the
right quantity of smoke to the oil paper and give the leaf a proper
pressure, can prepare beautiful leaf impressions, such as a nat-
iiraKst would be proud to possess.
Specimens thus prepared can be neatly preserved in a book
form, interleaving the impressions with tissue paper.
BOTANICAL SPECIMENS. 281
TO DRY BOTANICAL SPECIMENS FOR PRESERYA-
TION.
(HE plants you wish to preserve should be gathered when
the weather is dry ; and after placing the ends in water,
let them remain in a cool place till the next day. When
about to be submitted to the process of dr^'ing, place
each plant between several sheets of blotting paper,
and iron it with a large smooth heater pretty strongly
warmed, till all the moisture is dissipated. Colors may
thus be fixed which otherwise become pale or nearly white.
Some plants require more moderate heat than others, and herein
consists the nicety of the experiment ; but I have generally found,
that if the iron be not too hot, and is passed rapidly, yet care-
fully, over the surface of the blotting paper, it answers the purpose
equally well with plants of almost every variety of hue and thick-
ness. In compound flowers, with those also of a stubborn and
solid form, some little care and skill are required in cutting away
the under part, by which means the profile and forms of the flow-
ers will be more distinctly exhibited. This is especially neces-
sary when the method employed by Major Velley is adopted, viz.,
to fix the flowers and fruit down securely -with gum upon the
paper, previous to ironing, by which means they become almost
incorporated with the surface. When this very delicate process is
attempted, blotting paper should be laid under every part except-
ing the blossoms, in order to prevent staining the white paper.
Great care must be taken to keep preserved specimens in a dry
place, and also to handle them gently ; and thus they can be kept
a long time, affording a source of great pleasure.
24*
282 DECALCOMANIE.
DECALCOMANIE
Is another name for a style of decorating that has
been in vogue an indefinite time, and comes under the
head of transferring.
It is almost superfluous to mention the variety of pur-
poses to which Decalcomanie may be applied : it can be
transferred upon every thing to which ornamentation is
required ; and the variety of designs which are printed
specially for it are so numerous, that some thing or other
may be procured that will suit the taste of the most fas-
tidious.
A few of the articles that may be decorated can be
mentioned, by way of showing what a variety this style
will embrace : all kinds of crockery, china, porcelain,
vases, glass, book-covers, folios, boxes of all kinds,
&c.
The method of transferring beautiful designs is so
simple, and all the material requisite for the art so
reasonable, that it brings it within the means of " tout le
monde.^'
Flat surfaces are more suitable for this style ; for, if

DECALCOMANIE. 283
the surface present a concave or convex, the design has
to be cut, and the beauty of the subject may be endan-
gered to accommodate the shape.
Articles Requisite.— Cement same as for Diapha-
nie, copal-varnish, designs, a duck-quill sable, and a flat
camel's-hair brush.
Directions. — Cut out your designs neatly with a
small pair of scissors ; apply the cement by means of
your small sable, and apply it to the article to be deco-
rated;place on your design, and press equally all over
to exclude the air ; damp it a little, and keep pressing
equally, so that the design may adhere firmly in every
part ; when the cement is sufficiently dry, which will be
soon, damp again with water a little more freely, and
remove the paper. Be careful in manipulating this pro-
cess : if you are not, you may remove some of the colored
part with it. If such should occur, instantly replace it
as well as you are able ; sometimes this can not be done.
If such an accident should occur, and you possess a
knowledge of Oriental painting, your panacea will be in
that : you can retouch with those colors, and bring it
back nearly to its original beauty ; in fact, a knowledge
of Oriental painting and papier mache is an " open

284 DECALCOMANIE.
sesame " to almost all the styles treated by Prof. Day,
such as painting on rice-paper, signs, magic-lanterns,
glass, heraldic emblazonry, illuminatory diaphanie, imi-
tation of ebony-inlaying, &c.
In case you have no Oriental knowledge, match the
colors as near as possible with water-color paints ; allow
time to dry, and varnish with copal.
Sometimes the cement becomes too thick for use. It
may be restored to its proper flowing consistency by
placing your bottle in a warm bed of sand, and applying
it while warm.
If you have to apply your design to a ground-work
that is dark, it would be advisable to give your picture a
coat of white,— Winsor and Newton's Chinese white;
the reason for which is, some parts of the pictures are
semi-transparent, and if impasted on a dark ground
they would lose part of their beauty ; but, by giving it a
coat of white before transferring, it retains its brilliancy.

DIAPHAKIE. 285
DIAPHANIE.
It is scarcely necessary to specify the purposes to
which this invention may be applied. "Windows, lamp-
shades, fire-screens, and, indeed, all other uses for which
stained and ornamented glass is ordinarily employed,
completely superseding the clumsy wire and other blinds.
As a pleasing occupation for ladies and gentlemen, the
work is one of the most useful and beautiful of the imi-
tative arts. Cleanliness and the comparatively small
cost of the materials used also recommend it to the
attention of those who have leisure, either for amuse-
ment or for the purpose of profit, as windows in
churches, halls, conservatories, &c., may be decorated
in any style, ancient or modern, and made to appear of
great beauty and value.
The unsightly view of walls, chimneys, &c., from
staircase-windows, so frequently an annoyance to the
eye in houses situated in towns, may be completely ex-
cluded without materially interfering with the light, and
that agreeable appearance given to an apartment which
stained glass invariably imparts.

288 DIAPHANIE.
The designs used for this work are produced by new
processes in lithography, and possess all the richness
and fullness of color obtained by the most expensive art
of glass-staining.
The materials used in the work are as follows
:
Glass to decorate, prints or designs, a roller, a bottle of
clearing-liquid, a bottle of washable varnish, a few
brushes, and a bottle of vitreous cement.
The roller is employed to press the paper upon the
glass, to remove the bubbles of air : this can not be ac-
complished without much difficulty by any other means,
as the paper is apt to tear ; which, of course, spoils the
picture.
Observations.— In decorating a window, the effect
as a whole is to be considered. For example, the posi-
tion of a window : if at a distance or elevation from the
eye, the design should be bold. Avoid, particularly if
the panes be small, crowding each pane with little de-
signs : the window-frames should not be made conspicu-
ous by putting a border round each frame ; but the same
grounding should be used, as a rule, and the border
placed round the whole window, so as to make it appear
one window, and not a number of little ones. Neither

DIAPHANIE. 287
should the clifFerent styles be mixed. Frequently parts of
several sheets are used to form one window : they should
be chosen with some regard to the harmony of colors.
The smallness of the cost, and the greater ease with
which the operations are performed, render it desirable
to use separate glass, cut to the size of the window ; and,
when finished, they may be fixed in the sash or frame
with a few brads, a bead, or any similar contrivance.
However, windows already fixed, if within reach, may
be decorated without being removed, but it is more
difficult.
One advantage in using separate pieces of glass is,
that in cleaning there is no liability of damage ; besides,
they may be removed at pleasure. Common sheet-glass,
flat, free from specks and bubbles, should be selected.
Instructions. — Clean the glass, and lay it flat upon
a folded cloth ; and, having obtained the necessary mate-
rials, cut out the medallions or subjects (unless the
paper is to be applied in one piece), and proceed to ar-
range and fasten it in its appointed place in the manner
hereinafter described.
If there is to be a border, that is to be next attended
to. This finished, damp the printed side of the ground-

288 DIAPHANIE.
ing-paper, and lay it over. Raise one end of the glass,
and, looking through it, you will perceive the exact posi-
tion the subject and border occupy ; trace round them
carefully with a blacklead-penci!: remove the ground-
ing, and cut it out, taking care to cut a trifle within the
pencil-marks, so that the ground may overlap the subject
a little.
When this is done, thoroughly damp the uncolored
side of the paper with sponge and cold water ; turn it
over, and apply a generous coating of vitreous cement to
the colored surface with a flat camel's-hair brush of
moderate width, and at once apply the cemented side to
the glass, pressing it down with the roller, commencing
at the center, and gi'adually passing to the edges, which
should cause the superfluity of cement to ooze out a lit-
tle. This eflfectually removes all air-bubbles ; and, if the
cement has been properly applied, no difficulty will
occur. Keep the white side damp during this operation.
See that your roller works well before you commence,
or your work may be irrecoverably spoiled. It is advis-
able to have some pieces of wetted paper laid over the
design, between it and the roller, to prevent the cement
getting on to the roller. "When the cement has become

DIAPHANIE. 289
hard and dry (about eighteen hours is sufficient), the
paper can be removed by wetting it once more, and
rubbing it with a piece of cloth, a sponge, or the hand.
The whole of it may thus be removed, as the cement
holds with considerable tenacity the colored surface on
to the glass; care must, however, be taken not to rub
too hard or too much when the greater portion of the
paper is removed, or a blemish may thereby be caused.
Be careful to keep the work wet during this operation;
and, when finished, stand it by for a little time to dry;
then coat it over with clearing-liquid; and, when this has
become dry and hard, a coating of the washable varnish
completes the work. Both the clearing-liquid and the
varnish should be applied with flat cameFs-hair brushes.
Remarks.— If the colors on the sheet are not suffi-
ciently rich, they may be heightened; or if there be any
scratches or blemishes, they may be hidden by applying
color of the same tint. If they are retouched witli
water-color, it will be requisite to thinly coat over what
you paint with varnish : if you retouch it with varnish-
paint, same as is used for Oriental, there will be no occa-
sion. The same holds good if you color over with lamp-
black the joinings.

290 DIAPHANIB.
SECOND METHOD.
Give the glass an even coating of the transfer-varnish
or antique-varnish,— either will do ; and, as soon as this
becomes sticky, damp the back of the prints with a
sponge and cold water, and apply them to the glass, and
press down well with the roller, as before directed.
Should the adhesion be imperfect, through the varnish
drying uneqally, it may be remedied by holding it a few
minutes to the fire. When the varnish is quite dry, the
back of the print should have one or two coatings of
clearing-varnish ; if two, the first must be dry before the
second is applied. Allow the work to remain a day or
so, and apply a coating of copal-varnish. The joinings
can be penciled over with lampblack.
SHEETS OF PLAIN COLORS.
Very pretty windows may be made with the sheets of
plain colors, by cutting out the design with a sharp pen-
knife, and applying it to the glass, afterwards entirely
covering the window with a second color : thus, if blue
has been first put upon the glass, the design cut out, and
another sheet of crimson is covered over the whole, the
design will be crimson, relieved by purple ; or, the glass

CHARCOAL-DRAWING. 291
may first be entirely covered, and any design in a second
color cut out and applied.
CHARCOAL-DRAWma.
Provide yourself with some sticks of charcoal, black
and Vv'hite crayon, stumps, chamois-leather, rag, and
crayon-holder.
FOR CHARCOAL-DRAWING TO IMITATE LITHOGRAPHY.
Get a pine-wood frame and a sheet of crayon-paper.
Ascertain the size of the lithograph that you intend to
copy ; have the frame near the size ; cut the crayon-paper
to match, and commence to sketch it in the folhwing man-
ner : Put some strong flour-paste, such as bookbinders
use, over the frame. Damp your crayon-paper with
clean water, and paste your paper upon the frame : when
dry it will be ready to work upon. Proceed in the fol-
lowing way : draw in your subject with charcoal ; use
the stump to blend, repeating the shades until you get
what you want. As finer touches are required for
foliage and branches, houses and figures, these have to
be done with the fine point of your black chalk. A few
292 CHARCOAL-DRAWING.
li":hts can be added to advanta"fe with the white chalk.
When all this is completed to your satisfaction, preserve
the drawing by coating over the back of it with " pre-
serving-varnish." When dry, cut out your drawing, and
mount it upon a sheet of stiff white board.
The receipt for the " preserving-varnish " is at the
end of the book.
CHARCOAL DRAWING, AS PRACTICED MORE GENERALLY
BY ARTISTS.
Procure tinted, crayon, or common brown paper
;
cut the size that you wish to make your drawing;pin it
on the drawing-board, and commence your sketch with
charcoal. If a mistake is made, it is easily dusted off
with the rag. Get your forms and shades in with char-
coal, and tone down by using the stumps, and occasion-
ally with the fingers. Half-lights can be wiped out by
means of the chamois, and high lights can be put in Avith
white chalk. This style is exceedingly useful for artists
and others, to get in their first ideas, as charcoal works
so free and cifective. When you have worked in all
you can, use a liquid fixatif: this can be obtained
from the publishers of this book, with full directions

CHARCOAL-DRAWING. 293
how to use it. After the fixatif has been applied, it
secures your drawing ; and, if desirable, you can re-
touch with charcoal and chalk to good purpose. Always
use the fixatif after retouching. This can be repeated
indefinitely.
The same process from beginning to end can be as
readily drawn on canvas, the fixatif applied, and, when
you have obtained all the effect you wish, you can com-
mence oil-painting right over it.
HINTS FOR DESIGNERS AND ILLUSTRATORS.
To be a designer or an illustrator, artistically con-
sidered, requires a natural talent for sketching objects
with facility, a facile pencil, a versatile genius, a quick
imagination, and ready invention. As we do not all
possess these indispensable qualifications, we can not
all be first-class illustrators or designers ; but, if we
have a little to work upon, we may improve it, and
perhaps, with perseverance and application, make our-
selves quite acceptable in either capacity.
For designers in prints, it is a profitable way to im-
prove time by sketching single and separate flowers, and

294 HINTS FOR DESIGNERS AND ILLUSTRATORS.
leaves and buds, then arranging them in little groups,
then re-arranging them, making one flower the principal
in one group, and the others subservient to it ; and, in
another group of the same flowers, making one of the
others the principal. By doing this a number of times,
and following it up for a number of days, you will ob-
tain a facility of arranging that can not be obtained in
any other way.
Many pleasing designs are made with combinations of
ovals, rounds, squares, triangles, and all the manifold
shapes that angles and curves can be put to.
In sketching, always strive to be neat and clear with
outliaes, if you wish to be a successful designer.
Some of the principal colors that designers use are
the three chromes, Chinese white, lampblack, carmine,
emerald-green, Prussian blue, vermilion, pink madder,
burnt sienna, scarlet, and combinations that these colors
will make. It will be observed that most of these
enumerated are opaque colors ; but those that are not
may be made so by adding white.
To give facility for working with the brush, the
draughtsman can not do better than study and practice
the two pages of this book, 196 and 197.

HINTS FOR DESIGNERS AND ILLUSTRATORS. 295
For an illustrator, a much wider range of sketching is
necessary ; and he can not do better than begin with sub-
jects either from nature or acknowledged good copies.
For instance, make a sketch of a chair, then put the
model away, and sketch one from memory. When fin-
ished, compare it with the original : it is a failure perhaps;
so tear it up, and try again and again, until you have
every stave and point correct, and well in your memory.
Sketch every thing else in the same way, individually
and collectively, until you can do them readily.
Figures and all kinds of quadrupeds should be treated
precisely in the same way ; and the more difficult the
subject, the more pains should be taken.
This copying from good models, and then drawing the
same from memory until fairly accomplished, is a won-
derful stepping-stone to a successful illustrator.
A perusal of the article on charcoal-drawing as prac-
ticed by artists would be advantageous, and could be
followed out in developing the first ideas of subjects, and
bringing them into form and order.

296 LINN^OGRAPHY.
LINN^OGRAPHY.
This is an easy method of procuring outlines soft and
artistic, and can not fail to be correct, as they are copied
from natural leaves; and, if it is manipulated neatly, the
result bears a near resemblance to stippling. We will ivean illustration with a fern-leaf. Procure a fine-shaped
fern, and place it flat upon a sheet of white drawing-
board;pin it down with little baby-pins, in order that it
may lie close to the paper in every part ; then prepare a
weak shade of Indian-ink in a saucer or plate. Dip
your brush in it, charge it pretty well, and commence
rubbing it on the comb, backwards and forwards, while
holding it over your leaf. The effect will be, that the ink
will be forced through the teeth of the comb, and descend
upon the paper in small round dots. Proceed in tl
way until you have acquired the depth of shade ywant
;then remove the pins and fern-leaf, and you will
find a pleasing outline of the fern, shaded neatly. Youcan repeat this with other leaves, and form them into a
group. Flowers may likewise be done in the same way.
Flowers and larger leaves will require to be finished with
lis
ou

LINN^OGRAPHY. 297
the sable by velning the leaves, and penciling in the
stamens and anthers to the flowers. Colors may be used
for variety, taking the place of the Indian-ink, and
tinted board in place of white. If the paper be prepared
with isinglass, in the same way as for bronzing (see page
198), you can proceed to linnaeograph your leaves in the
same way as spoken of, and afterwards stain them with
varnish-color, according to directions for Oriental paint-
ing.
The same method may be applied to silk, satin, and
cloth. If either of these articles are used, they must be
first stretched upon a flat board, and fastened with nails ;
then coated over with isinglass : afterwards proceed in
the same way as upon any other surface.
The linnceographic process may be used to advantage
in forming a background for water-color flowers, in
doing which the flowers and leaves must be correctly
drawn on tracing-paper, and neatly cut out with penknife
or scissors ; then arrange your flowers and leaves upon
your drawing-paper, and weight them down with little
weights instead of pins. Be careful to have the edges
close down ; then begin the linnaeographing. If done
carefully, it has a very similar effect to stippling, and is

298 PERMANENT FLOWER-PAINTING.
done in a few minutes in comparison to the wearying
time taken to stipple. You can now remove the paper,
and proceed to paint the flowers and leaves in the ordi-
nary way. Articles requisite for plain linna30graphy
:
»
saucer, comb, tooth-brush, and crow-quill sable.
Letters, horses, cows, dogs, sheep, figures, monogi'ams,
&c., may be linnaeographed if cut out neatly and
fastened well upon the paper.
PERMANENT FLOWER-PAINTING.
This style of pamting is suitable for folding-screens,
cuspadores, &c.
Procure a tube of flake-white, a bottle of copal var-
nish, palette, and knife, and the following colors in pow-
der : carmine, Prussian blue, chrome-yellow, black, burnt
sienna, and Yandyke-brown, a few sable brushes of vari-
ous sizes, and a few camel's-hair brushes.
Sketch your design upon what you are going to deco-
rate, with chalk, any color that will show ; then prepare
some of the flake-white upon your palette, by mixing
sufficient copal varnish with it to make it flow readily.
Coat over your flowers, birds, leaves, and stems with

PERMANENT FLOWER-PAINTING. 299
this twice or three times. Allow it to dry a short time;
then, with one of your camel's-hair brushes, dry, char-
ging the brush with the powder-color you wish, and shade
on carefully the tint required. For pink flowers, use car-
mine ; blue flowers, the Prussian blue ; for purple flowers,
purple powder made with carmine and a little blue. Yel-
low flowers, with chrome-yellow, afterwards with a little
sienna. The leaves shade with green powders, made
with chrome-yellow and blue, in various proportions, to
suit the tint, introducing a little sienna or Vandyke-brown,
if brown tints are required. For white flowers, use black
and a little chrome with it : the stems shade green after-
wards, adding a little Vandyke-brown.
If you require any of the flowers of a much stronger
color, it will be necessary to add a little poppy-oil besides
the varnish. This will give it additional stickiness, and
make it receive more color.
Be careful to coat over the flowers and leaves evenly,
or the powder-colors, when applied, will go on streaky.
After the powder is all done, if you wish to vein the
leaves, get a little varnish, and mix some Vandyke-brown
with it and pencil them in ; likewise the stamens of flow-
ers that require them ; the anthers do with chrome yel-
low.

300 TO PAINT FLOWERS ON TINTED PAPER.
TO PAIXT FLOWERS ON TINTED PAPER.
First paint all over your flowers with Chinese white.
"When dry, repeat coating until you get them as white as
London board. Some flowers require to be painted more
solid with the white than others : such as yellow, scarlet,
blue, and purple flowers. After you have your flowers
and buds satisfactorily done, you can then proceed in the
regular way, as written for flower-painting, only more
care must be observed in laying the washes on, and not
attempt to retouch before it is quite dry, or the white
will wash up and mix with your colors, and the conse-
quence will be that your flowers in the high lights will
not be so brilliant as they otherwise would be.
The green leaves paint on the tinted paper, in the
same manner as if you were painting on white paper (see
article on Green Leaves) ; and if you want a bright green,
or part of a leaf bright, pencil on some Chinese white,
and stain over it the tint required.

TREATMENT OP AUTUMN LEAVES. 301
TREATMENT OF AUTUMN LEAVES.
The painting of autumn leaves has most deservedly
grown into public favor, owing to the artistic exertions
of several in this line of art, who have succeeded in
placing admirable specimens of brilliant leaf-beauty be-
fore the patrons of art ; and whether they are introduced
in single sprays, or harmonized in groups, never fail to
attract attention, as the leaves are capable of being made
into very handsome groups, owing to their varied tints,
which are second to none but the flowers to which they
are related.
The treatment of the leaves is varied to suit the
coloring of each. For yellow leaves, such as are often
seen among the sumach and maple, use gallstone;and
while moist wash in a delicate tint of pink madder. For
brilliant red leaves, paint over twice with gallstone
and gamboge, and afterwards with pure carmine, the
general tint required. If there are any dark parts on the
leaf, wash in Vandyke-brown while the carmine is moist.
For leaves that are partially turned, and have a variety
of colors in one leaf get the tints mixed upon the palette,

302 TREATMENT OF AUTUMN LEAVES.
all ready to apply, and wash them in with different
brushes, first coating the leaf over with clean water, and
putting some blotting-paper upon it, in order to absorb
the superfluous moisture. Float on your color as near
the real shade as you can mix it, using gallstone, Indian
yellow, chrome-yellow, gamboge, raw sienna; yellow
ocher, for yellows, adding a little Prussian blue to either
of the yellows to make green. For red parts, use car-
mine and pink-madder. For brown leaves, such as
are sometimes seen on beech-trees, use gamboge, burnt
sienna, and burnt umber. For some oak-leaves that
have a peculiar yellow tinge, use yellow-ocher, and float
on a little raw-umber while the yellow-ocher is moist.
All autumnal leaves washed in, in this general man-
ner, require to have a little more finish, either in broad
touches, or stippling, or lined.
The veins can be painted in with a long crow-quill
sable, in Chinese white, and stained if requisite. One
side of the vein should be relieved with a stroke of dark
color. Some of the veins are penciled in with crimson-
lake and Vandyke-brown, equal parts.

GREEN LEAVES IN WATER-COLORS. 303
TREATMENT OF GREEN LEAVES IN
WATER-COLORS.
Leaves are painted In various ways, and, if painted
well, add very much to the beauty of the flowers.
General treatment is to coat over the shadows and
shades with neutral tint or Indian-ink, and then wash
over with various-tinted greens. A few directions for
treatment with different colors will greatly assist those
who are fond of flower-painting.
For dark leaves, coat over the shades with neutras
pretty strong ; when dry, wash over all the leaf with
green, composed of indigo and raw sienna ; when dry,
retouch with broad touches the shadows and couvoln-
tions.
For some kinds of rose-leaves, use emerald-green and
carmine for the shades, and wash over with emerald-
green and pale chrome-yellow ; finish with small touches
to increase the depth in some parts.
For small, delicate leaves, and new leaves, gamboge
and Prussian blue. Let the gamboge predominate ; and
in some leaves a faint trace of carmine may be pen-

304 GREEN LEAVES IN WATER-COLORS.
cilled in. The majority of green leaves may be treated
with gamboge and Prussian blue, in numberless tints,
occasionally washing in a little carmine in some in-
stances, and burnt sienna in others. All leaves, after
the broad washes are in, can be worked over, sometimes
to great advantage, by a little stippling or a few lines.
The amount of finish in this way depends upon the skill
of the artist. If you find you are not improving it
after working over for a considerable time, leave oflT,
and come again to it some future time, fresh, and deter-
mined to succeed.
Sap-green makes a very good wash for some leaves,
strengthened Avith a little burnt sienna and Prussian blue
in the shades.
The veins of green leaves, if dark, can be pencilled in
with Vandyke-brown, adding a little indigo for the
darker places. If the veins are lighter than the leaf,
pencil them in with Chinese white, and stain them with
color. For drops of water, the under part must be
darker, and the light may be put in with white, or
scraped up with the point of a penknife.
The lights on a cluster of anthers in a flower are often
made with good effect with the point of a penknife.

Ilhmitiation, &l
(305)


ILLUMINATING.
]N ancient times, our forefathers had a
way of introducing the first letter of sen-
tences to their readers, dressed and dec-
orated with brilliant colors; and some-
times, by way of emphasizing a whole sentence, every
letter would be illumined, so as to attract more attention.
The style of letters usually selected for illumining are
the old English. Any others can be used;but these,
and such as these, are better adapted to show the style.
The letters should be neatly drawn, and skeletoned out
with gold-brouze ; then filled in with one of the bright-
est colors. For variety, some of the letters may be out-
lined with silver or lampblack, always using the crow-
quill sable for outlining. When silver or gold shell is
used, it can be made to look almost as bright as leaf-
gold or silver by rubbing with an agate burnisher.
It is requisite to be provided with the following arti-
cles : gold shell, silver shell, and the following cakes of
water-colors: vermilion, cobalt-blue, carmine, lamp-
307

305 ILLUMINATING.
black, emerald-green, gamboge, coustant white ; two
sable brushes,— one a crow-quill with hairs about five-
eighths of an inch long, the other an ordinary duck-quill
size,— and a tool called an agate burnisher. But, in
the absence of this, any small rounded stone or piece of
metal will do, so that it is quite clean.
Observations.— The crow-quill brush is best suited
for outlining the letters : being a little longer, it carries
the paint better. If the letters are large, the duck size
will be better for filling in ; and, in doing which, you
can alternate the colors according to taste. If you de-
sire a purple, you can make a very beautiful one by
adding carmine to cobalt-blue ; and if you desire a scar-
let, add a little carmine to gamboge. Wiien the letters
are finished, you can vary the appearance a little more
by shading them very delicately with black, weakened
down to a neutral tint. The emerald-green and vermil-
ion make very rich contrasts in one letter. Blue and
scarlet in others, and gamboge and purple, and blue, pur-
ple, and emerald, for more sombre ones.

SOEEEKTO-WOOD CUTTING.
SORRENTO-WOOD CUTTINGS-.
Choose a simple pattern to commence with;make a
very exact drawing of it on paper, of such fabric as can
be cut through easily. Paste the paper on the wood in-
tended to be cut; then saw and cut through paper and
,vood on the lines of the drawing with small, sharp in-
struments. If desirable, some of the pieces cut out
may be painted and re-iuserted.
When in Italy, we saw splendid specimens of this
work ; among them the wedding-gift of the city of Turin
to Prince Untberto, a sort of box, valued at five thousand
francs. It was a complicated piece of work, and exqui-
sitely wrought. When shut, it was only a handsome box
;
but it opened into jewel and sewing boxes, a writing-
desk, toilet-table, music-stand, drawers, and various
other conveniences, the whole inlaid and bordered with
tiny bits of colored wood.

310 HERALDIC EMBLAZONING.
HERALDIC EMBLAZONING-.
We do not intend to enter into the origin of heraldry,
or give any elaborate description of armorial bearings,
or attempt to trace out any family crests or coats of
arms, but merely to give the modus operandi of fol-
lowing out the emblazonry of any crest or coat of arms
that may be found in heraldic books ; and to facilitate
this object, it is requisite to be acquainted with the lead-
ing terms us^d. The shield is divided into the following
parts, A, B, C. The chief sub-divided into A, the dex-
ter or right hand ; B, the middle chief point ; C, the
sinister, or left-hand chief point ; D, the collar, or honor
point ; E, the heart, or fess point ; F, the nombril, or
navel point ; and G, H, I, the base, subdivided into G,
the dexter base point ; H, the middle base point ; and I,
the sinister base point. (See Fig. 1.)
The shield, with its points and parts thus described, is
distinguished by certain armorial colors called tinctures,
separated by division-lines. The shape of the shield is
optional : the whole space within the bounding-lines of
the shield is called tlie field. The tinctures used in
heraldry are metals, colors, and furs.
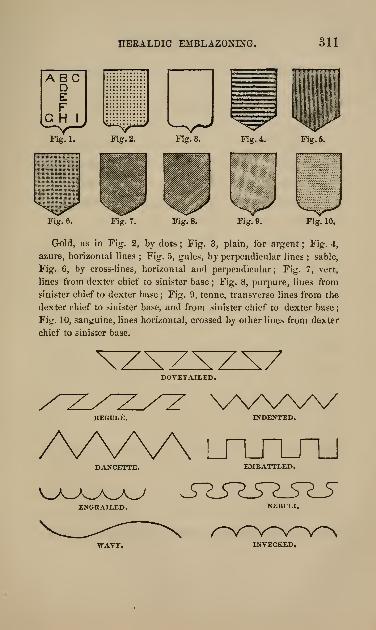
HERALDIC EMBLAZONING. 311
Fig. 6. Fig. 7. Fig. 8. Fig. 9. Fig. 10.
Gold, as in Fig. 2, bv dots ; Fig. 3, plain, for argent ; Fig. 4,
azure, horizontal lines ; Fig. 5, gules, by perpendicular lines ; sable,
Fig. 6, by cross-lines, horizontal and perpendicular; Fig. 7, vert,
lines from dexter chief to sinister base ; Fig. 8, piirpure, lines from
sinister chief to dexter base; Fig. 9, tenne, transverse lines from the
dexter chief to sinister base, and from sinister chief to dexter base;
Fig. 10, sanguine, lines horizontal, crossed by other lines from dexter
chief to sinister base.
DOVETAILED.
w^/^y^/INDENTED.
Ay\A^ innsijEMBATTLED.
wAvr. INYECKED.

312 HERALDIC EMBLAZONING.
Names abridged. In English.
Or, Or, Gold.
At., Argent, Silver.
Az., Azure, Blue.
Gu., Gules, Vermilion.
Sa., Sable, Black.
Vert, Vert, Green.
Purp., Purpure, Purple.
Ten., Tenne, Tan.
Sang., Sanguine, Indian Red,
The two principal furs used in heraldry are ermine
and vair.
Emblazonry is represented in engravings, that are not
colored, by the following marks : gold is represented
by dots ; silver, by the shield being plain ; blue, by
horizontal lines ; red, by perpendicular lines ; sable, by
cross-lines, horizontal and perpendicular;green, by lines
from the dexter chief to the sinister base;
purple, by
lines from the sinister chief to the dexter base ; tan, by
transverse lines from the dexter chief to the sinister base,
and from the sinister chief to the dexter base ; Indian
red, by lines horizontal, crossed by other lines from the
dexter chief to the sinister base. (See Figs. 2 to 10.)

HERALDIC EMBLAZONING. 3 13
ATTITUDES OR POSITIONS OF ANIMALS.
When a lion or other beast of prey stands upright,
with one ear and one eye seen, he is termed rampant
;
when walking forward, with one eye and one ear seen,
passant ; when sitting, sejant ; when lying down, cou-
chant. If in any of these positions the animal looks
full face, so that both eyes and ears may be seen, the
word guardant is annexed to passant, rampant, sejant, or
couchaut, as the case may be ; and if he look back, the
word reguardant. Animals of the deer kind have their
positions otherwise blazoned. Thus, when looking full-
faced, they are said to be at gaze ; when standing, sta-
tant; when walking, tripping; when leaping forward,
springing ; when running, courant ; and when at rest on
the ground, lodged.
Parts that are specified in the directions to be gold
are mentioned as Or. Such parts can be done two ways;
viz., with gold-leaf or gold-bronze : the latter is most
simple, and easier to do. Get gold-bronze, mix it with a
little dissolved gum-arabic, and coat over all the parts
marked Or, and, when thoroughly dry, rub it hard with
the a^ate burnisher, same as mentioned in directions for

314 HERALDIC EMBLAZONING.
illuminating. If leaf-gold is required, you dissolve
isinglass in hot water : make it pretty strong, and pencil
over the parts (while the Isinglass is warm) that are to
be gold ; allow it to dry ; then pencil over the same with
gold-size, and proceed in the same way as directions for
gilding. (See page 206.) The parts marked Ar., argent,
silver, may be done with white bronze mixed with a
little gum, and, when dry, rubbed with the agate ; or the
part can be left white, if the coat-of-arms is being painted
on white paper ; and if tinted paper, a few coatings of
constant white will answer the purpose. For vert, use
emerald-green ; for purpure, use carmine and a little
cobalt-blue ; for gules, use vermilion ; for sable, use
lampblack ; for tenne, use yellow ochre and a little
burnt sienna ; for sanguine, use Indian-red ; for azure,
use cobalt-blue.
In finishing, gold and bronze are shaded with burnt
sienna ; and in the darker shades add a little Vandyke-
brown. All the other colors may be enriched by a little
shading : for vermilion, use carmine ; for purple, use
purple, and add very little black, to darken it a trifle ; for
green, gamboge and a little black ; for tenne and san-
guine, use Vandyke-brown ; for white, use the black,
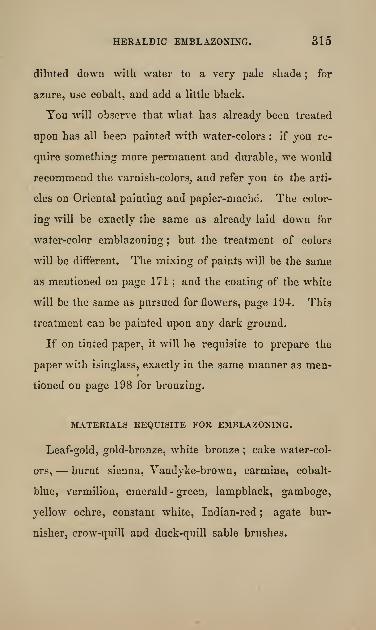
HERALDIC EMBLAZONING. 315
diluted down with water to a very pale shade ; for
azure, use cobalt, and add a little black.
You will observe that what has already been treated
upon has all been painted with water-colors : if you re-
quire something more permanent and durable, we would
recommend the varnish-colors, and refer you to the arti-
cles on Oriental painting and papier-mache. The color-
ing will be exactly the same as already laid down for
water-color emblazoning ; but the treatment of colors
will be different. The mixing of paints will be the same
as mentioned on page 171 ; and the coating of the white
will be the same as pursued for flowers, page 194. This
treatment can be painted upon any dark ground.
If on tinted paper, it will be requisite to prepare the
paper with isinglass, exactly in the same manner as men-
tioned on page 198 for bronzing.
MATERIALS REQUISITE FOR EMBLAZONING.
Leaf-gold, gold-bronze, Avhite bronze ; cake water-col-
ors, — burnt sienna, Yandyke-brown, carmine, cobalt-
blue, vermilion, emerald -green, lampblack, gamboge,
yellow ochre, constant white, Indian-red ; agate bur-
nisher, crow-quill and duck-quill sable brushes.

316 CUTTING OUT PAPER ORNAMENTS.
HOW TO CONVERT BROKEN CAKE-COLORS
INTO MOIST COLORS.
Put the broken color into a small cup, and cover witli
water. Let it remain until the color is dissolved or suffi-
ciently softened ; then get it out and place it upon a porce-
lain palette or clean plate. Add about one-third of its
original bulk of honey to it ; mix it well with a small
palette-knife, and put it in one of the porcelain pans :
when the water moisture has evaporated, it is ready for
use.
DIRECTIONS FOR CUTTING OUT PAPER
ORNAMENTS.
Procure several tints of tissue-paper of delicate colors,
such as pink, blue, green, yellow, and white. Decide
upon the size and shape you wish your subject, whether
round, square, or oval.
For example : We will suppose it to be a circle the size
of an ordinary plate. Draw out your circle with com-
passess, or from your plate, upon the tissue-paper.

CUTTING OUT PAPER ORNAMENTS. 317
Double it over and over four times, in such a way as to
make your paper assume the shape of a cone one-eighth
of a circle. Now cut a piece of white letter-paper
exactly the same size as one-eighth of a circle, and upon
it draw a single design with pen and ink, observing that
each figure should be separate. When complete, place it
carefully inside the first division of your folded paper.
You can now" trace the pattern with lead-pencil on the
tissue-paper. Tliat being done, remove your original
pattern, and commence cutting out the parts you have
marked with a pair of embroidery scissors. When you
have cut them all out, unfold your paper, and you will
have your pattern repeated eight times ; and, when done
neatly, it has a pleasing appearance. If it is not all you
desire, try again. A few trials will make you perfect.
The paper ornament, when finished, may be used as a
mat-stand, scent-bottle, or pincushion, or to place upon
a dessert plate.
This style of paper-cutting may be used for many pur-
poses that your own ingenuity may suggest.

318 DIRECTIONS FOR BROXZE STENCILLING.
DIRECTIONS FOR BRONZE STENCILLING.
Procure papers of three or four different kiuds of
bronzes,— white, gold, copper, and salmon. A bottle of
gold-size, a flat camel's-hair brush, penknife, and a flat
piece of tin six or eight inches square. Make a rubber
of a bit of soft leather, with soft cotton inside. Tie it
with thread, so as to keep it in shape.
Draw the subject you want on thin, strong writing-
paper. Whether flowers, figures, houses, letters, or
scroll ornament, place the paper with your drawing on
the tin, and commence cutting out with the point of your
penknife, leaving a little band, now and then, to hold
your design together. With a little practice this can be
done very neatly. Your design being ready, coat over
any article you intend to decorate.
For an example, we will take a little fancy table that
has been varnished or coated with oil-paint. Wash it
well, so as to free it entirely from grease. When quite
dry, coat it over evenly with gold-size with the flat
brush. Allow it to dry about twenty minutes ; then get
all your bronze papers open;place your design on the
ENGRAVINGS OR PRINTS UPON GLASS. 319
part coated with gold-size. Charge your leather rubber
well with the desired bronze, and rub gently the bronze
on to the stencil. Great care is requisite in rubbing on
the bronze, or you may break some of the delicate bands
that hold together your design. The bronze readily
adheres to the sticky property of the gold-size.
If desirable, you can stain with transparent color what
you have stencilled. In that case you must allow it to
dry a few days, and use the same colors as directed in
Oriental painting.
FOR USING ORDINARY ENGRAVINGS OR
PRINTS UPON GLASS.
The engravings or prints used for this purpose should
be on paper that contains little or no size ;uiid those,
answer best that are strongly printed.
Lay the print flat, and damp with sponge and water
the plain or unprinted side. Apply a generous coating
of transfer-varnish on the glass. Place on tJie print
face to the glass ; then press with the roller, as before
directed in the article on diaphanie ; and, having satisfied
yourself that no air-bubbles remain between the face of

320 IMITATION OF INLAYING WITH EBONY.
the priDt and the glass, lay it at some distance from the
fire to dry.
Damp the back of the print again with water, and
commence rubbing off the superfluous paper. This must
be done with care, or the face of the print will be
injured.
When you have removed sufficient of the paper, and
allowed the moisture to dry, apply with the camel's-hair
brush the clearing-varnish.
If you wish, you can stain some of the parts with
varnish-color, as used in oriental. Afterwards varnish
all over with copal-varnish.
IMITATION OF INLAYING WITH EBONY.
Procure any article that is made with holly-wood or
any other light-colored Avood. Trace neatly with lead-
pencil any design you wish, and proceed to outline the
same with your crow-quill sable. Afterwards fill in all
the interstices with lamp-black.
The designs for this style may be as simple or as
elaborate as for any style of decorating ; and any one
who has a steady hand for outlining can accomplish it.

IMITATION OF INLAYING WITH EBONY. 321
"We will suppose, for example, that you only want a
border composed of ivy-leaves. Sketch in your pattern
with your crow-quill brush charged with black. Vein
the leaves, and leave all the connecting-stems white.
Fill in to the width of your border with black.
The same design may be reversed, which is much
easier to do for a border. In this case, pencil in your
leaves with black, leaving the veins white ;the connect-
ing-stems do with black. Make your black smooth and
solid, even if you have to go over two or three times.
Chinese designs, with figures, buildings, birds, trees,
flowers, &c., look very well in this style, on small tables,
folio, and book-covers ; indeed, this style can be applied
to advantage on any article that is made in light-colored
Avood. I once saw a complete toilet-set ornamented ia
this style, chairs and bed included.
The articles required are a pan of Winsor and New-
ton's lamp-black ; two sable brushes,— one a crow-quill
sable, with the hairs five-eighths of an inch long ; the
other a duck or goose-quill, according to the spaces you
have to fill in.
After finishing your design, if the article is one that
will be handled much, it is better to give it a coat or two

322 DIRECTIONS FOR CLEANING BRUSHES.
of copal-varnish. If two, allow the first coat to dr^ a
couple of days before applying the second.
The reason for varnishing is, the lamp-black is water-
color ; and, if any moisture gets upon it, it would smear
and spoil the effect of your work.
If you are an oriental-painter, and have the requisites
for that style, you can use your lamp-black mixed with
varnish, in place of using water-color.
To those who have painted papier-mache, and are
familiar with varnishing, if they wish they may put an
extra finish upon their work by giving it two coats of
varnish as before directed, and then following the direc-
tions for polishing as mentioned on page 202.
DIRECTIONS FOR CLEANING BRUSHES.
Always leave your brushes clean. For water-color
brushes, Indian-ink, and sepia, wash them in clean
water.
Brushes that are used in alcoholic varnishes, such as
spirit-sandarac, cabinet, varnish for pearling, preserving-
varnish, and Grecian varnish, should be washed in
alcohol.

IMITATION OF GROUND GLASS. 323
All brushes used in oil painting, oriental and papier-
mache, and turpentine varnishes, such as transfer-var-
nish, antique varnish, mastic, and copal, should be
washed in turpentine, and afterwards with soap and warm
water. Attention to this, and your brushes will always
be in working order, and will last a long time ; but if
neglected, and the color or varnish is allowed to remain
in, they soon spoil and get ruined.
IMITATION OF GROUND GLASS.
Take one part of flake-white ; add two parts of sugar
of lead ; mix with equal parts of oil and turpentine.
The color must be used thin, and applied with a paint-
ing-brush of moderate size. Then, with a painter's
duster or badger, clean and free from dust. Commence
gently dabbing the glass with the ends of the luiir until
your work acquires uniformity of appearance. This will
wear a considerable time, and it may be waslied with
weak soap and water if necessary ; but, should you
require to repaint it, the first may be removed with very
little labor by applying with a sponge a solution of pot-
ash.

324 GRECIAN VARNISH.
Another method, more simple : Get some putty;pre-
pare it in a round ball, and dab over your glass evenly;
let it dry a couple of days, then repeat it. If evenly
done, it looks well, and answers every purpose for which
ground glass is used. If you should require to remove
it, it may be done with very little trouble, by applying,
wdth a piece of sponge or cotton, oil of tartar, or solutiou
of potash.
TRANSFER-VARNISH.
To six ounces of fir-balsam add three ounces of recti-
fied spirits of turpentine. Shake well together, and it is
ready for use.
GRECIAN VARNISH.
Take three ounces of fir-balsam, two ounces of ninety-
five per cent alcohol, and one ounce of rectified spirits of
turpentine. Shake well together ;strain if requisite, and
it is ready for use.

SEALING WAX. 325
SEALING WAX TO IMITATE CORAL.
,'>": ::-
ELT sealing wax of the de-
sired color in first proof al-
( cohol. Spread thickly over
!^ a pasteboard, basket, plate,
^^ or small waiter. Stir rice,
sago, and small bits of tap-
ioca, into the vessel of dis-
solved sealing-wax ; spread
the same over the basket, etc. ; dry thoroughly. This
is pretty for card receivers.
Sealing-wax Painting. — Into twelve large-mouthed
bottles, containing about half a gill each, put as many
colors and shades of sealing wax. Pour over alcohol,
best quality, sufficient to dissolve the wax. Paint
flowers, birds, etc., with the same to imitate enameled
painting. A friend of ours, who had much skill in
painting, received $60 for a small table painted in
this way.

326 PRESERVING-VARNISH.
CLEAR VARNISH SUITABLE FOR ENGRAV-
INGS, &c.
To six ounces of fir-balsam add twelve ounces of rec-
tified spirits of turpentine. Shake well together ; strain
if requisite, and it is ready for use.
PRESERVING-VARNISH.
To half an ounce of shellac add one pint of ninety-five
per cent alcohol. Let it remain two days, occasionally
shaking it. Pour off from the sediment, and it is ready
for use.
(327)


THE AQUARIUM.
giving some simple directions for
making aquaria, we believe that we
are performing an acceptable service to
our readers ; for within comparatively
a short time the aquarium has become
a popular source of entertainment and in-
struction, and by means of it a fresh impetus
has been given to the study of the won-
ders of the ocean depths. No more attractive
object can be found, than a well-stocked aquarium, with
its living curiosities of animal and vegetable life, nor one
so continually changing in its character— ever varying,
ever new. We give a few simple directions to assist the
reader, although the subject is not strictly within the
scope of our volume. Bat we have frequently been in-
quired of relative to the mode of constructing an aqua-
rium, and think our readers will be gratified to find a
few simple rules within their reach.
The first requisite is a tank, which can be of any
(329)
330 THE AQUARIUM.
shape to suit the maker's fancy and his facilities for
construction. The square or oblong forms are generally-
preferred, being easier of manufacture, although octagons,
or other angular forms, are readily made. Great care
must be taken that the tank is perfectly water-tight ; and
this is one of the chief difficulties to be encountered. Of
course, simple tanks can be made of glass tumblers, china
bowls, etc., but we are speaking of those on a more
extensive scale. The tank is, in few words, a water-tight
box with glass sides and a slate or marble bottom. A
cabinet maker, or any ingenious person, can easily make
one by constructing the skeleton of a box, or the frame
of a box, and fitting glass sides into solid grooves in the
frame. Also have a glass slab for a cover, raising it a little
from the top of the tank by placing bits of cork upon
the edges, in order that air may pass over the water. The
dimensions can be decided according to taste or convenience.
The following are found to be very available sizes :—
18 inches long, 13 inches wide, and 13 inches high.
30 «' « 18 " " " 18 "
48 " " 24 " •' " 24 " *
Having completed the tank, the next, and perhaps
more difficult step, is to fit it up, or " stock it ;" and

THE AQUARIUM. 331
here is a field for the display of taste and beauty. Of
course, this process depends upon whether the tank is for
a salt or fresh water aquarium— the tank itself being
the same for both. In a small aquarium it is not best
to fill up the tank with rock-work, as all the space thus
occupied diminishes to that extent the room for the ani-
mal and vegetable life. Before fitting up the tank, it
should be well soaked for two or three days, to remove
any loose particles and all scent and foul matter from the
cement used in fastening the glass sides, as any such im-
purities will destroy all the animal life contained in the
tank. Cover the bottom of the tank evenly to the depth
of one or two inches (the depth is not essential) with
coarse sand, pebbles, small shells, etc., washed clean. In
this layer the aquatic animals will delight to amuse them-
selves. Next, place stones and rocks of difi'erent sizes in
the tank, piling or adjusting them so that open spaces
will be left between the stones, corresponding to the
caverns and hiding places in the beds of brooks and on
the bottom of the ocean. Allow one piece of rock to
project above the surface of the water, so that such of the
animals as desire can crawl up and breathe atmospheric
ak. The tank should be filled perhaps two thirds full of

832 THE AQUARIUM.
water, and the hight marked on the side of the tank.
As the water evaporates, fill up with fresh water to this
mark. If the aquarium is for salt water, the filling up
to compensate for evaporation should be done with, fresh
water, (not sea water,) as the salt remains in the tank
after the evaporation. The water should be occasionally
supplied with fresh air, by means of a syringe, and changed
from time to time during the first week, or until the plants
and animals seem to thrive naturally.
The aquarium should be stocked with the vegetable
life Jlrst, and the plants should be suffered to remain a
week or more before any animals are introduced, as some
plants may die, and dead leaves and sticks may accumu-
late. These should be removed as soon as seen.
In a marine aquarium, branches of coral make a very
pretty ornament to the interior arrangement. An excur-
sion on the sea shore will supply a variety of plants, etc.,
with which to stock the tank. Make your exploring
expedition when the tide is out, supplied with a basket,
hammer, chisel, etc. Turn over large stones, and under-
neath them you will generally find excellent specimens.
Search in the fissures of the rocks, pools, and basins,
and find marine plants. If possible, do not detach them

THE AQUARIUM. 333
from the rock, but cut away the piece to which they are
attached, and bring the whole away ; the plant is more
likely to live in this way. If it is a delicate plant, place
it in a jar and cover it with water, or it will soon die by
exposure. In these excursions, you will find mollusca,
univalves, bivalves, barnacles, etc. Sea anemones wdll be
found adhering to the rocks ; star-fish, curious specimens
of the crab, and others, will be found under loose stones
at the lowest tide level.
The knowledge of a practical naturalist would be of
great assistance in fitting up the aquarium, as his prac-
ticed eye would detect many beautiful specimens which
might wholly escape the notice of those unskilled in nat-
ural history. The water for a marine aquarium should
of course be from the sea.
The fitting up of a fresh water aquarium is easily done.
We subjoin the names of a few plants, simply to specify
those most desirable :—
Forget-me-not, Yellow "Water Lily,
Ferns, Water Cress,
Water Violet, Tape Grass,
Common Rushes, Sweet Flag,
Common Dock, Golden Club,
Duck "Weed, Water Lobelia,
White Water Lily,
25

334 THE AQUARIUM.
and many others which are familiar to the reader Most
of these are common to our brooks and ponds. In placin^r
plants in the tank which require fixedness of roots, it is
well first to inclose the roots in a ball of wet clay.
Pond snails are easily procured, and are an important
accession, as they consume decayed or decaying vegeta-
tion, and in fact act as natural scavengers. Care must be
exercised to have neither too strong nor too feeble a light.
The fresh water muscle, and all the genera and species
which abound in ponds and creeks, are suitable for the
aquarium, and the same may be said of the fishes. The
spawn of the mollusca furnishes some food for the fish
;
but they should be fed daily, not with bread, but with
red worms cut up small, and occasionally v.ith millet
seeds. Pioces of dried beef, in minute fragments, will
answer as a substitute for worms. All impurities should
be removed from the tank, to prevent an unpleasant
odor, and to preserve the life of the animals.
From the hints thus given enough can be gleaned to
enable any one to attempt to make an aqr.arium with a
good prospect of success. An examination of one well
arranged would be of great advantage in giving correct
ideas of the construction and arrangrement.

A FERN-CASE FOR A SHORT PURSE. 335
A FERN-CASE FOE, A SHORT PURSE.
The base, which can be made by a carpenter if re-
quired, must consist of a plain board for a bottom, three
inches longer and wider than the case is to be. To the
bottom attach ogee-moulding, the large side downwards,
three iuches wide, in the top of which there should be a
groove for the reception of the glass.
Get five panes of glass : three of them, say, twelve
iuches by eighteen ; and two, twelve inches by twelve,
or in those proportions. Then set the lower edges of
two of the larger panes, and of the two smaller ones
into the grooves of the mouldings, and paste them
together (using gum-tragacanth dissolved in water to
the consisteucy of flour-puste; over the joined edges
with silk galloon. Cover all the echjes with the galloon,
lay the remaining pane over the top, and your case is
ready, with the exception of a zinc pan, which any tin-
man will make for you, and which is to be of a size to
fit into the base. Its depth should be of the width of
your moulding,— say three inches.
This pan is to be filled half full of pieces of charcoal,
of, say, an inch to an inch and a half square, with some
smaller pieces mixed in, but without dust.

336 A FERN-CASE FOR A SHORT PURSE.
The plants, which will grow better if transplanted in
their native earth, can be placed upon the charcoal.
Then moisten, but do not wet the soil.
It will require little or no care, and will not need to
be watered for months, as the moisture arising in the
case is sufBcient.
For the plants, a trip into the woods for mosses, ferns,
ground-laurel, little pine-trees, and checkerberry, squaw-
berrj, and cranberry vines to enliven the picture, and
such other plants as your taste may suggest, will be a
pleasant way of spending an afternoon.
The arrangement of the plants in the case must be
left to the taste of the maker ; but it is a irood rule to
place the tallest plants in the centre.

hallauMttS |ttni{ts
(337)

TRACING PAPER.
|ET a sheet of fine tissue paper, and rub it all over thinly
with clarified linseed oil, when it will be quite trans-
parent ; hang it up to dry ; it takes some time to dry,
but it must be allowed to dry thoroughly before using
it, or it may spoil the picture or engraving you trace
from. With this kind of tracing paper, being trans-
parent, you have merely to place it over pictures or
engravings, and with a lead pencil mark over your drawing with
a steady hand.
SPIRIT SAXDARAC VARNISH.
Six ounces of pulverized sandarac, two ounces of pulverized
shellac, four ounces of pulverized resin, four of turpentine,
thirty-two ounces of alcohol ; let the vessel you make it in be
surrounded with wann water, gradually made hot ; when all the
gums are dissolved, strain, and in a few days it will be ready for
use. Good for varnishing any thing that is wanted to dry quickly.
TRANSFER VARNISH.
To six ounces of fir balsam add twelve of rectified spirits of tur-
pentine ; shake well together ; strain if requisite, and it is ready for
use. Good for transferring engravings, and holds the ink firmlv ;
is sometimes used for varnishing maps, engi-avings, etc.
(339)

840 MISCELLANEOUS RECEIPTS.
MASTIC VAUNISH.
Dissolve (without heat) six ounces of bruised mastic in twelve
ounces of rectified spirits of turpentine ; when dissolved, strain it
into another bottle, cork it, and place it where the sun will strike.
After a time there will be a precipitate ; then put it in another bot-
tle clear. This is a good varnish for maps and engravings.
Another.— Six ounces of 95 per cent, alcohol ; six ounces of
mastic; fourteen of turpentine. Likewise good for engravings,
maps, etc.
HOW TO MAKE TRANSFER PAPER.
Take any opaque color, and mix it with a very weak solution of
gum water. The opaque colors best for this purpose are Indian red,
yellow ocher, chrome yellow, and white, ^^^len mixed, coat it over
thin drawing paper, with a flat brush ; when dry, it is ready for
use. It is very serviceable to transfer your sketch made on the
tracing paper : for oil pictures, for instance, when you have made
your sketch on the transparent tracing paper, place your transfer
paper, the color side to face the canvas, fit on your trace, and mark
all your drawing with a bone tracer, or with the point of your
sharpened pencil stick, when a very legible outline will be trans-
ferred to the canvas, of whatever color your transfer paper is.
Of course you will choose a color that will show ; chrome or
yellow ocher shows quite sufficiently on light-colored canvas.
After removing your paper, it is well to mark over on your can-
vas \\'ith lead pencil.
In making the transfer paper, be careful not to put too much gum
in, or the color will not leave so freely as is requisite for tracing.
MISCELLANEOUS RECEIPTS. 841
ANTIQUE VARNISH.
This receipt has never before been given, although large sums have
repeatedlg been offered for the secret. All other receipts are worth-
less, and no other preparation will stand the test of time, as this
has done.
Take one ounce of pure Venice turpentine ; mix well with two
ounces of pure spirits of turpentine ; warm in a large bottle. In
another bottle put four ounces of best fir balsam, (it must be pure,)
Avith two ounces of 95 per cent, alcohol ; shake well each bottle
frequently for six hours or more, then mix both preparations in the
large bottle. The whole should stand several days before usmg, in
a warm place.
CABINET VARNISH.
To one gallon of alcohol add six ounces of gum sandarac, three
ounces of gum mastic, one half ounce turpentine varnish ;put all
in a tin can, and in a warm place, occasionally shaking. Twelve
days or so will dissolve the gums. Strain, and it is ready for
use. This varnish is good for any sort of wood work, violins, etc.
TURPENTINE VARNISH.
To one gallon of oil of turpentine add five pounds of powdered
resin ; boil for thirty minutes ; strain it ; when cold, it is fit for use.
PAPIER MACHE VARNISH FOR PEARLING.
Take one quart of the spirit sandarac varnish, mix in three
ounces of lampblack, and one ounce of Prussian blue ;blend them
together, and it is ready for use.
^42 MISCELLANEOUS RECEIPTS.
TO TARNISH COLORED ENGRAVINGS, CHARTS,MAPS, ETC.
Make a frame stiff and strong, similar to those used for canvas
in oil painting, except it better be secured at the corners. Then
procure cotton cloth two inches larger than the frame all round;
this paste well on one side with strong binder's paste; also paste
the picture or map, which should lay a few minutes to become
moist throughout, and place the pasted sides together, (the cloth
and paper,) and rub with a bone folder, commencing at the middle,
out to the corners, that it may not wrinkle. The assistance of a
second person would be desirable to hold up the corners until
you are prepared to smooth as directed. Before this is dry, tack
with lace tacks to the frame evenly ; when it dries it will become
very tight and smooth.
After the whole is thoroughly dry, take a piece of isinglass, say
three inches square, break in small pieces and pour on hot water,
about a small cup full, and keep it hot till the isinglass is all dis-
solved, and while the solution is warm, with a flat camel's hair
brush, coat the face of your picture evenly, avoiding as far as pos-
sible touching a second time (particularly if it is colored) till the
first is dry. Be sure that every part has re?cived a portion of the
size. When dry varnish with Outside, or Mastic varnish.
RECEIPT FOR MAKING GOLD SIZE.
Take one pint of boiled oil, and three quarters of a pound of
litharge ; boil them together for three hours, occasionally stirring
it up ; when cold, let it settle for a few days, pour off the clear
liquid, and it is ready for use.
MISCELLANEOUS RECEIPTS. S43
TO STRETCH ENGRAVINGS FOR FRAMING.
Prepare them as already directed. Pictures much soiled may
be washed in clean water, and with blotting or other porous
paper the superfluous water absorbs the dirt ; they may be then
stretched, and be made to look as smooth and fresh as new.
TO CLEANSE CABINET WORK.
An excellent method is, in the first place, to saturate the surface
with pure olive oil, and then apply a solution made by dissolving
gum arabic in boiling alcohol. This will give to the furniture a
most brilliant appearance.
Another mode is to dissolve a poiuid and a half of potash in a
gallon of hot water ; then add a pound of virgin wax, and after
boiling it for half an hour, allow it to cool, and the wax will rise
to the surface. Put the wax into a mortar, and work it with a
marble pestle, adding soft water until it becomes of the consistency
of soft paste. Lay this on the furniture, and rub it carefully, when
dry, with a woolen rag, and a beautiful brilliancy is soon ob-
tained.
SPATTER WORK.
Select the pattern of leaves, ferns, or other design, according to
fancy, and affix to the surface of the material which is used, by
means of fine needles thickly placed, and closely securing every
part of the pattern, so that the edges leave no space between the
pattern and the material. Mix India-ink with water in a thin
paste. Dip a tooth-brush in the mixture, and, holding the satu-
rated brush over the work, quickly draw the teeth of a line comb
over the brush, repeating the operation until the surface is com-

3U MISCELLANEOUS RECEIPTS.
pletely spattered as desired. "When thoroughly dry, remove the
pattern ; and it will be found in relief tastefully set off by the
spattering.
Very coarse spatter is made by using the brush without drawing
a comb across.
All kinds of holly-wood ornaments, tidies, velvet cushions, etc.,
may be ornamented by spatter work.


Copyright © 2022 FDOKUMEN